/


Теги: programming languages programming computer science computer engineering wiley publishing
ISBN: 076456997X
Год: 2008


Текст
76034ffirs.qxd:Toolbox
4/2/08
12:50 PM
Page iii
BSD UNIX®
TO O L B OX
1000+ Commands for FreeBSD®, OpenBSD,
and NetBSD®Power Users
Christopher Negus
François Caen
76034ffirs.qxd:Toolbox
4/2/08
12:50 PM
Page ii
76034ffirs.qxd:Toolbox
4/2/08
12:50 PM
Page i
BSD UNIX®
TO O L B OX
76034ffirs.qxd:Toolbox
4/2/08
12:50 PM
Page ii
76034ffirs.qxd:Toolbox
4/2/08
12:50 PM
Page iii
BSD UNIX®
TO O L B OX
1000+ Commands for FreeBSD®, OpenBSD,
and NetBSD®Power Users
Christopher Negus
François Caen
76034ffirs.qxd:Toolbox
4/2/08
12:50 PM
Page iv
BSD UNIX® Toolbox:
1000+ Commands for FreeBSD®, OpenBSD, and NetBSD®
Power Users
Published by
Wiley Publishing, Inc.
10475 Crosspoint Boulevard
Indianapolis, IN 46256
www.wiley.com
Copyright © 2008 by Wiley Publishing, Inc., Indianapolis, Indiana
Published simultaneously in Canada
ISBN: 978-0-470-37603-4
Manufactured in the United States of America
10 9 8 7 6 5 4 3 2 1
Library of Congress Cataloging-in-Publication Data is available from the publisher.
No part of this publication may be reproduced, stored in a retrieval system or transmitted in any form or by
any means, electronic, mechanical, photocopying, recording, scanning or otherwise, except as permitted under
Sections 107 or 108 of the 1976 United States Copyright Act, without either the prior written permission of the
Publisher, or authorization through payment of the appropriate per-copy fee to the Copyright Clearance Center,
222 Rosewood Drive, Danvers, MA 01923, (978) 750-8400, fax (978) 646-8600. Requests to the Publisher for permission should be addressed to the Legal Department, Wiley Publishing, Inc., 10475 Crosspoint Blvd., Indianapolis,
IN 46256, (317) 572-3447, fax (317) 572-4355, or online at http://www.wiley.com/go/permissions.
Limit of Liability/Disclaimer of Warranty: The publisher and the author make no representations or warranties
with respect to the accuracy or completeness of the contents of this work and specifically disclaim all warranties,
including without limitation warranties of fitness for a particular purpose. No warranty may be created or
extended by sales or promotional materials. The advice and strategies contained herein may not be suitable for
every situation. This work is sold with the understanding that the publisher is not engaged in rendering legal,
accounting, or other professional services. If professional assistance is required, the services of a competent professional person should be sought. Neither the publisher nor the author shall be liable for damages arising herefrom. The fact that an organization or Website is referred to in this work as a citation and/or a potential source of
further information does not mean that the author or the publisher endorses the information the organization or
Website may provide or recommendations it may make. Further, readers should be aware that Internet Websites
listed in this work may have changed or disappeared between when this work was written and when it is read.
For general information on our other products and services please contact our Customer Care Department
within the United States at (800) 762-2974, outside the United States at (317) 572-3993 or fax (317) 572-4002.
Trademarks: Wiley, the Wiley logo, and related trade dress are trademarks or registered trademarks of John
Wiley & Sons, Inc. and/or its affiliates, in the United States and other countries, and may not be used without
written permission. UNIX is a registered trademark of X/Open Company. FreeBSD is a registered trademark
of FreeBSD Foundation. NetBSD is a registered trademark of NetBSD Foundation. All other trademarks are the
property of their respective owners. Wiley Publishing, Inc. is not associated with any product or vendor mentioned in this book.
Wiley also publishes its books in a variety of electronic formats. Some content that appears in print may not be
available in electronic books.
76034ffirs.qxd:Toolbox
4/2/08
12:50 PM
Page v
As always, I dedicate my work on this book to my wife, Sheree.
— Christopher Negus
To my wife, Tonya, for supporting me in all my endeavors.
— François Caen
76034ffirs.qxd:Toolbox
4/2/08
12:50 PM
Page vi
76034ffirs.qxd:Toolbox
4/2/08
12:50 PM
Page vii
About the Authors
Christopher Negus is the author of the best-selling Fedora and Red Hat Linux Bibles,
Linux Toys, Linux Troubleshooting Bible, and Linux Bible 2008 Edition. He is a member of
the Madison Linux Users Group. Before becoming a full-time writer, Chris served for
eight years on development teams for the UNIX operating system at AT&T, where UNIX
was created and developed. He also worked with Novell on Linux development and
Caldera Linux.
François Caen, through his company Turbosphere LLC, hosts and manages business
application infrastructures, with 95 percent running on Linux systems. As an open
source advocate, he has lectured on OSS network management and Internet services
and served as president of the Tacoma Linux Users Group. François is a Red Hat
Certified Engineer (RHCE). In his spare time, he enjoys managing enterprise Cisco
networks.
About the Technical Editor
Thomas Blader first began dabbling in Linus/UNIX in 1993 with Yggdrasil Linux
and BSD. Since 1997, he has worked for the same company as a Solaris/Linux administrator. He has recently become involved with network security. He also does UNIXrelated consulting and software development as well as book writing and editing.
76034ffirs.qxd:Toolbox
4/2/08
12:50 PM
Page viii
76034ffirs.qxd:Toolbox
4/2/08
12:50 PM
Page ix
Credits
Acquisitions Editor
Vice President and Executive Publisher
Jenny Watson
Joseph B. Wikert
Development Editor
Project Coordinator, Cover
William Bridges
Lynsey Osborn
Technical Editor
Compositor
Thomas Blader
Laurie Stewart,
Happenstance Type-O-Rama
Production Editor
Daniel Scribner
Proofreader
Copy Editor
David Parise,
Word One
Michael Koch
Indexer
Editorial Manager
Mary Beth Wakefield
Production Manager
Tim Tate
Vice President and
Executive Group Publisher
Richard Swadley
Melanie Belkin
76034ffirs.qxd:Toolbox
4/2/08
12:50 PM
Page x
Contents at a Glance
Chapter 1: Starting with BSD Systems . . . . . . . . . . . . . . . . . . . .1
Chapter 2: Installing FreeBSD and Adding Software . . . . . . . . . .13
Chapter 3: Using the Shell . . . . . . . . . . . . . . . . . . . . . . . . . . .33
Chapter 4: Working with Files . . . . . . . . . . . . . . . . . . . . . . . . .51
Chapter 5: Manipulating Text . . . . . . . . . . . . . . . . . . . . . . . . . .71
Chapter 6: Playing with Multimedia . . . . . . . . . . . . . . . . . . . . .89
Chapter 7: Administering File Systems . . . . . . . . . . . . . . . . . .103
Chapter 8: Backups and Removable Media . . . . . . . . . . . . . . .127
Chapter 9: Checking and Managing Running Processes . . . . . .143
Chapter 10: Managing the System . . . . . . . . . . . . . . . . . . . . .161
Chapter 11: Managing Network Connections . . . . . . . . . . . . .185
Chapter 12: Accessing Network Resources . . . . . . . . . . . . . . .205
Chapter 13: Doing Remote System Administration . . . . . . . . .225
Chapter 14: Locking Down Security . . . . . . . . . . . . . . . . . . . .243
Appendix A: Using vi or Vim Editors . . . . . . . . . . . . . . . . . . . .263
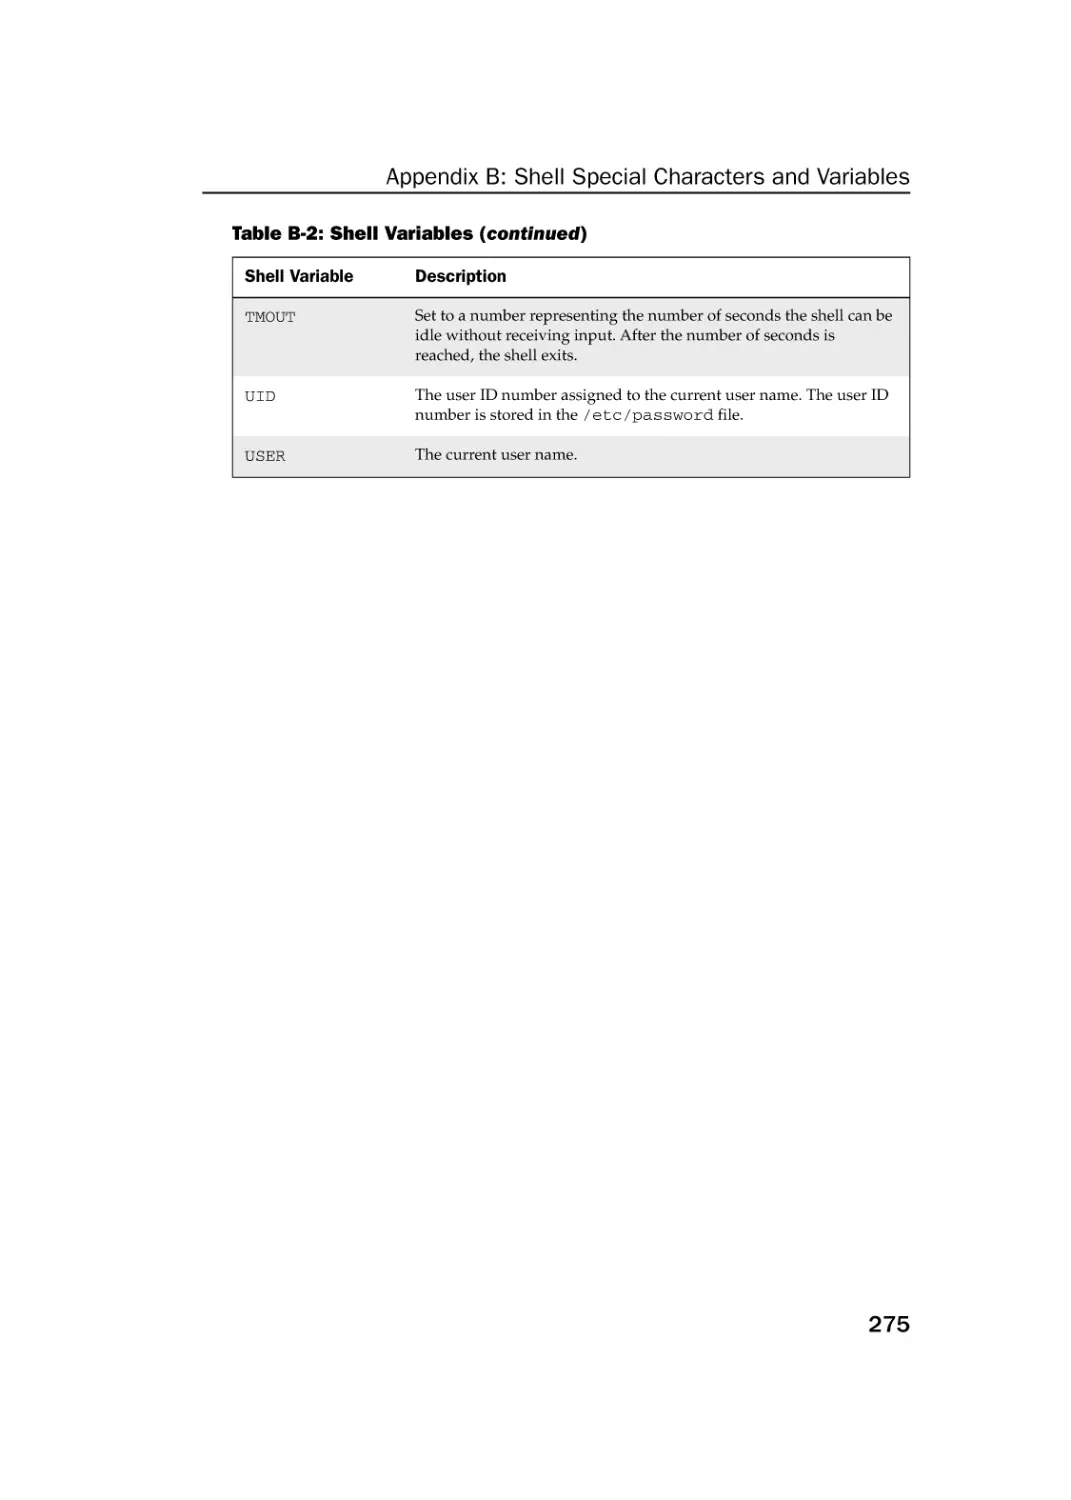
Appendix B: Shell Special Characters and Variables . . . . . . . .271
Appendix C: Personal Configuration Files . . . . . . . . . . . . . . . .277
Index . . . . . . . . . . . . . . . . . . . . . . . . . . . . . . . . . . . . . . . . . .281
76034ftoc.qxd:Toolbox
4/2/08
1:04 PM
Page xi
Contents
Acknowledgments
Introduction
Chapter 1: Starting with BSD Systems
About FreeBSD, NetBSD, and OpenBSD
Finding BSD Resources
Focusing on BSD Commands
Finding Commands
Command Reference Information in BSD
Summary
Chapter 2: Installing FreeBSD and Adding Software
Before Installing FreeBSD
Installing FreeBSD
Booting the Install Disc
Starting the Install Process
Adding, Deleting, and Managing Software
Finding Software
Installing Software Packages (binary)
Removing Software Packages (binary)
Installing Software Using Ports (source code)
Getting and Installing Applications with Ports
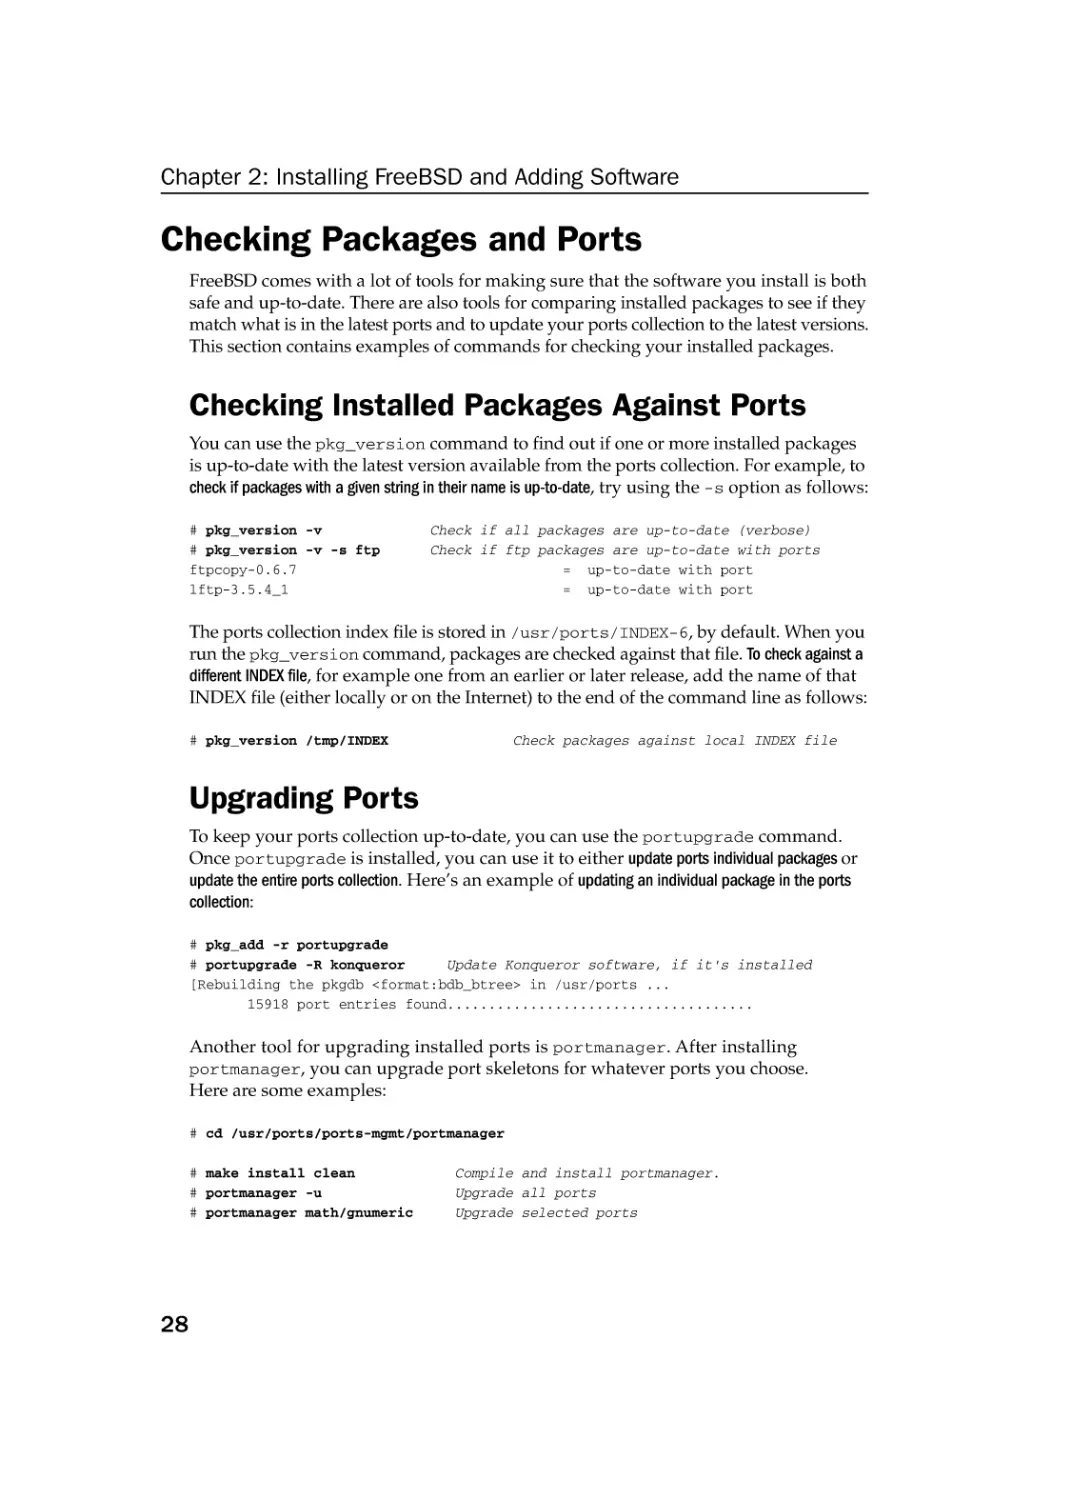
Checking Packages and Ports
Checking Installed Packages Against Ports
Upgrading Ports
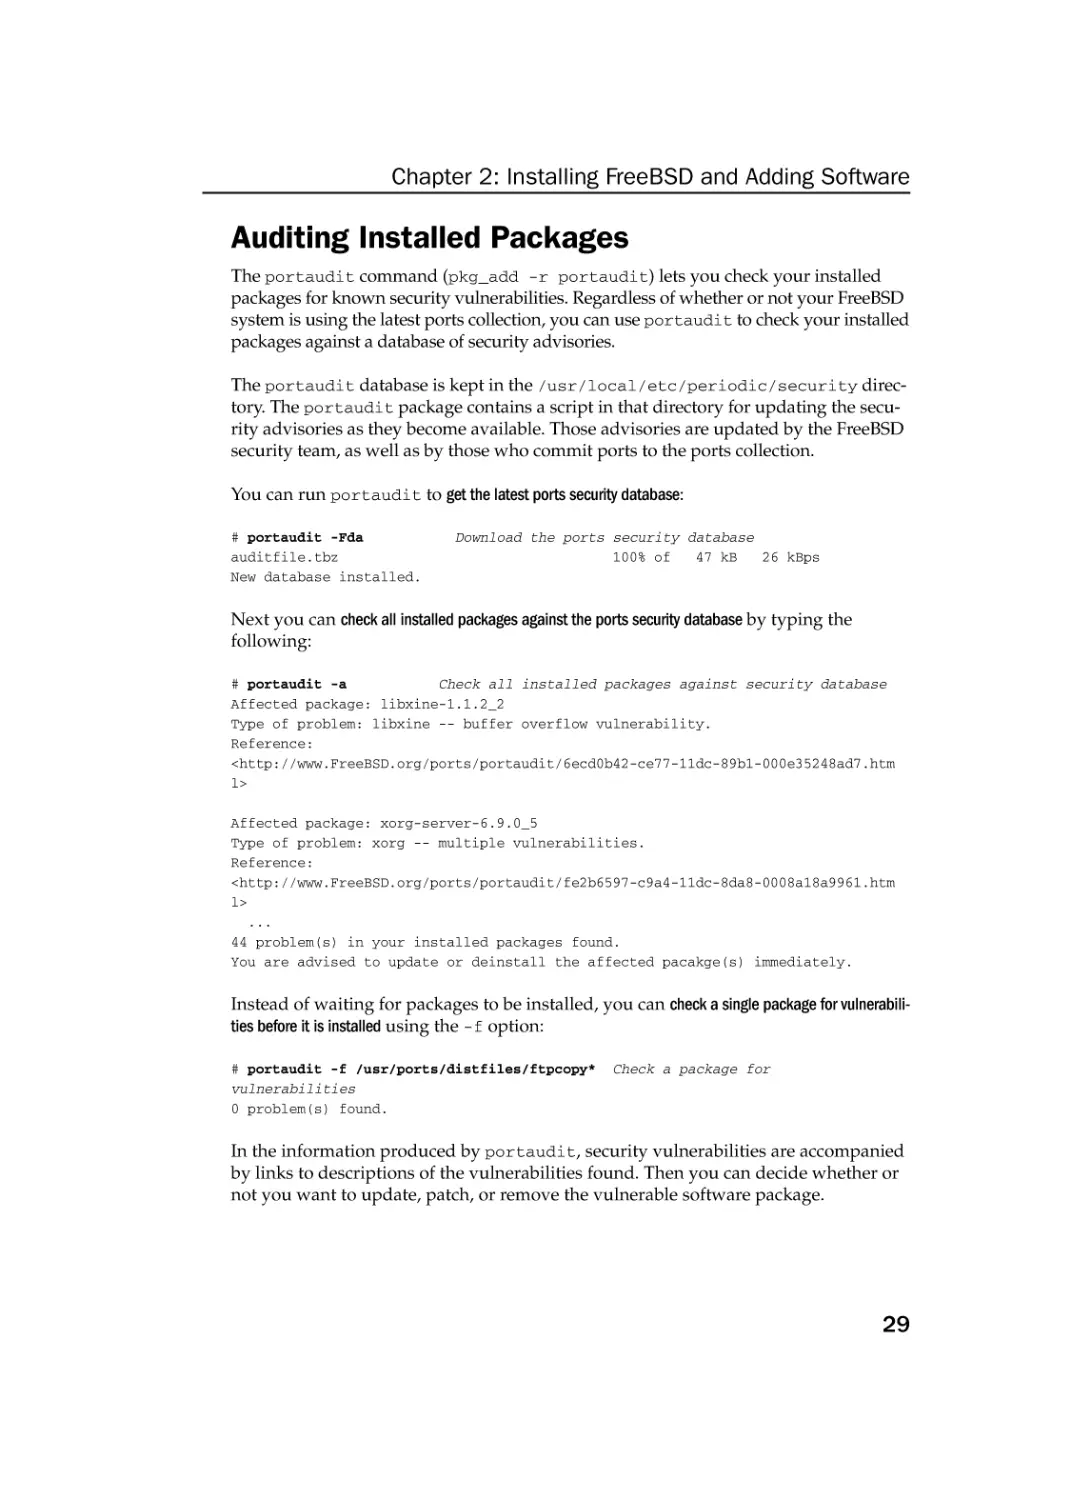
Auditing Installed Packages
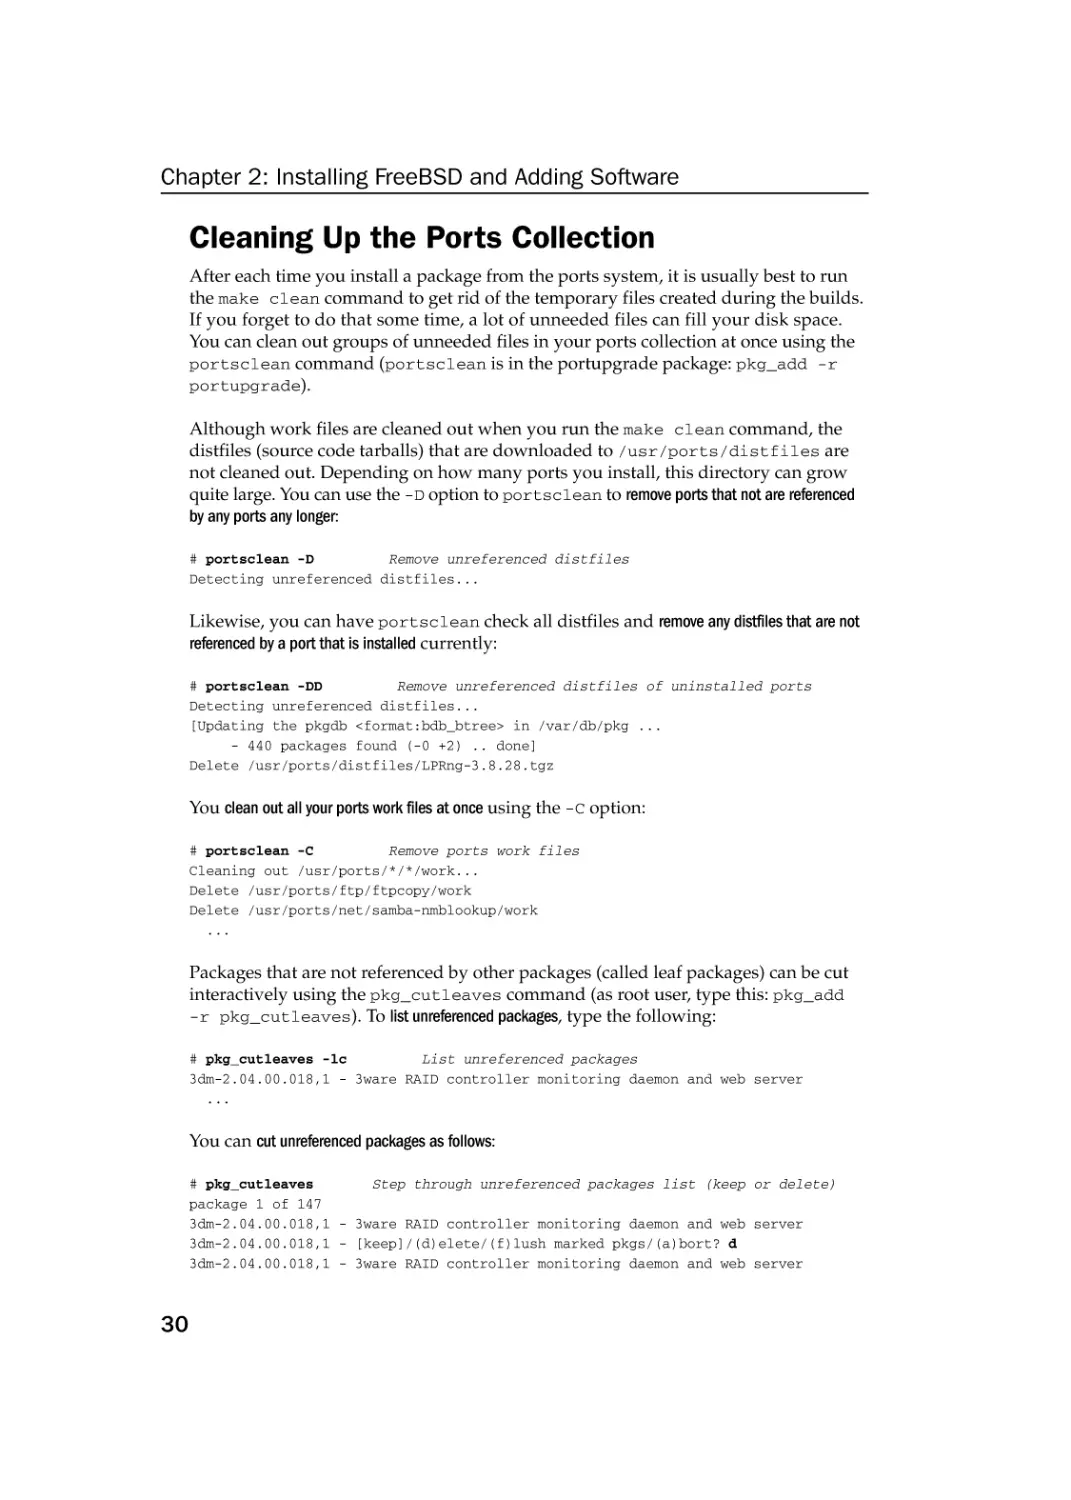
Cleaning Up the Ports Collection
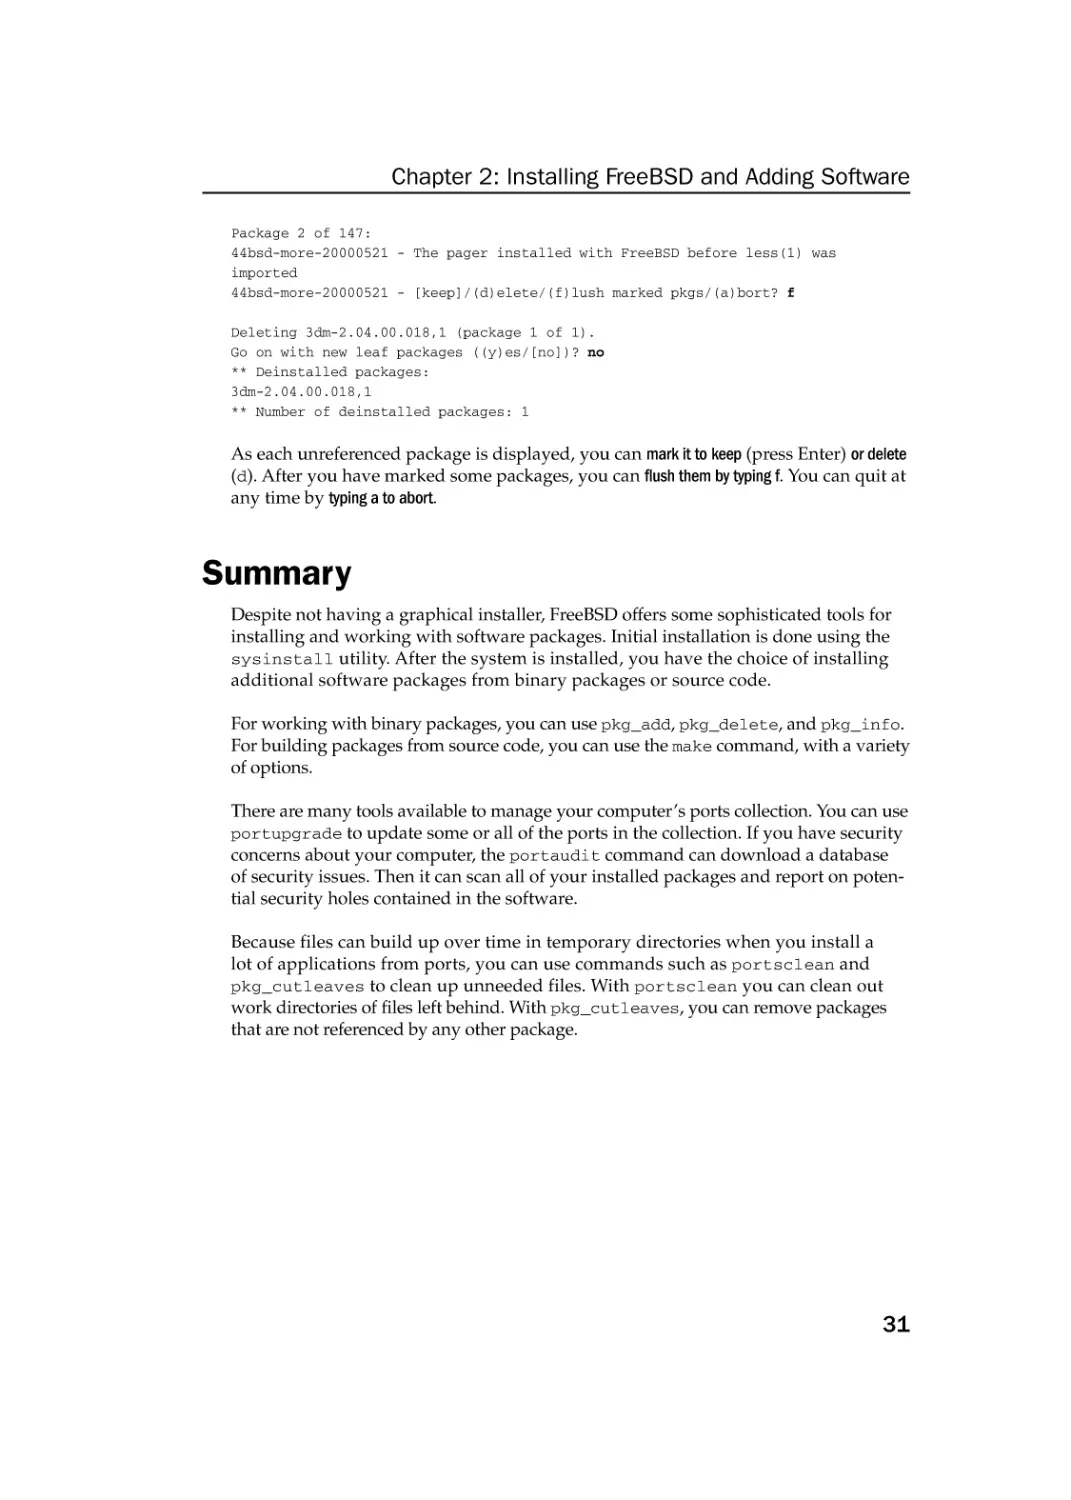
Summary
Chapter 3: Using the Shell
Terminal Windows and Shell Access
Using Terminal Windows
Using Virtual Terminals
xix
xxi
1
2
4
6
7
8
11
13
13
14
14
15
19
19
21
22
23
25
28
28
28
29
30
31
33
33
33
35
76034ftoc.qxd:Toolbox
4/2/08
1:04 PM
Page xii
Contents
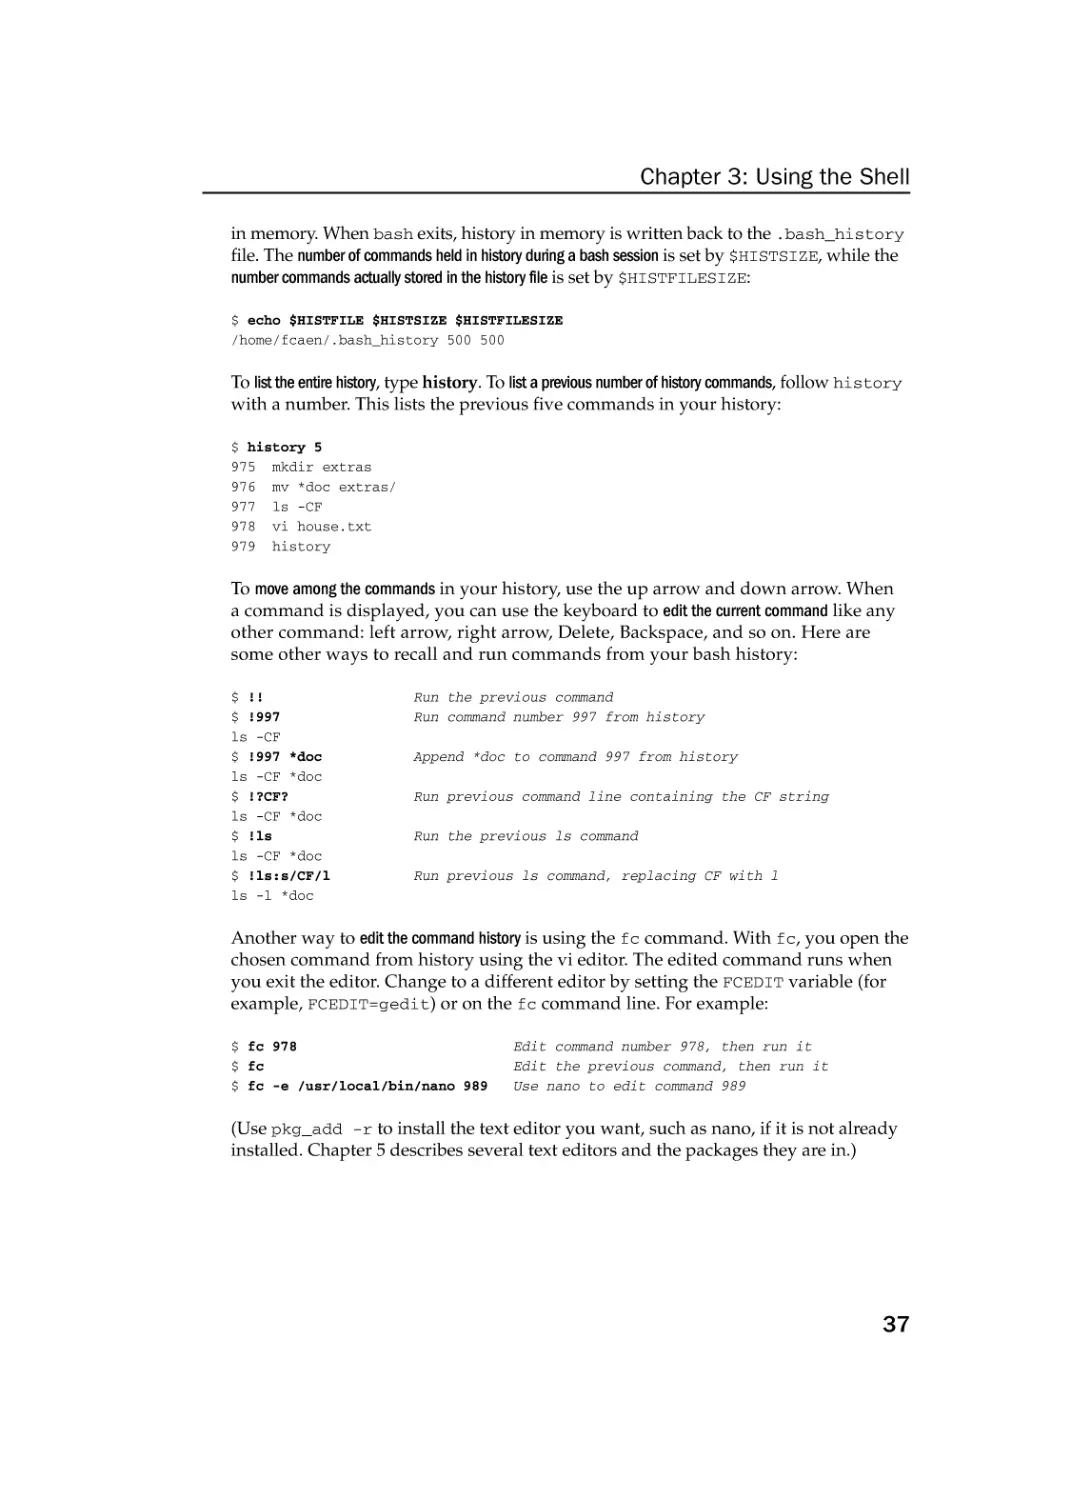
Using the Shell
Using Bash History
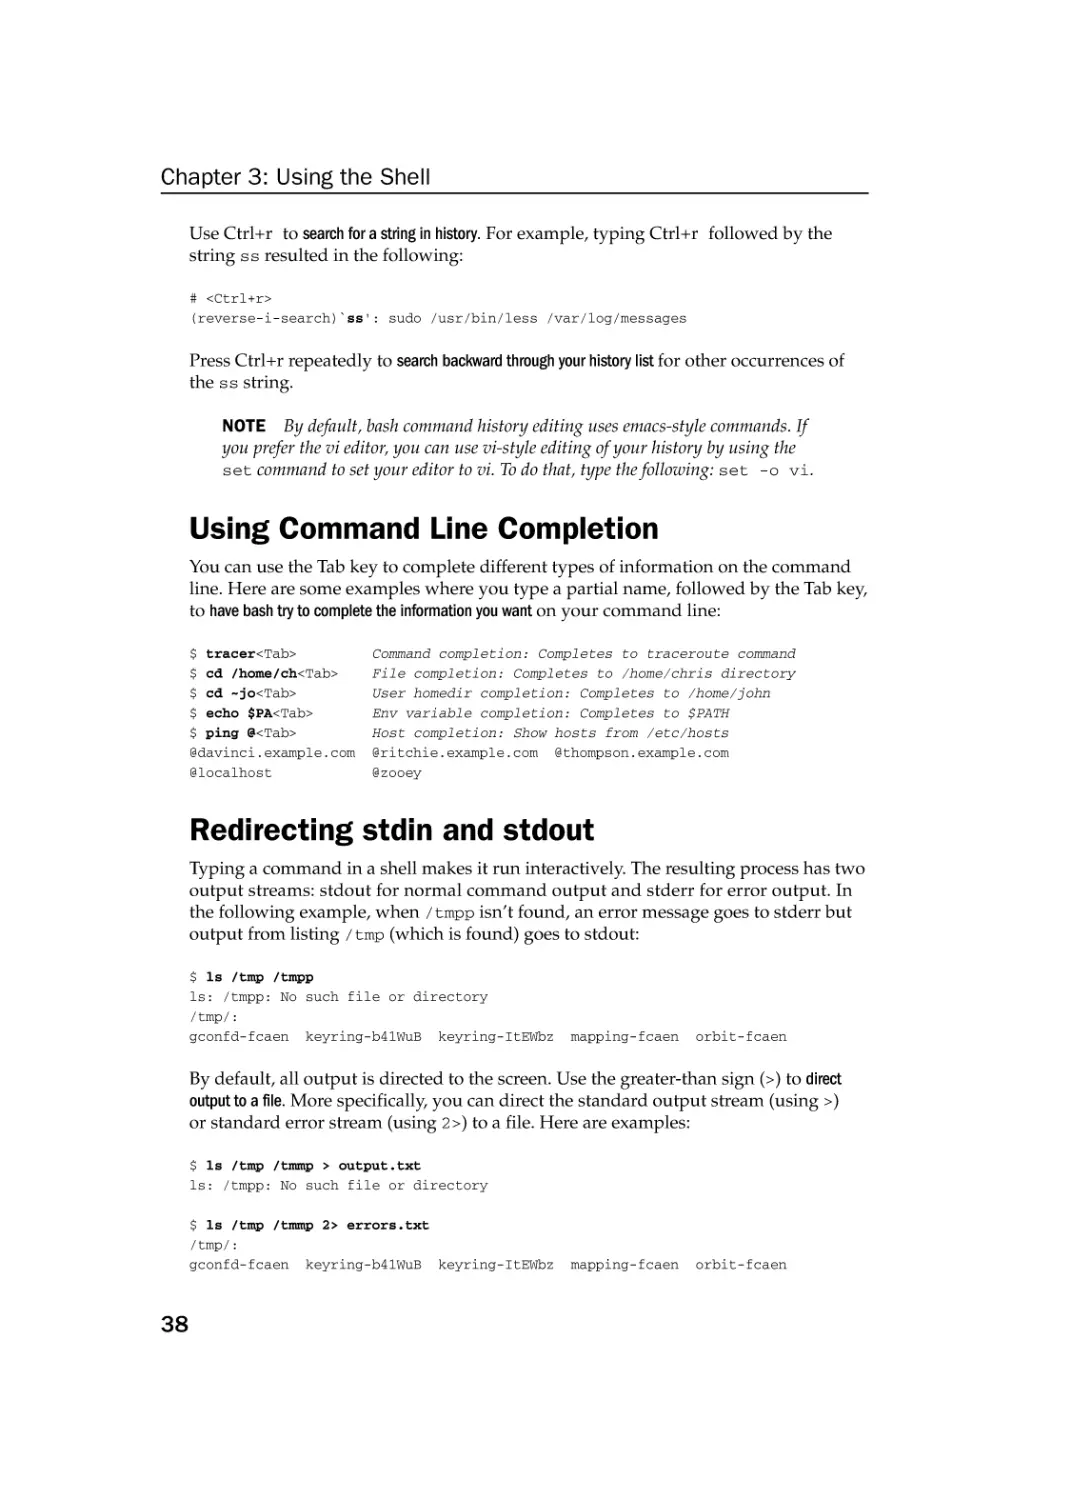
Using Command Line Completion
Redirecting stdin and stdout
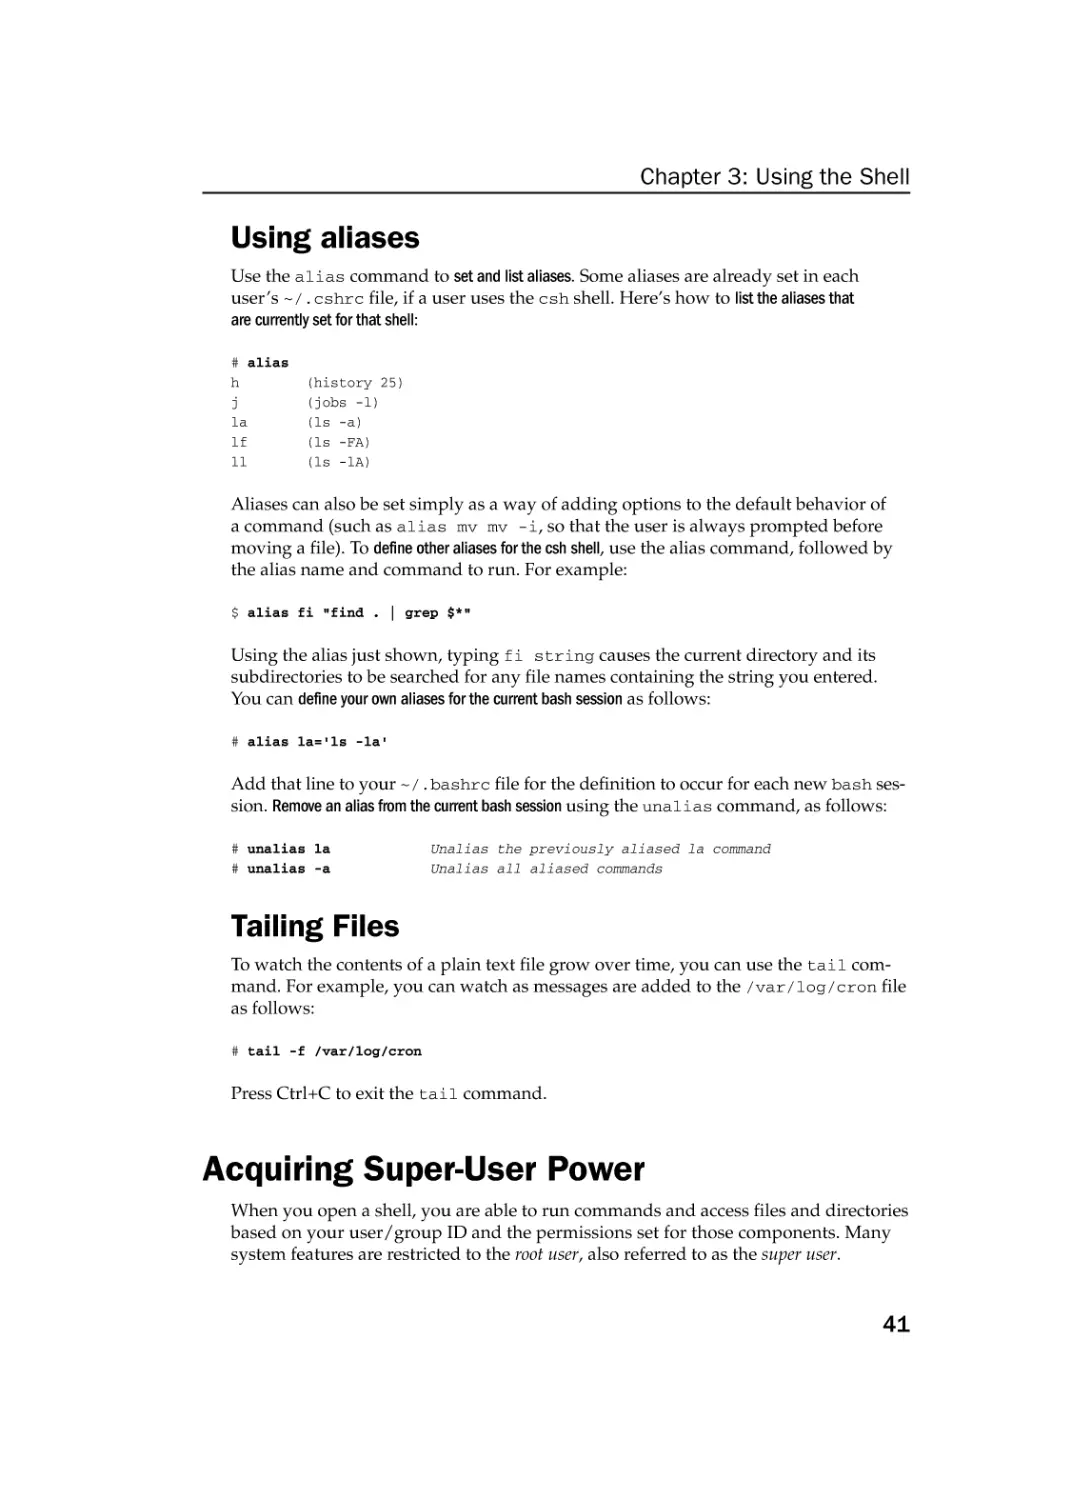
Using aliases
Tailing Files
Acquiring Super-User Power
36
38
38
41
41
41
Using the su Command
Delegating Power with sudo
42
43
Using Environment Variables
Creating Simple Shell Scripts
44
45
Editing and Running a Script
Adding Content to Your Script
Summary
Chapter 4: Working with Files
Understanding File Types
Using
Using
Using
Using
Using
45
46
50
51
51
Regular Files
Directories
Symbolic and Hard Links
Device Files
Named Pipes and Sockets
51
52
53
54
54
Setting File and Directory Permissions
55
Changing Permissions with chmod
Setting the umask
Changing Ownership
Traversing the File System
Copying Files
Changing File Attributes
Searching for Files
Generating the locate Database
Finding Files with locate
Locating Files with find
Using Other Commands to Find Files
Finding Out More About Files
Listing Files
Verifying Files
Summary
xii
36
56
58
58
59
60
62
63
63
64
65
67
67
67
68
69
76034ftoc.qxd:Toolbox
4/2/08
1:04 PM
Page xiii
Contents
Chapter 5: Manipulating Text
Matching Text with Regular Expressions
Editing Text Files
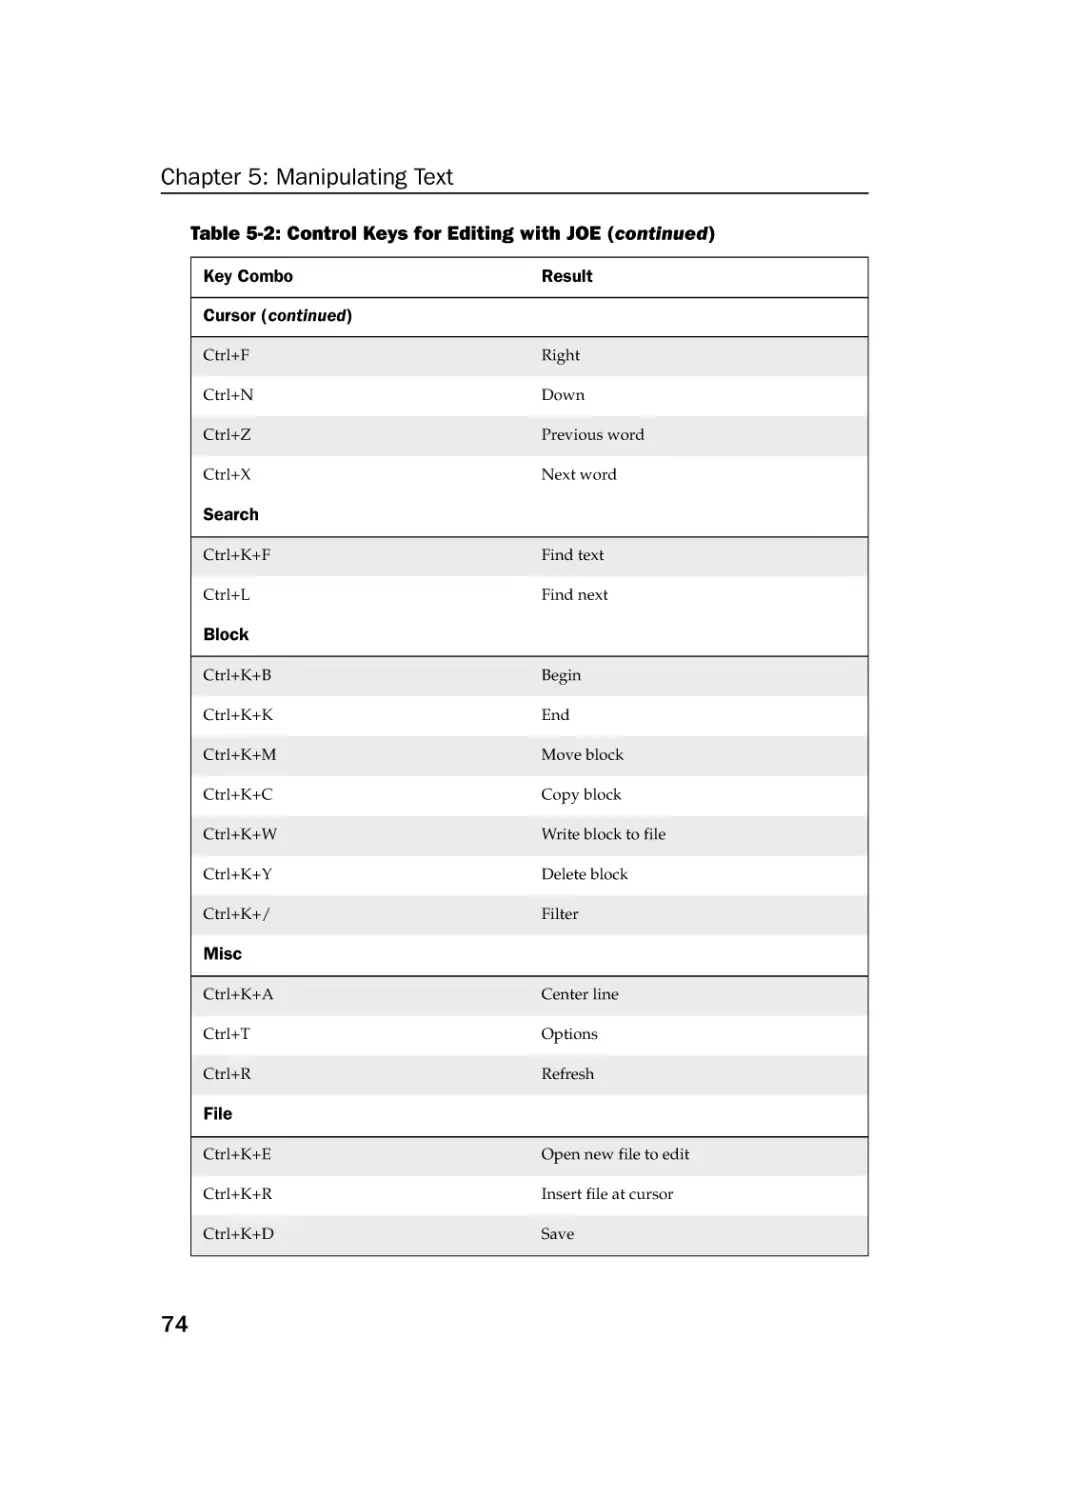
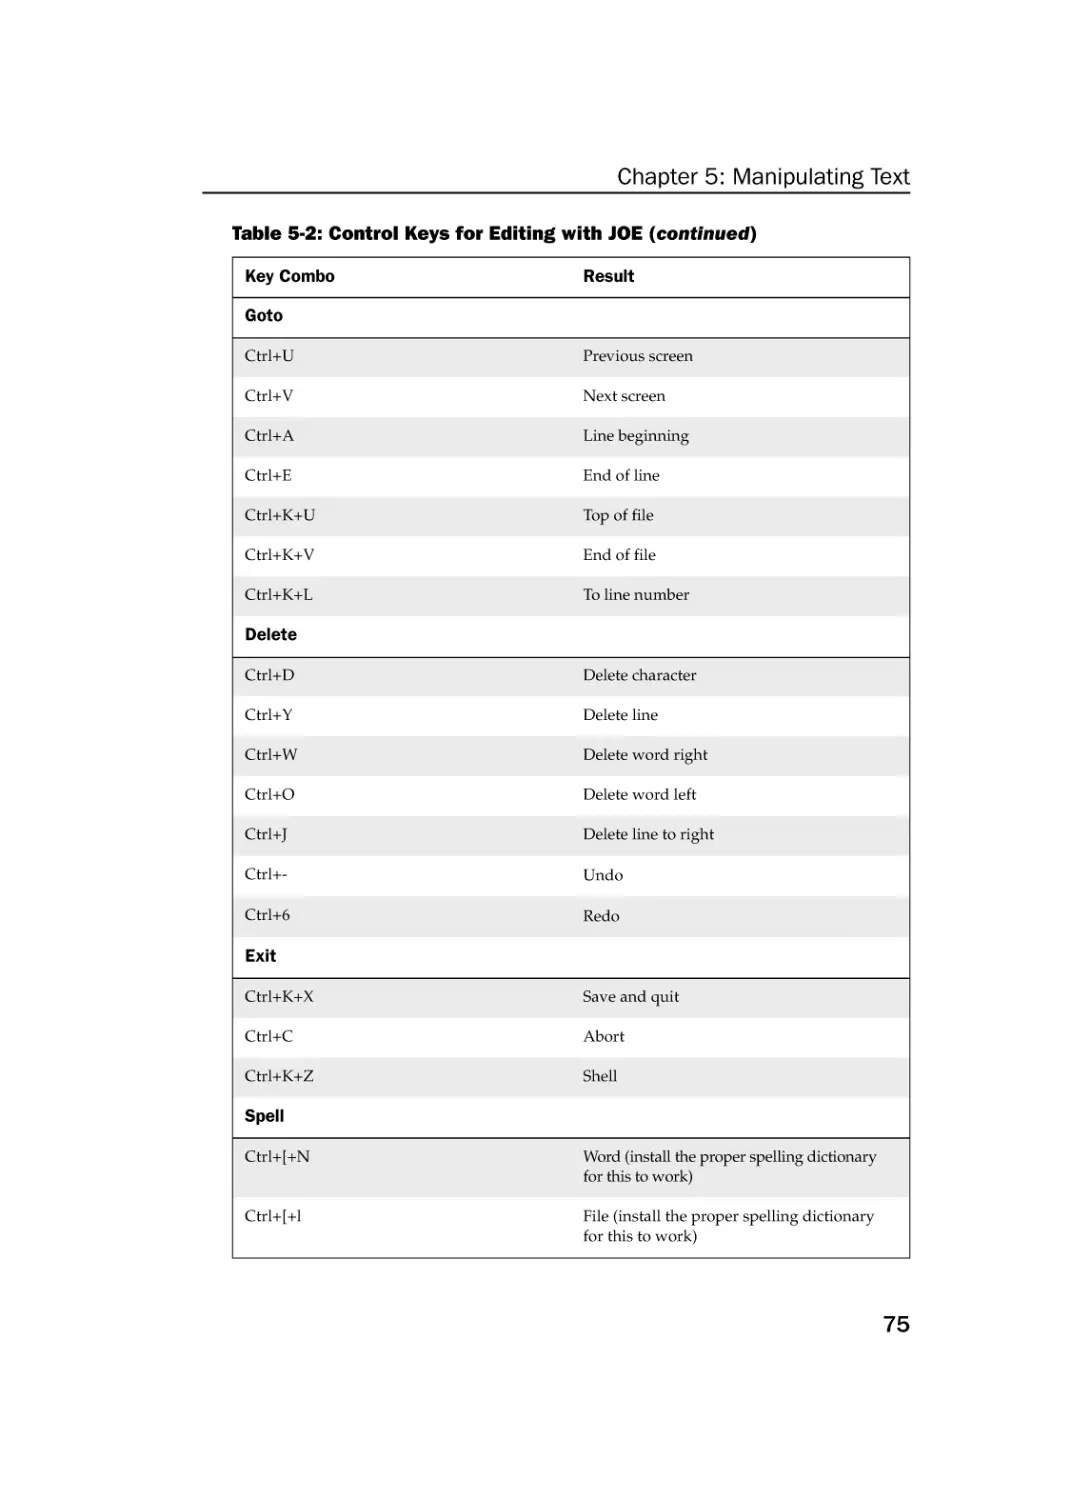
Using the JOE Editor
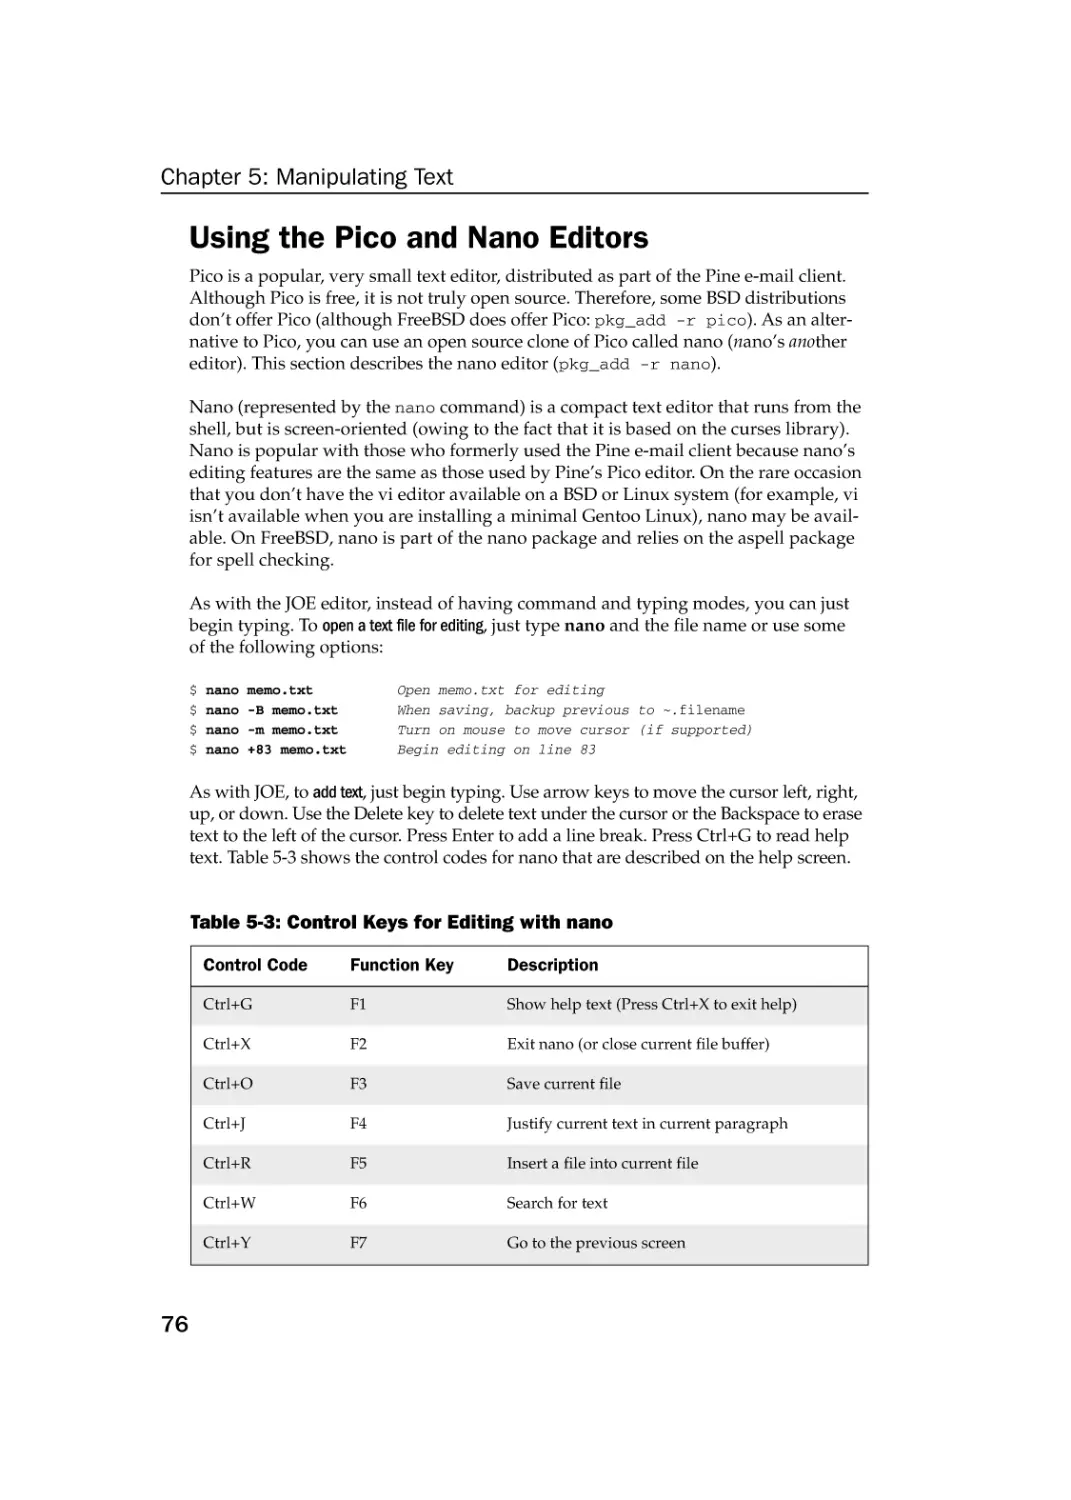
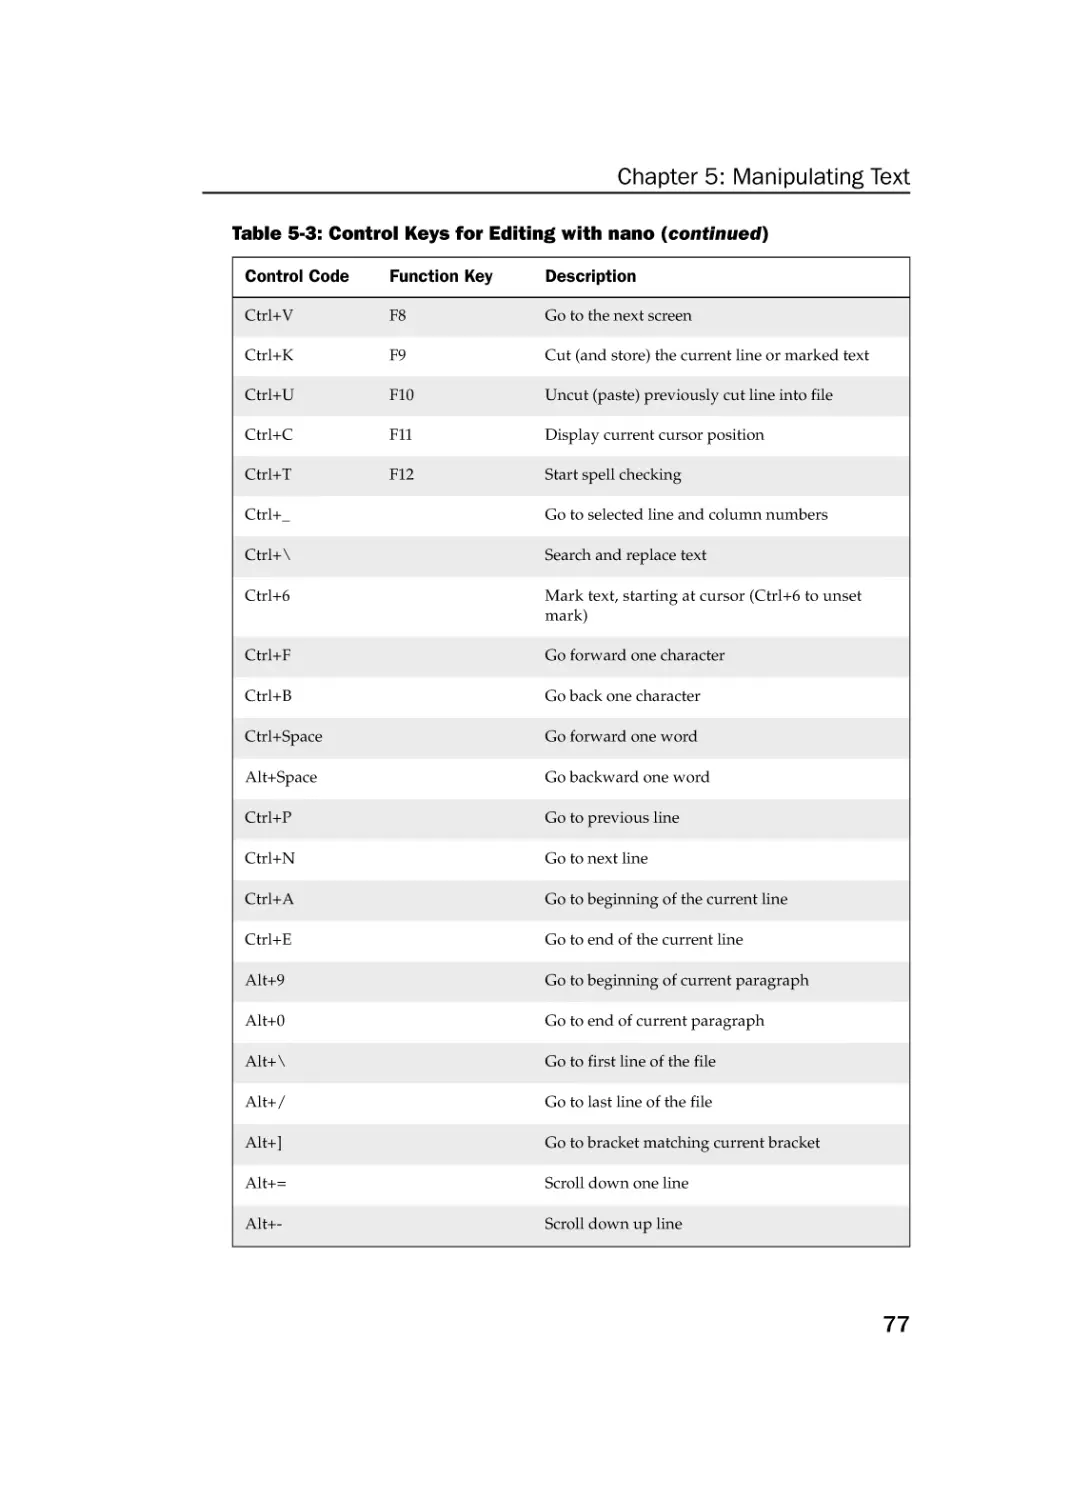
Using the Pico and Nano Editors
Graphical Text Editors
Listing, Sorting, and Changing Text
Listing Text Files
Paging Through Text
Paginating Text Files with pr
Searching for Text with grep
Replacing Text with sed
Translate or Remove Characters with tr
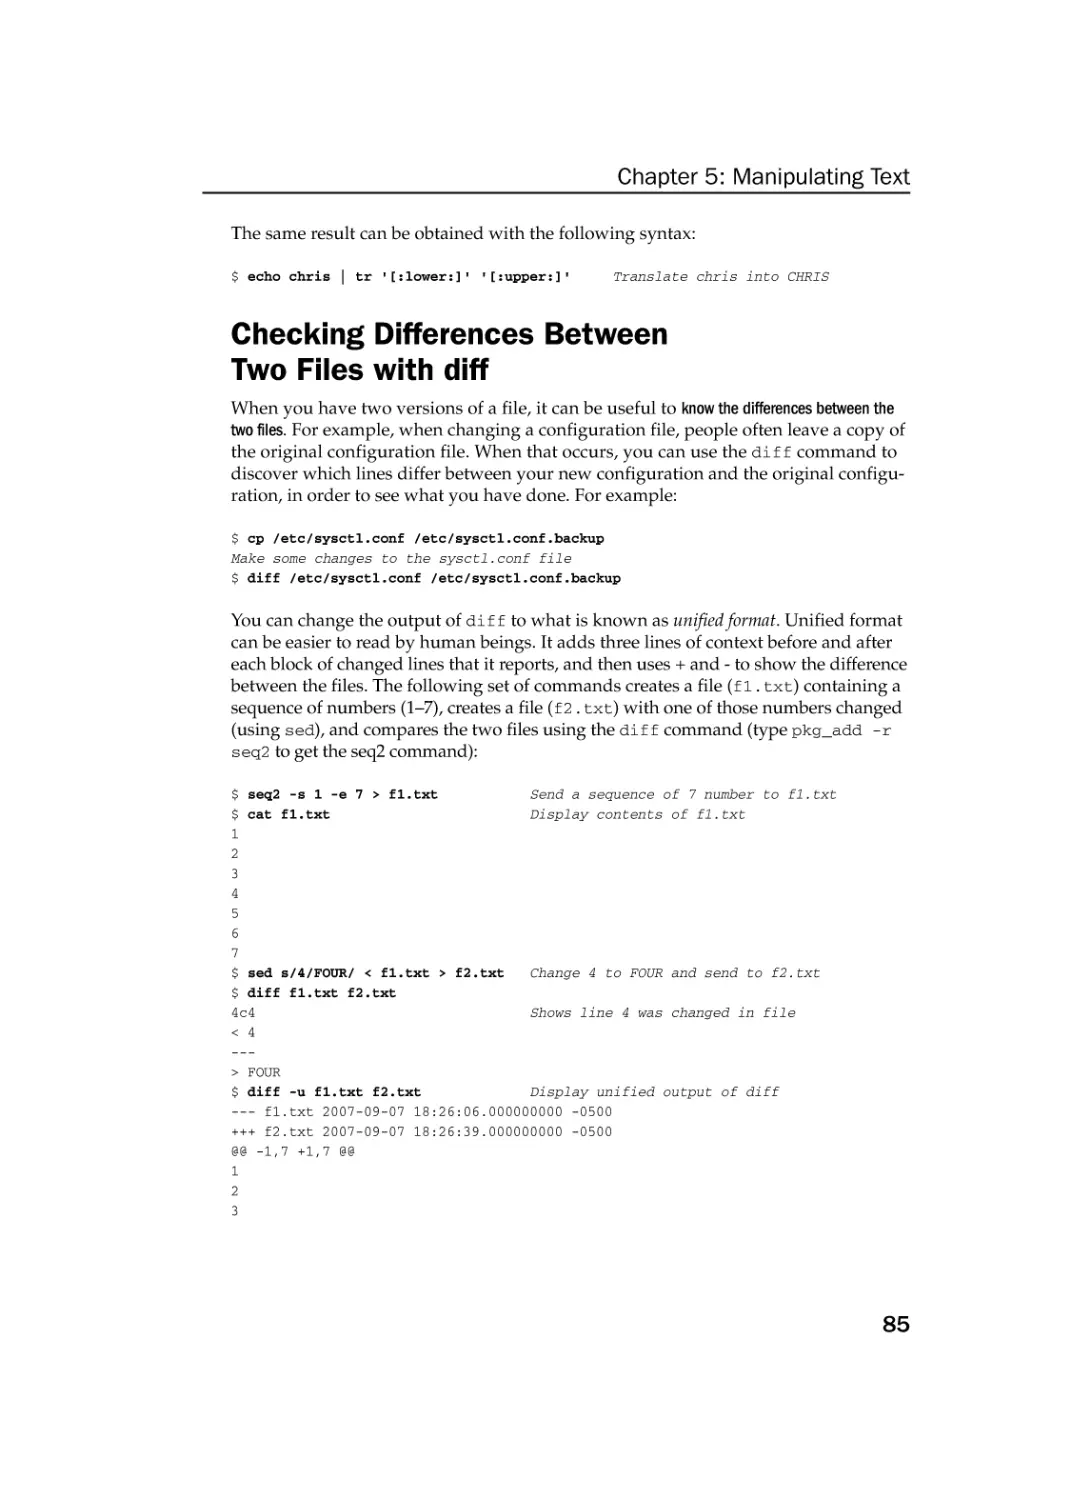
Checking Differences Between Two Files with diff
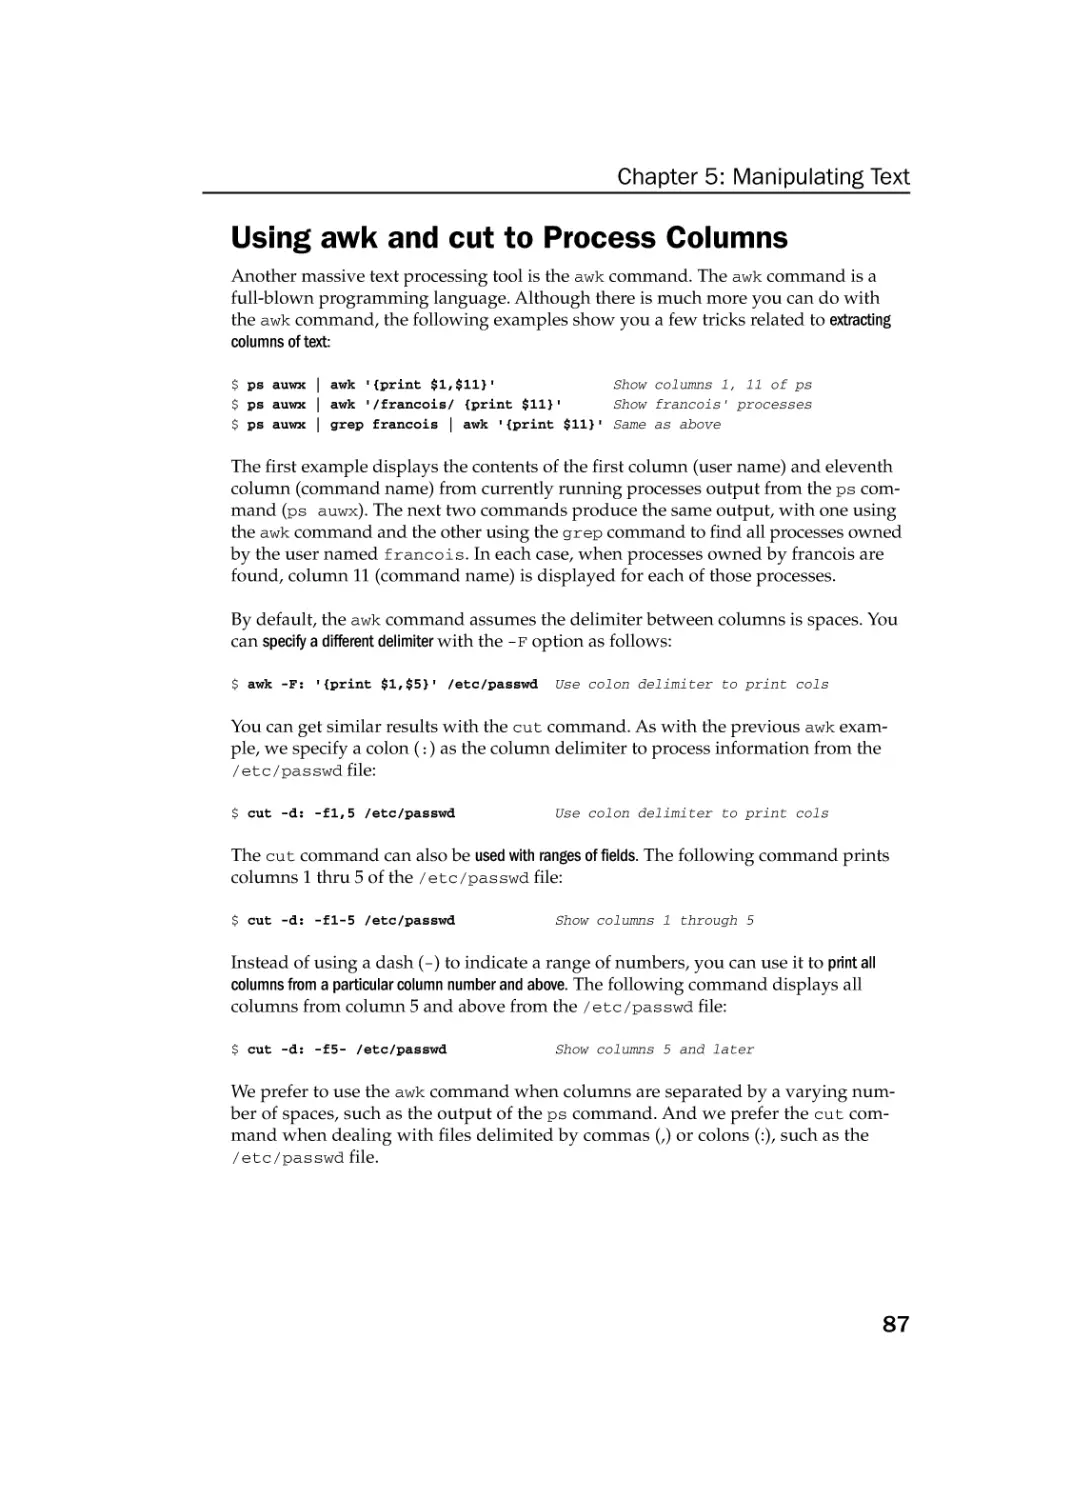
Using awk and cut to Process Columns
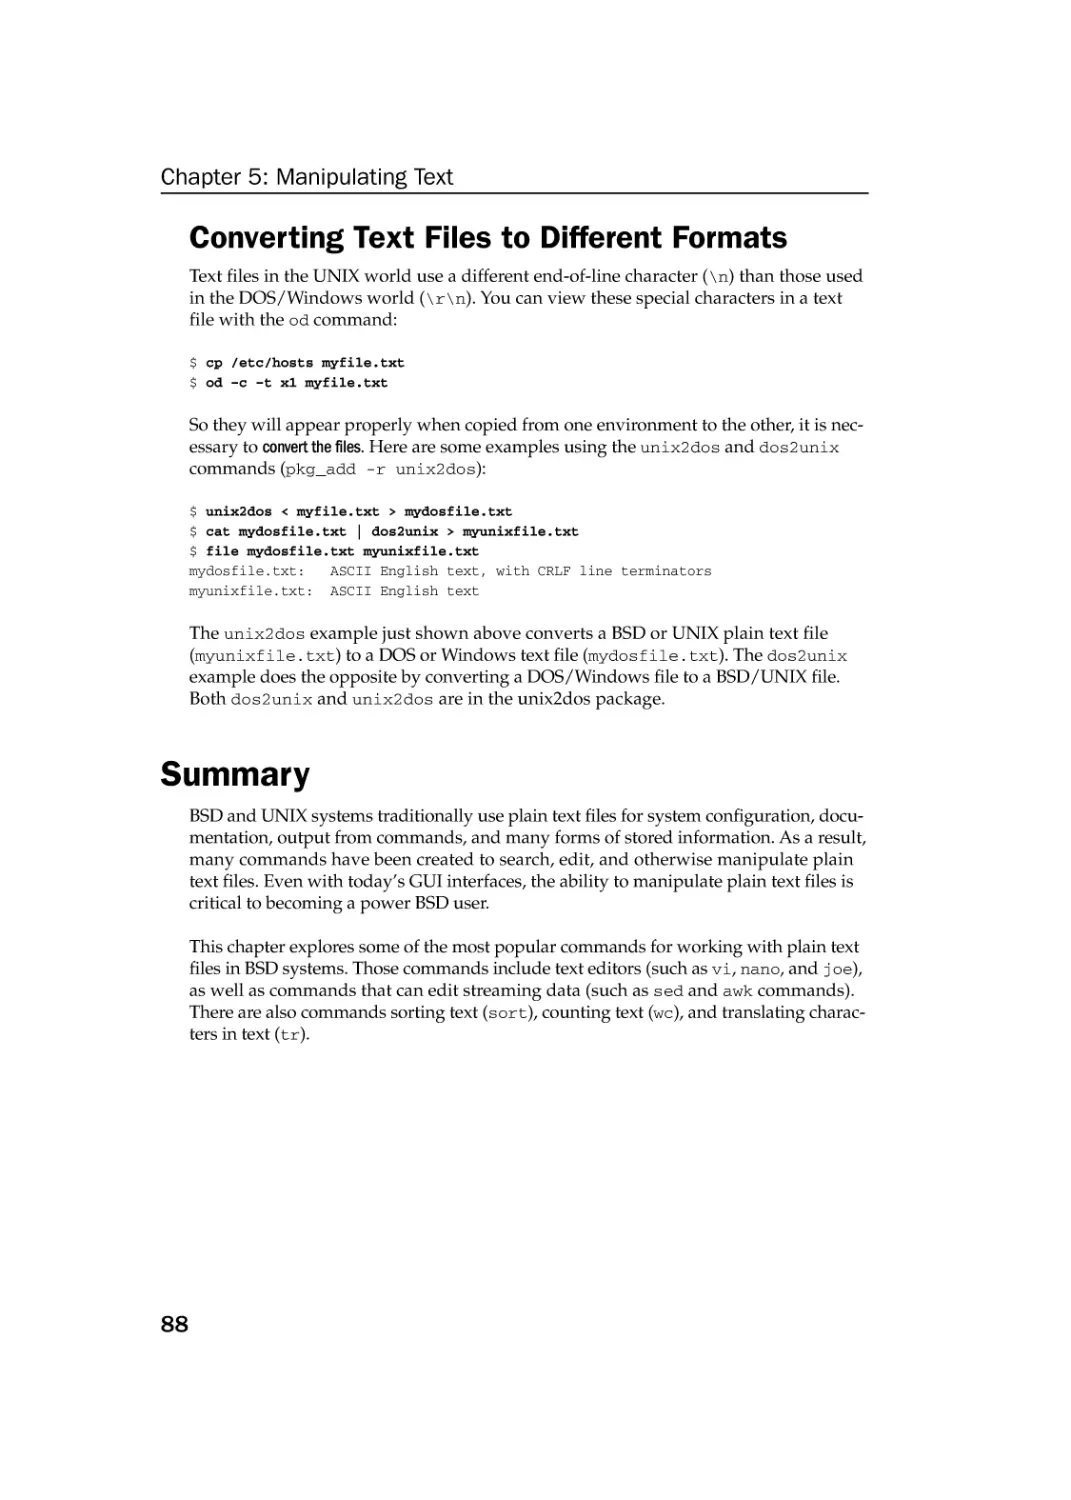
Converting Text Files to Different Formats
Summary
Chapter 6: Playing with Multimedia
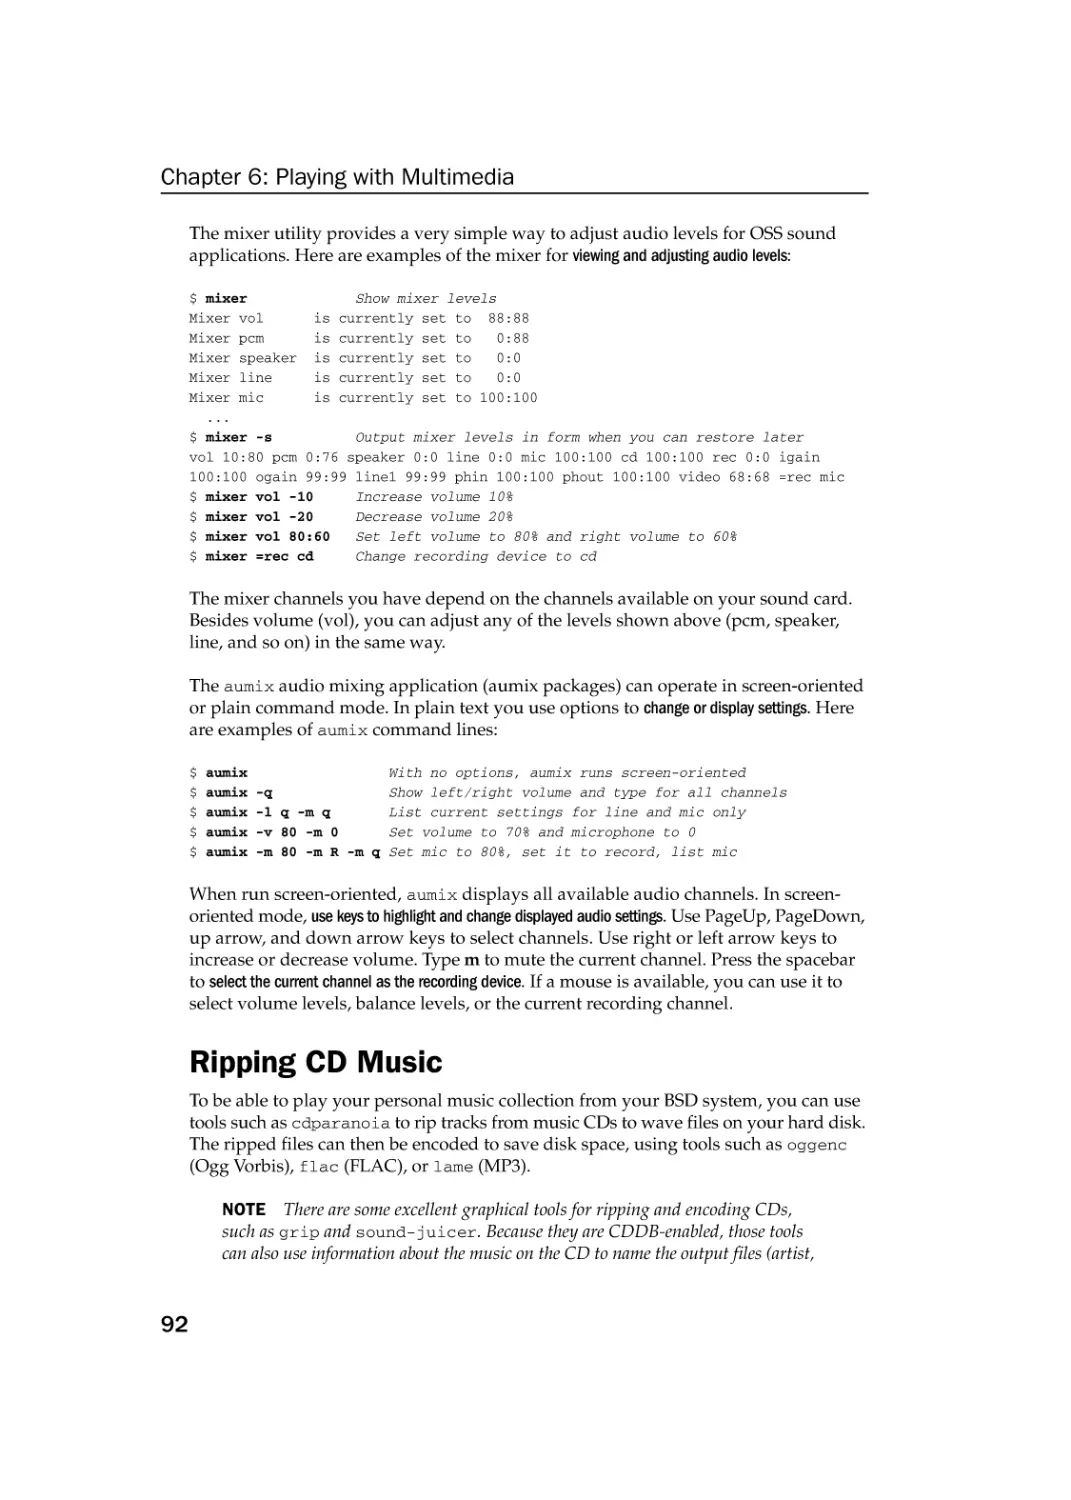
Working with Audio
Starting with Audio
Playing Music
Adjusting Audio Levels
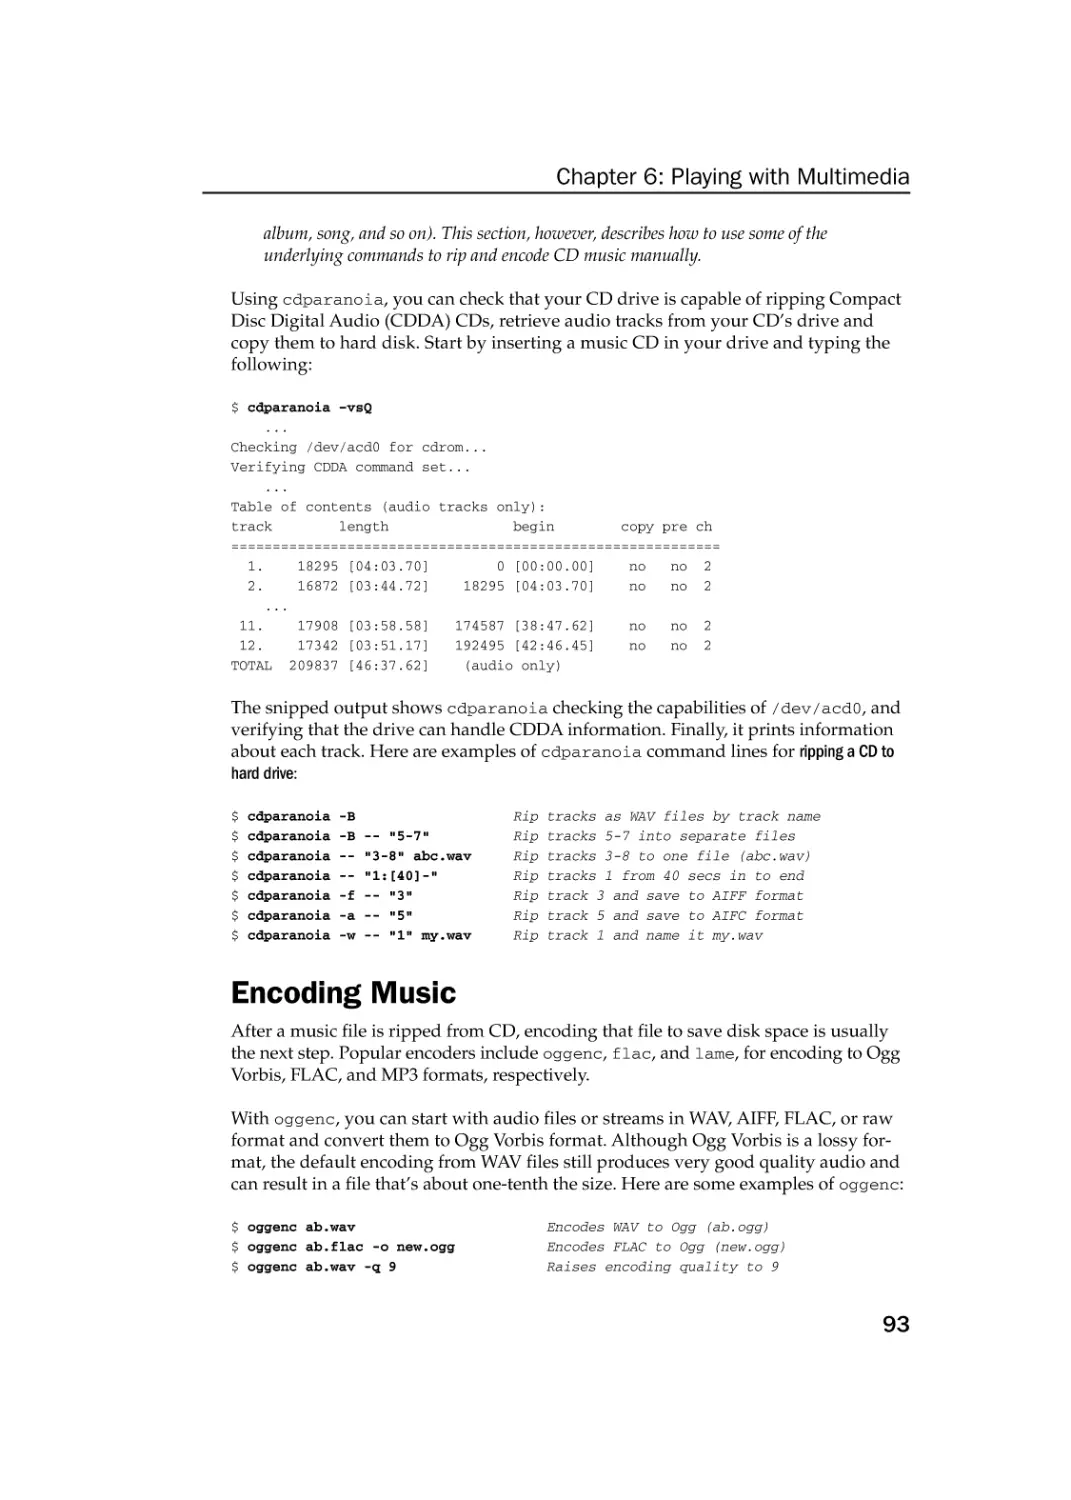
Ripping CD Music
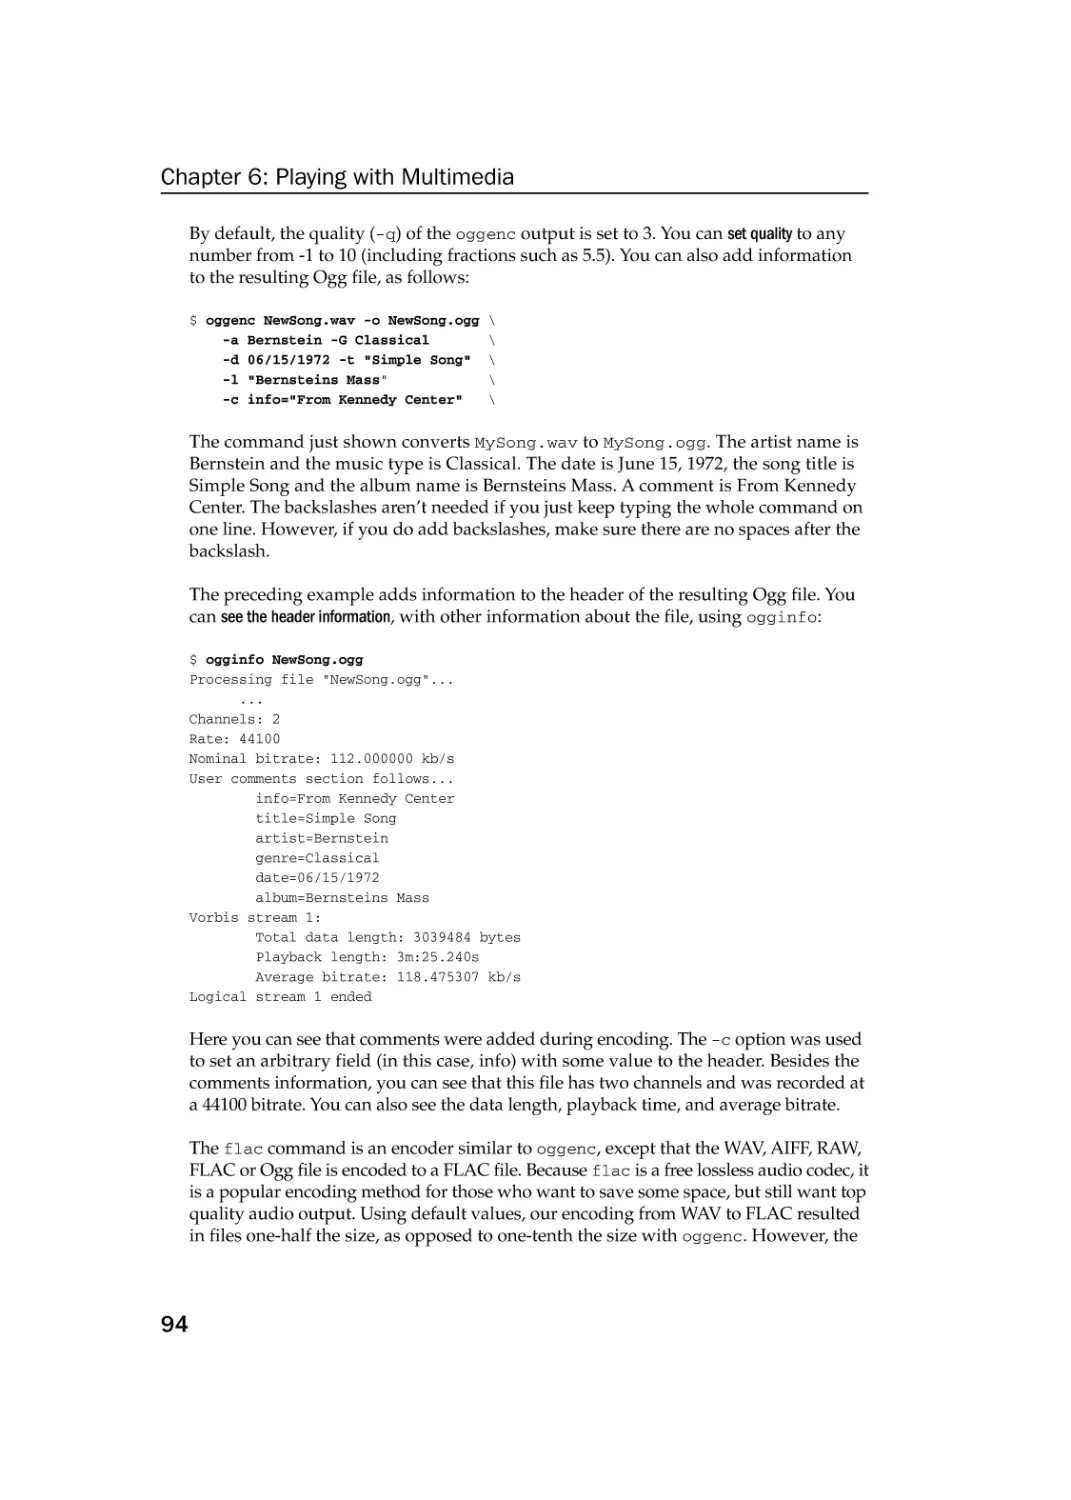
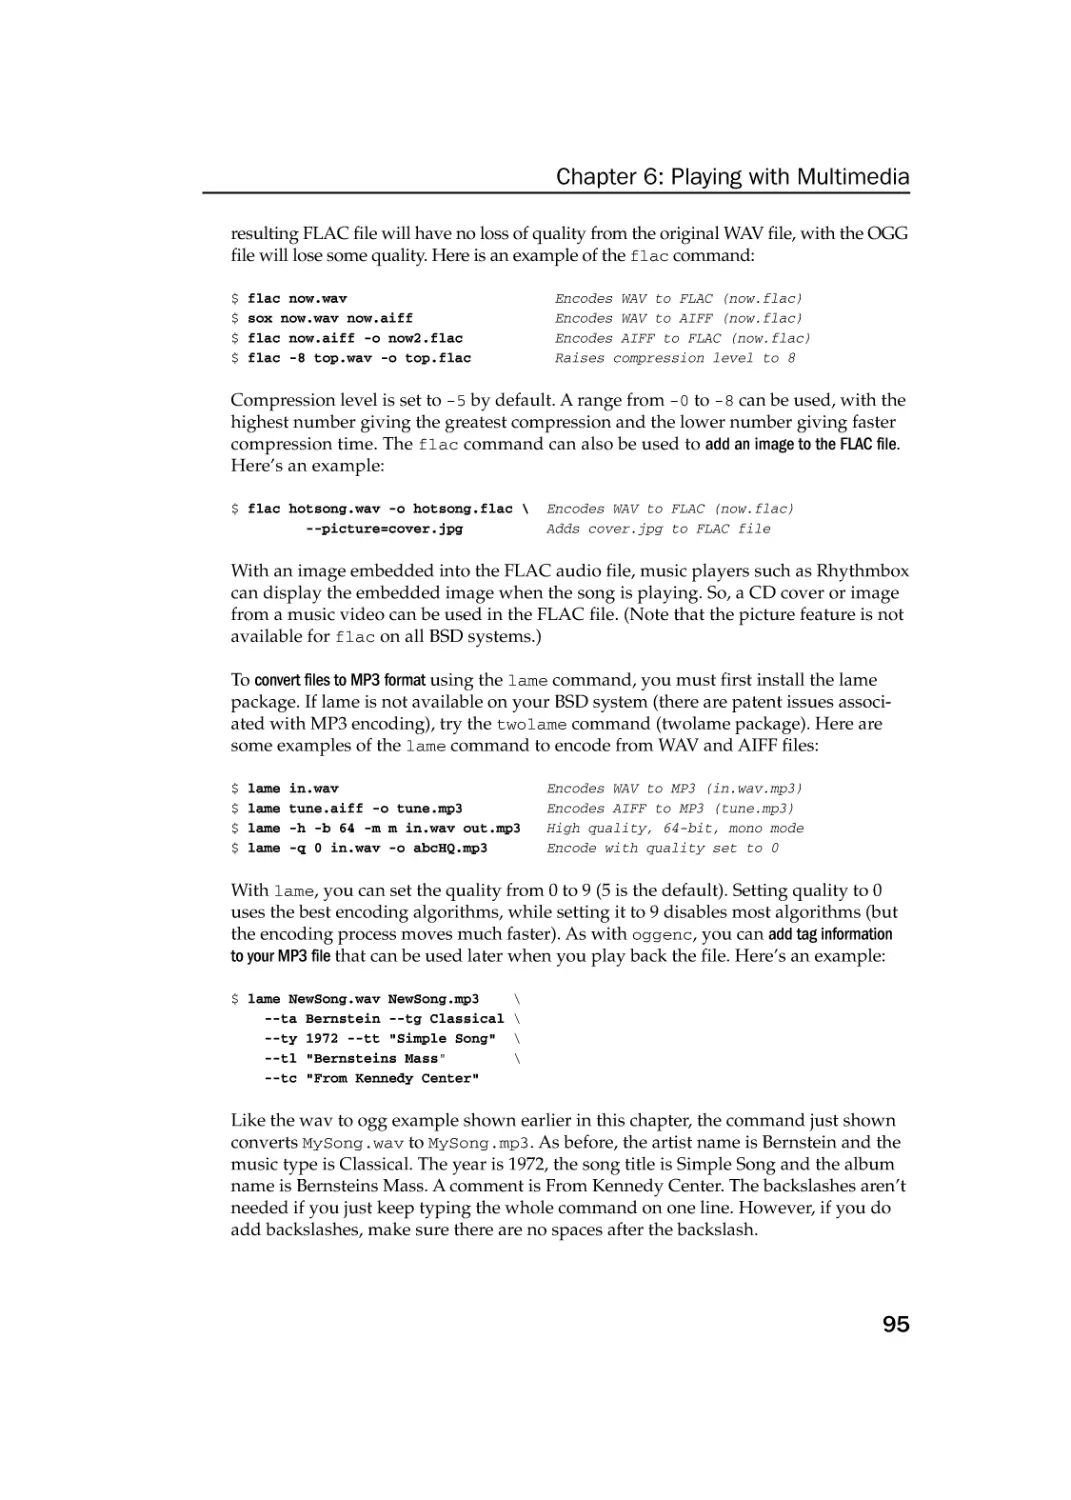
Encoding Music
Converting Audio Files
Transforming Images
Getting Information about Images
Converting Images
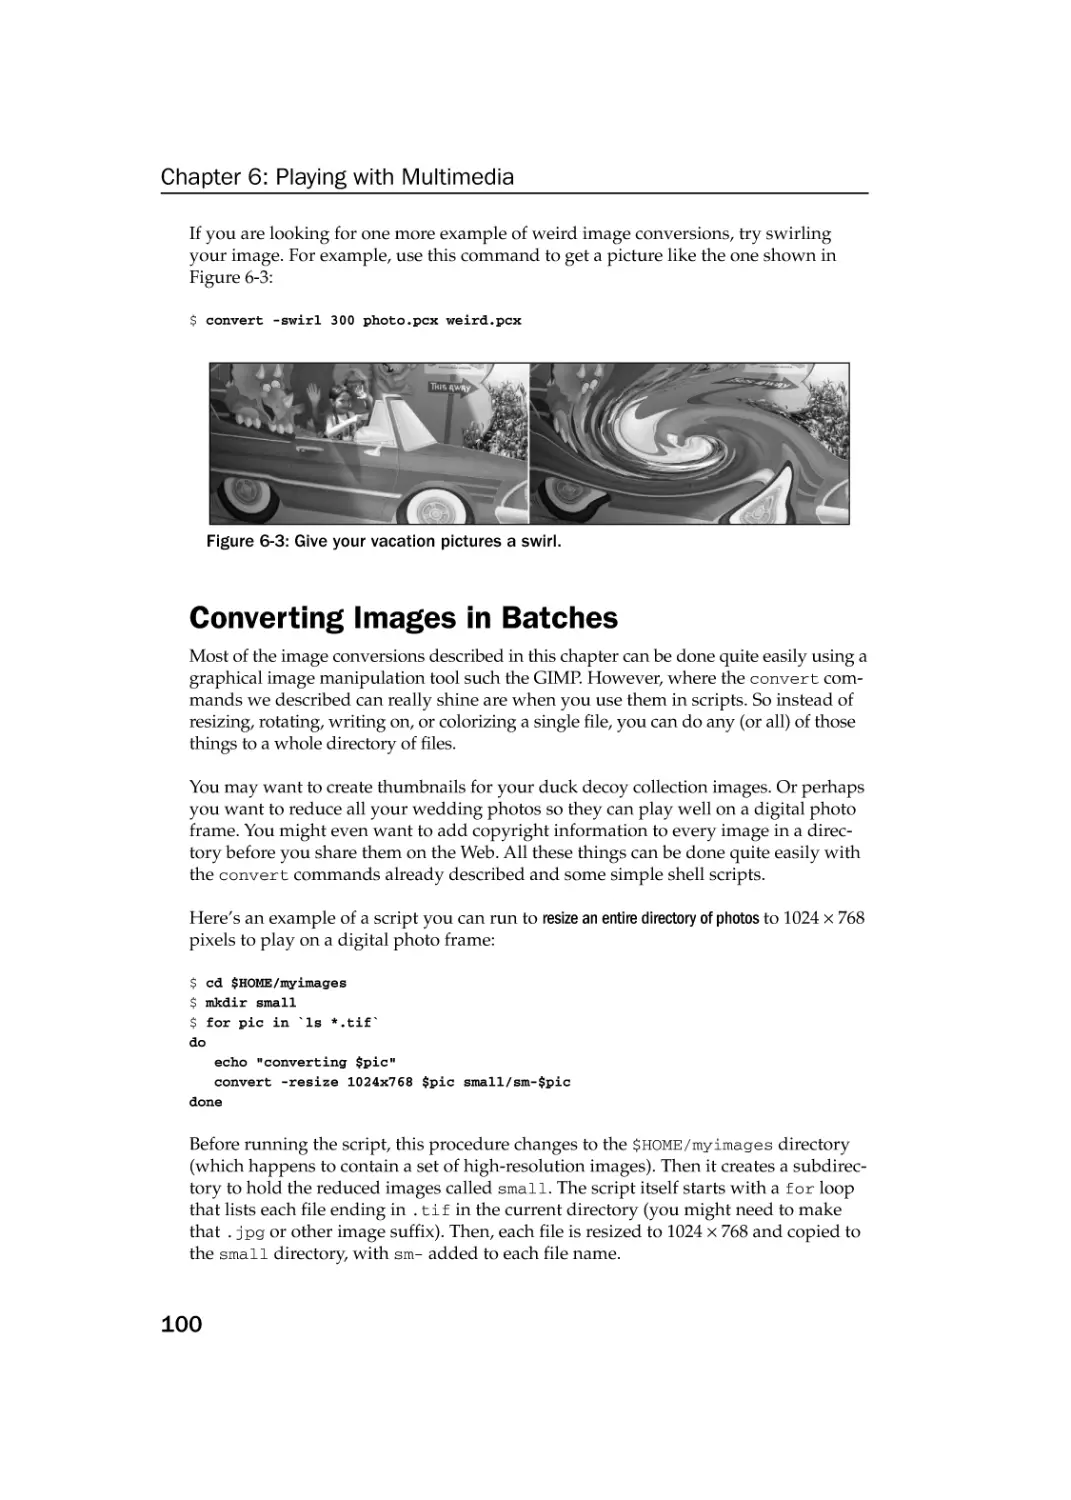
Converting Images in Batches
Summary
Chapter 7: Administering File Systems
71
71
72
73
76
78
78
78
79
80
81
83
84
85
87
88
88
89
89
89
90
91
92
93
96
97
97
98
100
101
103
Understanding File System Basics
103
Setting Up the Disk Initially
Checking Your Disk Setup
Understanding File System Types
104
104
106
xiii
76034ftoc.qxd:Toolbox
4/2/08
1:04 PM
Page xiv
Contents
Creating and Managing File Systems
Slicing and Partitioning Hard Disks
Working with Linux-Compatible File Systems
Creating a Memory Disk File System
Creating and Using Swap Partitions
Mounting and Unmounting File Systems
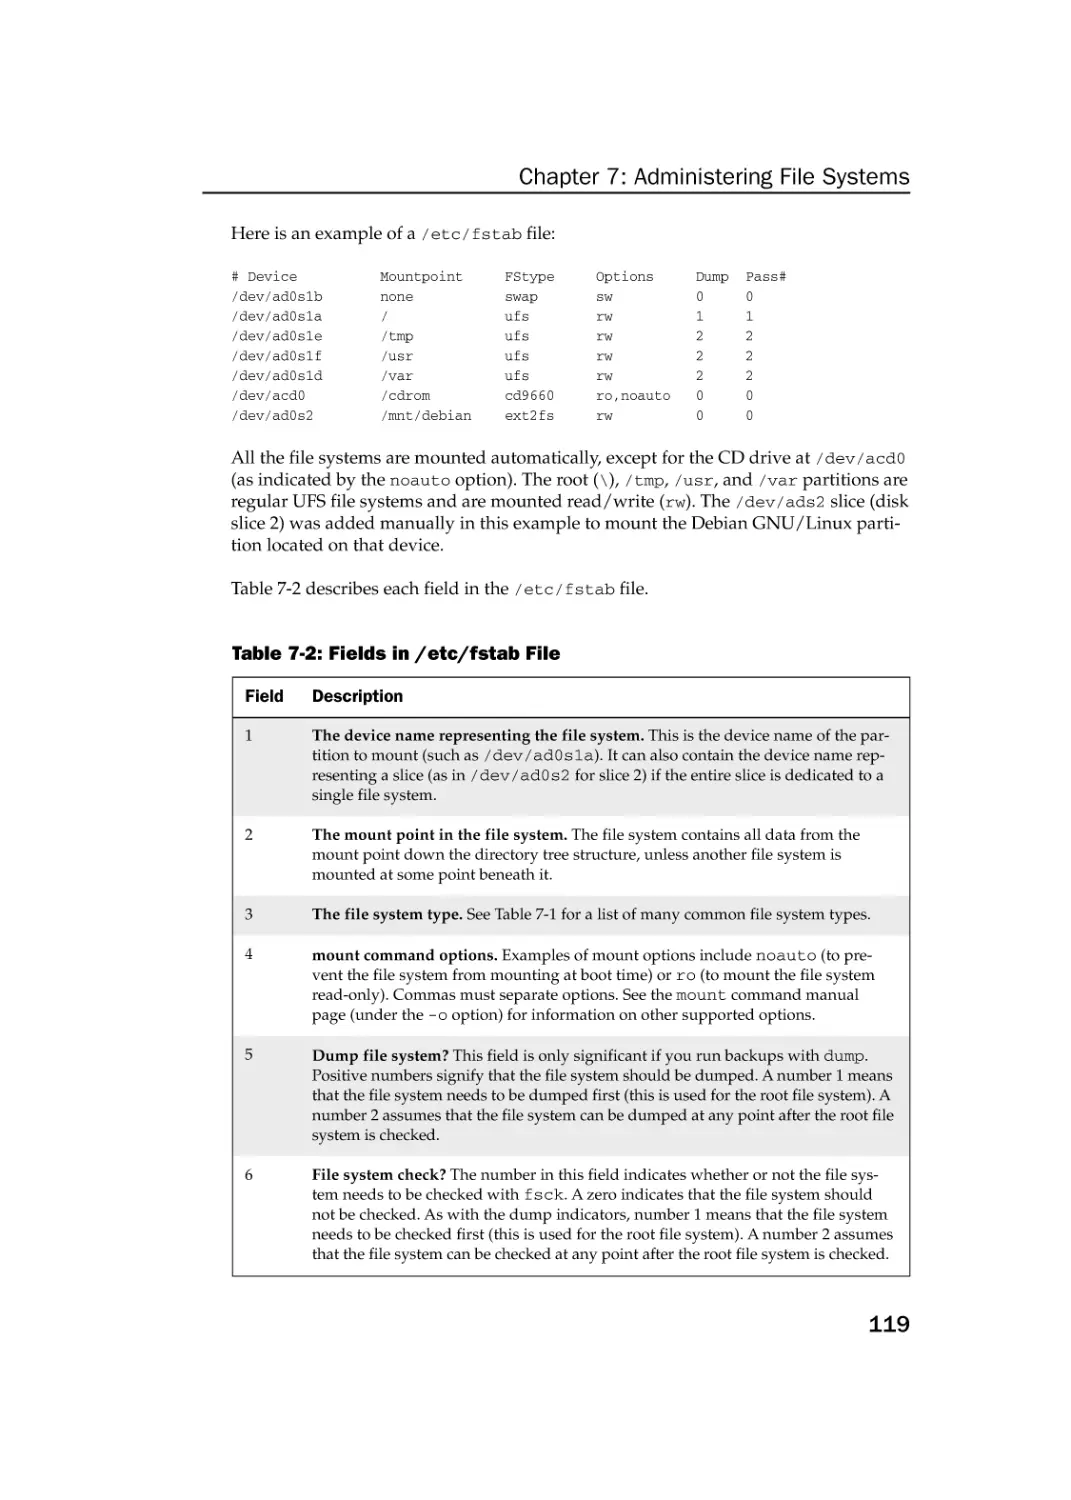
Mounting File Systems from the fstab File
Mounting File Systems with the mount Command
Unmounting File Systems with umount
Checking File Systems
Finding Out About File System Use
Summary
107
107
114
116
117
118
118
120
121
122
124
126
Chapter 8: Backups and Removable Media
127
Backing Up Data to Compressed Archives
127
Creating Backup Archives with tar
Using Compression Tools
Listing, Joining, and Adding Files to tar Archives
Backing Up Over Networks
Backing Up tar Archives Over ssh
Backing Up Files with rsync
Backing Up with unison
Backing Up to Removable Media
Creating Backup Images with mkisofs
Burning Backup Images with cdrecord
Making and Burning DVDs with growisofs
Summary
Chapter 9: Checking and Managing Running Processes
Listing Active Processes
127
129
132
133
133
134
136
137
137
140
141
142
143
144
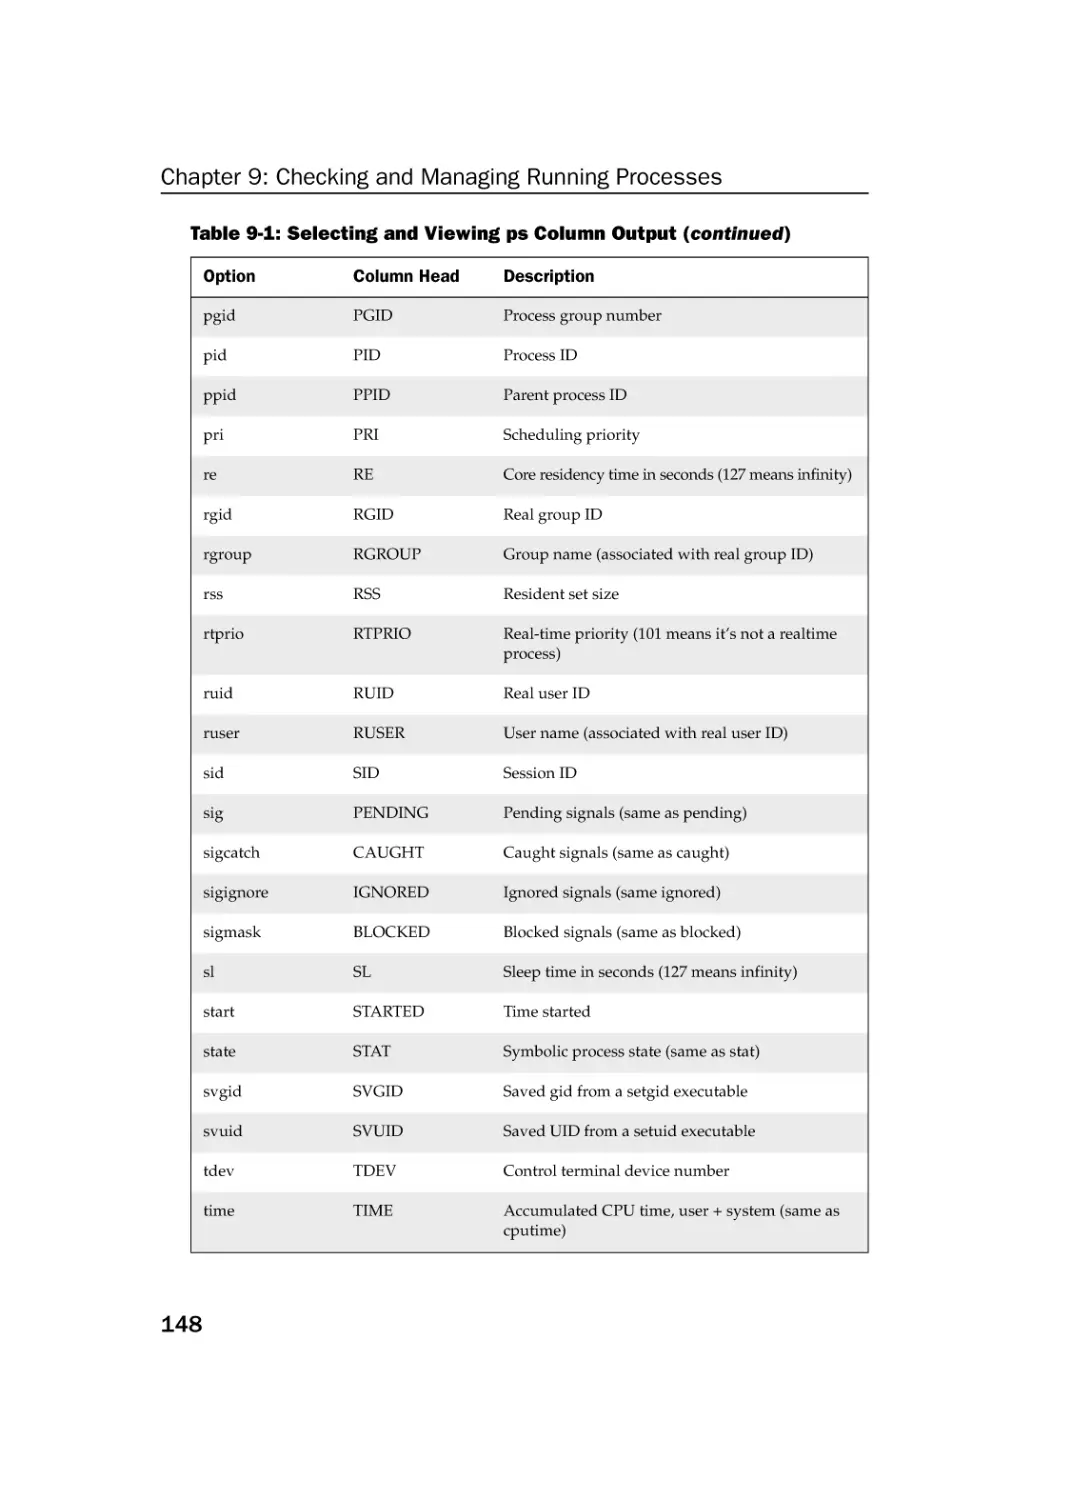
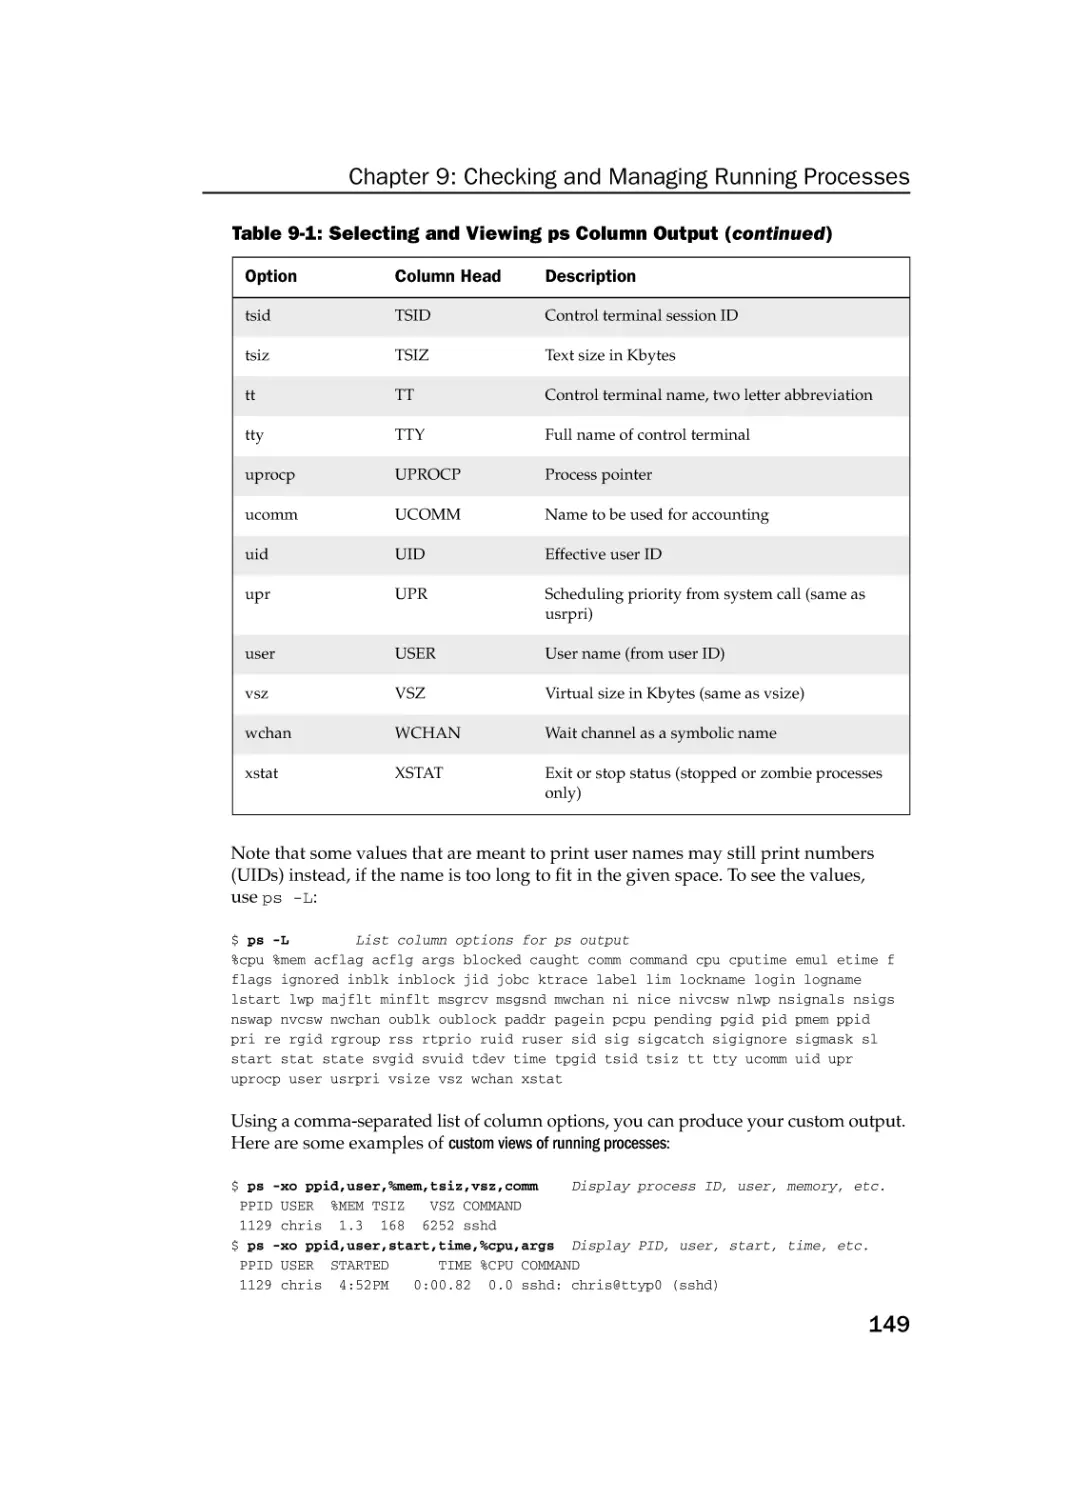
Viewing Active Processes with ps
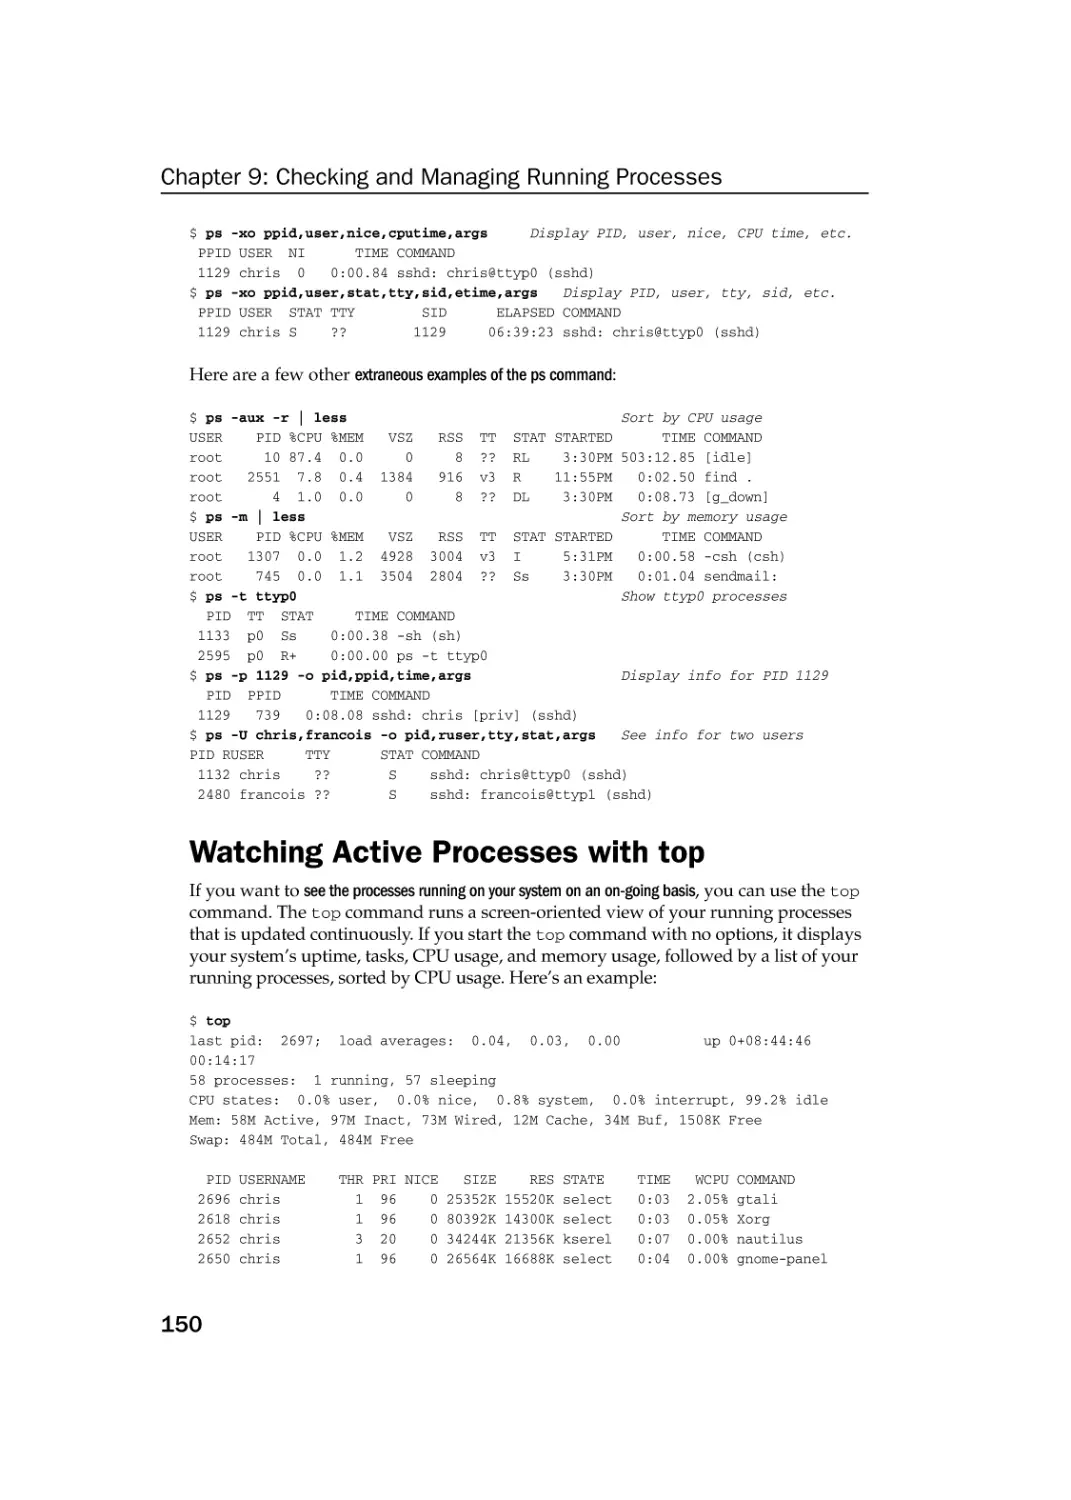
Watching Active Processes with top
144
150
Finding and Controlling Processes
151
Using pgrep to Find Processes
Using fuser to Find Processes
Summary
xiv
152
152
159
76034ftoc.qxd:Toolbox
4/2/08
1:04 PM
Page xv
Contents
Chapter 10: Managing the System
Monitoring Resources
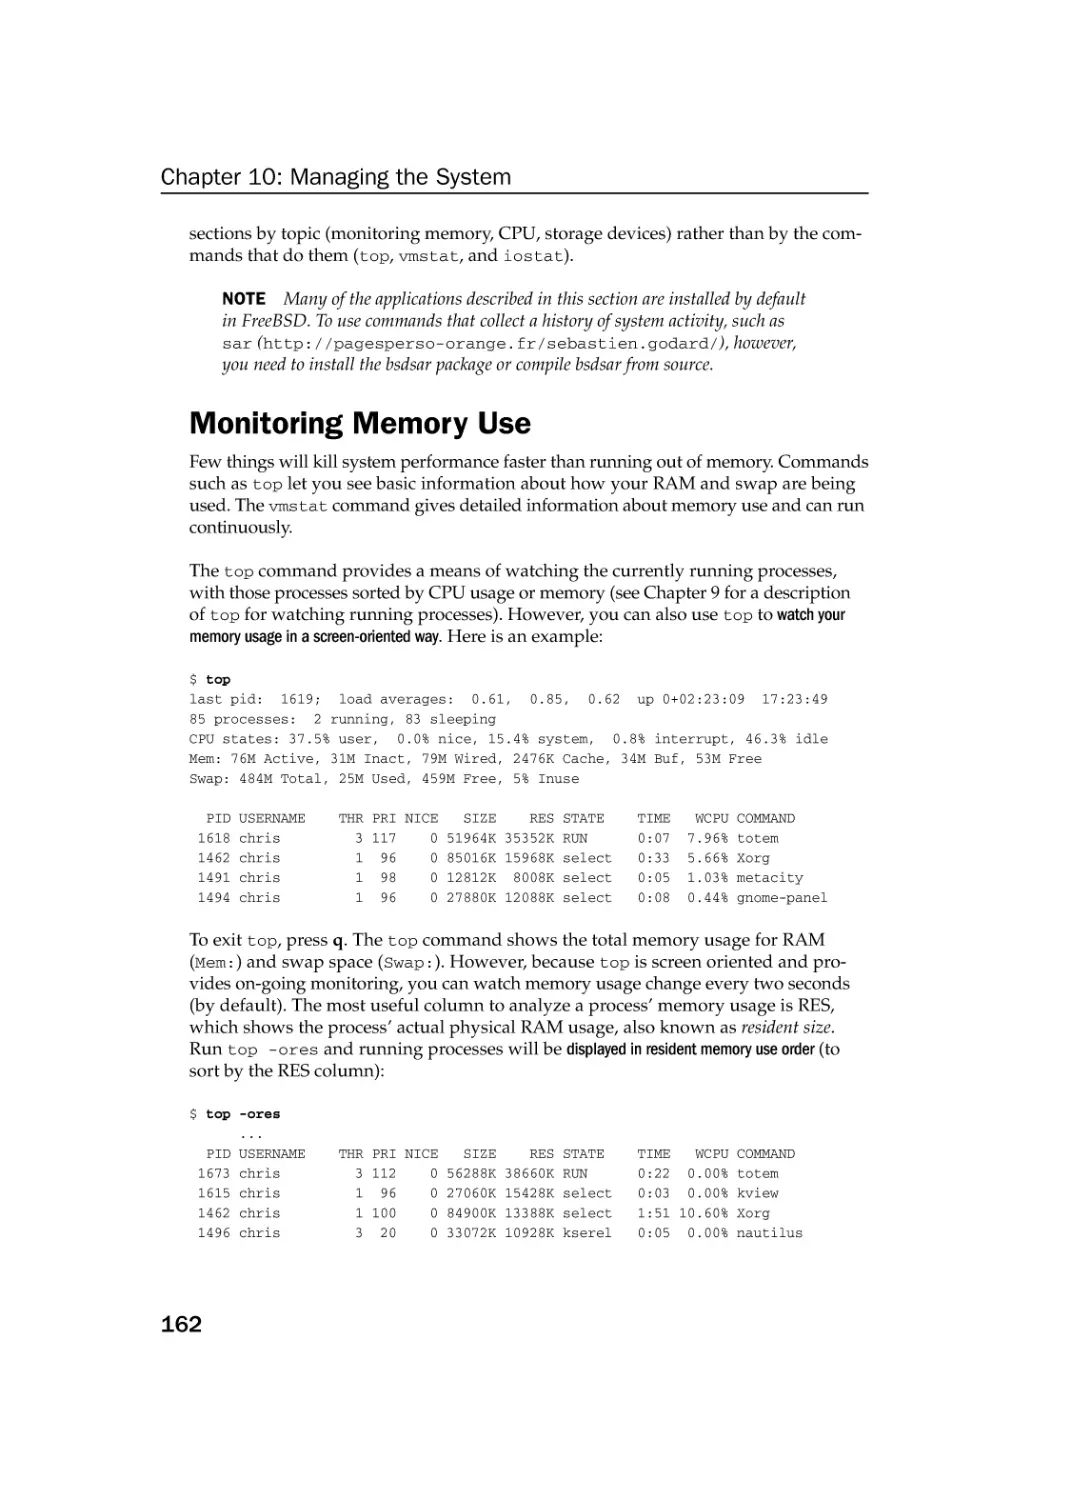
Monitoring Memory Use
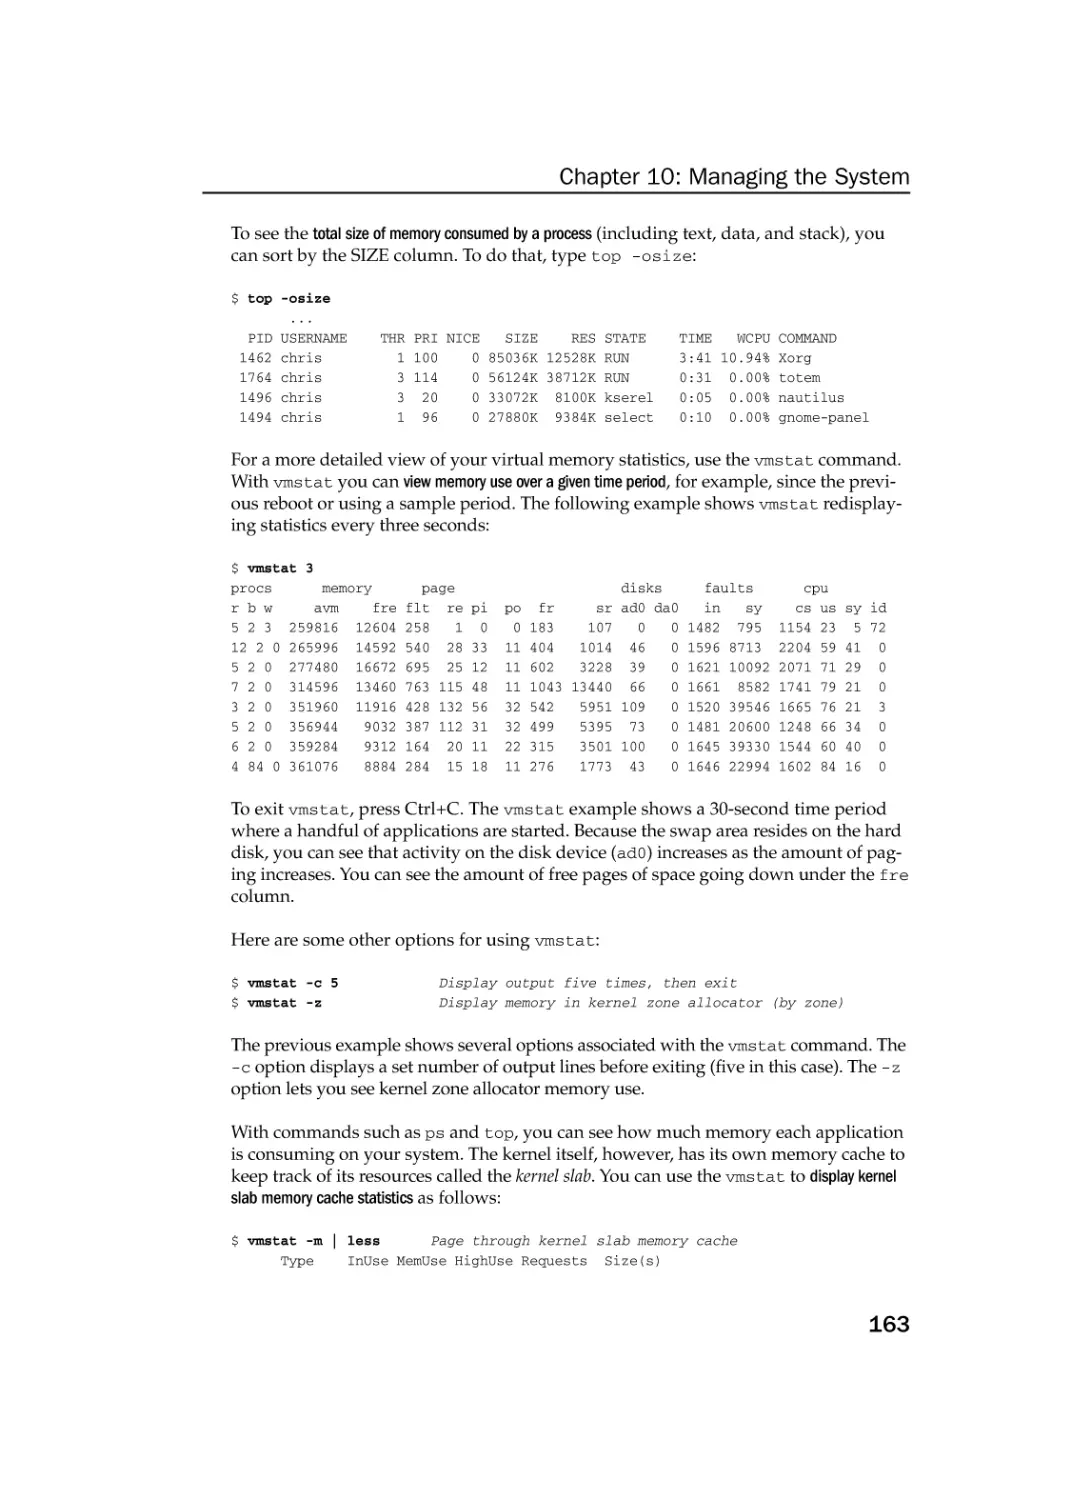
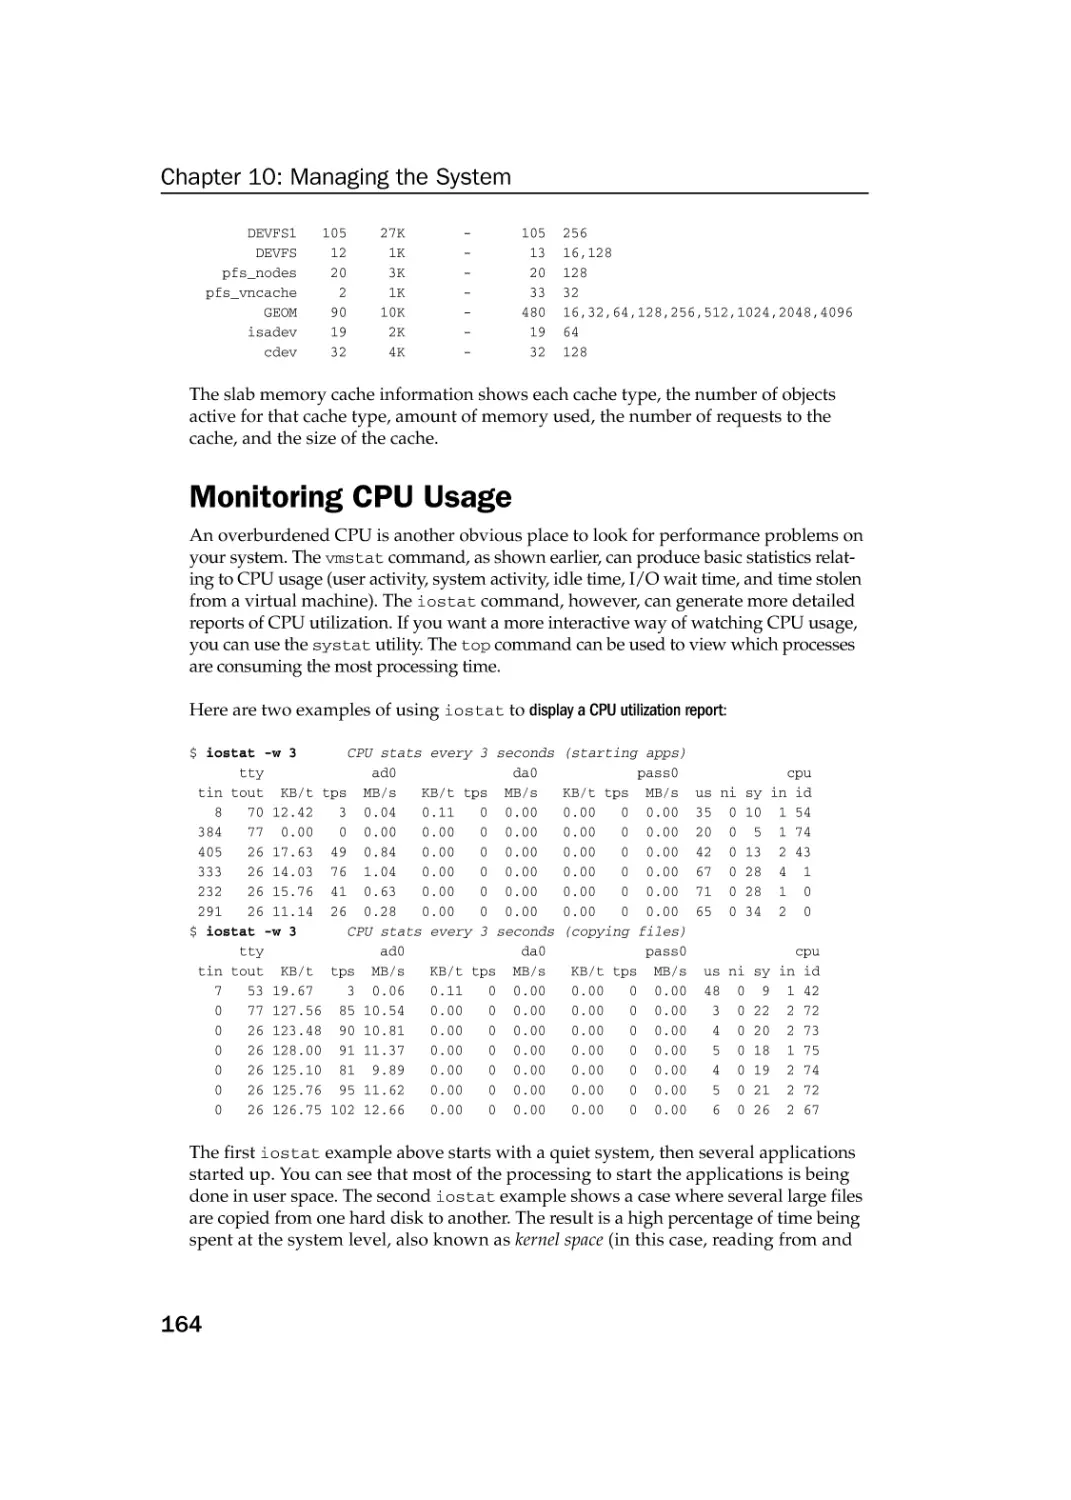
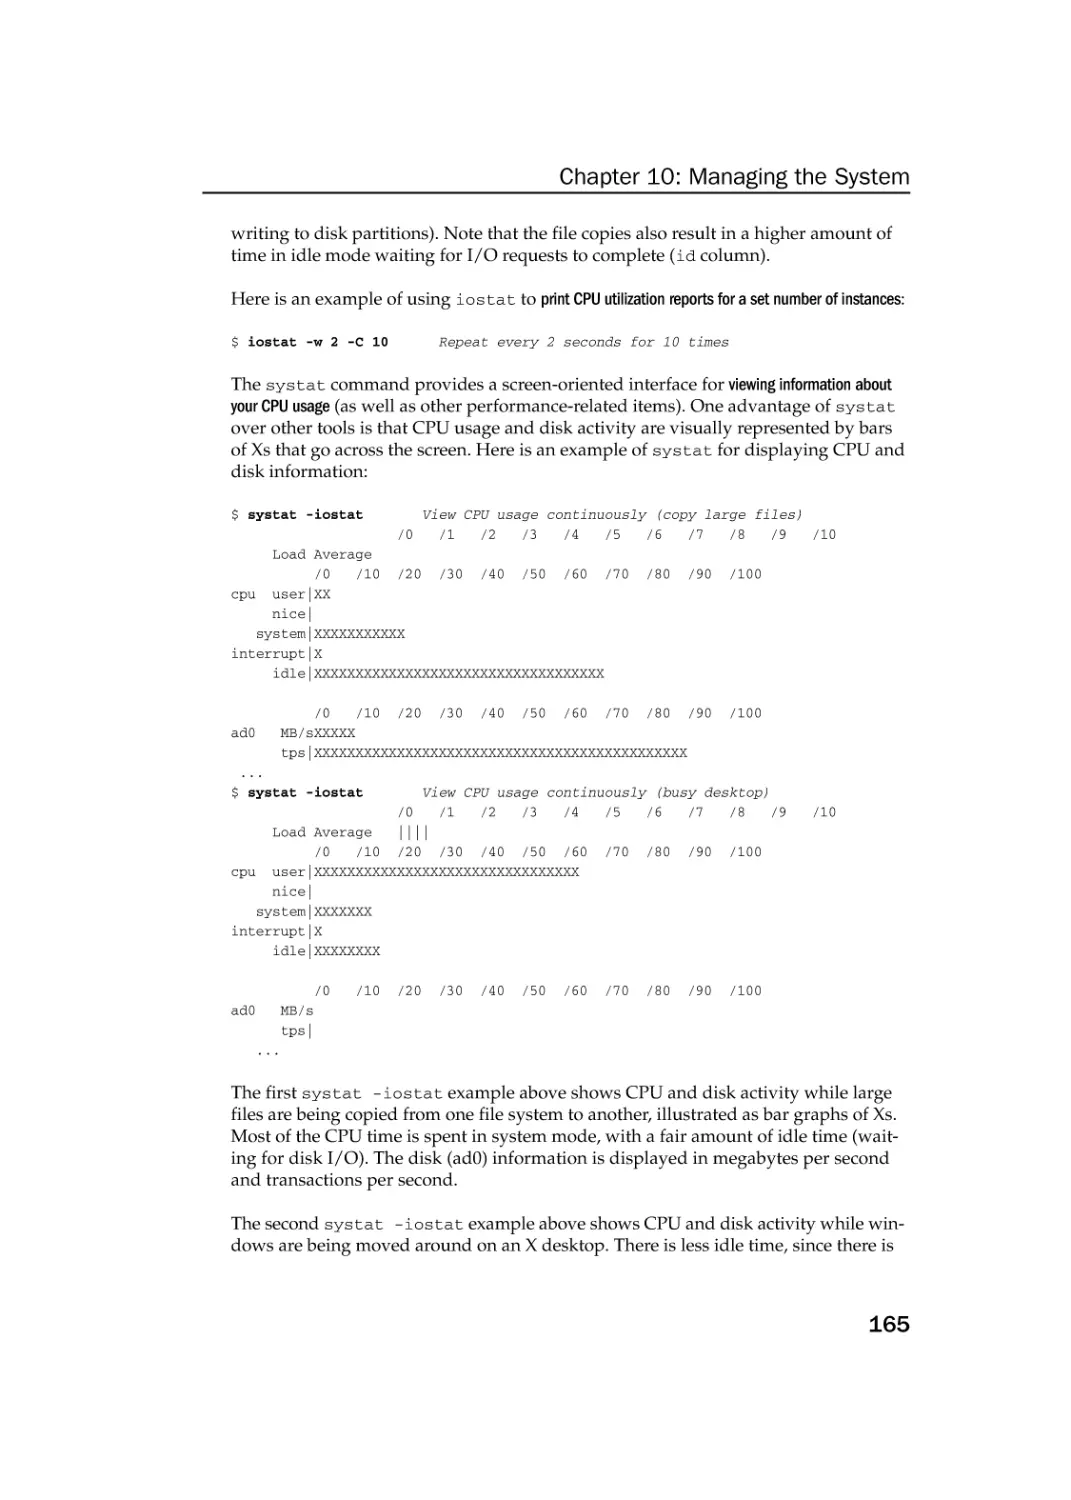
Monitoring CPU Usage
Monitoring Storage Devices
Mastering Time
Changing Time Zone
Displaying and Setting Your Time and Date
Using Network Time Protocol to Set Date/Time
Checking Uptime
Managing the Boot Process
Using the boot0 Boot Loader
Using bsdlabel to Check Out Partitions
Changing to the GRUB boot loader
Controlling System Services
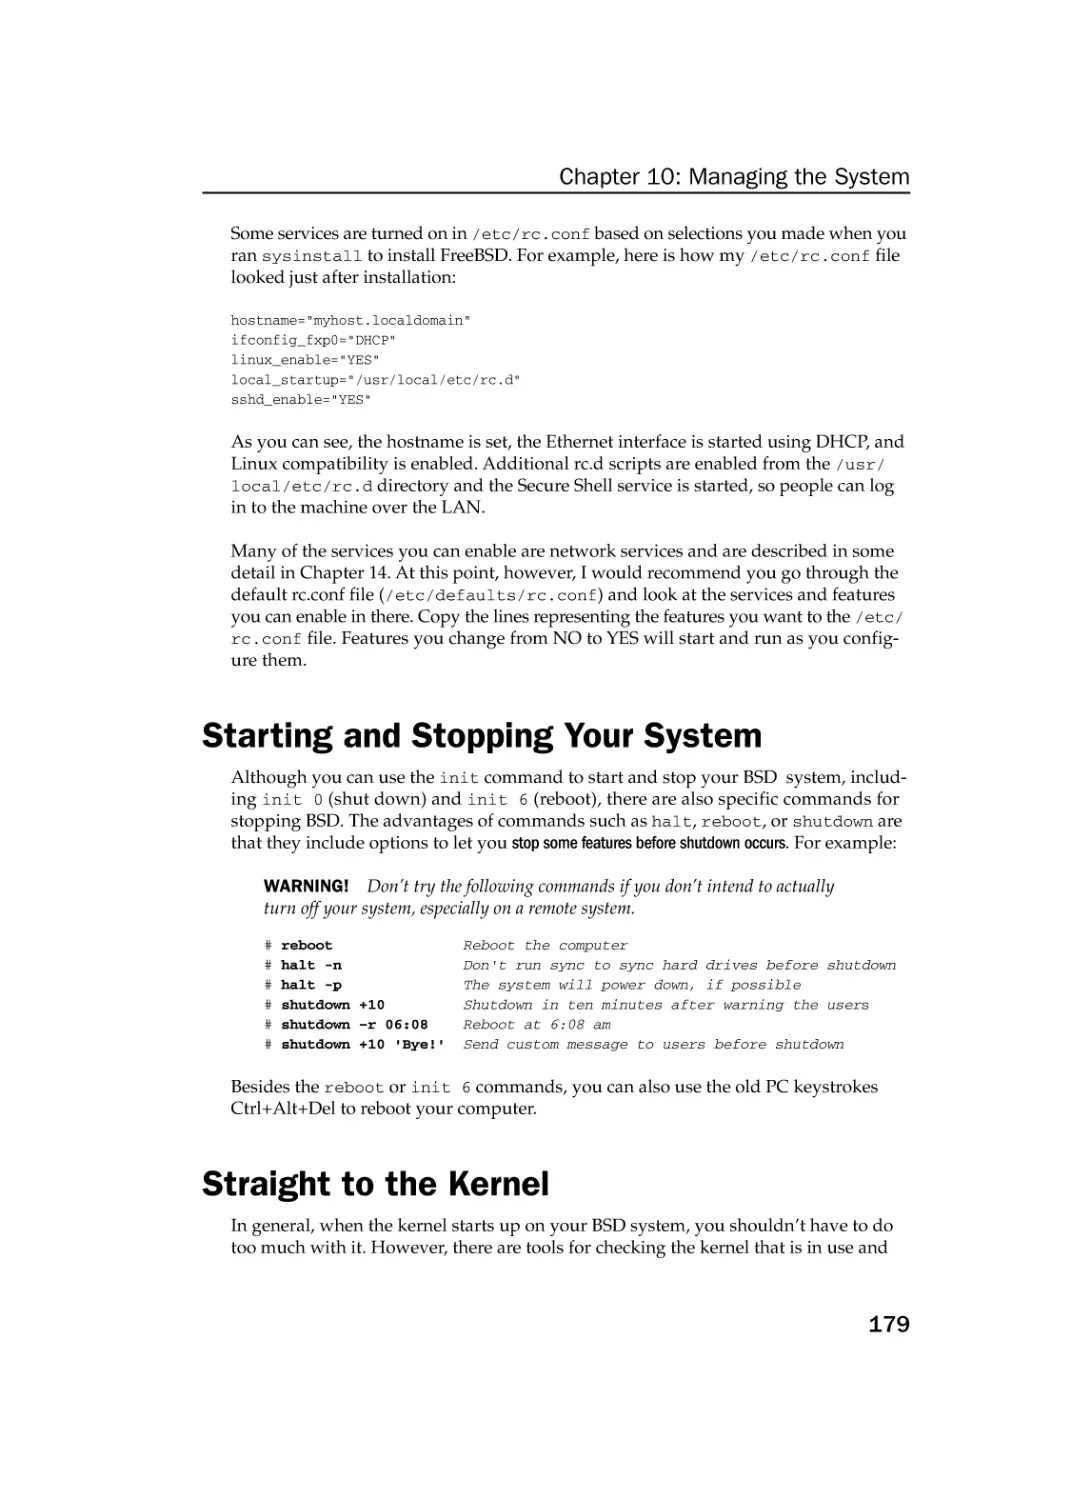
Starting and Stopping Your System
Straight to the Kernel
Poking at the Hardware
Summary
Chapter 11: Managing Network Connections
Configuring Network Interfaces Using sysinstall
Managing Network Interface Cards
Managing Network Connections
Starting and Stopping Ethernet Connections
Starting and Stopping Network Services
Using Wireless Connections
Getting Wireless Driver
Configuring Wireless Interfaces
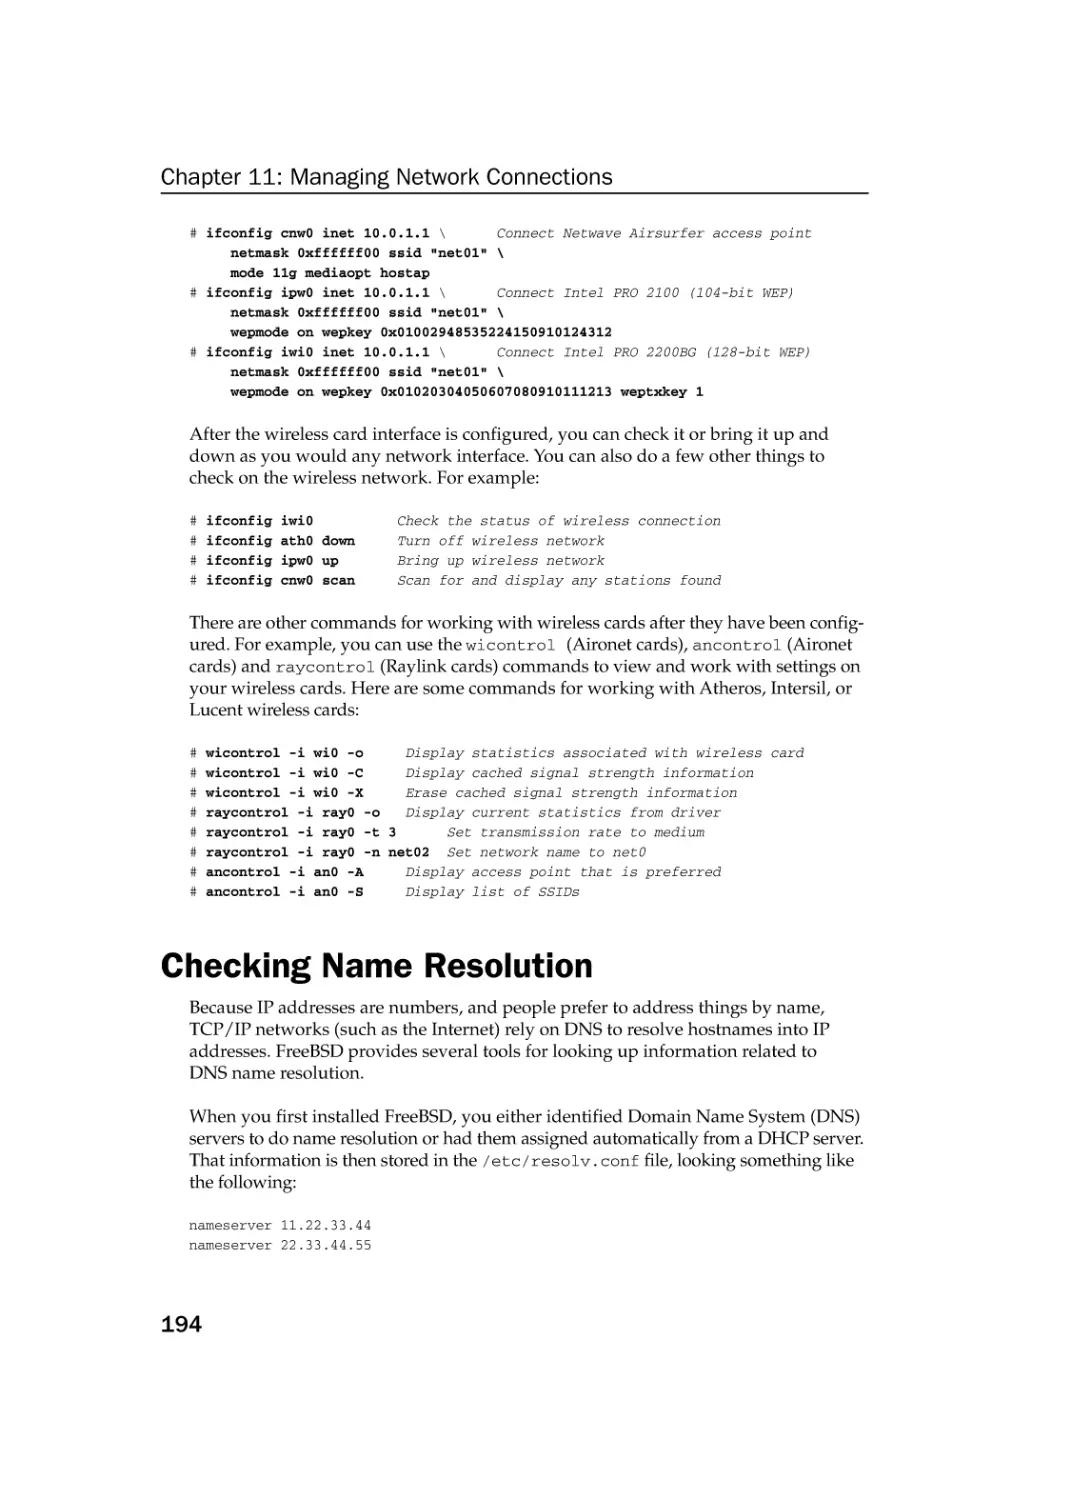
Checking Name Resolution
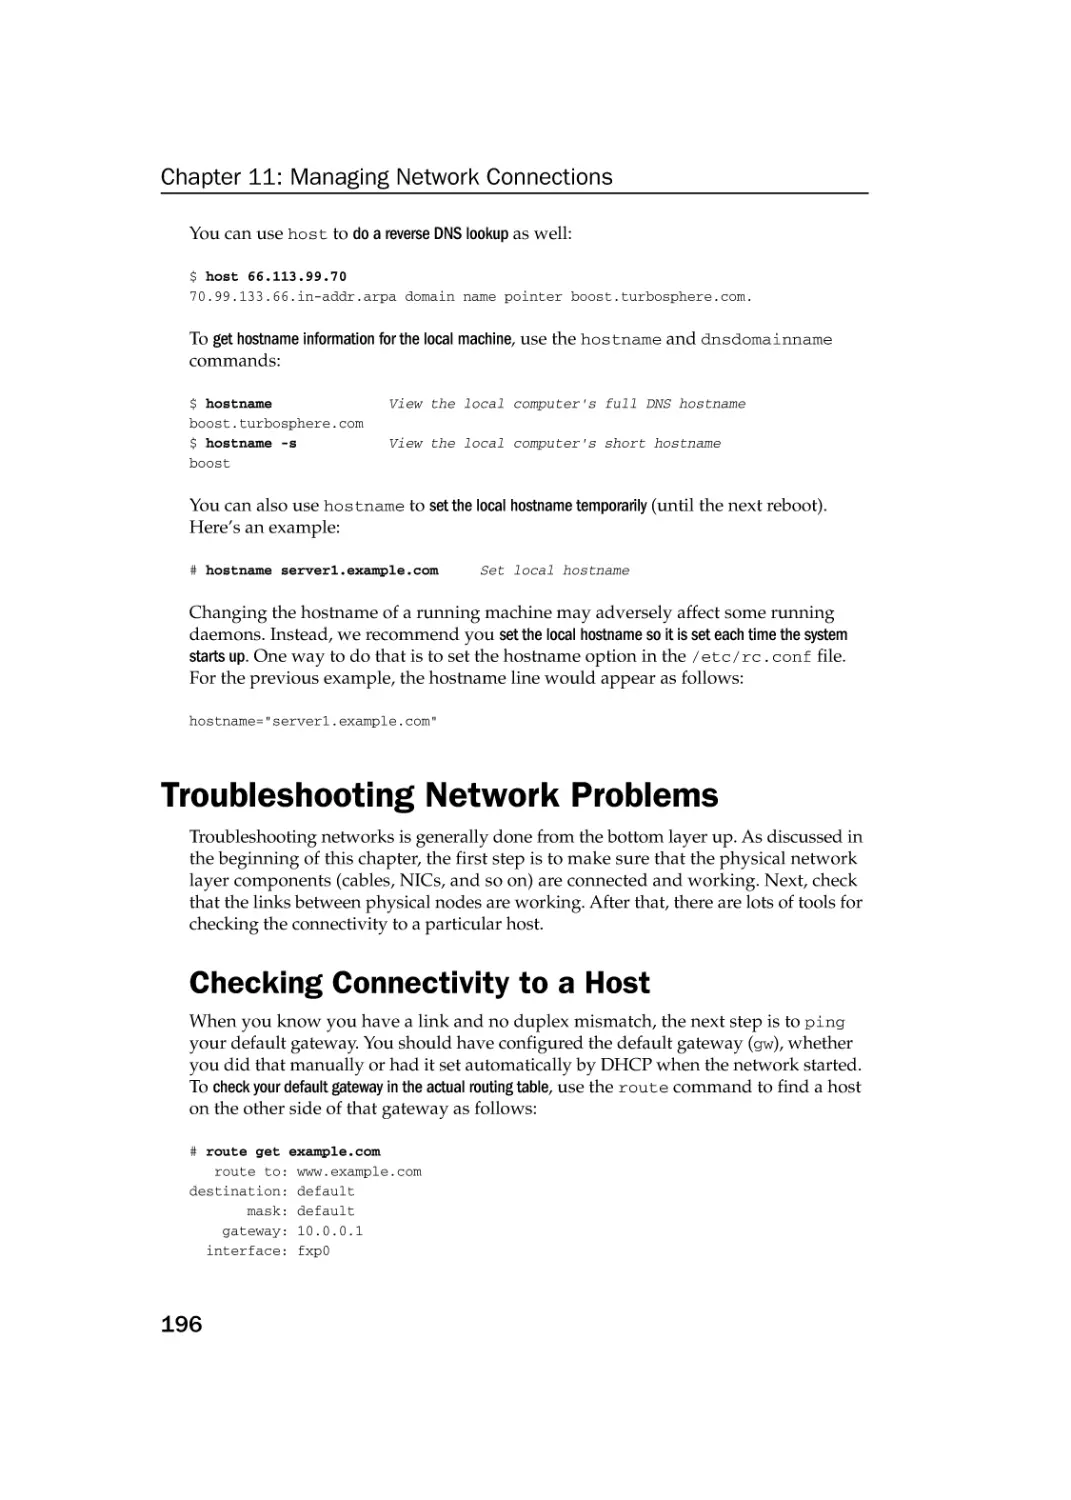
Troubleshooting Network Problems
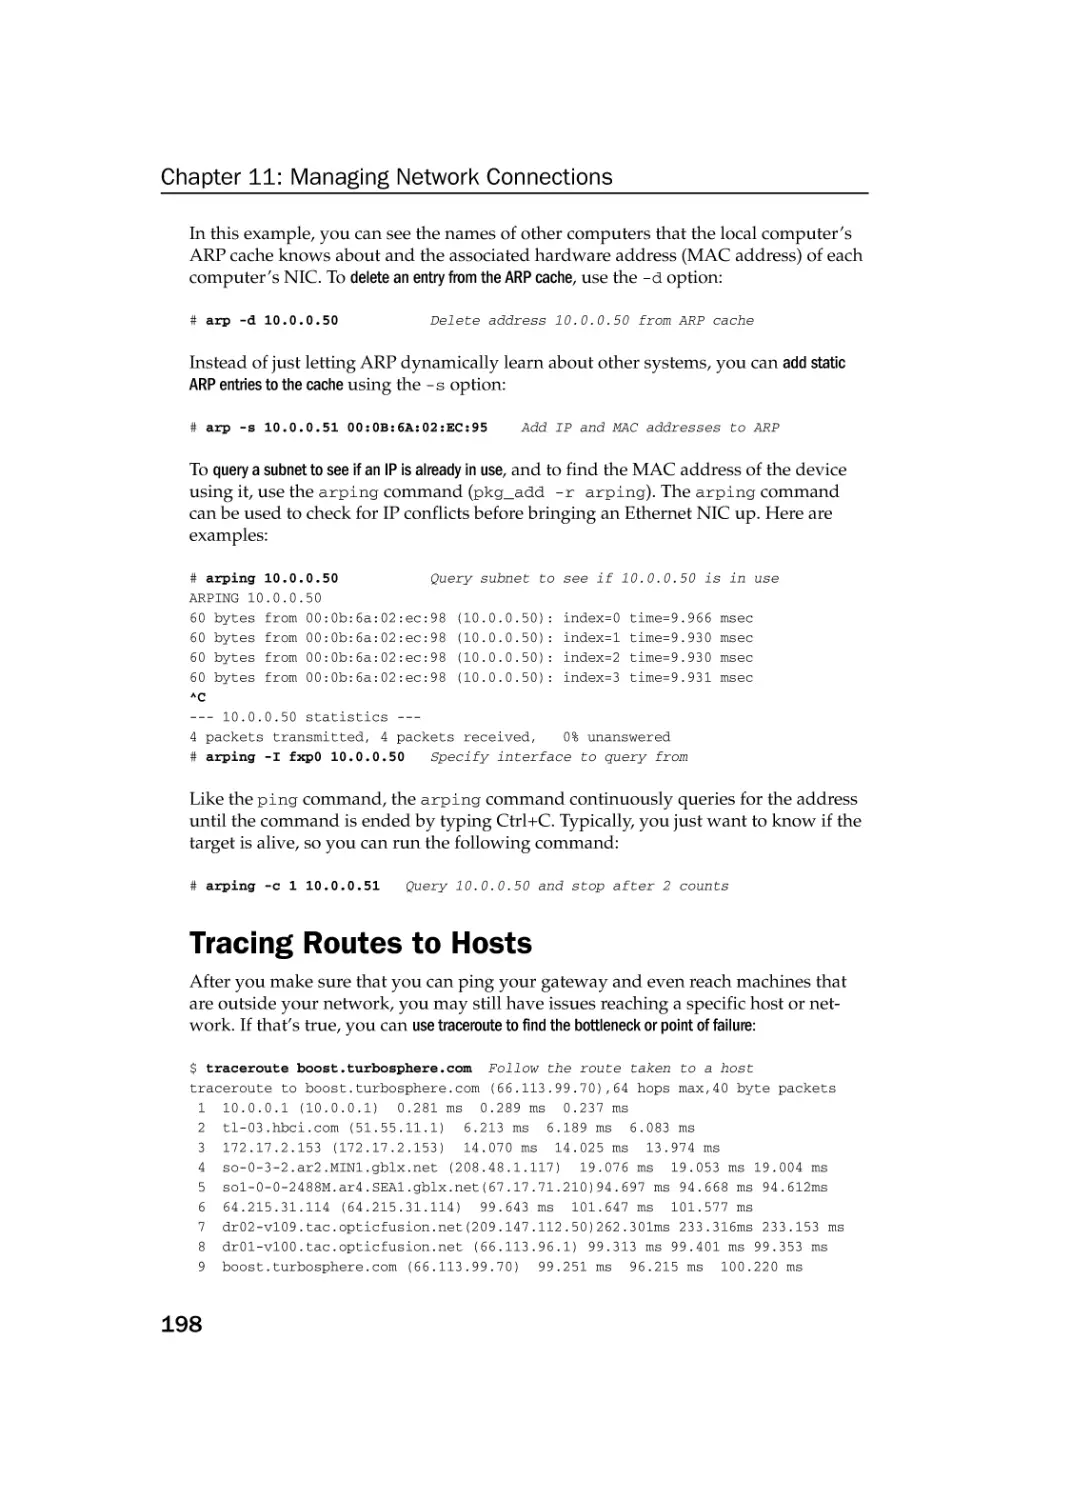
Checking Connectivity to a Host
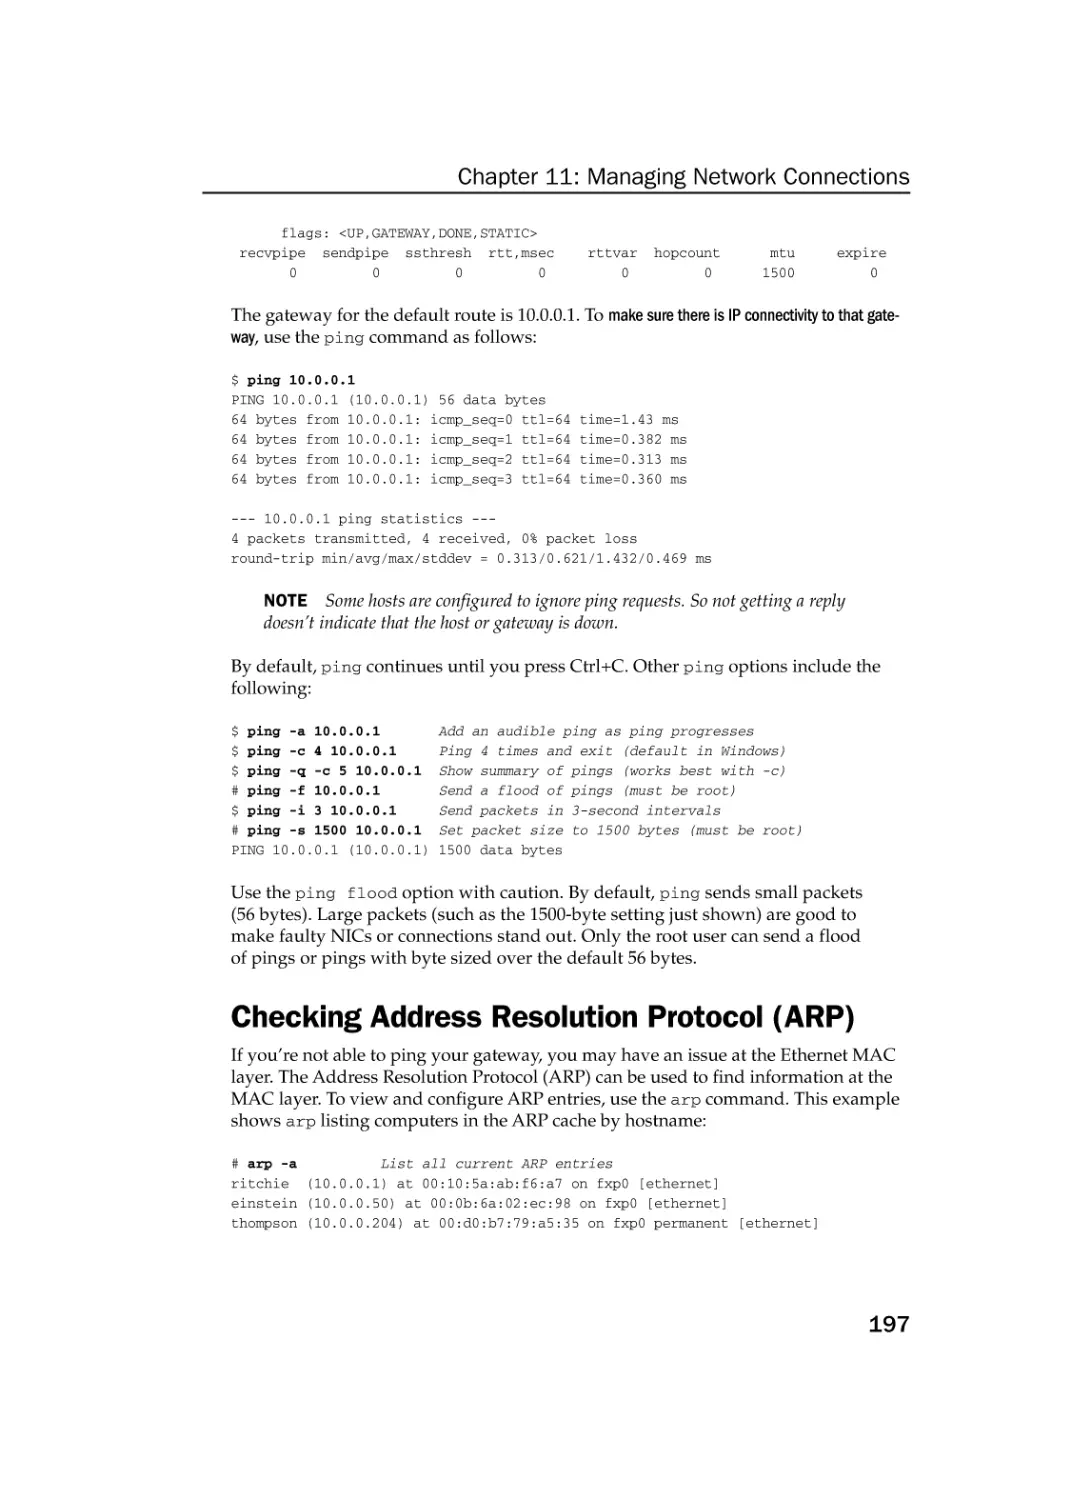
Checking Address Resolution Protocol (ARP)
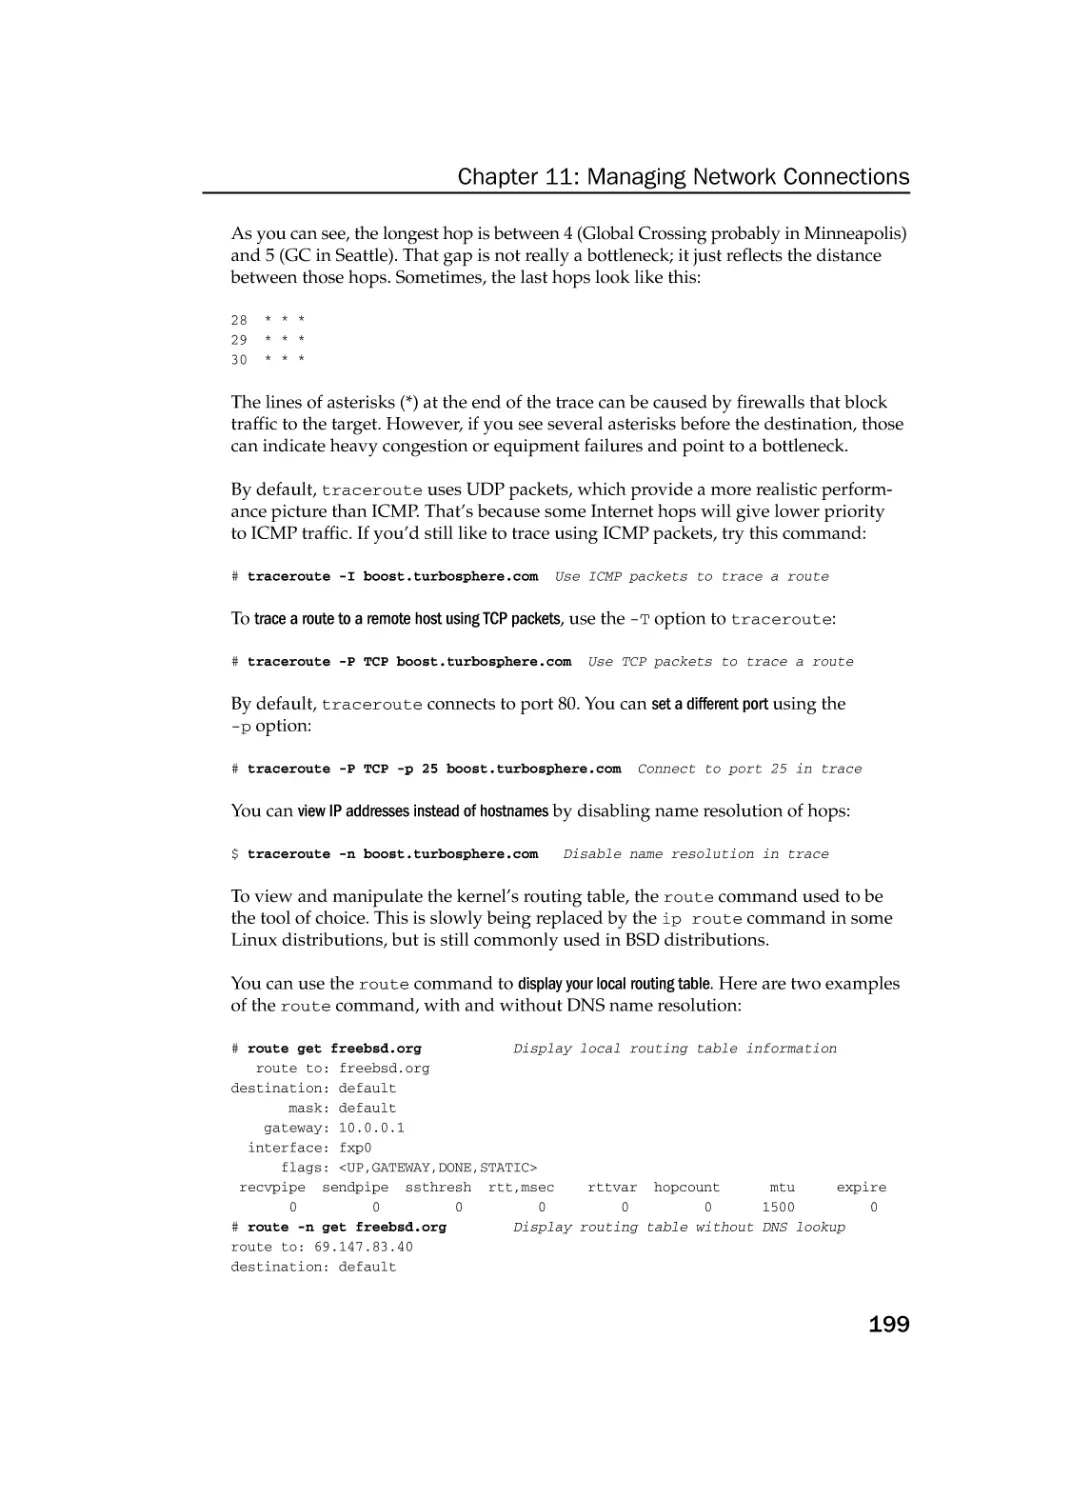
Tracing Routes to Hosts
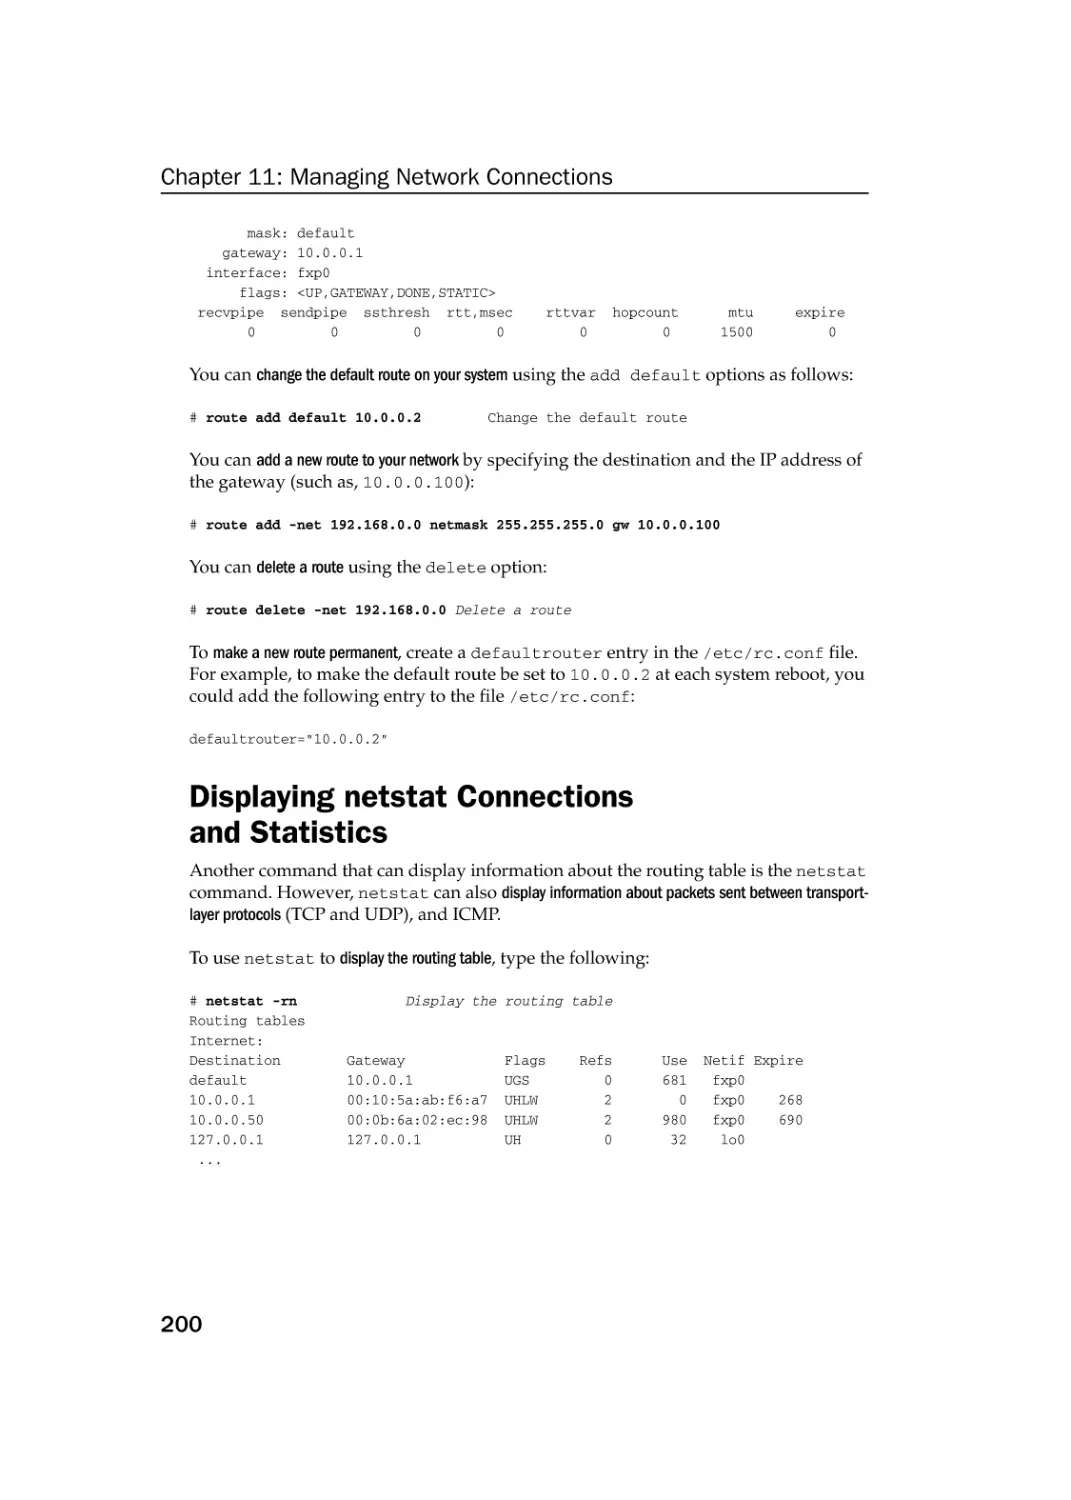
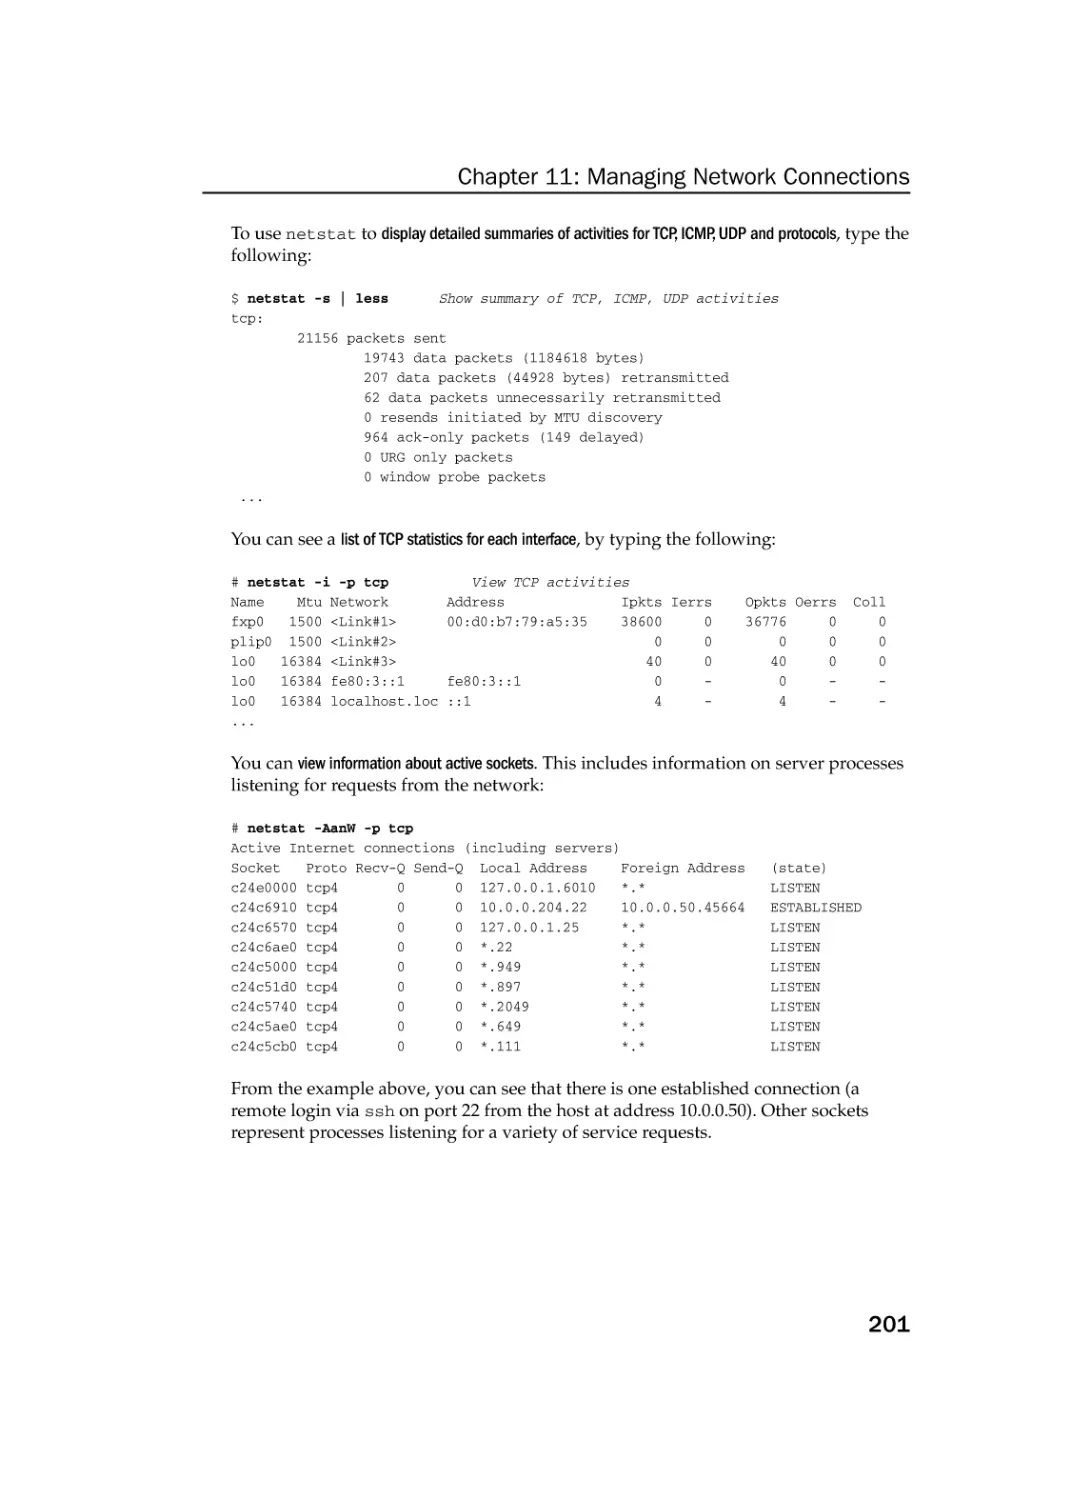
Displaying netstat Connections and Statistics
Other Useful Network Tools
Summary
161
161
162
164
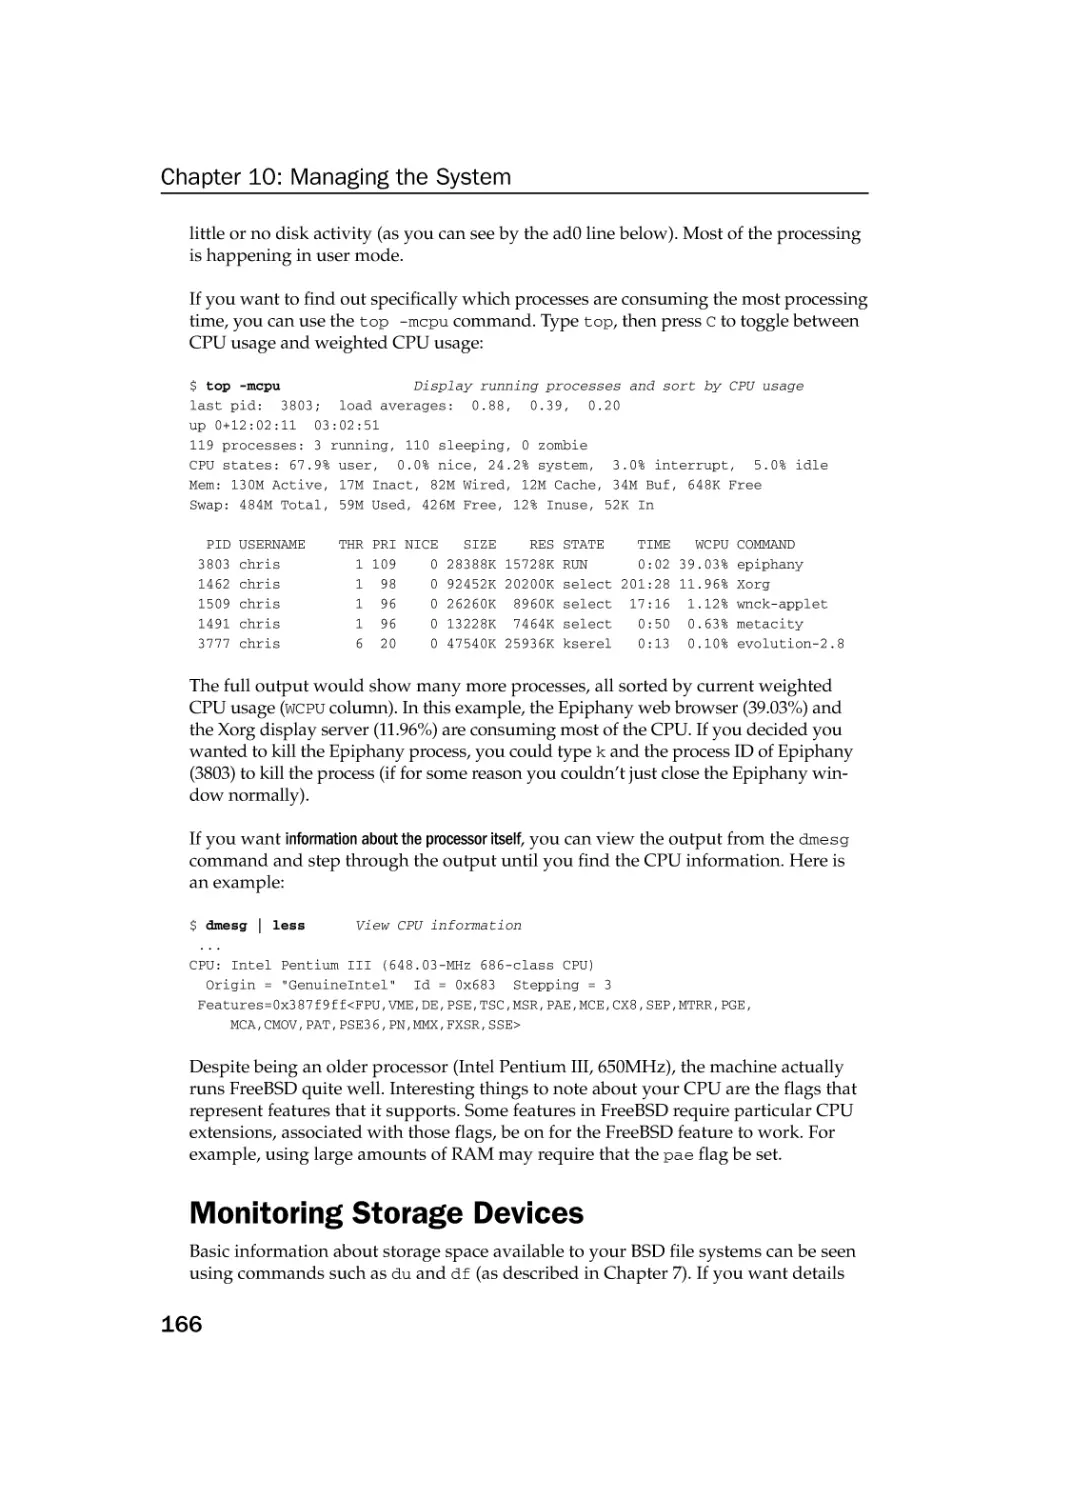
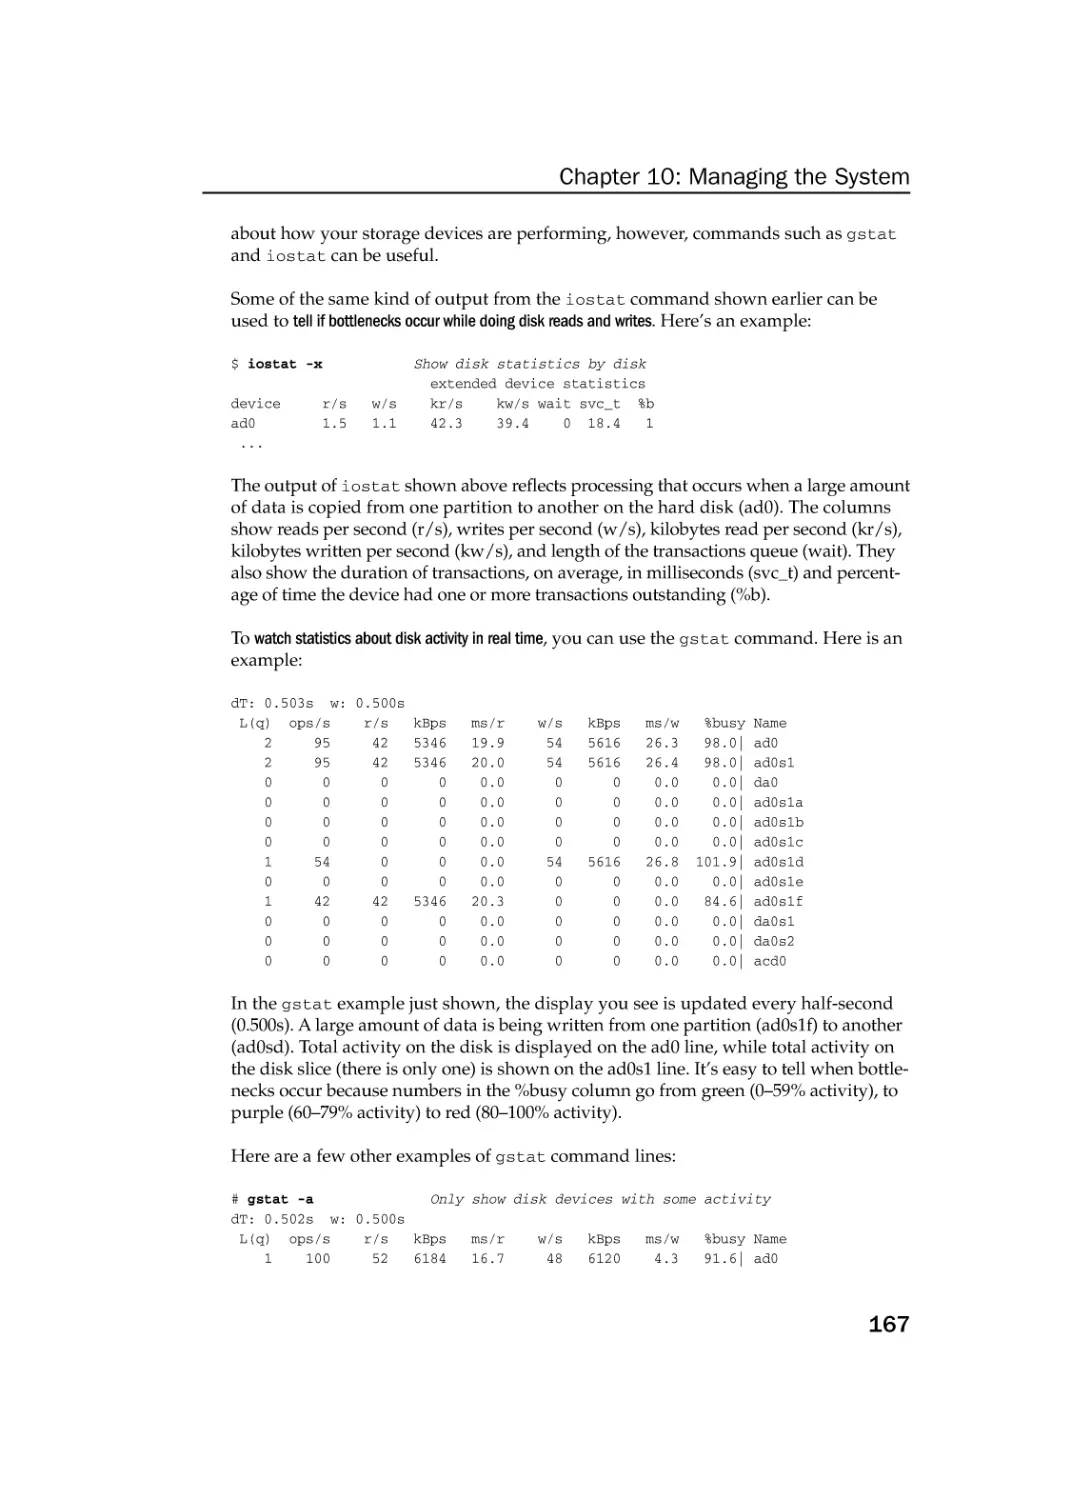
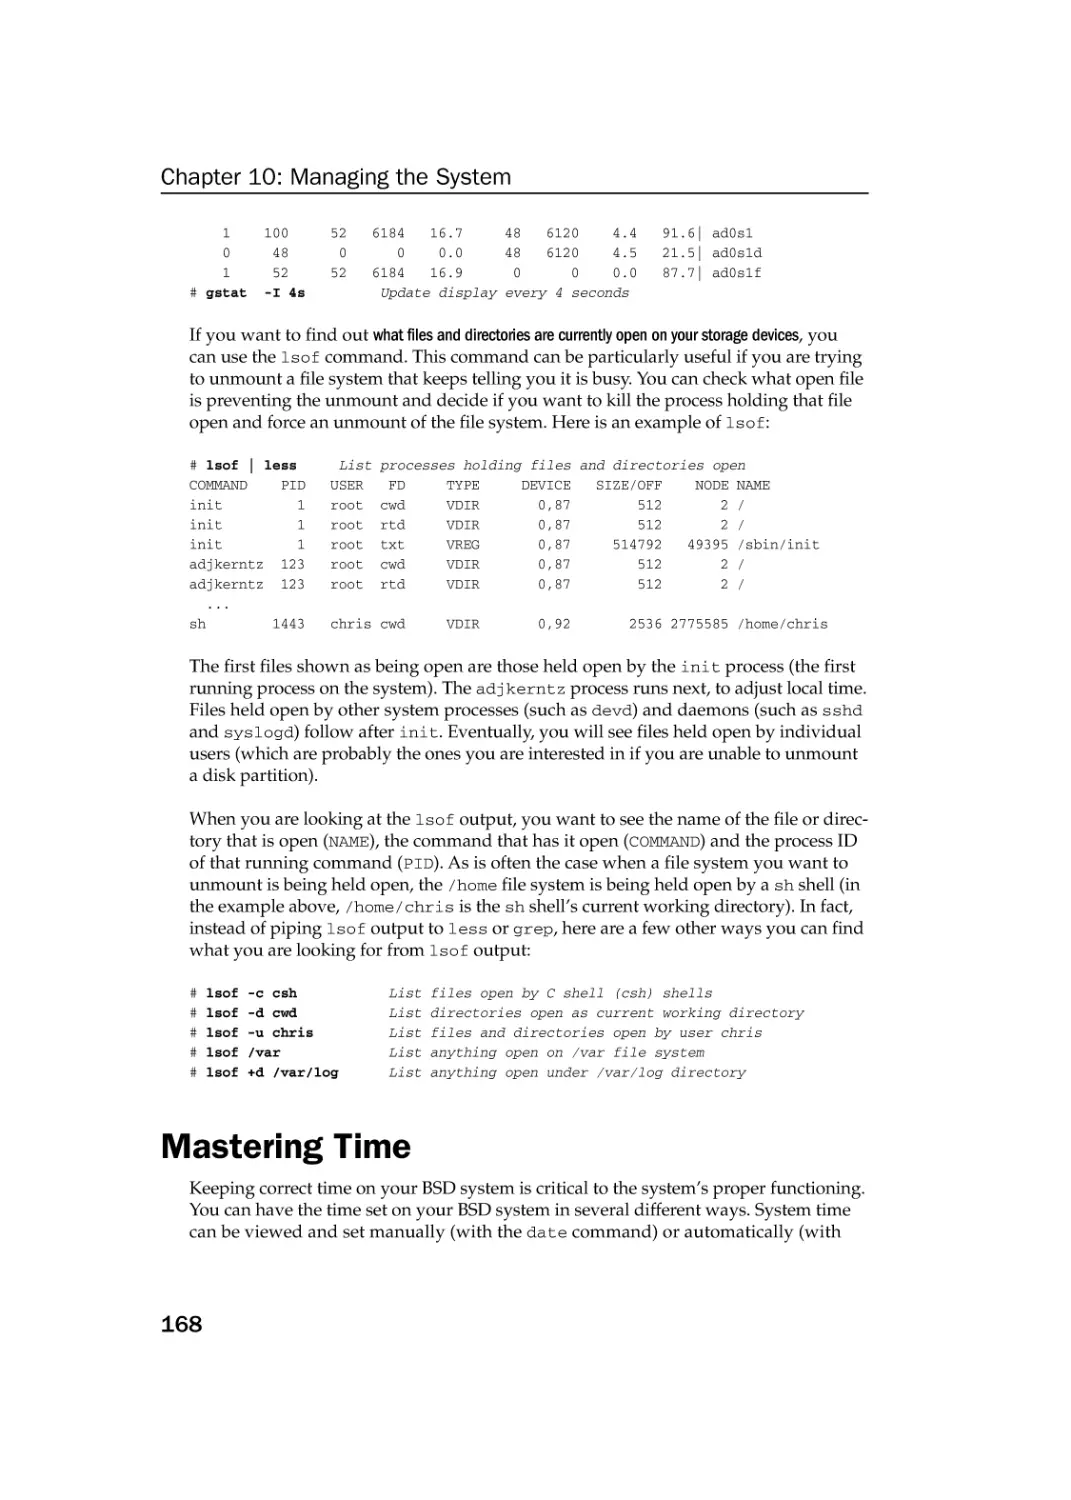
166
168
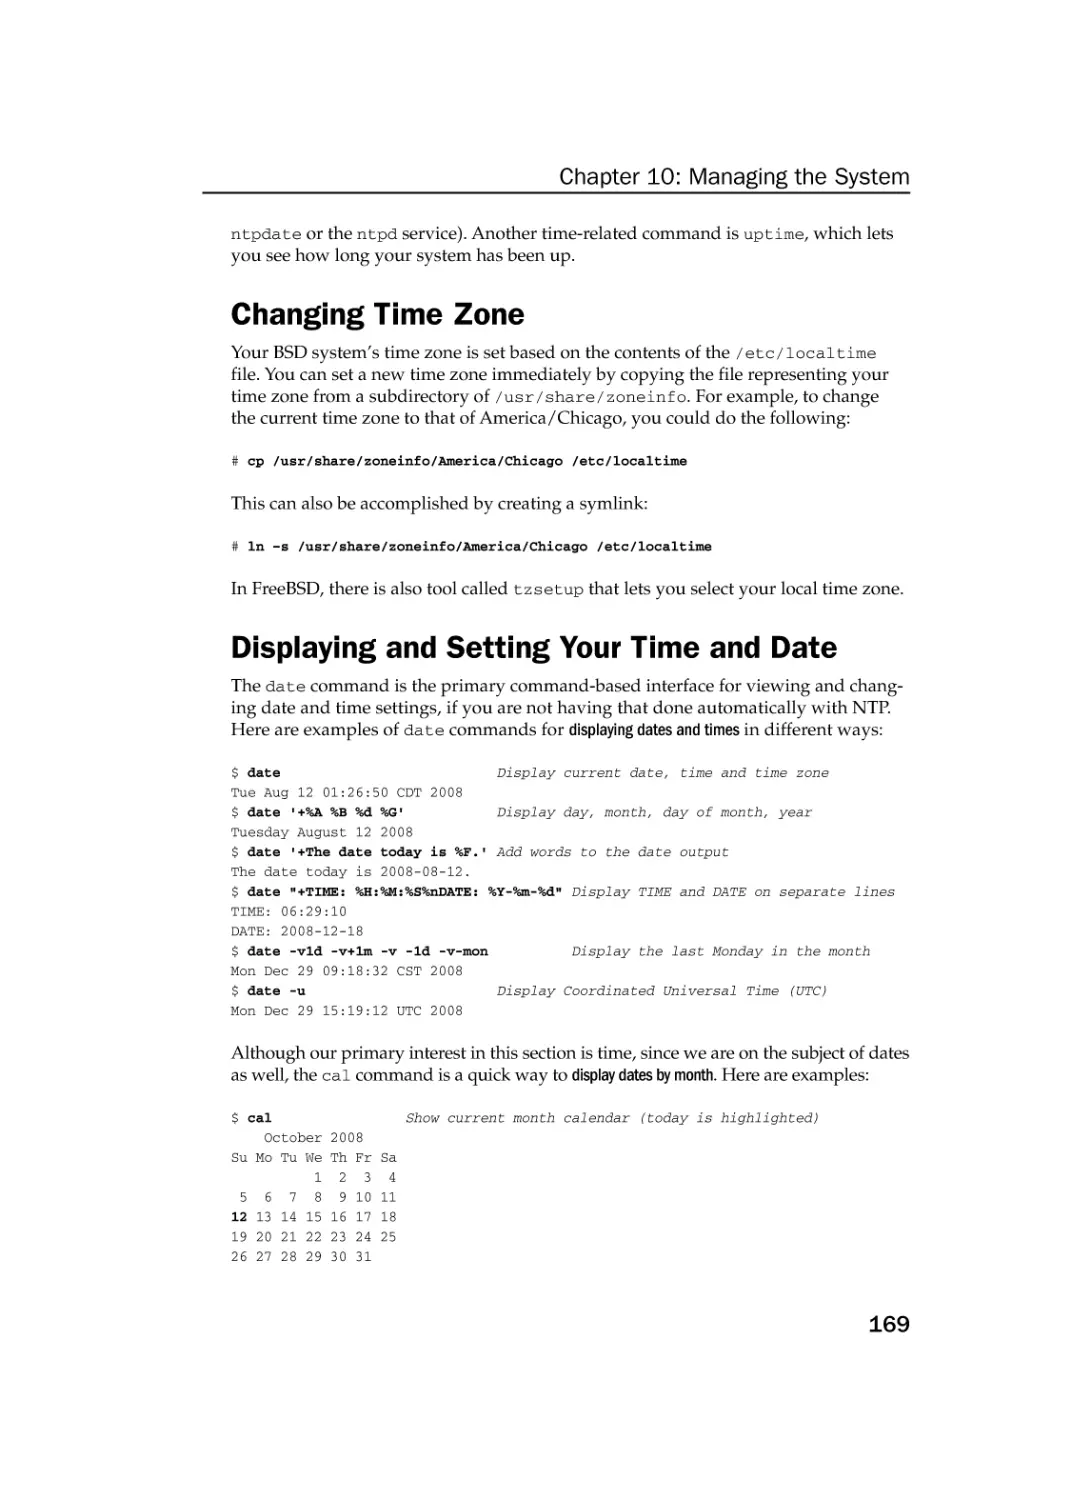
169
169
170
172
172
173
176
176
178
179
179
182
183
185
185
186
190
190
191
192
192
193
194
196
196
197
198
200
202
203
xv
76034ftoc.qxd:Toolbox
4/2/08
1:04 PM
Page xvi
Contents
Chapter 12: Accessing Network Resources
205
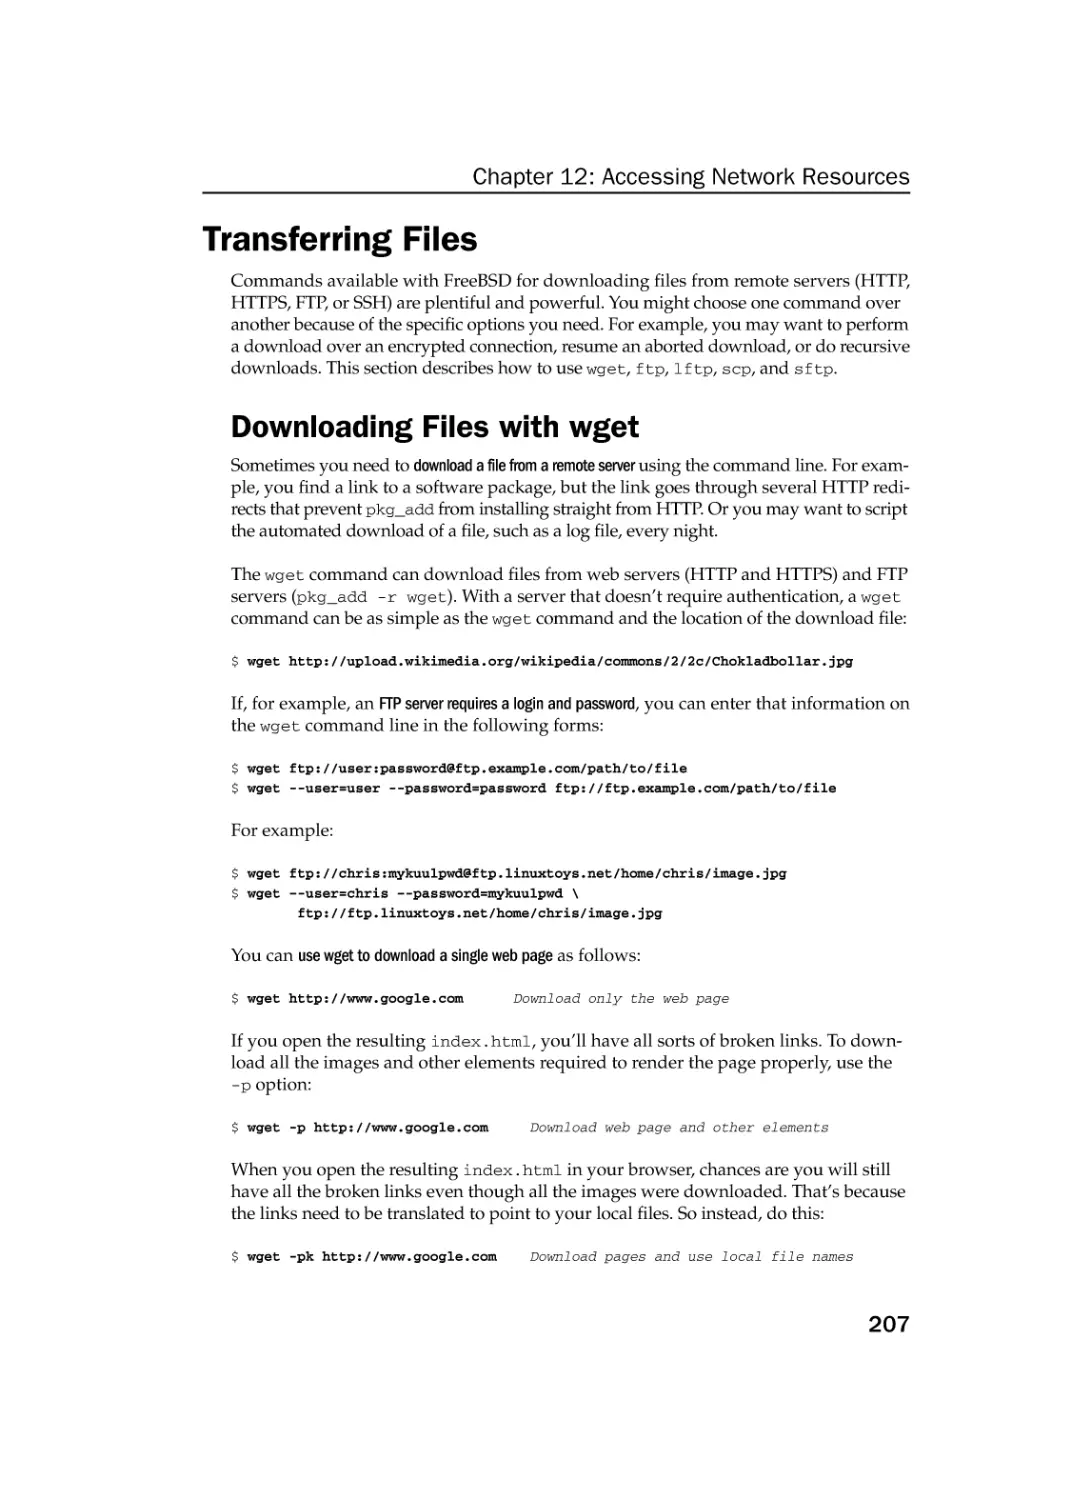
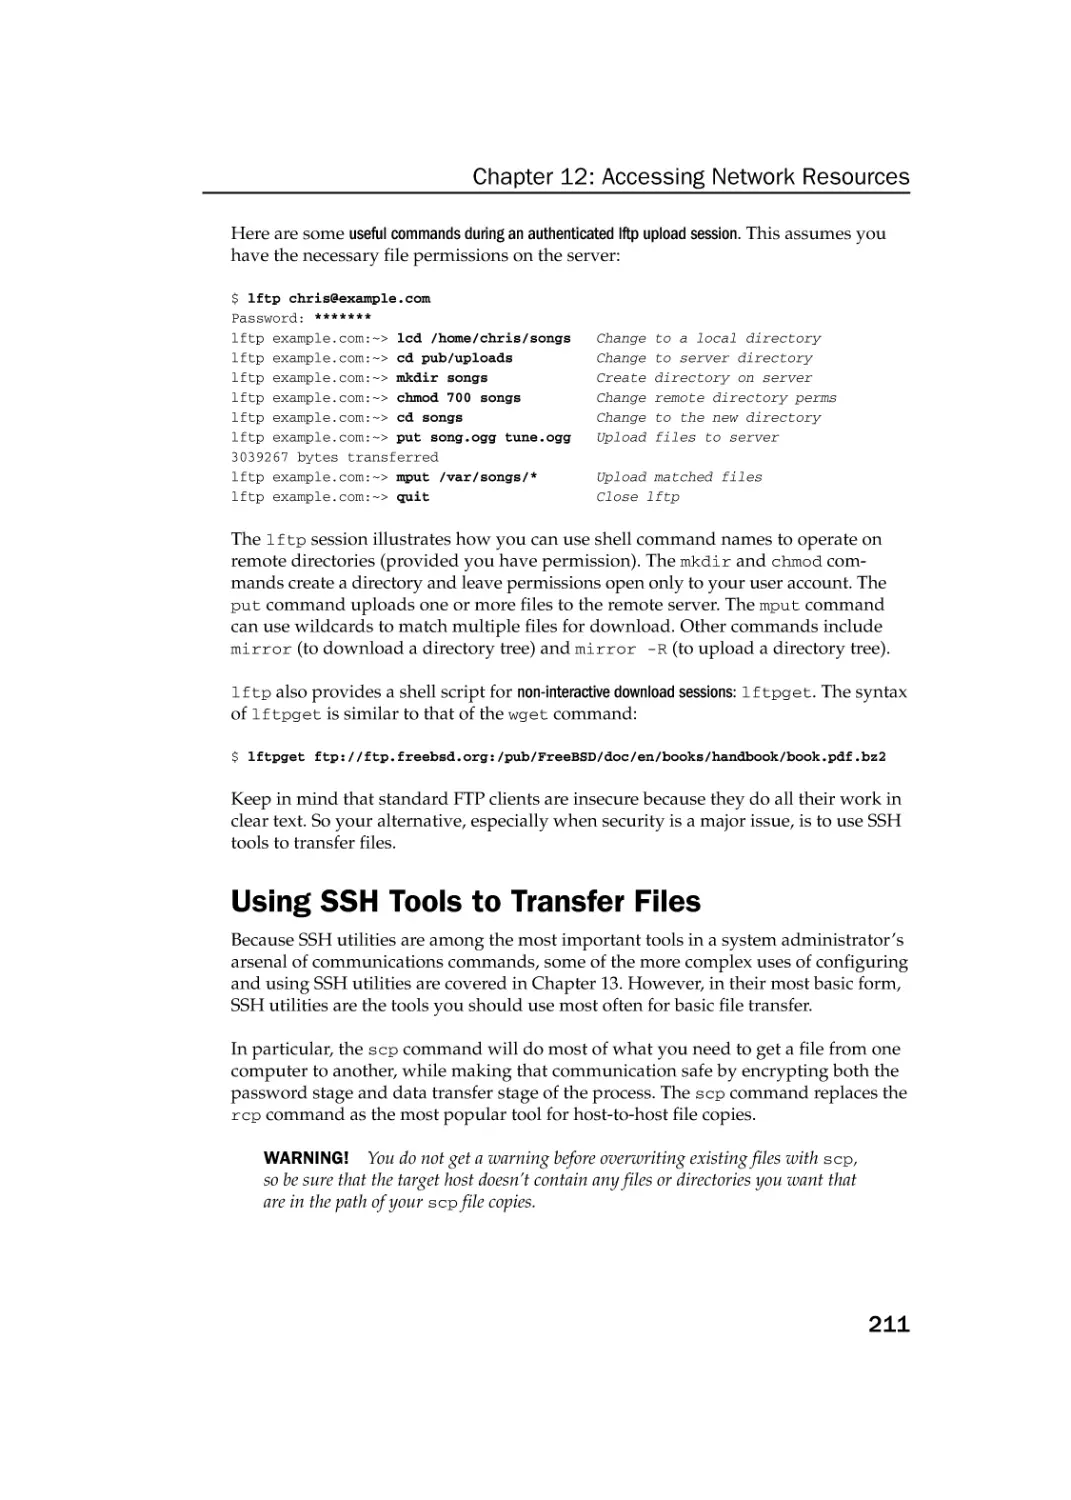
Running Commands to Browse the Web
Transferring Files
205
207
Downloading Files with wget
Transferring Files with cURL
Transferring Files with FTP Commands
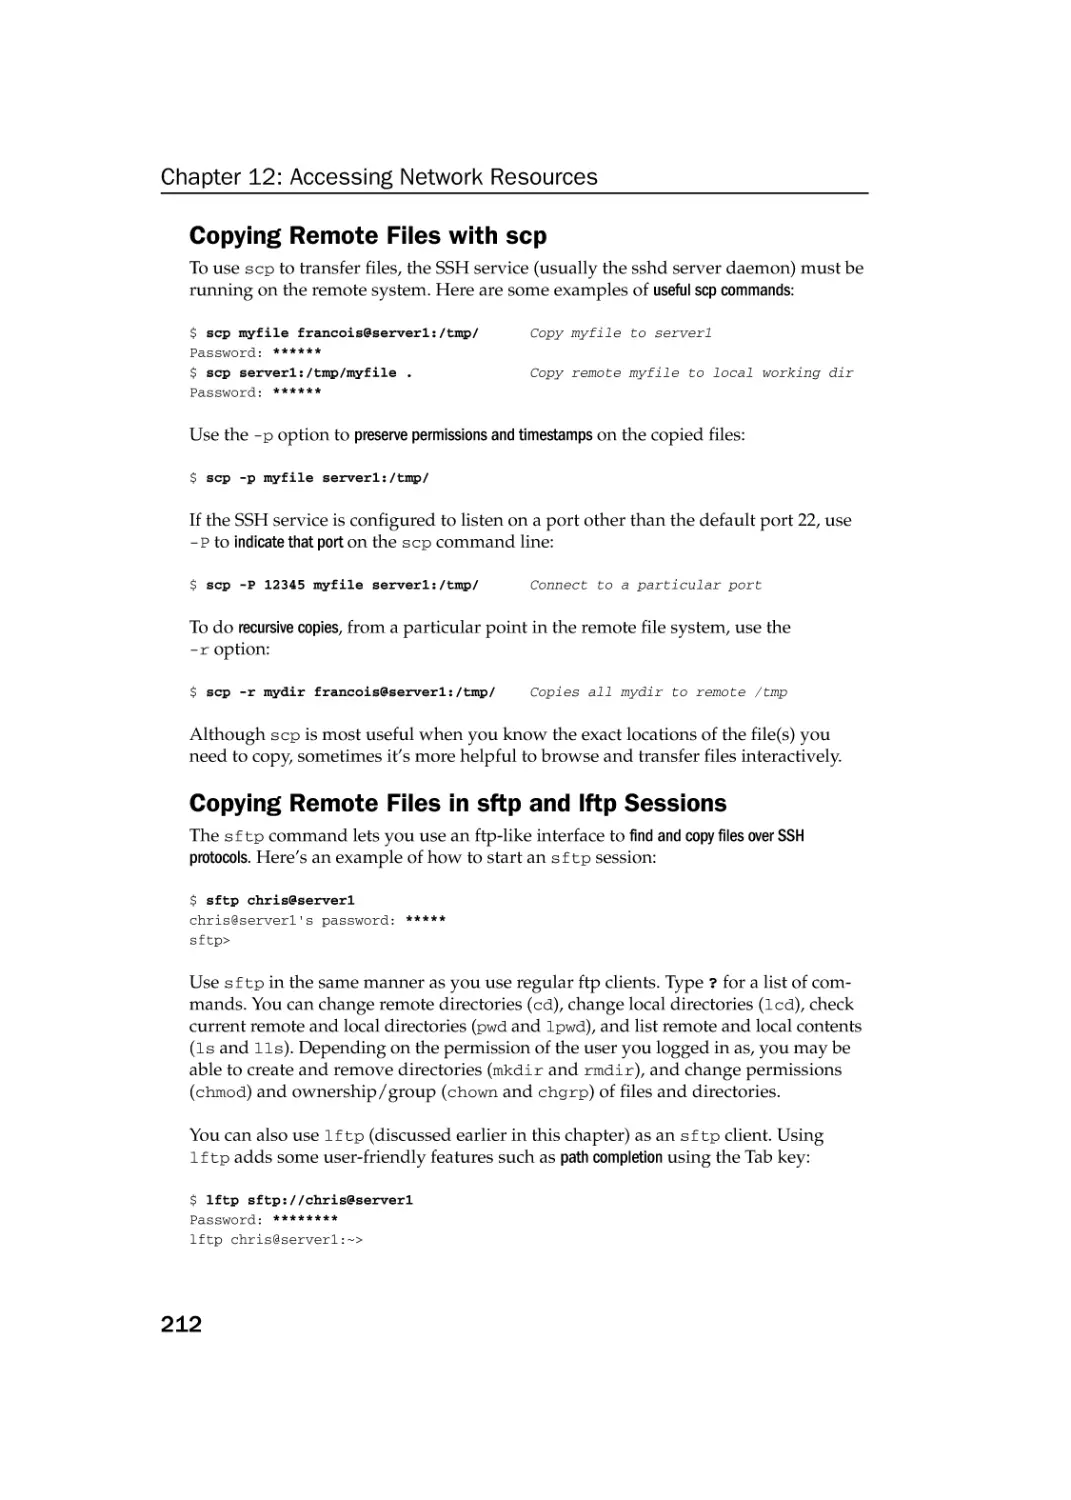
Using SSH Tools to Transfer Files
Using Windows File Transfer Tools
207
208
209
211
213
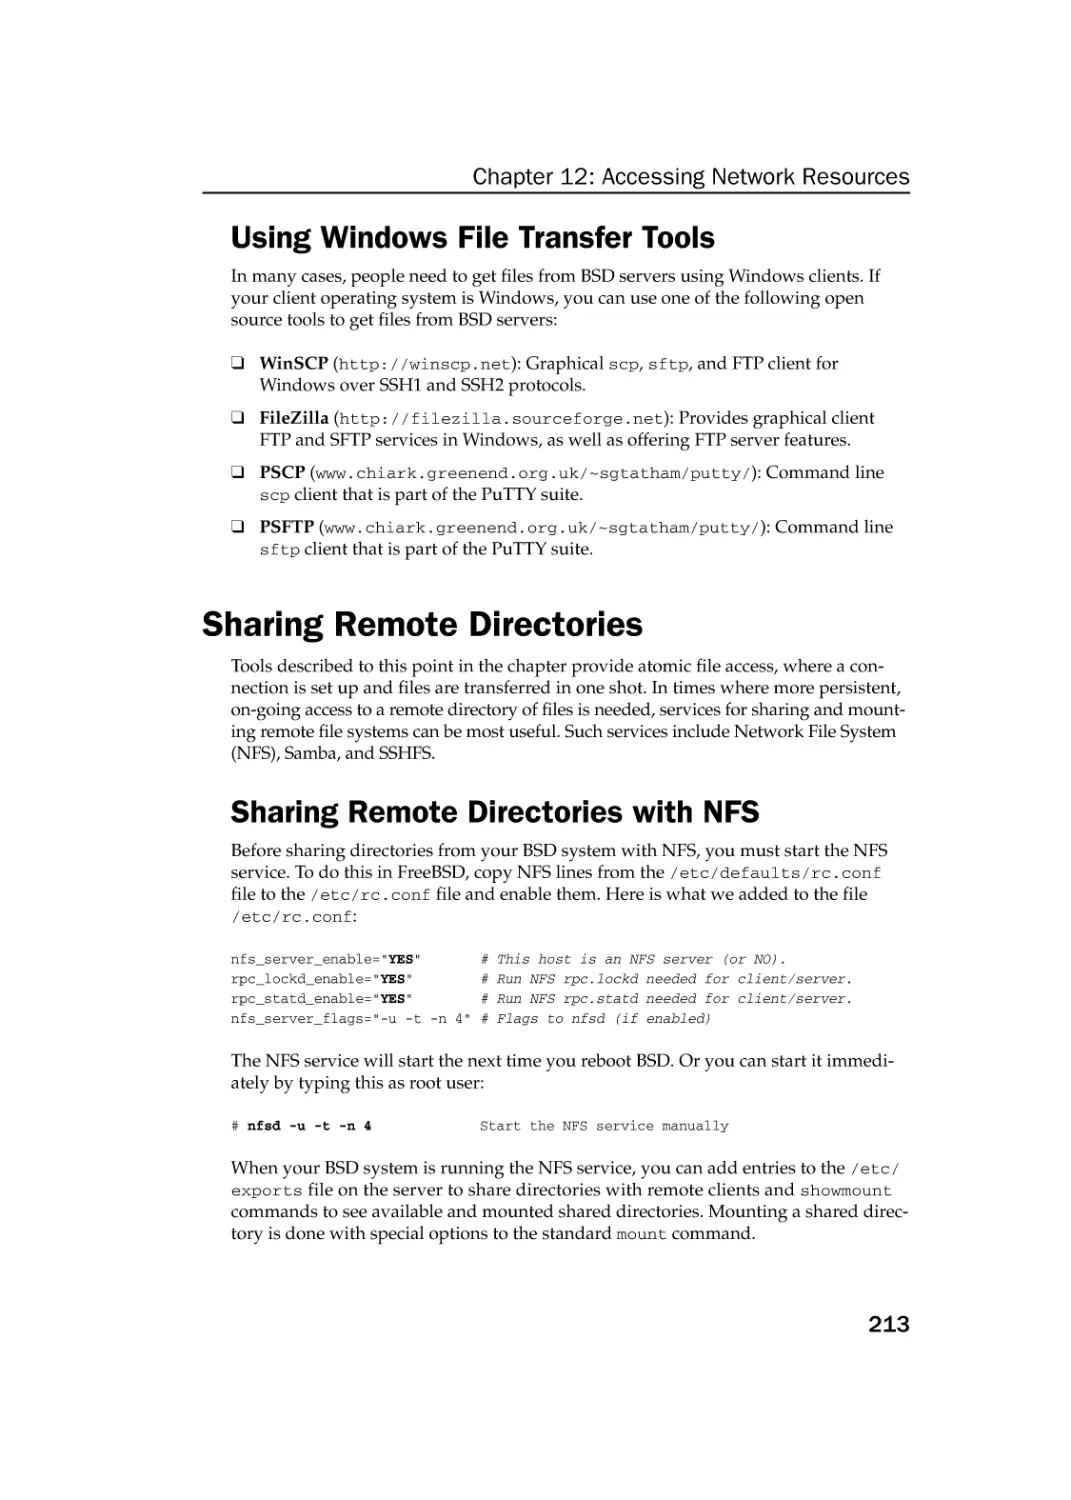
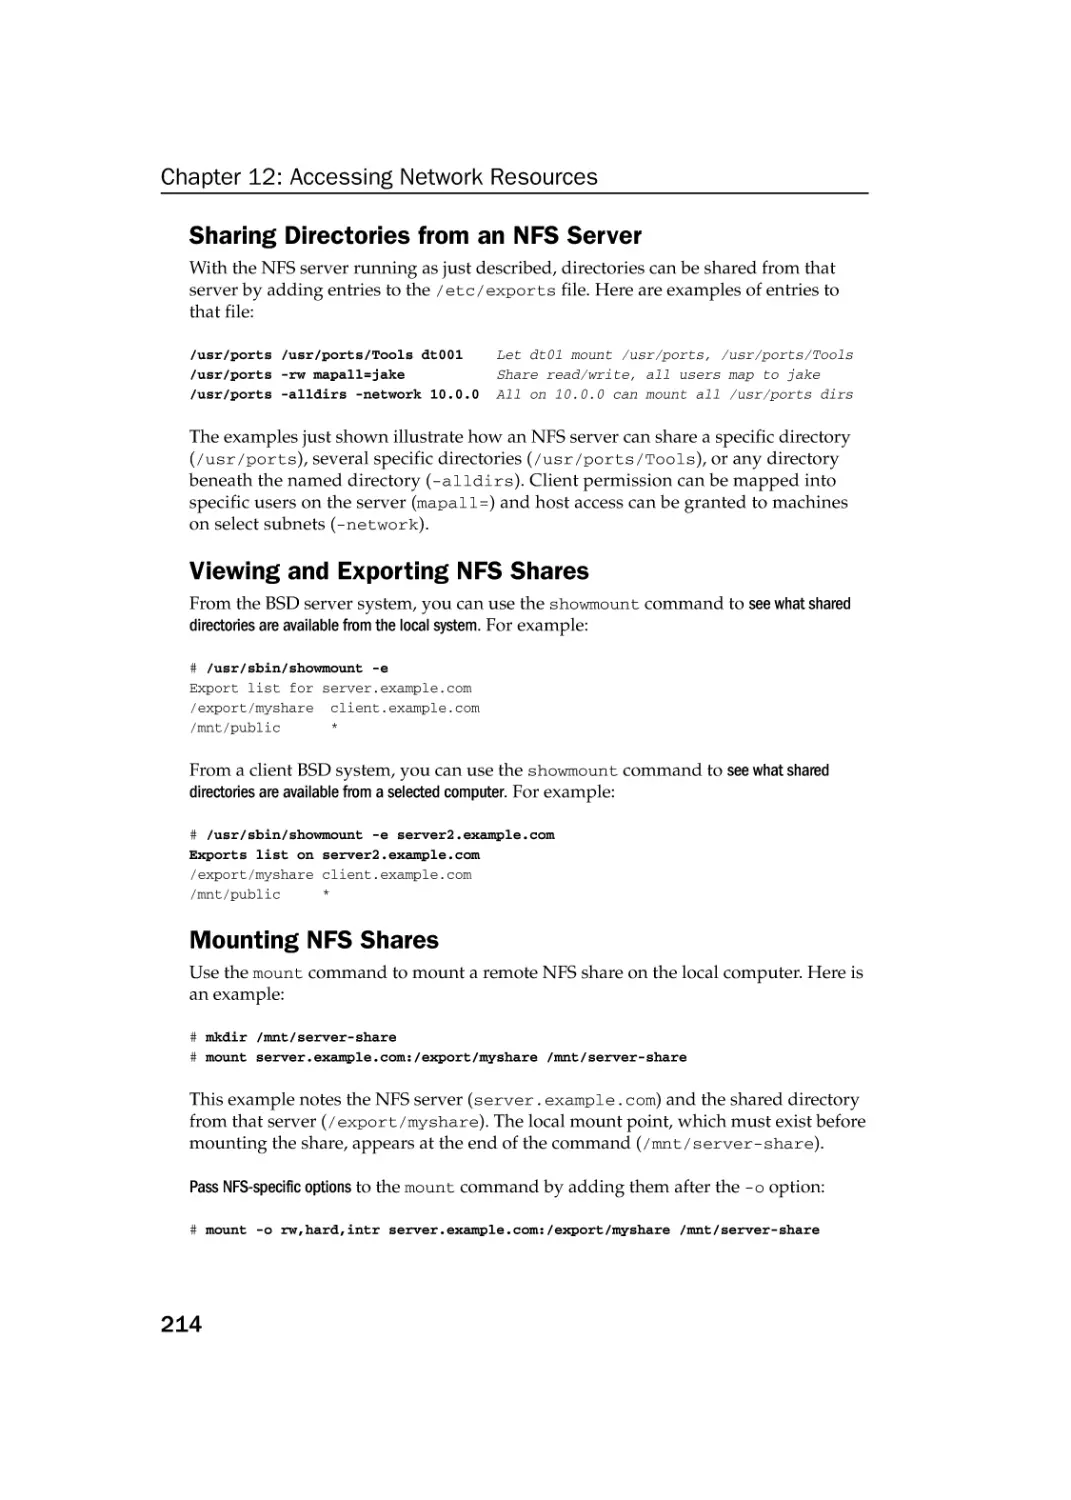
Sharing Remote Directories
Sharing Remote Directories with NFS
Sharing Remote Directories with Samba
Sharing Remote Directories with SSHFS
Chatting with Friends in IRC
Using Text-Based e-mail Clients
Managing e-mail with mail
Managing e-mail with mutt
Summary
Chapter 13: Doing Remote System Administration
Doing Remote Login and Tunneling with SSH
Configuring SSH
Logging in Remotely with ssh
Using screen: A Rich Remote Shell
Using a Remote Windows Desktop
213
213
215
218
219
220
221
222
223
225
225
227
228
233
236
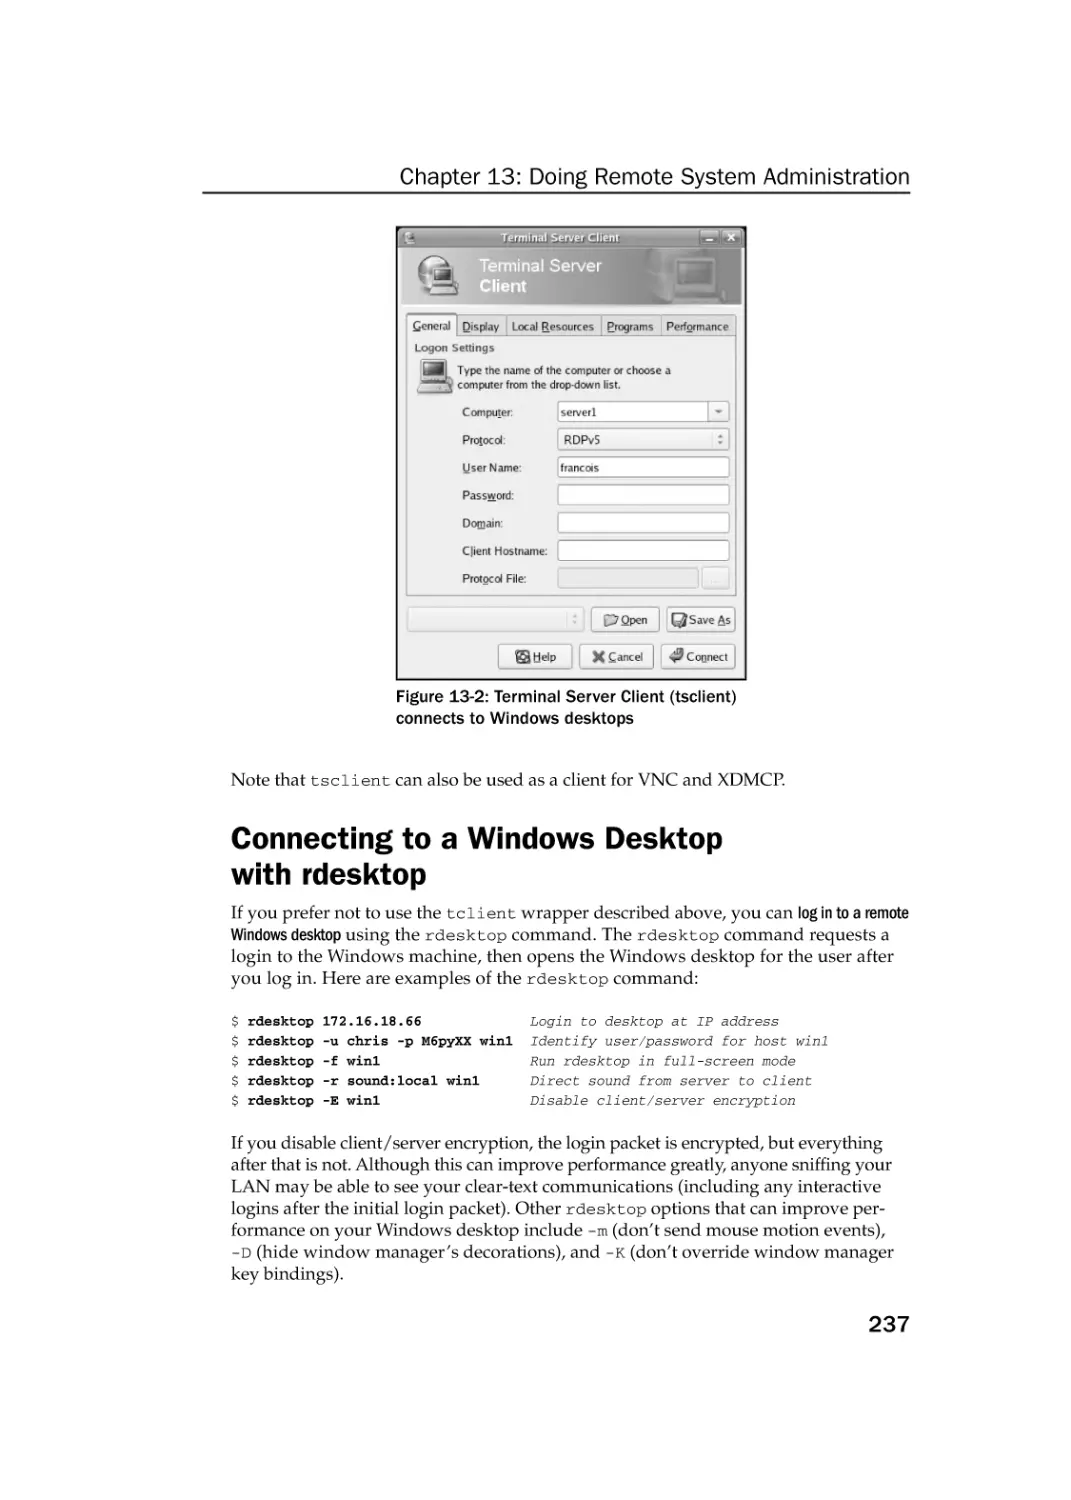
Connecting to a Windows Desktop with tsclient
Connecting to a Windows Desktop with rdesktop
236
237
Using Remote BSD Desktop and Applications
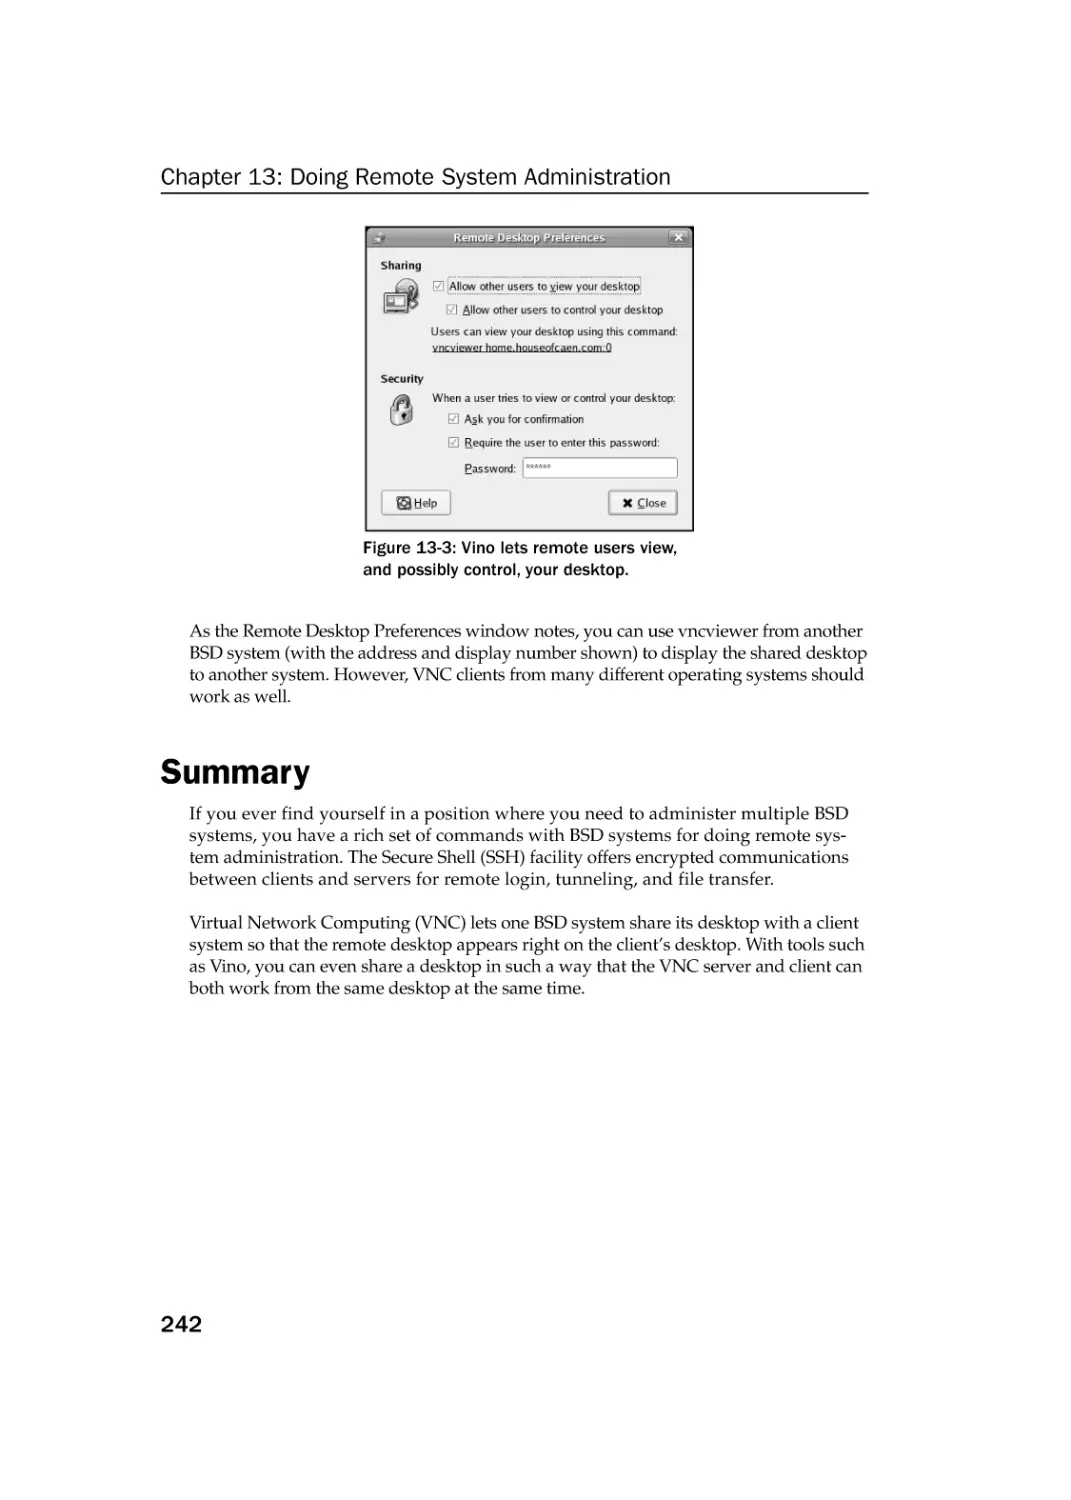
Sharing Desktops Using VNC
238
239
Setting Up the VNC Server
Starting Up the VNC Client
Using VNC on Untrusted Networks with SSH
Sharing a VNC Desktop with Vino
Summary
Chapter 14: Locking Down Security
239
240
241
241
242
243
Working with Users and Groups
244
Managing Users the GUI Way
Adding User Accounts
244
244
xvi
76034ftoc.qxd:Toolbox
4/2/08
1:04 PM
Page xvii
Contents
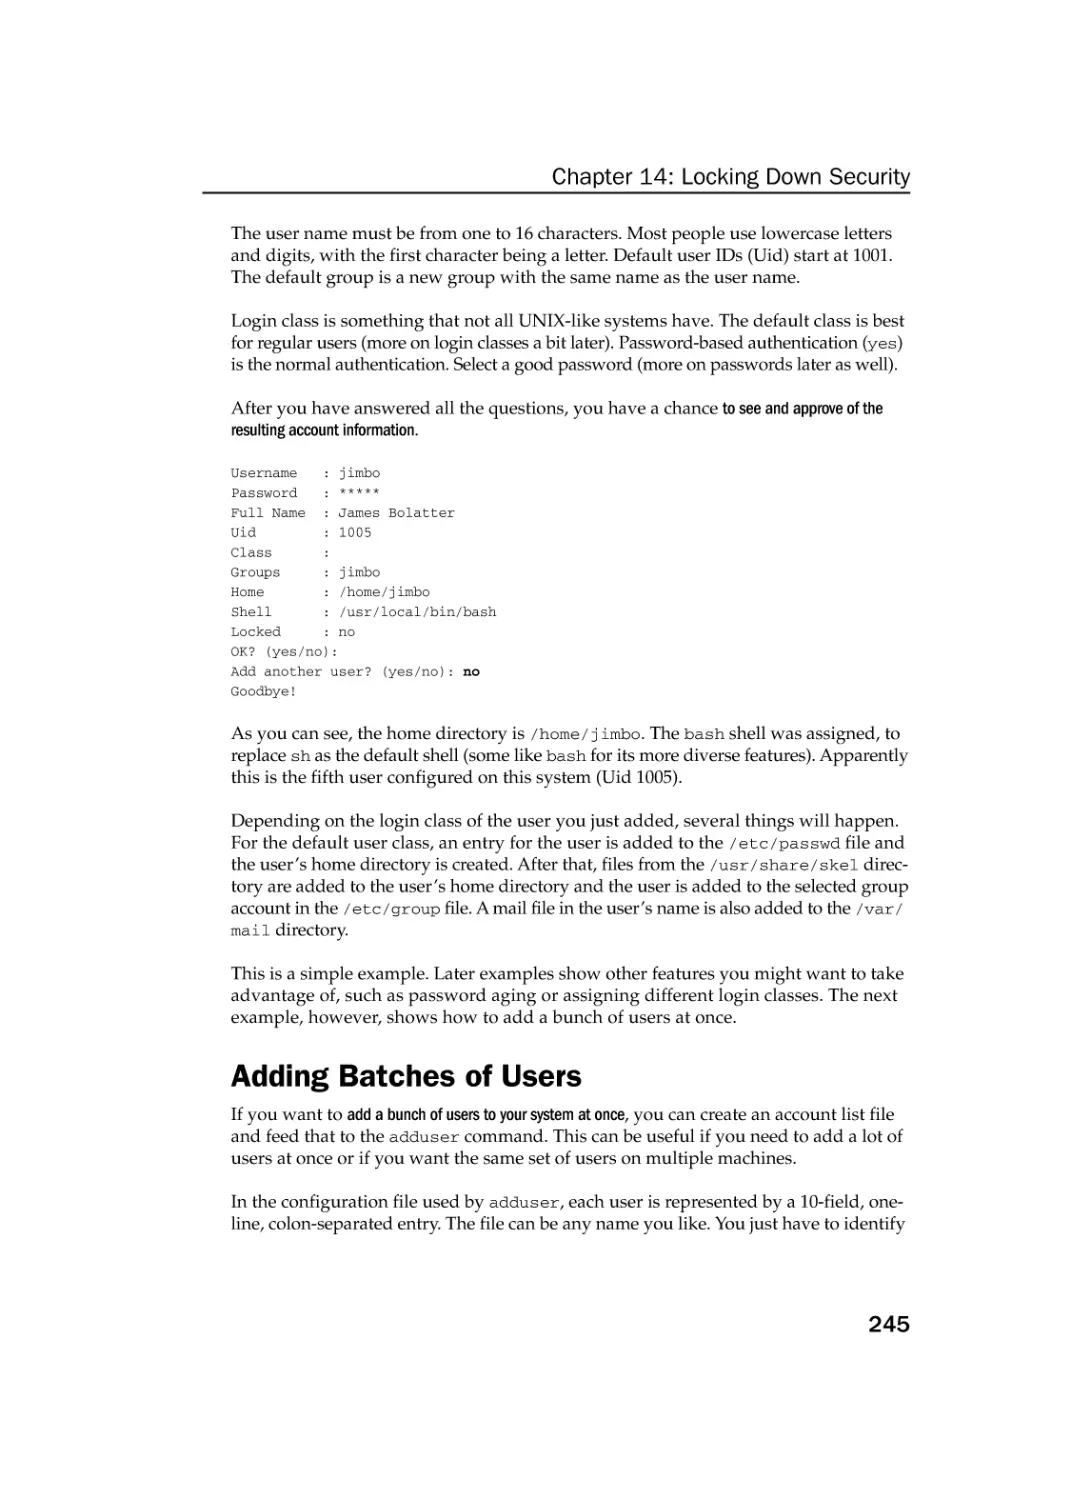
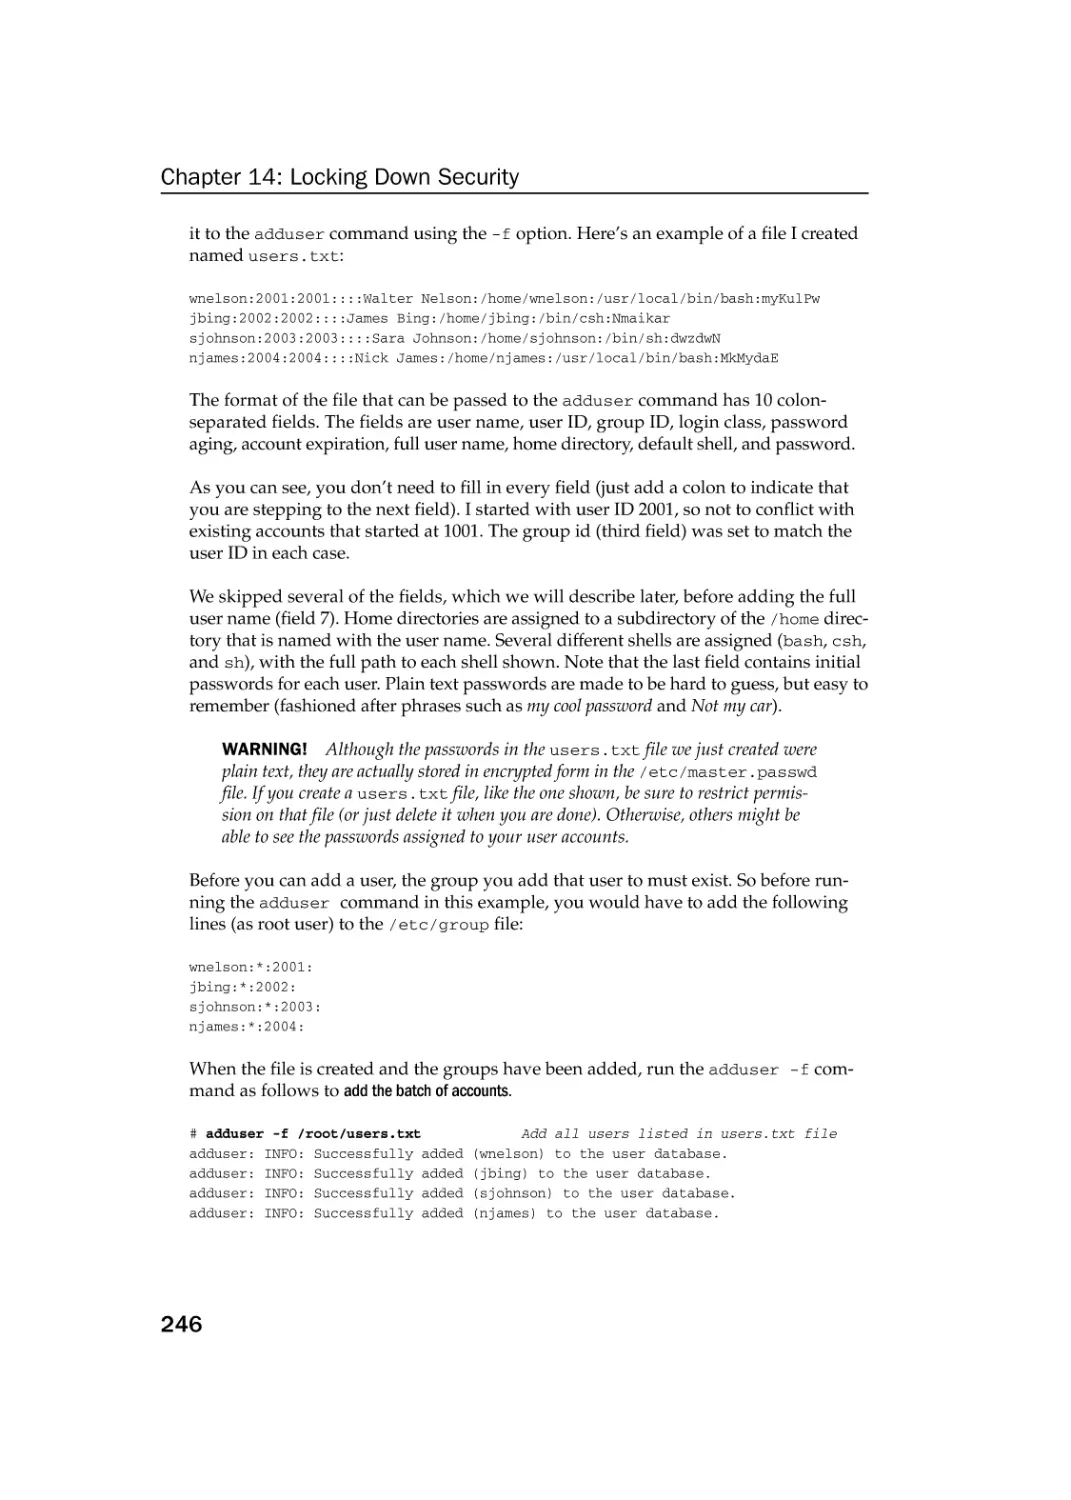
Adding Batches of Users
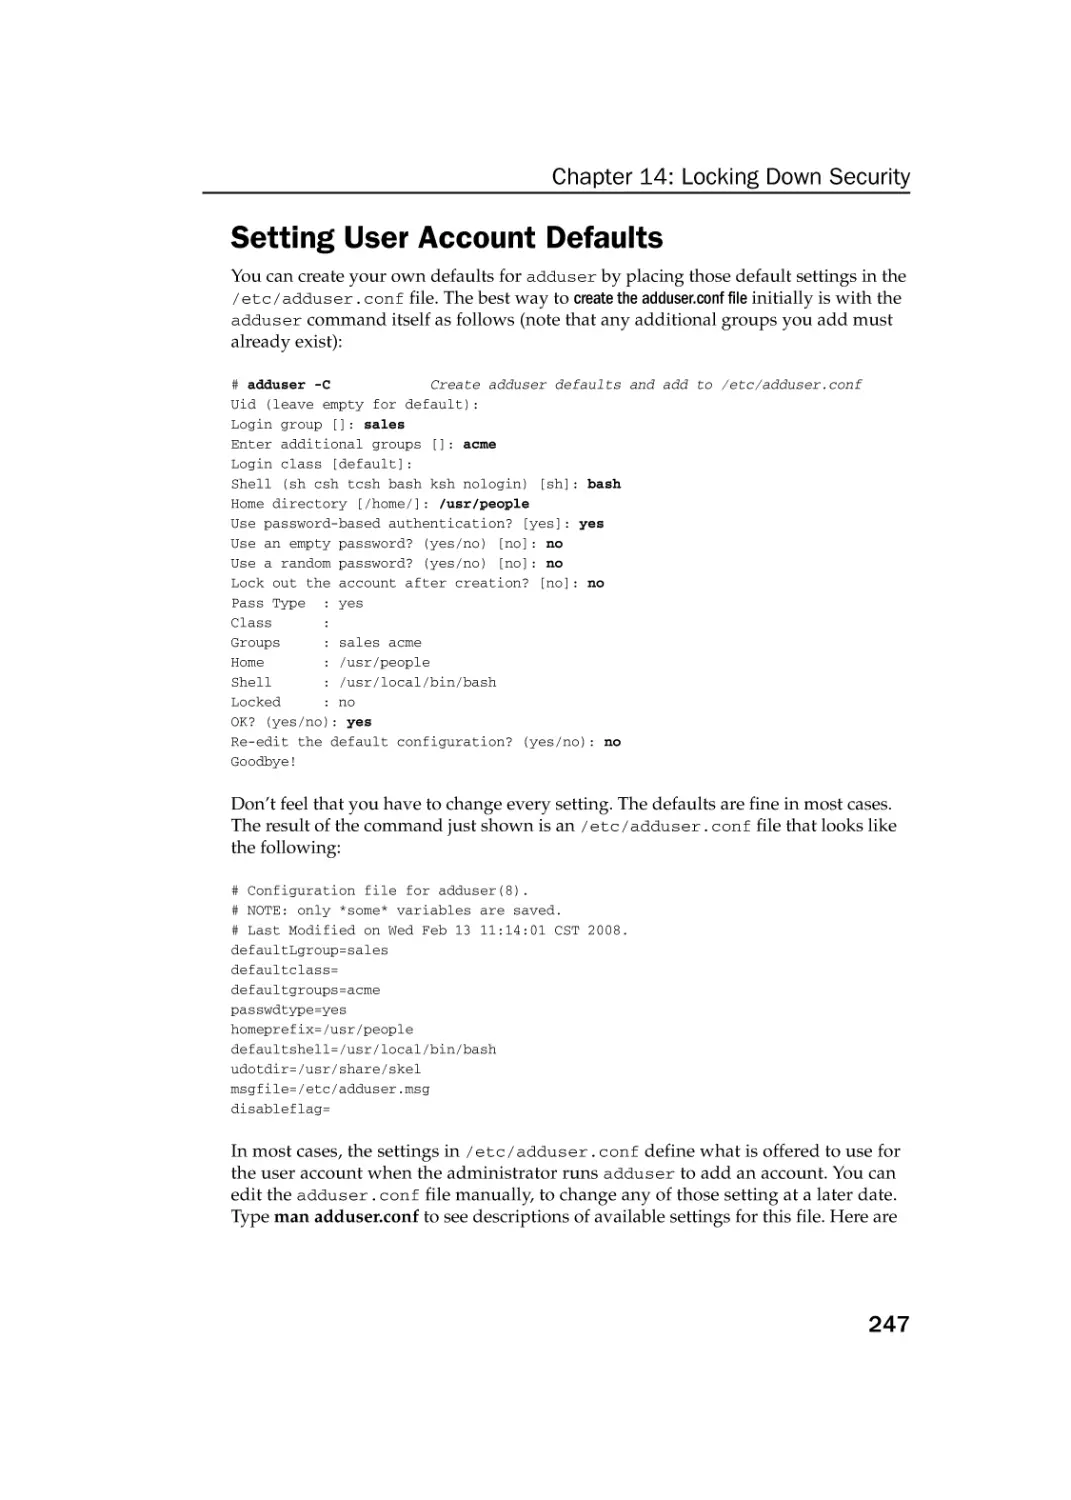
Setting User Account Defaults
Using Options When Adding Users
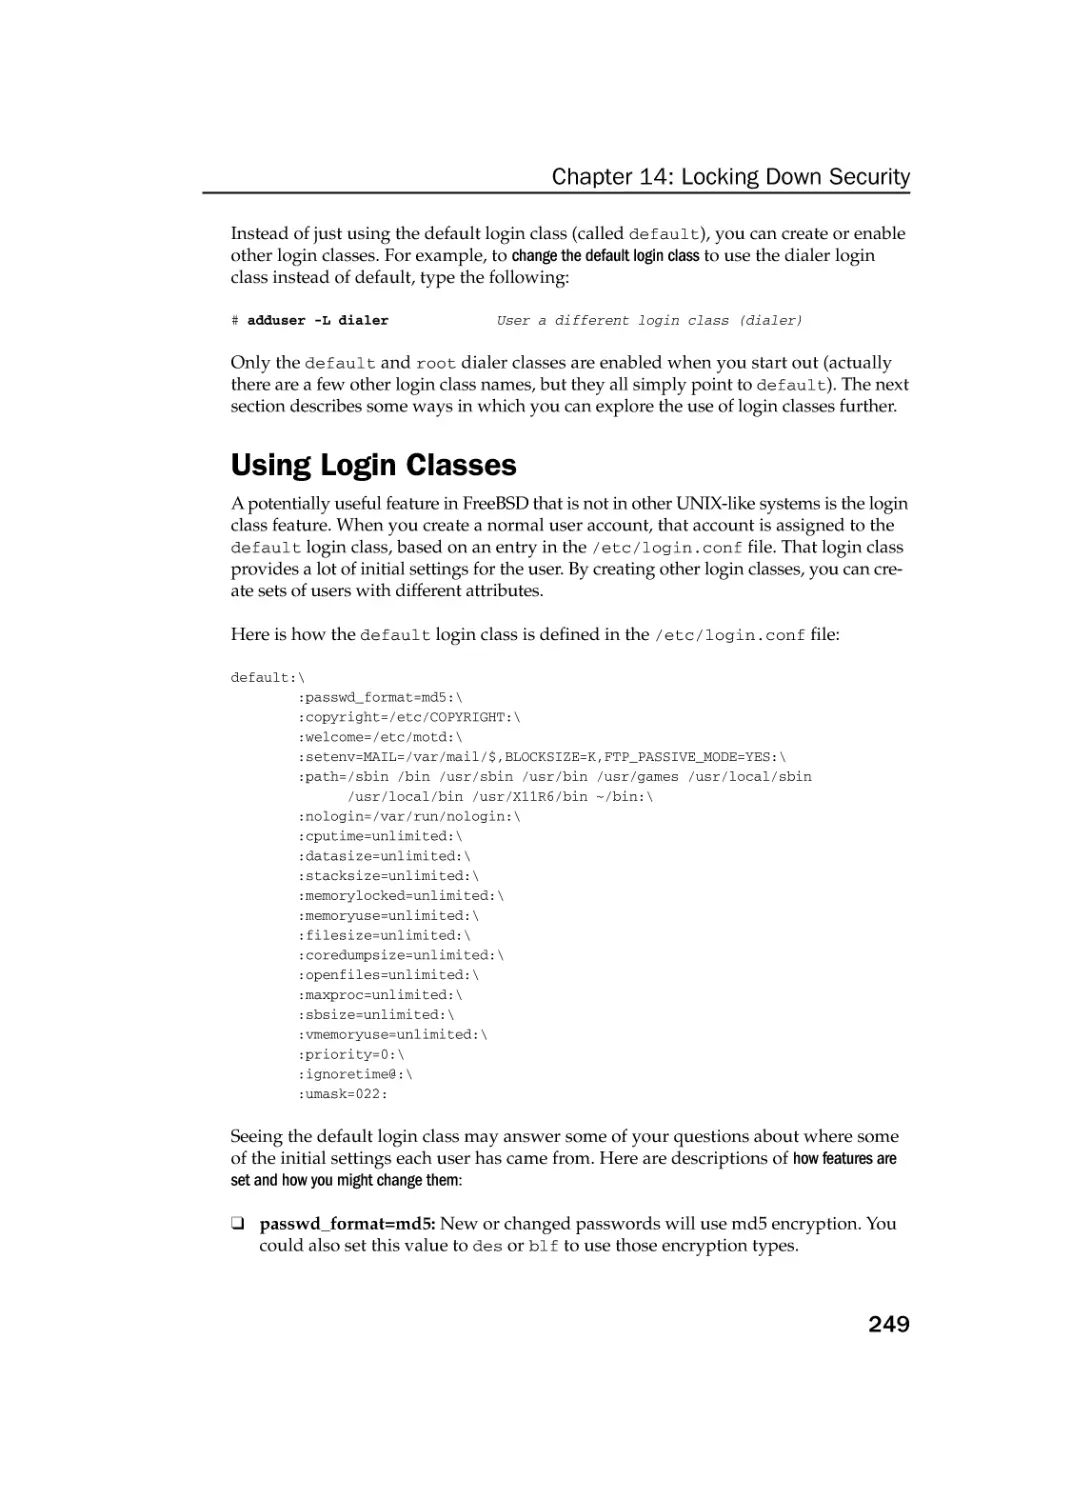
Using Login Classes
Modifying User Accounts
Deleting User Accounts
Managing Passwords
Adding Groups
245
247
248
249
250
251
252
252
Checking on Users
Securing Network Services
Configuring the Built-In Firewall
Working with System Logs
Using Advanced Security Features
Summary
253
255
258
261
261
262
Appendix A: Using vi or Vim Editors
263
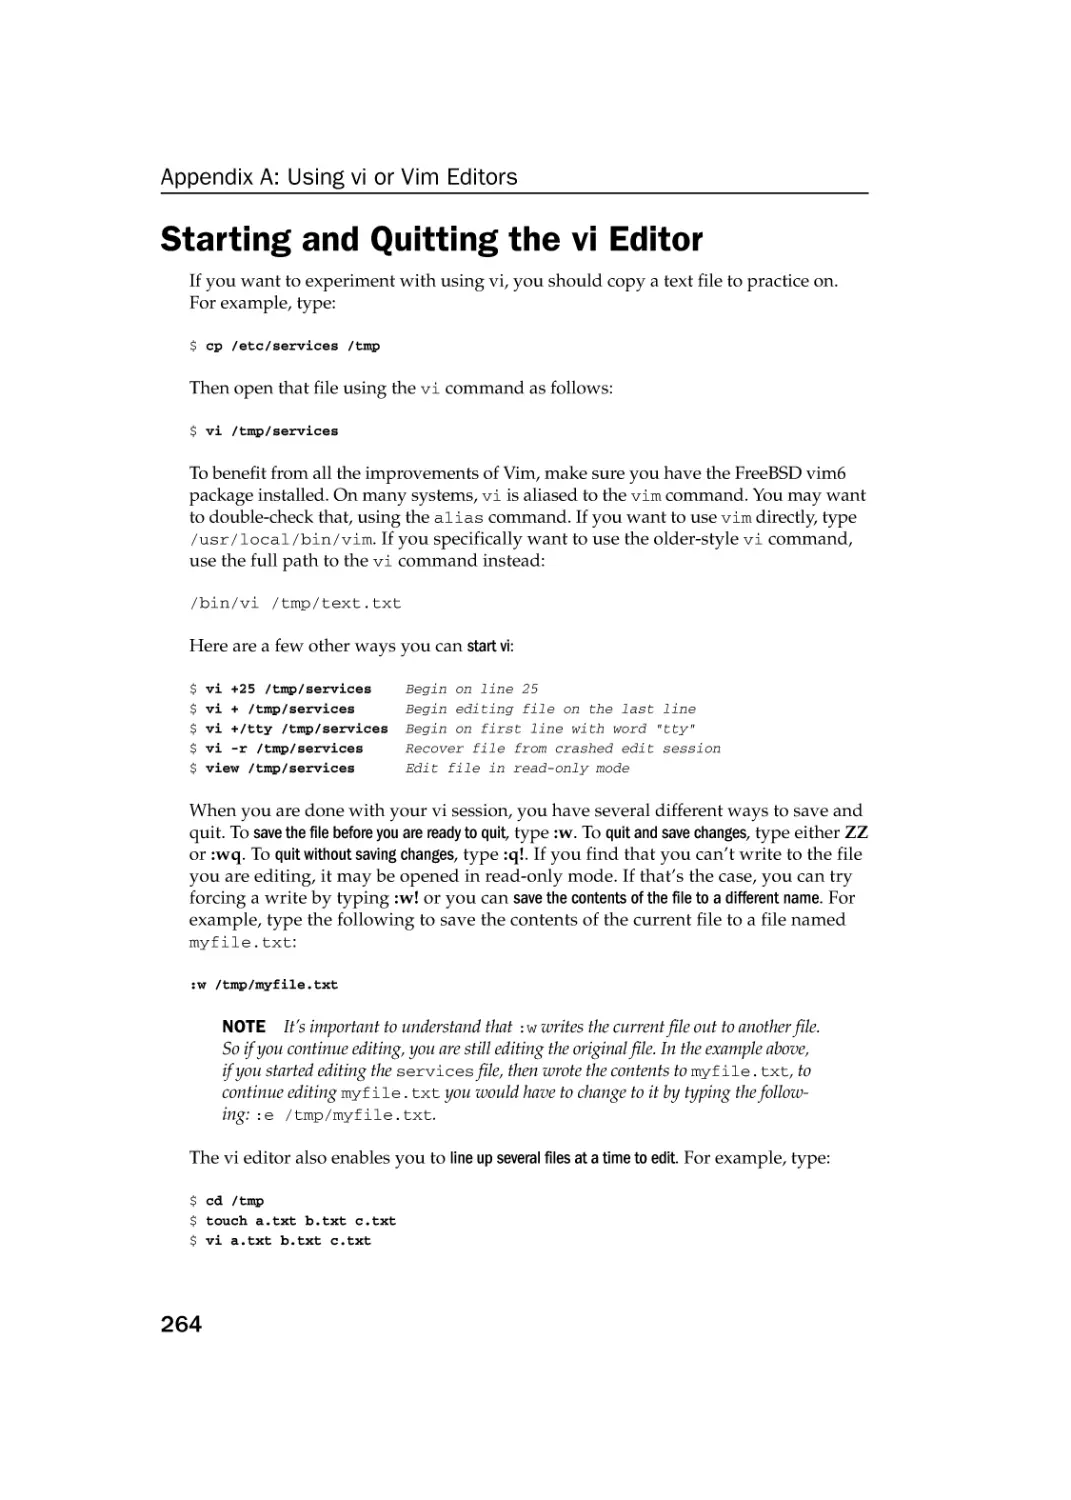
Starting and Quitting the vi Editor
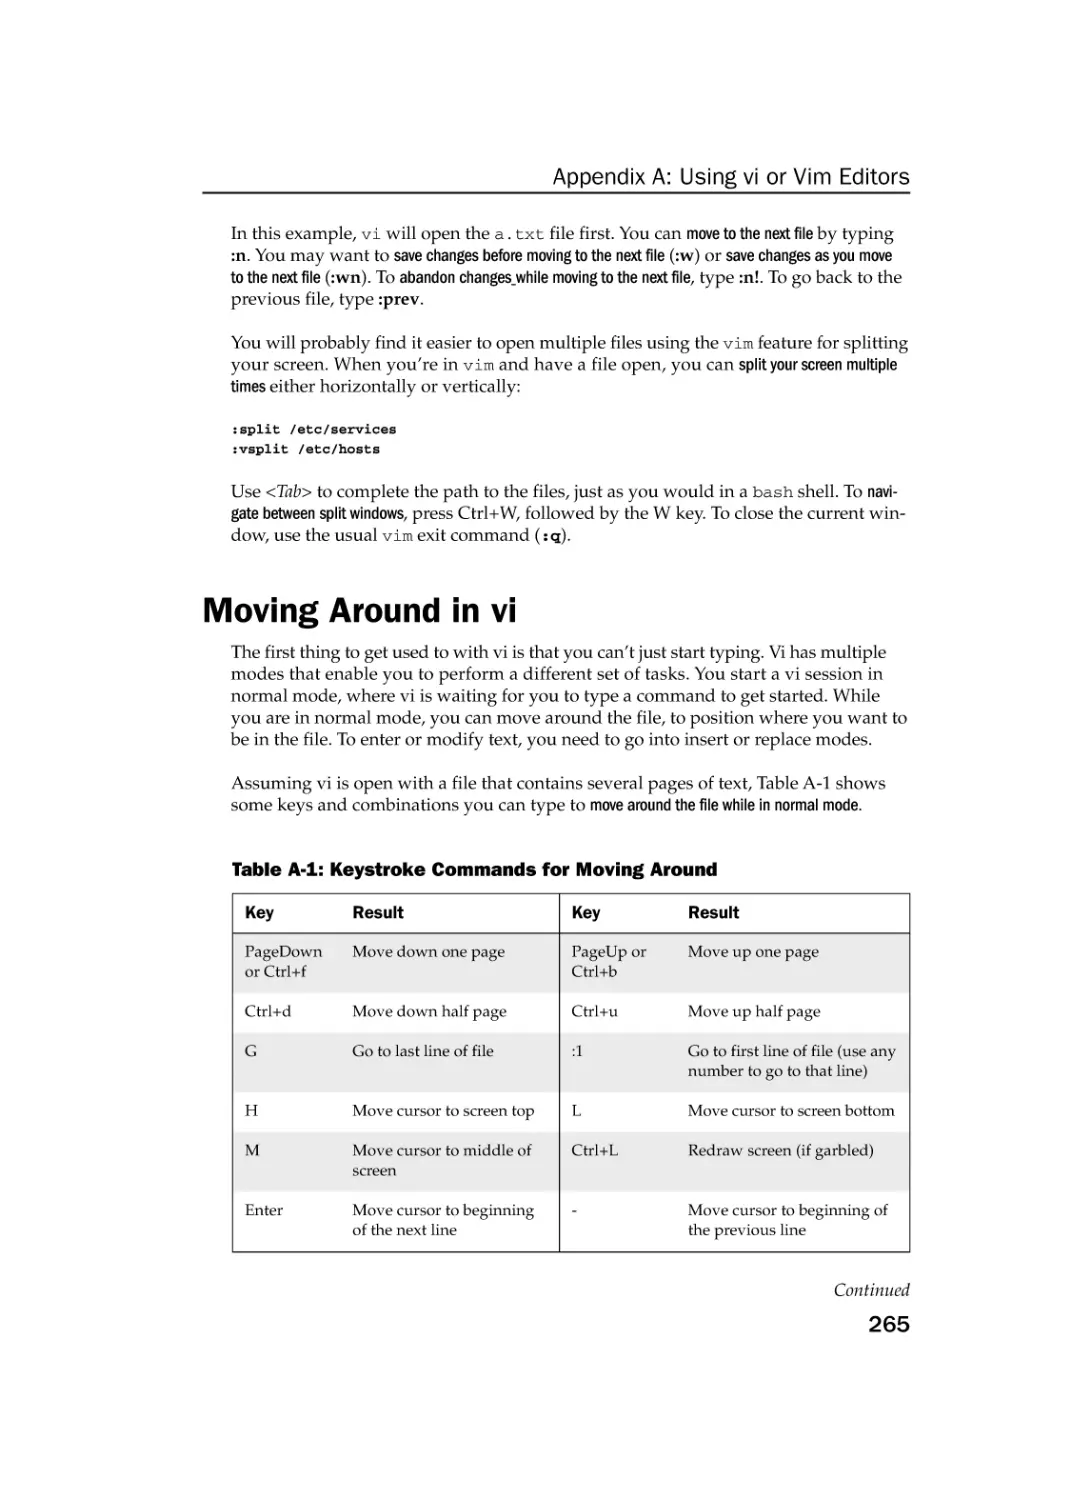
Moving Around in vi
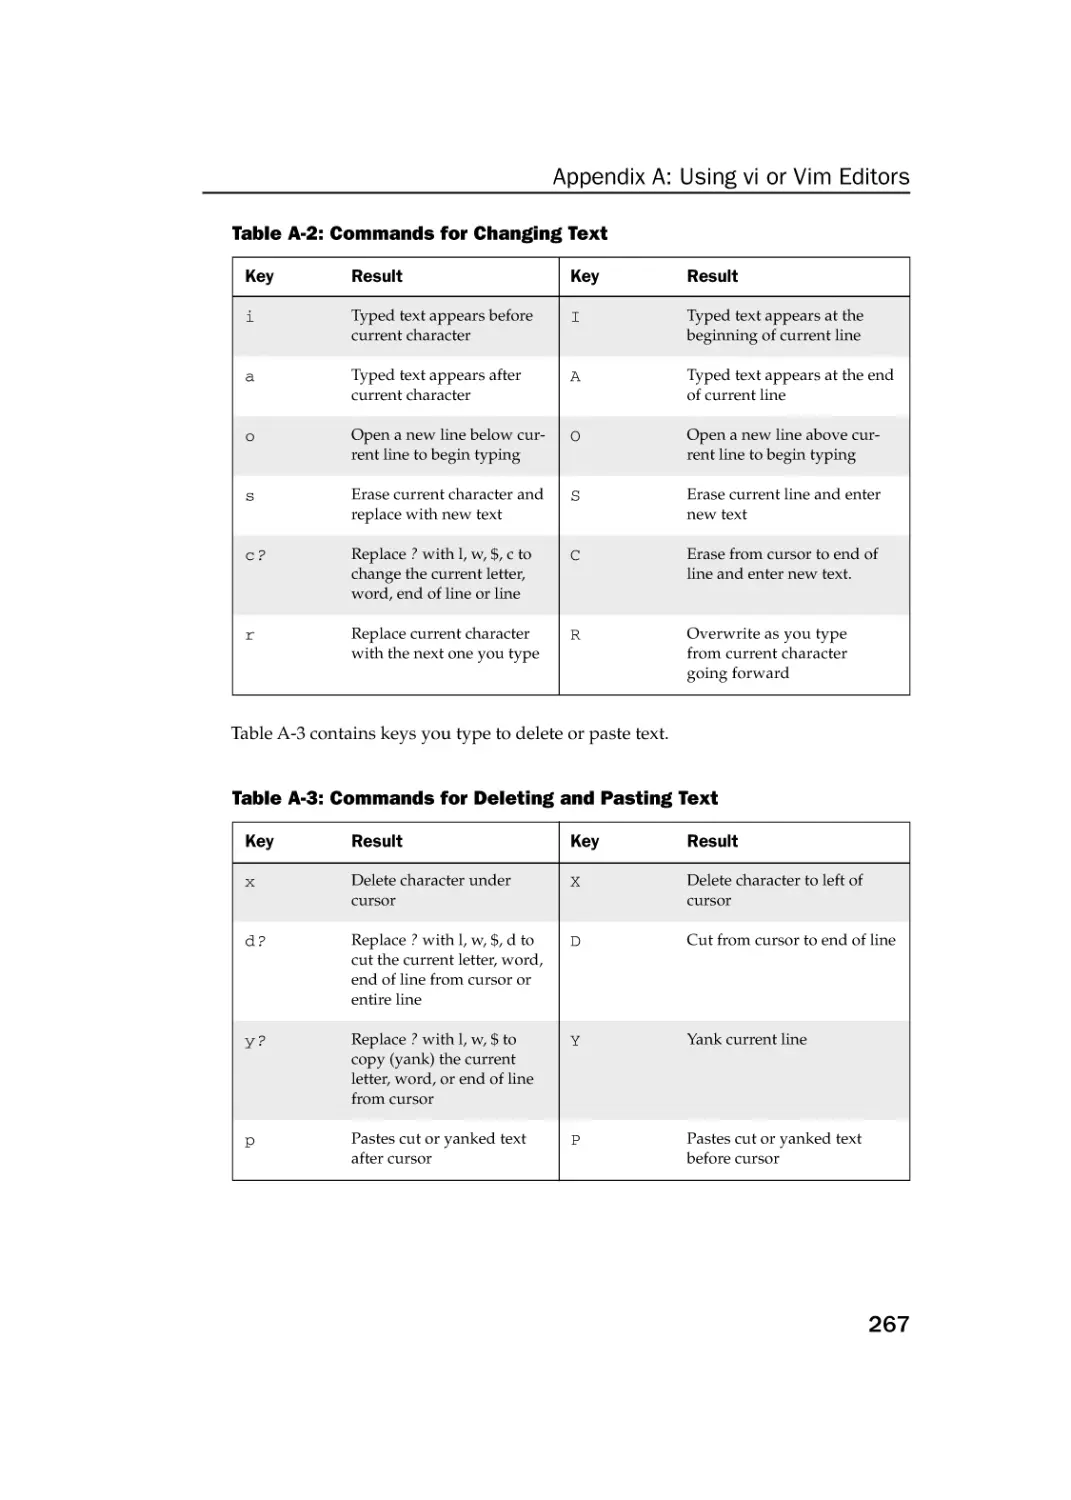
Changing and Deleting Text in vi
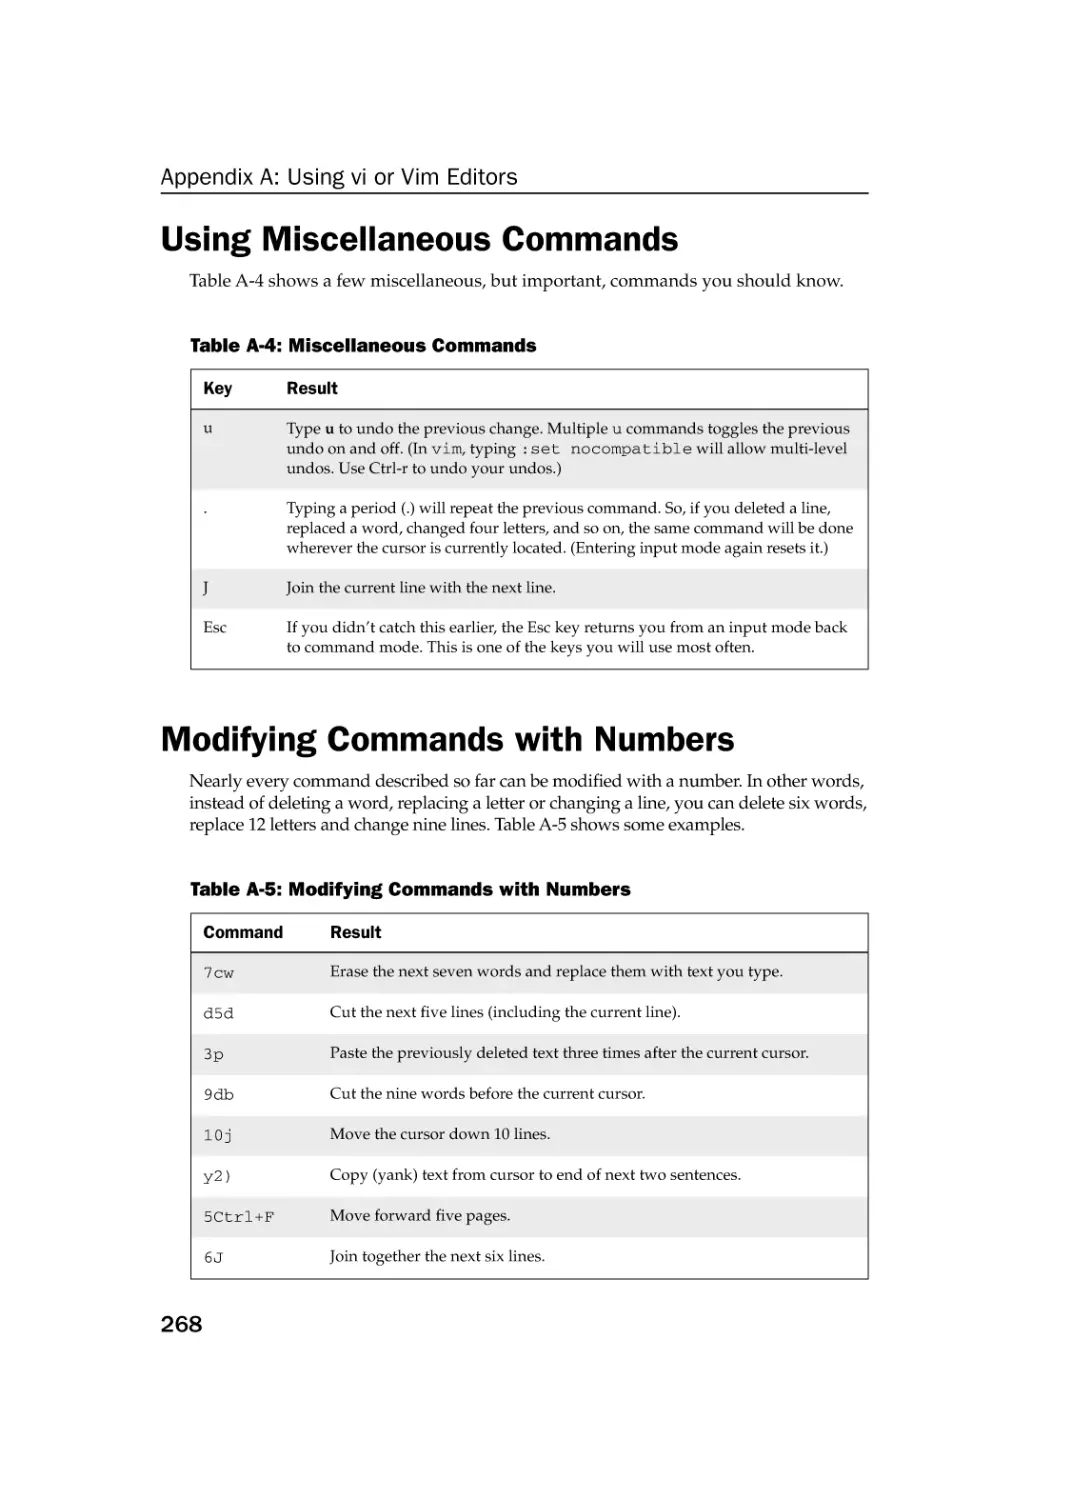
Using Miscellaneous Commands
Modifying Commands with Numbers
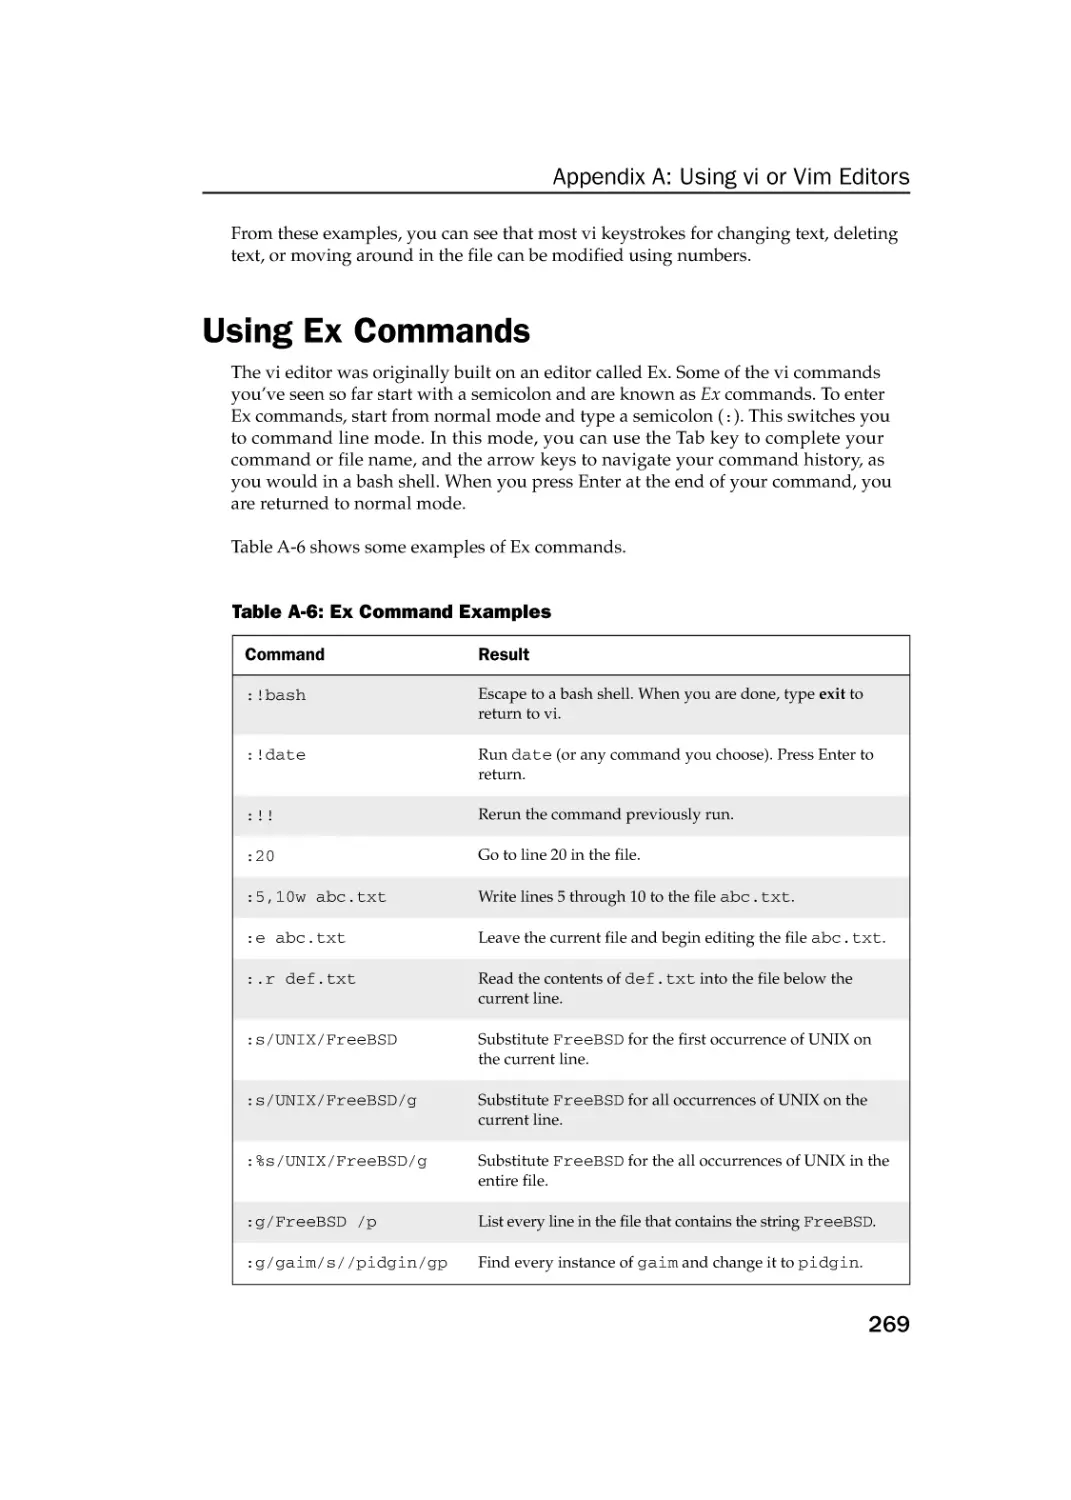
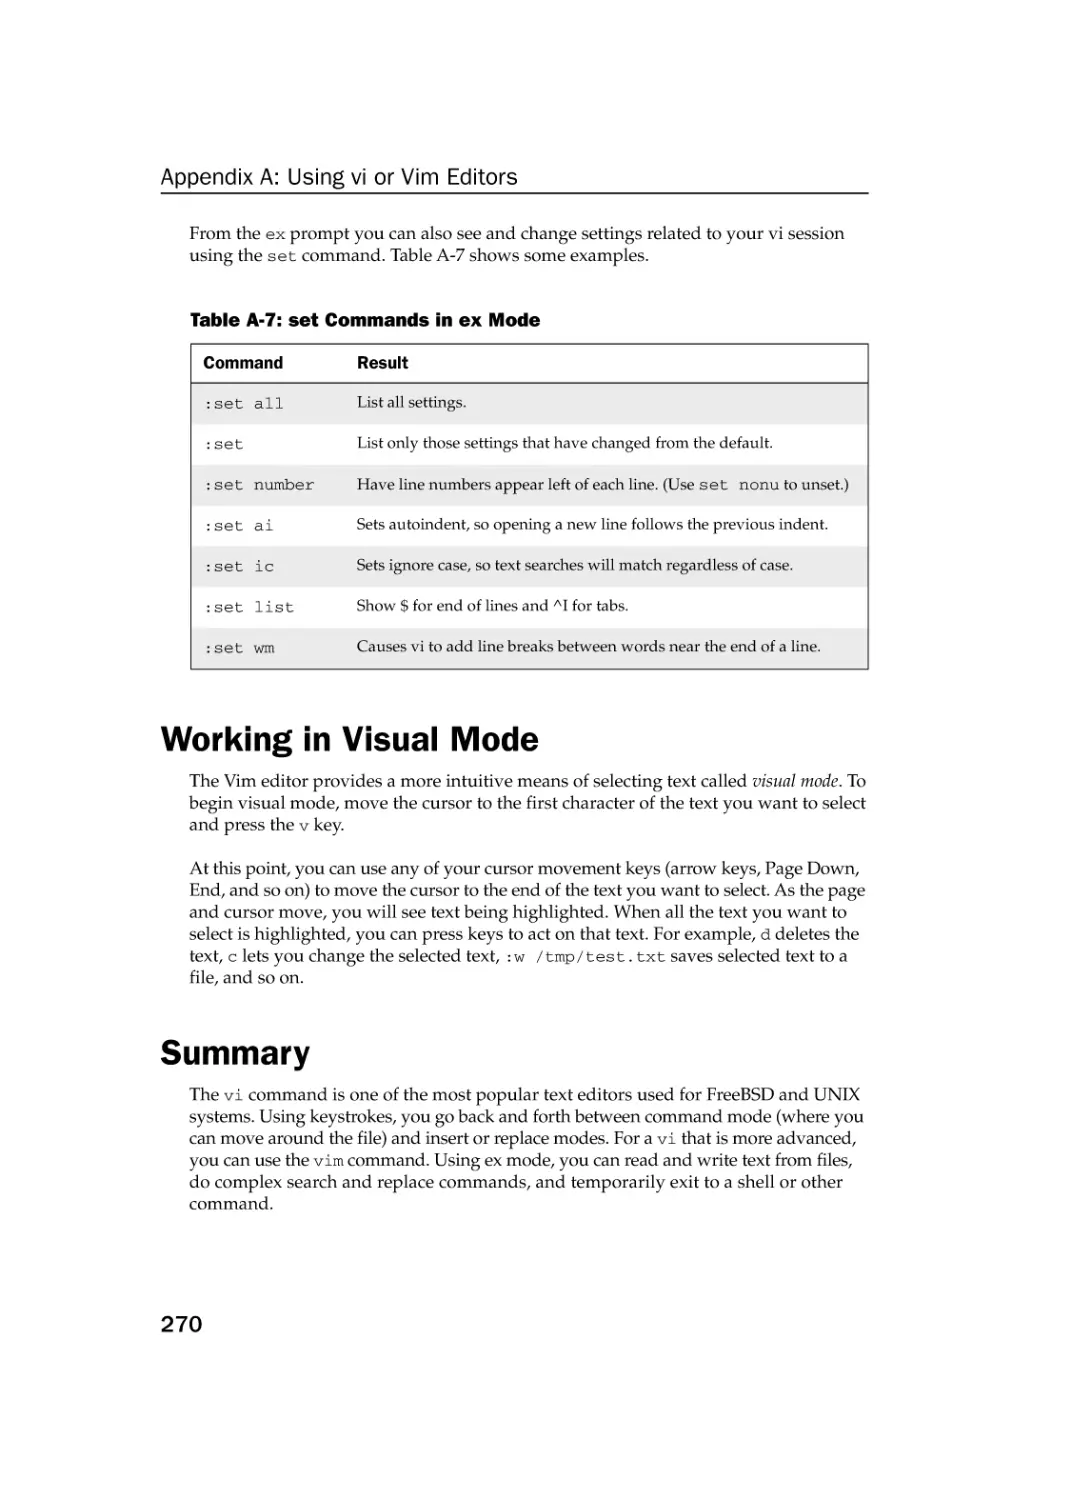
Using Ex Commands
Working in Visual Mode
Summary
264
265
266
268
268
269
270
270
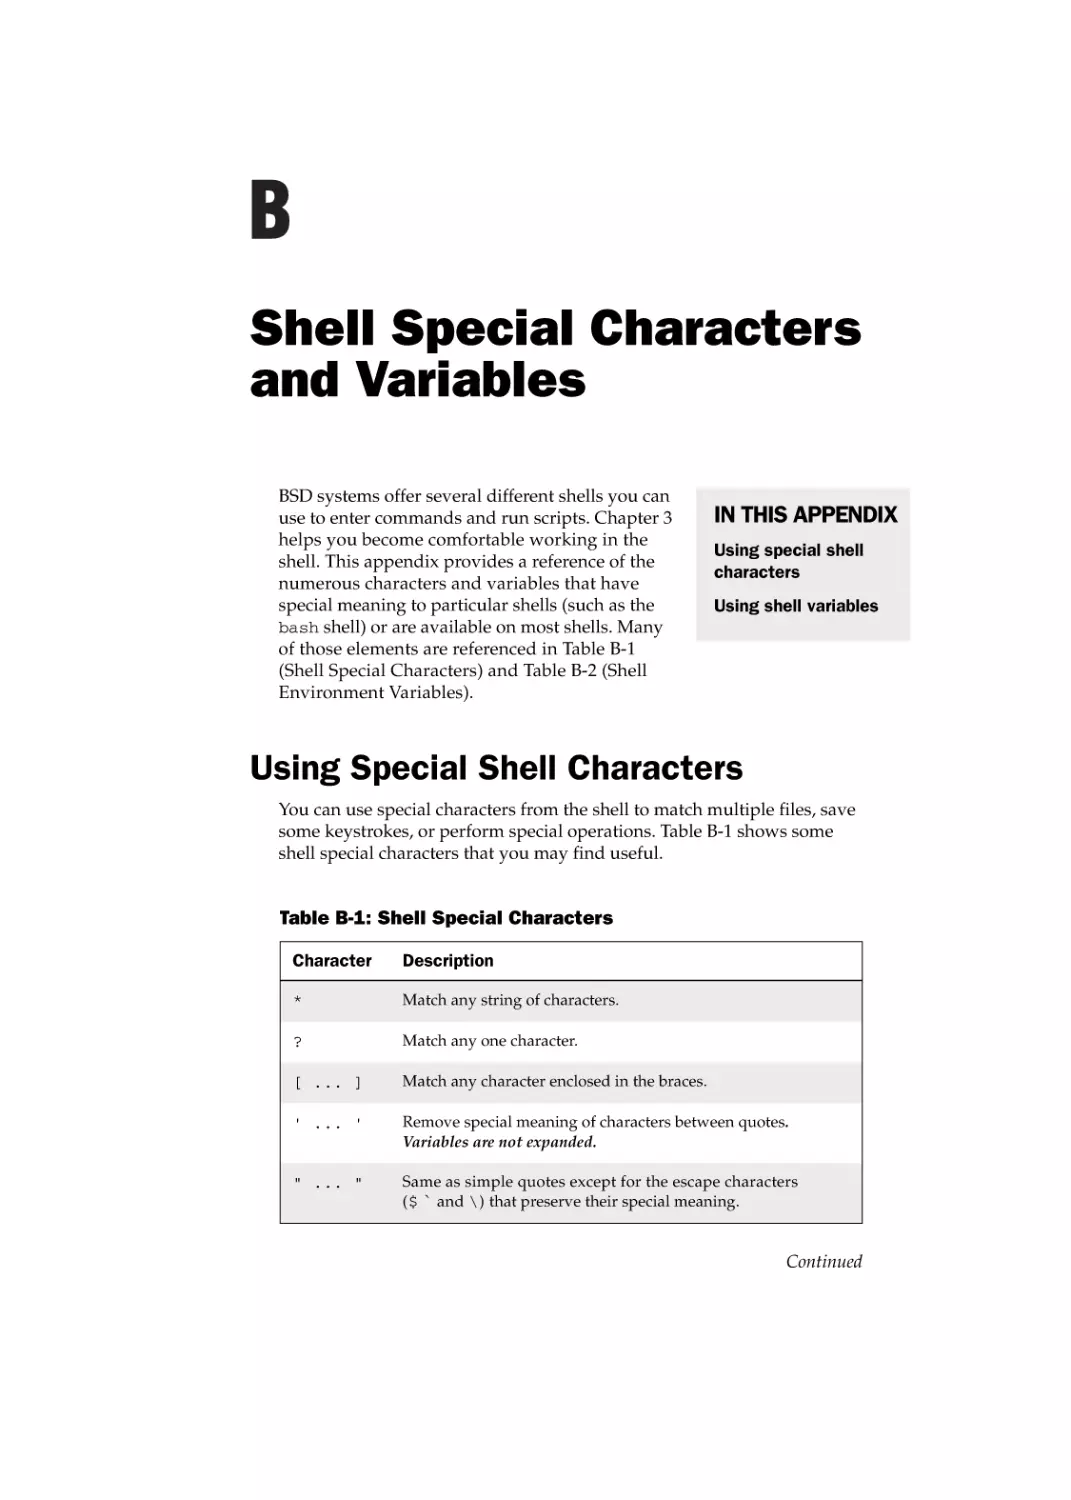
Appendix B: Shell Special Characters and Variables
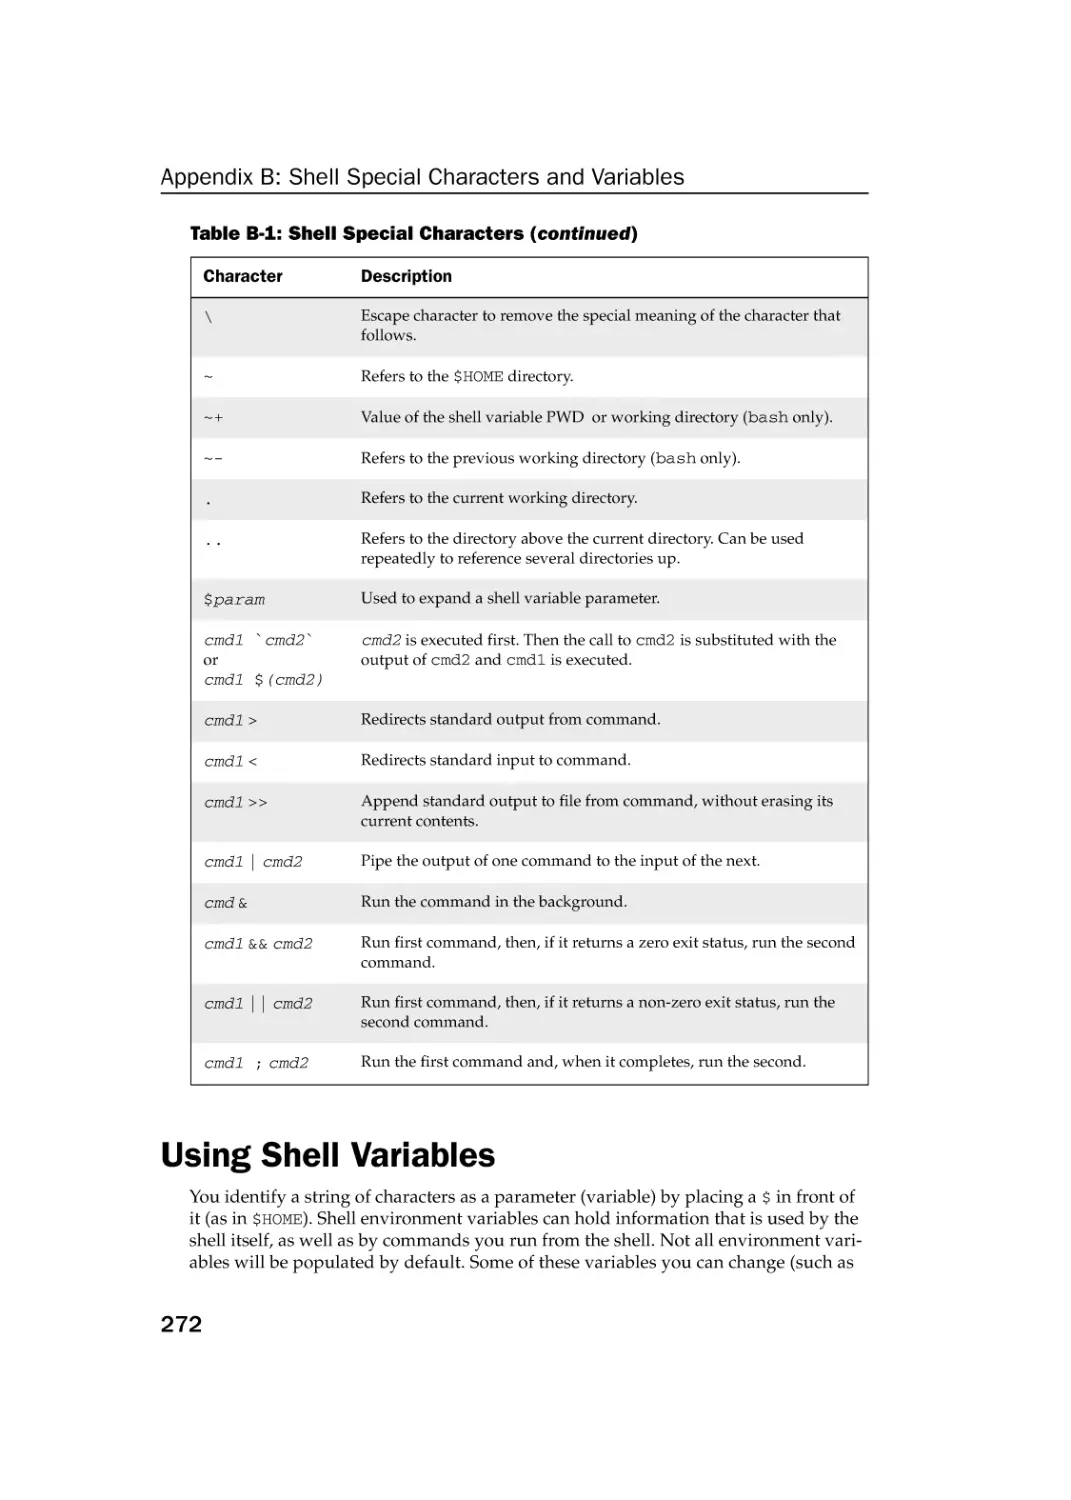
Using Special Shell Characters
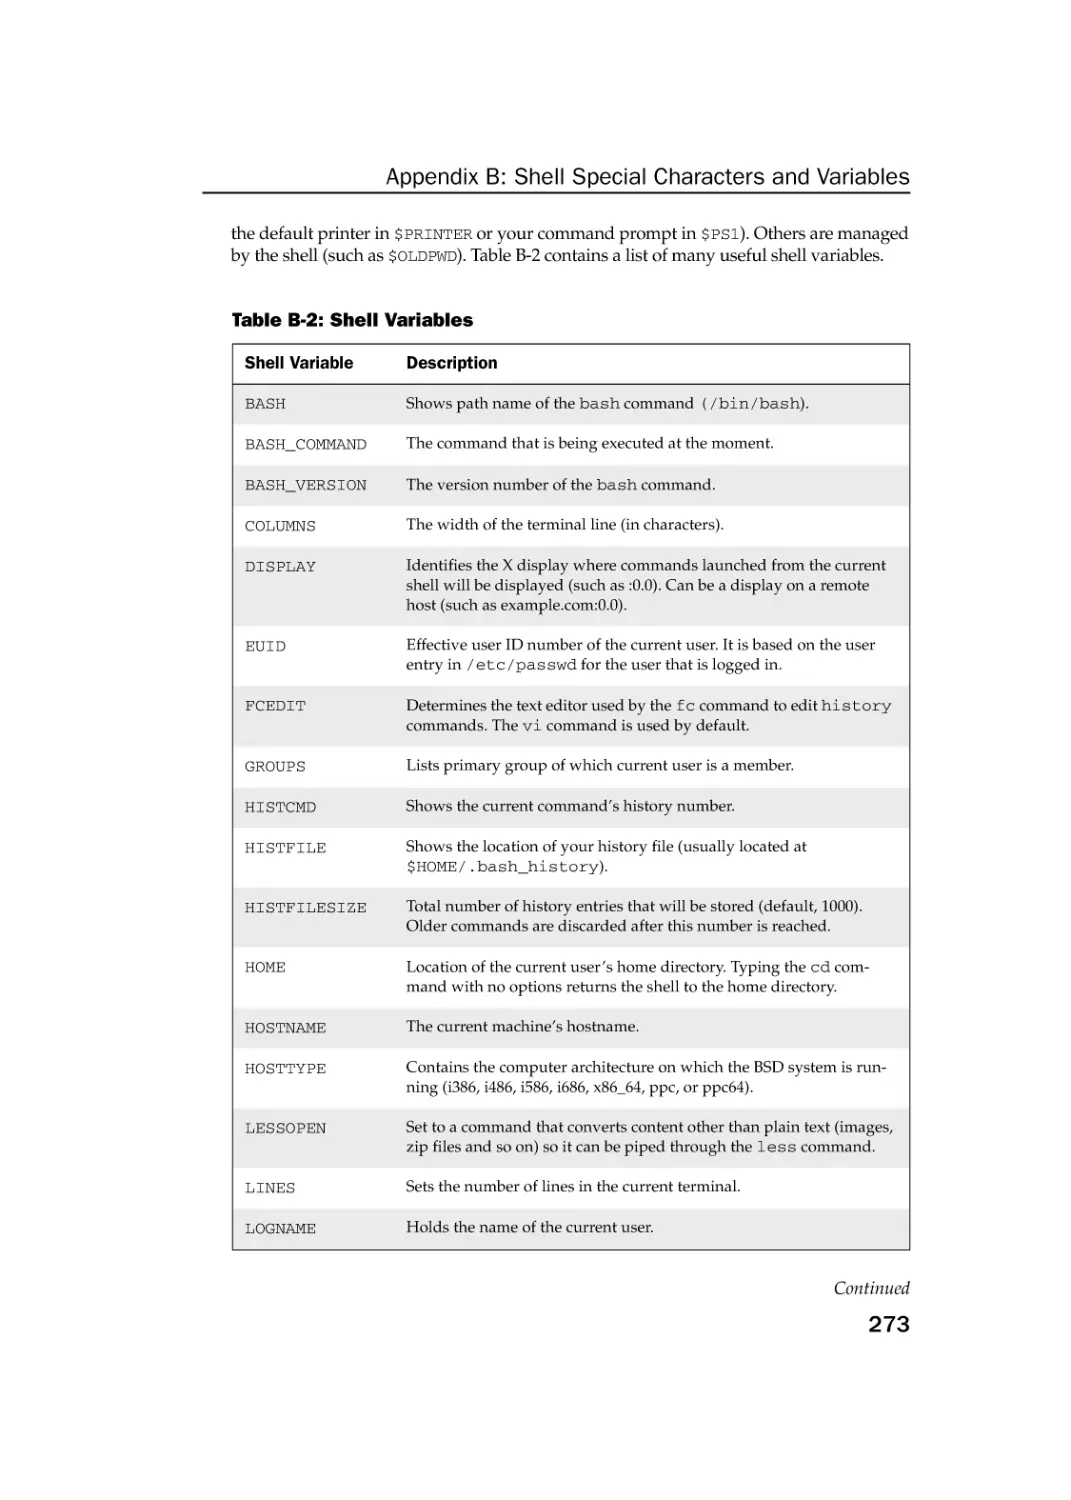
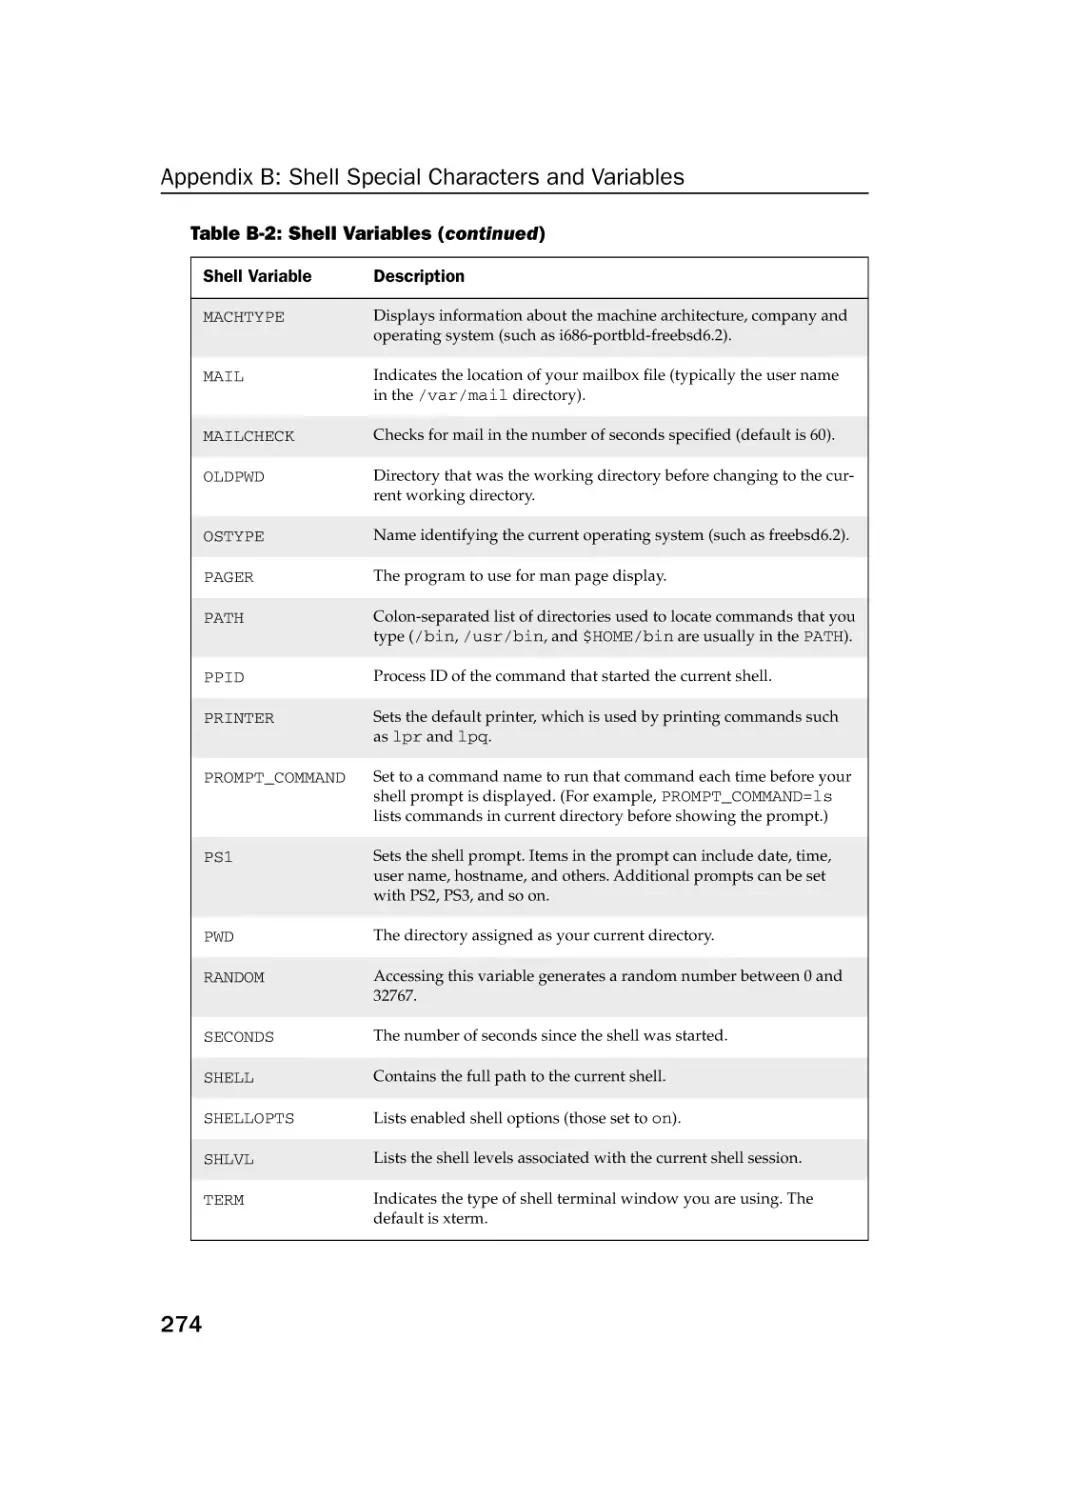
Using Shell Variables
Appendix C: Personal Configuration Files
Index
271
271
272
277
281
xvii
76034flast.qxd:Toolbox
4/2/08
1:06 PM
Page xviii
76034flast.qxd:Toolbox
4/2/08
1:06 PM
Page xix
Acknowledgments
I would like to acknowledge the FreeBSD, OpenBSD, and NetBSD development communities, who have continued the noble tradition begun by the Berkeley Software
Distribution decades ago. Their efforts have led to some of the most secure and stable
computer operating systems in or out of the free and open source software world.
Special thanks to François Caen for giving up most of his free time over the past year
as we developed and wrote the books in our Toolbox series. Thomas Blader did his
usual excellent job tech editing this book. At Wiley, I’d like to thank Jenny Watson for
sticking with us through the development of the book. Special thanks to Bill Bridges,
who kept us on track during a challenging development schedule.
— Christopher Negus
I would like to thank Chris Negus for giving me the opportunity to co-author this book
with him. We had wanted to write together for the last couple of years, and this Toolbox
series was the perfect fit for our collaboration.
I couldn’t have worked on this book without the unrelenting support from my wife,
Tonya. Thank you for emptying the dishwasher all those times even though we both
know it’s my job.
Thanks to Thomas Blader for his detailed tech editing. Having done some tech editing in
the past, I know what a tough job it can be. Thanks to Sara Shlaer and Jenny Watson at
Wiley for being the most patient cat-herders out there. Special thanks to Wayne Tucker
and Jesse Keating for all the knowledge they’ve shared with me during and before this
project.
— François Caen
76034flast.qxd:Toolbox
4/2/08
1:06 PM
Page xx
76034flast.qxd:Toolbox
4/2/08
1:06 PM
Page xxi
Introduction
BSD UNIX Toolbox provides you with more than 1,000 specific command lines to help
you become a BSD power user. Whether you are a systems administrator or desktop
user, the book will show you commands to create file systems, troubleshoot networks,
lock down security, and dig out almost anything you care to know about your BSD
system.
This book’s focus for your BSD command line journey is FreeBSD, one of the most
popular BSD derivatives in the world. Tapping into the skills needed to run those
systems can help you to work with your own BSD systems and to learn what you
need as a BSD professional.
Who Should Read This Book
This book is for anyone who wants to access the power of a BSD system as a systems
administrator or user. You may be a free and open source software (FOSS) enthusiast,
a BSD professional, or possibly a computer professional who is increasingly finding
the Windows systems in your data center supplanted by BSD and Linux boxes.
The bottom line is that you want to find quick and efficient ways of getting FreeBSD,
NetBSD, and OpenBSD systems working at peak performance. Those systems may be
a few desktop systems at work, a file and print server at your school, or a home web
server that you’re doing just for fun.
In the best case, you should already have some experience with BSD, Linux or other
UNIX-like systems. However, if you are a computer professional with skills managing other types of operating systems, such as Windows, you should be able to easily
adapt your knowledge to be able to use the specific commands we cover in the book.
What This Book Covers
This is not a beginner’s BSD UNIX book. Before you jump in, it would be best if you
have a basic working knowledge of what BSD and other UNIX systems are, how the
shell works, and what processes, file systems, and network interfaces are. The book
will then supplement that knowledge with information you need to do the following
activities:
❑ Get software — FreeBSD offers both binary software packages and source packages
in the ports database that can be used to download, build, and install software from
76034flast.qxd:Toolbox
4/2/08
1:06 PM
Page xxii
Introduction
source code. With tools such as pkg_info, pkg_add, and pkg_delete, you’ll learn
the best ways to find, download, install, and otherwise manage software from the
command line.
❑ Access applications — Find what’s available from the FreeBSD distribution, then
select and install the ones you want using the sysinstall utility.
❑ Use the shell — Find neat techniques and tips for using the shell.
❑ Play with multimedia — Play and work with multimedia content from your computer. You can also modify audio and image files, and then convert the content of
those files to different formats.
❑ Work with files — Use, manipulate, convert, and secure a wide range of file types
in BSD systems.
❑ Administer file systems — Access, format, partition, and monitor your file storage hardware (hard disks, CD/DVD drives, floppy disks, USB flash drives, and
so on). Then create, format, and check the file systems that exist on those hardware devices.
❑ Back up and restore data — Use simple commands to gather, archive, and compress your files into efficient backup archives. Then store those archives locally
or on remote computers.
❑ Work with processes — List running processes in a variety of ways, such as by
CPU use, processor use, or process ID. Then change running processes to have
them run in the background or foreground. Send signals to processes to have
them re-read configuration files, stop and resume processing, or stop completely
(abort).
❑ Manage the system — Run commands to check system resources, such as memory
usage, boot loaders, and kernel modules.
❑ Monitor networks — Bring wired, wireless, and dial-up network connections up
and down. Check routing, DNS, and host information. Keep an eye on network
traffic.
❑ Get network resources — Connect to BSD and Windows remote file systems using
FTP, NFS, and Samba facilities. Use shell-based commands to browse the Web.
❑ Do remote administration — Access and administer other computers using remote
login (ssh, telnet, and so on), and screen. Learn about remote administration interfaces, such as SWAT and CUPS.
❑ Lock down security — Set up firewalls and system logging to secure your BSD
systems.
❑ Get reference information — Use the appendixes at the end of this book to get
more information about the shell (such as metacharacters and shell variables) and
personal configuration files.
xxii
76034flast.qxd:Toolbox
4/2/08
1:06 PM
Page xxiii
Introduction
Hopefully, if we have done it right, it will be easier to use this book than to Google for
the command lines or GUI tools you need.
After you have mastered many of the features described in this book, you’ll have gained
the following advantages:
❑ Hundreds of commands — By compressing a lot of information into a small space,
you will have access to hundreds of useful commands, in over 1,000 command lines,
in a handy form to carry with you.
❑ Critical BSD information — This book lists connections to the most critical information on the Web for succeeding with BSD systems in general and FreeBSD in
particular.
❑ Transferable knowledge — Most of the same commands and options you use in
BSD systems will work exactly the same way on other UNIX-like systems. Different
UNIX systems, on the other hand, offer different graphical administration tools.
And even within a particular distribution, graphical tools change more often than
commands do.
❑ Quick problem solving — By the time others have started up a desktop and
launched a graphical administration tool, you will have already run a half dozen
commands and solved the problem.
❑ Enduring value — Many of the commands described in this book were used in
early UNIX systems. So you are gaining tools that reflect the experience of thousands of computer experts for more than 30 years.
Because the full documentation for commands used in BSD systems consists of thousands of man pages, info text, and help messages, you will surely want to reach
beyond the pages of this book from time to time. Luckily, FreeBSD and other UNIX
systems include helpful information installed on the system itself. Chapter 1 contains
descriptions of how to access that information that is probably already installed, or
can be easily installed, on your BSD system.
How This Book Is Structured
This book is neither a pure reference book (with alphabetically listed components) nor a
guide (with step-by-step procedures for doing tasks). Instead, the book is organized by
topics and aimed at including as many useful commands and options as we could fit in.
Chapter 1 starts by giving you a basic understanding of what BSD is and how it
relates to the operating systems that are derived from BSD, such as FreeBSD, NetBSD,
and OpenBSD. Then it describes some of the vast resources available to support your
experience with this book (such as man pages, info material, and help text). Chapter 2
xxiii
76034flast.qxd:Toolbox
4/2/08
1:06 PM
Page xxiv
Introduction
provides a quick overview of installation and then describes useful commands such
as pkg_info and pkg_add for getting and managing your BSD software.
Chapters 3, 4, 5, and 6 describe commands that a regular user may find useful on BSD
systems. Chapter 3 describes tools for using the shell, Chapter 4 covers commands for
working with files, and Chapter 5 describes how to manipulate text. Chapter 6 tells
how to work with music and image files.
Starting with Chapter 7, we get into topics relating to system administration. Creating
and checking file systems is covered in Chapter 7, while commands for doing data
backups are described in Chapter 8. Chapter 9 describes how to manipulate running
processes, and Chapter 10 describes administrative tools for managing basic components, such as hardware modules, CPU use, and memory use.
Chapter 11 begins the chapters devoted to managing network resources by describing how to set up and work with wired, wireless, and dial-up network interfaces.
Chapter 12 covers text-based commands for web browsing, file transfer, file sharing,
chats, and e-mail. Tools for doing remote system administration are included in
Chapter 13.
Chapter 14 covers how to lock down security using features such as firewalls and
logging. After that there are three appendices that provide reference information for
text editing, shell features (metacharacters and variables), and personal configuration files.
What You Need to Use This Book
Although we hope you enjoy the beauty of our prose, this is not meant to be a book
you curl up with in front of a nice fire with a glass of wine. We expect you will be sitting in front of a computer screen trying to connect to a network, fix a file system, or
add a user. The wine is optional.
In other words, the book is meant to be a companion as you work on a FreeBSD,
NetBSD, or OpenBSD operating system. All those systems are available for the x86
and x86_64 computer architectures. Some specific versions of those systems are also
available for IBM PowerPC, SPARC, Intel ia64 (Itanium), and Alpha. If you don’t
already have one of those systems installed, refer to Chapter 2 for information on
getting and installing those systems.
All the commands in this book have been tested against FreeBSD on x86 or x86_64
architecture. However, because many of these commands have been around for a
long time (some dating back over 30 years to the original UNIX days), most will
work exactly as described here on NetBSD, OpenBSD, and other derivative systems,
regardless of CPU architecture.
xxiv
76034flast.qxd:Toolbox
4/2/08
1:06 PM
Page xxv
Introduction
Many of the commands described in this book will work on other UNIX and Linux
systems as well. Because this book focuses on FreeBSD and other BSD-based distributions, descriptions will differ from other UNIX-like systems most prominently in the
areas of packaging, installation, and GUI administration tools.
Conventions
To help you get the most from the text and keep track of what’s happening, we’ve used
a number of conventions throughout the book. In particular, we have created styles for
showing commands that allow us to fit as many command lines as possible in the book.
With command examples, computer output (shell prompts and messages) is shown in
regular monospace font, computer input (the stuff you type) is shown in bold monospace font, and a short description (if included) appears in italics. Here is an example:
$ ls *jpg
hat.jpg
dog.jpg
...
List all JPEG files in the current directory
To save space, output is sometimes truncated (or skipped altogether). Three dots
(...) are sometimes used to indicate that additional output was cut. If a command
is particularly long, backslashes will appear at the end of each line to indicate that
input is continuing to the next line. Here is an example:
# oggenc NewSong.wav -o NewSong.ogg
-a Bernstein -G Classical
-d 06/15/1972 -t “Simple Song”
-l “Bernsteins Mass”
-c info=”From Kennedy Center”
\
\
\
\
In the example just shown, you can type the backslashes to have all that information
included in the single command. Or, you can simply put all the information on a single line (excluding the backslashes). Note that command prompts are shown in one
of two ways:
$
#
Indicates a regular user prompt
Indicates the root prompt
As noted, when a dollar sign prompt ($) appears, any user can run the command. With a
pound sign prompt (#), you probably need to be the root user for the command to work.
Notes and warnings appear as follows:
NOTE
Warnings and notes are offset and placed in italic like this.
xxv
76034flast.qxd:Toolbox
4/2/08
1:06 PM
Page xxvi
Introduction
As for styles in the text:
❑ We highlight new terms and important words with italics when we introduce them.
❑ We show keyboard strokes like this: Ctrl+A. If the command requires you to type
an uppercase letter, the combination will show this: Ctrl+Shift+A.
❑ We show file names, URLs, and code within the text like so:
persistence.properties.
One final technique we use is to highlight text that describes what an upcoming command is meant to do. For example, we may say something like, “use the following
command to display the contents of a file.” We’ve styled descriptions in this way to provide quick visual cues to the readers, so you can easily scan the page for that command you just knew had to be there.
xxvi
76034c01.qxd:Toolbox
3/29/08
10:40 AM
Page 1
Starting with BSD
Systems
Whether you use BSD systems every day or just
tweak one once in a while, a book that presents efficient ways to use, check, fix, secure, and enhance
your system can be an invaluable resource.
BSD UNIX Toolbox is that resource.
BSD UNIX Toolbox is aimed primarily at BSD
power users and systems administrators. To give
you what you need, we tell you how to quickly
locate and get software, monitor the health and
security of your systems, and access network
resources. In short, we cut to the most efficient
ways of using BSD systems.
IN THIS CHAPTER
Find BSD resources
Learn quick and
powerful commands
Have a handy reference to many useful
utilities
Work as BSD gurus do
Our goal with BSD UNIX Toolbox is to pack a lot of useful information for
using BSD systems into a small package that you can carry around with
you. To that end, we describe:
❑ Commands — Tons of command line examples to use BSD systems
in helpful and clever ways
❑ GUI Tools — Quick pointers to graphical administration tools to
configure your system
❑ Software packages — Short procedures to find and download tons
of applications
❑ Online resources — Listings of the best locations to find BSD forums,
mailing lists, IRC channels, and other online resources
❑ Local documentation — Tools for gathering more information from
man pages, doc directories, help commands, and other resources on
your BSD system
Because you’re not a beginner with BSD systems, you won’t see a lot of
screenshots of windows, icons, and menus. What you will see, however,
76034c01.qxd:Toolbox
3/29/08
10:40 AM
Page 2
Chapter 1: Starting with BSD Systems
is the quickest path to getting the information you need to use your BSD system to its
fullest extent.
If this sounds useful to you, please read on.
About FreeBSD, NetBSD, and OpenBSD
In the early 1970s, AT&T released the UNIX source code to several colleges and universities, allowing them to begin changing, adapting, and improving that code as
they pleased. That decision has led to the development of every major free and open
source software operating system today, not least of which are the systems based on
the Berkeley Software Distribution (BSD).
The twisty history of BSD is easy to Google for, if you care to learn the details. For our
purposes, let’s just say that:
❑ BSD began as a set of software add-ons to AT&T’s Sixth Edition UNIX.
❑ Over the years, BSD developers split off on their own development path, rewriting
software with the intention of replacing all AT&T copyrighted code.
❑ In the early 1990s, AT&T’s UNIX System Laboratories sued BSD developers
(Berkeley Software Design, Inc.) for copyright infringement.
❑ Although the lawsuit was eventually settled (with only a few files needing to be
changed from the BSD code), the Linux operating system was able to become a
leader of open source software development while questions surrounding free
BSD were being threshed out.
❑ In 1995, the final version of BSD from Berkeley was released under the name
4.4BSD-Lite, release 2. Today’s BSD operating systems, including FreeBSD,
NetBSD, and OpenBSD, are all based to some extent on 4.4BSD-Lite.
Operating systems derived from BSD have a well-earned reputation for stability and
security. BSD was developed at a time when computing resources (disk space, network
bandwidth, and memory) were meager by today’s standards. So BSD systems were
operated by efficient commands, instead of the bloated applications and dumbed-down
graphical interfaces often seen today.
Because of the nature of BSD systems, people running those systems required a
high level of expertise. Even when simplified graphical user interfaces based on
the X Window System began to appear, to effectively operate a BSD system you
still needed to know about such things as kernels, device drivers, modules, and
daemons. Because security came before ease-of-use, a BSD expert needed to know
how to deal with the fact that many features they may have wanted were not installed,
or were turned off, by default.
2
76034c01.qxd:Toolbox
3/29/08
10:40 AM
Page 3
Chapter 1: Starting with BSD Systems
If you are someone who has used Linux before, transitioning to a BSD system shouldn’t
be too hard. However, BSD systems tend to behave a bit more like older UNIX systems
than they do like Linux. Many interfaces are text-based, offering lots of power if you
know what you are doing. Despite that fact, however, all the major desktop components
that, for example, you get with the GNOME desktop environment are available with
BSD systems. So you don’t have to live on the command line.
Here is a list of popular BSD-based operating systems that are still being developed
today:
❑ FreeBSD (www.freebsd.org) is the most popular of the BSD operating system
distributions. It can be operated as a server, workstation, or desktop system, but
has also been used in network appliances and special-purpose embedded systems.
It has a reputation for maximum performance.
❑ NetBSD (www.netbsd.org) has a reputation for being very portable, with versions
of NetBSD running as an embedded system on a variety of hardware. NetBSD can
run on anything from 32-bit and 64-bit PCs to personal digital assistants (PDAs) to
VAX minicomputers.
❑ OpenBSD (www.netbsd.org) is a popular system for network servers, although it
can operate as a workstation or network appliance as well. The goal of OpenBSD is
to attain maximum security. Unlike FreeBSD and NetBSD, which are covered under
the BSD license, OpenBSD is covered primarily under the more-permissive Internet
Systems Consortium (ISC) license.
❑ DragonFly BSD (www.dragonflybsd.org) was originally based on FreeBSD. Its
goal was to develop technologies different from FreeBSD in such areas as symmetric multiprocessing and concurrency. So the focus has been on expanding features
in the kernel.
Other free (as in no cost, as well as freedom to do what you like with the code)
operating systems based on BSD include Darwin (on which Mac OS X is based)
and desktop-oriented systems such as PC-BSD and DesktopBSD. FreeSBIE is a
live CD BSD system. Proprietary operating systems that have been derived from
BSD include:
❑ Mac OS X (www.apple.com/macosx) is produced by Apple, Inc. and focuses on
adding an easy-to-use graphical interface to sell with its line of computers. There
is also a Mac OS X Server product available. Although Mac OS X was originally
based on Darwin, it is considered a closed-source operating system with open
source components.
❑ SunOS (www.sun.com) was developed by Sun Microsystems and was very popular as a professional workstation system. Sun stopped development of SunOS in
favor of Solaris. However, because Solaris represented a merging of SunOS and
UNIX System V, many BSD features made their way into Solaris.
3
76034c01.qxd:Toolbox
3/29/08
10:40 AM
Page 4
Chapter 1: Starting with BSD Systems
There is a larger list of BSD distributions that you can find at the DistroWatch site
(http://distrowatch.com/search.php?category=BSD). Besides offering descriptions of those BSD distributions, you can also find links to where you can purchase or
download the software.
Finding BSD Resources
Although there is still a BSD web site (www.bsd.org), it largely acts as a pointer to
BSD resources related to particular BSD distributions. The following sections contain
useful links related to the FreeBSD, NetBSD, and OpenBSD sites.
FreeBSD Resources
Here are links to useful resources from the FreeBSD site (www.freebsd.org):
❑ Support for FreeBSD (freebsd.org/support.html) — You can find connections
to both community and commercial support for FreeBSD.
❑ Getting FreeBSD software (freebsd.org/where.html) — Links to information
for downloading or purchasing FreeBSD installation CDs or DVDs are listed on
this site. This includes links to software for different architectures (i386, amd64,
powerpc, and so on).
❑ FreeBSD features list (freebsd.org/about.html) — Describes the key features
of FreeBSD.
❑ News on FreeBSD (freebsd.org/news/) — This is a gathering point for news
about FreeBSD. There are links to news flashes, press releases, articles, and development status. You can also find links here to development sites and forums related
to FreeBSD and BSD in general.
❑ FreeBSD projects (freebsd.org/projects/) — Provides information about
FreeBSD development projects. Besides basic development projects for FreeBSD,
you can also find links to special projects (such as Google Summer of Code) and
FreeBSD initiatives associated with established open source projects (such as Java,
GNOME, KDE, and OpenOffice.org).
NetBSD Resources
Here are links to useful resources from the NetBSD site (www.netbsd.org):
❑ NetBSD support (netbsd.org/support) — Provides information about community and professional support, supported hardware, bug submissions, and security.
❑ Getting NetBSD software (netbsd.org/releases) — Links to information for
downloading NetBSD CDs or DVDs are listed on this site. There are bittorrent, FTP,
and HTTP methods for downloading software.
❑ About NetBSD (netbsd.org/about) — Describes the key features of NetBSD.
4
76034c01.qxd:Toolbox
3/29/08
10:40 AM
Page 5
Chapter 1: Starting with BSD Systems
❑ NetBSD news (netbsd.org/changes/) — Contains the latest news about
NetBSD. This includes ongoing lists of development changes to NetBSD.
❑ Software packages (netbsd.org/docs/software/packages.html) — Find
information about the NetBSD Packages Colledction (pkgsrc). This includes information on available packages, documentation, and supported platforms.
OpenBSD Resources
Here are links to useful resources from the OpenBSD site (www.openbsd.org):
❑ OpenBSD support (openbsd.org/support.html) — Provides information on
commercial support and consulting available for OpenBSD around the world.
❑ Getting OpenBSD software (openbsd.org/ftp.html) — Links to information
for downloading OpenBSD CDs or DVDs are listed on this site. Software mirrors
are available via FTP, HTTP, ASF, and RSYNC.
❑ Goals of OpenBSD project (openbsd.org/goals.html) — Describes the goals
of the OpenBSD project.
❑ OpenBSD News (openbsd.org/press.html/) — Contains links to press coverage of OpenBSD.
❑ Frequently asked questions (cvs.openbsd.org/faq) — Contains the Frequently
Asked Questions (FAQ) list for OpenBSD.
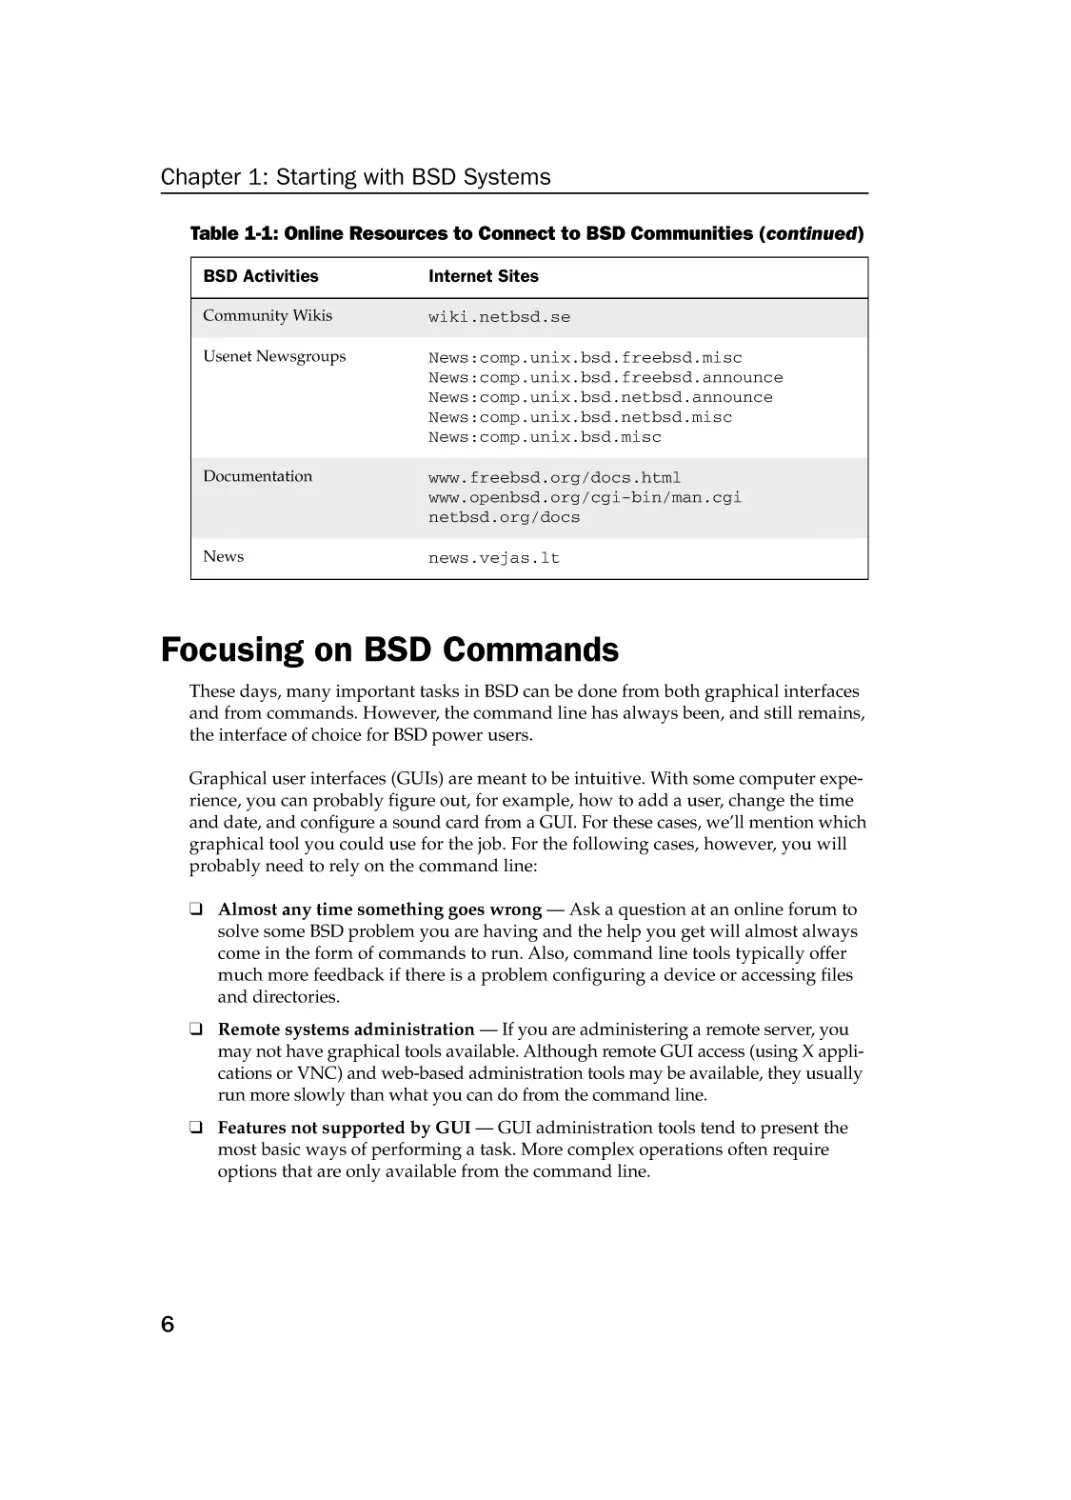
BSD Community Connections
If you want to communicate with the FreeBSD, OpenBSD, or NetBSD communities,
Table 1-1 shows a quick list of links to the most useful communications venues related
to those projects.
Table 1-1: Online Resources to Connect to BSD Communities
BSD Activities
Internet Sites
Mailing lists
lists.freebsd.org/mailman/listinfo
www.openbsd.org/mail.html
www.netbsd.org/mailinglists
IRC chats
www.netbsd.org/community/#chat
www.freebsd.org/community/irc.html
Forums
www.bsdforums.org
www.bsdnexus.com
www.freebsdwiki.net
Blogs
planet.freebsdish.org
Continued
5
76034c01.qxd:Toolbox
3/29/08
10:40 AM
Page 6
Chapter 1: Starting with BSD Systems
Table 1-1: Online Resources to Connect to BSD Communities (continued)
BSD Activities
Internet Sites
Community Wikis
wiki.netbsd.se
Usenet Newsgroups
News:comp.unix.bsd.freebsd.misc
News:comp.unix.bsd.freebsd.announce
News:comp.unix.bsd.netbsd.announce
News:comp.unix.bsd.netbsd.misc
News:comp.unix.bsd.misc
Documentation
www.freebsd.org/docs.html
www.openbsd.org/cgi-bin/man.cgi
netbsd.org/docs
News
news.vejas.lt
Focusing on BSD Commands
These days, many important tasks in BSD can be done from both graphical interfaces
and from commands. However, the command line has always been, and still remains,
the interface of choice for BSD power users.
Graphical user interfaces (GUIs) are meant to be intuitive. With some computer experience, you can probably figure out, for example, how to add a user, change the time
and date, and configure a sound card from a GUI. For these cases, we’ll mention which
graphical tool you could use for the job. For the following cases, however, you will
probably need to rely on the command line:
❑ Almost any time something goes wrong — Ask a question at an online forum to
solve some BSD problem you are having and the help you get will almost always
come in the form of commands to run. Also, command line tools typically offer
much more feedback if there is a problem configuring a device or accessing files
and directories.
❑ Remote systems administration — If you are administering a remote server, you
may not have graphical tools available. Although remote GUI access (using X applications or VNC) and web-based administration tools may be available, they usually
run more slowly than what you can do from the command line.
❑ Features not supported by GUI — GUI administration tools tend to present the
most basic ways of performing a task. More complex operations often require
options that are only available from the command line.
6
76034c01.qxd:Toolbox
3/29/08
10:40 AM
Page 7
Chapter 1: Starting with BSD Systems
❑ GUI is broken or not installed — If no graphical interface is available, or if the
installed GUI isn’t working properly, you may be forced to work from the command line. Broken GUIs can happen for lots of reasons, such as when you use a
third-party, binary-only driver from NVIDIA or ATI and a kernel upgrade makes
the driver incompatible. Also, many BSD servers don’t even have GUIs installed.
The bottom line is that to unlock the full power of your BSD system, you must be able
to use shell commands. Thousands of commands are available for BSD to monitor and
manage every aspect of your BSD system.
But whether you are a BSD guru or novice, one challenge looms large. How do you
remember the most critical commands and options you need, when a command shell
might only show you this:
$
BSD UNIX Toolbox is not just another command reference or rehash of man pages.
Instead, this book presents commands in BSD systems by the way you use them. In
other words, instead of listing commands alphabetically, we group together commands
for working with file systems, connecting to networks, and managing processes in their
own sections, so you can access commands by what you want to do, not only by how
they’re named.
Likewise, we won’t just give you a listing of every option available for every command.
Instead, we’ll show you working examples of the most important and useful options to
use with each command. From there, we’ll tell you quick ways to find more options, if
you need them, from man pages, the info facility, and help options.
Finding Commands
All the commands described in this book may not be installed when you go to run them.
You might type a command and see a message similar to:
mycommand: command not found
This might happen for the following reasons:
❑ You mistyped the command name.
❑ The command is not in your PATH.
❑ You may need to be the root user for the command to be in your PATH.
❑ The command is not installed on your computer.
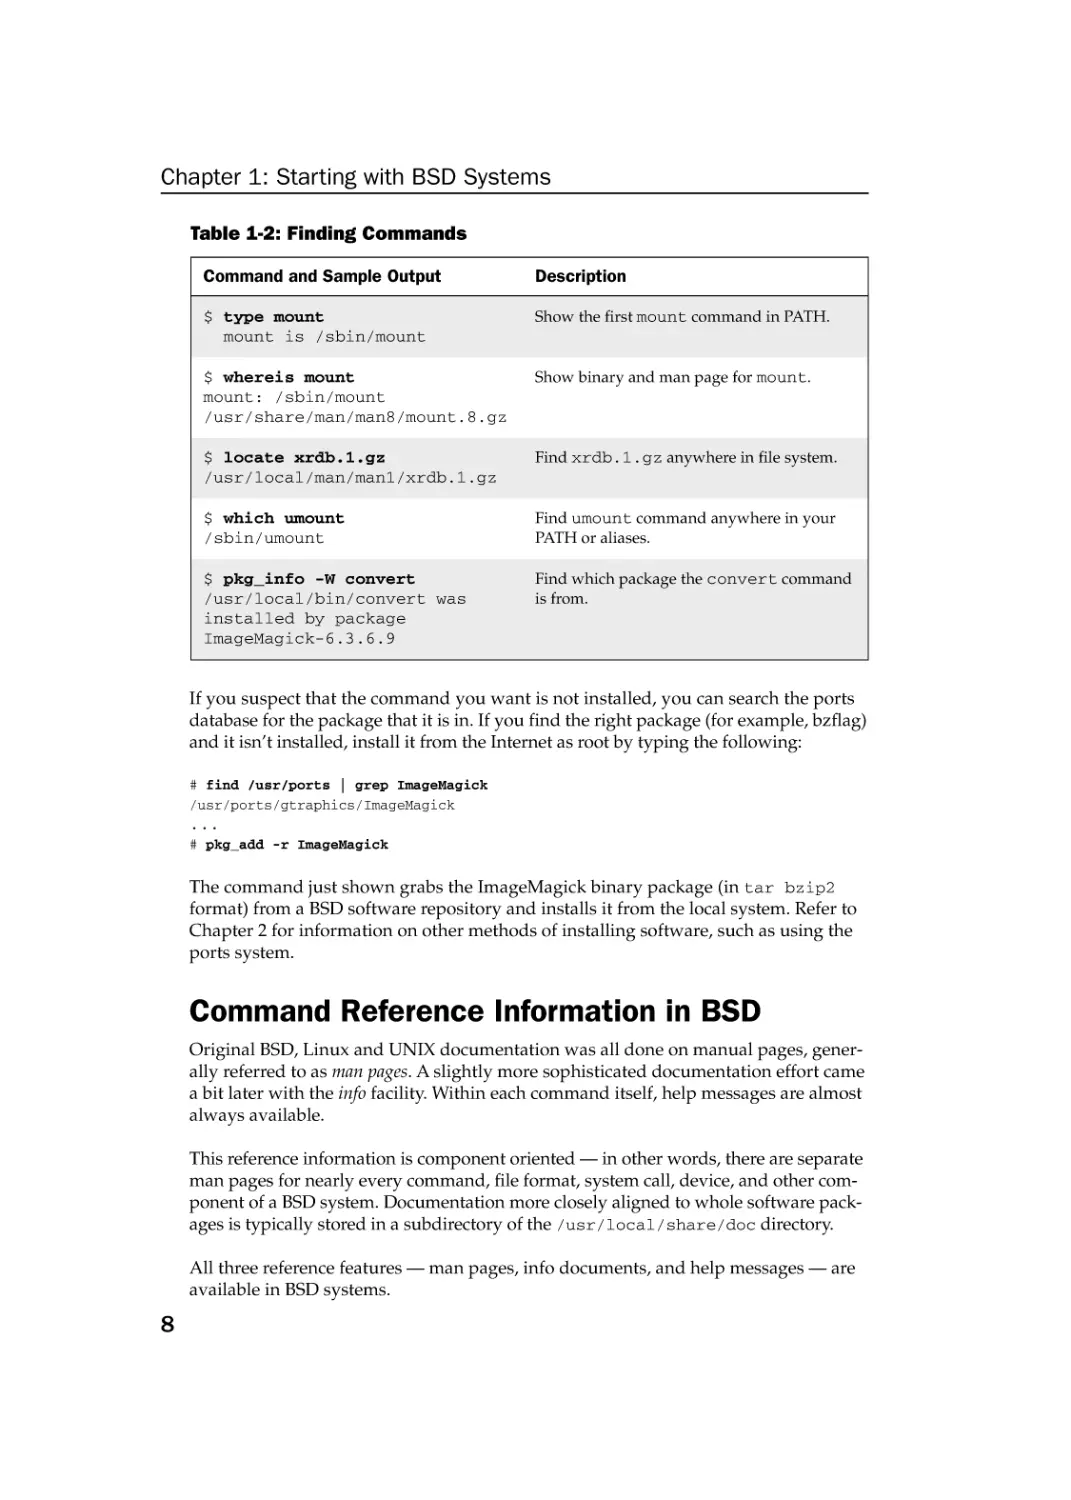
Table 1-2 shows some commands you can run to look for a command you want to use.
7
76034c01.qxd:Toolbox
3/29/08
10:40 AM
Page 8
Chapter 1: Starting with BSD Systems
Table 1-2: Finding Commands
Command and Sample Output
Description
$ type mount
mount is /sbin/mount
Show the first mount command in PATH.
$ whereis mount
mount: /sbin/mount
/usr/share/man/man8/mount.8.gz
Show binary and man page for mount.
$ locate xrdb.1.gz
/usr/local/man/man1/xrdb.1.gz
Find xrdb.1.gz anywhere in file system.
$ which umount
/sbin/umount
Find umount command anywhere in your
PATH or aliases.
$ pkg_info -W convert
/usr/local/bin/convert was
installed by package
ImageMagick-6.3.6.9
Find which package the convert command
is from.
If you suspect that the command you want is not installed, you can search the ports
database for the package that it is in. If you find the right package (for example, bzflag)
and it isn’t installed, install it from the Internet as root by typing the following:
# find /usr/ports | grep ImageMagick
/usr/ports/gtraphics/ImageMagick
...
# pkg_add -r ImageMagick
The command just shown grabs the ImageMagick binary package (in tar bzip2
format) from a BSD software repository and installs it from the local system. Refer to
Chapter 2 for information on other methods of installing software, such as using the
ports system.
Command Reference Information in BSD
Original BSD, Linux and UNIX documentation was all done on manual pages, generally referred to as man pages. A slightly more sophisticated documentation effort came
a bit later with the info facility. Within each command itself, help messages are almost
always available.
This reference information is component oriented — in other words, there are separate
man pages for nearly every command, file format, system call, device, and other component of a BSD system. Documentation more closely aligned to whole software packages is typically stored in a subdirectory of the /usr/local/share/doc directory.
All three reference features — man pages, info documents, and help messages — are
available in BSD systems.
8
76034c01.qxd:Toolbox
3/29/08
10:40 AM
Page 9
Chapter 1: Starting with BSD Systems
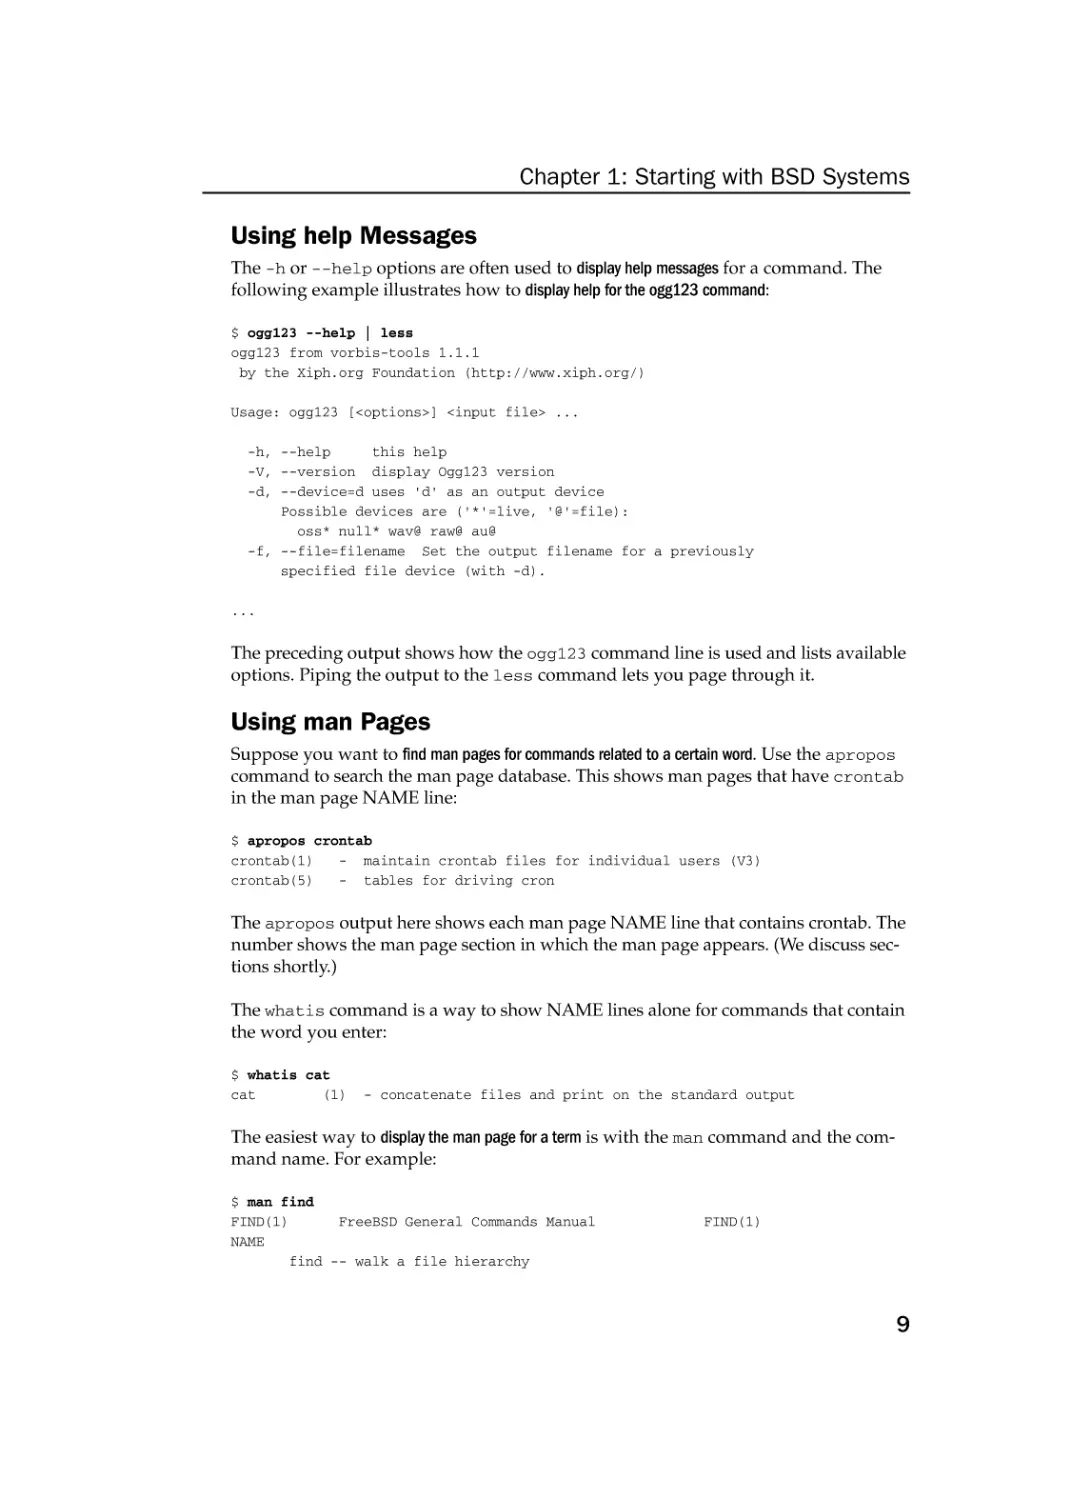
Using help Messages
The -h or --help options are often used to display help messages for a command. The
following example illustrates how to display help for the ogg123 command:
$ ogg123 --help | less
ogg123 from vorbis-tools 1.1.1
by the Xiph.org Foundation (http://www.xiph.org/)
Usage: ogg123 [<options>] <input file> ...
-h, --help
this help
-V, --version display Ogg123 version
-d, --device=d uses ‘d’ as an output device
Possible devices are (‘*’=live, ‘@’=file):
oss* null* wav@ raw@ au@
-f, --file=filename Set the output filename for a previously
specified file device (with -d).
...
The preceding output shows how the ogg123 command line is used and lists available
options. Piping the output to the less command lets you page through it.
Using man Pages
Suppose you want to find man pages for commands related to a certain word. Use the apropos
command to search the man page database. This shows man pages that have crontab
in the man page NAME line:
$ apropos crontab
crontab(1)
- maintain crontab files for individual users (V3)
crontab(5)
- tables for driving cron
The apropos output here shows each man page NAME line that contains crontab. The
number shows the man page section in which the man page appears. (We discuss sections shortly.)
The whatis command is a way to show NAME lines alone for commands that contain
the word you enter:
$ whatis cat
cat
(1)
- concatenate files and print on the standard output
The easiest way to display the man page for a term is with the man command and the command name. For example:
$ man find
FIND(1)
FreeBSD General Commands Manual
NAME
find -- walk a file hierarchy
FIND(1)
9
76034c01.qxd:Toolbox
3/29/08
10:40 AM
Page 10
Chapter 1: Starting with BSD Systems
SYNOPSIS
find [-H | -L | -P] [-EXdsx] [-f pathname] [pathname ...] expression
...
The preceding command displays the first man page found for the find command.
As you saw in the earlier example, some terms have multiple man pages. For example,
there is a man page for the crontab command and one for the crontab files. Man
pages are organized into sections, as shown in Table 1-3.
Table 1-3: man Page Sections
Section
Description
1
General user commands
2
System calls
3
Programming routines / library functions
4
Devices
5
Configuration files and file formats
6
Games
7
Miscellaneous
8
Administrative commands and daemons
9
Kernel Interface
The following code shows some other examples of useful options with the man
command.
$
$
$
$
$
man
man
man
man
man
-a mount
5 crontab
mount -P more
-f mount
-k mount
Shows all man pages related to component
Shows section 5 man page for component
Use more, not less to page through
Same as the whatis command
Same as the apropos command
Man pages are also available on the Internet. Here are some nice sites for finding
BSD man pages:
http://www.freebsd.org/cgi/man.cgi
http://www.openbsd.org/cgi-bin/man.cgi
http://netbsd.gw.com/cgi-bin/man-cgi?++NetBSD-current
10
76034c01.qxd:Toolbox
3/29/08
10:40 AM
Page 11
Chapter 1: Starting with BSD Systems
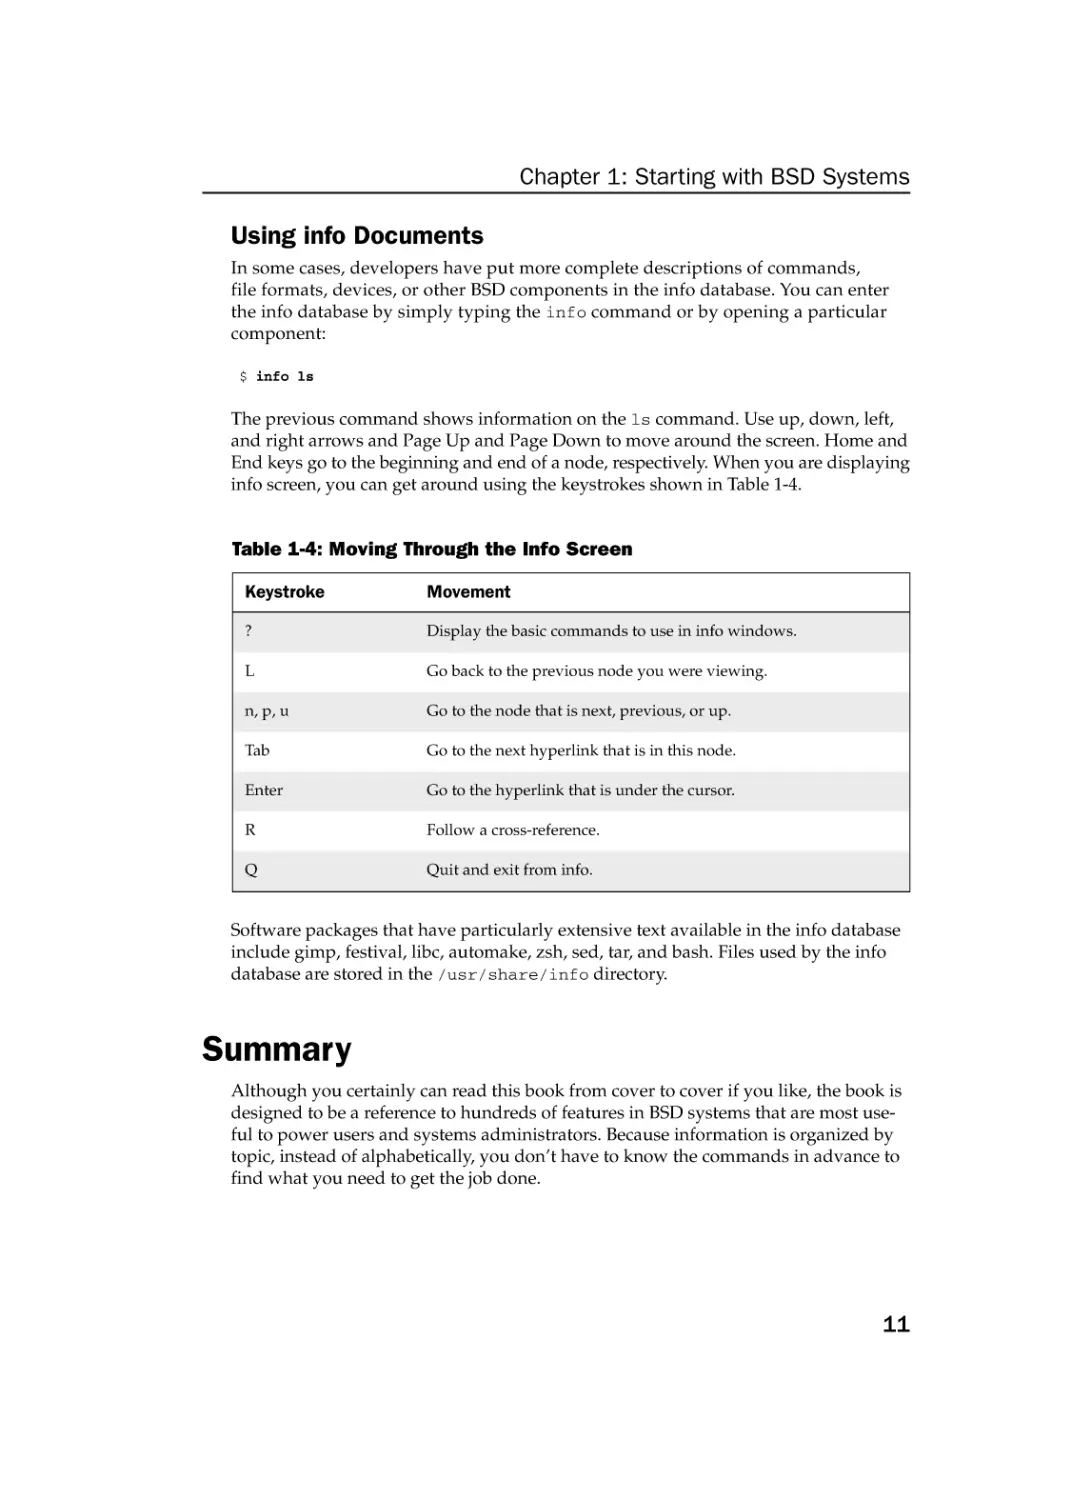
Using info Documents
In some cases, developers have put more complete descriptions of commands,
file formats, devices, or other BSD components in the info database. You can enter
the info database by simply typing the info command or by opening a particular
component:
$ info ls
The previous command shows information on the ls command. Use up, down, left,
and right arrows and Page Up and Page Down to move around the screen. Home and
End keys go to the beginning and end of a node, respectively. When you are displaying
info screen, you can get around using the keystrokes shown in Table 1-4.
Table 1-4: Moving Through the Info Screen
Keystroke
Movement
?
Display the basic commands to use in info windows.
L
Go back to the previous node you were viewing.
n, p, u
Go to the node that is next, previous, or up.
Tab
Go to the next hyperlink that is in this node.
Enter
Go to the hyperlink that is under the cursor.
R
Follow a cross-reference.
Q
Quit and exit from info.
Software packages that have particularly extensive text available in the info database
include gimp, festival, libc, automake, zsh, sed, tar, and bash. Files used by the info
database are stored in the /usr/share/info directory.
Summary
Although you certainly can read this book from cover to cover if you like, the book is
designed to be a reference to hundreds of features in BSD systems that are most useful to power users and systems administrators. Because information is organized by
topic, instead of alphabetically, you don’t have to know the commands in advance to
find what you need to get the job done.
11
76034c01.qxd:Toolbox
3/29/08
10:40 AM
Page 12
Chapter 1: Starting with BSD Systems
Most of the features described in this book will work equally well in FreeBSD, NetBSD,
OpenBSD, and other BSD systems. In fact, many of the commands described here are
in such widespread use that you could use them exactly as described here on most
Linux and UNIX systems as well.
The next chapter describes how to get and install BSD software.
12
76034c02.qxd:Toolbox
3/29/08
10:41 AM
Page 13
Installing FreeBSD
and Adding Software
In the tradition of the first UNIX systems, FreeBSD
offers a text-based installation facility that includes
a utility called sysinstall. The installer is aimed at
professionals, who are more interested in power
and flexibility than fancy graphical screens and
hand-holding. After initialization you can run
sysinstall again, to add more software packages and configure some network settings.
IN THIS CHAPTER
Installing FreeBSD
Getting software packages with pkg_add
Using ports to get and
install software
Despite its simplicity, the installer offers many of
the same powerful features that you can find in
more refined Linux and UNIX installers. It can configure your hard disks
and install from different local media (CD, DVD, or hard disk) or remote
servers (FTP, HTTP or NFS servers). It also leads you through the initial
configuration of users, mice, network services, and other important start-up
features.
After installation, FreeBSD offers tools such as pkg_info, pkg_add,
pkg_delete, and pkg_check to add and otherwise work with software
packages in FreeBSD. You can also run the sysinstall utility again to
install more packages after your initial FreeBSD install. To install packages from source code, FreeBSD offers the ports collection, along with
tools such as portsnap and portupgrade.
This chapter highlights critical issues you need to know during the initial
FreeBSD installation. It also provides detailed examples of commands just
mentioned for managing software after installation.
Before Installing FreeBSD
You can get FreeBSD installation software from the Getting FreeBSD
web page at www.freebsd.org/where.html. From that page, you
can find where to purchase FreeBSD CDs or DVDs. For example,
you can purchase a four-CD set or single DVD from the FreeBSD Mall
(www.freebsdmall.com), with or without the FreeBSD handbook.
76034c02.qxd:Toolbox
3/29/08
10:41 AM
Page 14
Chapter 2: Installing FreeBSD and Adding Software
You can also learn where to download free ISO images for supported FreeBSD architectures from the Getting FreeBSD page. Supported architectures include: Intel i386,
Alpha/AXP, AMD 64-bit (Athalon64, Athlon64-FX or Opteron), ia64, PowerPC, and
Sparc64. For example, available downloads of several FreeBSD releases can be obtained
from: ftp.freebsd.org/pub/FreeBSD/ISO-IMAGES-i386
From the http://FreeBSD.org/docs.html page, you can access FreeBSD documentation that can help you if you hit any snags during installation. For example, select the
FAQ for installation tips, supported hardware, bootloaders, and other topics you need
to get started.
To simply erase everything on your computer’s hard disk to install FreeBSD, you don’t
have to prepare your hard disks in advance. If you want to keep any data from your
hard disk, back up that data before proceeding. To keep existing data on your hard disk
and add FreeBSD, you may need to resize existing disk partitions and repartition your
disk. Refer to Chapter 7 for information on disk resizing and partitioning commands.
NOTE If you are booting multiple operating systems from the same computer, the
order in which those systems are installed is important. If you want Windows on
the machine, install it first, because it will overwrite your boot manager and make
FreeBSD temporarily unbootable. Linux system installers usually ask whether
or not you want to install a boot loader, and may even let you configure that boot
loader to boot FreeBSD as well. If the boot manager is erased, access the FreeBSD
file system and run bootinst.exe boot.bin from the tools directory on
the CD to reinstall the FreeBSD boot manager.
Installing FreeBSD
The FreeBSD installation procedure described in this section uses the three-CD
FreeBSD installation set. The computer described has an x86 architecture and an
available Ethernet connection to the Internet (to add software that is not on the
CDs). This procedure was tested on FreeBSD 7 and 6.3.
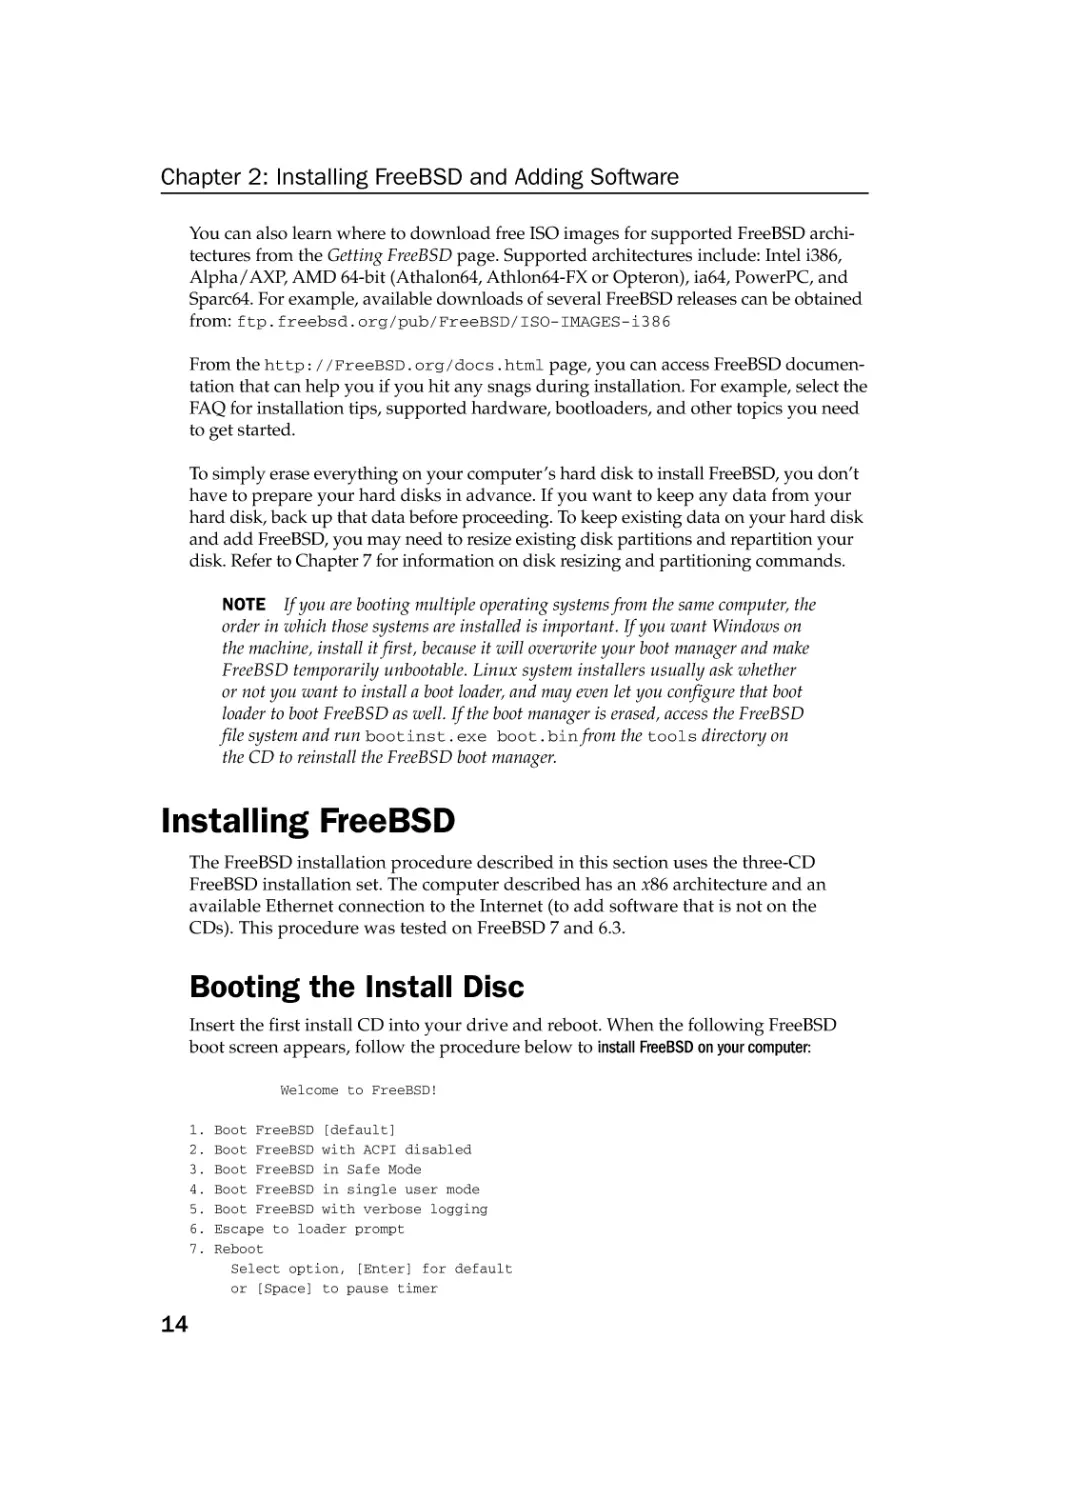
Booting the Install Disc
Insert the first install CD into your drive and reboot. When the following FreeBSD
boot screen appears, follow the procedure below to install FreeBSD on your computer:
Welcome to FreeBSD!
1.
2.
3.
4.
5.
6.
7.
14
Boot FreeBSD [default]
Boot FreeBSD with ACPI disabled
Boot FreeBSD in Safe Mode
Boot FreeBSD in single user mode
Boot FreeBSD with verbose logging
Escape to loader prompt
Reboot
Select option, [Enter] for default
or [Space] to pause timer
76034c02.qxd:Toolbox
3/29/08
10:41 AM
Page 15
Chapter 2: Installing FreeBSD and Adding Software
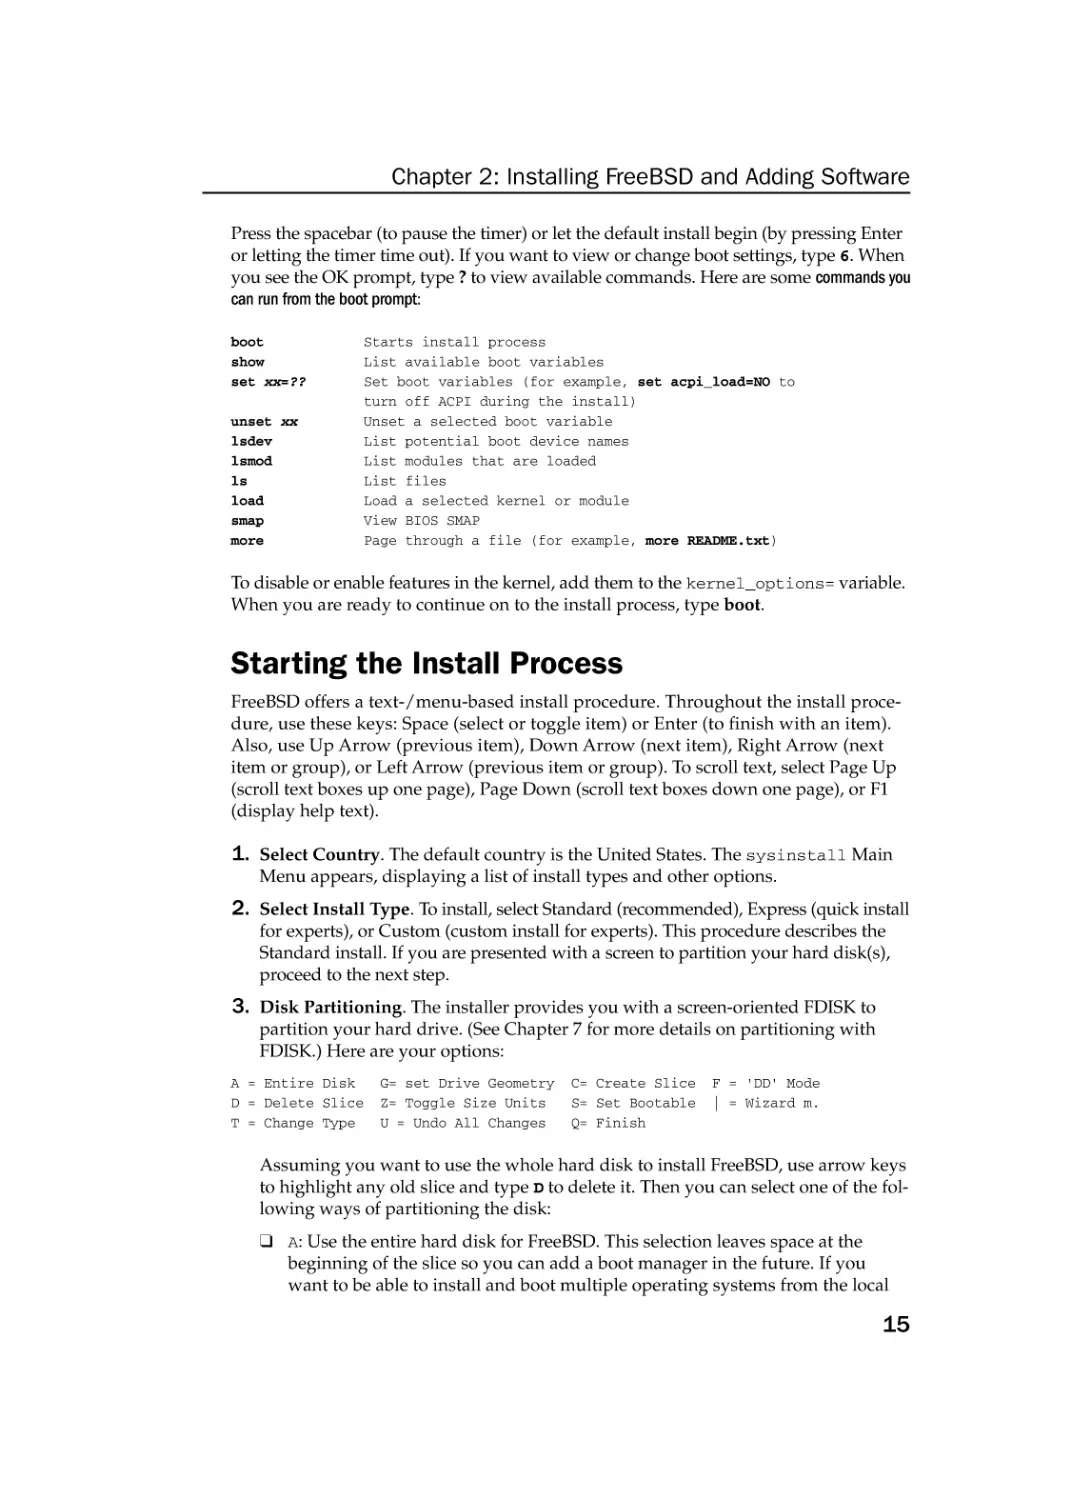
Press the spacebar (to pause the timer) or let the default install begin (by pressing Enter
or letting the timer time out). If you want to view or change boot settings, type 6. When
you see the OK prompt, type ? to view available commands. Here are some commands you
can run from the boot prompt:
boot
show
set xx=??
unset xx
lsdev
lsmod
ls
load
smap
more
Starts install process
List available boot variables
Set boot variables (for example, set acpi_load=NO to
turn off ACPI during the install)
Unset a selected boot variable
List potential boot device names
List modules that are loaded
List files
Load a selected kernel or module
View BIOS SMAP
Page through a file (for example, more README.txt)
To disable or enable features in the kernel, add them to the kernel_options= variable.
When you are ready to continue on to the install process, type boot.
Starting the Install Process
FreeBSD offers a text-/menu-based install procedure. Throughout the install procedure, use these keys: Space (select or toggle item) or Enter (to finish with an item).
Also, use Up Arrow (previous item), Down Arrow (next item), Right Arrow (next
item or group), or Left Arrow (previous item or group). To scroll text, select Page Up
(scroll text boxes up one page), Page Down (scroll text boxes down one page), or F1
(display help text).
1. Select Country. The default country is the United States. The sysinstall Main
Menu appears, displaying a list of install types and other options.
2. Select Install Type. To install, select Standard (recommended), Express (quick install
for experts), or Custom (custom install for experts). This procedure describes the
Standard install. If you are presented with a screen to partition your hard disk(s),
proceed to the next step.
3. Disk Partitioning. The installer provides you with a screen-oriented FDISK to
partition your hard drive. (See Chapter 7 for more details on partitioning with
FDISK.) Here are your options:
A = Entire Disk
D = Delete Slice
T = Change Type
G= set Drive Geometry
Z= Toggle Size Units
U = Undo All Changes
C= Create Slice
S= Set Bootable
Q= Finish
F = ‘DD’ Mode
| = Wizard m.
Assuming you want to use the whole hard disk to install FreeBSD, use arrow keys
to highlight any old slice and type D to delete it. Then you can select one of the following ways of partitioning the disk:
❑ A: Use the entire hard disk for FreeBSD. This selection leaves space at the
beginning of the slice so you can add a boot manager in the future. If you
want to be able to install and boot multiple operating systems from the local
15
76034c02.qxd:Toolbox
3/29/08
10:41 AM
Page 16
Chapter 2: Installing FreeBSD and Adding Software
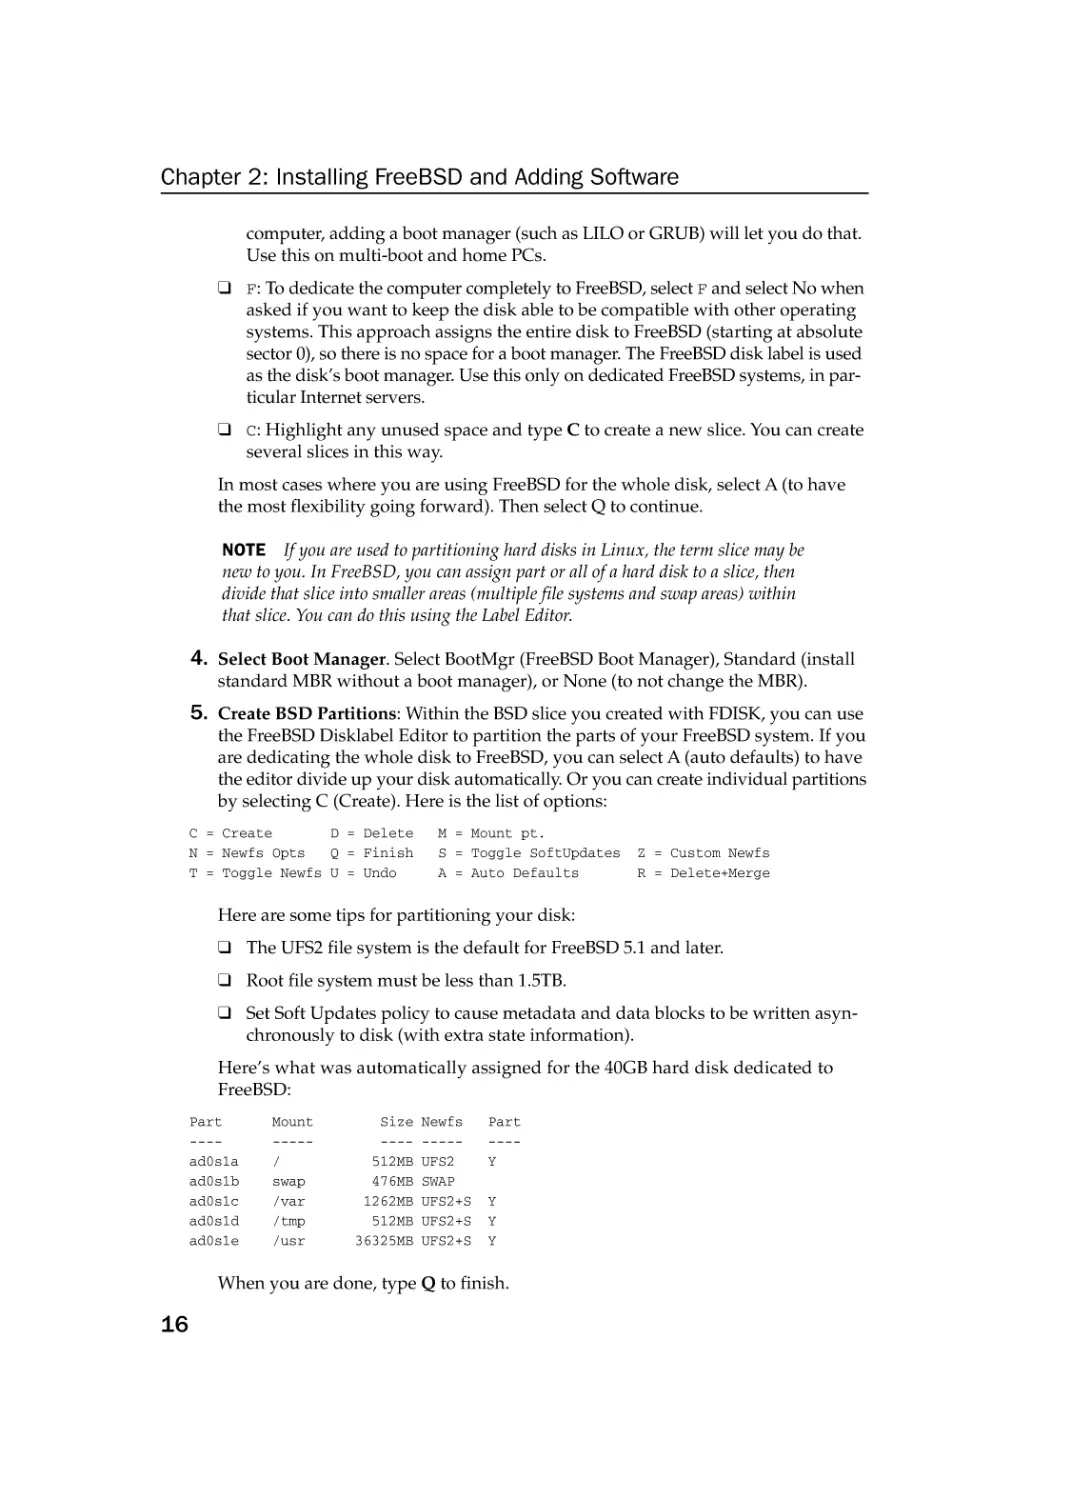
computer, adding a boot manager (such as LILO or GRUB) will let you do that.
Use this on multi-boot and home PCs.
❑ F: To dedicate the computer completely to FreeBSD, select F and select No when
asked if you want to keep the disk able to be compatible with other operating
systems. This approach assigns the entire disk to FreeBSD (starting at absolute
sector 0), so there is no space for a boot manager. The FreeBSD disk label is used
as the disk’s boot manager. Use this only on dedicated FreeBSD systems, in particular Internet servers.
❑ C: Highlight any unused space and type C to create a new slice. You can create
several slices in this way.
In most cases where you are using FreeBSD for the whole disk, select A (to have
the most flexibility going forward). Then select Q to continue.
NOTE If you are used to partitioning hard disks in Linux, the term slice may be
new to you. In FreeBSD, you can assign part or all of a hard disk to a slice, then
divide that slice into smaller areas (multiple file systems and swap areas) within
that slice. You can do this using the Label Editor.
4. Select Boot Manager. Select BootMgr (FreeBSD Boot Manager), Standard (install
standard MBR without a boot manager), or None (to not change the MBR).
5. Create BSD Partitions: Within the BSD slice you created with FDISK, you can use
the FreeBSD Disklabel Editor to partition the parts of your FreeBSD system. If you
are dedicating the whole disk to FreeBSD, you can select A (auto defaults) to have
the editor divide up your disk automatically. Or you can create individual partitions
by selecting C (Create). Here is the list of options:
C = Create
D = Delete
N = Newfs Opts
Q = Finish
T = Toggle Newfs U = Undo
M = Mount pt.
S = Toggle SoftUpdates
A = Auto Defaults
Z = Custom Newfs
R = Delete+Merge
Here are some tips for partitioning your disk:
❑ The UFS2 file system is the default for FreeBSD 5.1 and later.
❑ Root file system must be less than 1.5TB.
❑ Set Soft Updates policy to cause metadata and data blocks to be written asynchronously to disk (with extra state information).
Here’s what was automatically assigned for the 40GB hard disk dedicated to
FreeBSD:
Part
---ad0s1a
ad0s1b
ad0s1c
ad0s1d
ad0s1e
Mount
----/
swap
/var
/tmp
/usr
Size
---512MB
476MB
1262MB
512MB
36325MB
Newfs
----UFS2
SWAP
UFS2+S
UFS2+S
UFS2+S
Part
---Y
Y
Y
Y
When you are done, type Q to finish.
16
76034c02.qxd:Toolbox
3/29/08
10:41 AM
Page 17
Chapter 2: Installing FreeBSD and Adding Software
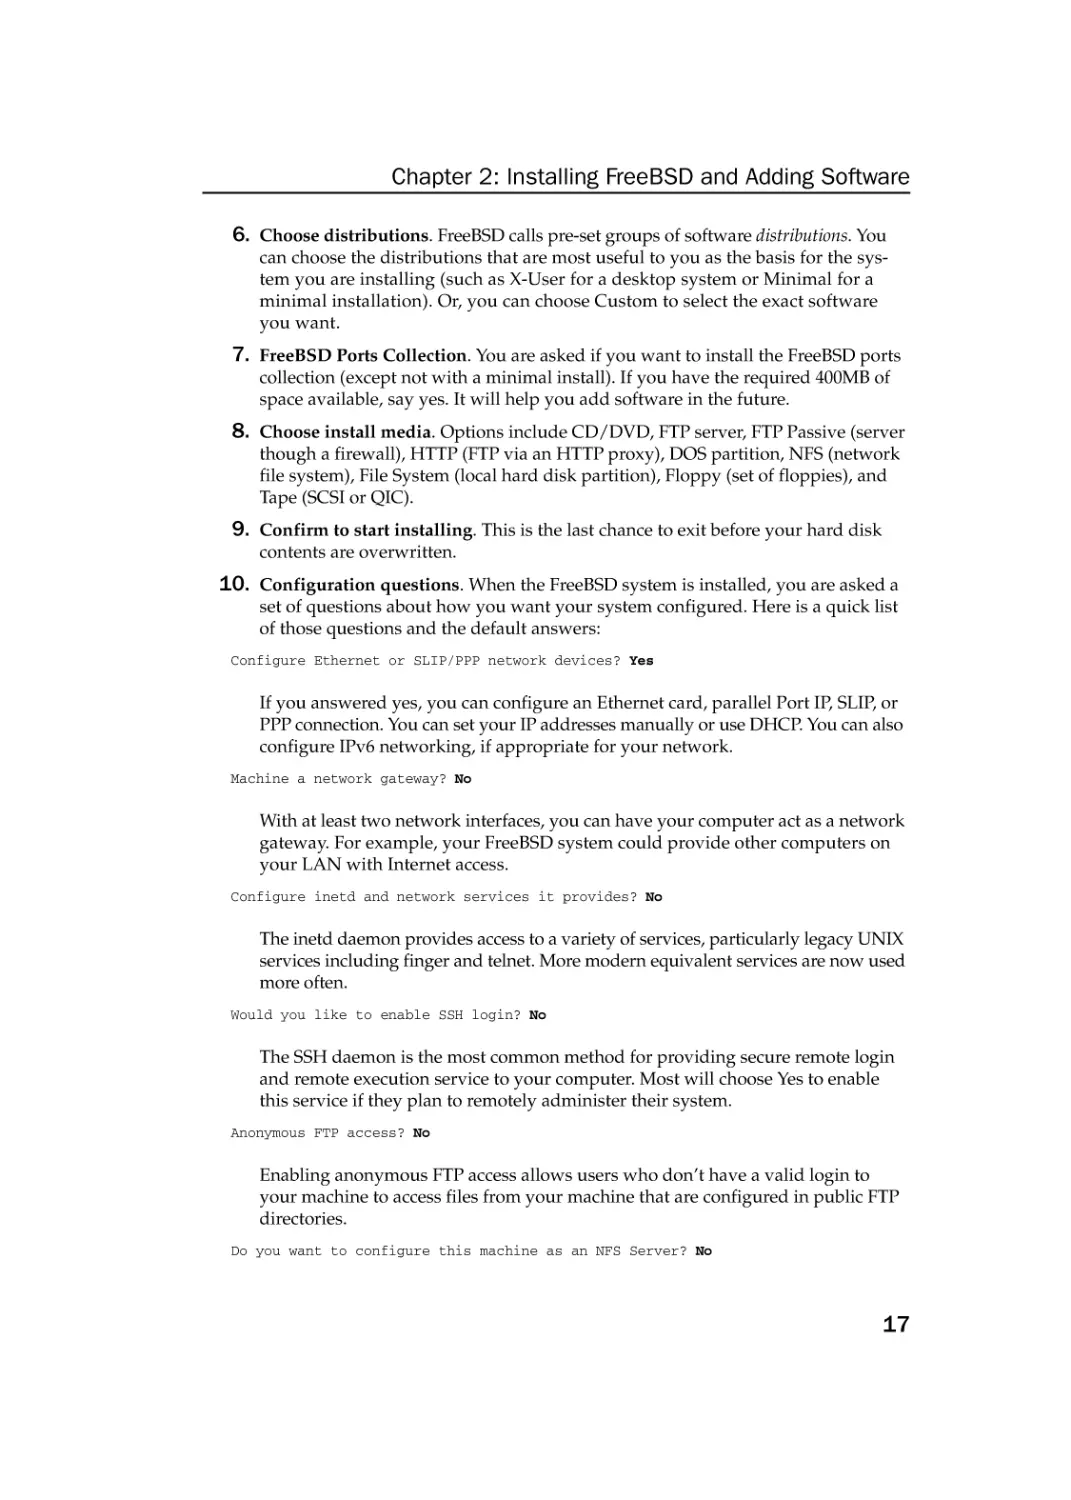
6. Choose distributions. FreeBSD calls pre-set groups of software distributions. You
can choose the distributions that are most useful to you as the basis for the system you are installing (such as X-User for a desktop system or Minimal for a
minimal installation). Or, you can choose Custom to select the exact software
you want.
7. FreeBSD Ports Collection. You are asked if you want to install the FreeBSD ports
collection (except not with a minimal install). If you have the required 400MB of
space available, say yes. It will help you add software in the future.
8. Choose install media. Options include CD/DVD, FTP server, FTP Passive (server
though a firewall), HTTP (FTP via an HTTP proxy), DOS partition, NFS (network
file system), File System (local hard disk partition), Floppy (set of floppies), and
Tape (SCSI or QIC).
9. Confirm to start installing. This is the last chance to exit before your hard disk
contents are overwritten.
10. Configuration questions. When the FreeBSD system is installed, you are asked a
set of questions about how you want your system configured. Here is a quick list
of those questions and the default answers:
Configure Ethernet or SLIP/PPP network devices? Yes
If you answered yes, you can configure an Ethernet card, parallel Port IP, SLIP, or
PPP connection. You can set your IP addresses manually or use DHCP. You can also
configure IPv6 networking, if appropriate for your network.
Machine a network gateway? No
With at least two network interfaces, you can have your computer act as a network
gateway. For example, your FreeBSD system could provide other computers on
your LAN with Internet access.
Configure inetd and network services it provides? No
The inetd daemon provides access to a variety of services, particularly legacy UNIX
services including finger and telnet. More modern equivalent services are now used
more often.
Would you like to enable SSH login? No
The SSH daemon is the most common method for providing secure remote login
and remote execution service to your computer. Most will choose Yes to enable
this service if they plan to remotely administer their system.
Anonymous FTP access? No
Enabling anonymous FTP access allows users who don’t have a valid login to
your machine to access files from your machine that are configured in public FTP
directories.
Do you want to configure this machine as an NFS Server? No
17
76034c02.qxd:Toolbox
3/29/08
10:41 AM
Page 18
Chapter 2: Installing FreeBSD and Adding Software
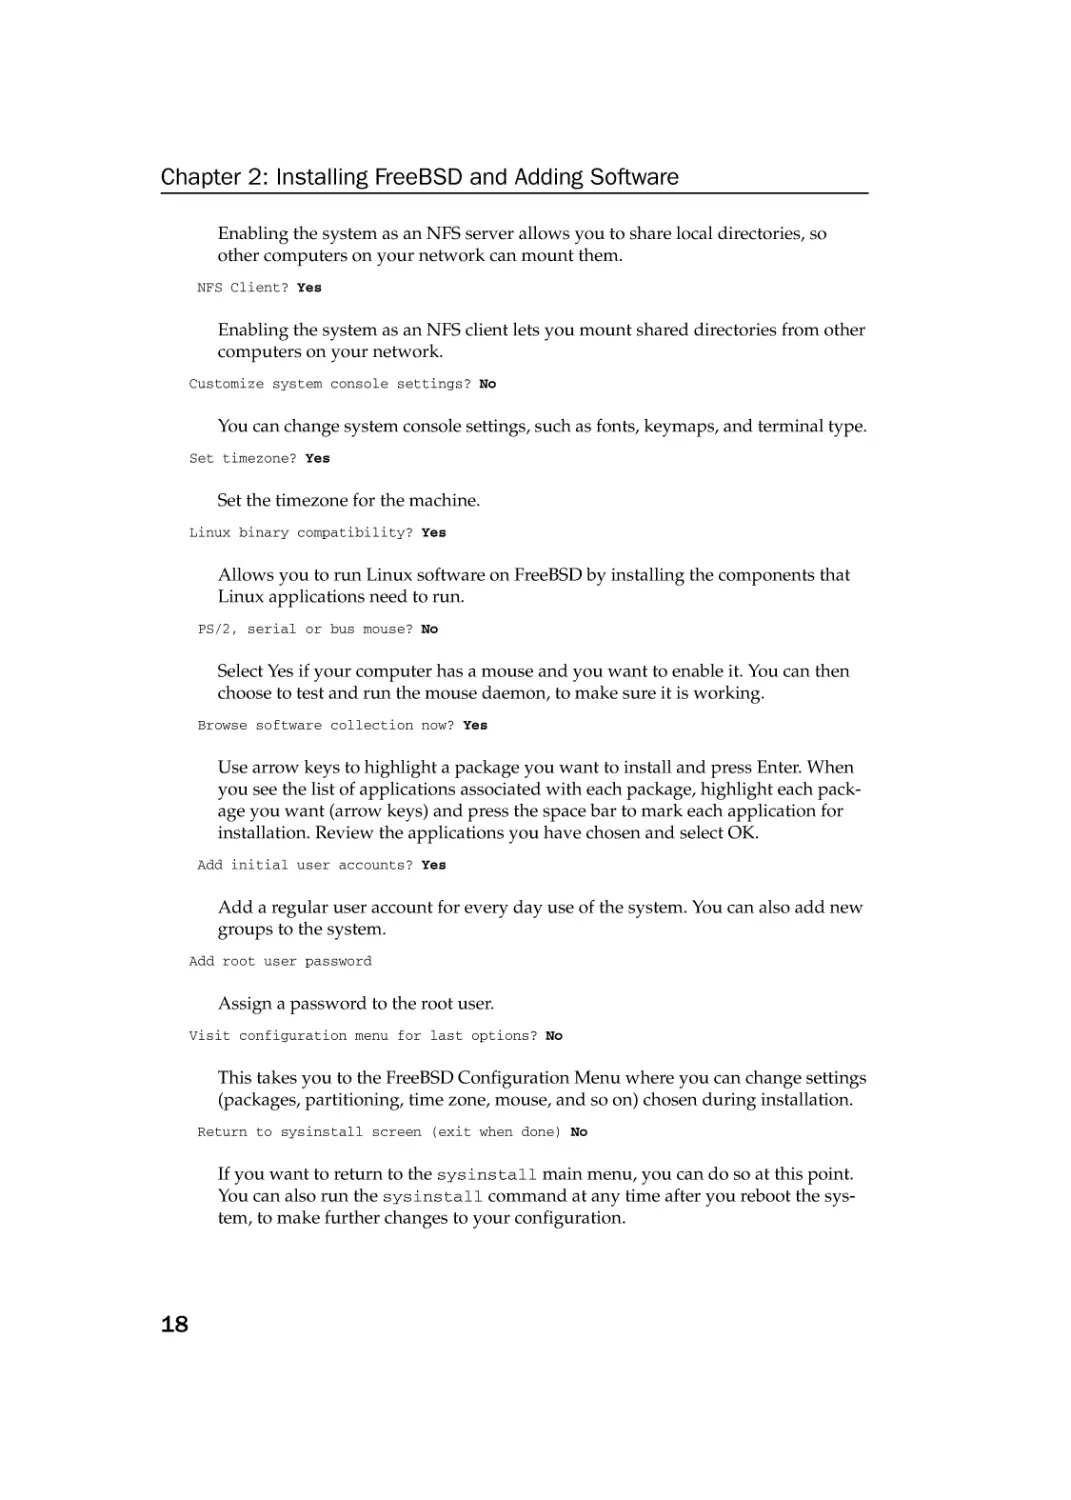
Enabling the system as an NFS server allows you to share local directories, so
other computers on your network can mount them.
NFS Client? Yes
Enabling the system as an NFS client lets you mount shared directories from other
computers on your network.
Customize system console settings? No
You can change system console settings, such as fonts, keymaps, and terminal type.
Set timezone? Yes
Set the timezone for the machine.
Linux binary compatibility? Yes
Allows you to run Linux software on FreeBSD by installing the components that
Linux applications need to run.
PS/2, serial or bus mouse? No
Select Yes if your computer has a mouse and you want to enable it. You can then
choose to test and run the mouse daemon, to make sure it is working.
Browse software collection now? Yes
Use arrow keys to highlight a package you want to install and press Enter. When
you see the list of applications associated with each package, highlight each package you want (arrow keys) and press the space bar to mark each application for
installation. Review the applications you have chosen and select OK.
Add initial user accounts? Yes
Add a regular user account for every day use of the system. You can also add new
groups to the system.
Add root user password
Assign a password to the root user.
Visit configuration menu for last options? No
This takes you to the FreeBSD Configuration Menu where you can change settings
(packages, partitioning, time zone, mouse, and so on) chosen during installation.
Return to sysinstall screen (exit when done) No
If you want to return to the sysinstall main menu, you can do so at this point.
You can also run the sysinstall command at any time after you reboot the system, to make further changes to your configuration.
18
76034c02.qxd:Toolbox
3/29/08
10:41 AM
Page 19
Chapter 2: Installing FreeBSD and Adding Software
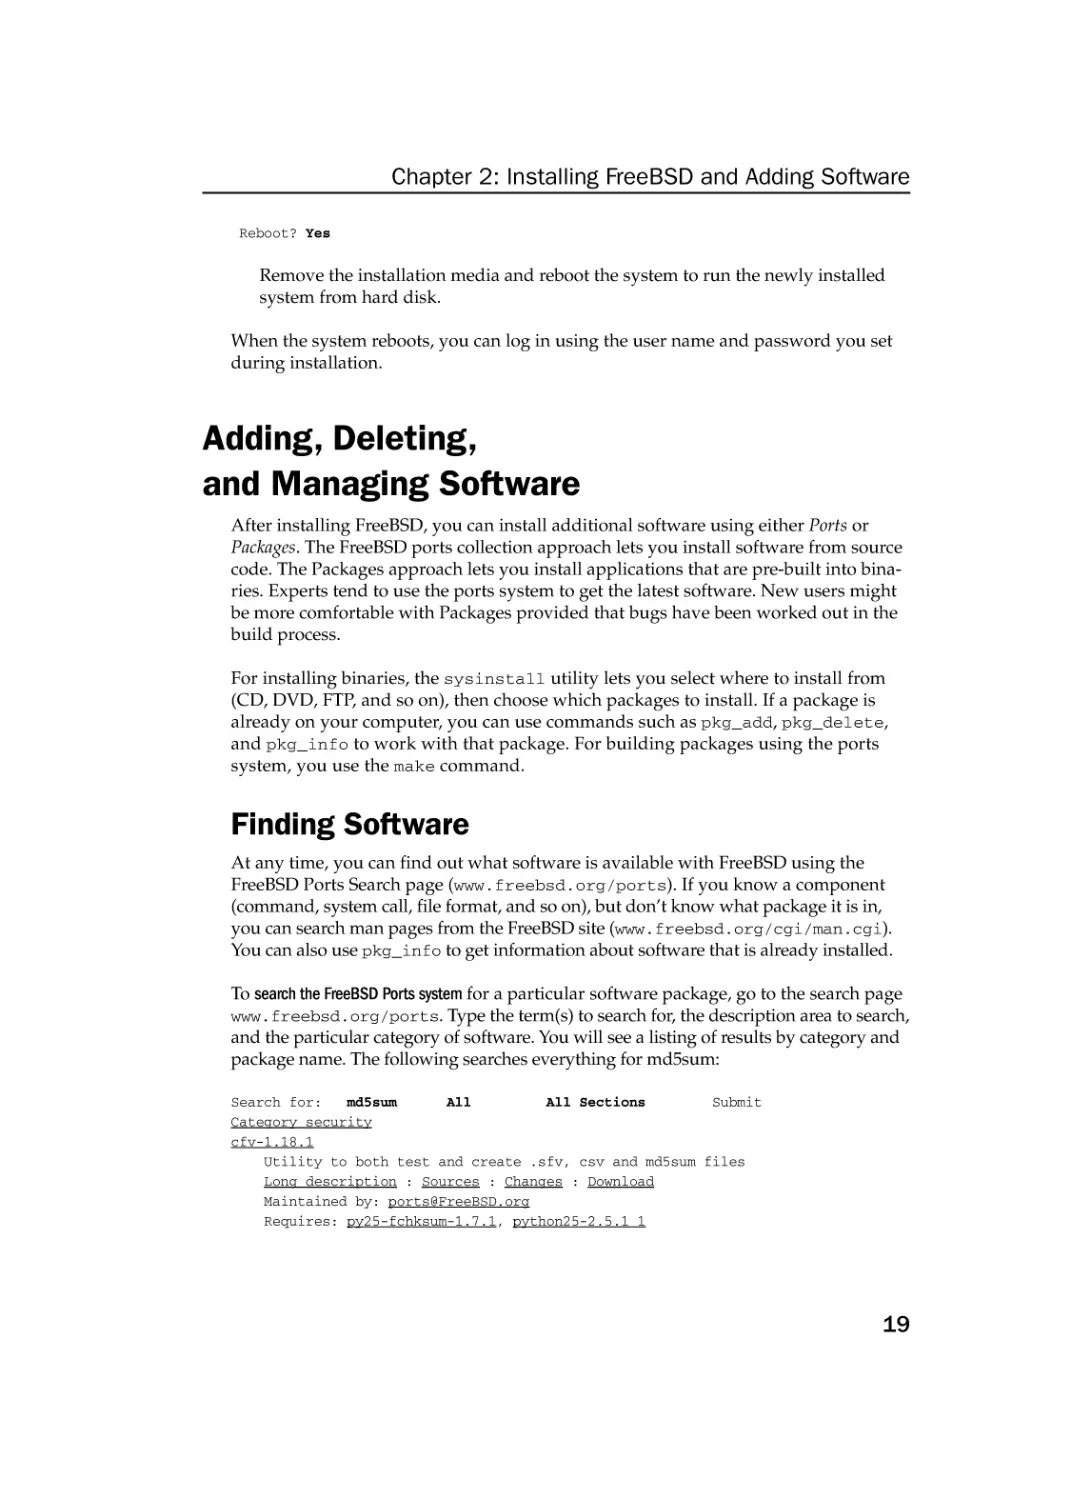
Reboot? Yes
Remove the installation media and reboot the system to run the newly installed
system from hard disk.
When the system reboots, you can log in using the user name and password you set
during installation.
Adding, Deleting,
and Managing Software
After installing FreeBSD, you can install additional software using either Ports or
Packages. The FreeBSD ports collection approach lets you install software from source
code. The Packages approach lets you install applications that are pre-built into binaries. Experts tend to use the ports system to get the latest software. New users might
be more comfortable with Packages provided that bugs have been worked out in the
build process.
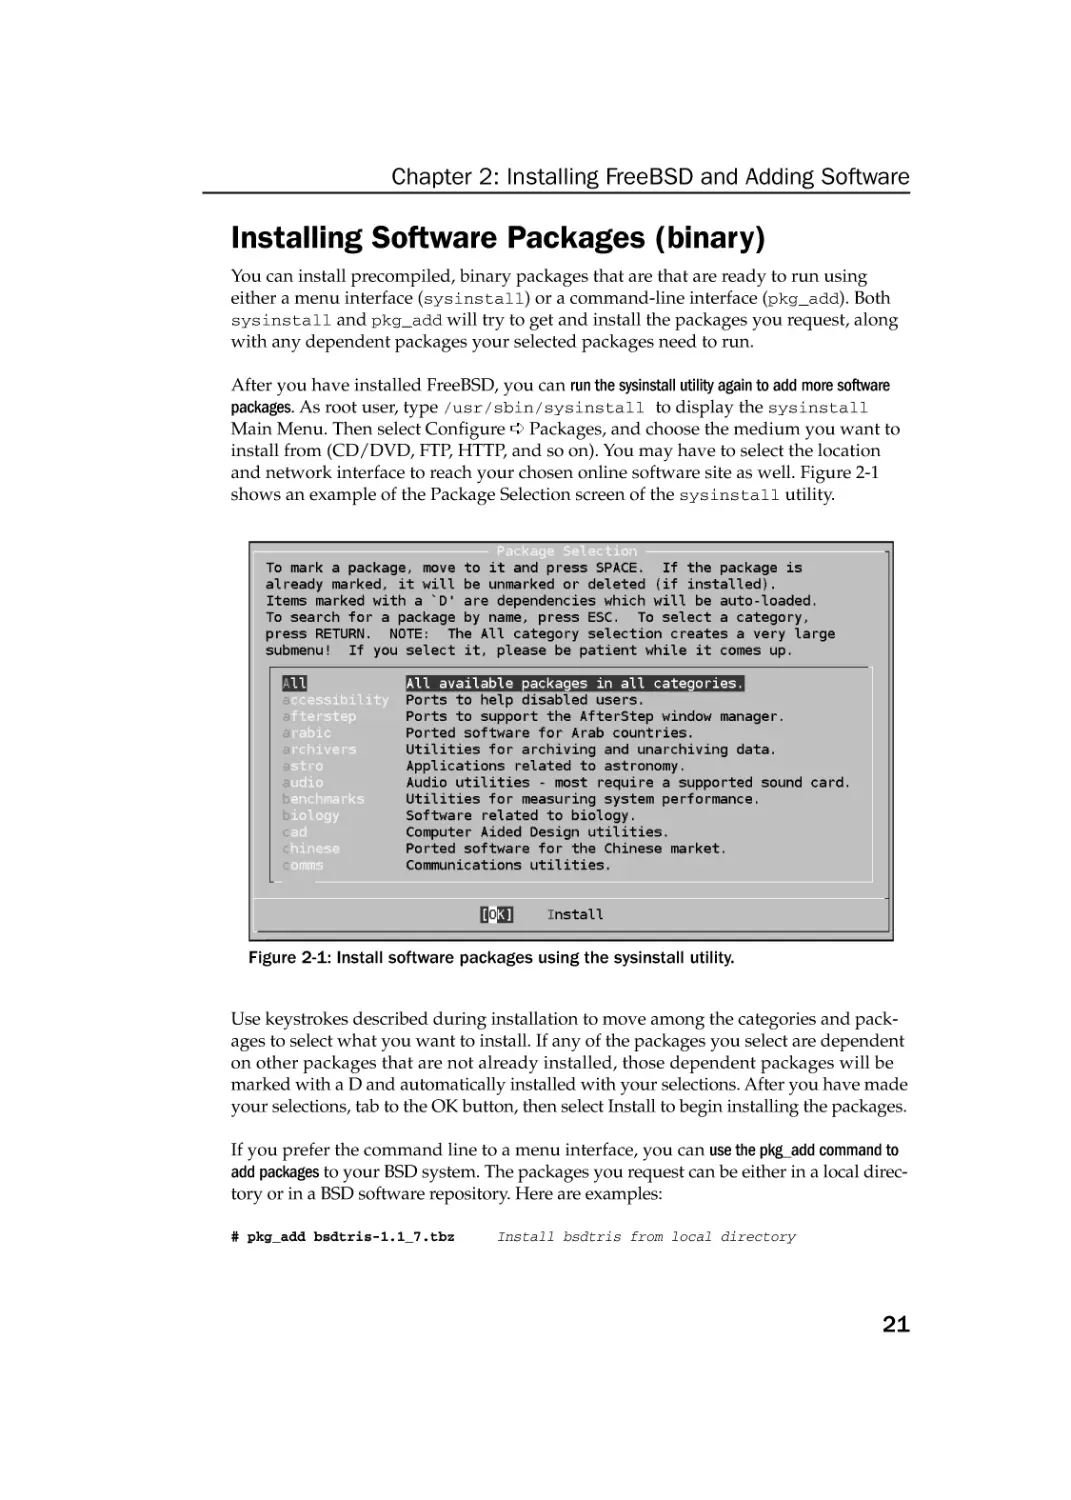
For installing binaries, the sysinstall utility lets you select where to install from
(CD, DVD, FTP, and so on), then choose which packages to install. If a package is
already on your computer, you can use commands such as pkg_add, pkg_delete,
and pkg_info to work with that package. For building packages using the ports
system, you use the make command.
Finding Software
At any time, you can find out what software is available with FreeBSD using the
FreeBSD Ports Search page (www.freebsd.org/ports). If you know a component
(command, system call, file format, and so on), but don’t know what package it is in,
you can search man pages from the FreeBSD site (www.freebsd.org/cgi/man.cgi).
You can also use pkg_info to get information about software that is already installed.
To search the FreeBSD Ports system for a particular software package, go to the search page
www.freebsd.org/ports. Type the term(s) to search for, the description area to search,
and the particular category of software. You will see a listing of results by category and
package name. The following searches everything for md5sum:
Search for:
md5sum
All
All Sections
Submit
Category security
cfv-1.18.1
Utility to both test and create .sfv, csv and md5sum files
Long description : Sources : Changes : Download
Maintained by: ports@FreeBSD.org
Requires: py25-fchksum-1.7.1, python25-2.5.1_1
19
76034c02.qxd:Toolbox
3/29/08
10:41 AM
Page 20
Chapter 2: Installing FreeBSD and Adding Software
To read about available commands, file formats and other things before you install them,
use the FreeBSD Hypertext Man Pages page (www.freebsd.org/cgi/man.cgi).
Search by man page name or keyword. This example searches for the pkg_info
man page:
Man Page or Keyword Search:
pkg_info
| Submit |
| Reset |
? Man
| All Sections |
| FreeBSD Ports |
o Apropos Keyword Search (all sections) | html | Output format
home | help
PKG_INFO(1)
FreeBSD General Commands Manual
PKG_INFO(1)
NAME
pkg_info -- a utility for displaying information on software packages
You can check whether a package is already installed and list information about installed packages
using the pkg_info command. (Depending on your shell, you may need to wrap
wildcard characters in quotes, as in: pkginfo "cdrtools*".) Here are examples:
#
#
#
#
#
#
#
#
#
pkg_info
pkg_info
pkg_info
pkg_info
pkg_info
pkg_info
pkg_info
pkg_info
pkg_info
| less
-I gnome* | less
cdrtools* | less
-d cdrtools* | less
-c cdrtools* | less
-f cdrtools* | less
-L cdrtools* | less
-i gnome-games* | less
-k kdebase* | less
Show
Show
Show
Show
Show
Show
Show
Show
Show
name/index line for all packages
name/index line for matching packages
info for installed package cdrtools
long description of package
comment line of package
list of files in package
list of full paths to files in package
install script for package (if any)
de-install script for package (if any)
You can find out about package dependencies using the pkg_info command. Here are
examples:
# pkg_info -R cdrtools* | less
# pkg_info -r cdrtools* | less
Show packages required by installed package
Show packages requested package depends on
Before you install the packages that interest you, there are other ways to get information about packages and categories as well. If you installed the ports database, you
could simply search the /usr/ports directory, since packages are organized by directories
named after each category and package name. For example:
# find /usr/ports -type d | grep quake | less
Show ports with quake in the name
If you want to search your entire system for any sign of a particular package, command or file, you
can use the locate command to search the entire file system. That is, provided that
you configured the locate database to include the entire contents of your file system.
Chapter 4 contains information on how to create a locate database.
Perhaps the most obvious way to browse through available groups and packages is to
view the packages in the sysinstall utility, as described in the next section.
20
76034c02.qxd:Toolbox
3/29/08
10:41 AM
Page 21
Chapter 2: Installing FreeBSD and Adding Software
Installing Software Packages (binary)
You can install precompiled, binary packages that are that are ready to run using
either a menu interface (sysinstall) or a command-line interface (pkg_add). Both
sysinstall and pkg_add will try to get and install the packages you request, along
with any dependent packages your selected packages need to run.
After you have installed FreeBSD, you can run the sysinstall utility again to add more software
packages. As root user, type /usr/sbin/sysinstall to display the sysinstall
Main Menu. Then select Configure ➪ Packages, and choose the medium you want to
install from (CD/DVD, FTP, HTTP, and so on). You may have to select the location
and network interface to reach your chosen online software site as well. Figure 2-1
shows an example of the Package Selection screen of the sysinstall utility.
Figure 2-1: Install software packages using the sysinstall utility.
Use keystrokes described during installation to move among the categories and packages to select what you want to install. If any of the packages you select are dependent
on other packages that are not already installed, those dependent packages will be
marked with a D and automatically installed with your selections. After you have made
your selections, tab to the OK button, then select Install to begin installing the packages.
If you prefer the command line to a menu interface, you can use the pkg_add command to
add packages to your BSD system. The packages you request can be either in a local directory or in a BSD software repository. Here are examples:
# pkg_add bsdtris-1.1_7.tbz
Install bsdtris from local directory
21
76034c02.qxd:Toolbox
3/29/08
10:41 AM
Page 22
Chapter 2: Installing FreeBSD and Adding Software
# pkg_add -r freebsd-games
Download/install freebsd-games from network
# pkg_add -r -K xmines
Download/install xmines, save pkg to local dir
# pkg_add -v lsof-4.79D.tbz
Install lsof in verbose mode
Requested space: 455200 bytes, free space: 1155635200 bytes
in /var/tmp/instmp.09jSIz
extract: Package name is lsof-4.79D
extract: CWD to /usr/local
extract /usr/local/sbin/lsof
...
To verify the contents of a package before installing it, you can use the -M (Master) option
to pkg_add. With -M, instead of installing a package, the contents of the package are
copied to a subdirectory of /var/tmp, where you can inspect them before installing.
For example, with memdump-1.01.tbz in the local directory, type this:
# pkg_add -M memdump-1.01.tbz
Put package contents in /var/tmp to check
With the package extracted to the /var/tmp directory, you can now examine the contents of the package. Look for directories with names such as instmp.??????, where
each ? is replaced by a letter or number. The -M option can be used in conjunction with
the -S (Slave) mode.
Removing Software Packages (binary)
To remove previously installed software packages, you can use the pkg_delete command. Here are some examples of pkg_delete for deleting a package:
# pkg_delete -n dbus-0.93_3
Check what would happen before deleting package
pkg_delete: package ‘dbus-0.93_3’ is required by these other packages
and may not be deinstalled:
dbus-glib-0.71
avahi-0.6.14
policykit-0.1.20060514_2
hal-0.5.8.20060917_2
...
pkg_delete: 1 package deletion(s) failed
The -n option to pkg_delete shows you what would happen when you run the
pkg_delete live, without actually running it. Running pkg_delete -n before actually deleting the package is a good idea. This will tell you dependencies on the package, if there are any, but not actually delete the package. If there are no dependencies,
it will show you the exact files that would be deleted, so you can see if there’s anything you would miss.
22
76034c02.qxd:Toolbox
3/29/08
10:41 AM
Page 23
Chapter 2: Installing FreeBSD and Adding Software
Here are some other useful options for deleting packages with pkg_delete:
# pkg_delete xmines*
Delete package, using wildcard
# pkg_delete -i akode*
Delete set of packages, confirming each
delete akode-2.0.1,1? y
...
# pkg_delete -v xmines*
Delete with verbose output
pkg_delete: no such package 'xmines*' installed
pkg_delete: 1 package deletion(s) failed
Think hard before you use any of the following options with pkg_delete. The first
example below forces the named package to be deleted, even if other packages are dependent on it. In the second example, all installed packages are deleted, which I presume
brings the system down to just the base system (I’m not going to try this myself, but
mention it because the option is there):
# pkg_delete -f metacity* Forcibly remove package (no dependency checks)
# pkg_delete -a
Danger, Danger! This will remove all installed packages
Another option that’s a bit dangerous, but potentially useful is the -r option. Use this
option if you want to remove a package, plus all packages that depend on it. Before you use this
option, it is probably a good idea to do some non-destructive trials. For example:
# pkg_delete -n -r gstreamer* | less Non-destructive results of recursive delete
# pkg_delete -r gstreamer*
Danger! Recursively delete package and dependencies
Installing Software Using Ports (source code)
The BSD ports collection contains sets of make files, patches, and descriptive information needed to get, compile and install thousands of applications that have been ported
to FreeBSD. When you install the ports collection, it is stored in the /usr/ports directory. From there, you can run a few simple commands to build selected applications
from source code and install them on your system.
In general, installing packages from the ports collection is generally preferred by more
expert users. That’s because building from source code offers opportunities for checking
the code, modifying it to work efficiently for your uses, and incorporating the latest
patches.
When you first installed FreeBSD, you were given the opportunity to install the ports
collection. If you chose not to do that at the time, you can install the ports collection
later, as described in the following section.
23
76034c02.qxd:Toolbox
3/29/08
10:41 AM
Page 24
Chapter 2: Installing FreeBSD and Adding Software
Getting the Ports Collection
There are several ways to get the ports collection for your FreeBSD system after the
system is installed. Choices include sysinstall, portsnap, or cvsup. Of the three,
the sysinstall method is probably the most intuitive, but each is pretty easy to use.
This first procedure either installs or updates your ports collection using portsnap:
1. Create the ports directory (if it doesn’t already exist):
# mkdir /usr/ports
2. If it is not already installed, install portsnap:
# pkg_add -r portsnap
3. Download ports collection to /var/db/portsnap:
# portsnap fetch
4. Do one of the following to either install a new /usr/ports or update an existing
/usr/ports collection, respectively:
# portsnap extract
Install a new ports collection
or
# portsnap update
Update an existing ports collection
To use sysinstall to install the ports collection, run the sysinstall command as root user.
Then select Configure ➪ Distributions ➪ ports. With ports selected, select OK. When
prompted, select the location of the ports collection (CD, DVD, FTP site, etc.) and the
ports collection will be extracted to the /usr/ports directory structure.
To use cvsup to install the ports collection, do the following:
1. Create the ports directory:
# mkdir /usr/ports
2. Install cvsup:
# pkg_add -r cvsup-without-gui
3. Run the cvsup command, replacing cvsup.FreeBSD.org with a FreeBSD mirror
site nearer to your location and optionally copying and modifying the ports-supfile:
# cvsup -L 2 -h cvsup.FreeBSD.org /usr/share/examples/cvsup/ports-supfile
Regardless of which of the three procedures you used to get your FreeBSD ports collection, the next section provides instructions for using the ports collection to install
applications on your FreeBSD system.
24
76034c02.qxd:Toolbox
3/29/08
10:41 AM
Page 25
Chapter 2: Installing FreeBSD and Adding Software
Getting and Installing Applications
with Ports
Applications in the ports collection are available via port skeletons. A port skeleton is
represented by a directory in the /usr/ports directory structure that contains components needed to get the source code, compile it, and install the components.
Basically, the skeleton contains all the information needed to build an application from
source code, without containing the source code itself. The source code itself is contained in a tarball referred to as a distfile. During the build process you get the distfile
from a FreeBSD mirror site on the Internet or from a local disk.
Here’s how to see the port skeleton for the ftpcopy application:
# cd /usr/ports/ftp/ftpcopy
Change to the ftpcopy directory in ports
# ls -CF
Lists the contents of the ftpcopy directory
Makefile
distinfo
files/
pkg-descr
pkg-plist
The Makefile file is used by the make command to describe how the application
is to be compiled. The distinfo file contains the md5 and sha256 checksums needed
to check the download files used to build the port. The files directory contains any
patch files to the application, such as those needed to get the application to run in
FreeBSD or to fix a security problem.
The pkg-descr file contains a description of the package and usually a web site for
the project that created the software. The pkg-plist file identifies the files installed
from the application and the locations in the local file system where to install them.
Besides the executable commands (for example, ftpcp, ftpcopy, and ftpls), the file might
also contain libraries, images, or documentation (such as ChangeLog, README or other
documents).
Doing a Quick Build
For the most basic type of application installation with ports, all you need to do is run
a few make commands. Continuing with the example of the ftpcopy application, here’s
how you can install an application using a ports collection:
# cd /usr/ports/ftp/ftpcopy
Change to the ftpcopy directory in ports
# make build
Download and build ftpcopy application
=> ftpcopy-0.6.7.tar.gz doesn’t seem to exist in /usr/ports/distfiles/.
=> Attempting to fetch from http://www.ohse.de/uwe/ftpcopy/.
===> Extracting for ftpcopy-0.6.7
=> MD5 Checksum OK for ftpcopy-0.6.7.tar.gz.
=> SHA256 Checksum OK for ftpcopy-0.6.7.tar.gz.
===>
ftpcopy-0.6.7 depends on file: /usr/local/bin/perl5.8.8 - found
===> Patching for ftpcopy-0.6.7
===>
ftpcopy-0.6.7 depends on file: /usr/local/bin/perl5.8.8 - found
25
76034c02.qxd:Toolbox
3/29/08
10:41 AM
Page 26
Chapter 2: Installing FreeBSD and Adding Software
===> Applying FreeBSD patches for ftpcopy-0.6.7
===>
ftpcopy-0.6.7 depends on file: /usr/local/bin/perl5.8.8 - found
===> Configuring for ftpcopy-0.6.7
===> Building for ftpcopy-0.6.7
...
# make install
Install ftpcopy binaries and documents
===> Installing for ftpcopy-0.6.7
===>
Generating temporary packing list
===> Checking if ftp/ftpcopy already installed
cd /usr/ports/ftp/ftpcopy/work/web/ftpcopy-0.6.7/compile && install -s -o root
-g wheel -m 555 ftpcopy ftpls /usr/local/bin && install -o root -g wheel -m
444 ftpcopy.1 ftpcp.1 ftpls.1 /usr/local/man/man1 && install -o root -g wheel
-m 555 ftpcp /usr/local/bin
/bin/mkdir -p /usr/local/share/doc/ftpcopy && cd
/usr/ports/ftp/ftpcopy/work/web/ftpcopy-0.6.7/compile && install -o root -g
wheel -m 444 ChangeLog NEWS README THANKS ftpcopy.html ftpls.html
/usr/local/share/doc/ftpcopy
===>
Compressing manual pages for ftpcopy-0.6.7
===>
Registering installation for ftpcopy-0.6.7
# make clean
Clean up files left behind from build
===> Cleaning for perl-5.8.8
===> Cleaning for ftpcopy-0.6.7
# pkg_info ftpcopy*
Check that ftpcopy package was installed
ftpcopy-0.6.7
Command line ftp tools for listing and mirroring
# pkg_info -L ftpcopy*
List files from ftpcopy package
Information for ftpcopy-0.6.7:
Files:
/usr/local/man/man1/ftpcopy.1.gz
/usr/local/man/man1/ftpcp.1.gz
/usr/local/man/man1/ftpls.1.gz
/usr/local/bin/ftpcp
/usr/local/bin/ftpcopy
/usr/local/bin/ftpls
/usr/local/share/doc/ftpcopy/ChangeLog
/usr/local/share/doc/ftpcopy/NEWS
...
After changing to the directory representing the application you want to install, you
run three make commands. The make build command downloads the software package (source code distfile), runs checksums to check its validity, applies patches, fulfills
dependencies, and builds the binaries (commands).
The make install command puts the application’s files where they need to go in
the file system, compresses man pages, and registers the package as installed. The
make clean command cleans up temporary files left behind.
After a package is installed, you can use the pkg_info command to verify that the package is installed. Then run pkg_info again with -L to list the contents of the package.
26
76034c02.qxd:Toolbox
3/29/08
10:41 AM
Page 27
Chapter 2: Installing FreeBSD and Adding Software
Using Other make Options
There are other options you can run with the make commands that let you do portions
of what was done in the previous procedure separately. Remember that all these commands should be run from the directory associated with the port. To run checksums on the
application’s distfile, type the following:
# make checksum
Run checksums on the application’s distfile
=> MD5 Checksum OK for ftpcopy-0.6.7.tar.gz.
=> SHA256 Checksum OK for ftpcopy-0.6.7.tar.gz.
To do the build up to the configure portion, run the following:
# make configure
To the make up to the configuration
To remove the package, type the following:
# make deinstall
Remove the package
If you have made changes to the source code, documents or other components of the
package, you might want to repackage those changes into a new distfile. The following
result is that the package is installed and a new distfile tarball is created:
# make package
Create a new distfile tarball of application
===> Installing for ftpcopy-0.6.7
...
Creating package /usr/ports/ftp/ftpcopy/ftpcopy-0.6.7.tbz
Registering depends:.
Creating bzip’d tar ball in ‘/usr/ports/ftp/ftpcopy/ftpcopy-0.6.7.tbz’
To just download the application’s distfile to the /usr/ports/distfiles directory, type the
following:
# make fetch
Download the distfile but don’t install it
=> ftpcopy-0.6.7.tar.gz doesn’t seem to exist in /usr/ports/distfiles/.
=> Attempting to fetch from http://www.ohse.de/uwe/ftpcopy/.
ftpcopy-0.6.7.tar.gz
100% of
131 kB 44kBps
To download the selected distfile, plus any dependent distfiles, as follows:
# make fetch-recursive
Download the distfile, plus dependencies
While we are on the subject of using make to make cool stuff, here is something useful
if you are interested in README files. By running the following commands, in the
/usr/ports directory, you can create a README.html file for every package and consolidate those
files in a /usr/ports/README.html file. Here’s an example:
# cd /usr/ports
# make readmes
Create lots of README.html files in /usr/ports
27
76034c02.qxd:Toolbox
3/29/08
10:41 AM
Page 28
Chapter 2: Installing FreeBSD and Adding Software
Checking Packages and Ports
FreeBSD comes with a lot of tools for making sure that the software you install is both
safe and up-to-date. There are also tools for comparing installed packages to see if they
match what is in the latest ports and to update your ports collection to the latest versions.
This section contains examples of commands for checking your installed packages.
Checking Installed Packages Against Ports
You can use the pkg_version command to find out if one or more installed packages
is up-to-date with the latest version available from the ports collection. For example, to
check if packages with a given string in their name is up-to-date, try using the -s option as follows:
# pkg_version -v
# pkg_version -v -s ftp
ftpcopy-0.6.7
lftp-3.5.4_1
Check if all packages are up-to-date (verbose)
Check if ftp packages are up-to-date with ports
= up-to-date with port
= up-to-date with port
The ports collection index file is stored in /usr/ports/INDEX-6, by default. When you
run the pkg_version command, packages are checked against that file. To check against a
different INDEX file, for example one from an earlier or later release, add the name of that
INDEX file (either locally or on the Internet) to the end of the command line as follows:
# pkg_version /tmp/INDEX
Check packages against local INDEX file
Upgrading Ports
To keep your ports collection up-to-date, you can use the portupgrade command.
Once portupgrade is installed, you can use it to either update ports individual packages or
update the entire ports collection. Here’s an example of updating an individual package in the ports
collection:
# pkg_add -r portupgrade
# portupgrade -R konqueror
Update Konqueror software, if it’s installed
[Rebuilding the pkgdb <format:bdb_btree> in /usr/ports ...
15918 port entries found.....................................
Another tool for upgrading installed ports is portmanager. After installing
portmanager, you can upgrade port skeletons for whatever ports you choose.
Here are some examples:
# cd /usr/ports/ports-mgmt/portmanager
# make install clean
# portmanager -u
# portmanager math/gnumeric
28
Compile and install portmanager.
Upgrade all ports
Upgrade selected ports
76034c02.qxd:Toolbox
3/29/08
10:41 AM
Page 29
Chapter 2: Installing FreeBSD and Adding Software
Auditing Installed Packages
The portaudit command (pkg_add -r portaudit) lets you check your installed
packages for known security vulnerabilities. Regardless of whether or not your FreeBSD
system is using the latest ports collection, you can use portaudit to check your installed
packages against a database of security advisories.
The portaudit database is kept in the /usr/local/etc/periodic/security directory. The portaudit package contains a script in that directory for updating the security advisories as they become available. Those advisories are updated by the FreeBSD
security team, as well as by those who commit ports to the ports collection.
You can run portaudit to get the latest ports security database:
# portaudit -Fda
auditfile.tbz
New database installed.
Download the ports security database
100% of
47 kB
26 kBps
Next you can check all installed packages against the ports security database by typing the
following:
# portaudit -a
Check all installed packages against security database
Affected package: libxine-1.1.2_2
Type of problem: libxine -- buffer overflow vulnerability.
Reference:
<http://www.FreeBSD.org/ports/portaudit/6ecd0b42-ce77-11dc-89b1-000e35248ad7.htm
l>
Affected package: xorg-server-6.9.0_5
Type of problem: xorg -- multiple vulnerabilities.
Reference:
<http://www.FreeBSD.org/ports/portaudit/fe2b6597-c9a4-11dc-8da8-0008a18a9961.htm
l>
...
44 problem(s) in your installed packages found.
You are advised to update or deinstall the affected pacakge(s) immediately.
Instead of waiting for packages to be installed, you can check a single package for vulnerabilities before it is installed using the -f option:
# portaudit -f /usr/ports/distfiles/ftpcopy*
vulnerabilities
0 problem(s) found.
Check a package for
In the information produced by portaudit, security vulnerabilities are accompanied
by links to descriptions of the vulnerabilities found. Then you can decide whether or
not you want to update, patch, or remove the vulnerable software package.
29
76034c02.qxd:Toolbox
3/29/08
10:41 AM
Page 30
Chapter 2: Installing FreeBSD and Adding Software
Cleaning Up the Ports Collection
After each time you install a package from the ports system, it is usually best to run
the make clean command to get rid of the temporary files created during the builds.
If you forget to do that some time, a lot of unneeded files can fill your disk space.
You can clean out groups of unneeded files in your ports collection at once using the
portsclean command (portsclean is in the portupgrade package: pkg_add -r
portupgrade).
Although work files are cleaned out when you run the make clean command, the
distfiles (source code tarballs) that are downloaded to /usr/ports/distfiles are
not cleaned out. Depending on how many ports you install, this directory can grow
quite large. You can use the -D option to portsclean to remove ports that not are referenced
by any ports any longer:
# portsclean -D
Remove unreferenced distfiles
Detecting unreferenced distfiles...
Likewise, you can have portsclean check all distfiles and remove any distfiles that are not
referenced by a port that is installed currently:
# portsclean -DD
Remove unreferenced distfiles of uninstalled ports
Detecting unreferenced distfiles...
[Updating the pkgdb <format:bdb_btree> in /var/db/pkg ...
- 440 packages found (-0 +2) .. done]
Delete /usr/ports/distfiles/LPRng-3.8.28.tgz
You clean out all your ports work files at once using the -C option:
# portsclean -C
Remove ports work files
Cleaning out /usr/ports/*/*/work...
Delete /usr/ports/ftp/ftpcopy/work
Delete /usr/ports/net/samba-nmblookup/work
...
Packages that are not referenced by other packages (called leaf packages) can be cut
interactively using the pkg_cutleaves command (as root user, type this: pkg_add
-r pkg_cutleaves). To list unreferenced packages, type the following:
# pkg_cutleaves -lc
List unreferenced packages
3dm-2.04.00.018,1 - 3ware RAID controller monitoring daemon and web server
...
You can cut unreferenced packages as follows:
# pkg_cutleaves
Step through unreferenced packages list (keep or delete)
package 1 of 147
3dm-2.04.00.018,1 - 3ware RAID controller monitoring daemon and web server
3dm-2.04.00.018,1 - [keep]/(d)elete/(f)lush marked pkgs/(a)bort? d
3dm-2.04.00.018,1 - 3ware RAID controller monitoring daemon and web server
30
76034c02.qxd:Toolbox
3/29/08
10:41 AM
Page 31
Chapter 2: Installing FreeBSD and Adding Software
Package 2 of 147:
44bsd-more-20000521 - The pager installed with FreeBSD before less(1) was
imported
44bsd-more-20000521 - [keep]/(d)elete/(f)lush marked pkgs/(a)bort? f
Deleting 3dm-2.04.00.018,1 (package 1 of 1).
Go on with new leaf packages ((y)es/[no])? no
** Deinstalled packages:
3dm-2.04.00.018,1
** Number of deinstalled packages: 1
As each unreferenced package is displayed, you can mark it to keep (press Enter) or delete
(d). After you have marked some packages, you can flush them by typing f. You can quit at
any time by typing a to abort.
Summary
Despite not having a graphical installer, FreeBSD offers some sophisticated tools for
installing and working with software packages. Initial installation is done using the
sysinstall utility. After the system is installed, you have the choice of installing
additional software packages from binary packages or source code.
For working with binary packages, you can use pkg_add, pkg_delete, and pkg_info.
For building packages from source code, you can use the make command, with a variety
of options.
There are many tools available to manage your computer’s ports collection. You can use
portupgrade to update some or all of the ports in the collection. If you have security
concerns about your computer, the portaudit command can download a database
of security issues. Then it can scan all of your installed packages and report on potential security holes contained in the software.
Because files can build up over time in temporary directories when you install a
lot of applications from ports, you can use commands such as portsclean and
pkg_cutleaves to clean up unneeded files. With portsclean you can clean out
work directories of files left behind. With pkg_cutleaves, you can remove packages
that are not referenced by any other package.
31
76034c02.qxd:Toolbox
3/29/08
10:41 AM
Page 32
76034c03.qxd:Toolbox
3/29/08
10:42 AM
Page 33
Using the Shell
The use of a shell command interpreter (usually
just called a shell) dates back to the early days of
the first UNIX systems. Besides their obvious use
of running commands, shells have many built-in
features such as environment variables, aliases,
and a variety of functions for programming.
There are several different shells to choose from
on BSD systems. By default, the root user is
assigned to use the C shell (csh) and a regular
user is assigned the Bourne shell (sh). With Linux
systems, most users use what is called the Bourne
Again Shell (bash). There are other shells available as well (such as zsh, ksh, or tcsh).
IN THIS CHAPTER
Accessing the shell
Using the shell
Acquiring super-user
powers
Using environmental
variables
Creating simple shell
scripts
This chapter offers information that will help you use BSD shells, in general, and the bash shell, in particular.
Terminal Windows
and Shell Access
The most common way to access a shell from a BSD graphical interface is
using a Terminal window. From a graphical interface, you can often access
virtual terminals to get to a shell. With no graphical interface, and a textbased login, you are typically dropped directly to a shell after login.
Using Terminal Windows
To open a Terminal window from GNOME, select Accessories ➪ Terminal.
This opens a gnome-terminal window, displaying a bash shell prompt.
From an XFce desktop, select the Terminal icon from the XFce panel. From
KDE, select the Terminal Program icon to start a konsole terminal window.
Figure 3-1 shows an example of a gnome-terminal window.
76034c03.qxd:Toolbox
3/29/08
10:42 AM
Page 34
Chapter 3: Using the Shell
Figure 3-1: Type shell commands into a gnome-terminal window.
Commands shown in Figure 3-1 illustrate that the current shell is the bash shell
(/usr/local/bin/bash); the current user is the desktop user who launched the
window (chris), and the current directory is that user’s home directory (/home/chris).
The user name (chris) and hostname (localhost) appear in the title bar.
The gnome-terminal window not only lets you access a shell, it also has controls for
managing your shells. For example, click File ➪ Open Tab to open another shell on a different tab, click File ➪ Open Terminal to open a new Terminal window, or select Terminal ➪ Set
Title to set a new title in the title bar.
You can also use control key sequences to work with a Terminal window. Open a shell
on a new tab by typing Shift+Ctrl+t, open a new Terminal window with Shift+Ctrl+n, close a tab
with Shift+Ctrl+w, and close a Terminal window with Shift+Ctrl+q. Highlight text and copy
it with Shift+Ctrl+c, then paste it in the same or different window with Shift+Ctrl+v or by clicking the center button on your mouse.
Other key sequences for controlling Terminal windows include pressing F11 to show
the window in full screen mode. Type Ctrl+Shift++ to zoom in (make text larger) or Ctrl+(that’s Ctrl and a minus sign) to zoom out (make text smaller). Switch among tabs using
Ctrl+PageUp and Ctrl+PageDown (previous and next tab), or use Alt+1, Alt+2, Alt+3
and so on to go to tab one, two, or three (and so on). Type Ctrl+D to exit the shell, which
closes the current tab or entire Terminal window (if it’s the last tab).
The gnome-terminal window also supports profiles (select Edit ➪ Current Profile).
Some profile settings are cosmetic (allow bold text, cursor blinks, terminal bell, colors,
images, and transparency). Other settings are functional. For example, by default, the
terminal saves 500 scrollback lines (318 kilobytes). Some people like to be able to
scroll back further and are willing to give up more memory to allow that.
34
76034c03.qxd:Toolbox
3/29/08
10:42 AM
Page 35
Chapter 3: Using the Shell
If you launch gnome-terminal manually, you can add options. Here are some examples:
#
#
#
#
gnome-terminal
gnome-terminal
gnome-terminal
gnome-terminal
-x alsamixer
--tab --tab --tab
--geometry 80x20
--zoom=2
Start
Start
Start
Start
terminal with alsamixer displayed
a terminal with three open tabs
terminal 80 characters by 20 lines
terminal with larger font
Besides gnome-terminal, you can use many other Terminal windows. Here are some examples:
xterm (basic terminal emulator that comes with X), aterm (terminal emulator modeled after Afterstep XVT VT102 emulator), and konsole (terminal emulator delivered
with the KDE desktop). The Enlightenment desktop project offers the eterm terminal
(which includes features such as message logs on the screen background). Each of the
Terminal window commands just named can be obtained by installing the software
package of the same name, except for konsole, which is in the kdebase package.
Using Virtual Terminals
When FreeBSD boots in multi-user mode, eight virtual consoles (represented by a
console message window and virtual terminals ttyv0 through ttyv7) are created with
text-based logins. If an X Window System desktop is running, X is probably running
in virtual console 8. Virtual console 1 is where console messages are displayed. If X
isn’t running, chances are you’re looking at virtual console 2.
From X, you can switch to another virtual console with Ctrl+Alt+F1, Ctrl+Alt+F2, and so on
up to F8. From a text virtual console, you can switch using Alt+F1, Alt+F2 and so on.
Press Alt+F9 to return to the X GUI. Each console allows you to log in using different
user accounts. Switching to look at another console doesn’t affect running processes
in any of them. When you switch to virtual terminal one through six, you see a login
prompt similar to the following:
FreeBSD/i386 (localhost) (ttyv1)
login:
Separate getty processes manage each virtual terminal. If you are in a Terminal window, type this command to see what getty processes look like before you log in to
any virtual terminals:
# ps
780
781
782
783
784
785
786
awx | grep -v grep | grep getty
v1
Is+
0:00.01 /usr/libexec/getty Pc ttyv1
v2
Is+
0:00.01 /usr/libexec/getty Pc ttyv2
v3
Is+
0:00.01 /usr/libexec/getty Pc ttyv3
v4
Is+
0:00.01 /usr/libexec/getty Pc ttyv4
v5
Is+
0:00.01 /usr/libexec/getty Pc ttyv5
v6
Is+
0:00.01 /usr/libexec/getty Pc ttyv6
v7
Is+
0:00.01 /usr/libexec/getty Pc ttyv7
35
76034c03.qxd:Toolbox
3/29/08
10:42 AM
Page 36
Chapter 3: Using the Shell
After you log in on the first console, getty handles your login, and then fires up an
sh shell:
# ps awx | grep -v grep | grep v0
780 v0
Is
0:00.04 login [pam] (login)
2300 v0
S
0:00.02 -sh (sh)
Virtual consoles are configured in the /etc/ttys file. You can have fewer or more
virtual terminals by adding or deleting getty lines from that file. (Look for the Virtual
terminals section.) Type the following to see which ttys are configured:
# grep ttyv /etc/ttys
ttyv0
“/usr/libexec/getty Pc”
...
cons25
on
secure
Using the Shell
After you open a shell (whether from a text-based login or Terminal window), the shell
environment is set up based on the user who started the shell. Each user’s default shell
is assigned based on the user’s entry in the /etc/passwd file. By default, the root
user’s password is set to csh (/bin/csh) and regular users are set to sh (/bin/sh). To
use the bash shell, you can set the user’s shell to /usr/local/bin/bash. Examples in
this section use the bash shell.
Bash shell settings for all users’ shells are located in /etc/profile. User-specific shell
settings are determined by commands executed from several dot files in the user’s home
directory (if they exist): .bash_profile, .bash_login, and .profile. When a shell is
closed, any commands in the user’s ~/.bash_logout file are executed. Changing settings in these files permanently changes the user’s shell settings but does not affect shells
that are already running. (Other shells use different configuration files.)
There are a variety of ways in which you can list and change your shell environment.
One of the biggest ways is to change which user you are; in particular, to become the
super user (see the section “Acquiring Super User Power” later in this chapter).
Using Bash History
The Bourne Again Shell (bash) is used by many UNIX-like systems. Built into bash,
as with other shells, is a history feature that lets you review, change, and reuse commands that you have run in the past.
When bash starts, it reads the ~/.bash_history file and loads it into memory. This file
is set by the value of $HISTFILE. During a bash session, commands are added to history
36
76034c03.qxd:Toolbox
3/29/08
10:42 AM
Page 37
Chapter 3: Using the Shell
in memory. When bash exits, history in memory is written back to the .bash_history
file. The number of commands held in history during a bash session is set by $HISTSIZE, while the
number commands actually stored in the history file is set by $HISTFILESIZE:
$ echo $HISTFILE $HISTSIZE $HISTFILESIZE
/home/fcaen/.bash_history 500 500
To list the entire history, type history. To list a previous number of history commands, follow history
with a number. This lists the previous five commands in your history:
$ history 5
975 mkdir extras
976 mv *doc extras/
977 ls -CF
978 vi house.txt
979 history
To move among the commands in your history, use the up arrow and down arrow. When
a command is displayed, you can use the keyboard to edit the current command like any
other command: left arrow, right arrow, Delete, Backspace, and so on. Here are
some other ways to recall and run commands from your bash history:
$ !!
$ !997
ls -CF
$ !997 *doc
ls -CF *doc
$ !?CF?
ls -CF *doc
$ !ls
ls -CF *doc
$ !ls:s/CF/l
ls -l *doc
Run the previous command
Run command number 997 from history
Append *doc to command 997 from history
Run previous command line containing the CF string
Run the previous ls command
Run previous ls command, replacing CF with l
Another way to edit the command history is using the fc command. With fc, you open the
chosen command from history using the vi editor. The edited command runs when
you exit the editor. Change to a different editor by setting the FCEDIT variable (for
example, FCEDIT=gedit) or on the fc command line. For example:
$ fc 978
$ fc
$ fc -e /usr/local/bin/nano 989
Edit command number 978, then run it
Edit the previous command, then run it
Use nano to edit command 989
(Use pkg_add -r to install the text editor you want, such as nano, if it is not already
installed. Chapter 5 describes several text editors and the packages they are in.)
37
76034c03.qxd:Toolbox
3/29/08
10:42 AM
Page 38
Chapter 3: Using the Shell
Use Ctrl+r to search for a string in history. For example, typing Ctrl+r followed by the
string ss resulted in the following:
# <Ctrl+r>
(reverse-i-search)`ss’: sudo /usr/bin/less /var/log/messages
Press Ctrl+r repeatedly to search backward through your history list for other occurrences of
the ss string.
NOTE By default, bash command history editing uses emacs-style commands. If
you prefer the vi editor, you can use vi-style editing of your history by using the
set command to set your editor to vi. To do that, type the following: set -o vi.
Using Command Line Completion
You can use the Tab key to complete different types of information on the command
line. Here are some examples where you type a partial name, followed by the Tab key,
to have bash try to complete the information you want on your command line:
$ tracer<Tab>
$ cd /home/ch<Tab>
$ cd ~jo<Tab>
$ echo $PA<Tab>
$ ping @<Tab>
@davinci.example.com
@localhost
Command completion: Completes to traceroute command
File completion: Completes to /home/chris directory
User homedir completion: Completes to /home/john
Env variable completion: Completes to $PATH
Host completion: Show hosts from /etc/hosts
@ritchie.example.com @thompson.example.com
@zooey
Redirecting stdin and stdout
Typing a command in a shell makes it run interactively. The resulting process has two
output streams: stdout for normal command output and stderr for error output. In
the following example, when /tmpp isn’t found, an error message goes to stderr but
output from listing /tmp (which is found) goes to stdout:
$ ls /tmp /tmpp
ls: /tmpp: No such file or directory
/tmp/:
gconfd-fcaen keyring-b41WuB keyring-ItEWbz
mapping-fcaen
orbit-fcaen
By default, all output is directed to the screen. Use the greater-than sign (>) to direct
output to a file. More specifically, you can direct the standard output stream (using >)
or standard error stream (using 2>) to a file. Here are examples:
$ ls /tmp /tmmp > output.txt
ls: /tmpp: No such file or directory
$ ls /tmp /tmmp 2> errors.txt
/tmp/:
gconfd-fcaen keyring-b41WuB keyring-ItEWbz
38
mapping-fcaen
orbit-fcaen
76034c03.qxd:Toolbox
3/29/08
10:42 AM
Page 39
Chapter 3: Using the Shell
$ ls /tmp /tmmp 2> errors.txt > output.txt
$ ls /tmp /tmmp > everything.txt 2>&1
In the first example, stdout is redirected to the file output.txt, while stderr is
still directed to the screen. In the second example, stderr (stream 2) is directed
to errors.txt while stdout goes to the screen. In the third example, the first
two examples are combined. The last example directs both streams to the
everything.txt file. To append to a file instead of overwriting it, use two greaterthan signs:
$ ls /tmp >> output.txt
If you don’t ever want to see an output stream, you can simply direct the output stream to
a special bit bucket file (/dev/null):
# ls /tmp 2> /dev/null
TIP Another time you may want to redirect stderr is when you run jobs with
crontab. You could redirect stderr to a mail message that goes to the crontab’s
owner. That way, any error messages can be sent to the person running the job.
Just as you can direct standard output from a command, you can also direct standard
input to a command. For example, the following command e-mails the /etc/hosts file
to the user named chris on the local system:
$ mail chris < /etc/hosts
Using pipes, you can redirect output from one process to another process rather than just files.
Here is an example where the output of the ls command is piped to the sort command to have the output sorted:
# ls /tmp | sort
In the next example, a pipe and redirection are combined (the stdout of the ls command is
sorted and stderr is dumped to the bit bucket):
# ls /tmp/ /tmmp 2> /dev/null | sort
Pipes can be used for tons of things:
#
#
#
#
pkg_info | grep -i gnome | wc -l
ps auwx | grep firefox
ps auwx | less
whereis -m pkg_add | awk ‘{print $2}’
The first command line in the preceding code lists all installed packages, grabs those
packages that have gnome in them (regardless of case), and does a count of how many
lines are left (effectively counting packages with gnome in the name). The second
39
76034c03.qxd:Toolbox
3/29/08
10:42 AM
Page 40
Chapter 3: Using the Shell
command line displays Firefox processes taken from the long process list (assuming
the Firefox web browser is running). The third command line lets you page through
the process list. The last line displays the word pkg_add: followed by the path to the
pkg_add man page, and then displays only the path to the man page (the second element on the line).
Using backticks, you can execute one section of a command line first and feed the output of that
command to the rest of the command line. Here are examples:
# pkg_info -W `which mkisofs`
/usr/local/bin/mkisofs was installed by package cdrtools-2.01_6
# ls -l `which traceroute`
-r-sr-xr-x 1 root wheel 19836 Jan 15 18:33 /usr/sbin/traceroute
The first command line in the preceding example finds the full path of the mkisofs
command and finds the package that contains that command. The second command
line finds the full path to traceroute and does a long list (ls -l) of that command.
A more advanced and powerful way to take the output of one command and pass it as a parameter to another is with the xargs command. For example, after installing the cdrtools
package, I ran the following command:
# find /usr/local/bin | grep iso | xargs ls
/usr/local/bin/growisofs
/usr/local/bin/isodump
/usr/local/bin/iso-info
/usr/local/bin/isoinfo
/usr/local/bin/iso-read
/usr/local/bin/isovfy
/usr/local/bin/isodebug
/usr/local/bin/mkisofs
To display the command xargs is going to run, use the -t option as follows:
# cd /usr/local/bin
# echo iso* | xargs -t ls
ls iso-info iso-read isodebug isodump isoinfo isovfy
iso-info
isodebug
isoinfo
iso-read
isodump
isovfy
In the above example, the entire output of echo is passed to pkg_info. Using the -t
option to xargs, a verbose output of the command line appears before the command
is executed. Now have xargs pass each output string from ls as input to individual
pkg_add commands. Use the -I option to define {} as the placeholder for the string:
# ls /usr/local/bin/mk* | xargs -t -I {} pkg_info -W {}
pkg_info -W /usr/local/bin/mkbundle
/usr/local/bin/mkbundle was installed by package mono-1.2.5.1
pkg_info -W /usr/local/bin/mkisofs
/usr/local/bin/mkisofs was installed by package cdrtools-2.01_6
As you can see from the output, separate pkg_info commands are run for each
option passed by ls.
40
76034c03.qxd:Toolbox
3/29/08
10:42 AM
Page 41
Chapter 3: Using the Shell
Using aliases
Use the alias command to set and list aliases. Some aliases are already set in each
user’s ~/.cshrc file, if a user uses the csh shell. Here’s how to list the aliases that
are currently set for that shell:
# alias
h
j
la
lf
ll
(history 25)
(jobs -l)
(ls -a)
(ls -FA)
(ls -lA)
Aliases can also be set simply as a way of adding options to the default behavior of
a command (such as alias mv mv -i, so that the user is always prompted before
moving a file). To define other aliases for the csh shell, use the alias command, followed by
the alias name and command to run. For example:
$ alias fi “find . | grep $*”
Using the alias just shown, typing fi string causes the current directory and its
subdirectories to be searched for any file names containing the string you entered.
You can define your own aliases for the current bash session as follows:
# alias la=’ls -la’
Add that line to your ~/.bashrc file for the definition to occur for each new bash session. Remove an alias from the current bash session using the unalias command, as follows:
# unalias la
# unalias -a
Unalias the previously aliased la command
Unalias all aliased commands
Tailing Files
To watch the contents of a plain text file grow over time, you can use the tail command. For example, you can watch as messages are added to the /var/log/cron file
as follows:
# tail -f /var/log/cron
Press Ctrl+C to exit the tail command.
Acquiring Super-User Power
When you open a shell, you are able to run commands and access files and directories
based on your user/group ID and the permissions set for those components. Many
system features are restricted to the root user, also referred to as the super user.
41
76034c03.qxd:Toolbox
3/29/08
10:42 AM
Page 42
Chapter 3: Using the Shell
Because BSD distributions have a reputation for extraordinary security, access to the
root user account is discouraged except in very specific situations. By default, root
access is only allowed from terminals listed in /etc/ttys as secure. That includes
only virtual terminals accessible from the console.
So if you need to use the root account, the only way to do that, as FreeBSD is delivered,
is to log in directly as root from the computer’s console terminal. To be able to become
root user, while logged in as another user, you need to change some security settings
and use either the su or sudoers command as described below.
Using the su Command
Non-root users are prevented from becoming root users based on settings in the
/etc/pam.d/su file. Those settings only allow the root user or members of the
wheel group access to the root user account via the su command. If you change
the /etc/pam.d/su file to allow a user to use the su command, you can run the
su (super user) command to become the root user. However, simply using su, as in the
following code, doesn’t give you a login shell with the root user’s environment:
$ su
Password:*****
# echo $MAIL
/var/mail/fcaen
After running su, the user still has fcaen’s MAIL folder. To enable the root user’s environment,
use the su command with the dash option (-), as follows:
# exit
$ su Password: *****
# echo $MAIL
/var/mail/root
In most cases, use su -, unless you have a very specific reason not to. If no user is specified, su defaults to the root user. However, su can also be used to become other users:
$ su - cnegus
The su command can also be used to execute a single command as a particular user provided
that the user has been given permission to use su at all:
$ su -c whoami
Password: ******
root
# su -c ‘less /var/log/messages’
Although in the second example you are logged in as a regular user, when you run
whoami with su -c, it shows that you are the root user. In the directly preceding
example, the quotes are required around the less command line to identify
42
76034c03.qxd:Toolbox
3/29/08
10:42 AM
Page 43
Chapter 3: Using the Shell
/var/log/messages as an option to less. As seen above, whoami can be useful to
determine which user you’re currently running a command as:
$ whoami
fcaen
Delegating Power with sudo
The sudo command allows very granular delegation of power to users other than the
root user. The sudo facility is a great tool, when you have multiple users, for granting
specific escalated privileges and logging everything the users do with those privileges.
Unless otherwise specified, sudo runs as root. To use the sudo command, you must
install the sudo package.
The sudo command is configured in /usr/local/etc/sudoers.
WARNING! Never edit this file with your normal text editor. Instead, always use
the visudo command.
If you look at the sudoers file that shipped with your distribution, you’ll see different
empty sections delimited by comments and one active statement:
root
ALL=(ALL) ALL
This means that the user root is allowed on any hosts to run any command as any user.
Now add the following line setting the first field to a user account on your system:
fcaen ALL= /usr/bin/less /var/log/messages
Now fcaen (or whichever user you’ve added) can do the following:
$ sudo /usr/bin/less /var/log/messages
Password:
After fcaen types his own password, he can page through the /var/log/messages
file. A timestamp is set at that time as well. For the next five minutes (by default), that
user can type the command line above and have it work without being prompted for
the password.
Every use of sudo gets logged in /var/log/messages:
Feb 24 21:58:57 localhost sudo: fcaen : user NOT in sudoers ; TTY=ttyv3 ;
PWD=/home/fcaen ; USER=root ; COMMAND=/usr/bin/less /var/log/messages
Next add this line to /etc/sudoers:
fcaen
server1=(chris)
/bin/ls /home/chris
43
76034c03.qxd:Toolbox
3/29/08
10:42 AM
Page 44
Chapter 3: Using the Shell
Now fcaen can do the following:
$ sudo -u chris /bin/ls /home/chris
The sudo command just shown runs as chris and will work only on the host server1.
In some organizations, the sudoers file is centrally managed and deployed to all the
hosts, so it can be useful to specify sudo permissions on specific hosts.
Sudo also allows the definition of aliases, or predefined groups of users, commands,
and hosts. Check the sudoers man page and the /usr/local/etc/sudoers file on
your BSD system for examples of those features.
Using Environment Variables
Small chunks of information that are useful to your shell environment are stored in
what are referred to as environment variables. By convention, environment variable
names are all uppercase (although that convention is not enforced). If you use the
bash shell, some environment variables might be set for you from various bash start
scripts: /etc/profile and ~/.bash_profile (if it exists).
To display all of the environment variables, in alphabetical order, that are already set for your
shell, type the following:
$ set | less
BASH=/usr/local/bin/bash
BASH_VERSION=’3.2.25(0)-release
BLOCKSIZE=K
COLUMNS=80
HISTSIZE=500
HOME=/home/fcaen
HOSTNAME=einstein
...
The output just shown contains only a few examples of the environment variables you
will see. You can also set, or reset, any variables yourself. For example, to assign the value 123
to the variable ABC (then display the contents of ABC), type the following:
$ ABC=123
$ echo $ABC
123
The variable ABC exists only in the shell it was created in. If you launch a command
from that shell (ls, cat, firefox, and so on), that new process will not see the variable. Start a new bash process and test this:
$ bash
$ echo $ABC
$
44
76034c03.qxd:Toolbox
3/29/08
10:42 AM
Page 45
Chapter 3: Using the Shell
You can make variables part of the environment and inheritable by children processes by exporting them:
$ export ABC=123
$ c
$ echo $ABC
123
Also, you can concatenate a string to an existing variable:
# export PATH=$PATH:/home/fcaen
To list your bash’s environment variables use:
# env
When you go to create your own environment variables, avoid using names that are
already commonly used by the system for environment variables. See Appendix B for
a list of shell environment variables.
Creating Simple Shell Scripts
Shell scripts are good for automating repetitive shell tasks. Bash and other shells
include the basic constructs found in various programming languages, such as loops,
tests, case statements, and so on. The main difference is that there is only one type of
variable: strings.
Editing and Running a Script
Shell scripts are simple text files. You can create them using your favorite text editor
(such as vi). To run, the shell script file must be executable. For example, if you created
a shell script with a file name of myscript.sh, you could make it executable as follows:
$ chmod u+x myscript.sh
Or, instead of making it executable, you could precede the script with the bash command to run it (bash myscript.sh). Also, the first line of your bash scripts should
always be the following:
#!/usr/local/bin/bash
As with any command, besides being executable the shell script you create must also
either be in your PATH or be identified by its full or relative path when you run it. In
other words, if you just try to run your script, you may get the following result:
$ myscript.sh
bash: myscript.sh: command not found
45
76034c03.qxd:Toolbox
3/29/08
10:42 AM
Page 46
Chapter 3: Using the Shell
In this example, the directory containing myscript.sh is not included in your PATH.
To correct this problem, you can edit your path, copy the script to a directory in your
PATH, or enter the full or relative path to your script as shown here:
$
$
$
$
mkdir ~/bin ; cp myscript.sh ~/bin/ ; PATH=$PATH:~/bin
cp myscript.sh /usr/local/bin
./myscript.sh
/tmp/myscript.sh
Avoid putting a dot (.) into the PATH to indicate that commands can be run from the
current directory. This is a technique that could result in commands that have the
same file name as important, well-known commands (such as ls or cat). The proper
file could end up being overridden, if a command of the same name exists in the current directory.
Adding Content to Your Script
Although a shell script can be a simple sequence of commands, shell scripts can also be
used as you would any programming language. For example, a script can produce different results based on giving it different input. This section describes how to use compound commands, such as if/then statements, case statements, and for/while loops
in your shell scripts.
The following example code assigns the string abc to the variable MYSTRING. It then
tests the input to see if it equals abc and acts based on the outcome of the test. The
test is the section that takes place between the brackets ( [ ] ):
MYSTRING=abc
if [ $MYSTRING = abc ] ; then
echo “The variable is abc”
fi
To negate the test, use != instead of = as shown in the following:
if [ $MYSTRING != abc ] ; then
echo “$MYSTRING is not abc”;
fi
The following are examples of testing for numbers:
MYNUMBER=1
if [ $MYNUMBER
if [ $MYNUMBER
if [ $MYNUMBER
if [ $MYNUMBER
if [ $MYNUMBER
-eq
-lt
-le
-gt
-ge
1
2
1
0
1
]
]
]
]
]
;
;
;
;
;
then
then
then
then
then
echo
echo
echo
echo
echo
“MYNUMBER
“MYNUMBER
“MYNUMBER
“MYNUMBER
“MYNUMBER
equals 1”; fi
<2”; fi
<=1”; fi
>0”; fi
>=1”; fi
Let’s look at some tests on file names. In this example, you can check whether a file exists
(-e), whether it’s a regular file (-f), or whether it is a directory (-d). These checks are
46
76034c03.qxd:Toolbox
3/29/08
10:42 AM
Page 47
Chapter 3: Using the Shell
done with if/then statements. If there is no match, then the else statement is used
to produce the result.
filename=”$HOME”
if [ -e $filename ] ; then echo “$filename exists”; fi
if [ -f “$filename” ] ; then
echo “$filename is a regular file”
elif [ -d “$filename” ] ; then
echo “$filename is a directory”
else
echo “I have no idea what $filename is”
fi
Table 3-1 shows examples of tests you can perform on files, strings, and variables.
Table 3-1: Operators for Test Expressions
Operator
Test being performed
-a file
Check that the file exists (same as –e).
-b file
Check whether file is a special block device.
-c file
Check whether file is a character special (such as serial device).
-d file
Check whether file is a directory.
-e file
Check whether file exists (same as -a).
-f file
Check whether file exists and is a regular file (for example, not a
directory, socket, pipe, link, or device file).
-g file
Check whether file has the set-group-id bit set.
-h file
Check whether file is a symbolic link (same as –L).
-k file
Check whether file has the sticky bit set.
-L file
Check whether file is a symbolic link (same as -h).
-n string
Check whether the string length is greater than 0 bytes.
-O file
Check whether you own the file.
-p file
Check whether the file is a named pipe.
-r file
Check whether the file is readable by you.
Continued
47
76034c03.qxd:Toolbox
3/29/08
10:42 AM
Page 48
Chapter 3: Using the Shell
Table 3-1: Operators for Test Expressions (continued)
48
Operator
Test being performed
-s file
Check whether the file exists and is it larger than 0 bytes.
-S file
Check whether the file exists and is a socket.
-t fd
Check whether the file descriptor is connected to a terminal.
-u file
Check whether the file has the set-user-id bit set.
-w file
Check whether the file is writable by you.
-x file
Check whether the file is executable by you.
-z string
Check whether the length of the string is 0 (zero) bytes.
expr1 -a expr2
Check whether both the first and the second expressions
are true.
expr1 -o expr2
Check whether either of the two expressions is true.
file1 -nt file2
Check whether the first file is newer than the second file
(using the modification timestamp).
file1 -ot file2
Check whether the first file is older than the second file (using
the modification timestamp).
file1 -ef file2
Check whether the two files are associated by a link (a hard
link or a symbolic link).
var1 = var2
Check whether the first variable is equal to the second variable.
var1 -eq var2
Check whether the first variable is equal to the second variable.
var1 -ge var2
Check whether the first variable is greater than or equal to the
second variable.
var1 -gt var2
Check whether the first variable is greater than the second
variable.
var1 -le var2
Check whether the first variable is less than or equal to the
second.
var1 -lt var2
Check whether the first variable is less than the second variable.
var1 != var2
var1 -ne var2
Check whether the first variable is not equal to the second
variable.
76034c03.qxd:Toolbox
3/29/08
10:42 AM
Page 49
Chapter 3: Using the Shell
Another frequently used construct is the case command. Using the case statement,
you can test for different cases and take an action based on the result. Similar to a
switch statement in programming languages, case statements can take the place
of several nested if statements.
case “$VAR” in
string1)
{ action1 };;
string2)
{ action2 };;
*)
{ default action } ;;
esac
You can find examples of case usage in the system start-up scripts found in the
/etc/rc.d/ directory. Each initscript takes actions based on what parameter was
passed to it and the selection is done via a large case construct.
The bash shell also offers standard loop constructs, illustrated by a few examples that follow.
In the first example, all the values of the NUMBER variable (0 through 9) appear on the
for line:
for NUMBER in 0 1 2 3 4 5 6 7 8 9
do
echo The number is $NUMBER
done
In the following examples, the output from the ls command (a list of files) provides
the variables that the for statement acts on:
for FILE in `/bin/ls`; do echo $FILE; done
Instead of feeding the whole list of values to a for statement, you can increment a value
and continue through a while loop until a condition is met. In the following example, VAR begins
as 0 and the while loop continues to increment until the value of VAR becomes 3:
VAR=0
while [ $VAR -lt 3 ]; do
echo $VAR
VAR=$[$VAR+1]
Done
Another way to get the same result as the while statement just shown is to use the
until statement, as shown in the following example:
VAR=0
until [ $VAR -eq 3 ]; do echo $VAR; VAR=$[$VAR+1]; done
49
76034c03.qxd:Toolbox
3/29/08
10:42 AM
Page 50
Chapter 3: Using the Shell
If you are just starting with shell programming, refer to the Bash Guide for Beginners
(http://tldp.org/LDP/Bash-Beginners-Guide/html/index.html). Use that
guide, along with reference material such as the bash man page, to step through many
examples of shell scripting techniques. If you use the C shell (csh) see Introduction to
the C shell (http://docs.freebsd.org/44doc/usd/04.csh/paper.html) for further information.
Summary
Despite improvements in graphical user interfaces, the shell is still the most common
method for power users to work with BSD systems. The csh and sh shells are used
by default for the root user and regular users, respectively. These days, many people
also use the Bourne Again Shell (bash) with BSD and other UNIX-like systems. It
includes many helpful features for recalling commands (history), completing commands, assigning aliases, and redirecting output from and input to commands. You
can make powerful commands of your own using simple shell scripting techniques.
50
76034c04.qxd:Toolbox
3/29/08
10:43 AM
Page 51
Working with Files
Everything in a BSD file system can be viewed
as a file. This includes data files, directories,
devices, named pipes, links, and other types of
files. Associated with each file is a set of information that determines who can access the file
and how they can access it. This chapter covers
many commands for exploring and working
with files.
Understanding File Types
IN THIS CHAPTER
Setting permissions
Traversing the file
system
Creating and copying
files
Using hard/symbolic
links
Changing file attributes
Directories and regular files are by far the file
types you will use most often. However, there are
several other types of files you will encounter as
you use BSD. From the command line, there are
many ways you can create, find, and list different
types of files.
Searching for files
Listing and verifying
files
Files that provide access to the hardware components on your computer
are referred to as device files. There are character and block devices. There
are hard links and soft links you can use to make the same file accessible from
different locations. Less often used directly by regular users are named pipes
and sockets, which provide access points for processes to communicate with
each other.
Using Regular Files
Regular files consist of data files (documents, music, images, archives,
and so on) and commands (binaries and scripts). You can determine the
type of a file using the file command. In the following example, you
change to the directory containing bash shell documentation and use file
to view some of the file types in that directory:
$ cd /usr/local/share/doc/libogg
$ file *
framing.html:
HTML document text
ogg:
directory
76034c04.qxd:Toolbox
3/29/08
10:43 AM
Page 52
Chapter 4: Working with Files
rfc3533.txt:
stream.png:
...
ASCII English text
PNG image data, 592 x 37, 8-bit colormap, non-interlaced
The file command that was run shows document and image files of different formats, related to libogg. It can look inside the files and determine that a file contains
text with HTML markup (used in web pages), plain text, or an image. There is even
a subdirectory shown (ogg).
Creating regular files can be done by any application that can save its data. If you just
want to create some blank files to start with, there are many ways to do that. Here are two
examples:
$ touch /tmp/newfile.txt
$ cat /dev/null > /tmp/newfile2.txt
Create a blank file
Create an empty file
Doing a long list on a file is another way to determine its file type. For example:
$ ls -l /tmp/newfile2.txt
List a file to see its type
-rw-rw-r-- 1 chris chris 0 Sep 5 14:19 newfile2
A dash in the first character of the 10-character permission information (-rw-rw-r--)
indicates that the item is a regular file. (Permissions are explained in the “Setting File
and Directory Permissions” section later in this chapter.) Commands are also regular
files, but are usually saved as executables. Here are some examples:
$ ls -l /usr/bin/apropos
-r-xr-xr-x 1 root wheel 2248 Jan 12 2007 /usr/bin/apropos
$ file /usr/bin/apropos
/usr/bin/apropos: Bourne shell script text executable
$ file /bin/ls
/bin/ls: ELF 32-bit LSB executable, Intel 80386, version 1 (FreeBSD), for
FreeBSD 6.3, dynamically linked (uses shared libs), stripped
You can see that the apropos command is executable by the x settings for owner,
group, and others. By running file on apropos, you can see that it is a shell script.
That’s opposed to a binary executable, such as the ls command indicated above.
Using Directories
A directory is a container for files and subdirectories. Directories are set up in a hierarchy from the root (/) down to multiple subdirectories, each separated by a slash (/).
Directories are called folders when you access them from graphical file managers.
To create new directories for storing your data, you can use the mkdir command. Here
are examples of using mkdir to create directories in different ways:
$ mkdir /tmp/new
Create “new” directory in /tmp
$ mkdir -p /tmp/a/b/c/new Create parent directories as needed for “new”
$ mkdir -m 700 /tmp/new2 Create new2 with drwx------ permissions
52
76034c04.qxd:Toolbox
3/29/08
10:43 AM
Page 53
Chapter 4: Working with Files
The first mkdir command simply adds the new directory to the existing /tmp directory. The second example creates directories as needed (subdirectories a, b, and c) to
create the resulting new directory. The last command adds the -m option to set directory permissions as well.
You can identify the file as a directory because the first character in the 10-character permission string for a directory is a d:
$ file /tmp/new
/tmp/new: directory
$ ls -ld /tmp/new
drwxr-xr-x 2 chris chris 4096 Sep
5 14:53
/tmp/new
Note also that the execute bits (x) must be on, if you want people to be able to use the
directory as their current directories.
Using Symbolic and Hard Links
Instead of copying files and directories to different parts of the file system, links can
be set up to access that same file from multiple locations. BSD supports both soft links
(usually called symbolic links) and hard links.
When you try to open a symbolic link that points to a file or change to one that points
to a directory, the command you run acts on the file or directory that is the target of
that link. The target has its own set of permissions and ownership that you cannot see
from the symbolic link. The symbolic link can exist on a different disk partition than
the target. In fact, the symbolic link can exist, even if the target doesn’t.
NOTE When you use commands such as tar to backup files that include symbolic links, there are ways of choosing whether or not the actual file the symbolic
link points to is archived. If you do back up the actual file, restoring the file can
cause the link to be overwritten (which may not be what you want). See the tar
man page for details on different ways of backing up symbolic links.
A hard link can only be used on files (not directories) and is basically a way of giving
multiple names to the same physical file. Every physical file has at least one hard link,
which is commonly thought of as the file itself. Any additional names (hard links) that
point to that single physical file must be on the same partition as the original target file
(in fact, one way to tell that files are hard links is that they all have the same inode number). Changing permission, ownership, date/timestamp, or content of any hard link
to a file results in all others being changed as well. However, deleting one link will not
remove the file; it will continue to exist until the last link, or technically the last inode, to
the file is deleted.
Here are some examples of using the ln command to create hard and symbolic links:
$ touch myfile
$ ln myfile myfile-hardlink
$ ln -s myfile myfile-symlink
53
76034c04.qxd:Toolbox
3/29/08
10:43 AM
Page 54
Chapter 4: Working with Files
$ ls -li myfile*
292007 -rw-rw-r-292007 -rw-rw-r-292008 lrwxr-xr-x
3 francois francois 0 Mar 25 00:07 myfile
3 francois francois 0 Mar 25 00:07 myfile-hardlink
2 francois francois 6 Mar 25 00:09 myfile-symlink -> myfile
Note that after creating the hard and symbolic link files, we used the ls -li command
to list the results. The -li option shows the inodes associated with each file. You can
see that myfile and myfile-hardlink both have the inode number of 292007 (signifying the exact same file on the hard disk). The myfile-symlink symbolic link has a
different inode number. And although the hard link simply appears as a file (-), the
symbolic link is identified as a link (l) with wide-open permissions. You won’t know if
you can access the file the symbolic link points to until you try it or list the link target.
Using Device Files
When applications need to communicate with your computer’s hardware, they
direct data to device files. By convention, device files are stored in the /dev directory.
Historically, devices were generally divided into block devices (such as storage
media) and character devices (such as serial ports and terminal devices). FreeBSD,
however, uses only character devices to communicate with the hardware.
Here are examples of device files:
$ ls -l /dev/*
crw-r----- 1 root
crw-r----- 1 root
crw--w---- 1 chris
crw------- 1 chris
crw------- 1 root
operator
operator
tty
tty
wheel
List devices
0, 94 Jan 29
0, 85 Jan 29
0, 100 Jan 31
0, 60 Jan 30
0, 61 Jan 29
19:12
19:12
06:07
07:18
19:12
acd0
ad0
ttyp0
ttyv0
ttyv1
CD drive
Hard Drive
Remote login terminal
First virtual terminal
Second virtual terminal
Using Named Pipes and Sockets
When you want to allow one process to send information to another process, you can
simply pipe (|) the output from one to the input of the other. However, to provide a
presence in the file system from which a process can communicate with other processes,
you can create named pipes or sockets. Named pipes are typically used for interprocess
communication on the local system while sockets can be used for processes to communicate over a network.
Named pipes and sockets are often set up by applications in the /tmp directory. Here
are some examples of named pipes and sockets:
$ ls -l /tmp/.TV-chris/tvtimefifo-local /tmp/.X11-unix/X0
prw------- 1 chris chris 0 Sep 26 2007 /tmp/.TV-chris/tvtimefifo-local
srwx------ 1 chris wheel 0 Sep 4 01:30 /tmp/fam-chris/fam-
54
76034c04.qxd:Toolbox
3/29/08
10:43 AM
Page 55
Chapter 4: Working with Files
The first listing is a named pipe set up by a TV card player (note the p at the beginning indicating a named pipe). The second listing is a socket set up for interprocess
communications.
To create your own named pipe, use the mkfifo command as follows:
$ mkfifo mypipe
$ ls -l mypipe
prw-r--r-- 1 chris chris 0 Sep 26 00:57 mypipe
To find out what sockets are currently active on your system, use the sockstat command as follows:
$ sockstat
USER
COMMAND
chris
gnome-term
chris
gnome-term
root
syslogd
root
syslogd
root
devd
PID
6514
6514
557
557
501
FD
3
10
4
5
4
PROTO LOCAL ADDRESS
FOREIGN ADDRESS
stream -> /tmp/.X11-unix/X0
stream -> /tmp/.ICE-unix/2373
dgram /var/run/log
dgram /var/run/logpriv
stream /var/run/devd.pipe
Unless you are developing applications, you probably won’t need to create named
pipes or sockets. Another way to find where named pipes and sockets exist on your
system is to use the -type option to the find command, as described later in this
chapter.
Setting File and Directory Permissions
The ability to access files, run commands, and change to a directory can be restricted
with permission settings for user, group, and other users. When you do a long list
(ls -l) of files and directories, the beginning 10 characters shown indicate what
the item is (file, directory, character device, and so on) along with whether or not the
item can be read, written, or executed. Figure 4-1 illustrates the meaning of those
10 characters.
421
421
421
drwxrwxrwx
file type
indicator
user
group
other
Figure 4-1: Read, write, and
execute permissions are set
for files and directories.
55
76034c04.qxd:Toolbox
3/29/08
10:43 AM
Page 56
Chapter 4: Working with Files
To follow along with examples in this section, create a directory called /tmp/test
and a file called /tmp/test/hello.txt. Then do a long listing of those two items,
as follows:
$ mkdir /tmp/test
$ echo “some text” > /tmp/test/hello.txt
$ ls -ld /tmp/test/ /tmp/test/hello.txt
drwxrwxr-x 2 francois wheel 4096 Mar 21 13:11 /tmp/test
-rw-r--r-- 2 francois wheel
10 Mar 21 13:11 /tmp/test/hello.txt
After creating the directory and file, the first character of the long listing shows
/tmp/test as a directory (d) and hello.txt as a file (-). Other types of files available in BSD that would appear as the first character include character devices (c),
block devices (b) or symbolic links (l), named pipes (p), and sockets (s).
The next nine characters represent the permissions set on the file and directory. The first
rwx indicates that the owner (francois) has read, write, and execute permissions on
the directory. Likewise, the group wheel has the same permission (rwx). Then all other
users have only read and execute permission (r-x); the dash indicates the missing write
permission. For the hello.txt file, the user and group have read permission (r--)
and others have read permission (r--).
When you set out to change permissions, each permission can be represented by an
octal number (where read is 4, write is 2, and execute is 1) or a letter (rwx). Generally
speaking, read permission lets you view the contents of the directory, write lets you
change (add or modify) the contents of the directory, and execute lets you change to
(in other words, access) the directory.
If you don’t like the permissions you see on files or directories you own, you can
change those permissions using the chmod command.
Changing Permissions with chmod
The chmod command lets you change the access permissions of files and directories. Table 4-1
shows several chmod command lines and how access to the directory or file changes.
Table 4-1: Changing Directory and File Access Permission
56
chmod command
(octal or letters)
Original
Permission
New
Permission
Description
chmod 0700
any
drwx------
The directory’s owner can read or
write files in that directory as well
as change to it. All other users
(except root) have no access.
76034c04.qxd:Toolbox
3/29/08
10:43 AM
Page 57
Chapter 4: Working with Files
Table 4-1: Changing Directory and File Access Permission (continued)
chmod command
(octal or letters)
Original
Permission
New
Permission
Description
chmod 0711
any
drwx--x--x
Same for owner. All others can
change to directory, but not view
or change files in the directory.
This can be useful for server
hardening, where you prevent
someone from listing directory
contents, but allow access to a
file in the directory if someone
already knows it’s there.
chmod go+r
drwx------
drwxr--r--
Adding read permission to a
directory may not give desired
results. Without execute on,
others can’t view the contents
of any files in that directory.
any
drwxrwxrwx
All permissions are wide open.
chmod a-rwx
any
d---------
All permissions are closed. Good
to protect a directory from errant
changes. However, backup programs that run as non-root may
fail to back up the directory’s
contents.
chmod 666
any
-rw-rw-rw-
Open read/write permissions
completely on a file.
chmod go-rw
-rw-rw-rw-
-rw-------
Don’t let anyone except owner
view, change, or delete the file.
chmod 644
any
-rw-r--r--
Only the owner can change or
delete the file, but all can view it.
chmod 0777
chmod a=rwx
chmod 0000
The first 0 in the mode line can usually be dropped (so you can use 777 instead of 0777).
That placeholder has special meaning. It is an octal digit that can be used on commands
(executables) to indicate that the command can run as a set-UID program (4), run as
a set-GID program (2), or become a sticky program (1). With set-UID and set-GID, the
command runs with the assigned user or group permissions (instead of running with
permission of the user or group that launched the command).
WARNING! SUID should not be used on shell scripts. A shell script that is
owned by the root user is vulnerable to being exploited, resulting in an attacker
gaining access to a shell with root user permissions.
57
76034c04.qxd:Toolbox
3/29/08
10:43 AM
Page 58
Chapter 4: Working with Files
Having the sticky bit on for a directory keeps users from removing or renaming files
from that directory that they don’t own (/tmp is an example). Given the right permission settings, however, users can change the contents of files they don’t own in a sticky
bit directory. The final permission character is t instead of x on a sticky directory. A
command with sticky bit on used to cause the command to stay in memory, even while
not being used. This is an old UNIX feature that is not supported in most modern BSD,
UNIX, and Linux systems.
The -R option is a handy feature of the chmod command. With -R, you can recursively
change permissions of all files and directories starting from a point in the file system. Here are some
examples:
# chmod -R 700 /tmp/test
Open permission only to owner below /tmp/test
# chmod -R 000 /tmp/test
Close all permissions below /tmp/test
# chmod -R a+rwx /tmp/test Open all permissions to all below /tmp/test
Note that the -R option is inclusive of the directory you indicate. So the permissions
above, for example, would change for the /tmp/test directory itself, and not just for
the files and directories below that directory.
Setting the umask
Permissions given to a file or directory are assigned originally at the time that item is created. How those permissions are set is based on the user’s current umask value. Using the
umask command, you can set the permissions given to files and directories when you create them.
$
$
$
$
umask
umask
umask
umask
0066
0077
0022
0777
Make
Make
Make
Make
directories
directories
directories
directories
drwx--x--x
drwx-----drwxr-xr-x
d---------
and
and
and
and
files
files
files
files
-rw-------rw-------rw-r--r-----------
Changing Ownership
When you create a file or directory, your user account is assigned to that file or directory. So is your primary group. As root user, you can change the ownership (user) and group
assigned to a file to a different user or group using the chown and chgrp commands. Here are
some examples:
#
#
#
#
chown
chown
chgrp
chown
chris test/
chris:market test/
market test/
-R chris test/
Change
Change
Change
Change
owner to chris
owner to chris and group to market
group to market
all files below test/ to owner chris
The recursive option to chown (-R) just shown is useful if you need to change the
ownership of an entire directory structure. As with chmod, using chown recursively
changes permissions for the directory named, along with its contents. You might use
chown recursively when a person leaves a company or stops using your web service.
You can use chown -R to reassign their entire /home directory to a different user.
58
76034c04.qxd:Toolbox
3/29/08
10:43 AM
Page 59
Chapter 4: Working with Files
Traversing the File System
Basic commands for changing directories (cd), checking the current directory (pwd)
and listing directory content (ls) are well known to even casual shell users. So this section focuses on some less-common options to those commands, as well as other lesserknown features for moving around the file system. Here are some quick examples of
cd for moving around the file system:
$ cd
$ cd $HOME
$ cd ~
$ cd ~francois
$ cd $ cd $OLDPWD
$ cd ~/public_html
exists)
$ cd ..
$ cd /usr/bin
$ cd usr/bin
Change
Change
Change
Change
Change
Change
Change
to
to
to
to
to
to
to
your home directory
your home directory
your home directory
francois’ home directory
previous working directory
previous working directory (bash shell)
public_html in your home directory (if it
Change to parent of current directory
Change to usr/bin from root directory
Change to usr/bin beneath current directory
If you want to find out what your current directory is, use pwd (print working directory):
$ pwd
/home/francois
Creating symbolic links is a way to access a file from other parts of the file system
(see the section “Using Symbolic and Hard Links” earlier in this chapter for more
information on symbolic and hard links). However, symbolic links can cause some
confusion about how parent directories are viewed. The following commands create
a symbolic link to the /tmp directory from your home directory and show how to tell
where you are related to a linked directory:
$ cd $HOME
$ ln -s /tmp tmp-link
$ ls -l tmp-link
lrwxrwxrwx 1 francois francois 13 Mar 24 12:41 tmp-link -> /tmp
$ cd tmp-link/
$ pwd
/home/francois/tmp-link
$ pwd -P
Show the permanent location
/tmp
$ pwd -L
Show the link location
/home/francois/tmp-link
$ cd -L ..
Go to the parent of the link location
$ pwd
/home/francois
$ cd tmp-link
$ cd -P ..
Go to the parent of the permanent location
$ pwd
/
59
76034c04.qxd:Toolbox
3/29/08
10:43 AM
Page 60
Chapter 4: Working with Files
Using the -P and -L options to pwd and cd, you can work with symbolically linked directories
in their permanent or link locations, respectively. For example, cd -L .. takes you up one
level to your home directory, whereas cd -P .. takes you up one level above the
permanent directory (/). Likewise, the -P and -L options to pwd show permanent
and link locations.
If you use the csh or bash shells, they can remember a list of working directories for
you. Such a list can be useful if you want to return to previously visited directories. That
list is organized in the form of a stack. Use pushd and popd to add and remove directories.
$ pwd
/home/francois
$ pushd /usr/share/man/
/usr/share/man ~
$ pushd /var/log/
/var/log /usr/share/man ~
$ dirs
/var/log /usr/share/man ~
$ dirs -v
0 /var/log
1 /usr/share/man
2 ~
$ popd
/usr/share/man ~
$ pwd
/usr/share/man
$ popd
~
$ pwd
/home/francois
The dirs, pushd, and popd commands can also be used to manipulate the order of
directories on the stack. For example, pushd -0 pushes the last directory on the
stack to the top of the stack (making it the current directory). The pushd -2 command pushes the third directory from the bottom of the stack to the top.
Copying Files
Provided you have write permission to the target directory, copying files and directories can be done with some fairly simple commands. The standard cp command will
copy a file to a new name or the same name in a new directory, with a new timestamp associated
with the new file. Other options to cp let you retain date/timestamps, copy recursively, and prompt before overwriting. Here are some examples:
# cd ; mkdir public_html ; touch index.html
# cp -i index.html public_html/
Copy with new timestamp
# cp -il index.html public_html/
Create hard link instead of copy
# cp -Rv public_html/ /mnt/usb/
Copy all files recursively (with
verbose)
60
76034c04.qxd:Toolbox
3/29/08
10:43 AM
Page 61
Chapter 4: Working with Files
The above examples show ways of copying files related to a personal web server. In the
first cp example above, if an index.html file exists in public_html, you are prompted
before overwriting it with the new file. In the next example, the index.html file is hardlinked to a file of the same name in the public_html directory. In that case, because
both hard links point to the same file, editing the file from either location will change the
contents of the file in both locations. (The link can only be done if public_html/ and
your home directory are in the same file system.)
The cp -Rv command copies all files below the public_html/ directory, updating
ownership and permission settings to match those of the user running the command.
It also uses current date- and timestamps. If, for example, /mnt/usb represented a USB
flash drive, that command would be a way to copy the contents of your personal web
server to that drive.
The dd command is another way to copy data. This command is very powerful because on
BSD systems, everything is a file, including hardware peripherals. Here is an example:
$ dd if=/dev/zero of=/tmp/mynullfile count=1
1+0 records in
1+0 records out
512 bytes transferred in 0.000253 secs (2022113 bytes/sec)
/dev/zero is a special file that generates null characters. In the example just shown,
the dd command takes /dev/zero as input file and outputs to /tmp/mynullfile. The
count is the number of blocks. By default, a block is 512 bytes. The result is a 512-bytes
long file full of null characters. You could use less or vi to view the contents of the
file. However, a better tool to view the file would be the od (Octal Dump) command:
$ od -vt x1 /tmp/mynullfile
View an octal dump of a file
Here’s another example of the dd command. This time, we set the block size to 2 bytes
and copied 10 blocks (20 bytes):
$ dd if=/dev/zero of=/tmp/mynullfile count=10 bs=2
10+0 records in
10+0 records out
20 bytes transferred in 0.000367 secs (54507 bytes/sec)
WARNING! The following dd commands overwrite the contents of your disk partitions. To be on the safe side, examples show data being written to USB drives.
That’s so you could use something like a USB memory stick, which we presume can
be overwritten without harming the contents of your hard drives. Don’t try these
commands if you have any confusion about the devices you are dealing with.
The following command line clones the first partition of the second IDE drive to the first USB
drive. This can be useful for backing up a small partition to a USB memory stick.
(Warning, the following command overwrites the contents of your USB drive.)
# dd if=/dev/ad1s1 of=/dev/da0s1
61
76034c04.qxd:Toolbox
3/29/08
10:43 AM
Page 62
Chapter 4: Working with Files
The next example makes a compressed backup of the first partition of the primary master
IDE drive. Typically the partition should be unmounted before a backup such as this.
# umount /dev/da0s1
# dd if=/dev/da0s1 | gzip > bootpart.gz
The following command copies a boot image (diskboot.img) to your USB flash drive
(assuming the drive appears as /dev/da0):
# dd if=diskboot.img of=/dev/da0
This example copies the Master Boot Record from the second IDE hard drive to a file
named mymbrfile:
# dd if=/dev/ad1s1 of=mymbrfile bs=512 count=1
If you add the dd_rescue program to your BSD system (pkg_add –r dd_rescue) you
can create an ISO image with a command that is similar to dd but has many options and
much more verbose feedback:
# dd_rescue /dev/acd0 myimage.iso
dd_rescue: (info): ipos:
139264.0k, opos:
139264.0k, xferd:
139264.0k8.0k
errs:
0, errxfer:
0.0k, succxfer:
139264.0k
+curr.rate:
6702kB/s, avg.rate: 8312kB/s, avg.load: 16.6%
Changing File Attributes
Files and directories in BSD file systems have read, write, and execute permissions
associated with user, group, and others. However, there are also other attributes that
can be attached to files and directories that are specific to certain file system types.
If you have added ext2 or ext3 file systems to your BSD system (possibly for Linux
compatibility) you have special attributes that you may choose to use. Tools for
creating and working with ext2 and ext3 file systems are available in FreeBSD from
the e2fsprogs package (pkg_add -r e2fsprogs). See Chapter 7 for information on
creating and using ext2 and ext3 file systems.
You can list ext2/ext3 attributes with the lsattr command. Most attributes are obscure
and not turned on by default. Here’s an example of using lsattr to see some files’
attributes:
# lsattr /mnt/usb/*
------------- /mnt/usb/01.txt
------------- /mnt/usb/02.txt
------------- /mnt/usb/03.txt
------------- /mnt/usb/04.txt
$ lsattr -aR /tmp/ | less
62
Recursively list all /tmp attributes
76034c04.qxd:Toolbox
3/29/08
10:43 AM
Page 63
Chapter 4: Working with Files
The dashes represent 13 ext2/ext3 attributes that can be set. None are on by default.
Those attributes are the following: a (append only), c (compressed), d (no dump), i
(immutable), j (data journaling), s (secure deletion), t (no tail-merging), u (undeletable),
A (no atime updates), D (synchronous directory updates), S (synchronous updates), and
T (top of directory hierarchy). You can change these attributes using the chattr command.
Here are some examples:
# chattr +i /mnt/usb/01.txt
$ chattr +a /mnt/usb/02.txt
$ chattr +d /mnt/usb/03.txt
$ lsattr /mnt/usb/*.txt
----i-------- /mnt/usb/01.txt
-----a------- /mnt/usb/02.txt
------d------ /mnt/usb/03.txt
As shown in the preceding example, with the +i option set, the 01.txt file becomes
immutable, meaning that it can’t be deleted, renamed, changed, or have a link created
to it. Here, this prevents any arbitrary changes to that file. (The root user can’t even
remove an immutable file without agreeing to override the i attribute.) With +a set,
a file can only be appended to and not deleted. If you use the dump command to back
up your ext2/ext3 file systems, the +d option can prevent selected files from being
backed up.
To remove an attribute with chatter, use the minus sign (-). For example:
# chattr -i /mnt/usb/01.txt
NOTE Crackers who successfully break into a machine will often replace
some system binaries (such as ls or ps) with corrupt versions and make them
immutable. It’s a good idea to occasionally check the attributes set for your
executables (in /bin, /usr/bin, /sbin, and /usr/sbin, for example).
Searching for Files
Your BSD system can be configured to keep a database of all the files in the file system (with a few exceptions defined in /etc/locate.rc) by periodically running
the /usr/libexec/locate.updatedb script. The locate command enables
you to search that database. The results come back instantly, since the database is
searched and not the actual file system. Before locate was available, most BSD
users ran the find command to find files in the file system. Both locate and find
are covered here.
Generating the locate Database
You can generate the locate database by running the following script:
$ /usr/libexec/locate.updatedb
63
76034c04.qxd:Toolbox
3/29/08
10:43 AM
Page 64
Chapter 4: Working with Files
Note that by running this script as a regular user, the database will only include files
that are accessible to all users, as well as that user in particular. You can run this script
as root user to gather all files on your computer. But that could pose a security risk by
allowing non-root users to see files you might otherwise want hidden from their sites.
After you run the locate.updatedb script, the /var/db/locate.database is created. You could add that script to a cron job to run periodically. You are now ready to
use the locate command to search for files.
Finding Files with locate
Because the database contains the name of every node in the file system, and not just
commands, you can use locate to find commands, devices, man pages, data file or anything else
identified by a name in the file system. Here is an example:
$ locate atapifd
...
/boot/kernel/atapifd.ko
...
The above example found the atapi.ko kernel module. locate is case sensitive unless
you use the –i option. Here’s an example:
$ locate -i ImageMagick-6
/usr/local/share/ImageMagick-6.3.6
/usr/local/share/ImageMagick-6.3.6/ChangeLog
...
Here are some examples using locate with regular expressions and with output limits:
$ locate *atapi*ko
Locate files with atapi and ko in the name
...
/boot/kernel/atapicam.ko
/boot/kernel/atapicd.ko
/boot/kernel/atapifd.ko
/boot/kernel/atapist.ko
$ locate -l 5 kernel
Limit number of files found to five
/boot/kernel
/boot/kernel/3dfx.ko
/boot/kernel/3dfx_linux.ko
/boot/kernel/aac.ko
/boot/kernel/aac_linux.ko
locate: [show only 5 lines]
You can find information about the location and size of the locate database as follows:
$ locate -S
Database: /var/db/locate.database
Compression: Front: 21.64%, Bigram: 61.00%, Total: 15.57%
Filenames: 276585, Characters: 13071602, Database size: 2035326
Bigram characters: 793708, Integers: 9379, 8-Bit characters: 0
64
76034c04.qxd:Toolbox
3/29/08
10:43 AM
Page 65
Chapter 4: Working with Files
To update the locate database immediately, run the locate.updatedb command again
manually:
$ /usr/libexec/locate.updatedb
Locating Files with find
Before the days of locate, the way to find files was with the find command. Although
locate will come up with a file faster, find has many other powerful options for finding files based on attributes other than the name.
NOTE Searching the entire file system can take a long time to complete. Before
searching the whole file system, consider searching a subset of the file system or
excluding certain directories or remotely mounted file systems.
This example searches the root file system (/) recursively for files named
wlan_wep.ko:
$ find / -name “wlan_wep.ko” -print
find: /tmp/fam-root: Permission denied
find: /usr/local/etc/samba: Permission denied
/usr/share/man/man4/wlan_wep.4.gz
/usr/share/man/cat4/wlan_wep.4.gz
/boot/kernel/wlan_wep.ko
Running find as a normal user can result in long lists of Permission denied as
find tries to enter a directory you do not have permissions to. You can filter out the
inaccessible directories:
$ find / -name wlan_wep.ko 2>&1 | grep -v “Permission denied”
Or send all errors to the /dev/null bit bucket:
$ find / -name wlan_wep.ko 2> /dev/null
Because searches with find are case sensitive and must match the name exactly
(wlan_wep.ko won’t match other instances of wlan_wep), you can use regular
expressions to make your searches more inclusive. Here’s an example:
$ find / -name ‘wlan_wep*’ 2> /dev/null
/boot/kernel/wlan_wep.ko
/boot/GENERIC/wlan_wep.ko
/usr/share/man/man4/wlan_wep.4.gz
...
You can also find files based on timestamps. This command line finds files in /usr/bin/
that have been accessed in the past two minutes:
$ find /usr/bin/ -amin -2
/usr/bin/
/usr/bin/find
65
76034c04.qxd:Toolbox
3/29/08
10:43 AM
Page 66
Chapter 4: Working with Files
This finds files that have not been accessed in /home/chris for over 60 days:
$ find /home/chris/ -atime +60
Use the -type d option to find directories. The following command line finds all directories under /etc and redirects stderr to the bit bucket (/dev/null):
$ find /etc -type d -print 2> /dev/null
This command line finds files in /sbin with permissions that match 555:
$ find /sbin/ -perm 555
/sbin/adjkerntz
/sbin/atacontrol
...
The exec option to find is very powerful, because it lets you act on the files found with
the find command. The following command finds all the files in /var owned by the user
francois (must be a valid user) and executes the ls -l command on each one:
$ find /var -user francois -exec ls -l {} \;
An alternative to the find command’s exec option is xargs:
$ find /var -user francois | xargs ls –l
There are big differences on how the two commands just shown operate, leading to
very different performance. The find -exec spawns the command ls for each result
it finds. The xargs command works more efficiently by passing many results as input
to a single ls command.
To negate a search criterion, place an exclamation point (!) before that criterion. The next
example finds all the files that are not owned by the group root and are regular files,
and then does an ls -l on each:
$ find / ! -group wheel -type f
2> /dev/null | xargs ls –l
The next example finds the files in /sbin that are regular files and are not executable
by others, then feeds them to an ls -l command:
$ find /sbin/ -type f ! -perm o+x
| xargs ls –l
Finding files by size is a great way to determine what is filling up your hard disks. The following command line finds all files that are greater than 10 MB (+10M), lists those files
from largest to smallest (ls -lS) and directs that list to a file (/tmp/bigfiles.txt):
$ find / -xdev -size +10M
66
| xargs ls -lS > /tmp/bigfiles.txt
76034c04.qxd:Toolbox
3/29/08
10:43 AM
Page 67
Chapter 4: Working with Files
In this example, the -xdev option prevents any mounted file systems, besides the root
file system, from being searched. This is a good way to keep the find command from
searching special file systems (such as the /proc file system, if that is mounted) and
any remotely mounted file systems, as well as other locally mounted file systems.
Using Other Commands to Find Files
Other commands for finding files include the whereis and which commands. Here
are some examples of those commands:
$ whereis man
man: /usr/bin/man /usr/share/man/man1/man1.gz
The whereis command is useful because it not only finds commands, it also finds man
pages and configuration files associated with a command. From the example of whereis for the
word man, you can see the man executable, its configuration file, and the location of
man pages for the man command. The which command is useful when you’re looking
for the actual location of an executable file in your PATH, as in this example:
$ pkg_info -W `which mkfs.ext2`
/usr/local/sbin/mkfs.ext2 was installed by package e2fsprogs-1.40.2_1
Finding Out More About Files
Now that you know how to find files, you can get more information about those files.
Using less-common options to the ls command lets you list information about a file
that you won’t see when you run ls without options. Commands such as file help
you identify a file’s type. With md5sum and sha1sum, you can verify the validity of
a file.
Listing Files
Although you are probably quite familiar with the ls command, you may not be
familiar with many of the useful options for ls that can help you find out a lot about
the files on your system. Here are some examples of using ls to display long lists (-l) of
files and directories:
$
$
$
$
$
$
$
$
ls
ls
ls
ls
ls
ls
ls
ls
-l
-la
-lt
-lS
-li
-ln
-lh
-lR
Files and directories in current directory
Includes files/directories beginning with dot (.)
Orders files by time recently changed
Orders files by size (largest first)
Lists the inode associated with each file
List numeric user/group IDs, instead of names
List file sizes in human-readable form (K, M, etc.)
List files recursively, from current and subdirectories
67
76034c04.qxd:Toolbox
3/29/08
10:43 AM
Page 68
Chapter 4: Working with Files
When you list files, there are also ways to have different types of files appear differently in the
listing:
$ ls -F
BSD6.2@
$ ls -G
$ ls -C
BSD7/
Add a character to indicate file type
memo.txt
pipefile|
script.sh* xpid.socket=
Show file types as different colors
Show files listing in columns
In the -F example, the output shows several different file types. The BSD6.2@ indicates
a symbolic link to a directory, BSD7/ is a regular directory, memo.txt is a regular file
(no extra character), pipefile| is a named pipe (created with mkfifo), script.sh*
is an executable file, and xpid.socket= is a socket. The next two examples display
different file types in different colors and list output in columns, respectively.
Verifying Files
When files such as software packages and CD or DVD images are shared over the
Internet, often a sha1sum or md5sum file is published with it. Those files contain
checksums that can be used to make sure that the file you downloaded is exactly
the one that the repository published.
The following are examples of downloading an ISO image file, then using the md5
and sha256 commands to verify checksums of the file:
$ wget -c
ftp://ftp.freebsd.org/pub/FreeBSD/releases/i386/ISO-IMAGES/6.3/6.3-RELEASE-i386disc1.iso
$ md5 6.3-RELEASE-i386-disc1.iso
MD5 (6.3-RELEASE-i386-disc1.iso) =
cdb0dfa4b2db3e4c9cc19138f4fb2ada
$ sha256 6.3-RELEASE-i386-disc1.iso
SHA156 (6.3-RELEASE-i386-disc1.iso) =
15081a56d184a18c7cc3a5c3cd0d7d5b7d9304c9cc1d5fc40d875b0fd3047721
Which command you choose depends on whether the provider of the file you are
checking distributed md5sum or sha1sum information. FreeBSD offers both md5 and
sha1 files. For example, here is what the CHECKSUM.MD5 file for the FreeBSD 6.3
distribution looked like:
MD5
MD5
MD5
MD5
MD5
68
(6.3-RELEASE-i386-bootonly.iso) = ab1db0ae643e8c12ddbe855f533b8fae
(6.3-RELEASE-i386-disc1.iso) = cdb0dfa4b2db3e4c9cc19138f4fb2ada
(6.3-RELEASE-i386-disc2.iso) = e73a3d9cf5f3bfbf07384ef0a93ae5d5
(6.3-RELEASE-i386-disc3.iso) = 123840107a5578ce22875c440d41f453
(6.3-RELEASE-i386-docs.iso) = 17aa87ccfb01f4453d8ce078874029ab
76034c04.qxd:Toolbox
3/29/08
10:43 AM
Page 69
Chapter 4: Working with Files
With all the ISO files listed in this CHECKSUM.MD5 file contained in the current
directory, you can verify them all at once using the -c option and the Linux-compatible
md5sum command. Here is an example:
$ /usr/compat/linux/usr/bin/md5sum -c CHECKSUM.MD5
6.3-RELEASE-i386-bootonly.iso: OK
6.3-RELEASE-i386-disc1.iso: OK
6.3-RELEASE-i386-disc2.iso: OK
6.3-RELEASE-i386-disc3.iso: OK
6.3-RELEASE-i386-docs.iso: OK
To verify only one of the files listed in the checksum file, you could do something like the
following:
$ grep bootonly CHECKSUM.MD5 | /usr/compat/linux/usr/bin/md5sum -c
6.3-RELEASE-i386-bootonly.iso: OK
If you had a SHA1SUM file instead of an MD5SUM file to check against, you could use
the sha1sum command in the same way. By combining the find command described
earlier in this chapter with the m5 command, you can verify any part of your file system. For example, here’s how to create an MD5 checksum for every file in the /etc directory so
they can be checked later to see if any have changed:
# find /etc -type f -exec md5 {} \; 2>/dev/null > /tmp/md5.list
The result of the previous command line is a /tmp/md5.list file that contains a 128-bit
checksum for every file in the /etc directory. Later, you could type the following command to see if any of those files have changed:
# cd /etc
# /usr/compat/linux/usr/bin/md5sum -c /tmp/md5.list | grep -v ‘OK’
./hosts.allow: FAILED
md5sum: WARNING: 1 of 1668 computed checksums did NOT match
As you can see from the output only one file changed (hosts.allow). So the next
step is to check the changed file and see if the changes to that file were intentional.
Summary
There are dozens of commands for exploring and working with files in BSD. Commands
such as chmod can change the permissions associated with a file, whereas commands
that include lsattr and chattr can be used to list and change file attributes that are
associated with ext2 and ext3 file system types.
69
76034c04.qxd:Toolbox
3/29/08
10:43 AM
Page 70
Chapter 4: Working with Files
To move around the file system, people use the cd command most often. However, to
move repeatedly among the same directories, you can use the pushd and popd commands to work with a stack of directories.
Copying files is done with the cp command. However, the dd command can be used
to copy files (such as disk images) from a device (such as a CD-ROM drive). For creating directories, you can use the mkdir command.
Instead of keeping multiple copies of a file around on the file system, you can use symbolic links and hard links to have multiple file names point to the same file or directory.
Symbolic links can be anywhere in the file system, whereas hard links must exist on the
same partition that the original file is on.
To search for files, BSD systems offer the locate and find commands. To verify
the integrity of files you download from the Internet, you can use the md5, sha256,
md5sum, and sha1sum commands.
70
76034c05.qxd:Toolbox
3/29/08
10:45 AM
Page 71
Manipulating Text
With only a shell available on the first UNIX systems (on which BSD systems were based), using
those systems meant dealing primarily with commands and plain text files. Documents, program
code, configuration files, e-mail, and almost anything you created or configured was represented
by text files. To work with those files, developers
created many text manipulation tools.
Despite having graphical tools for working with
text, most seasoned BSD users find command line
tools to be more efficient and convenient. Text
editors such as vi (vim), Emacs, JOE, nano, and
Pico are available with most BSD distributions.
Commands such as grep, sed, and awk can be
used to find, and possibly change, pieces of information within text files.
This chapter explains how to use many popular
commands for working with text files in BSD systems. It also explores some of the less common
uses of text manipulation commands that you
might find interesting.
Matching Text with
Regular Expressions
IN THIS CHAPTER
Matching text with
Regular Expressions
Editing text files with
vi, JOE, or nano
Using graphical text
editors
Listing text with cat,
head, and tail
Paging text with less
and more
Paginating text with pr
Searching for text
with grep
Stream editing with
sed, tr, cut, and awk
Finding differences in
files with diff
Converting text files
to different formats
Many of the tools for working with text enable you to use Regular
Expressions, sometimes referred to as regex, to identify the text you are
looking for based on some pattern. You can use these strings to find text
within a text editor or use them with search commands to scan multiple
files for the strings of text you want.
A RegEx search pattern can include a specific string of text (as in a word
such as UNIX) or a location (such as end of a line or beginning of a word).
It can also be specific (find just the word hello) or more inclusive (find any
word beginning with h and ending with o).
76034c05.qxd:Toolbox
3/29/08
10:45 AM
Page 72
Chapter 5: Manipulating Text
Appendix C includes reference information for shell metacharacters that can be used in
conjunction with Regular Expressions to do the exact kinds of matches you are looking
for. This section shows examples of using Regular Expressions with several different
tools you encounter throughout this chapter.
Table 5-1 shows some examples using basic Regular Expressions to match text strings.
Table 5-1: Matching Using Regular Expressions
Expression
Matches
a*
a, ab, abc, aecjejich
^a
Any “a” appearing at the beginning of a line
*a$
Any “a” appearing at the end of a line
a.c
3-character strings that begin with a and end with c
[bcf]at
bat, cat, or fat
[a-d]at
aat, bat, cat, dat, but not Aat, Bat, and so on
[A-D]at
Aat, Bat, Cat, Dat, but not aat, bat, and so on
1[3-5]7
137, 147, and 157
\tHello
A tab character preceding the word Hello
\.[tT][xX][Tt]
.txt, .TXT, .TxT or other case combinations
Many examples of Regular Expressions are used in examples throughout this chapter.
Keep in mind that not every command that incorporates RegEx uses its features the
same way.
Editing Text Files
There are many text editors in the BSD/UNIX world. The most common editor is vi,
which can be found on virtually any UNIX system available today. That is why knowing
how to at least make minor file edits in vi is a critical skill for any BSD administrator.
One day, if you find yourself in a minimalist, foreign BSD, Linux, or other UNIX environment, trying to bring a server back online, vi is the tool that will almost always be there.
On FreeBSD, an improved version of vi is available called vim (install the vim6 package
to get it). Vim (Vi IMproved) with the vim6 package will provide the most up-to-date,
feature-rich, and user-friendly vi editor. For more details about using vi and vim, refer
to Appendix A.
72
76034c05.qxd:Toolbox
3/29/08
10:45 AM
Page 73
Chapter 5: Manipulating Text
Traditionally, the other popular UNIX text editor has been Emacs and its more graphical
variant, XEmacs. Emacs is a powerful multi-function tool that can also act as a mail/
news reader or shell, and perform other functions. Emacs is also known for its very
complex series of keyboard shortcuts that require three arms to execute properly.
In the mid-1990s, Emacs was ahead of vi in terms of features. Now that Vim is widely
available, both can provide all the text-editing features you’ll ever need. If you are not
already familiar with either vi or Emacs, we recommend you start by learning vi.
Many other command line and GUI text editors are available for BSD systems. Textbased editors that you may find to be simpler than vi and Emacs include JED, JOE,
and nano. Start any of those editors by typing its command name, optionally followed
by the file name you want to edit. The following sections offer some quick descriptions
of how to use each of those editors.
Using the JOE Editor
If you have used classic word processors such as WordStar that worked with text files,
you might be comfortable with the JOE editor. To use JOE, install the joe package (as
root, type pkg_add -r joe). To use the spell checker in JOE, install the aspell package.
With JOE, instead of entering a command or text mode, you are always ready to type.
To move around in the file, you can use control characters or the arrow keys. To open a
text file for editing, just type joe and the file name or use some of the following options:
$
$
$
$
joe
joe
joe
joe
memo.txt
-wordwrap memo.txt
-lmargin 5 -tab 5 memo.txt
+25 memo.txt
Open memo.txt for editing
Turn on wordwrap while editing
Set left margin to 5 and tab to 5
Begin editing on line 25
To add text, just begin typing. You can use keyboard shortcuts for many functions. Use arrow
keys to move the cursor left, right, up, or down. Use the Delete key to delete text under
the cursor or the Backspace key to erase text to the left of the cursor. Press Enter to add a
line break. Press Ctrl+K+H to see the help screen. Table 5-2 shows the most commonly
used control keys for editing in JOE.
Table 5-2: Control Keys for Editing with JOE
Key Combo
Result
Cursor
Ctrl+B
Left
Ctrl+P
Up
Continued
73
76034c05.qxd:Toolbox
3/29/08
10:45 AM
Page 74
Chapter 5: Manipulating Text
Table 5-2: Control Keys for Editing with JOE (continued)
Key Combo
Result
Cursor (continued)
Ctrl+F
Right
Ctrl+N
Down
Ctrl+Z
Previous word
Ctrl+X
Next word
Search
Ctrl+K+F
Find text
Ctrl+L
Find next
Block
Ctrl+K+B
Begin
Ctrl+K+K
End
Ctrl+K+M
Move block
Ctrl+K+C
Copy block
Ctrl+K+W
Write block to file
Ctrl+K+Y
Delete block
Ctrl+K+/
Filter
Misc
Ctrl+K+A
Center line
Ctrl+T
Options
Ctrl+R
Refresh
File
74
Ctrl+K+E
Open new file to edit
Ctrl+K+R
Insert file at cursor
Ctrl+K+D
Save
76034c05.qxd:Toolbox
3/29/08
10:45 AM
Page 75
Chapter 5: Manipulating Text
Table 5-2: Control Keys for Editing with JOE (continued)
Key Combo
Result
Goto
Ctrl+U
Previous screen
Ctrl+V
Next screen
Ctrl+A
Line beginning
Ctrl+E
End of line
Ctrl+K+U
Top of file
Ctrl+K+V
End of file
Ctrl+K+L
To line number
Delete
Ctrl+D
Delete character
Ctrl+Y
Delete line
Ctrl+W
Delete word right
Ctrl+O
Delete word left
Ctrl+J
Delete line to right
Ctrl+-
Undo
Ctrl+6
Redo
Exit
Ctrl+K+X
Save and quit
Ctrl+C
Abort
Ctrl+K+Z
Shell
Spell
Ctrl+[+N
Word (install the proper spelling dictionary
for this to work)
Ctrl+[+l
File (install the proper spelling dictionary
for this to work)
75
76034c05.qxd:Toolbox
3/29/08
10:45 AM
Page 76
Chapter 5: Manipulating Text
Using the Pico and Nano Editors
Pico is a popular, very small text editor, distributed as part of the Pine e-mail client.
Although Pico is free, it is not truly open source. Therefore, some BSD distributions
don’t offer Pico (although FreeBSD does offer Pico: pkg_add -r pico). As an alternative to Pico, you can use an open source clone of Pico called nano (nano’s another
editor). This section describes the nano editor (pkg_add -r nano).
Nano (represented by the nano command) is a compact text editor that runs from the
shell, but is screen-oriented (owing to the fact that it is based on the curses library).
Nano is popular with those who formerly used the Pine e-mail client because nano’s
editing features are the same as those used by Pine’s Pico editor. On the rare occasion
that you don’t have the vi editor available on a BSD or Linux system (for example, vi
isn’t available when you are installing a minimal Gentoo Linux), nano may be available. On FreeBSD, nano is part of the nano package and relies on the aspell package
for spell checking.
As with the JOE editor, instead of having command and typing modes, you can just
begin typing. To open a text file for editing, just type nano and the file name or use some
of the following options:
$
$
$
$
nano
nano
nano
nano
Open memo.txt for editing
When saving, backup previous to ~.filename
Turn on mouse to move cursor (if supported)
Begin editing on line 83
memo.txt
-B memo.txt
-m memo.txt
+83 memo.txt
As with JOE, to add text, just begin typing. Use arrow keys to move the cursor left, right,
up, or down. Use the Delete key to delete text under the cursor or the Backspace to erase
text to the left of the cursor. Press Enter to add a line break. Press Ctrl+G to read help
text. Table 5-3 shows the control codes for nano that are described on the help screen.
Table 5-3: Control Keys for Editing with nano
76
Control Code
Function Key
Description
Ctrl+G
F1
Show help text (Press Ctrl+X to exit help)
Ctrl+X
F2
Exit nano (or close current file buffer)
Ctrl+O
F3
Save current file
Ctrl+J
F4
Justify current text in current paragraph
Ctrl+R
F5
Insert a file into current file
Ctrl+W
F6
Search for text
Ctrl+Y
F7
Go to the previous screen
76034c05.qxd:Toolbox
3/29/08
10:45 AM
Page 77
Chapter 5: Manipulating Text
Table 5-3: Control Keys for Editing with nano (continued)
Control Code
Function Key
Description
Ctrl+V
F8
Go to the next screen
Ctrl+K
F9
Cut (and store) the current line or marked text
Ctrl+U
F10
Uncut (paste) previously cut line into file
Ctrl+C
F11
Display current cursor position
Ctrl+T
F12
Start spell checking
Ctrl+_
Go to selected line and column numbers
Ctrl+\
Search and replace text
Ctrl+6
Mark text, starting at cursor (Ctrl+6 to unset
mark)
Ctrl+F
Go forward one character
Ctrl+B
Go back one character
Ctrl+Space
Go forward one word
Alt+Space
Go backward one word
Ctrl+P
Go to previous line
Ctrl+N
Go to next line
Ctrl+A
Go to beginning of the current line
Ctrl+E
Go to end of the current line
Alt+9
Go to beginning of current paragraph
Alt+0
Go to end of current paragraph
Alt+\
Go to first line of the file
Alt+/
Go to last line of the file
Alt+]
Go to bracket matching current bracket
Alt+=
Scroll down one line
Alt+-
Scroll down up line
77
76034c05.qxd:Toolbox
3/29/08
10:45 AM
Page 78
Chapter 5: Manipulating Text
Graphical Text Editors
Just because you are editing text doesn’t mean you have to use a text-based editor.
One advantage of using a graphical text editor is that you can use a mouse to select
menus, highlight text, cut and copy text, or run special plug-ins.
You can expect to have the GNOME text editor (gedit) if your BSD system has the
GNOME desktop installed. Features in gedit enable you to check spelling, list document
statistics, change display fonts and colors, and print your documents. The KDE desktop
also has its own KDE text editor (kedit in the kdeutils package). It includes similar features to the GNOME text editor, along with a few extras, such as the ability to send the
current document with kmail or another user-configurable KDE Component.
Vim itself comes with an X GUI version. It is launched with the gvim command, which
is part of the vim6 package. If you’d like to turn GUI Vim into a more user-friendly text
editor, you can install Cream (pkg_add -r cream).
Other text editors you can install include nedit (with features for using macros and
executing shell commands) and leafpad (which is similar to the Windows Notepad text
editor). The Scribes text editor (scribes) includes some advanced features for automatic
correction, replacement, indentation, and word completion.
Listing, Sorting, and Changing Text
Instead of just editing a single text file, you can use a variety of BSD commands to
display, search, and manipulate the contents of one or more text files at a time.
Listing Text Files
The most basic method to display the content of a text file is with the cat command. The
cat command concatenates (in other words, outputs as a string of characters) the contents of a text file to your display (by default). You can then use different shell metacharacters to direct the contents of that file in different ways. For example:
$
$
$
$
$
$
cat
cat
cat
cat
cat
cat
myfile.txt
myfile.txt > copy.txt
myfile.txt >> myotherfile.txt
-s myfile.txt
-n myfile.txt
-b myfile.txt
Send entire file to the screen
Direct file contents to another file
Append file contents to another file
Discard multiple consecutive blank lines
Show line numbers with output
Show line numbers only on non-blank lines
However, if your block of text is more than a few lines long, using cat by itself becomes
impractical. That’s when you need better tools to look at the beginning, the end, or page
through the entire text.
78
76034c05.qxd:Toolbox
3/29/08
10:45 AM
Page 79
Chapter 5: Manipulating Text
To view the top of a file, use head:
$ head myfile.txt
$ cat myfile.txt | head
Both of these command lines use the head command to output the top 10 lines of the
file. You can specify the line count as a parameter to display any number of lines from
the beginning of a file. For example:
$ head -n 50 myfile.txt
$ ps auwx | head -n 15
Show the first 50 lines of a file
Show the first 15 lines of ps output
This can also be done using this outdated (but shorter) syntax:
$ head -50 myfile.txt
$ ps auwx | head -15
You can use the tail command in a similar way to view the end of a file or command output:
$ tail -n 15 myfile.txt
$ tail -15 myfile.txt
$ ps auwx | tail -n 15
Display the last 15 lines in a file
Display the last 15 lines in a file
Display the last 15 lines of ps output
The tail command can also be used to continuously watch the end of a file as the file is written
to by another program. This is very useful for reading live log files when troubleshooting Apache, Sendmail, or many other system services:
# tail -f /var/log/messages
# tail -f /var/log/maillog
# tail -f /var/log/auth.log
Watch system messages live
Watch mail server messages live
Watch login attempt messages live
Paging Through Text
When you have a large chunk of text and need to get to more than just its beginning
or end, you need a tool to page through the text. The original UNIX system pager was the
more command:
$ ps auwx | more
$ more myfile.txt
Page through the output of ps (press spacebar)
Page through the contents of a file
However, more has some limitations. For example, in the line with ps above, more
could not scroll up. The less command was created as a more powerful and userfriendly more. The common saying when less was introduced was: “What is less?
less is more!” We recommend you no longer use more, and use less instead.
NOTE The less command has another benefit worth noting. Unlike text editors
such as vi, it does not read the entire file when it starts. This results in faster start-up
times when viewing large files.
79
76034c05.qxd:Toolbox
3/29/08
10:45 AM
Page 80
Chapter 5: Manipulating Text
The less command can be used with the same syntax as more in the examples above:
$ ps auwx | less
$ cat myfile.txt | less
$ less myfile.txt
Page through the output of ps
Page through the contents of a file
Page through a text file
The less command enables you to navigate using the up and down arrow keys, PageUp,
PageDown, and the spacebar. If you are using less on a file (not standard input), press
v to open the current file in vi. As in vi, G takes you to the end of the file. F takes you to
the end of the file, and then scrolls the file as new input is added, similar to a tail -f.
As in vi, while viewing a file with less, you can search for a string by pressing / (forward
slash) followed by the string and Enter. To search for further occurrences, press / and
Enter repeatedly. To search backwards, press ? followed by the search string and Enter.
To scroll forward and back while using less, use the f and b keys, respectively. For example, 10f scrolls forward ten lines and 15b scrolls back 15 lines. Type d to scroll down
half a screen and u to scroll up half a screen.
Paginating Text Files with pr
The pr command provides a quick way to format a bunch of text into a form where it
can be printed. This can be particularly useful if you want to print the results of some
commands, without having to open up a word processor or text editor. With pr, you
can format text into pages with header information such as date, time, file name, and page number. Here is an example:
$ ls /usr/ports | sort | pr -4 | less
Paginate ports directory in 4 cols
In this example, the ls command lists the contents of the /usr/ports directory and
pipes that list to the sort command, to be sorted alphabetically. Next, that list is piped
to the pr command, which converts the single-column list into four columns (-4) and
paginates it. Finally, the less command enables you to page through the text.
Instead of paging through the output, you can send the output to a file or to a printer. Here
are examples of that:
$ ls /usr/ports | sort | pr -4 | less > pkg.txt
$ ls /usr/ports | sort | pr -4 | less | lpr
Send pr output to a file
Send pr output to printer
Other text manipulation you can do with the pr command includes double-spacing the
text (-d), or offsetting the text a certain number of spaces from the left margin (for
example, -o 5 to indent five spaces from the left).
80
76034c05.qxd:Toolbox
3/29/08
10:45 AM
Page 81
Chapter 5: Manipulating Text
Searching for Text with grep
The grep command comes in handy when you need to perform more advanced string searches in
a file. In fact, the phrase to grep has actually entered the computer jargon as a verb, just as
to Google has entered the popular language. Here are examples of the grep command:
$
#
$
$
$
grep francois myfile.txt
grep -i ftp /etc/services
ps auwx | grep init
ps auwx | grep “\[*\]”
dmesg | grep “[ ]ata\|^ata”
Show
Show
Show
Show
Show
lines containing francois
lines containing FTP
init lines from ps output
bracketed commands
ata kernel device information
These command lines have some particular uses, beyond being examples of the grep
command. By searching /etc/services for ftp you can see port numbers associated
with FTP services. Displaying bracketed commands that are output from the ps command is a way to see commands for which ps cannot display options. The last command
checks the kernel buffer ring for any ATA device information, such as hard disks and
CD-ROM drives.
The grep command can also recursively search a few or a whole lot of files at the same time. The
following command recursively searches (-R) files in the /usr/local/etc and /etc
directories for the string ftp (-i for any case):
$ grep -Ri ftp /usr/local/etc /etc | less
Add line numbers (-n) to your grep command to find the exact lines where the search
terms occur:
$ grep -Rin ftp /etc /usr/local/etc | less
To colorize the searched term in the search results, add the --color option:
# grep --color -Rin ftp /etc/services | less
By default, in a multi-file search, the file name is displayed for each search result.
Use the -h option to disable the display of file names. This example searches for the string
relay in the files dmesg.today, dmesg.yesterday, and so on:
# grep -h acpi /var/log/dmesg*
If you want to ignore case when you search messages, use the -i option:
# grep -i audio /var/log/messages
Search file for audio (any case)
81
76034c05.qxd:Toolbox
3/29/08
10:45 AM
Page 82
Chapter 5: Manipulating Text
To display only the name of the file that includes the search term, add the -l option:
$ grep -Ril FTP /etc
To display all lines that do not match the string, add the -v option:
# grep -v “#” /etc/ttys | less
Show lines that don’t contain comments
When piping the output of ps into grep, here’s a trick to prevent the
grep process from appearing in the grep results:
NOTE
# ps auwx | grep “[i]nit”
Checking Word Counts with wc
There are times when you need to know the number of lines that match a search string.
The wc command can be used to count the lines that it receives. For example, the following command lists how many times a specific IP address appears in log files:
$ grep 192.198.1.1 /var/log/* | wc -l
The wc command has other uses as well. By default, wc prints the number of lines, words and
bytes in a file:
$ wc /usr/local/share/doc/jpeg/README List counts for a single file
385
3006
19945 /usr/local/share/doc/README
$ wc /usr/local/share/doc/jpeg/*
List single counts/totals for many files
385
3006
19945 /usr/local/share/doc/README
118
813
5364 /usr/local/share/doc/coderules.doc
...
6658 52200 339141 total
Sorting Output with sort
It can also be useful to sort the content of a file or the output of a command. This can be helpful
in bringing order to disorderly output. The following examples list the names of all
software packages currently installed, grabs any with gnome in the name, and sorts
the results in alphanumeric order (forward and reverse):
$ pkg_info | grep gnome | sort
$ pkg_info | grep gnome | sort -r
Sort in alphanumeric order
Sort in reverse alphanumeric order
The following command sorts processes based on descending memory usage (fourth field of ps
output). The –k option specifies the key field to use for sorting. 4,4 indicates that the
fourth field and only the fourth field is a key field.
$ ps auwx | sort –r –k 4,4
82
76034c05.qxd:Toolbox
3/29/08
10:45 AM
Page 83
Chapter 5: Manipulating Text
The following command line sorts loaded kernel modules in increasing size order. The n option
tells sort to treat the second field as a number and not a string:
# kldstat | sort -k 2,2n
Finding Text in Binaries with Strings
Sometimes you need to read the ASCII text that is inside a binary file. Occasionally,
you can learn a lot about an executable that way. For those occurrences, use strings
to extract all the human-readable ASCII text. Here are some examples:
$ strings /bin/ls | grep -i libc
$ cat /bin/ls | strings
$ strings /bin/ls
Find occurrences of libc in ls
List all ASCII text in ls
List all ASCII text in ls
Replacing Text with sed
Finding text within a file is sometimes the first step towards replacing text. Editing
streams of text is done using the sed command. The sed command is actually a fullblown scripting language. For the examples in this chapter, we cover basic text replacement with the sed command.
If you are familiar with text replacement commands in vi, sed has some similarities.
In the following example, you would replace only the first occurrence per line of francois with
chris. Here, sed takes its input from a pipe, while sending its output to stdout (your
screen). The original file itself is not changed:
$ cat myfile.txt | sed s/francois/chris/
Adding a g to the end of the substitution line, as in the following command, causes
every occurrence of francois to be changed to chris. Also, in the following example,
input is directed from the file myfile.txt and output is directed to mynewfile.txt:
$ sed s/francois/chris/g < myfile.txt > mynewfile.txt
The next example replaces the first occurrences of myname on each line in the
/etc/hosts file with yourname. The output is directed to the /tmp/hosts file.
$ sed ‘s/myname/yourname/’ < /etc/hosts > /tmp/hosts
Although the forward slash is the sed command’s default delimiter, you can change the
delimiter to any other character of your choice. Changing the delimiter can make your
life easier when the string contains slashes. For example, the previous command line
that contains a path could be replaced with either of the following commands:
$ sed ‘s-/nsswitch.conf-/nsswitch.conf and stuff-’ < /etc/hosts | grep nss
$ sed ‘sD/termios.hD/termios.h and stuffD’ < /etc/gettytab | grep termios
83
76034c05.qxd:Toolbox
3/29/08
10:45 AM
Page 84
Chapter 5: Manipulating Text
In the first line shown, a dash (-) is used as the delimiter. In the second case, the letter D
is the delimiter.
The sed command can run multiple substitutions at once, by preceding each one with -e.
Here, in the text streaming from myfile.txt, all occurrences of francois are changed
to FRANCOIS and occurrences of chris are changed to CHRIS:
$ sed -e s/francois/FRANCOIS/g -e s/chris/CHRIS/g < myfile.txt
You can use sed to add newline characters to a stream of text. The following example is done
from the bash shell. Where Enter appears, press the Enter key. The > is on the second
line and is generated by bash, not typed in.
$ echo aaabccc | sed ‘s/b/\Enter
> /’
aaa
ccc
The trick just shown does not work on the left side of the sed substitution command.
When you need to substitute newline characters, it’s easier to use the tr command.
Translate or Remove Characters with tr
The tr command is an easy way to do simple character translations on the fly. In the following
example, new lines are replaced with spaces, so all the files listed from the current
directory are output on one line:
$ ls | tr ‘\n’ ‘ ‘
Replace newline characters with spaces
The tr command can be used to replace one character with another, but does not work with
strings as sed does. The following command replaces all instances of the lowercase
letter f with a capital F.
$ tr f F < myfile.txt
Replace every f in the file with F
You can also use the tr command to simply delete characters. Here are two examples:
$ ls | tr -d ‘\n’
$ tr -d f < myfile.txt
Delete new lines (resulting in one line)
Delete every letter f from the file
The tr command can do some nifty tricks when you specify ranges of characters to work
on. Here’s an example of capitalizing lowercase letters to uppercase letters:
$ echo chris | tr a-z A-Z
CHRIS
84
Translate chris into CHRIS
76034c05.qxd:Toolbox
3/29/08
10:45 AM
Page 85
Chapter 5: Manipulating Text
The same result can be obtained with the following syntax:
$ echo chris | tr ‘[:lower:]’ ‘[:upper:]’
Translate chris into CHRIS
Checking Differences Between
Two Files with diff
When you have two versions of a file, it can be useful to know the differences between the
two files. For example, when changing a configuration file, people often leave a copy of
the original configuration file. When that occurs, you can use the diff command to
discover which lines differ between your new configuration and the original configuration, in order to see what you have done. For example:
$ cp /etc/sysctl.conf /etc/sysctl.conf.backup
Make some changes to the sysctl.conf file
$ diff /etc/sysctl.conf /etc/sysctl.conf.backup
You can change the output of diff to what is known as unified format. Unified format
can be easier to read by human beings. It adds three lines of context before and after
each block of changed lines that it reports, and then uses + and - to show the difference
between the files. The following set of commands creates a file (f1.txt) containing a
sequence of numbers (1–7), creates a file (f2.txt) with one of those numbers changed
(using sed), and compares the two files using the diff command (type pkg_add -r
seq2 to get the seq2 command):
$ seq2 -s 1 -e 7 > f1.txt
Send a sequence of 7 number to f1.txt
$ cat f1.txt
Display contents of f1.txt
1
2
3
4
5
6
7
$ sed s/4/FOUR/ < f1.txt > f2.txt
Change 4 to FOUR and send to f2.txt
$ diff f1.txt f2.txt
4c4
Shows line 4 was changed in file
< 4
--> FOUR
$ diff -u f1.txt f2.txt
Display unified output of diff
--- f1.txt 2007-09-07 18:26:06.000000000 -0500
+++ f2.txt 2007-09-07 18:26:39.000000000 -0500
@@ -1,7 +1,7 @@
1
2
3
85
76034c05.qxd:Toolbox
3/29/08
10:45 AM
Page 86
Chapter 5: Manipulating Text
-4
+FOUR
5
6
7
The diff -u output just displayed adds information such as modification dates and
times to the regular diff output. The sdiff command can be used to give you yet
another view. The sdiff command can merge the output of two files interactively, as shown
in the following output:
$ sdiff f1.txt f2.txt
1
2
3
4
5
6
7
1
2
3
| FOUR
5
6
7
Another variation on the diff theme is vimdiff, which opens the two files side by
side in vim and outlines the differences in color. (As root, type pkg_add -r vim6 to
install those commands.) Similarly, gvimdiff opens the two files in gvim.
The output of diff -u can be fed into the patch command. The patch command
takes an old file and a diff file as input and outputs a patched file. Following on the example above, use the diff command between the two files to generate a patch and then
apply the patch to the first file:
$ diff -u f1.txt f2.txt > patchfile.txt
$ patch f1.txt < patchfile.txt
Hmm... Looks like a unified diff to me...
The text leading up to this was:
...
$ cat f1.txt
1
2
3
FOUR
5
6
7
That is how many OSS developers (including kernel developers) distribute their code
patches. The patch and diff can also be run on entire directory trees. However, that
usage is outside the scope of this book.
86
76034c05.qxd:Toolbox
3/29/08
10:45 AM
Page 87
Chapter 5: Manipulating Text
Using awk and cut to Process Columns
Another massive text processing tool is the awk command. The awk command is a
full-blown programming language. Although there is much more you can do with
the awk command, the following examples show you a few tricks related to extracting
columns of text:
$ ps auwx | awk ‘{print $1,$11}’
Show columns 1, 11 of ps
$ ps auwx | awk ‘/francois/ {print $11}’
Show francois’ processes
$ ps auwx | grep francois | awk ‘{print $11}’ Same as above
The first example displays the contents of the first column (user name) and eleventh
column (command name) from currently running processes output from the ps command (ps auwx). The next two commands produce the same output, with one using
the awk command and the other using the grep command to find all processes owned
by the user named francois. In each case, when processes owned by francois are
found, column 11 (command name) is displayed for each of those processes.
By default, the awk command assumes the delimiter between columns is spaces. You
can specify a different delimiter with the -F option as follows:
$ awk -F: ‘{print $1,$5}’ /etc/passwd
Use colon delimiter to print cols
You can get similar results with the cut command. As with the previous awk example, we specify a colon (:) as the column delimiter to process information from the
/etc/passwd file:
$ cut -d: -f1,5 /etc/passwd
Use colon delimiter to print cols
The cut command can also be used with ranges of fields. The following command prints
columns 1 thru 5 of the /etc/passwd file:
$ cut -d: -f1-5 /etc/passwd
Show columns 1 through 5
Instead of using a dash (-) to indicate a range of numbers, you can use it to print all
columns from a particular column number and above. The following command displays all
columns from column 5 and above from the /etc/passwd file:
$ cut -d: -f5- /etc/passwd
Show columns 5 and later
We prefer to use the awk command when columns are separated by a varying number of spaces, such as the output of the ps command. And we prefer the cut command when dealing with files delimited by commas (,) or colons (:), such as the
/etc/passwd file.
87
76034c05.qxd:Toolbox
3/29/08
10:45 AM
Page 88
Chapter 5: Manipulating Text
Converting Text Files to Different Formats
Text files in the UNIX world use a different end-of-line character (\n) than those used
in the DOS/Windows world (\r\n). You can view these special characters in a text
file with the od command:
$ cp /etc/hosts myfile.txt
$ od –c –t x1 myfile.txt
So they will appear properly when copied from one environment to the other, it is necessary to convert the files. Here are some examples using the unix2dos and dos2unix
commands (pkg_add -r unix2dos):
$ unix2dos < myfile.txt > mydosfile.txt
$ cat mydosfile.txt | dos2unix > myunixfile.txt
$ file mydosfile.txt myunixfile.txt
mydosfile.txt:
ASCII English text, with CRLF line terminators
myunixfile.txt: ASCII English text
The unix2dos example just shown above converts a BSD or UNIX plain text file
(myunixfile.txt) to a DOS or Windows text file (mydosfile.txt). The dos2unix
example does the opposite by converting a DOS/Windows file to a BSD/UNIX file.
Both dos2unix and unix2dos are in the unix2dos package.
Summary
BSD and UNIX systems traditionally use plain text files for system configuration, documentation, output from commands, and many forms of stored information. As a result,
many commands have been created to search, edit, and otherwise manipulate plain
text files. Even with today’s GUI interfaces, the ability to manipulate plain text files is
critical to becoming a power BSD user.
This chapter explores some of the most popular commands for working with plain text
files in BSD systems. Those commands include text editors (such as vi, nano, and joe),
as well as commands that can edit streaming data (such as sed and awk commands).
There are also commands sorting text (sort), counting text (wc), and translating characters in text (tr).
88
76034c06.qxd:Toolbox
3/29/08
10:46 AM
Page 89
Playing with Multimedia
There’s no need to go to a GUI tool, if all you need
to do is play a song or convert an image or audio
file to a different form. There are commands for
working with multimedia files (audio or images)
that are quick and efficient if you find yourself
working from the shell. And if you need to manipulate batches of multimedia files, the same command you use to transform one file can be added
to a script to repeat the process on many files.
This chapter focuses on tools for working with
audio and digital image files from the shell.
Working with Audio
IN THIS CHAPTER
Playing music with
play, ogg123, and
mpg321
Adjusting audio with
alsamixer and aumix
Ripping music CDs
with cdparanoia
Encoding music with
oggenc, flac, and lame
Converting audio files
with sox
Transforming digital
There are commands available for BSD systems
images with convert
that can manipulate files in dozens of audio formats. Commands such as ogg123, mpg321, and
play can be used to listen to audio files. There
are commands for ripping songs from music CDs and encoding them
to store efficiently. There are even commands to let you stream audio so
anyone on your network can listen to your playlist.
Starting with Audio
Your BSD system may not be configured to play sound when you first
install it. If that’s the case, you need to load the appropriate drivers for
your sound card to work. The drivers for many popular sound cards are
already included with FreeBSD. Here is a quick procedure to find and configure sound in FreeBSD:
# dmesg | grep -i audio
Check if your sound card was detected
pcm0: <AudioPCI ES1373-B> port 0xdf00-0xdf3f irq 6 at device 7.0 on
pci1
# lspci | grep -i audio
List PCI audio devices (from pciutils
package)
01:07.0 Multimedia audio controller: Ensoniq ES1371 [AudioPCI-97]
(rev 06)
76034c06.qxd:Toolbox
3/29/08
10:46 AM
Page 90
Chapter 6: Playing with Multimedia
Next check the /boot/defaults/loader.conf file to find the module for your card.
Don’t edit that file! Instead, add entries to /boot/loader.conf to enable sound and load
your sound card’s driver. In my case, I added this and rebooted:
sound_load=”YES”
snd_es137x_load=”YES”
# Digital sound system
# es137x
If you are not sure exactly which sound card you have, you can try loading all sound
drivers with the line snd_driver_load=”YES” instead of the es137x line shown
above. After reboot, sound devices in /dev that should now be available include dsp,
dsp0.0, audio, audio0.0, mixer0, and sndstat. (The devices you get depend on
your sound card.) Type this to see if the sound module was properly configured:
$ cat /dev/sndstat
Check your installed audio device
FreeBSD Audio Driver (newpcm)
Installed devices:
pcm0: <AudioPCI ES1373-B> at io 0xdf00 irq 6 kld snd_es137x
(1p/1r/0v channels duplex default)
Some sound commands let you enter a specific device, which is particularly useful if
you have multiple sound cards or CD drives. Mixing applications use /dev/mixer0
by default. Your CD device is likely /dev/acd0. For some reason, permissions on
/dev/acd0 are closed to all but root, by default. So, as root, you might need to open
permissions to let regular users play music from a CD as follows:
$ chmod 666 /dev/acd0
Open permissions so any user can play CDs.
Next, check out the Adjusting Audio Levels section and then try playing some audio.
For the audio players described in the rest of this section, you can install the following packages: sox, vorbis-tools, libvorbis, mpg123, and aumix. For audio ripping and
encoding, you can install packages such as cdparanoia and flac. You can use pkg_add
-r package to install any of those packages.
Playing Music
Depending on the audio format you want to play, several command line players are
available for BSD. The play command (based on the sox facility, described later), can
play audio files in multiple, freely available formats. You can use ogg123 to play popular open source music formats, including Ogg Vorbis, Free Lossless Audio Codec
(FLAC) and Speex files. The mpg321 player, which is available in the FreeBSD software repository, is popular for playing MP3 music files.
Type play -h to see audio formats and effects available to use with play:
$ play -help
...
Supported file formats: aiff al au auto avr cdr cvs dat vms hcom la lu maud nul
ossdsp prc raw sb sf sl smp sndt sph 8svx sw txw ub ul uw voc vox wav wve
90
76034c06.qxd:Toolbox
3/29/08
10:46 AM
Page 91
Chapter 6: Playing with Multimedia
Supported effects: avg band bandpass bandreject chorus compand copy dcshift
deemph earwax echo echos fade filter flanger highp highpass lowp lowpass mask
mcompand noiseprof noisered pan phaser pick pitch polyphase rate repeat resample
reverb reverse silence speed stat stretch swap synth trim vibro vol
Here are some examples of playing files using play:
$
$
$
$
$
play
play
play
play
play
inconceivable.wav
*.wav
hi.au vol .6
-r 14000 short.aiff
song.wav speed 2
Play WAV file (maybe ripped from CD)
Play all WAV files in directory (up to 32)
AU file, lower volume (can lower distortion)
AIFF, sampling rate of 14000 hertz
Speed up playback (to sing like the Chipmunks)
If you don’t have any audio files available, there’s an audio file you can play to get a
quick doink here: /usr/local/lib/firefox/res/samples/test.wav.
Here are examples for playing Ogg Vorbis (www.vorbis.com) files with ogg123:
$
$
$
$
$
$
ogg123
ogg123
ogg123
ogg123
ogg123
ogg123
mysong.ogg
Play ogg file
http://vorbis.com/music/Lumme-Badloop.ogg
Play Web address
-z *.ogg
Play files in pseudo-random order
-Z *.ogg
Same as -z, but repeat forever
/var/music/
Play songs in /var/music and sub directories
-@ myplaylist
Play songs from playlist
A playlist is simply a list of directories or individual Ogg files to play. When a directory is listed, all Ogg files are played from that directory or any of its subdirectories.
When playing multiple files, press Ctrl+C to skip to the next song. Press Ctrl+C twice
to quit.
To use the mpg321 player to play MP3 files, you need to install the mpg321 package
(pkg_add -r mpg321). Here are examples for playing MP3 audio files with mpg321:
$
$
$
$
$
mpg321 yoursong.mp3
mpg321 -@ mp3list
cat mp3list | mpg321 -@ mpg321 -z *.mp3
mpg321 -Z *.mp3
Play
Play
Pipe
Play
Same
MP3 file
songs from playlist of MP3s
playlist to mpg321
files in pseudo-random order
as -z, but repeat forever
An mpg321 playlist is simply a list of files. You can produce the list using a simple ls
command and directing the output to a file. Use full paths to the files, unless you plan
to use the list from a location from which relative paths make sense.
Adjusting Audio Levels
Open Source Sound System (OSS) is the default sound system for most BSD systems.
If you configured sound as described earlier in this chapter, you should be able to
adjust audio levels using tools such as mixer and aumix.
91
76034c06.qxd:Toolbox
3/29/08
10:46 AM
Page 92
Chapter 6: Playing with Multimedia
The mixer utility provides a very simple way to adjust audio levels for OSS sound
applications. Here are examples of the mixer for viewing and adjusting audio levels:
$ mixer
Show mixer levels
Mixer vol
is currently set to 88:88
Mixer pcm
is currently set to
0:88
Mixer speaker is currently set to
0:0
Mixer line
is currently set to
0:0
Mixer mic
is currently set to 100:100
...
$ mixer -s
Output mixer levels in form when you can restore later
vol 10:80 pcm 0:76 speaker 0:0 line 0:0 mic 100:100 cd 100:100 rec 0:0 igain
100:100 ogain 99:99 line1 99:99 phin 100:100 phout 100:100 video 68:68 =rec mic
$ mixer vol -10
Increase volume 10%
$ mixer vol -20
Decrease volume 20%
$ mixer vol 80:60
Set left volume to 80% and right volume to 60%
$ mixer =rec cd
Change recording device to cd
The mixer channels you have depend on the channels available on your sound card.
Besides volume (vol), you can adjust any of the levels shown above (pcm, speaker,
line, and so on) in the same way.
The aumix audio mixing application (aumix packages) can operate in screen-oriented
or plain command mode. In plain text you use options to change or display settings. Here
are examples of aumix command lines:
$
$
$
$
$
aumix
aumix
aumix
aumix
aumix
-q
-l q -m q
-v 80 -m 0
-m 80 -m R -m q
With no options, aumix runs screen-oriented
Show left/right volume and type for all channels
List current settings for line and mic only
Set volume to 70% and microphone to 0
Set mic to 80%, set it to record, list mic
When run screen-oriented, aumix displays all available audio channels. In screenoriented mode, use keys to highlight and change displayed audio settings. Use PageUp, PageDown,
up arrow, and down arrow keys to select channels. Use right or left arrow keys to
increase or decrease volume. Type m to mute the current channel. Press the spacebar
to select the current channel as the recording device. If a mouse is available, you can use it to
select volume levels, balance levels, or the current recording channel.
Ripping CD Music
To be able to play your personal music collection from your BSD system, you can use
tools such as cdparanoia to rip tracks from music CDs to wave files on your hard disk.
The ripped files can then be encoded to save disk space, using tools such as oggenc
(Ogg Vorbis), flac (FLAC), or lame (MP3).
NOTE There are some excellent graphical tools for ripping and encoding CDs,
such as grip and sound-juicer. Because they are CDDB-enabled, those tools
can also use information about the music on the CD to name the output files (artist,
92
76034c06.qxd:Toolbox
3/29/08
10:46 AM
Page 93
Chapter 6: Playing with Multimedia
album, song, and so on). This section, however, describes how to use some of the
underlying commands to rip and encode CD music manually.
Using cdparanoia, you can check that your CD drive is capable of ripping Compact
Disc Digital Audio (CDDA) CDs, retrieve audio tracks from your CD’s drive and
copy them to hard disk. Start by inserting a music CD in your drive and typing the
following:
$ cdparanoia –vsQ
...
Checking /dev/acd0 for cdrom...
Verifying CDDA command set...
...
Table of contents (audio tracks only):
track
length
begin
copy pre ch
===========================================================
1.
18295 [04:03.70]
0 [00:00.00]
no
no 2
2.
16872 [03:44.72]
18295 [04:03.70]
no
no 2
...
11.
17908 [03:58.58]
174587 [38:47.62]
no
no 2
12.
17342 [03:51.17]
192495 [42:46.45]
no
no 2
TOTAL 209837 [46:37.62]
(audio only)
The snipped output shows cdparanoia checking the capabilities of /dev/acd0, and
verifying that the drive can handle CDDA information. Finally, it prints information
about each track. Here are examples of cdparanoia command lines for ripping a CD to
hard drive:
$
$
$
$
$
$
$
cdparanoia
cdparanoia
cdparanoia
cdparanoia
cdparanoia
cdparanoia
cdparanoia
-B
-B
---f
-a
-w
-- “5-7”
“3-8” abc.wav
“1:[40]-”
-- “3”
-- “5”
-- “1” my.wav
Rip
Rip
Rip
Rip
Rip
Rip
Rip
tracks as WAV files by track name
tracks 5-7 into separate files
tracks 3-8 to one file (abc.wav)
tracks 1 from 40 secs in to end
track 3 and save to AIFF format
track 5 and save to AIFC format
track 1 and name it my.wav
Encoding Music
After a music file is ripped from CD, encoding that file to save disk space is usually
the next step. Popular encoders include oggenc, flac, and lame, for encoding to Ogg
Vorbis, FLAC, and MP3 formats, respectively.
With oggenc, you can start with audio files or streams in WAV, AIFF, FLAC, or raw
format and convert them to Ogg Vorbis format. Although Ogg Vorbis is a lossy format, the default encoding from WAV files still produces very good quality audio and
can result in a file that’s about one-tenth the size. Here are some examples of oggenc:
$ oggenc ab.wav
$ oggenc ab.flac -o new.ogg
$ oggenc ab.wav -q 9
Encodes WAV to Ogg (ab.ogg)
Encodes FLAC to Ogg (new.ogg)
Raises encoding quality to 9
93
76034c06.qxd:Toolbox
3/29/08
10:46 AM
Page 94
Chapter 6: Playing with Multimedia
By default, the quality (-q) of the oggenc output is set to 3. You can set quality to any
number from -1 to 10 (including fractions such as 5.5). You can also add information
to the resulting Ogg file, as follows:
$ oggenc NewSong.wav -o NewSong.ogg
-a Bernstein -G Classical
-d 06/15/1972 -t “Simple Song”
-l “Bernsteins Mass”
-c info=”From Kennedy Center”
\
\
\
\
\
The command just shown converts MySong.wav to MySong.ogg. The artist name is
Bernstein and the music type is Classical. The date is June 15, 1972, the song title is
Simple Song and the album name is Bernsteins Mass. A comment is From Kennedy
Center. The backslashes aren’t needed if you just keep typing the whole command on
one line. However, if you do add backslashes, make sure there are no spaces after the
backslash.
The preceding example adds information to the header of the resulting Ogg file. You
can see the header information, with other information about the file, using ogginfo:
$ ogginfo NewSong.ogg
Processing file “NewSong.ogg”...
...
Channels: 2
Rate: 44100
Nominal bitrate: 112.000000 kb/s
User comments section follows...
info=From Kennedy Center
title=Simple Song
artist=Bernstein
genre=Classical
date=06/15/1972
album=Bernsteins Mass
Vorbis stream 1:
Total data length: 3039484 bytes
Playback length: 3m:25.240s
Average bitrate: 118.475307 kb/s
Logical stream 1 ended
Here you can see that comments were added during encoding. The -c option was used
to set an arbitrary field (in this case, info) with some value to the header. Besides the
comments information, you can see that this file has two channels and was recorded at
a 44100 bitrate. You can also see the data length, playback time, and average bitrate.
The flac command is an encoder similar to oggenc, except that the WAV, AIFF, RAW,
FLAC or Ogg file is encoded to a FLAC file. Because flac is a free lossless audio codec, it
is a popular encoding method for those who want to save some space, but still want top
quality audio output. Using default values, our encoding from WAV to FLAC resulted
in files one-half the size, as opposed to one-tenth the size with oggenc. However, the
94
76034c06.qxd:Toolbox
3/29/08
10:46 AM
Page 95
Chapter 6: Playing with Multimedia
resulting FLAC file will have no loss of quality from the original WAV file, with the OGG
file will lose some quality. Here is an example of the flac command:
$
$
$
$
Encodes WAV to FLAC (now.flac)
Encodes WAV to AIFF (now.flac)
Encodes AIFF to FLAC (now.flac)
Raises compression level to 8
flac now.wav
sox now.wav now.aiff
flac now.aiff -o now2.flac
flac -8 top.wav -o top.flac
Compression level is set to -5 by default. A range from -0 to -8 can be used, with the
highest number giving the greatest compression and the lower number giving faster
compression time. The flac command can also be used to add an image to the FLAC file.
Here’s an example:
$ flac hotsong.wav -o hotsong.flac \
--picture=cover.jpg
Encodes WAV to FLAC (now.flac)
Adds cover.jpg to FLAC file
With an image embedded into the FLAC audio file, music players such as Rhythmbox
can display the embedded image when the song is playing. So, a CD cover or image
from a music video can be used in the FLAC file. (Note that the picture feature is not
available for flac on all BSD systems.)
To convert files to MP3 format using the lame command, you must first install the lame
package. If lame is not available on your BSD system (there are patent issues associated with MP3 encoding), try the twolame command (twolame package). Here are
some examples of the lame command to encode from WAV and AIFF files:
$
$
$
$
lame
lame
lame
lame
in.wav
tune.aiff -o tune.mp3
-h -b 64 -m m in.wav out.mp3
-q 0 in.wav -o abcHQ.mp3
Encodes WAV to MP3 (in.wav.mp3)
Encodes AIFF to MP3 (tune.mp3)
High quality, 64-bit, mono mode
Encode with quality set to 0
With lame, you can set the quality from 0 to 9 (5 is the default). Setting quality to 0
uses the best encoding algorithms, while setting it to 9 disables most algorithms (but
the encoding process moves much faster). As with oggenc, you can add tag information
to your MP3 file that can be used later when you play back the file. Here’s an example:
$ lame NewSong.wav NewSong.mp3
--ta Bernstein --tg Classical
--ty 1972 --tt “Simple Song”
--tl “Bernsteins Mass”
--tc “From Kennedy Center”
\
\
\
\
Like the wav to ogg example shown earlier in this chapter, the command just shown
converts MySong.wav to MySong.mp3. As before, the artist name is Bernstein and the
music type is Classical. The year is 1972, the song title is Simple Song and the album
name is Bernsteins Mass. A comment is From Kennedy Center. The backslashes aren’t
needed if you just keep typing the whole command on one line. However, if you do
add backslashes, make sure there are no spaces after the backslash.
95
76034c06.qxd:Toolbox
3/29/08
10:46 AM
Page 96
Chapter 6: Playing with Multimedia
The tag information appears on the screen in graphical MP3 players (such as
Rhythmbox and Totem, when they have been enabled to play MP3 format). You
can also see tag information when you use command line players, such as the
following mpg321 example:
$ mpg123 NewSong.mp3
High Performance MPEG 1.0/2.0/2.5 Audio Player for Layer 1, 2, and 3.
...
Title : Simple Song
Artist: Bernstein
Album : Bernsteins Mass
Year : 1972
Comment: From Kennedy Center
Genre : Classical
Playing MPEG stream from NewSong.mp3 ...
MPEG 1.0 layer III, 128 kbit/s, 44100 Hz joint-stereo
Converting Audio Files
The sox utility is an extremely versatile tool for working with audio files in different
freely available formats. Here are a few examples of things you can do with sox:
The following command concatenates two WAV files to a single output file:
$ sox head.wav tail.wav output.wav
This command mixes two wave files:
$ soxmix sound1.wav sound2.wav output.wav
To use sox to display information about a file, use the stat effect as follows:
$ sox sound1.wav -e stat
Samples read:
208512
Length (seconds):
9.456327
Scaled by:
2147483647.0
Maximum amplitude:
0.200592
Minimum amplitude:
-0.224701
Midline amplitude:
-0.012054
Mean
norm:
0.030373
Mean
amplitude:
0.000054
RMS
amplitude:
0.040391
Maximum delta:
0.060852
Minimum delta:
0.000000
Mean
delta:
0.006643
RMS
delta:
0.009028
Rough
frequency:
784
Volume adjustment:
4.450
96
76034c06.qxd:Toolbox
3/29/08
10:46 AM
Page 97
Chapter 6: Playing with Multimedia
Use trim to delete seconds of sound from an audio file. For example:
$ sox sound1.wav output.wav trim 4
$ sox sound1.wav output.wav trim 2 6
Trim 4 seconds from start
Keep from 2-6 seconds of file
The first example deletes the first 4 seconds from sound1.wav and writes the results
to output.wav. The second example takes sound1.wav, keeps the section between
second 2 and second 6 and deletes the rest, and writes to output.wav.
Transforming Images
With directories full of digital images, the ability to manipulate images from the command line can be a huge time saver. The ImageMagick package (available with FreeBSD)
comes with some very useful tools for transforming your digital images into forms you
can work with. This section shows some commands for manipulating digital images,
and provides examples of simple scripts for making those changes in batches.
Getting Information about Images
To get information about an image, use the identify command, as follows:
$ identify p2090142.jpg
p2090142.jpg JPEG 2048x1536+0+0 DirectClass 8-bit 402.037kb
$ identify -verbose p2090142.jpg | less
Image p2090142.jpg
Format: JPG (Joint Photographic Experts Group JFIF format)
Standard deviation: 61.1665 (0.239869)
Colors: 205713
Rendering intent: Undefined
Resolution: 72x72
Units: PixelsPerInch
Filesize: 402.037kb
Interlace: None
Background color: white
Border color: rgb(223,223,223)
Matte color: grey74
Transparent color: black
Page geometry: 2048x1536+0+0
Compression: JPEG
Quality: 44
The first command in the preceding example displays basic information about the
image (its file name, format, geometry, class, channel depth, and file size). The second
command shows every bit of information it can extract from the image. In addition to the
information you see in the example, the verbose output also shows creation times, the
type of camera used, aperture value, and ISO speed rating.
97
76034c06.qxd:Toolbox
3/29/08
10:46 AM
Page 98
Chapter 6: Playing with Multimedia
Converting Images
The convert command is the Swiss Army knife of file converters. Here are some
ways to manipulate images using the convert command. The following examples
convert image files from one format to another:
$ convert tree.jpg tree.png
$ convert icon.gif icon.bmp
$ convert photo.tiff photo.pcx
Convert a JPEG to a PNG file
Convert a GIF to a BMP file
Convert a TIFF to a PCX file
Image types that convert supports include JPG, BMP, PCX, GIF, PNG, TIFF, XPM, and
XWD. Here are examples of convert being used to resize images:
$ convert -resize 1024x768 hat.jpg hat-sm.jpg
$ convert -sample 50%x50% dog.jpg dog-half.jpg
The first example creates an image (hat-sm.jpg) that is 1024 × 768 pixels. The second
example reduced the image dog.jpg in half (50%x50%) and saves it as dog-half.jpg.
You can rotate images from 0 to 360 degrees. Here are examples:
$ convert -rotate 270 sky.jpg sky-final.jpg
$ convert -rotate 90 house.jpg house-final.jpg
Rotate image 270 degrees
Rotate image 90 degrees
You can add text to an image using the -draw option:
$ convert -fill black -pointsize 60 -font helvetica
-draw ‘text 10,80 “Copyright NegusNet Inc.”’
\
p10.jpg p10-cp.jpg
\
The previous example adds copyright information to an image, using 60-point black
Helvetica font to write text on the image. The text is placed 10 points in and 80 points
down from the upper left corner. The new image name is p10-cp.jpg, to indicate
that the new image had copyright information added.
Here are some interesting ways to create thumbnails with the convert command:
$ convert -thumbnail 120x120
$ convert -thumbnail 120x120
$ convert -thumbnail 120x120
-background red a.jpg
a.jpg a-a.png
-frame 40x40 a.jpg a-b.png
-frame 40x40 -rotate 10 \
a-c.png
All three examples create a 120 × 120 thumbnail. The second adds the -frame option
to put a border around the thumbnail, so it looks like a picture frame. The last example sets the -rotate angle to 10, so that the image looks slightly askew, and fills the
background in red. Figure 6-1 shows the results of these three examples.
98
76034c06.qxd:Toolbox
3/29/08
11:05 AM
Page 99
Chapter 6: Playing with Multimedia
Figure 6-1: Use convert to create a regular, framed, and angled thumbnail.
Besides the things you can do to make images useful and manageable, there are also
ways of making your images fun and even weird. Here are some examples:
$ convert -sepia-tone 75% house.jpg oldhouse.png
$ convert -charcoal 5 house.jpg char-house.png
$ convert -colorize 175 house.jpg color-house.png
The -sepia-tone option gives the image an “old west” sort of look. The -charcoal
option makes the image look as if the picture was hand-drawn using charcoal. By using
the -colorize option, every pixel in the image is modified using the colorize number
provided (175 in this case). Figure 6-2 shows the original house picture in the upper-left
corner, the sepiatone in the upper right, the charcoal in the lower left, and the colorized
house in the lower right.
Figure 6-2: Start with a normal image and sepiatone, charcoal, and colorize it.
99
76034c06.qxd:Toolbox
3/29/08
10:46 AM
Page 100
Chapter 6: Playing with Multimedia
If you are looking for one more example of weird image conversions, try swirling
your image. For example, use this command to get a picture like the one shown in
Figure 6-3:
$ convert -swirl 300 photo.pcx weird.pcx
Figure 6-3: Give your vacation pictures a swirl.
Converting Images in Batches
Most of the image conversions described in this chapter can be done quite easily using a
graphical image manipulation tool such the GIMP. However, where the convert commands we described can really shine are when you use them in scripts. So instead of
resizing, rotating, writing on, or colorizing a single file, you can do any (or all) of those
things to a whole directory of files.
You may want to create thumbnails for your duck decoy collection images. Or perhaps
you want to reduce all your wedding photos so they can play well on a digital photo
frame. You might even want to add copyright information to every image in a directory before you share them on the Web. All these things can be done quite easily with
the convert commands already described and some simple shell scripts.
Here’s an example of a script you can run to resize an entire directory of photos to 1024 × 768
pixels to play on a digital photo frame:
$ cd $HOME/myimages
$ mkdir small
$ for pic in `ls *.tif`
do
echo “converting $pic”
convert -resize 1024x768 $pic small/sm-$pic
done
Before running the script, this procedure changes to the $HOME/myimages directory
(which happens to contain a set of high-resolution images). Then it creates a subdirectory to hold the reduced images called small. The script itself starts with a for loop
that lists each file ending in .tif in the current directory (you might need to make
that .jpg or other image suffix). Then, each file is resized to 1024 × 768 and copied to
the small directory, with sm- added to each file name.
100
76034c06.qxd:Toolbox
3/29/08
10:46 AM
Page 101
Chapter 6: Playing with Multimedia
Using that same basic script, you can use any of the convert command lines shown
earlier, or make up your own to suit your needs. You might be able to convert a whole
directory of images in a few minutes that would have taken you hours of clicking in
the GUI.
Summary
The shell can provide a quick and efficient venue for working with your audio and
digital image files. This chapter describes ways of playing, ripping, encoding, converting, and streaming audio files from the command line. As for digital images, the
chapter provides many examples of using the convert command for resizing, rotating, converting, writing on, and otherwise manipulating those images.
101
76034c06.qxd:Toolbox
3/29/08
10:46 AM
Page 102
76034c07.qxd:Toolbox
3/29/08
10:48 AM
Page 103
Administering File
Systems
File systems provide the structures in which files,
directories, devices, and other elements of the
system are accessed from your BSD system.
FreeBSD primarily uses the UNIX File System
(UFS), although it also supports many different
types of file systems (ext3, msdos, cd9660, ntfs,
and so on) to some extent. FreeBSD can also
work with file systems on many different types
of media (hard disks, CDs, USB flash drives, ZIP
drives, and so on).
Creating and managing disk slices, partitions,
and the file systems on partitions are among the
most critical jobs in administering a BSD system.
That’s because if you mess up your file system,
you might very well lose the critical data stored
on your computer’s hard disk or removable media.
This chapter contains commands for partitioning
storage media, creating file systems, mounting
and unmounting file systems, and checking file
systems for errors and disk space.
IN THIS CHAPTER
Understanding file
system types
Partitioning disks with
sysinstall, fdisk, and
bsdlabel
Working with Linux file
systems
Using swap with
swapon, swapoff, and
swapinfo
Mounting file systems
Unmounting file
systems
Checking the systems
Checking disk space
with du and df
Understanding File
System Basics
Even though there are a lot of different file system types available for
FreeBSD systems, there are not many that you need to set up a basic BSD
system. If you are coming from a Linux or other UNIX system background,
however, you should start by understanding how BSD systems divide up
disks into slices and partitions.
In FreeBSD, the four primary parts into which you can divide a hard disk
are called slices. Within each slice that’s dedicated to FreeBSD, the disk
76034c07.qxd:Toolbox
3/29/08
10:48 AM
Page 104
Chapter 7: Administering File Systems
space can be divided into what are referred to as partitions. You can have multiple
partitions within a slice, each representing a different part of the total file system
(such as /usr, /var, /tmp, and of course the root partition /).
NOTE If you are coming from a Linux background, what BSD users call slices are
what you refer to as partitions. The reason that Linux systems can have more than
four partitions is that they can have extended partitions.
Setting Up the Disk Initially
Assuming you are starting to set up FreeBSD with a disk you can erase completely, the
FreeBSD installer provides you with the opportunity to format your disk. The quick
install procedure in Chapter 2 highlights the opportunities you have for setting up
your disk for use with FreeBSD. That procedure lets you:
❑ Create Slices: Using the fdisk utility, you can choose to dedicate the entire hard
disk to either compatibility mode (where you can add other operating systems later)
or dedicated mode (where only a single BSD system can boot from the disk). To install
other operating systems, as described later in this chapter, you need to select compatibility mode. (Note that the fdisk utility is different from the utility of the same
name you find in DOS or Linux systems.
❑ Create Partitions: Within FreeBSD slices, you can create partitions using the
bsdlabel utility. Partitions can include the normal UFS file systems and swap
space, however.
In the process of creating slices and partitions, you will also install boot code in the
master boot record and on the BSD slice itself. Details on using fdisk and bsdlabel
to work with slices, partitions, and boot code are contained in this chapter.
Checking Your Disk Setup
If you took the default settings when you installed the FreeBSD system, you might
have put the entire BSD system on slice one, consuming the entire hard disk. Within
that slice, you might have multiple partitions. For example, the output of the mount
command shows how the disk space is divided among several partitions that are then mounted in
different places in the file system:
$ mount
Display mounted disk partitions
/dev/ad0s1a on / (ufs, local)
devfs on /dev (devfs, local)
/dev/ad0s1e on /tmp (ufs, local, soft-updates)
/dev/ad0s1f on /usr (ufs, local, soft-updates)
/dev/ad0s1d on /var (ufs, local, soft-updates)
Four disk partitions are mounted in the above example. The first partition (a) on the first
slice (s1) on the first disk (ad0) accessible from /dev/ad0s1a is mounted on the root file
system (/). Partition 4 (/dev/ad0s1d) is mounted on /var, partition 5 (/dev/ad0s1e)
104
76034c07.qxd:Toolbox
3/29/08
10:48 AM
Page 105
Chapter 7: Administering File Systems
is on /tmp, and partition 6 is on /usr. The devfs file system is where the computer’s
devices can be accessed (/dev directory) and isn’t used to store data. One partition not
shown here is the swap partition. You can see available swap partitions using the swapinfo
command:
$ swapinfo -h
Device
/dev/ad0s1b
1K-blocks
487880
Display information about swap partitions
Used
Avail Capacity
0B
476M
0%
There is one swap partition in the example above that has 476MB of space available.
Next, to get a sense of how the disk space is distributed among the partitions on your
hard disk, you can use the df command as follows:
$ df -h
Filesystem
/dev/ad0s1a
devfs
/dev/ad0s1e
/dev/ad0s1f
/dev/ad0s1d
Display
Size
496M
1.0K
496M
16G
1.2G
disk space usage
Used
Avail Capacity
39M
417M
9%
1.0K
0B
100%
32K
456M
0%
1.7G
13G
11%
19M
1.1G
2%
Mounted on
/
/dev
/tmp
/usr
/var
In this example, we assigned 20GB of a 40GB hard drive to the BSD slice (slice 1).
The output of df shows how that disk space was divided among the root partition
/ (496MB), /tmp (496MB), /var (1.2GB) and /usr (16G). This default install expects
you to keep most of your applications and data in the /usr partition. In fact, your
system’s /home directory (where user data are stored) as well as /compat and /sys
directories are links to permanent directories in the /usr partition.
The last thing to do for now is show how the disk slices are configured using the fdisk
command:
# fdisk ad0
Show slice information for the first hard disk
******* Working on device /dev/ad0 *******
parameters extracted from in-core disklabel are:
cylinders=79428 heads=16 sectors/track=63 (1008 blks/cyl)
...
Media sector size is 512
Warning: BIOS sector numbering starts with sector 1
Information from DOS bootblock is:
The data for partition 1 is:
sysid 165 (0xa5),(FreeBSD/NetBSD/386BSD)
start 63, size 40949622 (19994 Meg), flag 80 (active)
beg: cyl 0/ head 1/ sector 1;
end: cyl 1023/ head 254/ sector 63
The data for partition 2 is:
<UNUSED>
The data for partition 3 is:
<UNUSED>
The data for partition 4 is:
<UNUSED>
105
76034c07.qxd:Toolbox
3/29/08
10:48 AM
Page 106
Chapter 7: Administering File Systems
You can see that only the first slice is defined (although they happen to call them partitions here), and it consumes about 20GB of space (19994 Meg). So the other slices are
available to be configured later (if needed).
The disk configuration just shown is used for most of the examples in this chapter.
Understanding File System Types
To use FreeBSD, you can get by with very few different file system types. The UNIX
File System (UFS) is used for most disk storage needs. As noted earlier, you also should
have at least one partition defined as a swap area. However, cases where you might
want to use other file system types with FreeBSD include:
❑ Other Local Operating Systems: If multiple operating systems (such as Windows
or Linux) are installed on your hard disk, you might want to access the data from
the partitions containing those systems (even if only to read the data).
❑ Other Media: You may have a CD, DVD, backup tape, or other media that contains
data formatted in other file system types. Even in cases where FreeBSD can’t create
file systems of a certain type, it may be able to mount and use those file systems.
Most of the examples in this chapter use UFS file systems to illustrate how a file system
is created and managed. However, Table 7-1 lists different file system types and describes
when you might want to use them.
Table 7-1: File System Types Supported in FreeBSD
106
File System Type
Description
ufs
Default file system type used with FreeBSD and other BSD systems.
ext2fs
Most commonly used file system with Linux is ext3. It contains journaling features for safer data and fast reboots after unintended shutdowns.
The ext2 file system is the predecessor of ext3, but doesn’t contain journaling. Either type can be mounted as an ext2fs in FreeBSD. However,
journaling will not be enabled if you mount an ext3 file system using
mount_ext2fs.
cd9660
File system type used on most data CDs and DVDs. Evolved from the
High Sierra file system (which was the original standard used on CDROM). May contain Rock Ridge extensions to allow cd9660 file systems
to support long filenames and other information (file permissions, ownership, and links).
msdosfs
MS-DOS file system. Can be used to mount older MS-DOS file systems,
such as those on old floppy disks.
ntfs
Microsoft New Technology File System (NTFS). Useful when file systems need to share files with most Windows systems (as with dual
booting or removable drives).
76034c07.qxd:Toolbox
3/29/08
10:48 AM
Page 107
Chapter 7: Administering File Systems
Table 7-1: File System Types Supported in FreeBSD (continued)
File System Type
Description
reiserfs
Journaling file system that used to be the default on some SUSE,
Slackware, and other Linux systems. Reiserfs is not well-supported
on many BSD systems.
swap
Used on swap partitions to hold data temporarily when RAM is not
currently available.
unionfs
Often used on live CDs to give the appearance of being able to write
to read-only file systems, while the actual saved data resides in a
writeable area (such as a ramdisk).
Besides those file system types listed, there are also what are referred to as network shared
file systems. Locally, a network shared file system may be a ufs, ntfs, or other normal file
system type. However, all or part of those file systems can be shared with network protocols such as Samba (smbfs file system type), NFS (nfs), and NetWare (nwfs).
You can use procedures in the following sections to create, manage, mount, and otherwise use the file system types just described.
Creating and Managing File Systems
FreeBSD gives you the option of either having the installer create a default partitioning
and file system scheme or letting you set that all up manually when you first install
FreeBSD. It does this by running the sysinstall utility, which in turn uses tools such
as bsdlabel and fdisk to actually change your disk slices and partitions.
After your BSD system is installed, you can use sysinstall again to create or change
partitions and slices. Or, you can use command-line utilities directly to change and work
with your disk partitions and the file systems created on those partitions.
Slicing and Partitioning Hard Disks
Historically, PC hard drives have used a 32-bit PC-BIOS partition table with a Master
Boot Record (MBR). This limits the sizes of partitions (referred to as slices in BSD systems) to 2TB and only allows four primary partitions per drive. The use of extended
partitions is a way to overcome the four-primary-partition limit. In order to overcome
the 2TB limit, PC-BIOS partition tables are being replaced with GPT (GUID Partition
Tables).
FreeBSD uses the fdisk utility to create and manage slices. It uses the bsdlabel utility to work with the partitions within each slice. Both have simplified interfaces available through the sysinstall utility.
107
76034c07.qxd:Toolbox
3/29/08
10:48 AM
Page 108
Chapter 7: Administering File Systems
NOTE If you prefer to use graphical tools for partitioning, resizing, and otherwise
manipulating your hard disk, you can try gparted or qtparted partitioning
tools. The command names and package names are the same for those two tools.
Changing Disk Slices with sysinstall
To work with your hard disk slices and partitions in various ways, you can run
the sysinstall utility. This provides a screen-oriented interface to the fdisk and
bsdlabel commands. After starting sysinstall as root user, select the following
to work with your disk slices:
Configure ➪ Fdisk
The Disk Slice (PC-style partition) Editor
Here is an example of the sysinstall Fdisk screen:
Disk name:
DISK Geometry:
Offset
0
ad0
FDISK Partition Editor
4983 cyls/255 heads/63 sectors = 80051895 sectors (39087MB)
Size(ST)
63
62
63
40949622
40949685
15631245
56580930
1558305
58139235
21924189
The
A =
D =
T =
End
40949684
56580929
58139234
80063423
Name
12
ad0s1
ad0s2
ad0s3
-
PType
Desc
unused
0
8
freebsd
4
ext2fs
4 linux_swap
12
unused
following commands are supported (in upper
Use Entire Disk
G = set Drive Geometry
Delete Slice
Z = Toggle Size Units
Change Type
U = Undo All Changes
Subtype
or lower case):
C = Create Slice
S = Set Bootable
W = Write Changes
Flags
165
131
130
0
F = `DD’ mode
| = Wizard m.
Use F1 or ? to get more help, arrow keys to select.
The following are some selections you can make from the Fdisk screen to change your
BSD slices (PC partitions). Keep in mind that your PC partition table will not change until
you write the changes to disk (by pressing w). Also, note that at any time before a
write you can undo your changes by typing the following key:
U
Undo any changes made since previous write
To change or delete an existing slice, use the arrow keys to highlight the slice you want to
change or delete. Then type one of the following to change it:
D
T
S
Deletes the highlighted slice
Change the slice type (PC partition types)
Use 165 (FreeBSD), 6 (DOS FAT16), 7 (NTFS), 130 (Linux swap), 131 (Linux)
Set the current slice as bootable
To create a new slice, use the arrow keys to highlight the unused space entry. Then type
the following to start creating the slice:
C
108
Create a new slice from unused space
76034c07.qxd:Toolbox
3/29/08
10:48 AM
Page 109
Chapter 7: Administering File Systems
You are asked to enter the size of the new slice (such as, 10G, 10705M, or 10962094K).
Next enter the slice (PC partition) type as 165 for FreeBSD, 6 for DOS, 7 for NTFS, 130
for Linux swap, or 131 for Linux.
Here are some other things to do with the sysinstall FDISK Partition Editor:
A
Z
G
Assigns the entire disk to the first slice (only do this at first install)
Steps through display of slice sizes (standard, KB, MB, and GB)
Change the geometry of the drive
When you are done, type the following to write all changes to the partition table:
W
Write changes to partition table
To exit without saving changes, type q. At this point, sysinstall also gives you the
option of installing a boot manager on the drive. If your system is running, you probably don’t want to mess with the boot manager at this point (so select None).
Changing Disk Slices with fdisk
The fdisk command is a useful BSD tool for listing and changing disk slices. Keep
in mind that modifying or deleting slices can cause valuable data to be removed, so
be sure of your changes before writing them to disk. To use the fdisk command to
list information about the slices on your hard disk, type the following commands as root user:
# fdisk -p ad0
Display slice table information in config file format
# /dev/ad0
g c79428 h16 s63
p 1 0xa5 63 40949622
p 2 0x83 40949685 15631245
a 2
p 3 0x82 56580930 1558305
# fdisk -s ad0
Display slice table summary information
/dev/ad0: 79428 cyl 16 hd 63 sec
Part
Start
Size Type Flags
1:
63
40949622 0xa5 0x00
2:
40949685
15631245 0x83 0x80
3:
56580930
1558305 0x82 0x00
# fdisk ad0
Long list of disk slices for the first IDE hard disk (ad0)
...
The data for partition 1 is:
sysid 165 (0xa5),(FreeBSD/NetBSD/386BSD)
start 63, size 40949622 (19994 Meg), flag 80 (active)
beg: cyl 0/ head 1/ sector 1;
end: cyl 1023/ head 254/ sector 63
The data for partition 2 is:
sysid 131 (0x83),(Linux native)
start 40949685, size 15631245 (7632 Meg), flag 0
beg: cyl 1023/ head 254/ sector 63;
end: cyl 1023/ head 254/ sector 63
The data for partition 3 is:
sysid 130 (0x82),(Linux swap or Solaris x86)
109
76034c07.qxd:Toolbox
3/29/08
10:48 AM
Page 110
Chapter 7: Administering File Systems
start 56580930, size 1558305 (760 Meg), flag 0
beg: cyl 1023/ head 254/ sector 63;
end: cyl 1023/ head 254/ sector 63
The data for partition 4 is:
<UNUSED>
The output just displayed shows three configured partitions and one that is unused.
FreeBSD is assigned to the first slice (it contains all BSD partitions, which are described
later). The second is a native Linux slice (an entire Debian root file system happens to
be installed there). The third slice contains the Linux swap area.
There are several ways you can change existing slices using the fdisk command:
WARNING! Here is where you can do real damage to your existing file systems.
Be sure to have backup copies of important data. If you are uncomfortable changing
partition tables, try to find an expert to help.
# fdisk -a ad0
Change active slice, to boot from different slice by default
Partition 1 is marked as active
Do you want to change the active partition? [n] y
Supply a decimal value for “active partition” [1] 2
Change slice 2 to active
Are you happy with this choice [n] y
...
2: sysid 131 (0x83),(Linux native)
start 40949685, size 15631245 (7632 Meg), flag 80 (active)
...
Should we write new partition table? [n] y
Write changes to table
# fdisk -i ad0
Interactively change slice table
******* Working on device /dev/ad0 *******
parameters extracted from in-core disklabel are:
cylinders=79428 heads=16 sectors/track=63 (1008 blks/cyl)
...
Do you want to change our idea of what BIOS thinks?[n] n No to change disk geom
...
Data for partition 1 is:
sysid 165 (0xa5),(FreeBSD/NetBSD/386BSD)
start 63, size 40949622 (19994 Meg), flag 80 (active)
beg: cyl 0/ head 1/ sector 1;
end: cyl 1023/ head 254/ sector 63
Do you want to change it? [n] y
Supply a decimal value for “sysid (165=FreeBSD)” [165] 165
Supply a decimal value for “start” [63] 63
Supply a decimal value for “size” [80063361] 80063361
Explicitly specify beg/end address ? [n] y
...
Do you want to change the active partition? [n] n
...
Should we write new partition table?[n] y
Danger! y writes changes, n doesn’t
110
76034c07.qxd:Toolbox
3/29/08
10:48 AM
Page 111
Chapter 7: Administering File Systems
The previous procedure stepped through changing the settings associated with an
existing slice (the first slice on your first hard disk). To create a new slice, run the same
command, stepping past all defined slices, until you get to a slice marked <UNUSED>.
Then type y and proceed as follows:
# fdisk -i ad0
...
The data for partition 4 is:
<UNUSED>
Do you want to change it? [n] y
Supply a decimal value for “sysid (165=FreeBSD)” [165] 165
Supply a decimal value for “start” [58139235] 58139235
Supply a decimal value for “size” [1558305] 1558305
Explicitly specify beg/end address ? [n] n
sysid 165 (0xa5),(FreeBSD/NetBSD/386BSD)
start 58139235, size 1558305 (760 Meg), flag 0
beg: cyl 333/ head 13/ sector 1;
end: cyl 855/ head 11/ sector 63
Are we happy with this entry? [n] y
Partition 2 is marked active
Do you want to change the active partition? [n] n
We haven’t changed the partition table yet.
...
Should we write new partition table? [n] y
This is your last chance.
The example just shown started at the first available point after the third slice. The file
system type was specified as FreeBSD (165). With the new slice created you can go on
to partition that slice into smaller sections.
Changing Partitions with sysinstall
BSD systems refer to the separate disk areas within a slice as partitions. Creating separate partitions allows an administrator to assign separate disk space to different parts
of the file system. Using the sysinstall or bsdlabel utilities, you can list, configure,
and change the partitions within your BSD slice.
NOTE Your BSD system is probably not configured to allow you to change disk
partitions by default. To open permissions to modify your partitions, type the following command as the root user: sysctl kern.geom.debugflags=16. Everything
you do after this point should be done with great consideration, since you can very
easily make the data on your disk inaccessible.
Type sysinstall as root user. Then select the following to open the FreeBSD
Disklabel Editor:
Configure ➪ Label
The disk Label editor
111
76034c07.qxd:Toolbox
3/29/08
10:48 AM
Page 112
Chapter 7: Administering File Systems
The following example of the FreeBSD Disklabel Editor displays all BSD slices on the local
hard disk:
FreeBSD Disklabel Editor
Disk: ad0
Disk: ad0
Part
---ad0s1a
ad0s1b
ad0s1d
ad0s1e
ad0s1f
The
C =
N =
T =
Use
Partition name: ad0s1
Partition name: ad0s4
Mount
----<none>
swap
<none>
<none>
<none>
Size
---512MB
476MB
1262MB
512MB
17232MB
Newfs
----*
SWAP
*
*
*
Free: 0 blocks (0MB)
Free: 1558305 blocks (760MB)
Part
----
Mount
-----
Size Newfs
---- -----
following commands are valid here (upper or lower case):
Create
D = Delete
M = Mount pt.
W = Write
Newfs Opts
Q = Finish
S = Toggle SoftUpdates
Z = Custom Newfs
Toggle Newfs U = Undo
A = Auto Defaults
R = Delete+Merge
F1 or ? to get more help, arrow keys to select.
The previous example shows the first IDE hard disk (ad0) containing two slices (ad0s1
and ad0s4) that are configured as FreeBSD slices. The first slice is where the entire operating system is installed. The second slice contains 760MB of disk space, all of which is
currently free.
To create partitions on a slice using available disk space, highlight the slice you want (in this case,
ad0s4) and press C. You are prompted for the following information:
❑ Partition size: Identify how much space should be assigned to the partition in
blocks, gigabytes (G), or megagytes (M) up to the maximum amount available
on the disk.
❑ File system or swap: Indicate whether the disk will contain a file system or swap
space.
❑ Mount point: If it’s a file system, specify the point in the file system where the
partition will be mounted (for example, /mnt/music). You should create this
mount point before creating the partition (as root, type mkdir /mnt/music).
The new partition is created. In this example, here is what the new partition looked like:
ad0s4a
/mnt/music
100MB UFS2+S Y
You can also change existing partitions in different ways. For example, with the partition
just created highlighted, here are some ways of changing that partition:
U
N
112
Undo any changes made since previous write
Add additional UFS newfs options while creating this file system
76034c07.qxd:Toolbox
3/29/08
10:48 AM
Page 113
Chapter 7: Administering File Systems
M
D
Change the mount point to a different place in the file system
Deletes the highlighted partition
When you are done making changes, type the following to write all changes to the disk label:
W
Write changes to partition table
If you want to just exit without saving changes, simply type Q.
Changing Partitions with bsdlabel
The bsdlabel provides a command-line alternative to sysinstall for changing the
partitions you have on a BSD slice. To view partition information on a particular BSD slice, type
the following:
# bsdlabel ad0s1
# /dev/ad0s1:
8 partitions:
#
size
a: 1048576
b:
975760
c: 40949622
d: 2584576
e: 1048576
f: 35292134
Display partition information from a BSD slice
offset
0
1048576
0
2024336
4608912
5657488
fstype
4.2BSD
swap
unused
4.2BSD
4.2BSD
4.2BSD
[fsize bsize bps/cpg]
0
0
0
0
0
0
0
0
0
0
0
# “raw” part, don’t edit
0
0
0
There are several ways you can create or change labels for an existing slice (don’t do this on
slices that have data you want to keep):
# bsdlabel -n -w ad0s4
# bsdlabel -w ad0s4
# bsdlabel -e ad0s4
Show results of writing a label, but not writing
Writing a standard label to disk 1, slice 4 (ad0s4)
Opens the label for ad0s4 in an editor
With the -w option, a standard label is added to the slice. The standard label assigned
the entire slice as a single partition. By editing the label (-e), which opens the label
in the vi editor, you can identify the file system type as 4.2BSD. Next, you need to
create a file system on the new partition.
Creating a UFS File System on a Partition
To create a UFS file system on an empty partition, you can use the newfs command. In the
example above, because you made the entire label a single partition, you can identify
the entire slice as containing the new file system. Here is an example:
# newfs -N /dev/ad0s4
Show results of adding UFS files system, but not writing
/dev/ad0s4: 760.9MB (1558304 sectors) block size 16384, fragment size 2048
using 5 cylinder groups of 183.77MB, 11761 blks, 23552 inodes.
super-block backups (for fsck -b #) at:
160, 376512, 752864, 1129216, 1505568
# newfs /dev/ad0s4
Write the UFS file system to disk 1, slice 4
113
76034c07.qxd:Toolbox
3/29/08
10:48 AM
Page 114
Chapter 7: Administering File Systems
At this point, your file system should be ready to use. Later, we describe more about
how to use the mount command to mount file systems. For the moment, you could
try the following to quickly check that the new file system can be mounted:
# mkdir /mnt/music
# mount /dev/ad0s4 /mnt/music
Create the mount point directory
Mount filesystem on disk 1,slice 4 to /mnt/music
Working with Linux-Compatible
File Systems
Having Linux compatibility software included with FreeBSD makes it possible to have
Linux-compatible file systems, such as ext2 and ext3 file systems. Besides including
tools (such as mkfs.ext2 and mkfs.ext3) for creating Linux file systems, there
are also tools for checking (fsck.ext2 and fsck.ext3) and adjusting parameters
(tune2fs) of a Linux file system. (You need to add Linux Compatibility during
installation to get these features.)
The device examples below create and use the ext2 file system on the third slice of
the first IDE hard disk (/dev/ad0a1). If instead of working with an IDE drive you
are using a SCSI or USB memory stick, the first such disk would be identified as a da
drive. When you go to create a Linux-compatible file system, you can do so by either
creating it to the entire drive (da0) or a slice on that drive (da0s1).
Creating Linux-Compatible File Systems
To create a Linux-compatible file system in FreeBSD, you can start by creating a slice dedicated
to Linux. Refer to the “Changing Disk Slices with sysinstall” section earlier in this
chapter for information on creating a slice. Then assign that slice to a partition type
of 131 (Linux ext2fs). You are now ready to make an ext2 or ext3 file system on that
partition.
NOTE If procedures in this chapter don’t work, make sure that you have the
Linux compatibility feature installed and the Linux driver loaded (kldload
linux). Keep in mind that ext2 and ext3 support is not particularly stable. For
production machines we recommend using the UFS file system in most cases.
Here are some examples using the mkfs.ext2 and mkfs.ext3 commands to create an
ext2 or ext3 file system on a Linux (ext2fs) slice:
# cd /usr/compat/linux/sbin
Change to Linux sbin (or add to your $PATH)
# ./mkfs.ext2 -v /dev/ad0s4
Create ext2 file system on disk 1/slice 4 (ad0s4)
mke2fs 1.38 (30-Jun-2005)
/dev/ad0s4 is not a block special device.
Proceed anyway? (y,n) y
Filesystem label=
OS type: Linux
Block size=4096 (log=2)
Fragment size=4096 (log=2)
97536 inodes, 194788 blocks
114
76034c07.qxd:Toolbox
3/29/08
10:48 AM
Page 115
Chapter 7: Administering File Systems
9739 blocks (5.00%) reserved for the super user
First data block=0
Maximum filesystem blocks=201326592
6 block groups
32768 blocks per group, 32768 fragments per group
16256 inodes per group
Superblock backups stored on blocks:
32768, 98304, 163840
...
# ./mkfs.ext2 -v -c /dev/ad0s4
Verbose and scan for bad blocks
...
/dev/ad0s4 is not a block special device.
Proceed anyway? (y,n) y
...
Running command: badblocks -b 4096 -s /dev/ad0s4 194788
Checking for bad blocks (read-only test): done
788
...
# ./mkfs.ext3 -v -c /dev/ad0s4
Same a previous, but creates ext3 file system
Viewing and Changing Linux File System Attributes
Using the tune2fs or dumpe2fs commands you can view attributes of ext2 and ext3 file
systems. The tune2fs command can also be used to change file system attributes. Here are
examples (both commands produce the same output):
# cd /usr/compat/linux/sbin
Change to Linux sbin directory
# ./tune2fs -l /dev/ad0s4 | less
View tunable file system attributes
# ./dumpe2fs -h /dev/ad0s4 | less
Same as tune2fs output
Filesystem volume name:
mypartition
Last mounted on:
<not available>
Filesystem UUID:
86d67872-3c9c-456a-986b-25c802d060c9
Filesystem magic number: 0xEF53
Filesystem revision #:
1 (dynamic)
Filesystem features:
has_journal resize_inode filetype sparse_super
large_file
Default mount options:
(none)
Filesystem state:
clean
Errors behavior:
Continue
Filesystem OS type:
Linux
Inode count:
97536
Block count:
194788
Reserved block count:
9739
Free blocks:
187424
Free inodes:
97525
First block:
0
Block size:
4096
Fragment size:
4096
Reserved GDT blocks:
47
Blocks per group:
32768
Fragments per group:
32768
Inodes per group:
16256
Inode blocks per group:
508
Filesystem created:
Tue Feb 19 00:41:23 2008
115
76034c07.qxd:Toolbox
3/29/08
10:48 AM
Page 116
Chapter 7: Administering File Systems
Last mount time:
Last write time:
Mount count:
Maximum mount count:
Last checked:
Check interval:
Next check after:
Reserved blocks uid:
Reserved blocks gid:
n/a
Tue Feb 19 00:41:25 2008
0
36
Tue Feb 19 00:41:23 2008
15552000 (6 months)
Sun Aug 17 01:41:23 2008
0 (user root)
0 (group wheel)
The output shows a lot of information about the file system. For example, if you have
a file system that needs to create many small files (such as a news server), you can check
that you don’t run out of inodes. Setting the Maximum mount count ensures that the
file system is checked for errors after it has been mounted the selected number of times.
You can also find dates and times for when a file system was created, last mounted, and
last written to.
To change settings on an existing ext2 or ext3 file system, you can use the tune2fs command.
The following command changes the number of mounts before a forced file system
check:
# tune2fs -c 31 /dev/ad0s4
Sets # of mounts before check is forced
tune2fs 1.38 (30-Jun-2005)
Setting maximal mount count to 31
If you’d like to switch to forced file system checks based on time interval rather than number
of mounts, disable mount count checking by setting it to negative 1 (-1):
# tune2fs -c -1 /dev/ad0s4
tune2fs 1.38 (30-Jun-2005)
Setting maximal mount count to -1
Use the -i option to enable time-dependent checking. Here are some examples:
#
#
#
#
#
tune2fs
tune2fs
tune2fs
tune2fs
tune2fs
-i
-i
-i
-i
-i
10 /dev/ad0s4
1d /dev/ad0s4
3w /dev/ad0s4
6m /dev/ad0s4
0 /dev/ad0s4
Check after 10 days
Check after 1 day
Check after 3 weeks
Check after 6 months
Disable time-dependent checking
Be sure you always have either mount count- or time-dependent checking turned on.
Creating a Memory Disk File System
If you want to make a file system that is more portable (in other words, not tied to a
physical disk), you can create a memory disk file system. A memory disk file system is
one that sits within a file on an existing file system. You can format it as a file system,
mount and unmount it, and even move it around and use it from different computers.
Memory disk file systems are useful for such things as backing up data, creating live
CDs, or running dedicated virtual operating systems. In the example that follows, you
116
76034c07.qxd:Toolbox
3/29/08
10:48 AM
Page 117
Chapter 7: Administering File Systems
create a blank 1GB disk image file, format it as a file system, and then mount it to access
data on the file system:
# dd if=/dev/zero of=mydisk count=2048000
Create zero-filled 1GB file
2048000+0 records in
2048000+0 records out
1048576000 bytes transferred in 56.519717 secs (18552393 bytes/sec)
# du -sh mydisk
Check memory disk file size
1.0G
mydisk
# mdconfig -a -t vnode -f mydisk -u 2
Identifies mydisk as memory disk file
# bsdlabel -w md2 auto
Adds BSD label to file
# newfs md2a
Creates UFS file system
/dev/md2a: 1000.0MB (2047984 sectors) block size 16384, fragment size 2048
using 6 cylinder groups of 183.77MB, 11761 blks, 23552 inodes.
super-block backups (for fsck -b #) at:
160, 376512, 752864, 1129216, 1505568, 1881920
# mkdir /mnt/mydisk
Creates mount point
# mount /dev/md2a /mnt/mydisk
Mounts memory disk
In this procedure, the dd command creates an empty disk image file of 2048000 blocks
(about 1 GB). The mdconfig command identifies the mydisk file as the storage area
for the memory disk. The bsdlabel command adds the BSD label to the file image.
The newfs command creates a UFS file system on that image.
When the virtual file system is mounted, you can access it as you would any file system.
When you are done with the file system, leave it and unmount it:
#
#
#
#
#
cd /mnt/mydisk
mkdir test
cp /etc/hosts .
cd
umount /mnt/mydisk
Change to the mount point
Create a directory on the file system
Copy a file to the file system
Leave the file system
Unmount the file system
With the virtual file system unmounted, you could move it to another system or burn
it to a CD to use a file system in another location. If you don’t want the file system any
more, simply delete the file.
Creating and Using Swap Partitions
Swap partitions are needed in BSD systems to hold data that overflows from your
system’s RAM. If you didn’t create a swap partition when you installed BSD, you can
create it later manually. You can create your swap area either on a regular disk partition
(identify a new partition as swap when you create partitions as described earlier) or
in a file formatted as a swap partition.
If you don’t have a spare partition, you can create a swap area within a file as follows:
# dd if=/dev/zero of=/tmp/swapfile00 count=65536
65536+0 records in
65536+0 records out
33554432 bytes transferred in 1.541522 secs (21767079 bytes/sec)
117
76034c07.qxd:Toolbox
3/29/08
10:48 AM
Page 118
Chapter 7: Administering File Systems
# chmod 600 /tmp/swapfile00
# mdconfig -a -t vnode -f /tmp/swapfile00 -u -0
# swapon /dev/md0
The dd command above creates a 32MB file named swapfile00. The chmod command
locks down the permissions on the file. The mdconfig command configures the swap
file as an md device.
After you have created a swap partition or swap file, you need to tell the system to use the
swap area you made using the swapon command. This is similar to what happens at boot
time. Here are examples:
# swapon /dev/md0
Turn swap on for /dev/md0 partition
You can use the swapinfo command to see a list of your swap files and partitions:
# swapinfo
Filename
/dev/ad0s1b
/dev/md0
Total
# swapinfo -h
Device
/dev/ad0s1b
/dev/md0
Total
# swapinfo -k
View all swap files and partitions that are on
1K-blocks
Used
Avail Capacity
487880
0
487880
0%
32768
0
32768
0%
520648
0
520648
0%
View all swap files and partitions in megabytes
1K-blocks
Used
Avail Capacity
487880
0B
476M
0%
32768
0B
32M
0%
520648
0B
508M
0%
View all swap files and partitions in kilobytes
To turn off a swap area, you can use the swapoff command. Only do this if you are sure
your swap area is not being used, because it may crash the system:
# swapoff /dev/md0
# swapoff /dev/ad0s1b
# swapoff -a
Turn off swap file
Turn off swap partition
Turn off all swap partitions
Mounting and Unmounting File Systems
Before you can use a regular, non-swap file system, you need to attach it to a directory in your computer’s file system tree by mounting it. Your root file system (/) and
other file systems you use on an ongoing basis are typically mounted automatically
based on entries in your /etc/fstab file. Other file systems can be mounted manually as they are needed, using the mount command.
Mounting File Systems from the fstab File
When you first install FreeBSD, the /etc/fstab file is usually set up automatically to
contain information about your root partition and other partitions. Those partitions can
then be set to mount at boot time or be ready to mount manually (with mount points
and other options ready to use when a manual mount is done).
118
76034c07.qxd:Toolbox
3/29/08
10:48 AM
Page 119
Chapter 7: Administering File Systems
Here is an example of a /etc/fstab file:
# Device
/dev/ad0s1b
/dev/ad0s1a
/dev/ad0s1e
/dev/ad0s1f
/dev/ad0s1d
/dev/acd0
/dev/ad0s2
Mountpoint
none
/
/tmp
/usr
/var
/cdrom
/mnt/debian
FStype
swap
ufs
ufs
ufs
ufs
cd9660
ext2fs
Options
sw
rw
rw
rw
rw
ro,noauto
rw
Dump
0
1
2
2
2
0
0
Pass#
0
1
2
2
2
0
0
All the file systems are mounted automatically, except for the CD drive at /dev/acd0
(as indicated by the noauto option). The root (\), /tmp, /usr, and /var partitions are
regular UFS file systems and are mounted read/write (rw). The /dev/ads2 slice (disk
slice 2) was added manually in this example to mount the Debian GNU/Linux partition located on that device.
Table 7-2 describes each field in the /etc/fstab file.
Table 7-2: Fields in /etc/fstab File
Field
Description
1
The device name representing the file system. This is the device name of the partition to mount (such as /dev/ad0s1a). It can also contain the device name representing a slice (as in /dev/ad0s2 for slice 2) if the entire slice is dedicated to a
single file system.
2
The mount point in the file system. The file system contains all data from the
mount point down the directory tree structure, unless another file system is
mounted at some point beneath it.
3
The file system type. See Table 7-1 for a list of many common file system types.
4
mount command options. Examples of mount options include noauto (to prevent the file system from mounting at boot time) or ro (to mount the file system
read-only). Commas must separate options. See the mount command manual
page (under the -o option) for information on other supported options.
5
Dump file system? This field is only significant if you run backups with dump.
Positive numbers signify that the file system should be dumped. A number 1 means
that the file system needs to be dumped first (this is used for the root file system). A
number 2 assumes that the file system can be dumped at any point after the root file
system is checked.
6
File system check? The number in this field indicates whether or not the file system needs to be checked with fsck. A zero indicates that the file system should
not be checked. As with the dump indicators, number 1 means that the file system
needs to be checked first (this is used for the root file system). A number 2 assumes
that the file system can be checked at any point after the root file system is checked.
119
76034c07.qxd:Toolbox
3/29/08
10:48 AM
Page 120
Chapter 7: Administering File Systems
You can create your own entries for any hard disk or removable media partitions you
want in the /etc/fstab file. Remote file systems (NFS, Samba, and others) can also
contain entries in the /etc/fstab file to automatically mount those file systems at
boot time or later by hand.
Mounting File Systems with
the mount Command
The mount command is used to view mounted file systems, as well as to mount any
local (hard disk, USB drive, CD, DVD, and so on) or remote (NFS, Samba, and so on)
file systems. Here are examples of the mount command for listing mounted file systems:
$ mount
List mounted remote and local file systems
/dev/ad0s1a on / (ufs, local)
devfs on /dev (devfs, local)
/dev/ad0s1e on /tmp (ufs, local, soft-updates)
/dev/ad0s1f on /usr (ufs, local, soft-updates)
/dev/ad0s1d on /var (ufs, local, soft-updates)
/dev/ad0s2 on /mnt/debian (ext2fs, local)
$ mount -v
List mounted file systems with file system ids
/dev/ad0s1a on / (ufs, local, fsid 3abeb447a6961229)
devfs on /dev (devfs, local, fsid 00ff000505000000)
/dev/ad0s1e on /tmp (ufs, local, soft-updates, fsid 3abeb447c27d4dec)
/dev/ad0s1f on /usr (ufs, local, soft-updates, fsid 3abeb44746a302f2)
/dev/ad0s1d on /var (ufs, local, soft-updates, fsid 3bbeb44797a19385)
/dev/ad0s2 on /mnt/debian (ext2fs, local, fsid 4f00000008000000)
Use the -t option to list only mounts of a specific file system type:
$ mount -t ufs
List mounted ufs file systems
/dev/ad0s1a on / (ufs, local)
/dev/ad0s1e on /tmp (ufs, local, soft-updates)
/dev/ad0s1f on /usr (ufs, local, soft-updates)
/dev/ad0s1d on /var (ufs, local, soft-updates)
$ mount -t ext2fs
List mounted ext2 file systems
/dev/ad0s2 on /mnt/debian (ext2fs, local)
Here is a simple mount command to mount a local file system (the /dev/ad0s4 device) on
an existing directory named /mnt/music.
# mount /dev/ad0s4 /mnt/music
# mount -v /dev/ad0s4 /mnt/music/
Mount a local file system
Mount file system, more verbose
In the examples above, the mount command will either look for an entry for
/dev/sda1 in the /etc/fstab file or try to guess the type of file system.
Use -t to explicitly indicate the type of file system to mount:
# mount -v -t ext2fs /dev/ad0s4 /mnt/music/ Mount an ext2 file system
/dev/ad0s4 on /mnt/music (ext2fs, local, fsid 5e00000008000000)
120
76034c07.qxd:Toolbox
3/29/08
10:48 AM
Page 121
Chapter 7: Administering File Systems
If you’re mounting something that is listed in your fstab file already, you only need to
specify one item: mount point or device. For example, with the following fstab entry:
/dev/ad0s4
/mnt/music
ext2fs
rw
2 2
you can mount the file system using only some of the options:
# mount -v
/dev/ad0s4
# mount -v
/dev/ad0s4
/dev/ad0s4
on /mnt/music
/mnt/music
on /mnt/music
Mount file system with device name only
(ext2fs, local, fsid 5e00000008000000)
Mount file system with mount point only
(ext2fs, local, fsid 5e00000008000000)
You can specify mount options by adding -o and a comma-separated list of options. They
are the same options you can add to field 4 of the /etc/fstab file. By default, partitions are mounted with read/write access. You can explicitly indicate to mount a file
system as read/write (rw) or read-only (ro):
# mount -v
/dev/ad0s4
# mount -v
/dev/ad0s4
-t
on
-t
on
ext2fs -o rw /dev/ad0s4 /mnt/music Mount read/write
/mnt/music (ext2fs, local, fsid 5e00000008000000)
ext2fs -o ro /dev/ad0s4 /mnt/music Mount read-only
/mnt/music (ext2fs, local, fsid 5e00000008000000)
A few other useful mount options you can use include:
❑ noatime: Does not update the access time on files. Good on file systems with a
lot of I/O, such as mail spools and logs.
❑ noexec: Prevents execution of binaries located on this file system. Can be used to
increase security, for example for /tmp in environments with untrusted users.
Just as you can swap to a file, you can create a file system in a file and then mount it so you can
view its contents as you would any file system. Creating and mounting such a file is
described in the “Creating a Memory Disk File System” section earlier in this chapter.
A common situation where you might want to mount a file in loopback is after downloading a BSD install CD or LiveCD. By mounting that CD image, you can view its contents
or copy files from that image to your hard disk.
# mdconfig -a -t vnode -f /usr/images/FreeSBIE-2.0.1-RELEASE.iso -u 1
# mkdir /mnt/freesbie
# mount -t cd9660 /dev/md1 /mnt/freesbie
# ls /mnt/freesbie/
.cshrc
boot
etc
media
rescue
tmp
.profile
boot.catalog home
mnt
root
usr
COPYRIGHT dev
lib
pkg_info.txt
sbin
uzip
bin
dist
libexec
proc
sys
var
Unmounting File Systems with umount
To unmount a file system, use the umount command. You can umount the file system using
the device name or the mount point. You’re better off umounting with the mount point,
to avoid mistyping the device name (many of which are very similar).
121
76034c07.qxd:Toolbox
3/29/08
10:48 AM
Page 122
Chapter 7: Administering File Systems
# umount -v /dev/ad0s4
/dev/sda1 umounted
# umount -v /mnt/music
/tmp/diskboot.img umounted
Unmount by device name
Unmount by mount point
If the device is busy, the unmount will fail. A common reason for an unmount to fail is
that you have a shell open with the current directory of a directory inside the mount:
# umount -v /mnt/mymount/
umount: unmount of /mnt/music failed: Device busy
Checking File Systems
File systems are traditionally checked when the system first boots up. Settings in the
/etc/fstab file are used to determine which file systems are checked before they are
mounted. The fsck command, which actually depends on a set of file system-specific
fsck commands, not only can check for consistency problems in a file system, it can
also interactively repair those problems when necessary.
After file systems are mounted and users are allowed to access the system, fsck can be
run again with the -B flag to do background checking. You can run fsck at any time to
check, and possibly repair, a file system.
Instead of having fsck try to figure out the file system type you are checking, you can
run the file system-specific commands directly on your file systems. These commands
include fsck_ufs and fsck_msdosfs.
The following example shows how to check a UFS file system by simply adding the device
name of the disk partition you want to check with the fsck_ufs command:
# fsck_ufs /dev/ad0s4
Check UFS file system of inconsistencies
** /dev/ad0s4
** Last Mounted on /mnt/extra
** Phase 1 - Check Blocks and Sizes
** Phase 2 - Check Pathnames
** Phase 3 - Check Connectivity
** Phase 4 - Check Reference Counts
** Phase 5 - Check Cyl groups
377 files, 864 used, 373871 free (15 frags, 46732 blocks, 0.0% fragmentation)
This example shows a file system check on slice four of IDE disk 1 (/dev/ad0s4). The
slice is not currently mounted, so if fixes needed to be done to the disk, they could be.
Here are some other examples of options you can use when checking a file system with
the fsck_ufs command:
# fsck_ufs -B /dev/ad0s1f
# fsck_ufs -B -f ad0s1f
122
Run check in the background
Force file system check, even if marked clean
76034c07.qxd:Toolbox
3/29/08
10:48 AM
Page 123
Chapter 7: Administering File Systems
** /usr/.snap/fsck_snapshot
** Last Mounted on /usr
** Phase 1 - Check Blocks and Sizes
** Phase 2 - Check Pathnames
** Phase 3 - Check Connectivity
** Phase 4 - Check Reference Counts
** Phase 5 - Check Cyl groups
198317 files, 1814392 used, 6730360 free (25136 frags, 838153 blocks, 0.3%
fragmentation)
# fsck_ufs -d /dev/ad0s1a
Print commands without executing (debug mode)
# fsck_ufs -y /dev/ad0s1c
Make fsck say yes to any questions (like repairs)
If you want to check a DOS file system, you can use the fsck_msdos command. In this
example, the second partition on a USB memory stick (/dev/da0s2) contains a DOS
file system. You can create that DOS partition originally using the newfs_msdos command. (Note that memory sticks and SCSI drives device names begin with da, as
opposed to IDE disks which are named ad.)
# newfs_msdos /dev/md2a
Create DOS file system on USB device 1, slice 2
# fsck_msdosfs /dev/da0s2
Check DOS partition (on 2nd slice, 1st da device)
** /dev/da0s2 (NO WRITE)
** Phase 1 - Read and Compare FATs
** Phase 2 - Check Cluster Chains
** Phase 3 - Checking Directories
** Phase 4 - Checking for Lost Files
2712 files, 610448 free (38153 clusters)
MARK FILE SYSTEM CLEAN? no
***** FILE SYSTEM IS LEFT MARKED AS DIRTY *****
Note that the file system was listed as NO WRITE, because it was currently mounted.
So it could not be marked as clean. The file system could be marked as clean after
unmounting the file system and running fsck_msdosfs again:
# umount /dev/da0s2
# fsck_msdosfs /dev/da0s2
Run check again after unmounting
** /dev/da0s2
** Phase 1 - Read and Compare FATs
** Phase 2 - Check Cluster Chains
** Phase 3 - Checking Directories
** Phase 4 - Checking for Lost Files
2712 files, 610448 free (38153 clusters)
If fsck encounters errors during the file system check (and you have not indicated -y
to automatically respond yes and continue), you can interactively say whether or not you want
to fix the errors. Here is an example:
# fsck_msdosfs /dev/da0s2
** /dev/da0s2
** Phase 1 - Read and Compare FATs
Check a file system that has errors
123
76034c07.qxd:Toolbox
3/29/08
10:48 AM
Page 124
Chapter 7: Administering File Systems
** Phase 2 - Check Cluster Chains
** Phase 3 - Checking Directories
/hello.txt starts with free cluster
Truncate? [yn] y
** Phase 4 - Checking for Lost Files
2713 files, 610448 free (38153 clusters)
MARK FILE SYSTEM CLEAN? [yn] y
MARKING FILE SYSTEM CLEAN
***** FILE SYSTEM WAS MODIFIED *****
In the example just shown, the file hello.txt was open in a text editor when the
memory stick containing the file was unplugged. This subsequent file system check
showed the error, and I was able to correct it by typing y.
Finding Out About File System Use
Running out of disk space can be annoying on your desktop system and potentially a
disaster on your servers. To determine how much disk space is available and how much
is currently in use, you can use the df command. To check how much space particular
files and directories are consuming, use the du command.
The df command provides utilization summaries of your mounted file systems. Using the -h
option, you can have the data (which is shown in bytes by default) converted to kilobytes (K), megabytes (M) and gigabytes (G), to make that output more human-readable:
$ df -h
Filesystem
/dev/ad0s1a
devfs
/dev/ad0s1e
/dev/ad0s1f
/dev/ad0s1d
/dev/ad0s2
/dev/da0s1
Display space on file systems in human readable form
Size
Used
Avail Capacity Mounted on
496M
39M
417M
9%
/
1.0K
1.0K
0B
100%
/dev
496M
32K
456M
0%
/tmp
16G
3.5G
12G
23%
/usr
1.2G
19M
1.1G
2%
/var
7.3G
593M
6.4G
8%
/mnt/debian
48M
856K
45M
2%
/mnt/da0s1
Every file that is physically saved to a file system is represented by an inode. If your
file system has many small files, it’s possible that you might run out of inodes. To have
the df command check inode utilization use the -i option:
$ df -hi
Filesystem
/dev/ad0s1a
devfs
/dev/ad0s1e
/dev/ad0s1f
/dev/ad0s1d
124
Display how many inodes are available and used
Size
Used
Avail Capacity iused
ifree %iused
496M
39M
417M
9%
1117
64673
2%
1.0K
1.0K
0B
100%
0
0 100%
496M
34K
456M
0%
17
65773
0%
16G
3.5G
12G
23% 198316 2015570
9%
1.2G
19M
1.1G
2%
2523 162339
2%
Mounted on
/
/dev
/tmp
/usr
/var
76034c07.qxd:Toolbox
3/29/08
10:48 AM
Page 125
Chapter 7: Administering File Systems
If you have network mounts (such as Samba or NFS), these will show up, too, in your
df output. To limit df output to local file systems, use the -l (as in local) option:
$ df -hl
Display disk space only for local file systems
To display output for a particular file system type, use the -T option:
$ df -ht ufs
Filesystem
/dev/ad0s1a
...
Only display ufs file system types
Size
Used
Avail Capacity Mounted on
496M
39M
417M
9%
/
To check for disk space usage for particular files or directories in a file system, use the du command.
The following command was run as the user named francois:
$ du -h /home/
Show disk space usage for /home directory
du: /home/chris: Permission denied
4.0K
/home/francois/Mail
52K
/home/francois
64K
/home/
The output shows that access to another home directory’s disk use (in this case /home/
chris) was denied for security reasons. So the next examples will show how to avoid
permission issues and get totals that are correct by using the root user account. This is clearly visible
when we use -s to summarize
$ du -sh /home
Regular user is denied space totals to others’ homes
du: /home/chris: Permission denied
du: /home/horatio199: Permission denied
64K
/home
# du -sh /home
You can display summary disk use as root user
1.6G
/home
You can specify multiple directories with the -c option and total them up:
# du -sch /home /var
1.6G
/home
111M
/var
1.7G
total
Show directory and total summaries
You can combine du with the find command to check out disk space in all directories beneath
a point in your directory structure. Use the following command to view the disk space used
in directories beneath the /var file system:
# find /var -maxdepth 1 -type d -exec du -sh {} \;
44M
/var
2.0K
/var/account
8.0K
/var/at
125
76034c07.qxd:Toolbox
3/29/08
10:48 AM
Page 126
Chapter 7: Administering File Systems
2.0K
...
438K
86K
4.0K
53K
2.0K
/var/audit
/var/log
/var/mail
/var/msgs
/var/named
/var/preserve
Summary
Creating and managing file systems is a critical part of BSD system administration.
Most BSD systems use the UNIX File System (UFS) as the primary file system type for
storing data. However, most BSD systems can mount and use data from a variety of
file system types, including ext2, ext3, ntfs, msdos, reiserfs, and unionfs. It can also
work with network file systems, such as NFS, nwfs, and smbfs.
You can partition hard disks with commands such as fdisk and bsdlabel. Tools
for working with file systems include those that create file systems (newfs), mount/
unmount file systems (mount and umount), and check for problems (fsck). To see
how much space has been used in file systems, use the df and du commands.
126
76034c08.qxd:Toolbox
3/29/08
10:49 AM
Page 127
Backups and
Removable Media
Data backups in UNIX were traditionally done by
running commands to archive and compress the
files to backup, then writing that backup archive to
tape. Choices for archive tools, compression techniques, and backup media have grown tremendously in recent years. Tape archiving has, for
many, been replaced by techniques for backing up
data over the network, to other hard disks, or to
CDs, DVDs, or other low-cost removable media.
This chapter details some useful tools for backing
up and restoring your critical data. The first part
of the chapter details how to use basic tools such
as tar, gzip, and rsync for backups.
Backing Up Data to
Compressed Archives
IN THIS CHAPTER
Creating backup
archives with tar
Compressing backups
with gzip, bzip2,
and lzop
Backing up over the
network with SSH
Doing network backups with rsync
Making backup ISO
images with mkisofs
Burning backup
images to CD or
DVD with cdrecord
and growisofs
If you are coming from a Windows background,
you may be used to tools such as WinZip and
PKZIP, which both archive and compress groups of files in one application.
BSD systems offer separate tools for gathering groups of files into a single
archive (such as tar) and compressing that archive for efficient storage
(gzip, bzip2, and lzop). However, you can also do the two steps together
by using additional options to the tar command.
Creating Backup Archives with tar
The tar command, which stands for tape archiver, dates back to early UNIX
systems. Although magnetic tape was the common medium that tar wrote
to originally, today, tar is most often used to create an archive file that can
be distributed using a variety of media.
76034c08.qxd:Toolbox
3/29/08
10:49 AM
Page 128
Chapter 8: Backups and Removable Media
The fact that the tar command is rich in features is reflected in the dozens of options
available with tar. The basic operations of tar, however, are used to create a backup
archive (-c), extract files from an archive (-x), and update files in an archive (-u). You
can also append files to (-r or -A) or list the contents of an archive (-t).
NOTE Although the tar command is available on nearly all UNIX and BSD
systems, it behaves differently on many systems. For example, Solaris does not
support -z to manage tar archives compressed in gzip format. The Star (pronounced ess-tar) command supports access control lists (ACLs) and file flags
(for extended permissions used by Samba).
As part of the process of creating a tar archive, you can add options that compress
the resulting archive. For example, add -j to compress the archive in bzip2 format
or -z to compress in gzip format. By convention, regular tar files end in .tar, while
compressed tar files end in .tar.bz2 (compressed with bzip2) or .tar.gz (compressed with gzip). If you compress a file manually with lzop (see www.lzop.org),
the compressed tar file should end in .tar.lzo. (As root, type pkg_add -r lzop
to install lzop.)
In addition to being used for backups, tar files are popular ways to distribute source
code and binaries from software projects. That’s because you can expect every BSD
and UNIX -like system to contain the tools you need to work with tar files.
NOTE One quirk of working with the tar command comes from the fact that
tar was created before there were standards regarding how options are entered.
Although you can prefix tar options with a dash, it isn’t always necessary. So you
might see a command that begins tar xvf with no dashes to indicate the options.
A classic example for using the tar command might combine old-style options and
pipes for compressing the output; for example:
$ tar cf - *.txt | gzip -c > myfiles.tar.gz Make archive, zip it and output
The example just shown illustrates a two-step process you might find in documentation for old UNIX systems. The tar command creates (c) an archive from all .txt files
in the current directory. Instead of writing to the default tape device (/dev/sa0), the
f option says to direct output to a file (or in this case, “-” for standard output). The
output is piped to the gzip command and output to stdout (-c), and then redirected
to the myfiles.tar.gz file. Note that tar is one of the few commands that doesn’t
require that options be preceded by a dash (-).
New tar versions, on modern BSD systems, can create the archive and compress the output in
one step:
$
$
a
a
128
tar czf myfiles.tar.gz *.txt
tar czvf myfiles.tar.gz *.txt
textfile1.txt
textfile2.txt
Create gzipped tar file of .txt files
Be more verbose creating archive
76034c08.qxd:Toolbox
3/29/08
10:49 AM
Page 129
Chapter 8: Backups and Removable Media
In the examples just shown, note that the new archive name (myfiles.tar.gz) must
immediately follow the f option to tar (which indicates the name of the archive).
Otherwise the output from tar will be directed to the default tape device (/dev/sa0)
or stdout (if you use “-” instead of a file name). The z option says to do gzip compression and v produces verbose descriptions of processing.
When you want to return the files to a file system (unzipping and untarring), you can also
do that as either a one-step or two-step process, using the tar and optionally the
gunzip command:
$ gunzip -c myfiles.tar.gz | tar xf -
Unzips and untars archive
Or try the following command line instead:
$ gunzip myfiles.tar.gz ; tar xf myfiles.tar
Unzips then untars archive
This command removes the tar.gz file, leaving only the .tar file. To do that same
procedure in one step, you could use the following command:
$ tar xzvf myfiles.tar.gz
x textfile1.txt
x textfile2.txt
The result of the previous commands is that the archived .txt files are copied from
the archive to the current directory. The x option extracts the files, z uncompresses
(unzips) the files, v makes the output and f indicates that the next option is the name
of the archive file (myfiles.tar.gz).
Using Compression Tools
Compression is an important aspect of working with backup files. It takes less disk
space on your backup medium (CD, DVD, tape, and so on) or server to store compressed files. It also takes less time to transfer the archives to the media or download
the files over a network.
Although compression can save a lot of storage space and transfer times, it can significantly increase your CPU usage. You can consider using hardware compression on a
tape drive (see www.amanda.org/docs/faq.html#id346016).
NOTE See the man page of the mt command for details on how compression can
be set via software for most magnetic tape drives.
In the examples shown in the previous section, tar calls the gzip command. But tar
can work with many compression tools. Out of the box on FreeBSD, tar will work with
gzip and bzip2. A third compression utility we add to our toolbox is the lzop command, which can be used with tar in a different way. The order of these tools from
fastest/least compression to slowest/most compression is: lzop, gzip, and bzip2.
129
76034c08.qxd:Toolbox
3/29/08
10:49 AM
Page 130
Chapter 8: Backups and Removable Media
If you are archiving and compressing large amounts of data, the time it takes to compress your backups can be significant. So you should be aware that, in general, bzip2
may take about five times longer than lzop and only give you twice the compression.
However, with each compression command, you can choose different compression levels, to balance the need for more compression with the time that compression takes.
To use the tar command with bzip2 compression, use the -j option. You can add the
bzip2 package with pkg_add –r bzip2 if it does not exist:
$ tar cjvf myfiles.tar.bz2 *.txt
Create archive, compress with bzip2
You can also uncompress (-j) a bzip2 compressed file as you extract files (-x) using the tar
command:
$ tar xjvf myfiles.tar.bz2
Extract files, uncompress bzip2 compression
The lzop compression utility is a bit less integrated into tar. Before you can use
lzop, you need to install the lzop package. To do lzop compression, you can pipe the
output of tar to lzop as follows:
# pkg_add -r lzop
$ tar -cf - *.txt | lzop > myfiles.tar.lzo
$ lzop -d < myfiles.tar.lzo | tar -xf -
Create lzop compressed tar archive
Extract lzop-compressed tar archive
In the previous examples, the command line reverses the old syntax of tar with a switch
before the command. For normal use and in other examples, we used the modern syntax
of tar with no switch.
NOTE You may encounter .rar compressed files in the RAR format. This format
seems to be popular in the world of peer-to-peer networks. RAR is a proprietary
format so there is no widespread compressing tool. There is a rar package available
in the FreeBSD ports system (/usr/ports/archivers/rar). The unrar command, on
the other hand, has a binary package available with FreeBSD.
Compressing with gzip
As noted, you can use any of the compression commands alone (as opposed to within the tar
command line). Here are some examples of the gzip command to create and work
with gzip-compressed files:
$ gzip myfile
gzips myfile and renames it myfile.gz
The following command provides the same result, with verbose output:
$ gzip -v myfile
gzips myfile with verbose output
myfile: 86.0% -- replaced with myfile.gz
$ gzip -tv myfile.gz
Tests integrity of gzip file
myfile.gz:
OK
$ gzip -lv myfile.gz
Get detailed info about gzip file
130
76034c08.qxd:Toolbox
3/29/08
10:49 AM
Page 131
Chapter 8: Backups and Removable Media
method crc
date time
compressed
defla 0f27d9e4 Jul 10 04:48
46785
uncompr.
334045
ratio uncompressed_name
86.0% myfile
Use any one of the following commands to compress all files in a directory:
$ gzip -rv mydir
Compress all files in a directory
mydir/file1: 39.1% -- replaced with mydir/file1.gz
mydir/file2: 39.5% -- replaced with mydir/file2.gz
$ gzip -1 myfile
Fastest compression time, least compression
$ gzip -9 myfile
Slowest compression time, most compression
Add a dash before a number from 1 to 9 to set the compression level. As illustrated
above, -1 is the fastest (least) and -9 is the slowest (most) compression. The default
for gzip is level 6. The lzop command has fewer levels: 1, 3 (default), 7, 8, and 9.
Compression levels for bzip2 behave differently.
To uncompress a gzipped file, you can use the gunzip command. Use either of the following
examples:
$ gunzip -v myfile.gz
Unzips myfile.gz and renames it myfile
myfile.gz:
86.0% -- replaced with myfile
$ gzip -dv myfile.gz
Same as previous command line
Although the examples just shown refer to zipping regular files, the same options can
be used to compress tar archives.
Compressing with bzip2
The bzip2 command is considered to provide the highest compression among the compression tools described in this chapter. Here are some examples of bzip2:
$ bzip2 myfile
Compresses file and renames it myfile.bz2
$ bzip2 -v myfile
Same as previous command, but more verbose
myfile: 9.529:1, 0.840 bits/byte, 89.51% saved, 334045 in, 35056 out.
$ bunzip2 myfile.bz2
Uncompresses file and renames it myfile
$ bzip2 -d myfile.bz2
Same as previous command
$ bunzip2 -v myfile.bz2
Same as previous command, but more verbose
myfile.bz2: done
Compressing with lzop
The lzop command behaves differently from gzip and bzip2. The lzop command is
best in cases where compression speed is more important than the resulting compression ratio. When lzop compresses the contents of a file it leaves the original file intact
(unless you use -U), but creates a new file with a .lzo suffix. Use either of the following examples of the lzop command to compress a file called myfile:
$ lzop -v myfile
Leave myfile, create compressed myfile.lzo
compressing myfile into myfile.lzo
$ lzop -U myfile
Remove myfile, create compressed myfile.lzo
131
76034c08.qxd:Toolbox
3/29/08
10:49 AM
Page 132
Chapter 8: Backups and Removable Media
With myfile.lzo created, choose any of the following commands to test, list, or uncompress
the file:
$ lzop -t myfile.lzo
Test the compressed file’s integrity
$ lzop --info myfile.lzo
List internal header for each file
$ lzop -l myfile.lzo
List compression info for each file
method
compressed uncompr. ratio uncompressed_name
LZO1X-1
59008
99468 59.3% myfile
$ lzop --ls myfile.lzo
Show contents of compressed file as ls -l
$ cat myfile | lzop > x.lzo Compress standin and direct to stdout
$ lzop -dv myfile.lzo
Leave myfile.lzo, make uncompressed myfile
Unlike gzip and bzip2, lzop has no related command for unlzopping. Always just
use the -d option to lzop to uncompress a file. If fed a list of file and directory names,
the lzop command will compress all files and ignore directories. The original file name,
permission modes, and timestamps are used on the compressed file as were used on the
original file.
Listing, Joining, and Adding Files
to tar Archives
So far, all we’ve done with tar is create and unpack archives. There are also options
for listing the contents of archives, joining archives together, adding files to an existing archive, and deleting files from an archive.
To list an archive’s contents, use the -t option:
$ tar tvf myfiles.tar
-rw-r--r-- root/root
-rw-r--r-- root/root
$ tar tzvf myfiles.tgz
List files from uncompressed archive
9584 2008-07-05 11:20:33 textfile1.txt
9584 2008-07-09 10:23:44 textfile2.txt
List files from gzip compressed archive
If the archive were a tar archive compressed with lzop and named myfile.tar.lzo,
you could list that tar/lzop file’s contents as follows:
$ lzop -d < myfiles.tar.lzo | tar -tf -
List lzo/tar archives
Use the -r option to add one or more files to an existing archive. In the following example,
myfile is added to the archive.tar archive file:
$ tar rvf archive.tar myfile
Add a file to a tar archive
You can use wildcards to match multiple files to add to your archive:
$ tar rvf archive.tar *.txt
132
Add multiple files to a tar archive
76034c08.qxd:Toolbox
3/29/08
10:49 AM
Page 133
Chapter 8: Backups and Removable Media
Backing Up Over Networks
After you have backed up your files and gathered them into a tar archive, what do
you do with that archive? The primary reason for having a backup is in case something happens (such as hard disk crash) where you need to restore files from that
backup. Methods you can employ to keep those backups safe include:
❑ Copying backups to removable media such as tape, CD, or DVD (as described
later in this chapter)
❑ Copying them to another machine over a network
Fast and reliable networks, inexpensive high-capacity hard disks, and the security
that comes with moving your data off-site have all made network backups a popular
practice. For an individual backing up personal data or for a small office, combining
a few simple commands may be all you need to create efficient and secure backups.
This approach represents a direct application of the UNIX philosophy: joining together
simple programs that do one thing to get a more complex job done.
Although just about any command that can copy files over a network can be used to
move your backup data to a remote machine, some utilities are especially good for
the job. Using OpenSSH tools such as ssh and scp, you can set up secure passwordless transfers of backup archives and encrypted transmissions of those archives.
Tools such as the rsync command can save resources by backing up only files (or
parts of files) that have changed since the previous backup. With tools such as unison
(www.cis.upenn.edu/~bcpierce/unison/), you can back up files over a network
from Windows, as well as BSD systems.
The following sections describe some of these techniques for backing up your data to
other machines over a network.
NOTE A similar tool that might interest you is the rsnapshot command
(pkg_add -r rshapshot). The rsnapshot command (www.rsnapshot.org/)
can work with with rsync to make configurable hourly, daily, weekly or monthly
snapshots of a file system. It uses hard links to keep a snapshot of a file system, which
it can then sync with changed files.
Backing Up tar Archives Over ssh
OpenSSH (www.openssh.org/) provides tools to securely do remote login, remote
execution, and remote file copy over network interfaces. By setting up two machines
to share encryption keys, you can transfer files between those machines without entering passwords for each transmission. That fact lets you create scripts to back up your
data from an SSH client to an SSH server, without any manual intervention.
133
76034c08.qxd:Toolbox
3/29/08
10:49 AM
Page 134
Chapter 8: Backups and Removable Media
From a central BSD system, you can gather backups from multiple client machines using OpenSSH
commands. The following example runs the tar command on a remote site (to archive
and compress the files), pipes the tar stream to standard output, and uses the ssh command to catch the backup locally (over ssh) with tar:
$ mkdir mybackup ; cd mybackup
$ ssh francois@server1 ‘tar cf - myfile*’ | tar xvf francois@server1’s password: ******
myfile1
myfile2
In the example just shown, all files beginning with myfile are copied from the home
directory of francois on server1 and placed in the current directory. Note that the left
side of the pipe creates the archive and the right side expands the files from the archive
to the current directory. (Keep in mind that ssh might overwrite local files if they exist,
which is why we created an empty directory in the example.)
To reverse the process and copy files from the local system to the remote system, we run a local
tar command first. This time, however, we add a cd command to put the files in the
directory of our choice on the remote machine:
$ tar cf - myfile* | ssh francois@server1 \
‘cd /home/francois/myfolder; tar xvf -’
francois@server1’s password: ******
myfile1
myfile2
In this next example, we’re not going to untar the files on the receiving end, but instead
write the results to tgz files:
$ ssh francois@server1 ‘tar czf - myfile*’ | cat > myfiles.tgz
$ tar cvzf - myfile* | ssh francois@server1 ‘cat > myfiles.tgz’
The first example takes all files beginning with myfile from the francois user’s home
directory on server1, tars and compresses those files, and directs those compressed
files to the myfiles.tgz file on the local system. The second example does the reverse
by taking all files beginning with myfile in the local directory and sending them to a
myfiles.tgz file on the remote system.
The examples just shown are good for copying files over the network. Besides providing compression they also enable you to use any tar features you choose, such as incremental backup features.
Backing Up Files with rsync
A more feature-rich command for doing backups is rsync. What makes rsync so
unique is the rsync algorithm, which compares the local and remote files one small
block at a time using checksums, and only transfers the blocks that are different. This
134
76034c08.qxd:Toolbox
3/29/08
10:49 AM
Page 135
Chapter 8: Backups and Removable Media
algorithm is so efficient that it has been reused in many backup products. To add the
rsync package, you can use pkg_add -r rsync.
The rsync command can work either on top of a remote shell (ssh), or by running
an rsyncd daemon on the server end. The following example uses rsync over ssh to
mirror a directory:
$ rsync -avz --delete chris@server1:/home/chris/pics/ chrispics/
The command just shown is intended to mirror the remote directory structure
(/home/chris/pics/) to a directory on the local system (chrispics/). The -a
says to run in archive mode (recursively copying all files from the remote directory),
the -z option compresses the files, and -v makes the output verbose. The --delete
tells rsync to delete any files on the local system that no longer exist on the remote
system.
For on-going backups, you can have rsync do seven-day incremental backups.
Here’s an example:
# mkdir /mnt/backups
# rsync --delete --backup
\
--backup-dir=/mnt/backups/backup-`date +%A` \
-avz chris@server1:/home/chris/Personal/
\
/mnt/backups/current-backup/
When the command just shown runs, all the files from /home/chris/Personal
on the remote system server1 are copied to the local directory /mnt/backups/
current-backup. The first time the command is run, all files are backed up to the
current-backup directory. The next time the command runs (on the next day), all files
modified that day are copied to a directory named after the current day of the week,
such as /mnt/backups/backup-Monday. Over a week, seven directories will be created that reflect changes over each of the past seven days.
Another trick for rotated backups is to use hard links instead of multiple copies of the files.
This two-step process consists of rotating the files, then running rsync:
# rm -rf /mnt/backups/backup-old/
# mv /mnt/backups/backup-current/ /mnt/backups/backup-old/
# rsync --delete --link-dest=/mnt/backups/backup-old -avz \
chris@server1:/home/chris/Personal/ /mnt/backups/backup-current/
In the previous procedure, the existing backup-current directory replaces the
backup-old directory, deleting the two-week-old full backup with last-week’s full
backup. When the new full backup is run with rsync using the --link-dest option,
if any of the files being backed up from the remote Personal directory on server1
existed during the previous backup (now in backup-old), a hard link between the
file in the backup-current directory and backup-old directory is created.
135
76034c08.qxd:Toolbox
3/29/08
10:49 AM
Page 136
Chapter 8: Backups and Removable Media
You can save a lot of space by having hard links between files in your backup-old
and backup-current directory. For example, if you had a file named file1.txt in
both directories, you could check that both were the same physical file by listing the
files’ inodes as follows:
$ ls -i /mnt/backups/backup*/file1.txt
260761 /mnt/backups/backup-current/file1.txt
260761 /mnt/backups/backup-old/file1.txt
Backing Up with unison
Although the rsync command is good to back up one machine to another, it assumes
that the machine being backed up is the only one where the data is being modified.
What if you have two machines that both modify the same file and you want to sync
those files? Unison is a tool that will let you do that.
It’s common for people to want to work with the same documents on their laptop
and desktop systems. Those machines might even run different operating systems.
Because unison is a cross-platform application, it can let you sync files that are on both
BSD and Windows systems. In FreeBSD, to use unison you must install the unison
package (type the pkg_add -r unison command).
With unison, you can define two roots representing the two paths to synchronize. Those
roots can be local or remote over ssh. For example:
$ unison /home/francois ssh://francois@server1//home/fcaen
$ unison /home/francois /mnt/backups/francois-homedir
Unison contains both graphical and command-line tools for doing unison backups. It
will try to run the graphical version by default. This may fail if you don’t have a desktop running or if you’re launching unison from within screen. To force unison to run in
command line mode, add the -ui text option as follows:
$ unison /home/francois ssh://francois@server1//home/fcaen -ui text
Contacting server...
francois@server1’s password:
Looking for changes
Waiting for changes from server
Reconciling changes
local
server1
newfile ---->
memo.txt [f] y
Propagating updates
...
The unison utility will then compare the two roots and for each change that occurred
since last time, ask you what you want to do. In the example above, there’s a new file
called memo.txt on the local system. You are asked if you want to proceed with the
update (in this case, copy memo.txt from the local machine to server1). Type y to do
the updates.
136
76034c08.qxd:Toolbox
3/29/08
10:49 AM
Page 137
Chapter 8: Backups and Removable Media
If you trust unison, add -auto to make it take default actions without prompting you:
$ unison /home/francois ssh://francois@server1//home/fcaen –auto
There is no man page for unison. However, you can see unison options with the -help
option. There is a manual in /usr/local/share/doc/unison. You can also display
and page through the unison manual using the -doc all option as shown here:
$ unison -help
$ unison -doc all | less
See unison options
Display unison manual
If you find yourself synchronizing two roots frequently, you can create a profile, which
is a series of presets. In graphical mode, the default screen makes you create profiles.
Profiles are stored in .prf text files in the ~/.unison/ directory. They can be as simple as the following:
root = /home/francois
root = ssh://francois@server1//home/fcaen
If this is stored in a profile called fc-home.prf you can invoke it simply with the
following command line:
$ unison fc-home
Backing Up to Removable Media
The capacity of CDs and DVDs, and the low costs of those media, has made them
attractive options as computer backup media. Using tools that commonly come with
BSD systems, you can gather files to back up into CD or DVD images and burn those
images to the appropriate media.
Command-line tools such as mkisofs (for creating CD images) and cdrecord (for burning images to CD or DVD) once provided the most popular interfaces for making backups to CD or DVD. Now there are many graphical front ends to those tools you could
also consider using. For example, GUI tools for mastering and burning CDs/DVDs
include K3b (the KDE CD and DVD Kreator) and Nautilus (GNOME’s file manager that
offers a CD-burning feature). Other GUI tools for burning CDs include gcombust, X-CDRoast, and graveman.
The commands for creating file system images to back up to CD or DVD, as well as
to burn those images, are described in this section. To get the mkisofs and cdrecord
commands you need to install the cdrtools package (pkg_add -r cdrtools).
Creating Backup Images with mkisofs
Most data CDs and DVDs can be accessed on both Windows and BSD systems because
they are created using the ISO9660 standard for formatting the information on those
137
76034c08.qxd:Toolbox
3/29/08
10:49 AM
Page 138
Chapter 8: Backups and Removable Media
discs. Because most modern operating systems need to save more information about
file and directories than the basic ISO9660 standard includes, extensions to that standard were added to contain that information.
Using the mkisofs command, you can back up the file and directory structure from
any point in your BSD file system and produce an ISO9660 image. That image can
include the following kinds of extensions:
❑ System Use Sharing Protocol (SUSP) are records identified in the Rock Ridge
Interchange Protocol. SUSP records can include UNIX -style attributes, such as
ownership, long file names, and special files (such as character devices and
symbolic links).
❑ Joliet directory records store longer file names in a form that makes them usable
to Windows systems.
❑ Hierarchical File System (HFS) extensions allow the ISO image to appear as
an HFS file system, which is the native file system for Macintosh computers.
Likewise, Data and Resource forks can be added in different ways to be read
by Macs.
When you set out to create your ISO image, consider where you will ultimately need
to access the files you back up using mkisofs (BSD, Linux, Windows, or Macs). After
the image is created, it can be used in different ways, the most obvious of which is to
burn the image to a CD or DVD.
Besides being useful in producing all or portions of a BSD file system to use on a
portable medium, mkisofs is also useful for creating live CDs/DVDs. It does this
by adding boot information to the image that can launch a BSD kernel or other operating system, bypassing the computer’s hard drive.
Because most BSD users store their personal files in their home directories, a common
way to use mkisofs to back up files is to back up everything under the /home directory.
Here are some examples of using mkisofs to create an ISO image from all files and directories
under the /home directory:
#
#
#
#
cd /tmp
mkisofs -o home.iso /home
Create basic ISO9660 image
mkisofs -o home2.iso -J -R /home
Add Joliet Rock Ridge extensions
mkisofs -o home3.iso -J -R -hfs /home Also add HFS extensions
In each of the three examples above, all files and directories beneath the /home directory are added to the ISO image (home.iso). The first example has no extensions, so
all file names are converted to DOS-style naming (8.3 characters). The second example
uses Joliet and Rock Ridge extensions, so file names and permissions should appear
as they did on the original BSD system when you open the ISO on a BSD, Linux, or
Windows system. The last example also makes the files on the image readable from
a Mac file system.
138
76034c08.qxd:Toolbox
3/29/08
10:49 AM
Page 139
Chapter 8: Backups and Removable Media
You can have multiple sources added to the image. Here are some examples:
# mkisofs -o home.iso -R -J music/ docs/ \
chris.pdf /var/spool/mail
# mkisofs -o home.iso -J -R
\
-graft-points Pictures/=/var/pics/ \
/home/chris
Multiple directories/files
Graft files on to the image
The first example above shows various files and directories being combined and
placed on the root of the ISO image. The second example grafts the contents of the
/var/pics directory into the /home/chris/Pictures directory. As a result, on
the CD image the /Pictures directory will contain all content from the /var/pics
directory. Use the -graft option if backing up files from multiple directories causes
name duplication errors.
Adding information into the header of the ISO image can help you identify the contents of that
image later. This is especially useful if the image is being saved or distributed online,
without a physical disc you can write on. Here are some examples:
# mkisofs -o /tmp/home.iso -R -J
\ Add header info to ISO
-p www.handsonhistory.com
\
-publisher “Swan Bay Folk Art Center” \
-V “WebBackup”
\
-A “mkisofs”
\
-volset “All web site material on November 2, 2008” \
/home/chris
In the example above, -p indicates the preparer ID, which could include a phone number, mailing address or web site for contacting the preparer of the ISO image. With the
option -publisher, you can indicate a 128-character description of the preparer (possibly the company or organization name). The -V indicates the volume ID. Volume ID
is important because in some operating systems this volume ID is used to mount the
CD when it is inserted. For example, in the command line shown above, the CD would
be mounted on /media/WebBackup in FreeBSD and other BSD systems. The -A option
can be used to indicate the application used to create the ISO image. The -volset
option can contain a string of information about a set of ISO images.
When you have created your ISO image, and before you burn it to disc, you can check
the image and make sure you can access the files it contains. Here are ways to check
it out:
# isoinfo -d -i home.iso
Display header information
CD-ROM is in ISO 9660 format
System id: FreeBSD
Volume id: WebBackup
Volume set id: All Website material on November 2, 2008
Publisher id: Swan Bay Folk Art Center
Data preparer id: www.handsonhistory.com
139
76034c08.qxd:Toolbox
3/29/08
10:49 AM
Page 140
Chapter 8: Backups and Removable Media
Application id: mkisofs
Copyright File id:
Abstract File id:
Bibliographic File id:
Volume set size is: 1
Volume set sequence number is: 1
Logical block size is: 2048
Volume size is: 23805
Joliet with UCS level 3 found
Rock Ridge signatures version 1 found
You can see a lot of the information entered on the mkisofs command line when the
image was created. If this had been an image that was going to be published, we
might also have indicated the locations on the CD of a copyright file (-copyright),
abstract file (-abstract), and bibliographic file (-biblio). Provided that the header
is okay, you can next try accessing files on the ISO image by mounting it:
#
#
#
#
#
mkdir /mnt/myimage
mdconfig -a -t vnode -f home.iso -u 0
mount -t cd9660 /dev/md0 /mnt/myimage
ls -l /mnt/myimage
umount /mnt/myimage
Create a mount point
Create a memory disk device for ISO
Mount the ISO
Check the ISO contents
Unmount the image when done
Besides checking that you can access the files and directories on the ISO, make sure
that the date- and timestamps, ownership, and permissions are set as you would like.
That information might be useful if you need to restore the information at a later date.
Burning Backup Images with cdrecord
The cdrecord command is the most popular BSD command line tool for burning
CD and DVD images. After you have created an ISO image (as described earlier)
or obtained one otherwise (such as downloading an install CD or live CD from the
Internet), cdrecord makes it easy to put that image on a disc. To use cdrecord,
you must have the cdrtools package installed and you need to load the driver
required by your CD burner. For example:
# pkg_add -r cdrtools
# kldload /boot/kernel/atapicam.ko
There is no difference in making a CD or DVD ISO image, aside from the fact that a
DVD image can obviously be bigger than a CD image. Check the media you have for
their capacity. A CD can typically hold 650 MB, 700 MB, or 800 MB, whereas mini CDs
can hold 50 MB, 180 MB, 185 MB, or 193 MB. Single-layer DVDs hold 4.7 GB while
double-layer DVDs can hold 8.4 GB.
NOTE Keep in mind, however, that CD/DVD manufacturers list their capacities
based on 1000 KB per 1 MB, instead of 1024 KB. Type du --si home.iso to
list the size of your ISO instead of du -sh as you would normally, to check if
your ISO will fit on the media you have.
140
76034c08.qxd:Toolbox
3/29/08
10:49 AM
Page 141
Chapter 8: Backups and Removable Media
Before you begin burning your image to CD or DVD, check that your drive supports CD/DVD
burning and determine the address of the drive. Use the --scanbus option to cdrecord
to do that:
# cdrecord --scanbus
Shows a drive that cannot do burning
scsibus0:
0,0,0 0) ‘SAMSUNG ‘ ‘DVD-ROM SD-616E ‘ ‘F503’ Removable CD-ROM
0,0,0 1) *
0,0,0 2) *
...
# cdrecord --scanbus
Shows a drive that can burn CDs or DVDs
scsibus0:
0,0,0 0) ‘LITE-ON ‘ ‘DVDRW SOHW-1633S’ ‘BS0C’ Removable CD-ROM
0,0,0 1) *
0,0,0 2) *
...
In the two examples shown, the first indicates a CD/DVD drive that only supports
reading and cannot burn CDs (DVD-ROM and CD-ROM). The second example shows
a drive that can burn CDs or DVDs (DVDRW). Insert the medium you want to record
on. Assuming your drive can burn the media you have, here are some simple cdrecord
commands for burning a CD or DVD images:
#
#
#
#
#
#
#
#
cdrecord
cdrecord
cdrecord
cdrecord
cdrecord
cdrecord
cdrecord
cdrecord
–blank=fast ...
-dummy home.iso ...
-v home.iso ...
-v -e d speed=24 home.iso...
-pad home.iso ...
-eject home.iso
-/dev/cdrw home.iso...
dev=0,2,0 home.iso
Blank a CDRW disc in fast mode
Test burn without actually burning
Burn CD (default settings) in verbose
Set specific speed
Can’t read track so add 15 zeroed sectors
Eject CD/DVD when burn is done
Identify drive by device name (may differ)
Identify drive by SCSI name
The cdrecord command can also burn multi-session CDs/DVDs. Here is an example:
# cdrecord -multi home.iso
Start a multi-burn session
# cdrecord -msinfo
Check the session offset for next burn
Using /dev/cdrom of unknown capabilities
0,93041
# mkisofs -J -R -o new.iso \
Create a second ISO to burn
-C 0,93041 /home/chris/more Indicate start point and new data for ISO
# cdrecord new.iso
Burn new data to existing CD
You can use multiple -multi burns until the CD is filled up. For the final burn, don’t
use -multi, so that the CD will be closed.
Making and Burning DVDs with growisofs
Using the growisofs command you can combine the two steps of gathering files into an ISO
image (mkisofs) and burning that image to DVD (cdrecord). Besides saving a step, the growisofs
141
76034c08.qxd:Toolbox
3/29/08
10:49 AM
Page 142
Chapter 8: Backups and Removable Media
command also offers the advantage of keeping a session open by default until you
close it, so you don’t need to do anything special for multi-burn sessions.
Here is an example of some growisofs commands for a multi-burn session:
# growisofs -Z /dev/cd0 -R -J /home/chris
# growisofs -Z /dev/cd0 -R -J /home/francois
# growisofs -M /dev/cd0=/dev/zero
Master and burn to DVD
Add to burn
Close burn
If you want to add options when creating the ISO image, you can simply add mkisofs
options to the command line. (For example, see how the -R and -J options are added
in the above examples.)
If you want to burn a DVD image using growisofs, you can use the -dvd-compat option. Here’s
an example:
# growisofs -dvd-compat -Z /dev/cd0=image.iso Burn an ISO image to DVD
The -dvd-compat option can improve compatibility with different DVD drives over
some multi-session DVD burning procedures.
Summary
BSD and its predecessor UNIX systems handled data backups by combining commands
that each handled a discrete set of features. Backups of your critical data can still be
done in this way. In fact, many of the tools you can use will perform more securely and
efficiently than ever before.
The tape archiver utility (tar command) has expanded well beyond its original job
of making magnetic tape backups of data files. Because nearly every BSD, Linux, and
UNIX system includes tar, it has become a standard utility for packaging software and
backing up data to compressed archives. Those archives can then be transported and
stored in a variety of ways.
To move backed up data to other machines over a network, you can use remote execution features of OpenSSH tools (such as ssh). You can also use an excellent utility
called rsync. With rsync, you can save resources by only backing up files (or parts
of files) that have changed.
Inexpensive CDs and DVDs have made those media popular for doing personal and
small-office backups. The mkisofs command can create file systems of backed up data
in ISO9660 format that can be restored on a variety of systems (BSD, Linux, Windows,
or Mac). After mkisofs command has created an ISO image, the image can be burned
to CD or DVD using the cdrecord or growisofs commands.
142
76034c09.qxd:Toolbox
3/29/08
10:50 AM
Page 143
Checking and Managing
Running Processes
When an executable program starts up, it runs
as a process that is under the management of
your BSD system’s process table. Every BSD system provides all the tools you need to view and
change the processes running on your system.
The ps and top commands are great for viewing
information on your running processes. There are
literally dozens of options to ps and top to help
you view process information exactly the way
you want to. The pgrep command can further
help find the process you want.
There are commands such as nice and renice
for raising and lowering processor priority for
a process. You can move processes to run in the
background (bg command) or back to the foreground (fg command).
Sending signals to a process is a way of changing
its behavior or killing it altogether. Using the kill
and killall commands, you can send signals to
processes by PID or name, respectively. You can
also send other signals to processes to do such
things as reread configuration files or continue on
with a stopped process.
IN THIS CHAPTER
View active processes
with ps and top
Finding and controlling
processes
Adjust CPU priority
with nice and renice
Move processes to
background (bg) or
foreground (fg)
Killing and signaling
processes with kill
and killall
Using at and batch to
run commands
Scheduling commands
to run repeatedly
with cron
To run commands at scheduled times or so they are not tied to your shell
session, you can use the at and batch commands. To run commands
repetitively at set times, there are the cron and anacron facilities.
76034c09.qxd:Toolbox
3/29/08
10:50 AM
Page 144
Chapter 9: Checking and Managing Running Processes
Listing Active Processes
To see which processes are currently running on a system, most people use the ps and
top commands. The ps command gives you a snapshot (in a simple list) of processes
running at the moment. The top command offers a screen-oriented, constantly updated
listing of running commands, sorted as you choose (by CPU use, I/O, UID, and so on).
NOTE To see all the output shown in the following examples, you need to
mount the proc file system. One way to do that is to add the following line to
your /etc/fstab file (as root user):
proc
/proc
procfs
rw
0 0
Then type the following command (as root user):
# mount
/proc
Viewing Active Processes with ps
Every BSD system (as well as every system derived from UNIX, such as Linux, Mac
OS X, and others) includes the ps command. Over the years, however, many slightly
different versions of ps have appeared, offering slightly different options. Because ps
dates back to the first UNIX systems, it also supports non-standard ways of entering
some options (for example, allowing you to drop the dash before an option in some
cases).
The different uses of ps shown in this chapter will work on FreeBSD, OpenBSD, NetBSD,
and most other UNIX and Linux systems. Here are some examples you can run to show
processes running for the current user (Table 9-1 contains column descriptions of ps output):
$ ps
PID TT STAT
TIME
810 v0 I+
0.00.09
1117 v2 S
0.00.02
1125 v2 R+
0.00.00
$ ps -U chris
PID TT STAT
TIME
1132 ?? S
0:00.01
810 v0 I+
0.00.09
1117 v2 S
0.00.02
1125 v2 R+
0.00.00
1133 p0 Ss+ 0.00.00
...
$ ps -U chris -u
USER
PID %CPU %MEM
chris 1132 0.0 1.3
chris
810 0.0 0.6
chris 1117 0.0 0.6
chris 1133 0.0 0.6
chris 1204 0.0 0.4
...
144
List processes of current user at current shell
COMMAND
-sh (sh)
-sh (sh)
ps
Show all chris’ running processes (simple output)
COMMAND
sshd: chris@ttyp0 (sshd)
-sh (sh)
-sh (sh)
ps -U chris
-sh (sh)
Show
VSZ
6252
1756
1752
1756
1460
all chris’ running processes (with CPU/MEM)
RSS TT STAT STARTED
TIME COMMAND
3312 ?? S
4:52PM 0:00.03 sshd: chris@ttyp0
1400 v0 I+
3:30PM 0:00.09 -sh (sh)
1396 v2 I+
4:45PM 0:00.05 -sh (sh)
1396 p0 Ss
4:52PM 0:00.03 -sh (sh)
1036 p0 R+
5:07PM 0:00.00 ps -U chris -u
76034c09.qxd:Toolbox
3/29/08
10:50 AM
Page 145
Chapter 9: Checking and Managing Running Processes
$ ps -fU chris
Show all chris’ running processes (with PID)
PID TT STAT
TIME COMMAND
1132 ?? S
0:00.06 sshd: chris@ttyp0 (sshd)
810 v0 I+
0:00.09 -sh (sh)
1117 v2 I+
0:00.05 -sh (sh)
1133 p0 Ss
0:00.03 -sh (sh)
1211 p0 R+
0:00.00 ps -fU chris
...
$ ps -vU chris
Show all chris’ running processes (with SL and
PID STAT
TIME SL RE PAGEIN
VSZ
RSS
LIM TSIZ %CPU %MEM
1132 S
0:00.16
0 127
0 6252 3312
- 168 0.0 1.3
810 I+
0:00.09 127 127
2 1756 1400
- 100 0.0 0.6
1133 Ss
0:00.08
0 127
0 1756 1400
- 100 0.0 0.6
1244 I+
0:00.02 47 110
0 1752 1392
- 100 0.0 0.6
1264 R+
0:00.01
0
0
0 1460 1044
24 0.0 0.4
...
RE)
COMMAND
sshd: chris
-sh (sh)
-sh (sh)
-sh (sh)
ps -vU
These examples illustrate some of the processes from a user logged in locally and
remotely (over sshd). The first example above shows ps alone being run from a
Terminal window, so you only see the processes for the current shell running in that
window. Other examples let you display different information for each process. The
SL and RE columns show how many seconds the process has been sleeping and how
long it has been in core memory, respectively (127 means forever).
Here are ps examples showing output for every process currently running on the system:
$ ps -x | less
Show running processes, even without controlling terminals
PID TT STAT
TIME COMMAND
0 ?? WLs
0:00.00 [swapper]
1 ?? ILs
0:00.01 /sbin/init -2 ?? DL
0:00.49 [g_event]
...
$ ps -xl | less
Show long listing of processes
UID
PID PPID CPU PRI NI
VSZ
RSS MWCHAN STAT TT
TIME COMMAND
0
0
0
1 96 0
0
0 WLs
??
0:00.00 [swapper]
0
1
0
0
8 0
772
388 wait
ILs
??
0:00.01 /sbin/init
0
2
0
0 -8 0
0
8 DL
??
0:00.49 [g_event]
...
$ ps -xj | less
Show running process, with user name/process group
USER
PID PPID PGID
SID JOBC STAT TT
TIME COMMAND
root
0
0
0
0
0 WLs
??
0:00.00 [swapper]
root
1
0
1
1
0 ILs
??
0:00.01 /sbin/init -root
2
0
0
0
0 DL
??
0:00.56 [g_event]
...
$ ps -aux | less
Show running process, long BSD style
USER
PID %CPU %MEM
VSZ
RSS TT STAT STARTED
TIME COMMAND
root
10 99.0 0.0
0
8 ?? RL
3:30PM 209:34.30 [idle]
root
0 0.0 0.0
0
0 ?? WLs
3:30PM
0:00.00 [swapper]
root
1 0.0 0.2
772
388 ?? ILs
3:30PM
0:00.01 /sbin/init -...
$ ps auwx
Show every running process, long BSD style, wide format
$ ps auwwx
Show every running process, long BSD style, unlimited width
145
76034c09.qxd:Toolbox
3/29/08
10:50 AM
Page 146
Chapter 9: Checking and Managing Running Processes
The previous two commands are useful if you want to see the entire output of ps entries.
If output goes beyond your column width, it will wrap instead of truncating.
Some processes start up other processes. For example, a web server (httpd daemon)
will spin off multiple httpd daemons to wait for requests to your web server. You
can view the hierarchy of processes (in a tree view) using the pstree command (as root, type
pkg_add -r pstree to install it):
$ pstree
Show processes alphabetically in tree format
-+= 00000 root [swapper]
|-+= 00001 root /sbin/init -| |--= 00121 root adjkerntz -i
...
| |-+= 00739 root /usr/sbin/sshd
| | \-+= 01129 root sshd: chris [priv] (sshd)
| |
\-+- 01132 chris sshd: chris@ttyp0 (sshd)
| |
\-+= 01133 chris -sh (sh)
| |
\-+= 01999 chris pstree
| |
\-+- 02000 chris sh -c ps -axwwo user,pid,ppid,pgid,command
| |
\--- 02001 chris ps -axwwo user,pid,ppid,pgid,command
...
The “tree” example just shown illustrates a different way of displaying the hierarchy
of processes. The sshd processes show a running Secure Shell Daemon with a user
logging in over the network, resulting in a bash shell (and eventually a ps command)
starting.
If you prefer personalized views of ps output, you can select exactly which columns
of data to display with ps using the -o option. Table 9-1 shows available column output and the options to add to -o to have each column print with ps.
Table 9-1: Selecting and Viewing ps Column Output
146
Option
Column Head
Description
%cpu
%CPU
Percentage of CPU use
%mem
%MEM
Percentage memory use
acflag
ACFLG
Accounting flag
args
COMMAND
Command and arguments
comm
COMMAND
Command only
command
COMMAND
Command and arguments (same as args)
cpu
CPU
Short-term CPU usage factor (for scheduling)
etime
ELAPSED
Elapsed runtime
76034c09.qxd:Toolbox
3/29/08
10:50 AM
Page 147
Chapter 9: Checking and Managing Running Processes
Table 9-1: Selecting and Viewing ps Column Output (continued)
Option
Column Head
Description
flags
F
Process flags, in hexadecimal (same as f)
inblk
INBLK
Total blocks read (same as inblock)
jid
JID
Jail ID
jobc
JOBC
Job control count
ktrace
KTRACE
Tracing flags
label
LABEL
MAC label
lim
LIM
Memory use limit
lockname
LOCK
Lock currently blocked on (as a symbolic name)
logname
LOGIN
Login name of user who started the session
lstart
STARTED
Time started
majflt
MAJFLT
Total page faults
minflt
MINFLT
Total page reclaims
msgrcv
MSGRCV
Total messages received (pipes/sockets reads)
msgsnd
MSGSND
Total messages sent (pipes/sockets writes)
mwchan
MWCHAN
Wait channel or lock currently blocked on
nice
NI
Nice value (same as ni)
nivcsw
NIVCSW
Total involuntary context switches
nsigs
NSIGS
Total signals taken (same as nsignals)
nswap
NSWAP
Total swaps in and out
nvcsw
NVCSW
Total voluntary context switches
nwchan
NWCHAN
Wait channel (as an address)
oublk
OUBLK
Total blocks written (same as oublock)
paddr
PADDR
Swap address
pagein
PAGEIN
Pageins (same as majflt)
Continued
147
76034c09.qxd:Toolbox
3/29/08
10:50 AM
Page 148
Chapter 9: Checking and Managing Running Processes
Table 9-1: Selecting and Viewing ps Column Output (continued)
148
Option
Column Head
Description
pgid
PGID
Process group number
pid
PID
Process ID
ppid
PPID
Parent process ID
pri
PRI
Scheduling priority
re
RE
Core residency time in seconds (127 means infinity)
rgid
RGID
Real group ID
rgroup
RGROUP
Group name (associated with real group ID)
rss
RSS
Resident set size
rtprio
RTPRIO
Real-time priority (101 means it’s not a realtime
process)
ruid
RUID
Real user ID
ruser
RUSER
User name (associated with real user ID)
sid
SID
Session ID
sig
PENDING
Pending signals (same as pending)
sigcatch
CAUGHT
Caught signals (same as caught)
sigignore
IGNORED
Ignored signals (same ignored)
sigmask
BLOCKED
Blocked signals (same as blocked)
sl
SL
Sleep time in seconds (127 means infinity)
start
STARTED
Time started
state
STAT
Symbolic process state (same as stat)
svgid
SVGID
Saved gid from a setgid executable
svuid
SVUID
Saved UID from a setuid executable
tdev
TDEV
Control terminal device number
time
TIME
Accumulated CPU time, user + system (same as
cputime)
76034c09.qxd:Toolbox
3/29/08
10:50 AM
Page 149
Chapter 9: Checking and Managing Running Processes
Table 9-1: Selecting and Viewing ps Column Output (continued)
Option
Column Head
Description
tsid
TSID
Control terminal session ID
tsiz
TSIZ
Text size in Kbytes
tt
TT
Control terminal name, two letter abbreviation
tty
TTY
Full name of control terminal
uprocp
UPROCP
Process pointer
ucomm
UCOMM
Name to be used for accounting
uid
UID
Effective user ID
upr
UPR
Scheduling priority from system call (same as
usrpri)
user
USER
User name (from user ID)
vsz
VSZ
Virtual size in Kbytes (same as vsize)
wchan
WCHAN
Wait channel as a symbolic name
xstat
XSTAT
Exit or stop status (stopped or zombie processes
only)
Note that some values that are meant to print user names may still print numbers
(UIDs) instead, if the name is too long to fit in the given space. To see the values,
use ps -L:
$ ps -L
List column options for ps output
%cpu %mem acflag acflg args blocked caught comm command cpu cputime emul etime f
flags ignored inblk inblock jid jobc ktrace label lim lockname login logname
lstart lwp majflt minflt msgrcv msgsnd mwchan ni nice nivcsw nlwp nsignals nsigs
nswap nvcsw nwchan oublk oublock paddr pagein pcpu pending pgid pid pmem ppid
pri re rgid rgroup rss rtprio ruid ruser sid sig sigcatch sigignore sigmask sl
start stat state svgid svuid tdev time tpgid tsid tsiz tt tty ucomm uid upr
uprocp user usrpri vsize vsz wchan xstat
Using a comma-separated list of column options, you can produce your custom output.
Here are some examples of custom views of running processes:
$ ps -xo ppid,user,%mem,tsiz,vsz,comm
Display process ID, user, memory, etc.
PPID USER %MEM TSIZ
VSZ COMMAND
1129 chris 1.3 168 6252 sshd
$ ps -xo ppid,user,start,time,%cpu,args Display PID, user, start, time, etc.
PPID USER STARTED
TIME %CPU COMMAND
1129 chris 4:52PM
0:00.82 0.0 sshd: chris@ttyp0 (sshd)
149
76034c09.qxd:Toolbox
3/29/08
10:50 AM
Page 150
Chapter 9: Checking and Managing Running Processes
$ ps -xo ppid,user,nice,cputime,args
Display PID, user, nice, CPU time, etc.
PPID USER NI
TIME COMMAND
1129 chris 0
0:00.84 sshd: chris@ttyp0 (sshd)
$ ps -xo ppid,user,stat,tty,sid,etime,args
Display PID, user, tty, sid, etc.
PPID USER STAT TTY
SID
ELAPSED COMMAND
1129 chris S
??
1129
06:39:23 sshd: chris@ttyp0 (sshd)
Here are a few other extraneous examples of the ps command:
$ ps -aux -r | less
Sort by CPU usage
USER
PID %CPU %MEM
VSZ
RSS TT STAT STARTED
TIME COMMAND
root
10 87.4 0.0
0
8 ?? RL
3:30PM 503:12.85 [idle]
root
2551 7.8 0.4 1384
916 v3 R
11:55PM
0:02.50 find .
root
4 1.0 0.0
0
8 ?? DL
3:30PM
0:08.73 [g_down]
$ ps -m | less
Sort by memory usage
USER
PID %CPU %MEM
VSZ
RSS TT STAT STARTED
TIME COMMAND
root
1307 0.0 1.2 4928 3004 v3 I
5:31PM
0:00.58 -csh (csh)
root
745 0.0 1.1 3504 2804 ?? Ss
3:30PM
0:01.04 sendmail:
$ ps -t ttyp0
Show ttyp0 processes
PID TT STAT
TIME COMMAND
1133 p0 Ss
0:00.38 -sh (sh)
2595 p0 R+
0:00.00 ps -t ttyp0
$ ps -p 1129 -o pid,ppid,time,args
Display info for PID 1129
PID PPID
TIME COMMAND
1129
739
0:08.08 sshd: chris [priv] (sshd)
$ ps -U chris,francois -o pid,ruser,tty,stat,args
See info for two users
PID RUSER
TTY
STAT COMMAND
1132 chris
??
S
sshd: chris@ttyp0 (sshd)
2480 francois ??
S
sshd: francois@ttyp1 (sshd)
Watching Active Processes with top
If you want to see the processes running on your system on an on-going basis, you can use the top
command. The top command runs a screen-oriented view of your running processes
that is updated continuously. If you start the top command with no options, it displays
your system’s uptime, tasks, CPU usage, and memory usage, followed by a list of your
running processes, sorted by CPU usage. Here’s an example:
$ top
last pid: 2697; load averages: 0.04, 0.03, 0.00
up 0+08:44:46
00:14:17
58 processes: 1 running, 57 sleeping
CPU states: 0.0% user, 0.0% nice, 0.8% system, 0.0% interrupt, 99.2% idle
Mem: 58M Active, 97M Inact, 73M Wired, 12M Cache, 34M Buf, 1508K Free
Swap: 484M Total, 484M Free
PID
2696
2618
2652
2650
150
USERNAME
chris
chris
chris
chris
THR PRI NICE
SIZE
RES STATE
1 96
0 25352K 15520K select
1 96
0 80392K 14300K select
3 20
0 34244K 21356K kserel
1 96
0 26564K 16688K select
TIME
0:03
0:03
0:07
0:04
WCPU
2.05%
0.05%
0.00%
0.00%
COMMAND
gtali
Xorg
nautilus
gnome-panel
76034c09.qxd:Toolbox
3/29/08
10:50 AM
Page 151
Chapter 9: Checking and Managing Running Processes
Here are examples of other options you can use to start top to continuously display running
processes:
$
$
$
$
$
top
top
top
top
top
-s 5
-U francois
-S
-d 10
-b
Change update delay to 5 seconds (from default 3)
Only see processes of effective user name francois
Display system processes, as well as other processes
Refresh the screen 10 times before quitting
Run in non-interative non-screen-oriented batch mode
This last example (top –b) formats the output of top in a way that is suitable for output to a file, as opposed to redrawing the same screen for interactive viewing. This
can be used to create a log of processes, for example, when hunting down that runaway process that eats up all your resources in the middle of the night. Here’s how
to run top and log the output for 10 hours:
$ top –b –d 12000 > myprocesslog &
When top is running, you can update and sort the process list in different ways. To immediately
update the process list, press Space. Press C to sort by CPU and weighted CPU time. Press I to have
idle processes displayed or not displayed. Or, press m to toggle between CPU and IO modes. While in
IO mode, press o to select the order in which data is sorted.
There are several ways to change the behavior of top as it’s running. Press s and type a number
representing seconds to change the delay between refreshes. Press u and enter a user name to
display only processes for the selected user. To view only a select number of processes, type n and type
the number you want to see. Press Ctrl-L at any point to redraw the screen.
You can act on any of the running processes in different ways. To signal (kill) a running process,
type k followed by the PID of the process you want to send the signal to. This sends
the default 15 signal (TERM), which allows the process to close in an orderly way. To
give a process higher or lower run priority, type r and then add a negative number (to increase
priority) or a positive number (to reduce priority), followed by the process ID of the
process you want to change.
If you want to find more information about how to use top, type ? during a top session. The
man page also has a lot of information about how to use top:
$ man top
View the top man page
When you are done using top, type q to exit.
Finding and Controlling Processes
Changing a running process first means finding the process you want to change, then
modifying the processing priority or sending the process a signal to change its behavior.
If you are looking for a particular process, you might find it tough to locate it in a large
list of processes output by ps or top. The pgrep command offers ways of searching
through your active processes for the ones you are looking for. The renice command
151
76034c09.qxd:Toolbox
3/29/08
10:50 AM
Page 152
Chapter 9: Checking and Managing Running Processes
lets you change the processing priority of running processes. The kill, pkill, and
killall commands let you send signals to running processes (including signals to
end those processes).
Using pgrep to Find Processes
In its most basic form, you can use pgrep to search for a command name (or part of
one) and produce the process ID of any process that includes that name. For example:
$ pgrep init
2617
1
Show PID for any process including ‘init’ string
Because we know there is only one init command running, we next use the -l option
to see each process’s command name (to learn why two processes showed up):
$ pgrep -l init
2617 xinit
1 init
Show PID and name for any process including ‘init’ string
You can also search for processes that are associated with a particular user:
$ pgrep -lu chris
2803 vim
2552 bash
2551 sshd
List all processes owned by user chris
Probably the most useful way to use pgrep is to have it find the process IDs of the running
processes and pipe those PIDs to another command to produce the output. Here are some examples (look for other commands if metacity or firefox isn’t running):
$ ps -p `pgrep metacity`
Search for metacity and run ps (short)
PID TT
STAT
TIME COMMAND
2617 ??
Is
00:07.02 /usr/local/bin/metacity --sm-client-id=default0
$ ps -fp `pgrep xinit`
Search for xinit and run ps (full)
PID TT STAT
TIME COMMAND
2617 v2 I+
0:00.01 /usr/X11R6/bin/xinit /home/chris/.xinitrc
# renice -5 `pgrep firefox`
Search for firefox, improve its priority
20522: old priority 0, new priority -5
20557: old priority 0, new priority –5
Any command that can take a process ID as input can be combined with pgrep in
these ways. As the previous example of pgrep illustrates, you can use commands
such as renice to change how a process behaves while it is running.
Using fuser to Find Processes
Another way to locate a particular process is by what the process is accessing. The fuser
command (as root, type pkg_add -r fuser) can be used to find which processes have a
file or a socket open at the moment. After the processes are found, fuser can be used to
152
76034c09.qxd:Toolbox
3/29/08
10:50 AM
Page 153
Chapter 9: Checking and Managing Running Processes
send signals to those processes. The fuser command is most useful for finding out
if files are being held open by processes on mounted file systems (such as local hard
disks or Samba shares). Finding those processes allows you to close them properly
(or just kill them if you must) so the file system can be unmounted cleanly.
Here are some examples of the fuser command for listing processes that have files open on a
selected file system:
# fuser -cu /home
Output of processes with /home open (with user name)
/home:
575x(root)
649x(root)
656x(root)
739x(root)
745x(root)
749x(smmsp)
755x(root)
802cx(root)
805x(root)
806x(root)
807x(root)
808x(root)
809x(root)
810c(chris) 1122x(root) 1129x(root) 1132x(chris)
1133c(chris) 1537cx(root) 2629x(chris) 2632x(chris) 2639x(chris)
2660x(chris) 3300x(root) 3316x(root) 3320x(root)
The example just shown displays the process ID for running processes associated with
/home. Each may have a file open, a shell open, or be a child process of a shell with the
current directory in /home or its subdirectories. The -c causes /home to be treated as
the mount point (so anything below that point is matched) and -u causes the owner of
each process to be listed.
Letters between the process IDs and user names indicate how the files being held
open are being used. In these examples, an x indicates that the file is the executable
text of the process, and a c says that the file is the current working directory of the
process. Other possible letters include r (file is in the process’s root directory), j (file
is the jail root of the process), t (file is the kernel tracing file of the process), y (the
process uses the file as its controlling tty), m (file is mmapped), w (the file is open for
writing), a (file is open as append only), s (file has a shared lock), and e (file has an
exclusive lock).
Here are other examples using fuser to show processes with files open:
# fuser -c -m /boot
# fuser -u /boot
Show PIDs/symbols for processes opening /boot
Show PIDs/symbols/user of /boot, not subdirectories
After you know which processes have files open, you can close those processes manually or kill them. Close processes manually if at all possible, since simply killing
processes can leave files in an unclean state! Here are examples of using fuser to kill
or send other signals to all processes with files open to a file system:
# fuser -k /tmp/my.txt
Kill processes with /tmp/my.txt open (SIGKILL)
Even after a process is running, you can change its behavior in different ways. With
the renice command, shown earlier, you can adjust a running process’s priority in
your system’s scheduler. With the nice command, you can determine the default
priority and also set a higher or lower priority at the time you launch a process.
Another way you can change how a running process behaves is to send a signal to
that process. The kill and killall commands can be used to send signals to running processes. Likewise, the pkill command can send a signal to a process.
153
76034c09.qxd:Toolbox
3/29/08
10:50 AM
Page 154
Chapter 9: Checking and Managing Running Processes
Adjusting Processor Priority with nice
Every running process has a nice value that can be used to tell the BSD process scheduler what priority should be given to that process. Positive values of niceness actually
give your process a lower priority. The concept came about during the days of large,
multi-user UNIX systems where you could be “nice” by running a non-urgent process
at lower priority so other users had a shot at the CPU.
Niceness doesn’t enforce scheduling priority, but is merely a suggestion to the scheduler.
The default nice value is 0. You can use the nice command to run a process at a higher
or lower priority than the default. The priority number can range from –35 (most favorable scheduling priority) to 19 (least favorable scheduling priority). Although the root
user can raise or lower any user’s nice value, a regular user can only lower the priorities
of a process (setting a higher nice value).
WARNING! Proceed with caution when assigning negative nice values to
processes. This can possibly crash your machine if critical system processes
lose their high priority.
Here are a few examples of starting a command with nice to change a command’s nice
value:
$ nice -n 12 nroff -man a.roff | less
# nice -n -10 designer
Format man pages at low priority
Launch QT Designer at higher priority
When a process is already running, you can change the process’s nice value using the renice
command. Here are some examples of the renice command:
$ renice +2 -u francois
Renice francois’ processes +2
$ renice +5 4737
Renice PID 4737 by +5
# renice -3 `pgrep -u chris spamd`
Renice chris’ spamd processes –3
9688: old priority -1, new priority -3
20279: old priority -1, new priority -3
20282: old priority -1, new priority -3
The backticks are use used in the previous command line to indicate that the output
of the pgrep command (presumably PIDs of spamd daemons run by chris) be fed to
the renice command.
The niceness settings for your processes are displayed by default when you run top.
You can also see niceness settings using -o nice when you produce custom output
from the ps command.
Running Processes in the Background and Foreground
When you run a process from a shell, it is run in the foreground by default. That
means that you can’t type another command until the first one is done. By adding an
ampersand (&) to the end of a command line, you can run that command line in the
background. Using the fg, bg, and jobs commands, along with various control codes,
you can move commands between background and foreground.
154
76034c09.qxd:Toolbox
3/29/08
10:50 AM
Page 155
Chapter 9: Checking and Managing Running Processes
In the following sequence of commands, we start the GIMP image program from a
Terminal window. After that is a series of control keys and commands to stop and start
the process and move it between foreground and background:
$ gimp
<Ctrl+Z>
[1]+ Stopped
$ bg 1
$ bg %1
$ fg 1
$ fg %1
gimp
<Ctrl+C>
Run gimp in the foreground
Stop process and place in background
gimp
Start process running again
Start process running again
Continue running process in
Continue running process in
in background (bash)
in background (sh)
foreground (bash)
foreground (sh)
Kill process
Note that processes placed in the background are given a job ID number (in this case,
1). By placing a percentage sign in front of the number (for example, %1), you can identify a particular background process to the bg and fg commands or with the bash shell;
simply type the number with the command (as in fg 1). With one or more background
jobs running at the current shell, you can use the jobs command to manage your background jobs:
$ jobs
[1]
Running
[2]
Running
[3]Running
[4]+
Stopped
$ jobs -l
[1] 31676 Running
[2] 31677 Running
[3]- 31683 Running
[4]+ 31688 Stopped
$ jobs -l %2
[2] 31677 Running
Display background jobs for current shell
gimp &
xmms &
gedit &
gtali
Display PID with each job’s information
gimp &
xmms &
gedit &
gtali
Display information only for job %2
xmms &
The processes running in the jobs examples might have been done while you were
logged in (using ssh) to a remote system, but wanted to run remote GUI applications on your
local desktop. By running those processes in the background, you can have multiple
applications running at once, while still having those applications associated with
your current shell.
NOTE With fg or bg, if you don’t indicate which process to act on, the current
job is used. The current job has a plus sign (+) next to it.
The fg and bg commands manipulate running processes by moving those processes
to the foreground or background. Another way to manipulate running commands is to
send signals directly to those processes. A common way to send signals to running
processes is with the kill and killall commands.
Killing and Signaling Processes
You can stop or change running processes by sending signals to those processes.
Commands such as kill and killall can send signals you select to running
processes, which as their names imply, is often a signal to kill the process.
155
76034c09.qxd:Toolbox
3/29/08
10:50 AM
Page 156
Chapter 9: Checking and Managing Running Processes
Signals are represented by numbers (9, 15, and so on) and strings (SIGKILL, SIGTERM,
and so on). Table 9-2 shows standard signals you can send to processes in BSD systems.
Table 9-2: Standard Signals to Send to Processes
156
Signal Number
Signal Name
Description
1
SIGHUP
Hang up from terminal or controlling process died
2
SIGINT
Interrupt program
3
SIGQUIT
Quit program
4
SIGILL
Illegal instruction
5
SIGTRAP
Trace trap
6
SIGABRT
Abort sent from abort function
7
SIGEMT
Emulate instruction executed
8
SIGFPE
Floating point exception
9
SIGKILL
Kill signal
10
SIGBUS
Bus error
11
SIGSEGV
Segmentation violation
12
SIGSYS
Non-existent system call invoked
13
SIGPIPE
Pipe broken (nothing to read write to pipe)
14
SIGALRM
Timer signal from alarm system call
15
SIGTERM
Termination signal
16
SIGURG
Discard signal
17
SIGSTOP
Stop the process
18
SIGTSTP
Stop typed at terminal
19
SIGCONT
Continue if process is stopped
20
SIGCHLD
Child status changed
21
SIGTTIN
Terminal tries to read background process
22
SIGTTOU
Terminal tries to write to background process
76034c09.qxd:Toolbox
3/29/08
10:50 AM
Page 157
Chapter 9: Checking and Managing Running Processes
The kill command can send signals to processes by process ID or job number while the
killall command can signal processes by command name. Here are some examples:
$
$
$
$
$
$
kill 28665
kill -9 4895
kill -SIGCONT 5254
kill %3
killall spamd
killall -SIGHUP sendmail
Send SIGTERM to process with PID 28665
Send SIGKILL to process with PID 4895
Continue a stopped process (pid 5254)
Kill the process represented by job %3
Kill all spamd daemons currently running
Have sendmail processes reread config files
The SIGKILL (9) signal, used generously by trigger-happy novice administrators,
should be reserved as a last resort. It does not allow the targeted process to exit cleanly
but forces it to end abruptly. This can potentially result in loss or corruption of data handled by that process. The SIGHUP signal was originally used on UNIX systems to indicate that a terminal was being disconnected from a mainframe (such as from a hang-up
of a dial-in modem). However, daemon processes, such as sendmail and httpd, were
implemented to catch SIGHUP signals as an indication that those processes should reread
configuration files.
Running Processes Away from Current Shell
If you want a process to continue to run, even if you disconnect from the current shell
session, there are several ways to go about doing that. You can use the nohup command
to run a process in a way that it is impervious to a hang-up signal:
$ nohup mylongscript.sh &
# nohup nice -9 gcc hello.c &
Run mylongscript.sh with no ability to interrupt
Run gcc uninterrupted and higher priority
Using nohup is different than running the command with an ampersand alone because
with nohup the command will keep running, even if you exit the shell that launched
the command.
The nohup command was commonly used in the days of slow processors and dial-up
connections (so you didn’t have to stay logged into an expensive connection while a long
compile completed). Also, today using tools such as screen (described in Chapter 13)
you can keep a shell session active, even after you disconnect your network connection
to that shell.
Scheduling Processes to Run
Commands associated with the cron facility can be used to set a command to run at
a specific time (including now) so that it is not connected to the current shell. The at
command runs a command at the time you set. Enter the at command, type the commands
you want to run at the later time, and press Ctrl-D to queue the job:
# at now +1 minute
Start command running in one minute
at> ls -R /usr/ports > /tmp/portlist.txt
at> <Ctrl+D> <EOT>
job 5 at Thu Mar 20 20:37:00 2008
# at teatime
Start command at 4pm today
157
76034c09.qxd:Toolbox
3/29/08
10:50 AM
Page 158
Chapter 9: Checking and Managing Running Processes
# at now +5 days
# at 06/25/08
Start a command in five days
Start a command at current time on June 25, 2008\
Another way to run a command that’s not connected with the current shell is with the
batch command. With batch, you can set a command to start as soon as the processor is ready
(load average below .8):
# batch
Start command running immediately
at> find /mnt/isos | grep jpg$ > /tmp/mypics
at> <Ctrl+D> <EOT>
Note that after the at or batch commands you see a secondary at> prompt. Type the
command you want to run at that prompt and press Enter. After that, you can continue
to enter commands. When you are done, press Ctrl+D on a line by itself to queue the
commands you entered to run.
When the commands are entered, you can check the queue of at and batch jobs that are set to
run by typing the atq command:
$ atq
Date
Tue Dec 29 16:00:00 CST 2008
Sat Aug 2 19:24:00 CST 2008
Owner
root
root
Queue
c
c
Job#
4
5
Regular users can’t view queued jobs. The root user can see everyone’s queued at jobs.
If you want to delete an at job from the queue, use the atrm command:
# atrm 5
Delete at job number 5
The at and batch commands are for queuing up a command to run as a one-shot
deal. You can use the cron facility to set up commands to run repeatedly. These commands
are scripted into cron jobs, which are scheduled in crontab files. There is one system
crontab file (/etc/crontab). Also, each user can create a personal crontab file that
can launch commands at times that the user chooses. To create a personal crontab file, type
the following:
$ crontab -e
Create a personal crontab file
The crontab -e command opens your crontab file (or creates a new one) using the
vi text editor. Here are examples of several entries you could add to a crontab file:
15 8 * * Mon,Tue,Wed,Thu,Fri mail chris < /var/project/stats.txt
* * 1 1,4,7,10 * find /doc | grep .doc$ > /var/sales/documents.txt
The first crontab example shown sends a mail message to the user named chris by
directing the contents of /var/project/stats.txt into that message. That mail command is run Monday through Friday at 8:15 am. In the second example, on the first day
of January, April, July, and October the find command runs to look for every .doc file
in /doc and sends the resulting list of files to /var/sales/documents.txt.
158
76034c09.qxd:Toolbox
3/29/08
10:50 AM
Page 159
Chapter 9: Checking and Managing Running Processes
The last part of each crontab entry is the command that is run. The first five fields represent the time and date the command is run. The fields from left to right are: minute
(0 to 59), hour (0 to 23), day of the month (0 to 31), month (0 to 12 or Jan, Feb, Mar, Apr,
May, Jun, Jul, Aug, Sep, Oct, Nov, or Dec), and day of the week (0 to 7 or Sun, Mon, Tue,
Wed, Thu, Fri, or Sat). An asterisk (*) in a field means to match any value for that field.
Here are some other options with the crontab command:
# crontab -eu chris
Edit another user’s crontab (root only)
$ crontab -l
List contents of your crontab file
15 8 * * Mon,Tue,Wed,Thu,Fri mail chris < /var/project/stats.txt
* * 1 1,4,7,10 * find / | grep .doc$ > /var/sales/documents.txt
$ crontab -r
Delete your crontab file
An alternative to the cron facility is the anacron facility (pkg_add -r anacron). With
anacron, as with cron, you can configure commands to run periodically. However,
anacron is most appropriate for machines that are not on all the time. If a command
is not run because the computer was off during the scheduled time, the next time the
computer is on, the anacron facility makes sure that the commands that were missed
during the down time are run after the system resumes.
Summary
Watching and working with the processes that run on your BSD system are important
activities to make sure that your system is operating efficiently. Using commands such
as ps and top, you can view the processes running on your system. You can also use
pgrep to search for and list particular processes.
With commands such as nice and renice, you can adjust the recommended priorities
at which selected processes run. When a process is running, you can change how it is
running or kill the process by sending it a signal from the kill or killall commands.
After launching a command from the current shell, you can set that command’s process
to run in the background (bg) or foreground (fg). You can also stop and restart the
process using different control codes.
To schedule a command to run at a later time, you can use the at or batch commands. To set up a command to run repeatedly at set intervals, you can use the
cron or anacron facilities.
159
76034c09.qxd:Toolbox
3/29/08
10:50 AM
Page 160
76034c10.qxd:Toolbox
3/29/08
10:51 AM
Page 161
Managing the System
Without careful management, the demands
on your BSD system can sometimes exceed the
resources you have available. Being able to monitor your system’s activities (memory, CPU, and
device usage) over time can help you make sure
that your machine has enough resources to do
what you need it to. Likewise, managing other
aspects of your system, such as the device drivers
it uses and how the boot process works, can help
avoid performance problems and system failures.
This chapter is divided into several sections that
relate to ways of managing your FreeBSD or
other BSD system. The first section can help you
monitor the resources (processing power, devices,
and memory) on your BSD system. The next section describes how to check and set your system
clock. Descriptions of the boot process and subsequent run levels follow. The last sections describe
how to work with the kernel and related device
drivers, as well as how to view information about
your computer’s hardware components.
Monitoring Resources
FreeBSD, OpenBSD, NetBSD, and other UNIX-like
systems do a wonderful job of keeping track of
what they do. If you care to look, you can find lots
of information about how your CPU, hard disks,
virtual memory, and other computer resources are
being used.
IN THIS CHAPTER
Checking memory use
with top and vmstat
Viewing CPU usage
with iostat, systat,
and top
Monitoring storage
devices with iostat,
gstat, and lsof
Working with dates/
time using date, cal,
and NTP
Changing boot loader
behavior
Switching to the
GRUB boot loader
Shutting down the system with reboot, halt,
and shutdown
Checking and changing kernel driver settings with kldstat,
kldunload, and kldload
Watching hardware
settings with lspci
and dmidecode
You can use commands to view information
about how your computer’s virtual memory, processor, storage devices, and
network interfaces are being used on your system. There are commands that
can monitor several different aspects of your system’s resources. Because
this book is not just a man page, however, we have divided up the following
76034c10.qxd:Toolbox
3/29/08
10:51 AM
Page 162
Chapter 10: Managing the System
sections by topic (monitoring memory, CPU, storage devices) rather than by the commands that do them (top, vmstat, and iostat).
NOTE Many of the applications described in this section are installed by default
in FreeBSD. To use commands that collect a history of system activity, such as
sar (http://pagesperso-orange.fr/sebastien.godard/), however,
you need to install the bsdsar package or compile bsdsar from source.
Monitoring Memory Use
Few things will kill system performance faster than running out of memory. Commands
such as top let you see basic information about how your RAM and swap are being
used. The vmstat command gives detailed information about memory use and can run
continuously.
The top command provides a means of watching the currently running processes,
with those processes sorted by CPU usage or memory (see Chapter 9 for a description
of top for watching running processes). However, you can also use top to watch your
memory usage in a screen-oriented way. Here is an example:
$ top
last pid: 1619; load averages: 0.61, 0.85, 0.62 up 0+02:23:09 17:23:49
85 processes: 2 running, 83 sleeping
CPU states: 37.5% user, 0.0% nice, 15.4% system, 0.8% interrupt, 46.3% idle
Mem: 76M Active, 31M Inact, 79M Wired, 2476K Cache, 34M Buf, 53M Free
Swap: 484M Total, 25M Used, 459M Free, 5% Inuse
PID
1618
1462
1491
1494
USERNAME
chris
chris
chris
chris
THR PRI NICE
SIZE
RES STATE
3 117
0 51964K 35352K RUN
1 96
0 85016K 15968K select
1 98
0 12812K 8008K select
1 96
0 27880K 12088K select
TIME
0:07
0:33
0:05
0:08
WCPU
7.96%
5.66%
1.03%
0.44%
COMMAND
totem
Xorg
metacity
gnome-panel
To exit top, press q. The top command shows the total memory usage for RAM
(Mem:) and swap space (Swap:). However, because top is screen oriented and provides on-going monitoring, you can watch memory usage change every two seconds
(by default). The most useful column to analyze a process’ memory usage is RES,
which shows the process’ actual physical RAM usage, also known as resident size.
Run top -ores and running processes will be displayed in resident memory use order (to
sort by the RES column):
$ top -ores
...
PID USERNAME
1673 chris
1615 chris
1462 chris
1496 chris
162
THR PRI NICE
SIZE
RES STATE
3 112
0 56288K 38660K RUN
1 96
0 27060K 15428K select
1 100
0 84900K 13388K select
3 20
0 33072K 10928K kserel
TIME
WCPU COMMAND
0:22 0.00% totem
0:03 0.00% kview
1:51 10.60% Xorg
0:05 0.00% nautilus
76034c10.qxd:Toolbox
3/29/08
10:51 AM
Page 163
Chapter 10: Managing the System
To see the total size of memory consumed by a process (including text, data, and stack), you
can sort by the SIZE column. To do that, type top -osize:
$ top -osize
...
PID USERNAME
1462 chris
1764 chris
1496 chris
1494 chris
THR PRI NICE
SIZE
RES STATE
1 100
0 85036K 12528K RUN
3 114
0 56124K 38712K RUN
3 20
0 33072K 8100K kserel
1 96
0 27880K 9384K select
TIME
WCPU COMMAND
3:41 10.94% Xorg
0:31 0.00% totem
0:05 0.00% nautilus
0:10 0.00% gnome-panel
For a more detailed view of your virtual memory statistics, use the vmstat command.
With vmstat you can view memory use over a given time period, for example, since the previous reboot or using a sample period. The following example shows vmstat redisplaying statistics every three seconds:
$ vmstat 3
procs
memory
r b w
avm
fre
5 2 3 259816 12604
12 2 0 265996 14592
5 2 0 277480 16672
7 2 0 314596 13460
3 2 0 351960 11916
5 2 0 356944
9032
6 2 0 359284
9312
4 84 0 361076
8884
page
flt re
258
1
540 28
695 25
763 115
428 132
387 112
164 20
284 15
pi
0
33
12
48
56
31
11
18
po
0
11
11
11
32
32
22
11
disks
fr
sr ad0 da0
183
107
0
0
404
1014 46
0
602
3228 39
0
1043 13440 66
0
542
5951 109
0
499
5395 73
0
315
3501 100
0
276
1773 43
0
faults
in
sy
1482 795
1596 8713
1621 10092
1661 8582
1520 39546
1481 20600
1645 39330
1646 22994
cpu
cs us
1154 23
2204 59
2071 71
1741 79
1665 76
1248 66
1544 60
1602 84
sy id
5 72
41 0
29 0
21 0
21 3
34 0
40 0
16 0
To exit vmstat, press Ctrl+C. The vmstat example shows a 30-second time period
where a handful of applications are started. Because the swap area resides on the hard
disk, you can see that activity on the disk device (ad0) increases as the amount of paging increases. You can see the amount of free pages of space going down under the fre
column.
Here are some other options for using vmstat:
$ vmstat -c 5
$ vmstat -z
Display output five times, then exit
Display memory in kernel zone allocator (by zone)
The previous example shows several options associated with the vmstat command. The
-c option displays a set number of output lines before exiting (five in this case). The -z
option lets you see kernel zone allocator memory use.
With commands such as ps and top, you can see how much memory each application
is consuming on your system. The kernel itself, however, has its own memory cache to
keep track of its resources called the kernel slab. You can use the vmstat to display kernel
slab memory cache statistics as follows:
$ vmstat -m | less
Page through kernel slab memory cache
Type
InUse MemUse HighUse Requests Size(s)
163
76034c10.qxd:Toolbox
3/29/08
10:51 AM
Page 164
Chapter 10: Managing the System
DEVFS1
DEVFS
pfs_nodes
pfs_vncache
GEOM
isadev
cdev
105
12
20
2
90
19
32
27K
1K
3K
1K
10K
2K
4K
-
105
13
20
33
480
19
32
256
16,128
128
32
16,32,64,128,256,512,1024,2048,4096
64
128
The slab memory cache information shows each cache type, the number of objects
active for that cache type, amount of memory used, the number of requests to the
cache, and the size of the cache.
Monitoring CPU Usage
An overburdened CPU is another obvious place to look for performance problems on
your system. The vmstat command, as shown earlier, can produce basic statistics relating to CPU usage (user activity, system activity, idle time, I/O wait time, and time stolen
from a virtual machine). The iostat command, however, can generate more detailed
reports of CPU utilization. If you want a more interactive way of watching CPU usage,
you can use the systat utility. The top command can be used to view which processes
are consuming the most processing time.
Here are two examples of using iostat to display a CPU utilization report:
$ iostat -w 3
CPU stats every 3 seconds
tty
ad0
da0
tin tout KB/t tps MB/s
KB/t tps MB/s
8
70 12.42
3 0.04
0.11
0 0.00
384
77 0.00
0 0.00
0.00
0 0.00
405
26 17.63 49 0.84
0.00
0 0.00
333
26 14.03 76 1.04
0.00
0 0.00
232
26 15.76 41 0.63
0.00
0 0.00
291
26 11.14 26 0.28
0.00
0 0.00
$ iostat -w 3
CPU stats every 3 seconds
tty
ad0
da0
tin tout KB/t tps MB/s
KB/t tps MB/s
7
53 19.67
3 0.06
0.11
0 0.00
0
77 127.56 85 10.54
0.00
0 0.00
0
26 123.48 90 10.81
0.00
0 0.00
0
26 128.00 91 11.37
0.00
0 0.00
0
26 125.10 81 9.89
0.00
0 0.00
0
26 125.76 95 11.62
0.00
0 0.00
0
26 126.75 102 12.66
0.00
0 0.00
(starting apps)
pass0
KB/t tps MB/s
0.00
0 0.00
0.00
0 0.00
0.00
0 0.00
0.00
0 0.00
0.00
0 0.00
0.00
0 0.00
(copying files)
pass0
KB/t tps MB/s
0.00
0 0.00
0.00
0 0.00
0.00
0 0.00
0.00
0 0.00
0.00
0 0.00
0.00
0 0.00
0.00
0 0.00
cpu
us ni sy in id
35 0 10 1 54
20 0 5 1 74
42 0 13 2 43
67 0 28 4 1
71 0 28 1 0
65 0 34 2 0
cpu
us ni sy in id
48 0 9 1 42
3 0 22 2 72
4 0 20 2 73
5 0 18 1 75
4 0 19 2 74
5 0 21 2 72
6 0 26 2 67
The first iostat example above starts with a quiet system, then several applications
started up. You can see that most of the processing to start the applications is being
done in user space. The second iostat example shows a case where several large files
are copied from one hard disk to another. The result is a high percentage of time being
spent at the system level, also known as kernel space (in this case, reading from and
164
76034c10.qxd:Toolbox
3/29/08
10:51 AM
Page 165
Chapter 10: Managing the System
writing to disk partitions). Note that the file copies also result in a higher amount of
time in idle mode waiting for I/O requests to complete (id column).
Here is an example of using iostat to print CPU utilization reports for a set number of instances:
$ iostat -w 2 -C 10
Repeat every 2 seconds for 10 times
The systat command provides a screen-oriented interface for viewing information about
your CPU usage (as well as other performance-related items). One advantage of systat
over other tools is that CPU usage and disk activity are visually represented by bars
of Xs that go across the screen. Here is an example of systat for displaying CPU and
disk information:
$ systat -iostat
/0
View CPU usage continuously (copy large files)
/1
/2
/3
/4
/5
/6
/7
/8
/9
/10
Load Average
/0
/10 /20 /30 /40 /50 /60 /70
cpu user|XX
nice|
system|XXXXXXXXXXX
interrupt|X
idle|XXXXXXXXXXXXXXXXXXXXXXXXXXXXXXXXXXX
ad0
/80
/90
/100
/0
/10 /20 /30 /40 /50 /60 /70 /80 /90
MB/sXXXXX
tps|XXXXXXXXXXXXXXXXXXXXXXXXXXXXXXXXXXXXXXXXXXXXX
/100
...
$ systat -iostat
View CPU usage continuously (busy desktop)
/0
/1
/2
/3
/4
/5
/6
/7
/8
/9
Load Average
||||
/0
/10 /20 /30 /40 /50 /60 /70 /80 /90 /100
cpu user|XXXXXXXXXXXXXXXXXXXXXXXXXXXXXXXX
nice|
system|XXXXXXX
interrupt|X
idle|XXXXXXXX
ad0
/0
MB/s
tps|
/10
/20
/30
/40
/50
/60
/70
/80
/90
/10
/100
...
The first systat -iostat example above shows CPU and disk activity while large
files are being copied from one file system to another, illustrated as bar graphs of Xs.
Most of the CPU time is spent in system mode, with a fair amount of idle time (waiting for disk I/O). The disk (ad0) information is displayed in megabytes per second
and transactions per second.
The second systat -iostat example above shows CPU and disk activity while windows are being moved around on an X desktop. There is less idle time, since there is
165
76034c10.qxd:Toolbox
3/29/08
10:51 AM
Page 166
Chapter 10: Managing the System
little or no disk activity (as you can see by the ad0 line below). Most of the processing
is happening in user mode.
If you want to find out specifically which processes are consuming the most processing
time, you can use the top -mcpu command. Type top, then press C to toggle between
CPU usage and weighted CPU usage:
$ top -mcpu
Display running processes and sort by CPU usage
last pid: 3803; load averages: 0.88, 0.39, 0.20
up 0+12:02:11 03:02:51
119 processes: 3 running, 110 sleeping, 0 zombie
CPU states: 67.9% user, 0.0% nice, 24.2% system, 3.0% interrupt, 5.0% idle
Mem: 130M Active, 17M Inact, 82M Wired, 12M Cache, 34M Buf, 648K Free
Swap: 484M Total, 59M Used, 426M Free, 12% Inuse, 52K In
PID
3803
1462
1509
1491
3777
USERNAME
chris
chris
chris
chris
chris
THR PRI NICE
SIZE
RES STATE
TIME
WCPU COMMAND
1 109
0 28388K 15728K RUN
0:02 39.03% epiphany
1 98
0 92452K 20200K select 201:28 11.96% Xorg
1 96
0 26260K 8960K select 17:16 1.12% wnck-applet
1 96
0 13228K 7464K select
0:50 0.63% metacity
6 20
0 47540K 25936K kserel
0:13 0.10% evolution-2.8
The full output would show many more processes, all sorted by current weighted
CPU usage (WCPU column). In this example, the Epiphany web browser (39.03%) and
the Xorg display server (11.96%) are consuming most of the CPU. If you decided you
wanted to kill the Epiphany process, you could type k and the process ID of Epiphany
(3803) to kill the process (if for some reason you couldn’t just close the Epiphany window normally).
If you want information about the processor itself, you can view the output from the dmesg
command and step through the output until you find the CPU information. Here is
an example:
$ dmesg | less
View CPU information
...
CPU: Intel Pentium III (648.03-MHz 686-class CPU)
Origin = “GenuineIntel” Id = 0x683 Stepping = 3
Features=0x387f9ff<FPU,VME,DE,PSE,TSC,MSR,PAE,MCE,CX8,SEP,MTRR,PGE,
MCA,CMOV,PAT,PSE36,PN,MMX,FXSR,SSE>
Despite being an older processor (Intel Pentium III, 650MHz), the machine actually
runs FreeBSD quite well. Interesting things to note about your CPU are the flags that
represent features that it supports. Some features in FreeBSD require particular CPU
extensions, associated with those flags, be on for the FreeBSD feature to work. For
example, using large amounts of RAM may require that the pae flag be set.
Monitoring Storage Devices
Basic information about storage space available to your BSD file systems can be seen
using commands such as du and df (as described in Chapter 7). If you want details
166
76034c10.qxd:Toolbox
3/29/08
10:51 AM
Page 167
Chapter 10: Managing the System
about how your storage devices are performing, however, commands such as gstat
and iostat can be useful.
Some of the same kind of output from the iostat command shown earlier can be
used to tell if bottlenecks occur while doing disk reads and writes. Here’s an example:
$ iostat -x
device
ad0
...
r/s
1.5
w/s
1.1
Show disk statistics by disk
extended device statistics
kr/s
kw/s wait svc_t %b
42.3
39.4
0 18.4
1
The output of iostat shown above reflects processing that occurs when a large amount
of data is copied from one partition to another on the hard disk (ad0). The columns
show reads per second (r/s), writes per second (w/s), kilobytes read per second (kr/s),
kilobytes written per second (kw/s), and length of the transactions queue (wait). They
also show the duration of transactions, on average, in milliseconds (svc_t) and percentage of time the device had one or more transactions outstanding (%b).
To watch statistics about disk activity in real time, you can use the gstat command. Here is an
example:
dT: 0.503s w: 0.500s
L(q) ops/s
r/s
kBps
2
95
42
5346
2
95
42
5346
0
0
0
0
0
0
0
0
0
0
0
0
0
0
0
0
1
54
0
0
0
0
0
0
1
42
42
5346
0
0
0
0
0
0
0
0
0
0
0
0
ms/r
19.9
20.0
0.0
0.0
0.0
0.0
0.0
0.0
20.3
0.0
0.0
0.0
w/s
54
54
0
0
0
0
54
0
0
0
0
0
kBps
5616
5616
0
0
0
0
5616
0
0
0
0
0
ms/w
26.3
26.4
0.0
0.0
0.0
0.0
26.8
0.0
0.0
0.0
0.0
0.0
%busy
98.0|
98.0|
0.0|
0.0|
0.0|
0.0|
101.9|
0.0|
84.6|
0.0|
0.0|
0.0|
Name
ad0
ad0s1
da0
ad0s1a
ad0s1b
ad0s1c
ad0s1d
ad0s1e
ad0s1f
da0s1
da0s2
acd0
In the gstat example just shown, the display you see is updated every half-second
(0.500s). A large amount of data is being written from one partition (ad0s1f) to another
(ad0sd). Total activity on the disk is displayed on the ad0 line, while total activity on
the disk slice (there is only one) is shown on the ad0s1 line. It’s easy to tell when bottlenecks occur because numbers in the %busy column go from green (0–59% activity), to
purple (60–79% activity) to red (80–100% activity).
Here are a few other examples of gstat command lines:
# gstat -a
Only show disk devices with some activity
dT: 0.502s w: 0.500s
L(q) ops/s
r/s
kBps
ms/r
w/s
kBps
ms/w
%busy Name
1
100
52
6184
16.7
48
6120
4.3
91.6| ad0
167
76034c10.qxd:Toolbox
3/29/08
10:51 AM
Page 168
Chapter 10: Managing the System
1
0
1
# gstat
100
48
52
-I 4s
52
0
52
6184
16.7
48
6120
4.4
0
0.0
48
6120
4.5
6184
16.9
0
0
0.0
Update display every 4 seconds
91.6| ad0s1
21.5| ad0s1d
87.7| ad0s1f
If you want to find out what files and directories are currently open on your storage devices, you
can use the lsof command. This command can be particularly useful if you are trying
to unmount a file system that keeps telling you it is busy. You can check what open file
is preventing the unmount and decide if you want to kill the process holding that file
open and force an unmount of the file system. Here is an example of lsof:
# lsof | less
COMMAND
PID
init
1
init
1
init
1
adjkerntz 123
adjkerntz 123
...
sh
1443
List
USER
root
root
root
root
root
processes holding files and directories open
FD
TYPE
DEVICE
SIZE/OFF
NODE NAME
cwd
VDIR
0,87
512
2 /
rtd
VDIR
0,87
512
2 /
txt
VREG
0,87
514792
49395 /sbin/init
cwd
VDIR
0,87
512
2 /
rtd
VDIR
0,87
512
2 /
chris cwd
VDIR
0,92
2536 2775585 /home/chris
The first files shown as being open are those held open by the init process (the first
running process on the system). The adjkerntz process runs next, to adjust local time.
Files held open by other system processes (such as devd) and daemons (such as sshd
and syslogd) follow after init. Eventually, you will see files held open by individual
users (which are probably the ones you are interested in if you are unable to unmount
a disk partition).
When you are looking at the lsof output, you want to see the name of the file or directory that is open (NAME), the command that has it open (COMMAND) and the process ID
of that running command (PID). As is often the case when a file system you want to
unmount is being held open, the /home file system is being held open by a sh shell (in
the example above, /home/chris is the sh shell’s current working directory). In fact,
instead of piping lsof output to less or grep, here are a few other ways you can find
what you are looking for from lsof output:
#
#
#
#
#
lsof
lsof
lsof
lsof
lsof
-c csh
-d cwd
-u chris
/var
+d /var/log
List
List
List
List
List
files open by C shell (csh) shells
directories open as current working directory
files and directories open by user chris
anything open on /var file system
anything open under /var/log directory
Mastering Time
Keeping correct time on your BSD system is critical to the system’s proper functioning.
You can have the time set on your BSD system in several different ways. System time
can be viewed and set manually (with the date command) or automatically (with
168
76034c10.qxd:Toolbox
3/29/08
10:51 AM
Page 169
Chapter 10: Managing the System
ntpdate or the ntpd service). Another time-related command is uptime, which lets
you see how long your system has been up.
Changing Time Zone
Your BSD system’s time zone is set based on the contents of the /etc/localtime
file. You can set a new time zone immediately by copying the file representing your
time zone from a subdirectory of /usr/share/zoneinfo. For example, to change
the current time zone to that of America/Chicago, you could do the following:
# cp /usr/share/zoneinfo/America/Chicago /etc/localtime
This can also be accomplished by creating a symlink:
# ln –s /usr/share/zoneinfo/America/Chicago /etc/localtime
In FreeBSD, there is also tool called tzsetup that lets you select your local time zone.
Displaying and Setting Your Time and Date
The date command is the primary command-based interface for viewing and changing date and time settings, if you are not having that done automatically with NTP.
Here are examples of date commands for displaying dates and times in different ways:
$ date
Display current date, time and time zone
Tue Aug 12 01:26:50 CDT 2008
$ date ‘+%A %B %d %G’
Display day, month, day of month, year
Tuesday August 12 2008
$ date ‘+The date today is %F.’ Add words to the date output
The date today is 2008-08-12.
$ date “+TIME: %H:%M:%S%nDATE: %Y-%m-%d” Display TIME and DATE on separate lines
TIME: 06:29:10
DATE: 2008-12-18
$ date -v1d -v+1m -v -1d -v-mon
Display the last Monday in the month
Mon Dec 29 09:18:32 CST 2008
$ date -u
Display Coordinated Universal Time (UTC)
Mon Dec 29 15:19:12 UTC 2008
Although our primary interest in this section is time, since we are on the subject of dates
as well, the cal command is a quick way to display dates by month. Here are examples:
$ cal
October
Su Mo Tu We
1
5 6 7 8
12 13 14 15
19 20 21 22
26 27 28 29
Show current month calendar (today is highlighted)
2008
Th Fr
2 3
9 10
16 17
23 24
30 31
Sa
4
11
18
25
169
76034c10.qxd:Toolbox
3/29/08
10:51 AM
Page 170
Chapter 10: Managing the System
$ cal 2008
January
Su Mo Tu We Th
1 2 3
6 7 8 9 10
13 14 15 16 17
20 21 22 23 24
27 28 29 30 31
Show whole year’s calendar
2008
Fr
4
11
18
25
Sa
5
12
19
26
...
$ cal -j
October 2008
Su Mo Tu We Th
275 276
279 280 281 282 283
286 287 288 289 290
293 294 295 296 297
300 301 302 303 304
February
Su Mo Tu We Th Fr Sa
1 2
3 4 5 6 7 8 9
10 11 12 13 14 15 16
17 18 19 20 21 22 23
24 25 26 27 28 29
March
Su Mo Tu We Th Fr Sa
1
2 3 4 5 6 7 8
9 10 11 12 13 14 15
16 17 18 19 20 21 22
23 24 25 26 27 28 29
30 31
Show Julian calendar (numbered from January 1)
Fr
277
284
291
298
305
Sa
278
285
292
299
The date command can also be used to change the system date and time. (Be careful,
however, because randomly changing the date could crash your system.) Here are
examples:
# date 0812152100
Set date/time to Aug, 12, 2:21PM, 2008
Mon Dec 15 21:00:00 CST 2008
# date -v +2H
Adjust time to 2 hours later
Sun Aug 12 11:42:33 CDT 2008
# date -v +3m
Adjust date/time to one month earlier
Wed Nov 12 11:42:38 CDT 2008
The next time you boot FreeBSD, the system time will be reset based on the value of
your hardware clock (or your NTP server, if NTP service is enabled). And the next time
you shut down, the hardware clock will be reset to the system time, in order to preserve
that time while the machine is powered off. One way to make sure that you always get
the correct time set for your system is to use the Network Time Protocol (NTP).
Using Network Time Protocol
to Set Date/Time
When you install FreeBSD, you are given the opportunity to set your time zone and
whether your system clock reflects local or UTC time. Your system will display the date
and time based on your hardware clock and time zone. As noted earlier, one way to
make sure that your system’s time doesn’t drift is to use Network Time Protocol (NTP).
The ntpd daemon is installed with the FreeBSD system. To have your FreeBSD system synchronize time with a time server on the network, all you need to do is create
170
76034c10.qxd:Toolbox
3/29/08
10:51 AM
Page 171
Chapter 10: Managing the System
a configuration file and enable the ntpd service. Edit the /etc/ntp.conf file to create
at least a server and driftfile entry. For example:
server pool.ntp.org
driftfile /var/db/ntpd.drift
restrict default ignore
To enable the Network Time Protocol service (ntpd daemon), you can add the following
lines to your /etc/rc.conf file:
ntpd_enable=”YES”
ntpd_program=”/usr/sbin/ntpd”
ntpd_config=”/etc/ntp.conf”
ntpd_sync_on_start=”YES”
# Run ntpd Network Time Protocol (or NO).
# path to ntpd, if you want a different one.
# ntpd(8) configuration file
# Sync time on ntpd startup,
#
even if offset is high
ntpd_flags=”-p /var/run/ntpd.pid -f /var/db/ntpd.drift”
# Options to ntpd
Actually, all you need to do is add the ntpd_enable and ntpd_sync_on_start
lines and make sure they are set to YES. The other ntpd lines are set by default (in
the /etc/defaults/rc.conf file) and are just shown here for your information. The
next time your system starts, your system time will be set based on information gathered from the NTP server and your local time zone settings. If you prefer to start the
ntpd daemon manually, you could type the following:
# /usr/sbin/ntpd -p /var/run/ntpd.pid -f /var/db/ntpd.drift -c /etc/ntp.conf
When the ntpd service is set up to run, the resulting setup turns your machine into
a time server, listening on UDP port 123. Unless you have very specific needs (and
your own GPS or atomic clock), running ntpd on your machine can be both a waste
of resources and a security risk. For that reason, some system administrators prefer
using ntpdate (often in a daily cronjob) to set their system time via NTP:
# ntpdate pool.ntp.org
Set date/time immediately from pool.ntp.org
15 Aug 00:37:12 ntpdate[9706]:
adjust time server 66.92.68.11 offset 0.009204 sec
If you try running ntpdate while ntpd is running, you will get the following error:
# ntpdate pool.ntp.org
15 Aug 00:37:00 ntpdate[9695]: the NTP socket is in use, exiting
Note that the ntpdate command has been marked as deprecated and will disappear
in the future. It has been replaced by the following options of ntpd:
# ntpd –qg
The –q option tells ntpd to exit after setting the clock (as opposed to keep running as
a daemon). The –g option prevents ntpd from panicking if the system clock is off by
more than 1000 seconds.
171
76034c10.qxd:Toolbox
3/29/08
10:51 AM
Page 172
Chapter 10: Managing the System
NOTE You can set your computer’s hardware clock in the BIOS. How your
BSD system interprets your hardware clock depends on several things. If the
/etc/wall_cmos_clock file exists, BSD assumes that the hardware clock
should be interpreted as local time. If not, the time is interpreted as UTC
time. Based on your hardware clock and time zone, the running adjkerntz
process adjusts the kernel clock and stores that information. Type sysctl
machdep.adjkerntz to see that offset.
Checking Uptime
A matter of pride among BSD and other Linux and UNIX enthusiasts is how long
they can keep their systems running without having to reboot. BSD systems have
been known to run for years without having to reboot. The time that a BSD system
has been running since the previous reboot is referred to as uptime. You can check your
system’s uptime as follows:
$ uptime
6:53pm
Check how long your system has been running
up 196 days, 14:25, 3 users, load average: 1.66, 0.88, 0.35
The output of uptime shows the current time, how many days and hours the system
has been up and how many users are currently logged in. After that, uptime shows
the system load over the past 1-, 5-, and 15-minute time periods.
Managing the Boot Process
When a PC (x86) first starts up, the basic input/output system (BIOS) looks to its boot
order settings to determine where to find the operating system to boot. Typically, if a
bootable medium has not been inserted into a removable drive (CD, DVD, floppy disk,
and so on), the BIOS looks to the master boot record (MBR) on the first bootable hard
disk. At this point, for most BSD systems, control of the boot process is handed to the
boot loader.
FreeBSD and other BSD and UNIX systems have a choice of boot loaders. By default,
however, FreeBSD uses the boot0 boot loader. By configuring boot0, you not only can
have your computer boot FreeBSD exactly as you would like, but you can also configure it to boot other operating systems installed on your computer. Or you can choose
to use a different boot loader (such as GRUB, described later) to direct the boot process.
A BSD system boots up in several stages. The first is actually the stage where the BIOS
starts to initialize the hardware and find the master boot record, usually on hard disk,
where the boot0 boot loader takes over. Next, boot1 starts and uses bsdlabel to find
boot2. Next boot2 starts, which passes control to the boot loader or directly to the kernel. At the end of that, with FreeBSD you should see a boot prompt that is similar to the
following:
F1 FreeBSD
Default: F1
172
76034c10.qxd:Toolbox
3/29/08
10:51 AM
Page 173
Chapter 10: Managing the System
When a BSD system is selected to boot from the boot loader, the boot loader goes to
the partition you asked to boot and either boots a secondary boot loader or loads the
kernel. In the final stage of the bootstrapping process in FreeBSD, the kernel is booted,
the rc scripts start up system services, and you are presented with a prompt or display
manager screen to login.
The following sections describe commands for modifying the boot loader and start-up
scripts associated with your BSD system.
Using the boot0 Boot Loader
The /boot/boot0 file contains the default boot image used by FreeBSD. If you want
to replace your boot image with one that you compile yourself, you can do that with
the boot0cfg command. However, the boot0cfg command can also be used to view
or change settings related to the current boot loader.
NOTE When referring to disks in the following examples, IDE disks begin with
ad and SCSI disks begin with da. So the first IDE disk is ad0, the second is ad1,
and so on. Likewise with SCSI disks named da0, da1, and so on. The first slice on
IDE disk 1 is ad0s1.
Here are some examples using the boot0cfg command to check and change your boot
image:
# boot0cfg -v ad0
#
flag
start chs
1
0x80
0: 1: 1
Display information about boot0 loader on IDE disk 1
type
end chs
offset
size
0xa5
1023:254:63
63
40949622
version=1.0 drive=0x80 mask=0xf
options=packet,update,nosetdrv
default_selection=F1 (Slice 1)
ticks=182
The output from boot0cfg -v shows you information about how boot0 is set up on
the selected disk (in this case, the first disk, ad0). In this case, only one slice (1) on the
first disk (0x80) is bootable. The slice starts at cylinder 0, head 0, and sector 0. It ends at
cylinder 1023, head 254, and sector 63. The type of the slice is 0Xa5 (used with FreeBSD,
NetBSD, and 386BSD).
After the version number (1.0), the output shows that the BIOS will be told to boot the
first hard disk (0x80), that four disk slices are enabled (0xf), and that the boot prompt
timeout is set to 182 ticks (about 10 seconds). The three options say to use the disk packet
(BIOS INT 0x13 extension) interface for disk I/O (packet), allow the master boot record
to be updated by the boot manager (update), and don’t force the drive containing the
disk referenced by -d option to be used.
Now that you see the settings, here is how you can make changes to the boot0 boot loader.
173
76034c10.qxd:Toolbox
3/29/08
10:51 AM
Page 174
Chapter 10: Managing the System
WARNING! If you mess up your boot loader, your computer could become temporarily unbootable. I recommend that you have a rescue CD available to correct
the problem if your system becomes unbootable.
# boot0cfg -B ad0
# boot0cfg -b /root/boot0 ad0
# boot0cfg -t 364 ad0
Install /boot/boot0, no slice table change
Install specific boot0 boot manager file
Change timeout to 20 seconds (364 ticks)
So far, the examples show a case where there is a single 40GB hard drive with 20GB
assigned to FreeBSD on a single slice. However, there may be cases where you have
multiple bootable operating systems on the same or multiple hard disks.
For example, here are a few tips for installing multiple operating systems on the same
computer:
❑ Windows — If possible, always try to install Windows first. At least some versions of Windows are a bit antisocial, thinking they own your machine, and will
probably overwrite your master boot record (without making your BSD system
bootable). With Windows installed first, that system can easily be added to your
BSD boot loader so any OS can boot.
❑ Linux — Most Linux systems will happily coexist with FreeBSD or other BSD systems. When you install Linux, just tell the installer to put the Linux boot loader
(probably GRUB) on the partition containing the /boot directory (often just the
/ partition). You can then tell the installer not to overwrite the master boot record
(which I presume contains your BSD boot0 boot loader).
To illustrate a computer that dual boots with FreeBSD and Debian GNU/Linux, we
installed FreeBSD first (slice 1). Then we installed Debian, putting the operating system on slice 2 and making a separate slice containing a swap partition for Linux. We
installed the GRUB boot loader during the Debian installation on slice 2, which GRUB
referred to as hd0,1. (for disk 1, partition 2).
NOTE Before things get more confused here, we need to clear up some terminology.
In BSD, you can divide the disk into up to four parts referred to as slices. Within a
BSD slice, you can further divide the disk into what are called partitions. In Linux,
what BSD refers to as slices are called partitions. You can have more than the four
primary partitions in Linux because it allows what are called extended partitions.
For clarity, and because this is a BSD book, we are trying to use the BSD slice,
partition terminology.
Anyway, with FreeBSD and Debian Linux installed, here’s what output from the boot
loader with two bootable operating systems looks like:
# boot0cfg -v ad0
#
flag
start chs
174
Display information about boot0 loader (mutiple OS)
type
end chs
offset
size
76034c10.qxd:Toolbox
3/29/08
10:51 AM
Page 175
Chapter 10: Managing the System
1
2
3
0x80
0x00
0x00
0: 1: 1
1023:254:63
1023:254:63
0xa5
0x83
0x82
1023:254:63
1023:254:63
1023:254:63
version=1.0 drive=0x80 mask=0xf
options=packet,update,nosetdrv
default_selection=F1 (Slice 1)
63
40949685
56580930
40949622
15631245
1558305
ticks=182
You can see from the output that there are two more slices assigned. Slice 2 is a Linux
partition type (0x83) and slice 3 is a swap type (0x82). Slice 2 is bootable.
You can use the fdisk command to see more details about the types and sizes of each slice:
# fdisk ad0
Display disk slice information
******* Working on device /dev/ad0 *******
...
The data for partition 1 is:
sysid 165 (0xa5),(FreeBSD/NetBSD/386BSD)
start 63, size 40949622 (19994 Meg), flag 80 (active)
beg: cyl 0/ head 1/ sector 1;
end: cyl 1023/ head 254/ sector 63
The data for partition 2 is:
sysid 131 (0x83),(Linux native)
start 40949685, size 15631245 (7632 Meg), flag 0
beg: cyl 1023/ head 254/ sector 63;
end: cyl 1023/ head 254/ sector 63
The data for partition 3 is:
sysid 130 (0x82),(Linux swap or Solaris x86)
start 56580930, size 1558305 (760 Meg), flag 0
beg: cyl 1023/ head 254/ sector 63;
end: cyl 1023/ head 254/ sector 63
The data for partition 4 is:
<UNUSED>
The fdisk output helps to see more details about each slice. Here are some ways that
you can work with those slices. To change the default slice to boot to slice 2, type this:
# boot0cfg -v -s 2 ad0
...
default_selection=F2 (Slice2)
Set slice 2 as default slice
If you have multiple hard disks, you can also tell the computer’s BIOS to look for the
boot loader on a hard disk other than the first hard disk (0x80). For example, type this
to have the computer’s BIOS look for a boot loader on the second hard disk (0x81):
# boot0cfg -v -d 0x81 ad0
Look for boot loader on second drive (0x81)
...
version=1.0 drive=0x81 mask=0xf ticks=182
175
76034c10.qxd:Toolbox
3/29/08
10:51 AM
Page 176
Chapter 10: Managing the System
Using bsdlabel to Check Out Partitions
When you first installed FreeBSD, the sysinstall installer created partitions on your BSD
disk slice. To display and work with those partitions within a particular BSD disk slice,
you can use the bsdlabel command. Assuming that the first slice of your disk contains
your BSD slice, type the following command to see the partitions on the slice:
# bsdlabel ad0s1
# /dev/ad0s1:
8 partitions:
#
size
a: 1048576
b:
975760
c: 40949622
d: 2584576
e: 1048576
f: 35292134
Display partitions on BSD disk 0, slice 1
offset
0
1048576
0
2024336
4608912
5657488
fstype
4.2BSD
swap
unused
4.2BSD
4.2BSD
4.2BSD
[fsize bsize bps/cpg]
2048 16384
8
0
0
# “raw” part, don’t edit
2048 16384 28552
2048 16384
8
2048 16384 28552
The output from BSD label shows the different BSD partitions within the first slice of
the first IDE hard drive (ad0s1). You can better see how these partitions relate to how you use
your file system by running the df command to display mounted partitions:
# df -h
Filesystem
/dev/ad0s1a
devfs
/dev/ad0s1e
/dev/ad0s1f
/dev/ad0s1d
Display mounted partitions
Size
Used
Avail Capacity
496M
39M
418M
8%
1.0K
1.0K
0B
100%
496M
16K
456M
0%
16G
1.7G
13G
11%
1.2G
19M
1.1G
2%
Mounted on
/
/dev
/tmp
/usr
/var
As you can see, of the eight partitions, partition a, d, e, and f are mounted on the root
(/), /var, /tmp, and /usr directories, respectively. Partition b is the swap partition.
Partition c is the “raw” part and should not be modified. (The devfs file system, /dev,
provides access to the computer’s hardware devices.)
Because the discussion in this chapter relates to the boot process, refer to Chapter 7
for information on other uses of the bsdlabel and fdisk commands for creating
and modifying disk slices and partitions.
Changing to the GRUB boot loader
There is no reason you have to use the boot0 boot loader to boot your BSD system. In
fact, these days, many people use the Grand Unified Boot Loader (GRUB), especially
in situations where they are booting multiple operating systems, such as Linux. GRUB
has some fancy features, such as splash screens and menus for selecting and editing
boot options.
176
76034c10.qxd:Toolbox
3/29/08
10:51 AM
Page 177
Chapter 10: Managing the System
There is a grub package available with FreeBSD. Or you can configure GRUB from
one of the other systems installed on your computer, if they have it. To install GRUB in
FreeBSD, type the following:
# pkg_add -r grub
Install the grub package
Next, set up your GRUB files by creating /boot/grub directory and copying the GRUB files
you need there.
# mkdir /boot/grub
Create the /boot/grub directory
# cp -Rf /usr/local/share/grub/i386-freebsd/ /boot/grub Copy files to /boot/grub
Next you need to create a menu.lst file, using any text editor, to tell GRUB what to boot
and how. In this example, the FreeBSD system and the Debian GNU/Linux system
described earlier are set up to boot from the GRUB boot screen.
default=0
timeout 15
title FreeBSD
rootnoverify (hd0,0)
makeactive
chainloader +1
title Debian GNU/Linux
root (hd0,1)
chainloader +1
The default operating system to boot is the first one (default=0), FreeBSD. GRUB will
pause for 15 seconds (timeout 15) before booting the default operating system. Because
boot loaders are installed on both the FreeBSD and Debian partitions, an easy way to
configure the two systems to boot is with chainloader. That will let you see a secondary
boot screen for each of those two systems.
Now you need to overwrite the hard disk’s master boot record. Because you will
probably be unable to write to your hard disk’s MBR by default, run the following
sysctl command to make it possible to overwrite the MBR:
# sysctl kern.geom.debugflags=16
Once you have the menu.list file created and are able to write to the master boot record,
you can install it to the master boot record using the grub-install command. Type
the following to install GRUB to the master boot record on disk ad0:
WARNING! You are about to overwrite your computer’s master boot record. If
you did something wrong in your menu.lst file, grub-install will probably fail.
However, if the write completed with information that you think won’t work,
you can always put the old boot0 loader back by typing boot0cfg -B ad0.
177
76034c10.qxd:Toolbox
3/29/08
10:51 AM
Page 178
Chapter 10: Managing the System
# grub-install /dev/ad0
Installation finished. No error reported.
This is the contents of the device map /boot/grub/device.map.
Check if this is correct or not. If any of the lines is incorrect,
fix it and re-run the script `grub-install’.
(fd0)
/dev/fd0
(hd0)
/dev/ad0
root (hd0,1)
chainloader +1
At this point you should be able to reboot your computer and see the GRUB screen
after control is passed off from the BIOS.
Instead of using chainloader, you can be more specific about the next stage of the boot process.
For BSD systems, you can call the loader program directly. For Linux systems, you
can identify the location of the kernel to boot. Here are examples:
title FreeBSD
root (hd0,0,a)
kernel /boot/loader
title
root
kernel
initrd
Debian GNU/Linux, kernel 2.6.18-4-686
(hd0,1)
/boot/vmlinuz-2.6.18-4-686 root=/dev/hda2 ro
/boot/initrd.img-2.6.18-4-686
In the example just shown, selecting the FreeBSD title from the GRUB boot screen will
run /boot/loader from hard disk (disk 0, slice 0, and partition a). The Debian title
will boot the selected kernel directly to the selected kernel (vmlinuz) and initial RAM
disk (initrd.img).
You can do other things with GRUB as well. For example, you can use an image as a splash
screen for when GRUB boots. Create a 16-color, 640 × 480 image, save it to XPM format. Do
this in the GNU Image Manipulation Program (The GIMP) by selecting Image ➪
Mode ➪ Index, then setting the number of colors to 16. Next, gzip the image and
copy it to the /boot/grub directory. For example, if you created an image named
splash.xpm.gz, you could identify the image as your spash screen by adding this
line to the menu.lst file:
splashimage=(hd0,0,a)/boot/grub/splash.xpm.gz
Controlling System Services
Many BSD administrators leave the basic start-up features alone and focus on configuring and enabling system services. Most of the optional services are represented by
start-up scripts in the /etc/rc.d directory. The service is actually turned on and configured in the /etc/rc.conf file.
178
76034c10.qxd:Toolbox
3/29/08
10:51 AM
Page 179
Chapter 10: Managing the System
Some services are turned on in /etc/rc.conf based on selections you made when you
ran sysinstall to install FreeBSD. For example, here is how my /etc/rc.conf file
looked just after installation:
hostname=”myhost.localdomain”
ifconfig_fxp0=”DHCP”
linux_enable=”YES”
local_startup=”/usr/local/etc/rc.d”
sshd_enable=”YES”
As you can see, the hostname is set, the Ethernet interface is started using DHCP, and
Linux compatibility is enabled. Additional rc.d scripts are enabled from the /usr/
local/etc/rc.d directory and the Secure Shell service is started, so people can log
in to the machine over the LAN.
Many of the services you can enable are network services and are described in some
detail in Chapter 14. At this point, however, I would recommend you go through the
default rc.conf file (/etc/defaults/rc.conf) and look at the services and features
you can enable in there. Copy the lines representing the features you want to the /etc/
rc.conf file. Features you change from NO to YES will start and run as you configure them.
Starting and Stopping Your System
Although you can use the init command to start and stop your BSD system, including init 0 (shut down) and init 6 (reboot), there are also specific commands for
stopping BSD. The advantages of commands such as halt, reboot, or shutdown are
that they include options to let you stop some features before shutdown occurs. For example:
WARNING! Don’t try the following commands if you don’t intend to actually
turn off your system, especially on a remote system.
#
#
#
#
#
#
reboot
halt -n
halt -p
shutdown +10
shutdown –r 06:08
shutdown +10 ‘Bye!’
Reboot the computer
Don’t run sync to sync hard drives before shutdown
The system will power down, if possible
Shutdown in ten minutes after warning the users
Reboot at 6:08 am
Send custom message to users before shutdown
Besides the reboot or init 6 commands, you can also use the old PC keystrokes
Ctrl+Alt+Del to reboot your computer.
Straight to the Kernel
In general, when the kernel starts up on your BSD system, you shouldn’t have to do
too much with it. However, there are tools for checking the kernel that is in use and
179
76034c10.qxd:Toolbox
3/29/08
10:51 AM
Page 180
Chapter 10: Managing the System
for seeing information about how the kernel started up. Also, if something goes wrong
or if there is some extra support you need to add to the kernel, there are tools to do
those things.
To find out what version of BSD you are running, type the following:
$ uname -r
Display name of current release
6.3-RELEASE
$ uname -a
Display all name and release information
FreeBSD myhost.localdomain 6.3-RELEASE FreeBSD 6.3-RELEASE #0: Wed Aug 16
04:18:52 UTC 2008 root@dessler.cse.buffalo.edu:/usr/obj/usr/src/sys/GENERIC
i386
When the kernel starts, messages about what occurs are placed in the system message
buffer. You can display the contents of the system message buffer using the dmesg command:
$ dmesg |less
Copyright (c) 1992-2008 The FreeBSD Project.
Copyright (c) 1979, 1980, 1983, 1986, 1988, 1989, 1991, 1992, 1993, 1994
The Regents of the University of California. All rights reserved.
FreeBSD is a registered trademark of The FreeBSD Foundation.
FreeBSD 6.3-RELEASE #0: Wed Jan 16 04:18:52 UTC 2008
root@dessler.cse.buffalo.edu:/usr/obj/usr/src/sys/GENERIC
Timecounter “i8254” frequency 1193182 Hz quality 0
CPU: Intel Pentium III (648.03-MHz 686-class CPU)
Origin = “GenuineIntel” Id = 0x683 Stepping = 3
Features=0x387f9ff<FPU,VME,DE,PSE,TSC,MSR,PAE,MCE,CX8,SEP,MTRR,PGE,MCA,CMOV,PAT,
PSE36,PN,MMX,FXSR,SSE>
real memory = 267124736 (254 MB)
avail memory = 251854848 (240 MB)
kbd1 at kbdmux0
ath_hal: 0.9.20.3 (AR5210, AR5211, AR5212, RF5111, RF5112, RF2413, RF5413)
hptrr: HPT RocketRAID controller driver v1.1 (Jan 16 2008 04:16:19)
acpi0: <CAYMAN 8C1A100A> on motherboard
acpi0: Power Button (fixed)
Timecounter “ACPI-fast” frequency 3579545 Hz quality 1000
acpi_timer0: <24-bit timer at 3.579545MHz> port 0x408-0x40b on acpi0
...
If that buffer fills up, it may no longer contain the beginning of the recorded information. In that case, you can use less /var/log/dmesg.
Other information of interest about kernel processing can be found in the /var/log
files, in particular, the messages file. You can page through those files as follows:
# less
Aug 14
Aug 14
...
Aug 14
180
/var/log/messages*
Page through /var/log/messages
23:27:11 thompson newsyslog[557]: logfile first created
23:27:11 thompson syslogd: kernel boot file is /boot/kernel/kernel
23:27:11 thompson kernel: kbd1 at kbdmux0
76034c10.qxd:Toolbox
3/29/08
10:51 AM
Page 181
Chapter 10: Managing the System
Aug 14 23:27:11 thompson kernel: acpi0: <CAYMAN 8C1A100A> on motherboard
Aug 14 23:27:11 thompson kernel: acpi0: Power Button (fixed)
Aug 14 23:27:11 thompson kernel: Timecounter “ACPI-fast”
frequency 3579545 Hz quality 1000
Aug 14 23:27:11 thompson kernel: cpu0: <ACPI CPU> on acpi0
Aug 14 23:27:11 thompson kernel: pcib0: <ACPI Host-PCI bridge> port 0xcf8-0xcff
on acpi0
Aug 14 23:27:11 thompson kernel: fxp0: <Intel 82559 Pro/100 Ethernet>
port 0xde80-0xdebf mem 0xff8fd000-0 xff8fdfff,0xff700000-0xff7fffff
irq 11 at device 1.0 on pci1
In the best circumstances, all the hardware connected to your computer should be
detected and configured with the proper drivers. In some cases, however, either the
wrong driver is detected or the necessary driver may not be available on your system.
For those cases, FreeBSD offers ways of listing loadable modules and adding new ones
to your system.
The kldstat command lets you view the names of the loaded modules, their address, size,
and reference Id. Here is an example:
# kldstat
Id Refs Address
1
7 0xc0400000
2
1 0xc0ba1000
3
1 0xc0400000
Size
7a05b0
5c304
7a05b0
Name
kernel
acpi.ko
linux.ko
If you want to find out more information about a particular module, you can use the kldstat
command. Here’s an example:
# kldstat -n acpi.ko
List status of a particular module
2
1 0xc0ba1000 5c304
acpi.ko
# kldstat -v -n acpi.ko Show more verbose information about module
Id Refs Address
Size
Name
2
1 0xc0ba1000 5c304
acpi.ko
Contains modules:
Id Name
1 nexus/acpi
2 acpi/acpi_button
3 acpi/acpi_isab
4 pcib/acpi_pci
5 acpi/acpi_pcib
6 pci/acpi_pcib
7 acpi/acpi_sysresource
...
# kldstat -v -i 3
List status of a particular module by Id
Id Refs Address
Size
Name
3
1 0xc0400000 7a05b0 linux.ko
Contains modules:
Id Name
391 linuxelf
392 linuxaout
181
76034c10.qxd:Toolbox
3/29/08
10:51 AM
Page 182
Chapter 10: Managing the System
If you decide that you need to add a loadable module to get some hardware item on your
system working properly, you can use the kldload command.
# cd /boot/kernel
# kldload smbfs.ko
# kldload -v vesa.ko
Loaded vesa.ko, id=7
Change to directory containing modules
Load module for Samba filesystem
Load vesa module and be more verbose
To remove a loadable module that is currently loaded, you can use the kldunload
command:
# kldunload smbfs.ko
# kldunload -v vesa.ko
Unoaded vesa.ko, id=7
Unload module for Samba filesystem
Unload vesa module and be more verbose
You can control kernel parameters with the system running using the sysctl command. You can
also add parameters permanently to the /etc/sysctl.conf file, so they can load as
a group or at each reboot. Here are some examples:
# sysctl -a | less
List all kernel parameters
kernel.ostype: FreeBSD
kernel.osrelease: 6.3-RELEASE
kern.osrevision: 199506
...
# sysctl kern.hostname
List value of particular parameter
kern.hostname: mycomputer.localdomain
# sysctl kern.geom.debugflags=16 Set value of kernel.geom.debugflags to 16
As noted earlier, if you want to change any of your kernel parameters permanently,
you should add them to the /etc/sysctl.conf file. Parameter settings in that file
are in the form parameter = value.
Poking at the Hardware
If you just generally want to find out more about your computer’s hardware, there
are a few commands you can try. First install pciutils (pkg_add -r pciutils). The
lspci command from that package lists information about PCI devices on your computer:
# lspci
List PCI hardware items
00:00.0 Host bridge: Intel Corporation 82810E DC-133 GMCH
[Graphics Memory Controller Hub] (rev 03)
00:01.0 VGA compatible controller: Intel Corporation 82810E DC-133 CGC
[Chipset Graphics Controller] (rev 03)
00:1e.0 PCI bridge: Intel Corporation 82801AA PCI Bridge (rev 02)
00:1f.0 ISA bridge: Intel Corporation 82801AA ISA Bridge (LPC) (rev 02)
00:1f.1 IDE interface: Intel Corporation 82801AA IDE Controller (rev 02)
00:1f.2 USB Controller: Intel Corporation 82801AA USB Controller (rev 02)
00:1f.3 SMBus: Intel Corporation 82801AA SMBus Controller (rev 02)
01:01.0 Ethernet controller: Intel Corporation 82557/8/9 [Ethernet Pro 100]
182
76034c10.qxd:Toolbox
3/29/08
10:51 AM
Page 183
Chapter 10: Managing the System
01:07.0 Multimedia audio controller: Ensoniq ES1371 [AudioPCI-97] (rev 06)
01:09.0 Network controller: Broadcom Corporation BCM4306 802.11b/g
Wireless LAN Controller (rev 03)
...
# lspci -v
List PCI hardware items with more details
# lspci -vv
List PCI hardware items with even more details
Using the dmidecode command, you can display information about your computer’s hardware
components, including information about what features are supported in the BIOS
(pkg_add -r dmiencode). Here is an example:
# dmidecode | less
List hardware components
# dmidecode 2.7
SMBIOS 2.3 present.
55 structures occupying 2021 bytes.
Table at 0x000F0EF0.
Handle 0x0000, DMI type 0, 20 bytes.
BIOS Information
Vendor: Intel Corp.
Version: CA8120A.86.0008.P04.0003290002
...
Summary
FreeBSD, OpenBSD, NetBSD, and other BSD systems make it easy for you to watch
and modify many aspects of your running system to make sure it is operating at
peak performance. Commands such as top, vmstat, and iostat, let you see how
your system is using its memory, CPU, and storage devices. Using commands such
as date and cal, as well as services such as NTP, you can watch and manage your
system’s date and time settings.
To manage the features that are set and services that come up when you boot your
system, you can modify features associated with your boot0 boot loader. Or you
can change your boot loader to a different one, such as GRUB. Commands such as
reboot, halt, and shutdown let you safely stop or reboot your computer.
When it comes to managing your computer’s hardware, commands such as kldstat,
kldload, and kldunload let you work with loadable modules. You can view information about your hardware with such commands as lspci and dmidecode.
183
76034c10.qxd:Toolbox
3/29/08
10:51 AM
Page 184
76034c11.qxd:Toolbox
3/29/08
10:52 AM
Page 185
Managing Network
Connections
Connecting to a network from a BSD system
is often as easy as attaching your computer’s
network interface card to your ISP’s hardware
(such as a DSL or cable modem) and rebooting.
However, if your network interface doesn’t come
up or requires some manual intervention, there
are many commands available for configuring
network interfaces, checking network connections, and setting up special routing.
This chapter covers many useful commands for
configuring and working with your network
interface cards (NICs), such as sysinstall and
ifconfig. In particular, it covers ways of configuring wired Ethernet, wireless Ethernet, and
modem network hardware. The chapter describes
commands such as netstat, dig, and ping for
getting information about your network when
your hardware is connected and network interfaces are in place.
IN THIS CHAPTER
Get network statistics
Starting network
devices with ifconfig
Managing wireless
cards
Checking DNS name
resolution with dig,
host, and hostname
Check connectivity
with ping and arping
Trace connections
with traceroute and
route
Watch the network
with netstat, tcpdump,
and nmap
Configuring Network
Interfaces Using sysinstall
When you first install your FreeBSD system, the installer lets you configure any wired Ethernet cards attached to your computer, with the use of a
DHCP server detected on your network. Alternatively, you can set a static
IP address, along with your hostname and IP addresses for your gateway
machine and name servers. After installation, you can use the sysinstall
utility to configure your network interfaces. Start it as root user by typing:
# sysinstall
76034c11.qxd:Toolbox
3/29/08
10:52 AM
Page 186
Chapter 11: Managing Network Connections
From the FreeBSD Configuration menu that appears, select Networking ➪ Interfaces.
At this point you have options of configuring your network interfaces based on the
networking hardware connected to your computer. For example:
❑ Ethernet Network Interface Card (fxp0, lnc0, or other) — Wired connection to
Ethernet network
❑ Parallel Port IP (plip0) — Direct connection to another computer between the
parallel ports
❑ Serial Line Internet Protocol (cuad0) — Serial port connection to a modem or
null modem to another computer
❑ Point-to-Point Protocol (ppp0) — Serial port connection to modem or null modem
to another computer
Of the two serial interfaces, SLIP is older but PPP is more commonly used today. PLIP
requires a special cable and, because Ethernet network cards are so inexpensive these
days, PLIP is rarely used.
If your Ethernet NIC is supported, you should see the name of that card in the sysinstall
display. To configure that interface, you can configure IPv6 networking. Then you have
the option of either getting your computer’s address information from DHCP, or configuring it manually. If you configure manually, you can enter the computer’s hostname,
domain name, gateway (IPv4), name server, IP address (IPv4) netmask, and any options
to ifconfig.
In some cases, however, your network interfaces may not be working. Likewise, there
may be ways you want to work with your network interfaces that are not supported
from sysinstall. In those cases, the following sections describe how to work with your
network interfaces from the command line.
NOTE The interface names for your Ethernet NICs are based on the driver used
to support that NIC. If you are coming from a Linux environment you may expect
Ethernet interfaces to be named eth0, eth1 and so on. In FreeBSD, the names might
be fxp0, em0, lnc0 or something else. Examples in this chapter use fxp0 to represent
a wired Ethernet NIC interface.
Managing Network Interface Cards
If the network hardware on your computer didn’t immediately come up and let you
connect to the Internet, there are some steps you should go through to troubleshoot
the problem:
❑ Check that your network interface card (NIC) is properly installed and that the
cable is connected to your network (ISPs CPE, switch, and so on).
186
76034c11.qxd:Toolbox
3/29/08
10:52 AM
Page 187
Chapter 11: Managing Network Connections
❑ After the cable is connected, make sure you have a link with no speed or duplex
mismatches.
❑ If all else fails, consider replacing your NIC with a known-good spare to isolate a
hardware failure.
To check your link from your BSD system and to set speed and duplex, the ifconfig
command provides that and many other features.
NOTE If you are used to tools such as ethtool and mii-tool, coming from
Linux or other UNIX environments, the ifconfig command contains many of
the same features you would get from those two commands.
To view the syntax of the ifconfig command, type any invalid option:
# ifconfig -?
View options to the ifconfig command
ifconfig: illegal option -- ?
usage: ifconfig [-L] [-C] interface address_family [address [dest_address]]
[parameters]
ifconfig interface create
ifconfig -a [-L] [-C] [-d] [-m] [-u] [-v] [address_family]
ifconfig -l [-d] [-u] [address_family]
ifconfig [-L] [-C] [-d] [-m] [-u] [-v]
To display just the names of every available network interface, use the -l option. The following
example shows that there is a Ethernet NIC (fxp0), parallel port (plip0) and loopback (lo0):
# ifconfig -l
fxp0 plip0 lo0
List names of network interfaces
To display settings for a specific Ethernet card, add the interface name to the command. For
example, to view card information for fxp0 (the first wired Ethernet NIC), type:
# ifconfig fxp0
See settings for NIC at fxp0
fxp0: flags=8843<UP,BROADCAST,RUNNING,SIMPLEX,MULTICAST> mtu 1500
options=8<VLAN_MTU>
inet 10.0.0.204 netmask 0xffffff00 broadcast 10.0.0.255
ether 00:d0:b7:79:a5:35
media: Ethernet autoselect (100baseTX <full-duplex>)
status: active
To display a capabilities list for a particular network card, use the -m option:
# ifconfig -m fxp0
Display driver information for NIC
fxp0: flags=108843<UP,BROADCAST,RUNNING,SIMPLEX,NEEDSGIANT> mtu 1500
options=8<VLAN_MTU>
capabilities=8<VLAN_MTU>
187
76034c11.qxd:Toolbox
3/29/08
10:52 AM
Page 188
Chapter 11: Managing Network Connections
inet 10.0.0.204 netmask 0xffffff00 broadcast 10.0.0.255
ether 00:d0:b7:79:a5:35
media: Ethernet autoselect (100baseTX <full-duplex>)
status: active
supported media:
media autoselect
media 100baseTX mediaopt full-duplex
media 100baseTX
media 10baseT/UTP mediaopt full-duplex
media 10baseT/UTP
media none
media 100baseTX mediaopt hw-loopback
The ifconfig command can be used to change NIC settings as well as display them.
To hard-set the NIC to 100Mpbs with full duplex, type this:
# ifconfig fxp0 media 100baseTX mediaopt full-duplex
Change speed/duplex
# ifconfig fxp0
View new NIC settings
fxp0: flags=8843<UP,BROADCAST,RUNNING,SIMPLEX,MULTICAST> mtu 1500
options=8<VLAN_MTU>
inet 10.0.0.204 netmask 0xffffff00 broadcast 10.0.0.255
ether 00:d0:b7:79:a5:35
media: Ethernet 100baseTX <full-duplex>
status: active
To hard-set the speed to 10Mpbs, type this:
# ifconfig fxp0 media 10baseT/UTP
Change speed
# ifconfig fxp0
View new NIC settings
fxp0: flags=8843<UP,BROADCAST,RUNNING,SIMPLEX,MULTICAST> mtu 1500
options=8<VLAN_MTU>
inet 10.0.0.204 netmask 0xffffff00 broadcast 10.0.0.255
ether 00:d0:b7:79:a5:35
media: Ethernet 10baseT/UTP <full-duplex>
status: active
To change the IP address and netmask, type this:
# ifconfig fxp0 inet 10.0.0.208 netmask 255.0.0.0 Change IP and netmask
# ifconfig fxp0
View new NIC settings
fxp0: flags=8843<UP,BROADCAST,RUNNING,SIMPLEX,MULTICAST> mtu 1500
options=8<VLAN_MTU>
inet 10.0.0.208 netmask 0xff000000 broadcast 10.255.255.255
ether 00:d0:b7:79:a5:35
media: Ethernet 10baseT/UTP <full-duplex>
status: active
The changes just made to your NIC settings are good for the current session. When
you reboot, however, those settings will be lost. To make these settings stick at the next reboot
188
76034c11.qxd:Toolbox
3/29/08
10:52 AM
Page 189
Chapter 11: Managing Network Connections
or network restart, add the options to the ifconfig_fxp0 line in the /etc/rc.conf file
(change fxp0 to the appropriate interface name if it’s not the first Ethernet NIC interface). For example:
ifconfig_fxp0=”inet 10.0.0.208 netmask 255.0.0.0 media 100baseTX”
The netstat command provides many ways to get network interface statistics. With no
options, netstat shows active network connections and active sockets as follows:
$ netstat
Show active connections and sockets
Active Internet connections
Proto Recv-Q Send-Q Local Address
Foreign Address
(state)
tcp4
0
0 10.0.0.204.62963
10.0.0.204.ssh
TIME_WAIT
tcp4
0
0 10.0.0.204.ssh
einstein.47835
ESTABLISHED
Active UNIX domain sockets
Address Type
Recv-Q Send-Q
Inode
Conn Refs Nextref Addr
c241aa64 stream
0
0
0 c241a9d8
0
0
c241a9d8 stream
0
0
0 c241aa64
0
0
c241a4ec stream
0
0 c2445bb0
0
0
0 /var/run/devd.pipe
...
To show quick statistics on all network interfaces, use netstat as follows:
$ netstat -i
netstat -i
Name
Mtu Network
fxp0
1500 <Link#1>
fxp0
1500 10
plip0 1500 <Link#2>
lo0
16384 <Link#3>
...
Get network interface statistics for all interfaces
Address
00:d0:b7:79:a5:35
10.0.0.204
Ipkts Ierrs
8019
0
313
0
0
27
0
Opkts Oerrs
2910
0
183
0
0
27
0
Coll
0
0
0
Use the -w option to get netstat to refresh network interface statistics every second:
$ netstat -w 2 -I fxp0
Refresh network statistics every 2 seconds
input
(Total)
output
packets errs
bytes
packets errs
bytes colls
13
0
266
12
0
244
0
2
0
5938
1
0
84282
0
92
2
6676
116
0
115574
0
183
3
16862
225
0
369602
0
152
2
13642
191
0
264566
0
137
4
6836
169
0
103890
0
113
0
10276
139
0
144936
0
You can check if there are active connections to your computer from netstat with the -p option
as follows:
$ netstat -p tcp
Active Internet connections
Display active TCP connections
189
76034c11.qxd:Toolbox
3/29/08
10:52 AM
Page 190
Chapter 11: Managing Network Connections
Proto Recv-Q Send-Q
tcp4
0
0
tcp4
0
0
Local Address
10.0.0.204.ssh
10.0.0.204.ssh
Foreign Address
thompson.62963
einstein.47835
(state)
ESTABLISHED
ESTABLISHED
As the output indicates, the netstat shows two connections from remote computers
that have active ssh sessions to the local computer. Here are some other quick examples of the netstat command:
$
$
$
$
$
netstat
netstat
netstat
netstat
netstat
-r
-rs
-s -p tcp | less
-n
-m
Display
Display
Display
Display
Display
kernel routing tables for IPv4 and IPv6
routing stats (bad routes, dynamic routes)
detailed statistics for TCP interfaces
output with IP addresses, not hostnames
information on network memory buffers
Managing Network Connections
Starting and stopping the network interfaces for your wired Ethernet connections to
your LAN or the Internet are usually handled automatically at the time you boot and
shut down your BSD system. However, you can run scripts from the /etc/rc.d
directory to start and stop your network interfaces any time you want or edit the
/etc/rc.conf file to set whether or not your network services start automatically.
The ifconfig command can also be used to configure, activate, and deactivate
interfaces.
Starting and Stopping Ethernet Connections
The reason that your wired Ethernet interfaces just come up in many cases when you
boot your BSD system is that the netif service is set to be on when the system boots
up. After the system is booted, you can use the netif script to stop, start, and restart
your network interfaces.
The script that starts your network interfaces in FreeBSD is /etc/rc.d/netif. As with
other BSD services, you can start and stop the netif service by running the script with
options such as start, stop, and restart.
To take all network interfaces offline then bring them back online, type the following as root user:
# /etc/rc.d/netif restart
Shutdown and bring up network interfaces
Stopping network: lo0 fxp0 plip0.
DHCPREQUEST on fxp0 to 255.255.255.255 port 67
DHCPACK from 10.0.0.1
bound to 10.0.0.204 -- renewal in 7200 seconds.
lo0: flags=8049<UP,LOOPBACK,RUNNING,MULTICAST> mtu 16384
inet6 fe80::1%lo0 prefixlen 64 scopeid 0x3
inet6 ::1 prefixlen 128
inet 127.0.0.1 netmask 0xff000000
fxp0: flags=8843<UP,BROADCAST,RUNNING,SIMPLEX,MULTICAST> mtu 1500
190
76034c11.qxd:Toolbox
3/29/08
10:52 AM
Page 191
Chapter 11: Managing Network Connections
options=8<VLAN_MTU>
inet 10.0.0.204 netmask 0xffffff00 broadcast 10.0.0.255
ether 00:d0:b7:79:a5:35
media: Ethernet 10baseT/UTP <full-duplex>
status: active
Use the start and stop options to start and stop your network interfaces, respectively:
# /etc/rc.d/netif stop
# /etc/rc.d/netif start
Shutdown network interfaces
Bring up network interfaces
You can also use the ifconfig command to bring network interfaces up and down.
For example:
# ifconfig fxp0 down
Turn off network interface for Ethernet card (fxp0)
# ifconfig fxp0 -d
List network interfaces that are down
fxp0: flags=8802<BROADCAST,SIMPLEX,MULTICAST> mtu 1500
...
# ifconfig fxp0 up
Turn on network interface for Ethernet card (fxp0)
# ifconfig fxp0 -u
List network interfaces that are up
fxp0: flags=8843<UP,BROADCAST,RUNNING,SIMPLEX,MULTICAST> mtu
...
Note that the network interfaces will appear as active after running ifconfig with the
down option. However, the words UP and RUNNING will no longer appear when you
list the interface and no data will be able to go in either direction across that interface.
When your network interfaces are up, there are tools you can use to view information
about those interfaces and associated NICs.
Starting and Stopping Network Services
You can start and stop services associated with your network interfaces in much the
same way that you used the netif script to start and stop the interfaces. Services
such as the Secure Shell (sshd) and Network File System (nfsd) can be set to start
automatically when the system boots based on settings in the /etc/rc.conf file.
Information on how to configure and start network services is contained in Chapter 10.
To find out the options available when you run network service scripts, just type the
path to the script with no options. For example:
# /etc/rc.d/sendmail
Check options available with start-up script
Usage: /etc/rc.d/sendmail [fast|force|one](start|stop|restart|rcvar|status|poll)
Here are some examples of starting and using network services that have already
been configured:
# /etc/rc.d/sshd restart
# /etc/rc.d/sshd reload
Stop and start the SSH service
Reload config files from /etc/ssh directory
191
76034c11.qxd:Toolbox
3/29/08
10:52 AM
Page 192
Chapter 11: Managing Network Connections
# /etc/rc.d/sshd keygen
Generate host keys, if you need them (/etc/ssh)
# /etc/rc.d/nfsd status
nfsd is not running
# /etc/rc.d/nfsd start
Starting nfsd
# /etc/rc.d/nfsd start
Waiting for PIDS: 8394 8395
Check status of NFS service
Start the NFS service
Show process IDS of NFS server processes
8396 8397 8398
Using Wireless Connections
Setting up wireless connections in FreeBSD has been tricky in the past, primarily due
to the fact that open source drivers have not been available for the vast majority of
wireless LAN cards on the market. So the first thing you need to do is choose a wireless card that is supported by BSD. The next thing is to configure your wireless network interface using the ifconfig command.
Getting Wireless Driver
If you have any choice in the matter, you should purchase a wireless LAN card that
has open source drivers available that are packaged with your BSD system. If you are
not sure of the manufacturer and model of your wireless card, if you have a PCI card
you can determine exactly what wireless card you have, using the lspci command (pkg_add
-r pciutils):
# lspci | grep -i wireless
Search for wireless PCI cards
01:09.0 Network controller: Broadcom Corporation BCM4306 802.11b/g
Wireless LAN Controller (rev 03)
The wireless card shown is not one of the supported cards. If that is the case with your
card, you might be able to use the ndis miniport driver wrapper (type man ndis). With
the ndis driver you can use Windows drivers to get your wireless LAN cards to work.
Wireless LAN cards for which there are drivers in FreeBSD are shown in Table 11-1.
Table 11-1: Wireless LAN Cards for FreeBSD
192
Driver name
Supported Wireless Cards
Line to add to
/boot/loader.conf
an
Aironet Communications 4500/4800
Cisco Aironet 340 and 350 series
Xircom Wireless Ethernet Adapter
if_an_load=”YES”
ath
Atheros 802.11 Wireless Adapter
Supports all Atheros Cardbus/PCI (except
AR5005VL)
if_ath_load=”YES”
76034c11.qxd:Toolbox
3/29/08
10:52 AM
Page 193
Chapter 11: Managing Network Connections
Table 11-1: Wireless LAN Cards for FreeBSD (continued)
Driver name
Supported Wireless Cards
Line to add to
/boot/loader.conf
awi
AMD PCnetMobile IEEE802.11
BayStack 650/660
Icom SL-200
Melco WLI-PCM
NEL SSMagic
Netwave AirSurfer Plus/Pro
Nokia C020 WLAN
Farallon SkyLINE
if_awi_load=”YES”
cnw
Netwave AirSurfer Wireless LAN
Xircon CreditCard Netwave
if_cnw_load=”YES”
ipw
Intel PRO/Wireless 2100 MiniPCI
if_ipw_load=”YES”
iwi
Intel PRO/Wireless 2200BG/ 2225BG
MiniPCI/ 2915ABG 802.11 Adapters
if_iwi_load=”YES”
ral
Ralink Technology RT2500
if_ral_load=”YES”
ural
Ralink Technology RT2500USB
if_ural_load=”YES”
wi
Dozens of cards that include the following
wireless chipsets:
Lucent Hermes, Intersil PRISM-II, Intersil
PRISM-2.5 and Symbol Spectrun24
if_wi_load=”YES”
As indicated in the third column, if the wireless driver isn’t already built into your
kernel, you can configure it to load as a module when you boot your computer. Just
add the line shown to the /boot/loader.conf file. Along with the specific driver
for your card, you also need the wlan 802.11 generic driver:
wlan_load=”YES”
Configuring Wireless Interfaces
Here are some ifconfig command lines to configure network interfaces for the supported cards shown in Table 11-1 (once the drivers have been loaded). To give you an
idea of the available options, different options are shown with each wireless interface
command line:
# ifconfig an0 inet 10.0.1.1 netmask 0xffffff00
Add Aironet card interface
# ifconfig ath0 inet 10.0.1.1 \
Connect Atheros card to existing network
netmask 0xffffff00 ssid “net01”
named net01
# ifconfig awi0 inet 10.0.1.1 \
Connect PCnetMobile card (64-bit WEP)
netmask 0xffffff00 ssid “net01”
wepmode on wepkey 0x45320185622
193
76034c11.qxd:Toolbox
3/29/08
10:52 AM
Page 194
Chapter 11: Managing Network Connections
# ifconfig cnw0 inet 10.0.1.1 \
Connect Netwave Airsurfer access point
netmask 0xffffff00 ssid “net01” \
mode 11g mediaopt hostap
# ifconfig ipw0 inet 10.0.1.1 \
Connect Intel PRO 2100 (104-bit WEP)
netmask 0xffffff00 ssid “net01” \
wepmode on wepkey 0x01002948535224150910124312
# ifconfig iwi0 inet 10.0.1.1 \
Connect Intel PRO 2200BG (128-bit WEP)
netmask 0xffffff00 ssid “net01” \
wepmode on wepkey 0x01020304050607080910111213 weptxkey 1
After the wireless card interface is configured, you can check it or bring it up and
down as you would any network interface. You can also do a few other things to
check on the wireless network. For example:
#
#
#
#
ifconfig
ifconfig
ifconfig
ifconfig
iwi0
ath0 down
ipw0 up
cnw0 scan
Check the status of wireless connection
Turn off wireless network
Bring up wireless network
Scan for and display any stations found
There are other commands for working with wireless cards after they have been configured. For example, you can use the wicontrol (Aironet cards), ancontrol (Aironet
cards) and raycontrol (Raylink cards) commands to view and work with settings on
your wireless cards. Here are some commands for working with Atheros, Intersil, or
Lucent wireless cards:
#
#
#
#
#
#
#
#
wicontrol -i wi0 -o
Display statistics associated with wireless card
wicontrol -i wi0 -C
Display cached signal strength information
wicontrol -i wi0 -X
Erase cached signal strength information
raycontrol -i ray0 -o
Display current statistics from driver
raycontrol -i ray0 -t 3
Set transmission rate to medium
raycontrol -i ray0 -n net02 Set network name to net0
ancontrol -i an0 -A
Display access point that is preferred
ancontrol -i an0 -S
Display list of SSIDs
Checking Name Resolution
Because IP addresses are numbers, and people prefer to address things by name,
TCP/IP networks (such as the Internet) rely on DNS to resolve hostnames into IP
addresses. FreeBSD provides several tools for looking up information related to
DNS name resolution.
When you first installed FreeBSD, you either identified Domain Name System (DNS)
servers to do name resolution or had them assigned automatically from a DHCP server.
That information is then stored in the /etc/resolv.conf file, looking something like
the following:
nameserver 11.22.33.44
nameserver 22.33.44.55
194
76034c11.qxd:Toolbox
3/29/08
10:52 AM
Page 195
Chapter 11: Managing Network Connections
The numbers shown above are replaced by real IP addresses of computers that serve
as DNS name servers. When you can connect to working DNS servers, you can use
commands to query those servers and look up host computers.
You can use the dig command (which should be used instead of the deprecated
nslookup command) to look up information from a DNS server. The host command
can be used to look up address information for a hostname or domain name.
To search your DNS servers for a particular hostname (in the following examples
www.turbosphere.com), use the dig command as follows:
$ dig www.turbosphere.com
Search DNS servers set in /etc/resolv.conf
; <<>> DiG 9.3.3 <<>> www.turbosphere.com
;; global options: printcmd
;; Got answer:
;; ->>HEADER<<- opcode: QUERY, status: NOERROR, id: 45
;; flags: qr rd ra; QUERY: 1, ANSWER: 2, AUTHORITY: 2, ADDITIONAL: 2
;; QUESTION SECTION:
;www.turbosphere.com.
…
IN
A
Instead of using your assigned name server, you can query a specific name server. This is
useful if you believe that your name server is not resolving the address of a particular
host properly. So you can check different servers to see how the name resolves. The
following example queries the DNS server at 4.2.2.1:
$ dig www.turbosphere.com @4.2.2.1
Using dig, you can also query for a specific record type:
$ dig turbosphere.com mx
$ dig turbosphere.com ns
Queries for the mail exchanger
Queries for the authoritative name servers
Use the +trace option to trace a recursive query from the top-level DNS servers down to
the authoritative servers:
$ dig +trace www.turbosphere.com
Recursively trace DNS servers
If you just want to see the IP address of a host computer, use the +short option:
$ dig +short www.turbosphere.com
turbosphere.com.
66.113.99.70
Display only name/IP address pair
You can use dig to do a reverse lookup to find DNS information based on IP address:
$ dig -x 66.113.99.70
Get DNS information based on IP address
195
76034c11.qxd:Toolbox
3/29/08
10:52 AM
Page 196
Chapter 11: Managing Network Connections
You can use host to do a reverse DNS lookup as well:
$ host 66.113.99.70
70.99.133.66.in-addr.arpa domain name pointer boost.turbosphere.com.
To get hostname information for the local machine, use the hostname and dnsdomainname
commands:
$ hostname
boost.turbosphere.com
$ hostname -s
boost
View the local computer’s full DNS hostname
View the local computer’s short hostname
You can also use hostname to set the local hostname temporarily (until the next reboot).
Here’s an example:
# hostname server1.example.com
Set local hostname
Changing the hostname of a running machine may adversely affect some running
daemons. Instead, we recommend you set the local hostname so it is set each time the system
starts up. One way to do that is to set the hostname option in the /etc/rc.conf file.
For the previous example, the hostname line would appear as follows:
hostname=”server1.example.com”
Troubleshooting Network Problems
Troubleshooting networks is generally done from the bottom layer up. As discussed in
the beginning of this chapter, the first step is to make sure that the physical network
layer components (cables, NICs, and so on) are connected and working. Next, check
that the links between physical nodes are working. After that, there are lots of tools for
checking the connectivity to a particular host.
Checking Connectivity to a Host
When you know you have a link and no duplex mismatch, the next step is to ping
your default gateway. You should have configured the default gateway (gw), whether
you did that manually or had it set automatically by DHCP when the network started.
To check your default gateway in the actual routing table, use the route command to find a host
on the other side of that gateway as follows:
# route get example.com
route to: www.example.com
destination: default
mask: default
gateway: 10.0.0.1
interface: fxp0
196
76034c11.qxd:Toolbox
3/29/08
10:52 AM
Page 197
Chapter 11: Managing Network Connections
flags: <UP,GATEWAY,DONE,STATIC>
recvpipe sendpipe ssthresh rtt,msec
0
0
0
0
rttvar
0
hopcount
0
mtu
1500
expire
0
The gateway for the default route is 10.0.0.1. To make sure there is IP connectivity to that gateway, use the ping command as follows:
$ ping 10.0.0.1
PING 10.0.0.1 (10.0.0.1) 56 data bytes
64 bytes from 10.0.0.1: icmp_seq=0 ttl=64
64 bytes from 10.0.0.1: icmp_seq=1 ttl=64
64 bytes from 10.0.0.1: icmp_seq=2 ttl=64
64 bytes from 10.0.0.1: icmp_seq=3 ttl=64
time=1.43 ms
time=0.382 ms
time=0.313 ms
time=0.360 ms
--- 10.0.0.1 ping statistics --4 packets transmitted, 4 received, 0% packet loss
round-trip min/avg/max/stddev = 0.313/0.621/1.432/0.469 ms
NOTE Some hosts are configured to ignore ping requests. So not getting a reply
doesn’t indicate that the host or gateway is down.
By default, ping continues until you press Ctrl+C. Other ping options include the
following:
$ ping -a 10.0.0.1
$ ping -c 4 10.0.0.1
$ ping -q -c 5 10.0.0.1
# ping -f 10.0.0.1
$ ping -i 3 10.0.0.1
# ping -s 1500 10.0.0.1
PING 10.0.0.1 (10.0.0.1)
Add an audible ping as ping progresses
Ping 4 times and exit (default in Windows)
Show summary of pings (works best with -c)
Send a flood of pings (must be root)
Send packets in 3-second intervals
Set packet size to 1500 bytes (must be root)
1500 data bytes
Use the ping flood option with caution. By default, ping sends small packets
(56 bytes). Large packets (such as the 1500-byte setting just shown) are good to
make faulty NICs or connections stand out. Only the root user can send a flood
of pings or pings with byte sized over the default 56 bytes.
Checking Address Resolution Protocol (ARP)
If you’re not able to ping your gateway, you may have an issue at the Ethernet MAC
layer. The Address Resolution Protocol (ARP) can be used to find information at the
MAC layer. To view and configure ARP entries, use the arp command. This example
shows arp listing computers in the ARP cache by hostname:
# arp -a
List all current ARP entries
ritchie (10.0.0.1) at 00:10:5a:ab:f6:a7 on fxp0 [ethernet]
einstein (10.0.0.50) at 00:0b:6a:02:ec:98 on fxp0 [ethernet]
thompson (10.0.0.204) at 00:d0:b7:79:a5:35 on fxp0 permanent [ethernet]
197
76034c11.qxd:Toolbox
3/29/08
10:52 AM
Page 198
Chapter 11: Managing Network Connections
In this example, you can see the names of other computers that the local computer’s
ARP cache knows about and the associated hardware address (MAC address) of each
computer’s NIC. To delete an entry from the ARP cache, use the -d option:
# arp -d 10.0.0.50
Delete address 10.0.0.50 from ARP cache
Instead of just letting ARP dynamically learn about other systems, you can add static
ARP entries to the cache using the -s option:
# arp -s 10.0.0.51 00:0B:6A:02:EC:95
Add IP and MAC addresses to ARP
To query a subnet to see if an IP is already in use, and to find the MAC address of the device
using it, use the arping command (pkg_add -r arping). The arping command
can be used to check for IP conflicts before bringing an Ethernet NIC up. Here are
examples:
# arping 10.0.0.50
Query subnet to see if 10.0.0.50 is in use
ARPING 10.0.0.50
60 bytes from 00:0b:6a:02:ec:98 (10.0.0.50): index=0 time=9.966 msec
60 bytes from 00:0b:6a:02:ec:98 (10.0.0.50): index=1 time=9.930 msec
60 bytes from 00:0b:6a:02:ec:98 (10.0.0.50): index=2 time=9.930 msec
60 bytes from 00:0b:6a:02:ec:98 (10.0.0.50): index=3 time=9.931 msec
^C
--- 10.0.0.50 statistics --4 packets transmitted, 4 packets received,
0% unanswered
# arping -I fxp0 10.0.0.50
Specify interface to query from
Like the ping command, the arping command continuously queries for the address
until the command is ended by typing Ctrl+C. Typically, you just want to know if the
target is alive, so you can run the following command:
# arping -c 1 10.0.0.51
Query 10.0.0.50 and stop after 2 counts
Tracing Routes to Hosts
After you make sure that you can ping your gateway and even reach machines that
are outside your network, you may still have issues reaching a specific host or network. If that’s true, you can use traceroute to find the bottleneck or point of failure:
$ traceroute boost.turbosphere.com Follow the route taken to a host
traceroute to boost.turbosphere.com (66.113.99.70),64 hops max,40 byte packets
1 10.0.0.1 (10.0.0.1) 0.281 ms 0.289 ms 0.237 ms
2 tl-03.hbci.com (51.55.11.1) 6.213 ms 6.189 ms 6.083 ms
3 172.17.2.153 (172.17.2.153) 14.070 ms 14.025 ms 13.974 ms
4 so-0-3-2.ar2.MIN1.gblx.net (208.48.1.117) 19.076 ms 19.053 ms 19.004 ms
5 so1-0-0-2488M.ar4.SEA1.gblx.net(67.17.71.210)94.697 ms 94.668 ms 94.612ms
6 64.215.31.114 (64.215.31.114) 99.643 ms 101.647 ms 101.577 ms
7 dr02-v109.tac.opticfusion.net(209.147.112.50)262.301ms 233.316ms 233.153 ms
8 dr01-v100.tac.opticfusion.net (66.113.96.1) 99.313 ms 99.401 ms 99.353 ms
9 boost.turbosphere.com (66.113.99.70) 99.251 ms 96.215 ms 100.220 ms
198
76034c11.qxd:Toolbox
3/29/08
10:52 AM
Page 199
Chapter 11: Managing Network Connections
As you can see, the longest hop is between 4 (Global Crossing probably in Minneapolis)
and 5 (GC in Seattle). That gap is not really a bottleneck; it just reflects the distance
between those hops. Sometimes, the last hops look like this:
28
29
30
* * *
* * *
* * *
The lines of asterisks (*) at the end of the trace can be caused by firewalls that block
traffic to the target. However, if you see several asterisks before the destination, those
can indicate heavy congestion or equipment failures and point to a bottleneck.
By default, traceroute uses UDP packets, which provide a more realistic performance picture than ICMP. That’s because some Internet hops will give lower priority
to ICMP traffic. If you’d still like to trace using ICMP packets, try this command:
# traceroute -I boost.turbosphere.com
Use ICMP packets to trace a route
To trace a route to a remote host using TCP packets, use the -T option to traceroute:
# traceroute -P TCP boost.turbosphere.com
Use TCP packets to trace a route
By default, traceroute connects to port 80. You can set a different port using the
-p option:
# traceroute -P TCP -p 25 boost.turbosphere.com
Connect to port 25 in trace
You can view IP addresses instead of hostnames by disabling name resolution of hops:
$ traceroute -n boost.turbosphere.com
Disable name resolution in trace
To view and manipulate the kernel’s routing table, the route command used to be
the tool of choice. This is slowly being replaced by the ip route command in some
Linux distributions, but is still commonly used in BSD distributions.
You can use the route command to display your local routing table. Here are two examples
of the route command, with and without DNS name resolution:
# route get freebsd.org
Display local routing table information
route to: freebsd.org
destination: default
mask: default
gateway: 10.0.0.1
interface: fxp0
flags: <UP,GATEWAY,DONE,STATIC>
recvpipe sendpipe ssthresh rtt,msec
rttvar hopcount
mtu
expire
0
0
0
0
0
0
1500
0
# route -n get freebsd.org
Display routing table without DNS lookup
route to: 69.147.83.40
destination: default
199
76034c11.qxd:Toolbox
3/29/08
10:52 AM
Page 200
Chapter 11: Managing Network Connections
mask: default
gateway: 10.0.0.1
interface: fxp0
flags: <UP,GATEWAY,DONE,STATIC>
recvpipe sendpipe ssthresh rtt,msec
0
0
0
0
rttvar
0
hopcount
0
mtu
1500
expire
0
You can change the default route on your system using the add default options as follows:
# route add default 10.0.0.2
Change the default route
You can add a new route to your network by specifying the destination and the IP address of
the gateway (such as, 10.0.0.100):
# route add -net 192.168.0.0 netmask 255.255.255.0 gw 10.0.0.100
You can delete a route using the delete option:
# route delete -net 192.168.0.0 Delete a route
To make a new route permanent, create a defaultrouter entry in the /etc/rc.conf file.
For example, to make the default route be set to 10.0.0.2 at each system reboot, you
could add the following entry to the file /etc/rc.conf:
defaultrouter=”10.0.0.2”
Displaying netstat Connections
and Statistics
Another command that can display information about the routing table is the netstat
command. However, netstat can also display information about packets sent between transportlayer protocols (TCP and UDP), and ICMP.
To use netstat to display the routing table, type the following:
# netstat -rn
Routing tables
Internet:
Destination
default
10.0.0.1
10.0.0.50
127.0.0.1
...
200
Display the routing table
Gateway
10.0.0.1
00:10:5a:ab:f6:a7
00:0b:6a:02:ec:98
127.0.0.1
Flags
UGS
UHLW
UHLW
UH
Refs
0
2
2
0
Use
681
0
980
32
Netif Expire
fxp0
fxp0
268
fxp0
690
lo0
76034c11.qxd:Toolbox
3/29/08
10:52 AM
Page 201
Chapter 11: Managing Network Connections
To use netstat to display detailed summaries of activities for TCP, ICMP, UDP and protocols, type the
following:
$ netstat -s | less
Show summary of TCP, ICMP, UDP activities
tcp:
21156 packets sent
19743 data packets (1184618 bytes)
207 data packets (44928 bytes) retransmitted
62 data packets unnecessarily retransmitted
0 resends initiated by MTU discovery
964 ack-only packets (149 delayed)
0 URG only packets
0 window probe packets
...
You can see a list of TCP statistics for each interface, by typing the following:
# netstat -i -p tcp
Name
Mtu Network
fxp0
1500 <Link#1>
plip0 1500 <Link#2>
lo0
16384 <Link#3>
lo0
16384 fe80:3::1
lo0
16384 localhost.loc
...
View TCP activities
Address
Ipkts Ierrs
00:d0:b7:79:a5:35
38600
0
0
0
40
0
fe80:3::1
0
::1
4
-
Opkts Oerrs
36776
0
0
0
40
0
0
4
-
Coll
0
0
0
-
You can view information about active sockets. This includes information on server processes
listening for requests from the network:
# netstat -AanW -p tcp
Active Internet connections (including servers)
Socket
Proto Recv-Q Send-Q Local Address
Foreign Address
c24e0000 tcp4
0
0 127.0.0.1.6010
*.*
c24c6910 tcp4
0
0 10.0.0.204.22
10.0.0.50.45664
c24c6570 tcp4
0
0 127.0.0.1.25
*.*
c24c6ae0 tcp4
0
0 *.22
*.*
c24c5000 tcp4
0
0 *.949
*.*
c24c51d0 tcp4
0
0 *.897
*.*
c24c5740 tcp4
0
0 *.2049
*.*
c24c5ae0 tcp4
0
0 *.649
*.*
c24c5cb0 tcp4
0
0 *.111
*.*
(state)
LISTEN
ESTABLISHED
LISTEN
LISTEN
LISTEN
LISTEN
LISTEN
LISTEN
LISTEN
From the example above, you can see that there is one established connection (a
remote login via ssh on port 22 from the host at address 10.0.0.50). Other sockets
represent processes listening for a variety of service requests.
201
76034c11.qxd:Toolbox
3/29/08
10:52 AM
Page 202
Chapter 11: Managing Network Connections
To display how much data has been transferred over a particular interface (in bytes), use the -I and -b
options. For example:
# netstat -I fxp0 -b
Name Mtu Network Address
Ipkts Ierrs Ibytes
fxp0 1500 <Link#1> 00:d0:b7:79:a5:35 39753
0 5213277
fxp0 1500 10/24
thompson
39662
- 4651787
Opkts Oerrs Obytes
37430
0 4322243
37388
- 3797160
Other Useful Network Tools
If you’d like to see header information about packets as they are sent and received by your
system, use tcpdump. The tcpdump command has a lot of advanced features, most of
which revolve around filtering and finding a needle in a haystack of packets. If you
run tcpdump on a remote machine, your screen will be flooded with all the ssh traffic
between your client and the remote machine. To get started without having to learn
too much about how tcpdump filtering works, run the following command:
# tcpdump not port ssh
Find all TCP packets EXCEPT those associated with ssh
If you’d like to dig deeper into packet-level traffic, use wireshark (formerly known as
ethereal). A graphical version of wireshark is available for the GNOME desktop
environment (pkg_add -r wireshark). You can run wireshark with X over ssh
on a remote machine. Wireshark is a very powerful packet sniffer that rivals the
best commercial tools.
To explore networks and remote machines and see what services they offer, use nmap (pkg_add -r
nmap). The nmap command is the most common port scanner. It was even featured in
the movie The Matrix Reloaded. Make sure that you are authorized to scan the systems
or networks you are scanning. The nmap command is part of the nmap package and
can be run as a user, but several scan types require root privilege.
Here’s how to do a basic host scan with nmap:
# nmap 127.0.0.1
# nmap 10.0.0.1
Scan your localhost, to see how nmap works
Scan ports on computer at 10.0.0.1
To get maximum verbosity from nmap, use the -vv option:
# nmap -vv 10.0.0.1
Show maximum verbosity from nmap output
To use nmap to scan an entire network, use the network address as an argument. In the following example, we add the –sP option to tell nmap to perform a simple ping sweep:
# nmap -vv –sP 10.0.0.0/24
Scan hosts on an entire network
You can be very specific about the information that nmap gathers for you. In the following example, the -P0 option tells nmap not to use ping (this is good for scanning
machines that don’t respond to ping). The -O option displays OS fingerprinting for
202
76034c11.qxd:Toolbox
3/29/08
10:52 AM
Page 203
Chapter 11: Managing Network Connections
the machine you are scanning. The -p 100-200 tells nmap to scan only ports 100
through 200:
# nmap -vv -P0 -O -p 100-200 10.0.0.1
No ping, OS fingerprint, ports 100-200
The nmap command has a lot more options for advanced usage. Refer to the nmap
man page (man nmap) for further information.
Summary
Nearly every aspect of the network connections from your BSD system can be configured, checked, and monitored using command line tools. You can view and change
settings of your NICs using the ifconfig command. You can view network statistics
with netstat.
To start and stop your network, commands such as netif and ifconfig are easy
to manage. When a connection is established, you can see statistics about that connection using netstat and route commands.
To check DNS name resolution, use the dig, host, and hostname commands.
Commands for checking connectivity and routes to a host include ping, arp,
traceroute, and arping.
203
76034c11.qxd:Toolbox
3/29/08
10:52 AM
Page 204
76034c12.qxd:Toolbox
3/29/08
10:53 AM
Page 205
Accessing Network
Resources
In the time it takes to fire up a graphical FTP client,
you could already have downloaded a few dozen
files from a remote server using command line
tools. Even when a GUI is available, commands
for transferring files, web browsing, sharing directories, and reading mail can be quick and efficient
to use. When no GUI is available, they can be
lifesavers.
This chapter covers commands for accessing
resources (files, e-mail, shared directories, and
online chats) over the network.
Running Commands
to Browse the Web
IN THIS CHAPTER
Web browsing with
elinks
Wget, curl, lftp, and
scp for file transfers
Sharing directories
with NFS, Samba, and
SSHFS
IRC chats with irssi
Mail and mutt e-mail
clients
Text-mode web browsers provide a quick way to check that a web server
is working or to get information from a web server when a useable GUI
isn’t available. The once-popular lynx text-based browser was supplanted
in most UNIX-like systems by the links browser, which was later replaced
by elinks.
The elinks browser runs in a terminal window. Aside from not displaying images in the terminal, elinks can handle most basic HTML content
and features: tables, frames, tabbed browsing, cookies, history, mime
types, and simple cascading style sheets (CSS). You can even use your
mouse to follow links and select menu items.
Because elinks supports multiple colors, as long as the terminal you are
using supports multiple colors, it’s easy to spot links and headings in the
76034c12.qxd:Toolbox
3/29/08
10:53 AM
Page 206
Chapter 12: Accessing Network Resources
text. (Colors may not work within a screen session.) Here are some examples of
elinks command lines:
$ elinks
$ elinks www.handsonhistory.com
Prompts for file name or URL
Opens file name or URL you request
If you have a mouse, click near the top of the terminal window to see the menu. Select
the menu name or item you want. Select a link to go to that link. Table 12-1 shows
elinks keyboard navigation keys.
Table 12-1: Control Keys for Using elinks
Keys
Description
Keys
Description
Esc (or F9)
Toggle menu on and off
(then arrow keys or mouse
to navigate menus).
=
View page information.
Down
arrow
Go to next link or editable
field on page.
Ctrl+R
Reload page.
Up arrow
Go to previous link or
editable field on the page.
a
Bookmark current page.
Right arrow
or Enter
Go forward to highlighted
link. Enter text in highlighted form field.
t
Open new browser tab.
Left arrow
Go back to previous page.
>
Go to next tab.
/
Search forward.
<
Go to previous tab.
?
Search backwards.
c
Close current tab.
n
Find next.
d
Download current link.
N
Find previous.
D
View downloads.
PageUp
Scroll one page up.
A
Add current link to
bookmarks.
PageDown
Scroll one page down.
s
View bookmarks.
g
Go to a URL.
v
View current image.
q or Ctrl+C
Exit elinks.
h
View global history manager.
You can add global settings for elinks to /etc/elinks.conf. Per-user settings are
stored in each user’s $HOME/.elinks directory. Type man elinkskeys to see available settings.
206
76034c12.qxd:Toolbox
3/29/08
10:53 AM
Page 207
Chapter 12: Accessing Network Resources
Transferring Files
Commands available with FreeBSD for downloading files from remote servers (HTTP,
HTTPS, FTP, or SSH) are plentiful and powerful. You might choose one command over
another because of the specific options you need. For example, you may want to perform
a download over an encrypted connection, resume an aborted download, or do recursive
downloads. This section describes how to use wget, ftp, lftp, scp, and sftp.
Downloading Files with wget
Sometimes you need to download a file from a remote server using the command line. For example, you find a link to a software package, but the link goes through several HTTP redirects that prevent pkg_add from installing straight from HTTP. Or you may want to script
the automated download of a file, such as a log file, every night.
The wget command can download files from web servers (HTTP and HTTPS) and FTP
servers (pkg_add -r wget). With a server that doesn’t require authentication, a wget
command can be as simple as the wget command and the location of the download file:
$ wget http://upload.wikimedia.org/wikipedia/commons/2/2c/Chokladbollar.jpg
If, for example, an FTP server requires a login and password, you can enter that information on
the wget command line in the following forms:
$ wget ftp://user:password@ftp.example.com/path/to/file
$ wget --user=user --password=password ftp://ftp.example.com/path/to/file
For example:
$ wget ftp://chris:mykuulpwd@ftp.linuxtoys.net/home/chris/image.jpg
$ wget –-user=chris –-password=mykuulpwd \
ftp://ftp.linuxtoys.net/home/chris/image.jpg
You can use wget to download a single web page as follows:
$ wget http://www.google.com
Download only the web page
If you open the resulting index.html, you’ll have all sorts of broken links. To download all the images and other elements required to render the page properly, use the
-p option:
$ wget -p http://www.google.com
Download web page and other elements
When you open the resulting index.html in your browser, chances are you will still
have all the broken links even though all the images were downloaded. That’s because
the links need to be translated to point to your local files. So instead, do this:
$ wget -pk http://www.google.com
Download pages and use local file names
207
76034c12.qxd:Toolbox
3/29/08
10:53 AM
Page 208
Chapter 12: Accessing Network Resources
And if you’d like wget to keep the original file and also do the translation, type this:
$ wget -pkK http://www.google.com
Rename to local names, keep original
Sometimes an HTML file you download does not have a .html extension, but ends
in .asp or .cgi instead. That may result in your browser not knowing how to open
your local copy of the file. You can have wget append .html to those files using the
-E option:
$ wget -E http://www.aspexamples.com
Append .html to downloaded files
With the wget command, you can recursively mirror an entire web site. While copying files
and directories for the entire depth of the server’s file structure, the -m option adds
timestamping and keeps FTP directory listings. (Use this with caution, because it can
take a lot of time and space):
$ wget -m http://www.linuxtoys.net
Using some of the options just described, the following command line results in the
most usable local copy of a web site:
$ wget -mEkK http://www.linuxtoys.net
If you have ever had a large file download (such as a CD or DVD image file) disconnect before it completed, you may find the -c option to wget to be a lifesaver. Using
-c, wget resumes where it left off, continuing an interrupted file download. For example:
$ wget http://example.com/DVD.iso
Begin downloading large file
...
95%[========== ] 685,251,583 55K/s
Download killed before completion
$ wget -c http://example.com/DVD.iso Resume download where stopped
...
HTTP request sent, awaiting response... 206 Partial Content
Length: 699,389,952 (667), 691,513 (66M) remaining [text/plain]
Because of the continue feature (-c), wget can be particularly useful for those with
slow Internet connections who need to download large files. If you have ever had a
several hour download get killed just before it finished, you’ll know what we mean.
(Note that if you don’t use -c when you mean to resume a file download, the file will
be saved to a different file: the original name with a .1 appended to it.)
Transferring Files with cURL
The client for URLs application (curl command) provides similar features to wget
for transferring files using web and FTP protocols. However, the curl command can
also transfer files using other popular protocols, including SSH protocols (SCP and
SFTP), LDAP, DICT, Telnet, and File.
208
76034c12.qxd:Toolbox
3/29/08
10:53 AM
Page 209
Chapter 12: Accessing Network Resources
Instead of supporting large, recursive downloads (as wget does), curl is designed for
single-shot file transfers. It does, however, support more protocols (as noted) and some
neat advanced features. Here are a few interesting examples of file transfers with curl for
downloading a three-disc set of ISO images for FreeBSD:
$ curl -O \
ftp.freebsd.org/pub/FreeBSD/ISO-IMAGES-i386/6.3/6.3-RELEASE-i386-disc[1-3].iso
$ curl -OO \
ftp.freebsd.org/pub/FreeBSD/ISO-IMAGES-i386/6.3/6.3-RELEASE-i386-disc{1,2,3}.iso
The commands just shown illustrate how to use square brackets to indicate a range
[1-3] and curly brackets for a list {1,2,3} of characters or numbers to match files.
The following set of curl commands illustrates how to download, upload, and delete
files from password-protected servers.
$ curl
-Q
$ curl
-Q
$ curl
-O ftp://chris:MyPasswd@ftp.example.com/home/chris/fileA \
‘-DELE fileA’
-T install.log ftp://chris:MyPasswd@ftp.example.com/tmp/ \
“-RNFR install.log” -Q “-RNTO Xinstall.log
ftp://ftp.freebsd.org/pub/FreeBSD/doc/en/books/
List books contents
The first command line adds a user name and password (chris:MyPasswd), downloads a file (fileA) from the server, and then deletes the file on the server once the
download is done (-Q ‘-DELE fileA’). The next example uploads (-T) the file
install.log to an FTP server. Then it renames the remote file to Xinstall.log.
The last example tells curl to list the contents of the /pub/FreeBSD/doc/en/books/
directory at ftp.freebsd.org.
Transferring Files with FTP Commands
Most BSD systems come with the standard FTP client (ftp command), that works the
same way it does on most UNIX and Windows systems. We recommend you use the
full-featured user-friendly lftp instead (as root, type pkg_add -r lftp).
With these FTP clients, you open a session to the FTP server (as opposed to just grabbing a file, as you do with wget and curl). Then you navigate the server much as you
would a local file system, getting and putting documents across the network connection. Here are examples of how to connect to an FTP server with lftp:
$ lftp ftp.freebsd.org
lftp ftp.freebsd.org:~>
$ lftp francois@example.com
lftp example.com:~>
$ lftp -u francois example.com
Password: ******
lftp example.com:~>
$ lftp -u francois,Mypwd example.com
lftp example.com:~>
Anonymous connection
Authenticated connection
Authenticated connection
Authentication with password
209
76034c12.qxd:Toolbox
3/29/08
10:53 AM
Page 210
Chapter 12: Accessing Network Resources
$ lftp
lftp :~> open ftp.freebsd.org
lftp ftp.freebsd.org:~>
Start lftp with no connection
Start connection in lftp session
WARNING! The fourth example should be avoided in real life. Passwords that are
entered in a command line end up stored in clear text in your ~/.bash_history,
if you use the bash shell. They may also be visible to other users in the output of
ps auwx.
When a connection is established to an FTP server, you can use a set of commands
during the FTP session. FTP commands are similar to shell commands. Just as in a
bash shell, you can press Tab to autocomplete file names. In a session, lftp also supports sending multiple jobs to the background (Ctrl+Z) and returning them to foreground (wait or fg). These are useful if you want to continue traversing the FTP site
while files are downloading or uploading. Background jobs run in parallel. Type jobs
to see a list of running background jobs. Type help to see a list of lftp commands.
The following sample lftp session illustrates useful commands when downloading:
$ lftp ftp.freebsd.org
lftp ftp.freebsd.org:~> pwd
Check current directory
ftp://ftp.freebsd.org
lftp ftp.freebsd.org:~> ls
List current directory
drwxr-xr-x
3 ftpuser ftpuser
512 Jun 5 2007 pub
drwxr-xr-x
3 ftpuser ftpuser
512 Jun 5 2007 sup
lftp ftp.freebsd.org:~> cd /pub/FreeBSD/doc/en/books/faq Change directory
lftp ftp.freebsd.org:...> get book.pdf.bz2
Download a file
book.pdf.bz2 at 776398 (1%) 467.2K/s eta:26m {Receiving data]
lftp ftp.freebsd.org:...> <Ctrl+z>
Send download to background
lftp ftp.freebsd.org:...> cd /pub/FreeBSD/doc/en/articles/explaining-bsd
lftp ftp.freebsd.org:...> mget *
Get all from explaining-bsd
lftp ftp.freebsd.org:...> !ls
Run local ls
lftp ftp.freebsd.org:...> bookmark add article
Bookmark location
lftp ftp.freebsd.org:...> quit
Close lftp
This session logs in as the anonymous user at ftp.freebsd.org. After changing to
the directory containing the document I was looking for, I downloaded it using the
get command. By typing Ctrl+Z, the download could continue while I did other
activities. Next, the mget command (which allows wildcards such as *) downloaded
all files from the explaining-bsd directory.
Any command preceded by an exclamation mark (such as !ls) is executed by the local
shell. The bookmark command saves the current location (in this case, the directory
/pub/FreeBSD/doc/en/articles/explaining-bsd on the freebsd.org FTP site)
under the name article, so next time I can run lftp article to return to the same
location. The quit command ends the session.
210
76034c12.qxd:Toolbox
3/29/08
10:53 AM
Page 211
Chapter 12: Accessing Network Resources
Here are some useful commands during an authenticated lftp upload session. This assumes you
have the necessary file permissions on the server:
$ lftp chris@example.com
Password: *******
lftp example.com:~> lcd /home/chris/songs
lftp example.com:~> cd pub/uploads
lftp example.com:~> mkdir songs
lftp example.com:~> chmod 700 songs
lftp example.com:~> cd songs
lftp example.com:~> put song.ogg tune.ogg
3039267 bytes transferred
lftp example.com:~> mput /var/songs/*
lftp example.com:~> quit
Change
Change
Create
Change
Change
Upload
to a local directory
to server directory
directory on server
remote directory perms
to the new directory
files to server
Upload matched files
Close lftp
The lftp session illustrates how you can use shell command names to operate on
remote directories (provided you have permission). The mkdir and chmod commands create a directory and leave permissions open only to your user account. The
put command uploads one or more files to the remote server. The mput command
can use wildcards to match multiple files for download. Other commands include
mirror (to download a directory tree) and mirror -R (to upload a directory tree).
lftp also provides a shell script for non-interactive download sessions: lftpget. The syntax
of lftpget is similar to that of the wget command:
$ lftpget ftp://ftp.freebsd.org:/pub/FreeBSD/doc/en/books/handbook/book.pdf.bz2
Keep in mind that standard FTP clients are insecure because they do all their work in
clear text. So your alternative, especially when security is a major issue, is to use SSH
tools to transfer files.
Using SSH Tools to Transfer Files
Because SSH utilities are among the most important tools in a system administrator’s
arsenal of communications commands, some of the more complex uses of configuring
and using SSH utilities are covered in Chapter 13. However, in their most basic form,
SSH utilities are the tools you should use most often for basic file transfer.
In particular, the scp command will do most of what you need to get a file from one
computer to another, while making that communication safe by encrypting both the
password stage and data transfer stage of the process. The scp command replaces the
rcp command as the most popular tool for host-to-host file copies.
WARNING! You do not get a warning before overwriting existing files with scp,
so be sure that the target host doesn’t contain any files or directories you want that
are in the path of your scp file copies.
211
76034c12.qxd:Toolbox
3/29/08
10:53 AM
Page 212
Chapter 12: Accessing Network Resources
Copying Remote Files with scp
To use scp to transfer files, the SSH service (usually the sshd server daemon) must be
running on the remote system. Here are some examples of useful scp commands:
$ scp myfile francois@server1:/tmp/
Password: ******
$ scp server1:/tmp/myfile .
Password: ******
Copy myfile to server1
Copy remote myfile to local working dir
Use the -p option to preserve permissions and timestamps on the copied files:
$ scp -p myfile server1:/tmp/
If the SSH service is configured to listen on a port other than the default port 22, use
-P to indicate that port on the scp command line:
$ scp -P 12345 myfile server1:/tmp/
Connect to a particular port
To do recursive copies, from a particular point in the remote file system, use the
-r option:
$ scp -r mydir francois@server1:/tmp/
Copies all mydir to remote /tmp
Although scp is most useful when you know the exact locations of the file(s) you
need to copy, sometimes it’s more helpful to browse and transfer files interactively.
Copying Remote Files in sftp and lftp Sessions
The sftp command lets you use an ftp-like interface to find and copy files over SSH
protocols. Here’s an example of how to start an sftp session:
$ sftp chris@server1
chris@server1’s password: *****
sftp>
Use sftp in the same manner as you use regular ftp clients. Type ? for a list of commands. You can change remote directories (cd), change local directories (lcd), check
current remote and local directories (pwd and lpwd), and list remote and local contents
(ls and lls). Depending on the permission of the user you logged in as, you may be
able to create and remove directories (mkdir and rmdir), and change permissions
(chmod) and ownership/group (chown and chgrp) of files and directories.
You can also use lftp (discussed earlier in this chapter) as an sftp client. Using
lftp adds some user-friendly features such as path completion using the Tab key:
$ lftp sftp://chris@server1
Password: ********
lftp chris@server1:~>
212
76034c12.qxd:Toolbox
3/29/08
10:53 AM
Page 213
Chapter 12: Accessing Network Resources
Using Windows File Transfer Tools
In many cases, people need to get files from BSD servers using Windows clients. If
your client operating system is Windows, you can use one of the following open
source tools to get files from BSD servers:
❑ WinSCP (http://winscp.net): Graphical scp, sftp, and FTP client for
Windows over SSH1 and SSH2 protocols.
❑ FileZilla (http://filezilla.sourceforge.net): Provides graphical client
FTP and SFTP services in Windows, as well as offering FTP server features.
❑ PSCP (www.chiark.greenend.org.uk/~sgtatham/putty/): Command line
scp client that is part of the PuTTY suite.
❑ PSFTP (www.chiark.greenend.org.uk/~sgtatham/putty/): Command line
sftp client that is part of the PuTTY suite.
Sharing Remote Directories
Tools described to this point in the chapter provide atomic file access, where a connection is set up and files are transferred in one shot. In times where more persistent,
on-going access to a remote directory of files is needed, services for sharing and mounting remote file systems can be most useful. Such services include Network File System
(NFS), Samba, and SSHFS.
Sharing Remote Directories with NFS
Before sharing directories from your BSD system with NFS, you must start the NFS
service. To do this in FreeBSD, copy NFS lines from the /etc/defaults/rc.conf
file to the /etc/rc.conf file and enable them. Here is what we added to the file
/etc/rc.conf:
nfs_server_enable=”YES”
rpc_lockd_enable=”YES”
rpc_statd_enable=”YES”
nfs_server_flags=”-u -t -n 4”
#
#
#
#
This host is an NFS server (or NO).
Run NFS rpc.lockd needed for client/server.
Run NFS rpc.statd needed for client/server.
Flags to nfsd (if enabled)
The NFS service will start the next time you reboot BSD. Or you can start it immediately by typing this as root user:
# nfsd -u -t -n 4
Start the NFS service manually
When your BSD system is running the NFS service, you can add entries to the /etc/
exports file on the server to share directories with remote clients and showmount
commands to see available and mounted shared directories. Mounting a shared directory is done with special options to the standard mount command.
213
76034c12.qxd:Toolbox
3/29/08
10:53 AM
Page 214
Chapter 12: Accessing Network Resources
Sharing Directories from an NFS Server
With the NFS server running as just described, directories can be shared from that
server by adding entries to the /etc/exports file. Here are examples of entries to
that file:
/usr/ports /usr/ports/Tools dt001
/usr/ports -rw mapall=jake
/usr/ports -alldirs -network 10.0.0
Let dt01 mount /usr/ports, /usr/ports/Tools
Share read/write, all users map to jake
All on 10.0.0 can mount all /usr/ports dirs
The examples just shown illustrate how an NFS server can share a specific directory
(/usr/ports), several specific directories (/usr/ports/Tools), or any directory
beneath the named directory (-alldirs). Client permission can be mapped into
specific users on the server (mapall=) and host access can be granted to machines
on select subnets (-network).
Viewing and Exporting NFS Shares
From the BSD server system, you can use the showmount command to see what shared
directories are available from the local system. For example:
# /usr/sbin/showmount -e
Export list for server.example.com
/export/myshare client.example.com
/mnt/public
*
From a client BSD system, you can use the showmount command to see what shared
directories are available from a selected computer. For example:
# /usr/sbin/showmount -e server2.example.com
Exports list on server2.example.com
/export/myshare client.example.com
/mnt/public
*
Mounting NFS Shares
Use the mount command to mount a remote NFS share on the local computer. Here is
an example:
# mkdir /mnt/server-share
# mount server.example.com:/export/myshare /mnt/server-share
This example notes the NFS server (server.example.com) and the shared directory
from that server (/export/myshare). The local mount point, which must exist before
mounting the share, appears at the end of the command (/mnt/server-share).
Pass NFS-specific options to the mount command by adding them after the -o option:
# mount -o rw,hard,intr server.example.com:/export/myshare /mnt/server-share
214
76034c12.qxd:Toolbox
3/29/08
10:53 AM
Page 215
Chapter 12: Accessing Network Resources
The rw option mounts the remote directory with read-write permissions, assuming
that permission is available. With hard set, someone using the share will see a server
not responding message when a read or write operation times out. If that happens,
having set the intr option lets you interrupt a hung request to a remote server (type Ctrl+C).
Sharing Remote Directories with Samba
Samba is the open source implementation of the Windows file and print sharing protocol
originally known as Server Message Block (SMB) and now called Common Internet File
System (CIFS). There is an implementation of Samba in BSD, as well as in many other
operating systems. You can install the basic Samba package by typing this as root user:
$ pkg_add -r samba3
Graphical tools for sharing, querying, and mounting shared SMB directories from
Windows include the Samba SWAT web-based administration tool. To use the SWAT tool
in FreeBSD, enable the inetd service (add inetd_enable=”YES” to /etc/rc.conf) and
turn on SWAT (remove the comment character from the swat line in /etc/inetd.conf).
Reboot (or run /usr/sbin/inetd -wW -C 60) and open SWAT by pointing your
browser at the SWAT service (http://localhost:901) and typing the root user name
and password.
You can create an initial /usr/local/etc/smb.conf file from the Samba SWAT
screen or create it directly using any text editor. Commands for working with Samba
shares can be used to query SMB servers, mount directories, and share directories.
To start a Samba server, you can run the smbd and nmbd servers manually. However,
if you have SWAT running as described above, you can start the entire service (with
the proper options), add shares, and view your configuration from the SWAT screen.
From the Samba SWAT screen, select STATUS, then choose Start All to start the service.
Viewing and Accessing Samba Shares
To scan your network for SMB hosts, type the following:
$ findsmb
*=DMB
+=LMB
IP ADDR
NETBIOS NAME WORKGROUP/OS/VERSION
-------------------------------------------------------------------192.168.1.1
SERVER1
+[MYWORKGROUP] [Unix] [Samba 3.0.25a-3.fc7]
To view a text representation of your network neighborhood (shared directories and printers), use
smbtree:
# smbtree
Password: ******
MYGROUP
\\THOMPSON
Samba Server Version 3.0.25a-3.fc7
215
76034c12.qxd:Toolbox
3/29/08
10:53 AM
Page 216
Chapter 12: Accessing Network Resources
\\THOMPSON\hp2100
\\THOMPSON\IPC$
\\EINSTEIN
\\EINSTEIN\hp5550
\\EINSTEIN\IPC$
HP LaserJet 2100M Printer
IPC Service (Samba Server Version 3.0.25a-3.fc7)
Samba Server
HP DeskJet 5550 Printer
IPC Service (Samba Server)
To add an existing BSD user as a Samba user, use the smbpasswd command:
# smbpasswd -a francois
New SMB password: ******
Retype new SMB password: ******
Added user francois
To list services offered by a server to an anonymous user, type the following:
$ smbclient -L server
Password: ******
Anynymous login successful
Domain=[MYGROUP] OS=[Unix] Server=Samba 3.0.23c
tree connect failed: NT_STSTUS_LOGON_FAILURE
Here’s the output from smbclient for a specific user named francois:
$ smbclient -L server -U francois
Password: ******
Domain=[MYGROUP] OS=[Unix] Server=[Samba 3.0.23c]
Sharename
--------IPC$
hp5550
Type
---IPC
Printer
Comment
------IPC Service (Samba Server Version 3.0.23c)
HP DeskJet 5550 Printer
Server
--------THOMPSON
Comment
------Samba Server Version 3.0.23c
Workgroup
--------MYGROUP
Master
------THOMPSON
To connect to a Samba share ftp-style, type the following:
$ smbclient //192.168.1.1/myshare -U francois
Password:
Domain=[MYWORKGROUP] OS=[Unix] Server=[Samba 3.0.23c]
smb: \>
As with most FTP clients, type help or ? to see a list of available commands. Likewise,
you can use common shell-type commands, such as cd, ls, get, put, and quit, to get
around on the SMB host.
216
76034c12.qxd:Toolbox
3/29/08
10:53 AM
Page 217
Chapter 12: Accessing Network Resources
Mounting Samba Shares
You can mount remote Samba shares on your local file system much as you would a local file
system or remote NFS file system. To mount the share:
# mount -t smbfs //francois@192.168.1.1/myshare /mnt/mymount/
NOTE The Samba file system (smbfs), while still available on FreeBSD, is deprecated on some Linux systems. If you are mounting a Samba share from a BSD system to a Linux system, indicate CIFS (-t cifs) as the file system type when you
mount that remote Samba share.
You can see the current connections and file locks on a server using the smbstatus command.
This will tell you if someone has mounted your shared directories or is currently using
an smbclient connection to your server:
# smbstatus
Samba version 3.0.23c
PID
Username
Group
Machine
-----------------------------------------5466 francois
francois 10.0.0.55
(10.0.0.55)
Service
pid
machine
Connected at
------------------------------------------myshare
5644 10.0.0.55 Tue Jun 3 15:08:29 2008
No locked files
To see a more brief output, use the -b option:
$ smbstatus -b
Looking Up Samba Hosts
NetBIOS names are used to identify hosts in Samba. You can determine the IP address of a
computer using the nmblookup command to broadcast for a particular NetBIOS name
on the local subnet as follows:
$ nmblookup thompson
querying thompson on 192.168.1.255
192.168.1.1 server1<00>
To find the IP address for a server on a specific subnet, use the -U option:
$ nmblookup -U 192.168.1.0 server1
querying server1 on 192.168.1.255
192.168.1.1 server1<00>
217
76034c12.qxd:Toolbox
3/29/08
10:53 AM
Page 218
Chapter 12: Accessing Network Resources
Checking Samba Configuration
If you are unable to use a Samba share or if you have other problems communicating
with your Samba server, you can test the Samba configuration on the server. The
testparm command can be used to check your main Samba configuration file (smb.conf):
$ testparm
Load smb config files from /usr/local/etc/smb.conf
Processing section “[homes]”
Processing section “[printers]”
Processing section “[myshare]”
Loaded services file OK.
Server role: ROLE_STANDALONE
Press Enter to see a dump of your service definitions
After pressing Enter as instructed, you can see the settings from your smb.conf file.
Here’s how an entry for the myshare shared directory, used earlier in an example,
might appear in the smb.conf file:
[myshare]
path = /home/francois
username = francois
valid users = francois
hosts allow = einstein
available = yes
This entry allows the Samba user francois to access the /home/francois directory
(represented by the myshare share name) from the host computer named einstein.
The share is shown as being currently available.
The previous example of testparm showed the entries you set in the smb.conf file.
However, it doesn’t show all the default entries you didn’t set. You can view those using the
-v option. Pipe it to the less command to page through the settings:
$ testparm -v | less
If you want to test a configuration file before it goes live, you can tell testparm to use a file
other than /etc/samba/smb.conf:
$ testparm /etc/samba/test-smb.conf
Sharing Remote Directories with SSHFS
Another magical trick you can do over the SSH protocol is mount remote file systems.
Using the SSH file system (sshfs), you can mount any directory from an SSH server
that your user account can access from your local BSD system. sshfs provides encryption of the mount operation as well as of all the data being transferred. Another cool
aspect of sshfs is that it requires no setup on the server side (other than having SSH
service running).
218
76034c12.qxd:Toolbox
3/29/08
10:53 AM
Page 219
Chapter 12: Accessing Network Resources
Here is a quick procedure for mounting a directory of documents from a remote server to a local
directory. Doing this only requires that the remote server is running SSH, is accessible,
and that the directory you want is accessible to your user account on the server. Here
we are mounting a directory named /var/docs from the host at 10.0.0.50 to a mount
point called /mnt/docs on the local system:
#
#
#
#
#
pkg_add -r fusefs-sshfs
kldload /usr/local/modules/fuse.ko
sysctl vfs.usermount=1
mkdir /mnt/docs
sshfs chris@10.0.0.50:/var/docs /mnt/docs
Install fuse-sshfs software
Install fuse.ko module
Allow regular users to mount
Create mount point
Mount remote directory
When you are done using the remote directory, you can unmount it with the umount
command:
# umount /var/docs
Unmount remote directory
Chatting with Friends in IRC
Despite the emergence of instant messaging, Internet Relay Chat (IRC) is still used
by a lot of people today. Freenode.net has tons of chat rooms dedicated to supporting
major open source software projects. In fact, many people stay logged into them all
day and just watch the discussions of their favorite BSD projects scroll by. This is
known as lurking.
The xchat utility is a good graphical, multi-operating system IRC client (to install,
type pkg_add -r xchat). Once the xchat package is installed, from the GNOME
desktop in FreeBSD you can select Applications ➪ Internet ➪ XChat IRC. But the elite
way to do IRC is to run a text-mode client in screen on an always-on machine, such
as an old server. Another similar option is to use an IRC proxy client, also known as a
bouncer, such as dircproxy.
The original IRC client was ircII. It allowed the addition of scripts — in some ways
similar to macros found in productivity suites — that automated some of the commands
and increased usability. The most popular was PhoEniX by Vassago. Then came BitchX,
which started as an ircII script and then became a full-blown client. Today, most people
use irssi. To install and launch irssi from FreeBSD, type:
# pkg_add -r irssi
$ irssi -n JayJoe200x
In this example, the user name (nick) is set to JayJoe199x (you should choose your
own). You should see a blue status bar at the bottom of the screen indicating that you
are in Window 1, the status window. IRC commands are preceded with a / character.
For example, to connect to the freenode server, type:
/connect chat.freenode.net
219
76034c12.qxd:Toolbox
3/29/08
10:53 AM
Page 220
Chapter 12: Accessing Network Resources
If you don’t add your user name on the command line, you are connected to chat
.freenode.net under the user name you are logged in under. On IRC, a chat room
is called a channel and has a pound sign (#) in front of the name. Next, try joining the
#freebsd IRC channel:
/join #freebsd
Your screen should look similar to Figure 12-1.
Figure 12-1: irssi connected to #freebsd on Freenode
You are now in the channel in Window 2, as indicated in the status bar. Switch among
the irssi windows by typing Alt+1, Alt+2, and so on (or Ctrl+N and Ctrl+P). To
get help at any time, type /help. To get help for a command, type /help command, where
command is the name of the command you want more information on. Help text will
output in the status window, not necessarily the current window.
To add to the IRC chat, simply type a message and press Enter to send the message to
those in the channel. Type /part to leave a channel. Type /quit to exit the program.
There is a lot more to irssi. You can customize it and improve your experience significantly. Refer to the irssi documentation (www.irssi.org/documentation) for
more information about how to use irssi.
Using Text-Based e-mail Clients
Most Mail User Agents (MUAs) are GUI-based these days. So if you began using e-mail
in the past decade or so, you probably think of Evolution, Kmail, Thunderbird, or (on
Windows systems) Outlook when it comes to e-mail clients. On the first UNIX and BSD
systems, however, e-mail was handled by text-based applications.
220
76034c12.qxd:Toolbox
3/29/08
10:53 AM
Page 221
Chapter 12: Accessing Network Resources
If you find yourself needing to check e-mail on a remote server or other text-based
environment, venerable text-based mail clients are available and still quite useful. In
fact, some hard-core geeks still use text-based mail clients exclusively, touting their
efficiency and scoffing at HTML-based messages.
The mail clients described in this chapter expect your messages to be stored in standard MBOX format on the local system. That means that you are either logged into
the mail server or you have already downloaded the messages locally (for example,
by using POP3 or similar).
NOTE Text-based mail clients can be used to read mail already downloaded by
other mail clients. For example, you could open your Evolution mail Inbox file by
typing mail -f $HOME/.evolution/mail/local/Inbox.
Managing e-mail with mail
The oldest, and easiest to use when you just want a quick check for messages in the
root user’s mailbox on a remote server, is the mail command (/bin/mail). If your
$MAIL variable is set, just login as root and type mail. Otherwise, use the -f option,
as noted earlier, to identify the mailbox file directly (mail -f /var/mail/root).
Although mail can be used interactively, it is often used for sending script-based e-mails.
Here are some examples:
$ uname -a | mail -s ‘My BSD version’ chris@example.com
$ ps auwx | mail -s ‘My Process List’ chris@example.com
The two mail examples just shown provide quick ways to mail off some text without
having to open a GUI mail application. The first example sends the output from the
uname -a command to the user chris@example.com. The subject (-s) is set to ‘My
BSD Version’. In the second example, a list of currently running processes (ps auwx)
is sent to the same user with a subject of ‘My Process List’.
Used interactively, by default the mail command opens the mailbox set by your current
shell’s $MAIL value. For example:
# echo $MAIL
/var/mail/root
# mail
Mail version 8.1 6/6/93. Type ? for help.
“/var/mail/root”: 25 messages 25 new
>N 1 root@thompson.locald Tue Jan 8 03:02
N 2 root@thompson.locald Tue Jan 8 03:02
N 3 root@thompson.locald Sat Jan 19 03:02
N 4 root@thompson.locald Sat Jan 19 03:02
&
41/1193
73/2504
35/1119
70/2419
“X5
“X5
“X5
“X5
security run output”
daily run output”
security run output”
daily run output”
221
76034c12.qxd:Toolbox
3/29/08
10:53 AM
Page 222
Chapter 12: Accessing Network Resources
The current message has a greater-than sign (>) next to it. New messages have an N
at the beginning, unread (but not new) have a U, and if there is no letter, the message
has been read. The prompt at the bottom (&) is ready to accept commands.
At this point, you are in command mode. You can use simple commands to move
around and perform basic mail functions in mail. Type ? to see a list of commands, or type
the number of the message you want to see. Type v3 to open the third message in the
vi editor. Type h18 to see a list of message headers that begins with message 18. To
reply to message 7, type r7 (type your message, then put a dot on a line by itself to
send the message). Type d4 to delete the fourth message (or d4-9 to delete messages
four through nine). Type !bash to escape to the shell (then exit to return to mail).
Before you exit mail, know that any messages you view will be copied from your mailbox file to your $HOME/mbox file when you exit, unless you preserve them (pre*). To
have all messages stay in your mailbox, exit by typing x. To save your changes to the
mailbox, type q to exit.
You can open any file that is in MBOX format when you use mail. For example, if you
are logged in as root user, but want to open the mailbox for the user chris, type this:
# mail -f /var/mail/chris
Managing e-mail with mutt
If you want to use a command-line mail client on an on-going basis, we recommend
you use mutt instead of mail. The mail command has many limitations, such as not
being able to send attachments without encoding them in advance (such as with the
uuencode command), while mutt has many features for handling modern e-mail needs.
The mutt command is part of the mutt package (pkg_add -r mutt).
Like mail, mutt can also be used to pop off a message from a script. mutt also adds
the capability to send attachments. For example:
$ mutt -s “My BSD Version” -a /tmp/version.txt \
chris@example.com < email-body.txt
$ mutt -s “My BSD Version” -a /tmp/version.txt \
chris@example.com < /dev/null
The first example just shown includes the file email-body.txt as the body of the
message and attaches the file /tmp/version.txt as an attachment. The second
example sends the attachment, but has a blank message body (< /dev/null).
You can begin your mutt mail session (assuming your default $MAIL mailbox) by simply
typing:
$ mutt
222
76034c12.qxd:Toolbox
3/29/08
10:53 AM
Page 223
Chapter 12: Accessing Network Resources
/home/chris/Mail does not exist. Create it? ([yes]/no): y
q:Quit
1 O
2 O
d:Del
u:Undel
s:Save
Jun 16 Jason Buckman
Jun 18 Billy Bob
m:Mail
r:Reply
g:Group
?:Help
( 69) Try out tripwire
( 171) Visit the place
--Mutt: /var/mail/root [Msgs:22 New:2 Old:20 63K]--(date/date)--(all)--
Because mutt is screen-oriented, it is easier to use than mail. As with mail, you use
key commands to move around in mutt. As usual, type ? to get help. Hints appear across the
top bar to help you with your mail. Use the up and down arrow keys to highlight the
messages you want to read. Press Enter to view the highlighted message. Use PageUp
and PageDown to page through each message or advance to the next message. Press i
to return to the message headers.
Search forward for text using slash (/) or backwards using Escape slash (Esc-/). Type
n to search again. Press Tab to jump to the next new or unread message. Or go to the
previous one using Esc-Tab. Type s to save the current message to a file. Type d to delete
a message. To undelete a message, type the message number to go to it, then press u to
undelete it.
To send a new mail message, type m. After adding the recipient and subject, a blank message opens in vi (or whatever you have your $EDITOR set to). After exiting the message
body, type a to add an attachment, if you like. Type ? to see other ways of manipulating your message, headers or attachments. Press y to send the message or q to abort
the send.
When you are done, type x to exit without changing your mailbox; type q to exit and
incorporate the changes you made (messages read, deleted, and so on).
Summary
Network access commands provide quick and efficient ways to get content you need
over a network. The elinks web browser is a popular screen-oriented command for
browsing the Web or taking a quick look at any HTML file. Dozens of commands are
available to download files over FTP, HTTP, SSH, or other protocols, including wget,
curl, lftp, and scp.
For more on-going access to remote directories of files, this chapter covers how to
use NFS, Samba, and SSHFS command tools. You can do IRC chats, which are popular
among open source projects, using the irssi command. For text-based e-mail clients,
you have choices such as the mail and mutt commands.
223
76034c12.qxd:Toolbox
3/29/08
10:53 AM
Page 224
76034c13.qxd:Toolbox
3/29/08
10:54 AM
Page 225
Doing Remote System
Administration
Most professional BSD administrators do not run
a graphical interface on their Internet servers. As a
result, when you need to access other computers
for remote administration, you will almost surely
need to work from the command line at some
time. Luckily, there are many feature-rich BSD
commands to help you do so.
Tools associated with the Secure Shell (SSH) service not only allow remote login and file transfer,
but they also offer encrypted communication to
keep your remote administration work secure.
With tools such as Virtual Network Computing
(VNC), you can have a server’s remote desktop
appear on your local client computer. These and
other features for doing remote systems administration are described in this chapter.
Doing Remote Login
and Tunneling with SSH
IN THIS CHAPTER
Configuring SSH
Using SSH for remote
login
Using SSH to do
tunneling
Using SSH to provide
proxy service
Using SSH with
private keys
Using screen remote
multiplexing terminal
Accessing remote
Windows desktops
Sharing remote desktops with VNC
BSD systems, like their big brother UNIX, grew up on university networks. At a time when the only users of these networks were students and
professors, and with networks mostly isolated from each other, there was
little need for security.
Applications and protocols that were designed in those times (the 1970s
and 1980s) reflect that lack of concern for encryption and authentication.
SMTP is a perfect example of that. This is also true of the first generation
of UNIX remote tools: telnet, ftp (file transfer protocol), rsh (remote
shell), rcp (remote copy), rexec (remote execution) and rlogin (remote
login). These tools send user credentials and traffic in clear text. For that
reason, they are very dangerous to use on the public, untrusted Internet,
and have become mostly deprecated and replaced with the Secure Shell
(SSH) commands (ssh, scp, sftp commands, and related services).
76034c13.qxd:Toolbox
3/29/08
10:54 AM
Page 226
Chapter 13: Doing Remote System Administration
Although there are still some uses for the legacy remote commands (see the “Using
Legacy Communications Tools” sidebar), most of this section describes how to use
SSH commands to handle most of your needs for remote communications commands.
Using Legacy Communications Tools
Despite the fact that SSH provides better tools for remote communications, legacy
communications commands, sometimes referred to as r commands, are still included
with most major BSD distributions. Some of these tools will perform faster than equivalent SSH commands because they don’t need to do encryption. So some old-school
UNIX administrators may use them occasionally on private networks or still include
them in old scripts. Although, for the most part, you should ignore these legacy remote
commands, one of these commands in particular can be useful in some cases: telnet.
The telnet command is still used to communicate with some network appliances
(routers, switches, UPSes, and so on) that do not have the horsepower to run an ssh
daemon. Even though it poses a security risk, some appliance manufactures include
telnet support anyway.
One good way to use the telnet command, however, is for troubleshooting many
Internet protocols such as POP3, SMTP, HTTP, and others. Under the hood, these
plain-text protocols are simply automated telnet sessions during which a client (such
as a browser or mail user agent) exchanges text with a server. The only difference is
the TCP port in use. Here is an example of how you could telnet to the HTTP port
(80) of a web server:
$ telnet www.example.com 80
Trying 208.77.188.166...
Connected to www.example.com.
Escape character is ‘^]’.
GET /index.html
<!DOCTYPE html PUBLIC “-//W3C//DTD XHTML 1.1//EN”
“http://www.w3.org/TR/xhtml11/DTD/xhtml11.dtd”>
<html xmlns=”http://www.w3.org/1999/xhtml” xml:lang=”en”>
<head>
<title>My Web server...
Similarly, you can telnet to a mail server on port 25 (SMTP) and 110 (POP3) and issue
the proper commands to troubleshoot e-mail problems. For more complete descriptions of using the telnet command to troubleshoot network protocols, refer to Linux
Troubleshooting Bible (ISBN 076456997X, Wiley Publishing, 2004), pages 505 and 508.
If you need to forcefully exit your telnet session, type the escape sequence (Ctrl+]
by default). This will stop sending your keyboard input to the remote end and bring
you to the telnet command prompt where can type quit or ? for more options.
226
76034c13.qxd:Toolbox
3/29/08
10:54 AM
Page 227
Chapter 13: Doing Remote System Administration
Configuring SSH
Nowadays, the all-purpose tool of remote system administration is Secure Shell (SSH).
SSH commands and services replace all the old remote tools, add strong encryption,
public keys, and many other features. The most common implementation of SSH in the
free and open source software world is OpenSSH (www.openssh.com), maintained by
the OpenBSD project. OpenSSH provides both client and server components. Here are
a few facts about SSH:
❑ For Windows, you can use the SSH tools within Cygwin (www.cygwin.com). But
unless you’re already using Cygwin (a UNIX-like environment for Windows), we
recommend PuTTY (www.chiark.greenend.org/uk/sgatatham/putty). PuTTY
is a powerful open source Telnet/SSH client.
❑ Use SSH version 2 whenever possible, because it is the most secure. Some
SSH-enabled network appliances may only support older, less secure versions.
OpenSSH supports all versions. Some older BSD systems accepted SSH v1 and
v2 connections. Newer releases accept version 2 by default.
❑ In FreeBSD, to enable the SSH service, check that the following line is contained
in the /etc/rc.conf file (which it should be by default):
sshd_enable=”YES”
To configure the service, edit the /etc/ssh/sshd_config file.
❑ To configure the ssh client, edit the /etc/ssh/ssh_config file.
If you prefer to use graphical tools to administer your remote BSD system, you can
enable X11 Tunneling (also called X11 Port Forwarding). With X11 Tunneling enabled
(on both the SSH client and server), you can start an X application on the server and
have it displayed on the client. All communication across that connection is encrypted.
FreeBSD comes with X11 forwarding turned on (X11Forwarding yes) for the server
(sshd daemon). You still need to enable it on the client side. To enable X11 forwarding on
the client for a one-time session, connect with the following command:
$ ssh –X francois@myserver
To enable X11 forwarding permanently for all users, add ForwardX11 yes to /etc/ssh/
ssh_config. To enable it permanently for a specific user only, add the lines to that
user’s ~/.ssh/config. After those settings have been added, the –X option is no longer
required to use X11 Tunneling. Run ssh to connect to the remote system as you would
normally. To test that the tunneling is working, run xclock after ssh’ing into the remote
machine, and it should appear on your client desktop.
SSH Tunneling is an excellent way to securely use remote graphical tools!
227
76034c13.qxd:Toolbox
3/29/08
10:54 AM
Page 228
Chapter 13: Doing Remote System Administration
Logging in Remotely with ssh
To securely log in to a remote host, you can use either of two different syntaxes to specify
the user name:
$ ssh -l francois myserver
$ ssh francois@myserver
However, scp and sftp commands (discussed in Chapter 12) only support the
user@server syntax, so we recommend you get used to that one. If you don’t specify
the user name, ssh will attempt to log in using the same user you are logged in as
locally. When connected, if you need to forcefully exit your ssh session, type the escape
sequence of a tilde followed by a period (~.).
Accessing SSH on a Different Port
For security purposes, a remote host may have its SSH service listening to a different port
than the default port number 22. If that’s the case, use the -p option to ssh to contact
that service:
$ ssh -p 12345 francois@turbosphere.com
Connect to SSH on port 12345
Using SSH to Do Tunneling (X11 Port Forwarding)
With SSH tunneling configured as described earlier, the SSH service forwards X
Window System clients to your local display. However, tunneling can be used with
other TCP-based protocols as well.
Tunneling for X11 Clients
The following sequence of commands illustrates starting an SSH session, then starting a few X
applications so they appear on the local desktop:
$ ssh –x francois@myserver
Start ssh connection to myserver
francois@myserver’s password: *******
[francois@myserver ~}$ echo $DISPLAY
Show the current X display entry
localhost:10.0
SSH sets display to localhost:10.0
[francois@myserver ~}$ xeyes&
Show moving desktop eyes
[francois@myserver ~}$ gnome-system-monitor&
Monitor system activities
[francois@myserver ~}$ xcalc&
Use a calculator
As more connections are requested, the $DISPLAY will be set to 11.0, 12.0, and so on.
Tunneling for CUPS Printing Remote Administration
X11 is not the only protocol that can be tunneled over SSH. You can forward any TCP port
with SSH. This is a great way to configure secure tunnels quickly and easily. No configuration is required on the server side.
228
76034c13.qxd:Toolbox
3/29/08
10:54 AM
Page 229
Chapter 13: Doing Remote System Administration
For example, myserver is a print server with the CUPS printing service’s web-based
user interface enabled (running on port 631). That GUI is only accessible from the
local machine. On my client PC, I tunnel to that service using ssh with the following
options:
$ ssh -L 1234:localhost:631 myserver
This example forwards port 1234 on my client PC to localhost port 631 on the server.
I can now browse to http://localhost:1234 on my client PC. This will be redirected
to cupsd listening on port 631 on the server. Note that you need root privilege to forward ports with numbers less than 1024.
Tunneling to an Internet Service
Another example of using SSH tunneling is when your local machine is blocked from connecting to the Internet, but you can get to another machine (myserver) that has an Internet
connection. The following example enables you to visit the Google.com web site (HTTP,
TCP port 80) across an SSH connection to a computer named myserver that has a connection to the Internet:
$ ssh -L 12345:google.com:80 myserver
With this example, any connection to the local port 12345 is directed across an SSH
tunnel to myserver, which in turn opens a connection to Google.com port 80. You
can now browse to http://localhost:12345 and use myserver as a relay to the
Google.com web site. Since you only intend to use ssh to forward a port, and not to
obtain a shell on the server, you can add the –N option to prevent the execution of remote
commands:
$ ssh -L 12345:google.com:80 –N myserver
Using SSH as a SOCKS Proxy
The previous example demonstrates that you can forward a port from the client to a
machine other than the server. In the real world, the best way to get your browser traffic out
of your local network via an encrypted tunnel is using SSH’s built-in SOCKS proxy feature. For
example:
$ ssh -D 12345 myserver
The dynamic (-D) option of ssh enables you to log in to myserver (as usual). As long
as the connection is open, all requests directed to port 12345 are then forwarded to
myserver. Next, set your browser of choice to use localhost port 12345 as a SOCKS
v4 proxy and you’re good to go.
For example, to get to the Connection Settings window in your Firefox browser select
Edit ➪ Preferences. Then either choose General ➪ Connection Settings (Firefox 1.5) or
229
76034c13.qxd:Toolbox
3/29/08
10:54 AM
Page 230
Chapter 13: Doing Remote System Administration
Advanced ➪ Network ➪ Settings (Firefox 2). Select Manual proxy configuration, but
do not enter anything on the fields for HTTP and other protocols. They all work over
SOCKS v4. See the Firefox Connections Settings window in Figure 13-1.
Figure 13-1: Use the Firefox Connections Settings window
for proxy configuration.
To test your setup, try disconnecting your ssh session and browsing to any web site.
Your browser should give you a proxy error.
From a Windows client, the same port forwarding can be accomplished in Putty by
selecting Connection ➪ SSH ➪ Tunnels.
Using ssh with Public Key Authentication
Up to this point, we’ve only used ssh with the default password authentication. The
ssh command also supports public key authentication. This offers several benefits:
❑ Automated logins for scripts and cron jobs: By assigning an empty passphrase
you can use ssh in a script to log in automatically. Although this is convenient,
it is also dangerous, because anybody who gets to your key file can connect to
any machine you can. Configuring for automatic login can also be done with a
passphrase and a key agent. This is a trade-off between convenience and security,
as explained below.
❑ A two-factor authentication: When using a passphrase-protected key for interactive logins, authentication is done using two factors (the key and the passphrase)
instead of one.
230
76034c13.qxd:Toolbox
3/29/08
10:54 AM
Page 231
Chapter 13: Doing Remote System Administration
Using Public Key Logins
Here’s the process for setting up key-based communications between two BSD systems. In
the following example, we use empty passphrases for no-password logins. If you prefer to protect your key with a passphrase, simply enter it when prompted during the
first step (key pair creation).
On the client system, run the following ssh-keygen command to generate the key pair
while logged in as the user who needs to initiate communications:
$ ssh-keygen
Generating public/private rsa key pair.
Enter file in which to save the key (/home/chris/.ssh/id_rsa): <Enter>
Enter passphrase (empty for no passphrase): <Enter>
Enter same passphrase again: <Enter>
Your identification has been saved in /home/chris/.ssh/id_rsa.
Your public key has been saved in /home/chris/.ssh/id_rsa.pub.
The key fingerprint is:
ac:db:a4:8e:3f:2a:90:4f:05:9f:b4:44:74:0e:d3:db chris@host.domain.com
Note that at each prompt you pressed the Enter key to create the default key file name
and to enter (and verify) an empty passphrase. You now have a private key that you
need to keep very safe, especially since in this procedure you didn’t protect it with a
passphrase.
You also now have a public key (id_rsa.pub), which was created by the previous
command. This public key needs to be installed on hosts you want to connect to. The
content of ~/.ssh/id_rsa.pub needs to be copied (securely) to ~/.ssh/authorized_
keys for the user you want to ssh to on the remote server. The authorized_keys
file can contain more than one public key, if multiple users use ssh to connect to this
account.
Log in to the remote server system as the user that you will want to ssh as with the key.
If you don’t already have a ~/.ssh directory, the first step is to create it as follows:
$ cd
$ mkdir .ssh
$ chmod 700 .ssh
The next step is to copy (securely) the public key file from the client and put it in an
authorized keys file on the server. This can be accomplished using scp. For example,
assuming the client system named myclient and client user named chris, type the
following on the server:
$
$
$
$
scp chris@myclient:/home/chris/.ssh/id_rsa.pub Get client id_rsa.pub
cat id_rsa.pub >> ~/.ssh/authorized_keys
Add to your keys
chmod 600 ~/.ssh/authorized_keys
Close permissions
rm id_rsa.pub
Delete public key after copying its content
This procedure can also be accomplished by editing the ~/.ssh/authorized_keys
text file on the server and copying and pasting the public key from the client. Make
231
76034c13.qxd:Toolbox
3/29/08
10:54 AM
Page 232
Chapter 13: Doing Remote System Administration
sure you do so securely over ssh, and make sure not to insert any line breaks in the
key. The entire key should fit on one single line, even if it wraps on your screen.
Then from the client (using the client and server user accounts you just configured),
you can just ssh to the server and the key will be used. If you set a passphrase, you
will be asked for it as you would for a password.
Saving Private Keys to Use from a USB Flash Drive
If you’d like to store your private key somewhere safer than your hard drive, you can use a
USB flash drive (sometimes called a thumbdrive or pen drive):
$ mv ~/.ssh/id_rsa /media/THUMBDRIVE1/myprivatekey
And then, when you want to use the key, insert the USB drive and type the following:
$ ssh -i /media/THUMBDRIVE1/myprivatekey chris@myserver
Using keys with passphrases is more secure than simple passwords, but also more
cumbersome. To make your life easier, you can use ssh-agent to store unlocked keys for
the duration of your session. When you add an unlocked key to your running ssh-agent,
you can run ssh using the key without being prompted for the passphrase each time.
To see what the ssh-agent command does, run the command with no option. A
three-line bash script appears when you run it, as follows:
$ ssh-agent
SSH_AUTH_SOCK=/tmp/ssh-SkEQZ18329/agent.18329; export SSH_AUTH_SOCK;
SSH_AGENT_PID=18330; export SSH_AGENT_PID;
echo Agent pid 18330;
The first two lines of the output just shown need to be executed by your shell. Copy
and paste those lines into your shell now. You can avoid this extra step by starting
ssh-agent and having the bash shell evaluate its output by typing the following:
$ eval `ssh-agent`
Agent pid 18408
You can now unlock keys and add them to your running agent. Assuming you have
already run the ssh-keygen command to create a default key, let’s add that default key
using the ssh-add command:
$ ssh-add
Enter passphrase for /home/chris/.ssh/id_rsa: *******
Identity added: /home/chris/.ssh/id_rsa (/home/chris/.ssh/id_rsa)
Next you could add the key you stored on the USB thumbdrive:
$ ssh-add /media/THUMBDRIVE1/myprivatekey
232
76034c13.qxd:Toolbox
3/29/08
10:54 AM
Page 233
Chapter 13: Doing Remote System Administration
Use the -l option to ssh-add to list the keys stored in the agent:
$ ssh-add -l
2048 f7:b0:7a:5a:65:3c:cd:45:b5:1c:de:f8:26:ee:8d:78 /home/chris/.ssh/id_rsa
(RSA)
2048 f7:b0:7a:5a:65:3c:cd:45:b5:1c:de:f8:26:ee:8d:78
/media/THUMBDRIVE1/myprivatekey (RSA)
To remove one key from the agent, for example the one from the USB thumbdrive, run
ssh-add with the -d option as follows:
$ ssh-add -d /media/THUMBDRIVE1/myprivatekey
To remove all the keys stored in the agent, use the -D option:
$ ssh-add -D
Using screen: A Rich Remote Shell
The ssh command gives you only one screen. If you lose that screen, you lose all you
were doing on the remote computer. That can be very bad if you were in the middle
of something important, such as a 12-hour compile. And if you want to do three things
at once, for example vi httpd.conf, tail -f error_log, service httpd reload,
you need to open three separate ssh sessions.
Essentially, screen is a terminal multiplexer. If you are a system administrator working on remote servers, screen is a great tool for managing a remote computer with only
a command line interface available. Besides allowing multiple shell sessions, screen
also lets you disconnect, and then reconnect to that same screen session later.
The screen software package is available with FreeBSD. To create and install the screen
package, type the following from the FreeBSD server on which you want to use screen:
# cd /usr/ports/sysutils/screen
# make install
To use screen, run the ssh command from a client system to connect to the BSD server
where screen is installed. Then simply type the following command:
$ screen
If you ran screen from a Terminal window, after you see the license message press
Enter and you should see a regular bash prompt in the window. To control screen,
press the Ctrl+A key combo, followed by another keystroke. For example, Ctrl+A followed by ? (noted as Ctrl+A, ?) displays the help screen. With screen running, here
are some commands and control keys you can use to operate screen.
$ screen -ls
There is a screen on:
List active screens
233
76034c13.qxd:Toolbox
3/29/08
10:54 AM
Page 234
Chapter 13: Doing Remote System Administration
7089.pts-2.myserver
(Attached)
1 Socket in /var/run/screen/S-francois.
$ Ctrl+A, A
Set window’s title to: My Server
$ Ctrl+A, C
$ Ctrl+A, “
Num Name
Flags
0 My Server
1 bash
$ Ctrl+A, Ctrl+D
$ screen -ls
There is a screen on:
7089.pts-2.myserver
(Detached)
1 Socket in /var/run/screen/S-francois.
Shows screen is attached
Change window title
Type a new title
Create a new window
Show active window titles
Up/down arrows change windows
Detach screen from terminal
List active screens
Shows screen is detached
The screen session just shown resulted in two windows (each running a bash shell)
being created. You can create as many as you like and name them as you choose. Also,
instead of detaching from the screen session, you could have just closed it by exiting
the shell in each open window (type exit or Ctrl+D).
When the screen session is detached, you are returned to the shell that was opened
when you first logged into the server. You can reconnect to that screen session as
described in the following “Reconnecting to a screen Session” section.
Table 13-1 shows some other useful control key sequences available with screen.
Table 13-1: Control Keys for Using screen
234
Keys
Description
Ctrl+A, ?
Show help screen.
Ctrl+A, C
Create new window.
Ctrl+A, Ctrl+D
Detach screen from terminal. The screen session and its windows
keep running.
Ctrl+A, “
View list of windows.
Ctrl+A, ‘
Prompt for number or name of window to switch to.
Ctrl+A, Ctrl+N
Go to next window, if multiple screen windows are open.
Ctrl+A, n
View next window.
Ctrl+A, P
View previous window.
Ctrl+A, A
Rename current window.
Ctrl+A, W
Show the list of window names in the title bar.
76034c13.qxd:Toolbox
3/29/08
10:54 AM
Page 235
Chapter 13: Doing Remote System Administration
Reconnecting to a screen Session
After you detach from a screen session, you can return to that screen again later (even
after you log out and disconnect from the server). To reconnect when only one screen is
running, type the following:
$ screen -r
If there are several screen sessions running, screen -r won’t work. For example, this
shows what happens when two detached screen sessions are running:
$ screen -r
There are several suitable screens on:
7089.pts-2.myserver
(Detached)
7263.pts-2.myserver
(Detached)
Type “screen [-d] -r [pid.]tty.host” to resume one of them.
As the output suggests, you could identify the screen session you want by its name
(which, by default, is a combination of the session’s process ID, tty name, and hostname). For example:
$ screen -r 7089.pts-2.myserver
Naming screen Sessions
Instead of using the default names, you can create more descriptive names for your screen
sessions when you start screen. For example:
$ screen -S mysession
$ screen -ls
There is a screen on:
26523.mysession (Attached)
Sharing screen Sessions
The screen command also allows the sharing of screens. This feature is great for tech
support, because each person connected to the session can both type into and watch
the current session! Creating a named screen, as in the preceding section, makes this
easier. Because you are sharing a screen, use either a temporary user account or temporary password, for security reasons. Then another person on a different computer
can ssh to the server (using the same user name) and type the following:
$ screen -x mysession
Just as with screen -r, if there’s only one screen running, you don’t need to specify
which screen you’re connecting to:
$ screen -x
235
76034c13.qxd:Toolbox
3/29/08
10:54 AM
Page 236
Chapter 13: Doing Remote System Administration
Using a Remote Windows Desktop
Many system administrators who become comfortable using a BSD desktop prefer to
do administration of their Windows systems from BSD whenever possible. BSD systems provide tools such as rdesktop and tsclient, which enable you to connect to a
Windows system running Windows Terminal Services.
NOTE Because there are no BSD or other UNIX implementations of Microsoft’s
proprietary Remote Desktop Protocol (RDP), there are no methods for doing RDPenabled Remote Windows Desktops in FreeBSD. If you are interested in encrypted
remote desktop solutions, refer to projects that use SSH to encrypt remote desktops,
such as NoMachine (www.nomachine.com).
To be able to connect to your Windows system desktop from FreeBSD, you have to enable Remote
Desktop from your Windows system. To do that from Windows XP (and others) rightclick My Computer and select Properties. Then choose the Remote tab from the System
Properties window and select the Allow users to connect remotely to this computer
check box. Select which users you want to let connect to the Windows box and click OK.
Now, from FreeBSD, you can use either the rdesktop or tsclient (a graphical wrapper
around rdesktop) to connect to the Windows system using Remote Desktop Protocol
(RDP). If those applications are not already installed, type the following from your
FreeBSD system:
# pkg_add -r rdesktop
# pkg_add -r tsclient
Connecting to a Windows Desktop
with tsclient
If you are used to using Windows’ Remote Desktop Connection (formerly known as
Terminal Services Client) to connect from one Windows box to another, you will probably find the tsclient tool a good way to connect to a Windows desktop from a BSD
system. Running tsclient opens a Terminal Server Client window that mimics the
Windows remote desktop client’s user interface.
When the tsclient package is installed, launch tsclient by selecting Applications ➪
Internet ➪ Terminal Server Client from the GNOME desktop or by typing the following from the shell:
$ tsclient &
Figure 13-2 shows the Terminal Server Client window.
Probably all you need to enter on this screen is the name or IP address of the Windows
system. You will probably be prompted for user name and password, depending on
how the Windows system is configured. Select different tabs to further refine your connection to the remote Windows desktop.
236
76034c13.qxd:Toolbox
3/29/08
10:54 AM
Page 237
Chapter 13: Doing Remote System Administration
Figure 13-2: Terminal Server Client (tsclient)
connects to Windows desktops
Note that tsclient can also be used as a client for VNC and XDMCP.
Connecting to a Windows Desktop
with rdesktop
If you prefer not to use the tclient wrapper described above, you can log in to a remote
Windows desktop using the rdesktop command. The rdesktop command requests a
login to the Windows machine, then opens the Windows desktop for the user after
you log in. Here are examples of the rdesktop command:
$
$
$
$
$
rdesktop
rdesktop
rdesktop
rdesktop
rdesktop
172.16.18.66
-u chris -p M6pyXX win1
-f win1
-r sound:local win1
-E win1
Login to desktop at IP address
Identify user/password for host win1
Run rdesktop in full-screen mode
Direct sound from server to client
Disable client/server encryption
If you disable client/server encryption, the login packet is encrypted, but everything
after that is not. Although this can improve performance greatly, anyone sniffing your
LAN may be able to see your clear-text communications (including any interactive
logins after the initial login packet). Other rdesktop options that can improve performance on your Windows desktop include -m (don’t send mouse motion events),
-D (hide window manager’s decorations), and -K (don’t override window manager
key bindings).
237
76034c13.qxd:Toolbox
3/29/08
10:54 AM
Page 238
Chapter 13: Doing Remote System Administration
Using Remote BSD Desktop
and Applications
The X Window System (X) should not be run on typical production servers for security
and performance reasons. But thanks to the client-server nature of X, you can run an
X-enabled program on a remote machine with its graphical output directed to your desktop. In that relationship, the application running from the remote machine is referred to
as the X client, and your desktop is the X server. When running remote X applications on
untrusted networks or the Internet, use SSH forwarding as described earlier. On trusted
LANs, do it without SSH, as described here.
By default, your X desktop will not allow remote X applications to connect (pop-up)
on your desktop. You can allow remote apps on your desktop using the xhost command. On
your local BSD display, use the xhost command to control which remote machines can
connect to X and display applications on your desktop. Here are examples of xhost:
NOTE Listening for remote X clients is disabled in FreeBSD by default. Before
you allow access to your X display, you need to start your X desktop with the
-listen_tcp option. For example, start your desktop by typing: startx
-listen_tcp.
$ xhost
List allowed hosts
access control enabled, only authorized clients can connect
$ xhost +
Disable access control (dangerous)
access control disabled, clients can connect from any host
$ xhost Re-enable access control
access control enabled, only authorized clients can connect
$ xhost remotemachine
Add an allowed host
remotemachine being added to access control list
Access control should be completely disabled only for troubleshooting purposes.
However, with access enabled for a particular host machine (remotemachine in this
case), you can do the following from a shell on the remote computer to have X
applications from that machine appear on the local desktop (in this case called
localmachine):
$
$
$
$
export DISPLAY=localmachine:0
xterm &
xclock &
gtali &
Set the DISPLAY to localmachine:0
Open remote Terminal on local
Open remote clock on local
Open remote dice game on local
After setting the DISPLAY variable on remotemachine to point to localmachine, any application run from that shell on remotemachine should appear on Desktop 0 on localmachine.
In this case, we started Terminal window, clock, and game applications.
Sharing X applications in this way between BSD and other UNIX-like hosts is pretty easy.
However, it is not trivial to use across other computer platforms. If your desktop runs
238
76034c13.qxd:Toolbox
3/29/08
10:54 AM
Page 239
Chapter 13: Doing Remote System Administration
Windows, you have to run an X server. A free solution is Cygwin, which includes an X
server. There are also feature-rich commercial X servers but they can be very expensive.
To share remote desktops across different operating system platforms, we suggest you
use Virtual Network Computing (VNC).
Sharing Desktops Using VNC
Virtual Network Computing (VNC) consists of server and client software that enables
you to assume remote control of a full desktop display from one computer on another. In FreeBSD
and similar systems, you need the VNC package to access a remote desktop on your display (client) or share a desktop from your computer (server). To install those VNC client
and server software components, type the following:
# pkg_add -r vnc
VNC client and server are available for, and interoperable with, many different operating systems. VNC servers are available on BSD, Linux, Windows (32-bit), Mac OS X,
and UNIX systems. VNC clients are offered on those, and many other types of systems
(including OS/2, PalmOS, and even as a Java application running in a web browser).
NOTE Opening access to manipulate your desktop represents a security risk. You
can help minimize that risk by running the VNC server on the local host only, then
having remote users connect to the machine using SSH (or Putty from Windows
systems).
Setting Up the VNC Server
Because VNC shares desktops on a per-user basis, you can start by logging in as the
user whose desktop you want to share. As that user, you want to create a VNC password and launch the VNC server. Here’s how:
1. Create a directory to hold the VNC settings:
$ mkdir $HOME/.vnc
2. Create a VNC password for that user:
$ vncpasswd
Password: *******
Verify: *******
3. Finally, you can start the VNC service (vncserver) either by running vncserver
directly from the shell or by adding the command to a start-up file that is launched
each time the system boots. For now, run the following command to start the VNC
server:
$ vncserver
239
76034c13.qxd:Toolbox
3/29/08
10:54 AM
Page 240
Chapter 13: Doing Remote System Administration
If you are using the firewall built into your system, make sure you open the port(s)
for VNC. Each display runs on its own port. Display number N is accessed on TCP
port 5900+N. For example, display 1 is accessible on port 5901. Refer to Chapter 14
for more details on firewalls.
The vncserver command will start an Xvnc process to listen on the first available display (probably :1). It will also create a basic set of X applications to start when someone
connects to the server (in the $HOME/.vnc/xstartup file). You can add or change those
applications as you like, including the window manager used (twm is the default). In
that same directory are log files and the VNC passwd file.
A VNC client, with access to your computer and your password, can connect to your
VNC service as described in the next section. If you are setting up the VNC service
temporarily, after the client is done connecting to your VNC service, you can kill the
VNC server as follows:
$ vncserver -kill :1
Killing Xvnc process ID 49901
Starting Up the VNC Client
With the VNC server running, you can connect to a desktop on that server from any
of the client systems mentioned earlier (BSD, Windows, Linux, Mac OS X, UNIX, and
so on). For example, assuming your VNC server is on a system named myserver,
you could type the following command to start that remote desktop from another BSD
system:
$ vncviewer myserver:1
Connect to VNC service on myserver display 1
You can also use tsclient to connect; for this example, you would just specify
myserver:1 as the computer and VNC as the protocol. By default, once you connect
via VNC, all you get is a very basic window manager (twm) and a terminal. To get the full
desktop next time the user logs in, you should edit your VNC $HOME/.vnc/xstartup
file on the VNC server. For example, log in as the user who started the server and type
the following:
$ vi $HOME/.vnc/xstartup
When editing that file, change the following lines to include the window manager you
want (replace twm) and applications you want (replace or add applications starting
with the xterm line). Here is an example of the contents of that file:
#!/bin/sh
[ -r $HOME/.Xresources ] && xrdb $HOME/.Xresources
xsetroot -solid grey
vncconfig -iconic &
xterm -geometry 80x24+10+10 -ls -title “$VNCDESKTOP Desktop” &
twm &
240
76034c13.qxd:Toolbox
3/29/08
10:54 AM
Page 241
Chapter 13: Doing Remote System Administration
On older version of the VNC software, the file may not exist. So create it and add the
two lines above. After creating the file, set its permissions as follows:
# chmod 755 $HOME/.vnc/xstartup
Then, for the changes to take effect you need to kill and restart the VNC server.
Using VNC on Untrusted Networks with SSH
VNC is a considered to be an insecure protocol. The password is sent using fairly weak
encryption and the rest of the session is not encrypted at all. For that reason, when using
VNC over an untrusted network or the Internet, we recommend you tunnel it over SSH.
For a general description of how the SSH service works, refer to the “Doing Remote
Login and Tunneling with SSH” section earlier in this chapter. To forward VNC display 2 (port 5902) on the computer named myserver, to the same local port, type the
following:
$ ssh -L 5902:localhost:5902 myserver
In case VNC is already running on the client, you could assign the service to an arbitrary port (to avoid running into the same port number). For example:
$ ssh –L 55902:localhost:5902 user@myserver
$ vncviewer localhost:55902
NOTE If you start using VNC routinely, you may want to look at tightvnc.
The tightvnc project provides another open source implementation of the VNC
protocol, under active development and with newer features and optimizations.
These features include built-in ssh tunneling.
Sharing a VNC Desktop with Vino
If you’re running GNOME and would like to share your existing GNOME desktop (display :0),
you can do so with Vino (as root, type pkg_add -r vino). From the GNOME Desktop
panel, select System ➪ Preference ➪ Remote Desktop to display the Remote Desktop
Preferences window (vino-preferences command) shown in Figure 13-3.
In the Remote Desktop Preferences window, selecting the “Allow other users to view
your desktop” check box enables remote VNC viewers to view your desktop; by contrast, selecting the “Allow other users to control your desktop” check box enables others to manipulate your desktop with their mouse and keyboard.
If the “Ask you for confirmation” check box is selected, a remote request to view your
desktop causes a pop-up window to okay the connection before the requestor can see
your desktop. Selecting the “Require the user to enter this password” check box is a
good idea, to prevent those without a password from viewing your desktop. (Be sure
the password is at least eight characters.)
241
76034c13.qxd:Toolbox
3/29/08
10:54 AM
Page 242
Chapter 13: Doing Remote System Administration
Figure 13-3: Vino lets remote users view,
and possibly control, your desktop.
As the Remote Desktop Preferences window notes, you can use vncviewer from another
BSD system (with the address and display number shown) to display the shared desktop
to another system. However, VNC clients from many different operating systems should
work as well.
Summary
If you ever find yourself in a position where you need to administer multiple BSD
systems, you have a rich set of commands with BSD systems for doing remote system administration. The Secure Shell (SSH) facility offers encrypted communications
between clients and servers for remote login, tunneling, and file transfer.
Virtual Network Computing (VNC) lets one BSD system share its desktop with a client
system so that the remote desktop appears right on the client’s desktop. With tools such
as Vino, you can even share a desktop in such a way that the VNC server and client can
both work from the same desktop at the same time.
242
76034c14.qxd:Toolbox
3/29/08
10:55 AM
Page 243
Locking Down Security
Securing your BSD system means many things. To
be secure, you need to restrict access to the user
accounts and services on the system. However,
after that, security means checking that no one has
gotten around the defenses you have set up.
IN THIS CHAPTER
Add user accounts and
change user settings
with adduser
FreeBSD, NetBSD, OpenBSD, and other systems
based on BSD distributions are designed in many
ways to be secure by default. That means that there
are no user accounts with blank passwords, that
the firewall is restrictive by default, and that most
network services (Web, FTP, and so on) are off by
default (even if the service’s software is installed).
Delete users with
rmuser
As someone setting up a BSD system, you can go
beyond the default settings to make your system
even more secure. For example, by setting up services in chrooted jails you can prevent an intruder
from accessing parts of the computer system that
are outside the compromised service. By encrypting critical data, you can make it nearly impossible
for someone to use stolen data.
Configure firewalls
with ipfw
Add and change passwords with passwd
See who’s logged in
with last and who
Manage log files Syslog
Check out advanced
security with tripwire
and chkrootkit
Although many of the commands covered in this book can be used to
check and improve the security of your BSD system, some basic BSD features are particularly geared toward security. For example, secure user
accounts with good password protection, a solid firewall, and consistent
logging (and log monitoring) are critical to having a secure BSD system.
Commands related to those features, plus some advanced features related
to protecting network services, are covered in this chapter.
NOTE Although a lot of computer security efforts focus on protecting computers from outside attackers, policies protecting data from
those inside a company have become a growing issue. Procedures in
this chapter should be enhanced with policies that restrict internal
users from accessing data they don’t need for their jobs and tracking
improper access from those users.
76034c14.qxd:Toolbox
3/29/08
10:55 AM
Page 244
Chapter 14: Locking Down Security
Working with Users and Groups
During most BSD installation procedures you are asked to assign a password to the
root user (for system administration). Then you might be asked to create a user name
of your choice and assign a password to that as well (for everyday computer use).
We encourage you to always log in as a regular user and only su or sudo to the root
account when necessary. (In fact, by default, you are not allowed to log in remotely
using ssh to a BSD system as root user.) When FreeBSD is installed, you can use commands or graphical tools to add more users, modify user accounts, and assign and
change passwords.
Managing Users the GUI Way
For a GNOME desktop system with X, you can manage users and groups with the User
Manager window (System ➪ Administration ➪ Users and Groups). When managing
user accounts for servers, one option is to use web-based GUIs.
The most commonly used general-purpose tool is Webmin (www.webmin.com). Make
sure you do not run Webmin on its default port (10000) for security reasons. Or, better
yet, run services such as Webmin over SSH tunnels, so communication is encrypted. You
can also use special-purpose web interfaces. For example, there are many web-hosting
automation GUIs, such as cPanel (www.cpanel.com), Plesk (www.swsoft.com/plesk),
or Ensim (www.ensim.com).
Adding User Accounts
To add new users you can use the adduser command. With no options, adduser steps you
through the information you need to enter to add a user account. Here’s an example of
using adduser to add a user interactively:
# adduser
Start an interactive session to add a user
Username: jimbo
Full name: James Bolatter
Uid (Leave empty for default):
Login group [jimbo]:
Login group is jimbo. Invite jimbo into other groups? []:
Login class [default]:
Shell (sh csh tcsh bash ksh nologin) [sh]: bash
Home directory [/home/jimbo]:
Use password-based authentication? [yes]:
Use an empty password? (yes/no) [no]:
Use a random password? (yes/no) [no]:
Enter password: *********
Enter password again: *********
Lock out the account after creation? [no]:
244
76034c14.qxd:Toolbox
3/29/08
10:55 AM
Page 245
Chapter 14: Locking Down Security
The user name must be from one to 16 characters. Most people use lowercase letters
and digits, with the first character being a letter. Default user IDs (Uid) start at 1001.
The default group is a new group with the same name as the user name.
Login class is something that not all UNIX-like systems have. The default class is best
for regular users (more on login classes a bit later). Password-based authentication (yes)
is the normal authentication. Select a good password (more on passwords later as well).
After you have answered all the questions, you have a chance to see and approve of the
resulting account information.
Username
: jimbo
Password
: *****
Full Name : James Bolatter
Uid
: 1005
Class
:
Groups
: jimbo
Home
: /home/jimbo
Shell
: /usr/local/bin/bash
Locked
: no
OK? (yes/no):
Add another user? (yes/no): no
Goodbye!
As you can see, the home directory is /home/jimbo. The bash shell was assigned, to
replace sh as the default shell (some like bash for its more diverse features). Apparently
this is the fifth user configured on this system (Uid 1005).
Depending on the login class of the user you just added, several things will happen.
For the default user class, an entry for the user is added to the /etc/passwd file and
the user’s home directory is created. After that, files from the /usr/share/skel directory are added to the user’s home directory and the user is added to the selected group
account in the /etc/group file. A mail file in the user’s name is also added to the /var/
mail directory.
This is a simple example. Later examples show other features you might want to take
advantage of, such as password aging or assigning different login classes. The next
example, however, shows how to add a bunch of users at once.
Adding Batches of Users
If you want to add a bunch of users to your system at once, you can create an account list file
and feed that to the adduser command. This can be useful if you need to add a lot of
users at once or if you want the same set of users on multiple machines.
In the configuration file used by adduser, each user is represented by a 10-field, oneline, colon-separated entry. The file can be any name you like. You just have to identify
245
76034c14.qxd:Toolbox
3/29/08
10:55 AM
Page 246
Chapter 14: Locking Down Security
it to the adduser command using the -f option. Here’s an example of a file I created
named users.txt:
wnelson:2001:2001::::Walter Nelson:/home/wnelson:/usr/local/bin/bash:myKulPw
jbing:2002:2002::::James Bing:/home/jbing:/bin/csh:Nmaikar
sjohnson:2003:2003::::Sara Johnson:/home/sjohnson:/bin/sh:dwzdwN
njames:2004:2004::::Nick James:/home/njames:/usr/local/bin/bash:MkMydaE
The format of the file that can be passed to the adduser command has 10 colonseparated fields. The fields are user name, user ID, group ID, login class, password
aging, account expiration, full user name, home directory, default shell, and password.
As you can see, you don’t need to fill in every field (just add a colon to indicate that
you are stepping to the next field). I started with user ID 2001, so not to conflict with
existing accounts that started at 1001. The group id (third field) was set to match the
user ID in each case.
We skipped several of the fields, which we will describe later, before adding the full
user name (field 7). Home directories are assigned to a subdirectory of the /home directory that is named with the user name. Several different shells are assigned (bash, csh,
and sh), with the full path to each shell shown. Note that the last field contains initial
passwords for each user. Plain text passwords are made to be hard to guess, but easy to
remember (fashioned after phrases such as my cool password and Not my car).
WARNING! Although the passwords in the users.txt file we just created were
plain text, they are actually stored in encrypted form in the /etc/master.passwd
file. If you create a users.txt file, like the one shown, be sure to restrict permission on that file (or just delete it when you are done). Otherwise, others might be
able to see the passwords assigned to your user accounts.
Before you can add a user, the group you add that user to must exist. So before running the adduser command in this example, you would have to add the following
lines (as root user) to the /etc/group file:
wnelson:*:2001:
jbing:*:2002:
sjohnson:*:2003:
njames:*:2004:
When the file is created and the groups have been added, run the adduser -f command as follows to add the batch of accounts.
# adduser -f /root/users.txt
adduser: INFO: Successfully added
adduser: INFO: Successfully added
adduser: INFO: Successfully added
adduser: INFO: Successfully added
246
Add all users listed in users.txt file
(wnelson) to the user database.
(jbing) to the user database.
(sjohnson) to the user database.
(njames) to the user database.
76034c14.qxd:Toolbox
3/29/08
10:55 AM
Page 247
Chapter 14: Locking Down Security
Setting User Account Defaults
You can create your own defaults for adduser by placing those default settings in the
/etc/adduser.conf file. The best way to create the adduser.conf file initially is with the
adduser command itself as follows (note that any additional groups you add must
already exist):
# adduser -C
Create adduser defaults and add to /etc/adduser.conf
Uid (leave empty for default):
Login group []: sales
Enter additional groups []: acme
Login class [default]:
Shell (sh csh tcsh bash ksh nologin) [sh]: bash
Home directory [/home/]: /usr/people
Use password-based authentication? [yes]: yes
Use an empty password? (yes/no) [no]: no
Use a random password? (yes/no) [no]: no
Lock out the account after creation? [no]: no
Pass Type : yes
Class
:
Groups
: sales acme
Home
: /usr/people
Shell
: /usr/local/bin/bash
Locked
: no
OK? (yes/no): yes
Re-edit the default configuration? (yes/no): no
Goodbye!
Don’t feel that you have to change every setting. The defaults are fine in most cases.
The result of the command just shown is an /etc/adduser.conf file that looks like
the following:
# Configuration file for adduser(8).
# NOTE: only *some* variables are saved.
# Last Modified on Wed Feb 13 11:14:01 CST 2008.
defaultLgroup=sales
defaultclass=
defaultgroups=acme
passwdtype=yes
homeprefix=/usr/people
defaultshell=/usr/local/bin/bash
udotdir=/usr/share/skel
msgfile=/etc/adduser.msg
disableflag=
In most cases, the settings in /etc/adduser.conf define what is offered to use for
the user account when the administrator runs adduser to add an account. You can
edit the adduser.conf file manually, to change any of those setting at a later date.
Type man adduser.conf to see descriptions of available settings for this file. Here are
247
76034c14.qxd:Toolbox
3/29/08
10:55 AM
Page 248
Chapter 14: Locking Down Security
some examples of settings you may want to add to adduser.conf (these are meant to be examples
so don’t use any setting more than once):
defaultgroups=”sales market acme”
passwdtype=no
passwdtype=none
passwdtype=random
defaultshell=/bin/sh
upwexpire=120d
upwexpire=31-12-2008
uuid=1500
#
#
#
#
#
#
#
#
You can have multiple extra groups
Disable user’s password, so can’t login
No password, can login without password
adduser makes password and displays it
Must be a shell listed in /etc/shells
User password expires in 120 days
Password expires on December 31, 2008
Default userid (between 1000 and 65534)
Overriding these options when you use the adduser command can be done in a couple
of ways. If you are prompted to use the default value while creating a user interactively,
just type a new value if you want to not use the default. However, you can also override
many of the default values by adding options to the adduser command line. The next
section shows examples of options to adduser.
Using Options When Adding Users
There are command line options to adduser that you can use to override the default
settings. For example, you can change the default location where home directories are placed as
follows:
# adduser -d /usr/people
Assign /usr/people to create home directories in
To use a different default shell, use the -s option as follows:
# adduser -s /bin/csh
Assign /bin/csh as the default shell
Type ls -a /usr/share/skel to see the files that will be copied in each user’s home
directory when that user’s account is created. You can add any files or directories you
like to that directory that you would want to be copied to users’ home directories when
their account is created. To change the location of the skel directory, type the following:
# adduser -k /usr/share/myskel
Use myskel directory to hold initial user files
To bypass the defaults in your /etc/adduser.conf file, and use the system defaults instead, use
the -N option as follows:
# adduser -N
Don’t use defaults from your adduser.conf file
Usually, adduser will try to create the home directory for the new user you are adding.
If you want to explicitly not create the new home directory, type the following:
# adduser -D
248
Don’t create the new user’s home directory
76034c14.qxd:Toolbox
3/29/08
10:55 AM
Page 249
Chapter 14: Locking Down Security
Instead of just using the default login class (called default), you can create or enable
other login classes. For example, to change the default login class to use the dialer login
class instead of default, type the following:
# adduser -L dialer
User a different login class (dialer)
Only the default and root dialer classes are enabled when you start out (actually
there are a few other login class names, but they all simply point to default). The next
section describes some ways in which you can explore the use of login classes further.
Using Login Classes
A potentially useful feature in FreeBSD that is not in other UNIX-like systems is the login
class feature. When you create a normal user account, that account is assigned to the
default login class, based on an entry in the /etc/login.conf file. That login class
provides a lot of initial settings for the user. By creating other login classes, you can create sets of users with different attributes.
Here is how the default login class is defined in the /etc/login.conf file:
default:\
:passwd_format=md5:\
:copyright=/etc/COPYRIGHT:\
:welcome=/etc/motd:\
:setenv=MAIL=/var/mail/$,BLOCKSIZE=K,FTP_PASSIVE_MODE=YES:\
:path=/sbin /bin /usr/sbin /usr/bin /usr/games /usr/local/sbin
/usr/local/bin /usr/X11R6/bin ~/bin:\
:nologin=/var/run/nologin:\
:cputime=unlimited:\
:datasize=unlimited:\
:stacksize=unlimited:\
:memorylocked=unlimited:\
:memoryuse=unlimited:\
:filesize=unlimited:\
:coredumpsize=unlimited:\
:openfiles=unlimited:\
:maxproc=unlimited:\
:sbsize=unlimited:\
:vmemoryuse=unlimited:\
:priority=0:\
:ignoretime@:\
:umask=022:
Seeing the default login class may answer some of your questions about where some
of the initial settings each user has came from. Here are descriptions of how features are
set and how you might change them:
❑ passwd_format=md5: New or changed passwords will use md5 encryption. You
could also set this value to des or blf to use those encryption types.
249
76034c14.qxd:Toolbox
3/29/08
10:55 AM
Page 250
Chapter 14: Locking Down Security
❑ copyright=/etc/COPYRIGHT: Indicates a file containing additional copyright
information. You could add your own copyright information to this file if your
system contains other copyrighted code.
❑ welcome=/etc/motd: Assigns the message of the day to /etc/motd. Text from this
file is displayed when the user first logs in.
❑ setenv...: Sets several shell variables (such as the location of the user’s mailbox).
❑ path...: Sets the user’s initial path. (Expect this path to be replaced by settings from
other configuration files.)
❑ nologin=/var/run/nologin: Tells the user account that if the /var/run/nologin
file exists, the user should be prevented from logging in. (A system administrator
can create this file to temporarily prevent users from logging in.)
❑ priority=0: This is the initial nice level set for the user.
❑ umask=022: Sets the umask so that, by default, when the user creates a file it has
644 permission, or if it is a directory it has 755 permission. In other words, other
users and groups can see and read from those files and directories, but not write
to them.
The rest of the settings in this login class could be used to limit resources available to
the user. However, all of them are set to unlimited. So users will not be limited in the
size of files they can create, how much memory they can use, how many processes
they can run, and so on. Refer to the login.conf man page for information on how
to set resource limits, or for that matter, any other settings you might want to add or
change in the login.conf file.
To create your own login classes you can simply uncomment some of the classes in the
login.conf file or add your own to that file. If you make changes to login.conf, you
need to rebuild the login database as follows:
# cap_mkdb /etc/login.conf
Create the login.conf.db database
The login process uses the settings in the login.conf.db file each time the user logs
in to your BSD system.
Modifying User Accounts
After a user account is created, places for changing some of those initial settings are
spread across multiple locations. Check the dot files (files beginning with a period) in
the user’s home directory for settings specific to the user’s shell and applications. To
change basic user account information, stored in the /etc/passwd file, you can use
the vipw command as follows:
# vipw
250
Safely edit the /etc/passwd file
76034c14.qxd:Toolbox
3/29/08
10:55 AM
Page 251
Chapter 14: Locking Down Security
The reason for using the vipw file, instead of just opening the file in a regular text editor, is that vipw will lock the passwd file so that its contents can’t get out of sync. Only
the root user can edit this file. Here’s an example of an entry in the /etc/passwd file:
mike:*:1006:1006:Mike Smith:/home/mike:/bin/csh
In this example, the user name is mike, with a user ID and group ID of 1006. The user’s
full name is Mike Smith. The home directory is /home/mike and his default shell is
/bin/csh. The asterisk in the second field indicates that the user’s password is stored
in the /etc/master.passwd file.
WARNING! Be careful changing user ID and group ID numbers. Although you
can do it, it will probably result in the user not being able to access files in his or
her own directory.
Deleting User Accounts
With the rmuser command you can remove user accounts from the system, as well as other
files (home directories, mail spool files and so on) if you choose. Here are examples:
# rmuser jjones
Delete user account
Matching password entry:
jjones:*:1009:1009::0:0:John W. Jones:/home/jjones:/bin/csh
Is this the entry you wish to remove? yes
Remove user’s home directory (/home/jjones)? yes
Removing user (jjones): mailspool home passwd.
As you can see, besides removing the entry from the /etc/passwd file, you also have
the opportunity to remove the user’s home directory. If you say yes, rmuser removes the
passwd entry, home directory, and mail spool file (in this case, /var/mail/jjones).
Besides the things the rmuser command just told you about, it also does some other
things. Those things include: removing the crontab, killing queued at jobs, killing all
processes, removing tmp files, and removing group memberships for the user. Here
are some other options for removing user accounts:
# rmuser -y jjones
Delete user account, answer yes to all questions
Removing user (jjones): mailspool home passwd.
# rmuser -v jjones
Provide much more verbose output when removing user
Matching password entry:
jjones:*:1009:1009::0:0:John W. Jones:/home/jjones:/bin/csh
Is this the entry you wish to remove? yes
Remove user’s home directory (/home/jjones)? yes
Removing crontab for (jjones):.
Removing at(1) jobs owned by (jjones): 0 removed
251
76034c14.qxd:Toolbox
3/29/08
10:55 AM
Page 252
Chapter 14: Locking Down Security
Removing IPC mechanisms
Terminating all processes owned by (jjones): -KILL signal sent to 3 processes.
Removing files owned by (jjones) in /tmp: 28 removed
Removing files owned by (jjones) in /var/tmp: 3 removed
Removing mail spool(s) for (jjones): /var/mail/jjones
Removing user (jjones) (including home directory) from system: Done.
Managing Passwords
Adding or changing a password is usually done quite simply with the passwd command. Besides passwd there are commands such as chfn and vipw (described earlier)
for working with user passwords.
Regular users can change only their own passwords, whereas the root user can change the
password for any user. For example:
$ passwd
Change a regular user’s own password
Changing local password for chris
Old Password: ********
New Password: *********
Retype New Password: *********
# passwd joseph
Root can change any user’s password
Changing local password for joseph
New Password: *******
Retype New Password: *******
In the first example, a regular user (chris) changes his own password. Even while
logged in, the user must type the current password before entering a new one. Unlike
other UNIX-like systems, however, passwd doesn’t prevent users from setting a password that is too short, based on a dictionary word, doesn’t have enough different
characters, or is otherwise easy to guess. So it is important that users choose good
passwords on their own.
The root user, in the second example, can change any user password without the old
password. Likewise, the root user can assign a short or easy-to-guess password, so
diligence should be exercised there as well in choosing a good password.
Passwords should be at least eight characters, a combination of letters and other characters (numbers, punctuation, and so on), and not include real words. As noted earlier
in this chapter, make passwords easy to remember but hard to guess.
Adding Groups
Each new user is assigned to one or more groups. You can create groups at any time
and add users to those groups. The permissions that each group has to use files and
directories in your BSD system depend on how the group permission bits are set on
each item. Assigning users to a group enables you to attach ownership to files, directories, and applications so that those users can work together on a project or have
common access to resources.
252
76034c14.qxd:Toolbox
3/29/08
10:55 AM
Page 253
Chapter 14: Locking Down Security
Although there are graphical tools for adding, removing, and modifying groups (such
as the Users and Groups window in GNOME), most administrators just manually
edit the /etc/group file to work with groups. The format of the /etc/group file is
like a shortened /etc/passwd file.
Here is a shortened version of the /etc/group file to illustrate a few different groups:
wheel:*:0:
tty:*:4:
operator:*:5:root
mail:*:6:
bin:*:7:
www:*:80:
nogroup:*:65533:
nobody:*:65534:
cups:*:193:
sales:*:1001:curt,mike,sally
wnelson:*:2001:
jbing:*:2002:mike,sally
The structure of the /etc/group file is group name, password (optional), group ID,
and users assigned to that group. Normally, the password field simply has an asterisk
(*) in it. Users are assigned to a group in a comma-separated list.
The group conventions with FreeBSD include starting regular user accounts at 1001 and
above. Accounts below 100 are administrative groups. Special groups, typically used
for mapping group permissions for users across network interfaces, include nogroup
(GID 65533) and nobody (GID 65534).
When you add a user with the adduser command, the default is to also create a
new group and assign the user’s name and ID to that group. This approach ensures
that less care needs to be taken when protecting the permissions of a file the user
creates. Other users can be added to a user’s group if they need to work on a project
together.
If you use any of the existing groups, the wheel group is the one you will most
likely be interested in. Adding a user to the wheel group is a common way to
provide root privilege to that user.
Keep in mind that removing a group or user doesn’t remove the files, directories,
devices or other items owned by that group or user. If you do a long listing (ls -l)
of a file or directory assigned to a user or group that was deleted, the UID or GID of
the deleted user or group is displayed, instead of a user or group name.
Checking on Users
After you have created user accounts, and let those users loose on your computer,
you can use several commands to keep track of how they are using your computer.
253
76034c14.qxd:Toolbox
3/29/08
10:55 AM
Page 254
Chapter 14: Locking Down Security
Commands for checking on user activity on your BSD system that are covered in other
chapters include the following:
❑ The find command to search the system for files anywhere on the system that are
owned by selected users (see Chapter 4).
❑ The du command to see how much disk space has been used in selected users’ home
directories (see Chapter 7).
❑ Commands such as fuser, ps, and top to find out which processes users are running (see Chapter 9).
Aside from the commands just mentioned, there are commands for checking such
things as who is logged into your system and getting general information about the
users with accounts on your system. Here are examples of commands for getting information about people logging into your system:
$ last
List the most recent successful logins
greek
ttyv3
Sun Oct 5 18:05
still logged in
chris
ttyv1
Sun Oct 4 13:39
still logged in
jjones
ttyp0
thompson
Sun Oct 5 14:02
still logged in
chris
ttyp3
:0.0
Sat Oct 4 15:47
still logged in
jim
ttyp0
10.0.0.50
Fri Oct 3 13:46 - 15:40 (01:53)
francois ttyp4
Thu Oct 2 11:14 - 13:38 (2+02:24)
$ last -h thompson
List logins from host computer thompson
julian
ttyp0
thompson
Mon Oct 6 12:28 - 12:28 (00:00)
morris
ttyp0
thompson
Tue Sep 31 13:08 - 13:08 (00:00)
baboon
ttyp0
thompson
Sun Sep 8 09:40 - 09:40 (00:00)
francois ttyp0
thompson
Fri Aug 22 17:23 - 17:23 (00:00)
$ who -u
List who is currently logged in (long form)
greek
ttyv3
Oct 13 18:05 17:24
jim
ttyp0
Oct 13 12:29
.
root
ttyp3
Oct 13 18:18 13:46
francois ttyp2
Oct 13 23:05 old
(:0.0)
chris
ttyp1
Oct 13 15:47 old
$ users
List who is currently logged in (short form)
chris francois greek jim root
With the last command, you can see when each user logged in (or opened a new shell)
and either how long they were logged in or a note that they are still logged in. The ttyv1
and ttyv3 terminal lines show users working from virtual terminals on the console. The
ttyp? lines indicate a person opening a shell from a remote computer (thompson) or
local X display (:0.0). The -h option to the last command lets you see who logged in
most recently from a particular host computer. The who -u and users commands show
information on currently logged-in users.
Here are some commands for finding out more about individual users on your system:
$ id
Your identity (UID, GID and group for current shell)
uid=1001(chris) gid=1001(chris) groups=0(wheel)
$ who am i
Your identity (user, tty, login date, location)
chris
ttyp2
Oct 3 2140 (:0.0)
254
76034c14.qxd:Toolbox
3/29/08
10:55 AM
Page 255
Chapter 14: Locking Down Security
NOTE If you were to log in as a regular user such as chris, then use su to get root
permission, the output of id and who would show different users. That’s because
id reflects the permission you switched to (root) and who shows the user who
logged in originally (chris).
$ finger -s chris
User information (short)
Login
Name
TTy
Idle
Login Time
Office
Office Phone
chris
Chris Negus p2
1d
Oct 4 13:39 A-111
555-1212
$ finger -l chris
User information (long)
Login: chris
Name: Chris Negus
Directory: /home/chris
Shell: /bin/bash
Office: A-111, 555-1212
Home Phone: 555-2323
On since Sat Oct 4 13:39 (CDT) on tty1
2 days idle
New mail received Mon Oct 6 13:46 2008 (CDT)
Unread since Sat Oct 4 09:32 2008 (CDT)
No Plan.
Besides displaying basic information about the user (login, name, home directory,
shell, and so on), the finger command will also display any information stored
in special files in the user’s home directory. For example, the contents of the user’s
~/.plan and ~/.project files, if those files exist, are displayed at the end of the
finger output. With a one-line .project file and multi-line .plan file, output
could appear as follows:
$ finger -l chris
User information (long, .project and .plan files)
...
Project:
My project is to take over the world.
Plan:
My grand plan is
to take over the world
by installing BSD on every computer
Securing Network Services
Even a computer system with all the security features in the world won’t be secure if
the system administrator doesn’t enable those features. Although some level of security is achieved in BSD systems by the fact that network services are not turned on or
even installed by default, some of the best ways of securing network services require
some extra work.
This section tells how to start various network services. Then it describes ways of configuring and securing those services.
In FreeBSD, most network services are secured by adding settings to configuration files
in the /etc directory and by configuring how the network services start. Network services that start when you boot your computer do so based primarily on two features:
❑ /etc/rc.d/ scripts: Most network services are handled by daemon processes (such
as sshd, named, and nfsd). However, those services are actually launched from
255
76034c14.qxd:Toolbox
3/29/08
10:55 AM
Page 256
Chapter 14: Locking Down Security
scripts in the /etc/rc.d directory. Those scripts can be run with simple arguments,
such as start, stop, or restart in order to get the services they provide running.
❑ rc.conf files: When and how each of the rc.d scripts runs is determined by
entries in rc.conf files. The /etc/defaults/rc.conf file contains the default
setting of available services. However, it also holds tons of commented lines that
can be uncommented and modified to configure and launch the service scripts in
the /etc/rc.d directory. To change how services start from the default, you can
create an /etc/rc.conf file, then copy and uncomment entries from the original
rc.conf file.
When FreeBSD and other BSD systems boot up, the rc.conf files are read and the
appropriate services (with appropriate settings) are started. The rest of this section is
devoted to showing you entries you can add to your /etc/rc.conf file to start and
secure a variety of network services. (Refer to Chapter 12 for some basic ways of
enabling NFS and Samba network services.)
WARNING! If you make a mistake in your /etc/rc.conf file, it is possible for
that mistake to keep your system from booting completely. Be very careful editing
your /etc/rc.conf file (and have a rescue disk handy just in case).
The examples below are taken from the Network Configuration Sub-Section of the
/etc/defaults/rc.conf file. By adding the following settings to your own /etc/
rc.conf file, you can enable the services described. To start the service immediately, run the
related startup script. For example:
# /etc/rc.d/ftpd start
Start the FTP service after it has been enabled
The start-up script usually starts a service daemon (ftpd in this case). Examples in
the sections below show how the resulting service daemons are run after you add
different flags to the /etc/rc.conf file.
❑ Syslog Daemon (syslogd): Add these settings to /etc/rc.conf to configure
syslogd to start at boot time:
syslogd_enable=”YES”
# Run syslog daemon (or NO).
syslogd_program=”/usr/sbin/syslogd” # path to syslogd,
syslogd_flags=”-s”
# Flags to syslogd (if enabled).
By specifying other options in quotes with syslogd_flags, you can change how
the syslogd daemon operates. The following illustrates resulting syslogd command lines:
# /usr/sbin/syslogd -s
Default. Only log local messages (secure mode)
# /usr/sbin/syslogd -4
Log data only on IPv4 addresses
# /usr/sbin/syslogd -a 192.168.0.5/24
Let syslogd take datagrams from 192.168.0.5
# /usr/sbin/syslogd -b 192.168.0.1/24
Have syslogd bind to address 192.168.0.1
# /usr/sbin/syslogd -d
syslogd in debug mode (look if syslogd is broken)
# /usr/sbin/syslogd -m 10
Change mark message from 20 to 10 minutes
256
76034c14.qxd:Toolbox
3/29/08
10:55 AM
Page 257
Chapter 14: Locking Down Security
For more information on syslogd, see the description of system logs later in this
chapter.
❑ Internet Super Server Daemon (inetd): Add these settings to /etc/rc.conf to
configure the inetd super server. If inetd_enable=”YES” is set, the inetd daemon
starts at boot time to listen for requests for a variety of services (many of which are
legacy UNIX services, though others can be enabled here as well). Individual services (such as rlogind, tftp, or bootpd) can be enabled by removing the comment
in front of that service in the /etc/inetd.conf file):
inetd_enable=”YES”
inetd_program=”/usr/sbin/inetd”
inetd_flags=”-wW -C 60”
# Run the network daemon dispatcher (YES/NO).
# Path to inetd, if you want a different one.
# Optional flags to inetd
By specifying other options in quotes with inetd_flags you can change how the
inetd daemon operates. The following illustrates resulting inetd command lines:
# /usr/sbin/inetd -wW -C 60
Default. Use TCP wrappers for internal/external
Service can be invoked only 60 times from IP addr
# /usr/sbin/inetd -wW -C 60 -R 128
Limit number of times service
can be invoked in one minute to 128
# /usr/sbin/inetd -wW -a 192.168.0.1 Bind to a specific IP address
# /usr/sbin/inetd -wW -o Linux Report system as Linux, to confuse intruders
❑ Domain Name System service (named): Add these settings to /etc/rc.conf to
configure the named service, so your system can act as a DNS server. Some of the
named settings shown here are on by default, but are here for your information.
If named_enable=”YES” is set, the named daemon starts at boot time to listen for
requests for DNS service:
named_enable=”YES”
named_program=”/usr/sbin/named”
#named_flags=””
named_pidfile=”/var/run/named/pid”
named_uid=”bind”
named_chrootdir=”/var/named”
named_chroot_autoupdate=”YES”
named_symlink_enable=”YES”
#
#
#
#
#
#
#
#
#
Run named, the DNS server (or NO)
Path to named, if you want a different one
Flags for named
Must set this in named.conf as well
User to run named as
Chroot directory (or “” not to auto-chroot)
Automatically install/update chrooted
components of named. See /etc/rc.d/named
Symlink the chrooted pid file
DNS service is a complex and potentially dangerous (from a security standpoint)
service to enable. One thing to note from a security standpoint is that named is run
in a chroot environment (/var/named) by default. This makes it more secure than
other services by the fact that, if the service is cracked, the intruder cannot necessarily access other services from the same location.
The service must be configured using files in the /var/named/etc/namedb directory (starting with named.conf). Whole books are written on the proper setup and
maintenance of DNS service. For our purposes (commands, silly), we’ll just show
you a few different ways of running the named daemon which result from uncommenting and adding options to the named_flags entry:
# /usr/sbin/named -p 34690
# /usr/sbin/named -v
Run named on alternate port (not default 53)
Just report version of named and exit
257
76034c14.qxd:Toolbox
3/29/08
10:55 AM
Page 258
Chapter 14: Locking Down Security
BIND 9.3.3
# /usr/sbin/named -4
# /usr/sbin/named -6
# /usr/sbin/named -n 3
Only use IPv4 protocols
Only use IPv6 protocols
Tell named to use 3 CPUs, creating one thread each
❑ Secure Shell service (sshd): The Secure Shell service is one that is often enabled
in BSD and other UNIX-like systems. There are many ways to use the SSH service
(see Chapter 13 for details). However, to enable SSH you need only set the ssh_
enable=”YES” entry. Here are values associated with the SSH service that you
can add to the /etc/rc.conf file:
sshd_enable=”YES”
sshd_program=”/usr/sbin/sshd”
sshd_flags=””
# Enable sshd
# Path to sshd, if you want a different one
# Additional flags for sshd.
To configure the sshd service, you need to modify files in the /etc/ssh directory
(particularly the sshd_config file). By specifying other options in quotes with
sshd_flags you can change how the sshd daemon operates. The following illustrates resulting sshd command lines:
# /usr/sbin/sshd -f /root/my_cfg Specify new sshd_config file (to test)
# /usr/sbin/sshd -g 60
Change client login time from 120 to 60 secs
# /usr/sbin/sshd -p 53943
Change listening port to 53943 (for security)
❑ File Transfer Protocol service (ftpd): The FTP service is one of the oldest, and still
active, services for sharing files over the Internet or other network. To enable FTP
service you need only set the ftpd_enable=”YES” entry. Here are values associated with the FTP service that you can add to the /etc/rc.conf file:
ftpd_enable=”YES”
ftpd_program=”/usr/libexec/ftpd”
ftpd_flags=””
# Enable stand-alone ftpd.
# Path to ftpd, if you want a different one
# Additional flags to stand-alone ftpd
Several files in the /etc directory control access to the FTP service: ftpusers,
ftpchroot, ftphosts, ftpwelcome, and ftpmotd. By specifying options in
quotes with ftpd_flags you can change how the ftpd daemon operates. The
following illustrate resulting ftpd command lines:
#
#
#
#
/usr/sbin/ftpd
/usr/sbin/ftpd
/usr/sbin/ftpd
/usr/sbin/ftpd
-D
Default. Run ftpd as a daemon process
-D -A
Only allow anonymous access to FTP service
-D -A -m
Let anonymous user write files (given file perms)
-D -a example.com
Listen for FTP requests to example.com
Another service you can configure from the /etc/rc.conf file is your BSD firewall.
Configuring firewalls, however, requires more explanation. Read on.
Configuring the Built-In Firewall
A firewall is a critical tool for keeping your computer safe from intruders over the
Internet or other network. It can protect your computer by checking every packet of
258
76034c14.qxd:Toolbox
3/29/08
10:55 AM
Page 259
Chapter 14: Locking Down Security
data that comes to your computer’s network interfaces, then making a decision about
what to do with that packet based on the parameters you set.
Three firewall facilities are built into FreeBSD: IPFILTER, IPFIREWALL, and PacketFilter.
This section focuses on the IPFILTER firewall features. There are ports of IPFILTER available not only on FreeBSD, but also on NetBSD and OpenBSD. You can learn more about
IPFILTER from the official FAQ: www.phildev.net/ipf.
When you build a firewall, there are a few things you should think about. If possible,
work from the console terminal, because as you develop your firewall rules it’s possible that you might lock yourself out by mistake. In your rules, be sure to handle loopback (lo and 127.0.0.0 interface) situations.
To enable IPFILTER firewall, add the following settings to the /etc/rc.conf file, create a
rules file, and start the firewall. Here’s an example of settings to add to the /etc/rc.conf file:
firewall_enable=”YES”
firewall_type=”/etc/ipf.rules”
firewall_logging=”YES”
firewall_script=”/etc/rc.firewall”
firewall_quiet=”NO”
firewall_flags=””
#
#
#
#
#
#
Set to YES to enable firewall functionality
Use /etc/ipf.rules for firewall rules
Set to YES to enable events logging
Which script to run to set up the firewall
Set to YES to suppress rule display
Flags passed to ipfw when type is a file
ipfilter_enable=”YES”
ipfilter_program=”/sbin/ipf”
ipfilter_rules=”/etc/ipf.rules”
#
#
#
#
#
Set to YES to enable ipfilter functionality
Where the ipfilter program lives
Rules definition file for ipfilter, see
/usr/src/contrib/ipfilter/rules for example
Additional flags for ipfilter
ipfilter_flags=””
Note that firewall_enable, firewall_logging, and ipfilter_enable are all set
to YES. The next important thing to notice is that the /etc/ipf.rules file is where
the rules that define how your firewall behaves are stored. Here is an example of a set
of firewall rules added to the /etc/ipf.rules file:
add
add
add
add
add
add
add
add
add
add
add
add
add
add
add
add
add
allow all from any to any via lo0
allow all from any to 127.0.0.0/8
allow all from 127.0.0.0/8 to any
check-state
allow tcp from any to any established
allow all from any to any out keep-state
allow icmp from any to any
allow tcp from any to any 22 setup keep-state
allow tcp from any to any 25 setup keep-state
allow tcp from any to any 53 setup keep-state
allow udp from any to any 53 keep-state
allow tcp from any to any 80 setup keep-state
allow tcp from any to any 110 setup keep-state
allow tcp from any to any 123 setup keep-state
allow udp from any to any 123 setup keep-state
allow tcp from any to any 143 setup keep-state
deny log all from any to any
259
76034c14.qxd:Toolbox
3/29/08
10:55 AM
Page 260
Chapter 14: Locking Down Security
The first three lines above allow whatever you want to do from the local system (lo0
and 127.0.0.1). The check-state option causes packets to be checked against the dynamic
ruleset. The next two lines allow packets from established connections and keep-state
state. The icmp line allows other computers to ping your computer.
The rest of the lines have to do with packets that request services from your system. This
machine allows connections to requests for SSH (port 22), SMTP mail (port 25), DNS
service (port 53), web service (port 80), Post Office Protocol v3 (port 110), and IMAP mail
v2 (143). The last line says to log services from any other ports that are denied.
To get the firewall settings in rc.conf working and the firewall rules in ipf.rules,
you need to start the ipfw firewall service. Here’s how to do that:
# /etc/rc.d/ipfw start
Starts the ipfw firewall service
Flushed all rules.
Starting divert daemons:Flushed all rules.
00100 allow ip from any to any via lo0
00200 allow ip from any to 127.0.0.0/8
00300 allow ip from 127.0.0.0/8 to any
00400 check-state
00500 allow tcp from any to any established
00600 allow ip from any to any out keep-state
00700 allow icmp from any to any
00800 allow tcp from any to any dst-port 22 setup keep-state
00900 allow tcp from any to any dst-port 25 setup keep-state
01000 allow tcp from any to any dst-port 53 setup keep-state
01100 allow udp from any to any dst-port 53 keep-state
01200 allow tcp from any to any dst-port 80 setup keep-state
01300 allow tcp from any to any dst-port 110 setup keep-state
01400 allow tcp from any to any dst-port 123 setup keep-state
01500 allow udp from any to any dst-port 123 setup keep-state
01600 allow tcp from any to any dst-port 143 setup keep-state
01700 deny log ip from any to any
Firewall rules loaded.
Firewall logging enabled
net.inet.ip.fw.enable: 0 -> 1
Once you have a working firewall, which you should at this point, you can use a variety of IPFILTER commands to work with that firewall. Keep in mind that changes you
make to the firewall live will be lost at the next reboot if you don’t save those changes.
So, in general, it’s best to make rule changes to the ipf.rules file and simply restart
the service to test them out.
Here are some commands for checking out the state of your firewall:
# ipfw list
List the current set of firewall rules
00100 allow ip from any to any via lo0
00200 allow ip from any to 127.0.0.0/8
...
260
76034c14.qxd:Toolbox
3/29/08
10:55 AM
Page 261
Chapter 14: Locking Down Security
# ipfw show
Show statistics for each matching packet rule
# ipfw -at list List the current rules with statistics and timestamps
# ipfw zero
Zeros the counters so you can start with fresh statistics
If you want to add a rule directly to the firewall (until the next reboot), you can run
the ipfw command directly with the add option. You should choose a rule number
that is appropriate for the type of rule.
# ipfw -q add 1550 allow tcp from any to 21 setup keep-state
Allow outside connections to FTP service (port 21)
# ipfw -q delete 1550 Delete rule number 1550
There are many other features in ipfw for setting up and working with firewall rules.
Refer to the ipfw man page for details.
Working with System Logs
Most BSD systems are configured to log many of the activities that occur on those systems. Those activities are then written to log files located in the /var/log directory or
its subdirectories. This logging is done by the Syslog facility.
FreeBSD uses the syslogd (system log daemon) as part of the basic installed system to
manage system logging. That daemon is started automatically from the syslogd initialization script (/etc/rc.d/syslogd). Information about system activities is then directed
to files in the /var/log directory such as messages, security, cron, auth.log, and
others, based on settings in the /etc/syslog.conf file.
You can check any of the log files manually (using vi or another favorite text editor).
You can send your own messages to the syslogd logging facility using the logger command.
Here are a couple of examples:
# logger Added new video card
# logger -p warn -t CARD -f /tmp/my.txt
Message added to messages file
Priority, tag, message file
In the first example, the words Added new video card are sent to the messages file. In
the second example, priority of the message is set to info and a tag of CARD is added
to each line in the message. The message text is taken from the /tmp/my.txt file that
I created before running the command. To see these log entries in real time, use tail
–f or less as described in Chapter 5.
Using Advanced Security Features
A dozen or so pages covering security-related commands are not nearly enough to
address the depth of security tools available to you as a BSD system administrator.
261
76034c14.qxd:Toolbox
3/29/08
10:55 AM
Page 262
Chapter 14: Locking Down Security
Beyond the commands covered in this chapter, here are descriptions of some features
you may want to look into to further secure your BSD system:
❑ Central logging: If you’re managing more than a couple of BSD servers, it becomes
preferable to have all your systems log to a central syslog server. When you implement your syslog server, you may want to explore using syslog-ng. (As root, type
pkg_add -r syslog-ng).
❑ Tripwire: Using the tripwire package, you can take a snapshot of all the files on
your system, then later use that snapshot to find if any of those files have been
changed. This is particularly useful to find out if any applications have been modified that should not have been. First, you take a baseline of your system file. Then
at regular intervals, you run a tripwire integrity check to see if any of your applications or configuration files have been modified.
❑ chkrootkit: If you suspect your system has been compromised, download and build
chkrootkit from www.chkrootkit.org . To install it in FreeBSD, type pkg_add -r
chkrootkit. This will help you detect rootkits that may have been used to take over
your machine. We recommend you run chkrootkit from a LiveCD or after mounting
the suspected drive on a clean system.
Summary
Although there are many tools available for securing your BSD system, the first line
of security starts with securing the user accounts on your system and the services that
run on your system. Commands such as adduser, rmuser, and passwd are standard
tools for setting up user and group accounts.
Because most serious security breaches outside your organization can come from intruders accessing your systems on public networks, setting up secure firewalls is important
for any system connected to the Internet. The ipfw facility is one of several facilities in
FreeBSD that provides the firewall features you can configure to meet your needs.
To keep track of activities on your system, the Syslog facility logs information about
nearly every aspect of the actions that take place on your system. There are also many
other software packages you can add to help check the security of your system, such
as chkrootkit and tripwire.
262
76034bapp01.qxd:Toolbox
3/29/08
11:15 AM
Page 263
Using vi or Vim Editors
Although easy-to-use graphical text editors (such
as gedit and kedit) are readily available with
BSD systems, most power users still use vi or
Emacs to edit text files. Besides the fact that vi
and Emacs will work from any shell (no GUI
required), they offer other advantages such as
your hands never having to leave the keyboard
and integration with useful utilities. And unlike
GUI editors, text-based editors are usable over
slow Internet connections such as dial-up or
satellite.
IN THIS APPENDIX
Using the vi editor
Starting/quitting the
vi editor
Moving around in vi
Changing and
deleting text
Using Ex commands
This appendix focuses on features of the vi editor
Using visual mode
that can not only help you with basic editing, but
also help you do some advanced text manipulation. We chose to cover vi rather than Emacs
because vi is more universal and leaner, and also because vi keyboard shortcuts only require two arms. Because some UNIX-like systems use the Vim
(Vi IMproved) editor in the place of the older vi editor, the descriptions
in this appendix are extended to cover Vim as well. Some features in Vim
that are not in vi include multiple undo levels, syntax highlighting, and
online help.
NOTE If you have never used vi or Vim before, try out the tutor
that comes with the vim6 package. Run the vimtutor command
and follow the instructions to step through many of the key features
of vi and Vim. To see the differences between vi and Vim, type :help
vi_diff.txt while running the vim command. To install the vim6
package, type the following as root user: pkg_add -r vim6.
Depending on how your vim6 package was built, you may or may not get
all the latest vim features working at first. In many cases, the compatible
option is on, which causes conflicting behaviors between vi and vim to
behave like vi (see the text on undo later in this appendix). To turn on the
latest vim features type :set incompatible while editing with vim or
add this to your ~/.vimrc file:
set incompatible
76034bapp01.qxd:Toolbox
3/29/08
11:15 AM
Page 264
Appendix A: Using vi or Vim Editors
Starting and Quitting the vi Editor
If you want to experiment with using vi, you should copy a text file to practice on.
For example, type:
$ cp /etc/services /tmp
Then open that file using the vi command as follows:
$ vi /tmp/services
To benefit from all the improvements of Vim, make sure you have the FreeBSD vim6
package installed. On many systems, vi is aliased to the vim command. You may want
to double-check that, using the alias command. If you want to use vim directly, type
/usr/local/bin/vim. If you specifically want to use the older-style vi command,
use the full path to the vi command instead:
/bin/vi /tmp/text.txt
Here are a few other ways you can start vi:
$
$
$
$
$
vi +25 /tmp/services
vi + /tmp/services
vi +/tty /tmp/services
vi -r /tmp/services
view /tmp/services
Begin on line 25
Begin editing file on the last line
Begin on first line with word “tty”
Recover file from crashed edit session
Edit file in read-only mode
When you are done with your vi session, you have several different ways to save and
quit. To save the file before you are ready to quit, type :w. To quit and save changes, type either ZZ
or :wq. To quit without saving changes, type :q!. If you find that you can’t write to the file
you are editing, it may be opened in read-only mode. If that’s the case, you can try
forcing a write by typing :w! or you can save the contents of the file to a different name. For
example, type the following to save the contents of the current file to a file named
myfile.txt:
:w /tmp/myfile.txt
NOTE It’s important to understand that :w writes the current file out to another file.
So if you continue editing, you are still editing the original file. In the example above,
if you started editing the services file, then wrote the contents to myfile.txt, to
continue editing myfile.txt you would have to change to it by typing the following: :e /tmp/myfile.txt.
The vi editor also enables you to line up several files at a time to edit. For example, type:
$ cd /tmp
$ touch a.txt b.txt c.txt
$ vi a.txt b.txt c.txt
264
76034bapp01.qxd:Toolbox
3/29/08
11:15 AM
Page 265
Appendix A: Using vi or Vim Editors
In this example, vi will open the a.txt file first. You can move to the next file by typing
:n. You may want to save changes before moving to the next file (:w) or save changes as you move
to the next file (:wn). To abandon changes while moving to the next file, type :n!. To go back to the
previous file, type :prev.
You will probably find it easier to open multiple files using the vim feature for splitting
your screen. When you’re in vim and have a file open, you can split your screen multiple
times either horizontally or vertically:
:split /etc/services
:vsplit /etc/hosts
Use <Tab> to complete the path to the files, just as you would in a bash shell. To navigate between split windows, press Ctrl+W, followed by the W key. To close the current window, use the usual vim exit command (:q).
Moving Around in vi
The first thing to get used to with vi is that you can’t just start typing. Vi has multiple
modes that enable you to perform a different set of tasks. You start a vi session in
normal mode, where vi is waiting for you to type a command to get started. While
you are in normal mode, you can move around the file, to position where you want to
be in the file. To enter or modify text, you need to go into insert or replace modes.
Assuming vi is open with a file that contains several pages of text, Table A-1 shows
some keys and combinations you can type to move around the file while in normal mode.
Table A-1: Keystroke Commands for Moving Around
Key
Result
Key
Result
PageDown
or Ctrl+f
Move down one page
PageUp or
Ctrl+b
Move up one page
Ctrl+d
Move down half page
Ctrl+u
Move up half page
G
Go to last line of file
:1
Go to first line of file (use any
number to go to that line)
H
Move cursor to screen top
L
Move cursor to screen bottom
M
Move cursor to middle of
screen
Ctrl+L
Redraw screen (if garbled)
Enter
Move cursor to beginning
of the next line
-
Move cursor to beginning of
the previous line
Continued
265
76034bapp01.qxd:Toolbox
3/29/08
11:15 AM
Page 266
Appendix A: Using vi or Vim Editors
Table A-1: Keystroke Commands for Moving Around (continued)
Key
Result
Key
Result
End or $
Move cursor to end of line
Home or ^
or 0
Move cursor to line beginning
(
Move cursor to beginning
of previous sentence
)
Move cursor to beginning of
next sentence
{
Move cursor to beginning
of previous paragraph
}
Move cursor to beginning of
next paragraph
w
Move cursor to next
word (space, new line or
punctuation)
W
Move cursor to next word
(space or new line)
b
Move cursor to previous
word (space, new line or
punctuation)
B
Move cursor to previous
word (space or new line)
e
Move cursor to end of next
word (space, new line or
punctuation)
E
Move cursor to end of next
word (space or new line)
Left arrow
or
Backspace
or h
Move cursor left one letter
Right arrow
or l
Move cursor right one letter
k or up
arrow
Move cursor up one line
j or down
arrow
Move cursor down one line
/string
Find next occurrence of
string
?string
Find previous occurrence of
string
n or /
Find same string again
(forward)
N or ?
Find same string again
(backwards)
Changing and Deleting Text in vi
To begin changing or adding to text with vi, you can enter insert or replace modes, as
shown in Table A-2. When you enter insert or replace mode, the characters you type
will appear in the text document (as opposed to being interpreted as commands).
Press the Esc key to exit to normal mode after you are done inserting or replacing text.
266
76034bapp01.qxd:Toolbox
3/29/08
11:15 AM
Page 267
Appendix A: Using vi or Vim Editors
Table A-2: Commands for Changing Text
Key
Result
Key
Result
i
Typed text appears before
current character
I
Typed text appears at the
beginning of current line
a
Typed text appears after
current character
A
Typed text appears at the end
of current line
o
Open a new line below current line to begin typing
O
Open a new line above current line to begin typing
s
Erase current character and
replace with new text
S
Erase current line and enter
new text
c?
Replace ? with l, w, $, c to
change the current letter,
word, end of line or line
C
Erase from cursor to end of
line and enter new text.
r
Replace current character
with the next one you type
R
Overwrite as you type
from current character
going forward
Table A-3 contains keys you type to delete or paste text.
Table A-3: Commands for Deleting and Pasting Text
Key
Result
Key
Result
x
Delete character under
cursor
X
Delete character to left of
cursor
d?
Replace ? with l, w, $, d to
cut the current letter, word,
end of line from cursor or
entire line
D
Cut from cursor to end of line
y?
Replace ? with l, w, $ to
copy (yank) the current
letter, word, or end of line
from cursor
Y
Yank current line
p
Pastes cut or yanked text
after cursor
P
Pastes cut or yanked text
before cursor
267
76034bapp01.qxd:Toolbox
3/29/08
11:16 AM
Page 268
Appendix A: Using vi or Vim Editors
Using Miscellaneous Commands
Table A-4 shows a few miscellaneous, but important, commands you should know.
Table A-4: Miscellaneous Commands
Key
Result
u
Type u to undo the previous change. Multiple u commands toggles the previous
undo on and off. (In vim, typing :set nocompatible will allow multi-level
undos. Use Ctrl-r to undo your undos.)
.
Typing a period (.) will repeat the previous command. So, if you deleted a line,
replaced a word, changed four letters, and so on, the same command will be done
wherever the cursor is currently located. (Entering input mode again resets it.)
J
Join the current line with the next line.
Esc
If you didn’t catch this earlier, the Esc key returns you from an input mode back
to command mode. This is one of the keys you will use most often.
Modifying Commands with Numbers
Nearly every command described so far can be modified with a number. In other words,
instead of deleting a word, replacing a letter or changing a line, you can delete six words,
replace 12 letters and change nine lines. Table A-5 shows some examples.
Table A-5: Modifying Commands with Numbers
268
Command
Result
7cw
Erase the next seven words and replace them with text you type.
d5d
Cut the next five lines (including the current line).
3p
Paste the previously deleted text three times after the current cursor.
9db
Cut the nine words before the current cursor.
10j
Move the cursor down 10 lines.
y2)
Copy (yank) text from cursor to end of next two sentences.
5Ctrl+F
Move forward five pages.
6J
Join together the next six lines.
76034bapp01.qxd:Toolbox
3/29/08
11:16 AM
Page 269
Appendix A: Using vi or Vim Editors
From these examples, you can see that most vi keystrokes for changing text, deleting
text, or moving around in the file can be modified using numbers.
Using Ex Commands
The vi editor was originally built on an editor called Ex. Some of the vi commands
you’ve seen so far start with a semicolon and are known as Ex commands. To enter
Ex commands, start from normal mode and type a semicolon (:). This switches you
to command line mode. In this mode, you can use the Tab key to complete your
command or file name, and the arrow keys to navigate your command history, as
you would in a bash shell. When you press Enter at the end of your command, you
are returned to normal mode.
Table A-6 shows some examples of Ex commands.
Table A-6: Ex Command Examples
Command
Result
:!bash
Escape to a bash shell. When you are done, type exit to
return to vi.
:!date
Run date (or any command you choose). Press Enter to
return.
:!!
Rerun the command previously run.
:20
Go to line 20 in the file.
:5,10w abc.txt
Write lines 5 through 10 to the file abc.txt.
:e abc.txt
Leave the current file and begin editing the file abc.txt.
:.r def.txt
Read the contents of def.txt into the file below the
current line.
:s/UNIX/FreeBSD
Substitute FreeBSD for the first occurrence of UNIX on
the current line.
:s/UNIX/FreeBSD/g
Substitute FreeBSD for all occurrences of UNIX on the
current line.
:%s/UNIX/FreeBSD/g
Substitute FreeBSD for the all occurrences of UNIX in the
entire file.
:g/FreeBSD /p
List every line in the file that contains the string FreeBSD.
:g/gaim/s//pidgin/gp
Find every instance of gaim and change it to pidgin.
269
76034bapp01.qxd:Toolbox
3/29/08
11:16 AM
Page 270
Appendix A: Using vi or Vim Editors
From the ex prompt you can also see and change settings related to your vi session
using the set command. Table A-7 shows some examples.
Table A-7: set Commands in ex Mode
Command
Result
:set all
List all settings.
:set
List only those settings that have changed from the default.
:set number
Have line numbers appear left of each line. (Use set nonu to unset.)
:set ai
Sets autoindent, so opening a new line follows the previous indent.
:set ic
Sets ignore case, so text searches will match regardless of case.
:set list
Show $ for end of lines and ^I for tabs.
:set wm
Causes vi to add line breaks between words near the end of a line.
Working in Visual Mode
The Vim editor provides a more intuitive means of selecting text called visual mode. To
begin visual mode, move the cursor to the first character of the text you want to select
and press the v key.
At this point, you can use any of your cursor movement keys (arrow keys, Page Down,
End, and so on) to move the cursor to the end of the text you want to select. As the page
and cursor move, you will see text being highlighted. When all the text you want to
select is highlighted, you can press keys to act on that text. For example, d deletes the
text, c lets you change the selected text, :w /tmp/test.txt saves selected text to a
file, and so on.
Summary
The vi command is one of the most popular text editors used for FreeBSD and UNIX
systems. Using keystrokes, you go back and forth between command mode (where you
can move around the file) and insert or replace modes. For a vi that is more advanced,
you can use the vim command. Using ex mode, you can read and write text from files,
do complex search and replace commands, and temporarily exit to a shell or other
command.
270
76034bapp02.qxd:Toolbox
3/29/08
10:57 AM
Page 271
Shell Special Characters
and Variables
BSD systems offer several different shells you can
use to enter commands and run scripts. Chapter 3
helps you become comfortable working in the
shell. This appendix provides a reference of the
numerous characters and variables that have
special meaning to particular shells (such as the
bash shell) or are available on most shells. Many
of those elements are referenced in Table B-1
(Shell Special Characters) and Table B-2 (Shell
Environment Variables).
IN THIS APPENDIX
Using special shell
characters
Using shell variables
Using Special Shell Characters
You can use special characters from the shell to match multiple files, save
some keystrokes, or perform special operations. Table B-1 shows some
shell special characters that you may find useful.
Table B-1: Shell Special Characters
Character
Description
*
Match any string of characters.
?
Match any one character.
[ ... ]
Match any character enclosed in the braces.
‘ ... ‘
Remove special meaning of characters between quotes.
Variables are not expanded.
“ ... “
Same as simple quotes except for the escape characters
($ ` and \ ) that preserve their special meaning.
Continued
76034bapp02.qxd:Toolbox
3/29/08
10:57 AM
Page 272
Appendix B: Shell Special Characters and Variables
Table B-1: Shell Special Characters (continued)
Character
Description
\
Escape character to remove the special meaning of the character that
follows.
~
Refers to the $HOME directory.
~+
Value of the shell variable PWD or working directory (bash only).
~-
Refers to the previous working directory (bash only).
.
Refers to the current working directory.
..
Refers to the directory above the current directory. Can be used
repeatedly to reference several directories up.
$param
Used to expand a shell variable parameter.
cmd1 `cmd2`
cmd2 is executed first. Then the call to cmd2 is substituted with the
output of cmd2 and cmd1 is executed.
or
cmd1 $(cmd2)
cmd1 >
Redirects standard output from command.
cmd1 <
Redirects standard input to command.
cmd1 >>
Append standard output to file from command, without erasing its
current contents.
cmd1 | cmd2
Pipe the output of one command to the input of the next.
cmd &
Run the command in the background.
cmd1 && cmd2
Run first command, then, if it returns a zero exit status, run the second
command.
cmd1 || cmd2
Run first command, then, if it returns a non-zero exit status, run the
second command.
cmd1 ; cmd2
Run the first command and, when it completes, run the second.
Using Shell Variables
You identify a string of characters as a parameter (variable) by placing a $ in front of
it (as in $HOME). Shell environment variables can hold information that is used by the
shell itself, as well as by commands you run from the shell. Not all environment variables will be populated by default. Some of these variables you can change (such as
272
76034bapp02.qxd:Toolbox
3/29/08
10:57 AM
Page 273
Appendix B: Shell Special Characters and Variables
the default printer in $PRINTER or your command prompt in $PS1). Others are managed
by the shell (such as $OLDPWD). Table B-2 contains a list of many useful shell variables.
Table B-2: Shell Variables
Shell Variable
Description
BASH
Shows path name of the bash command (/bin/bash).
BASH_COMMAND
The command that is being executed at the moment.
BASH_VERSION
The version number of the bash command.
COLUMNS
The width of the terminal line (in characters).
DISPLAY
Identifies the X display where commands launched from the current
shell will be displayed (such as :0.0). Can be a display on a remote
host (such as example.com:0.0).
EUID
Effective user ID number of the current user. It is based on the user
entry in /etc/passwd for the user that is logged in.
FCEDIT
Determines the text editor used by the fc command to edit history
commands. The vi command is used by default.
GROUPS
Lists primary group of which current user is a member.
HISTCMD
Shows the current command’s history number.
HISTFILE
Shows the location of your history file (usually located at
$HOME/.bash_history).
HISTFILESIZE
Total number of history entries that will be stored (default, 1000).
Older commands are discarded after this number is reached.
HOME
Location of the current user’s home directory. Typing the cd command with no options returns the shell to the home directory.
HOSTNAME
The current machine’s hostname.
HOSTTYPE
Contains the computer architecture on which the BSD system is running (i386, i486, i586, i686, x86_64, ppc, or ppc64).
LESSOPEN
Set to a command that converts content other than plain text (images,
zip files and so on) so it can be piped through the less command.
LINES
Sets the number of lines in the current terminal.
LOGNAME
Holds the name of the current user.
Continued
273
76034bapp02.qxd:Toolbox
3/29/08
10:57 AM
Page 274
Appendix B: Shell Special Characters and Variables
Table B-2: Shell Variables (continued)
274
Shell Variable
Description
MACHTYPE
Displays information about the machine architecture, company and
operating system (such as i686-portbld-freebsd6.2).
MAIL
Indicates the location of your mailbox file (typically the user name
in the /var/mail directory).
MAILCHECK
Checks for mail in the number of seconds specified (default is 60).
OLDPWD
Directory that was the working directory before changing to the current working directory.
OSTYPE
Name identifying the current operating system (such as freebsd6.2).
PAGER
The program to use for man page display.
PATH
Colon-separated list of directories used to locate commands that you
type (/bin, /usr/bin, and $HOME/bin are usually in the PATH).
PPID
Process ID of the command that started the current shell.
PRINTER
Sets the default printer, which is used by printing commands such
as lpr and lpq.
PROMPT_COMMAND
Set to a command name to run that command each time before your
shell prompt is displayed. (For example, PROMPT_COMMAND=ls
lists commands in current directory before showing the prompt.)
PS1
Sets the shell prompt. Items in the prompt can include date, time,
user name, hostname, and others. Additional prompts can be set
with PS2, PS3, and so on.
PWD
The directory assigned as your current directory.
RANDOM
Accessing this variable generates a random number between 0 and
32767.
SECONDS
The number of seconds since the shell was started.
SHELL
Contains the full path to the current shell.
SHELLOPTS
Lists enabled shell options (those set to on).
SHLVL
Lists the shell levels associated with the current shell session.
TERM
Indicates the type of shell terminal window you are using. The
default is xterm.
76034bapp02.qxd:Toolbox
3/29/08
10:57 AM
Page 275
Appendix B: Shell Special Characters and Variables
Table B-2: Shell Variables (continued)
Shell Variable
Description
TMOUT
Set to a number representing the number of seconds the shell can be
idle without receiving input. After the number of seconds is
reached, the shell exits.
UID
The user ID number assigned to the current user name. The user ID
number is stored in the /etc/password file.
USER
The current user name.
275
76034bapp02.qxd:Toolbox
3/29/08
10:57 AM
Page 276
76034bapp03.qxd:Toolbox
3/29/08
10:58 AM
Page 277
Personal
Configuration Files
In the home directory for every user account is a
set of files and directories containing personal
settings for that account. Because most configuration files and directories begin with a dot (.), you
don’t see them if you open a folder window to
your home directory. Likewise, you typically
need the -a option to ls to see those files when
you list directory contents.
This appendix describes many of the dot files each
user can work with on a BSD system. After creating
configuration files you like, you can, when appropriate, do such things as save them to /usr/share/
skel (so every new user gets them) or save them if
the user account moves to another machine.
IN THIS APPENDIX
Shell configuration files
Browser and e-mail
configuration files
Desktop configuration
files
Network services
configuration files
Music player configuration files
NOTE Some of the files described in this appendix won’t exist until
you either start the application associated with the files or create the
files manually.
Bash shell files: Home directory files for storing and changing bash
settings include:
❑ .bash_profile: Commands added to this file are executed when you
invoke bash as a login shell or use bash as your default shell.
❑ .bashrc: Commands added to this file are executed when you start a
bash shell which is not a login shell, and your default shell is not bash.
(To have .bashrc sourced on login when your default shell is set
to bash, add the following line to your .bash_profile: test -f
~/.bashrc && . ~/.bashrc.)
❑ .bash_logout: Commands added to this file are executed when you
log out from a bash shell.
❑ .bash_history: Stores history of commands run by the user from a
bash shell.
76034bapp03.qxd:Toolbox
3/29/08
10:58 AM
Page 278
Appendix C: Personal Configuration Files
C shell files: Besides system-wide /etc/profile and /etc/csh.cshrc files, home
directory files for storing and changing C shell (tcsh and csh) settings include:
❑ .login: Commands added to this file are executed when you log in to a C shell
shell.
❑ .tcshrc or .cshrc: Commands added to either of these files are executed when
you start any C shell.
❑ .history: Stores history of commands run by the user from a C shell.
Bourne shell files: If you are using the Bourne (sh) shell, which is the default for regular users in FreeBSD, the .shrc file in your home directory is important to know
about. Commands in this file are run when the sh shell starts. The file sets several
aliases for you and sets your command line editor (emacs by default). This is a good
place to add directories to your $PATH or to change your shell prompt. (I always
change the default editor to vi from emacs.)
Elinks browser files: With the elinks text-based browser, after the system configuration file is read (/usr/local/etc/elinks/elinks.conf), if it exists, several other
files are used for configuration settings. The following are contained in each user’s
.elinks directory:
❑ elinks.conf: Contains individual elinks configuration settings.
❑ bookmarks: Contains any bookmarks you set while using elinks.
❑ cookies: Stores cookies obtained while using elinks.
❑ exmodehist: Contains ex mode history.
❑ formhist: Contains history of information entered into forms while using elinks.
❑ globhist: Contains a history of web addresses visited while using elinks.
❑ searchhist: Contains a history of search terms entered while using elinks.
❑ .tcshrc or .cshrc: Commands added to either of these files are executed when
you start any C shell.
Evolution files: Configuration files, mail boxes, calendars, contacts, and other files
needed to support the Evolution groupwise suite are contained in the .evolution
directory in each user’s home directory. Files should not be edited directly in this directory structure, but rather should be modified through the Evolution client. This directory, however, is a place to check if the disk space consumed in your home directory is
growing out of control.
Firefox configuration files: If you use the Firefox browser, settings for your use of
the browser are stored in the .mozilla/firefox directory of your home directory.
If you ever plan to move to another machine or a different web browser, you might
want to keep your bookmarks.html file. That file can be exported later to a different
environment.
278
76034bapp03.qxd:Toolbox
3/29/08
10:58 AM
Page 279
Appendix C: Personal Configuration Files
GNOME configuration files: Users who run the GNOME desktop will have a .gnome2
directory in their home directories. Within sub-directories are configuration files for
GNOME applications you run, such as Rhythmbox music player (rhythmbox/), Totem
video player (totem) and Evince document viewer (evince/). Many of the config files
are in XML format, so you can read them (although you typically shouldn’t edit them
directly). Keeping this information can be useful because it can include album art,
playlists, and preferences (such as colors and toolbars).
KDE configuration files: If you run the KDE desktop, the .kde directory will contain information relating to the KDE desktop, window manager, and related KDE
applications. As with GNOME, many KDE configuration files are stored in XML format, so you can view their contents with any text editor. You can drop scripts in the
.kde/Autostart directory to have them executed on KDE startup.
mail configuration files: Settings for the mail command are stored in the .mailrc
and .mail_aliases files.
ncftp configuration files: If you use the ncftp FTP client, settings relating to your
ncftp sessions are stored in the .ncftp directory in your home directory. The firewall file in that directory lets you set firewalls, including information for using ncftp
through a proxy server. The history file keeps a list of commands that were previously run during FTP sessions. The log file gathers error and informational messages.
The prefs_v3 file contains ncftp preferences.
Trusted hosts files: Although regular users can’t change the system-wide hosts.allow
or hosts.deny files, they can add a list of trusted hosts and, optionally, users from those
hosts to their own .rhosts file in their home directories. If services such as rlogin
or rcp are enabled (/etc/inetd.conf), a person from the trusted host can use those
commands to log in or copy files to your machine without entering a password. This
is a good thing to do if all of the computers on your network are wired together, in the
same room, in a cabin in the Himalayas, with no outside connections. Otherwise, you
should consider using trusted hosts in this way to be very insecure.
Secure Shell configuration files: If you use the secure shell (ssh) service, the .ssh
directory in your home directory can be used to manage security settings. Here are
examples:
❑ known_hosts: Keeps a list of host computers you have verified as authentic.
❑ identity: Private authentication keys from SSH protocol version 1.
❑ id_rsa: Private authentication keys from SSH protocol version 2.
❑ id_dsa: Private authentication keys from SSH protocol version 2.
❑ identity.pub, id_dsa.pub, id_rsa.pub: Public keys for the three private
keys just described.
❑ authorized_keys: File that contains public keys of remote clients.
279
76034bapp03.qxd:Toolbox
3/29/08
10:58 AM
Page 280
Appendix C: Personal Configuration Files
Virtual network computing files: If you use vncserver utility to share your desktop
with other computers on the network, settings for how vncserver behaves are stored
in your home directory’s .vnc directory. The xstartup file in that directory contains
applications that run on the VNC desktop when you start it up. The vncpasswd file
holds the passwords stored for use by vnserver.
For each display that is started, a file named host:#.log is created (where host is
the hostname and # is the display number). There is also a host:#.pid file for each
display containing the process ID of the Xvnc process associated with the display.
X startup files: If you start your desktop interface using the startx command, the
.xinitrc file can be used to indicate which desktop environment to start. For example, add /usr/local/bin/gnome-session to .xinitrc to start the GNOME desktop environment. Add /usr/local/bin/startkde to .xinitrc to have the KDE
desktop environment start.
XMMS configuration files: If you use the XMMS music player, configuration files for
that player are contained in the .xmms directory in your home directory. Subdirectories
of that directory include Plugins (which hold audio plug-ins) and Skins (which holds
available skins to use with the player). The config file in that directory holds preference
settings for XMMS. The xmms.m3u file contains paths for songs the player has played.
280
4/2/08
5:19 PM
Page 281
Index
76034bindex.qxd:Toolbox
Index
A
Address Resolution Protocol (ARP),
197–198
entry, delete from cache, 198
static entries, addint to cache, 198
subnet query, 198
view/configure entries, 197–198
adduser command
account defaults, setting, 247–248
batches of users, adding, 246
default shell, changing, 248
home directory, change default
location, 248
home directory, don’t create, 248–249
login class, changing, 249
new users, adding interactively,
244–245
settings, types of, 247
skel directory location, changing, 248
AIFC files, save track as, 93
AIFF files
encoded from WAV, 95
encoding to FLAC, 95
encoding to MP3, 95
playing, 91
save track as, 93
alias(es)
defining, 41
listing, 41
removing, 41
alias command
bash session alias, defining, 41
listing aliases, 41
anonymous access, file transfer
protocol (FTP), 17
apropos command, man pages,
searching, 9
archive(s)
contents, listing, 132
files, adding to, 132
tar archive, creating, 128–129
wildcards, matching files with, 132
arp command
ARP cache, delete entry, 198
ARP entries, viewing, 197–198
static entries, adding to cache, 198
arping command, IP, query use of, 198
ASCII text, extracting from binary
file, 83
at command, processes, scheduling
runs, 157–158
AT&T Unix, 2
aterm, 35
atq command, processes, checking run
queue, 158
atrm command, processes, delete from
run queue, 158
attachments, e-mail, 222
attributes of files
changing, 63
listing, 62–63
AU files, playing, 91
audio, 89–97
AIFF files, playing, 91
AU files, playing, 91
audio formats/effects, viewing, 90–91
audio mixing, displaying/changing
settings, 92
CDs, ripping to hard drive, 93
current channel, setting as recording
device, 92
76034bindex.qxd:Toolbox
4/2/08
5:19 PM
Page 282
■ A–BLevel 1 on spread
First Index
Index
display settings, changing, 92
files, displaying information about, 96
header information, viewing, 94
MP3 files, playing, 91
MP3 format, convert files to, 95
mute, 92
ogg file, playing, 91
playlists, playing songs from, 91
seconds of sound, deleting, 97
skip to next song, 91
sound card drivers, configuring, 89–90
speed up playback, 91
viewing/adjusting levels, 92
volume, adjusting, 92
WAV files, concatenating, 96
WAV files, mixing, 96
WAV files, playing, 91
XMMS configuration files, 280
aumix command, audio display settings,
changing, 92
automatic login, Secure Shell (SSH), 230
awk command
columns of text, extracting, 87
delimiter, changing, 87
B
backticks, output redirection, 40
backup(s), 127–142
CD/DVD images, burning, 140–141
clone part of file, 61
files with symbolic links, 53
ISO9660 image, creating, 138–140
over networks. See network backups
See also archive(s); compression
bad blocks, scanning for, 115
BASH, 273
bash command, new bash process,
starting, 44
bash shell, 36–50
aliases, 41
command line completion, 38
environment variables, 44–45
history. See bash shell history
282
information source on, 50
input of shell, directing, 39
loops/looping, 49
output of shell, directing, 38–40
scripts, creating, 45–50
settings, directory files for, 277
tailing files, 41
bash shell history, 36–38
backward search, 38
edit command history, 37
edit current command, 37
listing history, 37
moving among commands, 37
previous commands, listing, 37
string, search for, 38
BASH_COMMAND, 273
BASH_VERSION, 273
batch command, processes, scheduling
runs, 158
Berkeley Software Distribution (BSD),
BSD system, development of, 2
bg command, running processes, in
background, 155
binary files
ASCII text, extracting from, 83
crackers, tampering with, 63
BIOS SMAP, viewing, 15
bit bucket file, output streams, directing
to, 39
BitchX, 219
block devices, types of, 54
blogs, web sites for, 5
BMP file, conversion to, 98
boot command, FreeBSD install,
starting, 15
boot process, 172–178
boot, stages of, 172
boot image, changing, 173
boot loader, 172
Boot Manager (BootMgr), 16
boot prompt, commands run from, 15
boot0cfg command, 173–174
changing, caution about, 174
default slice to boot, changing, 175
4/2/08
5:19 PM
Page 283
Index ■ B–C
FreeBSD installation, 14–15
FreeBSD settings, changing, 15
GRUB boot loader, 176–178
ISO images, creating, 62
kernel for, specifying location, 178
Master Boot Record, overwriting, 177
multiple operating systems, operations
with, 174–176
reboot, 179
second drive, search for boot loader, 175
slice to boot, changing, 175
boot0cfg command, 173–174
boot image, checking, 173
boot loader, installing, 174
boot loader on second hard disk,
finding, 175
changes to boot loader, 174
default slice to boot, changing, 175
two operating system information,
displaying, 174–175
bottlenecks
network connections, 198–199
storage devices, checking for, 167
bouncer, 219
Bourn shell, .shrc file, 278
Bourne Again Shell, 36
See also bash shell
browsers
elinks browser, 205–206, 278
SSH, SOCKS proxy Internet connection,
229–230
BSD system
backups, 127–142
compression, 129–132
development of, 2
directories, 52–53
files, 51–70
multimedia, 89–101
network connections, 185–203
network resources, 205–223
network services, 255–258
online communities, 5–6
operating systems, 3–4
processes, managing, 143–159
remote system administration,
225–242
resources, web sites for, 4–5
security, 243–262
shells, 33–50
system logs, 261
system management, 161–183
text, working with, 71–88
version, finding, 180
bsdlabel command
BSD label, adding to file, 117
partition information on slice, viewing,
113, 176
bsdlabel utility
for hard drive partitioning, 107
partitions on slice, changing, 104
bsdsar utility, installing, 162
bzip2 compression, 130
adding package to system, 130
compress files, 131
tar command with, 128
uncompress files, 130, 131
C
C shell, settings, directory files for, 278
cal command, calendar, displaying,
169–170
capitalization, lowercase letters,
capitalizing, 84–85
case usage, testing for, 49
cat command
audio device, checking, 90
empty files, creating, 52
text, replacing, 83
text file content, displaying, 78, 85
top of file, viewing, 79
CD(s)
capacities, 140
ejecting, 141
FreeBSD, 13
GUI tools for burning/mastering,
92–93, 137
ISO images, burning, 140–141
283
Index
76034bindex.qxd:Toolbox
76034bindex.qxd:Toolbox
4/2/08
5:19 PM
Page 284
Index ■ C
multi-burn session, 141–142
permission, open for CD playing, 90
ripping to hard drive, 93
setting as recording device, 92
cd command, change directory, 51,
59, 117
CD drive, capabilities, checking,
93, 141
cd9660 file system, features of, 106
cdparanoia command
CDDA capability, verifying, 93
CDs, ripping to hard drive, 93
cdrecord command, 140–141
burn multi-session CDs/DVDs, 141
CD/DVD burning capability,
checking, 141
CDs/DVDs, burning images to, 141
central logging, 262
character devices, types of, 54
character translations, 84–85
characters, replacing, 84
delete characters, 84
ranges of characters, specifying,
84–85
spaces, replacing newline characters
with, 84
charcoal tone, adding to images, 99
chatting, Internet Relay Chat (IRC),
219–220
chattr command, file attributes,
changing, 63
checksums
files, verifying, 68–69
functions of, 68
MD5 checksum, creating for files, 69
run on distfile, 27
chgrp command, group ownership,
changing, 58, 212
chkrootkit, 262
chmod command
permission, open for CD playing, 90
permissions, changing, 56–58
shell scripts, executable, 45
VNC permissions, setting, 241
284
chown command, group ownership,
changing, 58, 212
color(s)
file types, viewing, 68
images, colorizing, 99–100
search term, colorizing, 81
column(s)
contents, displaying, 87
delimiter, changing, 87
printing, 87
COLUMNS, 273
command(s)
configuration files, finding, 67
finding, commands for, 8
help messages for, displaying, 9
info documents for, 11
man pages for, 9–10
not found, reasons for, 7–8
as regular files, 52
command line completion, shells, 38
Common Internet File System (CIFS).
See Samba
compatibility mode, hard drive, 104
compression, 129–132
all files in directory, 131
backup, of hard drive partition, 62
benefits of, 129
bzip2 compression, 130–131
gzip compression, 130–131
lzop compression, 130–131
RAR format, 130
tar files, create backup/compress,
128–129
unzip archive, 129
with verbosity, 130–131
See also specific compression tools
connect command, freenode server,
connecting to, 219
convert command
batches of images, converting, 100
directory of photos, resizing, 100
image file formats, converting, 98
resizing images, 98, 100
rotating images, 98
4/2/08
5:19 PM
Page 285
Index ■ C–D
special effects, adding, 99–100
text, adding to images, 98
thumbnails, creating, 98
convert files, text files, to other
formats, 88
copy and paste, Terminal windows, 34
copyright, login class, 250
cp command
copy file to file system, 117
copy files, 60–61
cPanel, 244
CPU usage, 164–166
information, viewing, 165–166
processor information, 166
running processes, sort by CPU
usage, 166
utilization summary, 164–165
crackers, binaries, tampering with, 63
crontab command
crontab file, creating, 158–159
edit crontab, other users, 159
file, deleting, 159
file, listing contents, 159
personal crontab file, creating, 158
curl command
FTP server, upload to, 209
single-shot file transfers, 209
username/password, adding, 209
cut command, columns, printing, 87
cvsup command, ports collection,
installing, 24
Cygwin, 227, 239
D
data, copy data, 61
database(s), locate database, 63–65
date. See time/date
date command
time/date, changing, 170
time/date, displaying, 169
dd command
backup, compressed, 62
boot image file, creating, 62
data, copying, 61
IDE drive, clone partition of, 61
swap area, creating within file, 117–118
warning, 61
zero-filled file, creating, 117
delete
characters, 84
directory, 60
job from queue, 158
ports collection packages, 22–23
user accounts, 251–252
vi editor, 267
delimiter(s)
changing, 83–84
columns, changing, 87
device(s)
block devices, 54
character devices, 54
device files, examples of, 54
df command
disk space usage, checking, 105, 125
inode utilization, checking, 124
limit output to local file system, 125
mounted partitions, displaying, 176
mounting file systems, utilization
summary, 124
diff command, files, comparing, 85–86
dig command
host IP address, viewing, 195
record type query, 195
reverse DNS lookup, 195
specific name server query, 195
trace recursive query, 195
directory(ies), 52–69
adding, 60
creating, 52–53
current, viewing, 59
defining, 52
finding, 66
of images, resizing, 100
inaccessible, filtering, 65
moving among, 59–60
ownership, changing, 58
285
Index
76034bindex.qxd:Toolbox
76034bindex.qxd:Toolbox
4/2/08
5:19 PM
Page 286
Index ■ D–E
permissions, changing, 56–57
permissions, setting, 53, 56
remote, sharing. See remote directory
sharing
removing, 60
sticky bit, functions of, 57–58
symbolic links, creating, 59–60
dirs command, directories, changing
order, 60
disk partitioning, FreeBSD installation,
15–16
Disklabel Editor, 16
DISPLAY, 273
distfiles
checksum, running on, 27
ports skeleton, 25
removing, 30
distributions, FreeBSD, 17
dmesg command
CPU information, viewing, 166
sound card, detecting, 89
dmesg command, system message
buffer contents, displaying, 180
dmidecode command, hardware
information, listing, 183
documentation
software packages, subdirectory for, 8
web sites for, 6, 14
See also man pages
Domain Name System (DNS) servers,
194–196
host IP address, viewing, 195
host name, search for, 195
hostname, setting, 196
hostname for local machine,
viewing, 196
IP address-based information,
listing, 195
IP addresses of, 194–195
record type query, 195
recursive query, tracing, 195
reverse DNS lookup, 196
specific server query, 195
286
Domain Name System (DNS) service,
configuring, 257–258
DOS file system
checking, 123
creating, 123
features of, 106
dos2unix command, file conversion, 88
double-spacing, text, 80
DragonFly BSD, features of, 3
du command
disk space usage, checking, 117, 125
multiple directories, specifying, 125
dumping, file systems, 119
DVD(s)
capacities, 140
ejecting, 141
FreeBSD, 13
ISO images, burning, 140–142
multi-burn session, 141–142
DVD drive
capabilities, checking, 141
compatibility, improving, 142
E
echo command
bash history, number of commands, 37
lowercase letters, capitalizing, 84–85
editors. See text editors
elinks browser, 205–206
configuration file, 278
navigation keys, 206
user directory, files in, 278
elinks command, prompt for file
name, 206
Emacs editor, features of, 73
e-mail, 220–223
attachments, sending, 222
configuration files, 279
mail command, 221–222
MBOX format, 221
mutt command, 222–223
troubleshooting, 226
Ensim, 244
4/2/08
5:19 PM
Page 287
Index ■ E–F
env command, environment variables,
listing, 45
environment variables, 44–45
displaying, 44
inheritance, 45
listing, 45
setting/resetting, 44
shell, listing of, 272–275
eterm, 35
Ethernet Network Interface Card (NIC),
186–190
capabilities, displaying, 187–188
configuring, 17, 186
functions of, 186
hard-set speed of, 188
IP address/netmask, changing, 188
name of, displaying, 187
network interface, stopping, 191
settings, changing, 188
settings, displaying, 187
settings, making permanent, 188–189
speed, hard-setting, 188
statistics, refreshing, 189
statistics, viewing, 189
troubleshooting, 186–187
ethtool command, 187
EUID, 273
Evolution, home directory, files in, 278
Ex editor, vi commands from, 269–270
export command
DISPLAY, set to local machine, 237
inheritance, variables, 45
variables, concatenate string to, 45
ext2/ext3 file systems, 114–116
attributes, changing, 115–116
attributes, listing, 62–63, 115
creating on partition, 114–115
and journaling, 106
settings, changing, 116
F
fc command, bash history, editing, 37
FCEDIT, 273
FDISK
geometry of drive, changing, 109
hard drive partitioning, 15–16, 104,
107–109
sysinstall, interface provide by, 108
write changes to partition table, 109
fdisk command
new slices, creating, 111
partitions, creating, 107
slice information for first drive,
listing, 105
slice information, listing, 109, 175
slice table, changing interactively, 110
slice table information, displaying, 109
slices, changing, 110
slices, list for IDE hard disk, 109–110
warning, 110
fg command, running processes, in
foreground, 155
file(s), 51–70
attributes, changing, 63
attributes, listing, 62–63
blank files, creating, 52
checksums, verifying, 68–69
clone part of file, 61
copy data, 61
copy file, 60–61
device files, 54
differences between files, checking,
85–86
file names, tests on, 46–47
file types, viewing, 51–52
links, symbolic and hard, 53–54
listing, 15, 52, 67–68
locate database, creating, 63–64
locate database, file information,
finding, 64–65
locate database, updating, 65
MD5 checksum, creating for, 69
ownership, changing, 58
permissions, changing, 56–57
permissions, setting, 56
search, 64
search, timestamp-based, 65–66
287
Index
76034bindex.qxd:Toolbox
76034bindex.qxd:Toolbox
4/2/08
5:19 PM
Page 288
Index ■ F
search by size, 66–67
search criterion, negating, 66
search with regular expressions, 65
text, sending output to, 80
file command
contents of file, determining, 53
executables, saving, 52
file systems
checking, 122–123
disk usage, checking, 125–126
dumping, 119
errors, fixing, 123–124
ext2/ext3. See ext2/ext3 file systems
file, mounting in loopback, 121
FreeBSD default, 16, 106
inode utilization, checking, 124
Linux-compatible, creating, 114–116
local, display disk space for, 125
local, mounting, 120
memory disk system, creating,
116–117
mount options, 121
mounted, listing, 120
mounted, utilization summary of, 124
mounting, 118–121
mounting as read/write or
read-only, 121
multiple directories, showing, 125
network shared file systems, 107
output, displaying, 125
root user account, using, 125
supported by FreeBSD, 106–107
swap areas, creating within file,
117–118
swap areas, turning on/off, 118
swap files, listing, 118
time-dependent checks on, 116
unmounting, 121–122
file transfer protocol (FTP), 209–211
anonymous access, 17
connect to server, 209–210
downloading commands, 210
FreeBSD access, 17
ftpcopy application, building, 25–26
288
ftpcopy directory, listing contents, 25
ftpcopy package, list files, 20
ncftp configuration files, 279
non-interactive download session, 211
server. See lftp command
upload session, 211
File Transfer Protocol service (ftpd)
command lines, 258
enabling, 258
file transfers, 208–213
with cURL, 208–209
file transfer protocol (FTP), 209–211
interrupting, 208
login/passwords, 207
with Secure Shell (SSH), 211–212
single web page, 207
usable copy of web site, 208
web site, mirroring, 208
with wget, 207–208
Windows tools, 213
FileZilla, 213
filter(s), inaccessible directories, 65
find command
act on files with (exec option), 66
directories, finding, 66
directory disk space, checking,
125–126
inaccessible directories, filtering, 65
ports, search for software, 20
regular expressions with, 65
root file system, searching, 65
search criterion, negating, 66
size-based search, 66–67
timestamp based search, 65
unaccessed files, finding, 66
findsmb command, SMB host, scan
for, 215
finger command, user information,
checking, 255
Firefox, configuration files, 278
firewalls, 258–261
IPFILTER, enabling, 259
ipfw, starting service, 260
rules, adding, 259–260
4/2/08
5:19 PM
Page 289
Index ■ F–G
settings, 259
status check, 260–261
flac command, WAV to FLAC
encoding, 95
FLAC file
encoded from AIFF, 95
encoded from WAV, 95
images, adding to, 95
flash drive
boot image, copying to, 62
IDE drive clone, copying to, 61
private key, saving to, 232–233
flood of pings, sending, 197
folders, directories as, 52
forums, web sites for, 5
FreeBSD
boot settings, changing, 15
configuration, 17–19
documentation for, 14
features of, 3
file systems supported by, 103,
106–107
installed packages up-to-date,
checking, 28
installing, 14–19
man pages for, 20
nano editor, 76
Packages approach, 19
port skeletons, 25
ports, upgrading, 28
ports collection, finding software,
19–20
ports collection, installing, 23–24
ports collection, installing application
with, 25–27
ports collection, removing files, 30–31
ports security vulnerabilities,
checking, 29
README files, creating, 27
resources, web sites for, 4, 13–14,
19–20
software, information about, 19
software, installing, 21–22
software, removing, 22–23
sysinstall utility, 13, 18, 19, 21, 24
vim editor, 72
FreeBSDMall, 13
Freenode.net, 219–220
fsck command
check after unmount, 123
check from background, 122
DOS file system, checking, 123
file system with errors, checking,
123–124
force file system check, 122–123
print commands without executing, 123
UFS file system, checking, 122
fstab file
fields in, 119–120
file systems, mounting from, 118–120
FTP. See file transfer protocol (FTP)
FTP Passive, FreeBSD, 17
fuser command
kill processes, 153
running processes with open files,
viewing, 153
G
games, installing, 22
gcombust, 137
getty processes, virtual terminals, 35–36
GIF file, convert to other formats, 98
gimp command, running processes in
foreground/background, 155
GNOME desktop
configuration files, 279
remote desktop, sharing with
VNC, 241
Terminal window, opening/using, 33–35
user management from, 244
GNOME text editor, features of, 78
gnome-terminal command, terminal
window, launching, 35
GNU Image Manipulation Program
(GIMP), 178
gparted utility, 108
Grand Unified Boot Loader. See GRUB
boot loader
289
Index
76034bindex.qxd:Toolbox
76034bindex.qxd:Toolbox
4/2/08
5:19 PM
Page 290
Index ■ G–H
graphical user interface (GUI), broken,
causes of, 7
graveman, 137
grep command
colorize search term, 81
display file name, disabling, 81
display unmatched strings, 82
exact line, finding, 81
file in list, verifying, 69
ignore case, 81
name of file, displaying, 82
recursive search, 81
text strings search, 81
grip, CD files, ripping/encoding, 92
group(s)
ownership, changing, 58
passwords, 253
permissions, 252–253
special groups, 253
types of, 253
users, adding to, 253
GROUPS, 273
growisofs command, 141–142
compact option, 142
DVDs, burning images, 142
multi-burn session, 142
GRUB boot loader, 176–178
files, copying to directory, 177
install to master boot record, 177–178
installing, 177
splash screen at boot, image on, 178
grub command, boot loader,
reloading, 178
gstat command, disk devices with
activity, showing, 167–168
gtali command, remote dice game,
open on local, 238
gunzip command, uncompress gzipped
files, 131
gzip compression, 130–131
all files in directory, 131
gzip file information, displaying,
130–131
and tar command, 130–131
uncompress files, 131
290
H
halt command, warning, 179
hard drive(s)
boot image, copying, 62
CDs, ripping to, 93
compatibility mode, 104
dedicated mode, 104
IDE drive, cloning partition of, 61
IDE drive, compressed backup of
partition, 62
partitioning. See hard drive partitioning;
slice(s)
hard drive partitioning, 103–106, 110
with bsdlabel, 113
changes, writing to disk, 108–109
configuration, viewing, 105–106
disk label, writing changes to, 113
disk space divisions, viewing, 104–105
FDISK, 15–16, 104, 107–109
FreeBSD, 15–16
fstab file, mounting systems from,
118–120
gparted/qtparted utilities for, 108
mount point, specifying, 112
mounted partitions, displaying, 176
multiple operating systems, operations
with, 174–175
partition size, specifying, 112
partition tables, changing information
in, 110–111
partitions, changing, 112–113
partitions on slice, viewing, 176
permissions to modify, command
for, 111
root partition, 104
with sysinstall, 111–113
UFS file system, creating on partition,
113–114
See also slice(s)
hard links
creating, 53–54
functions of, 53
network backups, rotating files,
135–136
4/2/08
5:19 PM
Page 291
Index ■ H–I
hardware, 182–183
components, listing, 183
networking, 186
PCI device information, listing,
182–183
head command, top of file, viewing, 79
header information
audio file, viewing, 94
FLAC file, adding image to, 95
ISO9660 image, 139
text, 80
text, format into pages, 89
help messages, for commands,
displaying, 9
hierarchical file systems
extension, adding to image, 138
functions of, 138
HISTCMD, 273
HISTFILE, 273
HISTFILESIZE, 273
history, bash shell. See bash shell
history
history command, bash shell
history, 37
HOME, 273
host(s)
connectivity to, checking, 196–197
trusted, adding, 279
hostname(s). See hostname command
HOSTNAME, 273
hostname command
hostname setting at start-up, 196
reverse DNS lookup, 196
temporary hostname, setting, 196
HOSTTYPE, 273
I
id command, user information,
checking, 254
IDE drives. See hard drive(s)
identify command, image information,
accessing, 97
ifconfig command
Ethernet card settings, displaying, 187
network card capabilities, displaying,
187–188
NIC, hard-set speed of, 188
NIC, starting/stopping, 191
NIC names, displaying, 187
NIC settings, changing, 187–189, 188
options, viewing, 187
wireless cards, configuring, 193–194
ImageMagic, 97
installing, 8
images, 97–101
colorizing, 99–100
convert to other formats, 98
FLAC file, adding to, 95
on GRUB boot loader splash screen, 178
information about, viewing, 97
resize directory of, 100–101
resizing, 98
rotating, 98
swirling effect, 100
text, adding to, 98
thumbnails, creating, 98–99
INDEX file, software packages, checking
version, 28
info command, info database,
entering, 11
info documents
for commands, displaying, 11
moving through screen, 11
inheritance, environment variables, 45
inode(s)
defined, 124
displaying, 54
utilization, checking, 124
input of shell, directing, 39
installation, FreeBSD, 14–19
Internet
elinks browser, 205–206
man pages on, 10
protocols, troubleshooting, 226
software packages, installing from, 8
tunneling to, 229
Internet Relay Chat (IRC), 219–220
exiting, 220
291
Index
76034bindex.qxd:Toolbox
76034bindex.qxd:Toolbox
4/2/08
5:19 PM
Page 292
Index ■ I–K
freenode server, connecting to,
219–220
help, 220
joining channel, 220
proxy client/bouncer, 219
send message, 220
Internet Super Server Daemon, 17, 257
IP address
host IP address, viewing, 195
IP connectivity, checking, 197
IP in use, checking, 198
NIC, changing address, 188
Samba, finding addresses, 217
subnet query for, 198
viewing, 199
IPFILTER. See firewalls
IPFIREWALL, 259
ipfw command
firewall rules, adding, 261
firewall rules, checking, 260–261
IRC chats, web sites for, 5
irssi
commands, help for, 220
installing, 219–220
messages, sending, 220
irssi command, irssi, launching, 219
ISO images
creating, 62
downloading free images, 14
See also ISO9660 image
ISO9660 image, 138–140
checking, 139–140
create image, 138
extensions, 138
header information, adding, 139
mounting, 140
multiple sources, adding to, 139
isoinfo command, header information,
viewing, 139–140
isotat command
CPU utilization report, printing, 165
CPU utilization report, viewing, 164
disk statistics, showing, 167
292
J
JED editor, 73
jobs command, background jobs,
managing, 155
JOE editor, 73–75
control keys for editing, 73–75
installing, 73
joe command, 73–75
open text file, 73
spell checker, 73
text, adding, 73
join command, freebsd IRC channel,
joining, 220
Joliet Rock Ridge extensions, adding to
ISO image, 138
journaling, and ext3 file system, 106
JPEG file, convert to other formats, 98
K
K3b, 137
KDE desktop
configuration files, 279
terminal emulator for, 35
KDE text editor, features of, 78
kernel modules, 179–182
adding modules, 182
enable/disable features, 15
kernel slab memory cache statistics,
viewing, 163–164
kernel space, 164–165
loaded, viewing information on, 181
loading, 15
location of boot, specifying, 178
parameters, control of, 182
processing, information about,
180–181
sorting, 83
system message buffer contents,
viewing, 180
keyboard shortcuts
elinks browser, 206
JOE editor, 73–75
4/2/08
5:19 PM
Page 293
Index ■ K–L
nano editor, 76–77
vi editor, 265–266
kill running processes
kill command, 157
killall command, 157
signal to running process, sending, 157
stopping by command name, 157
VNC server, 240
kldload command, 140
module, loading, 182, 219
kldstat command
kernel modules, sorting by size, 83
loaded module information,
viewing, 181
kldunload command, module,
unloading, 182
konsole, 35
L
lame command
MP3 format, file conversion to, 95
tag information, adding to MP3 files,
95–96
LAN cards, types of, 192–193
last command, logins, checking, 254
leafpad editor, 78
legacy communications tools, telnet
command, 226
less command
paging with, 79–80, 180–181
scrolling with, 80
strings, search for, 80
LESSOPEN, 273
lftp command
bookmark location, 210
close session, 211
current directory, checking, 210
current directory, listing, 210
directory, creating on server, 211
download, sending to background, 210
FTP server, connecting to, 209–210
local directory, change to, 211
matched files, uploading, 211
new directory, change to, 211
path completion, 212
remote directory perms, changing, 211
server directory, change to, 211
upload files to server, 211
lftpget command, non-interactive
download, 211
line spacing, double-spacing, 80
LINES, 273
link(s). See hard links; symbolic links
Linux
boot loader, 14
FreeBSD, configuring for, 18
installing, 174
ln command, hard/symbolic links,
creating, 53, 169
load command, kernel/module,
loading, 15
local file systems. See file systems
locate command, files, finding, 64–65
logger command, messages, sending to
syslogd, 261
login class, 249–250
defining, 249
features, changing, 249–250
login database, rebuilding, 250
LOGNAME, 273
loops/looping
file system, mounting in loopback, 121
shell scripts, 49
lowercase letters, capitalizing, 84–85
ls command
device files, listing, 54
file, identifying as directory, 53
file lists, long, display of, 52, 67
file types, appearance in list, 68
files, listing, 15
ftpcopy directory, listing contents, 25
inodes of file, displaying, 54
ISO contents, checking, 140
named pipes/sockets, listing, 54–55
new lines, deleting, 84
newline characters, replacing with
spaces, 84
293
Index
76034bindex.qxd:Toolbox
76034bindex.qxd:Toolbox
4/2/08
5:19 PM
Page 294
Index ■ L–M
output, redirecting, 38–39, 80
ports in directory, paginating, 80
lsattr command, file attributes,
listing, 62
lsdev command, boot device names,
listing, 15
lsmod command, loaded module names,
viewing, 15
lsof command, open files/directories,
checking, 168
lspci command
PCI audio devices, listing, 89–90
PCI hardware information, listing,
182–183
wireless card, search for, 192
lurking, 219
lzop compression, 130–131
archive, creating, 130
archives, listing, 132
compress files, 131
extract archive, 130
tar command with, 130
uncompress files, 132
M
Mac OS X, 3
MACHTYPE, 274
MAIL, 274
mail command, 221–222
open mailbox, 221–222
MAILCHECK, 274
mailing lists, web sites for, 5
make command
checksum, run on distfile, 25–26
distfile, downloading, 27
ftpcopy application, building, 25–26
README.html files, creating, 27
man pages
for commands, displaying, 9–10
finding, 67
for FreeBSD, 20
on Internet, 10
sections of, 10
web sites for, 10
294
man command
all pages, showing, 10
man page, displaying, 9
page section, viewing, 10
Master Boot Record, 107
copying to file, 62
GRUB boot loader, installing to,
177–178
warning, 177
MBOX format, e-mail, 221
md5sum command
md5sum data, checking, 68–69
software, search for, 19
mdconfig command
ISO memory disk device, creating, 140
memory disk file, identifying, 117
memory
consumption by process, viewing, 163
kernel slab memory, 163–164
resident size, viewing, 162
sort processes by usage, 82
usage, screen-oriented view, 162
usage, time-oriented view, 163
memory disk file system
creating, 116–117
mounting and unmounting, 117
merging, output of text file, 86
message buffer, contents, viewing, 180
Microsoft Windows
file transfer tools, 213
installing, 174
installing first, 14
SSH tools for, 227
mirroring
remote directory, 135
software mirrors, sources for, 5
web site, 208
mixer command, audio volume,
adjusting, 92
mkdir command
directory, creating, 52–53
GRUB directory, creating, 177
mount point, creating, 114, 117, 140
path, editing, 46
4/2/08
5:19 PM
Page 295
Index ■ M–N
ports directory, creating, 24
VNC directory, creating, 239
mkfifo command, named pipe,
creating, 55
mkfs command
bad blocks, scan for, 115
ext3/ext3 file systems, creating on
partition, 114–115
mkisofs command, 137–140
extensions to image, types of, 138
files, grafting to image, 139
header information, adding to
image, 139
ISO images, creating, 138, 141
multiple sources, adding to image, 139
more command, paging with, 79
mount. See also mount command
file systems. See file systems
ISO image, 140
mount point, creating, 114, 117
Samba shared directories, 217
SSH shared directories, 219
mount command
file system type, specifying for
mounting, 120–121
file systems, mounting, 114
first in PATH, displaying, 8
ISO images, mounting, 140
local file system, mount to, 120
loopback mount, 121
memory disk, mounting, 117
mount with device name only, 121
mount with mount point only, 121
mounted file systems, listing, 120
mounted partitions, displaying,
104–105
mounted systems, listing, 120
NFS shared directories, 214–215
read/write or read-only, specifying, 121
Samba shares, mounting, 217
mouse, enabling, 18
MP3 files
converting files to, 95
encoded from WAV/AIFF, 95
playing, 91
tag information, adding, 95–96
MP321 command
MP3 files, playing, 91
playlists, playing songs from, 91
tag information, viewing, 96
multimedia, 89–101
audio, 89–97
images, 97–101
music. See audio
mute, audio, 92
mutt command, 222–223
attachments, sending, 222
keyboard shortcuts, 223
mail session, beginning, 222–223
new message, sending, 223
mv command
backup, rotating, 135
private keys, storing, 232
N
named pipes. See piping
nano editor, 73, 76–77
control keys for editing, 76–77
nano command, 76
spell checker, 76
Nautilus, 137
ncftp configuration files, 279
ndis miniport driver wrapper, 192
nedit editor, 78
NetBSD
features of, 3
resources, web sites for, 4–5
NetBSD Packages Collection
(pkgsrc), 5
netmask, NIC, changing, 188
netstat command, 189–190
active socket information,
viewing, 201
data transfer over interface,
displaying, 202
NIC statistics, displaying, 189
NIC statistics, refreshing, 189
routing table, displaying, 200
295
Index
76034bindex.qxd:Toolbox
76034bindex.qxd:Toolbox
4/2/08
5:19 PM
Page 296
Index ■ N
TCP connections, active, viewing,
189–190
TCP statistics, listing, 201
TCP/ICMP/UDP summaries,
displaying, 201
NetWare file system, 107
network backups, 133–137
directory, mirror of, 135
local system to remote system, copy
files to, 134
multiple client machines, gathering
backups from, 134
OpenSSH, backup over, 133–134
rotating files, 135–136
with rsync, 134–136
snapshots approach, 133
sync files, 136–137
with unison, 136–137
network connections, 185–203
active connections, checking, 189–190
DNS servers, 194–196
Ethernet Network Interface Card (NIC),
186–190
host scanning, 202
interface names, displaying, 187
interfaces, shutdown/bring online,
190–191
network scanning, 202–203
network services, starting/stopping,
191–192
packet header information, viewing, 202
packet-level traffic information, 202
problems with. See network
connections troubleshooting
shutdown, 191
starting, 191
wireless. See wireless connections
network connections troubleshooting,
196–203
active socket information, viewing, 201
Address Resolution Protocol (ARP),
checking, 197–198
data transfer over interface,
displaying, 202
296
default gateway, checking, 196–197
default route, changing, 200
delete route, 200
Internet protocols, 226
IP addresses, viewing, 199
IP connectivity, checking, 197
IP in use, checking, 198
local routing table, displaying, 199–200
network interface cards, checking,
186–187
new route, adding to network, 200
point of failure, identifying, 198–199
ports, connecting to, 199
remote hoste, trace route to, 199
routing table, displaying, 200
TCP statistics, listing, 201
TCP/ICMP/UDP summaries,
displaying, 201
Network File System (NFS)
enabling, 18
hung request, interrupting, 215
network shared file systems, types
of, 107
permissions, 214
processes, viewing, 192
service, starting, 213
shared directories, viewing, 214
shares, mounting, 214–215
status check, 192
network interface card (NIC). See
Ethernet Network Interface
Card (NIC)
network resources, 205–223
chatting, 219–220
elinks browser, 205–206
e-mail, 220–223
file transfers, 208–213
remote directory sharing, 213–219
remote servers, downloading files from,
207–208
network services, 255–258
Domain Name System (DNS) service,
257–258
enable services, 256
4/2/08
5:19 PM
Page 297
Index ■ N–P
file transfer protocol service (ftpd), 258
Internet Super Server Daemon, 257
Secure Shell service (sshd), 258
starting at boot, 255–256
Syslog Daemon, 256–257
Network Time Protocol (NTP), time/date,
setting with, 170–172
newfs command
DOS file system, creating, 123
UFS file system, creating, 117
UFS file system, creating on partition,
113–114
newline characters, adding to text
stream, 84
NFS (network file system). See Network
File System (NFS)
nfsd command, NFS service,
starting, 213
nice command
nice value, changing, 154
running processes, adjusting priority, 154
warning, 154
nmap command
host scan, 202, 202–203
network scan, 202
port scan, 202
verbosity from, 202
nmblookup command, IP address,
identifying, 217
nohup command, hang-up signal,
avoiding, 157
nologin, login class, 250
NT file system, features of, 106
ntpd command, NTP time, setting, 171
ntpdate command
NTP time, setting, 171
ntpd command as future replacement
for, 171
numbers, testing for, 46
O
od command, octal dump, viewing, 61
ogg file, playing, 91
ogg123 command
ogg file, playing, 91
playlists, playing songs from, 91
repeat song, 91
Web address, playing, 91
oggenc command, music, encoding, 93–94
ogginfo command, header information,
viewing, 94
OLDPWD, 274
online BSD communities, 5–6
Open Source Sound System (OSS), 91–92
OpenBSD, 227
features of, 3
resources, web sites for, 5
OpenSSH
backup over, 133–134
See also Secure Shell (SSH)
operating systems
BSD-based systems, 3–4
multiple, installing, 174
multiple, Windows, installing first, 14
two, boot loader output, 174–175
OSTYPE, 274
output of shell, 38–40
append to file, 39
backticks, use of, 40
direct to bit bucket file, 39
direct to file, 38–39
error output (stderr), 38
pass on as parameters, 40
piping, 39
redirect from processes, 39
output of text file
merging, 86
patched file, outputting, 86
sending to printer or file, 80
sorting, 82
ownership, changing, 58
P
Packages, FreeBSD software, 19
PacketFilter, 259
PAGER, 274
297
Index
76034bindex.qxd:Toolbox
76034bindex.qxd:Toolbox
4/2/08
5:19 PM
Page 298
Index ■ P
pagination, text files, 80
paging, through text files, 79–80
parallel port IP, functions of, 186
partitioning. See hard drive partitioning;
slice(s)
passwd command
regular user password, changing, 252
root user, changing password, 252
password(s)
account information, changing,
250–251
changing by users, 252
components of, 252
FreeBSD, 18
FTP server, 207
groups, 253
for root user, assigning, 18
root users, changing passwords, 252
shell, 36
user accounts, changing, 252
user accounts, file for, 246
VNC password, creating, 239
warning, 246
patch command, patched file, output
to, 86
patched file, outputting, 86
PATH
dot (.), functions of, 46
editing, 46
mount/unmound commands in,
displaying, 8
shell scripts in, 45–46
shell variable functions, 274
PCX file, conversion to, 98
permission(s), 56–58
changing, 56–57
groups, 252–253
listed file, characters related to,
55–56
NFS shared directories, 214
recursive changes to, 58
setting, 53, 56
unmask values, 58
298
pgrep command
process IDs, finding, 152
user related processes, finding, 152
PhoEniX, 219
pico editor, features of, 76
ping command
command options, 197
host completion, 38
IP connectivity, checking, 197
warning, 197
piping
functions of, 51, 54
named pipes, creating, 55
named pipes, examples of, 54–55
output of shell, 39
pkg_add command
fuse-sshfs software, installing, 219
GRUB, installing, 177
remote desktop, adding, 235
Samba, installing, 215
software packages, installing, 21–22, 24
VNC client/server components,
installing, 239
pkg_cutleaves command,
unreferenced packages, listing,
30–31
pkg_delete command, software
packages, removing, 22–23
pkg_info command
ftpcopy package, list files, 20
software package dependencies,
checking, 20
software package information, 20,
39–40
sorting, 82
pkg_version command, software
packages, checking version, 28
PKZIP, 127
play command
audio formats/effects, viewing, 90–91
music files, playing, 91
playlists, playing songs from, 91
Plesk, 244
4/2/08
5:19 PM
Page 299
Index ■ P
PNG file, conversion to, 98
point-to-point protocol, functions of, 186
popd command
add/remove directories, 60
directories, changing order, 60
portaudit command
security database, downloading, 29
vulnerabilities, checking for, 29
portmanager command, ports,
upgrading, 28
ports collection, 23–31
components of, 23
contents of package, verifying, 22
cvsup for installation, 24
directory, creating, 24
distfile, 25, 27, 30
ftpcopy directory, 25
installing, 24
package installation, verifying, 26
port database, search for package, 8
port skeletons, 25
removing files, 30–31
removing ports, 30
security, 29
software, finding, 19–20
space requirements, 17
sysinstall for installing, 24
upgrading, 24, 28
portsclean command, remove
ports, 30
portsnap command, ports,
updating, 24
portsupgrade command, ports,
upgrading, 28
PPID, 274
pr command
double-spacing, 80
text, format into pages, 89
PRINTER, 274
printing
columns, 87
commands without executing, 123
lines/words/bytes in file, printing, 82
text, sending to printer, 80
private keys
remove keys from agent, 233
saving to flash drive, 232–233
stored, listing of, 233
proc file system, 67, 144
process(es)
active, listing, 144–146
background jobs, managing, 155
column output, customizing, 146–150
crontab file, creating, 158–159
delete job from queue, 158
finding, 152–153
forground/background, moving
between, 155
hang-up signal, ignoring, 157
hierarchy, viewing, 146
kill running process, 151, 153, 157
on-going viewing of, 150–151
piping, 54–55
priority, adjusting, 154
running processes, sort by CPU
usage, 166
scheduling runs, 157–159
signals, sending to, 155–156
sorting, memory usage as basis, 82
processor. See CPU usage
profile settings, Terminal windows, 34
PROMPT_COMMAND, 274
ps command
column output, 149
end of file, viewing, 79
every running process, viewing, 145
getty processes, viewing, 35–36
process IDs, finding/piping, 152
processes list, viewing, 221
running processes, custom views,
149–150
running processes for current user,
showing, 144–145
sort processes, 82, 150
top of file, viewing, 79
two users, viewing information for, 150
PS1, 274
PSCP file transfer, 213
299
Index
76034bindex.qxd:Toolbox
76034bindex.qxd:Toolbox
4/2/08
5:19 PM
Page 300
Index ■ P–R
PSFTP file transfer, 213
pstree command, running processes,
tree views, 146
public key authentication
copying key, 231–232
with Secure Shell (SSH), 230–231
pushd command
add/remove directories, 60
directories, changing order, 60
PuTTY, 227
PWD, 274
pwd command
print working directory, 59
symbolic links, creating, 59–60
Q
qtparted utility, 108
R
RANDOM, 274
ranges of characters, specifying, 84–85
RAR format, features of, 130
rcp (remote copy), 225
rdesktop command, Windows Remote
Desktop, connecting to, 237
README files, FreeBSD, creating, 27
README.html files, creating, 27
read-only access, file systems, mounting
with, 121
read/write access, file systems,
mounting with, 121
reboot, after installation, 19
reboot command
benefits of, 179
warning, 179
regex. See regular expressions
regular expressions
file searches with, 65
text strings, matching with, 71–72
reiser file system, features of, 107
remote directory sharing
with Network File System (NFS),
213–215
300
with Samba, 215–218
with SSH file system, 218–219
remote servers, downloading files from,
207–208
remote system administration, 225–242
legacy communications tools, 226
screen package, 233–235
with Secure Shell (SSH), 225–233
Virtual Network Computing (VNC),
239–242
Windows’ Remote Desktop Connection,
236–237
X Window System, 238–239
renice command, running processes,
adjusting priority, 152
replace, text operations, 83–84
resize, images, 98
rexec (remote execution), 225
rlogin (remote login), 225
rmuser command, user accounts,
deleting, 251
root partition, 104
root users (super users), 41–44
becoming, 42
delegating power, 43–44
disk use, displaying, 125
enable environment, 42
passwords, assigning, 18
passwords, changing, 252
shell password, 36
rotate, images, 98
route command
default gateway, checking, 196–197
default gateway, adding, 200
delete route, 200
local routing table, displaying, 199–200
new network route, adding, 200
routing table, displaying, 199–200
rsh (remote shell), 225
rsnapshot command, with rsync
command, 133
rsync command, 134–136
hard links, use of, 135
incremental backups, 135
4/2/08
5:19 PM
Page 301
Index ■ R–S
mirror directory, 135
rsnapshot command with, 133
S
Samba, 215–218
BSD user, adding, 216
configuration files, checking, 218
file locks, viewing, 217
ftp-style connection, 216
IP addresses, finding, 217
network neighborhood, text
representation of, 215–216
server services, listing, 216
shares, mounting, 217
SMB hosts, scan for, 215
SWAT tool, 215
Samba file system, 107
scp command, 211–212
copy file to server, 212
port to use, indicating, 212
recursive copies, 212
timestamp/permission, preserving, 212
warning, 211
screen command, 233–236
active screens, listing, 233–234
keyboard shortcuts, 234–235
reconnect to session, 235
screen package, installing, 233
screen sessions, sharing, 235
sessions, naming, 235
several screens running, 235
screen terminal multiplexer, 233–236
control key functions, 234
running, 233
sharing screens, 235
See also screen command
Scribes text editor, 78
scripts, creating. See shell scripts
scrolling
elinks browser, 206
less command, 80
sdiff command, files output,
merging, 86
search
elinks browser, 206
files, with regular expressions, 65
files by size, 66–67
man pages, finding, 67
search criterion, negating, 66
for string in history, 38
text, 80–82
SECONDS, 274
seconds of sound, deleting, 97
Secure Shell (SSH), 225–233
accessing on different port, 228
client, configuring, 227
configuration files, 279
file system, directory sharing with,
218–219
forceful exit, 228
log in to remote host, 228
private key, saving to flash drive,
232–233
public key authentication with,
230–231
remote files, copying, 212
as SOCKS proxy, 229–230
SSH daemon, 17
starting/stopping, 191
tools for Windows, 227
tunneling, for CUPS printing service,
227–228
tunneling, for X11 clients, 228
tunneling, to Internet connection, 229
tunneling, X11 port forwarding,
enabling, 227
version 2, benefits of, 227
Virtual Network Computing (VNC)
with, 241
See also ssh command
Secure Shell service (sshd),
enabling, 258
security, 243–262
central logging, 262
chkrootkit, 262
firewalls, 258–261
301
Index
76034bindex.qxd:Toolbox
76034bindex.qxd:Toolbox
4/2/08
5:19 PM
Page 302
Index ■ S
groups, 252–253
network services, 255–258
passwords, managing, 252
permissions, 56–58
ports collection, 29
private keys, storing, 232–233
public key authentication, 230–232
system logs, 261
tripwire package, 262
two-factor authentication, 230
user accounts, 244–252
users, information about, 253–255
Webmin, user management, 244
sed command
change number, send to text file, 85
delimiter, changing, 83
multiple substitutions, 84
newline characters, adding with, 84
text, replacing, 83–84
sepia tone, adding to images, 99
serial line internet protocol, functions
of, 186
Server Message Block (SMB). See
Samba
set command
boot variables, setting, 15
environment variables, displaying, 44
setenv, login class, 250
sftp command, file transfer, 212
sha1sum files, 68–69
SHELL, 274
shell(s)
aliases, 41
command line completion, 38
environment variables, 44–45
output streams, directing, 38–40
root users (super users), 41–44
scripts. See shell scripts
special characters, 271–272
tailing files, 41
Terminal window to access, 33–36
user-specific settings, 36
variables, listing of, 272–275
See also bash shell
302
shell scripts, 45–49
content, adding to, 46–49
executable, 45
first line, 45
information source on, 50
loops/looping, 49
in PATH, 45–46
test expressions, operators for, 47–48
SHELLOPTS, 274
SHLVL, 274
show command, boot variables,
listing, 15
.shrc file, Bourn shell, 278
shutdown command, warning, 179
shutdown of system, features to stop,
specifying,179
slice(s)
bsdlabel utility, 104
changing, 108, 110
create or change labels, 113
creating, 108–109, 111
defined, 16, 103–104
deleting, 110
displaying, 112
labels, creating/changing, 113
listing information about, 109–110, 175
partition information on, viewing, 113
partitions on slice, creating, 112
partitions on slice, viewing, 176
See also hard drive partitioning
smap command, BIOS SMAP,
viewing, 15
smbclient command
FTP-style file sharing, 216
services, listing, 216
smbpasswd command, BSD user, adding
to Samba, 216
smbstatus command
brief output, 217
current connections/file locks,
viewing, 217
smbtree command, network
neighborhood, text representation
of, 215–216
4/2/08
5:19 PM
Page 303
Index ■ S
snapshots approach, network
backups, 133
sockets
functions of, 51, 54
on system, viewing, 55
socketstat command, sockets,
listing, 55
SOCKS proxy, SSH feature, 229–230
software packages
documentation, subdirectory for, 8
finding, 19–20
info database pages, directory for, 11
installing, 21–22
installing with ports. See ports
collection
Internet source for, 8
removing, 22–23
resources, web sites for, 5
verify contents of, 22
version, checking, 28
sort command
descending memory usage as basis, 82
by kernel module size order, 83
output piped to, 39, 80
sorting
by CPU usage, 150, 166
kernel modules, 83
by memory usage, 150
processes, memory-usage as basis, 82
processes list, 151
text file content, 82
See also sort command
sound card drivers, configuring, 89–90
sound-juicer, CD files,
ripping/encoding, 92
sox command
file information, displaying, 96
seconds of sound, deleting, 97
WAV files, concatenating, 96
soxmix command, WAV files,
mixing, 96
spaces
newline characters, replacing with, 84
text files, 80
spell checker
JOE editor, 73
nano editor, 76
split command, vi editor screen,
splitting, 265
SSH. See Secure Shell (SSH)
ssh command, 227–233
default key, adding, 232–233
Internet service, tunneling to, 229
key pair, generating, 231
private key, storing, 232–233
public key authentication, 230–232
remote commands, preventing, 229
remote host, secure log-in, 228
remove stored keys, 233
as SOCKS proxy, 229–230
ssh, accessing on different port, 228
ssh client, configuring, 227
ssh session, forcible exit, 228
VNC server, using, 241
X11 clients, tunneling for, 228–229
X11 forwarding, enabling, 227
sshfs command, remote directory,
mounting, 219
stderr. See output of shell
stdin. See input of shell
stdout. See output of shell
sticky bit, functions of, 57–58
storage devices, 166–168
bottlenecks, checking, 167
files/directories of, viewing, 168
string(s), text, searching, 80, 81–82
su command, shell, super user
functions, 42
substitutions, multiple substitutions,
running, 84
sudo command
shell, delegating power with, 43–44
warning, 43
SunOS, 3
super users. See root users (super users)
support
steps to take, 6–7
web sites for, 4–6
303
Index
76034bindex.qxd:Toolbox
76034bindex.qxd:Toolbox
4/2/08
5:19 PM
Page 304
Index ■ S–T
swap areas. See hard drive partitioning
swap file system, features of, 107
swapinfo command
swap files/partitions, viewing, 118
swap partition information,
displaying, 105
swapoff command, swap area, turning
off, 118
swapon command
swap area, turning on, 118
system use directive, 118
SWAT tool, Samba, 215
swirling effect, images, 100
symbolic links
backup file with, 53
to directories, creating, 59–60
files, creating, 53–54
functions of, 53, 59
sync files, with unison, 136–137
sysctl command
kernel parameter values, listing, 182
kernel parameters, listing, 182
MBR, overwriting, 177
regular users, adding, 219
sysinstall utility
main menu, return to, 18
as menu interface, 21
network connections, configuring,
185–186
partitions, changing, 111–113
ports collection, installing, 24
slices, changing, 107–109
software packages, 13, 19, 21
Syslog Daemon, command lines,
256–257
systat command, CPU usage,
viewing, 165
system administration, remote. See
remote system administration
system logs, syslogd facility, messages
to, 261
system management, 161–183
boot process, 172–178
CPU usage, 164–166
304
hardware, 182–183
kernel modules, 179–182
memory management, 162–164
stopping system, 179
storage devices, 166–168
system services, 178–179
time/date, 168–172
system services, 178–179
installing, 178–179
network, starting/stopping, 191–192
system use sharing protocol (SUSP),
ISO9660 image, 138
T
tail command
end of file, viewing, 79
end of file, watching, 79
file size, watching, 41
tape archiver, see also tar command
using, web site information on, 129
tar command
archive contents, listing, 132
archive/compress output, 128–129
basic operations of, 128
behavior, difference between Linux
systems, 128
with bzip2 compression, 128, 130
dashes/no dashes in, 128
extract/uncompress files, 130
files, adding to archive, 132
local to remote system, copy files
from, 134
with lzop compression, 130
multiple files to add to archive,
matching, 132
remote site, running from, 134
return files to file system, 129
tar/lzop file content, listing, 132
tgz files, writing files to, 134
unzips/untars archive, 129
TCP. See transport-layer protocols (TCP)
tcpdump command, TCP packets,
finding, 202
4/2/08
5:19 PM
Page 305
Index ■ T
telnet command, Internet protocols,
troubleshooting, 226
TERM, 274
terminal multiplexer, screen package,
233–235
Terminal Services Client. See Windows’
Remote Desktop Connection
Terminal windows, 33–36
control key sequences, 34
elinks browser, 205–206
opening, 33
profile settings, 34
scrollback lines, 34
shell-management settings, 34
types of, 35
virtual terminals, 35–36
zoom, 34
testparm command
configuration files, testing, 218
default entries, viewing, 218
Samba configuration, checking, 218
text
character translations, 84–85
columns, processing of, 87
content, directing, 78
convert to other formats, 88
differences between files, checking,
85–86
double-spacing, 80
end of file, viewing, 79
header information, 80
images, adding text to, 98
listing files, 78–79
matching with regular expressions,
71–72
multiple substitutions, running, 84
navigation/scrolling, 80
newline characters, adding, 84
number of lines/words/bytes,
printing, 82
paginating files, 80
paging through, 79–80
replace first occurrence of, 83
send output to printer, 80
sorting output, 82–83
strings, search for, 80, 81–82
text replacement, 83–84
top of file, viewing, 79
word counts, 82
text editors
Emacs editor, 73
GNOME, 78
JED editor, 73
JOE editor, 73–75
KDE text editor, 78
leafpad editor, 78
nano editor, 73, 76–77
nedit editor, 78
pico editor, 76
Scribes text editor, 78
vi editor, 72, 264–270
vim editor, 72
XEmacs editor, 73
tgz files, writing files to, tar
command, 134
thumbnails, of images, creating, 98–99
TIFF file, convert to other formats, 98
time/date, 168–172
displaying, 169–170
Network Time Protocol (NTP), use of,
170–172
time zone, changing, 169
time zone, setting, 18
uptime, checking, 172
timestamps, search files based on,
65–66
TMOUT, 275
top command
adjusting while running, 151
CPU usage information, viewing, 151
help information about, 151
log of processes, creating, 151
memory consumption size,
viewing, 163
memory use, screen-oriented
view, 162
running processes, ongoing viewing of,
150–151
305
Index
76034bindex.qxd:Toolbox
76034bindex.qxd:Toolbox
4/2/08
5:19 PM
Page 306
Index ■ T–U
running processes, resident memory
use order, 162
running processes, sort by CPU
usage, 166
touch command
blank files, creating, 52
hard/symbolic links, creating, 53
tr command
characters, replacing, 84
letters, deleting, 84
tracer command, traceroute,
completing, 38
tracerout command, 198–199
bottlenecks, checking for, 198–199
IP addresses, viewing, 199
set different port, 199
TCP packets, trace route with, 199
transport layer protocols (TCP/UDP)
forward port with SSH, 228–229
packet information, displaying, 200
statistics, listing, 201
summary of activities, 201
tripwire package, 262
troubleshooting
command not found, 7–8
e-mail, 226
network connections. See network
connections troubleshooting
tsclient command, Windows Remote
Desktop, connecting to, 236–237
tune2fs command
ext2/ext3 file system, change
settings, 116
file system attributes, viewing,
115–116
interval-based system checks, 116
time-dependent checking, 116
tunneling
for CUPS printing service, 227–228
to Internet connection, 229
for X11 clients, 228
X11 port forwarding, enabling, 227
306
U
UFS file system
checking, 122–123
creating on partition, 113–114
FreeBSD default, 16, 106
UFS2 file system, 16
UID, 275
unalias command, remove alias, 41
uname command, BSD version,
displaying, 180, 221
unified format, defined, 85
union file system, features of, 107
unison command, 136–137
automatic operation, 137
command line mode, running in, 136
profile, creating, 137
sync files with, 136–137
UNIX File System, 103
unix2dos command, file conversion, 88
unmask command, permissions,
setting, 58
unmask values
login class, 250
permissions, 58
unmount
file systems, 121–122
See also unmount command
unmount command
device name, unmount by, 122
failure of, 122
ISO image, unmounting, 140
mount point, unmount by, 122
in PATH, finding, 8
remote directory, unmount by, 122, 219
unrar command, 130
unset command, boot variables,
unselecting, 15
upgrading, ports collection, 28
uptime command, system uptime,
checking, 172
USB memory stick. See flash drive
Usenet newsgroups, sites for, 6
4/2/08
5:19 PM
Page 307
Index ■ U–V
USER, 275
user(s)
adding to groups, 253
directory information, displaying, 255
information about, viewing, 254–255
Webmin, user management, 244
user accounts, 244–252
account defaults, setting, 247–248
account information, changing,
250–251
account information, displaying, 245
adding, 244–245
batches of users, adding, 245–246
deleting, 251–252
FreeBSD, 18
login class, 249–250
options, setting, 248–249
ownership, changing, 58
passwords, 246
regular users, adding, 18
See also adduser comand
users command, logins, checking, 254
utilization summary(ies)
CPU usage, 164–165
mounted file systems, 124
V
verbosity
compression with, 130–131
kernel modules, showing
information, 181
software installation, 22
user accounts, deleting, 251
vi command
text files, opening, 264
vi editor, starting, 264
vi editor, 72, 264–270
adding/changing text, 266–267
aliased from vim command, 264
delete/paste text, 267
Ex commands, 269–270
keystroke commands, listing of,
265–266
navigation in, 265–266
numbers, modifying commands
with, 268
quitting, 264
save and quit, 264
saving files, 264
several files, editing, 264–265
split screen, 265
text files, opening, 264
vim-enhanced package. See Vim (Vi
IMproved)
in visual mode, 270
write current file to another file, 264
Vim (Vi IMproved)
benefits of, 72
opening, 264
X GUI version, 78
Vino, VNC desktop, sharing with,
241–242
vipw command, account information,
changing, 250–251
Virtual Network Computing (VNC)
components of, 239
configuration files, 280
remote desktop, 225
remote desktop, enabling, 240–241
with Secure Shell (SSH), 241
server, launching, 239–240
Vino, sharing desktop with,
241–242
virtual terminals, 35–36
configuring, 36
getty processes, 35–36
switching between, 35
visudo command, versus sudo
command, 43
vmstat command
kernel slab memory cache statistics,
viewing, 163–164
memory use over time period,
viewing, 163
vncpasswd command, VNC password,
creating, 239
307
Index
76034bindex.qxd:Toolbox
76034bindex.qxd:Toolbox
4/2/08
5:19 PM
Page 308
Index ■ V–X
vncserver command
killing, 240
VNC server, starting, 239–240
vncviewer command, remote desktop,
enabling, 239
volume, audio, adjusting, 92
W
WAV files
concatenating, 96
encoding to AIFF, 95
encoding to FLAC, 95
encoding to MP3, 95
encoding to Ogg, 93
mixing, 96
playing, 91
ripping, 93
wc command, file lines/words/bytes,
printing, 82
Web address, playing, 91
wget command, 207–208
FTP server login, 207
html, append to downloaded files, 208
interrupted download, continuing, 208
rename to local names, 208
single web page, downloading, 207
web site, local usable copy, 208
web site, recursive mirror, 208
whatis command, keyword search, man
pages, 9
whereis command, files, finding, 67
which command, files, finding, 67
who am i command, user information,
checking, 254
who command, logins, checking, 254
whoami command, root user,
confirming, 43
wicontrol command
wireless card information, viewing, 194
wireless card settings, 194
wiki, web site for, 6
308
wildcards, archived files,
matching, 132
Windows’ Remote Desktop Connection,
236–237
connecting with rdesktop, 237
remote desktop, enabling, 236
Terminal Server Client, connecting with,
236–237
WinSCP, 213
WinZip, 127
wireless connections, 192–194
Atheros/Intersil/Lucent, commands
for, 194
configuring, 193–194
drivers, listing of, 192–193
drivers, loading, 193
generic driver, use of, 193
LAN cards, types of, 192–193
scan for stations, 194
starting/stopping, 194
status check, 194
wireless card, search for, 192
word counts, text files, checking, 82
X
X GUI version, vim editor, 78
X Window System, 238–239
configuration files, 280
remote apps, allowing, 238
remote machine, running on, 238
X11 port forwarding
enabling, 227
X11 clients, tunneling for, 228
xargs command
compared to exec command, 66
output, redirecting, 40
X-CD-Roast, 137
xchat utility, 219
xclock command, remote clock, open
on local, 238
XEmacs editor, 73
4/2/08
5:19 PM
Page 309
Index ■ X–Z
xhost command, remote apps,
allowing, 237
xmines, installing, 22
XMMS music player, configuration
files, 280
xterm, 35
xterm command, remote terminal, open
on local, 238
Z
zoom, Terminal windows, 34
309
Index
76034bindex.qxd:Toolbox
76034badvert.qxd:Toolbox
4/2/08
12:39 PM
Page 310
Take a look inside
the Linux toolbox.
®
Check out other books available
in the series.
978-0-470-08292-8
978-0-470-08293-5
978-0-470-08291-1
Available now at www.wiley.com
Wiley and the Wiley logo are registered trademarks of John Wiley & Sons, Inc. and/or its affiliates. Linux is a registered trademark of Linus Torvalds. All other trademarks are the property of their respective owners.