/


Автор: Wilson J.
Теги: programming languages programming computer science mathematical modeling dynamic ui android fragments
ISBN: 978-1-78328-309-5
Год: 2013


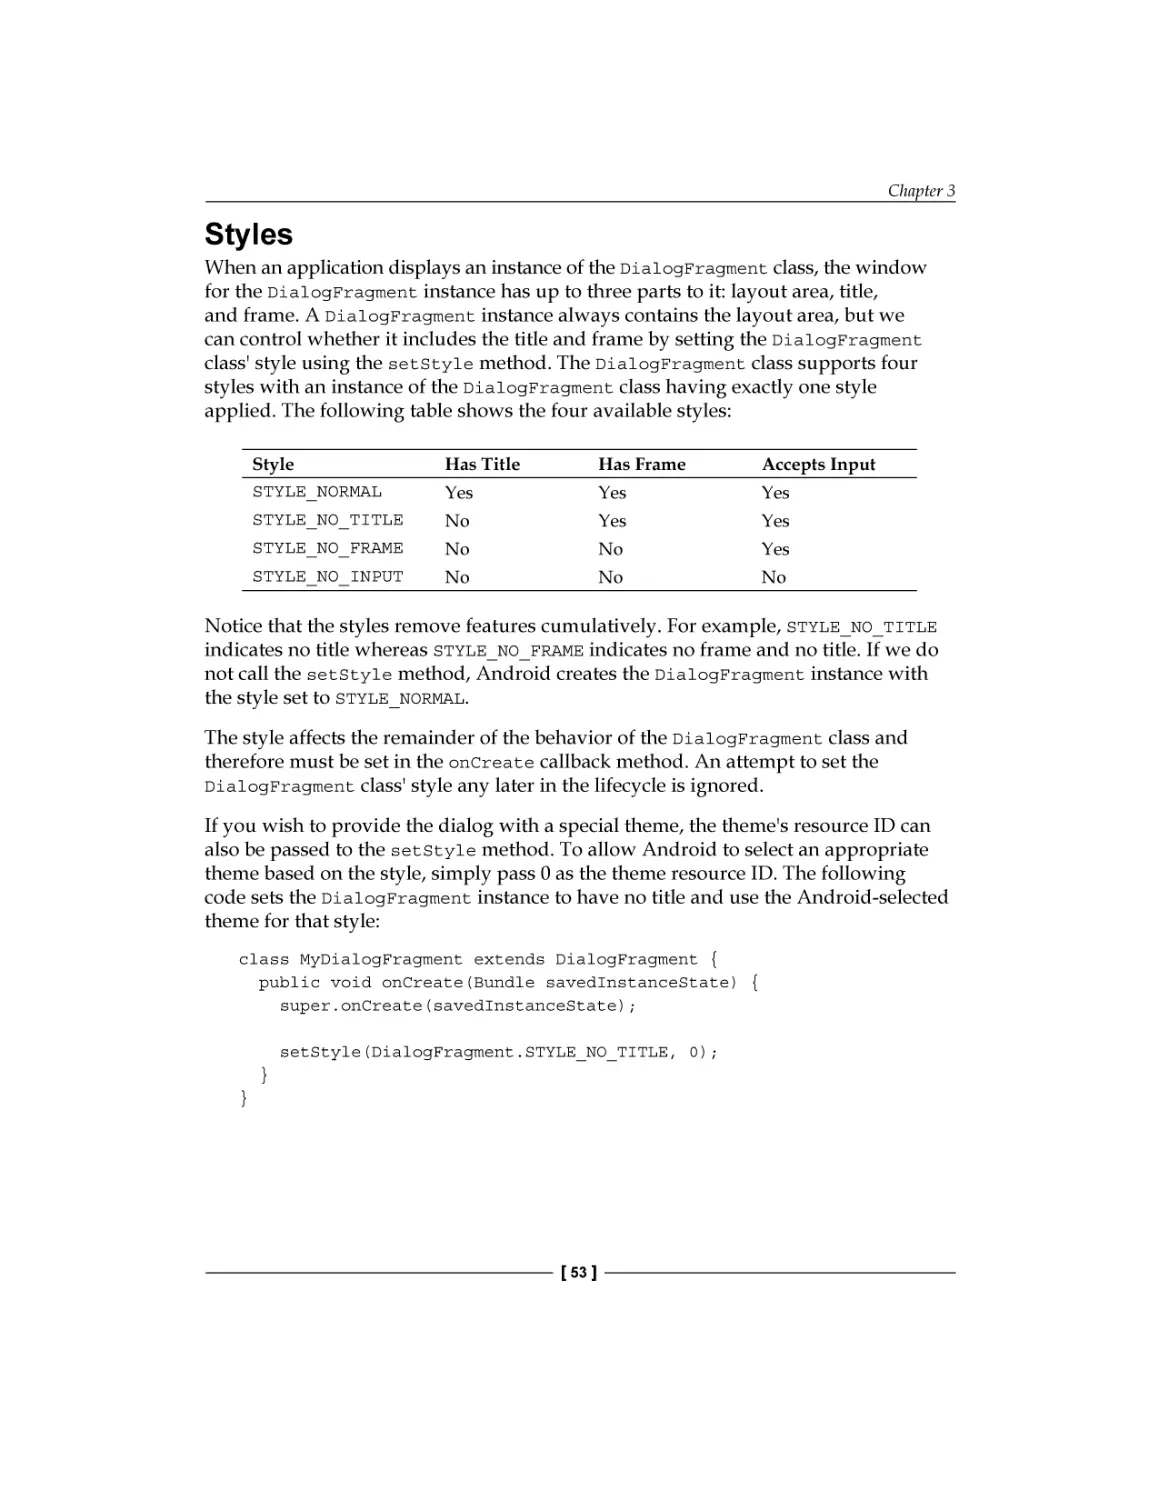
Текст
Creating Dynamic UI with
Android Fragments
Leverage the power of Android Fragments to develop
dynamic user interfaces for your apps
Jim Wilson
BIRMINGHAM - MUMBAI
Creating Dynamic UI with Android Fragments
Copyright © 2013 Packt Publishing
All rights reserved. No part of this book may be reproduced, stored in a retrieval
system, or transmitted in any form or by any means, without the prior written
permission of the publisher, except in the case of brief quotations embedded in
critical articles or reviews.
Every effort has been made in the preparation of this book to ensure the accuracy
of the information presented. However, the information contained in this book is
sold without warranty, either express or implied. Neither the author, nor Packt
Publishing, and its dealers and distributors will be held liable for any damages
caused or alleged to be caused directly or indirectly by this book.
Packt Publishing has endeavored to provide trademark information about all of the
companies and products mentioned in this book by the appropriate use of capitals.
However, Packt Publishing cannot guarantee the accuracy of this information.
First published: September 2013
Production Reference: 1180913
Published by Packt Publishing Ltd.
Livery Place
35 Livery Street
Birmingham B3 2PB, UK.
ISBN 978-1-78328-309-5
www.packtpub.com
Cover Image by Asher Wishkerman (wishkerman@hotmail.com)
Credits
Author
Jim Wilson
Reviewers
Robert Dale Johnson III
Project Coordinator
Michelle Quadros
Proofreader
Jonathan Todd
Alex Lockwood
Indexer
Acquisition Editor
Priya Subramani
Edward Gordon
Anthony Albuquerque
Commissioning Editor
Poonam Jain
Technical Editors
Pratik More
Anusri Ramchandran
Graphics
Sheetal Aute
Production Coordinator
Kyle Albuquerque
Cover Work
Kyle Albuquerque
About the Author
Jim Wilson is president of JW Hedgehog, Inc., a consulting firm specializing in
solutions for the Android, iOS, and Microsoft platforms. Jim has nearly 30 years of
software engineering experience, with the past 13 years heavily focused on creating
mobile device and location-based solutions. After nearly a decade as a Microsoft
Device Application Development MVP, Jim now focuses on developing Android
and iOS device applications.
Jim's passion is teaching and mentoring software developers. He is a regular
contributor of Android-related training materials to Pluralsight (http://training.
jwhh.com), a leading provider of online developer training. Jim has authored more
than 30 articles on device application development, and has developed mobility
and smart client curriculums for several organizations. You can find Jim speaking
at a variety of industry conferences, including AnDevCon, Microsoft Professional
Developers Conference, Tech Ed, VS Live, Mobile and Embedded Developers
Conference, and many others.
Jim and his wife, along with several cats, live in Celebration, Florida (just 3 miles
from Walt Disney World). Check out Jim's blog (http://blog.jwhh.com) where
he talks about a variety of mobile software development issues as well as the fun
of life just 3 miles from the "House of Mouse".
You can reach Jim at androidtraining@jwhh.com.
Acknowledgments
First and foremost I want to thank my beloved wife, Bonnie. Without her support
and patience through the many long nights and six (often seven) day work weeks,
this project (and so many others) would never have happened. Our life together
has grown into more than I could have ever hoped or dreamed. I love you.
Thank you to my dear friend Rev. Dr. William A. Lewis of Community Presbyterian
Church in Celebration. Your friendship and guidance have opened my eyes up to a
life of joy and purpose beyond imagination.
To all the folks at Pluralsight, thank you for creating an organization that offers
people like me the opportunity to dig deep into technology and share the knowledge
gained with others.
About the Reviewers
Robert Dale Johnson III is a Software Engineer who specializes in Android,
Joomla, and BD-J (BluRay Disc – Java) development. He graduated in 2008
from California State University Northridge with a BS in Computer Science.
He started his career working with BD-J for Deluxe Digital Studios (DDS),
Panasonic, and Deluxe Digital Distribution (D3), where he worked on movie
titles such as Avatar, Oceans, Spinal Tap, and Conquest of the Planet of the Apes
along with many other titles and web-enabled BluRay features. During his time
at D3, Robert made the transition from BD-J to Android development where he
was a principal developer on the StarzPlay, EncorePlay, and MovieplexPlay apps.
He also worked on the NookVideo app developed for non-Nook devices. During his
time with D3 Robert moved to Nashville, TN and eventually found Aloompa LLC
where he found a home as a Senior Android Developer developing applications
for festivals throughout the country such as Coachella, Stagecoach, Governsball,
Bannaroo, and many more.
Along with his fulltime professional pursuits, Robert is a seasoned freelancer
with many projects in his repertoire (see his personal website www.rdjiii.info)
and has started a software consulting company, Contrahere Solutions LLC
(see www.contrahere.com). You can reach Robert by going to one of the websites
previously mentioned or by e-mail anytime at robert.dale.johnson.iii@gmail.
com. Robert is also an avid racquetball player who travels across the country playing
in tournaments as a Team Ektelon player. He is a motorcycle enthusiast and loves to
dabble in tech such as Arduino and RaspberryPi in his spare time.
I would like to thank my son Xander Johnson for being the best son I
could ever wish for. His love and appreciation drives me to become
the best that I can, pushing me forward with a smile on my face and
joy in my heart. Xander, I love you and thank you for everything you
have and will do to make me a better person.
Alex Lockwood is an experienced developer/consultant in the Android
community, and an active user on StackOverflow. His blog can be found at
http://www.androiddesignpatterns.com.
www.PacktPub.com
Support files, eBooks, discount offers and more
You might want to visit www.PacktPub.com for support files and downloads related
to your book.
Did you know that Packt offers eBook versions of every book published, with PDF
and ePub files available? You can upgrade to the eBook version at www.PacktPub.com
and as a print book customer, you are entitled to a discount on the eBook copy. Get in
touch with us at service@packtpub.com for more details.
At www.PacktPub.com, you can also read a collection of free technical articles,
sign up for a range of free newsletters and receive exclusive discounts and offers
on Packt books and eBooks.
TM
http://PacktLib.PacktPub.com
Do you need instant solutions to your IT questions? PacktLib is Packt's online
digital book library. Here, you can access, read and search across Packt's entire
library of books.
Why Subscribe?
•
Fully searchable across every book published by Packt
•
Copy and paste, print and bookmark content
•
On demand and accessible via web browser
Free Access for Packt account holders
If you have an account with Packt at www.PacktPub.com, you can use this to access
PacktLib today and view nine entirely free books. Simply use your login credentials
for immediate access.
Table of Contents
Preface
Chapter 1: Fragments and UI Modularization
The need for a new approach to UI creation
The broad platform support of fragments
Fragments simplify common Android tasks
The relationship between fragments and activities
Making the shift to fragments
The old thinking – activity-oriented
Defining the activity appearance
Displaying the activity UI
The new thinking – fragment-oriented
Creating the fragment layout resources
Creating the Fragment class
Converting the activity to use fragments
Summary
Chapter 2: Fragments and UI Flexibility
Creating UI flexibility
Dynamic fragment layout selection
Adding an alternate layout resource
Managing fragment layout by screen size
Eliminating redundancy
Design fragments for flexibility
Avoiding tight coupling
Abstracting fragment relationships
Encapsulating fragment operations
Loosely connecting the pieces
Fragments protect against the unexpected
Evolving layout resource files
Creating the book description activity
1
5
5
6
7
7
8
8
9
10
11
11
14
16
18
19
19
20
22
25
27
30
30
30
33
34
36
36
37
Table of Contents
Making the MainActivity class adaptive
Summary
Chapter 3: Fragment Lifecycle and Specialization
Understanding the fragment lifecycle
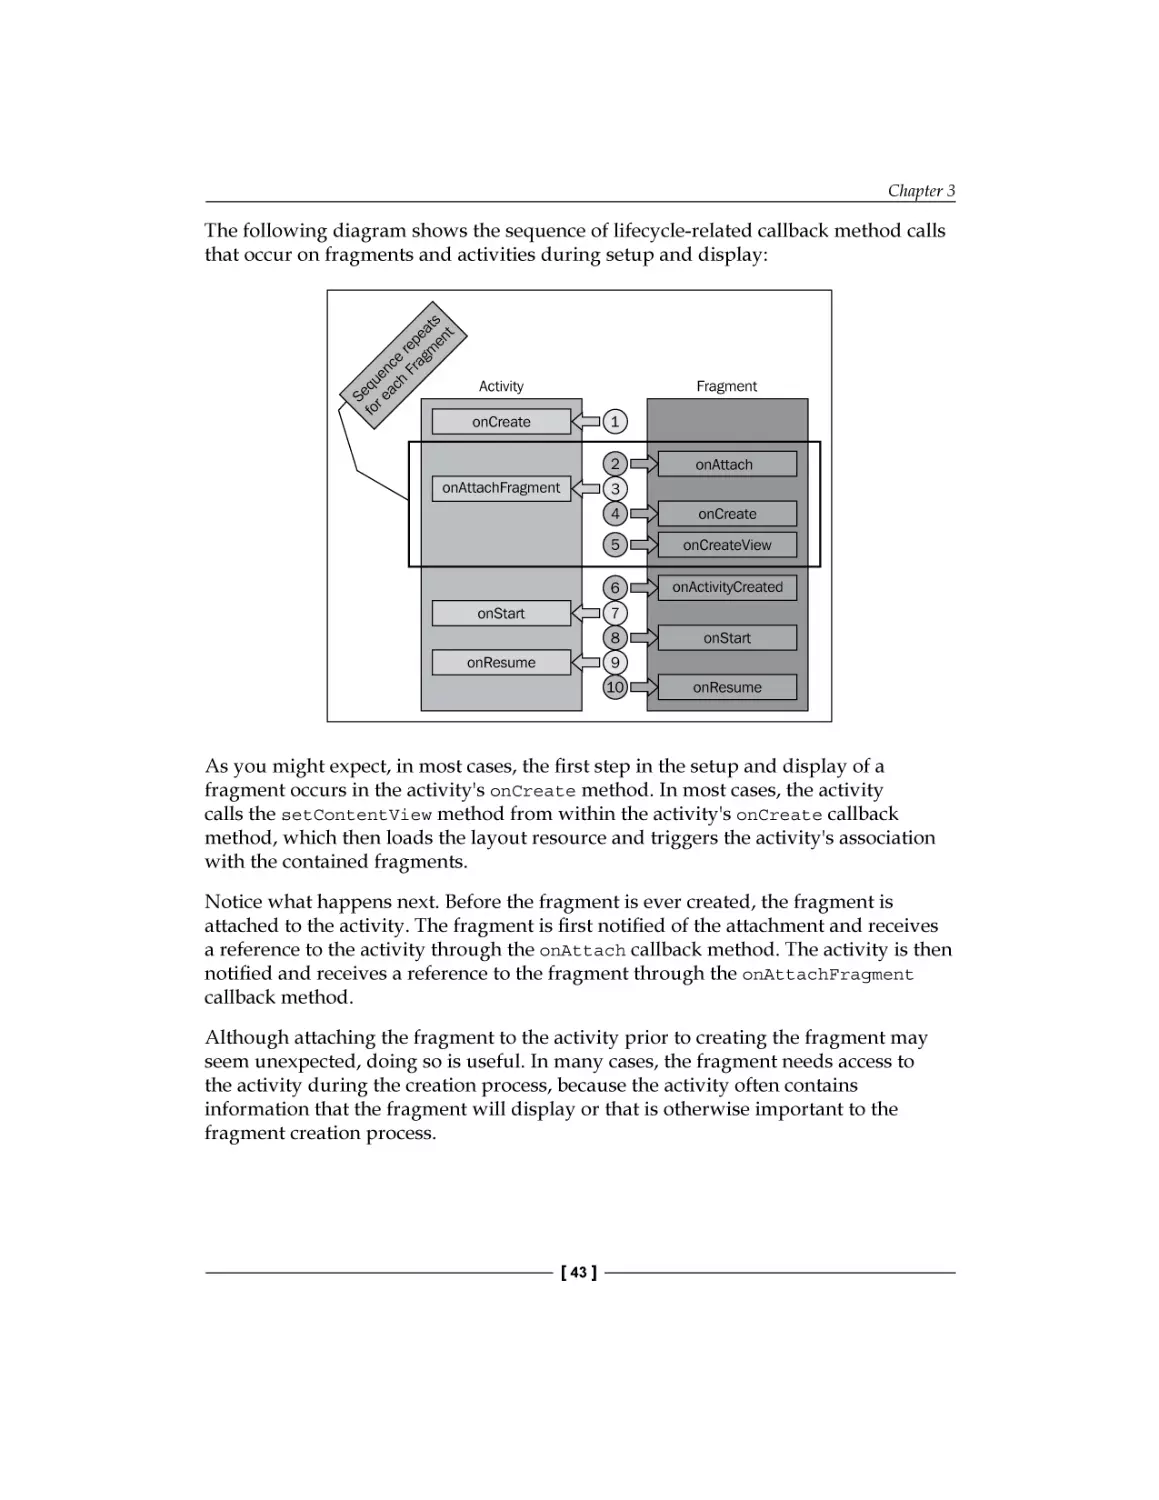
Understanding fragment setup and display
Avoiding method name confusion
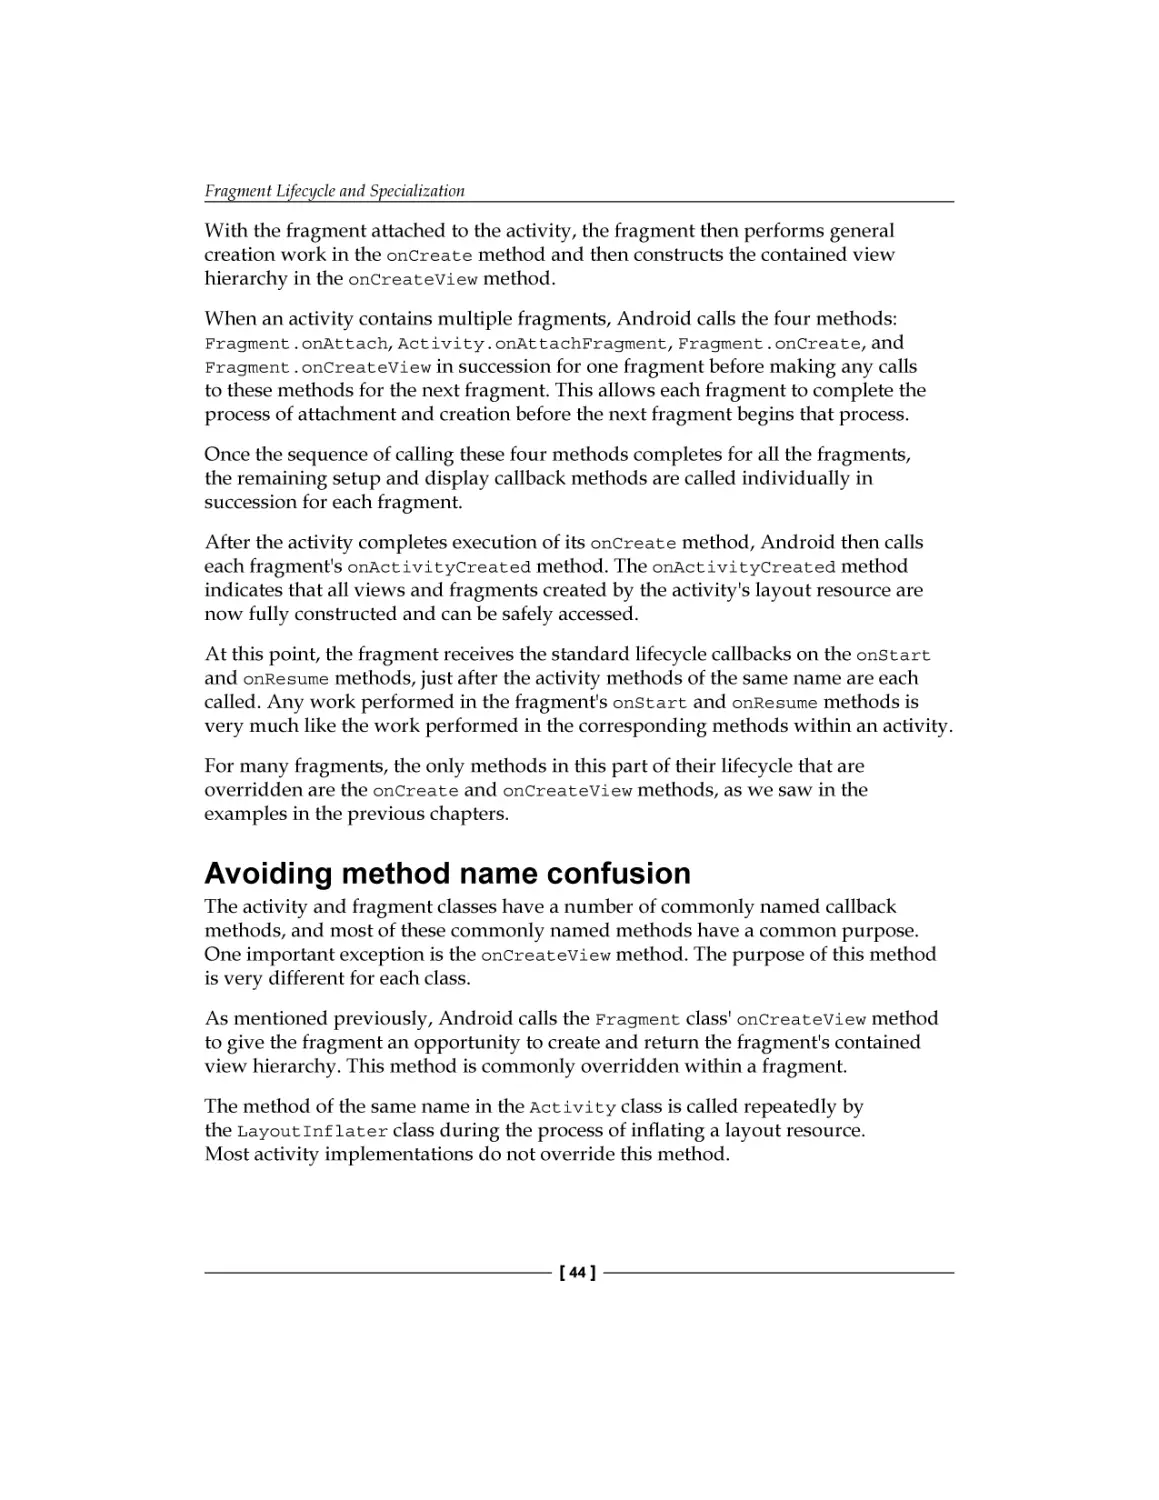
Understanding fragment hide and teardown
Maximizing available resources
Managing a fragment state
Special purpose fragment classes
ListFragment
38
40
41
42
42
44
45
46
46
47
47
Associating data with the list
Separating data from display
47
48
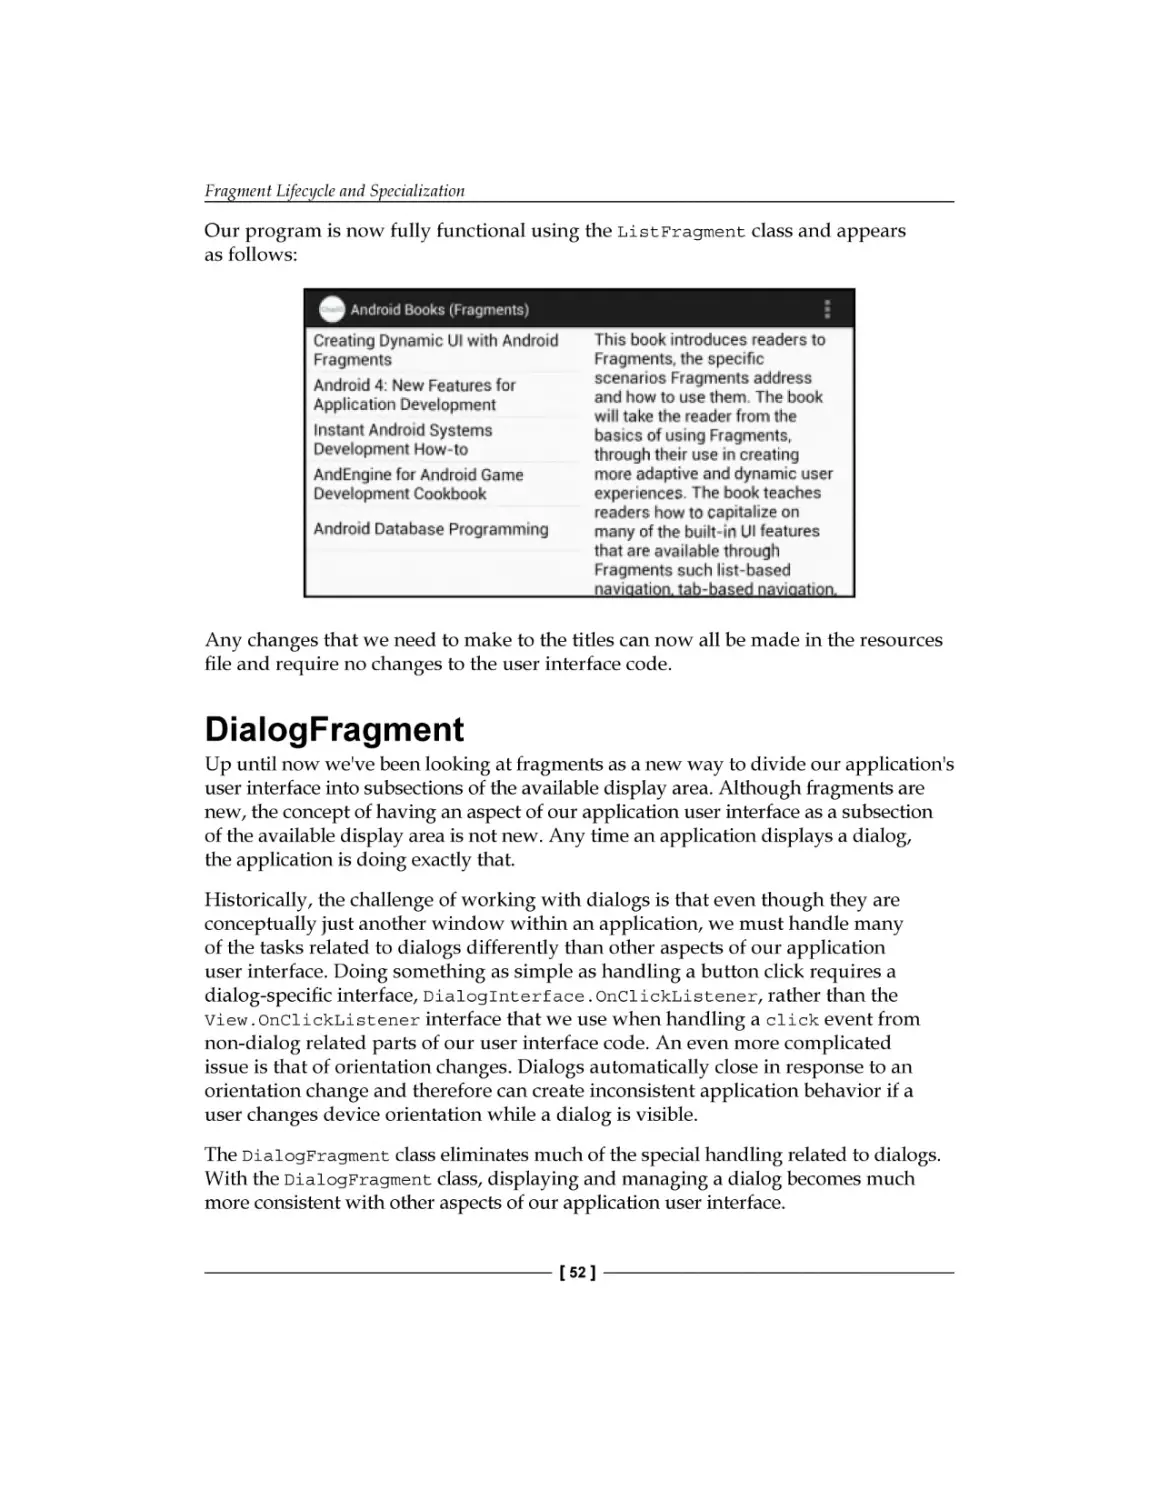
DialogFragment
52
Styles
Layout
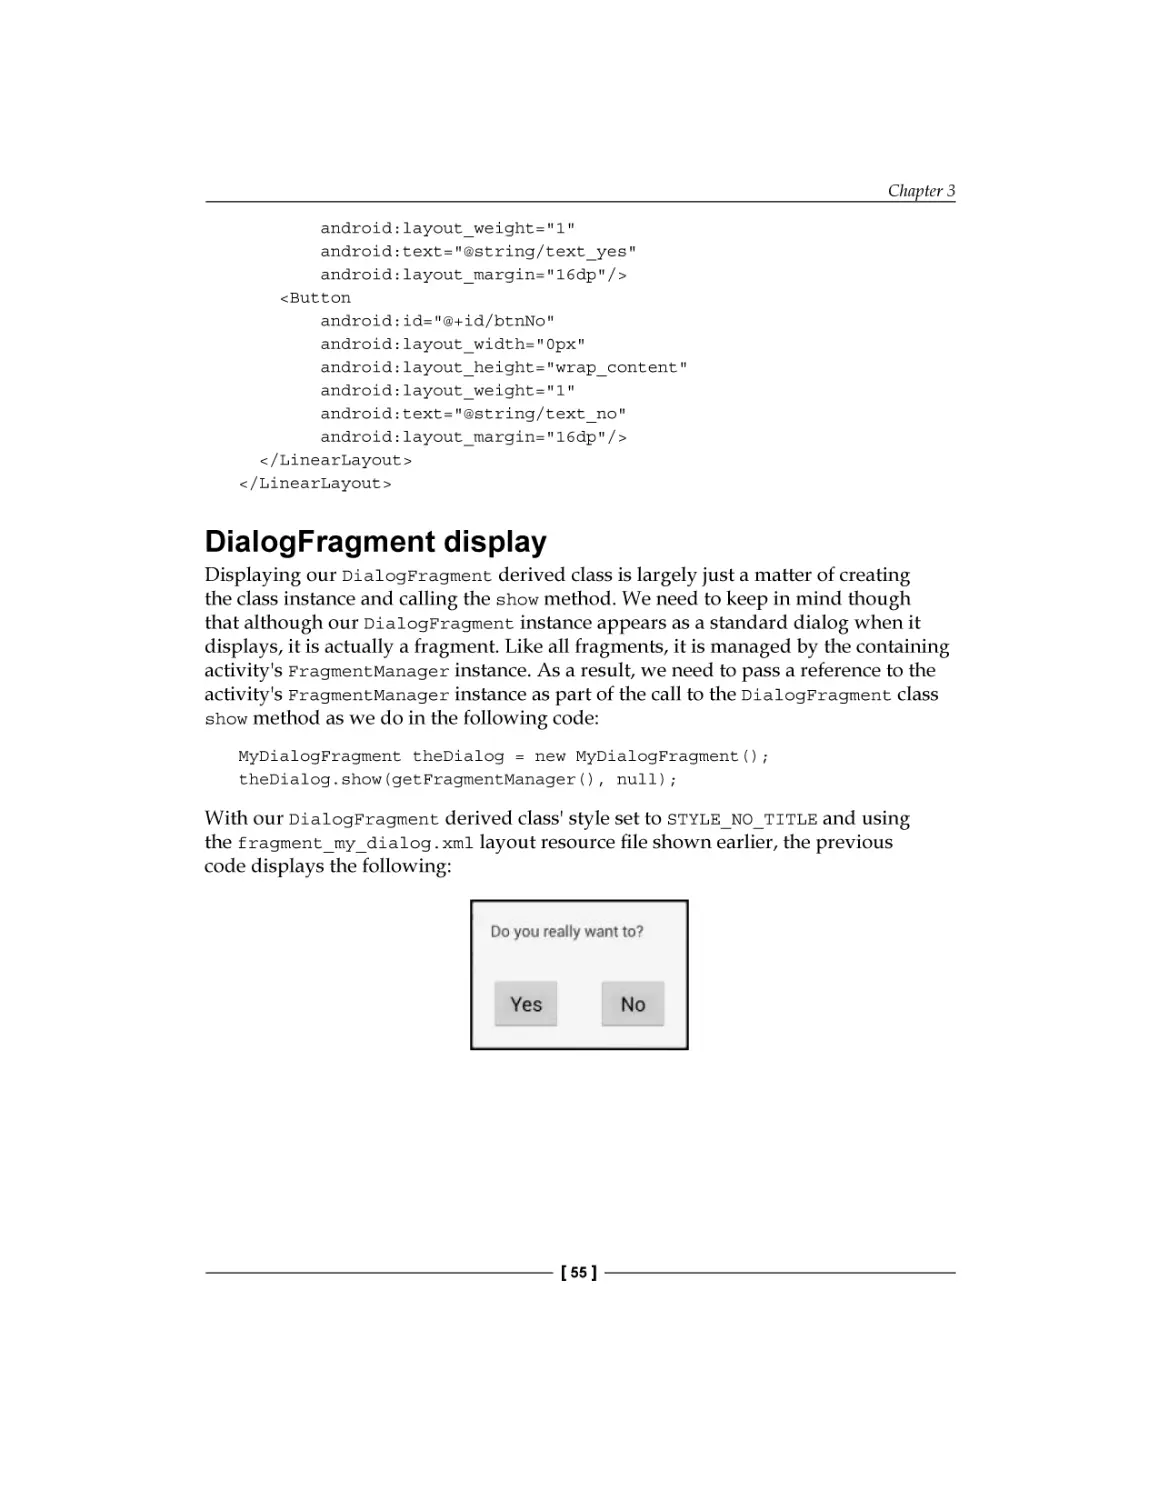
DialogFragment display
Event handling
Dialog identity
53
54
55
56
57
Summary
Chapter 4: Working with Fragment Transactions
Intentional screen management
Dynamically managing fragments
Deferred execution of transaction changes
Adding and removing fragments
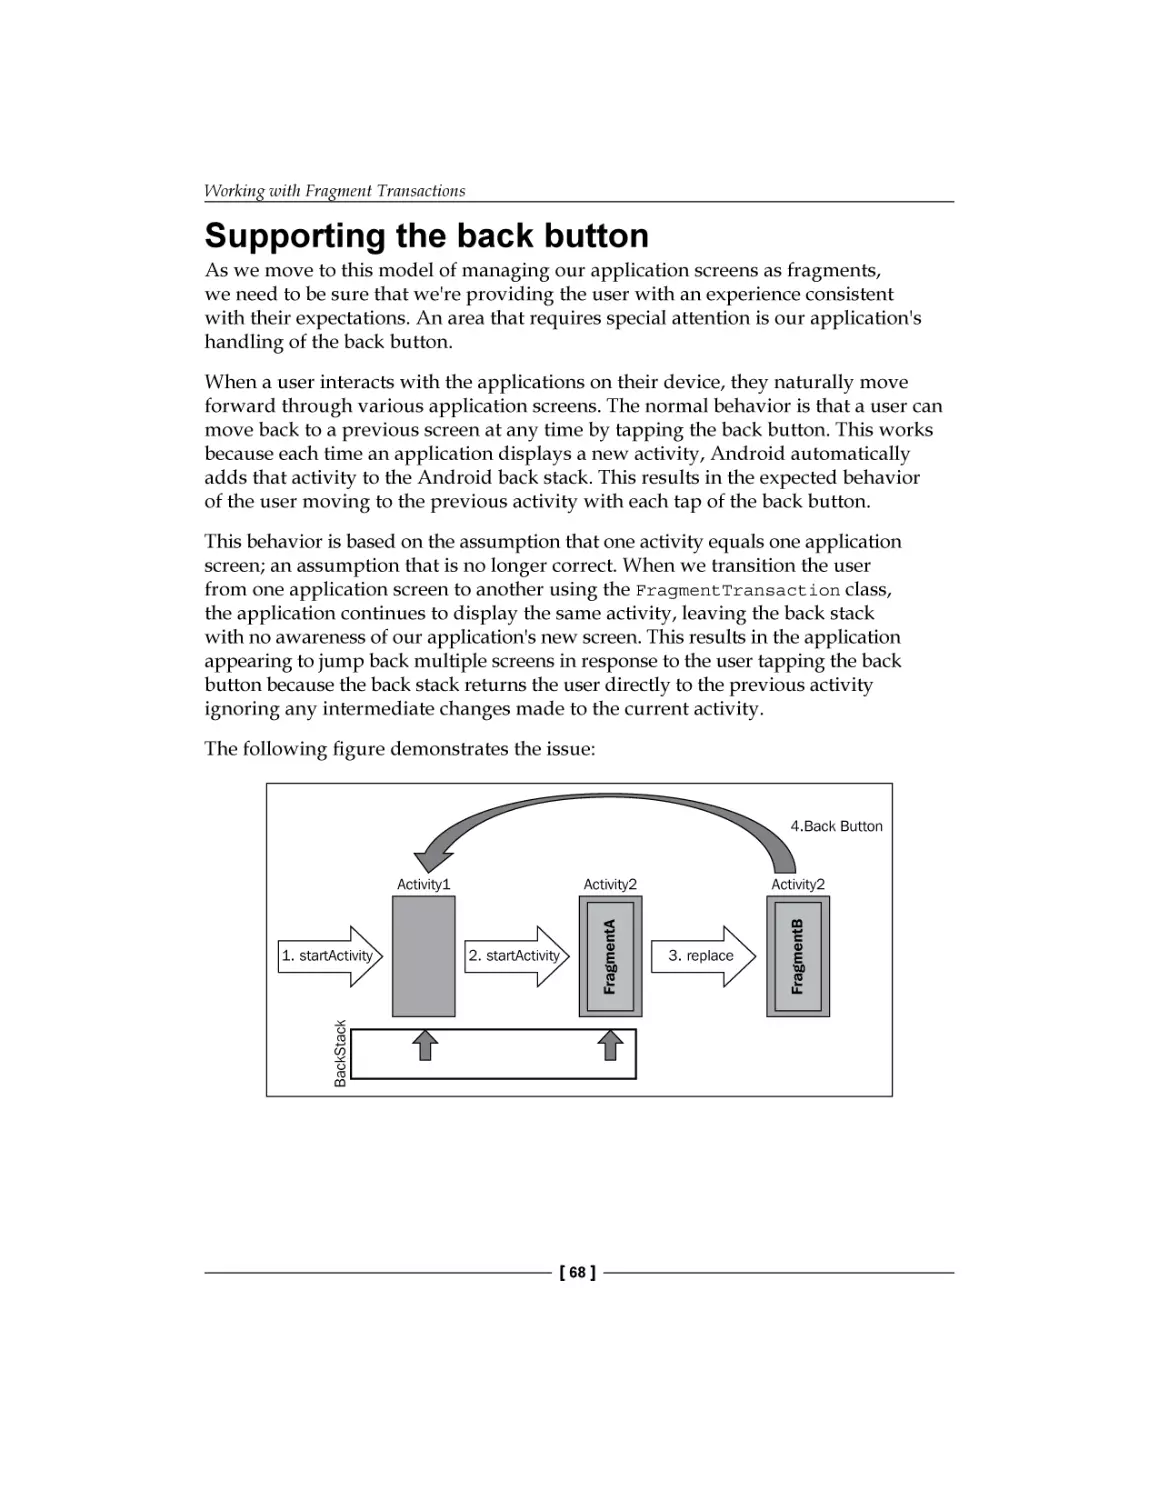
Supporting the back button
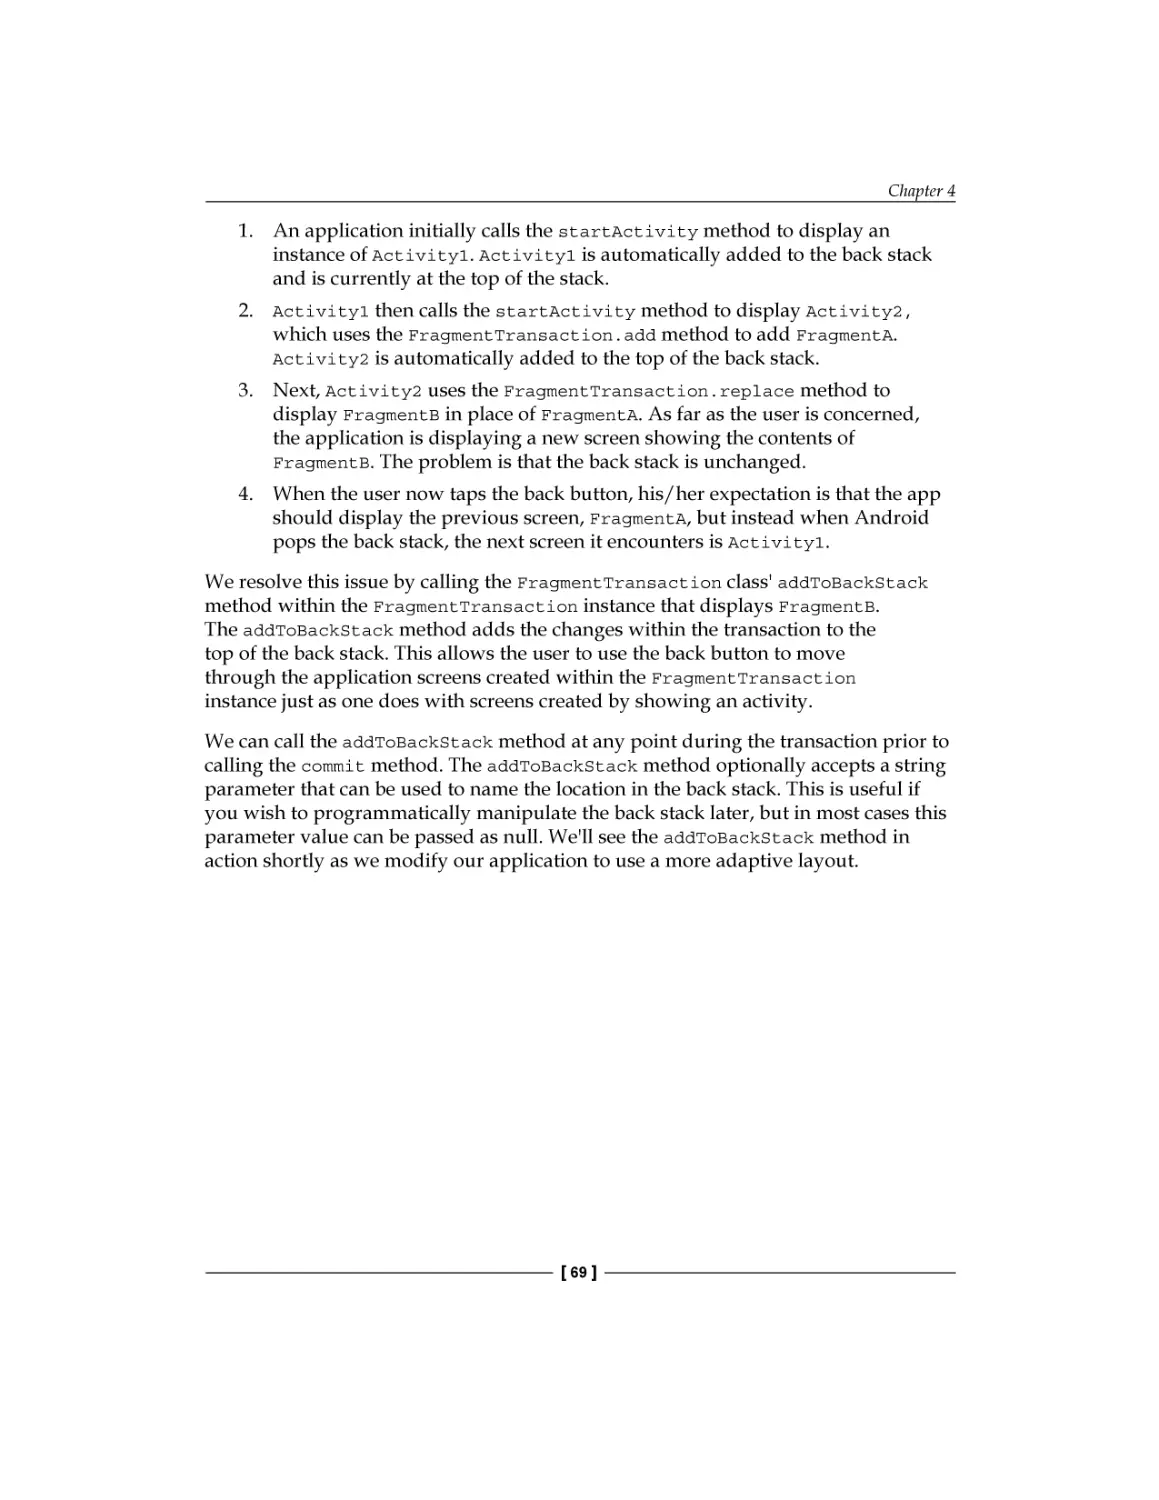
Creating an adaptive application layout
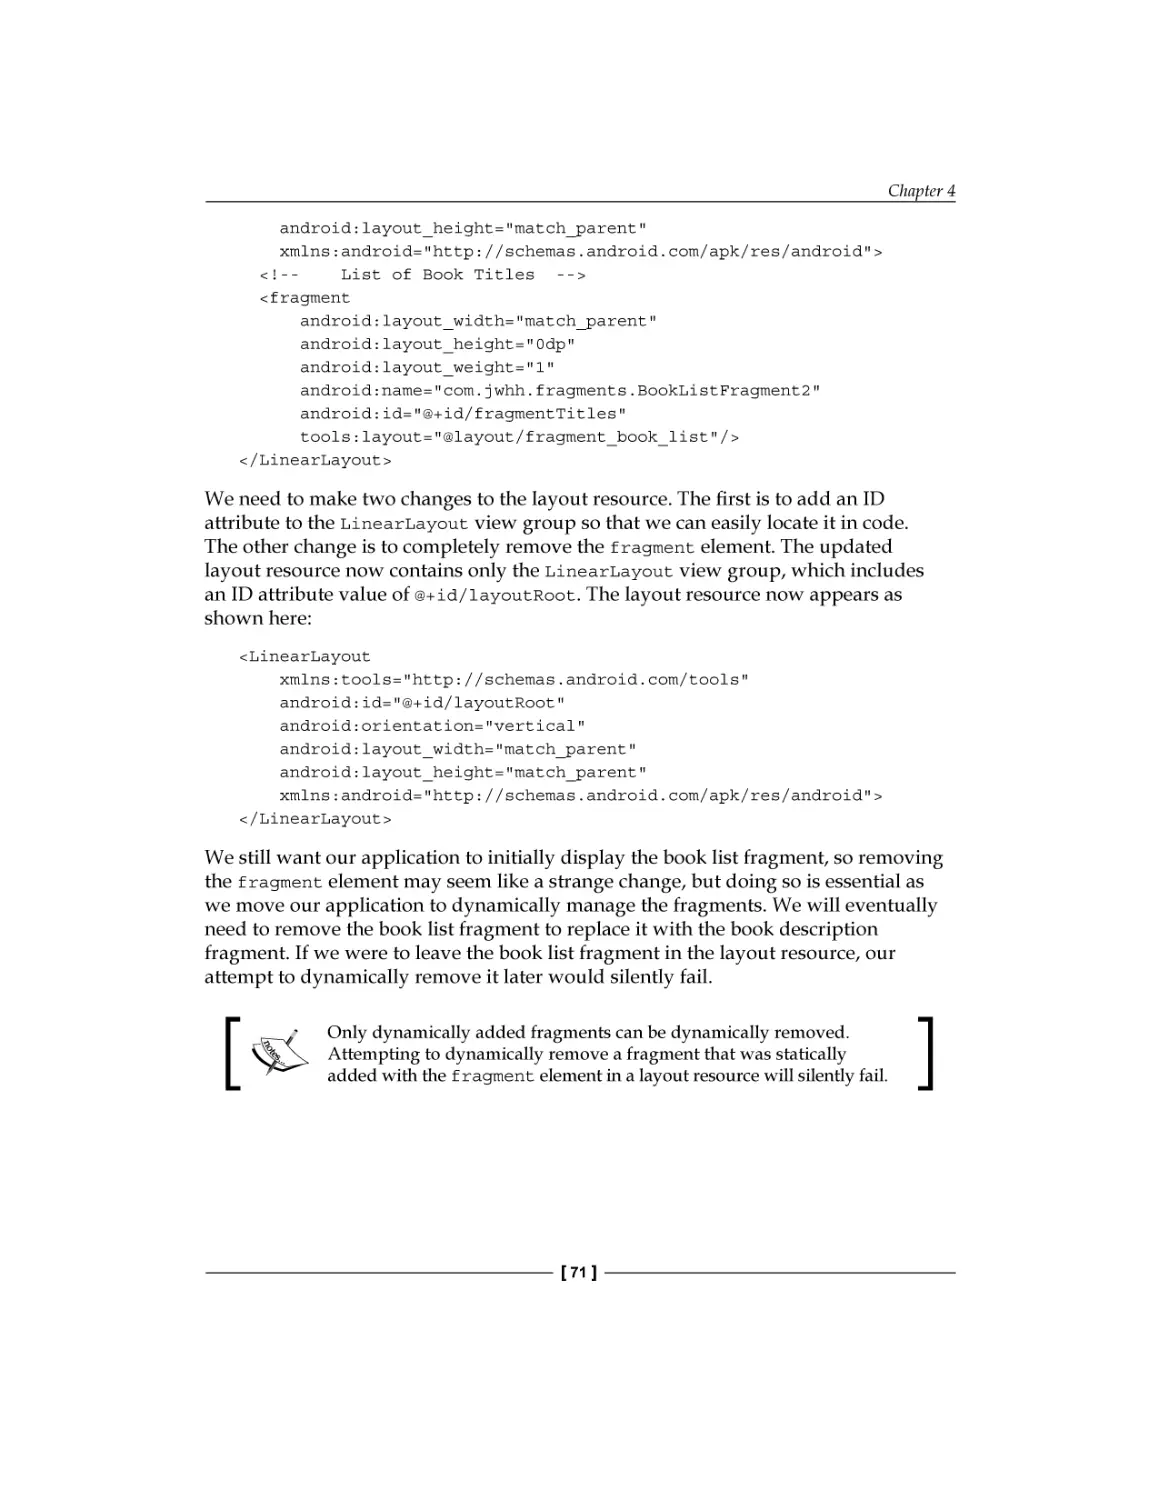
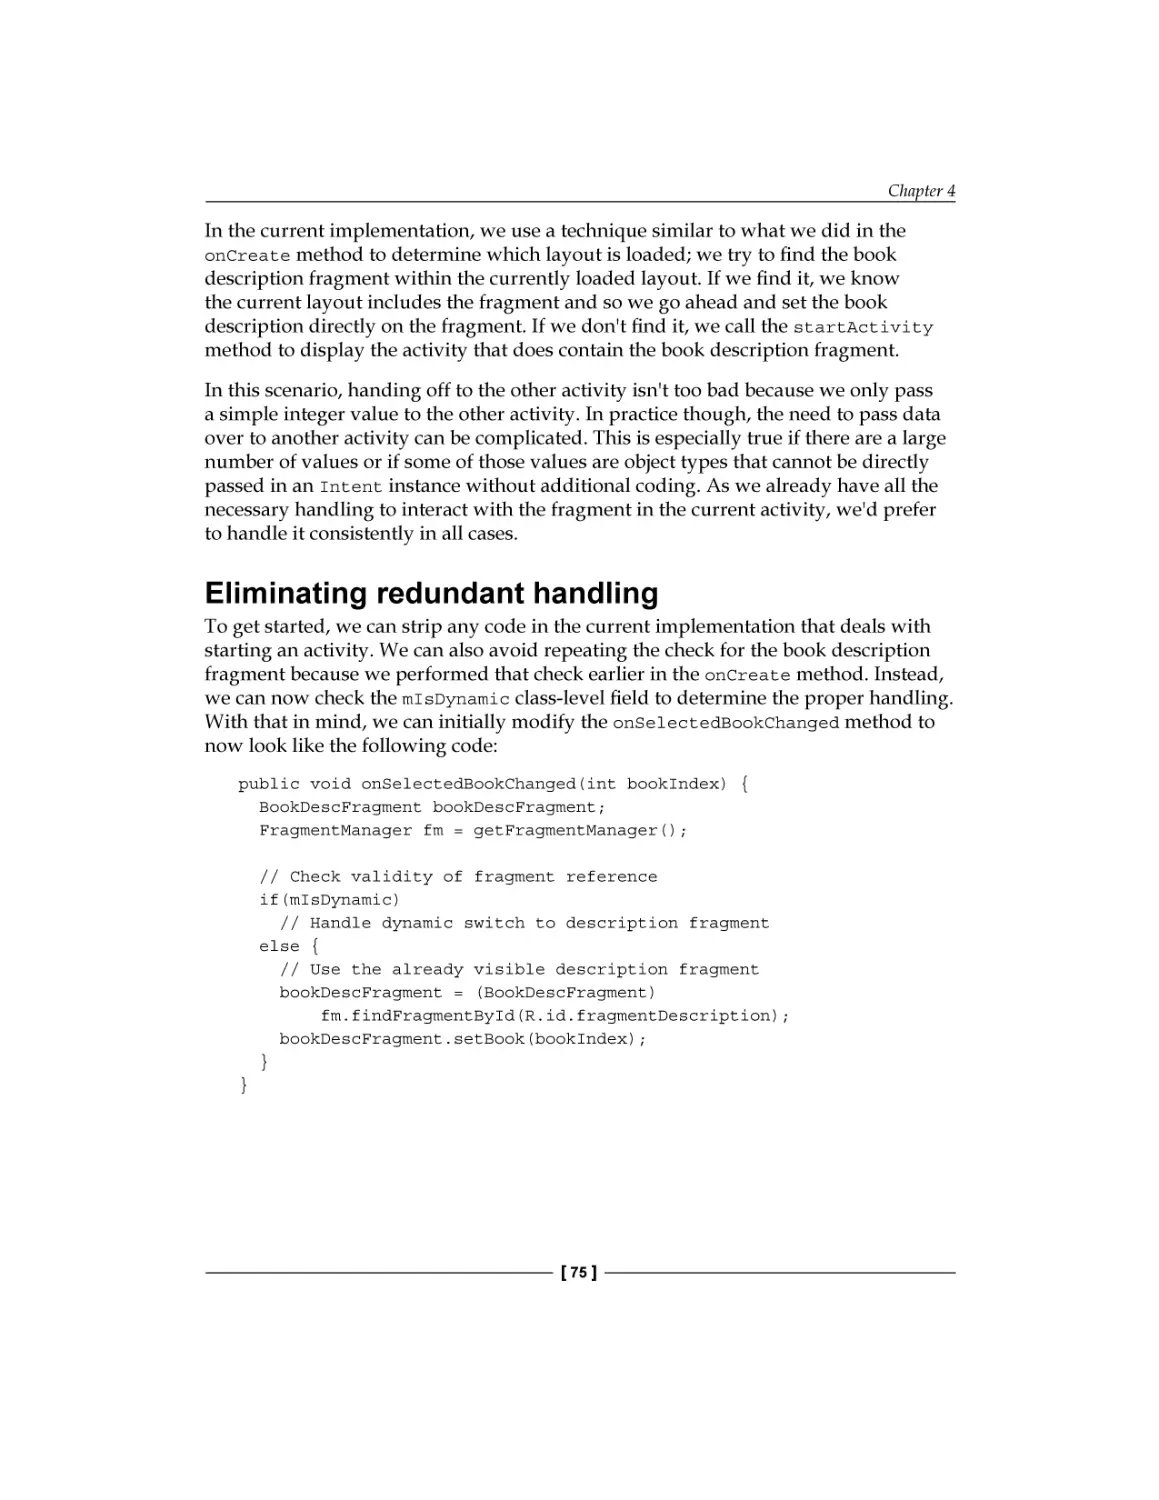
Updating the layout to support dynamic fragments
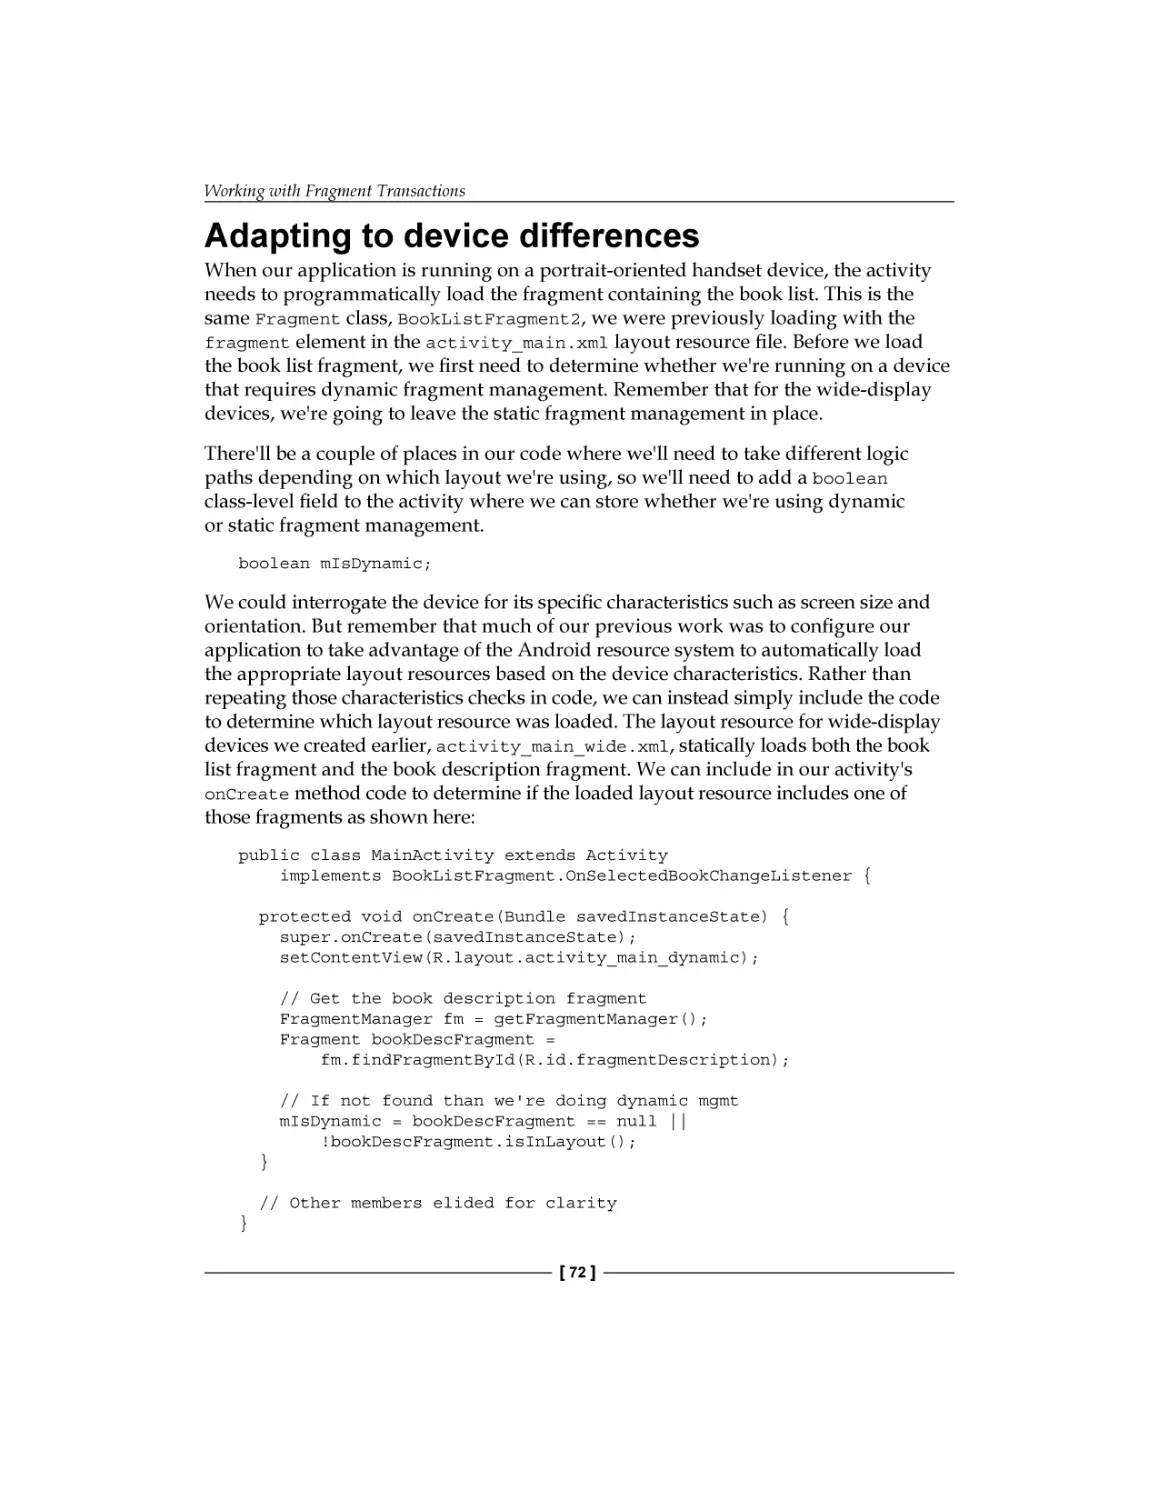
Adapting to device differences
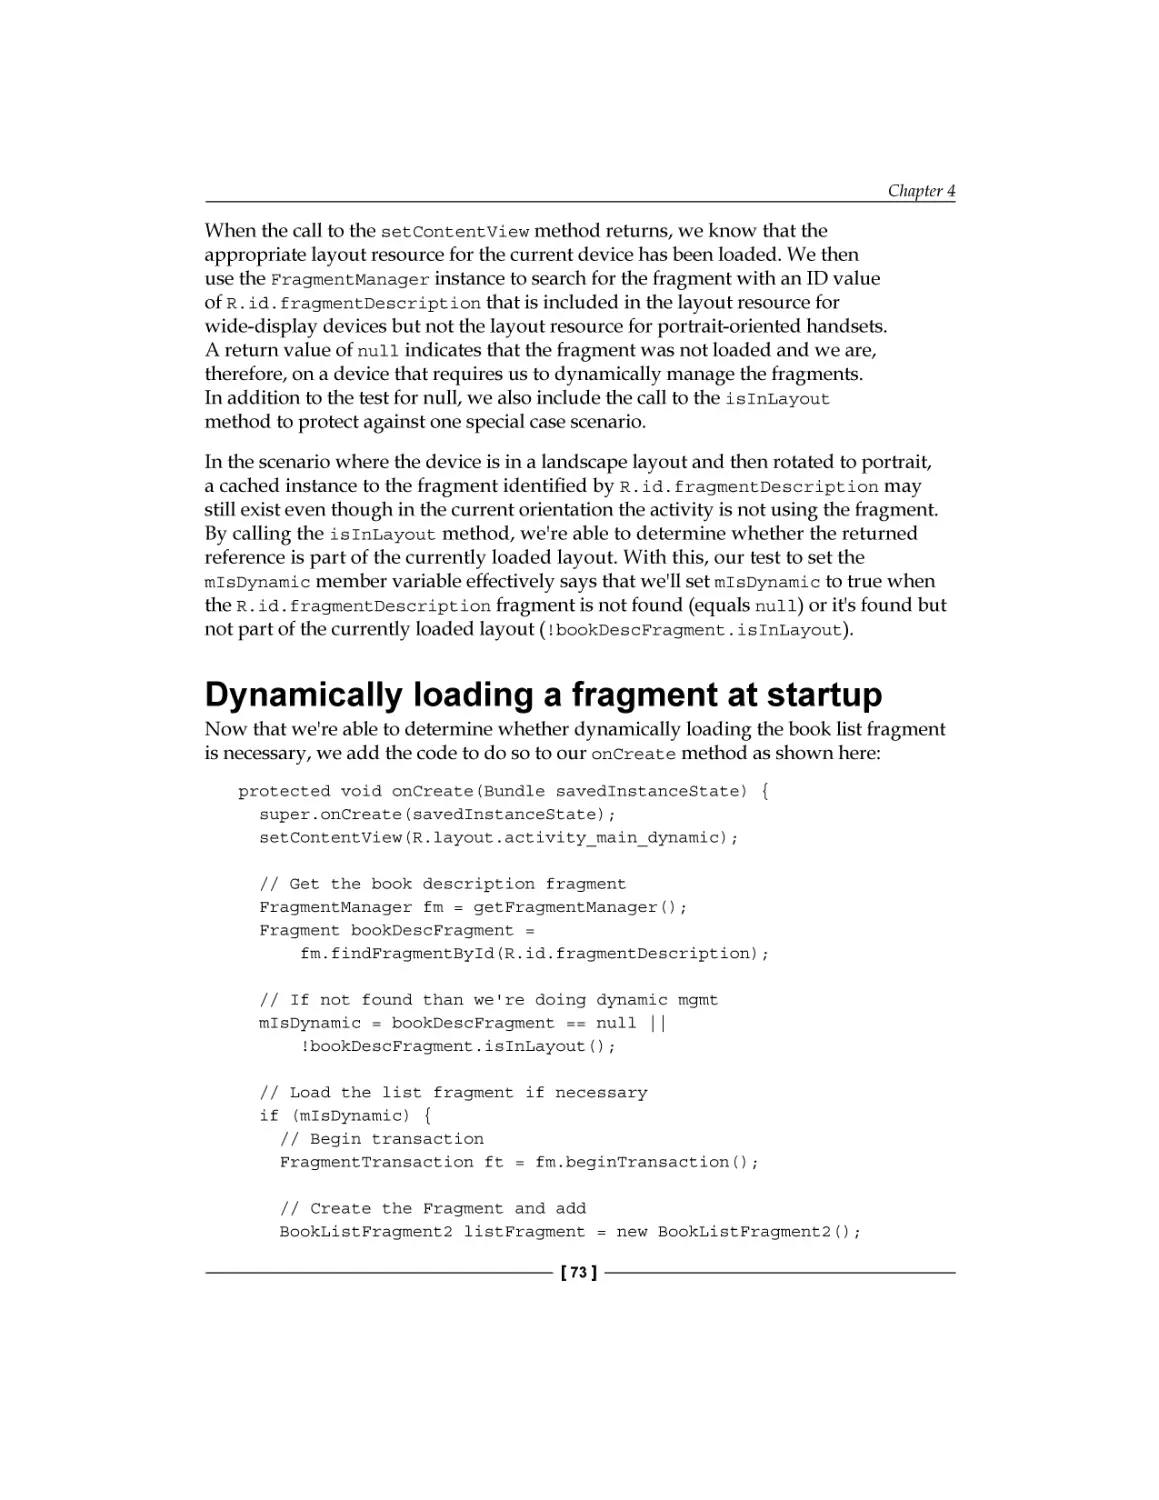
Dynamically loading a fragment at startup
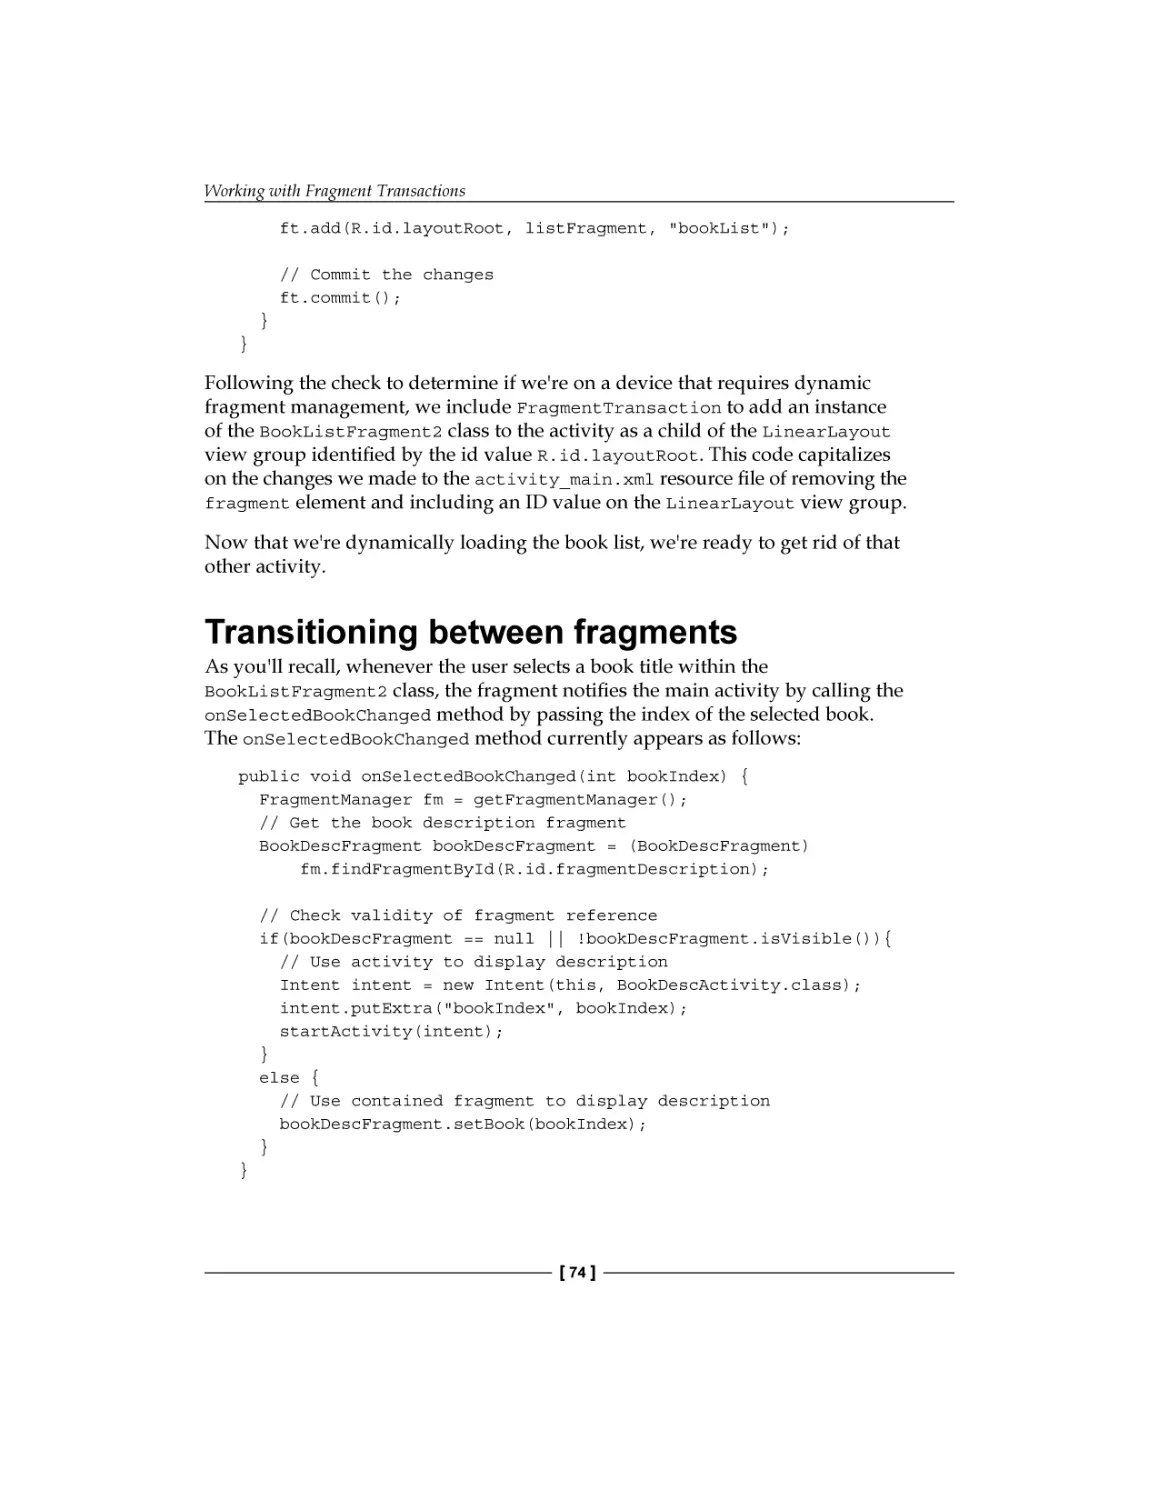
Transitioning between fragments
Eliminating redundant handling
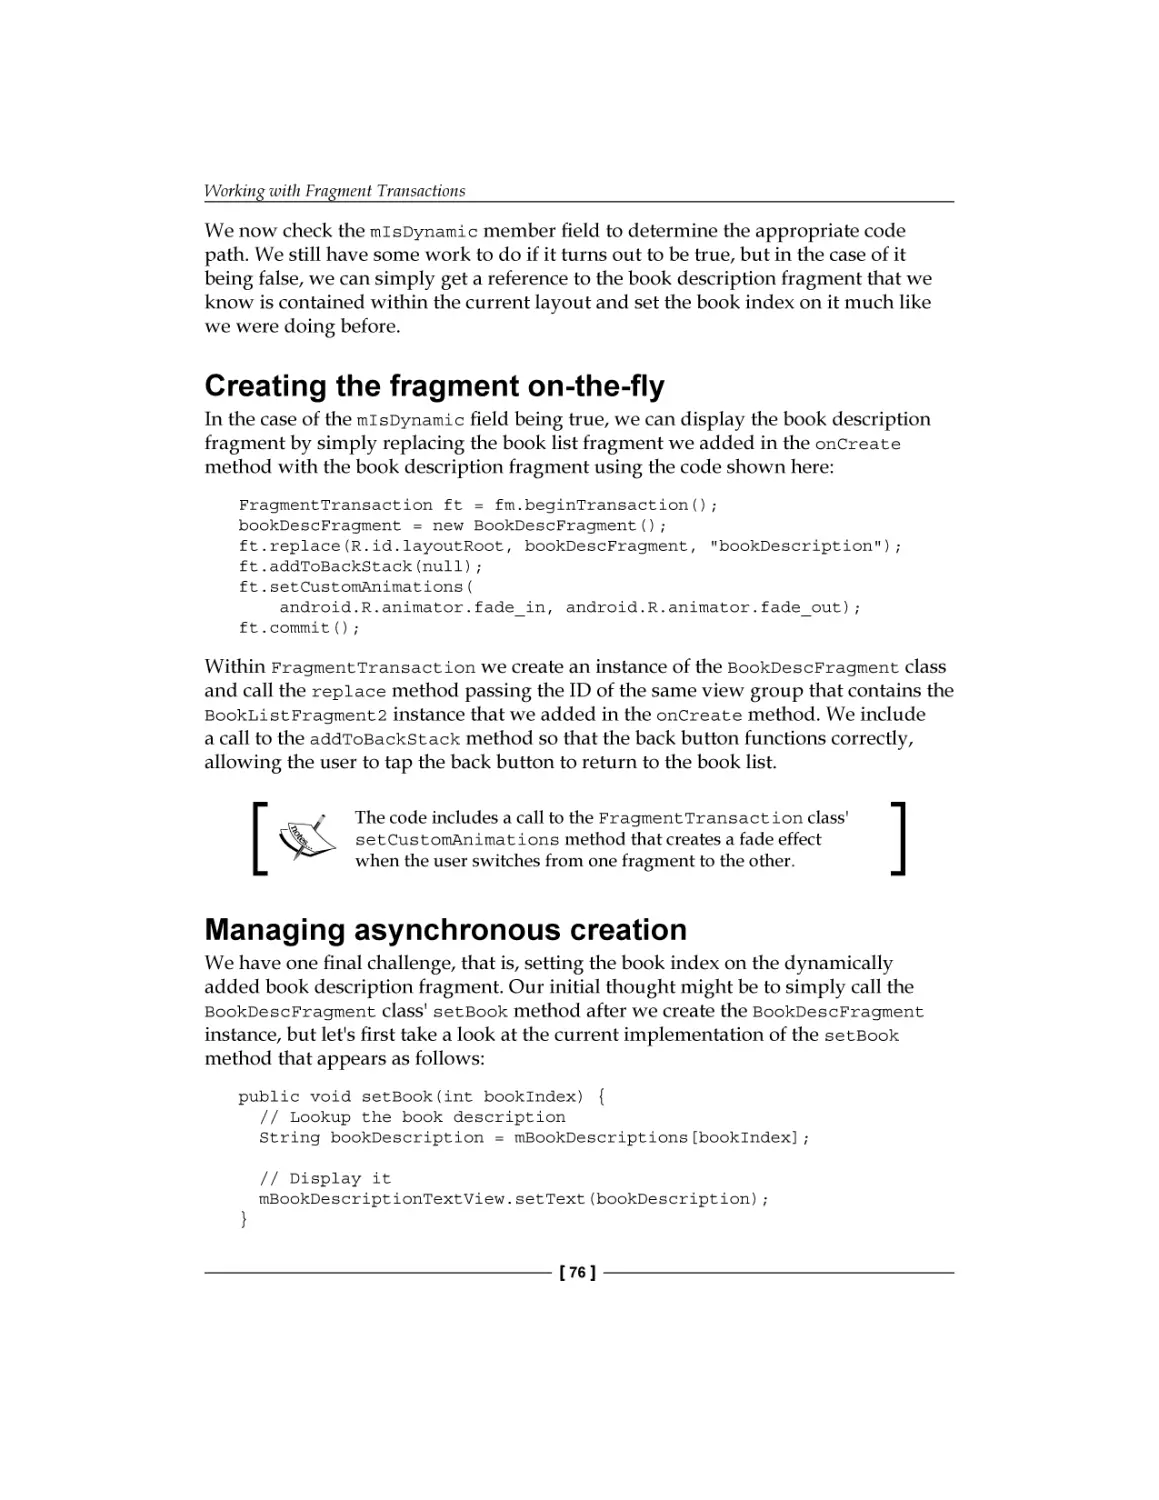
Creating the fragment on-the-fly
Managing asynchronous creation
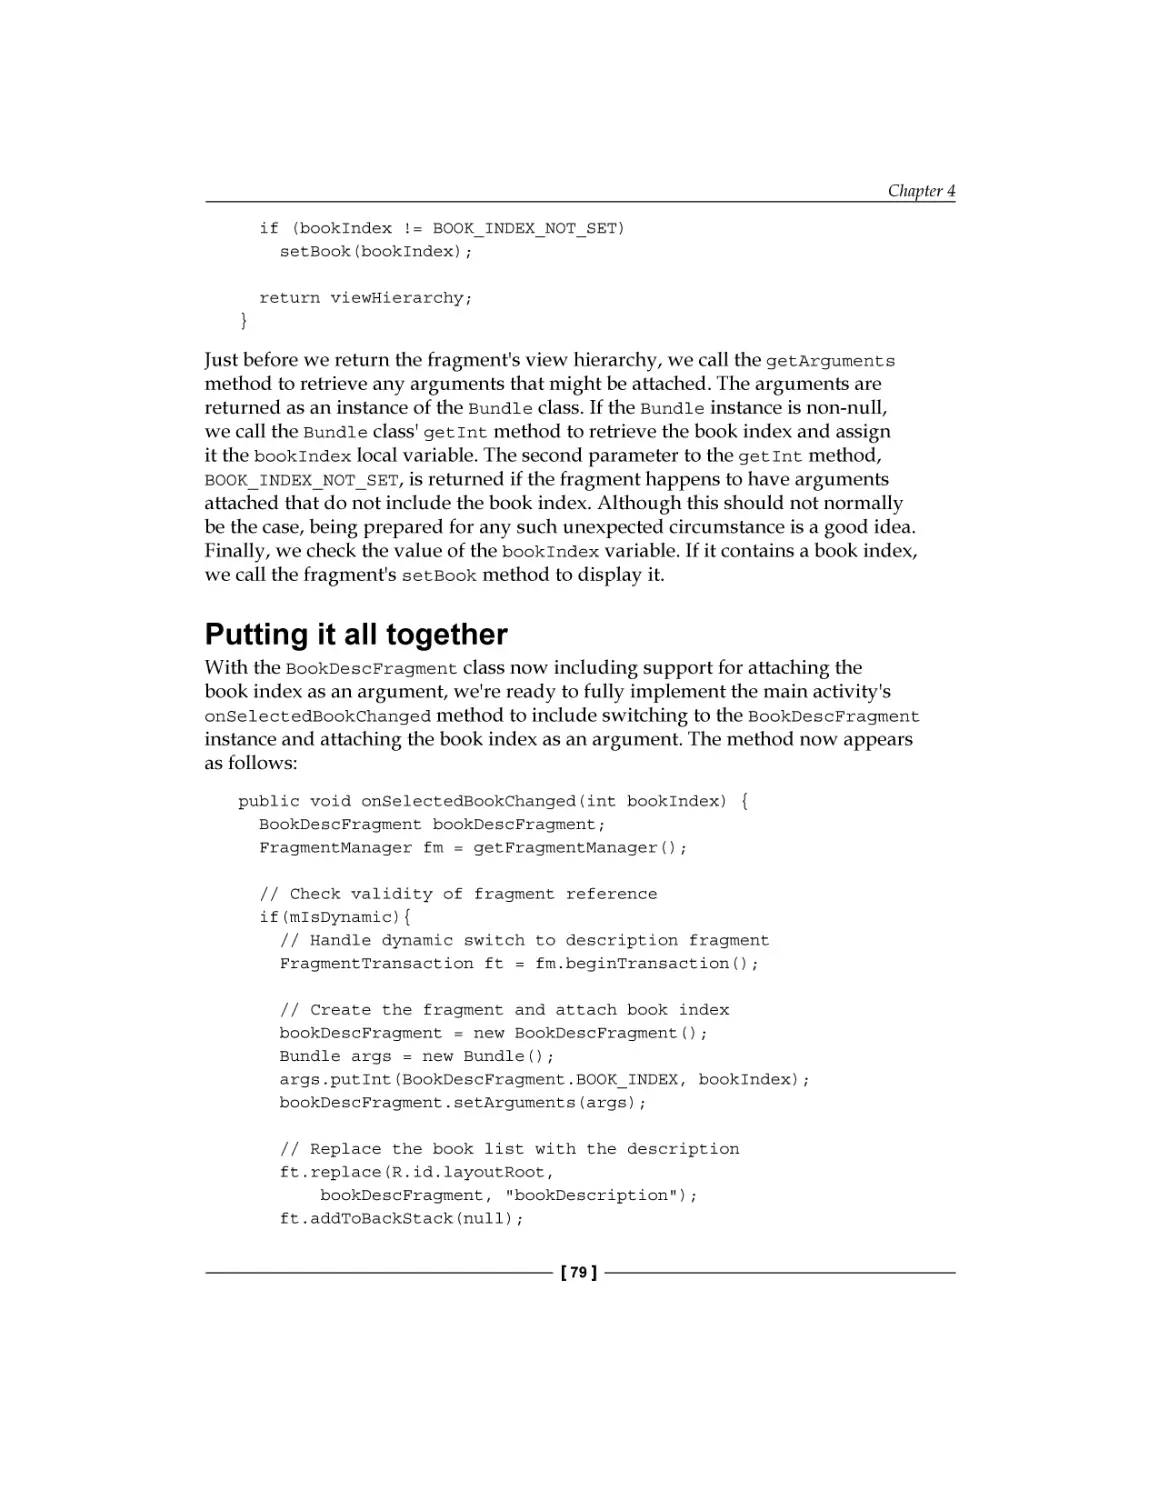
Putting it all together
Summary
Chapter 5: Creating Rich Navigation with Fragments
A brave new world
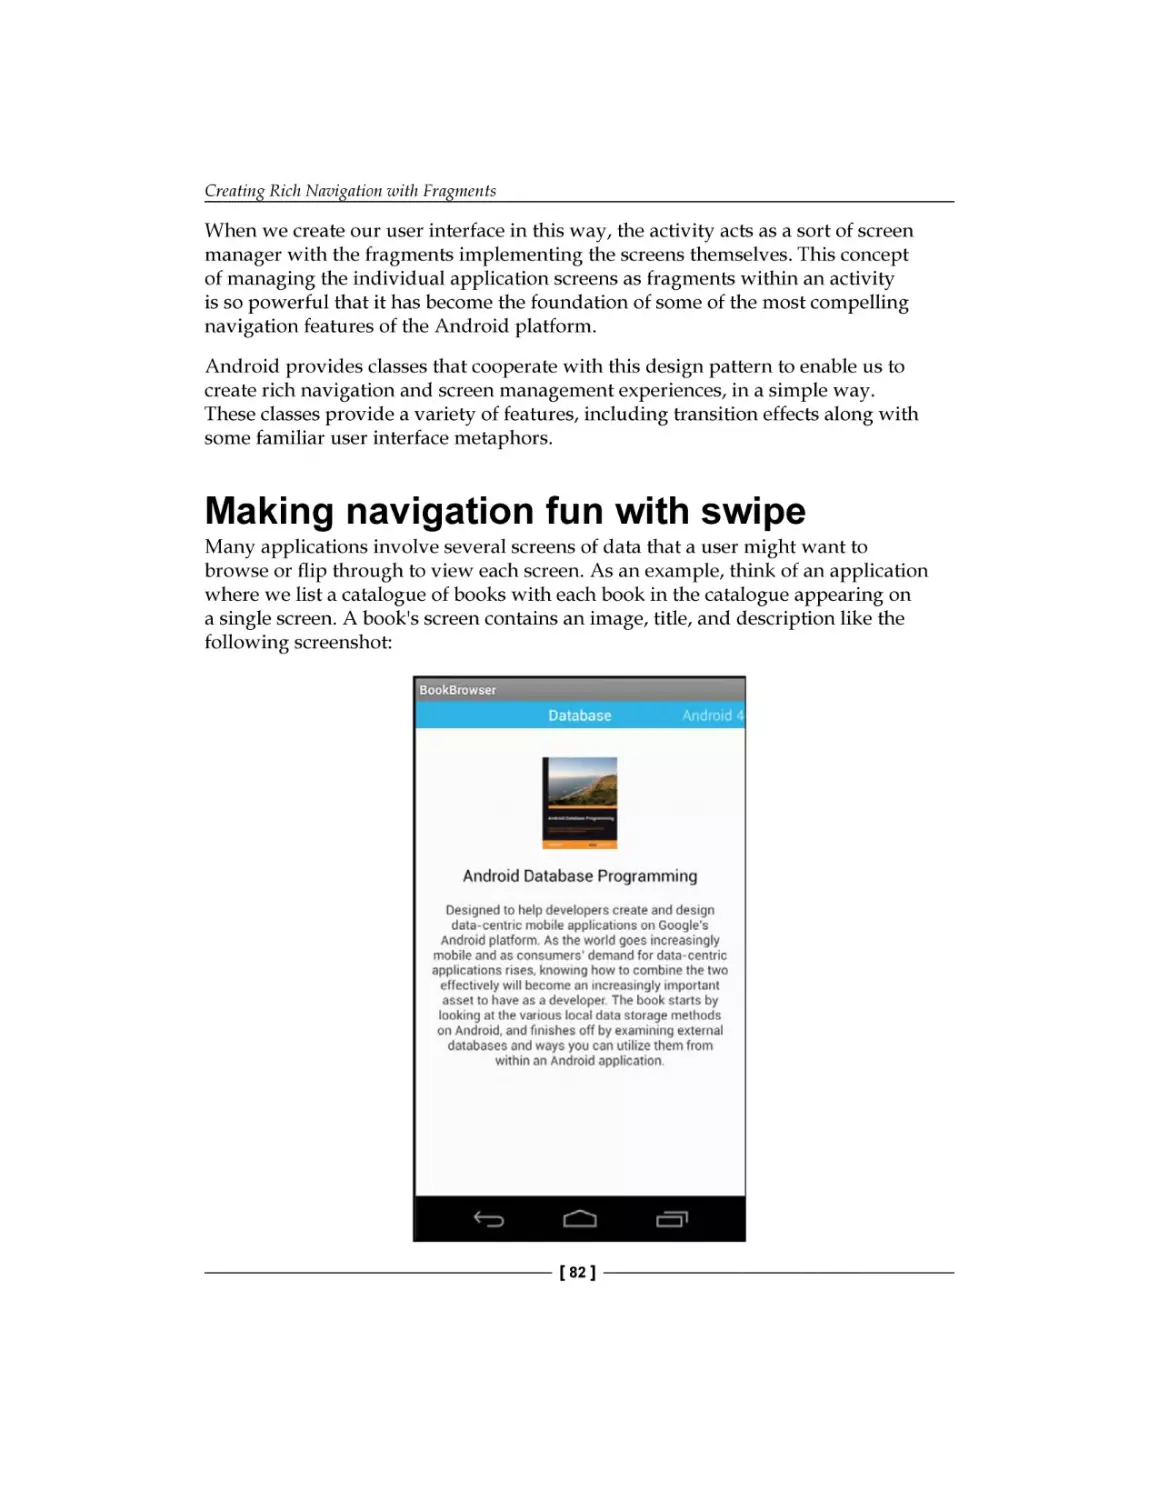
Making navigation fun with swipe
Implementing swipe navigation
Managing the swipe fragments
Putting the swipe UI into place
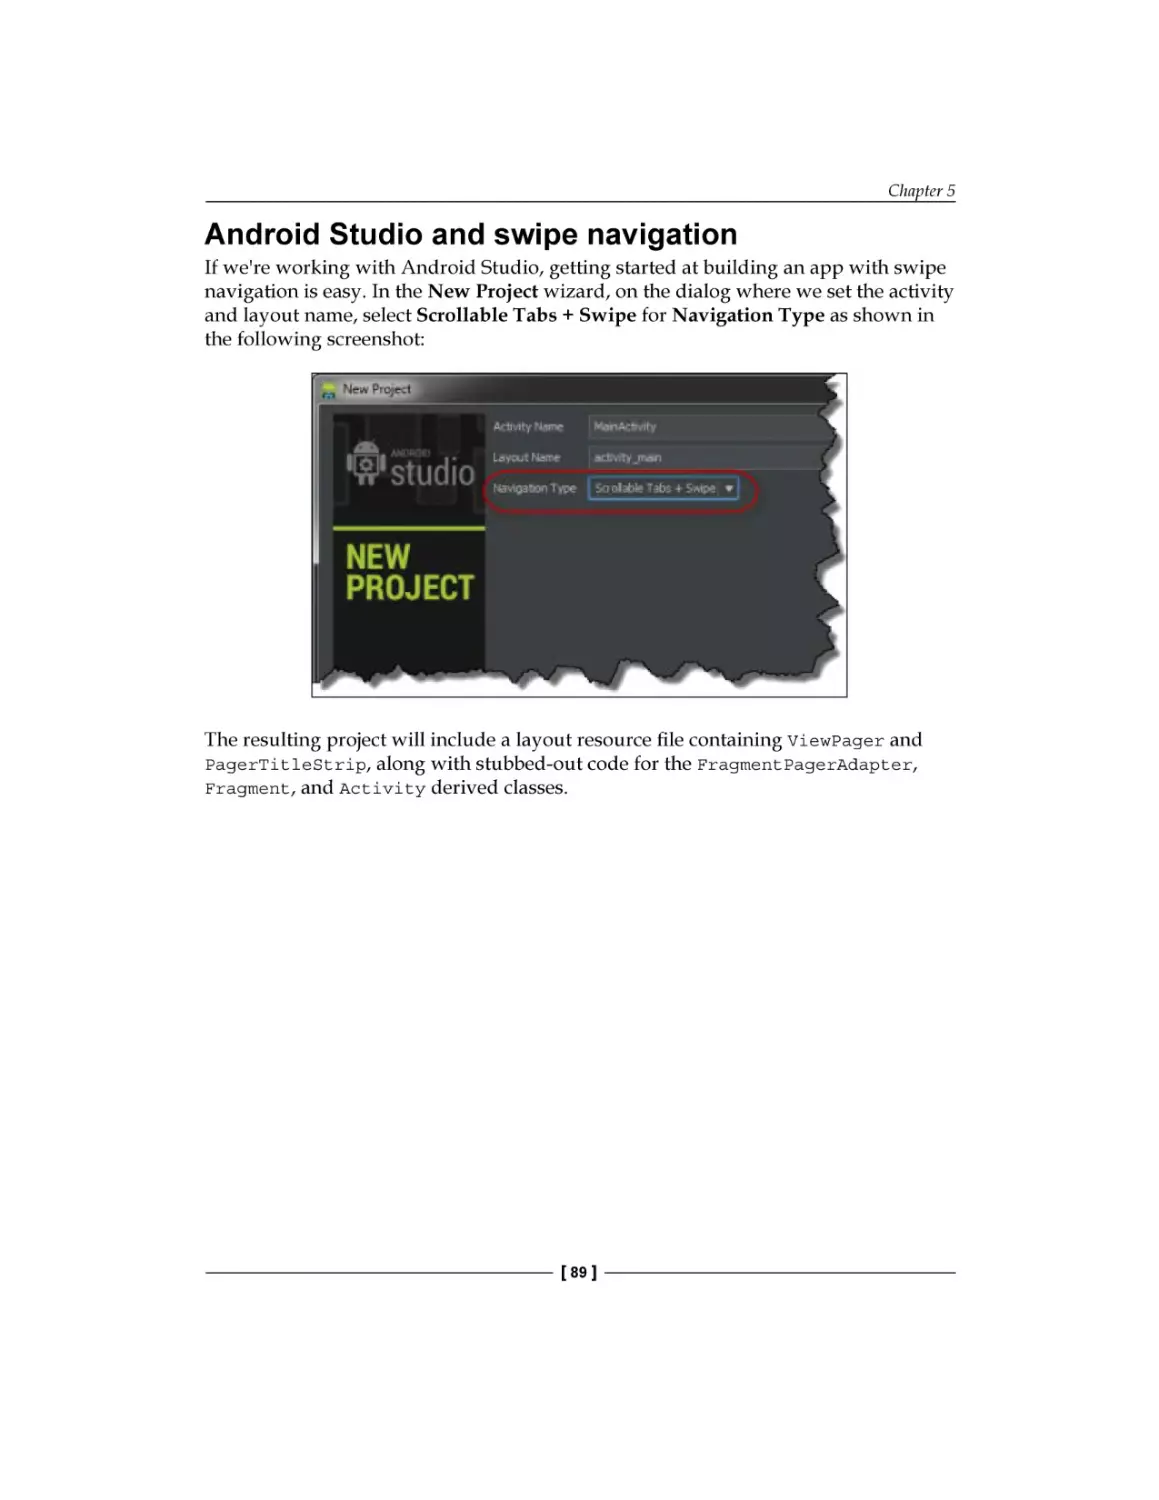
Android Studio and swipe navigation
61
63
63
64
65
66
68
70
70
72
73
74
75
76
76
79
80
81
81
82
84
84
86
89
[ ii ]
Table of Contents
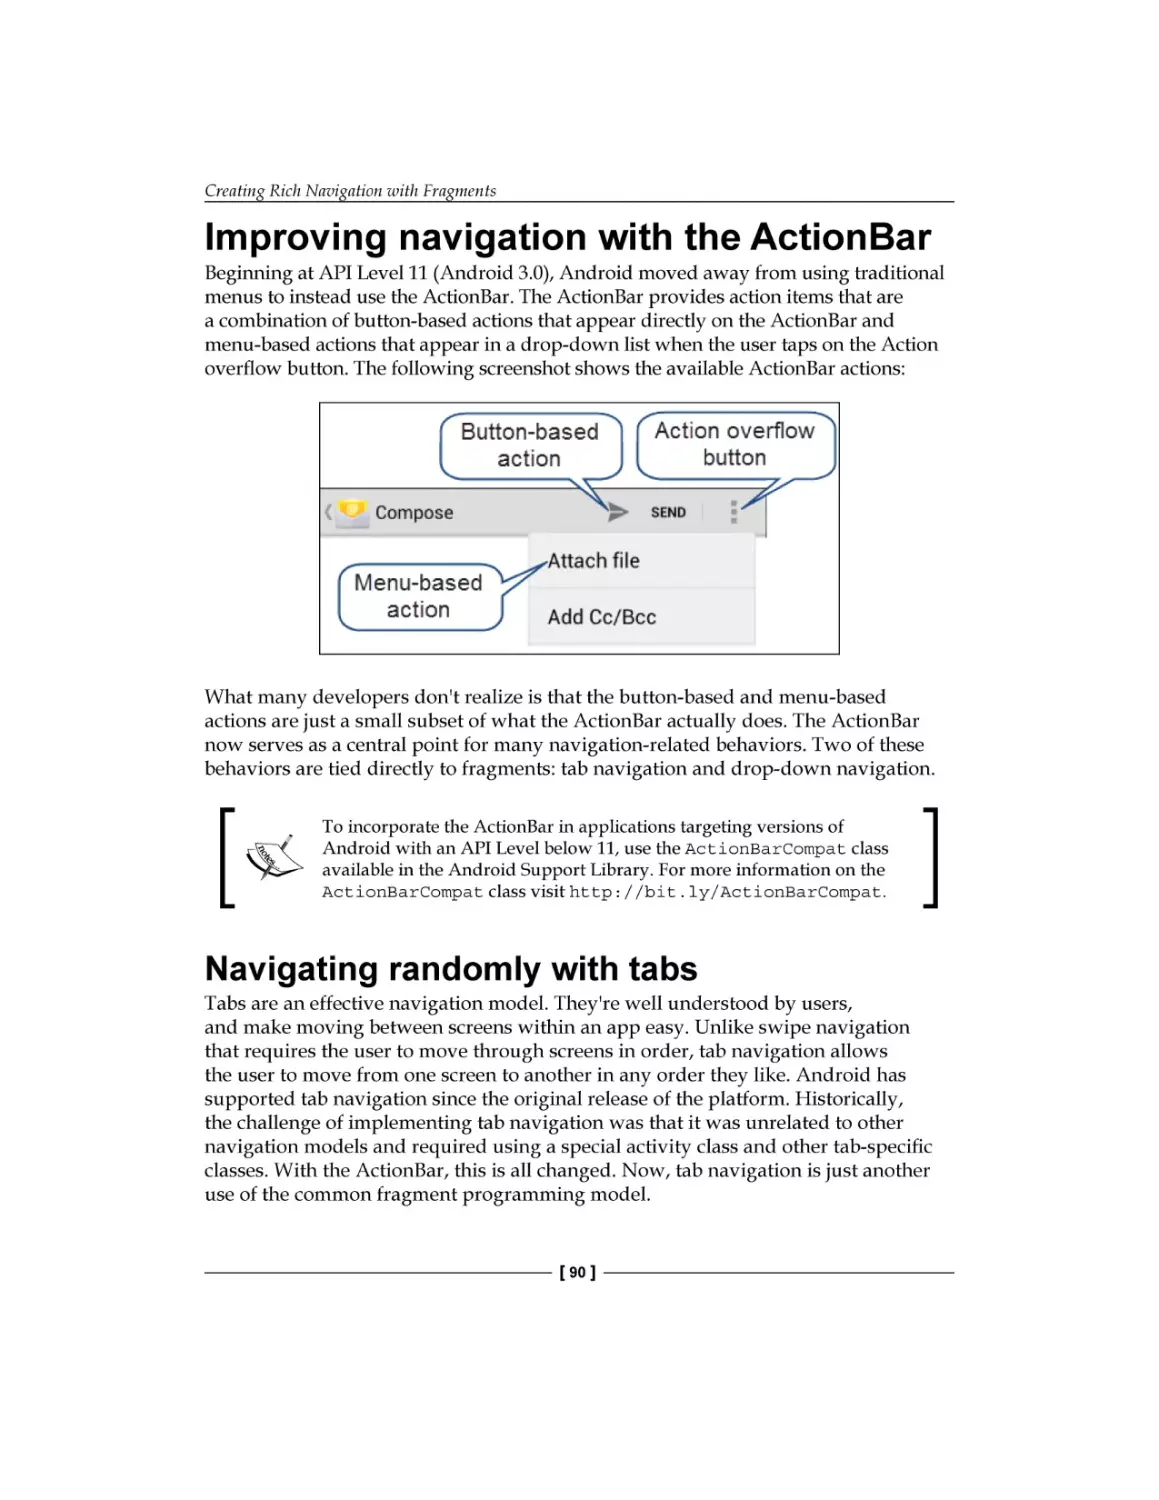
Improving navigation with the ActionBar
Navigating randomly with tabs
Managing tab selection
Connecting the fragments to the tabs
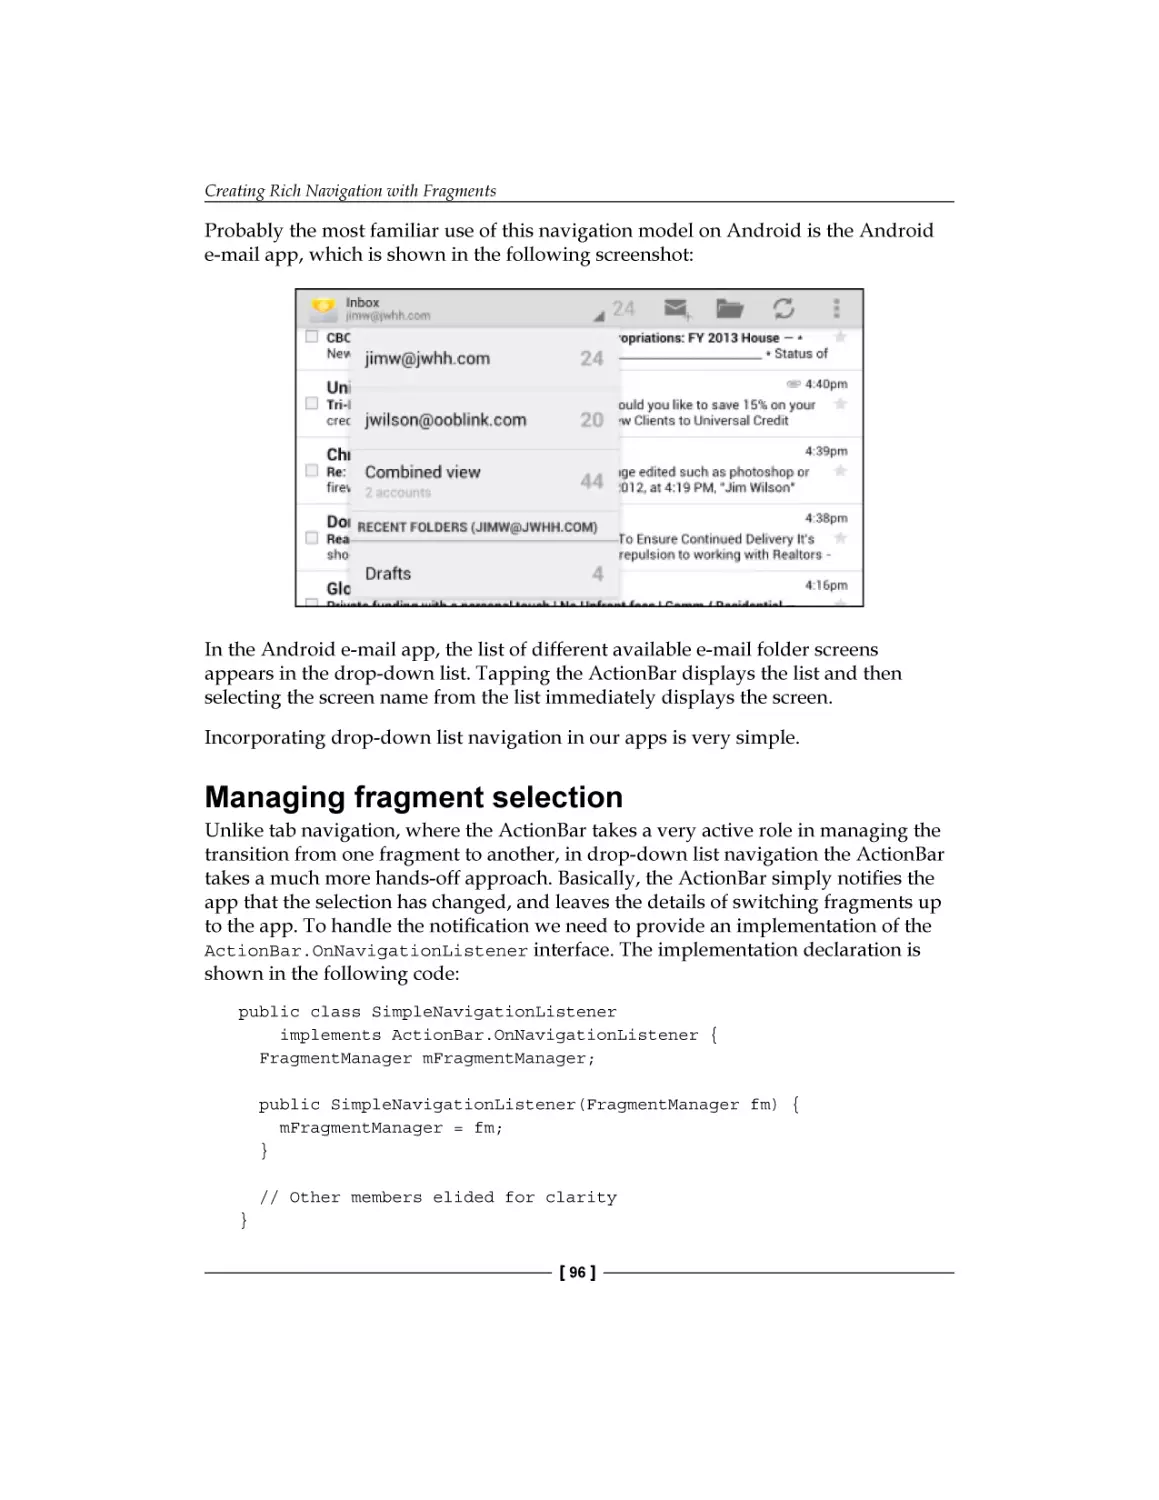
Providing direct access with drop-down list navigation
Managing fragment selection
Providing the navigation choices
Android Studio and drop-down list navigation
Summary
Index
90
90
91
94
95
96
98
100
100
101
[ iii ]
Preface
Long gone are the days of the mobile apps with a static UI squished onto a tiny screen.
Today's users expect mobile apps to be dynamic and highly interactive. They expect
an app to look fantastic when they're looking at it on their medium-resolution
smartphone, and that same app needs to look just as fantastic when they switch
over to using it on their high-resolution tablet. Apps need to provide rich navigation
features. Also, apps need to be adaptive and responsive.
Trying to meet these demands using Android's traditional activity-centric UI
design model is difficult. As developers, we need more control than that afforded
by activities. We need a new approach: fragments give us that new approach.
In this book, you'll learn how to use fragments to meet the challenges of creating
dynamic UIs in the modern world of mobile app development.
What this book covers
Chapter 1, Fragments and UI Modularization, introduces fragments, UI modularization,
and the role fragments play in developing a modularized UI. This chapter
demonstrates the creation of simple fragments and using fragments statically
within activities.
Chapter 2, Fragments and UI Flexibility, builds on the concepts introduced in the
previous chapter to provide solutions to specific differences in device layouts.
This chapter explains how to use adaptive activity layout definitions to provide
support for a wide variety of device form factors, with a small set of fragments
that automatically rearrange based on the current device's UI requirements.
Preface
Chapter 3, Fragment Lifecycle and Specialization, discusses the relationship of the lifecycle
of fragments to that of activities, and demonstrates the appropriate programming
actions at the various points in the lifecycle. Leveraging this knowledge, the special
purpose fragment classes ListFragment and DialogFragment are introduced
to demonstrate their behavior and provide a deeper understanding of how their
behavior in the activity lifecycle differs from that of standard fragments.
Chapter 4, Working with Fragment Transactions, explains how to create multiple app
screens within a single activity, by dynamically adding and removing fragments
using fragment transactions. Topics covered include, implementing back button
behavior and dynamically adapting multi-fragment UIs to differences in device
characteristics.
Chapter 5, Creating Rich Navigation with Fragments, brings everything together by
building on the previous chapters to show how to use fragments to enhance the
user's experience through rich navigation features. This chapter demonstrates how
to implement a number of navigation features, including screen browsing with
swipe-based paging, direct screen access with the drop-down list navigation,
and random screen viewing with tabs.
What you need for this book
To follow the examples in this book, you should have a basic knowledge of
Android programming and a working Android development environment.
This book focuses primarily on Android Studio as the Android development
environment, but other tools such as Eclipse with the ADT plugin, JetBrains'
IntelliJ IDEA, or a similar Android-enabled development tool can be used.
Who this book is for
This book is for anyone with a basic understanding of Android programming,
who would like to improve the appearance and usability of their applications.
Whether you're looking to create a more interactive user experience, create more
dynamically adaptive UIs, provide better support for tablets and smartphones in
a single app, reduce the complexity of managing your app UIs, or just trying to
expand your UI design philosophy, this book is for you.
[2]
Preface
Conventions
In this book, you will find a number of styles of text that distinguish between
different kinds of information. Here are some examples of these styles, and an
explanation of their meaning.
Code words in text are shown as follows: "An application initially calls the
startActivity method to display an instance of Activity1. Activity1."
A block of code is set as follows:
<string-array name="screen_names">
<item>First View</item>
<item>Second View</item>
<item>Third View</item>
</string-array>
New terms and important words are shown in bold. Words that you see on
the screen, in menus or dialog boxes for example, appear in the text like this:
"Select layout as the Resource type."
Warnings or important notes appear in a box like this.
Tips and tricks appear like this.
Reader feedback
Feedback from our readers is always welcome. Let us know what you think about
this book—what you liked or may have disliked. Reader feedback is important for
us to develop titles that you really get the most out of.
To send us general feedback, simply send an e-mail to feedback@packtpub.com,
and mention the book title via the subject of your message.
If there is a topic that you have expertise in and you are interested in either writing
or contributing to a book, see our author guide on www.packtpub.com/authors.
[3]
Preface
Customer support
Now that you are the proud owner of a Packt book, we have a number of things to
help you to get the most from your purchase.
Downloading the example code
You can download the example code files for all Packt books you have purchased
from your account at http://www.packtpub.com. If you purchased this book
elsewhere, you can visit http://www.packtpub.com/support and register to have
the files e-mailed directly to you.
Errata
Although we have taken every care to ensure the accuracy of our content, mistakes
do happen. If you find a mistake in one of our books—maybe a mistake in the text or
the code—we would be grateful if you would report this to us. By doing so, you can
save other readers from frustration and help us improve subsequent versions of this
book. If you find any errata, please report them by visiting http://www.packtpub.
com/submit-errata, selecting your book, clicking on the errata submission form link,
and entering the details of your errata. Once your errata are verified, your submission
will be accepted and the errata will be uploaded on our website, or added to any list of
existing errata, under the Errata section of that title. Any existing errata can be viewed
by selecting your title from http://www.packtpub.com/support.
Piracy
Piracy of copyright material on the Internet is an ongoing problem across all
media. At Packt, we take the protection of our copyright and licenses very seriously.
If you come across any illegal copies of our works, in any form, on the Internet,
please provide us with the location address or website name immediately so that
we can pursue a remedy.
Please contact us at copyright@packtpub.com with a link to the suspected
pirated material.
We appreciate your help in protecting our authors, and our ability to bring you
valuable content.
Questions
You can contact us at questions@packtpub.com if you are having a problem with
any aspect of the book, and we will do our best to address it.
[4]
Fragments and UI
Modularization
This chapter introduces fragments, UI modularization, and the role fragments play in
developing a modularized UI. The chapter demonstrates creating simple fragments
and using fragments statically within activities.
Let us have a look at the topics to be covered:
•
•
•
•
The need for UI modularization
Fragments are the foundation of modularization
Support for fragments across Android versions
Creating fragments
By the end of this chapter, we will be able to create and use fragments within a static
activity layout.
The need for a new approach to
UI creation
Chances are that the first class you learned to use when you became an Android
developer was the Activity class. After all, the Activity class provided your
app with a user interface. By organizing your user interface components onto
an activity, the activity became the canvas on which you were painting your
application masterpiece.
In the early days of Android, building an application's user interface directly within
an activity worked reasonably well. The majority of early applications had a relatively
simple user interface and the number of different Android device form factors was
small. In most cases, with the help of a few layout resources, a single activity worked
fine across different device form factors.
Fragments and UI Modularization
Today, Android devices come in a wide variety of form factors with incredible
variation in their size and shape. Combine this with the rich, highly interactive
user interfaces of modern Android applications, and the creation of a single
activity that effectively manages the user interface across such divergent form
factors becomes extremely difficult.
A possible solution is to define one activity to provide the user experience for a subset
of device form factors; for example, smartphones. Then define another activity for
a different subset of form factors such as tablets. The problem with this approach is
that activities tend to have a lot of responsibilities beyond simply rendering the user
interface. With multiple activities performing essentially the same tasks, we must
either duplicate the logic within each of the activities, or increase the complexity of our
program by finding ways to share the logic across the activities. The approach of using
different activities for different form factors also substantially increases the number of
activities in the program, easily doubling or tripling the number of activities required.
We need a better solution. We need a solution that allows us to modularize our
application user interface into sections that we can arrange as needed within an
activity. Fragments are that solution.
Android fragments allow us to partition the user interface into functional groupings
of user interface components and logic. An activity can load and arrange the fragments
as needed for a given device form factor. The fragments take care of the form factor
details while the activity manages the overall user interface issues.
The broad platform support of fragments
The Fragment class was added to Android at API Level 11 (Android 3.0). This was
the first version of Android that officially supported tablets. The addition of tablet
support exacerbated an already difficult problem; developing Android applications
was becoming increasingly difficult because of the wide variety of Android device
form factors.
Fortunately, fragments provide a solution to the problem. With fragments,
we can much more easily create applications that support a variety of form
factors, because we can partition our user interfaces into effective groupings
of components and their associated logic.
There was one problem with fragments. Up until very recently, the majority
of Android devices had an API Level below 11 and therefore didn't support
fragments. Fortunately, Google released the Android Support Library, available
at http://developer.android.com/tools/extras/support-library.html,
which makes fragments available to any device running API Level 4 (Android 1.6)
or above. With the Android Support Library, fragments are now available to
virtually every Android device in use.
[6]
Chapter 1
Applications created with Android Studio automatically include the
Android Support Library, and therefore support fragments on virtually
all SDK versions in use. If you will be using a development tool other
than Android Studio to create applications that target devices running
on a SDK level below 11, see the Android Developers Blog post,
Fragments For All, available at http://android-developers.
blogspot.com/2011/03/fragments-for-all.html, for directions
on manually adding the Android Support Library to your projects.
Fragments simplify common Android tasks
Fragments not only simplify the way we create our application user interfaces but
they also simplify many of the built-in Android user interface tasks. User interface
concepts such as tabbed displays, list displays, and dialog boxes have all historically
had distinctly different approaches. When we think about it, though, they are all
variations on a common concept, that is, combining user interface components and
logic into a functional group. Fragments formalize this concept, and therefore allow
us to take a consistent approach to these formerly disparate tasks. We talk about each
of these issues in detail as well as some of the specialized fragment classes such as
the DialogFragment class and the ListFragment class later in this book.
The relationship between fragments
and activities
Fragments do not replace activities but rather supplement them. A fragment always
exists within an activity. An activity instance can contain any number of fragments
but a given fragment instance can only exist within a single activity. A fragment
is closely tied to the activity on which it exists and the lifetime of that fragment is
tightly coupled to the lifetime of the containing activity. We'll talk much more about
the close relationship between the lifetime of a fragment and the containing activity
in Chapter 3, Fragment Lifecycle and Specialization.
One thing we don't want to do is make the common mistake of overusing fragments.
So often when someone learns about fragments, they make the assumption that
every activity must contain fragments, and that's simply not the case.
As we go through this book, we'll discuss the features and capabilities of fragments
and a variety of scenarios where they work well. We'll always want to keep those in
mind as we're building our applications. In those situations where fragments add
value, we definitely want to use them. However, it is equally important that we avoid
complicating our applications by using fragments in those cases where they do not
provide value.
[7]
Fragments and UI Modularization
Making the shift to fragments
Although fragments are a very powerful tool, fundamentally they do something
very simple. Fragments group user interface components and their associated logic.
Creating the portion of your user interface associated with a fragment is very much
like doing so for an activity. In most cases, the view hierarchy for a particular fragment
is created from a layout resource; although, just as with activities, the view hierarchy
can be programmatically generated.
Creating a layout resource for a fragment follows the same rules and techniques as
doing so for an activity. The key difference is that we're looking for opportunities
to partition our user interface layout into manageable subsections when working
with fragments.
The easiest way to get started working with fragments is for us to walk through
converting a traditional activity-oriented user interface to use fragments.
The old thinking – activity-oriented
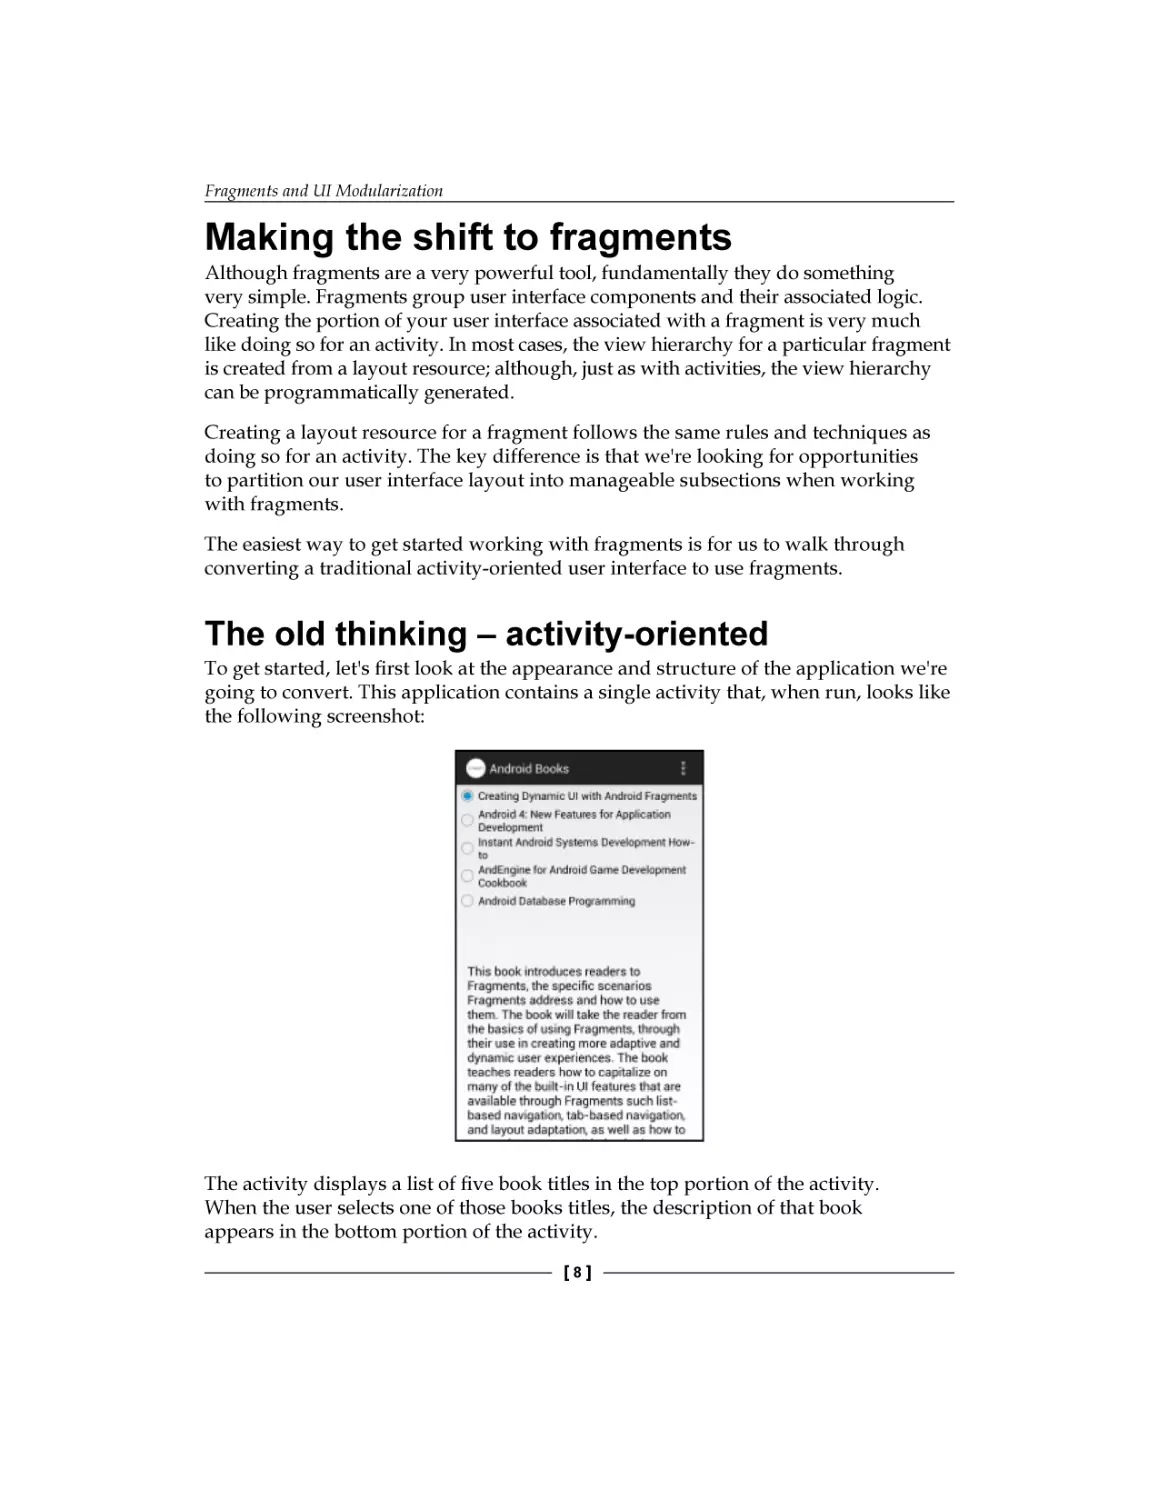
To get started, let's first look at the appearance and structure of the application we're
going to convert. This application contains a single activity that, when run, looks like
the following screenshot:
The activity displays a list of five book titles in the top portion of the activity.
When the user selects one of those books titles, the description of that book
appears in the bottom portion of the activity.
[8]
Chapter 1
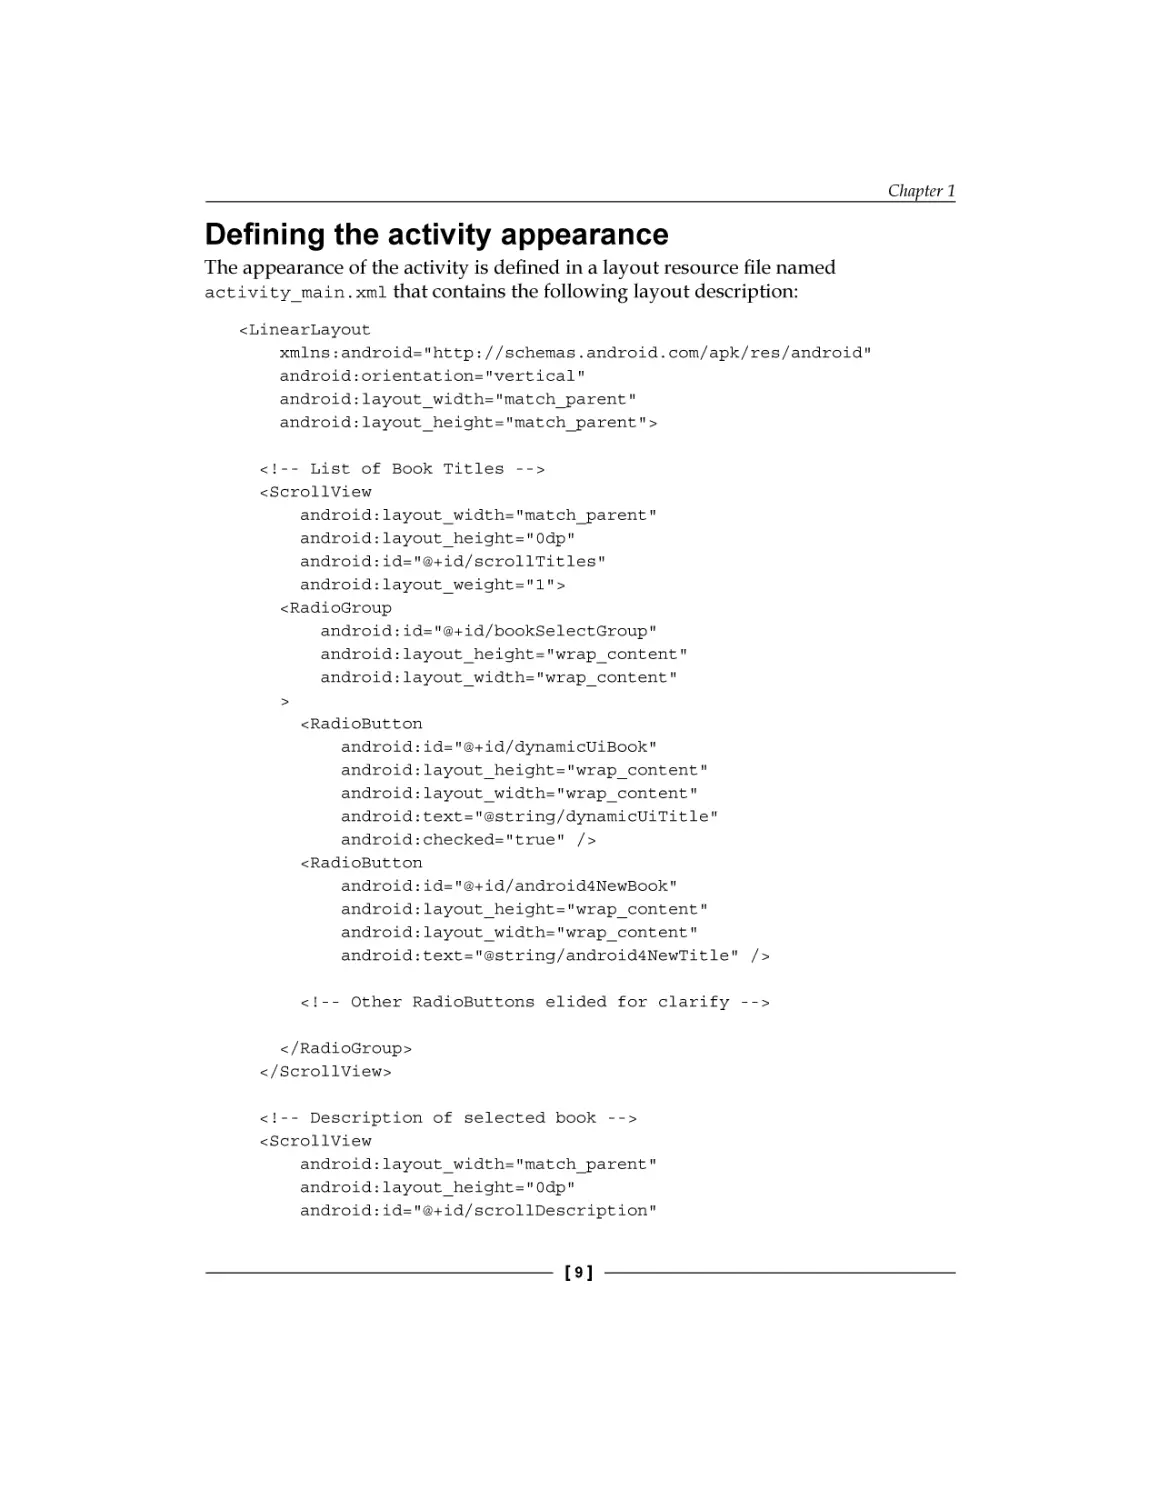
Defining the activity appearance
The appearance of the activity is defined in a layout resource file named
activity_main.xml that contains the following layout description:
<LinearLayout
xmlns:android="http://schemas.android.com/apk/res/android"
android:orientation="vertical"
android:layout_width="match_parent"
android:layout_height="match_parent">
<!-- List of Book Titles -->
<ScrollView
android:layout_width="match_parent"
android:layout_height="0dp"
android:id="@+id/scrollTitles"
android:layout_weight="1">
<RadioGroup
android:id="@+id/bookSelectGroup"
android:layout_height="wrap_content"
android:layout_width="wrap_content"
>
<RadioButton
android:id="@+id/dynamicUiBook"
android:layout_height="wrap_content"
android:layout_width="wrap_content"
android:text="@string/dynamicUiTitle"
android:checked="true" />
<RadioButton
android:id="@+id/android4NewBook"
android:layout_height="wrap_content"
android:layout_width="wrap_content"
android:text="@string/android4NewTitle" />
<!-- Other RadioButtons elided for clarify -->
</RadioGroup>
</ScrollView>
<!-- Description of selected book -->
<ScrollView
android:layout_width="match_parent"
android:layout_height="0dp"
android:id="@+id/scrollDescription"
[9]
Fragments and UI Modularization
android:layout_weight="1">
<TextView
android:layout_width="wrap_content"
android:layout_height="wrap_content"
android:textAppearance="?android:attr/
textAppearanceMedium"
android:text="@string/dynamicUiDescription"
android:id="@+id/textView"
android:paddingLeft="@dimen/activity_horizontal_margin"
android:paddingRight="@dimen/activity_horizontal_margin"
android:gravity="fill_horizontal"/>
</ScrollView>
</LinearLayout>
Downloading the example code
You can download the example code files for all Packt books you have
purchased from your account at http://www.packtpub.com. If you
purchased this book elsewhere, you can visit http://www.packtpub.
com/support and register to have the files e-mailed directly to you.
This layout resource is reasonably simple and is explained as follows:
•
The overall layout is defined within a vertically-oriented LinearLayout
element containing the two ScrollView elements
•
Both of the ScrollView elements have a layout_weight value of 1 that
causes the top-level LinearLayout element to divide the screen equally
between the two ScrollView elements
•
The top ScrollView element, with the id value of scrollTitles,
wraps a RadioGroup element containing a series of the RadioButton
elements, one for each book
•
The bottom ScrollView element, with the id value of scrollDescription,
contains a TextView element that displays the selected book's description
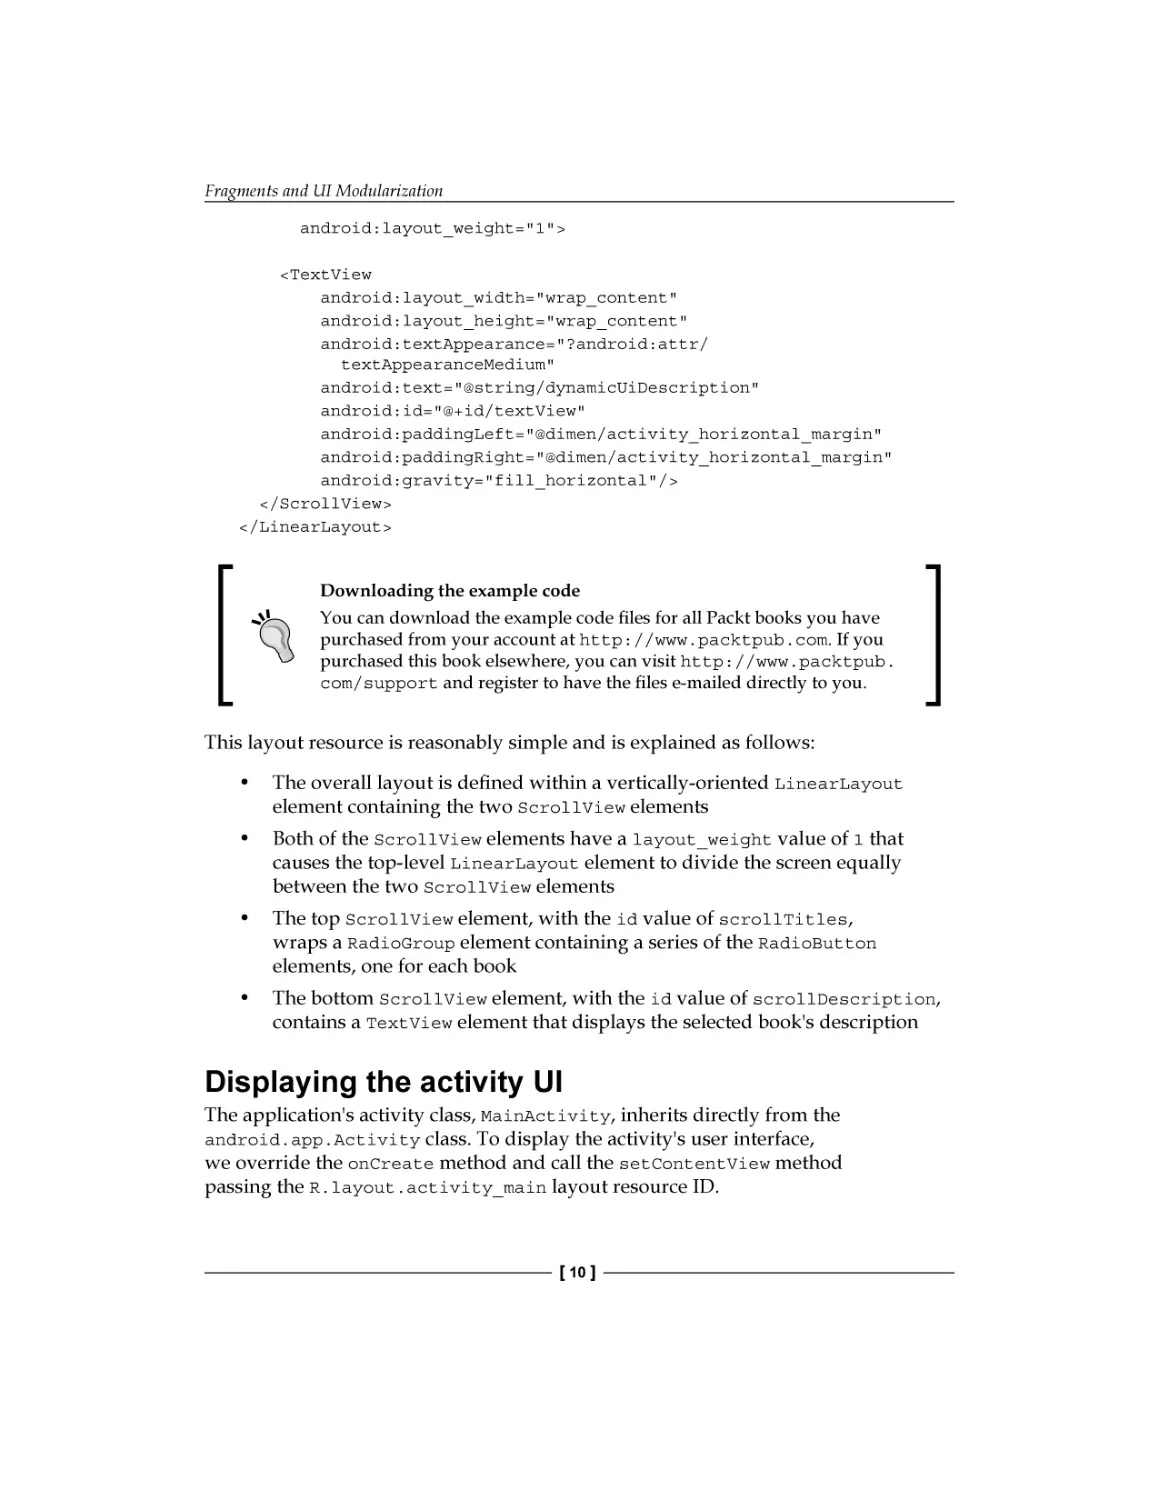
Displaying the activity UI
The application's activity class, MainActivity, inherits directly from the
android.app.Activity class. To display the activity's user interface,
we override the onCreate method and call the setContentView method
passing the R.layout.activity_main layout resource ID.
[ 10 ]
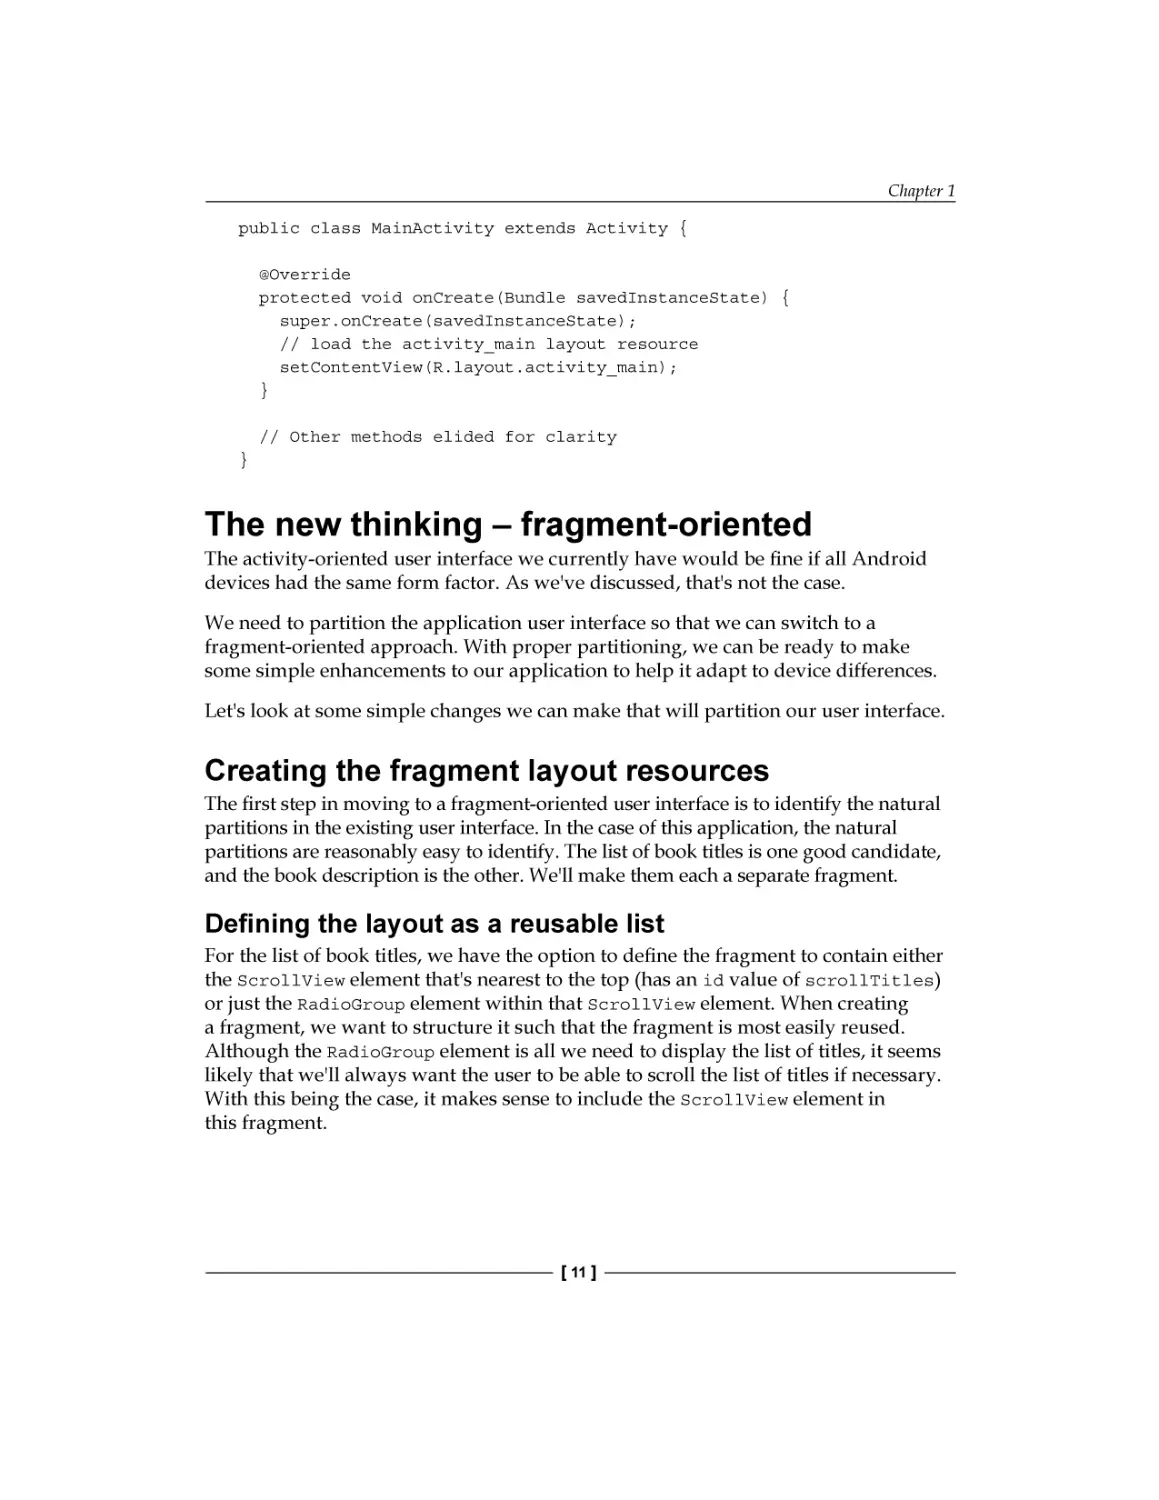
Chapter 1
public class MainActivity extends Activity {
@Override
protected void onCreate(Bundle savedInstanceState) {
super.onCreate(savedInstanceState);
// load the activity_main layout resource
setContentView(R.layout.activity_main);
}
// Other methods elided for clarity
}
The new thinking – fragment-oriented
The activity-oriented user interface we currently have would be fine if all Android
devices had the same form factor. As we've discussed, that's not the case.
We need to partition the application user interface so that we can switch to a
fragment-oriented approach. With proper partitioning, we can be ready to make
some simple enhancements to our application to help it adapt to device differences.
Let's look at some simple changes we can make that will partition our user interface.
Creating the fragment layout resources
The first step in moving to a fragment-oriented user interface is to identify the natural
partitions in the existing user interface. In the case of this application, the natural
partitions are reasonably easy to identify. The list of book titles is one good candidate,
and the book description is the other. We'll make them each a separate fragment.
Defining the layout as a reusable list
For the list of book titles, we have the option to define the fragment to contain either
the ScrollView element that's nearest to the top (has an id value of scrollTitles)
or just the RadioGroup element within that ScrollView element. When creating
a fragment, we want to structure it such that the fragment is most easily reused.
Although the RadioGroup element is all we need to display the list of titles, it seems
likely that we'll always want the user to be able to scroll the list of titles if necessary.
With this being the case, it makes sense to include the ScrollView element in
this fragment.
[ 11 ]
Fragments and UI Modularization
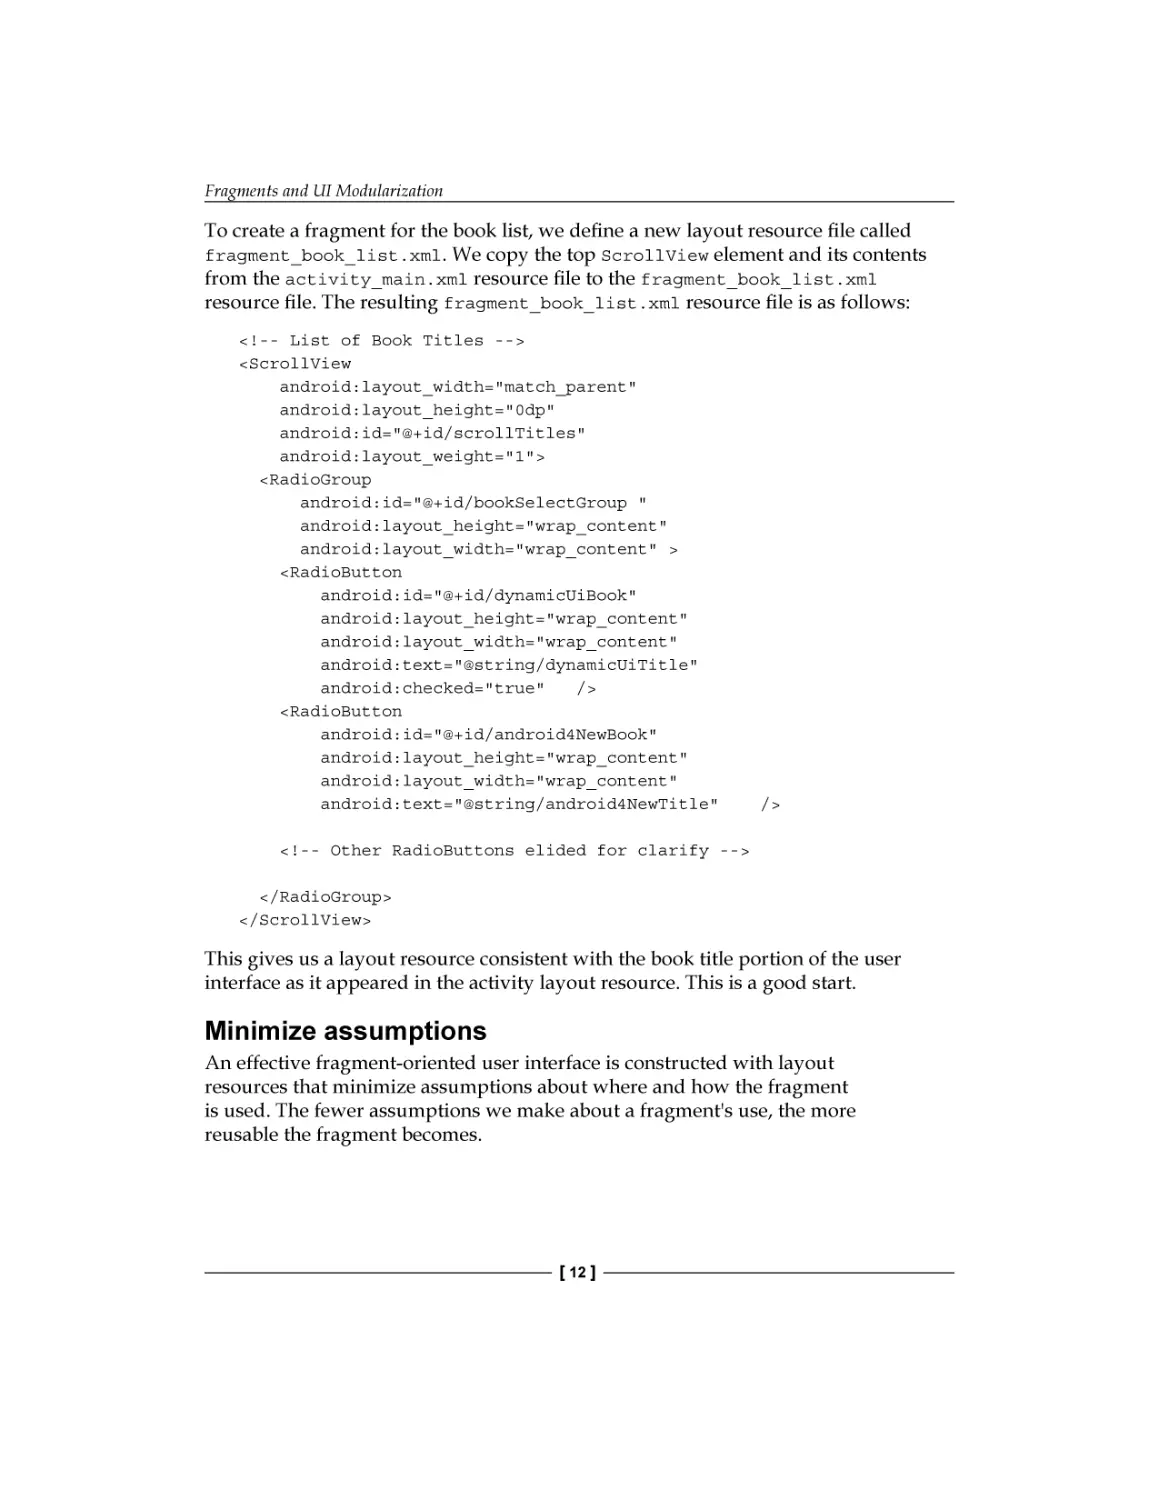
To create a fragment for the book list, we define a new layout resource file called
fragment_book_list.xml. We copy the top ScrollView element and its contents
from the activity_main.xml resource file to the fragment_book_list.xml
resource file. The resulting fragment_book_list.xml resource file is as follows:
<!-- List of Book Titles -->
<ScrollView
android:layout_width="match_parent"
android:layout_height="0dp"
android:id="@+id/scrollTitles"
android:layout_weight="1">
<RadioGroup
android:id="@+id/bookSelectGroup "
android:layout_height="wrap_content"
android:layout_width="wrap_content" >
<RadioButton
android:id="@+id/dynamicUiBook"
android:layout_height="wrap_content"
android:layout_width="wrap_content"
android:text="@string/dynamicUiTitle"
android:checked="true"
/>
<RadioButton
android:id="@+id/android4NewBook"
android:layout_height="wrap_content"
android:layout_width="wrap_content"
android:text="@string/android4NewTitle"
/>
<!-- Other RadioButtons elided for clarify -->
</RadioGroup>
</ScrollView>
This gives us a layout resource consistent with the book title portion of the user
interface as it appeared in the activity layout resource. This is a good start.
Minimize assumptions
An effective fragment-oriented user interface is constructed with layout
resources that minimize assumptions about where and how the fragment
is used. The fewer assumptions we make about a fragment's use, the more
reusable the fragment becomes.
[ 12 ]
Chapter 1
The layout in the fragment_book_list.xml resource file as we now have
it is very limiting because it includes significant assumptions. For example,
the root ScrollView element includes a layout_height attribute with a
value of 0. This assumes that the fragment will be placed within a layout
that calculates the height for the fragment.
A layout_height attribute value of 0 prevents the ScrollView element from
properly rendering when we use the fragment within any of the many layouts that
require the ScrollView element to specify a meaningful height. A layout_height
attribute value of 0 prevents the fragment from properly rendering even when
doing something as simple as placing the fragment within a horizontally oriented
LinearLayout element. The layout_weight attribute has similar issues.
In general, a good practice is to design the fragment to fully occupy whatever space
it is placed within. This gives the layout in which the fragment is used the most
control over the placement and sizing of the fragment.
To do this, we'll remove the layout_weight attribute from the ScrollView
element and change the layout_height attribute value to match_parent.
Because the ScrollView element is now the root node of the layout resource,
we also need to add the android namespace prefix declaration.
The following code snippet shows the updated ScrollView element:
<ScrollView
xmlns:android="http://schemas.android.com/apk/res/android"
android:layout_width="match_parent"
android:layout_height="match_parent"
android:id="@+id/scrollTitles">
<!—RadioGroup and RadioButton elements elided for clarity -->
</ScrollView>
With the updated ScrollView element, the fragment layout can now adapt to almost
any layout it's referenced within.
[ 13 ]
Fragments and UI Modularization
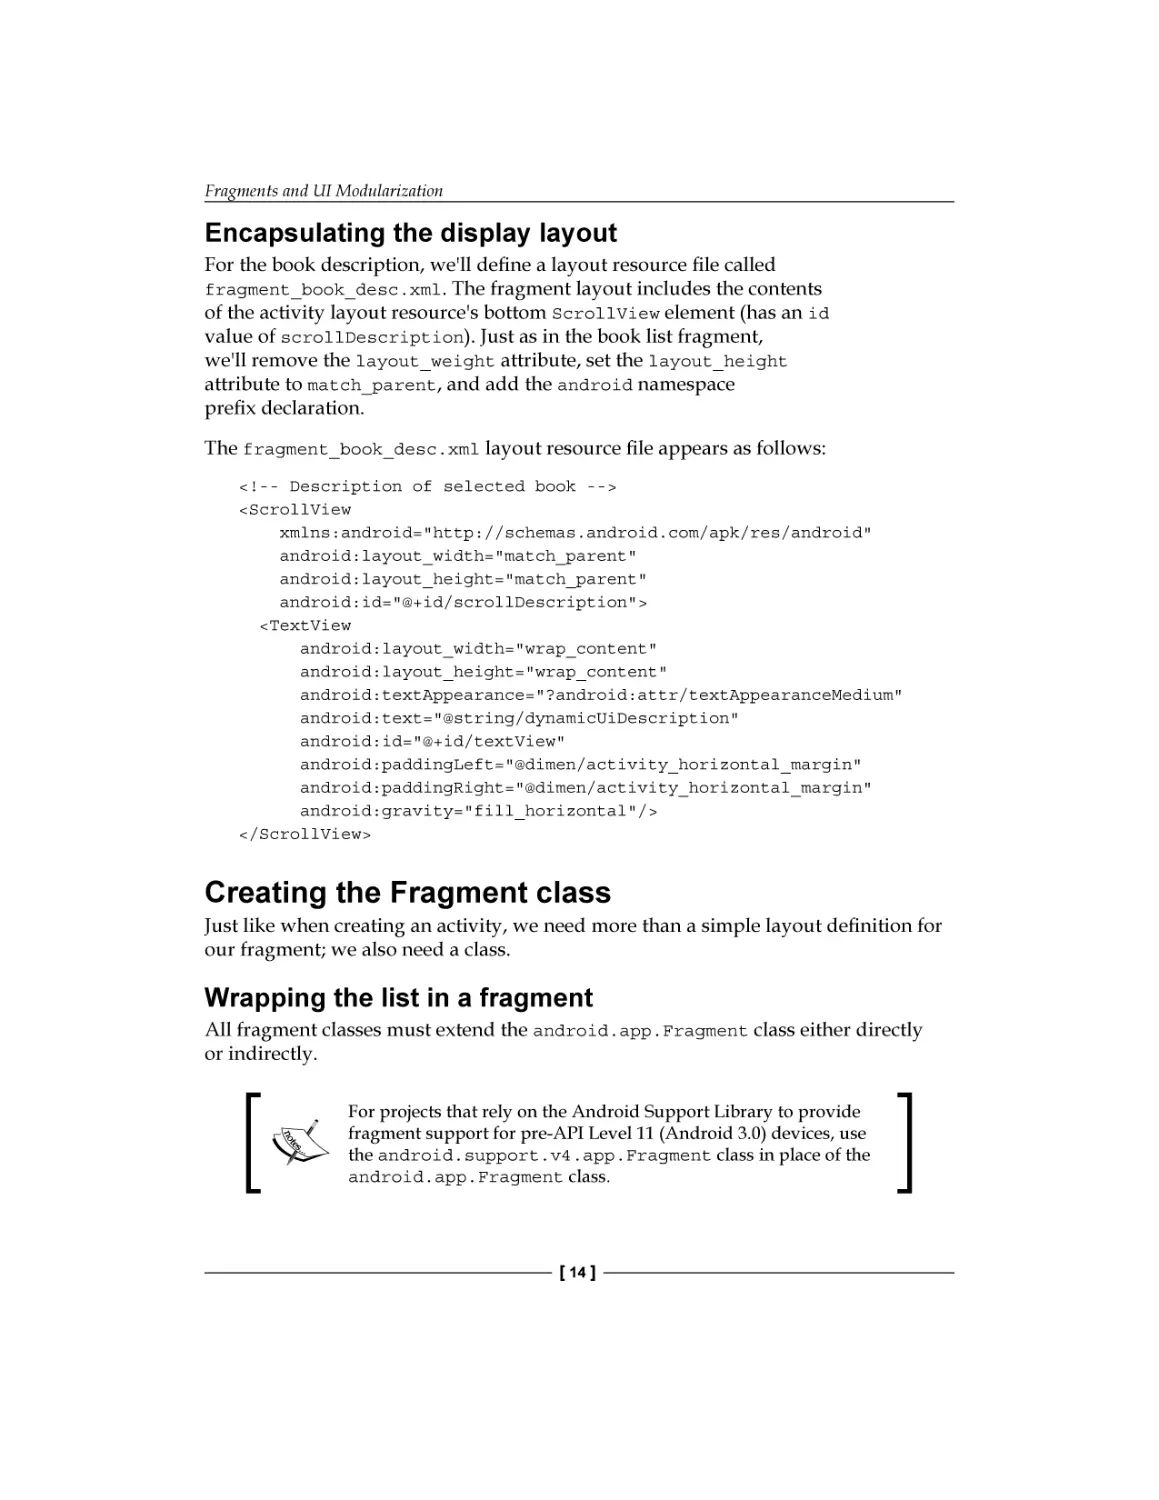
Encapsulating the display layout
For the book description, we'll define a layout resource file called
fragment_book_desc.xml. The fragment layout includes the contents
of the activity layout resource's bottom ScrollView element (has an id
value of scrollDescription). Just as in the book list fragment,
we'll remove the layout_weight attribute, set the layout_height
attribute to match_parent, and add the android namespace
prefix declaration.
The fragment_book_desc.xml layout resource file appears as follows:
<!-- Description of selected book -->
<ScrollView
xmlns:android="http://schemas.android.com/apk/res/android"
android:layout_width="match_parent"
android:layout_height="match_parent"
android:id="@+id/scrollDescription">
<TextView
android:layout_width="wrap_content"
android:layout_height="wrap_content"
android:textAppearance="?android:attr/textAppearanceMedium"
android:text="@string/dynamicUiDescription"
android:id="@+id/textView"
android:paddingLeft="@dimen/activity_horizontal_margin"
android:paddingRight="@dimen/activity_horizontal_margin"
android:gravity="fill_horizontal"/>
</ScrollView>
Creating the Fragment class
Just like when creating an activity, we need more than a simple layout definition for
our fragment; we also need a class.
Wrapping the list in a fragment
All fragment classes must extend the android.app.Fragment class either directly
or indirectly.
For projects that rely on the Android Support Library to provide
fragment support for pre-API Level 11 (Android 3.0) devices, use
the android.support.v4.app.Fragment class in place of the
android.app.Fragment class.
[ 14 ]
Chapter 1
We'll call the class for the fragment that manages the book list, BookListFragment.
The class will directly extend the Fragment class as follows:
Import android.app.Ftragment;
public class BookListFragment extends Fragment { … }
During the creation of a fragment, the Android framework calls a number of methods
on that fragment. One of the most important of these is the onCreateView method.
The onCreateView method is responsible for returning the view hierarchy represented
by the fragment. The Android framework attaches that returned view hierarchy for the
fragment to the appropriate place in the activity's overall view hierarchy.
In a case like the BookListFragment class where the Fragment class inherits directly
from the Fragment class, we must override the onCreateView method and perform
the work necessary to construct the view hierarchy.
The onCreateView method receives three parameters. We'll focus on just the first
two for now:
•
inflater: This is a reference to a LayoutInflater instance that is able to read
•
container: This is a reference to the ViewGroup instance within the activity's
and expand layout resources within the context of the containing activity
layout where the fragment's view hierarchy is to be attached
The LayoutInflater class provides a method called inflate that handles
the details of converting a layout resource into the corresponding view
hierarchy and returns a reference to the root view of that hierarchy. Using the
LayoutInflater.inflate method, we can implement our BookListFragment
class' onCreateView method to construct and return the view hierarchy
corresponding to the R.layout.fragment_book_list layout resource as
shown in the following code:
@Override
public View onCreateView(LayoutInflater inflater, ViewGroup
container, Bundle savedInstanceState) {
View viewHierarchy =
inflater.inflate(R.layout.fragment_book_list,
container, false);
return viewHierarchy;
}
[ 15 ]
Fragments and UI Modularization
You'll notice in the preceding code we include the container reference and a Boolean
value of false in the call to the inflate method. The container reference provides
the necessary layout parameters for the inflate method to properly format the new
view hierarchy. The parameter value of false indicates that container is to be used
only for the layout parameters. If this value were true, the inflate method would also
attach the new view hierarchy to the container view group. We do not want to attach
the new view hierarchy to the container view group in the onCreateView method
because the activity will handle that.
Providing the display fragment
For the book description fragment, we'll define a class called BookDescFragment.
This class is identical to the BookListFragment class except the BookDescFragment
class uses the R.layout.fragment_book_desc layout resource as follows:
public class BookDescFragment extends Fragment {
@Override
public View onCreateView(LayoutInflater inflater, ViewGroup
container, Bundle savedInstanceState) {
View viewHierarchy =
inflater.inflate(R.layout.fragment_book_desc, container,
false);
return viewHierarchy;
}
}
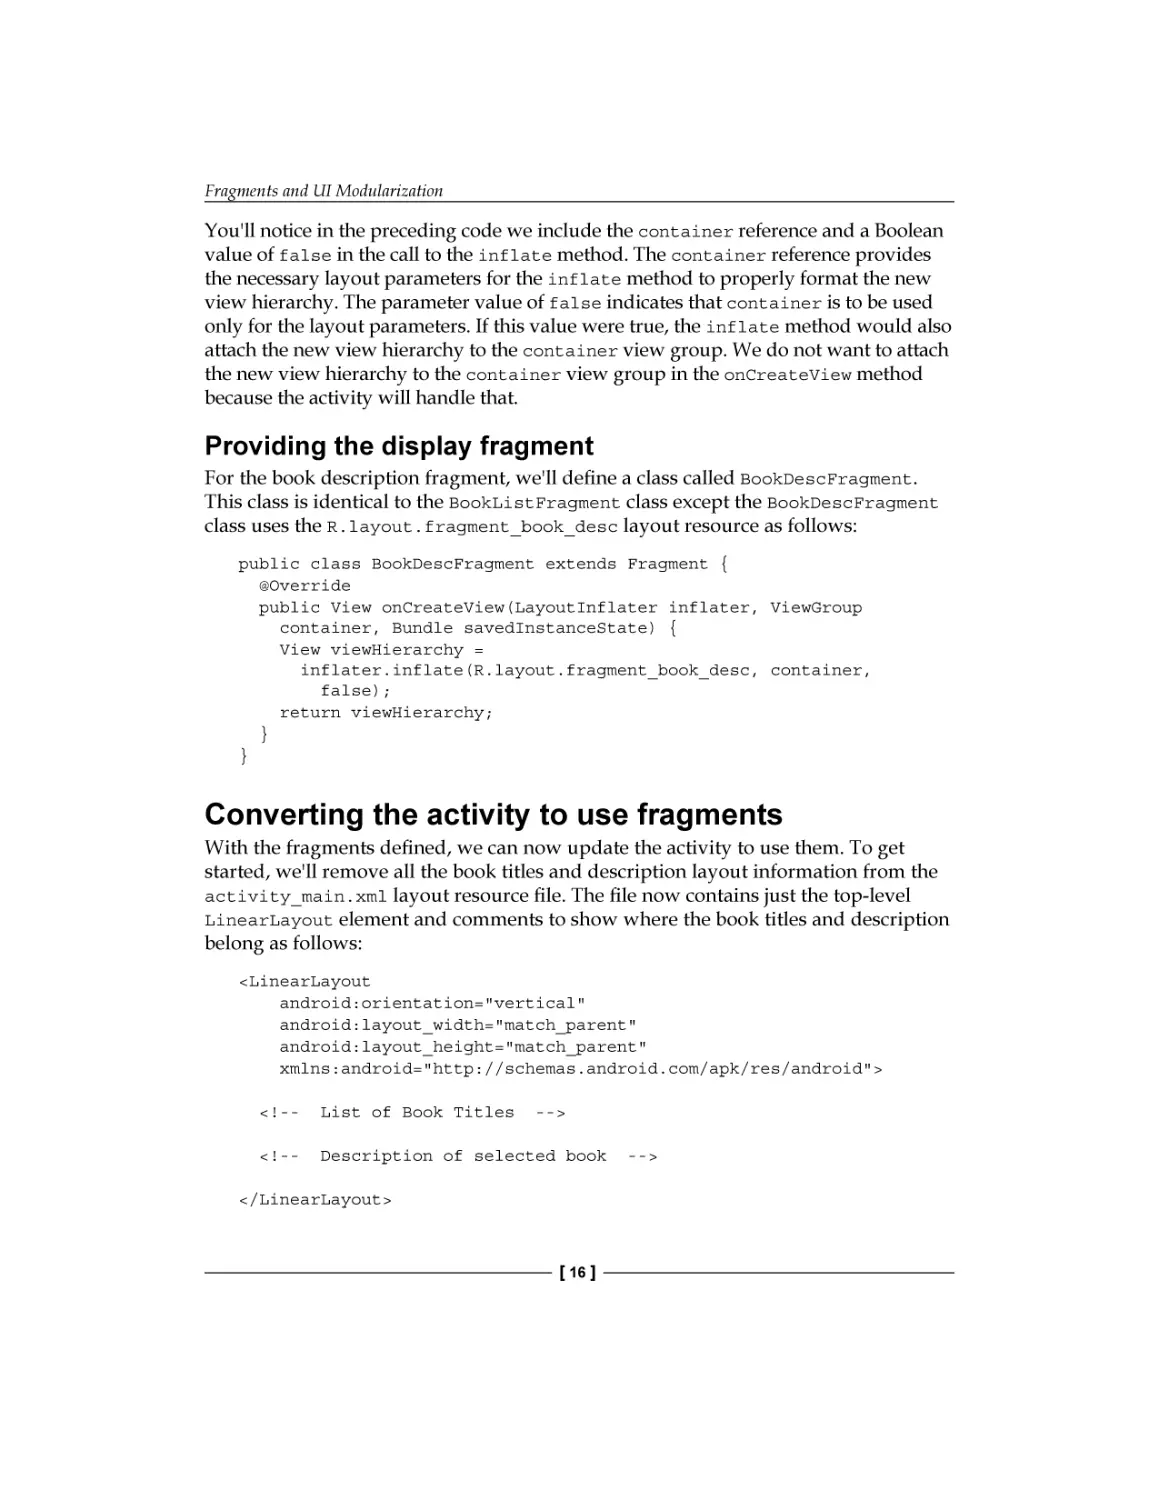
Converting the activity to use fragments
With the fragments defined, we can now update the activity to use them. To get
started, we'll remove all the book titles and description layout information from the
activity_main.xml layout resource file. The file now contains just the top-level
LinearLayout element and comments to show where the book titles and description
belong as follows:
<LinearLayout
android:orientation="vertical"
android:layout_width="match_parent"
android:layout_height="match_parent"
xmlns:android="http://schemas.android.com/apk/res/android">
<!--
List of Book Titles
-->
<!--
Description of selected book
</LinearLayout>
[ 16 ]
-->
Chapter 1
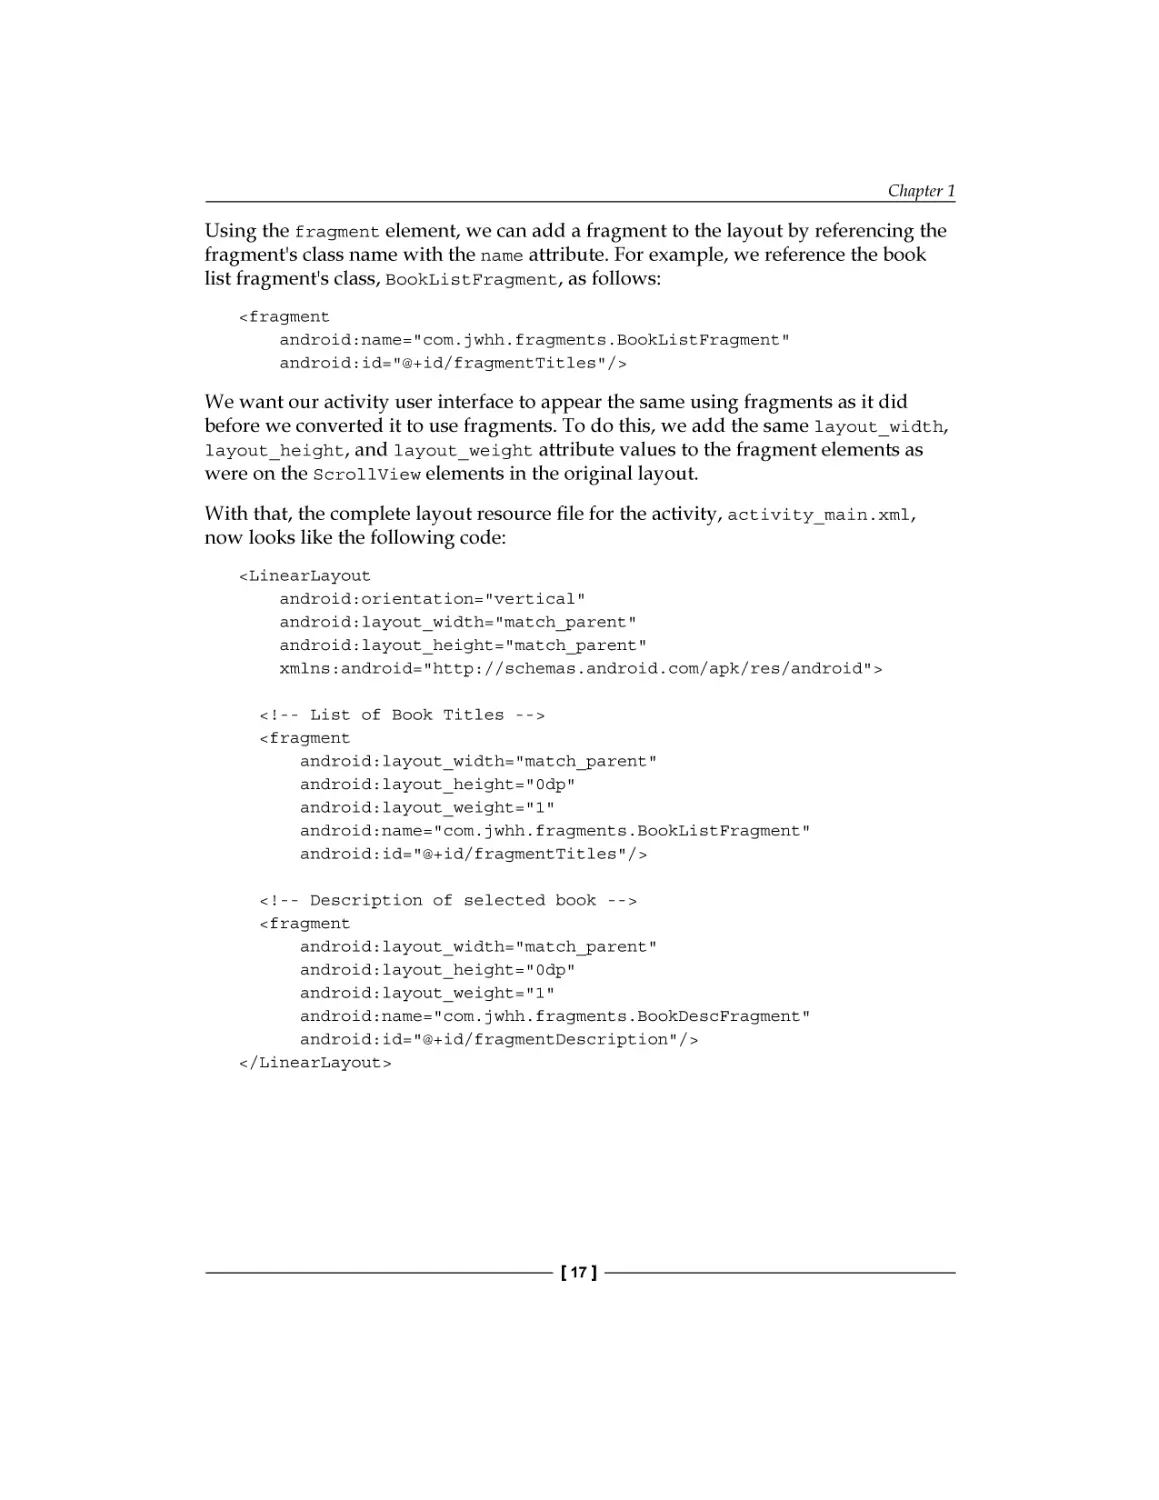
Using the fragment element, we can add a fragment to the layout by referencing the
fragment's class name with the name attribute. For example, we reference the book
list fragment's class, BookListFragment, as follows:
<fragment
android:name="com.jwhh.fragments.BookListFragment"
android:id="@+id/fragmentTitles"/>
We want our activity user interface to appear the same using fragments as it did
before we converted it to use fragments. To do this, we add the same layout_width,
layout_height, and layout_weight attribute values to the fragment elements as
were on the ScrollView elements in the original layout.
With that, the complete layout resource file for the activity, activity_main.xml,
now looks like the following code:
<LinearLayout
android:orientation="vertical"
android:layout_width="match_parent"
android:layout_height="match_parent"
xmlns:android="http://schemas.android.com/apk/res/android">
<!-- List of Book Titles -->
<fragment
android:layout_width="match_parent"
android:layout_height="0dp"
android:layout_weight="1"
android:name="com.jwhh.fragments.BookListFragment"
android:id="@+id/fragmentTitles"/>
<!-- Description of selected book -->
<fragment
android:layout_width="match_parent"
android:layout_height="0dp"
android:layout_weight="1"
android:name="com.jwhh.fragments.BookDescFragment"
android:id="@+id/fragmentDescription"/>
</LinearLayout>
[ 17 ]
Fragments and UI Modularization
If you are working with Android Studio, you might find
a tools:layout attribute on the fragment element.
This attribute is used by Android Studio to provide a
preview of the layout within the graphical designer.
It has no effect on your application's appearance when
the application is run.
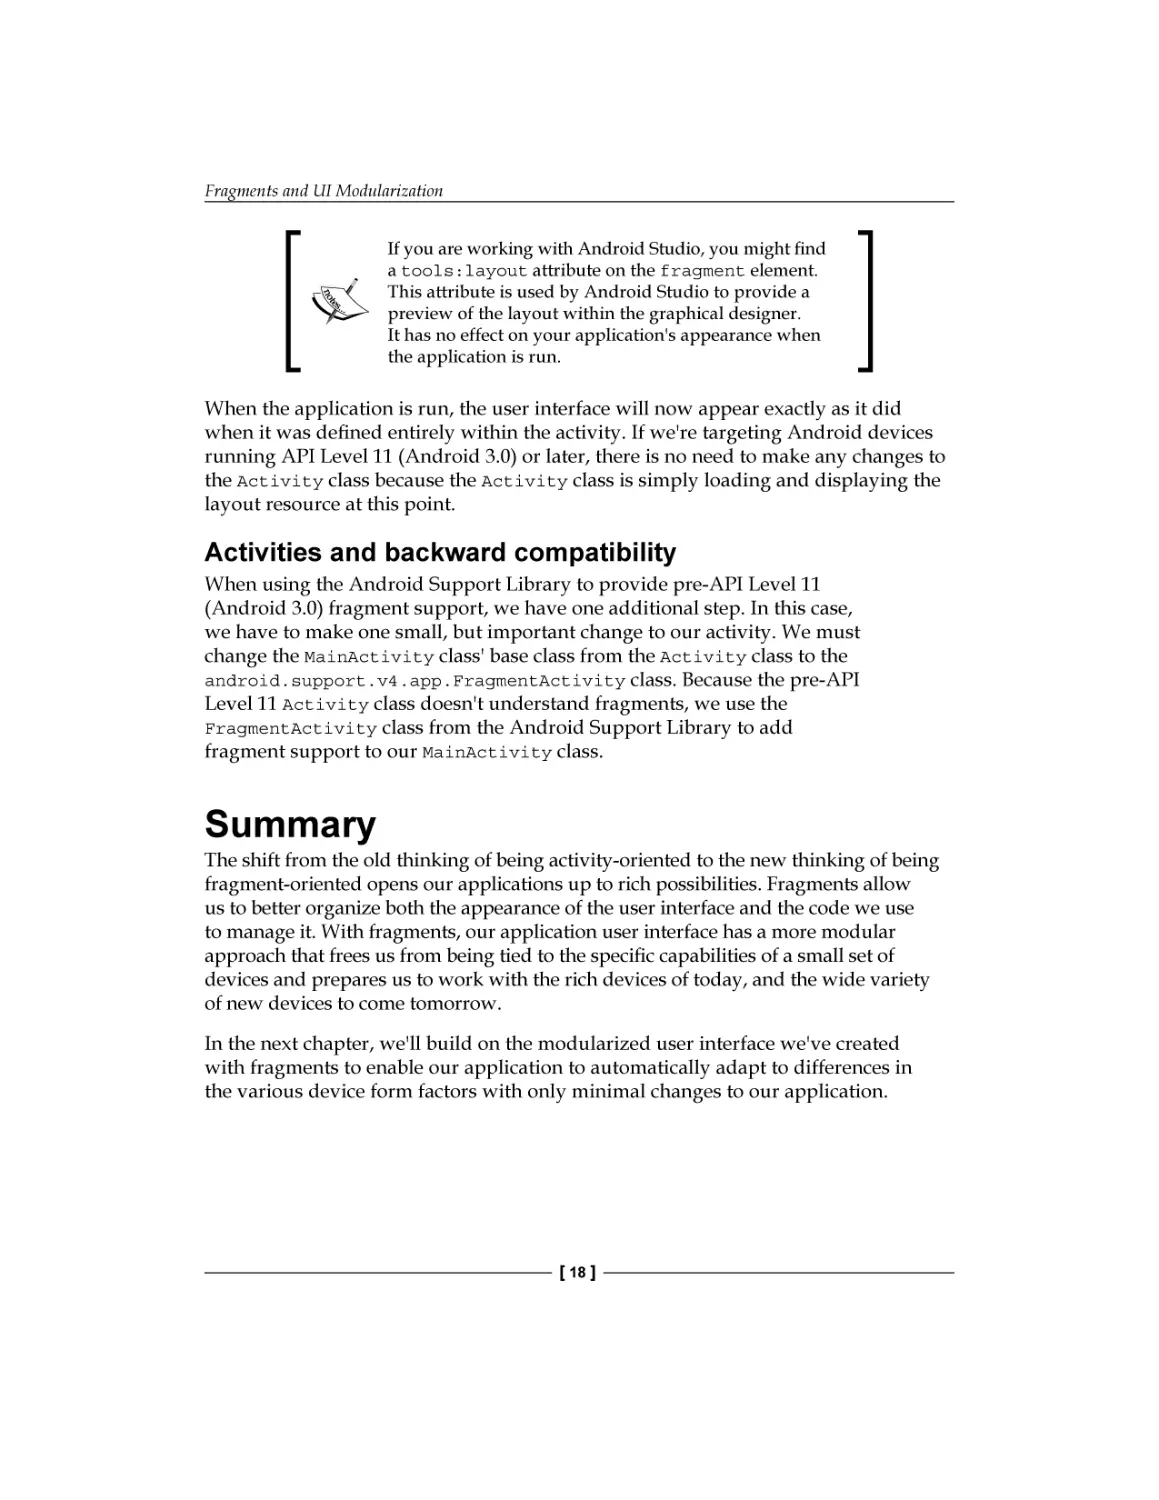
When the application is run, the user interface will now appear exactly as it did
when it was defined entirely within the activity. If we're targeting Android devices
running API Level 11 (Android 3.0) or later, there is no need to make any changes to
the Activity class because the Activity class is simply loading and displaying the
layout resource at this point.
Activities and backward compatibility
When using the Android Support Library to provide pre-API Level 11
(Android 3.0) fragment support, we have one additional step. In this case,
we have to make one small, but important change to our activity. We must
change the MainActivity class' base class from the Activity class to the
android.support.v4.app.FragmentActivity class. Because the pre-API
Level 11 Activity class doesn't understand fragments, we use the
FragmentActivity class from the Android Support Library to add
fragment support to our MainActivity class.
Summary
The shift from the old thinking of being activity-oriented to the new thinking of being
fragment-oriented opens our applications up to rich possibilities. Fragments allow
us to better organize both the appearance of the user interface and the code we use
to manage it. With fragments, our application user interface has a more modular
approach that frees us from being tied to the specific capabilities of a small set of
devices and prepares us to work with the rich devices of today, and the wide variety
of new devices to come tomorrow.
In the next chapter, we'll build on the modularized user interface we've created
with fragments to enable our application to automatically adapt to differences in
the various device form factors with only minimal changes to our application.
[ 18 ]
Fragments and UI Flexibility
This chapter builds on the concepts introduced in the previous chapter to provide
solutions to addressing specific differences in device layouts. The chapter explains
the use of adaptive Activity layout definitions to create apps that automatically
rearrange their user interface in response to differences in device form factors.
With adaptive Activity layout definitions, applications are able to support a wide
variety of devices using just a few properly designed fragments.
In this chapter, we will cover the following topics:
•
Simplifying the challenge of supporting device differences
•
Dynamic resource selection
•
Coordinating fragment content
•
The role of FragmentManager
•
Supporting fragments across activities
By the end of this chapter, we will be able to implement a user interface that uses
fragments to automatically adapt to differences in device layouts and coordinates
user actions across the involved fragments.
Creating UI flexibility
Utilizing fragments in our user interface design provides a good foundation for
creating applications that more easily adapt to device differences, but we must
go a little further to create truly flexible UIs. We must design our application such
that the fragments that make up the UI are easily rearranged in response to the
characteristics of the device on which the app is currently running.
Fragments and UI Flexibility
To achieve this, we must use some techniques to dynamically change the layout of
individual fragments in response to the current device's characteristics. Once we
employ such a technique, we must be sure that we implement our fragments in
such a way that each fragment is able to function effectively independent of layout
changes that might affect the behavior or even existence of other fragments within
the activity.
Dynamic fragment layout selection
As we mentioned in the previous section, creating a flexible UI requires that the
layout and positioning of fragments within an activity must be able to change
in response to differences in device characteristics. We can include code in our
application to dynamically arrange fragments in response to the form factor of
the device on which our app is running, but in most cases, doing so is not only
unnecessary but also undesirable. The deeper the dependencies between the
user interface and application code, the more difficult maintaining and enhancing
an application becomes. Although there will always be some degree of dependency
between our user interface and application code, we want to minimize such
dependencies and instead do as much of our user interface layout-related work
within layout resources as possible.
The easiest way to build flexibility into our application user interface is to
take advantage of the Android resource system's built-in device adaptability.
Android allows us to design different layout-related resources for our application
with each optimized for and associated with a specific set of device characteristics.
At runtime, the Android resource system takes care of automatically selecting and
loading the appropriate resources for the current device. Although this feature can
be used to dynamically modify the layout of any activity, we'll see that it is
particularly effective when used in conjunction with fragments.
To see Android resource selection in action, let's continue with our application
from the previous chapter. As you'll recall, the layout for our activity is in the
activity_main.xml resource file and looks like this:
<LinearLayout
android:orientation=""vertical""
android:layout_width=""match_parent""
android:layout_height=""match_parent""
xmlns:android=""http://schemas.android.com/apk/res/android"">
<!-- List of Book Titles -->
<fragment
android:layout_width=""match_parent""
android:layout_height=""0dp""
[ 20 ]
Chapter 2
android:layout_weight=""1""
android:name=""com.jwhh.fragments.BookListFragment""
android:id=""@+id/fragmentTitles""/>
<!-- Description of selected book -->
<fragment
android:layout_width=""match_parent""
android:layout_height=""0dp""
android:layout_weight=""1""
android:name=""com.jwhh.fragments.BookDescFragment""
android:id=""@+id/fragmentDescription""/>
</LinearLayout>
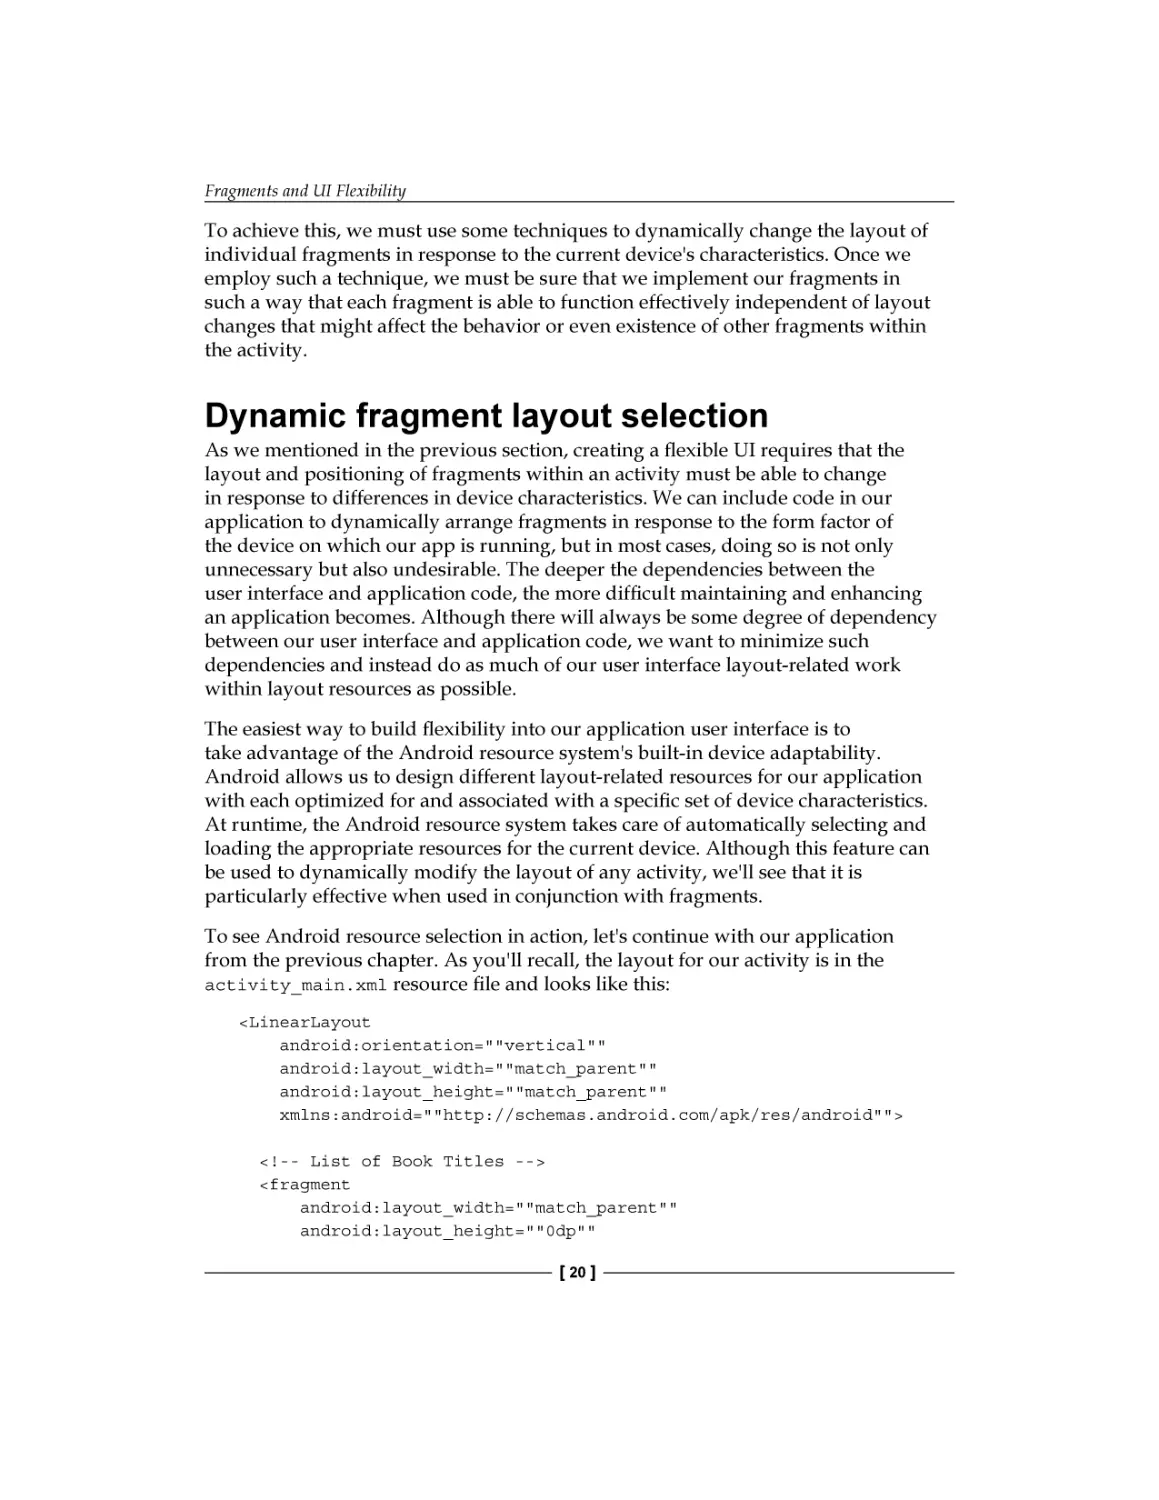
This layout stacks our fragments, BookListFragment and BookDescFragment,
one on top of the other. Although that layout renders well on a smartphone held
vertically in the portrait orientation, rotating the phone so that it's held horizontally
in the landscape orientation creates a much less attractive appearance as seen here:
The current layout is clearly not making the best use of the available screen space in
this orientation. When the phone is orientated in landscape, the application would
look much better if we position the two fragments side-by-side.
[ 21 ]
Fragments and UI Flexibility
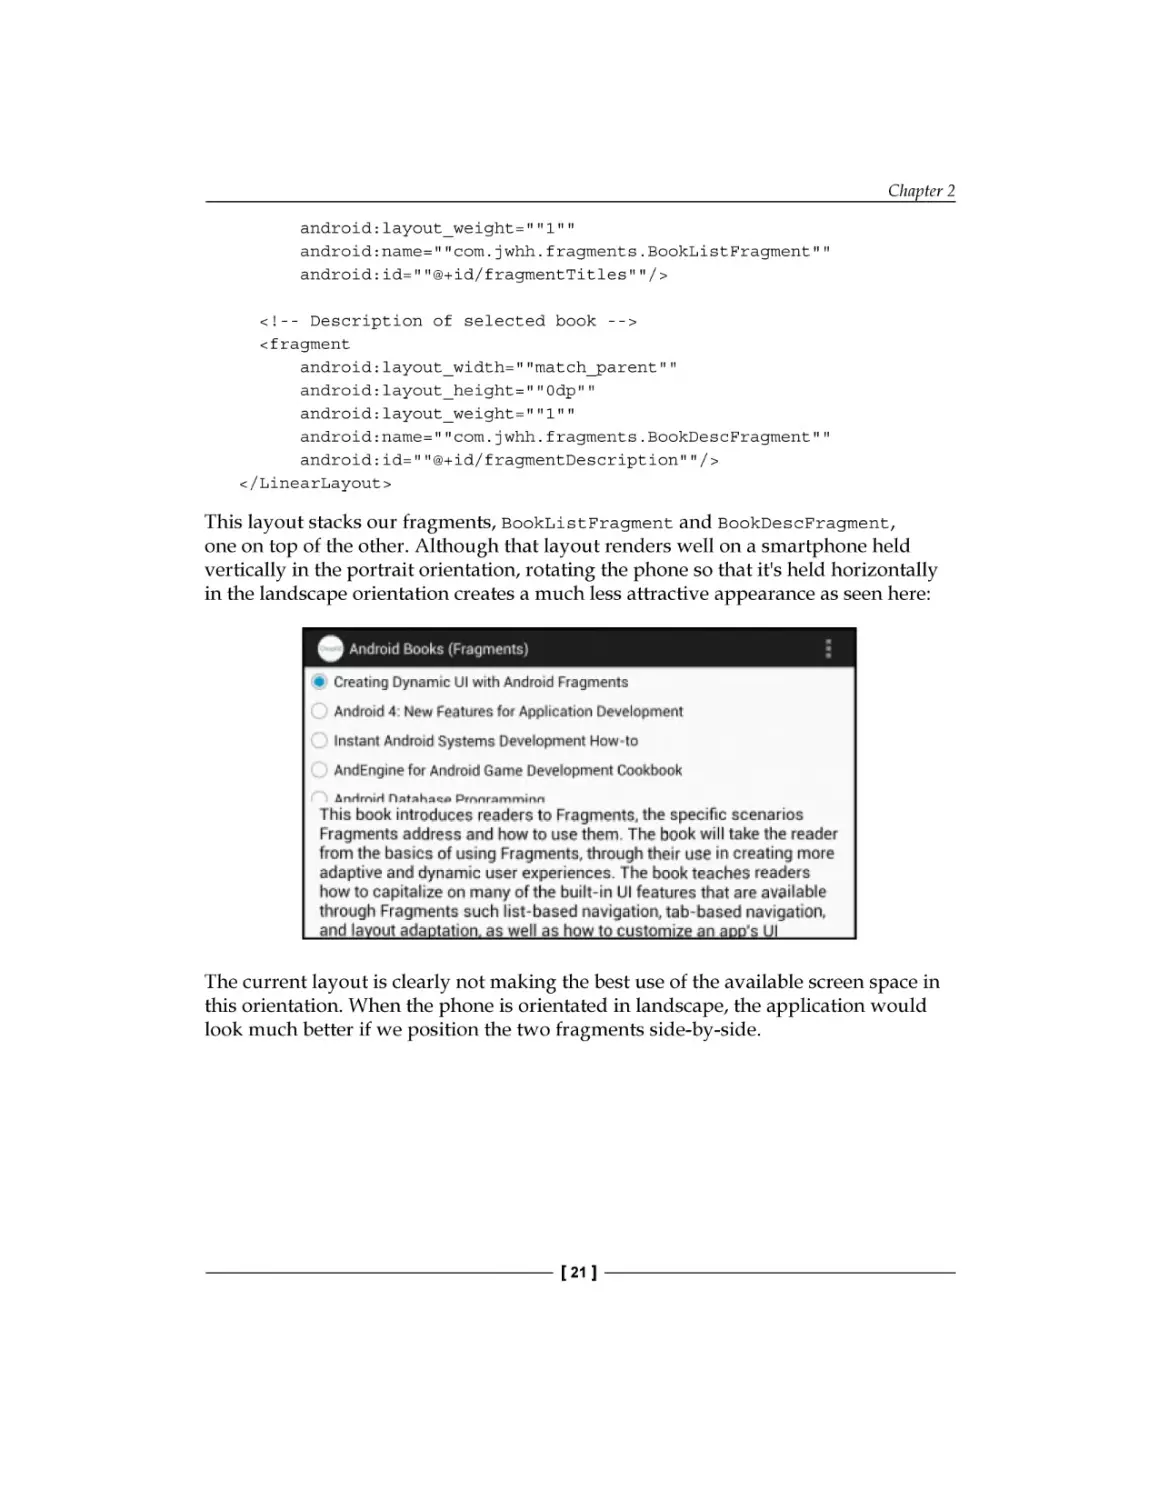
Adding an alternate layout resource
We can add support for an alternative layout to our application by creating a
new resource file with the fragments appropriately arranged. To create the
resource file, we first add another folder under the res folder of the project
tree called layout-land.
The resource folder name creates the association between the
resource file and the device characteristics, not any special
behavior on the part of Android Studio.
To create the new folder in Android Studio, perform the following steps:
1. Expand the src folder in the project explorer window.
2. Expand the main folder under src.
3. Right-click on the res folder under main.
4. Select New.
5. Select Android resource directory to open the New Resource Directory
dialog.
6. Select layout as Resource type:.
7. Highlight Orientation under Available qualifiers: and click on the >> button
to move it to Chosen qualifiers:.
8. Select Landscape under Screen orientation:.
The New Resource Directory dialog will appear similar to the following screenshot:
[ 22 ]
Chapter 2
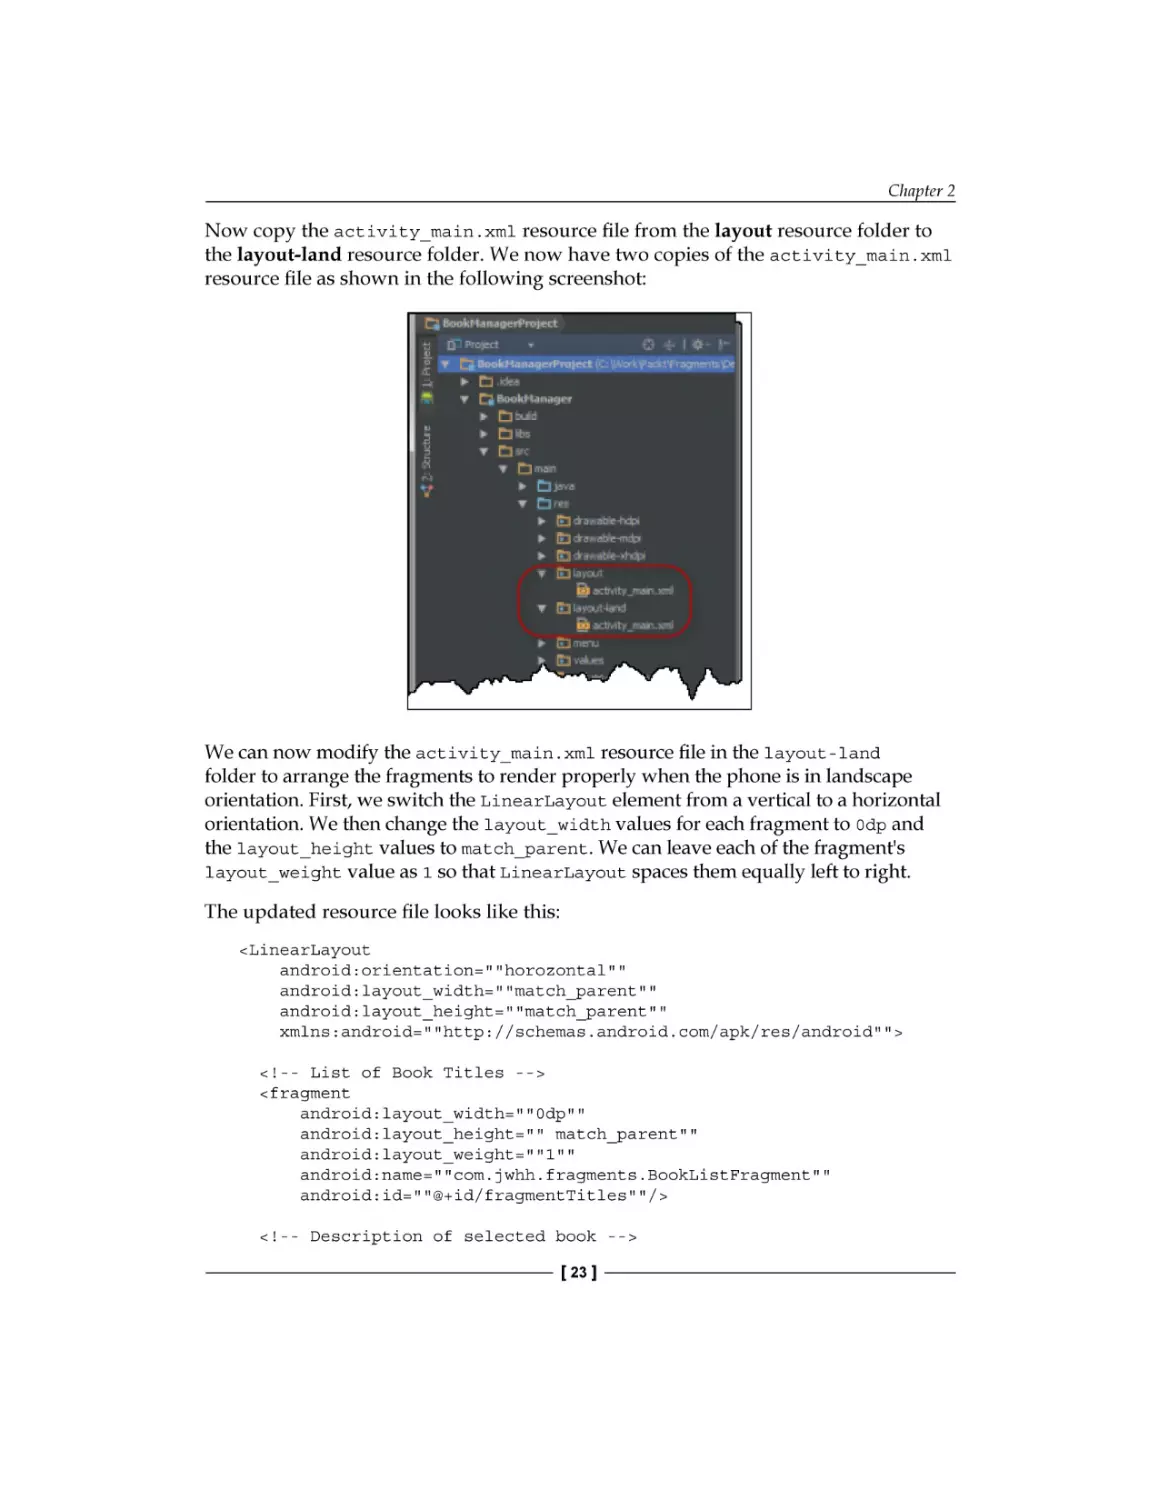
Now copy the activity_main.xml resource file from the layout resource folder to
the layout-land resource folder. We now have two copies of the activity_main.xml
resource file as shown in the following screenshot:
We can now modify the activity_main.xml resource file in the layout-land
folder to arrange the fragments to render properly when the phone is in landscape
orientation. First, we switch the LinearLayout element from a vertical to a horizontal
orientation. We then change the layout_width values for each fragment to 0dp and
the layout_height values to match_parent. We can leave each of the fragment's
layout_weight value as 1 so that LinearLayout spaces them equally left to right.
The updated resource file looks like this:
<LinearLayout
android:orientation=""horozontal""
android:layout_width=""match_parent""
android:layout_height=""match_parent""
xmlns:android=""http://schemas.android.com/apk/res/android"">
<!-- List of Book Titles -->
<fragment
android:layout_width=""0dp""
android:layout_height="" match_parent""
android:layout_weight=""1""
android:name=""com.jwhh.fragments.BookListFragment""
android:id=""@+id/fragmentTitles""/>
<!-- Description of selected book -->
[ 23 ]
Fragments and UI Flexibility
<fragment
android:layout_width=""0dp""
android:layout_height=""match_parent""
android:layout_weight=""1""
android:name=""com.jwhh.fragments.BookDescFragment""
android:id=""@+id/fragmentDescription""/>
</LinearLayout>
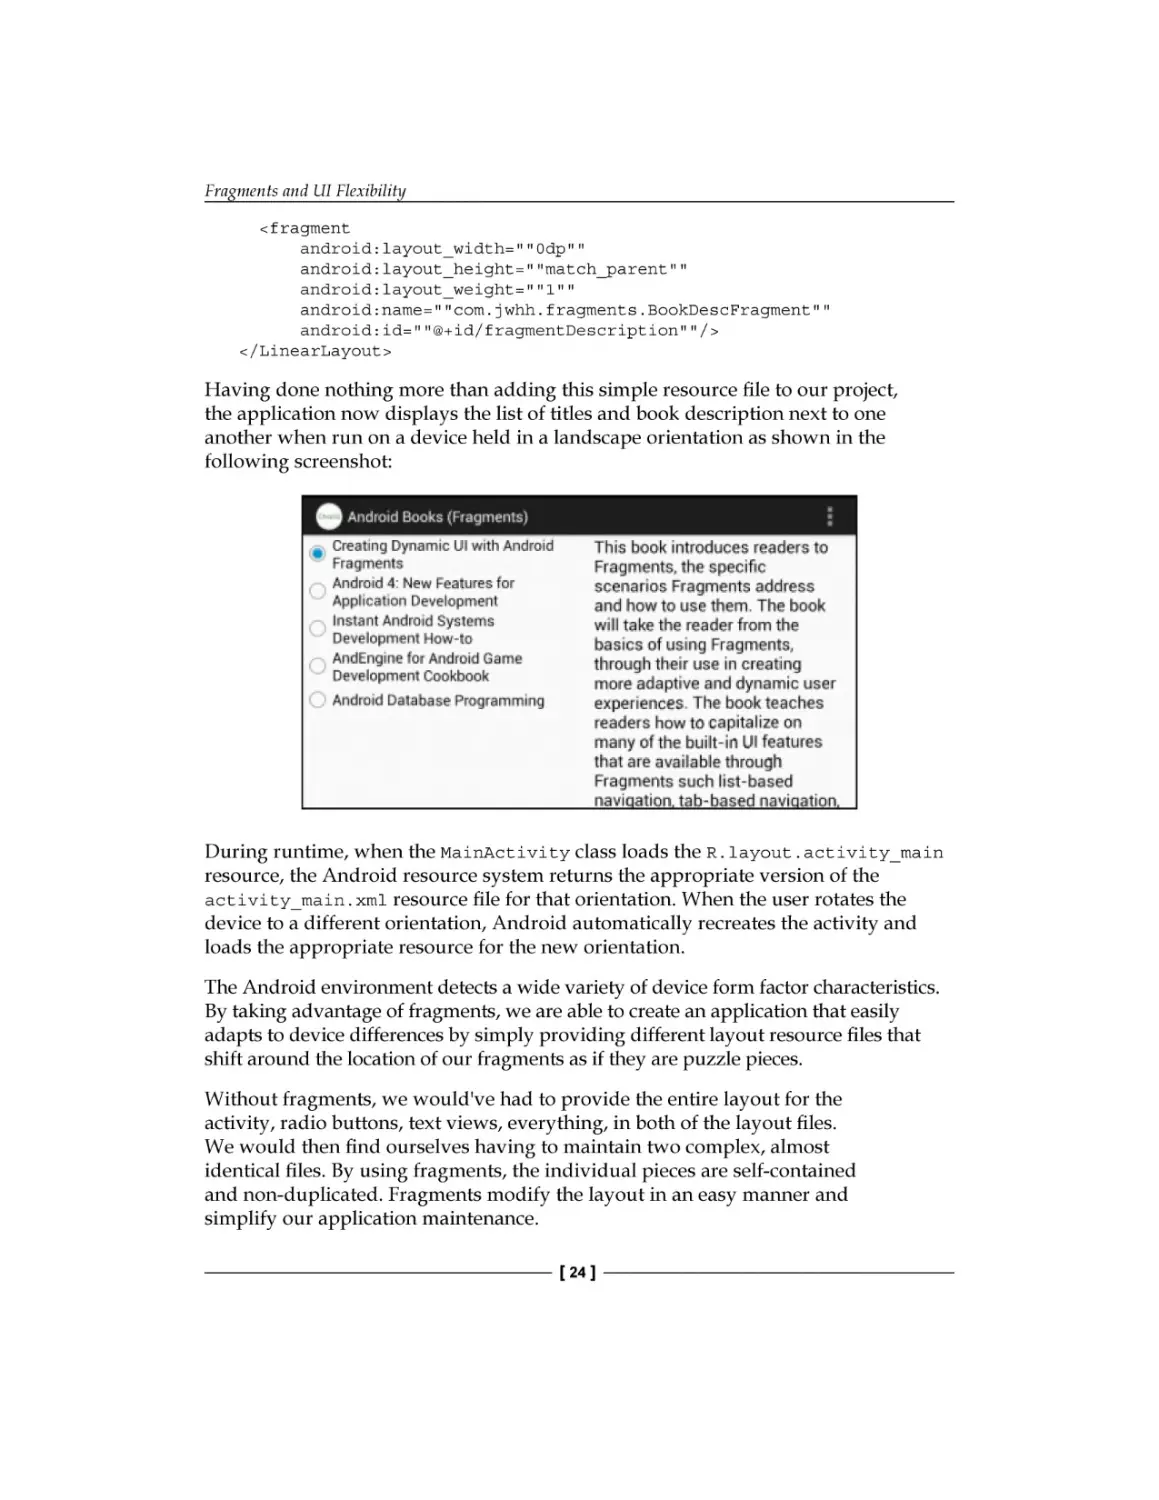
Having done nothing more than adding this simple resource file to our project,
the application now displays the list of titles and book description next to one
another when run on a device held in a landscape orientation as shown in the
following screenshot:
During runtime, when the MainActivity class loads the R.layout.activity_main
resource, the Android resource system returns the appropriate version of the
activity_main.xml resource file for that orientation. When the user rotates the
device to a different orientation, Android automatically recreates the activity and
loads the appropriate resource for the new orientation.
The Android environment detects a wide variety of device form factor characteristics.
By taking advantage of fragments, we are able to create an application that easily
adapts to device differences by simply providing different layout resource files that
shift around the location of our fragments as if they are puzzle pieces.
Without fragments, we would've had to provide the entire layout for the
activity, radio buttons, text views, everything, in both of the layout files.
We would then find ourselves having to maintain two complex, almost
identical files. By using fragments, the individual pieces are self-contained
and non-duplicated. Fragments modify the layout in an easy manner and
simplify our application maintenance.
[ 24 ]
Chapter 2
Managing fragment layout by screen size
The same technique we use to adapt our user interface to device orientation
differences can be taken much further to work with differences in screen size.
The Android resource system has device screen size awareness and therefore
supports creating corresponding resource folders. The resource selection can
be based on general screen size groups or specific screen size constraints.
Differences in device screen size are one of the most common reasons for using
layout resources to manage fragments. With this being the case, understanding
how to use layout resources to deal with differences in screen size is essential to
working effectively with fragments.
Resource screen size groups
The configuration information of each Android device includes the screen
size group to which the device belongs. The four screen size groups are
small, normal, large, or xlarge.
For specific information on the size of screens in each group,
see Range of screens supported in the Android documentation
available at http://developer.android.com/guide/
practices/screens_support.html#range.
Just as we created a specific layout resource file for landscape orientation, we can
create a layout resource file targeting a particular screen size group. We associate the
resource file with the desired screen size group by placing the file in the appropriately
named resource folder. For example, we place a layout resource file designed for
devices with a screen size group of large in the layout-large resource folder.
Screen size groups date back to the early days of Android when there was little
practical experience in dealing with the wide variety of device form factors that
now exist. As time has gone on and the number of Android device form factors
has grown, file size groups have turned out to be a less than ideal solution.
Problems with screen size groups stem from two main issues:
1. The size range of the groups is not consistently applied, which results in
the size range within the groups overlapping one another. One device with
a 7-inch screen might be classified as large while another device with the
same size screen might be classified as xlarge.
[ 25 ]
Fragments and UI Flexibility
2. Groups are sometimes too broad. For example, the large group includes
devices with 5-inch screens and devices with 7-inch screens. These screen
sizes tend to have very different layout requirements. A device with a
5-inch screen tends to work best with handset-style layouts like that for
a smartphone, whereas a device with a 7-inch screen tends to work best
with a tablet-style layout.
Size groups are still in use because they are the best option available for dealing with
screen size differences on pre-API Level 13 devices. Fortunately, less than half of the
Android devices in use today are pre-API Level 13, and the ratio is shrinking rapidly.
For information on the distribution of devices in use by API Level or by
screen size group, see the Android developer, Dashboards, available at
http://developer.android.com/about/dashboards.
Resource screen size qualifiers
At API Level 13 (Android 3.2), Android introduced a substantial improvement over
screen size groups known as resource screen size qualifiers. Resource screen size
qualifiers allow us to associate resources with specific screen size requirements.
With screen size qualifiers, we have a very detailed level of control over which
layout resources are associated with each device form factor.
To avoid the complications inherent in the wide variety of screen pixel densities
and physical screen sizes available, Android uses a canonicalized unit of measure
called the density independent pixel (dp) when managing screen sizes. If you've
been working with Android for any length of time, you are probably already familiar
with density independent pixels as they are the preferred unit of measure when
positioning and sizing views within an Android user interface.
A dp always corresponds to the physical size of a pixel on a 160 dpi device and
therefore provides a consistent unit of measure independent of the physical pixel
size of the device. For example, one 7-inch display device may have a physical
pixel count of 1280x720 while another 7-inch display device has a physical pixel
count of 1920x1080, but both devices have a dp count of approximately 1000x600.
The Android platform takes care of the details of mapping between density
independent pixels and the physical pixels of a device.
[ 26 ]
Chapter 2
Android provides three types of screen size qualifiers: smallest width, available screen
width, and available screen height:
•
Smallest width screen size qualifier: This is referred to as smallest screen
width in the Android Studio New Directory Resource dialog. It corresponds
to the number of device independent pixels at the screen's narrowest point
independent of the device orientation. Changing the device orientation does
not change the device's smallest width. We specify the name of a resource
folder based on the device's smallest width by adding sw, followed by
the desired screen size in device independent pixels, followed by dp.
For example, a layout resource folder containing layout resource files for
devices with a smallest width of at least 600 dp is named layout-sw600dp.
•
Available width screen size qualifier: This is referred to as screen width in
the Android Studio New Directory Resource dialog. It corresponds to the
number of device independent pixels measured left to right at the device's
current orientation. Changing the device orientation changes the available
width. We specify the name of a resource folder based on available width
by adding w, followed by the width in density independent pixels, followed
by dp. A layout resource folder containing resource files for a device with an
available width of at least 600 dp is named layout-w600dp.
•
Available height screen size qualifier: This is referred to as screen height
in the Android Studio New Directory Resource dialog. It corresponds to the
number of device independent pixels measured top to bottom, but otherwise
behaves identically to the available width screen size qualifier, and follows
the same naming pattern except that h is used instead of w. A layout resource
folder containing resource files for a device with an available height of at
least 600 dp is named layout-h600dp.
Eliminating redundancy
As the number of form factors our application targets grow, managing the
resource files within the different layout resource folders can become somewhat
complicated due to the fact that we'll likely want to use the same layout resource
file for different qualifiers. To demonstrate this problem, let's update our application
to use the version of the activity_main.xml resource file we currently use for
landscape-oriented devices on other devices. We'll use that same resource file
on devices in the large screen size group and on devices with a current width of
600 dp or greater.
[ 27 ]
Fragments and UI Flexibility
We first create two additional folders under our res folder: layout-large and
layout-w600dp. We then copy the activity_main.xml file from the layout-land
folder to the two folders we just created. Doing this is easy enough but we now have
a maintenance headache. Every time we make a change to that layout, we have to be
sure that we make it in all three folders.
To avoid this resource file duplication, we can use layout aliasing.
Layout aliasing
Layout aliasing allows us to have just a single copy of each layout resource file.
We can then provide the resource system with information as to which file to
choose for each form factor.
To get started, we'll rename the activity_main.xml resource file in the
layout-land resource folder as activity_main_wide.xml. We then move
the file to the layout resource folder and delete the layout-land folder.
We now create a new resource folder called values-land under the res folder.
To create the folder in Android Studio, follow the same steps as we used earlier
to create the layout-land folder except set the Resource type: as values rather
than layout.
Within this folder, we create a new resource file, the name of which doesn't matter,
but the file containing values for aliasing is often named refs.xml because it
contains a list of references to other resources, so that's what we'll use. To create
the file using Android Studio, perform the following steps:
1. Right-click on the values-land resource folder.
2. Select New.
3. Select the values resource file.
4. Specify refs.xml as the filename.
In the refs.xml file, be sure that there is already a root element named resources.
Within that element, add an item element with a type attribute value of layout.
This indicates that we're providing an alias entry for a layout resource. We set the
value of the name attribute to be the name of the default layout resource, which in
our case is activity_main. We then give the item element a value of @layout/
activity_main_wide. The complete refs.xml resource file now appears as follows:
<resources>
<item type=""layout"" name=""activity_main"">
@layout/activity_main_wide
</item>
</resources>
[ 28 ]
Chapter 2
With this file in place, any call to load the layout resource R.layout.activity_main
will instead load R.layout.activity_main_wide when the application is running
on a device in landscape orientation.
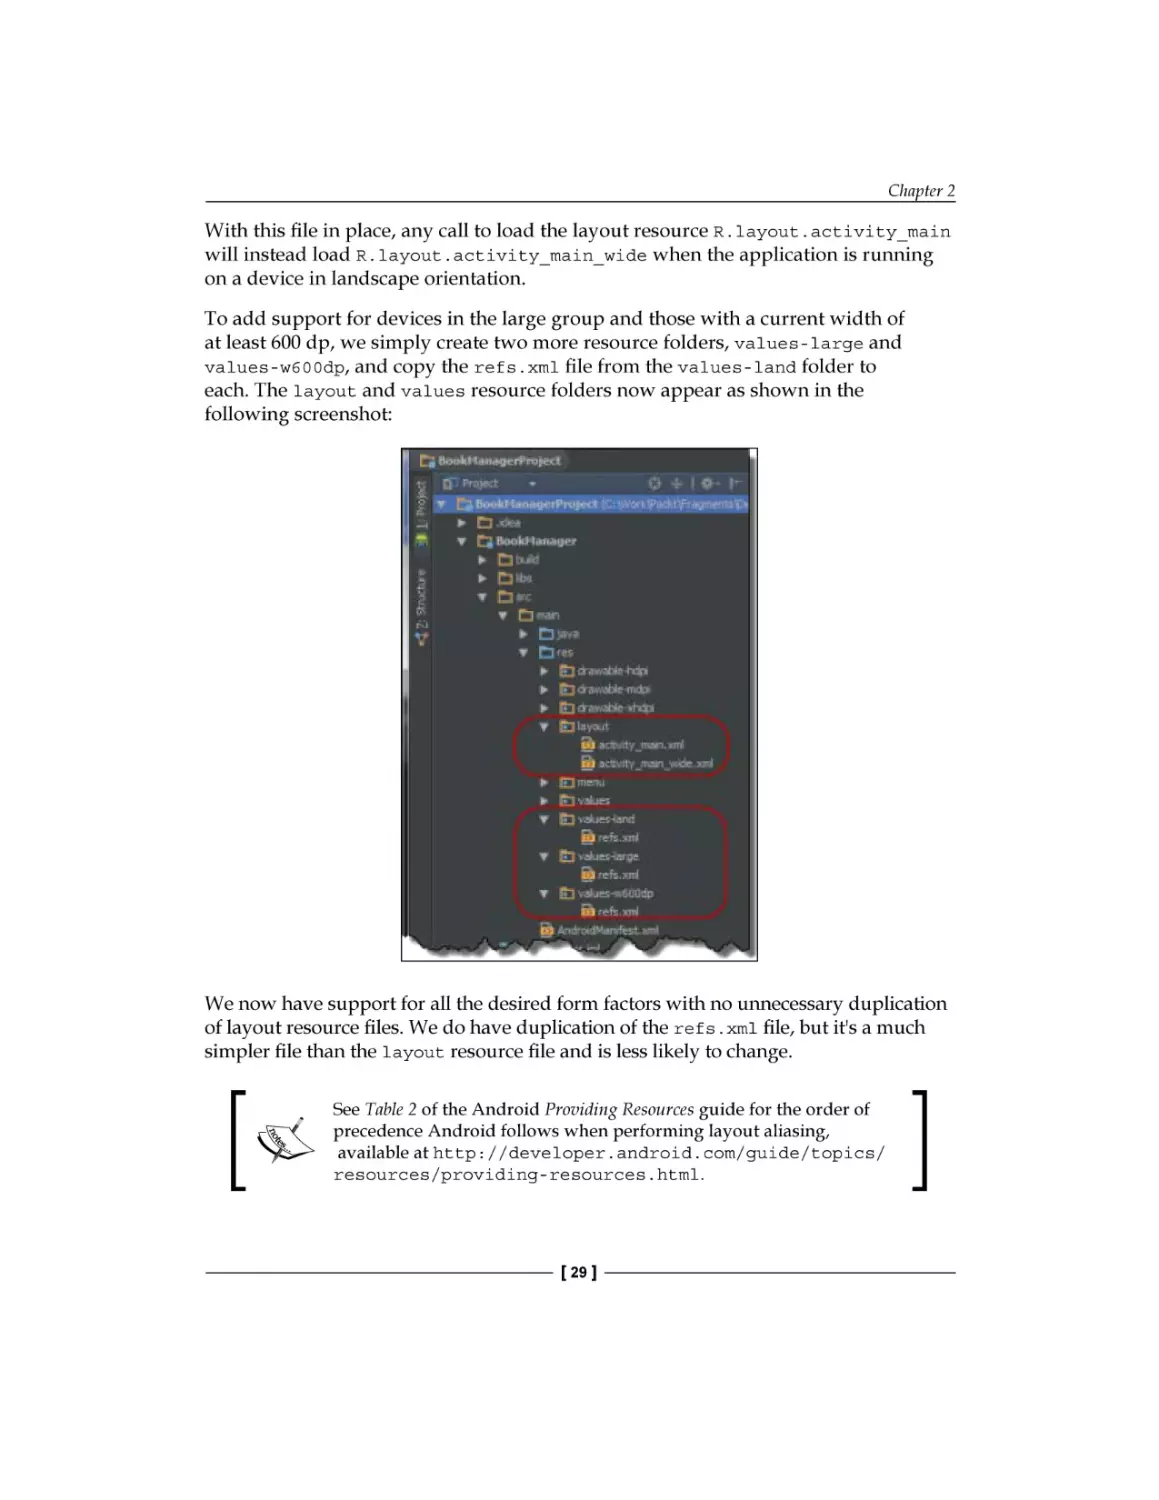
To add support for devices in the large group and those with a current width of
at least 600 dp, we simply create two more resource folders, values-large and
values-w600dp, and copy the refs.xml file from the values-land folder to
each. The layout and values resource folders now appear as shown in the
following screenshot:
We now have support for all the desired form factors with no unnecessary duplication
of layout resource files. We do have duplication of the refs.xml file, but it's a much
simpler file than the layout resource file and is less likely to change.
See Table 2 of the Android Providing Resources guide for the order of
precedence Android follows when performing layout aliasing,
available at http://developer.android.com/guide/topics/
resources/providing-resources.html.
[ 29 ]
Fragments and UI Flexibility
Design fragments for flexibility
With our user interface well-partitioned and adaptable, we need to be sure that
each fragment functions effectively, as layout differences cause the behavior and
possibly even the existence of other fragments within the activity to change. When an
application user interface is divided into fragments, the fragments exist completely
independent of one another rarely. Very often a user's interaction with one fragment
has some effect on other fragments within the same activity. In the case of our
application, this issue arises when a user selects a book within BookListFragment.
In response to the user's selection, the application is responsible for displaying the
corresponding description in BookDescFragment.
Avoiding tight coupling
One possible solution to coordinating fragment content is to allow the fragments
to directly communicate with one another. To coordinate content within our
application, we could pass the BookDescFragment reference into BookListFragment
when we first create the activity. In response to each user selection within
BookListFragment, BookListFragment would then directly update TextView
contained within BookDescFragment.
Although simple to implement, this solution is problematic because it tightly
couples the two Fragment classes to each other. The BookListFragment fragment
is only usable within activities that also contain the BookDescFragment fragment,
and making changes to the layout of BookDescFragment may potentially break
BookListFragment. We always want to keep in mind that a key goal of using
fragments is to be well-partitioned and adaptable.
Abstracting fragment relationships
Instead of creating direct relationships between the fragments, we can take
advantage of the abstraction provided by interfaces. By defining a simple callback
interface to represent the act of a user making a book selection, we can completely
eliminate tight coupling between fragments. The BookListFragment class can
be written to provide notification of a user selection through the interface.
By implementing the interface on the activity, the activity can then handle
coordinating the user selection within BookListFragment with updating the
displayed description within BookDeskFragment.
[ 30 ]
Chapter 2
Defining the callback interface
The callback interface should include methods for any interaction with the fragment
that may be meaningful to the activity containing the fragment. At the same time,
the interface should not burden the activity with unnecessary details. The interface
should be focused on application-level actions such as selecting a book rather than
implementation-level actions such as tapping on a radio button. The implementationlevel details should be isolated within the fragment. We should also be sure to design
the interface without any preconceived ideas of what the activity will do with
the notification.
In the case of BookListFragment, the only action of interest to the activity is the user
selecting a book. This tells us the interface needs just a single method; we'll call the
interface method onSelectedBookChanged. We know in the case of this application,
the goal is to display the selected book description, so one possibility is to have the
onSelectedBookChanged method include a parameter for the book description.
The problem with passing the book description is that doing so limits the use
of BookListFragment to just this one use case, displaying the book description.
Instead, by passing an identifier for the book, BookListFragment is available for any
use case in which the user selects a book. For simplicity, in our example, we'll use an
array index as the identifier; in a real scenario, the identifier would more likely be a
key to locate the book information within a data store or service.
We'll call our new interface OnSelectedBookChangeListener. The interface looks
like this:
public interface OnSelectedBookChangeListener {
void onSelectedBookChanged(int bookIndex);
}
Making the fragment self-contained
The BookListFragment class needs to hide the details of user selections and
instead translate each selection to a book identifier, which in our case is an array
index. We first need to update the BookListFragment class to handle the radio
button selections by implementing the RadioGroup.OnCheckedChangeListener
interface as follows:
public class BookListFragment extends Fragment
implements RadioGroup.OnCheckedChangeListener {
@Override
public void onCheckedChanged(RadioGroup radioGroup, int id)
}
[ 31 ]
{
Fragments and UI Flexibility
// Other members elided for clarity
}
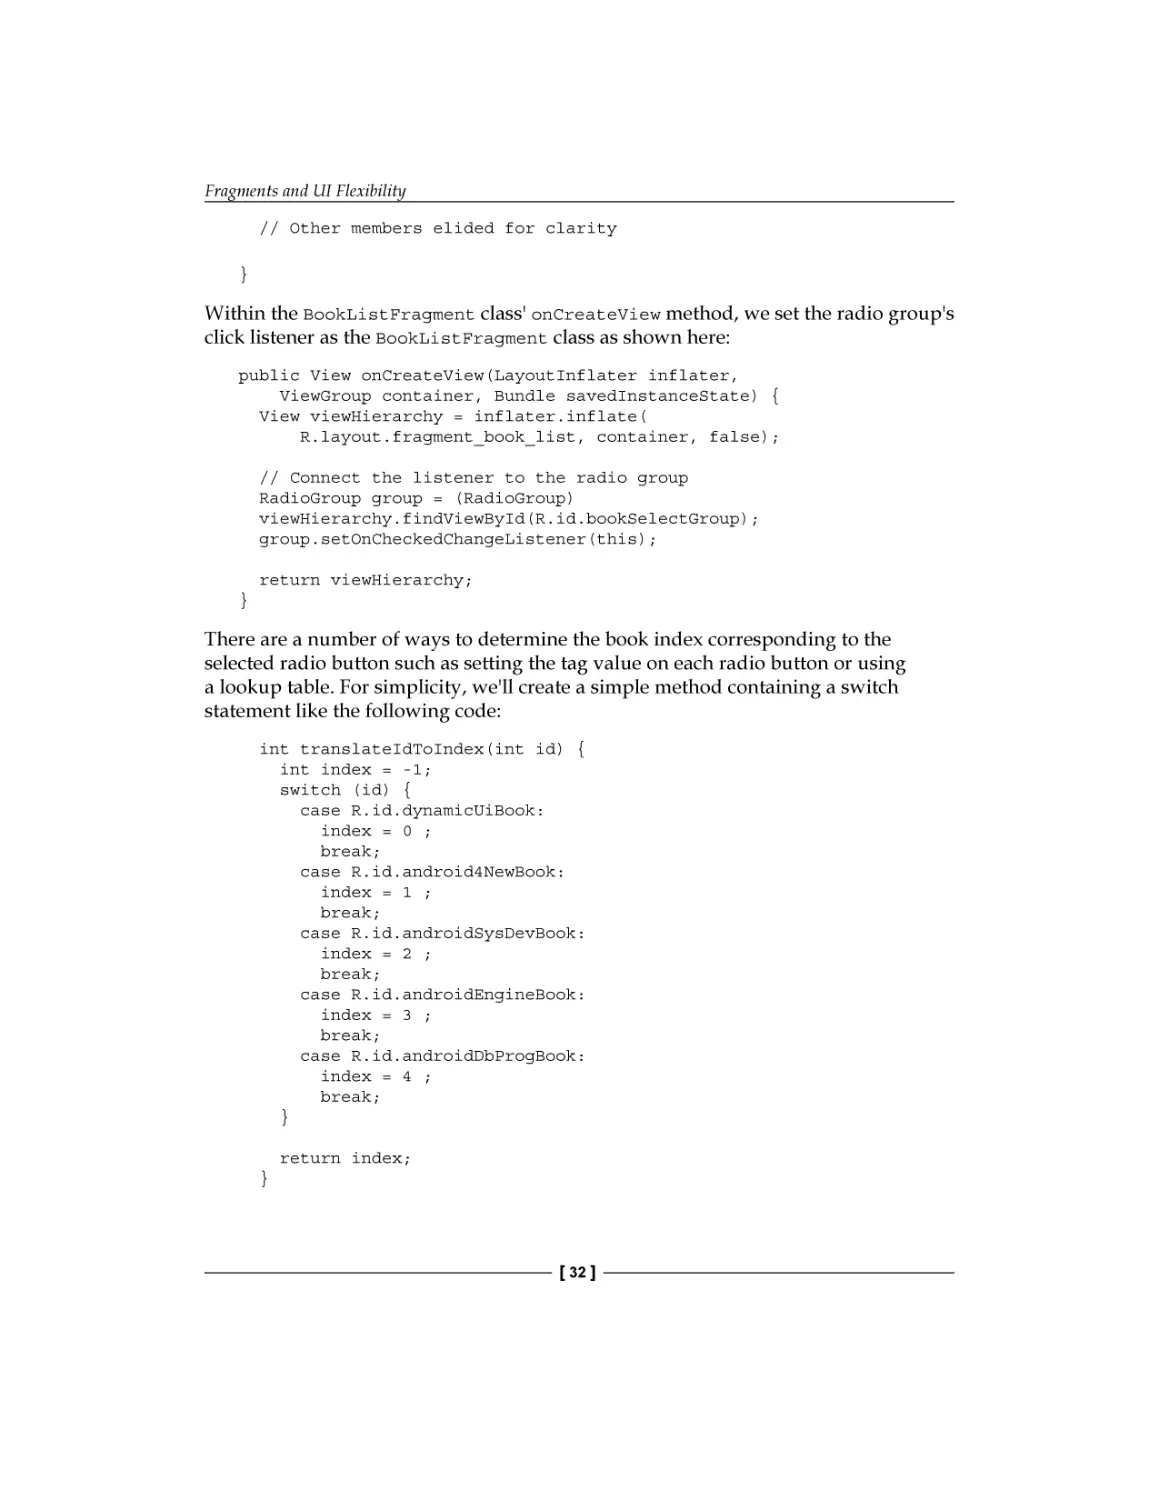
Within the BookListFragment class' onCreateView method, we set the radio group's
click listener as the BookListFragment class as shown here:
public View onCreateView(LayoutInflater inflater,
ViewGroup container, Bundle savedInstanceState) {
View viewHierarchy = inflater.inflate(
R.layout.fragment_book_list, container, false);
// Connect the listener to the radio group
RadioGroup group = (RadioGroup)
viewHierarchy.findViewById(R.id.bookSelectGroup);
group.setOnCheckedChangeListener(this);
return viewHierarchy;
}
There are a number of ways to determine the book index corresponding to the
selected radio button such as setting the tag value on each radio button or using
a lookup table. For simplicity, we'll create a simple method containing a switch
statement like the following code:
int translateIdToIndex(int id) {
int index = -1;
switch (id) {
case R.id.dynamicUiBook:
index = 0 ;
break;
case R.id.android4NewBook:
index = 1 ;
break;
case R.id.androidSysDevBook:
index = 2 ;
break;
case R.id.androidEngineBook:
index = 3 ;
break;
case R.id.androidDbProgBook:
index = 4 ;
break;
}
return index;
}
[ 32 ]
Chapter 2
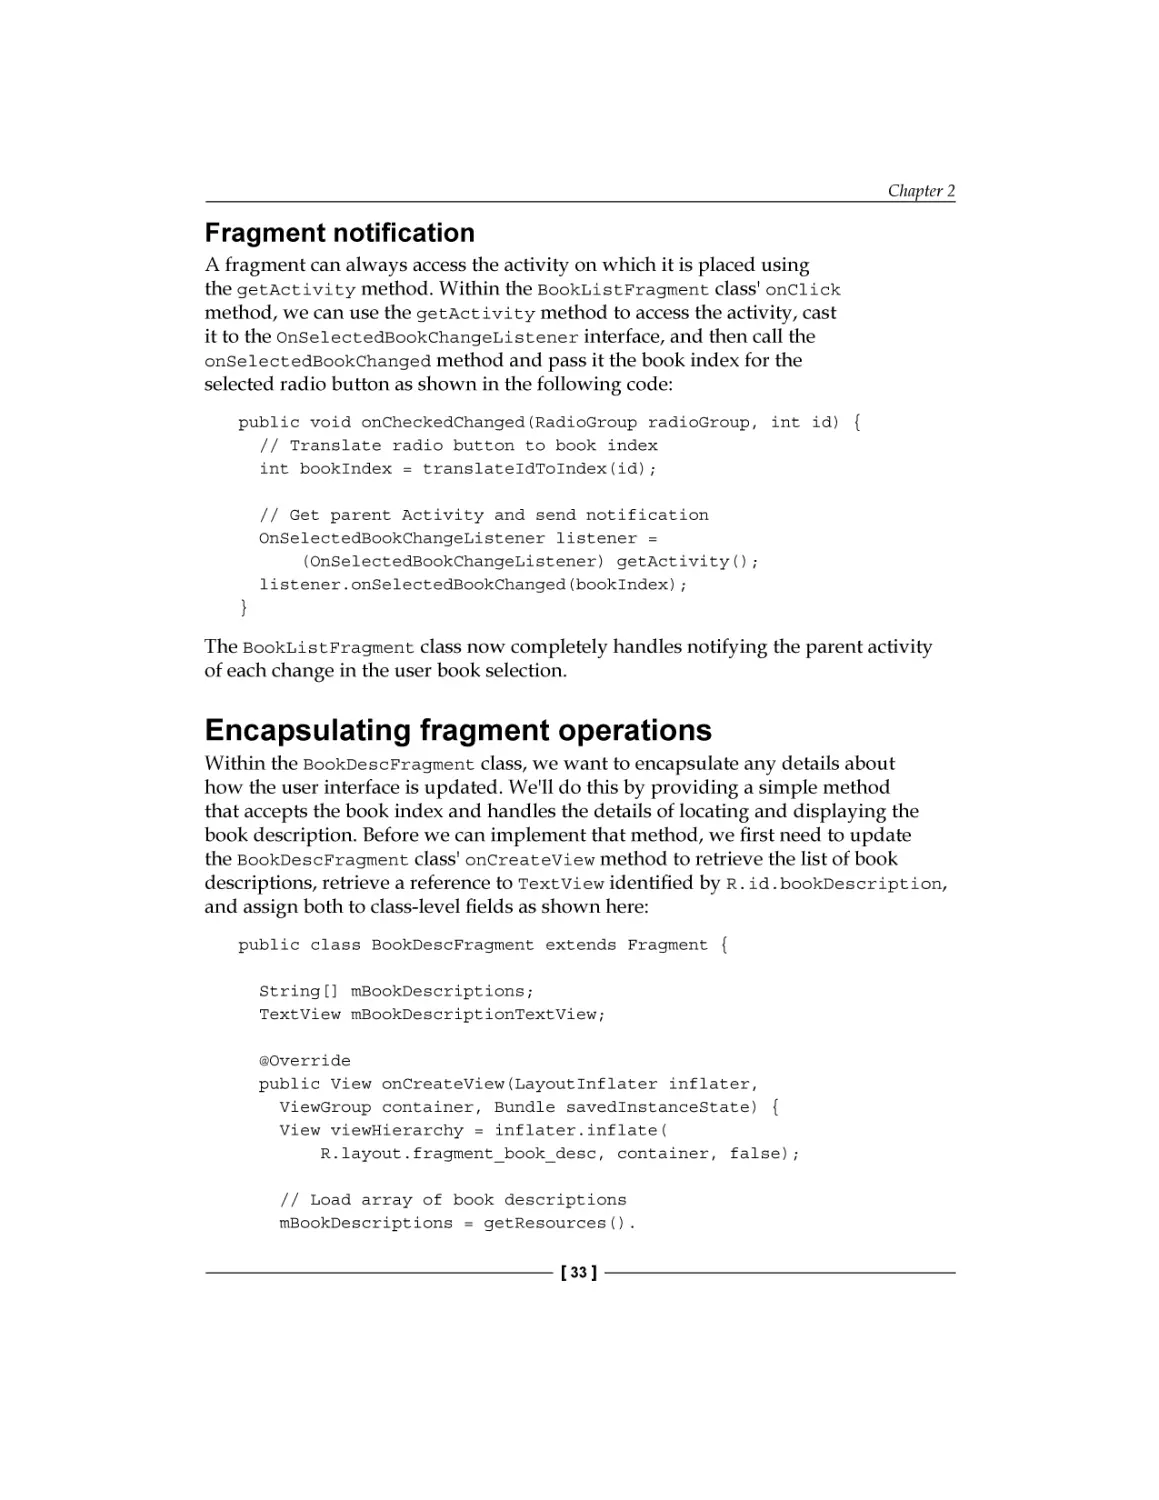
Fragment notification
A fragment can always access the activity on which it is placed using
the getActivity method. Within the BookListFragment class' onClick
method, we can use the getActivity method to access the activity, cast
it to the OnSelectedBookChangeListener interface, and then call the
onSelectedBookChanged method and pass it the book index for the
selected radio button as shown in the following code:
public void onCheckedChanged(RadioGroup radioGroup, int id) {
// Translate radio button to book index
int bookIndex = translateIdToIndex(id);
// Get parent Activity and send notification
OnSelectedBookChangeListener listener =
(OnSelectedBookChangeListener) getActivity();
listener.onSelectedBookChanged(bookIndex);
}
The BookListFragment class now completely handles notifying the parent activity
of each change in the user book selection.
Encapsulating fragment operations
Within the BookDescFragment class, we want to encapsulate any details about
how the user interface is updated. We'll do this by providing a simple method
that accepts the book index and handles the details of locating and displaying the
book description. Before we can implement that method, we first need to update
the BookDescFragment class' onCreateView method to retrieve the list of book
descriptions, retrieve a reference to TextView identified by R.id.bookDescription,
and assign both to class-level fields as shown here:
public class BookDescFragment extends Fragment {
String[] mBookDescriptions;
TextView mBookDescriptionTextView;
@Override
public View onCreateView(LayoutInflater inflater,
ViewGroup container, Bundle savedInstanceState) {
View viewHierarchy = inflater.inflate(
R.layout.fragment_book_desc, container, false);
// Load array of book descriptions
mBookDescriptions = getResources().
[ 33 ]
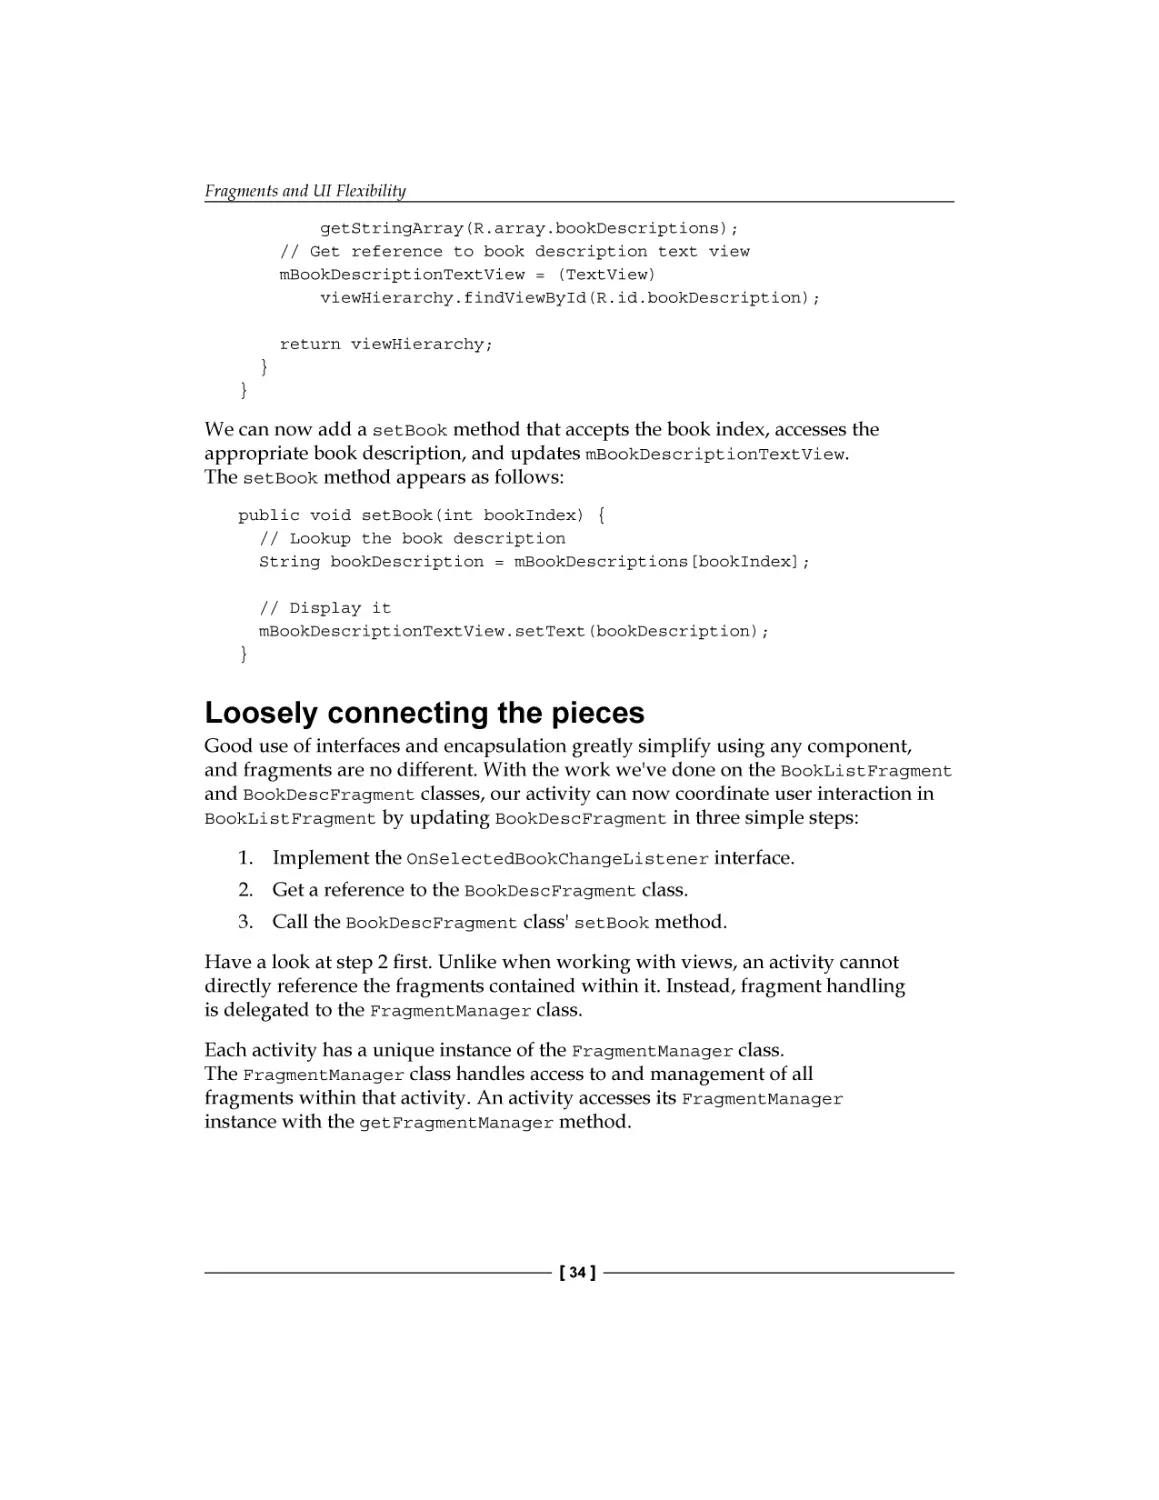
Fragments and UI Flexibility
getStringArray(R.array.bookDescriptions);
// Get reference to book description text view
mBookDescriptionTextView = (TextView)
viewHierarchy.findViewById(R.id.bookDescription);
return viewHierarchy;
}
}
We can now add a setBook method that accepts the book index, accesses the
appropriate book description, and updates mBookDescriptionTextView.
The setBook method appears as follows:
public void setBook(int bookIndex) {
// Lookup the book description
String bookDescription = mBookDescriptions[bookIndex];
// Display it
mBookDescriptionTextView.setText(bookDescription);
}
Loosely connecting the pieces
Good use of interfaces and encapsulation greatly simplify using any component,
and fragments are no different. With the work we've done on the BookListFragment
and BookDescFragment classes, our activity can now coordinate user interaction in
BookListFragment by updating BookDescFragment in three simple steps:
1. Implement the OnSelectedBookChangeListener interface.
2. Get a reference to the BookDescFragment class.
3. Call the BookDescFragment class' setBook method.
Have a look at step 2 first. Unlike when working with views, an activity cannot
directly reference the fragments contained within it. Instead, fragment handling
is delegated to the FragmentManager class.
Each activity has a unique instance of the FragmentManager class.
The FragmentManager class handles access to and management of all
fragments within that activity. An activity accesses its FragmentManager
instance with the getFragmentManager method.
[ 34 ]
Chapter 2
When working with the Android Support Library, use the
FragmentActivity class' getSupportFragmentManager
method in place of the standard Activity class'
getFragmentManager method to access the current
FragmentManager instance.
With FragmentManager, an activity can access the contained fragments by calling the
FragmentManager.findFragmentById method and passing the desired fragment's
ID value from the layout resource.
FragmentManager is an important class with a number of powerful
capabilities. We'll talk much more about FragmentManager in
Chapter 4, Working with Fragment Transactions.
By using FragmentManager to access BookDescFragment, we can now implement
the BookListFragment.OnSelectedBookChangeListener interface on our activity
to update the displayed description for each user selection in BookListFragment.
public class MainActivity extends Activity
implements OnSelectedBookChangeListener{
@Override
public void onSelectedBookChanged(int bookIndex) {
// Access the FragmentManager
FragmentManager fragmentManager = getFragmentManager();
// Get the book description fragment
BookDescFragment bookDescFragment = (BookDescFragment)
fragmentManager.findFragmentById
(R.id.fragmentDescription);
// Display the book title
if(bookDescFragment != null)
bookDescFragment.setBook(bookIndex);
}
// other members elided for clarity
}
[ 35 ]
Fragments and UI Flexibility
Fragments protect against the unexpected
The true test of user interface flexibility is in how well the user interface design
and implementation hold up when encountering an unexpected change request.
A well-designed fragment-based user interface allows us to create incredible
dynamic user interfaces that can evolve and change with minimal impact on the
code. As an example, let's make what could potentially be a major design change
on our application.
Currently, the application always shows the book list and description on the same
activity. The only difference is whether the fragments are positioned vertically or
horizontally relative to one another. Imagine we receive feedback from our users that
they don't like the way the app appears when viewed on a portrait-oriented handset.
When viewed on a portrait-oriented handset, they would like the list and description
to appear on separate activities. In all other cases, they want the app to continue to
show the list and description side-by-side.
Evolving layout resource files
We first create a duplicate copy of the activity_main.xml resource file in the
layout resource folder named activity_book_desc.xml. To do this in Android
Studio, perform the following steps:
1. Right-click on the activity_main.xml file in the project explorer window
and select Copy.
2. Right-click on the layout folder and select Paste.
3. Change the filename to activity_book_desc.xml.
Remove the fragment element for BookListFragment from the activity_book_
desc.xml file so it now shows only BookDescFragment as in the following code:
<LinearLayout
xmlns:tools=""http://schemas.android.com/tools""
android:orientation=""vertical""
android:layout_width=""match_parent""
android:layout_height=""match_parent""
xmlns:android=""http://schemas.android.com/apk/res/android"">
<!-- Description of selected book -->
<fragment
android:layout_width=""match_parent""
android:layout_height=""0dp""
android:layout_weight=""1""
android:name=""com.jwhh.fragments_after.BookDescFragment""
[ 36 ]
Chapter 2
android:id=""@+id/fragmentDescription""
tools:layout=""@layout/fragment_book_desc""/>
</LinearLayout>
In the activity_main.xml resource file, remove BookDescFragment so that it now
appears as follows:
<LinearLayout
xmlns:tools=""http://schemas.android.com/tools""
android:orientation=""vertical""
android:layout_width=""match_parent""
android:layout_height=""match_parent""
xmlns:android=""http://schemas.android.com/apk/res/android"">
<!-List of Book Titles -->
<fragment
android:layout_width=""match_parent""
android:layout_height=""0dp""
android:layout_weight=""1""
android:name=""com.jwhh.fragments_after.BookListFragment""
android:id=""@+id/fragmentTitles""
tools:layout=""@layout/fragment_book_list""/>
</LinearLayout>
We now have layout resources for each of the activities. Remember that these
changes will not affect the appearance of the app in scenarios that use the
activity_main_wide.xml resource file.
Creating the book description activity
To display the book description, we add a simple activity named BookDescActivity
that uses the activity_book_desc.xml layout resource. The activity relies on an
"Intent extra" to pass the book index. Since BookDescFragment contains all the
logic necessary to display a book description, we can simply get a reference to
BookDescFragment and set the book index just as we did in the MainActivity
class as shown here:
public class BookDescActivity extends Activity {
@Override
protected void onCreate(Bundle savedInstanceState) {
super.onCreate(savedInstanceState);
setContentView(R.layout.activity_book_desc);
[ 37 ]
Fragments and UI Flexibility
// Retrieve the book index from the Activity Intent
Intent intent = getIntent();
int bookIndex = intent.getIntExtra(""bookIndex"", -1);
if (bookIndex != -1) {
// Use FragmentManager to access BookDescFragment
FragmentManager fm = getFragmentManager();
BookDescFragment bookDescFragment = (BookDescFragment)
fm.findFragmentById(R.id.fragmentDescription);
// Display the book title
bookDescFragment.setBook(bookIndex);
}
}
}
Making the MainActivity class adaptive
The MainActivity class has some extra work to do now because the specific
fragments contained within it will vary. When running on a device with a screen
that is at least 600 dp wide or when running on a device in the large screen group,
the MainActivity class always contains an instance of BookDescFragment. On the
other hand, when running on other devices, the presence of BookDescFragment
will depend upon the device's current orientation. We could add code to the
MainActivity class to test for all of these various scenarios or we could take a
simpler approach, that is, check whether the activity contains an instance of the
BookDescFragment class.
Using this approach, we have the MainActivity class' onSelectedBookChanged
method to check the validity of BookDescFragment returned by FragmentManager.
If FragmentManager returns a valid reference, the method can call setBook on
BookDescFragment just as it has been. If the returned reference is not valid,
the onSelectedBookChanged method calls startActivity with an Intent
instance containing the information to display BookDescActivity that includes
bookIndex as an extra as shown in the following code:
public void onSelectedBookChanged(int bookIndex) {
// Access the FragmentManager
FragmentManager fm = getFragmentManager();
// Get the book description fragment
BookDescFragment bookDescFragment = (BookDescFragment)
fm.findFragmentById(R.id.fragmentDescription);
// Check validity of fragment reference
if(bookDescFragment == null || !bookDescFragment.isVisible()){
[ 38 ]
Chapter 2
// Use activity to display description
Intent intent = new Intent(this, BookDescActivity.class);
intent.putExtra(""bookIndex"", bookIndex);
startActivity(intent);
}
else {
// Use contained fragment to display description
bookDescFragment.setBook(bookIndex);
}
}
Notice the if statement that checks the validity of bookDescFragment. In most
cases, a simple check for whether the reference is null is all we need. The one
exception is the case of when the app is run on a handset device on which the user
has viewed the app in landscape orientation and then rotated the device to portrait.
In this situation, the BookDescFragment instance is not visible but the activity's
FragmentManager instance may be caching a reference to an invisible instance
remaining from the landscape layout. For this reason, we check both for a null
reference and for visibility. We'll discuss the details of fragment lifecycle, creation,
and caching over the next two chapters.
We now have adaptability built into our app. The scenarios that use
the activity_main_wide.xml resource file look as they always did.
On portrait-oriented handset devices, our app provides the user interface
with two separate activities: one for the book list and one for the book
description. The application now appears on portrait-oriented handset
devices as shown here:
[ 39 ]
Fragments and UI Flexibility
Summary
Fragments provide our applications with a level of user interface flexibility that
would be difficult to achieve otherwise. By properly designing our application to
use fragments and associating the fragment resources with the appropriate device
characteristics, we're able to build apps that contain a rich user interface that
automatically adapts to the wide variety of Android device form factors that
exist. We get all of these capabilities while writing only minimal code.
In the next chapter, we dig into the lifecycle of fragments and explore how we can
leverage the fragment lifecycle to create more responsive user interfaces and leverage
specialized Fragment classes.
[ 40 ]
Fragment Lifecycle
and Specialization
This chapter discusses the relationship of the lifecycle of fragments to that of
activities, and demonstrates the appropriate programming actions at the various
points in the lifecycle. The special purpose fragment classes ListFragment and
DialogFragment are introduced with coverage of their use and how their behavior
in the activity lifecycle differs from that of standard fragments.
The following topics are covered in this chapter:
•
Fragment setup/display event sequence
•
Fragment teardown/hide event sequence
•
Working with the ListFragment class
•
Working with the DialogFragment class
•
Interacting with a DialogFragment class as a traditional Dialog class
•
Wrapping an existing Dialog class in a DialogFragment class
By the end of this chapter, we will be able to coordinate the setup and teardown
of fragments within their host activities, and be able to effectively utilize the
ListFragment and DialogFragment classes.
Fragment Lifecycle and Specialization
Understanding the fragment lifecycle
One of the challenges of developing Android applications is assuring that our
applications effectively handle the lifecycle of the application's activities. During the
lifetime of an application, a given activity may be created, destroyed, and recreated
many times. A simple action such as a user rotating a device from a portrait to
landscape orientation, or vice-versa, normally causes the visible activity to be
completely destroyed and recreated using the appropriate resources for the new
orientation. Applications that do not cooperate effectively with this natural lifecycle
will often crash or behave in some other undesirable manner.
As we know, each fragment instance exists within a single activity; therefore,
that fragment must cooperate in some way with the activity lifecycle. In fact,
not only do fragments cooperate with the activity lifecycle but also they are
intimately connected.
In both the setup and display phase and hide and teardown phase, fragments
provide many of the same lifecycle-related callback methods as activities.
In addition, fragments provide additional lifecycle-related callback methods
that relate to the fragment's relationship to the containing activity.
As our applications become more sophisticated and we work with more specialized
implementations of the fragment class, understanding the fragment class' lifecycle
and the relationship to the activity lifecycle is essential.
If you are unfamiliar with the basics of Android's activity lifecycle
callback methods, please see the Activity Lifecycle section of the Android
Activity documentation at http://developer.android.com/
reference/android/app/Activity.html#ActivityLifecycle.
Understanding fragment setup and display
Fragment setup and display is a multiphase process involving the fragment's
association with an activity, the fragments' creation, and the standard lifecycle events
of moving the activity into the running state (also known as the resumed or active
state). Understanding the behavior of the lifecycle events and the associated callback
methods is essential for using fragments effectively. Once we have an understanding
of the lifecycle events and the callback methods, we'll look at just how the event
callback methods are used.
[ 42 ]
Chapter 3
S
fo equ
re e
ac nce
h
Fr rep
ag ea
m ts
en
t
The following diagram shows the sequence of lifecycle-related callback method calls
that occur on fragments and activities during setup and display:
Fragment
Activity
onCreate
1
2
onAttachFragment
onAttach
3
4
onCreate
5
onCreateView
6
onActivityCreated
7
onStart
8
onResume
onStart
9
10
onResume
As you might expect, in most cases, the first step in the setup and display of a
fragment occurs in the activity's onCreate method. In most cases, the activity
calls the setContentView method from within the activity's onCreate callback
method, which then loads the layout resource and triggers the activity's association
with the contained fragments.
Notice what happens next. Before the fragment is ever created, the fragment is
attached to the activity. The fragment is first notified of the attachment and receives
a reference to the activity through the onAttach callback method. The activity is then
notified and receives a reference to the fragment through the onAttachFragment
callback method.
Although attaching the fragment to the activity prior to creating the fragment may
seem unexpected, doing so is useful. In many cases, the fragment needs access to
the activity during the creation process, because the activity often contains
information that the fragment will display or that is otherwise important to the
fragment creation process.
[ 43 ]
Fragment Lifecycle and Specialization
With the fragment attached to the activity, the fragment then performs general
creation work in the onCreate method and then constructs the contained view
hierarchy in the onCreateView method.
When an activity contains multiple fragments, Android calls the four methods:
Fragment.onAttach, Activity.onAttachFragment, Fragment.onCreate, and
Fragment.onCreateView in succession for one fragment before making any calls
to these methods for the next fragment. This allows each fragment to complete the
process of attachment and creation before the next fragment begins that process.
Once the sequence of calling these four methods completes for all the fragments,
the remaining setup and display callback methods are called individually in
succession for each fragment.
After the activity completes execution of its onCreate method, Android then calls
each fragment's onActivityCreated method. The onActivityCreated method
indicates that all views and fragments created by the activity's layout resource are
now fully constructed and can be safely accessed.
At this point, the fragment receives the standard lifecycle callbacks on the onStart
and onResume methods, just after the activity methods of the same name are each
called. Any work performed in the fragment's onStart and onResume methods is
very much like the work performed in the corresponding methods within an activity.
For many fragments, the only methods in this part of their lifecycle that are
overridden are the onCreate and onCreateView methods, as we saw in the
examples in the previous chapters.
Avoiding method name confusion
The activity and fragment classes have a number of commonly named callback
methods, and most of these commonly named methods have a common purpose.
One important exception is the onCreateView method. The purpose of this method
is very different for each class.
As mentioned previously, Android calls the Fragment class' onCreateView method
to give the fragment an opportunity to create and return the fragment's contained
view hierarchy. This method is commonly overridden within a fragment.
The method of the same name in the Activity class is called repeatedly by
the LayoutInflater class during the process of inflating a layout resource.
Most activity implementations do not override this method.
[ 44 ]
Chapter 3
Understanding fragment hide and teardown
Just as fragments behave in a similar way to activities during setup and display,
they also behave in a similar way during hide and teardown, as shown in the
following diagram:
Fragment
Activity
onPause
1
onPause
2
3
4
onStop
6
5
onStop
7
onDestroyView
8
onDestroy
onDetach
9
onDestroy
ts
ea t
rep en
ce gm
en Fra
qu h
Se eac
for
onSaveInstanceState
onSaveInstanceState
10
Initially during hide and teardown, fragments behave just as activities. When the
user switches to another activity, each fragment's onPause, onSaveInstanceState,
and onStop methods are called. For each method, the fragment implementation is
called first, followed by the activity implementation.
After the onStop method is called, fragments begin to behave a little differently than
activities. Consistent with the separation of fragment creation from fragment view
hierarchy creation, fragment view hierarchy destruction is separate from fragment
destruction. Following the call to the activity's onStop method, the fragment's
onDestroyView method is called indicating that the view hierarchy returned by
the fragment's onCreateView method is being destroyed. The fragment's onDestroy
method is then called followed by the fragment's onDetach method. At this point,
the fragment has no association with an activity and any calls to the getActivity
method will return null.
For activities containing multiple fragments, Android calls the sequence of the
three methods, onDestroyView, onDestroy, and onDetach, for an individual
fragment, before beginning the sequence of calling these three methods for the
next fragment. This groups the process of destroying and detaching each fragment
similar to the way Android groups the process of attaching and creating each
fragment. Once this sequence completes for all fragments, Android then calls the
activity's onDestroy method.
[ 45 ]
Fragment Lifecycle and Specialization
Maximizing available resources
For the most part, lifecycle management for a fragment is very much like that of
an activity. There is, however, one important exception: the two-phase nature of
fragment creation and destruction. Fragments separate the creation and destruction
of the fragment from the fragment's contained view hierarchy. This is because
fragments have the ability to exist and be associated with an activity in the absence
of the fragment's view hierarchy.
There are many scenarios where an activity may contain multiple fragments, but
have only a subset of those fragments visible at any point in time. In such a case,
the contained fragments can all have their onAttach and onCreate methods called.
But the call to each fragment's onCreateView method is delayed until the time
comes for the app to make the contents of that fragment visible. Similarly, when the
time comes to hide the contents of a fragment, only the fragment's onDestroyView
method is called, not the onDestroy and onDetach methods.
This behavior comes into play when fragments are dynamically managed within an
activity. This behavior allows the overhead of associating a fragment with an activity
and initializing the fragment's state to occur only once while being able to easily
change the visibility of the fragment's view hierarchy. This is important when we
explicitly manage the visibility of fragments using the FragmentTransaction class,
and in certain action bar features that manage fragments. We'll talk about
these issues in the next two chapters.
Managing a fragment state
For many fragment implementations, the most important callback method in the
lifecycle sequence is the onSaveInstanceState method. Just as with an activity,
this callback method provides the fragment with an opportunity to persist any state
before the fragment is destroyed, such as when the user moves to another activity
or when the user rotates the device to a different orientation. In both of these cases,
the activity and contained fragments may be completely torn down and recreated.
By persisting the fragment state in the onSaveInstanceState method, that state is
latter passed back to the fragment in both the onCreate and onCreateView methods.
When managing the state of a fragment, you want to be sure to separate work
that is general to the fragment's overall existence from work specific to setting
up the view hierarchy. Any expensive initialization work that's general to the
fragment's existence such as connecting to a data source, complex calculations,
or resource allocations should occur in the onCreate method rather than the
onCreateView method. This way, if only the fragment's view hierarchy is
destroyed and the fragment remains intact, you avoid unnecessarily
repeating expensive initialization work.
[ 46 ]
Chapter 3
Special purpose fragment classes
Now that we understand the lifecycle of fragments, we can look at some of
the specialized versions of the Fragment class. As we go through each of these
specialized classes, remember they all ultimately inherit from the Fragment class
and therefore experience the same lifecycle behavior. Many of these specialized
classes have an impact on what operations are safe to perform at the various points
in the lifecycle, and some of these classes even add their own lifecycle methods.
Understanding each of these classes and their interaction with the fragment
lifecycle is essential for using the classes effectively.
ListFragment
One of the simplest fragment-derived classes to use and yet one of the most
helpful is the ListFragment class. The ListFragment class provides a fragment
that encapsulates a ListView and, as the name implies, is useful for displaying
lists of data.
Associating data with the list
Unlike the base Fragment class, we're not required to override the onCreateView
callback method for the ListFragment class. The ListFragment class provides
a standard appearance and only requires that we associate some data.
The ListFragment class does all the work of creating the view hierarchy
and displaying that data.
We associate data with the ListFragment class by calling the ListFragment
class' setListAdapter method and passing a reference to an object that implements
the ListAdapter interface. Android provides a number of classes that implement
this interface such as ArrayAdapter, SimpleAdapter, and SimpleCursorAdapter.
The specific class you use will depend on how your source data is stored. If none
of the standard Android classes meet your specific requirements, you can create a
custom implementation reasonably easy.
For a discussion about creating a custom list adapter, see the
Android tutorial Displaying the Quick Contact Badge at http://
developer.android.com/training/contacts-provider/
display-contact-badge.html.
The call to setListAdapter requires that the view hierarchy for the ListFragment
be completely constructed. As a result, we normally do not call the setListAdapter
method any earlier than the onActivityCreated callback method.
[ 47 ]
Fragment Lifecycle and Specialization
The ListFragment class wraps an instance of the ListView class, which is accessible
through the getListView method. In most scenarios, we can feel free to interact
with the contained ListView instance directly and take advantage of any features
offered by the ListView class. The one very important exception is when we set
the ListAdapter instance. Both the ListFragment and ListView classes expose a
setListAdapter method, but we must be sure to use the ListFragment version of
the method.
The ListFragment class relies on certain initialization behaviors that occur within
the ListFragment.setListAdapter method; therefore, the process of calling the
setListAdapter method directly on the contained ListView instance bypasses
this initialization behavior and may cause the application to become unstable.
Separating data from display
Up until now, our application has used a fixed layout of several RadioButton
views to display the list of books. Using a fixed layout to display such options
is not generally a good choice, because any changes to the book list require that
we go in and directly modify the fragment layout. In practice, we would prefer
to have a layout that is independent of the specific titles. We could write code to
dynamically generate the RadioButton views, but there is an easier way. We can
instead use the ListFragment class.
By switching our application to use the ListFragment class, we can simply store
the list of book titles in an array resource and associate the contents of that array
resource with the ListFragment instance. In the event of adding more titles or
needing to change one of the titles, we simply modify the array resource file.
There is no need for us to make any changes to the actual fragment layout.
Our application already has all the book titles stored as individual string resources,
so we just need to add an array resource for them. We'll add the book titles array to
the arrays.xml resource file within the values resource folder where we currently
have an array resource defined to hold the list of book descriptions.
Within the resources root element of the arrays.xml resource file, add a stringarray element that includes a name attribute with a value of bookTitles. Within the
string-array element, add an item for each book title that references the string
resource for each title. We want to be sure that we list the book title array entries in the
same order as the bookDescription array entries because we use the array index as
the ID value for each book when we notify the activity of the user's book selection.
The array resource entries for the book title and description arrays appear as follows:
<resources>
<!-- Book Titles -->
[ 48 ]
Chapter 3
<string-array name="bookTitles">
<item>@string/dynamicUiTitle</item>
<item>@string/android4NewTitle</item>
<item>@string/androidSysDevTitle</item>
<item>@string/androidEngineTitle</item>
<item>@string/androidDbProgTitle</item>
</string-array>
<!-- Book Descriptions -->
<string-array name="bookDescriptions">
<item>@string/dynamicUiDescription</item>
<item>@string/android4NewDescription</item>
<item>@string/androidSysDevDescription</item>
<item>@string/androidEngineDescription</item>
<item>@string/androidDbProgDescription</item>
</string-array>
</resources>
With the titles stored as an array resource, we can now easily create a ListFragment
derived class to display the book titles.
Creating the ListFragment derived class
The first step is to add a new class to our project. To do this, we'll create a new class
named BookListFragment2 that extends the ListFragment class as shown in the
following code line:
class BookListFragment2 extends ListFragment {
}
Next, we override the onActivityCreated method as follows:
public void onActivityCreated(Bundle savedInstanceState) {
super.onActivityCreated(savedInstanceState);
String[] bookTitles =
getResources().getStringArray(R.array.bookTitles);
ArrayAdapter<String> bookTitlesAdapter =
new ArrayAdapter<String>(getActivity(),
android.R.layout.simple_list_item_1, bookTitles);
setListAdapter(bookTitlesAdapter);
}
[ 49 ]
Fragment Lifecycle and Specialization
In the onActivityCreated method, we first call the base class implementation that
is required by all classes that extend ListFragment. We then load the bookTitles
array resource and associate it with an instance of the ArrayAdapter class named
bookTitlesAdapter. The array adapter takes the context as the first parameter,
which we get by accessing the activity, and takes the array as the third parameter.
The second parameter is the ID of the resource to use to lay out each entry in the
list. This resource can be a custom resource or one of the built-in Android resources.
In our case, we're using the built-in Android layout resource android.R.layout.
simple_list_item_1, which displays a single string value for each row within
the ListView. The last step is to call the setListAdapter method and pass the
bookTitlesAdapter method.
Creating a custom layout resource for the ListFragment class is just
like doing so for the ListView class, and is discussed in detail in the
Android developer documentation: http://developer.android.
com/reference/android/app/ListFragment.html.
Handling ListFragment item selection
For our application to work correctly, we need to inform the activity each time
the user selects one of the titles. Because we use an interface to loosely couple
our fragment with the activity, this turns out to be a pretty simple task.
We first override the ListFragment class' onListItemClick method.
The ListFragment class calls the onListItemClick method when the
user selects an entry within the ListFragment instance. The onListItemClick
method receives several selection-related parameters including the zero-based
position of the selection. Our ListFragment is loaded from an array, so this
position value corresponds to the selected title's array index.
With the position parameter value corresponding directly to the array index,
all we have to do to inform the activity of the user selection is get a reference to
the activity, cast it to our OnSelectionChangeListener interface, and call the
interface's onSelectedBookChanged method, passing the position parameter
value as shown in this code:
public void onListItemClick(ListView l, View v,
int position, long id) {
// Access the Activity and cast to the inteface
OnSelectedBookChangeListener listener =
(OnSelectedBookChangeListener)
[ 50 ]
Chapter 3
getActivity();
// Notify the Activity of the selection
listener.onSelectedBookChanged(position);
}
All the activity classes in our application that will use our BookListFragment2 class
already implement the OnSelectionChangeListener interface, so there is no change
required to the activity classes.
Updating the layout resources
We now update the activity_main.xml resource file to use the BookListFragment2
class instead of the original BookListFragment class as shown in the following code:
<LinearLayout
android:orientation="vertical"
android:layout_width="match_parent"
android:layout_height="match_parent"
xmlns:android="http://schemas.android.com/apk/res/android">
<!-- List of Book Titles ** using the ListFragment **-->
<fragment
android:layout_width="match_parent"
android:layout_height="0dp"
android:layout_weight="1"
android:name="com.jwhh.fragments.BookListFragment2"
android:id="@+id/fragmentTitles"/>
<!-- Description of selected book -->
<fragment
android:layout_width="match_parent"
android:layout_height="0dp"
android:layout_weight="1"
android:name="com.jwhh.fragments.BookDescFragment"
android:id="@+id/fragmentDescription"/>
</LinearLayout>
We need to make the same change in the activity_main_wide.xml file.
[ 51 ]
Fragment Lifecycle and Specialization
Our program is now fully functional using the ListFragment class and appears
as follows:
Any changes that we need to make to the titles can now all be made in the resources
file and require no changes to the user interface code.
DialogFragment
Up until now we've been looking at fragments as a new way to divide our application's
user interface into subsections of the available display area. Although fragments are
new, the concept of having an aspect of our application user interface as a subsection
of the available display area is not new. Any time an application displays a dialog,
the application is doing exactly that.
Historically, the challenge of working with dialogs is that even though they are
conceptually just another window within an application, we must handle many
of the tasks related to dialogs differently than other aspects of our application
user interface. Doing something as simple as handling a button click requires a
dialog-specific interface, DialogInterface.OnClickListener, rather than the
View.OnClickListener interface that we use when handling a click event from
non-dialog related parts of our user interface code. An even more complicated
issue is that of orientation changes. Dialogs automatically close in response to an
orientation change and therefore can create inconsistent application behavior if a
user changes device orientation while a dialog is visible.
The DialogFragment class eliminates much of the special handling related to dialogs.
With the DialogFragment class, displaying and managing a dialog becomes much
more consistent with other aspects of our application user interface.
[ 52 ]
Chapter 3
Styles
When an application displays an instance of the DialogFragment class, the window
for the DialogFragment instance has up to three parts to it: layout area, title,
and frame. A DialogFragment instance always contains the layout area, but we
can control whether it includes the title and frame by setting the DialogFragment
class' style using the setStyle method. The DialogFragment class supports four
styles with an instance of the DialogFragment class having exactly one style
applied. The following table shows the four available styles:
Style
STYLE_NORMAL
Has Title
Has Frame
Accepts Input
Yes
Yes
Yes
STYLE_NO_TITLE
No
Yes
Yes
STYLE_NO_FRAME
No
No
Yes
STYLE_NO_INPUT
No
No
No
Notice that the styles remove features cumulatively. For example, STYLE_NO_TITLE
indicates no title whereas STYLE_NO_FRAME indicates no frame and no title. If we do
not call the setStyle method, Android creates the DialogFragment instance with
the style set to STYLE_NORMAL.
The style affects the remainder of the behavior of the DialogFragment class and
therefore must be set in the onCreate callback method. An attempt to set the
DialogFragment class' style any later in the lifecycle is ignored.
If you wish to provide the dialog with a special theme, the theme's resource ID can
also be passed to the setStyle method. To allow Android to select an appropriate
theme based on the style, simply pass 0 as the theme resource ID. The following
code sets the DialogFragment instance to have no title and use the Android-selected
theme for that style:
class MyDialogFragment extends DialogFragment {
public void onCreate(Bundle savedInstanceState) {
super.onCreate(savedInstanceState);
setStyle(DialogFragment.STYLE_NO_TITLE, 0);
}
}
[ 53 ]
Fragment Lifecycle and Specialization
Layout
Populating the layout of an instance of the DialogFragment class is just like that of a
standard fragment derived class. We simply override the onCreateView method and
inflate the layout resource.
public View onCreateView(LayoutInflater inflater,
ViewGroup container, Bundle savedInstanceState) {
View theView = inflater.inflate(R.layout.fragment_my_dialog,
container, false);
return theView;
}
Creating a layout resource for use with a DialogFragment derived class works
exactly as creating a layout resource for any other fragment derived class. To have
our DialogFragment instance display a line of text and two buttons, we define the
fragment_my_dialog.xml layout resource as shown in the following XML:
<LinearLayout
xmlns:android="http://schemas.android.com/apk/res/android"
android:orientation="vertical"
android:layout_width="match_parent"
android:layout_height="match_parent">
<!-- Text -->
<TextView
android:layout_width="fill_parent"
android:layout_height="0px"
android:layout_weight="1"
android:text="@string/dialogSimpleFragmentPrompt"
android:layout_margin="16dp"/>
<!-- Two buttons side-by-side -->
<LinearLayout
android:layout_width="fill_parent"
android:layout_height="0px"
android:orientation="horizontal"
android:layout_weight="3">
<Button
android:id="@+id/btnYes"
android:layout_width="0px"
android:layout_height="wrap_content"
[ 54 ]
Chapter 3
android:layout_weight="1"
android:text="@string/text_yes"
android:layout_margin="16dp"/>
<Button
android:id="@+id/btnNo"
android:layout_width="0px"
android:layout_height="wrap_content"
android:layout_weight="1"
android:text="@string/text_no"
android:layout_margin="16dp"/>
</LinearLayout>
</LinearLayout>
DialogFragment display
Displaying our DialogFragment derived class is largely just a matter of creating
the class instance and calling the show method. We need to keep in mind though
that although our DialogFragment instance appears as a standard dialog when it
displays, it is actually a fragment. Like all fragments, it is managed by the containing
activity's FragmentManager instance. As a result, we need to pass a reference to the
activity's FragmentManager instance as part of the call to the DialogFragment class
show method as we do in the following code:
MyDialogFragment theDialog = new MyDialogFragment();
theDialog.show(getFragmentManager(), null);
With our DialogFragment derived class' style set to STYLE_NO_TITLE and using
the fragment_my_dialog.xml layout resource file shown earlier, the previous
code displays the following:
[ 55 ]
Fragment Lifecycle and Specialization
Event handling
One of the key values of the DialogFragment class is that it provides greater
consistency in our code than is available when using the traditional Dialog class.
Most aspects of working with the DialogFragment class are the same as when
working with other fragments. No longer does displaying a dialog have to be
handled so much differently than other aspects of our application user interface.
For example, no special handling is required to deal with orientation changes.
Another place where this greater consistency is evident is in event handling,
because our button click event handling can use the standard view class
event interfaces.
To handle the button clicks, our DialogFragment derived class simply implements
the View.OnClickListener interface. The following code shows setting the yes and
no button click events to call back to our DialogFragment derived class in our class'
onCreateView callback method:
public View onCreateView(LayoutInflater inflater,
ViewGroup container, Bundle savedInstanceState) {
View theView = inflater.inflate(
R.layout.fragment_my_dialog, container, false);
// Connect the Yes button click event and request focus
View yesButton = theView.findViewById(R.id.btnYes);
yesButton.setOnClickListener(this);
yesButton.requestFocus();
// Connect the No button click event
View noButton = theView.findViewById(R.id.btnNo);
noButton.setOnClickListener(this);
return theView;
}
Notice that we're setting up the button click handling just as we would if we
were working within any other fragment or even directly within the activity.
We can also handle notifying the activity of the user's interaction with the
DialogFragment derived class consistently with the way we do with other
fragments. Just as we did in the previous chapter, our DialogFragment
derived class simply provides an interface for notifying the activity which
of the available buttons the user selects, as shown in the following code:
public class MyDialogFragment extends DialogFragment
implements View.OnClickListener {
// Interface Activity implements for notification
[ 56 ]
Chapter 3
public interface OnButtonClickListener {
void onButtonClick(int buttonId);
}
// Other members elided for clarity
}
As long as the activity implements the interface, our DialogFragment derived class
can notify the activity of which button the user clicked.
In the handler for our button click events, we'll follow the same pattern we did in the
previous chapter. We access the containing activity, cast it to the expected interface,
and call the interface method, as shown in the following code:
public void onClick(View view) {
int buttonId = view.getId();
// Notify the Activity of the button selection
OnButtonClickListener parentActivity =
(OnButtonClickListener) getActivity();
parentActivity.onButtonClick(buttonId);
// Close the dialog fragment
dismiss();
}
Notice that there is one bit of special handling in the previous method. Just as with the
traditional Dialog class, we must call the dismiss method on the DialogFragment
derived class when we no longer wish to display it.
Dialog identity
Although we treat our DialogFragment derived class as just another fragment,
it still has a part of its identity that is tied to the traditional Dialog class. In fact,
Android actually wraps our DialogFragment derived class within a traditional
Dialog instance. This occurs in a callback method, specific to the DialogFragment
class, named onCreateDialog that Android calls just prior to calling the
onCreateView callback method.
The Dialog instance that the onCreateDialog method returns is the window that is
ultimately displayed to the user. The layout we create within our DialogFragment
derived class is simply wrapped within the Dialog window. We can access that
Dialog instance later in the lifecycle to access Dialog related behavior or even
override the method to provide our own Dialog instance.
[ 57 ]
Fragment Lifecycle and Specialization
Accessing Dialog related behavior
Accessing the Dialog related behavior of our DialogFragment derived class
requires a reference to the Dialog instance created in the onCreateDialog method.
We retrieve that reference by calling the getDialog method. Once we have the
reference to the Dialog instance, we can access aspects of the class' dialog identity
that are not otherwise available.
When we create a DialogFragment derived class with the style set to STYLE_NORMAL,
the displayed dialog includes a title area above the layout area. The value of the title
can only be set by calling the setTitle method on the Dialog instance that wraps
our DialogFragment instance. A similar issue comes up in dealing with the dialog
cancellation behavior. By default, the user can cancel a dialog by tapping on the
activity behind the dialog. In many cases, this may be unacceptable as we want to
require the user to acknowledge one of the choices within the dialog. The following
code sets these Dialog related behaviors after the button click handling is set up:
public View onCreateView(LayoutInflater inflater,
ViewGroup container, Bundle savedInstanceState) {
View theView = inflater.inflate(R.layout.fragment_my_dialog,
container, false);
View yesButton = theView.findViewById(R.id.btnYes);
yesButton.setOnClickListener(this);
yesButton.requestFocus();
View noButton = theView.findViewById(R.id.btnNo);
noButton.setOnClickListener(this);
// Set the dialog aspects of the dialog fragment
Dialog dialog = getDialog();
dialog.setTitle(getString(R.string.myDialogFragmentTitle));
dialog.setCanceledOnTouchOutside(false);
return theView;
}
The code first sets the dialog title and then sets the option to prevent the user from
closing the dialog by tapping on the activity window. For the call to the setTitle
method to work, we will need to change the call to the setStyle method in the
onCreate callback method to set the style to STYLE_NORMAL so that the dialog will
have a title area.
[ 58 ]
Chapter 3
Wrapping an existing dialog in a fragment
There may be times where we like the programming consistency that the
DialogFragment class offers, but want to take advantage of the features
provided by a class that derives from the traditional Dialog class. By overriding
the DialogFragment class' onCreateDialog method, we can do exactly that.
Overriding the onCreateDialog method allows us to replace the DialogFragment
class' default Dialog instance with one we create. A great example of when this
is useful is in leveraging the Android AlertDialog class.
The AlertDialog class provides a variety of default behaviors and allows us to
display text, an icon, and buttons all without having to create a layout resource.
There is something we must keep in mind when we're leveraging a class that
inherits from the traditional Dialog class. Although outside interaction with our
class will be consistent with other DialogFragment derived classes, any interactions
with the traditional Dialog class that occur within our DialogFragment derived
class will be done in the traditional Dialog class way. For example, to create a
DialogFragment derived class that utilizes the AlertDialog class requires that our
class implements the Dialog class way of handling click events that is to implement
the DialogInterface.OnClickListener interface as shown in the following code:
public class AlertDialogFragment extends DialogFragment
implements DialogInterface.OnClickListener{ }
Within our class' onCreateDialog method, we create the AlertDialog instance
using the AlertDialog.Builder class just as if we were going to display the
AlertDialog instance directly. Within the onCreateDialog method we set all the
options on the AlertDialog.Builder instance, including the title, message, icon,
and buttons. Notice, though, that we never call the AlertDialog.Builder class'
show method, but instead call its create method. We then take the reference to
the newly created AlertDialog instance and return it from the onCreateDialog
method. All of these steps are shown in the following code:
public Dialog onCreateDialog(Bundle savedInstanceState) {
// Create the Builder for the AlertDialog
AlertDialog.Builder builder =
new AlertDialog.Builder(getActivity());
// Set the AlertDialog options
builder.setTitle(R.string.alert_dialog_title)
.setMessage(R.string.alert_dialog_message)
.setIcon(R.drawable.ic_launcher)
.setCancelable(false)
.setPositiveButton(R.string.text_yes, this)
[ 59 ]
Fragment Lifecycle and Specialization
.setNegativeButton(R.string.text_no, this);
// Create and return the AlertDialog
AlertDialog alertDialog = builder.create();
return alertDialog;
}
The Dialog instance we create is now managed as a part of the DialogFragment
instance. Everything else we do with our AlertDialogFragment class will be just
as it is with the other DialogFragment derived classes we create.
When our app shows our AlertDialogFragment class, it appears as the
following screenshot:
Notice that we didn't need to override the onCreateView callback method,
because the Dialog instance we create in the onCreateDialog callback method
provides the desired display characteristics.
Overriding the DialogFragment class' onCreateDialog callback method is a
powerful technique that allows us to enjoy the benefits of the DialogFragment
class while still leveraging existing investment we may have in traditional Dialog
classes, whether they be a built-in class such as the AlertDialog class or some
custom Dialog class we may have as part of our own code library.
[ 60 ]
Chapter 3
Summary
Understanding the fragment lifecycle empowers us to leverage the phases of creation
and destruction of fragments to more efficiently manage fragments and the data
associated with them. By working with this natural lifecycle, we can take advantage
of the specialized fragment classes to create a rich user experience, while following a
more consistent programming model than was previously available.
In the next chapter, we build on our understanding of the fragment lifecycle
to take more direct control of fragments to dynamically add and remove them
within individual activities.
[ 61 ]
Working with
Fragment Transactions
This chapter covers dynamically managing fragments within an activity,
implementing back button behavior, and monitoring user interaction with
the back button.
Let's have a look at the topics covered:
•
Understanding FragmentTransactions
•
Dynamically adding and removing fragments
•
Managing fragment UI separate from activity relationship
•
Adding back button support to FragmentTransactions
By the end of this chapter, we will be able to create interactive UIs that use fragments
to dynamically change the appearance of the screen in response to user actions.
Intentional screen management
Until now, we've considered each activity to always correspond to a single screen
in our application. We've used fragments only to represent subsections within
each screen. As an example, let's think back to the way we've constructed our
book-browsing application. In the case of a wide-display device, our application
uses a single activity containing two fragments. One fragment displays the list
of book titles, and the other fragment displays the description of the currently
selected book. Because both of these fragments appear on the screen at the
same time, we display and manage them from a single activity. In the case of
a portrait-oriented handset, we chose to display the book list and the book
description on separate screens. Because the two fragments do not appear on
the screen at the same time, we manage them in separate activities.
Working with Fragment Transactions
An interesting thing is that the tasks our application performs are identical in
both cases. The only difference is how much information we're able to display
on the screen at one time. That one detail causes us to add an extra activity to
our application. We also increase the complexity of our application because the
code to launch a new activity is more involved than the code we use to simply
update a fragment within the same activity. And we have duplicated code in the
activities because they both interact with the book description fragment.
As you'll recall, when we started talking about fragments in Chapter 1, Fragments and
UI Modularization, we mentioned that one of the key values of fragments is that they
help reduce unnecessary complications, activity proliferation, and logic duplication.
Yet as the application is currently written, we're experiencing all of those things.
We need to evolve our thinking about UI design a little further. Rather than
having activities within our application that simply react to what information
happens to fit on the device's physical display, we instead need to focus on
intentionally managing the relationship between the screens in our application
and the corresponding activities.
To the user, the experience of moving to a new screen simply means that the
view layout they are looking at is replaced with a different view layout.
Historically, we've tended to design our applications so that each activity has
a relatively fixed layout. As a result, moving the user to a new screen has
required displaying a new activity, but fragments give us another option.
Rather than simply using fragments to manage logical subsections of the screen,
we can also use them to manage logical groupings of an entire screen. We can then
dynamically manage the fragments within an activity to change from one fragment
to another. This gives the user the experience of moving from one screen to the next
while giving us the convenience of managing common user interface elements within
a single activity.
Dynamically managing fragments
The process of dynamically managing fragments commonly involves multiple steps.
The steps may be simple like removing one fragment and adding another, or they
may be more complex, involving the removal and addition of multiple fragments.
In any case, we need to be certain that all dynamic changes to the fragments within
an activity that constitute a shift from one application screen to the next occur
together as a single unit of work. Android does this by grouping the steps into
transactions using the FragmentTransaction class.
[ 64 ]
Chapter 4
Conceptually, the FragmentTransaction class behaves in a manner consistent
with other transaction models: start the transaction, identify the desired changes,
and commit the transaction once all changes within that unit of work are identified.
When we're ready to make changes, we start a new FragmentTransaction instance
by calling the beginTransaction method on the activity's FragmentManager instance,
which returns back a reference to a FragmentTransaction instance. We then use
the new FragmentTransaction instance to identify the desired changes to the list of
displayed fragments within the activity. While we're in the transaction, these changes
are queued up but not yet applied. Finally, when we've identified all the desired
changes, we call the FragmentTransaction class' commit method.
Once all the changes in the transaction are applied, our application display
is updated to reflect those changes, giving the user the feel of moving to a new
screen of our application. Although a number of steps have occurred within our
application, from the user's perspective everything behaves just as if we had
displayed a new activity.
Deferred execution of transaction changes
The call to the commit method does not apply the changes immediately.
When we work with the FragmentTransaction class, we are not doing any direct
work on the application user interface. Instead, we're building a To-Do list of
work to be done to the user interface in the future. Each method that we call on a
FragmentTransaction instance adds another To-Do item to the list. When we're
done adding to the To-Do list and we call the commit method, those instructions
get packaged up and sent to the main UI thread's message queue. The UI thread
then walks through the list, performing the actual user interface work on behalf
of the FragmentTransaction instance.
The deferred execution of the work performed within a FragmentTransaction
instance works well in most cases. It can, however, create problems if our application
code needs to find a fragment or interact with a view that is added by a fragment
immediately following the call to the commit method. Although such a requirement
is not normally the case, it does sometimes come up.
If we do have such a requirement, we can force the FragmentTransaction
instance's work to be executed immediately by calling the FragmentManager
class' executePendingTransactions method after the call to the
FragmentTransaction instance's commit method. When a call to the
executePendingTransactions method returns, we know that all the
committed FragmentTransaction work has been performed.
[ 65 ]
Working with Fragment Transactions
We need to be careful by only calling the executePendingTransactions method on
the main UI thread; this method causes the pending user interface work to execute,
and therefore triggers direct interaction with the user interface.
Adding and removing fragments
There are a number of methods available on the FragmentTransaction class to
manipulate the fragments within an activity, but the most fundamental are the add
and remove methods.
The add method allows us to place a newly created fragment instance within a
specific view group of our activity as shown here:
// Begin the transaction
FragmentManager fm = getFragmentManager();
FragmentTransaction ft = fm.beginTransaction();
// Create the Fragment and add
BookListFragment2 listFragment = new BookListFragment2();
ft.add(R.id.layoutRoot, listFragment, "bookList");
// Commit the changes
ft.commit();
We first create a new FragmentTransaction instance using the activity's
FragmentManager instance. We then create a new instance of our
BookListFragment2 class and attach it to the activity as a child of the
LinearLayout view group identified by the R.id.layoutRoot ID value.
Finally, we commit the FragmentTransaction instance indicating that
we're done making changes.
The string value, "bookList", that we pass as the third parameter to the add method
is simply a tag value. We can use the tag value to later locate the fragment instance
in much the same way as we might use the ID value. When adding fragments
dynamically, we use tags as identifiers rather than ID values simply because there
is no way to associate an ID value with a dynamically added fragment.
The tag value comes in handy when we're ready to display a different fragment
because we need to have a reference to the existing fragment to pass to the remove
method so that we can remove it before adding a new fragment. The following code
shows how we can update the display to show the BookDescFragment class in place
of the BookListFragment2 class we added in the previous code:
[ 66 ]
Chapter 4
FragmentManager fm = getFragmentManager();
Fragment listFragment = fm.findFragmentByTag("bookList");
BookDescFragment bookDescFragment = new BookDescFragment();
FragmentTransaction ft = fm.beginTransaction();
ft.remove(listFragment);
ft.add(R.id.layoutRoot, bookDescFragment, "bookDescription");
ft.commit();
We begin by using the tag value to find our existing BookListFragment2 instance
using the FragmentManager class' findFragmentByTag method. We then create
an instance of the new fragment we wish to add. Now that we have references to
the fragment we want to remove and the one we want to add, we begin fragment
transaction. Within the transaction, we remove the BookListFragment2 instance by
passing the reference to the FragmentTransaction class' remove method and then
add the new fragment using the add method just as we did earlier. Finally, we call
the commit method to allow the changes to be made.
This process of removing the fragment instance under a particular view group and
adding another in its place occurs frequently enough that the FragmentTransaction
class includes a convenient method named replace. The replace method allows
us to simply identify the information for the fragment we wish to add. It takes care
of the details of removing any other fragments that may exist within the target view
group. Using the replace method, the code to remove the BookListFragment2
instance and add the BookDescFragment instance can be written as follows:
FragmentManager fm = getFragmentManager();
bookDescFragment = new BookDescFragment();
FragmentTransaction ft = fm.beginTransaction();
ft.replace(R.id.layoutRoot, bookDescFragment, "bookDescription");
ft.commit();
Notice that this code, with the exception of the method name, is identical to the case
of simply adding a fragment. We create our fragment instance, and then within the
FragmentTransaction call, the replace method passes the ID of the target view
group, fragment instance, and tag. The replace method handles the details of
removing any fragment that may currently be within the R.id.layoutRoot view
group. It then adds the BookDescFragment instance to the view group.
[ 67 ]
Working with Fragment Transactions
Supporting the back button
As we move to this model of managing our application screens as fragments,
we need to be sure that we're providing the user with an experience consistent
with their expectations. An area that requires special attention is our application's
handling of the back button.
When a user interacts with the applications on their device, they naturally move
forward through various application screens. The normal behavior is that a user can
move back to a previous screen at any time by tapping the back button. This works
because each time an application displays a new activity, Android automatically
adds that activity to the Android back stack. This results in the expected behavior
of the user moving to the previous activity with each tap of the back button.
This behavior is based on the assumption that one activity equals one application
screen; an assumption that is no longer correct. When we transition the user
from one application screen to another using the FragmentTransaction class,
the application continues to display the same activity, leaving the back stack
with no awareness of our application's new screen. This results in the application
appearing to jump back multiple screens in response to the user tapping the back
button because the back stack returns the user directly to the previous activity
ignoring any intermediate changes made to the current activity.
The following figure demonstrates the issue:
4.Back Button
[ 68 ]
Activity2
3. replace
FragmentB
2. startActivity
BackStack
1. startActivity
Activity2
FragmentA
Activity1
Chapter 4
1. An application initially calls the startActivity method to display an
instance of Activity1. Activity1 is automatically added to the back stack
and is currently at the top of the stack.
2. Activity1 then calls the startActivity method to display Activity2,
which uses the FragmentTransaction.add method to add FragmentA.
Activity2 is automatically added to the top of the back stack.
3. Next, Activity2 uses the FragmentTransaction.replace method to
display FragmentB in place of FragmentA. As far as the user is concerned,
the application is displaying a new screen showing the contents of
FragmentB. The problem is that the back stack is unchanged.
4. When the user now taps the back button, his/her expectation is that the app
should display the previous screen, FragmentA, but instead when Android
pops the back stack, the next screen it encounters is Activity1.
We resolve this issue by calling the FragmentTransaction class' addToBackStack
method within the FragmentTransaction instance that displays FragmentB.
The addToBackStack method adds the changes within the transaction to the
top of the back stack. This allows the user to use the back button to move
through the application screens created within the FragmentTransaction
instance just as one does with screens created by showing an activity.
We can call the addToBackStack method at any point during the transaction prior to
calling the commit method. The addToBackStack method optionally accepts a string
parameter that can be used to name the location in the back stack. This is useful if
you wish to programmatically manipulate the back stack later, but in most cases this
parameter value can be passed as null. We'll see the addToBackStack method in
action shortly as we modify our application to use a more adaptive layout.
[ 69 ]
Working with Fragment Transactions
Creating an adaptive application layout
Let's put our discussion of dynamic fragment management into practice by
updating our application to work with just a single activity. This one activity
will handle both scenarios: wide-display devices where both fragments appear
side-by-side and portrait-oriented handsets where the fragments appear as
two separate screens. As a reminder, the application appears as shown in the
following screenshot in each scenario:
In our application, we'll leave the wide-display aspect of the program alone because
static layout management is working fine there. Our work is on the portrait-oriented
handset aspect of the application. For these devices, we'll update the application's
main activity to dynamically switch between displaying the fragment containing
the list of books and the fragment displaying the selected book description.
Updating the layout to support
dynamic fragments
Before we write any code to dynamically manage the fragments within
our application, we first need to modify the activity layout resource for
portrait-oriented handset devices. That resource is contained in the
activity_main.xml layout resource file and currently appears as
shown here:
<LinearLayout
xmlns:tools="http://schemas.android.com/tools"
android:orientation="vertical"
android:layout_width="match_parent"
[ 70 ]
Chapter 4
android:layout_height="match_parent"
xmlns:android="http://schemas.android.com/apk/res/android">
<!-List of Book Titles -->
<fragment
android:layout_width="match_parent"
android:layout_height="0dp"
android:layout_weight="1"
android:name="com.jwhh.fragments.BookListFragment2"
android:id="@+id/fragmentTitles"
tools:layout="@layout/fragment_book_list"/>
</LinearLayout>
We need to make two changes to the layout resource. The first is to add an ID
attribute to the LinearLayout view group so that we can easily locate it in code.
The other change is to completely remove the fragment element. The updated
layout resource now contains only the LinearLayout view group, which includes
an ID attribute value of @+id/layoutRoot. The layout resource now appears as
shown here:
<LinearLayout
xmlns:tools="http://schemas.android.com/tools"
android:id="@+id/layoutRoot"
android:orientation="vertical"
android:layout_width="match_parent"
android:layout_height="match_parent"
xmlns:android="http://schemas.android.com/apk/res/android">
</LinearLayout>
We still want our application to initially display the book list fragment, so removing
the fragment element may seem like a strange change, but doing so is essential as
we move our application to dynamically manage the fragments. We will eventually
need to remove the book list fragment to replace it with the book description
fragment. If we were to leave the book list fragment in the layout resource, our
attempt to dynamically remove it later would silently fail.
Only dynamically added fragments can be dynamically removed.
Attempting to dynamically remove a fragment that was statically
added with the fragment element in a layout resource will silently fail.
[ 71 ]
Working with Fragment Transactions
Adapting to device differences
When our application is running on a portrait-oriented handset device, the activity
needs to programmatically load the fragment containing the book list. This is the
same Fragment class, BookListFragment2, we were previously loading with the
fragment element in the activity_main.xml layout resource file. Before we load
the book list fragment, we first need to determine whether we're running on a device
that requires dynamic fragment management. Remember that for the wide-display
devices, we're going to leave the static fragment management in place.
There'll be a couple of places in our code where we'll need to take different logic
paths depending on which layout we're using, so we'll need to add a boolean
class-level field to the activity where we can store whether we're using dynamic
or static fragment management.
boolean mIsDynamic;
We could interrogate the device for its specific characteristics such as screen size and
orientation. But remember that much of our previous work was to configure our
application to take advantage of the Android resource system to automatically load
the appropriate layout resources based on the device characteristics. Rather than
repeating those characteristics checks in code, we can instead simply include the code
to determine which layout resource was loaded. The layout resource for wide-display
devices we created earlier, activity_main_wide.xml, statically loads both the book
list fragment and the book description fragment. We can include in our activity's
onCreate method code to determine if the loaded layout resource includes one of
those fragments as shown here:
public class MainActivity extends Activity
implements BookListFragment.OnSelectedBookChangeListener {
protected void onCreate(Bundle savedInstanceState) {
super.onCreate(savedInstanceState);
setContentView(R.layout.activity_main_dynamic);
// Get the book description fragment
FragmentManager fm = getFragmentManager();
Fragment bookDescFragment =
fm.findFragmentById(R.id.fragmentDescription);
// If not found than we're doing dynamic mgmt
mIsDynamic = bookDescFragment == null ||
!bookDescFragment.isInLayout();
}
// Other members elided for clarity
}
[ 72 ]
Chapter 4
When the call to the setContentView method returns, we know that the
appropriate layout resource for the current device has been loaded. We then
use the FragmentManager instance to search for the fragment with an ID value
of R.id.fragmentDescription that is included in the layout resource for
wide-display devices but not the layout resource for portrait-oriented handsets.
A return value of null indicates that the fragment was not loaded and we are,
therefore, on a device that requires us to dynamically manage the fragments.
In addition to the test for null, we also include the call to the isInLayout
method to protect against one special case scenario.
In the scenario where the device is in a landscape layout and then rotated to portrait,
a cached instance to the fragment identified by R.id.fragmentDescription may
still exist even though in the current orientation the activity is not using the fragment.
By calling the isInLayout method, we're able to determine whether the returned
reference is part of the currently loaded layout. With this, our test to set the
mIsDynamic member variable effectively says that we'll set mIsDynamic to true when
the R.id.fragmentDescription fragment is not found (equals null) or it's found but
not part of the currently loaded layout (!bookDescFragment.isInLayout).
Dynamically loading a fragment at startup
Now that we're able to determine whether dynamically loading the book list fragment
is necessary, we add the code to do so to our onCreate method as shown here:
protected void onCreate(Bundle savedInstanceState) {
super.onCreate(savedInstanceState);
setContentView(R.layout.activity_main_dynamic);
// Get the book description fragment
FragmentManager fm = getFragmentManager();
Fragment bookDescFragment =
fm.findFragmentById(R.id.fragmentDescription);
// If not found than we're doing dynamic mgmt
mIsDynamic = bookDescFragment == null ||
!bookDescFragment.isInLayout();
// Load the list fragment if necessary
if (mIsDynamic) {
// Begin transaction
FragmentTransaction ft = fm.beginTransaction();
// Create the Fragment and add
BookListFragment2 listFragment = new BookListFragment2();
[ 73 ]
Working with Fragment Transactions
ft.add(R.id.layoutRoot, listFragment, "bookList");
// Commit the changes
ft.commit();
}
}
Following the check to determine if we're on a device that requires dynamic
fragment management, we include FragmentTransaction to add an instance
of the BookListFragment2 class to the activity as a child of the LinearLayout
view group identified by the id value R.id.layoutRoot. This code capitalizes
on the changes we made to the activity_main.xml resource file of removing the
fragment element and including an ID value on the LinearLayout view group.
Now that we're dynamically loading the book list, we're ready to get rid of that
other activity.
Transitioning between fragments
As you'll recall, whenever the user selects a book title within the
BookListFragment2 class, the fragment notifies the main activity by calling the
onSelectedBookChanged method by passing the index of the selected book.
The onSelectedBookChanged method currently appears as follows:
public void onSelectedBookChanged(int bookIndex) {
FragmentManager fm = getFragmentManager();
// Get the book description fragment
BookDescFragment bookDescFragment = (BookDescFragment)
fm.findFragmentById(R.id.fragmentDescription);
// Check validity of fragment reference
if(bookDescFragment == null || !bookDescFragment.isVisible()){
// Use activity to display description
Intent intent = new Intent(this, BookDescActivity.class);
intent.putExtra("bookIndex", bookIndex);
startActivity(intent);
}
else {
// Use contained fragment to display description
bookDescFragment.setBook(bookIndex);
}
}
[ 74 ]
Chapter 4
In the current implementation, we use a technique similar to what we did in the
onCreate method to determine which layout is loaded; we try to find the book
description fragment within the currently loaded layout. If we find it, we know
the current layout includes the fragment and so we go ahead and set the book
description directly on the fragment. If we don't find it, we call the startActivity
method to display the activity that does contain the book description fragment.
In this scenario, handing off to the other activity isn't too bad because we only pass
a simple integer value to the other activity. In practice though, the need to pass data
over to another activity can be complicated. This is especially true if there are a large
number of values or if some of those values are object types that cannot be directly
passed in an Intent instance without additional coding. As we already have all the
necessary handling to interact with the fragment in the current activity, we'd prefer
to handle it consistently in all cases.
Eliminating redundant handling
To get started, we can strip any code in the current implementation that deals with
starting an activity. We can also avoid repeating the check for the book description
fragment because we performed that check earlier in the onCreate method. Instead,
we can now check the mIsDynamic class-level field to determine the proper handling.
With that in mind, we can initially modify the onSelectedBookChanged method to
now look like the following code:
public void onSelectedBookChanged(int bookIndex) {
BookDescFragment bookDescFragment;
FragmentManager fm = getFragmentManager();
// Check validity of fragment reference
if(mIsDynamic)
// Handle dynamic switch to description fragment
else {
// Use the already visible description fragment
bookDescFragment = (BookDescFragment)
fm.findFragmentById(R.id.fragmentDescription);
bookDescFragment.setBook(bookIndex);
}
}
[ 75 ]
Working with Fragment Transactions
We now check the mIsDynamic member field to determine the appropriate code
path. We still have some work to do if it turns out to be true, but in the case of it
being false, we can simply get a reference to the book description fragment that we
know is contained within the current layout and set the book index on it much like
we were doing before.
Creating the fragment on-the-fly
In the case of the mIsDynamic field being true, we can display the book description
fragment by simply replacing the book list fragment we added in the onCreate
method with the book description fragment using the code shown here:
FragmentTransaction ft = fm.beginTransaction();
bookDescFragment = new BookDescFragment();
ft.replace(R.id.layoutRoot, bookDescFragment, "bookDescription");
ft.addToBackStack(null);
ft.setCustomAnimations(
android.R.animator.fade_in, android.R.animator.fade_out);
ft.commit();
Within FragmentTransaction we create an instance of the BookDescFragment class
and call the replace method passing the ID of the same view group that contains the
BookListFragment2 instance that we added in the onCreate method. We include
a call to the addToBackStack method so that the back button functions correctly,
allowing the user to tap the back button to return to the book list.
The code includes a call to the FragmentTransaction class'
setCustomAnimations method that creates a fade effect
when the user switches from one fragment to the other.
Managing asynchronous creation
We have one final challenge, that is, setting the book index on the dynamically
added book description fragment. Our initial thought might be to simply call the
BookDescFragment class' setBook method after we create the BookDescFragment
instance, but let's first take a look at the current implementation of the setBook
method that appears as follows:
public void setBook(int bookIndex) {
// Lookup the book description
String bookDescription = mBookDescriptions[bookIndex];
// Display it
mBookDescriptionTextView.setText(bookDescription);
}
[ 76 ]
Chapter 4
The last line of the method attempts to set the value of mBookDescriptionTextView
within the fragment, which is a problem. Remember that the work we do within
a FragmentTransaction class is not immediately applied to the user interface,
but is instead performed only after we call the commit method. As a result, the
BookDescFragment instance's onCreate and onCreateView methods have not
yet been called. Therefore, any views associated with the BookDescFragment
instance have not yet been created. An attempt to call the setText method on the
mBookDescriptionTextView instance would result in a null reference exception.
One possible solution would be to modify the setBook method to be aware of the
current state of the fragment. In that scenario, the setBook method would check
whether the BookDescFragment instance had been fully created. If not, it would
store the book index value in the class-level field and later automatically set the
mBookDescriptionTextView value as part of the creation process. Although there
may be some scenarios that warrant such a complicated solution, fragments give
us an easier one.
The Fragment base class includes a method called setArguments. With the
setArguments method, we can attach data values, otherwise known as arguments,
to the fragment that can then be accessed later in the fragment lifecycle using the
getArguments method. Much like we do when associating extras with an Intent
instance, a good practice is to define constants on the target class to name the argument
values. It is also a good programming practice to provide a constant for an argument
default value in the case of non-nullable types such as integers as shown here:
public class BookDescFragment extends Fragment {
// Book index argument name
public static final String BOOK_INDEX = "book index";
// Book index default value
private static final int BOOK_INDEX_NOT_SET = -1;
// Other members elided for clarity
}
We'll use the BOOK_INDEX constant to get and set the book index value and the
BOOK_INDEX_NOT_SET constant to indicate whether the book index argument
has been set.
[ 77 ]
Working with Fragment Transactions
We can now update the BookDescFragment class' onCreateView method to look for
arguments that might be attached to the fragment. Before we make any changes to
the onCreateView method, let's look at the current implementation that follows:
public View onCreateView(LayoutInflater inflater,
ViewGroup container, Bundle savedInstanceState) {
View viewHierarchy = inflater.inflate(
R.layout.fragment_book_desc, container, false);
// Load array of book descriptions
mBookDescriptions =
getResources().getStringArray(R.array.bookDescriptions);
// Get reference to book description text view
mBookDescriptionTextView = (TextView)
viewHierarchy.findViewById(R.id.bookDescription);
return viewHierarchy;
}
As the onCreateView method is currently implemented, it simply inflates the layout
resource, loads the array containing the book descriptions, and caches a reference to
the TextView instance where the book description is loaded.
We can now update the method to look for and use a book index that might be
attached as an argument. The updated method appears as follows:
public View onCreateView(LayoutInflater inflater,
ViewGroup container, Bundle savedInstanceState) {
View viewHierarchy = inflater.inflate(
R.layout.fragment_book_desc, container, false);
// Load array of book descriptions
mBookDescriptions =
getResources().getStringArray(R.array.bookDescriptions);
// Get reference to book description text view
mBookDescriptionTextView = (TextView)
viewHierarchy.findViewById(R.id.bookDescription);
// Retrieve the book index if attached
Bundle args = getArguments();
int bookIndex = args != null ?
args.getInt(BOOK_INDEX, BOOK_INDEX_NOT_SET) :
BOOK_INDEX_NOT_SET;
// If we find the book index, use it
[ 78 ]
Chapter 4
if (bookIndex != BOOK_INDEX_NOT_SET)
setBook(bookIndex);
return viewHierarchy;
}
Just before we return the fragment's view hierarchy, we call the getArguments
method to retrieve any arguments that might be attached. The arguments are
returned as an instance of the Bundle class. If the Bundle instance is non-null,
we call the Bundle class' getInt method to retrieve the book index and assign
it the bookIndex local variable. The second parameter to the getInt method,
BOOK_INDEX_NOT_SET, is returned if the fragment happens to have arguments
attached that do not include the book index. Although this should not normally
be the case, being prepared for any such unexpected circumstance is a good idea.
Finally, we check the value of the bookIndex variable. If it contains a book index,
we call the fragment's setBook method to display it.
Putting it all together
With the BookDescFragment class now including support for attaching the
book index as an argument, we're ready to fully implement the main activity's
onSelectedBookChanged method to include switching to the BookDescFragment
instance and attaching the book index as an argument. The method now appears
as follows:
public void onSelectedBookChanged(int bookIndex) {
BookDescFragment bookDescFragment;
FragmentManager fm = getFragmentManager();
// Check validity of fragment reference
if(mIsDynamic){
// Handle dynamic switch to description fragment
FragmentTransaction ft = fm.beginTransaction();
// Create the fragment and attach book index
bookDescFragment = new BookDescFragment();
Bundle args = new Bundle();
args.putInt(BookDescFragment.BOOK_INDEX, bookIndex);
bookDescFragment.setArguments(args);
// Replace the book list with the description
ft.replace(R.id.layoutRoot,
bookDescFragment, "bookDescription");
ft.addToBackStack(null);
[ 79 ]
Working with Fragment Transactions
ft.setCustomAnimations(
android.R.animator.fade_in, android.R.animator.fade_out);
ft.commit();
}
else {
// Use the already visible description fragment
bookDescFragment = (BookDescFragment)
fm.findFragmentById(R.id.fragmentDescription);
bookDescFragment.setBook(bookIndex);
}
}
Just as before, we start with the check to see if we're doing dynamic fragment
management. Once we determine we are, we start the FragmentTransaction
instance and create the BookDescFragment instance. We then create a new Bundle
instance, store the book index into it, and then attach the Bundle instance to the
BookDescFragment instance with the setArguments method. Finally, we put the
BookDescFragment instance into place as the current fragment, take care of the
back stack, enable animation, and complete the transaction.
Everything is now complete. When the user selects a book title from the list,
the onSelectedBookChanged method gets called. The onSelectedBookChanged
method then creates and displays the BookDescFragment instance with the
appropriate book index attached as an argument. When the BookDescFragment
instance is ultimately created, its onCreateView method will then retrieve the book
index from the arguments and display the appropriate description.
Summary
Intentional screen management frees us from the burden of tying each
application screen to an individual activity. Using the FragmentTransaction
class, we're able to dynamically switch between individual fragments within
an activity, eliminating the need to create a separate activity class for each
screen in our application. This helps to prevent the proliferation of unnecessary
activity classes, better organize our applications, and avoid the associated
increase in complexity.
We'll see in the next chapter that this ability to dynamically manage multiple screens
within a single activity opens us up to greater flexibility and an increased richness in
the appearance and navigation behavior of our Android applications.
[ 80 ]
Creating Rich Navigation
with Fragments
This chapter demonstrates the role of fragments in creating a rich user interface
navigation experience.
The following topics are covered in this chapter:
•
Swipe navigation
•
The role of the Android action bar
•
The close relationship between the action bar and fragments
•
Associating menus with fragments
•
List navigation
•
Tab navigation
By the end of this chapter, we will be able to implement solutions that utilize
fragments to provide rich user navigation, including swipe navigation,
tab navigation, and drop-down list navigation.
A brave new world
As we've seen, fragments provide us with the ability to closely control and manage
our application user interface. Through the use of the FragmentTransaction class
we can provide the user with the experience of moving from one screen to another
by simply switching between different fragments. This takes us to an entirely new
way of thinking: a brave new world of application design.
Creating Rich Navigation with Fragments
When we create our user interface in this way, the activity acts as a sort of screen
manager with the fragments implementing the screens themselves. This concept
of managing the individual application screens as fragments within an activity
is so powerful that it has become the foundation of some of the most compelling
navigation features of the Android platform.
Android provides classes that cooperate with this design pattern to enable us to
create rich navigation and screen management experiences, in a simple way.
These classes provide a variety of features, including transition effects along with
some familiar user interface metaphors.
Making navigation fun with swipe
Many applications involve several screens of data that a user might want to
browse or flip through to view each screen. As an example, think of an application
where we list a catalogue of books with each book in the catalogue appearing on
a single screen. A book's screen contains an image, title, and description like the
following screenshot:
[ 82 ]
Chapter 5
To view each book's information, the user needs to move to each screen. We could
put a next button and a previous button on the screen, but a more natural action is
for the user to use their thumb or finger to swipe the screen from one edge of the
display to the other and have the screen with the next book's information slide into
place as represented in the following screenshot:
This creates a very natural navigation experience, and honestly, is a more fun way to
navigate through an application than using buttons.
[ 83 ]
Creating Rich Navigation with Fragments
Implementing swipe navigation
Implementing swipe navigation is pretty simple, and fragments are at the core.
Each of the screens is implemented as a fragment derived class. Each screen can
be a completely different fragment derived class or the screens can be instances
of the same fragment derived class with different data. To create a book browser
app such as the one shown in the previous screenshot, we can use a simple
fragment derived class that sets the book image, title, and description.
There is one thing about the fragment derived class that is a bit unusual. At the time of
this writing, the classes involved in managing swipe navigation are relatively new and
are only available in the android.support.v4.app package. As a result, the fragment
derived class created by us must inherit from the support package version of the
Fragment class, android.support.v4.app.Fragment, even when our app is targeting
the Android versions that natively support fragments. The fragment class definition
will appear similar to the following code:
import android.support.v4.app.Fragment;
public class BookFragment extends Fragment {
// members elided for clarity
}
Managing the swipe fragments
Presenting the individual fragments that represent the application screens
requires an adapter to manage the creation and delivery of each fragment.
The Android support library includes two classes that provide this capability:
FragmentPagerAdapter and FragmentStatePagerAdapter.
The FragmentPagerAdapter class is useful for scenarios where there are a small
number of fragments. When a given fragment instance is created, it is directly stored in
the FragmentManager class and that same instance is re-used each time that fragment's
page is displayed. The fragment's onDestroyView method is called when the user
switches to a different fragment, but not the onDestroy method. It's important that
we only use the FragmentPagerAdapter class in cases where there's a relatively small
number of fragments, because we should assume that once a fragment is created,
it will exist as long as the FragmentPagerAdapter class exists.
[ 84 ]
Chapter 5
The FragmentStatePagerAdapter class is useful for scenarios where there is a
large number of fragments, because fragments may be destroyed when they are no
longer visible. Fragments managed by FragmentStatePagerAdapter will always
have their onDestroyView method called, and may have their onDestroy method
called as well. The call to the onDestroy method does not necessarily occur as
soon as the user swipes to another fragment it may occur much later depending
on the device's available resources. The FragmentStatePagerAdapter class gives
the fragment an opportunity to save its state through the platform's call to the
onSaveInstanceState method.
The ability to discard and recreate the contained fragments also makes the
FragmentStatePagerAdapter class useful for scenarios where the list of
fragments being displayed may change. The details of implementing an updatable
FragmentStatePagerAdapter instance are beyond the scope of this book, but an
example is available at http://bit.ly/UpdateFragmentStatePagerAdapter.
To create a book browser app as seen in the previous screenshot, we'll extend
the FragmentPagerAdapter class because we'll be displaying just a few books.
We'll name our class as BookPagerAdapter, the declaration of which is shown
in the following code:
public class BookPagerAdapter extends FragmentPagerAdapter {
// members elided for clarity
}
To implement our BookPagerAdapter class, we just need to override a few methods.
The primary method, getItem, is responsible for returning each fragment instance.
Our getItem method appears as follows:
public Fragment getItem(int idx) {
// Store the argument values for this fragment
Bundle arguments = new Bundle();
arguments.putString(
BookFragment.BOOK_TITLE, mCourseTitles[idx]);
arguments.putString(
BookFragment.BOOK_DESCRIPTIONS, mCourseDescriptions[idx]);
arguments.putInt(
BookFragment.TOP_IMAGE, mTopImageResourceIds[idx]);
// Create the fragment instance and pass the arguments
BookFragment bookFragment = new BookFragment();
bookFragment.setArguments(arguments);
// return the fragment instance
return bookFragment;
}
[ 85 ]
Creating Rich Navigation with Fragments
When the app displays a particular book's page for the first time, the getItem
method is called with the index of the page as a parameter named idx in our code.
Before creating the fragment, we retrieve the book title, description, and image
resource ID from arrays containing those values and store them in a Bundle instance.
We then create an instance of our BookFragment class and associate the argument
Bundle instance with it. Finally, we return the BookFragment reference. When our
BookFragment instance is displayed, it will access the values in the argument Bundle
instance and display them.
We now must override two additional methods: getPageTitle and getCount.
The getPageTitle method returns the string that is visible in the thin bar above
each fragment. Like the getItem method, the getPageTitle method receives the
index of the page being displayed. The getPageTitle method simply returns a
value from an array containing short versions of the page title, as shown in the
following code:
public CharSequence getPageTitle(int idx) {
return mCourseTitlesShort[idx];
}
The getCount method is responsible for returning the number of screens we'll
be displaying. We can simply return the length of the array we're using in the
getPageTitle method, as shown in the following code:
public int getCount() {
return mCourseTitlesShort.length;
}
Implementing our BookPagerAdapter class takes care of the code that manages our
fragments. Now, we just need to put the appropriate layout within our activity and
connect it with the adapter.
Putting the swipe UI into place
The swipe user interface behavior and effects come from two Android classes:
ViewPager and PagerTitleStrip. The ViewPager class is the primary class.
It manages the user interaction, provides the swipe animation effects, and cooperates
with the adapter class that provides each screen's fragment. The PagerTitleStrip
class handles the displaying of the thin title bar above each fragment. The string
values returned from our BookPagerAdapter class' getPageTitle method are
displayed within the PagerTitleStrip instance.
[ 86 ]
Chapter 5
We'll create a layout resource file for our application's activity called
activity_main.xml containing the ViewPager and PagerTitleStrip
classes, as shown in the following XML layout:
<android.support.v4.view.ViewPager
xmlns:android="http://schemas.android.com/apk/res/android"
android:id="@+id/pager"
android:layout_width="match_parent"
android:layout_height="match_parent">
<android.support.v4.view.PagerTitleStrip
android:id="@+id/pager_title_strip"
android:layout_width="match_parent"
android:layout_height="wrap_content"
android:layout_gravity="top"
android:background="#33b5e5"
android:paddingBottom="4dp"
android:paddingTop="4dp"
android:textColor="#fff"/>
</android.support.v4.view.ViewPager>
Our layout resource file contains ViewPager as the root node, and is set to
occupy the entire activity. The ViewPager class has an ID value of pager.
The PagerTitleStrip class is set to fill the full width of ViewPager, and to be
positioned at the top. Alternatively we could set the layout_gravity attribute
to a value of bottom to position PagerTitleStrip at the bottom of the ViewPager
class' display area. Although, other values for the layout_gravity attribute are
technically valid, they tend to be problematic. As a general rule, we want to limit
our choices for the layout_gravity attribute to be either top or bottom.
We have our complete layout and have already created the adapter that will manage
the fragments within our application. We're now ready to declare our activity class,
which we'll name MainActivity. The class declaration appears as follows:
import android.support.v4.app.FragmentActivity;
import android.support.v4.view.ViewPager;
public class MainActivity extends FragmentActivity {
BookPagerAdapter mBookPagerAdapter;
ViewPager mViewPager;
// other members elided for clarity
}
[ 87 ]
Creating Rich Navigation with Fragments
Notice that we're inheriting from the support library class FragmentActvity rather
than the regular Activity class. This is due to the same issue we discussed when we
declared our BookFragment class. The classes that provide the swipe behavior are in
the support library; therefore, they expect all fragment-related classes to be from that
library. Our activity class includes member variables for our BookPagerAdapter and
ViewPager classes.
The last thing we need to do is connect our BookPagerAdapter class to the
ViewPager class. We'll do that in our onCreate method, which appears as follows:
protected void onCreate(Bundle savedInstanceState) {
super.onCreate(savedInstanceState);
setContentView(R.layout.activity_main);
mBookPagerAdapter = new BookPagerAdapter(
getSupportFragmentManager(), this);
mViewPager = (ViewPager) findViewById(R.id.pager);
mViewPager.setAdapter(mBookPagerAdapter);
}
As we can see, our job here is pretty easy. We call the setContentView method with
the R.layout.activity_main resource we just created. When the setContentView
method returns, we create our BookPagerAdapter instance passing the activity's
FragmentManager instance and the activity's this pointer so our BookPagerAdapter
can use it as the context. With our BookPagerAdapter created, we use the activity
class' findViewById method to get a reference to the ViewPager class that we created
with the layout resource file. Finally, we call the ViewPager instance's setAdapter
method to connect the BookPagerAdapter instance to our ViewPager instance.
We now have everything in place. Our book browser is all ready for the user to
browse through our list of books using swipe navigation.
[ 88 ]
Chapter 5
Android Studio and swipe navigation
If we're working with Android Studio, getting started at building an app with swipe
navigation is easy. In the New Project wizard, on the dialog where we set the activity
and layout name, select Scrollable Tabs + Swipe for Navigation Type as shown in
the following screenshot:
The resulting project will include a layout resource file containing ViewPager and
PagerTitleStrip, along with stubbed-out code for the FragmentPagerAdapter,
Fragment, and Activity derived classes.
[ 89 ]
Creating Rich Navigation with Fragments
Improving navigation with the ActionBar
Beginning at API Level 11 (Android 3.0), Android moved away from using traditional
menus to instead use the ActionBar. The ActionBar provides action items that are
a combination of button-based actions that appear directly on the ActionBar and
menu-based actions that appear in a drop-down list when the user taps on the Action
overflow button. The following screenshot shows the available ActionBar actions:
What many developers don't realize is that the button-based and menu-based
actions are just a small subset of what the ActionBar actually does. The ActionBar
now serves as a central point for many navigation-related behaviors. Two of these
behaviors are tied directly to fragments: tab navigation and drop-down navigation.
To incorporate the ActionBar in applications targeting versions of
Android with an API Level below 11, use the ActionBarCompat class
available in the Android Support Library. For more information on the
ActionBarCompat class visit http://bit.ly/ActionBarCompat.
Navigating randomly with tabs
Tabs are an effective navigation model. They're well understood by users,
and make moving between screens within an app easy. Unlike swipe navigation
that requires the user to move through screens in order, tab navigation allows
the user to move from one screen to another in any order they like. Android has
supported tab navigation since the original release of the platform. Historically,
the challenge of implementing tab navigation was that it was unrelated to other
navigation models and required using a special activity class and other tab-specific
classes. With the ActionBar, this is all changed. Now, tab navigation is just another
use of the common fragment programming model.
[ 90 ]
Chapter 5
The ActionBar allows us to associate an instance of a fragment derived class with
each tab. The following screenshot shows the top portion of the screen of two
different devices, with the ActionBar displaying tabs:
Notice that the ActionBar automatically adapts the way the tabs are displayed
in response to the available screen space. On the narrower device, the ActionBar
places the tabs under the main portion of the ActionBar, whereas on the wider
device with more horizontal screen space, the tabs appear directly on the main
portion of the ActionBar.
Managing tab selection
The ActionBar manages all the heavy lifting when it comes to implementing tab
navigation. It draws the tabs, indicates which tab is currently selected, and even
takes care of beginning and committing a fragment transaction. All we have to do is
handle which fragment is visible, based on the tab currently selected. We do this by
providing an implementation of the ActionBar.TabListener interface for each tab.
The following code shows the declaration of a class implementing the interface:
public class SimpleTabListener implements ActionBar.TabListener {
boolean mFirstSelect = true;
Fragment mFragment;
public SimpleTabListener(Fragment fragment) {
mFragment = fragment;
}
// Other members elided for clarity
}
[ 91 ]
Creating Rich Navigation with Fragments
Our TabListener implementation has two member variables. The boolean
member variable, mFirstSelect, is used to control the special handling that's
necessary the first time the fragment managed by our SimpleTabListener
class is selected. The other member variable, mFragment, holds a reference to
the fragment that is managed by the TabListener instance, which is set in our
SimpleTabListener constructor.
The first TabListener interface method we'll implement is the onTabSelected
method. As the method name indicates, onTabSelected is called each time
the tab associated with this TabListener instance becomes the selected tab.
The onTabSelected method is implemented as shown in the following code:
public void onTabSelected(
ActionBar.Tab tab, FragmentTransaction fragmentTransaction) {
if (mFirstSelect) {
fragmentTransaction.add(android.R.id.content, mFragment);
mFirstSelect = false;
}
else
fragmentTransaction.attach(mFragment);
}
Two parameters are passed to the onTabSelected method. The first parameter is a
reference to the tab instance that is associated with our TabListener implementation.
The second parameter is the FragmentTransaction instance that is managed by the
ActionBar. The ActionBar starts this transaction, and will commit the transaction
after onTabSelected returns.
The first time the onTabSelected method is called, we use the passed
FragmentTransaction instance to add our fragment to the display using
the add method. As we discussed in the previous chapter, the first parameter
to the add method is the ID of the view group under which we want the
fragment to be placed. Just as when we're managing FragmentsTransaction
ourselves, this can be any valid view group within the activity layout. In the
previous code, we're using a special ID value that is predefined by Android,
android.R.id.content. The android.R.id.content ID value indicates that
we want the fragment to occupy the entire content area of the activity rather
than be placed under a specific view group within the activity.
We only use the add method the first time the tab is selected; every time thereafter,
we use the FragmentTransaction class' attach method. We'll talk more about that
in a moment.
[ 92 ]
Chapter 5
The next TabListener interface method we'll implement is the onTabUnselected
method, which is shown in the following code:
public void onTabUnselected(
ActionBar.Tab tab, FragmentTransaction fragmentTransaction) {
fragmentTransaction.detach(mFragment);
}
The onTabUnselected method receives the same parameters as the onTabSelected
method. Our implementation of this method is simple, having only one line in which
we call the FragmentTransaction class' detach method.
The detach method call in the onTabUnselected method works together with the
attach method call in the onTabSelected method. Once the fragment is initially
added to the activity, as we do in the onTabSelected method the first time the
fragment is shown, we can then call the detach method to tear down the fragment's
view hierarchy, but leave the fragment associated with the activity. When we call the
attach method within the onTabSelected method, the next time the user selects the
tab for the fragment, the fragment's view hierarchy is rebuilt at the same place within
the activity where the fragment was originally added.
This technique of calling the detach and attach methods allows us to manage
the fragments more efficiently. When we call the detach method, the fragment's
onDestroyView method is called, but not the onDestroy method. When we later
call the attach method, the fragment's onCreateView method is called, but not the
onCreate method, because the fragment does not need to be fully recreated just its
view hierarchy needs to be recreated.
There is a bit of potential confusion related to method names that we need to be
aware of. When a fragment instance is passed to the FragmentTransaction class'
detach method, the Fragment class' onDetach method does not get called. This is
because the detach method tears down the fragment's view hierarchy but leaves
the fragment associated with the activity; the fragment remains attached. Similarly,
when a fragment instance is passed to the FragmentTransaction class' attach
method, the Fragment class' onAttach method does not get called because the
fragment is already attached to the activity. This is certainly a little confusing,
but it ultimately comes down to a bad choice of method names on the part of the
API designers rather than being a technical inconsistency.
[ 93 ]
Creating Rich Navigation with Fragments
The last method on the TabListener interface, onTabReselected, is called in
scenarios where the user taps the tab that is already selected; in other words,
the user reselects the same tab. In most cases, this method can be left empty,
as shown in the following code:
public void onTabReselected(
ActionBar.Tab tab, FragmentTransaction fragmentTransaction) { }
Connecting the fragments to the tabs
With our TabListener implementation in place, we can now connect the fragments
to the tabs. We'll do this in the activity's onCreate method, which is shown in the
following code:
protected void onCreate(Bundle savedInstanceState) {
super.onCreate(savedInstanceState);
// Put ActionBar in Tab mode
ActionBar actionBar = getActionBar();
actionBar.setNavigationMode(ActionBar.NAVIGATION_MODE_TABS);
// Create the first tab
Fragment firstFragment = new FirstFragment();
ActionBar.TabListener firstListener =
new SimpleTabListener(firstFragment);
ActionBar.Tab firstTab = actionBar.newTab()
.setText("First")
.setTabListener(firstListener);
actionBar.addTab(firstTab);
// Create the second tab
Fragment secondFragment = new SecondFragment();
ActionBar.TabListener secondListener =
new SimpleTabListener(secondFragment);
ActionBar.Tab secondTab = actionBar.newTab()
.setText("Second")
.setTabListener(secondListener);
actionBar.addTab(secondTab);
}
In our onCreate implementation, we start by getting a reference to the ActionBar,
and putting the ActionBar into tab navigation mode. This step is essential;
without it, the tabs we add will never be visible.
[ 94 ]
Chapter 5
For the first tab, we create the fragment that will serve as the body of the tab.
This can be virtually any fragment derived class. We then associate our TabListener
implementation with the fragment. With the fragment and TabListener
implementation in place, we create a new ActionBar.Tab instance with the
call to the newTab method, we then set the text that will display within the tab,
and associate our TabListener instance with the tab. Finally, we add the
ActionBar.Tab instance to the ActionBar with the addTab method. We then
repeat those steps for the second tab.
With that, we now have tab navigation implemented in our application. Using this
technique, we're able to leverage all the capabilities of fragments and implement
tab-based navigation in a way that is consistent with other ways we use fragments.
One thing that may appear unusual about our onCreate method implementation
is the absence of a call to the setContentView method. In this case, we don't
need to associate a layout resource with the activity, because we're using the
special-purpose android.R.id.content resource ID when we call the add
method in our onTabSelected implementation. As we mentioned earlier,
the resource ID android.R.id.content indicates that the fragment occupies
the entire content area. If we wanted the tab to control the display of a fragment
within some view group, we would call setContentView with a resource
containing the desired layout. We would then use the ID of the view group
within that layout in our call to the add method.
Providing direct access with drop-down
list navigation
Tab navigation works well when an app has just a few predictable screens,
but quickly becomes cluttered if there are a large number of screens. For those
scenarios where an app has a large number of screens or possibly the number of
screens might even change over time, drop-down list navigation provides a much
better solution than tabs. Drop-down list navigation places a drop-down list on the
ActionBar containing the list of available screen names. When the user chooses a
screen name from the list, the app immediately displays the corresponding screen.
[ 95 ]
Creating Rich Navigation with Fragments
Probably the most familiar use of this navigation model on Android is the Android
e-mail app, which is shown in the following screenshot:
In the Android e-mail app, the list of different available e-mail folder screens
appears in the drop-down list. Tapping the ActionBar displays the list and then
selecting the screen name from the list immediately displays the screen.
Incorporating drop-down list navigation in our apps is very simple.
Managing fragment selection
Unlike tab navigation, where the ActionBar takes a very active role in managing the
transition from one fragment to another, in drop-down list navigation the ActionBar
takes a much more hands-off approach. Basically, the ActionBar simply notifies the
app that the selection has changed, and leaves the details of switching fragments up
to the app. To handle the notification we need to provide an implementation of the
ActionBar.OnNavigationListener interface. The implementation declaration is
shown in the following code:
public class SimpleNavigationListener
implements ActionBar.OnNavigationListener {
FragmentManager mFragmentManager;
public SimpleNavigationListener(FragmentManager fm) {
mFragmentManager = fm;
}
// Other members elided for clarity
}
[ 96 ]
Chapter 5
Our ActionBar.OnNavigationListener implementation has a single member
variable, mFragmentManager, to hold a reference to the activity's FragmentManager
instance. The FragmentManager reference is passed to our class in the constructor.
Unlike in tab navigation where each tab instance is managed by a separate
TabListener instance, in drop-down list navigation a single OnNavigationListener
implementation handles all the selections. The OnNavigationListener interface's
only method, onNavigationItemSelected, is called each time the selection changes
and is responsible for taking care of displaying the appropriate fragment, as shown
in the following implementation:
public boolean onNavigationItemSelected(
int itemPosition, long itemId) {
Fragment fragment = null;
// Create an instance of the appropriate Fragment
switch (itemPosition) {
case 0:
fragment = new FirstFragment();
break;
case 1:
fragment = new SecondFragment();
break;
case 2:
fragment = new ThirdFragment();
break;
}
// Replace the currently visible fragment with the new one
if (fragment != null) {
FragmentTransaction ft = mFragmentManager.beginTransaction();
ft.replace(android.R.id.content, fragment);
ft.commit();
}
return true;
}
We receive the zero-based index of the selection as the first parameter,
itemPosition. We'll be populating the list of screen names from a simple
String array so the second parameter, itemId, does not have value to us.
If we were to use a more structured data source, the itemId parameter
would contain the ID of the selection.
[ 97 ]
Creating Rich Navigation with Fragments
Using a switch statement, we create an instance of the appropriate fragment derived
class. Once we have the fragment instance, we replace the currently visible fragment
with the one we just created. We again use the layout resource ID, android.R.id.
content, indicating that the fragment occupies the entire content area of the activity.
Just as with tab navigation, we could instead use the ID value of a view group within
the activity's layout, if we prefer.
Notice that we're explicitly creating and committing the FragmentTransaction
instance in our code. This is another important difference from how tab navigation
is managed; we're responsible for all the details. The test that the local variable,
fragment, is not null is just a sanity check. As long as we don't display more than
three values for the user to select from, the fragment variable will never be null.
Providing a method return value of true simply indicates that we have handled
the event.
Providing the navigation choices
We now need to provide the ActionBar with the information necessary to display
the list of navigation choices. We do that in the activity's onCreate method,
which is shown in the following code:
protected void onCreate(Bundle savedInstanceState) {
super.onCreate(savedInstanceState);
// Put the ActionBar in the right mode and clear any clutter
ActionBar actionBar = getActionBar();
actionBar.setNavigationMode(ActionBar.NAVIGATION_MODE_LIST);
actionBar.setDisplayShowTitleEnabled(false);
// Get the list of display values and wrap in an adapter
String[] screenNames =
getResources().getStringArray(R.array.screen_names);
ArrayAdapter<String> adapter = new ArrayAdapter<String>(this,
android.R.layout.simple_list_item_1, screenNames);
// Create the Listener and associate with the ActionBar
ActionBar.OnNavigationListener listener =
new SimpleNavigationListener(getFragmentManager());
actionBar.setListNavigationCallbacks(adapter, listener);
}
[ 98 ]
Chapter 5
The first step in setting up drop-down list navigation is to put the ActionBar
into list navigation mode with the call to the setNavigationMode method.
The drop-down list containing the screen choices appears directly on the
ActionBar, which can be problematic if the ActionBar attempts to show both
the drop-down list and the activity title text. To make room for the list, we call
the setDisplayShowTitleEnabled method with a value of false so that the
title doesn't display.
We retrieve the list of display values from the array resource, which is a regular
String array. We wrap the String array in an instance of the ArrayAdapter class
just as we would if we were planning to associate the String array with a standard
ListView instance appearing within a layout definition for an activity. The String
array resource definition appears as shown in the following XML code:
<string-array name="screen_names">
<item>First View</item>
<item>Second View</item>
<item>Third View</item>
</string-array>
We then create an instance of SimpleNavigationListener, which we had
defined earlier. Finally, we set the list of displayed screen names and the screen
selection handler by calling the setListNavigationCallbacks method to associate
the ArrayAdapter and SimpleNavigationListener implementations with the
ActionBar.
[ 99 ]
Creating Rich Navigation with Fragments
With that we have drop-down navigation fully implemented. When we run the
application, the list of screen selections will appear as shown in the following
screenshot. The ActionBar initially appears as shown on the left-hand side in the
following screenshot, with the currently selected screen's name displayed. When the
user taps on the currently selected screen name, the list expands to display the list of
available screen names as shown on the right-hand side of the following screenshot.
With the list expanded, the user can easily jump directly to any of the available
screens by tapping on the desired screen's name within the list.
Android Studio and drop-down list navigation
If we're working with Android Studio, we can create a project that supports
drop-down list navigation directly from the New Project wizard by selecting
Dropdown as the Navigation Type, similar to the way we created a project with
swipe navigation. The resulting project will contain a stubbed-out ActionBar.
OnNavigationListener implementation along with the code within the activity
to put the ActionBar into drop-down list navigation mode, and associate the
ActionBar.OnNavigationListener implementation with the ActionBar.
Summary
Fragments are the foundation of modern Android app development, allowing us to
display multiple application screens within a single activity. Thanks to the flexibility
provided by fragments, we can now incorporate rich navigation into our apps with
relative ease. Using these rich navigation capabilities, we're able to create a more
dynamic user interface experience that make our apps more compelling and that
users find more fun to work with.
[ 100 ]
Index
A
abstract fragment
callback interface, defining 31
ActionBarCompat class
URL 90
ActionBar.OnNavigationListener
interface 96
ActionBar.TabListener interface 91
activity
compatibility 18
activity appearance
defining 9, 10
Activity class 5, 18, 44, 88
Activity Lifecycle
URL 42
activity-oriented
activity appearance, defining 9, 10
activity UI, displaying 10
activity UI
displaying 10
adaptive application layout
creating 70
add method 66, 67, 92, 95
addTab method 95
addToBackStack method 69, 76
AlertDialog class 59
AlertDialogFragment class 60
android.app.Activity class 10
android.app.Fragment class 14
Android developer documentation
URL 50
Android Developers Blog post
URL 7
Android documentation
URL 25
Android Studio 89, 100
Android Support Library
URL 6
android.support.v4.app.Fragment class 14
ArrayAdapter class 50, 99
assumptions
minimizing 12, 13
asynchronous creation
managing 76-78
attach method 93
available height screen size qualifier 27
available width screen size qualifier 27
B
back button
supporting 68, 69
backward
compatibility 18
beginTransaction method 65
BookDescFragment
class 16, 33, 38, 66, 76, 79
BookDescFragment instance 39, 67, 77-79
book description
creating 37
BookFragment class 86, 88
BookFragment instance 86
bookIndex variable 79
BookListFragment class 15, 16, 30-33
BookPagerAdapter class 85-88
BookPagerAdapter instance 88
bookTitlesAdapter method 50
Bundle class 79
Bundle instance 80, 86
C
commit method 65-77
container 15
D
dashboards
URL 26
data
separating, from display 48, 49
density independent pixel (dp) 26
detach method 93
Dialog
behavior, accessing 58
identity 57
wrapping, in fragment 59, 60
Dialog class 57
DialogFragment class
about 7, 52
display 55
event handling 56, 57
layout 54
Styles 53
DialogFragment instance 53, 55
direct access
providing, with drop-down list navigation
95, 96
dismiss method 57
display fragment
providing 16
display layout
encapsulating 14
drop-down list navigation
about 100
direct access, providing with 95, 96
E
event handling 56, 57
example code
downloading 10
executePendingTransactions method 65, 66
F
file
creating, Android Studio used 28
fragment
about 6, 8
abstraction 30
adding 66, 67
and activities, relation between 7
back button, supporting 68, 69
connecting, to tabs 94, 95
designing, for flexibility 30
disadvantages 6
list, wrapping 14, 15
loading, at startup 73
managing 64
notification 33
operations, encapsulating 33, 34
pieces, connecting loosely 34
removing 66, 67
setup 42-44
tight coupling, avoiding 30
transaction changes, executing 65, 66
transitioning between 74
used, for simpifying Android tasks 7
FragmentActivity class 18
fragment class
DialogFragment class 52
display fragment, providing 16
ListFragment class 47
list, wrapping in fragment 14, 15
Fragment class 6, 15, 44, 47, 72
fragment display 42-44
fragment element 17, 18, 71-74
fragment hide 45
fragment layout
alternate layout resource, adding 22-24
managing, by screen size 25
redundancy, eliminating 27
fragment layout resources
assumptions, minimizing 12, 13
defining, as reusable list 11, 12
display layout, encapsulating 14
fragment lifecycle
about 42
available resources, maximizing 46
fragment display 42-44
fragment hide 45
fragment setup 42-44
[ 102 ]
fragment teardown 45
FragmentManager class 34, 65, 66, 73, 84
FragmentManager.findFragmentById
method 35
FragmentManager instance 34, 35, 39, 65
fragment on-the-fly
creating 76
fragment-oriented
activity, converting to use fragments 16-18
fragment class, creating 14
fragment layout resources 11
FragmentPagerAdapter class 84, 85
fragment selection
managing 96-98
fragment state
managing 46
FragmentStatePagerAdapter class
about 85
URL 85
fragment teardown 45
FragmentTransaction class 46, 64-68, 76, 80,
81, 93
FragmentTransaction instance 65, 92
FragmentTransaction.replace method 69
fragment variable 98
G
getActivity method 33, 45
getArguments method 77-79
getCount method 86
getFragmentManager method 34
getInt method 79
getItem method 85, 86
getListView method 48
getPageTitle method 86
getSupportFragmentManager method 35
I
id value 10, 11
if statement 39
inflate method 16
inflater 15
Intent instance 38, 75, 77
isInLayout method 73
item element 28
L
layout
about 54
adapting, to device differences 72, 73
updating, to support dynamic
fragments 70, 71
layout aliasing 28, 29
layout_gravity attribute 87
layout_height attribute 13, 14, 17
LayoutInflater class 15, 44
LayoutInflater instance 15
layout-land 22
layout resource files
evolving 36, 37
updating 51, 52
layout_weight attribute 13, 14, 17
layout_width attribute 17
LinearLayout element 10, 13, 16, 23
list
data, associating with 47
wrapping, in fragment 14, 15
ListAdapter instance 48
ListAdapter interface 47
ListFragment class
about 7, 47
data, associating with list 47
data, separating from display 48, 49
ListFragment derived class
creating 49, 50
ListFragment instance 48-50
ListFragment item selection
handling 50
ListFragment.setListAdapter method 48
ListView class 48
ListView instance 99
M
MainActivity class
about 18, 24, 37, 38
making 38
mBookDescriptionTextView instance 77
method name confusion
avoiding 44
mIsDynamic field 76
[ 103 ]
N
remove method 66
replace method 67, 76
resources
maximizing 46
resource screen size groups 25, 26
resource screen size qualifiers 26
reusable list
layout, defining 11, 12
name attribute 17, 28, 48
navigation
choices, providing 98, 99
improving, with ActionBar 90
newTab method 95
O
onActivityCreated callback method 47
onActivityCreated method 44, 49, 50
onAttach callback method 43
onAttach method 46, 93
onCreateDialog method 57, 59
onCreate method 43-46, 72-76, 93-98
onCreateView callback method 56-60
onCreateView method 15, 16, 32, 33, 44-46,
54, 77-80
onDestroy method 45, 46, 84, 85, 93
onDestroyView method 45, 46, 84, 85
onDetach method 45, 46, 93
onListItemClick method 50
onResume method 44
onSaveInstanceState method 46, 85
onSelectedBookChanged method 31-33, 38,
50, 74-80
OnSelectedBookChangeListener i
nterface 33
OnSelectionChangeListener interface 50, 51
onStart method 44
onStop method 45
onTabSelected method 92, 93
onTabUnselected method 93
P
PagerTitleStrip class 86, 87
PagerTitleStrip instance 86
position parameter 50
R
RadioGroup element 10, 11
redundant handling
eliminating 75
S
screen management 63, 64
screen size
fragment layout, managing by 25
resource screen size groups 25, 26
resource screen size qualifiers 26
screen size qualifiers
available height screen size qualifier 27
available width screen size qualifier 27
smallest width screen size qualifier 27
ScrollView element 10-13, 17
setAdapter method 88
setArguments method 77, 80
setBook method 34, 76-79
setContentView method 10, 43, 73, 88, 95
setCustomAnimations method 76
setDisplayShowTitleEnabled method 99
setListAdapter method 47, 48
setListNavigationCallbacks method 99
setNavigationMode method 99
setStyle method 53
setText method 77
setTitle method 58
show method 55, 59
SimpleTabListener class 92
smallest width screen size qualifier 27
startActivity method 69, 75
string-array element 48
Styles 53
swipe
used, for making navigation 82, 83
swipe navigation
about 89
implementing 84
swipe fragments, managing 84-86
[ 104 ]
swipe UI, placing 86-88
switch statement 98
T
TabListener interface 94
TabListener interface method 92, 93
tabs
fragments, connecting to 94, 95
managing 91
navigating with 90, 91
TextView element 10
TextView instance 78
tools:layout attribute 18
transaction changes
executing 65, 66
U
UI creation
need for 5, 6
UI flexibility
creating 19, 20
fragment layout 20, 21
fragments, designing for flexibility 30
V
ViewGroup instance 15
View.OnClickListener interface 52, 56
ViewPager class 86-88
ViewPager instance 88
[ 105 ]
Thank you for buying
Creating Dynamic UI with
Android Fragments
About Packt Publishing
Packt, pronounced 'packed', published its first book "Mastering phpMyAdmin for Effective
MySQL Management" in April 2004 and subsequently continued to specialize in publishing
highly focused books on specific technologies and solutions.
Our books and publications share the experiences of your fellow IT professionals in adapting
and customizing today's systems, applications, and frameworks. Our solution based books
give you the knowledge and power to customize the software and technologies you're using
to get the job done. Packt books are more specific and less general than the IT books you have
seen in the past. Our unique business model allows us to bring you more focused information,
giving you more of what you need to know, and less of what you don't.
Packt is a modern, yet unique publishing company, which focuses on producing quality,
cutting-edge books for communities of developers, administrators, and newbies alike.
For more information, please visit our website: www.packtpub.com.
About Packt Open Source
In 2010, Packt launched two new brands, Packt Open Source and Packt Enterprise, in order
to continue its focus on specialization. This book is part of the Packt Open Source brand,
home to books published on software built around Open Source licences, and offering
information to anybody from advanced developers to budding web designers. The Open
Source brand also runs Packt's Open Source Royalty Scheme, by which Packt gives a royalty
to each Open Source project about whose software a book is sold.
Writing for Packt
We welcome all inquiries from people who are interested in authoring. Book proposals
should be sent to author@packtpub.com. If your book idea is still at an early stage and you
would like to discuss it first before writing a formal book proposal, contact us; one of our
commissioning editors will get in touch with you.
We're not just looking for published authors; if you have strong technical skills but no writing
experience, our experienced editors can help you develop a writing career, or simply get some
additional reward for your expertise.
Android User Interface
Development: Beginner's Guide
ISBN: 978-1-84951-448-4
Paperback: 304 pages
Quickly design and develop compelling user
interfaces for your Android applications
1.
Leverage the Android platform's flexibility and
power to design impactful user-interfaces
2.
Build compelling, user-friendly applications
that will look great on any Android device
3.
Make your application stand out from the rest
with styles and themes
4.
A practical Beginner's Guide to take you
step-by-step through the process of developing
user interfaces to get your applications noticed!
Instant Android Fragmentation
Management How-to
ISBN: 978-1-78216-086-1
Paperback: 66 pages
A complete hands-on guide to solving the biggest
problem facing Android application developers today
1.
Learn something new in an Instant!
A short, fast, focused guide delivering
immediate results.
2.
Learn how to write apps that work on
any Android version
3.
Ready to use code to solve any
compatibility issue
4.
Get hands-on with the biggest issue
that faces Android developers
Please check www.PacktPub.com for information on our titles
Android 4: New Features for
Application Development
ISBN: 978-1-84951-952-6
Paperback: 166 pages
Develop Android applications using the new features
of Android Ice Cream Sandwich
1.
Learn new APIs in Android 4
2.
Get familiar with the best practices in
developing Android applications
3.
Step-by-step approach with clearly
explained sample codes
Android 3.0 Application
Development Cookbook
ISBN: 978-1-84951-294-7
Paperback: 272 pages
Over 70 working recipes covering every aspect of
Android development
1.
Written for Android 3.0 but also applicable to
lower versions
2.
Quickly develop applications that take
advantage of the very latest mobile technologies,
including web apps, sensors, and touch screens
4.
Part of Packt's Cookbook series: Discover tips
and tricks for varied and imaginative uses of
the latest Android features
Please check www.PacktPub.com for information on our titles