/


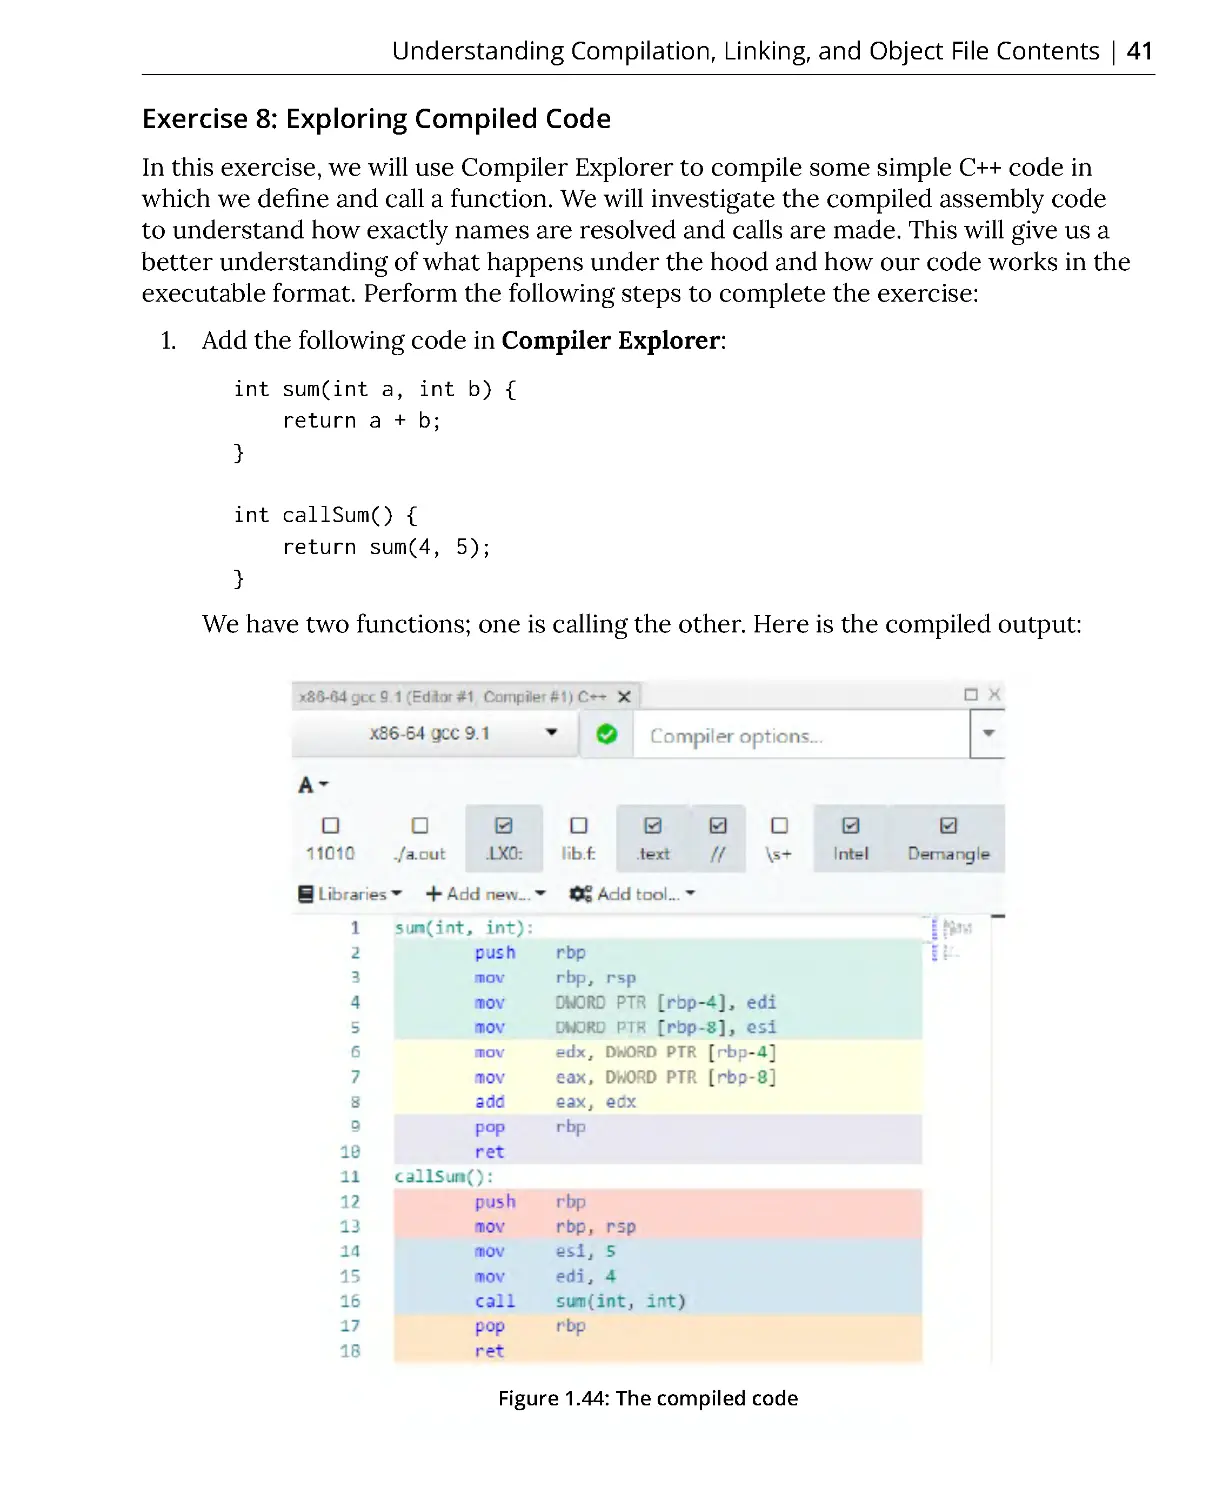


Похожие


Текст
Gazihan Alankus
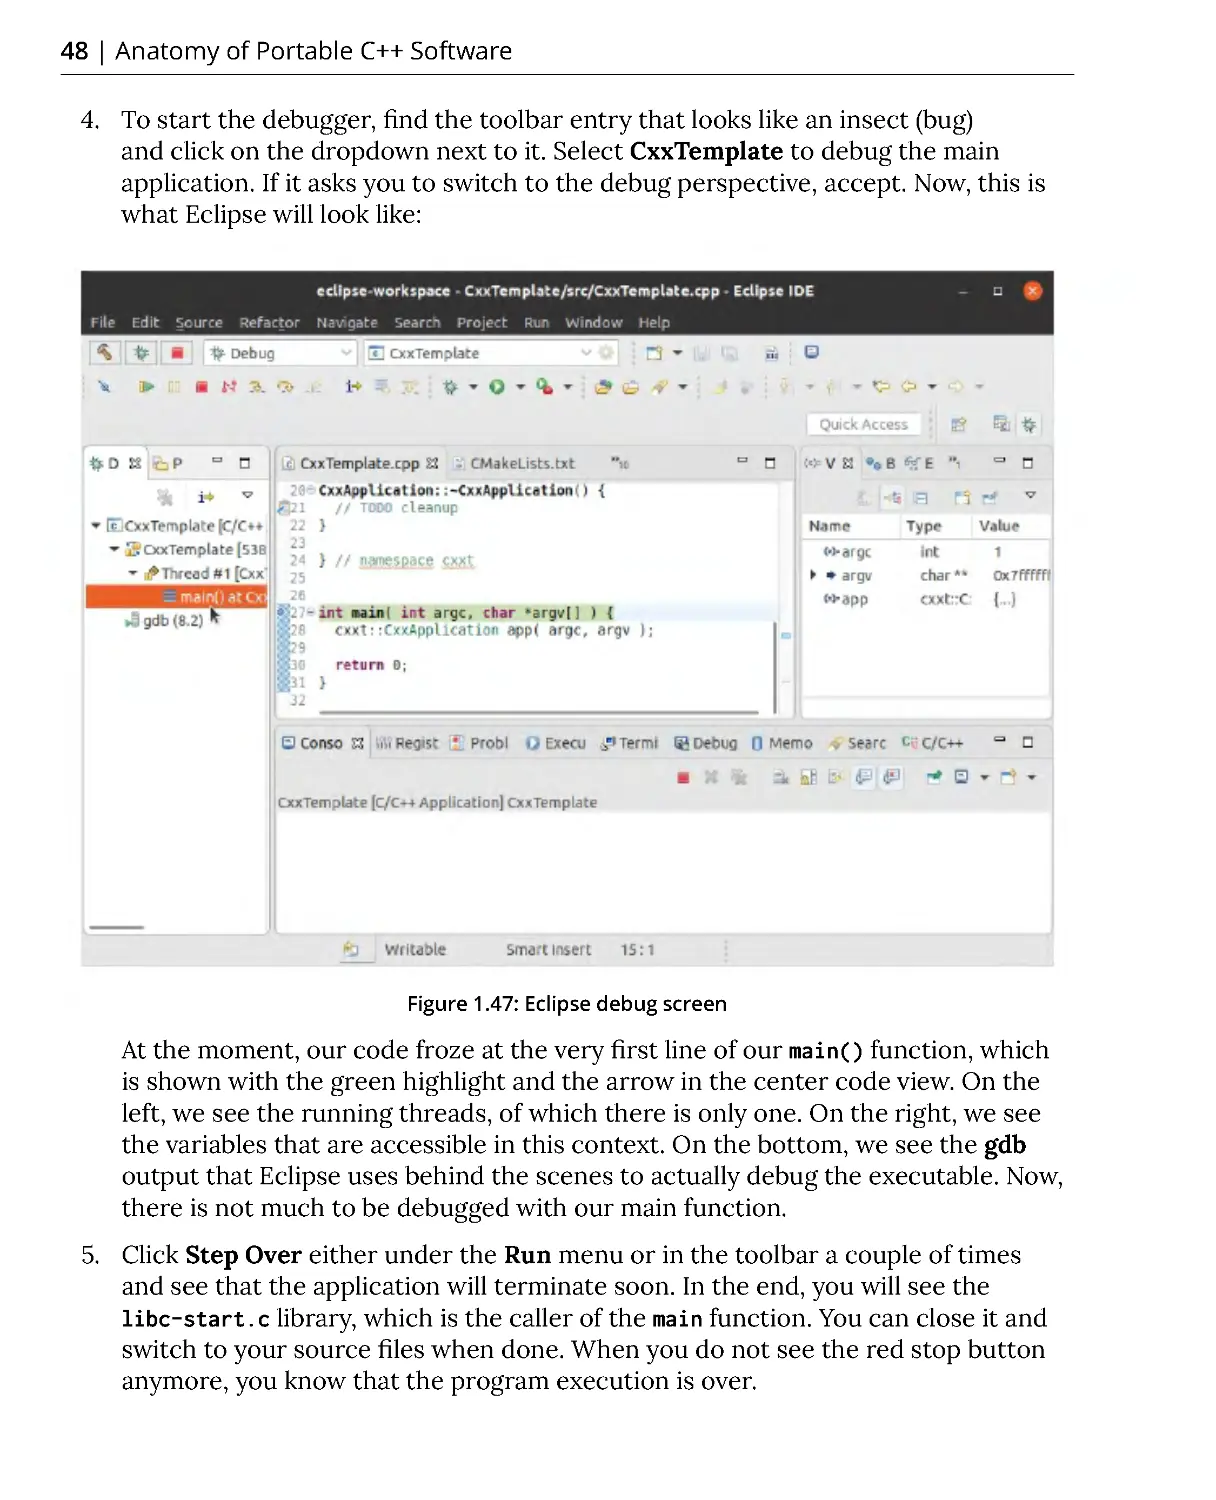
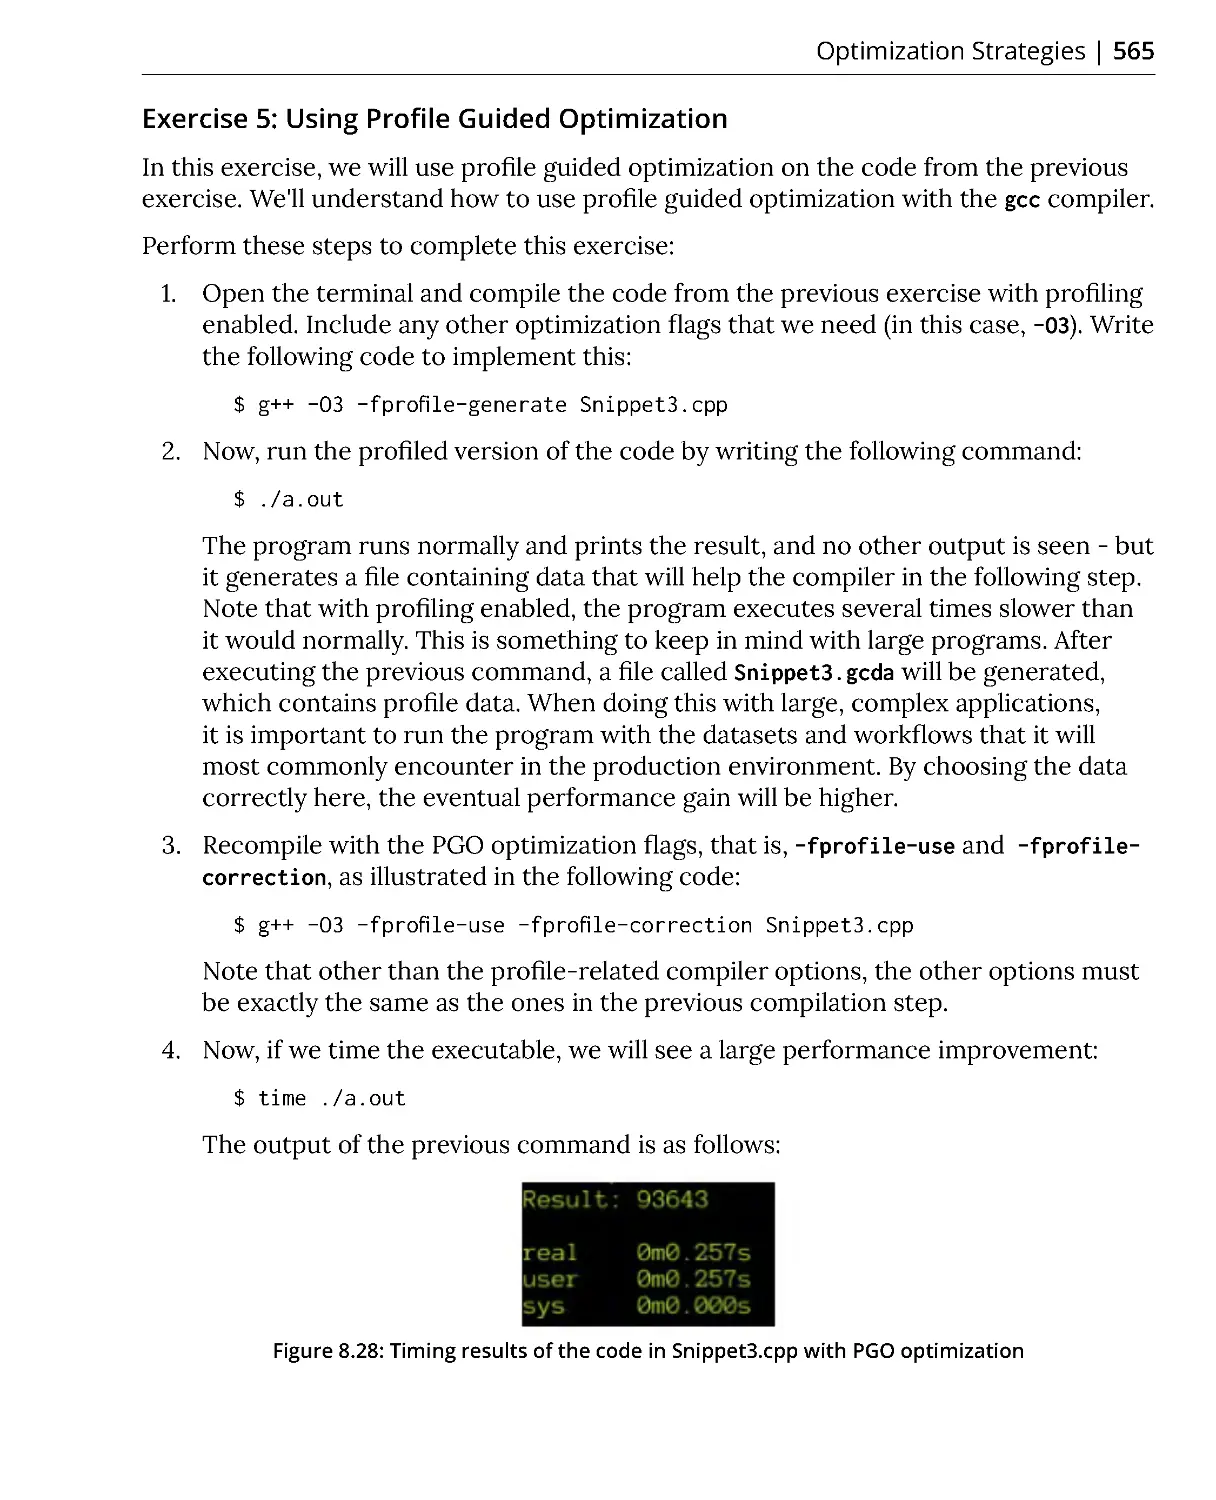
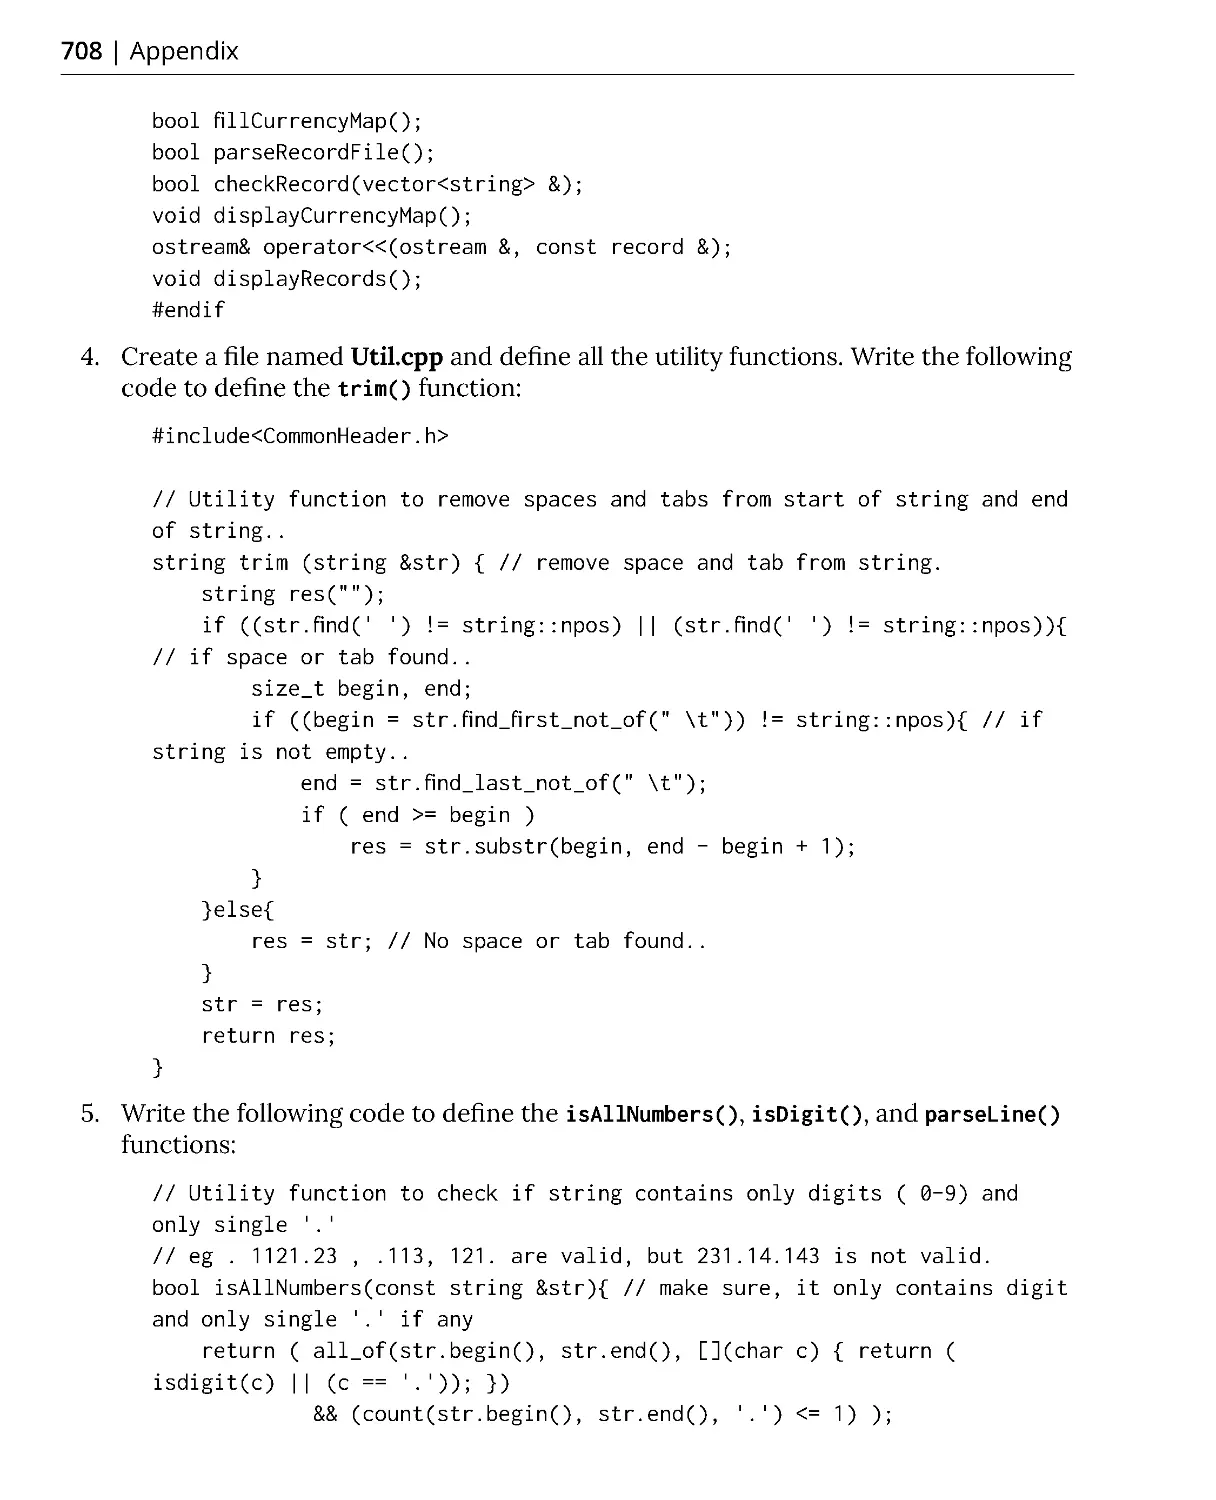
Olena Lizina
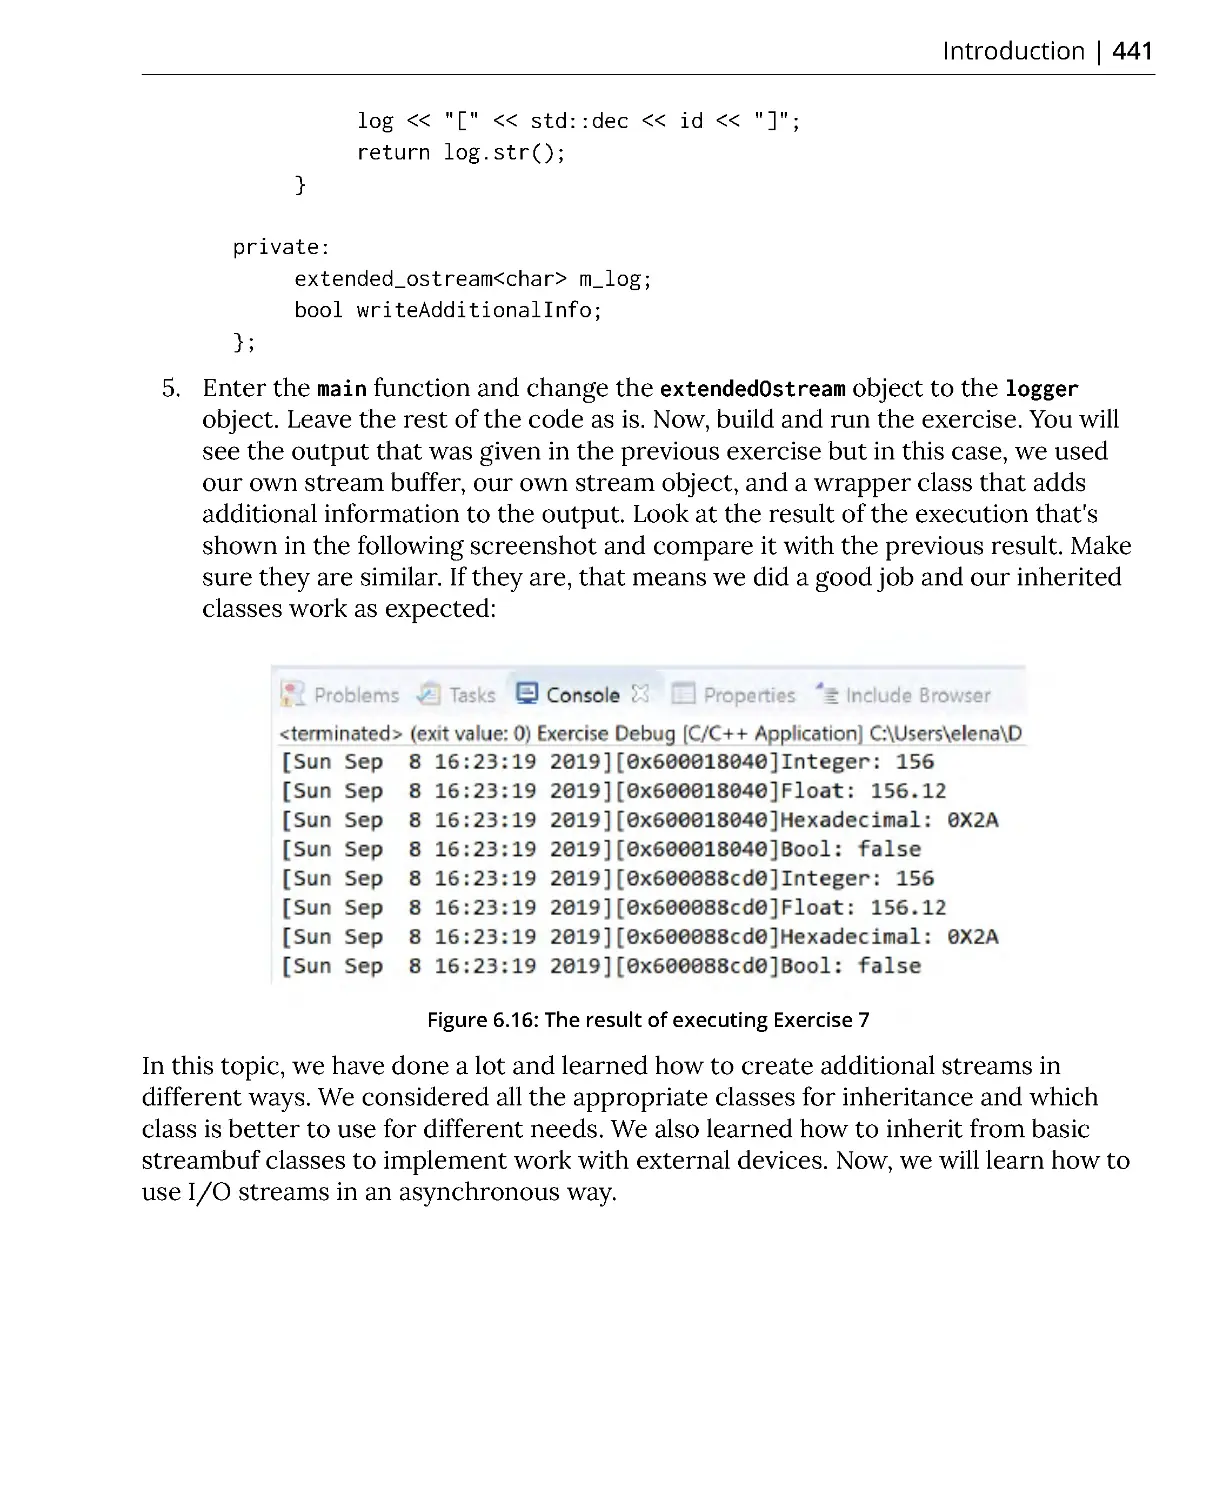
Rakesh Mane
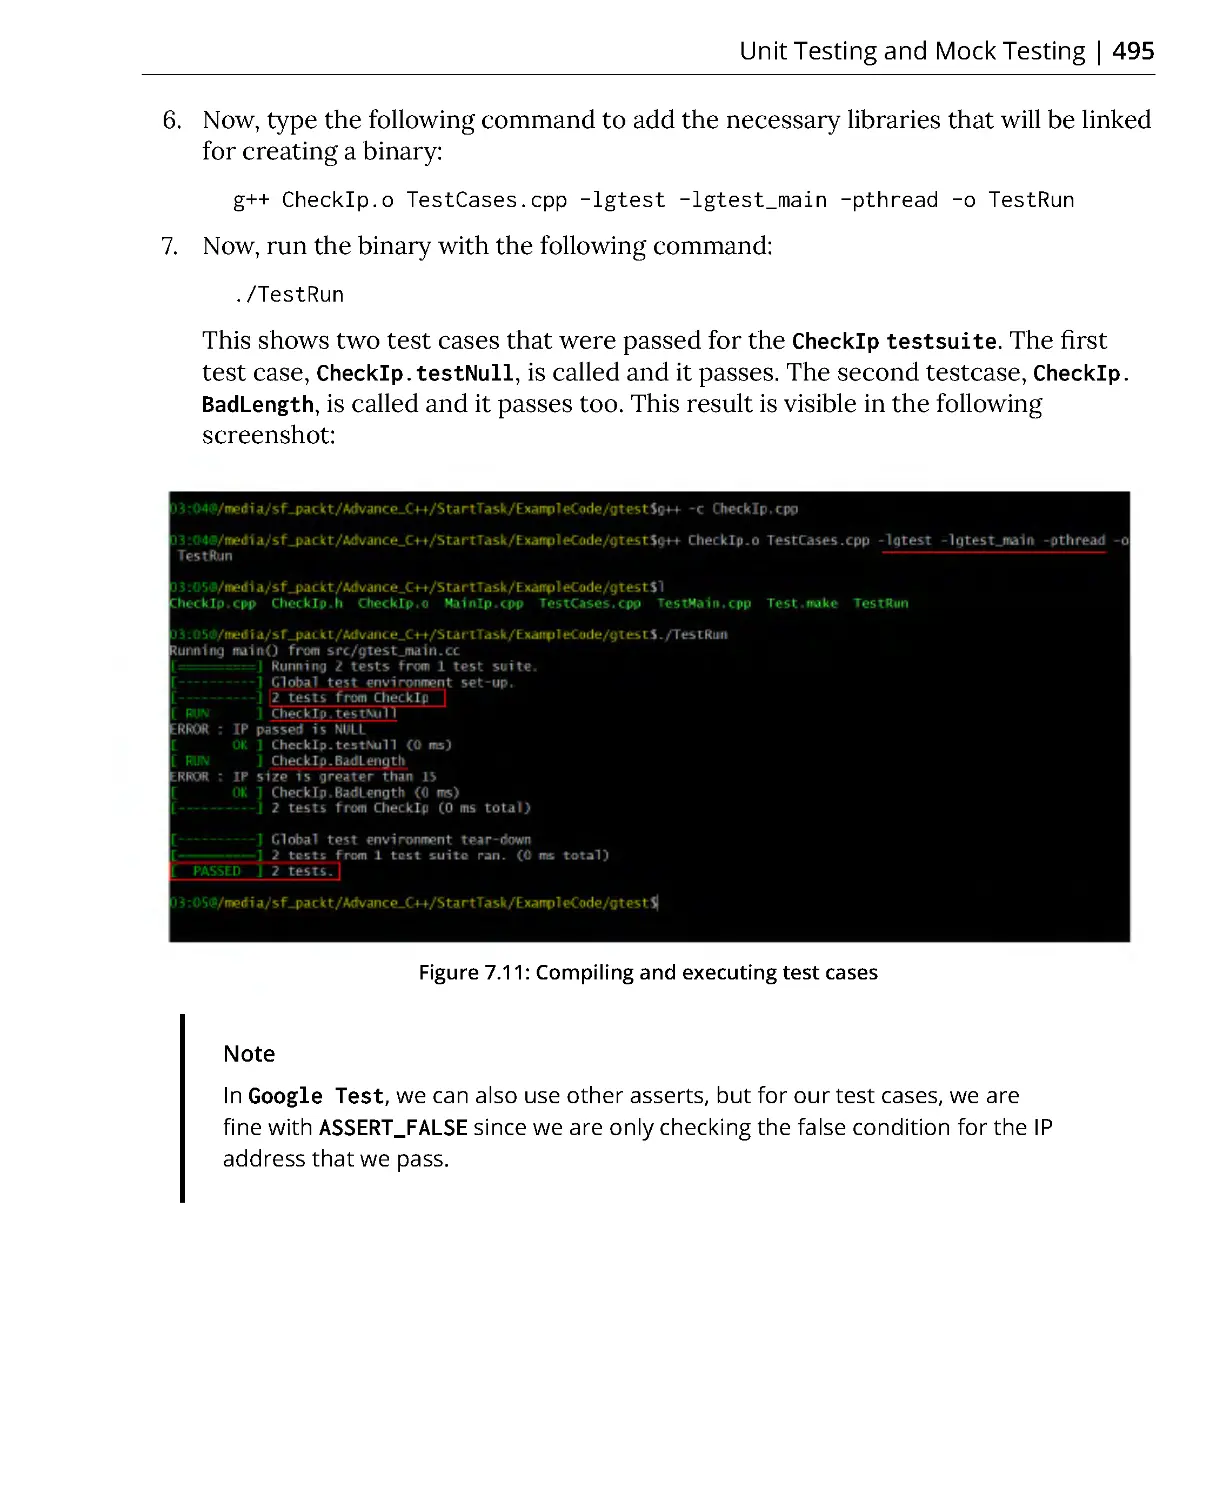
Vivek Nagarajan
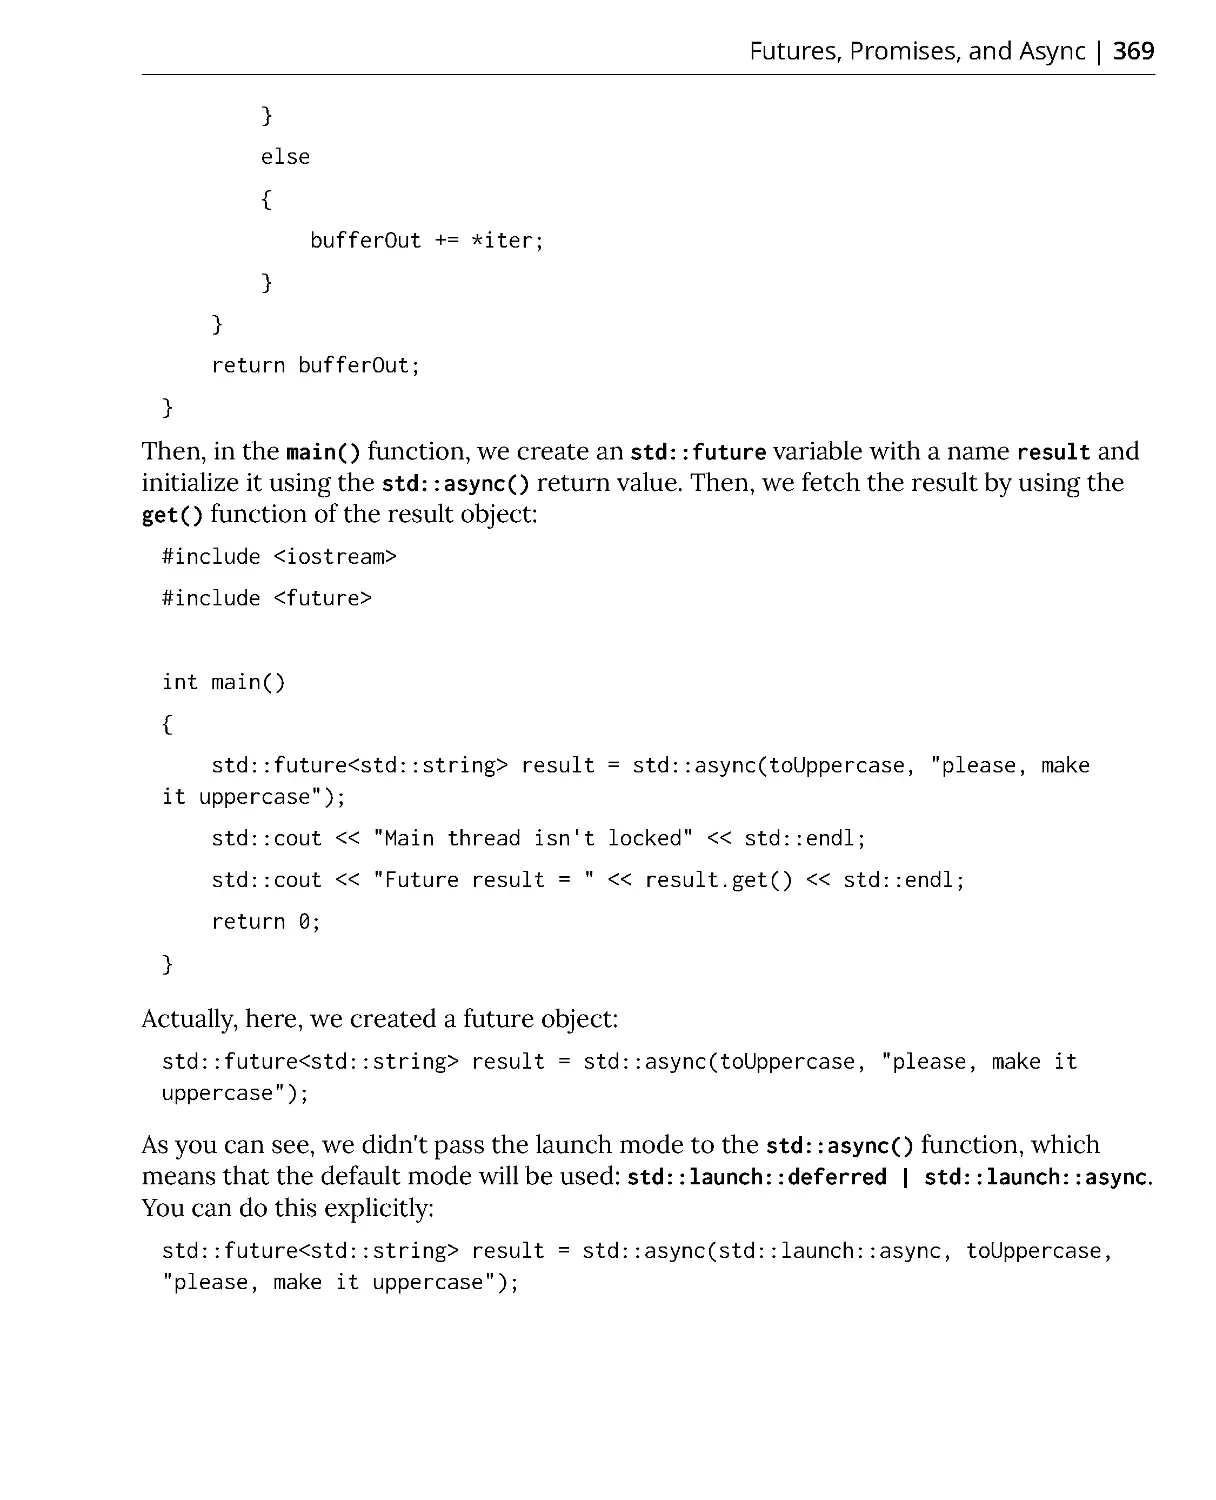
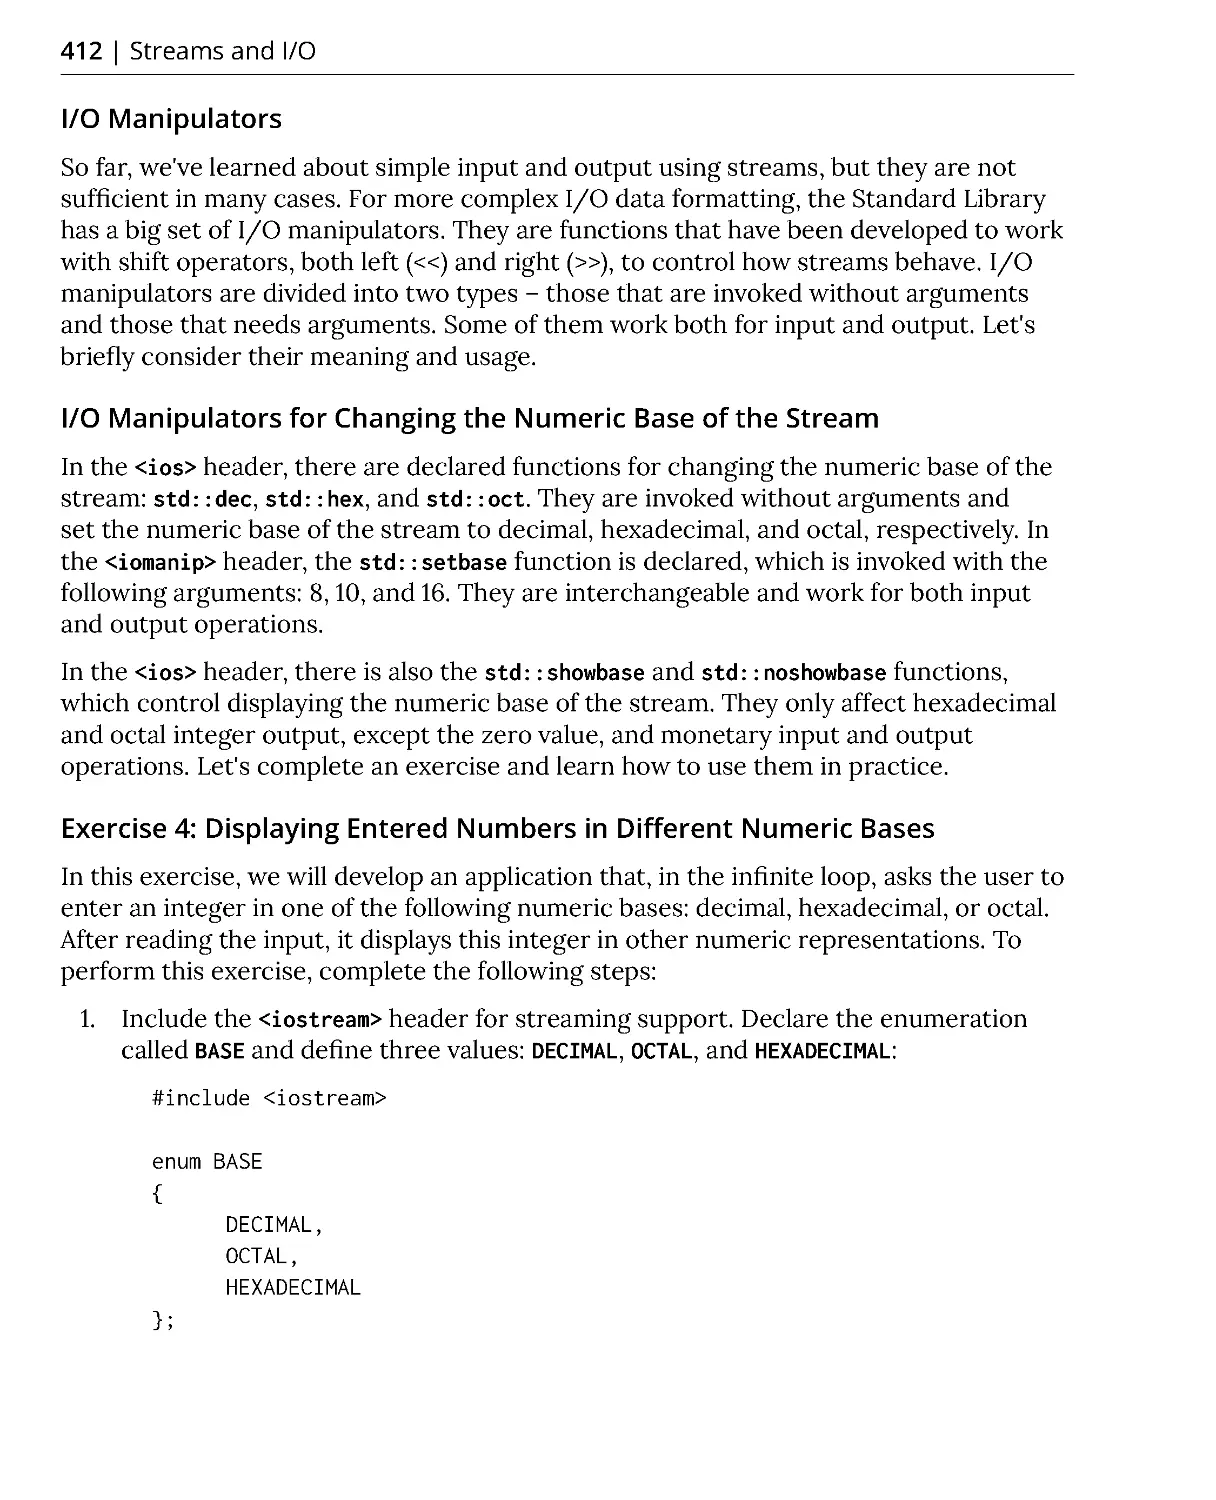
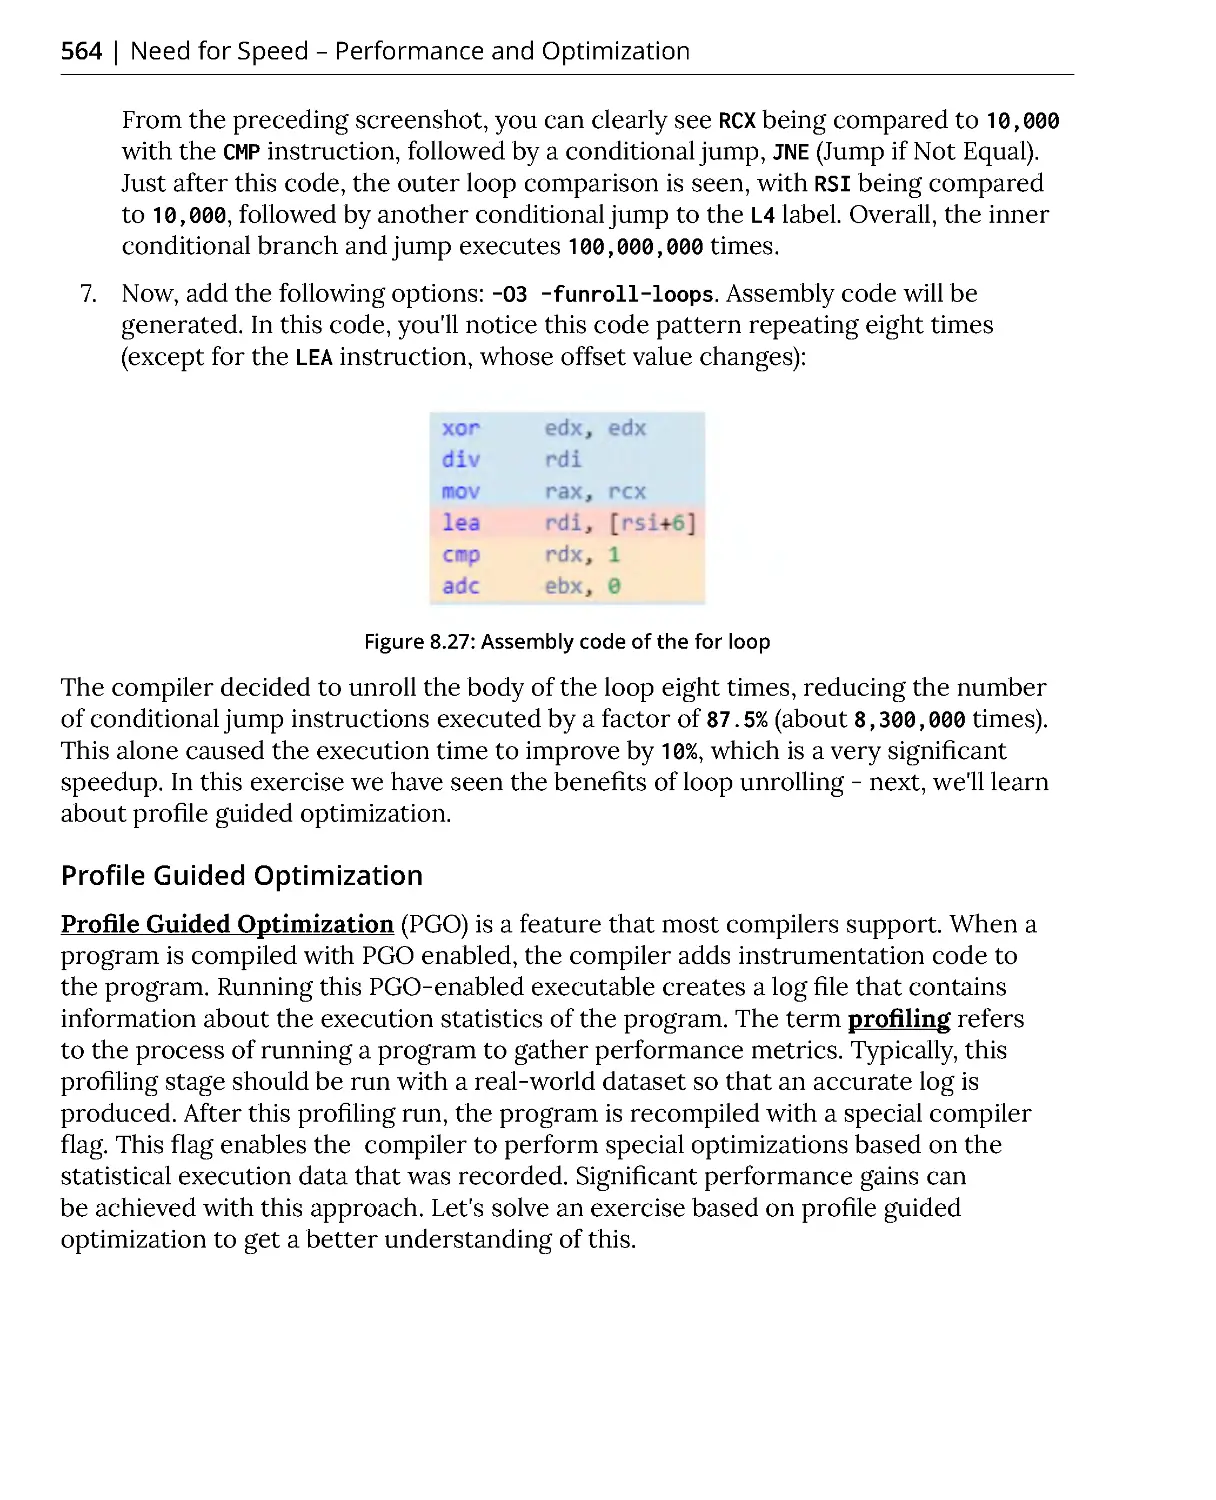
Brian Price
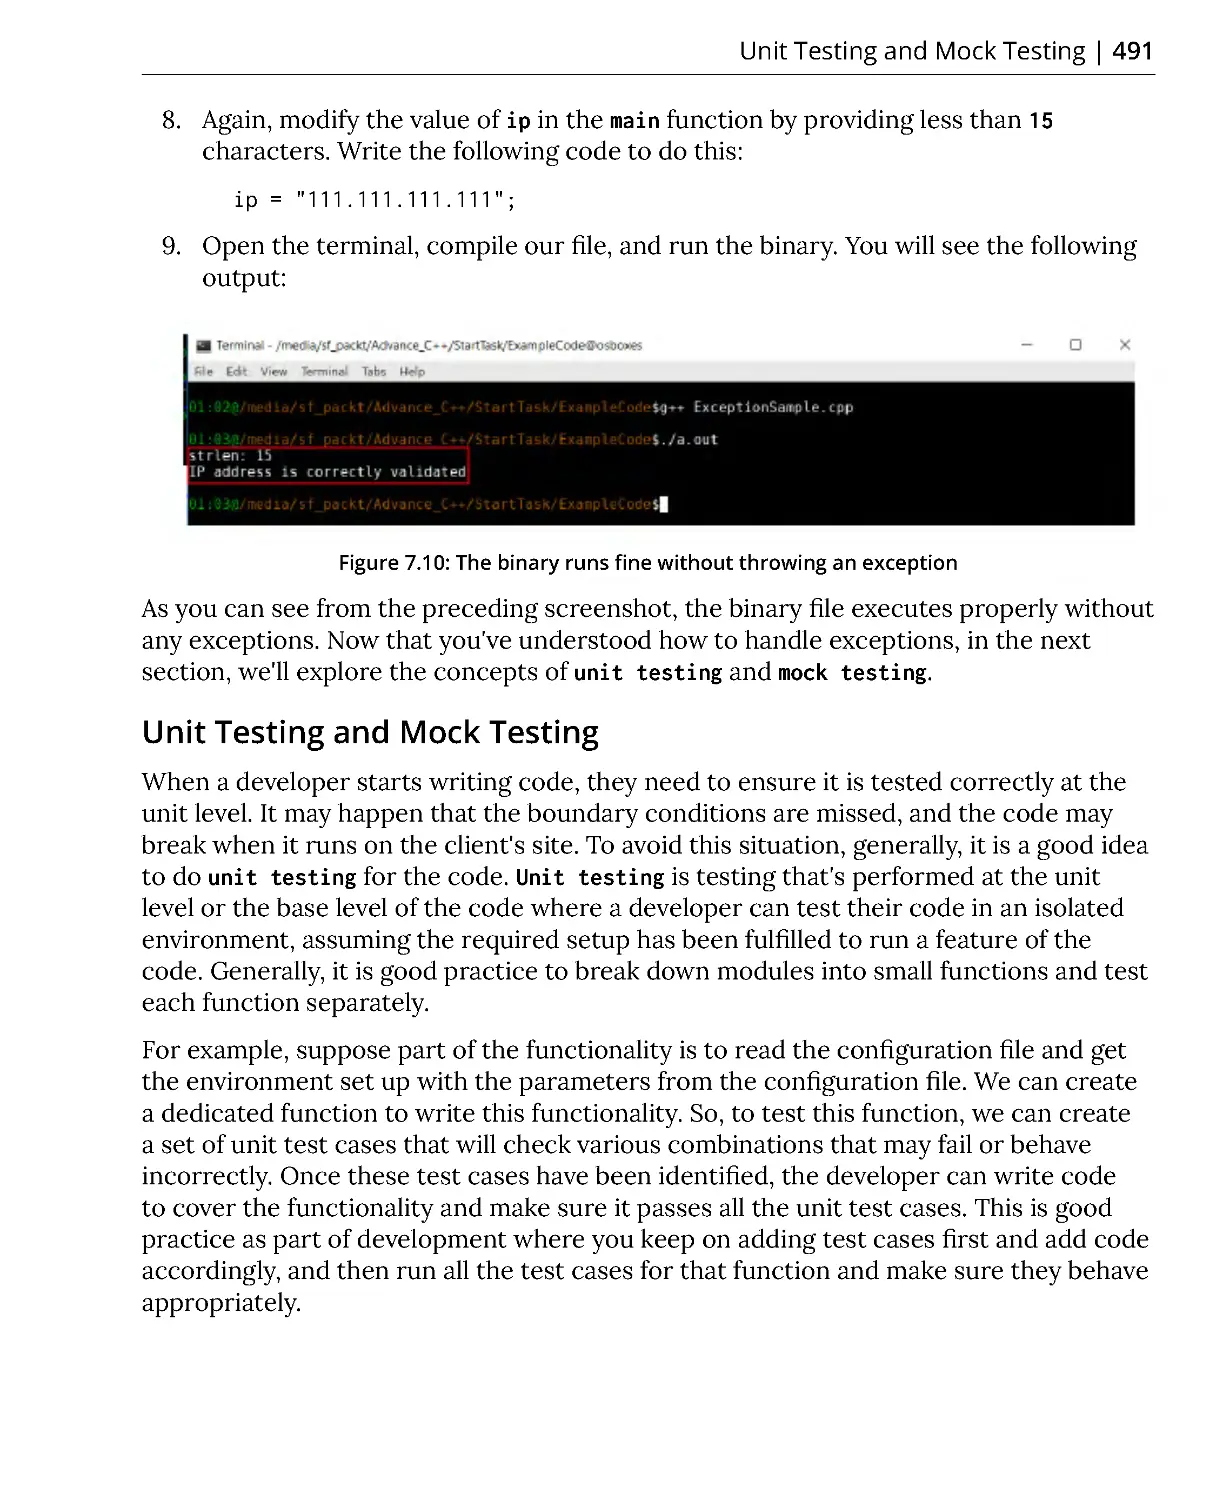
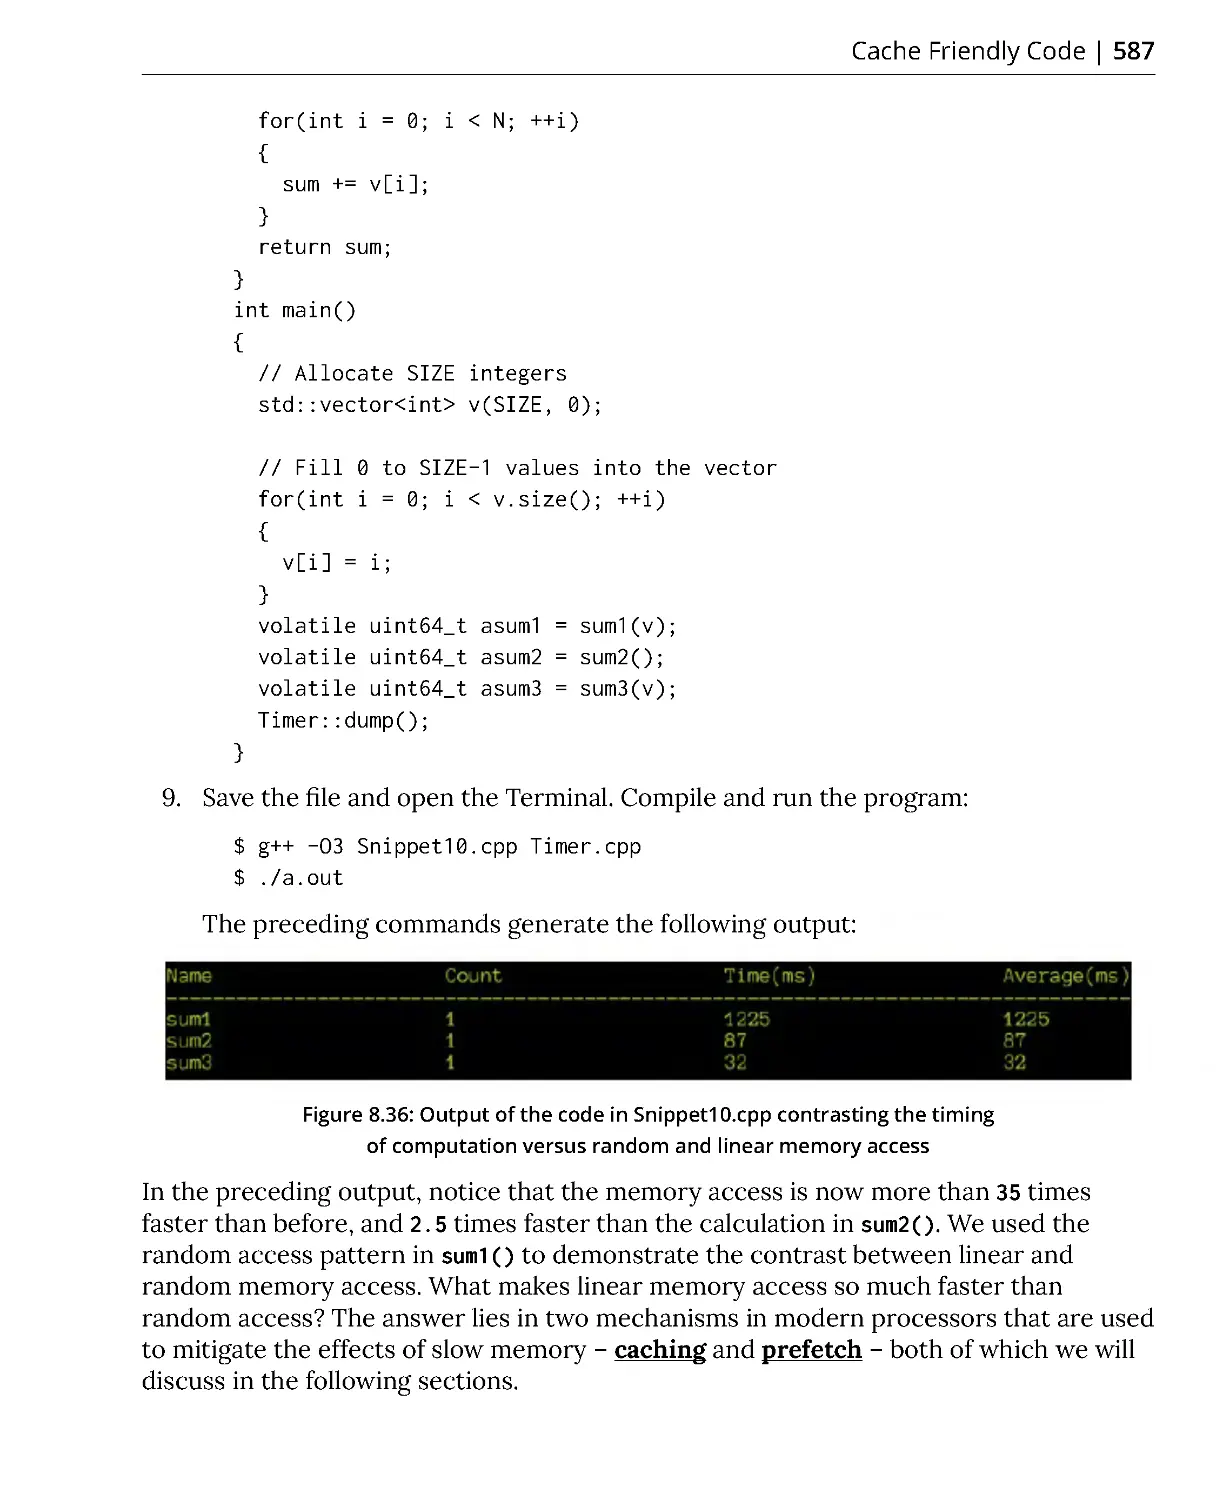
Master the technique of confidently writing robust
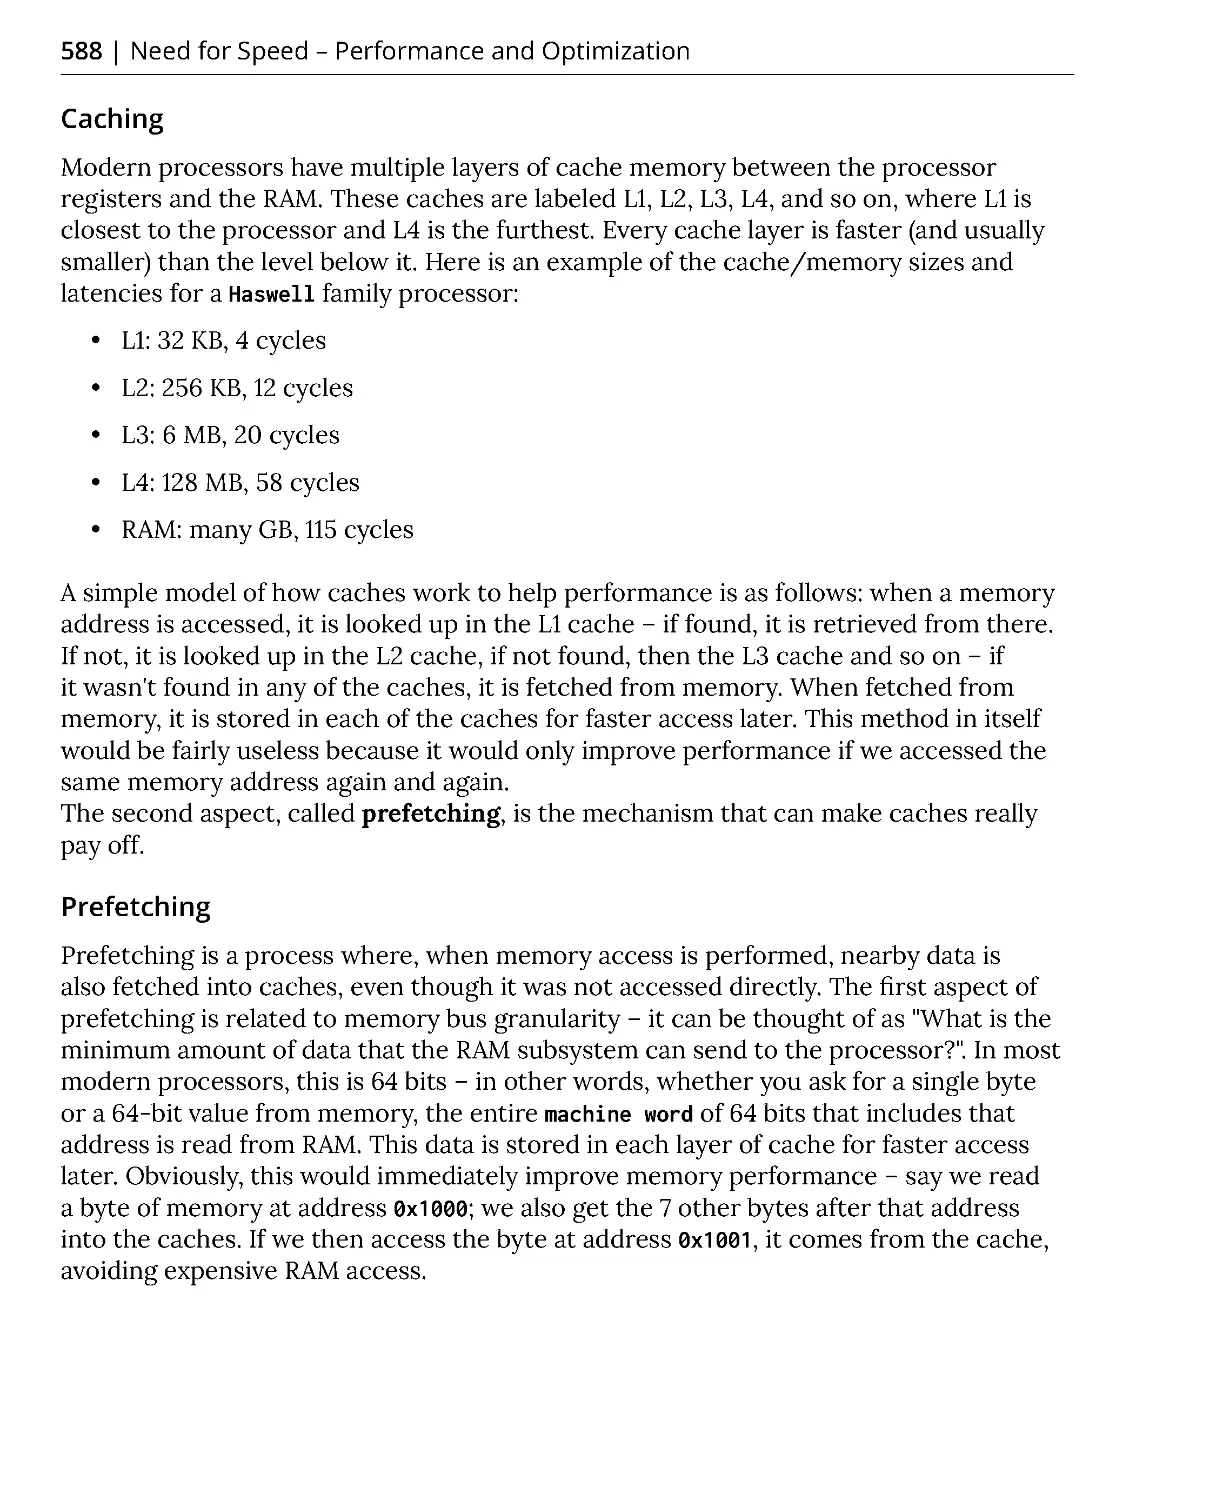
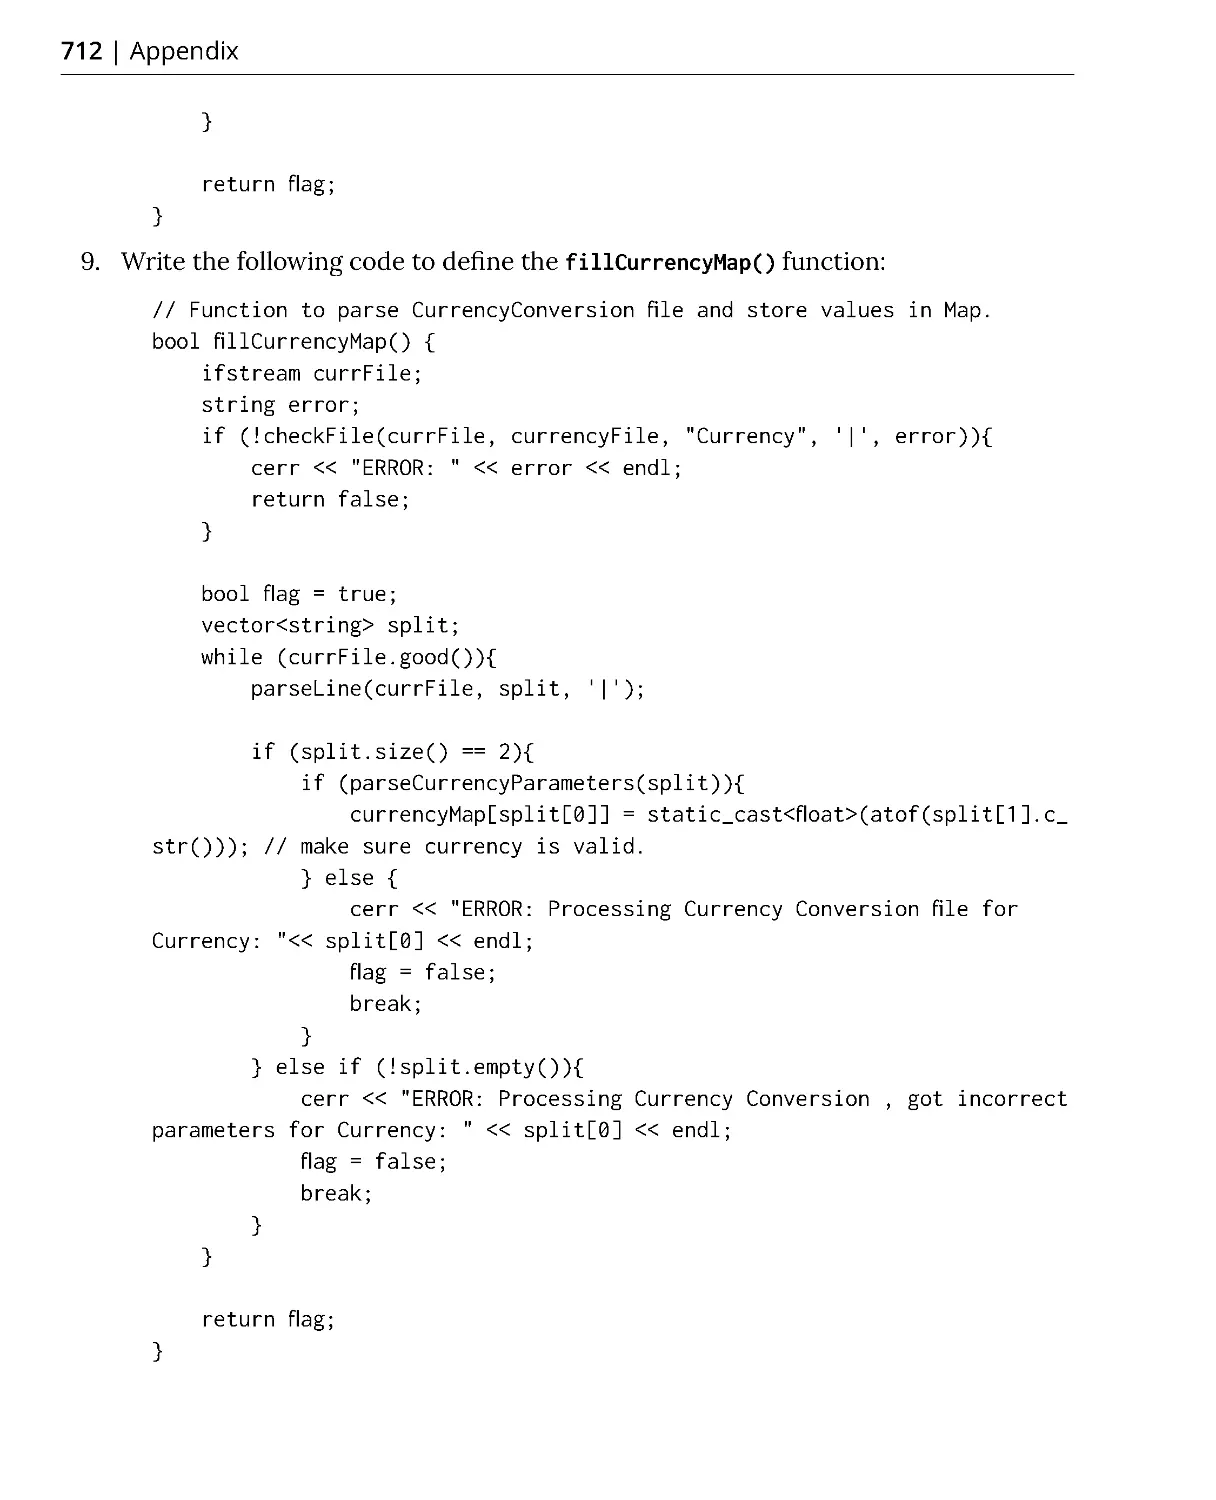
C++ code
Advanced C++
Advanced C++
Copyright © 2019 Packt Publishing
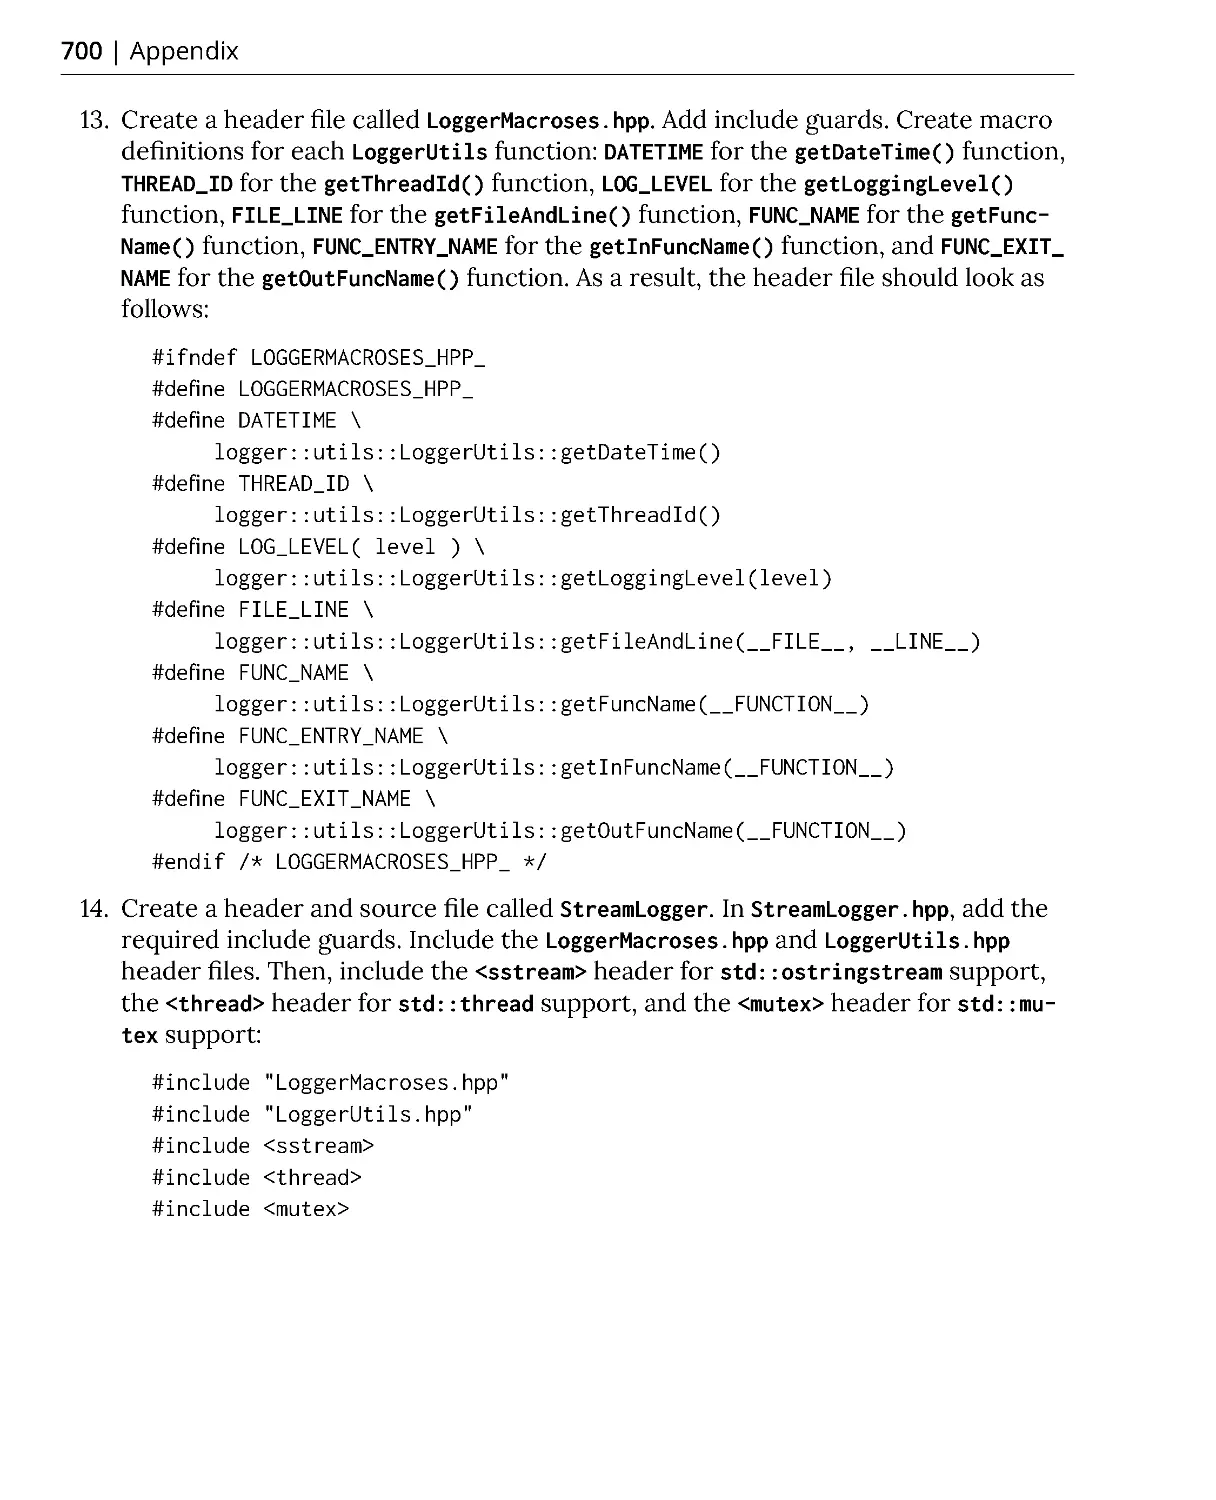
All rights reserved. No part of this book may be reproduced, stored in a retrieval system,
or transmitted in any form or by any means, without the prior written permission of the
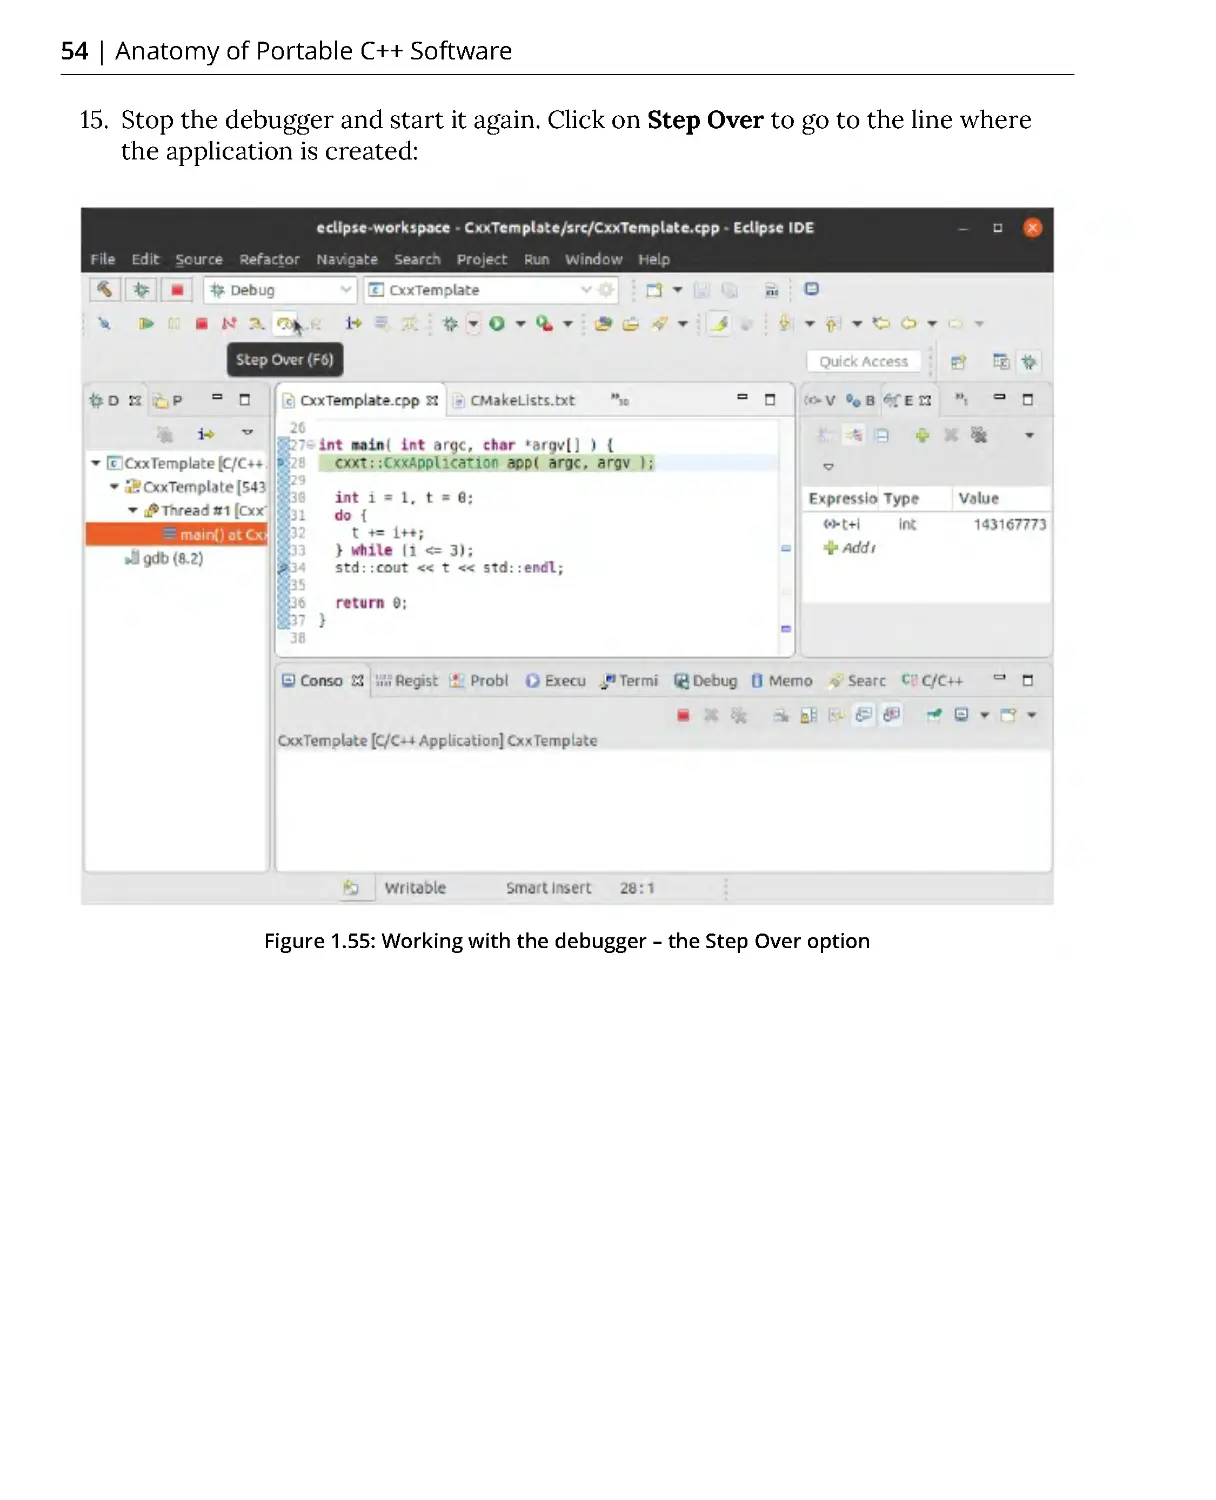
publisher, except in the case of brief quotations embedded in critical articles or reviews.
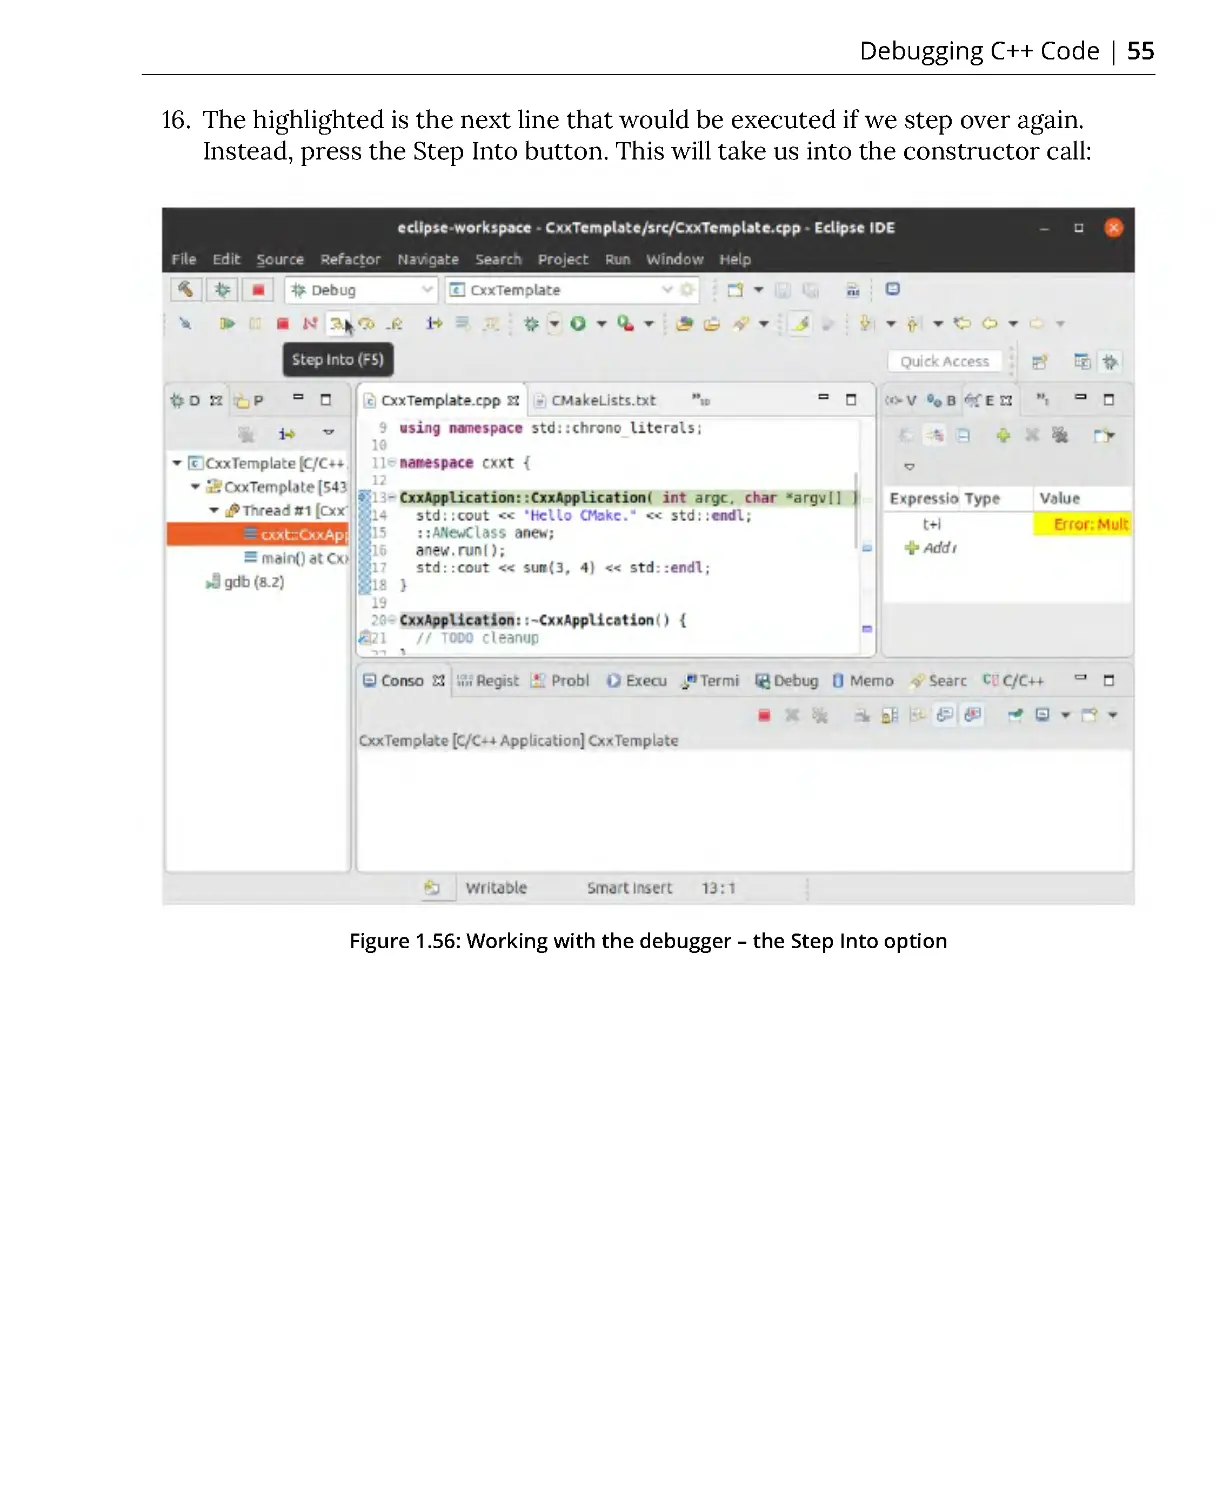
Every effort has been made in the preparation of this book to ensure the accuracy of
the information presented. However, the information contained in this book is sold
without warranty, either express or implied. Neither the authors, nor Packt Publishing,
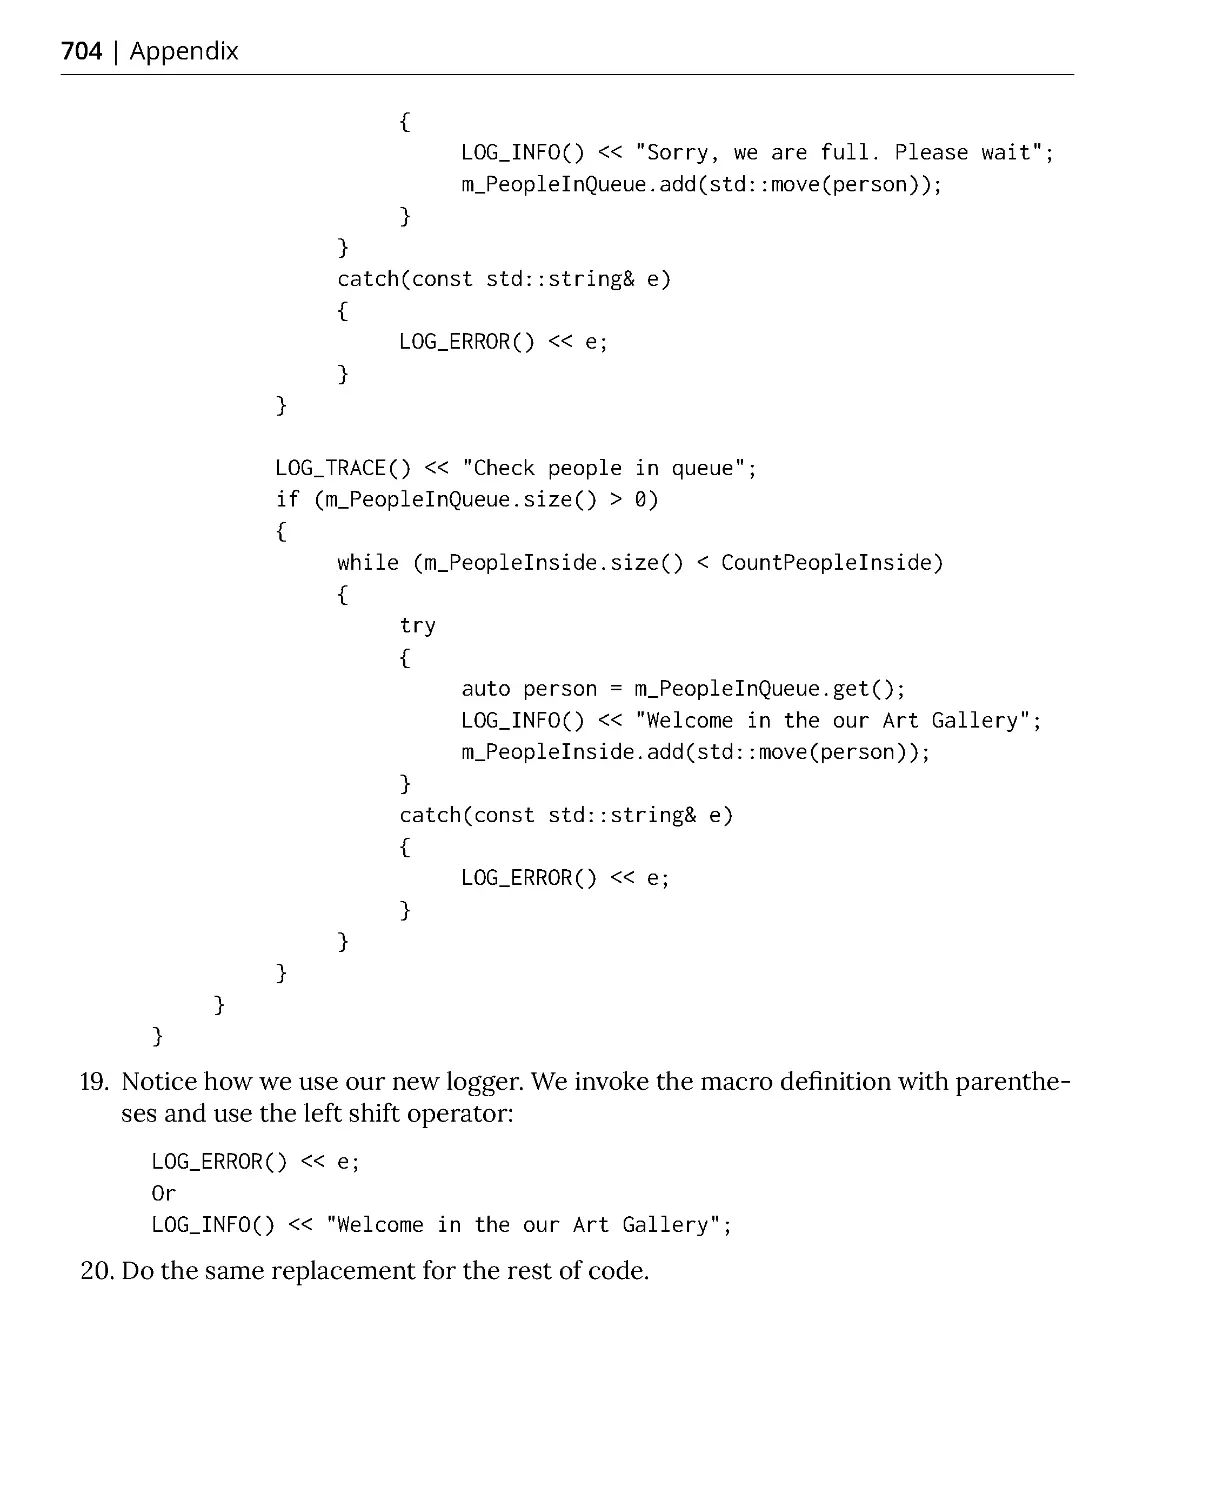
and its dealers and distributors will be held liable for any damages caused or alleged to
be caused directly or indirectly by this book.
Packt Publishing has endeavored to provide trademark information about all of the
companies and products mentioned in this book by the appropriate use of capitals.
However, Packt Publishing cannot guarantee the accuracy of this information.
Authors: Gazihan Alankus, Olena Lizina, Rakesh Mane, Vivek Nagarajan,
and Brian Price
Technical Reviewers: Anil Achary and Deepak Selvakumar
Managing Editor: Bhavesh Bangera
Acquisitions Editors: Kunal Sawant, Koushik Sen, and Sneha Shinde
Production Editor: Samita Warang
Editorial Board: Shubhopriya Banerjee, Bharat Botle, Ewan Buckingham,
Mahesh Dhyani, Manasa Kumar, Alex Mazonowicz, Bridget Neale, Dominic Pereira,
Shiny Poojary, Abhisekh Rane, Erol Staveley, Ankita Thakur, Nitesh Thakur,
and Jonathan Wray.
First Published: October 2019
Production Reference: 1311019
ISBN: 978-1-83882-113-5
Published by Packt Publishing Ltd.
Livery Place, 35 Livery Street
Birmingham B3 2PB, UK
Table of Contents
Preface
i
Chapter 1: Anatomy of Portable C++ Software
1
Introduction .................................................................................................... 2
Managing C++ Projects .................................................................................. 3
The Code-Build-Test-Run Loop ........................................................................... 3
Building a CMake Project .................................................................................... 4
Exercise 1: Using CMake to Generate Ninja Build Files ................................... 5
Importing a CMake Project into Eclipse CDT .............................................. 8
Exercise 2: Importing the CMake File into Eclipse CDT ................................... 9
Exercise 3: Adding New Source Files to CMake and Eclipse CDT ................. 13
Activity 1: Adding a New Source-Header File Pair to the Project ................. 16
Unit Testing .................................................................................................. 17
Preparing for the Unit Tests ............................................................................. 17
Exercise 4: Preparing Our Project for Unit Testing ........................................ 18
Building, Running, and Writing Unit Tests ...................................................... 19
Exercise 5: Building and Running Tests ........................................................... 20
Exercise 6: Testing the Functionality of Code ................................................. 26
Activity 2: Adding a New Class and Its Test .................................................... 30
Understanding Compilation, Linking, and Object File Contents ............ 32
Compilation and Linking Steps ........................................................................ 32
Exercise 7: Identifying Build Steps ................................................................... 32
The Linking Step ................................................................................................. 39
Diving Deeper: Viewing Object Files ................................................................ 40
Exercise 8: Exploring Compiled Code .............................................................. 41
Debugging C++ Code .................................................................................... 46
Exercise 9: Debugging with Eclipse CDT .......................................................... 47
Writing Readable Code ................................................................................ 56
Indentation and Formatting ............................................................................. 56
Use Meaningful Names as Identifiers ............................................................. 58
Keeping Algorithms Clear and Simple ............................................................. 60
Exercise 10: Making Code Readable ................................................................ 62
Activity 3: Making Code More Readable .......................................................... 66
Summary ....................................................................................................... 68
Chapter 2A: No Ducks Allowed – Types and Deduction
71
Introduction .................................................................................................. 72
C++ Types ...................................................................................................... 73
C++ Fundamental Types .................................................................................... 73
C++ Literals ......................................................................................................... 73
Specifying Types – Variables ....................................................................... 74
Exercise 1: Declaring Variables and Exploring Sizes ...................................... 76
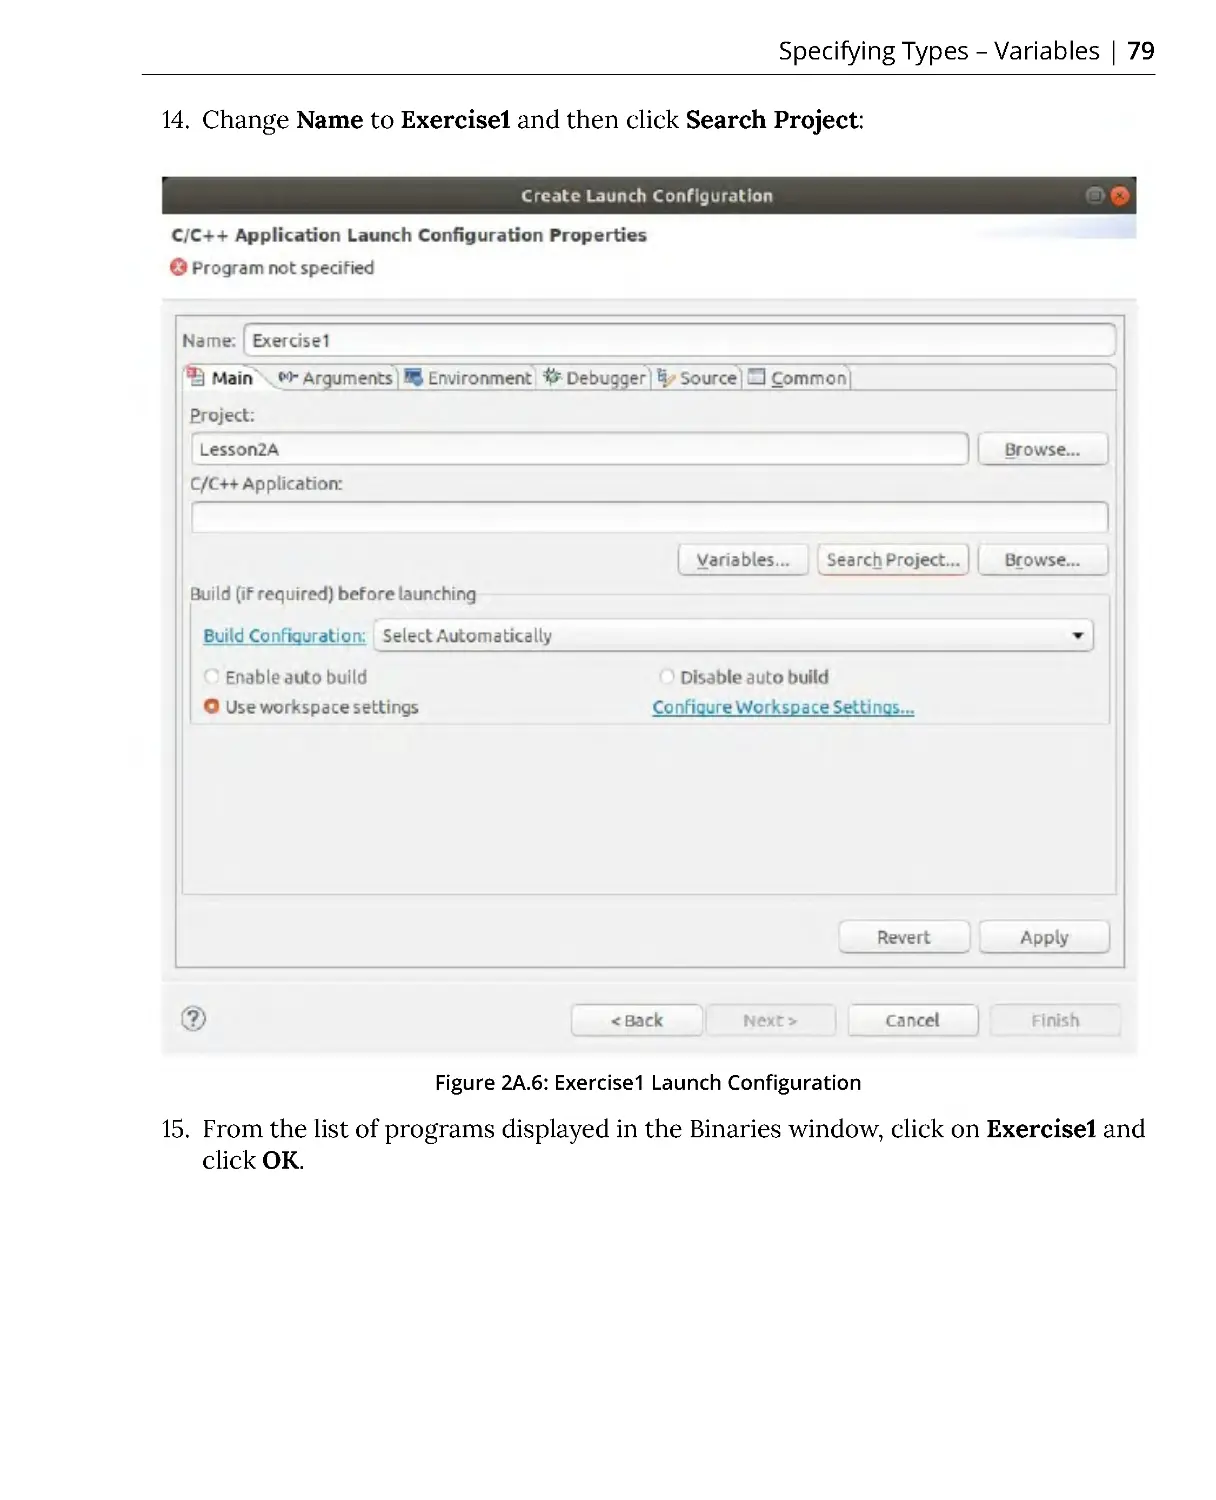
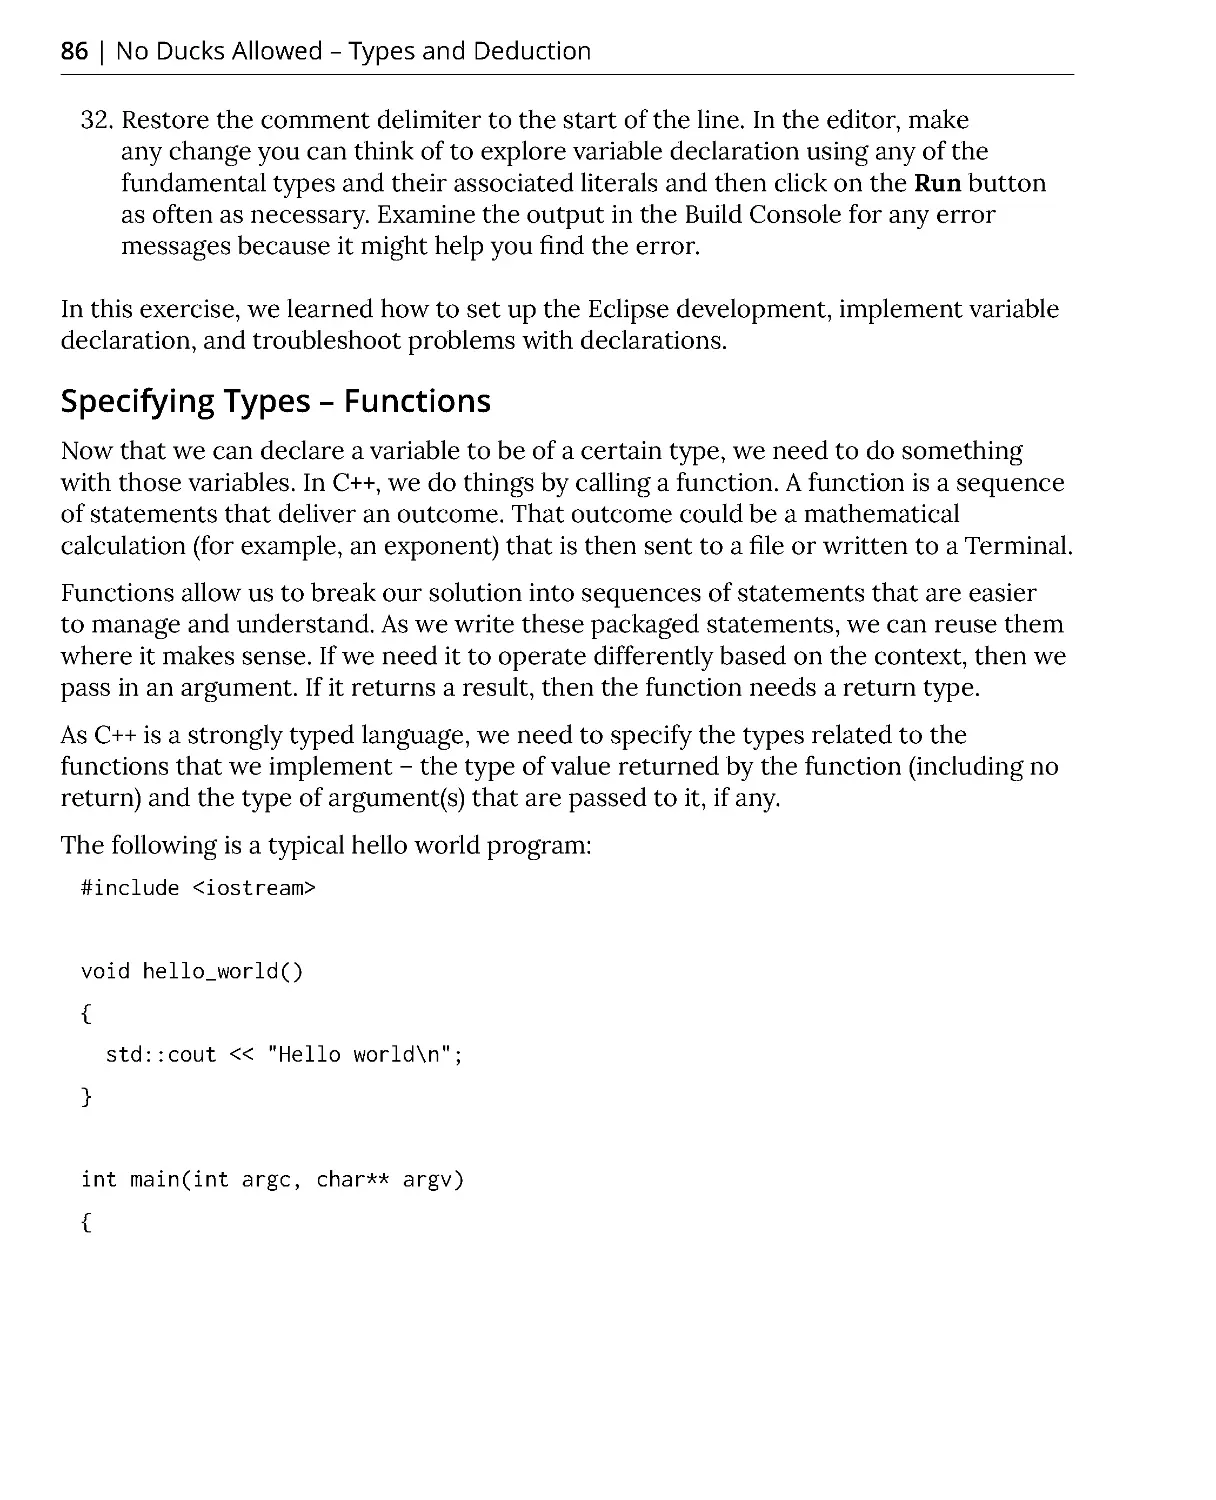
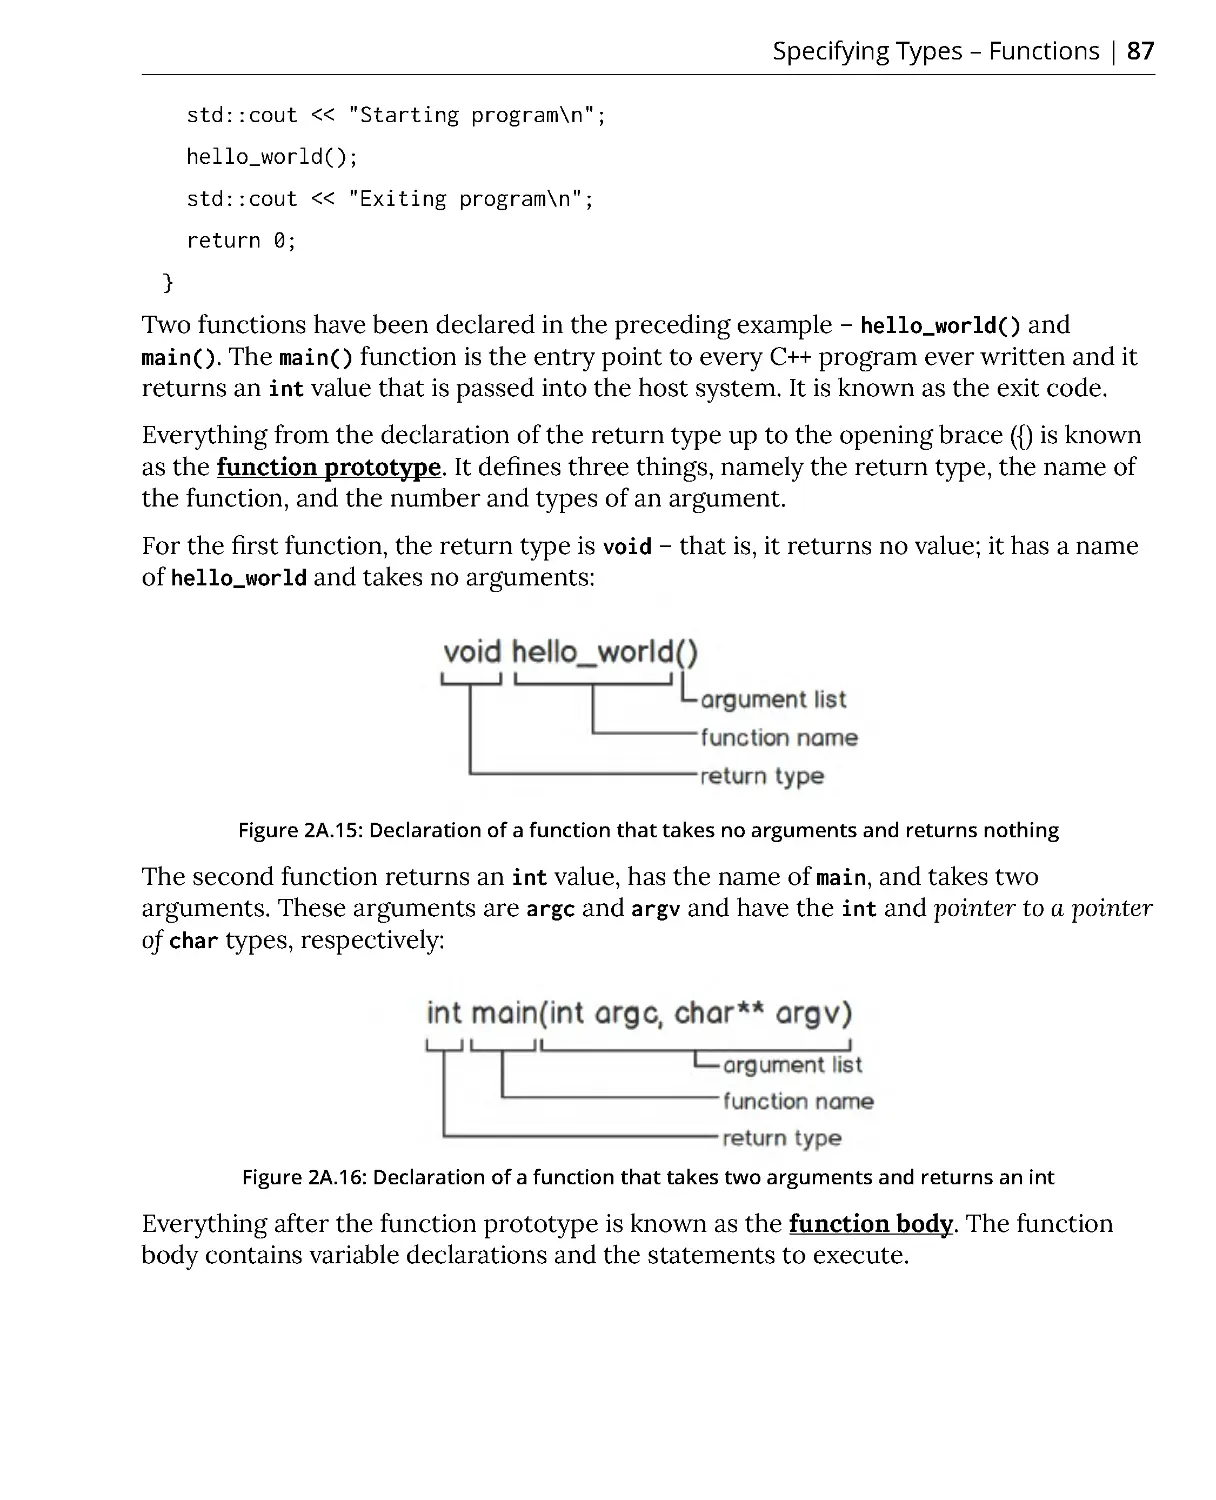
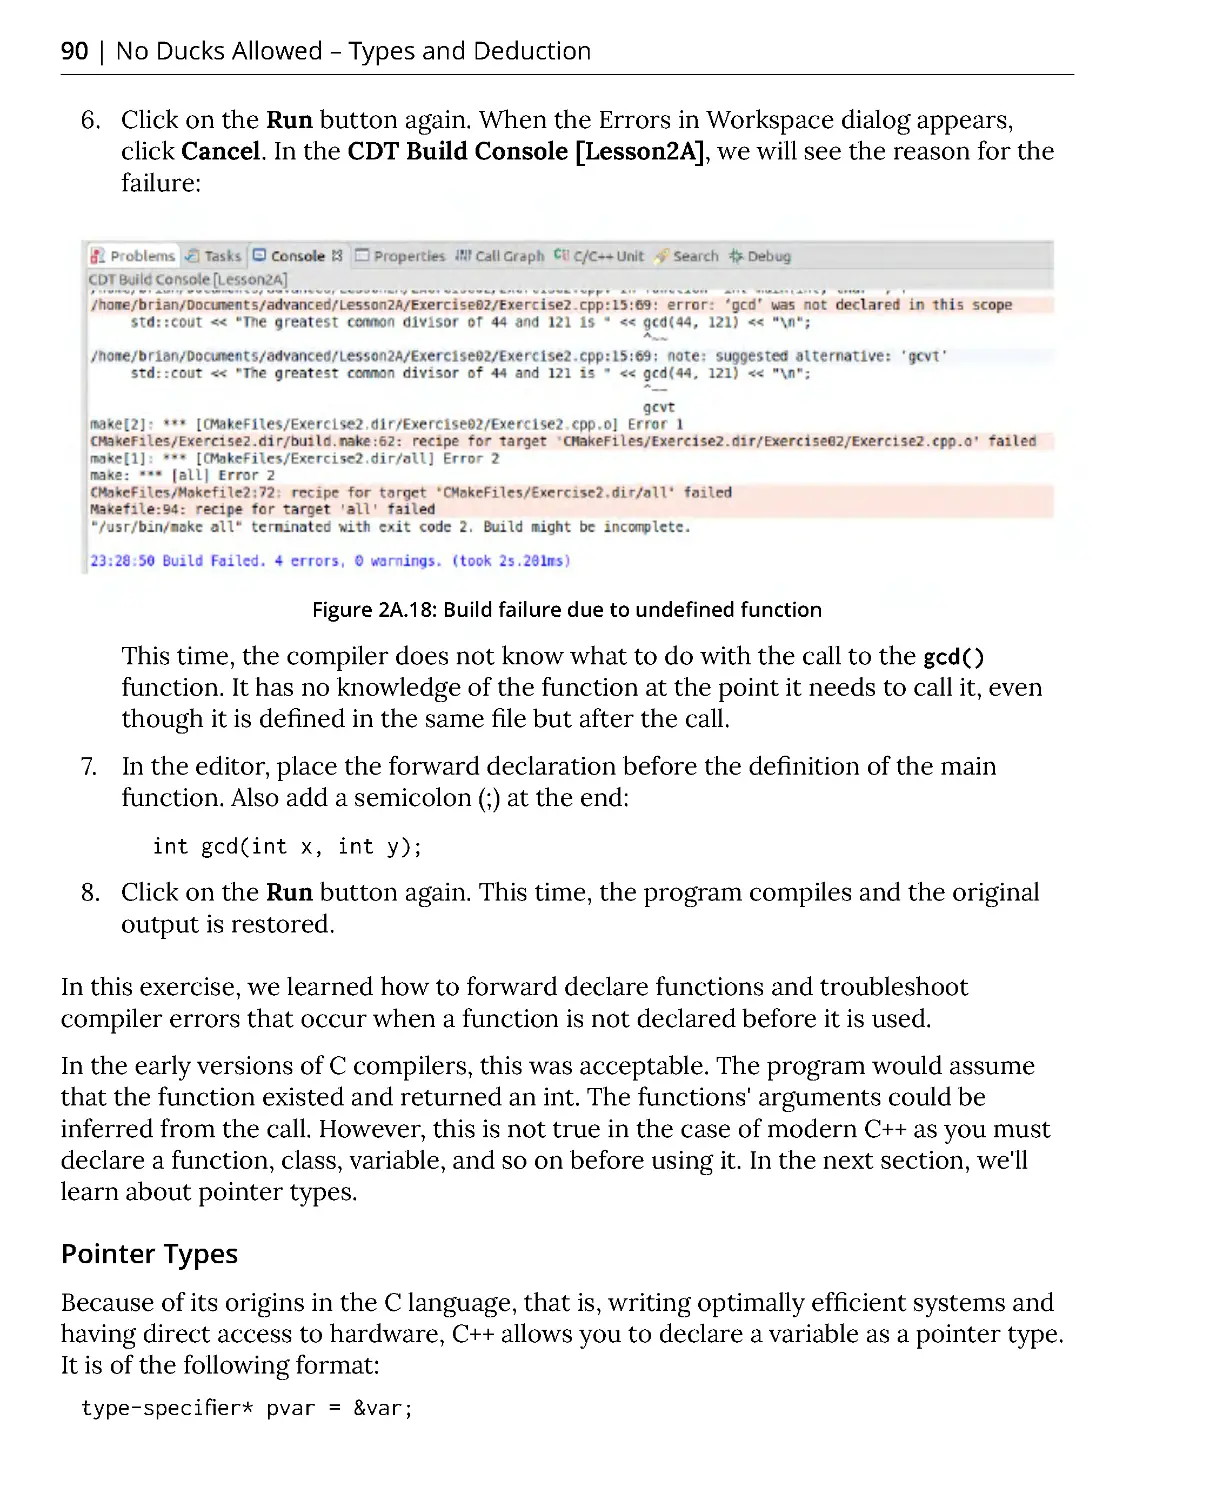
Specifying Types – Functions ...................................................................... 86
Exercise 2: Declaring Functions ....................................................................... 88
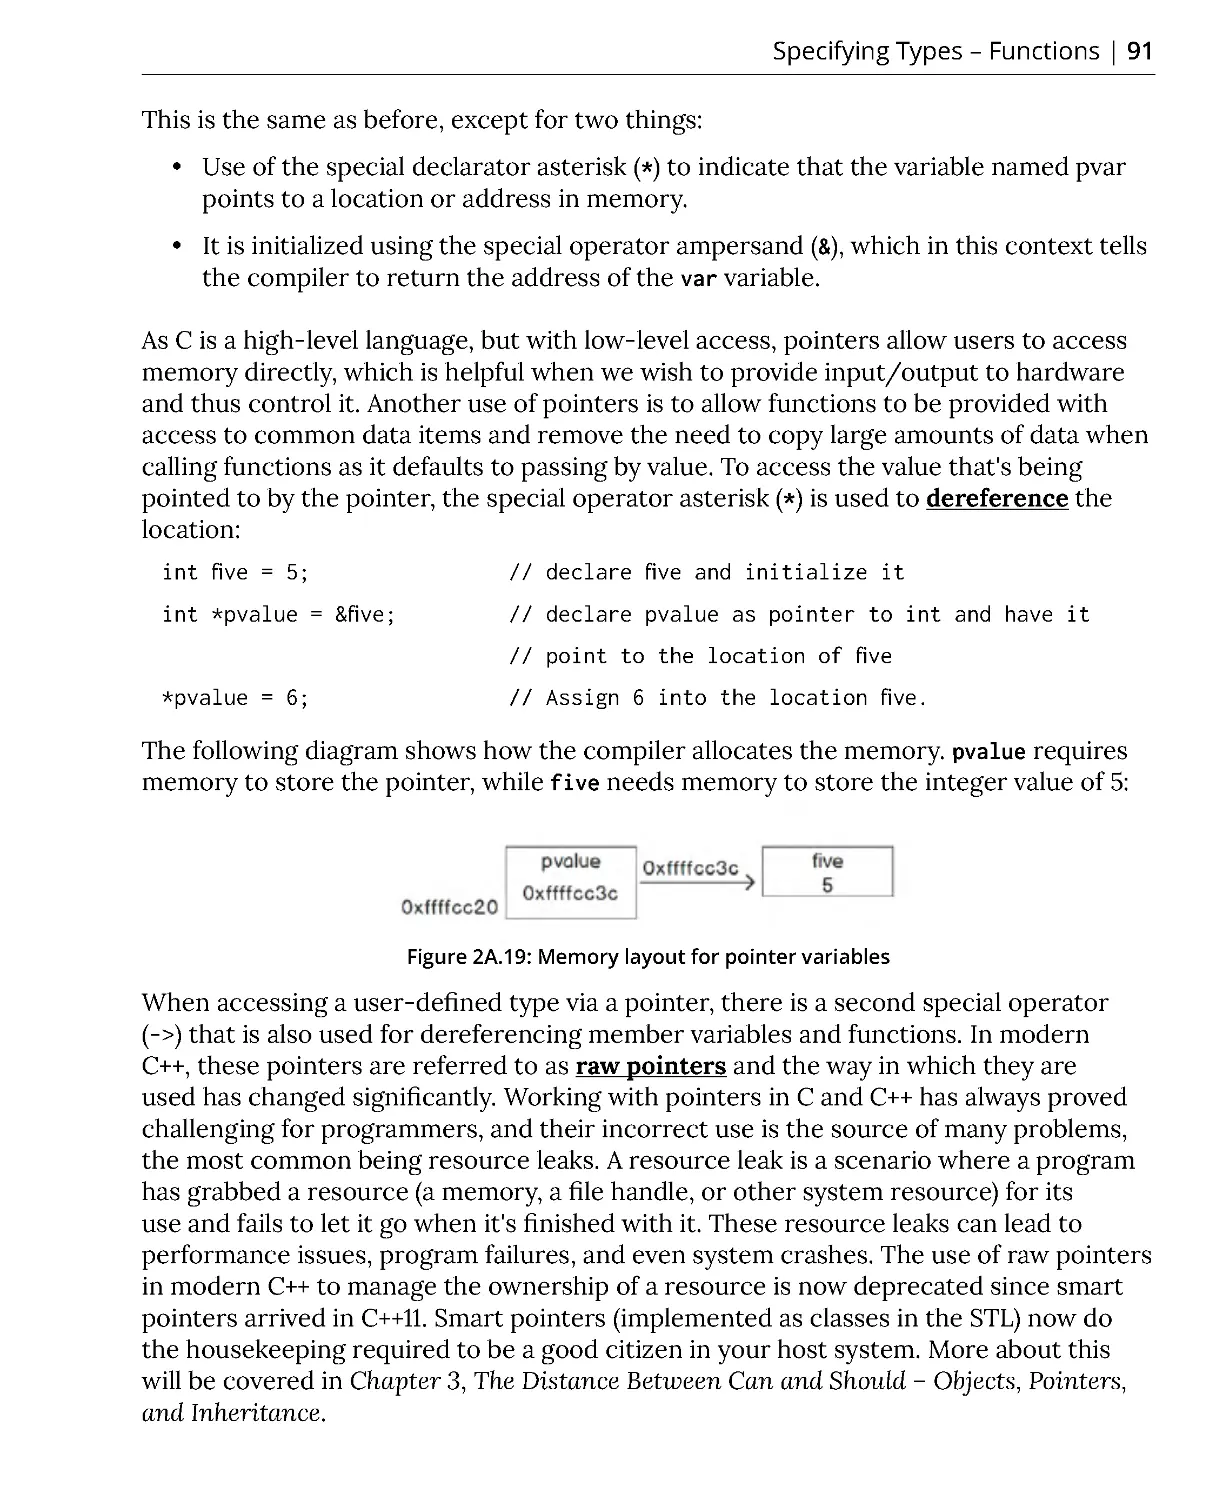
Pointer Types ...................................................................................................... 90
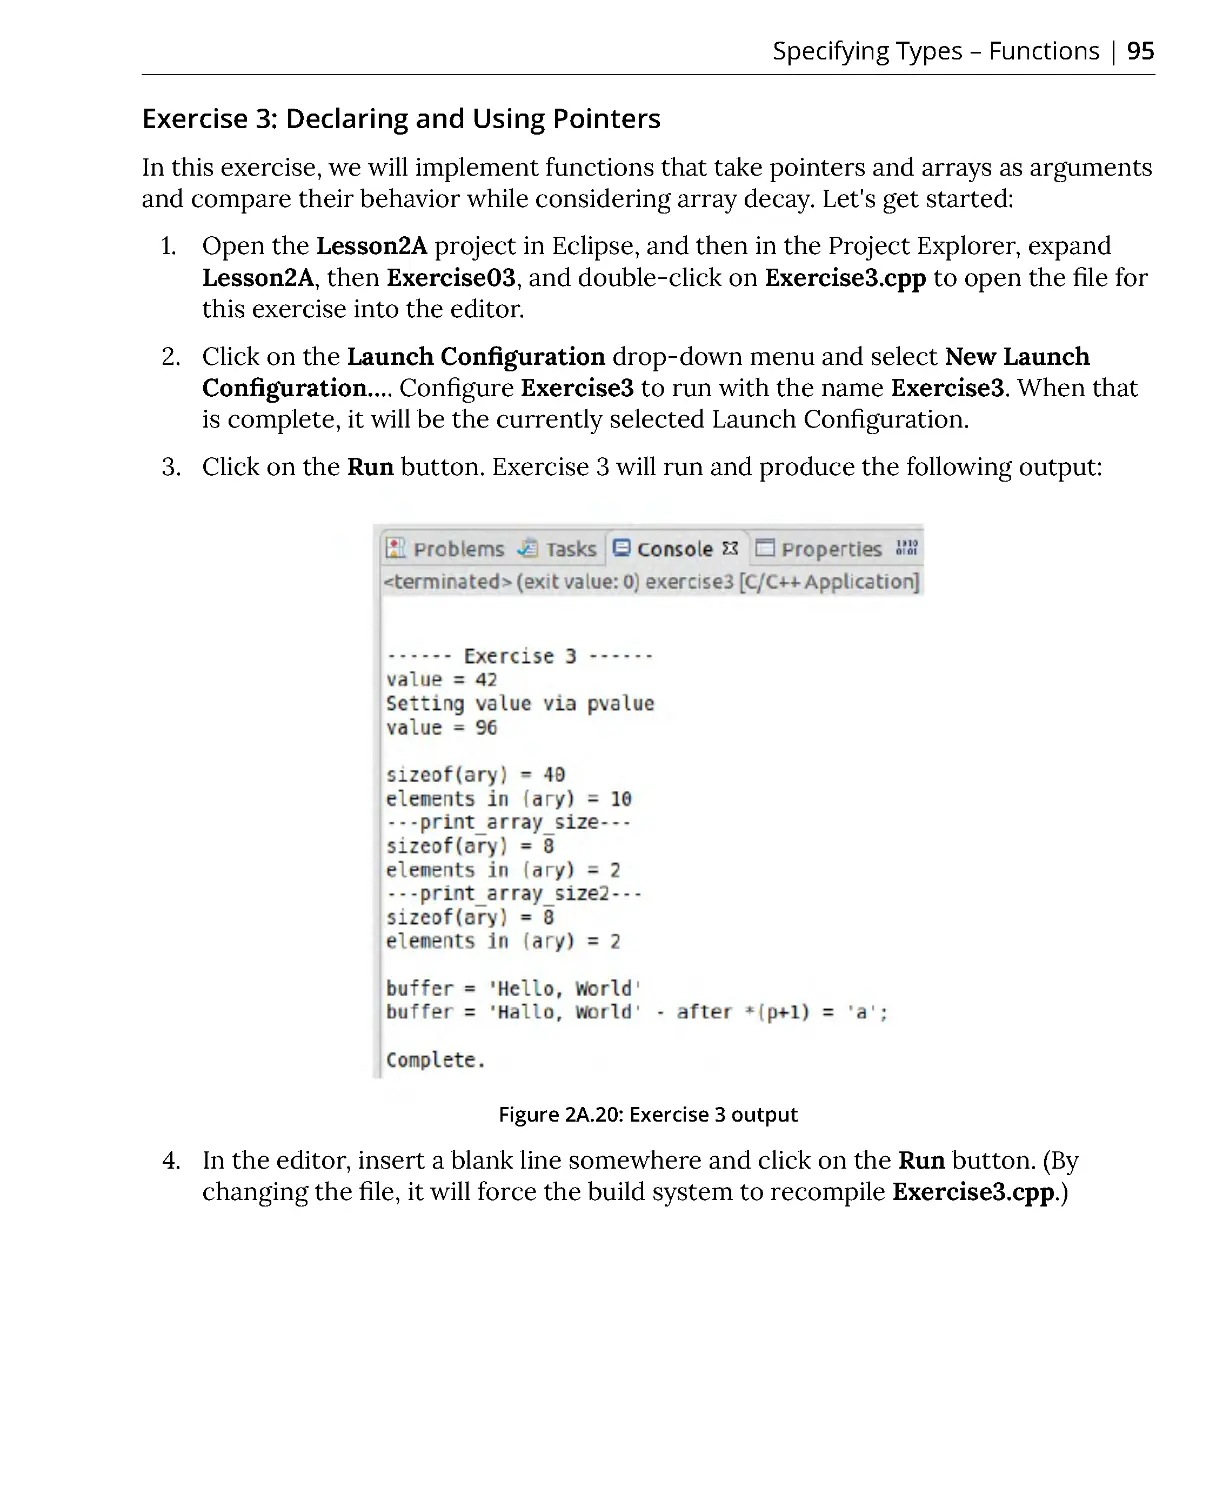
Exercise 3: Declaring and Using Pointers ....................................................... 95
Creating User Types ..................................................................................... 99
Enumerations ..................................................................................................... 99
Exercise 4: Enumerations – Old and New School ........................................ 104
Structures and Classes ................................................................................... 107
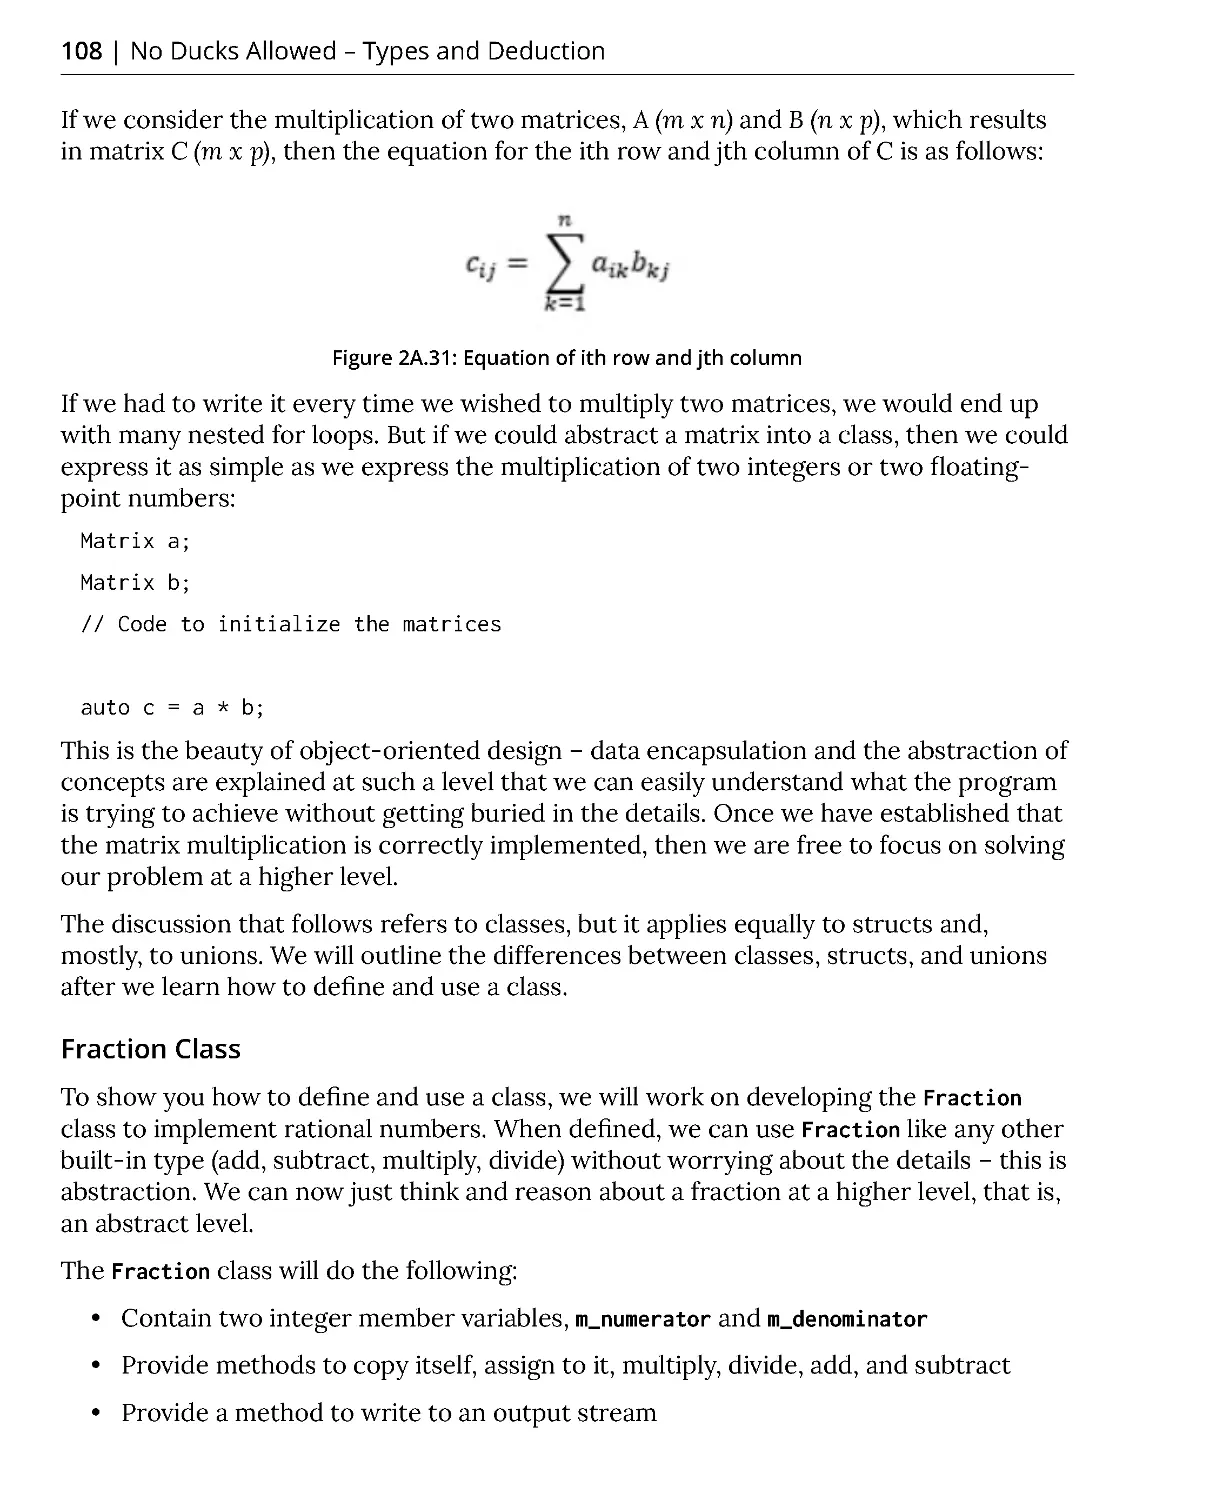
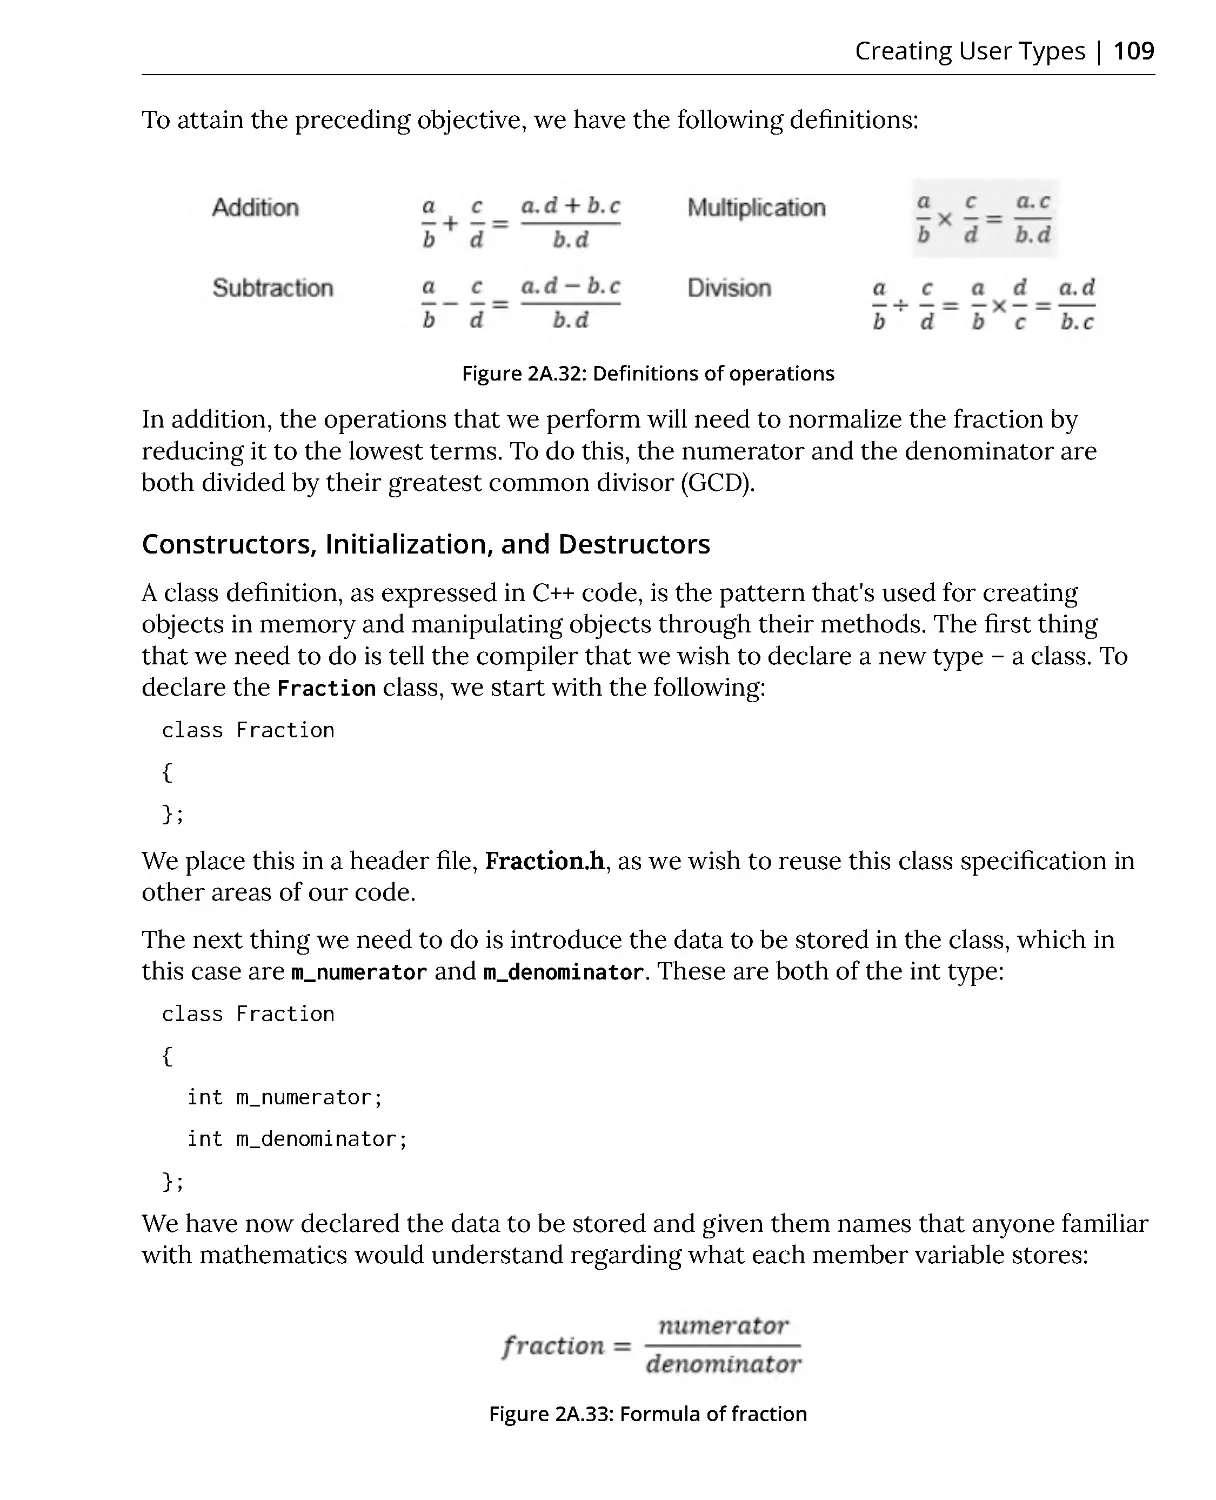
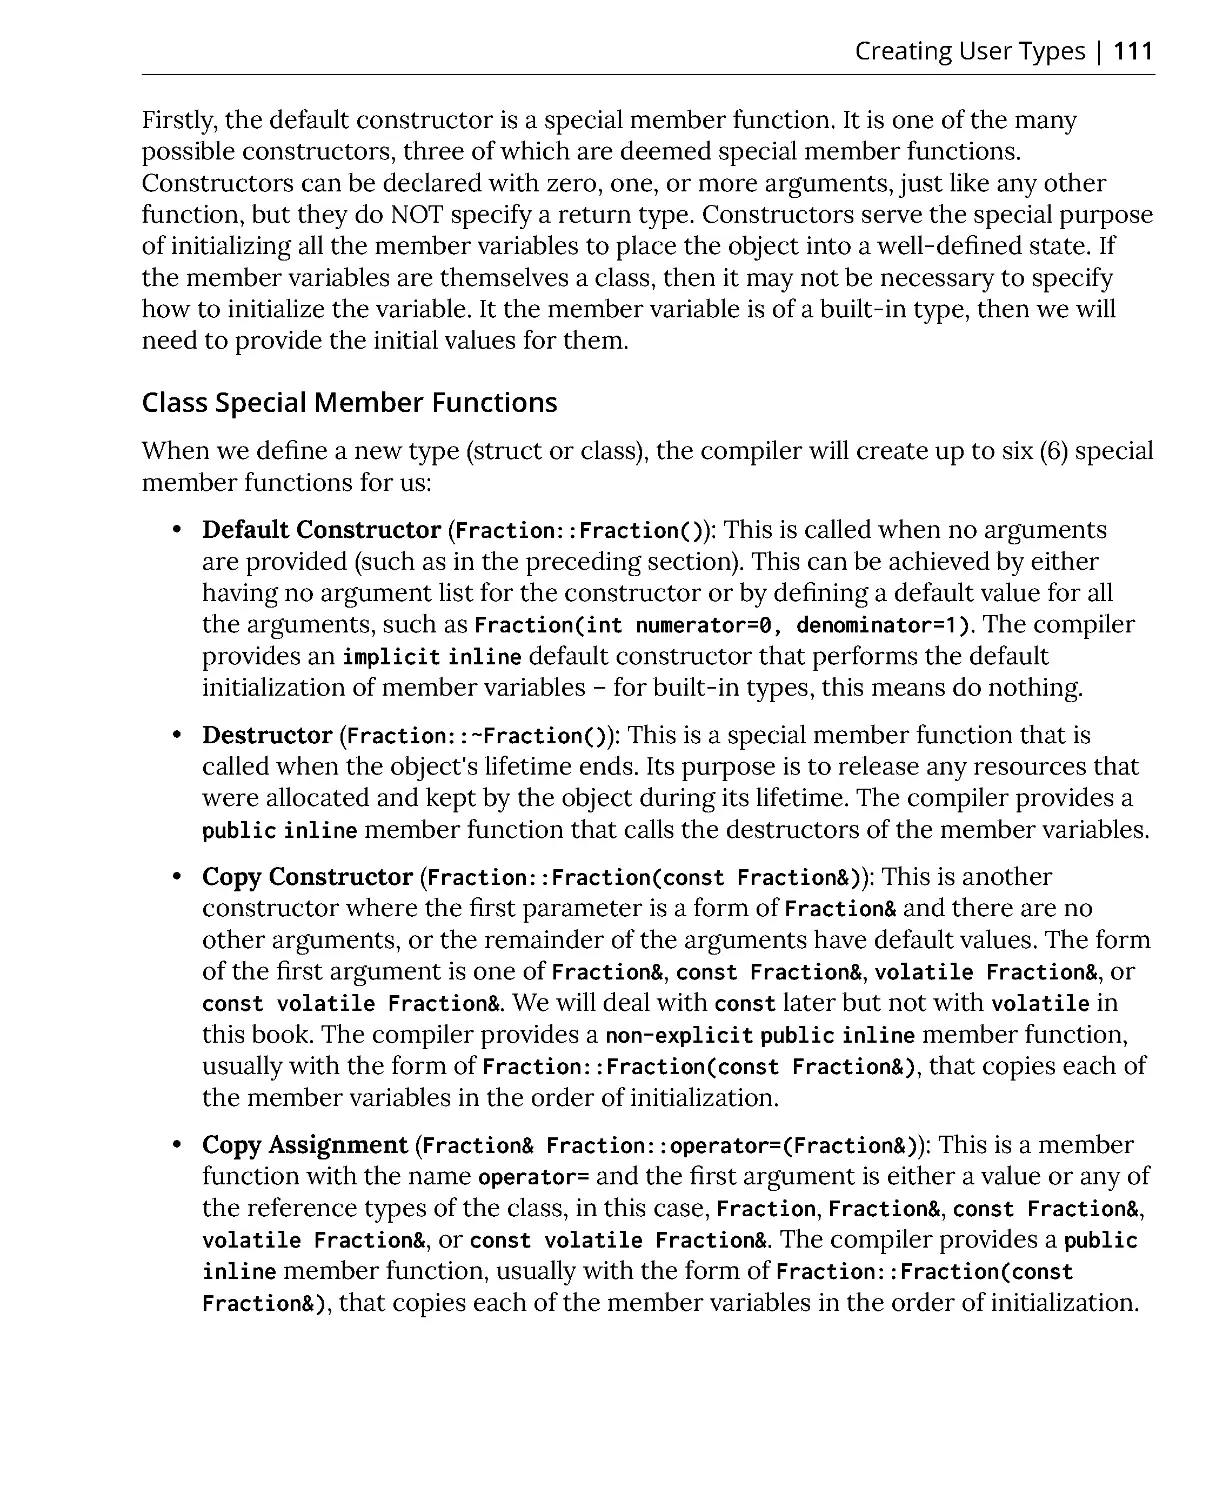
Fraction Class .................................................................................................. 108
Constructors, Initialization, and Destructors .............................................. 109
Class Special Member Functions ................................................................... 111
Implicit Versus Explicit Constructors ............................................................ 112
Class Special Member Functions – Compiler Generation Rules ................ 113
Defaulting and Deleting Special Member Functions .................................. 113
Rule of Three/Five and Rule of Zero ............................................................. 115
Constructors – Initializing the Object ........................................................... 115
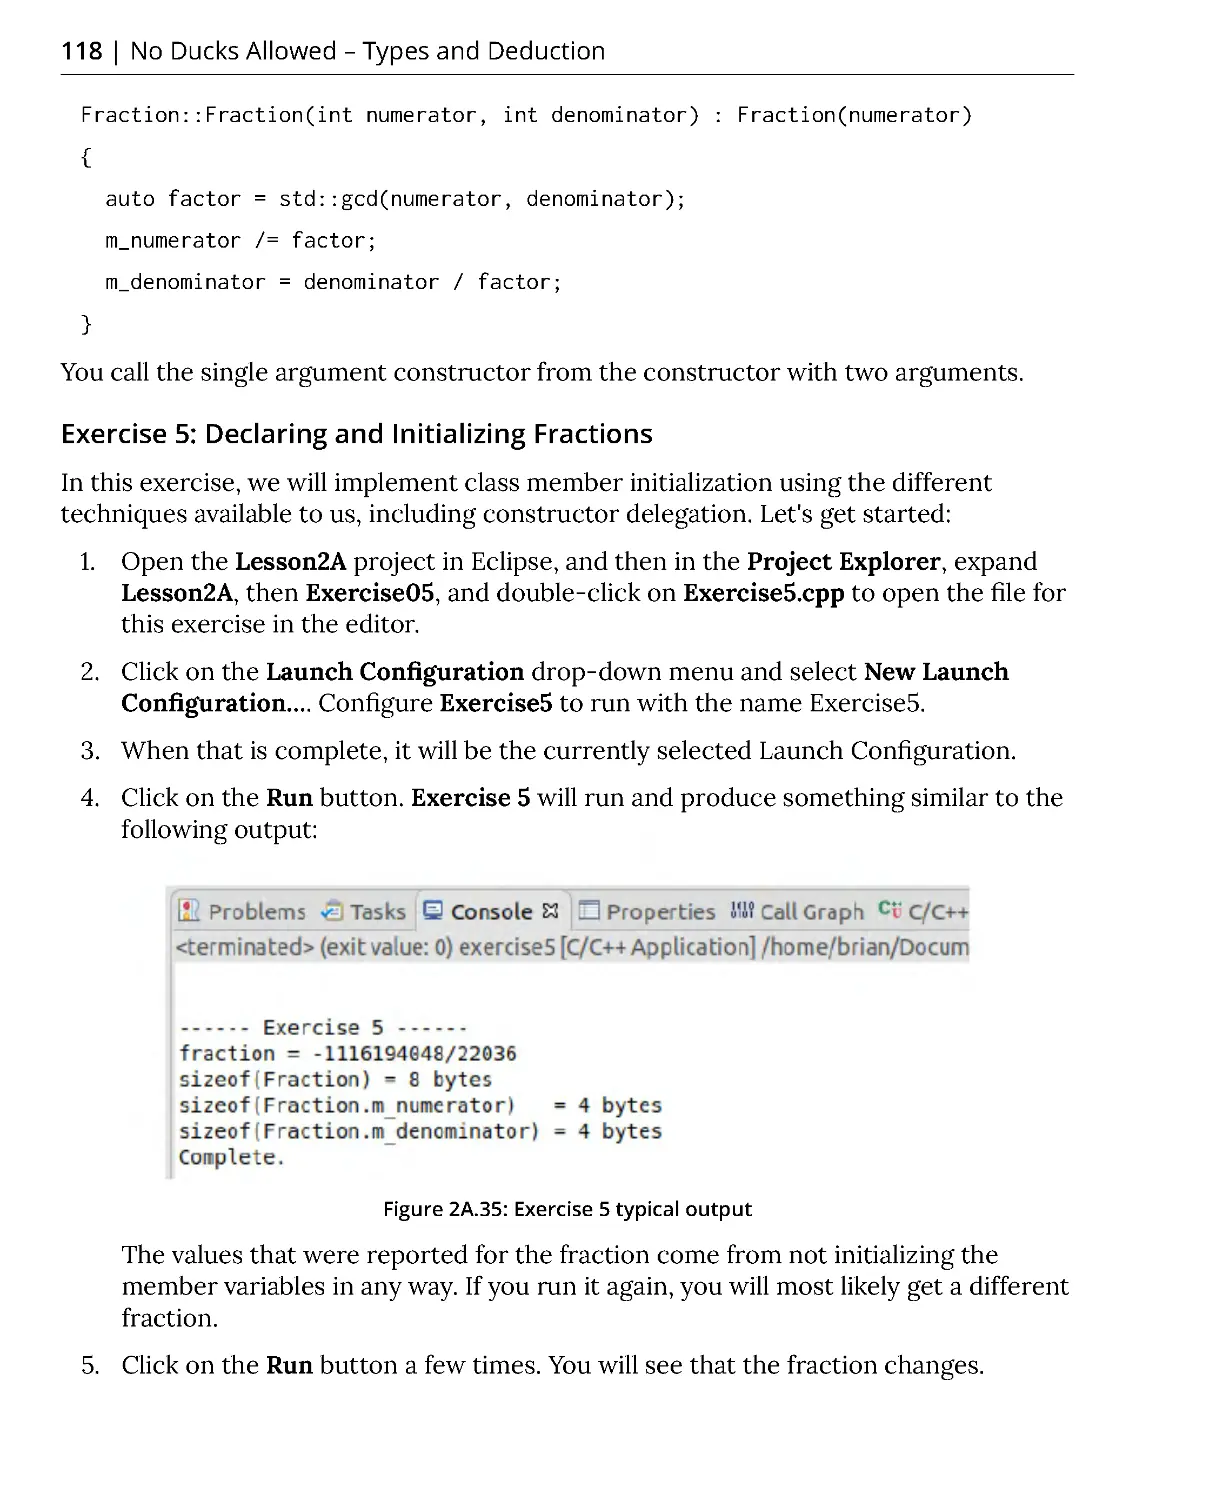
Exercise 5: Declaring and Initializing Fractions ........................................... 118
Values Versus References and Const ........................................................... 120
Exercise 6: Declaring and Using Reference Types ....................................... 123
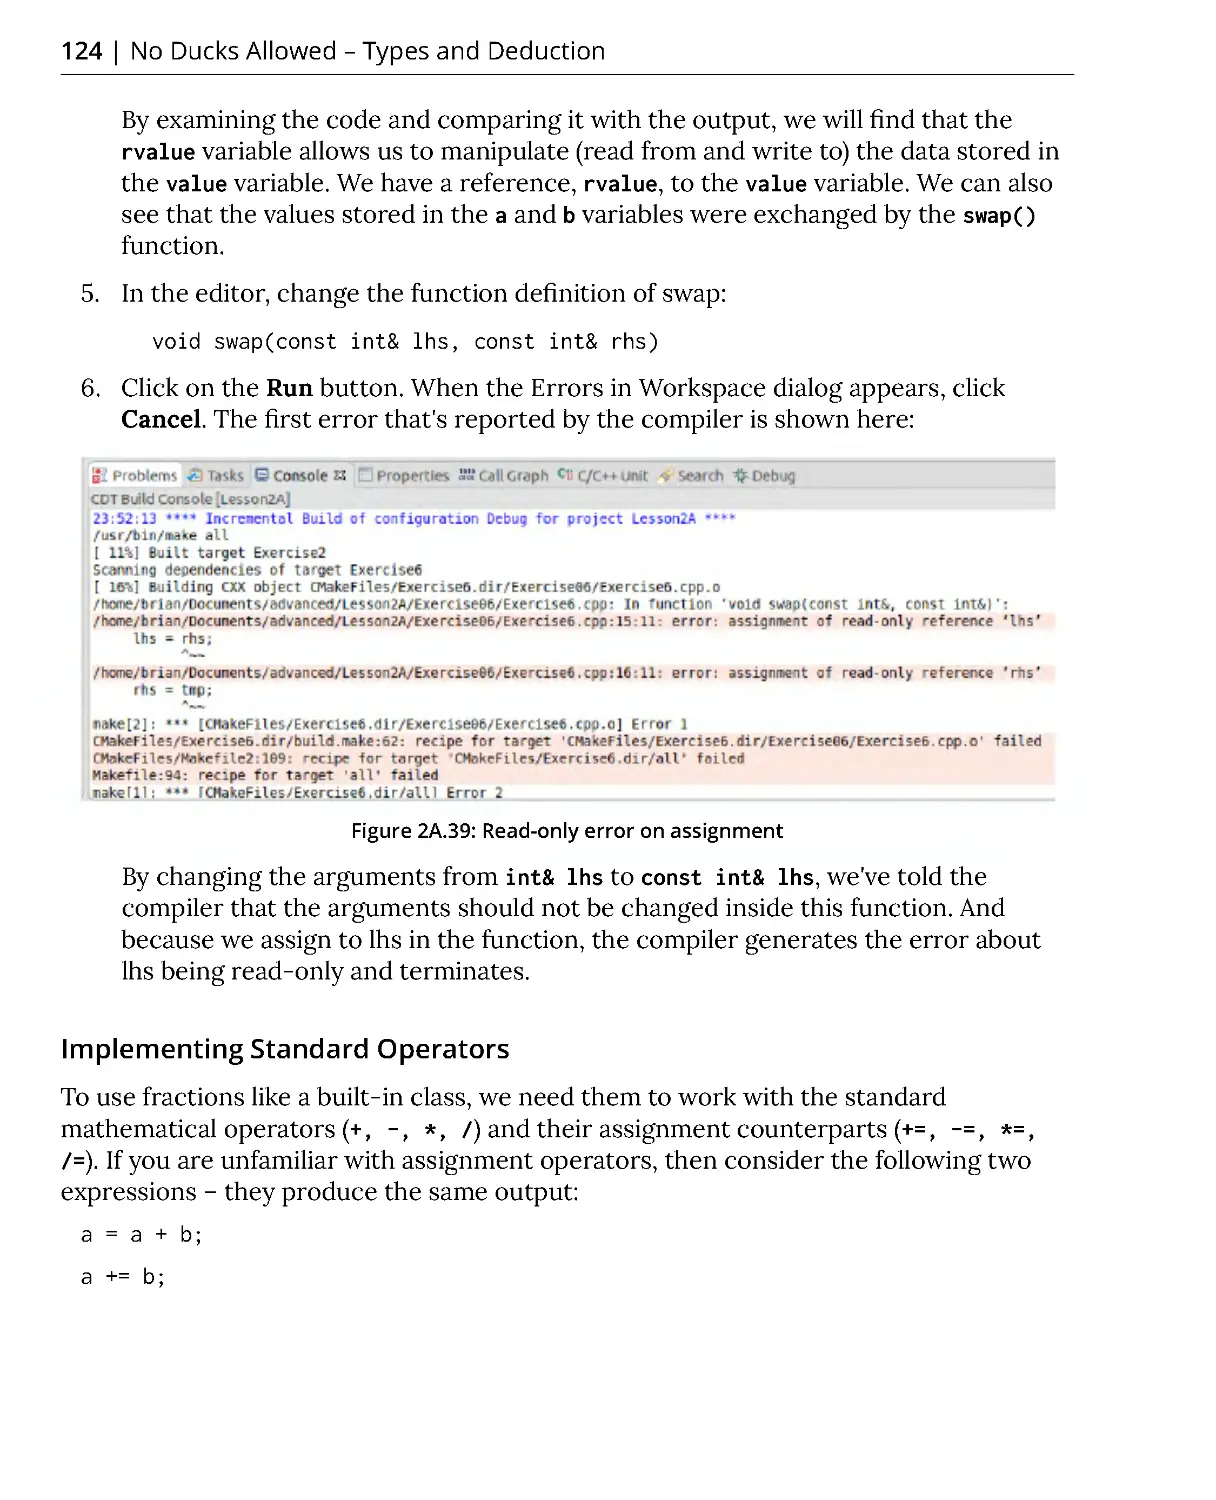
Implementing Standard Operators .............................................................. 124
Implementing the Output Stream Operator (<<) ........................................ 125
Structuring Our Code ..................................................................................... 126
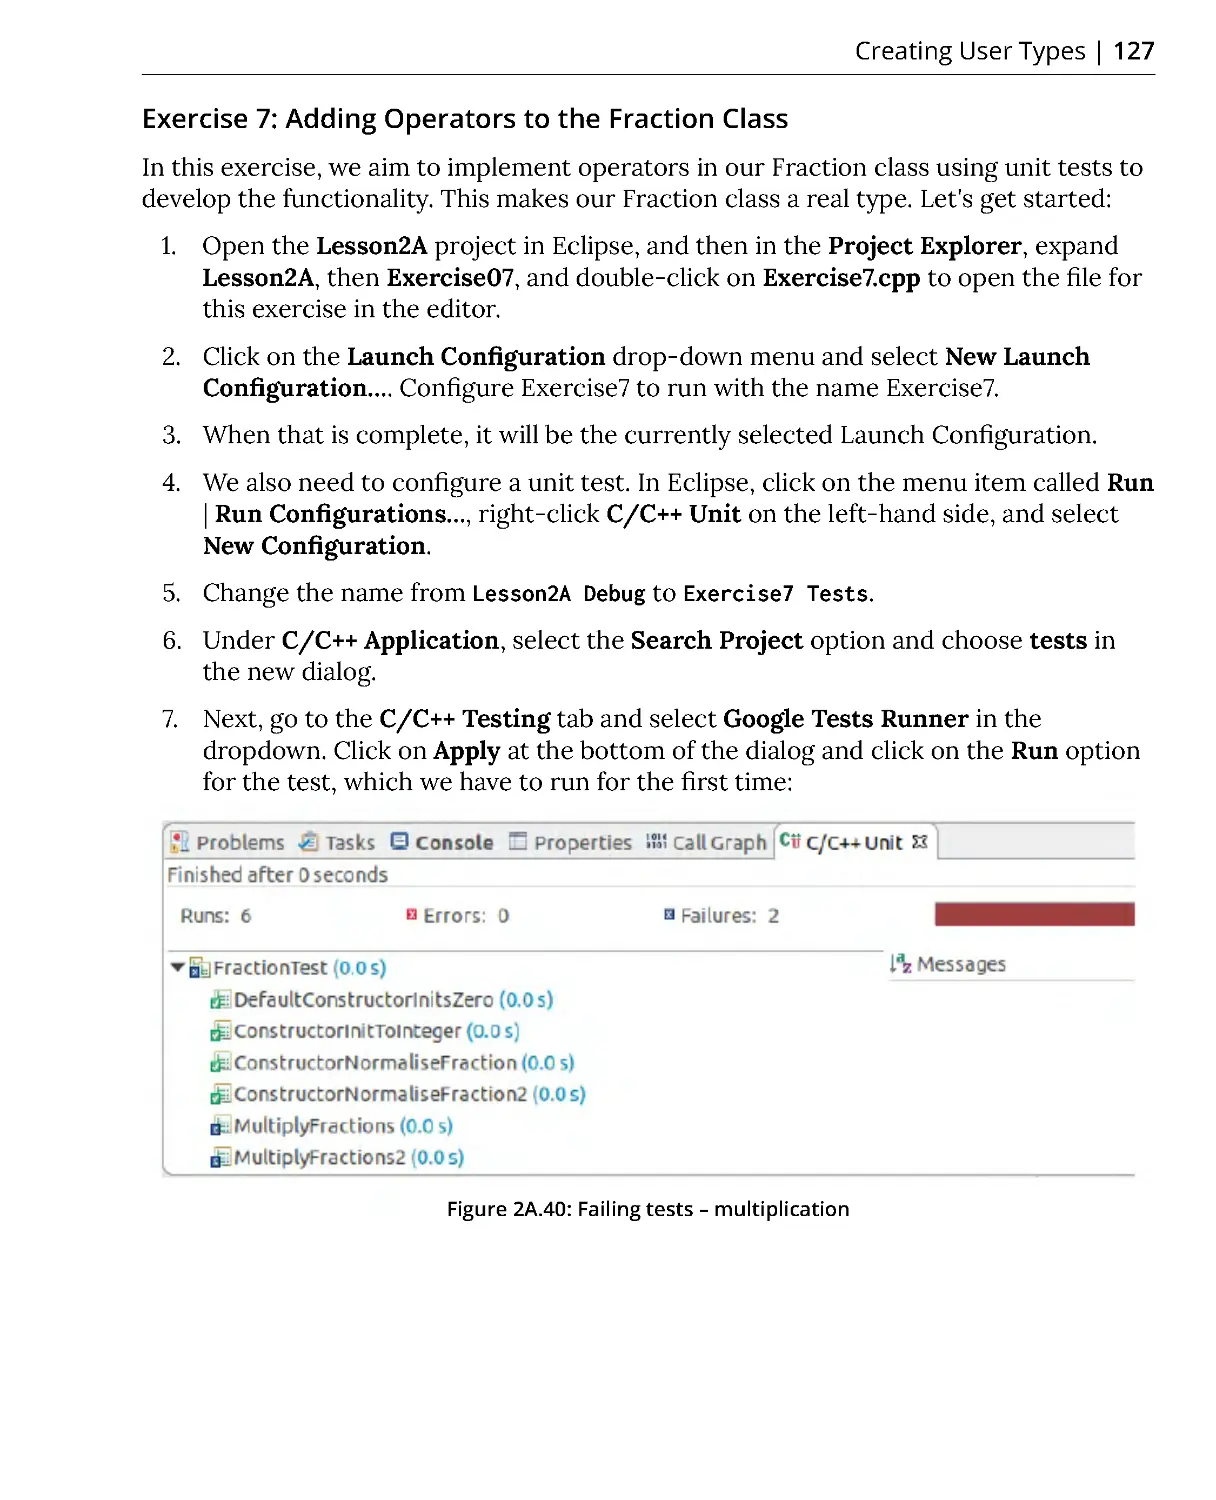
Exercise 7: Adding Operators to the Fraction Class .................................... 127
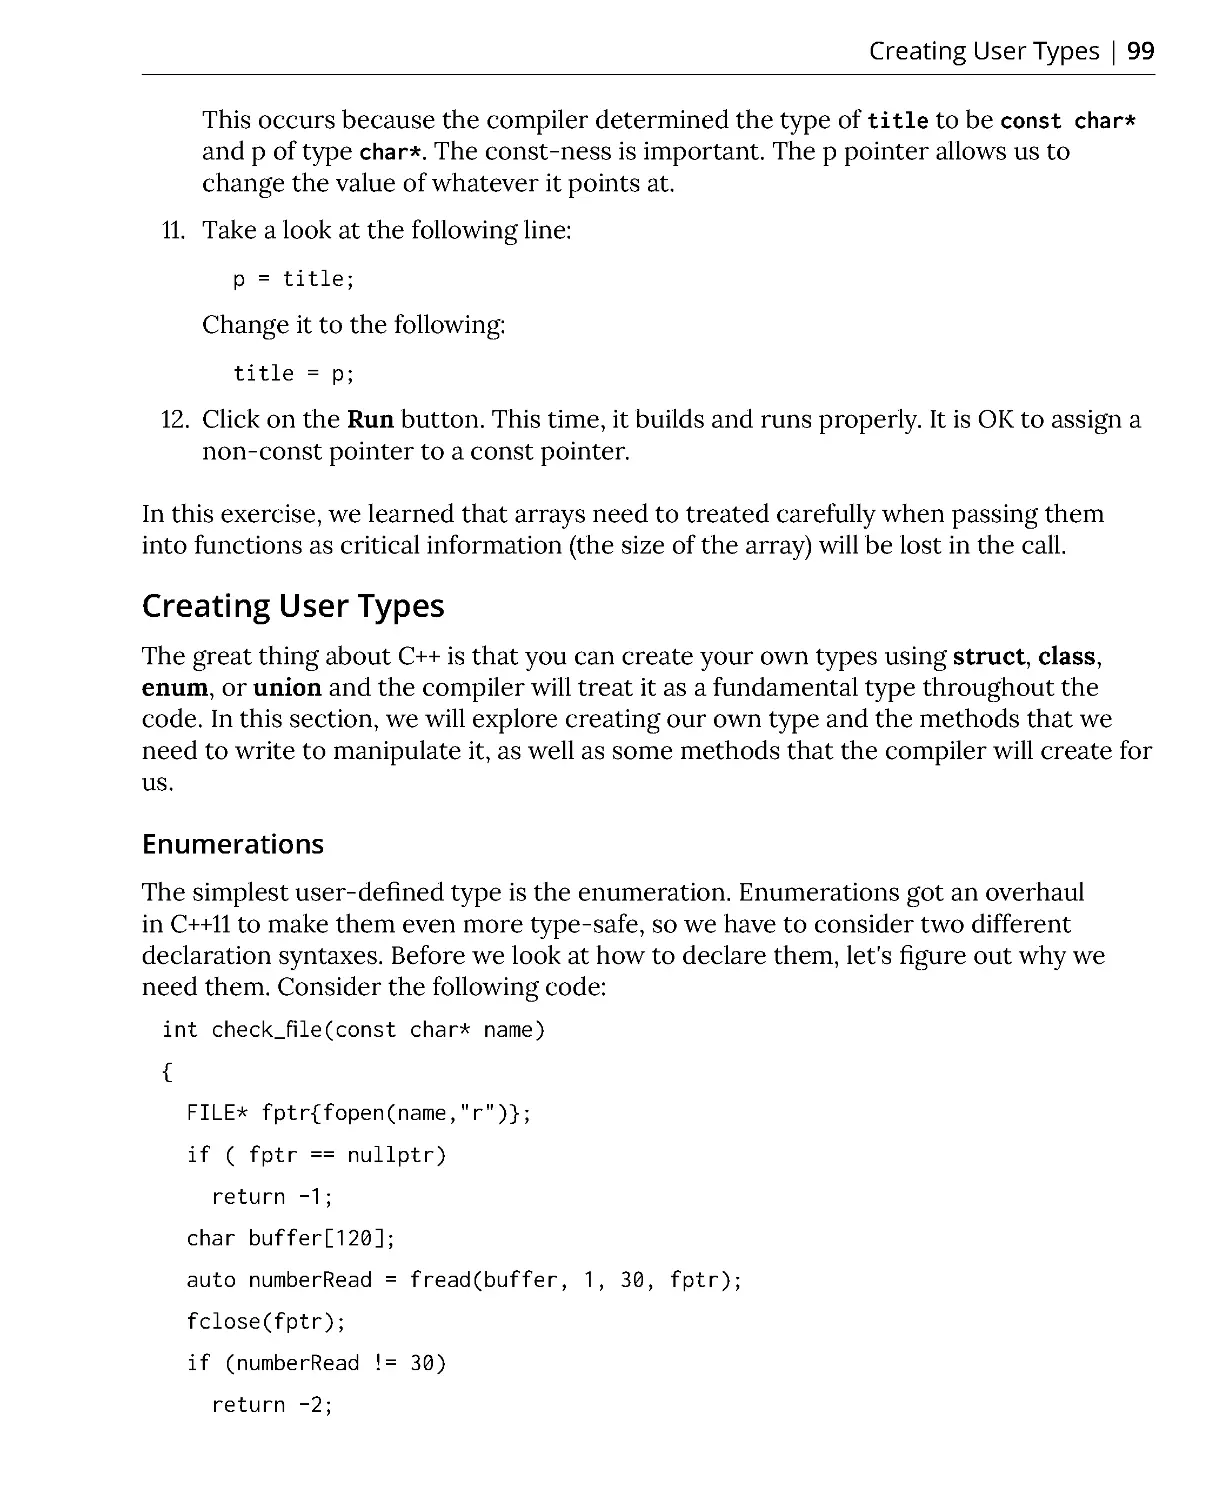
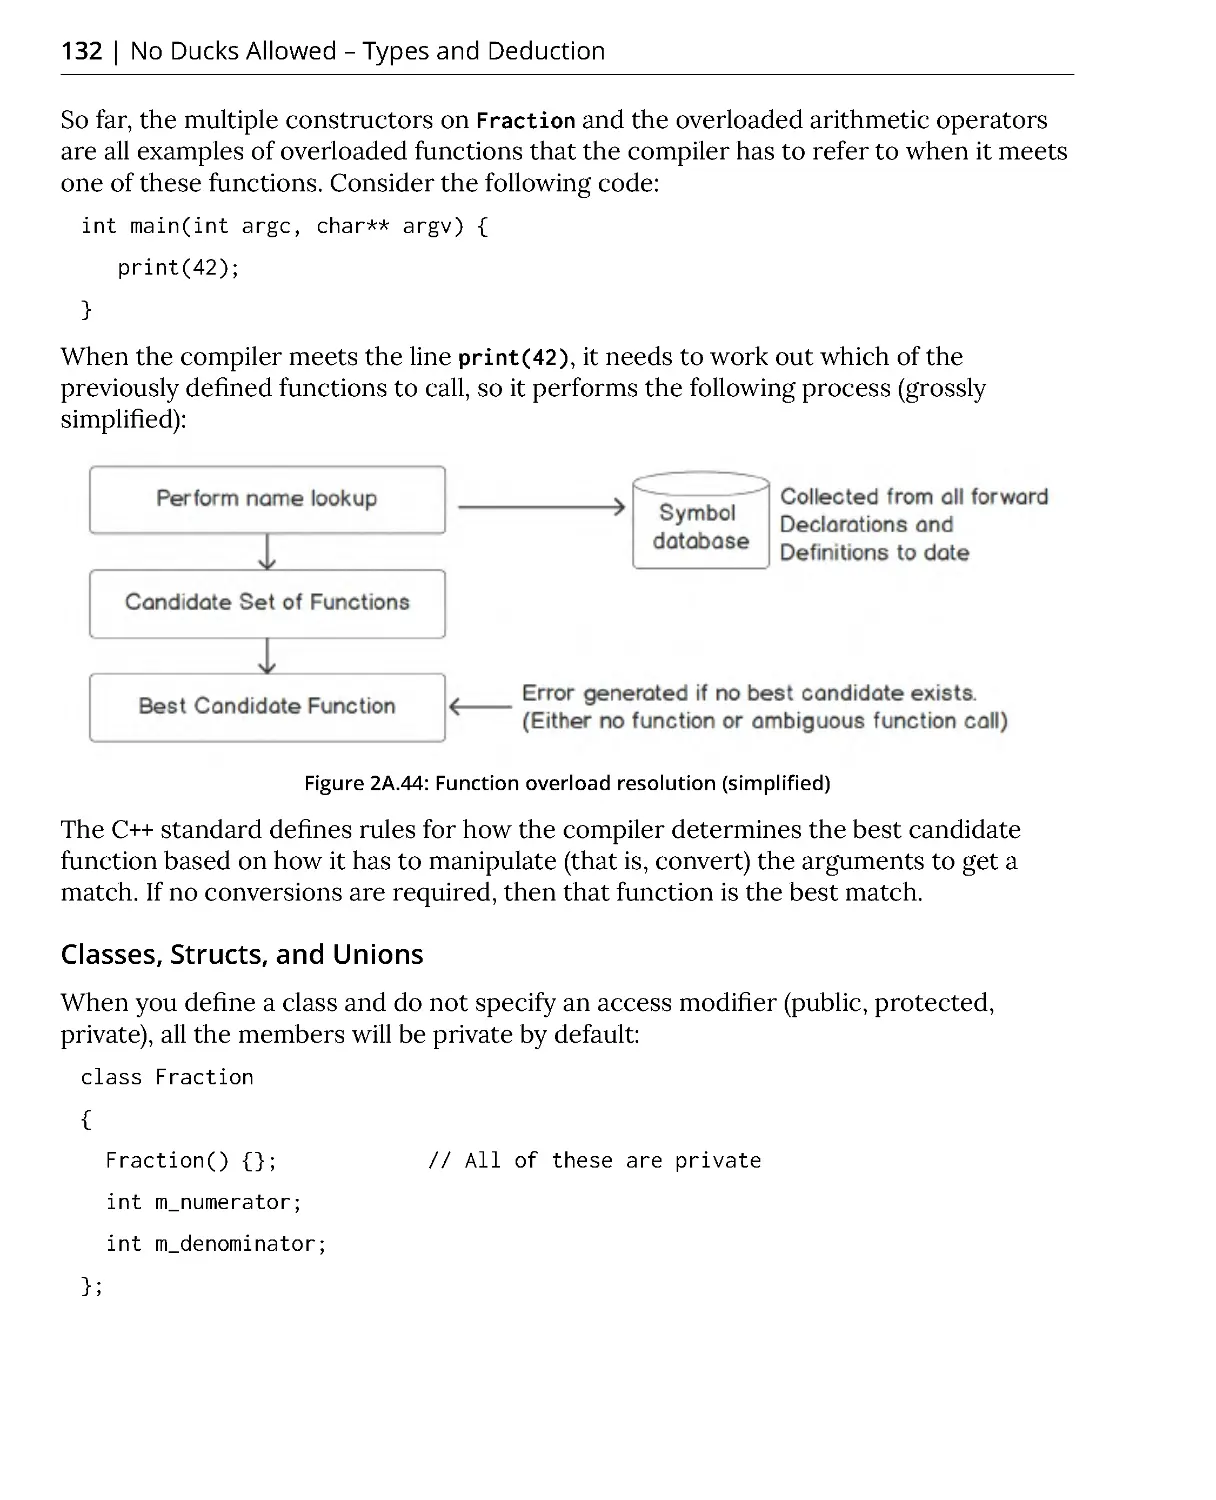
Function Overloading ..................................................................................... 131
Classes, Structs, and Unions .......................................................................... 132
Activity 1: Graphics Processing ..................................................................... 134
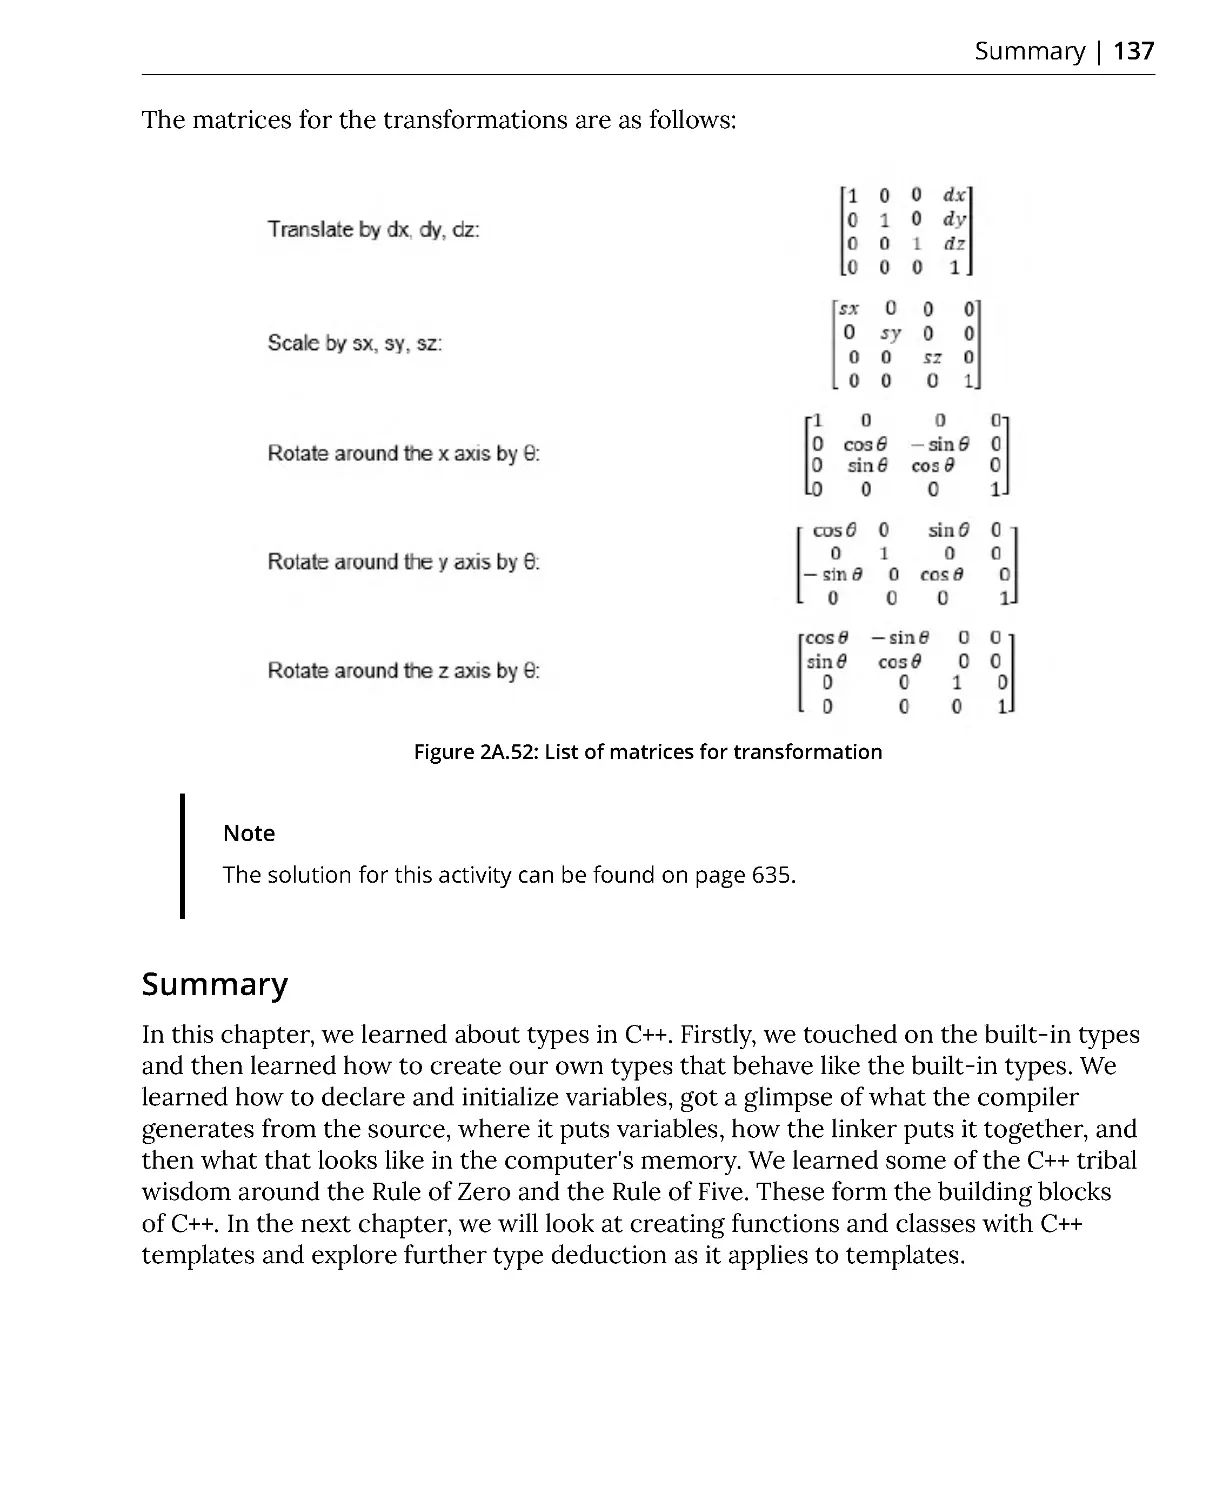
Summary ..................................................................................................... 137
Chapter 2B: No Ducks Allowed – Templates
and Deduction
139
Introduction ................................................................................................ 140
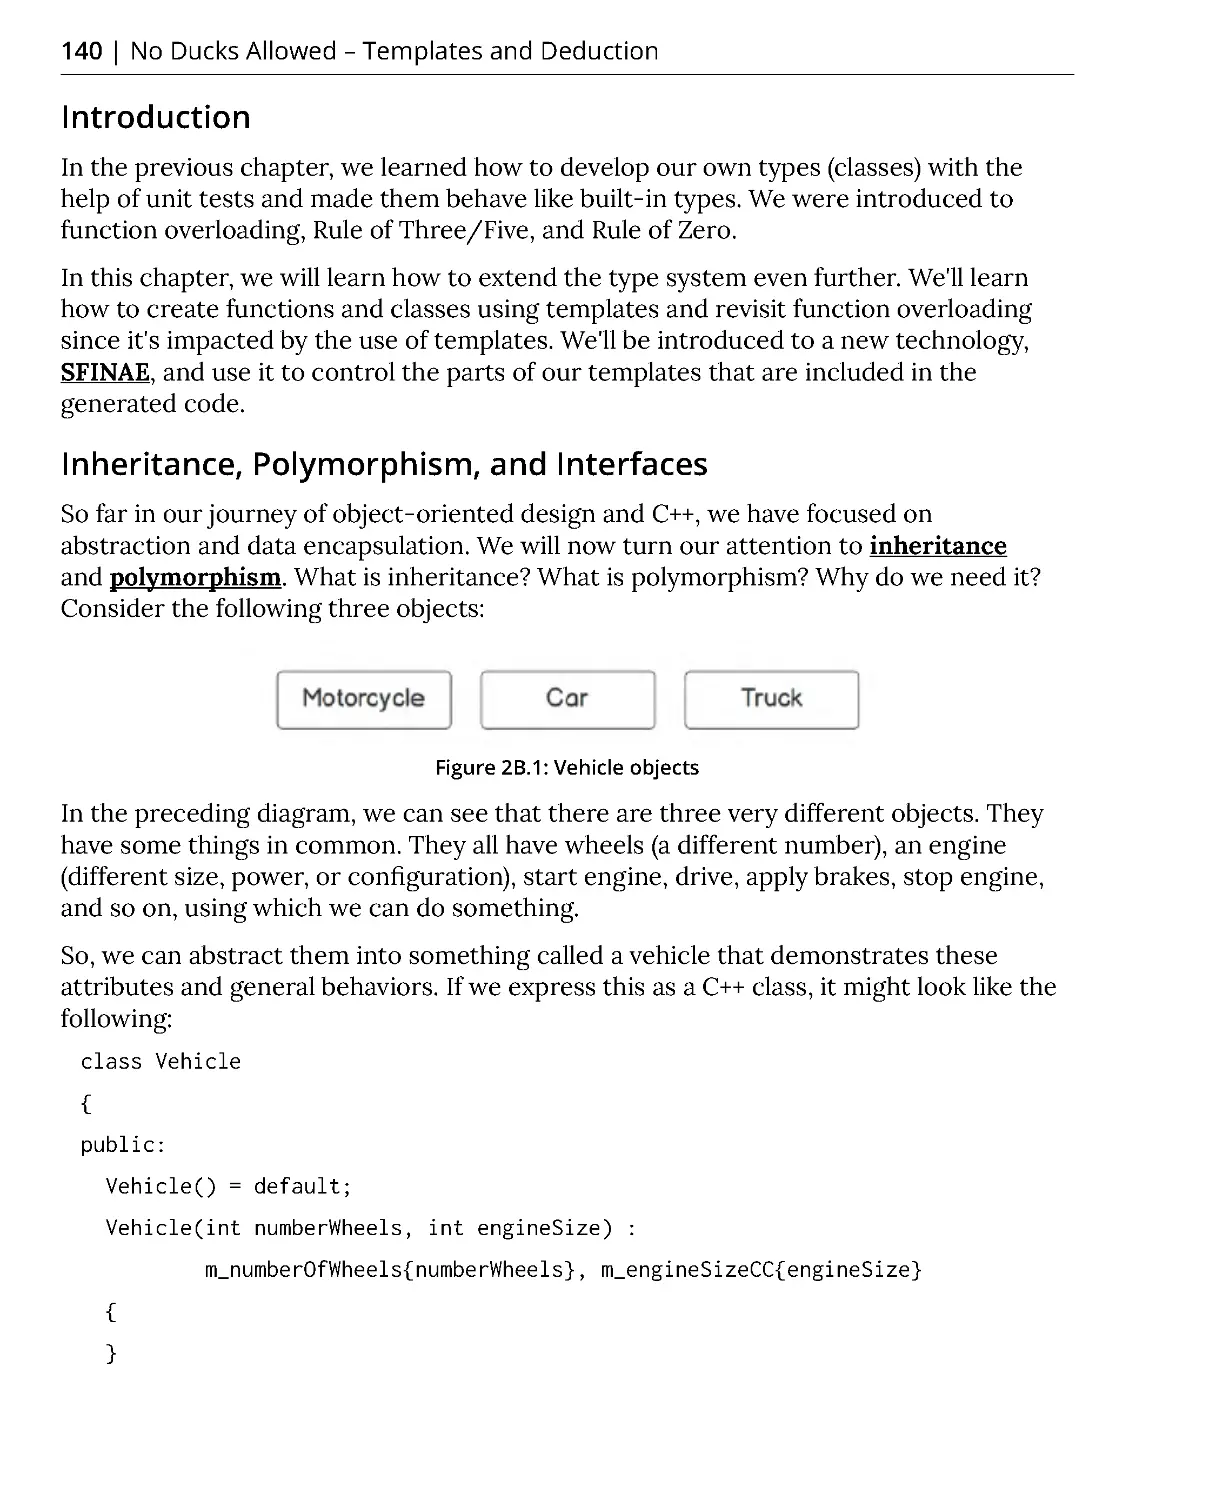
Inheritance, Polymorphism, and Interfaces ........................................... 140
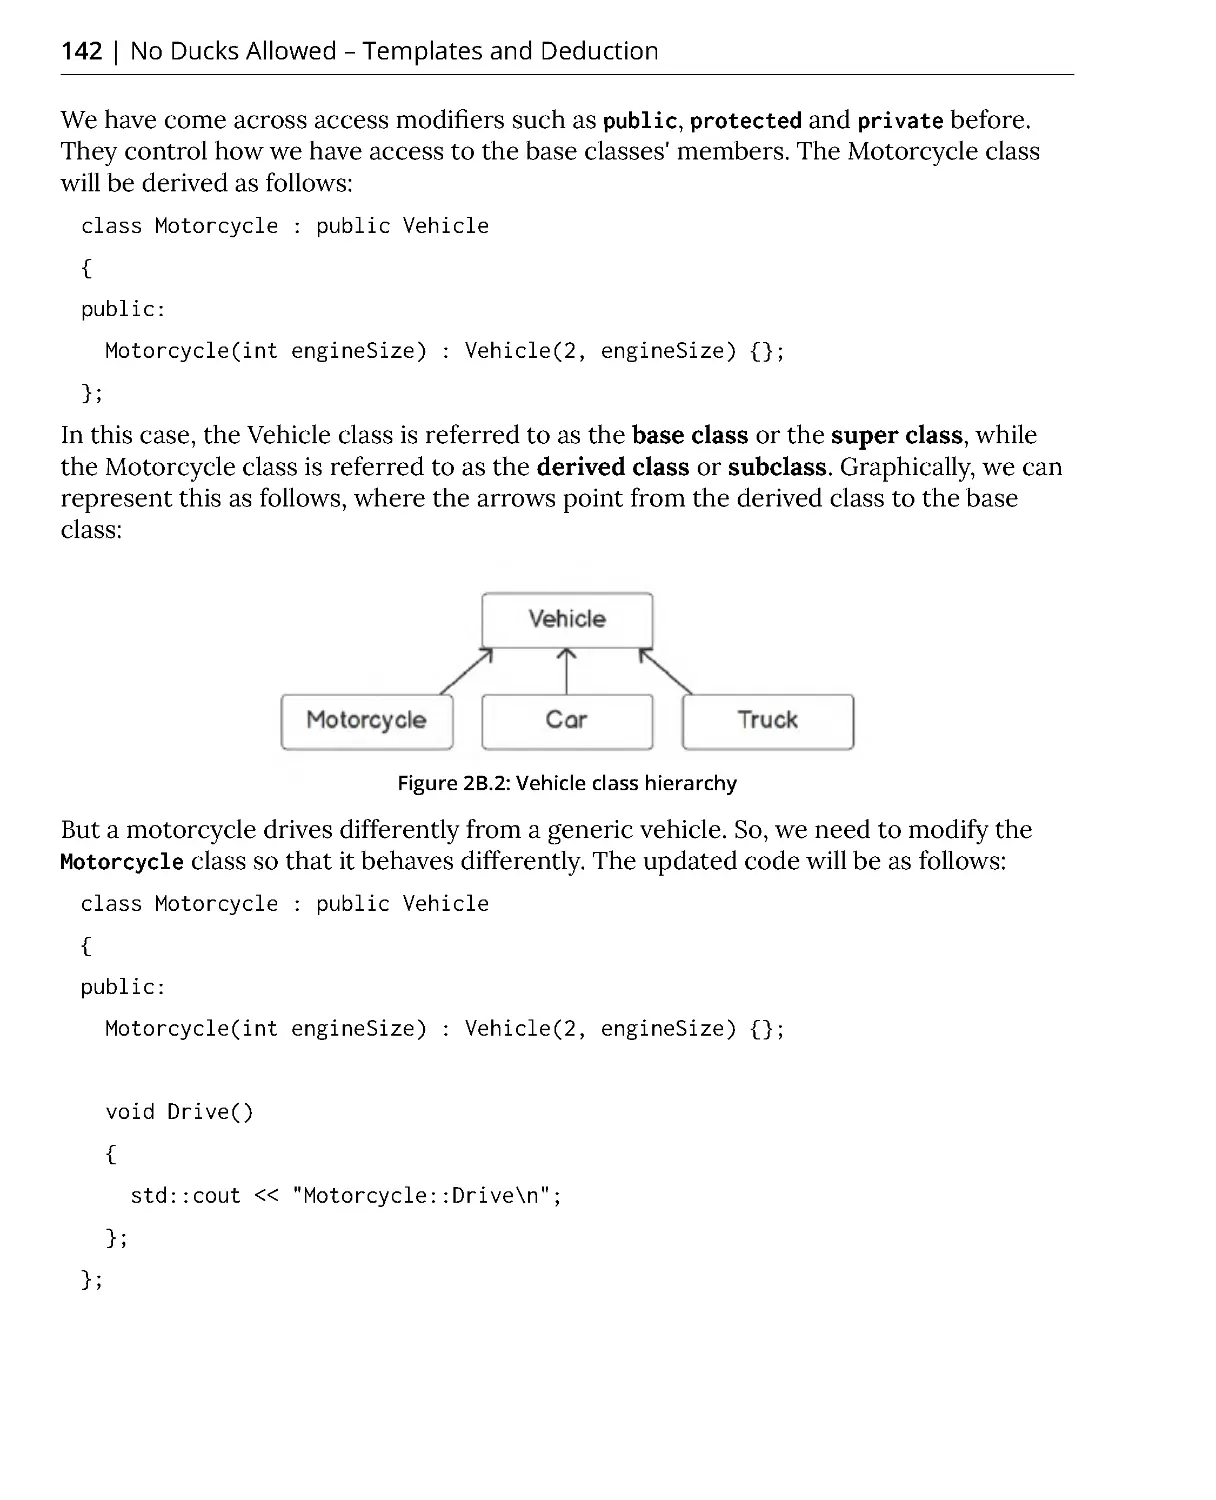
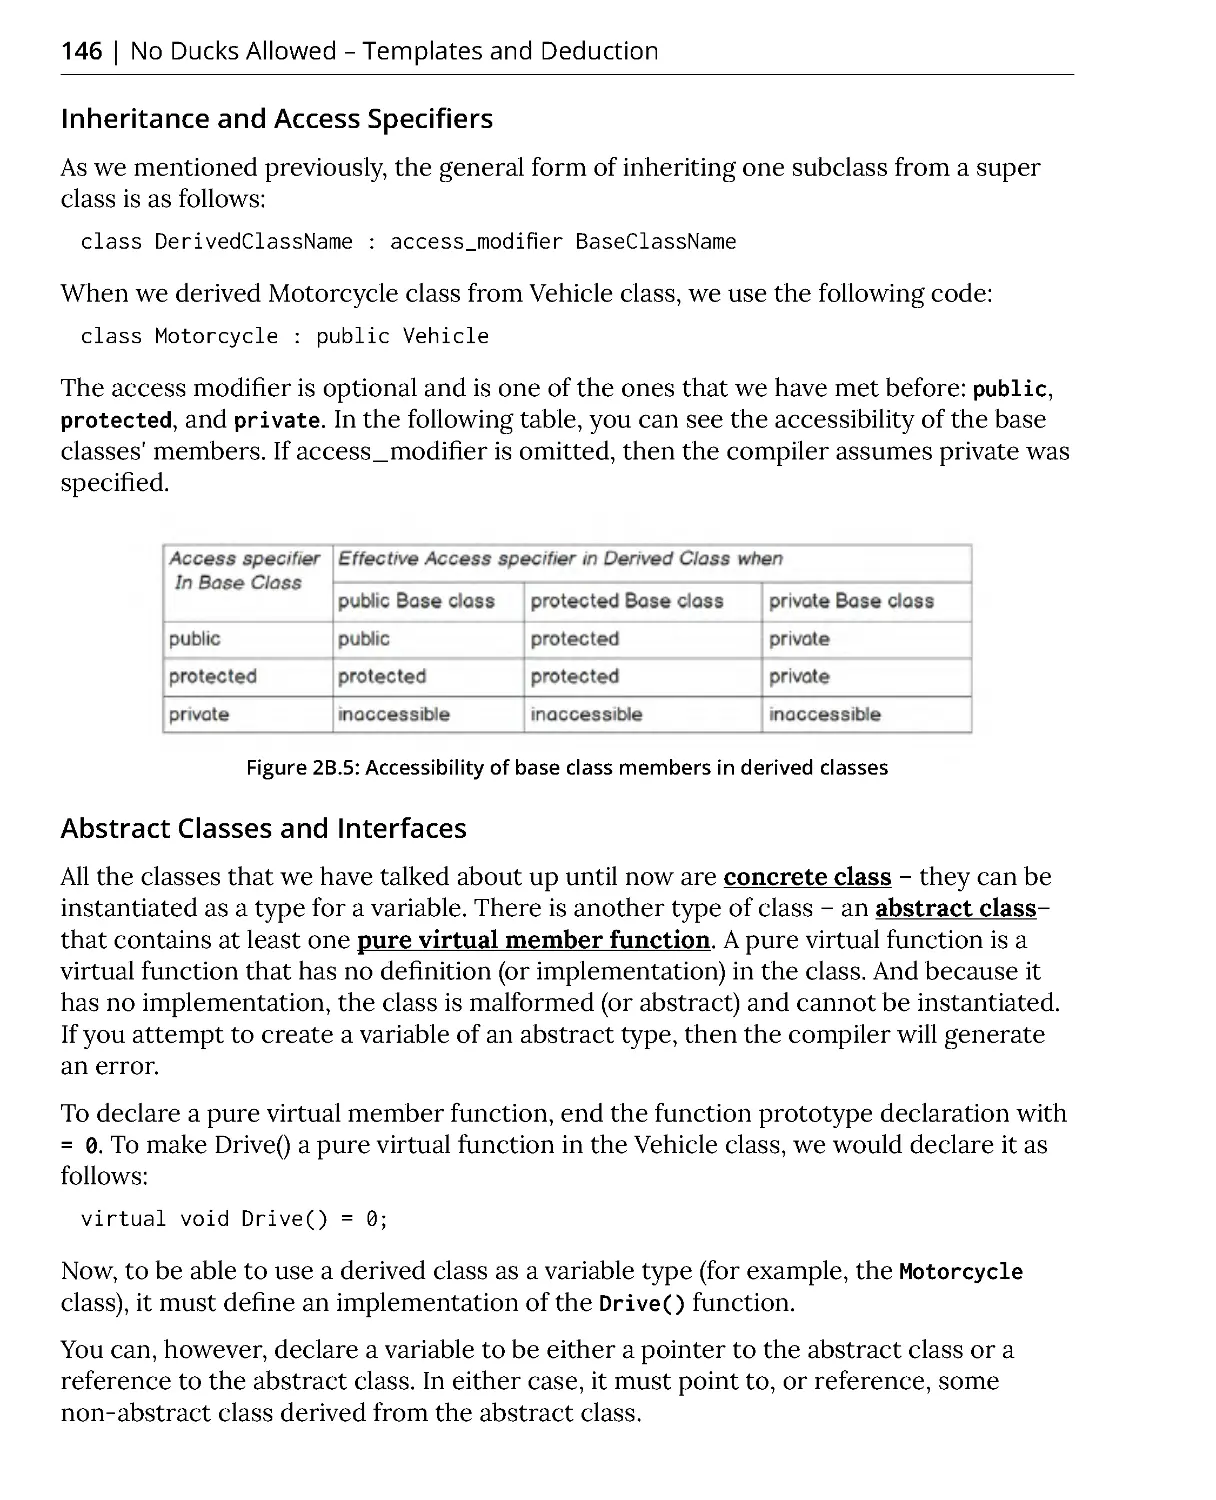
Inheritance and Access Specifiers ................................................................ 146
Abstract Classes and Interfaces .................................................................... 146
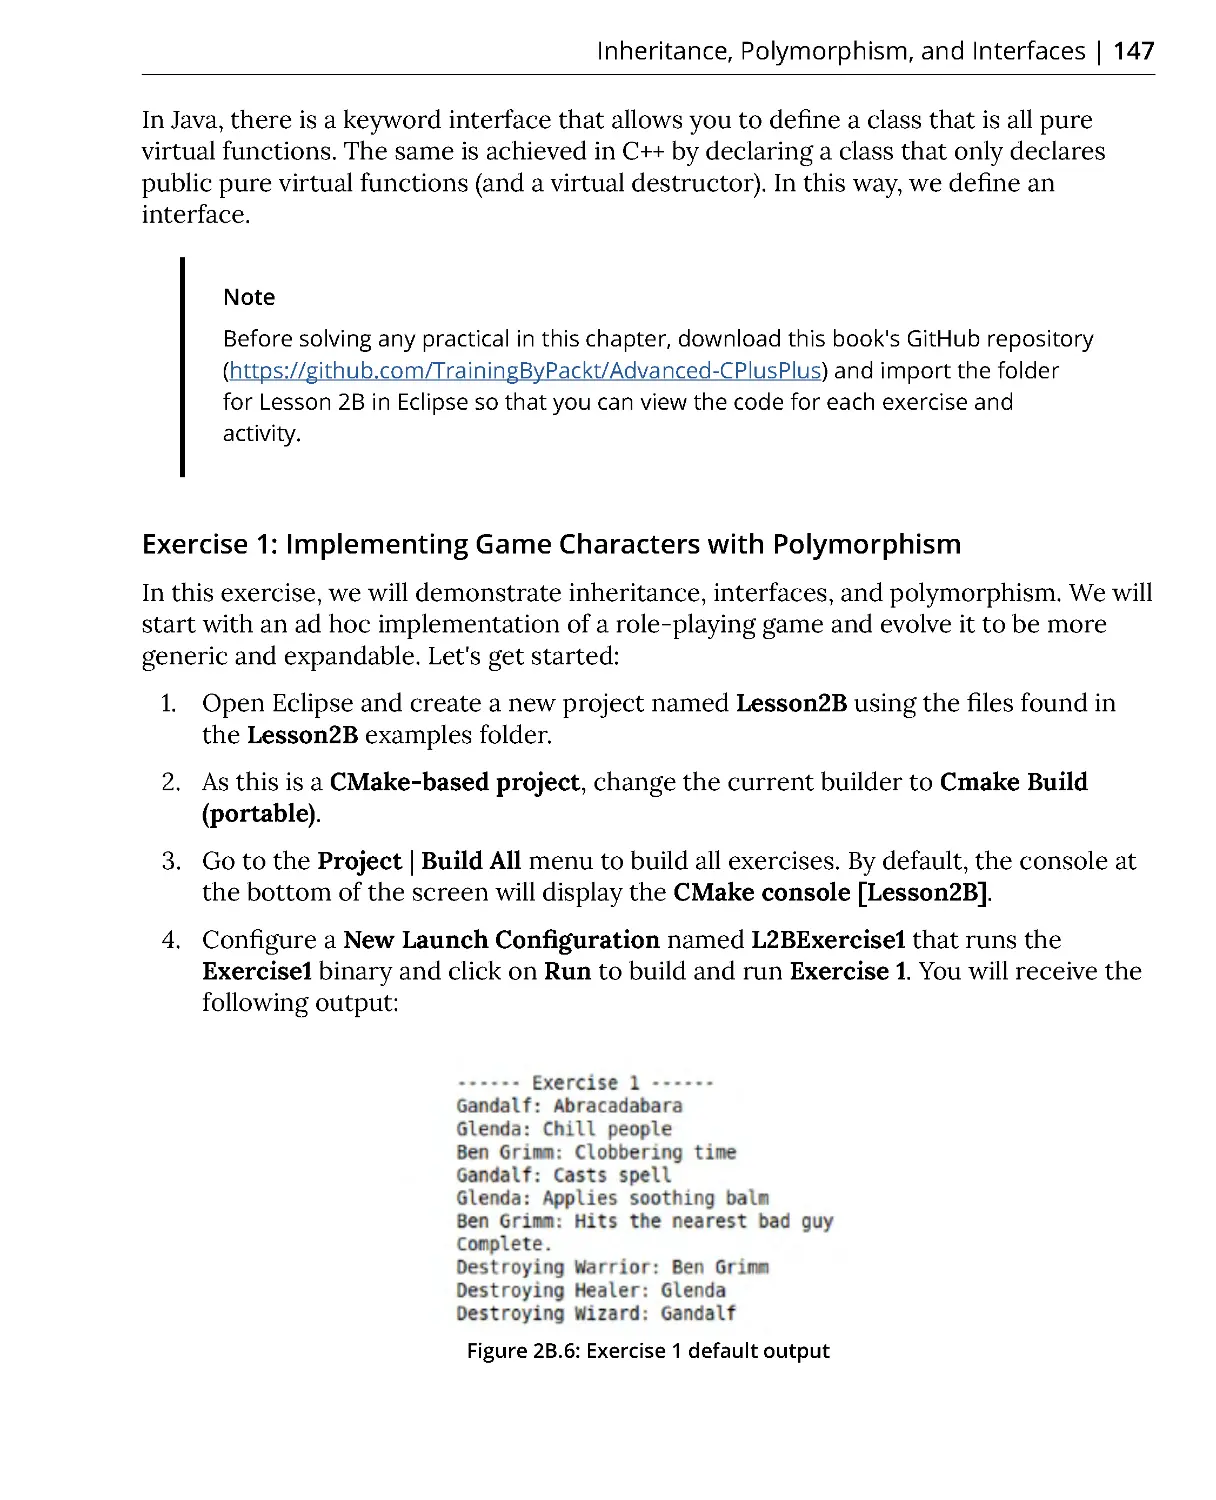
Exercise 1: Implementing Game Characters with Polymorphism ............ 147
Classes, Structs, and Unions Revisited ......................................................... 151
Visibility, Lifetime, and Access ................................................................. 152
Namespaces .................................................................................................... 155
Templates – Generic Programming ......................................................... 156
What is Generic Programming? ..................................................................... 157
Introducing C++ Templates ............................................................................ 157
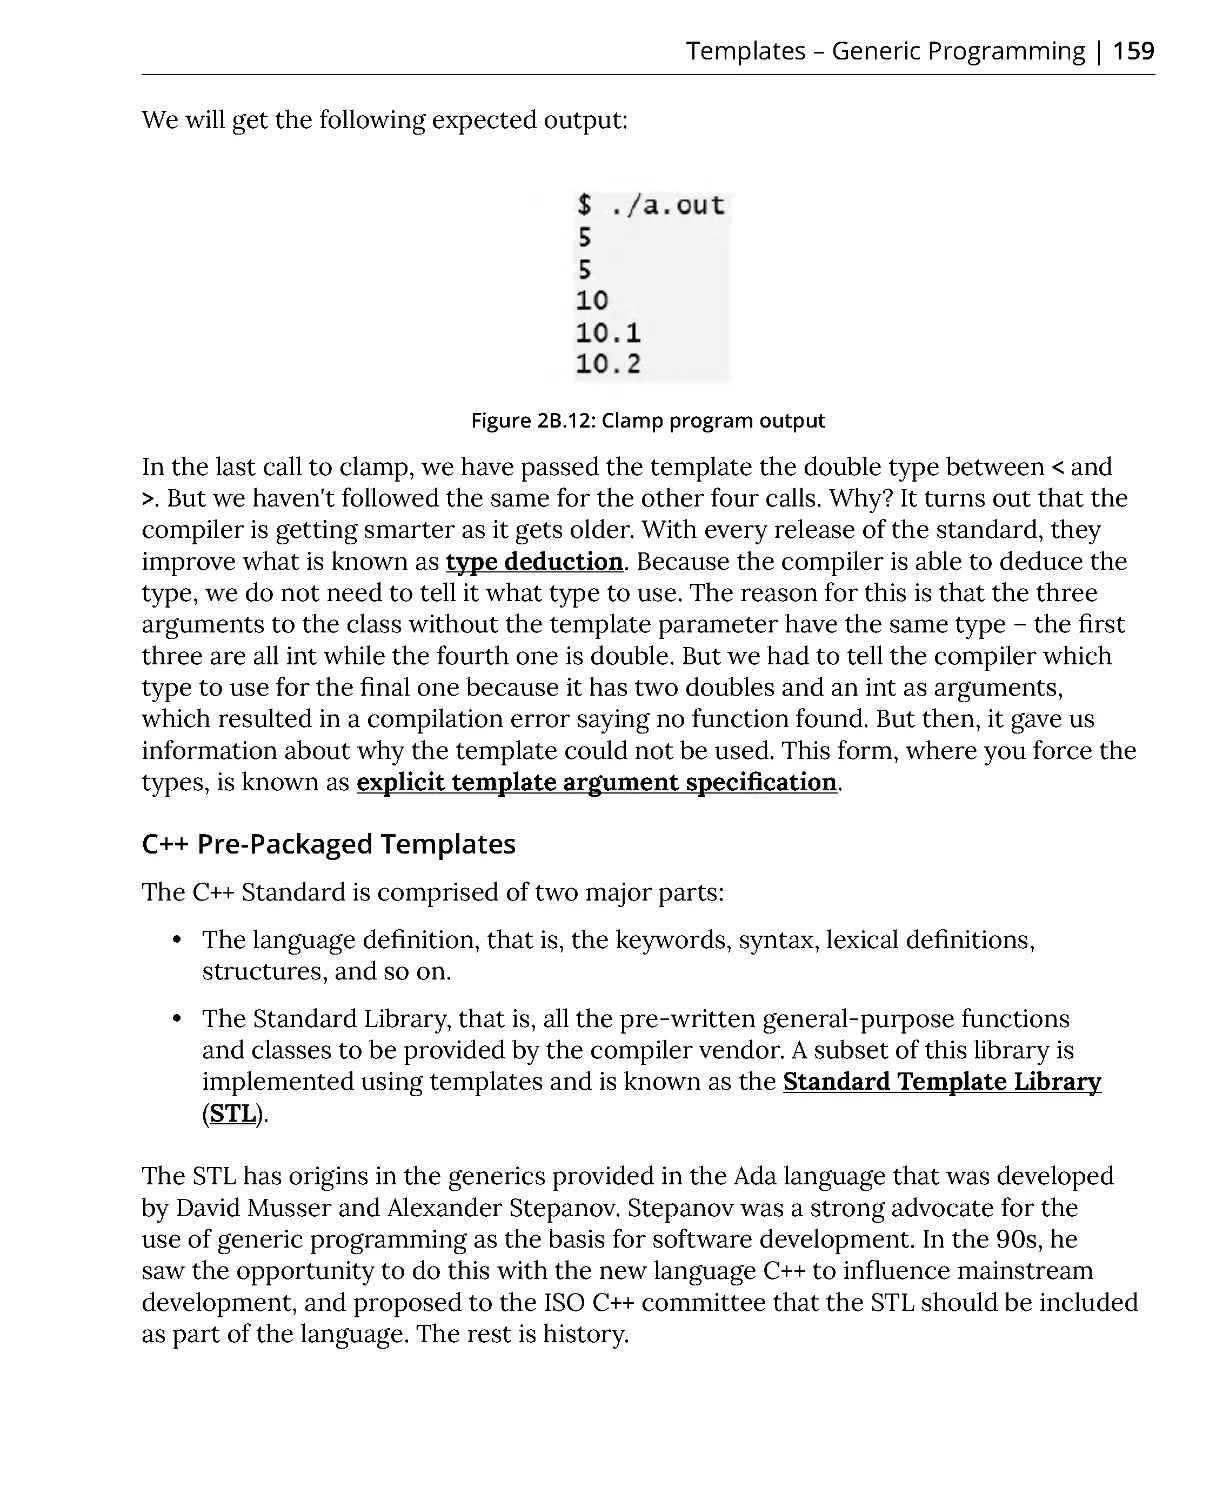
C++ Pre-Packaged Templates ........................................................................ 159
Type Aliases – typedef and using ............................................................. 161
Exercise 2: Implementing Aliases .................................................................. 162
Templates – More than Generic Programming ...................................... 163
Substitution Failure Is Not An Error – SFINAE ............................................. 164
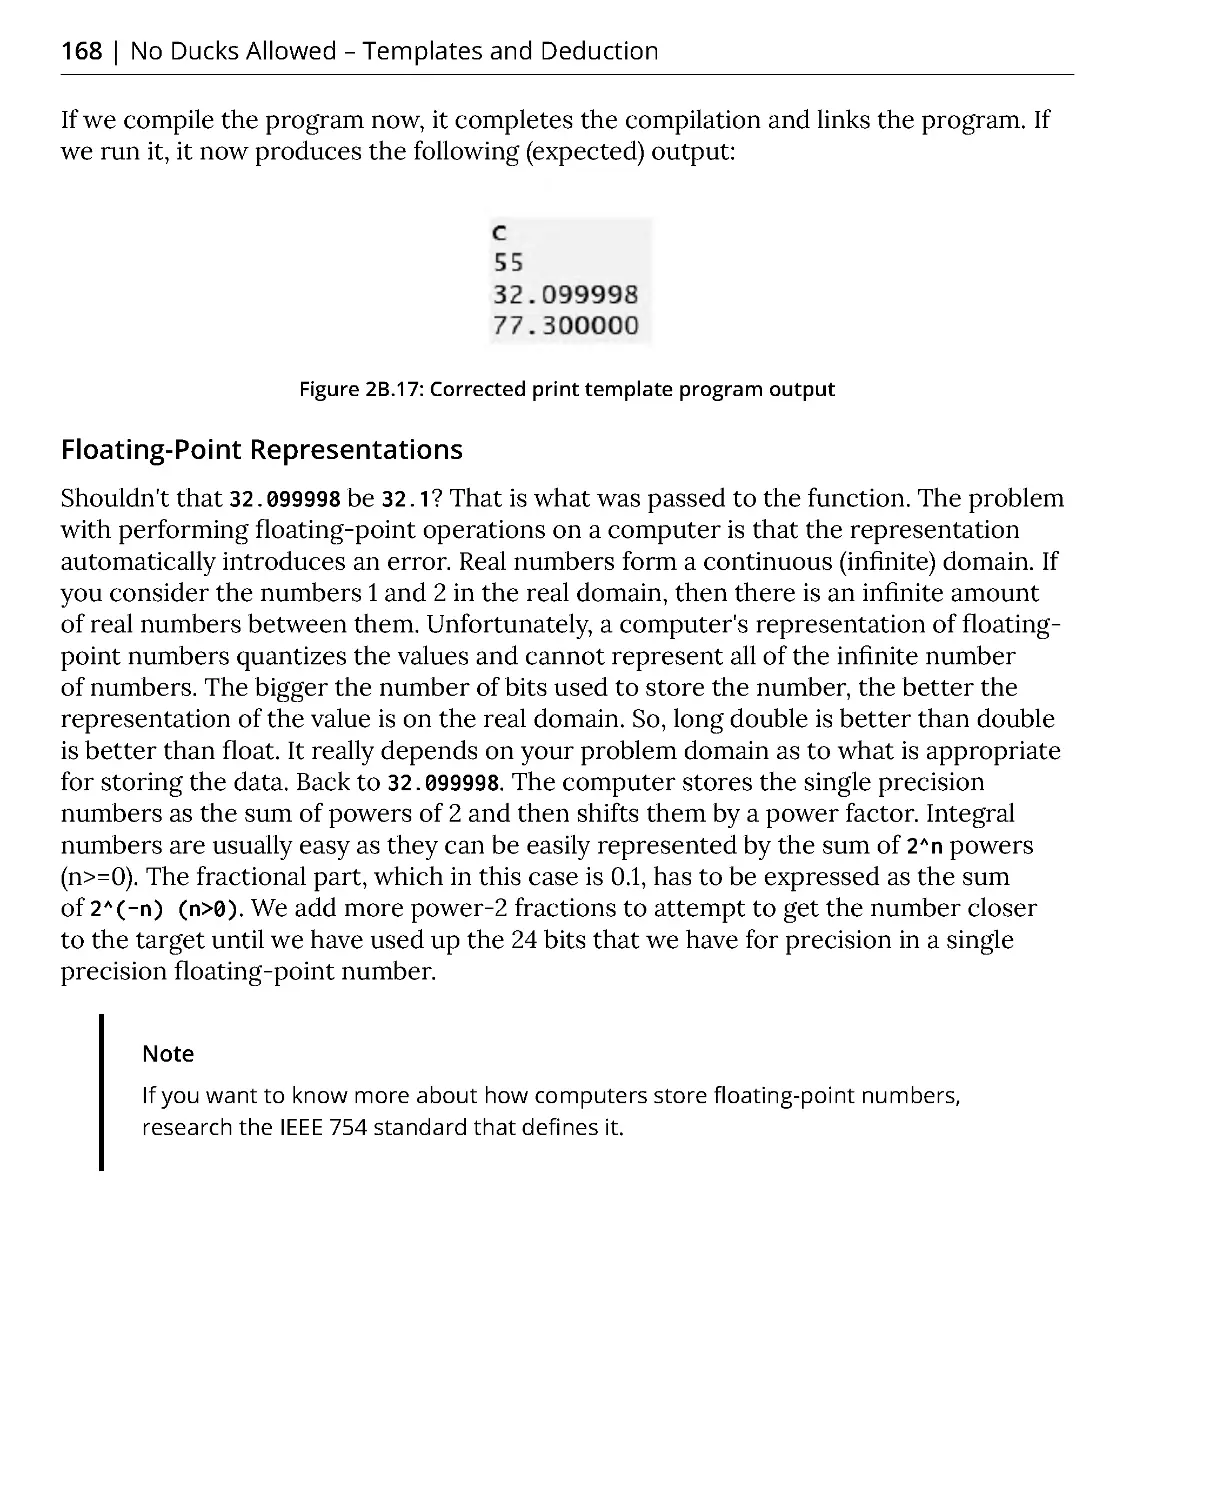
Floating-Point Representations .................................................................... 168
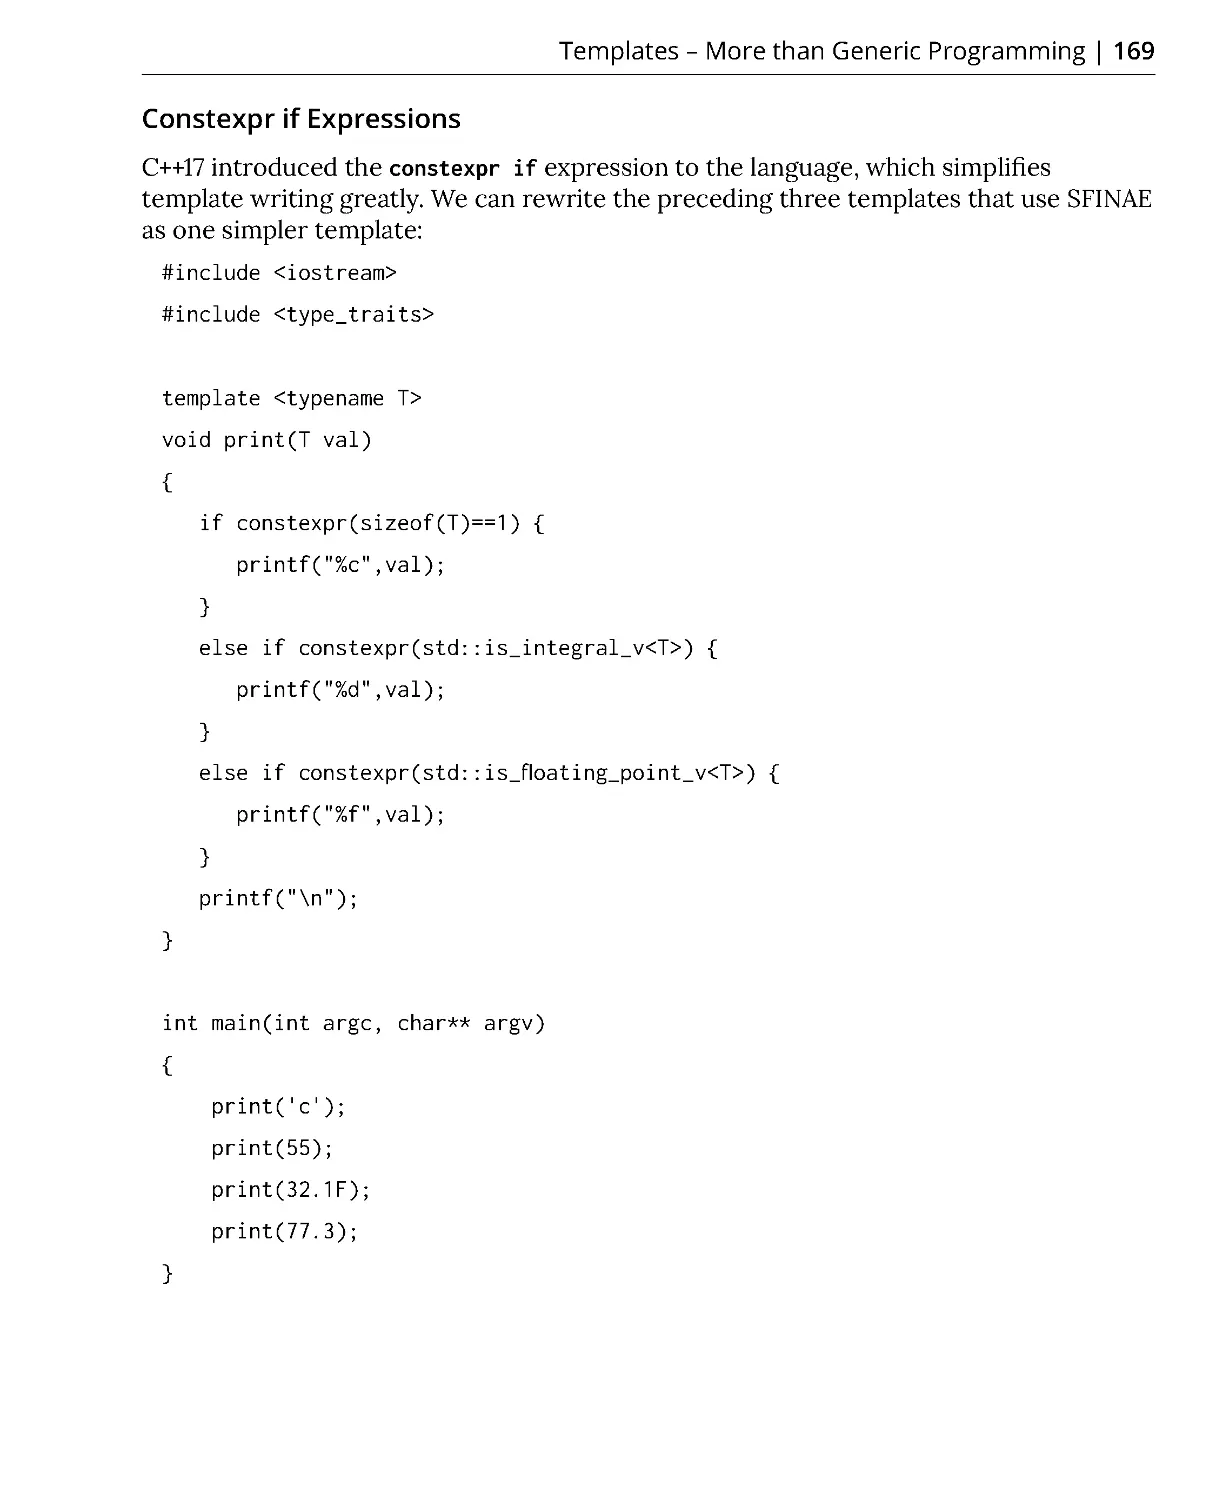
Constexpr if Expressions ................................................................................ 169
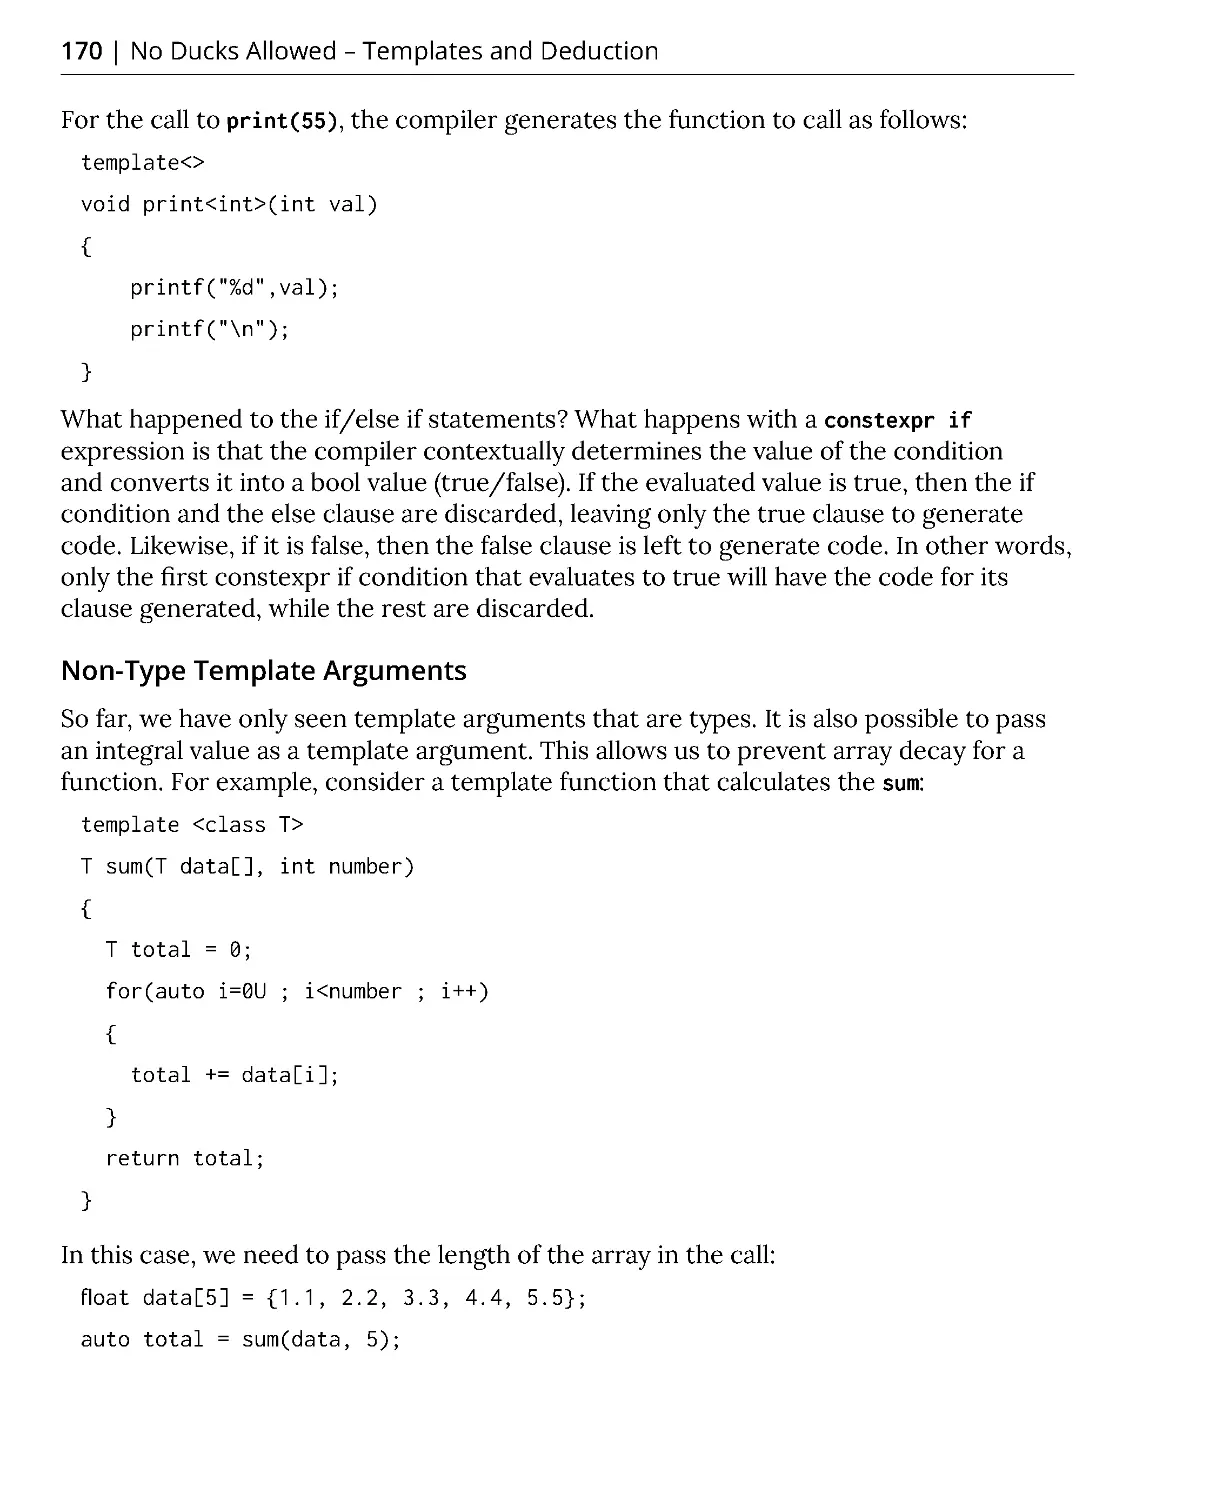
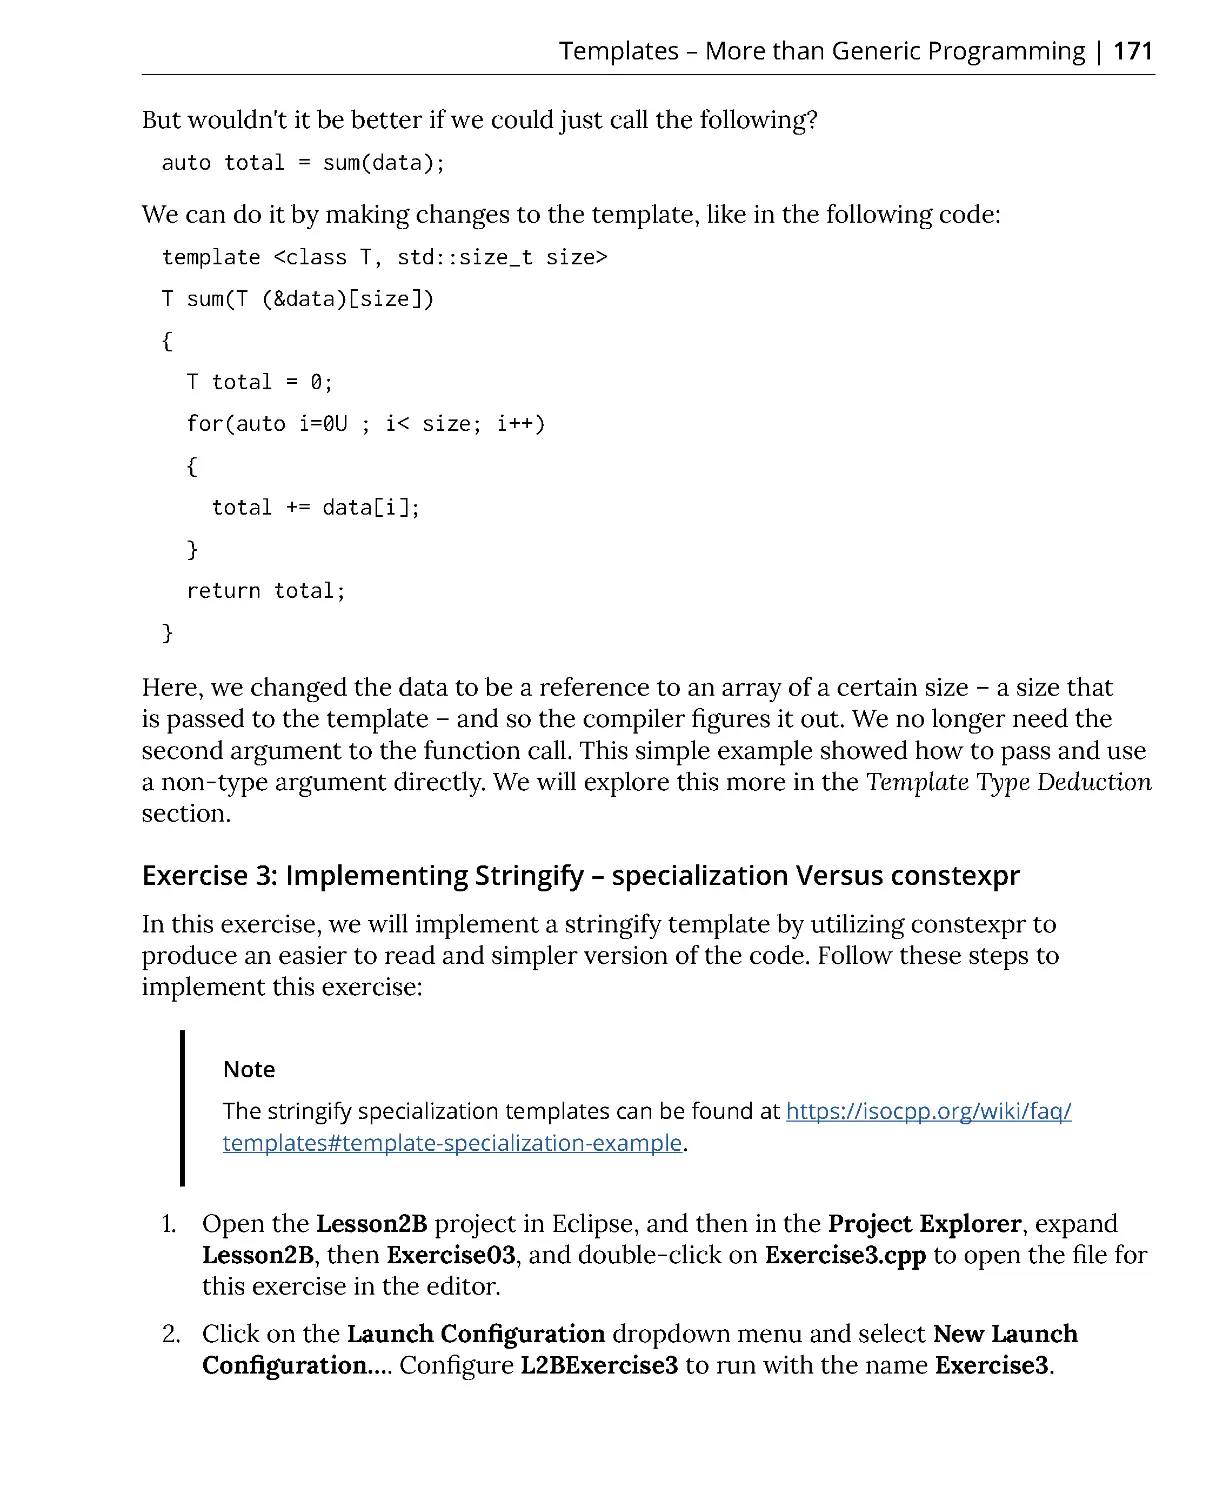
Non-Type Template Arguments .................................................................... 170
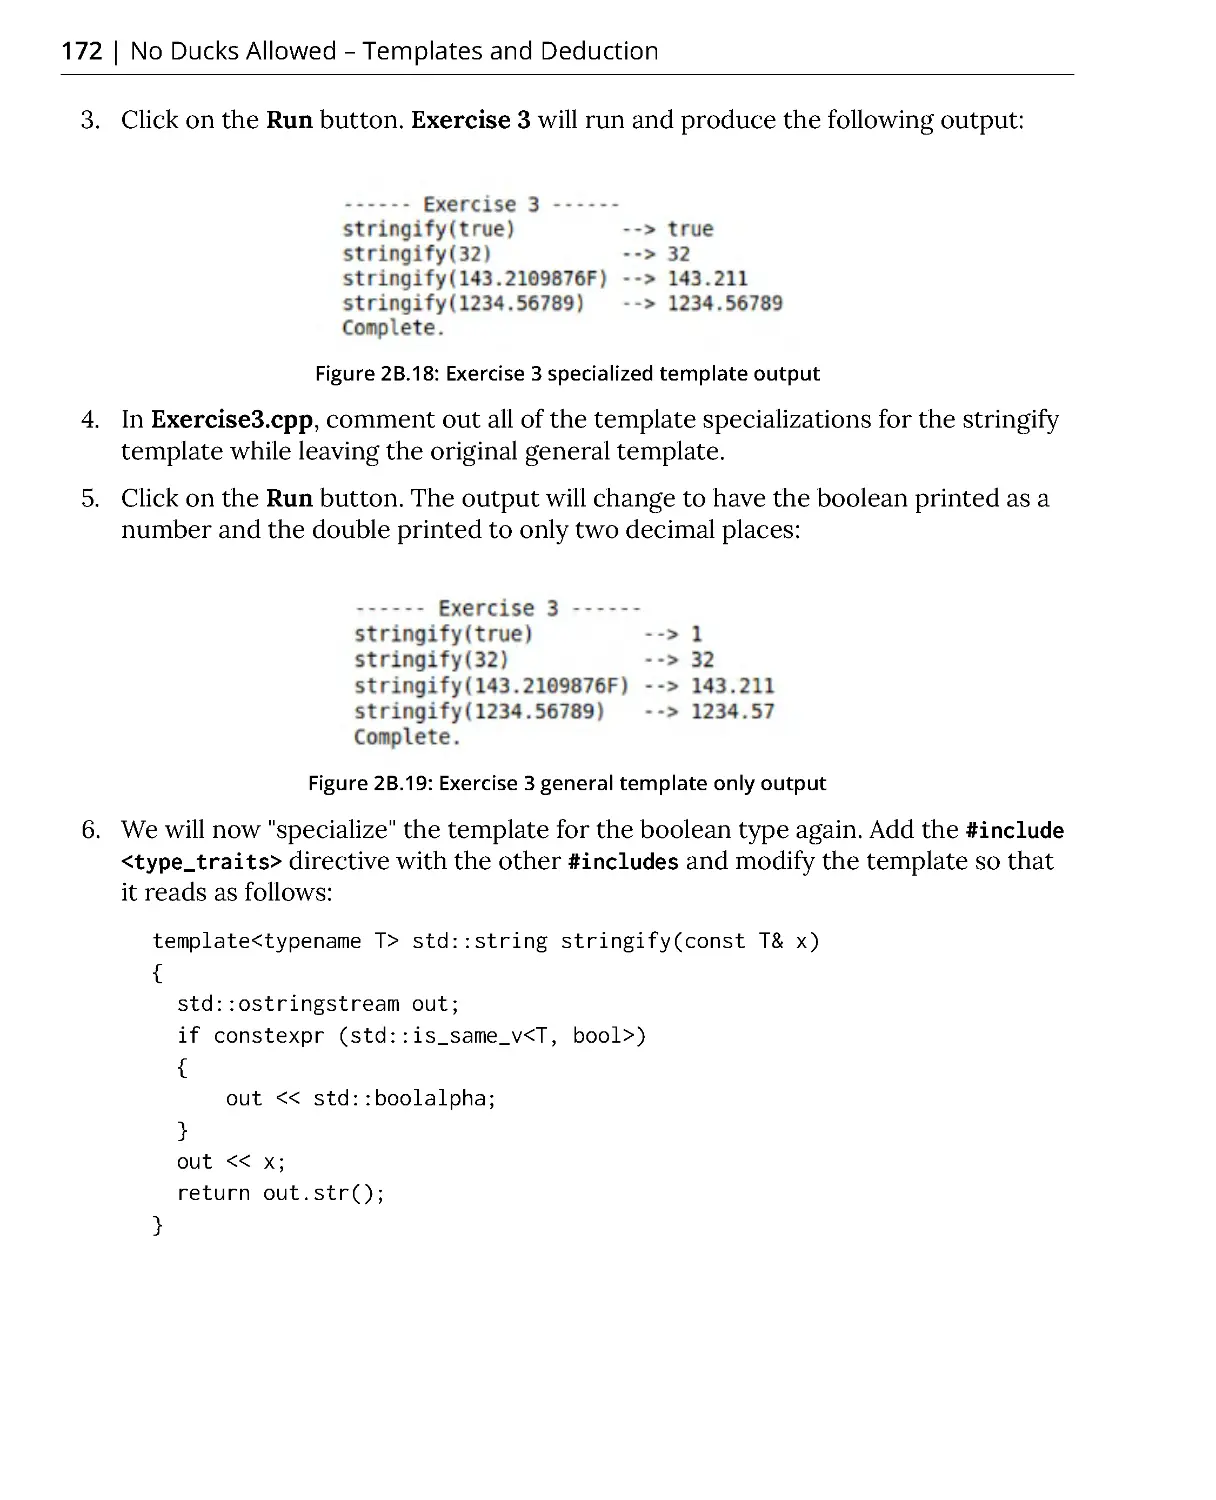
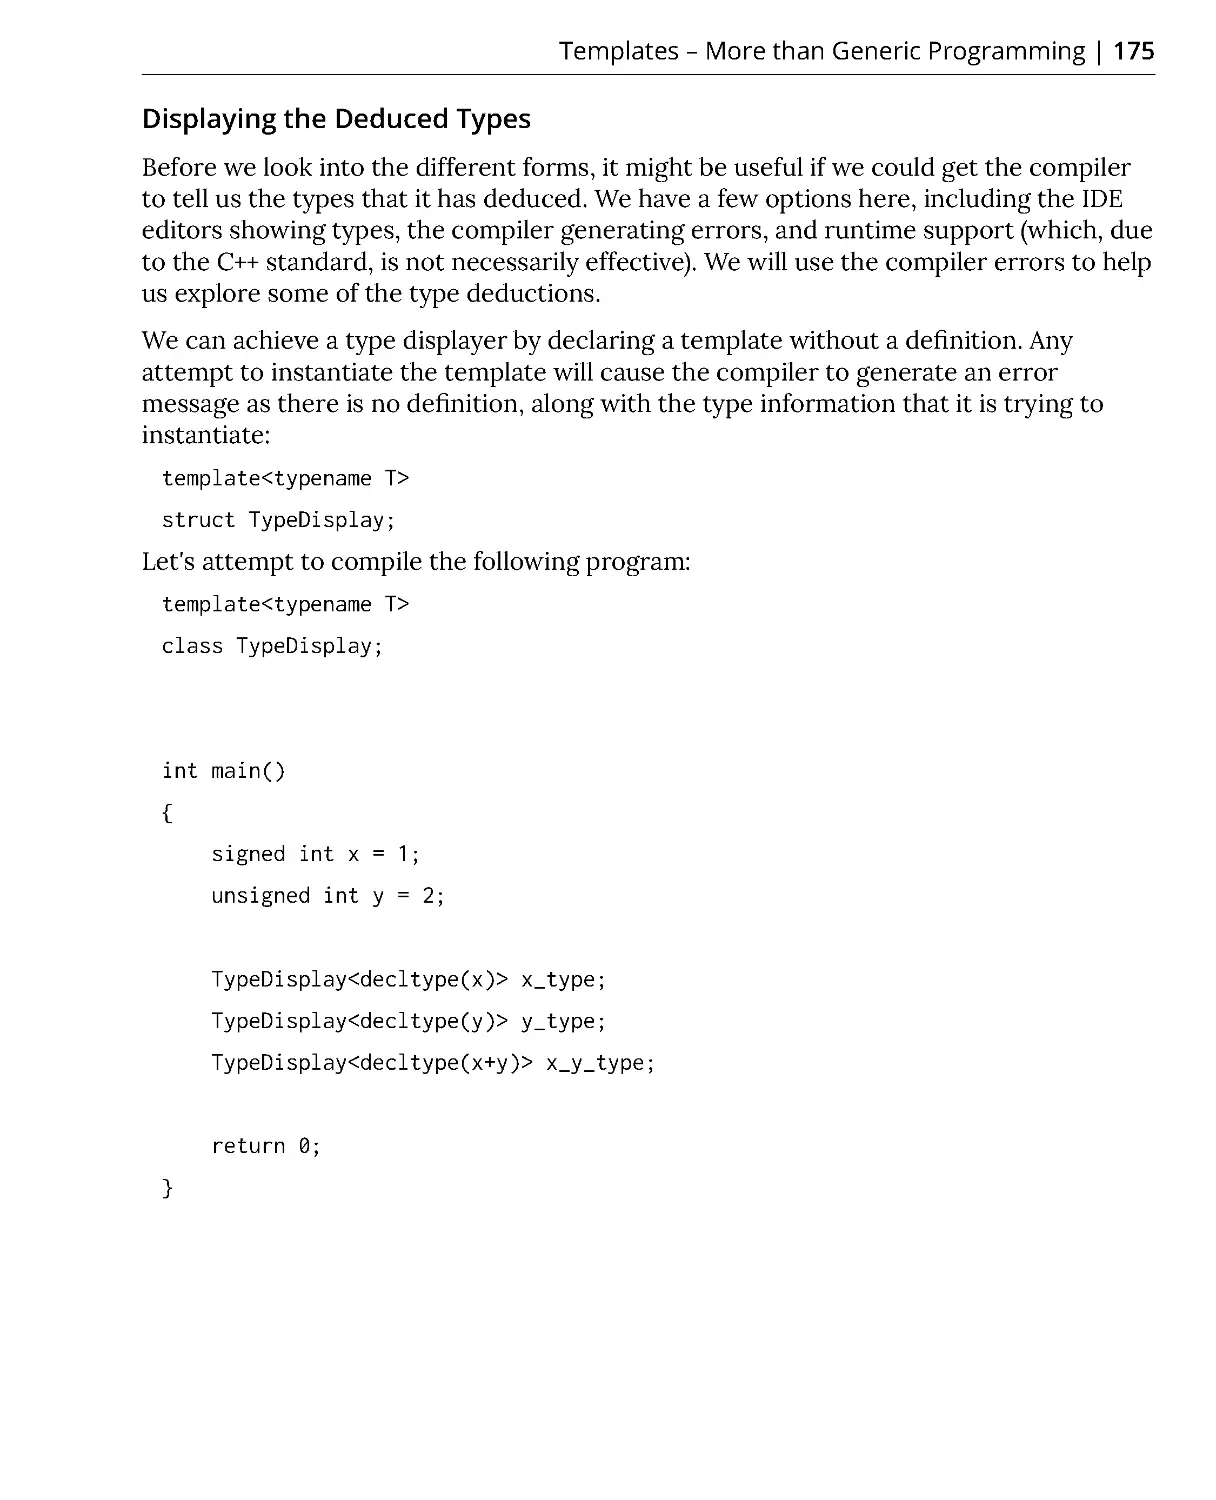
Exercise 3: Implementing Stringify – specialization Versus constexpr .... 171
Function Overloading Revisited .................................................................... 174
Template Type Deduction .............................................................................. 174
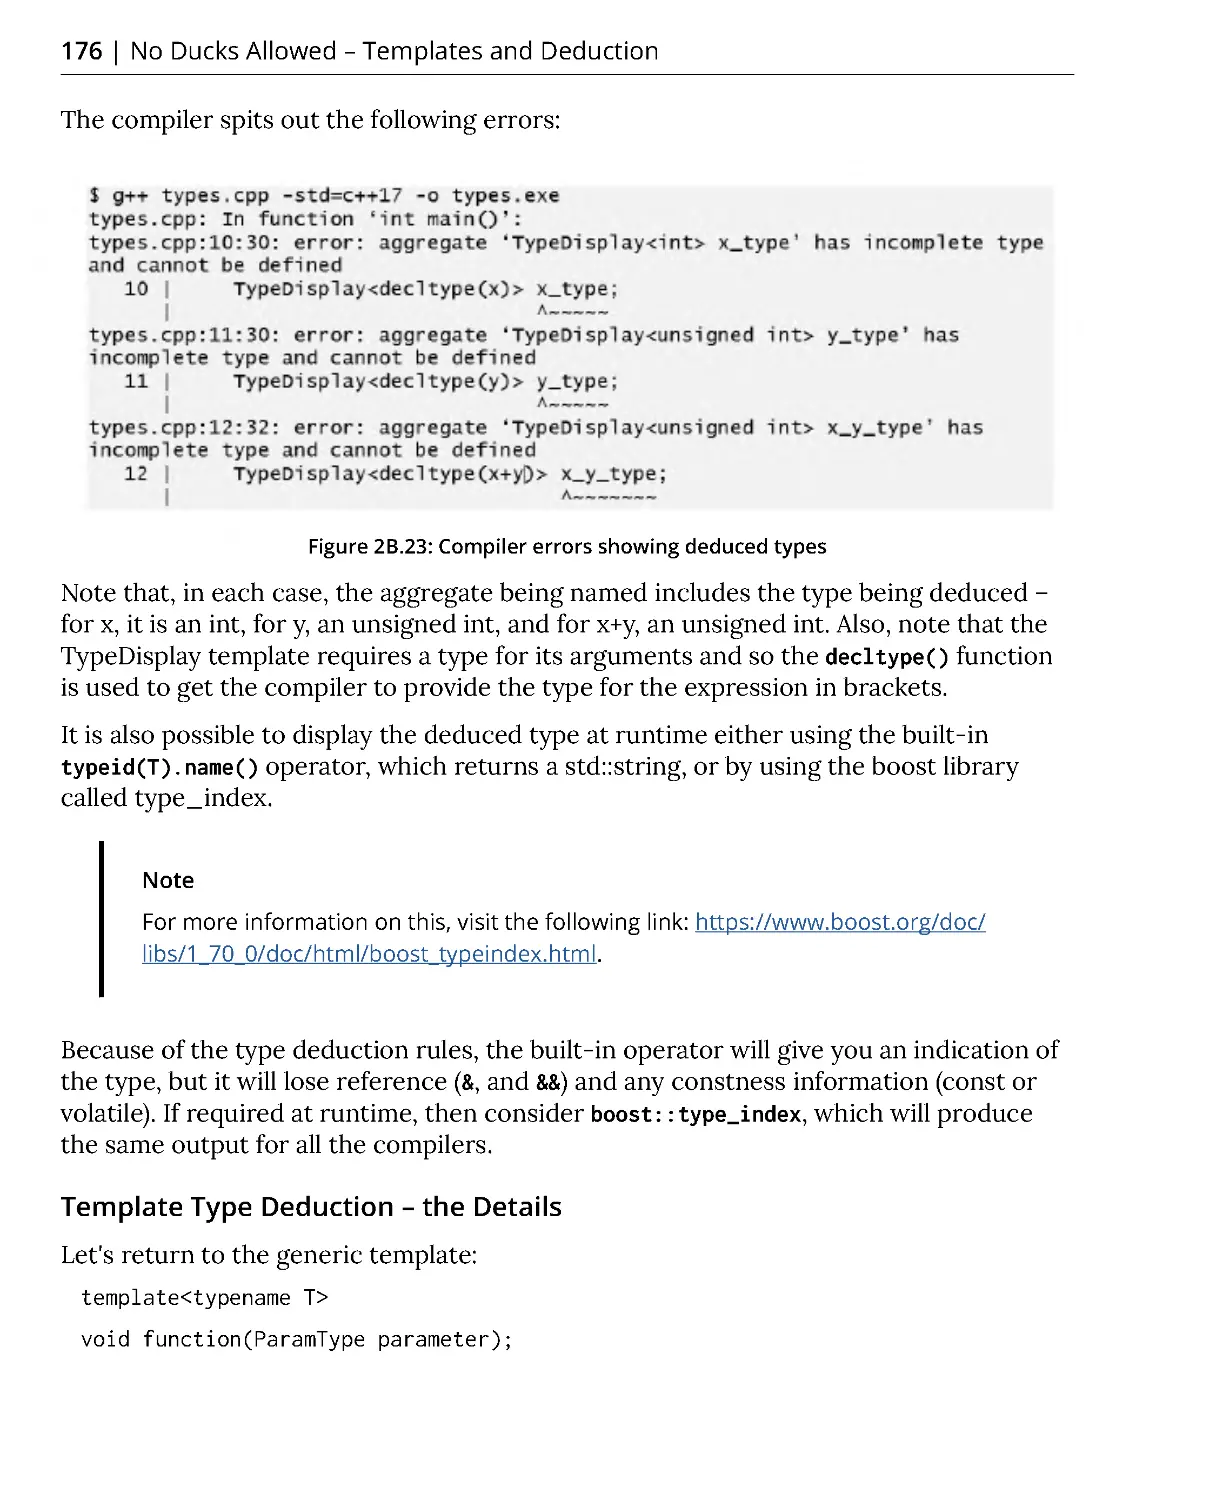
Displaying the Deduced Types ...................................................................... 175
Template Type Deduction – the Details ....................................................... 176
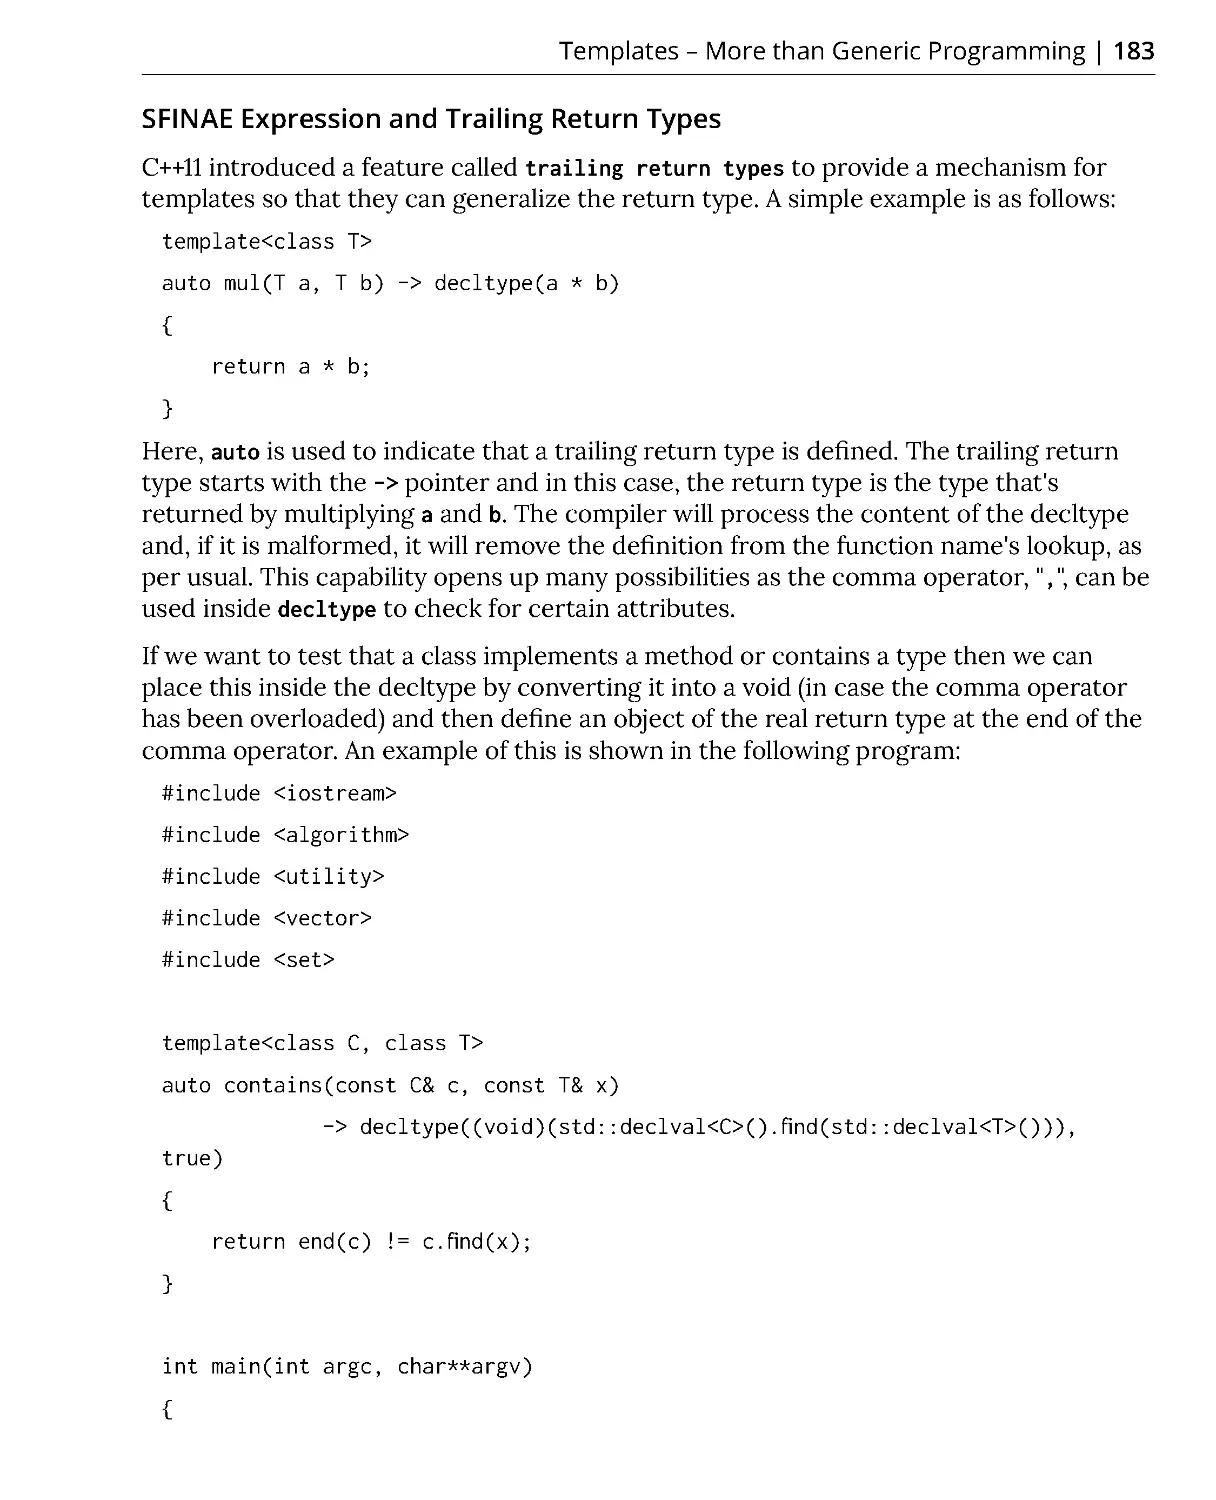
SFINAE Expression and Trailing Return Types ............................................. 183
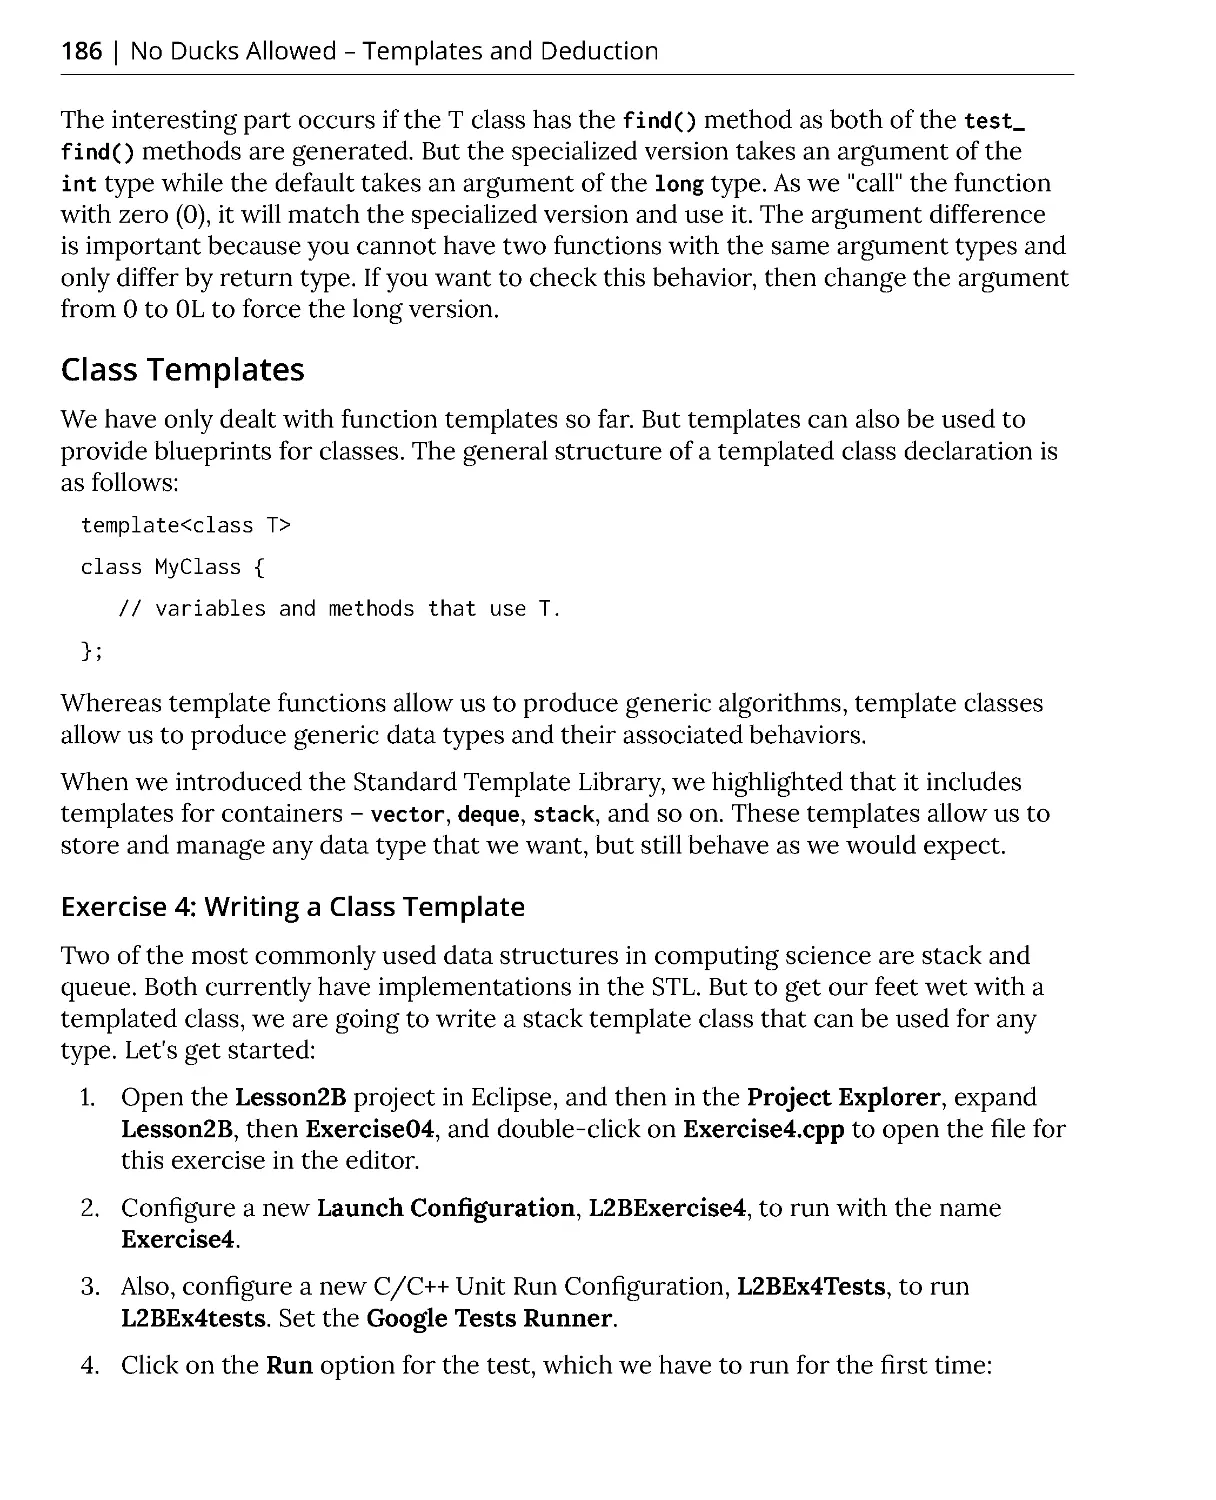
Class Templates ......................................................................................... 186
Exercise 4: Writing a Class Template ............................................................ 186
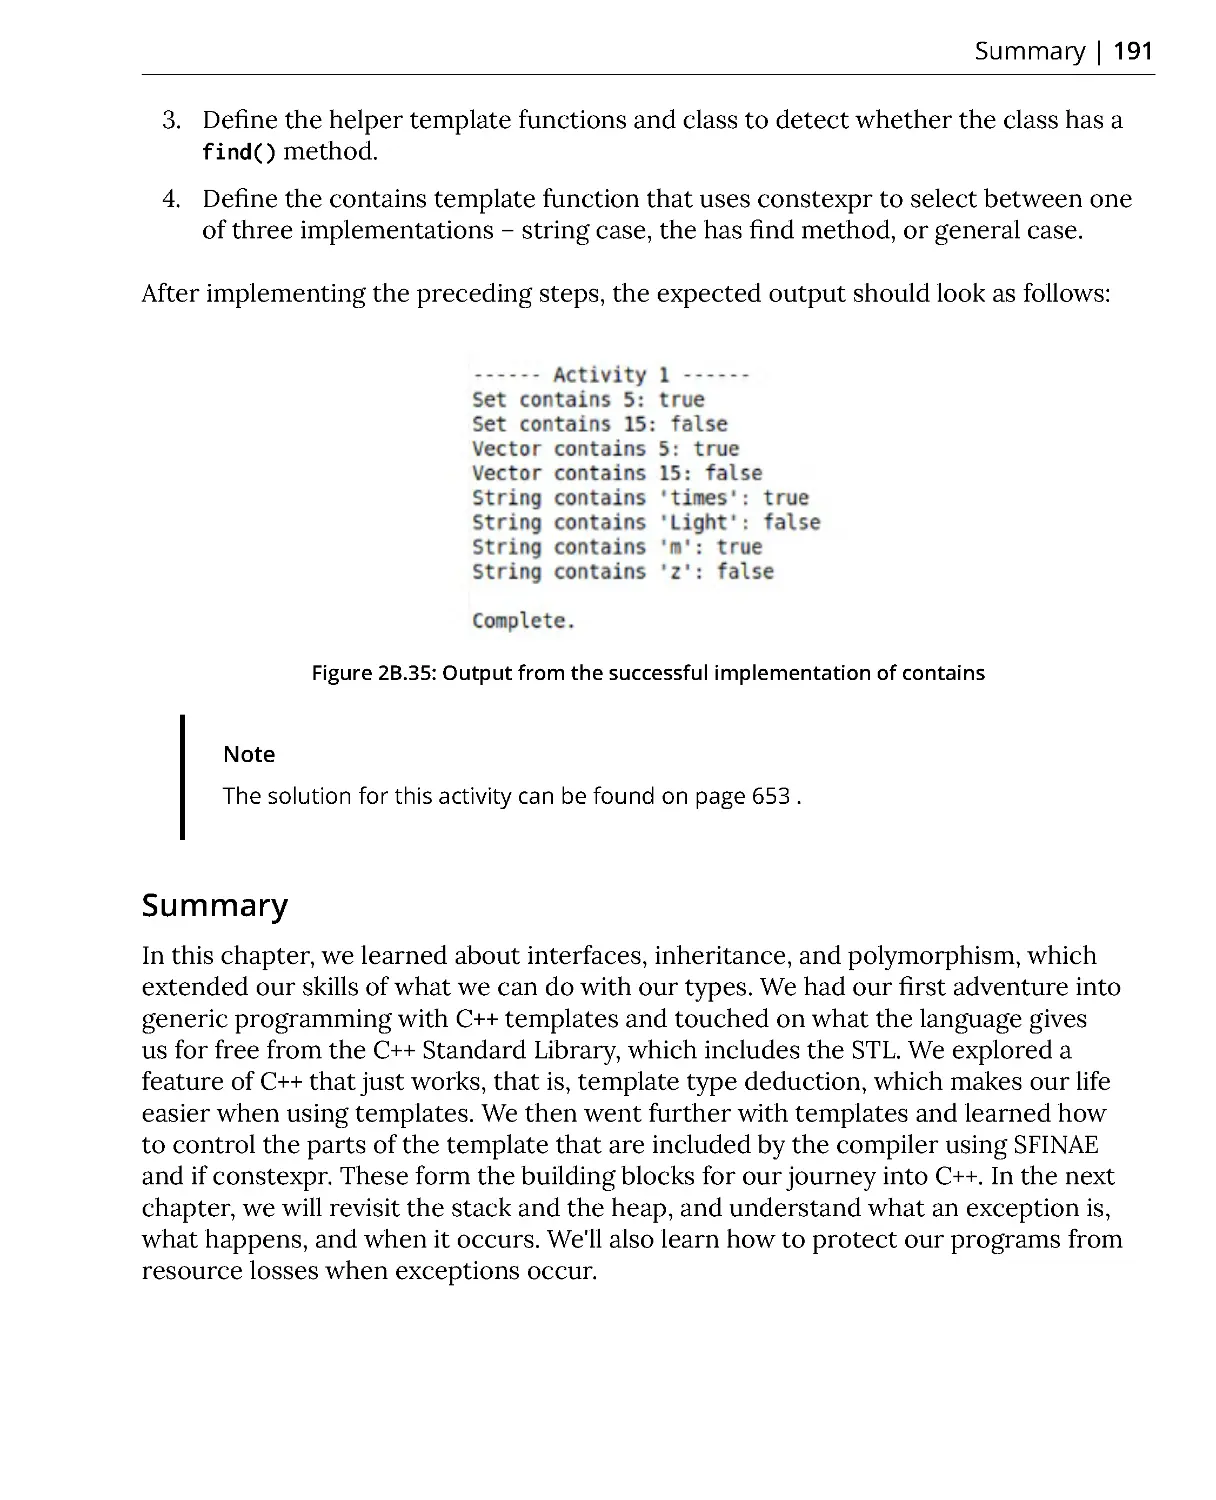
Activity 1: Developing a Generic "contains" Template Function ............... 190
Summary ..................................................................................................... 191
Chapter 3: No Leaks Allowed - Exceptions and Resources 193
Introduction ................................................................................................ 194
Variable Scope and Lifetime .......................................................................... 194
Exceptions in C++ ....................................................................................... 200
The Need for Exceptions ................................................................................ 200
Stack Unwinding ............................................................................................. 206
Exercise 1: Implementing exceptions in Fraction and Stack ..................... 206
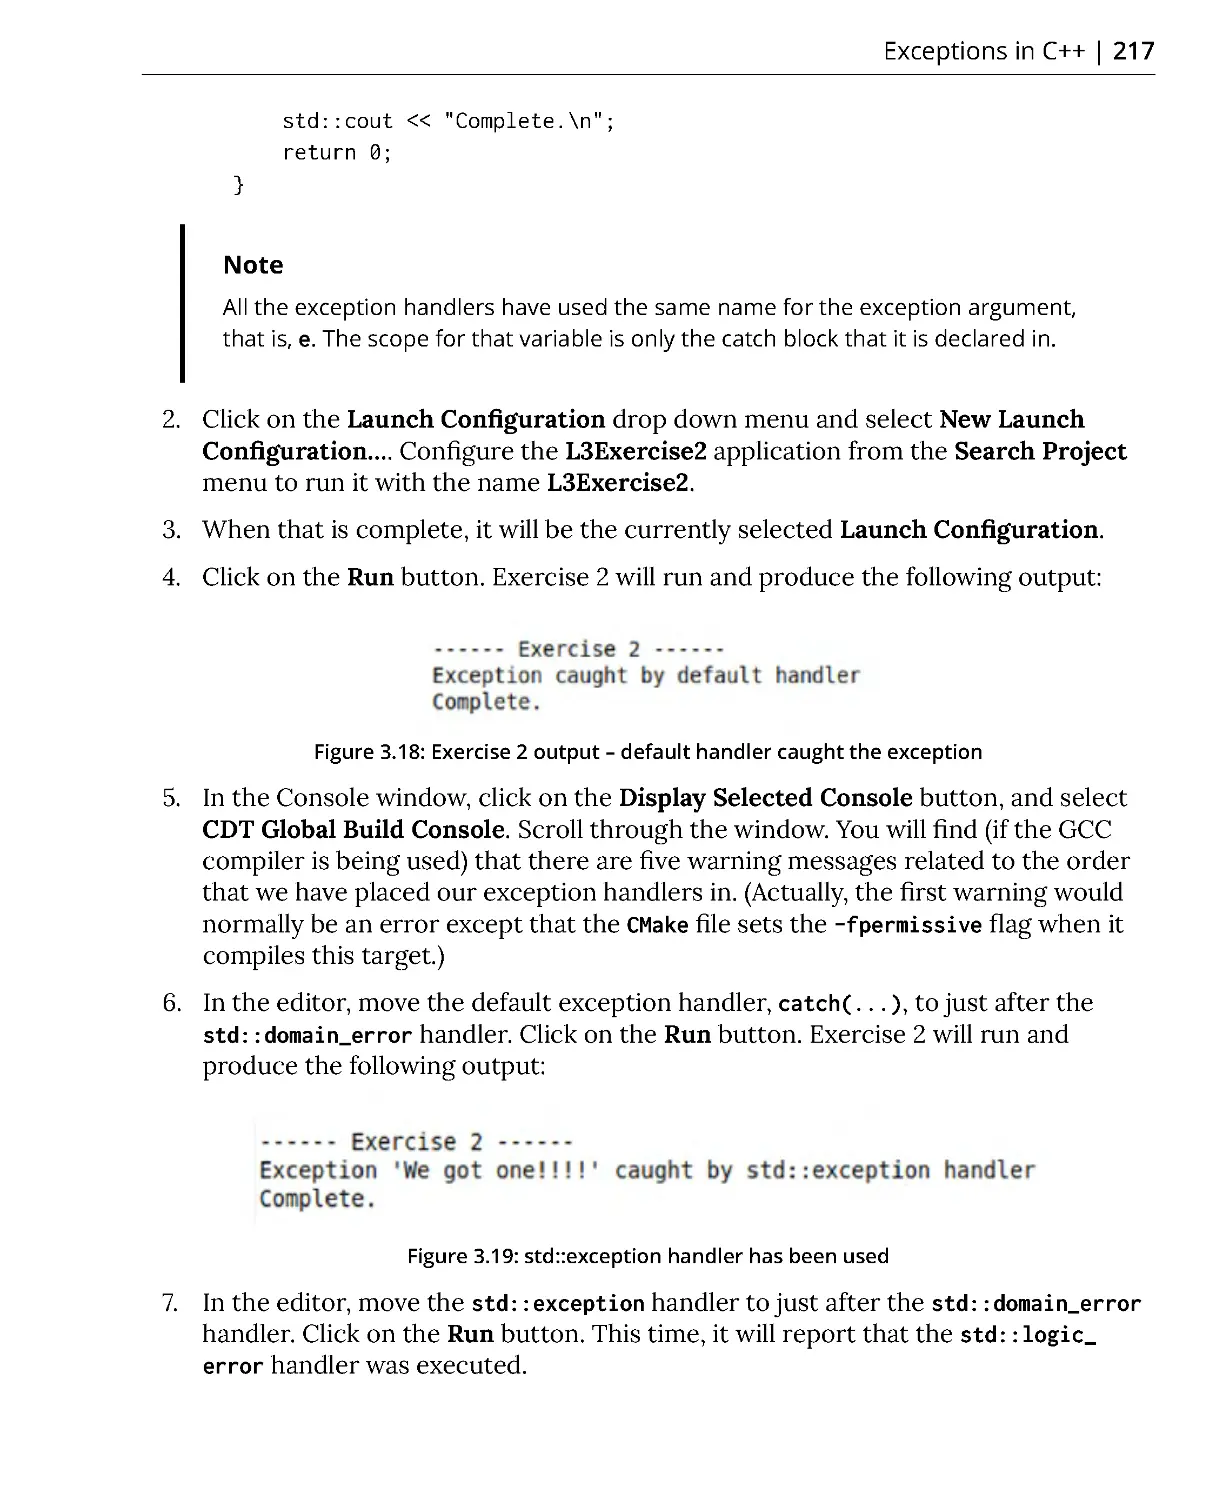
What Happens When an Exception is Thrown? ........................................... 212
Throw-by-Value or Throw-by-Pointer ........................................................... 212
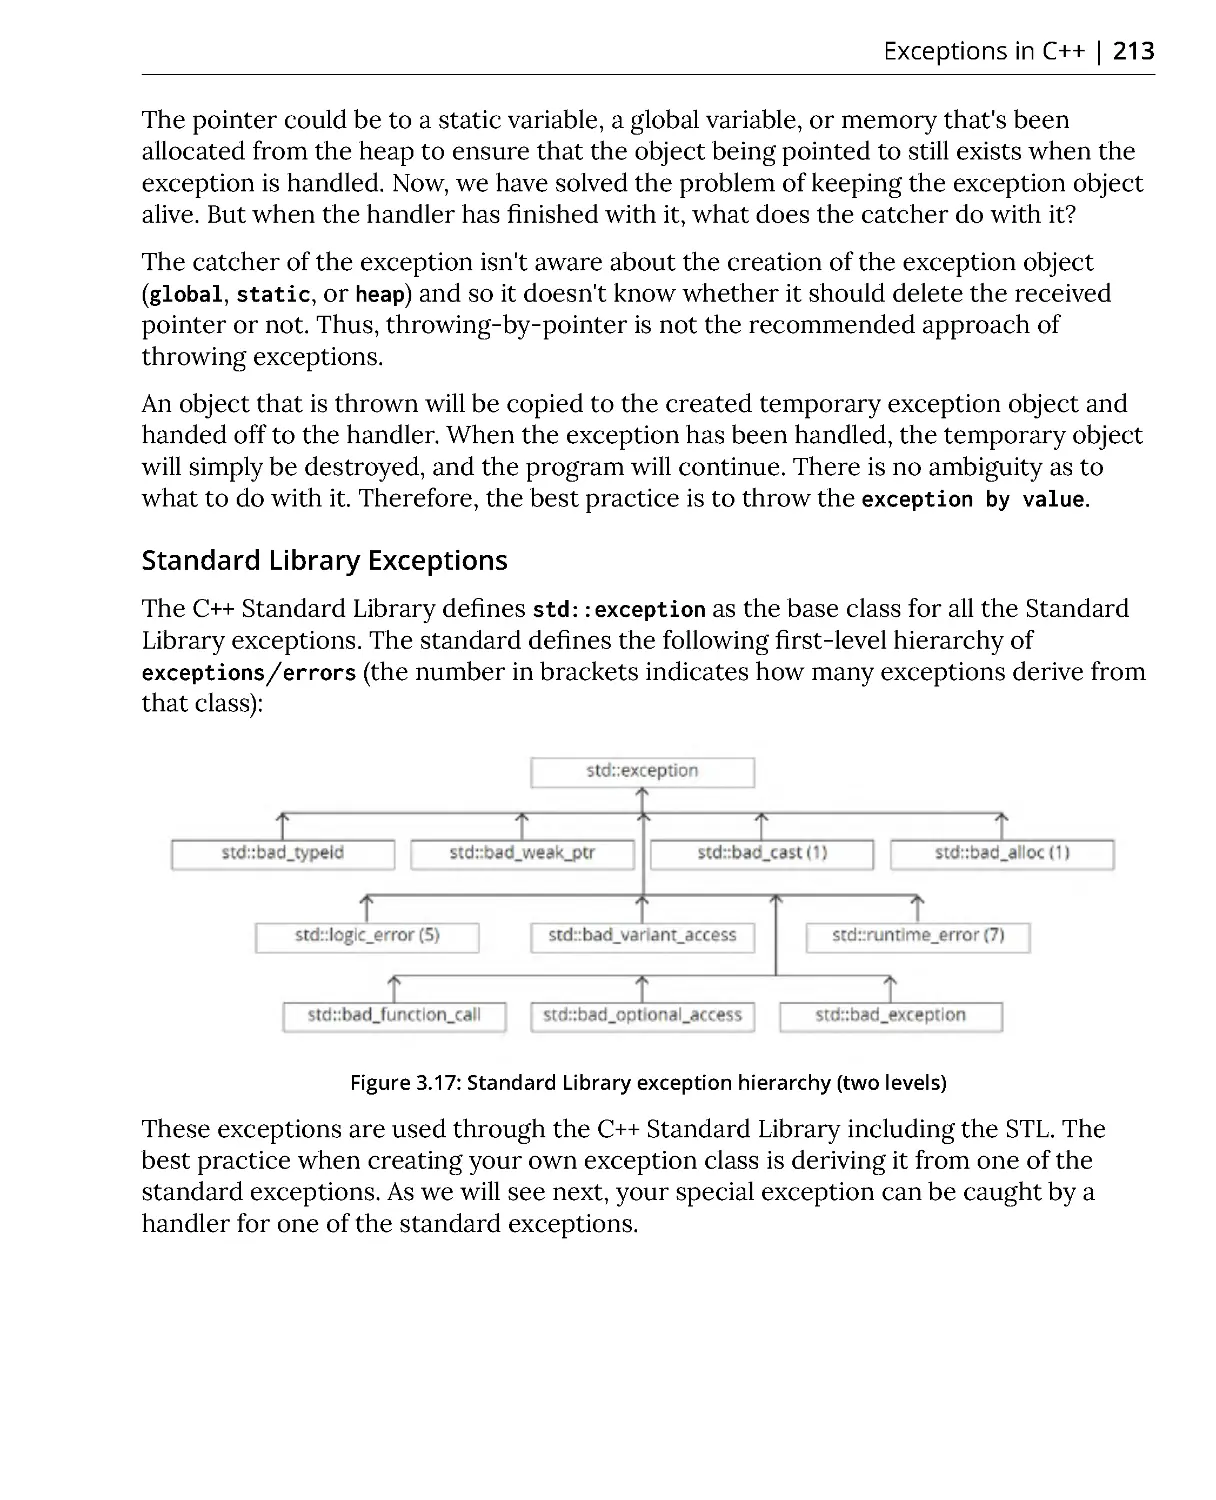
Standard Library Exceptions ......................................................................... 213
Catching Exceptions ....................................................................................... 214
Exercise 2: Implementing Exception Handlers ............................................ 216
CMake Generator Expressions ...................................................................... 218
Exception Usage Guidelines .......................................................................... 219
Resource Management (in an Exceptional World) ................................ 219
Resource Acquisition Is Initialization ........................................................... 220
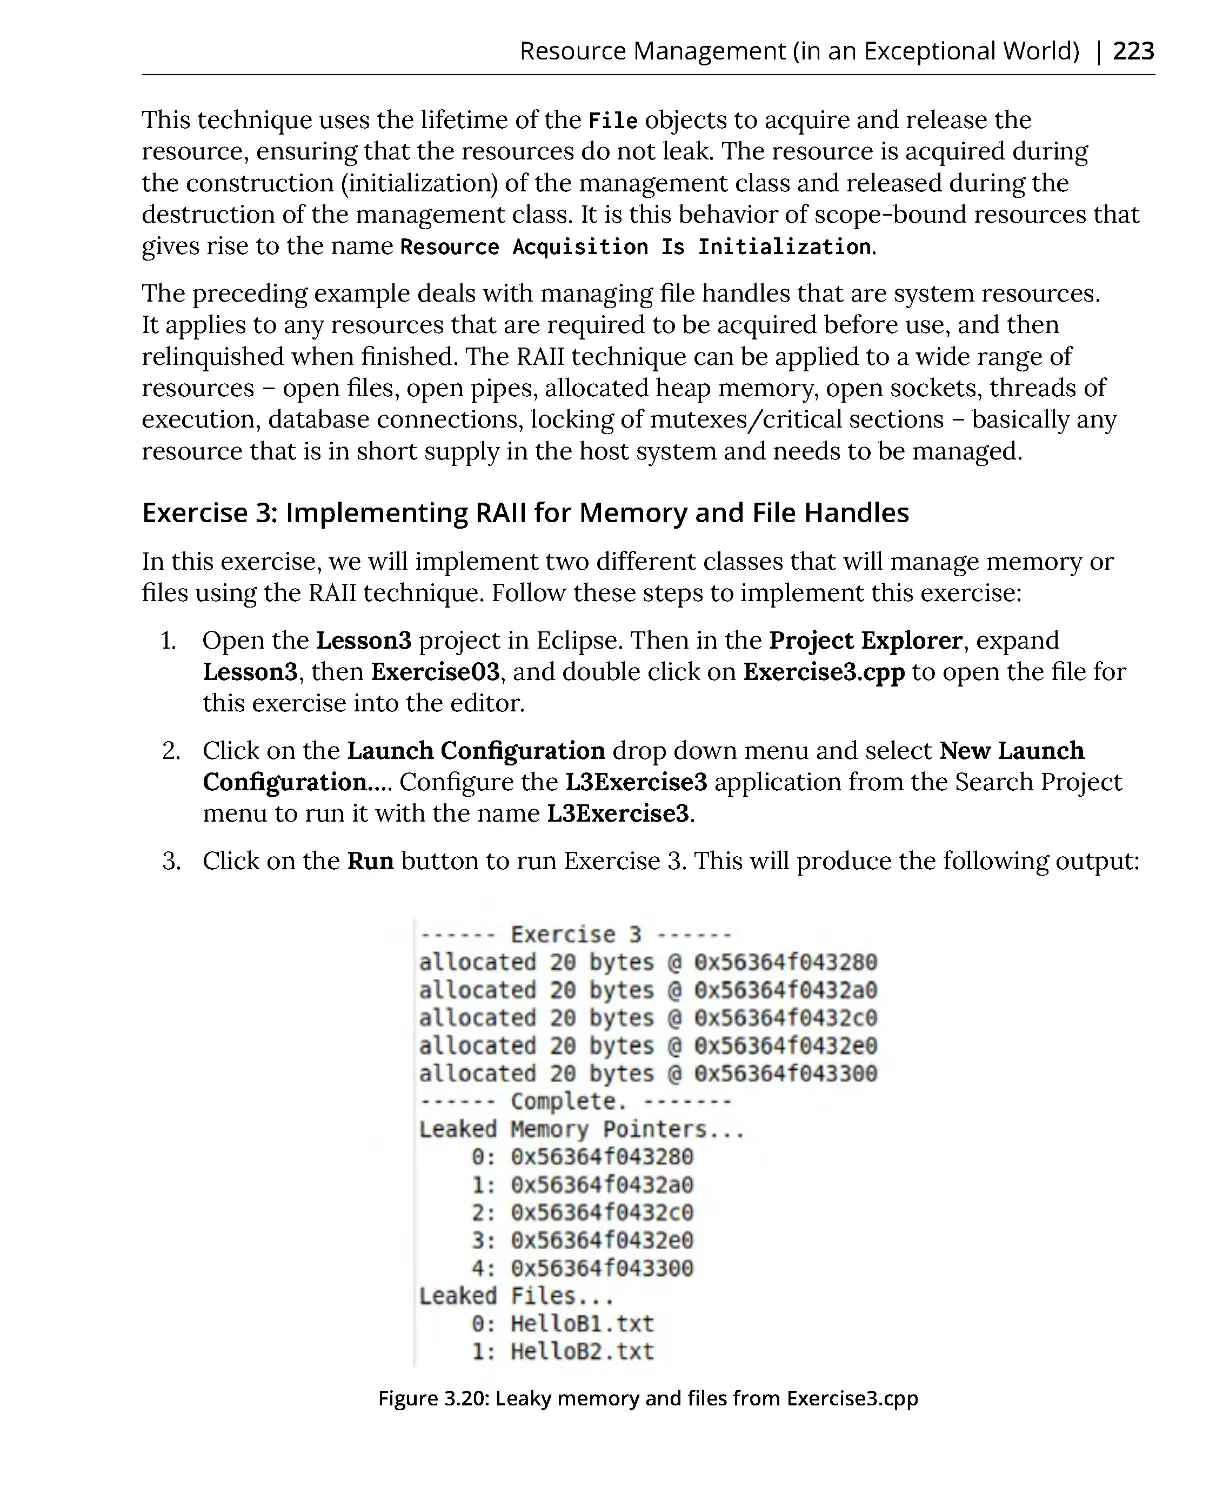
Exercise 3: Implementing RAII for Memory and File Handles ................... 223
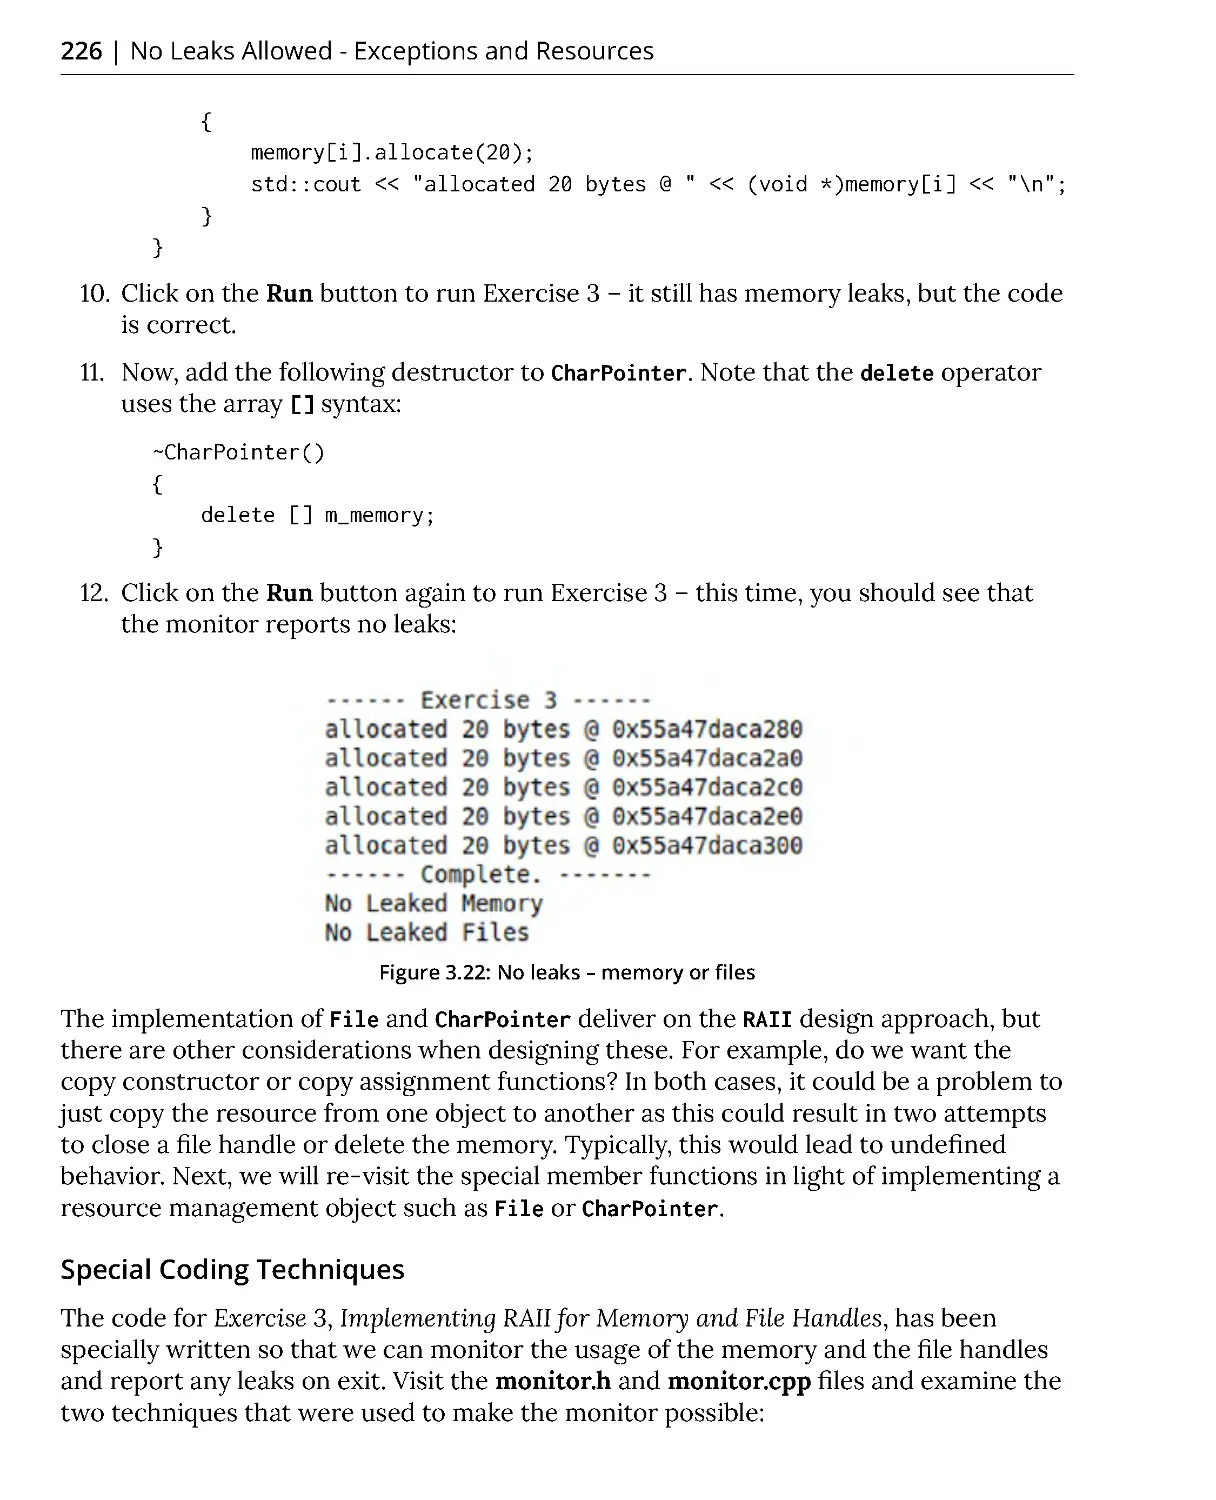
Special Coding Techniques ............................................................................ 226
C++ doesn't Need finally ................................................................................ 227
RAII and the STL .............................................................................................. 227
Who Owns This Object? .................................................................................. 227
Temporary Objects ......................................................................................... 229
Move Semantics .............................................................................................. 229
Implementing a Smart Pointer ...................................................................... 230
STL Smart Pointers ......................................................................................... 235
std::unique_ptr ............................................................................................... 236
std::shared_ptr ............................................................................................... 237
std::weak_ptr ................................................................................................... 238
Smart Pointers and Calling Functions .......................................................... 241
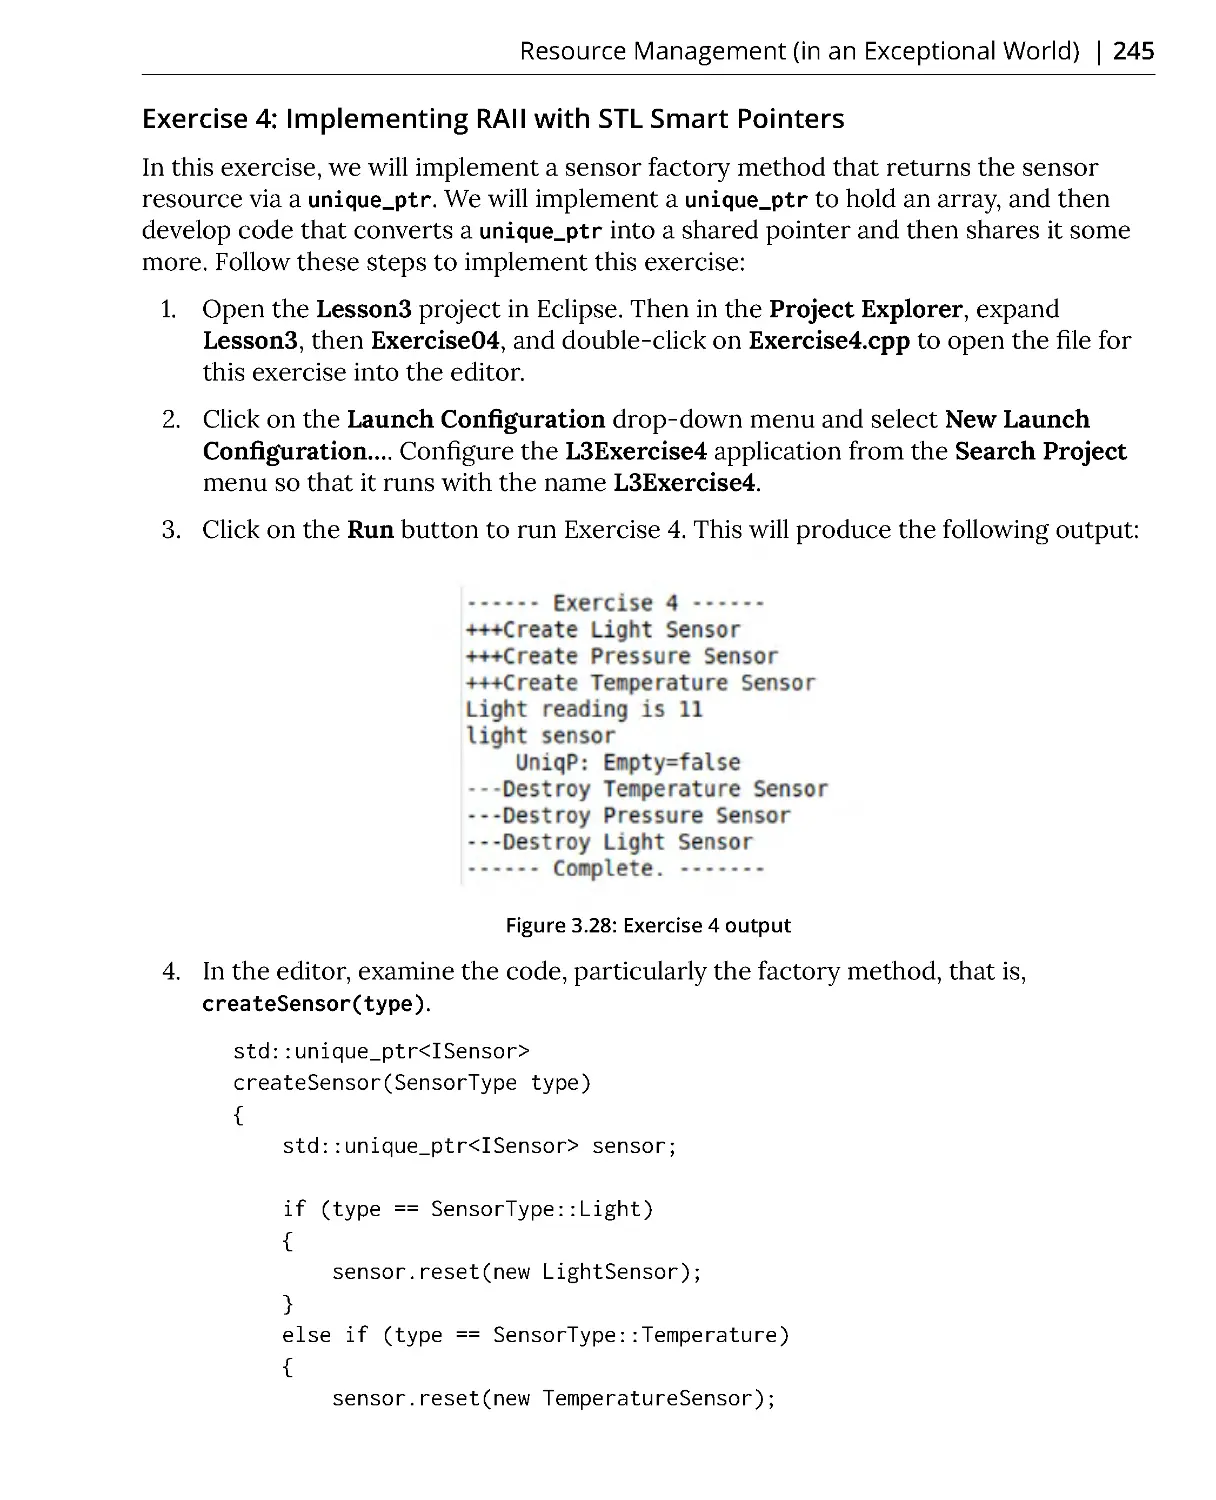
Exercise 4: Implementing RAII with STL Smart Pointers ............................ 245
Rule of Zero/Five – A Different Perspective ................................................. 250
Activity 1: Implementing Graphics Processing with RAII and Move ......... 252
When is a Function Called? ............................................................................ 253
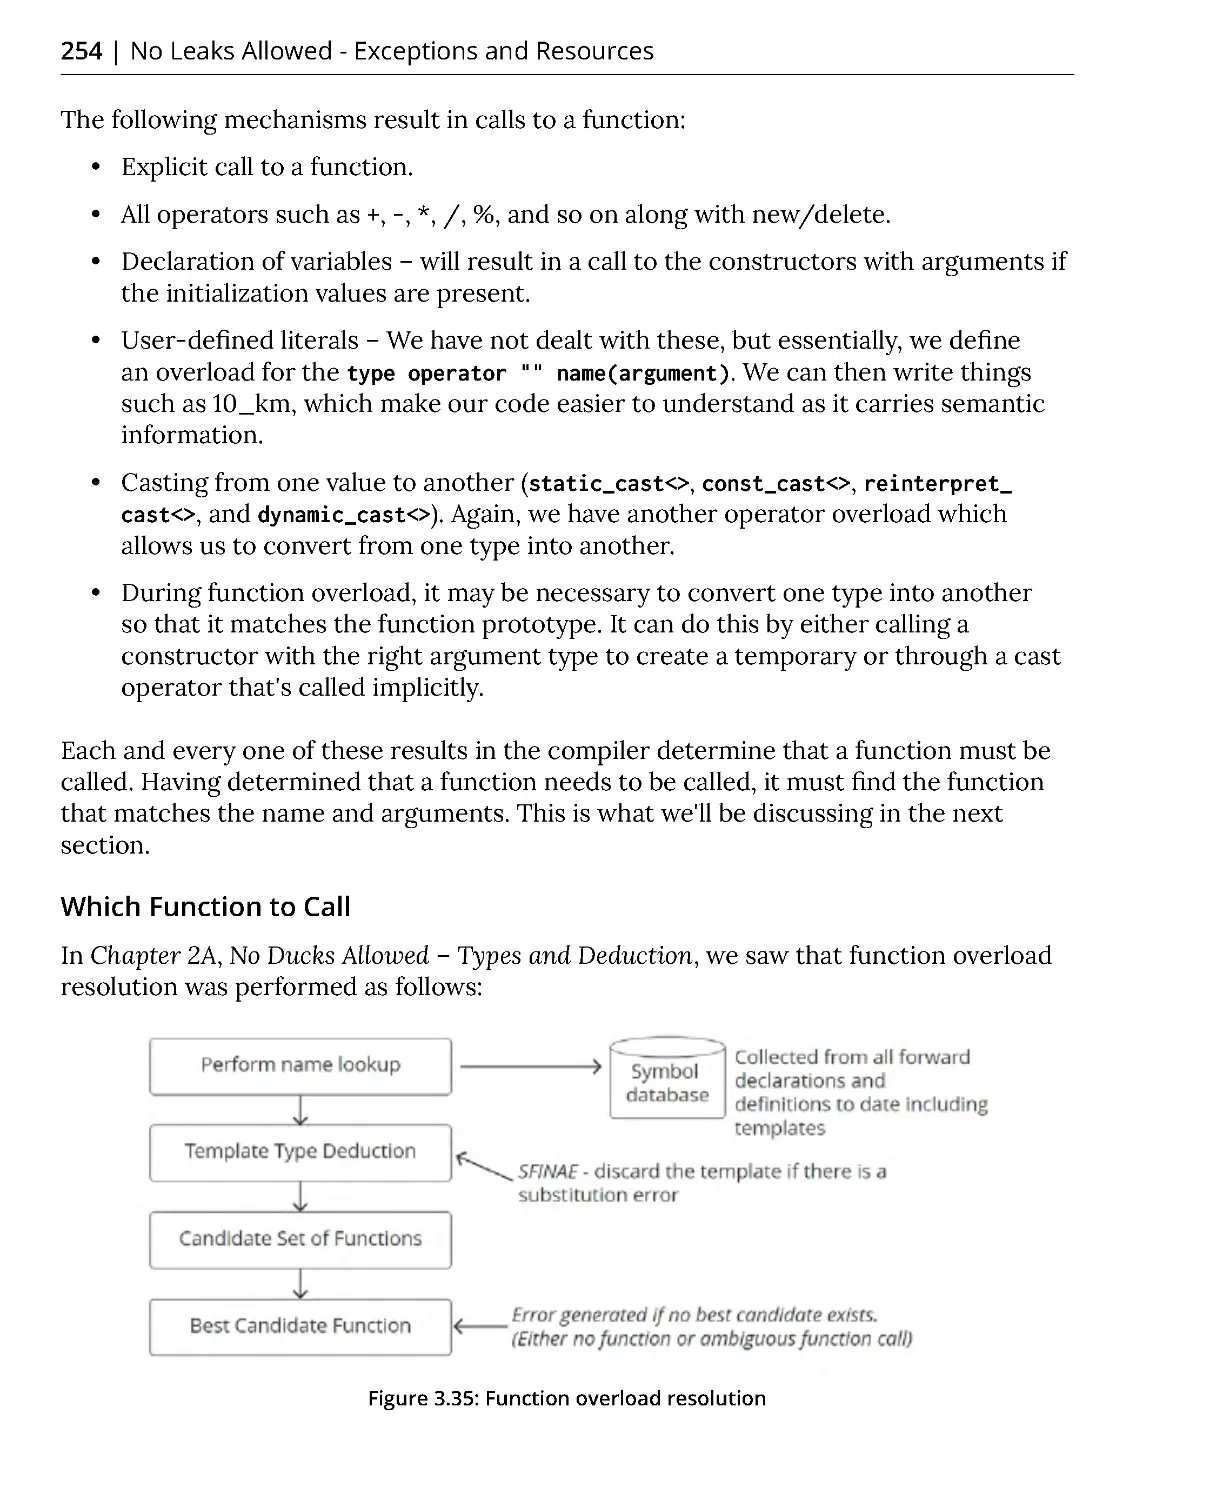
Which Function to Call .................................................................................... 254
Identifiers ......................................................................................................... 255
Names .............................................................................................................. 255
Name lookup ................................................................................................... 256
Argument-Dependent Lookup ...................................................................... 256
Caveat Emptor ................................................................................................ 258
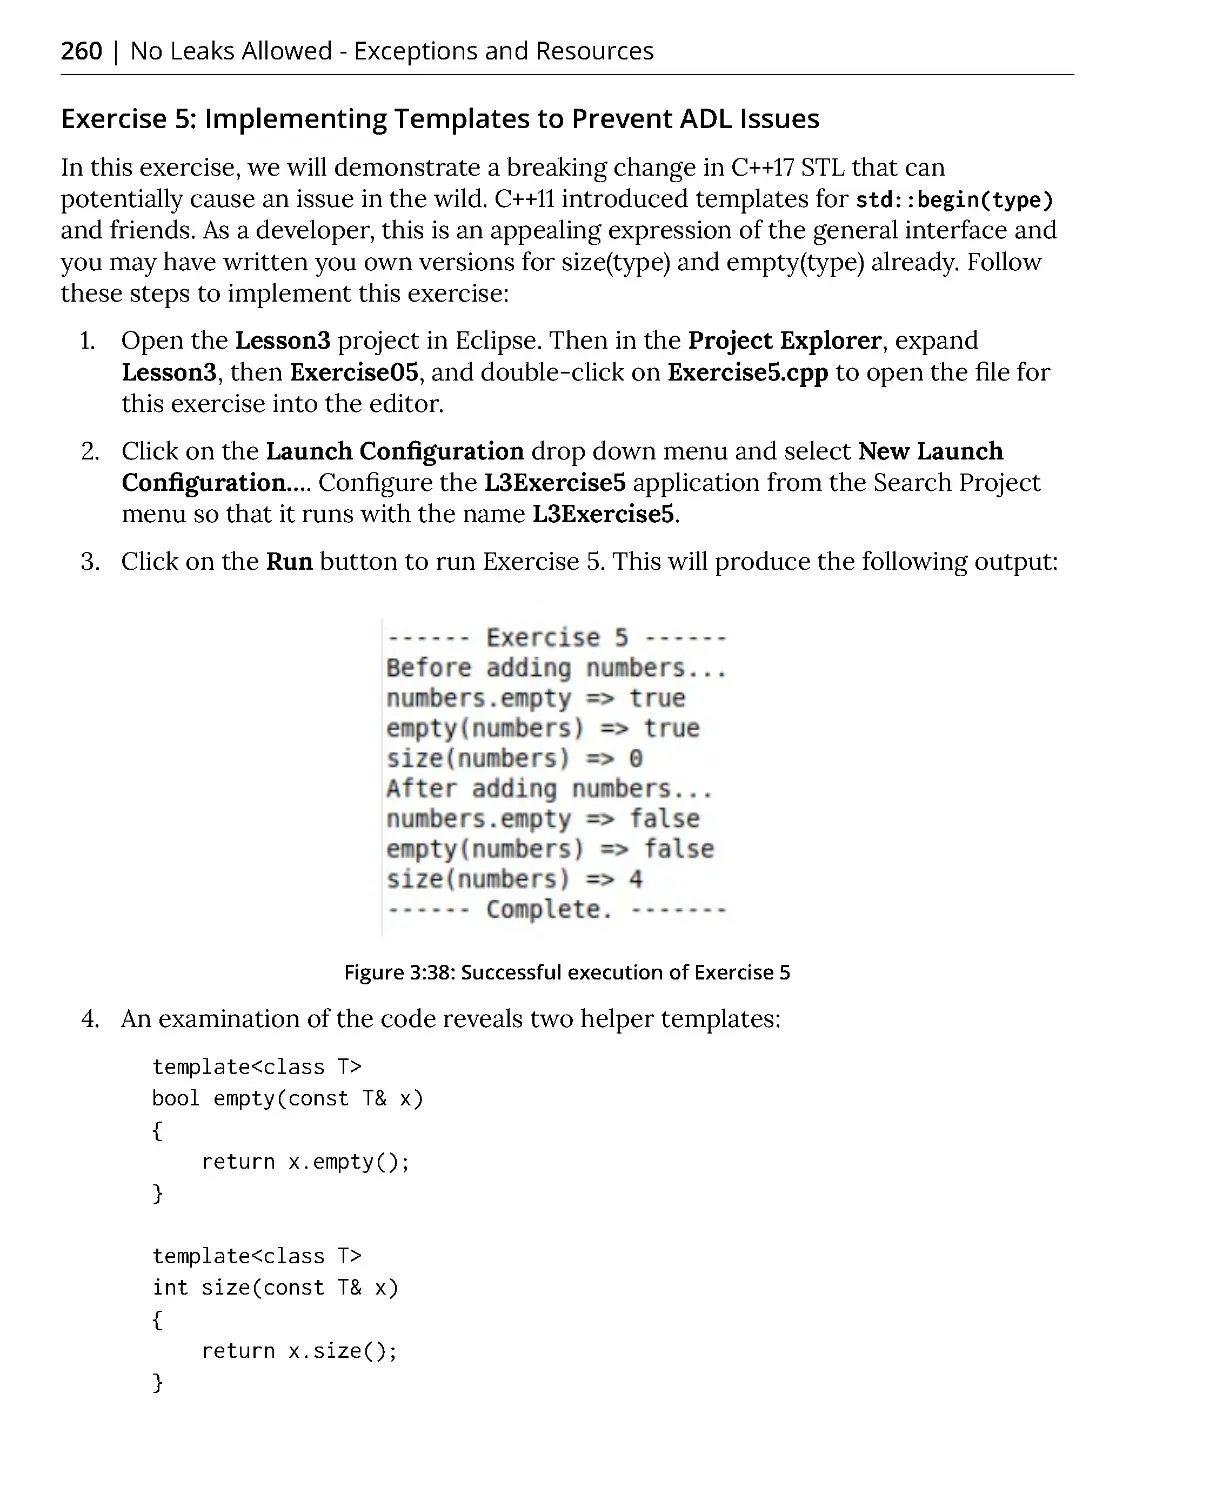
Exercise 5: Implementing Templates to Prevent ADL Issues .................... 260
Implicit Conversion ......................................................................................... 262
Explicit – Preventing Implicit Conversion .................................................... 262
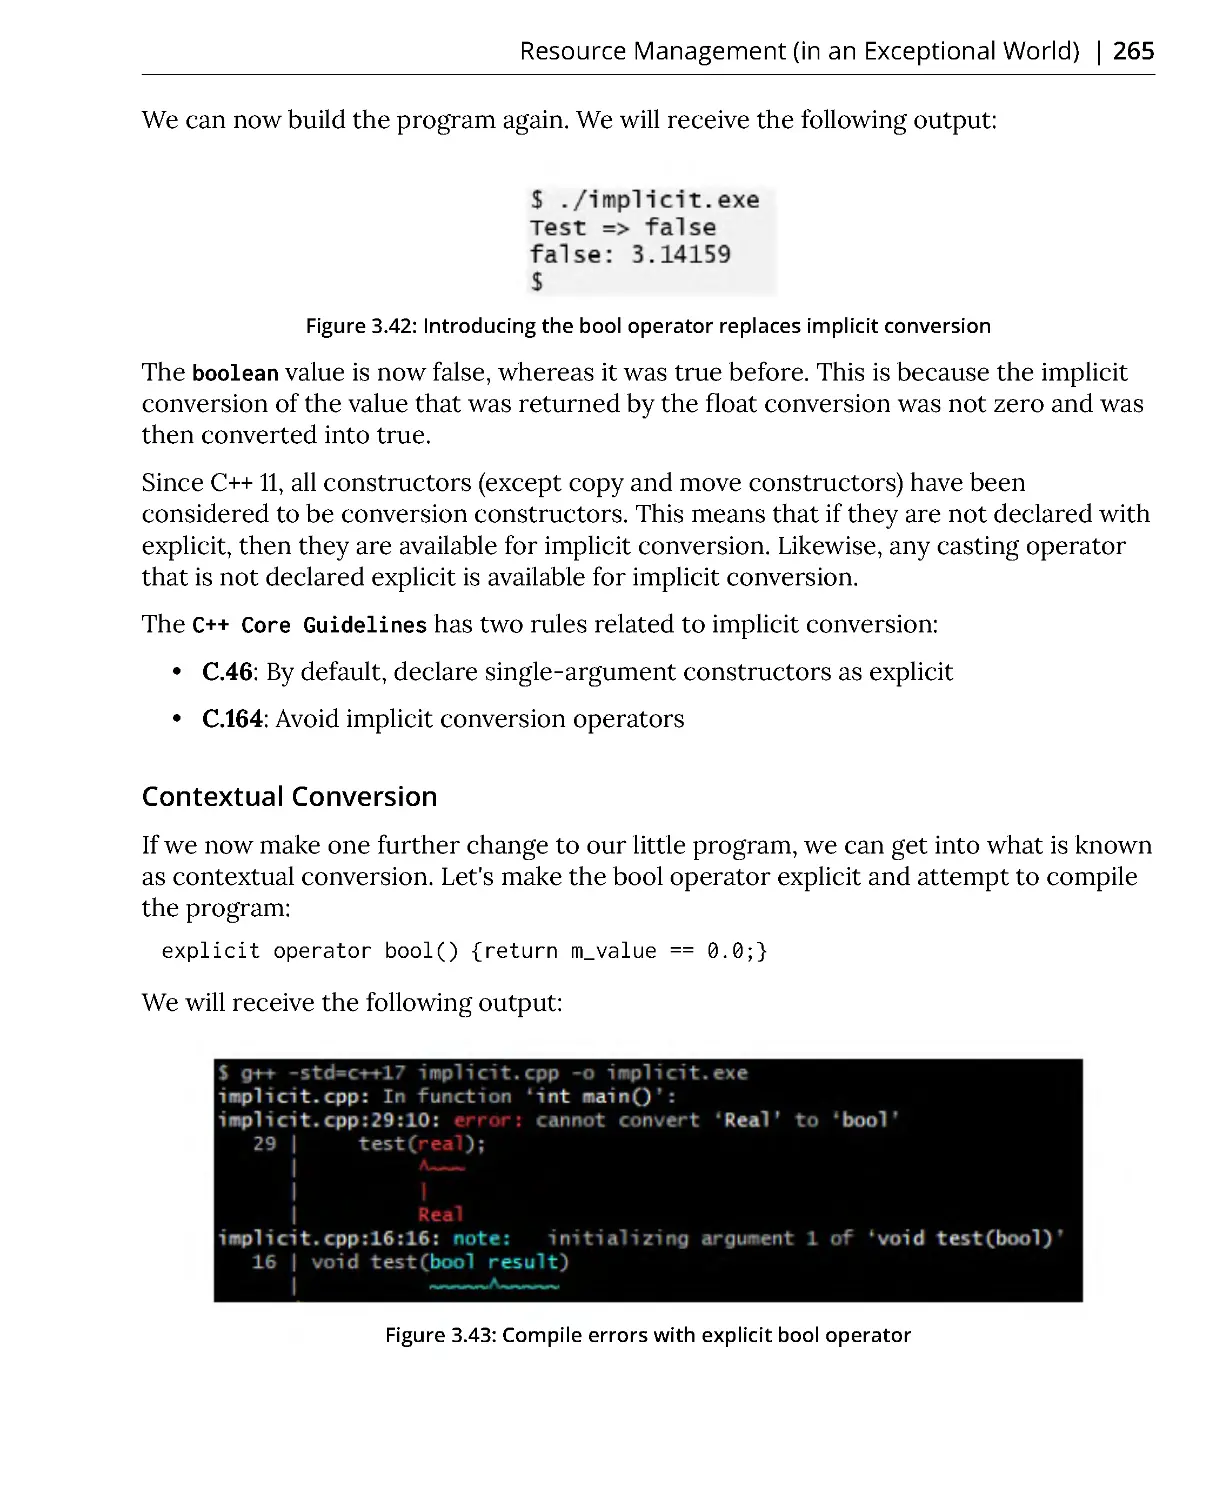
Contextual Conversion ................................................................................... 265
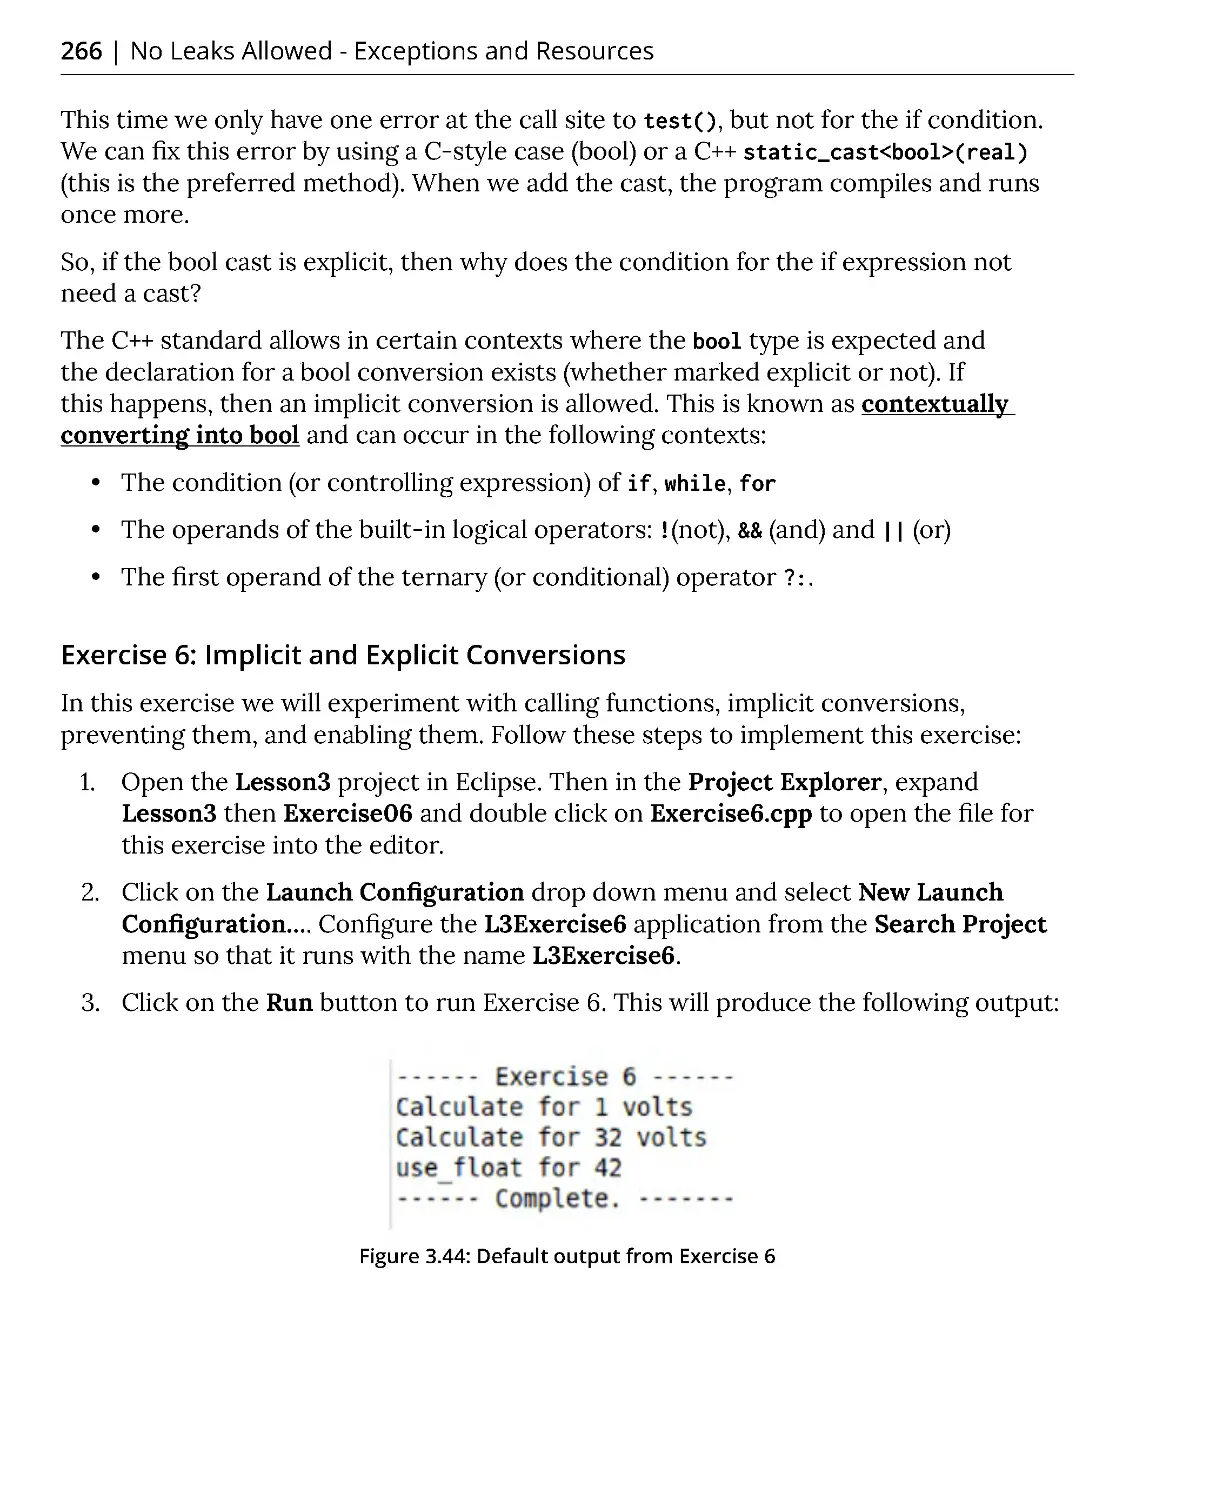
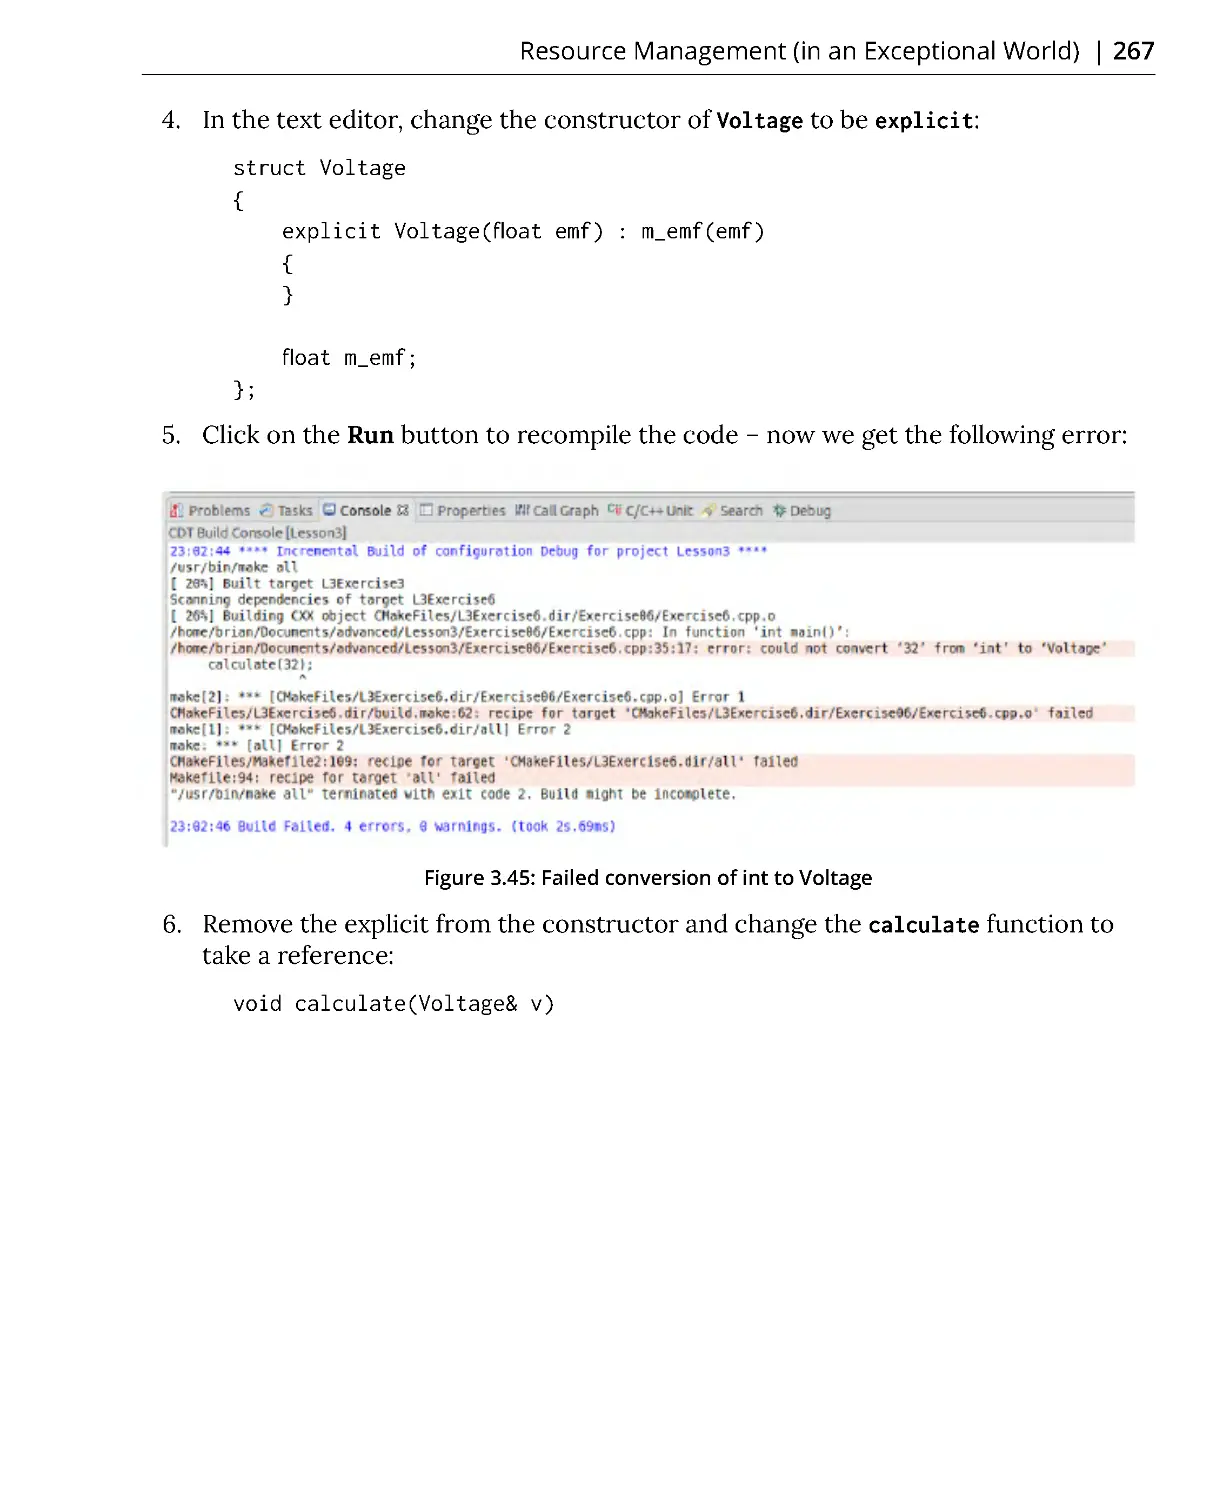
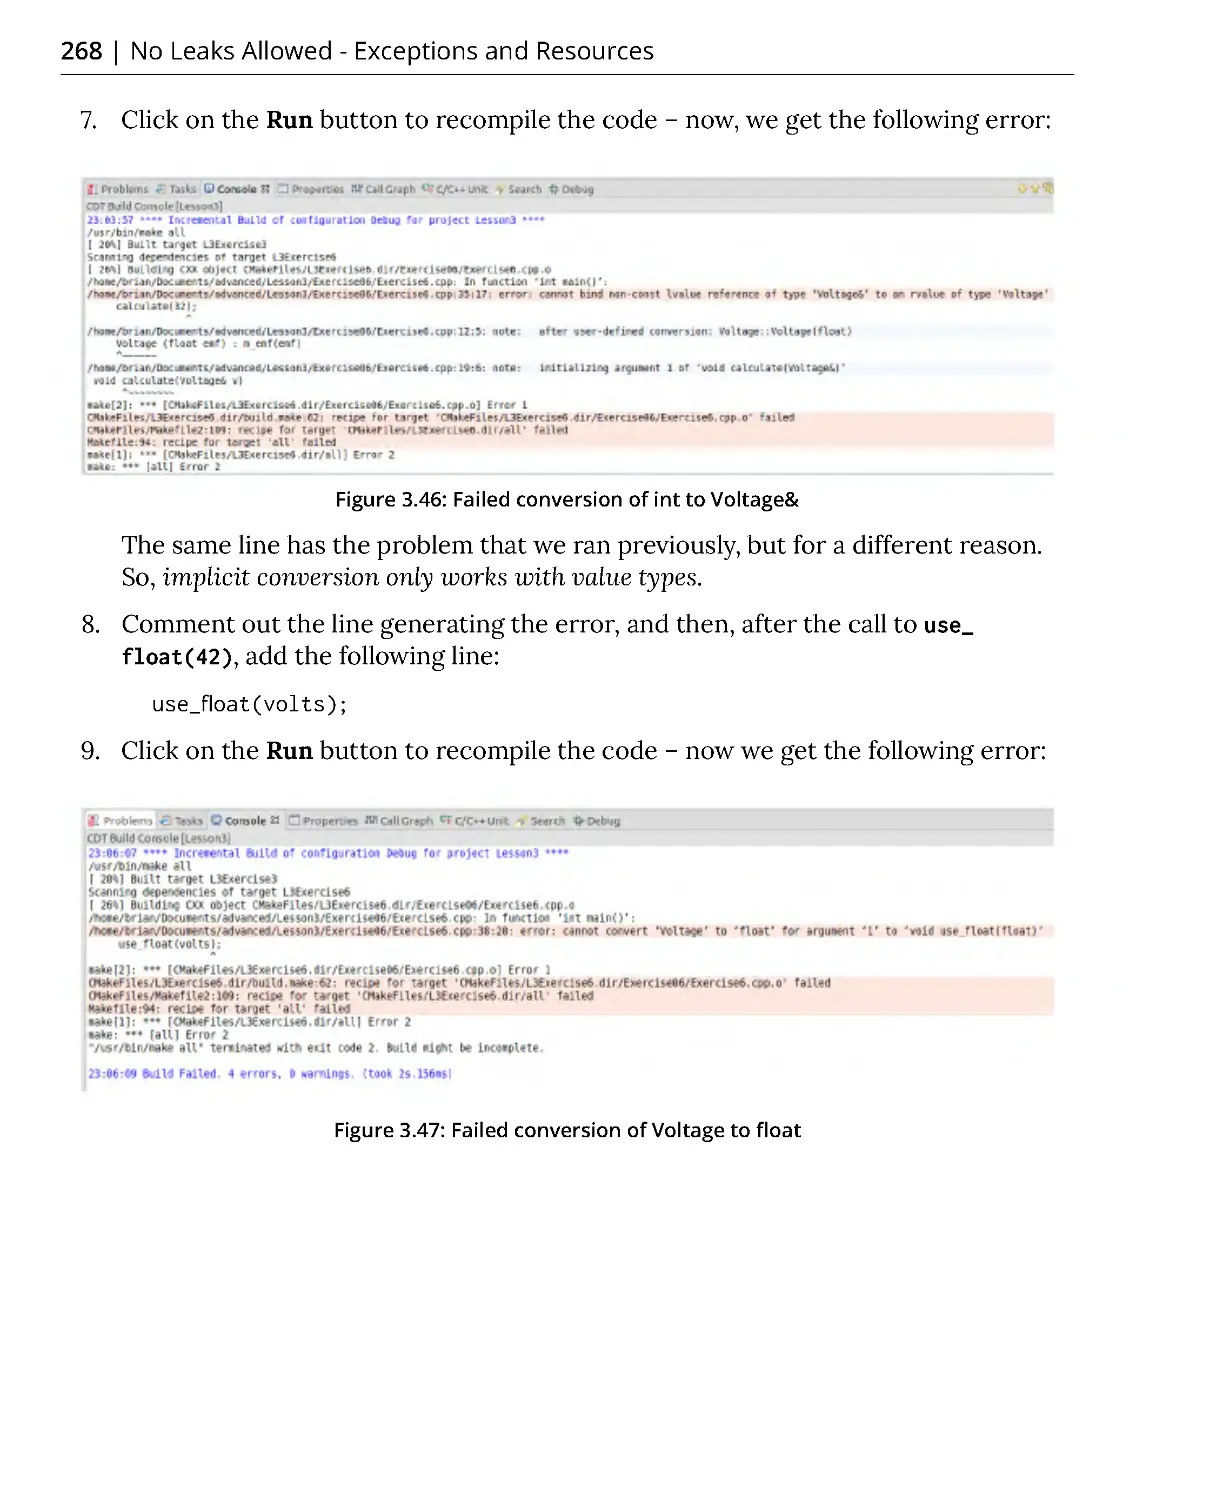
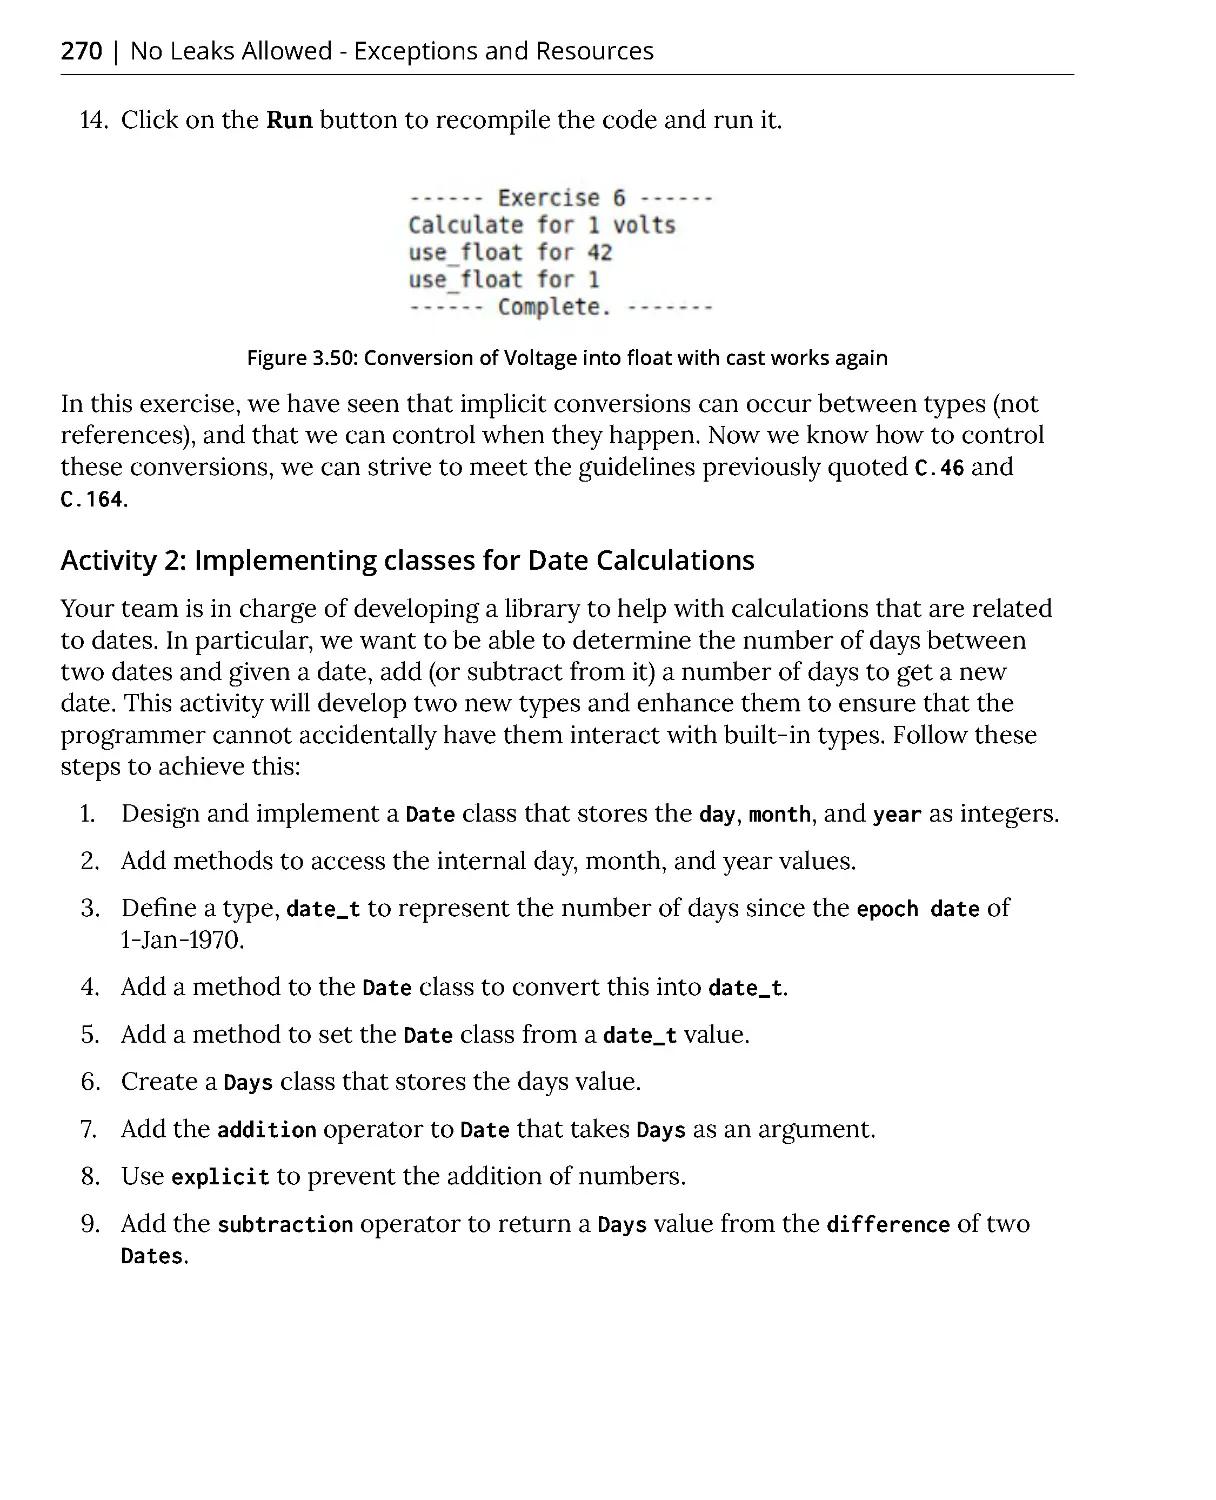
Exercise 6: Implicit and Explicit Conversions .............................................. 266
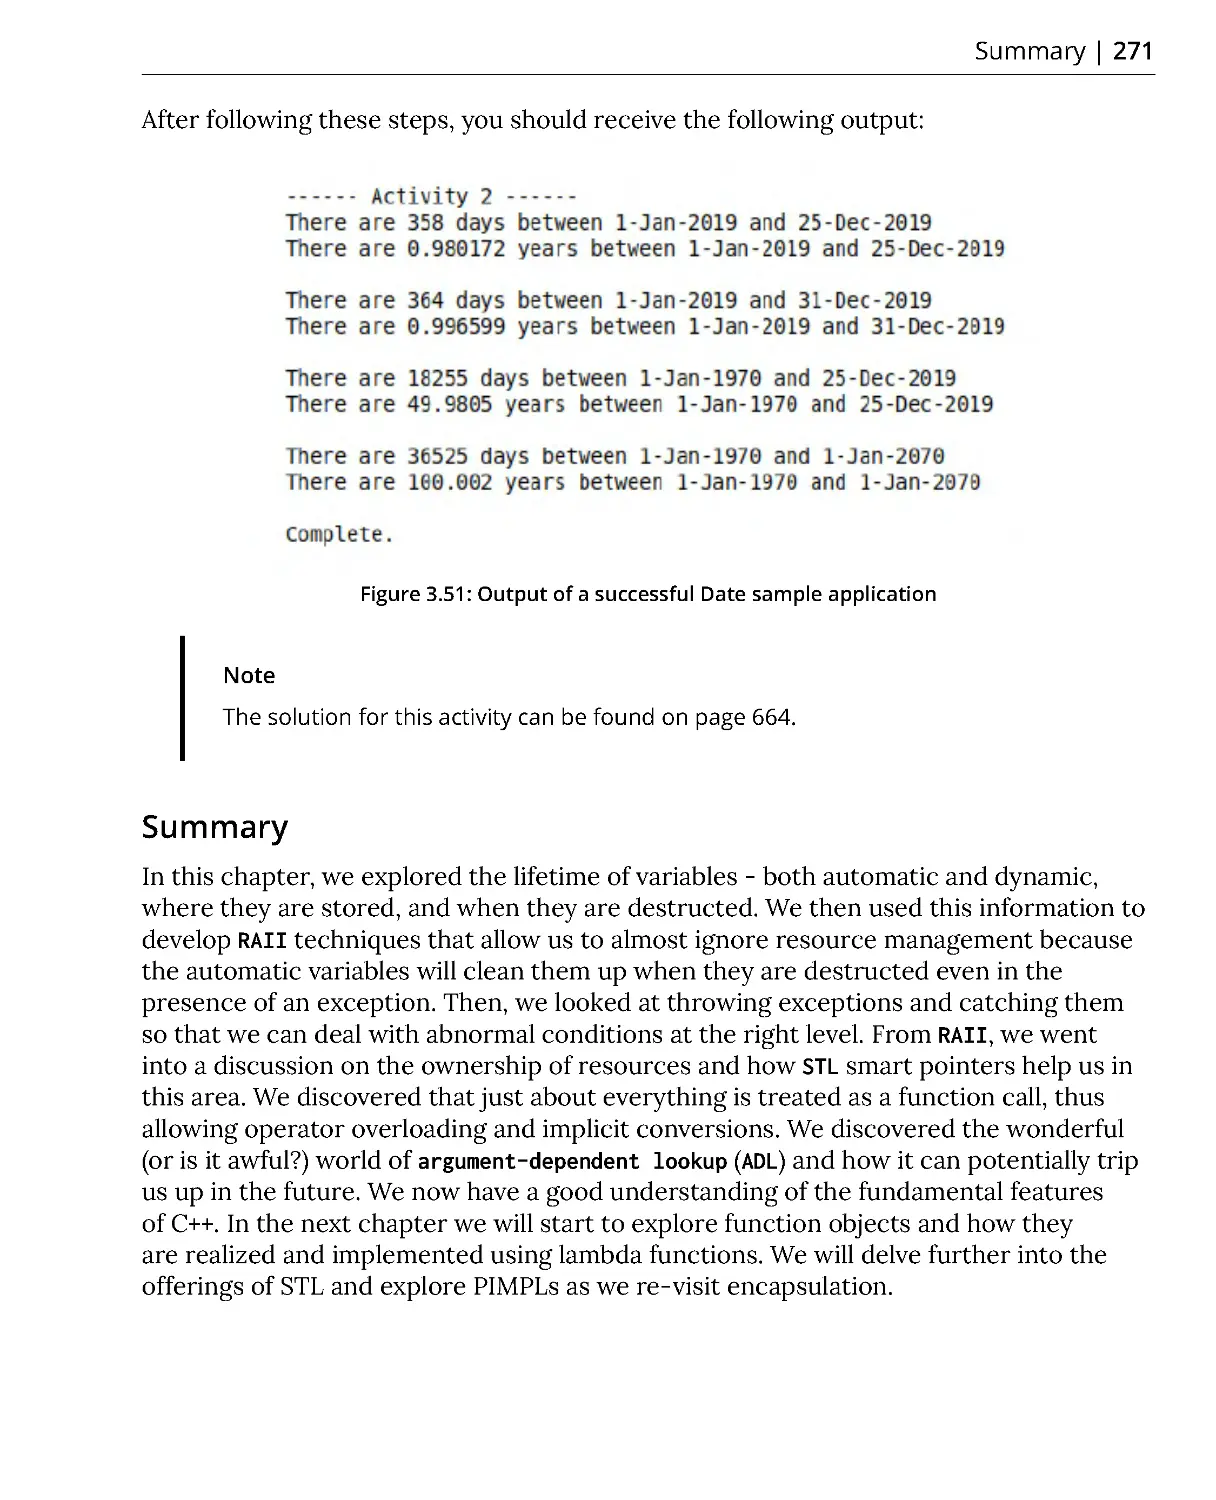
Activity 2: Implementing classes for Date Calculations ............................. 270
Summary ..................................................................................................... 271
Chapter 4: Separation of Concerns - Software
Architecture, Functions, and Variadic Templates
273
Introduction ................................................................................................ 274
The Pointer to Implementation (PIMPL) Idiom ........................................... 274
Logical and Physical Dependencies .............................................................. 274
The Pointer to Implementation (PIMPL) Idiom ........................................... 276
Advantages and Disadvantages of PIMPL .................................................... 280
Implementing PIMPL with unique_ptr<> ..................................................... 280
unique_ptr<> PIMPL Special Functions ........................................................ 283
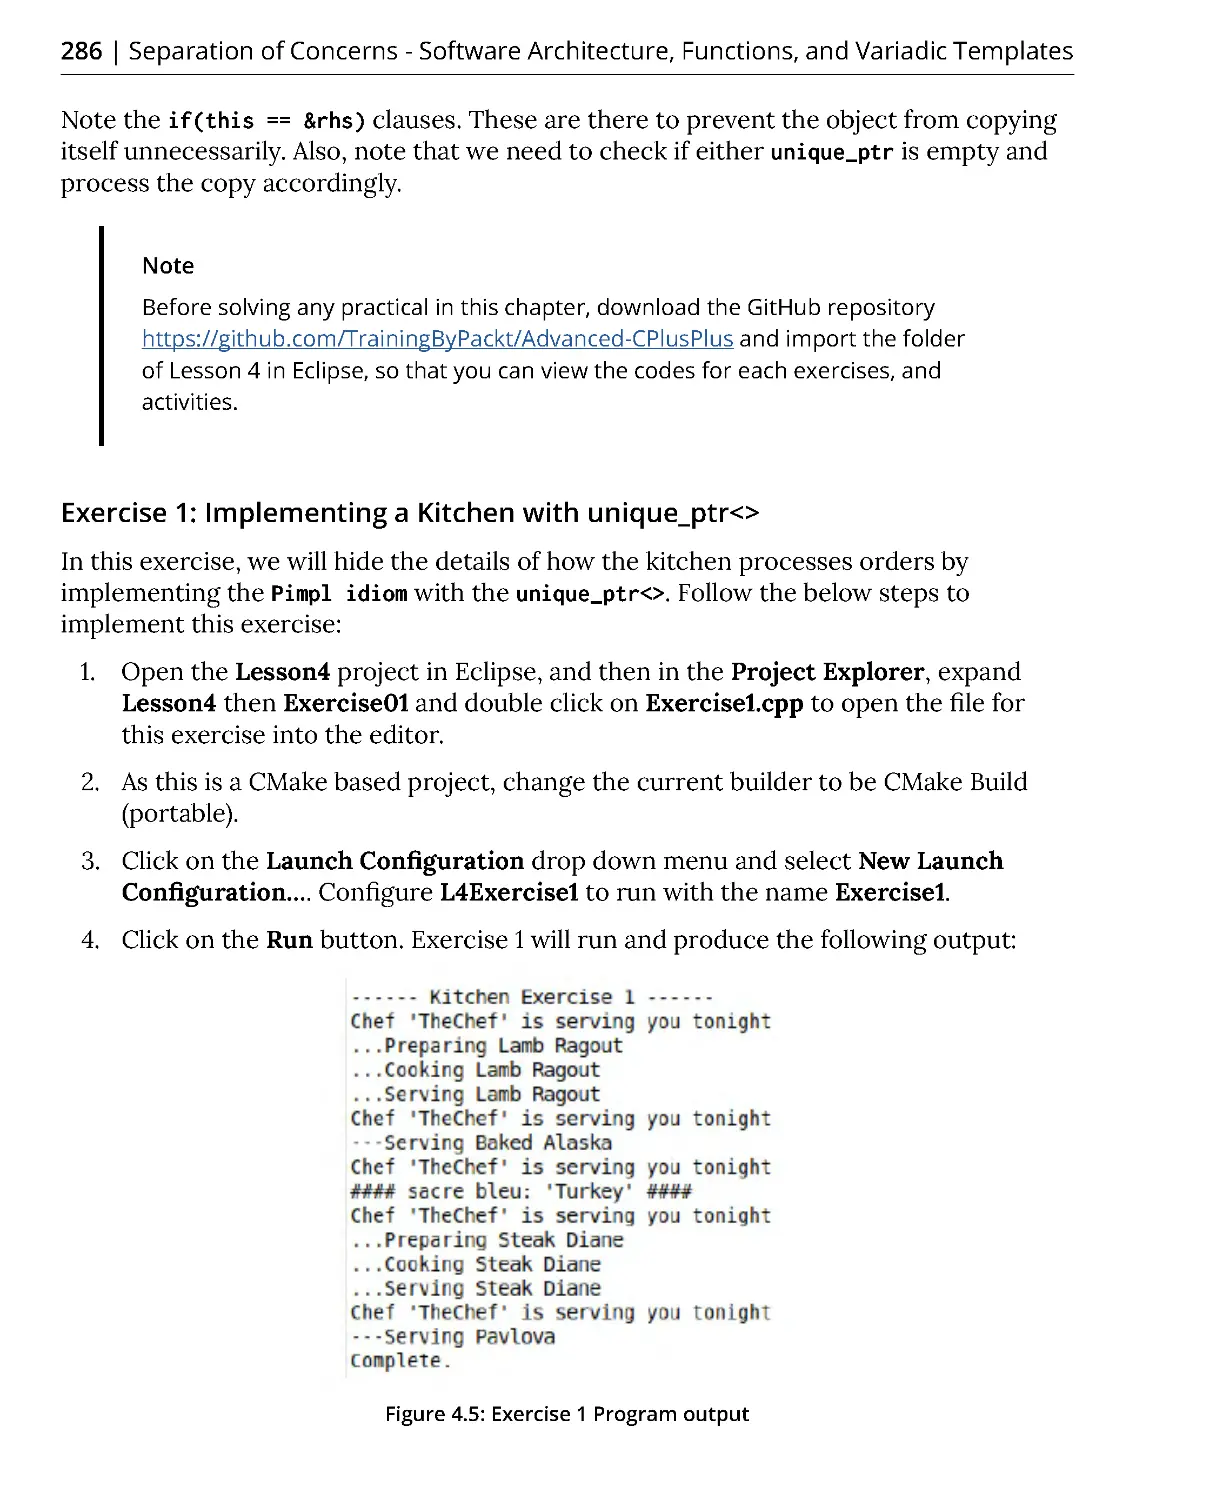
Exercise 1: Implementing a Kitchen with unique_ptr<> ............................ 286
Function Objects and Lambda Expressions ............................................ 290
Function Pointers ............................................................................................ 290
What is a Function Object? ............................................................................ 294
Exercise 2: Implementing function objects ................................................. 297
std::function<> template ............................................................................... 299
Exercise 3: Implementing callbacks with std::function .............................. 302
What is a Lambda Expression? ...................................................................... 305
Capturing data into Lambdas ........................................................................ 307
Exercise 4: Implementing Lambdas .............................................................. 309
Variadic Templates .................................................................................... 313
Activity 1: Implement a multicast event handler ....................................... 317
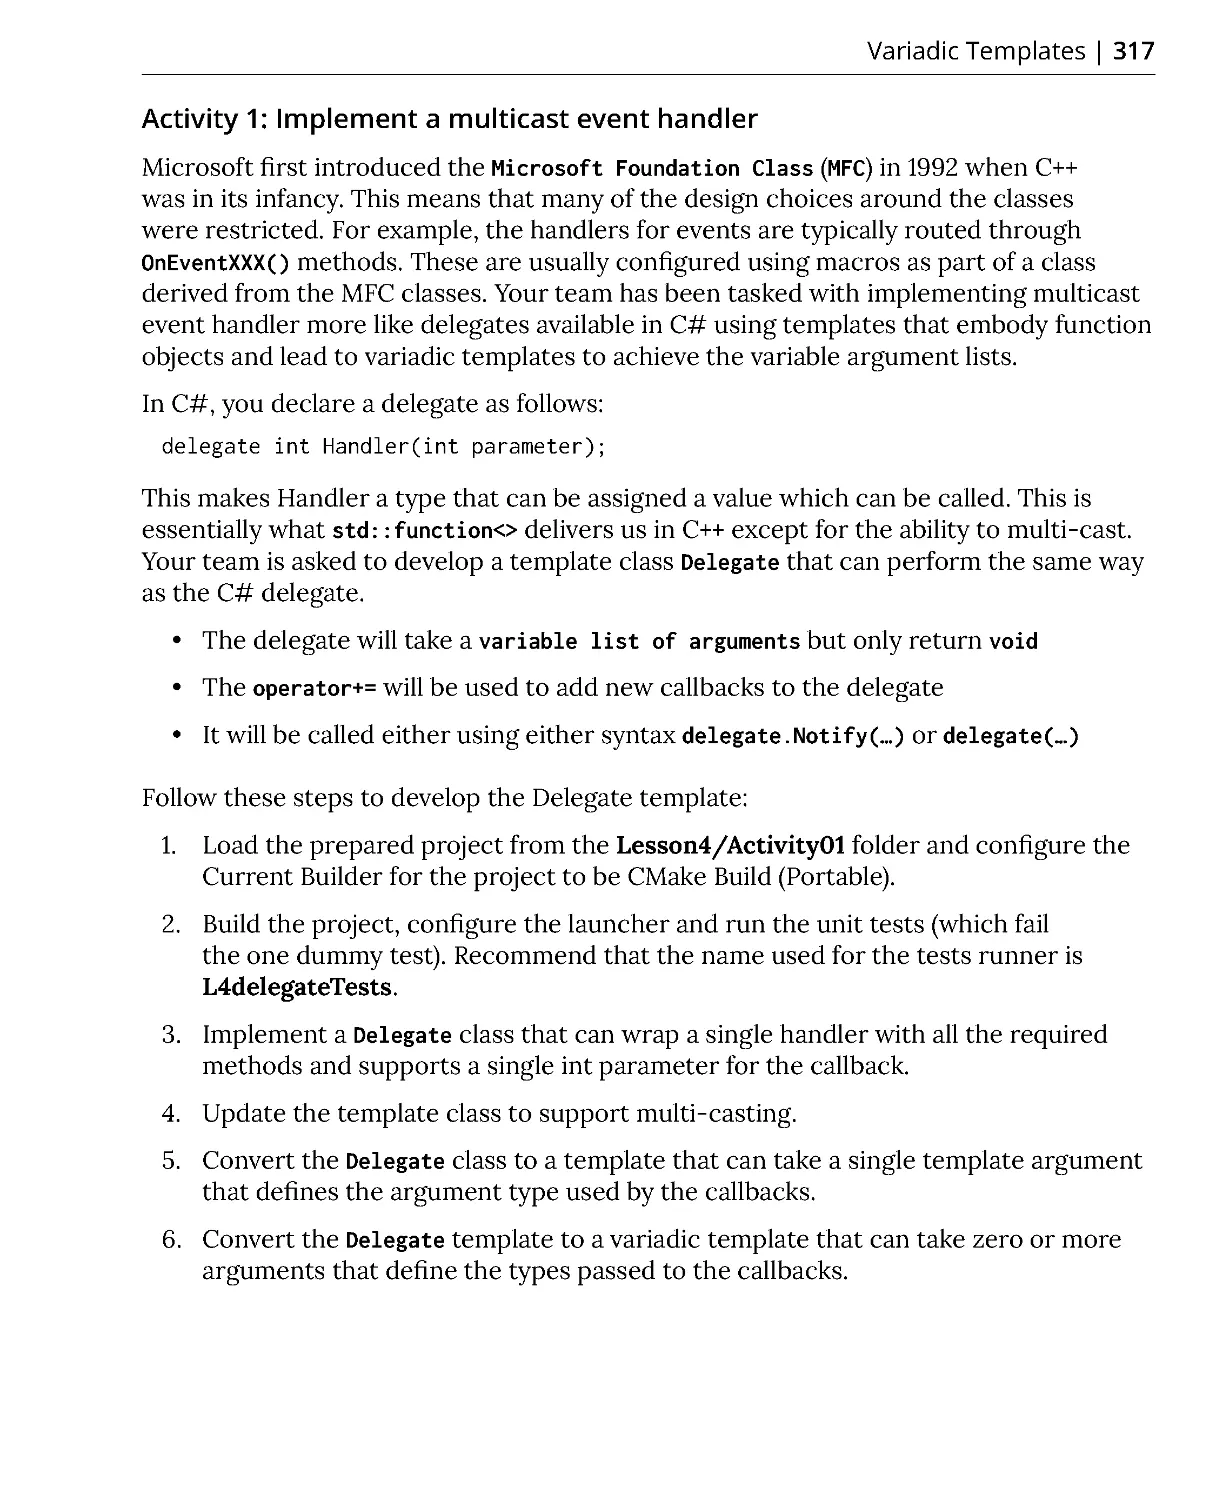
Summary ..................................................................................................... 318
Chapter 5: The Philosophers' Dinner – Threads and
Concurrency
321
Introduction ................................................................................................ 322
Synchronous, Asynchronous, and Threaded Execution ....................... 323
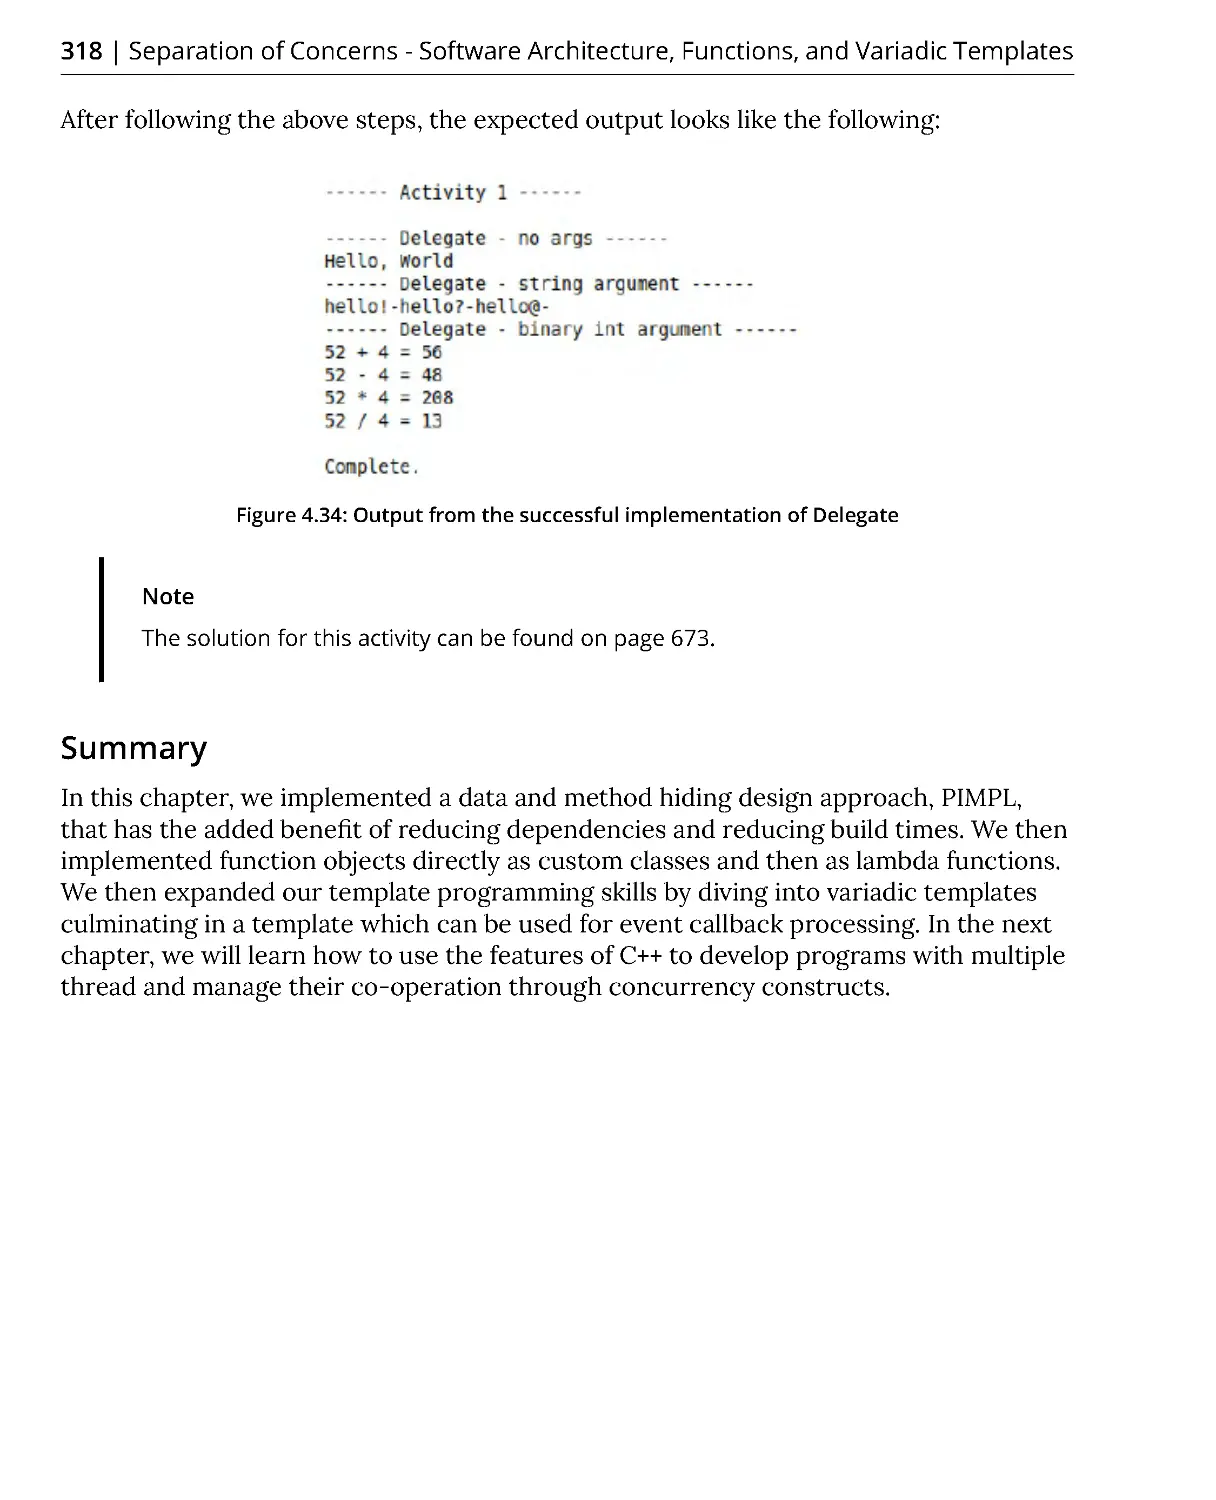
Concurrency .................................................................................................... 323
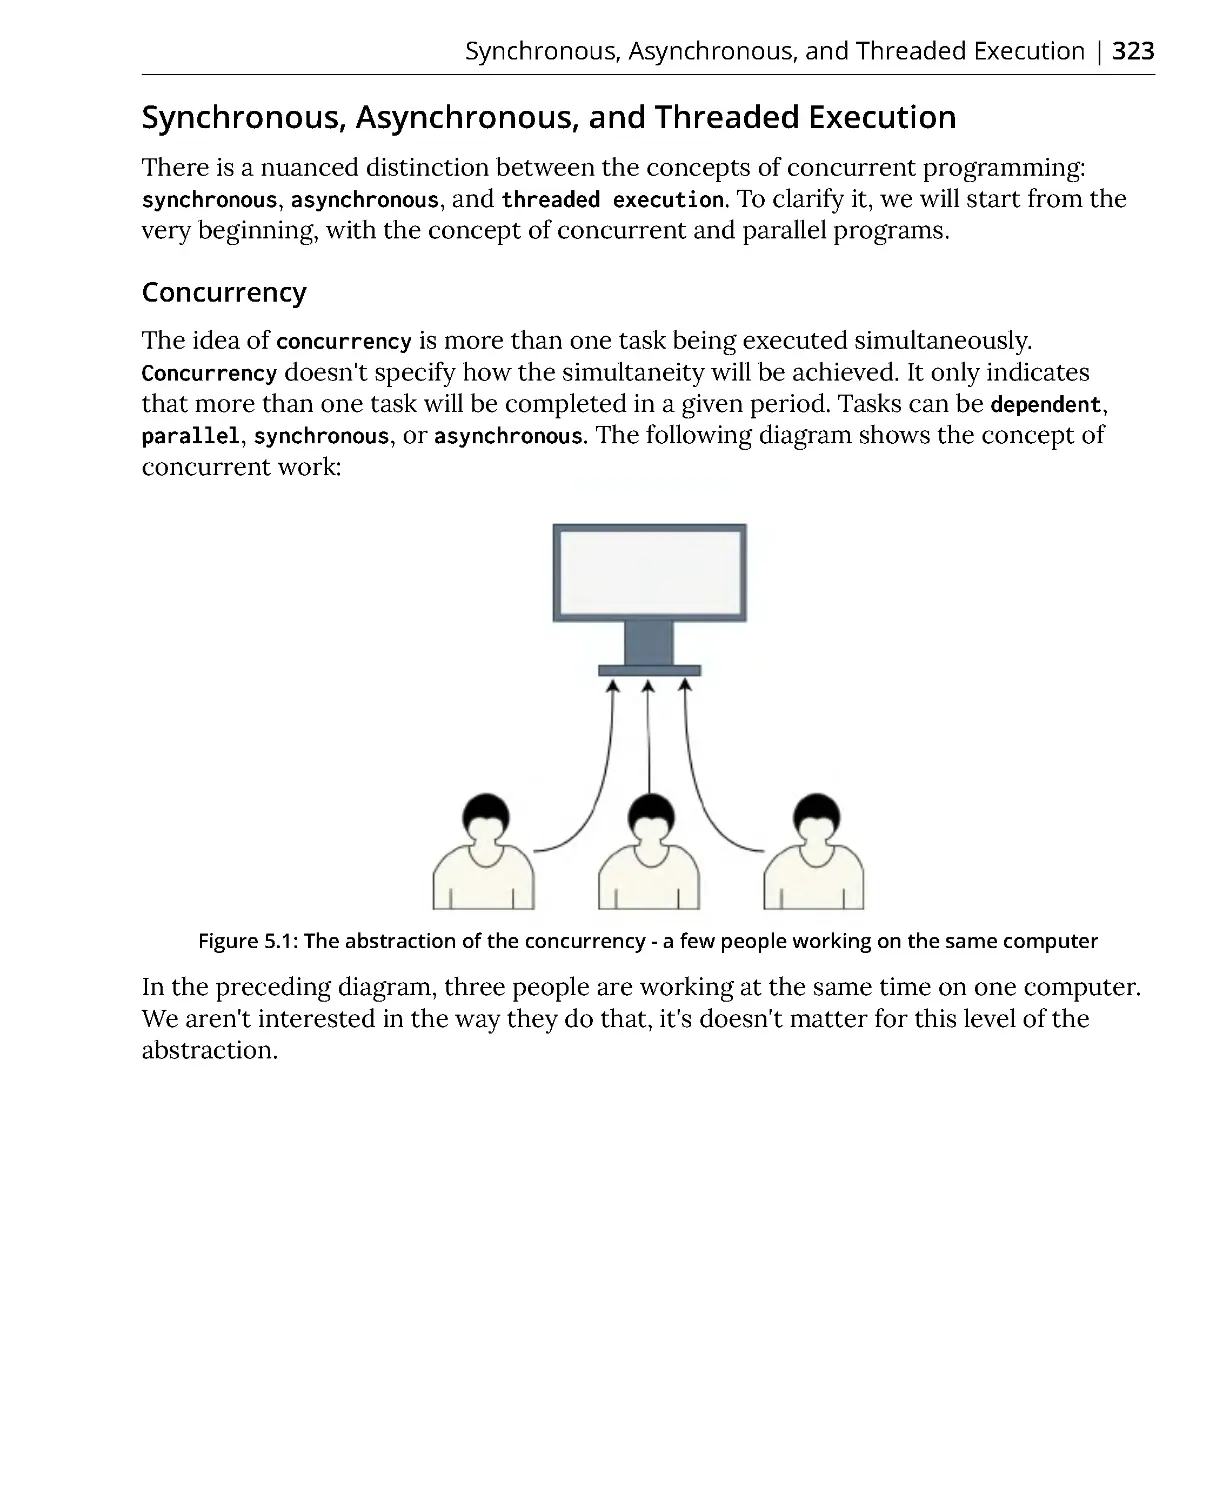
Parallelism ....................................................................................................... 324
Synchronous Execution .................................................................................. 327
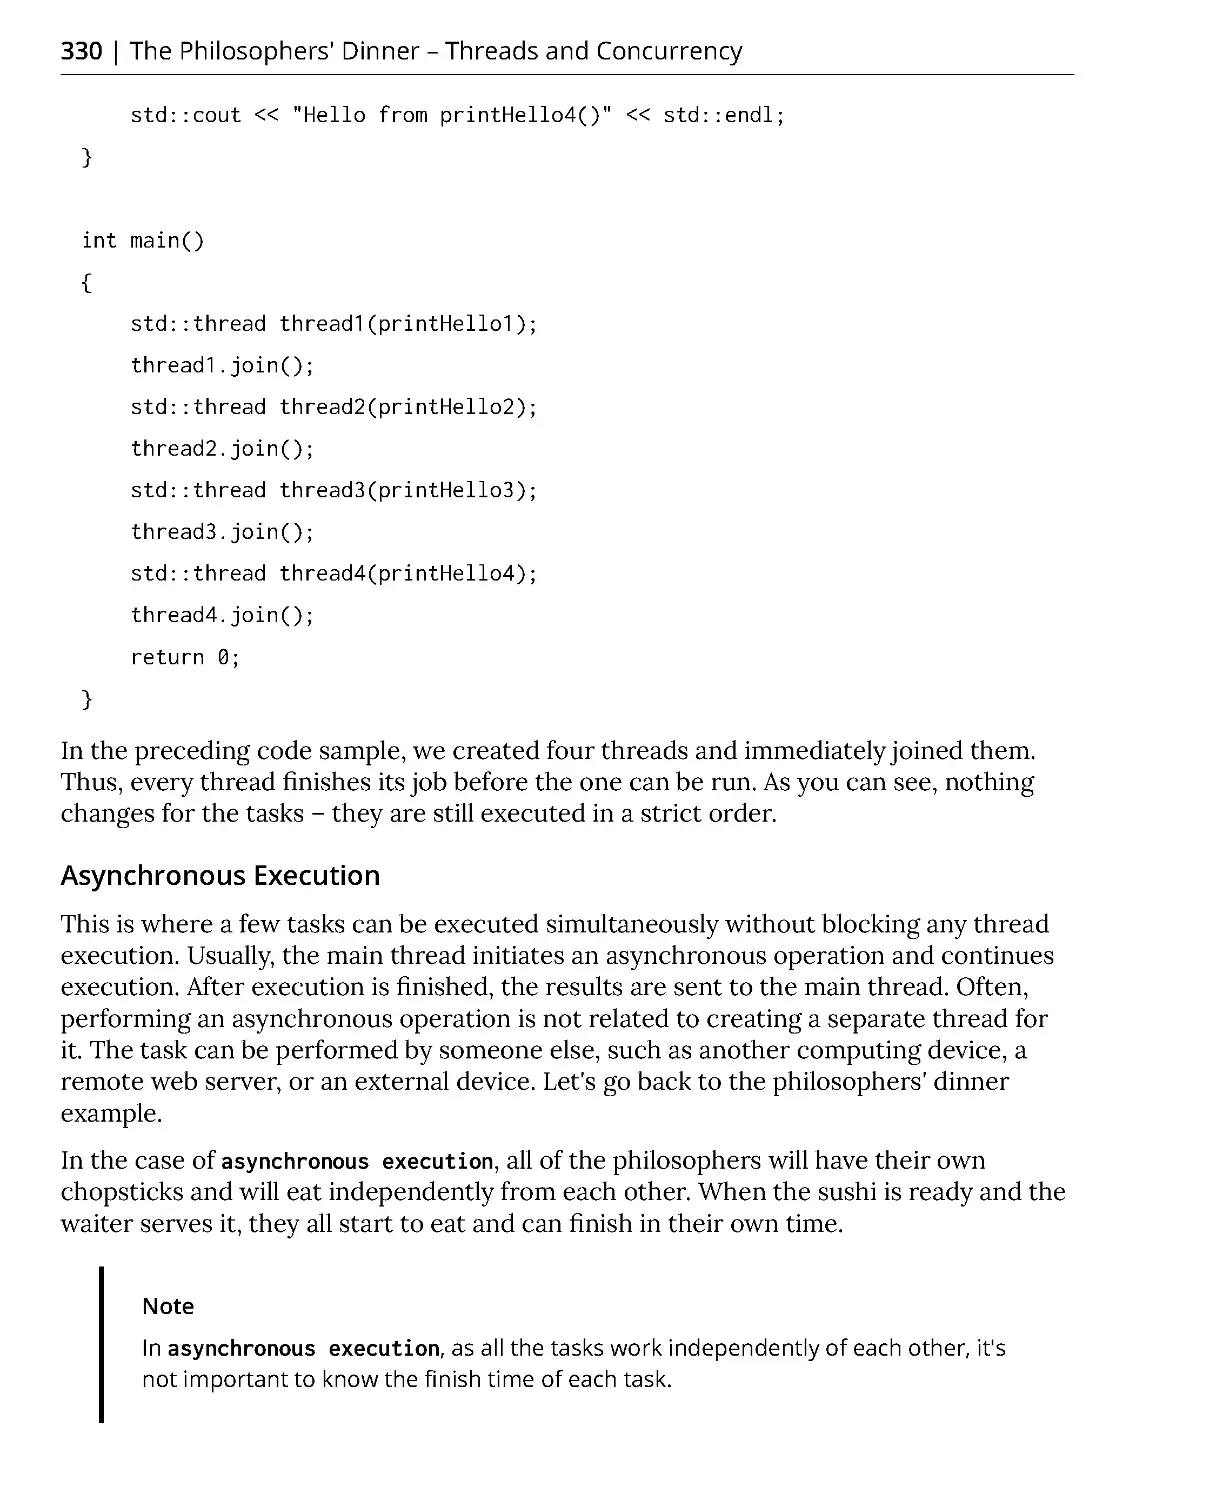
Asynchronous Execution ................................................................................ 330
Exercise 1: Creating Threads in a Different Way ......................................... 336
Review Synchronization, Data Hazards, and Race Conditions ............. 340
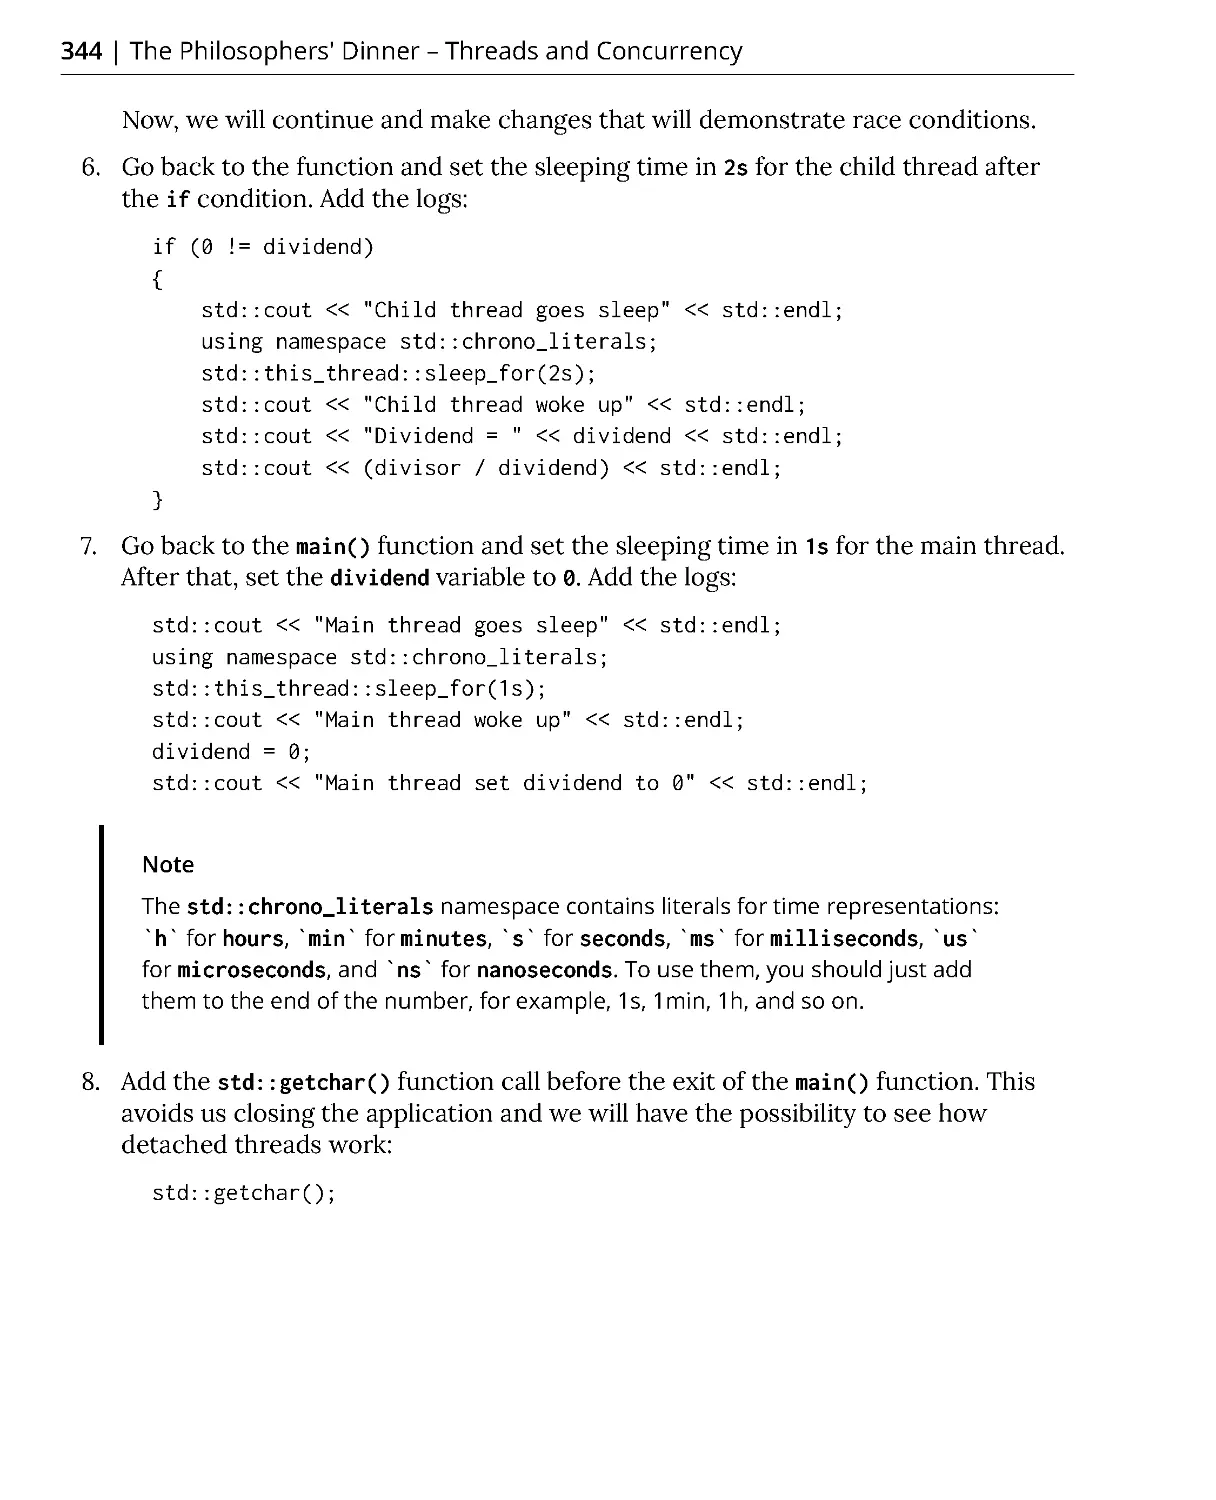
Exercise 2: Writing an Example of Race Conditions .................................... 342
Data Hazards ................................................................................................... 346
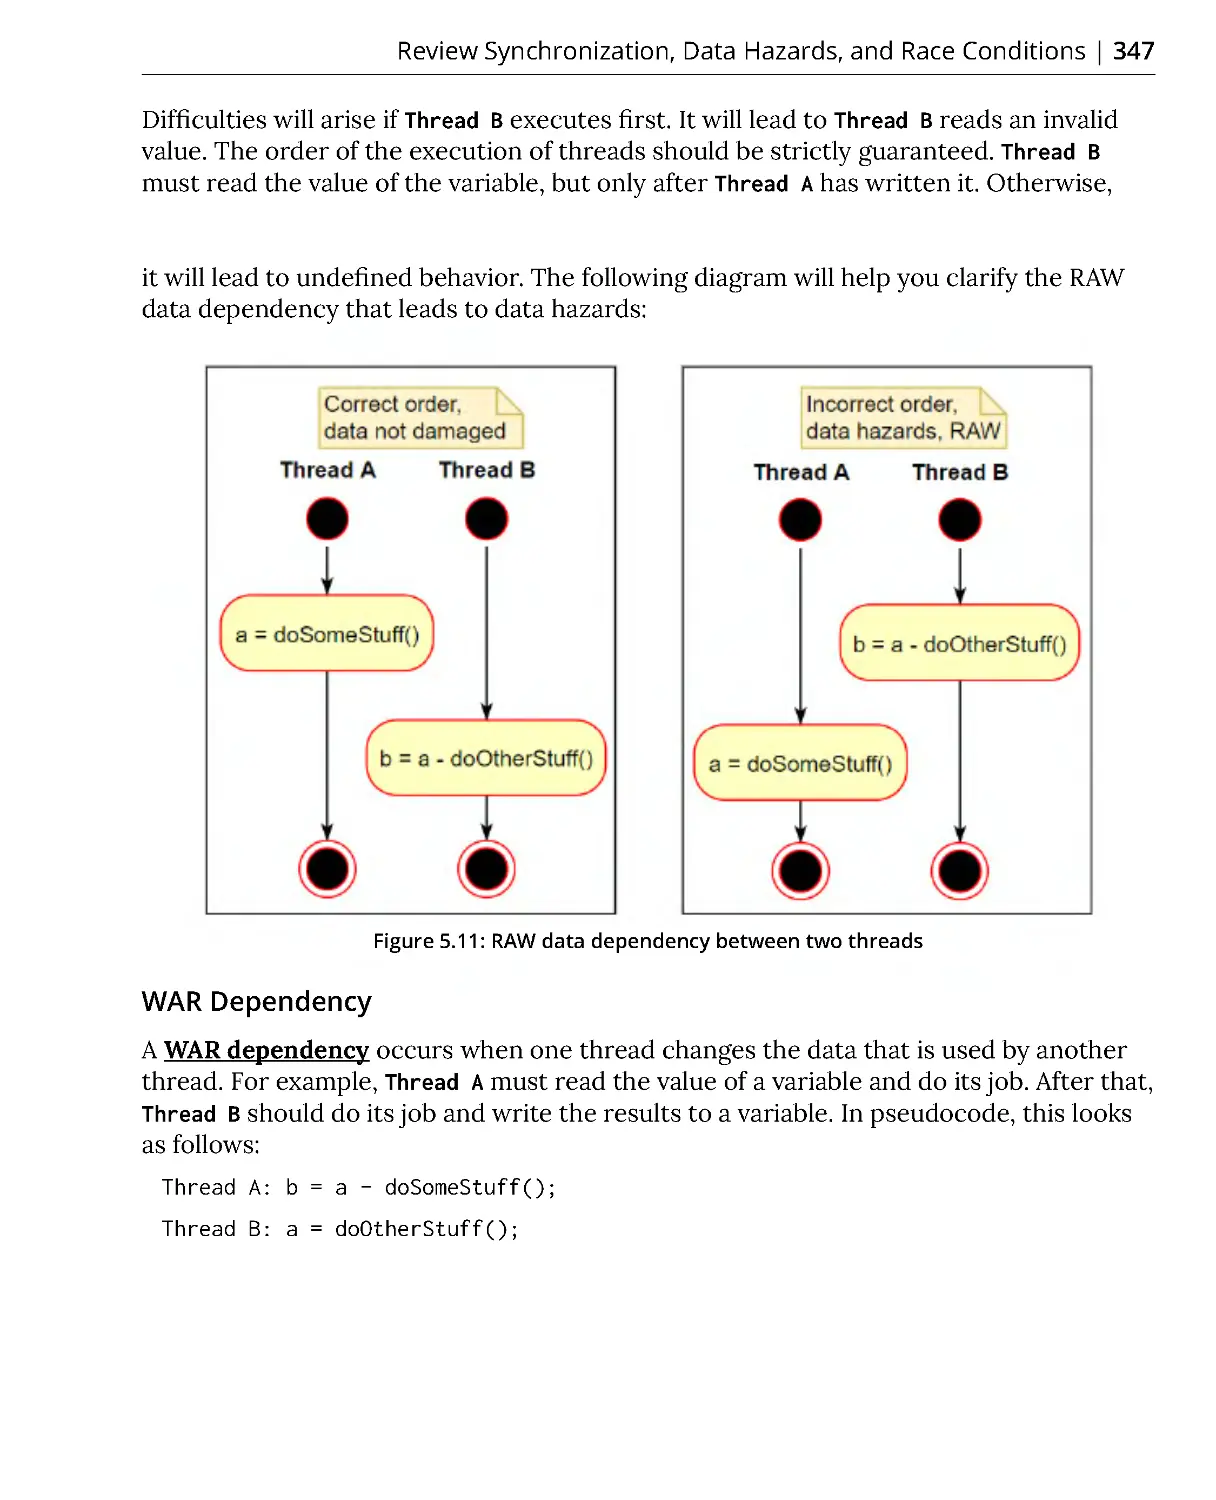
RAW Dependency ............................................................................................ 346
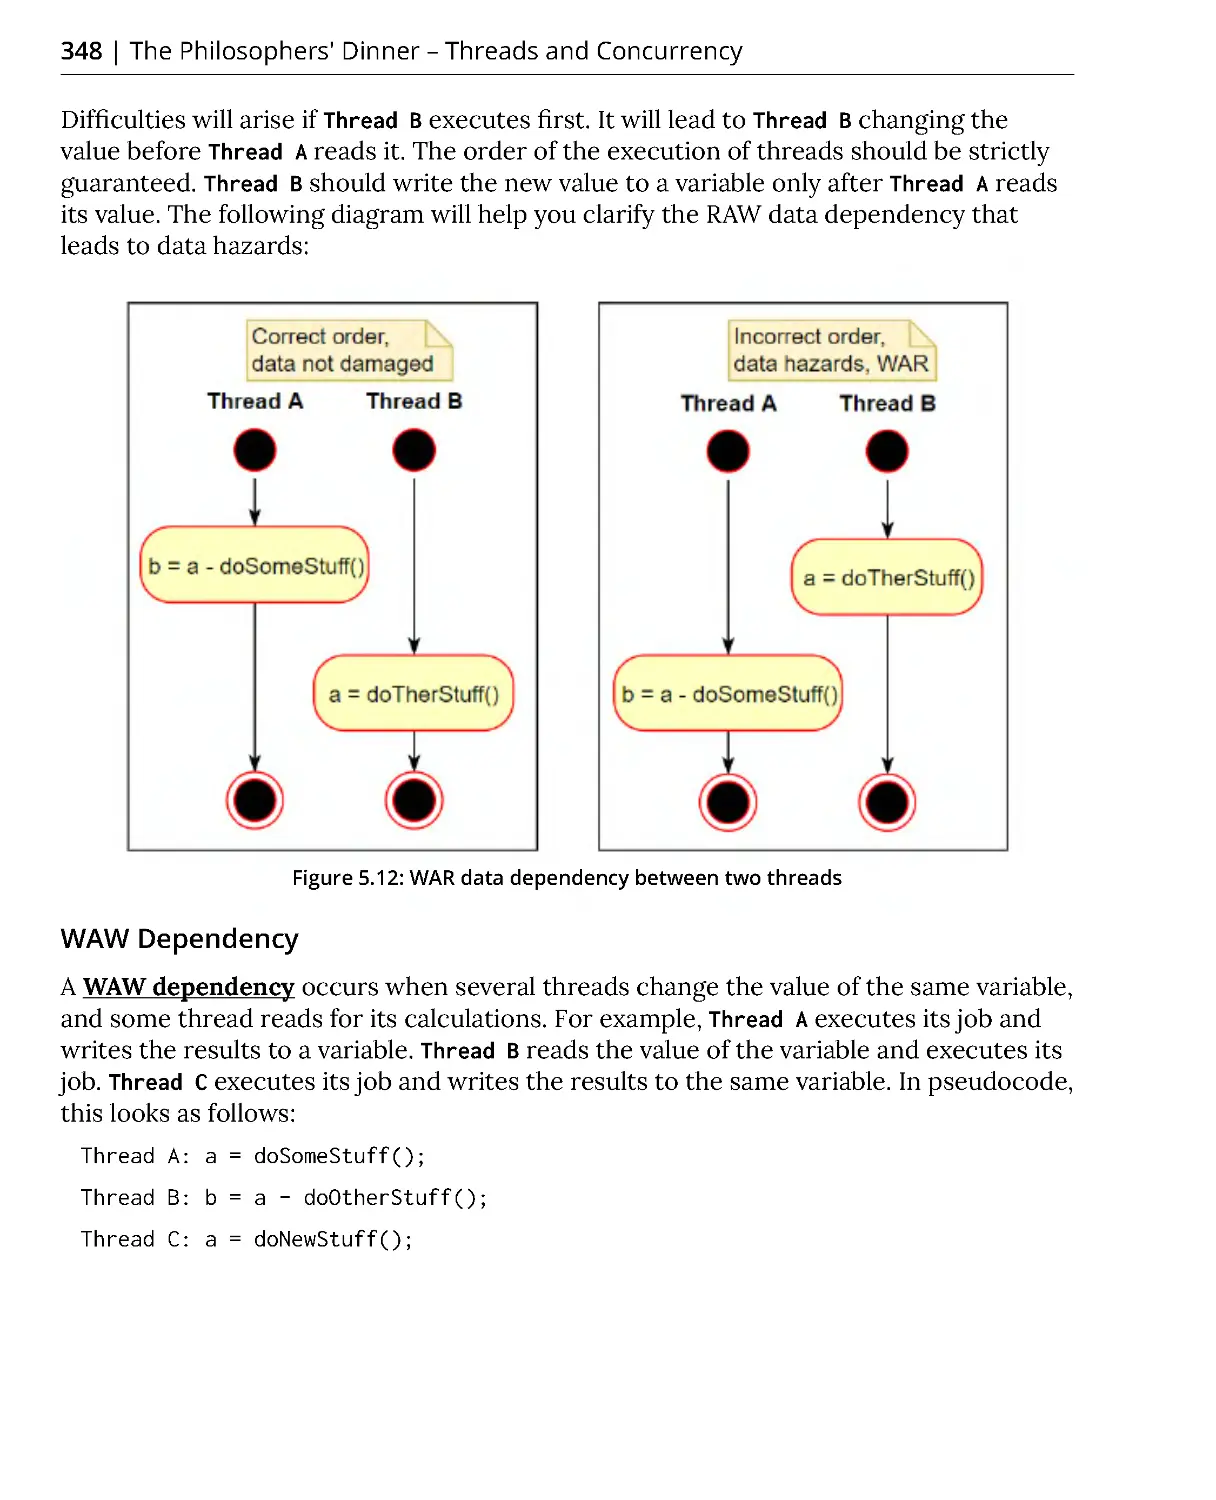
WAR Dependency ............................................................................................ 347
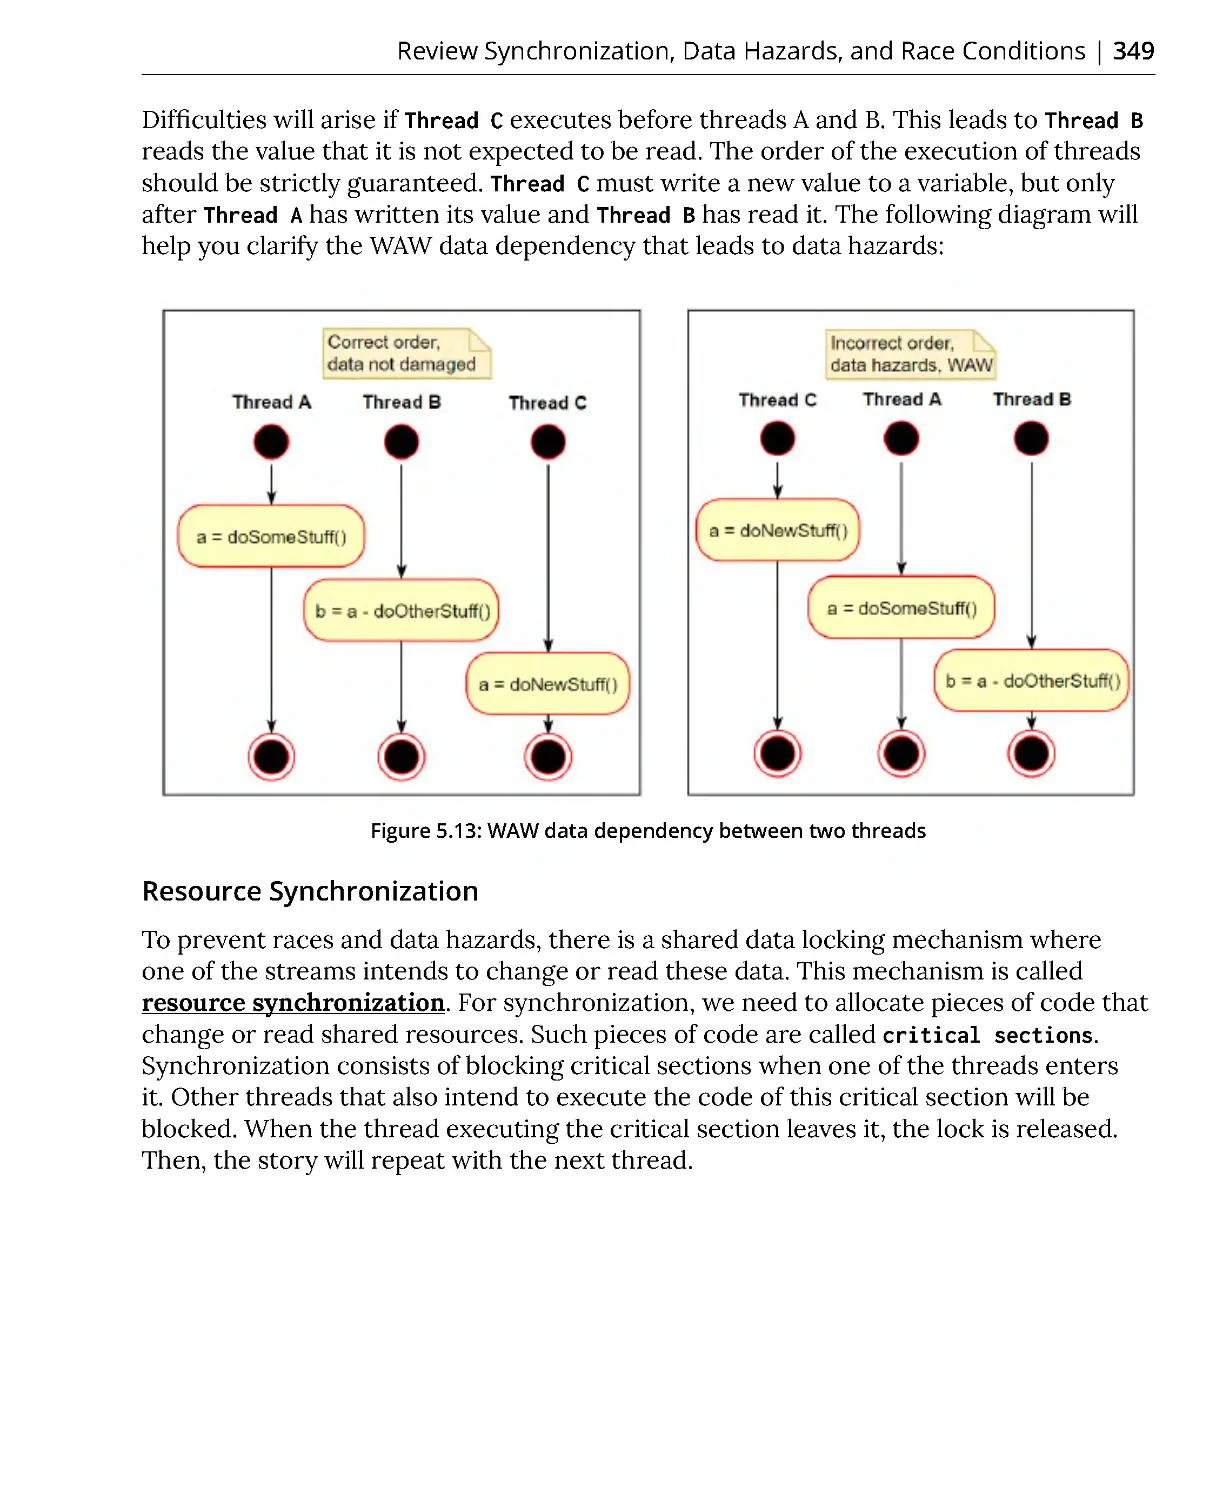
WAW Dependency ........................................................................................... 348
Resource Synchronization ............................................................................. 349
Event Synchronization .................................................................................... 352
Deadlock .......................................................................................................... 355
Move Semantics for Multithreading Closures ............................................. 356
Exercise 3: Moving Objects to a Thread Function ....................................... 359
Exercise 4: Creating and Working with an STL Container of Threads ..... 363
Futures, Promises, and Async .................................................................. 368
Exercise 5: Synchronization with Future Results ........................................ 382
Activity 1: Creating a Simulator to Model the Work of the Art Gallery .... 385
Summary ..................................................................................................... 389
Chapter 6: Streams and I/O
391
Introduction ................................................................................................ 392
Reviewing the I/O Portion of the Standard Library .................................... 393
Predefined Standard Stream Objects ........................................................... 395
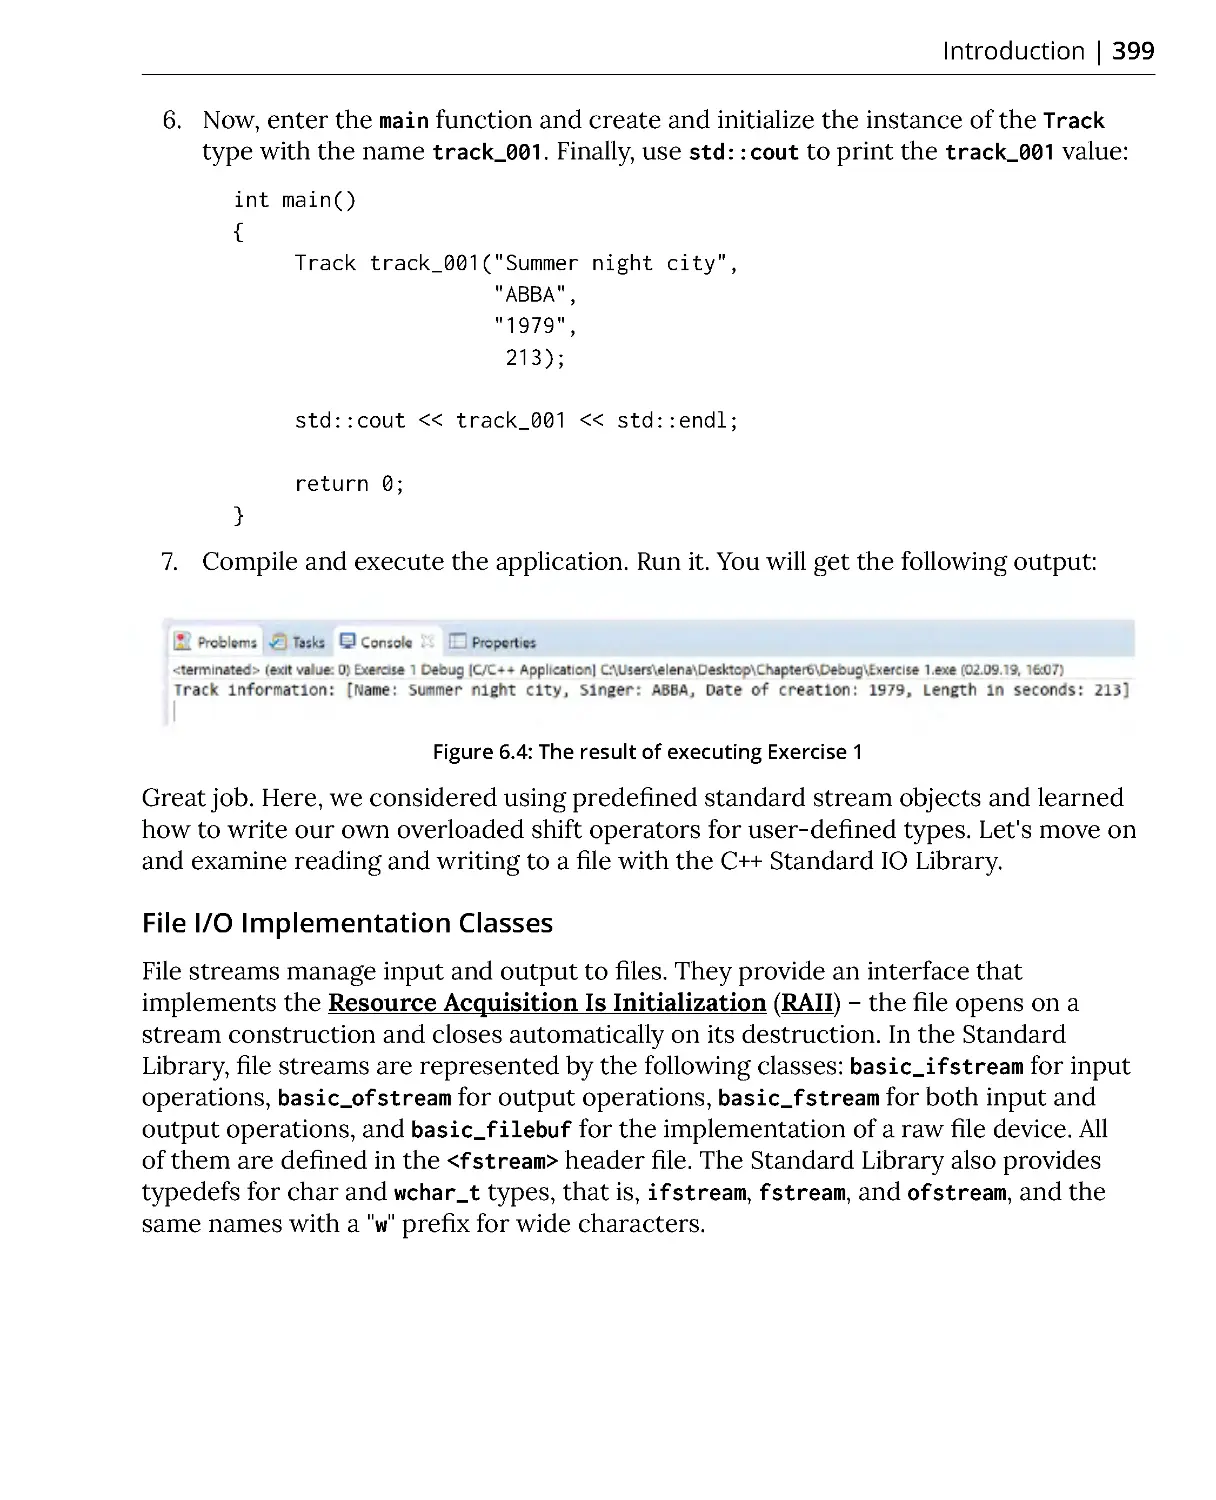
Exercise 1: Overriding the Left Shift Operator, <<,
for User-Defined Types .................................................................................. 397
File I/O Implementation Classes ................................................................... 399
Exercise 2: Reading and Writing User-Defined Data Types to a File ......... 403
String I/O Implementation ............................................................................. 407
Exercise 3: Creating a Function for Replacement Words in a String ........ 409
I/O Manipulators ............................................................................................. 412
I/O Manipulators for Changing the Numeric Base of the Stream ........... 412
Exercise 4: Displaying Entered Numbers in Different Numeric Bases ..... 412
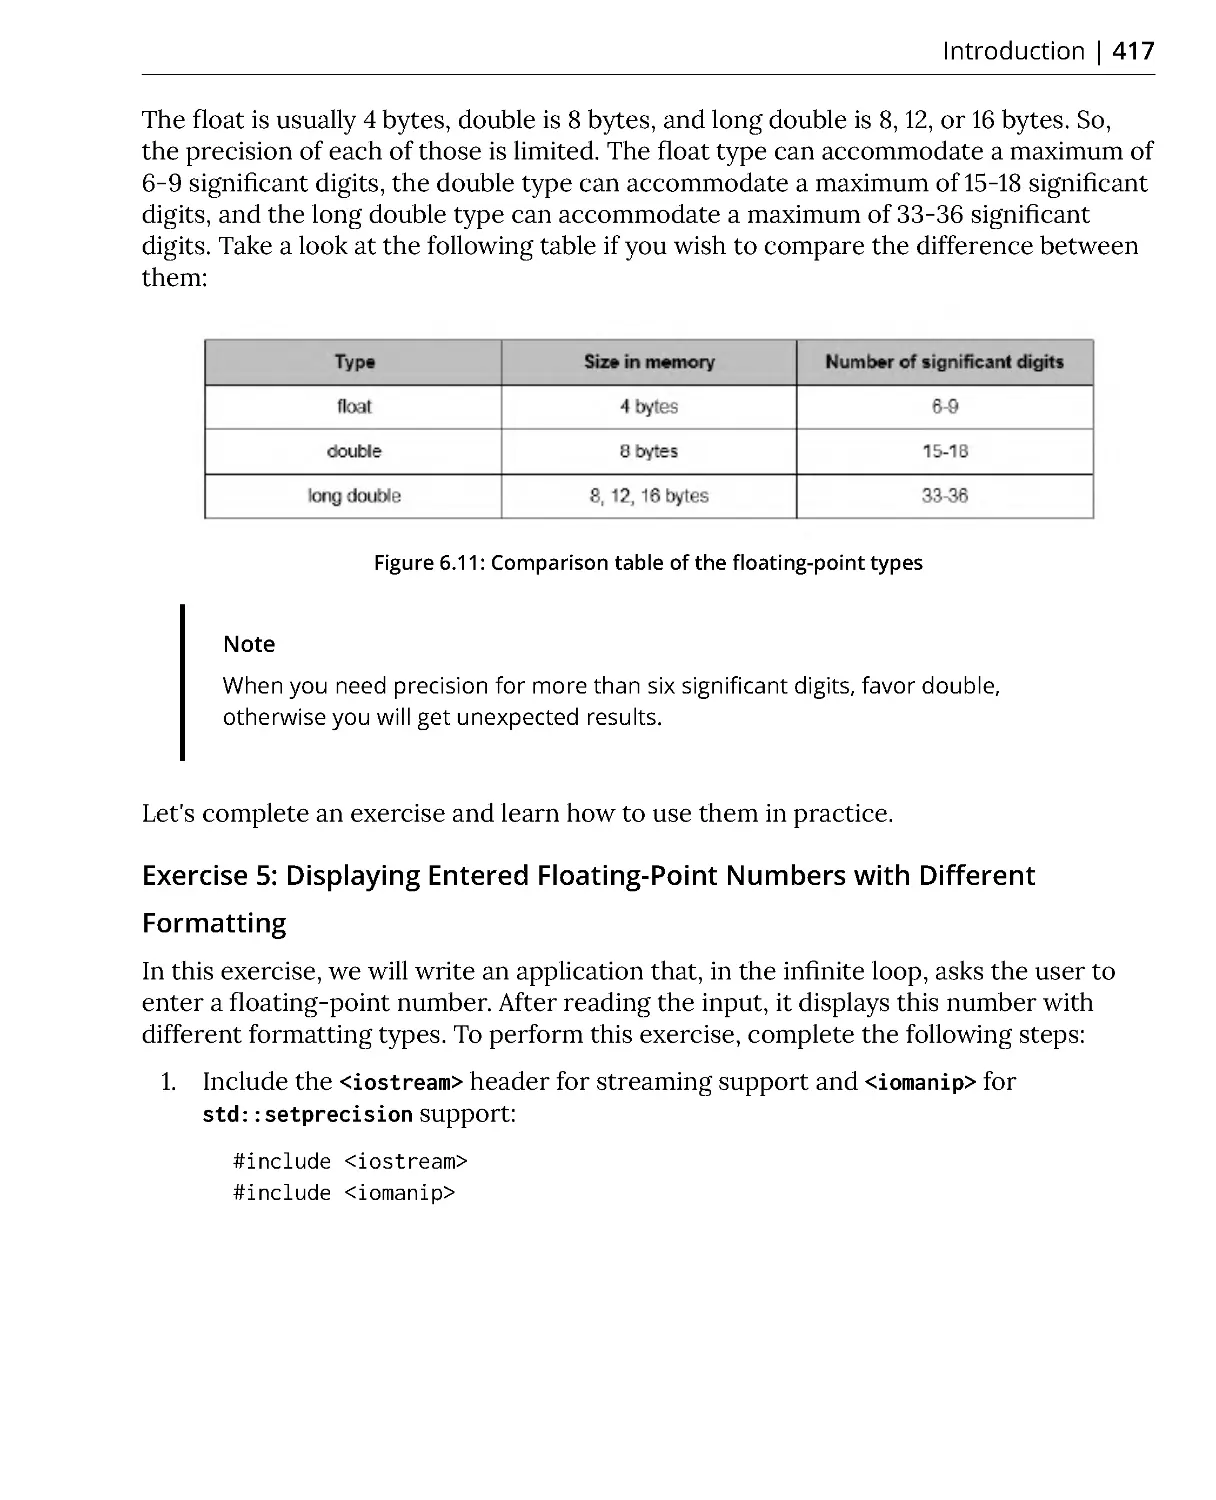
I/O Manipulators for Floating-Point Formatting ......................................... 416
Exercise 5: Displaying Entered Floating-Point Numbers
with Different Formatting .............................................................................. 417
I/O Manipulators for Boolean Formatting ................................................... 423
I/O Manipulators for Field Width and Fill Control ....................................... 424
I/O Manipulators for Other Numeric Formatting ....................................... 426
I/O Manipulators for Whitespace Processing .............................................. 428
Making Additional Streams ........................................................................... 430
How to Make an Additional Stream – Composition .................................... 431
Exercise 6: Composing the Standard Stream Object
in the User-Defined Class ............................................................................... 432
How to Make an Additional Stream – Inheritance ...................................... 436
Exercise 7: Inheriting the Standard Stream Object .................................... 438
Leveraging Asynchronous I/O ....................................................................... 442
Asynchronous I/O on Windows Platforms ................................................... 442
Asynchronous I/O on Linux Platforms ......................................................... 452
Exercise 8: Asynchronously Reading from a File in Linux .......................... 454
Asynchronous Cross-Platform I/O Libraries ................................................ 459
Interaction of Threads and I/O ...................................................................... 462
Exercise 9: Developing a Thread-Safe Wrapper for std::cout .................... 463
Using Macros ................................................................................................... 468
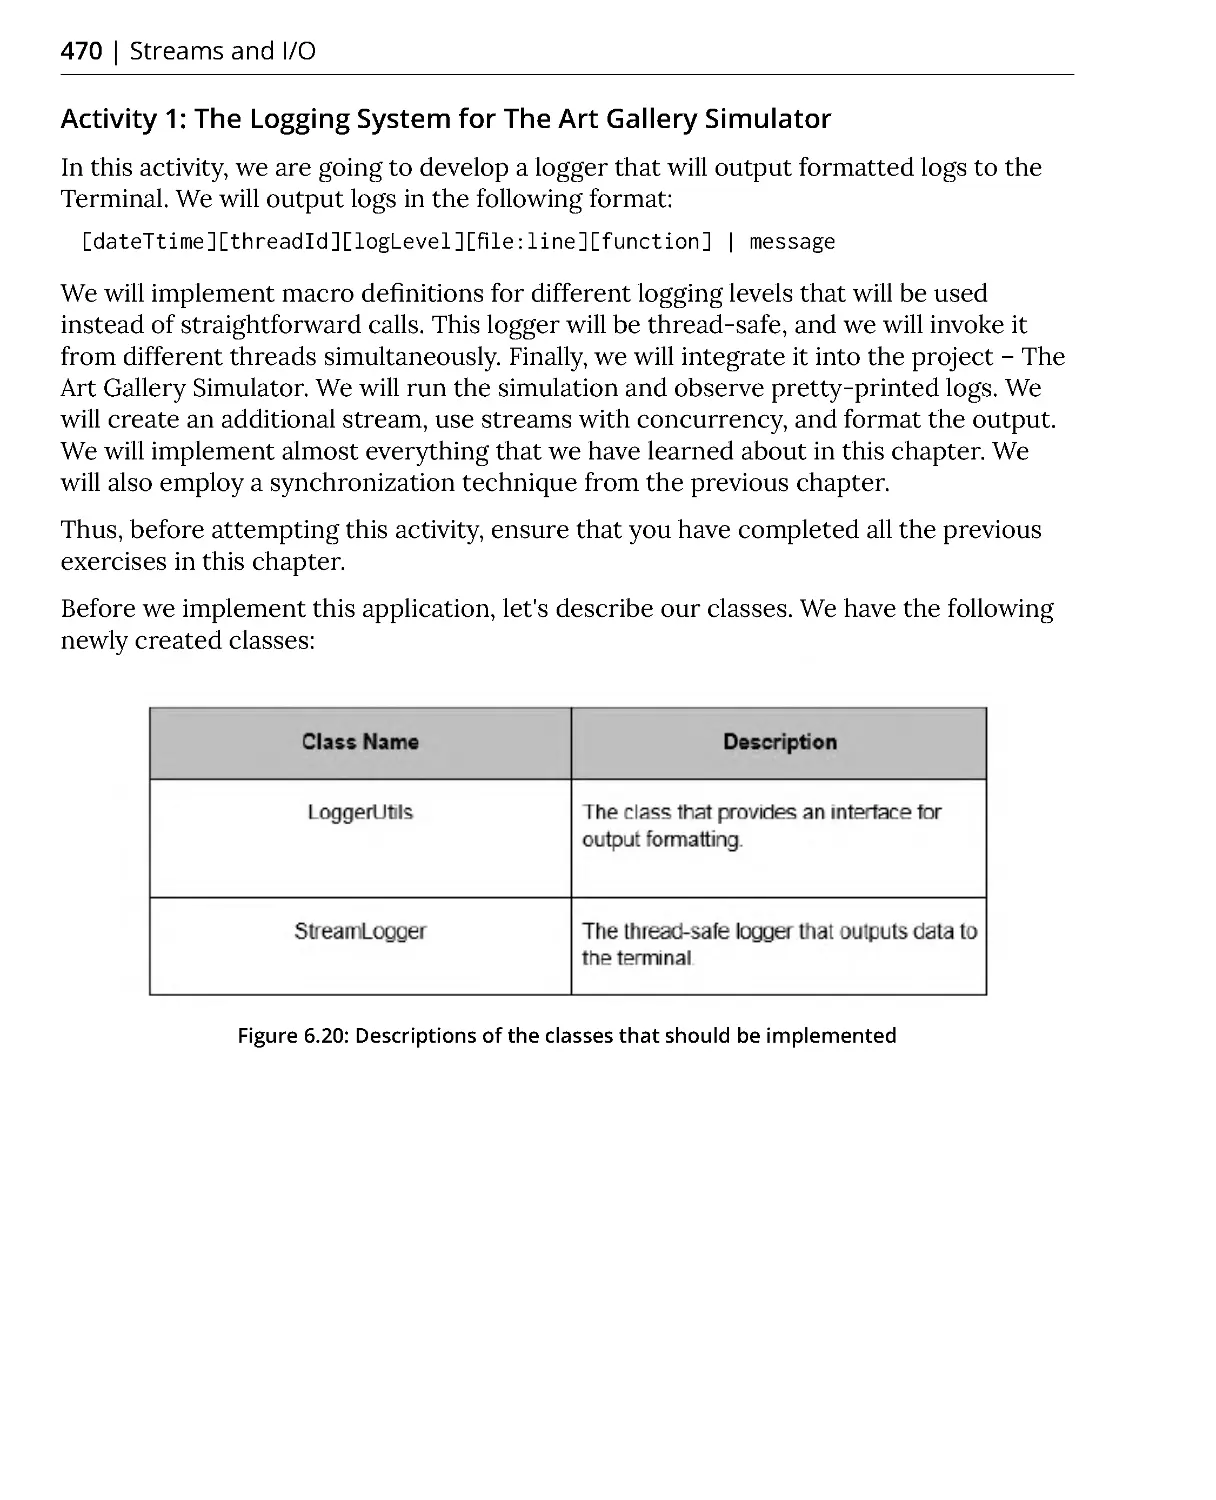
Activity 1: The Logging System for The Art Gallery Simulator ................... 470
Summary ..................................................................................................... 474
Chapter 7: Everybody Falls, It's How You Get
Back Up – Testing and Debugging
477
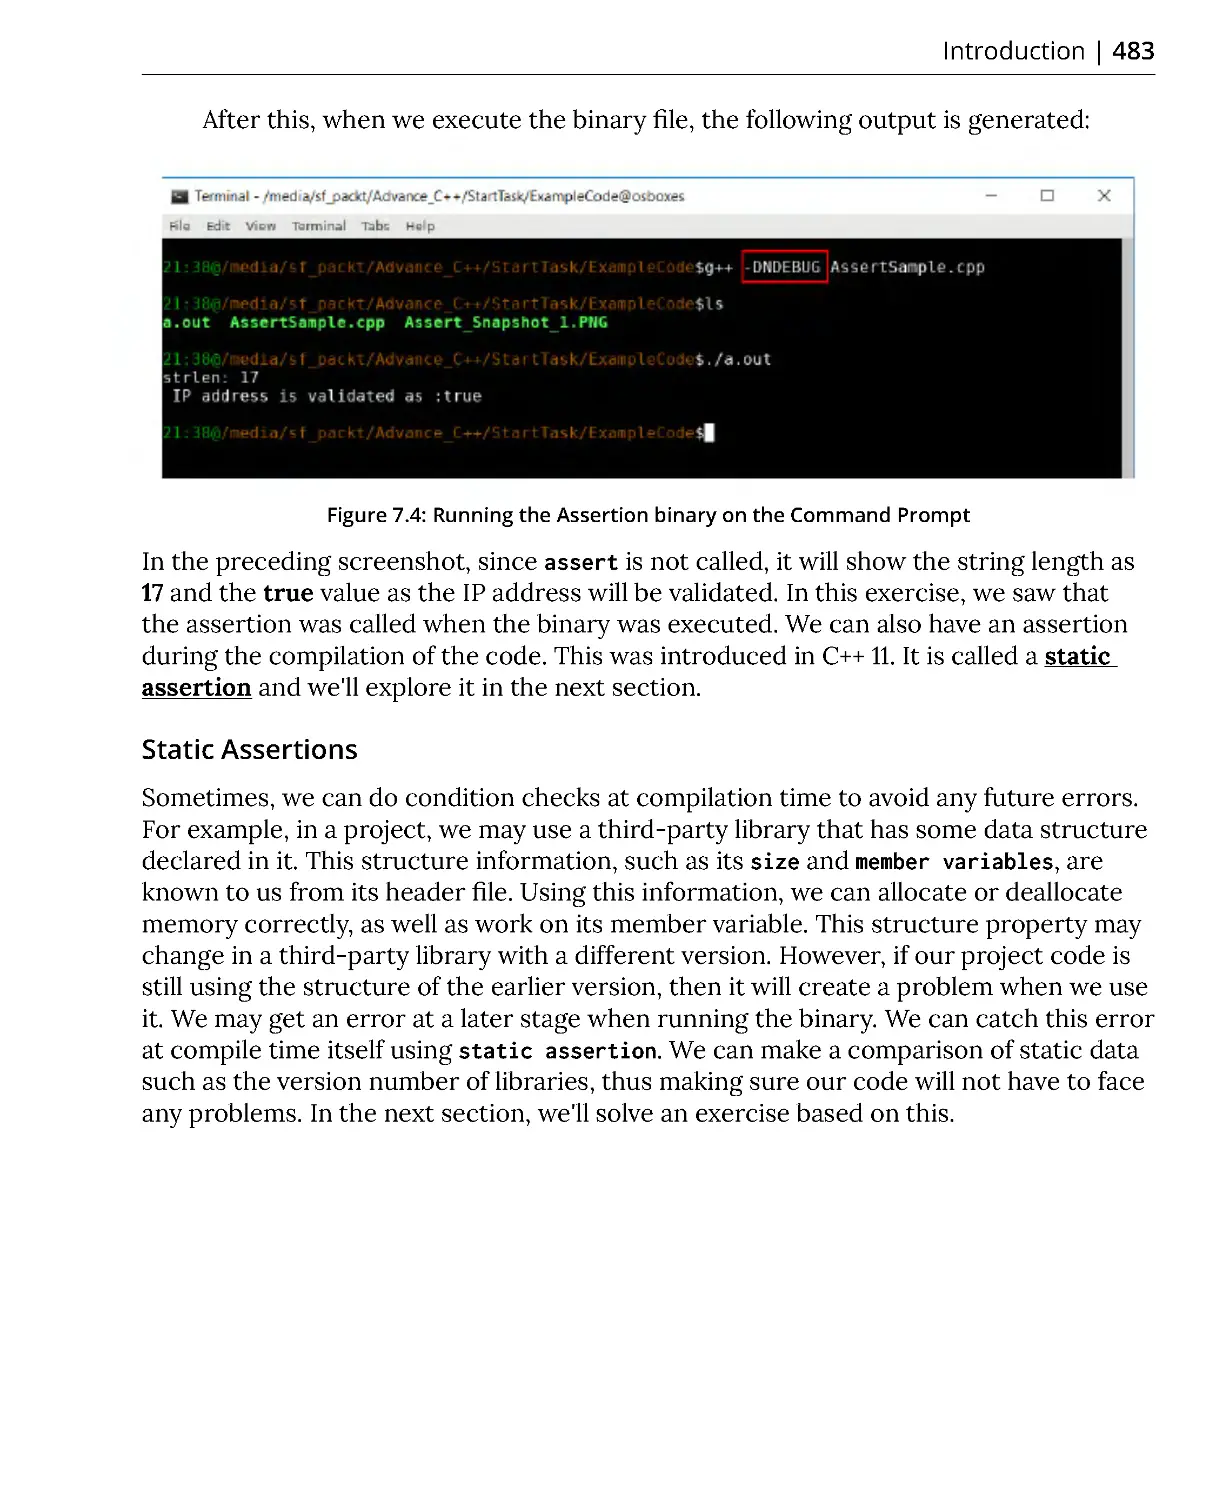
Introduction ................................................................................................ 478
Assertions ........................................................................................................ 479
Exercise 1: Writing and Testing Our First Assertion ................................... 479
Static Assertions .............................................................................................. 483
Exercise 2: Testing Static Assertions ............................................................. 484
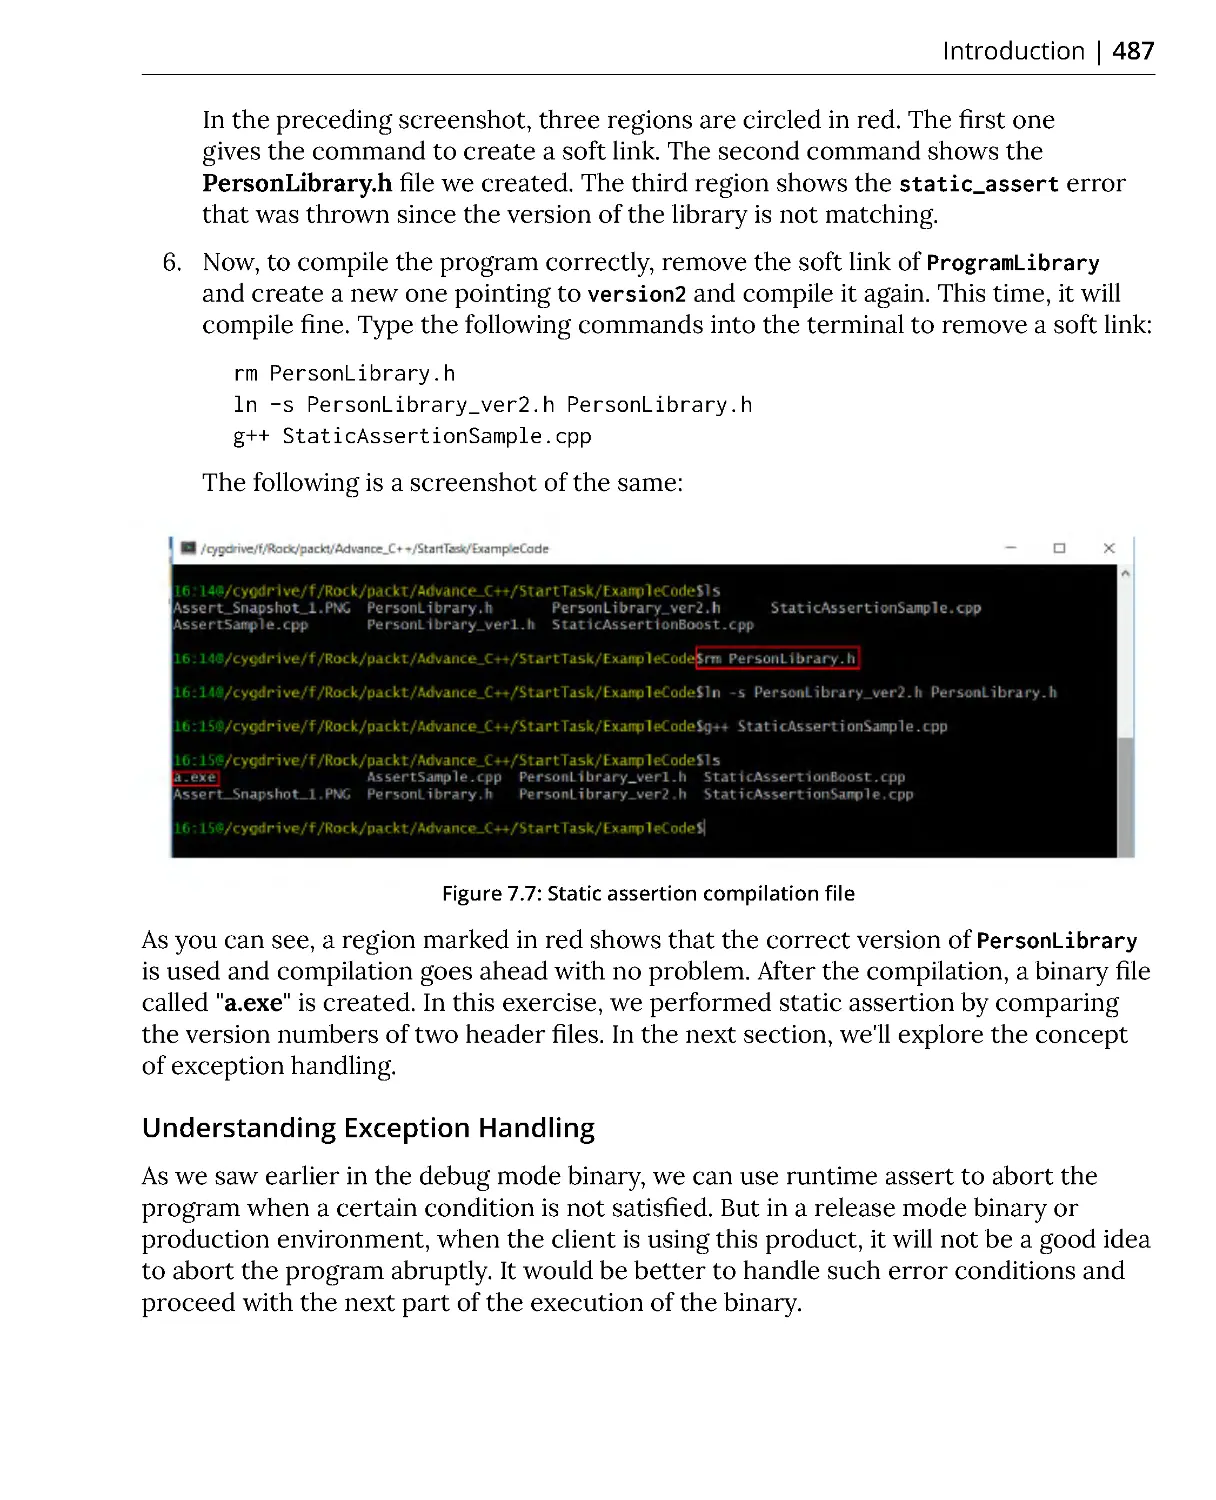
Understanding Exception Handling .............................................................. 487
Exercise 3: Performing Exception Handling ................................................ 488
Unit Testing and Mock Testing ................................................................. 491
Exercise 4: Creating Our First Unit Test Case .............................................. 492
Unit Testing Using Mock Objects .................................................................. 499
Exercise 5: Creating Mock Objects ................................................................ 500
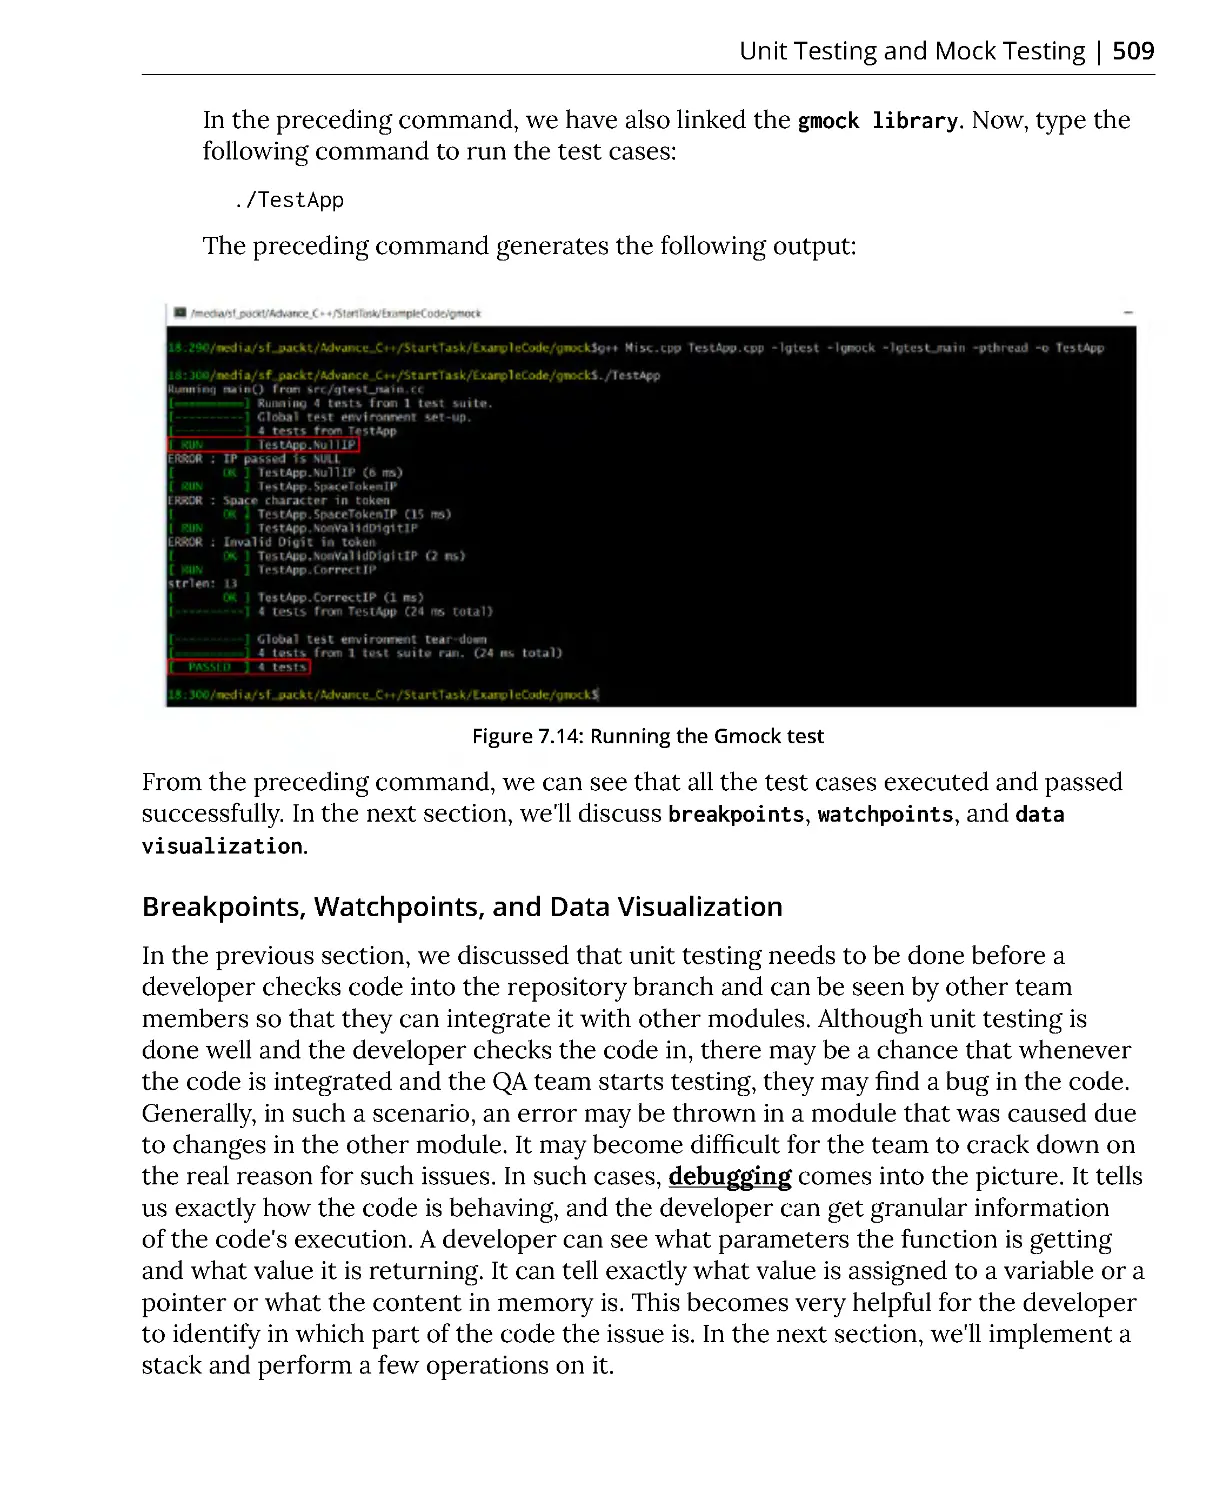
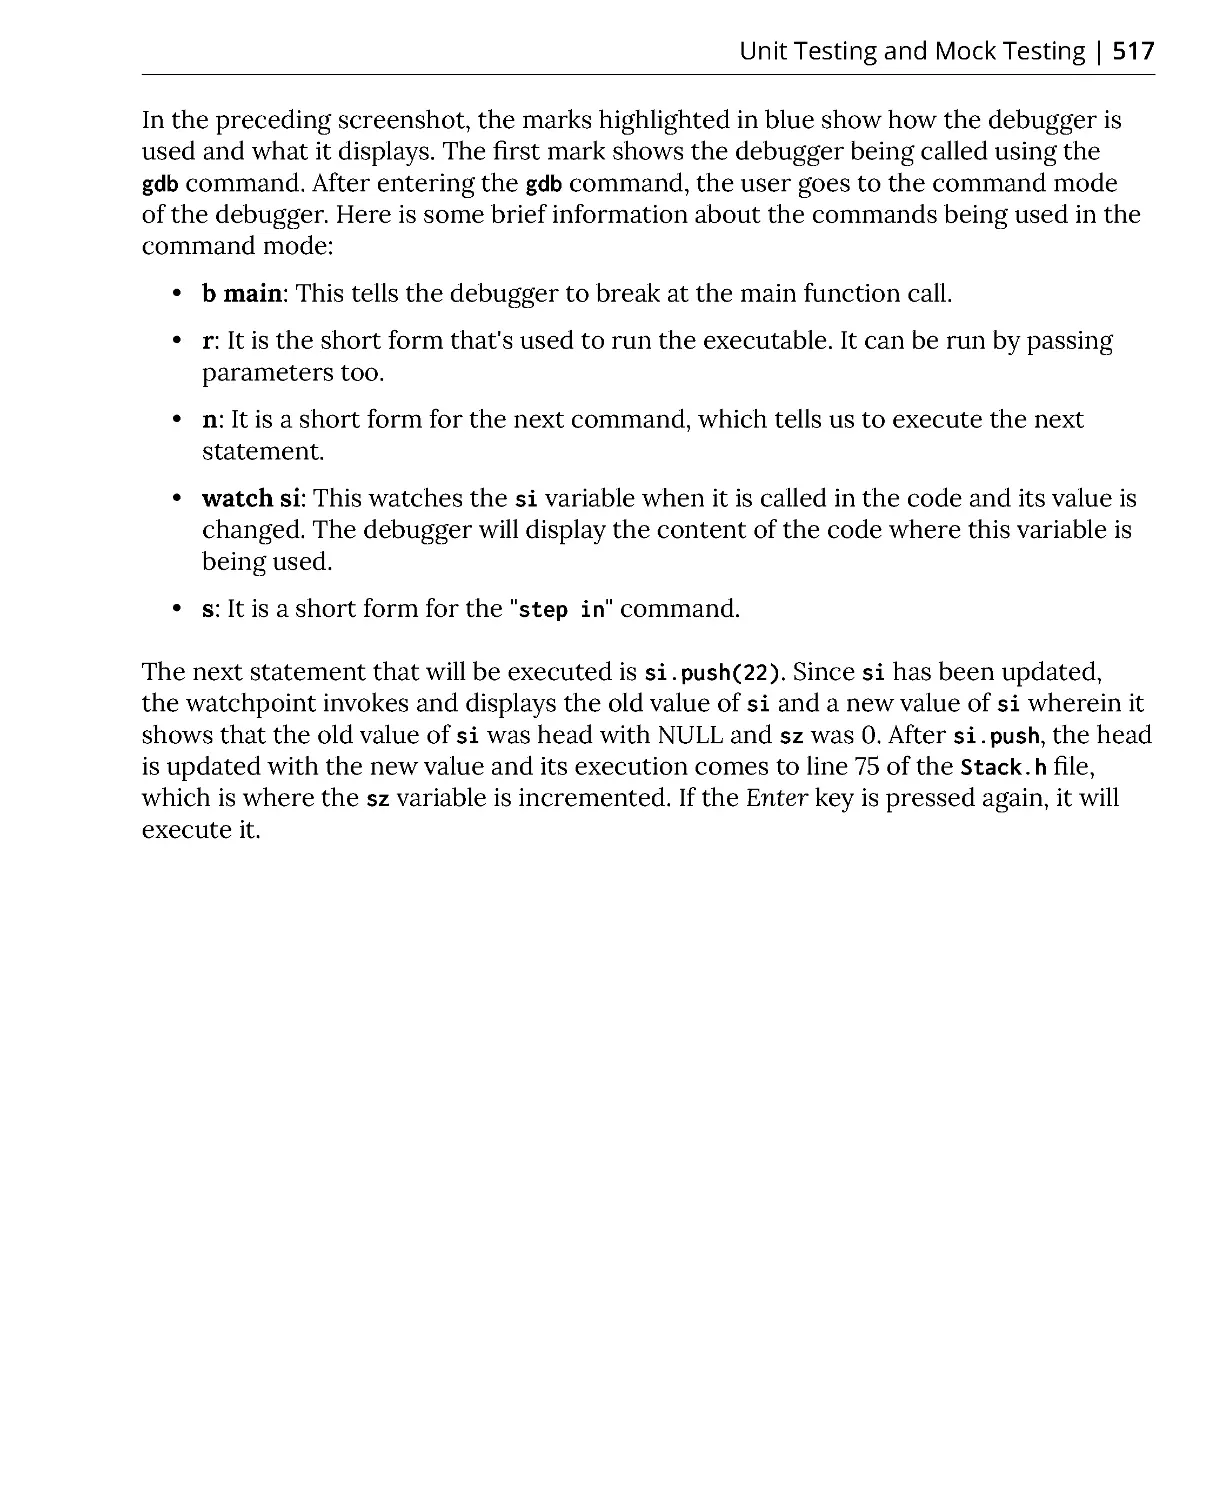
Breakpoints, Watchpoints, and Data Visualization .................................... 509
Working with the Stack Data Structure ....................................................... 510
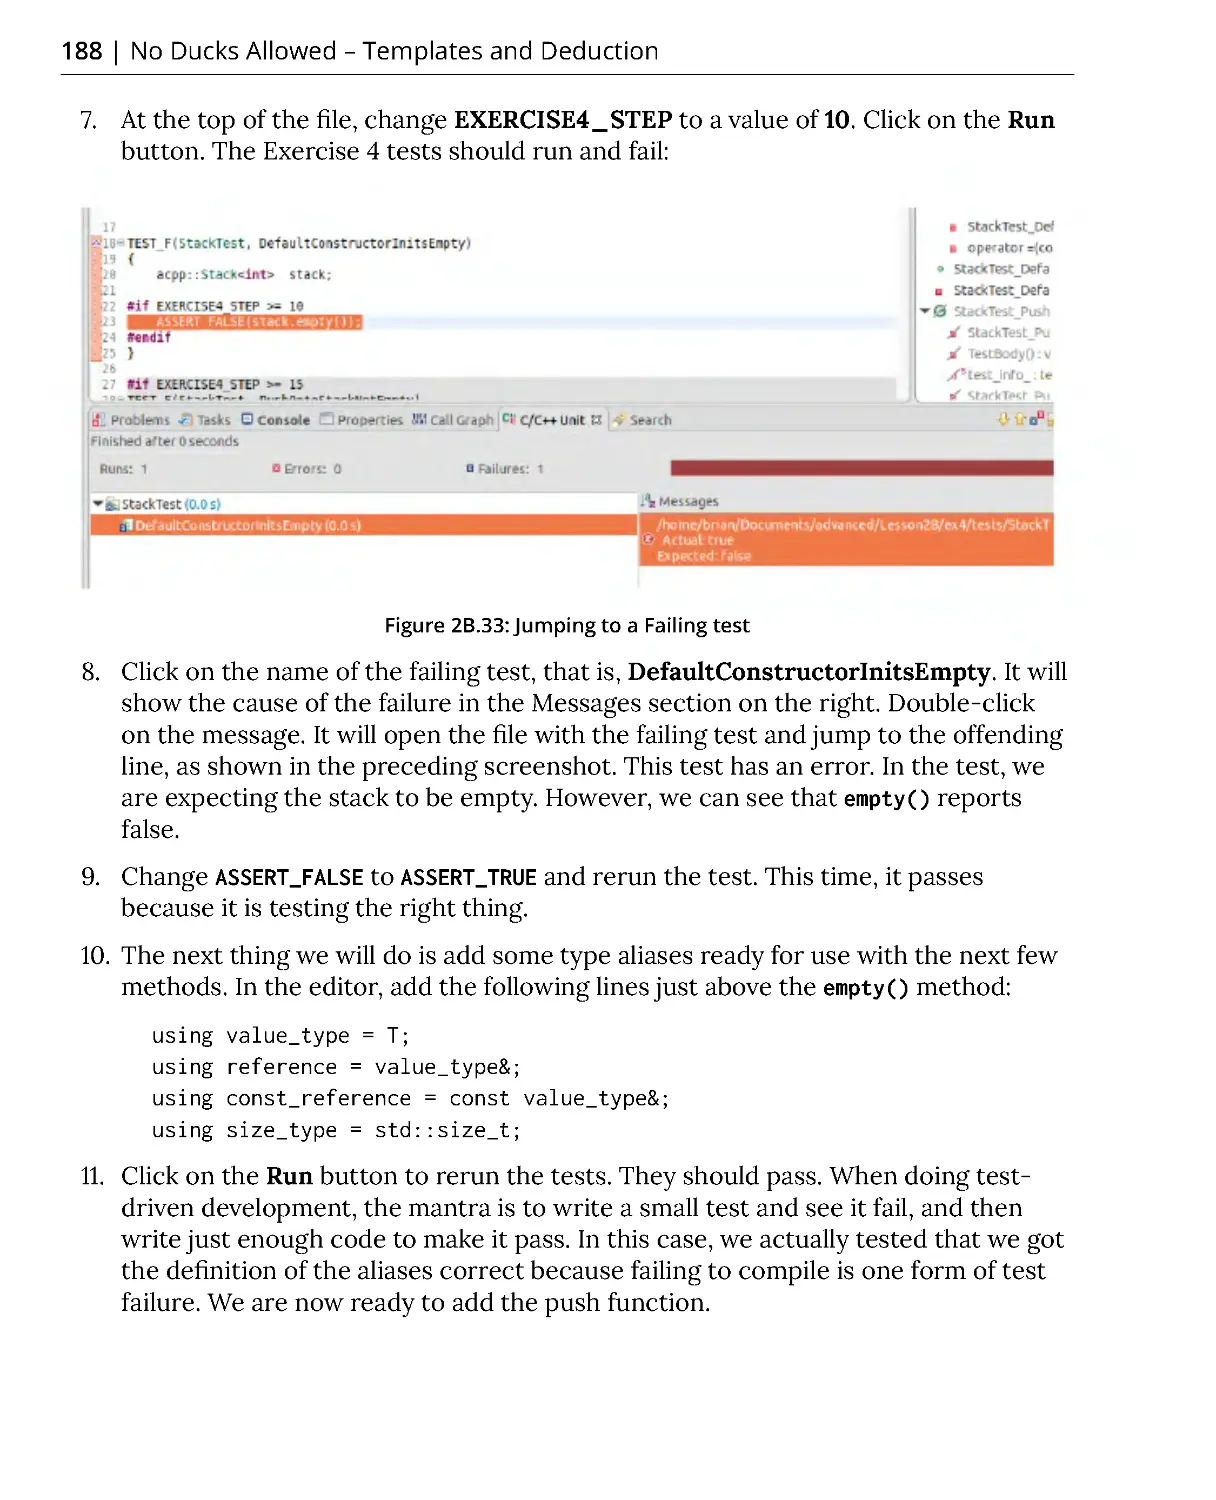
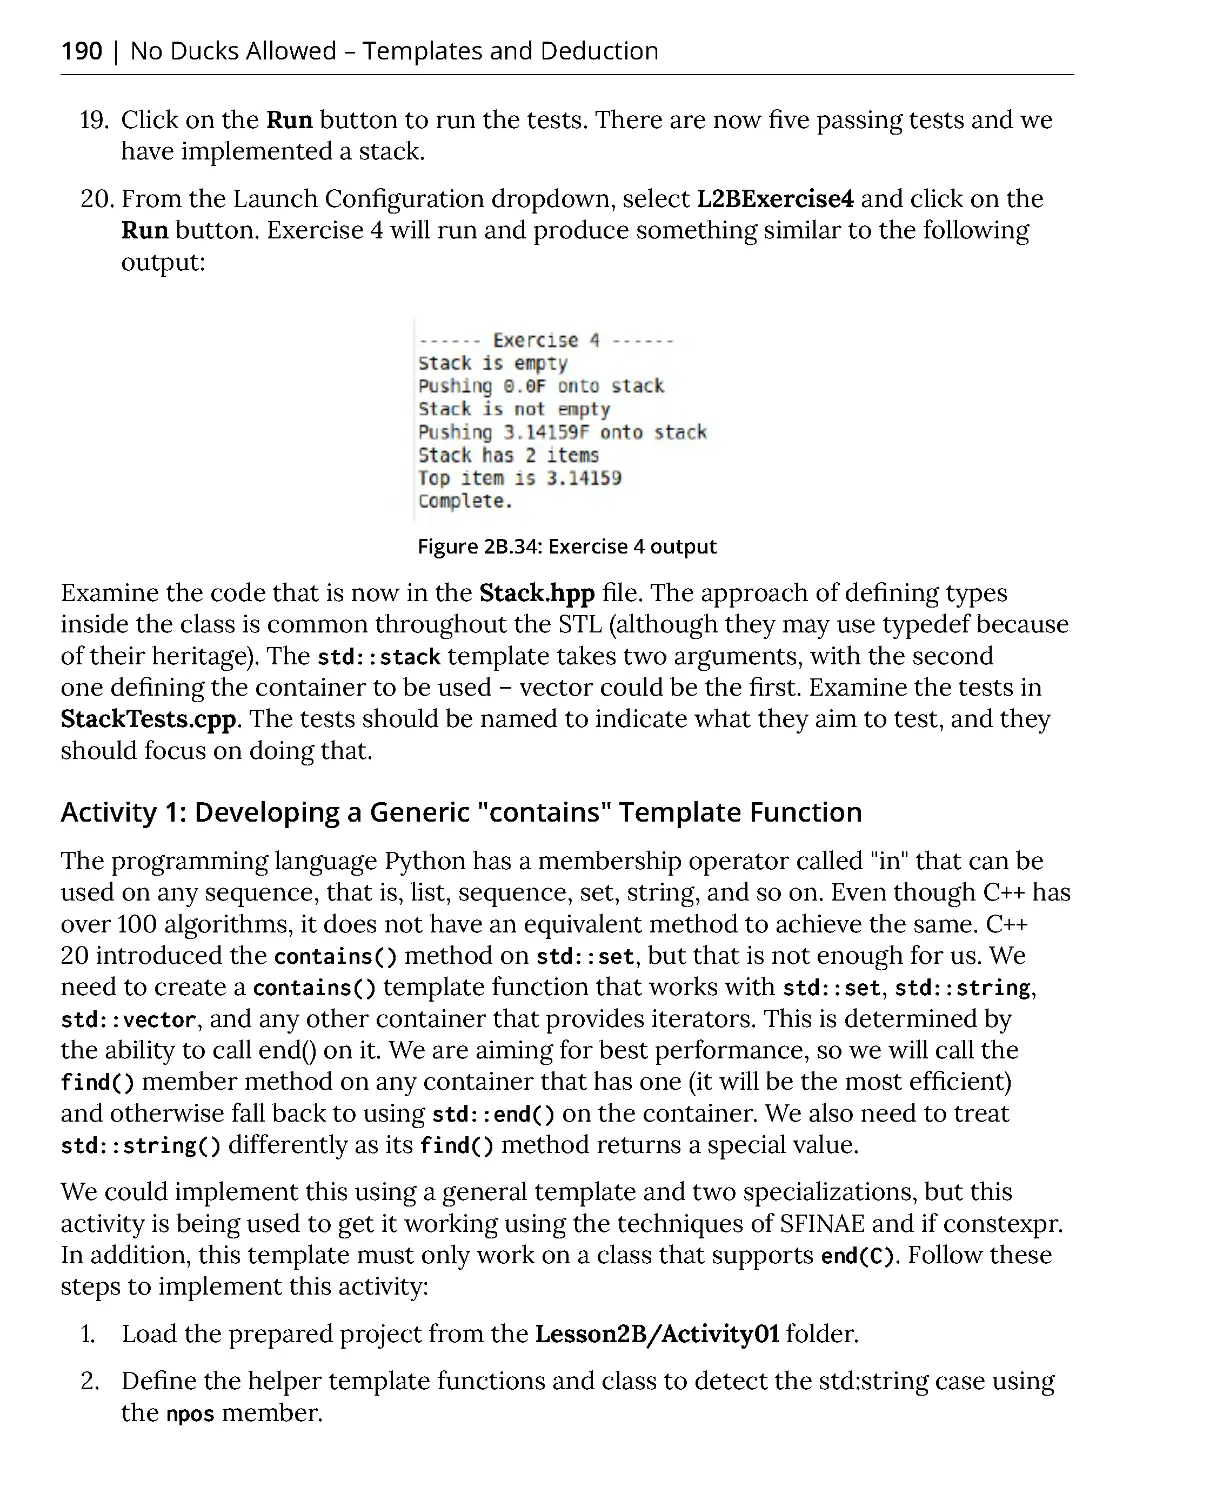
Activity 1: Checking the Accuracy of the Functions Using Test Cases
and Understanding Test-Driven Development (TDD) ................................. 524
Summary ..................................................................................................... 532
Chapter 8: Need for Speed – Performance
and Optimization
535
Introduction ................................................................................................ 536
Performance Measurement ..................................................................... 536
Manual Estimation .......................................................................................... 537
Studying Generated Assembly Code ............................................................ 538
Manual Execution Timing .............................................................................. 547
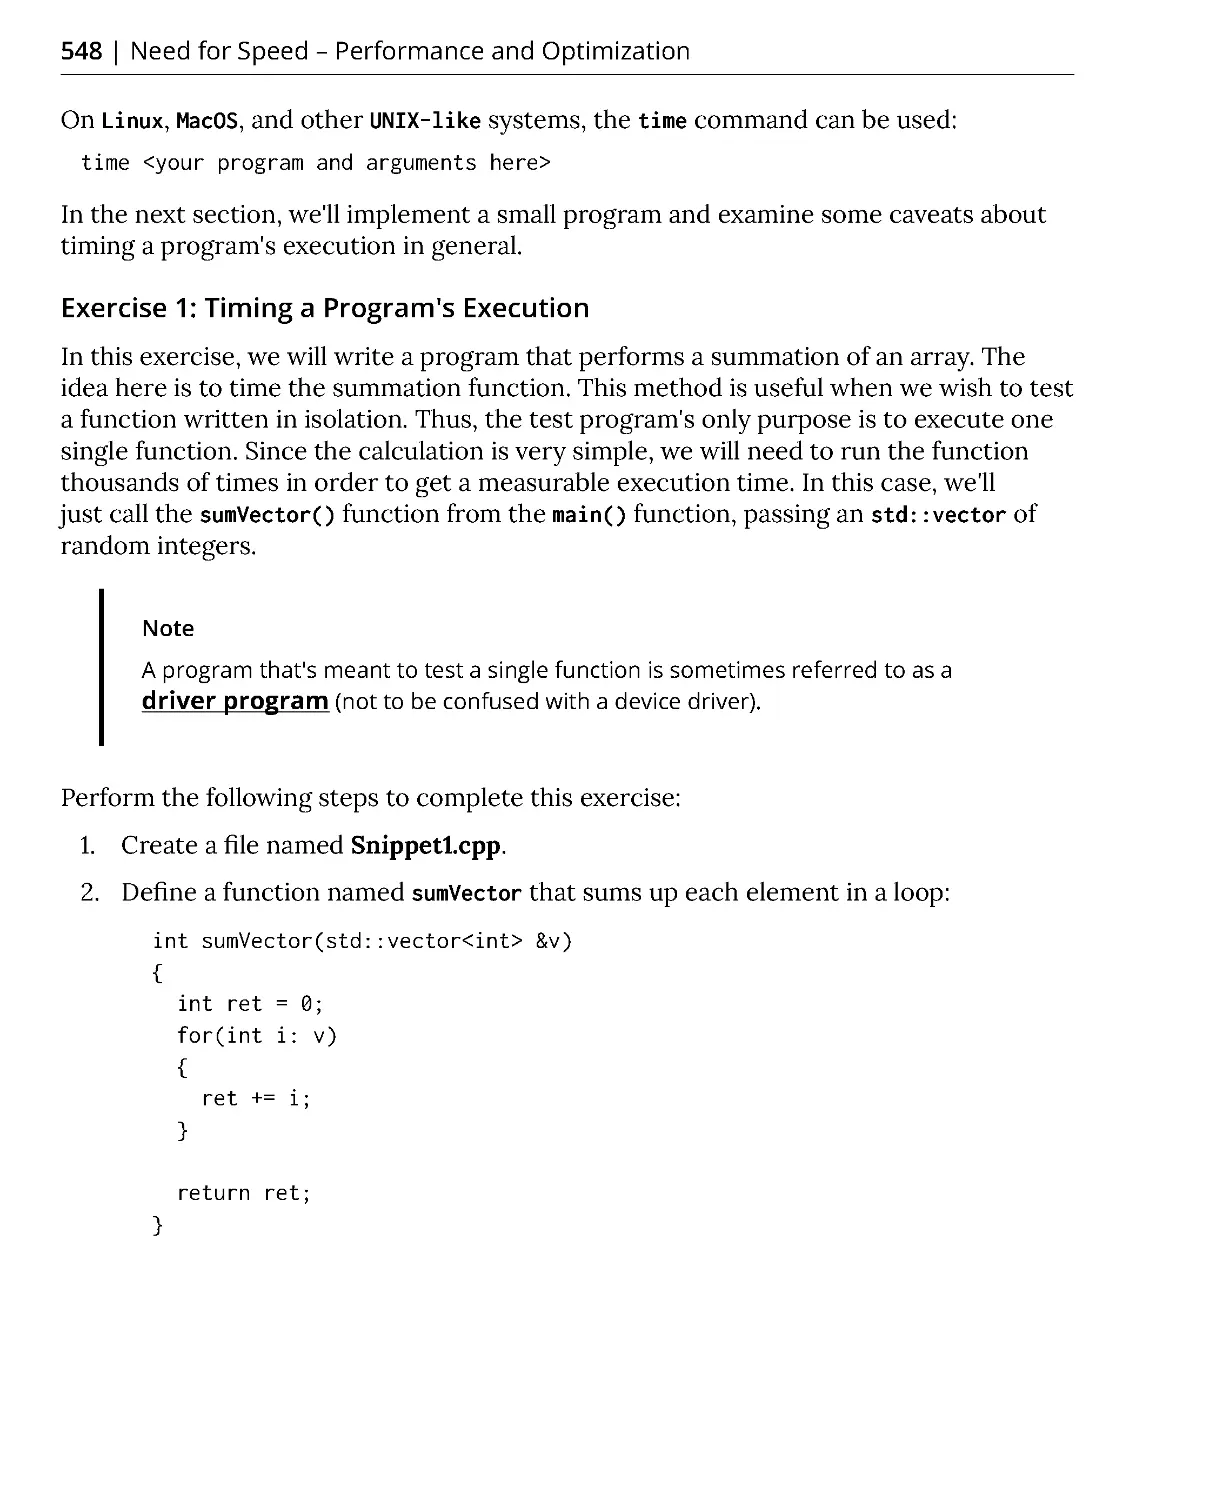
Exercise 1: Timing a Program's Execution ................................................... 548
Timing Programs without Side Effects ......................................................... 552
Source Code Instrumentation ....................................................................... 553
Exercise 2: Writing a Code Timer Class ......................................................... 553
Runtime Profiling ....................................................................................... 559
Exercise 3: Using perf to Profile Programs .................................................. 559
Optimization Strategies ............................................................................ 561
Compiler-Based Optimization ....................................................................... 561
Loop Unrolling ................................................................................................. 561
Exercise 4: Using Loop Unrolling Optimizations ......................................... 562
Profile Guided Optimization .......................................................................... 564
Exercise 5: Using Profile Guided Optimization ............................................ 565
Parallelization .................................................................................................. 566
Exercise 6: Using Compiler Parallelization ................................................... 566
Source Code Micro Optimizations ................................................................ 568
Using the std::vector Container Efficiently .................................................. 568
Exercise 7: Optimizing Vector Growth .......................................................... 569
Short-Circuit Logical Operators ..................................................................... 573
Exercise 8: Optimizing Logical Operators .................................................... 573
Branch Prediction ........................................................................................... 576
Exercise 9: Optimization for Branch Prediction .......................................... 576
Further Optimizations ............................................................................... 579
Cache Friendly Code .................................................................................. 580
Exercise 10: Exploring the Effect of Caches on Data Structures ............... 580
Exercise 11: Measuring the Impact of Memory Access .............................. 584
Caching ............................................................................................................. 588
Prefetching ...................................................................................................... 588
Effects of Caching on Algorithms .................................................................. 589
Optimizing for Cache-Friendliness ................................................................ 590
Exercise 12: Exploring the Cost of Heap Allocations .................................. 591
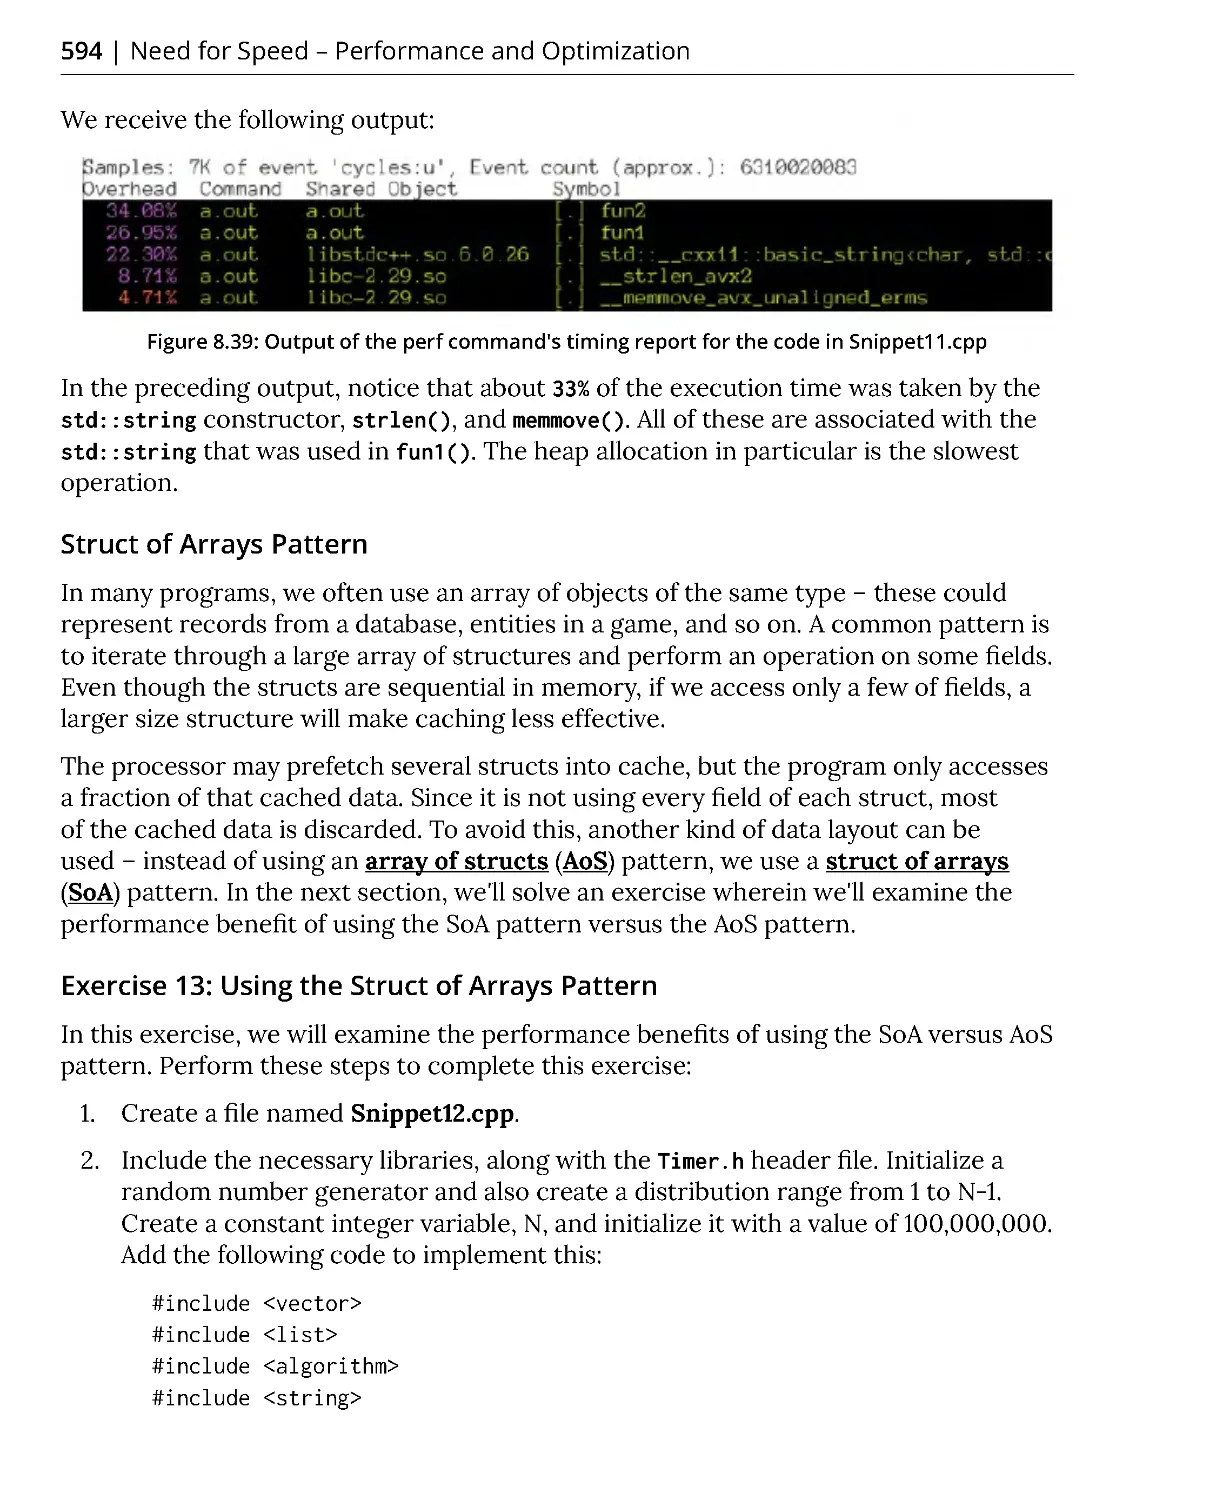
Struct of Arrays Pattern - ................................................................................
594
Exercise 13: Using the Struct of Arrays Pattern .......................................... 594
Algorithmic Optimizations ............................................................................. 598
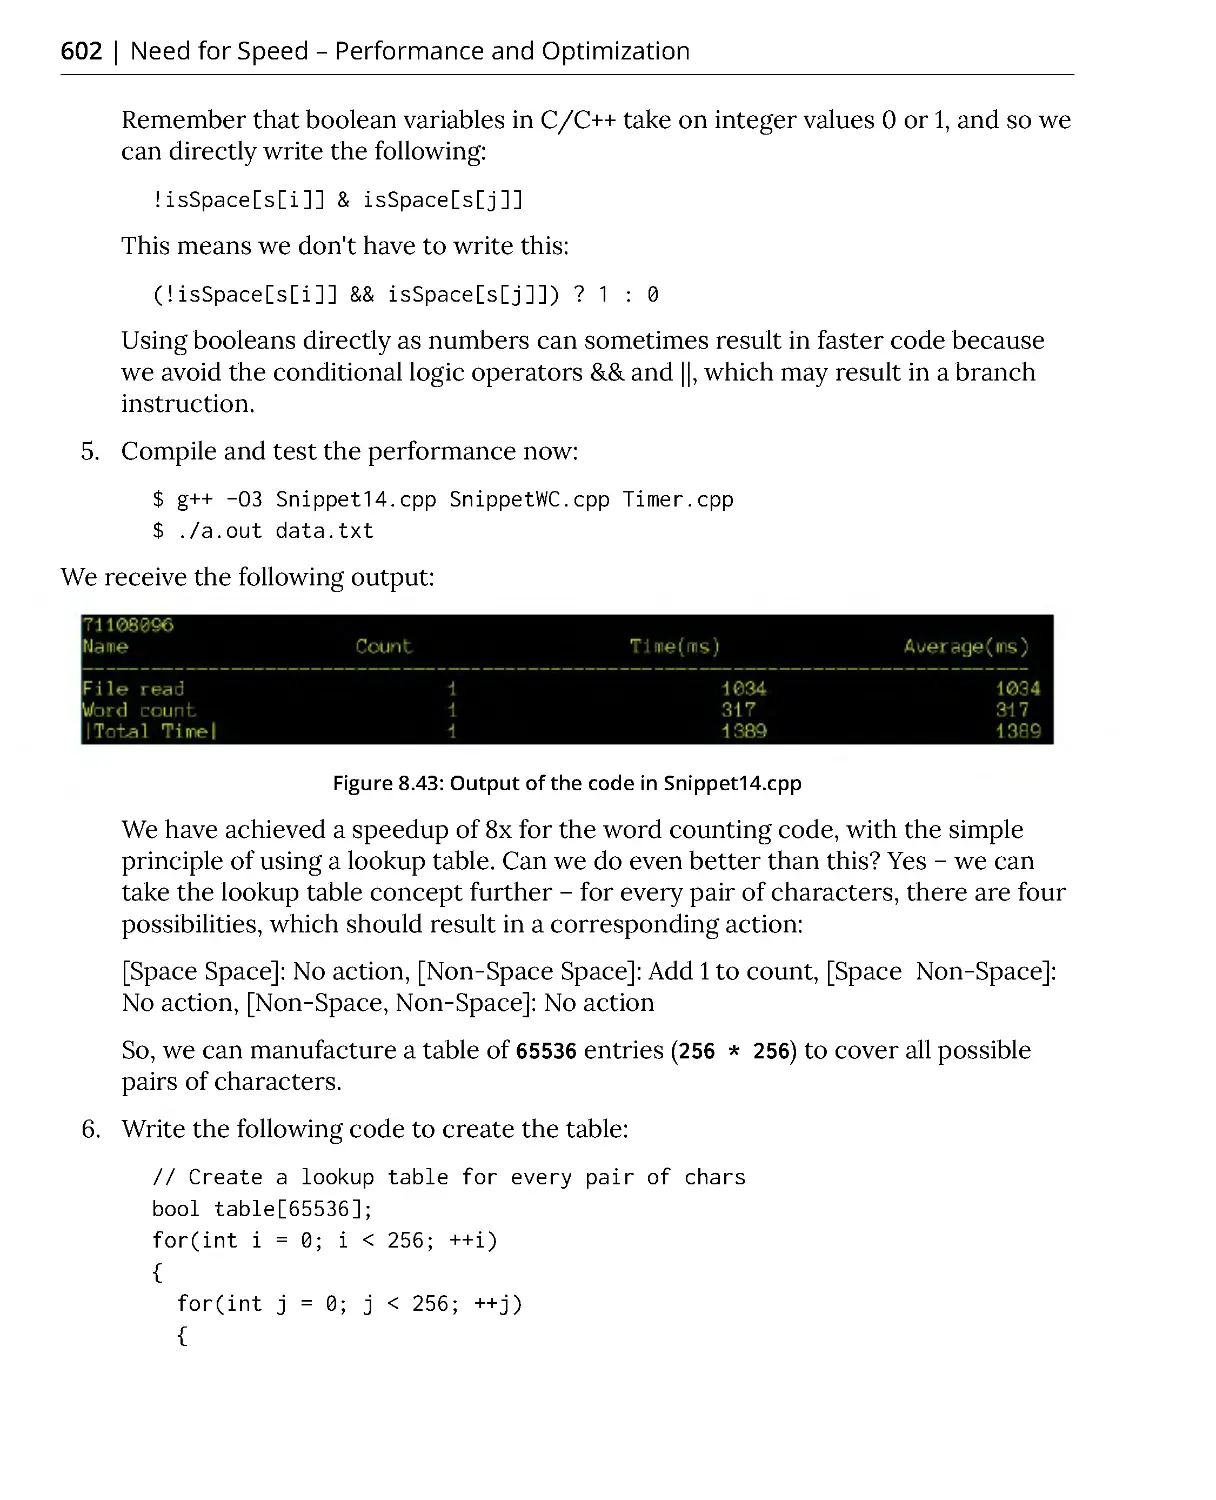
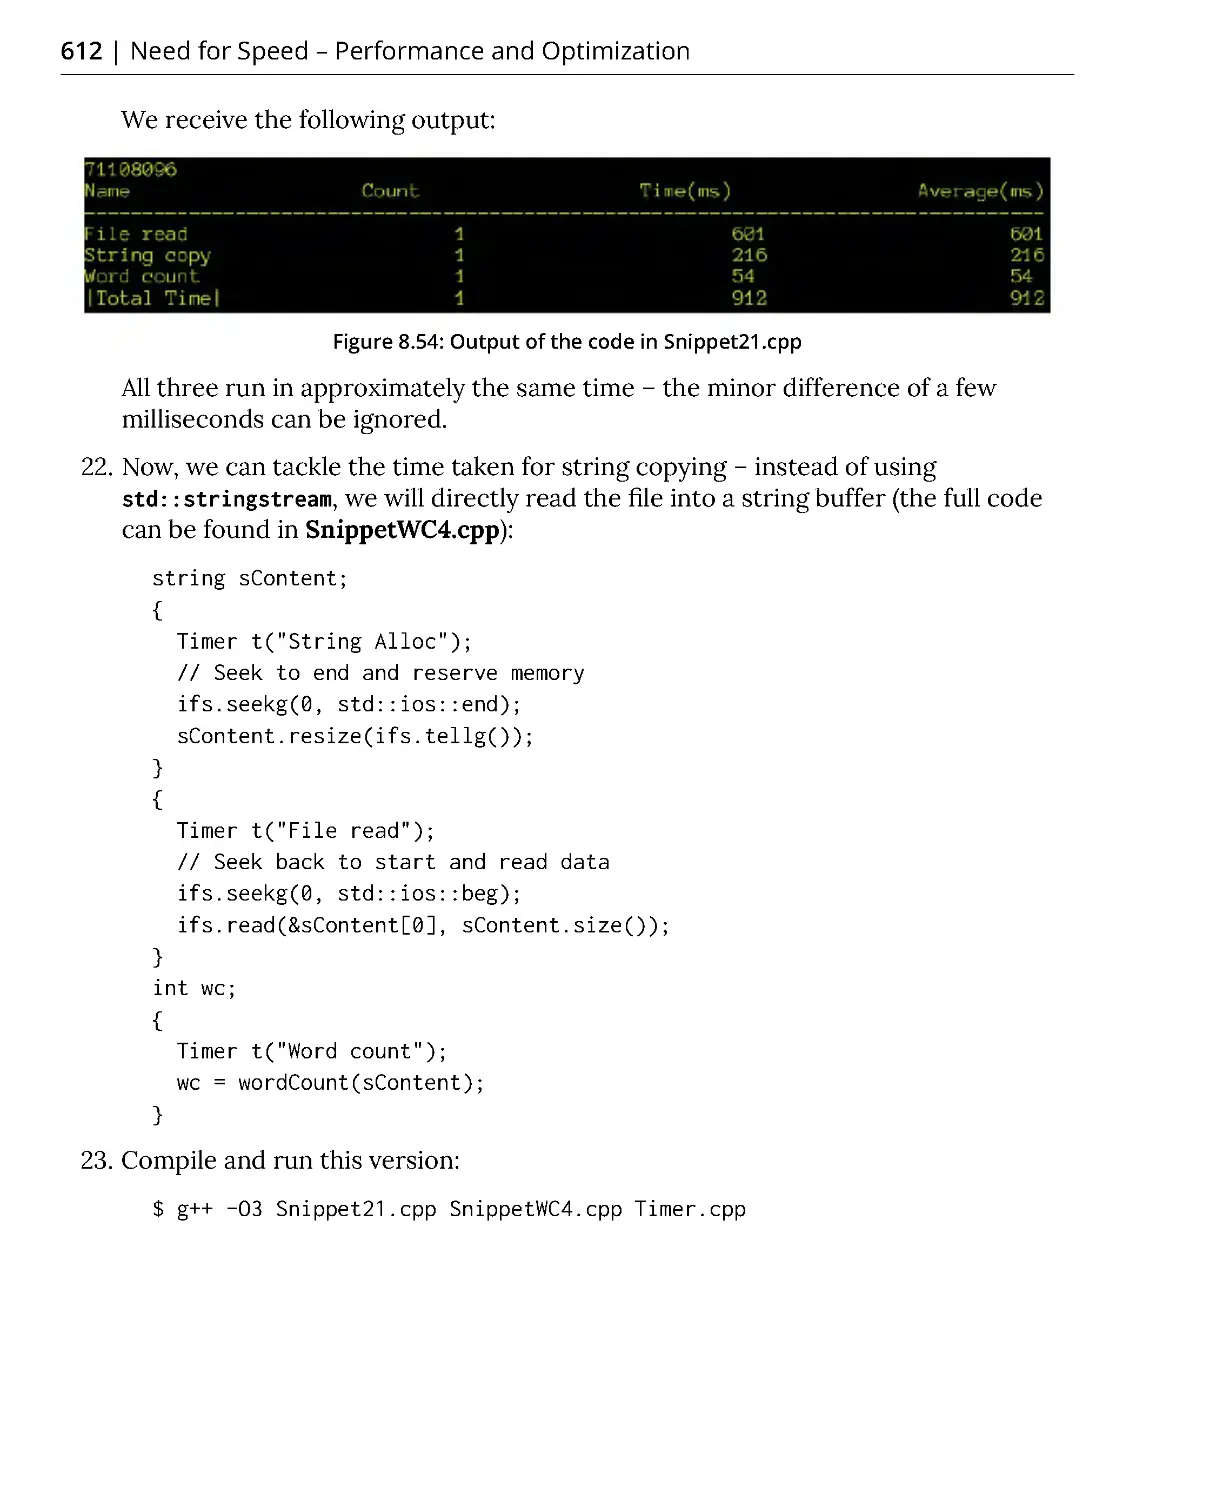
Exercise 14: Optimizing a Word Count Program ......................................... 599
Activity 1: Optimizing a Spell Check Algorithm ........................................... 614
Summary ..................................................................................................... 617
Appendix
619
Index
731
About
This section briefly introduces the authors, the coverage of this book, the technical skills you'll
need to get started, and the hardware and software requirements required to complete all of
the included activities and exercises.
Preface
>
ii | Preface
About the Book
C++ is one of the most widely used programming languages and is applied in a variety of
domains, right from gaming to graphical user interface (GUI) programming and even
operating systems. If you're looking to expand your career opportunities, mastering the
advanced features of C++ is key.
The book begins with advanced C++ concepts by helping you decipher the sophisticated
C++ type system and understand how various stages of compilation convert source
code to object code. You'll then learn how to recognize the tools that need to be used in
order to control the flow of execution, capture data, and pass data around. By creating
small models, you'll even discover how to use advanced lambdas and captures and
express common API design patterns in C++. As you cover later chapters, you'll explore
ways to optimize your code by learning about memory alignment, cache access, and
the time a program takes to run. The concluding chapter will help you to maximize
performance by understanding modern CPU branch prediction and how to make your
code cache-friendly.
By the end of this book, you'll have developed programming skills that will set you apart
from other C++ programmers.
About the Authors
Gazihan Alankus holds a PhD in computer science from Washington University in St.
Louis. Currently, he is an assistant professor at the Izmir University of Economics in
Turkey. He teaches and conducts research on game development, mobile application
development, and human-computer interaction. He is a Google developer expert in
Dart and develops Flutter applications with his students in his company Gbot, which he
founded in 2019.
Olena Lizina is a software developer with 5 years experience in C++. She has practical
knowledge of developing systems for monitoring and managing remote computers with
a lot of users for an international product company. For the last 4 years, she has been
working for international outsourcing companies on automotive projects for well-
known automotive concerns. She has been participating in the development of complex
and highly performant applications on different projects, such as HMI (Human Machine
Interface), navigation, and applications for work with sensors.
Rakesh Mane has over 18 years experience in the software industry. He has worked
with proficient programmers from a variety of regions: India, the US, and Singapore. He
has mostly worked in C++, Python, shell scripting, and database. In his spare time, he
likes to listen to music and travel. Also, he likes to play with, experiment with, and break
things using software tools and code.
About the Book | iii
Vivek Nagarajan is a self-taught programmer who started out in the 1980s on 8-bit
systems. He has worked on a large number of software projects and has 14 years of
professional experience with C++. Aside from this, he has worked on a wide variety
of languages and frameworks across the years. He is an amateur powerlifter, DIY
enthusiast, and motorcycle racer. He currently works as an independent software
consultant.
Brian Price has over 30 years experience working in a variety of languages, projects,
and industries, including over 20 years experience in C++. He was worked on power
station simulators, SCADA systems, and medical devices. He is currently crafting
software in C++, CMake, and Python for a next-generation medical device. He enjoys
solving puzzles and the Euler project in a variety of languages.
Learning Objectives
By the end of this book, you will be able to:
• Delve into the anatomy and workflow of C++
• Study the pros and cons of different approaches to coding in C++
• Test, run, and debug your programs
• Link object files as a dynamic library
• Use templates, SFINAE, constexpr if expressions and variadic templates
• Apply best practice to resource management
Audience
If you have worked in C++ but want to learn how to make the most of this language,
especially for large projects, this book is for you. A general understanding of
programming and knowledge of using an editor to produce code files in project
directories is a must. Some experience with strongly typed languages, such as C and
C++, is also recommended.
Approach
This fast-paced book is designed to teach you concepts quickly through descriptive
graphics and challenging exercises. The book will have "call-outs," with key take away
points and the most common pitfalls to keep you interested, while breaking up the
topics into manageable sections.
iv | Preface
Hardware Requirements
For the optimal student experience, we recommend the following hardware
configuration:
• Any entry-level PC/Mac with Windows, Linux, or macOS will suffice
• Processor: Dual core or equivalent
• Memory: 4 GB RAM (8 GB preferred)
• Storage: 35 GB of available space
Software Requirements
You'll also need the following software installed in advance:
• Operating system: Windows 7 SP1 32/64-bit, Windows 8.1 32/64-bit, or Windows
10 32/64-bit, Ubuntu 14.04 or later, or macOS Sierra or later
• Browser: Google Chrome or Mozilla Firefox
Installation and Setup
Before you embark on this book, you will need to install the following libraries used in
this book. You will find the steps to install these here.
Installing CMake
We will use CMake version 3.12.1 or later. We have two options for installation.
Option 1:
If you are using Ubuntu 18.10, you can install CMake globally using the following
command:
sudo apt install cmake
When you run the following command:
cmake –version
You should see the following output:
cmake version 3.12 .1
CMake suite maintained and supported by Kitware (kitware.com/cmake).
If the version you see here is lower than 3.12.1 (for example, 3.10), you should install
CMake locally using the following instructions.
Option 2:
About the Book | v
If you are using an older Linux version, you may get a CMake version that is lower than
3.12 .1 . Then, you need to install it locally. Use the following commands:
wget \
https://github.com/Kitware/CMake/releases/download/v3.15 .1/cmake-3 .15 .1 -
Linux-x86_64.sh
sh cmake-3 .15 .1 -Linux-x86_64 .sh
When you see the software license, type y and press Enter. When asked about the
installation location, type y and press Enter again. This should install it to a new folder
in your system.
Now, we will add that folder to our path. Type the following. Note that the first line is a
bit too long and the line breaks in this document. You should write it as a single line, as
follows:
echo "export PATH=\"$HOME/cmake-3 .15.1 -Linux-x86_64/bin:$PATH\"" >> .bash_
profile
source .profile
Now, when you type the following:
cmake –version
You should see the following output:
cmake version 3.15 .1
CMake suite maintained and supported by Kitware (kitware.com/cmake).
3.15.1 is the current latest release at the time of writing this document. Since it is newer
than 3.12 .1, this will suffice for our purposes.
Installing Git
Test the current installation by typing the following:
git --version
You should see a line such as the following:
git version 2.17 .1
If you see the following line instead, you need to install git:
command 'git' not found
vi | Preface
Here is how you can install git in Ubuntu:
sudo apt install git
Installing g++
Test the current installation by typing the following:
g++ --version
You should see an output such as the following:
g++ (Ubuntu 7.4 .0 -1ubuntu1~18 .04) 7.4 .0
Copyright (C) 2017 Free Software Foundation, Inc.
This is free software; see the source for copying conditions. There is NO
warranty; not even for MERCHANTABILITY or FITNESS FOR A PARTICULAR PURPOSE.
If it is not installed, type the following code to install it:
sudo apt install g++
Installing Ninja
Test the current installation by typing the following:
ninja --version
You should see an output such as the following:
1.8 .2
If it is not installed, type the following code to install it:
sudo apt install ninja-build
Installing Eclipse CDT and cmake4eclipse
There are multiple ways of installing Eclipse CDT. To get the latest stable version,
we will use the official installer. Go to this website and download the Linux installer:
https://www.eclipse.org/downloads/packages/installer.
Follow the instructions there and install Eclipse IDE for C/C++ Developers. Once
you have installed it, run the Eclipse executable. If you did not change the default
configuration, typing the following command in the terminal will run it:
~ /eclipse/cpp-2019 -03/eclipse/eclipse
You will choose a workspace folder and then you will be greeted with a Welcome tab in
the main Eclipse window.
About the Book | vii
Now, we will install cmake4eclipse. An easy way to do this is to go to this website
and drag the Install icon to the Eclipse window: https://github.com/15knots/
cmake4eclipse#installation. It will ask you to restart Eclipse, after which you are ready
to modify the CMake project to work with Eclipse.
Installing GoogleTest
We will install GoogleTest in our system, which will also install other packages that are
dependent on it. Write the following command:
sudo apt install libgtest-dev google-mock
This command installs the include files and source files for GoogleTest. Now, we need
to build the source files that we installed to create the GoogleTest library. Run the
following commands to do this:
cd /usr/src/gtest
sudo cmake CMakeLists.txt
sudo make
sudo cp *.a /usr/lib
Installing the Code Bundle
Copy the code bundle for the class to the C:/Code folder.
Additional Resources
The code bundle for this book is also hosted on GitHub at https://github.com/
TrainingByPackt/Advanced-CPlusPlus.
We also have other code bundles from our rich catalog of books and videos available at
https://github.com/PacktPublishing/. Check them out!
Learning Objectives
By the end of this chapter, you will be able to:
•
Establish the code-build-test process
•
Describe the various stages of compilation
•
Decipher complicated C++ type systems
•
Configure projects with unit tests
•
Convert source code to object code
•
Write readable code and debug it
In this chapter, we will learn to establish the code-build-test model that will be used throughout
the book, write beautiful code, and perform unit tests.
Anatomy of Portable
C++ Software
1
2 | Anatomy of Portable C++ Software
Introduction
C++ is one of the oldest and most popular languages that you can use to write efficient
code. It is both "close to the metal," like C, and has advanced object-oriented features,
like Java. Being an efficient low-level language makes C++ the language of choice for
domains in which efficiency is paramount, such as games, simulations, and embedded
systems. At the same time, being an object-oriented language with advanced features
such as generics, references, and countless others makes it suitable for large projects
that are developed and maintained by multiple people.
Almost any programming experience involves organizing your code base and using
libraries written by others. C++ is no different. Unless your program is simple, you
will distribute your code into multiple files that you need to organize, and you will
use various libraries that fulfill tasks, usually in a much more efficient and robust way
than your code would. C++ projects that do not use any third-party libraries are edge
cases that do not represent the majority of projects, which use many libraries. These
projects and their libraries are expected to work in different hardware architectures
and operating systems. Therefore, it is important to spend time on project setup and
understand the tools used to manage dependencies if you are going to develop anything
meaningful with C++.
Most modern and popular high-level languages have standard tools to maintain
projects, build them, and handle their library dependencies. Many of these have
repositories that host libraries and tools that automatically download and use libraries
from those repositories. For example, Python has pip, which takes care of downloading
and using appropriate versions of libraries that the programmer wants to use. Similarly,
JavaScript has npm, Java has maven, Dart has pub, and C# has NuGet. In most of these
languages, you list the name of the library and the version that you would like to
use, and the tool automatically downloads and uses the compatible version of the
library. These languages benefit from the fact that the programs are built and run in a
controlled environment in which a certain level of hardware and software requirements
are satisfied. C++, on the other hand, is expected to work in a variety of contexts with
different architectures, including very primitive hardware. Hence, C++ programmers
are less pampered when it comes to building programs and performing dependency
management.
Managing C++ Projects | 3
Managing C++ Projects
In the world of C++, we have several tools that help in managing project sources
and their dependencies. For example, pkg-config, Autotools, make, and CMake are the
most notable ones in the community. Compared to the tools of the other high-level
languages, these are much more complicated to use. CMake has arisen among these as
the de facto standard for managing C++ projects and their dependencies. It is more
opinionated compared to make, and it is accepted as the direct project format for most
IDEs (Integrated Development Environments).
While CMake helps with managing projects and their dependencies, the experience is
still far from higher-level languages in which you list the libraries and their versions
that you want to use and everything else is taken care of for you. With CMake, you
still are responsible for installing libraries properly in your development environment,
and you are expected to use compatible versions for each library. In popular Linux
distributions with extensive package managers, you can easily install binary versions of
most popular libraries. However, sometimes, you may have to compile and install the
libraries yourself. This is a part of the whole C++ developer experience, which you will
gather by learning more about the development platform of your choice. Here, we will
focus more on how to properly set up our CMake projects, including understanding and
resolving issues related to libraries.
The Code-Build-Test-Run Loop
In order to base our discussion on a solid foundation, we will immediately start with
a practical example. We will start with a C++ code base template that you can use as a
starting point for your own projects. We will see how we can build and compile it using
CMake on the command line. We will also set up the Eclipse IDE for C/C++ developers
and import our CMake project. The use of an IDE will provide us with facilities that ease
the creation of source code and enable us to debug our programs line by line to view
what exactly happens during the execution of our program and correct our mistakes in
an informed fashion rather than trial and error and superstition.
4 | Anatomy of Portable C++ Software
Building a CMake Project
The de facto standard for C++ projects is to use CMake to organize and build the
project. Here, we will use a basic template project as a starting point. The following is
the folder structure of a sample template:
Figure 1.1: Folder structure of a sample template
In the preceding figure, the .gitignore file lists the file patterns that should not be
added to the git version control system. Such ignored files include the outputs of the
build process, which are created locally and should not be shared among computers.
The files in the include and src folders are the actual C++ source files, and the
CMakeLists.txt file is the CMake script file that glues the project together by handling
the source compilation rules, library dependencies, and other project settings. CMake
rules are high-level platform-independent rules. CMake uses them to create various
types of make files for different platforms.
Building a project with CMake is a two-step process. First, we get CMake to generate
platform-dependent configuration files for a native build system that will compile
and build the project. Then, we will use the generated files to build the project. The
platform-dependent build systems that CMake can generate configuration files for
include UNIX Makefiles, Ninja build files, NMake Makefiles, and MinGW Makefiles. The
choice here depends on the platform in use, the availability of these tools, and personal
preference. UNIX Makefiles are a de facto standard for Unix and Linux, whereas NMake
is its Windows and Visual Studio counterpart. MinGW, on the other hand, is a Unix-like
environment in Windows in which Makefiles are also in use. Ninja is a modern build
system that provides exceptional speed compared to other build systems coupled with
multi-platform support, which we choose to use here. Furthermore, in addition to these
command-line build systems, we can also generate IDE projects for Visual Studio,
XCode, Eclipse CDT, and many others, and build our projects inside the IDE. Therefore,
CMake is a meta tool that will create the configuration files for another system that will
actually build the project. In the next section, we will solve an exercise, wherein we will
generate Ninja build files using CMake.
Managing C++ Projects | 5
Exercise 1: Using CMake to Generate Ninja Build Files
In this exercise, we will use CMake to generate Ninja build files, which are used
to build C++ projects. We will first download our source code from a git repository
and will use CMake and Ninja to build it. The aim of this exercise is to use CMake to
generate Ninja build files, build the project, and then run them.
Note
The link to the GitHub repository can be found here: https://github.com/
TrainingByPackt/Advanced-CPlusPlus/tree/master/Lesson1/Exercise01/project.
Perform the following steps to complete the exercise:
1. In a terminal window, type the following command to download the CxxTemplate
repository from GitHub onto your local system:
git clone https://github.com/TrainingByPackt/Advanced-CPlusPlus/tree/
master/Lesson1/Exercise01/project
The output of the previous command is similar to the following:
Figure 1.2: Checking out the sample project from GitHub
Now you have the source code in the CxxTemplate folder.
2. Navigate into the CxxTemplate folder by typing the following command in the
terminal:
cd CxxTemplate
3. Now you can list all the files in the project by typing the following command:
find .
6 | Anatomy of Portable C++ Software
4. Generate our Ninja build file using the cmake command in the CxxTemplate folder.
To do that, write the following command:
cmake -Bbuild -H .
- G Ninja
The output of the preceding command is as follows:
Figure 1.3: Generating the Ninja build file
Let's explain parts of the preceding command. With -Bbuild, we are telling CMake
to use the build folder to generate build artifacts. Since this folder does not exist,
CMake will create it. With –H ., we are telling CMake to use the current folder as
the source. By using a separate build folder, we will keep our source files clean and
all the build artifacts will live in the build folder, which is ignored by Git thanks
to our .gitignore file. With –GNinja, we are telling CMake to use the Ninja build
system.
5. Run the following commands to list the project files and to check the files that
were created inside the build folder:
ls
ls build
The preceding command will show the following output in the terminal:
Figure 1.4: Files in the build folder
Managing C++ Projects | 7
It's clear that the preceding files will be present inside the build folder. build.ninja
and rules.ninja in the preceding output are the Ninja build files that can actually
build our project in this platform.
Note
By using CMake, we did not have to write the Ninja build files and avoided
committing to the Unix platform. Instead, we have a meta-build system that can
generate low-level build files for other platforms such as UNIX/Linux, MinGW, and
Nmake.
6. Now, go into the build folder and build our project by typing the following
commands in the terminal:
cd build
ninja
You should see a final output like the following:
Figure 1.5: Building with ninja
7. Type ls in the build folder and check whether we have generated the CxxTemplate
executable or not:
ls
The previous command yields the following output in the terminal:
Figure 1.6: Files in the build folder after running ninja
In the preceding figure, you can see that the CxxTemplate executable is generated.
8 | Anatomy of Portable C++ Software
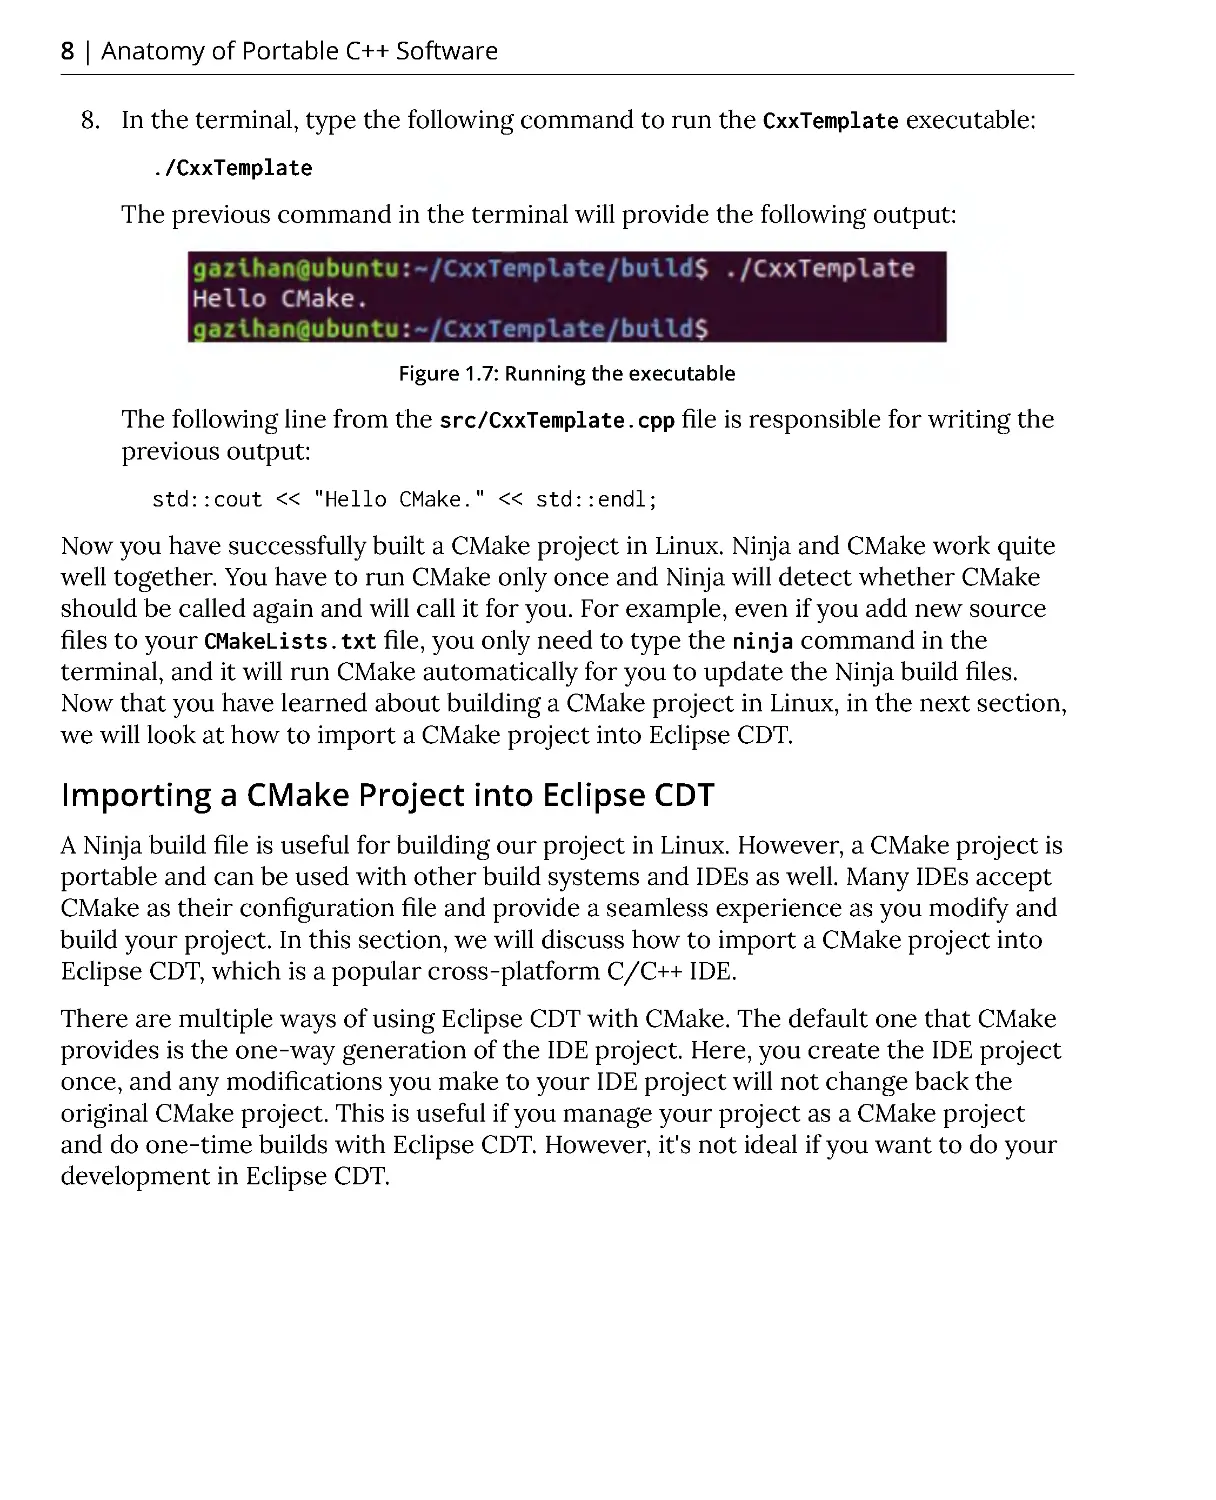
8. In the terminal, type the following command to run the CxxTemplate executable:
. /CxxTemplate
The previous command in the terminal will provide the following output:
Figure 1.7: Running the executable
The following line from the src/CxxTemplate.cpp file is responsible for writing the
previous output:
std::cout << "Hello CMake." << std::endl;
Now you have successfully built a CMake project in Linux. Ninja and CMake work quite
well together. You have to run CMake only once and Ninja will detect whether CMake
should be called again and will call it for you. For example, even if you add new source
files to your CMakeLists.txt file, you only need to type the ninja command in the
terminal, and it will run CMake automatically for you to update the Ninja build files.
Now that you have learned about building a CMake project in Linux, in the next section,
we will look at how to import a CMake project into Eclipse CDT.
Importing a CMake Project into Eclipse CDT
A Ninja build file is useful for building our project in Linux. However, a CMake project is
portable and can be used with other build systems and IDEs as well. Many IDEs accept
CMake as their configuration file and provide a seamless experience as you modify and
build your project. In this section, we will discuss how to import a CMake project into
Eclipse CDT, which is a popular cross-platform C/C++ IDE.
There are multiple ways of using Eclipse CDT with CMake. The default one that CMake
provides is the one-way generation of the IDE project. Here, you create the IDE project
once, and any modifications you make to your IDE project will not change back the
original CMake project. This is useful if you manage your project as a CMake project
and do one-time builds with Eclipse CDT. However, it's not ideal if you want to do your
development in Eclipse CDT.
Importing a CMake Project into Eclipse CDT | 9
Another way of using CMake with Eclipse CDT is to use the custom cmake4eclipse
plugin. When using this plugin, you do not abandon your CMakeLists.txt file and
make a one-way switch to Eclipse CDT's own project manager. Instead, you keep
managing your project through the CMakeLists.txt file, which continues to be the main
configuration file of your project. Eclipse CDT actively works with your CMakeLists.txt
file to build your project. You can add or remove source files and make other changes in
your CMakeLists.txt, and the cmake4eclipse plugin applies those changes to the Eclipse
CDT project at every build. You will have a nice IDE experience while keeping your
CMake project current. The benefit of this approach is that you can always quit using
Eclipse CDT and use your CMakeLists.txt file to switch to another build system (such as
Ninja) later. We will use this second approach in the following exercise.
Exercise 2: Importing the CMake File into Eclipse CDT
In the last exercise, you developed a CMake project and you would like to start using
Eclipse CDT IDE to edit and build that project. In this exercise, we will import our
CMake project into the Eclipse CDT IDE using the cmake4eclipse plugin. Perform the
following steps to complete the exercise:
1. Open Eclipse CDT.
2. Create a new C++ project in the location of our current project (the folder that
contains the CMakeLists.txt file and the src folder). Go to File | New | Project. A
New Project dialog box appears like the one in the following screenshot:
Figure 1.8: New Project dialog box
10 | Anatomy of Portable C++ Software
3. Select the C++ Project option and click on the Next button. A C++ Project dialog
box appears like the one in the following screenshot:
Figure 1.9: C++ Project dialog box
4. Accept everything, including switching to the C/C++ perspective, and click Finish.
5. Click on the Restore button at the top-left corner to view the newly created
project:
Figure 1.10: The Restore button
Importing a CMake Project into Eclipse CDT | 11
6. Click on the CxxTemplate project. Go to Project | Properties, then select Tool
Chain Editor under C/C++ Build from the left pane and set Current builder to
CMake Builder (portable). Then, click on the Apply and Close button:
Figure 1.11: Project properties
7. Then, choose the Project | Build All menu item to build the project:
Figure 1.12: Building the project
12 | Anatomy of Portable C++ Software
8. In the following Console pane, you will see the output of CMake as if you called
it from the command line, followed by a call to make all that actually builds our
project:
Figure 1.13: The build output
9. If you did not get any errors in the previous steps, you can run the project using
the menu item Run | Run. If you are given some options, choose Local C/C++
Application and CxxTemplate as the executable:
Figure 1.14: Running a project
10. When it runs, you will see the output of the program in the Console pane as
follows:
Figure 1.15: Output of the project
Importing a CMake Project into Eclipse CDT | 13
You have successfully built and run a CMake project using Eclipse CDT. In the next
exercise, we will introduce a frequent change to our projects by adding new source files
with new classes.
Exercise 3: Adding New Source Files to CMake and Eclipse CDT
As you develop significantly bigger C++ projects, you will tend to add new source files to
it as the project grows to meet the set expectations. In this exercise, we will add a new
. cpp and .h file pair to our project and see how CMake and Eclipse CDT work together
with these changes. We will add these files inside the project using the new class
wizard, but you can also create them with any other text editor. Perform the following
steps to add new source files to CMake and Eclipse CDT:
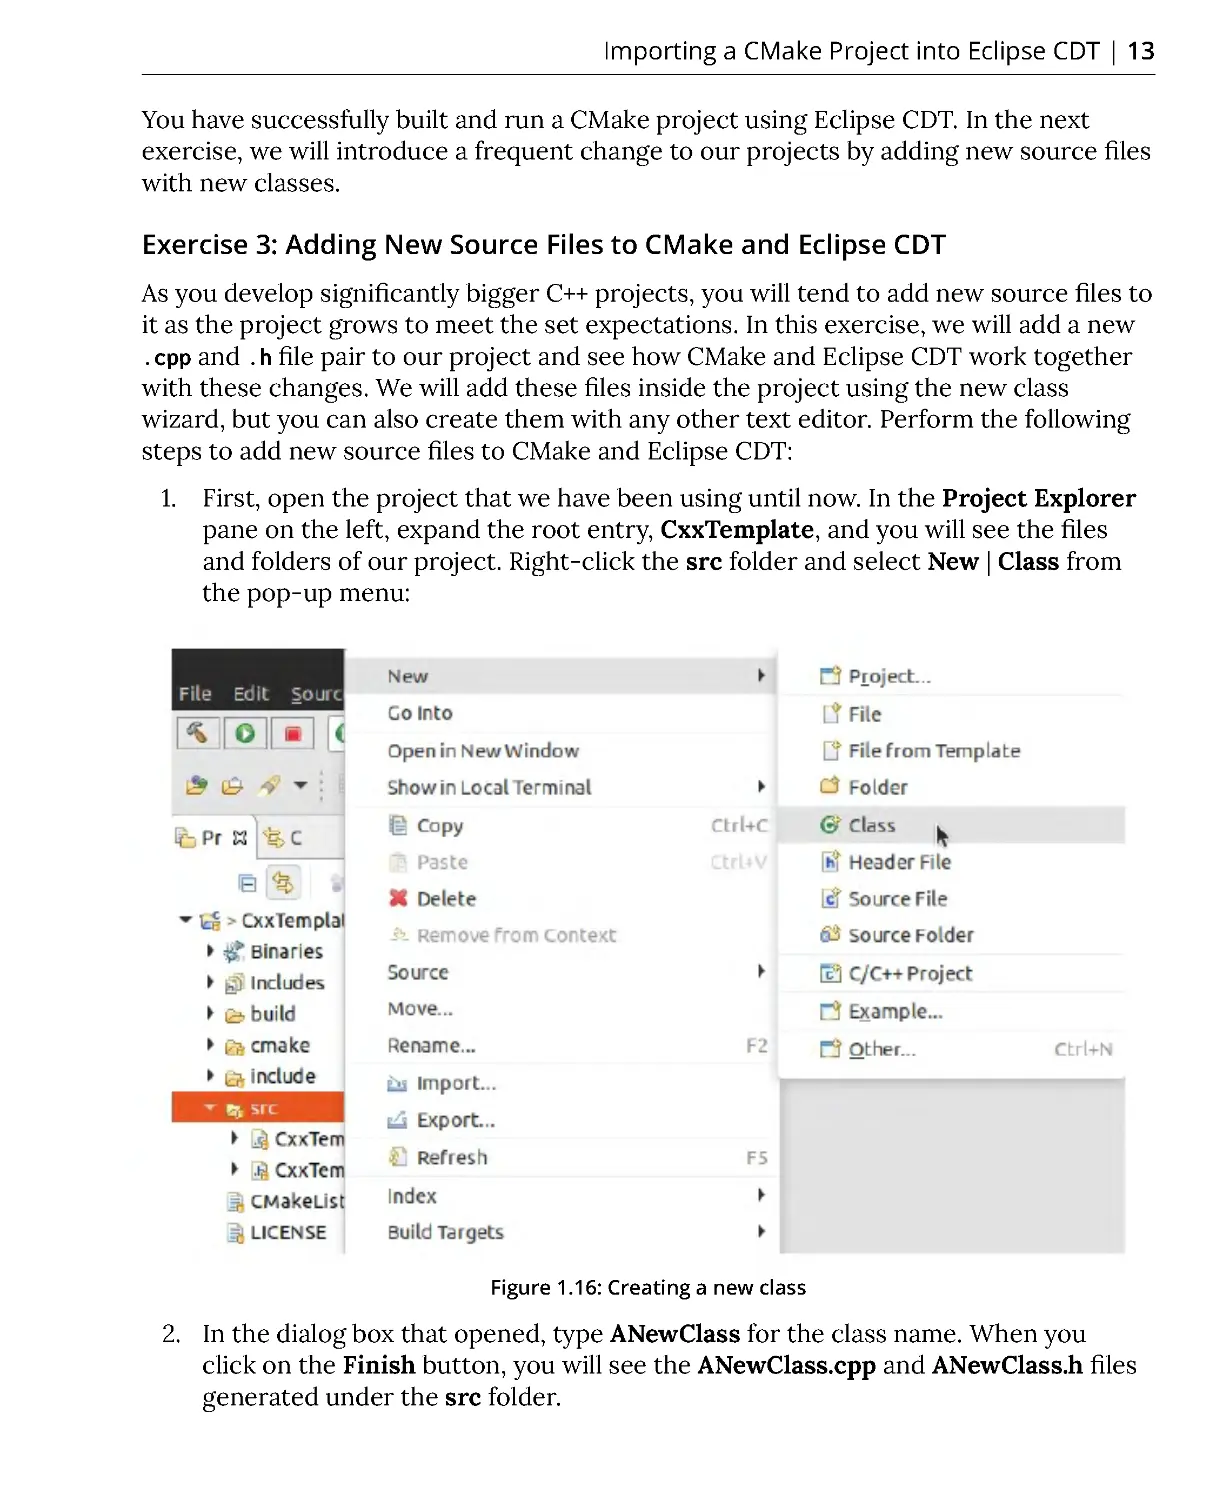
1. First, open the project that we have been using until now. In the Project Explorer
pane on the left, expand the root entry, CxxTemplate, and you will see the files
and folders of our project. Right-click the src folder and select New | Class from
the pop-up menu:
Figure 1.16: Creating a new class
2. In the dialog box that opened, type ANewClass for the class name. When you
click on the Finish button, you will see the ANewClass.cpp and ANewClass.h files
generated under the src folder.
14 | Anatomy of Portable C++ Software
3. Now, let's write some code into the ANewClass class and access it from the
CxxTemplate class that we already had. Open ANewClass.cpp and change the
beginning of the file to match the following, and then save the file:
#include "ANewClass.h"
#include <iostream>
void ANewClass::run() {
std::cout << "Hello from ANewClass." << std::endl;
}
You will see that Eclipse warns us with a Member declaration not found message:
Figure 1.17: Analyzer warning
This error is generated since we need to add this to our ANewClass.h file as well.
Such warnings are made possible by analyzers in IDEs and are quite useful as they
help you fix your code as you are typing, without running the compiler.
4. Open the ANewClass.h file, add the following code, and save the file:
public:
void run(); // we added this line
ANewClass();
You should see that the error in the .cpp file went away. If it did not go away, it
may be because you may have forgotten to save one of the files. You should make
it a habit to press Ctrl + S to save the current file, or Shift + Ctrl + S to save all the
files that you edited.
Importing a CMake Project into Eclipse CDT | 15
5. Now, let's use this class from our other class, CxxTemplate.cpp. Open that file,
perform the following modifications, and save the file. Here, we are first importing
header files and in the constructor of CxxApplication, we are printing text to the
console. Then, we are creating a new instance of ANewClass and calling its run
method:
#include "CxxTemplate.h"
#include "ANewClass.h"
#include <string>
...
CxxApplication::CxxApplication( int argc, char *argv[] ) {
std::cout << "Hello CMake." << std::endl;
::ANewClass anew;
anew.run();
}
Note
The complete code of this file can be found here: https://github.com/
TrainingByPackt/Advanced-CPlusPlus/blob/master/Lesson1/Exercise03/src/
CxxTemplate.cpp.
6. Try to build the project by clicking on the Project | Build All menu options. You
will get some undefined reference errors in two lines. This is because our project
is built with CMake's rules and we did not let CMake know about this new file.
Open the CMakeLists.txt file, make the following modification, and save the file:
add_executable(CxxTemplate
src/CxxTemplate.cpp
src/ANewClass.cpp
)
Try to build the project again. This time you should not see any errors.
16 | Anatomy of Portable C++ Software
7. Run the project using the Run | Run menu option. You should see the following
output in the terminal:
Figure 1.18: Program output
You modified a CMake project, added new files to it, and ran it fine. Note that we
created the files in the src folder and let the CMakeLists.txt file know about the CPP
file. If you do not use Eclipse, you can simply continue with the usual CMake build
commands and your program will run successfully. So far, we have checked out the
sample code from GitHub and built it both with plain CMake and with the Eclipse IDE.
We also added a new class to the CMake project and rebuilt it in Eclipse IDE. Now you
know how to build and modify CMake projects. In the next section, we will perform an
activity of adding a new source-header file pair to the project.
Activity 1: Adding a New Source-Header File Pair to the Project
As you develop C++ projects, you add new source files to it as the project grows. You
may want to add new source files for various reasons. For example, let's say you are
developing an accounting application in which you calculate interest rates in many
places of your project, and you want to create a function in a separate file so that you
can reuse it throughout your project. To keep things simple, here we will create a
simple summation function instead. In this activity, we will add a new source-header
file pair to the project. Perform the following steps to complete the activity:
1. Open the project that we created in the earlier exercise in the Eclipse IDE.
2. Add the SumFunc.cpp and SumFunc.h file pair to the project.
3. Create a simple function named sum that returns the sum of two integers.
4. Call the function from the CxxTemplate class constructor.
5. Build and run the project in Eclipse.
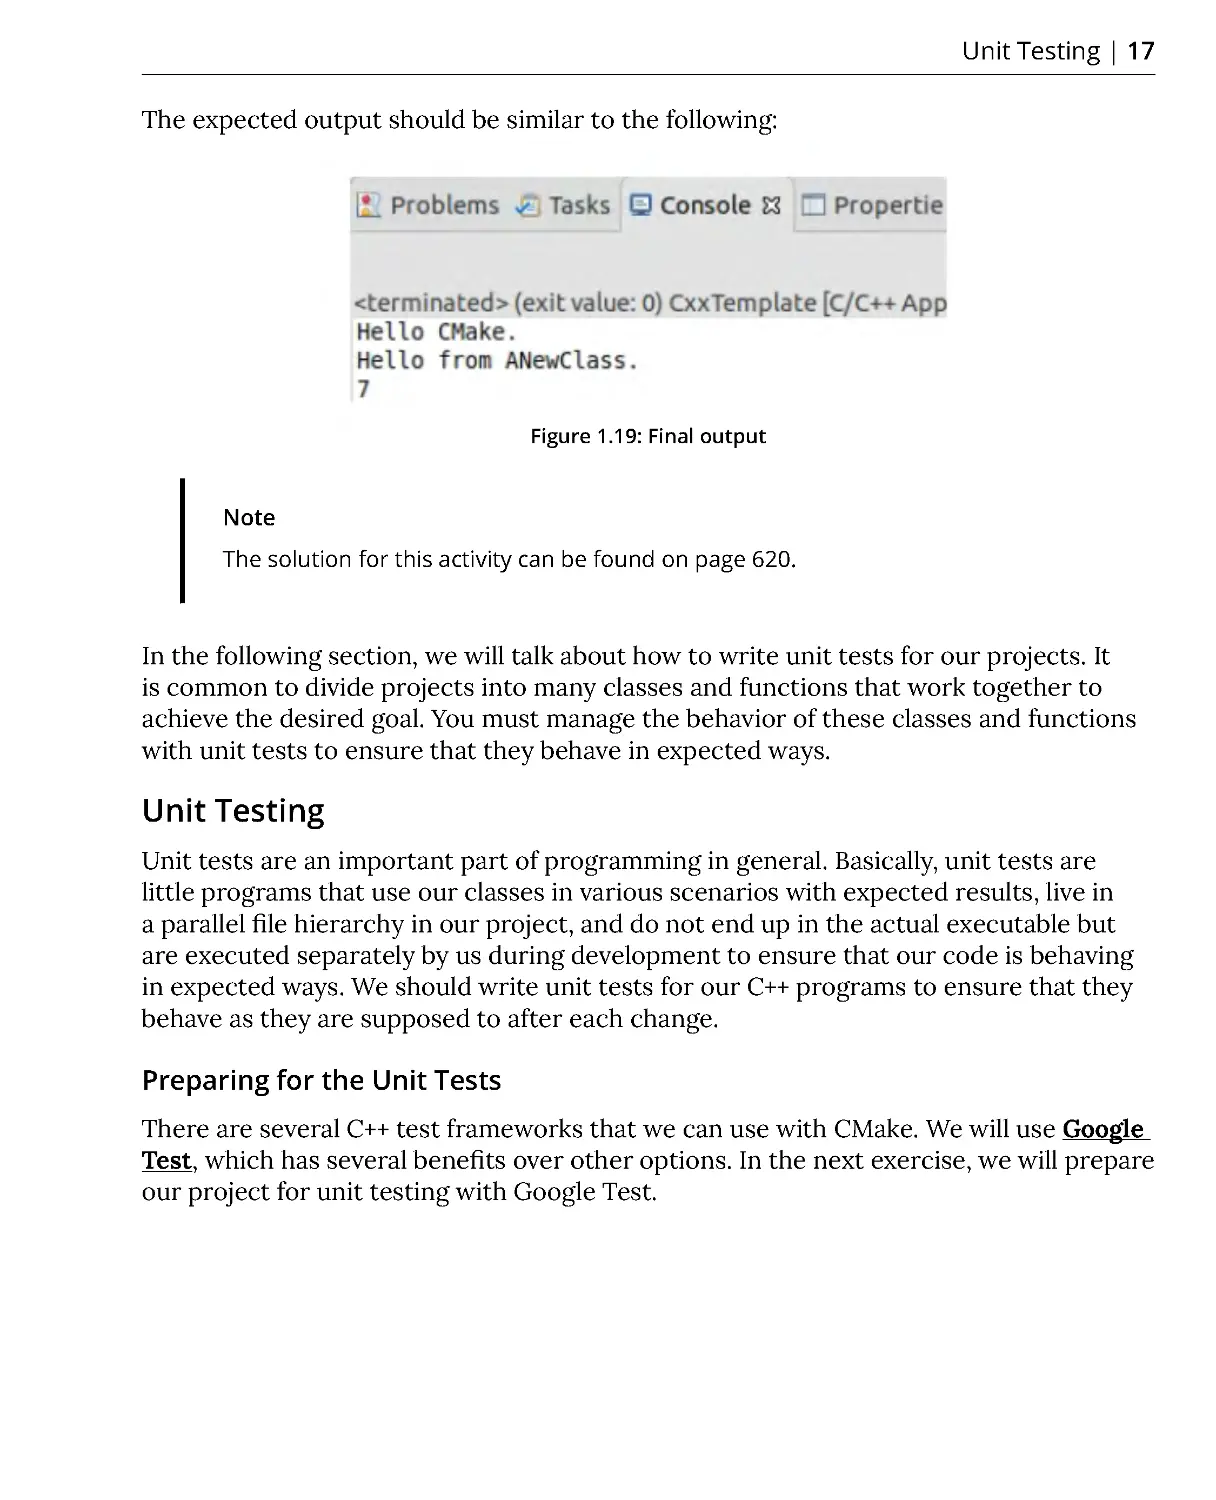
Unit Testing | 17
The expected output should be similar to the following:
Figure 1.19: Final output
Note
The solution for this activity can be found on page 620.
In the following section, we will talk about how to write unit tests for our projects. It
is common to divide projects into many classes and functions that work together to
achieve the desired goal. You must manage the behavior of these classes and functions
with unit tests to ensure that they behave in expected ways.
Unit Testing
Unit tests are an important part of programming in general. Basically, unit tests are
little programs that use our classes in various scenarios with expected results, live in
a parallel file hierarchy in our project, and do not end up in the actual executable but
are executed separately by us during development to ensure that our code is behaving
in expected ways. We should write unit tests for our C++ programs to ensure that they
behave as they are supposed to after each change.
Preparing for the Unit Tests
There are several C++ test frameworks that we can use with CMake. We will use Google
Test, which has several benefits over other options. In the next exercise, we will prepare
our project for unit testing with Google Test.
18 | Anatomy of Portable C++ Software
Exercise 4: Preparing Our Project for Unit Testing
We have installed Google Test but our project is not set up to use Google Test for unit
testing. In addition to the installation, there are settings that need to be carried out in
our CMake project to have Google Test unit tests. Follow these steps to implement this
exercise:
1. Open Eclipse CDT and select the CxxTemplate project that we have been using.
2. Create a new folder named tests as we will perform all our tests there.
3. Edit our base CMakeLists.txt file to allow tests in the tests folder. Note that we
already had code to find the GTest package that brings GoogleTest capability to
CMake. We will add our new lines just after that:
find_package(GTest)
if(GTEST_FOUND)
set(Gtest_FOUND TRUE)
endif()
if(GTest_FOUND)
include(GoogleTest)
endif()
# add these two lines below
enable_testing()
add_subdirectory(tests)
This is all we need to add to our main CMakeLists.txt file.
4. Create another CMakeLists.txt file inside our tests folder. This will be used
because of the add_subdirectory(tests) line that we had in our main CMakeLists.
txt file. This tests/CMakeLists.txt file will manage the test sources.
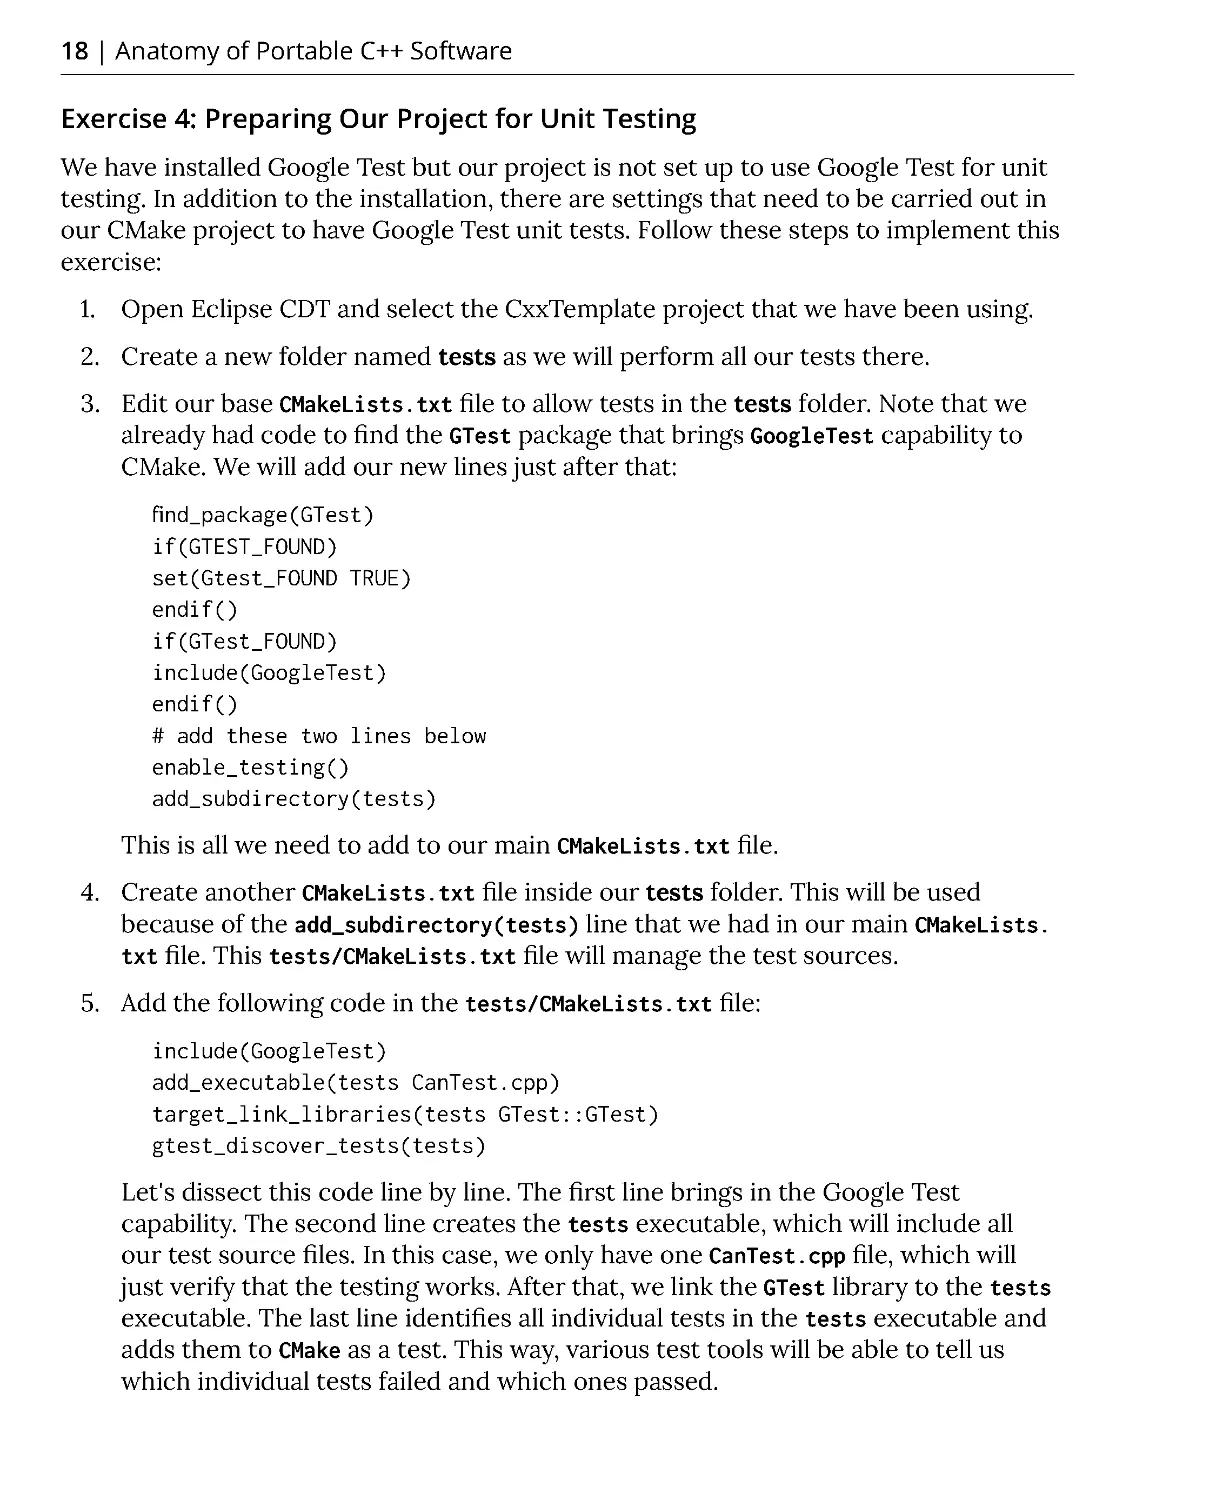
5. Add the following code in the tests/CMakeLists.txt file:
include(GoogleTest)
add_executable(tests CanTest.cpp)
target_link_libraries(tests GTest::GTest)
gtest_discover_tests(tests)
Let's dissect this code line by line. The first line brings in the Google Test
capability. The second line creates the tests executable, which will include all
our test source files. In this case, we only have one CanTest.cpp file, which will
just verify that the testing works. After that, we link the GTest library to the tests
executable. The last line identifies all individual tests in the tests executable and
adds them to CMake as a test. This way, various test tools will be able to tell us
which individual tests failed and which ones passed.
Unit Testing | 19
6. Create a tests/CanTest.cpp file. Add this code to simply verify that tests are
running, without actually testing anything in our actual project:
#include "gtest/gtest.h"
namespace {
class CanTest: public ::testing::Test {};
TEST_F(CanTest, CanReallyTest) {
EXPECT_EQ(0, 0);
}
}
int main(int argc, char **argv) {
::testing::InitGoogleTest(&argc, argv);
return RUN_ALL _TESTS();
}
The TEST_F line is an individual test. Now, EXPECT_EQ(0, 0) is testing whether zero is
equal to zero, which will always succeed if we can actually run the test. We will later add
the results of our own classes here to be tested against various values. Now we have the
necessary setup for Google Test in our project. Next, we will build and run these tests.
Building, Running, and Writing Unit Tests
Now, we will discuss how to build, run, and write unit tests. The example that we have
so far is a simple dummy test that is ready to be built and run. Later, we will add tests
that make more sense and view the output of passing and failing tests. In the following
exercise, we will build, run, and write unit tests for the project that we created in the
previous exercise.
20 | Anatomy of Portable C++ Software
Exercise 5: Building and Running Tests
So far, you have created a project with GoogleTest set up, but you did not build or run
the tests we created. In this exercise, we will build and run the tests that we created.
Since we added our tests folder using add_subdirectory, building the project will
automatically build the tests. Running the tests will require some more effort. Perform
the following steps to complete the exercise:
1. Open our CMake project in Eclipse CDT.
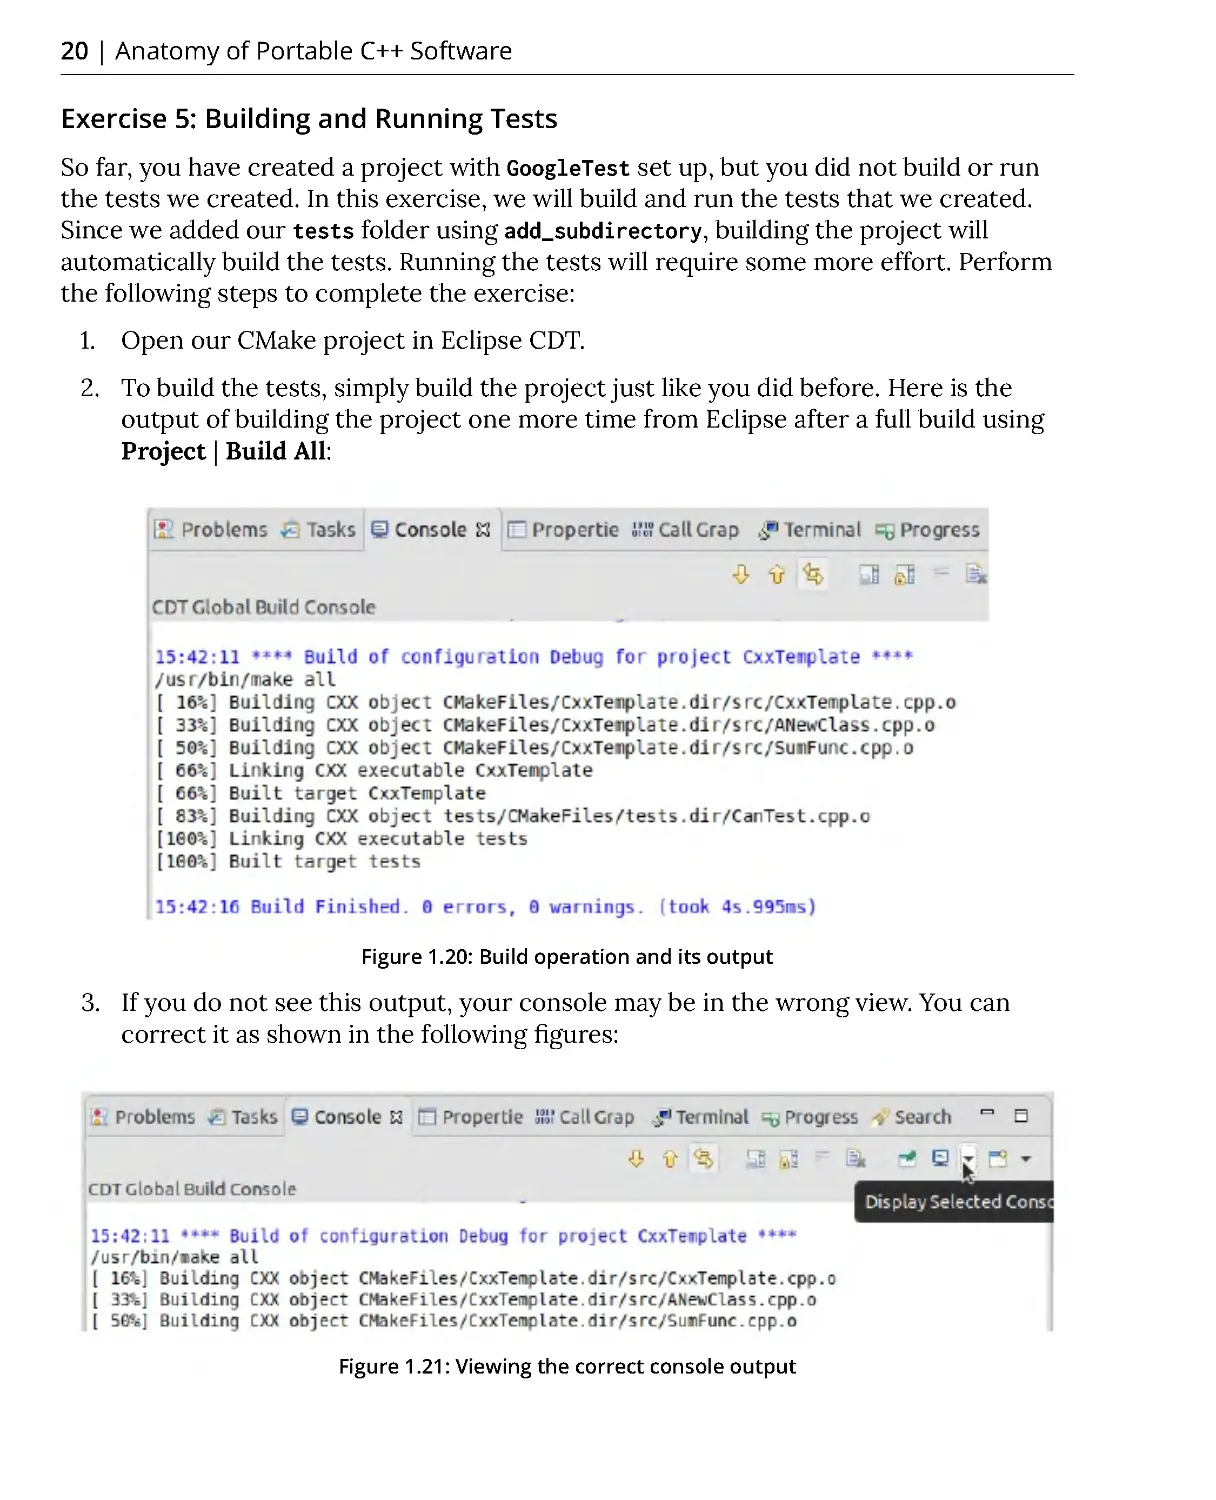
2. To build the tests, simply build the project just like you did before. Here is the
output of building the project one more time from Eclipse after a full build using
Project | Build All:
Figure 1.20: Build operation and its output
3. If you do not see this output, your console may be in the wrong view. You can
correct it as shown in the following figures:
Figure 1.21: Viewing the correct console output
Unit Testing | 21
Figure 1.22: Viewing the correct console output
As you can see, our project now has two executable targets. They both live in the
build folder, as with any other build artifact. Their locations are build/Debug/
CxxTemplate and build/Debug/tests/tests. Since they are executables, we can
simply run them.
4. We ran CxxTemplate before and will not see any extra output now. Run the other
executable by typing the following command in the terminal while we are in our
project folder:
. /build/Debug/tests/tests
The preceding code generates the following output in the terminal:
Figure 1.23: Running the tests executable
This is the simple output of our tests executable. If you want to see whether the
tests have passed, you can simply run this. However, testing is so much more than
that.
22 | Anatomy of Portable C++ Software
5. One of the ways you can run your tests is by using the ctest command. Write the
following commands in the terminal while you are in the project folder. We go to
the folder where the tests executable resides, run ctest there, and come back:
cd build/Debug/tests
ctest
cd ../../..
And here is the output that you will see:
Figure 1.24: Running ctest
Note
The ctest command can run your tests executable with a number of options,
including the ability to submit test results automatically to online dashboards.
Here, we will simply run the ctest command; its further features are left as an
exercise for the interested reader. You can type ctest --help or visit the online
documentation to discover ctest further at https://cmake.org/cmake/help/latest/
manual/ctest.1.html#.
6. Another way to run the tests is to run them inside Eclipse, in a nice graphical
report format. For this, we will create a run configuration that is test-aware. In
Eclipse, click on Run | Run Configurations..., right-click C/C++ Unit on the left,
and select New Configuration.
Unit Testing | 23
7. Change the name from CxxTemplate Debug to CxxTemplate Tests as follows:
Figure 1.25: Changing the name of the run configuration
8. Under C/C++ Application, select the Search Project option:
Figure 1.26: Run Configurations
24 | Anatomy of Portable C++ Software
9. Choose tests in the new dialog:
Figure 1.27: Creating the test run configuration and selecting the tests executable
10. Next, go to the C/C++ Testing tab and select Google Tests Runner in the
dropdown. Click on Apply at the bottom of the dialog and click on the Run option
for the test that we have to run for the first time:
Figure 1.28: Run Configurations
Unit Testing | 25
11. In the upcoming runs, you can either click the dropdown next to the play button
in the toolbar, or choose Run | Run History to choose CxxTemplate Tests:
Figure 1.29: Finalizing the run configuration settings and selecting a configuration to run
The result will be similar to the following screenshot:
Figure 1.30: Run results of the unit test
This is a nice report that contains entries for all tests—only one for now. You may prefer
this if you do not want to leave the IDE. Furthermore, when you have many tests, this
interface can help you filter them effectively. Now you have built and run tests that
were written using Google Test. You ran them in a couple of different ways, including
directly executing the test, using ctest, and using Eclipse CDT. In the next section, we
will solve an exercise wherein we will actually test the functionality of our code.
26 | Anatomy of Portable C++ Software
Exercise 6: Testing the Functionality of Code
You have run simple tests but now you want to write meaningful tests that are testing
functionality. In the initial activity, we created SumFunc.cpp, which had the sum function.
Now, in this exercise, we will write a test for that file. In this test, we will use the sum
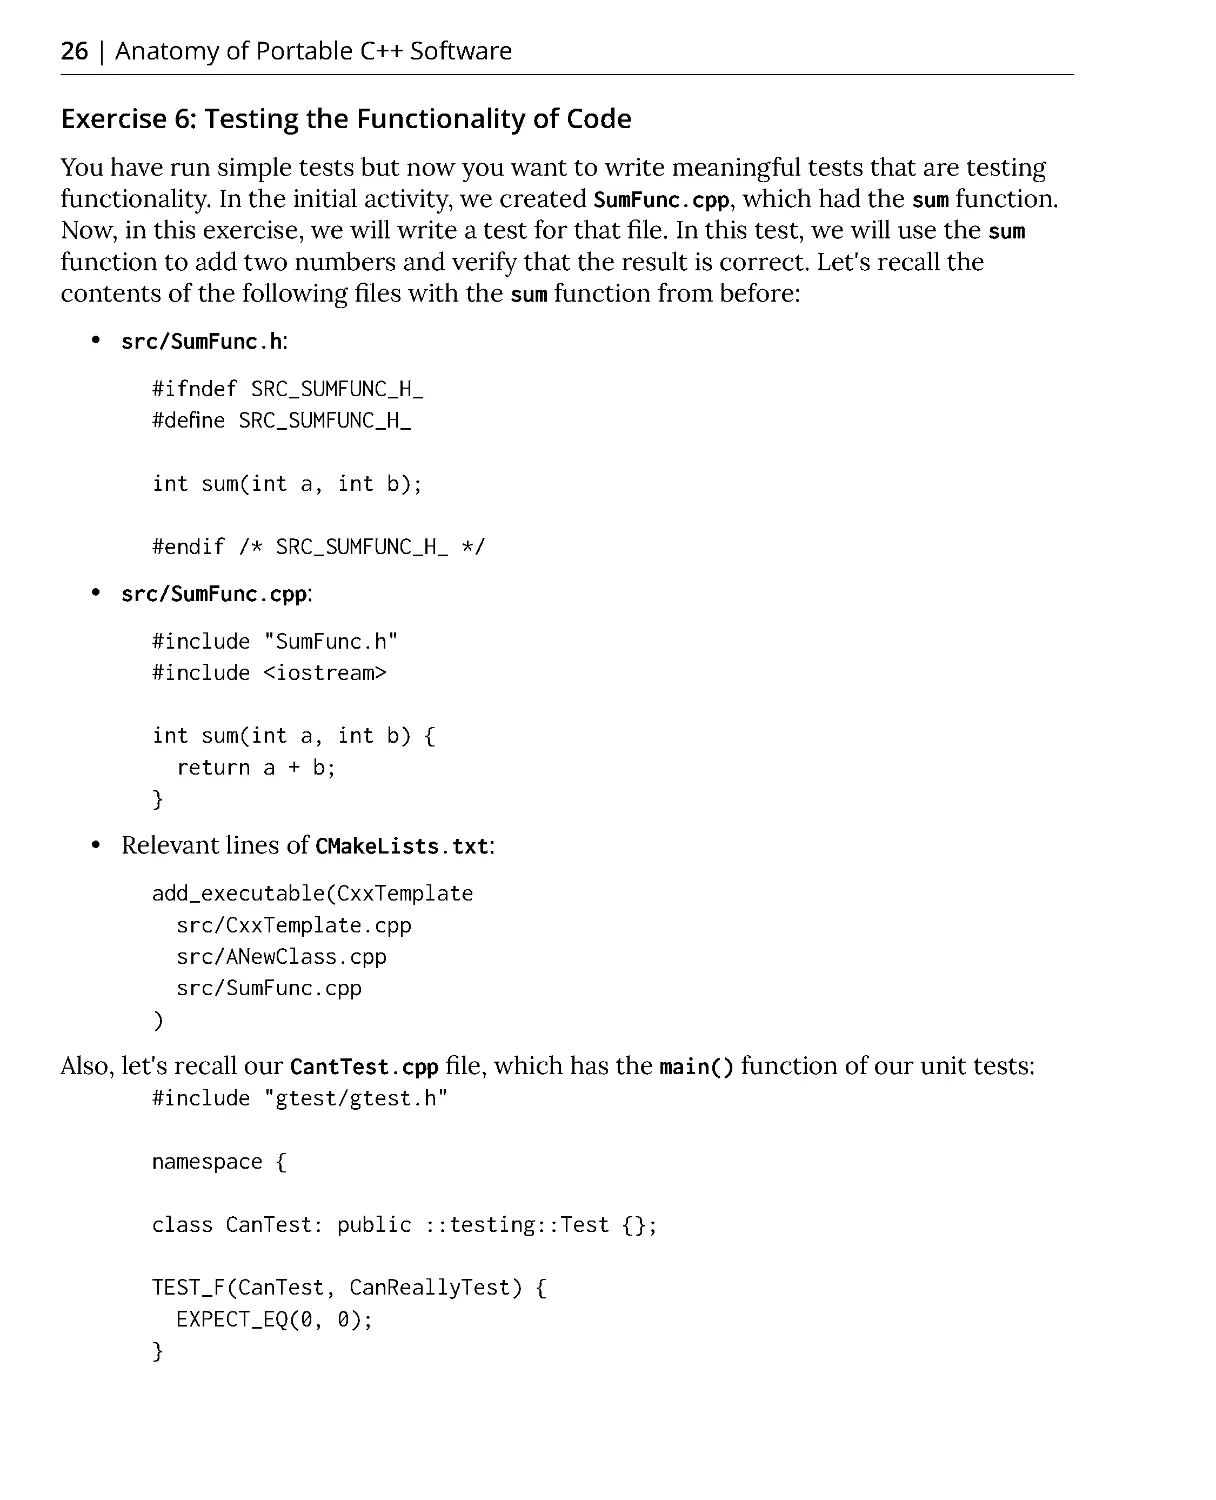
function to add two numbers and verify that the result is correct. Let's recall the
contents of the following files with the sum function from before:
• src/SumFunc.h:
#ifndef SRC_SUMFUNC _H _
#define SRC_SUMFUNC _H _
int sum(int a, int b);
#endif /* SRC_SUMFUNC _H _ */
• src/SumFunc.cpp:
#include "SumFunc.h"
#include <iostream>
int sum(int a, int b) {
return a + b;
}
• Relevant lines of CMakeLists.txt:
add_executable(CxxTemplate
src/CxxTemplate.cpp
src/ANewClass.cpp
src/SumFunc.cpp
)
Also, let's recall our CantTest.cpp file, which has the main() function of our unit tests:
#include "gtest/gtest.h"
namespace {
class CanTest: public ::testing::Test {};
TEST_F(CanTest, CanReallyTest) {
EXPECT_EQ(0, 0);
}
Unit Testing | 27
}
int main(int argc, char **argv) {
::testing::InitGoogleTest(&argc, argv);
return RUN_ALL _TESTS();
}
Perform the following steps to complete the exercise:
1. Open our CMake project in Eclipse CDT.
2. Add a new test source file (tests/SumFuncTest.cpp) with the following content:
#include "gtest/gtest.h"
#include "../src/SumFunc.h"
namespace {
class SumFuncTest: public ::testing::Test {};
TEST_F(SumFuncTest, CanSumCorrectly) {
EXPECT_EQ(7, sum(3, 4));
}
}
Note that this does not have a main() function since CanTest.cpp has one and these
will be linked together. Secondly, note that this includes SumFunc.h, which is in the
src folder of the project and uses it as sum(3, 4) inside the test. This is how we use
our project code in tests.
3. Make the following change in the tests/CMakeLists.txt file to build the test:
include(GoogleTest)
add_executable(tests CanTest.cpp SumFuncTest.cpp ../src/SumFunc.cpp) #
added files here
target_link_libraries(tests GTest::GTest)
gtest_discover_tests(tests)
Note that we added both the test (SumFuncTest.cpp) and the code that it tests (../
src/SumFunc.cpp) to the executable, as our test code is using the code from the
actual project.
28 | Anatomy of Portable C++ Software
4. Build the project and run the test as before. You should see the following report:
Figure 1.31: Output after running the test
We can add such tests to our project and all of them will appear on the screen as
shown in the preceeding screenshot.
5. Now, let's add one more test that will actually fail. In the tests/SumFuncTest.cpp
file, make the following change:
TEST_F(SumFuncTest, CanSumCorrectly) {
EXPECT_EQ(7, sum(3, 4));
}
// add this test
TEST_F(SumFuncTest, CanSumAbsoluteValues) {
EXPECT_EQ(6, sum(3, -3));
}
Note that this test assumes that the absolute values of the inputs are summed
up, which is incorrect. The result of this call is 0 but is expected to be 6 in this
example. This is the only change that we have to make in our project to add this
test.
Unit Testing | 29
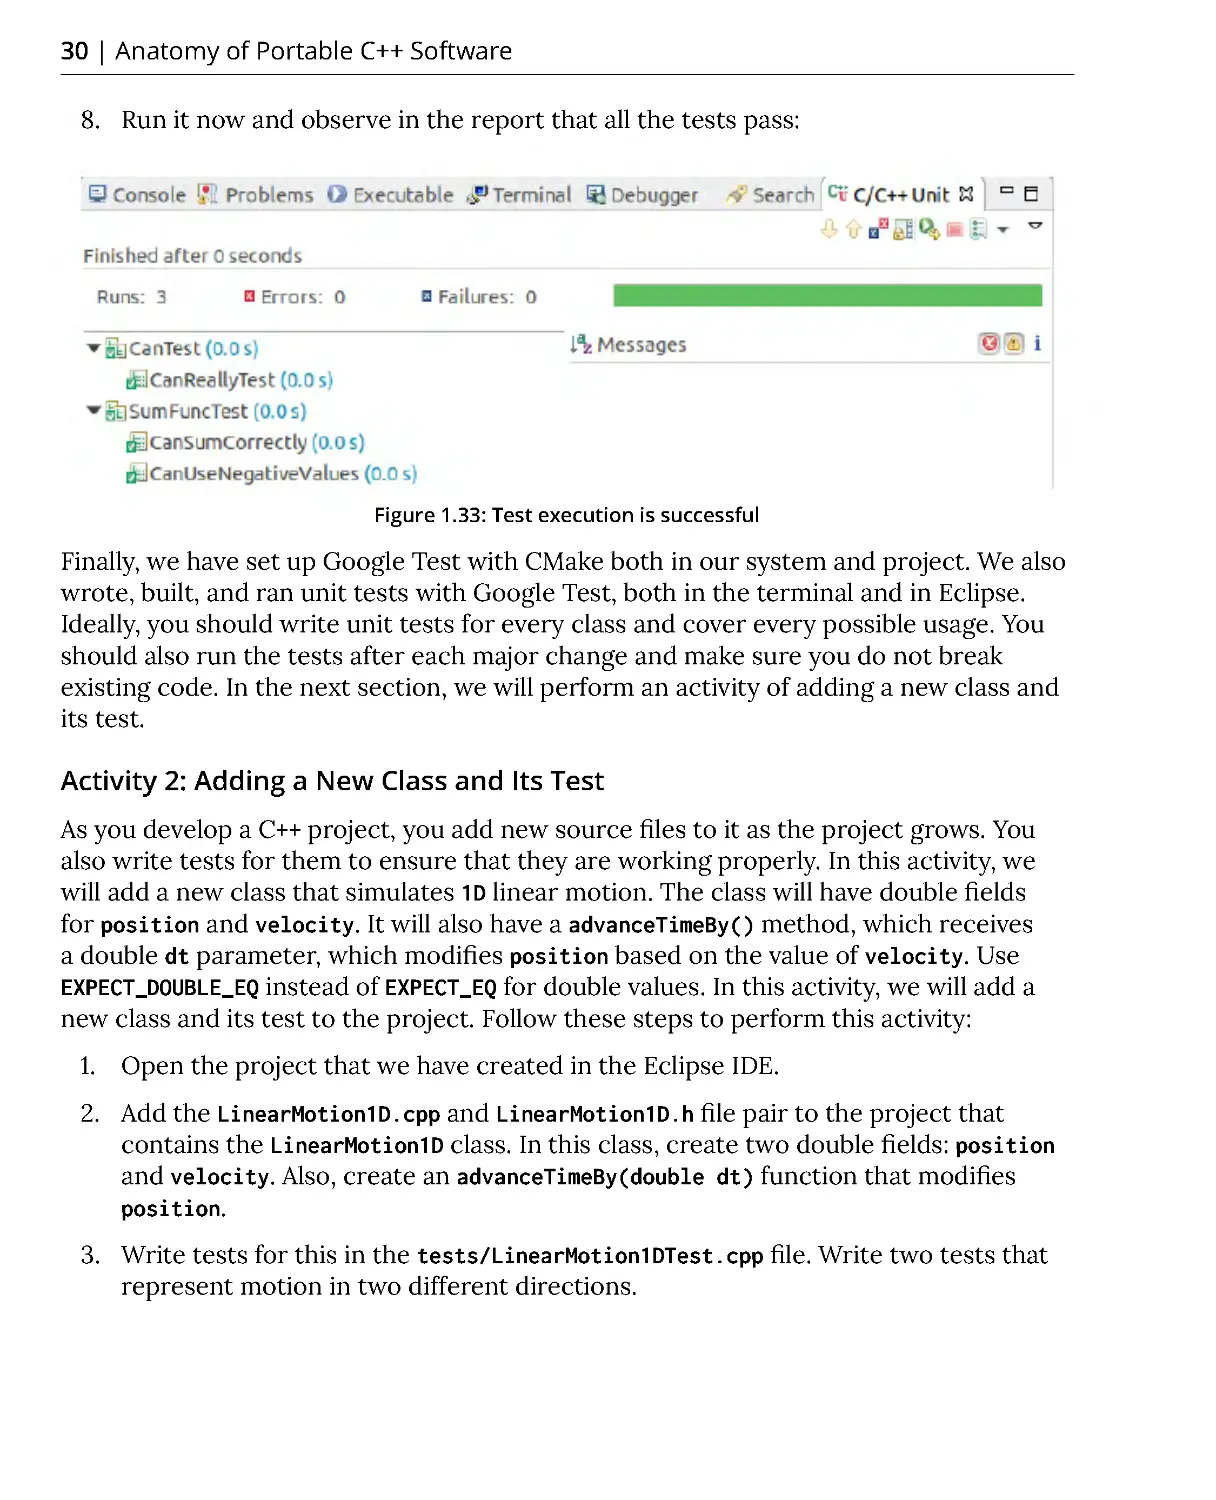
6. Now, build the project and run the test. You should see this report:
Figure 1.32: The build report
As you can see in the preceding figure, the first two tests passed and the last test
failed. When we see this output, there are two options: either our project code
is wrong, or the test is wrong. In this case, our test is wrong. This is because our
CanSumAbsoluteValues test case expects that 6 is equal to sum(3, -3). This is
because we assumed that our function sums up the absolute values of the integers
provided. However, this is not the case. Our function simply adds the given
numbers, whether they are positive or negative. Therefore, this test had a faulty
assumption and failed.
7. Let's change the test and fix it. Change the test so that we expect the sum of -3
and 3 to be 0. Rename the test to reflect what this test actually does:
TEST_F(SumFuncTest, CanSumCorrectly) {
EXPECT_EQ(7, sum(3, 4));
}
// change this part
TEST_F(SumFuncTest, CanUseNegativeValues) {
EXPECT_EQ(0, sum(3, -3));
}
30 | Anatomy of Portable C++ Software
8. Run it now and observe in the report that all the tests pass:
Figure 1.33: Test execution is successful
Finally, we have set up Google Test with CMake both in our system and project. We also
wrote, built, and ran unit tests with Google Test, both in the terminal and in Eclipse.
Ideally, you should write unit tests for every class and cover every possible usage. You
should also run the tests after each major change and make sure you do not break
existing code. In the next section, we will perform an activity of adding a new class and
its test.
Activity 2: Adding a New Class and Its Test
As you develop a C++ project, you add new source files to it as the project grows. You
also write tests for them to ensure that they are working properly. In this activity, we
will add a new class that simulates 1D linear motion. The class will have double fields
for position and velocity. It will also have a advanceTimeBy() method, which receives
a double dt parameter, which modifies position based on the value of velocity. Use
EXPECT_DOUBLE_EQ instead of EXPECT_EQ for double values. In this activity, we will add a
new class and its test to the project. Follow these steps to perform this activity:
1. Open the project that we have created in the Eclipse IDE.
2. Add the LinearMotion1D.cpp and LinearMotion1D.h file pair to the project that
contains the LinearMotion1D class. In this class, create two double fields: position
and velocity. Also, create an advanceTimeBy(double dt) function that modifies
position.
3. Write tests for this in the tests/LinearMotion1DTest.cpp file. Write two tests that
represent motion in two different directions.
Unit Testing | 31
4. Build and run it in the Eclipse IDE.
5. Verify that the tests have passed.
The final test results should look similar to the following:
Figure 1.34: Final test results
Note
The solution for this activity can be found on page 622.
Adding new classes and their tests is a very common task in C++ development. We
create classes for various reasons. Sometimes, we have a nice software design plan and
we create the classes that it calls for. Other times, when a class becomes too large and
monolithic, we separate some of its responsibility to another class in a meaningful way.
Having this task be practical is important to prevent dragging your feet and ending up
with huge monolithic classes. In the following section, we discuss what happens during
the compilation and linking stages. This will give us a better perspective of what is
happening under the hood of C++ programs.
32 | Anatomy of Portable C++ Software
Understanding Compilation, Linking, and Object File Contents
One of the main reasons for using C++ is efficiency. C++ gives us control over memory
management, which is why understanding how objects are laid out in memory is
important. Furthermore, C++ source files and libraries are compiled to object files for
the target hardware and linked together. Often, C++ programmers have to deal with
linker problems, which is why understanding the steps of the compilation and being
able to investigate object files is important. On the other hand, large projects are
developed and maintained by teams over a long period of time, which is why creating
clean and understandable code is important. As with any other software, bugs arise in
C++ projects and need to be identified, analyzed, and resolved carefully by observing
the program behavior. Therefore, learning how to debug C++ code is also important. In
the next section, we will learn how to create code that is efficient, plays well with other
code, and is maintainable.
Compilation and Linking Steps
A C++ project is created as a set of source code files and project configuration files that
organize the sources and library dependencies. In the compilation step, these sources
are first converted to object files. In the linking step, these object files are linked
together to form the executable that is the ultimate output of the project. The libraries
that the project uses are also linked at this step.
In the upcoming exercises, we will use our existing project to observe the compilation
and linking stages. Then, we will manually recreate them to view the process in more
detail.
Exercise 7: Identifying Build Steps
You have been building your projects without investigating the details of the build
actions. In this exercise, we will investigate the details of our project's build steps.
Perform the following to complete the exercise:
1. Open the terminal.
2. Navigate to the build folder wherein our Makefile file resides by typing the
following command:
cd build/Debug
Understanding Compilation, Linking, and Object File Contents | 33
3. Clean the project and run the build in VERBOSE mode using the following command:
make clean
make VERBOSE=1 all
You will get a detailed output of the build process in the terminal, which may look
a bit crowded:
Figure 1.35: The build process part 1
34 | Anatomy of Portable C++ Software
Figure 1.36: The build process part 2
Understanding Compilation, Linking, and Object File Contents | 35
Figure 1.37: The full build output
Here are some of the lines from this output. The following lines are the important
ones related to the compilation and linkage of the main executable:
/usr/bin/c++
-g
- pthread -std=gnu++1z -o CMakeFiles/CxxTemplate.dir/
src/CxxTemplate.cpp.o
- c /home/username/Packt/Cpp2019/CxxTemplate/src/
CxxTemplate.cpp
/usr/bin/c++
-g
- pthread -std=gnu++1z -o CMakeFiles/CxxTemplate.
dir/src/ANewClass.cpp.o
- c /home/username/Packt/Cpp2019/CxxTemplate/src/
ANewClass.cpp
/usr/bin/c++
-g
- pthread -std=gnu++1z -o CMakeFiles/CxxTemplate.dir/
src/SumFunc.cpp.o
- c /home/username/Packt/Cpp2019/CxxTemplate/src/SumFunc.
cpp
36 | Anatomy of Portable C++ Software
/usr/bin/c++
-g
- pthread -std=gnu++1z -o CMakeFiles/CxxTemplate.dir/
src/LinearMotion1D.cpp.o
- c /home/username/Packt/Cpp2019/CxxTemplate/src/
LinearMotion1D.cpp
/usr/bin/c++ -g CMakeFiles/CxxTemplate.dir/src/CxxTemplate.cpp.o
CMakeFiles/CxxTemplate.dir/src/ANewClass.cpp.o CMakeFiles/CxxTemplate.dir/
src/SumFunc.cpp.o CMakeFiles/CxxTemplate.dir/src/LinearMotion1D.cpp.o
-o
CxxTemplate -pthread
4. The c++ command here is just a symbolic link to the g++ compiler. To see that it's
actually a chain of symbolic links, type the following command:
namei /usr/bin/c++
You will see the following output:
Figure 1.38: The chain of symbolic links for /usr/bin/c++
Therefore, we will use c++ and g++ interchangeably throughout our discussion. In
the build output that we quoted earlier, the first four lines are compiling each .cpp
source file and creating the corresponding .o object file. The last line is linking
together these object files to create the CxxTemplate executable. The following
figure visually presents this process:
Understanding Compilation, Linking, and Object File Contents | 37
Figure 1.39: Execution stages of a C++ project
As the previous figure shows, the CPP files that are added to CMake as a part of a
target, along with the header files that they included, are compiled to object files,
which are later linked together to create the target executable.
5. To understand this process even further, let's carry out the compilation steps
ourselves. In the terminal, go to the project folder and create a new folder named
mybuild using the following commands:
cd ~/CxxTemplate
mkdir mybuild
6. Then, run the following commands to compile the CPP source files to object files:
/usr/bin/c++ src/CxxTemplate.cpp -o mybuild/CxxTemplate.o
-c
/usr/bin/c++ src/ANewClass.cpp -o mybuild/ANewClass.o
-c
/usr/bin/c++ src/SumFunc.cpp -o mybuild/SumFunc.o
-c
/usr/bin/c++ src/LinearMotion1D.cpp -o mybuild/LinearMotion1D.o
-c
7. Go into the mybuild directory and see what's there using the following command:
cd mybuild
ls
We see the following output as expected. These are our object files:
Figure 1.40: Compiled object files
38 | Anatomy of Portable C++ Software
8. In the next step, link the object files together to form our executable. Type the
following command:
/usr/bin/c++ CxxTemplate.o ANewClass.o SumFunc.o LinearMotion1D.o
-o
CxxTemplate
9. Now, let's see our executable among the list of files here by typing the following
command:
ls
This shows the new CxxTemplate file in the following figure:
Figure 1.41: Linked executable file
10. Now, run our executable by typing the following command:
. /CxxTemplate
And see the output that we had before:
Figure 1.42: Executable file output
Now that you have examined the details of the build process and have recreated them
yourself, in the next section, let's explore the linking process.
Understanding Compilation, Linking, and Object File Contents | 39
The Linking Step
In this section, let's look at a connection between two source files and how they end up
in the same executable. Look at the sum function in the following figure:
Figure 1.43: The linking process
The sum function's body is defined in SumFunc.cpp. It has a forward declaration in
SumFunc.h. This way, the source files that want to use the sum function can know
about its signature. Once they know its signature, they can call it and trust that the
actual function definition will be there during runtime, without actually having any
interaction with SumFunc.cpp where the function is defined.
After compilation, CxxTemplate.cpp, which calls the sum function, carries that call into
its object file. Still, it does not know where the function definition is. The object file of
SumFunc.cpp has that definition, but it has nothing to do with CxxTemplate.o, yet.
During the linking step, the linker matches the call in CxxTemplate.o with the definition
in SumFunc.o . The call works fine in the executable as a result. Had the linker not found
the definition of the sum function, it would have given a linker error.
The linker finds the sum function by its name and parameters. This is called resolving
a symbol. The classes, functions, and variables defined in object files are placed in a
symbol table and each reference to a symbol is resolved via a lookup at this table. When
the symbol is not there, you receive a symbol could not be resolved error.
40 | Anatomy of Portable C++ Software
This took us through the two stages of the build process: compilation and linking.
Notice that we used rather simpler commands compared to that of CMake, when we
compiled our sources manually. Feel free to type man g++ to see all the options there.
Later, we discussed linking and how symbols are resolved. We also talked about possible
issues with the linking step. In the next section, we will learn about object files.
Diving Deeper: Viewing Object Files
For the linking step to work without errors, we need to have all our symbol references
match our symbol definitions. Most of the time, we can analyze how things will
be resolved just by looking at the source files. Sometimes, in complex situations,
we may have a difficult time understanding why a symbol is not being resolved. In
such situations, looking at the contents of object files to investigate references and
definitions can be useful to resolve the problem. Besides linker errors, understanding
object file contents and how linking works in general is useful for a C++ programmer.
Knowing what is happening under the hood may help programmers understand the
whole process in a better way.
When our source code is compiled to object files, our statements and expressions are
converted to assembly code, which is the low-level language that the CPU understands.
Each instruction in assembly contains an operation, followed by operators, which
are registers of the CPU. There are instructions to load data to and from registers
and operate on values in registers. The objdump command in Linux helps us view the
contents of these object files.
Note
We will utilize Compiler Explorer, a nice online tool that is easier to use, where
you can write code on the window to the left, and on the right, you can see the
compiled assembly code. Here is the link to the Compiler Explorer: https://godbolt.
org.
Understanding Compilation, Linking, and Object File Contents | 41
Exercise 8: Exploring Compiled Code
In this exercise, we will use Compiler Explorer to compile some simple C++ code in
which we define and call a function. We will investigate the compiled assembly code
to understand how exactly names are resolved and calls are made. This will give us a
better understanding of what happens under the hood and how our code works in the
executable format. Perform the following steps to complete the exercise:
1. Add the following code in Compiler Explorer:
int sum(int a, int b) {
return a + b;
}
int callSum() {
return sum(4, 5);
}
We have two functions; one is calling the other. Here is the compiled output:
Figure 1.44: The compiled code
42 | Anatomy of Portable C++ Software
While it's not very clear, you can more or less make out what it is doing. We are
not going to dive into the details of assembly code, but we will focus on how
symbols are resolved during the linker stage. Let's focus on the following lines for
now:
sum(int, int):
...
callSum():
...
call sum(int, int)
...
The call sum(int, int) line does what you expect: it calls the preceding sum
function and places the arguments in some registers. The important point here is
that the functions are identified by their names and the types of their parameters
in order. The linker looks for the appropriate function with this signature. Note
that the return value is not a part of the signature.
2. Disable the Demangle checkbox and see how these function names are actually
stored:
Understanding Compilation, Linking, and Object File Contents | 43
Figure 1.45: Compiled code without demangling
Here, our lines became this:
_ Z 3sumii:
...
_ Z 7callSumv:
...
call
_ Z 3sumii
...
44 | Anatomy of Portable C++ Software
The preceding are the mangled names of these functions. After _Z, the number
tells us how long the function name is, so that the following letters are correctly
interpreted. After the function name, we have v for no parameters and i for an int
parameter. You can change these function signatures to view other possible types.
3. Now, let's look at how classes are compiled. Add the following code into Compiler
Explorer under the existing code:
class MyClass {
private:
inta=5;
int myPrivateFunc(int i) {
a=4;
return i + a;
}
public:
intb=6;
int myFunc(){
return sum(1, myPrivateFunc(b));
}
};
MyClass myObject;
int main() {
myObject.myFunc();
}
Understanding Compilation, Linking, and Object File Contents | 45
Here is the compiled version of these added lines:
Figure 1.46: The compiled version
46 | Anatomy of Portable C++ Software
You may be surprised that there is no class definition in the compiled code. The
methods are similar to global functions, but with a twist: their mangled names contain
the class name and they receive the object instance as a parameter. Creating an
instance simply allocates space for the fields of the class.
During the linker phase, these mangled function names are used to match callers with
callees. For callers that cannot find a callee, we get linker errors. Most linker errors can
be resolved by carefully checking sources. However, in some cases, viewing the object
file contents with objdump can help get to the bottom of the problem.
Debugging C++ Code
There are different levels of problems that you can come across while developing a C++
project:
• First, you may receive compiler errors. These can happen because of a mistake you
made in syntax, or a wrong choice for a type, and so on. The compiler is the first
hoop you have to jump through, and it catches some mistakes you may have made.
• The second hoop is the linker. There, a typical mistake is to use something that is
declared, but not actually defined. This happens often when you use the wrong
header file for a library—the header file advertises a certain signature that does not
exist in any of the source files or libraries. Once you also jump through the linker
hoop, your program is ready to execute.
• Now, the next hoop to jump through is to avoid any runtime errors. Your code may
have compiled and linked properly, but it may be doing things that do not work,
such as dereferencing a null pointer or dividing by zero.
To find and fix runtime errors, you have to interact with and monitor the running
application in some way. An often-used technique is to add print statements to
the code and monitor the logs that it generates, hoping to correlate the application
behavior with the logs to pinpoint the region in code that has the problem. While this
works for some cases, sometimes you need to take a closer look at the execution.
Debugging C++ Code | 47
A debugger is a better tool to fight runtime errors. A debugger can let you run code line
by line, continue running and pause on the lines that you want, investigate the values
of memory, and pause on errors, among other things. This lets you watch what exactly
is going on with memory as your program is running and identify the line of code that
results in the unwanted behavior.
gdb is the canonical command-line debugger that can debug C++ programs. However,
it may be difficult to use as debugging is inherently a visual task—you want to be able
to look at lines of code, values of variables, and the output of the program at the same
time. Luckily, Eclipse CDT includes a visual debugger that is easy to use.
Exercise 9: Debugging with Eclipse CDT
You have been simply running your projects and viewing the output. Now you want to
learn how to debug your code in detail. In this exercise, we will explore Eclipse CDT's
debugging capabilities. Perform the following steps to complete the exercise:
1. Open the CMake project in Eclipse CDT.
2. To ensure that we have an existing run configuration, click Run | Run
Configurations. There, you should see a CxxTemplate entry under C/C++
Application.
Note
Since we ran our project before, it should be there. If not, please go back and
create it again.
3. Close the dialog box to continue.
48 | Anatomy of Portable C++ Software
4. To start the debugger, find the toolbar entry that looks like an insect (bug)
and click on the dropdown next to it. Select CxxTemplate to debug the main
application. If it asks you to switch to the debug perspective, accept. Now, this is
what Eclipse will look like:
Figure 1.47: Eclipse debug screen
At the moment, our code froze at the very first line of our main() function, which
is shown with the green highlight and the arrow in the center code view. On the
left, we see the running threads, of which there is only one. On the right, we see
the variables that are accessible in this context. On the bottom, we see the gdb
output that Eclipse uses behind the scenes to actually debug the executable. Now,
there is not much to be debugged with our main function.
5. Click Step Over either under the Run menu or in the toolbar a couple of times
and see that the application will terminate soon. In the end, you will see the
libc-start.c library, which is the caller of the main function. You can close it and
switch to your source files when done. When you do not see the red stop button
anymore, you know that the program execution is over.
Debugging C++ Code | 49
6. Edit our main function by adding the following code:
inti=1,t =0;
do{
t += i++;
} while (i <= 3);
std::cout << t << std::endl;
The post-increment operator mixed with the occasional do-while loop can be a
head-scratcher for some. This is because we try to execute the algorithm in our
heads. However, our debugger is perfectly able to run it step by step and show us
what exactly happens during execution.
7. Start debugging after adding the preceding code. Click on the dropdown next
to the Debug button in the toolbar and select CxxTemplate. Press F6 a couple of
times to step over in the code. It will show us how the variables change as well as
the line of code that will be executed next:
Figure 1.48: Stepping over the code
50 | Anatomy of Portable C++ Software
8. Seeing the variables change after the execution of each line of code makes the
algorithm much clearer to understand. As you press F6, note that the following are
the values after each execution of the t += i++; line:
Figure 1.49: Variable states through time
The preceding output clearly explains how the values are changing and why 6 is
printed at the end.
9. Explore other features of the debugger. While the variable view is useful, you can
also hover over any variable and browse its value:
Debugging C++ Code | 51
Figure 1.50: View option of the debugger
Furthermore, the Expression view helps you calculate things that are otherwise
not clear from the values that you browse.
10. Click on Expression on the right-hand side and click on the Add button:
Figure 1.51: Adding an expression
52 | Anatomy of Portable C++ Software
11. Type t+i and hit Enter. Now you see the total in the list of expressions:
Figure 1.52: Expression view with a new expression
You can press the red square in the toolbar or select Run | Terminate to stop
debugging at any time. Another feature is breakpoints, which tell the debugger to
pause whenever it goes to a line marked with a breakpoint. So far, we have been
stepping through our code line by line, which may be very time-consuming in a
large project. Instead, you usually want to continue the execution until it arrives at
the code that you are interested in.
12. Now, instead of going line by line, add a breakpoint in the line that does the
printing. For this, double-click on the area to the left of the line number of this
line. In the following figure, the dot represents a breakpoint:
Figure 1.53: Workin with breakpoints
Debugging C++ Code | 53
13. Now start the debugger. As usual, it will start paused. Now select Run | Resume or
click on the toolbar button. It will run the three executions of the loop and pause
at our breakpoint. This way, we saved time by stepping through code that we are
not investigating:
Figure 1.54: Working with the debugger
14. While we have been dealing with the loop that we added, we ignored the line that
creates an app object. The Step Over command was skipping this line. However, we
also have the option to go into the constructor call that is in this line. For that, we
will use Run | Step Into or the corresponding toolbar button.
54 | Anatomy of Portable C++ Software
15. Stop the debugger and start it again. Click on Step Over to go to the line where
the application is created:
Figure 1.55: Working with the debugger – the Step Over option
Debugging C++ Code | 55
16. The highlighted is the next line that would be executed if we step over again.
Instead, press the Step Into button. This will take us into the constructor call:
Figure 1.56: Working with the debugger – the Step Into option
56 | Anatomy of Portable C++ Software
This is a handy feature for diving deeper into the function instead of simply stepping
over it. Also, notice the call stack in the left debug view. You can always click on the
lower entries to go and view the callers' contexts again.
This was a brief introduction to the Eclipse CDT debugger, which uses GDB under the
hood to give you a visual debugging experience. You may find debugging useful when
trying to understand runtime errors better and correcting the mistakes that caused
them.
Writing Readable Code
While visual debuggers are quite useful to identify and eliminate runtime errors or
unintended program behavior, it is a better idea to write code that is less likely to have
problems to begin with. One way to do that is to strive to write code that is easier to
read and to understand. Then, finding problems in code becomes more like identifying
contradictions between English sentences and less like solving cryptic puzzles. When
you are writing code in a way that is understandable, your mistakes will often be
apparent as you are making them and will be easier to spot when you come back to
solve problems that slipped through.
After some unenjoyable maintenance experiences, you realize that the primary purpose
of the programs that you write is not to make the computer do what you want to,
but to tell the reader what the computer will do when the program runs. This usually
means that you need to do more typing, which IDEs can help with. This may also mean
that you sometimes write code that is not the most optimal in terms of execution
time or memory used. If this goes against what you have learned, consider that you
may be trading a minuscule amount of efficiency for the risk of being incorrect. With
the vast processing power and memory at our disposal, you may be making your code
unnecessarily cryptic and possibly buggy in the vain quest for efficiency. In the next
sections, we will list some rules of thumb that may help you write code that is more
readable.
Indentation and Formatting
C++ code, as in many other programming languages, is composed of program blocks. A
function has a set of statements that form its body as a block. A loop's block statements
will execute in iterations. An if statement's block executes if the given condition is true
and the corresponding else statement's block executes otherwise.
Writing Readable Code | 57
Curly braces, or lack thereof for single-statement blocks, inform the computer, whereas
indentation in the form of white space informs the human reader about the block
structure. The lack of indentation, or misleading indentation, can make it very difficult
for the reader to understand the structure of the code. Therefore, we should strive to
keep our code well-indented. Consider the following two code blocks:
// Block 1
if (result == 2)
firstFunction();
secondFunction();
// Block 2
if (result == 2)
firstFunction();
secondFunction();
While they are identical in terms of execution, it is much clearer in the second one that
firstFunction() is executed only if result is 2. Now consider the following code:
if (result == 2)
firstFunction();
secondFunction();
This is simply misleading. If the reader is not careful, they might easily assume that
secondFunction() is executed only if result is 2. However, this code is identical to the
two previous examples in terms of execution.
If you feel like correcting indentation is slowing you down, you can use your editor's
formatting facilities to help you. In Eclipse, you can select a block of code and use
Source | Correct Indentation to fix the indentation of that selection, or use Source |
Format to also fix other formatting issues with code.
Beyond indentation, other formatting rules such as placing the curly brace at the
correct line, inserting spaces around binary operators, and inserting a space after each
comma are also very important formatting rules that you should abide by to keep your
code well-formatted and easy to read.
58 | Anatomy of Portable C++ Software
In Eclipse, you can set formatting rules per-workspace in Window | Preferences | C/
C++ | Code Style | Formatter or per-project in Project | Properties | C/C++ General |
Formatter. You can either select one of the industry-standard styles such as K&R or
GNU, or you can modify them and create your own. This becomes especially important
when you use Source | Format to format your code. For example, if you choose to use
spaces for indentation but Eclipse's formatting rules are set to tabs, your code would
become a mixture of tabs and spaces.
Use Meaningful Names as Identifiers
In our code, we use identifiers to name many items—variables, functions, class
names, types, and so on. For the computer, these identifiers are merely a sequence of
characters to distinguish them from one another. However, for the reader, they're much
more. The identifier should completely and unambiguously describe the item that it
represents. At the same time, it should not be overly long. Furthermore, it should abide
by the style standards that are in use.
Consider the following code:
studentsFile File = runFileCheck("students.dat");
bool flag = File.check();
if (flag) {
int Count_Names = 0;
while (File.CheckNextElement() == true) {
Count_Names += 1;
}
std::cout << Count_Names << std::endl;
}
Writing Readable Code | 59
While this is a perfectly valid piece of C++ code, it is quite difficult to read. Let's list
the problems with it. First of all, let's look at the style problems of the identifiers.
The studentsFile class name starts with a lowercase letter, which should have been
uppercase instead. The File variable should have started with a lowercase letter.
The Count_Names variable should have started with a lowercase letter and should
not have had an underscore in it. The CheckNextElement method should have started
with a lowercase letter. While these may seem arbitrary rules, being consistent in
naming carries extra information about the name—when you see a word that starts
with an uppercase letter, you immediately understand that it must be a class name.
Furthermore, it is simply a distraction to have names that do not obey the standard in
use.
Now, let's look beyond the style and inspect the names themselves. The first
problematic name is the runFileCheck function. A method is an action that returns
a value: its name should both clearly explain what it does as well as what it returns.
"Check" is an overused word that is too vague for most situations. Yes, we checked it,
it's there—what should we do with it then? In this case, it seems we actually read the file
and create a File object. In that case, runFileCheck should have been readFile instead.
This clearly explains the action being taken, and the return value is what you would
expect. If you wanted to be more specific about the return value, readAsFile could be
another alternative. Similarly, the check method is vague and should be exists instead.
The CheckNextElement method is also vague and should be nextElementExists instead.
Another overused vague word is flag, which is often used for Boolean variables. The
name suggests an on/off situation but gives no clue as to what its value would mean.
In this case, its true value means that the file exists, and the false value means that
the file does not exist. The trick for naming Boolean variables is to devise a question
or statement that is correct when the value of the variable is true. In this example,
fileExists and doesFileExist are two good choices.
Our next misnamed variable is Count_Names, or countNames with its correct capitalization.
This is a bad name for an integer because the name does not suggest a number—it
suggests an action that results in a number. Instead, an identifier such as numNames or
nameCount would clearly communicate what the number inside means.
60 | Anatomy of Portable C++ Software
Keeping Algorithms Clear and Simple
When we read code, the steps that are taken and the flow should make sense. Things
that are done indirectly—byproducts of functions, multiple actions being done together
in the name of efficiency, and so on—are things that make it difficult to understand your
code for the reader. For example, let's look at the following code:
int *input = getInputArray();
int length = getInputArrayLength();
intsum=0;
int minVal = 0;
for(inti=0;i<length;++i){
sum += input[i];
if (i == 0 || minVal > input[i]) {
minVal = input[i];
}
if (input[i] < 0) {
input[i] *= -1;
}
}
Here, we have an array that we are processing in a loop. At first glance, it is not very
clear what exactly the loop is doing. The variable names are helping us understand
what is going on, but we must run the algorithm in our heads to be sure that what's
being advertised by those names is really happening here. There are three different
operations that are taking place in this loop. Firstly, we are finding the sum of all the
elements. Secondly, we are finding the minimum element in the array. Thirdly, we are
taking the absolute value of each element after these operations.
Now consider this alternative version:
int *input = getInputArray();
int length = getInputArrayLength();
intsum=0;
for(inti=0;i<length;++i){
Writing Readable Code | 61
sum += input[i];
}
int minVal = 0;
for(inti=0;i<length;++i){
if (i == 0 || minVal > input[i]) {
minVal = input[i];
}
}
for(inti=0;i<length;++i){
if (input[i] < 0) {
input[i] *= -1;
}
}
Now everything is much clearer. The first loop finds the sum of the inputs, the second
loop finds the minimum element, and the third loop finds the absolute value of each
element. Although it's much clearer and more understandable, you may feel like you
are doing three loops, and therefore wasting CPU resources. The drive to create more
efficient code may compel you to merge these loops. Note that the efficiency gains you
have here would be minuscule; your program's time complexity would still be O(n).
While creating code, readability and efficiency are two constraints that can often be in
competition. If you want to develop readable and maintainable code, you should always
prioritize readability. Then, you should strive to develop code that is also efficient.
Otherwise, code that has low readability risks being difficult to maintain, or worse, risks
having bugs that are difficult to identify and fix. Your program's high efficiency would
be irrelevant when it is producing incorrect results or when the cost of adding new
features to it becomes too high.
62 | Anatomy of Portable C++ Software
Exercise 10: Making Code Readable
There are style and indentation problems in the following code. Spaces are used
inconsistently, and the indentation is incorrect. Also, the decision on single-statement
if blocks having curly braces or not is inconsistent. The following piece of code has
problems in terms of indentation, formatting, naming, and clarity:
//a is the input array and Len is its length
void arrayPlay(int *a, int Len) {
intS=0;
intM=0;
int Lim_value = 100;
bool flag = true;
for(inti=0;i<Len;++i){
S += a[i];
if(i==0||M>a[i]){
M = a[i];
}
if (a[i] >= Lim_value) {
flag = true;
}
if(a[i]<0){
a[i] *= 2;
}
}
}
Let's fix these problems and make it compatible with a common C++ code style. Perform
the following steps to complete this exercise:
1. Open Eclipse CDT.
2. Create a new ArrayPlay.cpp file in the src folder and paste the preceding code.
Make sure you do not have any text selected. Then, go to Source | Format from the
top menu and accept the dialog to format the entire file. This makes our code look
like the following:
//a is the input array and Len is its length
void arrayPlay(int *a, int Len) {
intS=0;
Writing Readable Code | 63
intM=0;
int Lim_value = 100;
bool flag = true;
for(inti=0;i<Len;++i){
S += a[i];
if(i==0||M>a[i]){
M = a[i];
}
if (a[i] >= Lim_value) {
flag = true;
}
if(a[i]<0){
a[i] *= 2;
}
}
}
Now that the code is a bit easier to follow, let's try to understand what it does.
Thanks to the comments, we understand that we have an input array, a, whose
length is Len. Better names for these would be input and inputLength.
3. Let's make that first change and rename a to input. If you are using Eclipse, you
can select Refactor | Rename to rename one occurrence and all others will be
renamed as well. Do the same for Len and rename it to inputLength.
4. The updated code will look like the following. Note that we do not need the
comment anymore since parameter names are self-explanatory:
void arrayPlay(int *input, int inputLength) {
intS=0;
intM=0;
int Lim_value = 100;
bool flag = true;
for (int i = 0; i < inputLength; ++i) {
S += input[i];
if(i==0||M>input[i]){
M = input[i];
}
64 | Anatomy of Portable C++ Software
if (input[i] >= Lim_value) {
flag = true;
}
if (input[i] < 0) {
input[i] *= 2;
}
}
}
5. We have a couple of other variables defined before the loop. Let's try to
understand them. It seems all it does with S is to add each element to it. Therefore,
S must be sum. M, on the other hand, seems to be the minimum element—let's name
it smallest.
6. Lim_value seems to be a threshold, where we simply want to know whether it has
been crossed. Let's rename it topThreshold. The flag variable is set to true if this
threshold is crossed. Let's rename it to isTopThresholdCrossed. Here is the state of
the code after these changes with Refactor | Rename:
void arrayPlay(int *input, int inputLength) {
intsum=0;
int smallest = 0;
int topThreshold = 100;
bool isTopThresholdCrossed = true;
for (int i = 0; i < inputLength; ++i) {
sum += input[i];
if (i == 0 || smallest > input[i]) {
smallest = input[i];
}
if (input[i] >= topThreshold) {
isTopThresholdCrossed = true;
}
if (input[i] < 0) {
input[i] *= 2;
}
}
}
Writing Readable Code | 65
Now, let's see how we can make this code simpler and easier to understand. The
preceding code is doing these things: calculating the sum of the input elements,
finding the smallest one, determining whether the top threshold was crossed, and
multiplying each element by two.
7. Since all of these are done in the same loop, the algorithm is not very clear now.
Fix that and have four separate loops:
void arrayPlay(int *input, int inputLength) {
// find the sum of the input
intsum=0;
for (int i = 0; i < inputLength; ++i) {
sum += input[i];
}
// find the smallest element
int smallest = 0;
for (int i = 0; i < inputLength; ++i) {
if (i == 0 || smallest > input[i]) {
smallest = input[i];
}
}
// determine whether top threshold is crossed
int topThreshold = 100;
bool isTopThresholdCrossed = true;
for (int i = 0; i < inputLength; ++i) {
if (input[i] >= topThreshold) {
isTopThresholdCrossed = true;
}
}
// multiply each element by 2
for (int i = 0; i < inputLength; ++i) {
if (input[i] < 0) {
input[i] *= 2;
}
}
}
66 | Anatomy of Portable C++ Software
Now the code is much clearer. While it's very easy to understand what each block is
doing, we also added comments to make it even more clear. In this section, we gained a
better understanding of how our code is converted to executables. Then, we discussed
ways of identifying and resolving possible errors with our code. We finalized this with a
discussion about how to write readable code that is less likely to have problems. In the
next section, we will solve an activity wherein we will be making code more readable.
Activity 3: Making Code More Readable
You may have code that is unreadable and contains bugs, either because you wrote
it in a hurry, or you received it from someone else. You want to change the code to
eliminate its bugs and to make it more readable. We have a piece of code that needs to
be improved. Improve it step by step and resolve the issues using a debugger. Perform
the following steps to implement this activity:
1. Below you will find the source for SpeedCalculator.cpp and SpeedCalculator.h .
They contain the SpeedCalculator class. Add these two files to your project.
2. Create an instance of this class in your main() function and call its run() method.
3. Fix the style and naming problems in the code.
4. Simplify the code to make it more understandable.
5. Run the code and observe the problem at runtime.
6. Use the debugger to fix the problem.
Here's the code for SpeedCalculator.cpp and SpeedCalculator.h that you will add to
your project. You will modify them as a part of this activity:
// SpeedCalculator.h
#ifndef SRC_SPEEDCALCULATOR_H _
#define SRC_SPEEDCALCULATOR _H _
class SpeedCalculator {
private:
int numEntries;
double *positions;
double *timesInSeconds;
double *speeds;
public:
void initializeData(int numEntries);
void calculateAndPrintSpeedData();
};
Writing Readable Code | 67
#endif /* SRC_SPEEDCALCULATOR _H _ */
//SpeedCalculator.cpp
#include "SpeedCalculator.h"
#include <cstdlib>
#include <ctime>
#include <iostream>
#include <cassert>
void SpeedCalculator::initializeData(int numEntries) {
this->numEntries = numEntries;
positions = new double[numEntries];
timesInSeconds = new double[numEntries];
srand(time(NULL));
timesInSeconds[0] = 0.0;
positions[0] = 0.0;
for (int i = 0; i < numEntries; ++i) {
positions[i] = positions[i-1] + (rand()%500);
timesInSeconds[i] = timesInSeconds[i-1] + ((rand()%10) + 1);
}
}
void SpeedCalculator::calculateAndPrintSpeedData() {
double maxSpeed = 0;
double minSpeed = 0;
double speedLimit = 100;
double limitCrossDuration = 0;
for (int i = 0; i < numEntries; ++i) {
double dt = timesInSeconds[i+1] - timesInSeconds[i];
assert (dt > 0);
double speed = (positions[i+1] - positions[i]) / dt;
if (maxSpeed < speed) {
maxSpeed = speed;
}
if (minSpeed > speed) {
minSpeed = speed;
}
if (speed > speedLimit) {
limitCrossDuration += dt;
}
68 | Anatomy of Portable C++ Software
speeds[i] = speed;
}
std::cout << "Max speed: " << maxSpeed << std::endl;
std::cout << "Min speed: " << minSpeed << std::endl;
std::cout << "Total duration: " <<
timesInSeconds[numEntries - 1] - timesInSeconds[0] << " seconds" <<
std::endl;
std::cout << "Crossed the speed limit for " << limitCrossDuration << "
seconds"<< std::endl;
delete[] speeds;
}
Note
The solution for this activity can be found on page 626.
Summary
In this chapter, we learned how to create C++ projects that are portable and
maintainable. We first learned how to create CMake projects and how to import them
to Eclipse CDT, giving us the choice to use the command line or an IDE. The rest of the
chapter focused on eliminating various problems in our projects. First, we learned how
to add unit tests to a project and how to use them to ensure that our code works as
intended. We continued this with a discussion about the compilation and linking steps
that our code goes through and observed the contents of object files to gain a better
understanding of executable files. Then, we learned how to debug our code visually in
the IDE to eliminate runtime errors. We finished this discussion with a number of rules
of thumb that help create readable, understandable, and maintainable code. These
methods will come in handy on your C++ journey. In the next chapter, we will learn
more about C++'s type system and templates.
Learning Objectives
By the end of this chapter, you will be able to:
•
Implement your own classes that behave like built-in types
•
Implement classes that control which functions the compiler creates (Rule of Zero/Rule of
Five)
•
Develop functions using auto variables, like you always have
•
Implement classes and functions by making use of strong typing to write safer code
This chapter will give you a good grounding in the C++ type system and allow you to write your
own types that work in that system.
No Ducks Allowed –
Types and Deduction
2A
72 | No Ducks Allowed – Types and Deduction
Introduction
C++ is a strongly typed, statically typed language. The compiler uses type information
related to the variables that are used and the context in which they are used to detect
and prevent certain classes of programming errors. This means that every object has
a type and that type does not change, ever. In contrast, dynamically typed languages
such as Python and PHP defer this type checking until runtime (also known as late
binding), and the type of a variable may change during the execution of the application.
These languages use the duck test instead of the variables type – that is, "if it walks and
talks like a duck, then it must be a duck." Statically typed languages such as C++ rely
on the type to determine whether a variable can be used for a given purpose, while
dynamically typed languages rely on the presence of certain methods and properties to
determine its suitability.
C++ was originally described as "C with classes". What does this mean? Basically, C
provided a set of built-in fundamental types – int, float, char, and so on – along with
pointers and arrays of these items. You aggregate these into data structures of related
items using a struct. C++ extends this to classes so that you can define your own types
completely with the operators that can be used to manipulate them, thereby making
them first-class citizens in the language. Since its humble beginnings, C++ has evolved
to be way more than just "C with classes", as it can now express the object-oriented
paradigm (encapsulation, polymorphism, abstraction, and inheritance), the functional
paradigm, and generic programming (templates).
In this book, we will focus on what it means for C++ to support the object-oriented
paradigm. As your experience as a developer grows and you are exposed to languages
such as Clojure, Haskell, Lisp, and other functional languages, they will help you to
write robust C++ code. Dynamically typed languages such as Python, PHP, and Ruby
have already influenced the way we write C++ code. With the arrival of C++17 came the
introduction of the std::variant class – a class that holds whatever type that we choose
(at compile time) and acts a lot like variables in dynamic languages.
In the previous chapter, we learned how to create C++ projects that are portable and
maintainable using CMake. We learned how to incorporate unit tests in our projects to
help write correct code and how to debug problems when they arise. We learned how
the toolchain takes our code and runs it through a pipeline of programs to produce the
executable files. We finished with some rules of thumb that help us to create readable,
understandable, and maintainable code.
In this chapter, we will go on a whirlwind tour of the C++ type system, declaring and
using our own types as we go.
C++ Types | 73
C++ Types
As a strongly and, statically typed language, C++ provides several fundamental types and
the ability to define their own types with as much or as little functionality as needed
to solve the problem at hand. This section will start by introducing the fundamental
types, initializing them, declaring a variable, and associating a type with it. We will then
explore how to declare and define a new type.
C++ Fundamental Types
C++ includes several fundamental types, or built-in types. The C++ standard defines the
minimum size in memory for each type and their relative sizes. The compiler recognizes
these fundamental types and has built-in rules that define what operations can and
cannot be performed on them. There are also rules for implicit conversions between
types; for example, conversion from an int type to a float type.
Note
See the Fundamental Types section at https://en.cppreference.com/w/cpp/
language/types for a brief description of all the built-in types.
C++ Literals
C++ literals are used to tell the compiler the values that you wish to associate with a
variable either when you declare it or when you assign to it. Each of the built-in types in
the previous section has a form of literal associated with it.
Note
See the Literals section at https://en.cppreference.com/w/cpp/language/
expressions for a brief description of the literals for each type.
74 | No Ducks Allowed – Types and Deduction
Specifying Types – Variables
As C++ is a statically typed language, it is necessary to specify the type of a variable
when it is declared. When you declare a function, it is necessary to specify the return
type and the types of arguments that are being passed to it. There are two choices for
specifying the type to a variable when you declare it:
• Explicitly: You, as the programmer, are dictating exactly what the type is.
• Implicitly (using auto): You are telling the compiler to look at the value that was
used to initialize the variable and determine its type. This is known as (auto) type
deduction.
The general form of declaration for a scalar variable is one of the following:
type-specifier var;
// 1. Default-initialized variable
type-specifier var = init-value;
// 2. Assignment initialized
variable
type-specifier var{init-value};
// 3. Brace-initialize variable
type-specifier indicates what type (fundamental or user-defined) you wish to associate
with the var variable. All three forms result in the compiler allocating some storage to
hold the value in, and all future references to var will refer to that location. init-value
is used to initialize the storage location. Default initialization does nothing for built-in
types and will call the constructor of a user-defined type according to the function
overloading resolution to initialize the storage.
The compiler must know how much memory to allocate and provides an operator to
determine how large a type or variable is – sizeof.
Based on our declarations, the compiler will set aside space in the computer's memory
to store the data item that the variable refers to. Consider the following declarations:
int value = 42;
// declare value to be an integer and initialize to 42
short a_value{64}; // declare a_value to be a short integer and initialize
// to64
int bad_idea;
// declare bad_idea to be an integer and DO NOT
// initialize it. Use of this variable before setting
// it is UNDEFINED BEHAVIOUR.
float pi = 3.1415F; // declare pi to be a single precision floating point
// number and initialize it to pi.
Specifying Types – Variables | 75
double e{2.71828}; // declare e to be a double precision floating point
// number and initialize it to natural number e.
auto title = "Sir Robin of Loxley"; // Let the compiler determine the type
If these are declared within the scope of a function, then the compiler allocates the
memory for them from what is known as the stack. The memory layout for this may
look something like the following:
Figure 2A.1: Memory layout of variables
The compiler will allocate the memory in the order we declare the variables. The
unused memory occurs because the compiler allocates the memory so that the
fundamental types are generally accessed atomically and are aligned to the appropriate
memory boundaries for efficiency. Note that title is of the const char * type, which is
a pointer that we'll discuss next, along with const. The "Sir Robin of Loxley" string will
be stored in a different part of memory that is initialized when the program is loaded.
We will discuss program memory later.
A slight modification of the scalar declaration syntax gives us the syntax for declaring
arrays of values:
type-specifier ary[count];
// 1. Default-initialized
type-specifier ary[count] = {comma-separated list}; // 2. Assignment
initialized
type-specifier ary[count]{comma-separated list}; // 3. Brace-initialized
This can be done for multi-dimensional arrays like so:
type-specifier ary2d[countX][countY];
type-specifier ary3d[countX][countY][countZ];
// etc...
76 | No Ducks Allowed – Types and Deduction
Note that count, countX, and other items in the preceding declarations must be
evaluated to a constant during compile time, otherwise this will result in an error.
Additionally, the number of items in the comma-separated initializer list must be less
than or equal to count or, again, there will be a compilation error. In the next section,
we'll apply the concepts we've learned so far in an exercise.
Note
Before solving any practical in this chapter, download this book's GitHub repository
(https://github.com/TrainingByPackt/Advanced-CPlusPlus) and import the folder of
Lesson 2A in Eclipse so that you can view the codes for each exercise and activity.
Exercise 1: Declaring Variables and Exploring Sizes
This exercise will set up all the exercises for this chapter and then get you familiar with
declaring and initializing variables that are of a built-in type. You will also be introduced
to the auto declaration, arrays, and sizeof. Let's get started:
1. Open Eclipse (used in Chapter 1, Anatomy of Portable C++ Software) and if the
Launcher window appears, click on Launch.
2. Go to File, select Project... under New ►, and go to Select C++ Project (not the C/
C++ Project).
3. Click Next >, clear the Use default location checkbox, and enter Lesson2A as the
Project name.
4. Select Empty Project for the Project Type. Then, click on Browse... and navigate
to the folder containing the Lesson2A examples.
5. Click on Open to select the folder and close the dialog.
6. Click Next >, Next >, and then Finish.
7. To help you with the exercises, we will configure the workspace to automatically
save the files before builds. Go to Window and select Preferences. Under General,
open Workspace and select Build.
Specifying Types – Variables | 77
8. Check the Save automatically before build box and then click Apply and Close.
9. Just like Chapter 1, Anatomy of Portable C++ Software, this is a CMake-based
project, so we need to change the current builder. Click on Lesson2A in the
Project Explorer and then on Properties under the Project menu. Select Tool
Chain Editor under C/C++ Build from the left pane and set Current builder to
Cmake Build (portable).
10. Click Apply and Close. Then, choose the Project | Build All menu item to build all
the exercises. By default, the console at the bottom of the screen will display the
CMake Console [Lesson2A]:
Figure 2A.2: CMake console output
11. In the top-right corner of the console, click on the Display Selected Console
button and then select CDT Global Build Console from the list:
Figure 2A.3: Selecting a different console
78 | No Ducks Allowed – Types and Deduction
This will show the outcome of the build – it should show 0 errors and 3 warnings:
Figure 2A.4: Build process console output
12. As the build was successful, we want to run Exercise1. At the top of the window,
click on the drop-down list where it says No Launch Configurations:
Figure 2A.5: Launch Configuration menu
13. Click on New Launch Configuration.... Leave the defaults as is and click Next >.
Specifying Types – Variables | 79
14. Change Name to Exercise1 and then click Search Project:
Figure 2A.6: Exercise1 Launch Configuration
15. From the list of programs displayed in the Binaries window, click on Exercise1 and
click OK.
80 | No Ducks Allowed – Types and Deduction
16. Click Finish. This will result in exercise1 being displayed in the Launch
Configuration drop-down box:
Figure 2A.7: Change to Launch Configuration
17. To run Exercise1, click on the Run button. Exercise1 will execute and display its
output in the console:
Figure 2A.8: Output from exercise1
The program does nothing of worth – it just outputs the sizes of various types on
your system. But this shows that the program is valid and can be compiled. Note
that the numbers for your system may be different (especially the sizeof(title)
value).
18. In the Project Explorer, expand Lesson2A, then Exercise01, and double-click on
Exercise1.cpp to open the file for this exercise in the editor:
int main(int argc, char**argv)
{
std::cout << "\n\n------ Exercise 1 ------\n";
int value = 42;
// declare value to be an integer & initialize to
42
short a_value{64}; // declare a_value to be a short integer &
// initialize to 64
int bad_idea;
// declare bad_idea to be an integer and DO NOT
// initialize it. Use of this variable before
Specifying Types – Variables | 81
// setting it is UNDEFINED BEHAVIOUR.
float pi = 3.1415F; // declare pi to be a single precision floating
// point number and initialize it to pi.
double e{2.71828}; // declare e to be a double precision floating
point
// number and initialize it to natural number e.
auto title = "Sir Robin of Loxley";
// Let the compiler determine the type
int ary[15]{};
// array of 15 integers - zero initialized
// double pi = 3.14159; // step 24 - remove comment at front
// auto speed;
// step 25 - remove comment at front
// value = "Hello world";// step 26 - remove comment at front
// title = 123456789;
// step 27 - remove comment at front
// short sh_int{32768}; // step 28 - remove comment at front
std::cout << "sizeof(int) = " << sizeof(int) << "\n";
std::cout << "sizeof(short) = " << sizeof(short) << "\n";
std::cout << "sizeof(float) = " << sizeof(float) << "\n";
std::cout << "sizeof(double) = " << sizeof(double) << "\n";
std::cout << "sizeof(title) = " << sizeof(title) << "\n";
std::cout << "sizeof(ary) = " << sizeof(ary)
<< " = " << sizeof(ary)/sizeof(ary[0])
<< " * " << sizeof(ary[0]) << "\n";
std::cout << "Complete.\n";
return 0;
}
One thing to note about the preceding program is that the first statement of
the main function is actually an executable statement and not a declaration. C++
allows you to declare a variable just about anywhere. Its predecessor, C, originally
required that all variables must be declared before any executable statements.
Best Practice
Declare a variable as close as possible to where it will be used and initialize it.
82 | No Ducks Allowed – Types and Deduction
19. In the editor, uncomment the line marked as step 24 by removing the delimiters
(//) at the beginning of the line:
double pi = 3.14159; // step 24 - remove comment at front
// auto speed;
// step 25 - remove comment at front
// value = "Hello world";// step 26 - remove comment at front
// title = 123456789;
// step 27 - remove comment at front
// short sh_int{32768}; // step 28 - remove comment at front
20. Click on the Run button again. This will cause the program to be built again. This
time, the build will fail with an error:
Figure 2A.9: Errors in Workspace dialog
21. Click on Cancel to close the dialog. If CDT Build Console [Lesson2A] is not
displayed, then select it as the active console:
Figure 2A.10: Duplicate declaration error
Specifying Types – Variables | 83
This time, the build fails because we have tried to redefine the type of the variable,
that is, pi. The compiler gives helpful information about where we need to look to
fix it.
22. Restore the comment delimiter to the start of the line. In the editor, uncomment
the line marked as step 25 by removing the delimiters (//) at the beginning of the
line:
// double pi = 3.14159; // step 24 - remove comment at front
auto speed;
// step 25 - remove comment at front
// value = "Hello world";// step 26 - remove comment at front
// title = 123456789;
// step 27 - remove comment at front
// short sh_int{32768}; // step 28 - remove comment at front
23. Click on the Run button again. When the Errors in Workspace dialog appears, click
Cancel:
Figure 2A.11: Auto declaration error – no initialization
Again, the build fails, but this time, we did not give the compiler enough
information to deduce the type of speed – auto typed variables MUST be
initialized.
24. Restore the comment delimiter to the start of the line. In the editor, uncomment
the line marked as step 26 by removing the comment starting delimiter (//) at the
beginning of the line:
// double pi = 3.14159; // step 24 - remove comment at front
// auto speed;
// step 25 - remove comment at front
value = "Hello world";// step 26 - remove comment at front
// title = 123456789;
// step 27 - remove comment at front
// short sh_int{32768}; // step 28 - remove comment at front
84 | No Ducks Allowed – Types and Deduction
25. Click on the Run button again. When the Errors in Workspace dialog appears, click
Cancel:
Figure 2A.12: Assignment of an incorrect value type to a variable
This time, the build fails because we have tried to assign the wrong type of data,
that is, "Hello world", which is a const char*, to a variable of type int, that is, value.
26. Restore the comment delimiter to the start of the line. In the editor, uncomment
the line marked as step 27 by removing the delimiters (//) at the beginning of the
line:
// double pi = 3.14159; // step 24 - remove comment at front
// auto speed;
// step 25 - remove comment at front
// value = "Hello world";// step 26 - remove comment at front
title = 123456789;
// step 27 - remove comment at front
// short sh_int{32768}; // step 28 - remove comment at front
27. Click on the Run button again. When the Errors in Workspace dialog appears, click
Cancel:
Figure 2A.13: Assignment of an incorrect value type to an auto variable
Specifying Types – Variables | 85
Again, the build fails because we have tried to assign the wrong type of data, that
is, 123456789 of type int, to title, which is a const char*. A very useful thing to
note here is that title was declared with the auto type. The error message that
was generated by the compiler tells us that title was deduced to be of the const
char* type.
28. Restore the comment delimiter to the start of the line. In the editor, uncomment
the line marked as step 28 by removing the delimiters (//) at the beginning of the
line:
// double pi = 3.14159; // step 24 - remove comment at front
// auto speed;
// step 25 - remove comment at front
// value = "Hello world";// step 26 - remove comment at front
// title = 123456789;
// step 27 - remove comment at front
short sh_int{32768}; // step 28 - remove comment at front
29. Click on the Run button again. When the Errors in Workspace dialog appears, click
Cancel:
Figure 2A.14: Assignment of a value that's too large to fit in the variable
Again, the build fails, but this time because the value that we tried to initialize
sh_int with (32768) does not fit in the memory allocated to the short type. A short
occupies two bytes of memory and is considered a signed quantity of 16 bits. This
means that the range of values that can be stored in a short is -2^(16-1) to 2^(16-
1)-1, or -32768 to 32767.
30. Change the value from 32768 to 32767 and click on the Run button. This time, the
program compiles and runs because the value can be represented by a short.
31. Change the value from 32767 to -32768 and click on the Run button. Again, the
program compiles and runs because the value can be represented by a short.
86 | No Ducks Allowed – Types and Deduction
32. Restore the comment delimiter to the start of the line. In the editor, make
any change you can think of to explore variable declaration using any of the
fundamental types and their associated literals and then click on the Run button
as often as necessary. Examine the output in the Build Console for any error
messages because it might help you find the error.
In this exercise, we learned how to set up the Eclipse development, implement variable
declaration, and troubleshoot problems with declarations.
Specifying Types – Functions
Now that we can declare a variable to be of a certain type, we need to do something
with those variables. In C++, we do things by calling a function. A function is a sequence
of statements that deliver an outcome. That outcome could be a mathematical
calculation (for example, an exponent) that is then sent to a file or written to a Terminal.
Functions allow us to break our solution into sequences of statements that are easier
to manage and understand. As we write these packaged statements, we can reuse them
where it makes sense. If we need it to operate differently based on the context, then we
pass in an argument. If it returns a result, then the function needs a return type.
As C++ is a strongly typed language, we need to specify the types related to the
functions that we implement – the type of value returned by the function (including no
return) and the type of argument(s) that are passed to it, if any.
The following is a typical hello world program:
#include <iostream>
void hello_world()
{
std::cout << "Hello world\n";
}
int main(int argc, char** argv)
{
Specifying Types – Functions | 87
std::cout << "Starting program\n";
hello_world();
std::cout << "Exiting program\n";
return 0;
}
Two functions have been declared in the preceding example – hello_world() and
main(). The main() function is the entry point to every C++ program ever written and it
returns an int value that is passed into the host system. It is known as the exit code.
Everything from the declaration of the return type up to the opening brace ({) is known
as the function prototype. It defines three things, namely the return type, the name of
the function, and the number and types of an argument.
For the first function, the return type is void – that is, it returns no value; it has a name
of hello_world and takes no arguments:
Figure 2A.15: Declaration of a function that takes no arguments and returns nothing
The second function returns an int value, has the name of main, and takes two
arguments. These arguments are argc and argv and have the int and pointer to a pointer
of char types, respectively:
Figure 2A.16: Declaration of a function that takes two arguments and returns an int
Everything after the function prototype is known as the function body. The function
body contains variable declarations and the statements to execute.
88 | No Ducks Allowed – Types and Deduction
A function must be declared before it is used – that is, the compiler needs to know its
arguments and its return type. If the function is defined in the file that it is to be used in
after the call to it, then you can solve this problem by providing a forward declaration of
the function before it is used.
A forward declaration is made by placing the function prototype that was terminated
by a semicolon in the file before it is called. For hello_world(), this would be done as
follows:
void hello_world();
For the main function, this would be done as follows:
int main(int, char**);
A function prototype does not need the names of the arguments, only the types.
However, to help the users of the function, it is a good idea to keep them.
In C++, the definition of the function can be in one file and needs to be called from a
different file. So, how does the second file know the prototype of the function it wishes
to call? This is achieved by placing the forward declarations into a separate file known
as a header file and including it in the second file.
Exercise 2: Declaring Functions
In this exercise, we will test what the compiler needs to know when it encounters a
function call and implements a forward declaration to resolve an unknown function.
Let's get started.
1. Open the Lesson2A project in Eclipse, and then, in the Project Explorer, expand
Lesson2A, then Exercise02 and double-click on Exercise2.cpp to open the file for
this exercise into the editor.
2. Click on the Launch Configuration drop-down menu and select New Launch
Configuration... .
3. Configure Exercise2 to run with the name Exercise2. When that is complete, it will
be the currently selected Launch Configuration.
Specifying Types – Functions | 89
4. Click on the Run button. Exercise 2 will run and produce the following output:
Figure 2A.17: Output from the exercise2 program
5. Go into the editor and change the code by moving the gcd function so that it's
after main. It should look as follows:
int main(int argc, char**argv)
{
std::cout << "\n\n------ Exercise 2 ------\n";
std::cout << "The greatest common divisor of 44 and 121 is " <<
gcd(44, 121) << "\n";
std::cout << "Complete.\n";
return 0;
}
int gcd(int x, int y)
{
while(y!=0)
{
auto c{x%y};
x=y;
y=c;
}
return x;
}
90 | No Ducks Allowed – Types and Deduction
6. Click on the Run button again. When the Errors in Workspace dialog appears,
click Cancel. In the CDT Build Console [Lesson2A], we will see the reason for the
failure:
Figure 2A.18: Build failure due to undefined function
This time, the compiler does not know what to do with the call to the gcd()
function. It has no knowledge of the function at the point it needs to call it, even
though it is defined in the same file but after the call.
7. In the editor, place the forward declaration before the definition of the main
function. Also add a semicolon (;) at the end:
int gcd(int x, int y);
8. Click on the Run button again. This time, the program compiles and the original
output is restored.
In this exercise, we learned how to forward declare functions and troubleshoot
compiler errors that occur when a function is not declared before it is used.
In the early versions of C compilers, this was acceptable. The program would assume
that the function existed and returned an int. The functions' arguments could be
inferred from the call. However, this is not true in the case of modern C++ as you must
declare a function, class, variable, and so on before using it. In the next section, we'll
learn about pointer types.
Pointer Types
Because of its origins in the C language, that is, writing optimally efficient systems and
having direct access to hardware, C++ allows you to declare a variable as a pointer type.
It is of the following format:
type-specifier* pvar = &var;
Specifying Types – Functions | 91
This is the same as before, except for two things:
• Use of the special declarator asterisk (*) to indicate that the variable named pvar
points to a location or address in memory.
• It is initialized using the special operator ampersand (&), which in this context tells
the compiler to return the address of the var variable.
As C is a high-level language, but with low-level access, pointers allow users to access
memory directly, which is helpful when we wish to provide input/output to hardware
and thus control it. Another use of pointers is to allow functions to be provided with
access to common data items and remove the need to copy large amounts of data when
calling functions as it defaults to passing by value. To access the value that's being
pointed to by the pointer, the special operator asterisk (*) is used to dereference the
location:
intfive=5;
// declare five and initialize it
int *pvalue = &five;
// declare pvalue as pointer to int and have it
// point to the location of five
*pvalue = 6;
// Assign 6 into the location five.
The following diagram shows how the compiler allocates the memory. pvalue requires
memory to store the pointer, while five needs memory to store the integer value of 5:
Figure 2A.19: Memory layout for pointer variables
When accessing a user-defined type via a pointer, there is a second special operator
(->) that is also used for dereferencing member variables and functions. In modern
C++, these pointers are referred to as raw pointers and the way in which they are
used has changed significantly. Working with pointers in C and C++ has always proved
challenging for programmers, and their incorrect use is the source of many problems,
the most common being resource leaks. A resource leak is a scenario where a program
has grabbed a resource (a memory, a file handle, or other system resource) for its
use and fails to let it go when it's finished with it. These resource leaks can lead to
performance issues, program failures, and even system crashes. The use of raw pointers
in modern C++ to manage the ownership of a resource is now deprecated since smart
pointers arrived in C++11. Smart pointers (implemented as classes in the STL) now do
the housekeeping required to be a good citizen in your host system. More about this
will be covered in Chapter 3, The Distance Between Can and Should – Objects, Pointers,
and Inheritance.
92 | No Ducks Allowed – Types and Deduction
In the preceding code, when pvalue is declared, the compiler allocates memory to
store only the address of the memory it will be referring to. Like other variables, you
should always ensure that a pointer is initialized before it is used as dereferencing an
uninitialized pointer results in an undefined behavior. Exactly how much memory is
allocated to store a pointer is dependent upon the system that the compiler is designed
for and how many bits the processor supports. But all pointers will be of the same size,
regardless of what type they point to.
A pointer can also be passed to a function. This allows the function to access the data
being pointed to and possibly modify it. Consider the following implementation of swap:
void swap(int* data1, int* data2)
{
int temp{*data1};
// Initialize temp from value pointed to by
data1
*data1 = *data2;
// Copy data pointed to by data2 into location
// pointed to by data1
*data2 = temp;
// Store the temporarily cached value from
temp
// into the location pointed to by data2
}
This shows how to declare pointers as arguments to a function, how to get the value
from the pointer by using the dereferencing operator *, as well as how to set a value
through the dereference operator.
The following example allocates memory from the host system using the new operator
and releases it back to the host system using the delete operator:
char* name = new char[20]; // Allocate 20 chars worth of memory and
assign it
// to name.
Do something with name
delete [] name;
Specifying Types – Functions | 93
In the preceding code, the first line creates an array of 20 characters using the array
allocation form of the new operator. It makes a call to the host system to allocate 20 *
sizeof(char) bytes of memory for our use. Exactly how much memory is allocated is up
to the host system, but it is guaranteed to be at least 20 * sizeof(char) bytes. If it fails to
allocate the required memory, then one of two things will happen:
• It will throw an exception
• It will return nullptr. This is a special literal that was introduced in C++11. Earlier,
C++ used 0 or NULL to indicate a non-valid pointer. C++11 made this a strongly
typed value as well.
On most systems, the first outcome will be the result, and you will need to deal with the
exception. The second outcome is possible from two scenarios – calling the nothrow
variant of new, that is, new(std::nothrow) int [250], or on embedded systems where
the overhead of exception processing is not sufficiently deterministic.
Finally, note that the call to delete uses the array form of the delete operator, that is,
with square brackets, []. It is important to ensure that the same form is used with the
new and delete operators. When new is used on a user-defined type (which will be
discussed in the next section), it does more than just allocate memory:
MyClass* object = new MyClass;
In the preceding code, the call to new allocates sufficient memory to store MyClass and,
if successful, it then proceeds to call the constructor to initialize the data:
MyClass* objects = new MyClass[12];
In the preceding code, the call to new allocates sufficient memory to store 12 copies of
MyClass and, if successful, it then proceeds to call the constructor 12 times to initialize
the data for each object.
Note that object and objects, which were declared in the preceding snippets of code,
have the same type. Strictly speaking, objects should be a pointer to an array of
MyClass, but it is actually a pointer to an instance of MyClass. objects points to the first
instance in the array of MyClass.
Consider the following excerpt of code:
void printMyClasses(MyClass* objects, size_t number)
{
for( auto i{0U} ; i<number ; i++ ) {
std::cout << objects[i] << "\n";
}
94 | No Ducks Allowed – Types and Deduction
}
void process()
{
MyClass objects[12];
// Do something with objects
printMyClasses(objects, sizeof(objects)/sizeof(MyClass));
}
In the process() function, objects is of the "array of 12 MyClass items" type, but when
it is passed to printMyClasses(), it is converted (by the compiler) into the "a pointer
to MyClass" type. This is by design (inherited from C) and is known as array decay
and can be the cause of errors by new programmers. We could attempt to declare
printMyClasses() as follows:
void printMyClasses(MyClass objects[12], size_t number)
This would still suffer from array decay as the compiler changes the argument object
to MyClass*; it does not keep the dimension information in this case. Array decay is the
reason that we need to pass number to the printMyClasses() function: so that we know
how many items are in the array. C++ provides two mechanisms for dealing with array
decay:
• Use of iterators to pass a range into the method. STL containers (see the C++
Pre-Packaged Templates section in Chapter 2B, No Ducks Allowed – Templates and
Deduction) offer the begin() and end() methods so that we can obtain iterators
that allow algorithms to traverse an array or part thereof.
Note
For C++20, the ISO standard committee is considering the inclusion of a concept
known as Ranges that will allow both the begin and end iterators to be captured in
one object.
• Use of templates (see the Non-Type Template Arguments section in Chapter 2B, No
Ducks Allowed – Templates and Deduction).
Specifying Types – Functions | 95
Exercise 3: Declaring and Using Pointers
In this exercise, we will implement functions that take pointers and arrays as arguments
and compare their behavior while considering array decay. Let's get started:
1. Open the Lesson2A project in Eclipse, and then in the Project Explorer, expand
Lesson2A, then Exercise03, and double-click on Exercise3.cpp to open the file for
this exercise into the editor.
2. Click on the Launch Configuration drop-down menu and select New Launch
Configuration... . Configure Exercise3 to run with the name Exercise3. When that
is complete, it will be the currently selected Launch Configuration.
3. Click on the Run button. Exercise 3 will run and produce the following output:
Figure 2A.20: Exercise 3 output
4. In the editor, insert a blank line somewhere and click on the Run button. (By
changing the file, it will force the build system to recompile Exercise3.cpp.)
96 | No Ducks Allowed – Types and Deduction
5. If we now look at the CDT Global Build Console, we will see two warnings from
the compiler:
Figure 2A.21: Exercise 3 compiler warnings
The preceding screenshot does not show the full warning message. For the gcc
compiler being used here, the full warning is as follows:
exercise3.cpp:22:45: warning: 'sizeof' on array function parameter 'ary'
will return size of 'int*' [-Wsizeof-array-argument].
The warning gives us more information about the declaration that causes the
issue. It traces back to the following function:
void print_array_size2(int ary[10])
{
std::cout << "---print_array_size2---\n";
std::cout << "sizeof(ary) = " << sizeof(ary) << "\n";
std::cout << "elements in (ary) = " << sizeof(ary)/sizeof(ary[0]) <<
"\n";
}
Here, we can see an example of array decay – actually, unexpected array decay.
Since the days of C, arrays and pointers are (almost) interchangeable. So, as far as
the compiler is concerned, the argument that's passed to print_array_size2() is of
the int* type and is borne out by the warning stating that sizeof will return size
of 'int*':
Specifying Types – Functions | 97
Figure 2A.22: Exercise 3 partial output
The sizeof(ary)/sizeof(arg[0]) calculation should return the number of elements
in an array. The first elements in (ary) = 10 is generated from the main function
and ary was declared as ary[10], so it is correct. The elements in (ary) = 2 under
the ---print_array_size2--- banner shows the problem with array decay and why
the compiler generated a warning. Why the value of 2? On a test PC, a pointer
occupies 8 bytes (64 bits), while an int only occupies 4 bytes, so we get 8/4 = 2.
6. In the editor, locate the line in main() where ary is declared and change it to the
following:
int ary[15]{};
7. Click on the Run button. If you examine the CDT Global Build Console, you will
see that the number of errors is still the same. This is another symptom of array
decay. Let's say we're given the following function prototype:
void print_array_size2(int ary[10])
You may expect that trying to pass int ary[15] would cause an error or at least a
warning since the argument prototypes do not match. As we stated previously, the
compiler treats the argument as int* ary, so the function may as well have been
declared as follows:
void print_array_size2(int* ary)
98 | No Ducks Allowed – Types and Deduction
8. In the editor, change the name of print_array_size2 to print_array_size all
through the file. Click on the Run button. When the Errors in Workspace dialog
appears, click Cancel. Open the CDT Global Build Console and examine the error
message:
Figure 2A.23: Redefinition error
This time, the compiler generates a redefinition error pointing to the two print_
array_size methods that appear to have different argument types – int* ary
and int ary[10]. This is the confirmation that, when used as an argument to a
function, int ary[10] generates the same as if int* ary was declared.
9. Restore the file to its original state.
10. In the main() function, locate the line with Step 11 in a comment and remove the
comment at the beginning of the line. Click on the Run button. When the Errors in
Workspace dialog appears, click Cancel. Open the CDT Global Build Console and
examine the error message:
Figure 2A.24: Redefinition error
The full error message is as follows:
exercise3.cpp:53:9: error: invalid conversion from 'const char*' to
'char*' [-fpermissive]
Creating User Types | 99
This occurs because the compiler determined the type of title to be const char*
and p of type char*. The const-ness is important. The p pointer allows us to
change the value of whatever it points at.
11. Take a look at the following line:
p = title;
Change it to the following:
title = p;
12. Click on the Run button. This time, it builds and runs properly. It is OK to assign a
non-const pointer to a const pointer.
In this exercise, we learned that arrays need to treated carefully when passing them
into functions as critical information (the size of the array) will be lost in the call.
Creating User Types
The great thing about C++ is that you can create your own types using struct, class,
enum, or union and the compiler will treat it as a fundamental type throughout the
code. In this section, we will explore creating our own type and the methods that we
need to write to manipulate it, as well as some methods that the compiler will create for
us.
Enumerations
The simplest user-defined type is the enumeration. Enumerations got an overhaul
in C++11 to make them even more type-safe, so we have to consider two different
declaration syntaxes. Before we look at how to declare them, let's figure out why we
need them. Consider the following code:
int check_file(const char* name)
{
FILE* fptr{fopen(name,"r")};
if ( fptr == nullptr)
return -1;
char buffer[120];
auto numberRead = fread(buffer, 1, 30, fptr);
fclose(fptr);
if (numberRead != 30)
return -2;
100 | No Ducks Allowed – Types and Deduction
if(is_valid(buffer))
return -3;
return 0;
}
This is typical of many C library functions where a status code is returned and you need
the main page to know what they mean. In the preceding code, -1, -2, -3, and 0 are
known as magic numbers. You need to read the code to understand what each number
means. Now, consider the following version of the code:
FileCheckStatus check_file(const char* name)
{
FILE* fptr{fopen(name,"r")};
if ( fptr == nullptr)
return FileCheckStatus::NotFound;
char buffer[30];
auto numberRead = fread(buffer, 1, 30, fptr);
fclose(fptr);
if (numberRead != 30)
return FileCheckStatus::IncorrectSize;
if(is_valid(buffer))
return FileCheckStatus::InvalidContents;
return FileCheckStatus::Good;
}
This uses an enumeration class to communicate the result and attach the meaning to
the name of the values. A user of the function can now use the enumerations as the
code is easier to understand and use. So, the magic numbers (related to the status) have
been replaced with an enumerated value that has a descriptive title. Let's learn about
the declaration of FileCheckStatus by referring to the following pieces of code:
enum FileCheckStatus
// Old-style enum declaration
{
Good,
//=0 -Valuedefaultsto0
NotFound,
// = 1 - Value set to one more than previous
Creating User Types | 101
IncorrectSize,
// = 2 - Value set to one more than previous
InvalidContents,
// = 3 - Value set to one more than previous
};
If we want to use the values from the magic numbers, then we would declare them like
so:
enum FileCheckStatus
// Old-style enum declaration
{
Good = 0,
NotFound = -1,
IncorrectSize = -2,
InvalidContents = -3,
};
Alternatively, by turning the order around, we can set the first value and the compiler
will do the rest:
enum FileCheckStatus
// Old-style enum declaration
{
InvalidContents = -3,
// Force to -3
IncorrectSize,
// set to -2(=-3+1)
NotFound,
// Set to -1(=-2+1)
Good,
// Set to 0(=-1+1)
};
The preceding function can also be written as follows:
FileCheckStatus check_file(const char* name)
{
FILE* fptr{fopen(name,"r")};
if ( fptr == nullptr)
return NotFound;
char buffer[30];
auto numberRead = fread(buffer, 1, 30, fptr);
fclose(fptr);
102 | No Ducks Allowed – Types and Deduction
if (numberRead != 30)
return IncorrectSize;
if(is_valid(buffer))
return InvalidContents;
return Good;
}
Note that the scoping directive, FileCheckStatus::, is missing from the code, but it will
still compile and work. This raises the issue of scope, which we will discuss in detail
later in the Visibility, Lifetime, and Access section of Chapter 2B, No Ducks Allowed –
Templates and Deduction. For now, know that every type and variable has a scope and
the problem with old-style enumerations is that their enumerators are added into the
same scope as the enumeration. Let's say we have two enumerations defined as follows:
enum Result
{
Pass,
Fail,
Unknown,
};
enum Option
{
Keep,
Discard,
Pass,
Play
};
We now have a problem in which the Pass enumerator is defined twice and has two
different values. Old-style enumerations also allow us to write a valid compiler but
apparently nonsensical code, such as the following:
Option option{Keep};
Result result{Unknown};
if (option == result)
Creating User Types | 103
{
// Do something
}
As we are trying to develop code that is clear in intent and easy to understand,
comparing a result to an option has no meaning. The problem is that the compiler
would implicitly convert the value into an integer and thus be able to compare it.
C++11 introduced a new concept that is referred to as an enum class or scoped
enumeration. The scoped enumeration definition of the preceding code looks as
follows:
enum class Result
{
Pass,
Fail,
Unknown,
};
enum class Option
{
Keep,
Discard,
Pass,
Play
};
This means that the preceding code will no longer compile:
Option option{Keep};
// error: must use scope specifier Option::Keep
Result result{Unknown};
// error: must use scope specifier
Result::Unknown
if (option == result)
// error: can no longer compare the different
types
{
// Do something
}
104 | No Ducks Allowed – Types and Deduction
As the name implies, scoped enumeration places the enumerators inside the scope of
the enumeration name. In addition, a scoped enumeration will no longer be implicitly
converted into an integer (hence the if statement will fail to compile). You can still
convert the enumerator into an integer, but you will need to cast it:
int value = static_cast<int>(Option::Play);
Exercise 4: Enumerations – Old and New School
In this exercise, we will implement a program that uses enumerations to represent
predefined values and determine the consequential changes required when they are
changed to a scoped enum. Let's get started:
1. Open the Lesson2A project in Eclipse, and then in the Project Explorer, expand
Lesson2A, then Exercise04, and double-click on Exercise4.cpp to open the file for
this exercise in the editor.
2. Click on the Launch Configuration drop-down menu and select New Launch
Configuration... . Configure Exercise4 to run with the name Exercise4.
3. When that is complete, it will be the currently selected Launch Configuration.
4. Click on the Run button. Exercise 4 will run and produce the following output:
Figure 2A.25: Exercise 4 output
5. Examine the code in the editor. Currently, we can compare apples and oranges. At
the definition of printOrange(), change the argument to be Orange:
void printOrange(Orange orange)
Creating User Types | 105
6. Click on the Run button. When the Errors in Workspace dialog appears, click
Cancel:
Figure 2A.26: Cannot convert error
By changing the argument type, we forced the compiler to enforce the type of the
value that was passed to the function.
7. Call the printOrange() function twice by passing the orange enum variable in the
initial call and the apple variable in the second call, respectively:
printOrange(orange);
printOrange(apple);
This shows that the compiler is implicitly converting the orange and apple into an
int so that it can call the function. Also, note the warning about comparing Apple
and Orange.
8. Restore the printOrange() function by taking an int argument and changing the
definition of the orange enum to the following:
enum class Orange;
9. Click on the Run button. When the Errors in Workspace dialog appears, click
Cancel:
Figure 2A.27: Multiple errors for scoped enum changes
106 | No Ducks Allowed – Types and Deduction
10. Locate the first error listed for this build:
Figure 2A.28: First scoped enum error
11. The first thing to note about scoped enums is that when you reference the
enumerators, they must have a scope specifier. Therefore, in the editor, go and
change this line to the following:
Orange orange{Orange::Hamlin};
12. Click on the Run button. When the Errors in Workspace dialog appears, click
Cancel. Good news – the error count dropped to 8 from 9. Check the errors in the
console and locate the first one:
Figure 2A.29: Second scoped enum error
This error reports that it is not able to find an insertion operator (<<) for an
ostream that knows how to handle the Orange type. Because this involves a
template-based class (which we'll talk about later), the error messages become
very long-winded. Take a minute to look at all the messages that appear from this
error to the next (red lines). It shows you what the compiler was trying to do to be
able to compile that line.
13. Change the indicated line to read the following:
std::cout << "orange = " << static_cast<int>(orange) << "\n";
Creating User Types | 107
14. Click on the Run button. When the Errors in Workspace dialog appears, click
Cancel. Good news – the error count dropped to 6 from 8. Check the errors in the
console and locate the first one:
Figure 2A.30: Third scoped enum error
This error reports (finally) that you cannot compare apples and oranges. At this
point, we decide that the program is attempting to do something that makes no
sense and there is no point in attempting to fix the rest. We could fix this error by
casting it to an int again, but we would need to cast for the next error as well. The
final error would then be that Valencia is missing the Orange:: scope specifier.
15. It is left as an exercise for you to get the file to compile again with orange as a
scope enumeration.
In this exercise, we found that scope enums improve the strong type checking of C++
and if we wish to use them as an integral value, then we need to cast them, unlike
non-scope enums, which are implicitly converted.
Troubleshooting Compiler Errors
As seen from the preceding exercise, the compiler can generate a very large
amount of error and warning messages from one error. This is why it is
recommended to find the first error and fix it first. Development in IDEs or using
build systems that color-code errors can make this easier.
Structures and Classes
Enumerations are the first of the user-defined types, but they do not really extend the
language so that we can express the solutions to our problems at the appropriate level
of abstraction. Structs and classes, however, allow us to capture and group the data and
then associate methods to manipulate that data in a consistent and meaningful manner.
108 | No Ducks Allowed – Types and Deduction
If we consider the multiplication of two matrices, A (m x n) and B (n x p), which results
in matrix C (m x p), then the equation for the ith row and jth column of C is as follows:
Figure 2A.31: Equation of ith row and jth column
If we had to write it every time we wished to multiply two matrices, we would end up
with many nested for loops. But if we could abstract a matrix into a class, then we could
express it as simple as we express the multiplication of two integers or two floating-
point numbers:
Matrix a;
Matrix b;
// Code to initialize the matrices
autoc=a*b;
This is the beauty of object-oriented design – data encapsulation and the abstraction of
concepts are explained at such a level that we can easily understand what the program
is trying to achieve without getting buried in the details. Once we have established that
the matrix multiplication is correctly implemented, then we are free to focus on solving
our problem at a higher level.
The discussion that follows refers to classes, but it applies equally to structs and,
mostly, to unions. We will outline the differences between classes, structs, and unions
after we learn how to define and use a class.
Fraction Class
To show you how to define and use a class, we will work on developing the Fraction
class to implement rational numbers. When defined, we can use Fraction like any other
built-in type (add, subtract, multiply, divide) without worrying about the details – this is
abstraction. We can now just think and reason about a fraction at a higher level, that is,
an abstract level.
The Fraction class will do the following:
• Contain two integer member variables, m_numerator and m_denominator
• Provide methods to copy itself, assign to it, multiply, divide, add, and subtract
• Provide a method to write to an output stream
Creating User Types | 109
To attain the preceding objective, we have the following definitions:
Figure 2A.32: Definitions of operations
In addition, the operations that we perform will need to normalize the fraction by
reducing it to the lowest terms. To do this, the numerator and the denominator are
both divided by their greatest common divisor (GCD).
Constructors, Initialization, and Destructors
A class definition, as expressed in C++ code, is the pattern that's used for creating
objects in memory and manipulating objects through their methods. The first thing
that we need to do is tell the compiler that we wish to declare a new type – a class. To
declare the Fraction class, we start with the following:
class Fraction
{
};
We place this in a header file, Fraction.h, as we wish to reuse this class specification in
other areas of our code.
The next thing we need to do is introduce the data to be stored in the class, which in
this case are m_numerator and m_denominator. These are both of the int type:
class Fraction
{
int m_numerator;
int m_denominator;
};
We have now declared the data to be stored and given them names that anyone familiar
with mathematics would understand regarding what each member variable stores:
Figure 2A.33: Formula of fraction
110 | No Ducks Allowed – Types and Deduction
As this is a class, by default, any item that's declared is assumed to be private. This
means that no external entity can access these variables. It is this feature of hiding
(making data private, and for that matter, some methods) that enables encapsulation in
C++. C++ has three class access modifiers:
• public: This means that the member (variable or function) is accessible from
anywhere outside of the class.
• private: This means that the member (variable or function) cannot be accessed
from outside the class. In fact, it cannot even be viewed. Private variables and
functions can only be accessed from within the class or by a friend method
or class. The private members (variables and functions) are used by the public
functions to achieve the desired functionality.
• protected: This is a cross between private and public. From outside the class, the
variable or function is private. However, for any class that is derived from the class
that declares the protected members, they are treated as public.
At this point in our definition of the class, this is not very useful. Let's change the
declaration to the following:
class Fraction
{
public:
int m_numerator;
int m_denominator;
};
By doing this, we can access the internal variables. The Fraction number; variable
declaration will cause the compiler to do two things:
• Allocate enough memory to hold both the data items (depending on the types,
this may or may not involve padding, that is, the inclusion or addition of unused
memory to align members for the most efficient access). The sizeof operator can
tell us how much memory is allocated for our class.
• Initialize the data items by calling the default constructor.
These steps are the same that the compiler does for built-in types, that is, step 2 does
nothing, leading to uninitialized variables. But what is this default constructor? And
what does it do?
Creating User Types | 111
Firstly, the default constructor is a special member function. It is one of the many
possible constructors, three of which are deemed special member functions.
Constructors can be declared with zero, one, or more arguments, just like any other
function, but they do NOT specify a return type. Constructors serve the special purpose
of initializing all the member variables to place the object into a well-defined state. If
the member variables are themselves a class, then it may not be necessary to specify
how to initialize the variable. It the member variable is of a built-in type, then we will
need to provide the initial values for them.
Class Special Member Functions
When we define a new type (struct or class), the compiler will create up to six (6) special
member functions for us:
• Default Constructor (Fraction::Fraction()): This is called when no arguments
are provided (such as in the preceding section). This can be achieved by either
having no argument list for the constructor or by defining a default value for all
the arguments, such as Fraction(int numerator=0, denominator=1). The compiler
provides an implicit inline default constructor that performs the default
initialization of member variables – for built-in types, this means do nothing.
• Destructor (Fraction::~Fraction()): This is a special member function that is
called when the object's lifetime ends. Its purpose is to release any resources that
were allocated and kept by the object during its lifetime. The compiler provides a
public inline member function that calls the destructors of the member variables.
• Copy Constructor (Fraction::Fraction(const Fraction&)): This is another
constructor where the first parameter is a form of Fraction& and there are no
other arguments, or the remainder of the arguments have default values. The form
of the first argument is one of Fraction&, const Fraction&, volatile Fraction&, or
const volatile Fraction&. We will deal with const later but not with volatile in
this book. The compiler provides a non-explicit public inline member function,
usually with the form of Fraction::Fraction(const Fraction&), that copies each of
the member variables in the order of initialization.
• Copy Assignment (Fraction& Fraction::operator=(Fraction&)): This is a member
function with the name operator= and the first argument is either a value or any of
the reference types of the class, in this case, Fraction, Fraction&, const Fraction&,
volatile Fraction&, or const volatile Fraction&. The compiler provides a public
inline member function, usually with the form of Fraction::Fraction(const
Fraction&), that copies each of the member variables in the order of initialization.
112 | No Ducks Allowed – Types and Deduction
• Move Constructor (Fraction::Fraction(Fraction&&)): This is a new type of
constructor that was introduced in C++11 where the first parameter is a form of
Fraction&& and there are no other arguments, or the remainder of the arguments
have default values. The form of the first argument is one of Fraction&&, const
Fraction&&, volatile Fraction&&, or const volatile Fraction&&. The compiler
provides a non-explicit public inline member function, usually with the form of
Fraction::Fraction(Fraction&&), that moves each of the member variables in the
order of initialization.
• Move Assignment (Fraction& Fraction::operator=(Fraction&&)): This is a new
type of assignment operator that was introduced in C++11 and is a member
function with the name operator=, and the first argument is any of the forms that
are allowed for the move constructor. The compiler provides a public inline
member function, usually with the form of Fraction::Fraction(Fraction&&), that
copies each of the member variables in the order of initialization.
Except for the default constructor, these functions deal with managing the resources
owned by this class – that is, how to copy/move them and how to dispose of them. On
the other hand, the default constructor is more like any other constructor that takes
values – it only initializes the resources.
We can declare any of these special functions, force them to be defaulted (that is, have
the compiler generate the default version), or force them to not be created. There are
also rules about when these are automatically generated in the presence of the other
special functions. The first four functions are relatively straightforward conceptually,
but the two "move" special member functions take some additional explanation. We will
deal with what is known as move semantics in detail in Chapter 3, The Distance Between
Can and Should – Objects, Pointers, and Inheritance, but for now it is essentially what it
indicates – it moves something from one object to the other.
Implicit Versus Explicit Constructors
The preceding description talks about the compiler generating implicit or non-explicit
constructors. If a constructor exists that can be called with one argument, for example,
a Copy Constructor, or a Move Constructor, by default, the compiler is allowed to
invoke it if necessary so that it can convert it from one type to another type, allowing
an expression, function call, or assignment to be encoded. This is not always a desired
behavior, and we may wish to prevent the implicit conversion and ensure that if the
user of our class really wants that conversion, then they have to write it out in the
program. To achieve this, we prefix the declaration of the constructor with the explicit
keyword, like so:
explicit Fraction(int numerator, int denominator = 1);
Creating User Types | 113
The explicit keyword can be applied to other operators as well, where the compiler may
use it for type conversion.
Class Special Member Functions – Compiler Generation Rules
Firstly, the Default Constructor will not be generated if we declare any other form of
constructor – default, copy, move, or user-defined. None of the other special member
functions affect its generation.
Secondly, a Destructor will not be generated if a destructor is declared. None of the
other special member functions affect its generation.
The generation of the other four special functions is dependent on the presence of
the declaration of the destructor or one of the other special functions, as shown in the
following table:
Figure 2A.34: Special Member Function Generation Rules
Defaulting and Deleting Special Member Functions
Prior to C++11, if we wanted to prevent the use of a copy constructor or copy
assignment member function, then we had to declare the function as private and not
provide a definition of the function:
class Fraction
{
public:
Fraction();
private:
Fraction(const Fraction&);
114 | No Ducks Allowed – Types and Deduction
Fraction& operator=(const Fraction&);
};
In this manner, we ensured that if anyone tried to access the copy constructor or
copy assignment from outside the class, then the compiler would generate an error
stating that the function is not accessible. This still declares the functions, and they
are accessible from within the class. It is an effective means, but not perfect, to remove
these special member functions from use.
But we can do better since C++11 introduced two new declaration forms that allow us to
override the default behavior of the compiler, as defined in the preceding rules.
Firstly, we can force the compiler to not generate the method by declaring it with the =
delete suffix, like so:
Fraction(const Fraction&) = delete;
Note
We can omit the name of the parameter if it is not used. This is true for any
function or member function. In fact, depending on the warning level that's been
set for the compiler, it may even generate a warning that the argument is not being
used.
Alternatively, we can force the compiler to generate its default implementation of a
special member function by using the = default suffix, like so:
Fraction(const Fraction&) = default;
If this is only the declaration of the function, then we can also omit the name of
the argument. Although, good practice dictates that we should name the argument
to indicate its use. That way, the users of our classes do not need to look at the
implementation of calling the function.
Note
Declaring a special member function using the default suffix is deemed to be a
user-defined member function for the purpose of the aforementioned rules.
Creating User Types | 115
Rule of Three/Five and Rule of Zero
As we discussed previously, with the exception of the default constructor, the special
member functions deal with the semantics of managing the resources owned by this
class – that is, how to copy/move them and how to dispose of them. This leads to two
"rules" within the C++ community about dealing with the special functions.
Prior to C++11, there was the Rule of Three, which dealt with the copy constructor,
copy assignment operator, and the destructor. It basically states that we need to
implement one of these methods since the management of the encapsulated resource is
non-trivial.
With the introduction of the move constructor and move assignment operator in C++11,
this rule was expanded to the Rule of Five. No changes were made to the essence of the
rule. Simply, the number of special member functions increased to five. Remembering
the rules for compiler generation, there is an additional reason for ensuring all five
special methods are implemented (or forced via = default), and that is, if the compiler
does not have access to a move-semantic function, it will attempt to use a copy-
semantic function, and this may not be what is desired.
Note
For more details, see the C.ctor: Constructors, assignments, and destructors
section of the C++ Core Guidelines, which can be found here: http://isocpp.github.
io/CppCoreGuidelines/CppCoreGuidelines.
Constructors – Initializing the Object
The main task of a constructor is to put the object into a stable state so that any
operations performed on or by the object through its member functions result in a
consistent defined behavior. While the previous statement is true of the copy and move
constructors, they achieve this by different semantics (copying or moving from another
object).
There are four different mechanisms available for us to control the initial state of an
object. C++ has a lot of rules for which initialization is used in such a case. We will not
go into the details of the C++ standard's default initialization, zero initialization, value
initialization, constant initialization, and so on. Just know that the best approach is to
be explicit about the initialization of your variables.
116 | No Ducks Allowed – Types and Deduction
The first and least preferred initialization mechanism is to assign values to the member
variables in the body of the constructor, like so:
Fraction::Fraction()
{
this->m_numerator = 0;
this->m_denominator = 1;
}
Fraction::Fraction(int numerator, int denominator)
{
m_numerator = numerator;
m_denominator = denominator;
}
It is clear what values are used to initialize the variables. Strictly speaking, this is not the
initialization of the class – according to the standard, initialization is complete when the
body of the constructor is called. This is simple to maintain, particularly in this class.
For larger classes that have multiple constructors and many member variables, it can be
a maintenance problem. If you change one constructor, you will need to change them
all. It also has the problem that if the member variable is of a reference type (which we'll
talk about later), then it cannot be done in the body of the constructor.
The default constructor uses the this pointer. Every member function, including
constructors and destructors, are called with one implicit argument (even though it is
never declared) – the this pointer. this points to the current instance of the object.
The -> operator is another dereference operator and is shorthand in this case, that is,
*(this).m _numerator. The use of this-> is optional and can be omitted. Other languages,
such as Python, require the implicit pointer/reference to be declared and used (the
convention in Python is to call self).
The second mechanism is the use of a member initialization list, which has a caveat in
its use. For our Fraction class, we have the following:
Fraction::Fraction() : m_numerator(0), m_denominator(1)
{
}
Fraction::Fraction(int numerator, int denominator) :
Creating User Types | 117
m_numerator(numerator), m_denominator(denominator)
{
}
The sections of code after the colon, :, and before the opening brace, {,
in (m_numerator(0), m_denominator(1) and m_numerator(numerator), m_
denominator(denominator) are the member initialization lists. We can initialize a
reference type in the member initialization list.
Member Initialization List Order
Regardless of the order in which you place the members in the member
initialization list, the compiler will initialize the members in the order that they are
declared in the class.
The third and recommended initialization is the default member initialization that was
introduced in C++11. We define default initial values when the variable is declared either
using assignment or the brace initializer:
class Fraction
{
public:
int m_numerator = 0;
// equals initializer
int m_denominator{1}; // brace initializer
};
If the constructor does not define the initial value of the member variable, then this
default value will be used to initialize the variable. This has the advantage of ensuring
that all the constructors produce the same initialization unless they have been explicitly
modified in the definition of the constructor.
C++11 also introduced a fourth style of initialization, known as constructor delegation. It
is a modification of the Member Initialization List where, instead of listing the member
variables and their initial values, another constructor is called. The following example
is contrived, and you would not write a class this way, but it shows the syntax for the
constructor delegation:
Fraction::Fraction(int numerator) : m_numerator(numerator), m_denominator(1)
{
}
118 | No Ducks Allowed – Types and Deduction
Fraction::Fraction(int numerator, int denominator) : Fraction(numerator)
{
auto factor = std::gcd(numerator, denominator);
m_numerator /= factor;
m_denominator = denominator / factor;
}
You call the single argument constructor from the constructor with two arguments.
Exercise 5: Declaring and Initializing Fractions
In this exercise, we will implement class member initialization using the different
techniques available to us, including constructor delegation. Let's get started:
1. Open the Lesson2A project in Eclipse, and then in the Project Explorer, expand
Lesson2A, then Exercise05, and double-click on Exercise5.cpp to open the file for
this exercise in the editor.
2. Click on the Launch Configuration drop-down menu and select New Launch
Configuration... . Configure Exercise5 to run with the name Exercise5.
3. When that is complete, it will be the currently selected Launch Configuration.
4. Click on the Run button. Exercise 5 will run and produce something similar to the
following output:
Figure 2A.35: Exercise 5 typical output
The values that were reported for the fraction come from not initializing the
member variables in any way. If you run it again, you will most likely get a different
fraction.
5. Click on the Run button a few times. You will see that the fraction changes.
Creating User Types | 119
6. In the editor, change the constructor to read as follows:
Fraction() : m_numerator{0}, m_denominator{1}
{
}
7. Click on the Run button and observe the output:
Figure 2A.36: Modified Exercise 5 output
This time, the fraction value is defined by the values we specified in the member
initialization list.
8. In the editor, add the following two constructors:
Fraction(int numerator) : m_numerator(numerator), m_denominator(1)
{
}
Fraction(int numerator, int denominator) : Fraction(numerator)
{
auto factor = std::gcd(numerator, denominator);
m_numerator /= factor;
m_denominator = denominator / factor;
}
9. In the main function, change the declaration of fraction to include initialization:
Fraction fraction{3,2};
120 | No Ducks Allowed – Types and Deduction
10. Click on the Run button and observe the output:
Figure 2A.37: Example of constructor delegation
In this exercise, we implemented member variable initialization using the member
initialization list and constructor delegation. We will return to fractions in Exercise 7,
Adding Operators to the Fraction Class.
Values Versus References and Const
So far, we have only dealt with value types, that is, the variable holds the value of the
object. A pointer holds a value (which is the address of the object) that we are interested
in (or nullptr). But this can lead to inefficiencies and problems with managing resources.
We will talk about addressing the inefficiencies here but deal with the resource
management problem in Chapter 3, The Distance Between Can and Should – Objects,
Pointers, and Inheritance.
Consider the following problem..We have a 10×10 matrix of double types that we wish to
write an inversion function for. The class is declared as follows:
class Matrix10x10
{
private:
double m_data[10][10];
};
Creating User Types | 121
If we were to take sizeof(Matrix10x10), we would get sizeof(double) x 10 x 10 = 800
bytes. Now, if we were to implement an inversion matrix function for this, its signature
might look like this:
Matrix10x10 invert(Matrix10x10 lhs);
Matrix10x10 mat;
// set up mat
Matrix10x10 inv = invert(mat);
Firstly, this means that the compiler would need to pass the value held by mat to the
invert() function and copy the 800 bytes onto the stack. The function then does
whatever it needs to do to invert the matrix (an L-U decomposition, calculation of
the determinant – whatever approach the implementer chooses) and then copy the
800-byte result back to the inv variable. Passing large values on the stack is never a
good idea, for two reasons:
• The stack is a finite resource that's given to our program by the host operating
system.
• Copying large values around the system is inefficient.
This approach is known as pass-by-value. That is, the value of an item we wish to
process is copied to the function.
In C (and C++), this limitation is addressed by the use of pointers. The preceding code
may become the following:
void invert(Matrix10x10* src, Matrix10x10* inv);
Matrix10x10 mat;
Matrix10x10 inv;
// set up mat
invert(&mat, &inv);
Here, we just pass the address of the src and target for the inverse result as two
pointers (which is a small number of bytes). Unfortunately, this results in code inside
the function that has to use the dereference operator (*) every time we use src or inv,
making the code more difficult to read. In addition, the use of pointers has led to many
problems.
122 | No Ducks Allowed – Types and Deduction
C++ introduced a better approach – the variable alias or reference. A reference type
is declared with the ampersand (&) operator. So, we can declare the invert method as
follows:
void invert(Matrix10x10& src, Matrix10x10& inv);
Matrix10x10 mat;
Matrix10x10 inv;
// set up mat
invert(mat, inv);
Note that calling the method requires no special operator to pass the reference. From
the compiler's viewpoint, a reference is still a pointer with one limitation – it cannot
hold a nullptr. From the programmer's viewpoint, a reference allows us to reason about
our code without having to worry about having the right dereference operator in the
right place. This is known as pass-by-reference.
We saw references being passed to the copy constructor and the copy assignment
method. The types of references, when used for their move equivalents, are known as
rvalue reference operators and will be explained in Chapter 3, The Distance Between
Can and Should – Objects, Pointers, and Inheritance.
One advantage of pass-by-value was that we cannot inadvertently modify the value
of the variable that's passed into a method. Now, if we pass-by-reference, we can no
longer guarantee that the method we are calling will not modify the original variable. To
address this, we can change the signature of the invert method to read as follows:
void invert(const Matrix10x10& src, Matrix10x10& inv);
The const keyword tells the compiler that, when it is processing the definition of the
invert() function, it is illegal to assign a new value to any part of the value referenced
by src. If the method does attempt to modify src, the compiler will generate an error.
In the Specifying Types – Variables section, we found that the declaration of auto title
resulted in title being of the const char * type. Now, we can explain the const part.
The title variable is a pointer to a char that is constant. In other words, we cannot
change the value of the data stored in the memory that we are pointing to. Therefore,
we cannot do the following:
*title = 's';
Creating User Types | 123
This is because the compiler will generate an error related to changing a constant value.
We can, however, change the value stored in the pointer. We are allowed to do the
following:
title = "Maid Marian";
We have now been introduced to references for use as argument types to functions, but
they can also be used as member variables instead of pointers. There are differences
between references and pointers:
A reference must refer to an actual object (no equivalent of nullptr). A reference cannot
be changed once it has been initialized (this has the consequence that a reference must
either be default member initialized or appear in the member initialization list).The
object must exist for as long as the reference to it exists (if the object can be destroyed
before the reference is destroyed, then there is the potential for undefined behavior if
an attempt is made to access the object).
Exercise 6: Declaring and Using Reference Types
In this exercise, we will declare and use reference types to make the code efficient and
easier to read. Let's get started:
1. Open the Lesson2A project in Eclipse, and then in the Project Explorer, expand
Lesson2A, then Exercise06, and double-click on Exercise6.cpp to open the file for
this exercise in the editor.
2. Click on the Launch Configuration drop-down menu and select New Launch
Configuration... . Configure Exercise6 to run with the name Exercise6.
3. When that is complete, it will be the currently selected Launch Configuration.
4. Click on the Run button. Exercise 6 will run and produce something similar to the
following output:
Figure 2A.38: Exercise 6 output
124 | No Ducks Allowed – Types and Deduction
By examining the code and comparing it with the output, we will find that the
rvalue variable allows us to manipulate (read from and write to) the data stored in
the value variable. We have a reference, rvalue, to the value variable. We can also
see that the values stored in the a and b variables were exchanged by the swap()
function.
5. In the editor, change the function definition of swap:
void swap(const int& lhs, const int& rhs)
6. Click on the Run button. When the Errors in Workspace dialog appears, click
Cancel. The first error that's reported by the compiler is shown here:
Figure 2A.39: Read-only error on assignment
By changing the arguments from int& lhs to const int& lhs, we've told the
compiler that the arguments should not be changed inside this function. And
because we assign to lhs in the function, the compiler generates the error about
lhs being read-only and terminates.
Implementing Standard Operators
To use fractions like a built-in class, we need them to work with the standard
mathematical operators (+, -, *, /) and their assignment counterparts (+=, -=, *=,
/=). If you are unfamiliar with assignment operators, then consider the following two
expressions – they produce the same output:
a=a+b;
a+=b;
Creating User Types | 125
The syntax for declaring these two operators for Fraction is as follows:
// member function declarations
Fraction& operator+=(const Fraction& rhs);
Fraction operator+(const Fraction& rhs) const;
// normal function declaration of operator+
Fraction operator+(const Fraction& lhs, const Fraction& rhs);
Because the operator+= method modifies the contents of the left-hand variable (adds
a to b and then stores it again in a), it is recommended that it is implemented as a
member variable. In this case, as we have not created a new value, we can just return a
reference to the existing lhs.
The operator+ method, on the other hand, should not modify lhs nor rhs and return
a new object. The implementer is free to implement it as a member function or as
a free function. Both are shown in the preceding code, but only one should exist.
The interesting thing to note about the member function's implementation is the
const keyword at the end of the declaration. This tells the compiler that when this
member function is called, it will not modify the internal state of the object. While
both approaches are valid, if possible, operator+ should be implemented as a normal
function, outside of the class.
The same approach can be used for the other operators – (subtract), * (multiply),
and / (divide). The preceding methods implement the semantics for the standard
mathematical operators and make our type act like the built-in types.
Implementing the Output Stream Operator (<<)
C++ abstracts Input/Output (I/O) into the stream class hierarchy in the standard library
(which we will talk about in Chapter 2B, No Ducks Allowed – Templates and Deduction).
In Exercise 5, Declaring and Initializing Fractions, we saw that we could insert the
fraction into an output stream as follows:
std::cout << "fraction = " << fraction.getNumerator() << "/"
<< fraction.getDenominator() << "\n";
126 | No Ducks Allowed – Types and Deduction
So far, for our Fraction class, we have written out the numerator and denominator
values by accessing the data values from outside using the getNumerator() and
getDenominator() methods, but there is a better way to do this. As part of making our
classes first-class citizens in C++, where it makes sense, we should overload the I/O
operators. In this chapter, we will only look at the output operator, <<, also known as
the insertion operator. That way, we can replace the previous code with a much cleaner
version:
std::cout << "fraction = " << fraction << "\n";
We can overload the operator as either a friend function or a normal function (if the
class provides getter functions of the data that we need to insert). For our purpose, we
define it as a normal function:
inline std::ostream& operator<< (std::ostream &out, const Fraction &rhs)
{
out << rhs.getNumerator() << " / " << rhs.getDenominator();
return out;
}
Structuring Our Code
Before we delve into the exercise where we implement the operators and turn our
Fraction into a full-blown type in the C++ world, we need to have a brief discussion
about where we put the bits and pieces of our class – the declaration and the definition.
The declaration is the blueprint for our class that indicates what data storage it requires
and the methods that it will implement. The definition is the actual implementation
details of each of the methods.
In languages such as Java and C#, the declaration and the definition are one and the
same and they must exist in one file (Java) or across multiple files (C# partial classes).
In C++, depending on the class and how much you wish to expose to other classes, the
declaration MUST appear in a header file (which can be #included in other files for use)
and the definition can appear in one of three places – inline in the definition, inline in
the same file as the definition, or in a separate implementation file.
The header file is usually named with the .hpp extension, while the implementation file
is typically one of *.cpp or *.cxx. The implementation file is also known as a translation
unit. By defining a function as inline, we allow the compiler to optimize the code in a
way that the function may not even exist in the final program – it has substituted the
steps we put into the function into the locations that we call the function from.
Creating User Types | 127
Exercise 7: Adding Operators to the Fraction Class
In this exercise, we aim to implement operators in our Fraction class using unit tests to
develop the functionality. This makes our Fraction class a real type. Let's get started:
1. Open the Lesson2A project in Eclipse, and then in the Project Explorer, expand
Lesson2A, then Exercise07, and double-click on Exercise7.cpp to open the file for
this exercise in the editor.
2. Click on the Launch Configuration drop-down menu and select New Launch
Configuration... . Configure Exercise7 to run with the name Exercise7.
3. When that is complete, it will be the currently selected Launch Configuration.
4. We also need to configure a unit test. In Eclipse, click on the menu item called Run
| Run Configurations..., right-click C/C++ Unit on the left-hand side, and select
New Configuration.
5. Change the name from Lesson2A Debug to Exercise7 Tests.
6. Under C/C++ Application, select the Search Project option and choose tests in
the new dialog.
7. Next, go to the C/C++ Testing tab and select Google Tests Runner in the
dropdown. Click on Apply at the bottom of the dialog and click on the Run option
for the test, which we have to run for the first time:
Figure 2A.40: Failing tests – multiplication
128 | No Ducks Allowed – Types and Deduction
8. Open the Fraction.cpp file in the editor and locate the operator*= function.
Update it with the following code:
Fraction& Fraction::operator*=(const Fraction& rhs)
{
Fraction tmp(m_numerator*rhs.m _numerator, m_denominator*rhs.m_
denominator);
*this = tmp;
return *this;
}
9. Click on the Run button to rerun the tests. This time, all the tests pass:
Figure 2A.41: Passing tests
10. In your IDE, open the tests/FractionTests.cpp file and find the two tests that
were failing. One tested operator*=(), while the other tested operator*(). How
did fixing operator*=() fix operator*()? If you open Fraction.hpp in the editor,
you will find that the operator*() function was implemented for you by making a
call to operator*=(), that is, it is marked inline and is a normal function and not a
member function. In general, this is the approach to take when overloading these
operators – the one that modifies the object that is calling it is a member function,
whereas the one that has to generate a new value is a normal function that calls
the member function.
11. Open Fraction.hpp in the editor and change the line near the top of the file so that
it reads like so:
#define EXERCISE7_STEP 11
Creating User Types | 129
12. Click on the Run button to rerun the tests – this time, we have added two more
tests that fail – AddFractions and AddFractions2:
Figure 2A.42: Additional tests to fail
13. Locate the operator+= function in the Function.cpp file.
14. Make the necessary changes to the function and click on the Run button to rerun
the tests until the tests pass. Look at the equations that define its operation given
earlier and see how operator*=() was implemented.
15. Open Fraction.hpp in the editor and change the line near the top of the file to
read like so:
#define EXERCISE7_STEP 15
16. Click on the Run button to rerun the tests – his time, we have added two more
tests that fail – SubtractFractions and SubtractFractions2.
17. Locate the operator-= function in the Function.cpp file.
18. Make the necessary changes to the function and click on the Run button to rerun
the tests until the tests pass.
19. Open Fraction.hpp in the editor and change the line near the top of the file to
read like so:
#define EXERCISE7_STEP 19
20. Click on the Run button to rerun the tests – this time, we have added two more
tests that fail – DivideFractions and DivideFractions2.
130 | No Ducks Allowed – Types and Deduction
21. Locate the operator/= function in the Function.cpp file.
22. Make the necessary changes to the function and click on the Run button to rerun
the tests until the tests pass.
23. Open Fraction.hpp in the editor and change the line near the top of the file to
read like so:
#define EXERCISE7_STEP 23
24. Click on the Run button to rerun the tests – this time, we have added one more
test that fails – InsertOperator.
25. Locate the operator<< function in the Function.hpp file.
26. Make the necessary changes to the function and click on the Run button to rerun
the tests until the tests pass.
27. From the Launch Configuration, select Exercise7 and click on the Run button.
This will produce the following output:
Figure 2A.43: Functional Fraction class
This completes our implementation of the Fraction class for now. We will return to
it again when we consider exceptions in Chapter 3, The Distance Between Can and
Should – Objects, Pointers, and Inheritance, so that we can deal with illegal values in our
fractions (denominators of 0).
Creating User Types | 131
Function Overloading
C++ supports a feature known as function overloading, which is where two or more
functions have the same name, but their argument list is different. The number of
arguments can be the same, but at least one of the argument types has to be different.
Alternatively, they may have a different number of arguments. So, the function
prototype for the multiple functions are different. However, two functions cannot have
the same function name, the same argument types, and a different return type. The
following is an example of overloading:
std::ostream& print(std::ostream& os, int value) {
os << value << " is an int\n";
return os;
}
std::ostream& print(std::ostream& os, float value) {
os << value << " is a single precision float\n";
return os;
}
std::ostream& print(std::ostream& os, double value) {
os << value << " is a double precision float \n";
return os;
}
// The next function causes the compiler to generate an error
// as it only differs by return type.
void print(std::ostream& os, double value) {
os << value << " is a double precision float!\n";
}
132 | No Ducks Allowed – Types and Deduction
So far, the multiple constructors on Fraction and the overloaded arithmetic operators
are all examples of overloaded functions that the compiler has to refer to when it meets
one of these functions. Consider the following code:
int main(int argc, char** argv) {
print(42);
}
When the compiler meets the line print(42), it needs to work out which of the
previously defined functions to call, so it performs the following process (grossly
simplified):
Figure 2A.44: Function overload resolution (simplified)
The C++ standard defines rules for how the compiler determines the best candidate
function based on how it has to manipulate (that is, convert) the arguments to get a
match. If no conversions are required, then that function is the best match.
Classes, Structs, and Unions
When you define a class and do not specify an access modifier (public, protected,
private), all the members will be private by default:
class Fraction
{
Fraction() {};
// All of these are private
int m_numerator;
int m_denominator;
};
Creating User Types | 133
When you define a struct and do not specify an access modifier (public, protected,
private), all the members will be public by default:
struct Fraction
{
Fraction() {};
// All of these are public
int m_numerator;
int m_denominator;
};
There is one other difference, which we will look at after we explain inheritance and
polymorphism. A union is a different type of data construct from a struct and a class
but is the same. A union is a special type of struct declaration where all the members
occupy the same memory and only one member is valid at a given time. An example of a
union declaration is as follows:
union variant
{
int m_ivalue;
float m_fvalue;
double m_dvalue;
};
When you define a union and do not specify an access modifier (public, protected,
private), all the members will be public by default.
The main problem with a union is that there is no intrinsic way to know which of the
values is valid at any given time. This is resolved by defining what is known as a tagged
union – that is, a struct that holds the union and an enum that identifies whether it is
the valid value. There are also other restrictions on what can and cannot be included in
a union (for example, only one member can have a default member initializer). We will
not be exploring unions in depth in this book.
134 | No Ducks Allowed – Types and Deduction
Activity 1: Graphics Processing
In a modern computing environment, matrices are used everywhere to solve various
problems – to solve simultaneous equations, to analyze electricity power grids or
electric circuits, to perform manipulations on objects for graphics rendering, and
to deliver implementations of machine learning. In the world of graphics, whether
two-dimensional (2D) or three-dimensional (3D), all the operations that you would
want to perform on your objects can be done with the help of matrix multiplication.
Your team has been tasked with developing a representation of points, transformation
matrices, and the operations that you might want to perform on them. Follow these
steps to achieve this:
1. Load the prepared project from the Lesson2A/Activity01 folder.
2. Create a class called Point3d that can be constructed by default to be the origin,
or using an initializer list of three or four values (data is stored directly in the
class).
3. Create a class called Matrix3d that can be constructed by default to an identity
matrix, or using a nested initializer list to provide all the values (data is stored
directly in the class).
4. On Point3d, overload operator() so that it takes the (index) argument in order to
return the value at x(0), y(1), z(2), and w(3).
5. On Matrix3d, overload operator() to take (row, col) arguments so that it returns
the value.
6. Add the unit tests to verify all of the aforementioned features.
7. Add operator*=(const Matrix3d&) and operator==(const Matrix3d&) to the
Matrix3d class, as well as the unit tests for them.
8. Add free functions for multiplying two Matrix3d objects and a Matrix3d object by
a Point3d object with unit tests.
9. Add standalone methods for creating a matrix to translate, scale, and rotate
(around the x, y, z axes) and their unit tests.
Creating User Types | 135
After implementing the preceding steps, the expected output is as follows:
Figure 2A.45: Successfully running the activity program
For the purpose of this activity, we will not be worrying about the possibility of out of
range on indices. We will talk about this in Chapter 3, The Distance Between Can and
Should – Objects, Pointers, and Inheritance. An identity matrix is a square matrix (4 x
4, in our case) where all the values on the diagonal are set to one (1) and all the other
values are zero (0).
When working with 3D graphics, we use an augmented matrix for the points (vertices)
and for the transformations so that all the transformations (translation, scaling,
rotation) can be achieved by using multiplication.
An n × m matrix is an array of n rows of m numbers. For example, a 2 x 3 matrix could
look like this:
Figure 2A.46: Matrix of 2x3
A vertex in three dimensions can be represented as a three-tuple (x,y,z). However, we
augment it with another ordinate, w (=1 for a vertex, =0 for a direction), making it
a four-tuple (x, y, z, 1). Rather than using a tuple, we place it in a 4 x 1 matrix, as
follows:
Figure 2A.47: 4x1 Matrix
136 | No Ducks Allowed – Types and Deduction
If we multiply the 4 x 1 matrix (point) by a 4 x 4 matrix (transformation), we can
manipulate the point. If Ti represents a transformation, then we can multiply the
transformations together to achieve some manipulation of the point:
Figure 2A.48: Multiplying transformations
To multiply a transformation matrix, A x P = B, we do the following:
Figure 2A.49: Multiplying transformation matrix
We can also express it like so:
Figure 2A.50: Expression of multiplying transformations
Likewise, the same can be done for two 4 x 4 matrices, multiplied together, AxB=C:
Figure 2A.51 Expression of 4x4 matrix multiplication:
Summary | 137
The matrices for the transformations are as follows:
Figure 2A.52: List of matrices for transformation
Note
The solution for this activity can be found on page 635.
Summary
In this chapter, we learned about types in C++. Firstly, we touched on the built-in types
and then learned how to create our own types that behave like the built-in types. We
learned how to declare and initialize variables, got a glimpse of what the compiler
generates from the source, where it puts variables, how the linker puts it together, and
then what that looks like in the computer's memory. We learned some of the C++ tribal
wisdom around the Rule of Zero and the Rule of Five. These form the building blocks
of C++. In the next chapter, we will look at creating functions and classes with C++
templates and explore further type deduction as it applies to templates.
Learning Objectives
By the end of this chapter, you will be able to:
•
Develop your own classes to an even greater effect using inheritance and polymorphism
•
Implement an alias to make your code easier to read
•
Develop templates using SFINAE and constexpr to simplify your code
•
Implement your own solutions using the STL to leverage generic programming
•
Describe the context and basic rules for type deduction
This chapter will show you how to define and extend your types through inheritance,
polymorphism, and templates.
No Ducks Allowed
– Templates and
Deduction
2B
140 | No Ducks Allowed – Templates and Deduction
Introduction
In the previous chapter, we learned how to develop our own types (classes) with the
help of unit tests and made them behave like built-in types. We were introduced to
function overloading, Rule of Three/Five, and Rule of Zero.
In this chapter, we will learn how to extend the type system even further. We'll learn
how to create functions and classes using templates and revisit function overloading
since it's impacted by the use of templates. We'll be introduced to a new technology,
SFINAE, and use it to control the parts of our templates that are included in the
generated code.
Inheritance, Polymorphism, and Interfaces
So far in our journey of object-oriented design and C++, we have focused on
abstraction and data encapsulation. We will now turn our attention to inheritance
and polymorphism. What is inheritance? What is polymorphism? Why do we need it?
Consider the following three objects:
Figure 2B.1: Vehicle objects
In the preceding diagram, we can see that there are three very different objects. They
have some things in common. They all have wheels (a different number), an engine
(different size, power, or configuration), start engine, drive, apply brakes, stop engine,
and so on, using which we can do something.
So, we can abstract them into something called a vehicle that demonstrates these
attributes and general behaviors. If we express this as a C++ class, it might look like the
following:
class Vehicle
{
public:
Vehicle() = default;
Vehicle(int numberWheels, int engineSize) :
m_numberOfWheels{numberWheels}, m_engineSizeCC{engineSize}
{
}
Inheritance, Polymorphism, and Interfaces | 141
bool StartEngine()
{
std::cout << "Vehicle::StartEngine " << m_engineSizeCC << " CC\n";
return true;
};
void Drive()
{
std::cout << "Vehicle::Drive\n";
};
void ApplyBrakes()
{
std::cout << "Vehicle::ApplyBrakes to " << m_numberOfWheels << "
wheels\n";
};
bool StopEngine()
{
std::cout << "Vehicle::StopEngine\n";
return true;
};
private:
int m_numberOfWheels {4};
int m_engineSizeCC{1000};
};
The Vehicle class is a more generalized (or abstract) expression of Motorcycle, Car, and
Truck. We can now create more specialized types by reusing what is already available
in the Vehicle class. We are going to reuse Vehicle's properties and methods by using
inheritance. The syntax for inheritance is as follows:
class DerivedClassName : access_modifier BaseClassName
{
// Body of DerivedClass
};
142 | No Ducks Allowed – Templates and Deduction
We have come across access modifiers such as public, protected and private before.
They control how we have access to the base classes' members. The Motorcycle class
will be derived as follows:
class Motorcycle : public Vehicle
{
public:
Motorcycle(int engineSize) : Vehicle(2, engineSize) {};
};
In this case, the Vehicle class is referred to as the base class or the super class, while
the Motorcycle class is referred to as the derived class or subclass. Graphically, we can
represent this as follows, where the arrows point from the derived class to the base
class:
Figure 2B.2: Vehicle class hierarchy
But a motorcycle drives differently from a generic vehicle. So, we need to modify the
Motorcycle class so that it behaves differently. The updated code will be as follows:
class Motorcycle : public Vehicle
{
public:
Motorcycle(int engineSize) : Vehicle(2, engineSize) {};
void Drive()
{
std::cout << "Motorcycle::Drive\n";
};
};
Inheritance, Polymorphism, and Interfaces | 143
If we think about object-oriented design, this is about modeling a problem space in
terms of objects that collaborate. These objects communicate with each other through
messages. Now, we have two classes that respond to the same message (the Drive()
method) in different ways. The sender of the message has no knowledge of what will
happen and doesn't really care, and this is the essence of polymorphism.
Note
Polymorphism comes from the Greek words poly and morph, where poly means
many and morph means form. So, polymorphism means having many forms.
We can now use these classes to try out polymorphism:
#include <iostream>
int main()
{
Vehicle vehicle;
Motorcycle cycle{1500};
Vehicle* myVehicle{&vehicle};
myVehicle->StartEngine();
myVehicle->Drive();
myVehicle->ApplyBrakes();
myVehicle->StopEngine();
myVehicle = &cycle;
myVehicle->StartEngine();
myVehicle->Drive();
myVehicle->ApplyBrakes();
myVehicle->StopEngine();
return 0;
}
144 | No Ducks Allowed – Templates and Deduction
If we compile and run this program, we get the following output:
Figure 2B.3: Vehicle program output
In the preceding screenshot, the lines after the line Vehicle::StartEngine 1500 cc are
all related to the Motorcycle. But the Drive line still shows Vehicle::Drive and not the
expected Motorcycle::Drive. What's going on? The problem is that we have not told the
compiler that the Drive method in the Vehicle class can be modified (or overridden) by
a derived class. We need to make one change in our code:
virtual void Drive()
{
std::cout << "Vehicle::Drive\n";
};
By adding the virtual keyword before the member function declaration, we are telling
the compiler that a derived class can (but doesn't have to) override or replace the
function. If we make this change and then compile and run the program, we get the
following output:
Figure 2B.4: Vehicle program output with virtual methods
Inheritance, Polymorphism, and Interfaces | 145
Now, we have learned about inheritance and polymorphism. We used a pointer to a
Vehicle class to control the Motorcycle class. Another change to the code should be
made as a matter of best practice. We should also change the declaration of the Drive
function in the Motorcyle as follows:
void Drive() override
{
std::cout << "Motorcycle::Drive\n";
};
C++11 introduced the override keyword as a hint to the compiler, stating that a
particular method should have the same function prototype as a method somewhere in
its parent tree. If it cannot find one, then the compiler will report an error. This is a very
useful feature and can save you from hours of debugging. If there is some way for the
compiler to report an error, use it. The earlier a defect is detected, the easier it is to fix.
One final change is that whenever we add a virtual function to a class, we must declare
its destructor virtual:
class Vehicle
{
public:
// Constructors - hidden
virtual ~Vehicle() = default; // Virtual Destructor
// Other methods and data -- hidden
};
We saw this with the Drive() function before it was made virtual. When the destructor
is called through the pointer to a Vehicle, it needs to know which destructor to call.
Thus, making it virtual enables this. If you fail to do so, then you can end up with
resource leaks or spliced objects.
146 | No Ducks Allowed – Templates and Deduction
Inheritance and Access Specifiers
As we mentioned previously, the general form of inheriting one subclass from a super
class is as follows:
class DerivedClassName : access_modifier BaseClassName
When we derived Motorcycle class from Vehicle class, we use the following code:
class Motorcycle : public Vehicle
The access modifier is optional and is one of the ones that we have met before: public,
protected, and private. In the following table, you can see the accessibility of the base
classes' members. If access_modifier is omitted, then the compiler assumes private was
specified.
Figure 2B.5: Accessibility of base class members in derived classes
Abstract Classes and Interfaces
All the classes that we have talked about up until now are concrete class – they can be
instantiated as a type for a variable. There is another type of class – an abstract class–
that contains at least one pure virtual member function. A pure virtual function is a
virtual function that has no definition (or implementation) in the class. And because it
has no implementation, the class is malformed (or abstract) and cannot be instantiated.
If you attempt to create a variable of an abstract type, then the compiler will generate
an error.
To declare a pure virtual member function, end the function prototype declaration with
= 0. To make Drive() a pure virtual function in the Vehicle class, we would declare it as
follows:
virtual void Drive() = 0;
Now, to be able to use a derived class as a variable type (for example, the Motorcycle
class), it must define an implementation of the Drive() function.
You can, however, declare a variable to be either a pointer to the abstract class or a
reference to the abstract class. In either case, it must point to, or reference, some
non-abstract class derived from the abstract class.
Inheritance, Polymorphism, and Interfaces | 147
In Java, there is a keyword interface that allows you to define a class that is all pure
virtual functions. The same is achieved in C++ by declaring a class that only declares
public pure virtual functions (and a virtual destructor). In this way, we define an
interface.
Note
Before solving any practical in this chapter, download this book's GitHub repository
(https://github.com/TrainingByPackt/Advanced-CPlusPlus) and import the folder
for Lesson 2B in Eclipse so that you can view the code for each exercise and
activity.
Exercise 1: Implementing Game Characters with Polymorphism
In this exercise, we will demonstrate inheritance, interfaces, and polymorphism. We will
start with an ad hoc implementation of a role-playing game and evolve it to be more
generic and expandable. Let's get started:
1. Open Eclipse and create a new project named Lesson2B using the files found in
the Lesson2B examples folder.
2. As this is a CMake-based project, change the current builder to Cmake Build
(portable).
3. Go to the Project | Build All menu to build all exercises. By default, the console at
the bottom of the screen will display the CMake console [Lesson2B].
4. Configure a New Launch Configuration named L2BExercise1 that runs the
Exercise1 binary and click on Run to build and run Exercise 1. You will receive the
following output:
Figure 2B.6: Exercise 1 default output
148 | No Ducks Allowed – Templates and Deduction
5. Open Exercise1.cpp in the editor and examine the existing code. You will notice
that the three characters are implemented as separate classes and that they
are each instantiated and manipulated separately by calling speak() and act()
directly. This is fine for a small program. But as the game grew to tens or hundreds
of characters, it would become unmanageable. So, we need to abstract all the
characters. Add the following Interface declaration to the top of the file:
class ICharacter
{
public:
~ I Character() {
std::cout << "Destroying Character\n";
}
virtual void speak() = 0;
virtual void act() = 0;
};
Normally, the destructor would be empty, but here, it has logging to show the
behavior.
6. Derive the Wizard, Healer, and Warrior classes from this interface class and add the
override keyword to the end of the declarations of the speak() and act() functions
for each class:
class Wizard : public Icharacter { ...
7. Click the Run button to rebuild and run the exercise. We will now see that the
base class destructor is also called after the destructor of the derived class:
Figure 2B.7: Output of the modified program
Inheritance, Polymorphism, and Interfaces | 149
8. Create the characters and manage them in a container such as a vector. Create
the following two methods in the file, before the main() function:
void createCharacters(std::vector<ICharacter*>& cast)
{
cast.push_back(new Wizard("Gandalf"));
cast.push_back(new Healer("Glenda"));
cast.push_back(new Warrior("Ben Grimm"));
}
void freeCharacters(std::vector<ICharacter*>& cast)
{
for(auto* character : cast)
{
delete character;
}
cast.clear();
}
9. Replace the content of main() with the following code:
int main(int argc, char**argv)
{
std::cout << "\n------ Exercise 1 ------\n";
std::vector<ICharacter*> cast;
createCharacters(cast);
for(auto* character : cast)
{
character->speak();
}
for(auto* character : cast)
{
character->act();
}
freeCharacters(cast);
std::cout << "Complete.\n";
return 0;
}
150 | No Ducks Allowed – Templates and Deduction
10. Click the Run button to rebuild and run the exercise. Here is the output that is
generated:
Figure 2B.8: Output of the polymorphic version
As you can see from the preceding screenshot, the logging for Destroying Wizard
and so on has disappeared. The problem is that the container holds the pointers to
the base class and that it doesn't know how to call the full destructor in each case.
11. To fix this, simply declare the destructor for ICharacter as virtual:
virtual ~ICharacter() {
12. Click the Run button to rebuild and run the exercise. The output now reads as
follows:
Figure 2B.9: Output from the full polymorphic version
We have now implemented an interface to our ICharacter characters and used them
polymorphically by simply calling the speak() and act() methods through a base class
pointer stored in a container.
Inheritance, Polymorphism, and Interfaces | 151
Classes, Structs, and Unions Revisited
Previously, we discussed that the difference between a class and a struct was the
default access modifier – private for class and public for struct. This difference goes
one step further – it applies to the base class if it does not specify anything:
class DerivedC : Base // inherits as if "class DerivedC : private Base" was
used
{
};
struct DerivedS : Base // inherits as if "struct DerivedS : public Base" was
used
{
};
It should be noted that a union can neither be a base class nor be derived from a base
class. If there is essentially no difference between a struct and a class, then which type
should we use? Essentially, it is one of convention. A struct is used to bundle together
several related elements, while a class can do things and has responsibilities. An
example of a struct is as follows:
struct Point
// A point in 3D space
{
double m_x;
double m_y;
double m_z;
};
In the preceding code, we can see that it groups together three coordinates so that
we can reason about a point in a 3D space. This structure can be passed as a coherent
dataset to methods that need points, rather than three separate arguments per point. A
class, on the other hand, models an object that can perform actions. Take a look at the
following example:
class Matrix
{
public:
Matrix& operator*(const Matrix& rhs)
{
152 | No Ducks Allowed – Templates and Deduction
// nitty gritty of the multiplication
}
private:
// Declaration of the 2D array to store matrix.
};
A rule of thumb is to use a class if there is at least one private member as this implies
that the details of the implementation will be behind the public member functions.
Visibility, Lifetime, and Access
We have talked about creating our own types and declaring variables and functions
while mainly focusing on simple functions and a single file. We will now look at what
happens when there are multiple source files (translation units) that contain classes and
function definitions. Also, we'll check which variables and functions can be visible from
the other parts of the source files, how long the variables live, and look at the difference
between internal and external linkage. In Chapter 1, Anatomy of Portable C++ Software,
we saw how the toolchain works to compile the source files and produce the object files
and that the the linker puts it all together to form an executable program.
When a compiler processes a source file, it generates an object file that contains the
translated C++ code and enough information for the linker to resolve any references
from the compiled source file to another source file. In Chapter 1, Anatomy of Portable
C++ Software, CxxTemplate.cpp called sum(), which is defined in the SumFunc.cpp file.
When the compiler constructs an object file, it creates the following segments:
• Code segment (also known as text): This is the translation of the C++ functions into
the target machine instructions.
• Data segment: This contains all the variables and data structures that are declared
in the program, not local or allocated off the heap or stack, and are initialized.
• BSS segment: This contains all the variables and data structures that are declared
in the program, not local or allocated off the heap or stack, and are not initialized
(but will be initialized to zero).
• Database of exported symbols: A list of variables and functions that are in this
object file and their location.
Visibility, Lifetime, and Access | 153
• Database of referenced symbols: A list of variables and functions this object file
needs from outside itself and where they are used.
Note
BSS is used to name the uninitialized data segment and its name is historically
derived from Block Started by Symbol.
The linker then collects all the code segments, data segments, and BSS segments
together to form the program. It uses the information in the two databases (DB) to
resolve all the referenced symbols to the exported symbols list and patch the code
segments with this information so that they can operate correctly. Graphically, this is
depicted as follows:
Figure 2B.10: Parts of the object files and the executable file
154 | No Ducks Allowed – Templates and Deduction
For the purposes of the discussion that follows, BSS and data segments will be referred
to simply as data segment (the only difference being that BSS is not initialized). When
a program is executed, it is loaded into memory and its memory looks a bit like the
executable file layout – it contains the text segment, data segment, BSS segment, and
free memory allocated by the host system, which contains what is known as the stack
and the heap. The stack typically starts at the top of the memory and grows down,
while the heap starts where BSS finishes and grows up, toward the stack:
Figure 2B.11: CxxTemplate runtime memory map
The section of the program in which a variable or identifier is accessible is known as the
scope. There are two broad categories of scope:
• Local scope (also known as block scope): This applies to anything declared within
a block that is enclosed with curly braces ({}). The variable can be accessed inside
the curly braces. Just like blocks can be nested, so can the scope of the variable.
This typically includes local variables and function parameters, and these are
generally stored in the stack.
• Global / file scope: This applies to variables declared outside a normal function or
class, as well as to the normal functions. The variable can be accessed anywhere
in the file and possibly from other files (global) if the linkage is correct. These
variables are allocated memory by the linker in the data segment. The identifiers
are placed into the global namespace, which is the default namespace.
Visibility, Lifetime, and Access | 155
Namespaces
We can think of a namespace as a dictionary of names of variables, functions, and
user-defined types. For small programs, it is ok to use the global namespace as there
is very little chance of you creating multiple variables with the same name and getting
name clashes. As programs get larger, and more third-party libraries are included, the
chance of name clashes increases. Therefore, library writers will put their code into a
namespace (that is hopefully unique). This allows the programmer to control access to
the identifiers in the namespace. By using the standard library, we have already been
using the std namespace. A namespace is declared like so:
namespace name_of_namespace {
// put declarations in here
}
It is usual for name_of_namespace to be short, and namespaces can be nested.
Note
A good use of namespaces can be seen in the boost libraries here: https://www.
boost.org/.
A variable has another attribute, that of lifetime. There are three fundamental lifetimes;
two that are managed by the compiler and one that the programmer chooses:
• Automatic lifetime: Local variables are created when they are declared and are
destroyed upon exiting the scope that they are in. These are managed by the stack.
• Permanent lifetime: Global variables and static local variables. The compiler
causes global variables to be created when the program begins (before entering
the main() function) and causes static local variables to be created when they are
first accessed. In both cases, the variable is destroyed when the program exits.
These variables are placed in the data segments by the linker.
• Dynamic lifetime : Variables are created and destroyed by request of the
programmer (through the use of new and delete). These variables have their
memory allocated from the heap.
156 | No Ducks Allowed – Templates and Deduction
The final attribute of a variable we will consider is linkage. Linkage indicates what the
compiler and linker will do if they encounter variables and functions that have the same
name (or identifier). For a function, its actually what is known as the mangled name –
the compiler uses the name of the function, its return type, and its argument types to
produce a mangled name. There are three types of linkage:
• No linkage: This means that the identifier only refers to itself and applies to local
variables and locally defined user types (that is, inside a block).
• Internal linkage: This means that the identifier can be accessed anywhere
in the file in which it is declared. This applies to static global variables, const
global variables, static functions, and any variables or functions declared in an
anonymous namespace within the file. An anonymous namespace is a namespace
with no stated name.
• External linkage: This means that, with the right forward declarations, it can be
accessed from within all files. This includes normal functions, non-static global
variables, extern const global variables, and user-defined types.
While these are termed linkages, only the last one actually involves the linker. The
other two are achieved by the compiler excluding information from the DB of exported
identifiers.
Templates – Generic Programming
As a computer scientist, or as a programming enthusiast, at some point in time, you
probably had to write one (or more) sort algorithms. When discussing the algorithm,
you were not particularly concerned about the type of data being sorted, just that the
two objects of that type could be compared and that the domain is a totally ordered set
(that is, if one object is compared with any other, you can determine which comes first).
Different programming languages provide different solutions to this problem:
• Python: A dynamic language with built-in function sort and member functions on
list. As a dynamic language, it does not need to concern itself with the type if it can
call the comparison operator and a swap function.
• C: This has a function in its standard library called qsort that has the following
signature:
void qsort (void* base, size_t num, size_t size,
int (*compare)(const void*,const void*));
This deals with different types as base is a void pointer. size_t size defines how
big each object is, while the compare() function defines how to compare the two
objects.
Templates – Generic Programming | 157
• C++: std::sort() is a function provided in its standard library, where one of its
signatures is as follows:
template< class RandomIt > void sort( RandomIt first, RandomIt last );
In this case, the details of the type are captured in the iterator type called RandomIt
and passed to the method when compiled.
In the next section, we will briefly define generic programming, show how C++
implements them through templates, highlight what the language already provides, and
discuss how the compiler deducts the types so that they can be used for the template.
What is Generic Programming?
When you developed a sort algorithm, you may have originally focused on just sorting
plain numbers. But once that is established, you could then abstract that to any type,
provided that the type exhibits certain attributes such as total ordered set (that is,
the comparison operator, <, has meaning between all the elements in the domain we
are sorting over). So, to express an algorithm in terms of generic programming, we
define a placeholder in the algorithm for the type that needs to be manipulated by that
algorithm.
Generic programming is the development of a type-agnostic general algorithm. The
algorithm can be reused by passing types as arguments. In this way, algorithms are
abstracted and allow the compiler to optimize based on types.
In other words, generic programming is an approach to programming where an
algorithm is defined with types as parameters that are specified when the algorithm is
instantiated. Many languages provide support for generic programming with different
names. In C++, generic programming is supported through the language feature known
as templates.
Introducing C++ Templates
Templates are C++'s support for generic programming. Think of a template as a cookie
cutter, and the type that we give it as a parameter as cookie dough (which can be
chocolate brownie, ginger snap, or some other delicious flavor). When we apply the
cookie cutter, we end up with instances of cookies that are in the same form but have
different flavors. So, a template captures the definition of a generic function or class
and when specified with types as arguments, the compiler goes to work to write the
class or function for us as if the type was hand-coded by us. It has several advantages,
such as the following:
• You only need to develop the class or algorithm once and evolve it.
• You can apply it to many types.
158 | No Ducks Allowed – Templates and Deduction
• You can hide complex details behind a simple interface and the compiler can apply
optimizations to the generated code, based on the type.
So, how do we write a template? Let's start with a template that will allow us to clamp
a value within a range from lo to hi and be able to use it on int, float, double, or any
other built-in type:
template <class T>
T clamp(T val, T lo, T hi)
{
return(val<lo)?lo:(hi<val)?hi:val;
}
Let's break this down:
• Line 1: template <class T> declares what follows to be a template and uses one
type, which has a placeholder of T in the template.
• Line 2: Declares the prototype for this function when T is substituted. It declares
that the function clamp takes three arguments of type T and returns a value of
type T.
• Line 4: This is the beauty of templates – provided that the type that's passed in has
a < operator, then we can perform a clamp on the three values so that lo <= val
<= hi. This algorithm is valid for all the types that can be ordered.
Let's say we use it in the following program:
#include <iostream>
int main()
{
std::cout << clamp(5, 3, 10) << "\n";
std::cout << clamp(3, 5, 10) << "\n";
std::cout << clamp(13, 3, 10) << "\n";
std::cout << clamp(13.0, 3.0, 10.1) << "\n";
std::cout << clamp<double>(13.0, 3, 10.2) << "\n";
return 0;
}
Templates – Generic Programming | 159
We will get the following expected output:
Figure 2B.12: Clamp program output
In the last call to clamp, we have passed the template the double type between < and
>. But we haven't followed the same for the other four calls. Why? It turns out that the
compiler is getting smarter as it gets older. With every release of the standard, they
improve what is known as type deduction. Because the compiler is able to deduce the
type, we do not need to tell it what type to use. The reason for this is that the three
arguments to the class without the template parameter have the same type – the first
three are all int while the fourth one is double. But we had to tell the compiler which
type to use for the final one because it has two doubles and an int as arguments,
which resulted in a compilation error saying no function found. But then, it gave us
information about why the template could not be used. This form, where you force the
types, is known as explicit template argument specification.
C++ Pre-Packaged Templates
The C++ Standard is comprised of two major parts:
• The language definition, that is, the keywords, syntax, lexical definitions,
structures, and so on.
• The Standard Library, that is, all the pre-written general-purpose functions
and classes to be provided by the compiler vendor. A subset of this library is
implemented using templates and is known as the Standard Template Library
(STL).
The STL has origins in the generics provided in the Ada language that was developed
by David Musser and Alexander Stepanov. Stepanov was a strong advocate for the
use of generic programming as the basis for software development. In the 90s, he
saw the opportunity to do this with the new language C++ to influence mainstream
development, and proposed to the ISO C++ committee that the STL should be included
as part of the language. The rest is history.
160 | No Ducks Allowed – Templates and Deduction
The STL is comprised of four categories of predefined generic algorithms and classes:
• Containers: General sequence (vector, list, deque) and associative containers (set,
multiset, map)
• Iterators: A set of classes to traverse across containers and define the extent of
the container (ranges expressed as begin() and end()). Note that one fundamental
design choice in the STL is that end() points to a position one after the last item –
mathematically, that is [begin(), end()).
• Algorithms: Over 100 different algorithms covering sorting, searching, set
operations, and others.
• Functions: Support for functors (function objects where objects can be called like
functions). One use is for predicates in template algorithms such as find_if().
The clamp function template that we implemented previously is simplistic and while
it would work for any type that supports the less than operator, it would not be very
efficient – it could result in very large copies if the type has a large size. Since C++17, the
STL includes a std::clamp() function that is declared more like this:
#include <cassert>
template<class T, class Compare>
const T& clamp( const T& v, const T& lo, const T& hi, Compare comp )
{
return assert( !comp(hi, lo) ),
comp(v,lo)?lo:comp(hi,v)?hi:v;
}
template<class T>
const T& clamp( const T& v, const T& lo, const T& hi )
{
return clamp( v, lo, hi, std::less<>() );
}
As we can see, it uses references for the arguments and the return value. Changing the
arguments to use references reduces what has to be passed on and returned on the
stack. Also, note that the designers have worked to produce a more general version
of the template so that we are not reliant on the < operator that exists for the type.
However, we can define the ordering by passing comp.
Type Aliases – typedef and using | 161
From the preceding examples, we have seen that, like functions, templates can take
multiple comma-separated parameters.
Type Aliases – typedef and using
If you have used the std::string class, then you have been using an alias. There are a
few template classes related to strings that need to implement the same functionality.
But the type representing a character is different. For example, for std::string, the
representation is char, while std::wstring uses wchar_t . There are several others for
char16_t and char32_t . Any variation in the functionality will be managed through traits
or template specialization.
Prior to C++11, this would have been aliased from the std::basic_string base class, as
follows:
namespace std {
typedef basic_string<char> string;
}
This does two main things:
• Reduces the amount of typing required to declare the variable. This is a simple
case, but when you declare a unique pointer to a map of strings to object, it can
get very long and you will make errors:
typedef std::unique_ptr<std::map<std::string,myClass>> UptrMapStrToClass;
• Improves the readability as you now conceptually think of it as a string and do not
need to worry about the details.
But C++11 introduced a better way – alias declarations – which utilizes the using
keyword. The preceding code can be implemented like so:
namespace std {
using string = basic_string<char>;
}
The preceding example is simple and the alias, either typedef or using, is not too hard
to grok. But when the alias involves more complicated expressions, they too can be a
little unreadable – particularly function pointers. Consider the following code:
typedef int (*FunctionPointer)(const std::string&, const Point&);
Now, consider the following code:
using FunctionPointer = int (*)(const std::string&, const Point&);
162 | No Ducks Allowed – Templates and Deduction
There is a reason for the new feature in C++11 where alias declaration may be
incorporated easily into templates – they can be templatized. A typedef cannot be
templatized and while it is possible to achieve the same outcome with typedef, the
alias declaration (using) is the preferred method as it results in simpler and easier to
understand template code.
Exercise 2: Implementing Aliases
In this exercise, we will implement aliases using a typedef and see how the code
becomes easier to read and efficient by using a reference. Follow these steps to
implement this exercise:
1. Open the Lesson2B project in Eclipse, and then in the Project Explorer, expand
Lesson2B, then Exercise02 and double-click on Exercise2.cpp to open the file for
this exercise in the editor.
2. Click on the Launch Configuration dropdown menu and select New Launch
Configuration... . Configure L2BExercise2 to run with the name Exercise2. When
that is complete, it will be the currently selected Launch Configuration.
3. Click on the Run button. Exercise 2 will run and produce something similar to the
following output:
Figure 2B.13: Exercise 2 output
4. In the editor, before the declaration of the printVector() function, add the
following line:
typedef std::vector<int> IntVector;
5. Now, change all occurrences of std::vector<int> in the file with IntVector.
6. Click on the Run button. The output should be the same as before.
7. In the editor, change the line that you previously added to the following:
using IntVector = std::vector<int>;
8. Click on the Run button. The output should be the same as before.
9. In the editor, add the following line:
using IntVectorIter = std::vector<int>::iterator;
Templates – More than Generic Programming | 163
10. Now, change the one occurrence of IntVector::iterator to IntVectorIter.
11. Click on the Run button. The output should be the same as before.
In this exercise, there appears to be little difference between typedef and using alias.
In either case, the use of a well-named alias makes code easier to read and understand.
When more complicated aliases are involved, using produces an easier way to write an
alias. Introduced in C++11, using is now the preferred method for defining an alias. It has
other advantages over typedef, such as being able to use it inside templates.
Templates – More than Generic Programming
Templates can also deliver much more than just generic programming (a cookie cutter
with types). In the case of generic programming, the template operates as a blueprint
that cannot be changed and delivers the compiled version of the template for the
specified type or types.
Templates can be written to provide specialization of a function or algorithm based
on the types involved. This is known as template specialization and is not generic
programming in the sense we previously used it. It can only be called generic
programming when it makes certain types behave as we would expect them to do in a
given context. It cannot be called generic programming when the algorithm that's used
for all types is modified.
Examine the following sample of specialization code:
#include <iostream>
#include <type_traits>
template <typename T, std::enable_if_t<sizeof(T) == 1, int> = 0>
void print(T val)
{
printf("%c\n", val);
}
template <typename T, std::enable_if_t<sizeof(T) == sizeof(int), int> = 0>
void print(T val)
{
printf("%d\n", val);
164 | No Ducks Allowed – Templates and Deduction
}
template <typename T, std::enable_if_t<sizeof(T) == sizeof(double), int> =
0>
void print(T val)
{
printf("%f\n", val);
}
int main(int argc, char** argv)
{
print('c');
print(55);
print(32.1F);
print(77.3);
}
It defines a template that calls printf() with a different format string, based on the
specialization of the template using std::enable_if _t<> and sizeof(). When we run it,
the following output is generated:
Figure 2B.14: Erroneous print template program output
Substitution Failure Is Not An Error – SFINAE
The value printed for 32.1F (-1073741824) does not bear any resemblance to the number.
If we examine the code that was generated by the compiler for the following program,
we will find that it has generated the code as if we wrote the following (and more):
template<typename int, int=0>
void print<int,0>(int val)
{
printf("%d\n",val);
Templates – More than Generic Programming | 165
}
template<typename float, int=0>
void print<float,0>(float val)
{
printf("%d\n", val);
}
Why does it generate this code? The preceding templates use a feature of the C++
compiler called Substitution Failure Is Not An Error, or SFINAE. Basically, during the
substitution phase of a template, based on the types, if the compiler is unable to form
valid code, then it just drops the definition and continues rather than producing an
error. Let's try and fix the preceding code and get the right outcome for print. To do
that, we will introduce the use of std::enable_if _t<> and access what are known as
type traits to help us. Firstly, we will replace the last template with the following code:
#include <type_traits>
template <typename T, std::enable_if_t<std::is_floating_point_v<T>, int> = 0>
void print(T val)
{
printf("%f\n", val);
}
This takes some explaining. Firstly, we consider the definition of std::enable_if _t,
which is actually a type alias:
template<bool B, class T = void>
struct enable_if {};
template<class T>
struct enable_if<true, T> { typedef T type; };
template< bool B, class T = void >
using enable_if_t = typename enable_if<B,T>::type;
166 | No Ducks Allowed – Templates and Deduction
The first template for enable_if will result in the definition of an empty struct (or
class). The second template for enable_if is a specialization for true as a first template
argument that will result in the class with a typedef definition. The definition of enable_
if_t is a helper template that removes the need for us to enter ::type on the end of the
template when we use it. So, how does this work? Consider the following code:
template <typename T, std::enable_if_t<condition, int> = 0>
void print(T val) { ... }
If the condition that is evaluated at compile time results in true, then the enable_if _t
template will result in a template that looks like this:
template <typename T, int = 0>
void print(T val) { ... }
This is valid syntax and the function is added to the symbol table as a candidate
function. If the condition that is calculated at compile time results in false, then the
enable_if _t template will result in a template that looks like this:
template <typename T, = 0>
void print(T val) { ... }
This is malformed code which is now discarded – SFINAE at work.
std::is_floating_point_v<T> is another helper class that accesses the ::value member
of the std::is_floating_point<T> template. Its name says it all – it will be true if T is a
floating-point type (float, double, long double); otherwise, it will be false. If we make
this change, then the compiler (GCC) generates the following error:
Figure 2B.15: Compiler error for the modified print template program
The problem now is that we have two templates that can satisfy when the type is a float:
template <typename T, std::enable_if_t<sizeof(T) == sizeof(int), int> = 0>
void print(T val)
{
printf("%d\n", val);
}
Templates – More than Generic Programming | 167
template <typename T, std::enable_if_t<std::is_floating_point_v<T>, int> = 0>
void print(T val)
{
printf("%f\n", val);
}
It turns out that (usually) sizeof(float) == sizeof(int), so we need to make another
change. We'll replace the first condition with another type trait – std::is_integral_v<>:
template <typename T, std::enable_if_t<std::is_integral_v<T>, int> = 0>
void print(T val)
{
printf("%d\n", val);
}
If we make this change, then the compiler (GCC) generates the following error:
Figure 2B.16: Second compiler error for the modified print template program
We fixed the floating-point ambiguity, but the problem here is that std::is_
integral_v(char) returns true and again there are two functions that are generated
by the templates for a type of char with the same prototype. It turns out that the
conditions that's passed to std::enable_if_t<> obeys standard C++ logic expressions.
So, to fix this problem, we will add an extra condition that will exclude chars:
template <typename T, std::enable_if_t<std::is_integral_v<T> && sizeof(T) !=
1,int>=0>
void print(T val)
{
printf("%d\n", val);
}
168 | No Ducks Allowed – Templates and Deduction
If we compile the program now, it completes the compilation and links the program. If
we run it, it now produces the following (expected) output:
Figure 2B.17: Corrected print template program output
Floating-Point Representations
Shouldn't that 32.099998 be 32.1? That is what was passed to the function. The problem
with performing floating-point operations on a computer is that the representation
automatically introduces an error. Real numbers form a continuous (infinite) domain. If
you consider the numbers 1 and 2 in the real domain, then there is an infinite amount
of real numbers between them. Unfortunately, a computer's representation of floating-
point numbers quantizes the values and cannot represent all of the infinite number
of numbers. The bigger the number of bits used to store the number, the better the
representation of the value is on the real domain. So, long double is better than double
is better than float. It really depends on your problem domain as to what is appropriate
for storing the data. Back to 32.099998. The computer stores the single precision
numbers as the sum of powers of 2 and then shifts them by a power factor. Integral
numbers are usually easy as they can be easily represented by the sum of 2^n powers
(n>=0). The fractional part, which in this case is 0.1, has to be expressed as the sum
of 2^(-n) (n>0). We add more power-2 fractions to attempt to get the number closer
to the target until we have used up the 24 bits that we have for precision in a single
precision floating-point number.
Note
If you want to know more about how computers store floating-point numbers,
research the IEEE 754 standard that defines it.
Templates – More than Generic Programming | 169
Constexpr if Expressions
C++17 introduced the constexpr if expression to the language, which simplifies
template writing greatly. We can rewrite the preceding three templates that use SFINAE
as one simpler template:
#include <iostream>
#include <type_traits>
template <typename T>
void print(T val)
{
if constexpr(sizeof(T)==1) {
printf("%c",val);
}
else if constexpr(std::is_integral_v<T>) {
printf("%d",val);
}
else if constexpr(std::is_floating_point_v<T>) {
printf("%f",val);
}
printf("\n");
}
int main(int argc, char** argv)
{
print('c');
print(55);
print(32.1F);
print(77.3);
}
170 | No Ducks Allowed – Templates and Deduction
For the call to print(55), the compiler generates the function to call as follows:
template<>
void print<int>(int val)
{
printf("%d",val);
printf("\n");
}
What happened to the if/else if statements? What happens with a constexpr if
expression is that the compiler contextually determines the value of the condition
and converts it into a bool value (true/false). If the evaluated value is true, then the if
condition and the else clause are discarded, leaving only the true clause to generate
code. Likewise, if it is false, then the false clause is left to generate code. In other words,
only the first constexpr if condition that evaluates to true will have the code for its
clause generated, while the rest are discarded.
Non-Type Template Arguments
So far, we have only seen template arguments that are types. It is also possible to pass
an integral value as a template argument. This allows us to prevent array decay for a
function. For example, consider a template function that calculates the sum:
template <class T>
T sum(T data[], int number)
{
Ttotal=0;
for(auto i=0U ; i<number ; i++)
{
total += data[i];
}
return total;
}
In this case, we need to pass the length of the array in the call:
float data[5] = {1.1, 2.2, 3.3, 4.4, 5.5};
auto total = sum(data, 5);
Templates – More than Generic Programming | 171
But wouldn't it be better if we could just call the following?
auto total = sum(data);
We can do it by making changes to the template, like in the following code:
template <class T, std::size_t size>
T sum(T (&data)[size])
{
Ttotal=0;
for(auto i=0U ; i< size; i++)
{
total += data[i];
}
return total;
}
Here, we changed the data to be a reference to an array of a certain size – a size that
is passed to the template – and so the compiler figures it out. We no longer need the
second argument to the function call. This simple example showed how to pass and use
a non-type argument directly. We will explore this more in the Template Type Deduction
section.
Exercise 3: Implementing Stringify – specialization Versus constexpr
In this exercise, we will implement a stringify template by utilizing constexpr to
produce an easier to read and simpler version of the code. Follow these steps to
implement this exercise:
Note
The stringify specialization templates can be found at https://isocpp.org/wiki/faq/
templates#template-specialization-example.
1. Open the Lesson2B project in Eclipse, and then in the Project Explorer, expand
Lesson2B, then Exercise03, and double-click on Exercise3.cpp to open the file for
this exercise in the editor.
2. Click on the Launch Configuration dropdown menu and select New Launch
Configuration... . Configure L2BExercise3 to run with the name Exercise3.
172 | No Ducks Allowed – Templates and Deduction
3. Click on the Run button. Exercise 3 will run and produce the following output:
Figure 2B.18: Exercise 3 specialized template output
4. In Exercise3.cpp, comment out all of the template specializations for the stringify
template while leaving the original general template.
5. Click on the Run button. The output will change to have the boolean printed as a
number and the double printed to only two decimal places:
Figure 2B.19: Exercise 3 general template only output
6. We will now "specialize" the template for the boolean type again. Add the #include
<type_traits> directive with the other #includes and modify the template so that
it reads as follows:
template<typename T> std::string stringify(const T& x)
{
std::ostringstream out;
if constexpr (std::is_same _v<T, bool>)
{
out << std::boolalpha;
}
out << x;
return out.str();
}
Templates – More than Generic Programming | 173
7. Click on the Run button. The output boolean stringify works as before:
Figure 2B.20: stringify tailored for boolean
8. We will now "specialize" the template for the floating-point types (float, double,
long double) again. Modify the template so that it reads as follows:
template<typename T> std::string stringify(const T& x)
{
std::ostringstream out;
if constexpr (std::is_same _v<T, bool>)
{
out << std::boolalpha;
}
else if constexpr (std::is_floating_point_v<T>)
{
const int sigdigits = std::numeric_limits<T>::digits10;
out << std::setprecision(sigdigits);
}
out << x;
return out.str();
}
9. Click on the Run button. The output is restored to the original:
Figure 2B.21: constexpr if version template output
10. If you compare the original version with multiple templates to the final version,
you will find that the final version is more like a normal function and is easier to
read and maintain.
174 | No Ducks Allowed – Templates and Deduction
In the exercise, we learned how much simpler and compact our templates can be when
using the new constexpr if construct in C++17.
Function Overloading Revisited
When we first discussed function overloading, we only considered the scenarios where
the name of the function came from the list of functions that we wrote by hand. Now,
we need to update this. We can also write templated functions that can have the same
name. Like we did previously, when the compiler meets the line print(55), it needs to
work out which of the previously defined functions to call. So, it performs the following
process (grossly simplified):
Figure 2B.22: Function overload resolution with templates (simplified)
Template Type Deduction
When we first introduced templates, we touched on Template type deduction. Now, we
are going to explore this further. We will start by considering the general declaration
for a function template:
template<typename T>
void function(ParamType parameter);
The call for this might look like this:
function(expression);
// deduce T and ParamType from expression
When the compiler reaches this line, it must now deduce two types related to the
template – T and ParamType. These are often different due to qualifiers and other
attributes attached to the T in the ParamType (for example pointer, reference, const,
and so on). The types are related but the deduction progresses differently, depending
on the form of expression used.
Templates – More than Generic Programming | 175
Displaying the Deduced Types
Before we look into the different forms, it might be useful if we could get the compiler
to tell us the types that it has deduced. We have a few options here, including the IDE
editors showing types, the compiler generating errors, and runtime support (which, due
to the C++ standard, is not necessarily effective). We will use the compiler errors to help
us explore some of the type deductions.
We can achieve a type displayer by declaring a template without a definition. Any
attempt to instantiate the template will cause the compiler to generate an error
message as there is no definition, along with the type information that it is trying to
instantiate:
template<typename T>
struct TypeDisplay;
Let's attempt to compile the following program:
template<typename T>
class TypeDisplay;
int main()
{
signed int x = 1;
unsigned int y = 2;
TypeDisplay<decltype(x)> x_type;
TypeDisplay<decltype(y)> y_type;
TypeDisplay<decltype(x+y)> x_y _type;
return 0;
}
176 | No Ducks Allowed – Templates and Deduction
The compiler spits out the following errors:
Figure 2B.23: Compiler errors showing deduced types
Note that, in each case, the aggregate being named includes the type being deduced –
for x, it is an int, for y, an unsigned int, and for x+y, an unsigned int. Also, note that the
TypeDisplay template requires a type for its arguments and so the decltype() function
is used to get the compiler to provide the type for the expression in brackets.
It is also possible to display the deduced type at runtime either using the built-in
typeid(T).name() operator, which returns a std::string, or by using the boost library
called type_index.
Note
For more information on this, visit the following link: https://www.boost.org/doc/
libs/1_70 _0/doc/html/boost_typeindex.html.
Because of the type deduction rules, the built-in operator will give you an indication of
the type, but it will lose reference (&, and &&) and any constness information (const or
volatile). If required at runtime, then consider boost::type_index, which will produce
the same output for all the compilers.
Template Type Deduction – the Details
Let's return to the generic template:
template<typename T>
void function(ParamType parameter);
Templates – More than Generic Programming | 177
Let's say that the call looks like this:
function(expression);
// deduce T and ParamType from expression
Type deduction proceeds differently depending on the form of ParamType used:
• ParamType is a value (T): Pass-by-value function call
• ParamType is a reference or pointer (T& or T*): Pass-by-reference function call
• ParamType is a rvalue reference (T&&): Pass-by-reference function call or
something else
Case 1: ParamType is pass-by-value (T)
template<typename T>
void function(T parameter);
As a pass-by-value call, this means that the parameter will be a copy of whatever is
passed in. Because this is a new instance of the object, the following rules are applied to
the expression:
• If the expression's type is a reference, then ignore the reference part.
• If, after step 1, the remaining type is const and/or volatile, then ignore those as
well.
What's left is T. Let's attempt to compile the following file code:
template<typename T>
class TypeDisplay;
template<typename T>
void function(T parameter)
{
TypeDisplay<T> type;
}
void types()
{
intx=42;
function(x);
}
178 | No Ducks Allowed – Templates and Deduction
The compiler produces the following error:
Figure 2B.24: Compiler error showing a deduced type for the pass by type
So, the type is deduced to be int. Likewise, we get exactly the same error if we declare
the following:
const int x = 42;
function(x);
The same will happen if we declare this version:
intx=42;
const int& rx = x;
function(rx);
In all three cases, the deduced type is int, as per the rules stated previously.
Case 2: ParamType is pass-by-reference (T&)
As a pass-by-reference call, this means that the parameter will be able to access the
original storage location of the object. Because of this, the generated function has to
honor the constness and volatileness we ignored before. The following rules are applied
to type deduction:
• If the expression's type is a reference, then ignore the reference part.
• Pattern match what's left of the type of expression with ParamType to determine
T.
Let's attempt to compile the following file:
template<typename T>
class TypeDisplay;
template<typename T>
void function(T& parameter)
{
TypeDisplay<T> type;
Templates – More than Generic Programming | 179
}
void types()
{
intx=42;
function(x);
}
The compiler will generate the following error:
Figure 2B.25: Compiler error showing the deduced type for pass by reference
From this, we can see that the compiler has T as an int from ParamType as int&.
Changing x to be a const int provides no surprises as T is deduced to be const int from
ParamType as const int&:
Figure 2B.26: Compiler error showing the deduced type for pass by const reference
Likewise, introducing rx as a reference to a const int, as before, gives no surprises, as T
is deduced to be const int from ParamType as const int&:
void types()
{
const int x = 42;
const int& rx = x;
function(rx);
}
Figure 2B.27: Compiler error showing the deduced type when passing a const reference
180 | No Ducks Allowed – Templates and Deduction
If we change the declaration to include a const, then the compiler will honor the
constness when it generates the function from the template:
template<typename T>
void function(const T& parameter)
{
TypeDisplay<T> type;
}
This time, the compiler reports the following
• int x: T is int (as the constness will be honored), while the parameter's type is
const int&.
• const int x: T is int (const is in the pattern, leaving int), while the parameter's type
is const int&.
• const int& rx: T is int (reference is ignored, const is in the pattern, leaving int),
while the parameter's type is const int&.
If we attempt to compile the following, what do we expect? Normally, an array decays to
be a pointer:
int ary[15];
function(ary);
The compiler error is as follows:
Figure 2B.28: Compiler error showing the deduced type for the array argument
when passed by reference
This time, the array is captured as a reference and the size is also included. So, if ary
was declared as ary[10], then a completely different function would result. Let's revert
the template to the following:
template<typename T>
void function(T parameter)
{
TypeDisplay<T> type;
}
Templates – More than Generic Programming | 181
If we attempt to compile the array call, then the error reports the following:
Figure 2B.29: Compiler error showing the deduced type for the array argument
when passed by value
We can see that, in this case, the array has decayed as the usual behavior when passing
an array to a function. We saw this behavior when talking about Non-Type Template
Arguments.
Case 3: ParamType is a rvalue reference (T&&)
T&& is called a rvalue reference while T& is called a lvalue reference. C++ not only
characterizes an expression by type but also by a property called the value category.
These categories control expression evaluation in the compiler, including the rules
for creating, copying, and moving temporary objects. There are five expression value
categories defined in the C++17 standard that have the following relationships:
Figure 2B.30: C++ value categories
182 | No Ducks Allowed – Templates and Deduction
The definitions of each are as follows:
• An expression that determines the identity of an object is a glvalue.
• An expression whose evaluation initializes an object or the operand of an operator
is a prvalue. Examples include a literal (except string literal) such as 3.1415, true or
nullptr, the this pointer, post increment, and post decrement expressions.
• A glvalue object that has resources and can be reused (because its life is ending)
is an xvalue. Examples include a function call whose return type is an rvalue
reference to an object, such as std::move().
• A glvalue that is not an xvalue is an lvalue. Examples include the name of a
variable, a function or a data member, or a string literal.
• A prvalue or xvalue is an rvalue.
It does not matter if you do not fully understand these for the explanation that follows
–
just know that an expression that is considered to be an lvalue can have its address
taken (using the address of operator, that is, "&"). The type deduction rules for the
following require that you know what an lvalue is, as well as what it isn't:
template<typename T>
void function(T&& parameter)
{
TypeDisplay<T> type;
}
The type deduction rules for this ParamType form are as follows:
• If the expression is an lvalue reference, then both T and ParamType are deduced
to be an lvalue reference. This is the only scenario where the type is deduced to be
a reference.
• If the expression is an rvalue reference, then the rules for Case 2 apply.
Templates – More than Generic Programming | 183
SFINAE Expression and Trailing Return Types
C++11 introduced a feature called trailing return types to provide a mechanism for
templates so that they can generalize the return type. A simple example is as follows:
template<class T>
auto mul(T a, T b) -> decltype(a * b)
{
return a * b;
}
Here, auto is used to indicate that a trailing return type is defined. The trailing return
type starts with the -> pointer and in this case, the return type is the type that's
returned by multiplying a and b. The compiler will process the content of the decltype
and, if it is malformed, it will remove the definition from the function name's lookup, as
per usual. This capability opens up many possibilities as the comma operator, ",", can be
used inside decltype to check for certain attributes.
If we want to test that a class implements a method or contains a type then we can
place this inside the decltype by converting it into a void (in case the comma operator
has been overloaded) and then define an object of the real return type at the end of the
comma operator. An example of this is shown in the following program:
#include <iostream>
#include <algorithm>
#include <utility>
#include <vector>
#include <set>
template<class C, class T>
auto contains(const C& c, const T& x)
- > decltype((void)(std::declval<C>().find(std::declval<T>())),
true)
{
return end(c) != c.find(x);
}
int main(int argc, char**argv)
{
184 | No Ducks Allowed – Templates and Deduction
std::cout << "\n\n------ SFINAE Exercise ------\n";
std::set<int> mySet {1,2,3,4,5};
std::cout << std::boolalpha;
std::cout << "Set contains 5: " << contains(mySet,5) << "\n";
std::cout << "Set contains 15: " << contains(mySet,15) << "\n";
std::cout << "Complete.\n";
return 0;
}
When this program is compiled and executed, we obtain the following output:
Figure 2B.31: Output from the SFINAE expression
The return type is given by the following code:
decltype( (void)(std::declval<C>().find(std::declval<T>())), true)
Let's break this down:
• The operand of decltype is a comma-separated list of expressions. This means that
the compiler will construct but not evaluate the expressions and use the type of
the right-most value to determine the return type for the function.
• std::declval<T>() allows us to convert the T type into a reference type that we
can then use to access member functions without having to actually construct an
object.
• As with all SFINAE-based operations, if any expression in the comma-separated
list is invalid, then the function is discarded. If they are all valid, then it is added to
the list of functions for lookup.
• The cast to void is to prevent any problems that may arise if the user overloads the
comma operator.
• Basically, this is testing whether the C class has a member function called find()
that takes class T, class T&, or const class T& as an argument.
Templates – More than Generic Programming | 185
This method will work for std::set, which has a find() method that takes one argument
but will fail for other containers because they do not have a find() member method.
This approach works well if we are only dealing with one type. But if we have a function
that needs to produce different implementations based on type, as we have seen before,
the if constexpr approach is much cleaner and generally easier to understand. To use
the if constexpr approach, we need to produce templates that will evaluate to true or
false at compile time. The standard library provides helper classes for this: std::true_
type and std::false_type. These two structures have a static constant member named
value set to true and false, respectively. Using SFINAE and template overloads, we
can create new detection classes that derive from either of these classes to give us the
desired outcome:
template <class T, class A0>
auto test_find(long) -> std::false_type;
template <class T, class A0>
auto test_find(int)
-> decltype(void(std::declval<T>().find(std::declval<A0>())), std::true_
type{});
template <class T, class A0>
struct has_find : decltype(test_find<T,A0>(0)) {};
The first template for test_find creates the default behavior that will set the return
type to std::false_type. Note that this has an argument type of long.
The second template for test_find creates a specialization that tests for a class that has
a member function called find() and has a return type of std::true_type. Note that this
has an argument type of int.
The has_find<T,A0> template works by deriving itself from the return types of the
test_find() functions. If the T class does not have the find() method, then only the
std::false_type version of test_find() is generated and so the has_find<T,A0>::value
value will be false and can be used in if constexpr().
186 | No Ducks Allowed – Templates and Deduction
The interesting part occurs if the T class has the find() method as both of the test_
find() methods are generated. But the specialized version takes an argument of the
int type while the default takes an argument of the long type. As we "call" the function
with zero (0), it will match the specialized version and use it. The argument difference
is important because you cannot have two functions with the same argument types and
only differ by return type. If you want to check this behavior, then change the argument
from 0 to 0L to force the long version.
Class Templates
We have only dealt with function templates so far. But templates can also be used to
provide blueprints for classes. The general structure of a templated class declaration is
as follows:
template<class T>
class MyClass {
// variables and methods that use T.
};
Whereas template functions allow us to produce generic algorithms, template classes
allow us to produce generic data types and their associated behaviors.
When we introduced the Standard Template Library, we highlighted that it includes
templates for containers – vector, deque, stack, and so on. These templates allow us to
store and manage any data type that we want, but still behave as we would expect.
Exercise 4: Writing a Class Template
Two of the most commonly used data structures in computing science are stack and
queue. Both currently have implementations in the STL. But to get our feet wet with a
templated class, we are going to write a stack template class that can be used for any
type. Let's get started:
1. Open the Lesson2B project in Eclipse, and then in the Project Explorer, expand
Lesson2B, then Exercise04, and double-click on Exercise4.cpp to open the file for
this exercise in the editor.
2. Configure a new Launch Configuration, L2BExercise4, to run with the name
Exercise4.
3. Also, configure a new C/C++ Unit Run Configuration, L2BEx4Tests, to run
L2BEx4tests. Set the Google Tests Runner.
4. Click on the Run option for the test, which we have to run for the first time:
Class Templates | 187
Figure 2B.32: Initial unit test for stacks
5. Open Stack.hpp in the editor. You will find the following code:
#pragma once
#include <vector>
#include <cstddef>
#define EXERCISE4_STEP
1
namespace acpp
{
template <typename T>
class Stack
{
public:
private:
std::vector<T> m_stack;
};
} // namespace acpp
The first thing to note with a template definition is that it must be placed in a
header file that can be included where we need to reuse it. Secondly, we have used
a pragma directive (#pragma once) which tells the compiler that if it encounters
this file again to be #included, it does not need to be. While not strictly part of
the standard, nearly all modern C++ compilers support it. Finally, note that, for the
purpose of this exercise, we have chosen to store the items in the STL vector.
6. In the editor, add the following declaration in the public section of the Stack class:
bool empty() const
{
return m_stack.empty();
}
188 | No Ducks Allowed – Templates and Deduction
7. At the top of the file, change EXERCISE4_STEP to a value of 10. Click on the Run
button. The Exercise 4 tests should run and fail:
Figure 2B.33: Jumping to a Failing test
8. Click on the name of the failing test, that is, DefaultConstructorInitsEmpty. It will
show the cause of the failure in the Messages section on the right. Double-click
on the message. It will open the file with the failing test and jump to the offending
line, as shown in the preceding screenshot. This test has an error. In the test, we
are expecting the stack to be empty. However, we can see that empty() reports
false.
9. Change ASSERT_FALSE to ASSERT_TRUE and rerun the test. This time, it passes
because it is testing the right thing.
10. The next thing we will do is add some type aliases ready for use with the next few
methods. In the editor, add the following lines just above the empty() method:
using value_type = T;
using reference = value_type&;
using const_reference = const value_type&;
using size_type = std::size_t;
11. Click on the Run button to rerun the tests. They should pass. When doing test-
driven development, the mantra is to write a small test and see it fail, and then
write just enough code to make it pass. In this case, we actually tested that we got
the definition of the aliases correct because failing to compile is one form of test
failure. We are now ready to add the push function.
Class Templates | 189
12. In the editor, change Stack.hpp by adding the following code just below the
empty() method:
void push(const value_type& value)
{
m_stack.push_back(value);
}
13. At the top of the file, change EXERCISE4_STEP to a value of 15. Click on
the Run button. We now have two tests that run and pass. The new test,
PushOntoStackNotEmpty, in StackTests.cpp proves that the push does something to
make the stack no longer empty. We need to add more methods to make sure that
it has done the expected.
14. In the editor, change Stack.hpp by adding the following code just below the push()
method and change EXERCISE4_STEP to a value of 16:
size_type size() const
{
return m_stack.size();
}
15. Click on the Run button to run the tests. There should now have three passing
tests.
16. In the editor, change Stack.hpp by adding the following code just below the push()
method and change EXERCISE4_STEP to a value of 18:
void pop()
{
m_stack.pop_back();
}
17. Click on the Run button to run the tests. There should now be four passing tests.
18. In the editor, change Stack.hpp by adding the following code just below the pop()
method and change EXERCISE4_STEP to a value of 20:
reference top()
{
m_stack.back();
}
const_reference top() const
{
m_stack.back();
}
190 | No Ducks Allowed – Templates and Deduction
19. Click on the Run button to run the tests. There are now five passing tests and we
have implemented a stack.
20. From the Launch Configuration dropdown, select L2BExercise4 and click on the
Run button. Exercise 4 will run and produce something similar to the following
output:
Figure 2B.34: Exercise 4 output
Examine the code that is now in the Stack.hpp file. The approach of defining types
inside the class is common throughout the STL (although they may use typedef because
of their heritage). The std::stack template takes two arguments, with the second
one defining the container to be used – vector could be the first. Examine the tests in
StackTests.cpp. The tests should be named to indicate what they aim to test, and they
should focus on doing that.
Activity 1: Developing a Generic "contains" Template Function
The programming language Python has a membership operator called "in" that can be
used on any sequence, that is, list, sequence, set, string, and so on. Even though C++ has
over 100 algorithms, it does not have an equivalent method to achieve the same. C++
20 introduced the contains() method on std::set, but that is not enough for us. We
need to create a contains() template function that works with std::set, std::string,
std::vector, and any other container that provides iterators. This is determined by
the ability to call end() on it. We are aiming for best performance, so we will call the
find() member method on any container that has one (it will be the most efficient)
and otherwise fall back to using std::end() on the container. We also need to treat
std::string() differently as its find() method returns a special value.
We could implement this using a general template and two specializations, but this
activity is being used to get it working using the techniques of SFINAE and if constexpr.
In addition, this template must only work on a class that supports end(C). Follow these
steps to implement this activity:
1. Load the prepared project from the Lesson2B/Activity01 folder.
2. Define the helper template functions and class to detect the std:string case using
the npos member.
Summary | 191
3. Define the helper template functions and class to detect whether the class has a
find() method.
4. Define the contains template function that uses constexpr to select between one
of three implementations – string case, the has find method, or general case.
After implementing the preceding steps, the expected output should look as follows:
Figure 2B.35: Output from the successful implementation of contains
Note
The solution for this activity can be found on page 653 .
Summary
In this chapter, we learned about interfaces, inheritance, and polymorphism, which
extended our skills of what we can do with our types. We had our first adventure into
generic programming with C++ templates and touched on what the language gives
us for free from the C++ Standard Library, which includes the STL. We explored a
feature of C++ that just works, that is, template type deduction, which makes our life
easier when using templates. We then went further with templates and learned how
to control the parts of the template that are included by the compiler using SFINAE
and if constexpr. These form the building blocks for our journey into C++. In the next
chapter, we will revisit the stack and the heap, and understand what an exception is,
what happens, and when it occurs. We'll also learn how to protect our programs from
resource losses when exceptions occur.
Learning Objectives
By the end of this chapter, you will be able to:
•
Develop classes to manage resources
•
Develop exception-robust code so that the resources do not leak through RAII
•
Implement classes that can transfer resource ownership through move semantics
•
Implement classes that control implicit conversion
In this chapter, you will learn how to use a class to manage resources, protect against leaks, and
prevent copying a large amount of data.
No Leaks Allowed
- Exceptions and
Resources
3
194 | No Leaks Allowed - Exceptions and Resources
Introduction
In Chapter 2A, No Ducks Allowed – Types, and Deduction, we briefly touched on some
concepts, such as smart pointers and move semantics. In this chapter, we'll be exploring
them further. It turns out that these topics are very closely related to resource
management and writing robust code (code that will run often and for long periods
without problems).
To understand what happens, we are going to explore where variables get placed in
memory, as well as when and what happens when they go out of scope.
We will look at what the compiler generates as assembler code for what we enter, and
we will explore how all of this is affected when an exception occurs.
Variable Scope and Lifetime
In Chapter 2B, No Ducks Allowed – Templates, and Deduction, we discussed variable
scope and lifetimes. Let's quickly go through their different types:
Scope:
• Local scope (also known as block scope): This applies to anything that's declared
within a block that is enclosed within curly braces ({}).
• Global / file scope: This applies to variables declared outside a normal function or
a class, and also to the normal functions.
Lifetime:
• Automatic lifetime: Here, the local variables are created when they are declared,
and destroyed when they exit the scope that they are in. These are managed by
the stack.
• Permanent lifetime: Here, the global and static local variables have a permanent
lifetime.
• Dynamic lifetime: Here, the variables are created and destroyed at the request of
the programmer (using the new and delete operators). These variables have their
memory allocated from the heap.
Introduction | 195
We are going to use the following program to get a clarity on the behavior of local
variables – those that have an automatic lifetime and those that have a dynamic
lifetime:
Figure 3.1: Test program for variable scope and lifetime
196 | No Leaks Allowed - Exceptions and Resources
When we run the preceding program, the following output is generated:
Figure 3.2: Output from Lifetime test program
The hexadecimal numbers (0xNNNNNNNN) in the preceding output are the addresses of the
Int objects that are being constructed or destructed. Our program starts by entering
at line 46 with the main() function. At this point, the program has already done a lot of
initialization so that everything is readily available for us to use. The figures below that
refer to two stacks – PC Stack and Data Stack.
Introduction | 197
These are the abstract concepts that help us explain what happens behind the scenes.
The PC Stack (Program Counter Stack) is used to remember the values of the program
counter (a register pointing to the next instruction that needs to be run), while the Data
Stack holds the values or addresses that we are manipulating. Although these are two
separate stacks, on the real CPU, it will most likely be implemented as one stack. Let's
look at the following tables wherein we've used the abbreviation OLn to refer to a line
number from the output of the preceding program:
Figure 3.3: Detailed analysis of the test program's execution (part 1)
198 | No Leaks Allowed - Exceptions and Resources
Below is the second part of the detailed analysis of the test program's execution:
Figure 3.4: Detailed analysis of the test program's execution (part 2)
Introduction | 199
Below is the third part of the detailed analysis of the test program's execution:
Figure 3.5: Detailed analysis of the test program's execution (part 3)
From this simple program, we learned some important facts:
• Copy constructors are called when we pass by value (as we did in this case).
• Returning a type causes only one constructor to be called (not two constructors –
one to create the return object and one for the variable to store the returned data)
–
C++ calls this copy elision and it is now mandatory in the standard.
200 | No Leaks Allowed - Exceptions and Resources
• On termination of scope (the closing curly bracket '}'), any variable that goes
out of scope has its destructor called. If that is true, then why was the address
0x6000004d0 not shown with a destructor call (~Int())? This leads us to the next
fact.
• The destructor for a raw pointer only 'destroys' the pointer, not what it points
at. This means that when we exited the calculate() method, we leaked some
memory.
The last two facts are important in understanding and solving the problem of resource
leaks when we forget to free the resources. We will look at resource management after
we deal with exceptions in C++.
Exceptions in C++
We have seen how C++ manages the local scope variables with automatic and dynamic
lifetime. It calls the destructors of variables with an automatic lifetime when they go out
of scope. We've also seen how raw pointers get destroyed when they go out of scope.
As it does not clean up the dynamic lifetime variables, we lose them. This is a part of
the story that builds us towards Resource Acquisition Is Initialization (RAII) later. But,
first, we need to understand how exceptions change the flow of the program.
The Need for Exceptions
In Chapter 2A, No Ducks Allowed – Types and Deduction, we were introduced to
enumerations as a way of dealing with magic numbers for the check_file() function:
FileCheckStatus check_file(const char* name)
{
FILE* fptr{fopen(name,"r")};
if ( fptr == nullptr)
return FileCheckStatus::NotFound;
char buffer[30];
auto numberRead = fread(buffer, 1, 30, fptr);
fclose(fptr);
if (numberRead != 30)
return FileCheckStatus::IncorrectSize;
Exceptions in C++ | 201
if(is_valid(buffer))
return FileCheckStatus::InvalidContents;
return FileCheckStatus::Good;
}
The preceding function uses a technique known as status or error codes to report the
outcome of the operation. This is the approach that's used for C-style programming,
wherein errors related to the POSIX API and Windows API are handled.
Note
POSIX stands for Potable Operating System Interface. It is an IEEE standard for
software compatibility between variants of Unix and other operating systems.
This means that, the caller of the method must check the return value and take the
appropriate action for each error type. This approach works well when you can reason
about the types of errors that the code will generate. This is not always true. For
example, there may be a problem with the data that is fed to the program. This leads
to an abnormal state in the program that cannot be handled. The part of the code that
has the logic to deal with the error is removed from the section of code that detects the
problem.
While it is possible to write code that deals with such a problem, it increases the
complications of dealing with all error conditions, thereby making the program hard to
read, hard to reason about what the function is supposed to do, and thus very hard to
maintain.
For error handling, exceptions provide the following benefits over error codes:
• Error codes can be ignored – exceptions force the error to be dealt with (or the
program terminates).
• Exceptions can flow up the stack to the best method to respond to the error. Error
codes would require propagation out of each intermediate method.
• Exceptions separate the handling of errors from the main program flow, leading to
easy readability and maintainability of the software.
• Exceptions separate the code that detects the error, from the code that handles
the error.
202 | No Leaks Allowed - Exceptions and Resources
Provided you follow the best practices and use exceptions for abnormal conditions,
there is no (time) overhead in using exceptions. This is because a well-implemented
compiler will deliver the C++ mantra – you do not pay for what you don't use. It may
cost some memory and your code may be a little larger, but the running time should be
unaffected.
C++ uses exceptions to deal with runtime anomalies. By using exceptions, we can detect
an error, throw an exception, and the error propagates back to the location where it can
be handled. Let's modify the previous program to introduce the divide() function and
change the calculate() function to call it. We'll also add logging to the main() function so
that we can explore how the exceptions behave:
Figure 3.6: Modified test program for investigating exceptions
When we compile and run the preceding program, the following output is generated:
Exceptions in C++ | 203
Figure 3.7: Output from the test program
In the preceding code, you can see that the annotations are added to the right. Now, we
remove the comment from the result2 line in the program, recompile the program, and
rerun it. The new output that's generated is shown as follows:
Figure 3.8: Output from the test program – result2
By comparing the outputs, we can see that the first eight lines of each are the same.
The next two lines of the preceding output are added because the divide() function is
called twice. The last line indicates that an exception was thrown and that the program
was terminated.
204 | No Leaks Allowed - Exceptions and Resources
The second call to the divide() function attempted to divide by zero – an abnormal
operation. This leads to an exception. If an integer is divided by zero, then it leads to
a floating-point exception. This has to do with the way exceptions are generated in a
POSIX system – it uses something called a signal (we won't go into the details of signals
here). When an integer is divided by zero, the POSIX system maps it to the signal called
SIGFPE which was originally meant for floating-point error but is now the more
generic arithmetic error.
Note
According to the C++ standard, if a zero appears as the divisor for either the '/'
operator (divide) or the '%' operator (modulus), then the behavior is undefined.
Most systems will choose to throw an exception.
So, we have learned one important fact from the preceding explanation: that an
unhandled exception will terminate the program (internally, it calls std::terminate()).
We will fix the undefined behavior, catch the exception, and see the changes in the
output.
To fix the undefined behavior, we need to add #include <stdexcept> at the top of the
file and modify the divide() function:
Int divide(Int a, Int b )
{
if (b.m _value == 0)
throw std::domain_error("divide by zero error!");
return a.m _value/b.m_value;
}
When we re-compile and run the program, we get the following output:
Figure 3.9: Output when we throw an exception
Exceptions in C++ | 205
As we can see from the preceding output, not much has changed. It's just that we
don't get a floating-point exception (core dumped) – the program still terminates but
doesn't dump the core. We then added a try/catch block into the main() function to
ensure that the exception was no longer unhandled.
Figure 3.10: Catching the Exception
Recompile the program and run it to get the following output:
Figure 3.11: Output from the program that catches the exception
In the preceding output, an exception is thrown on the second line that is annotated
as "copy a for call to divide". Everything that is output after that is a result of the
exception being handled.
206 | No Leaks Allowed - Exceptions and Resources
Our code has transferred program control to the catch() statement in the main()
function and has executed the destructors for all the variables that had been
constructed on the stack (from the time the call was made in the try clause).
Stack Unwinding
The process of destroying all local function variables, as guaranteed by the C++
language is known as Stack Unwinding. As the stack unwinds in the presence of an
exception, C++ uses its well-defined rules to destroy all the objects in the scope.
When an exception occurs, the function call stack starts searching linearly from the
current function back to the function that called it, to the one that called that, and so
on, until an exception handler (expressed by a catch block) that matches the exception
is found.
If an exception handler is found, then the stack unwinding occurs, destroying all the
local variables for all the functions in the stack. The objects are destroyed in the reverse
order that they were created. If no handler is found to deal with the thrown exception,
then the program terminates (usually without warning the user).
Exercise 1: Implementing exceptions in Fraction and Stack
In this exercise, we will return to two classes that we worked on in Chapter 2A, No
Ducks Allowed – Types and Deduction and Chapter 2B, No Ducks Allowed – Templates and
Deduction – Fraction and Stack, both of which can experience runtime anomalies. We
are going to update their code so that they can raise exceptions whenever any problem
is detected. Follow these steps to implement this exercise:
1. Open Eclipse and create a new project named Lesson3 using the files found in the
Lesson3 examples folder.
2. As this is a CMake-based project, change the current builder to be CMake Build
(portable).
3. Go to the Project | Build All menu to build all the exercises. By default, the console
at the bottom of the screen will display the CMake Console [Lesson3].
4. Configure a new Launch Configuration, L3Exercise1 to run with the name
Exercise1.
5. Also, configure a new C/C++ Unit Run Configuration, L3Ex1Tests, to run
L3Ex1tests. Set the Google Tests Runner.
Exceptions in C++ | 207
6. Click on the Run option for the existing 18 tests to run and pass.
Figure 3.12: Existing tests all pass (Runs: 18)
7. Open Fraction.hpp in the editor and change the line at the top of the file to read
like so:
#define EXERCISE1_STEP 14
8. Click on the Run button to re-run the tests – we have added one test that will
attempt to create a Fraction with a zero denominator. The test expects that an
exception has been thrown:
Figure 3.13: New failing test ThrowsDomainErrorForZeroDenominator
208 | No Leaks Allowed - Exceptions and Resources
9. Click on the failing test name – the Messages window will now show the expected
behavior and the actual behavior. You may need to scroll to the right to read
it all. At the very right it indicates "Expected ... throws an exception of type
std::domain_error" and the next line states "Actual: it throws nothing".
10. Double-click on the message and it will take you to the following test:
Figure 3.14: The failing test
The ASSERT_THROW() macro requires two arguments. Since the Fraction
initializer has a comma in it, it is necessary to wrap the whole first argument
in an extra set of parentheses. The second argument is expected to get a
std::domain_error from this constructor. The internal try/catch structure is
present to confirm that the expected string is captured inside the exception
object. If we do not want to check this, then we could simply write the test like so:
ASSERT_THROW(({Fraction f1{1,0}; }), std::domain_error);
11. Open the file Fraction.cpp in the editor. Insert the following line near the top of
the file:
#include <stdexcept>
12. Modify the constructor to throw an exception if it's been created with a zero
denominator:
Fraction::Fraction(int numerator, int denominator)
: m_numerator{numerator}, m_
denominator{denominator}
{
if(m_denominator == 0)
{
Exceptions in C++ | 209
throw std::domain_error("Zero Denominator");
}
}
13. Click on the Run button to re-run the tests. 19 tests now pass.
14. Open Fraction.hpp in the editor and change the line near the top of the file to
read like so:
#define EXERCISE1_STEP 20
15. Click on the Run button to re-run the tests – the new test
ThrowsRunTimeErrorForZeroDenominator fails.
16. Click on the failing test name – the Messages window will now show the expected
behavior and the actual behavior. You may need to scroll to the right to read
it all. At the very right it indicates "Expected... throws an exception of type
std::runtime_error" and the next line states "Actual: it throws a different
type".
17. Double-click on the message again to open the failing test:
Figure 3.15: Another failing test
This test is verifying that the division assignment operator will throw an exception
for a divide by zero.
18. Open Fraction.cpp and locate the operator/=() function. You'll see that, inside
this function, it actually uses the constructor for Fraction, so it will throw a
std::domain_error.
210 | No Leaks Allowed - Exceptions and Resources
19. Now modify operator/=() to detect this problem before the constructor is called
so that it throws a std::runtime_error with the expected message.
20. Modify Fraction.cpp by adding a domain error that will detect the division
operator:
Fraction& Fraction::operator/=(const Fraction& rhs)
{
if (rhs.m _numerator == 0)
{
throw std::runtime_error("Fraction Divide By Zero");
}
Fraction tmp(m_numerator*rhs.m _denominator,
m_denominator*rhs.m _numerator);
*this = tmp;
return *this;
}
21. Click on the Run button to re-run the tests. All 20 tests pass.
22. Open Stack.hpp in the editor and change the line near the top of the file to read
like so:
#define EXERCISE1_STEP 27
23. Click on the Run button to re-run the tests – we have added one test that will
attempt to pop from an empty stack. In the C/C++ Unit tab window, click on the
triangle next to FractionTest to collapse the lists of tests and show the StackTest:
Figure 3.16: pop Stack test fails
Exceptions in C++ | 211
24. Use the C/C++ Unit window to click through and locate the failing test. Determine
the expected exception and then open Stack.hpp. Add #include <stdexcept> to the
top of the file and then update the pop() function so that it looks like this:
void pop()
{
if(empty())
throw std::underflow_error("Pop from empty stack");
m_stack.pop_back();
}
25. Click on the Run button to re-run the tests. 21 tests now pass.
26. Open Stack.hpp in the editor and change the line at the top of the file to read like
so:
#define EXERCISE1_STEP 31
27. Click on the Run button to re-run the tests – the newly added test,
TopEmptyStackThrowsUnderFlowException, fails.
28. Use the C/C++ Unit window to click through and locate the failing test. Determine
the expected exception and then open Stack.hpp. Update the non-const top()
method so that it looks as follows:
reference top()
{
if(empty())
throw std::underflow_error("Top from empty stack");
return m_stack.back();
}
29. Click on the Run button to re-run the tests. 22 tests pass.
30. Open Stack.hpp in the editor and change the line at the top of the file to read like
so:
#define EXERCISE1_STEP 35
31. Click on the Run button to re-run the tests – the newly added test,
TopEmptyConstStackThrowsUnderFlowException, fails.
32. Use the C/C++ Unit window to click through and locate the failing test. Determine
the expected exception and then open Stack.hpp. Update the const top() method
so that it looks as follows:
const_reference top() const
{
212 | No Leaks Allowed - Exceptions and Resources
if(empty())
throw std::underflow_error("Top from empty stack");
return m_stack.back();
}
33. Click on the Run button to re-run the tests. All 23 tests now pass.
In this exercise, we have added run time checking for pre-conditions that are part
of the normal operation of using our Fraction and Stack classes. This code will only
execute to throw an exception when one of the pre-conditions is violated, indicating
that there's a problem with the data or how our program was executed.
What Happens When an Exception is Thrown?
At some point, our program executes the following statement:
throw expression;
By executing this, we are signaling that an erroneous condition has occurred, and that
we want it handled. The next thing that happens is a temporary object, known as the
exception object, is constructed in an unspecified storage and copy-initialized from the
expression (which may call the move constructor and may be subject to copy elision).
The type of the exception object is statically determined from the expression with the
const and volatile qualifiers removed. Array types decay to pointers, while function
types are converted into a pointer of a function. If the type of expression is malformed
or abstract, then a compiler error will occur.
After the construction of the exception object, the control, along with the exception
object, is transferred to the exception handler. The exception handler that's chosen is
the one that has the closest matching type to the exception object as the stack unwinds.
The exception object exists until the last catch clause exits, unless it is rethrown. The
type of the expression must have an accessible copy constructor and a destructor.
Throw-by-Value or Throw-by-Pointer
Knowing that a temporary exception object is created, passed around, and then
destroyed, what type should the throw expression use? A value or a pointer?
We haven't talked much about specifying the types in the catch statements yet. We will
do that shortly. But for now, note that to catch a pointer type (which was thrown), the
catch pattern also needs to be of a pointer type.
If a pointer to an object is thrown, then the throwing party must ensure that what the
exception object will point at (as it will be a copy of a pointer) will be kept alive until the
exception has been handled, even through the stack unwinding.
Exceptions in C++ | 213
The pointer could be to a static variable, a global variable, or memory that's been
allocated from the heap to ensure that the object being pointed to still exists when the
exception is handled. Now, we have solved the problem of keeping the exception object
alive. But when the handler has finished with it, what does the catcher do with it?
The catcher of the exception isn't aware about the creation of the exception object
(global, static, or heap) and so it doesn't know whether it should delete the received
pointer or not. Thus, throwing-by-pointer is not the recommended approach of
throwing exceptions.
An object that is thrown will be copied to the created temporary exception object and
handed off to the handler. When the exception has been handled, the temporary object
will simply be destroyed, and the program will continue. There is no ambiguity as to
what to do with it. Therefore, the best practice is to throw the exception by value.
Standard Library Exceptions
The C++ Standard Library defines std::exception as the base class for all the Standard
Library exceptions. The standard defines the following first-level hierarchy of
exceptions/errors (the number in brackets indicates how many exceptions derive from
that class):
Figure 3.17: Standard Library exception hierarchy (two levels)
These exceptions are used through the C++ Standard Library including the STL. The
best practice when creating your own exception class is deriving it from one of the
standard exceptions. As we will see next, your special exception can be caught by a
handler for one of the standard exceptions.
214 | No Leaks Allowed - Exceptions and Resources
Catching Exceptions
While discussing the need for exceptions, we introduced the idea of throwing the
exceptions but did not really look at how C++ supports catching the exception. The
process of exception handling starts with a section of code being wrapped in a try
block to place it under exception inspection. The try block is followed by one or more
catch blocks, which are the exception handlers. When an exceptional circumstance
occurs while executing the code inside the try block, an exception is thrown, and
control is transferred to the exception handlers. If no exceptions are thrown, then all
the exception handlers are skipped, the code in the try block completes, and normal
execution continues. Let's express these concepts in a code snippet:
void SomeFunction()
{
try {
// code under exception inspection
}
catch(myexception e)
// first handler – catch by value
{
// some error handling steps
}
catch(std::exception* e)
// second handler – catch by pointer
{
// some other error handling steps
}
catch(std::runtime_error& e) // third handler – catch by reference
{
// some other error handling steps
}
catch(...)
// default exception handler – catch any
exception
{
// some other error handling steps
}
// Normal programming continues from here
}
Exceptions in C++ | 215
The preceding snippet shows the necessary keywords – try, and catch and introduces
the three different types of catch pattern (excluding the default handler):
• Catch exception by value: This is a costly mechanism as the exception handler
is processed like any other function. Catch-by-value means that a copy of the
exception object must be created and then passed to the handler. The creation
of the second copy slows down the exception handling process. This type can
also suffer from object slicing where a subclass is thrown, and the catch clause
is a super class. The catch clause will then only receive a copy of the super-class
object that loses the attributes of the original exception object. Therefore, we
should avoid catch-by-value exception handlers.
• Catch exception by pointer: As discussed when looking at throw-by-value, with
throw-by-pointer, this style of exception handler can only catch exceptions
thrown by the pointer. As we only want to throw by value, we should avoid catch-
by-pointer exception handlers.
• Catch expression by reference: This is the recommended style of exception
handler as it does not suffer from the issues related to catch-by-value and
catch-by-pointer. As a reference is passed to the handler, no second copy of the
exception object is made. Splicing does not occur because the reference still refers
to the originally thrown exception object. And since the exception was thrown by
value, the temporary exception object will be destroyed automatically when we
are done with it.
Note
When dealing with exceptions, it is throw-by-value and catch-by-reference.
When there are multiple catch blocks, the exception object type is used to match
the handlers in the order that they are specified. Once a handler is found to match,
it is executed, and the remaining exception handlers are ignored. This is different to
function resolution, where the compiler will find the best match to the arguments.
Thus, the exception handlers (catch blocks) should be defined from the more specific to
the more general. For example, the default handler (catch(...)) should always come last
in the definition.
216 | No Leaks Allowed - Exceptions and Resources
Exercise 2: Implementing Exception Handlers
In this exercise, we will implement a hierarchy of exception handlers to manage how
exceptions are processed. Follow these steps to implement this exercise:
1. Open the Lesson3 project in Eclipse. Then in the Project Explorer, expand
Lesson3 then Exercise02 and double click on exceptions.cpp to open the file for
this exercise into the editor. This file contains the following code:
#include <exception>
#include <iostream>
void run_exceptions()
{
try
{
throw std::domain_error("We got one!!!!");
}
catch(...)
{
std::cout << "Exception caught by default handler\n";
}
catch(const std::exception& e)
{
std::cout << "Exception '" << "' caught by std::exception
handler\n";
}
catch(const std::logic_error& e)
{
std::cout << "Exception '" << "' caught by std::logic_error
handler\n";
}
catch(const std::domain_error& e)
{
std::cout << "Exception '" << "' caught by std::domain_error
handler\n";
}
}
int main()
{
std::cout << "\n\n------ Exercise 2 ------\n";
run_exceptions();
Exceptions in C++ | 217
std::cout << "Complete.\n";
return 0;
}
Note
All the exception handlers have used the same name for the exception argument,
that is, e. The scope for that variable is only the catch block that it is declared in.
2. Click on the Launch Configuration drop down menu and select New Launch
Configuration... . Configure the L3Exercise2 application from the Search Project
menu to run it with the name L3Exercise2.
3. When that is complete, it will be the currently selected Launch Configuration.
4. Click on the Run button. Exercise 2 will run and produce the following output:
Figure 3.18: Exercise 2 output – default handler caught the exception
5. In the Console window, click on the Display Selected Console button, and select
CDT Global Build Console. Scroll through the window. You will find (if the GCC
compiler is being used) that there are five warning messages related to the order
that we have placed our exception handlers in. (Actually, the first warning would
normally be an error except that the CMake file sets the -fpermissive flag when it
compiles this target.)
6. In the editor, move the default exception handler, catch(...), to just after the
std::domain_error handler. Click on the Run button. Exercise 2 will run and
produce the following output:
Figure 3.19: std::exception handler has been used
7. In the editor, move the std::exception handler to just after the std::domain_error
handler. Click on the Run button. This time, it will report that the std::logic_
error handler was executed.
218 | No Leaks Allowed - Exceptions and Resources
8. In the editor, move the std:: logic_error handler to just after the std::domain_
error handler. Click on the Run button. This time, it will report that the std::
domain_error handler was executed which is actually what we would expect.
9. Now change the throw line to be a std::logic_error exception. Click on the Run
button. This time, it will report that std::logic_error handler was executed as
expected.
10. Now change the throw line to be a std::underflow_error exception. Click on
the Run button and this time it will report that the exception was caught by
the std::exception handler as expected. std::exception is the base class for all
Standard Library exceptions.
In this exercise, we implemented a series of exception handlers and observed how
the order of exception handlers affects the way an exception is caught and how the
exception hierarchy can be used.
CMake Generator Expressions
When working with CMake, it is sometimes necessary to adjust the value of a variable.
CMake is a build generator system that can generate build files for many build tools and
compiler tool chains. Because of this flexibility, if you want to turn on some feature in
the compiler, you only need to apply to it to one particular type. This is because the
command-line options are different between vendors. For example, the command line
option for the g++ compiler to enable C++17 support is -std=c++17, but for msvc it is /
std:c++17. If you open the CMakeLists.txt file and locate L3Exercise2 add_excutable,
then the following line will be after it:
target_compile_options(L3Exercise2 PRIVATE $<$<CXX_COMPILER _ID:GNU>:-
fpermissive>)
This uses the $<CXX_COMPILER_ID:GNU> variable query to check whether it is a GCC
compiler. If yes, then it generates a 1 (true), otherwise 0 (false). It also uses the
$<condition:true_string> condition expression to add -fpermissive to the compiler
options for the L3Exercise2 target, but only for the gcc compiler. These can be added
for each compiler type as separate calls to target_compile_options or via one call.
Note
For more information on generator expressions, please take a look at the
following link: https://cmake.org/cmake/help/v3.15/manual/cmake-generator-
expressions.7 .html.
Resource Management (in an Exceptional World) | 219
Exception Usage Guidelines
When using exceptions in your C++ code, remember the following points:
• Chant: Throw by value and catch by reference
• Do not use exceptions for normal program flow. If a function meets an abnormal
condition and is not able meet its (functional) obligations, then and only then do
you throw an exception. If the function can resolve the abnormal condition and
fulfil its obligations, then it is not an exception. They are named exceptions for a
reason and you will not incur any processing overhead if you do not use them.
• Do not throw an exception from within a destructor. Remember that because
of stack unwinding, local variable destructors will be executed. If a destructor
is called during the stack unwinding process and throws an exception, then the
program will terminate.
• Do not swallow exceptions. Do not use the default catch handler and do nothing
about the exception. The exception has been thrown to indicate that there is a
problem and you should do something about it. Ignoring an exception can lead
to a failure later that will be hard to troubleshoot. This is because any useful
information is truly lost with the swallowed exception.
• The exception object is copied from the throw.
Resource Management (in an Exceptional World)
So far, we have looked at local variable scope, and how automatic and dynamic lifetime
variables are dealt with when the variable goes out of scope – automatic lifetime
variables (those placed on the stack) are fully destructed while dynamic lifetime
variables (those allocated to the heap by the programmer) are not destructed: we just
lose any access to them. We have also seen that, when an exception is thrown, the
nearest matching handler is found and all the local variables between the throw point
and the handler will be destructed through the stack unwinding process.
We can use this knowledge to write robust resource management classes that will
relieve us from the need to keep track of resources (dynamic lifetime variables, file
handles, system handles, and so on) to ensure that they are released (back into the wild)
when we are done with them. The technique that's utilized to manage resources, both
under normal operating and under exceptions, is known as Resource Acquisition is
Initialization (RAII).
220 | No Leaks Allowed - Exceptions and Resources
Resource Acquisition Is Initialization
RAII is another good example of a badly named concept (the other is SFINAE). RAII, or
Resource Acquisition is Initialization describes the behavior of a class that's used to
manage resources. It may be better if it were named Destruction is Resource Release,
which really captures the essence of what the management class is attempting to do.
We could infer from our previous discussions how to make this work, but it will be more
instructive to show a separate example that will develop the resource management File
class and show how RAII also improves the readability and our ability to reason about
what a function does.
Consider the following code:
void do_something()
{
FILE* out{};
FILE* in = fopen("input.txt", "r");
try
{
if (in != nullptr)
{
// UNSAFE – an exception here will create a resource leak
out = fopen("output.txt", "w");
if (out != nullptr)
{
// Do some work
// UNSAFE – an exception here will create resource leaks
fclose(out);
}
fclose(in);
}
}
catch(std::exception& e)
{
Resource Management (in an Exceptional World) | 221
// Respond to the exception
}
}
This code shows two potential problems with the management of resources:
• Most importantly, the occurrence of an exception between the opening and
closing of a file results in the resource leaking. If this is a system resource, many
of these can lead to system instability or application performance being adversely
affected, since it starves for resources.
• In addition, the management of multiple resources within one method can lead
to deeply nested clauses because of error handling. This is detrimental to the
readability of the code and hence its understanding and maintainability. It is easy
to forget to release a resource, especially when there are multiple exit points.
So, how can we manage the resource so that we have exception-safe and simpler code?
This problem is not unique to C++ and different languages manage it differently. Java,
C#, and Python use a garbage collection approach that sweeps through created objects
and cleans them up when they are no longer referenced. But C++ does not have garbage
collection, so what is the solution?
Consider the following class:
class File {
public:
File(const char* name, const char* access) {
m_file = fopen(name, access);
if (m_file == nullptr) {
throw std::ios_base::failure("failed to open file");
}
}
~ File() {
fclose(m_file);
}
operator FILE*() {
return m_file;
222 | No Leaks Allowed - Exceptions and Resources
}
private:
FILE* m_file{};
};
This class implements the following characteristics:
• The constructor acquires the resource.
• If the resource is not acquired in the constructor, then an exception is thrown.
• When the class is destroyed, the resource is released.
If we use this class in the do_something() method, it then looks like this:
void do_something()
{
try
{
File in("input.txt", "r");
File out("output.txt", "w");
// Do some work
}
catch(std::exception& e)
{
// Respond to the exception
}
}
If an exception occurs while doing this, then C++ guarantees that all stack-based
objects will have their destructors called (stack unwinding), thus ensuring that the files
are closed. This solves the problem of resources leaking with the occurrence of an
exception as the resources are now automatically cleaned up. In addition, this method
is extremely easy to read so that we can understand the logic flow without having to
worry about error handling.
Resource Management (in an Exceptional World) | 223
This technique uses the lifetime of the File objects to acquire and release the
resource, ensuring that the resources do not leak. The resource is acquired during
the construction (initialization) of the management class and released during the
destruction of the management class. It is this behavior of scope-bound resources that
gives rise to the name Resource Acquisition Is Initialization.
The preceding example deals with managing file handles that are system resources.
It applies to any resources that are required to be acquired before use, and then
relinquished when finished. The RAII technique can be applied to a wide range of
resources – open files, open pipes, allocated heap memory, open sockets, threads of
execution, database connections, locking of mutexes/critical sections – basically any
resource that is in short supply in the host system and needs to be managed.
Exercise 3: Implementing RAII for Memory and File Handles
In this exercise, we will implement two different classes that will manage memory or
files using the RAII technique. Follow these steps to implement this exercise:
1. Open the Lesson3 project in Eclipse. Then in the Project Explorer, expand
Lesson3, then Exercise03, and double click on Exercise3.cpp to open the file for
this exercise into the editor.
2. Click on the Launch Configuration drop down menu and select New Launch
Configuration... . Configure the L3Exercise3 application from the Search Project
menu to run it with the name L3Exercise3.
3. Click on the Run button to run Exercise 3. This will produce the following output:
Figure 3.20: Leaky memory and files from Exercise3.cpp
224 | No Leaks Allowed - Exceptions and Resources
The output shows that we allocated memory five times and that the addresses are
returned by new. When executing from the main() function when the monitor is
destructed, it dumps a report of memory that was allocated and released, as well
as the files that were opened but never closed.
4. In the editor, type the following into the Exercise3.cpp file of the File class:
class File {
public:
File(const char* name, const char* access) {
m_file = fopen(name, access);
if (m_file == nullptr) {
throw std::ios_base::failure(""failed to open file"");
}
}
~ File() {
fclose(m_file);
}
operator FILE*() {
return m_file;
}
private:
FILE* m_file{};
};
5. Click on the Run button to run Exercise 3 – it still leaks files and memory, but the
code is correct.
6. Locate the LeakFiles() function and modify it so that it uses the new File class
(like in the preceding code) to prevent file leaks:
void LeakFiles()
{
File fh1{"HelloB1.txt", "w"};
fprintf(fh1, "Hello B2\n");
File fh2{"HelloB2.txt", "w"};
fprintf(fh2, "Hello B1\n");
}
Resource Management (in an Exceptional World) | 225
7. Click on the Run button to run Exercise 3. If you have modified LeakFiles()
correctly, then the output will be as follows:
Figure 3.21: No file leaks
8. Now in Exercise3.cpp, add the following CharPointer class:
class CharPointer
{
public:
void allocate(size_t size)
{
m_memory = new char[size];
}
operator char*() { return m_memory;}
private:
char* m_memory{};
};
9. Modify LeakPointers() to read like so:
void LeakPointers()
{
CharPointer memory[5];
for (auto i{0} ; i<5 ; i++)
226 | No Leaks Allowed - Exceptions and Resources
{
memory[i].allocate(20);
std::cout << "allocated 20 bytes @ " << (void *)memory[i] << "\n";
}
}
10. Click on the Run button to run Exercise 3 – it still has memory leaks, but the code
is correct.
11. Now, add the following destructor to CharPointer. Note that the delete operator
uses the array [] syntax:
~ CharPointer()
{
delete [] m_memory;
}
12. Click on the Run button again to run Exercise 3 – this time, you should see that
the monitor reports no leaks:
Figure 3.22: No leaks – memory or files
The implementation of File and CharPointer deliver on the RAII design approach, but
there are other considerations when designing these. For example, do we want the
copy constructor or copy assignment functions? In both cases, it could be a problem to
just copy the resource from one object to another as this could result in two attempts
to close a file handle or delete the memory. Typically, this would lead to undefined
behavior. Next, we will re-visit the special member functions in light of implementing a
resource management object such as File or CharPointer.
Special Coding Techniques
The code for Exercise 3, Implementing RAII for Memory and File Handles, has been
specially written so that we can monitor the usage of the memory and the file handles
and report any leaks on exit. Visit the monitor.h and monitor.cpp files and examine the
two techniques that were used to make the monitor possible:
Resource Management (in an Exceptional World) | 227
• Preprocessor macros: This is the special use of a preprocessor macro to
demonstrate the leaks and should not be used in production code, that is,
replacing a function by text substitution.
If you program to the Windows API, you may occasionally be caught with your
method names clashing with the macros Microsoft uses for its API methods. For
example, do not call any of your methods SendMessage if you include windows.h.
If you do, then depending on whether you are building ASCII mode or Unicode
mode, it will be substituted with SendMessageA or SendMessageW respectively.
• Defining our own new handler: This is an advanced technique and unless you
write embedded code, it's unlikely you will need it.
C++ doesn't Need finally
Other languages (C#, Java, and Visual Basic.NET) that support an exception throwing
mechanism have a try/catch/finally paradigm where the code in the finally block is
called on exit from the try block – either normally or by exception. C++ has no finally
block because it has access to a better mechanism that ensures that we cannot forget
to release a resource – RAII. Since the resource is represented by a local object, the
local object's destructor will free the resource.
The added advantage of this design pattern is that if a lot of resources are being
managed, then the finally block is proportionally large. RAII removes the need for
finally and leads to code that is easier to maintain.
RAII and the STL
The Standard Template Library (STL) utilizes RAII in many of its templates and classes.
For example, the smart pointers that were introduced in C++11, that is std::unique_ptr
and std::shared_ptr, help avoid many problems by ensuring that memory is deallocated
when it has been finished with, or by ensuring that the memory is not deallocated if it is
used elsewhere. Other examples in the STL include std::string (memory), std::vector
(memory), and std::fstream (file handles).
Who Owns This Object?
With the preceding implementations of File and CharPointer, we have tested Resource
Management with RAII. Let's explore it further. Firstly, we will define a class that has
more than just one resource:
class BufferedWriter
{
public:
228 | No Leaks Allowed - Exceptions and Resources
BufferedWriter(const char* filename);
~ BufferedWriter();
bool write(const char* data, size_t length);
private:
const size_t BufferSize{4096};
FILE* m_file{nullptr};
size_t m_writePos{0};
char* m_buffer{new char[BufferSize]};
};
The class is used for buffering the writing to the file.
Note
This is not usually necessary when using iostream derived classes as they already
provide buffering.
Each call to the write() function will add data into the allocated buffer until it reaches
the BufferSize at which point the data is actually written to the file and the buffer is
reset.
But what if we wanted to assign this instance of BufferedWriter to another instance or
copy it? What is the right behavior?
If we just let the default copy constructor/copy assignment do its their thing we get
a member-wise copy of the items. This would mean that we have two instances of
BufferedWriter that hold the same handle to the file and the pointer to the buffer.
When the first instance of the object is destroyed, being the good programmers
that we are, we will clean up the file by closing it and the memory by deleting it. The
second instance now has a file handle that is defunct and a pointer to memory that we
have told the operating system to recover for the next user. Any attempt to use these
resources, including destroying them, will result in undefined behavior and mostly likely
a program crash. The default copy constructor/copy-assignment operators execute
what is known as a shallow copy – that is, it copies all the members as they are, bit by
bit (but not what they refer to).
Resource Management (in an Exceptional World) | 229
The two resources that we have can be treated differently. Firstly, there should only be
one class that owns the m_buffer. There are two options in dealing with this:
• Prevent the copy of the class and hence the memory
• Perform a deep copy where the buffer in the second instance has been allocated by
the constructor and the contents of the first buffer is copied
Secondly, there should only be one class that owns the file handle (m_file). There are
two options in dealing with this:
• Prevent the copy of the class and hence the file handle
• Transfer the ownership from the original instance to the second instance and mark
the original as invalid or empty (whatever that means)
It is easy enough to implement a deep copy, but how do we transfer ownership of a
resource? To answer this question, we need to look at temporary objects and value
categories again.
Temporary Objects
A temporary object is created to store the intermediate results of an expression
before the result is deposited into a variable (or just forgotten). An expression is any
code that returns a value, including passing by value to a function, returning a value
from a function, implicit conversion, literals, and binary operators. Temporary objects
are rvalue expressions and they have memory, temporarily allocated for them as a
location, to place the expression result. It is this creation of temporaries and copying
data between them that caused some performance issues prior to C++11. To address this
issue, C++11 introduced rvalue references to enable what is known as move semantics.
Move Semantics
An rvalue reference (denoted by a double ampersand, '&&') is a reference that is only
assigned an rvalue that will extend the rvalue's lifetime until the rvalue reference is
done with it. So, rvalues can live beyond the expression that defined it. With rvalue
references, we can now implement move semantics through the move constructor and
move assignment operators. The purpose of move semantics is to steal resources from
the referenced object and thus avoid the expensive copy operations. When the move is
complete, the referenced object must be left in a stable state. In other words, the object
that was moved from must be left in a state that will not cause any undefined behavior
or a program crash when it is destroyed, nor should it affect the resources that were
stolen from it.
230 | No Leaks Allowed - Exceptions and Resources
C++11 also introduced a casting operator std::move(), that casts an lvalue to an rvalue
so that the move constructor or move assignment operator gets called to 'move' the
resources. The std::move() method does not actually move the data.
One unexpected thing to note is that, inside the move constructor and move
assignment operator, the rvalue reference is actually an lvalue. This means that if you
want to ensure move semantics happen within the method then you may need to use
std::move() again on the member variables.
As C++11 introduced move semantics, it also updated the Standard Library to take
advantage of this new capability. For example, std::string and std::vector have been
updated to include move semantics. To get the benefits of move semantics; you just
need to re-compile your code with the latest C++ compiler.
Implementing a Smart Pointer
A smart pointer is a resource management class that holds a pointer to a resource and
releases it when it goes out of scope. In this section, we will implement a smart pointer,
observe its behavior as a copy supporting class, evolve it to support move semantics
and finally remove its support for copy operations:
#include <iostream>
template<class T>
class smart_ptr
{
public:
smart_ptr(T* ptr = nullptr) :m_ptr(ptr)
{
}
~smart_ptr()
{
delete m_ptr;
}
// Copy constructor --> Do deep copy
Resource Management (in an Exceptional World) | 231
smart_ptr(const smart_ptr& a)
{
m_ptr = new T;
*m_ptr = *a.m _ptr;
// use operator=() to do deep copy
}
// Copy assignment --> Do deep copy
smart_ptr& operator=(const smart_ptr& a)
{
// Self-assignment detection
if (&a == this)
return *this;
// Release any resource we're holding
delete m_ptr;
// Copy the resource
m_ptr = new T;
*m_ptr = *a.m _ptr;
return *this;
}
T& operator*() const { return *m_ptr; }
T* operator->() const { return m_ptr; }
bool is_null() const { return m_ptr == nullptr; }
private:
T* m_ptr{nullptr};
};
class Resource
232 | No Leaks Allowed - Exceptions and Resources
{
public:
Resource() { std::cout << "Resource acquired\n"; }
~ Resource() { std::cout << "Resource released\n"; }
};
smart_ptr<Resource> createResource()
{
smart_ptr<Resource> res(new Resource);
// Step 1
return res; // return value invokes the copy constructor
// Step 2
}
int main()
{
smart_ptr<Resource> the_res;
the_res = createResource(); // assignment invokes the copy assignment Step
3/4
return 0; // Step 5
}
When we run this program, the following output generated:
Figure 3.23: Smart Pointer Program output
For such a simple program, there is a lot of acquiring and releasing of the resource.
Let's pull this apart:
1. The local variable, res, inside createResource() is created and initialized on the
heap (dynamic lifetime), causing the first "Resource acquired" message.
Resource Management (in an Exceptional World) | 233
2. It is possible for the compiler to create another temporary to return the value.
However, the compiler has executed copy elision to remove the copy (that is, it is
able to build the object directly onto a position in the stack allocated by the calling
function). The compiler has Return-Value-Optimization (RVO) and Named- Return-
Value-Optimization (NRVO) optimizations that it can apply and, under C++17 these
have been made mandatory in certain circumstances.
3. The temporary object is assigned to the the_res variable in the main() function by
copy assignment. Since copy assignment is doing a deep copy, another copy of the
resource is acquired.
4. When the assignment completes, the temporary object goes out of scope and we
get the first "Resource released" message.
5. When the main() function returns, the_res goes out of scope, which releases the
second Resource.
So, if the resource is large, we have a very inefficient method of creating the the_res
local variable in main() as we are creating and copying around large chunks of memory
because of the deep copy in the copy assignment. However, we know that when the
temporary variable created by createResource() is no longer needed, then we are going
to throw it away and release its resource. It would be more efficient in these scenarios
to transfer (or move) the resource from the temporary to the other instance of the type.
Move semantics makes it possible to rewrite our smart_ptr template to not do the deep
copy but transfer the resource.
Let's add move semantics to our smart_ptr class:
// Move constructor --> transfer resource
smart_ptr(smart_ptr&& a) : m_ptr(a.m_ptr)
{
a.m _ptr = nullptr;
// Put into safe state
}
// Move assignment --> transfer resource
smart_ptr& operator=(smart_ptr&& a)
{
// Self-assignment detection
if (&a == this)
return *this;
// Release any resource we're holding
234 | No Leaks Allowed - Exceptions and Resources
delete m_ptr;
// Transfer the resource
m_ptr = a.m _ptr;
a.m _ptr = nullptr;
// Put into safe state
return *this;
}
After re-running our program, we get the following output:
Figure 3.24: Smart pointer program output using move semantics
Now, because move assignment is now available, the compiler uses it on this line:
the_res = createResource(); // assignment invokes the copy assignment Step
3/4
Step 3 is now replaced with move assignment, meaning the deep copy has now been
removed.
Step 4 no longer frees the resource because the line with the comment "//" puts into a
safe state – it no longer has a resource to free because its ownership was transferred.
Another point to note with the move constructor and move assignment is that where
the arguments were const for their copy versions, they were non-const for their move
versions. This is called the transfer of ownership, which means that we need to modify
the parameter that is passed in.
An alternative implementation of the move constructor may look like the following:
// Move constructor --> transfer resource
smart_ptr(smart_ptr&& a)
{
std::swap(this->m_ptr, a.m _ptr);
}
Essentially, we are swapping the resource, and the C++ STL has support for swap as a
template with many specializations. This works because we used member initialization
to set m_ptr to nullptr. So, we are swapping a nullptr with the value stored in a.
Resource Management (in an Exceptional World) | 235
Now that we have fixed the unnecessary deep copy problem, we can actually remove
the copy operations from smart_ptr() as the transfer of ownership is actually what we
want. If we were to copy an instance of a non-temporary smart_ptr to another instance
of a non-temporary instance of smart_ptr, then we would have two objects that would
delete the resource when they go out of scope, and this is not the desired behavior. To
remove the (deep) copy operations we change the definition of our member functions,
as follows:
smart_ptr(const smart_ptr& a) = delete;
smart_ptr& operator=(const smart_ptr& a) = delete;
The postfix of = delete which we looked at in Chapter 2A, No Ducks Allowed – Types and
Deduction, tells the compiler that an attempt to access a function with that prototype is
now not valid code and causes an error.
STL Smart Pointers
Instead of having to write our own smart_ptr, the STL provides classes that we can
use to implement RAII on our objects. The original was std::auto_ptr(), which was
deprecated in C++ 11 and removed in C++ 17. It was created before rvalue reference
support and caused problems because it implemented move semantics using copy. C++
11 introduced three new templates to manage lifetime and ownership of resources:
• std::unique_ptr: Owns and manages a single object via a pointer and destroys
that object when unique_ptr goes out of scope. It has two versions: for single
objects (created using new) and for array of objects (created using new[]). unique_
ptr is as efficient as using the underlying pointer directly.
• std::shared_ptr: Retains shared ownership of an object through a pointer. It
manages the resource through the use of a reference counter. Every copy of
shared_ptr that's assigned to shared_ptr updates the reference count. When the
reference count goes to zero, this means that there are no owners left and the
resource is released/destroyed.
• std::weak_ptr: Provides an interface to the same resource as shared_ptr, but
does not modify the counter. It can be checked to see if the resource still exists,
but it will not prevent the resource from being destroyed. If you determine
that the resource still exists, then it can be used to obtain a shared_ptr to the
resource. One use case for it is a scenario where multiple shared_ptrs end in cyclic
references. A cyclic reference would prevent the auto releasing of resources. weak_
ptr is used to break the loop and allow the resources to be freed when they should
be.
236 | No Leaks Allowed - Exceptions and Resources
std::unique_ptr
std::unique_ptr() was introduced in C++ 11 to replace std::auto_ptr() and gives us
everything that smart_ptr does (and more). We can re-write our smart_ptr program as
follows:
#include <iostream>
#include <memory>
class Resource
{
public:
Resource() { std::cout << "Resource acquired\n"; }
~ Resource() { std::cout << "Resource released\n"; }
};
std::unique_ptr<Resource> createResource()
{
std::unique_ptr<Resource> res(new Resource);
return res;
}
int main()
{
std::unique_ptr<Resource> the_res;
the_res = createResource(); // assignment invokes the copy assignment
return 0;
}
We can go one step further than this, because C++ 14 introduced a helper method to
ensure exception safety when dealing with unique_ptrs:
std::unique_ptr<Resource> createResource()
{
return std::make_unique<Resource>();
}
Why is this necessary? Consider the following function call:
some_function(std::unique_ptr<T>(new T), std::unique_ptr<U>(new U));
Resource Management (in an Exceptional World) | 237
The problem with this is that the compiler is free to order the sequence of operations in
the argument list in any order it likes. It could call new T, then new U, then std::unique_
ptr<T>(), and finally std::unique_ptr<U>(). The problem with this sequence is that
if new U were to throw an exception, then the resource allocated by the call to new T
has not been placed in a unique_ptr and will not be cleaned up automatically. The use
of std::make_unique<>() guarantees the order of calls so that the construction of the
resource and the construction of unique_ptr will occur together and not leak resources.
The need for make_unique has been removed in C++17 where the rules around the order
of evaluation in these circumstances have been tightened. However, it is still probably a
good idea to use the make_unique<T>() approach as any future conversion to a shared_
ptr will be easier.
The name unique_ptr makes the intent of the template clear, that is, it is the only owner
of the object that it points to. This was not obvious from auto_ptr. Likewise, shared_ptr
is clear in that it intends to share the resource. The unique_ptr template provides
access to the following operators:
• T* get(): Returns the pointer to the hosted resource.
• operator bool(): Returns true if the instance manages a resource. (get() !=
nullptr).
• T& operator*(): A lvalue reference to the hosted resource. Same as *get().
• T* operator->(): A pointer to the hosted resource. Same as get().
• T& operator[](size_t index): For unique_ptr(new []), it provides access to the
hosted array as if it were natively an array. Returns an lvalue reference so that the
value can be set and get.
std::shared_ptr
A shared pointer is used when you want to share the ownership of a resource. Why
would you do this? Several scenarios would lend themselves well to the sharing of
resources, such as in the case of a GUI program, where you would probably want to
share the font objects, bitmap objects, and so on. The GoF flyweight design pattern
would be another example.
std::shared_ptr provides all of the same facilities as std::unique_ptr, but with more
overhead because it now has to track a reference count for the object. All of the
operators described for std::unique_ptr are available for use on std::shared_ptr.
One difference is that the recommended method to create a std::shared_ptr is to call
std::make_shared<>().
238 | No Leaks Allowed - Exceptions and Resources
When writing libraries or factories, the author of the library will not always know how
a user will want to use the objects that have been created, so the recommendation is
to return unique_ptr<T> from your factory methods. The reason for this is that the user
can easily convert a std::unique_ptr into a std::shared_ptr by assignment:
std::unique_ptr<MyClass> unique_obj = std::make_unique<MyClass>();
std::shared_ptr<MyClass> shared_obj = unique_obj;
This will transfer ownership and leave unique_obj empty.
Note
Once a resource has been made a shared resource, it cannot be reverted into a
unique object.
std::weak_ptr
A weak pointer is a variant of a shared pointer, but it doesn't hold a reference count
to the resource. So, it does not prevent it from being released when the count goes
to zero. Consider the following program structure, which may occur within a normal
graphical user interface (GUI):
#include <iostream>
#include <memory>
struct ScrollBar;
struct TextWindow;
struct Panel
{
~ Panel() {
std::cout << "--Panel destroyed\n";
}
void setScroll(const std::shared_ptr<ScrollBar> sb) {
m_scrollbar = sb;
}
void setText(const std::shared_ptr<TextWindow> tw) {
m_text = tw;
Resource Management (in an Exceptional World) | 239
}
std::weak_ptr<ScrollBar> m_scrollbar;
std::shared_ptr<TextWindow> m_text;
};
struct ScrollBar
{
~ ScrollBar() {
std::cout << "--ScrollBar destroyed\n";
}
void setPanel(const std::shared_ptr<Panel> panel) {
m_panel=panel;
}
std::shared_ptr<Panel> m_panel;
};
struct TextWindow
{
~ TextWindow() {
std::cout << "--TextWindow destroyed\n";
}
void setPanel(const std::shared_ptr<Panel> panel) {
m_panel=panel;
}
std::shared_ptr<Panel> m_panel;
};
void run_app()
{
std::shared_ptr<Panel> panel = std::make_shared<Panel>();
std::shared_ptr<ScrollBar> scrollbar = std::make_shared<ScrollBar>();
std::shared_ptr<TextWindow> textwindow = std::make_shared<TextWindow>();
scrollbar->setPanel(panel);
textwindow->setPanel(panel);
240 | No Leaks Allowed - Exceptions and Resources
panel->setScroll(scrollbar);
panel->setText(textwindow);
}
int main()
{
std::cout << "Starting app\n";
run_app();
std::cout << "Exited app\n";
return 0;
}
When executed, it outputs the following:
Figure 3.25: Weak pointer program output
This shows that the panel and the textwindow were not destroyed when the app exited.
This is because they both held a shared_ptr to each other and so the reference count
for both would not go to zero and trigger the destruction. If we depict the structure
diagrammatically, then we can see that it has a shared_ptr cycle:
Figure 3.26: weak_ptr and shared_ptr cycles
Resource Management (in an Exceptional World) | 241
Smart Pointers and Calling Functions
Now that we can manage our resources, how do we use them? Do we pass around the
smart pointers? When we have a smart pointer (unique_ptr or shared_ptr), we have four
options when calling a function:
• Pass the smart pointer by value
• Pass the smart pointer by reference
• Pass the managed resource by pointer
• Pass the managed resource by reference
This is not an exhaustive list but are the main ones to consider. The answer to how
we pass the smart pointer, or its resource, depends on our intent with the call to the
function:
• Is the intend of the function to just use the resource?
• Does the function take ownership of the resource?
• Does the function replace the managed object?
If the function is just going to use the resource, then it does not even need to know
that it is being handed a managed resource. It simply needs to use it and should be
called using the resource by pointer, or resource by reference (or even resource by
value):
do_something(Resource* resource);
do_something(Resource& resource);
do_something(Resource resource);
If you want to pass the ownership of the resource to the function, then the function
should be called by smart pointer by value and called using std::move():
do_something(std::unique_ptr<Resource> resource);
auto res = std::make_unique<Resource>();
do_something (std::move(res));
When do_something() returns, the res variable will be empty, and the resource is now
owned by do_something().
If you want to replace the managed object (a process known as reseating), then you
pass the smart pointer by reference:
do_something(std::unique_ptr<Resource>& resource);
242 | No Leaks Allowed - Exceptions and Resources
The following program puts all of this together to demonstrate each scenario and how
to call the function:
#include <iostream>
#include <memory>
#include <string>
#include <sstream>
class Resource
{
public:
Resource() { std::cout << "+++Resource acquired ["<< m_id <<"]\n"; }
~ Resource() { std::cout << "---Resource released ["<< m_id <<"]\n"; }
std::string name() const {
std::ostringstream ss;
ss << "the resource [" << m_id <<"]";
return ss.str();
}
int m_id{++m_count};
static int m_count;
};
int Resource::m_count{0};
void use_resource(Resource& res)
{
std::cout << "Enter use_resource\n";
std::cout << "...using " << res.name() << "\n";
std::cout << "Exit use_resource\n";
}
void take_ownership(std::unique_ptr<Resource> res)
{
std::cout << "Enter take_ownership\n";
if (res)
Resource Management (in an Exceptional World) | 243
std::cout << "...taken " << res->name() << "\n";
std::cout << "Exit take_ownership\n";
}
void reseat(std::unique_ptr<Resource>& res)
{
std::cout << "Enter reseat\n";
res.reset(new Resource);
if (res)
std::cout << "...reseated " << res->name() << "\n";
std::cout << "Exit reseat\n";
}
int main()
{
std::cout << "Starting...\n";
auto res = std::make_unique<Resource>();
// Use - pass resource by reference
use_resource(*res);
if (res)
std::cout << "We HAVE the resource " << res->name() << "\n\n";
else
std::cout << "We have LOST the resource\n\n";
// Pass ownership - pass smart pointer by value
take_ownership(std::move(res));
if (res)
std::cout << "We HAVE the resource " << res->name() << "\n\n";
else
std::cout << "We have LOST the resource\n\n";
// Replace (reseat) resource - pass smart pointer by reference
reseat(res);
244 | No Leaks Allowed - Exceptions and Resources
if (res)
std::cout << "We HAVE the resource " << res->name() << "\n\n";
else
std::cout << "We have LOST the resource\n\n";
std::cout << "Exiting...\n";
return 0;
}
When we run this program, we receive the following output:
Figure 3.27: Ownership passing Program output
Note
The C++ Core Guidelines has a whole section on resource management, smart
pointers, and how to use them here: http://isocpp.github.io/CppCoreGuidelines/
CppCoreGuidelines#S-resource. We have only touched on the most important that
are aspects covered by the guidelines.
Resource Management (in an Exceptional World) | 245
Exercise 4: Implementing RAII with STL Smart Pointers
In this exercise, we will implement a sensor factory method that returns the sensor
resource via a unique_ptr. We will implement a unique_ptr to hold an array, and then
develop code that converts a unique_ptr into a shared pointer and then shares it some
more. Follow these steps to implement this exercise:
1. Open the Lesson3 project in Eclipse. Then in the Project Explorer, expand
Lesson3, then Exercise04, and double-click on Exercise4.cpp to open the file for
this exercise into the editor.
2. Click on the Launch Configuration drop-down menu and select New Launch
Configuration... . Configure the L3Exercise4 application from the Search Project
menu so that it runs with the name L3Exercise4.
3. Click on the Run button to run Exercise 4. This will produce the following output:
Figure 3.28: Exercise 4 output
4. In the editor, examine the code, particularly the factory method, that is,
createSensor(type).
std::unique_ptr<ISensor>
createSensor(SensorType type)
{
std::unique_ptr<ISensor> sensor;
if (type == SensorType::Light)
{
sensor.reset(new LightSensor);
}
else if (type == SensorType::Temperature)
{
sensor.reset(new TemperatureSensor);
246 | No Leaks Allowed - Exceptions and Resources
}
else if (type == SensorType::Pressure)
{
sensor.reset(new PressureSensor);
}
return sensor;
}
This creates an empty unique pointer named sensor, and then resets the
contained pointer with the desired sensor according to the passed in type.
5. Open Exercise4.cpp in the editor and change the line near the top of the file to
read like so:
#define EXERCISE4_STEP 5
6. Click on the Run button to compile the code, which will fail with the following
error:
Figure 3.29: Compiler error for Step 5
The full error message is as follows:
error: conversion from 'std::unique_ptr<ISensor>' to non-scalar type
'SensorSPtr {aka std::shared_ptr<ISensor>}' requested
According to the error, we are attempting to assign a unique_ptr to a shared_ptr
and that is not allowed.
7. Locate the line reporting the error and change it to read like so:
SensorSPtr light2 = std::move(light);
Resource Management (in an Exceptional World) | 247
8. Click on the Run button to compile and run the program. The output is as follows:
Figure 3.30: Successful output for Exercise 4 (after EXERCISE4_STEP = 5)
The preceding output shows that we created three different sensors, that the
light sensor pointer went from holding the resource until it was moved, and that
the Light 2 shared pointer has two owners. Wait! What? Two owners? But all we
did was move the resource from light (a unique_ptr) to light2 (a shared_ptr). The
problem is actually the template method:
template<typename SP>
void printSharedPointer(SP sp, const char* message)
The first argument is passed by value, which means that a new copy of the shared_
ptr will be created and passed to the method for printing.
9. Let's fix that now by changing the template to pass-by-reference. Click on the Run
button to compile and run the program. The following output is generated:
Figure 3.31: Corrected printSharedPointer output
248 | No Leaks Allowed - Exceptions and Resources
10. Open Exercise4.cpp in the editor and change the line near the top of the file to
read like so:
#define EXERCISE4_STEP 12
11. Click on the Run button to compile and run the program. The following output is
generated:
Figure 3.32: Annotated Step 12 output for Exercise 4
12. Compare the output with the code in the testSensors() method. We'll find that we
can easily assign to an empty unique_ptr (light) and that we can assign from one
shared_ptr to another (light3 = light2) without the need for std::move() in either
case.
13. Open Exercise4.cpp in the editor and change the line near the top of the file to
read like so:
#define EXERCISE4_STEP 15
Resource Management (in an Exceptional World) | 249
14. Click on the Run button to compile and run the program. The output switches to
the following:
Figure 3.33: Managing arrays in unique_ptr
15. Open the editor and find the testArrays() method:
void testArrays()
{
std::unique_ptr<int []> board = std::make_unique<int []>(8*8);
for(int i=0 ; i<8 ; i++)
for(int j=0 ; j<8 ; j++)
board[i*8+j] = 10*(i+1)+j+1;
for(int i=0 ; i<8 ; i++)
{
char sep{' '};
for(int j=0 ; j<8 ; j++)
std::cout << board[i*8+j] << sep;
std::cout << "\n";
}
}
There are several things to note in this snippet of code. Firstly, the type is
declared as int[]. We have chosen int for this exercise, but it could be just
about any type. Secondly, when unique_ptr (and shared_ptr since C++ 17) is used
to manage an array, operator[] is defined. So, we simulate a two-dimensional
array by calculating a one-dimensional index from the two-dimensional indices'
board[i*8+j].
16. Edit the first line of the method and declare the auto type:
auto board = std::make_unique<int []>(8*8);
250 | No Leaks Allowed - Exceptions and Resources
17. Click on the Run button to compile and run the program – the output will be
identical to the previous run. This is a case where auto is very helpful as you no
longer need to type all the details into the type declaration, as well as the make_
unique() call.
In this exercise, we implemented a factory function that served up manufactured
sensors using unique_ptr to manage the lifetime of the sensor. We then implemented
code to change it from a unique_ptr and share it to several objects. Finally, we
developed a unique_ptr technique to manage a multi-dimensional array using a single-
dimensional array.
Rule of Zero/Five – A Different Perspective
When we introduced BufferedWriter, it had two resources being managed: memory
and a file. We then discussed how the default compiler generated copy operations
that are what are known as shallow copies. We talked about how we could manage the
resources differently – stop the copy, perform a deep copy, or transfer ownership. What
we decide to do in these circumstances is known as resource management policy. The
policy that you choose, impacts how you execute the Rule of Zero/Five.
In terms of resource management, a class can manage no resources, manage a resource
that can be copied but not moved, manage a resource that can be moved but not
copied, or manage a resource that should be neither copied nor moved. The following
classes show how these may be expressed:
struct NoResourceToManage
{
// use compiler generated copy & move constructors and operators
};
struct CopyOnlyResource
{
~ CopyOnlyResource()
{/* defined */ }
CopyOnlyResource(const CopyOnlyResource& rhs)
{/* defined */ }
CopyOnlyResource& operator=(const CopyOnlyResource& rhs) {/* defined */ }
CopyOnlyResource(CopyOnlyResource&& rhs) = delete;
CopyOnlyResource& operator=(CopyOnlyResource&& rhs) = delete;
Resource Management (in an Exceptional World) | 251
};
struct MoveOnlyResource
{
~ MoveOnlyResource()
{/* defined */ }
MoveOnlyResource(const MoveOnlyResource& rhs)
= delete;
MoveOnlyResource& operator=(const MoveOnlyResource& rhs) = delete;
MoveOnlyResource(MoveOnlyResource&& rhs)
{/* defined */ }
MoveOnlyResource& operator=(MoveOnlyResource&& rhs)
{/* defined */ }
};
struct NoMoveOrCopyResource
{
~ NoMoveOrCopyResource()
{/* defined */ }
NoMoveOrCopyResource(const NoMoveOrCopyResource& rhs)
=
delete;
NoMoveOrCopyResource& operator=(const NoMoveOrCopyResource& rhs) =
delete;
NoMoveOrCopyResource(NoMoveOrCopyResource&& rhs)
=
delete;
NoMoveOrCopyResource& operator=(NoMoveOrCopyResource&& rhs)
=
delete;
};
Because of the complexity of managing resources in all contexts and under exceptions,
the best practice is that if a class is responsible for managing a resource, then that class
is only responsible for managing that resource.
252 | No Leaks Allowed - Exceptions and Resources
Activity 1: Implementing Graphics Processing with RAII and Move
In Chapter 2A, No Ducks Allowed – Types and Deduction, your team worked hard and got
the implementation of Point3d and Matrix3d. Now, your company wants to market the
library and it needs two major improvements before they can do that:
• The classes must be in a namespace for our company, that is, Advanced C Plus Plus
Inc. So, the namespace for the graphics will be accp::gfx.
• The storage for the matrices in Point3d and Matrix3d is an intrinsic part of the
class and so it is allocated from the stack and not the heap. As an evolution in the
library matrix support, we need to allocate the memory from the heap. As we are
working toward implementing larger matrices in a future release, we also want to
introduce move semantics into our classes.
Follow these steps to achieve this:
1. Starting with our current version of the library (this can be found in the Lesson3/
Activity01 folder), place all of our classes into the acpp::gfx namespace.
2. Fix all the failing tests because of the change. (Fail could mean a failure to compile,
not just running the test.)
3. In Matrix3d, switch from declaring the matrix directly in the class to heap allocated
memory for storage.
4. Fix the failing tests by implementing a deep copy implementation of the copy
constructor and copy assignment operators. Make any other changes necessary
to adjust to the new internal representations. Note that you should not need to
modify any tests to get them to pass they only access the public interface which
means we can change the internal structure without affecting the client.
5. Trigger another failure by forcing a move constructor to be called in
CreateTranslationMatrix() by using std::move in the return statement. Introduce
the required move operations in the Matrix3d class to get the tests to compile and
pass.
6. Repeat steps 3 to 4 for Point3d.
Resource Management (in an Exceptional World) | 253
After implementing the preceding steps, the expected output would look unchanged
from the start:
Figure 3.34: Activity 1 output after successful conversion to use RAII
Note
The solution to this activity can be found on page: 657.
When is a Function Called?
All the operations that are performed by a C++ program are essentially function calls
(although the compiler may optimize these into inline sequences of operations).
However, it may not be obvious that you are making a function call due to syntactic
sugar. Syntactic sugar is the syntax within a programming language that makes it easier
to read or express. For example, when you write a = 2 + 5, you are essentially calling
operator=(&a, operator+(2, 5)). It is just that the language allows us to write the first
form, but the second form allows us to overload operators and extend these capabilities
to user-defined types.
254 | No Leaks Allowed - Exceptions and Resources
The following mechanisms result in calls to a function:
• Explicit call to a function.
• All operators such as +, -, *, /, %, and so on along with new/delete.
• Declaration of variables – will result in a call to the constructors with arguments if
the initialization values are present.
• User-defined literals – We have not dealt with these, but essentially, we define
an overload for the type operator "" name(argument). We can then write things
such as 10_km, which make our code easier to understand as it carries semantic
information.
• Casting from one value to another (static_cast<>, const_cast<>, reinterpret_
cast<>, and dynamic_cast<>). Again, we have another operator overload which
allows us to convert from one type into another.
• During function overload, it may be necessary to convert one type into another
so that it matches the function prototype. It can do this by either calling a
constructor with the right argument type to create a temporary or through a cast
operator that's called implicitly.
Each and every one of these results in the compiler determine that a function must be
called. Having determined that a function needs to be called, it must find the function
that matches the name and arguments. This is what we'll be discussing in the next
section.
Which Function to Call
In Chapter 2A, No Ducks Allowed – Types and Deduction, we saw that function overload
resolution was performed as follows:
Figure 3.35: Function overload resolution
Resource Management (in an Exceptional World) | 255
What we really did not dig into was the concept of name lookup. At some point the
compiler will encounter the following call to the func function:
func(a, b);
When this happens, it must associate its name with the declaration that introduced it.
This process is called name lookup. This name lookup is true for all the items in the
program (variables, namespaces, classes, functions, function templates, and templates).
For the program to compile, the name lookup process for variables, namespaces
and classes must produce a single declaration. However, for functions and function
templates the compiler may associate multiple declarations with the same name –
mainly through function overloads which may be extended to consider additional
functions due to Argument-dependent Lookup (ADL).
Identifiers
As defined in the C++ standard, an identifier is a sequence of uppercase and lowercase
Latin letters, digits, underscores, and most Unicode characters. A valid identifier
must begin with a non-digit character and is arbitrarily long and case-sensitive. Every
character is significant.
Names
A name is used to refer to an entity or to a label. A name is of one of the following
forms:
• An identifier
• An overloaded operator name in function notation (e.g. operator-, operator delete)
• A template name followed by its argument list (vector<int>)
• A user-defined conversion function name (operator float)
• A user-defined literal operator name (operator ""_ms)
Every entity and its name is introduced by a declaration while a name for a label is
introduced by either a goto statement or by a labeled statement. A name can be used
multiple times in one file (or translation unit) to refer to different entities depending
on the scope. A name may also be used to refer to the same entity across multiple files
(translation units), or different entities, depending upon the linkage. The compiler uses
name lookup to associate a declaration that introduces a name with an unknown name
in the program through name lookup.
256 | No Leaks Allowed - Exceptions and Resources
Name lookup
The name lookup process is one of two and is – selected based on the context:
• Qualified name lookup: The name appears to the right of the scope resolution
operator, ::, or possibly after ::, followed by the template keyword. A qualified
name may refer to a namespace member, class member or enumerator. The name
to the left of the :: operator defines the scope to lookup the name from. If there is
no name, then the global namespace is used.
• Unqualified name lookup: Everything else. In this case, name lookup examines the
current scope and all enclosing scopes.
If the unqualified name is left of the function-call operator, '()' then it uses Argument-
Dependent Lookup.
Argument-Dependent Lookup
The set of rules for looking up unqualified function names is called
Argument-dependent lookup (known as ADL), or Koenig lookup (named after Andrew
Koenig, who defined it and is a longtime member of the C++ standards committee).
Unqualified function names can appear as either a function-call expression or as part of
an implicit function call to an overloaded operator.
ADL basically says that in addition to the scopes and namespaces considered during
unqualified name lookup, the "associated namespaces" of all the arguments and
template parameters are also considered. Consider the following code:
#include <iostream>
#include <string>
int main()
{
std::string welcome{"Hello there"};
std::cout << welcome;
endl(std::cout);
}
Resource Management (in an Exceptional World) | 257
When we compile this code and run it, the output is as expected:
$ ./adl.exe
Hello there
$
This is an unusual way to write the program. Typically, it would be written like so:
#include <iostream>
#include <string>
int main()
{
std::string welcome{"Hello there"};
std::cout << welcome << std::endl;
}
We are using the strange method of calling endl() to show ADL. But there are two ADL
lookups occurring here.
The first function call that undergoes ADL is std::cout << welcome, which the compiler
considers to be operator<<(std::cout, welcome). The name operator, <<, is now looked
up in the available scopes and the namespace of its arguments – std. This additional
namespace resolves the name to the free method, that is, std::operator<<(ostream& os,
string& s), that's declared in the string header.
The second call is more obvious endl(std::cout). Again, the compiler can access the std
namespace to resolve this name lookup and finds the std::endl template in the header
ostream (included in iostream).
Without ADL, the compiler has no way to find either of these functions, because they
are free functions that are made known to us by the iostream and string packages.
The magic of the insertion operator (<<) would be lost and it would be tedious for the
programmer, if we were forced to write std::operator<<(std::cout, welcome). It would
be even worse if you consider chained insertions. Alternatively, you could write "using
namespace std;". Neither of those options is ideal, and that is why we need ADL (Koenig
lookup).
258 | No Leaks Allowed - Exceptions and Resources
Caveat Emptor
We have seen how ADL makes life easier for the programmer by including namespaces
related to the function argument types. However, this lookup capability does not come
without risk which, for the most part we can minimize. Consider the following sample
code:
#include <iostream>
namespace mylib
{
void is_substring(std::string superstring, std::string substring)
{
std::cout << "mylib::is_substring()\n";
}
void contains(std::string superstring, const char* substring) {
is_substring(superstring, substring);
}
}
int main() {
mylib::contains("Really long reference", "included");
}
When we compile and run the preceding program, we get the expected output:
Figure 3.36: ADL Sample program output
Resource Management (in an Exceptional World) | 259
The C++ standards committee then decides that it should introduce an is_substring()
function that looks like this:
namespace std {
void is_substring(std::string superstring, const char* substring)
{
std::cout << "std::is_substring()\n";
}
}
If we add this to the top of our file, compile it and re-run it, we now get the following
output:
Figure 3.37: ADL issue program output
Thanks to ADL, the (next C++ standard) compiler has picked up a different
implementation as a better fit for the unqualified function call of is_substring(). And
because of implicit conversion of arguments it does not clash which would cause an
ambiguity and a compiler error. It just silently adopts to the new method which could
lead to subtle and hard to find bugs if the argument order is different. The compiler can
only detect type and syntactic differences, not semantic ones.
Note
For the purposes of demonstrating how ADL works, we have added our function
to the std namespace. Namespaces serve a purpose of separating concerns,
and to add into someone else's namespace, in particular, the Standard Library
namespace (std) is not good practice.
So, why caveat emptor (buyer beware)? If you use third-party libraries for your
development (and that includes the C++ Standard Library), then when you upgrade the
library, you need to ensure that changes to the interface are not going to cause you
problems because of ADL.
260 | No Leaks Allowed - Exceptions and Resources
Exercise 5: Implementing Templates to Prevent ADL Issues
In this exercise, we will demonstrate a breaking change in C++17 STL that can
potentially cause an issue in the wild. C++11 introduced templates for std::begin(type)
and friends. As a developer, this is an appealing expression of the general interface and
you may have written you own versions for size(type) and empty(type) already. Follow
these steps to implement this exercise:
1. Open the Lesson3 project in Eclipse. Then in the Project Explorer, expand
Lesson3, then Exercise05, and double-click on Exercise5.cpp to open the file for
this exercise into the editor.
2. Click on the Launch Configuration drop down menu and select New Launch
Configuration... . Configure the L3Exercise5 application from the Search Project
menu so that it runs with the name L3Exercise5.
3. Click on the Run button to run Exercise 5. This will produce the following output:
Figure 3:38: Successful execution of Exercise 5
4. An examination of the code reveals two helper templates:
template<class T>
bool empty(const T& x)
{
return x.empty();
}
template<class T>
int size(const T& x)
{
return x.size();
}
Resource Management (in an Exceptional World) | 261
5. Unlike all the other exercises, this exercise has been configured to build under C++
14. Open the CMakeLists.txt file under Lesson3 and locate the following line:
set_property(TARGET L3Exercise5 PROPERTY CXX_STANDARD 14)
6. Change 14 to a 17.
7. Click on the Run button to compile the exercise which now fails:
Figure 3.39: Compilation fails under C++ 17 – ambiguous function call
8. Because the argument to the empty() and size() templates was a std::vector, the
ADL pulled in the newly included STL versions of these templates and broke our
code.
9. In the Exercise5.cpp file, locate the two occurrences of empty() and two
occurrences of size() that are generating the errors and insert two colons, "::",
before them (scope specifier).
10. Click on the Run button to compile and run the exercise. It now happily compiles
and runs again because the calls to the empty() and size() function are now
qualified. We could have equally specified std:: scope instead.
In this exercise, we implemented two template functions in the global namespace
that worked fine if we compiled the program under the C++ 14 standard. However, our
implementation broke when we compiled under C++17 because the STL library changed
and we had to change our implementation to ensure that the compiler located and used
the templates that we wrote.
262 | No Leaks Allowed - Exceptions and Resources
Implicit Conversion
In determining the Candidate Set of Function in Figure 3.36, Function overload
resolution, the compiler has to look at all of the available functions that have been found
during the name lookup and determine whether the argument number and types
match the call point. In determining whether the type matches, it will also examine all
the available conversions to determine whether there is a mechanism to convert from
the type T1 type (the type of the argument passed) to the T2 type (the type specified for
the function parameter). If it can convert from T1 to T2 for all arguments, then it will
add the function to the set of candidates.
This transformation from type T1 to type T2 is known as implicit conversion and occurs
when some type, T1, is used in an expression or context that does not accept that type
but accepts some other type, T2. This occurs in the following contexts:
• T1 is passed as an argument when calling a function declared with T2 as the
parameter.
• T1 is used as an operand to an operator that expects T2.
• T1 is used to initialize a new object of T2 (including return statements).
• T1 is used in a switch statement (in which case, T2 is an int).
• T1 is used in an if statement or do-while or while loop (where T2 is bool).
If an unambiguous conversion sequence from T1 to 2 exists, then the program will
compile. The conversions between built-in types are usually determined by the usual
arithmetic conversions.
Explicit – Preventing Implicit Conversion
Implicit conversion is a great feature that, make it possible for a programmer to express
their intent, and it just works most of the time. However, the compiler's ability to
convert one type into another without the programmer providing a hint, is not always
desirable. Consider the following small program:
#include <iostream>
class Real
{
public:
Resource Management (in an Exceptional World) | 263
Real(double value) : m_value{value} {}
operator float() {return m_value;}
float getValue() const {return m_value;}
private:
double m_value {0.0};
};
void test(bool result)
{
std::cout << std::boolalpha;
std::cout << "Test => " << result << "\n";
}
int main()
{
Real real{3.14159};
test(real);
if(real)
{
std::cout << "true: " << real.getValue() << "\n";
}
else
{
std::cout << "false: " << real.getValue() << "\n";
}
}
264 | No Leaks Allowed - Exceptions and Resources
When we compile it and run the preceding program, we get the following output:
Figure 3.40: Implicit conversion sample program output
Well, it may be a little unexpected that this compiled and actually produced an output.
The real variable is of the Real type which has a conversion operator to float – operator
float(). The test() function takes a bool as an argument and the if condition must
result in a bool as well. The compiler will convert any numeric type into a boolean type
with a value of false if the value is zero or true if the value is not zero. But if this is not
the behavior that we want we can prevent it by prefixing the declaration of the function
with the explicit keyword. Let's say we change the line so that it reads like so:
explicit operator float() {return m_value;}
If we now attempt to compile it, we get two errors:
Figure 3.41: Compile errors because implicit conversion was removed.
Both are related to not being able to convert the Real type into a bool – first, at the call
site to test() and then in the if condition.
Now, let's introduce a bool conversion operator to fix this problem.
operator bool() {return m_value == 0.0;}
Resource Management (in an Exceptional World) | 265
We can now build the program again. We will receive the following output:
Figure 3.42: Introducing the bool operator replaces implicit conversion
The boolean value is now false, whereas it was true before. This is because the implicit
conversion of the value that was returned by the float conversion was not zero and was
then converted into true.
Since C++ 11, all constructors (except copy and move constructors) have been
considered to be conversion constructors. This means that if they are not declared with
explicit, then they are available for implicit conversion. Likewise, any casting operator
that is not declared explicit is available for implicit conversion.
The C++ Core Guidelines has two rules related to implicit conversion:
• C.46: By default, declare single-argument constructors as explicit
• C.164: Avoid implicit conversion operators
Contextual Conversion
If we now make one further change to our little program, we can get into what is known
as contextual conversion. Let's make the bool operator explicit and attempt to compile
the program:
explicit operator bool() {return m_value == 0.0;}
We will receive the following output:
Figure 3.43: Compile errors with explicit bool operator
266 | No Leaks Allowed - Exceptions and Resources
This time we only have one error at the call site to test(), but not for the if condition.
We can fix this error by using a C-style case (bool) or a C++ static_cast<bool>(real)
(this is the preferred method). When we add the cast, the program compiles and runs
once more.
So, if the bool cast is explicit, then why does the condition for the if expression not
need a cast?
The C++ standard allows in certain contexts where the bool type is expected and
the declaration for a bool conversion exists (whether marked explicit or not). If
this happens, then an implicit conversion is allowed. This is known as contextually
converting into bool and can occur in the following contexts:
• The condition (or controlling expression) of if, while, for
• The operands of the built-in logical operators: !(not), && (and) and || (o r)
• The first operand of the ternary (or conditional) operator ?:.
Exercise 6: Implicit and Explicit Conversions
In this exercise we will experiment with calling functions, implicit conversions,
preventing them, and enabling them. Follow these steps to implement this exercise:
1. Open the Lesson3 project in Eclipse. Then in the Project Explorer, expand
Lesson3 then Exercise06 and double click on Exercise6.cpp to open the file for
this exercise into the editor.
2. Click on the Launch Configuration drop down menu and select New Launch
Configuration... . Configure the L3Exercise6 application from the Search Project
menu so that it runs with the name L3Exercise6.
3. Click on the Run button to run Exercise 6. This will produce the following output:
Figure 3.44: Default output from Exercise 6
Resource Management (in an Exceptional World) | 267
4. In the text editor, change the constructor of Voltage to be explicit:
struct Voltage
{
explicit Voltage(float emf) : m_emf(emf)
{
}
float m_emf;
};
5. Click on the Run button to recompile the code – now we get the following error:
Figure 3.45: Failed conversion of int to Voltage
6. Remove the explicit from the constructor and change the calculate function to
take a reference:
void calculate(Voltage& v)
268 | No Leaks Allowed - Exceptions and Resources
7. Click on the Run button to recompile the code – now, we get the following error:
Figure 3.46: Failed conversion of int to Voltage&
The same line has the problem that we ran previously, but for a different reason.
So, implicit conversion only works with value types.
8. Comment out the line generating the error, and then, after the call to use_
float(42), add the following line:
use_float(volts);
9. Click on the Run button to recompile the code – now we get the following error:
Figure 3.47: Failed conversion of Voltage to float
Resource Management (in an Exceptional World) | 269
10. Now, add the following casting operator to the Voltage class:
operator float() const
{
return m_emf;
}
11. Click on the Run button to recompile the code and run it:
Figure 3.48: Successfully converted Voltage to float
12. Now, place the explicit keyword in front of the cast that we just added and click
on the Run button to recompile the code. Again, we get an error:
Figure 3.49: Failure to convert Voltage to float
13. By adding the explicit declaration to the cast, we are preventing the compiler from
using the conversion operator. Change the line with the error to cast the volts
variable to a float:
use_float(static_cast<float>(volts));
270 | No Leaks Allowed - Exceptions and Resources
14. Click on the Run button to recompile the code and run it.
Figure 3.50: Conversion of Voltage into float with cast works again
In this exercise, we have seen that implicit conversions can occur between types (not
references), and that we can control when they happen. Now we know how to control
these conversions, we can strive to meet the guidelines previously quoted C.46 and
C.164.
Activity 2: Implementing classes for Date Calculations
Your team is in charge of developing a library to help with calculations that are related
to dates. In particular, we want to be able to determine the number of days between
two dates and given a date, add (or subtract from it) a number of days to get a new
date. This activity will develop two new types and enhance them to ensure that the
programmer cannot accidentally have them interact with built-in types. Follow these
steps to achieve this:
1. Design and implement a Date class that stores the day, month, and year as integers.
2. Add methods to access the internal day, month, and year values.
3. Define a type, date_t to represent the number of days since the epoch date of
1-Jan-1970.
4. Add a method to the Date class to convert this into date_t.
5. Add a method to set the Date class from a date_t value.
6. Create a Days class that stores the days value.
7. Add the addition operator to Date that takes Days as an argument.
8. Use explicit to prevent the addition of numbers.
9. Add the subtraction operator to return a Days value from the difference of two
Dates.
Summary | 271
After following these steps, you should receive the following output:
Figure 3.51: Output of a successful Date sample application
Note
The solution for this activity can be found on page 664.
Summary
In this chapter, we explored the lifetime of variables - both automatic and dynamic,
where they are stored, and when they are destructed. We then used this information to
develop RAII techniques that allow us to almost ignore resource management because
the automatic variables will clean them up when they are destructed even in the
presence of an exception. Then, we looked at throwing exceptions and catching them
so that we can deal with abnormal conditions at the right level. From RAII, we went
into a discussion on the ownership of resources and how STL smart pointers help us in
this area. We discovered that just about everything is treated as a function call, thus
allowing operator overloading and implicit conversions. We discovered the wonderful
(or is it awful?) world of argument-dependent lookup (ADL) and how it can potentially trip
us up in the future. We now have a good understanding of the fundamental features
of C++. In the next chapter we will start to explore function objects and how they
are realized and implemented using lambda functions. We will delve further into the
offerings of STL and explore PIMPLs as we re-visit encapsulation.
Learning Objectives
By the end of this chapter, you will be able to:
•
Develop classes using the PIMPL idiom to implement object-level encapsulation
•
Implement a callback system using functors, std::function, and lambda expressions
•
Implement lambdas using the right capture technique for the situation
•
Develop variadic templates to implement C# style delegates for event handling.
This chapter will show you how to implement the PIMPL idiom, and how to develop a callback
mechanism for your own programs.
Separation of
Concerns - Software
Architecture,
Functions, and
Variadic Templates
4
274 | Separation of Concerns - Software Architecture, Functions, and Variadic Templates
Introduction
In the previous chapter, we learned how to implement classes to properly manage
resources even when the exceptions occurred using RAII. We also learned about ADL
(Argument Dependent Lookup) and how it determines the function to be called. Finally,
we talked about how the explicit keyword can be used to prevent automatic conversion
between types by the compiler, known as implicit conversion
In this chapter, we will look into dependencies, both physical and logical, and see
how they can affect build times adversely. We'll also learn how to separate the visible
interface class from the implementation details to increase the speed of the build times.
We will then learn to capture functions and contexts so that we can call them later
using functors, std::function and lambda expressions. Finally, we will implement a
variadic template to deliver an event-based callback mechanism.
The Pointer to Implementation (PIMPL) Idiom
As projects implemented in C++ get larger and larger, there is the likelihood that the
build times will grow at a faster rate than the number of files. This is because of the
textual inclusion model used by the C++ build model. This is done so that the compiler
can determine the size and layout of the class, causing a coupling between the caller
and the callee, but allowing for optimization. Remember that everything must be
defined before it can be used. A future feature called Modules promises to address this
issue, but for now we need to understand the issue and the techniques used to address
the problem.
Logical and Physical Dependencies
When we wish to access a class from another class, we have a logical dependency. One
class is logically dependent upon another class. If we consider the Graphics classes,
Point3d and Matrix3d that we developed in Chapter 2A, No Ducks Allowed – Types and
Deduction and Chapter 3, The Distance between Can and Should – Objects, Pointers and
Inheritance, we have two logically independent classes Matrix3d and Point3d. However,
because of how we implemented the multiplication operator between the two, we
created a compile-time or physical dependency.
Introduction | 275
Figure 4.1: Physical Dependencies of Matrix3d and Point3d
As we can see with these relatively simple classes, the physical dependencies between
the header files and the implementation files can quickly get complicated. It is this
complexity that contributes to the build times of large projects because the number
of physical (and logical) dependencies grows to thousands. We have shown only 13
dependencies in the preceding diagram as indicated by the arrows. But there are
actually many more, as including a standard library header typically pulls in a hierarchy
of include files. This means that if one header file is modified, then all files that are
dependent upon it, either directly or indirectly, will need to be re-compiled to account
for the change. This trigger for rebuilding also occurs if the change is to the private
class members definition that users of the class cannot even access.
To help speed compile times, we have used the guard technique to prevent header files
from being processed multiple times:
#if !defined(MY_HEADER _INCLUDED)
#define MY_HEADER _INCLUDED
// definitions
#endif // !defined(MY_HEADER _INCLUDED)
And lately, most compilers now support the #pragma once directive which achieves the
same result.
276 | Separation of Concerns - Software Architecture, Functions, and Variadic Templates
These relationships between entities (files, classes, and so on) are known as coupling.
A file/class is highly coupled to another file/class if changes to the file/class result in
changes to the other file/class. A file/class is loosely coupled to another file/class if
changes to the file/class do not result in changes to the other file/class.
Highly coupled code (files/classes) introduce problems into a project. Highly coupled
code is hard to change (inflexible), hard to test and hard to understand. Loosely coupled
code on the other hand is easier to change (only modify one class), highly testable (only
need the class being tested) and easier to read and understand. Coupling reflects, and
is related to, the logical and physical dependencies.
The Pointer to Implementation (PIMPL) Idiom
One solution to this problem with coupling is to use the "Pimpl Idiom" (which stands
for Pointer to Implementation Idiom). This is also referred to as an opaque pointer,
the compiler firewall idiom or even Cheshire Cat technique. Consider the Qt library, in
particular, the Qt Platform Abstraction (QPA). It is an abstraction layer that hides the
details of the Operating Systems and/or platforms that the Qt application is hosted on.
One method to implement such a layer is to use the PIMPL idiom where the common
interface is exposed to the application developer, but the implementation of how
the functionality is delivered is hidden. Qt actually uses a variant of PIMPL known as
d-pointer.
For example, one feature of a GUI is the use of a dialog that is a popup window that
displays information or prompts for user input. It could be declared in dialog.hpp as
follows:
Note
For more information about QT Platform Abstraction (QPA), visit the following link:
https://doc.qt.io/qt-5/qpa.html#.
#pragma once
class Dialog
{
public:
Dialog();
~ Dialog();
Introduction | 277
void create(const char* message);
bool show();
private:
struct DialogImpl;
DialogImpl* m_pImpl;
};
The user has access to all the functions required to use a Dialog but has no knowledge
of how it is implemented. Note that we have a declared DialogImpl but not defined it. In
general, there is not much we can do with such a class as DialogImpl. But there is one
thing that is allowed and that is to declare a pointer to it. This feature of C++ allows us
to hide the implementation details in the implementation file. This means that in this
simple case we do not have any include files for this declaration.
The implementation file dialogImpl.cpp may be implemented as:
#include "dialog.hpp"
#include <iostream>
#include <string>
struct Dialog::DialogImpl
{
void create(const char* message)
{
m_message = message;
std::cout << "Creating the Dialog\n";
}
bool show()
{
std::cout << "Showing the message: '" << m_message << "'\n";
return true;
}
std::string m_message;
278 | Separation of Concerns - Software Architecture, Functions, and Variadic Templates
};
Dialog::Dialog() : m_pImpl(new DialogImpl)
{
}
Dialog::~Dialog()
{
delete m_pImpl;
}
void Dialog::create(const char* message)
{
m_pImpl->create(message);
}
bool Dialog::show()
{
return m_pImpl->show();
}
We note several things from this:
• We define the implementation class DialogImpl before we define the methods
required for Dialog. This is necessary because Dialog will need to exercise the
methods through m_pImpl which means that they need to be defined first.
• The Dialog constructor and destructor are responsible for the memory
management.
• We include all the necessary header files required for the implementation, in the
implementation file only. This reduces the coupling by minimizing the number of
headers included in the Dialog.hpp file.
Introduction | 279
The program can be executed as follows:
#include <iostream>
#include "dialog.hpp"
int main()
{
std::cout << "\n\n------ Pimpl ------\n";
Dialog dialog;
dialog.create("Hello World");
if (dialog.show())
{
std::cout << "Dialog displayed\n";
}
else
{
std::cout << "Dialog not displayed\n";
}
std::cout << "Complete.\n";
return 0;
}
On execution, the above program produces the following output:
Figure 4.2: Sample Pimpl implementation output
280 | Separation of Concerns - Software Architecture, Functions, and Variadic Templates
Advantages and Disadvantages of PIMPL
The biggest advantage in the use of PIMPL is that it breaks the compile-time
dependencies between the clients of a class and its implementation. This allows for
faster build times because PIMPL eliminates a large number of #include directives
in the definition (header) file, instead pushing them to only be necessary in the
implementation file.
It also decouples the implementation from the clients. We are now free to change the
implementation of the PIMPL class and only that file needs recompilation. This prevents
compilation cascades where changes to hidden members trigger the rebuilding of
clients. This is called a compilation-firewall.
Some other advantages of the PIMPL idiom are as follows:
• Data Hiding – the internal details of implementation are truly isolated in the
implementation class. If this is part of a library, then it can be used to prevent the
disclosure of information, such as Intellectual property.
• Binary Compatibility – the binary interface of the class is now independent of
the private fields. This means we can add fields to the implementation without
affecting the client. It also means we could deploy the Implementation class in a
shared library (DLL, or .so file) and be free to change it without affecting the client
code.
Such advantages come at a cost. The disadvantages are as follows:
• Maintenance Effort – there is additional code in the visible class that forwards
the calls to the Implementation class. This adds a level of indirection with a minor
increase in complexity.
• Memory Management – the addition of a pointer for the implementation now
requires us to manage the memory. It also requires additional storage to hold the
pointer and, in a memory constrained system (For example: Internet of Things
device) this may be critical.
Implementing PIMPL with unique_ptr<>
Our current implementation of Dialog uses a raw pointer to hold the PIMPL
implementation reference. In Chapter 3, The Distance between Can and Should – Objects,
Pointers and Inheritance, we discussed ownership of objects and introduced smart
pointers and RAII. The hidden object pointed to by the PIMPL pointer is a resource to
be managed and should be executed using RAII and std::unique_ptr. As we shall see,
there are some caveats for implementing PIMPL with std::unique_ptr.
Introduction | 281
Let's change our Dialog implementation to use smart pointers. Firstly, the header files
changes to introduce the #include <memory> line and the destructor can be removed as
the unique_ptr deletes the implementation class automatically.
#pragma once
#include <memory>
class Dialog
{
public:
Dialog();
void create(const char* message);
bool show();
private:
struct DialogImpl;
std::unique_ptr<DialogImpl> m_pImpl;
};
Obviously, we remove the destructor from the implementation file, and we modify the
constructor to use std::make_unique.
Dialog::Dialog() : m_pImpl(std::make_unique<DialogImpl>())
{
}
282 | Separation of Concerns - Software Architecture, Functions, and Variadic Templates
When re-compiling our new version, there are no problems with the Dialog.hpp and
DialogImpl.cpp files, but our client main.cpp reports the following errors (with the gcc
compiler), as you can see below:
Figure 4.3: Failed compilation of Pimpl using unique_ptr
The first error reports invalid application of 'sizeof ' to incomplete type
'Dialog::DialogImpl'. The problem is that in main.cpp file the compiler is trying to
call the destructor of Dialog for us when main() function ends. As we discussed in
Chapter 2A, No Ducks Allowed – Types and Deduction the compiler will generate a
destructor for us (as we removed it). This generated destructor will call the destructor
of unique_ptr which is the cause of the error. If we look at line 76, of unique_ptr.h
file, we'll find the following implementation of the operator() function for the default
deleter used by unique_ptr (the deleter is the function called by unique_ptr when it
destroys the object it points to):
void
operator()(_Tp* __ptr) const
{
static_assert(!is_void<_Tp>::value, "can't delete pointer to incomplete
type");
static_assert(sizeof(_Tp)>0, "can't delete pointer to incomplete type");
delete __ptr;
}
Introduction | 283
Our code is failing on the second static_assert() statement that terminates the
compilation with an error. The problem is that the compiler is trying to generate the
destructor for std::unique_ptr<DialogImpl> and DialogImpl is an incomplete type. So,
to fix the problem, we control the generation of the destructor to be at a point where
DialogImpl is a complete type.
To do this, we put the declaration of the destructor back into the class and add its
implementation to the DialogImpl.cpp file.
Dialog::~Dialog()
{
}
When we compile and run our program, it produces exactly the same output as before.
In fact, if we only need an empty destructor, we can replace the above code with the
following code:
Dialog::~Dialog() = default;
If we compile and run our program, then following output will be produced:
Figure 4.4: Sample unique_ptr Pimpl implementation output
unique_ptr<> PIMPL Special Functions
As PIMPL usually implies that the visible interface class owns the implementation class,
the move-semantics are a natural fit. However, in the same way the compiler generated
destructor implementation is correct, the compiler generated move constructor and
move assignment operator will give the desired behavior, that is, perform a move on
the member unique_ptr. The move operations both potentially need to perform a
delete before assigning the transferred value, and so, suffer from the same problem as
the destructor with incomplete types. The solution is the same as for the destructor –
declare the method in the header file and implement when the type is complete – in the
implementation file. So, our header file looks like the following:
class Dialog
{
public:
284 | Separation of Concerns - Software Architecture, Functions, and Variadic Templates
Dialog();
~ Dialog();
Dialog(Dialog&& rhs);
Dialog& operator=(Dialog&& rhs);
void create(const char* message);
bool show();
private:
struct DialogImpl;
std::unique_ptr<DialogImpl> m_pImpl;
};
While the implementation looks like:
Dialog::Dialog() : m_pImpl(std::make_unique<DialogImpl>())
{
}
Dialog::~Dialog() = default;
Dialog::Dialog(Dialog&& rhs) = default;
Dialog& Dialog::operator=(Dialog&& rhs) = default;
Depending upon the data items that we are hiding in our implementation class, we may
also desire copy functionality on our PIMPL classes. Using a std::unique_ptr inside
the Dialog class prevents the automatic generation of a copy constructor and copy
assignment operator, as the internal members do not support copy. Also, by defining
the move member functions, as we saw in Chapter 2A, No Ducks Allowed – Types and
Deduction, it also stops the compiler in generating the copy versions. In addition, if the
compiler did generate copy semantics for us, it would only be a shallow copy. But due
to the PIMPL implementation, we need a deep copy. So, we will need to write our own
copy special member functions. Again, the definition goes in the header file and the
implementation needs to be done where the type is complete, inside the DialogImpl.
cpp file.
Introduction | 285
In the header file, we add the following declarations:
Dialog(const Dialog& rhs);
Dialog& operator=(const Dialog& rhs);
And the implementation would look like:
Dialog::Dialog(const Dialog& rhs) : m_pImpl(nullptr)
{
if (this == &rhs) // do nothing on copying self
return;
if (rhs.m _pImpl) // rhs has something -> clone it
m_pImpl = std::make_unique<DialogImpl>(*rhs.m _pImpl);
}
Dialog& Dialog::operator=(const Dialog& rhs)
{
if (this == &rhs) // do nothing on assigning to self
return *this;
if (!rhs.m _pImpl) // rhs is empty -> delete ours
{
m_pImpl.reset();
}
else if (!m_pImpl) // ours is empty -> clone rhs
{
m_pImpl = std::make_unique<DialogImpl>(*rhs.m _pImpl);
}
else // use copy of DialogImpl
{
*m_pImpl = *rhs.m _pImpl;
}
}
286 | Separation of Concerns - Software Architecture, Functions, and Variadic Templates
Note the if(this == &rhs) clauses. These are there to prevent the object from copying
itself unnecessarily. Also, note that we need to check if either unique_ptr is empty and
process the copy accordingly.
Note
Before solving any practical in this chapter, download the GitHub repository
https://github.com/TrainingByPackt/Advanced-CPlusPlus and import the folder
of Lesson 4 in Eclipse, so that you can view the codes for each exercises, and
activities.
Exercise 1: Implementing a Kitchen with unique_ptr<>
In this exercise, we will hide the details of how the kitchen processes orders by
implementing the Pimpl idiom with the unique_ptr<>. Follow the below steps to
implement this exercise:
1. Open the Lesson4 project in Eclipse, and then in the Project Explorer, expand
Lesson4 then Exercise01 and double click on Exercise1.cpp to open the file for
this exercise into the editor.
2. As this is a CMake based project, change the current builder to be CMake Build
(portable).
3. Click on the Launch Configuration drop down menu and select New Launch
Configuration... . Configure L4Exercise1 to run with the name Exercise1.
4. Click on the Run button. Exercise 1 will run and produce the following output:
Figure 4.5: Exercise 1 Program output
Introduction | 287
5. Open kitchen.hpp in the editor, and you will find the following declaration:
class Kitchen
{
public:
Kitchen(std::string chef);
std::string processOrder(std::string order);
private:
std::string searchForRecipe(std::string order);
std::string searchForDessert(std::string order);
std::string cookRecipe(std::string recipe);
std::string serveDessert(std::string dessert);
std::vector<Recipe>::iterator getRecipe(std::string recipe);
std::vector<Dessert>::iterator getDessert(std::string recipe);
std::string m_chef;
std::vector<Recipe> m_recipes;
std::vector<Dessert> m_desserts;
};
Everything in the private section is details about how the kitchen delivers the
order to the customer. It has forced the inclusion of the header files recipe.hpp
and dessert.hpp creating a coupling between these detail files and the clients of
the Kitchen. We are going to move all the private members into an implementation
class and hide the details.
6. In the kitchen.hpp file, add the #include <memory> directive to gain access to the
unique_ptr. Add the declaration for the destructor ~Kitchen(); and then add the
following two lines into the top of the private section:
struct Impl;
std::unique_ptr<Impl> m_impl;
288 | Separation of Concerns - Software Architecture, Functions, and Variadic Templates
7. Open the kitchen.cpp file and add the following after the #include directives:
struct Kitchen::Impl
{
};
Kitchen::~Kitchen() = default;
8. Click on the Run button to re-build the program. You'll see that the output is still
the same as before.
9. Remove all the private members except the two new ones from the Kitchen class
in kitchen.hpp and add them into the Kitchen::Impl declarations. The kitchen.
hpp file has the following contents after removing the #include <vector>, #include
"recipe.hpp" and #include "dessert.hpp":
#pragma once
#include <string>
#include <memory>
class Kitchen
{
public:
Kitchen(std::string chef);
~ Kitchen();
std::string processOrder(std::string order);
private:
struct Impl;
std::unique_ptr<Impl> m_impl;
};
10. In the kitchen.cpp file, change the Kitchen constructor to be the Kitchen::Impl
constructor:
Kitchen::Impl::Impl(std::string chef) : m_chef{chef}
11. For the remainder of the original methods, change them to be scoped
to Kitchen::Impl instead of Kitchen::. For example, std::string
Kitchen::processOrder(std::string order) becomes std::string
Kitchen::Impl::processOrder(std::string order).
Introduction | 289
12. In Kitchen::Impl, add a constructor with a std::string argument and the
processOrder() method. The Kitchen::Impl declaration should now look like the
following:
struct Kitchen::Impl
{
Impl(std::string chef);
std::string processOrder(std::string order);
std::string searchForRecipe(std::string order);
std::string searchForDessert(std::string order);
std::string cookRecipe(std::string recipe);
std::string serveDessert(std::string dessert);
std::vector<Recipe>::iterator getRecipe(std::string recipe);
std::vector<Dessert>::iterator getDessert(std::string recipe);
std::string m_chef;
std::vector<Recipe> m_recipes;
std::vector<Dessert> m_desserts;
};
13. In kitchen.cpp, add the #include <vector>, #include "recipe.hpp" and #include
"dessert.hpp" to the top of the file.
14. Click on the Run button to re-build the program, and this time it will fail with two
undefined references – Kitchen::Kitchen and Kitchen::processOrder.
15. In Kitchen.cpp, after the Kitchen::Impl method definitions, add the following two
methods:
Kitchen::Kitchen(std::string chef) : m_impl(std::make_
unique<Kitchen::Impl>(chef))
{
}
std::string Kitchen::processOrder(std::string order)
{
return m_impl->processOrder(order);
}
290 | Separation of Concerns - Software Architecture, Functions, and Variadic Templates
16. Click on the Run button to re-build the program. The program will run again to
produce the original output.
Figure 4.6: The Kitchen program output using Pimpl
In this exercise, we have taken a class that held many details in its private members and
moved those details into a PIMPL class to hide the details and decouple the interface
from the implementation using the techniques previously described.
Function Objects and Lambda Expressions
One common pattern used in programming, particularly when implementing event-
based processing, such as asynchronous input and output, is the use of the callback. A
client registers that they want to be notified that an event has occurred (For example:
data is available to read, or a data transmission is complete). This pattern is known
as Observer pattern or Subscriber Publisher pattern. C++ supports a variety of
techniques to provide the callback mechanism.
Function Pointers
The first mechanism is the use of the function pointers. This is a legacy feature
inherited from the C language. The following program shows an example of a function
pointer:
#include <iostream>
using FnPtr = void (*)(void);
void function1()
Function Objects and Lambda Expressions | 291
{
std::cout << "function1 called\n";
}
int main()
{
std::cout << "\n\n------ Function Pointers ------\n";
FnPtr fn{function1};
fn();
std::cout << "Complete.\n";
return 0;
}
This program when compiled and executed, produces the following output:
Figure 4.7: Function Pointer Program output
Strictly speaking the code should be modified as follows:
FnPtr fn{&function1};
if(fn != nullptr)
fn();
First, thing to note is that the address of (&) operator should be used to initialize the
pointer. Secondly, we should check that the pointer is valid before calling it.
#include <iostream>
using FnPtr = void (*)(void);
struct foo
{
292 | Separation of Concerns - Software Architecture, Functions, and Variadic Templates
void bar() { std::cout << "foo:bar called\n"; }
};
int main()
{
std::cout << "\n\n------ Function Pointers ------\n";
foo object;
FnPtr fn{&object.bar};
fn();
std::cout << "Complete.\n";
return 0;
}
When we attempt to compile this program, we get the following errors:
Figure 4.8: Errors compiling function pointer program
The text of the first error is ISO C++ forbids taking the address of a bound member
function to form a pointer to member function. Say '&foo::bar'. It tells us that we
should use a different form to obtain the function address. The real error in this case is
the second error message: error: cannot convert 'void (foo::*)()' to 'FnPtr {aka void (*)
()}' in initialization. The real problem is that non-static member functions take a hidden
argument when they are called – the this pointer.
Function Objects and Lambda Expressions | 293
By changing the above program to the following:
#include <iostream>
using FnPtr = void (*)(void);
struct foo
{
static void bar() { std::cout << "foo:bar called\n"; }
};
int main()
{
std::cout << "\n\n------ Function Pointers ------\n";
FnPtr fn{&foo::bar};
fn();
std::cout << "Complete.\n";
return 0;
}
It compiles and runs successfully:
Figure 4.9: Function pointer program using static member function
The function pointer technique is often used when interfacing with C libraries that use
callbacks and operating system notifications which also support callbacks. In these two
cases, it would be normal for the callback to take an argument which is a void * to a
user registered data blob pointer. The data blob pointer could be the this pointer of a
class which is then dereferenced and the callback forwarded into a member function.
294 | Separation of Concerns - Software Architecture, Functions, and Variadic Templates
In other languages, such as Python and C#, it is a part of the language that capturing a
function pointer will also capture the sufficient data to call that function (for example:
self or this). C++ has the ability to make any object callable through the function call
operator which we'll cover next.
What is a Function Object?
C++ allows for the function call operator operator() to be overloaded. This leads to the
ability to make any object callable. An object that can be callable is known as a functor.
The Scaler class in the following program implements a functor.
struct Scaler
{
Scaler(int scale) : m_scale{scale} {};
int operator()(int value)
{
return m_scale * value;
}
int m_scale{1};
};
int main()
{
std::cout << "\n\n------ Functors ------\n";
Scaler timesTwo{2};
Scaler timesFour{4};
std::cout << "3 scaled by 2 = " << timesTwo(3) << "\n";
std::cout << "3 scaled by 4 = " << timesFour(3) << "\n";
std::cout << "Complete.\n";
Function Objects and Lambda Expressions | 295
return 0;
}
There are two objects of type Scaler created and they are used as functions inside the
lines generating output. The above program produces the following output:
Figure 4.10: Functors program output
One advantage of functors over function pointers is that they can contain state, either
as an object or across all instances. Another advantage is that they can be passed to
STL algorithms that expect a function (for example std::for_each) or an operator (for
example std::transform).
An example of such a use might look like following:
#include <iostream>
#include <vector>
#include <algorithm>
struct Scaler
{
Scaler(int scale) : m_scale{scale} {};
int operator()(int value)
{
return m_scale * value;
}
int m_scale{1};
};
void PrintVector(const char* prefix, std::vector<int>& values)
296 | Separation of Concerns - Software Architecture, Functions, and Variadic Templates
{
const char* sep = "";
std::cout << prefix << " = [";
for(auto n : values)
{
std::cout << sep << n;
sep=",";
}
std::cout << "]\n";
}
int main()
{
std::cout << "\n\n------ Functors with STL ------\n";
std::vector<int> values{1,2,3,4,5};
PrintVector("Before transform", values);
std::transform(values.begin(), values.end(), values.begin(), Scaler(3));
PrintVector("After transform", values);
std::cout << "Complete.\n";
return 0;
}
If we run this program, the output produced will look like the following:
Figure 4.11: Program output showing Scaler transformed vectors
Function Objects and Lambda Expressions | 297
Exercise 2: Implementing function objects
In this exercise, we will implement two different function objects that can work with
the STL algorithm for_each.
1. Open the Lesson4 project in Eclipse, and then in the Project Explorer, expand
Lesson4 then Exercise02 and double click on Exercise2.cpp to open the file for
this exercise into the editor.
2. As this is a CMake based project, change the current builder to be CMake Build
(portable).
3. Click on the Launch Configuration drop down menu and select New Launch
Configuration... . Configure L4Exercise2 to run with the name Exercise2.
4. Click on the Run button. Exercise 2 will run and produce the following output:
Figure 4.12: Exercise 2 Initial output
The first thing we will do is fix the formatting of the output by introducing a
function object.
5. In the editor, before the definition of main() function add the following class
definition:
struct Printer
{
void operator()(int n)
{
std::cout << m_sep << n;
m_sep = ", ";
}
const char* m_sep = "";
};
6. Inside the main() method replace the following code
std::cout << "Average of [";
for( auto n : values )
std::cout << n << ", ";
std::cout << "] = ";
298 | Separation of Concerns - Software Architecture, Functions, and Variadic Templates
with
std::cout << "Average of [";
std::for_each(values.begin(), values.end(), Printer());
std::cout << "] = ";
7. Click on the Run button. The exercise will run and produce the following output:
Figure 4.13: Exercise 2 Improved output format
8. The internal state of the Printer class allows us to fix the formatting. Now,
introduce an aggregator class that will allow us to calculate the average. Add the
following class definition to the top of the file:
struct Averager
{
void operator()(int n)
{
m_sum += n;
m_count++;
}
float operator()() const
{
return static_cast<float>(m_sum)/(m_count==0?1:m_count);
}
int m_count{0};
int m_sum{0};
};
9. Modifiy main() method to use the Averager class as follows:
int main(int argc, char**argv)
{
std::cout << "\n------ Exercise 2 ------\n";
std::vector<int> values {1,2,3,4,5,6,7,8,9,10};
Averager averager = std::for_each(values.begin(), values.end(),
Function Objects and Lambda Expressions | 299
Averager());
std::cout << "Average of [";
std::for_each(values.begin(), values.end(), Printer());
std::cout << "] = ";
std::cout << averager() << "\n";
std::cout << "Complete.\n";
return 0;
}
10. Click on the Run button. The exercise will run and produce the following output:
Figure 4.14: Exercise 2 output with average
Note that std::for_each() returns the instance of Averager passed into it. This instance
is copied into the variable averager that then contains the data required to calculate
the average. In this exercise, we implemented two function objects or functor classes:
Averager and Printer that we could use as functions when passed to the STL algorithm
for_each.
std::function<> template
C++11 introduced a general polymorphic function wrapper template, std::function<>,
that makes implementing callbacks and other function related capabilities easier.
std::function holds a callable object known as the target. If it does not contain a target,
then it is called empty. Calling an empty std::function will result in std::bad_function_
call exception being thrown.
The function object can store, copy or invoke a target that is any of the following
callable objects: functions, function objects (defines the operator()), a pointer to
member function or a lambda expression. We will cover more about it in the topic What
is a Lambda Expression?
300 | Separation of Concerns - Software Architecture, Functions, and Variadic Templates
When instantiating a std::function object, it is only necessary to provide the function
signature and not the value to initialize it with, leading to an empty instance. The
instantiation is done as follows:
Figure 4.15: Structure of a std::function declaration
The arguments to the template, define the function signature of the target stored by
variable. The signature starts with the return type (which may be void) and then places
inside the parentheses the list of types that the function will be invoked with.
The use of free functions and functors with std::function is straight forward. Provided
that the signature matches the parameters passed to the std::function template, we
can simply equate the free function or functor to the instance.
void FreeFunc(int value);
struct Functor
{
void operator()(int value);
};
std::function<void(int)> func;
Functor functor;
func = FreeFunc;
// Set target as FreeFunc
func(32);
// Call FreeFunc with argument 32
func = functor;
// set target as functor
func(42);
// Call Functor::operator() with
argument 42
However, if we want to use a method on an object instance then we need to use another
STL helper template std::bind(). If we run the following program:
#include <iostream>
Function Objects and Lambda Expressions | 301
#include <functional>
struct Binder
{
void method(int a, int b)
{
std::cout << "Binder::method(" << a << ", " << b << ")\n";
}
};
int main()
{
std::cout << "\n\n------ Member Functions using bind ------\n";
Binder binder;
std::function<void(int,int)> func;
auto func1 = std::bind(&Binder::method, &binder, 1, 2);
auto func2 = std::bind(&Binder::method, &binder, std::placeholders::_1,
std::placeholders::_2);
auto func3 = std::bind(&Binder::method, &binder, std::placeholders::_2,
std::placeholders::_1);
func = func1;
func(34,56);
func = func2;
func(34,56);
func = func3;
func(34,56);
std::cout << "Complete.\n";
302 | Separation of Concerns - Software Architecture, Functions, and Variadic Templates
return 0;
}
Then we get the following output:
Figure 4.16: Program output using std::bind() and std::function
Several points to note:
• The function method() is referenced using the class as a scope specifier;
• The address of the instance of Binder is passed as the second argument to
std::bind() which makes it the first argument passed to method(). This is
necessary as all non-static members have an implicit this pointer passed as the
first argument.
• Using the std::placeholders definitions, we can bind arguments used when
invoking the bound method and even change the order passed (as seen by func3).
C++11 introduced some syntactic sugar, known as lambda expressions, that make it
easier to define anonymous functions that can also be used to bind methods and assign
them to std::function instances expression. We'll cover more about it in the topic What
is a Lambda Expression?
Exercise 3: Implementing callbacks with std::function
In this exercise, we will implement function callbacks utilizing the std::function<>
template. Follow the below steps to implement this exercise:
1. Open the Lesson4 project in Eclipse, and then in the Project Explorer, expand
Lesson4 then Exercise03 and double click on Exercise3.cpp to open the file for
this exercise into the editor.
2. As this is a CMake based project, change the current builder to be CMake Build
(portable).
3. Click on the Launch Configuration drop down menu and select New Launch
Configuration... . Configure L4Exercise3 to run with the name Exercise3.
Function Objects and Lambda Expressions | 303
4. Click on the Run button. The exercise will run and produce the following output:
Figure 4.17: Exercise 3 output (Calling empty std::function)
5. The first thing we will do is prevent calling an empty std::function. Locate in
the function TestFunctionTemplate() the line func(42); and replace it with the
following code:
if (func)
{
func(42);
}
else
{
std::cout << "Not calling an empty func()\n";
}
6. Click on the Run button. The exercise will run and produce the following output:
Figure 4.18: Exercise 3 output (preventing call to empty std::function)
7. Add the FreeFunction() method to the file before the function
TestFunctionTemplate():
void FreeFunction(int n)
{
std::cout << "FreeFunction(" << n << ")\n";
}
8. In TestFunctionTemplate() function, immediately before if (func) add the
following line:
func = FreeFunction;
304 | Separation of Concerns - Software Architecture, Functions, and Variadic Templates
9. Click on the Run button. The exercise will run and produce the following output:
Figure 4.19: Exercise 3 output (FreeMethod)
10. Add the new class definition before TestFunctionTemplate() function:
struct FuncClass
{
void member(int n)
{
std::cout << "FuncClass::member(" << n << ")\n";
}
void operator()(int n)
{
std::cout << "FuncClass object(" << n << ")\n";
}
};
11. Replace the line func = FreeFunction; with the following code:
FuncClass funcClass;
func = funcClass;
12. Click on the Run button. The exercise will run and produce the following output:
4.20: Exercise 3 output (Object function call override)
13. Replace the line func = funcClass; with the following code:
func = std::bind(&FuncClass::member, &funcClass, std::placeholders::_1);
Function Objects and Lambda Expressions | 305
14. Click on the Run button. The exercise will run and produce the following output:
Figure 4.21: Exercise 3 output (Member function)
15. Replace the line func = std::bind(...); with the following code:
func = [](int n) {std::cout << "lambda function(" << n << ")\n";};
16. Click on the Run button. The exercise will run and produce the following output:
Figure 4.22: Exercise 3 output (lambda function)
In this exercise, we implemented four different types of function callback using the
std::function template – free method, class member function, class function call
method and a lambda function (which we look at next).
What is a Lambda Expression?
Since C++11, C++ has supported anonymous functions, also known as lambda expressions,
or just lambdas. The two most common forms of lambda expression are:
Figure 4.23: Most common forms of lambda expressions
Under normal circumstances, the compiler is able to deduce the return type of the
lambda based on the return statements within the function_body (as embodied by
form (1) in the figure above). However, if the compiler cannot determine the return type,
or if we wish to force a different type, then we can use form (2).
306 | Separation of Concerns - Software Architecture, Functions, and Variadic Templates
Everything after [captures] is the same as for a normal function definition, except that
the name is missing. Lambdas are a convenient way of defining a short method (just a
few lines) at the location it will be used. The lambda is often passed as an argument and
will typically not be re-used. It should also be noted that a lambda can be assigned to a
variable (usually declared with auto).
We can re-write the previous program where we used a Scaler class to use a lambda to
achieve the same outcome:
#include <iostream>
#include <vector>
#include <algorithm>
void PrintVector(const char* prefix, std::vector<int>& values)
{
const char* sep = "";
std::cout << prefix << " = [";
for(auto n : values)
{
std::cout << sep << n;
sep=",";
}
std::cout << "]\n";
}
int main()
{
std::cout << "\n\n------ Lambdas with STL ------\n";
std::vector<int> values{1,2,3,4,5};
PrintVector("Before transform", values);
std::transform(values.begin(), values.end(), values.begin(),
[] (int n) {return 5*n;}
);
Function Objects and Lambda Expressions | 307
PrintVector("After transform", values);
std::cout << "Complete.\n";
return 0;
}
When this program runs the output shows that the vector has been scaled by 5:
Figure 4.24: Transform using lambda for scaling
The lambda in this program is [] (int n) {return 5*n;} and has an empty capture
clause []. The empty capture clause means that the lambda function does not access
any variables from the surrounding scope. If there are no parameters passed to the
lambda, then the parameters clause () is optional.
Capturing data into Lambdas
The capture clause, or the lambda introducer (from the C++ specification), allows the
anonymous function to capture data from the surrounding scope for later use. This
combination of a function with a scope that resolves the functions variable is known
as a closure. The scope in this case is a set of variable bindings specified in the capture
clause. In the previous section, we said that lambdas are anonymous functions. With the
addition of variable capture through closures, lambdas are more correctly identified as
anonymous function objects. The compiler creates an anonymous class with an inline
constructor to capture the variables and a function call operator operator().
A capture clause is a comma-separated list of zero or more captured variables. There
is also the concept of default captures – either by reference or by value. So, the basic
syntax for a capture is:
• [&] – captures all automatic storage duration variables in scope by reference
• [=] – captures all automatic storage duration variables in scope by value (make a
copy)
• [&x, y] – captures x by reference and y by value
308 | Separation of Concerns - Software Architecture, Functions, and Variadic Templates
This is translated by the compiler into member variables that are initialized by the
constructor of the anonymous functor class. In case of the default captures (& and =),
they must come first and only the variables referenced in the body are captured. The
default capture can be overridden by placing the specific variable into the capture
clause after the default capture. For example, [&, x] will by default capture by
reference everything except x which it will capture by value.
However, while the default captures are convenient, they are not the preferred method
of capture. This is because it can lead to dangling references (capture by reference and
the referenced variable no longer exists when accessed by the lambda) or dangling
pointers (capture by value, especially this pointers). It is clearer to capture your
variables explicitly, which has the added benefit of the compiler being able to warn you
about unexpected effects (such as trying to capture global or static variables).
C++14 introduced the init capture to the capture clause allowing for safer code and
some optimizations. An init capture declares a variable in the capture clause and
initializes it for use inside the lambda. An example of this is:
intx=5;
inty=6;
auto fn = [z=x*x+y, x, y] ()
{
std::cout<<x<<"*"<<x<<"+"<<y<<"="<<z<<
"\n";
};
fn();
Here, z is declared and initialized in the capture clause so that it can be used in the
lambda. If you want to use the x and y in the lambda, then they must be captured
separately. As expected, when the lambda is called it produces the following output:
5*5+6=31
The init capture can also be used to capture movable objects into the lambda, or make
copies of class members as follows:
struct LambdaCapture
{
auto GetTheNameFunc ()
{
Function Objects and Lambda Expressions | 309
return [myName = myName] () { return myName.c _str(); };
}
std::string myName;
};
This captures the value of the member variable and happens to give it the same name
for use inside the lambda.
By default, a lambda is a const function, meaning that it cannot change the value of a
capture-by-value variable. Where it is desirable to modify the value, we need to use a
third form of lambda expression shown below.
Figure 4.25: Another form of lambda expression
In this case, specifiers is replaced by mutable, telling the compiler that we want to
modify the captured values. If we don't add mutable, and we attempt to modify a
captured value, then the compiler will produce an error.
Exercise 4: Implementing Lambdas
In this exercise we will implement lambdas to perform a number of actions in the
context of STL algorithms. Follow the below steps to implement this exercise:
1. Open the Lesson4 project in Eclipse, and then in the Project Explorer, expand
Lesson4 then Exercise04 and double click on Exercise4.cpp to open the file for
this exercise into the editor.
2. As this is a CMake based project, change the current builder to be CMake Build
(portable).
3. Click on the Launch Configuration drop down menu and select New Launch
Configuration... . Configure L4Exercise4 to run with the name Exercise4.
4. Click on the Run button. The exercise will run and produce the following output:
Figure 4.26: Initial output from Exercise 4
310 | Separation of Concerns - Software Architecture, Functions, and Variadic Templates
5. The program Exercise4.cpp contains two methods, PrintVector() and main().
PrintVector() is the same as the version we introduced in What is a Function
Object?. Now modify it to use the std::for_each() library function and a lambda
instead of the ranged-for loop. Update PrintVector() to be:
void PrintVector(const char* prefix, std::vector<int>& values)
{
const char* sep = "";
std::cout << prefix << " = [";
std::for_each(values.begin(), values.end(),
[&sep] (int n)
{
std::cout << sep << n;
sep=",";
}
);
std::cout << "]\n";
}
6. Click on the Run button and we get the same output as before.
7. Examine the lambda, we have captured the local variable sep by reference. Remove
the & from sep and click on the Run button. This time the compilation fails with
the following error:
Figure 4.27: Compilation failure due to modifying read-only variable
8. Change the lambda declaration to include the mutable specifier:
[sep] (int n) mutable
{
std::cout << sep << n;
sep=",";
}
9. Click on the Run button and we get the same output as before.
Function Objects and Lambda Expressions | 311
10. But we can go one step further. Remove the declaration of sep from the function
PrintVector() and change the lambda again to include an init capture. Write the
following code to implement this:
[sep = ""] (int n) mutable
{
std::cout << sep << n;
sep=",";
}
11. Click on the Run button and we get the same output as before. If we re-format the
function PrintVector() it now looks more compact as:
void PrintVector(const char* prefix, std::vector<int>& values)
{
std::cout << prefix << " = [";
std::for_each(values.begin(), values.end(), [sep = ""] (int n) mutable
{std::cout<<sep<<n;sep= ", ";});
std::cout << "]\n";
}
12. Add the following lines after the call to PrintVector() in main() method:
std::sort(values.begin(), values.end(), [](int a, int b) {return b<a;} );
PrintVector("After sort", values);
13. Click on the Run button and the output now adds the list of values sorted in
descending order:
Figure 4.28: Program output for descending sort lambda
14. Change the lambda function body to be {return a<b;}. Click on the Run button
and the output now shows the values sorted in ascending order:
Figure 4.29: Program output for ascending sort lambda
312 | Separation of Concerns - Software Architecture, Functions, and Variadic Templates
15. After the call to PrintVector() function, add the following lines of code:
int threshold{25};
auto pred = [threshold] (int a) { return a > threshold; };
auto count = std::count_if(values.begin(), values.end(), pred);
std::cout << "There are " << count << " values > " << threshold << "\n";
16. Click on the Run button and the output now reports the number of values > 25:
Figure 4.30: Output for count_if lambda stored in variable
17. Add the following lines after the ones above and click the Run button:
threshold = 40;
count = std::count_if(values.begin(), values.end(), pred);
std::cout << "There are " << count << " values > " << threshold << "\n";
Following output will be generated:
Figure 4.31: Erroneous output by re-using the pred lambda
18. The program wrongly reports that there are seven (7) values > 40; it should be
three (3). The problem is that when the lambda was created and stored in the
variable pred, it captured the current value of threshold which was 25. Change the
line that defines pred to the following:
auto pred = [&threshold] (int a) { return a > threshold; };
Variadic Templates | 313
19. Click on the Run button and the output now correctly reports the count:
Figure 4.32: Correct output re-using the pred lambda
In this exercise, we implemented several lambdas, using various features of the lambda
expression syntax including init capture and mutable.
Using lambdas
While lambdas are a powerful feature of C++, they should be used appropriately.
The goal is always to produce readable code. So, while a lambda might be short
and to the point, sometimes it will be better for maintenance purposes to factor
out the functionality into a well named method.
Variadic Templates
In Chapter 2B, No Ducks Allowed - Templates and Deduction, we introduced generic
programming and templates. Templates have been part of C++ before C++03. Prior to
C++11, templates were limited to a fixed number of arguments. In some cases, where a
variable number of arguments was required, it was necessary to write a template for
each variant of argument numbers required. Alternatively, there were variadic functions
like printf() that could take a variable number of arguments. The problem with variadic
functions is that they are not type safe as access to the arguments was through type
casts via the va_arg macro. C++11 changed all that with the introduction of variadic
templates where a single template can take an arbitrary number of arguments. C++17
improved the writing of variadic templates by introducing the constexpr if construct
that would allow the base case template to be merged with the "recursive" template.
The best approach is to implement a variadic template and explain how it works.
#include <iostream>
#include <string>
template<typename T, typename... Args>
T summer(T first, Args... args) {
314 | Separation of Concerns - Software Architecture, Functions, and Variadic Templates
if constexpr(sizeof...(args) > 0)
return first + summer(args...);
else
return first;
}
int main()
{
std::cout << "\n\n------ Variadic Templates ------\n";
auto sum = summer(1, 3, 5, 7, 9, 11);
std::cout << "sum = " << sum << "\n";
std::string s1{"ab"};
std::string s2{"cd"};
std::string s3{"ef"};
std::string strsum = summer(s1, s2, s3);
std::cout << "strsum = " << strsum << "\n";
std::cout << "Complete.\n";
return 0;
}
When we run this program, we get the following output:
Figure 4.33: Variadic Template Program Output
So, what are the parts of a variadic template? And how do we read one? Consider the
template from the above program:
template<typename T, typename... Args>
Variadic Templates | 315
T summer(T first, Args... args) {
if constexpr(sizeof...(args) > 0)
return first + summer(args...);
else
return first;
}
In the above code:
• typename... Args declares Args as a template parameter pack.
• Args... args is a function parameter pack, that is a bag of parameters whose types
are given by Args.
• sizeof...(args) returns the number of pack elements in args. It is a special form
of pack expansion.
• args... expands the pack in the recursive call to summer().
Alternatively, you can think of the template as effectively the equivalent of:
template<typename T, typename T1, typename T2, ..., typename Tn>
T summer(T first, T1 t1, T2, ..., Tn tn) {
if constexpr(sizeof...( t1, t2, ..., tn) > 0)
return first + summer(t1, t2, ..., tn);
else
return first;
}
When the compiler processes summer(1, 3, 5, 7, 9, 11) in the sample program, it
performs the following:
• It deduces that T is int and Args... is our parameter pack with <int, int, int, int,
int>.
• As there are more than zero args in the pack, the compiler generates first +
summer(args...) with the ellipsis unpacking the template argument transforming
summer(args...) into summer(3,5,7,9,11).
316 | Separation of Concerns - Software Architecture, Functions, and Variadic Templates
• The compiler then generates the code for summer(3,5,7,9,11). Again, resulting in
first + summer(args...) being applied where summer(5,7,9,11).
• This process is repeated until the compiler has to generate code for summer(11).
In this case, the else clause of the constexpr if statement is triggered which simply
returns first.
As the types are determined by the arguments to the template, we are not restricted
to the arguments having the same type. We have already met a couple of variadic
templates in the STL – std::function and std::bind.
There is another type of variadic template, one which forwards its arguments onto
another function or template. This kind of template does little on its own but provides a
standard approach to things. One example is the make_unique template which could be
implemented as:
template<typename T, typename... Args>
unique_ptr<T> make_unique(Args&&... args)
{
return unique_ptr<T>(new T(std::forward<Args>(args)...));
}
make_unique has to call the new operator to allocate memory and then call the
appropriate constructor for the type. The number of arguments required to call the
constructor can vary greatly. This form of variadic template introduces some addition
pack expansions:
• Args&&... means we have a list of forwarding references.
• std::forward<Args>(args)... which contains to parameter packs that are
expanded together and must have the same number of elements – Args the
template parameter pack and args the function parameter pack.
This pattern is used whenever we need to forward a function call to another function
call in a variadic template.
Variadic Templates | 317
Activity 1: Implement a multicast event handler
Microsoft first introduced the Microsoft Foundation Class (MFC) in 1992 when C++
was in its infancy. This means that many of the design choices around the classes
were restricted. For example, the handlers for events are typically routed through
OnEventXXX() methods. These are usually configured using macros as part of a class
derived from the MFC classes. Your team has been tasked with implementing multicast
event handler more like delegates available in C# using templates that embody function
objects and lead to variadic templates to achieve the variable argument lists.
In C#, you declare a delegate as follows:
delegate int Handler(int parameter);
This makes Handler a type that can be assigned a value which can be called. This is
essentially what std::function<> delivers us in C++ except for the ability to multi-cast.
Your team is asked to develop a template class Delegate that can perform the same way
as the C# delegate.
• The delegate will take a variable list of arguments but only return void
• The operator+= will be used to add new callbacks to the delegate
• It will be called either using either syntax delegate.Notify(...) or delegate(...)
Follow these steps to develop the Delegate template:
1. Load the prepared project from the Lesson4/Activity01 folder and configure the
Current Builder for the project to be CMake Build (Portable).
2. Build the project, configure the launcher and run the unit tests (which fail
the one dummy test). Recommend that the name used for the tests runner is
L4delegateTests.
3. Implement a Delegate class that can wrap a single handler with all the required
methods and supports a single int parameter for the callback.
4. Update the template class to support multi-casting.
5. Convert the Delegate class to a template that can take a single template argument
that defines the argument type used by the callbacks.
6. Convert the Delegate template to a variadic template that can take zero or more
arguments that define the types passed to the callbacks.
318 | Separation of Concerns - Software Architecture, Functions, and Variadic Templates
After following the above steps, the expected output looks like the following:
Figure 4.34: Output from the successful implementation of Delegate
Note
The solution for this activity can be found on page 673.
Summary
In this chapter, we implemented a data and method hiding design approach, PIMPL,
that has the added benefit of reducing dependencies and reducing build times. We then
implemented function objects directly as custom classes and then as lambda functions.
We then expanded our template programming skills by diving into variadic templates
culminating in a template which can be used for event callback processing. In the next
chapter, we will learn how to use the features of C++ to develop programs with multiple
thread and manage their co-operation through concurrency constructs.
Learning Objectives
By the end of this chapter, you will be able to:
•
Create synchronous and asynchronous multithreaded applications
•
Apply synchronization to handle data hazards and race conditions
•
Develop efficient multithreaded code with C++ thread library primitives
•
Create threads using move semantics for multithreading closures
•
Implement thread communication with futures, promises, and async
In this chapter, we will clarify the difference between basic terms in multithreaded
programming, learn how to write multi-threaded code, find out which resources are provided by
the C++ Standard Library for data access synchronization, learn how to prevent our code from
encountering race conditions and deadlocks.
The Philosophers'
Dinner – Threads and
Concurrency
5
322 | The Philosophers' Dinner – Threads and Concurrency
Introduction
In the previous chapter, we covered different types of dependencies and coupling in
C++. We looked at how common API design patterns and idioms can be implemented
in C++ and what data structures are provided by Standard Libraries, as well as their
efficacy. We also learned how to work with functional objects, lambdas, and captures.
This knowledge will help us learn how to write clear and efficient multithreaded
programs.
The heading of this chapter contains the name of the most significant synchronization
issue in concurrent programming – The Philosopher's Dinner. In a few words, this
definition is as follows.
Three philosophers are sitting at a round dining table with bowls of sushi. Chopsticks
are placed between each adjacent philosopher. Only one philosopher at a time can
eat their sushi with two chopsticks. Perhaps each philosopher will take one chopstick
and then wait until someone gives up another chopstick. Philosophers are an analogy
for three working processes and chopsticks for shared resources. "Who will grab the
two chopsticks first"symbolizes the race condition. When each philosopher holds a
chopstick and waits until another chopstick is available, it leads to a deadlock. This
analogy explains what problems occur during multithreading.
We will start our chapter with a brief introduction to the main multithreaded concepts.
We will consider the difference between synchronous, asynchronous, and threaded
execution. Using clear and simple examples, we will start with synchronization, data
hazards, and race conditions. We will find out why they appear in our code and how we
can manage them. The next part of this chapter is devoted to the C++ Standard Library
for threaded execution. Using examples, we will learn how and when to use thread
library primitives, and how does the move semantic interact with threads. We will also
practice with futures, promises, and async to receive results from threads.
This chapter will be concluded with a challenging activity in which we'll create an Art
Gallery simulator that works by simulating visitors and gallery staff. We will develop a
multithreaded generator that will simultaneously create and remove visitors from the
art gallery. Next, we will create a multithreaded class that is responsible for moving
visitors through the gallery. They will interact with each other using synchronization
techniques. Finally, we will create thread-safe storage, instances of which will be
accessed from the different threads.
In the next section, we will clarify a nuanced distinction between the concepts of
concurrent programming: synchronous, asynchronous, and threaded execution.
Synchronous, Asynchronous, and Threaded Execution | 323
Synchronous, Asynchronous, and Threaded Execution
There is a nuanced distinction between the concepts of concurrent programming:
synchronous, asynchronous, and threaded execution. To clarify it, we will start from the
very beginning, with the concept of concurrent and parallel programs.
Concurrency
The idea of concurrency is more than one task being executed simultaneously.
Concurrency doesn't specify how the simultaneity will be achieved. It only indicates
that more than one task will be completed in a given period. Tasks can be dependent,
parallel, synchronous, or asynchronous. The following diagram shows the concept of
concurrent work:
Figure 5.1: The abstraction of the concurrency - a few people working on the same computer
In the preceding diagram, three people are working at the same time on one computer.
We aren't interested in the way they do that, it's doesn't matter for this level of the
abstraction.
324 | The Philosophers' Dinner – Threads and Concurrency
Parallelism
Parallelism occurs when several tasks are performed simultaneously. The tasks work
in parallel due to hardware capabilities. The best example of parallelism is a multi-core
processor. For parallel execution, the tasks are divided into completely independent
subtasks that are performed in different processors' cores. After that, the result of the
execution can be combined. Look at the following diagram to understand the concept
of parallelism:
Figure 5.2: The abstraction of the parallelism - all of the tasks are executed by different people; they
don't interact with each other
In the preceding diagram, there are three people working at the same time on their own
computers – well, they're working in parallel.
Note
Concurrency and parallelism are not the same thing. Parallelism supplements
concurrency. It tells us how tasks are performed: they are independent of each
other and run in different computational units, that is, processors or cores.
Synchronous, Asynchronous, and Threaded Execution | 325
Now, we will smoothly move toward a threaded execution concept. When we talk
about threads, we mean the thread of execution. This is an abstraction of the operating
system, which allows us to perform several tasks simultaneously. Remember that the
entire program executes in a separate process. The operating system allocates the
address space, processor registers, and some additional resources for the process. All
of the worker threads are created within the process and share the same resources.
Each process has at least one thread that executes the main() function. We can create a
new thread for execution and assign a beginning function that will be the starting point
of this thread.
Note
The address space and registers of the processor are called Thread Context.
When the OS interrupts the thread's work, it must store the context of the current
thread and load the context of the next one.
Let's consider the creation of a new thread in the following example. To create a new
thread, we must include a <thread> header file. It contains classes and functions for
managing threads. Actually, there are a few possible ways to create an std::thread
object and thread of execution, as follows:
• Create an std::thread object without explicit initialization. Remember, the thread
needs a start function to run its job. We didn't point out which function is the
main one for this thread. This means that the thread of execution was not created.
Let's look at the following code sample, where we create an empty std::thread
object:
#include <thread>
int main()
{
std::thread myThread;
return 0;
}
326 | The Philosophers' Dinner – Threads and Concurrency
• Create an std::thread object and pass a pointer to a function as a constructor
argument. Now, the thread of execution will be created and will start its job from
the function that we passed in the constructor. Let's look at the following code
sample:
#include <iostream>
#include <thread>
void printHello()
{
std::cout << "hello" << std::endl;
}
int main()
{
std::thread myThread(printHello);
myThread.join();
return 0;
}
Here, we created an std::thread object and initialized it with the function pointer. This
is a simple function that returns void and doesn't take any parameters. Then, we tell
the main thread to wait until the new thread finishes using the join() function. We
always have to join() or detach() a thread until the end of the scope of the std::thread
object. If we don't do that, our application will be terminated by the OS using an
std::terminate() function that is called in the std::thread destructor. Instead of a
function pointer, we can also pass any callable object, such as lambda, std::function, or
a class with an overloaded operator().
Note
The thread of execution can finish its job before the destruction of the
std::thread object. It also can be destructed before the thread of execution
finishes its job. Always join() or detach() an std::thread object before its
destruction.
Now that we know about the main syntax for creating a thread, we can proceed to
the next important concepts. Let's find out what synchronous, asynchronous, and
multithreaded execution mean.
Synchronous, Asynchronous, and Threaded Execution | 327
Synchronous Execution
The term synchronous execution means that each subtask will be performed
sequentially, one by one. In other words, this means that if we have a few tasks to
execute, each of them can only start its work after the previous one has finished its
work. This term does not specify a way to perform tasks, or whether they will be
performed in a single or several threads. It only tells us about the execution order.
Let's go back to the philosophers' dinner example. In a single-threaded world, the
philosophers will eat one after the other.
The first philosopher takes two chopsticks and eats their sushi. Then, the second
philosopher takes two chopsticks and eats their sushi. They take turns until all of them
have finished their sushi. Take a look at the following diagram, which represents the
synchronous execution of four tasks in a single thread:
Figure 5.3: Synchronous execution in a single thread
Here, each of the tasks waits for the previous task to finish. Tasks can also be performed
synchronously in multiple threads. Consider the following diagram, which represents
the synchronous execution of four tasks in multiple threads. Again, each of the tasks
waits for the previous task to finish:
Figure 5.4: Synchronous execution in multiple threads
328 | The Philosophers' Dinner – Threads and Concurrency
In this case, each task is launched in a separate thread, but only after the previous
thread has completed its work. In a multithreaded world, the philosophers will still
eat one after the other, but with a small difference. Now, each of them has their own
chopsticks, but can only eat in a strict order.
Note
Synchronous execution means that the finishing time of each task is
synchronized. The order of the execution of tasks is the main point here.
Let's consider synchronous execution on the following code sample. When we run tasks
in a single thread, we just call the usual functions. For example, we implemented four
functions that print a message to the terminal. We ran them in a synchronous, single-
threaded way:
#include <iostream>
void printHello1()
{
std::cout << "Hello from printHello1()" << std::endl;
}
void printHello2()
{
std::cout << "Hello from printHello2()" << std::endl;
}
void printHello3()
{
std::cout << "Hello from printHello3()" << std::endl;
}
void printHello4()
{
std::cout << "Hello from printHello4()" << std::endl;
Synchronous, Asynchronous, and Threaded Execution | 329
}
int main()
{
printHello1();
printHello2();
printHello3();
printHello4();
return 0;
}
Here, we call all the functions one by one, and every next function runs after the
execution of the previous function. Now, let's run them in the different threads:
#include <iostream>
#include <thread>
void printHello1()
{
std::cout << "Hello from printHello1()" << std::endl;
}
void printHello2()
{
std::cout << "Hello from printHello2()" << std::endl;
}
void printHello3()
{
std::cout << "Hello from printHello3()" << std::endl;
}
void printHello4()
{
330 | The Philosophers' Dinner – Threads and Concurrency
std::cout << "Hello from printHello4()" << std::endl;
}
int main()
{
std::thread thread1(printHello1);
thread1.join();
std::thread thread2(printHello2);
thread2.join();
std::thread thread3(printHello3);
thread3.join();
std::thread thread4(printHello4);
thread4.join();
return 0;
}
In the preceding code sample, we created four threads and immediately joined them.
Thus, every thread finishes its job before the one can be run. As you can see, nothing
changes for the tasks – they are still executed in a strict order.
Asynchronous Execution
This is where a few tasks can be executed simultaneously without blocking any thread
execution. Usually, the main thread initiates an asynchronous operation and continues
execution. After execution is finished, the results are sent to the main thread. Often,
performing an asynchronous operation is not related to creating a separate thread for
it. The task can be performed by someone else, such as another computing device, a
remote web server, or an external device. Let's go back to the philosophers' dinner
example.
In the case of asynchronous execution, all of the philosophers will have their own
chopsticks and will eat independently from each other. When the sushi is ready and the
waiter serves it, they all start to eat and can finish in their own time.
Note
In asynchronous execution, as all the tasks work independently of each other, it's
not important to know the finish time of each task.
Synchronous, Asynchronous, and Threaded Execution | 331
Take a look at the following diagram, which represents the asynchronous execution of
four tasks in multiple threads:
Figure 5.5: Asynchronous execution in multiple threads
Each of them was started and finished at a different time. Let's consider this
asynchronous execution with a code sample. For example, we implemented four
functions that print a message to the terminal. We ran them in different threads:
#include <iostream>
#include <thread>
#include <chrono>
void printHello1()
{
std::cout << "Hello from thread: " << std::this_thread::get_id() <<
std::endl;
}
void printHello2()
{
std::cout << "Hello from thread: " << std::this_thread::get_id() <<
std::endl;
}
void printHello3()
{
332 | The Philosophers' Dinner – Threads and Concurrency
std::cout << "Hello from thread: " << std::this_thread::get_id() <<
std::endl;
}
void printHello4()
{
std::cout << "Hello from thread: " << std::this_thread::get_id() <<
std::endl;
}
int main()
{
std::thread thread1(printHello1);
std::thread thread2(printHello2);
std::thread thread3(printHello3);
std::thread thread4(printHello4);
thread1.detach();
thread2.detach();
thread3.detach();
thread4.detach();
using namespace std::chrono_literals;
std::this_thread::sleep_for(2s);
return 0;
}
Let's see what happens here. We used four functions from the previous examples, but
they were changed a little bit. We added the print of the thread's unique ID by using the
std::this_thread::get_id() function. This function returns the std::thread::id object,
which represents the unique ID of the thread. This class has overloaded operators for
the output and comparison, so we can use it in a different manner. For example, we
can check the thread ID and if it is the ID of the main thread, we can execute a special
job. In our example, we can print the thread ID to the terminal. Next, we created four
threads and detached them. This means that no thread will wait for the other to finish
working. From this moment, they become daemon threads.
Synchronous, Asynchronous, and Threaded Execution | 333
They will continue their job, but nobody knows about that. Then, we used the
std::this_thread::sleep_for(2s) function to make the main thread wait for two
seconds. We did that because when the main thread finishes its job, the application will
stop, and we won't be able to view the output of the detached threads in the terminal.
The following screenshot is an example of the output to the terminal:
Figure 5.6: The result of an example execution
In your IDE, the output can change as the order of execution is undefined. A real-
world example of asynchronous execution can be an internet browser wherein you
can open multiple tabs. When a new tab is opened, the application starts a new thread
and detaches them. Although the threads work independently, they can share some
resources, such as a file handler, to write logs or do something else.
Note
std::thread has a member function called get_id() that returns the unique
ID of the std::thread instance. If the std::thread instance wasn't initialized or
was joined or detached, get_id() returns a default std::thread::id object. This
means that no thread of execution is associated with the current std::thread
instance.
Let's use some pseudocode to show an example where computations are done by
another computational unit. For example, let's say we develop an application that
performs calculations with currency exchange. The user inputs an amount in one
currency, chooses another currency to exchange, and the application shows them
the amount in that currency. The application, in the background, sends a request to a
remote server that holds all the currency exchange rates.
334 | The Philosophers' Dinner – Threads and Concurrency
The remote server calculates the amount of the given currency and sends the result
back. Your application shows a progress bar at that time and allows the user to perform
other operations. When it receives the results, it displays them on the window. Let's
take a look at the following code:
#include <thread>
void runMessageLoop()
{
while (true)
{
if (message)
{
std::thread procRes(processResults, message);
procRes.detach();
}
}
}
void processResults(Result res)
{
display();
}
void sendRequest(Currency from, Currency to, double amount)
{
send();
}
void displayProgress()
{
}
Synchronous, Asynchronous, and Threaded Execution | 335
void getUserInput()
{
Currency from;
Currency to;
double amount;
std::thread progress(displayProgress);
progress.detach();
std::thread request(sendRequest, from, to, amount);
request.detach();
}
int main()
{
std::thread messageLoop(runMessageLoop);
messageLoop.detach();
std::thread userInput(getUserInput);
userInput.detach();
return 0;
}
Let's see what happens here. In the main() function, we created a thread called
messageLoop that executes the runMessageLoop() function. Some code that checks if
there are any new results from the server can be placed in this function. If a new result
is received, it creates a new thread, procRes, that will display the results in a window. We
also created another thread, userInput, in the main() function that gets currencies and
the amount from the user and creates a new thread, request, that will send a request
to the remote server. After sending the request, it creates a new thread, progress, that
will display a progress bar until the results are received. Since all the threads were
detached, they were able to work independently. Sure, this is just pseudocode, but
the main idea is clear – our application sends a request to the remote server, which
performs calculations for our application.
336 | The Philosophers' Dinner – Threads and Concurrency
Let's revise what we have learned about concurrency concepts using an example from
daily life. Here is a background wherein you've to write an application and provide all
the documentation and architectural concepts related to it:
• Single-threaded work: You write it yourself.
• Multi-threaded work: You invite your friends and write a project together.
Somebody writes an architectural concept, somebody takes care of documentation
work, and you focus on the coding part. All participants communicate with each
other to clarify any questions and share documentation, such as questions about
specifications.
• Parallel work: The tasks are divided. Someone writes the documentation for the
project, someone designs the diagrams, someone writes the test cases, and you
work independently. Participants don't communicate at all.
• Synchronized work: In this case, each of you are unable to understand what they
are supposed to do. Thus, you all decide to work one after the other. When the
architectural work is finished, the developer starts to write the code. Then, when
the development work is finished, someone starts to write the documentation.
• Asynchronous work: In this case, you hire an outsource company to complete the
project. While they are developing the project, you'll be engaged in some other
task.
Now, let's apply our knowledge in practice and solve an exercise to see how all it works.
Exercise 1: Creating Threads in a Different Way
In this exercise, we'll write a simple application that creates four threads; two of them
will work in a synchronized way and two of them will work asynchronously. All of them
will print some symbols to the terminal, so that we can see how the operating system
switches thread execution.
Note
Add the pthread linker flag in your project settings to let the compiler know that
you will use threading libraries. For Eclipse IDE you can do this following this
path: Project -> Properties -> C/C++ Build -> Settings -> G++ Linker ->
Miscellaneous -> Linker flags enter ‘-pthread'. This path is valid for Eclipse
Version: 3.8 .1, it may vary in different versions.
Synchronous, Asynchronous, and Threaded Execution | 337
Perform the following steps to complete this exercise:
1. Include some headers for threading support, namely <thread>, streaming support,
namely <iostream>, and functional objects support, namely <functional>:
#include <iostream>
#include <thread>
#include <functional>
2. Implement a free function, printNumbers(), that prints numbers from 0 to 100 in a
for loop:
void printNumbers()
{
for(inti=0;i<100;++i)
{
std::cout << i << " ";
}
std::cout << std::endl;
}
3. Implement a callable object, that is, a Printer class with an overloaded operator()
that prints a "*" symbol from 0 to 100000 in a for loop. For every 200 iterations,
print a new line symbol for more readable output:
class Printer
{
public:
void operator()()
{
for(int i = 0; i < 100000; ++i)
{
if (!(i % 200))
{
std::cout << std::endl;
}
std::cout << "*";
}
}
};
338 | The Philosophers' Dinner – Threads and Concurrency
4. Enter the main() function and then create a lambda object called printRevers that
prints the numbers from 100 to 0 in a for loop:
int main()
{
auto printRevers = []()
{
for(int i = 100; i >= 0; --i)
{
std::cout << i << " ";
}
std::cout << std::endl;
};
return 0;
}
5. Implement an std::function object called printOther that prints the "^" symbol
from 0 to 100000 in a for loop. For every 200 iterations, print a new line symbol for
more readable output:
std::function<void()> printOther = []()
{
for(int i = 0; i < 100000; ++i)
{
if (!(i % 200))
{
std::cout << std::endl;
}
std::cout << "^";
}
};
6. Create the first thread, thr1, and pass the printNumbers free function to its
constructor. Join it:
std::thread thr1(printNumbers);
thr1.join();
7. Create a second thread, thr2, and pass the printRevers lambda object to its
constructor. Join it:
std::thread thr2(printRevers);
thr2.join();
Synchronous, Asynchronous, and Threaded Execution | 339
8. Create an instance of the Printer class called print. Create a third thread, thr3,
and initialize it with the print object. Detach it using the detach() method:
Printer print;
std::thread thr3(print);
thr3.detach();
9. Create the last thread, thr4, and initialize it with the printOther object. Detach it:
std::thread thr4(printOther);
thr4.detach();
10. Add the std::getchar() function call before the exit of the main() function. This
avoids closing the application. We'll have the possibility to see how detached
threads work:
std::getchar();
11. Run this code in your editor. You will see that thr1 starts execution and the
program waits. After thr1 has finished, thr2 starts execution and the program
waits. This is an example of synchronous execution. After thr2 has finished its
work, threads thr3 and thr4 start execution. They are detached, so the program
can proceed with the execution. In the following output, you will see that the
symbols are mixed. This happens because the operating system performs
interruptions and the threads work at the same time.
Your output will be similar to the following:
Figure 5.7: The result of the exercise's execution
340 | The Philosophers' Dinner – Threads and Concurrency
In this exercise, we implemented four different ways we can initialize threads: with a
free function, with a lambda object, with a callable object, and with an std::function
object. There are a few more ways to initialize the thread, but we'll consider them in
the next section. We've also reviewed how we can implement a synchronous program
in multiple threads. We also tried to implement the asynchronous program and saw
that threads really work at the same time and independently. In the next section, we'll
learn about data hazards and race conditions and how we can avoid them by using
synchronization techniques.
Review Synchronization, Data Hazards, and Race Conditions
The key challenge of multithreaded programming is knowing how the threads work
with shared data. Shared data, also known as resources, are not only variables, but also
file descriptors and environment variables, and even Windows registries. For example,
if the threads just read the data, then there are no problems and no synchronization is
required. However, if at least one of the threads edits the data, race conditions could
arise. Usually, the operations on the data are not atomic, that is, they require several
steps. Even the simplest increment operation of a numeric variable is performed in the
following three steps:
1. Read the value of the variable.
2. Increment it.
3. Write the new value.
Due to the OSes interruptions, the thread can be stopped before it completes the
operation. For example, we have threads A and B and have a variable that is equal to 0.
Thread A starts the increment:
1. Reads the value of the variable (var = 0).
2. Increments it (tmp = 1).
3. Gets interrupted by the OS.
Thread B starts the increment:
1. Reads the value of the variable (var = 0).
2. Increments it (tmp = 1).
3. Writes the new value (var = 1).
4. Gets interrupted by the OS.
Review Synchronization, Data Hazards, and Race Conditions | 341
Thread A continues the increment:
1. Writes the new value (var = 1).
Thus, we expect the variable to be equal to 2 after the completion of the work, but in
fact, it is equal to 1. Have a look at the following diagram to get a better understanding
of this example:
Figure 5.8: Two threads increment the same shared variable
342 | The Philosophers' Dinner – Threads and Concurrency
Let's go back to the philosophers' dinner analogy. The original issue was that one
philosopher had only one chopstick. If all of them are hungry, then they will hurry to
grab two chopsticks. The first philosopher who grabs two chopsticks will be the first to
eat, and the others must wait. They will race for the sticks.
Now, let's apply our knowledge to practice and write some code to see how the race
conditions can appear in our code and can damage our data.
Exercise 2: Writing an Example of Race Conditions
In this exercise, we will write a simple application that will demonstrate race conditions
in action. We will create a classic example of a "check then act" race condition. We
will create a thread, which performs the division of two numbers. We will pass these
numbers by reference. After a check, if a dividend is equal to 0, we will set a small
timeout. At this time in the main thread, we will set the dividend to 0. When the child
thread wakes up, it will perform a division to 0. That will lead to an application crash.
We will also add some logs to see the execution flow.
Note
By default, all the variables are copied when they are passed to the thread. To pass
the variable as a reference, use the std::ref() function.
First, we implement the code without a race condition and ensure that it works as
expected. Perform the following steps:
1. Include headers for threading support, namely <thread>, streaming support,
namely <iostream>, and functional objects support, namely <functional>:
#include <iostream>
#include <chrono>
#include <thread>
2. Implement a divide() function, which performs a division of two integers. Pass the
divisor and dividend variables by reference. Check whether a dividend is equal to
0. Then, add the logs:
void divide(int& divisor, int& dividend)
{
if (0 != dividend)
{
std::cout << "Dividend = " << dividend << std::endl;
std::cout << "Result: " << (divisor / dividend) << std::endl;
}
Review Synchronization, Data Hazards, and Race Conditions | 343
else
{
std::cout << "Error: dividend = 0" << std::endl;
}
}
3. Enter the main() function, create two integers called divisor and dividend, and
initialize them with any non-zero values:
int main()
{
int divisor = 15;
int dividend = 5;
return 0;
}
4. Create the thr1 thread, pass the divide function, use divisor and dividend by
reference, and then detach the thread:
std::thread thr1(divide, std::ref(divisor), std::ref(dividend));
thr1.detach();
std::getchar();
Note
In the std::this_thread namespace there is a function called sleep_for
that blocks threads for a given period of time. As a parameter, it takes
std::chrono::duration – a template class to represent a time interval.
5. Run this code in your editor. You will see that the divide() function works
correctly in thr1. The output looks as follows:
Figure 5.9: The result of the correct exercise execution
344 | The Philosophers' Dinner – Threads and Concurrency
Now, we will continue and make changes that will demonstrate race conditions.
6. Go back to the function and set the sleeping time in 2s for the child thread after
the if condition. Add the logs:
if (0 != dividend)
{
std::cout << "Child thread goes sleep" << std::endl;
using namespace std::chrono_literals;
std::this_thread::sleep_for(2s);
std::cout << "Child thread woke up" << std::endl;
std::cout << "Dividend = " << dividend << std::endl;
std::cout << (divisor / dividend) << std::endl;
}
7. Go back to the main() function and set the sleeping time in 1s for the main thread.
After that, set the dividend variable to 0. Add the logs:
std::cout << "Main thread goes sleep" << std::endl;
using namespace std::chrono_literals;
std::this_thread::sleep_for(1s);
std::cout << "Main thread woke up" << std::endl;
dividend = 0;
std::cout << "Main thread set dividend to 0" << std::endl;
Note
The std::chrono_literals namespace contains literals for time representations:
`h ` for hours, `min` for minutes, `s ` for seconds, `ms` for milliseconds, `us`
for microseconds, and `ns` for nanoseconds. To use them, you should just add
them to the end of the number, for example, 1s, 1min, 1h, and so on.
8. Add the std::getchar() function call before the exit of the main() function. This
avoids us closing the application and we will have the possibility to see how
detached threads work:
std::getchar();
Review Synchronization, Data Hazards, and Race Conditions | 345
9. Run this code in your editor. You will see that the main thread goes to sleep for
1s. Then, the child thread enters the if condition and goes to sleep for 2s, which
means that it validates a dividend and it is not equal to 0. Then, the main thread
wakes up and sets a dividend variable to 0. Then, the child thread wakes up and
performs the division. But because the dividend is equal to 0 now, the application
crashes. If you run this example in Debug mode, you will see a SIGFPE exception
with a message: "Arithmetic exception". You will get the following output:
Figure 5.10: The result of the exercise's execution with race conditions
In this exercise, we considered "check then act" kinds of race conditions. We've set
periods of sleep for threads to emulate the OS interruption, but in real-world programs,
this situation may well happen but may not. It all depends on the OS and its scheduler.
This makes it enormously difficult to debug and fix race conditions. To avoid race
conditions in this example, we can act in a few ways:
• Pass copies of variables to the threaded function instead of passing references.
• Synchronize access to the shared variables between threads using Standard
Library primitives.
• Join child thread before the main thread changes a dividend value to 0.
Let's look at a few more ways to fix this race condition. All of them depend on a task
that you try to implement. In the next section, we will consider synchronization
primitives that are provided by the C++ Standard Library.
346 | The Philosophers' Dinner – Threads and Concurrency
Data Hazards
Previously, we considered the most harmless example, but sometimes, there are
situations where the data is damaged, and this leads to undefined program behavior
or abnormal termination. Such damage to data, as a result of race conditions or simply
wrong design, are known as data hazards. In general, this term implies that the final
result of a piece of work depends on the order of the thread's execution. If different
threads work with shared data or global variables, it may happen that, due to an
incorrect order of task execution by different threads, the result will vary from time to
time. This happens due to the dependencies between the data being multi-threaded.
Such dependency issues are conditionally divided into three groups:
• A true dependency: Read After Writing (R AW )
• An anti-dependency: Write After Reading (WAR)
• An output dependency: Write After Writing (WAW)
RAW Dependency
A RAW dependency occurs when one thread calculates the value that is used by another
thread. For example, Thread A should do its job and write the results to a variable.
Thread B must read the value of this variable and do its job. In pseudocode, this looks as
follows:
Thread A: a = doSomeStuff();
Thread B: b = a - doOtherStuff();
Review Synchronization, Data Hazards, and Race Conditions | 347
Difficulties will arise if Thread B executes first. It will lead to Thread B reads an invalid
value. The order of the execution of threads should be strictly guaranteed. Thread B
must read the value of the variable, but only after Thread A has written it. Otherwise,
it will lead to undefined behavior. The following diagram will help you clarify the RAW
data dependency that leads to data hazards:
Figure 5.11: RAW data dependency between two threads
WAR Dependency
A WAR dependency occurs when one thread changes the data that is used by another
thread. For example, Thread A must read the value of a variable and do its job. After that,
Thread B should do its job and write the results to a variable. In pseudocode, this looks
as follows:
Thread A: b = a - doSomeStuff();
Thread B: a = doOtherStuff();
348 | The Philosophers' Dinner – Threads and Concurrency
Difficulties will arise if Thread B executes first. It will lead to Thread B changing the
value before Thread A reads it. The order of the execution of threads should be strictly
guaranteed. Thread B should write the new value to a variable only after Thread A reads
its value. The following diagram will help you clarify the RAW data dependency that
leads to data hazards:
Figure 5.12: WAR data dependency between two threads
WAW Dependency
A WAW dependency occurs when several threads change the value of the same variable,
and some thread reads for its calculations. For example, Thread A executes its job and
writes the results to a variable. Thread B reads the value of the variable and executes its
job. Thread C executes its job and writes the results to the same variable. In pseudocode,
this looks as follows:
Thread A: a = doSomeStuff();
Thread B: b = a - doOtherStuff();
Thread C: a = doNewStuff();
Review Synchronization, Data Hazards, and Race Conditions | 349
Difficulties will arise if Thread C executes before threads A and B. This leads to Thread B
reads the value that it is not expected to be read. The order of the execution of threads
should be strictly guaranteed. Thread C must write a new value to a variable, but only
after Thread A has written its value and Thread B has read it. The following diagram will
help you clarify the WAW data dependency that leads to data hazards:
Figure 5.13: WAW data dependency between two threads
Resource Synchronization
To prevent races and data hazards, there is a shared data locking mechanism where
one of the streams intends to change or read these data. This mechanism is called
resource synchronization. For synchronization, we need to allocate pieces of code that
change or read shared resources. Such pieces of code are called critical sections.
Synchronization consists of blocking critical sections when one of the threads enters
it. Other threads that also intend to execute the code of this critical section will be
blocked. When the thread executing the critical section leaves it, the lock is released.
Then, the story will repeat with the next thread.
350 | The Philosophers' Dinner – Threads and Concurrency
Consider the previous example with an increment, but now with synchronized access.
Remember that we have threads A and B and have a variable that is equal to 0.
Thread A starts the increment:
1. Enters the critical section and locks it.
2. Reads the value of the variable (var = 0).
3. Increments it (tmp = 1).
4. Gets interrupted by the OS.
Thread B starts the increment:
1. Tries to enter the critical section; it's locked, so the thread is waiting.
Thread A continues the increment:
1. Writes the new value (var = 1).
Thread B continues the increment:
1. Enters the critical section and locks it.
2. Reads the value of the variable (var = 1).
3. Increments it (tmp = 2).
4. Writes the new value (var = 2).
Review Synchronization, Data Hazards, and Race Conditions | 351
After the completion of both threads, the variable contains the correct result. Thus,
synchronization ensures that shared data will not be damaged. Have a look at the
following diagram, to get a better understanding of this example:
Figure 5.14: Two threads increment the same shared variable in a synchronized way
Highlighting critical sections and anticipating the possible consequences of
non-synchronized access is a very difficult task. Because excessive synchronization
negates the very essence of multithreaded work. If two or three threads work on one
critical section rather quickly, however, there can be dozens of threads in the program
where all of them will be blocked in the critical section. This will greatly slow down the
program.
352 | The Philosophers' Dinner – Threads and Concurrency
Event Synchronization
There is another mechanism for synchronizing the work of threads – event
synchronization. This means the synchronization of the work of the threads when one
of them suspends its work until the other thread signals the occurrence of some event.
For example, there's Thread A, which receives a message from another process. It writes
the message to the queue and waits for new messages. There is another thread, Thread
B, that processes these messages. It reads messages from the queue and performs some
actions on them. When there are no messages, Thread B is sleeping. When Thread A
receives a new message, it wakes up Thread B and processes it. The following diagram
provides a clear understanding of the event synchronization of two threads:
Figure 5.15: Event synchronization of two threads
However, even in synchronized code can appear another reason for a race conditions –
a flawed interface of a class. To get an understanding of what this is, let's consider the
following example:
class Messages
{
public:
Messages(const int& size)
: ArraySize(size)
, currentIdx(0)
Review Synchronization, Data Hazards, and Race Conditions | 353
, msgArray(new std::string[ArraySize])
{}
void push(const std::string& msg)
{
msgArray[currentIdx++] = msg;
}
std::string pop()
{
auto msg = msgArray[currentIdx - 1];
msgArray[currentIdx - 1] = "";
--currentIdx;
return msg;
}
bool full()
{
return ArraySize == currentIdx;
}
bool empty()
{
return 0 == currentIdx;
}
private:
const int ArraySize;
int currentIdx;
std::string * msgArray;
};
354 | The Philosophers' Dinner – Threads and Concurrency
Here, we have a class called Messages that has a dynamically allocated array of strings.
In the constructor, it takes the size of the array and creates an array of the given size.
It has a function, full(), that returns true if the array is full and false otherwise. It also
has an empty() function that returns true if the array is empty and false otherwise. It
is the user's responsibility to check if the array is full before pushing a new value and
checking if the array is empty, and before popping a new value from the array. This is an
example of a poor interface of the class that leads to race conditions. Even if we protect
the push() and pop() functions with locks, race conditions will not disappear. Let's look
at the following example of using the Messages class:
int main()
{
Messages msgs(10);
std::thread thr1([&msgs](){
while(true)
{
if (!msgs.full())
{
msgs.push("Hello");
}
else
{
break;
}
}});
std::thread thr2([&msgs](){
while(true)
{
if (!msgs.empty())
{
std::cout << msgs.pop() << std::endl;
}
else
{
break;
Review Synchronization, Data Hazards, and Race Conditions | 355
}
}});
thr1.detach();
thr2.detach();
using namespace std::chrono_literals;
std::this_thread::sleep_for(2s);
return 0;
}
Here, we created a msgs variable and then created the first thread, which pushes value
to the msgs. Then, we created the second thread, which pops values from the array and
detaches them. Even if we protect all the functions by using a locking mechanism, one
of the threads can check the array's size and can be interrupted by the OS. At this time,
another thread can change the array. When the first thread continues its work, it can
try to push to the full array or pop from the empty array. So, synchronization is only
effective in a pair with a good design.
Deadlock
There is one more synchronization issue. Let's go back to the philosophers' dinner
example. The original issue was that one philosopher has only one chopstick. So, they
can eat their sushi one by one by sharing chopsticks with each other. Although it will
take a long time for them to finish their sushi, all of them will be well-fed. But if each
of them grabs a chopstick at the same time and doesn't want to share the second
chopstick, they won't be able to eat their sushi as each of them will be waiting for the
second chopstick forever. This leads to a deadlock. This happens when two threads
are waiting for another thread to continue its job. One of the causes of deadlocks is
when one thread joins another thread, but another thread joins the first thread. So,
when both threads are joined to each other, none of them can continue their job. Let's
consider the following example of a deadlock:
#include <thread>
std::thread* thr1;
std::thread* thr2;
void someStuff()
{
thr1->join();
356 | The Philosophers' Dinner – Threads and Concurrency
}
void someAnotherStuff()
{
thr2->join();
}
int main()
{
std::thread t1(someStuff);
std::thread t2(someAnotherStuff);
thr1 = &t1;
thr2 = &t2;
using namespace std::chrono_literals;
std::this_thread::sleep_for(2s);
return 0;
}
In the main function, we have two threads, t1 and t2. We initialized the t1 thread with
the someStuff() function, which does some useful work. We also initialized the t2
thread with the someAnotherStuff() function, which does some more useful work. We
have global pointers to these threads and a join pointer to the t1 thread in the function
that's executed by t2. We also join a pointer to the t2 thread into the function, which is
executed by t1. By doing this, they joined each other. This causes a deadlock.
In the next section, we will consider C++ thread library primitives for synchronization
and another cause of deadlocks.
Move Semantics for Multithreading Closures
The std::thread class cannot be copied, but what if we want to store a few threads, or
maybe 10 or 20? Sure, we can create the number of threads, and then we can join or
detach them like so:
std::thread thr1(someFunc);
std::thread thr2(someFunc);
std::thread thr3(someFunc);
std::thread thr4(someFunc);
Review Synchronization, Data Hazards, and Race Conditions | 357
std::thread thr5(someFunc);
thr1.join();
thr2.join();
thr3.join();
thr4.join();
thr5.join();
But it's more convenient to store a bunch of threads in an STL container, for example,
the vector of threads:
std::vector<std::thread> threads;
STL containers cannot be used with objects that don't support copy semantic. Thanks
to the move semantic, we can store non-copiable objects that have a move constructor
and move the assignment operator to the containers. Then, we can use a vector of
threads with the std::move() function. To initialize the threads in the container, we can
do something like the following:
for(inti=0;i<10;i++)
{
auto t = std::thread([i]()
{
std::cout << "thread: " << i << "\n";
});
threads.push_back(std::move(t));
}
Then, we can join or detach all of them:
for (auto& thr: threads)
{
if (thr.joinable())
{
thr.join();
}
}
358 | The Philosophers' Dinner – Threads and Concurrency
Move semantics can also be useful when we store an std::thread object as a class
member. In this case, we should design our class carefully, delete the copy constructor
and assignment operator, and implement a new move constructor and move
assignment operator. Let's consider the following code example of such a class:
class Handler
{
std::thread threadHandler;
public:
Handler(const Handler&) = delete;
Handler& operator=(const Handler&) = delete;
Handler(Handler && obj)
: threadHandler(std::move(obj.threadHandler))
{}
Handler & operator=(Handler && obj)
{
if (threadHandler.joinable())
{
threadHandler.join();
}
threadHandler = std::move(obj.threadHandler);
return *this;
}
~ Handler()
{
if (threadHandler.joinable())
{
threadHandler.join();
}
}
};
Review Synchronization, Data Hazards, and Race Conditions | 359
In the move assignment operator, we first check if the thread is joinable. If so, we join it
and only after that do we perform assignment operation.
Note
We should never assign one thread object to another without using join() or
detach() on them. This will lead to an std::terminate() function call.
It's also possible to use the std::move() function to move objects into a thread function.
It can be helpful for copying big objects, which is not advisable. Let's execute an
exercise to ensure that the objects can be moved into thread functions.
Exercise 3: Moving Objects to a Thread Function
In this exercise, we will write a simple application that demonstrates how std::move()
works for std::thread classes. We will create a class that has both a copy constructor
and a move constructor to see which one will be called when we move the object of
this class into the std::thread function. Perform the following steps to complete this
exercise:
1. Include headers for threading support, namely <thread>, and streaming support,
namely <iostream>:
#include <iostream>
#include <thread>
2. Implement the Handler clas, which has the default constructor, destructor, copy
constructor, assignment operator, move constructor, and move assignment
operator. They will do nothing except print a log:
class Handler
{
public:
Handler()
{
std::cout << "Handler()" << std::endl;
}
Handler(const Handler&)
{
std::cout << "Handler(const Handler&)" << std::endl;
}
Handler& operator=(const Handler&)
{
360 | The Philosophers' Dinner – Threads and Concurrency
std::cout << "Handler& operator=(const Handler&)" << std::endl;
return *this;
}
Handler(Handler && obj)
{
std::cout << "Handler(Handler && obj)" << std::endl;
}
Handler & operator=(Handler && obj)
{
std::cout << "Handler & operator=(Handler && obj)" << std::endl;
return *this;
}
~ Handler()
{
std::cout << "~Handler()" << std::endl;
}
};
3. Implement the doSomeJob() function, which actually does nothing here and just
prints a log message:
void doSomeJob(Handler&& h)
{
std::cout << "I'm here" << std::endl;
}
4. Enter the main() function and create a handler variable of the Handler type. Create
thr1, pass the doSomeJob() function, and move the handler variable:
Handler handler;
std::thread thr1(doSomeJob, std::move(handler));
5. Detach the thr1 thread and add a small sleep for the main thread to avoid closing
the application. We will be able to see the output from the detached thread:
thr1.detach();
using namespace std::chrono_literals;
std::this_thread::sleep_for(5s);
6. Run this code in your editor. In the terminal log, from the default constructor, you
will see two logs from the move operator, one log from a destructor, a message
from the doSomeJob() function, and, finally, two other log messages from the
destructor. We can see that the move constructor is called twice.
Review Synchronization, Data Hazards, and Race Conditions | 361
You will get the following output:
Figure 5.16: The result of the exercise's execution
As you can see, the Handler object was moved into the thread function. Despite that, all
the parameters, that were passed without the std::ref() function, were copied to the
thread's memory.
Let's consider one interesting issue. As you may remember, when we initialize
std::thread, all of the constructor arguments are copied into thread memory, including
a callable object – a lambda, a function, or an std::function. But what if our callable
object doesn't support copy semantics? For example, we created a class that has only a
move constructor and a move assignment operator:
class Converter
{
public:
Converter(Converter&&)
{
}
Converter& operator=(Converter&&)
{
return *this;
}
Converter() = default;
362 | The Philosophers' Dinner – Threads and Concurrency
Converter(const Converter&) = delete;
Converter& operator=(const Converter&) = delete;
void operator()(const std::string&)
{
// do nothing
}
};
How can we pass it to the thread constructor? If we pass it as it is, we will get a
compiler error; for example:
int main()
{
Converter convert;
std::thread convertThread(convert, "convert me");
convertThread.join();
return 0;
}
You will get the following output:
Figure 5.17: Example of a compilation error
There are lots of strange errors here. To fix this issue, we can use the std::move()
function to move the callable:
std::thread convertThread(std::move(convert), "convert me");
Review Synchronization, Data Hazards, and Race Conditions | 363
Now, everything is ok – the code is compiled and does exactly what we want it to do.
Now, let's consider one more interesting example. For example, you have a lambda
function that needs to capture a non-copiable object, for example, a unique_ptr:
auto unique = std::make_unique<Converter>();
Starting from C++ 14, we can use std::move() to capture movable objects. So, to capture
a unique pointer, we can use the following code:
std::thread convertThread([ unique = std::move(unique) ] {
unique->operator()("convert me");
});
As you can see, it's pretty useful to capture value in a lambda by using std::move. This
can be also useful when we do not want to copy some objects because they might take a
long time to copy.
Now, let's put our knowledge to practice and write an application example that
demonstrates how we can use std::move with threads.
Exercise 4: Creating and Working with an STL Container of Threads
In this exercise, we will write a simple application where we will use std::move() with
threads. First of all, we will implement a class that is move constructible. This class will
convert lowercase text into uppercase text. Then, we will create a vector of instances of
this class. Next, we will create a vector of std::thread objects. Finally, we will initialize
the threads with an object from the first vector.
Perform the following steps to complete this exercise:
1. Include headers for threading support, namely <thread>, streaming support,
namely <iostream>, and <vector>:
#include <iostream>
#include <thread>
#include <vector>
#include <string>
364 | The Philosophers' Dinner – Threads and Concurrency
2. Implement the Converter class, which has the m_bufferIn private member of the
const std::vector<std::string>& type. This is a reference to the original vector
of strings in lowercase. It also has a user constructor, which takes the bufferIn
variable. Then, we delete the copy constructor and assignment operators. Finally,
we define the overloaded operator(), where we convert all lowercase symbols into
uppercase. After conversion, we write the result to the result buffer:
class Converter
{
public:
Converter(std::vector<std::string>& bufferIn)
: m_bufferIn(bufferIn)
{
}
Converter(Converter&& rhs)
: m_bufferIn(std::move(rhs.m _bufferIn))
{
}
Converter(const Converter&) = delete;
Converter& operator=(const Converter&) = delete;
Converter& operator=(Converter&&) = delete;
void operator()(const int idx, std::vector<std::string>& result)
{
try
{
std::string::const_iterator end = m_bufferIn.at(idx).end();
std::string bufferOut;
for (std::string::const_iterator iter = m_bufferIn.at(idx).
begin(); iter != end; iter++)
{
if (*iter >= 97 && *iter <= 122)
{
bufferOut += static_cast<char>(static_cast<int>(*iter)
-
32);
}
else
{
bufferOut += *iter;
Review Synchronization, Data Hazards, and Race Conditions | 365
}
}
result[idx] = bufferOut;
}
catch(...)
{
std::cout << "Invalid index" << std::endl;
}
}
private:
const std::vector<std::string>& m_bufferIn;
};
3. Enter the main() function, create a constant value called numberOfTasks, and
set it to 5. Then, create a vector of a Converter object and reserve its size with
numberOfTasks. Then, create a vector of std::thread objects and reserve its size
with numberOfTasks:
const int numberOfTasks = 5;
std::vector<Converter> functions;
functions.reserve(numberOfTasks);
std::vector<std::thread> threads;
threads.reserve(numberOfTasks);
4. Create the vector of strings, textArr, and push five different big strings to be
converted:
std::vector<std::string> textArr;
textArr.emplace_back("In the previous topics, we learned almost all that
we need to work with threads. But we still have something interesting
to consider – how to synchronize threads using future results. When
we considered condition variables we didn't cover the second type of
synchronization with future results. Now it's time to learn that.");
textArr.emplace_back("First of all, let's consider a real-life example.
Imagine, you just passed the exam at the university. You were asked to
wait some amount of time for results. So, you have time to coffee with
your mates, and every 10-15 mins you check are results available. Then,
when you finished all your other activities, you just come to the door of
the lecture room and wait for results.");
textArr.emplace_back("In this exercise, we will write a simple application
where we will use std::move() with threads. First of all, we will
implement a class that is move constructible. This class will convert
lowercase text into uppercase text. Then we will create a vector of
366 | The Philosophers' Dinner – Threads and Concurrency
instances of this class. Next, we will create a vector of std::thread
object. Finally, we will initialize threads with an object from the first
vector");
textArr.emplace_back("Let's consider one interesting issue. As you
remember when we initialize std::thread all constructor arguments are
copied into thread memory, including a callable object – lambda, function,
std::function. But what if our callable object doesn't support copy
semantic? For example, we created a class that has only move constructor
and a move assignment operator:");
textArr.emplace_back("Run this code in your editor. You will see in
the terminal log from the default constructor, two logs from the
move operator, then one log from a destructor, then message from the
doSomeJob() function and, finally two other log messages from the
destructor. We see that the move constructor is called twice. You will get
the output like the following:");
5. Implement a for loop where we push Converter objects into the functions vector:
for (int i = 0; i < numberOfTasks; ++i)
{
functions.push_back(Converter(textArr));
}
6. Create a result vector of strings and push five empty strings. Then, create a
variable that will be an index of the array element:
std::vector<std::string> result;
for (int i = 0; i < numberOfTasks; ++i)
{
result.push_back("");
}
intidx=0;
7. Implement another for loop where we push std::thread objects into the threads
vector:
for (auto iter = functions.begin(); iter != functions.end(); ++iter)
{
std::thread tmp(std::move(*iter), idx, std::ref(result));
threads.push_back(std::move(tmp));
from = to;
to += step;
}
Review Synchronization, Data Hazards, and Race Conditions | 367
8. Implement a third for loop where we detach std::threads:
for (auto iter = threads.begin(); iter != threads.end(); ++iter)
{
(*iter).detach();
}
9. Add a small sleep for the main thread to avoid closing the application. Now, we can
see how detached threads work:
using namespace std::chrono_literals;
std::this_thread::sleep_for(5s);
10. Finally print the result into the terminal:
for (const auto& str : result)
{
std::cout << str;
}
11. Run this code in your editor. In the terminal, you can see that all strings are in
uppercase, which means that all threads were moved and run successfully. You will
get the following output:
Figure 5.18: The result of the exercise's execution
368 | The Philosophers' Dinner – Threads and Concurrency
In this exercise, we practiced how to create an STL container of move-only objects.
We also considered how to pass non-copiable objects to a thread constructor. This
knowledge will help us in the next section when we learn how to get the result from the
thread.
Futures, Promises, and Async
In the previous section, we learned almost all that we need to work with threads. But we
still have something interesting to consider, that is, synchronizing threads using future
results. When we considered condition variables, we didn't cover the second type of
synchronization with future results. Now, it's time to learn about that.
Suppose there is a situation wherein we run some thread and continue with other
work. When we need a result, we stop and check if it is ready. This situation describes
the actual work with future results. In C++, we have a header file called <future> that
contains two template classes which represent future results: std::future<> and
std::shared_future<>. We use std::future<> when we need a single future result and
use std::shared_future<> when we need multiple valid copies. We can compare them
with std::unique_ptr and std::shared_ptr.
To work with future results, we need a special mechanism to run the task in the
background and to receive the result later: the std::async() template function.
It takes a callable as a parameter and the launch mode – deferred or async and,
sure, parameters for the callable. The launch modes std::launch::async and
std::launch::deferred indicate how to execute task. When we pass std::launch::async,
we expect that function to be executed in a separate thread. When we pass
std::launch::deferred, the function call will be deferred until we ask for the results. We
can also pass both of them, for example, std::launch::deferred|std::launch::async.
This means that the run mode will depend on the implementation.
Now, let's consider an example of usage std::future with std::async. We have a
toUppercase() function, that converts the given string into uppercase:
std::string toUppercase(const std::string& bufIn)
{
std::string bufferOut;
for (std::string::const_iterator iter = bufIn.begin(); iter != bufIn.
end(); iter++)
{
if (*iter >= 97 && *iter <= 122)
{
bufferOut += static_cast<char>(static_cast<int>(*iter) - 32);
Futures, Promises, and Async | 369
}
else
{
bufferOut += *iter;
}
}
return bufferOut;
}
Then, in the main() function, we create an std::future variable with a name result and
initialize it using the std::async() return value. Then, we fetch the result by using the
get() function of the result object:
#include <iostream>
#include <future>
int main()
{
std::future<std::string> result = std::async(toUppercase, "please, make
it uppercase");
std::cout << "Main thread isn't locked" << std::endl;
std::cout << "Future result = " << result.get() << std::endl;
return 0;
}
Actually, here, we created a future object:
std::future<std::string> result = std::async(toUppercase, "please, make it
uppercase");
As you can see, we didn't pass the launch mode to the std::async() function, which
means that the default mode will be used: std::launch::deferred | std::launch::async.
You can do this explicitly:
std::future<std::string> result = std::async(std::launch::async, toUppercase,
"please, make it uppercase");
370 | The Philosophers' Dinner – Threads and Concurrency
Here, we are waiting for the results:
std::cout << "Future result = " << result.get() << std::endl;
If our task takes a long time, the thread will wait here until the end.
In general, we can use the std::async() function in the same way as we use the
std::thread constructor. We can pass any callable object. All of the arguments are
copied by default, and we can either move variables and callables or can pass them by
reference.
The std::future object is not protected by race conditions. So, to access it from
different threads and protect from damage, we should use mutexes. But if we need to
share a future object, it's better to use std::shared_future. Shared future results are
not thread-safe either. To avoid race conditions, we have to use mutexes or store the
threads' own copy of std::shared_future in every thread.
Note
Race conditions for std::future objects are very tricky. When the thread calls
get() function, the future object becomes invalid.
We can create a shared future by moving future to a constructor:
std::future<std::string> result = std::async(toUppercase, "please, make it
uppercase");
std::cout << "Main thread isn't locked" << std::endl;
std::shared_future<std::string> sharedResult(std::move(result));
std::cout << "Future result = " << sharedResult.get() << std::endl;
std::shared_future<std::string> anotherSharedResult(sharedResult);
std::cout << "Future result = " << anotherSharedResult.get() << std::endl;
As you can see, we created an std::shared_future variable from std::future and copied
it. Both shared future objects are referring to the same result.
Futures, Promises, and Async | 371
We can also create the shared future object using the share() member function of the
sdt::future object:
std::future<std::string> result = std::async(toUppercase, "please, make it
uppercase");
std::cout << "Main thread isn't locked" << std::endl;
auto sharedResult = result.share();
std::cout << "Future result = " << sharedResult.get() << std::endl;
Pay attention that, in both cases, the std::future object becomes invalid.
Another way we can get a future result from a separate thread is by using the
std::packaged_task<> template class. How do we work with them?
1. We create a new std::packaged_task and declare the callable function signature:
std::packaged_task<std::string(const std::string&)> task(toUppercase);
2. Then, we store the future result in the std::future variable:
auto futureResult = task.get_future();
3. Next, we run this task in a separate thread or call it as a function:
std::thread thr1(std::move(task), "please, make it uppercase");
thr1.detach();
4. Finally, we wait until the future results are ready:
std::cout << "Future result = " << futureResult.get() << std::endl;
Note
std::packaged_task is non-copyable. So, to run it in the separate thread, use the
std::move() function.
372 | The Philosophers' Dinner – Threads and Concurrency
There is one more important thing to take note of. If you don't want any results from
the thread and would prefer to wait until the thread finishes its work, you can use
std::future<void>. Now, when you call future.get(), your current thread will wait at
this point. Let's consider an example:
#include <iostream>
#include <future>
void toUppercase(const std::string& bufIn)
{
std::string bufferOut;
for (std::string::const_iterator iter = bufIn.begin(); iter != bufIn.
end(); iter++)
{
if (*iter >= 97 && *iter <= 122)
{
bufferOut += static_cast<char>(static_cast<int>(*iter) - 32);
}
else
{
bufferOut += *iter;
}
}
using namespace std::chrono_literals;
std::this_thread::sleep_for(2s);
std::cout << bufferOut << std::endl;
}
int main()
{
std::packaged_task<void(const std::string&)> task(toUppercase);
auto futureResult = task.get_future();
std::thread thr1(std::move(task), "please, make it uppercase");
Futures, Promises, and Async | 373
thr1.detach();
std::cout << "Main thread is not blocked here" << std::endl;
futureResult.get();
std::cout << "The packaged_task is done" << std::endl;
return 0;
}
As you can see, by waiting for another thread, we are making use of several techniques
such as condition variables, future results, and promises.
Now, let's move on to the next important feature in the Standard Library – the
std::promise<> template class. With this class, we can set the value of the type that we
want to receive and then get it using std::future. How do we work with them? For that,
we need to implement a function that takes an std::promise parameter:
void toUppercase(const std::string& bufIn, std::promise<std::string> result)
When the work is done, we need to initialize a new value with std::promise:
result.set_value(bufferOut);
For creating std::promise in the place where we'll be using it, we need to write the
following code:
std::promise<std::string> stringInUpper;
Once this is done, we must create std::future and get it from the promise:
std::future<std::string> futureRes = stringInUpper.get_future();
We need to run this function in the separate thread:
std::thread thr(toUppercase, "please, make it uppercase",
std::move(stringInUpper));
thr.detach();
Now, we need to wait until the future is set:
futureRes.wait();
std::cout << "Result = " << futureRes.get() << std::endl;
374 | The Philosophers' Dinner – Threads and Concurrency
The complete example of getting the result using promises is as follows:
#include <iostream>
#include <future>
void toUppercase(const std::string& bufIn, std::promise<std::string> result)
{
std::string bufferOut;
for (std::string::const_iterator iter = bufIn.begin(); iter != bufIn.
end(); iter++)
{
if (*iter >= 97 && *iter <= 122)
{
bufferOut += static_cast<char>(static_cast<int>(*iter) - 32);
}
else
{
bufferOut += *iter;
}
}
result.set_value(bufferOut);
}
int main()
{
std::promise<std::string> stringInUpper;
std::future<std::string> futureRes = stringInUpper.get_future();
std::thread thr(toUppercase, "please, make it uppercase",
std::move(stringInUpper));
Futures, Promises, and Async | 375
thr.detach();
std::cout << "Main thread is not blocked here" << std::endl;
futureRes.wait();
std::cout << "Result = " << futureRes.get() << std::endl;
return 0;
}
So, we covered almost everything that's required to write multithreaded applications,
except one important thing – what would happen if an exception is thrown in the
separate thread? For example, you pass a function in the thread and it throws an
exception. In this case, std::terminate() will be called for this thread. Other threads
will continue their job. Let's consider a simple example.
We have a getException() function that generates a message with a thread ID and
throws std::runtime_error:
#include <sstream>
#include <exception>
#include <iostream>
#include <future>
std::string getException()
{
std::stringstream ss;
ss << "Exception from thread: ";
ss << std::this_thread::get_id();
throw std::runtime_error(ss.str());
}
We also have the toUppercase() function. Which converts the given string into
uppercase and calls the getException() function, which throws an exception:
std::string toUppercase(const std::string& bufIn)
{
std::string bufferOut;
for (std::string::const_iterator iter = bufIn.begin(); iter != bufIn.
end(); iter++)
376 | The Philosophers' Dinner – Threads and Concurrency
{
if (*iter >= 97 && *iter <= 122)
{
bufferOut += static_cast<char>(static_cast<int>(*iter) - 32);
}
else
{
bufferOut += *iter;
getException();
}
}
return bufferOut;
}
Here is the main() function, where we create a new thread, thr, in the try-catch block.
We catch an exception and print the message to the terminal:
int main()
{
try
{
std::thread thr(toUppercase, "please, make it uppercase");
thr.join();
}
catch(const std::exception& ex)
{
std::cout << "Caught an exception: " << ex.what() << std::endl;
}
return 0;
}
Futures, Promises, and Async | 377
If you run this code in your IDE, you will see the following output:
Figure 5.19: The result of an example's execution
We can see that std::terminate() was called after throwing an exception. When
you have lots of threads in your program, it's very hard to find the right place where
the thread was terminated. Fortunately, we have a few mechanisms for catching an
exception from another thread. Let's consider them all.
The std::async function uses future results for transferring exceptions to the calling
thread. It stores std::exception_ptr in the future result and sets the ready flag. Then,
when you call get(), std::future checks if there any std::exception_ptr stored and
rethrows the exception. All we need to do is place a get() call in the try-catch block.
Let's consider an example. We will use two helper functions from the previous example,
that is, getException() and toUppercase(). They will stay the same. In the main()
function, we create an std::future object called result and run the toUppercase()
function using the std::async() function. Then, we call the get() function of the result
object in the try-catch block and catch an exception:
#include <iostream>
#include <future>
int main()
{
std::future<std::string> result = std::async(toUppercase, "please, make
it uppercase");
try
{
std::cout << "Future result = " << result.get() << std::endl;
}
catch(const std::exception& ex)
378 | The Philosophers' Dinner – Threads and Concurrency
{
std::cout << "Caught an exception: " << ex.what() << std::endl;
}
return 0;
}
If you run the preceding code in your IDE, you will get the following output:
Figure 5.20: The result of the example's execution
As you can see, we caught an exception and now we can handle it in some way.
The std::packaged_task<> class handles exceptions in the same way – it stores
std::exception_ptr in the future result, sets the ready flag, and then std::future
rethrows an exception in the get() call. Let's consider a small example. We will use two
helper functions from the previous example - getException() and toUppercase(). They
will stay the same. In the main() function, we create an std::packaged_task object called
task. By using the type of our toUppercase() function, it returns an integer and takes
two integers as parameters. We pass the toUppercase() function to the task object.
Then, we create an std::future object called result and get the result from the task
object using the get_future() function. Finally, we run the task object in the new thread,
thr, and in the try-catch block call the get() function of the result variable:
#include <iostream>
#include <future>
int main()
{
std::packaged_task<std::string(const std::string&)> task(toUppercase);
auto result = task.get_future();
std::thread thr(std::move(task), "please, make it uppercase");
thr.detach();
Futures, Promises, and Async | 379
try
{
std::cout << "Future result = " << result.get() << std::endl;
}
catch(const std::exception& ex)
{
std::cout << "Caught an exception: " << ex.what() << std::endl;
}
return 0;
}
If you run this code in your IDE, you will get the following output:
Figure 5.21: The result of this example's execution
The std::promise<> class handles exceptions in another way. It allows us to store an
exception manually using the set_exception() or set_exception_at_thread_exit()
function. To set an exception in std::promise, we have to catch it. If we do not catch
an exception, an error will be set in the destructor of std::promise as std::future_
errc::broken_promise in future result. When you call the get() function, an exception
will be rethrown. Let's consider an example. We will use a helper function from the
previous example – getException(). It's staying the same. However, we will change
the toUppercase() function and add the third parameter, std::promise. Now, we will
call the getException() function in the try block, catch an exception, and set it to the
std::promise value:
void toUppercase(const std::string& bufIn, std::promise<std::string> result)
{
std::string bufferOut;
try
{
380 | The Philosophers' Dinner – Threads and Concurrency
for (std::string::const_iterator iter = bufIn.begin(); iter !=
bufIn.end(); iter++)
{
if (*iter >= 97 && *iter <= 122)
{
bufferOut += static_cast<char>(static_cast<int>(*iter) -
32);
}
else
{
bufferOut += *iter;
getException();
}
}
}
catch(const std::exception& ex)
{
result.set_exception(std::make_exception_ptr(ex));
}
result.set_value(bufferOut);
}
Note
There are a few ways to set an exception to the promise. First of all, we can catch
std::exception and convert it into std::exception_ptr using the std::make_
exception_ptr() function. You can also use the std::current_exception()
function, which returns the std::exception_ptr object.
Futures, Promises, and Async | 381
In the main() function, we create a promise of the integer type called upperResult. We
create a future result called futureRes and set it from the upperResult promise value.
Next, we create a new thread, thr, pass the toUppercase() function to it, and move the
upperResult promise. Then, we call the wait() function of the futureRes object, which
makes the calling thread wait until the result becomes available. Then, in the try-catch
block, we call the get() function of the futureRes object and it rethrows an exception:
#include <iostream>
#include <future>
int main()
{
std::promise<std::string> upperResult;
std::future<std::string> futureRes = upperResult.get_future();
std::thread thr(toUppercase, "please, make it uppercase",
std::move(upperResult));
thr.detach();
futureRes.wait();
try
{
std::cout << "Result = " << futureRes.get() << std::endl;
}
catch(...)
{
std::cout << "Caught an exception" << std::endl;
}
return 0;
}
Note
When we create an std::promise<> object, we promise that we will obligatorily
set the value or the exception. If we do not do any that, the destructor
of std::promise will throw an exception, that is, std::future_error –
std::future_errc::broken_promise.
382 | The Philosophers' Dinner – Threads and Concurrency
If you run this code in your IDE, you will get the following output:
Figure 5.22: The result of this example's execution
That's all for handling exceptions in a multithreaded application. As you can see, it's
very similar to what we do in a single thread. Now, let's put our knowledge to practice
and write a simple application example that demonstrates how we can use different
future results for synchronization.
Exercise 5: Synchronization with Future Results
In this exercise, we will write a simple application to demonstrate how we can
use future results to receive values from the separate threads. We will run the
ToUppercase() callable object three times. We will execute the first task using the
std::async() function, the second task using the std::packaged_task<> template class,
and the last task using std::thread and std::promise.
Perform the following steps to complete this exercise:
1. Include the headers for threading support, namely <thread>, streaming support,
namely <iostream>, and <future> for future results support:
#include <iostream>
#include <thread>
#include <future>
2. Implement a ToUppercase class that will convert the given string into uppercase.
It has two overloaded operators, (). The first operator() takes the string to be
converted and returns the result value in uppercase. The second operator() takes
the string to be converted and an std::promise and stores the return value in a
promise:
class ToUppercase
{
public:
std::string operator()(const std::string& bufIn)
Futures, Promises, and Async | 383
{
std::string bufferOut;
for (std::string::const_iterator iter = bufIn.begin(); iter !=
bufIn.end(); iter++)
{
if (*iter >= 97 && *iter <= 122)
{
bufferOut += static_cast<char>(static_cast<int>(*iter) -
32);
}
else
{
bufferOut += *iter;
}
}
return bufferOut;
}
void operator()(const std::string& bufIn, std::promise<std::string>
result)
{
std::string bufferOut;
for (std::string::const_iterator iter = bufIn.begin(); iter !=
bufIn.end(); iter++)
{
if (*iter >= 97 && *iter <= 122)
{
bufferOut += static_cast<char>(static_cast<int>(*iter) -
32);
}
else
{
bufferOut += *iter;
}
}
result.set_value(bufferOut);
}
};
384 | The Philosophers' Dinner – Threads and Concurrency
3. Now, create a ToUppercase object, namely ptConverter, and create an
std::packaged_task, namely upperCaseResult1, which takes the ptConverter object
as a parameter. Create an std::future value and set it from upperCaseResult1. Run
this task in a separate thread:
ToUppercase ptConverter;
std::packaged_task<std::string(const std::string&)>
upperCaseResult1(ptConverter);
std::future<std::string> futureUpperResult1= upperCaseResult1.get_
future();
std::thread thr1(std::move(ptConverter), "This is a string for the first
asynchronous task");
thr1.detach();
4. Now, create a second ToUppercase object, namely fConverter. Create an
std::future object called futureUpperResult2 and set it from std::async():
ToUppercase fConverter;
std::future<std::string> futureUpperResult2 = std::async(fConverter, "This
is a string for the asynchronous task");
5. Now. create a third ToUppercase object. namely pConverter. Create an
std::promise value called promiseResult. Then, create an std::future value called
futureUpperResult3 and set it from promiseResult. Now, run the pConverter task in
the separate thread and pass promiseResult as an argument:
ToUppercase pConverter;
std::promise<std::string> promiseResult;
std::future<std::string> futureUpperResult3 = promiseResult.get_future();
std::thread thr2(pConverter, "This is a string for the task that returns a
promise", std::move(promiseResult));
thr2.detach();
6. Now, to receive the results from all the threads, wait for futureUpperResult3 to be
ready and then get all three results and print them:
futureUpperResult3.wait();
std::cout << "Converted strings: "
<< futureUpperResult1.get() << std::endl
<< futureUpperResult2.get() << std::endl
<< futureUpperResult3.get() << std::endl;
Futures, Promises, and Async | 385
7. Run this code in your editor. You will see the converted strings from all three
threads.
You will get the following output:
Figure 5.23: The result of this exercise's execution
So, what have we done here? We split big calculations into smaller parts and ran
them in separate threads. For long calculations, this will increase performance. In
this exercise, we learned how to receive results from threads. In this section, we also
learned how to pass an exception that was thrown in a separate thread to the calling
thread. We also learned how to synchronize the work of a few threads by an event, not
only with condition variables but also with future results.
Activity 1: Creating a Simulator to Model the Work of the Art Gallery
In this activity, we are going to create a simulator to model the working of an Art
Gallery. We have set a limit of visitors to the Gallery – only 50 people can be inside. To
implement this simulation, we need to create a Person class that will represent people
in the Art Gallery. Also, we need a Persons class, which is a thread-safe container for
people. We also need a Watchman class that controls how many people are inside it. If
the limit exceeds the Watchman, we put all the newcomers into a waiting list. Finally,
we need a Generator class that has two threads – one for creating new visitors and
another for notifying us that somebody has to leave the Gallery. Thus, we will cover
working with threads, mutexes, condition variables, lock_guards, and unique_locks.
This simulator will allow us to utilize the techniques that we've covered in this chapter.
Thus, before attempting this activity, ensure that you have completed all the previous
exercises in this chapter.
386 | The Philosophers' Dinner – Threads and Concurrency
To implement this application, we need to describe our classes. We have the following
classes:
Figure 5.24: Description of the classes that are used in this activity
Futures, Promises, and Async | 387
Let's create the class diagram before starting the implementation. All of the
aforementioned classes with relationships are shown in the following diagram:
Figure 5.25: The class diagram
Follow these steps to implement this activity:
1. Define and implement the Person class, which does nothing except print logs.
2. Create some thread-safe storage for Persons that wraps the std::vector class.
3. Implement the PersonGenerator class, that, in an infinite loop in different threads,
creates and removes visitors and notifies the Watchman class.
4. Create the Watchman class that, in an infinite loop in separate threads,
moves visitors from the queue to another queue on notification from the
PersonGenerator class.
5. Declare the corresponding objects in the main() function to simulate the Art
Gallery and how it works.
388 | The Philosophers' Dinner – Threads and Concurrency
After implementing these steps, you should get the following output, where you can see
the logs from all the implemented classes. Ensure that the simulation flows as expected.
The expected output should look similar to the following:
Figure 5.26: The result of the application's execution
Note
The solution for this activity can be found on page 681.
Summary | 389
Summary
In this chapter, we learned about working with threads that are supported by the
C++ Standard Library. This is fundamental if we want to write robust, fast, and clear
multithreaded applications.
We started by looking at general concepts regarding concurrency – what parallel,
concurrent, synchronous, asynchronous, and threaded execution is. Having a clear
understanding of these concepts allowed us to understand the architectural design of
the multithreaded application.
Next, we looked at the different issues that we faced while developing multithreaded
applications, such as data hazards, race conditions, and deadlocks. Understanding
these issues helped us build a clear synchronized architecture for our projects. We
considered the synchronization concept on some real-life examples, which gave us a
good understanding of the challenges that we may face while programming threaded
applications.
Next, we tried to work with different Standard Library primitives for synchronization.
We tried to figure out how to handle race conditions and implemented examples of
synchronization by events and synchronization by data. Next, we considered how the
move semantics apply to multithreading. We learned which classes from threading
support libraries are non-copiable but movable. We also considered how the move
semantics work in multithreaded closures. Finally, we learned how to receive results
from separate threads and how to synchronize threads using futures, promises, and
async.
We put all of these new skills into practice by building an Art Gallery simulator. We
built a multithreaded application with one main thread and four child threads. We
implemented communication between them by using condition variables. We protected
them using shared data by mutexes. In all, we employed everything we learned about in
this chapter.
In the next chapter, we're going to be taking a closer look at I/O operations and classes
in C++. We will start by looking at the I/O support of the Standard Library. Then, we will
move on to working with streams and asynchronous I/O operations. Next, we will learn
about the interaction of threads and I/O. We will write an activity that will allow us to
master our skills in I/O work in C++.
Learning Objectives
By the end of this chapter, you will be able to:
•
Write and read data to/from files or the console using the Standard I/O Library
•
Format and parse data using the in-memory I/O interface
•
Extend standard I/O streams for user-defined types
•
Develop applications that use the I/O Standard Library from multiple threads
In this chapter, we'll develop flexible and maintainable applications using the I/O Standard
Library, work with streams, learn how the I/O library can be used in multithreaded applications,
and finally learn to format and parse data using the Standard Library.
Streams and I/O
6
392 | Streams and I/O
Introduction
In the previous chapter, we covered one of the most challenging topics – concurrency
in C++. We looked at the main multithreaded concepts and differentiated between
synchronous, asynchronous, and threaded execution in C++. We learned the key points
about synchronization, data hazards, and race conditions. Finally, we looked at working
with threads in modern C++. In this chapter, we will go deeper and learn how to handle
I/O in multithreaded applications.
This chapter is dedicated to streams and I/O in C++. I/O is the general concept of
input and output operations. The main purpose of this part of the Standard Library is
to provide a clear interface regarding the input and output of data. But this is not the
only goal. There are a lot of situations where I/O can help us in our applications. It's
hard to imagine any application that doesn't write errors or exceptional situations into
the log file with the purpose of sending it to the development team for analysis. In GUI
applications, we always need to format the displayed information or parse the user
input. In complex and large applications, we usually need to log internal data structures,
and so on. In all these cases, we employ the I/O portion of the Standard Library.
We will start our chapter with a brief introduction to the Input/Output portion of
the Standard Library. We will learn about the I/O and explore their main concepts
and terms. Then, we will consider which types are supported by default and how we
can extend streams to user-defined types. Next, we will study the structure of the
I/O library and check the headers and classes available for our use. Finally, we will
investigate how to work with streams, read and write to a file, create multithreaded
applications with input and output operations, and format and parse text data.
This chapter will be concluded with a challenging and exciting activity in which we
will improve our Art Gallery Simulator project from the previous chapter and create
a robust, clear, multithreaded, and easy to use Logger. We will develop a class with a
clear interface that can be accessed from any place in the project. Next, we will adapt
it to work with several threads. Finally, we will integrate our robust logger into the Art
Gallery Simulator project.
Let's start by looking at the I/O part of the C++ Standard Library and learn what
opportunities are open to us with this set of tools.
Introduction | 393
Reviewing the I/O Portion of the Standard Library
In computer science, I/O is the term that implies the communication between
programs, devices, computers, and so on. In C++, we employ standard input and
standard output terms to describe the I/O process. Standard input means the streams
of data that are transferred into the program. To get this data, the program should
perform the read operation. Standard output means the streams of data that are
transferred from a program to an external device, such as a file, display, socket, printer,
and so on. To output this data, the program should perform the write operation.
Standard input and output streams are inherited from the main process and are
common for all child threads. Take a look at the following diagram to get a better
understanding of the considered terms:
Figure 6.1: I/O communication between devices
In the C++ Standard Library, most of the I/O classes are generalized class templates. All
of them are logically divided into two categories – abstractions and implementations.
We are already familiar with the abstraction classes and know that we can use them for
different purposes without recompiling the code. The same is true for the I/O library.
Here, we have six abstract classes that are the basis of the I/O operations in C++. We
will not deep dive into these interfaces. Usually, we use more high-level classes for our
operations and appeal to them only if we need to implement our own derived class.
394 | Streams and I/O
The ios_base abstract class is responsible for managing stream status flags, formatting
flags, callbacks, and private storage. The basic_streambuf abstract class provides
an interface for buffering input or output operations and provides access to the
source of input, such as a file, socket, or sink of output, such as a string or vector. The
basic_ios abstract class implements facilities for work with derived classes from the
basic_streambuf interface. The basic_ostream, basic_istream, and basic_iostream
abstract classes are wrappers for derived classes from the basic_streambuf interface
and provide a high-level input/output interface, respectively. Let's briefly consider
them and their relationships, which are shown in the following class diagram. You can
see that all of them, except for ios_base, are template classes. Under the name of each
class, you can find the file name where this class is defined:
Note
In the UML notation, we use the <<interface>> keyword to show that class is an
abstract class.
Figure 6.2: Class diagram of I/O abstract interfaces
Introduction | 395
Implementation classes are logically divided into the following categories: File I/O,
String I/O, Synchronized I/O, I/O manipulators, and predefined standard stream
objects. All of them are derived from the aforementioned abstract classes. Let's consider
each of them in detail in the upcoming sections.
Predefined Standard Stream Objects
We will start our acquaintance with the I/O Standard Library with the already familiar
std::cout class from the <iostream> header file. We use it for outputting the data to
the Terminal. You may also be aware about the std::cin class for reading user input –
but not everyone knows that std::cout and std::cin are predefined standard stream
objects that are used for formatting input and output to the Terminal. The <iostream>
header file also contains std::cerr and std::clog stream objects, which are used for
logging errors. As usual, there are also their analogs for wide characters with a prefix
of "w": wcout, wcin, wcerr, and wclog. All of these objects are automatically created and
initialized at system startup. Although it is safe to use these objects from multiple
threads, the output can be mixed. Let's revise how to use them. Since they are only
overloaded for built-in types, we should write our own overrides for user-defined types.
The std::cout stream object is often used with the std::endl manipulator. It inserts a
newline character in the output sequence and flushes it. Here is an example of using
them:
std::string name("Marilyn Monroe");
int age = 18;
std::cout << "Name: " << name << ", age: " << age << std::endl;
Originally, the std::cin object reads all input character sequence, symbol by symbol.
But it has overloads for built-in types and can read values such as numbers, strings,
characters, and so on. There is a little trick in reading strings; std::cin reads the string
until the next whitespace or newline symbol. So, if you need it to read a string, you have
to do it in a loop, read it word by word, or use the std::getline() function, which takes
the std::cin object as the first parameter and the destination string as the second.
Note
The right shift operator, >>, of the std::cin stream object reads only one word
from a line. Use std::getline(std::cin, str) to read the whole line.
396 | Streams and I/O
Here is an example of using std::cin with different types:
std::string name;
std::string sex;
int age;
std::cout << "Enter your name: " << std::endl;
std::getline(std::cin, name);
std::cout << "Enter your age: " << std::endl;
std::cin >> age;
std::cout << "Enter your sex (male, female):" << std::endl;
std::cin >> sex;
std::cout << "Your name is " << name << ", your age is " << age << ", your
sex is " << sex << std::endl;
As you can see, here, we read the name using the std::getline() function because the
user can input two or three words. We also read the age and then read the sex using the
right shift operator, >>, because we need to read only a single word. We then print the
read data to ensure that everything went well.
The std::cerr and std::clog stream objects differ in only one way – std::cerr immediately
flushes the output sequence, while std::clog buffers it and flushes only when the buffer
is full. When it comes to usage, they are very similar to std::cout. The only difference is
that the messages from std::cerr and std::clog (in most of the IDEs) are red in color.
In the following screenshot, you can see the output from these stream objects:
Figure 6.3: The output from the std::cerr and std::clog stream objects
Introduction | 397
Now, let's perform an exercise to consolidate everything we've learned.
Exercise 1: Overriding the Left Shift Operator, <<, for User-Defined Types
In this exercise, we will write a very useful portion of code that you can use anywhere
to output user-defined types. First of all, we will create a class with the name Track
that represents a musical track. It will have the following private members: name, singer,
length, and date. Then, we will override the left shift operator, <<, for this class. Next,
we will create an instance of this class and output it using the std::cout stream object.
Perform the following steps to execute this exercise:
1. Include the required headers: <iostream> for output to a console and <string> for
string support:
#include <iostream>
#include <string>
2. Declare the Track class and add the private section variables for keeping
information about the track, that is, m_Name, m_Singer, m_Date, and m_
LengthInSeconds. In the public section, add a constructor with parameters that
initialize all the private variables. Also, add the public section getters for all class
members:
class Track
{
public:
Track(const std::string& name,
const std::string& singer,
const std::string& date,
const unsigned int& lengthInSeconds)
: m_Name(name)
, m_Singer(singer)
, m_Date(date)
, m_LengthInSeconds(lengthInSeconds)
{
}
std::string getName() const { return m_Name; }
std::string getSinger() const { return m_Singer; }
std::string getDate() const { return m_Date; }
398 | Streams and I/O
unsigned int getLength() const { return m_LengthInSeconds; }
private:
std::string m_Name;
std::string m_Singer;
std::string m_Date;
unsigned int m_LengthInSeconds;
};
3. Now comes the most difficult part of the exercise: writing the overload function
for the Track type. This is a template function that has two type parameters: charT
and Traits:
template <typename charT, typename Traits>
4. We made this function inline to let the compiler know that we want it to perform
optimization on this function. The return type of this function is a reference to a
std::basic_ostream<charT, Traits> class. The name of this function is operator <<.
This function takes two parameters: the first is the reference to the std::basic_
ostream<charT, Traits> class and the second is a copy of the Track variable. The
full function declaration is as follows:
template <typename charT, typename Traits>
inline std::basic_ostream<charT, Traits>&
operator<<(std::basic_ostream<charT, Traits>& os, Track trackItem);
5. Now, add the function definition. Use the os variable, just like we use the std::cout
object, and format the output as you wish. Then, return the os variable from the
function. The complete code of the overloaded operator, <<, is as follows:
template <typename charT, typename Traits>
inline std::basic_ostream<charT, Traits>&
operator<<(std::basic_ostream<charT, Traits>& os, Track trackItem)
{
os << "Track information: ["
<< "Name: " << trackItem.getName()
<< ", Singer: " << trackItem.getSinger()
<< ", Date of creation: " << trackItem.getDate()
<< ", Length in seconds: " << trackItem.getLength()
<< "]";
return os;
}
Introduction | 399
6. Now, enter the main function and create and initialize the instance of the Track
type with the name track_001. Finally, use std::cout to print the track_001 value:
int main()
{
Track track_001("Summer night city",
"ABBA",
"1979",
213);
std::cout << track_001 << std::endl;
return 0;
}
7. Compile and execute the application. Run it. You will get the following output:
Figure 6.4: The result of executing Exercise 1
Great job. Here, we considered using predefined standard stream objects and learned
how to write our own overloaded shift operators for user-defined types. Let's move on
and examine reading and writing to a file with the C++ Standard IO Library.
File I/O Implementation Classes
File streams manage input and output to files. They provide an interface that
implements the Resource Acquisition Is Initialization (RAII) – the file opens on a
stream construction and closes automatically on its destruction. In the Standard
Library, file streams are represented by the following classes: basic_ifstream for input
operations, basic_ofstream for output operations, basic_fstream for both input and
output operations, and basic_filebuf for the implementation of a raw file device. All
of them are defined in the <fstream> header file. The Standard Library also provides
typedefs for char and wchar_t types, that is, ifstream, fstream, and ofstream, and the
same names with a "w" prefix for wide characters.
400 | Streams and I/O
We can create a file stream in two ways. The first way is to do this in one line, that is, to
open a file and connect a stream to a file by just passing the filename to a constructor:
std::ofstream outFile(filename);
std::ifstream outFile(filename);
std::fstream outFile(filename);
Another way is creating an object and then calling the open() function:
std::ofstream outFile;
outFile.open(filename);
Note
IO streams have bool variables: a goodbit, an eofbit, a failbit, and a badbit.
They are used to check the state of the stream after each operation and indicate
which error happened on the stream.
After the object's creation, we can check the stream status by checking the failbit or
checking the stream associated with the open file. To check a failbit, call the fail()
function on the file stream:
if (outFile.fail())
{
std::cerr << filename << " file couldn't be opened"<< std::endl;
}
To check whether the stream is associated with the open file, call the is_open()
function:
if (!outFile.is_open())
{
std::cerr << filename << " file couldn't be opened"<< std::endl;
}
Introduction | 401
Input, output, and bidirectional file streams can also be opened in different modes by
using flags. They are declared in the ios_base namespace. Besides the ios_base::in and
ios_base::out flags, we also have the ios_base::ate, ios_base::app, ios_base::trunc,
and ios_base::binary flags. The ios_base::trunc flag removes the content of the file.
The ios_base::app flag always writes the output to the end of the file. Even if you decide
to change the position in the file, you cannot do this. The ios_base::ate flag sets the
position of the file descriptor to the end of the file but allows you to modify the position
later. Finally, the ios_base::binary flag suppresses any formatting of the data so that
it's read or wrote in "raw" format. Let's consider all the possible combinations of open
modes.
By default, std::ofstream is opened in ios_base::out mode, std::ifstream is opened in
ios_base::in mode, and std::fstream is opened in ios_base::in|ios_base::out mode.
The ios_base::out|ios_base::trunc mode creates the file if it doesn't exist or removes
all the content from the existing file. The ios_base::out|ios_base::app mode creates
the file if it doesn't exist or opens the existing file and allows you to write only at the
end of the file. Both of the aforementioned modes can be combined with the ios_
base::in flag, so the file will be opened in read and write mode simultaneously.
Here is an example of how to open the file using the aforementioned modes:
std::ofstream outFile(filename, std::ios_base::out|std::ios_base::trunc);
You can also do the following:
std::ofstream outFile;
outFile.open(filename, std::ios_base::out|std::ios_base::trunc);
After we've opened the file stream in the required mode, we can start reading or writing
to a file. The file streams allow us to change our position in the file. Let's consider how
we can do this. To get the current file's position, we can call the tellp() function in
ios_base::out mode and the tellg() function in ios_base::in mode. It can be used later
so that we can return to this position if needed. We can also find the exact position in
a file by using the seekp() function in ios_base::out mode and the seekg() function in
ios_base::in mode. It takes two parameters: the number of characters to shift and from
which file position it should count. There are allowed three types of positions to seek:
std::ios_base::beg, that is, the beginning of file, std::ios_base::end, that is, the end of
file, and std::ios_base::cur, that is, the current position. Here is an example of calling
the seekp() function:
outFile.seekp(-5, std::ios_base::end);
As you can see, we ask to set the current file's position at the fifth character from the
end of the file.
402 | Streams and I/O
To write to the file, we can use the overloaded left shift operator, <<, for general
formatted output, the put() function to write a single character, or the write() function
to write a block of characters. Using the left shift operator is the most convenient way
to write data to file as you can pass any built-in type as an argument:
outFile << "This is line No " << 1 << std::endl;
The put() and write() functions can only be used with character values.
To read from a file, we can use the overloaded right shift operator, >>, or use a set of
functions for reading characters, such as read(), get(), and getline(). The right shift
operator is overloaded for all built-in types and we can use it like this:
std::ifstream inFile(filename);
std::string str;
int num;
float floatNum;
// for data: "book 3 24.5"
inFile >> str >> num >> floatNum;
Finally, the file stream is closed when the execution leaves the scope of visibility, so we
don't need to perform any additional actions to close the file.
Note
Be attentive while reading data from a file. The right shift operator, >>, only reads a
string until a whitespace or newline character. To read the full string, you could use
a loop or read each word in a separate variable, like we did in Exercise 1, Overriding
the Left Shift Operator ,<<, for User-Defined Types.
Now, let's practice reading and writing data to a file using the C++ IO Standard Library.
Introduction | 403
Exercise 2: Reading and Writing User-Defined Data Types to a File
In this exercise, we'll write a piece of code for a book shop. We need to store
information about book prices in a file and then read that information from a file when
needed. To implement this, we will create a class that represents a book with a name,
author, year of publishing, and a price. Next, we will create an instance of this class and
write it to a file. Later, we will read the information about the book from the file into the
instance of the book class. Perform the following steps to complete this exercise:
1. Include the required headers: <iostream> for output to a console, <string> for
string support, and <fstream> for I/O file library support:
#include <fstream>
#include <iostream>
#include <string>
2. Implement the Book class, which represents the book in a book shop. In the private
section, define four variables with self-explanatory names: m_Name, m_Author,
m_Year, and m_Price. In the public section, define a constructor with parameters,
which initializes all class members. Also, in the public section, define getters for all
the class members:
class Book
{
public:
Book(const std::string& name,
const std::string& author,
const int year,
const float price)
: m_Name(name)
, m_Author(author)
, m_Year(year)
, m_Price(price) {}
std::string getName() const { return m_Name; }
std::string getAuthor() const { return m_Author; }
int getYear() const { return m_Year; }
404 | Streams and I/O
float getPrice() const { return m_Price; }
private:
std::string m_Name;
std::string m_Author;
int m_Year;
float m_Price;
};
3. Enter the main function and declare the pricesFile variable, which holds the
filename:
std::string pricesFile("prices.txt");
4. Next, create an instance of the book class and initialize it with book name, author
name, year, and price:
Book book_001("Brave", "Olena Lizina", 2017, 33.57);
5. Write this class instance to a file. Create an instance of the std::ofstream
class. Open our file with the pricesFile variable name. Check if the stream is
successfully opened and print an error message if not:
std::ofstream outFile(pricesFile);
if (outFile.fail())
{
std::cerr << "Failed to open file " << pricesFile << std::endl;
return 1;
}
6. Then, write all the information about the book_001 book to a file using getters with
spaces between each item and a newline symbol at the end:
outFile << book_001 .getName() << " "
<< book_001 .getAuthor() << " "
<< book_001 .getYear() << " "
<< book_001 .getPrice() << std::endl;
Introduction | 405
7. Compile and execute the application. Now, go to the project folder and find where
the 'prices.txt' file is located. In the following screenshot, you can see the location
of the created file in the project directory:
Figure 6.5: Location of the created file
8. Open it in Notepad. In the following screenshot, you can see what the output to
the file looks like:
Figure 6.6: The result of the output of the user-defined type to the file
9. Now, let's read this data to the variable. Create an instance of the std::ifstream
class. Open the file called pricesFile. Check if the stream has been successfully
opened and print an error message if not:
std::ifstream inFile(pricesFile);
if (inFile.fail())
{
std::cerr << "Failed to open file " << pricesFile << std::endl;
return 1;
}
10. Create the local variables that will be used for the input from a file, namely name,
authorName, authorSurname, year, and price. Their names are self-explanatory:
std::string name;
std::string authorName;
std::string authorSurname;
int year;
float price;
406 | Streams and I/O
11. Now, read the data from the file into variables in the order they are in the file:
inFile >> name >> authorName >> authorSurname >> year >> price;
12. Create a Book instance called book_002 and initialize it with those read values:
Book book_002(name, std::string(authorName + " " + authorSurname), year,
price);
13. To check whether the read operation successfully executed, print the book_002
variable to the console:
std::cout << "Book name: " << book_002 .getName() << std::endl
<< "Author name: " << book_002 .getAuthor() << std::endl
<< "Year: " << book_002 .getYear() << std::endl
<< "Price: " << book_002 .getPrice() << std::endl;
14. Compile and execute the application again. In the console, you will see the
following output:
Figure 6.7: The result of executing Exercise 2
As you can see, we wrote and read custom formatted data from a file without
any difficulties. We created our own custom type, wrote it to the file using the
std::ofstream class, and checked that everything was wrote successfully. Then, we read
those data from a file to our custom variable using the std::ifstream class, output it to
the console, and ensured that everything was read correctly. By doing this, we learned
how to read and write data to a file using the I/O Standard Library. Now, let's move on
and learn about the in-memory portion of the I/O library.
Introduction | 407
String I/O Implementation
The I/O Standard Library allows input and output – not only to devices such as files but
also to memory, in particular, to the std::string objects. In this case, the string can be
a source for input operations as well as a sink for output operations. In the <sstream>
header file, stream classes are declared that manage input and output to strings. They,
like the file streams, also provides an interface that implements RAII – the string opens
for reading or writing upon the stream's creation and closes on its destruction. They are
represented in the Standard Library by the following classes: basic_stringbuf, which
implements a raw string interface, basic_istringstream for input operations, basic_
ostringstream for output operations, and basic_stringstream for both input and output
operations. The Standard Library also provides typedefs for char and wchar_t types:
istringstream, ostringstream, and stringstream and the same names with the "w" prefix
for wide characters.
To create an object of the std::istringstream class, we should pass the initializer string
as a constructor parameter or set it later using the str() function:
std::string track("ABBA 1967 Vule");
std::istringstream iss(track);
Alternatively, we can do the following:
std::string track("ABBA 1967 Vule");
std::istringstream iss;
iss.str(track);
Next, to read values from the stream, use the right shift operator, >>, which is
overloaded for all built-in types:
std::string group;
std::string name;
int year;
iss >> group >> year >> name;
To create an object of the std::ostringstream class, we just declare a variable of its
type:
std::ostringstream oss;
408 | Streams and I/O
Next, to write data to the string, use the left shift operator, <<, which is overloaded for
all built-in types:
std::string group("ABBA");
std::string name("Vule");
int year = 1967;
oss << group << std::endl
<< name << std::endl
<< year << std::endl;
To get the resulting string, use the str() function:
std::cout << oss.str();
The std::stringstream object works bidirectional, so it has both a default constructor
and a constructor that takes the string. We can create the default std::stringstream
object by declaring the variable of this type and then use it for reading and writing:
std::stringstream ss;
ss << "45";
int count;
ss >> count;
Also, we can create std::stringstream using the constructor with a string parameter.
Then, we can use it for reading and writing as usual:
std::string employee("Alex Ismailow 26");
std::stringstream ss(employee);
Alternatively, we can create a default std::stringstream object and initialize it by
setting a string using the str() function:
std::string employee("Charlz Buttler 26");
std::stringstream ss;
ss.str(employee);
Introduction | 409
Next, we can use the ss object for reading and writing:
std::string name;
std::string surname;
int age;
ss >> name >> surname >> age;
We can also apply open modes for these kinds of streams. Their functionality is similar
to that of file streams but with a little difference. ios_base::binary is irrelevant in
the case of working with string streams and ios_base::trunc is ignored. Thus, we can
open any of the string streams in four modes: ios_base::app, ios_base::ate, and ios_
base::in/ios_base::out.
Now, let's practice reading and writing data to a string using the C++ IO Standard
Library.
Exercise 3: Creating a Function for Replacement Words in a String
In this exercise, we will implement a function that parses the given string and replaces
the given word by other words. To complete this exercise, we create a callable class that
takes three parameters: the original string, the word to be replaced, and the word that
will be used for replacing. As a result, the new string should be returned. Perform the
following steps to complete this exercise:
1. Include the required headers: <iostream> for the output to a Terminal and
<sstream> for I/O string support:
#include <sstream>
#include <iostream>
2. Implement the callable class with the name Replacer. It has only one function
–
an overloaded parentheses operator, (), that returns a string and takes three
parameters: the original string, the word to be replaced, and the word to be used
for replacing. The function declaration looks as follows:
std::string operator()(const std::string& originalString,
const std::string& wordToBeReplaced,
const std::string& wordReplaceBy);
3. Next, create the istringstream object, that is, iss, and set the originalString
variable as the source of input:
std::istringstream iss(originalString);
410 | Streams and I/O
4. Create the ostringstream object, that is, oss, that will hold the converted string:
std::ostringstream oss;
5. Then, in the loop, while there is possible input, perform a read of the word to
the word variable. Check if this word is equal to the wordToBeReplaced variable.
If so, replace it with the wordReplaceBy variable and write to the oss stream. If
they are unequal, write the original word to the oss stream. After each word, add
a whitespace character since the iss stream truncates them. Finally, return the
result. The complete class is as follows:
class Replacer
{
public:
std::string operator()(const std::string& originalString,
const std::string& wordToBeReplaced,
const std::string& wordReplaceBy)
{
std::istringstream iss(originalString);
std::ostringstream oss;
std::string word;
while (iss >> word)
{
if (0 == word.compare(wordToBeReplaced))
{
oss << wordReplaceBy << " ";
}
else
{
oss<<word<<"";
}
}
return oss.str();
}
};
Introduction | 411
6. Enter the main function. Create an instance of the Replacer class with a name of
worker. Define the foodList variable and initialize it by the string that contains a
list of food; some items should be repeated. Define the changedList string variable
and initialize it by the return value of the worker() function. Use std::cout to
display the result in the Terminal:
int main()
{
Replacer worker;
std::string foodList("coffee tomatoes coffee cucumbers sugar");
std::string changedList(worker(foodList, "coffee", "chocolate"));
std::cout << changedList;
return 0;
}
7. Compile, build, and run the exercise. As a result, you will get the following output:
Figure 6.8: The result of executing Exercise 3
Well done! Here, we learned how to use string streams for formatting input and output.
We created an application that easily replaces words in a sentence, strengthened our
knowledge, and now we are ready to learn about I/O manipulators so that we can
improve our skills regarding working with threads.
412 | Streams and I/O
I/O Manipulators
So far, we've learned about simple input and output using streams, but they are not
sufficient in many cases. For more complex I/O data formatting, the Standard Library
has a big set of I/O manipulators. They are functions that have been developed to work
with shift operators, both left (<<) and right (>>), to control how streams behave. I/O
manipulators are divided into two types – those that are invoked without arguments
and those that needs arguments. Some of them work both for input and output. Let's
briefly consider their meaning and usage.
I/O Manipulators for Changing the Numeric Base of the Stream
In the <ios> header, there are declared functions for changing the numeric base of the
stream: std::dec, std::hex, and std::oct. They are invoked without arguments and
set the numeric base of the stream to decimal, hexadecimal, and octal, respectively. In
the <iomanip> header, the std::setbase function is declared, which is invoked with the
following arguments: 8, 10, and 16. They are interchangeable and work for both input
and output operations.
In the <ios> header, there is also the std::showbase and std::noshowbase functions,
which control displaying the numeric base of the stream. They only affect hexadecimal
and octal integer output, except the zero value, and monetary input and output
operations. Let's complete an exercise and learn how to use them in practice.
Exercise 4: Displaying Entered Numbers in Different Numeric Bases
In this exercise, we will develop an application that, in the infinite loop, asks the user to
enter an integer in one of the following numeric bases: decimal, hexadecimal, or octal.
After reading the input, it displays this integer in other numeric representations. To
perform this exercise, complete the following steps:
1. Include the <iostream> header for streaming support. Declare the enumeration
called BASE and define three values: DECIMAL, OCTAL, and HEXADECIMAL:
#include <iostream>
enum BASE
{
DECIMAL,
OCTAL,
HEXADECIMAL
};
Introduction | 413
2. Declare a function called displayInBases that takes two parameters – integer and
base. Next, define the switch statement, which tests the received numeric base
and displays the given integer in the other two numeric representations:
void displayInBases(const int number, const BASE numberBase)
{
switch(numberBase)
{
case DECIMAL:
std::cout << "Your input in octal with base: "
<< std::showbase << std::oct << number
<< ", without base: "
<< std::noshowbase << std::oct << number << std::endl;
std::cout << "Your input in hexadecimal with base: "
<< std::showbase << std::hex << number
<< ", without base: "
<< std::noshowbase << std::hex << number << std::endl;
break;
case OCTAL:
std::cout << "Your input in hexadecimal with base: "
<< std::showbase << std::hex << number
<< ", without base: "
<< std::noshowbase << std::hex << number << std::endl;
std::cout << "Your input in decimal with base: "
<< std::showbase << std::dec << number
<< ", without base: "
<< std::noshowbase << std::dec << number << std::endl;
break;
case HEXADECIMAL:
std::cout << "Your input in octal with base: "
<< std::showbase << std::oct << number
<< ", without base: "
<< std::noshowbase << std::oct << number << std::endl;
std::cout << "Your input in decimal with base: "
<< std::showbase << std::dec << number
<< ", without base: "
<< std::noshowbase << std::dec << number << std::endl;
break;
}
}
414 | Streams and I/O
3. Enter the main function and define the integer variable that will be used for
reading user input:
int integer;
4. Create an infinite while loop. Inside the loop, ask the user to enter a decimal value.
Read the input as a decimal integer. Pass it to the displayInBases function. Next,
ask the user to enter a hexadecimal value. Read the input as a hexadecimal integer.
Pass it to the displayInBases function. Finally, ask the user to enter an octal value.
Read the input as an octal integer. Pass it to the displayInBases function:
int main(int argc, char **argv)
{
int integer;
while(true)
{
std::cout << "Enter the decimal value: ";
std::cin >> std::dec >> integer;
displayInBases(integer, BASE::DECIMAL);
std::cout << "Enter the hexadecimal value: ";
std::cin >> std::hex >> integer;
displayInBases(integer, BASE::HEXADECIMAL);
std::cout << "Enter the octal value: ";
std::cin >> std::oct >> integer;
displayInBases(integer, BASE::OCTAL);
}
return 0;
}
Introduction | 415
5. Build and run the application. Follow the output and enter, for example, 12 in
different numeric representations. The output should be as follows:
Figure 6.9: The result of executing Exercise 4, part 1
6. Now, let's change std::dec, std::oct, and std::hex in the std::setbase() function
to check whether the output will be the same. First, add the <iomanip> header for
std::setbase() support. Next, in the main function in the loop, replace std::dec
with std::setbase(10), std::hex with std::setbase(16), and std::oct with
std::setbase(8):
int main(int argc, char **argv)
{
int integer;
while(true)
{
std::cout << "Enter the decimal value: ";
std::cin >> std::setbase(10) >> integer;
displayInBases(integer, BASE::DECIMAL);
std::cout << "Enter the hexadecimal value: ";
std::cin >> std::setbase(16) >> integer;
displayInBases(integer, BASE::HEXADECIMAL);
std::cout << "Enter the octal value: ";
std::cin >> std::setbase(8) >> integer;
displayInBases(integer, BASE::OCTAL);
}
return 0;
}
416 | Streams and I/O
7. Again, build and run the application. Follow the output and enter the same integer
(12) in different numeric representations. The output should be as follows:
Figure 6.10: The result of executing Exercise 4, part 2
Now, compare the results. As you can see, the output is identical. By doing this, we
made sure that these functions are interchangeable.
I/O Manipulators for Floating-Point Formatting
In the <ios> header, there are declared functions for changing floating-point digit
formatting: std::fixed, std::scientific, std::hexfloat, and std::defaultfloat.
They are invoked without arguments and set floatfield to fixed, scientific, fixed
and scientific, and default values, respectively. There is also the std:: showpoint and
std::noshowpoint functions, which control displaying floating-point digits. They only
affect the output. The std::noshowpoint function only affects floating-point digits
without the fractional part.
In the <iomanip> header, there is a declared std:: setprecision function that is invoked
with a number that represents precision. When the digits to the right of the point are
dropped, the result is rounded off. If the number is too big to be represented in the
normal way, the precision specification is ignored, and the number is displayed in a
more convenient way. You only need to set precision once and change it only when you
need another precision. When you choose a data type to store a floating-point variable,
you should notice some tricks. In C++, there are three data types that can represent
floating-point values: float, double, and long double.
Introduction | 417
The float is usually 4 bytes, double is 8 bytes, and long double is 8, 12, or 16 bytes. So,
the precision of each of those is limited. The float type can accommodate a maximum of
6-9 significant digits, the double type can accommodate a maximum of 15-18 significant
digits, and the long double type can accommodate a maximum of 33-36 significant
digits. Take a look at the following table if you wish to compare the difference between
them:
Figure 6.11: Comparison table of the floating-point types
Note
When you need precision for more than six significant digits, favor double,
otherwise you will get unexpected results.
Let's complete an exercise and learn how to use them in practice.
Exercise 5: Displaying Entered Floating-Point Numbers with Different
Formatting
In this exercise, we will write an application that, in the infinite loop, asks the user to
enter a floating-point number. After reading the input, it displays this number with
different formatting types. To perform this exercise, complete the following steps:
1. Include the <iostream> header for streaming support and <iomanip> for
std::setprecision support:
#include <iostream>
#include <iomanip>
418 | Streams and I/O
2. Next, declare a template formattingPrint function that has a template parameter
called FloatingPoint and takes a parameter variable of this type. Next, store
the previous precision in an auto variable by calling the precision() function in
the std::cout object. Then, display the given number in different formats in the
Terminal: with the point, without a point, and in the fixed, scientific, hexfloat, and
defaultfloat formats. Next, in the for loop, from 0 to 22, display the given number
with precision and the size of the loop counter. After the loop exits, set the
precision back using the value we stored earlier:
template< typename FloatingPoint >
void formattingPrint(const FloatingPoint number)
{
auto precision = std::cout.precision();
std::cout << "Default formatting with point: "
<< std::showpoint << number << std::endl
<< "Default formatting without point: "
<< std::noshowpoint << number << std::endl
<< "Fixed formatting: "
<< std::fixed << number << std::endl
<< "Scientific formatting: "
<< std::scientific << number << std::endl
<< "Hexfloat formatting: "
<< std::hexfloat << number << std::endl
<< "Defaultfloat formatting: "
<< std::defaultfloat << number << std::endl;
for(inti=0;i<22;i++)
{
std::cout << "Precision: " << i
<< ", number: " << std::setprecision(i)
<< number << std::endl;
}
std::cout << std::setprecision(precision);
}
Introduction | 419
3. Enter the main function. Declare a float variable called floatNum, a double variable
called doubleNum, and a long double variable called longDoubleNum. Then, in the
infinite while loop, ask the user to input a floating-point number, read the input
to longDoubleNum, and pass it to the formattingPrint function. Next, initialize
doubleNum by using the longDoubleNum value and pass it to the formattingPrint
function. Next, initialize floatNum by using the longDoubleNum value and pass it to
the formattingPrint function:
int main(int argc, char **argv)
{
float floatNum;
double doubleNum;
long double longDoubleNum;
while(true)
{
std::cout << "Enter the floating-point digit: ";
std::cin >> std::setprecision(36) >> longDoubleNum;
std::cout << "long double output" << std::endl;
formattingPrint(longDoubleNum);
doubleNum = longDoubleNum;
std::cout << "double output" << std::endl;
formattingPrint(doubleNum);
floatNum = longDoubleNum;
std::cout << "float output" << std::endl;
formattingPrint(floatNum);
}
return 0;
}
420 | Streams and I/O
4. Build and run the application. Follow the output and enter the floating-point value
with 22 significant digits, for example, 0.2222222222222222222222 . We will get a
long output. Now, we need to split it for analysis. Here is a screenshot of part of
the long double value's output:
Figure 6.12: The result of executing Exercise 5, part 1
Introduction | 421
We can see that, with the default, the fixed and defaultfloat formations only
output six significant digits. With scientific formatting, the output of the value
looks as expected. When we call setprecision(0) or setprecision(1), we expect
that no one digit will be outputted after the point. But with numbers less than 1
setprecision, this will leave one digit after the point. By doing this, we will see the
correct output until 21 precision. This means that on our system, the maximum
precision for a long double is 20 significant digits. Now, let's analyze the output for
the double value:
Figure 6.13: The result of executing Exercise 5, part 2
422 | Streams and I/O
Here, we can see the same results for formatting, but different for precision. The
inaccurate output starts from precision 17. This means that, on our system, the
maximum precision for double is 16 significant digits. Now, let's analyze the output
for float value:
Figure 6.14: The result of executing Exercise 5, part 3
Here, we can see the same results for formatting, but different ones for precision.
The inaccurate output starts from precision 8. This means that, on our system, the
maximum precision for the float is 8 significant digits. The results on different systems
should be different. An analysis of them will help you choose the correct data type for
your applications.
Note
Never use the float data type for representing money or exchange rates; you may
get the wrong result.
Introduction | 423
I/O Manipulators for Boolean Formatting
In the <ios> header, there are declared functions for changing boolean formatting:
std::boolalpha and std::noboolalpha. They are invoked without arguments and allow us
to display boolean values in textual or digital ways, respectively. They are used for both
input and output operations. Let's consider an example of using these I/O manipulators
for output operations. We will display the Boolean both as text and as a digit:
std::cout << "Default formatting of bool variables: "
<< "true: " << true
<< ", false: " << false << std::endl;
std::cout << "Formatting of bool variables with boolalpha flag is set: "
<< std::boolalpha
<< "true: " << true
<< ", false: " << false << std::endl;
std::cout << "Formatting of bool variables with noboolalpha flag is set: "
<< std::noboolalpha
<< "true: " << true
<< ", false: " << false << std::endl;
After compiling and running this example, you will get the following output:
Default formatting of bool variables: true: 1, false: 0
Formatting of bool variables with boolalpha flag is set: true: true, false:
false
Formatting of bool variables with noboolalpha flag is set: true: 1, false: 0
424 | Streams and I/O
As you can see, the default formatting of bool variables is performed with the
std::noboolalpha flag. To use these functions in input operations, we need to have a
source string that contains true/false words or 0/1 symbols. The std::boolalpha and
std::noboolalpha function calls in the input operation are as follows:
bool trueValue, falseValue;
std::istringstream iss("false true");
iss >> std::boolalpha >> falseValue >> trueValue;
std::istringstream iss("0 1");
iss >> std::noboolalpha >> falseValue >> trueValue;
If you then output these variables, you will see that they were initialized correctly by
reading boolean values.
I/O Manipulators for Field Width and Fill Control
In the Standard Library, there are also functions for manipulating by the width of the
outputted field, which characters should be used in the case when the width is more
than the output data, and in which place these filling characters should be inserted.
These functions will be useful when you want to align your output to the left or right
position or when you want to replace spaces with some other symbols. For example,
let's say you need to print prices in two columns. If you use standard formatting, you
will get the following output:
2.33 3 .45
2.2 4 .55
3.67 3 .02
This doesn't look very good and it's hard to read. If we apply the formatting, the output
will be as follows:
2.33 3 .45
2.2
4.55
3.67 3 .02
Introduction | 425
This looks better. Again, you may want to check which characters are being used to fill
in empty spaces and which are actually spaces that you inserted between digits. Let's
set the filling character to "*", for example. You will get the following output:
2.33* 3.45*
2.2** 4.55*
3.67* 3.02*
Now, you can see that the blank space is filled with stars. Now that we've considered
where it can be useful to format width and fill with output, let's consider how we can
do that with I/O manipulators. The std::setw and std::setfill functions are declared
in the <iomanip> header. std::setw takes an integer value as a parameter and sets the
width of the stream to exact n characters. There are a few cases where the width will be
set to 0. They are as follows:
• When the shift operator is called with std::string or char
• When the std::put_money() function is called
• When the std::quoted() function is called
In the <ios> header, there are declared functions for changing the place where filling
characters should be inserted: std::internal, std::left, and std::right. They are only
used for output operations and only affect integer, floating-point, and monetary values.
Now, let's consider an example of using all of them together. Let's output positive,
negative, floating-point, and hexadecimal values with a width of 10 and replace the
filling character with "#":
std::cout << "Internal fill: " << std::endl
<< std::setfill('#')
<< std::internal
<< std::setw(10) << -2 .38 << std::endl
<< std::setw(10) << 2.38 << std::endl
<< std::setw(10) << std::hex << std::showbase << 0x4b << std::endl;
std::cout << "Left fill: " << std::endl
<< std::left
<< std::setw(10) << -2 .38 << std::endl
<< std::setw(10) << 2.38 << std::endl
426 | Streams and I/O
<< std::setw(10) << std::hex << std::showbase << 0x4b << std::endl;
std::cout << "Right fill: " << std::endl
<< std::right
<< std::setw(10) << -2 .38 << std::endl
<< std::setw(10) << 2.38 << std::endl
<< std::setw(10) << std::hex << std::showbase << 0x4b << std::endl;
After building and running this example, you will get the following output:
Internal fill:
-#####2.38
######2.38
0x######4b
Left fill:
- 2 .38#####
2.38######
0x4b######
Right fill:
#####-2 .38
######2.38
######0x4b
I/O Manipulators for Other Numeric Formatting
If you need to output a positive numeric value with a "+" sign, you can use another
I/O manipulator from the <ios> header – the std::showpos function. The opposite of
meaning manipulator also exists – the std::noshowpos function. They both have an
effect on the output. Their use is very easy. Let's consider the following example:
std::cout << "Default formatting: " << 13 << " " << 0 << std::endl;
std::cout << "showpos flag is set: " << std::showpos << 13 << " " << 0 <<
std::endl;
std::cout << "noshowpos flag is set: " << std::noshowpos << 13 << " " << 0 <<
std::endl;
Introduction | 427
Here, we made the output with default formatting, then with the std::showpos flag, and
finally with the std::noshowpos flag. If you build and run this small example, you will see
that, by default, the std::noshowpos flag is set. Look at the result of execution:
Default formatting: 13 0
showpos flag is set: +13 +0
noshowpos flag is set: 13 0
You will also want to output uppercase characters for floating-point or hexadecimal
digits so that you can use functions from the <ios> header: std::uppercase and
std::nouppercase. They only work on the output. Let's consider a small example:
std::cout << "12345.0 in uppercase with precision 4: "
<< std::setprecision(4) << std::uppercase << 12345.0 << std::endl;
std::cout << "12345.0 in no uppercase with precision 4: "
<< std::setprecision(4) << std::nouppercase << 12345.0 <<
std::endl;
std::cout << "0x2a in uppercase: "
<< std::hex << std::showbase << std::uppercase << 0x2a <<
std::endl;
std::cout << "0x2a in nouppercase: "
<< std::hex << std::showbase << std::nouppercase << 0x2a <<
std::endl;
Here, we output floating-point and hexadecimal digits with and without the
std::uppercase flag. By default, the std::nouppercase flag is set. Look at the result of
execution:
12345.0 in uppercase with precision 4: 1.234E+004
12345.0 in no uppercase with precision 4: 1.234e+004
0x2a in uppercase: 0X2A
0x2a in nouppercase: 0x2a
428 | Streams and I/O
I/O Manipulators for Whitespace Processing
In the Standard Library, there are functions for processing whitespaces. The std::ws
function from the <istream> header only works with input streams and discards leading
whitespaces. The std::skipws and std::noskipws functions from the <ios> header are
used to control reading and writing leading whitespaces. They work for both input and
output streams. When the std::skipws flag is set, the stream ignores whitespaces in
front of the input of the character sequence. By default, the std::skipws flag is set. Let's
consider an example of using these I/O manipulators. First, we will read the input with
default formatting and output what we have read. Next, we will clear our strings and
read data with the std::noskipws flag:
std::string name;
std::string surname;
std::istringstream("Peppy Ping") >> name >> surname;
std::cout << "Your name: " << name << ", your surname: " << surname <<
std::endl;
name.clear();
surname.clear();
std::istringstream("Peppy Ping") >> std::noskipws >> name >> surname;
std::cout << "Your name: " << name << ", your surname: " << surname <<
std::endl;
After building and running this example, we will get the following output:
Your name: Peppy, your surname: Ping
Your name: Peppy, your surname:
As you can see from the preceding output, if we set the std::noskipws flag, we will read
whitespaces as well.
In the <iomanip> header, an unusual manipulator for this header has been declared:
std::quoted. When this function is applied to the input, it wraps a given string in
quotes with escaping characters. If the input string already contains escaped quotes, it
reads them as well. In order to understand this, let's consider a small example. We will
initialize a source string with some text without quotes and another string will initialize
with text with escaped quotes. Next, we will read them by using std::ostringstream
without a flag is set and provide the output via std::cout. Take a look at the following
example:
Introduction | 429
std::string str1("String without quotes");
std::string str2("String with quotes \"right here\"");
std::ostringstream ss;
ss << str1;
std::cout << "[" << ss.str() << "]" << std::endl;
ss.str("");
ss << str2;
std::cout << "[" << ss.str() << "]" << std::endl;
As a result, we will get the following output:
[String without quotes]
[String with quotes "right here"]
Now, let's do the same output but with std::quoted call:
std::string str1("String without quotes");
std::string str2("String with quotes \"right here\"");
std::ostringstream ss;
ss << std::quoted(str1);
std::cout << "[" << ss.str() << "]" << std::endl;
ss.str("");
ss << std::quoted(str2);
std::cout << "[" << ss.str() << "]" << std::endl;
Now, we will have a different result:
["String without quotes"]
["String with quotes \"right here\""]
Did you notice that the first string is wrapped by quotes and that the substring "right
here" from the second string is stored with escape characters?
430 | Streams and I/O
Now, you know how to wrap any string in the quotes. You can even write your own
wrapper to decrease the number of lines when you use std::quoted(). For example, we
moved the work with the stream to a separate function:
std::string quote(const std::string& str)
{
std::ostringstream oss;
oss << std::quoted(str);
return oss.str();
}
Then, we do the following when we need we call our wrapper:
std::string str1("String without quotes");
std::string str2("String with quotes \"right here\"");
std::coot << "[" << quote(str1) << "]" << std::endl;
std::cout << "[" << quote(str2) << "]" << std::endl;
Now, it looks much better. The first topic has come to an end, so let's revise what we
have just learned. In practice, we learned about the usage of predefined stream objects,
I/O operations with files with inner memory, I/O formatting, and the I/O of user-
defined types. Now that we have a complete understanding of how to work with the I/O
library in C++, we will consider what to do when the standard stream is not enough.
Making Additional Streams
When the provided interface of streams is not enough for resolving your task, you may
want to create an additional stream that will reuse one of the existing interfaces. You
may need to output or provide input from a specific external device, or you may need
to add the Id of the thread that invoked the I/O operation. There are a few ways to
do that. You may create a new class that will aggregate one of the existing streams as
a private member. It will implement all the needed functions, such as shift operators,
through already existing stream functions. Another way to do this is to inherit one of
the existing classes and override all the virtual functions in a way you need them.
Introduction | 431
First of all, you have to choose the appropriate class to be used. Your choice should
depend on which modification you want to add. Choose std::basic_istream,
std::basic_ostream, and std::basic_iostream if you need to modify input or output
operations. Choose std::ios_base if you want to modify the state information, control
information, private storage, and so on. Choose std::basic_ios if you want to modify
something related to the stream buffer. After you choose the correct base class, inherit
one of the aforementioned classes to create an additional stream.
There's one more thing you have to know – how to initialize correctly standard streams.
In terms of the initialization of a file or string stream and basic stream classes, there are
some big differences. Let's review them. To initialize the object of class that is derived
from the file stream class, you need to pass the file name. To initialize the object of
the class that is derived from the string stream class, you need to call the default
constructor. Both of them have their own stream buffers, so they don't need additional
manipulation on initialization. To initialize the object of the class that is derived from
the basic stream class, you need to pass a pointer to a stream buffer. You can create a
variable of the buffer or you may use the buffer of the predefined stream objects, such
as std::cout or std::cerr.
Let's review these two methods of creating additional streams in detail.
How to Make an Additional Stream – Composition
Composition means that you declare some of the standard stream objects in the private
section of your class as a class member. When you choose an appropriate standard
stream class, go to its header and notice which constructor it has. Then, you need to
correctly initialize this member in the constructor of your class. To use your class as a
stream object, you need to implement basic functions such as the shift operator, str(),
and so on. As you may remember, every stream class has overloaded shift operators for
built-in types. They also have overloaded shift operators for predefined functions such
as std::endl. You need to be able to use your class as a real stream object. Instead of
declaring all 18 overloaded shift operators, we just need to create one template. Also,
to allow for the use of predefined manipulators, we must declare a shift operator that
takes a pointer to a function.
This doesn't look very hard, so let's try to implement such a "wrapper" for the
std::ostream object.
432 | Streams and I/O
Exercise 6: Composing the Standard Stream Object in the User-Defined Class
In this exercise, we will create own stream object that wraps the std::ostream object
and adds additional features. We will create a class called extendedOstream that will
output data to the Terminal and insert the following data in front of each piece of
output: date and time and thread ID. To complete this exercise, perform the following
steps:
1. Include the required headers: <iostream> for std::endl support, <sstream> for
std::ostream support, <thread> for std::this_thread::get_id() support, <chrono>
for std::chrono::system_clock::now(), and <ctime> for converting timestamps into
readable representations:
Note
Don't forget to add the pthread linker flag to the Eclipse project settings for
threading support: Project -> Properties -> C/C++ Build -> Settings -> G++
Linker -> Miscellaneous -> Linker flags enter '-pthread'. This path is valid for
Eclipse Version: 3.8 .1; it may vary for different versions.
#include <iostream>
#include <sstream>
#include <thread>
#include <chrono>
#include <ctime>
2. Next, declare the extendedOstream class. Declare the std::ostream variable called
m_oss and the bool variable called writeAdditionalInfo. This bool variable will be
used to indicate whether extended data should be printed or not:
class extendedOstream
{
private:
std::ostream& m_oss;
bool writeAdditionalInfo;
};
Introduction | 433
3. Next, in the public section, define a default constructor and initialize m_oss with
std::cout to redirect output to the Terminal. Initialize writeAdditionalInfo with
true:
extendedOstream()
: m_oss(std::cout)
, writeAdditionalInfo(true)
{
}
4. Define a template overloaded left shift operator, <<, that returns a reference
to extendedOstream and takes a template parameter called value. Then, if
writeAdditionalInfo is true, output the time, thread ID, and the given value, and
then set writeAdditionalInfo to false. If writeAdditionalInfo is false, output only
the given value. This function will be used for the output of all built-in types:
template<typename T>
extendedOstream& operator<<(const T& value)
{
if (writeAdditionalInfo)
{
std::string time = fTime();
auto id = threadId();
m_oss << time << id << value;
writeAdditionalInfo = false;
}
else
{
m_oss << value;
}
return *this;
}
434 | Streams and I/O
5. Define another overloaded left shift operator that takes a pointer to the function
as a parameter and returns the reference to std::ostream. In the function body,
set writeAdditionalInfo to true, call the given function, and pass m_oss as an
argument. This overloaded operator will be used for predefined functions such as
std::endl:
extendedOstream&
operator<<(std::ostream& (*pfn)(std::ostream&))
{
writeAdditionalInfo = true;
pfn(m_oss);
return *this;
}
6. In the private section, define the fTime function, which returns std::string. It gets a
system time. Format it into a readable representation and return it:
std::string fTime()
{
auto now = std::chrono::system_clock::now();
std::time_t time = std::chrono::system_clock::to_time_t(now);
std::ostringstream oss;
std::string strTime(std::ctime(&time));
strTime.pop_back();
oss << "[" << strTime << "]";
return oss.str();
}
7. In the private section, define the threadId() function, which returns a string. Get
the id of the current thread, format it, and return it:
std::string threadId()
{
auto id = std::this_thread::get_id();
std::ostringstream oss;
oss << "[" << std::dec << id << "]";
return oss.str();
}
Introduction | 435
8. Enter the main function. To test how our stream object works, create an object of
the extendedOstream type called oss. Output different data, for example, integer,
float, hexadecimal, and bool:
extendedOstream oss;
oss << "Integer: " << 156 << std::endl;
oss << "Float: " << 156.12 << std::endl;
oss << "Hexadecimal: " << std::hex << std::showbase
<< std::uppercase << 0x2a << std::endl;
oss << "Bool: " << std::boolalpha << false << std::endl;
9. Then, create a thread, initialize it with a lambda function, and put the same output
inside the lambda. Don't forget to join the thread:
std::thread thr1([]()
{
extendedOstream oss;
oss << "Integer: " << 156 << std::endl;
oss << "Float: " << 156.12 << std::endl;
oss << "Hexadecimal: " << std::hex << std::showbase
<< std::uppercase << 0x2a << std::endl;
oss << "Bool: " << std::boolalpha << false << std::endl;
});
thr1.join();
10. Now, build and run the application. You will get the following output:
Figure 6.15: The result of executing Exercise 6
Consider each line of the output. You can see the next format of the output: "[date and
time][thread ID]output data". Ensure that the thread ID differs from thread to thread.
Then, the data was output in the expected format. So, as you can see, it's not too hard
to implement your own I/O stream object using the composition of the standard
stream.
436 | Streams and I/O
How to Make an Additional Stream – Inheritance
Inheritance means that you create your own stream class and inherit it from one
of the standard stream objects that has a virtual destructor. Your class must be a
template class and have template parameters, just like in the parent class. To use all
your inherited functions with the object of your class, the inheritance should be public.
In the constructor, you should initialize the parent class, depending on the class type
–
with the file name, with the stream buffer, or by default. Next, you should override
those basic functions that you would change according to your requirements.
The most common case where we need to inherit standard stream classes is when we
want to implement I/O operations for a new device, such as a socket or printer. All of
the defined standard stream classes are responsible for formatting input and output
and have overloads for strings, files, and the Terminal. Only the std::basic_streambuf
class is responsible for work with devices, so we need to inherit this class, write our
own implementation, and set it as a stream buffer for standard classes. The core
functionality of streambuf classes is to transport characters. It can use buffers to store
characters between flushing or can flush immediately after each call. These concepts
are called buffered and unbuffered characters transport.
The buffered characters transport for output operations works as follows:
1. Characters are buffered into the internal buffer by the sputc() function call.
2. When the buffer is full, sputc() invokes the protected virtual member, that is,
overflow().
3. The overflow() function transfers all buffer content to the external device.
4. When the pubsync() function is called, it calls the protected virtual member known
as sync().
5. The sync() function transfers all buffer content to the external device.
The unbuffered characters transport for output operations works slightly differently:
1. Characters are passed to the sputc() function.
2. The sputc() function immediately calls the protected virtual member known as
overflow().
3. The overflow() function transfers all buffer content to the external device.
So, for buffered and unbuffered characters transport for output operations, we should
override the overflow() and sync() functions, which do the actual work.
Introduction | 437
The buffered characters transport for input operations works as follows:
1. The sgetc() function reads the character from the internal buffer.
2. The sgetc() function invokes the sungetc() function, which makes the consumed
character available again.
3. If the internal buffer is empty, the sgetc() function invokes the underflow()
function.
4. The underflow() function reads characters from the external device to the internal
buffer.
The sgetc() and underflow() functions always return the same character. To read
different characters each time, we have another pair of functions: sbumpc() and uflow().
The algorithm of reading characters with them is the same:
1. The sbumpc() function reads the character from the internal buffer.
2. The sbumpc() function invokes the sputbackc() function, which makes the next
character available for input.
3. If the internal buffer is empty, the sbumpc() function invokes the uflow() function.
4. The uflow() function reads characters from the external device to the internal
buffer.
The unbuffered characters transport for input operations works as follows:
1. The sgetc() function invokes a protected virtual member known as underflow().
2. The underflow() function reads characters from the external device to the internal
buffer.
3. The sbumpc() function invokes a protected virtual member known as uflow().
4. The uflow() function reads characters from the external device to the internal
buffer.
In the case of any errors, the protected virtual member known as pbackfail() is
invoked, which handles error situations. So, as you can see, to override the std::basic_
streambuf class, we need to override the virtual members that work with external
devices. For the input streambuf, we should override the underflow(), uflow(), and
pbackfail() members. For the output streambuf, we should override the overflow() and
sync() members.
Let's consider all of these steps in more detail.
438 | Streams and I/O
Exercise 7: Inheriting the Standard Stream Object
In this exercise, we will create a class called extended_streambuf that inherits from
std::basic_streambuf. We will use a buffer of the std::cout stream object and override
the overflow() function so that we can write data to an external device (stdout). Next,
we will write an extended_ostream class that inherits from the std::basic_ostream class
and set a stream buffer to extended_streambuf. Finally, we will make minor changes to
our wrapper class and use extended_ostream as a private stream member. To complete
this exercise, perform the following steps:
1. Include the required headers: <iostream> for std::endl support, <sstream>
for std::ostream and std::basic_streambuf support, <thread> for std::this_
thread::get_id() support, <chrono> for std::chrono::system_clock::now(), and
<ctime> for converting timestamps into a readable state.
2. Create a template class called extended_streambuf that inherits from the
std::basic_streambuf class. Override a public member called overflow() that
writes a character to the output stream and returns the EOF or the written
character:
template< class CharT, class Traits = std::char_traits<CharT> >
class extended_streambuf : public std::basic_streambuf< CharT, Traits >
{
public:
int overflow( int c = EOF ) override
{
if (!Traits::eq_int_type(c, EOF))
{
return fputc(c, stdout);
}
return Traits::not_eof(c);
}
};
Introduction | 439
3. Next, create a template class called extended_ostream that is derived from the
std::basic_ostream class. In the private section, define a member of the extended_
streambuf class, namely buffer. Initialize the std::basic_ostream parent class with
a buffer member. Next, in the constructor body, invoke the init() function from
the parent class with buffer as an argument. Also, overload the rdbuf() function,
which returns a pointer to the buffer variable:
template< class CharT, class Traits = std::char_traits<CharT> >
class extended_ostream : public std::basic_ostream< CharT, Traits >
{
public:
extended_ostream()
: std::basic_ostream< CharT, Traits >::basic_ostream(&buffer)
, buffer()
{
this->init(&buffer);
}
extended_streambuf< CharT, Traits >* rdbuf () const
{
return (extended_streambuf< CharT, Traits >*)&buffer;
}
private:
extended_streambuf< CharT, Traits > buffer;
};
4. Rename an extendedOstream class to the logger to avoid misunderstandings with
similar names. Leave the existing interface as is but replace the std::ostream&
member with our own stream, that is, object - extended_ostream. The complete
class looks as follows:
class logger
{
public:
logger()
: m_log()
, writeAdditionalInfo(true)
{
}
template<typename T>
logger& operator<<(const T& value)
440 | Streams and I/O
{
if (writeAdditionalInfo)
{
std::string time = fTime();
auto id = threadId();
m_log << time << id << value;
writeAdditionalInfo = false;
}
else
{
m_log << value;
}
return *this;
}
logger&
operator<<(std::ostream& (*pfn)(std::ostream&))
{
writeAdditionalInfo = true;
pfn(m_log);
return *this;
}
private:
std::string fTime()
{
auto now = std::chrono::system_clock::now();
std::time_t time = std::chrono::system_clock::to_time_t(now);
std::ostringstream log;
std::string strTime(std::ctime(&time));
strTime.pop_back();
log << "[" << strTime << "]";
return log.str();
}
std::string threadId()
{
auto id = std::this_thread::get_id();
std::ostringstream log;
Introduction | 441
log << "[" << std::dec << id << "]";
return log.str();
}
private:
extended_ostream<char> m_log;
bool writeAdditionalInfo;
};
5. Enter the main function and change the extendedOstream object to the logger
object. Leave the rest of the code as is. Now, build and run the exercise. You will
see the output that was given in the previous exercise but in this case, we used
our own stream buffer, our own stream object, and a wrapper class that adds
additional information to the output. Look at the result of the execution that's
shown in the following screenshot and compare it with the previous result. Make
sure they are similar. If they are, that means we did a good job and our inherited
classes work as expected:
Figure 6.16: The result of executing Exercise 7
In this topic, we have done a lot and learned how to create additional streams in
different ways. We considered all the appropriate classes for inheritance and which
class is better to use for different needs. We also learned how to inherit from basic
streambuf classes to implement work with external devices. Now, we will learn how to
use I/O streams in an asynchronous way.
442 | Streams and I/O
Leveraging Asynchronous I/O
There are a lot of cases where I/O operations can take a lot of time, for example,
creating a backup file, searching a huge database, reading large files, and so on. You can
use threads to execute I/O operations without blocking the application's execution.
But for some applications, it's not a suitable way to handle long I/O, for example, when
there can are thousands of I/O operations per second. In those cases, C++ developers
use asynchronous I/O. It saves thread resources and ensure that the thread of the
execution cannot be blocked. Let's consider what synchronous and asynchronous I/O
is.
As you may recall from Chapter 5, The Philosophers' Dinner – Threads and
Concurrency, synchronous operation means that some thread invokes the operation
and waits for it to complete. It may be a single-threaded or multi-threaded application.
The main point is that the thread is waiting for the I/O operation to complete.
The asynchronous execution takes place when an operation does not block the
execution of the working thread. The thread that performs the asynchronous I/O
operation sends an asynchronous request and continues with another task. When the
operation has finished, the initial thread will be notified about the finish and it can
handle the results as necessary.
From this, it looks like asynchronous I/O is much better than synchronous, but it
depends on the situation. If you need to perform lots of fast I/O operations, it would
be more suitable to follow the synchronous way due to the overhead of processing
kernel I/O requests and signals. Thus, you need to consider all possible scenarios while
developing an architecture for your application.
The Standard Library doesn't support asynchronous I/O operations. So, to leverage
asynchronous I/O, we need to consider alternative libraries or write our own
implementations. First, let's consider platform-dependent implementations. Then, we
will look at cross-platform libraries.
Asynchronous I/O on Windows Platforms
Windows supports I/O operations for a variety of devices: files, directories, drives,
ports, pipes, sockets, terminals, and so on. In general, we use the same interface for I/O
for all of these devices, but some settings differ from device to device. Let's consider an
I/O operation on a file in Windows.
Introduction | 443
So, in Windows, we need to open a device and get a Handler for it. Different devices
open in different ways. To open a file, directory, drive, or port, we use the CreateFile
function from the <Windows.h> header. To open a pipe, we use the CreateNamedPipe
function. To open a socket, we use the socket() and accept() functions. To open a
terminal, we use the CreateConsoleScreenBuffer and GetStdHandle functions. All of them
return a device handler that is used in all the functions for work with that device.
The CreateFile function takes seven parameters that manage the work with the opened
device. The function declaration looks as follows:
HANDLE CreateFile( PCTSTR pszName,
DWORD dwDesiredAccess,
DWORD dwShareMode,
PSECURITY_ATTRIBUTES psa,
DWORD dwCreationDisposition,
DWORD dwFlagsAndAttributes,
HANDLE hFileTemplate);
The first parameter is pszName – the path to the file. The second parameter calls
dwDesiredAccess and manages access to the device. It can take one of the following
values:
0 // only for configuration changing
GENERIC_READ // only reading
GENERIC_WRITE // only for writing
GENERIC_READ | GENERIC_WRITE // both for reading and writing
The third parameter, dwShareMode, manages how the OS should handle all the new
CreateFile invocations when the file is already open. It can take one of the following
values:
0 // only one application can open device simultaneously
FILE_SHARE _READ // allows reading by multiple applications simultaneously
FILE_SHARE _WRITE // allows writing by multiple applications simultaneously
FILE_SHARE _READ | FILE_SHARE _WRITE // allows both reading and writing by
multiple applications simultaneously
FILE_SHARE _DELETE // allows moving or deleting by multiple applications
simultaneously
444 | Streams and I/O
The fourth parameter, psa, is usually set to NULL. The fifth parameter,
dwCreationDisposition, manages whether the file be opened or created. It can take one
of the following values:
CREATE_NEW // creates new file or fails if it is existing
CREATE_ALWAYS // creates new file or overrides existing
OPEN_EXISTING // opens file or fails if it is not exists
OPEN_ALWAYS // opens or creates file
TRUNCATE_EXISTING // opens existing file and truncates it or fails if it is
not exists
The sixth parameter, dwFlagsAndAttributes, manages the cache or work with the file. It
can take one of the following values for managing caching:
FILE_FLAG _NO_BUFFERING // do not use cache
FILE_FLAG _SEQUENTIAL_SCAN // tells the OS that you will read the file
sequentially
FILE_FLAG _RANDOM _ACCESS // tells the OS that you will not read the file in
sequentially
FILE_FLAG _WR1TE _THROUGH // write without cache but read with
It can take one of the following values for managing work with files:
FILE_FLAG _DELETE _ON _CLOSE // delete file after closing (for temporary files)
FILE_FLAG _BACKUP _SEMANTICS // used for backup and recovery programs
FILE_FLAG _POSIX _SEMANTICS // used to set case sensitive when creating or
opening a file
FILE_FLAG _OPEN _REPARSE _POINT // allows to open, read, write, and close files
differently
FILE_FLAG _OPEN _NO _RECALL // prevents the system from recovering the contents
of the file from archive media
FILE_FLAG _OVERLAPPED // allows to work with the device asynchronously
It can take one of the following values for file attributes:
FILE_ATTRIBUTE _ARCHIVE // file should be deleted
FILE_ATTRIBUTE _ENCRYPTED // file is encrypted
FILE_ATTRIBUTE _HIDDEN // file is hidden
FILE_ATTRIBUTE _NORMAL // other attributes are not set
FILE_ATTRIBUTE _NOT _CONTENT _ INDEXED // file is being processed by the
indexing service
Introduction | 445
FILE_ATTRIBUTE _OFFLINE // file is transferred to archive media
FILE_ATTRIBUTE _READONLY // only read access
FILE_ATTRIBUTE _SYSTEM // system file
FILE_ATTRIBUTE _TEMPORARY // temporary file
The last parameter, hFileTemplate, takes a handler to the open file or NULL as
parameters. If the file handler is passed, the CreateFile function ignores all the
attributes and flags and the use the attributes and flags of the open file.
That's all regarding CreateFile parameters. If it cannot open a device, it returns
INVALID_HANDLE _VALUE. The following example demonstrates how to open a file for
reading:
#include <iostream>
#include <Windows.h>
int main()
{
HANDLE hFile = CreateFile(TEXT("Test.txt"), GENERIC_READ,
FILE_SHARE _READ | FILE_SHARE_WRITE,
NULL, OPEN_ALWAYS, FILE_ATTRIBUTE _NORMAL,
NULL);
if (INVALID_HANDLE _VALUE == hFile)
std::cout << "Failed to open file for reading" << std::endl;
else
std::cout << "Successfully opened file for reading" << std::endl;
CloseHandle(hFile);
return 0;
}
446 | Streams and I/O
Next, to perform an input operation, we use the ReadFile function. It takes the file
descriptor as the first parameter, the source buffer as the second parameter, the
maximum number of bytes to read as the third parameter, the number of reading bytes
as the fourth parameter, and the NULL value for synchronous execution or the pointer
to a valid and unique OVERLAPPED structure as the last parameter. If the operation
succeeds, the ReadFile returns true, or false otherwise. The following example
demonstrates how to input from the previously opened file for reading:
BYTE pb[20];
DWORD dwNumBytes;
ReadFile(hFile, pb, 20, &dwNumBytes, NULL);
To perform the output operation, we use the WriteFile function. It has the same
declaration as ReadFile, but the third parameter sets the number of bytes to write and
the fifth parameter is a number of written bytes. The following example demonstrates
how to output to a previously opened file for writing:
BYTE pb[20] = "Some information\0";
DWORD dwNumBytes;
WriteFile(hFile, pb, 20, &dwNumBytes, NULL);
To write cached data to a device, use the FlushFileBuffer function. It takes a single
parameter – the file descriptor. Let's move to the asynchronous I/O. To let the OS know
that you plan to work with the device asynchronously, you need to open it with the
FILE_FLAG_OVERLAPPED flag. Now, opening the file for writing or reading looks as follows:
#include <iostream>
#include <Windows.h>
int main()
{
HANDLE hFile = CreateFile(TEXT("Test.txt"), GENERIC_READ,
FILE_SHARE _READ | FILE_SHARE_WRITE,
NULL, OPEN_ALWAYS, FILE_FLAG_OVERLAPPED,
NULL);
if (INVALID_HANDLE _VALUE == hFile)
std::cout << "Failed to open file for reading" << std::endl;
else
Introduction | 447
std::cout << "Successfully opened file for reading" << std::endl;
CloseHandle(hFile);
return 0;
}
We use the same operations to perform reading or writing to files, that is, ReadFile and
WriteFile, with the only difference that the number of reads or wrote bytes are set to
NULL and we must pass a valid and unique OVERLAPPED object. Let's consider what the
structure of the OVERLAPPED object is:
typedef struct _OVERLAPPED {
DWORD Internal; // for error code
DWORD InternalHigh; // for number of read bytes
DWORD Offset;
DWORD OffsetHigh;
HANDLE hEvent; // handle to an event
} OVERLAPPED, *LPOVERLAPPED;
The Internal member is set to STATUS_PENDING, which means that the operation hasn't
started yet. The number of read or wrote bytes will be written into the InternalHigh
member. Offset and OffsetHigh are ignored in asynchronous operations. The hEvent
member is used for receiving events about the completion of the asynchronous
operation.
Note
The order of the I/O operations is not guaranteed, so you cannot rely on this. If
you plan to write to a file at one place, and read from a file at another place, you
cannot rely on the order.
448 | Streams and I/O
There is one unusual thing in working with ReadFile and WriteFile in asynchronous
mode. They return a non-zero value if the I/O request was performed synchronously.
If they return FALSE, you need to invoke the GetLastError function to check why FALSE
was returned. If the error code is ERROR_IO_PENDING, this means that the I/O request was
successfully handled, is in a pending state, and will be performed later.
The last thing that you should remember is that you can't move or remove the
OVERLAPPED object or buffer with data until the I/O operation finishes. For each I/O
operation, you should create a new OVERLAPPED object.
Finally, let's consider the ways in which the system notifies us about completing the I/O
operation. There are a few such mechanisms: releasing the device, releasing the event,
producing an alert, and using I/O ports.
The "bad" approach: The WriteFile and ReadFile functions set a device to the "occupied"
state. When the I/O operation is finished, the driver sets a device to the "free" state.
We can check if the finished I/O operation is invoking the WaitForSingleObject or
WaitForMultipleObject functions. The following example demonstrates this approach:
#include <Windows.h>
#include <WinError.h>
int main()
{
HANDLE hFile = CreateFile(TEXT("Test.txt"), GENERIC_READ,
FILE_SHARE _READ | FILE_SHARE _WRITE,
NULL,
OPEN_ALWAYS, FILE_FLAG _OVERLAPPED,
NULL);
BYTE bBuffer[100];
OVERLAPPED o = { 0 };
BOOL bResult = ReadFile(hFile, bBuffer, 100, NULL, &o);
DWORD dwError = GetLastError();
if (bResult && (dwError == ERROR_IO _PENDING))
{
WaitForSingleObject(hFile, INFINITE);
Introduction | 449
bResult = TRUE;
}
CloseHandle(hFile);
return 0;
}
This is the easiest way to check if the I/O operation has finished. But this approach
makes the calling thread wait on the WaitForSingleObject call, so it becomes a
synchronous call. Moreover, you can initiate a few I/O operations for this device, but
you cannot be sure that the thread will wake up on the needed release of the device.
A little bit better, but not the best approach: Do you remember the last member of the
overlapped structure? You create an event by invoking the CreateEvent function and
set it to the OVERLAPPED object. Then, when the I/O operation has finished, the system
releases this event by calling the SetEvent function. Next, when the calling thread needs
to get the result of an executing I/O operation, you invoke WaitForSingleObject and
pass the descriptors for this event. The following example demonstrates this approach:
#include <Windows.h>
#include <synchapi.h>
int main()
{
HANDLE hFile = CreateFile(TEXT("Test.txt"), GENERIC_READ,
FILE_SHARE _READ | FILE_SHARE _WRITE,
NULL, OPEN_ALWAYS, FILE_FLAG _OVERLAPPED,
NULL);
BYTE bInBuffer[10];
OVERLAPPED o = { 0 };
o.hEvent = CreateEvent(NULL,TRUE,FALSE,"IOEvent");
ReadFile(hFile, bInBuffer, 10, NULL, &o);
///// do some work
450 | Streams and I/O
HANDLE hEvent = o.hEvent;
WaitForSingleObject(hEvent, INFINITE);
CloseHandle(hFile);
return 0;
}
It's a pretty easy approach if you wish to notify the calling thread about the end of the
I/O operation. But this is not the ideal way to do this because when there are a lot of
these operations, you need to create an event object for each of them.
One more approach that's not the best: The alertable I/O works in the following
way. We call ReadFileEx and WriteFileEx to the input/output. They are similar to the
standard ReadFile and WriteFile, but we don't pass the variable that stores the number
of read or wrote characters and we pass an address of the callback function. This
callback function is called a completion routine and has the following declaration:
VOID WINAPI
CompletionRoutine(DWORD dwError,
DWORD dwNumBytes,
OVERLAPPED* po);
ReadFileEx and WriteFileEx pass the address of the callback function to the device
driver. When the operation has finished on the device, the driver adds the address of
the callback function to the APC queue and the pointer to the OVERLAPPED structure.
Then, the OS invokes this function and passes the number of read or wrote bytes, error
code, and pointer to the OVERLAPPED structure.
The main cons of this approach are writing callback functions and using a lot of global
variables because callback functions have a small amount of information in the context.
Another reason not to use this approach is that only the calling thread can receive the
notification regarding completion.
Introduction | 451
Now that we've gone over the bad, let's look at the best approach for handling I/O
results – I/O ports. The I/O completion ports are developed to be used with thread
pools. To create such a port, we use CreateIoCompletionPort. The declaration of this
function looks as follows:
HANDLE
CreateIoCompletionPort(HANDLE hFile,
HANDLE hExistingCompletionPort,
ULONG_PTR CompletionKey,
DWORD dwNumberOfConcurrentThreads);
This function creates an I/O completion port and associates the device with this port.
To complete this action, we need to call it twice. To create the new completion port, we
invoke the CreateIoCompletionPort function and pass INVALID_HANDLE _VALUE as the first
parameter, NULL as a second parameter, 0 as a third parameter, and pass the number
of the threads for this port. Passing 0 as the fourth parameter will set the number of
threads equal to the number of processors.
Note
For the I/O completion port, it is recommended to use the number of threads that
is equal to the number of processors, multiplied twice.
Next, we need to associate this port with the input/output device. So, we invoke the
CreateIoCompletionPort function for the second time and pass a descriptor of the
device, a descriptor of the created completion port, the constant that will indicate
reading or writing to the device, and 0 as the number of threads. Then, when we
need to get the result of completion, we call GetQueuedCompletionStatus from our port
descriptor. If the operation completes, the function returns a result immediately. If it
doesn't, then the thread waits to complete. The following example demonstrates this
approach:
#include <Windows.h>
#include <synchapi.h>
int main()
{
HANDLE hFile = CreateFile(TEXT("Test.txt"), GENERIC_READ,
FILE_SHARE _READ | FILE_SHARE _WRITE,
452 | Streams and I/O
NULL, OPEN_ALWAYS, FILE_FLAG _OVERLAPPED,
NULL);
HANDLE m_hIOcp = CreateIoCompletionPort(INVALID_HANDLE _VALUE, NULL, 0,
0);
CreateIoCompletionPort(hFile, m_hIOcp, 1, 0);
BYTE bInBuffer[10];
OVERLAPPED o = { 0 };
ReadFile(hFile, bInBuffer, 10, NULL, &o);
DWORD dwNumBytes;
ULONG_PTR completionKey;
GetQueuedCompletionStatus(m_hIOcp, &dwNumBytes, &completionKey,
(OVERLAPPED**) &o, INFINITE);
CloseHandle(hFile);
return 0;
}
Asynchronous I/O on Linux Platforms
The asynchronous I/O on Linux supports input and output to different devices such as
sockets, pipes, and TTYs, except files. Yes, this is pretty strange, but Linux developers
decided that I/O operations with files are fast enough.
To open an I/O device, we use the open() function. It has the following declaration:
int open (const char *filename, int flags[, mode_t mode])
The first parameter is a filename, while the second parameter is a bitmask that controls
how the file should be opened. If the system cannot open the device, open() returns a
value of -1 . In the case of success, it returns a device descriptor. The possible flags for
open mode are O_RDONLY, O_WRONLY, and O_RDWR.
Introduction | 453
To perform input/output operations, we use the POSIX interface called aio. They have
a defined set of functions such as aio_read, aio_write, aio_fsync, and so on. They are
used to initiate the asynchronous operations. To get the result of execution, we can use
signal notification or the instantiation of a thread. Alternatively, we can choose not to
be notified at all. All of them are declared in the <aio.h> header.
Almost all of these take the aiocb structure (asynchronous IO control block) as a
parameter. It controls the IO operations. The declaration of this structure looks as
follows:
struct aiocb
{
int aio_fildes;
off_t aio_offset;
volatile void *aio_buf;
size_t aio_nbytes;
int aio_reqprio;
struct sigevent aio_sigevent;
int aio_lio_opcode;
};
The aio_fildes member is a descriptor to the opened device, while the aio_offset
member is an offset in the device where read or write operations should be done.
The aio_buf member is a pointer to the buffer to read or write from. The aio_nbytes
member is the size of the buffer. The aio_reqprio member is the priority of the
execution of this IO operation. The aio_sigevent member is a structure that points out
how the calling thread should be notified about the finish. The aio_lio_opcode member
is a type of I/O operation. The following example demonstrates how to initialize the
aiocb structure:
std::string fileContent;
constexpr int BUF_SIZE = 20;
fileContent.resize(BUF_SIZE, 0);
aiocb aiocbObj;
aiocbObj.aio_fildes = open("test.txt", O_RDONLY);
if (aiocbObj.aio_fildes == -1)
{
454 | Streams and I/O
std::cerr << "Failed to open file" << std::endl;
return -1;
}
aiocbObj.aio_buf = const_cast<char*>(fileContent.c _str());
aiocbObj.aio_nbytes = BUF_SIZE;
aiocbObj.aio_reqprio = 0;
aiocbObj.aio_offset = 0;
aiocbObj.aio_sigevent.sigev_notify = SIGEV_SIGNAL;
aiocbObj.aio_sigevent.sigev_signo = SIGUSR1;
aiocbObj.aio_sigevent.sigev_value.sival_ptr = &aiocbObj;
Here, we created a buffer for reading file content, namely fileContent. Then, we created
an aiocb structure called aiocbObj. Next, we opened a file for reading and checked if
this operation was successful. Then, we set the pointer to a buffer and a buffer size. The
buffer size tells the driver how many bytes should be read or wrote. Next, we pointed
out that we will read from the beginning of the file by setting the offset to 0. Then, we
set the notification type in SIGEV_SIGNAL, which means we would like to get a signal
notification about the finish operation. Then, we set the signal number, which should
trigger the notification about the finish. In our case, it's SIGUSR1 – the user-defined
signal. Next, we set the pointer to the aiocb structure to the signal handler.
After the creation and correct initialization of an aiocb structure, we can perform input
or output operations. Let's complete an exercise to understand how to use async I/O
on Linux platforms.
Exercise 8: Asynchronously Reading from a File in Linux
In this exercise, we will develop an application that reads data from a file in an
asynchronous way and outputs the read data to the console. When the read operation
is performed, the driver notifies the application using the triggering signal. To do this
exercise, perform the following steps:
1. Include all the required headers: <aio.h> for asynchronous reading and writing
support, <signal.h> for signal support, <fcntl.h> for operations with files,
<unistd.h> for symbolic constants support, <iostream> for output to the Terminal,
<chrono> for time options, and <thread> for threading support:
#include <aio.h>
#include <signal.h>
#include <fcntl.h>
Introduction | 455
#include <unistd.h>
#include <iostream>
#include <chrono>
#include <thread>
2. Create a bool variable called isDone that will indicate when the operation has been
completed:
bool isDone{};
3. Define the function that will be our signal handler, that is, aioSigHandler. It will be
called when the async operation is done. Signal handlers should have the following
signature:
void name(int number, siginfo_t* si, void* additional)
4. The first parameter is a signal number, the second parameter is a structure that
contains information about why the signal was generated, and the last parameter
is additional information. It can be cast to a pointer of the ucontext_t structure
so that we can receive the thread context that was interrupted by this signal. In
aioSigHandler, check whether the signal regarding the async I/O operation is
constant using SI_ASYNCIO. If so, output a message. Next, set isDone to true:
void
aioSigHandler(int no, siginfo_t* si, void*)
{
std::cout << "Signo: " << no << std::endl;
if (si->si_code == SI_ASYNCIO)
{
std::cout << "I/O completion signal received" << std::endl;
}
isDone = true;
}
5. Define another helping function called initSigAct. It will initialize the sigaction
structure. This structure defines which signal will be sent on the I/O operation's
finish and which handler should be called. Here, we chose SIGUSR1 – a user-
defined signal. In sa_flags, set that we want this signal to be delivered on action
restart or information received:
bool
initSigAct(struct sigaction& item)
{
item.sa _flags = SA_RESTART | SA_SIGINFO;
item.sa _sigaction = aioSigHandler;
456 | Streams and I/O
if (-1 == sigaction(SIGUSR1, &item, NULL))
{
std::cerr << "sigaction usr1 failed" << std::endl;
return false;
}
std::cout << "Successfully set up a async IO handler to SIGUSR1
action" << std::endl;
return true;
}
6. Define the helping function called fillAiocb, which fills in the aiocb structure
with the given parameters. It will take the reference to the aiocb structure, the file
descriptor, the pointer to a buffer, and the buffer's size as parameters. Set sigev_
signo in SIGUSR1, which we initialized previously:
void
fillAiocb(aiocb& item, const int& fileDescriptor,
char* buffer, const int& bufSize)
{
item.aio_fildes = fileDescriptor;
item.aio_buf = static_cast<void*>(buffer);
item.aio_nbytes = bufSize;
item.aio_reqprio = 0;
item.aio_offset = 0;
item.aio_sigevent.sigev_notify = SIGEV_SIGNAL;
item.aio_sigevent.sigev_signo = SIGUSR1;
item.aio_sigevent.sigev_value.sival_ptr = &item;
}
7. Enter the main function. Define the variable called buf_size, which holds the buffer
size. Create a buffer of that size:
constexpr int bufSize = 100;
char* buffer = new char(bufSize);
if (!buffer)
{
std::cerr << "Failed to allocate buffer" << std::endl;
return -1;
}
Introduction | 457
8. Create a variable called fileName that holds a file called "Test.txt". Then, open this
file with read-only access:
const std::string fileName("Test.txt");
int descriptor = open(fileName.c _str(), O_RDONLY);
if (-1 == descriptor)
{
std::cerr << "Failed to opene file for reading" << std::endl;
return -1;
}
std::cout << "Successfully opened file for reading" << std::endl;
9. Create a sigaction structure and initialize it using the initSigAct function:
struct sigaction sa;
if (!initSigAct(sa))
{
std::cerr << "failed registering signal" << std::endl;
return -1;
}
10. Create an aiocb structure and initialize it using the fillAiocb function:
aiocb aiocbObj;
fillAiocb(aiocbObj, descriptor, buffer, bufSize);
11. Perform a read operation using the aio_read function:
if (-1 == aio_read(&aiocbObj))
{
std::cerr << "aio_read failed" << std::endl;
}
12. Next, in the loop, evaluate the isDone variable. If it is false, make the thread sleep
for 3ms. By doing this, we will wait for the I/O operation to finish:
while (!isDone)
{
using namespace std::chrono_literals;
std::this_thread::sleep_for(3ms);
}
std::cout << "Successfully finished read operation. Buffer: " << std::endl
<< buffer;
458 | Streams and I/O
13. Before running this exercise, create a Test.txt file in the project directory and
write different symbols. For example, our file contains the following data:
a1a"1 a1\a1 a1
a1
a1a"1 a1\a1 a1
a1
a1a"1 a1\a1 a1
a1
a1a"1 a1\a1 a1
a1
a1a"1 a1\a1 a1
a1
a1a"1 a1\a1 a1
a1
a1a"1 a1\a1 a1
a1
a1a"1 a1\a1 a1
a1
a1a"1 a1\a1 a1
a1
a1a"1 a1\a1 a1
a1
a1a"1 a1\a1 a1
a1
a1a"1 a1\a1 a1
a1
a1a"1 a1\a1 a1
a1
a1a"1 a1\a1 a1
a1
Here, there's alphabetical characters, numerical characters, special symbols,
spaces, tabulation characters, and newline characters.
14. Now, build and run this exercise in your IDE. Your output will be similar to the
following:
Figure 6.17: The result of executing Exercise 8
You can see that the file was successfully opened for reading and that we successfully
set the SIGUSR1 signal and handler for it. Then, we received signal number 30, that is,
the SI_ASYNCIO signal. Finally, we can output what we have read and compare it with the
file content. By doing this, we can ensure that all the data was read correctly.
Introduction | 459
That's all for async I/O in Linux systems.
Note
You can find more information about asynchronous IO in Linux by going to Linux's
man pages: http://man7.org/linux/man-pages/man7/aio.7 .html.
Now, let's learn about what we can use for cross-platform applications.
Asynchronous Cross-Platform I/O Libraries
We've already considered the platform-specific decision for asynchronous I/O. Now, to
write a cross-platform application, you can use these platform-specific approaches and
use them with preprocessor directives; for example:
#ifdef WIN
#include <WinAIO.hpp>
#else
#include <LinAIO.hpp>
#endif
In both the headers, you can declare the same interface for platform-specific
implementations. You can also implement your own AIO library, which will use some
state machines or queue in the separate thread. Also, you can use some of the free
libraries that implement the necessary features. The most popular library is Boost.Asio.
It provides a lot of interfaces for asynchronous work, such as the following:
• Concurrency without threads
• Threads
• Buffers
• Streams
• Coroutines
• TCP, UDP, and ICMP
• Sockets
• SSL
• Timers
• Serial ports
460 | Streams and I/O
Let's briefly consider its interface for I/O operations. We can use the interface of the
Asio library for synchronous and asynchronous operations. All of the I/O operations
start from the io_service class, which provides core I/O functionality. It is declared
in the <boost/asio/io_service.hpp> header file. The synchronous I/O invokes the
run() function of the io_service object for a single operation that blocks the calling
thread until the job is done. The asynchronous I/O uses the run(), run_one(), poll(),
and poll_one() functions. The run() function runs the event loop to process request
handlers. The run_one() function does the same, but the event loop should process
only one handler. The poll() function runs the event loop to execute all the ready
handlers. poll_one() does the same but only for one handler. The following example
demonstrates the usage of all these functions:
boost::asio::io_service io_service1;
io_service1.run();
boost::asio::io_service io_service2;
io_service2.run _one();
boost::asio::io_service io_service3;
io_service3.poll();
boost::asio::io_service io_service4;
io_service4.poll_one();
It's possible to run the event handler before the actual I/O operations are called. Use
the working class with the io_service class to implement this feature in your code. The
work class guarantees that the run function will not return until you've decided that
there will not be any future I/O operations. For example, you can make the working
class a member of another class and remove it from the destructor. So, during the
lifetime of your class, io_service will be running:
boost::asio::io_service io_service1;
boost::asio::io_service::work work(io_service1);
io_service1.run();
boost::asio::io_service io_service2;
boost::asio::io_service::work work(io_service2);
io_service2.poll();
Introduction | 461
Next, to perform any I/O operations, we need the exact the I/O device, for example,
file, socket, and so on. There are many classes that implement work with different I/O
devices, for example, boost::asio::ip::tcp::socket from the <boost/asio/ip/tcp.hpp>
header. Next, to read and write to the socket, we make use of boost::asio::async_read
and boost::asio::async_write. They take a socket, boost::asio::buffer, and the
callback function as parameters. When the async operation is performed, the callback
function is invoked. We can pass a lambda function as a callback function or bind an
existing function using the boost::bind function. boost::bind creates a callable object.
The following example demonstrates how to write to a socket using Boost::Asio:
boost::asio::io_service ioService;
tcp::socket socket;
int length = 15;
char* msg = new char(length);
msg = "Hello, world!";
auto postHandler = [=]()
{
auto writeHandler = [=](boost::system::error_code ec, std::size_t
length)
{
if (ec)
{
socket_ . close();
}
else
{
462 | Streams and I/O
// wrote length characters
}
};
boost::asio::async_write(socket, boost::asio::buffer(msg, length),
writeHandler);
};
ioService.post(postHandler);
Here, we used lambda functions as callbacks for async I/O operations.
Note
The Boost.Asio is well-documented at https://www.boost.org/doc/libs/1_63 _0/
doc/html/boost_asio.html. There are lots of examples with different IO devices
and different approaches. You can refer to this documentation if you decide to use
Boost.Asio in your projects.
Here, we've considered different ways we can implement asynchronous I/O operations.
Depending on your requirements, environment, and allowed utilities, you can choose
the appropriate way to implement asynchronous I/O in your applications. Remember
that if you choose to perform many fast I/O operations, it's better to do them in a
synchronous way as it doesn't take up a lot of system resources. Now that we know how
to leverage asynchronous I/O, let's learn how to use I/O in multithreaded applications.
Interaction of Threads and I/O
The I/O Standard Library is not thread-safe. In the documentation of the Standard
Library, we can find an explanation that states that the concurrent access to the stream
or stream buffer can lead to a data race and, as a result, an undefined behavior. To avoid
this, we should synchronize access to the streams and buffers using the techniques that
we learned about in Chapter 5, The Philosophers' Dinner – Threads and Concurrency.
Let's talk a little bit about the std::cin and std::cout objects. Each call to them is
thread-safe, but let's consider the following example:
std::cout << "Counter: " << counter << std::endl;
Introduction | 463
In this line, we see that std::cout is called once, but each call to the shift operator is
actually a different call to the std::cout object. So, we can rewrite this line as follows:
std::cout << "Counter: ";
std::cout << counter;
std::cout << std::endl;
This code does exactly the same as the previous single line, that is, if you call this single
line from the different threads, your output will be mixed and unclear. You can modify it
to make it really thread-safe like so:
std::stringsream ss;
ss << "Counter: " << counter << std::endl;
std::cout << ss.str();
So, if you output to the Terminal using the second method, your output will be clear
and thread-safe. This behavior can vary, depending on the compiler or std library
version. You also have to know that std::cout and std::cin are synchronized among
them. This means that invoking std::cout always flushes the std::cin stream and the
invocation of std::cin always flushes the std::cout stream.
The best approach is to wrap all I/O operations in a guard class that will control access
to the stream using mutexes. If you need to output to the Terminal from multiple
threads using std::cout, you can implement a very simple class that does nothing but
lock the mutex and invoke std::cout. Let's complete an exercise and create such class.
Exercise 9: Developing a Thread-Safe Wrapper for std::cout
In this exercise, we will develop a simple std::cout wrapper that produces a thread-
safe output. We will write a small test function to check how it works. Let's start and
perform the following steps:
1. Include all the required headers:
#include <iostream> // for std::cout
#include <thread> // for std::thread
#include <mutex>
// for std::mutex
#include <sstream> // for std::ostringstream
464 | Streams and I/O
Now, let's think about our wrapper. We can create a variable of this class
somewhere and pass it to each created thread. However, this is a bad decision
because in complex applications, this will take a lot of effort. We can also do this
as a singleton so that we have access to it from everywhere. Next, we have to think
about the content of our class. Actually, we can use the classes that we created in
Exercise 7, Inheriting the Standard Stream Object. In that exercise, we overloaded
std::basic_streambuf and std::basic_ostream and set std::cout as the output
device. We can add a mutex to the overloaded function and use it as is. Note that
we don't need any additional logic – just the output data using std::cout. To do
this, we can create a simpler class. If we did not set the output device, applying
the left shift operator will not take effect and will store the data to be outputted
in the internal buffer. Great! Now, we need to think about how to get this buffer to
output using std::cout.
2. Implement a function such as write() that will lock a mutex and output to
std::cout from the internal buffer. The usage of this function will look as follows:
mtcout cout;
cout << msg << std::endl;
cout.write();
3. We have one function that will always be called automatically, and we can put the
code of the write function into it. It's a destructor. In this case, we combine the
creation and destruction into a single line. The usage of such an object will look as
follows:
mtcout{} << msg << std::endl;
4. Now, let's define our mtcout (multithreaded cout) class. It has a public default
constructor. In the private section, it has a static mutex variable. As you may recall,
the static variable is shared among all the instances of the class. In the destructor,
we lock the mutex and output using cout. Add a prefix to the output – the ID of
the current thread and a space character:
class mtcout : public std::ostringstream
{
public:
mtcout() = default;
~ mtcout()
{
Introduction | 465
std::lock_guard<std::mutex> lock(m_mux);
std::cout << std::this_thread::get_id() << " " << this->str();
}
private:
static std::mutex m_mux;
};
5. Next, declare the mutex variable outside the class. We are doing this because we
must declare a static variable in any source file:
std::mutex mtcout::m_mux;
6. Enter the main function. Create a lambda called func. It will test our mtcout class. It
takes string as a parameter and outputs this string in the loop from 0 to 1000 using
mtcout. Add the same output using std::cout and comment it out. Compare the
output in both cases:
auto func = [](const std::string msg)
{
using namespace std::chrono_literals;
for(inti=0;i<1000;++i)
{
mtcout{} << msg << std::endl;
//
std::cout << std::this_thread::get_id() << " " << msg <<
std::endl;
}
};
7. Create four threads and pass a lambda function as a parameter. Pass different
strings to each thread. Finally, join all four threads:
std::thread thr1(func, "111111111");
std::thread thr2(func, "222222222");
std::thread thr3(func, "333333333");
std::thread thr4(func, "444444444");
thr1.join();
thr2.join();
thr3.join();
thr4.join();
466 | Streams and I/O
8. Build and run the exercise for the first time. You will get the following output:
Figure 6.18: The result of executing Exercise 9, part 1
Here, we can see that each of threads outputs its own message. This message has
not been interrupted and the output looks clear.
9. Now, uncomment the output with std::cout in the lambda and comment out the
output using mtcout.
Introduction | 467
10. Again, build and run the application. Now, you will get a "dirty", mixed output, like
the following:
Figure 6.19: The result of executing Exercise 9, part 2
You can see this mixed output because we don't output a single string; instead, we
invoke std::cout four times:
std::cout << std::this_thread::get_id();
std::cout << " ";
std::cout << msg;
std::cout << std::endl;
Sure, we can format the string before outputting it, but it is more convenient to use
the mtcout class and not have to worry about formatting. You can create similar
wrappers for any stream so that you can perform I/O operations safely. You can change
the output and add any additional information, such as the ID of the current thread,
time, or whatever you need. Employ the things we learned about in Chapter 5, The
Philosophers' Dinner – Threads and Concurrency, to synchronize the I/O operations,
extend streams and make the output more useful for your needs.
468 | Streams and I/O
Using Macros
In the activity for this chapter, we will use macro definitions to simplify and beautify our
code, so let's do a refresher on how to use them. Macro definitions are preprocessor
directives. The syntax of the macro definition is as follows:
#define [name] [expression]
Here, [name] is any meaningful name and[expression] is any small function or value.
When the preprocessor faces the macro name, it replaces it with the expression. For
example, let's say you have the following macro:
#define MAX_NUMBER 15
Then, you use it in a few places in your code:
if (val < MAX_NUMBER)
while (val < MAX_NUMBER)
When the preprocessor finishes its work, the code will be as follows:
if (val < 15)
while (val < 15)
The preprocessor does the same work for functions. For example, let's say you have a
macro for getting the maximum number:
#definemax(a,b)a<b?b:a
Introduction | 469
Then, you use it in a few places in your code:
int res = max (5, 3);
std::cout << (max (a, b));
When the preprocessor finishes its work, the code will be as follows:
intres=5<3?3:5;
std::cout<<(a<b?b:a);
As an expression, you can use any valid expression, such as a function call, inline
function, value, and so on. If you need to write the expression in more than one line, use
the back-slash operator, "\". For example, the max definition we can write in two lines is
as follows:
#define max(a, b) \
a<b?b:a
Note
The macro definitions came from the C language. It's better to use const
variables or inline functions instead. However, there are still cases when it's more
convenient to use macro definitions, for example, in loggers when you wish to
define different logging levels.
Now. we know everything we need to complete the activity. So, let's sum up what we
have learned in this chapter and let's improve the project that we wrote in Chapter 5,
The Philosophers' Dinner – Threads and Concurrency. We'll be developing a thread-safe
logger and integrating it into our project.
470 | Streams and I/O
Activity 1: The Logging System for The Art Gallery Simulator
In this activity, we are going to develop a logger that will output formatted logs to the
Terminal. We will output logs in the following format:
[dateTtime][threadId][logLevel][file:line][function] | message
We will implement macro definitions for different logging levels that will be used
instead of straightforward calls. This logger will be thread-safe, and we will invoke it
from different threads simultaneously. Finally, we will integrate it into the project – The
Art Gallery Simulator. We will run the simulation and observe pretty-printed logs. We
will create an additional stream, use streams with concurrency, and format the output.
We will implement almost everything that we have learned about in this chapter. We
will also employ a synchronization technique from the previous chapter.
Thus, before attempting this activity, ensure that you have completed all the previous
exercises in this chapter.
Before we implement this application, let's describe our classes. We have the following
newly created classes:
Figure 6.20: Descriptions of the classes that should be implemented
Introduction | 471
We also have the following classes already implemented in The Art Gallery Simulator
project:
Figure 6.21: The table of already implemented classes in The Art Gallery Simulator project
472 | Streams and I/O
Let's add our new classes to the class diagram before we start the implementation. All
of the described classes with relationships are composed in the following diagram:
Figure 6.22: The class diagram
To receive the output in the desired format, the LoggerUtils class should have the
following static functions:
Figure 6.23: Descriptions of the LoggerUtils member functions
Introduction | 473
Follow these steps to complete this activity:
1. Define and implement the LoggerUtils class, which provides an interface for
output formatting. It contains static variables that format given data into the
required representation.
2. Define and implement the StreamLogger class, which provides a thread-safe
interface for output to the Terminal. It should format the output like so:
[dateTtime][threadId][logLevel][file:line: ][function] | message
3. In a separate header file, declare the macro definitions for different logging levels
that return a temporary object of the StreamLogger class.
4. Integrate the implemented logger into the classes from the Art Gallery simulator.
5. Replace all invocations of std::cout with the appropriate macro definition calls.
After implementing the aforementioned steps, you should get some output on the
Terminal regarding the logs from all the implemented classes. Take a look and ensure
that the logs are outputted in the desired format. The expected output should as
follows:
Figure 6.24: The result of the application's execution
474 | Streams and I/O
Note
The solution for this activity can be found on page 696.
Summary
In this chapter, we learned about I/O operations in C++. We considered the I/O
Standard Library, which provides an interface for synchronous I/O operations. Also, we
considered platform-dependent native tools for asynchronous I/O, and the Boost.Asio
library for cross-platform asynchronous I/O operations. We also learned how to use
I/O streams in multithreaded applications.
We started by looking at the basic features that the Standard Library provides for
I/O operations. We learned about predefined stream objects such as std::cin and
std::cout. In practice, we learned how to work with standard streams and override shift
operators for easy read and write custom data types.
Next, we practiced how to create additional streams. We inherited from the basic
stream class, implemented our own stream buffer class, and practiced their usage in the
exercises. We learned about the most appropriate stream classes for inheritance and
considered their pros and cons.
Then, we considered the approaches of asynchronous I/O operations on different
operating systems. We briefly considered using the cross-platform I/O library known
as Boost.Asio, which provides an interface for both synchronous and asynchronous
operations.
Finally, we learned about how to perform I/O operations in multithreaded applications.
We put all of these new skills into practice by building a multithreaded logger. We
created a logger abstraction and employed it in the Art Gallery simulator. As a result,
we created an easy, clear, and robust logging system that allows us to easily debug the
application using logs. In all, we employed everything we learned about in this chapter.
In the next chapter, we're going to be taking a closer look at testing and debugging
applications. We will start by learning about assertions and safety netting. Then, we will
practice writing unit tests and mocks for interfaces. After, we will practice debugging
applications in the IDE: we will use breakpoints, watchpoints, and data visualization.
Finally, we will write an activity that will master our skills of testing code.
Learning Objectives
By the end of this chapter, you will be able to:
•
Describe different types of assertions
•
Implement compile-time and runtime assertions
•
Implement exception handling
•
Describe and implement unit testing and mock testing
•
Debug C++ code using breakpoints and watchpoints
•
Inspect data variables and C++ objects in the debugger
In this chapter, you'll learn how to add assertions appropriately, add unit test cases so that code
behaves as per the requirements, and learn about debugging techniques so that you can find
bugs in the code and trace the root cause of them.
Everybody Falls, It's
How You Get Back
Up – Testing and
Debugging
7
478 | Everybody Falls, It's How You Get Back Up – Testing and Debugging
Introduction
During the Software Development Life Cycle (SDLC), once the requirement gathering
phase is complete, then generally comes the Design and Architecture phase, wherein
the high-level flow of the project is defined and broken down into smaller components
of modules. When there are many team members in a project, it is necessary that each
team member is clearly assigned a specific part of the module and that they are aware
of their requirements. This way, they can independently write their part of the code
in an isolated environment and make sure it works fine. Once their part of the work
is complete, they can integrate their module with the other developer's modules and
make sure the overall project is executing as per the requirements.
This concept can be applied to small projects too, where the developer is completely
working on a requirement, breaking it down into smaller components, developing
components in an isolated environment, making sure it executes as per the plan,
integrating all the small modules to complete the project, and finally testing it to ensure
that the overall project is working fine.
There is a good amount of testing required when the whole project is integrated and
executed. There may be a separate team (known as Quality Assurance, that is, QA)
dedicated to performing this task. Rather than finding issues at the project level, it
is a good strategy to test the code at each isolated stage. This testing needs to be
performed by the developer who's responsible for that module. This type of testing is
known as unit testing. Here, a developer can simulate the environment that's needed
to run that module and make sure they test a specific part of functionality written in a
module. For example, let's assume that, in a big project, there is a small module whose
functionality is to parse the configuration file and get the parameters that are needed to
set up the environment. If part of the code that parses the file takes an IP address as a
string, then the developer needs to ensure it is in the format XXX.XXX .XXX .XXX, where X
is a digit from 0-9 . The length of the string must be of limited size.
Here, the developer can create a test program that executes their part of the code:
parsing the file, extracting the IP address as a string, and testing if it is in the correct
format. Similarly, if the configuration has other parameters to be parsed and they
need to be in a specific format such as userid / password, file location for the log or
mount point, and so on, then all these will be part of the unit testing for that module.
In this chapter, we'll explain techniques such as assertions, safety nesting (exception
handling), unit testing, mocking, breakpoints, watchpoints, and data visualization to
pinpoint the source of errors and limit their growth. In the next section, we'll explore
the assertion technique.
Introduction | 479
Assertions
Using testing condition for the aforementioned scenario will help the project develop in
a better way as the flaws will be caught at a base level rather than at the later QA level.
There may be scenarios wherein even after writing the unit test cases and successful
execution of the code, issues may be found sch as the application crashing, the program
exiting unexpectedly, or the behavior is not as expected. To overcome such scenarios,
generally, a developer uses a debug mode binary to recreate the problem. Asserts are
used to ensure that the conditions are checked, otherwise the program's execution is
terminated.
This way, the problem can be traced fast. Also, in Debug Mode, the developer can traverse
the actual execution of the program line by line and check if the flow of code is as
expected or if the variables are set as expected and accessed correctly. Sometimes,
accessing pointer variables causes unexpected behaviors if they are not pointing to a
valid memory location.
When writing code, we can check if the necessary condition is satisfied. If not, then the
programmer may not want to execute the code further. This can be easily done using
an assertion. An assertion is a macro where the specific condition is checked and if it
doesn't meet the criteria, abort is called (program execution is stopped) and an error
message is printed as a standard error. This is generally a runtime assertion. There
can also be an assertion done at compile time. We will talk about this later. In the next
section, we'll solve an exercise wherein we'll be writing and testing our first assertion.
Exercise 1: Writing and Testing Our First Assertion
In this exercise, we'll write a function to parse an IP address and check if it's valid. As
part of our requirements, the IP address will be passed as a string literal in the XXX.
XXX.XXX .XXX format. In this format, X represents a digit from 0-9 . So, as part of testing
to check whether the string being parsed is correct or not, we need to ensure that the
string is not null and has a length that's less than 16. Follow these steps to implement
this exercise:
1. Create a new file named AssertSample.cpp.
2. Open the file and write the following code to include the header files:
#include<iostream>
#include<cassert>
#include<cstring>
using std::cout;
using std::endl;
480 | Everybody Falls, It's How You Get Back Up – Testing and Debugging
In the preceding code, #include<cassert> shows that we need to include the
cassert file where assert is defined.
3. Create a function named checkValidIp() that will take the IP address as input and
return a true value if the IP address meets our requirements. Write the following
code to define the function:
bool checkValidIp(const char * ip){
assert(ip != NULL);
assert(strlen(ip) < 16);
cout << "strlen: " << strlen(ip) << endl;
return true;
}
Here, assert(ip != NULL) shows that the assert macro is used to check condition
if the "ip" variable that was passed is not NULL. If it's NULL, then it will abort with
an error message. Also, assert(strlen(ip) < 16) shows that the assert is used to
check if "ip" is 16 character or less. If not, then it aborts with error message.
4. Now, create a main function that passes a different string literal to our
checkValidIp() function and makes sure it can be tested appropriately. Write the
following code for the main function:
int main(){
const char * ip;
ip = NULL;
bool check = checkValidIp(ip);
cout << " IP address is validated as :" << (check ? "true" : "false")
<< endl;
return 0;
}
In the preceding code, we've deliberately passed NULL to the ip variable to make
sure assert is called.
5. Open the Command Prompt and go to the location where the AssertSample.cpp file is
stored. Compile it with the g++ compiler by typing the following command:
g++ AssertSample.cpp
With this command, the a.out binary file is generated.
Introduction | 481
6. Run the a.out binary file by typing the following command in the compiler:
. /a.out
You will see the following output:
Figure 7.1: Running the Assertion binary on the Command Prompt
In the preceding screenshot, you can see three pieces of code circled in red.
The first highlighted portion shows the compilation of the .cpp file. The second
highlighted portion shows the a.out binary that that was generated by the
preceding compilation. The third highlighted part shows assertion throwing an
error for the NULL value being passed. It indicates the line number and function
name where the assertion is called.
7. Now, inside the main function, we will pass ip with a length greater than 16 and
check if the assert is called here too. Write the following code to implement this:
ip = "111.111.111.11111";
Again, open the compiler, compile the .cpp file, and run the binary file that's
generated. The following output will be displayed in the compiler:
Figure 7.2: Running the Assertion binary on the Command Prompt
482 | Everybody Falls, It's How You Get Back Up – Testing and Debugging
In the preceding screenshot, the assertion throws an error as the ip length that
was passed is greater than 16.
8. Now, to satisfy the assert condition so that the binary runs fine, we need to
update the value of ip inside the main function. Write the following code to do this:
ip = "111.111.111.111";
Again, open the compiler, compile the .cpp file, and run the binary file that was
generated. The following output is displayed in the compiler:
Figure 7.3: Running the Assertion binary on the Command Prompt
Note
As we're just dealing with assert here, we haven't added any extra functionality
to our checkValidIP() function. However, we'll use the same example in the
Exception Handling and Unit Testing sections wherein we'll add more functionality to
our function.
9. If we don't want the executable to abort due to assert in production or the release
environment, remove the assert macro call from the code. First, we'll update the
value of ip whose length is greater than 16. Add the following code to the file:
ip = "111.111.111.11111";
10. Now, during compilation, pass the -DNDEBUG macro. This will make sure that the
assert is not called in the binary. Write the following command to compile our .cpp
file in the Terminal:
g++ -DNDEBUG AssertSample.cpp
Introduction | 483
After this, when we execute the binary file, the following output is generated:
Figure 7.4: Running the Assertion binary on the Command Prompt
In the preceding screenshot, since assert is not called, it will show the string length as
17 and the true value as the IP address will be validated. In this exercise, we saw that
the assertion was called when the binary was executed. We can also have an assertion
during the compilation of the code. This was introduced in C++ 11. It is called a static
assertion and we'll explore it in the next section.
Static Assertions
Sometimes, we can do condition checks at compilation time to avoid any future errors.
For example, in a project, we may use a third-party library that has some data structure
declared in it. This structure information, such as its size and member variables, are
known to us from its header file. Using this information, we can allocate or deallocate
memory correctly, as well as work on its member variable. This structure property may
change in a third-party library with a different version. However, if our project code is
still using the structure of the earlier version, then it will create a problem when we use
it. We may get an error at a later stage when running the binary. We can catch this error
at compile time itself using static assertion. We can make a comparison of static data
such as the version number of libraries, thus making sure our code will not have to face
any problems. In the next section, we'll solve an exercise based on this.
484 | Everybody Falls, It's How You Get Back Up – Testing and Debugging
Exercise 2: Testing Static Assertions
In this exercise, we'll be comparing the version numbers of two header files by doing a
static assertion. If the version number is less than 1, then the static assert error will be
thrown. Perform the following steps to implement this exercise:
1. Create a header file named PersonLibrary_ver1.h and add the following code:
#ifndef __PERSON _H _ _
#define __PERSON_H _ _
#include<string>
using std::string;
#define PERSON_LIB _VERSION 1
struct person{
string name;
int age;
string address;
};
#endif
In the preceding code, the struct person is defined and consists of the following
attributes: name, age, and address. It also has the version number 1.
2. Create another header file named PersonLibrary_ver2.h and add the following
code:
#ifndef __PERSON _H _ _
#define __PERSON_H _ _
#include<string>
using std::string;
#define PERSON_LIB _VERSION 2
struct person{
string name;
Introduction | 485
int age;
string address;
string Mobile_No;
};
#endif
In the preceding code, the struct person is defined and consists of the following
attributes: name, age, address, and Mobile_No. It also has the version number 2.
Now, version 1 is the old version and version 2 is the new one. The following is a
screenshot of the two header files side by side:
Figure 7.5: Library file with a different version
3. Create a file named StaticAssertionSample.cpp and add the following code:
#include<iostream>
#include"PersonLibrary.h"
void doSanityCheck(){
static_assert(PERSON_LIB _VERSION > 1 , "PERSON LIBRARY VERSION not
greater than 1");
// Do any more sanity check before starting app ...
}
int main(){
doSanityCheck();
return 0;
}
486 | Everybody Falls, It's How You Get Back Up – Testing and Debugging
In the preceding code, we're doing a sanity check for our project before we build
and execute it. We have created a function named doSanityCheck() that performs
a version check for the library. It is done using static assertion and it is performed
at compile time. The second line of the code shows that the PersonLibrary.h file
is included. Inside the doSanityCheck() function, the static_assert() function
checks if this version of the library is greater than 1.
Note
If your project needs a struct of person defined in version 2 or higher of the
library to execute it correctly, we need files that match version 2, that is,
PERSON_LIB _VERSION should be set to 2 at least. If a developer gets version 1 of
the library and tries to create a binary for the project, it may create a problem in
execution. To avoid this scenario, in the main code of the project, we do a sanity
check for the project before it builds and executes.
4. To include version 1 of the library in our .cpp file, open the terminal and write the
following command:
ln -s PersonLibrary_ver1.h PersonLibrary.h
The preceding command will create a soft link of the PersonLibrary_ver1.h file
called PersonLibrary.h. It's like simulating the environment where we are using
PersonLibrary.h with version 1.
5. Compile our .cpp file using the following command in the terminal:
g++ StaticAssertionSample.cpp
Here is the output generated in the terminal:
Figure 7.6: Seeing a static error
Introduction | 487
In the preceding screenshot, three regions are circled in red. The first one
gives the command to create a soft link. The second command shows the
PersonLibrary.h file we created. The third region shows the static_assert error
that was thrown since the version of the library is not matching.
6. Now, to compile the program correctly, remove the soft link of ProgramLibrary
and create a new one pointing to version2 and compile it again. This time, it will
compile fine. Type the following commands into the terminal to remove a soft link:
rm PersonLibrary.h
ln -s PersonLibrary_ver2.h PersonLibrary.h
g++ StaticAssertionSample.cpp
The following is a screenshot of the same:
Figure 7.7: Static assertion compilation file
As you can see, a region marked in red shows that the correct version of PersonLibrary
is used and compilation goes ahead with no problem. After the compilation, a binary file
called "a.exe" is created. In this exercise, we performed static assertion by comparing
the version numbers of two header files. In the next section, we'll explore the concept
of exception handling.
Understanding Exception Handling
As we saw earlier in the debug mode binary, we can use runtime assert to abort the
program when a certain condition is not satisfied. But in a release mode binary or
production environment, when the client is using this product, it will not be a good idea
to abort the program abruptly. It would be better to handle such error conditions and
proceed with the next part of the execution of the binary.
488 | Everybody Falls, It's How You Get Back Up – Testing and Debugging
The worst case occurs when the binary needs to exit. It'll do so gracefully by adding the
correct log messages and cleaning all the allocated memory for this process. For such a
scenario, exception handling is used. Here, when an error condition is hit, execution is
transferred to a special block of code. The exception consists of three sections, which
are as follows:
• try block: Here, we check if the criteria match the necessary condition.
• throw block: It throws an exception if the criteria do not match.
• catch block: It catches the exception and performs the necessary execution for
that error condition.
In the next section, we'll solve an exercise wherein we'll perform exception handling on
our code.
Exercise 3: Performing Exception Handling
In this exercise, we'll be performing exception handling on our AssertSample.cpp code.
We'll replace the assert condition with our exception. Perform the following steps to
implement this exercise:
1. Create a file named ExceptionSample.cpp.
2. Add the following codes to add header files:
#include<iostream>
#include<cstring>
using std::cout;
using std::endl;
3. Create a checkValidIp() function wherein we have a try-catch block. If the
condition present in the try block is not satisfied, an exception will be thrown
and the message in the catch block will be printed. Add the following code to
accomplish this:
bool checkValidIp(const char * ip){
try{
if(ip == NULL)
throw ("ip is NULL");
if(strlen(ip) > 15)
throw int(strlen(ip));
}
catch(const char * str){
Introduction | 489
cout << "Error in checkValidIp :"<< str << endl;
return false;
}
catch(int len){
cout << "Error in checkValidIp, ip len:" << len <<" greater than
15 characters, condition fail" << endl;
return false;
}
cout << "strlen: " << strlen(ip) << endl;
return true;
}
In the preceding code, you can see the try block where the condition is checked.
Inside the try block, if ip is NULL, then it will throw an exception of the (const
char *) type. In the next condition, if ip is greater than 15, then it will throw an
exception with the int parameter type. This throw is caught by a correct catch
with matching parameters (int or const char *). Both exceptions return false
with some error message. Alternatively, in the catch block, you can perform extra
steps if any cleaning is needed or use the default values for variables that were
used for comparison in the exception.
Note
There is a default exception; for example, if there's a nested function that throws
an error with a different parameter, it can be caught as a higher-level function with
a parameter such as catch(...). Again, in the generic catch, you can create a default
behavior for exception handling.
4. Create the main() function and write the following code inside it:
int main(){
const char * ip;
ip = NULL;
if (checkValidIp(ip))
cout << "IP address is correctly validated" << endl;
else {
490 | Everybody Falls, It's How You Get Back Up – Testing and Debugging
/// work on error condition
// if needed exit program gracefully.
return -1;
}
return 0;
}
5. Open the terminal, compile our file, and run the binary. You will see the following
output:
Figure 7.8: Example execute code with exception handling
The preceding example throws an exception for ip being NULL and exits gracefully.
6. Now, modify the value of ip in the main function by providing more than 15
characters. Write the following code to do this:
ip = "111.111.111.11111";
7. Open the terminal, compile our file, and run the binary. You will see the following
output:
Figure 7.9: Another example of exception handling
It throws an error with a length mismatch for the ip string.
Unit Testing and Mock Testing | 491
8. Again, modify the value of ip in the main function by providing less than 15
characters. Write the following code to do this:
ip = "111.111.111.111";
9. Open the terminal, compile our file, and run the binary. You will see the following
output:
Figure 7.10: The binary runs fine without throwing an exception
As you can see from the preceding screenshot, the binary file executes properly without
any exceptions. Now that you've understood how to handle exceptions, in the next
section, we'll explore the concepts of unit testing and mock testing.
Unit Testing and Mock Testing
When a developer starts writing code, they need to ensure it is tested correctly at the
unit level. It may happen that the boundary conditions are missed, and the code may
break when it runs on the client's site. To avoid this situation, generally, it is a good idea
to do unit testing for the code. Unit testing is testing that's performed at the unit
level or the base level of the code where a developer can test their code in an isolated
environment, assuming the required setup has been fulfilled to run a feature of the
code. Generally, it is good practice to break down modules into small functions and test
each function separately.
For example, suppose part of the functionality is to read the configuration file and get
the environment set up with the parameters from the configuration file. We can create
a dedicated function to write this functionality. So, to test this function, we can create
a set of unit test cases that will check various combinations that may fail or behave
incorrectly. Once these test cases have been identified, the developer can write code
to cover the functionality and make sure it passes all the unit test cases. This is good
practice as part of development where you keep on adding test cases first and add code
accordingly, and then run all the test cases for that function and make sure they behave
appropriately.
492 | Everybody Falls, It's How You Get Back Up – Testing and Debugging
There are a good number of tools available for writing and integrating unit test cases for
a project. A few of them are cppunit, Google Test, Microsoft Unit Testing Framework,
and catch. For our example's purpose, we'll work on the Google Test framework. It is
freely available and can be integrated with the project. It uses the xUnit test framework
and has a collection of asserts that can be used to test the condition for test cases. In
the next section, we'll solve an exercise wherein we'll be creating our first unit test case.
Exercise 4: Creating Our First Unit Test Case
In this exercise, we'll work on the same scenario we discussed in the previous section
wherein the developer is tasked with writing a function to parse the configuration
file. Different valid parameters are passed in the configuration file, for example,
product executable name, version number, database connectivity information, IP
address to connect to the server, and so on. Assume that the developer will break
down all this functionality of parsing the file and setting and testing the parameters for
individual properties in a separate function. In our case, we assume that the developer
is writing functionality where they have parsed the IP address as a string and wants
to deduce if the string is the valid IP address. For now, the criteria to match the IP
address to be valid needs to satisfy the following conditions:
• The string should not be null.
• The string should contain no more than 16 characters
• The string should be in the XXX.XXX .XXX .XXX format, where X must be a digit from
0-9 .
Perform the following steps to implement this exercise:
1. Create the CheckIp.h header file and write the following code inside it:
#ifndef _CHECK _IP _H _
#define _CHECK _IP _H _
include <iostream>
include <cstring>
using namespace std;
bool checkValidIp(const char *);
#endif
In the preceding code, we wrote a function named checkValidIp() to check if the
IP address is valid. Again, just to understand the Google unit test, we will write
minimal code to understand the feature.
Unit Testing and Mock Testing | 493
2. Create a CheckIp.cpp file and write the following code, wherein we'll check if ip is
not NULL and that the length is less than 16:
#include "CheckIp.h"
#include<string>
#include<sstream>
bool checkValidIp(const char * ip){
if(ip == NULL){
cout << "Error : IP passes is NULL " << endl;
return false;
}
if(strlen(ip) > 15){
cout << "Error: IP size is greater than 15" << endl;
return false;
}
cout << "strlen: " << strlen(ip) << endl;
return true;
}
In the preceding code, if both conditions fail, the function returns false.
3. Call the checkValidIp() function to create a new file named MainIp.cpp. This file,
in general, will contain the main flow of the project but for our exercise's purpose,
we are just calling our checkValidIP() function. Add the following code inside it:
#include"CheckIp.h"
int main(){
const char * ip;
//ip = "111.111 .111 .111";
ip = "111.111.111.11111";
if (checkValidIp(ip))
cout << "IP address is correctly validated" << endl;
else {
/// work on error condition
// if needed exit program gracefully.
cout << " Got error in valid ip " << endl;
return -1;
}
return 0;
}
494 | Everybody Falls, It's How You Get Back Up – Testing and Debugging
4. To create test code, we'll create our first .cpp file, that is, TestCases.cpp. This will
contain test cases for our checkValidIp function. Write the following code inside it:
#include"CheckIp.h"
#include<gtest/gtest.h>
using namespace std;
const char * testIp;
TEST(CheckIp, testNull){
testIp=NULL;
ASSERT_FALSE(checkValidIp(testIp));
}
TEST(CheckIp, BadLength){
testIp = "232.13 .1231 .1321 .123";
ASSERT_FALSE(checkValidIp(testIp));
}
In the second line of the preceding code, we're including the gtest.h file. We're
also calling test cases using the TEST function, which takes two parameters: the
first is the testsuite name and the second is the testcase name. For our case, we
have created TestSuite CheckIp. In the TEST block, you will see that we have the
Google test define an assert called ASSERT_FALSE that will check if the condition is
false. If it's not, it will fail the test case and show the same in the results.
Note
Generally, for a Google test case and test suite, you can group them in a common
namespace and call the RUN_ALL _TESTS macro, which runs all the test cases
attached to test binary. For each test case, it calls the SetUp function to initialize
(like constructor in class), then it calls the actual test case, and finally, it calls the
TearDown function (like destructor in class). It is not necessary to write the SetUp
and TearDown functions unless you have to initialize something for the test cases.
5. Now, to run the test cases, we will create the main .cpp file for the test cases and
call the RUN_ALL _TESTS macro. Alternatively, we can create an executable by linking
the Google Test library that invokes RUN_ALL _TESTS. For our case, we will do the
latter. Open the terminal and run the following command to create a test run
binary:
g++ -c CheckIp.cpp
This will include the object file of CheckIp.cpp since the CheckValidIp function is
defined in it.
Unit Testing and Mock Testing | 495
6. Now, type the following command to add the necessary libraries that will be linked
for creating a binary:
g++ CheckIp.o TestCases.cpp -lgtest -lgtest_main -pthread -o TestRun
7. Now, run the binary with the following command:
. /TestRun
This shows two test cases that were passed for the CheckIp testsuite. The first
test case, CheckIp.testNull, is called and it passes. The second testcase, CheckIp.
BadLength, is called and it passes too. This result is visible in the following
screenshot:
Figure 7.11: Compiling and executing test cases
Note
In Google Test, we can also use other asserts, but for our test cases, we are
fine with ASSERT_FALSE since we are only checking the false condition for the IP
address that we pass.
496 | Everybody Falls, It's How You Get Back Up – Testing and Debugging
8. Now, we will add more test cases to make our code robust. This is generally good
practice for writing code. First, create the test cases and make sure the code runs
fine for new test cases and old test cases along with the correct functionality of
the code. To add more test cases, add the following code to the TestCases.cpp file:
TEST(CheckIp, WrongTokenCount){
testIp = "22.13111 .11";
ASSERT_FALSE(checkValidIp(testIp));
}
TEST(CheckIp, WrongTokenEmpty){
testIp = "22.131..11";
ASSERT_FALSE(checkValidIp(testIp));
}
TEST(CheckIp, WrongTokenStart){
testIp = ".2.1.31.11";
ASSERT_FALSE(checkValidIp(testIp));
}
TEST(CheckIp, WrongTokenEnd){
testIp = "2.13.11.1.";
ASSERT_FALSE(checkValidIp(testIp));
}
TEST(CheckIp, SpaceToken){
testIp = "2.13.11. 1";
ASSERT_FALSE(checkValidIp(testIp));
}
TEST(CheckIp, NonDigit){
testIp = "2.13 .b1.A1";
ASSERT_FALSE(checkValidIp(testIp));
}
TEST(CheckIp, NonValidDigit){
testIp = "2.13 .521 .61";
ASSERT_FALSE(checkValidIp(testIp));
}
TEST(CheckIp, CorrectIp){
testIp = "232.13.123.1";
ASSERT_FALSE(checkValidIp(testIp));
}
Unit Testing and Mock Testing | 497
In the preceding code, the first and second cases should fail with incorrect tokens.
The third case should fail if the IP starts with ".". The fourth case should fail if the
IP ends with ".". The fifth case should fail if IP has space in-between. The sixth case
should fail if the IP contains any non-digit characters. The seventh case should fail
if IP has a token value less than 0 and greater than 255. The last case should fail if
IP has wrong token counts.
9. Now, add the following code inside the CheckValidIp() function of the CheckIp.
cpp file. This code is required to handle new test cases:
if(ip[strlen(ip)-1] == '.'){
cout<<"ERROR : Incorrect token at end"<<endl;
return false;
}
isstringstream istrstr(ip);
vector<string> tokens;
string token;
regex expression("[^0-9]");
smatch m;
while(getline(istrstr, token, '.')){
if(token.empty()){
cout<<"ERROR : Got empty token"<<endl;
return false;
}
if(token.find(' ') != string::npos){
cout<<"ERROR : Space character in token"<<endl;
return false;
}
if(regex_search(token,m,expression)){
cout<<"ERROR : NonDigit character in token"<<endl;
return false;
}
int val = atoi(token.c _str());
if(val<0 || val>255){
cout<<"ERROR : Invalid digit in token"<<endl;
return false;
}
tokens.push_back(token);
}
if(tokens.size()!=4){
498 | Everybody Falls, It's How You Get Back Up – Testing and Debugging
cout<<"ERROR : Incorrect IP tokens used"<<endl;
return false;
}
cout<<"strlen: "<<strlen(ip)<<endl;
return true;
}
10. Open the terminal and write the following command to run the binary file:
. /TestRun
All the test cases have been executed, as shown in the following screenshot:
Figure 7.12: Output of test cases run
Unit Testing and Mock Testing | 499
The preceding screenshot shows that there are 10 test cases in the CheckIp test suite
and that all the test cases ran fine. In the next section, we'll learn about unit testing
using mock objects.
Unit Testing Using Mock Objects
When a developer works on unit testing, there may be scenarios wherein certain
interfaces are called after concrete actions have taken place. For example, as we
discussed in the preceding scenarios, let's assume that the project is designed in such
a way that, before its execution, it takes all the configuration information from the
database. It queries the database to get specific parameters, for example, the web
server's IP address, user, and password. It then tries to connect to a web server (maybe
there is another module that handles network-related tasks) or starts acting on the
items that are needed for an actual project. Previously, we worked on testing the
validity of the IP address. Now, we'll go a step further. Let's assume that the IP address
is fetched from the database and that we have a utility class that handles connecting to
DB and querying IP addresses.
Now, to test the IP address' validity, we need to assume the database connectivity has
been set up. This means that the application can query the database correctly and get
the results of the query, one of which is an IP address. Only then can we test the IP
address' validity. Now, in order to perform such testing, we must assume that all the
necessary activities have been completed and that we've got an IP address to test.
Here comes the mock object, which behaves like the real object. It provides the facility
for unit testing so that the application is under the impression that the IP address has
already been fetched from the database, but in reality, we have imitated it. To create
a mock object, we need to inherit it from the class that it needs to imitate. In the next
section, we'll walk through an exercise to get a better understanding of the mock
object.
500 | Everybody Falls, It's How You Get Back Up – Testing and Debugging
Exercise 5: Creating Mock Objects
In this exercise, we'll create mock objects by assuming that all the interfaces are
working as expected. Using these objects, we'll test a few functionalities such as
validating the IP address, checking DB connectivity, and checking whether the username
and password are in correct format. Once all the tests have passed, we'll confirm the
application and make it ready for QA. Perform the following steps to implement this
exercise:
1. Create a header file named Misc.h and include the necessary libraries:
#include<iostream>
#include<string>
#include<sstream>
#include<vector>
#include<iterator>
#include<regex>
using namespace std;
2. Create a class named ConnectDatabase that will connect to the database and return
the result of the query. Within the class, declare the Dbname, user, and passwd
variables. Also, declare a constructor and two virtual functions. Out of these two
virtual functions, the first one must be a destructor, and the second one must be
the getResult() function, which returns the query result from the database. Add
the following code to implement this:
class ConnectDatabase{
string DBname;
string user;
string passwd;
public:
ConnectDatabase() {}
ConnectDatabase(string _dbname, string _uname, string _passwd) :
DBname(_dbname), user(_uname), passwd(_passwd) { }
virtual ~ConnectDatabase() {}
virtual string getResult(string query);
};
Unit Testing and Mock Testing | 501
3. Create another class named WebServerConnect. Declare three string variables
inside the class, namely Webserver, uname, and passwd. Create constructor and
two virtual functions. Out of these two virtual functions, the first one must be
a destructor, and the second one must be the getRequest() function. Add the
following code to implement this:
class WebServerConnect{
string Webserver;
string uname;
string passwd;
public :
WebServerConnect(string _sname, string _uname, string _passwd) :
Webserver(_sname), uname(_uname), passwd(_passwd) { }
virtual ~WebServerConnect() {}
virtual string getRequest(string req);
};
Note
Virtual functions are required since we are going to create a Mock class from
the preceding class and call these functions.
4. Create a class named App. Create the constructors, and destructors and call all the
functions. Add the following code to implement this:
class App {
ConnectDatabase *DB;
WebServerConnect *WB;
public :
App():DB(NULL), WB(NULL) {}
~App() {
if(DB) deleteDB;
if(WB) deleteWB;
}
bool checkValidIp(string ip);
string getDBResult(string query);
string getWebResult(string query);
502 | Everybody Falls, It's How You Get Back Up – Testing and Debugging
void connectDB(string, string, string);
void connectDB(ConnectDatabase *db);
void connectWeb(string, string, string);
void run();
};
In the preceding code, the app will first query the database and get the IP address.
It then connects to the web server with the necessary information and query it to
get the required information.
5. Create a class named MockMisc.h and add the following code:
#include"Misc.h"
#include<gtest/gtest.h>
#include<gmock/gmock.h>
class MockDB : public ConnectDatabase {
public :
MockDB() {}
virtual ~MockDB(){}
MOCK_METHOD1(getResult, string( string) );
};
In the preceding code, you can see that we have included the gmock header file,
which is needed to create a mock class. Also, the MockDB class is inherited from the
ConnectDatabase class. The MOCK_METHOD1(getResult, string(string)); line states
that we are going to mock the getResult interface. So, during unit testing, we can
call the getResult function directly with the desired result without creating the
ConnectDatabase class and running a real query to the database. One important
point that needs to be noted here is that the function we need to mock must be
defined with the MOCK_METHOD[N] macro, where N is the number of parameters the
interface will take. In our case, the getResult interface takes one parameter. Thus,
it is mocked with the MOCK_METHOD1 macro.
6. Create a file named Misc.cpp and add the following code:
#include"Misc.h"
#include <unistd.h>
string ConnectDatabase::getResult(string query){
// dummy func, need to implement..
// assuming query sent to DB is success and
// will return some dummy string
return string("DB returned success");
Unit Testing and Mock Testing | 503
}
string WebServerConnect::getRequest(string req){
// dummy func, need to implement..
// assume no req string is sent to webserver. .
// its returns the result returned from server.
return string("Webserver returned success");
}
void App::connectDB(string dbname, string user, string passwd){
if(DB)
delete DB;
DB = new ConnectDatabase(dbname, user, passwd);
}
void App::connectDB(ConnectDatabase *db){
if(DB)
delete DB;
DB=db;
}
void App::connectWeb(string webname, string user, string passwd){
if(WB)
delete WB;
WB = new WebServerConnect(webname, user, passwd);
}
string App::getDBResult(string query){
return DB->getResult(query);
}
string App::getWebResult(string query) {
return WB->getRequest(query);
}
void App::run(){
if((DB==NULL)||(WB==NULL))
return ;
while( true ){
// read some request to be run on web and get result. ..
cout << getWebResult("dummy request to webserver") << endl;;
sleep(5);
504 | Everybody Falls, It's How You Get Back Up – Testing and Debugging
}
}
bool App::checkValidIp(string ip){
if(ip.empty()){
cout << "ERROR : IP passed is NULL " << endl;
return false;
}
if(ip.size() > 15){
cout << "ERROR : IP size is greater than 15" <<endl;
return false;
}
//check if last character in ip is not '.' as that is not captured in
tokenizing
if (ip[ip.size()-1] == '.'){
cout <<"ERROR : Incorrect token at end" << endl;
return false;
}
istringstream istrstr(ip);
vector<string> tokens;
string token;
regex expression("[^0-9]");
smatch m;
while( getline(istrstr, token, '.') ){
if ( token.empty() ){
cout << "ERROR : Got empty token " << endl;
return false;
}
if ( token.find(' ') != string::npos){
cout << "ERROR : Space character in token " << endl;
return false;
}
if ( regex_search(token, m, expression) ){
cout << "ERROR : NonDigit character in token " << endl;
return false;
}
int val = atoi(token.c _str());
if(val<0||val>255){
cout << "ERROR : Invalid Digit in token " << endl;
Unit Testing and Mock Testing | 505
return false;
}
tokens.push_back(token);
}
if ( tokens.size() != 4 ){
cout << " ERROR : Incorect IP tokens used" << endl;
return false;
}
cout << "strlen: " << ip.size() << endl;
return true;
}
In the preceding code, we have created a minimal interface and dummy
parameters to make it run so that we can understand the actual functionality.
We've developed basic functionalities for the getResult() and getRequest()
functions, where the DB query and WebServer query return a default string. Here,
the App::run() function assumes that both DB connectivity and web server
connectivity has been executed and now it can execute web queries at regular
intervals. At the end of each query, it will return the "Webserver returned success"
string by default.
7. Now, create a file named RunApp.cpp and write the following code inside the main
function:
#include"Misc.h"
int main(){
App app;
app.connectDB("dbname","dbuser", "dbpasswd");
string ip = app.getDBResult("dummy");
// DB query to get Webserver IP
// Similarly some miscellaneous activities to get configuratio
information
// Like querying DB to get correct username/passwd to connect to
WebServer..
// After getting IP from DB, check if the IP is valid..
//app.checkValidIp(ip);
// Now conect to webserver with parameters extracted from DB.
app.connectWeb("webname","user", "passwd");
506 | Everybody Falls, It's How You Get Back Up – Testing and Debugging
// Now run the App, like sending some request to webserver,
// getting result and doing activity with received data.
app.run();
return 0;
}
As you can see in the preceding code, the App class instance is created. Using this
instance, we connect to the database with the help of dummy parameters, namely
dbname, dbuser, and dbpasswd. Then, we query to the database to get the IP address
and other config parameters. We've commented the app.checkValidIp(ip) line
as we're assuming that the IP address that we've fetched from the DB needs to
be validated. Also, this function needs to be unit tested. Using the connectWeb()
function, we can connect to the web server by passing dummy parameters such
as webname, user, and passwd. Finally, we call the run() function, which will run in
iteration, thereby querying the web server and giving the default output.
8. Save all the files and open the terminal. In order to get the basic functionality
required to execute the project, we'll build the binary file and execute it to see the
result. Run the following command in the terminal:
g++ Misc.cpp RunApp.cpp -o RunApp
The preceding code will create binary file called RunApp in the current folder.
9. Now, write the following command to run the executable:
. /RunApp
The preceding command generates the following output in the Terminal:
Figure 7.13: Running the app
Unit Testing and Mock Testing | 507
As you can see in the preceding screenshot, the binary displays the output
"Webserver returned success" in a timely fashion. So far, our application is
running fine as it is assuming that all the interfaces are working as expected.
But we still have to test a few functionalities such as validating the IP address,
DB connectivity, checking whether the username and password are in the correct
format if any, and more before making it ready for QA.
10. Using the same infrastructure, start unit testing each functionality. For our
exercise, we'll assume that the DB connectivity has already been done and has
been queried to get the IP address. After that, we can start unit testing the validity
of the IP address. So, in our test case, the Database class needs to be mocked
and the getDBResult function must return the IP address. This IP address will
be passed to the checkValidIP function later, wherein we'll test it. To implement
this, create a class named TestApp.cpp wherein we'll be calling the checkValidIP
function:
#include"MockMisc.h"
using ::testing::_;
using ::testing::Return;
class TestApp : public ::testing::Test {
protected :
App testApp;
MockDB *mdb;
void SetUp(){
mdb = new MockDB();
testApp.connectDB(mdb);
}
void TearDown(){
}
};
TEST_F(TestApp, NullIP){
EXPECT_CALL(*mdb, getResult(_)) .
WillOnce(Return(""));
ASSERT_FALSE(testApp.checkValidIp(testApp.getDBResult("")));
}
TEST_F(TestApp, SpaceTokenIP){
508 | Everybody Falls, It's How You Get Back Up – Testing and Debugging
EXPECT_CALL(*mdb, getResult(_)) .
WillOnce(Return("13. 21 .31 .68"));
ASSERT_FALSE(testApp.checkValidIp(testApp.getDBResult("")));
}
TEST_F(TestApp, NonValidDigitIP){
EXPECT_CALL(*mdb, getResult(_)) .
WillOnce(Return("13.521 .31 .68"));
ASSERT_FALSE(testApp.checkValidIp(testApp.getDBResult("")));
}
TEST_F(TestApp, CorrectIP){
EXPECT_CALL(*mdb, getResult(_)) .
WillOnce(Return("212.121 .21 .45"));
ASSERT_TRUE(testApp.checkValidIp(testApp.getDBResult("")));
}
Here, we have used the testing and testing::Return namespaces to call mock
class interfaces and return the user-defined values that are meant for test cases.
Within the TEST_F function, we used the EXPECT_CALL function, wherein we pass the
instance of a mock object as the first parameter and pass the getResult() function
as the second parameter. The WillOnce(Return("")) line states that the interface
needs to be called once and will return "" and an empty string. This is the value
that needs to be passed to the checkValidIP function to test for the empty
string. This is checked with the ASSERT_FALSE macro. Similarly, other test cases
can be created using the mocked object of DB and passing the IP address to the
checkValidIP function. To create various test cases, the TestApp class is inherited
from the testing::Test class, which contains the App instance and Mocked object
of Database. Within the TestApp class, we have defined two functions, namely
SetUp() and TearDown(). Inside the SetUp() function, we created a MockDB instance
and tagged it to the testApp instance. Since nothing needs to be done for the
TearDown() function, we've kept it empty. Its destructor is called in the destructor
of the App class. Also, we passed two parameters inside the TEST_F function. The
first parameter is the Test class while the second parameter is the test case's
name.
11. Save all the files and open the terminal. Run the following command:
g++ Misc.cpp TestApp.cpp -lgtest -lgmock -lgtest_main -pthread -o TestApp
Unit Testing and Mock Testing | 509
In the preceding command, we have also linked the gmock library. Now, type the
following command to run the test cases:
. /TestApp
The preceding command generates the following output:
Figure 7.14: Running the Gmock test
From the preceding command, we can see that all the test cases executed and passed
successfully. In the next section, we'll discuss breakpoints, watchpoints, and data
visualization.
Breakpoints, Watchpoints, and Data Visualization
In the previous section, we discussed that unit testing needs to be done before a
developer checks code into the repository branch and can be seen by other team
members so that they can integrate it with other modules. Although unit testing is
done well and the developer checks the code in, there may be a chance that whenever
the code is integrated and the QA team starts testing, they may find a bug in the code.
Generally, in such a scenario, an error may be thrown in a module that was caused due
to changes in the other module. It may become difficult for the team to crack down on
the real reason for such issues. In such cases, debugging comes into the picture. It tells
us exactly how the code is behaving, and the developer can get granular information
of the code's execution. A developer can see what parameters the function is getting
and what value it is returning. It can tell exactly what value is assigned to a variable or a
pointer or what the content in memory is. This becomes very helpful for the developer
to identify in which part of the code the issue is. In the next section, we'll implement a
stack and perform a few operations on it.
510 | Everybody Falls, It's How You Get Back Up – Testing and Debugging
Working with the Stack Data Structure
Consider a scenario wherein a developer has been asked to develop his/her own
stack structure that can take in any parameter. Here, the requirement is that the stack
structure must follow the Last In First Out (LIFO) principle, where elements are placed
on top of each other and when they're removed from the stack, the last element should
be removed first. It should have the following functions:
• push() to place a new element on top of the stack
• top() to display the top element of the stack, if any
• pop() to remove the last inserted element from the stack
• is_empty() to check if the stack is empty
• size() to display the number of elements present in the stack
• clean() to empty the stack if it has any elements in it
The following lines of code show how to include the necessary libraries within the
Stack.h header file:
#ifndef STACK_H _ _
#define STACK_H _ _
#include<iostream>
using namespace std;
As we already know, the stack consists of various operations. To define each of these
functions, we'll write the following code:
template<typename T>
struct Node{
T element;
Node<T> *next;
};
template<typename T>
class Stack{
Node<T> *head;
int sz;
public :
Unit Testing and Mock Testing | 511
Stack():head(nullptr), sz(0){}
~ Stack();
bool is_empty();
int size();
T top();
void pop();
void push(T);
void clean();
};
template<typename T>
Stack<T>::~Stack(){
if ( head ) clean();
}
template<typename T>
void Stack<T>::clean(){
Node<T> *tmp;
while( head ){
tmp = head;
head = head -> next;
delete tmp;
sz--;
}
}
template<typename T>
int Stack<T>::size(){
return sz;
}
template<typename T>
bool Stack<T>::is_empty(){
return (head == nullptr) ? true : false;
}
512 | Everybody Falls, It's How You Get Back Up – Testing and Debugging
template<typename T>
T Stack<T>::top(){
if ( head == nullptr){
// throw error ...
throw(string("Cannot see top of empty stack"));
}else {
return head -> element;
}
}
template<typename T>
void Stack<T>::pop(){
if ( head == nullptr ){
// throw error
throw(string("Cannot pop empty stack"));
}else {
Node<T> *tmp = head ;
head = head -> next;
delete tmp;
sz--;
}
}
template<typename T>
void Stack<T>::push(T val){
Node<T> *tmp = new Node<T>();
tmp -> element = val;
tmp -> next = head;
head = tmp;
sz++;
}
// Miscellaneous functions for stack..
template<typename T>
Unit Testing and Mock Testing | 513
void displayStackStats(Stack<T> &st){
cout << endl << "------------------------------" << endl;
cout << "Showing Stack basic Stats ...
" << endl;
cout << "Stack is empty : " << (st.is_empty() ? "true" : "false") <<
endl;
cout << "Stack size :" << st.size() << endl;
cout << "--------------------------------" << endl << endl;
}
#endif
So far, we've seen how to implement a stack using a Single Linked List. Every time
push is called in Stack, a new element of a given value will be created and attached to
the beginning of the stack. We call this a head member variable and is where the head
will point to the next element in the stack and so on. When pop is called, the head will
be removed from the stack and will point to the next element of the stack.
Let's write the implementation of the previously created Stack in the Main.cpp file.
The main function has a try block that creates a Stack of integers, as well as a Stack of
characters. A few push and pop are done for both, and in-between, the top of the Stack
is called to display the latest element. For a stack of integers, there are three pushes
involved in the beginning: 22, 426, and 57. When the displayStackStats() function is
called, it should state the size of the stack to be 3. Then, we pop out 57 from the stack
and the top element must display 426. We'll do the same operation for the stack of char.
Here is the complete implementation of the stack:
#include"Stack.h"
int main(){
try {
Stack<int> si;
displayStackStats<int>(si);
si.push(22);
si.push(426);
cout << "Top of stack contains " << si.top() << endl;
si.push(57);
displayStackStats<int>(si);
514 | Everybody Falls, It's How You Get Back Up – Testing and Debugging
cout << "Top of stack contains " << si.top() << endl;
si.pop();
cout << "Top of stack contains " << si.top() << endl;
si.pop();
displayStackStats<int>(si);
Stack<char> sc;
sc.push('d');
sc.push('l');
displayStackStats<char>(sc);
cout << "Top of char stack contains:" << sc.top() << endl;
}
catch(string str){
cout << "Error : " << str << endl;
}
catch(...){
cout << "Error : Unexpected exception caught " << endl;
}
return 0;
}
When we compile the Main.cpp file by writing the following command, the Main
executable will be created in debug mode (since the -g option is being used). Thus, you
can debug the binary if needed:
g++ -g Main.cpp -o Main
We'll write the following command to execute the binary:
. /Main
Unit Testing and Mock Testing | 515
The preceding command generates the following output:
Figure 7.15: Main function using the Stack class
In the preceding output, the red ink in the second call to the statistics function shows
the correct information of showing three elements in a stack of int. However, the red
ink calls to the top of the int stack show random or garbage values. If the program is
run again, it will show some other random numbers and not the expected values of 57
and 426. Similarly, for the stack of char, the section highlighted in the red ink, that is,
top of char, shows a garbage value instead of the expected value, that is, "l". Later, the
execution shows the error of double free or corruption, which means free was called to
the same memory location again. Finally, the executable gave core dump. The program
didn't execute as expected and it may not be clear from the display where the actual
error lies. To debug Main, we'll write the following command:
gdb ./Main
516 | Everybody Falls, It's How You Get Back Up – Testing and Debugging
The preceding command generates the following output:
Figure 7.16: Debugger display – I
Unit Testing and Mock Testing | 517
In the preceding screenshot, the marks highlighted in blue show how the debugger is
used and what it displays. The first mark shows the debugger being called using the
gdb command. After entering the gdb command, the user goes to the command mode
of the debugger. Here is some brief information about the commands being used in the
command mode:
• b main: This tells the debugger to break at the main function call.
• r: It is the short form that's used to run the executable. It can be run by passing
parameters too.
• n: It is a short form for the next command, which tells us to execute the next
statement.
• watch si: This watches the si variable when it is called in the code and its value is
changed. The debugger will display the content of the code where this variable is
being used.
• s: It is a short form for the "step in" command.
The next statement that will be executed is si.push(22). Since si has been updated,
the watchpoint invokes and displays the old value of si and a new value of si wherein it
shows that the old value of si was head with NULL and sz was 0. After si.push, the head
is updated with the new value and its execution comes to line 75 of the Stack.h file,
which is where the sz variable is incremented. If the Enter key is pressed again, it will
execute it.
518 | Everybody Falls, It's How You Get Back Up – Testing and Debugging
Note that the execution has automatically moved from the main function to the
Stack::push function. The following is a screenshot of the continued commands on the
debugger:
Figure 7.17: Debugger display – II
The next command shows that sz has been updated with a new value of 1. After
pressing Enter, the execution of code moves back from Stack::push on the line 76 back
to the main function at line 8. This is highlighted in the following screenshot. It shows
that the execution stopped at the si.push(426) call. Once we step in, Stack::push will be
called. The execution moves to line 71 of the Stack.h program, as shown in the red ink.
Once execution comes to line 74, as shown in the red ink, the watch is called which
displays that si was updated with the new value. You can see that after the completion
of the Stack::push function, the flow went back to the Main code. The following is a
screenshot of the steps that were executed in the debugger:
Unit Testing and Mock Testing | 519
Figure 7.18: Debugger display – III
After pressing Enter, you will see that displayStackStats is called at line 11. In the
Main.cpp program, the next command displays the top element of the Stack, which
is being called on line 12. However, the display shows the value as 0 instead of the
expected value of 57. This is an error that we are still unable to figure out – why was the
value changed? However, it is clear that the value may have changed somewhere in the
preceding calls to the main function. So, this may not make us interested in continuing
with the debugging ahead of us. However, we need to proceed and debug from the
beginning again.
520 | Everybody Falls, It's How You Get Back Up – Testing and Debugging
The following screenshot shows the commands that will be used to debug the code:
Figure 7.19: Debugger display – IV
To rerun the program from the start, we must press r, and for confirmation and
continuation, we need to press y, which means we rerun the program from the start. It
will ask for confirmation; press y to continue. All of these commands are highlighted in
blue in the preceding screenshot. During execution at line 7, we need to run the 'display
*si.head' command, which will continuously display the contents of the si.head
memory location after every statement that's executed. As shown in the red ink, after
22 is pushed onto the stack, the head is updated with the correct values. Similarly, for
values 426 and 57, when inserted into the stack using push, the call to head is updated
correctly.
Unit Testing and Mock Testing | 521
Later, when displayStackStats is called, it shows the correct size of 3. But when the
top command is called, there is the wrong value shown in the head. This is highlighted
in red ink. Now, the code for the top command doesn't alter the value of head, so
it is clear that an error occurred in the previous statement of execution, that is, at
displayStackStats.
So, we have narrowed down the code where there may be an issue. We can run the
debugger to point displayStackStats and move inside displayStackStats to find
the reasons that caused the values to be altered inside the Stack. The following is
a screenshot of the same wherein the user needs to start the debugger from the
beginning:
Figure 7.20: Debugger display – IV
522 | Everybody Falls, It's How You Get Back Up – Testing and Debugging
After restarting the debugger from the beginning and coming to the execution point
at line 11 where displayStackStats is called, we need to step in. The flow is to go to the
start of the displayStackStats function. Also, we need to execute the next statement.
Since the initial checks in the function are clear, they don't alter the value of the head
and we can press Enter to execute the next steps. When we suspect that the next steps
can alter the value of the variable that we're looking for, we need to step in. This is done
in the preceding snapshot, highlighted in red. The latter execution comes to line 97,
that is, the last line for the displayStackStats function.
After typing in s, the execution moves to the destructor stack and calls the clean
function at line 81. This clean command deletes the tmp variable, which has the same
value as that of the head. The function empties the stack, which was not expected to
run. It was only the displayStackStats function that was supposed to be called and
executed to finally return to the main function. But the destructor may be called due to
the local variable in the function that goes out of scope after the function is completed.
Here, the local variable was the variable that was declared as a parameter to the
displayStackStats function at line 92. So, a local copy of the si variable from the main
function was created when the displayStackStats function was called. This variable
called the destructor of Stack when it went out of scope. Now, the pointers from the si
variable have been copied to the temporary variable and deleted the pointer at the end
by mistake. This was not intended by the developer. Thus, at the end of the execution of
the code, a double free error was stated. The si variable must call the Stack destructor
when it goes out of scope as it will try to free the same memory again. To resolve this
issue, it is clear that the displayStackStats function must be called with the passing
parameter as a reference. For that, we must update the code of the displayStackStats
function in the Stack.h file:
template<typename T>
void displayStackStats(Stack<T> &st){
cout << endl << "------------------------------" << endl;
cout << "Showing Stack basic Stats ...
" << endl;
cout << "Stack is empty : " << (st.is_empty() ? "true" : "false") <<
endl;
cout << "Stack size :" << st.size() << endl;
cout << "--------------------------------" << endl << endl;
}
Now, when we save and compile the Main.cpp file, the binary will be generated:
./Main
Unit Testing and Mock Testing | 523
The preceding command generates the following output in the Terminal:
Figure 7.21: Debugger display – IV
From the preceding screenshot, we can see that the expected values of 57 and 426 are
shown at the top of the stack. The displayStackStats function also displays the correct
information for int and the char Stack. Finally, we located the error using the debugger
and fixed it. In the next section, we'll solve an activity wherein we'll be developing
functions for parsing files and writing test cases to check the accuracy of the functions.
524 | Everybody Falls, It's How You Get Back Up – Testing and Debugging
Activity 1: Checking the Accuracy of the Functions Using Test Cases and
Understanding Test-Driven Development (TDD)
In this activity, we'll be developing functions so that we can parse files and then write
test cases to check the correctness of the functions we've developed.
An IT team in a big retail organization wants to keep track of product sales by storing
Product details and Customer details in its database as part of its reconciliation. On a
periodic basis, the sales department will provide this data to the IT team in a simple
text format. As the developer, you need to ensure that the basic sanity checking of
data is done and that all the records are parsed correctly before the company stores
records in the database. The sales department will provide two text files that hold
Customer information and Currency information for all the sales transactions. You
need to write parsing functions to process these files. The two files are RecordFile.txt
and CurrencyConversion.txt. The RecordFile.txt file contains details of the customer,
the products they have purchased, and the total price in regional currency and foreign
currency. The CurrencyConversion.txt file contains two fields, namely Currency and
ConversionRatio.
All the necessary information for the environment's setup for this project is kept in the
Configuration file. This will also hold filenames, along with other parameters (such as
DB, RESTAPI, and so on) and variable values in a file called parse.conf. It will contain two
fields per line separated by the "=" delimiter. The first line will be a header that states
"CONFIGURATION_FILE". For the Record file, the variable name is recordFile and
similarly for the Currency file, the variable name is currencyFile.
The following are the test conditions we'll be writing to check the accuracy of the
function that's used to parse the CurrencyConversion.txt file:
• The first line should be the header line and its first field should contain the
"Currency" string.
• The Currency field should be made up of three characters. For example: "USD", " GBP"
is valid.
• The ConversionRatio field should be made of floating-point numbers. For example,
1.2, 0.06 is valid.
• There should be exactly two fields for each line.
• The delimiter that's used for the record is "|".
Unit Testing and Mock Testing | 525
The following are test conditions we'll be writing to check the accuracy of the function
that's used to parse the RecordFile.txt file:
• The first line should contain the header line and its first field should contain the
"Customer Id" string.
• The Customer Id, Order Id, Product Id, and Quantity should all be integer values.
For example, 12312, 4531134 is valid.
• TotalPrice (Regional Currency) and TotalPrice (USD) should be floating-point
values. For example, 2433.34, 3434.11 is valid.
• The RegionalCurrency field should have its value present in the
CurrencyConversion.txt file or std::map.
• There should be exactly nine fields in each line, as defined in the HEADER
information of the file.
• The delimiter for the record is "|".
Follow these steps to implement this activity:
1. Parse the parse.conf configuration file, which includes the environment variables
for the project to run.
2. Set the recordFile and currencyFile variables correctly from Step 1.
3. Using these variables we retrieved from the Config file, parse the Currency file
with all conditions met. If the condition is not met, return the appropriate error
message.
4. Parse the Record file with all the conditions we've met. If not, then return an error
message.
5. Create a header file named CommonHeader.h and declare all the utility functions,
that is, isAllNumbers(), isDigit(), parseLine(), checkFile(), parseConfig(),
parseCurrencyParameters(), fillCurrencyMap(), parseRecordFile(), checkRecord(),
displayCurrencyMap(), and displayRecords().
6. Create a file named Util.cpp and define all the utility functions.
7. Create a file named ParseFiles.cpp and call the parseConfig(), fillCurrencyMap(),
and parseRecordFile() function.
8. Compile and execute the Util.cpp and ParseFiles.cpp files.
526 | Everybody Falls, It's How You Get Back Up – Testing and Debugging
9. Create a file named ParseFileTestCases.cpp and write test cases for the functions,
that is, trim(), isAllNumbers(), isDigit(), parseCurrencyParameters(), checkFile(),
parseConfig(), fillCurrencyMap(), and parseRecordFile().
10. Compile and execute the Util.cpp and ParseFileTestCases.cpp files.
The following is the flow diagram for parsing different files and displaying information:
Figure 7.22: Flow diagram
From above flowchart we have rough idea of executing the flow. To have a clear
understanding before writing the code, let's look at the finer details. It'll help define test
cases for each execution block.
Unit Testing and Mock Testing | 527
For parsing Config File block, we can break down steps into the following:
1. Check if config file exists and has read permission.
2. Check if it has appropriate header.
3. Parse whole file line by line.
4. For each line, parse fields with '=' as delimiter.
5. If there are 2 fields from above step , process to see if it is Currency file or Record
file variables and store appropriately.
6. If there are no 2 fields from step 4 go to next line.
7. After completely parsing file, check if both variables from above step are not
empty.
8. If empty, return with error.
For parsing Currency File block, we can break down steps into the following:
1. Read variable for CurrencyFile and see if the file exists and has read permission.
2. Check if it has appropriate header.
3. Parse whole file line by line, with '|' as delimiter.
4. If there are exactly 2 fields found for each line, consider first as Currency field
and second as conversion field.
5. If there are no 2 fields found from step 3, return with appropriate error message.
6. From step 4, do all checks for Currency field (it should be of 3 characters) and
Conversion Field ( should be digit).
7. If passed from step 6, store the currency/conversion value as pair on map with key
as Currency and value as digit.
8. If not passed from step 6, return error stating for that currency.
9. After complete parsing of the Currency file, there will be map created that will have
conversion values for all the currencies.
For parsing Record File block, we can break down steps into the following:
1. Read variable for RecordFile and see if the file exists and has read permission.
2. Check if it has appropriate header.
3. Parse whole file line by line, with '|' as delimiter.
528 | Everybody Falls, It's How You Get Back Up – Testing and Debugging
4. If there no 9 fields found from above step return with appropriate error message.
5. If there are 9 fields found, do corresponding checks for all fields listed in start of
activity.
6. If step 5 does not pass, return with appropriate error message.
7. If step 5 is passed, store the record in vector of records.
8. After completely parsing Record file, all the records will be stored in vector of
records.
While creating flow for parsing all the three files, we see few steps repeating for all 3
files such as:
Checking if file exists and is readable
Checking if file has a correct header information
Parsing the records with delimiter
Checking if field is Digit is common in Currency and Record file
Checking if field is Numeric is common in Currency and Record file
The above points will help in refactoring the code. Also, there will be one common
function for parsing the fields with delimiter, that is trim function. So, when we parse
records with delimiter we can get value with space or tab at begin or end and that may
not be needed , so we need to trim it once when parse the record.
Now we know we have above steps that are common we can write individual function
for them. To start with TDD, we first understand requirement for function and start
writing unit test cases first to test these functionalities. Then we write function such
that it will pass the unit test cases. If few test cases fail we iterate the steps of updating
function and executing test cases, until all of them pass.
For our example, above we can write trim function,
Now we know in trim function we need to remove first and last extra spaces/tab. For
example, if string contains " A A " , the trim should return "A A" remove all the spaces.
The trim function can return new string with expected value or it can update the same
string which was passed to it.
So now we can write signature of the trim function : string trim ( string &) ;
Unit Testing and Mock Testing | 529
We can write the following test cases for it:
• With only extra characters (" ") , returns empty string ().
• With only empty characters in beginning(" AA") return string with end characters
("AA")
• With only empty characters at end("AA ") , should return string with begin
characters("AA")
• With characters in middle (" AA ") return string with characters ("AA")
• With empty space in middle ("AA BB") , return the same string ("AA BB")
• All steps 3,4,5 with single character. Should return string with single character.
To create test cases , please check file ParseFileTestCases.cpp, test cases for trim
function are written in test suite trim. Now write Util.cpp file (All miscellaneous
functions are written in Util.cpp). Write trim function with signature shown above in
file. Execute test cases of trim function and check if it passes. It doesn't change the
function appropriately and test it again. Repeat till all test cases pass.
Now we are confident to use trim function in the project. Repeat similar steps for the
rest of the common functions (isDigit, isNumeric, parseHeader and so on). Please refer
the Util.cpp file and ParseFiletestCases.cpp for the same and test all the common
functions.
After completing common functions, we can write parse each file function separately.
Main thing to understand and learn here is how to break down module to small
functions. Find small repetitive tasks and create small functions for each so it is
refactored. Understand the detail functionality of these small functions and create
appropriate unit test cases.
Complete single function and thoroughly test it, if it fails, then update the function till
it passes all test cases. Similarly, complete other functions. Then write and execute
test cases for bigger functions, that should be relatively easy since we are calling small
functions tested above in these bigger functions.
530 | Everybody Falls, It's How You Get Back Up – Testing and Debugging
After implementing the preceding steps, we'll get the following output:
Figure 7.23: All tests running properly
Unit Testing and Mock Testing | 531
Below is the screenshot of the next steps:
Figure 7.24: All tests running properly
Note
The solution to this activity can be found on page 706.
532 | Everybody Falls, It's How You Get Back Up – Testing and Debugging
Summary
In this chapter, we looked at various ways in which errors that are thrown by
executables can be grabbed at compile time and runtime using asserts. We also learned
about static assertion. We understood how exceptions are generated and how to handle
them in the code. We also saw how unit testing can act as a savior to developers as
they'll be able to identify any issues in the code at the beginning. We utilized mock
objects for the classes that needed to be used in the test cases. We then learned about
the debugger, breakpoints, watchpoints, and visualizing the data. We were able to
locate the issues in the code using the debugger and fix them. We also solved an activity
wherein we wrote the necessary test cases to check the accuracy of the functions that
were used for parsing the files.
In the next chapter, we'll learn how to optimize our code. We'll review how the
processors execute the code and access the memory. We'll also learn how to determine
the excess time that will be taken by the software to execute. Finally, we'll learn about
memory alignment and cache access.
Learning Objectives
By the end of this chapter, you will be able to:
•
Time your code performance manually
•
Use source code instrumentation to measure code execution time
•
Use the perf tool to analyze program performance
•
Use the godbolt compiler explorer tool to analyze machine code generated by a compiler
•
Use compiler flags to generate better code
•
Apply code idioms that result in performance
•
Write cache-friendly code
•
Apply algorithm-level optimizations to real-world problems
In this chapter, we will explore concepts that will allow us to write fast code in general and
several practical techniques that apply to C++ in particular.
Need for Speed –
Performance and
Optimization
8
536 | Need for Speed – Performance and Optimization
Introduction
In today's world of extremely large and complicated software systems, stability and
maintainability are usually considered the major goals for most software projects,
whereas optimization has not been widely seen as a worthwhile goal since the 2000s.
This is because of the rapid acceleration of hardware technology that overtook software
demands on a regular schedule.
For many years, it seemed like the hardware improvements would continue to keep up
with the performance demands of software, but applications continued to grow larger
and more complex. Low-level native-compiled languages such as C and C++ dropped in
popularity compared to less performant but easier to use interpreted languages such as
Python or Ruby.
By the late 2000s, though, the trend of CPU transistor count (and performance)
doubling every 18 months (a consequence of Moore's Law) had stopped, and
performance improvements had flattened out. The expectation of 5 to 10 GHz
processors being widely available by the 2010s never materialized due to limitations of
physics and manufacturing costs. However, the rapid adoption of mobile devices and
the rise of high-performance computing applications for data science and machine
learning, suddenly resurrected the demand for fast and efficient code. Performance per
watt has become the new metric to aim for as large data centers consume enormous
amounts of power. For example, Google servers in the US used more power than the
entire nation of the UK in 2017.
So far in this book, we've learned how the C++ language has evolved in terms of ease of
use, without sacrificing any performance potential over a traditional language such as
C. This means we can write fast code in C++ without necessarily sacrificing readability
or stability. In the next section, we will learn about the concept of performance
measurement.
Performance Measurement
The most important aspect of optimization is the measurement of code execution time.
Unless we measure our application's performance with a wide range of input datasets,
we will have no clue as to which part takes the most time and, our optimization efforts
will be shot in the dark, with no guarantee of a result. There are several approaches for
measurement, and some of them are listed here:
• Runtime instrumentation or profiling
• Source code instrumentation
Performance Measurement | 537
• Manual execution timing
• Studying generated assembly code
• Manual estimation by studying the code and algorithms used
The preceding list is ordered in terms of how accurate the measurement is (with the
most accurate one first). However, each of these methods has different advantages. The
choice of which approach to adopt depends on the goals and scope of the optimization
effort. In an all-out effort to get the fastest possible implementation, all of these may be
required. We will examine each of these approaches in the following sections.
Manual Estimation
The biggest possible improvement in performance occurs when we replace an
algorithm with a superior one. For example, consider the two versions of a trivial
function that sums the integers from 1 to n:
int sum1(int n)
{
intret=0;
for(inti=1;i<=n;++i)
{
ret += i;
}
return ret;
}
int sum2(int n)
{
return(n*(n+1))/2;
}
The first function, sum1, uses a simple loop to calculate the sum and has a runtime
complexity that is proportional to n, whereas the second function, sum2, uses the
algebraic summation formula and takes constant time independent of n. In this quite
contrived example, we have optimized a function simply by using the basic knowledge
of algebra.
There are many well-known algorithms for every conceivable operation that have been
proven to be the most optimal. The best way to make our code run as fast as possible is
by using algorithms.
538 | Need for Speed – Performance and Optimization
It is essential to have a vocabulary of algorithms. We do not need to be an algorithm
expert, but we need to at least be aware of the existence of efficient algorithms in
various domains, even if we are not capable of implementing them from scratch. A
slightly deeper knowledge of algorithms will help us find parts of our program that
perform similar, if not exactly the same, computations as well-known algorithms.
Certain code features such as nested loops or linear scanning of data are often obvious
candidates for improvement, provided we can verify that these constructs are within
hotspots in the code. A hotspot is a section of code that runs very often and affects
performance significantly. The C++ standard library includes a lot of basic algorithms
that can be used as building blocks to improve the efficiency of many common
operations.
Studying Generated Assembly Code
Assembly language is a human readable representiation of the binary machine code
that actually executes on the processor. For any serious programmer of a compiled
language such as C++, a basic understanding of assembly language is a great asset.
Studying the generated assembly code for a program can give us some good insights
into how the compiler works and estimates of code efficiency. There are many cases
where this is the only approach possible to determine efficiency bottlenecks.
Apart from this, a basic knowledge of assembly language is essential to be able to
debug C++ code since some of the most difficult bugs to catch are those related to the
low-level generated code.
A very powerful and popular online tool that's used for analyzing compiler-generated
code is the Compiler Explorer that we will be using in this chapter.
Note
The Godbolt compiler explorer can be found at https://godbolt.org.
Performance Measurement | 539
The following is a screenshot of the Godbolt compiler explorer:
Figure 8.1: Godbolt compiler explorer
As you can see, the Godbolt compiler explorer consists of two panes. The one on the
left is where we type the code in, while the one on the right displays the generated
assembly code. The left-hand pane has a dropdown so that we can choose the desired
language. For our purposes, we will use the C++ language with the gcc compiler.
The right-hand pane has options that we can use to choose a compiler version. Almost
all the versions of popular compilers such as gcc, clang, and cl (Microsoft C++) are
present, including the ones for non-X86 architectures such as ARM.
Note
We will refer to the Intel processor architecture as x86 for simplicity, even though
the correct definition is x86/64. We will skip mentioning the "64" since almost all
processors being manufactured today are 64-bit. Even though x86 was invented
by Intel, now all PC processor manufacturers are licensed to use it.
In order to get familiar with the basics of the Compiler Explorer tool and understand
the x86 assembly code at a basic level, let's examine the assembly code generated by a
compiler for a simple function that sums up the integers from 1 to N. Here is the sum
function that needs to be written in the left-hand pane of the Compiler Explorer:
int sum(int n)
{
intret=0;
for(inti=1;i<=n;++i)
540 | Need for Speed – Performance and Optimization
{
ret += i;
}
return ret;
}
In the right-hand pane, the compiler must be set to x86-64 gcc 8.3, like this:
Figure 8.2: C++ compiler
Once this is done, the left-hand pane's code is automatically recompiled and the
assembly code is generated and displayed on the right-hand pane. Here, the output is
color-coded to show which lines of assembly code is generated from which lines of C++
code. The following screenshot shows the assembly code that was generated:
Performance Measurement | 541
Figure 8.3: Assembly result
Let's analyze the preceding assembly code briefly. Each instruction in the assembly
language consists of an opcode and one or more operands, which can be registers,
constant values, or memory addresses. A register is a very fast storage location in the
CPU. In the x86 architecture, there are eight main registers, namely RAX, RBX , RCX,
RDX, RSI, RDI, RSP, and RBP. The Intel x86/x64 architecture uses a curious pattern of
register naming:
• RAX is a general-purpose 64-bit integer register.
• EAX refers to the bottom 32 bits of RAX.
• AX refers to the bottom 16 bits of EAX.
• AL and AH refer to the bottom and top 8 bits of AX, respectively.
The same convention applies to other general-purpose registers such as RBX, RCX,
and RDX. The RSI, RDI, and RBP registers have 16-bit and 32-bit versions but not the
8-bit sub-registers. The opcode of an instruction can be of several types including
arithmetic, logical, bitwise, comparison or jump operations. It is common to refer to an
opcode as an instruction. For example, "mov instruction" means an instruction whose
opcode is mov. Here is the snapshot of the assembly code for our sum function:
Figure 8.4: Assembly code of the sum function
542 | Need for Speed – Performance and Optimization
In the preceding screenshot, the first few lines are called a function prologue, that is,
the instructions that are used to set up the stack frame and local variables. A stack
frame represents the localized data in a function that includes the arguments and
the local variables. When the function returns, the stack frame is discarded. The mov
instruction initializes a register or memory location with a constant value. The syntax
of the assembly code here is called Intel syntax. The convention with this syntax is that
the destination operand is always the first one. For example, the MOV RAX, RBX assembly
code means move the value in the RBX register to the RAX register.
Note
Assembly language is usually not case-sensitive, so EAX and eax mean the same
thing.
The DWORD PTR [rbp-8] expression in assembly is equivalent to the (*(DWORD*)
(rbp - 8)) C expression. In other words, the memory address rbp-8 is accessed as a 4
byte DWORD (a double word of memory – 32 bits). The square brackets in assembly code
represent dereferencing, much like the * operator in C/C++. The rbp register is the
base pointer that always contains the address of the base of the currently executing
functions stack. It is not essential to know how exactly this stack frame works but
remember that since the stack starts at a higher address and moves down, function
arguments and local variables have addresses as negative offsets from rbp. If you see
some negative offset from rbp, it refers to a local variable or argument.
In the preceding screenshot, the first mov instruction puts the value from the edi
register onto the stack—in this case, it represents the n argument that was passed in.
The last two mov instructions initialize the ret variable and the i loop variable in our
code to 0 and 1, respectively.
Now, examine the snapshot of the assembly code that follows the prologue and
initialization – this is our for() loop:
Figure 8.5: Assembly code of the for loop
In the preceding screenshot, the lines that have a string followed by a colon are called
labels. They're very similar to labels in programming languages such as BASIC, C/C++, or
Pascal and are used as targets of jump instructions (the assembly language equivalent
of goto statements).
Performance Measurement | 543
Instructions starting with J on x86 assembly are all jump instructions, such as JMP, JG,
JGE, JL, JLE, JE, JNE, and so on. Jump instructions are conditional or unconditional
gotos. In the preceding screenshot, the mov instruction loads the value of the i variable
from memory to the eax register. Then, it is compared against the n value in memory
with the cmp instruction.
Note
The JG instruction here means jump if greater.
If the comparison was greater, then the execution jumps to the .L2 label (which is
outside the loop). If not, the execution continues with the next instruction, like so:
Figure 8.6: Assembly code of the next instruction
Here, the value of i is reloaded again into eax, which seems unnecessary. But remember
that this assembly code is not optimized, so the compiler has generated code that
would be suboptimal and may include unnecessary work. Then, the value in eax is
added to ret, after which 1 is added to i. Finally, the execution jumps back to the.L3
label. These instructions between the .L2 and .L3 labels form the code that executes the
for loop and sums up the sequence of integers up to n, like so:
Figure 8.7: Assembly code of the for loop
This is called the function epilog. First, the value to be returned, ret, is moved into the
eax register – this is typically the register where the return value of a function is stored.
Then, the stack frame is reset and finally ret returns from the sum() function.
Note
The "ret" in the above assembly listing is the mnemonic for the RETURN instruction
and should not be confused with the "ret" variable in our C++ code example.
544 | Need for Speed – Performance and Optimization
It is not a simple job to figure out what a sequence of assembly instructions does, but a
general idea of the mapping between the source code and instructions can be gained by
observing the following points:
• Constant values in code can be directly recognized in the assembly.
• Arithmetic operations such as add, sub, imul, idiv, and many others can be
recognized.
• Conditional jumps map to loops and conditionals.
• Function calls can be directly read (the function name appears in the assembly
code).
Now, let's observe the effect of the code if we add a compiler flag for optimization in the
compiler options field at the top-right:
Figure 8.8: Adding a compiler flag for optimization
In the preceding screenshot, O3 stands for maximum optimization. The other flags,
such as -mno-avx, -mno-sse, and -mno-sse2, are used to prevent the compiler from
generating vector instructions that are not relevant to the current example. We can
see that the compiler is no longer accessing memory and only working with registers.
Notice the line xor eax, eax, which has an effect of storing 0 in eax—this is more
efficient than loading a constant 0 from memory into the register. Since memory takes
several clock cycles to access (anywhere from 5 to 100 clock cycles), using registers
alone will itself produce a massive speedup.
Performance Measurement | 545
When the compiler in the dropdown is changed to x86-64 clang 8.0.0, the assembly
code is changed, which can be seen in the following screenshot:
Figure 8.9: Assembly code with the new compiler
In the preceding assembly listing, observe that there is no instruction starting with J
(for jump). Thus, there is no looping construct at all! Let's examine how the compiler is
calculating the sum of 1 to n. If the value of n is <= 0, then it jumps to the.LBB0_1 label
where it exits, returning 0. Let's analyze the following instructions:
Figure 8.10: Assembly code with the new compiler
The following code is the C equivalent of the previous instructions. Remember that n is
in the EDI register (and hence also in the RDI register, since they overlap):
eax=n-1;
ecx=n-2;
rcx *= rax;
rcx >>= 1;
546 | Need for Speed – Performance and Optimization
eax=rcx+2*n;
eax--;
return eax;
Alternatively, if we were to write it in one line, it would look like this:
return((n-1)*(n-2)/2)+(n*2)-1;
If we simplify this expression, we get the following:
((n^2 -3n+2)/2)+2n-1
Alternatively, we can write it in the following format:
((n^2 -3n+2)+4n-2)/2
This can be simplified to the following:
(n^2+n)/2
Alternatively, we can write the following:
(n*(n+1))/2
This is the closed form equation for the summation of numbers 1 to n inclusive, and the
fastest way to compute it. The compiler was extremely clever—rather than just looking
at our code line by line, it reasoned that the effect of our loop was to calculate the sum,
and it figured out the algebra on its own. It did not figure out the simplest possible
expression, but an equivalent one that took a few extra operations. Nevertheless, taking
out the loop makes this function very much optimal.
If we modify the initial or final values of the i variable in the for loop to create a
different summation, the compiler is still able to perform the necessary algebraic
manipulation to derive a closed form solution needing no loops.
This is just one example of how compilers have become extremely efficient and appear
almost intelligent. However, we must understand that this particular optimization of
summations has been specifically programmed into the clang compiler. It does not
mean that the compiler can do this kind of trick for any possible loop computation —
that would actually require the compiler to have general artificial intelligence, as well as
all the mathematical knowledge in the world.
Let's explore another example of compiler optimization via generated assembly code.
Look at the following code:
#include <vector>
int three()
Performance Measurement | 547
{
const std::vector<int> v = {1, 2};
return v[0] + v[1];
}
In the compiler options, if we select the x86-64 clang 8.0.0 compiler and add -O3
- stdlib=libc++, the following assembly code is generated:
Figure 8.11: Assembly code generated with the new compiler
As you can see in the preceding screenshot, the compiler decided correctly that the
vector was not relevant to the function and removed all the baggage. It also did the
addition at compile time and directly used the result, 3, as a constant. The main things
to take forward from this section are as follows:
• Compilers can be extremely clever when optimizing code, given the right options.
• Studying generated assembly code is very useful to get a high-level estimate of
execution complexity.
• A basic understanding of how machine code works is valuable for any C++
programmer.
In the next section, we'll learn about manual execution timing.
Manual Execution Timing
This is the easiest way to quickly time small programs. We can use a command-line
tool to measure the time taken for a program to execute. On Windows 7 and above, the
following PowerShell command can be used:
powershell -Command "Measure-Command {<your program and arguments here>}"
548 | Need for Speed – Performance and Optimization
On Linux, MacOS, and other UNIX-like systems, the time command can be used:
time <your program and arguments here>
In the next section, we'll implement a small program and examine some caveats about
timing a program's execution in general.
Exercise 1: Timing a Program's Execution
In this exercise, we will write a program that performs a summation of an array. The
idea here is to time the summation function. This method is useful when we wish to test
a function written in isolation. Thus, the test program's only purpose is to execute one
single function. Since the calculation is very simple, we will need to run the function
thousands of times in order to get a measurable execution time. In this case, we'll
just call the sumVector() function from the main() function, passing an std::vector of
random integers.
Note
A program that's meant to test a single function is sometimes referred to as a
driver program (not to be confused with a device driver).
Perform the following steps to complete this exercise:
1. Create a file named Snippet1.cpp.
2. Define a function named sumVector that sums up each element in a loop:
int sumVector(std::vector<int> &v)
{
intret=0;
for(int i: v)
{
ret += i;
}
return ret;
}
Performance Measurement | 549
3. Define the main function. Use the C++11 random number generation facilities to
initialize a vector of 10,000 elements and then call the sumVector function 1,000
times. Write the following code to implement this:
#include <random>
#include <iostream>
int main()
{
// Initialize a random number generator
std::random_device dev;
std::mt19937 rng(dev());
// Create a distribution range from 0 to 1000
std::uniform_int_distribution<std::mt19937::result_type> dist(0,1000);
// Fill 10000 numbers in a vector
std::vector<int> v;
v.reserve(10000);
for(int i = 0; i < 10000; ++i)
{
v.push_back(dist(rng));
}
// Call out function 1000 times, accumulating to a total sum
double total = 0.0;
for(int i = 0; i < 1000; ++i)
{
total += sumVector(v);
}
std::cout << "Total: " << total << std::endl;
}
4. Compile, run, and time this program on a Linux Terminal using the following
commands:
$ g++ Snippet1.cpp
$ time ./a.out
The output of the previous command is as follows:
Figure 8.12: Output of timing the Snippet1.cpp code
550 | Need for Speed – Performance and Optimization
As you can see from the preceding output, for this system, the program executed
in 0.122 seconds (note that the results will vary, depending on your system's
configuration). If we run this timing command repeatedly, we may get slight
variations in the results as the program will be loaded in the memory after the first
run and will be marginally faster. It is best to run and time the program about 5
times and get an average value. We are usually not interested in the absolute value
of the time taken, but rather how the value improves as we optimize our code.
5. Use the following commands to explore the effect of using compiler optimization
flags:
$ g++ -O3 Snippet1.cpp
$ time ./a.out
The output is as follows:
Figure 8.13: Output of timing the Snippet1.cpp code compiled with -O3
From the preceding output, it seems that the program has become about 60 times
faster, which seems quite unbelievable.
6. Change the code to execute the loop 100,000 times rather than 1,000 times:
// Call out function 100000 times
for(int i = 0; i < 100000; ++i)
{
total += sumVector(v);
}
7. Recompile and time again using the following commands:
$ g++ -O3 Snippet1.cpp
$ time ./a.out
The output after executing previous command is as follows:
Figure 8.14: Output of timing the Snippet1.cpp code with 10,000 iterations
Performance Measurement | 551
From the preceding output, it still seems to take the exact same time. This seems
impossibe, but actually what happens is that since we never caused any side effect
in our program, such as printing the sum, the compiler is free to replace our code
with an empty program. Functionally, according to the C++ standard, this program
and an empty program are identical because there are no side effects of running it.
8. Open the Compiler Explorer and paste in the entire code. Set the compiler options
to -O3 and observe the generated code:
Figure 8.15: Snippet1.cpp code in Compiler Explorer
As you can see from the preceding screenshot, the lines within the for loop are
not color-coded and no assembly code was generated for them.
9. Change the code to make sure that the sum must be performed by printing a value
that depends on the computation with the following line:
std::cout<<"Total:"<<total<<std::endl;
552 | Need for Speed – Performance and Optimization
10. Here, we are just summing the result of sumVector() to a dummy double value
many time and printing it. After you make the changes in the code, open the
Terminal and write the following commands:
$ g++ -O3 Snippet1.cpp
$ time ./a.out
The output of the previous commands is as follows:
Figure 8.16: Output of timing the Snippet1.cpp code with a side effect of printing the value
In the preceding output, we can see that the program actually performed the
computation instead of just running as an empty program. Printing the total to cout is
a side effect that causes the compiler not to elide the code. Causing a side effect (such
as printing a result) that depends on the code's execution is one way to prevent the
compiler optimizer from removing code. In the next section, we'll learn how to time
programs without side effects.
Timing Programs without Side Effects
As seen in the previous exercise, we needed to create a side effect (using cout) in our
program so that the compiler did not ignore all the code we wrote. Another technique
to make the compiler believe that a piece of code has a side effect is to assign its
result to a volatile variable. The volatile qualifier tells the compiler: "This variable
must always be read from memory and written to memory, and not from a register."
The main purpose of a volatile variable is to access device memory, and such device
memory access must follow the rule mentioned above. Effectively, volatile variables are
considered by the compiler as if they could change from effects outside of the current
program, and thus will never be optimized. We will use this technique in the upcoming
sections.
There are more advanced ways to bypass this problem, that is, by specifying special
assembly code directives to the compiler rather than using side effects. But they
are outside the scope of this introductory material. For the examples that follow,
we'll always add code that ensures that a function's result is used in a side effect or
is assigned to a volatile variable. In future sections, we'll learn how to examine the
compiler generated assembly code and detect instances when the compiler elides code
for optimization purposes.
Performance Measurement | 553
Source Code Instrumentation
Instrumentation is a term that refers to the process of adding extra code to a program,
without changing its behavior, and capturing the information as it executes. This
may include performance timing (and possibly other measurements such as memory
allocation, or disk usage patterns). In the case of source code instrumentation, we
manually add code to time the execution of our program and log that data when
the program ends, for analysis. The advantage of this approach is its portability and
avoidance of any external tools. It also allows us to selectively add the timing to any part
of the code we choose.
Exercise 2: Writing a Code Timer Class
In this exercise, we'll create an RAII class that allows us to measure the execution
time of individual blocks of code. We will use this as the primary timing mechanism
for the code in the exercises that follow. It is not as sophisticated as other methods of
performance measurement but is much easier to use and serves most purposes. The
basic requirement of our class is as follows:
• We need to be able to record the cumulative time taken by a block of code.
• We need to be able to record the number of times it is invoked.
Perform the following steps to complete this exercise:
1. Create a file named Snippet2.cpp.
2. Include the following headers:
#include <map>
#include <string>
#include <chrono>
#include <iostream>
#include <cstdint>
using std::map;
using std::string;
using std::cerr;
using std::endl;
554 | Need for Speed – Performance and Optimization
3. Define the Timer class and the class member functions by writing the following
code:
class Timer
{
static map<string, int64_t> ms_Counts;
static map<string, int64_t> ms_Times;
const string &m_sName;
std::chrono::time_point<std::chrono::high_resolution_clock> m_tmStart;
As you can see from the preceding code, the class members consist of a name,
a starting timestamp, and two static maps. Every instance of this class is meant
to time a certain block of code. The block can be a function scope or any other
block delimited by curly braces. The usage pattern is to define an instance of
the Timer class at the top of the block while passing in a name (can be a function
name or some other convenient label). When instantiated, the current timestamp
is recorded, and when the block exits, the destructor of this class records the
cumulative time elapsed for this block, as well as the count of the number of times
this block executed. The times and counts are stored in the static maps ms_Times
and ms_Counts, respectively.
4. Define the constructor of the Timer class by writing the following code:
public:
// When constructed, save the name and current clock time
Timer(const string &sName): m_sName(sName)
{
m_tmStart = std::chrono::high_resolution_clock::now();
}
5. Define the destructor of the Timer class by writing the following code:
// When destroyed, add the time elapsed and also increment the count
under this name
~Timer()
{
auto tmNow = std::chrono::high_resolution_clock::now();
auto msElapsed = std::chrono::duration_
cast<std::chrono::milliseconds>(tmNow - m _tmStart);
ms_Counts[m_sName]++;
ms_Times[m_sName] += msElapsed.count();
}
Performance Measurement | 555
In the preceding code, the elapsed time is calculated in milliseconds. Then, we add
that to the cumulative elapsed time for this block name and increment the count
of how many times this block was executed.
6. Define a static function named dump() that prints out the summary of the timed
results:
// Print out the stats for each measured block/function
static void dump()
{
cerr << "Name\t\t\tCount\t\t\tTime(ms)\t\tAverage(ms)\n";
cerr << "-------------------------------------------------------------
----------------------\n";
for(const auto& it: ms_Times)
{
auto iCount = ms_Counts[it.first];
cerr << it.first << "\t\t\t" << iCount << "\t\t\t" << it.second <<
"\t\t\t" << it.second / iCount << "\n";
}
}
};
In the preceding code, the name, execution count, total time, and average time is
printed in a tabular form. We use multiple tabs between the field names and field
values to make them line up vertically on a console. This function can be modified
as we wish. For example, we can modify this code to dump the output as a CSV
file, so that it can be imported into a spreadsheet for further analysis.
7. Finally, define the static members to complete the class:
// Define static members
map<string, int64_t> Timer::ms_Counts;
map<string, int64_t> Timer::ms_Times;
const int64_t N = 1'000'000'000;
8. Now that we have defined the Timer class, define two simple functions that we
will time as an example. One will add and the other will multiply. Since these
operations are trivial, we will loop 1 billion times so that we can have some
measurable result.
Note
C++ 14 and above let us use the single-quote symbol within integer constants for
readability; for example, we can write 1'000'000 rather than 1000000.
556 | Need for Speed – Performance and Optimization
Write the functions for addition and multiplication. Both functions simply add and
multiply the integers 1 to N, respectively:
unsigned int testMul()
{
Timer t("Mul");
unsigned int x = 1;
for(inti=0;i<N;++i)
{
x*=i;
}
return x;
}
unsigned int testAdd()
{
Timer t("Add");
unsigned int x = 1;
for(inti=0;i<N;++i)
{
x+=i;
}
return x;
}
In the preceding code, we used unsigned int for the variable that we repeatedly
add/multiply. We used an unsigned type so that overflow during arithmetic does
not result in undefined behavior. Had we used a signed type, the program would
have undefined behavior and not be guaranteed to work in any way. Secondly, we
return the calculated value from the testAdd() and testMul() functions so that
we can ensure that the compiler does not remove the code (because of the lack of
side effects). In order to time each of these functions, we need to simply declare
an instance of a Timer class with a suitable label at the start of the function. The
timing is started as soon as the Timer object is instantiated and stopped when that
object goes out of scope.
Performance Measurement | 557
9. Write the main function, where we will simply call both test functions 10 times
each:
int main()
{
volatile unsigned int dummy;
for(inti=0;i<10;++i)
dummy = testAdd();
for(inti=0;i<10;++i)
dummy = testMul();
Timer::dump();
}
As you can see in the preceding code, we're calling each function 10 times so that
we can demonstrate the Timer class timing multiple runs of a function. Assigning
the result of the functions to a volatile variable forces the compiler to assume that
there is a global side effect. Hence, it will not elide the code in our test functions.
Before exiting, we call the Timer::dump static function to display the results.
10. Save the program and open a terminal. Compile and run the program with
different optimization levels – on the gcc and clang compilers, this is specified by
the -ON compiler flag, where N is a number from 1 to 3. Add the -O1 compiler flag
first:
$ g++ -O1 Snippet2.cpp && ./a.out
This code generates the following output:
Figure 8.17: Snippet2.cpp code performance when compiled with the -O1 option
11. Now, add the -O2 compiler flag in the terminal and execute the program:
$ g++ -O2 Snippet2.cpp && ./a.out
This generates the following output:
Figure 8.18: Snippet2.cpp code performance when compiled with the -O2 option
12. Add the -O3 compiler flag in the terminal and execute the program:
$ g++ -O3 Snippet2.cpp && ./a.out
558 | Need for Speed – Performance and Optimization
This generates the following output:
Figure 8.19: Snippet2.cpp code performance when compiled with the -O3 option
Notice that the testMul function became faster only at O3, but the testAdd function
got faster at O2 and much faster at O3. We can verify this by running the program
multiple times and averaging the times. There are no obvious reasons why some
functions speed up while others do not. We would have to exhaustively check
the generated code to understand why. It is not guaranteed that this will happen
on all the systems with different compilers or even compiler versions. The main
point to take home is that we can never assume performance but have to always
measure it, and always re-measure if we believe any change we made affects the
performance.
13. To make it easier to use our Timer class for timing individual functions, we can
write a macro. C++ 11 and above support a special compiler built-in macro called
__ func__ that always contains the currently executing function's name as a const
char*. Use this to define a macro so that we don't need to specify a label for our
Timer instances, as follows:
#define TIME_IT Timer t(__func__)
14. Add the TIME_IT macro to the start of the two functions, changing the existing line
that creates a Timer object:
unsigned int testMul()
{
TIME_IT;
unsigned int testAdd()
{
TIME_IT;
15. Save the program and open the terminal. Compile and run it again by using the
following command:
$ g++ -O3 Snippet2.cpp && ./a.out
The output of the previous command is as follows:
Figure 8.20: Snippet2.cpp code output when using a macro for timing
Runtime Profiling | 559
In the preceding output, notice that the actual function name is printed now. Another
advantage of using this macro is that we can add this to all potentially time-consuming
functions by default, and disable it for production builds by simply changing the
definition to a no-op, which will cause the timing code to never run - avoiding the
need to edit the code extensively. We will use this same Timer class for timing code in
forthcoming exercises.
Runtime Profiling
Profiling is a non-intrusive method of measuring the performance of the functions in a
program. Profilers work by sampling a program's current execution address at frequent
intervals (hundreds of times in a second) and making a log of which functions happened
to be executing at the time. This is a statistical sampling approach that has reasonable
accuracy. Sometimes, though, the results can be confusing as a program may spend
a lot of time on functions that are a part of the operating system kernel. The most
popular runtime profiling tool on Linux is perf. In the next section, we'll make use of
perf to profile our program.
Exercise 3: Using perf to Profile Programs
perf can be installed on Ubuntu as follows:
apt-get install linux-tools-common linux-tools-generic
To get familiar with the basics of using perf, we'll profile and analyze the program from
the previous exercise with the help of the perf tool. Perform the following steps to
complete this exercise:
1. Open the Snippet2.cpp file we created in the previous exercise, and remove the
TIME_IT macros from the two functions.
2. Open the terminal, recompile the code again with the -O3 flag, and then create a
profile data sample with perf as follows:
$ g++ -O3 Snippet2.cpp
$ perf record ./a.out
The output of the previous command is as follows:
Figure 8.21: Using the perf command to analyze the code in Snippet2.cpp
560 | Need for Speed – Performance and Optimization
This creates a file called perf.data which can be analyzed or visualized.
3. Now, use the following command to visualize the recorded data:
$ perf report
A console-based GUI will show the following data after executing the previous
command:
Figure 8.22: Using the perf command to analyze the code in Snippet2.cpp
You can move the cursor up and down to select a function and press Enter to get a
list of options.
4. Highlight testMul, press Enter, and choose Annotate testMul in the resulting list.
A list of assembly code is shown, with annotations describing the percentage of
execution time for each line of code, as follows:
Figure 8.23: Viewing the timing statistics using the perf command for the Snippet2.cpp code
Notice that the Integer Multiply (IMUL) instruction (integer multiply) took over 99%
of the time to execute. Traditionally, integer multiplications are always expensive on
the x86 architecture and this continues to be true, even in the latest generation of
CPUs. This annotation view displays arrows next to each jump or branching instruction
which, when highlighted, shows what comparison instruction it is associated with and
what address it jumps to with line drawings. You can navigate to the previous view by
pressing the left arrow key and exit the program using the q key.
Optimization Strategies | 561
Up until now, we've looked at several methods that are used to assess the performance
of our programs. This is the most critical stage of optimization since it tells us where we
need to direct our efforts. In the upcoming sections, we will explore various techniques
that will help us optimize our code.
Optimization Strategies
Optimization of code can be done in several ways, such as the following:
• Compiler-based optimization
• Source code micro-optimization
• Cache-friendly code
• Algorithmic optimization
Here, each technique has its pros and cons. We will examine each of these methods
in detail in the upcoming sections. Roughly speaking, these are ordered in terms of
effort required and also potential gains in performance. We'll look at compiler-based
optimization in the next section.
Compiler-Based Optimization
Passing the correct options to the compiler can net many performance benefits. A real-
world example of this is the Clear Linux distro (Linux distribution) that was created by
Intel. This distro has been compiled to extract the maximum performance from all the
code and outperforms most other Linux distributions by 30% on most benchmarks,
which is a very significant speedup. On the gcc and clang family of compilers, the most
basic option for optimization is -O<N>, where N is one of the numbers 1, 2, or 3. - O 3
enables almost every optimization in the compiler, but there are several others not
enabled by that flag that can make a difference.
Loop Unrolling
Loop unrolling is a technique that can be used by compilers to reduce the number
of branches that are executed. Every time a branch is executed, there is a certain
performance overhead. This can be reduced by repeating the loop body multiple
times, and reducing the number of times the loop is executed. Loop unrolling can be
done at the source level by the programmer, but modern compilers do a very good job
automatically.
562 | Need for Speed – Performance and Optimization
Even though modern processors mitigate the overhead of branching by means of
branch prediction and speculative execution circuits, loop unrolling still produces
performance benefits. Loop unrolling optimizations can be enabled on the gcc and clang
family of compilers with the -funroll-loops command-line flag. In the next section,
we'll test the performance of a program with and without loop unrolling enabled.
Exercise 4: Using Loop Unrolling Optimizations
In this exercise, we'll write a simple program that uses nested loops and test its
performance with and without loop unrolling enabled. We'll understand the way
compilers implement the automatic unrolling of loops.
Perform these steps to complete this exercise:
1. Create a file named Snippet3.cpp.
2. Write a program that takes the first 10,000 numbers and prints out how many of
these are factors of each other (the full code can be found in Snippet3.cpp):
# include <iostream>
int main()
{
intret=0;
for(size_t i = 1; i < 10000; ++i)
{
for(size_t j = 1; j < 10000; ++j)
{
if(i%j==0)
{
++ret;
}
}
}
std::cout << "Result: " << ret << std::endl;
}
3. Save the program and open the terminal. Compile the program with the -O3 flag
first and time it using the following command:
$ g++ -O3 Snippet3.cpp
$ time ./a.out
Optimization Strategies | 563
The output of the previous command is as follows:
Figure 8.24: Output of the code in Snippet3.cpp
4. Now, compile the same code with the loop unrolling enabled and time it again:
$ g++ -O3
- funroll-loops Snippet3.cpp
$ time ./a.out
The output of the previous command is as follows:
Figure 8.25: Output of the code in Snippet3.cpp compiled with the loop unrolling option
5. Open the Godbolt compiler explorer and paste the preceding complete code into
the left-side.
6. On the right-hand side, select x86-64 gcc 8.3 from the compiler options and write
the -O3 flag in the options. Assembly code will be generated. For the for loop, you'll
see the following output:
Figure 8.26: Assembly code of the for loop
564 | Need for Speed – Performance and Optimization
From the preceding screenshot, you can clearly see RCX being compared to 10,000
with the CMP instruction, followed by a conditional jump, JNE (Jump if Not Equal).
Just after this code, the outer loop comparison is seen, with RSI being compared
to 10,000, followed by another conditional jump to the L4 label. Overall, the inner
conditional branch and jump executes 100,000,000 times.
7. Now, add the following options: -O3
– funroll-loops. Assembly code will be
generated. In this code, you'll notice this code pattern repeating eight times
(except for the LEA instruction, whose offset value changes):
Figure 8.27: Assembly code of the for loop
The compiler decided to unroll the body of the loop eight times, reducing the number
of conditional jump instructions executed by a factor of 87.5% (about 8,300,000 times).
This alone caused the execution time to improve by 10%, which is a very significant
speedup. In this exercise we have seen the benefits of loop unrolling - next, we'll learn
about profile guided optimization.
Profile Guided Optimization
Profile Guided Optimization (PGO) is a feature that most compilers support. When a
program is compiled with PGO enabled, the compiler adds instrumentation code to
the program. Running this PGO-enabled executable creates a log file that contains
information about the execution statistics of the program. The term profiling refers
to the process of running a program to gather performance metrics. Typically, this
profiling stage should be run with a real-world dataset so that an accurate log is
produced. After this profiling run, the program is recompiled with a special compiler
flag. This flag enables the compiler to perform special optimizations based on the
statistical execution data that was recorded. Significant performance gains can
be achieved with this approach. Let's solve an exercise based on profile guided
optimization to get a better understanding of this.
Optimization Strategies | 565
Exercise 5: Using Profile Guided Optimization
In this exercise, we will use profile guided optimization on the code from the previous
exercise. We'll understand how to use profile guided optimization with the gcc compiler.
Perform these steps to complete this exercise:
1. Open the terminal and compile the code from the previous exercise with profiling
enabled. Include any other optimization flags that we need (in this case, -O3). Write
the following code to implement this:
$ g++ -O3
- fprofile-generate Snippet3.cpp
2. Now, run the profiled version of the code by writing the following command:
$ ./a.out
The program runs normally and prints the result, and no other output is seen - but
it generates a file containing data that will help the compiler in the following step.
Note that with profiling enabled, the program executes several times slower than
it would normally. This is something to keep in mind with large programs. After
executing the previous command, a file called Snippet3.gcda will be generated,
which contains profile data. When doing this with large, complex applications,
it is important to run the program with the datasets and workflows that it will
most commonly encounter in the production environment. By choosing the data
correctly here, the eventual performance gain will be higher.
3. Recompile with the PGO optimization flags, that is, -fprofile-use and -fprofile-
correction, as illustrated in the following code:
$ g++ -O3
- fprofile-use
- fprofile-correction Snippet3.cpp
Note that other than the profile-related compiler options, the other options must
be exactly the same as the ones in the previous compilation step.
4. Now, if we time the executable, we will see a large performance improvement:
$ time ./a.out
The output of the previous command is as follows:
Figure 8.28: Timing results of the code in Snippet3.cpp with PGO optimization
566 | Need for Speed – Performance and Optimization
In this exercise, we have seen the performance benefits gained by using profile guided
optimizations provided by the compiler. For this code, the improvement in performance
was about 2.7x - on larger programs, this can be even higher.
Parallelization
Most CPUs today have multiple cores, and even mobile phones have quad core
processors. We can exploit this parallel processing power very simply with compiler
flags that instruct it to generate parallelized code. One mechanism of parallelizing code
is to use the OpenMP extensions of the C/C++ language. However, this means changing
the source code and having detailed knowledge of how to use those extensions. The
other simpler option is a feature specific to the gcc compiler – it provides an extended
standard library that implements most algorithms to run as parallel ones.
Note
This automatic parallelization is only available for STL algorithms on gcc and is
not part of the C++ standard. The C++ 17 standard proposes extensions to the
standard library for parallel versions of most algorithms but is not supported by all
compilers yet. Also, in order to take advantage of this feature, the code would have
to be rewritten extensively.
Exercise 6: Using Compiler Parallelization
In this exercise, we will use the gcc parallel extensions feature to accelerate standard
library functions. Our aim is to understand how to use gcc parallel extensions.
Perform these steps to complete this exercise:
1. Create a file named Snippet4.cpp.
2. Write a simple program to sum up an initialized array with std::accumulate. Add
the following code to implement this:
#include <vector>
#include <string>
#include <iostream>
#include <algorithm>
#include <numeric>
#include <cstdint>
using std::cerr;
Optimization Strategies | 567
using std::endl;
int main()
{
// Fill 100,000,000 1s in a vector
std::vector<int> v( 100'000'000, 1);
// Call accumulate 100 times, accumulating to a total sum
uint64_t total = 0;
for(inti=0;i<100;++i)
{
total += std::accumulate(v.begin(), v.end(), 0);
}
std::cout << "Total: " << total << std::endl;
}
3. Save the program and open the terminal. Compile the program normally and time
the execution using the following commands:
$ g++ -O3 Snippet4.cpp
$ time ./a.out
The output of the previous command is as follows:
Figure 8.29: Output of the code in Snippet4.cpp
4. Now, compile the code with the parallelization options, that is, -O3
- fopenmp and
- D _GLIBCXX_PARALLEL:
$ g++ -O3
- fopenmp -D _GLIBCXX _PARALLEL Snippet4.cpp
$ time ./a.out
The output is as follows:
Figure 8.30: Output of the code in Snippet4.cpp compiled with parallelization options
568 | Need for Speed – Performance and Optimization
In the previous output, the user field shows the cumulative CPU time and the real
field shows the wall time. The ratio seen between the two is about 7x. This ratio will
vary, depending on how many CPU cores the system has (in this particular case, there
were eight cores). For this system, the ratio could reach 8x if the compiler was able
to perform 100% parallelization. Note that even though eight cores were used, the
actual improvement in execution time was only about 1.3x. This is probably because
the allocation and initialization of the vector takes up most of the time. This is a case
of Ahmdal's law, which says that the serial parts of program dominate execution time
when the parallelizable parts are made parallel. Despite this, we got a 1.3x speedup in
our code, which is a very good optimization result.
So far, we have covered some of the more impactful compiler optimization features
available in modern compilers. Apart from these, there are several other optimization
flags, but they may not produce very large improvements in performance. Two
particular optimization flags that apply to large projects with many different source
files is Link time optimization or Link time code generation. These are worth enabling
for large projects. In the next section, we'll look into source code micro optimizations.
Source Code Micro Optimizations
These are techniques that involve using certain idioms and patterns in the source
code that are usually faster than their equivalents. In earlier times, these kinds of
micro-optimizations were very fruitful, because compilers were not very clever. But
today, compiler technology is very much advanced, and the effect of these micro-
optimizations are not so marked. In spite of this, it is a very good habit to use these
because they will make the code faster even if compiled without optimization. Even in
development builds, code that is faster saves time when testing and debugging. We'll
look at the std::vector container in the next section:
Using the std::vector Container Efficiently
std::vector is one of the most simple and useful containers in the standard library.
It has no overhead over normal C style arrays, but has the ability to grow, as well as
optional bounds checking. You should almost always use std::vector when the number
of elements is not known at compile time.
A common idiom that's used with std::vector is to call push_back on it in a loop – as
it grows, the vector reallocates a new buffer, which is larger than the existing one by
a certain factor (the exact value of this growth factor depends on the standard library
implementation). In theory, this reallocation has minimal costs because it occurs
infrequently, but in practice, the operation of resizing in a vector involves copying the
elements of its buffer to a newly allocated larger buffer, which can be very expensive.
Optimization Strategies | 569
We can avoid these multiple allocations and copies by using the reserve() method.
When we know how many elements a vector will contain, calling the reserve() method
to pre-allocate the storage makes quite a difference. Let's implement an exercise in the
next section to optimize vector growth.
Exercise 7: Optimizing Vector Growth
In this exercise, we will time the effect of the push_back method in a loop, with and
without calling the reserve method. First, we will extract the Timer class we used in the
previous sections into a separate header and implementation file – this will allow us
to use it as common code for all the succeeding code snippets. Perform these steps to
complete this exercise:
1. Create a header file named Timer.h.
2. Include the necessary header files:
#include <map>
#include <string>
#include <chrono>
#include <cstdint>
3. Create a class named Timer. Within the Timer class, declare four variables, namely
ms_Counts, ms_Times, m_tmStart, and m_sName. Declare a constructor, destructor, and
the dump() method. Add the following code to implement this:
class Timer
{
static std::map<std::string, int64_t> ms_Counts;
static std::map<std::string, int64_t> ms_Times;
std::string m_sName;
std::chrono::time_point<std::chrono::high_resolution_clock> m_tmStart;
public:
// When constructed, save the name and current clock time
Timer(std::string sName);
// When destroyed, add the time elapsed and also increment the count
under this name
~ Timer();
// Print out the stats for each measured block/function
static void dump();
};
570 | Need for Speed – Performance and Optimization
4. Define a helper macro named TIME_IT to time functions by writing the following
code:
// Helper macro to time functions
#define TIME_IT Timer t(__func__)
5. Once the header file has been created, create a new file named Timer.cpp and
include the Timer.h file in it. Also, write the actual implementation for the
constructors, destructors, and the dump() method inside the Timer.cpp file. Write
the following code to implement this:
#include <string>
#include <iostream>
#include <cstdint>
#include "Timer.h"
using std::map;
using std::string;
using std::cerr;
using std::endl;
// When constructed, save the name and current clock time
Timer::Timer(string sName): m_sName(sName)
{
m_tmStart = std::chrono::high_resolution_clock::now();
}
// When destroyed, add the time elapsed and also increment the count under
this name
Timer::~Timer()
{
auto tmNow = std::chrono::high_resolution_clock::now();
auto msElapsed = std::chrono::duration_
cast<std::chrono::milliseconds>(tmNow - m _tmStart);
ms_Counts[m_sName]++;
ms_Times[m_sName] += msElapsed.count();
}
// Print out the stats for each measured block/function
void Timer::dump()
{
cerr << "Name\t\t\tCount\t\t\tTime(ms)\t\tAverage(ms)\n";
cerr << "---------------------------------------------------------------
--------------------\n";
for(const auto& it: ms_Times)
Optimization Strategies | 571
{
auto iCount = ms_Counts[it.first];
cerr << it.first << "\t\t\t" << iCount << "\t\t\t" << it.second <<
"\t\t\t" << it.second / iCount << "\n";
}
}
// Define static members
map<string, int64_t> Timer::ms_Counts;
map<string, int64_t> Timer::ms_Times;
6. Now, create a new file named Snippet5.cpp and write two functions that simply
fill a vector with the first 1,000,000 integers using the push_back() method. The
second function calls the reserve() method beforehand, but the first one does not.
Write the following code to implement this:
#include <vector>
#include <string>
#include <iostream>
#include "Timer.h"
using std::vector;
using std::cerr;
using std::endl;
const int N = 1000000;
void withoutReserve(vector<int> &v)
{
TIME_IT;
for(inti=0;i<N;++i)
{
v.push_back(i);
}
}
void withReserve(vector<int> &v)
{
TIME_IT;
v.reserve(N);
for(inti=0;i<N;++i)
{
v.push_back(i);
}
}
572 | Need for Speed – Performance and Optimization
7. Now, write the main function. Note the use of redundant braces to ensure that the
v1 and v2 vectors are destroyed after every iteration of the loop:
int main()
{
{
vector<int> v1;
for(inti=0;i<100;++i)
{
withoutReserve(v1);
}
}
{
vector<int> v2;
for(inti=0;i<100;++i)
{
withReserve(v2);
}
}
Timer::dump();
}
The reason we pass the vector by reference is to prevent the compiler from
optimizing out the entire code in the two functions. If we passed the vectors by
value, the functions would have no visible side effects and the compiler may just
elide the functions totally.
8. Save the program and open the terminal. Compile the Timer.cpp and Snippet5.cpp
files and run them as follows:
$ g++ -O3 Snippet5.cpp Timer.cpp
$ ./a.out
The output is as follows:
Figure 8.31: Output of the code in Snippet5.cpp showing the effect of vector::reserve()
Optimization Strategies | 573
As we can see, the effect of calling reserve() has resulted in an improvement of
about 4% in execution time. In a larger program that has run for a long time, the
system memory often becomes very fragmented. In such cases, the improvement by
pre-allocating memory with reserve() could be much better. In general, it is usually
faster to reserve memory beforehand, rather than doing it incrementally on the
fly. Even the Java Virtual Machine, for performance reasons, uses this technique of
allocating a huge chunk of memory upfront when starting up.
Short-Circuit Logical Operators
The && and || logical operators are short-circuited, which means that the following:
• If the left-hand side of the || operator is true, the right-hand side is not evaluated.
• If the left-hand side of the && operator is false, the right-hand side is not
evaluated.
By keeping the more unlikely (or less expensive) expression on the left-hand side, we
can reduce the amount of work that needs to be done. In the next section, we'll solve an
exercise and learn how to write logical expressions optimally.
Exercise 8: Optimizing Logical Operators
In this exercise, we will examine the impact of ordering conditional expressions when
used with logical operators. Perform these steps to complete this exercise:
1. Create a new file named Snippet6.cpp.
2. Include the necessary libraries and the Timer.h file that we created in the previous
exercise by writing the following code:
#include <vector>
#include <string>
#include <iostream>
#include <random>
#include "Timer.h"
using std::vector;
using std::cerr;
using std::endl;
574 | Need for Speed – Performance and Optimization
3. Define a function named sum1() that computes the sum of the integers between
0 and N. Each number is summed only if it meets either or of two specific criteria.
The first condition is that the number must be less than N/2. The second condition
is that the number, when divided by 3, must return 2 as a remainder. Here, we set
N to 100,000,000 so we have some measurable time taken by the code. Write the
following code to implement this:
const uint64_t N = 100000000;
uint64_t sum1()
{
TIME_IT;
uint64_t ret = 0;
for(uint64_t b=0; b < N; ++b)
{
if(b%3==2||b<N/2)
{
ret += b;
}
}
return ret;
}
4. Now, define another function named sum2(). It must contain the same logic that
we wrote for the previous function, sum1(). The only change here is that we
reverse the order of the conditional expression of the if statement. Write the
following code to implement this:
uint64_t sum2()
{
TIME_IT;
uint64_t ret = 0;
for(uint64_t b=0; b < N; ++b)
{
if(b<N/2||b%3==2)
{
ret += b;
}
}
return ret;
}
Optimization Strategies | 575
Note that in the sum2 function, the b < N/2 condition will evaluate to true half of
the time. Thus, the second condition, that is, b % 3 == 2, is only evaluated for half
of the iterations. If we assume for simplicity that both conditionals take 1 unit of
time, the total time taken for sum2() would be N/2 + (2 * N/2) = N * 3/2. In the
case of the sum1() function, the condition on the left-hand side will evaluate to
true only 33% of the time, and the remaining 66% of the time, both conditions will
be evaluated. Thus, the estimated time taken would be N/3 + (2 * N * 2/3) = N
* 5/3. We expect that the ratio between the times for the sum1 and sum2 function
would be 5/3 to 3/2 – that is, sum1 is 11% slower.
5. Add the following code in the main function:
int main()
{
volatile uint64_t dummy = 0;
for(inti=0;i<100;++i)
{
dummy = sum1();
}
for(inti=0;i<100;++i)
{
dummy = sum2();
}
Timer::dump();
}
6. Save the file and open the terminal. Compile and time the preceding program, as
well as the Timer.cpp file, by writing the following commands:
$ g++ -O3 Snippet6.cpp Timer.cpp
$ ./a.out
The output is as follows:
Figure 8.32: Output of the code in Snippet6.cpp showing the effect of optimizing boolean conditions
As you can see from the preceding output, we ended up with about 38% improvement
in speed, which is much more than expected. Why would this happen? The answer is
that the % operator performs an integer division, which is much more expensive than
a comparison, but the compiler will not generate a division instruction for the N/2
expression because it is a constant value.
576 | Need for Speed – Performance and Optimization
The sum1() function code executes the modulus operation for every iteration of the
loop and the overall execution time is dominated by the division. To summarize this, we
must always consider short-circuit logical operators and calculate how each side of the
expression is, and how many times it exectures in order to choose the optimal order
in which they should appear in the expression. This is equivalent of doing an expected
value calculation of probability theory. In the next section, we'll learn about branch
prediction.
Branch Prediction
Modern processors use a pipelined architecture, which is similar to a factory assembly
line, where an instruction flows along a pipeline and is processed by various workers
simultaneously. After each clock cycle, the instruction moves along the pipeline to the
next stage. This means that although each instruction may take many cycles to go from
start to finish, the overall throughput is one instruction completed per cycle.
The drawback here is that, if there is a conditional branch instruction, the CPU has no
idea which set of instructions are to be loaded after that (since there are two possible
alternatives). This condition is called a pipeline stall, and the processor must wait until
the condition of the branch has been evaluated completely, wasting precious cycles.
To mitigate this, modern processors use something called branch prediction – they try
to predict which way the branch goes. As the branch is encountered a greater number
of times, it gets more confident as to which way the branch is likely to take.
Despite this, the CPU is not omniscient, so if it starts loading the instructions of one
predicted branch, and later the conditional branch turned out to go the other way,
the entire pipeline after the branch has to be cleared and the actual branch needs to
be loaded from scratch. All the work done on the "assembly line" downstream of the
branch instruction has to be discarded and any changes need to be reversed.
This is a major bottleneck for performance, and it can be avoided – the simplest way is
to make sure a branch always goes one way as much as possible – like a loop.
Exercise 9: Optimization for Branch Prediction
In this exercise, we will explore and demonstrate the effect of CPU branch prediction
on performance. To explore this, we'll write two functions in a program – both perform
the same computation using two nested loops which iterate 100 and 100,000,000 times,
respectively. The difference between the two functions is that, in the first function,
the outer loop is the bigger one, whereas in the second function, the outer loop is the
smaller one.
Optimization Strategies | 577
For the first function, the outer loop fails branch prediction only once when it exits,
but the inner loop fails branch prediction 100,000,000 times – each time it exits. For the
second one, once again, the outer loop fails branch prediction only once when it exits,
but the inner loop fails branch prediction only 100 times – each time it exits. The factor
of 1,000,000 between these branch prediction failure counts will result in the first
function being slower than the second. Perform these steps to complete this exercise:
1. Create a file named Snippet7.cpp and include the necessary libraries:
#include <vector>
#include <string>
#include <iostream>
#include <random>
#include "Timer.h"
using std::vector;
using std::cerr;
using std::endl;
2. Define a function named sum1() with a nested loop. The outer for loop should
cycle N times, whereas the inner for loop should iterate 100 times. Set the value of
N to 100000000. Write the following code to implement this:
const uint64_t N = 100000000;
uint64_t sum1()
{
TIME_IT;
uint64_t ret = 0;
for(inti=0;i<N;++i)
{
for(intj=0;j<100;++j)
{
ret+=i^j;
}
}
return ret;
}
If we assume that the processor predicts branches in loops (statistically, the
branch instruction at the end of the loop is more likely to jump to the start of the
loop than not), then it will end up mispredicting every time j reaches 100 – in other
words, N times.
578 | Need for Speed – Performance and Optimization
3. Define a new function, sum2(), with a nested loop. The only change here is that
we must set the inner loop count to N and the outer loop count to 100. Add the
following code to implement this:
uint64_t sum2()
{
TIME_IT;
uint64_t ret = 0;
for(inti=0;i<100;++i)
{
for(intj=0;j<N;++j)
{
ret+=i^j;
}
}
return ret;
}
Now, our reasoning is that the branch misprediction happens only 100 times.
4. Add the following code in the main function:
int main()
{
volatile uint64_t dummy;
dummy = sum1();
dummy = sum2();
Timer::dump();
}
5. Save the file and open the terminal. Compile the preceding program, along with
the Timer.cpp file, and time them using the following commands. Remember that
you need to have the Timer.cpp and Timer.h files you created earlier in the same
directory:
$ g++ -O3 Snippet7.cpp Timer.cpp
$ ./a.out
The output of executing the previous command is as follows:
Figure 8.33: Output of the code in Snippet7.cpp showing the effect
of branch prediction optimization
Further Optimizations | 579
As you can see from the preceding output, there is a small but certainly significant
speedup of about 2% that can be attributed to the processor being able to predict
branches better for the sum2 function. In the next section, we'll explore more
optimization techniques.
Further Optimizations
Several other techniques exist that can be implemented as you code; some of them are
not guaranteed to produce better code, but it takes very little effort to change your
coding habits to do these reflexively. They cost nothing but may result in gains. A few of
these techniques are as follows:
• Pass parameters that are not primitive types by const reference when possible.
Even though move constructors can make copying inexpensive, they still involve
more overhead than using a const reference.
• Use pre-increment (++i) or pre-decrement (--i) operators rather than the postfix
versions. This usually has no utility for simple types such as integers but may do
so for complex types with a custom increment operator. Getting into a habit of
writing ++i rather than i++ is good practice unless post-increment is actually the
desired behavior. Apart from performance benefits, such code declares the intent
more clearly by using the right operator.
• Declare variables as late as possible – it is common in C to declare every variable at
the top of a function, but in C++, since variables can have non-trivial constructors,
it makes sense to only declare them in the actual block where they are used.
• In terms of loop hoisting, if there is any code or calculation in a loop that does not
change with the loop iteration, it makes sense to move it outside the loop. This
includes creating objects in a loop body. Often, it is more efficient to declare them
once, outside the loop. Modern compilers do this automatically, but it doesn't take
extra effort to do this yourself.
• Use const wherever possible. It does not change the meaning of the code, but it
lets the compiler make stronger assumptions about your code that may lead to
better optimization. Apart from this, using const makes code more readable and
reasonable.
• Integer division, modulus, and multiplication (especially by numbers that are not
powers of 2) are some of the slowest operations possible on X86 hardware. If you
need to perform such operations in a loop, perhaps you can do some algebraic
manipulation to get rid of them.
580 | Need for Speed – Performance and Optimization
As we mentioned, several such optimizations may be done by the compiler itself, but
doing them as a habit makes the code fast even in debug mode, which is a big advantage
when debugging. We have examined a few techniques for micro-optimizing code
already – the level of code change required to do these is relatively minor, and some of
these can produce major improvements in efficiency. If you want to write faster code
in general, you should aim to integrate these techniques as a default coding style over
time. In the next section, we'll learn about cache-friendly code.
Cache Friendly Code
Computer science was developed in the mid-20th century, when computers hardly
existed, but nevertheless, by the 1980s, most of the useful data structures and
algorithms had been discovered and refined. Algorithmic complexity analysis is a topic
that anyone who learns computer science encounters – and there are well-accepted
textbook definitions of the complexity of data structure operations. However, after 50
years since these things were analyzed, computers have evolved in a way that is quite
different from what could have been envisaged. For example, a common "fact" is that
the list data structures are faster for insertion operations than arrays. This seems like
common sense because inserting an element into an array involves moving all the items
after that point to new locations, whereas inserting into a list is merely a few pointer
manipulations. We will test this hypothesis in the following exercise.
Exercise 10: Exploring the Effect of Caches on Data Structures
In this exercise, we will examine the impact of the cache on arrays and lists in the C++
standard library. Perform these steps to complete this exercise:
1. Create a file named Snippet8.cpp.
2. Include the necessary libraries, along with the Timer.h header file. Write the
following code to implement this:
#include <vector>
#include <list>
#include <algorithm>
#include <string>
#include <iostream>
#include <random>
#include "Timer.h"
using std::vector;
using std::list;
using std::cerr;
using std::endl;
Cache Friendly Code | 581
3. Create a constant integer variable, N, and set its value to 100000:
const int N = 100000;
4. Initialize a random number generator and create a distribution range from 0 to
1000. Add the following code to achieve this:
std::random_device dev;
std::mt19937 rng(dev());
std::uniform_int_distribution<std::mt19937::result_type> dist(0,N);
5. Create a method named insertRandom() and insert elements from 0 to N into a
container at random positions. Add the following code to implement this:
template<class C> void insertRandom(C &l)
{
// insert one element to initialize
l.insert(l.end(), 0);
for(inti=0;i<N;++i)
{
int pos = dist(rng) % l.size();
auto it = l.begin();
advance(it, pos);
l.insert(it, i);
}
}
6. Create a method named insertStart() and insert elements from 0 to N into a
container at the start. Add the following code to implement this:
template<class C> void insertStart(C &l)
{
for(inti=0;i<N;++i)
{
l.insert(l.begin(), i);
}
}
582 | Need for Speed – Performance and Optimization
7. Create a method named insertEnd() and insert elements from 0 to N into a
container at the end. Add the following code to implement this:
template<class C> void insertEnd(C &l)
{
for(inti=0;i<N;++i)
{
l.insert(l.end(), i);
}
}
8. Write the following code in the main method:
int main()
{
std::list<int> l;
std::vector<int> v;
// list
{
Timer t("list random");
insertRandom(l);
}
{
Timer t("list end");
insertEnd(l);
}
{
Timer t("list start");
insertStart(l);
}
// vector
{
Timer t("vect random");
insertRandom(v);
}
{
Timer t("vect end");
insertEnd(v);
}
{
Timer t("vect start");
Cache Friendly Code | 583
insertStart(v);
}
cerr << endl << l.size() << endl << v.size() << endl;
Timer::dump();
}
9. Save the file and open the terminal. Compile the preceding program, along with
the Timer.cpp file, by writing the following commands:
$ g++ -O3 Snippet8.cpp Timer.cpp
$ ./a.out
The preceding command generates the following output:
Figure 8.34: Output of the code in Snippet8.cpp contrasting the timing
of std::list and std::vector insertion
As you can see from the preceding output, the code measures the time taken to insert
100000 integers at the start, end, and random locations for std::vector and std::list.
The vector clearly wins by a factor of 100 or more for the random case, and even the
worst case for the vector is 10x faster than the random case for the list.
Why does this happen? The answer lies in the way modern computer architecture has
evolved. CPU clock speeds have increased from about 1 Mhz in the early 80s to 5 GHz as
of mid-2019 – a speedup of 5,000x in clock frequency – and while the earliest CPUs used
multiple cycles per instruction, modern ones execute several instructions per cycle on a
single core (due to advanced techniques such as pipelining, which we described earlier).
For example, the IDIV instruction on the original Intel 8088 took over 100 clock cycles
to complete, whereas on modern processors, it can be completed in less than 5 cycles.
On the other hand, RAM bandwidth (the time taken to read or write a byte of memory)
has increased very slowly.
584 | Need for Speed – Performance and Optimization
Historically, processors have increased in speed by a factor of about 16,000x between
1980 and 2010. At the same time, the speed increase in RAM has been an order of
magnitude smaller – less than 100x. Thus, it is possible that single access to RAM by an
instruction causes the CPU to wait for a huge number of clock cycles. This would be an
unacceptable degradation of performance, and there have been a lot of technologies to
mitigate this issue. Before we explore this, let's measure the impact of memory access
in the next exercise.
Exercise 11: Measuring the Impact of Memory Access
In this exercise, we will examine the performance impact of randomly accessing
memory. Perform these steps to complete this exercise:
1. Create a new file named Snippet9.cpp.
2. Include the necessary libraries, along with the Timer.h header file. Create two
constant integer variables, SIZE and N, and set their values to 100000000. Also,
create a random number generator and a distribution range from 0 to N-1 . Write
the following code to implement this:
#include <vector>
#include <list>
#include <algorithm>
#include <string>
#include <iostream>
#include <random>
#include "Timer.h"
using std::vector;
using std::list;
using std::cerr;
using std::endl;
const int SIZE = 100'000'000;
const int N = 100'000'000;
std::random_device dev;
std::mt19937 rng(dev());
std::uniform_int_distribution<std::mt19937::result_type> dist(0,SIZE-1);
Cache Friendly Code | 585
3. Create the getPRIndex() function, which returns a pseudo random index between
0 and SIZE-1, where SIZE is the number of elements in the array. Write the
following code to implement this:
Note
We will discuss why we use a random number later.
uint64_t getPRIndex(uint64_t i)
{
return (15485863 * i) % SIZE;
}
4. Write a function named sum1() that accesses a large array of data randomly and
sums those elements:
uint64_t sum1(vector<int> &v)
{
TIME_IT;
uint64_t sum = 0;
for(inti=0;i<N;++i)
{
sum += v[getPRIndex(i)];
}
return sum;
}
5. Write a function named sum2() that sums random numbers without any memory
access:
uint64_t sum2()
{
TIME_IT;
uint64_t sum = 0;
for(inti=0;i<N;++i)
{
sum += getPRIndex(i);
}
return sum;
}
586 | Need for Speed – Performance and Optimization
6. In the main function, initialize the vector so that v[i] == i, thus, the only
difference between sum1() and sum2() is that sum1() accesses memory and sum2()
only performs computations. As usual, we use volatile to prevent the compiler
from removing all the code, since it has no side effects. Write the following code in
the main() function:
int main()
{
// Allocate SIZE integers
std::vector<int> v(SIZE, 0);
// Fill 0 to SIZE-1 values into the vector
for(int i = 0; i < v.size(); ++i)
{
v[i] = i;
}
volatile uint64_t asum1 = sum1(v);
volatile uint64_t asum2 = sum2();
Timer::dump();
}
7. Save the program and open the terminal. Compile and run the program by writing
the following commands:
$ g++ -O3 Snippet9.cpp Timer.cpp
$ ./a.out
The preceding code generates the following output:
Figure 8.35: Output of the code in Snippet9.cpp contrasting the timing
of computation versus random memory access
From the preceding output, we can clearly see a factor of about 14x difference in
performance.
8. Create a new file named Snippet10.cpp and add the same code that was present
in Snippet9.cpp. Add a new function named sum3() that accesses memory linearly
instead of randomly. Also, edit the main function. The updated code is as follows:
uint64_t sum3(vector<int> &v)
{
TIME_IT;
uint64_t sum = 0;
Cache Friendly Code | 587
for(inti=0;i<N;++i)
{
sum += v[i];
}
return sum;
}
int main()
{
// Allocate SIZE integers
std::vector<int> v(SIZE, 0);
// Fill 0 to SIZE-1 values into the vector
for(int i = 0; i < v.size(); ++i)
{
v[i] = i;
}
volatile uint64_t asum1 = sum1(v);
volatile uint64_t asum2 = sum2();
volatile uint64_t asum3 = sum3(v);
Timer::dump();
}
9. Save the file and open the Terminal. Compile and run the program:
$ g++ -O3 Snippet10.cpp Timer.cpp
$ ./a.out
The preceding commands generate the following output:
Figure 8.36: Output of the code in Snippet10.cpp contrasting the timing
of computation versus random and linear memory access
In the preceding output, notice that the memory access is now more than 35 times
faster than before, and 2.5 times faster than the calculation in sum2(). We used the
random access pattern in sum1() to demonstrate the contrast between linear and
random memory access. What makes linear memory access so much faster than
random access? The answer lies in two mechanisms in modern processors that are used
to mitigate the effects of slow memory – caching and prefetch – both of which we will
discuss in the following sections.
588 | Need for Speed – Performance and Optimization
Caching
Modern processors have multiple layers of cache memory between the processor
registers and the RAM. These caches are labeled L1, L2, L3, L4, and so on, where L1 is
closest to the processor and L4 is the furthest. Every cache layer is faster (and usually
smaller) than the level below it. Here is an example of the cache/memory sizes and
latencies for a Haswell family processor:
• L1: 32 KB, 4 cycles
• L2: 256 KB, 12 cycles
• L3: 6 MB, 20 cycles
• L4: 128 MB, 58 cycles
• RAM: many GB, 115 cycles
A simple model of how caches work to help performance is as follows: when a memory
address is accessed, it is looked up in the L1 cache – if found, it is retrieved from there.
If not, it is looked up in the L2 cache, if not found, then the L3 cache and so on – if
it wasn't found in any of the caches, it is fetched from memory. When fetched from
memory, it is stored in each of the caches for faster access later. This method in itself
would be fairly useless because it would only improve performance if we accessed the
same memory address again and again.
The second aspect, called prefetching, is the mechanism that can make caches really
pay off.
Prefetching
Prefetching is a process where, when memory access is performed, nearby data is
also fetched into caches, even though it was not accessed directly. The first aspect of
prefetching is related to memory bus granularity – it can be thought of as "What is the
minimum amount of data that the RAM subsystem can send to the processor?". In most
modern processors, this is 64 bits – in other words, whether you ask for a single byte
or a 64-bit value from memory, the entire machine word of 64 bits that includes that
address is read from RAM. This data is stored in each layer of cache for faster access
later. Obviously, this would immediately improve memory performance – say we read
a byte of memory at address 0x1000; we also get the 7 other bytes after that address
into the caches. If we then access the byte at address 0x1001, it comes from the cache,
avoiding expensive RAM access.
Cache Friendly Code | 589
The second aspect of prefetch takes this one step further – when the contents of the
RAM at an address is read, the processor reads not only that memory word, but much
more. On the x86 family of processors, this is between 32 and 128 bytes. This is called
the cache line size – the processor always writes and reads memory in chunks of that
size. When the CPU hardware detects that memory is being accessed in a linear fashion,
it prefetches memory into one cache line, based on its prediction of what addresses are
likely to be accessed subsequently.
CPUs are very clever in detecting regular access patterns both forwards and backwards,
and will prefetch efficiently. You can also provide hints to the processor using special
instructions to make it prefetch data according to the programmer's direction. These
instructions are provided as intrinsic functions on most compilers in order to avoid the
use of inline assembly language. When a memory address is read or written that is not
in a cache, it is termed a cache miss, and is a very expensive event and to be avoided at
all costs. The CPU hardware tries its best to mitigate cache misses, but the programmer
can analyze and modify the data access patterns to reduce cache misses maximally. The
description of caching here is a simplified model for instructional purposes – in reality,
CPUs have L1 caches for instructions as well as data, multiple cache lines, and very
complex mechanisms to make sure that multiple processors can keep their separate
caches in synchronization.
Note
A comprehensive description of cache implementations (and lots of other
information about memory subsystems) can be found in this famous online article:
https://lwn.net/Articles/250967/.
Effects of Caching on Algorithms
Having learned about caches, we can now reason why our first example of vector versus
list showed surprising results – from a computer science perspective, the following is
true:
For a list:
• Iterating to the Nth position is order N complexity.
• Inserting or deleting an element is an order 1 complexity.
590 | Need for Speed – Performance and Optimization
For an array (or vector):
• Iterating to the Nth position is order 1 complexity.
• Inserting or deleting an element at location N has complexity proportional to (S -
N), where S is the size of the array.
However, for modern architectures, the cost of a memory access is extremely high, but
the cost of accessing an adjacent address subsequently is almost 0 because it would
already be in the cache. This means that the iteration upon elements in a std::list that
are located non-sequentially in memory are likely to always cause a cache miss, causing
slow performance. On the other hand, since the elements of an array or std::vector are
always adjacent, caching and prefetching would reduce the overall cost of copying (S-N)
elements to a new location by a very large margin. Hence, the traditional analysis of the
two data structures that declares that lists work better for random insertions, while
technically correct, is not practically true, especially given the clearly sophisticated
caching behavior of modern CPU hardware. When our programs are data bound, the
analysis of algorithm complexity has to be augmented by understanding of what is
known as data locality.
Data locality can be defined simply as the average distance from the memory address
that was just accessed to the one that was accessed previously. In other words, making
memory access across addresses that are far from each other is a severe slowdown,
since data from closer addresses are likely to have been prefetched into the caches.
When data is already present in the cache(s), it is termed "hot"; otherwise, it is termed
"cold". Code that takes advantage of the cache is termed cache friendly. Cache-
unfriendly code, on the other hand would cause the cache lines to be wastefully
reloaded (termed cache invalidation). In the remainder of this section, we will look at
strategies regarding how to write cache-friendly code.
Optimizing for Cache-Friendliness
In the old days, optimization of code involved trying to minimize the number of
machine instructions in code, using more efficient instructions, and even reordering
instructions to allow pipelines to remain full. As of this day and age, compilers perform
all the aforementioned optimization to a level that most programmers would be unable
to – especially considering that compilers can do it across entire programs of hundreds
of millions of instructions. What remains firmly the responsibility of the programmer
even now is the ability to optimize data access patterns to take advantage of caching.
Cache Friendly Code | 591
The task is very simple – make sure that memory is accessed close to the memory that
was accessed before – but the methodology to achieve this can require lots of effort.
Note
The famous game programmer and code optimization guru Terje Mathisen, in the
90s, is claimed to have said: "All programming is an exercise in caching." Today, in
2019, this statement applies more than ever in this sub-domain of trying to write
fast code.
There are some basic rules of thumb for increasing cache-friendliness:
• The stack is always "hot", and so we should use local variables as much as possible.
• Dynamically allocated objects rarely have data locality with each other – avoid
them or use a preallocated pool of objects so they are in sequential in memory.
• Pointer-based data structures such as trees – and especially lists – consist of
multiple nodes allocated on the heap, and are very cache unfriendly.
• Runtime dispatch of virtual functions in OO code invalidates the instruction cache
–
avoid a dynamic dispatch in performance-critical code.
In the next section, we'll explore the cost of heap allocations.
Exercise 12: Exploring the Cost of Heap Allocations
In this exercise, we will examine the performance impact of dynamically allocated
memory and examine how heap memory affects the code's performance. Perform these
steps to complete this exercise:
1. Create a file named Snippet11.cpp.
2. Add the following code to include the necessary libraries:
#include <string>
#include <iostream>
#include <random>
#include "Timer.h"
using std::string;
using std::cerr;
using std::endl;
592 | Need for Speed – Performance and Optimization
3. Declare a constant variable, N, and a character array called fruits. Assign values to
them:
const int N = 10'000'000;
const char* fruits[] =
{"apple", "banana", "cherry", "durian", "guava", "jackfruit", "kumquat",
"mango", "orange", "pear"};
4. Create a function named fun1() that just loops over each string in fruits, copies it
to a string, and sums the characters of that string:
uint64_t fun1()
{
TIME_IT;
uint64_t sum = 0;
string s1;
for(uint64_t i = 0; i < N; ++i)
{
s1 = fruits[i % 10];
for(int k = 0; k < s1.size(); ++k) sum += s1[k];
}
return sum;
}
5. Create another function named sum2() that uses a locally declared character array
instead of a string and a loop to copy:
uint64_t fun2()
{
TIME_IT;
uint64_t sum = 0;
char s1[32];
for(uint64_t i = 0; i < N; ++i)
{
char *ps1 = s1;
const char *p1 = fruits[i % 10];
do { *ps1++ = *p1; } while(*p1++);
for(ps1 = s1; *ps1; ++ps1) sum += *ps1;
}
return sum;
}
Cache Friendly Code | 593
6. Write the following code inside the main() function:
int main()
{
for(inti=0;i<10;++i)
{
volatile uint64_t asum1 = fun1();
volatile uint64_t asum2 = fun2();
}
Timer::dump();
}
7. Save the file and open the terminal. Compile and run the program:
$ g++ -O3 Snippet11.cpp Timer.cpp
$ ./a.out
The preceding commands generate the following output:
Figure 8.37: Output of the code in Snippet11.cpp showing the effect of heap allocation on the timing
From the preceding output, notice that fun2() is almost twice as fast as fun1().
8. Now, use the perf command to profile:
$ perf record ./a.out
The preceding command generates the following output:
Figure 8.38: Output of the perf command profiling the code in Snippet11.cpp
9. Now, we can check the performance report with the following code:
$ perf report
594 | Need for Speed – Performance and Optimization
We receive the following output:
Figure 8.39: Output of the perf command's timing report for the code in Snippet11.cpp
In the preceding output, notice that about 33% of the execution time was taken by the
std::string constructor, strlen(), and memmove(). All of these are associated with the
std::string that was used in fun1(). The heap allocation in particular is the slowest
operation.
Struct of Arrays Pattern
In many programs, we often use an array of objects of the same type – these could
represent records from a database, entities in a game, and so on. A common pattern is
to iterate through a large array of structures and perform an operation on some fields.
Even though the structs are sequential in memory, if we access only a few of fields, a
larger size structure will make caching less effective.
The processor may prefetch several structs into cache, but the program only accesses
a fraction of that cached data. Since it is not using every field of each struct, most
of the cached data is discarded. To avoid this, another kind of data layout can be
used – instead of using an array of structs (AoS) pattern, we use a struct of arrays
(SoA) pattern. In the next section, we'll solve an exercise wherein we'll examine the
performance benefit of using the SoA pattern versus the AoS pattern.
Exercise 13: Using the Struct of Arrays Pattern
In this exercise, we will examine the performance benefits of using the SoA versus AoS
pattern. Perform these steps to complete this exercise:
1. Create a file named Snippet12.cpp.
2. Include the necessary libraries, along with the Timer.h header file. Initialize a
random number generator and also create a distribution range from 1 to N-1 .
Create a constant integer variable, N, and initialize it with a value of 100,000,000.
Add the following code to implement this:
#include <vector>
#include <list>
#include <algorithm>
#include <string>
Cache Friendly Code | 595
#include <iostream>
#include <random>
#include "Timer.h"
using std::vector;
using std::list;
using std::cerr;
using std::endl;
const int N = 100'000'000;
std::random_device dev;
std::mt19937 rng(dev());
std::uniform_int_distribution<std::mt19937::result_type> dist(1,N-1);
3. Write two different ways to represent data -– anarray of structs and a struct of
arrays. Use six fields of uint64_t so that we can emulate a large-sized structure
that would be more representative of a real- world program:
struct Data1
{
uint64_t field1;
uint64_t field2;
uint64_t field3;
uint64_t field4;
uint64_t field5;
uint64_t field6;
};
struct Data2
{
vector<uint64_t> field1;
vector<uint64_t> field2;
vector<uint64_t> field3;
vector<uint64_t> field4;
vector<uint64_t> field5;
vector<uint64_t> field6;
};
596 | Need for Speed – Performance and Optimization
struct Sum
{
uint64_t field1;
uint64_t field2;
uint64_t field3;
Sum(): field1(), field2(), field3() {}
};
4. Define two functions, namely sumAOS and sumSOA, that sum the values in field1,
field2, and field3 for the two preceding data structures. Write the following code
to implement this:
Sum sumAOS(vector<Data1> &aos)
{
TIME_IT;
Sum ret;
for(inti=0;i<N;++i)
{
ret.field1 += aos[i].field1;
ret.field2 += aos[i].field2;
ret.field3 += aos[i].field3;
}
return ret;
}
Sum sumSOA(Data2 &soa)
{
TIME_IT;
Sum ret;
for(inti=0;i<N;++i)
{
ret.field1 += soa.field1[i];
ret.field2 += soa.field2[i];
ret.field3 += soa.field3[i];
}
return ret;
}
Cache Friendly Code | 597
5. Write the following code inside the main function:
int main()
{
vector<Data1> arrOfStruct;
Data2 structOfArr;
// Reserve space
structOfArr.field1.reserve(N);
structOfArr.field2.reserve(N);
structOfArr.field3.reserve(N);
arrOfStruct.reserve(N);
// Fill random values
for(inti=0;i<N;++i)
{
Data1 temp;
temp.field1 = dist(rng);
temp.field2 = dist(rng);
temp.field3 = dist(rng);
arrOfStruct.push_back(temp);
structOfArr.field1.push_back(temp.field1);
structOfArr.field2.push_back(temp.field2);
structOfArr.field3.push_back(temp.field3);
}
Sum s1 = sumAOS(arrOfStruct);
Sum s2 = sumSOA(structOfArr);
Timer::dump();
}
6. Save the program and open the Terminal. Run the program to time it by adding the
following commands:
$ g++ -O3 Snippet12.cpp Timer.cpp
$ ./a.out
The preceding code generates the following output:
Figure 8.40: Output of the code in Snippet12.cpp contrasting the timing
of the AOS and SOA patterns
598 | Need for Speed – Performance and Optimization
The struct of arrays approach is twice as fast as the array of structs approach.
Considering that the addresses of the vectors in the struct would be quite far apart, we
may wonder why the caching behavior is better in the SoA case. The reason is because
of how caches are designed – rather than treating a cache as a single monolithic block,
it is divided into multiple lines, as we discussed earlier. When a memory address is
accessed, the 32- or 64-bit address is converted into a "tag" of a few bits and the cache
line associated with that tag is used. Memory addresses that are very close together will
get the same tag and reach the same cache line. If a highly differing address is accessed,
it reaches a different cache line. The effect of this line-based cache design on our test
program is that it is as if we have separate independent caches for each vector.
The preceding explanation for cache lines is a very much simplified one, but the basic
concept of cache lines applies. Code readability may seem slightly worse for this
structure of array pattern, but considering the increase in performance, it is well worth
it. This particular optimization becomes more effective as the size of the structure
grows larger. Also, remember that padding structures can inflate their size by a big
factor if the fields are of various sizes. We have explored the performance effects of
memory latency and learned a few ways to help the processor's caches be effective.
When writing a program that is performance-critical, we should keep caching effects in
mind. Sometimes, it makes sense to start out with a more cache-friendly architecture in
the first place. As always, we should always measure the performance of code before we
attempt to make radical changes in data structures. Optimization should be focused on
the most time-consuming areas of a program and not every part of it.
Algorithmic Optimizations
The simplest form of algorithmic optimization is to look for libraries that perform
your task – the most popular libraries are highly optimized and well-written. For
example, the Boost library provides many useful libraries that can come in handy
in many projects, such as Boost.Geometry, Boost.Graph, Boost.Interval, and Boost.
Multiprecision, to mention a few. It is far easier and wiser to use a professionally
written library than to attempt to create them yourself. For example, Boost.Graph
implements a dozen algorithms to process topological graphs, and each of them is
highly optimized.
Cache Friendly Code | 599
Many computations can be reduced to a series of standard algorithms composed
together – if done correctly, these can result in extremely efficient code – and often
even be parallelized to take advantage of multiple cores or SIMD by the compiler. For
the rest of this section, we will take one single program and attempt to optimize it in
various ways – this will be a word count program with the following specifications:
• To isolate the time taken by disk I/O, we will read the entire file to memory before
processing.
• Unicode support will be ignored, and we will assume English text in ASCII.
• We will use a large public domain literary text available online as test data.
Exercise 14: Optimizing a Word Count Program
In this lengthy exercise, we'll optimize a program using various optimization techniques.
We'll perform the incremental optimization of the practical program. The test data
that we will be using consists of the book named "A Tale of Two Cities", which has been
appended together 512 times.
Note
The dataset that's used in this exercise is available here: https://github.com/
TrainingByPackt/Advanced-CPlusPlus/blob/master/Lesson8/Exercise14/data.7z.
You will need to extract this 7zip archive and copy the resulting file, called data.txt,
into the folder where you work with this exercise.
Perform these steps to complete this exercise:
1. Write the basic boilerplate code that reads the file (the full code can be found in
SnippetWC.cpp). This will be a common driver for all the versions of the word
count that we write:
int wordCount(const string &s);
int main(int argc, char **argv)
{
if(argc > 1)
{
TIME_IT;
string sContent;
ostringstream buf;
ifstream ifs(argv[1]);
{
600 | Need for Speed – Performance and Optimization
Timer t("Read file");
buf << ifs.rdbuf();
sContent = buf.str();
sContent.push_back(' ');
}
cerr << wordCount(sContent) << endl;
}
Timer::dump();
}
We will use a dummy block to separate the timing of the code that reads the file
and also time main() itself to get the overall execution time.
Note that push_back adds a space at the end – this makes sure that the data ends
with a whitespace, simplifying the algorithms we use.
2. Write a basic word count function. The logic is very simple – for every character
in the string, if the character is not whitespace and the following one is, then it is
the end of a word and should be counted. Since our boilerplate code has added
a space at the end, any final word will be counted. This function is defined in
Snippet13.cpp:
int wordCount(const std::string &s)
{
int count = 0;
for(inti=0,j =1;i<s.size()-1;++i,++j)
{
if(!isspace(s[i]) && isspace(s[j]))
{
++count;
}
}
return count;
}
3. Let's compile, run, and get an idea of the performance. We will verify that it is
working right by comparing the result of our code with the results provided by the
standard wc program:
$ g++ -O3 Snippet13.cpp SnippetWC.cpp Timer.cpp
$ ./a.out data.txt
Cache Friendly Code | 601
We receive the following output:
Figure 8.41: Output of the code in Snippet13.cpp with a baseline wordcount implementation
Let's time the wc program:
$ time wc -w data.txt
We receive the following output:
Figure 8.42: Output of timing the wc program
The wc program displays the same word count, that is, 71108096, so we know our
code is correct. Our code took about 3.6 seconds, including reading the file, which
is much slower than wc.
4. Our first strategy to optimize is to see if there is a better way to implement
isspace(). Instead of a function, we can use a lookup table that can tell if a
character is a space or not (the code for this can be found in Snippet14.cpp):
int wordCount(const std::string &s)
{
// Create a lookup table
bool isSpace[256];
for(inti=0;i<256;++i)
{
isSpace[i] = isspace((unsigned char)i);
}
int count = 0;
int len = s.size() - 1;
for(inti=0,j =1;i<len;++i,++j)
{
count += !isSpace[s[i]] & isSpace[s[j]];
}
return count;
}
602 | Need for Speed – Performance and Optimization
Remember that boolean variables in C/C++ take on integer values 0 or 1, and so we
can directly write the following:
!isSpace[s[i]] & isSpace[s[j]]
This means we don't have to write this:
(!isSpace[s[i]] && isSpace[s[j]]) ? 1 : 0
Using booleans directly as numbers can sometimes result in faster code because
we avoid the conditional logic operators && and ||, which may result in a branch
instruction.
5. Compile and test the performance now:
$ g++ -O3 Snippet14.cpp SnippetWC.cpp Timer.cpp
$ ./a.out data.txt
We receive the following output:
Figure 8.43: Output of the code in Snippet14.cpp
We have achieved a speedup of 8x for the word counting code, with the simple
principle of using a lookup table. Can we do even better than this? Yes – we can
take the lookup table concept further – for every pair of characters, there are four
possibilities, which should result in a corresponding action:
[Space Space]: No action, [Non-Space Space]: Add 1 to count, [Space Non-Space]:
No action, [Non-Space, Non-Space]: No action
So, we can manufacture a table of 65536 entries (256 * 256) to cover all possible
pairs of characters.
6. Write the following code to create the table:
// Create a lookup table for every pair of chars
bool table[65536];
for(inti=0;i<256;++i)
{
for(intj=0;j<256;++j)
{
Cache Friendly Code | 603
intidx=j+i*256;
table[idx] = !isspace(j) && isspace(i);
}
}
The loop to count the words becomes the following (the full code can be found in
Snippet15.cpp):
int count = 0;
for(int i = 0; i < s.size() - 1; ++i)
{
// grab the 2 bytes at s[i] as a 16 bit value
unsigned short idx;
memcpy(&idx, &s[i], 2);
count += table[idx];
}
We read each character of the string as a single 16-bit value. Directly casting a
pointer from char* to another type and dereferencing it is undefined behavior
-
the correct way to do this is to use memcpy(). The compiler is smart enough to
use the CPU memory access instructions rather than actually call memcpy() for 2
bytes. We have ended up with the loop containing no conditional statement, which
should make it much faster. Remember that X86 architecture is little-endian – so a
16-bit value read from a character array will have the first character as its LSB and
the second as the MSB.
7. Now, time the code we wrote:
$ g++ -O3 Snippet15.cpp SnippetWC.cpp Timer.cpp
$ ./a.out data.txt
Figure 8.44: Output of the code in Snippet15.cpp
This larger lookup table resulted in a 1.8x speed improvement for wordCount().
Let's step back and look at this from another angle so that we can use existing the
standard library effectively. The advantages of this are two-fold – firstly, the code
is less prone to errors, and secondly, we could take advantage of the parallelization
available with some compilers.
604 | Need for Speed – Performance and Optimization
Let's rewrite the version of the program that uses the lookup table for isspace
using the standard algorithms. If we look at the main loop that counts the words,
we are taking 2 characters, and depending on some logic, we are accumulating 1 or
0 into the count variable. This is a common pattern seen in a lot of code:
X OP (a[0] OP2 b[0]) OP (a[1] OP2 b[1]) OP (a[2] OP2 b[2]) ... OP (a[N]
OP2 b[N])
Here, a and b are arrays of size N, X is an initial value, and OP and OP2 are operators.
There is a standard algorithm that encapsulates this pattern called std::inner_
product – it takes two sequences, applies an operator (OP2) between each pair of
elements, and applies another operator (OP) across these, starting with an initial
value X.
8. We can write the function as follows (the full code can be found in Snippet16.cpp):
int wordCount(const std::string &s)
{
// Create a lookup table for every char
bool table[256];
for(inti=0;i<256;++i)
{
table[i] = isspace((unsigned char)i) ? 1 : 0;
}
auto isWordEnd = [&](char a, char b)
{
return !table[a] & table[b];
};
return std::inner_product(s.begin(), s.end()-1, s.begin()+1, 0,
std::plus<int>(), isWordEnd);
}
This inner_product() call applies the isWordEnd() lambda on every s[n] and s[n+1]
and applies the standard addition function between the results of these. In effect,
we are adding 1 to the total when s[n] and s[n+1] are on a word ending.
Note
Even though this looks like a number of nested function calls, the compiler inlines
everything and there is no overhead.
Cache Friendly Code | 605
9. Compile and time the execution of this version:
$ g++ -O3 Snippet16.cpp SnippetWC.cpp Timer.cpp
$ ./a.out data.txt
We receive the following output:
Figure 8.45: Output of the code in Snippet16.cpp
Surprisingly, the code is slightly faster than our initial looped version in Snippet14.
cpp.
10. Can we adapt the same code to use the large lookup table? Indeed, we can – the
new function looks like this (the full code can be found in Snippet17.cpp):
int wordCount(const std::string &s)
{
// Create a lookup table for every pair of chars
bool table[65536];
for(inti=0;i<256;++i)
{
for(intj=0;j<256;++j)
{
intidx=j+i*256;
table[idx] = !isspace(j) && isspace(i);
}
}
auto isWordEnd = [&](char a, char b)
{
unsigned idx = (unsigned)a | (((unsigned)b) << 8);
return table[idx];
};
return std::inner_product(s.begin(), s.end()-1, s.begin()+1, 0,
std::plus<int>(), isWordEnd);
}
The only thing that changes from the previous loop-based code is that instead of
using memcpy() to convert two consecutive bytes into a word, we use a bitwise OR
operator to combine them.
606 | Need for Speed – Performance and Optimization
11. Compile and time the code:
$ g++ -O3 Snippet17.cpp SnippetWC.cpp Timer.cpp
$ ./a.out data.txt
We receive the following output:
Figure 8.46: Output of the code in Snippet17.cpp
This code is not quite as fast as the loop0based version we had in Snippet15.
cpp. The reason for this is that, in the looped version, we were reading 2 bytes
combined as a short to get the index, which requires no computation, but here, we
read 2 bytes into a short with a bitwise operation.
12. Now that we have the code where the bulk of the work is done by a standard
library function, we can now get automatic parallelization for free – compile and
test as follows:
$ g++ -O3
- fopenmp -D _GLIBCXX _PARALLEL Snippet17.cpp SnippetWC.cpp Timer.
cpp
$ ./a.out data.txt
We receive the following output:
Figure 8.47: Output of the code in Snippet17.cpp with the parallelized standard library
Clearly, it cannot be completely parallelized, so we only get about 2.5x
improvement in terms of speed, but we got it without having to do anything to the
code. Could we have made the loop-based code parallelizable in the same way? In
theory, yes – we could manually use OpenMP directives to achieve this; however,
it would require changes to the code and a knowledge of how to use OpenMP.
What about the version in Snippet16.cpp?
$ g++ -O3
- fopenmp -D _GLIBCXX _PARALLEL Snippet16.cpp SnippetWC.cpp Timer.
cpp
$ ./a.out data.txt
Cache Friendly Code | 607
We receive the following output:
Figure 8.48: Output of the code in Snippet16.cpp with the parallelized standard library
Similar improvements can be seen for this version too. Are we finished or can this
be even faster? Michael Abrash, a famous game programmer, coined the acronym
TANSTATFC – it stands for "There ain't no such thing as the fastest code". What
he meant is that, given enough effort, it was always possible to make code faster.
This seems impossible, but time and again, people have found faster and faster
ways of performing a computation – our code is no exception and we can still go
a bit further. One of the tradeoffs we can make for optimization is to make the
code less general – we already put some constraints on our code – for example,
that we only handle ASCII English text. By adding some more constraints on the
input data, we can do even better. Let's assume that there are no non-printable
characters in the file. This is a reasonable assumption for our input data. If we
assume this, then we can simplify the condition for detecting spaces – since all
the whitespace characters are greater than or equal to ASCII 32, we can avoid the
lookup table itself.
13. Let's implement the code based on our previous idea (the full code can be found in
Snippet18.cpp):
int wordCount(const std::string &s)
{
auto isWordEnd = [&](char a, char b)
{
returna>32&b<33;
};
return std::inner_product(s.begin(), s.end()-1, s.begin()+1, 0,
std::plus<int>(), isWordEnd);
}
14. Compile and run the program:
$ g++ -O3 Snippet18.cpp SnippetWC.cpp Timer.cpp
$ ./a.out data.txt
608 | Need for Speed – Performance and Optimization
We receive the following output:
Figure 8.49: Output of the code in Snippet18.cpp with simplified logic for detecting spaces
This version is twice as fast as the one that was parallelized, and it is just a few
lines of code.
Will using parallelization improve it even more?
$ g++ -O3
- fopenmp -D _GLIBCXX _PARALLEL Snippet18.cpp SnippetWC.cpp Timer.
cpp
$ ./a.out data.txt
We receive the following output:
Figure 8.50: Output of the code in Snippet18.cpp with the parallelized standard library
Unfortunately, this is not the case – it is actually slower. The overhead of managing
multiple threads and thread contention is sometimes more expensive than the
benefits of multithreaded code. At this point, we can see that the file-read code is
taking up most of the time – can we do anything about this?
15. Let's change the main() function to time the individual parts of it (the full code can
be found in SnippetWC2.cpp):
{
Timer t("File read");
buf << ifs.rdbuf();
}
{
Timer t("String copy");
sContent = buf.str();
}
{
Timer t("String push");
sContent.push_back(' ');
}
Cache Friendly Code | 609
int wc;
{
Timer t("Word count");
wc = wordCount(sContent);
}
16. Compile and run the preceding code:
$ g++ -O3 Snippet18.cpp SnippetWC2.cpp Timer.cpp
$ ./a.out data.txt
We receive the following output:
Figure 8.51: Output of the code in Snippet18.cpp with all operations timed
The majority of the time is taken by push_back() and copying the string. Since the
string is exactly the size of the file, push_back() ends up allocating a new buffer for
the string and copying the contents. How can we eliminate this push_back() call?
We appended a space to the end to be able to consistently count the last word, if
any, since our algorithm counts the ends of words. There are three ways to avoid
this: count the start of a word, rather than the end; count the last word, if any,
separately; and use the c_str() function so that we have a NUL character at the
end. Let's try each of these in turn now.
17. First, write the main function without push_back (the full code can be found in
SnippetWC3.cpp):
{
Timer t("File read");
buf << ifs.rdbuf();
}
{
Timer t("String copy");
sContent = buf.str();
}
int wc;
{
Timer t("Word count");
wc = wordCount(sContent);
}
610 | Need for Speed – Performance and Optimization
18. Change the code in wordCount() by renaming isWordEnd() to isWordStart() and
invert the logic. Consider a word as starting, if the current character is a space
and the succeeding one is not. Also, count one extra word if the string starts with
a non-space (the full code can be found in Snippet19.cpp):
int wordCount(const std::string &s)
{
auto isWordStart = [&](char a, char b)
{
returna<33&b>32;
};
// Count the first word if any
int count = s[0] > 32;
// count the remaining
return std::inner_product(s.begin(), s.end()-1, s.begin()+1, count,
std::plus<int>(), isWordStart);
}
19. Now, write the second alternative – to count the last word, if any. The code is
almost same as the Snippet18.cpp version, except we check for the last word (the
full code can be found in Snippet20.cpp):
int count = std::inner_product(s.begin(), s.end()-1, s.begin()+1, 0,
std::plus<int>(), isWordEnd);
// count the last word if any
if(s.back() > 32)
{
++count;
}
return count;
20. Write the third version that uses c_str() – all we need to do is change the
parameters for inner_product() (the full code can be found in Snippet21.cpp)
int wordCount(const std::string &s)
{
auto isWordEnd = [&](char a, char b)
{
returna>32&b<33;
};
const char *p = s.c _str();
Cache Friendly Code | 611
return std::inner_product(p, p + s.size(), p+1, 0, std::plus<int>(),
isWordEnd);
}
Since c_str() has a NUL at the end, it works as before.
21. Compile and time all three versions:
$ g++ -O3 Snippet19.cpp SnippetWC3.cpp Timer.cpp
$ ./a.out data.txt
We receive the following output:
Figure 8.52: Output of the code in Snippet19.cpp, which counts the beginnings
of words rather than the ends
Now enter the following command:
$ g++ -O3 Snippet20.cpp SnippetWC3.cpp Timer.cpp
$ ./a.out data.txt
We receive the following output:
Figure 8.53: Output of the code in Snippet20.cpp
Now enter the following command:
$ g++ -O3 Snippet21.cpp SnippetWC3.cpp Timer.cpp
$ ./a.out data.txt
612 | Need for Speed – Performance and Optimization
We receive the following output:
Figure 8.54: Output of the code in Snippet21.cpp
All three run in approximately the same time – the minor difference of a few
milliseconds can be ignored.
22. Now, we can tackle the time taken for string copying – instead of using
std::stringstream, we will directly read the file into a string buffer (the full code
can be found in SnippetWC4.cpp):
string sContent;
{
Timer t("String Alloc");
// Seek to end and reserve memory
ifs.seekg(0, std::ios::end);
sContent.resize(ifs.tellg());
}
{
Timer t("File read");
// Seek back to start and read data
ifs.seekg(0, std::ios::beg);
ifs.read(&sContent[0], sContent.size());
}
int wc;
{
Timer t("Word count");
wc = wordCount(sContent);
}
23. Compile and run this version:
$ g++ -O3 Snippet21.cpp SnippetWC4.cpp Timer.cpp
Cache Friendly Code | 613
We receive the following output:
Figure 8.55: Output of the code with changed file load code in SnippetWC4.cpp
We have now reduced the time taken by our file read code from about 1,000 ms
to 250 ms – a 4x improvement. The word count code started at about 2,500ms
and reduced to about 60 ms – a 40x improvement. The total performance
improvement for the entire program is 3.6x. We can still ask if this is the limit –
indeed, TANSTATFC still applies and there are a few more things that can be done:
instead of reading data into a std::string, use memory-mapped I/O to get a buffer
that directly points to the file. This could possibly be faster than allocation and
reading – it will require changing the word count code to accept a const char*
and a length, or an std::string_view. Use a different, faster allocator to allocate
memory. Compile for the native CPU using the -march=native flag. However, it
seems unlikely that we will be able to get very large performance gains from this,
since these optimizations have nothing to do with the word counting algorithm
itself. Another final attempt could be to forego the C++ constructs and write inline
SIMD code using compiler intrinsics (these are the functions that the compiler
translates directly into single assembly instructions). The knowledge that's
required to do this is beyond the scope of this introductory material.
24. Nevertheless, for the curious student, an AVX2 (256-bit SIMD) version of
wordCount() is provided (Snippet23.cpp). This version needs the input string to
have a length that is a multiple of 32 and a space at the end. This means that the
main function has to be rewritten (SnippetWC5.cpp):
$ g++ -O3
- m a r ch=native Snippet22.cpp SnippetWC5.cpp Timer.cpp
$ ./a.out data.txt
We receive the following output:
Figure 8.56: Output of the code in Snippet22.cpp that uses SIMD intrinsics
614 | Need for Speed – Performance and Optimization
Note that we need to use the -march=native flag so that the compiler uses the AVX
SIMD instruction set. If the processor does not support it, a compile error will result. If
this executable is compiled for an AV X target, and run on a system where the processor
does not support those instructions, the program crashes with an "Illegal instruction"
exception. There seems to be a very small improvement, but not significant – the effort
and learning curve required to optimize with the assembler or SIMD is usually too high
to be justified unless your application or industry has those demands. The SIMD version
processes 32 bytes at a time – yet there is practically no performance improvement. In
fact, if you check the generated assembly code for the regular C++ implementation in
the other snippets with the compiler explorer, you will see that the compiler itself has
used SIMD – this just goes to show how far compilers go in terms of making your code
fast.
Another point to note is that our file read and memory allocation is taking up most of
the time now – leaving aside memory allocation, we can conclude that our code has
become I/O bound as opposed to CPU bound. This means that no matter how fast we
write the code, it will be limited by how fast the data can be fetched. We started with
a very simple implementation of a word count algorithm, increased its complexity and
speed, and finally were able to go back to a very simple implementation that ended
up being the fastest. The overall speed improvement for the algorithm was a factor of
40x. We used a number of approaches that ranged from just rearranging code a bit,
to reimagining the problem in different ways, to performing micro-optimizations. No
single approach can work all the time, and optimization remains a creative endeavor
that needs imagination and skill and often, lateral thinking. As compilers get smarter
and smarter, it gets harder and harder to outdo them – yet, the programmer is the only
one who actually understands the code's intent, and there is always scope to make the
code faster.
Activity 1: Optimizing a Spell Check Algorithm
In this activity, we will attempt to optimize a program step by step. This activity is about
a simple spell checker that takes a dictionary and a text file and prints out a list of the
words in the text that are not present in the dictionary. A basic skeleton program is
provided in Speller.cpp, along with an example dictionary and text file as dict.txt and
data.txt, respectively. A file called out.txt is provided, which contains the desired output
of the program (a list of the indices of misspelled words). The text files are present in
the 7zip archive, that is, activity1.7z.
The dictionary is taken from the Linux word list that is provided with many Linux
distributions. The text file is like the one we used in the previous exercise – it is the
same large file we used in the word count exercise, with all punctuation removed and
converted into lower case.
Cache Friendly Code | 615
Note that the dictionary is only an example, so do not assume that all valid words
exist in it – many of the words in the output could well be correctly spelled words.
The skeleton code reads the dictionary and text files and calls the spell check code
(which you will write) on it. After that, it compares the resultant output with the
contents of out.txt and prints whether the program worked as expected. The function
that does the spell check returns a vector of indices of the words that were not in the
dictionary. Since we are focusing on only the spellcheck algorithm, only that code is
timed. The time taken for reading the files and comparing the output is not taken into
consideration. You will develop successively faster versions of this program – reference
implementations are provided in the reference folder as Speller1.cpp, Speller2.cpp, and
so on.
At each step, you will be only given hints as to what to change to make it faster – only
the code in the getMisspelt() function is to be modified, and not any other code. The
student is free to implement the code however they wish, as long as it produces the
correct results and the code within main() is not changed.
Note
Optimization is a creative and non-deterministic process – it is not guaranteed nor
always possible for the student to come up with the same code as the reference
implementations. It should not be a surprise if the code that you write does not
perform as well as the reference implementations. In fact, it may even be possible
that your code is faster than the reference.
Perform the following steps to implement this activity:
Make a copy of Speller.cpp called Speller1.cpp and implement the code for the
getMisspelt() function.Use std::set and its count() method to implement this.
1. Write the next version of the program as Speller2.cpp, and then compile it and
time it as before. Try using std::unordered_set rather than std::set. You should
get about a 2x speedup with this implementation.
In the final version, Speller3.cpp, use a Bloom filter data structure to implement the
spell check algorithm. Experiment with different numbers of hash functions and sizes
for the bloom filter to see what works best.
616 | Need for Speed – Performance and Optimization
2. For each of the preceding steps, compile the program and run it as follows (change
the input file name as required):
$ g++ -O3 Speller1.cpp Timer.cpp
$ ./a.out
Note
You should not expect the timings to be exactly as shown here, but if you
implement the code correctly, the relative improvement in speed should be close
to what we see here.
After executing the preceding commands for each step, the following outputs will be
generated. The outputs will show the timing for your code and an initial message if your
output is correct. The following is the output for Step 1:
Figure 8.57: Example output of the code for Step 1
The following is the output for Step 2:
Figure 8.58: Example output of the code for Step 2
The following is the output for Step 3:
Figure 8.59: Example output of the code for Step 3
Note
The solution for this activity can be found on page 725.
Summary | 617
Summary
We have covered a lot of complex material in this chapter. Optimizing code is a difficult
but necessary skill for any modern C++ developer. The demands of machine learning,
hyper-realistic games, big data analysis, and energy-efficient computing make this a
very vital area to learn about for any C++ professional. We have learned that the process
of performance optimization is divided into two stages.
Firstly, optimization starts with a proper performance measurement strategy, with
test conditions mirroring real-world data and usage patterns. We have learned how to
measure performance by various methods – studying assembler code, manual timing,
source code instrumentation, and using runtime profilers. Once we have accurate
measurements, we can actually understand which portions of our programs are actually
slow and focus our efforts there to get the maximum improvements.The second
stage involves actually modifying the program – we learned about several strategies,
starting with using the best compiler options for our code, using parallelization
features, and also using profile data to help the compiler, followed by some simple code
transformations that produce small but useful performance gains without major code
changes. We then learned about how to improve performance by structuring our loops
and conditionals in a way that makes the code more friendly to branch prediction.
Then, we learned about the dramatic and significant effects of caching on performance
and looked at some techniques, such as the SOA pattern, to make our code take
advantage of the caches in modern CPUs. Finally, we put all these things together for
a real-world example of a word count program and simple spell checker to practice
what we learned hands-on. There are a lot of other advanced techniques and theory
that need to be studied over and above the material in this chapter, but what we have
covered here should give any student a solid foundation for future learning.
By the end of these chapters, you have explored a number of topics related to using
advanced C++. In the first few chapters, you have learned how to write portable
software, use the type system to your advantage with templates, and learned to
use pointers and inheritance effectively. Then you have explored the C++ standard
library, including streams and concurrency, which are essential tools for building
large real world applications. In the final sections, you learned how to test and debug
your programs, and optimize your code to run efficiently. Among the widely used
programming languages C++ is perhaps the most complex, as well as being the most
expressive. This book is only a beginning, and would have given you a solid platform to
continue your further learning.
About
This section is included to assist the students to perform the activities in the book. It includes
detailed steps that are to be performed by the students to achieve the objectives of the
activities.
Appendix
>
620 | Appendix
Chapter 1 - Anatomy of Portable C++ Software
Activity 1: Adding a New Source-Header File Pair to the Project
In this activity, we will create a new source-header file pair that contains a new function
named sum. It takes two parameters and returns their sum. This file pair will be added to
the existing project. Follow these steps to implement this activity:
1. First, open the Eclipse IDE with the existing project that we created in Exercise 3,
Adding New Source Files to CMake and Eclipse CDT. Right-click on the src folder in
the Project Explorer pane.
Note
We can either create the .cpp and .h files separately or use the new class wizard
and later remove the class code. Using the new class wizard is handy since it also
creates useful boilerplate code.
2. Select New | Class from the pop-up menu. Type SumFunc and click on the Finish
button.
3. Next, edit the SumFunc.h file to look like the following code:
#ifndef SRC_SUMFUNC _H _
#define SRC_SUMFUNC _H _
int sum(int a, int b);
#endif /* SRC_SUMFUNC _H _ */
Note that we will actually delete the class and provide a single function instead.
We could have created these two files separately. However, the add class function
creates them both and adds some boilerplate code that we will make use of. Here,
our file starts and ends with an include guard, which is a common strategy to
prevent the double-inclusion problem. We have the forward declaration of our
function, which lets other files call the function after including this header file.
Chapter 1 - Anatomy of Portable C++ Software | 621
4. Next, edit the SumFunc.cpp file as illustrated here:
#include "SumFunc.h"
#include <iostream>
int sum(int a, int b) {
return a + b;
}
In this file, we include header files and provide the body of our function, which
adds and returns two given integers.
5. Edit the CMakeFiles.txt file so that its add_executable section reflects the follow-
ing code:
add_executable(CxxTemplate
src/CxxTemplate.cpp
src/ANewClass.cpp
src/SumFunc.cpp
)
Here, we added the src/SumFunc.cpp file to the list of executable source files so
that it is linked into the executable.
6. Make the following changes in CxxTemplate.cpp:
#include "CxxTemplate.h"
#include "ANewClass.h"
#include "SumFunc.h" //add this line
...
CxxApplication::CxxApplication( int argc, char *argv[] ) {
std::cout << "Hello CMake." << std::endl;
ANewClass anew;
anew.run();
std::cout << sum(3, 4) << std::endl; // add this line
}
Note
The complete code of this file can be found here: https://github.com/TrainingBy-
Packt/Advanced-CPlusPlus/blob/master/Lesson1/Activity01/src/CxxTemplate.cpp.
622 | Appendix
Here, we added a line in which we call the sum function with 3 and 4 and print the
result to the console.
7. Build and run the project (Project | Build All | Run | Run). The output you see
should be as follows:
Figure 1.57: The output
With this activity, you practiced adding a new source-header file pair to your project.
These file pairs are a very common pattern in C++ development. They can host global
functions such as the ones we had in this activity. More commonly, they host classes
and their definitions. Throughout your development effort, you will be adding many
more source-header file pairs to your application. Therefore, it is important to get used
to adding them and not dragging your feet, which would result in large monolithic files
that are difficult to maintain and test.
Activity 2: Adding a New Class and Its Test
In this activity, we will add a new class that simulates 1D linear motion. The class will
have double fields for position and velocity. It will also have a advanceTimeBy() method,
which receives a double dt parameter, which modifies position based on the value of
velocity. Use EXPECT_DOUBLE_EQ instead of EXPECT_EQ for double values. In this activity,
we will add a new class and its test to the project. Follow these steps to perform this
activity:
1. Open the Eclipse IDE with our existing project. To create a new class, right-click
the src folder in the Project Explorer pane and select New | Class. Type LinearMo-
tion1D as the name and create the class.
Chapter 1 - Anatomy of Portable C++ Software | 623
2. Open the LinearMotion1D.h file that we created in the previous step. Add the
position and velocity double fields into it. Also, add the forward reference to
the advanceTimeBy method, which takes a double dt variable as a parameter. The
constructors and destructors were already in the class. The following is the end
result of these changes in LinearMotion1D.h:
#ifndef SRC_LINEARMOTION1D _H _
#define SRC_LINEARMOTION1D _H_
class LinearMotion1D {
public:
double position;
double velocity;
void advanceTimeBy(double dt);
LinearMotion1D();
virtual ~LinearMotion1D();
};
#endif /* SRC_LINEARMOTION1D _H _ */
3. Now open LinearMotion1D.cpp and add the implementation for the advanceTimeBy
method. Our velocity is a field in our class and the time difference is a param-
eter to this method. A change in position is equal to the velocity multiplied by
the time change, so we calculate the result and add it to the position variable. We
also use the existing constructor code to initialize position and velocity to 0. The
following is the end result of these changes in LinearMotion1D.cpp:
#include "LinearMotion1D.h"
void LinearMotion1D::advanceTimeBy(double dt) {
position += velocity * dt;
}
LinearMotion1D::LinearMotion1D() {
position = 0;
velocity = 0;
}
LinearMotion1D::~LinearMotion1D() {
}
624 | Appendix
4. Create a test for this class. Right-click the tests folder and select New | Source
File. Type LinearMotion1DTest.cpp as the name and create it.
5. Now open LinearMotion1DTest.cpp. Create two tests for motions in two different
directions, left and right. For each of them, create a LinearMotion1D object, initial-
ize its position and velocity, and call advanceTimeBy to actually have the motion
happen. Then, check whether it moved to the same location that we expected. The
following is the end result of these changes in LinearMotion1DTest.cpp:
#include "gtest/gtest.h"
#include "../src/LinearMotion1D.h"
namespace {
class LinearMotion1DTest: public ::testing::Test {};
TEST_F(LinearMotion1DTest, CanMoveRight) {
LinearMotion1D l;
l.position = 10;
l.velocity = 2;
l.advanceTimeBy(3);
EXPECT_DOUBLE_EQ(16, l.position);
}
TEST_F(LinearMotion1DTest, CanMoveLeft) {
LinearMotion1D l;
l.position = 10;
l.velocity = -2;
l.advanceTimeBy(3);
EXPECT_DOUBLE_EQ(4, l.position);
}
}
Chapter 1 - Anatomy of Portable C++ Software | 625
6. Now modify our CMake configuration files so that these source files that we
generated are also used. For the LinearMotion1D class, add its .cpp file as an
executable so that it is compiled and linked together with the other source files.
Here is what the add_executable section of CMakeLists.txt becomes:
add_executable(CxxTemplate
src/CxxTemplate.cpp
src/ANewClass.cpp
src/SumFunc.cpp
src/LinearMotion1D.cpp # added
)
7. For the tests that we just created, edit tests/CMakeLists.txt. There, we need
to add both the test source file, LinearMotion1DTest.cpp, and the source file of
the class that it uses, LinearMotion1D.cpp. Since they are in different directo-
ries, access them as ../src/LinearMotion1D.cpp. Here is what the add_executable
section of tests/CMakeLists.txt becomes:
add_executable(tests
CanTest.cpp
SumFuncTest.cpp
. . /src/SumFunc.cpp
LinearMotion1DTest.cpp # added
. . /src/LinearMotion1D.cpp # added
)
8. Build the project and run the tests. We will see that all the tests are successful:
Figure 1.58: All tests are successful
626 | Appendix
With this activity, you performed the task of adding a new class and its test to the
project. You created a class that simulates one-dimensional motion and you wrote unit
tests to ensure that it is working properly.
Activity 3: Making Code More Readable
In this activity, you will practice improving the quality of a given code. Follow these
steps to implement this activity:
1. Open Eclipse CDT and create a class in a source-header file pair in Eclipse. To do
this, right-click the src folder in Project Explorer. Select New | Class from the
pop-up menu.
2. Type SpeedCalculator as the header filename and click Finish. It will create two
files: SpeedCalculator.h and SpeedCalculator.cpp. We provided the code for both
files above. Add the code that was provided for each file.
3. Now we need to add the class to the CMake project. Open the CMakeLists.txt file
in the root of your project (outside the src folder) and make the following change
in the file:
src/LinearMotion1D.cpp
src/SpeedCalculator.cpp # add this line
)
4. Now select File | Save All to save all the files and build the project by selecting
Project | Build All. Make sure there are no errors.
5. Create an instance of the SpeedCalculator class in our main() function and call its
run() method. Open CxxTemplate.cpp and include our new class, then edit the
main function by adding the following code:
#include "SpeedCalculator.h"
int main( int argc, char *argv[] ) {
cxxt::CxxApplication app( argc, argv );
// add these three lines
SpeedCalculator speedCalculator;
speedCalculator.initializeData(10);
speedCalculator.calculateAndPrintSpeedData();
return 0;
}
Chapter 1 - Anatomy of Portable C++ Software | 627
6. To fix the style, simply use Source | Format and choose to format the entire file.
Luckily, the variable names do not have any problems.
7. Simplify the code to make it more understandable. The loop in calculateAndPrint-
SpeedData is doing a couple of things at the same time. It's calculating the speed,
finding the minimum and maximum values of it, checking whether we crossed a
threshold, and storing the speed. If the speed was a transient value, taking it apart
would mean storing it somewhere to loop on it one more time. However, since
we are storing it in the speeds array anyway, we can loop one more time on it for
clarity of code. Here is the updated version of the loop:
for (int i = 0; i < numEntries; ++i) {
double dt = timesInSeconds[i + 1] - timesInSeconds[i];
assert(dt > 0);
double speed = (positions[i + 1] - positions[i]) / dt;
speeds[i] = speed;
}
for (int i = 0; i < numEntries; ++i) {
double speed = speeds[i];
if (maxSpeed < speed) {
maxSpeed = speed;
}
if (minSpeed > speed) {
minSpeed = speed;
}
}
for (int i = 0; i < numEntries; ++i) {
double speed = speeds[i];
double dt = timesInSeconds[i + 1] - timesInSeconds[i];
if (speed > speedLimit) {
limitCrossDuration += dt;
}
}
628 | Appendix
This is somewhat a matter of taste, but making the big for loop lighter helps with
the readability. In addition, it separates the tasks and removes the possibility of
them interacting with each other during a loop iteration. The first loop creates and
saves the speed values. The second loop finds the minimum and maximum speed
values. The third loop determines how long the speed limit was crossed for. Note
that this is a slightly less efficient implementation; however, it clearly separates
the actions taken and we do not have to mentally separate the discrete actions in
the long iteration of a loop.
8. Run the preceding code and observe the problem at runtime. While the code is
better in terms of style now, it suffers from several mistakes, some of which will
create runtime errors. First, when we run the application, we see the following
output in Eclipse:
Figure 1.59: Program output in Eclipse CDT
Note exit value: -1 at the top. When this is not 0, it means there was a problem
with our code.
9. Execute the program manually in the console. Here's the output we get:
Figure 1.60: Program output in the terminal with the error
Unfortunately, we do not get the segmentation fault error output in Eclipse,
therefore you have to check the exit value in the Eclipse console view. To find the
problem, we will use the debugger in the next step.
Chapter 1 - Anatomy of Portable C++ Software | 629
10. Press the debug toolbar button in Eclipse to start the application in debug mode.
Press the resume button to continue execution. It will stop at line 40 of SpeedCal-
culator.cpp, right when an error is about to happen. If you hover over speeds, you
realize that it is an invalid memory reference:
Figure 1.61: Invalid memory reference
11. Upon further examination, we realize that we never initialized the speeds pointer
to anything. Allocate memory for it in our speed calculator function:
void SpeedCalculator::calculateAndPrintSpeedData() {
speeds = new double[numEntries]; // add this line
double maxSpeed = 0;
12. Run it again. We get the following output:
Hello CMake.
Hello from ANewClass.
7
CxxTemplate: SpeedCalculator.cpp:38: void
SpeedCalculator::calculateAndPrintSpeedData(): Assertion `dt > 0' failed.
Note that this was an assertion that the code had to make sure that the calculated
dt was always larger than zero. This is something that we are sure of, and we
would like it to help us catch errors during development. Assert statements are
ignored in the production builds, so you can place them liberally in your code as
safeguards to catch errors during development. Especially since C++ lacks many
safety checks compared to higher-level languages, placing assert statements in
potentially unsafe code helps catch errors.
630 | Appendix
13. Let's investigate why our dt ended up not larger than zero. For this, we fire up the
debugger again. It stops at this strange place:
Figure 1.62: Debugger stopped at a library without source code
14. The actual error is raised deep inside a library. However, our own functions are
still on the stack and we can investigate their state at that time. Click on Speed-
Calculator above main in the tree to the left:
Figure 1.63: Value of dt as the program is running
Chapter 1 - Anatomy of Portable C++ Software | 631
It seems our dt becomes -43 here (the exact value is not important). Looking at the
Variables view, we realize that i is 9, which is the last element of our input array:
Figure 1.64: Values of variables
This feels like a boundary problem. Looking closely at the code, we realize that
we are using timesInSeconds[10], which is the non-existent eleventh element
of the array. Thinking further, we realize that we can only have 9 position-pair
subtractions, thus 9 speeds, when we have 10 positions. This is a very common and
hard-to-catch mistake as C++ does not enforce you to stay within the array.
15. Rework our whole code for this problem:
void SpeedCalculator::calculateAndPrintSpeedData() {
speeds = new double[numEntries - 1];
double maxSpeed = 0;
...
for(inti=0;i<numEntries-1;++i){
double dt = timesInSeconds[i + 1] - timesInSeconds[i];
...
for(inti=0;i<numEntries-1;++i){
632 | Appendix
double speed = speeds[i];
....
for(inti=0;i<numEntries-1;++i){
double speed = speeds[i];
Finally, our code seems to run without any errors as we can see in the following
output:
Figure 1.65: Program output
16. However, there is a curious point here: Min speed is always 0, no matter how many
times you run it. To investigate, let's put a breakpoint at the following line:
Figure 1.66: Placing a breakpoint
17. When we debug our code, we see that it never stops here. This is obviously wrong.
Upon further investigation, we realize that minSpeed is initially 0, and every other
speed value is larger than that. We should initialize it to either something very
large, or we need to get the very first element as the minimum value. Here, we
choose the second approach:
for(inti=0;i<numEntries-1;++i){
double speed = speeds[i];
if (i == 0 || maxSpeed < speed) { // changed
maxSpeed = speed;
}
Chapter 1 - Anatomy of Portable C++ Software | 633
if (i == 0 || minSpeed > speed) { // changed
minSpeed = speed;
}
}
While maxSpeed did not need this, it's good to be consistent. Now when we run the
code, we see that we do not get 0 as our minimum speed anymore:
Figure 1.67: Program output
18. Our code seems to be running fine. However, there is another mistake that we
have made. When we debug our code, we see that our first elements are not zero:
Figure 1.68: Values of variables
634 | Appendix
19. The pointer dereferenced the first element in the array. We had initialized
elements to zero here, but they do not seem to be zero. Here is the updated code:
// add these two lines:
timesInSeconds[0] = 0.0;
positions[0] = 0.0;
for (int i = 0; i < numEntries; ++i) {
positions[i] = positions[i - 1] + (rand() % 500);
timesInSeconds[i] = timesInSeconds[i - 1] + ((rand() % 10) + 1);
}
When we investigate, we realize that we start the loop at zero and overwrite the
first items. Furthermore, we try to access positions[0 - 1], which is a mistake
and another example of C++ not enforcing array boundaries. When we let the loop
start from 1, all these problems are gone:
timesInSeconds[0] = 0.0;
positions[0] = 0.0;
for (int i = 1; i < numEntries; ++i) {
positions[i] = positions[i - 1] + (rand() % 500);
timesInSeconds[i] = timesInSeconds[i - 1] + ((rand() % 10) + 1);
}
Here is the output generated with the updated code:
Figure 1.69: Program output
Just by looking at this code, we cannot tell the difference. It's all random values that
do not look very different than before. Such bugs are very hard to find and can cause
random behavior, leaving us with hard-to-track errors. Things that you can do to avoid
such errors include being extra careful when dereferencing pointers, especially in
loops; separating code into functions and writing unit tests for them; and using assert
statements liberally to enforce things that the compiler or the runtime does not.
Chapter 2A - No Ducks Allowed – Types and Deduction | 635
Chapter 2A - No Ducks Allowed – Types and Deduction
Activity 1: Graphics Processing
In this activity, we will implement two classes (Point3d and Matrix3d), along with the
multiplication operators so that we can translate, scale, and rotate points. We will
also implement some helper methods that create the necessary matrices for the
transformations. Follow these steps to implement this activity:
1. Load the prepared project from the Lesson2A/Activity01 folder and configure the
Current Builder for the project to be CMake Build (Portable). Build and configure
the launcher and run the unit tests (which fail). Recommend that the name that's
used for the test runner is L2AA1graphicstests.
CMake Configuration
Follow step 9 of Exercise 1, Declaring Variables and Exploring Sizes, to configure the
project as a CMake project.
2. Add a test for the Point3d class to verify that the default constructor creates an
origin point [0, 0, 0, 1].
3. Open the point3dTests.cpp file and add the following line at the top.
4. Replace the failing existing test with the following test:
TEST_F(Point3dTest, DefaultConstructorIsOrigin)
{
Point3d pt;
float expected[4] = {0,0,0,1};
for(size_t i=0 ; i < 4 ; i++)
{
ASSERT_NEAR(expected[i], pt(i), Epsilon) << "cell [" << i << "]";
}
}
This test requires us to write an access operator.
636 | Appendix
5. Replace the current class definition in point3d.hpp file with the following code:
include <cstddef>
class Point3d
{
public:
static constexpr size_t NumberRows{4};
float operator()(const int index) const
{
return m_data[index];
}
private:
float m_data[NumberRows];
};
The test now builds and runs but fails.
6. Add the declaration for the default constructor to the Point3d declaration:
Point3d();
7. Add the implementation to the point3d.cpp file:
Point3d::Point3d()
{
for(auto& item : m_data)
{
item = 0;
}
m_data[NumberRows-1] = 1;
}
The test now builds, runs, and passes.
8. Add the next test:
TEST_F(Point3dTest, InitListConstructor3)
{
Point3d pt {5.2, 3.5, 6.7};
float expected[4] = {5.2,3.5,6.7,1};
for(size_t i=0 ; i < 4 ; i++)
Chapter 2A - No Ducks Allowed – Types and Deduction | 637
{
ASSERT_NEAR(expected[i], pt(i), Epsilon) << "cell [" << i << "]";
}
}
This test fails to compile. Therefore, we need to implement another constructor –
the one that takes std::initializer_list<> as an argument.
9. Add the following include to the header file:
#include <initializer_list>
10. Add the following constructor declaration to the Point3d class in the header file:
Point3d(std::initializer_list<float> list);
11. Add the following code to the implementation file. This code ignores error
handling, which will be added in Lesson 3, The Distance Between Can and Should –
Objects, Pointers, and Inheritance:
Point3d::Point3d(std::initializer_list<float> list)
{
m_data[NumberRows-1] = 1;
int i{0};
for(auto it1 = list.begin();
i<NumberRows && it1 != list.end();
++it1, ++i)
{
m_data[i] = *it1;
}
}
The tests should now build, run, and pass.
12. Add the following test:
TEST_F(Point3dTest, InitListConstructor4)
{
Point3d pt {5.2, 3.5, 6.7, 2.0};
float expected[4] = {5.2,3.5,6.7,2.0};
for(size_t i=0 ; i < 4 ; i++)
{
ASSERT_NEAR(expected[i], pt(i), Epsilon) << "cell [" << i << "]";
}
}
The tests should still build, run, and pass.
638 | Appendix
13. It is now time to refactor the test cases by moving the verification loop into a
templated function in the Point3dTest class. Add the following template inside this
class:
template<size_t size>
void VerifyPoint(Point3d& pt, float (&expected)[size])
{
for(size_t i=0 ; i< size ; i++)
{
ASSERT_NEAR(expected[i], pt(i), Epsilon) << "cell [" << i << "]";
}
}
14. This now means that the last test can be rewritten as follows:
TEST_F(Point3dTest, InitListConstructor4)
{
Point3d pt {5.2, 3.5, 6.7, 2.0};
float expected[4] = {5.2,3.5,6.7,2.0};
VerifyPoint(pt, expected);
}
It is just as important to keep your tests readable in the same way as your
production code.
15. Next, add support for the equality and inequality operators through the following
tests:
TEST_F(Point3dTest, EqualityOperatorEqual)
{
Point3d pt1 {1,3,5};
Point3d pt2 {1,3,5};
ASSERT_EQ(pt1, pt2);
}
TEST_F(Point3dTest, EqualityOperatorNotEqual)
{
Point3d pt1 {1,2,3};
Point3d pt2 {1,2,4};
ASSERT_NE(pt1, pt2);
}
Chapter 2A - No Ducks Allowed – Types and Deduction | 639
16. To implement these, add the following declarations/definition in the header file:
bool operator==(const Point3d& rhs) const;
bool operator!=(const Point3d& rhs) const
{
return !operator==(rhs);
}
17. Now, add the equality implementation in the .cpp file:
bool Point3d::operator==(const Point3d& rhs) const
{
for(int i=0 ; i<NumberRows ; i++)
{
if (m_data[i] != rhs.m _data[i])
{
return false;
}
}
return true;
}
18. When we first added Point3d, we implemented a constant accessor. Add the
following test, where we need a non-constant accessor so that we can assign it to
the member:
TEST_F(Point3dTest, AccessOperator)
{
Point3d pt1;
Point3d pt2 {1,3,5};
pt1(0) = 1;
pt1(1) = 3;
pt1(2) = 5;
ASSERT_EQ(pt1, pt2);
}
19. To get this test to build, add the following accessor to the header:
float& operator()(const int index)
{
return m_data[index];
}
Note that it returns a reference. Thus, we can assign it to a member value.
640 | Appendix
20. To finish off Point3d, add lines to the class declaration for the default copy
constructor and copy assignment:
Point3d(const Point3d&) = default;
Point3d& operator=(const Point3d&) = default;
21. Now, add the Matrix3d classes. First, create two empty files, matrix3d.hpp and
matrix3d.cpp, in the top-level folder of the current project and then add an empty
file in the tests folder called matrix3dTests.cpp.
22. Open the CmakeLists.txt file in the top folder and add matrix3d.cpp to the follow-
ing line:
add_executable(graphics point3d.cpp main.cpp matrix3d.cpp)
23. Open the CMakeLists.txt file in the tests folder, add ../matrix3d.cpp to the defini-
tion of SRC_FILES, and add matrix3dTests.cpp to the definition of TEST_FILES:
SET(SRC_FILES
. . /matrix3d.cpp
. . /point3d.cpp)
SET(TEST_FILES
matrix3dTests.cpp
point3dTests.cpp)
The existing point3d tests should still build, run, and pass if you made those
changes correctly.
24. Add the following test plumbing to matrix3dTests.cpp:
#include "gtest/gtest.h"
#include "../matrix3d.hpp"
class Matrix3dTest : public ::testing::Test
{
public:
};
TEST_F(Matrix3dTest, DummyTest)
{
ASSERT_TRUE(false);
}
Chapter 2A - No Ducks Allowed – Types and Deduction | 641
25. Build and run the tests. The test that we just added should fail.
26. Replace DummyTest with the following test in matrix3dTests.cpp:
TEST_F(Matrix3dTest, DefaultConstructorIsIdentity)
{
Matrix3d mat;
for( int row{0} ; row<4 ; row++)
for( int col{0} ; col<4 ; col++)
{
int expected = (row==col) ? 1 : 0;
ASSERT_FLOAT _EQ(expected, mat(row,col)) << "cell[" << row <<
"][" << col << "]";
}
}
Building the tests will now fail because we have not defined the Matrix3d class. We
will do this now in matrix3d.hpp.
27. Add the following definition to matrix3d.hpp:
class Matrix3d
{
public:
float operator()(const int row, const int column) const
{
return m_data[row][column];
}
private:
float m_data[4][4];
};
The tests will now build but still fail because we haven't created a default
constructor that creates an identity matrix.
28. Add the declaration of the default constructor to the header file in the public
section of Matrix3d:
Matrix3d();
642 | Appendix
29. Add this definition to matrix3d.cpp:
#include "matrix3d.hpp"
Matrix3d::Matrix3d()
{
for(inti{0};i<4;i++)
for(intj{0};j<4;j++)
m_data[i][j] = (i==j);
}
The tests now build and pass.
30. Refactor the code slightly to make it more readable. Modify the header to read like
so:
#include <cstddef> // Required for size_t definition
class Matrix3d
{
public:
static constexpr size_t NumberRows{4};
static constexpr size_t NumberColumns{4};
Matrix3d();
float operator()(const int row, const int column) const
{
return m_data[row][column];
}
private:
float m_data[NumberRows][NumberColumns];
};
31. Update the matrix3d.cpp file to use the constants:
Matrix3d::Matrix3d()
{
for (int i{0} ; i< NumberRows ; i++)
for (int j{0} ; j< NumberColumns ; j++)
m_data[i][j] = (i==j);
}
Chapter 2A - No Ducks Allowed – Types and Deduction | 643
32. Rebuild the tests and make sure that they still pass.
33. Now, we need to add the initializer list constructor. To do that, add the
following test:
TEST_F(Matrix3dTest, InitListConstructor)
{
Matrix3d mat{ {1,2,3,4}, {5,6,7,8},{9,10,11,12}, {13,14,15,16}};
int expected{1};
for( int row{0} ; row<4 ; row++)
for( int col{0} ; col<4 ; col++, expected++)
{
ASSERT_FLOAT _EQ(expected, mat(row,col)) << "cell[" << row <<
"][" << col << "]";
}
}
34. Add the include file for the initializer list support and declare the constructor in
matrix3d.hpp:
#include <initializer_list>
class Matrix3d
{
public:
Matrix3d(std::initializer_list<std::initializer_list<float>> list);
35. Finally, add the implementation of the constructor to the .cpp file:
Matrix3d::Matrix3d(std::initializer_list<std::initializer_list<float>>
list)
{
int i{0};
for(auto it1 = list.begin(); i<NumberRows ; ++it1, ++i)
{
int j{0};
for(auto it2 = it1->begin(); j<NumberColumns ; ++it2, ++j)
m_data[i][j] = *it2;
}
}
644 | Appendix
36. To improve the readability of our tests, add a helper method to the test frame-
work. In the Matrix3dTest class, declare the following:
static constexpr float Epsilon{1e-12};
void VerifyMatrixResult(Matrix3d& expected, Matrix3d& actual);
37. Add the definition of the helper method:
void Matrix3dTest::VerifyMatrixResult(Matrix3d& expected, Matrix3d&
actual)
{
for( int row{0} ; row<4 ; row++)
for( int col{0} ; col<4 ; col++)
{
ASSERT_NEAR(expected(row,col), actual(row,col), Epsilon)
<< "cell[" << row << "][" << col << "]";
}
}
38. Write a test to multiply two matrices and get a new matrix (expected will be calcu-
lated by hand):
TEST_F(Matrix3dTest, MultiplyTwoMatricesGiveExpectedResult)
{
Matrix3d mat1{ {5,6,7,8}, {9,10,11,12}, {13,14,15,16}, {17,18,19,20}};
Matrix3d mat2{ {1,2,3,4}, {5,6,7,8}, {9,10,11,12}, {13,14,15,16}};
Matrix3d expected{ {202,228,254,280},
{314,356,398,440},
{426,484,542,600},
{538,612,686,760}};
Matrix3d result = mat1 * mat2;
VerifyMatrixResult(expected, result);
}
39. In the header file, define operator*=:
Matrix3d& operator*=(const Matrix3d& rhs);
Then, implement the inline version of operator* (outside the class declaration):
inline Matrix3d operator*(const Matrix3d& lhs, const Matrix3d& rhs)
{
Matrix3d temp(lhs);
temp *= rhs;
Chapter 2A - No Ducks Allowed – Types and Deduction | 645
return temp;
}
40. And the implementation to the matrix3d.cpp file:
Matrix3d& Matrix3d::operator*=(const Matrix3d& rhs)
{
Matrix3d temp;
for(int i=0 ; i<NumberRows ; i++)
for(int j=0 ; j<NumberColumns ; j++)
{
temp.m _data[i][j] = 0;
for (int k=0 ; k<NumberRows ; k++)
temp.m _data[i][j] += m_data[i][k] * rhs.m _data[k][j];
}
*this = temp;
return *this;
}
41. Build and run the tests – again, they should pass.
42. Introduce a second helper function to the test class by declaring it in the Matrix-
3dTest class:
void VerifyMatrixIsIdentity(Matrix3d& mat);
Then, declare it so that we can use it:
void Matrix3dTest::VerifyMatrixIsIdentity(Matrix3d& mat)
{
for( int row{0} ; row<4 ; row++)
for( int col{0} ; col<4 ; col++)
{
int expected = (row==col) ? 1 : 0;
ASSERT_FLOAT _EQ(expected, mat(row,col))
<< "cell[" << row << "][" << col << "]";
}
}
43. Update the one test to use it:
TEST_F(Matrix3dTest, DefaultConstructorIsIdentity)
{
Matrix3d mat;
646 | Appendix
VerifyMatrixIsIdentity(mat);
}
44. Write one sanity check test:
TEST_F(Matrix3dTest, IdentityTimesIdentityIsIdentity)
{
Matrix3d mat;
Matrix3d result = mat * mat;
VerifyMatrixIsIdentity(result);
}
45. Build and run the tests – they should still pass.
46. Now, we need to be able to multiply points and matrices. Add the following test:
TEST_F(Matrix3dTest, MultiplyMatrixWithPoint)
{
Matrix3d mat { {1,2,3,4}, {5,6,7,8}, {9,10,11,12}, {13,14,15,16}};
Point3d pt {15, 25, 35, 45};
Point3d expected{350, 830, 1310, 1790};
Point3d pt2 = mat * pt;
ASSERT_EQ(expected, pt2);
}
47. In matrix3d.hpp, add the include directive for point3d.hpp and add the following
declaration after the Matrix3d class declaration:
Point3d operator*(const Matrix3d& lhs, const Point3d& rhs);
48. Add the definition of the operator to the matrix3d.cpp file:
Point3d operator*(const Matrix3d& lhs, const Point3d& rhs)
{
Point3d pt;
for(int row{0} ; row<Matrix3d::NumberRows ; row++)
{
float sum{0};
for(int col{0} ; col<Matrix3d::NumberColumns ; col++)
{
sum += lhs(row, col) * rhs(col);
}
Chapter 2A - No Ducks Allowed – Types and Deduction | 647
pt(row) = sum;
}
return pt;
}
49. Build and run the tests. They should all be passing again.
50. At the top of matrix3dtests.cpp, add the include file:
#include <cmath>
51. Start adding the transformation matrix factory methods. Using the following tests,
we will develop the various factory methods (the tests should be added one at a
time):
TEST_F(Matrix3dTest, CreateTranslateIsCorrect)
{
Matrix3d mat = createTranslationMatrix(-0 .5, 2.5, 10.0);
Matrix3d expected {{1.0, 0.0, 0.0, -0 .5},
{0.0, 1.0, 0.0, 2.5},
{0.0, 0.0, 1.0, 10.0},
{0.0, 0.0, 0.0, 1.0}
};
VerifyMatrixResult(expected, mat);
}
TEST_F(Matrix3dTest, CreateScaleIsCorrect)
{
Matrix3d mat = createScaleMatrix(3.0, 2.5, 11.0);
Matrix3d expected {{3.0, 0.0, 0.0, 0.0},
{0.0, 2.5, 0.0, 0.0},
{0.0, 0.0, 11.0, 0.0},
{0.0, 0.0, 0.0, 1.0}
};
VerifyMatrixResult(expected, mat);
}
TEST_F(Matrix3dTest, CreateRotateX90IsCorrect)
{
Matrix3d mat = createRotationMatrixAboutX(90.0F);
Matrix3d expected {{1.0, 0.0, 0.0, 0.0},
{0.0, 0.0, -1 .0, 0.0},
648 | Appendix
{0.0, 1.0, 0.0, 0.0},
{0.0, 0.0, 0.0, 1.0}
};
VerifyMatrixResult(expected, mat);
}
TEST_F(Matrix3dTest, CreateRotateX60IsCorrect)
{
Matrix3d mat = createRotationMatrixAboutX(60.0F);
float sqrt3_2 = static_cast<float>(std::sqrt(3.0)/2.0);
Matrix3d expected {{1.0, 0.0,
0.0,
0.0},
{0.0, 0.5,
- sqrt3_2, 0.0},
{0.0, sqrt3_2, 0.5,
0.0},
{0.0, 0.0,
0.0,
1.0}
};
VerifyMatrixResult(expected, mat);
}
TEST_F(Matrix3dTest, CreateRotateY90IsCorrect)
{
Matrix3d mat = createRotationMatrixAboutY(90.0F);
Matrix3d expected {{0.0, 0.0, 1.0, 0.0},
{0.0, 1.0, 0.0, 0.0},
{-1 .0, 0.0, 0.0, 0.0},
{0.0, 0.0, 0.0, 1.0}
};
VerifyMatrixResult(expected, mat);
}
TEST_F(Matrix3dTest, CreateRotateY60IsCorrect)
{
Matrix3d mat = createRotationMatrixAboutY(60.0F);
float sqrt3_2 = static_cast<float>(std::sqrt(3.0)/2.0);
Matrix3d expected {{0.5,
0.0,
sqrt3_2, 0.0},
{0.0,
1.0,
0.0,
0.0},
{-sqrt3_2, 0.0,
0.5,
0.0},
{0.0,
0.0,
0.0,
1.0}
};
VerifyMatrixResult(expected, mat);
Chapter 2A - No Ducks Allowed – Types and Deduction | 649
}
TEST_F(Matrix3dTest, CreateRotateZ90IsCorrect)
{
Matrix3d mat = createRotationMatrixAboutZ(90.0F);
Matrix3d expected {{0.0, -1 .0, 0.0, 0.0},
{1.0, 0.0, 0.0, 0.0},
{0.0, 0.0, 1.0, 0.0},
{0.0, 0.0, 0.0, 1.0}
};
VerifyMatrixResult(expected, mat);
}
TEST_F(Matrix3dTest, CreateRotateZ60IsCorrect)
{
Matrix3d mat = createRotationMatrixAboutZ(60.0F);
float sqrt3_2 = static_cast<float>(std::sqrt(3.0)/2.0);
Matrix3d expected {{0.5,
- sqrt3_2, 0.0, 0.0},
{sqrt3_2,
0.5, 0.0, 0.0},
{0.0,
0.0, 1.0, 0.0},
{0.0,
0.0, 0.0, 1.0}
};
VerifyMatrixResult(expected, mat);
}
52. Add the following declarations to the matrix3d header file:
Matrix3d createTranslationMatrix(float dx, float dy, float dz);
Matrix3d createScaleMatrix(float sx, float sy, float sz);
Matrix3d createRotationMatrixAboutX(float degrees);
Matrix3d createRotationMatrixAboutY(float degrees);
Matrix3d createRotationMatrixAboutZ(float degrees);
53. At the top of the matrix3d implementation file, add #include <cmath>.
54. Finally, add the following implementations to the matrix3d implementation file:
Matrix3d createTranslationMatrix(float dx, float dy, float dz)
{
Matrix3d matrix;
matrix(0, 3) = dx;
matrix(1, 3) = dy;
650 | Appendix
matrix(2, 3) = dz;
return matrix;
}
Matrix3d createScaleMatrix(float sx, float sy, float sz)
{
Matrix3d matrix;
matrix(0, 0) = sx;
matrix(1, 1) = sy;
matrix(2, 2) = sz;
return matrix;
}
Matrix3d createRotationMatrixAboutX(float degrees)
{
Matrix3d matrix;
double pi{4.0F*atan(1.0F)};
double radians = degrees / 180.0 * pi;
float cos_theta = static_cast<float>(cos(radians));
float sin_theta = static_cast<float>(sin(radians));
matrix(1, 1) = cos_theta;
matrix(2, 2) = cos_theta;
matrix(1, 2) = -sin_theta;
matrix(2, 1) = sin_theta;
return matrix;
}
Matrix3d createRotationMatrixAboutY(float degrees)
{
Matrix3d matrix;
double pi{4.0F*atan(1.0F)};
double radians = degrees / 180.0 * pi;
float cos_theta = static_cast<float>(cos(radians));
float sin_theta = static_cast<float>(sin(radians));
matrix(0, 0) = cos_theta;
matrix(2, 2) = cos_theta;
Chapter 2A - No Ducks Allowed – Types and Deduction | 651
matrix(0, 2) = sin_theta;
matrix(2, 0) = -sin_theta;
return matrix;
}
Matrix3d createRotationMatrixAboutZ(float degrees)
{
Matrix3d matrix;
double pi{4.0F*atan(1.0F)};
double radians = degrees / 180.0 * pi;
float cos_theta = static_cast<float>(cos(radians));
float sin_theta = static_cast<float>(sin(radians));
matrix(0, 0) = cos_theta;
matrix(1, 1) = cos_theta;
matrix(0, 1) = -sin_theta;
matrix(1, 0) = sin_theta;
return matrix;
}
55. To get this to compile and pass the test, we need to add one more accessor to the
declaration of matrix3d:
float& operator()(const int row, const int column)
{
return m_data[row][column];
}
56. Build and run all the tests again to show that they all pass.
57. In point3d.hpp, add the include for <ostream> and add the following friend declara-
tion to the Point3d class at the end:
friend std::ostream& operator<<(std::ostream& , const Point3d& );
58. Write the inline implementation of the operator after the class:
inline std::ostream&
operator<<(std::ostream& os, const Point3d& pt)
{
const char* sep = "[ ";
for(auto value : pt.m _data)
{
652 | Appendix
os << sep << value;
sep=",";
}
os<<"]";
return os;
}
59. Open the main.cpp file and remove the comment delimiters, //, from the line:
//#define ACTIVITY1
60. Build and run the application called graphics – you will need to create a new Run
Configuration. If your implementations of Point3d and Matrix3d are correct, then
the program will display the following output:
Figure 2A.53: Successfully running the activity program
In this activity, we implemented two classes that form the basis of all the operations
that are required to implement 3D graphics rendering. We used operator overloading to
achieve this so that Matrix3d and Point3d can be used as if they were native types. This
can be easily extended to deal with vectors of points, which is required if we wish to
manipulate whole objects.
Chapter – 2B
-
No Ducks Allowed – Templates and Deduction | 653
Chapter – 2B - No Ducks Allowed – Templates and Deduction
Activity 1: Developing a Generic "contains" Template Function
In this activity, we will implement several helper classes that will be used to detect the
std::string class case and the std::set case and then use them to tailor the contains
function to the particular container. Follow these steps to implement this activity:
1. Load the prepared project from the Lesson2B/Activity01 folder. Build and config-
ure the launcher and run the unit tests (which fail the one dummy test). We
recommend that the name that's used for the tests runner is L2BA1tests.
2. Open the containsTests.cpp file and replace the existing test with the following:
TEST_F(containsTest, DetectNpos)
{
ASSERT_TRUE(has_npos_v<std::string>);
ASSERT_FALSE(has_npos_v<std::set<int>>);
ASSERT_FALSE(has_npos_v<std::vector<int>>);
}
This test requires us to write a set of helper templates to detect if the container
class supports a static member variable called npos.
3. Add the following code to the contains.hpp file:
template <class T>
auto test_npos(int) -> decltype((void)T::npos, std::true_type{});
template <class T>
auto test_npos(long) -> std::false_type;
template <class T>
struct has_npos : decltype(test_npos<T>(0)) {};
template< class T >
inline constexpr bool has_npos_v = has_npos<T>::value;
The tests now run and pass.
4. Add the following tests to the containsTest.cpp file:
TEST_F(containsTest, DetectFind)
{
ASSERT_TRUE((has_find_v<std::string, char>));
ASSERT_TRUE((has_find_v<std::set<int>, int>));
654 | Appendix
ASSERT_FALSE((has_find_v<std::vector<int>, int>));
}
This test requires us to write a set of helper templates to detect if the container
class has a find() method that takes one argument.
5. Add the following code to the contains.hpp file:
template <class T, class A0>
auto test_find(int) ->
decltype(void(std::declval<T>().find(std::declval<A0>())),
std::true_type{});
template <class T, class A0>
auto test_find(long) -> std::false_type;
template <class T, class A0>
struct has_find : decltype(test_find<T,A0>(0)) {};
template< class T, class A0 >
inline constexpr bool has_find_v = has_find<T, A0>::value;
The tests now run and pass.
6. Add the implementation for the generic container; in this case, the vector. Write
the following tests in the containsTest.cpp file:
TEST_F(containsTest, VectorContains)
{
std::vector<int> container {1,2,3,4,5};
ASSERT_TRUE(contains(container, 5));
ASSERT_FALSE(contains(container, 15));
}
7. Add the basic implementation of contains to the contains.hpp file:
template<class C, class T>
auto contains(const C& c, const T& key) -> decltype(std::end(c), true)
{
return std::end(c) != std::find(begin(c), end(c), key);
}
The tests now run and pass.
Chapter – 2B
-
No Ducks Allowed – Templates and Deduction | 655
8. The next step is to add the tests for the set special case to containsTest.cpp:
TEST_F(containsTest, SetContains)
{
std::set<int> container {1,2,3,4,5};
ASSERT_TRUE(contains(container, 5));
ASSERT_FALSE(contains(container, 15));
}
9. The implementation of contains is updated to test for the built-in set::find()
method:
template<class C, class T>
auto contains(const C& c, const T& key) -> decltype(std::end(c), true)
{
if constexpr(has_find_v<C, T>)
{
return std::end(c) != c.find(key);
}
else
{
return std::end(c) != std::find(begin(c), end(c), key);
}
}
The tests now run and pass.
10. Add the tests for the string special case to the containsTest.cpp file:
TEST_F(containsTest, StringContains)
{
std::string container{"This is the message"};
ASSERT_TRUE(contains(container, "the"));
ASSERT_TRUE(contains(container, 'm'));
ASSERT_FALSE(contains(container, "massage"));
ASSERT_FALSE(contains(container, 'z'));
}
11. Add the following implementation of contains to test for the presence of npos and
tailor the use of the find() method:
template<class C, class T>
auto contains(const C& c, const T& key) -> decltype(std::end(c), true)
{
656 | Appendix
if constexpr(has_npos_v<C>)
{
return C::npos != c.find(key);
}
else
if constexpr(has_find_v<C, T>)
{
return std::end(c) != c.find(key);
}
else
{
return std::end(c) != std::find(begin(c), end(c), key);
}
}
The tests now run and pass.
12. Build and run the application called contains. Create a new Run Configuration. If
your implementation of the contains template is correct, then the program will
display the following output:
Figure 2B.36: Output from the successful implementation of contains
In this activity, we used various templating techniques in conjunction with SFINAE
to select the appropriate implementation of a contains() function based upon the
capability of the containing class. We could have achieved the same result using a
generic template function and some specialized templates, but we took the path less
travelled and flexed our newly found template skills.
Chapter 3 - The Distance between Can and Should – Objects, Pointers and Inheritance | 657
Chapter 3 - The Distance between Can and Should – Objects, Point-
ers and Inheritance
Activity 1: Implementing Graphics Processing with RAII and Move
In this activity, we will develop our previous Matrix3d and Point3d classes to use a
unique_ptr<> to manage the memory associated with the data structures that are
required to implement these graphics classes. Let's get started:
1. Load the prepared project from the Lesson3/Activity01 folder and configure the
Current Builder for the project to be CMake Build (Portable). Build and configure
the launcher and run the unit tests. We recommend that the name that's used for
the tests runner is L3A1graphicstests.
2. Open point3d.hpp and add the lines marked with a comment to the file:
// ... lines omitted
#include <initializer_list>
#include <ostream>
namespace acpp::gfx { // Add this line
class Point3d
{
// ... lines omitted
};
} // Add this line
Note that the closing brace that's added to the end of the file does NOT have a
closing semi-colon. The nested namespace syntax acpp::gfx, is a new feature of
C++17. Previously, it would have required the explicit use of the namespace keyword
twice. Also, beware that, in trying to be helpful, your friendly neighborhood
IDE may insert the closing brace just after the line that you put the namespace
declaration.
3. Repeat the same treatment for matrix3d.hpp, matrix3d.cpp, and point3d.cpp –
ensure that the include files are not included in the scope of the namespace.
4. In the respective files (main.cpp, matrix3dTests.cpp, and point3dTests.cpp), just
after completing the #include directives, insert the following line:
using namespace acpp::gfx;
658 | Appendix
5. Now, run all the tests. All 18 existing tests should pass again. We have successfully
put our classes into a namespace.
6. Now we will move onto converting the Matrix3d class to use heap allocated
memory. In the matrix3d.hpp file, add an #include <memory> line to give us access
to the unique_ptr<> template.
7. Next, change the type of the declaration for m_data:
std::unique_ptr<float[]> m_data;
8. From this point forward, we will use the compiler and its errors to give us hints
as to what needs fixing. Attempting to build the tests now reveals that we have a
problem with the following two methods in the header file
float operator()(const int row, const int column) const
{
return m_data[row][column];
}
float& operator()(const int row, const int column)
{
return m_data[row][column];
}
The problem here is that unique_ptr holds a pointer to a single dimension array
and not a two- dimensional array. So, we need to convert the row and column into
a single index.
9. Add a new method called get_index() to get the one-dimensional index from the
row and column and update the preceding functions to use it:
float operator()(const int row, const int column) const
{
return m_data[get_index(row,column)];
}
float& operator()(const int row, const int column)
{
return m_data[get_index(row,column)];
}
private:
size_t get_index(const int row, const int column) const
{
return row * NumberColumns + column;
}
Chapter 3 - The Distance between Can and Should – Objects, Pointers and Inheritance | 659
10. After recompiling, the next error from the compiler refers to the following inline
function:
inline Matrix3d operator*(const Matrix3d& lhs, const Matrix3d& rhs)
{
Matrix3d temp(lhs); // <=== compiler error – ill formed copy
constructor
temp *= rhs;
return temp;
}
11. Whereas before, the default copy constructor was sufficient for our purposes, it
just did a shallow copy of all the elements of the array and that was correct. We
now have indirection to the data we need to copy and so we need to implement
a deep copy constructor and copy assignment. We will also need to address the
existing constructors. For now, just add the constructor declarations to the class
(adjacent to the other constructors):
Matrix3d(const Matrix3d& rhs);
Matrix3d& operator=(const Matrix3d& rhs);
Attempting to build the tests will now show that we have resolved all the issues in
the header file, and that we can move onto the implementation file.
12. Modify the two constructors to initialize unique_ptr as follows:
Matrix3d::Matrix3d() : m_data{new float[NumberRows*NumberColumns]}
{
for (int i{0} ; i< NumberRows ; i++)
for (int j{0} ; j< NumberColumns ; j++)
m_data[i][j] = (i==j);
}
Matrix3d::Matrix3d(std::initializer_list<std::initializer_list<float>>
list)
: m_data{new float[NumberRows*NumberColumns]}
{
int i{0};
for(auto it1 = list.begin(); i<NumberRows ; ++it1, ++i)
{
int j{0};
for(auto it2 = it1->begin(); j<NumberColumns ; ++it2, ++j)
m_data[i][j] = *it2;
}
}
660 | Appendix
13. We now need to address the single-dimensional array look-up. We need to change
the statements of the m_data[i][j] type with m_data[get_index(i,j)]. Change the
default constructor to read like so:
Matrix3d::Matrix3d() : m_data{new float[NumberRows*NumberColumns]}
{
for (int i{0} ; i< NumberRows ; i++)
for (int j{0} ; j< NumberColumns ; j++)
m_data[get_index(i, j)] = (i==j);
// <= change here
}
14. Change the initializer list constructor to be the following:
Matrix3d::Matrix3d(std::initializer_list<std::initializer_list<float>>
list)
: m_data{new float[NumberRows*NumberColumns]}
{
int i{0};
for(auto it1 = list.begin(); i<NumberRows ; ++it1, ++i)
{
int j{0};
for(auto it2 = it1->begin(); j<NumberColumns ; ++it2, ++j)
m_data[get_index(i, j)] = *it2;
// <= change here
}
}
15. Change the multiplication operator, being careful with the indices:
Matrix3d& Matrix3d::operator*=(const Matrix3d& rhs)
{
Matrix3d temp;
for(int i=0 ; i<NumberRows ; i++)
for(int j=0 ; j<NumberColumns ; j++)
{
temp.m _data[get_index(i, j)] = 0;
// <= change here
for (int k=0 ; k<NumberRows ; k++)
temp.m _data[get_index(i, j)] += m_data[get_index(i, k)]
* rhs.m _data[get_index(k, j)];
// <= change here
}
*this = temp;
return *this;
}
Chapter 3 - The Distance between Can and Should – Objects, Pointers and Inheritance | 661
16. With these changes in place, we have fixed all the compiler errors, but now we
have a linker error to deal with – the copy constructor that we only declared back
in step 11.
17. In the matrix3d.cpp file add the following definitions:
Matrix3d::Matrix3d(const Matrix3d& rhs) :
m_data{new float[NumberRows*NumberColumns]}
{
*this = rhs;
}
Matrix3d& Matrix3d::operator=(const Matrix3d& rhs)
{
for(int i=0 ; i< NumberRows*NumberColumns ; i++)
m_data[i] = rhs.m _data[i];
return *this;
}
18. The tests will now build and all of them will pass. The next step is to force a move
constructor. Locate the createTranslationMatrix() method in matrix3d.cpp and
change the return statement as follows:
return std::move(matrix);
19. In matrix3d.hpp declare the move constructor.
Matrix3d(Matrix3d&& rhs);
20. Rebuild the tests. Now, we get an error related to the move constructor not being
present.
21. Add the implementation of the constructor into matrix3d.cpp and rebuild the
tests.
Matrix3d::Matrix3d(Matrix3d&& rhs)
{
//std::cerr << "Matrix3d::Matrix3d(Matrix3d&& rhs)\n";
std::swap(m_data, rhs.m _data);
}
22. Rebuild and run the tests. They all pass again.
662 | Appendix
23. Just to confirm that the move constructor is being called, add #include <iostream>
to matrix3d.cpp, remove the comment from the output line in the move construc-
tor. and re-run the test. It will report an error after the tests have completed
because we sent it to the standard error channel (cerr). After the check, make the
line a comment again.
Note
Just a quick note about the move constructor – we did not explicitly initialize m_
data like we did for the other constructors. This means that it will be initialized as
empty and then swapped with the parameter that is passed in, which is a tem-
porary and so it is acceptable for it to not hold an array after the transaction – it
removes one allocation and deallocation of memory.
24. Now let's convert the Point3d class so that it can use heap allocated memory. In
the point3d.hpp file, add an #include <memory> line so that we have access to the
unique_ptr<> template.
25. Next, change the type of the declaration for m_data to be like so:
std::unique_ptr<float[]> m_data;
26. The compiler now tells us that we have a problem with the insertion operator
(<<) in point3d.hpp because we can't use a ranged-for on unique_ptr: Replace the
implementation with the following:
inline std::ostream&
operator<<(std::ostream& os, const Point3d& pt)
{
const char* sep = "[ ";
for(int i{0} ; i < Point3d::NumberRows ; i++)
{
os << sep << pt.m _data[i];
sep=",";
}
os<<"]";
return os;
}
Chapter 3 - The Distance between Can and Should – Objects, Pointers and Inheritance | 663
27. Open point3d.cpp and modify the default constructors to initialize the unique_ptr
and change the initialization loop since a ranged for cannot be used on the unique_
ptr:
Point3d::Point3d() : m_data{new float[NumberRows]}
{
for(int i{0} ; i < NumberRows-1 ; i++) {
m_data[i] = 0;
}
m_data[NumberRows-1] = 1;
}
28. Modify the other constructor by initializing the unique_ptr:
Point3d::Point3d(std::initializer_list<float> list)
: m_data{new float[NumberRows]}
29. Now all the tests run and pass, like they did previously.
30. Now, if we run the original application, L3graphics, then the output will be iden-
tical to the original, but the implementation uses RAII to allocate and manage the
memory that's used for the matrices and points.
Figure 3.52: Activity 1 output after successful conversion to use RAII
664 | Appendix
Activity 2: Implementing classes for Date Calculations
In this activity, we will implement two classes, Date and Days that will make it very easy
for us to work with dates and the time differences between them. Let's get started:
1. Load the prepared project from the Lesson3/Activity02 folder and configure the
Current Builder for the project to be CMake Build (Portable). Build and configure
the launcher and run the unit tests. We recommend that the name that's used for
the tests runner is L3A2datetests. The project has dummy files and one failing
test.
2. Open the date.hpp file in the editor and add the following lines inside the basic
Date class to allow access to the stored values:
int Day() const {return m_day;}
int Month() const {return m_month;}
int Year() const {return m_year;}
3. Open the dateTests.cpp file and add the following code to the DateTest class:
void VerifyDate(const Date& dt, int yearExp, int monthExp, int dayExp)
const
{
ASSERT_EQ(dayExp, dt.Day());
ASSERT_EQ(monthExp, dt.Month());
ASSERT_EQ(yearExp, dt.Year());
}
Normally, you would refactor this test as the tests develop, but we will pull it out
up front.
4. Replace ASSERT_FALSE() in the existing test with the following test:
Date dt;
VerifyDate(dt, 1970, 1, 1);
5. Rebuild and run the tests – they should now all pass.
6. Add the following test:
TEST_F(DateTest, Constructor1970Jan2)
{
Date dt(2, 1, 1970);
VerifyDate(dt, 1970, 1, 2);
}
Activity 2: Implementing classes for Date Calculations | 665
7. To make this test we need to add the following two constructors to the Date class:
Date() = default;
Date(int day, int month, int year) :
m_year{year}, m_month{month}, m_day{day}
{
}
8. We now need to introduce the functions to convert to/from the date_t type. Add
the following alias to the date.hpp file inside our namespace:
using date_t=int64_t;
9. To the Date class, add the declaration of the following method:
date_t ToDateT() const;
10. Then, add the following test:
TEST_F(DateTest, ToDateTDefaultIsZero)
{
Date dt;
ASSERT_EQ(0, dt.ToDateT());
}
11. As we are doing (TDD), we add the minimal implementation of the method to pass
the test.
date_t Date::ToDateT() const
{
return 0;
}
12. Now, we add the next test:
TEST_F(DateTest, ToDateT1970Jan2Is1)
{
Date dt(2, 1, 1970);
ASSERT_EQ(1, dt.ToDateT());
}
13. We continue to add one more test and then another, all the time refining the
algorithm in ToDateT() firstly to deal with dates in 1970, then 1-Jan-1971, and then
a date in 1973, which means we span one leap year, and so on. The full set of tests
that are used to develop the ToDateT() method are as follows:
TEST_F(DateTest, ToDateT1970Dec31Is364)
{
666 | Appendix
Date dt(31, 12, 1970);
ASSERT_EQ(364, dt.ToDateT());
}
TEST_F(DateTest, ToDateT1971Jan1Is365)
{
Date dt(1, 1, 1971);
ASSERT_EQ(365, dt.ToDateT());
}
TEST_F(DateTest, ToDateT1973Jan1Is1096)
{
Date dt(1, 1, 1973);
ASSERT_EQ(365*3+1, dt.ToDateT());
}
TEST_F(DateTest, ToDateT2019Aug28Is18136)
{
Date dt(28, 8, 2019);
ASSERT_EQ(18136, dt.ToDateT());
}
14. To pass all of these tests, we add the following items to the declaration of the Date
class:
public:
static constexpr int EpochYear = 1970;
static constexpr int DaysPerCommonYear = 365;
static constexpr int YearsBetweenLeapYears = 4;
private:
int GetDayOfYear(int day, int month, int year) const;
bool IsLeapYear(int year) const;
int CalcNumberLeapYearsFromEpoch(int year) const;
15. The implementation of ToDateT() and the supporting methods in date.cpp is as
follows:
namespace {
int daysBeforeMonth[2][12] =
{
{ 0, 31, 59, 90, 120, 151, 181, 212, 243, 273, 204, 334}, // Common
Year
{ 0, 31, 50, 91, 121, 152, 182, 213, 244, 274, 205, 335} // Leap Year
};
}
namespace acpp::date
{
Activity 2: Implementing classes for Date Calculations | 667
int Date::CalcNumberLeapYearsFromEpoch(int year) const
{
return (year-1)/YearsBetweenLeapYears
-
(EpochYear-1)/YearsBetweenLeapYears;
}
int Date::GetDayOfYear(int day, int month, int year) const
{
return daysBeforeMonth[IsLeapYear(year)][month-1] + day;
}
bool Date::IsLeapYear(int year) const
{
return (year%4)==0; // Not full story, but good enough to 2100
}
date_t Date::ToDateT() const
{
date_t value = GetDayOfYear(m_day, m_month, m_year) - 1;
value += (m_year-EpochYear) * DaysPerCommonYear;
date_t numberLeapYears = CalcNumberLeapYearsFromEpoch(m_year);
value += numberLeapYears;
return value;
}
}
16. Now that ToDateT() is working, we turn to its inverse, that is, FromDateT(). Again,
we build up the tests one at a time to develop the algorithm over a range of dates.
The following tests were used:
TEST_F(DateTest, FromDateT0Is1Jan1970)
{
Date dt;
dt.FromDateT(0);
ASSERT_EQ(0, dt.ToDateT());
VerifyDate(dt, 1970, 1, 1);
}
TEST_F(DateTest, FromDateT1Is2Jan1970)
{
Date dt;
dt.FromDateT(1);
ASSERT_EQ(1, dt.ToDateT());
VerifyDate(dt, 1970, 1, 2);
}
TEST_F(DateTest, FromDateT364Is31Dec1970)
{
668 | Appendix
Date dt;
dt.FromDateT(364);
ASSERT_EQ(364, dt.ToDateT());
VerifyDate(dt, 1970, 12, 31);
}
TEST_F(DateTest, FromDateT365Is1Jan1971)
{
Date dt;
dt.FromDateT(365);
ASSERT_EQ(365, dt.ToDateT());
VerifyDate(dt, 1971, 1, 1);
}
TEST_F(DateTest, FromDateT1096Is1Jan1973)
{
Date dt;
dt.FromDateT(1096);
ASSERT_EQ(1096, dt.ToDateT());
VerifyDate(dt, 1973, 1, 1);
}
TEST_F(DateTest, FromDateT18136Is28Aug2019)
{
Date dt;
dt.FromDateT(18136);
ASSERT_EQ(18136, dt.ToDateT());
VerifyDate(dt, 2019, 8, 28);
}
17. Add the following declarations to the header file:
public:
void FromDateT(date_t date);
private:
int CalcMonthDayOfYearIsIn(int dayOfYear, bool IsLeapYear) const;
18. Use the following implementation since the preceding tests are added one at a
time:
void Date::FromDateT(date_t date)
{
int number_years = date / DaysPerCommonYear;
date = date - number_years * DaysPerCommonYear;
m_year = EpochYear + number_years;
date_t numberLeapYears = CalcNumberLeapYearsFromEpoch(m_year);
date -= numberLeapYears;
Activity 2: Implementing classes for Date Calculations | 669
m_month = CalcMonthDayOfYearIsIn(date, IsLeapYear(m_year));
date -= daysBeforeMonth[IsLeapYear(m_year)][m_month-1];
m_day = date + 1;
}
int Date::CalcMonthDayOfYearIsIn(int dayOfYear, bool isLeapYear) const
{
for(inti=1;i<12;i++)
{
if ( daysBeforeMonth[isLeapYear][i] > dayOfYear)
return i;
}
return 12;
}
19. Now that we have the supporting routines ready, we can implement the real
feature of the Date class difference between two dates and determine the new
date by adding a number of days. Both of these operations need a new type (class)
Days.
20. Add the following implementation of Days to the header (above Date):
class Days
{
public:
Days() = default;
Days(int days) : m_days{days}
{}
operator int() const
{
return m_days;
}
private:
int m_days{0};
};
21. The first operator will be an addition of Days to Date. Add the following method
declaration (inside the public section of the Date class) :
Date& operator+=(const Days& day);
22. Then, add the inline implementation (outside the Date class) to the header file:
inline Date operator+(const Date& lhs, const Days& rhs )
{
Date tmp(lhs);
670 | Appendix
tmp += rhs;
return tmp;
}
23. Write the following tests to verify the sum operation:
TEST_F(DateTest, AddZeroDays)
{
Date dt(28, 8, 2019);
Days days;
dt += days;
VerifyDate(dt, 2019, 8, 28);
}
TEST_F(DateTest, AddFourDays)
{
Date dt(28, 8, 2019);
Days days(4);
dt += days;
VerifyDate(dt, 2019, 9, 1);
}
24. The actual implementation of the sum operation is simply based on the two
support methods
Date& Date::operator+=(const Days& day)
{
FromDateT(ToDateT()+day);
return *this;
}
25. Add the following test:
TEST_F(DateTest, AddFourDaysAsInt)
{
Date dt(28, 8, 2019);
dt+=4;
VerifyDate(dt, 2019, 9, 1);
}
26. When we run the tests, they all build and this test passes. But this is not the
desired outcome. We do not want them to be able to add naked integers to our
dates. (A future version may add months and years, so what does adding an
integer mean?). To make this fail by causing the build to fail, we change the Days
constructor to be explicit:
explicit Days(int days) : m_days{days}
{}
Activity 2: Implementing classes for Date Calculations | 671
27. Now the build fails, so we need to fix the test by changing the addition line to cast
to Days as follows:
dt += static_cast<Days>(4);
All tests should pass again.
28. The final functionality we want is the difference between two dates. Here are the
tests that were used to verify the implementation:
TEST_F(DateTest, DateDifferences27days)
{
Date dt1(28, 8, 2019);
Date dt2(1, 8, 2019);
Days days = dt1 - dt2;
ASSERT_EQ(27, (int)days);
}
TEST_F(DateTest, DateDifferences365days)
{
Date dt1(28, 8, 2019);
Date dt2(28, 8, 2018);
Days days = dt1 - dt2;
ASSERT_EQ(365, (int)days);
}
29. Add the following declaration of the function to the public section of the Date class
in the header file:
Days operator-(const Date& rhs) const;
30. Add the following code after the Date class in the header file:
inline Days Date::operator-(const Date& rhs) const
{
return Days(ToDateT() - rhs.ToDateT());
}
Because we made the Days constructor explicit, we must call it in the return
statement. With all these changes in place, all the tests should pass.
672 | Appendix
31. Configure L3A2date as a datetools binary and open main.cpp in the editor. Remove
the comment from the definition of ACTIVITY2:
#define ACTIVITY2
32. Build and then run the sample application. This will produce the following output:
Figure 3.53: Output of successful Date sample application
We have implemented all of the requirements of the Date and Days classes and
delivered them all with unit tests. The unit tests allowed us to implement incremental
functionality to build up the two complicated algorithms, ToDateT and FromDateT which
form the underlying support for the functionality that we wanted to deliver.
Chapter4 -SeparationofConcerns -SoftwareArchitecture,Functions, VariadicTemplates| 673
Chapter 4 - Separation of Concerns - Software Architecture, Func-
tions, Variadic Templates
Activity 1: Implement a multicast event handler
1. Load the prepared project from the Lesson4/Activity01 folder and configure the
Current Builder for the project to be CMake Build (Portable). Build the project,
configure the launcher and run the unit tests (which fail the one dummy test).
Recommend that the name used for the tests runner is L4delegateTests.
2. In delegateTests.cpp, replace the failing dummy test with the following test:
TEST_F(DelegateTest, BasicDelegate)
{
Delegate delegate;
ASSERT_NO _THROW(delegate.Notify(42));
}
3. This now fails to build, so we need to add a new method to Delegate. As this will
evolve into a template, we will do all of this development in the header file. In
delegate.hpp, and the following definition:
class Delegate
{
public:
Delegate() = default;
void Notify(int value) const
{
}
};
The test now runs and passes.
4. Add the following line to the existing test:
ASSERT_NO _THROW(delegate(22));
674 | Appendix
5. Again, the build fails, so we update the Delegate definition as follows (we could
have had Notify call operator(), but this is easier to read):
void operator()(int value)
{
Notify(value);
}
The test again runs and passes.
6. Before we add the next test, we are going to add some infrastructure to help us
develop our tests. The easiest thing to do with handlers is have them write to
std::cout, and to be able to verify that they were called, we need to capture the
output. To do this, re-route the standard output stream to a different buffer by
changing the DelegateTest class as follows:
class DelegateTest : public ::testing::Test
{
public:
void SetUp() override;
void TearDown() override;
std::stringstream m_buffer;
// Save cout's buffer here
std::streambuf *m_savedBuf{};
};
void DelegateTest::SetUp()
{
// Save the cout buffer
m_savedBuf = std::cout.rdbuf();
// Redirect cout to our buffer
std::cout.rdbuf(m_buffer.rdbuf());
}
void DelegateTest::TearDown()
{
// Restore cout buffer to original
std::cout.rdbuf(m_savedBuf);
}
7. Also add the include statements for <iostream>, <sstream> and <string> to the top
of the file.
Chapter4 -SeparationofConcerns -SoftwareArchitecture,Functions, VariadicTemplates| 675
8. With this support framework in place, add the following test:
TEST_F(DelegateTest, SingleCallback)
{
Delegate delegate;
delegate += [] (int value) { std::cout << "value = " << value; };
delegate.Notify(42);
std::string result = m_buffer.str();
ASSERT_STREQ("value = 42", result.c_str());
}
9. To make the tests build and run again, add the following code in the delegate.h
class:
Delegate& operator+=(const std::function<void(int)>& delegate)
{
m_delegate = delegate;
return *this;
}
Along with the following code:
private:
std::function<void(int)> m_delegate;
The tests now build, but our new test fails.
10. Update the Notify() method to be:
void Notify(int value) const
{
m_delegate(value);
}
11. The tests now build and our new test passes, but the original test now fails. The
call to the delegate is throwing an exception, so we need to check that the dele-
gate is not empty before calling it. Write the following code to do this:
void Notify(int value) const
{
if(m_delegate)
m_delegate(value);
}
All the tests now run and pass.
676 | Appendix
12. We now need to add multicast support to the Delegate class. Add the new test:
TEST_F(DelegateTest, DualCallbacks)
{
Delegate delegate;
delegate += [] (int value) { std::cout << "1: = " << value << "\n"; };
delegate += [] (int value) { std::cout << "2: = " << value << "\n"; };
delegate.Notify(12);
std::string result = m_buffer.str();
ASSERT_STREQ("1: = 12\n2: = 12\n", result.c _str());
}
13. Of course, this test now fails because the operator+=() only assigns to the member
variable. We need to add a list to store our delegates. We choose vector so we can
add to the end of the list as we want to call the delegates in the order that they
are added. Add #include <vector> to the top of delegate.hpp and update Delegate
replace m_delegate with m_delegates vector of the callbacks:
class Delegate
{
public:
Delegate() = default;
Delegate& operator+=(const std::function<void(int)>& delegate)
{
m_delegates.push_back(delegate);
return *this;
}
void Notify(int value) const
{
for(auto& delegate : m_delegates)
{
delegate(value);
}
}
void operator()(int value)
{
Notify(value);
}
private:
Chapter4 -SeparationofConcerns -SoftwareArchitecture,Functions, VariadicTemplates| 677
std::vector<std::function<void(int)>> m_delegates;
};
The tests all run and pass again.
14. We now have the basic multicast delegate class implemented. We now need to
convert it to a template- based class. Update the existing tests, by changing all of
the declarations of Delegate to Delegate<int> in the three tests.
15. Now update the Delegate class by adding template<class Arg> before the class to
convert it to a template, and substituting the four occurrences of int with Arg:
template<class Arg>
class Delegate
{
public:
Delegate() = default;
Delegate& operator+=(const std::function<void(Arg)>& delegate)
{
m_delegates.push_back(delegate);
return *this;
}
void Notify(Arg value) const
{
for(auto& delegate : m_delegates)
{
delegate(value);
}
}
void operator()(Arg value)
{
Notify(value);
}
private:
std::vector<std::function<void(Arg)>> m_delegates;
};
16. All the tests now run and pass as previously, so it stills works for int arguments for
the handlers.
678 | Appendix
17. Add the following test and re-run the tests to confirm that the template conver-
sion is correct:
TEST_F(DelegateTest, DualCallbacksString)
{
Delegate<std::string&> delegate;
delegate += [] (std::string value) { std::cout << "1: = " << value <<
"\n"; };
delegate += [] (std::string value) { std::cout << "2: = " << value <<
"\n"; };
std::string hi{"hi"};
delegate.Notify(hi);
std::string result = m_buffer.str();
ASSERT_STREQ("1: = hi\n2: = hi\n", result.c _str());
}
18. Now it operates as a template that takes one argument. We need to convert it into
a variadic template that takes zero or more arguments. Using the information from
the last topic, update the template to the following:
template<typename... ArgTypes>
class Delegate
{
public:
Delegate() = default;
Delegate& operator+=(const std::function<void(ArgTypes...)>& delegate)
{
m_delegates.push_back(delegate);
return *this;
}
void Notify(ArgTypes&&... args) const
{
for(auto& delegate : m_delegates)
{
delegate(std::forward<ArgTypes>(args)...);
}
}
void operator()(ArgTypes&&... args)
{
Chapter4 -SeparationofConcerns -SoftwareArchitecture,Functions, VariadicTemplates| 679
Notify(std::forward<ArgTypes>(args)...);
}
private:
std::vector<std::function<void(ArgTypes...)>> m_delegates;
};
The tests should still run and pass.
19. Add two more tests – zero argument test, and a mutliple argument test:
TEST_F(DelegateTest, DualCallbacksNoArgs)
{
Delegate delegate;
delegate += [] () { std::cout << "CB1\n"; };
delegate += [] () { std::cout << "CB2\n"; };
delegate.Notify();
std::string result = m_buffer.str();
ASSERT_STREQ("CB1\nCB2\n", result.c _str());
}
TEST_F(DelegateTest, DualCallbacksStringAndInt)
{
Delegate<std::string&, int> delegate;
delegate += [] (std::string& value, int i) {
std::cout << "1: = " << value << "," << i << "\n"; };
delegate += [] (std::string& value, int i) {
std::cout << "2: = " << value << "," << i << "\n"; };
std::string hi{"hi"};
delegate.Notify(hi, 52);
std::string result = m_buffer.str();
ASSERT_STREQ("1: = hi,52\n2: = hi,52\n", result.c _str());
}
All the tests run and pass showing that we have now implemented the desired
Delegate class.
680 | Appendix
20. Now, change the Run configuration to execute the program L4delegate. Open the
main.cpp file in the editor and change the definition at the top of the file to the
following and run the program:
#define ACTIVITY_STEP 27
We get the following output:
Figure 4.35: Output from the successful implementation of Delegate
In this activity, we started by implementing a class that provides the basic single
delegate functionality and then added multicast capability. With that implemented, and
unit tests in place, we were quickly able to convert to a template with one argument
and then to a variadic template version. Depending on the functionality that you are
developing, the approach of the specific implementation transitioning to a general form
and then to an even more general form is the correct one. Development of variadic
templates is not always obvious.
Chapter 5 - The Philosophers' Dinner – Threads and Concurrency | 681
Chapter 5 - The Philosophers' Dinner – Threads and Concurrency
Activity 1: Creating a Simulator to Model the Work of the Art Gallery
The Art Gallery work simulator is an application that simulates how the visitors and the
watchman behave. There is a quantity limit for visitors, that is, only 50 people can be
inside the gallery simultaneously. Visitors constantly come to the gallery. The watchman
checks if the limit of visitors has been exceeded. If so, it asks new visitors to wait and
puts them on a waiting list. If not, it allows them to enter the gallery. Visitors can leave
the gallery at any time. If somebody leaves the gallery, the watchman lets somebody
from the waiting list enter the gallery.
Follow these steps to implement this activity:
1. Create a file that will contain all the constants that we need for this project –
Common.hpp.
2. Add the include guards and the first variable, CountPeopleInside, which represents
that the limit for visitors is 50 people:
#ifndef COMMON_HPP
#define COMMON_HPP
constexpr size_t CountPeopleInside = 5;
#endif // COMMON_HPP
3. Now, create a header and the source files for the Person class, that is, Person.hpp
and Person.cpp. Also, add the include guards. Define the Person class and delete
the copy constructor and copy assignment operator; we will only use the user-de-
fined default constructor, move constructor, and move assignment operator and
default destructor. Add a private variable called m_Id; we will use it for logging.
Also, add a private static variable called m_NextId; it will be used for generating
unique IDs:
#ifndef PERSON_HPP
#define PERSON_HPP
class Person
{
public:
Person();
Person& operator=(Person&);
Person(Person&&);
~ Person() = default;
Person(const Person&) = delete;
682 | Appendix
Person& operator=(const Person&) = delete;
private:
int m_Id;
static int m_NextId;
};
#endif // PERSON_HPP
4. In the source file, define our static variable, m_NextId. Then, in the constructor,
initialize the m_Id variable with the value of m_NextId. Print the log in the construc-
tor. Implement the move copy constructor and the move assignment operator.
Now, implement thread-safe storage for our Person objects. Create the required
header and source files, that is, Persons.hpp and Persons.cpp. Also, add the include
guards. Include "Person.hpp" and the <mutex> and <vector> headers. Define the
Persons class with a user-defined default constructor and default destructor.
Declare the add() function for adding the Person and get() for getting the Person
and removing it from the list. Define the size() function to get the count of Person
elements, as well as removePerson(), which removes any person from the storage.
In the private section, declare a variable of the mutex type, namely m_Mutex, and
the vector to store Persons, namely m_Persons:
#ifndef PERSONS_HPP
#define PERSONS_HPP
#include "Person.hpp"
#include <mutex>
#include <vector>
class Persons
{
public:
Persons();
~ Persons() = default;
void add(Person&& person);
Person get();
size_t size() const;
void removePerson();
private:
std::mutex m_Mutex;
Chapter 5 - The Philosophers' Dinner – Threads and Concurrency | 683
std::vector<Person> m_Persons;
};
#endif // PERSONS_HPP
5. In the source file, declare the user-defined constructor where we reserve the size
of the vector to be 50 elements (to avoid resizing during growth):
Persons::Persons()
{
m_Persons.reserve(CountPeopleInside);
}
6. Declare the add() function, which takes an rvalue parameter of the Person type,
locks the mutex, and adds Person to the vector using the std::move() function:
void Persons::add(Person&& person)
{
std::lock_guard<std::mutex> m_lock(m_Mutex);
m_Persons.emplace_back(std::move(person));
}
7. Declare the get() function, which locks the mutex and returns the last element
and then removes it from the vector. If the vector is empty, it will throw an excep-
tion:
Person Persons::get()
{
std::lock_guard<std::mutex> m_lock(m_Mutex);
if (m_Persons.empty())
{
throw "Empty Persons storage";
}
Person result = std::move(m_Persons.back());
m_Persons.pop_back();
return result;
}
8. Declare the size() function, which returns the size of the vector:
size_t Persons::size() const
{
return m_Persons.size();
}
684 | Appendix
9. Finally, declare the removePerson() function, which locks the mutex and removes
the last item from the vector:
void Persons::removePerson()
{
std::lock_guard<std::mutex> m_lock(m_Mutex);
m_Persons.pop_back();
std::cout << "Persons | removePerson | removed" << std::endl;
}
10. Now, implement the PersonGenerator class, which is responsible for creating
and removing Person items. Create the respective header and source files, that
is, PersonGenerator.hpp and PersonGenerator.cpp. Also, add the include guards.
Include the "Person.hpp", <thread>, and <condition_variable> headers. Define the
PersonGenerator class. In the private section, define two std::thread variables,
namely m_CreateThread and m_RemoveThread. In one thread, we will create new
Person objects and will notify the user about removing Person objects in the other
thread asynchronously. Define a reference to a shared variable of the Persons type,
namely m_CreatedPersons. We will place every new person in it. m _CreatedPersons
will be shared between several threads. Define two references to std::condition_
variable, namely m_CondVarAddPerson and m_CondVarRemovePerson. They will be
used for communication between threads. Define two references to the std::mu-
tex variables, namely m_AddLock and m_RemoveLock. They will be used for receiving
access to condition variables. Finally, define two references to a bool value, namely
m_AddNotified and m_RemoveNotified. They will be used for checking whether the
notification is true or false. Also, in the private section, define two functions that
will be start functions for our threads – runCreating() and runRemoving(). Next,
define two functions that will trigger condition variables, namely notifyCreated()
and notifyRemoved(). In the public section, define a constructor that takes all the
references that we defined in the private section as a parameter. Finally, define a
destructor. This will ensure that the other default generated functions are deleted:
#ifndef PERSON_GENERATOR _HPP
#define PERSON_GENERATOR _HPP
#include "Persons.hpp"
#include <condition_variable>
#include <thread>
class PersonGenerator
{
public:
PersonGenerator(Persons& persons,
Chapter 5 - The Philosophers' Dinner – Threads and Concurrency | 685
std::condition_variable& add_person,
std::condition_variable& remove_person,
std::mutex& add_lock,
std::mutex& remove_lock,
bool& addNotified,
bool& removeNotified);
~ PersonGenerator();
PersonGenerator(const PersonGenerator&) = delete;
PersonGenerator(PersonGenerator&&) = delete;
PersonGenerator& operator=(const PersonGenerator&) = delete;
PersonGenerator& operator=(PersonGenerator&&) = delete;
private:
void runCreating();
void runRemoving();
void notifyCreated();
void notifyRemoved();
private:
std::thread m_CreateThread;
std::thread m_RemoveThread;
Persons& m_CreatedPersons;
// to notify about creating new person
std::condition_variable& m_CondVarAddPerson;
std::mutex& m_AddLock;
bool& m_AddNotified;
// to notify that person needs to be removed
std::condition_variable& m_CondVarRemovePerson;
std::mutex& m_RemoveLock;
bool& m_RemoveNotified;
};
#endif // PERSON_GENERATOR _HPP
686 | Appendix
11. Now, move on to the source file. Include the <stdlib.h> file so that we can access
the srand() and rand() functions, which are used for random number generation.
Include the <time.h> header so that we can access the time() function, as well as
the std::chrono namespace. They are used for when we work with time. Include
the <ratio> file, which used for typedefs so that we can work with the time library:
#include "PersonGenerator.hpp"
#include <iostream>
#include <stdlib.h>
/* srand, rand */
#include <time.h>
/* time, chrono */
#include <ratio>
/* std::milli */
12. Declare the constructor and initialize all the parameters except the threads in the
initializer list. Initialize the threads with the appropriate functions in the construc-
tor body:
PersonGenerator::PersonGenerator(Persons& persons,
std::condition_variable& add_person,
std::condition_variable& remove_person,
std::mutex& add_lock,
std::mutex& remove_lock,
bool& addNotified,
bool& removeNotified)
: m_CreatedPersons(persons)
, m_CondVarAddPerson(add_person)
, m_AddLock(add_lock)
, m_AddNotified(addNotified)
, m_CondVarRemovePerson(remove_person)
, m_RemoveLock(remove_lock)
, m_RemoveNotified(removeNotified)
{
m_CreateThread = std::thread(&PersonGenerator::runCreating, this);
m_RemoveThread = std::thread(&PersonGenerator::runRemoving, this);
}
13. Declare a destructor and check if the threads are joinable. Join them if not:
PersonGenerator::~PersonGenerator()
{
if (m_CreateThread.joinable())
{
m_CreateThread.join();
}
if (m_RemoveThread.joinable())
Chapter 5 - The Philosophers' Dinner – Threads and Concurrency | 687
{
m_RemoveThread.join();
}
}
14. Declare the runCreating() function, which is the start function for the m_CreateTh-
read thread. In this function, in an infinite loop, we will generate a random number
from 1 to 10 and make the current thread sleep for this time. After this, create a
Person value, add it to the shared container, and notify other threads about it:
void PersonGenerator::runCreating()
{
using namespace std::chrono_literals;
srand (time(NULL));
while(true)
{
std::chrono::duration<int, std::milli> duration((rand() % 10 +
1)*1000);
std::this_thread::sleep_for(duration);
std::cout << "PersonGenerator | runCreating | new person:" <<
std::endl;
m_CreatedPersons.add(std::move(Person()));
notifyCreated();
}
}
15. Declare the runRemoving() function, which is the start function for the m_RemoveTh-
read thread. In this function, in an infinite loop, we will generate a random number
from 20 to 30 and make the current thread sleep for this time. After this, notify
the other threads that some of the visitors should be removed:
void PersonGenerator::runRemoving()
{
using namespace std::chrono_literals;
srand (time(NULL));
while(true)
{
std::chrono::duration<int, std::milli> duration((rand() % 10 +
20)*1000);
std::this_thread::sleep_for(duration);
std::cout << "PersonGenerator | runRemoving | somebody has left
the gallery:" << std::endl;
688 | Appendix
notifyRemoved();
}
}
16. Declare the notifyCreated() and notifyRemoved() functions. In their bodies, lock
the appropriate mutex, set the appropriate bool variable to true, and call the
notify_all() functions on the appropriate condition variables:
void PersonGenerator::notifyCreated()
{
std::unique_lock<std::mutex> lock(m_AddLock);
m_AddNotified = true;
m_CondVarAddPerson.notify_all();
}
void PersonGenerator::notifyRemoved()
{
std::unique_lock<std::mutex> lock(m_RemoveLock);
m_RemoveNotified = true;
m_CondVarRemovePerson.notify_all();
}
17. Finally, we need to create the files for our last class, Watchman, namely Watch-
man.hpp and Watchman.cpp. As usual, add the include guards. Include the "Persons.
hpp", <thread>, <mutex>, and <condition_variable> headers. Define the Watchman
class. In the private section, define two std::thread variables, namely m_ThreadAdd
and m_ThreadRemove. In one of the threads, we will move new Person objects to the
appropriate queue and will remove Person objects in the other thread asynchro-
nously. Define the references to the shared Persons variables, namely m_Created-
People, m_PeopleInside, and m_PeopleInQueue. We will take every new person from
the m_CreatedPeople list and move them to the m_PeopleInside list if the limit is not
exceeded. We will move them to the m_PeopleInQueue list otherwise. They will be
shared between several threads. Define two references to std::condition_varia-
ble, namely m_CondVarAddPerson and m_CondVarRemovePerson. They will be used for
communication between threads. Define two references to the std::mutex varia-
bles, namely m_AddMux and m_RemoveMux. They will be used for receiving access to
condition variables. Finally, define two references to a bool value, namely m_AddNo-
tified and m_RemoveNotified. They will be used for checking if the notification is
true or false. Also, in the private section, define two functions that will be start
functions for our threads – runAdd() and runRemove(). In the public section, define
a constructor that takes all the references that we defined in the private section as
parameters. Now, define a destructor. Make sure that all the other default gener-
ated functions are deleted:
Chapter 5 - The Philosophers' Dinner – Threads and Concurrency | 689
#ifndef WATCHMAN_HPP
#define WATCHMAN_HPP
#include <mutex>
#include <thread>
#include <condition_variable>
#include "Persons.hpp"
class Watchman
{
public:
Watchman(std::condition_variable&,
std::condition_variable&,
std::mutex&,
std::mutex&,
bool&,
bool&,
Persons&,
Persons&,
Persons&);
~ Watchman();
Watchman(const Watchman&) = delete;
Watchman(Watchman&&) = delete;
Watchman& operator=(const Watchman&) = delete;
Watchman& operator=(Watchman&&) = delete;
private:
void runAdd();
void runRemove();
private:
std::thread m_ThreadAdd;
std::thread m_ThreadRemove;
std::condition_variable& m_CondVarRemovePerson;
std::condition_variable& m_CondVarAddPerson;
std::mutex& m_AddMux;
std::mutex& m_RemoveMux;
bool& m_AddNotified;
bool& m_RemoveNotified;
Persons& m_PeopleInside;
Persons& m_PeopleInQueue;
Persons& m_CreatedPeople;
};
#endif // WATCHMAN_HPP
690 | Appendix
18. Now, move on to the source file. Include the "Common.hpp" header so that we can
access the m_CountPeopleInside variable and the other necessary headers:
#include "Watchman.hpp"
#include "Common.hpp"
#include <iostream>
19. Declare the constructor and initialize all the parameters except for the threads
in the initializer list. Initialize the threads with the appropriate functions in the
constructor's body:
Watchman::Watchman(std::condition_variable& addPerson,
std::condition_variable& removePerson,
std::mutex& addMux,
std::mutex& removeMux,
bool& addNotified,
bool& removeNotified,
Persons& peopleInside,
Persons& peopleInQueue,
Persons& createdPeople)
: m_CondVarRemovePerson(removePerson)
, m_CondVarAddPerson(addPerson)
, m_AddMux(addMux)
, m_RemoveMux(removeMux)
, m_AddNotified(addNotified)
, m_RemoveNotified(removeNotified)
, m_PeopleInside(peopleInside)
, m_PeopleInQueue(peopleInQueue)
, m_CreatedPeople(createdPeople)
{
m_ThreadAdd = std::thread(&Watchman::runAdd, this);
m_ThreadRemove = std::thread(&Watchman::runRemove, this);
}
20. Declare a destructor and check if the threads are joinable. Join them if not:
Watchman::~Watchman()
{
if (m_ThreadAdd.joinable())
{
m_ThreadAdd.join();
}
if (m_ThreadRemove.joinable())
{
Chapter 5 - The Philosophers' Dinner – Threads and Concurrency | 691
m_ThreadRemove.join();
}
}
21. Declare the runAdd() function. Here, we create an infinite loop. In the loop, we
are waiting for a condition variable. When the condition variable notifies, we take
people from the m_CreatedPeople list and move them to the appropriate list, that is,
m_PeopleInside, or m_PeopleInQueue if the limit has been exceeded. Then, we check
if there are any people in the m_PeopleInQueue list and if m_PeopleInside is not full,
we move them into this list:
void Watchman::runAdd()
{
while (true)
{
std::unique_lock<std::mutex> locker(m_AddMux);
while(!m_AddNotified)
{
std::cerr << "Watchman | runAdd | false awakening" <<
std::endl;
m_CondVarAddPerson.wait(locker);
}
std::cout << "Watchman | runAdd | new person came" << std::endl;
m_AddNotified = false;
while (m_CreatedPeople.size() > 0)
{
try
{
auto person = m_CreatedPeople.get();
if (m_PeopleInside.size() < CountPeopleInside)
{
std::cout << "Watchman | runAdd | welcome in our The
Art Gallery" << std::endl;
m_PeopleInside.add(std::move(person));
}
else
{
std::cout << "Watchman | runAdd | Sorry, we are full.
Please wait" << std::endl;
m_PeopleInQueue.add(std::move(person));
}
}
catch(const std::string& e)
692 | Appendix
{
std::cout << e << std::endl;
}
}
std::cout << "Watchman | runAdd | check people in queue" <<
std::endl;
if (m_PeopleInQueue.size() > 0)
{
while (m_PeopleInside.size() < CountPeopleInside)
{
try
{
auto person = m_PeopleInQueue.get();
std::cout << "Watchman | runAdd | welcome in our The
Art Gallery" << std::endl;
m_PeopleInside.add(std::move(person));
}
catch(const std::string& e)
{
std::cout << e << std::endl;
}
}
}
}
}
22. Next, declare the runRemove() function, where we will remove visitors from m_
PeopleInside. Here, also in the infinite loop, we are waiting for the m_CondVarRe-
movePerson condition variable. When it notifies the thread, we remove people from
the list of visitors. Next, we will check if there's anybody in the m_PeopleInQueue list
and if the limit is not exceeded, we add them to m_PeopleInside:
void Watchman::runRemove()
{
while (true)
{
std::unique_lock<std::mutex> locker(m_RemoveMux);
while(!m_RemoveNotified)
{
std::cerr << "Watchman | runRemove | false awakening" <<
std::endl;
m_CondVarRemovePerson.wait(locker);
}
Chapter 5 - The Philosophers' Dinner – Threads and Concurrency | 693
m_RemoveNotified = false;
if (m_PeopleInside.size() > 0)
{
m_PeopleInside.removePerson();
std::cout << "Watchman | runRemove | good buy" << std::endl;
}
else
{
std::cout << "Watchman | runRemove | there is nobody in The
Art Gallery" << std::endl;
}
std::cout << "Watchman | runRemove | check people in queue" <<
std::endl;
if (m_PeopleInQueue.size() > 0)
{
while (m_PeopleInside.size() < CountPeopleInside)
{
try
{
auto person = m_PeopleInQueue.get();
std::cout << "Watchman | runRemove | welcome in our
The Art Gallery" << std::endl;
m_PeopleInside.add(std::move(person));
}
catch(const std::string& e)
{
std::cout << e << std::endl;
}
}
}
}
}
23. Finally, move to the main() function. First, create all the shared variables that we
used in the Watchman and PersonGenerator classes. Next, create the Watchman and
PersonGenerator variables and pass those shared variables to the constructors. At
the end of the main function read the character to avoid closing the application:
int main()
{
{
std::condition_variable g_CondVarRemovePerson;
std::condition_variable g_CondVarAddPerson;
694 | Appendix
std::mutex g_AddMux;
std::mutex g_RemoveMux;
bool g_AddNotified = false;;
bool g_RemoveNotified = false;
Persons g_PeopleInside;
Persons g_PeopleInQueue;
Persons g_CreatedPersons;
PersonGenerator generator(g_CreatedPersons, g_CondVarAddPerson,
g_CondVarRemovePerson,
g_AddMux, g_RemoveMux, g_AddNotified, g_
RemoveNotified);
Watchman watchman(g_CondVarAddPerson,
g_CondVarRemovePerson,
g_AddMux,
g_RemoveMux,
g_AddNotified,
g_RemoveNotified,
g_PeopleInside,
g_PeopleInQueue,
g_CreatedPersons);
}
char a;
std::cin >> a;
return 0;
}
Chapter 5 - The Philosophers' Dinner – Threads and Concurrency | 695
24. Compile and run the application. In the terminal, you will see logs from different
threads about creating and moving people from one list to another. Your output
will be similar to the following screenshot:
Figure 5.27: The result of the application's execution
As you can see, all the threads communicate with each other in a very easy and
clean way. We protected our shared data by using mutexes so that we can avoid race
conditions. Here, we used an exception to warn about the empty lists and caught
them in the thread's functions so that our threads handle exceptions on their own. We
also checked if the thread is joinable before joining it in the destructor. This allowed
us to avoid the unexpected termination of the program. Thus, this small project
demonstrates our skills when it comes to working with threads.
696 | Appendix
Chapter 6 – Streams and I/O
Activity 1 The Logging System for The Art Gallery Simulator
The thread-safe logger allows us to output data to the Terminal simultaneously. We
implement this logger by inheriting from the std::ostringstream class and using a
mutex for synchronization. We will implement a class that provides an interface for the
formatted output and our logger will use it to extend the basic output. We define macro
definitions for different logging levels to provide an interface that will be easy and clear
to use. Follow these steps to complete this activity:
1. Open the project from Lesson6.
2. Create a new directory called logger inside the src/ directory. You will get the
following hierarchy:
Figure 6.25: The hierarchy of the project
3. Create a header and source file called LoggerUtils. In LoggerUtils.hpp, add include
guards. Include the <string> header to add support for working with strings.
Define a namespace called logger and then define a nesting namespace called
utils. In the utils namespace, declare the LoggerUtils class.
4. In the public section, declare the following static functions: getDateTime, getThrea-
dId, getLoggingLevel, getFileAndLine, getFuncName, getInFuncName, and getOutFunc-
Name. Your class should look as follows:
#ifndef LOGGERUTILS_HPP _
#define LOGGERUTILS_HPP _
#include <string>
Chapter 6 – Streams and I/O | 697
namespace logger
{
namespace utils
{
class LoggerUtils
{
public:
static std::string getDateTime();
static std::string getThreadId();
static std::string getLoggingLevel(const std::string& level);
static std::string getFileAndLine(const std::string& file, const int&
line);
static std::string getFuncName(const std::string& func);
static std::string getInFuncName(const std::string& func);
static std::string getOutFuncName(const std::string& func);
};
} // namespace utils
} // namespace logger
#endif /* LOGGERUTILS_HPP _ */
5. In LoggerUtils.cpp, add the required includes: the "LoggerUtils.hpp" header,
<sstream> for std::stringstream support, and <ctime> for date and time support:
#include "LoggerUtils.hpp"
#include <sstream>
#include <ctime>
#include <thread>
6. Enter the logger and utils namespaces. Write the required function definitions.
In the getDateTime() function, get the local time using the localtime() function.
Format it into a string using the strftime() function. Convert it into the desired
format using std::stringstream:
std::string LoggerUtils::getDateTime()
{
time_t rawtime;
struct tm * timeinfo;
char buffer[80];
time (&rawtime);
timeinfo = localtime(&rawtime);
698 | Appendix
strftime(buffer,sizeof(buffer),"%d-%m-%YT%H:%M:%S",timeinfo);
std::stringstream ss;
ss << "[";
ss << buffer;
ss << "]";
return ss.str();
}
7. In the getThreadId() function, get the current thread ID and convert it into the
desired format using std::stringstream:
std::string LoggerUtils::getThreadId()
{
std::stringstream ss;
ss << "[";
ss << std::this_thread::get_id();
ss << "]";
return ss.str();
}
8. In the getLoggingLevel() function, convert the given string into the desired format
using std::stringstream:
std::string LoggerUtils::getLoggingLevel(const std::string& level)
{
std::stringstream ss;
ss << "[";
ss << level;
ss << "]";
return ss.str();
}
9. In the getFileAndLine() function, convert the given file and line into the desired
format using std::stringstream:
std::string LoggerUtils::getFileAndLine(const std::string& file, const int&
line)
{
std::stringstream ss;
ss<<"";
ss << file;
ss << ":";
Chapter 6 – Streams and I/O | 699
ss << line;
ss << ":";
return ss.str();
}
10. In the getFuncName() function, convert the function name into the desired format
using std::stringstream:
std::string LoggerUtils::getFuncName(const std::string& func)
{
std::stringstream ss;
ss<<"---";
ss << func;
ss << "()";
return ss.str();
}
11. In the getInFuncName() function convert the function name to the desired format
using std::stringstream.
std::string LoggerUtils::getInFuncName(const std::string& func)
{
std::stringstream ss;
ss<<"-->";
ss << func;
ss << "()";
return ss.str();
}
12. In the getOutFuncName() function, convert the function name into the desired
format using std::stringstream:
std::string LoggerUtils::getOutFuncName(const std::string& func)
{
std::stringstream ss;
ss<<"<-- ";
ss << func;
ss << "()";
return ss.str();
}
700 | Appendix
13. Create a header file called LoggerMacroses.hpp. Add include guards. Create macro
definitions for each LoggerUtils function: DATETIME for the getDateTime() function,
THREAD_ID for the getThreadId() function, LOG_LEVEL for the getLoggingLevel()
function, FILE_LINE for the getFileAndLine() function, FUNC_NAME for the getFunc-
Name() function, FUNC_ENTRY _NAME for the getInFuncName() function, and FUNC_EXIT _
NAME for the getOutFuncName() function. As a result, the header file should look as
follows:
#ifndef LOGGERMACROSES_HPP_
#define LOGGERMACROSES_HPP _
#define DATETIME \
logger::utils::LoggerUtils::getDateTime()
#define THREAD_ID \
logger::utils::LoggerUtils::getThreadId()
#define LOG_LEVEL( level ) \
logger::utils::LoggerUtils::getLoggingLevel(level)
#define FILE_LINE \
logger::utils::LoggerUtils::getFileAndLine(__FILE _ _,
__LINE__)
#define FUNC_NAME \
logger::utils::LoggerUtils::getFuncName(__FUNCTION _ _)
#define FUNC_ENTRY _NAME \
logger::utils::LoggerUtils::getInFuncName(__FUNCTION _ _)
#define FUNC_EXIT _NAME \
logger::utils::LoggerUtils::getOutFuncName(__FUNCTION _ _)
#endif /* LOGGERMACROSES_HPP _ */
14. Create a header and source file called StreamLogger. In StreamLogger.hpp, add the
required include guards. Include the LoggerMacroses.hpp and LoggerUtils.hpp
header files. Then, include the <sstream> header for std::ostringstream support,
the <thread> header for std::thread support, and the <mutex> header for std::mu-
tex support:
#include "LoggerMacroses.hpp"
#include "LoggerUtils.hpp"
#include <sstream>
#include <thread>
#include <mutex>
Chapter 6 – Streams and I/O | 701
15. Enter the namespace logger. Declare the StreamLogger class, which inherits from the
std::ostringstream class. This inheritance allows us to use an overloaded left shift
operator, <<, for logging. We don't set the output device, so the output will not
be performed – just stored in the internal buffer. In the private section, declare a
static std::mutex variable called m_mux. Declare constant strings so that you can
store the logging level, file and line, and function name. In the public section,
declare a constructor that takes the logging level, file and line, and function name
as parameters. Declare a class destructor. The class declaration should look like as
follows:
namespace logger
{
class StreamLogger : public std::ostringstream
{
public:
StreamLogger(const std::string logLevel,
const std::string fileLine,
const std::string funcName);
~ StreamLogger();
private:
static std::mutex m_mux;
const std::string m_logLevel;
const std::string m_fileLine;
const std::string m_funcName;
};
} // namespace logger
16. In StreamLogger.cpp, include the StreamLogger.hpp and <iostream> headers for
std::cout support. Enter the logger namespace. Define the constructor and
initialize all the members in the initializer list. Then, define the destructor and
enter its scope. Lock the m_mux mutex. If the internal buffer is empty, output only
the date and time, thread ID, logging level, file and line, and the function name.
As a result, we will get the line in the following format: [dateTtime][threadId]
[logLevel][file:line: ][name() --- ]. If the internal buffer contains any data,
output the same string with the buffer at the end. As a result, we will get the line
in the following format: [dateTtime][threadId][logLevel][file:line: ][name()
---
] | message. The complete source file should look as follows:
#include "StreamLogger.hpp"
#include <iostream>
std::mutex logger::StreamLogger::m_mux;
702 | Appendix
namespace logger
{
StreamLogger::StreamLogger(const std::string logLevel,
const std::string fileLine,
const std::string funcName)
: m_logLevel(logLevel)
, m_fileLine(fileLine)
, m_funcName(funcName)
{}
StreamLogger::~StreamLogger()
{
std::lock_guard<std::mutex> lock(m_mux);
if (this->str().empty())
{
std::cout << DATETIME << THREAD_ID << m_logLevel << m_fileLine <<
m_funcName << std::endl;
}
else
{
std::cout << DATETIME << THREAD_ID << m_logLevel << m_fileLine <<
m_funcName << " | " << this->str() << std::endl;
}
}
}
17. Create a header file called Logger.hpp and add the required include guards. Include
the StreamLogger.hpp and LoggerMacroses.hpp headers. Next, create the macro
definitions for the different logging levels: LOG_TRACE(), LOG_DEBUG(), LOG_WARN(),
LOG_TRACE(), LOG_INFO(), LOG_ERROR(), LOG_TRACE_ENTRY(), and LOG_TRACE_EXIT().
The complete header file should look as follows:
#ifndef LOGGER_HPP _
#define LOGGER_HPP _
#include "StreamLogger.hpp"
#include "LoggerMacroses.hpp"
#define LOG_TRACE() logger::StreamLogger{LOG_LEVEL("Trace"), FILE_LINE,
FUNC_NAME}
#define LOG_DEBUG() logger::StreamLogger{LOG_LEVEL("Debug"), FILE_LINE,
FUNC_NAME}
#define LOG_WARN() logger::StreamLogger{LOG_LEVEL("Warning"), FILE_LINE,
Chapter 6 – Streams and I/O | 703
FUNC_NAME}
#define LOG_TRACE() logger::StreamLogger{LOG_LEVEL("Trace"), FILE_LINE,
FUNC_NAME}
#define LOG_INFO() logger::StreamLogger{LOG_LEVEL("Info"), FILE_LINE, FUNC_
NAME}
#define LOG_ERROR() logger::StreamLogger{LOG_LEVEL("Error"), FILE_LINE,
FUNC_NAME}
#define LOG_TRACE_ENTRY() logger::StreamLogger{LOG_LEVEL("Error"), FILE_
LINE, FUNC_ENTRY_NAME}
#define LOG_TRACE_EXIT() logger::StreamLogger{LOG_LEVEL("Error"), FILE_
LINE, FUNC_EXIT _NAME}
#endif /* LOGGER_HPP _ */
18. Replace all the std::cout calls with the appropriate macro definition call. Include
the logger/Logger.hpp header in the Watchman.cpp source file. In the runAdd() func-
tion, replace all instances of std::cout with macro definitions for different logging
levels. The runAdd() function should look as follows:
void Watchman::runAdd()
{
while (true)
{
std::unique_lock<std::mutex> locker(m_AddMux);
while(!m_AddNotified)
{
LOG_DEBUG() << "Spurious awakening";
m_CondVarAddPerson.wait(locker);
}
LOG_INFO() << "New person came";
m_AddNotified = false;
while (m_CreatedPeople.size() > 0)
{
try
{
auto person = m_CreatedPeople.get();
if (m_PeopleInside.size() < CountPeopleInside)
{
LOG_INFO() << "Welcome in the our Art Gallery";
m_PeopleInside.add(std::move(person));
}
else
704 | Appendix
{
LOG_INFO() << "Sorry, we are full. Please wait";
m_PeopleInQueue.add(std::move(person));
}
}
catch(const std::string& e)
{
LOG_ERROR() << e;
}
}
LOG_TRACE() << "Check people in queue";
if (m_PeopleInQueue.size() > 0)
{
while (m_PeopleInside.size() < CountPeopleInside)
{
try
{
auto person = m_PeopleInQueue.get();
LOG_INFO() << "Welcome in the our Art Gallery";
m_PeopleInside.add(std::move(person));
}
catch(const std::string& e)
{
LOG_ERROR() << e;
}
}
}
}
}
19. Notice how we use our new logger. We invoke the macro definition with parenthe-
ses and use the left shift operator:
LOG_ERROR() << e;
Or
LOG_INFO() << "Welcome in the our Art Gallery";
20. Do the same replacement for the rest of code.
Chapter 6 – Streams and I/O | 705
21. Build and run the application. In the Terminal, you will see that log messages
appear from the different threads with different logging levels and with useful
information. After some time has passed, you will get some output similar to the
following:
Figure 6.26: The execution result of the activity project
As you can see, it's really easy to read and understand logs. You can easily change the
StreamLogger class to write logs to the file on the filesystem if your needs differ. You can
add any other information that you may need to debug your application using logs, such
as output function parameters. You can also override the left shift operator for your
custom types to output debug information easily.
In this project, we employed many things that we have learned about during this
chapter. We created an additional stream for thread-safe output, we formatted the
output to the desired representation, we employed std::stringstream to perform
formatting data, and we used macro definitions for convenient logger usage. Thus, this
project demonstrates our skills in working with concurrent I/O.
706 | Appendix
Chapter 7 - Everybody Falls, It's How You Get Back Up – Testing
and Debugging
Activity 1: Checking the Accuracy of the Functions Using Test Cases and Un-
derstanding Test-Driven Development (TDD)
For this activity, we'll develop the functions to parse the RecordFile.txt and
CurrencyConversion.txt files and write test cases to check the accuracy of the
functions. Follow these steps to implement this activity:
1. Create a configuration file named parse.conf and write the configurations.
2. Note that only two variables are of interest here, that is, currencyFile and record-
File. The rest are meant for other environment variables:
CONFIGURATION_FILE
currencyFile = ./CurrencyConversion.txt
recordFile = ./RecordFile.txt
DatabaseServer = 192.123 .41.112
UserId = sqluser
Password = sqluser
RestApiServer = 101.21 .231 .11
LogFilePath = /var/project/logs
3. Create a header file named CommonHeader.h and declare all the utility functions,
that is, isAllNumbers(), isDigit(), parseLine(), checkFile(), parseConfig(), parse-
CurrencyParameters(), fillCurrencyMap(), parseRecordFile(), checkRecord(),
displayCurrencyMap(), and displayRecords().
#ifndef __COMMON _HEADER _ _H
#define __COMMON_HEADER _ _H
#include<iostream>
#include<cstring>
#include<fstream>
#include<vector>
#include<string>
#include<map>
#include<sstream>
#include<iterator>
#include<algorithm>
#include<iomanip>
using namespace std;
Chapter 7 - Everybody Falls, It's How You Get Back Up – Testing and Debugging | 707
// Forward declaration of global variables.
extern string configFile;
extern string recordFile;
extern string currencyFile;
extern map<string, float> currencyMap;
struct record;
extern vector<record>
vecRecord;
//Structure to hold Record Data .
struct record{
int
customerId;
string firstName;
string lastName;
int
orderId;
int
productId;
int
quantity;
float totalPriceRegional;
string currency;
float totalPriceUsd;
record(vector<string> & in){
customerId
= atoi(in[0].c _str());
firstName
= in[1];
lastName
= in[2];
orderId
= atoi(in[3].c _str());
productId
= atoi(in[4].c _str());
quantity
= atoi(in[5].c _str());
totalPriceRegional = static_cast<float>(atof(in[6].c _str()));
currency
= in[7];
totalPriceUsd
= static_cast<float>(atof(in[8].c _str()));
}
};
// Declaration of Utility Functions..
string trim (string &);
bool isAllNumbers(const string &);
bool isDigit(const string &);
void parseLine(ifstream &, vector<string> &, char);
bool checkFile(ifstream &, string &, string, char, string &);
bool parseConfig();
bool parseCurrencyParameters( vector<string> &);
708 | Appendix
bool fillCurrencyMap();
bool parseRecordFile();
bool checkRecord(vector<string> &);
void displayCurrencyMap();
ostream& operator<<(ostream &, const record &);
void displayRecords();
#endif
4. Create a file named Util.cpp and define all the utility functions. Write the following
code to define the trim() function:
#include<CommonHeader.h>
// Utility function to remove spaces and tabs from start of string and end
of string..
string trim (string &str) { // remove space and tab from string.
string res("");
if ((str.find(' ') != string::npos) || (str.find(' ') != string::npos)){
// if space or tab found..
size_t begin, end;
if ((begin = str.find_first_not_of(" \t")) != string::npos){ // if
string is not empty..
end = str.find_last_not_of(" \t");
if(end>=begin)
res = str.substr(begin, end - begin + 1);
}
}else{
res = str; // No space or tab found..
}
str = res;
return res;
}
5. Write the following code to define the isAllNumbers(), isDigit(), and parseLine()
functions:
// Utility function to check if string contains only digits ( 0-9) and
only single '.'
// eg . 1121 .23 , .113, 121. are valid, but 231.14 .143 is not valid.
bool isAllNumbers(const string &str){ // make sure, it only contains digit
and only single '.' if any
return ( all_of(str.begin(), str.end(), [](char c) { return (
isdigit(c) || (c == '.')); })
&& (count(str.begin(), str.end(), '.') <= 1) );
Chapter 7 - Everybody Falls, It's How You Get Back Up – Testing and Debugging | 709
}
//Utility function to check if string contains only digits (0-9)..
bool isDigit(const string &str){
return ( all_of(str.begin(), str.end(), [](char c) { return
isdigit(c); }));
}
// Utility function, where single line of file <infile> is parsed using
delimiter.
// And store the tokens in vector of string.
void parseLine(ifstream &infile, vector<string> & vec, char delimiter){
string line, token;
getline(infile, line);
istringstream ss(line);
vec.clear();
while(getline(ss, token, delimiter)) // break line using delimiter
vec.push_back(token); // store tokens in vector of string
}
6. Write the following code to define the parseCurrencyParameters() and check-
Record() functions:
// Utility function to check if vector string of 2 strings contain correct
// currency and conversion ratio. currency should be 3 characters,
conversion ratio
// should be in decimal number format.
bool parseCurrencyParameters( vector<string> & vec){
trim(vec[0]); trim(vec[1]);
return ( (!vec[0].empty()) && (vec[0].size() == 3) && (!vec[1].
empty()) && (isAllNumbers(vec[1])) );
}
// Utility function, to check if vector of string has correct format for
records parsed from Record File.
// CustomerId, OrderId, ProductId, Quantity should be in integer format
// TotalPrice Regional and USD should be in decimal number format
// Currecny should be present in map.
bool checkRecord(vector<string> &split){
// Trim all string in vector
for (auto &s : split)
trim(s);
710 | Appendix
if ( !(isDigit(split[0]) && isDigit(split[3]) && isDigit(split[4]) &&
isDigit(split[5])) ){
cerr << "ERROR: Record with customer id:" << split[0] << " doesnt
have right DIGIT parameter" << endl;
return false;
}
if ( !(isAllNumbers(split[6]) && isAllNumbers(split[8])) ){
cerr << "ERROR: Record with customer id:" << split[0] << " doesnt
have right NUMBER parameter" << endl;
return false;
}
if ( currencyMap.find(split[7]) == currencyMap.end() ){
cerr << "ERROR: Record with customer id :" << split[0] << " has
currency :" << split[7] << " not present in map" << endl;
return false;
}
return true;
}
7. Write the following code to define the checkFile() function:
// Function to test initial conditions of file..
// Check if file is present and has correct header information.
bool checkFile(ifstream &inFile, string &fileName, string parameter, char
delimiter, string &error){
bool flag = true;
inFile.open(fileName);
if ( inFile.fail() ){
error = "Failed opening " + fileName + " file, with error: " +
strerror(errno);
flag = false;
}
if (flag){
vector<string> split;
// Parse first line as header and make sure it contains parameter
as first token.
parseLine(inFile, split, delimiter);
if (split.empty()){
error = fileName + " is empty";
Chapter 7 - Everybody Falls, It's How You Get Back Up – Testing and Debugging | 711
flag = false;
} else if ( split[0].find(parameter) == string::npos ){
error = "In " + fileName + " file, first line doesnt contain
header ";
flag = false;
}
}
return flag;
}
8. Write the following code to define parseConfig() function:
// Function to parse Config file. Each line will have '<name> = <value>
format
// Store CurrencyConversion file and Record File parameters correctly.
bool parseConfig() {
ifstream coffle;
string error;
if (!checkFile(confFile, configFile, "CONFIGURATION_FILE", '=', error))
{
cerr << "ERROR: " << error << endl;
return false;
}
bool flag = true;
vector<string> split;
while (confFile.good()){
parseLine(confFile, split, '=');
if ( split.size() == 2 ){
string name = trim(split[0]);
string value = trim(split[1]);
if ( name == "currencyFile" )
currencyFile = value;
else if ( name == "recordFile")
recordFile = value;
}
}
if ( currencyFile.empty() || recordFile.empty() ){
cerr << "ERROR : currencyfile or recordfile not set correctly." <<
endl;
flag = false;
712 | Appendix
}
return flag;
}
9. Write the following code to define the fillCurrencyMap() function:
// Function to parse CurrencyConversion file and store values in Map.
bool fillCurrencyMap() {
ifstream currFile;
string error;
if (!checkFile(currFile, currencyFile, "Currency", '|', error)){
cerr << "ERROR: " << error << endl;
return false;
}
bool flag = true;
vector<string> split;
while (currFile.good()){
parseLine(currFile, split, '|');
if (split.size() == 2){
if (parseCurrencyParameters(split)){
currencyMap[split[0]] = static_cast<float>(atof(split[1].c _
str())); // make sure currency is valid.
}else{
cerr << "ERROR: Processing Currency Conversion file for
Currency: "<< split[0] << endl;
flag = false;
break;
}
} else if (!split.empty()){
cerr << "ERROR: Processing Currency Conversion , got incorrect
parameters for Currency: " << split[0] << endl;
flag = false;
break;
}
}
return flag;
}
Chapter 7 - Everybody Falls, It's How You Get Back Up – Testing and Debugging | 713
10. Write the following code to define the parseRecordFile() function:
// Function to parse Record File ..
bool parseRecordFile(){
ifstream recFile;
string error;
if (!checkFile(recFile, recordFile, "Customer Id", '|', error)){
cerr << "ERROR: " << error << endl;
return false;
}
bool flag = true;
vector<string> split;
while(recFile.good()){
parseLine(recFile, split, '|');
if (split.size() == 9){
if (checkRecord(split)){
vecRecord.push_back(split); //Construct struct record and
save it in vector...
}else{
cerr << "ERROR : Parsing Record, for Customer Id: " <<
split[0] << endl;
flag = false;
break;
}
} else if (!split.empty()){
cerr << "ERROR: Processing Record, for Customer Id: " <<
split[0] << endl;
flag = false;
break;
}
}
return flag;
}
11. Write the following code to define the displayCurrencyMap() function:
void displayCurrencyMap(){
cout << "Currency MAP :" << endl;
for (auto p : currencyMap)
cout << p.first <<" :
" << p.second << endl;
714 | Appendix
cout << endl;
}
ostream& operator<<(ostream& os, const record &rec){
os << rec.customerId <<"|" << rec.firstName << "|" << rec.lastName <<
"|"
<< rec.orderId << "|" << rec.productId << "|" << rec.quantity <<
"|"
<< fixed << setprecision(2) << rec.totalPriceRegional << "|" << rec.
currency << "|"
<< fixed << setprecision(2) << rec.totalPriceUsd << endl;
return os;
}
12. Write the following code to define the displayRecords() function:
void displayRecords(){
cout << " Displaying records with '|' delimiter" << endl;
for (auto rec : vecRecord){
cout << rec;
}
cout << endl;
}
13. Create a file named ParseFiles.cpp and call the parseConfig(), fillCurrencyMap(),
and parseRecordFile() functions:
#include <CommonHeader.h>
// Global variables ...
string configFile = "./parse.conf";
string recordFile;
string currencyFile;
map<string, float> currencyMap;
vector<record>
vecRecord;
int main(){
// Read Config file to set global configuration variables.
if (!parseConfig()){
cerr << "Error parsing Config File " << endl;
return false;
}
// Read Currency file and fill map
if (!fillCurrencyMap()){
cerr << "Error setting CurrencyConversion Map " << endl;
return false;
Chapter 7 - Everybody Falls, It's How You Get Back Up – Testing and Debugging | 715
}
if (!parseRecordFile()){
cerr << "Error parsing Records File " << endl;
return false;
}
displayCurrencyMap();
displayRecords();
return 0;
}
14. Open the compiler. Compile and execute the Util.cpp and ParseFiles.cpp files by
writing the following command:
g++ -c
-g
-I.
-Wall Util.cpp
g++ -g
-I.
- Wall Util.o ParseFiles.cpp -o ParseFiles
The binary files for both will be generated.
In the following screenshot, you will see that both commands are stored in the
build.sh script and executed. After running this script, you will see that the latest
Util.o and ParseFiles files have been generated:
Figure 7.25: New files generated
716 | Appendix
15. After running the ParseFiles executable, we'll receive the following output:
Figure 7.26: New files generated
16. Create a file named ParseFileTestCases.cpp and write test cases for the utility
functions. Write the following test cases for the trim function:
#include<gtest/gtest.h>
#include"../CommonHeader.h"
using namespace std;
// Global variables ...
string configFile = "./parse.conf";
string recordFile;
string currencyFile;
map<string, float> currencyMap;
vector<record>
vecRecord;
void setDefault(){
configFile = "./parse.conf";
recordFile.clear();
currencyFile.clear();
currencyMap.clear();
vecRecord.clear();
}
Chapter 7 - Everybody Falls, It's How You Get Back Up – Testing and Debugging | 717
// Test Cases for trim function ...
TEST(trim, empty){
string str="
";
EXPECT_EQ(trim(str), string());
}
TEST(trim, start_space){
string str = "
adas";
EXPECT_EQ(trim(str), string("adas"));
}
TEST(trim, end_space){
string str = "trip
";
EXPECT_EQ(trim(str), string("trip"));
}
TEST(trim, string_middle){
string str = "
hdgf ";
EXPECT_EQ(trim(str), string("hdgf"));
}
TEST(trim, single_char_start){
string str = "c
";
EXPECT_EQ(trim(str), string("c"));
}
TEST(trim, single_char_end){
string str = "
c";
EXPECT_EQ(trim(str), string("c"));
}
TEST(trim, single_char_middle){
string str = "
c";
EXPECT_EQ(trim(str), string("c"));
}
17. Write the following test cases for the isAllNumbers function:
// Test Cases for isAllNumbers function..
TEST(isNumber, alphabets_present){
string str = "11.qwe13";
ASSERT_FALSE(isAllNumbers(str));
}
718 | Appendix
TEST(isNumber, special_character_present){
string str = "34.^%3";
ASSERT_FALSE(isAllNumbers(str));
}
TEST(isNumber, correct_number){
string str = "54.765";
ASSERT_TRUE(isAllNumbers(str));
}
TEST(isNumber, decimal_begin){
string str = ".624";
ASSERT_TRUE(isAllNumbers(str));
}
TEST(isNumber, decimal_end){
string str = "53.";
ASSERT_TRUE(isAllNumbers(str));
}
18. Write the following test cases for the isDigit function:
// Test Cases for isDigit funtion...
TEST(isDigit, alphabet_present){
string str = "527A";
ASSERT_FALSE(isDigit(str));
}
TEST(isDigit, decimal_present){
string str = "21.55";
ASSERT_FALSE(isDigit(str));
}
TEST(isDigit, correct_digit){
string str = "9769";
ASSERT_TRUE(isDigit(str));
}
19. Write the following test cases for the parseCurrencyParameters function:
// Test Cases for parseCurrencyParameters function
TEST(CurrencyParameters, extra_currency_chararcters){
vector<string> vec {"ASAA","34.22"};
ASSERT_FALSE(parseCurrencyParameters(vec));
}
Chapter 7 - Everybody Falls, It's How You Get Back Up – Testing and Debugging | 719
TEST(CurrencyParameters, correct_parameters){
vector<string> vec {"INR","1.44"};
ASSERT_TRUE(parseCurrencyParameters(vec));
}
20. Write the following test cases for the checkFile function:
//Test Cases for checkFile function...
TEST(checkFile, no_file_present){
string fileName = "./NoFile";
ifstream infile;
string parameter("nothing");
char delimit =';';
string err;
ASSERT_FALSE(checkFile(infile, fileName, parameter, delimit, err));
}
TEST(checkFile, empty_file){
string fileName = "./emptyFile";
ifstream infile;
string parameter("nothing");
char delimit =';';
string err;
ASSERT_FALSE(checkFile(infile, fileName, parameter, delimit, err));
}
TEST(checkFile, no_header){
string fileName = "./noHeaderFile";
ifstream infile;
string parameter("header");
char delimit ='|';
string err;
ASSERT_FALSE(checkFile(infile, fileName, parameter, delimit, err));
}
TEST(checkFile, incorrect_header){
string fileName = "./correctHeaderFile";
ifstream infile;
string parameter("header");
char delimit ='|';
string err;
ASSERT_FALSE(checkFile(infile, fileName, parameter, delimit, err));
}
TEST(checkFile, correct_file){
string fileName = "./correctHeaderFile";
ifstream infile;
720 | Appendix
string parameter("Currency");
char delimit ='|';
string err;
ASSERT_TRUE(checkFile(infile, fileName, parameter, delimit, err));
}
Note
The NoFile, emptyFile, noHeaderFile, and correctHeaderFile files that were
used as input parameters in the preceding functions can be found here: https://
github.com/TrainingByPackt/Advanced-CPlusPlus/tree/master/Lesson7/Activity01.
21. Write the following test cases for the parseConfig function:
//Test Cases for parseConfig function...
TEST(parseConfig, missing_currency_file){
setDefault();
configFile = "./parseMissingCurrency.conf";
ASSERT_FALSE(parseConfig());
}
TEST(parseConfig, missing_record_file){
setDefault();
configFile = "./parseMissingRecord.conf";
ASSERT_FALSE(parseConfig());
}
TEST(parseConfig, correct_config_file){
setDefault();
configFile = "./parse.conf";
ASSERT_TRUE(parseConfig());
}
Note
The parseMissingCurrency.conf, parseMissingRecord.conf, and parse.
conf files that were used as input parameters in the preceding functions can be
found here: https://github.com/TrainingByPackt/Advanced-CPlusPlus/tree/master/
Lesson7/Activity01.
Chapter 7 - Everybody Falls, It's How You Get Back Up – Testing and Debugging | 721
22. Write the following test cases for the fillCurrencyMap function:
//Test Cases for fillCurrencyMap function...
TEST(fillCurrencyMap, wrong_delimiter){
currencyFile = "./CurrencyWrongDelimiter.txt";
ASSERT_FALSE(fillCurrencyMap());
}
TEST(fillCurrencyMap, extra_column){
currencyFile = "./CurrencyExtraColumn.txt";
ASSERT_FALSE(fillCurrencyMap());
}
TEST(fillCurrencyMap, correct_file){
currencyFile = "./CurrencyConversion.txt";
ASSERT_TRUE(fillCurrencyMap());
}
Note
The CurrencyWrongDelimiter.txt, CurrencyExtraColumn.txt, and Cur-
rencyConversion.txt files that were used as input parameters in the preceding
functions can be found here: https://github.com/TrainingByPackt/Advanced-CPlus-
Plus/tree/master/Lesson7/Activity01.
23. Write the following test cases for the parseRecordFile function:
//Test Cases for parseRecordFile function...
TEST(parseRecordFile, wrong_delimiter){
recordFile = "./RecordWrongDelimiter.txt";
ASSERT_FALSE(parseRecordFile());
}
TEST(parseRecordFile, extra_column){
recordFile = "./RecordExtraColumn.txt";
ASSERT_FALSE(parseRecordFile());
}
TEST(parseRecordFile, correct_file){
722 | Appendix
recordFile = "./RecordFile.txt";
ASSERT_TRUE(parseRecordFile());
}
The RecordWrongDelimiter.txt, RecordExtraColumn.txt, and RecordFile.
txt files that were used as input parameters in the preceding functions can be
found here: https://github.com/TrainingByPackt/Advanced-CPlusPlus/tree/master/
Lesson7/Activity01.
24. Open the compiler. Compile and execute the Util.cpp and ParseFileTestCases.cpp
files by writing the following commands:
g++ -c
-g
- Wall ../Util.cpp -I . ./
g++ -c
-g
- Wall ParseFileTestCases.cpp
g++ -g
- Wall Util.o ParseFileTestCases.o
- l gtest -lgtest_main -pthread -o
ParseFileTestCases
The following is a screenshot of this. You will see all the commands stored in Test.
make script file. Once executed, it will create the binary program that was meant
for unit testing called ParseFileTestCases. You will also notice that a directory has
been created in Project called unitTesting. In this directory, all the unit testing-
related code is written, and a binary file is created. Also, the dependent library of
the project, Util.o, is also created by compiling the project in the Util.cpp file:
Figure 7.27: Executing all commands present in the script file
Chapter 7 - Everybody Falls, It's How You Get Back Up – Testing and Debugging | 723
25. Type the following command to run all the test cases:
. /ParseFileTestCases
The output on the screen will display the total tests running, that is, 31 from 8 test
suites. It will also display the statistics of individual test suites, along with pass/fail
results:
Figure 7.28: All tests running properly
724 | Appendix
Below is the screenshot of the next tests:
Figure 7.29: All tests running properly
Finally, we checked the accuracy of the functions that we developed by parsing two files
with the help of our test cases. This will ensure that our project will be running fine
when it's integrated with different functions/modules that have test cases.
Chapter 8 - Need for Speed – Performance and Optimization | 725
Chapter 8 - Need for Speed – Performance and Optimization
Activity 1: Optimizing a Spell Check Algorithm
In this activity, we'll be developing a simple spell check demonstration and try to make
it faster incrementally. You can use the skeleton file, Speller.cpp, as a starting point.
Perform the following steps to implement this activity:
1. For the first implementation of the spell check (the full code can be found in
Speller1.cpp) – create a dictionary set in the getMisspelt() function:
set<string> setDict(vecDict.begin(), vecDict.end());
2. Loop over the text words and check for words not in the dictionary with the
set::count() method. Add the misspelled words to the result vector:
vector<int> ret;
for(int i = 0; i < vecText.size(); ++i)
{
const string &s = vecText[i];
if(!setDict.count(s))
{
ret.push_back(i);
}
};
3. Open the terminal. Compile the program and run it as follows:
$ g++ -O3 Speller1.cpp Timer.cpp
$ ./a.out
The following output will be generated:
Figure 8.60: Example output of the solution for Step 1
4. Open the Speller2.cpp file and add the unordered_set header file to the program:
#include <unordered_set>
5. Next, change the set type that's used for the dictionary to unordered_set:
unordered_set<string> setDict(vecDict.begin(), vecDict.end());
726 | Appendix
6. Open the Terminal. Compile the program and run it as follows:
$ g++ -O3 Speller2.cpp Timer.cpp
$ ./a.out
The following output will be generated:
Figure 8.61: Example output of the solution for Step 2
7. For the third and final version, that is, Speller3.cpp, we will use a bloom filter.
Start by defining a hash function based on the BKDR function. Add the following
code to implement this:
const size_t SIZE = 16777215;
template<size_t SEED> size_t hasher(const string &s)
{
size_t h = 0;
size_t len = s.size();
for(size_t i = 0; i < len; i++)
{
h=h*SEED+s[i];
}
return h & SIZE;
}
Here, we used an integer template parameter so that we can create any number
of different hash functions with the same code. Notice the use of the 16777215
constant, which is equal to 2^24 – 1 . This lets us use the fast bitwise-and operator
instead of the modulus operator to keep the hashed integer less than SIZE. If you
want to change the size, keep it as one less than a power of two.
8. Next, let's declare a vector<bool> for a bloom filter in getMisspelt() and populate
it with the words in the dictionary. Use three hash functions. The BKDR hash can
be seeded with values such as 131, 3131, 31313, and so on. Add the following code
to implement this:
vector<bool> m_Bloom;
m_Bloom.resize(SIZE);
for(auto i = vecDict.begin(); i != vecDict.end(); ++i)
{
m_Bloom[hasher<131>(*i)] = true;
m_Bloom[hasher<3131>(*i)] = true;
Chapter 8 - Need for Speed – Performance and Optimization | 727
m_Bloom[hasher<31313>(*i)] = true;
}
9. Write the following code to create a loop that checks the words:
for(int i = 0; i < vecText.size(); ++i)
{
const string &s = vecText[i];
bool hasNoBloom =
!m_Bloom[hasher<131>(s)]
&& !m_Bloom[hasher<3131>(s)]
&& !m_Bloom[hasher<31313>(s)];
if(hasNoBloom)
{
ret.push_back(i);
}
else if(!setDict.count(s))
{
ret.push_back(i);
}
}
The bloom filter is checked first and if it finds the word in the dictionary, we have
to verify it, like we did previously.
10. Open the terminal. Compile the program and run it as follows:
$ g++ -O3 Speller3.cpp Timer.cpp
$ ./a.out
The following output will be generated:
Figure 8.62: Example output of the solution for Step 3
728 | Appendix
In the preceding activity, we attempted to solve a real-world problem and make it more
efficient. Let's consider some points for each of the implementations in the three steps,
as follows:
• For the first version, the most obvious solution with a std::set is used – however,
the performance is likely to be low because the set data structure is based on a
binary tree, which has O(log N) complexity for finding an element.
• For the second version, we can gain a large performance improvement simply by
switching to std::unordered_set, which uses a hash table as the underlying data
structure. If the hash function is good, the performance will be close to O(1).
• The third version, based on the Bloom filter data structure, requires some consid-
eration. -
The primary performance benefit of a bloom filter is because it is a compact data
structure that does not actually store the actual elements in it, thereby providing
very good cache performance.
From an implementation perspective, the following guidelines apply:
• vector<bool> can be used as the backing store as it is an efficient way to store and
retrieve bits.
• The false positive percentage of the bloom filter should be minimal – anything
more than 5% will not be efficient.
• There are many string hashing algorithms – the BKDR hash algorithm is used in
the reference implementation. A comprehensive of string hash algorithms with
implementation can be found here: http://www.partow.net/programming/hash-
functions/index.html.
• The number of hash functions and the size for the bloom filter that's used are very
critical to get the performance benefits.
• The nature of the dataset should be taken into account when deciding what
parameters the bloom filter should use – consider that, in this example, there are
very few words that are misspelled, and the majority of them are in the dictionary.
There are some questions worth probing, given the results we received:
• Why is the improvement in performance so meager with the Bloom Filter?
• What is the effect of using a larger or smaller capacity Bloom filter?
• What happens when fewer or more hash functions are used?
• Under what conditions would this version be much faster than the one in Speller2.
cpp?
Chapter 8 - Need for Speed – Performance and Optimization | 729
Here are the answers to these questions:
• Why is the improvement in performance so meager with the Bloom Filter?
std::unordered_set performs one hash operation and perhaps a couple of memory
accesses before reaching the value that's stored. The Bloom filter we use performs
three hash operations and three memory accesses. So, in essence, the work that's
done by the bloom filter is more than the hash table. Since there are only 31,870
words in our dictionary, the cache benefits of the Bloom filter are lost. This is
another case where the traditional analysis of data structures does not correspond
to real-life results because of caching.
• What is the effect of using a larger or smaller capacity Bloom filter?
When a larger capacity is used, the number of hash collisions reduce, along with
false positives, but the caching behavior worsens. Conversely, when a smaller
capacity is used, the hash collisions and the false positives increase, but the
caching behavior improves.
• What happens when fewer or more hash functions are used?
The more hash functions are used, the fewer the false positives, and vice versa.
• Under what conditions would this version be much faster than the one in Speller2.
cpp?
Bloom filters work best when the cost of testing a few bits is less than the cost
of accessing the value in the hash table. This only becomes true when the Bloom
filter bits fit completely within the cache and the dictionary does not.
About
All major keywords used in this book are captured alphabetically in this section. Each one is
accompanied by the page number of where they appear.
Index
>
A
ability: 22, 73, 190, 220,
262, 294, 317, 568, 590
absolute: 28-29,
60-61, 550
abstract: 108, 140-141,
146, 148, 157, 197,
212, 393-395
accelerate: 566
acceptable: 90
access: 14, 90-92, 102, 110,
114-115, 123, 132-133,
141-142, 146, 151-152,
155, 165, 178, 184, 219,
221, 224, 227, 235, 237,
252, 257, 270, 274-275,
277, 287, 307, 313, 321,
345, 350-351, 370,
394, 443-445, 457,
462-464, 532, 544, 552,
584-590, 594, 603
accounting: 16
accumulate: 566-567
accuracy: 523-525,
532, 559
activity: 16-17, 26, 30-31,
66, 68, 76, 134-135, 137,
147, 190-191, 252-253,
270-271, 317-318, 322,
385-389, 392, 468-470,
473-474, 506, 523-525,
528, 531-532, 614-616
address: 91-92, 120-122,
182, 200, 229, 274,
291-292, 302, 325, 450,
478-480, 483-485, 489,
492-493, 495, 499-500,
502, 506-508, 542,
559-560, 588-590, 598
adversely: 221, 274
advocate: 159
aggregate: 72, 176, 430
aggregator: 298
algorithm: 49-50, 60,
65, 156-158, 163, 183,
295, 297, 299, 306,
437, 537-538, 566,
580, 584, 590, 594,
604, 609, 613-615
aliases: 161-163, 188
allocate: 74-75, 92-93, 110,
225-226, 252, 316, 349,
456, 483, 586-587, 613
amount: 56, 107, 161, 168,
193, 333-335, 365,
450, 478, 573, 588
analyze: 40, 134,
421-422, 535, 541,
545, 559-560, 589
anatomy: 1, 76-77, 152
applied: 113, 177-178,
223, 316, 428, 478
apt-get: 559
article: 589
assert: 67, 160, 188, 208,
282-283, 480-488,
494-496, 507-508
assertion: 478-479,
481-484, 486-487, 532
assignment: 74-75, 84-85,
111-115, 117, 122, 124,
209, 226, 228-234,
236, 238, 252, 283-284,
357-359, 361, 364, 366
associate: 73-74,
107, 255, 451
asterisk: 91
atomic: 340
attach: 100
augment: 135
B
background: 333, 336, 368
back-slash: 469
backup: 442, 444
backwards: 589
bandwidth: 583
beautify: 468
benchmarks: 561
billion: 555
binaries: 79
binary: 3, 57, 147, 229,
280, 401, 409, 479-483,
486-488, 490-491,
494-495, 498, 506-507,
514, 522, 538
bindings: 307
bitmap: 237
bitmask: 452
bitwise: 541, 605-606
blocked: 349, 351,
373, 375, 442
boolean: 59, 172-173,
264-265, 423-424,
575, 602
bottleneck: 576
bottom: 24, 46, 48, 77,
127, 147, 206, 541
boundaries: 75
boundary: 491
bounds: 568
braces: 57, 62, 154,
194, 554, 572
bracket: 200
branch: 509, 561-562,
564, 576-578, 602, 617
breakpoint: 52-53
breaks: 280
button: 10-11, 13, 25,
48-49, 51, 53, 55, 77,
80, 82-86, 89-90, 95,
97-99, 104-107, 118-120,
123-124, 128-130,
148, 150, 162-163,
172-173, 188-190, 207,
209-212, 217-218,
223-226, 245-250,
260-261, 266-270, 286,
288-290, 297-299,
303-305, 309-313
C
caching: 444, 587-591,
594, 598, 617
calculate: 16, 51, 200,
202, 267, 298-299,
537, 546, 576
callable: 294, 299, 326,
337, 340, 361-362,
366, 368, 370-371,
382, 409, 461
callee: 46, 274
callees: 46
caller: 48, 201, 274
callers: 46, 56
callsum: 41-42
callsumv: 43
candidates: 262, 538
canonical: 47
capability: 18, 183,
230, 258
cassert: 67, 160, 479-480
casting: 107, 230, 254,
265, 269, 603
caveat: 116, 258-259
center: 48
chained: 257
chapter: 385
character: 148-149, 161,
255, 395, 401-402, 410,
425, 428, 437-438, 464,
480, 497, 504, 529, 592,
600-601, 603, 609-610
checkbox: 42, 76
checked: 16, 59, 235, 406,
454, 479, 489, 508
checkfile: 525-526
checkip: 492-497, 499
choice: 2-4, 46, 68,
160, 431, 537
chopsticks: 322, 327-328,
330, 342, 355
circuits: 134, 562
cities: 599
citizens: 72, 126
cmakefiles: 35-36
cmakelists: 4, 8-9, 15-16,
18, 26-27, 218, 261
compatible: 2-3, 62
compile: 3-4, 37, 41, 72,
76, 102-104, 106-107,
144, 152, 166, 168, 175,
177-178, 180-181, 185,
188, 202, 218, 246-250,
252, 255, 257-259,
261-262, 264-265,
275, 283, 292, 399,
405-406, 411, 479-483,
486-487, 490-491, 514,
522, 525-526, 532,
547, 549, 557-558,
562-563, 565, 567-568,
572, 575, 578, 583,
586-587, 593, 600, 602,
605-607, 609, 611-616
concrete: 146, 499
concurrent: 322-323,
389, 462
condition: 56, 166-167,
170, 212, 218-219, 264,
266, 322, 342, 344-345,
365, 368, 373, 385,
389, 479-480, 482-483,
487-490, 492-495,
525, 574-576, 607
configure: 1, 76, 88, 95,
104, 118, 123, 127, 147,
162, 171, 186, 206, 217,
223, 245, 260, 266,
286, 297, 302, 309, 317
connectdb: 502-503,
505, 507
connectweb: 502-503,
505-506
constant: 76, 115, 122-123,
185, 365, 451, 455, 537,
541-542, 544, 547, 575,
581, 584, 592, 594
constexpr: 139,
169-174, 185, 190-191,
313-316, 453, 456
constness: 176, 178, 180
context: 48, 72, 86, 91,
139, 163, 256, 262,
309, 325, 450, 455
contrast: 72, 587
cookie: 157, 163
counts: 497, 554-555,
569-571, 577,
604, 609, 611
countx: 75-76
county: 75
countz: 75
createfile: 443, 445-446,
448-449, 451
cstdlib: 67
cstring: 479, 488, 492
currencies: 335, 527
currency: 333-335,
524-525, 527-528
cyclic: 235
daemon: 332
dashboards: 22
database: 152-153, 223,
442, 492, 499-500, 502,
506-508, 524, 594
databases: 153
dataset: 151, 564, 599
datasets: 536, 565
datettime: 470, 473
dbname: 500, 503,
505-506
dbpasswd: 505-506
dbuser: 505-506
deadlock: 322, 355-356
debugger: 47-56, 66,
477, 516-523, 532
decimal: 172, 412-415
decipher: 1
declarator: 91
decltype: 175-176, 183-185
declval: 183-185
decouple: 290
decrement: 182
dedicated: 392, 478, 491
deduce: 83, 159, 174,
177, 305, 492
defunct: 228
delegate: 317-318
demangle: 42
department: 524
deprecated: 91, 235
derived: 110, 142, 144, 146,
148, 151, 153, 228, 317,
393-395, 431, 439
detach: 326, 332, 334-335,
339, 343, 355-357,
359-360, 367, 371, 373,
375, 378, 381, 384
dialog: 9-10, 13, 24,
47, 62, 76, 82-85,
90, 98, 105-107,
124, 127, 276-285
dividend: 342-345
d-pointer: 276
dropdown: 24-25,
48-49, 127, 162, 171,
190, 539, 545
dynamic: 72, 155-156,
194-195, 200, 219,
232, 254, 271, 591
E
eclipse: 3-4, 8-9, 13-14, 16,
18, 20, 22, 25, 27, 30-31,
47-48, 56-58, 62-63,
68, 76, 86, 88, 95, 104,
118, 123, 127, 147, 162,
171, 186, 206, 216, 223,
245, 260, 266, 286, 297,
302, 309, 336, 432
elision: 199, 212, 233
equation: 108, 546
equivalent: 123, 190, 315,
542, 545-546, 576
extends: 72
F
faulty: 29
fclose: 99-101, 200,
220-221, 224
fconverter: 384
feature: 52, 56, 110, 131,
145, 157, 162, 165, 183,
191, 218, 262, 274,
276-277, 290, 313, 373,
460, 491-492, 564, 566
features: 2, 22, 50, 61,
134, 271, 313, 318, 432,
459, 474, 538, 568, 617
female: 396
fetched: 499, 506, 588, 614
fields: 30, 46, 280,
524-525, 527-528,
594-595, 598
floatnum: 402, 419
flowchart: 526
frequency: 583
fstream: 227, 399-401, 403
G
generalize: 183
generate: 4-7, 107, 112,
114, 122-123, 128, 131,
146, 165, 170, 175, 179,
201, 218, 282-284, 316,
535, 566, 575, 587, 593
getvalue: 263
global: 46, 77, 96-98,
154-156, 194, 213,
217, 256, 261, 308,
346, 356, 450, 557
glvalue: 182
gninja: 6
godbolt: 40, 535,
538-539, 563
granular: 509
graphs: 598
greatest: 89, 109
gritty: 152
I
identity: 134-135, 182
idioms: 322, 535, 568
ifndef: 26, 66, 484,
492, 510
import: 3, 8-9, 68,
76, 147, 286
increment: 182, 340-341,
350-351, 554-555,
569-570, 579
init-value: 74
inline: 111-112, 126,
128, 253, 307, 398,
469, 589, 613
inputs: 28, 61, 333
insertion: 106, 126,
257, 580, 583
integers: 16, 29, 81, 108,
270, 342-343, 378,
513, 537, 539, 543,
548, 556, 571, 574,
579, 583, 586-587
inverse: 121
isdigit: 525-526, 529
isnumeric: 529
isocpp: 115, 171, 244
K
kernel: 442, 559
keyword: 112-113, 122, 125,
144-145, 147-148, 161,
256, 264, 269, 274, 394
L
leverage: 139, 442, 462
linearly: 206, 586
linkages: 156
literal: 73, 93, 182,
255, 479-480
location: 9, 74, 76, 91-92,
152, 178, 202, 229, 306,
405, 478-480, 515,
520, 541-542, 590
logger: 392, 439-441,
469-470, 473-474
loggers: 469
loxley: 75, 81
luckily: 47
lvalue: 181-182, 230, 237
M
macros: 227, 317, 468, 559
magnitude: 584
margin: 590
marginally: 550
matrices: 108, 134,
136-137, 252
matrix: 108, 120-122,
134-136, 151-152,
252, 274-275
minimal: 492, 505, 568
mismatch: 490
mockdb: 502, 507-508
mutable: 309-311, 313
mutexes: 223, 370,
385, 389, 463
myclass: 44, 93-94,
161, 186, 238
myfunc: 44
myname: 309
myobject: 44
mythread: 325-326
myvehicle: 143
myvehicle-: 143
N
nbytes: 453-454, 456
negative: 29, 425, 542
nullip: 507
number: 22, 44, 52, 59,
68, 74-76, 81, 87, 93-94,
97, 100, 110, 115, 121,
131, 140, 164, 168, 170,
172, 197, 213, 262, 270,
274-275, 278, 280, 309,
312-313, 315-316, 344,
356, 401, 413, 416-419,
430, 446-447, 450-451,
454-455, 458, 468, 481,
483-485, 492, 502,
510, 549, 553-554, 557,
561, 564, 568, 574, 576,
581, 584-585, 590,
594, 604, 614, 617
numerical: 458
O
objdump: 40, 46
object: 1, 32, 36-40, 46,
53, 59, 68, 72, 93-94,
111-112, 115-116, 120,
123, 125, 128, 134,
151-153, 156, 161,
177-178, 182-184, 199,
208, 212-213, 215, 219,
226-229, 233, 235,
237-238, 241, 262, 280,
282, 286, 292, 294-295,
297, 299-300, 304,
310, 325-326, 332-333,
337-340, 358-359, 361,
363, 365-366, 369-371,
377-378, 380-382, 384,
395, 397-398, 400,
407-410, 418, 431-432,
435-436, 438-439,
441, 447-450, 460-461,
463-464, 473, 494,
499, 508, 556, 558
offset: 447, 453-454,
456, 542, 564
opaque: 276
opcode: 453, 541
operator-: 129,
231, 237, 255
optimize: 126, 157, 253,
532, 550, 561, 569,
590, 599, 601, 614, 617
ostream: 106, 126, 131,
257, 394, 398, 431-432,
434, 438-441, 464
overlap: 545
overload: 126, 132, 134, 174,
253-254, 262, 398, 439
override: 114, 144-145,
148, 304, 397, 430,
436-438, 474
P
paradigm: 72, 227
parallel: 17, 323-324, 336,
389, 566-568, 606, 608
parameter: 30, 44, 46,
63, 96, 111-112, 114, 157,
159, 174, 176-178, 180,
182, 234, 262, 315-317,
343, 368, 373, 379, 384,
395, 407-408, 418, 425,
433-434, 443-446,
451-453, 455, 465, 489,
502, 508, 510, 522
pascal: 542
pop-up: 13
powers: 168, 579
powershell: 547
preceding: 4, 6-7, 21, 29,
42, 44, 49-50, 62, 65,
76, 81, 87, 92-93, 96,
100-101, 103, 107, 109,
111-112, 114, 121, 125,
135, 140, 144, 150-151,
161, 165, 169, 188, 191,
196-197, 201-205, 215,
223-224, 227, 247, 253,
258, 264, 275, 323-324,
330, 378, 428, 480-487,
489-494, 497, 499,
501-502, 505-507,
509, 515-517, 519-520,
522-523, 530, 537,
541-545, 547, 550-552,
554-557, 559, 563-564,
575, 578-579, 583,
586-587, 593-594,
596-598, 609, 616
prefetches: 589
prefix: 112, 295-296,
306, 310-311, 395,
399, 407, 464
primary: 56, 553
primitive: 2, 579
printf: 163-167,
169-170, 313
printhello: 326, 328-332
prioritize: 61
production: 227, 482,
487, 559, 565
prototype: 87-88, 97,
131, 145-146, 158,
167, 235, 254
pseudocode: 333,
335, 346-348
purchased: 524
pvalue: 91-92
python: 2, 72, 116, 156,
190, 221, 294, 536
Q
qualified: 256, 261
qualifier: 552
quality: 478
quantity: 85, 525
quantizes: 168
queried: 507
queries: 499, 505
R
recompile: 95, 203, 205,
267-270, 550, 559, 565
record: 524-525, 527-528,
553, 559, 593
recordfile: 524-525, 527
records: 524, 528, 554, 594
recover: 228
recreate: 32, 479
recreated: 38
recursive: 313, 315
redefine: 83
redirect: 433
reduce: 561, 573, 589-590
redundant: 572
refactor: 63-64
refined: 580
reflect: 29
repeat: 253, 349, 529
resize: 453, 612
restapi: 524
restore: 10, 83-86, 98, 105
restored: 90, 173
restricted: 316-317
result: 25-26, 28, 39, 57,
74, 76, 80, 86, 93, 100,
102-103, 115, 121, 160,
166, 180, 203, 205,
226, 228-229, 254,
263-264, 275-276, 299,
324, 333-335, 339,
342-343, 345-346, 351,
361, 364-371, 373-375,
377-383, 385, 388,
399, 405-406, 409-411,
415-416, 420-422, 427,
429, 435, 441, 449,
451, 453, 458, 462,
466-467, 473-474, 495,
500, 502-503, 506,
535-536, 541, 547, 549,
552, 555-557, 562, 565,
568, 577, 579, 581, 584,
595, 599-600, 602, 614
runtime: 39, 46-47, 56,
66, 68, 72, 154, 175-176,
202, 206, 209-210, 214,
375, 477, 479, 487, 532,
536-537, 559, 591, 617
rvalue: 122, 124, 177,
181-182, 229-230, 235
S
scientific: 416, 418, 421
sensor: 245-247, 250
server: 330, 333-335, 492,
499, 502-503, 505-506
setbase: 412, 415
setevent: 449
setfill: 425
setpanel: 239
setscroll: 238, 240
sfinae: 139-140,
164-166, 169, 183-185,
190-191, 220
showpos: 426-427
signature: 39, 42, 46,
121-122, 156, 300,
371, 455, 528-529
simplify: 66, 139,
468, 546, 607
simulating: 322, 486
simulation: 385, 388, 470
simulator: 322, 385, 389,
392, 470-471, 473-474
singleton: 464
solution: 17, 31, 68, 86,
137, 191, 221, 253, 271,
276, 283, 318, 388,
474, 531, 546, 616
splicing: 215
stdout: 438
stream: 108, 125, 394-397,
399-402, 404-405,
407, 410, 412, 425, 428,
430-432, 435-436,
438-439, 441, 462-464,
467, 470, 474
streambuf: 394,
436-439, 441, 464
streams: 349, 389,
391-393, 399-401,
407, 409, 411-412, 428,
430-431, 441, 459, 462,
467, 470, 474, 617
string: 15, 75, 161, 164,
172-173, 176, 182,
190-191, 208, 218, 227,
230, 242, 256-259, 277,
287-289, 309, 313-314,
353, 362-366, 368-375,
377-384, 394-398,
402-411, 424-425,
428-431, 433-434,
440, 453, 457, 465, 467,
478-480, 483-485, 490,
492-493, 497, 500-505,
508, 512, 514, 524-525,
528-529, 542, 553-555,
566, 569-571, 573, 577,
580, 584, 591-592, 594,
599-601, 603-605,
607-610, 612-613
stringbuf: 407
stringify: 171-173
strings: 161, 354, 364-367,
384-385, 395, 407,
428, 436, 465
strlen: 480, 488-489, 493,
497-498, 505, 594
strong: 71, 107, 159
stronger: 579
strongly: 72-73, 86, 93
strsum: 314
strtime: 434, 440
struct: 72, 99, 111, 133,
151, 165-166, 175, 185,
238-239, 250-251, 267,
277, 281, 284, 287-289,
291, 293-295, 297-298,
300-301, 304, 308, 447,
453, 455, 457, 484-486,
510, 594-596, 598
structure: 4, 57, 151, 186,
208, 238, 240, 252, 300,
392, 446-447, 449-450,
453-457, 483, 510, 580,
594-595, 598, 615
subscriber: 290
subset: 159
sumfunc: 16, 26-27,
35-39, 152
summary: 68, 137, 191,
271, 318, 389, 474,
532, 555, 617
summation: 16,
537, 546, 548
syntaxes: 99
systems: 1-2, 4, 8, 90, 93,
107, 201, 204, 276, 422,
459, 474, 536, 548, 558
T
tables: 197
tabular: 555
tabulation: 458
testcases: 494-496
testnull: 494-495
testrun: 495, 498
testsuite: 494-495
thereof: 57, 94
threshold: 64-65, 312
toolbar: 25, 48-49, 52-53
toolchain: 72, 152
topics: 194, 365, 392, 617
top-left: 10
top-right: 77, 544
totally: 156, 572
totalprice: 525
tricky: 370
trigger: 240, 252,
275, 280, 454
triggered: 316
triggering: 454
truevalue: 424
truncate: 444
try-catch: 376-378,
381, 488
two-fold: 603
two-step: 4
typedef: 161-163,
165-166, 190, 447
typedefs: 399, 407
typeid: 176
typeindex: 176
typename: 163-167, 169,
172-178, 180, 182, 187,
247, 313-316, 398, 418,
433, 439, 510-512, 522
type-safe: 99
U
underscore: 59
unequal: 410
unicode: 227, 255, 599
uniform: 549, 581,
584, 595
unions: 108, 132-133, 151
unique: 155, 161, 221, 227,
235-238, 241-243,
245-250, 280-289,
316, 332-333, 363,
368, 385, 446-447
unix-like: 4, 548
userid: 478
userinput: 335
username: 35-36,
500, 505, 507
V
validity: 499, 507
variant: 72, 93, 133,
238, 276, 313
vector: 149, 160, 162, 183,
186-187, 190, 227, 230,
255, 261, 287-289,
295-296, 298, 306-307,
310-311, 357, 363-366,
387, 394, 497, 500, 504,
528, 544, 546-549,
566-569, 571-573,
577, 580, 582-587,
589-590, 594-598, 615
velocity: 30
verbose: 33
verify: 18-19, 26, 31,
134, 538, 558, 600
virtual: 144-148, 150,
430, 436-437,
500-502, 573, 591
voltage: 267-270
W
webserver: 501,
503, 505-507
winapi: 450
wordcount: 599-601,
603-605, 607,
609-610, 612-613
wouldn: 171
wrapped: 214, 429
wrapper: 299, 430-431,
438, 441, 463-464
wrappers: 394, 467
writefile: 446-448, 450
writepos: 228
X
xvalue: 182
Y
yields: 7