/


Текст
murach
/
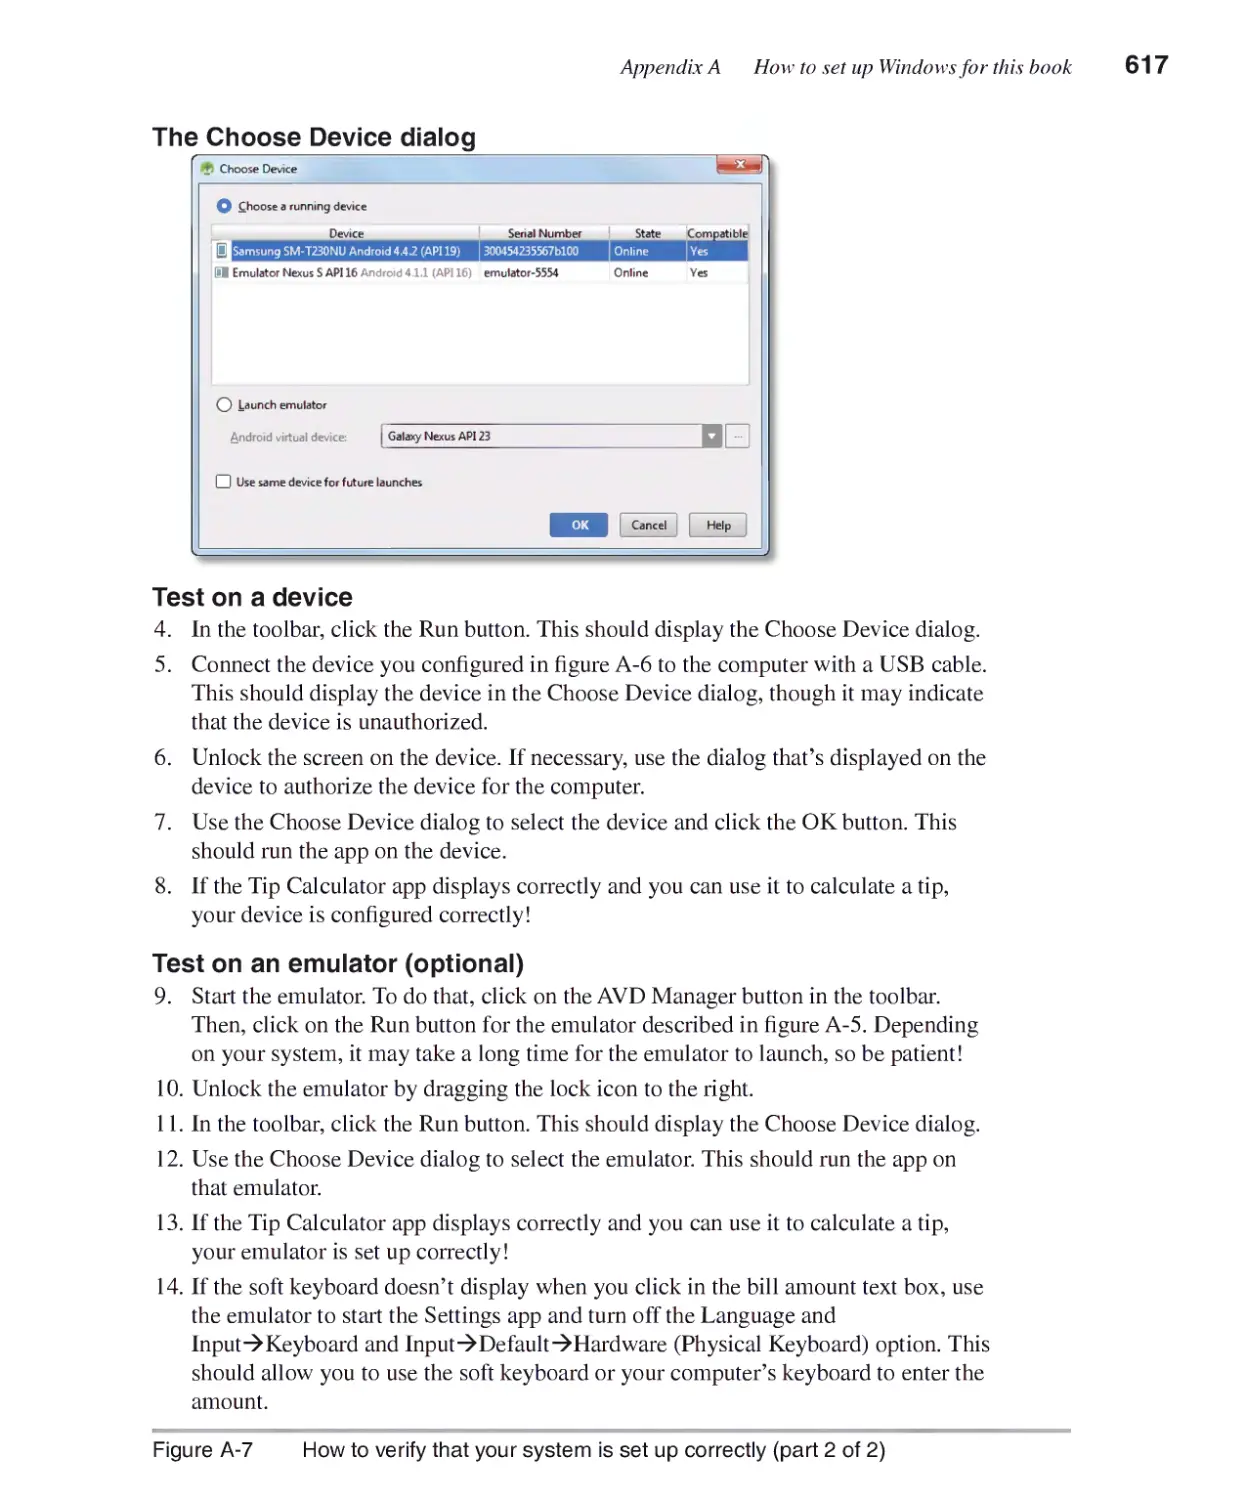
2nd Edition
Joel Murach
TRAINING & REFERENCE
2nd Edition
Joel Murach
Mike Murach & Associates, Inc.
4340 N. Knoll Ave. • Fresno, CA 93722
www.murach.com • murachbooks@murach.com
Author: Joel Murach
Editors: Mike Urban
Ray Halliday
Android Consultant: Leo Landau
Production: Maria Spera
Books for Java programmers
Miirach's Java Servlets and JSP (3rd Edition)
Murach 's Android Programming (2nd Edition)
Miirach's Beginning Java with NetBeans
Miirach's Beginning Java with Eclipse
Miirach's Java Programming (4th Edition)
Books for database programmers
Murach's MySQL (2nd Edition)
Murach's Oracle SQL and PL/SQL for Developers (2nd Edition)
Miirach's SQL Server 2012 for Developers
Books for web developers
Murach's HTML5 and CSS3 (3rd Edition)
Miirach's JavaScript (2nd Edition)
Miirach's jQuery (2nd Edition)
Murach's PHP and MySQL (2nd Edition)
Books for .NET programmers
Murach's C# 2012
Miirach's ASP.NET4.5 Web Programming with C#2012
Miirach's Visual Basic 2012
Miirach's ASP.NET4.5 Web Programming with VB 2012
For more on Murach books,
please visit us at www.murach.com
©2015, Mike Murach & Associates, Inc.
All riehts reserved.
Printed in the United States of America
10 98765432 1
ISBN: 978-1-890774-93-6
Content
Introduction
Section 1 Get started fast with Android
Section 2 Essential Android skills
Section 3 The News Reader app
Section 4 The Task List app
Section 5 Advanced Android skills
Appendixes
XV
Chapter 1 An introduction to Android and Android Studio 3
Chapter 2 How to start your first Android app 29
Chapter 3 How to finish your first Android app 55
Chapter 4 How to test and debug an Android app 95
Chapter 5 How to work with layouts and widgets 119
Chapter 6 How to handle events 165
Chapter 7 How to work with themes and styles 197
Chapter 8 How to work with menus and preferences 227
Chapter 9 How to work with fragments 259
Chapter 10 How to work with threads, files, adapters, and intents 287
Chapter 11 How to work with services and notifications 339
Chapter 12 How to work with broadcast receivers 381
Chapter 13 How to work with SQLite databases 397
Chapter 14 How to work with tabs and custom adapters 435
Chapter 15 How to work with content providers 467
Chapter 16 How to work with app widgets 501
Chapter 17 How to deploy an app 523
Chapter 18 How to work with locations and maps 543
Appendix A How to set up Windows for this book 601
Appendix B How to set up Mac OS X for this book 619
Appendix C How to set up Linux for this book 637
Expanded contents
Expanded contents
Section 1 Get started fast with Android
Chapter 1 An introduction to Android and Android Studio
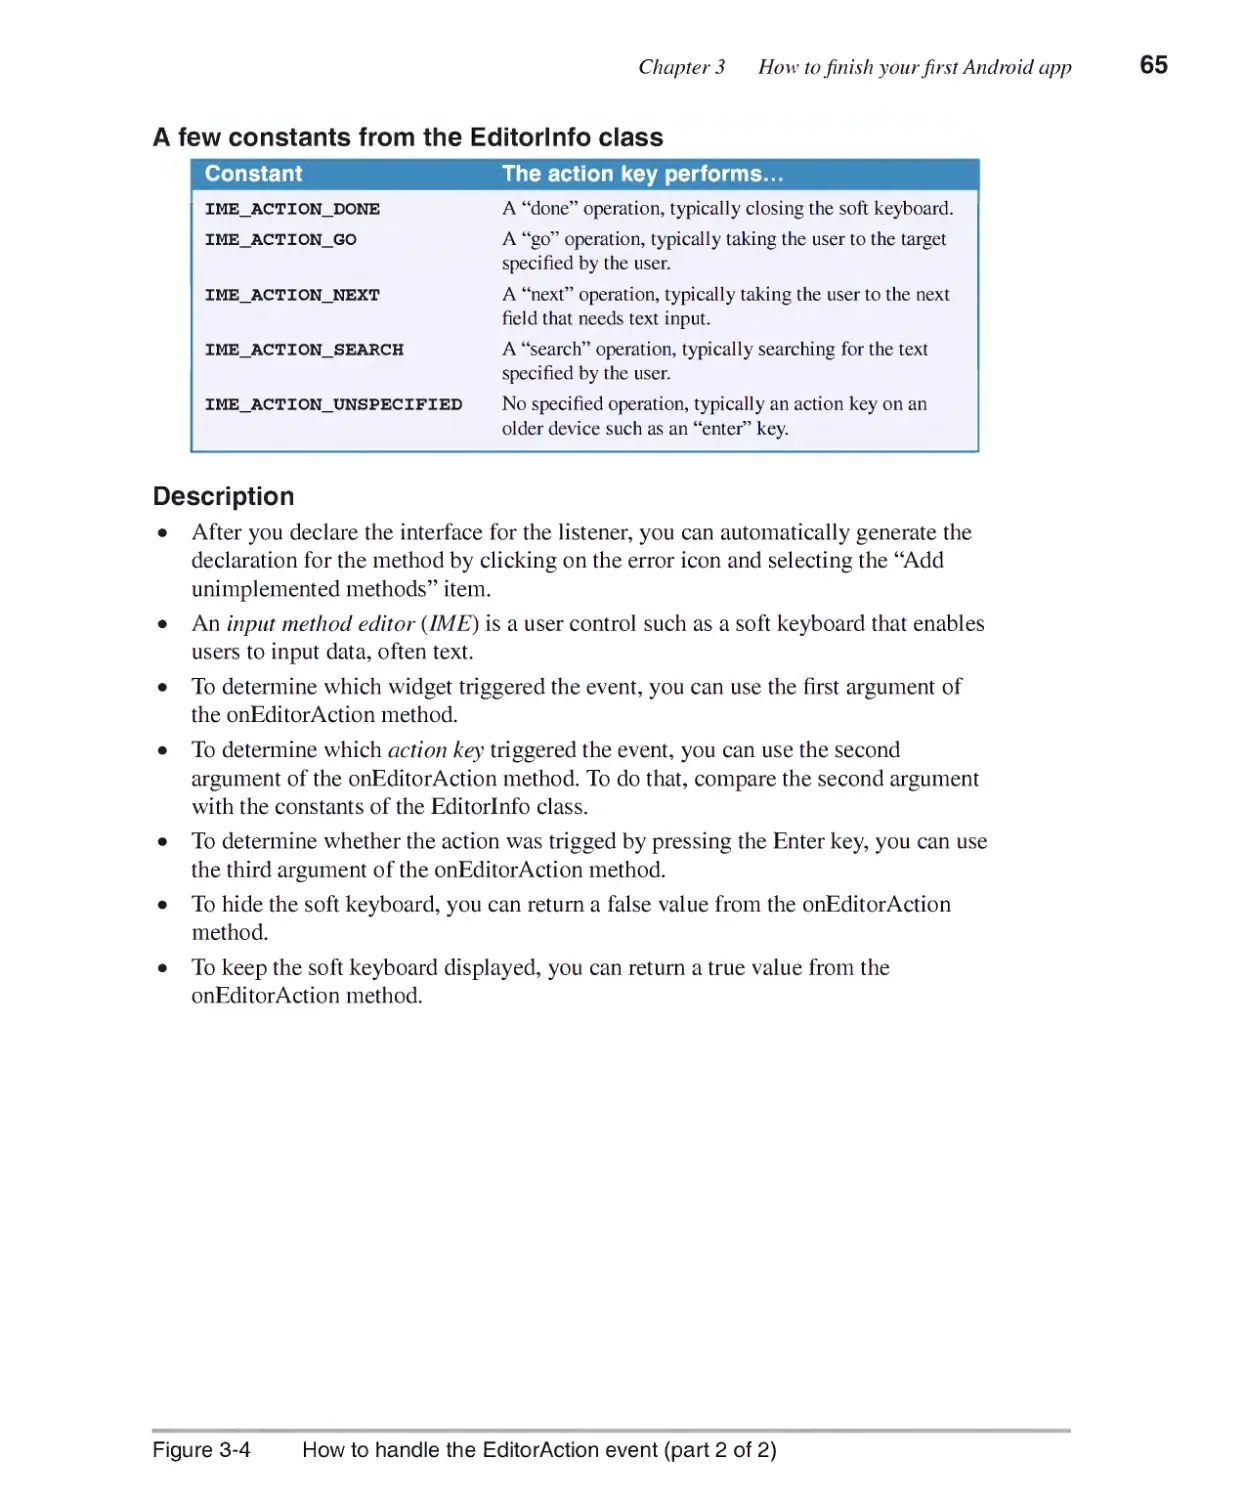
An overview of Android................................................................„^
Types of devices 4
Types of apps 6
A brief history 8
Versions 10
System architecture 12
How apps are compiled and run 14
An introduction to Android Studio.................................................. 16
How to work with the Welcome page 16
How to open an existing project 16
How to view the user interface for an app 18
How to view the code for an app 20
How to run an app on aphysical device 22
How to run an app on an emulator 22
The user interface 24
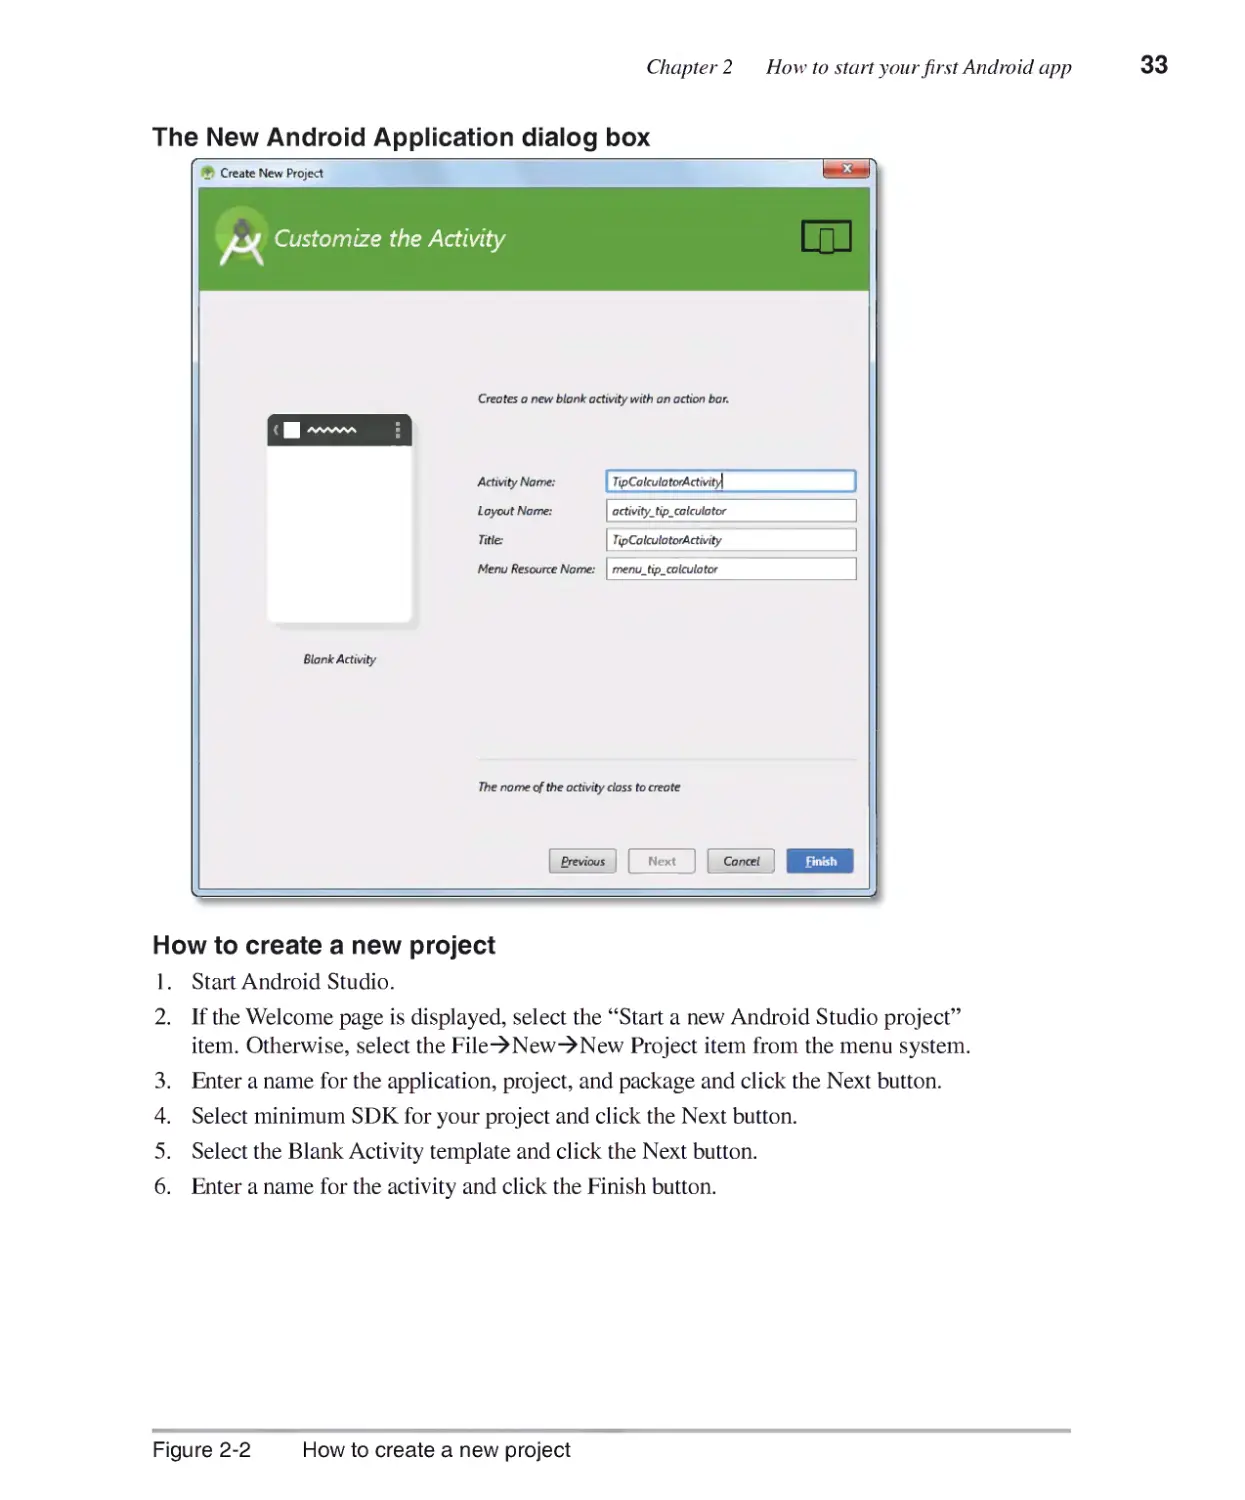
Chapter 2 How to start your first Android app
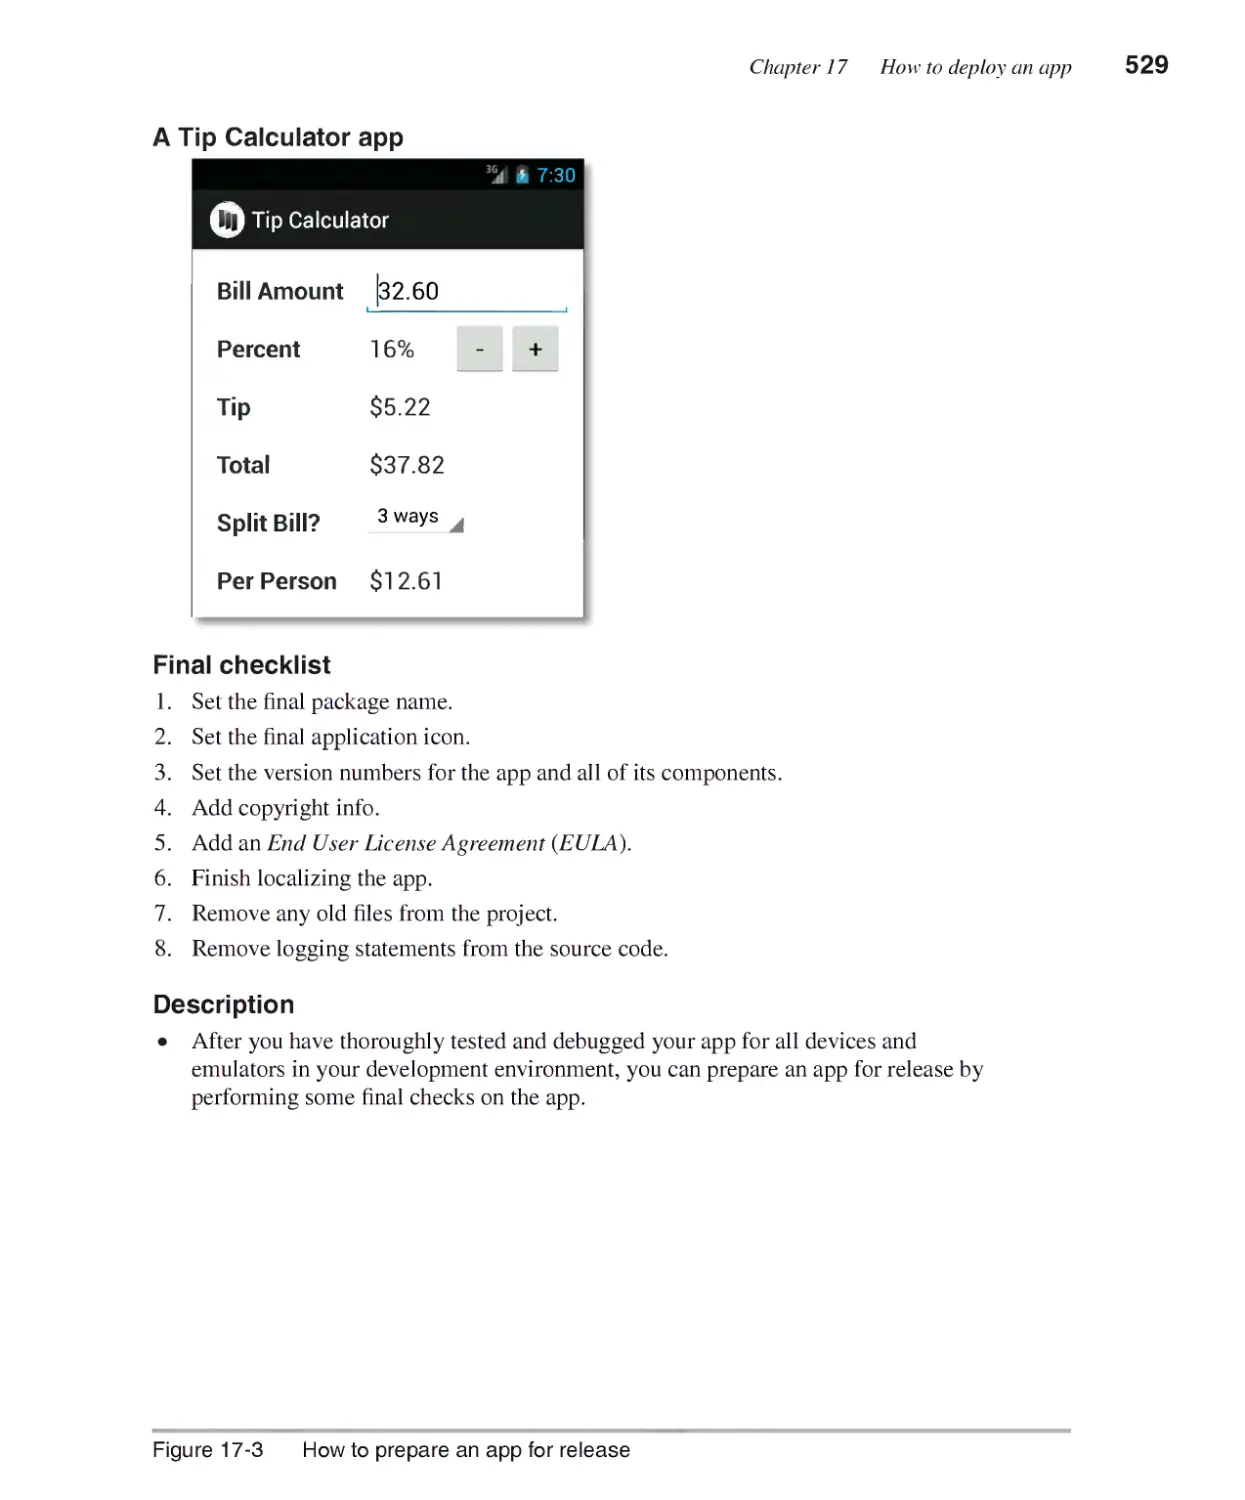
The Tip Calculator app ................................
The user interface 30
How to create anew project 32
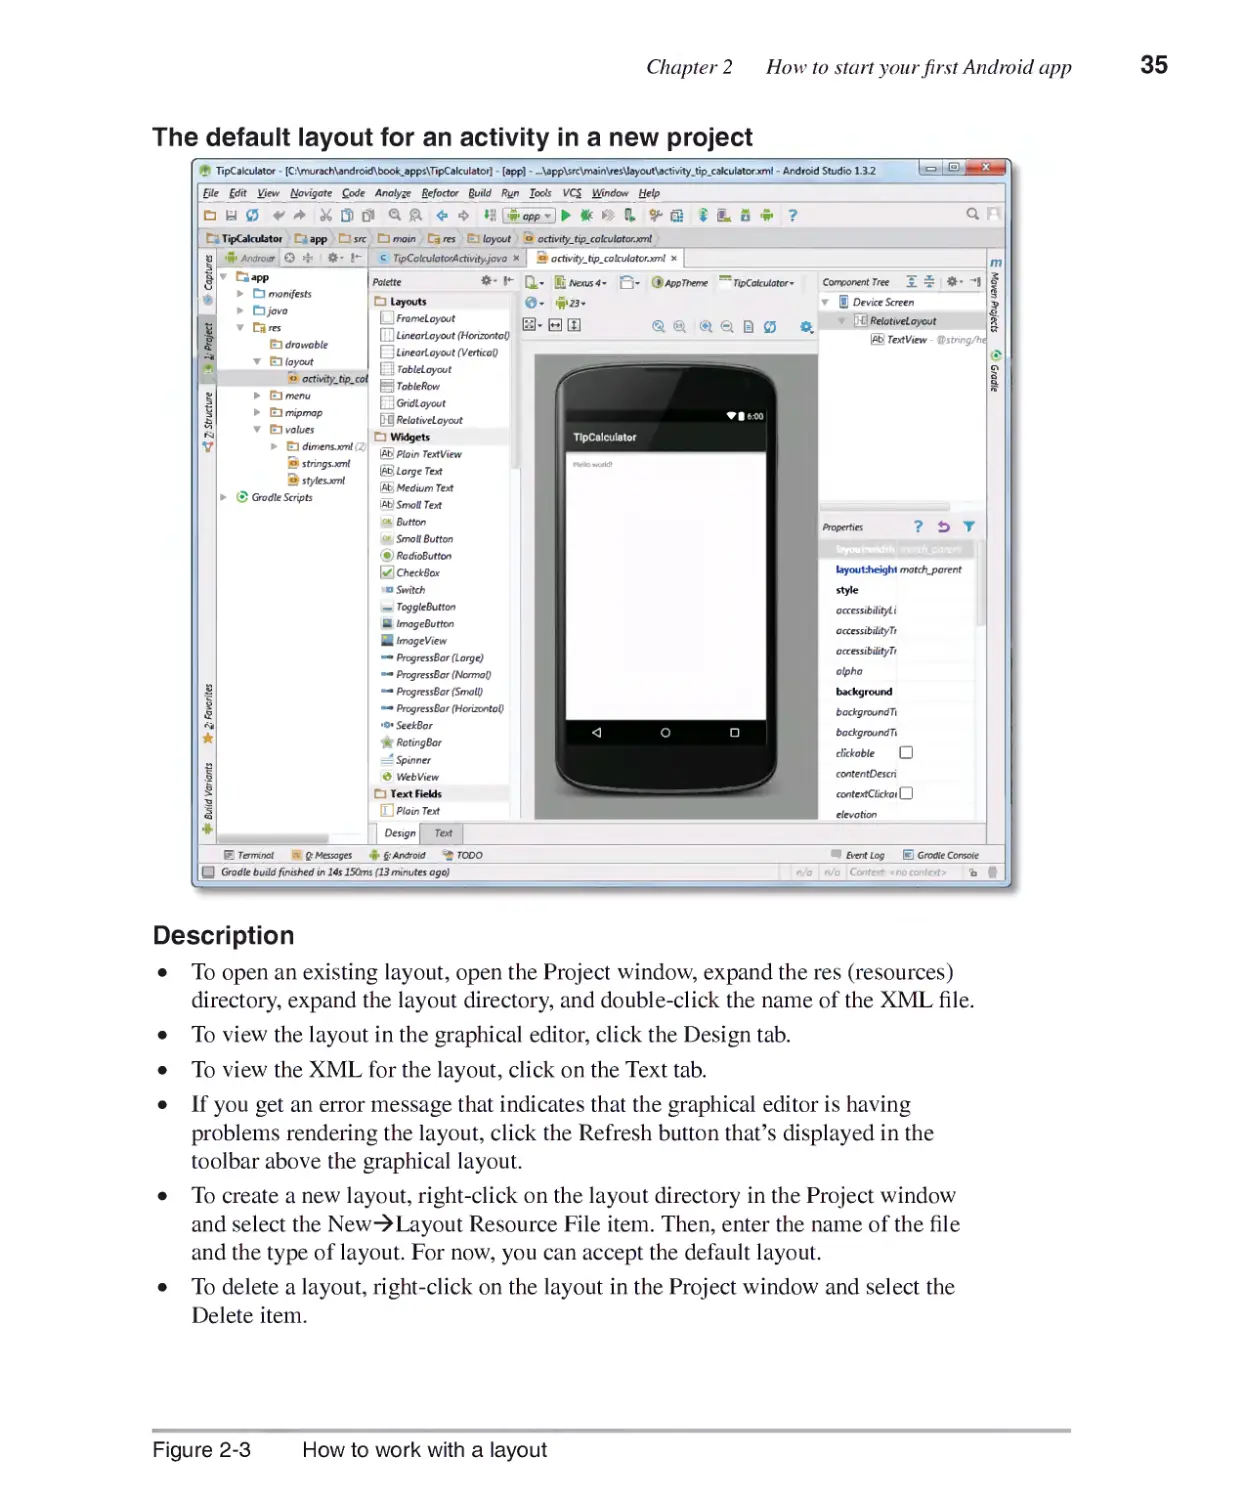
How to develop the user interface ..................................................34
How to work with a layout 34
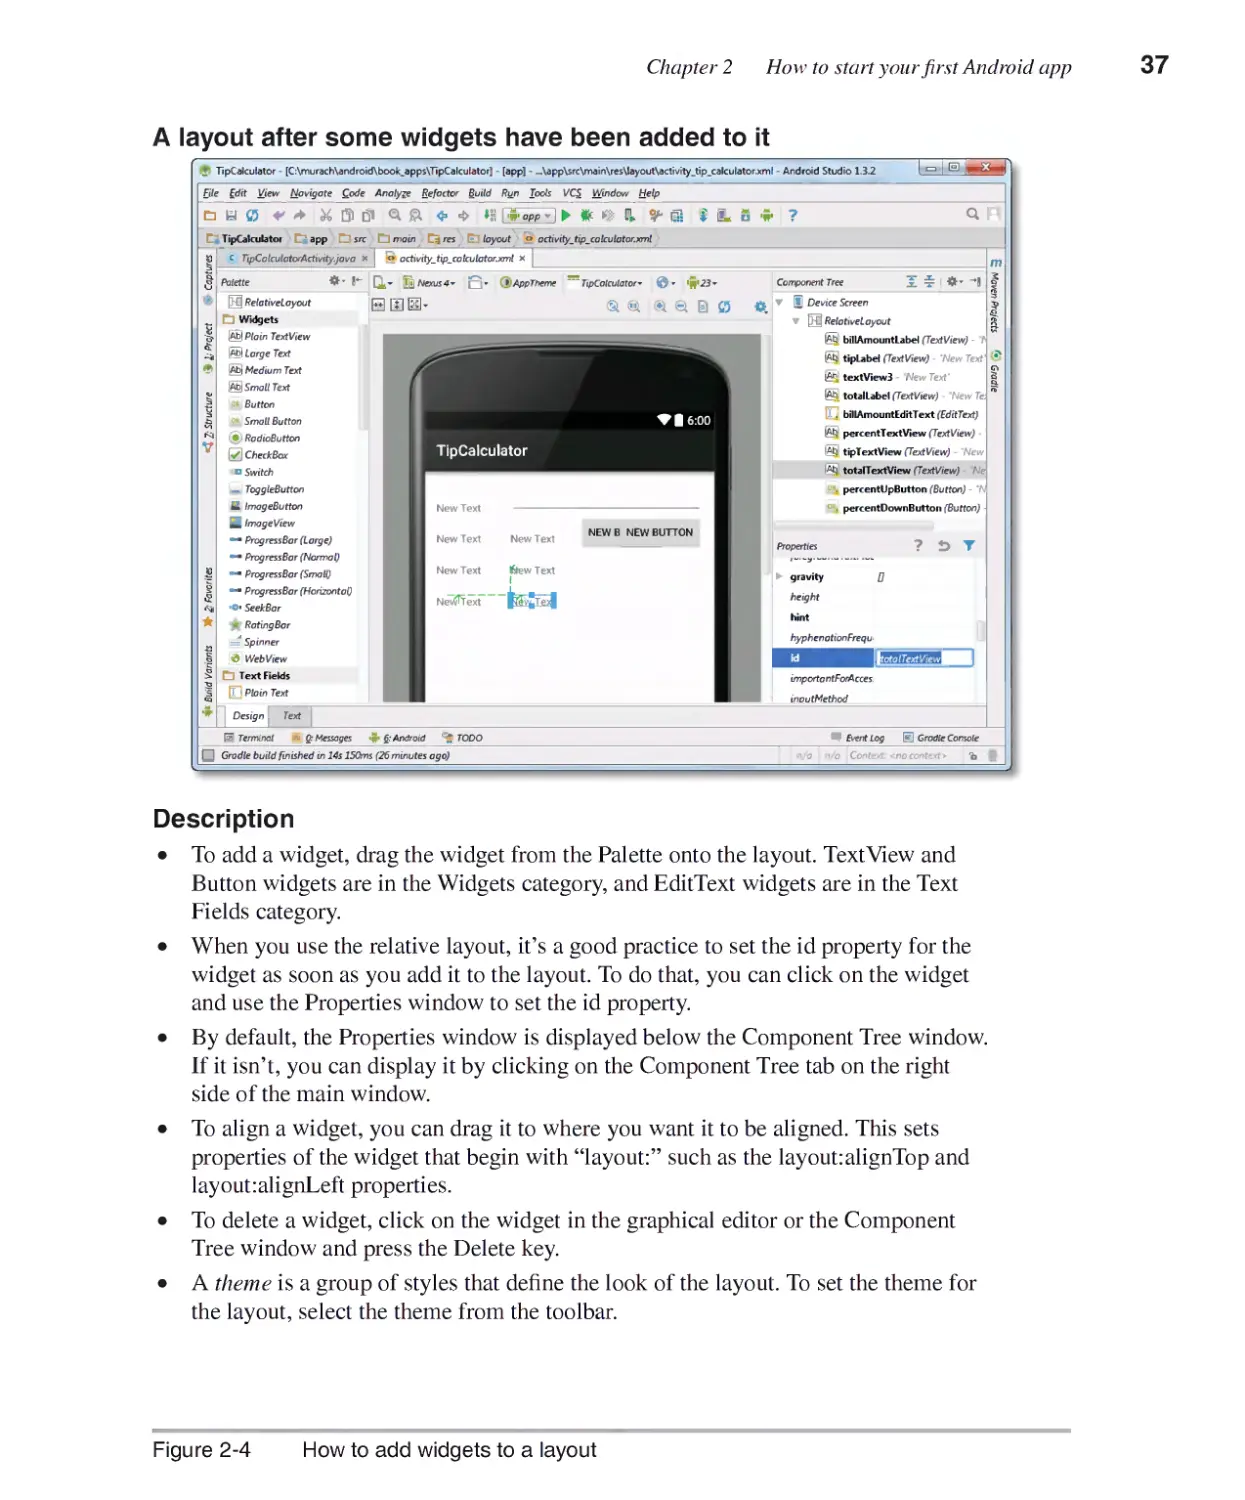
How to add widgets to a layout 36
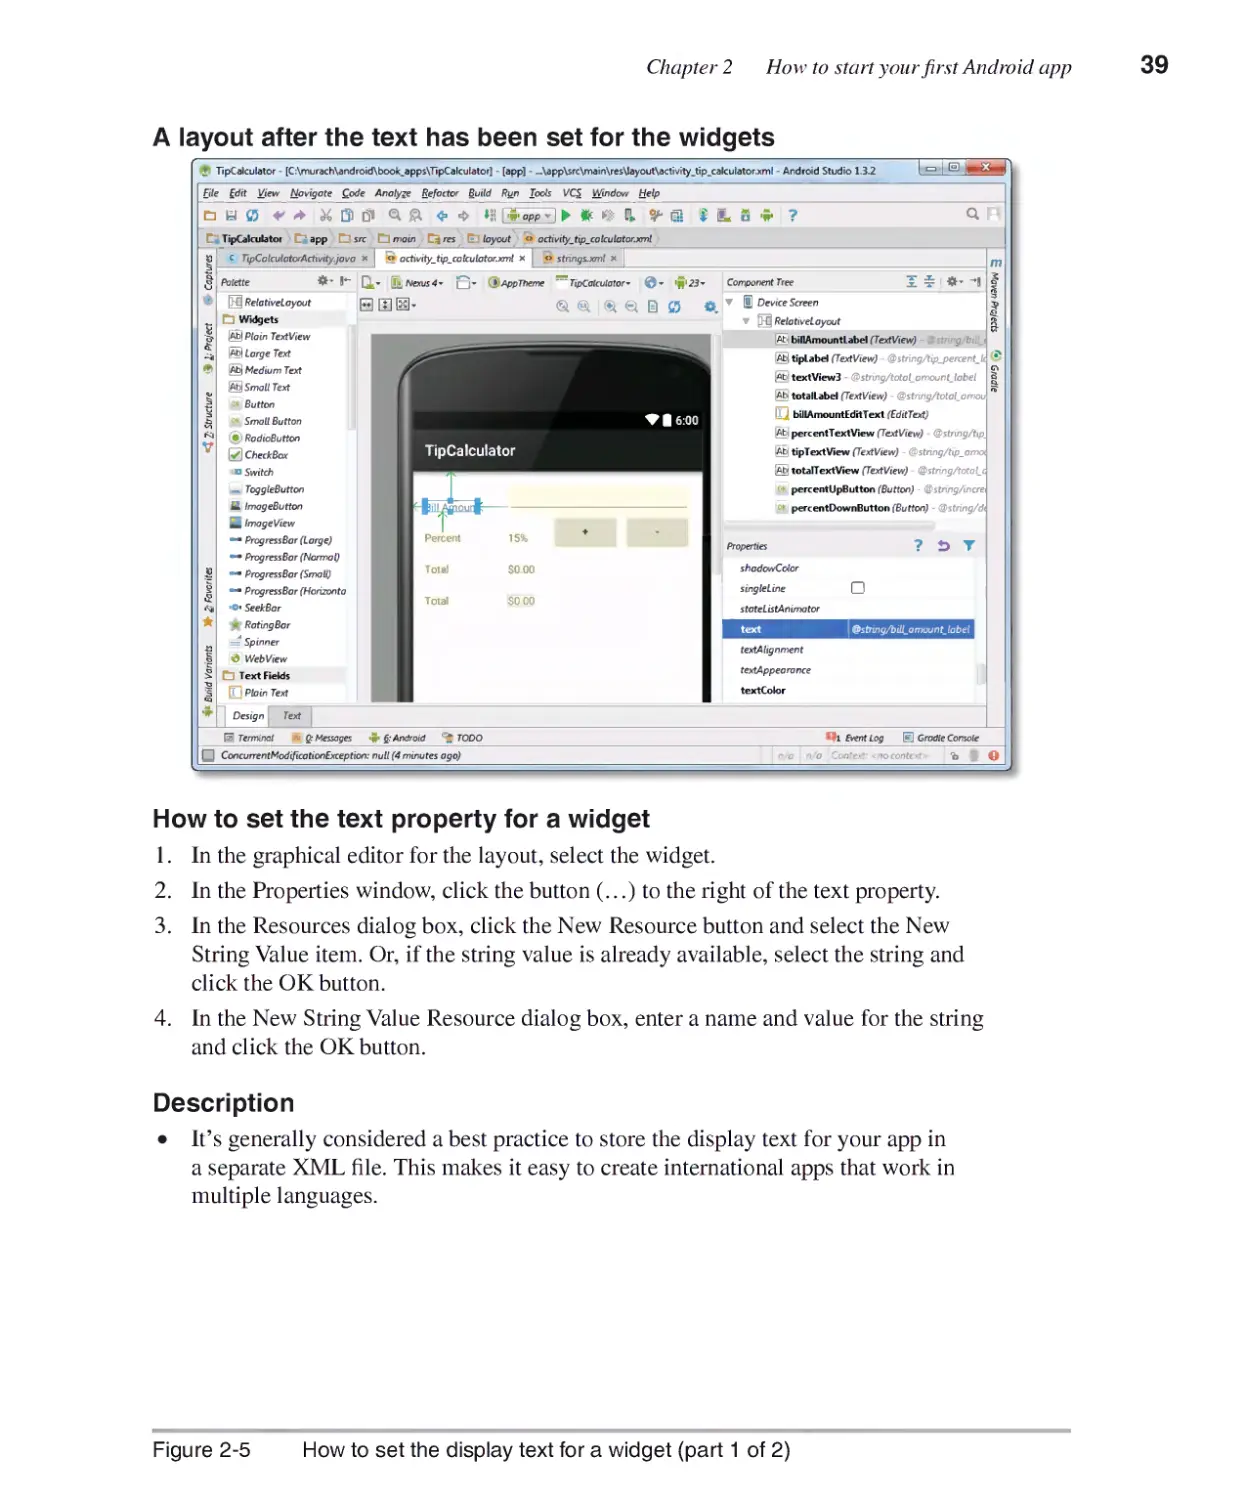
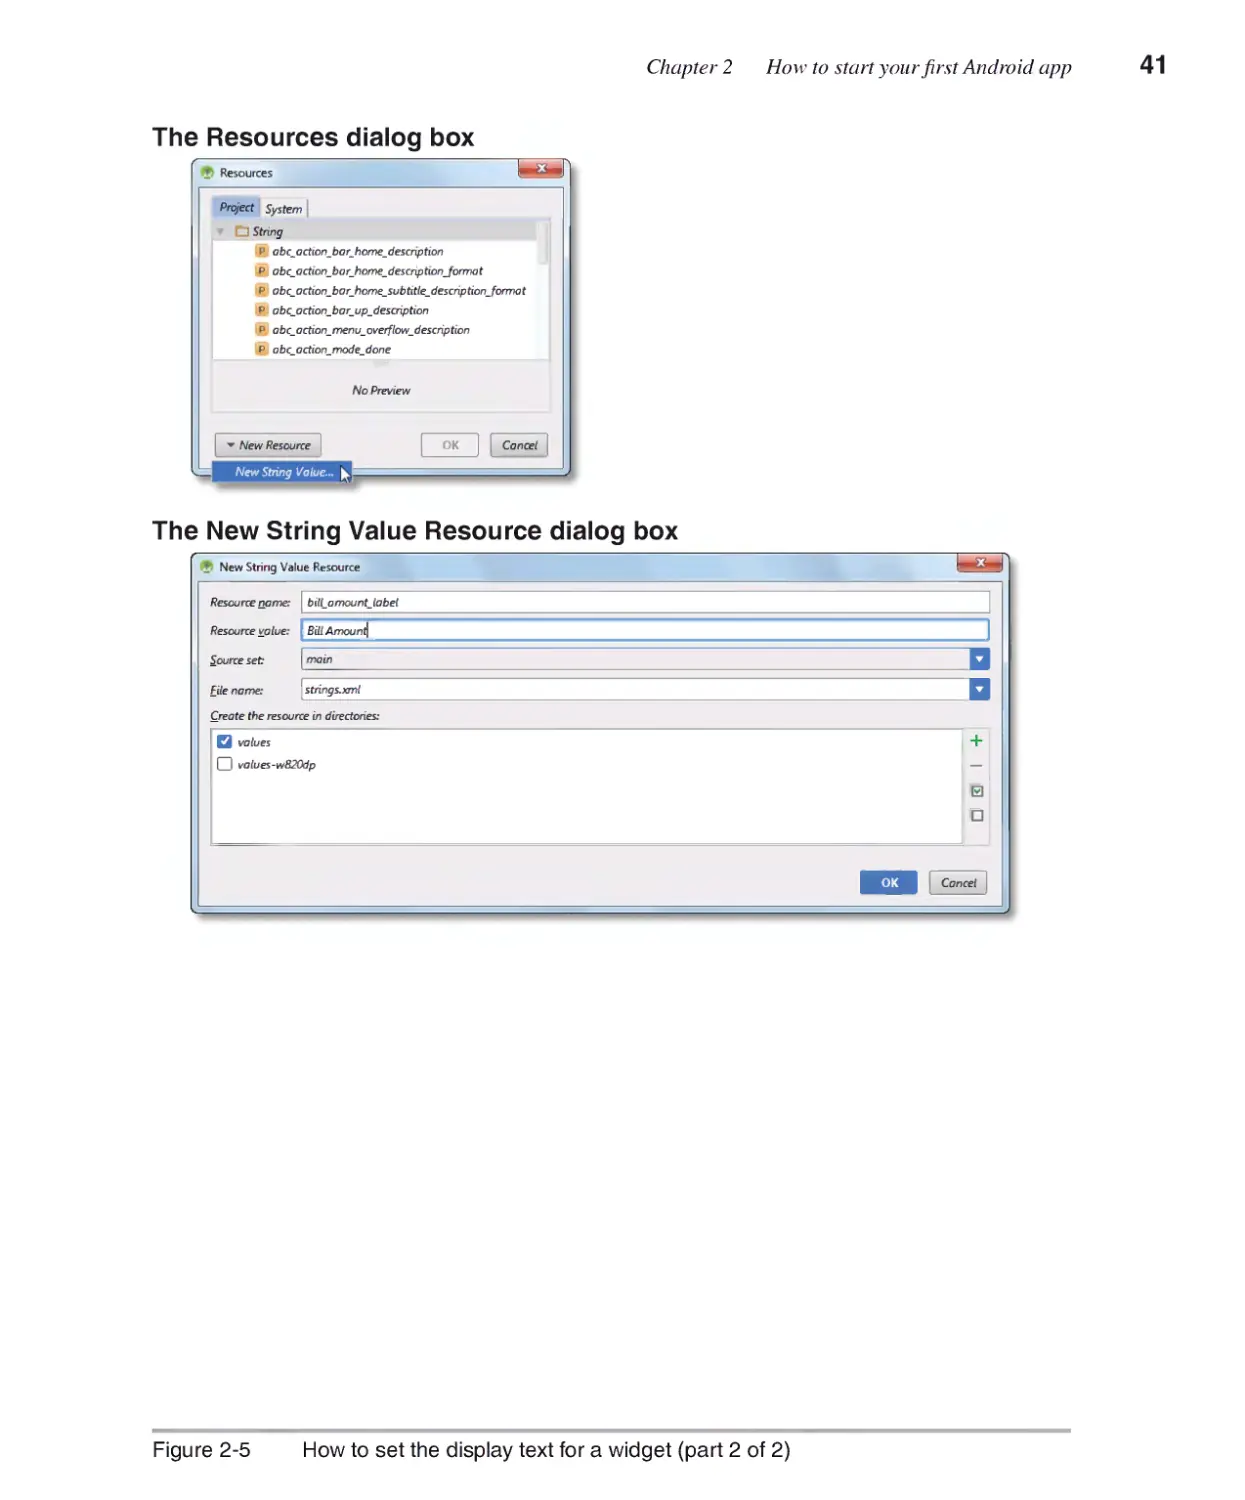
How to set the display text 38
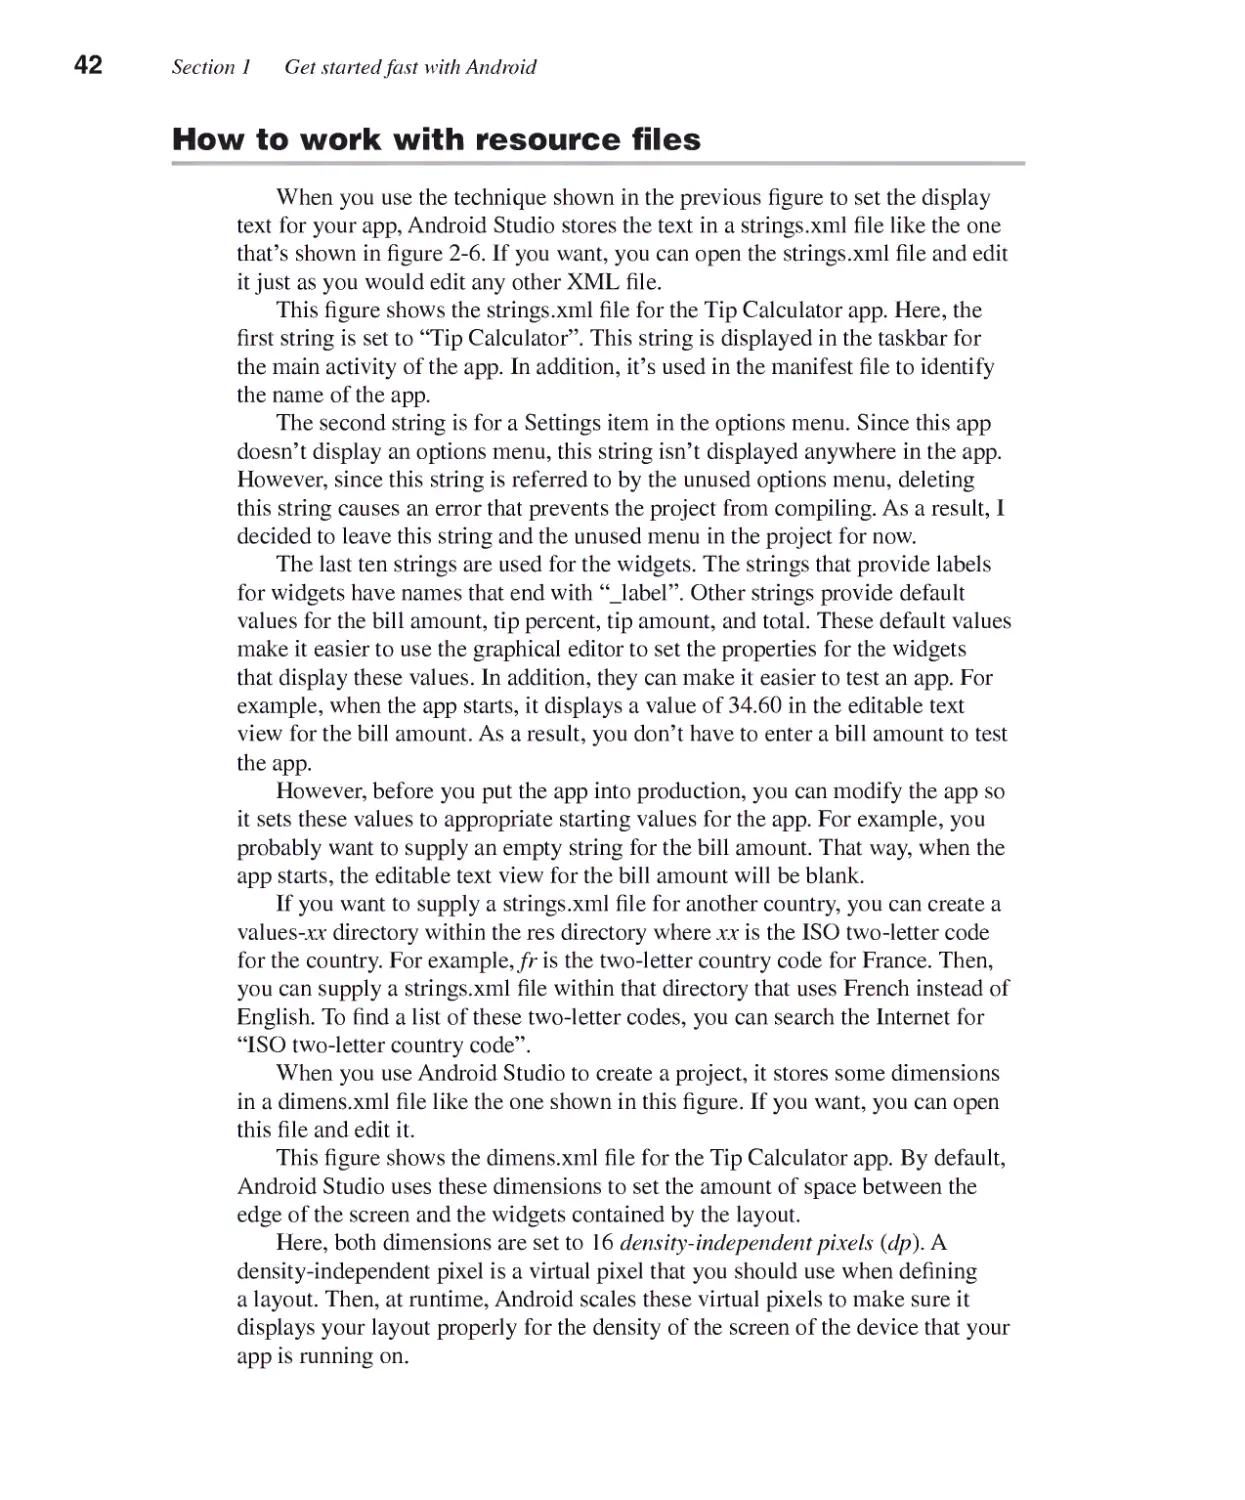
How to work with resource files 42
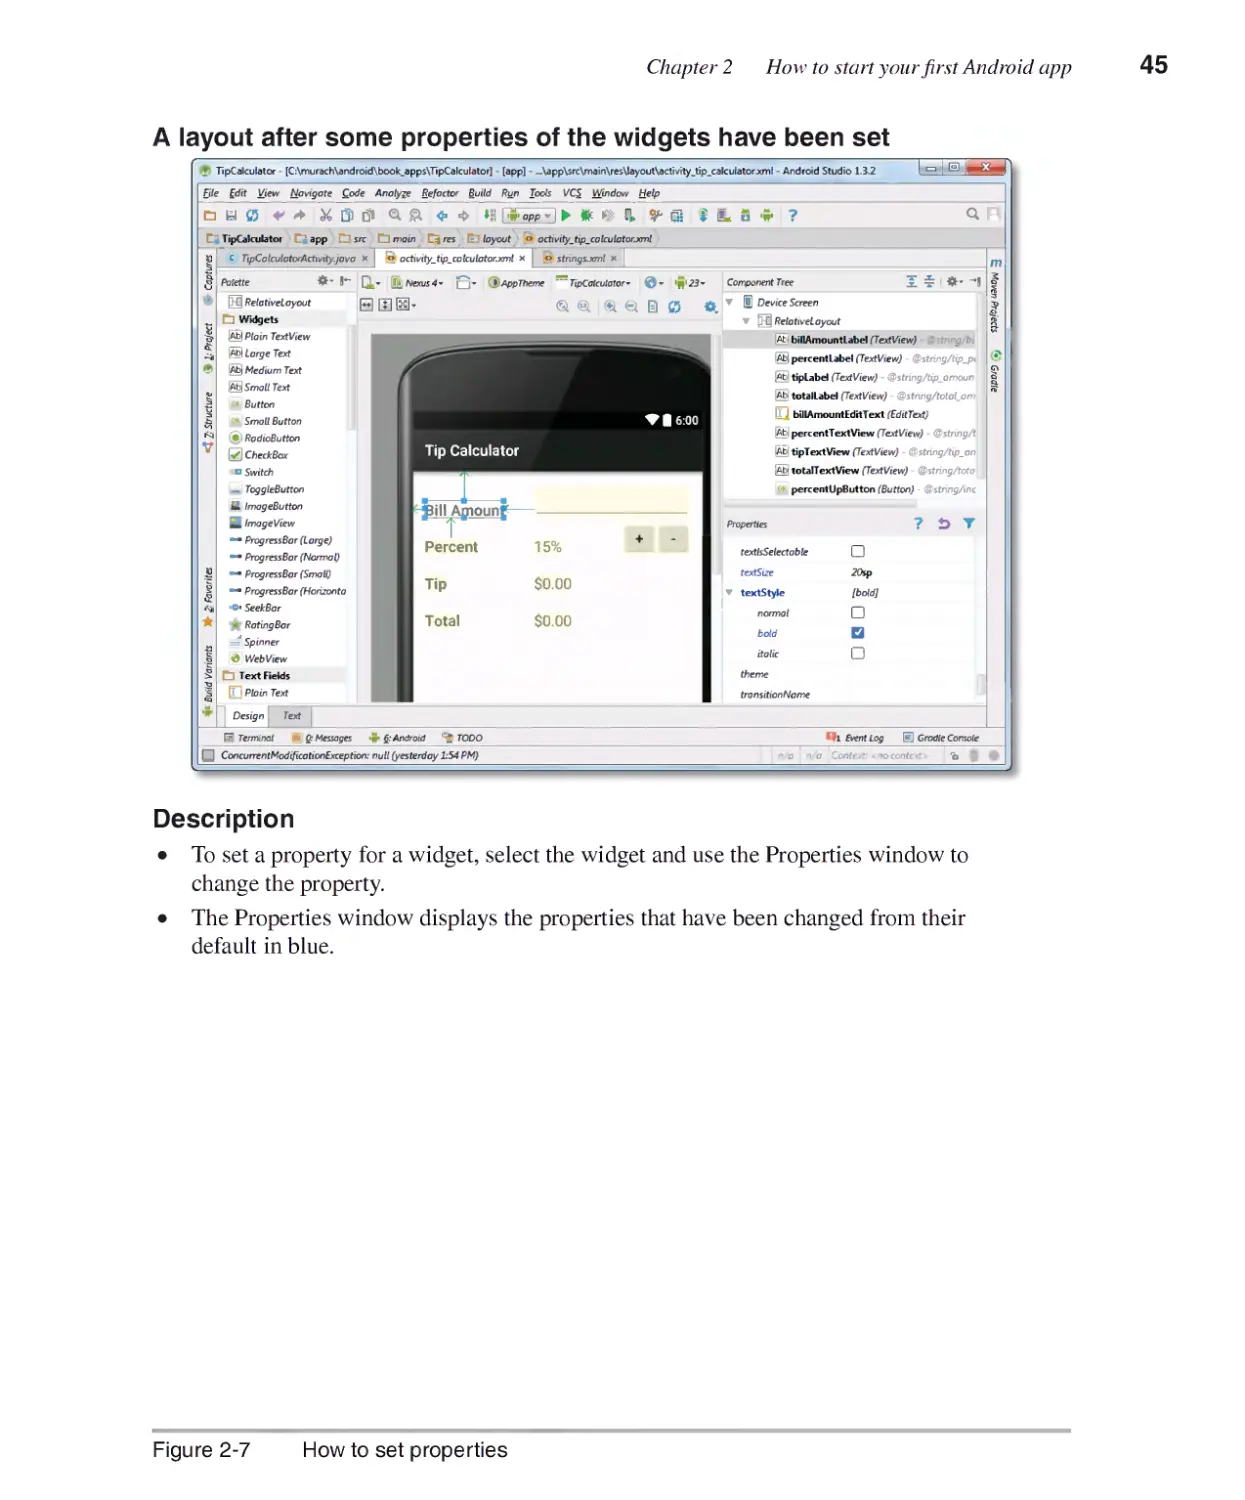
How to set properties 44
Common properties 46
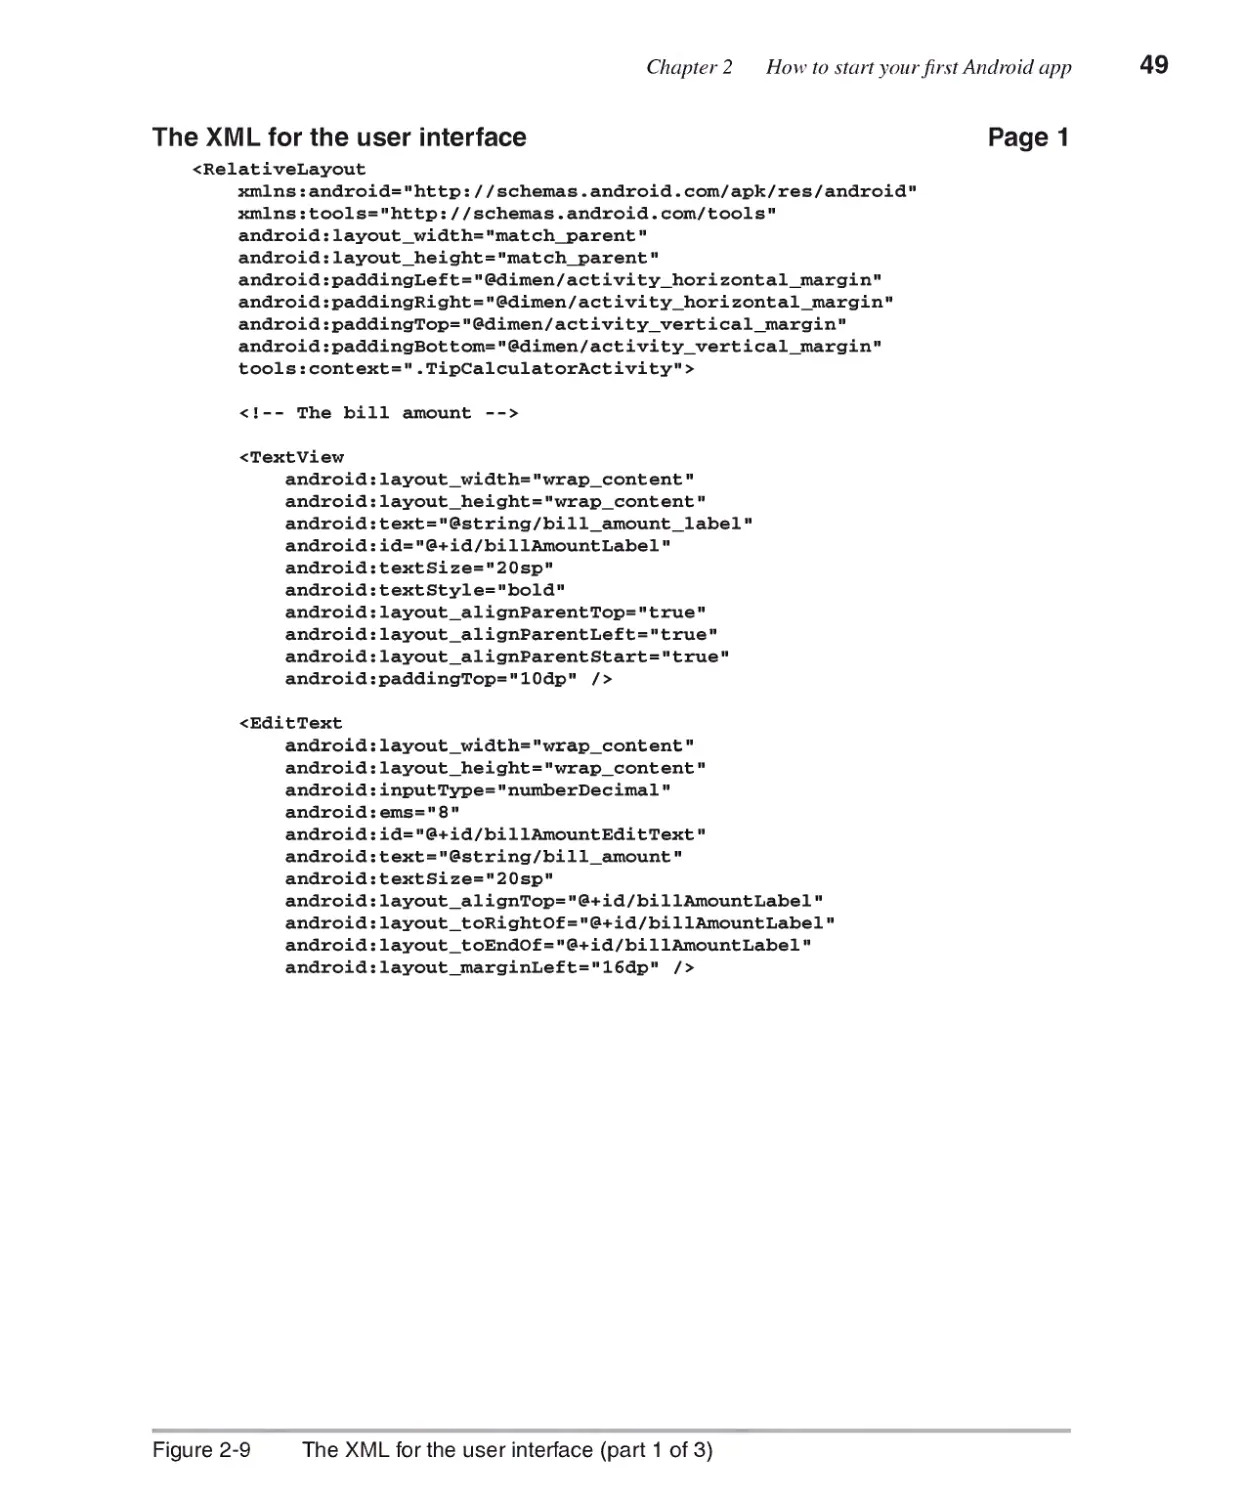
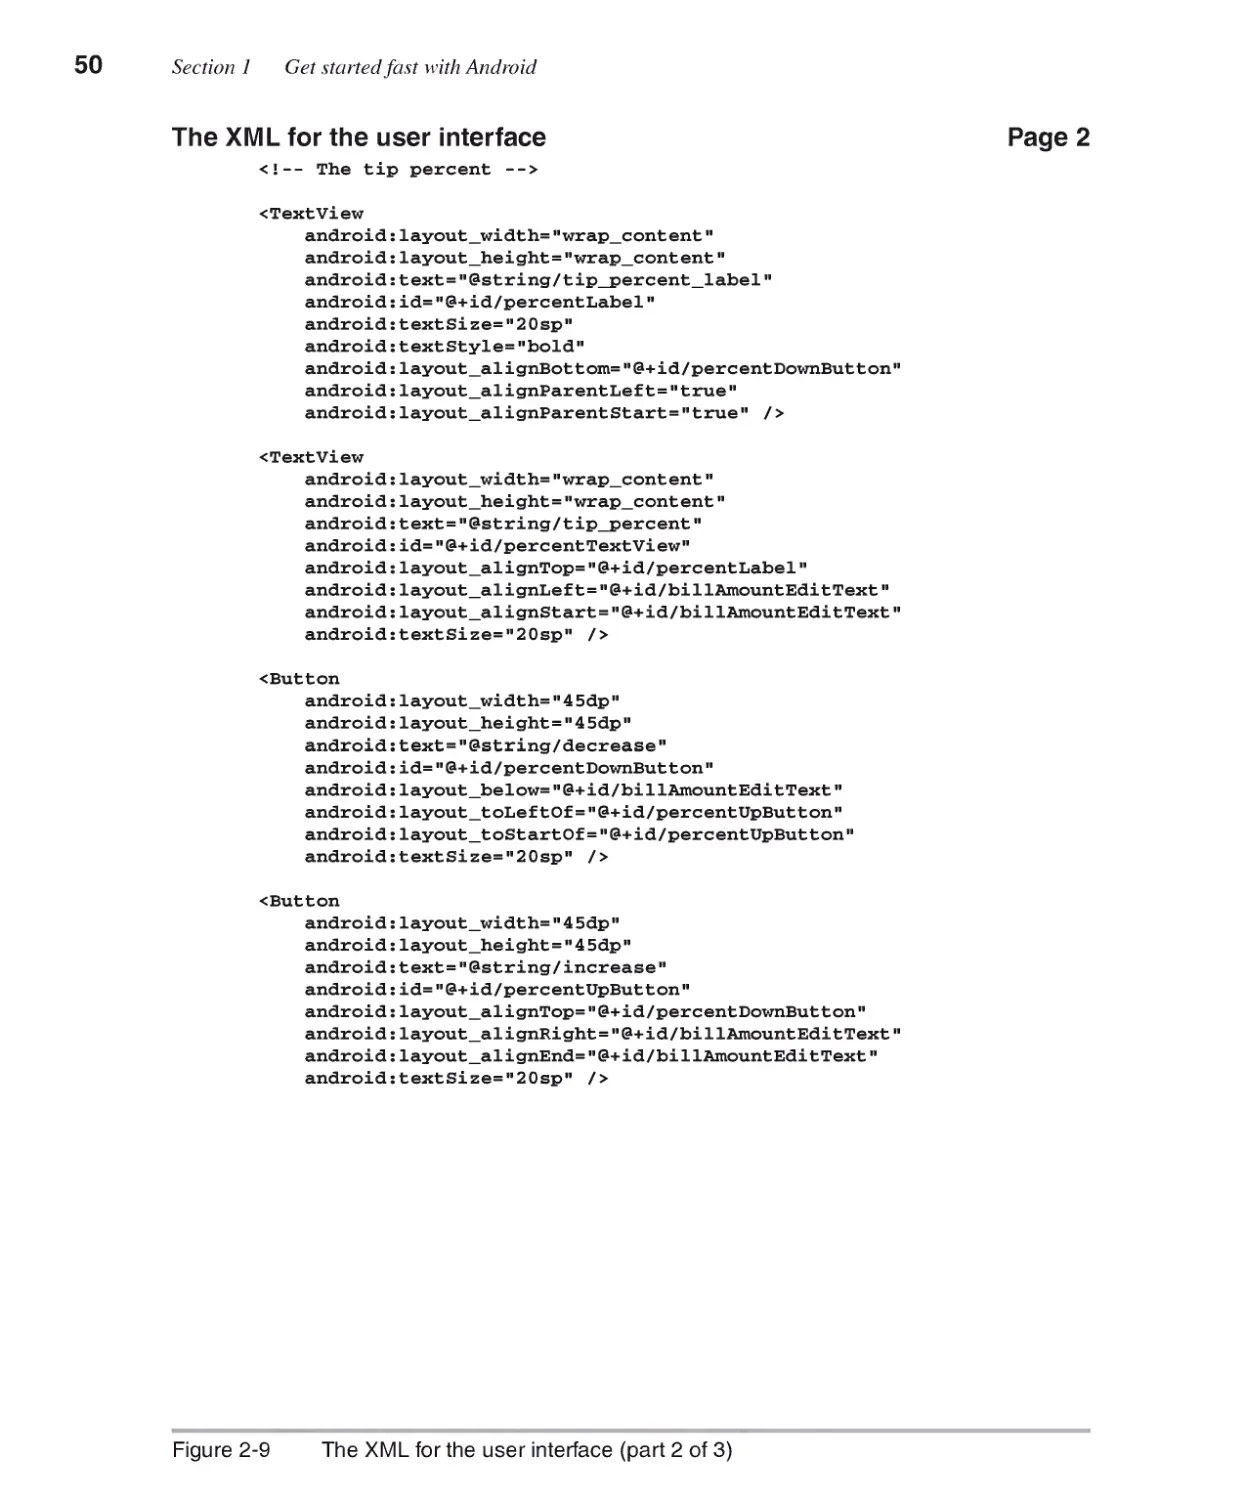
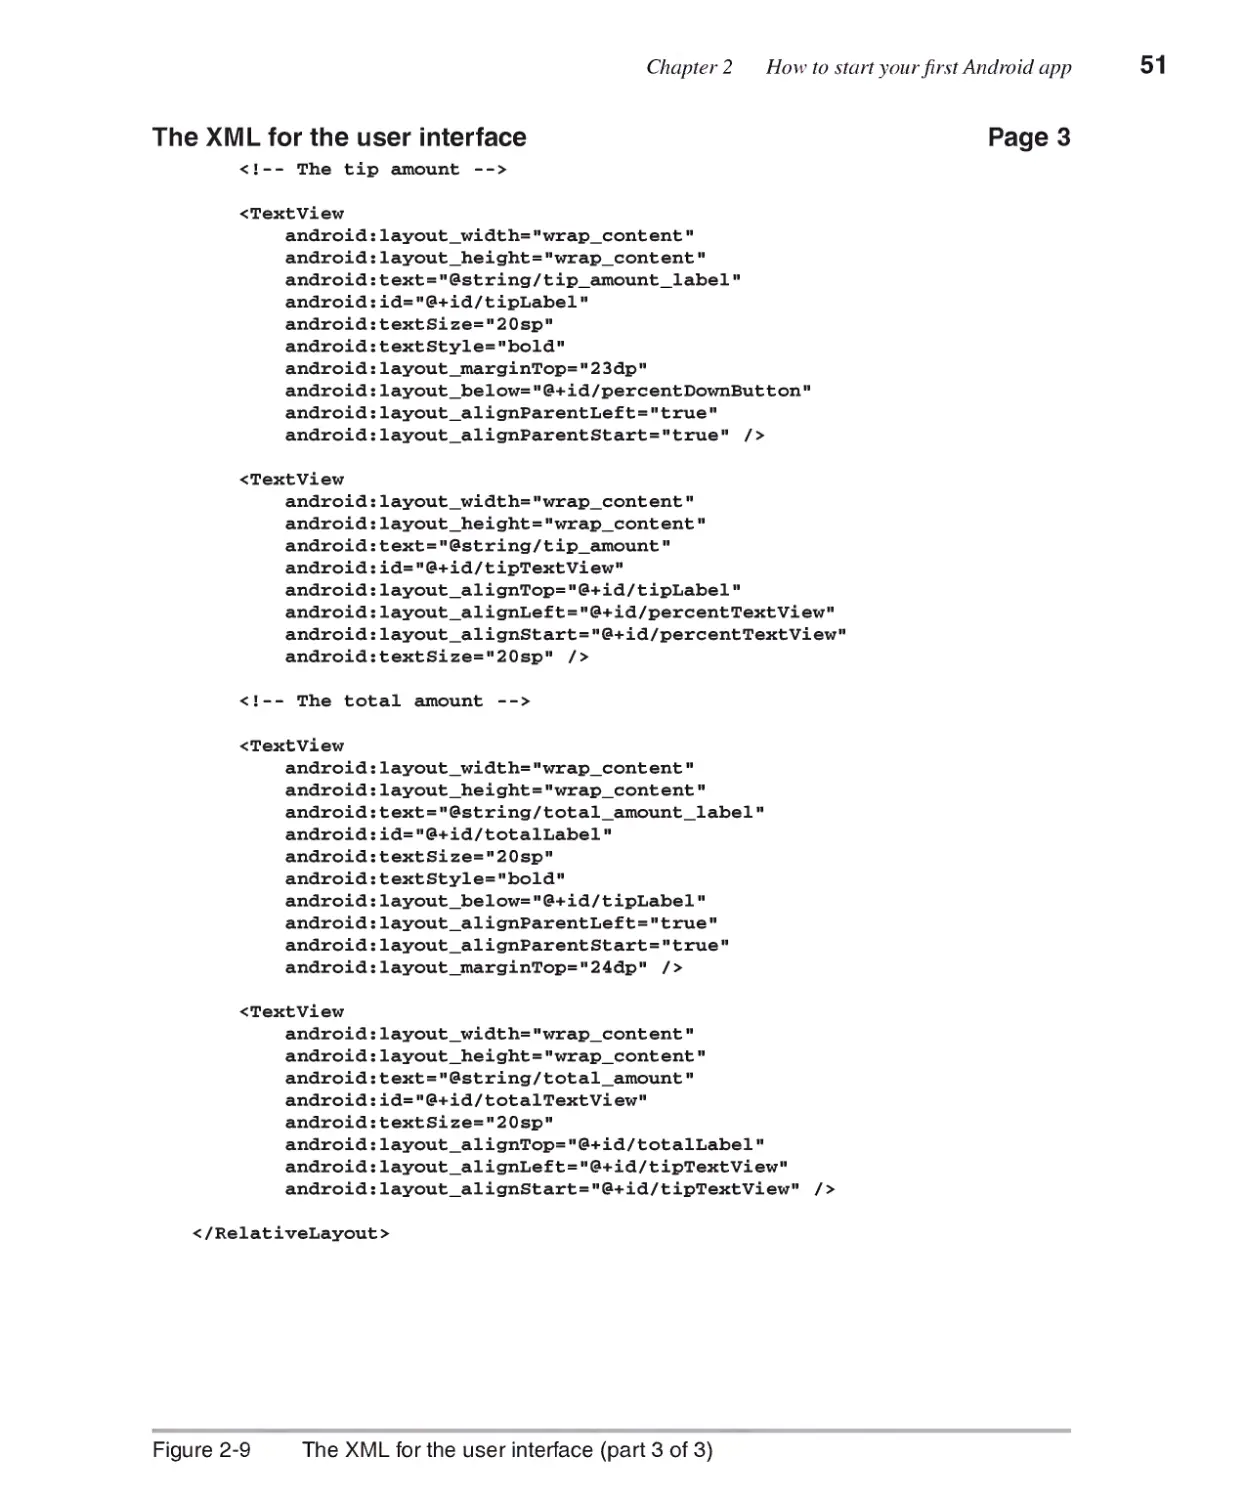
The XML for the user interface 48
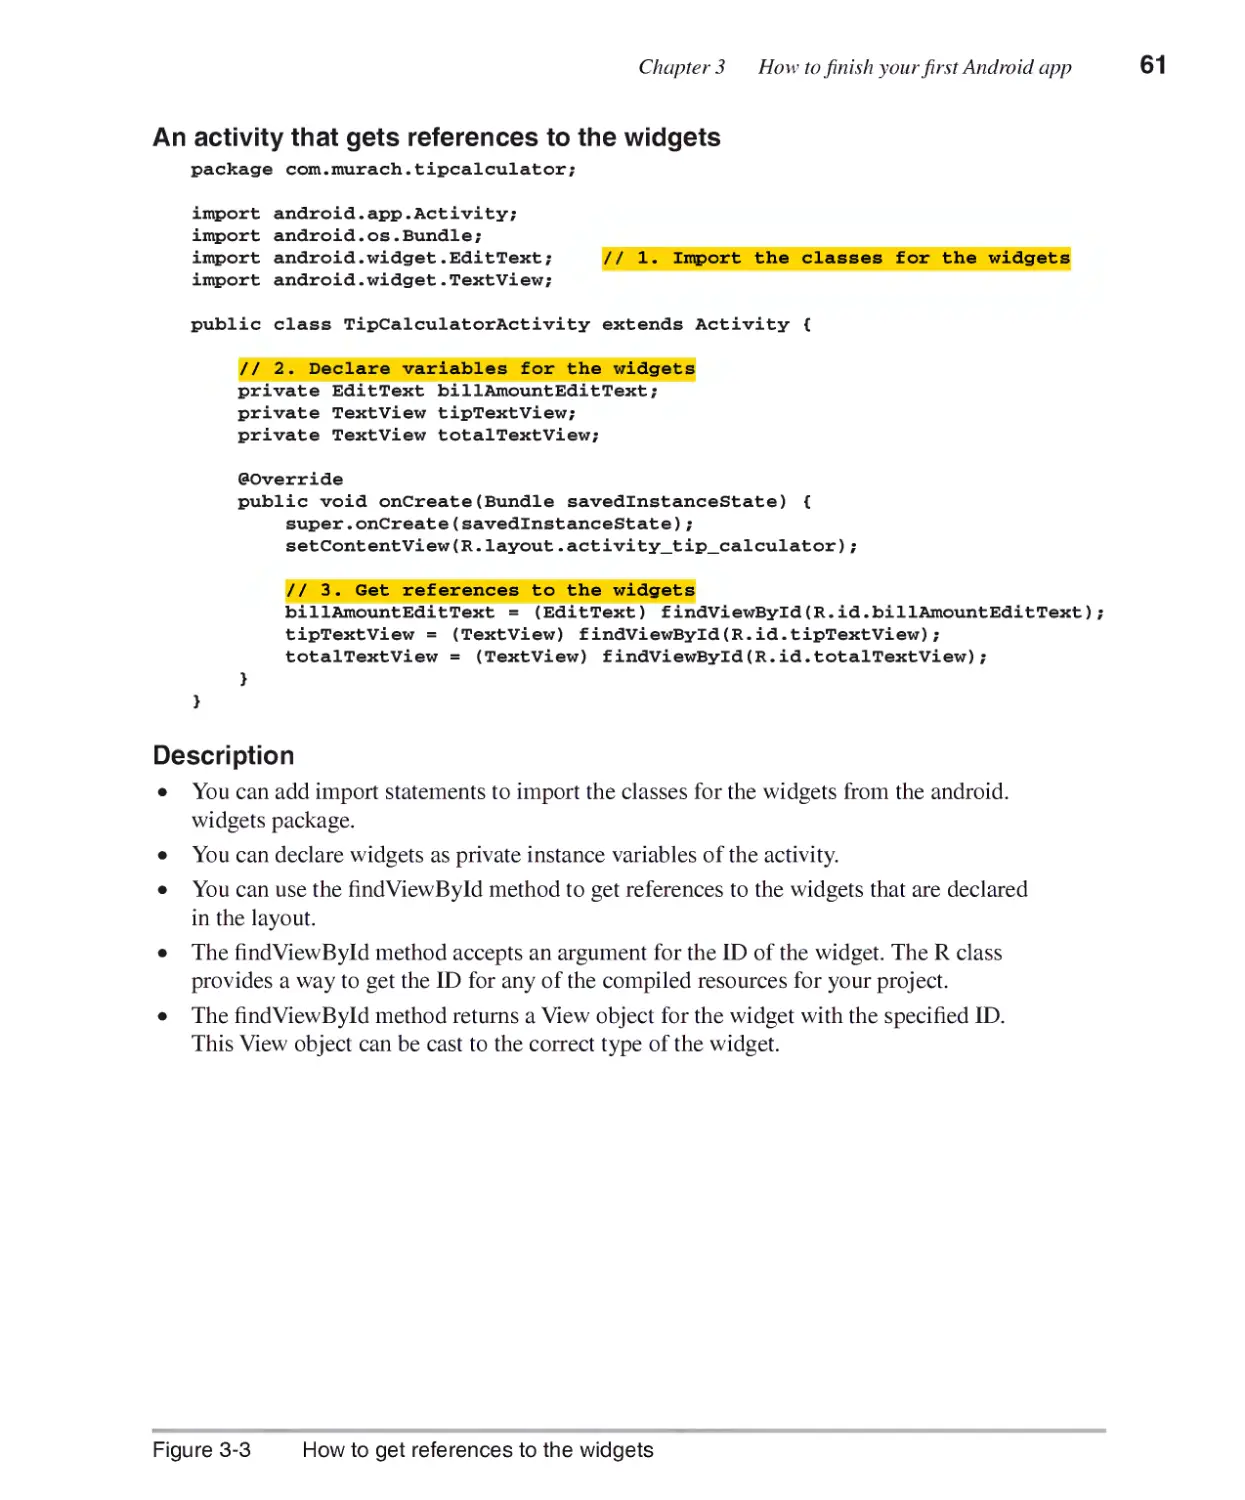
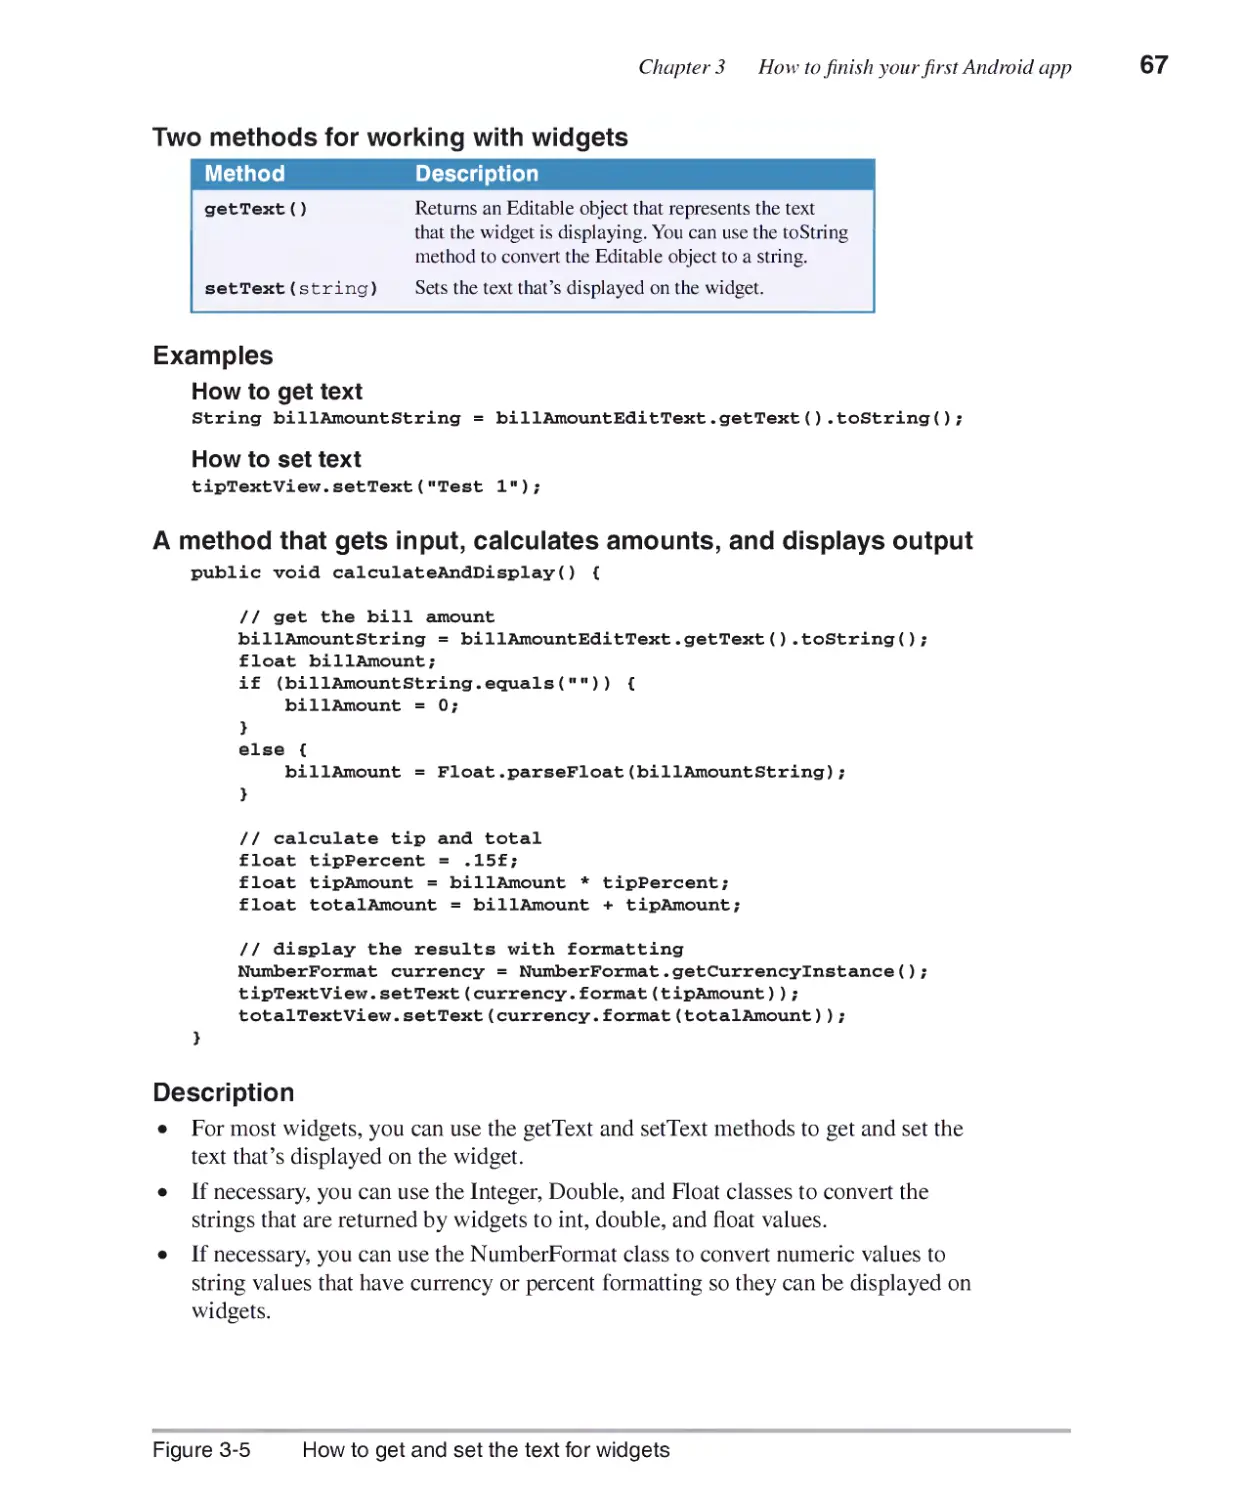
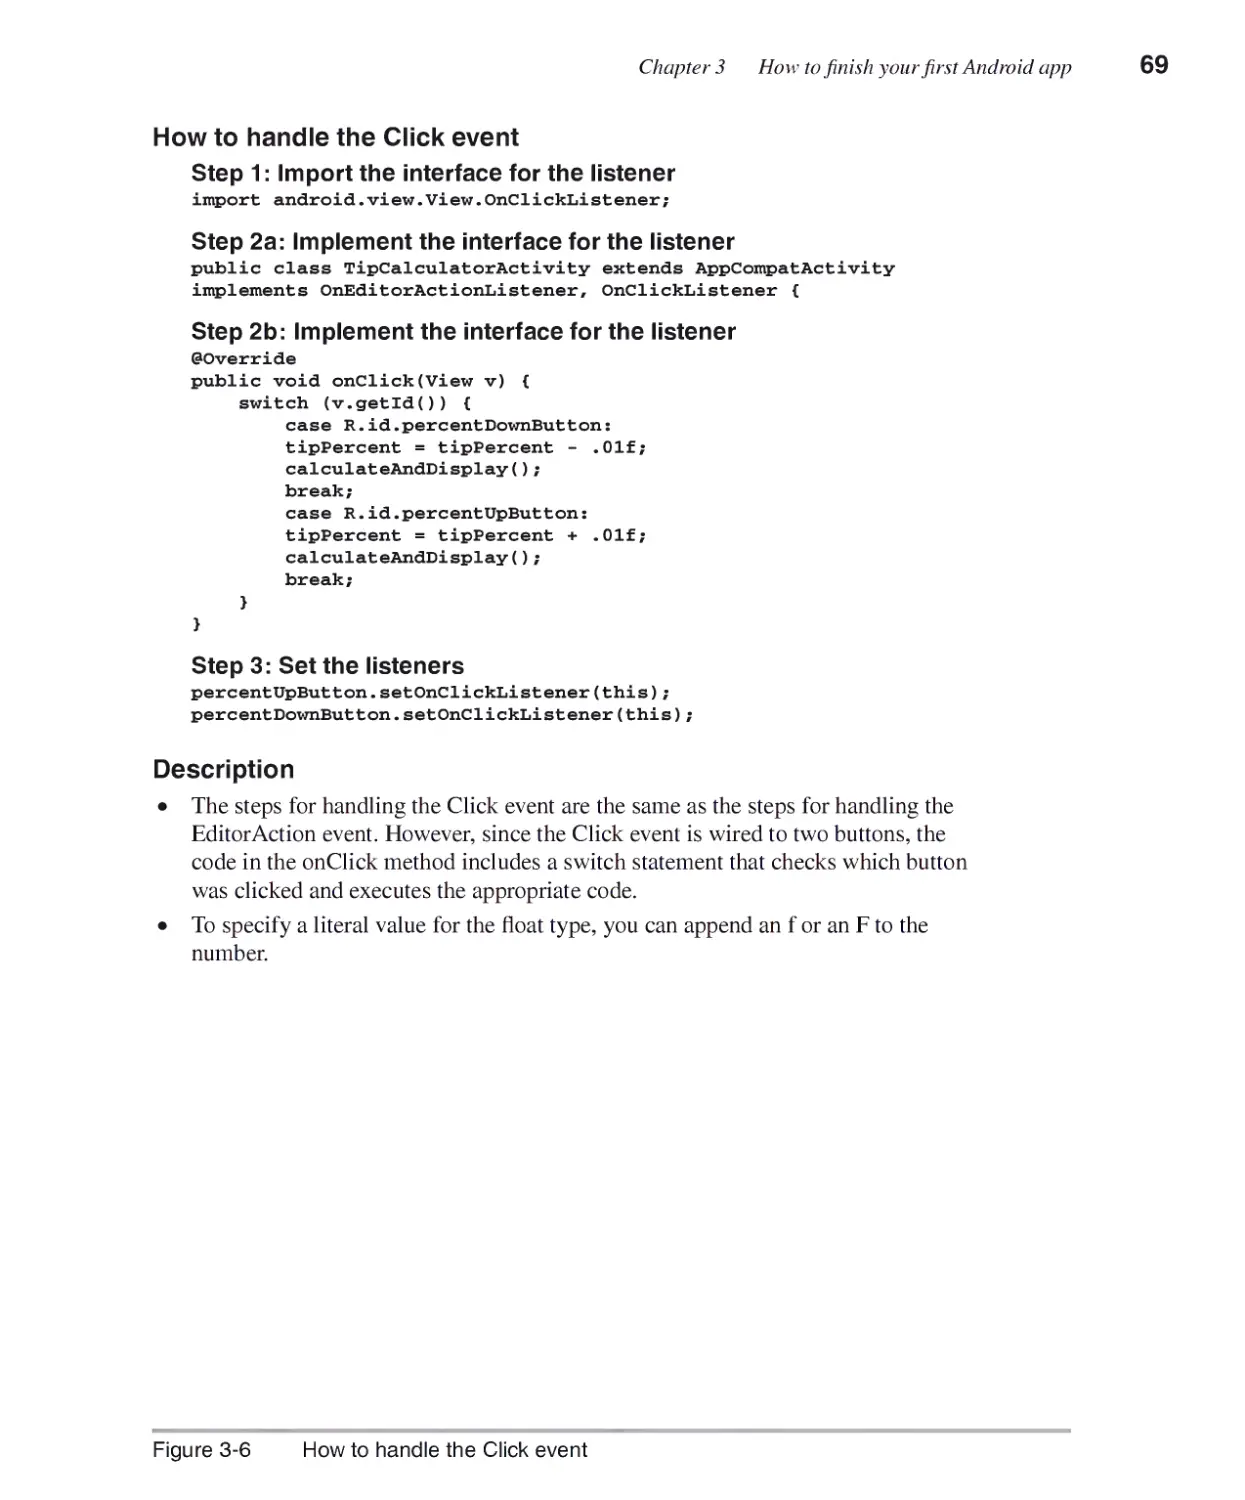
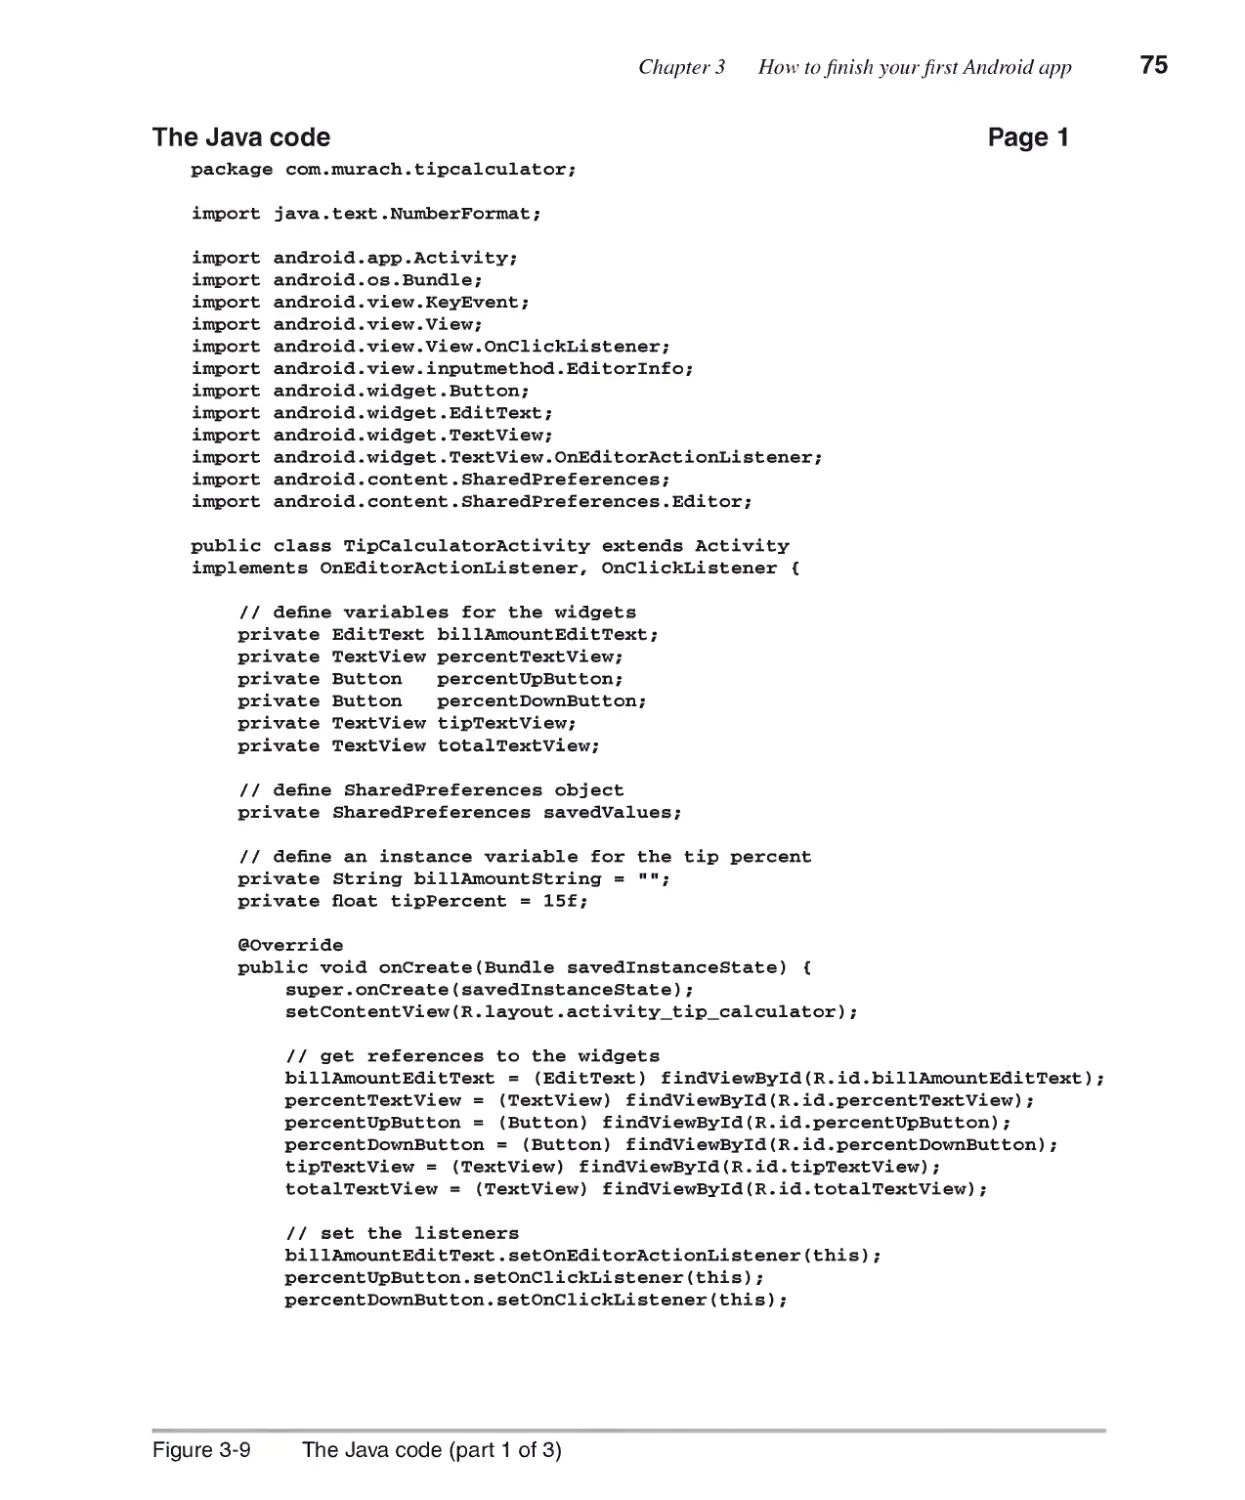
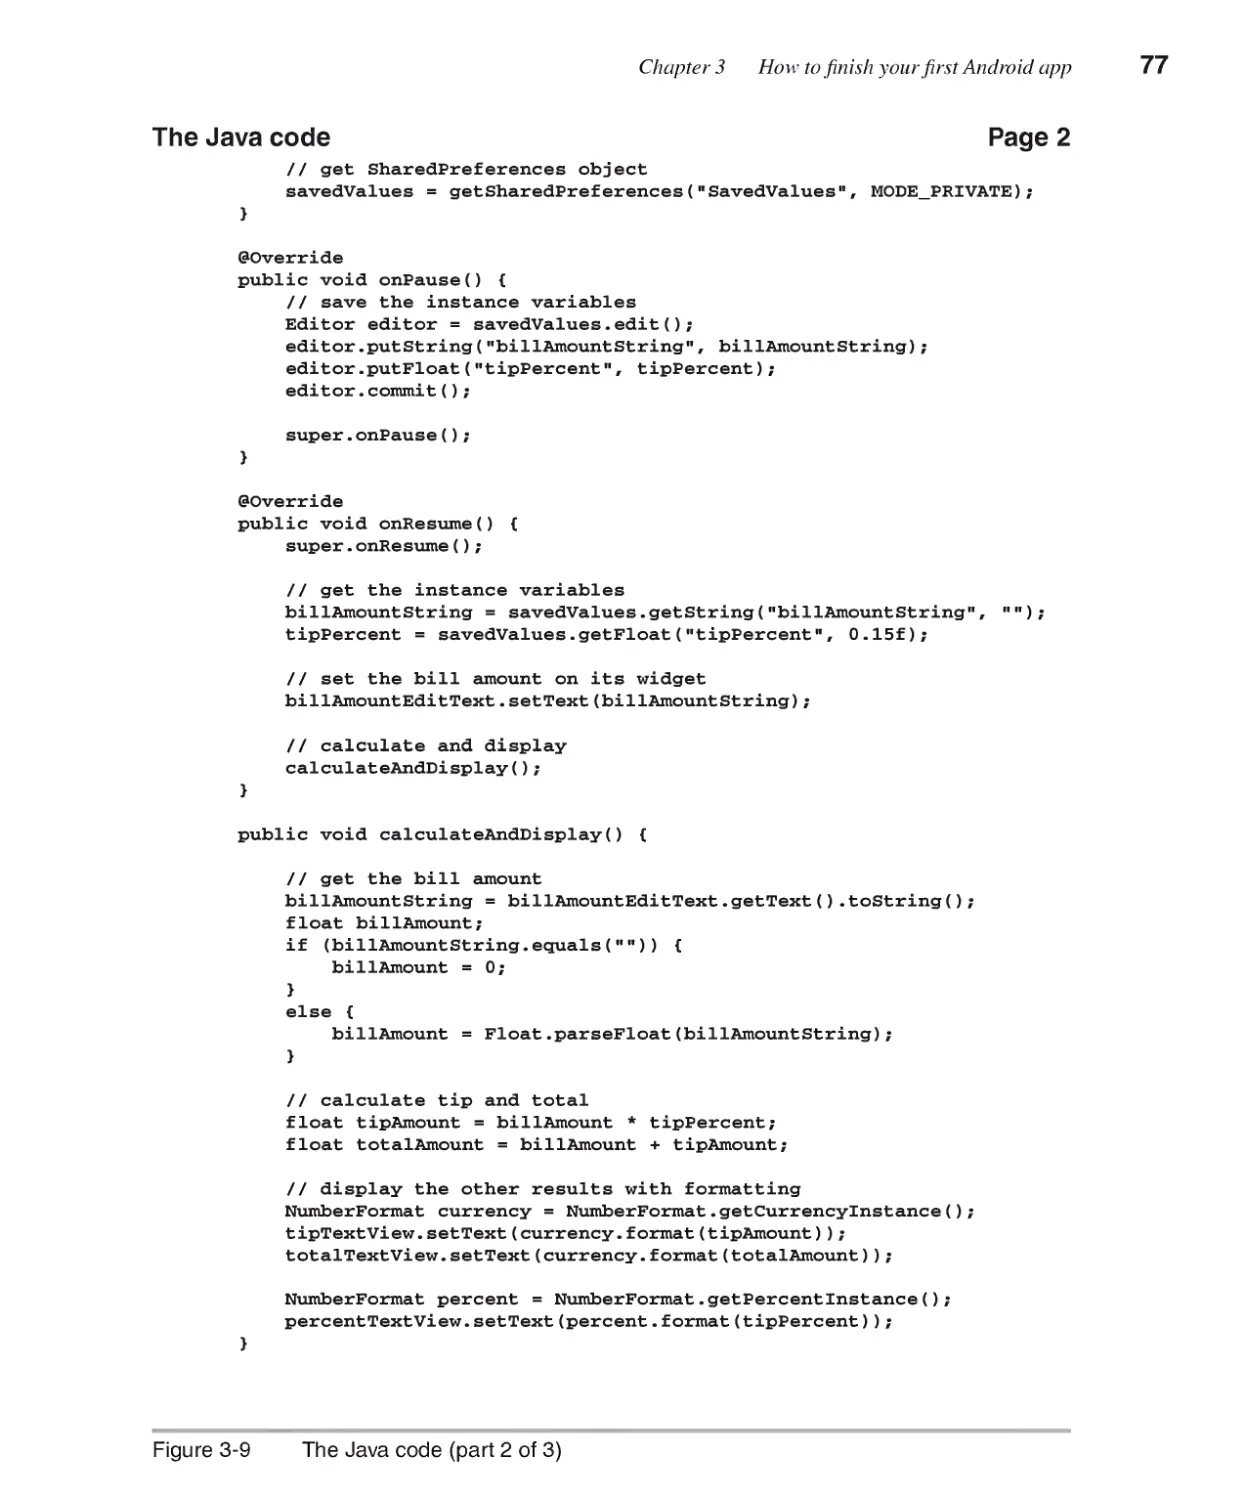
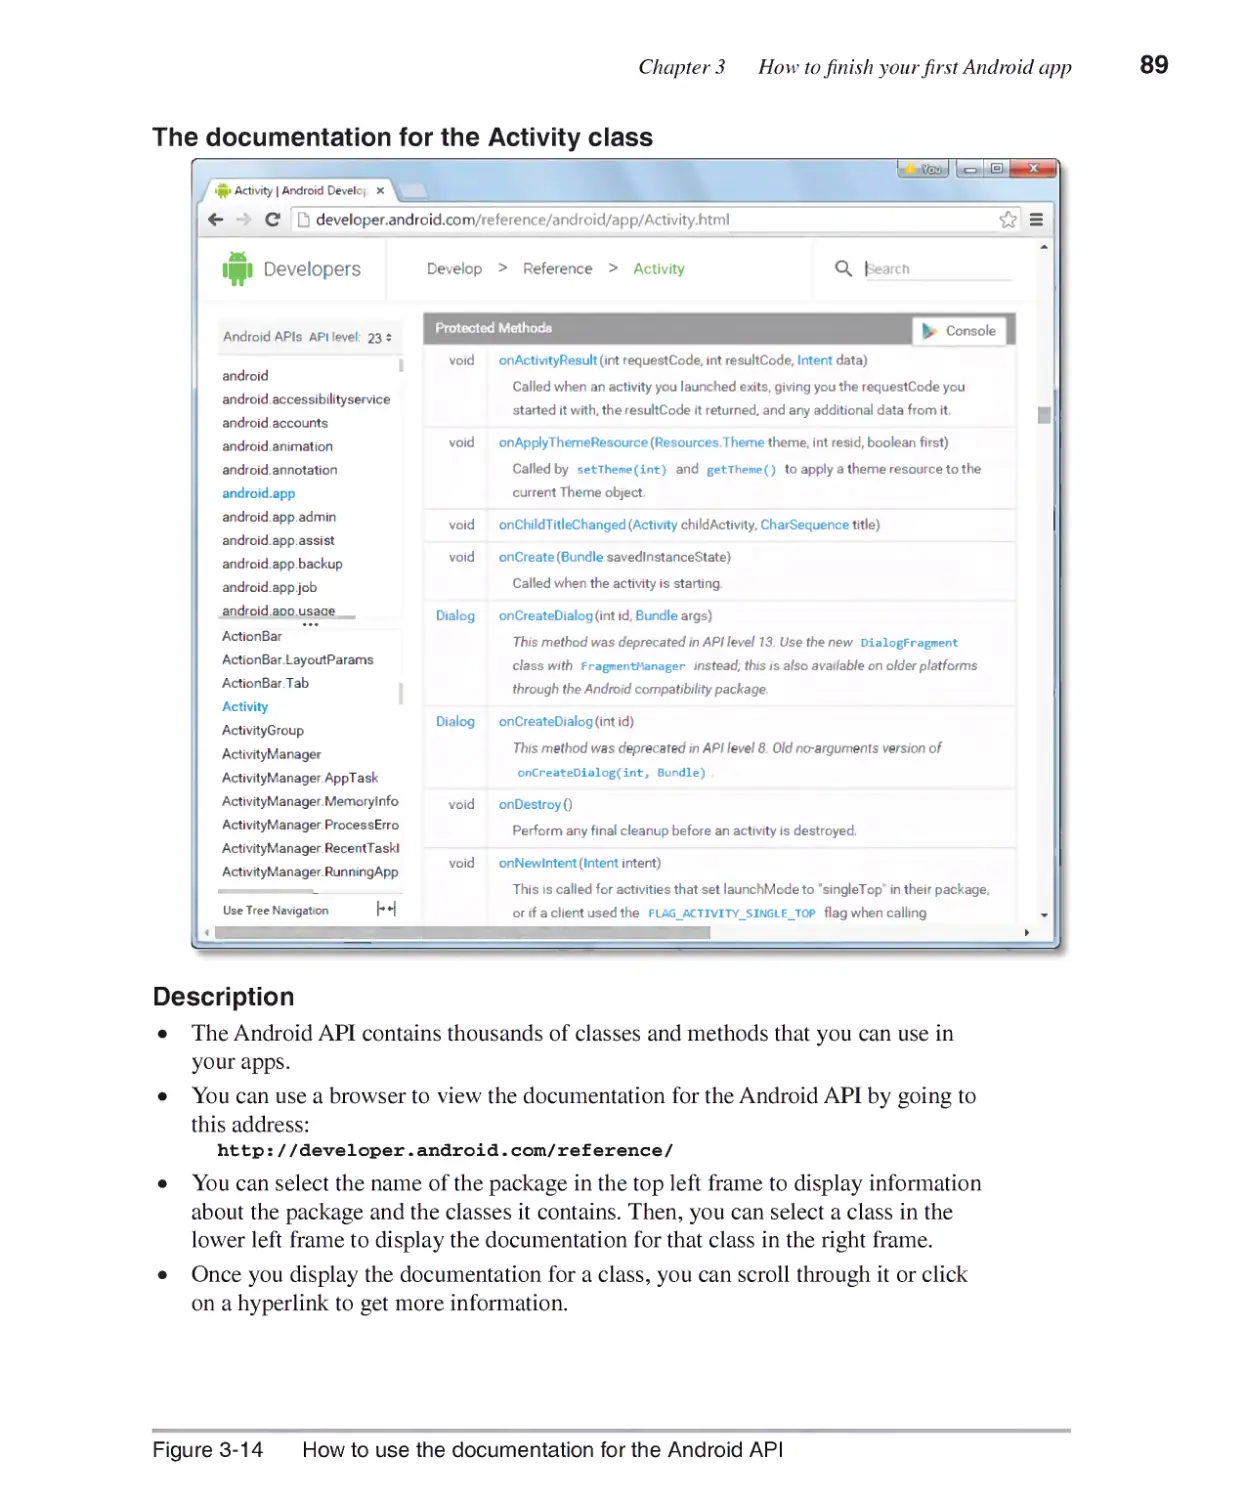
Chapter 3 How to finish your first Android app
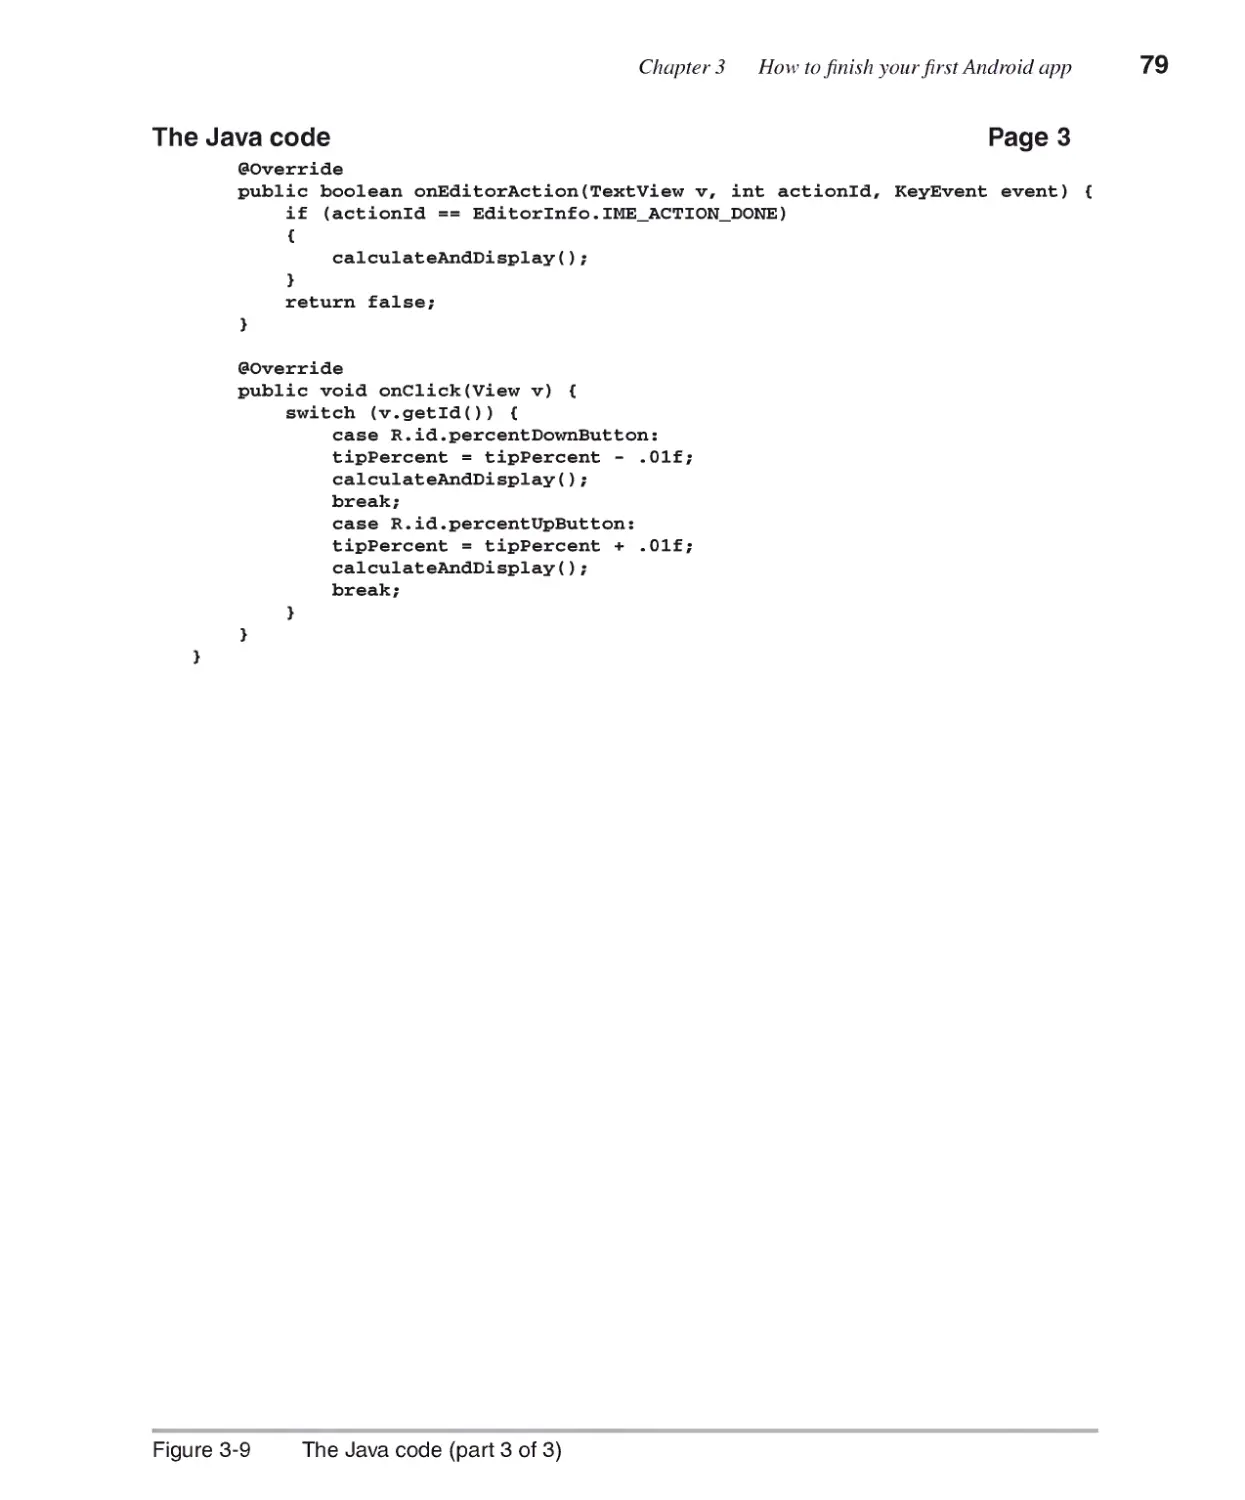
How to write the Java code..............................................................56
How to work with an activity 56
How to remove the v7 appcompat support library 58
How to get references to widgets 60
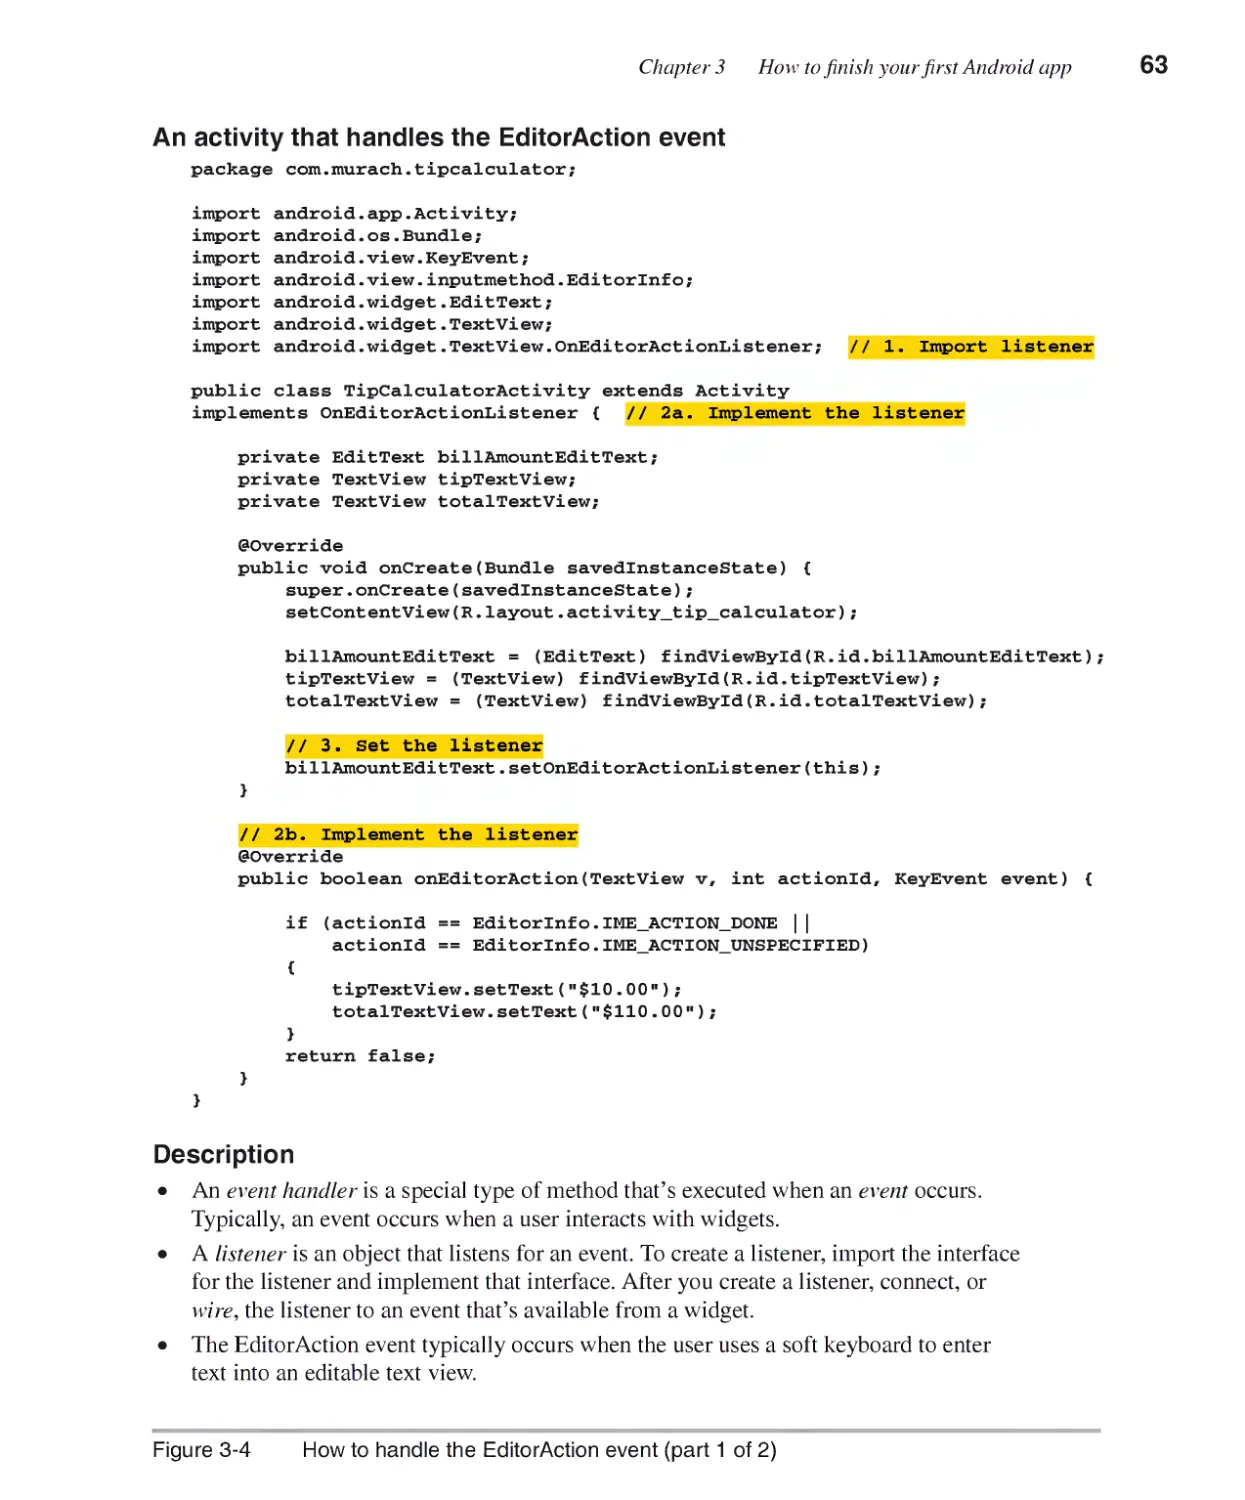
How to handle the EditorAction event 62
How to get and set the text for widgets 66
The lifecycle of an activity 70
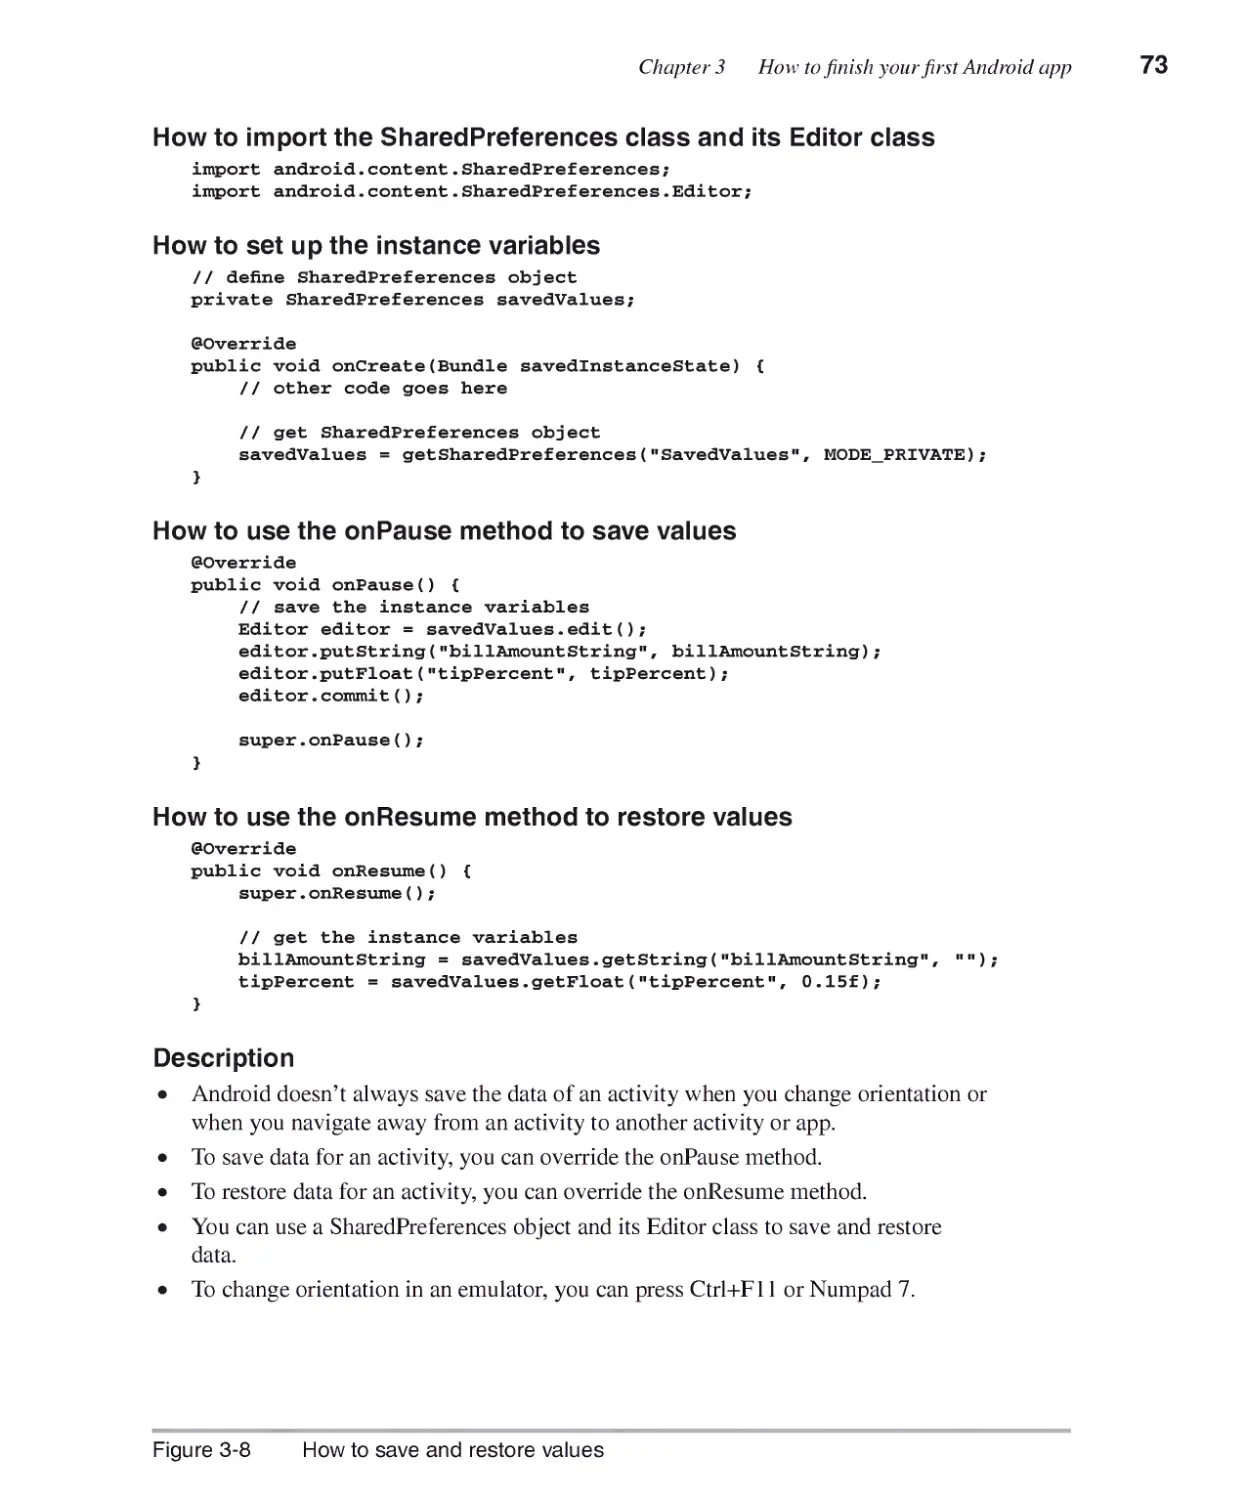
How to save and restore values 72
The Java code for the app 74
More skills for finishing an app.......................................................80
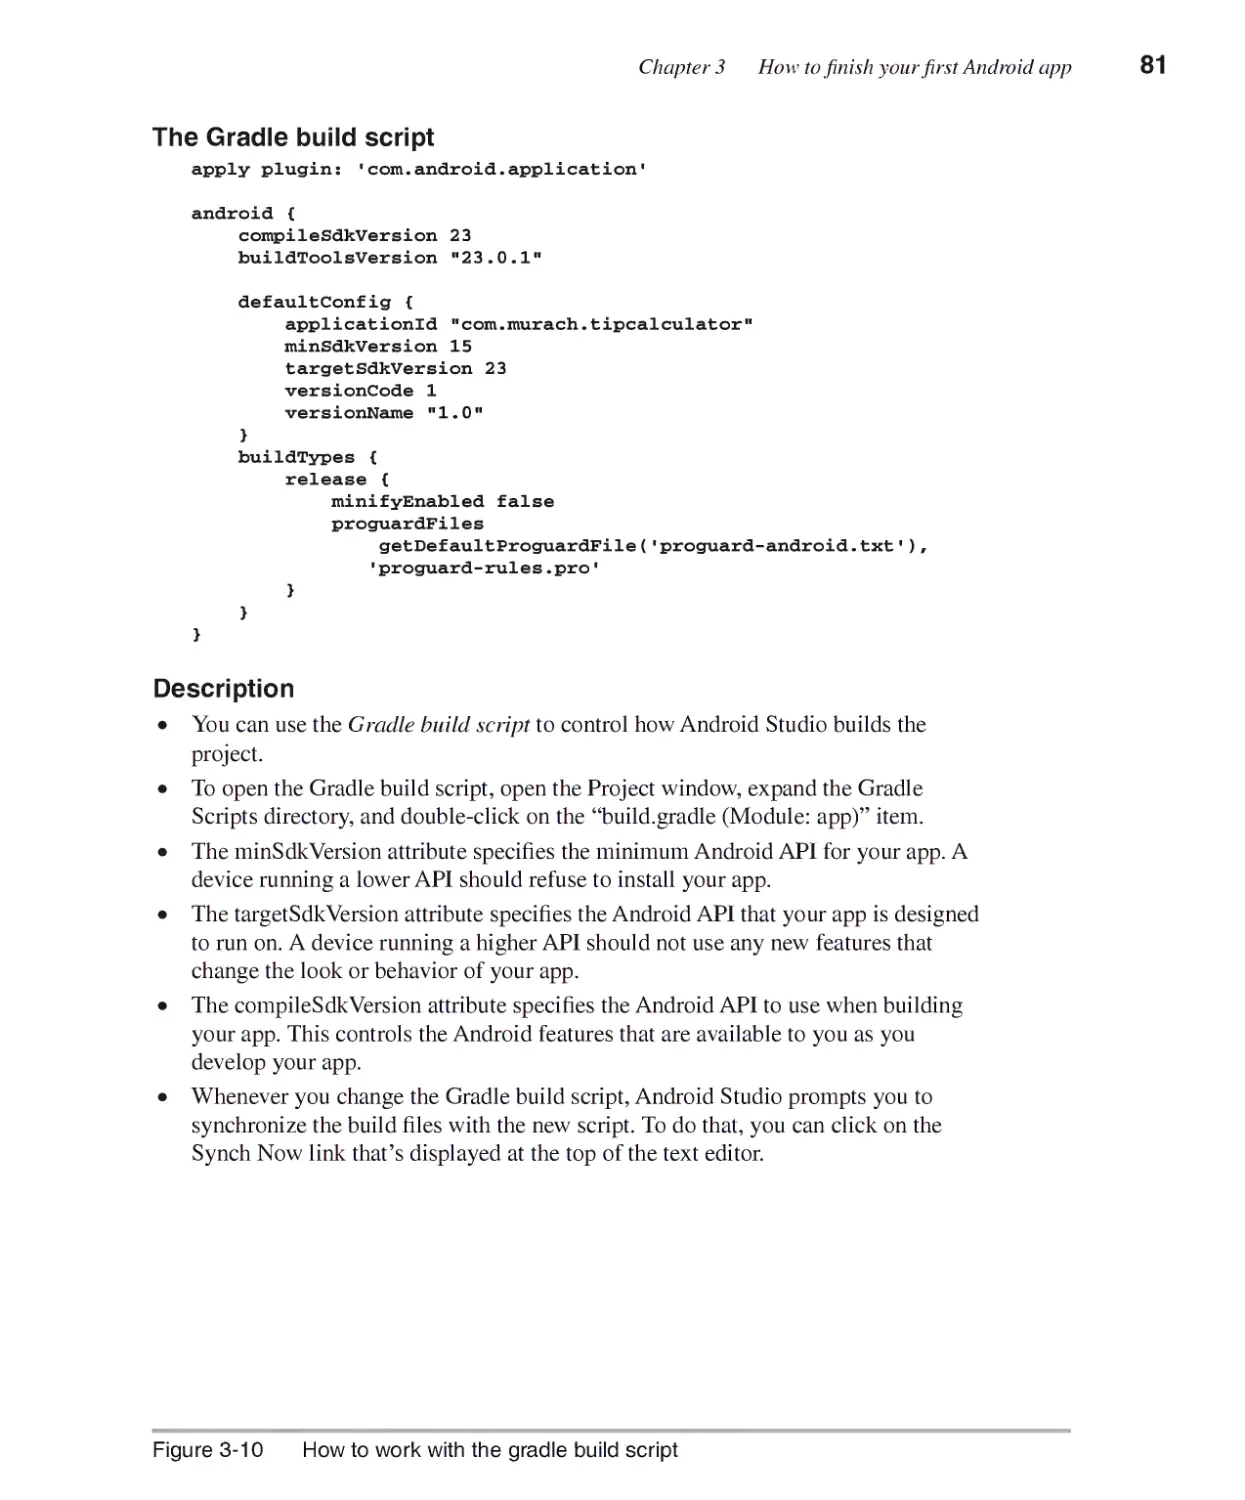
How to work with the Gradle build script 80
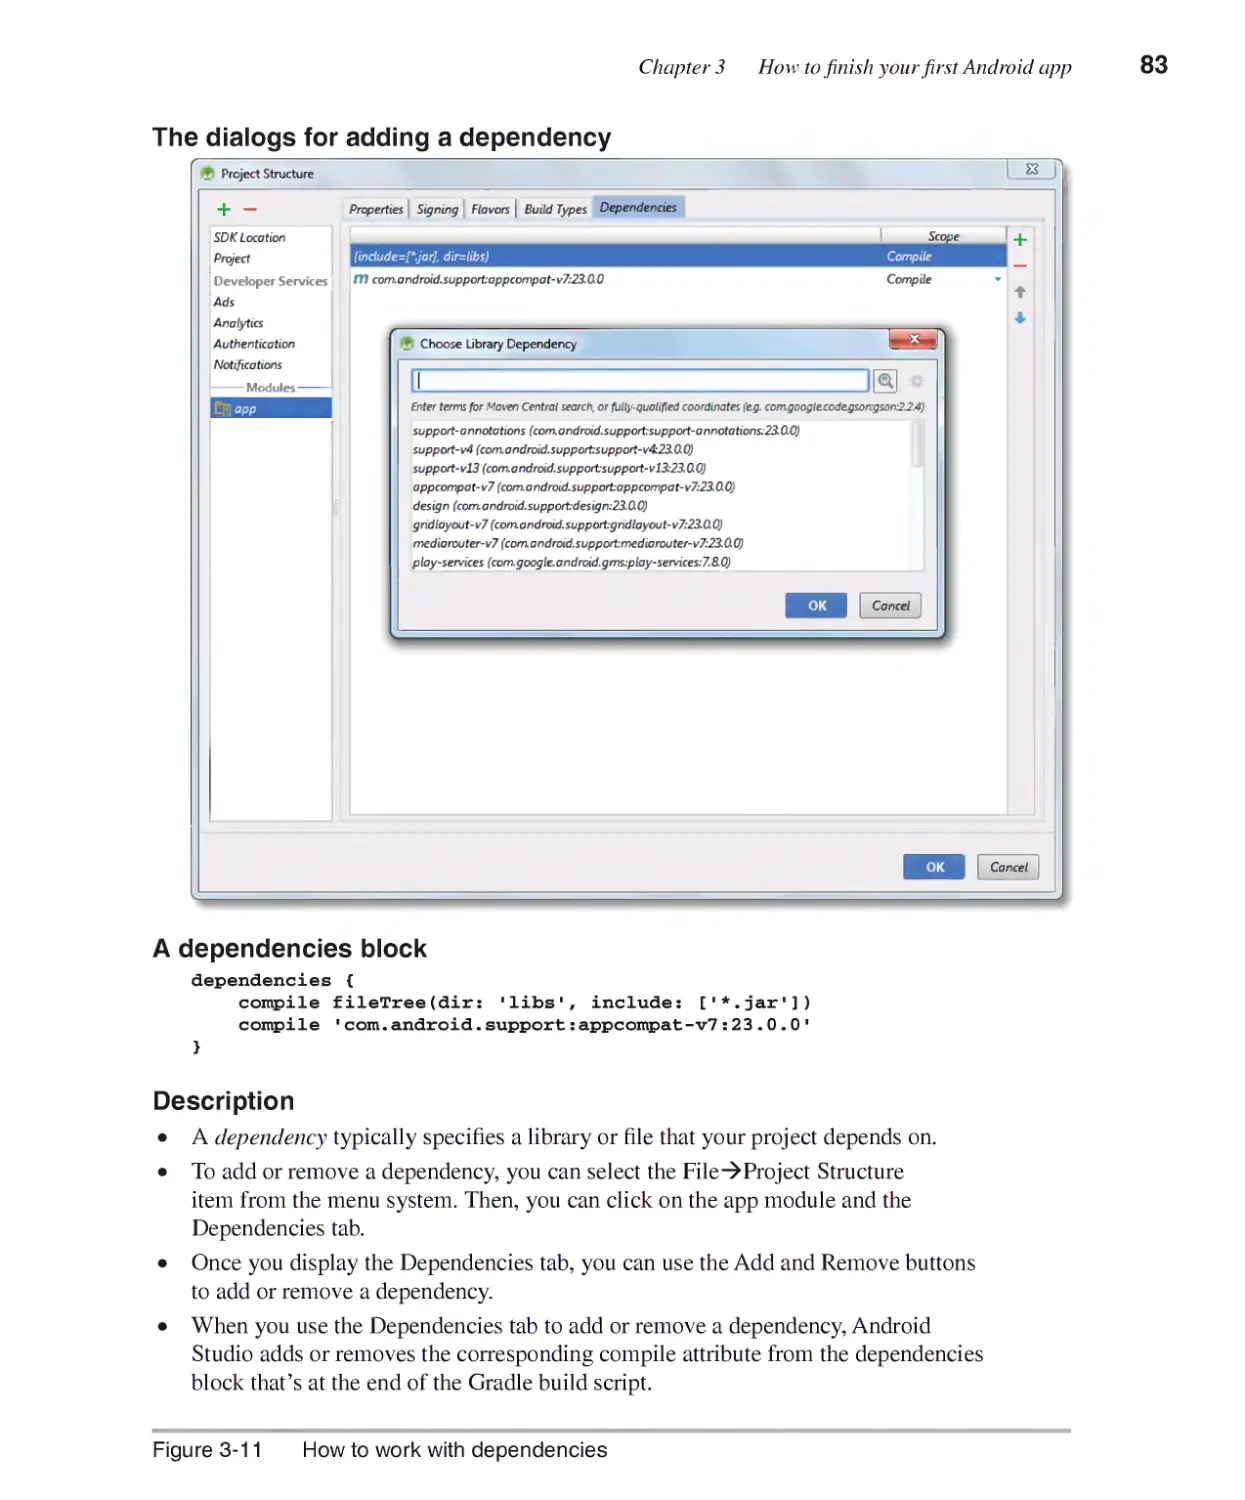
How to work with dependencies 82
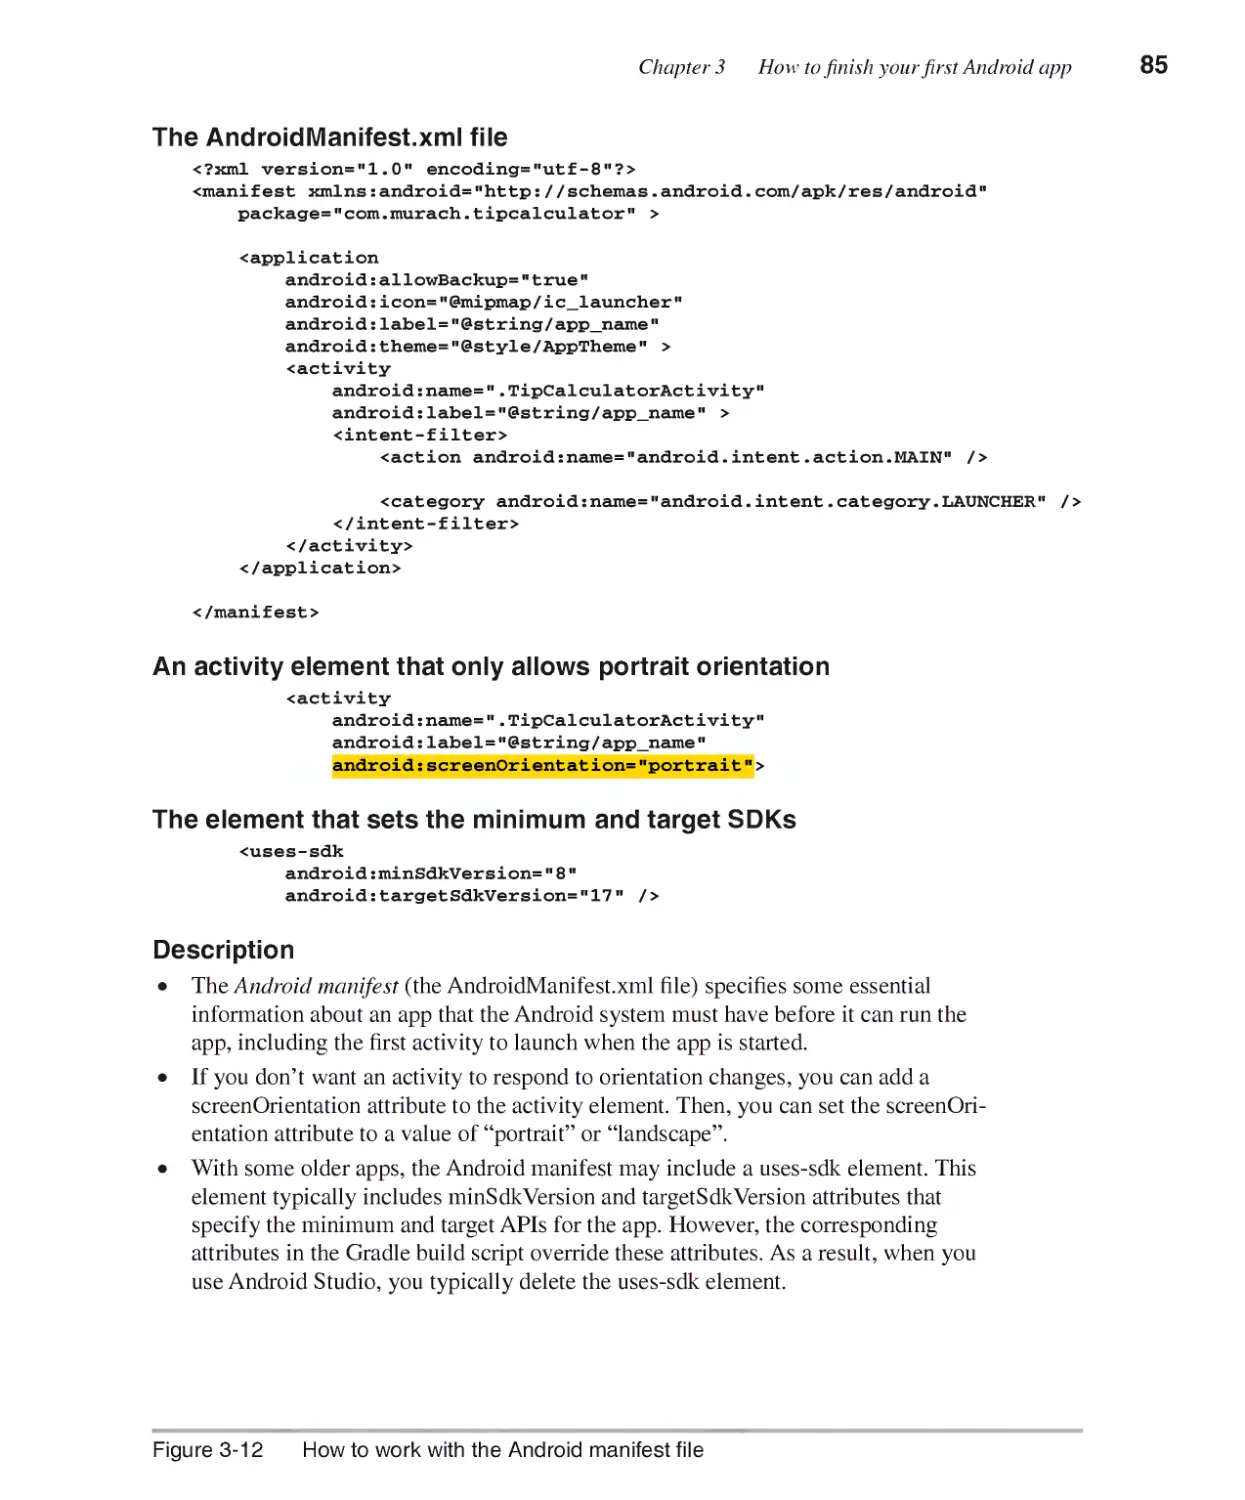
How to work with the Android manifest 84
How to set the launcher icon for an app 86
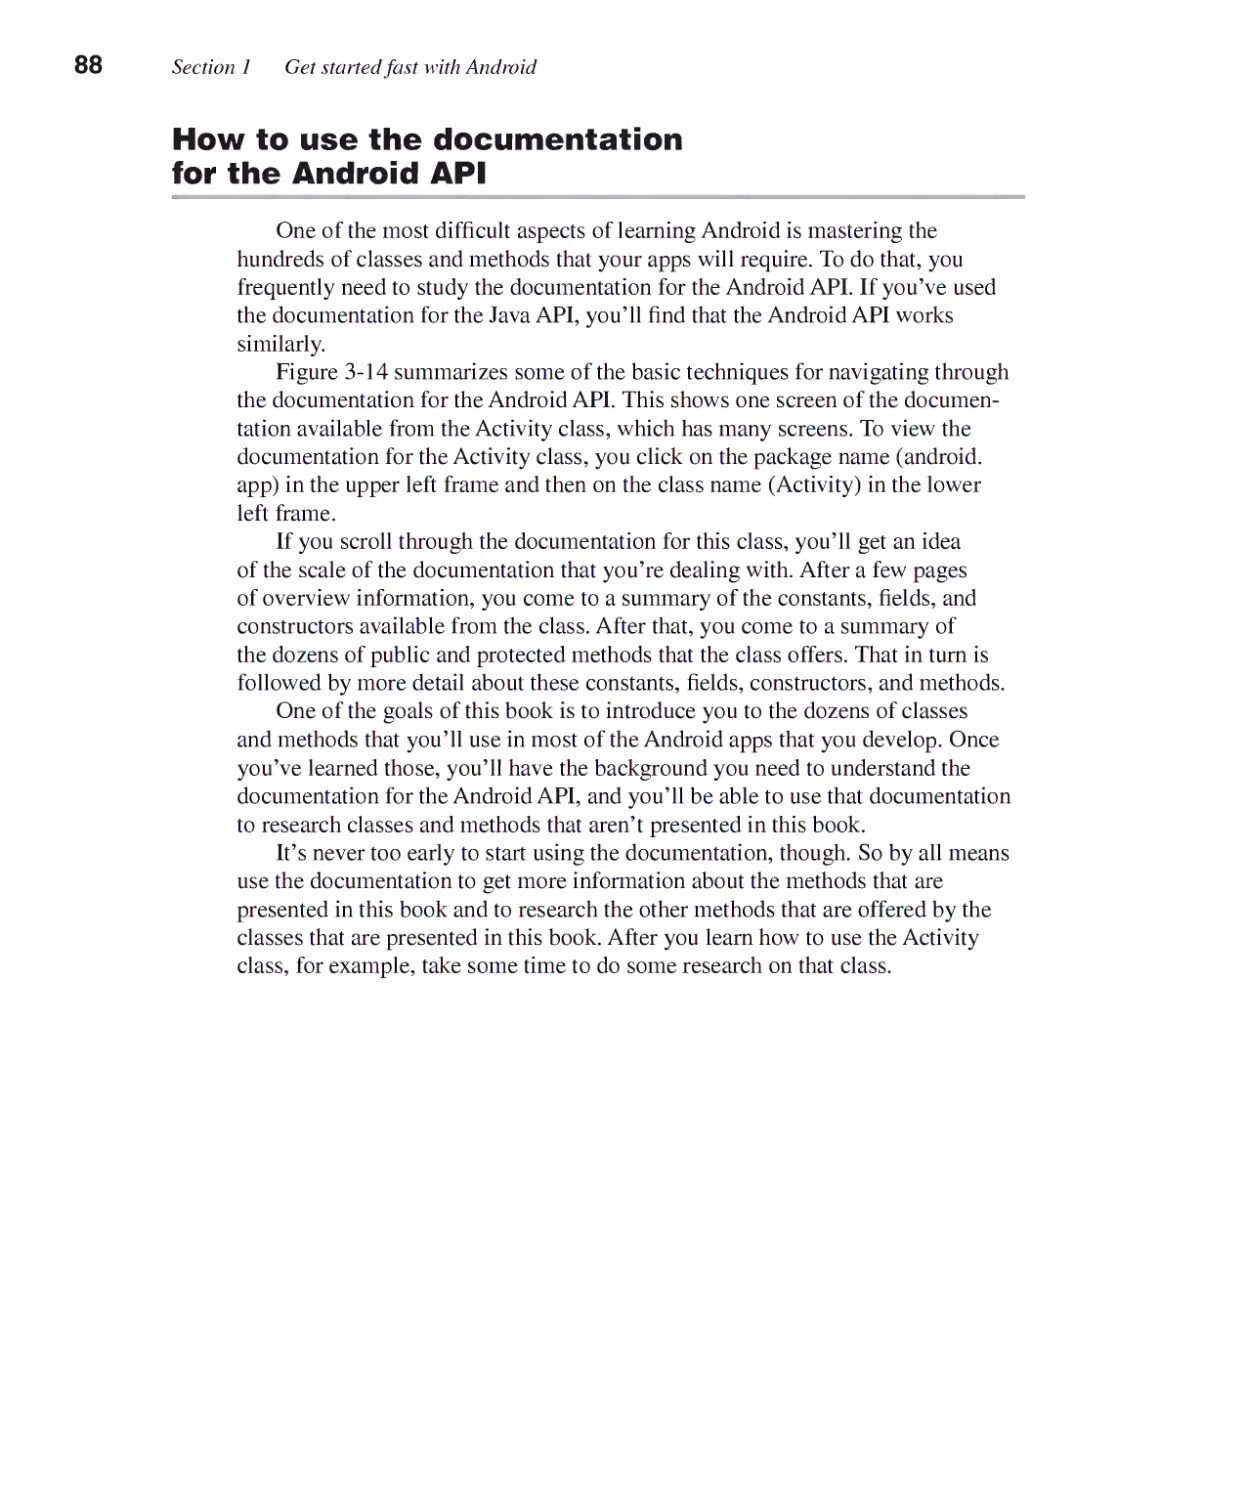
How to use the documentation for the Android API 88
VIii Expanded contents
Chapter 4 How to test and debug an Android app
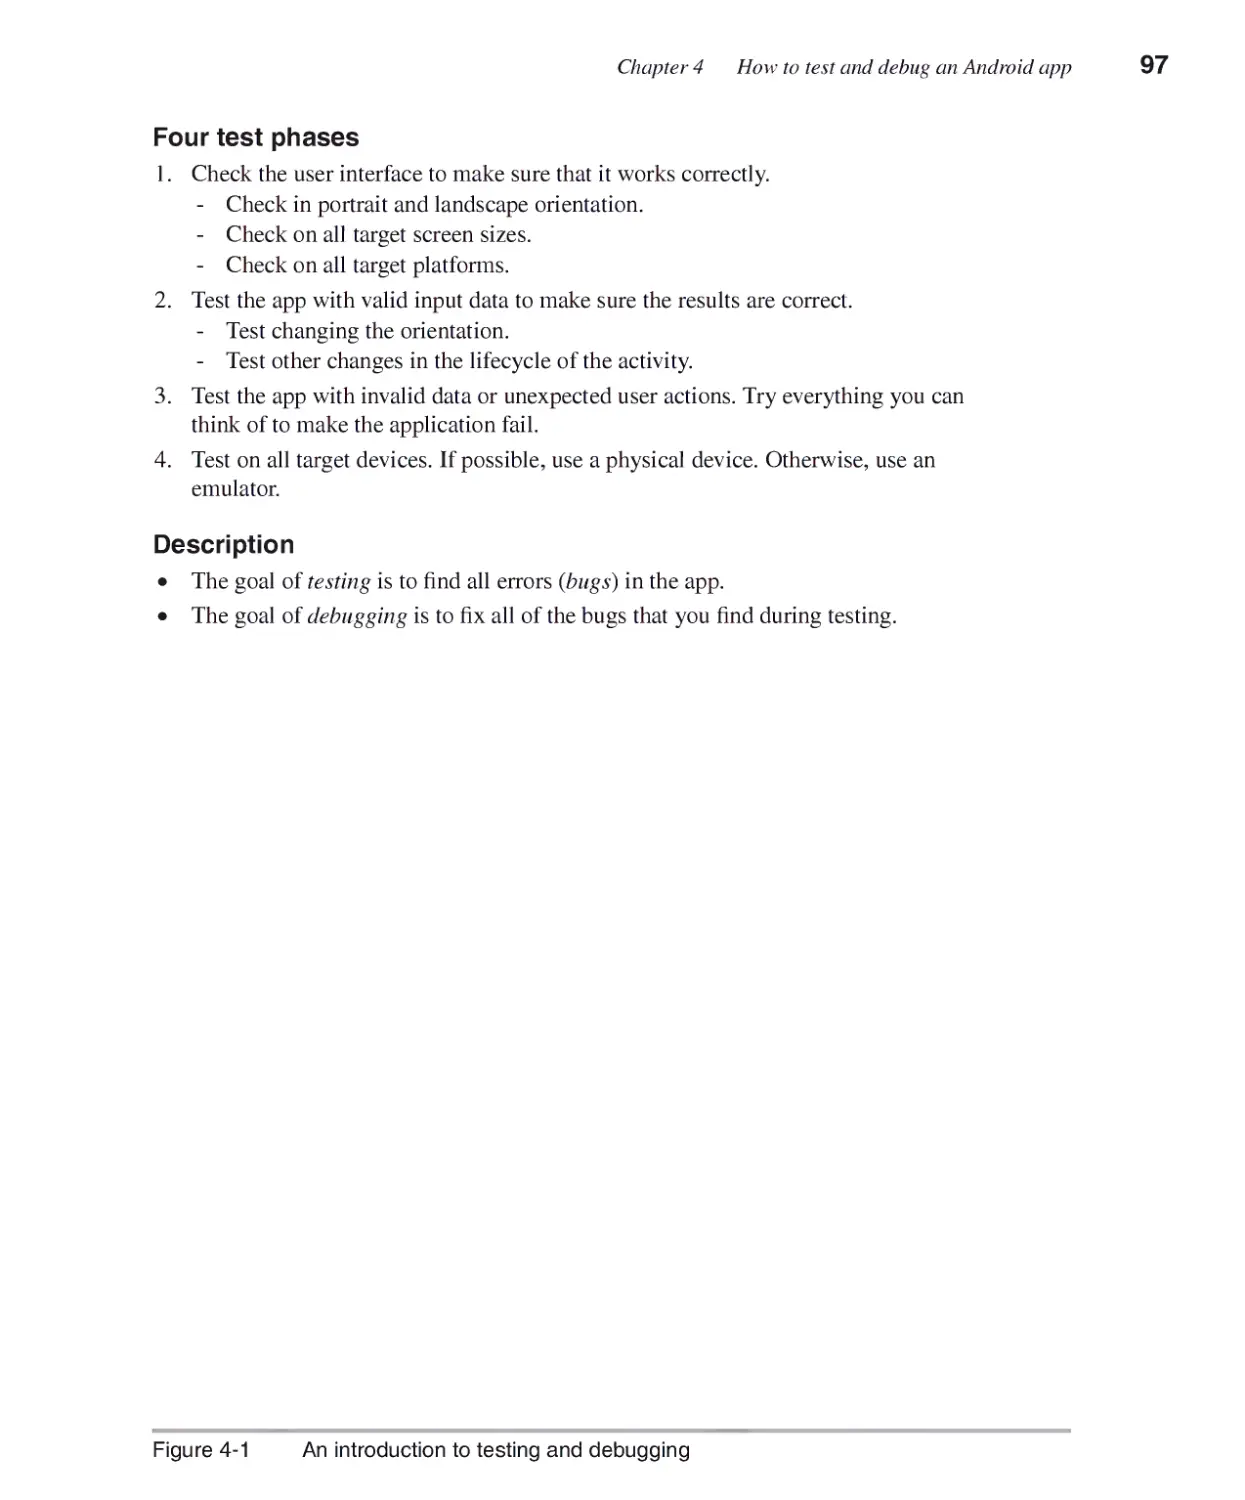
Basic skills for testing and debugging...........................................96
Typical test phases 96
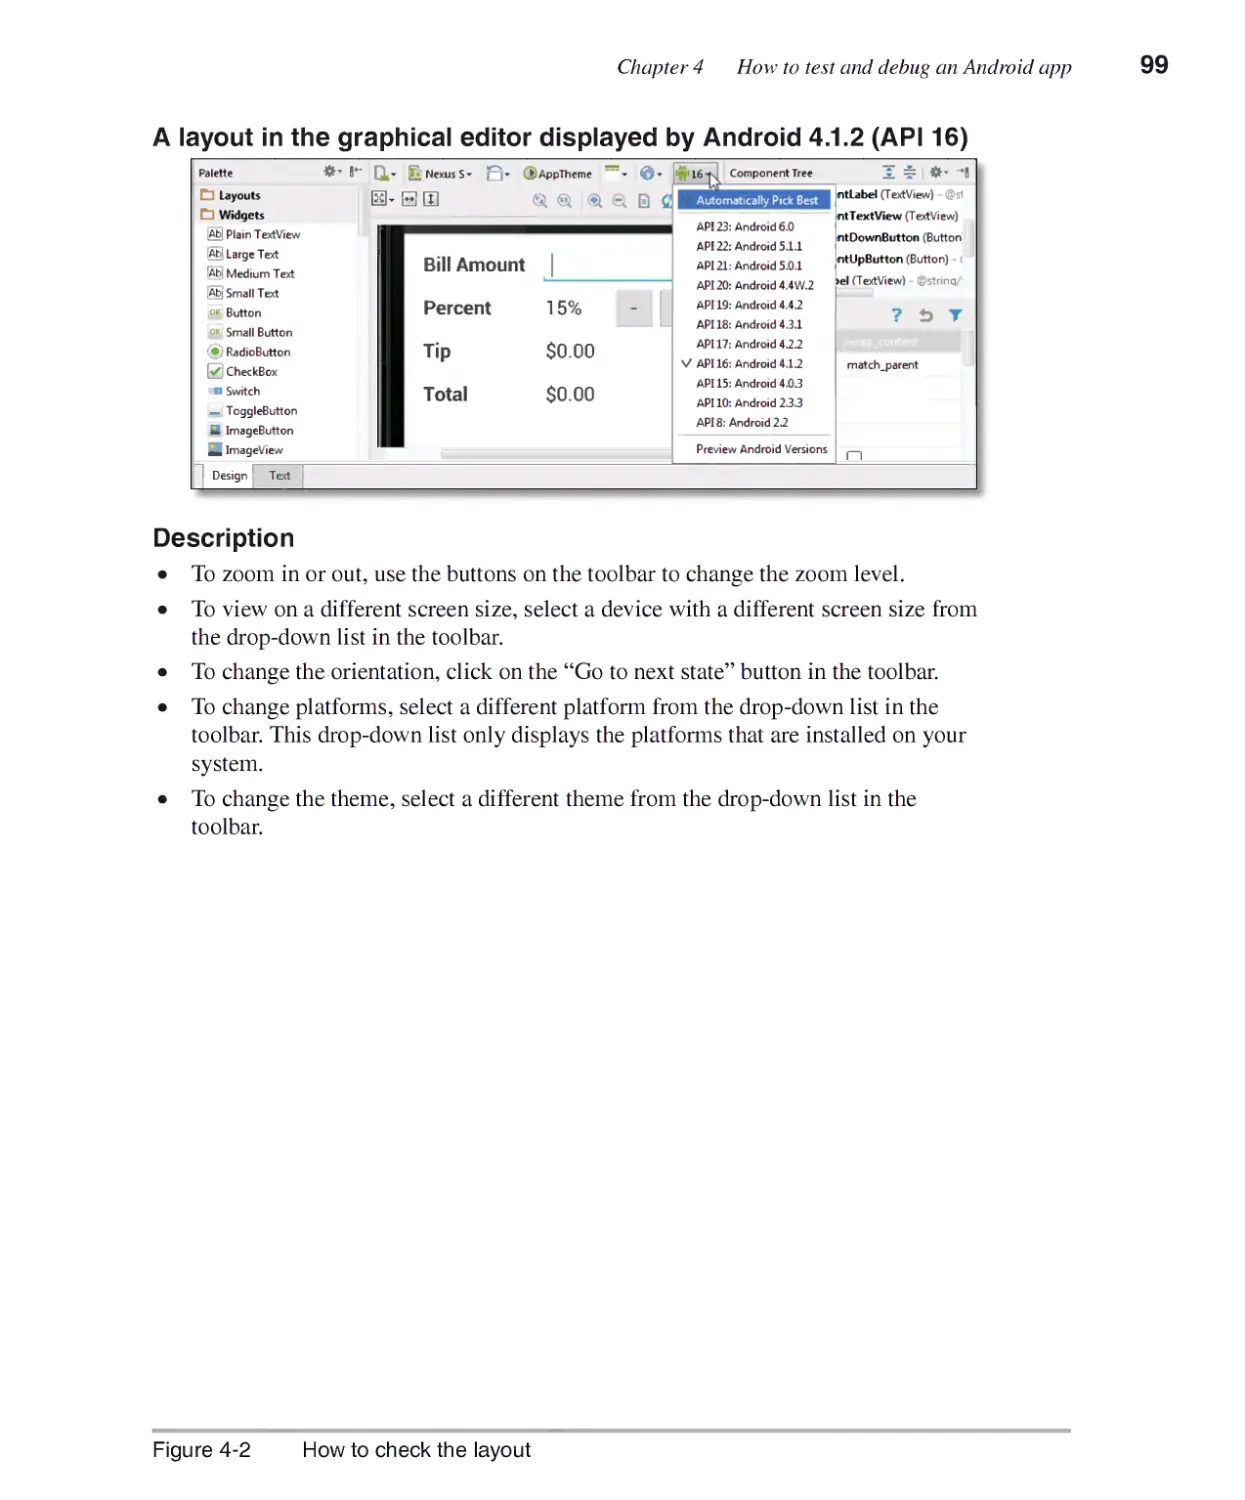
How to check the layout 98
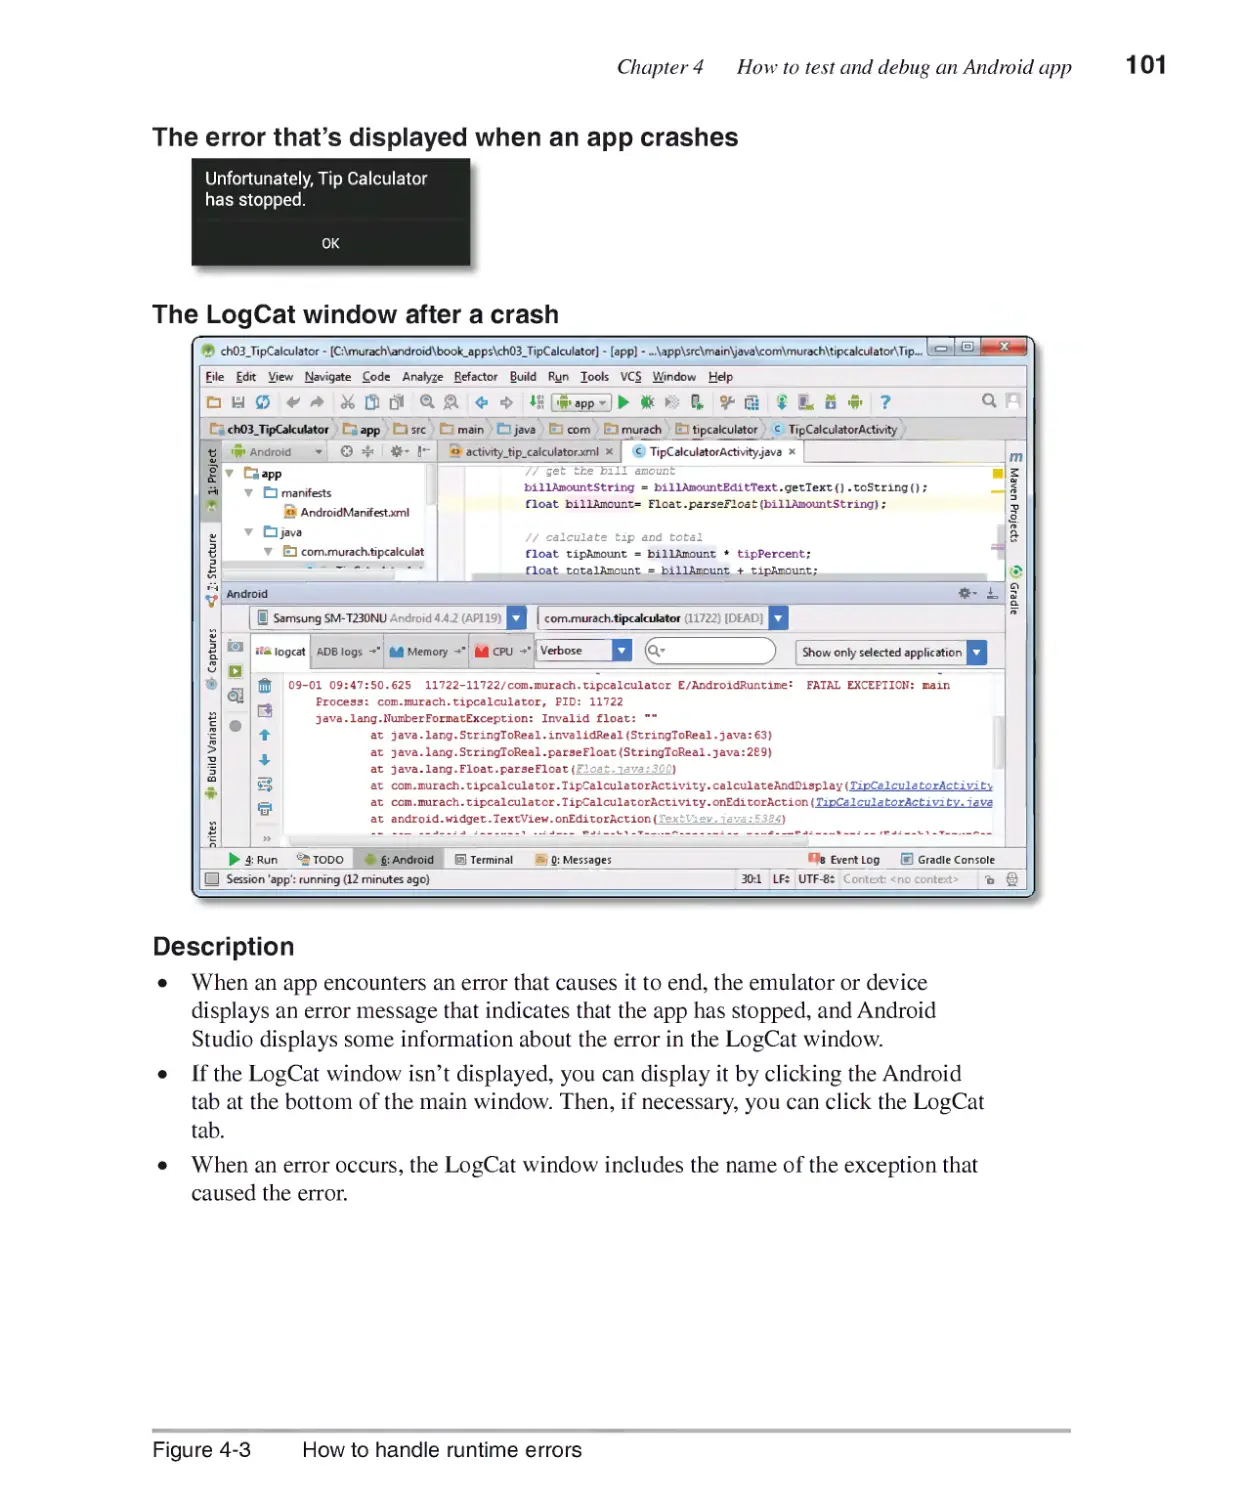
How to handle runtime errors 100
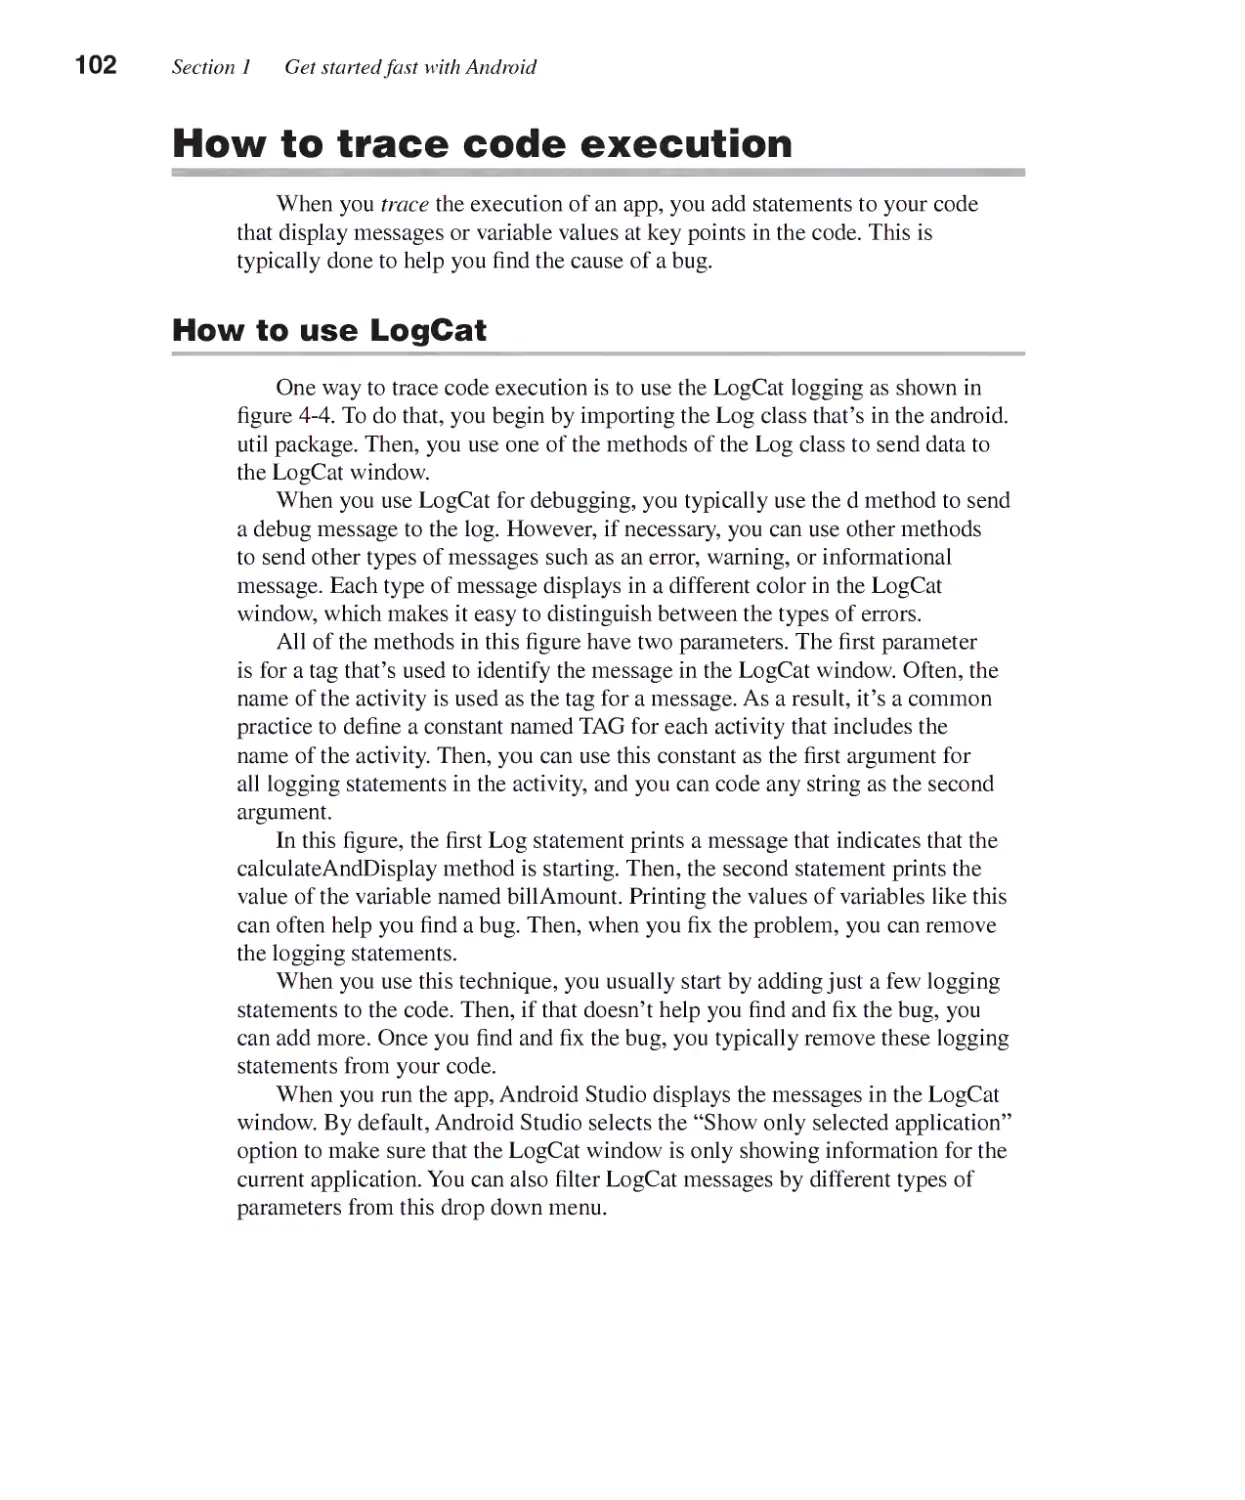
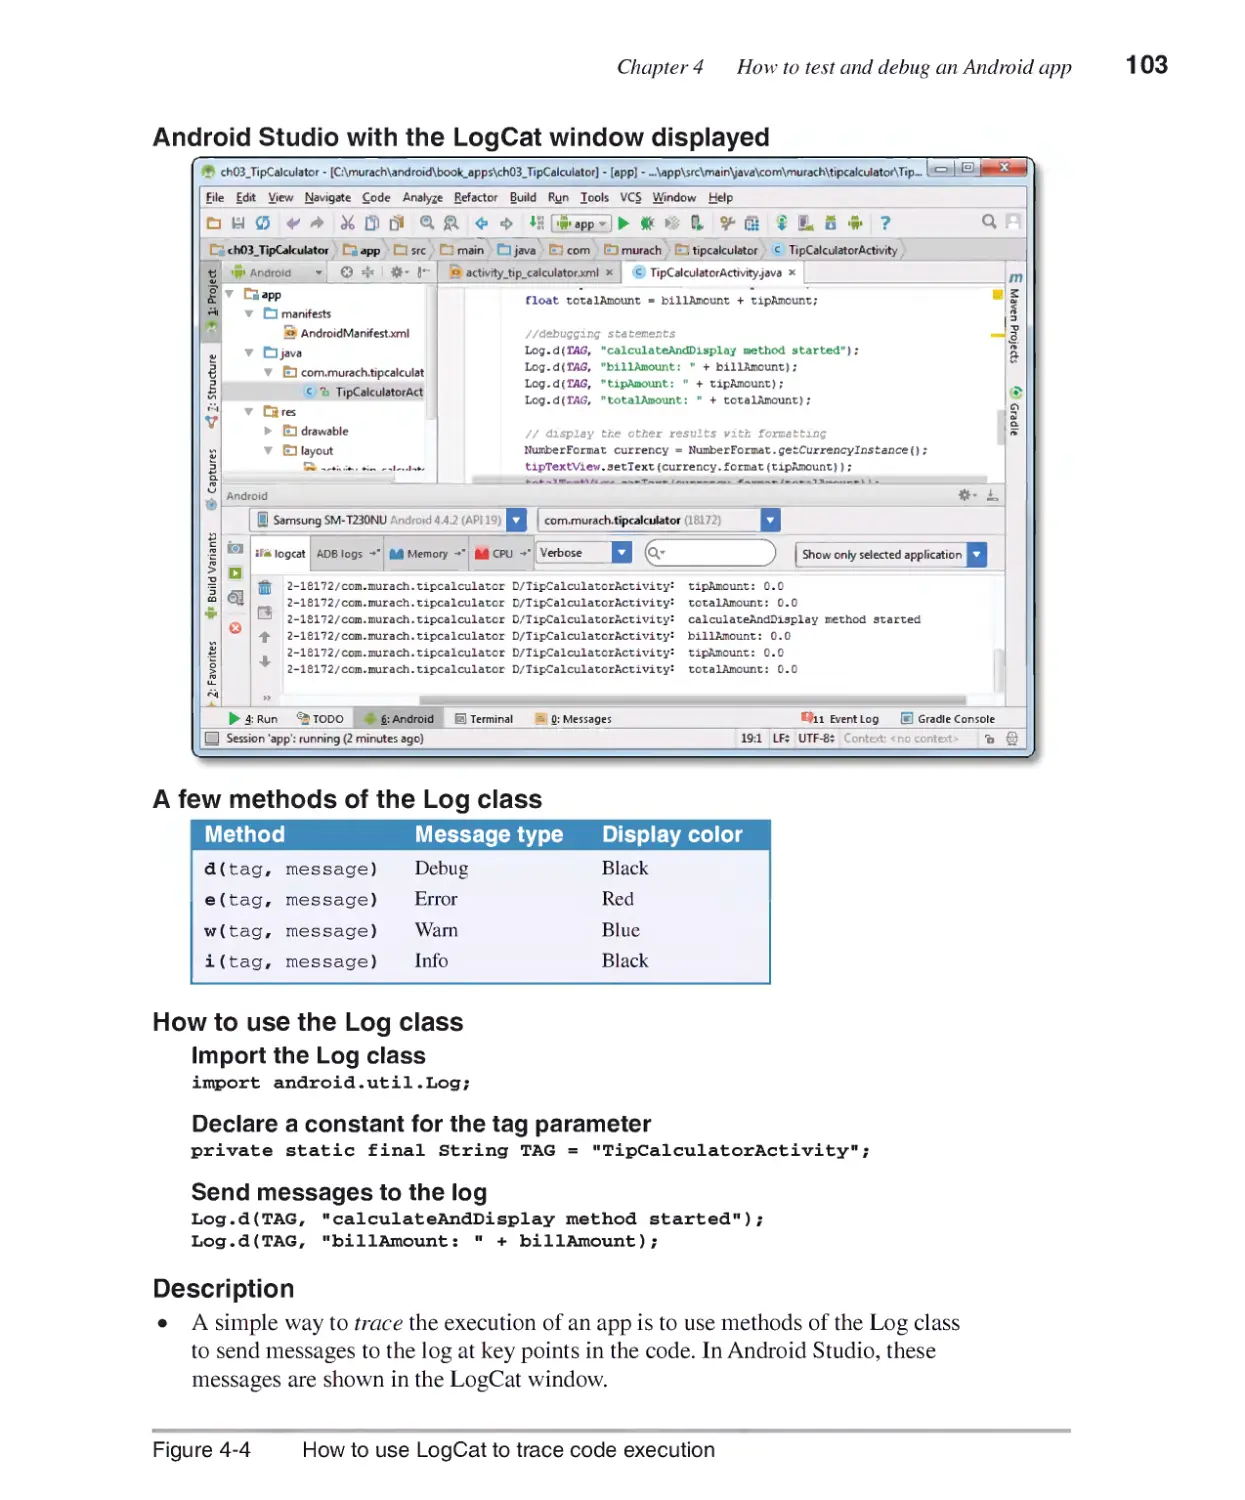
How to trace code execution......................................................... 102
How to use LogCat 102
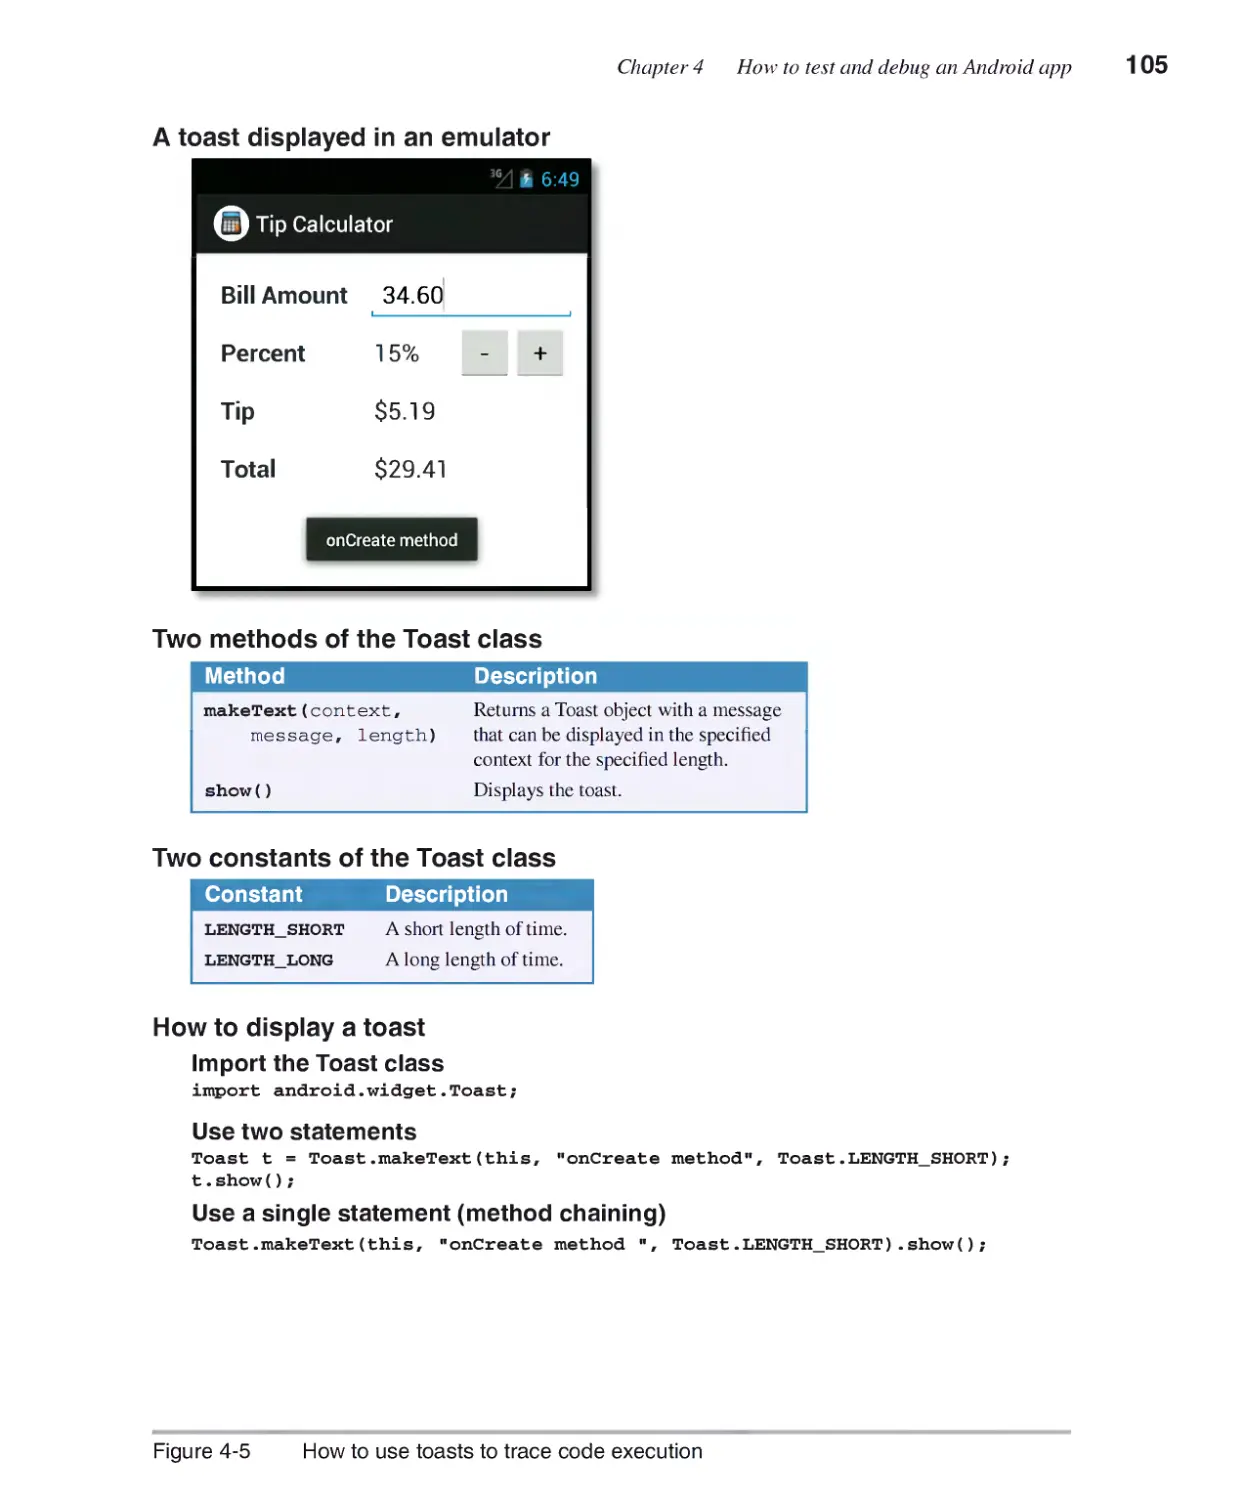
How to use toasts 104
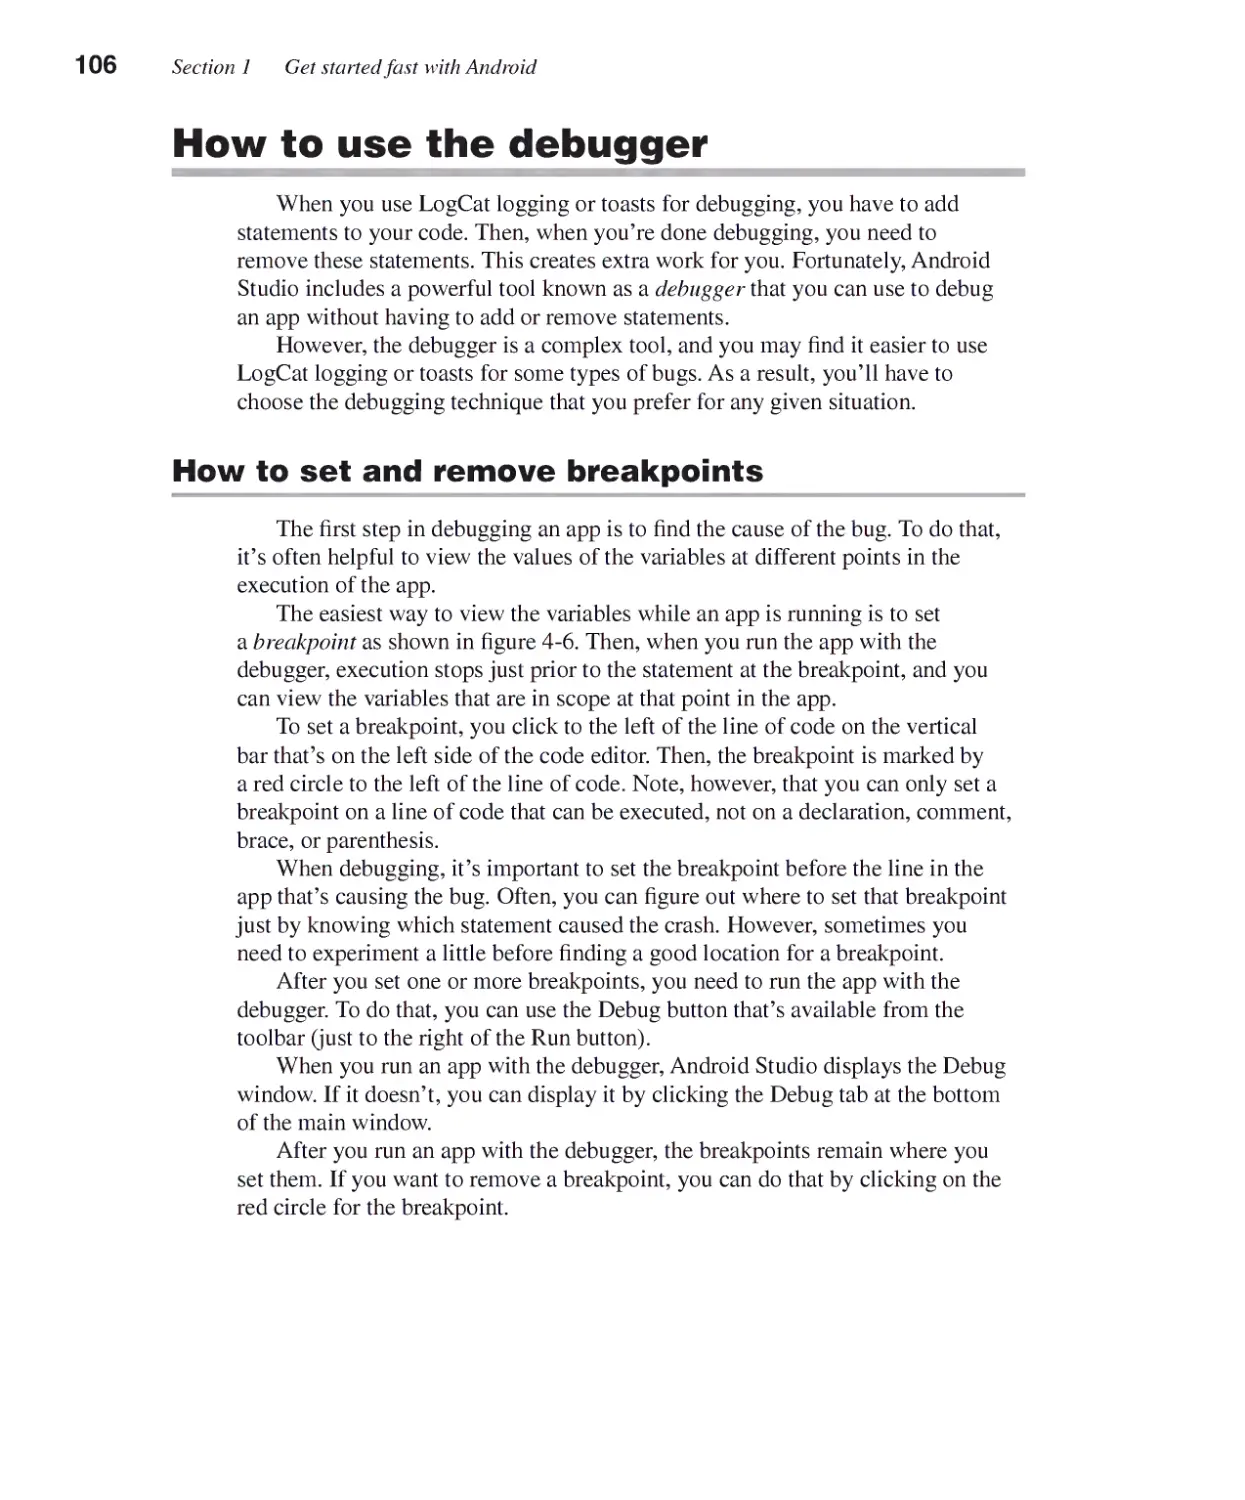
How to use the debugger............................................................... 106
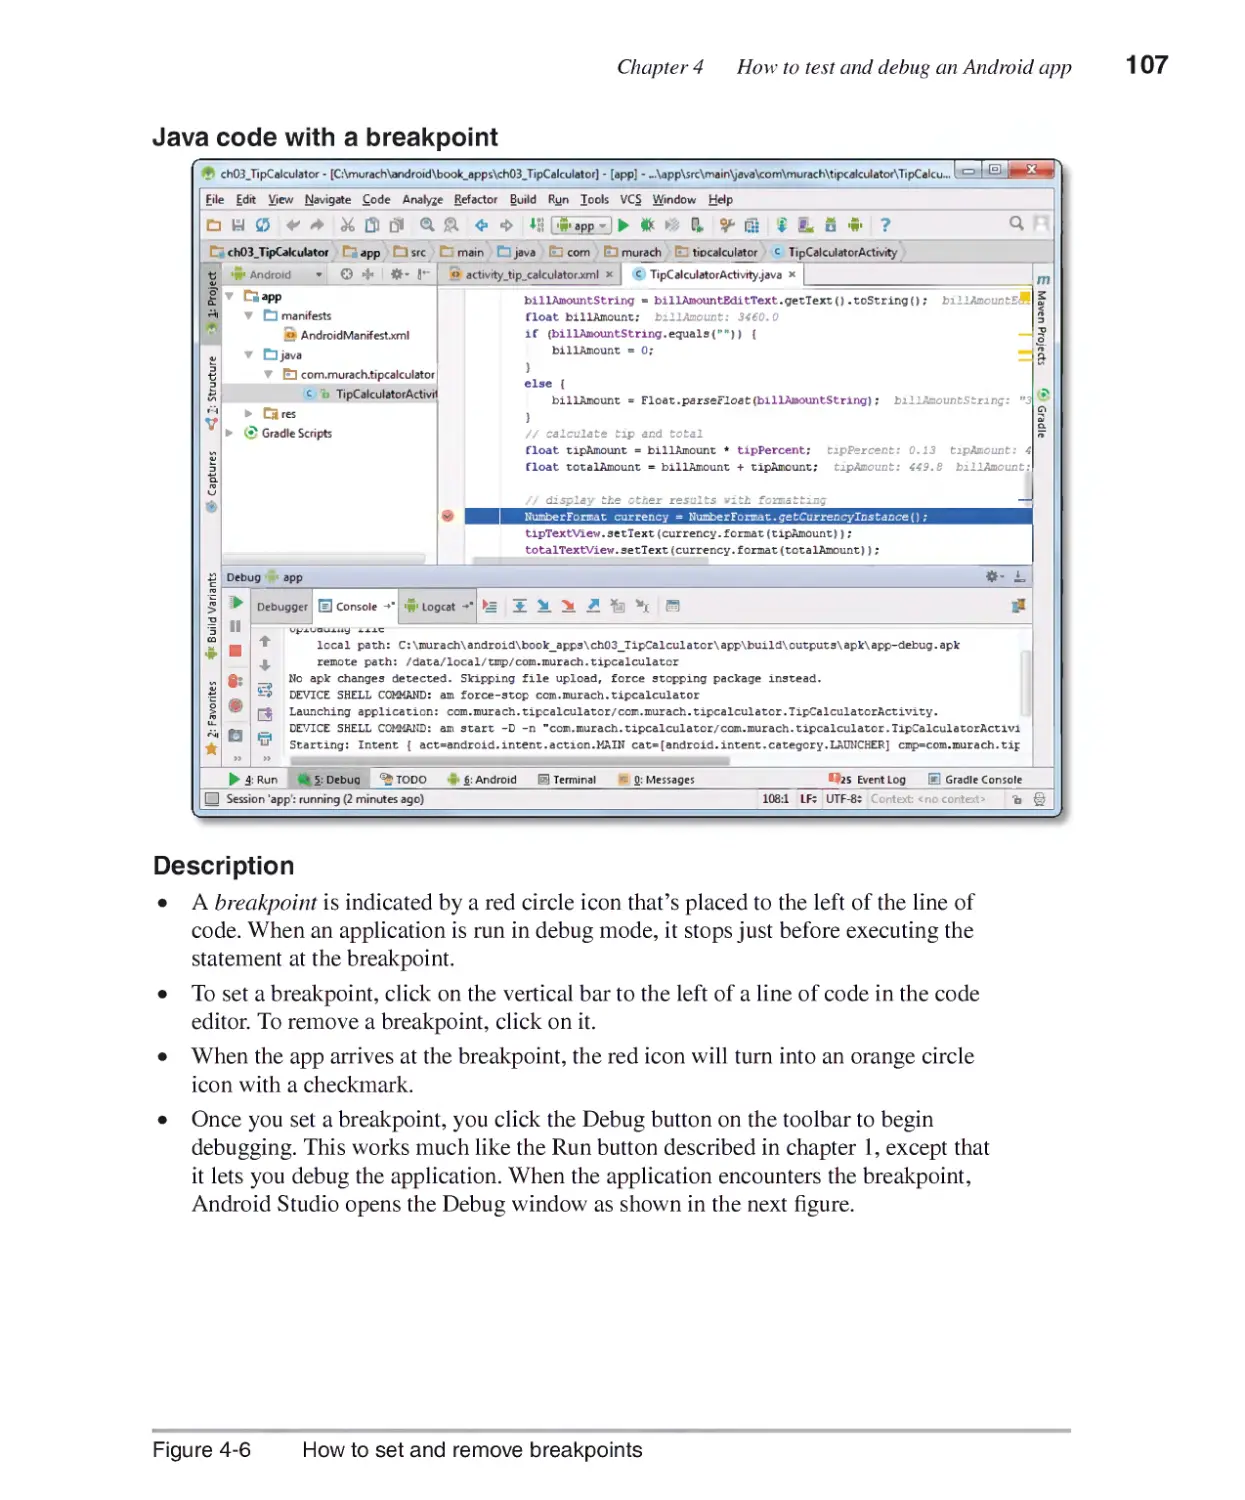
How to set and remove breakpoints 106
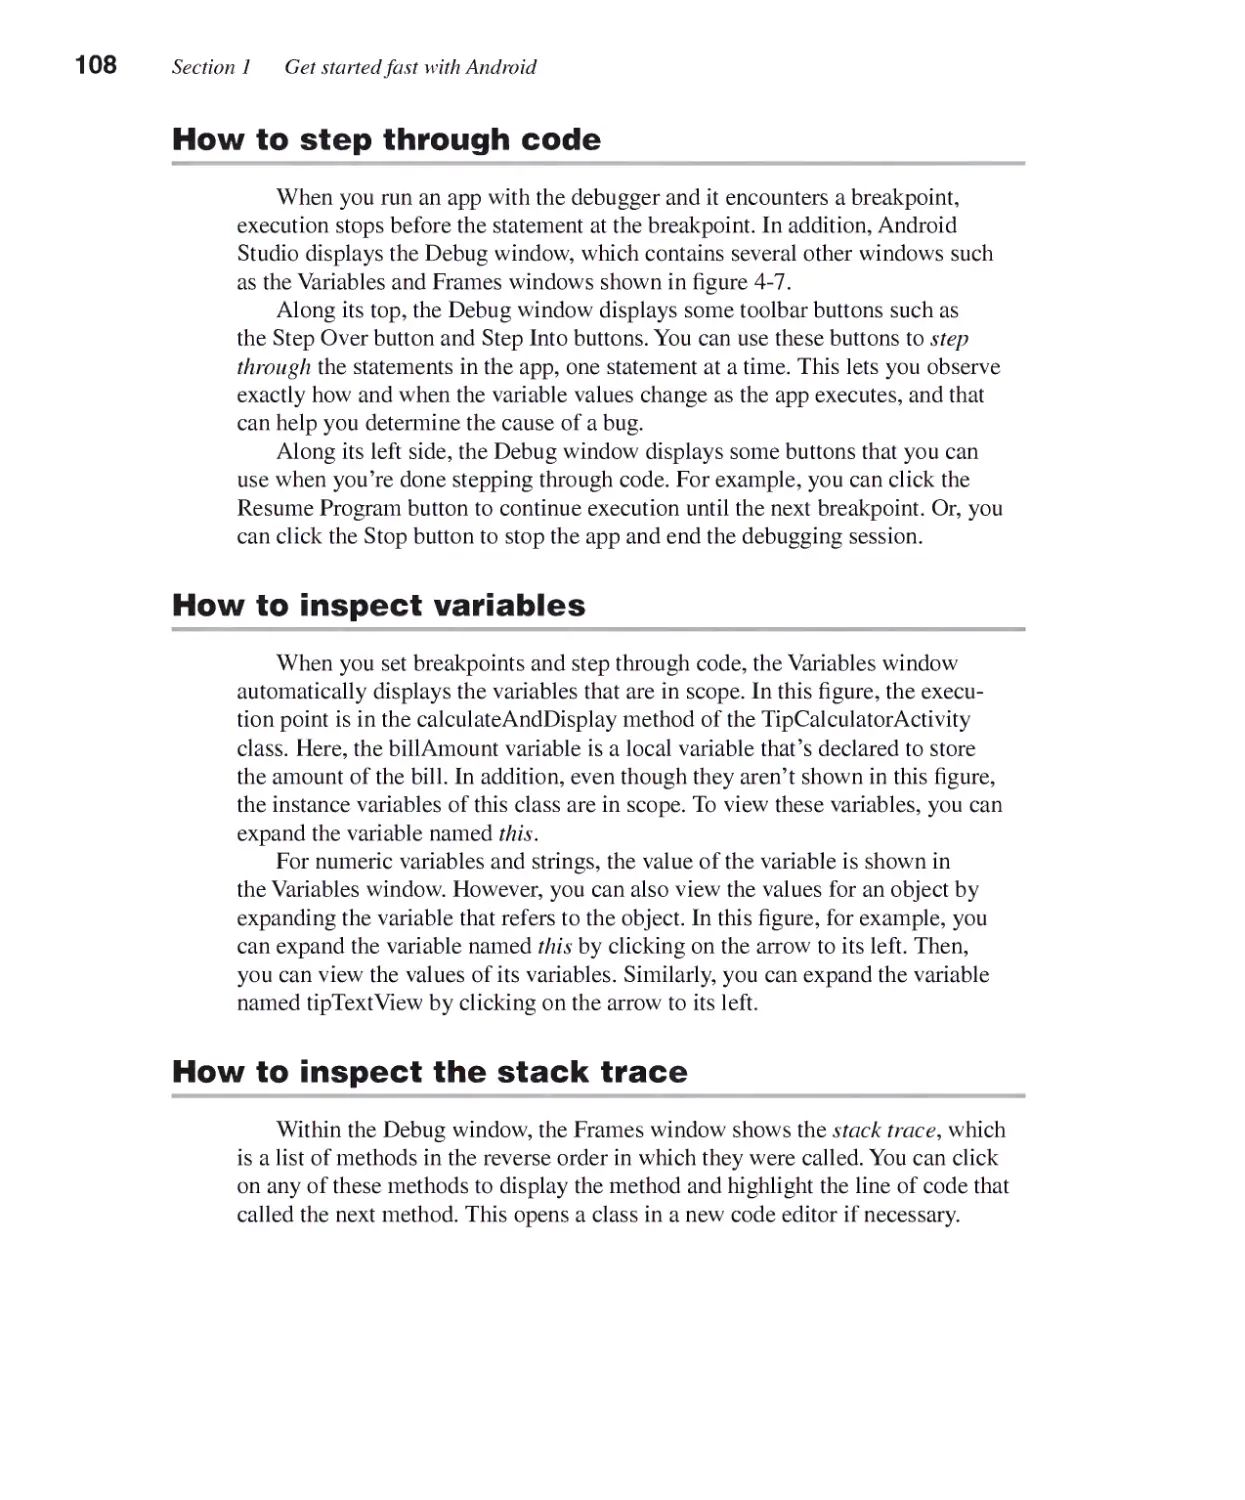
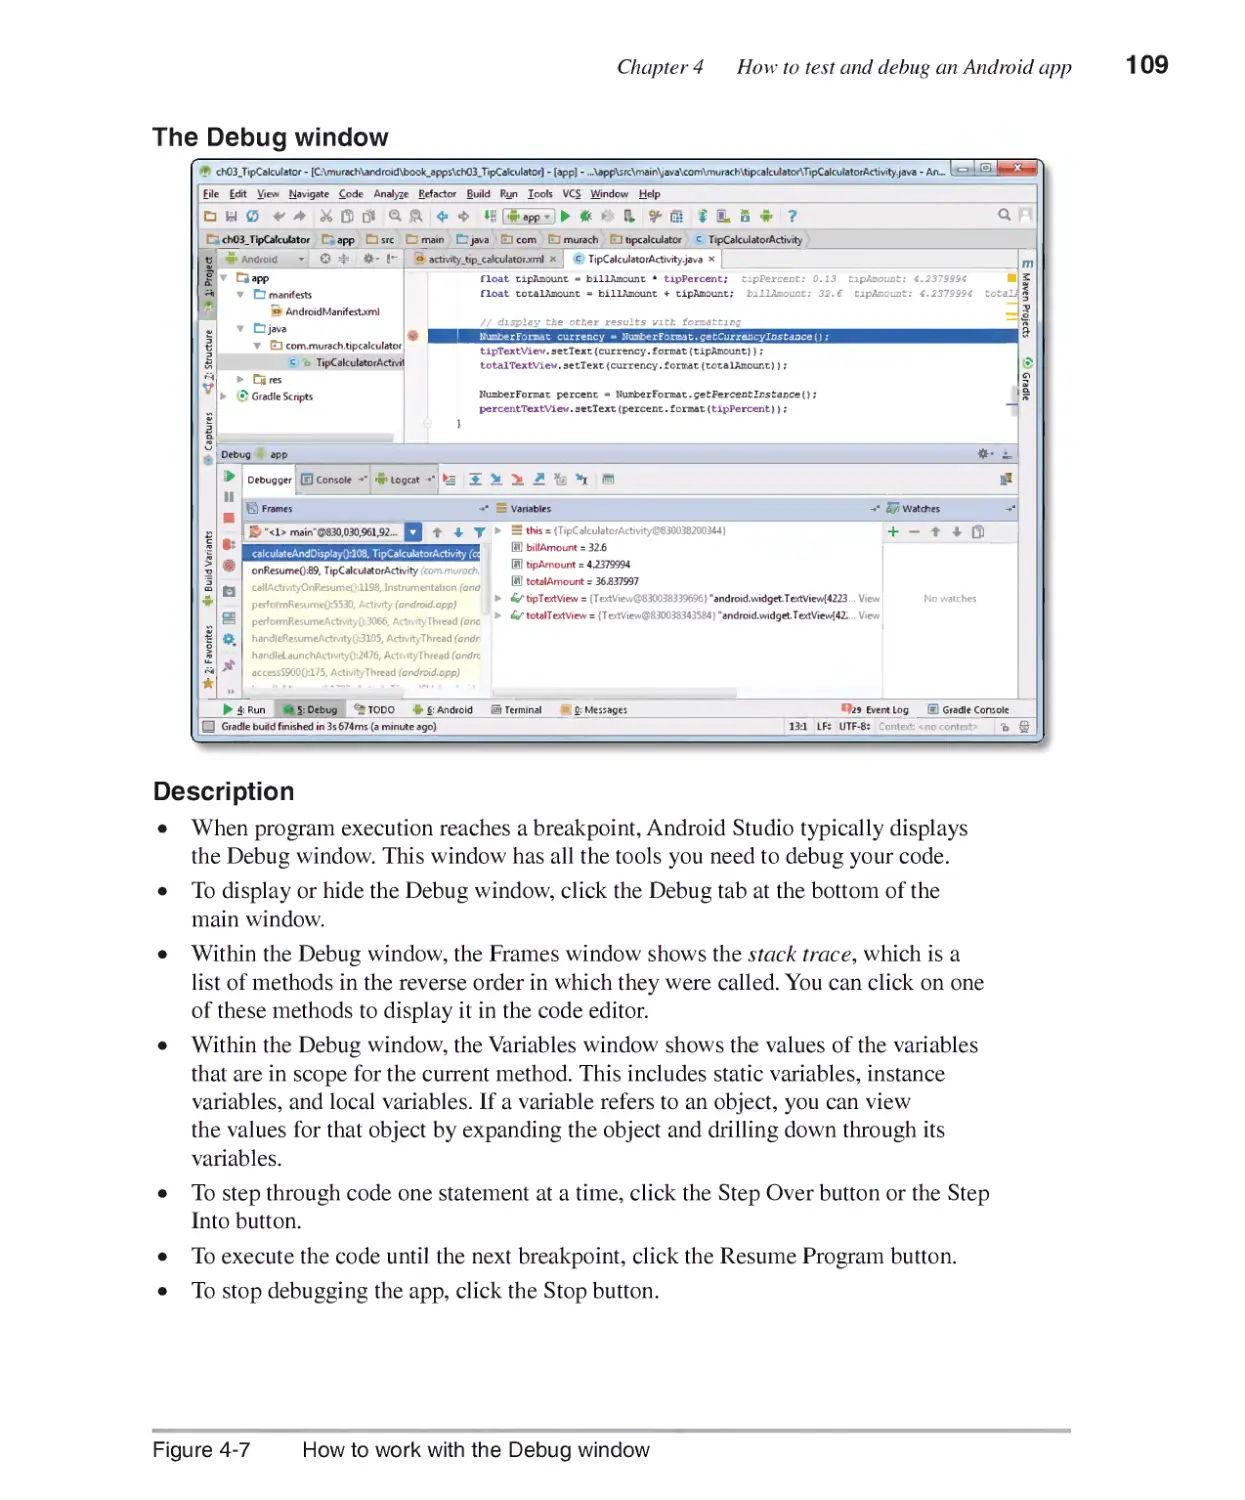
How to step through code 108
How to inspect variables 108
How to inspect the stack trace 108
How to create emulators................................................................ 110
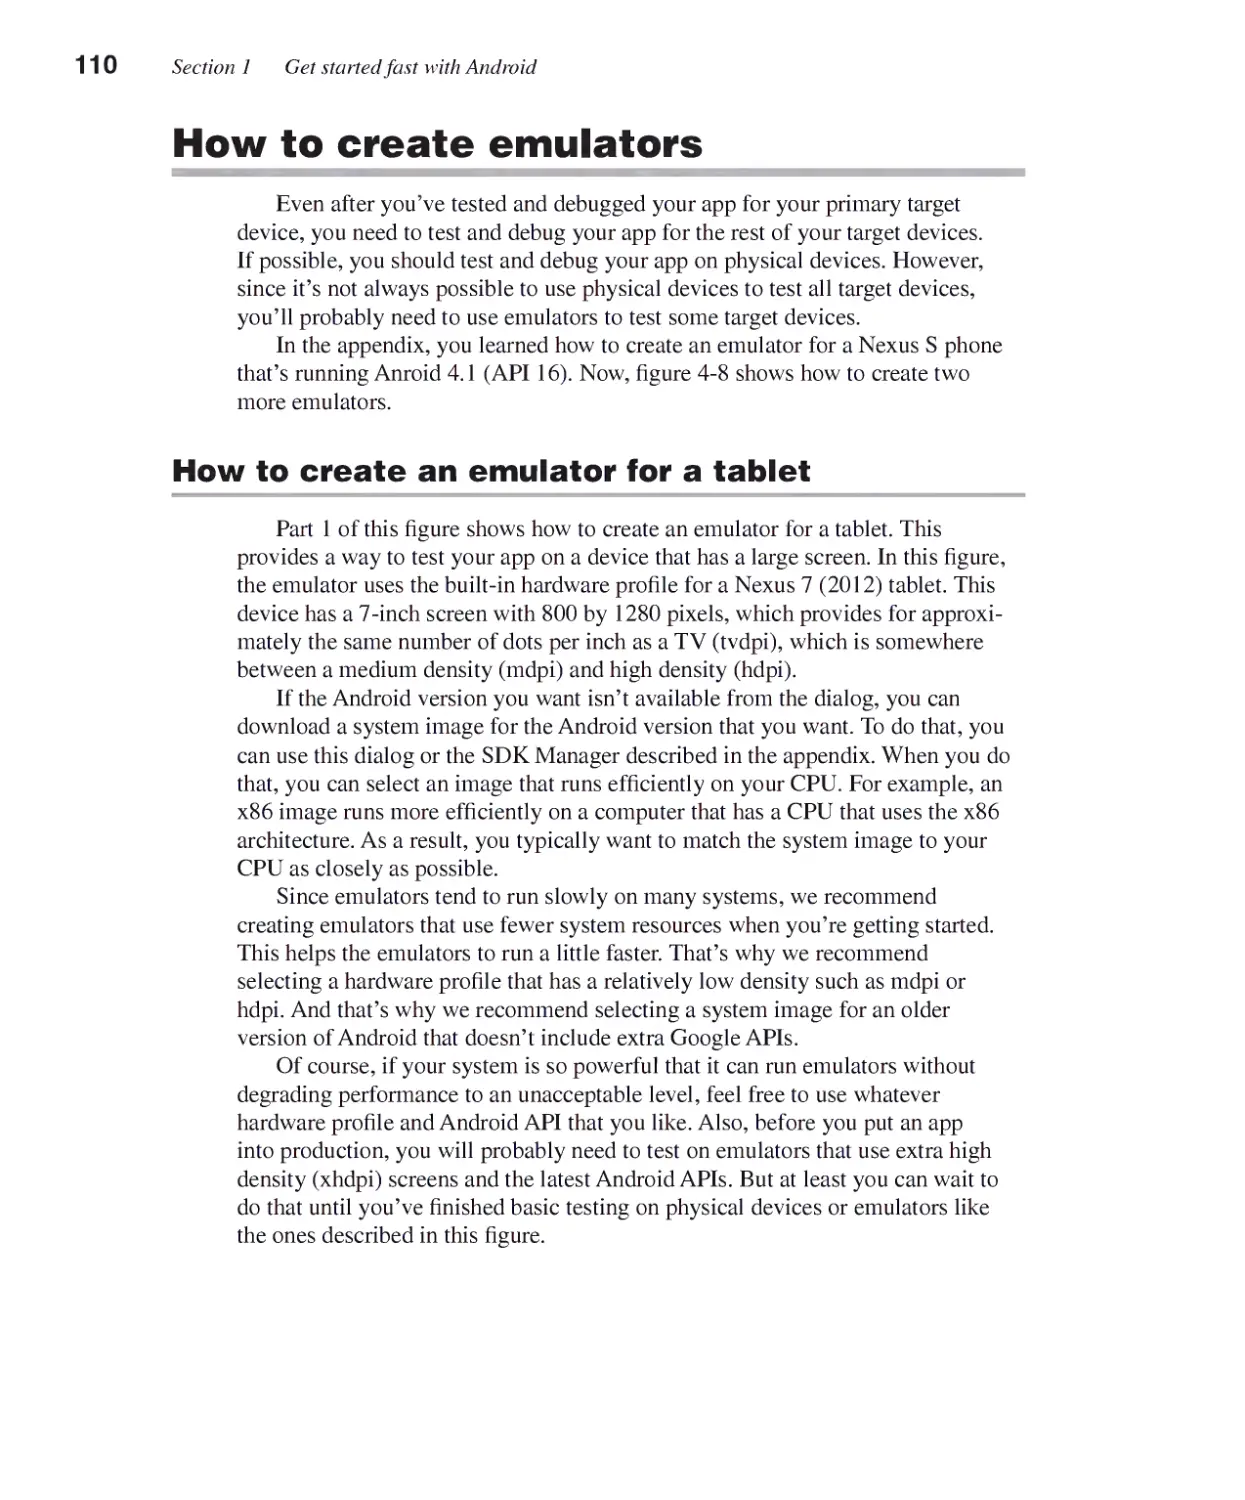
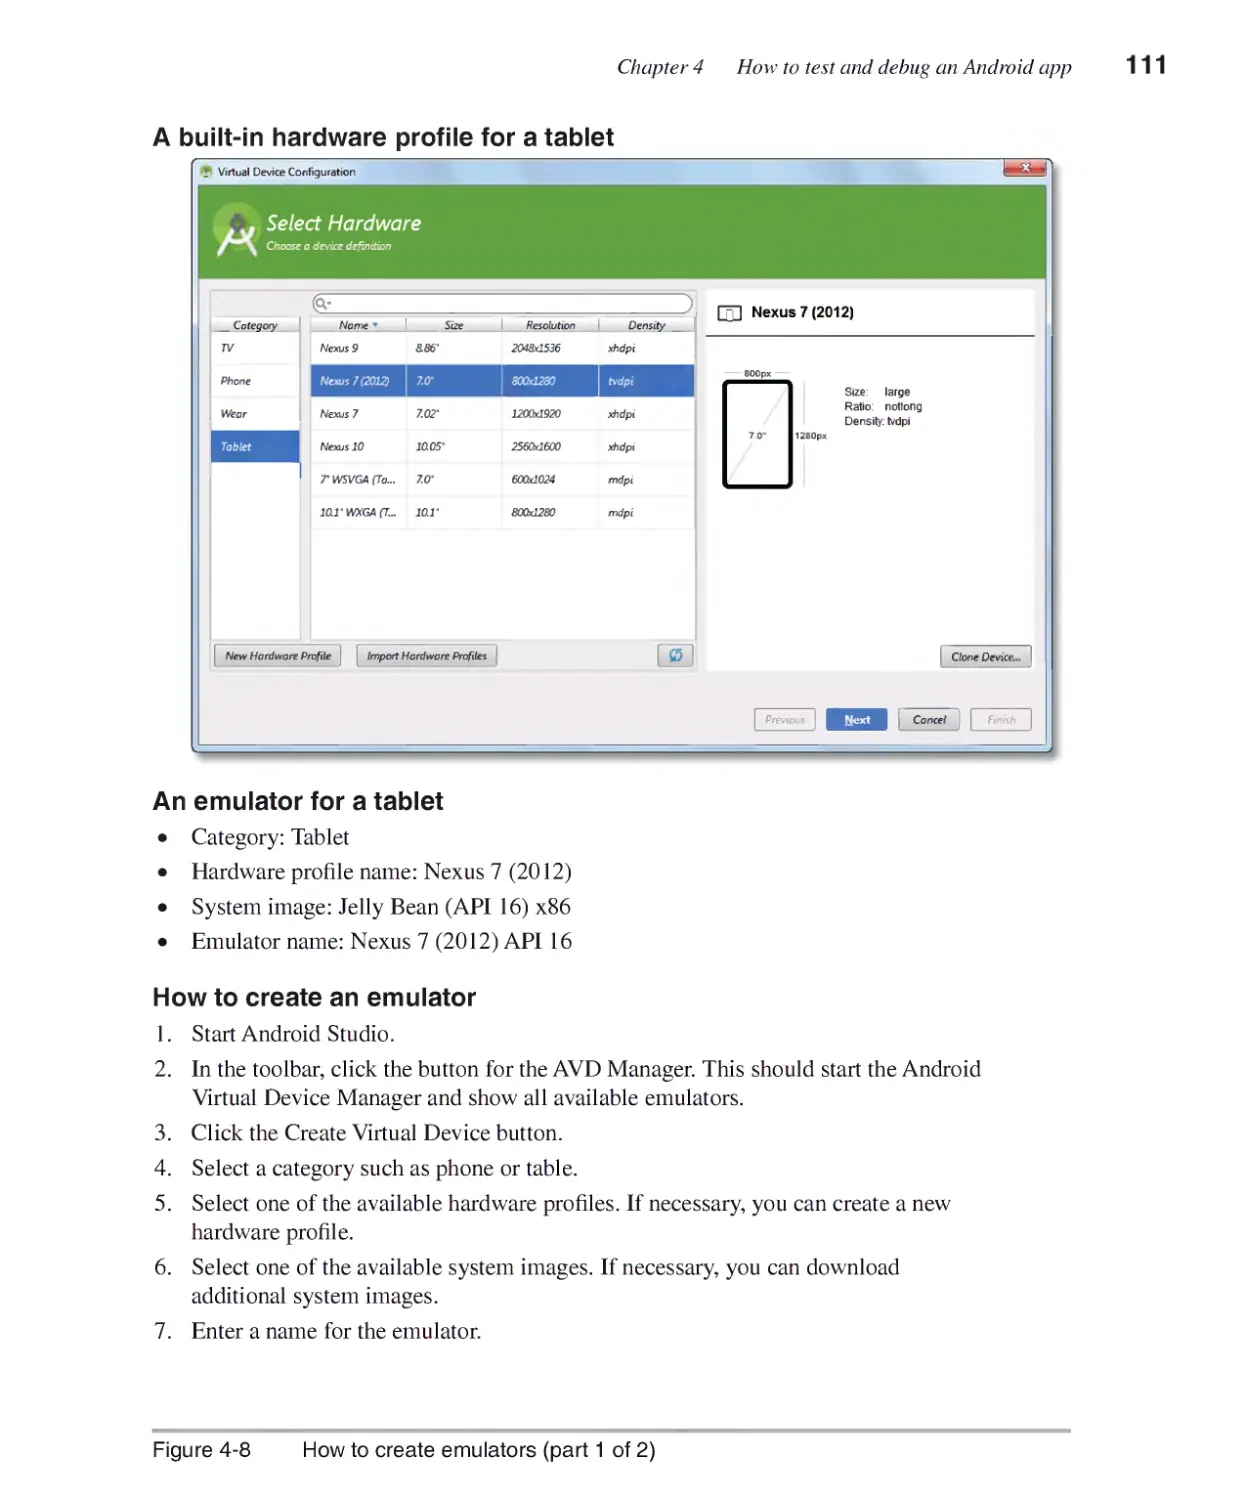
How to create an emulator for a tablet 110
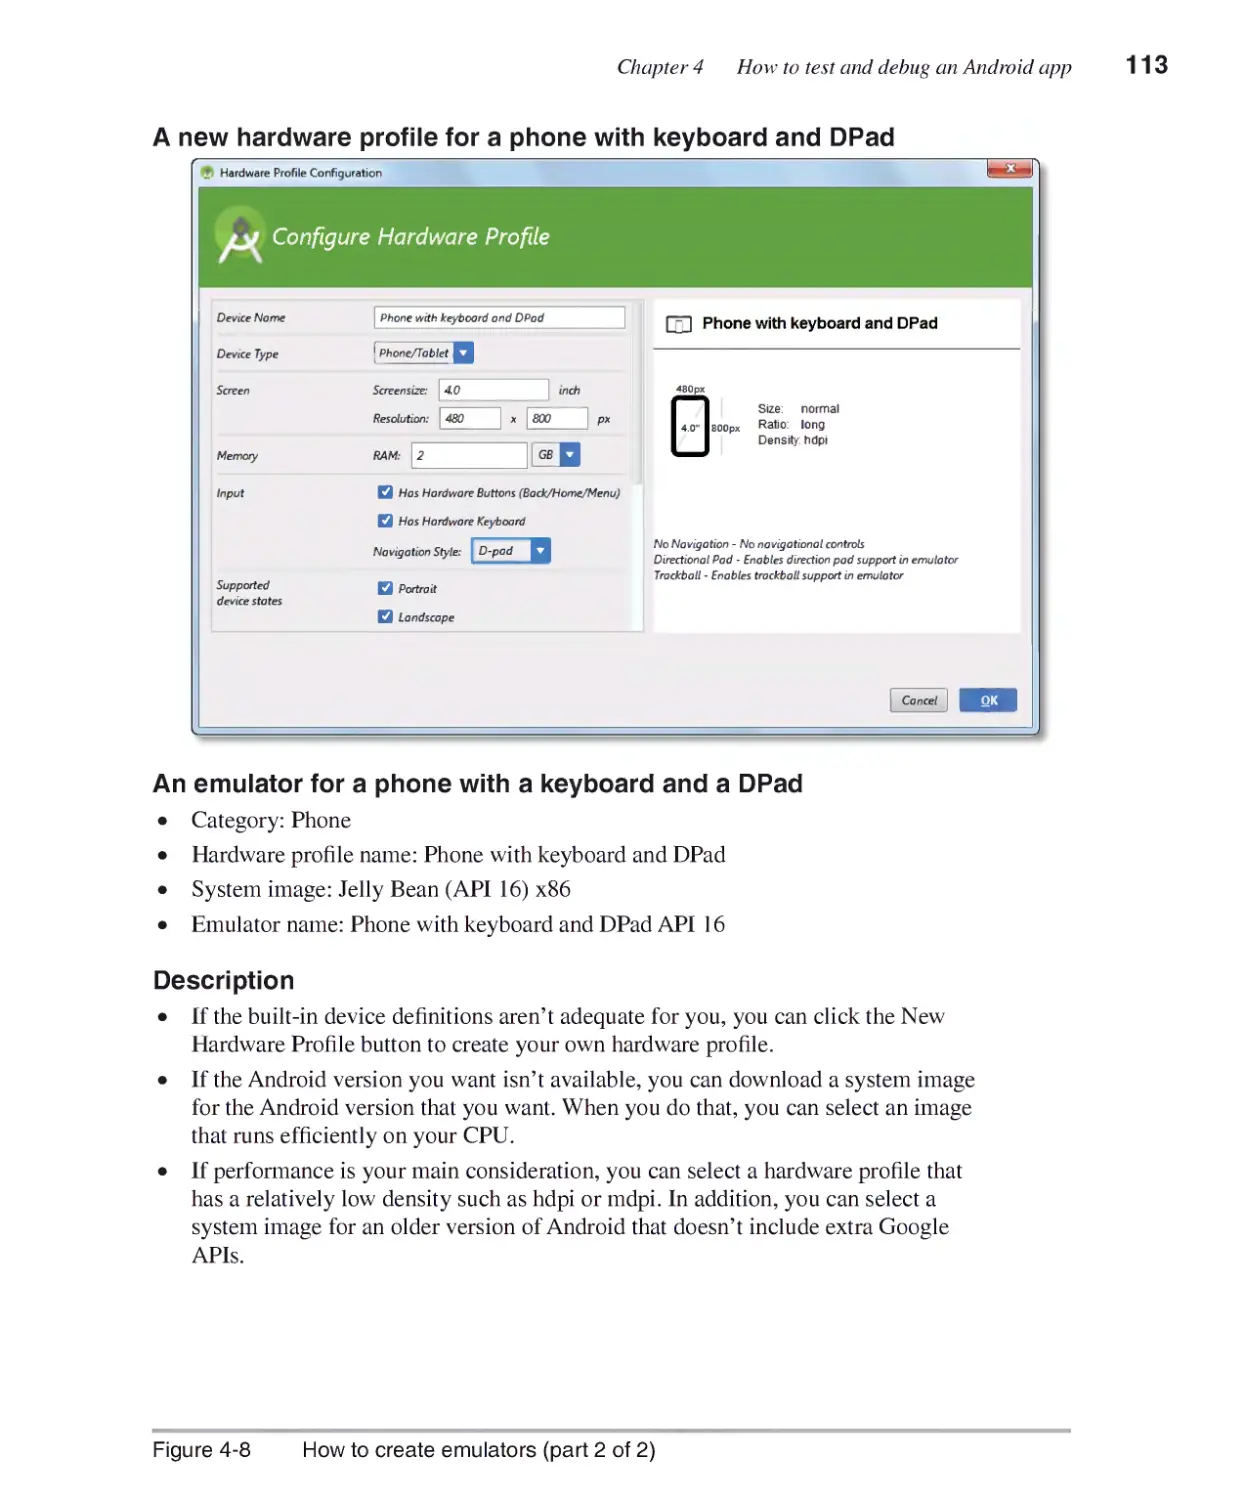
How to create an emulator for a phone with a hard keyboard and DPad 112
Section 2 Essential Android skills
Chapter 5 How to work with layouts and widgets
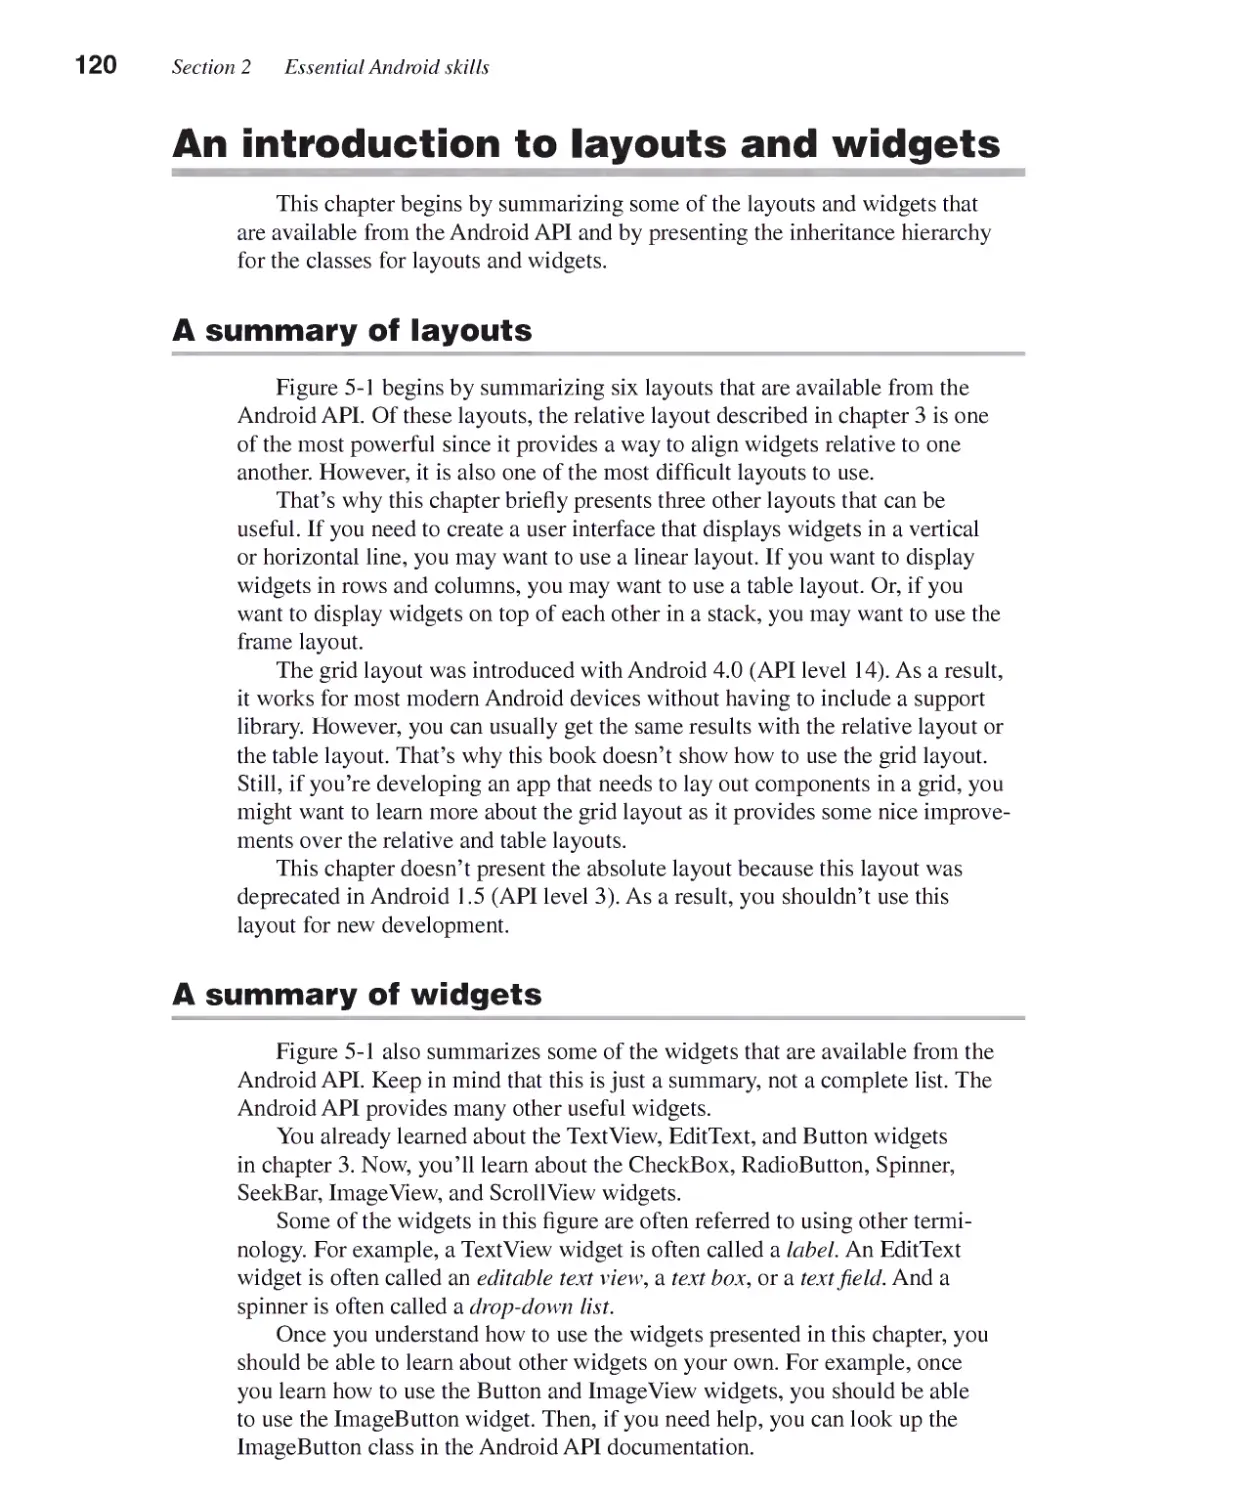
An introduction to layouts and widgets....................................... 120
A summary of layouts 120
A summary of widgets 120
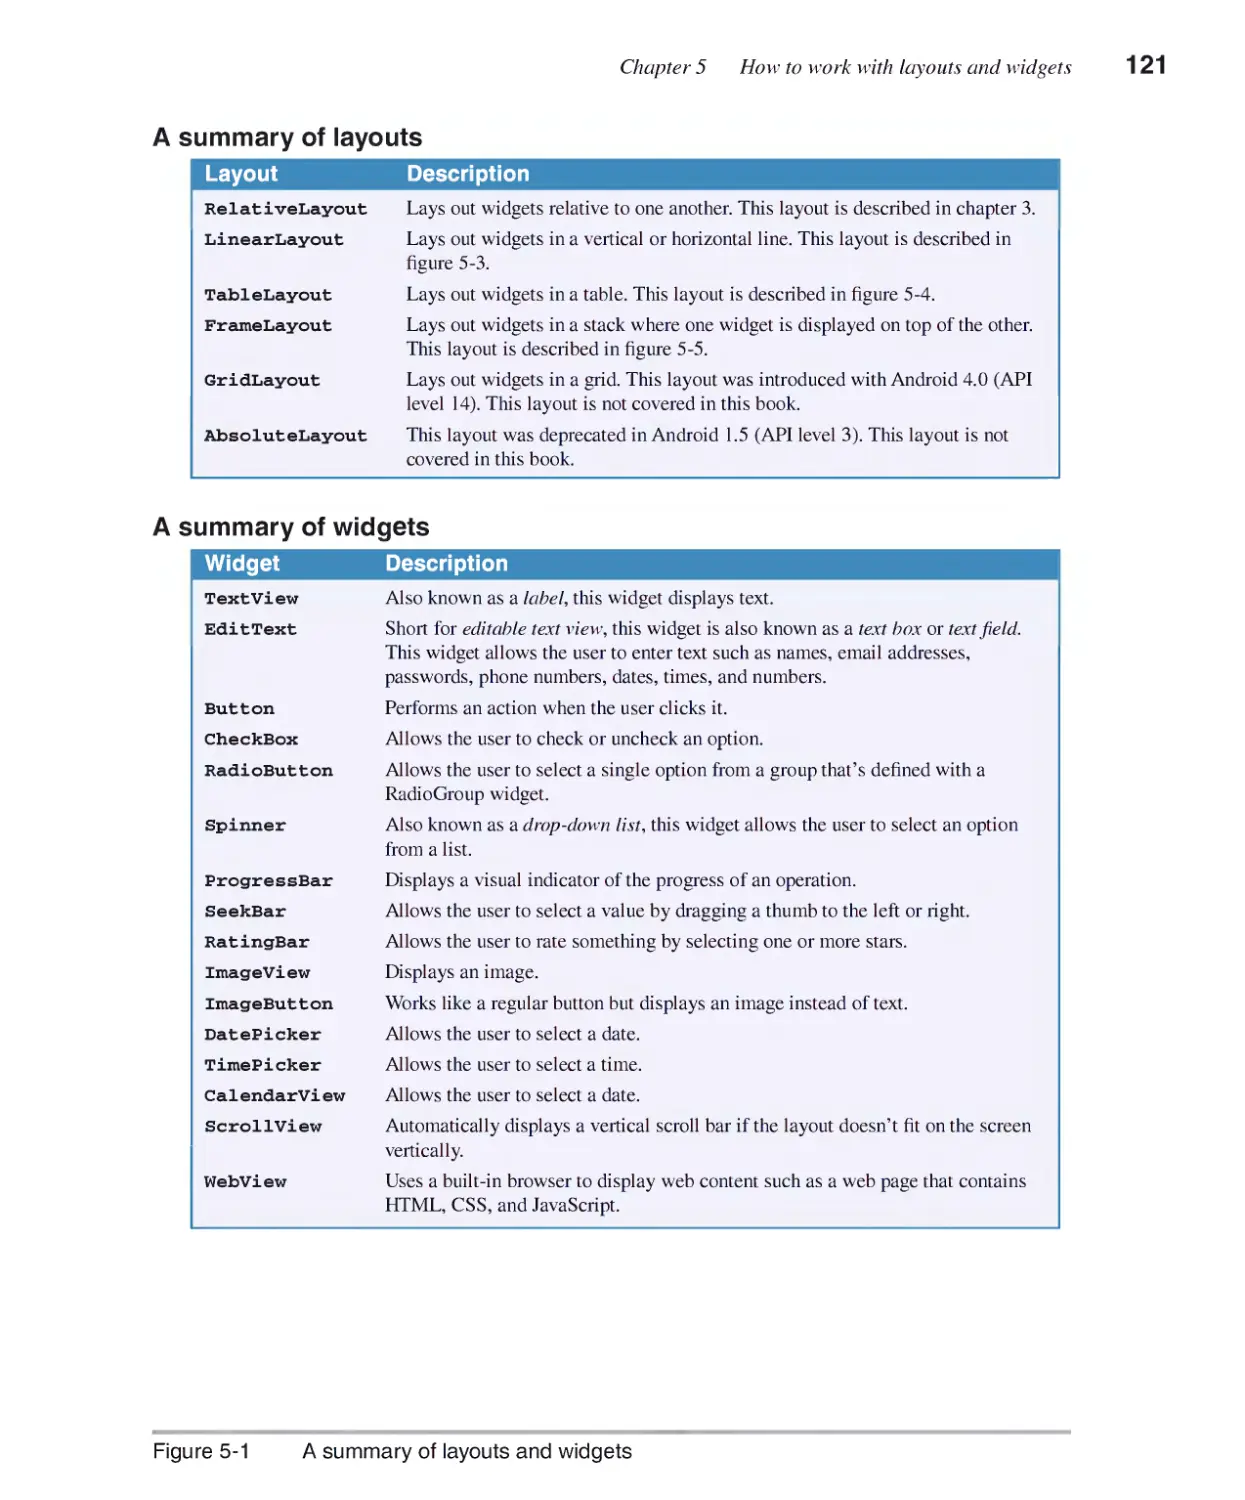
The View hierarchy 122
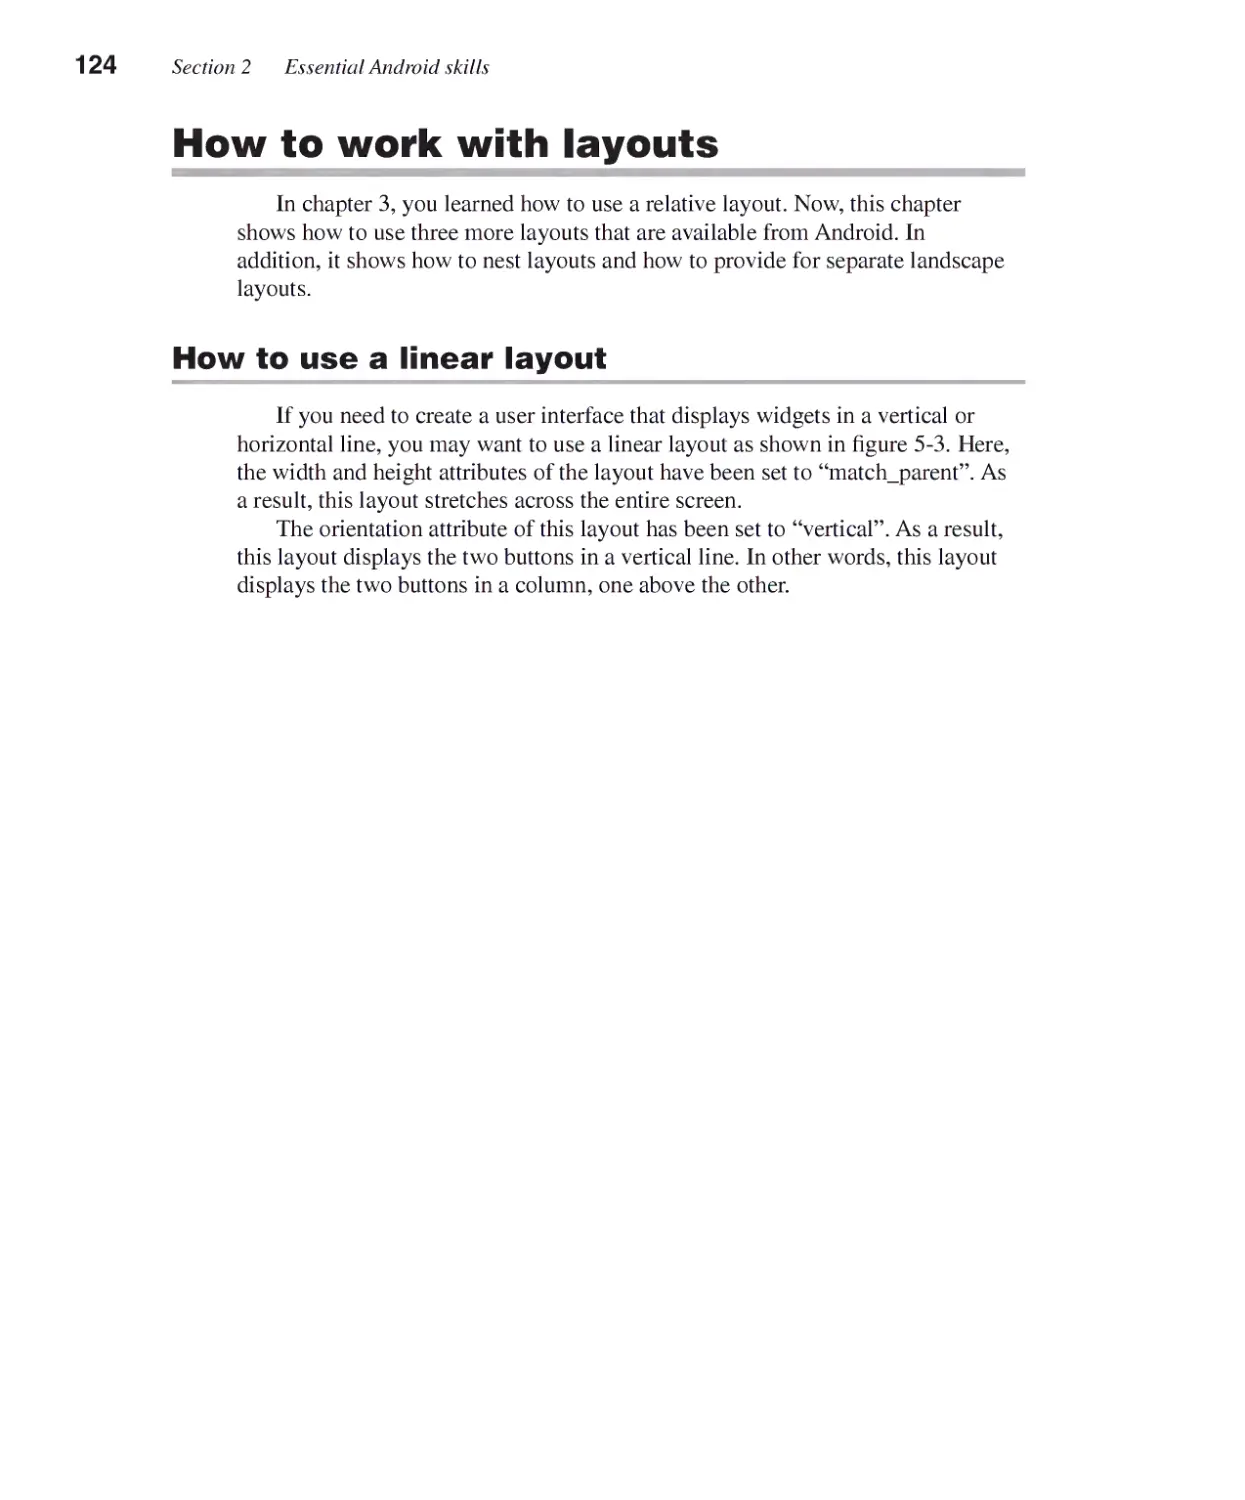
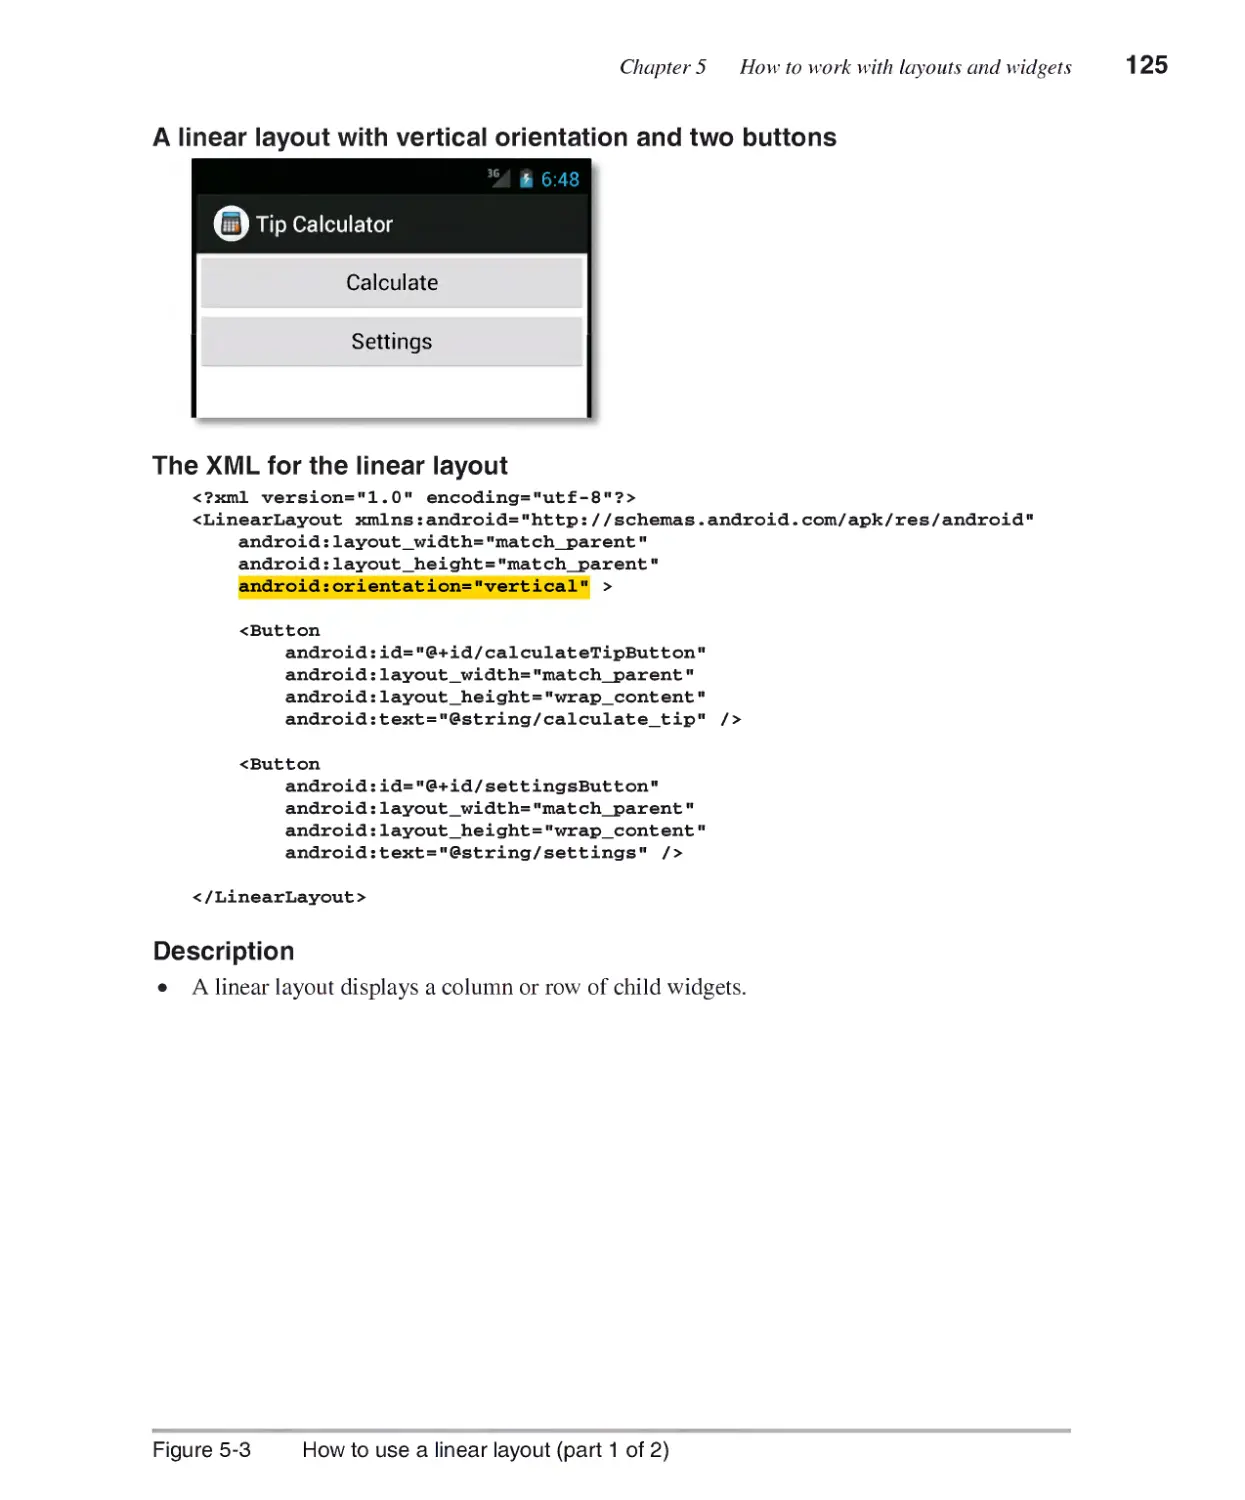
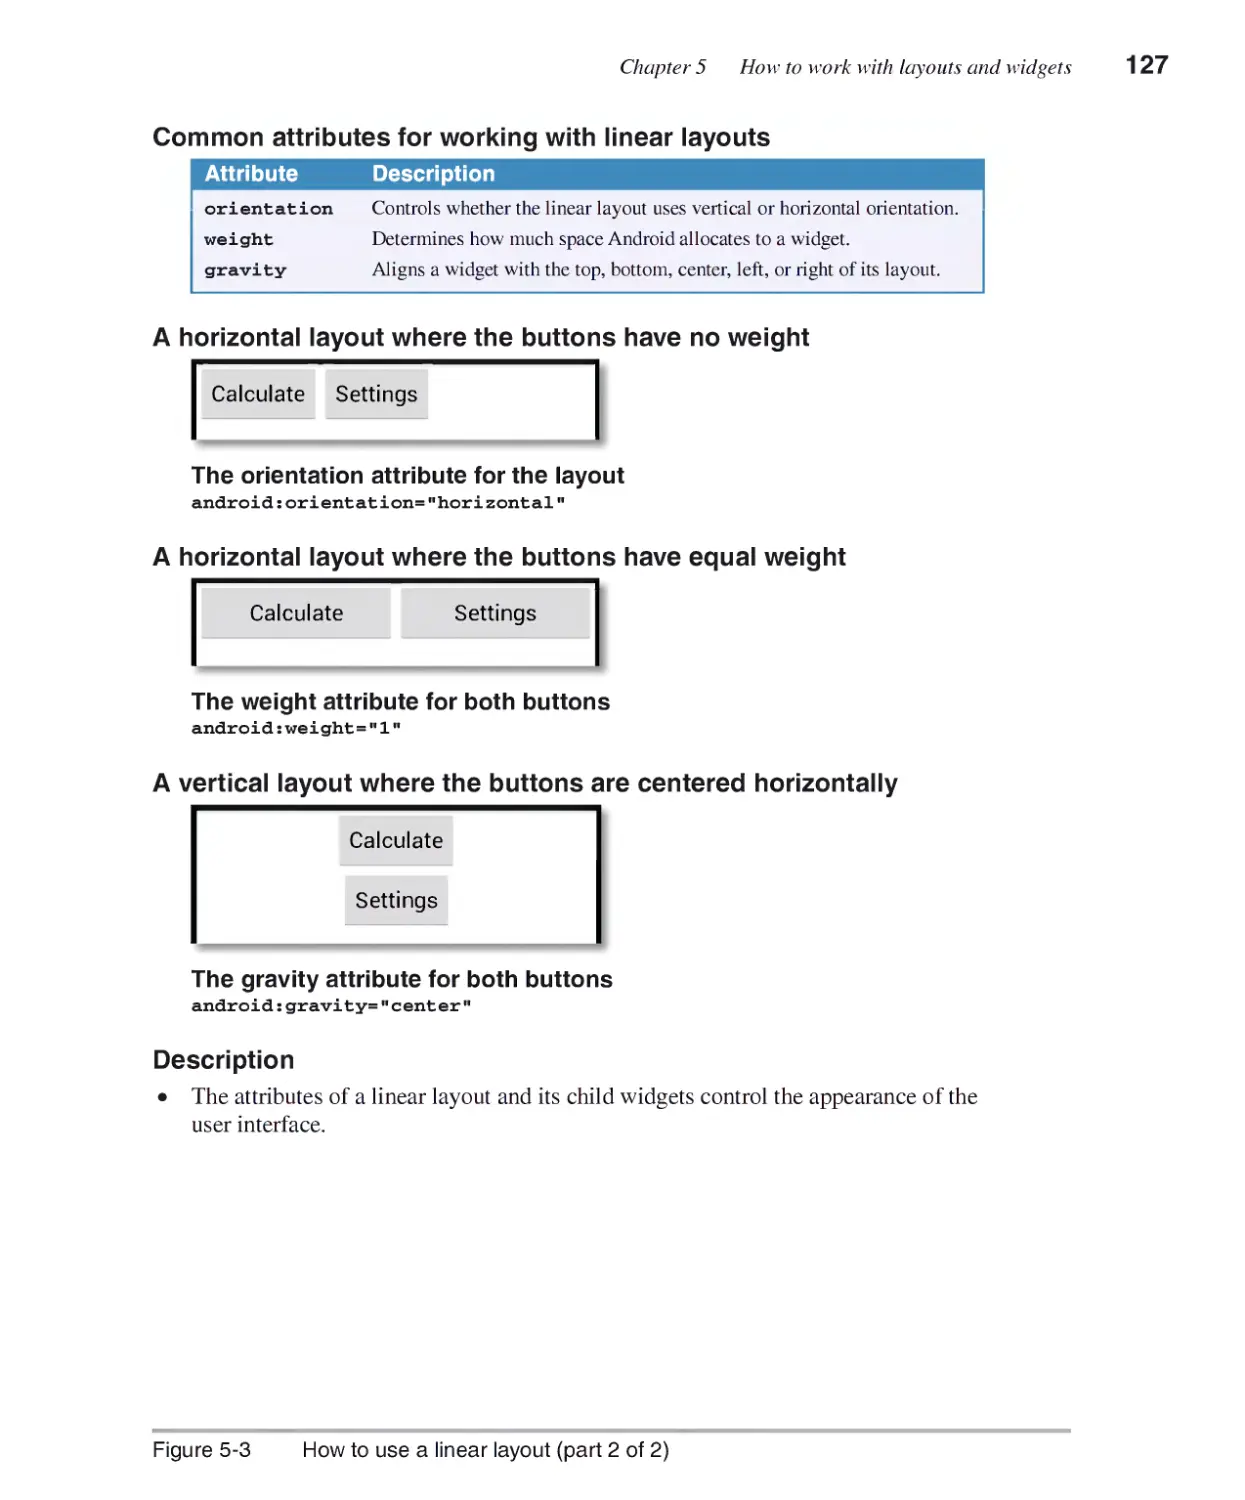
How to work with layouts............................................................... 124
How to use a linear layout 124
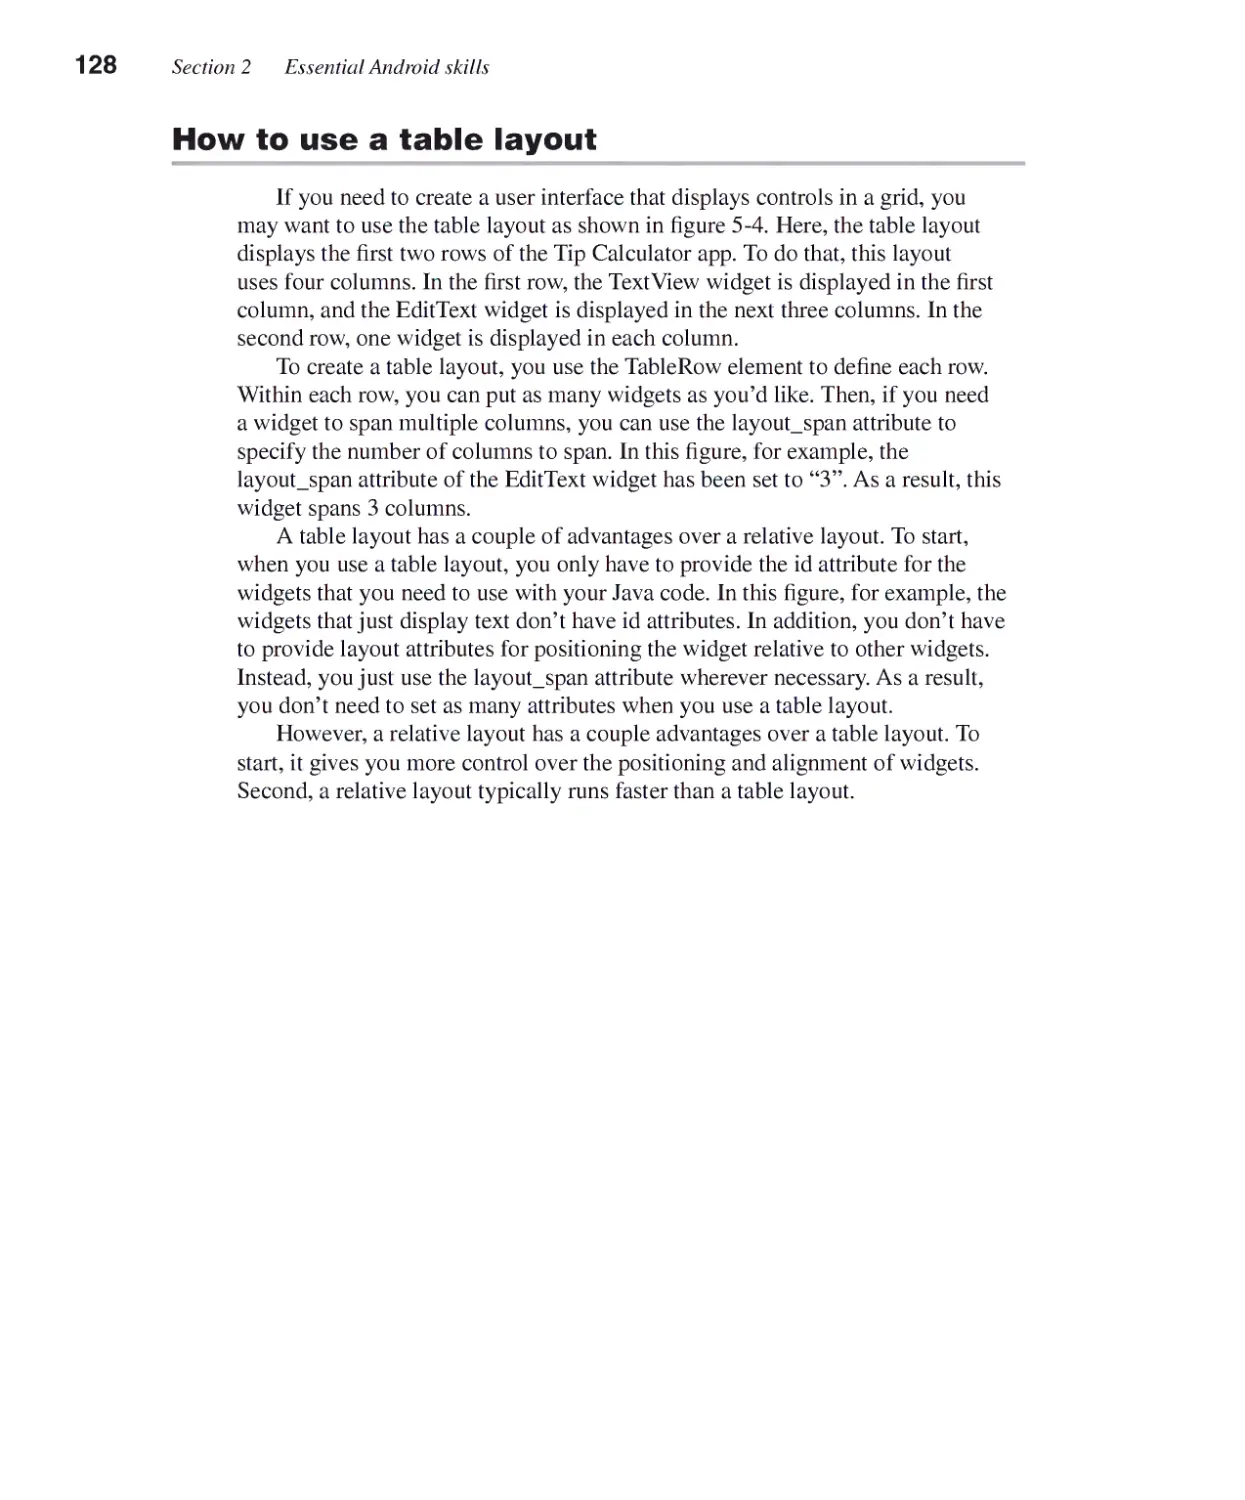
How to use a table layout 128
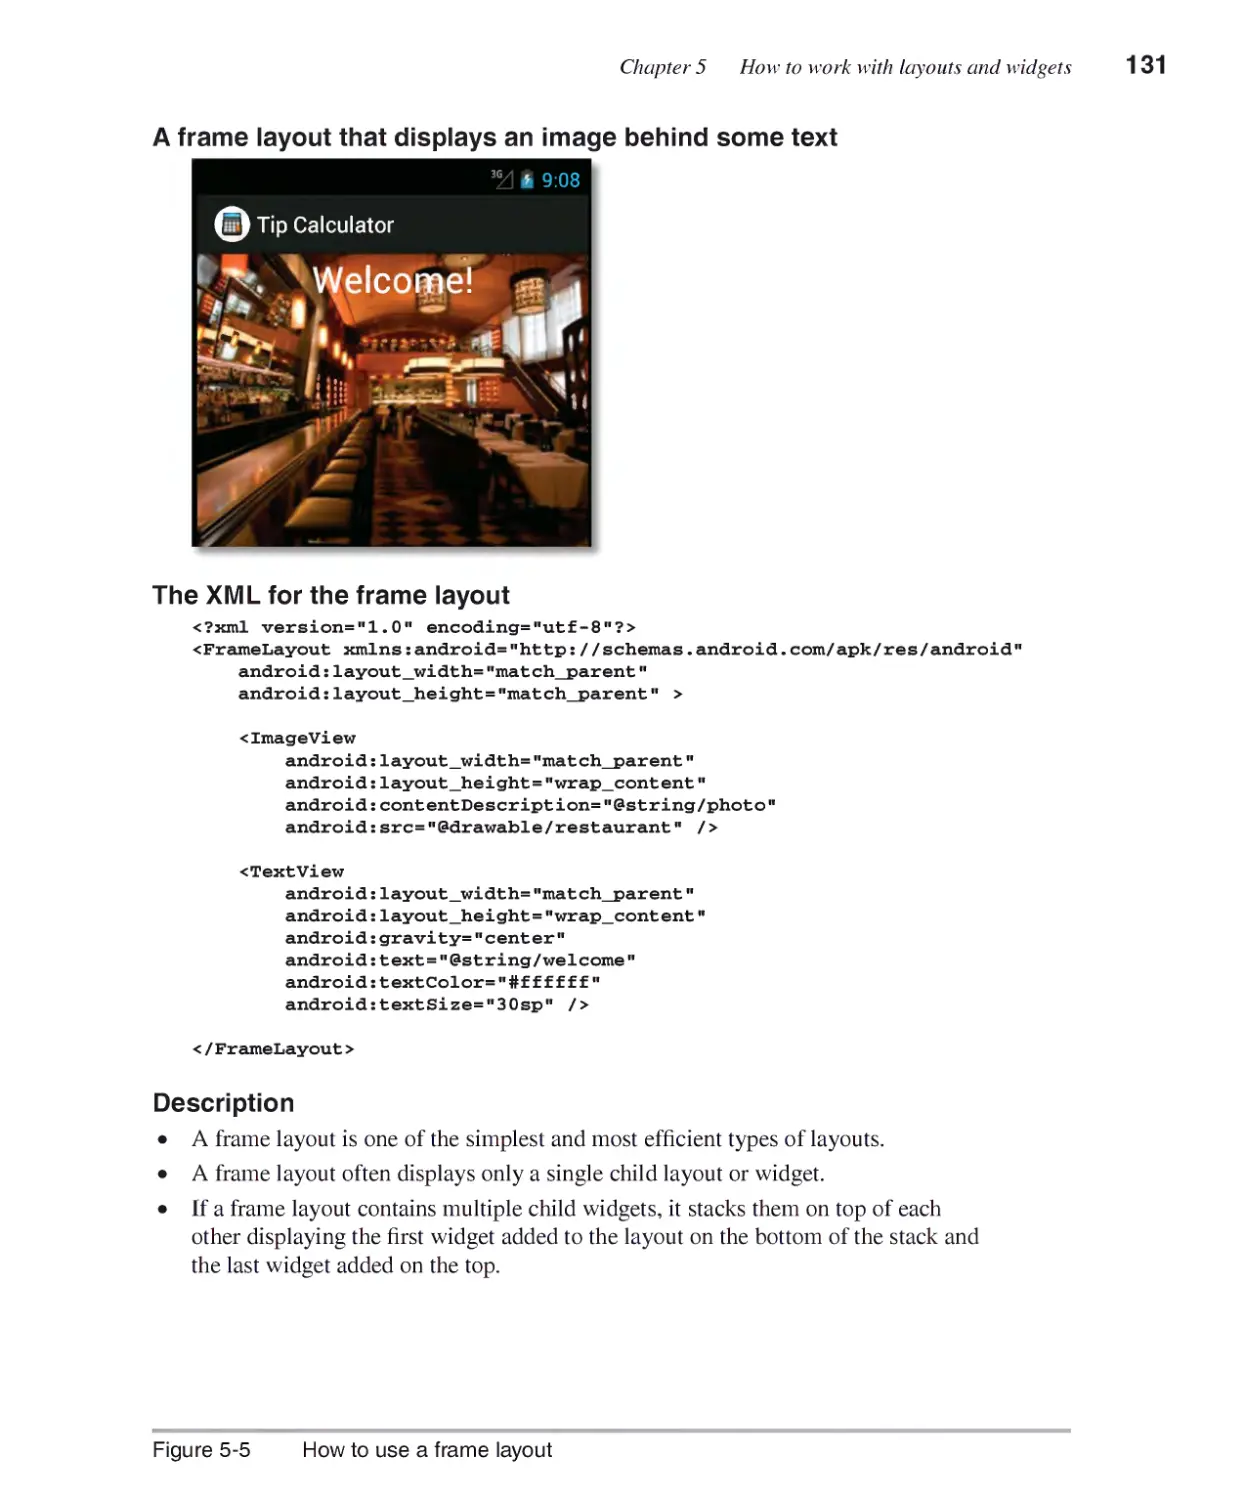
How to use a frame layout 130
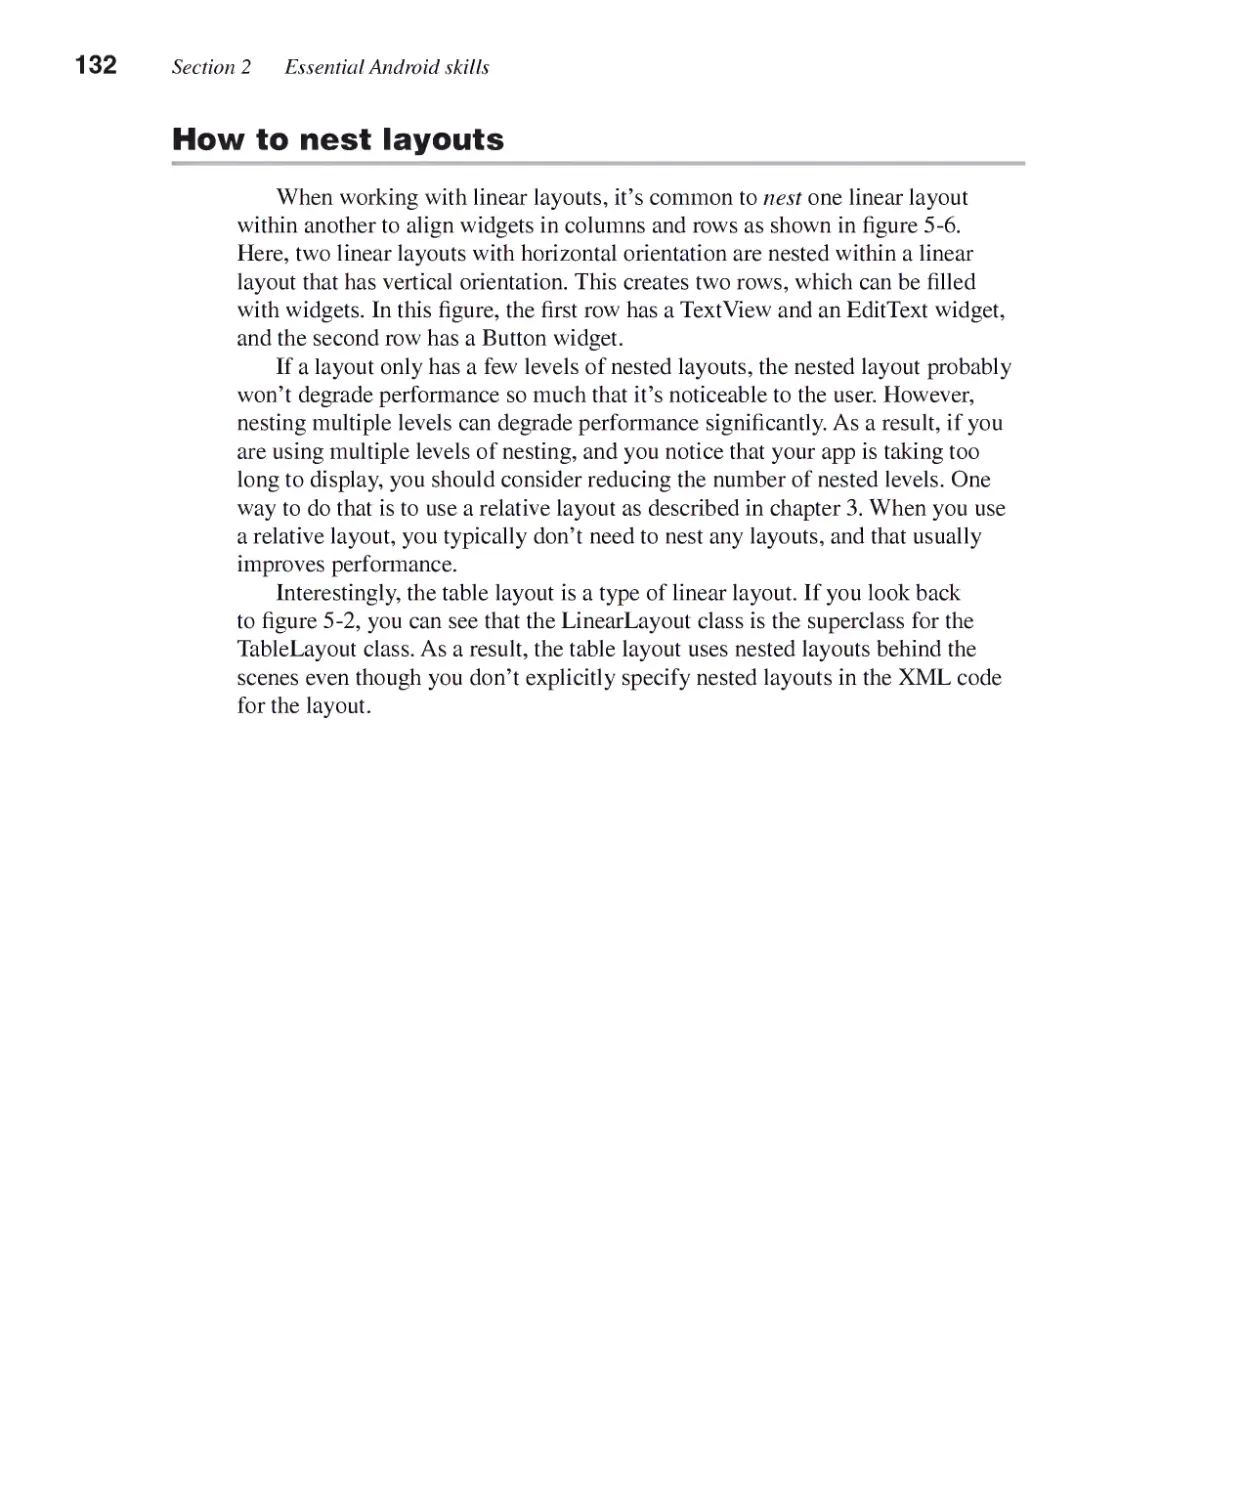
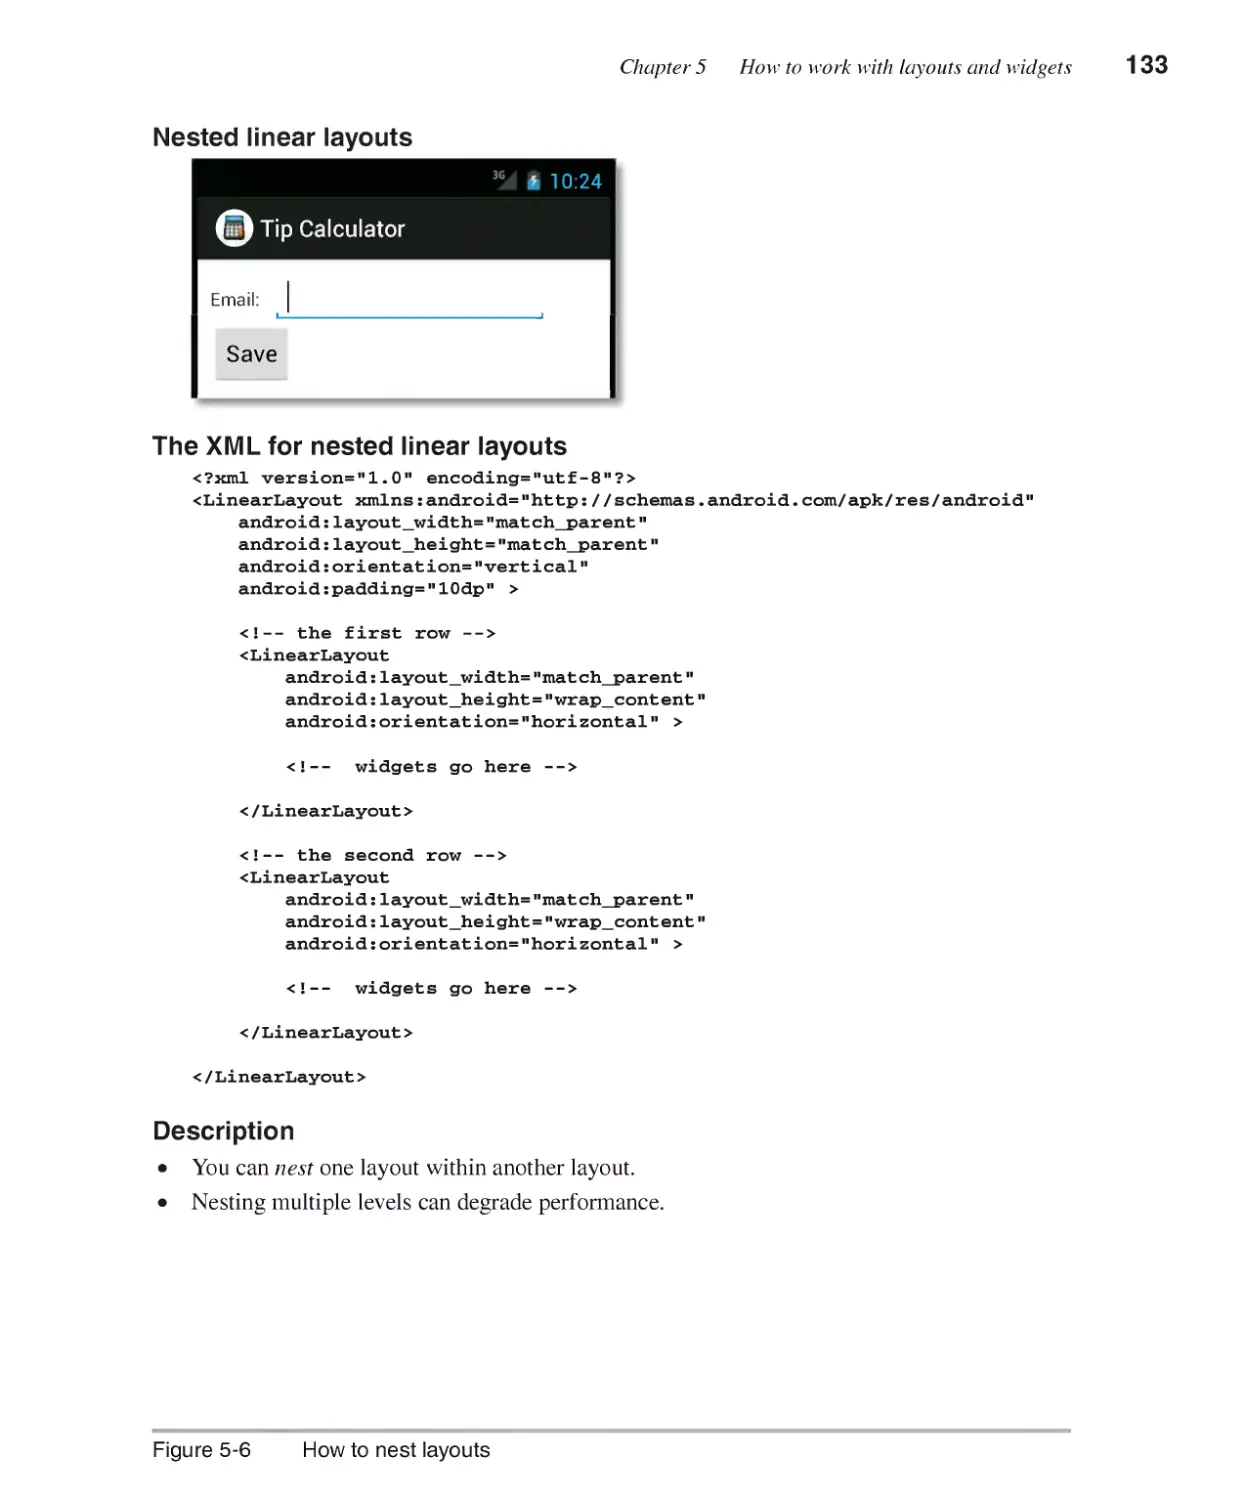
How to nest layouts 132
How to provide a landscape layout 134
How to work with widgets.............................................................. 136
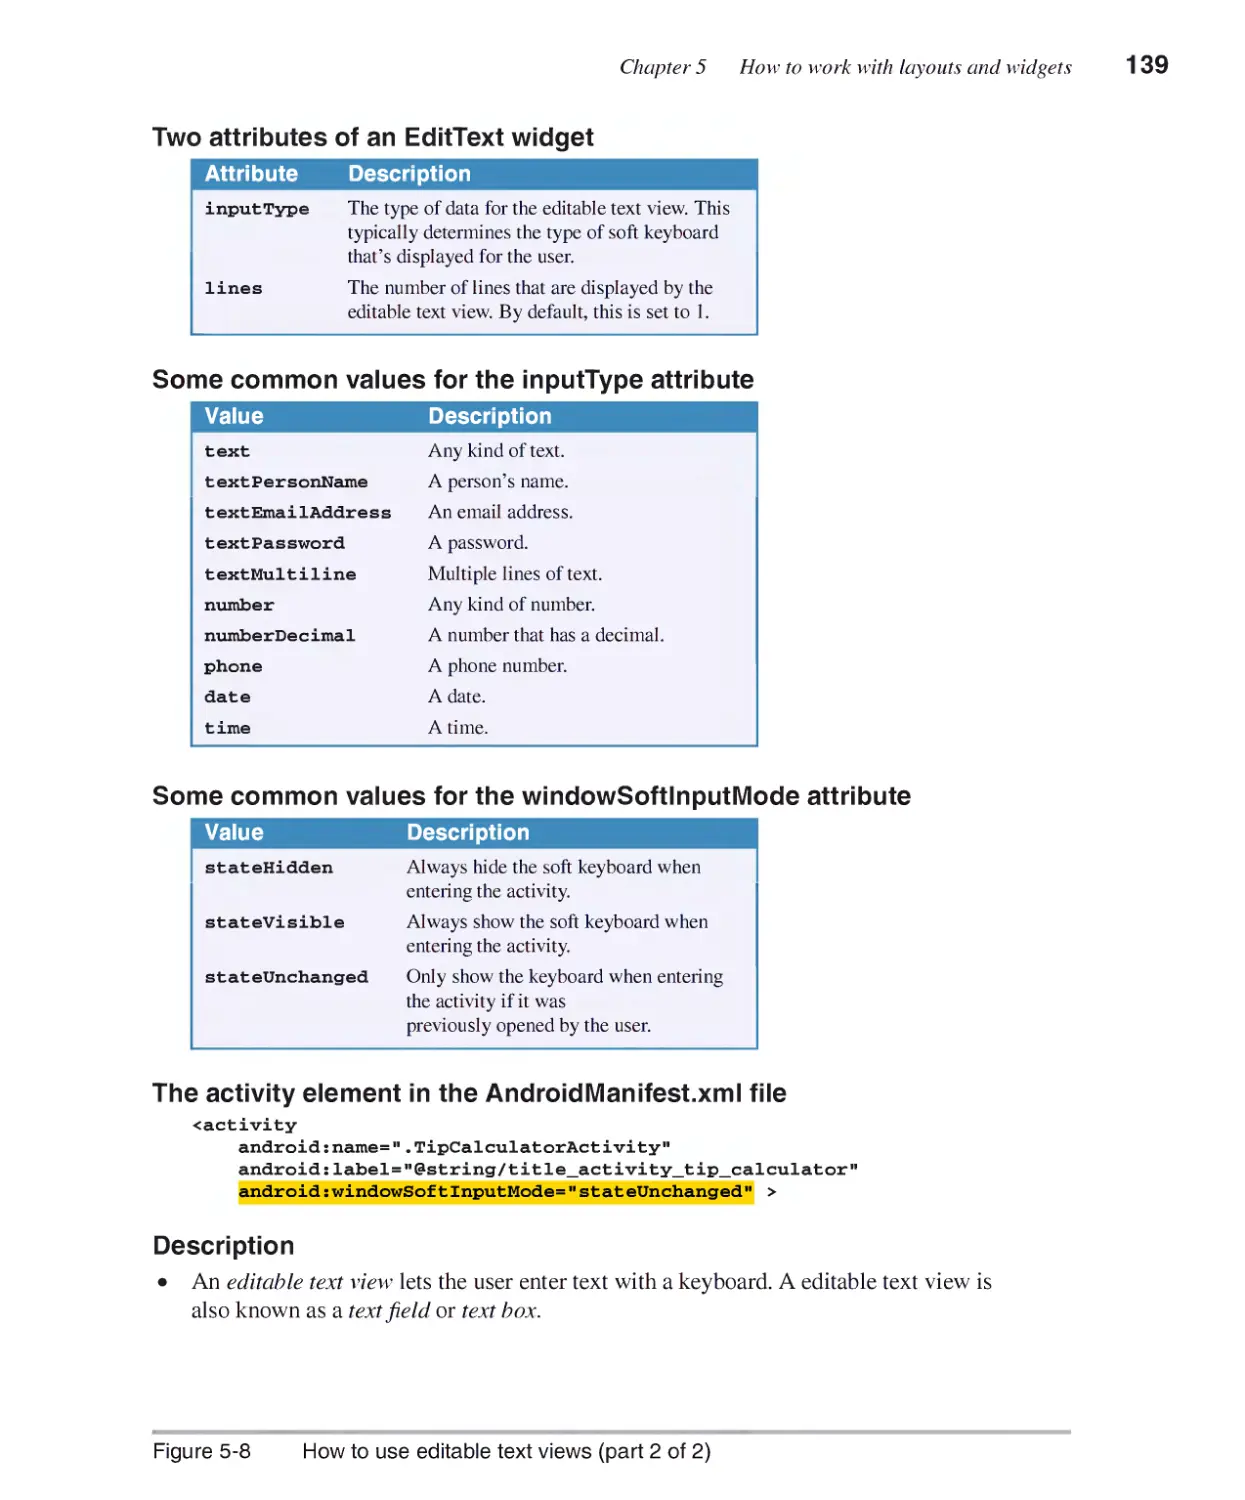
How to use editable text views 136
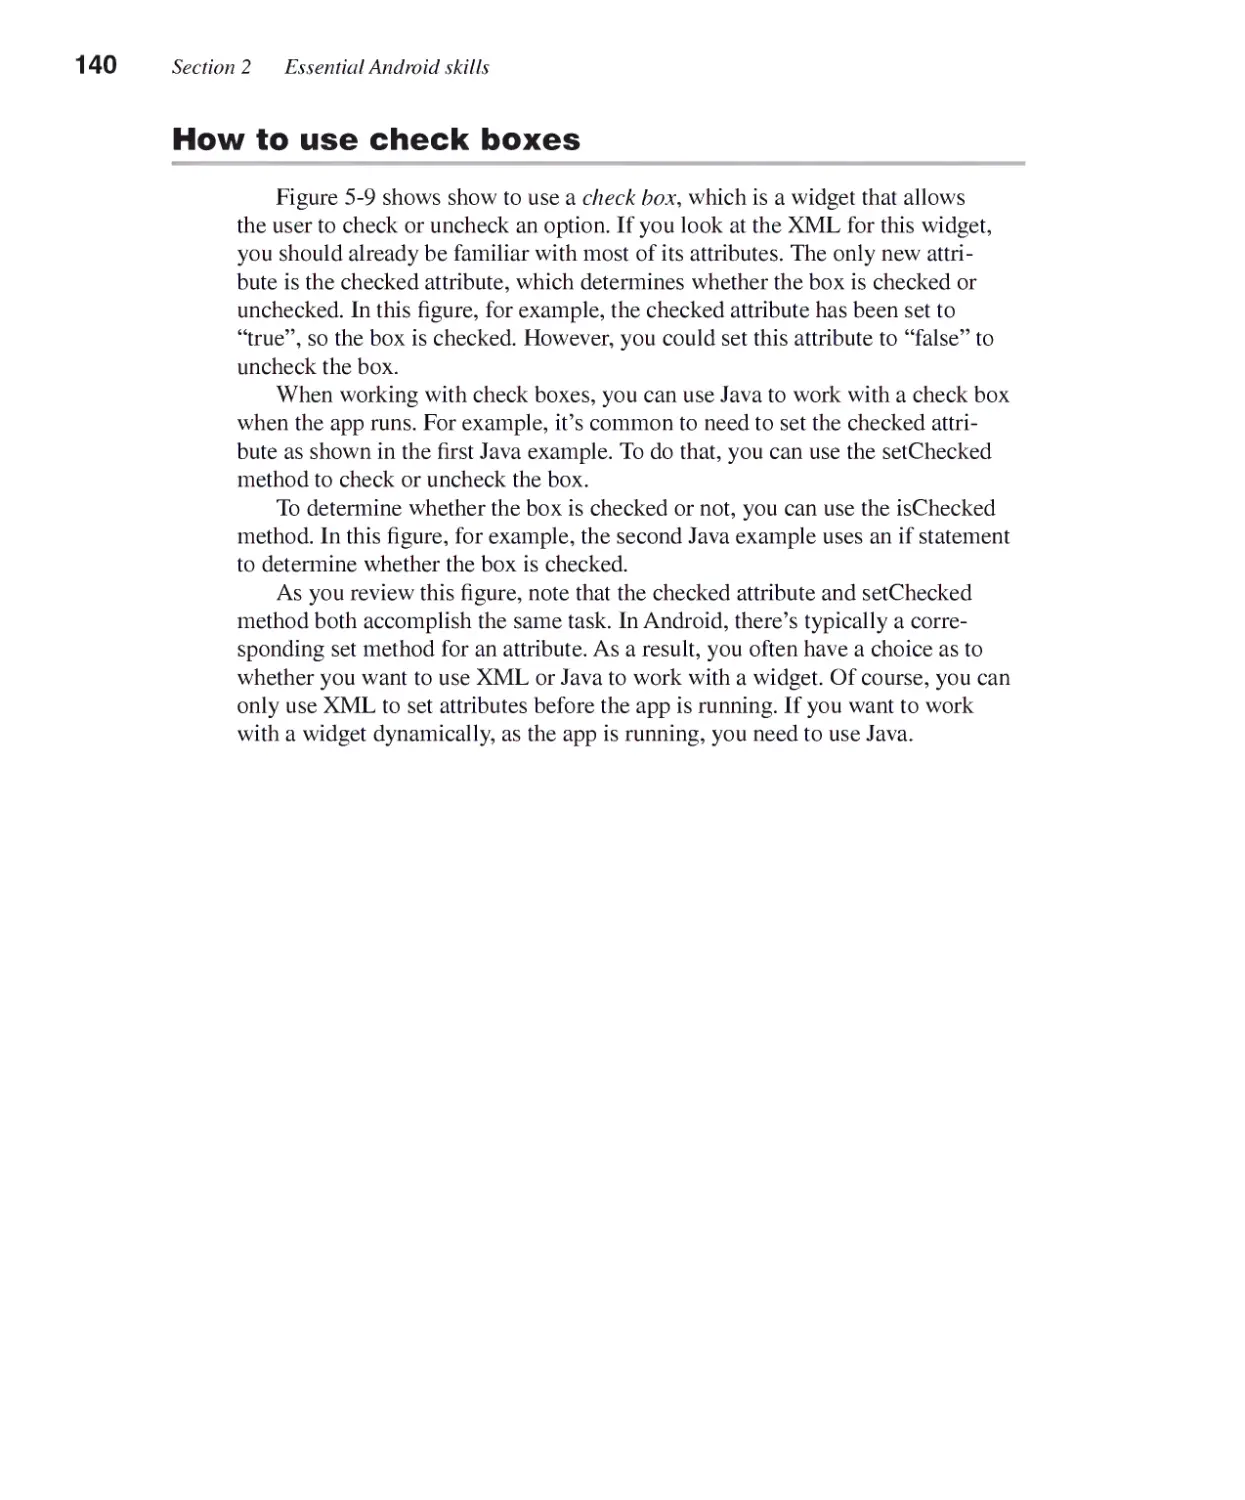
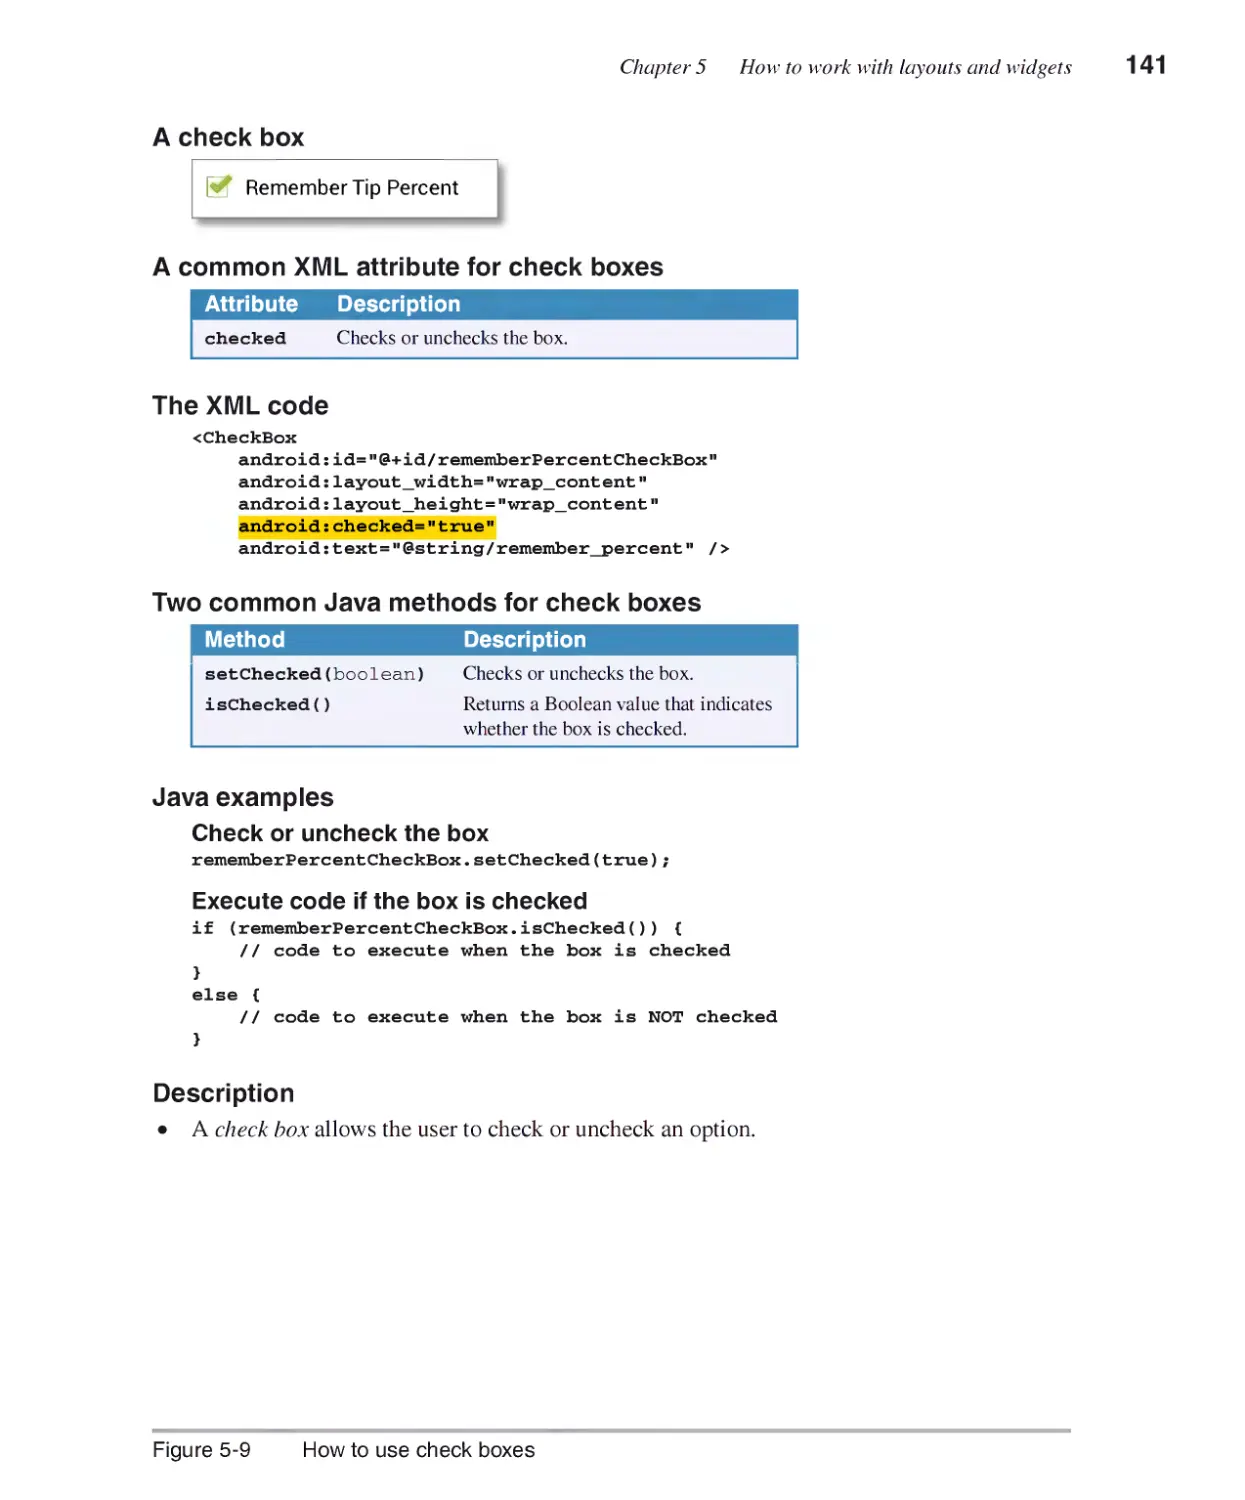
How to use checkboxes 140
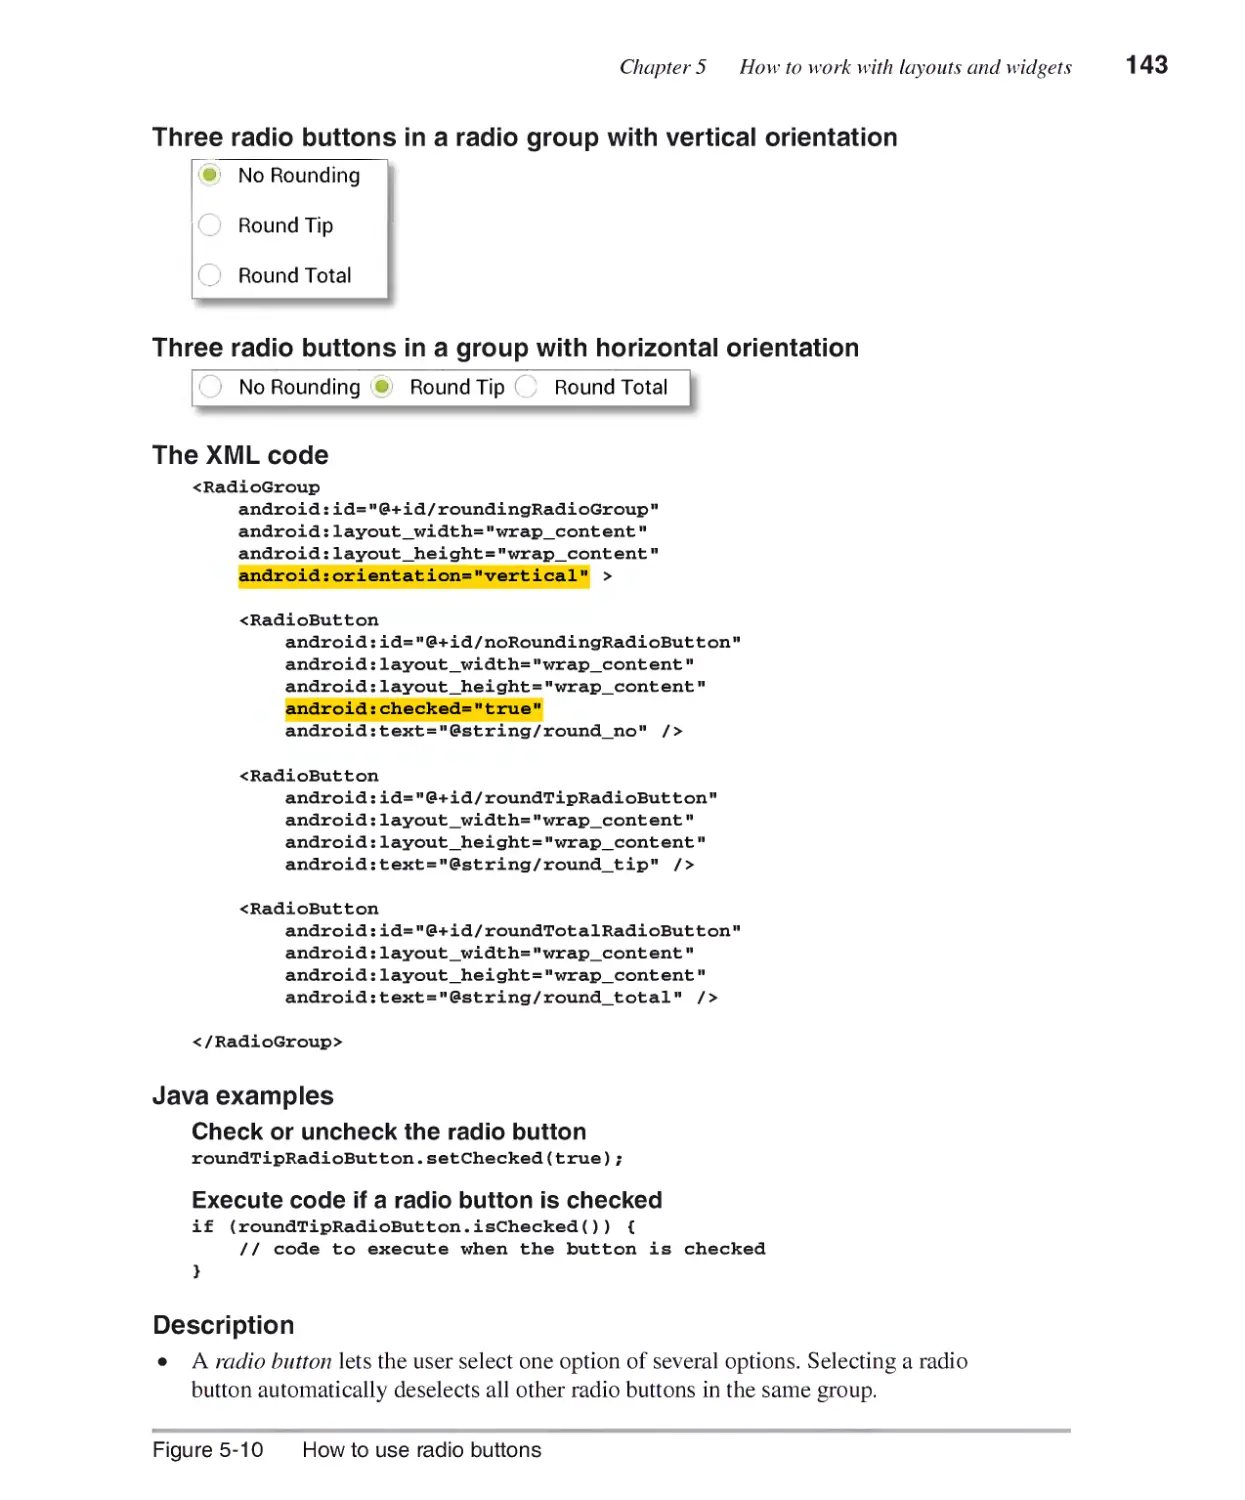
How to use radio buttons 142
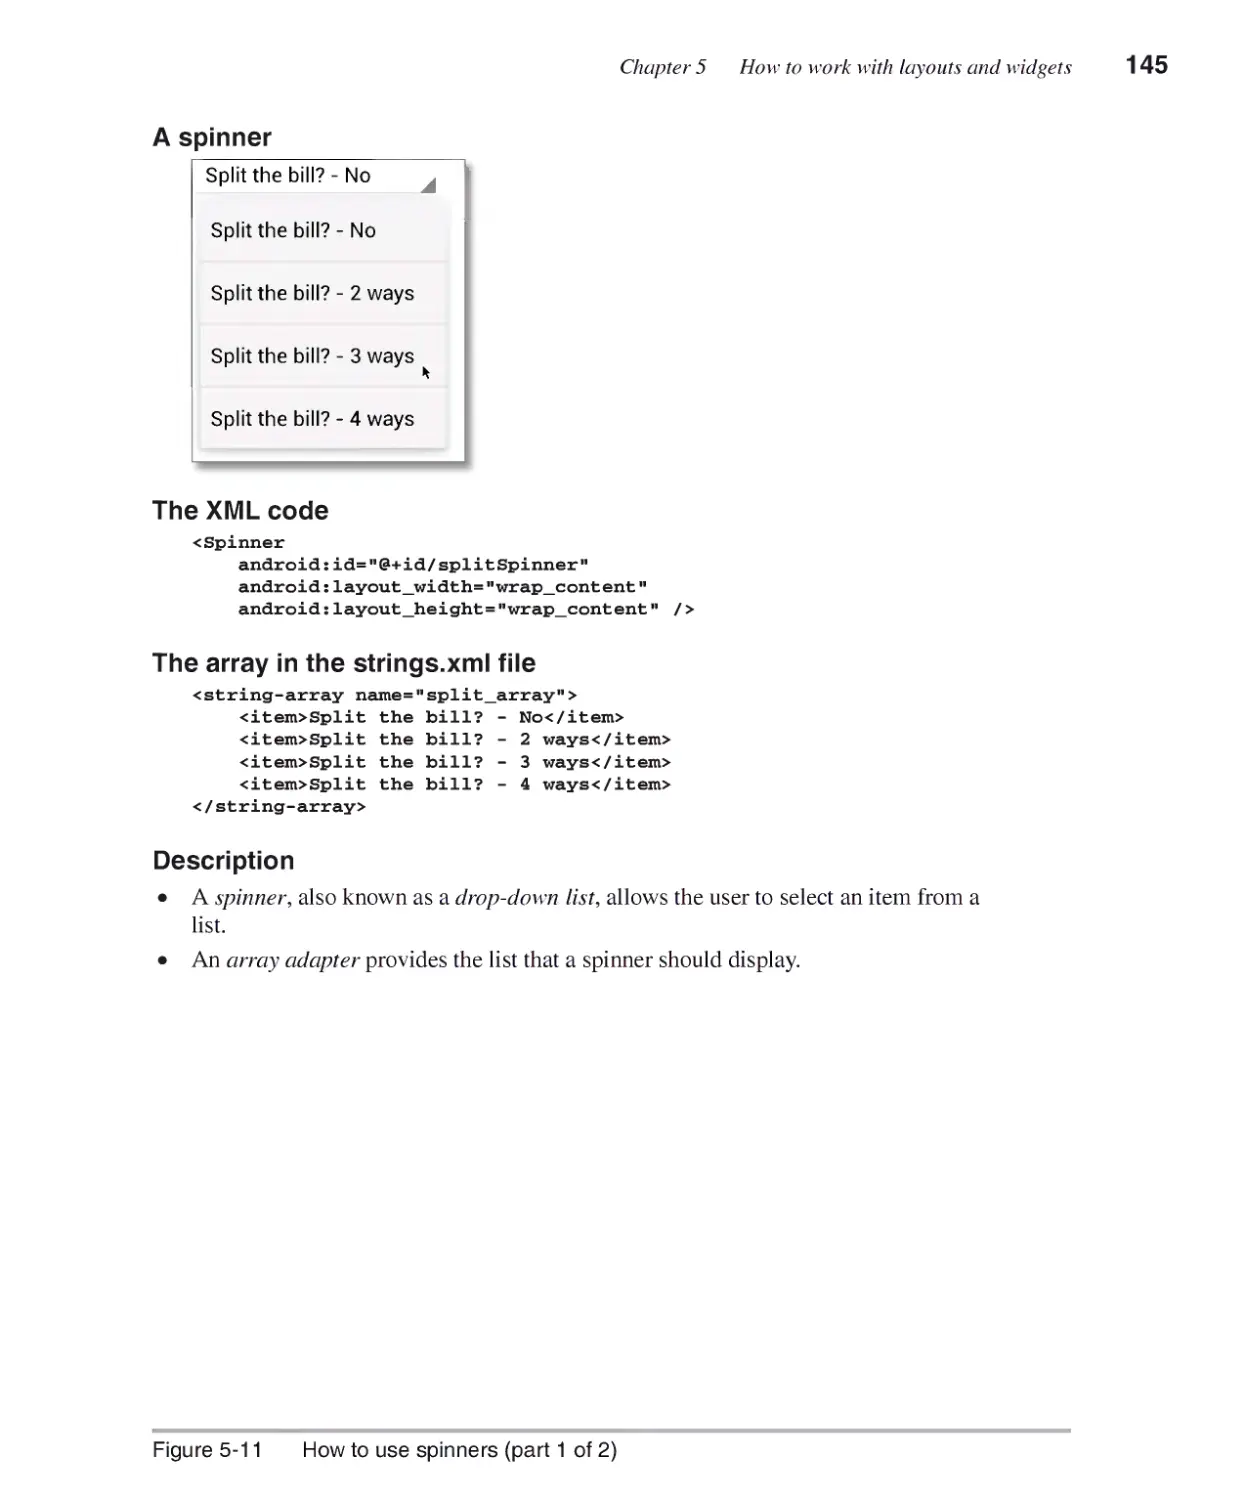
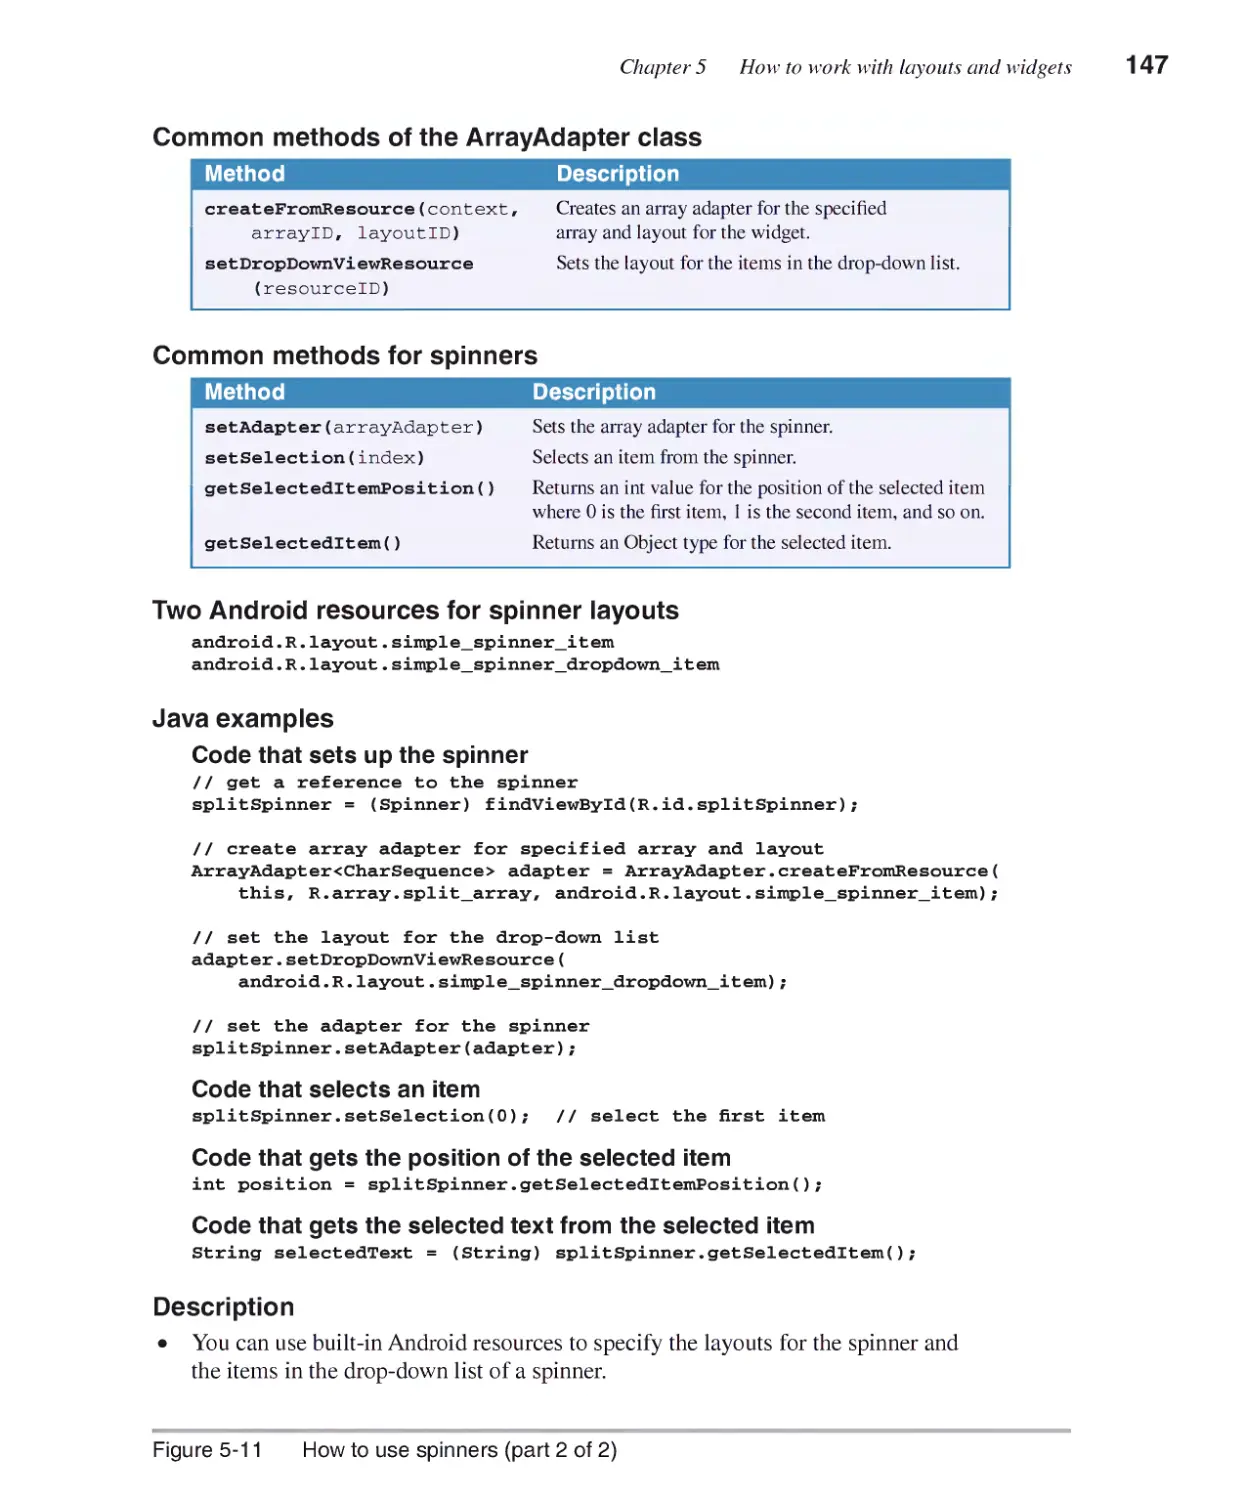
How to use spinners 144
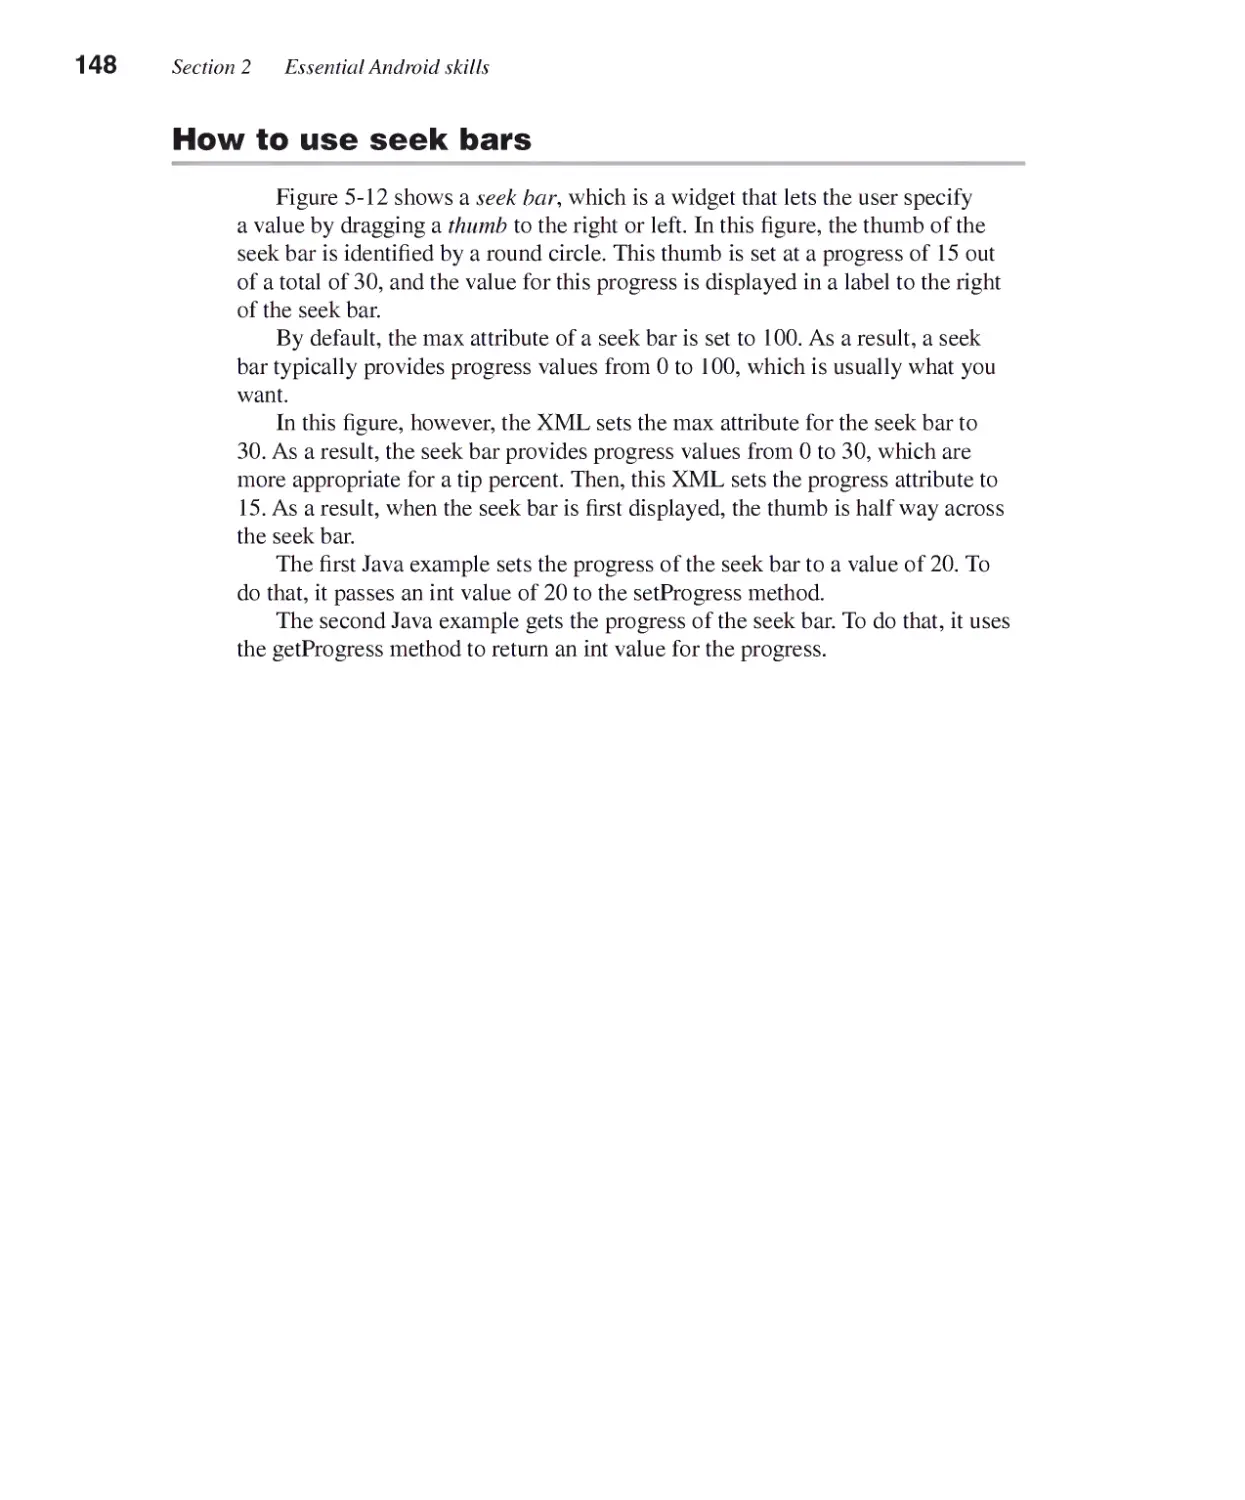
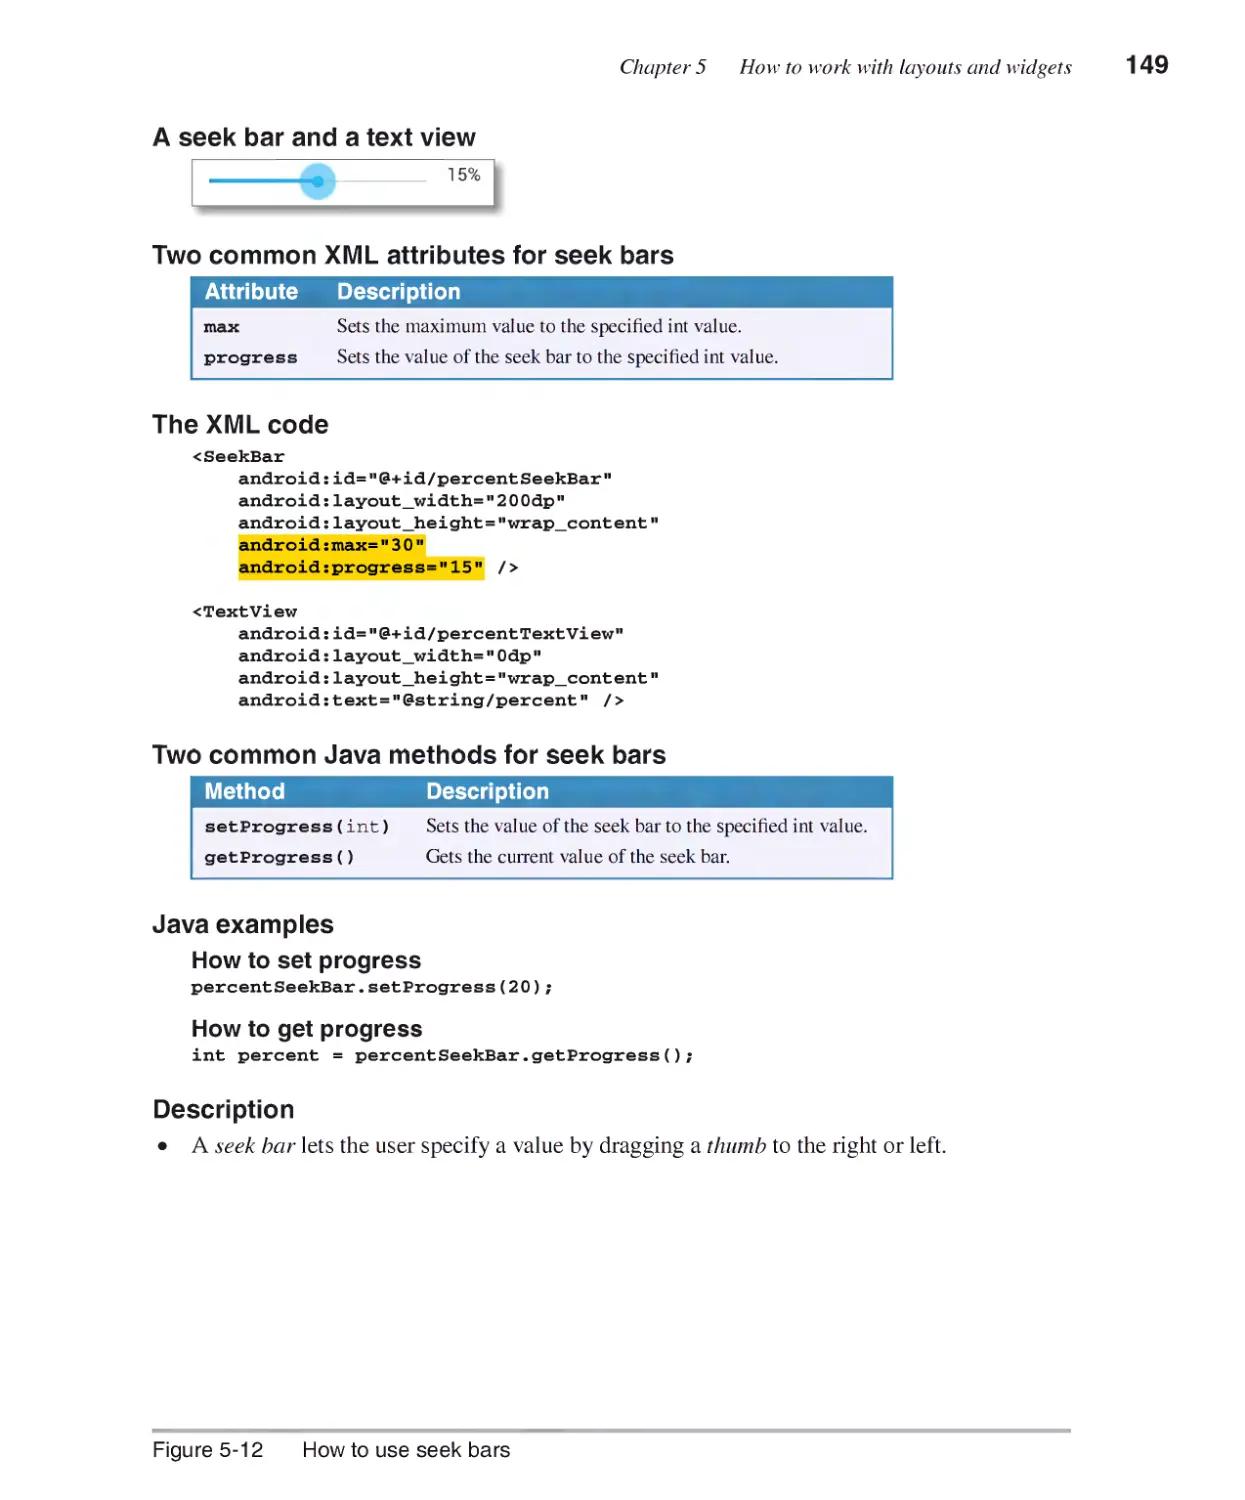
How to use seek bars 148
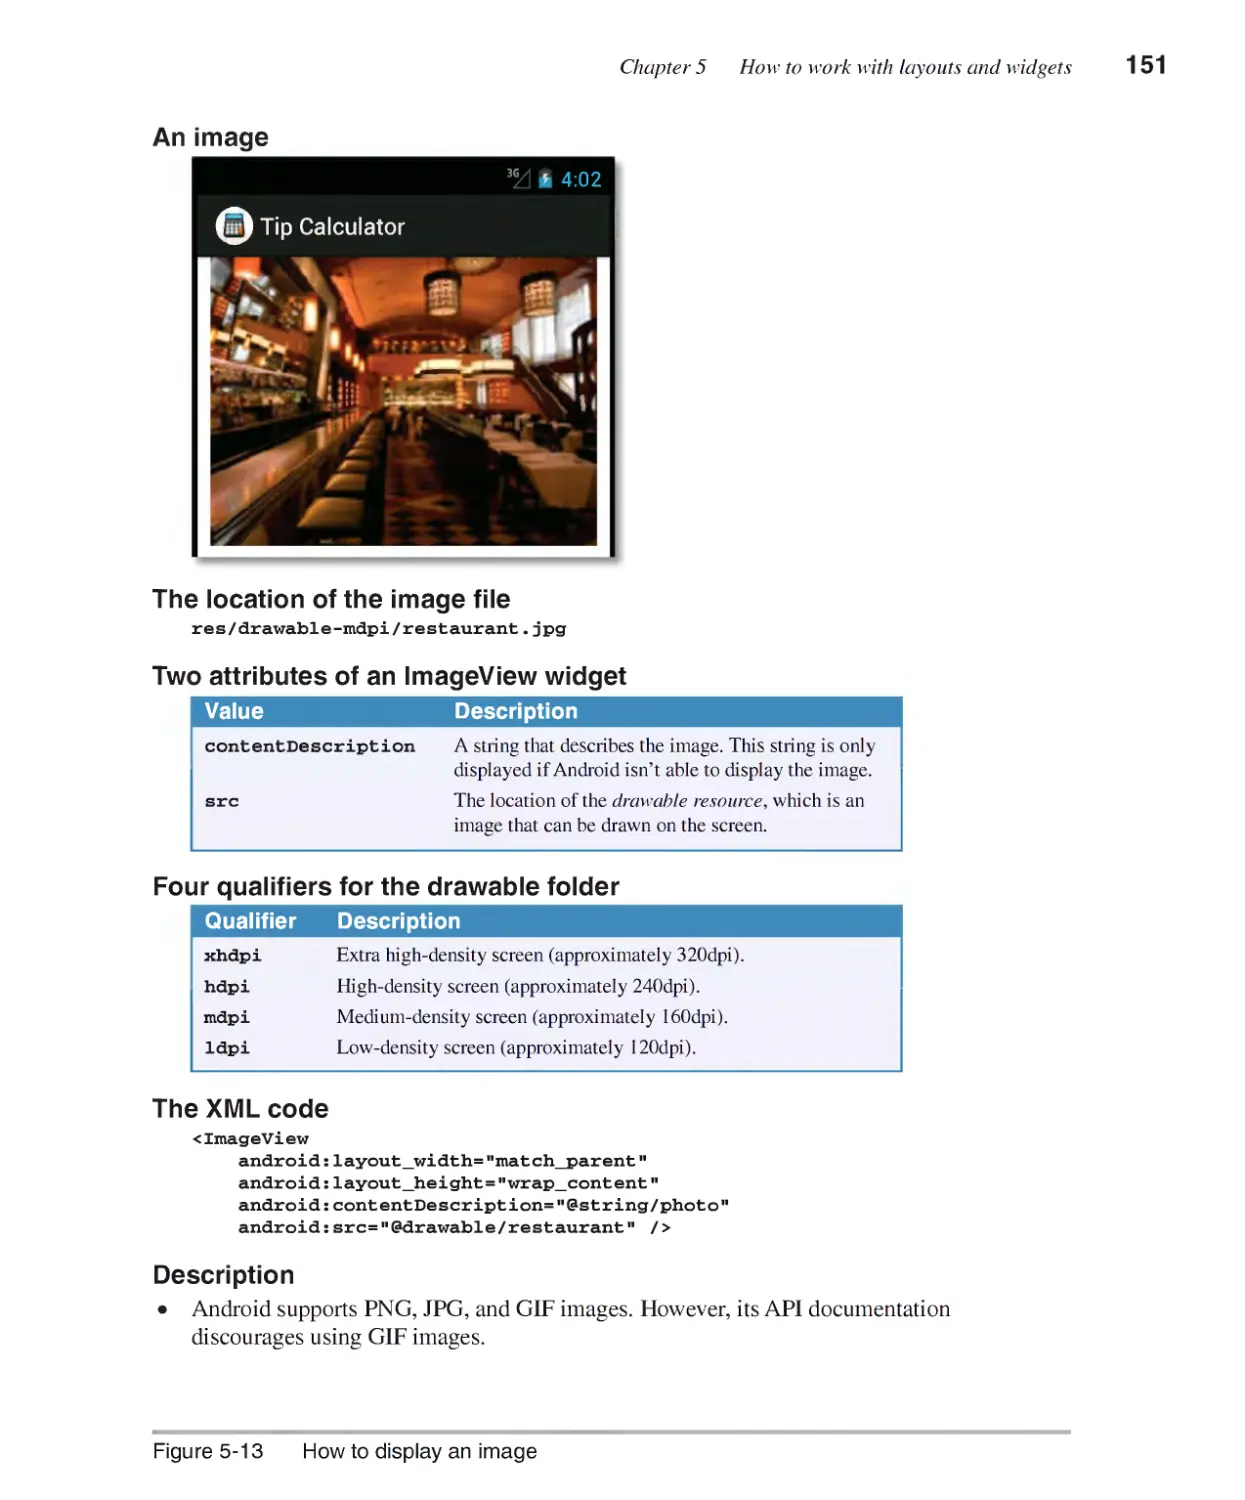
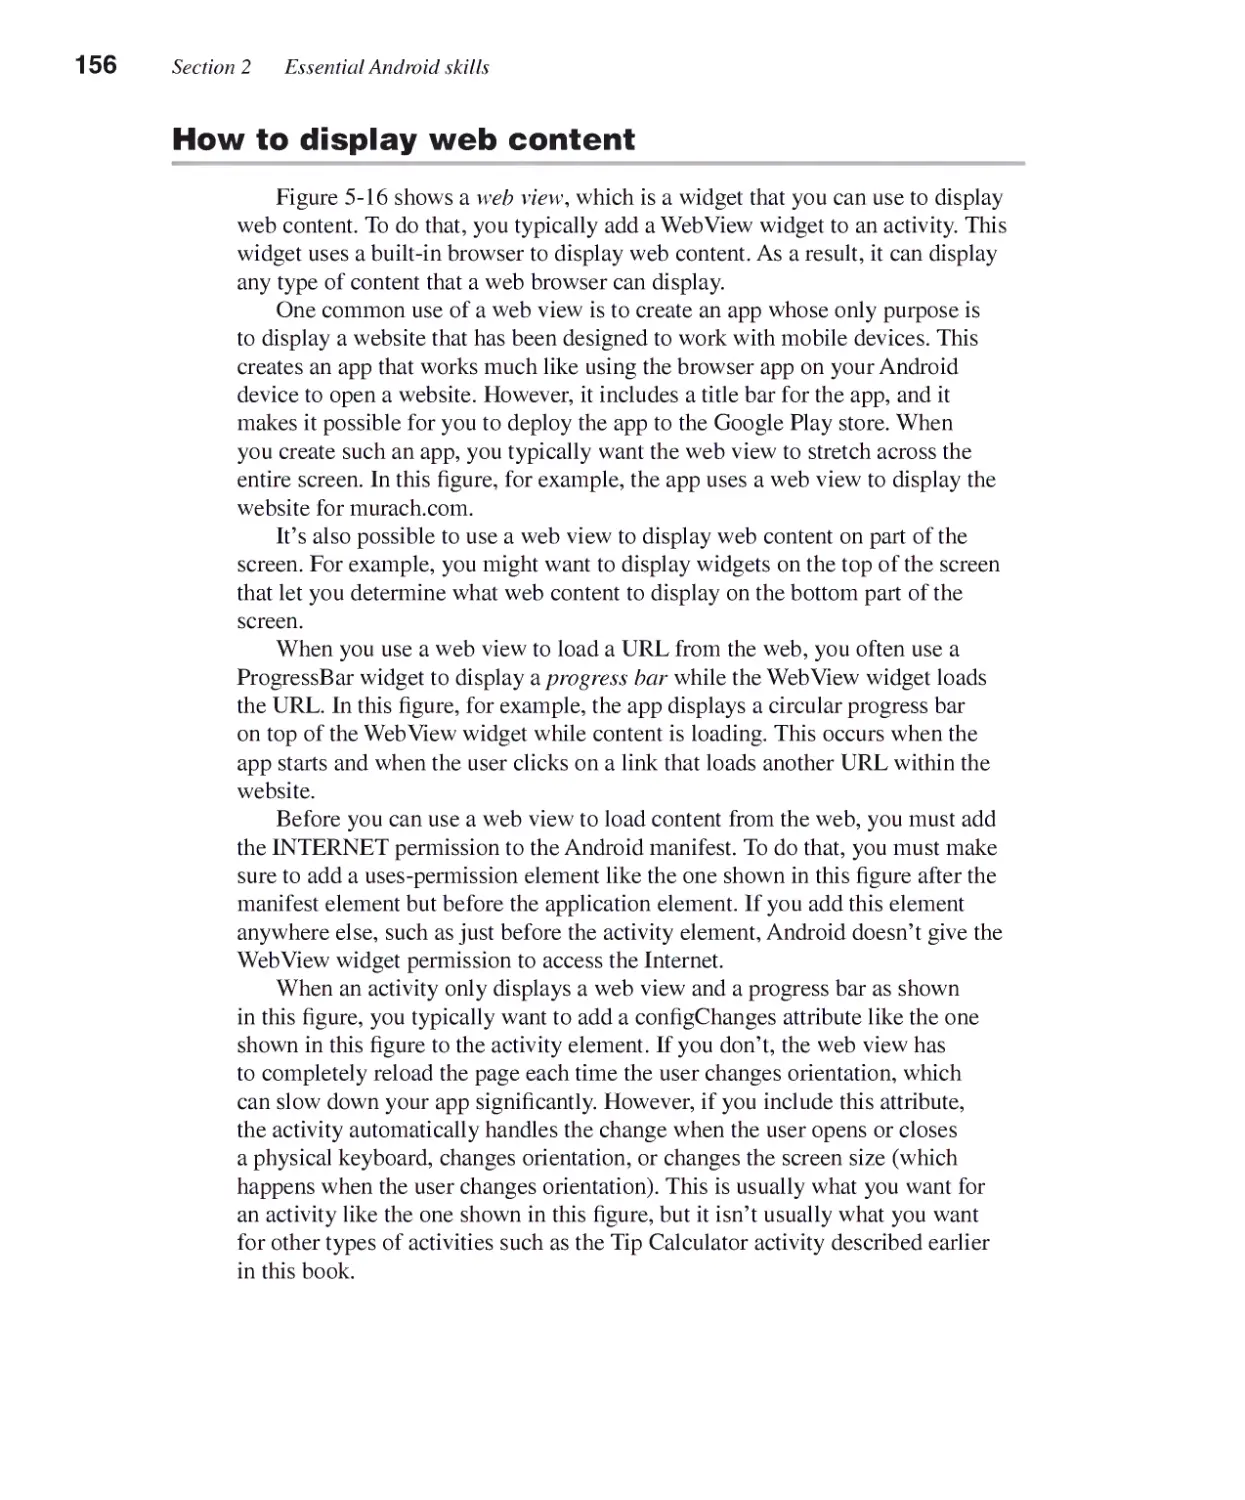
How to display images 150
How to show and hide widgets 152
How to add scroll bars 154
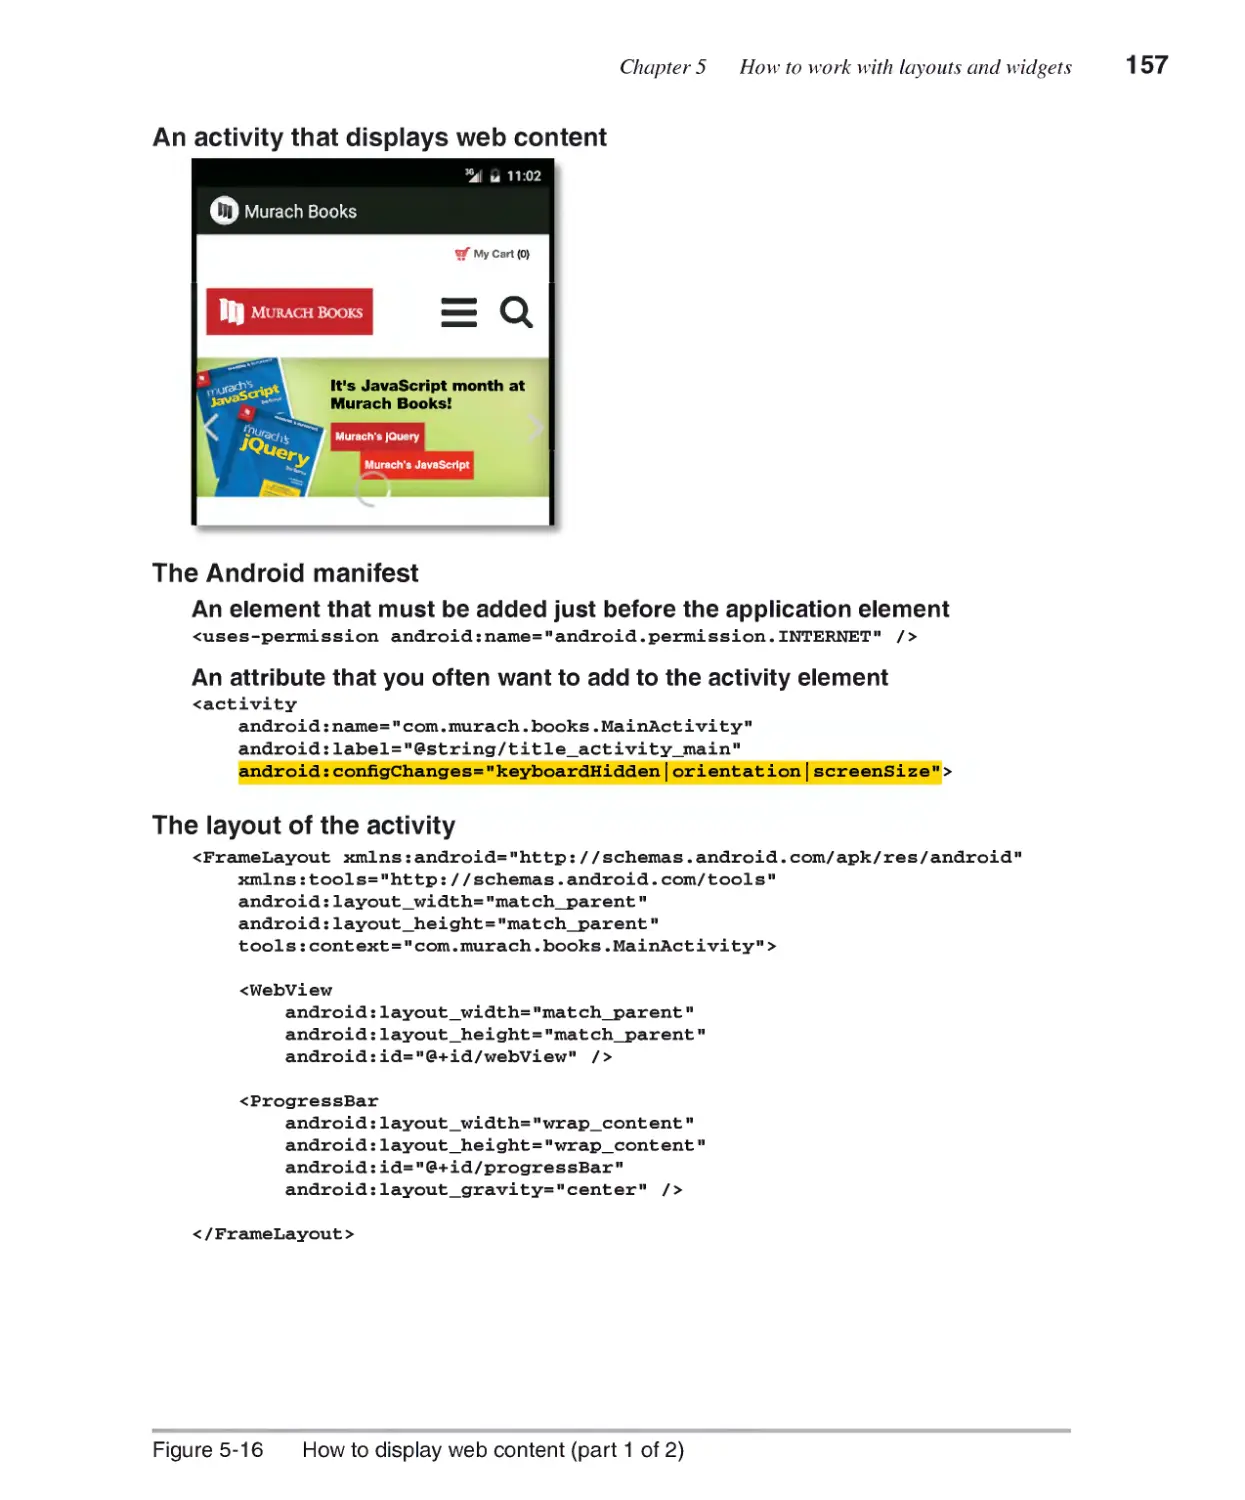
How to display web content 156
Chapter 6 How to handle events
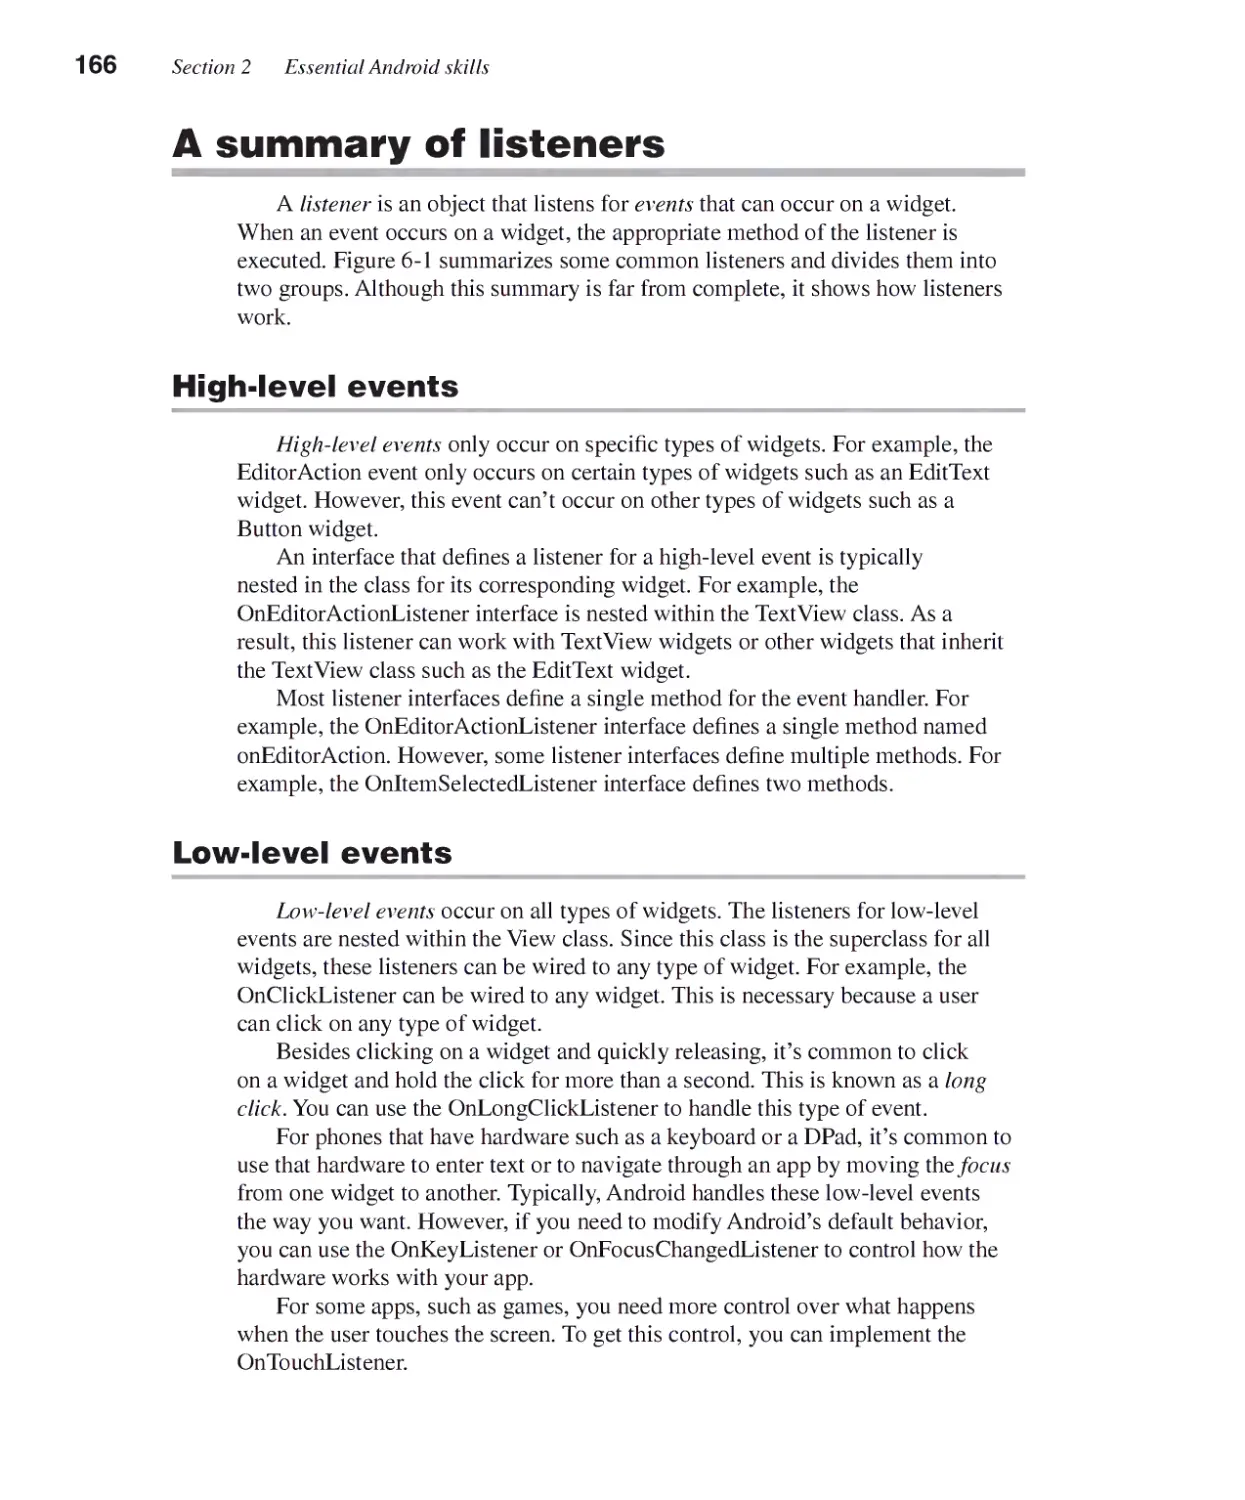
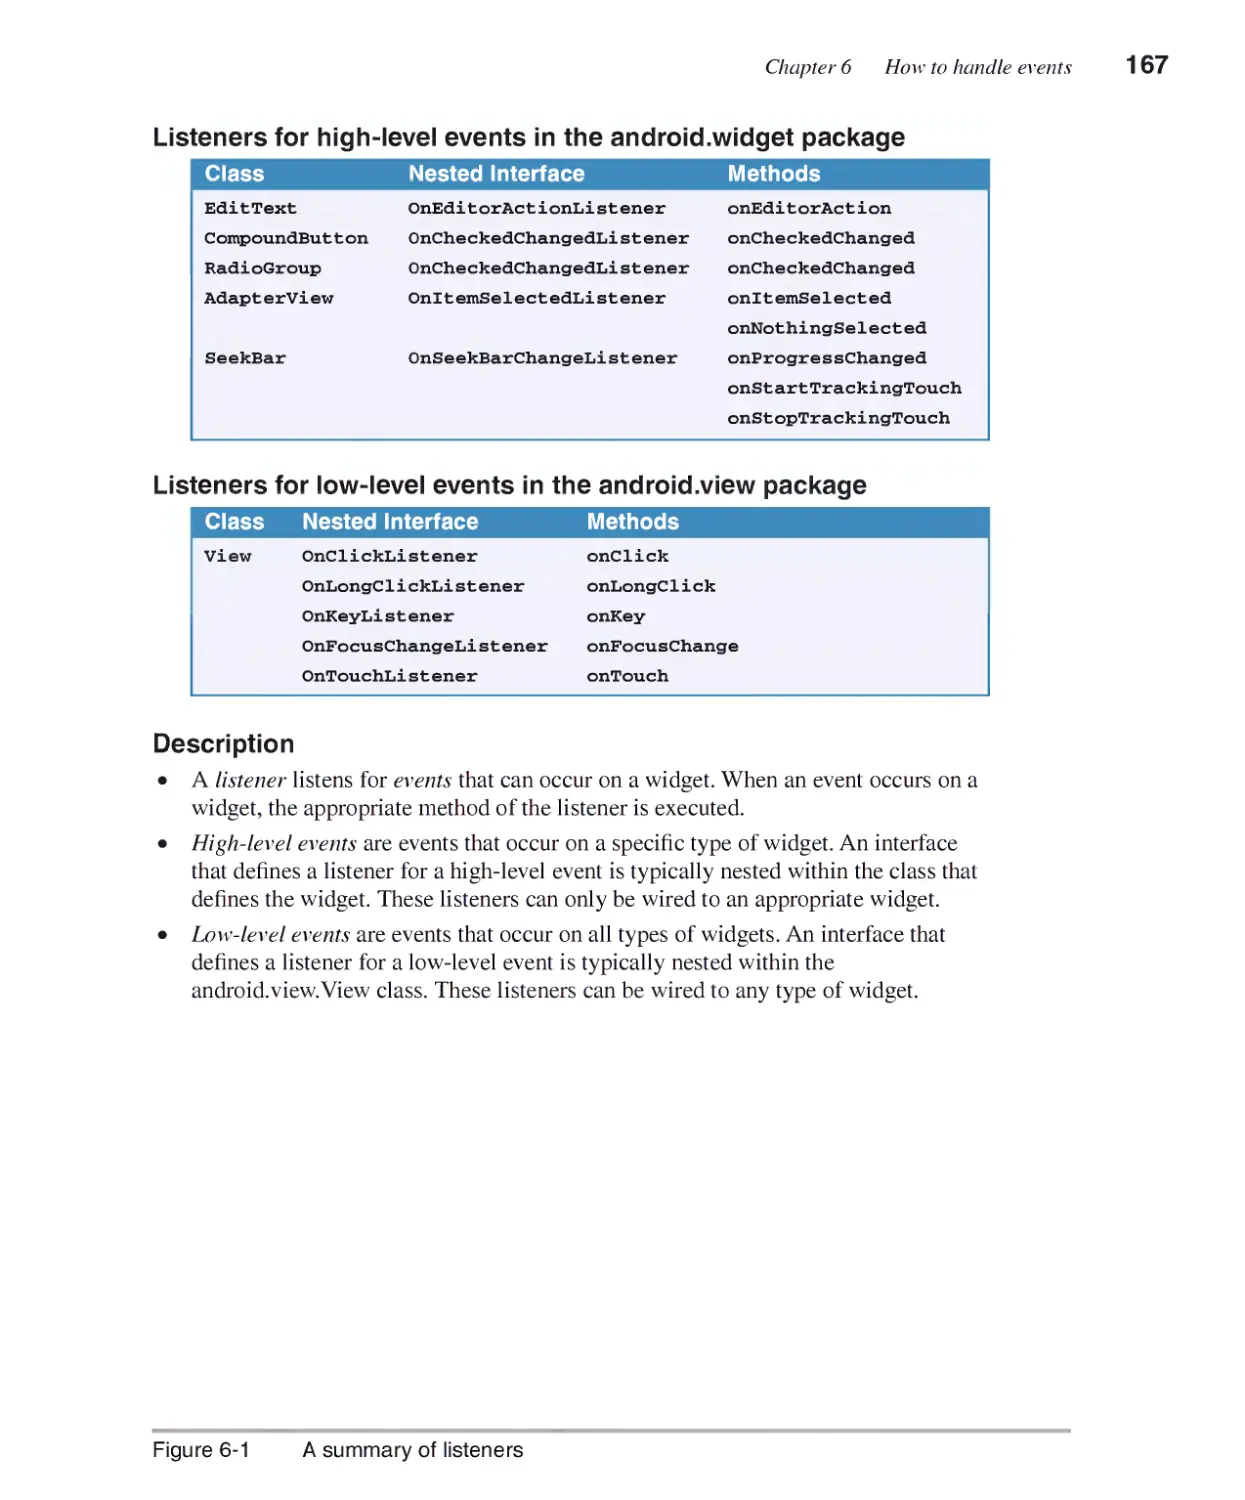
A summary of listeners ..................................................................166
High-level events 166
Low-level events 166
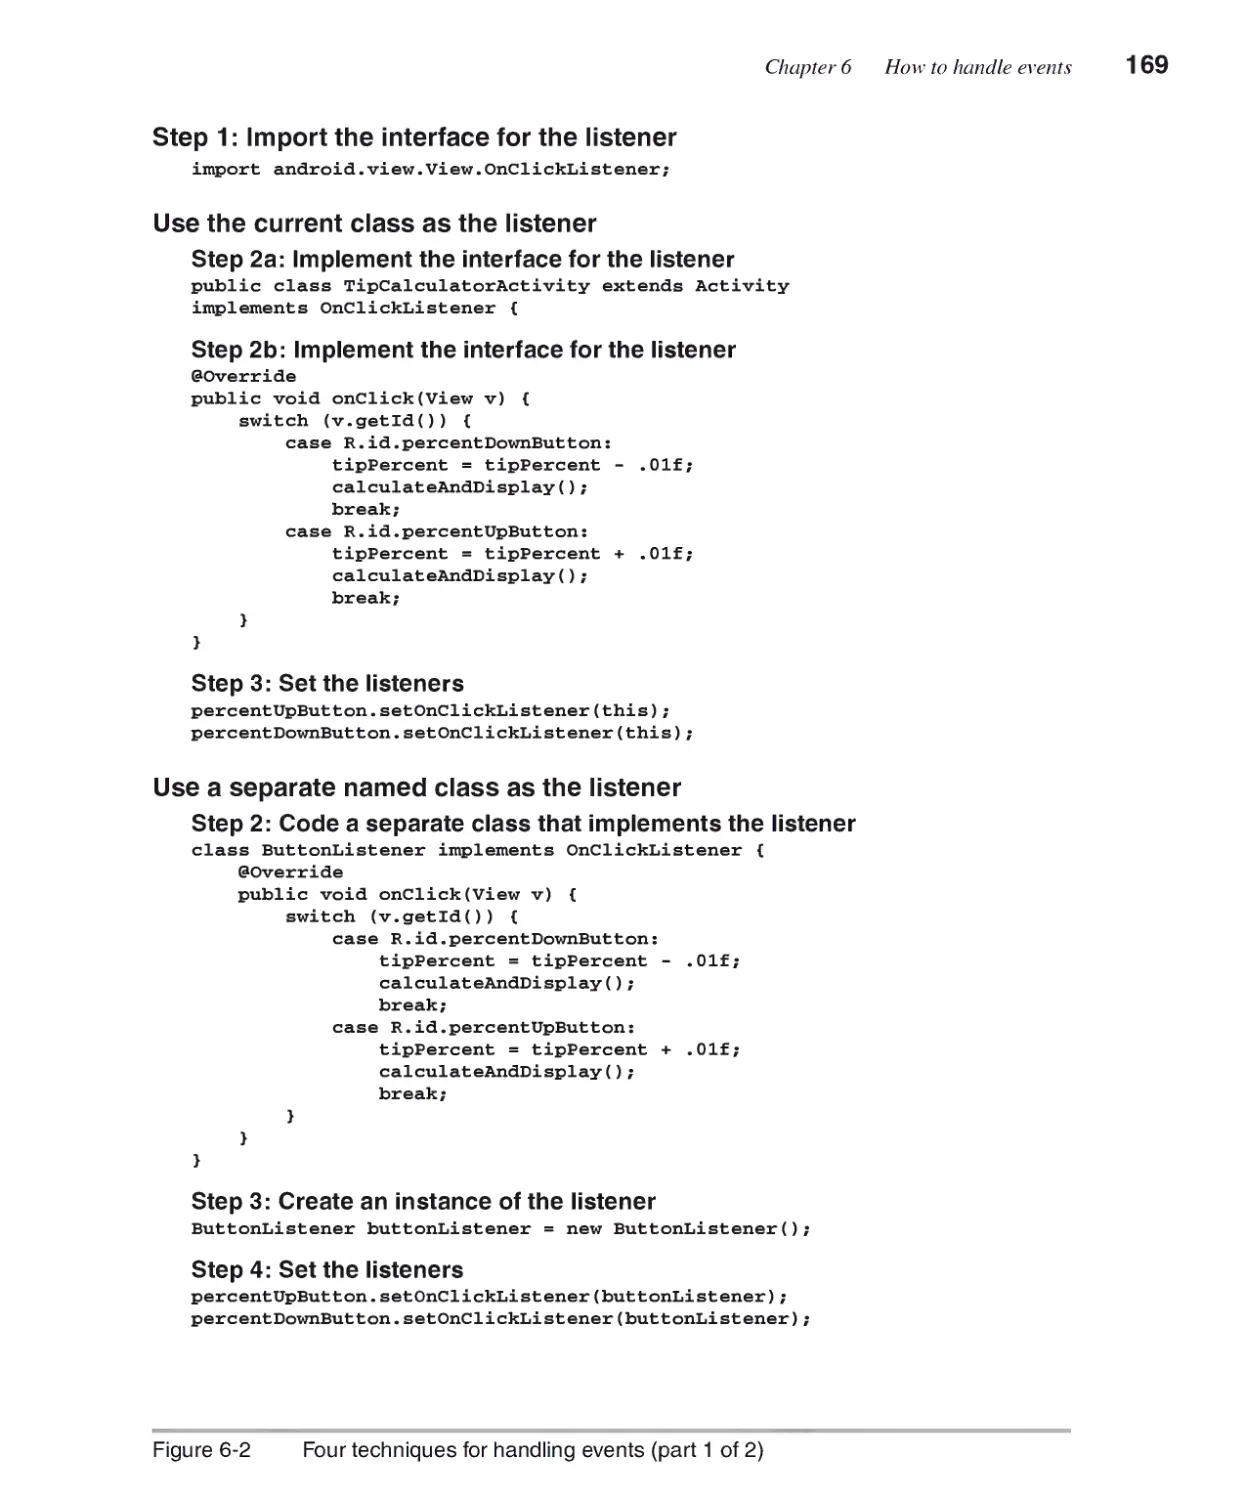
Four techniques for handling events............................................ 168
How to use the current class as the listener 168
How to use a named class as the listener 168
How to use an anonymous class as the listener 170
Expanded contents IX
How to use an anonymous inner class as the listener 170
When to use each technique 170
How to handle high-level events................................................... 172
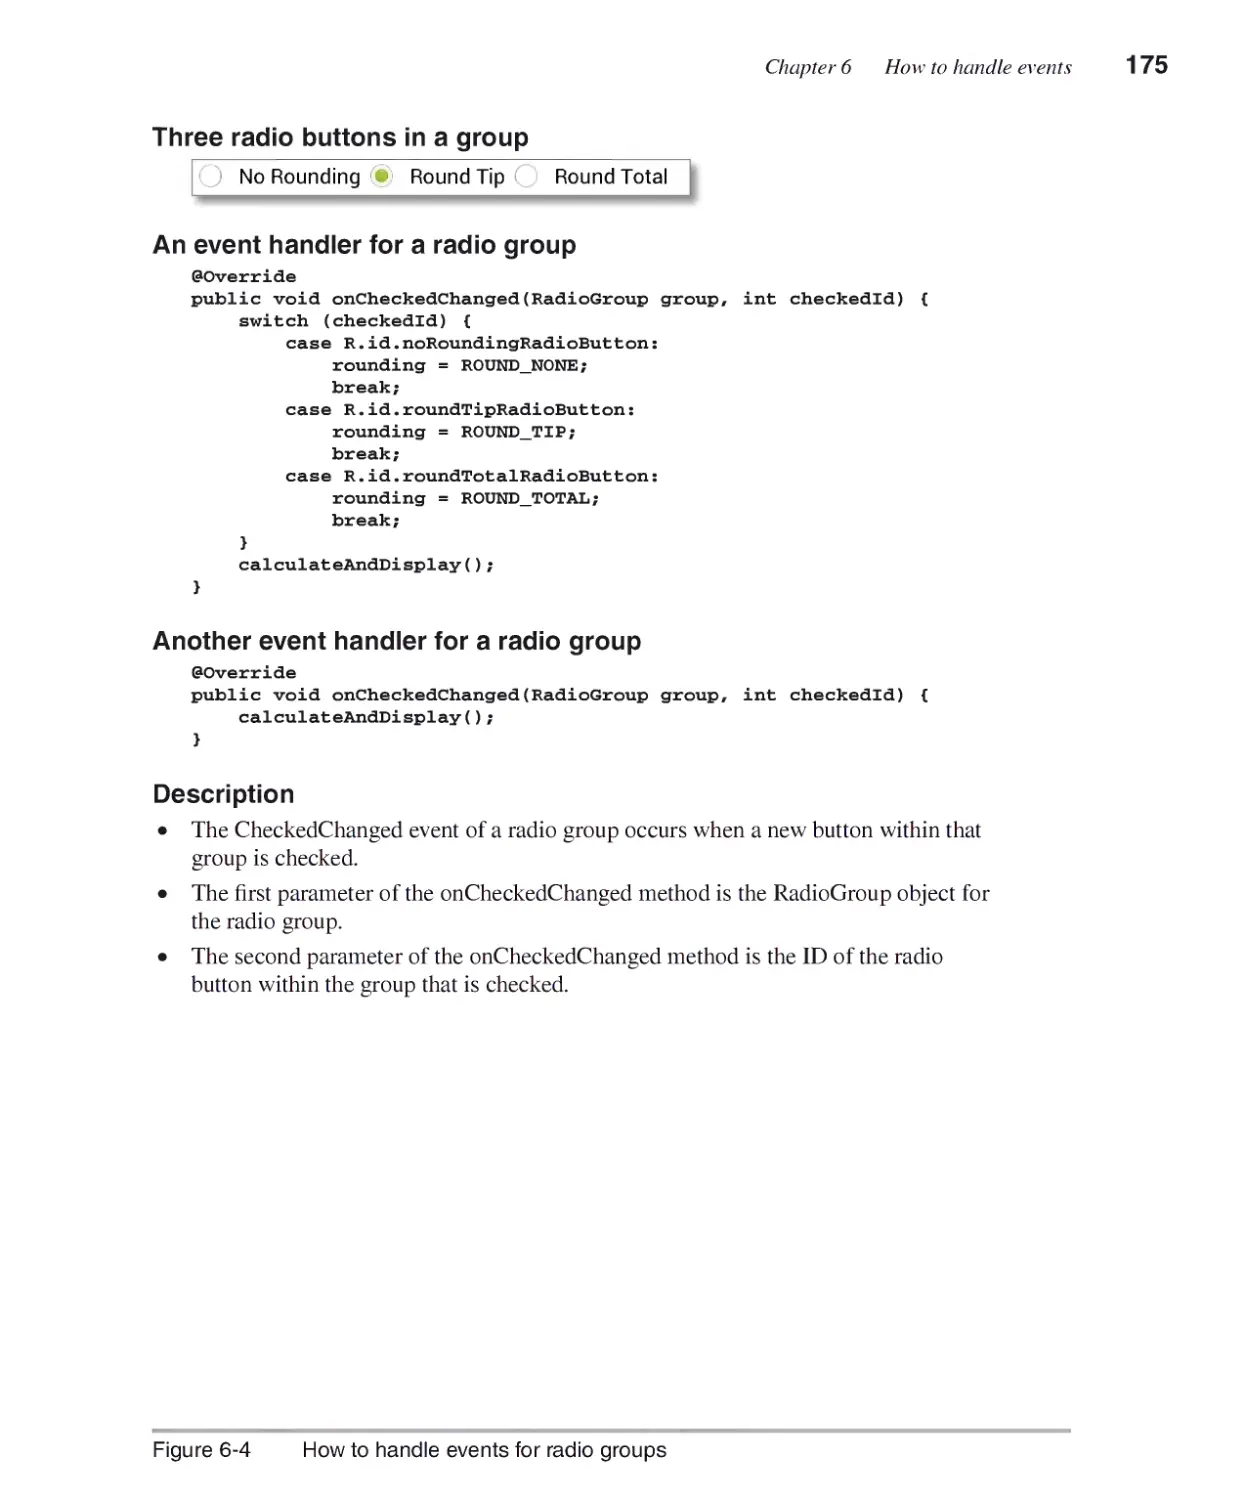
How to handle events for check boxes and radio buttons 172
How to handle events for radio groups 174
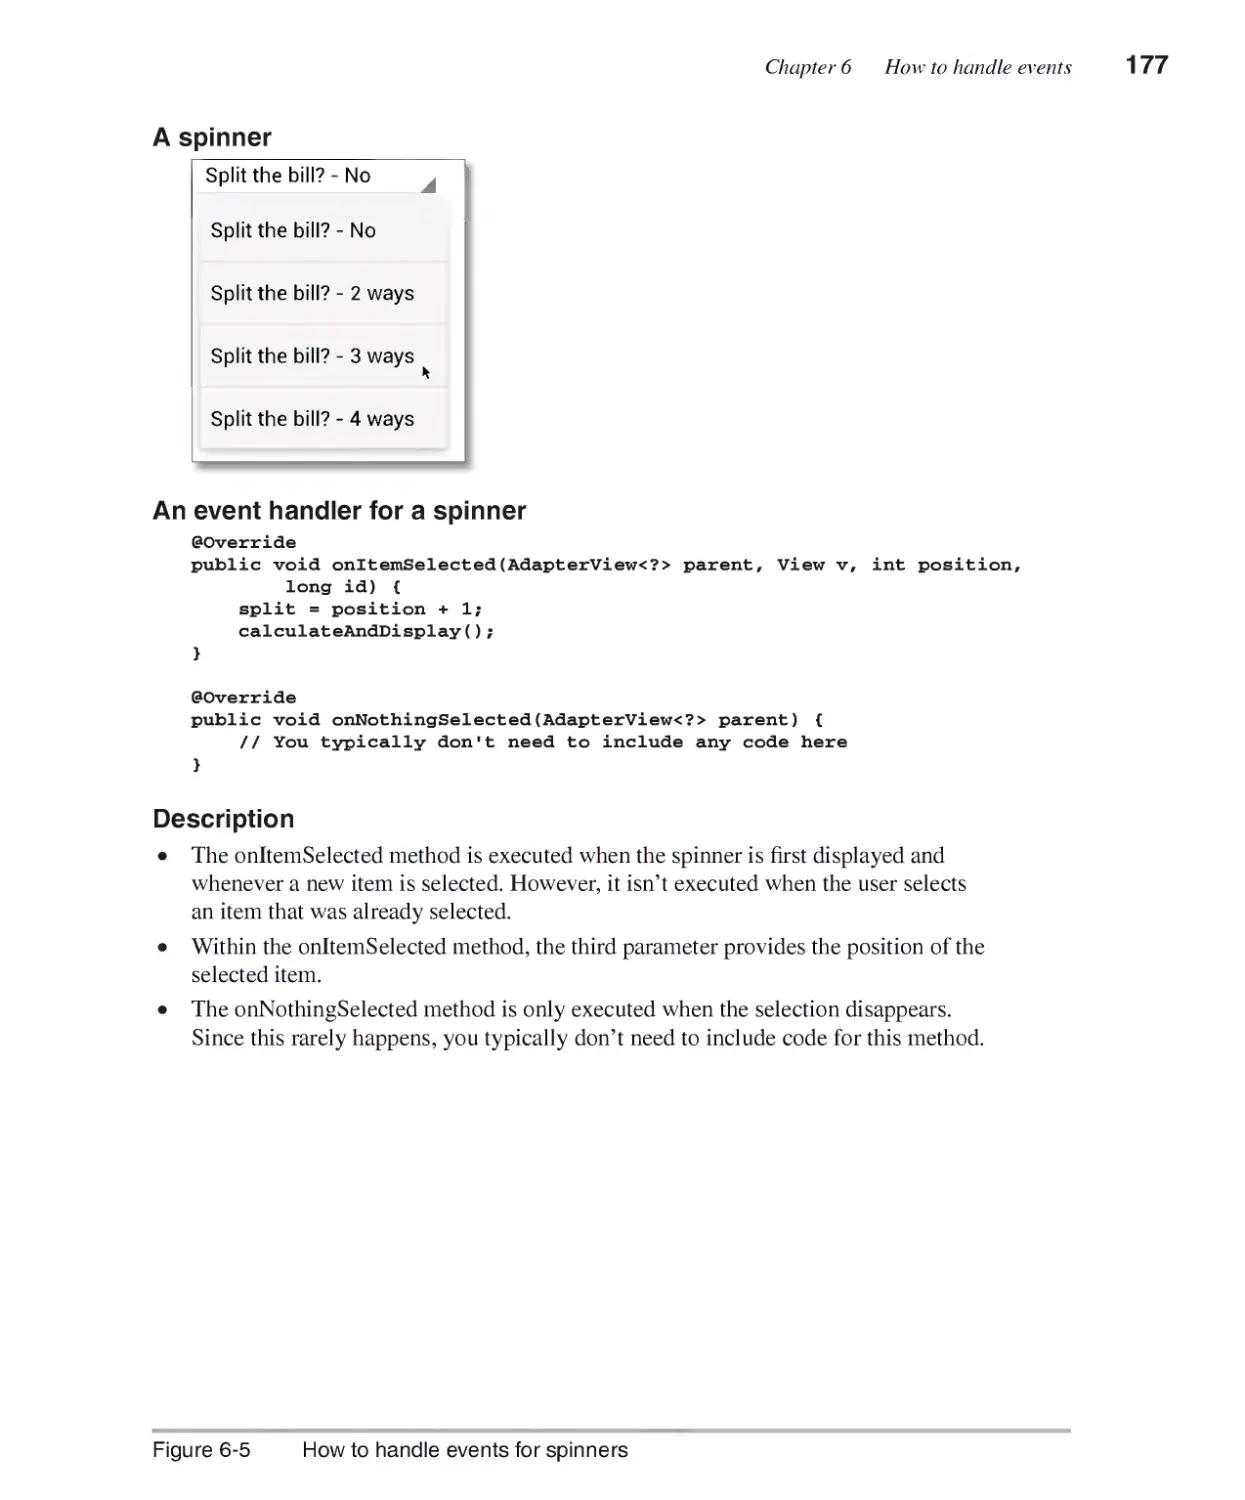
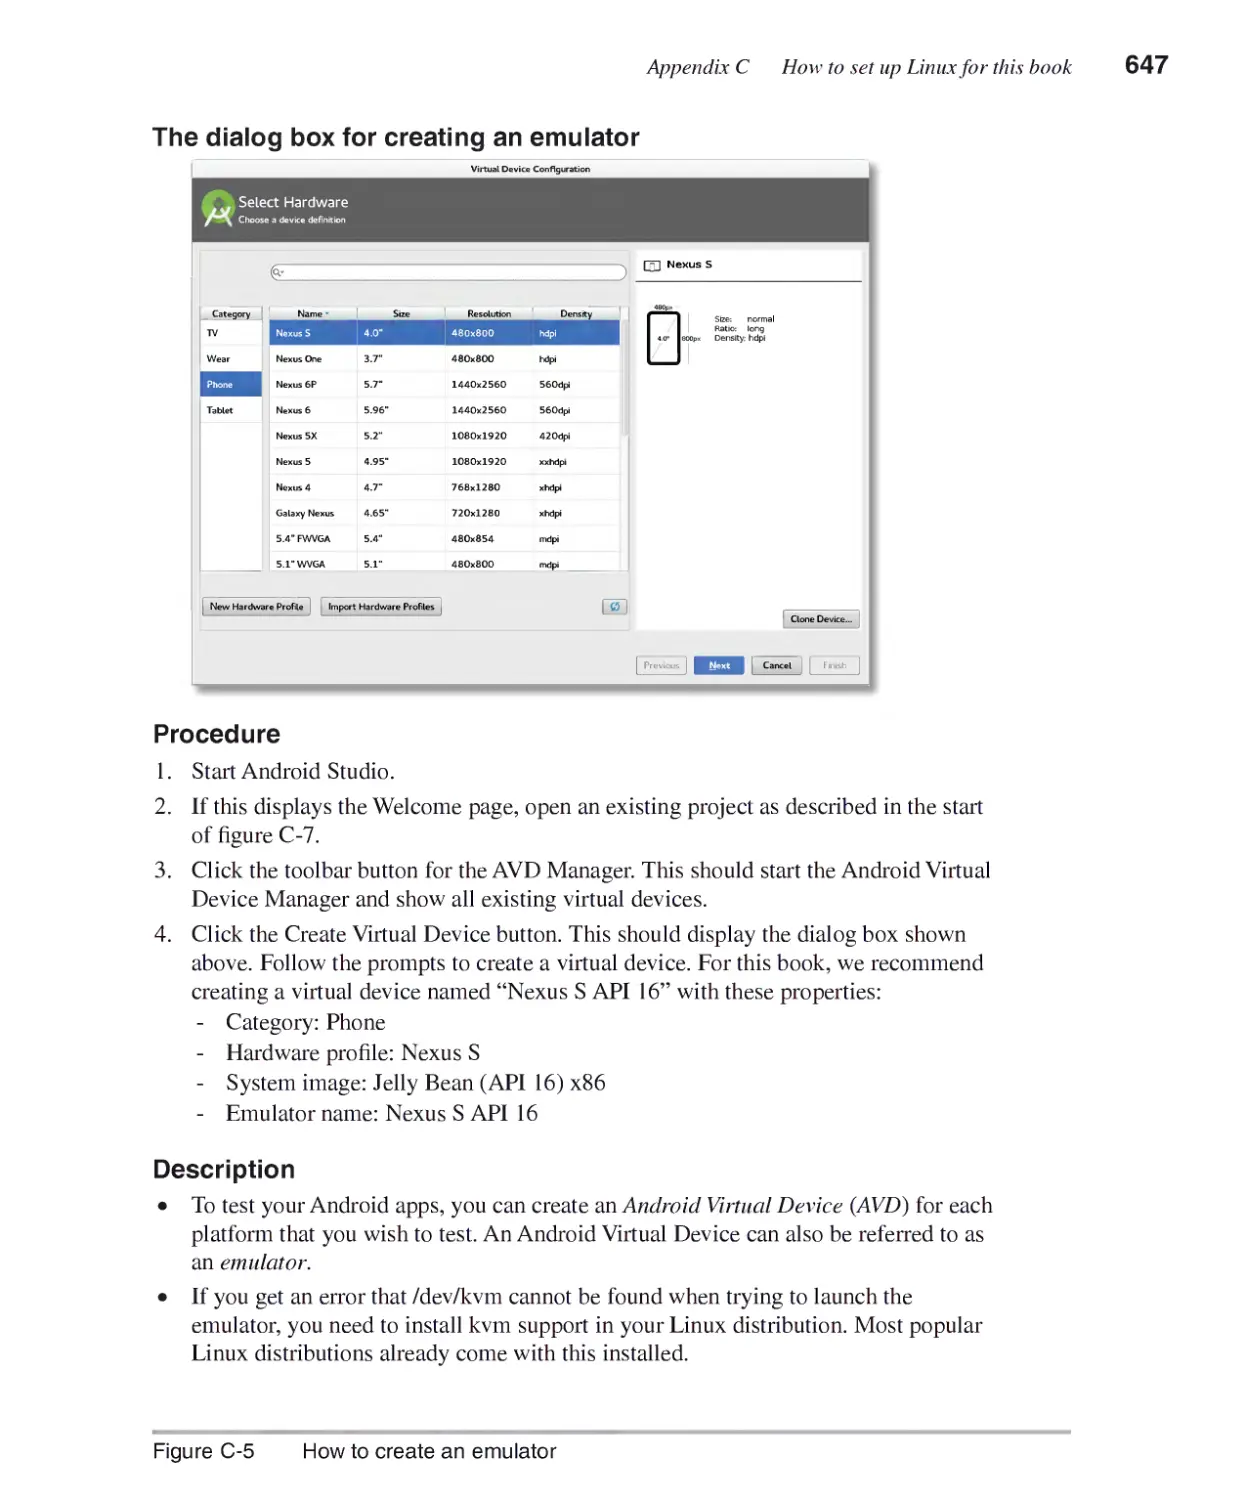
How to handle events for spinners 176
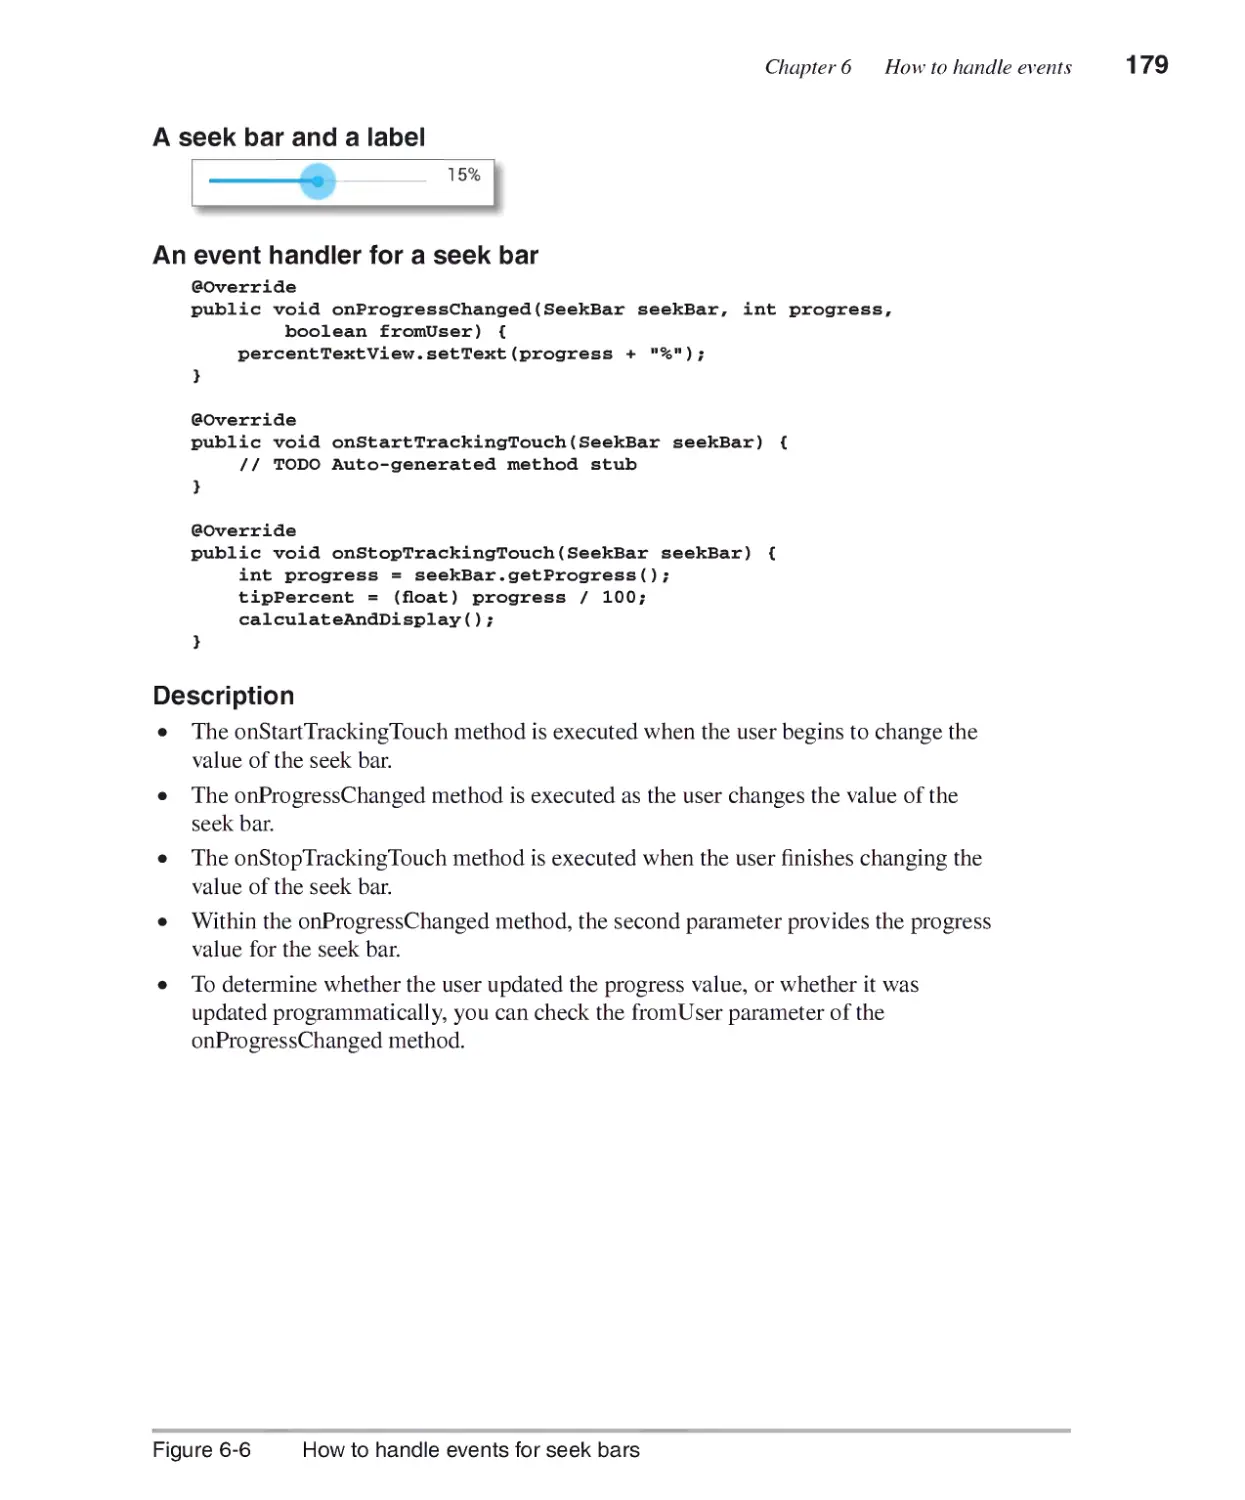
How to handle events for seek bars 178
How to handle low-level events..................................................... 180
How to handle Key events 180
How to handle Touch events 182
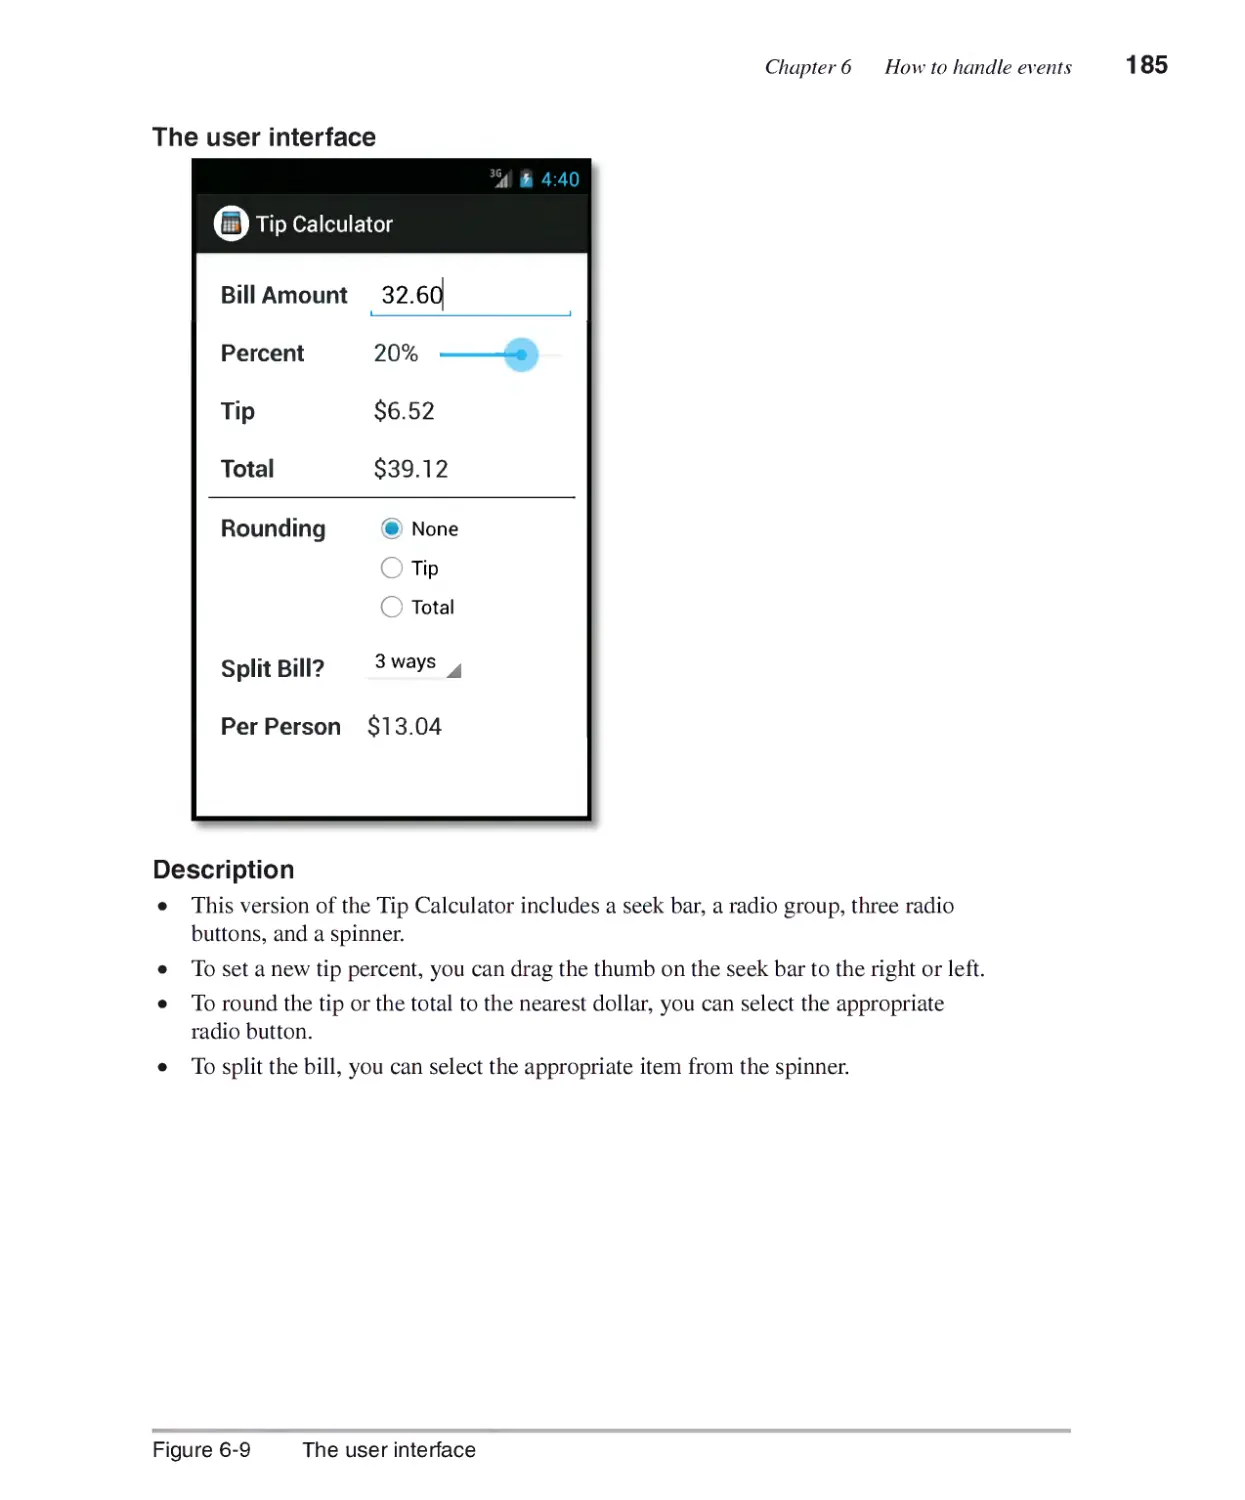
The Tip Calculator app................................................................... 184
The user interface 184
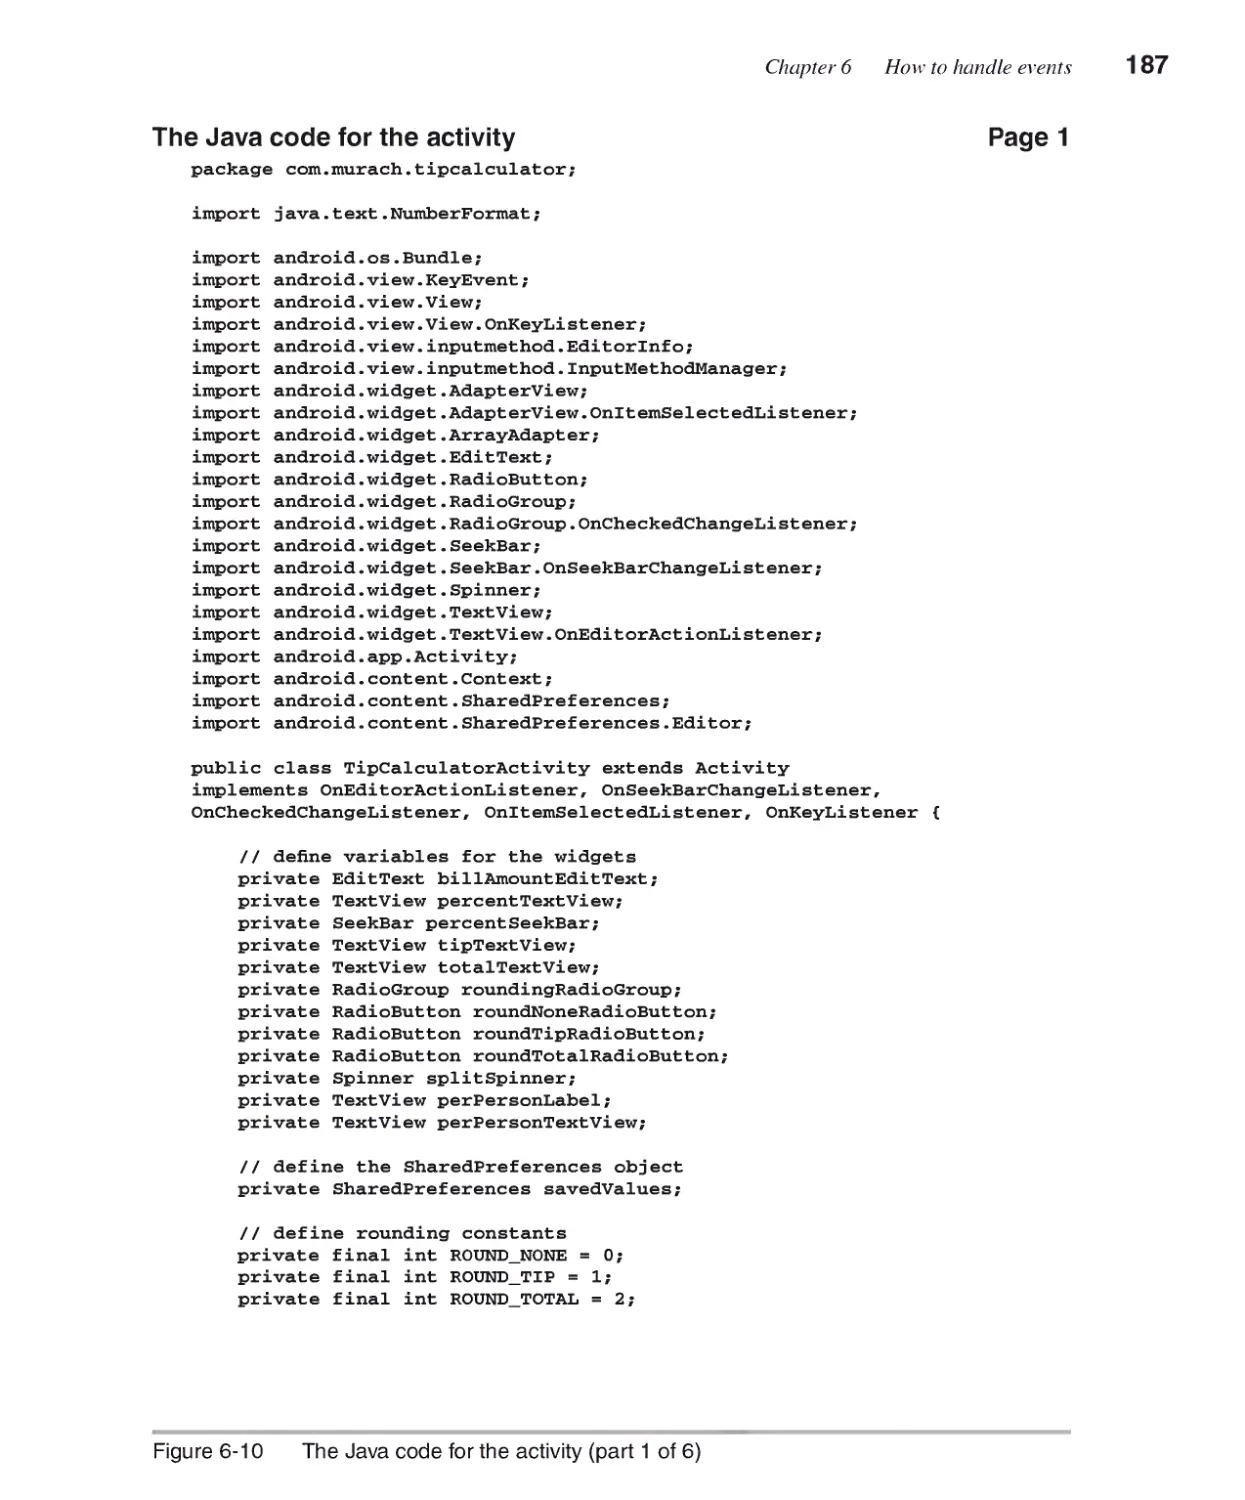
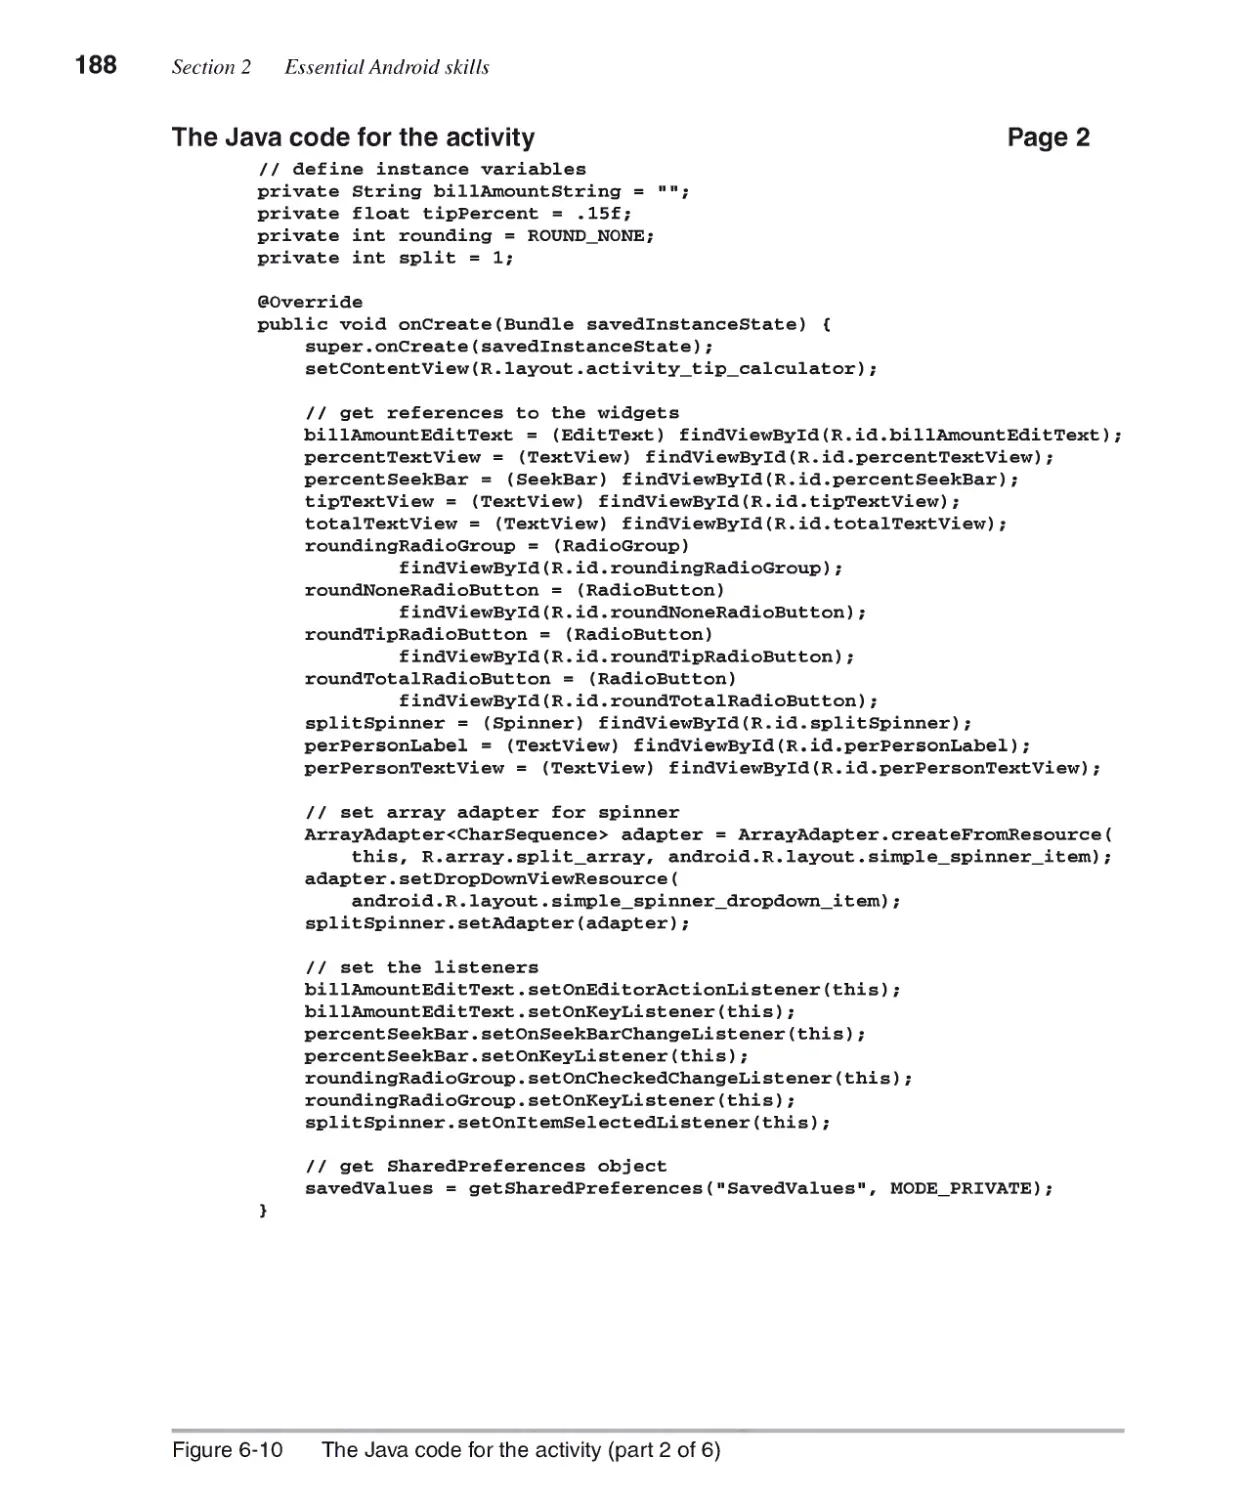
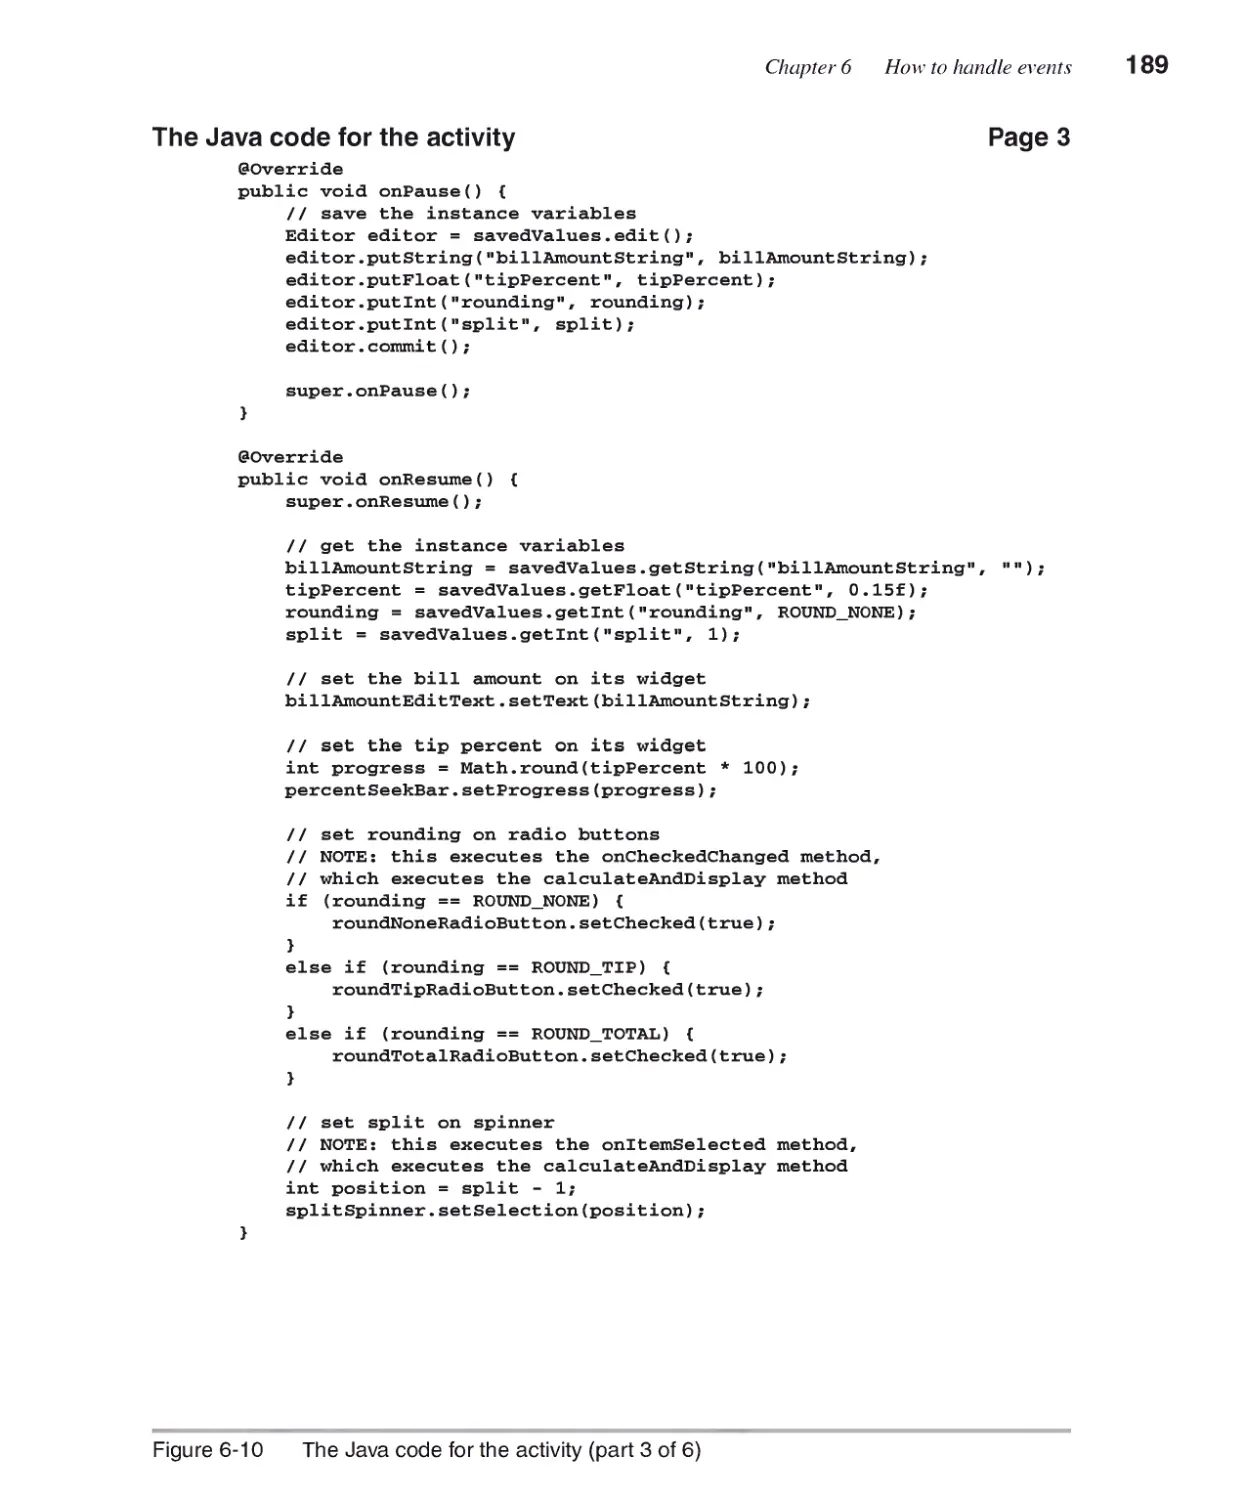
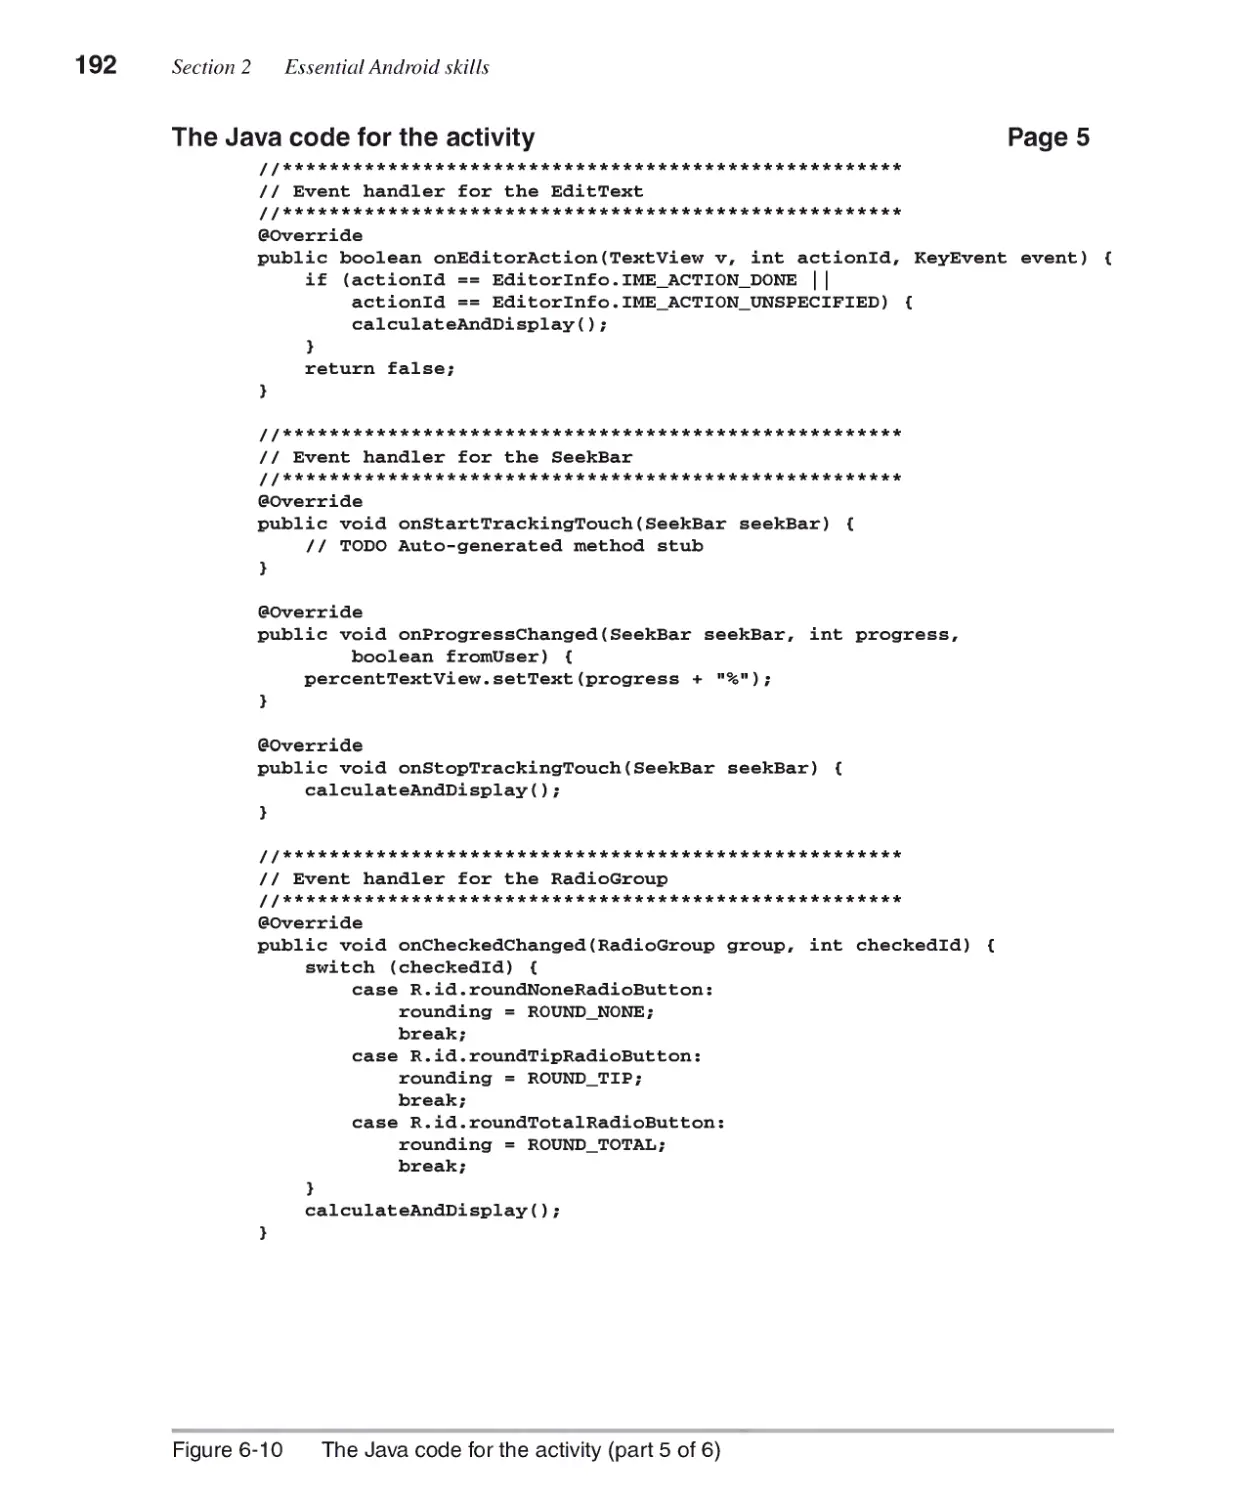
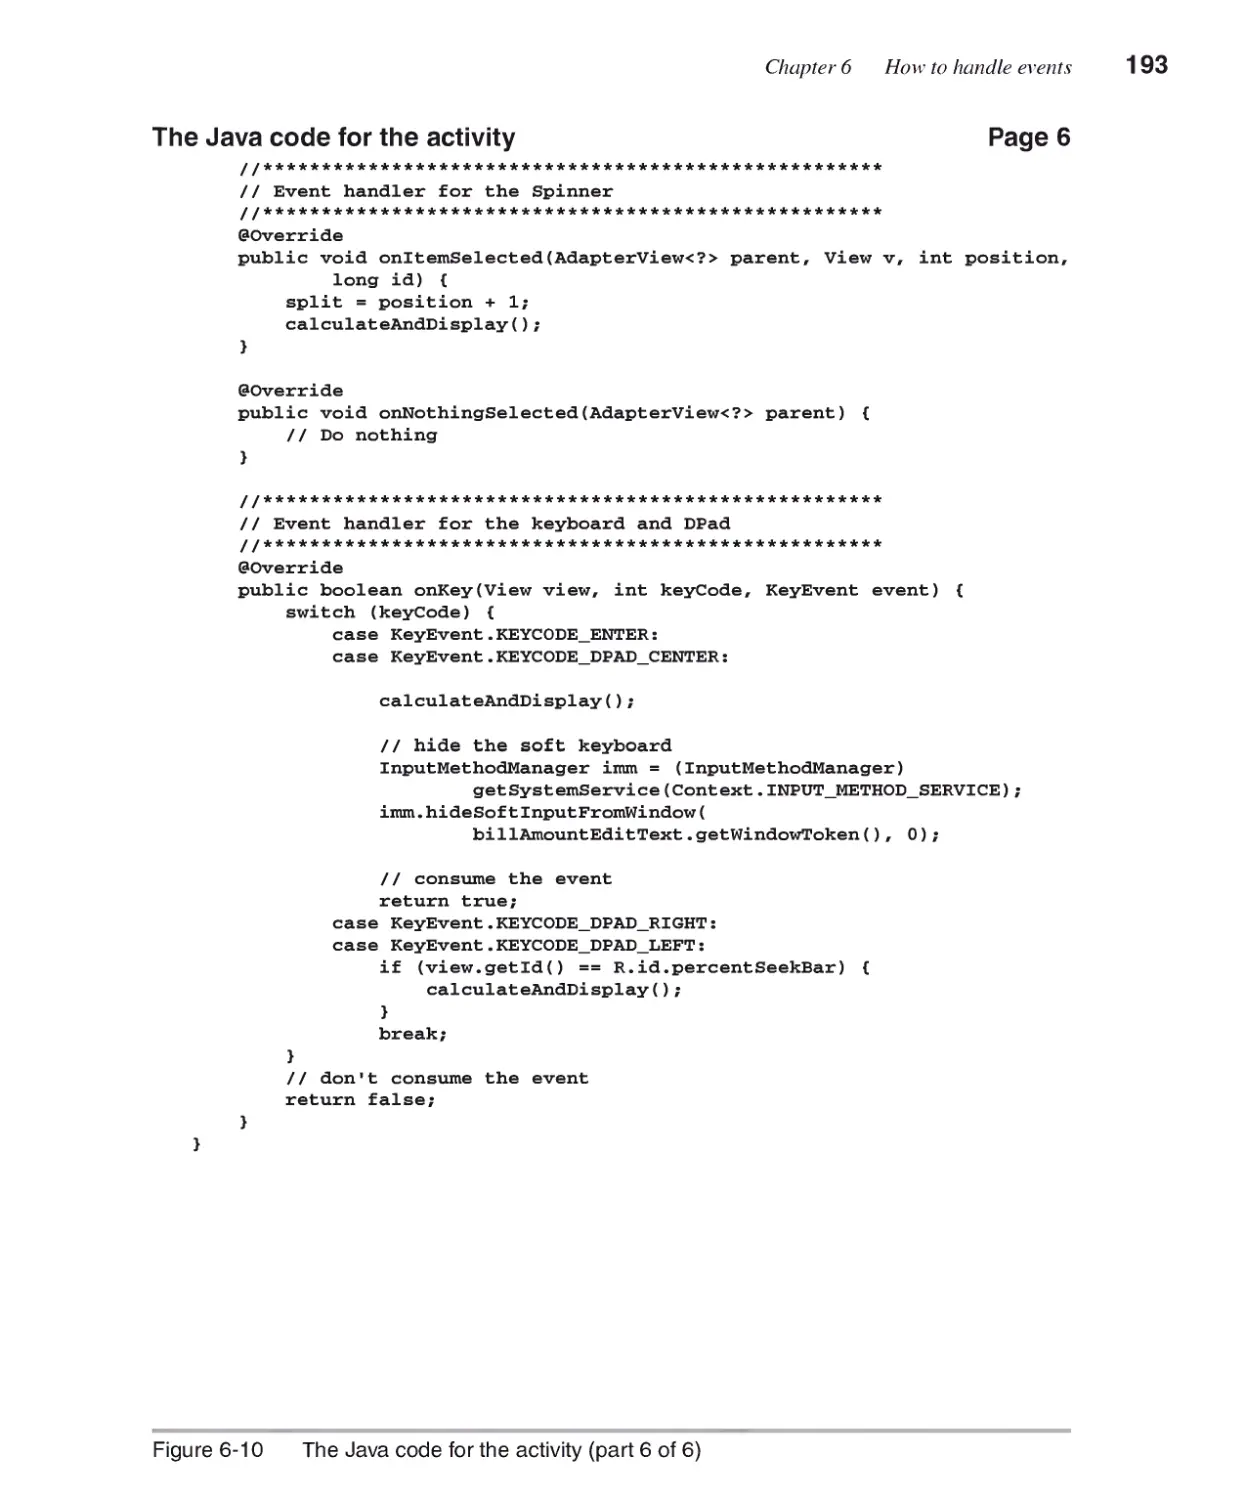
The Java code for the activity 186
Chapter 7 How to work with themes and styles
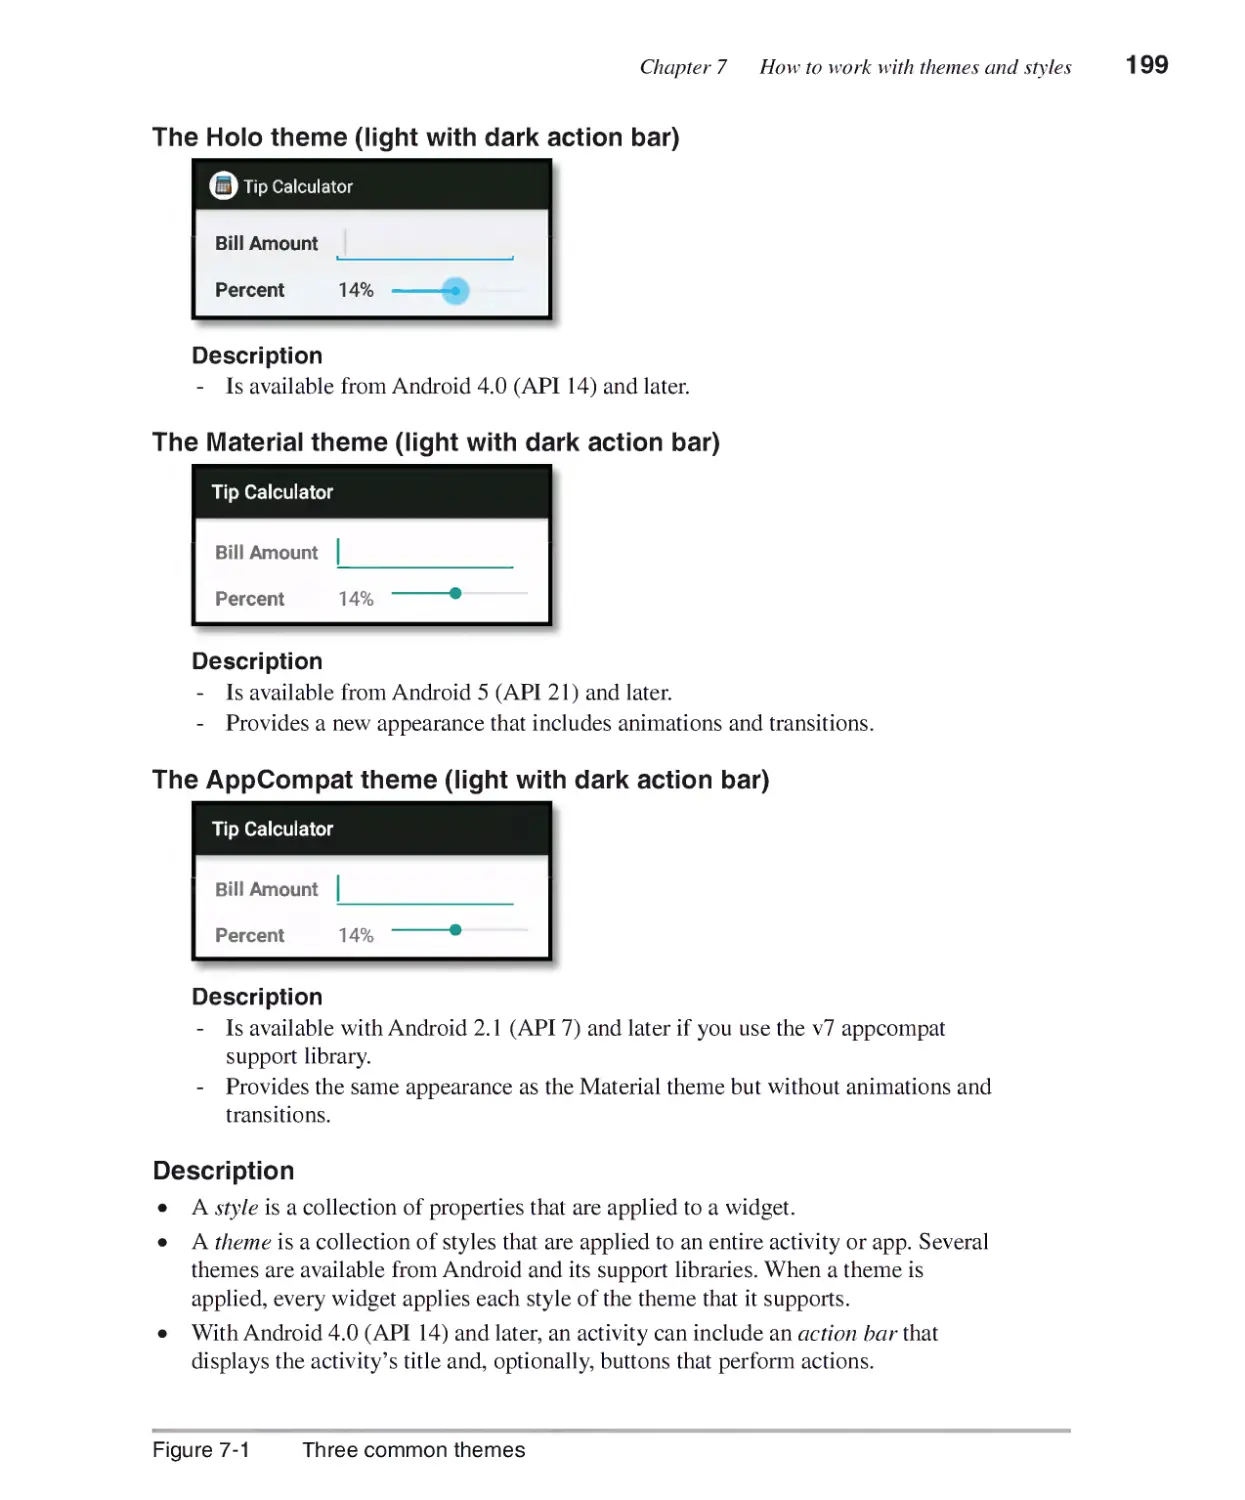
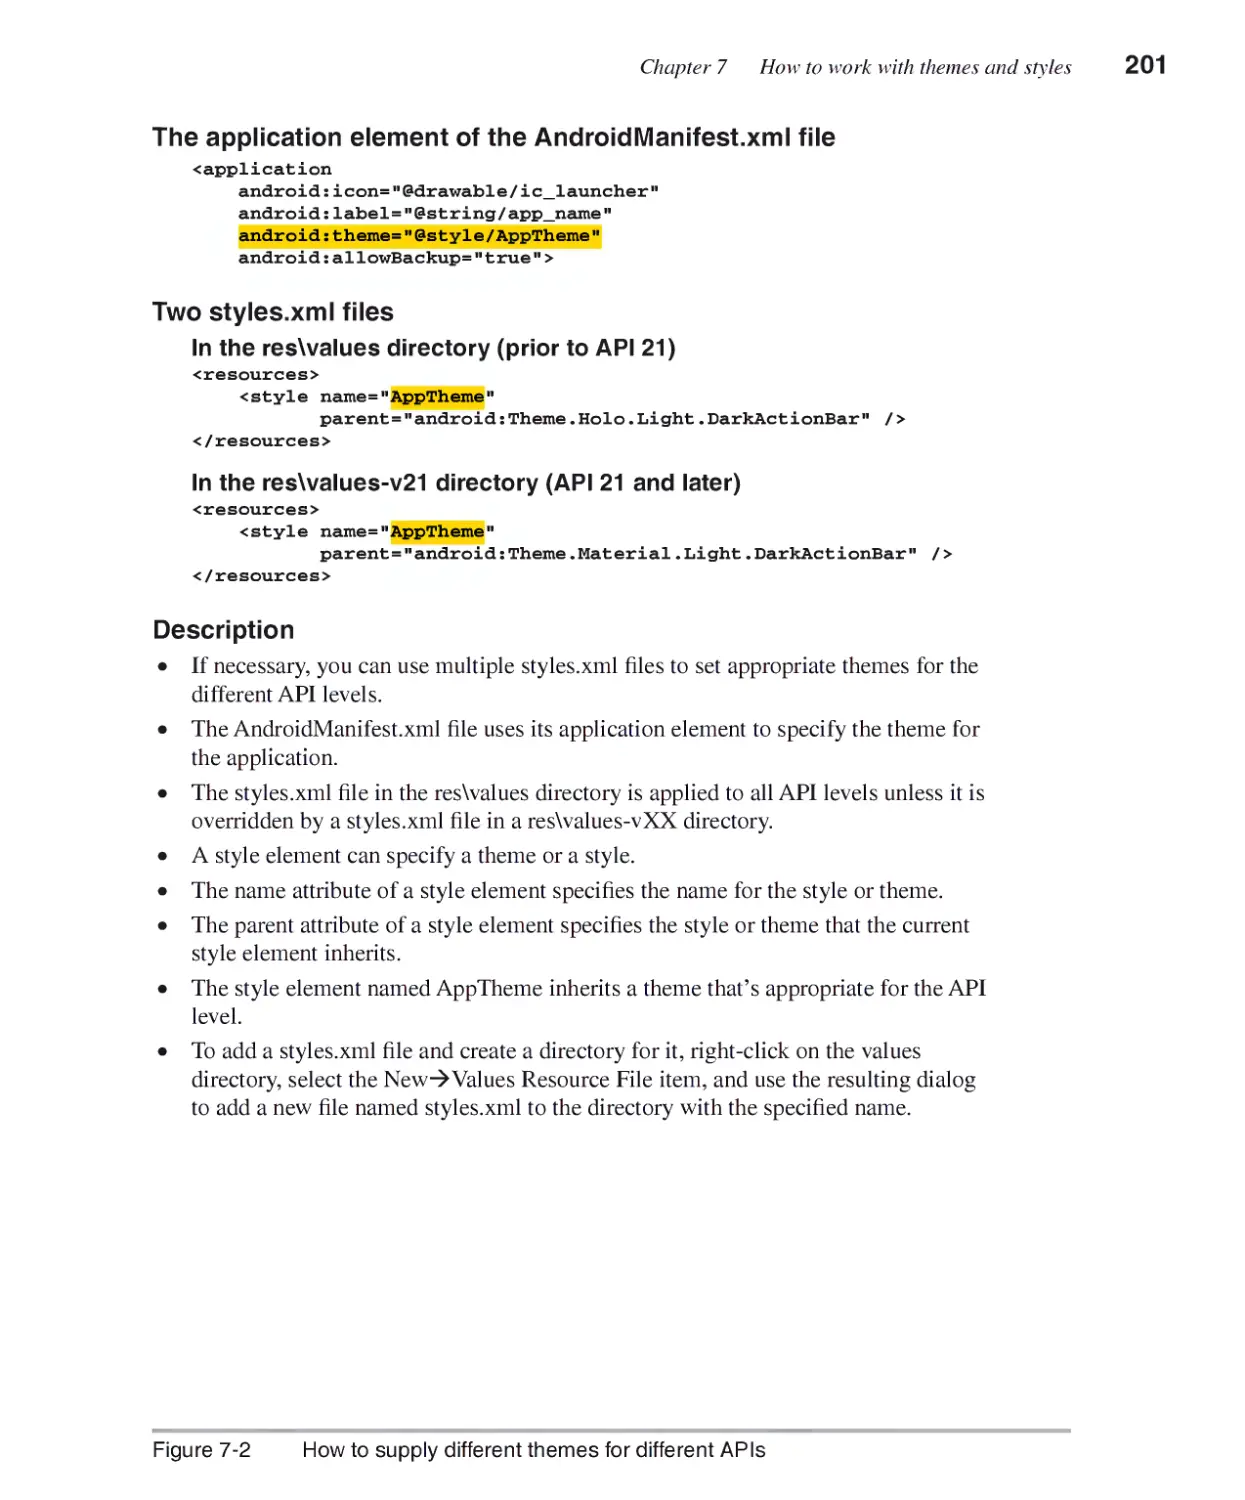
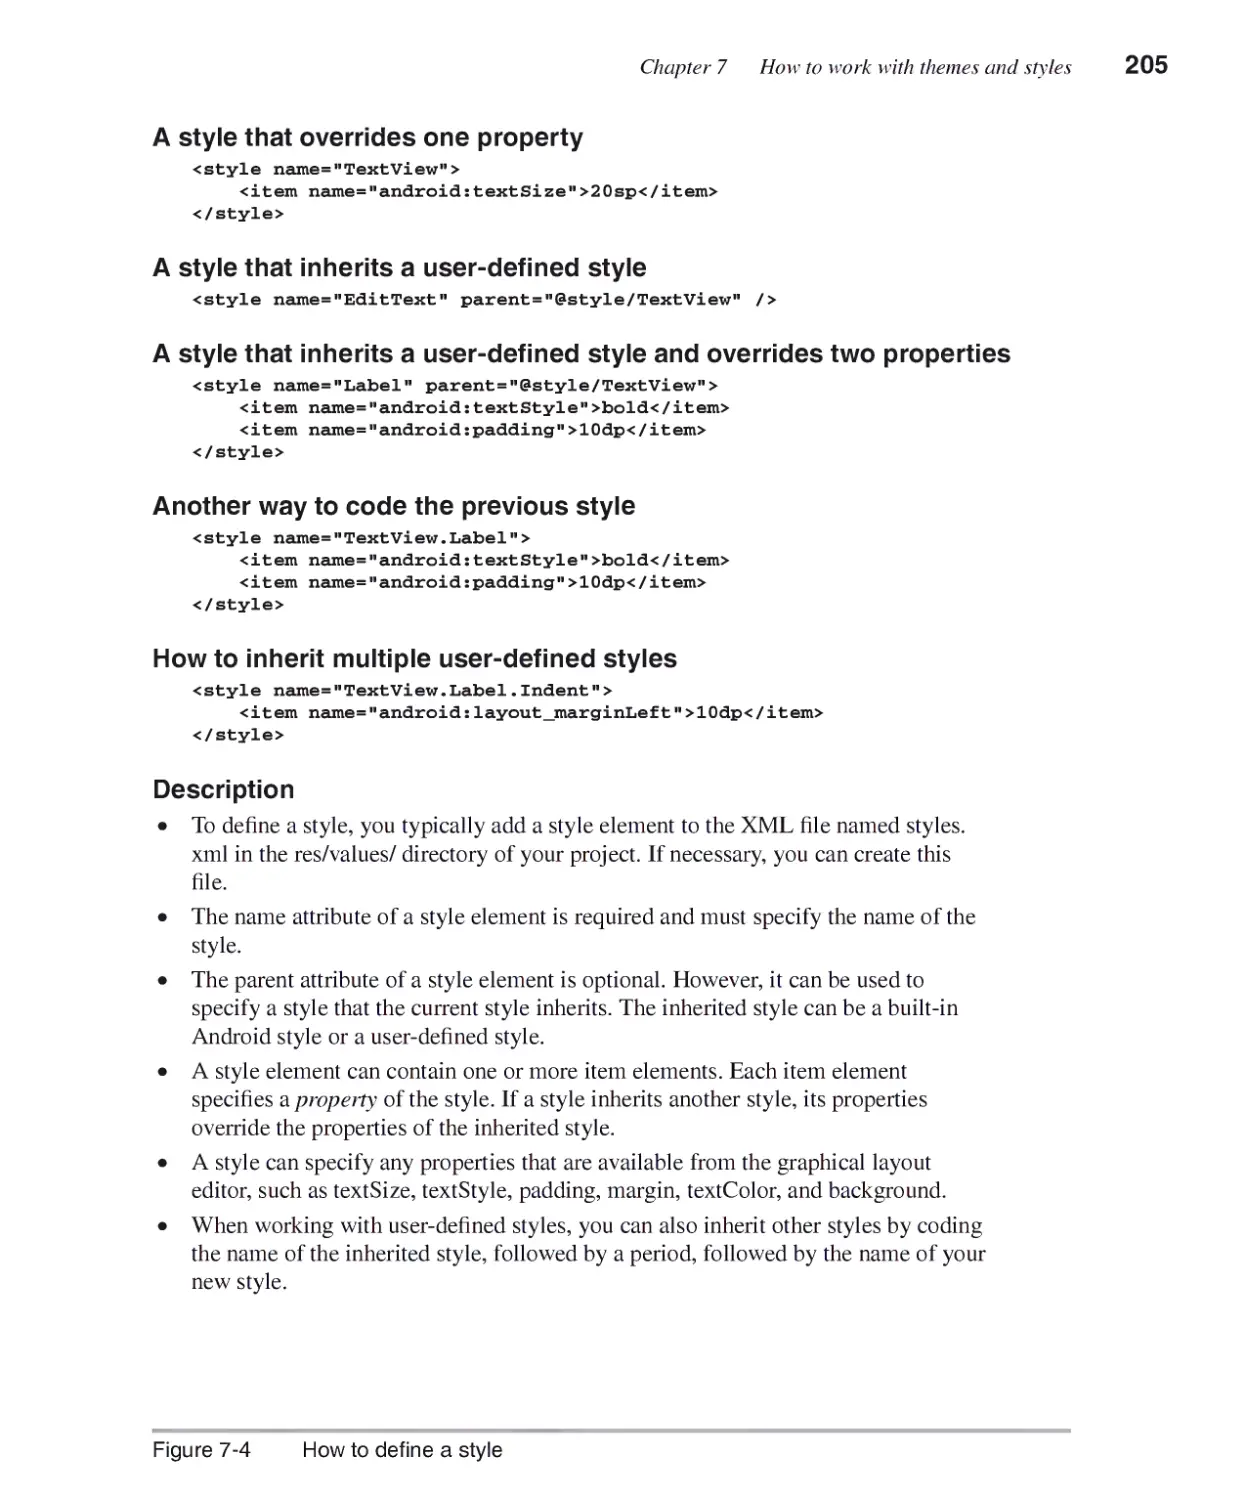
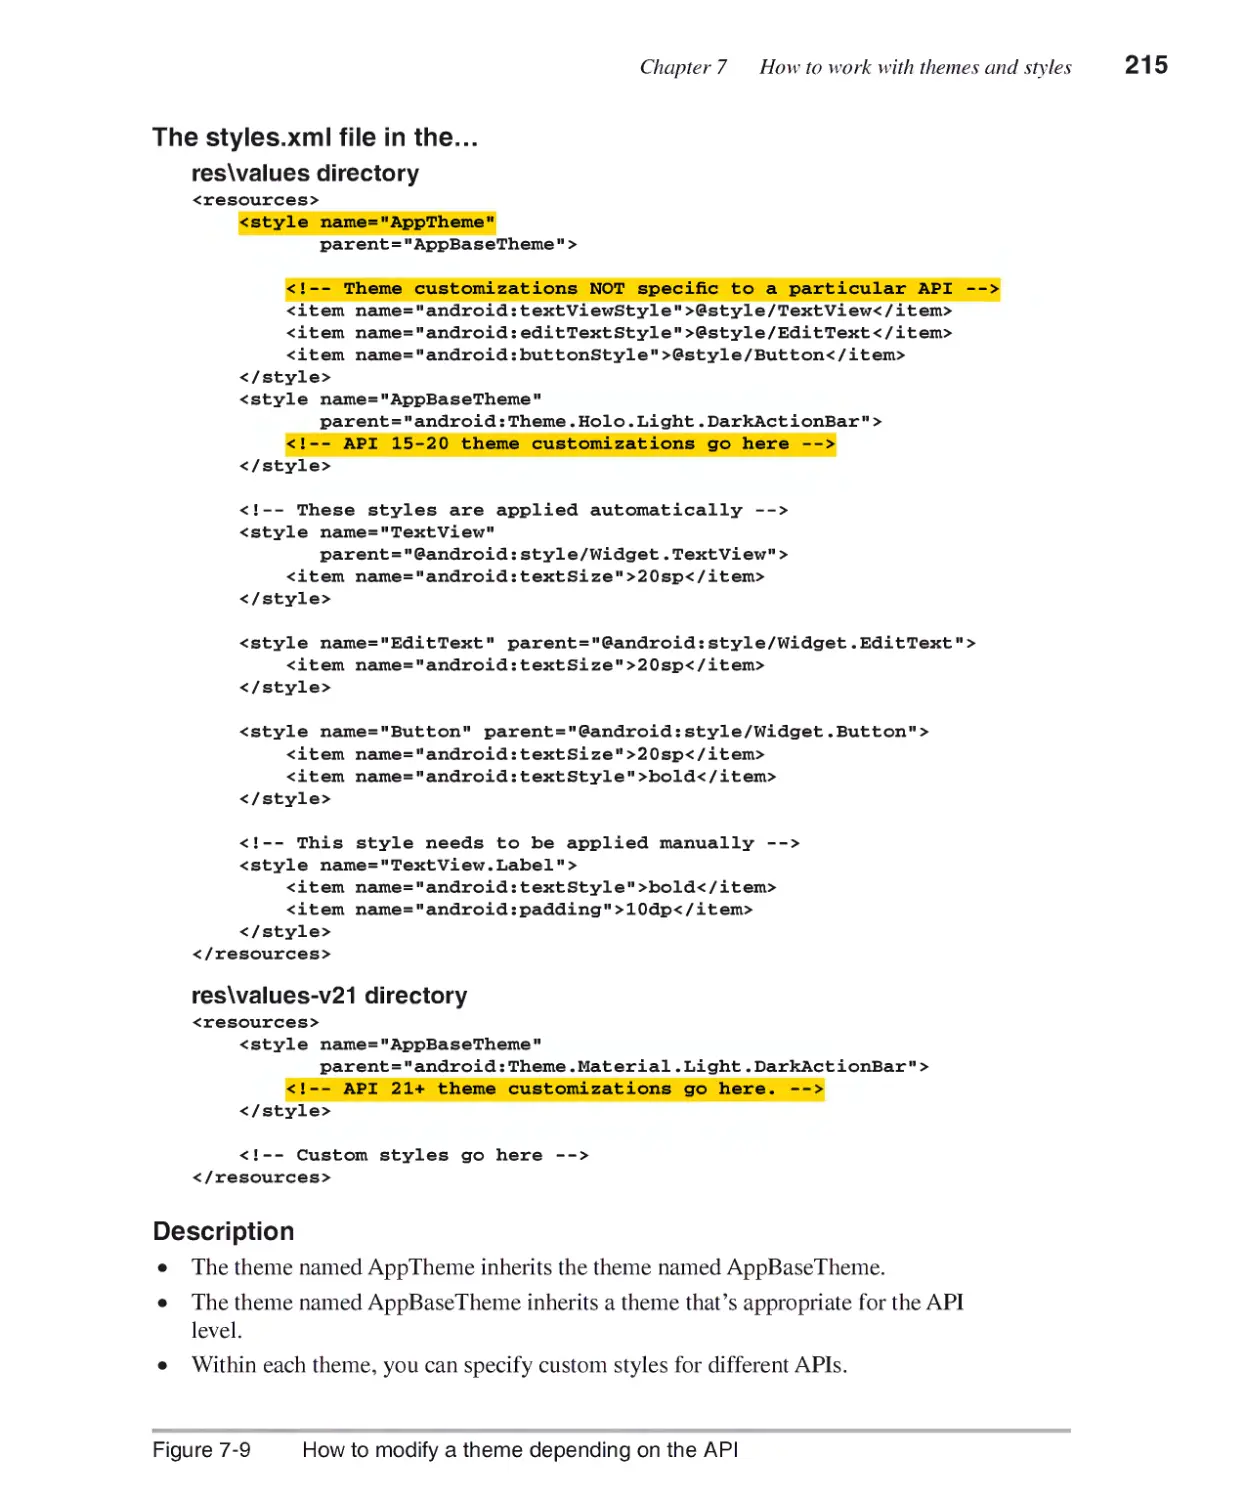
An introduction to themes and styles.......................................... 198
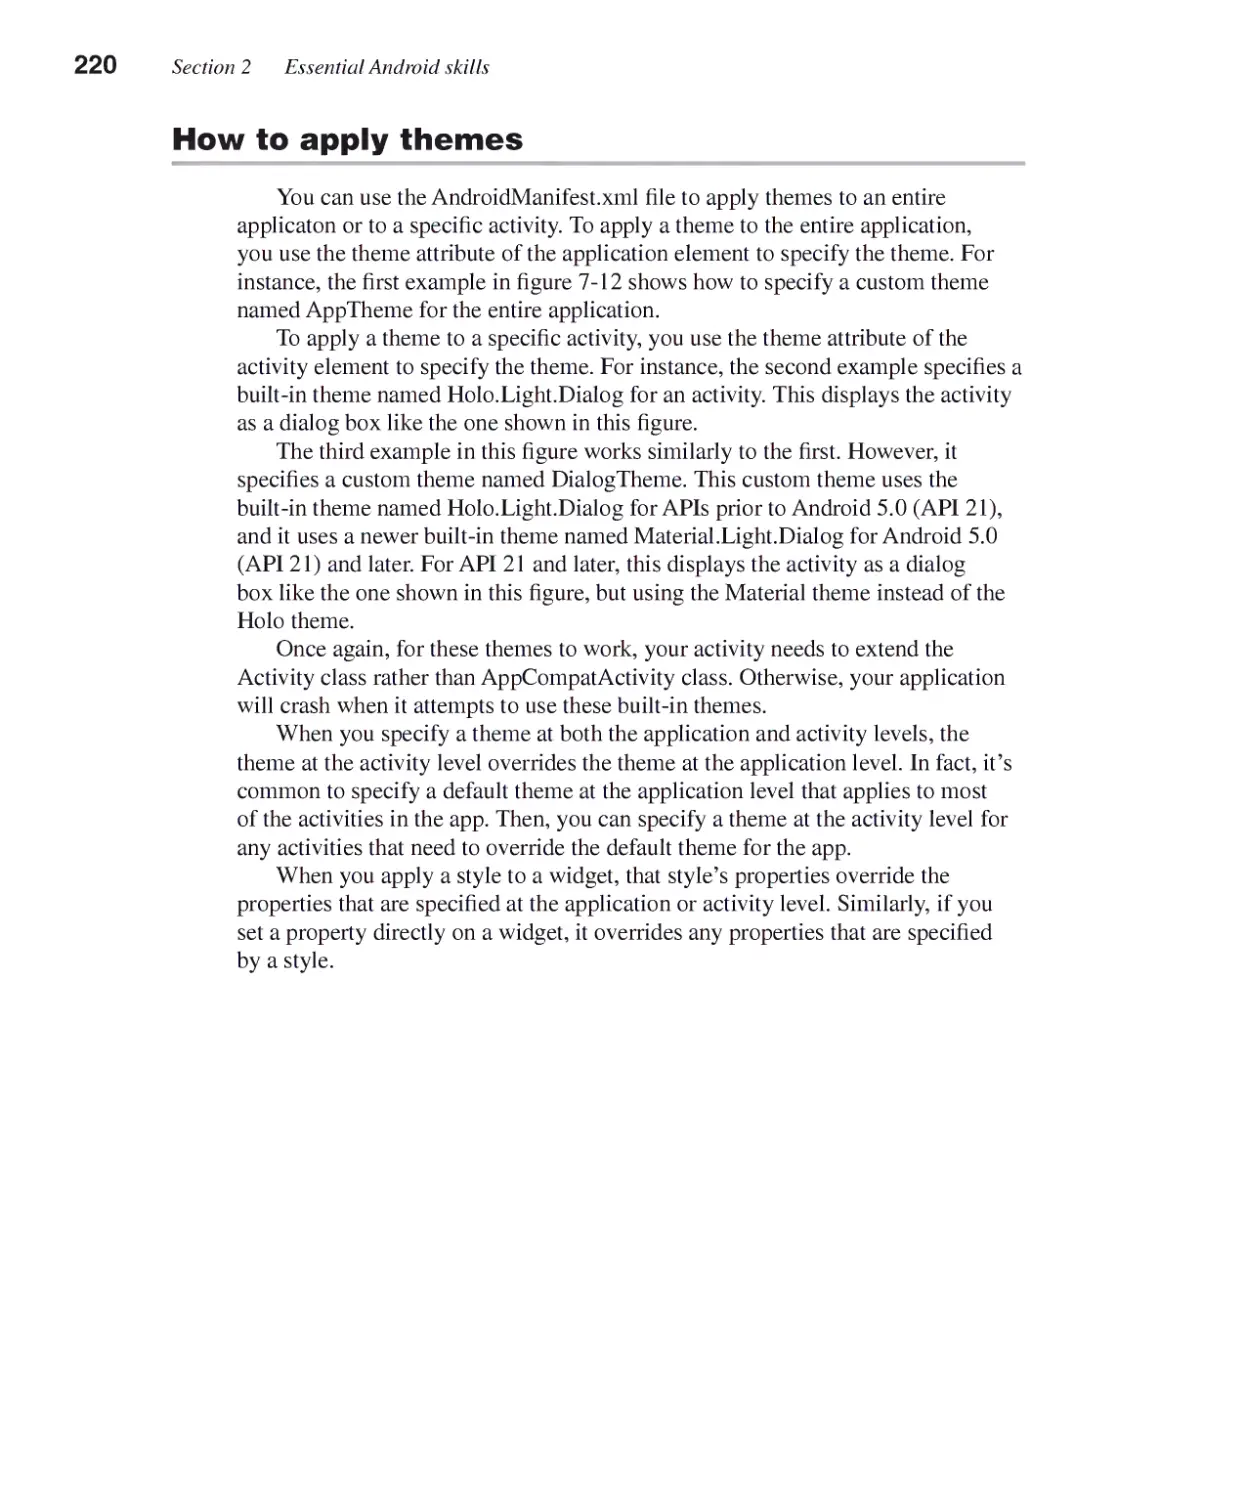
Three common themes 198
How to supply different themes for different APIs 200
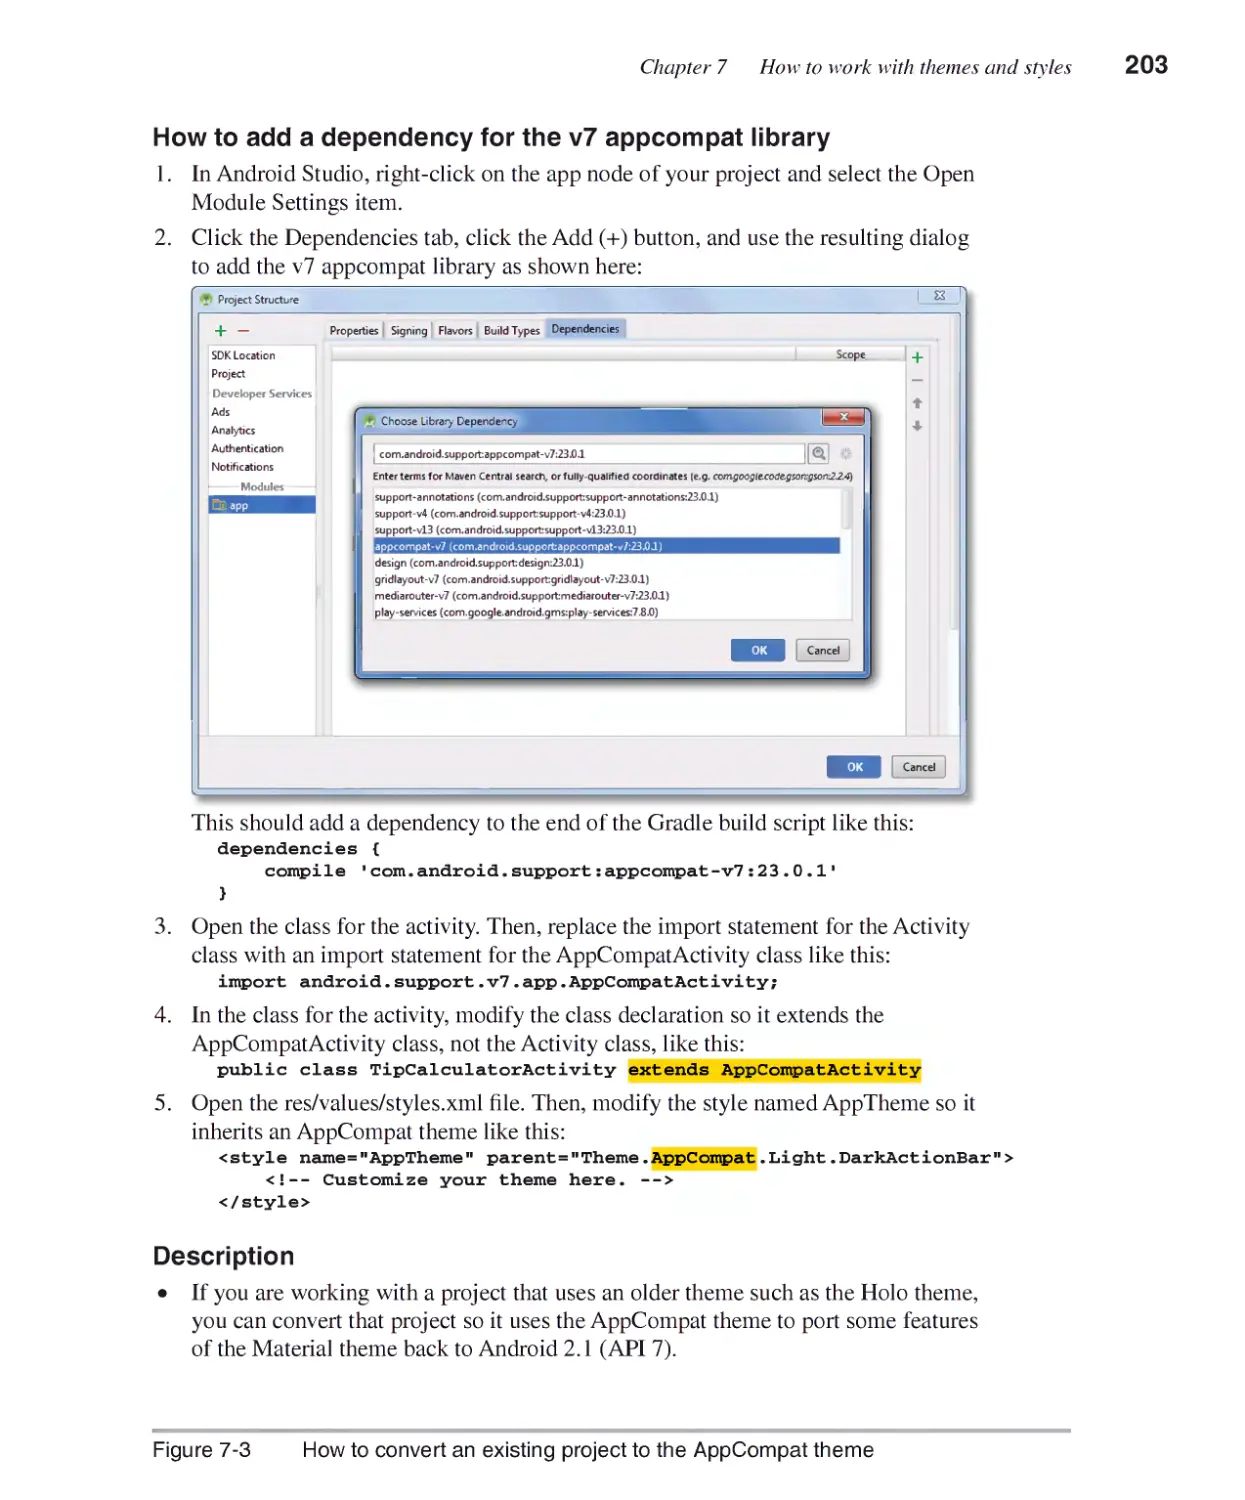
How to convert an existing project to the AppCompat theme 202
How to work with styles .................................................................204
How to define a style 204
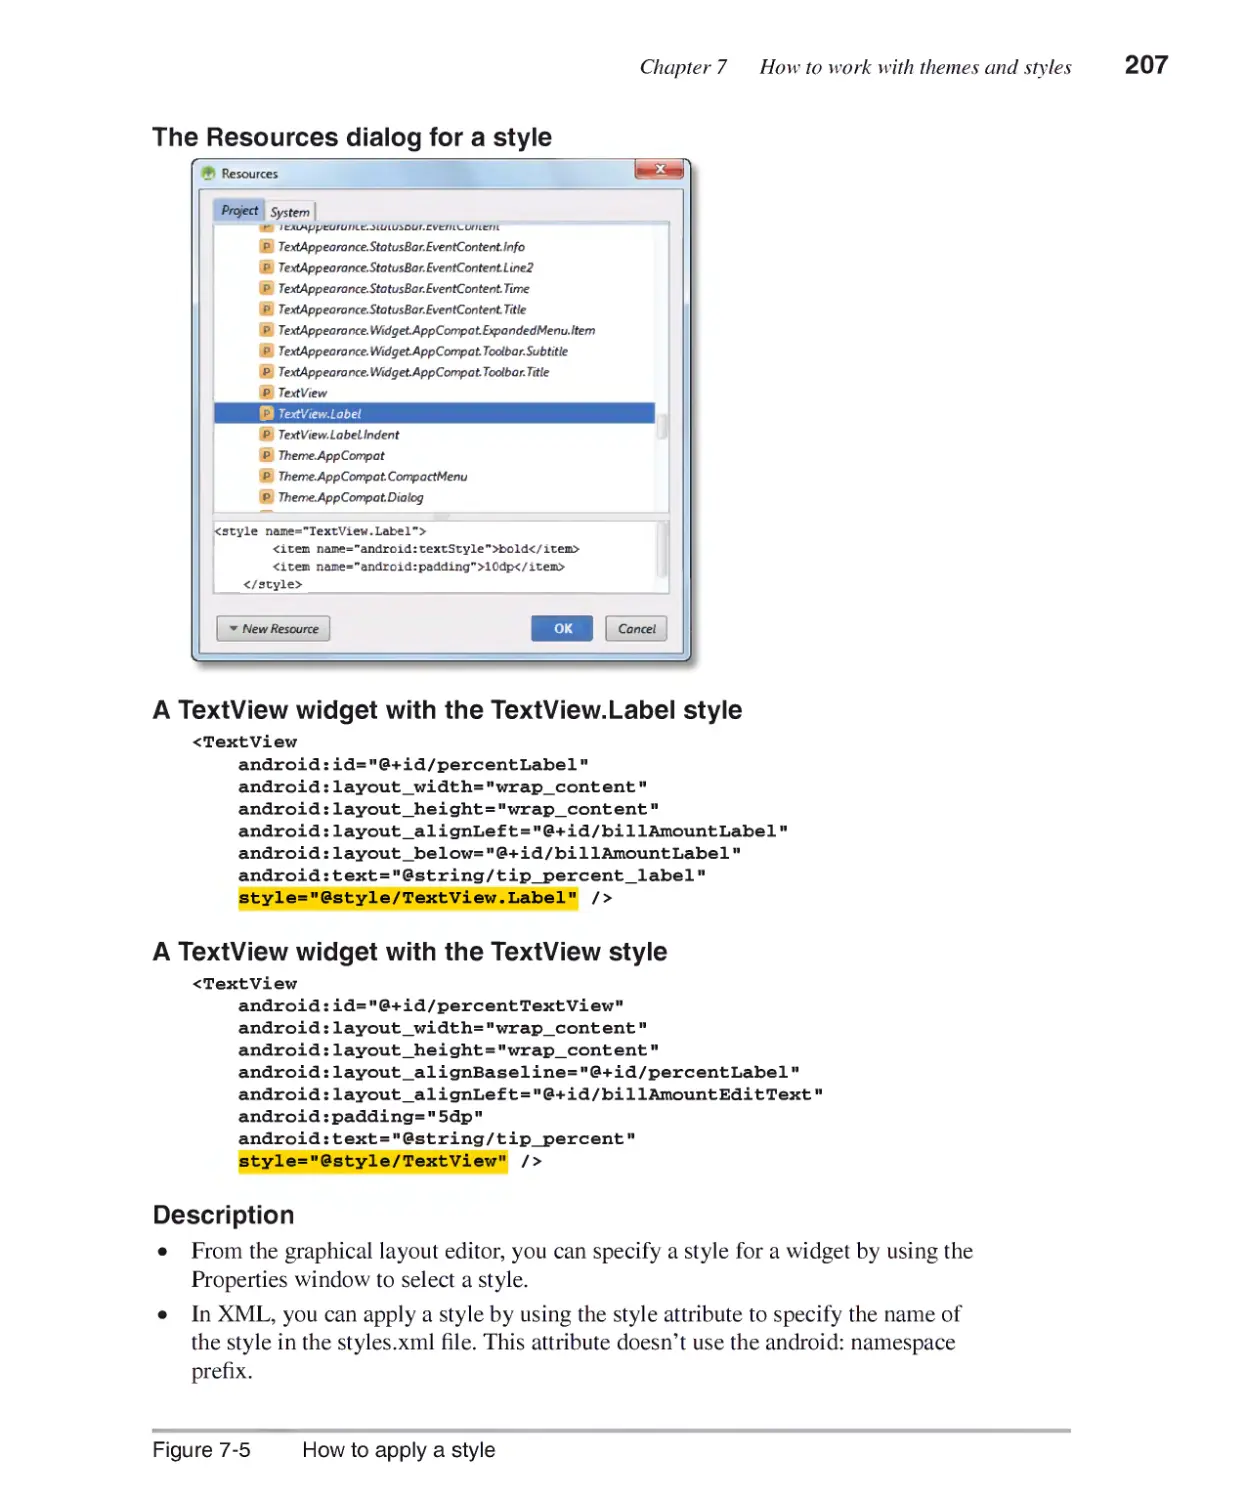
How to apply a style 206
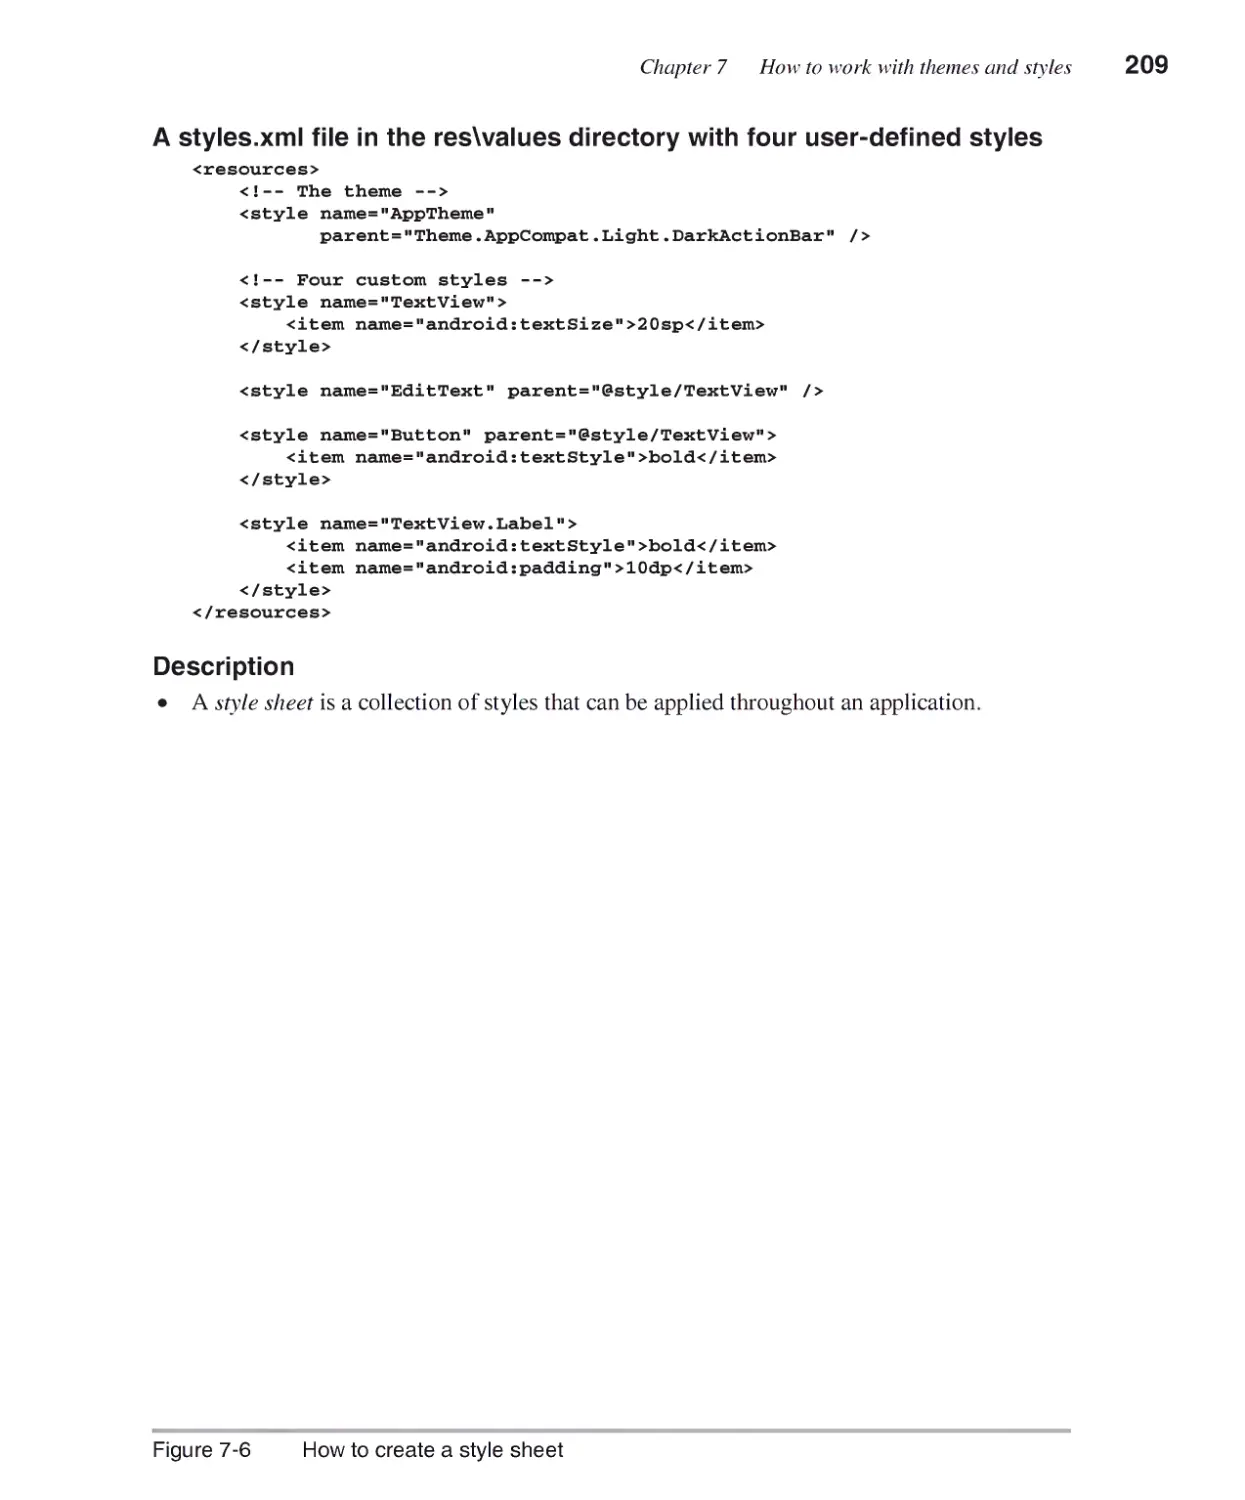
How to create a style sheet 208
How to work with themes............................................................... 210
How to modify a built-in theme 210
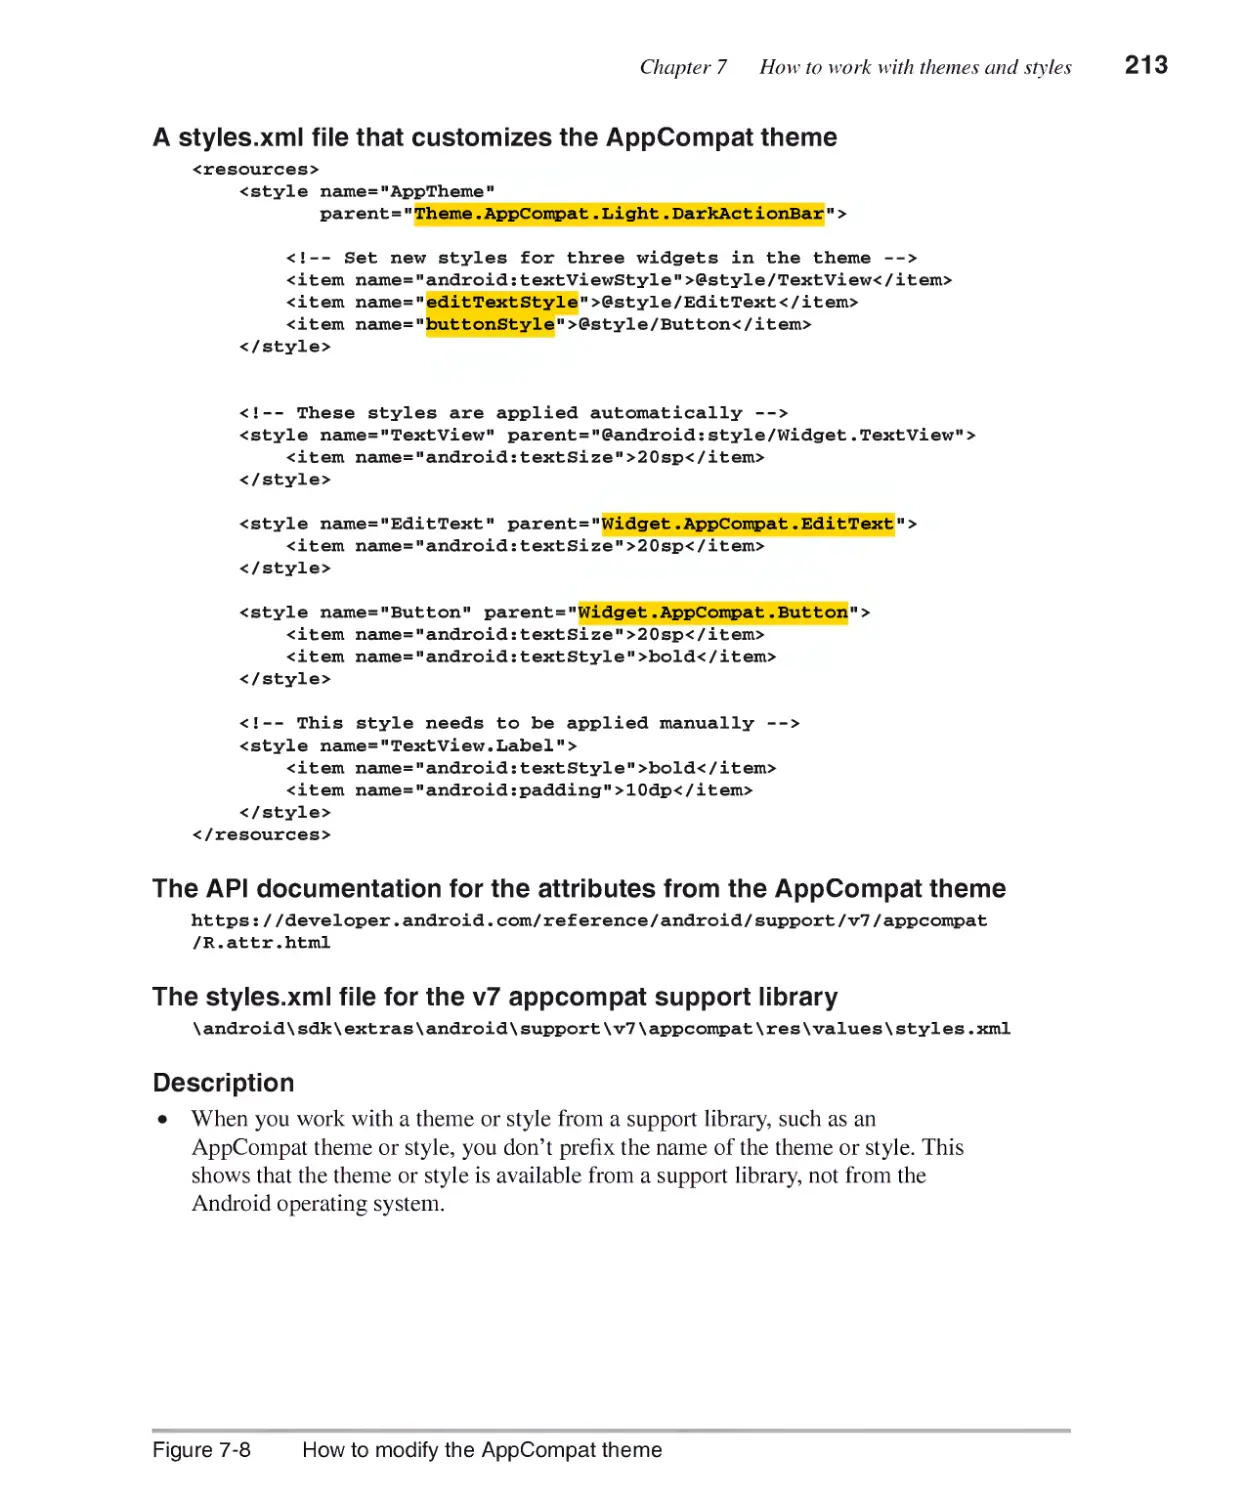
How to modify the AppCompat theme 212
How to modify a theme depending on the API 214
How to modify the text appearance for a theme 216
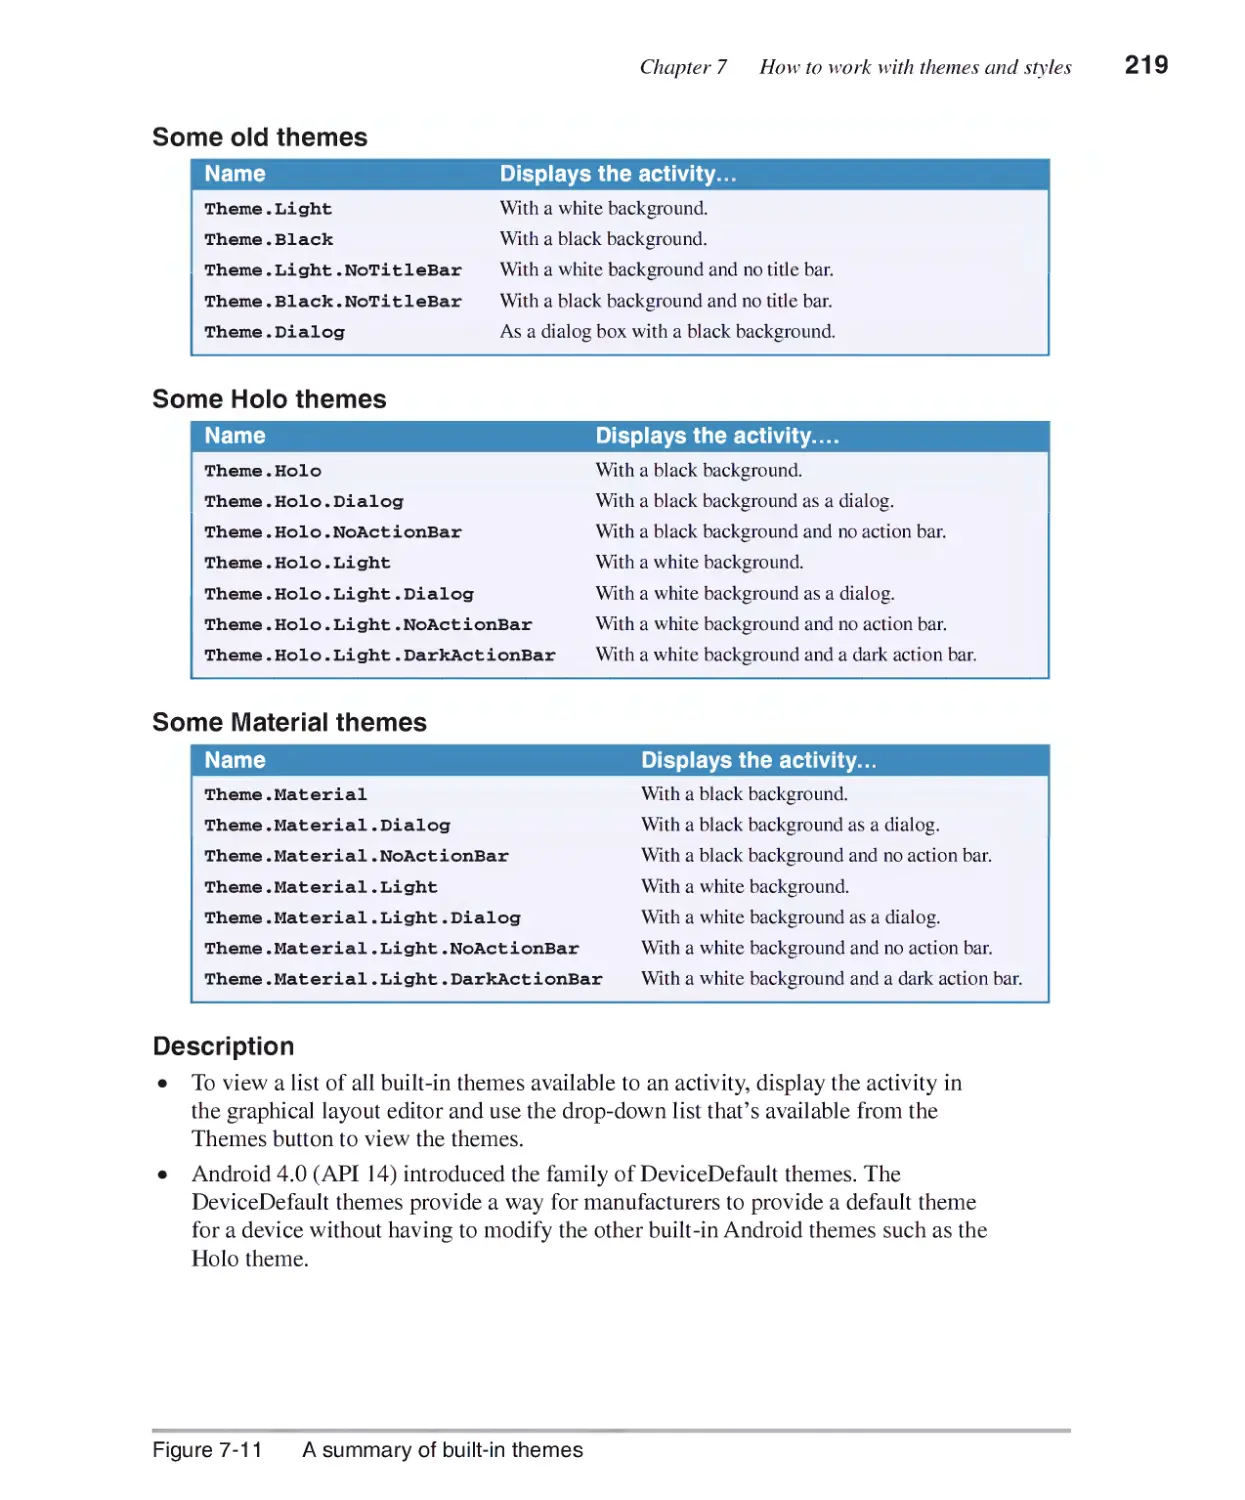
A summary of built-in themes 218
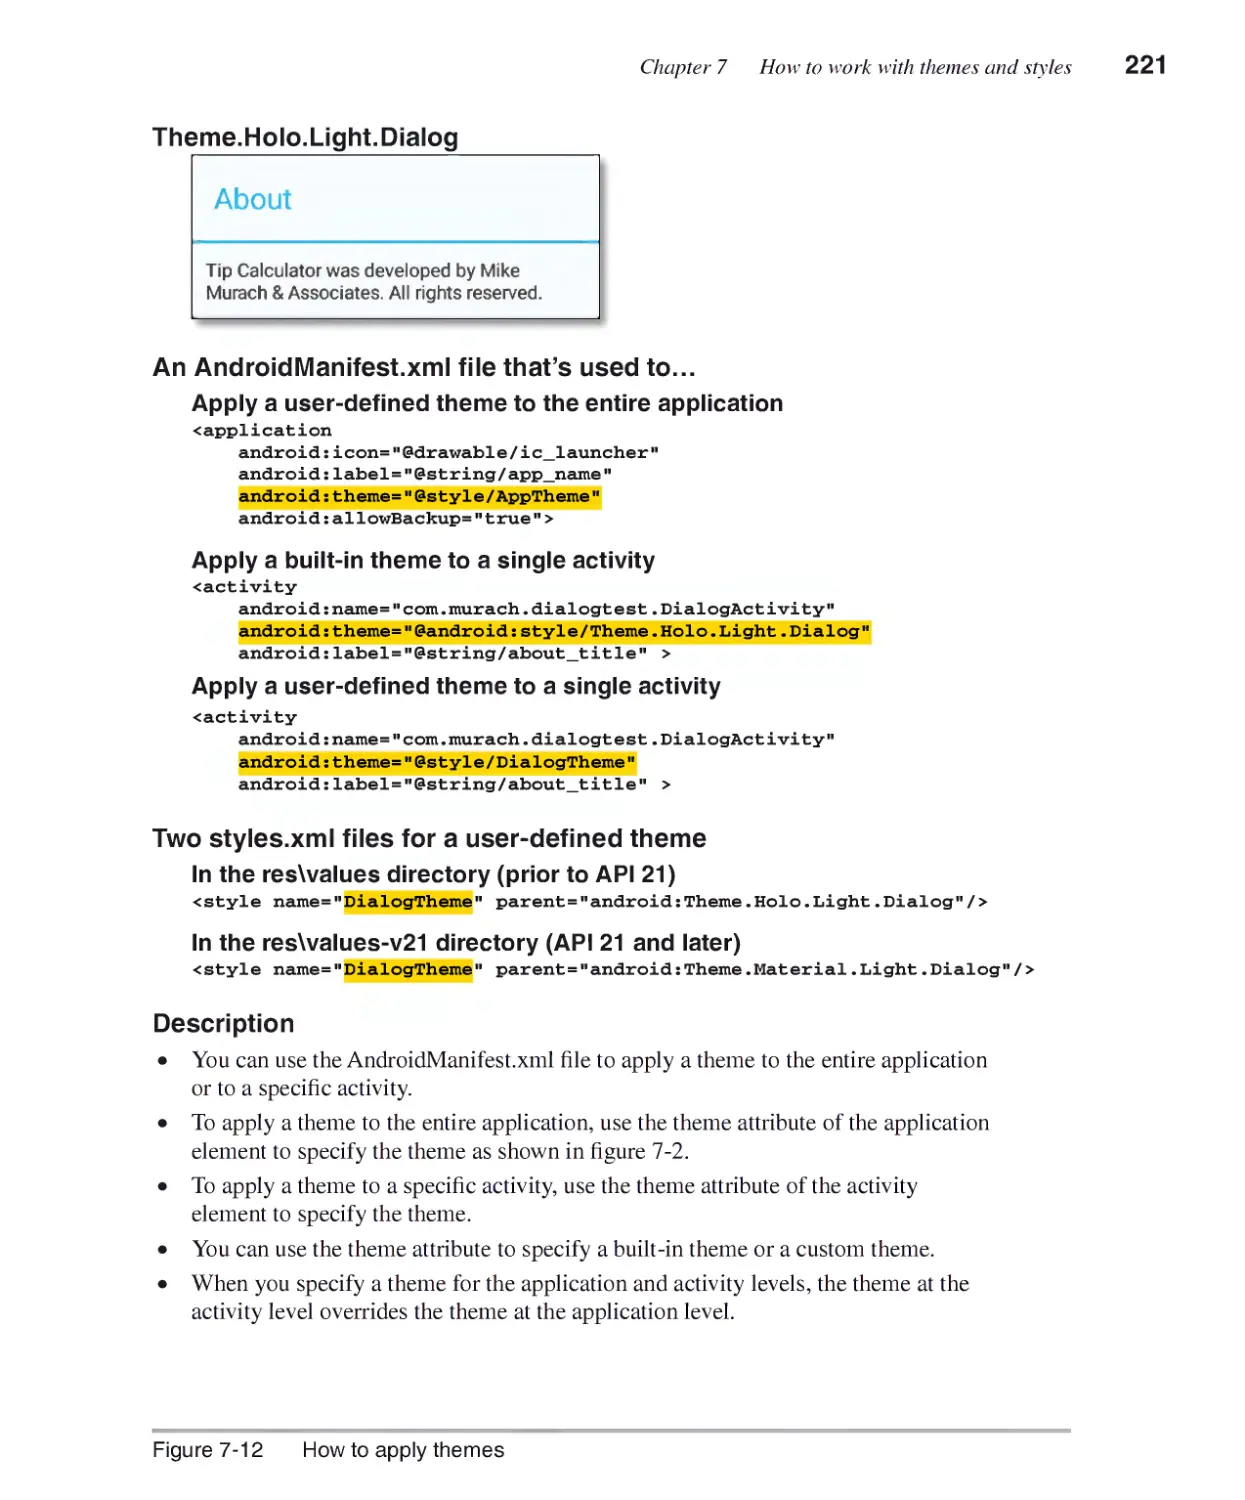
How to apply themes 220
How to work with colors.................................................................222
How to define colors 222
How to apply colors 222
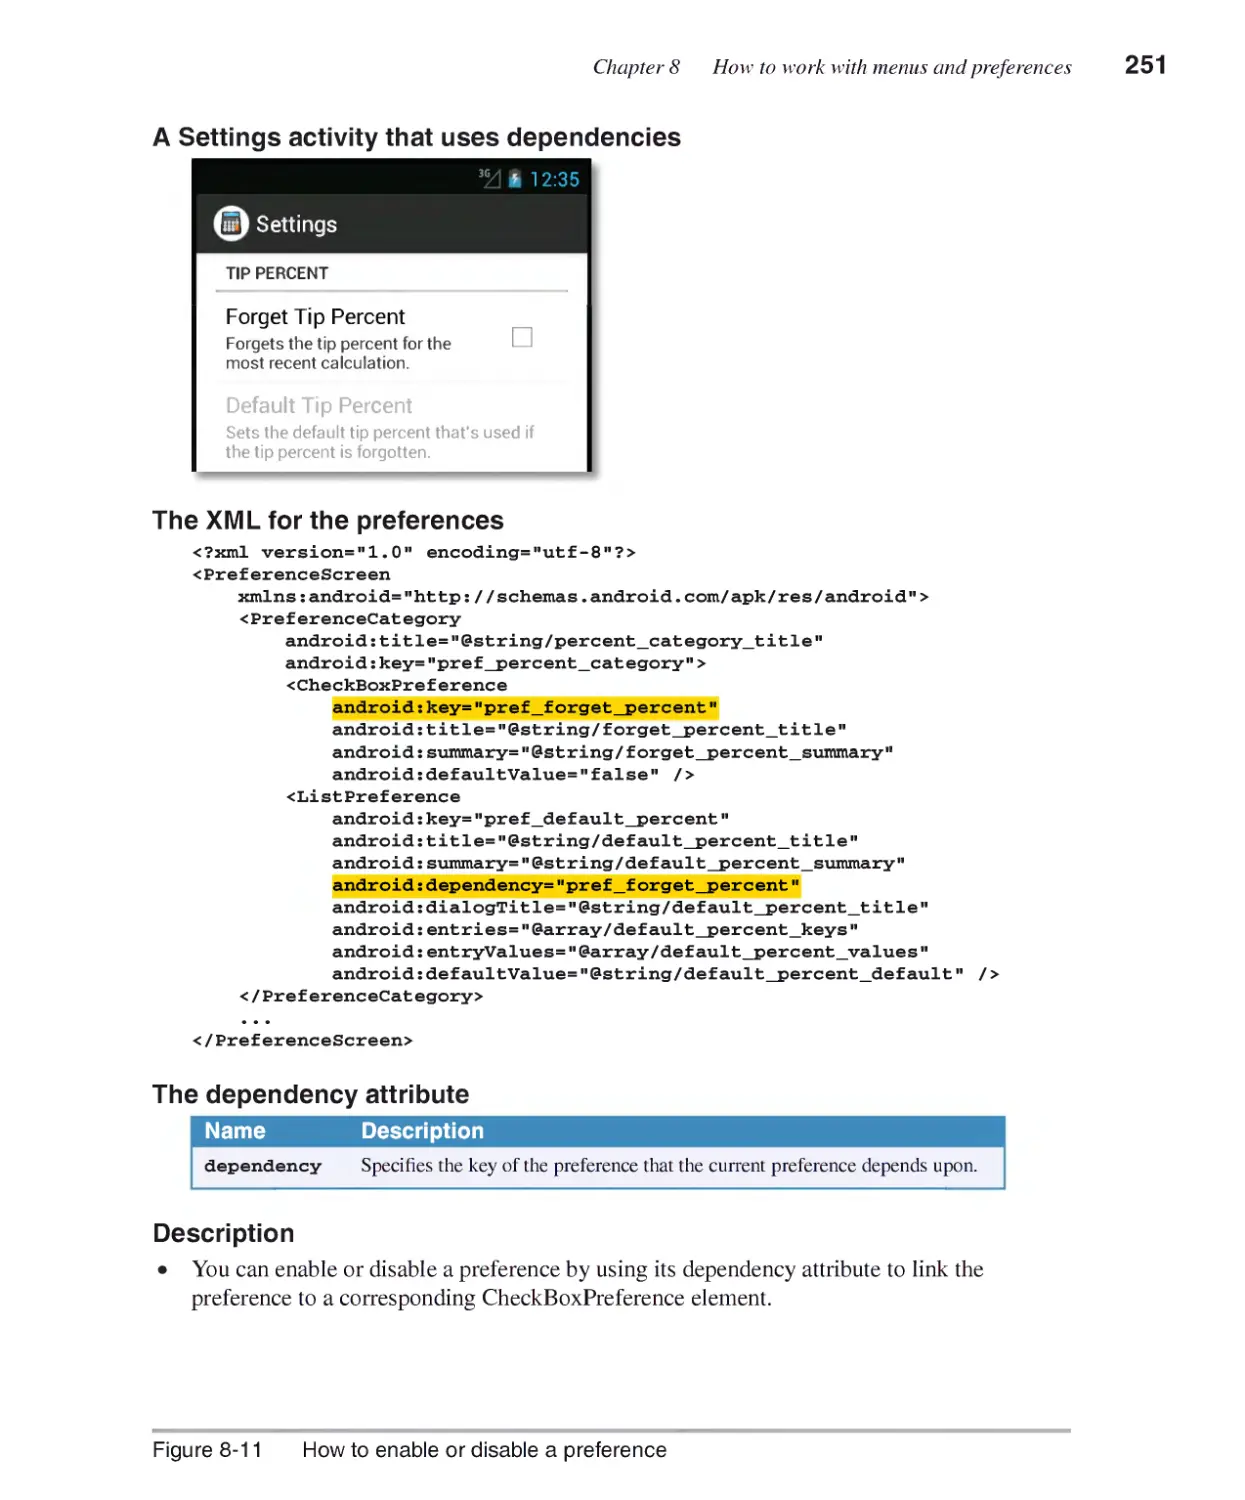
Chapter 8 How to work with menus and preferences
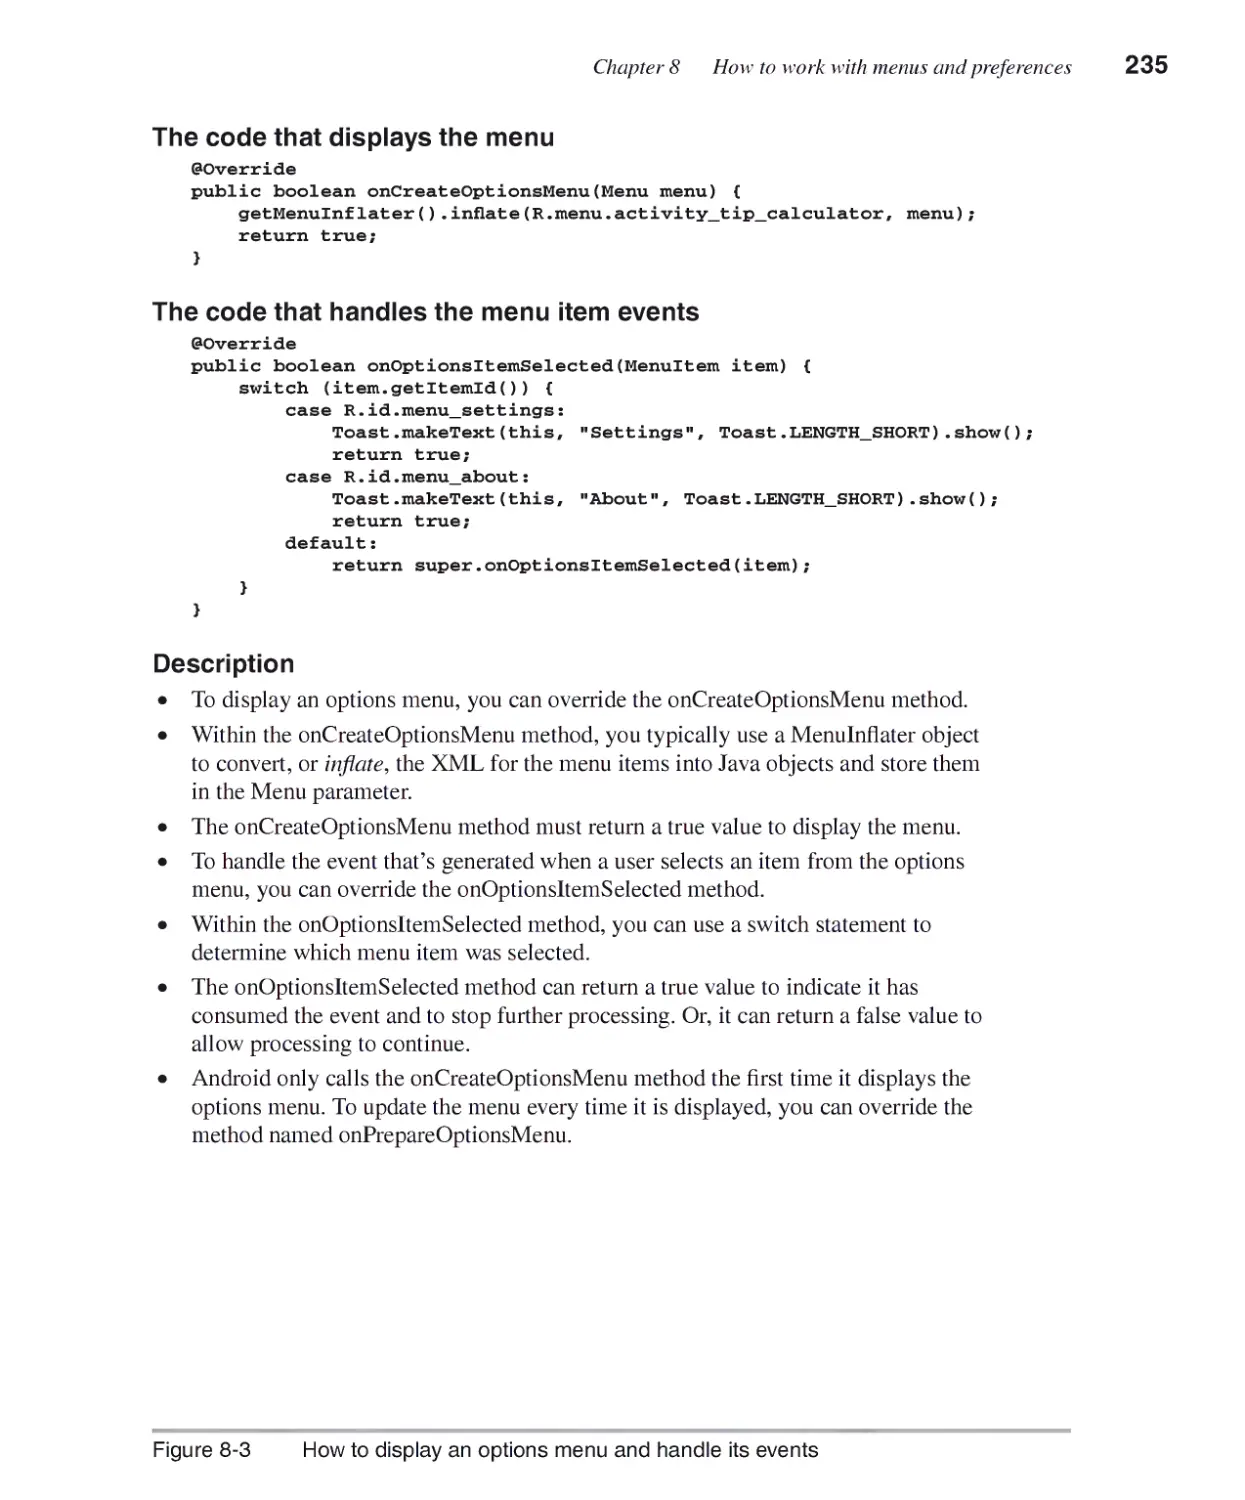
How to work with menus................................................................228
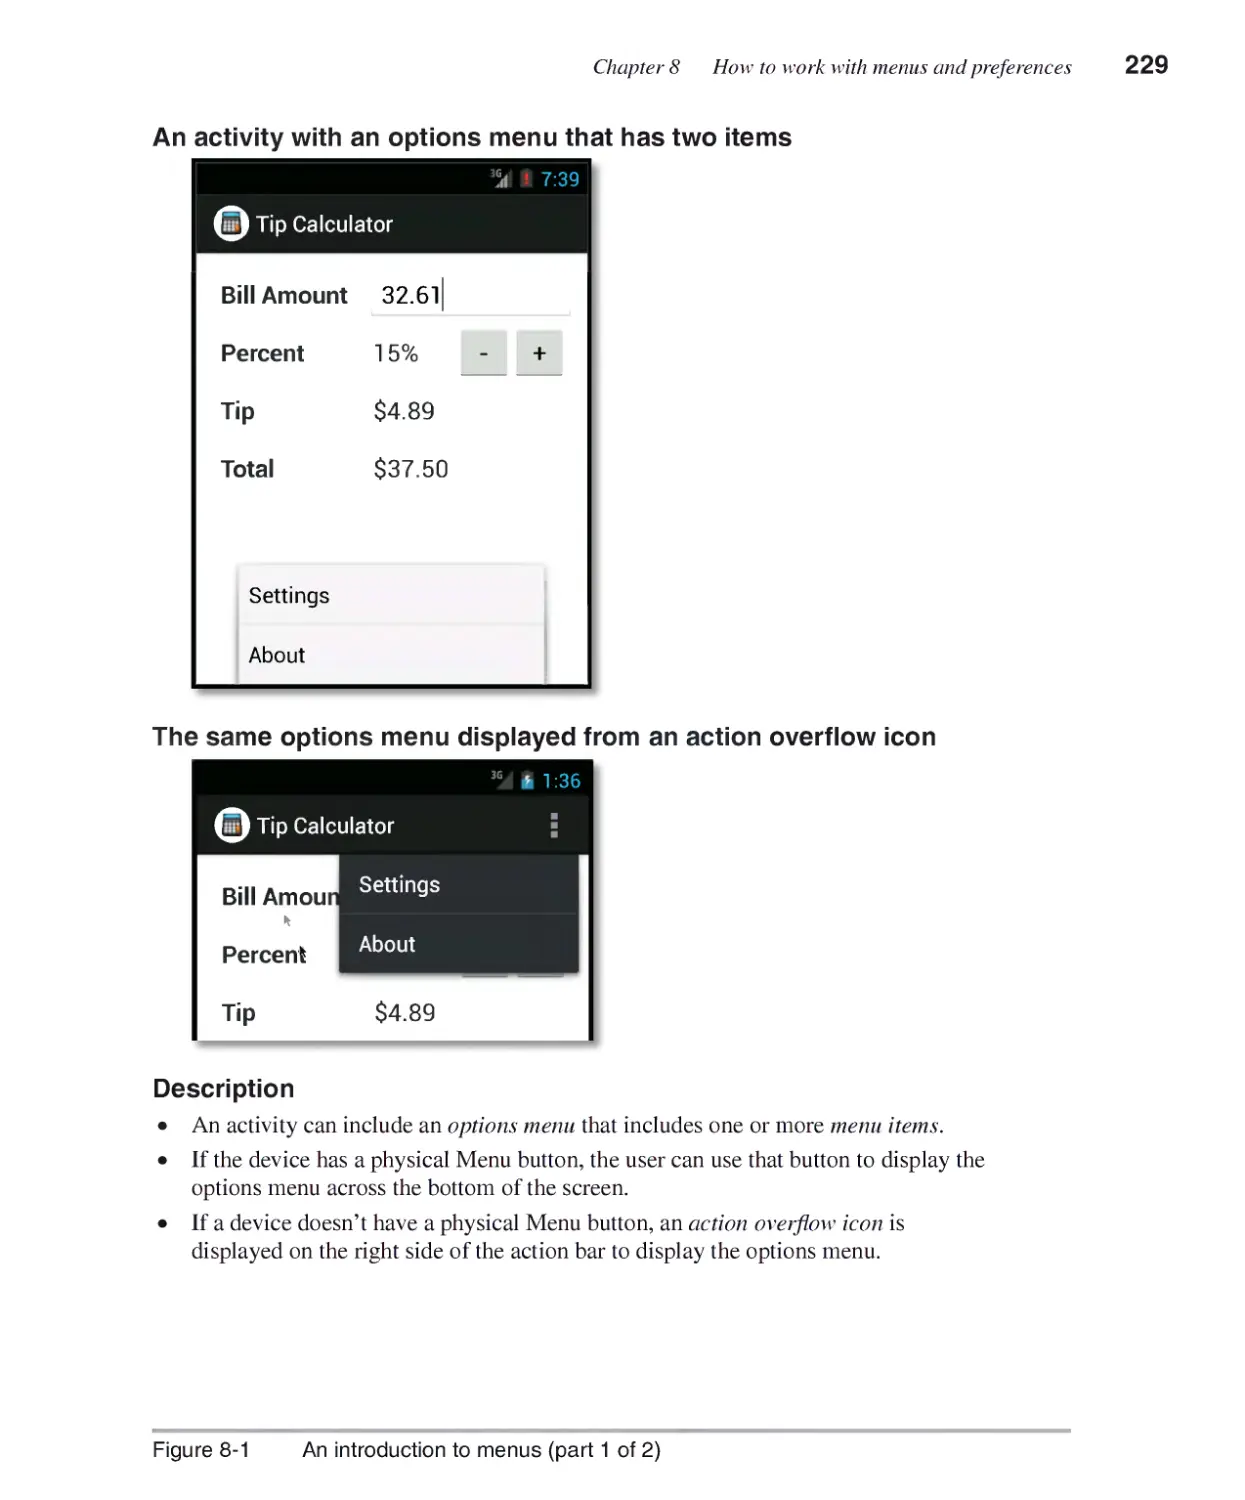
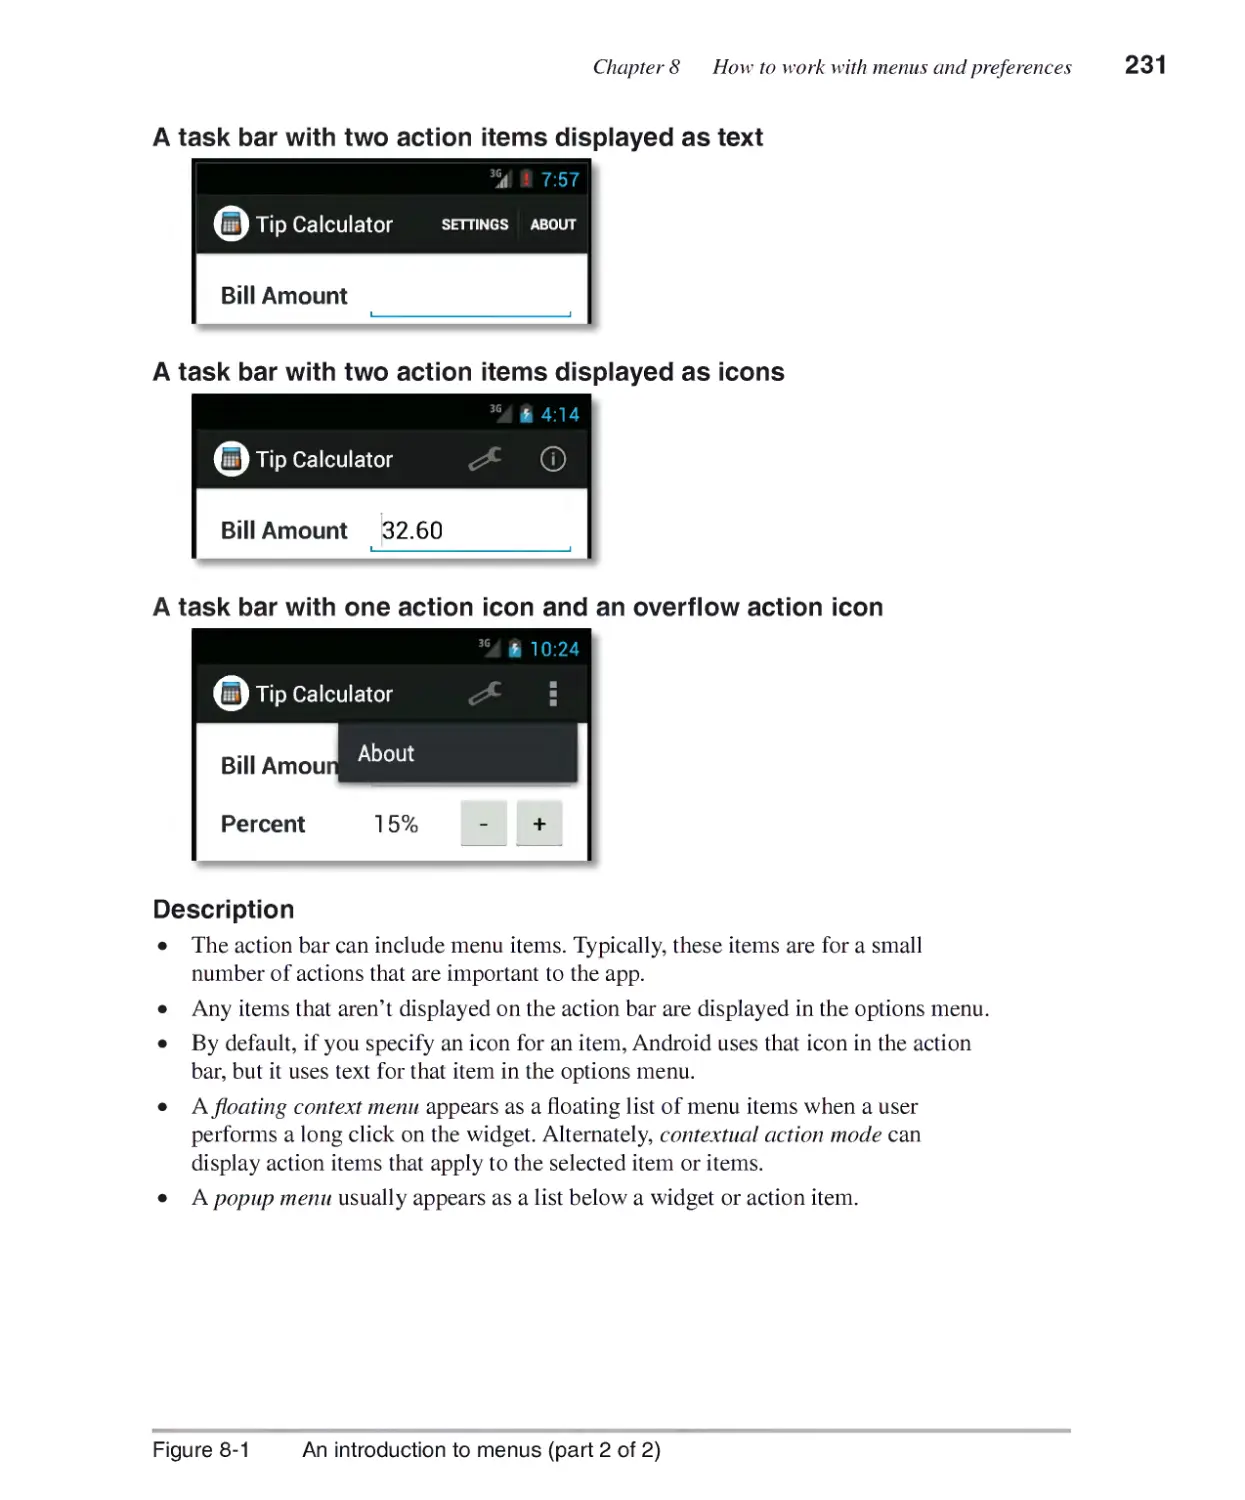
An introduction to menus 228
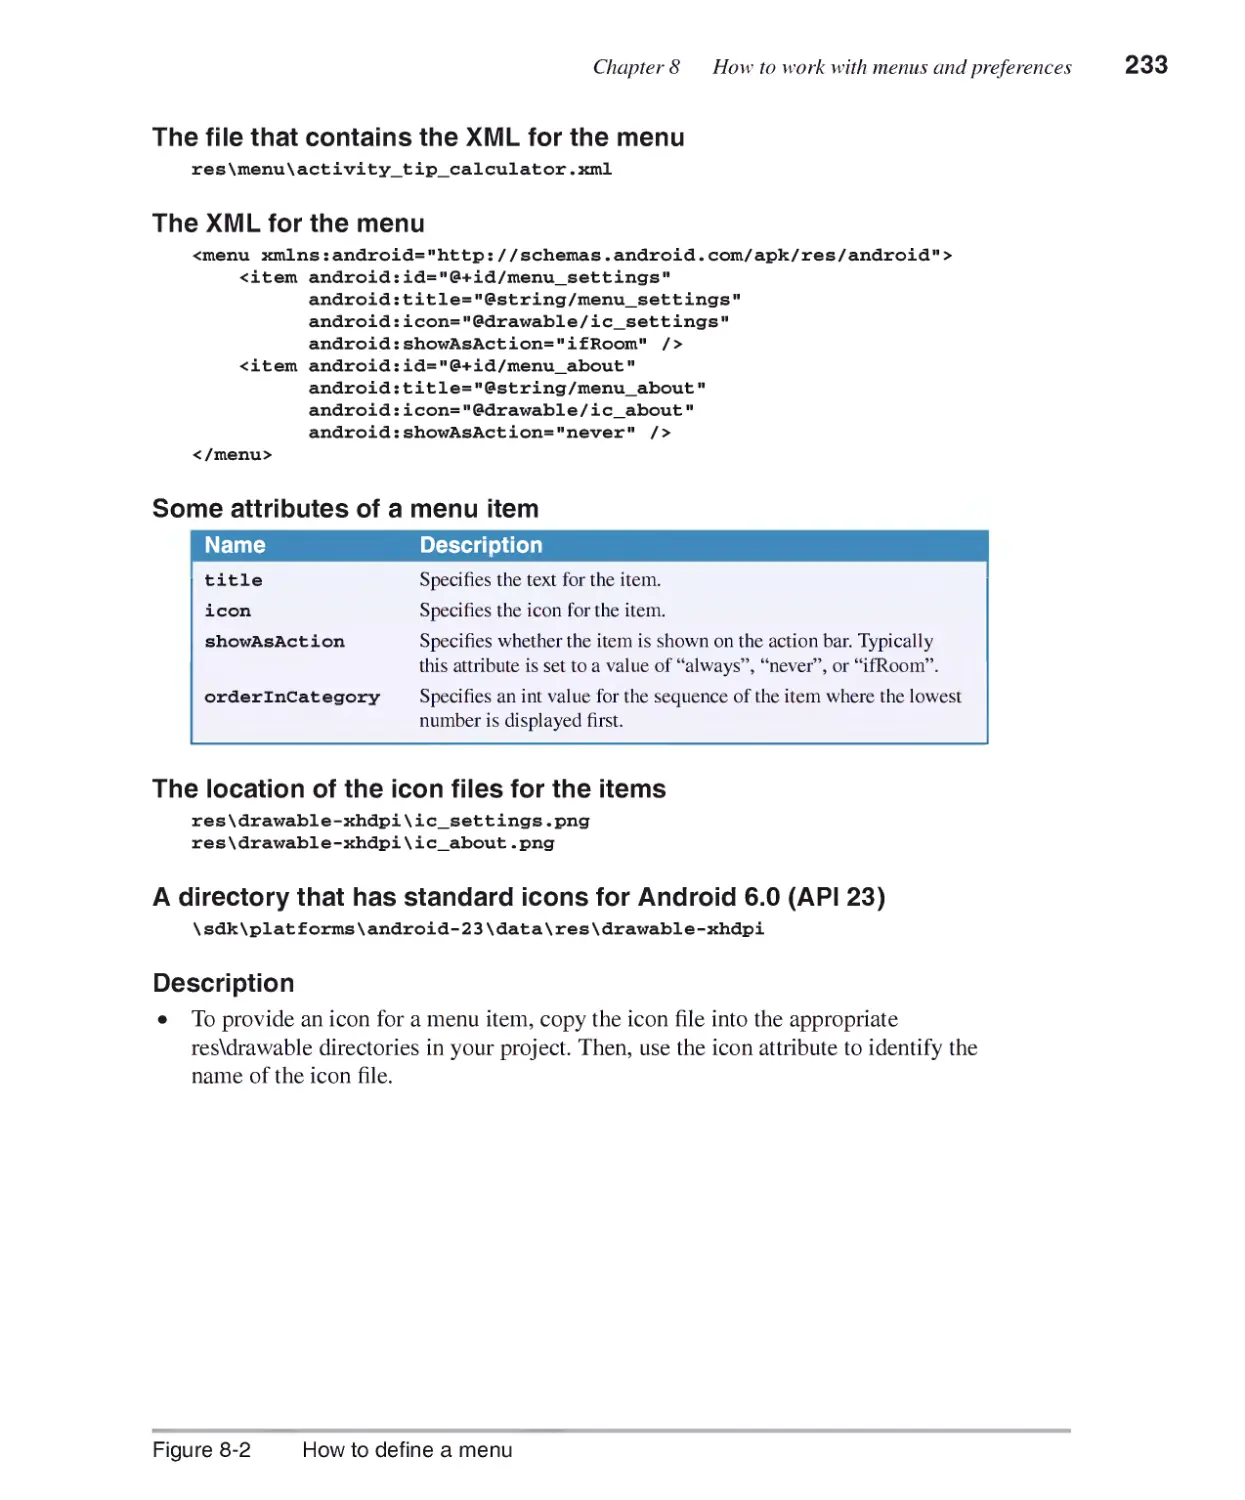
How to define a menu 232
How to display an options menu 234
How to handle option menu events 234
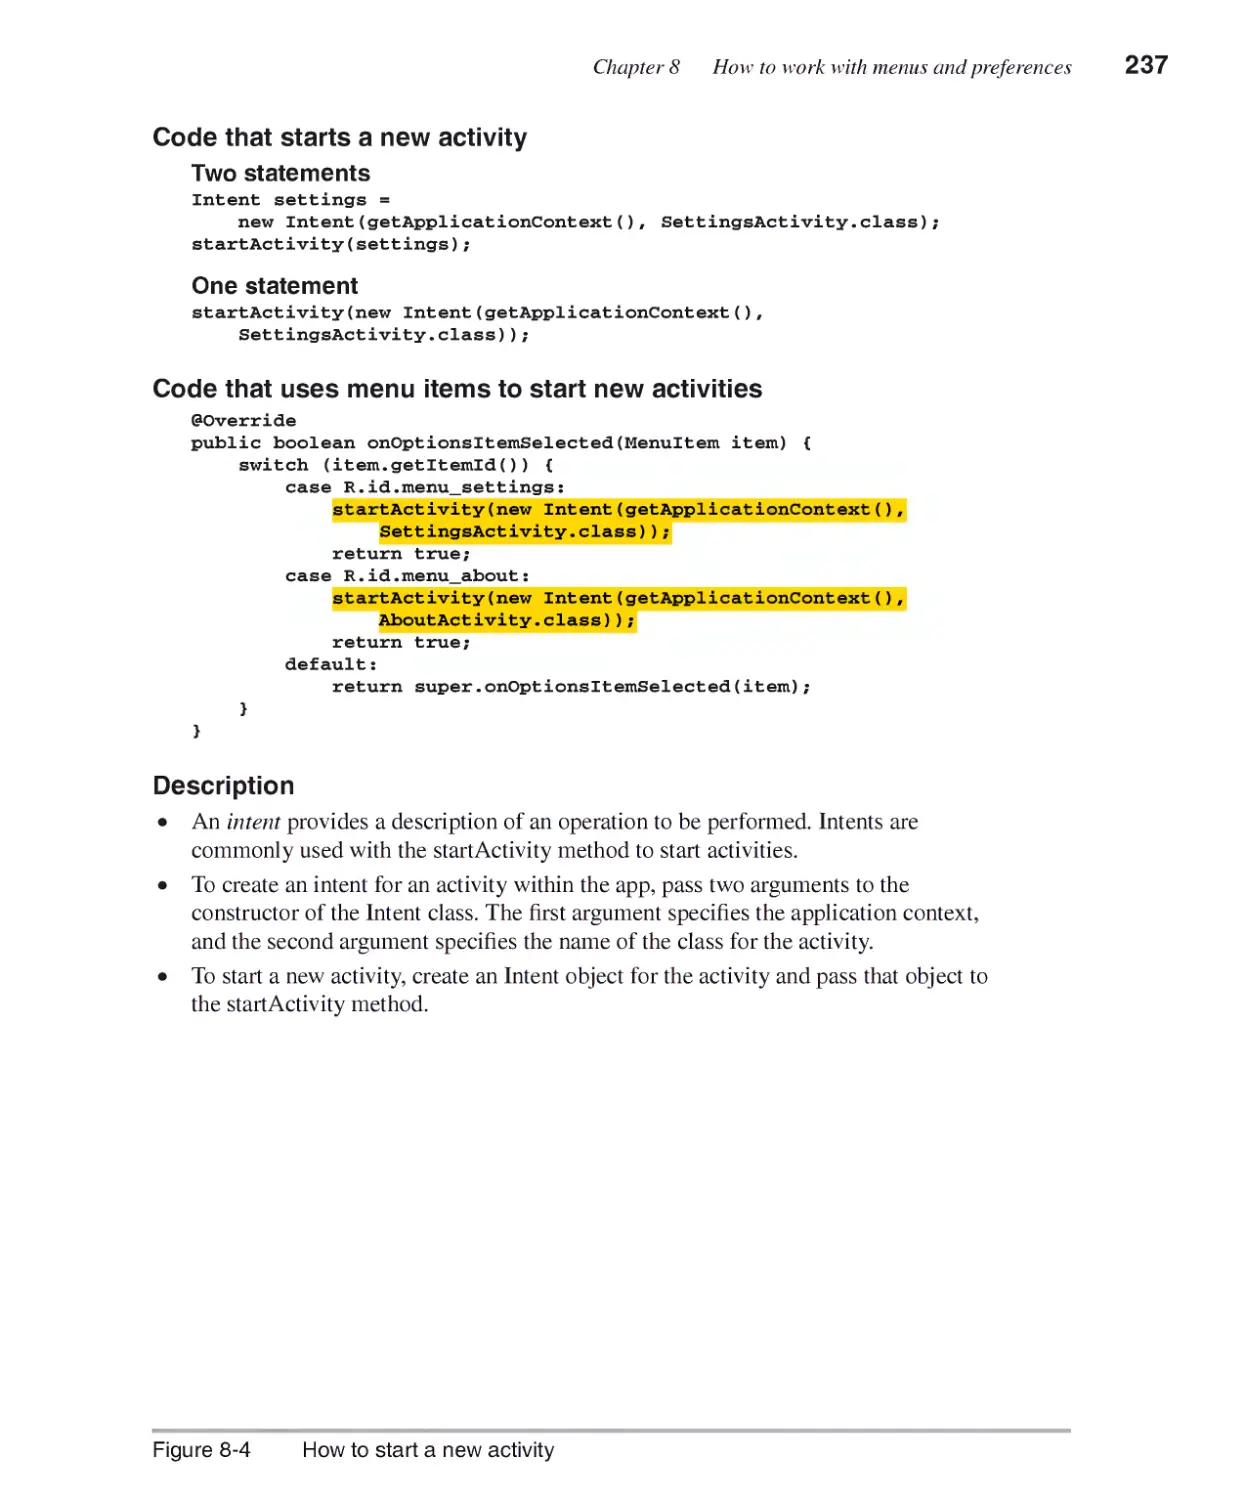
How to start anew activity 236
How to work with preferences.......................................................238
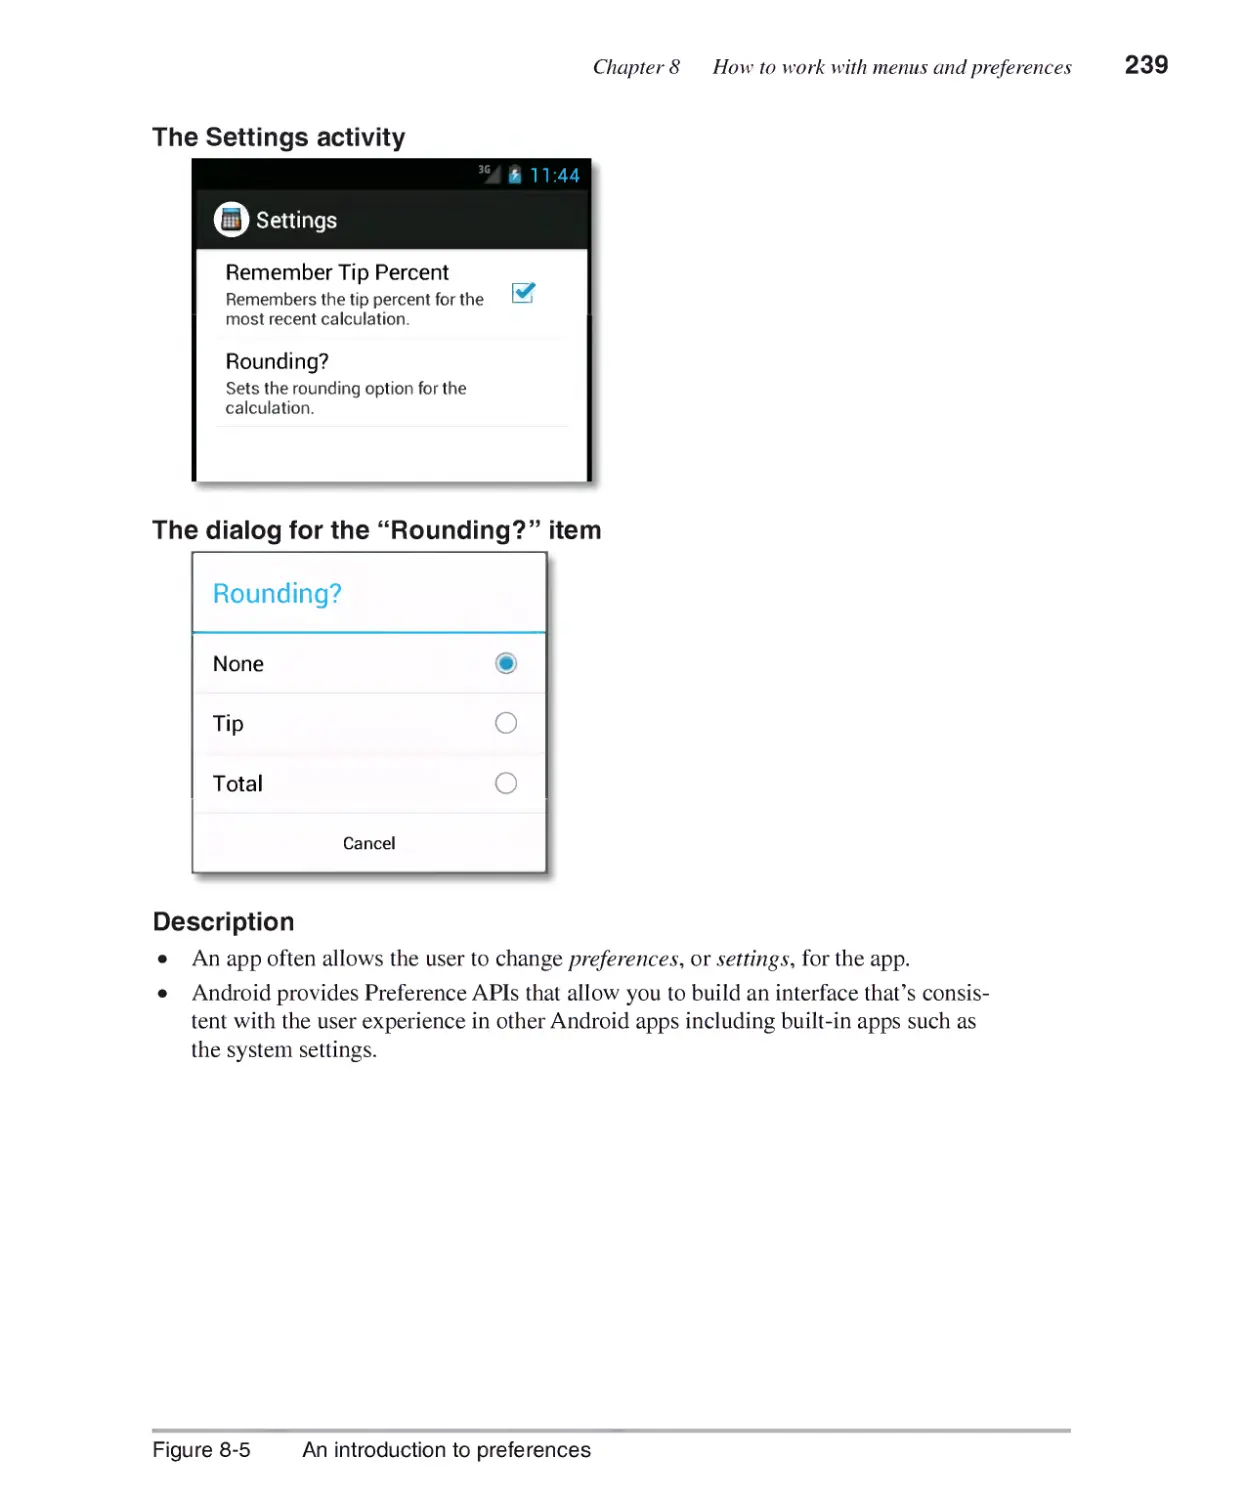
An introduction to preferences 238
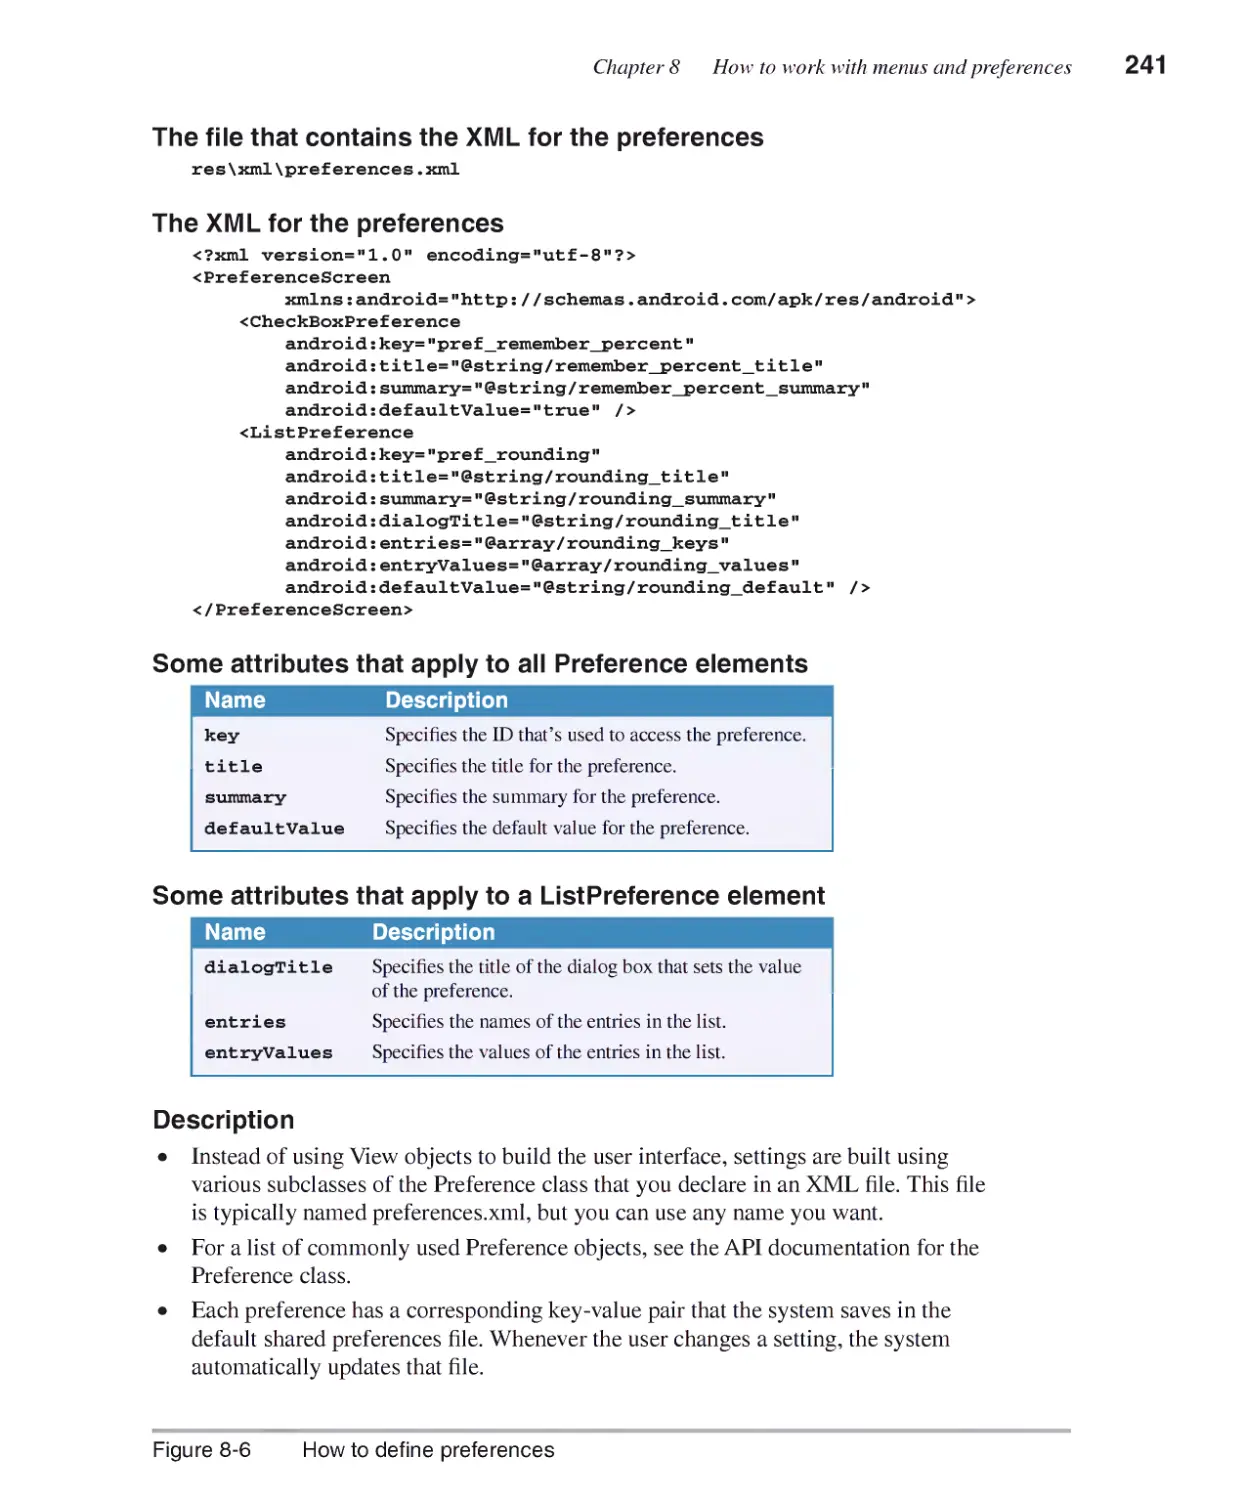
How to define preferences 240
How to display preferences 242
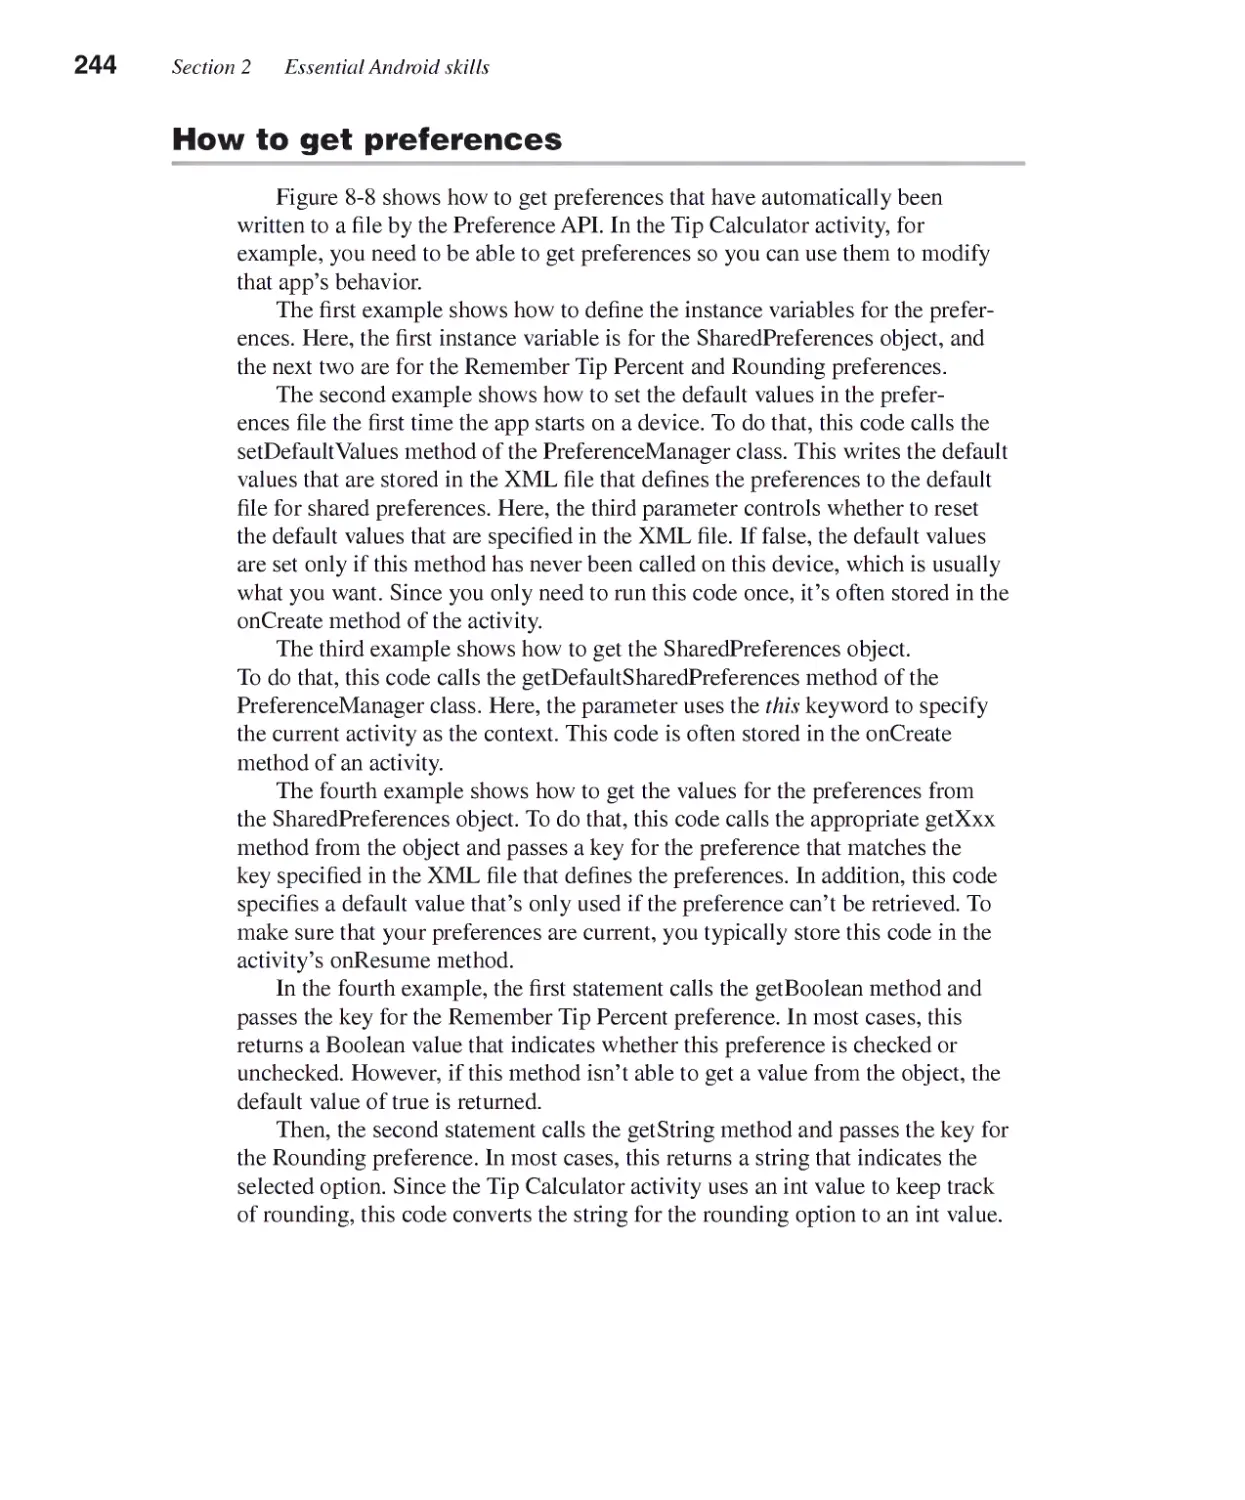
How to get preferences 244
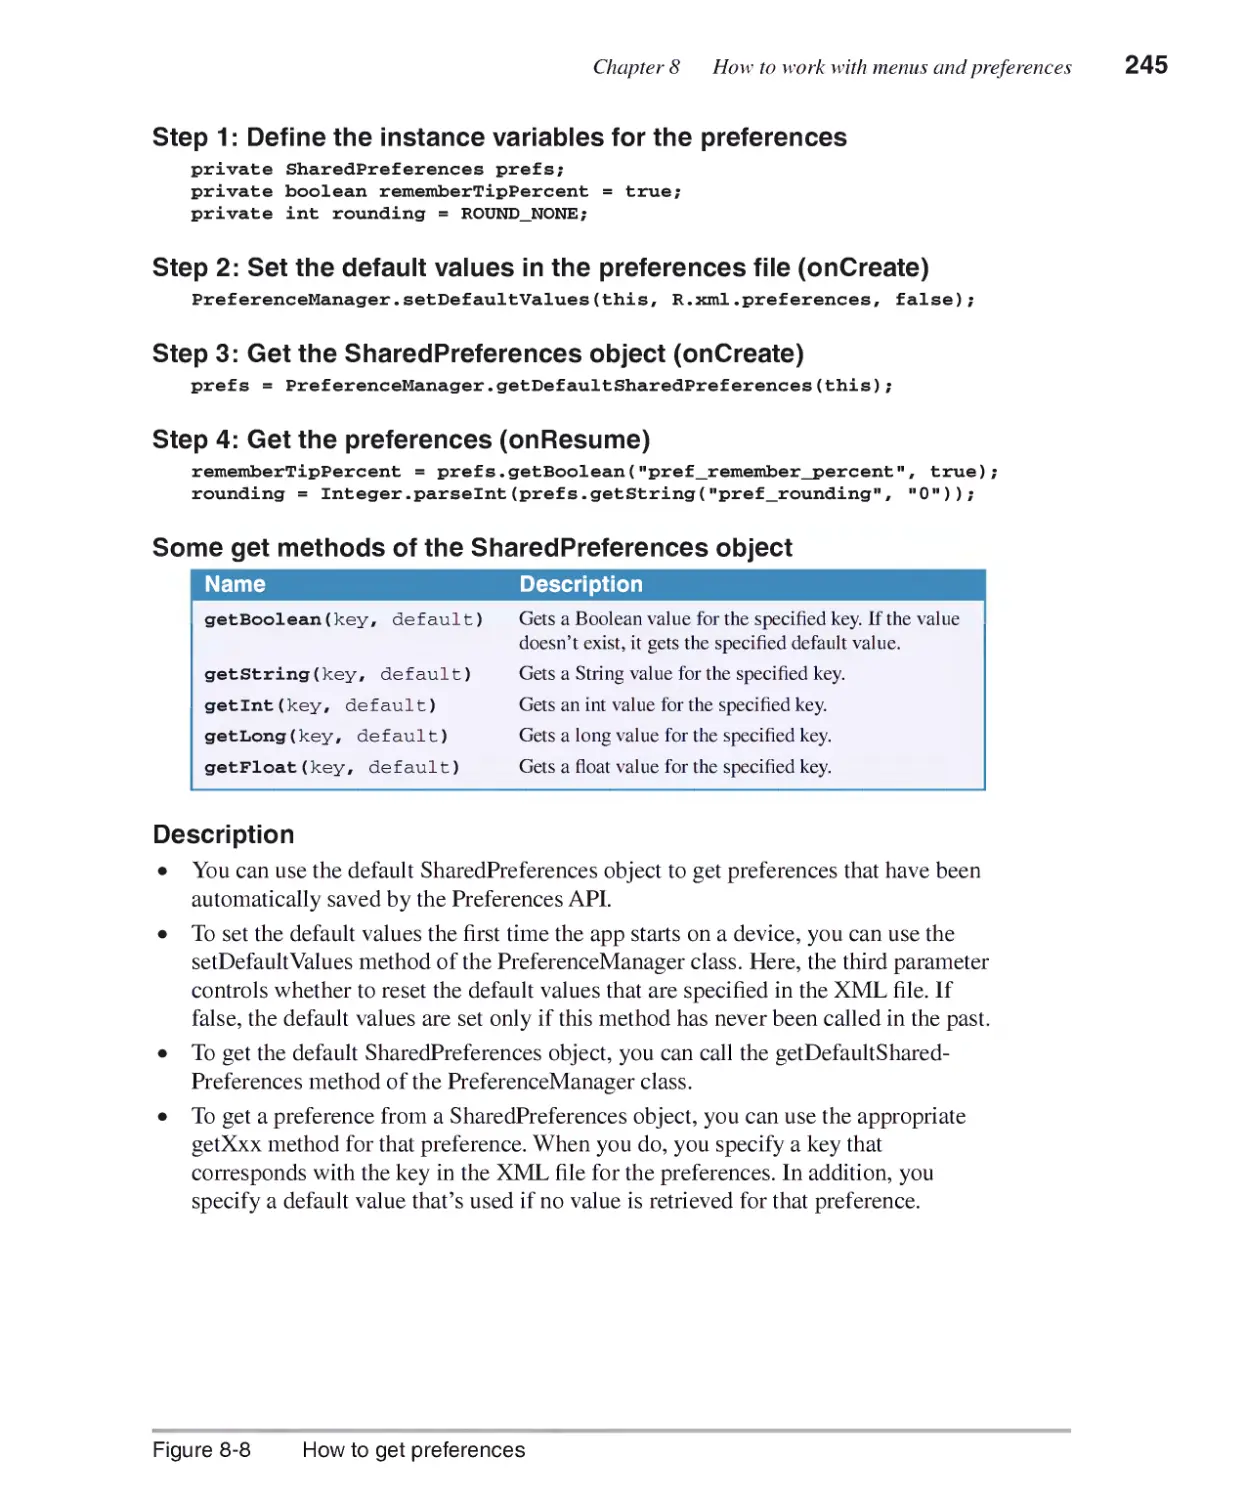
How to use preferences 246
More skills for working with preferences.....................................248
How to group preferences 248
How to enable and disable preferences 250
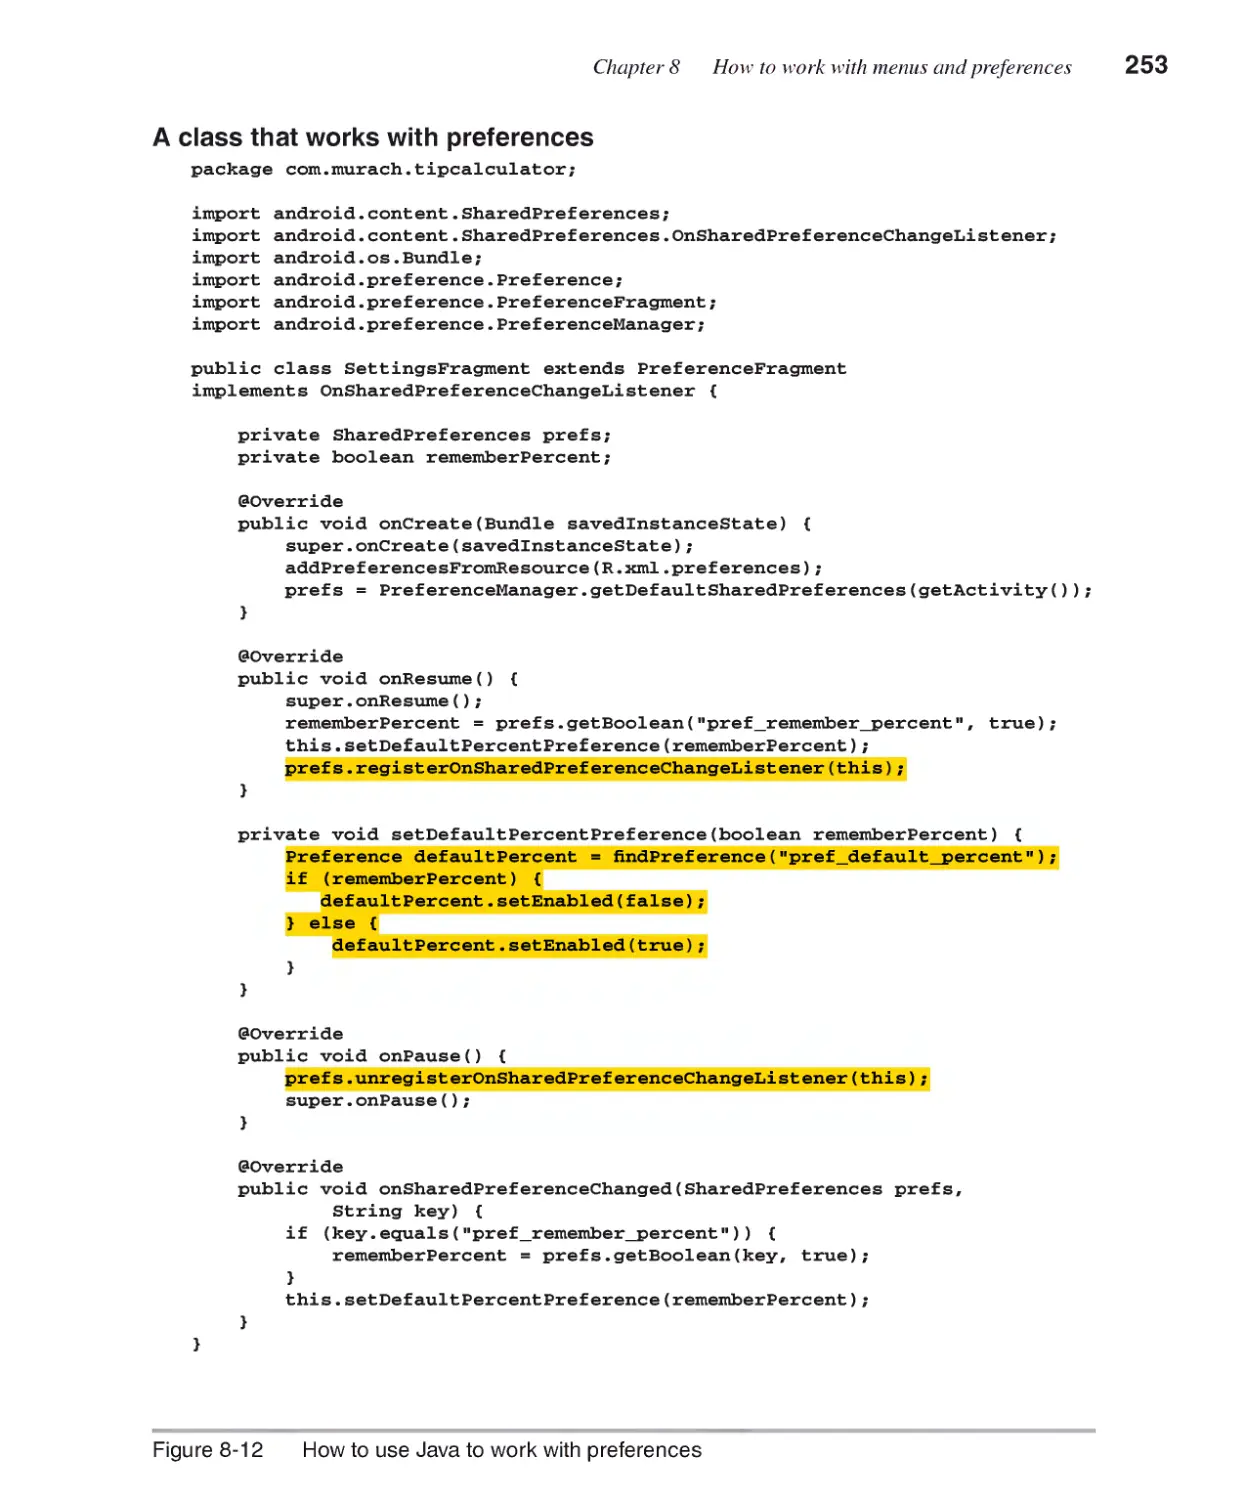
How to use Java to work with preferences 252
X Expanded contents
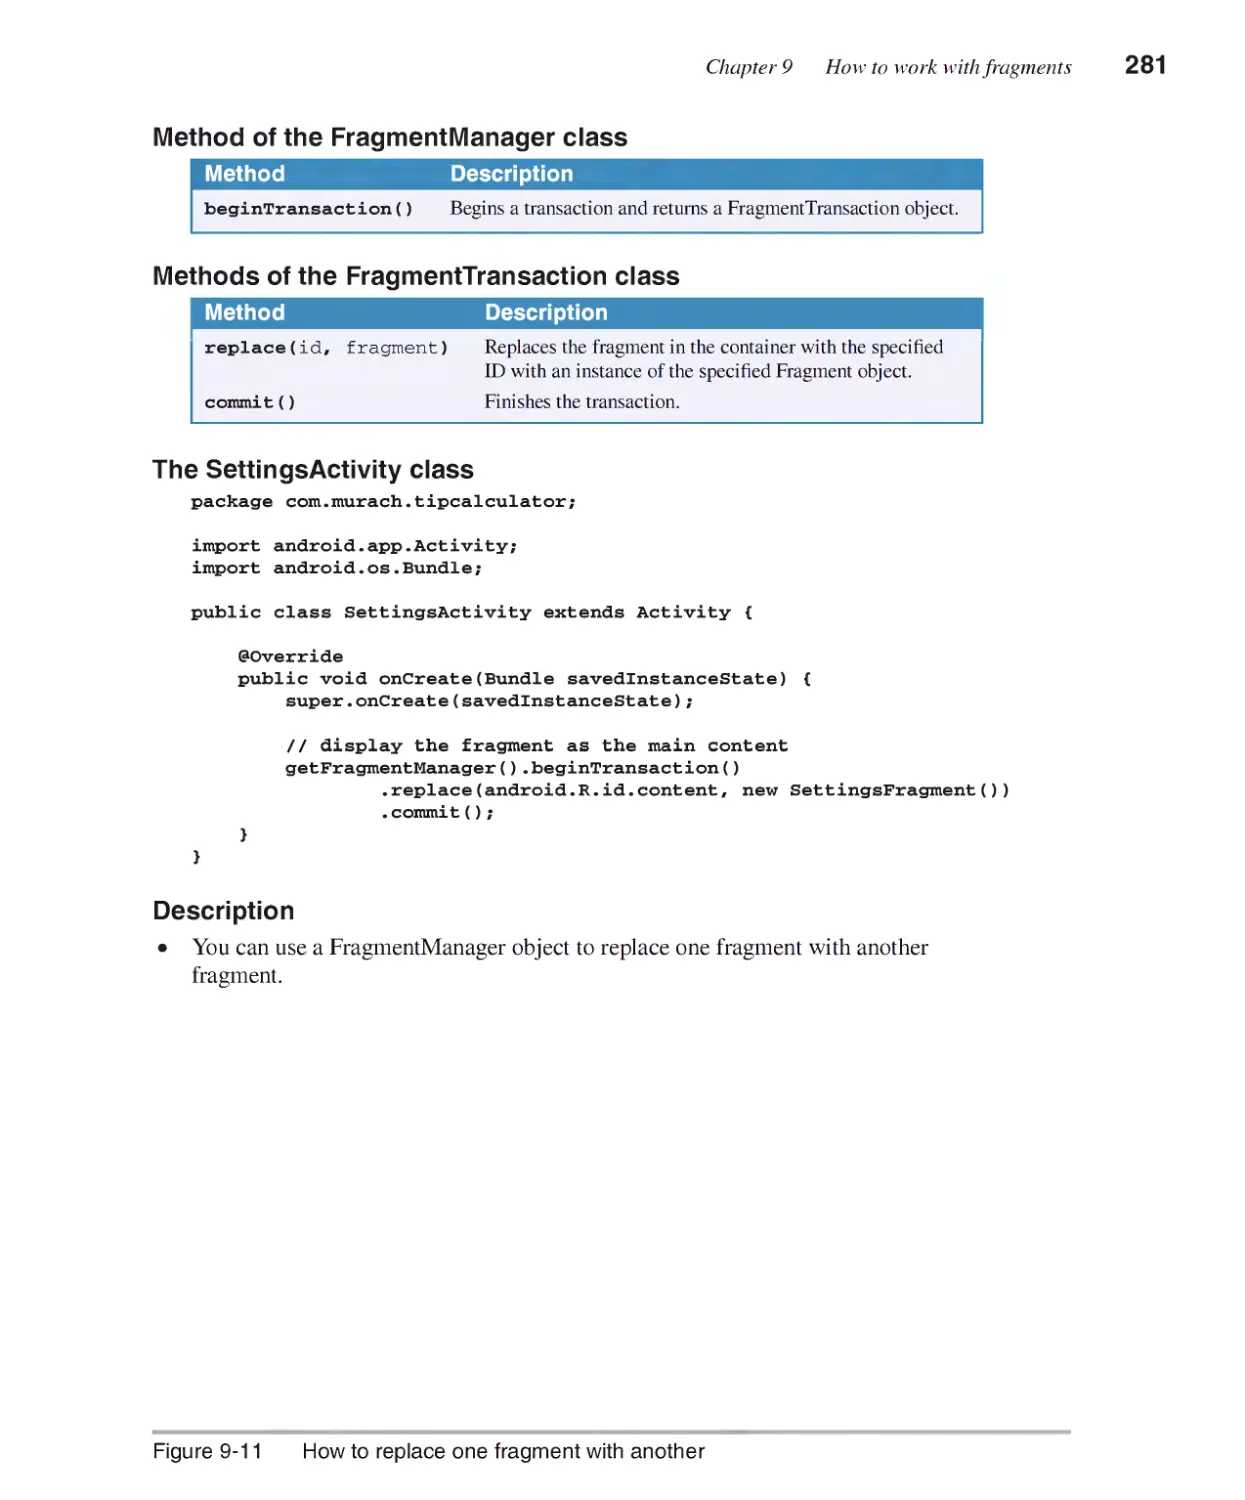
Chapter 9 How to work with fragments
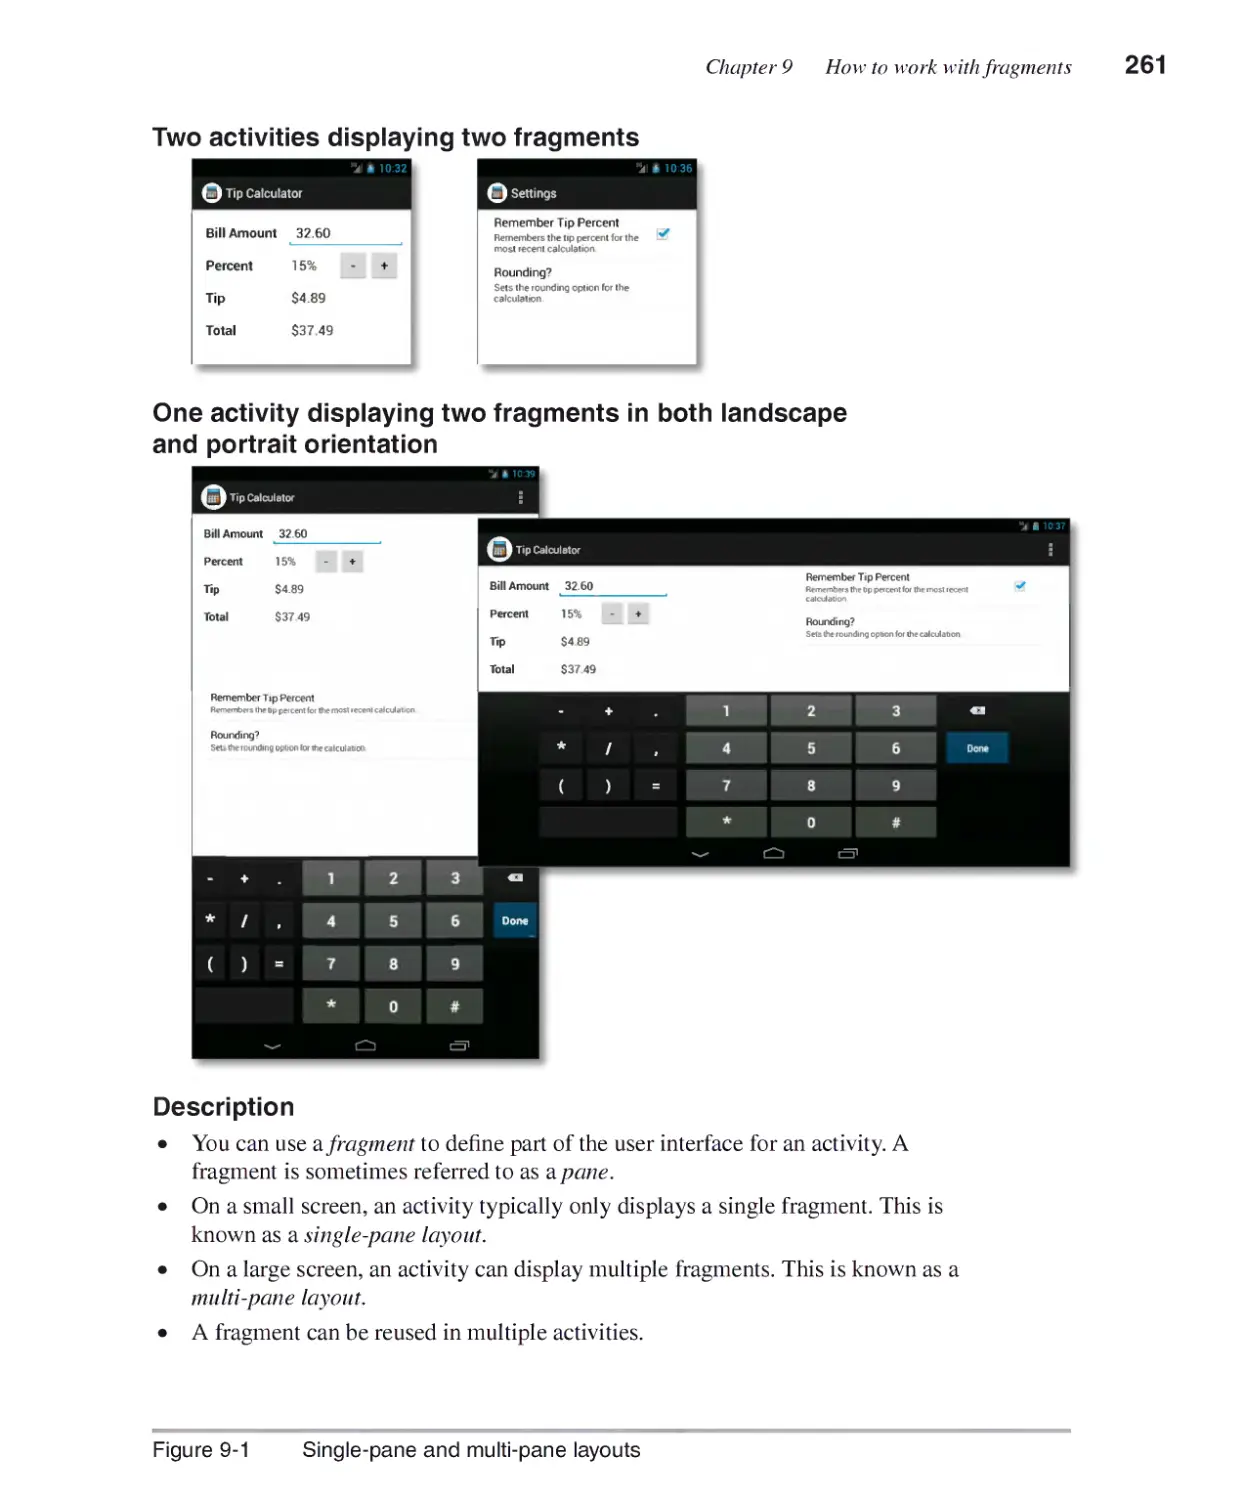
An introduction to fragments ........................................................260
Single-pane and multi-pane layouts 260
The lifecycle methods of a fragment 262
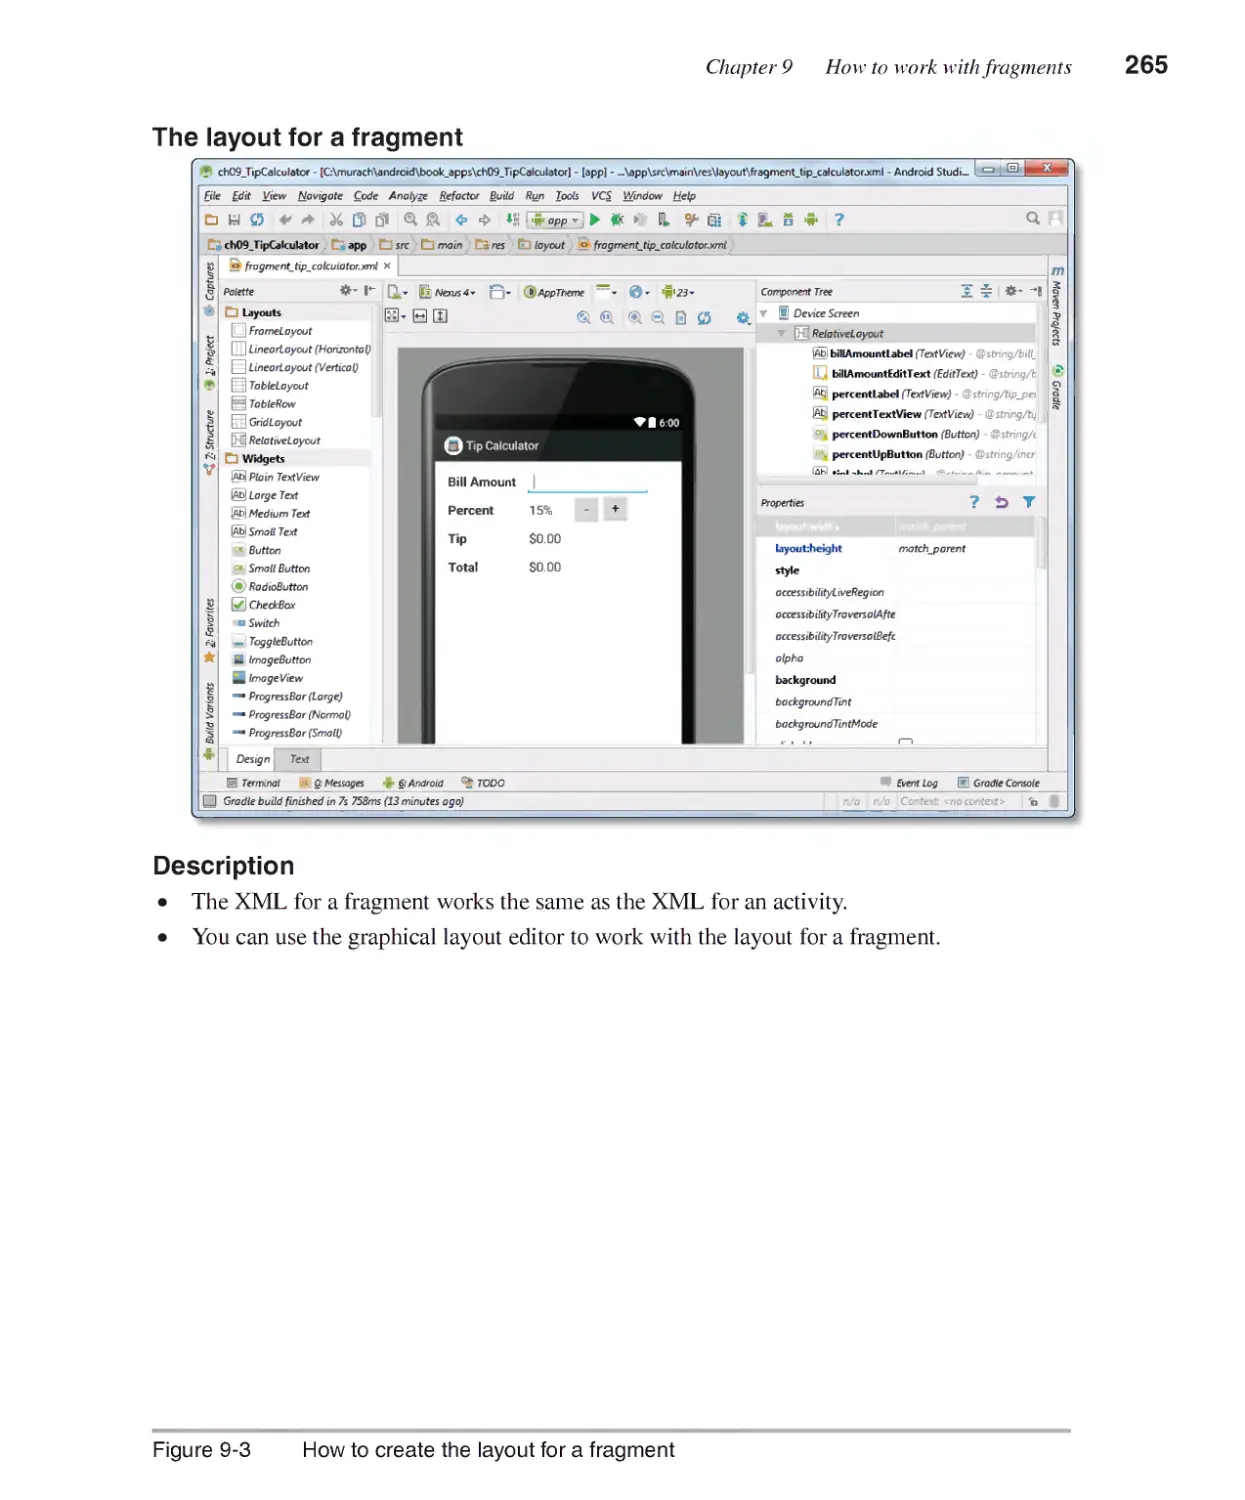
How to use single-pane layouts for small screens .....................264
How to create the layout for a fragment 264
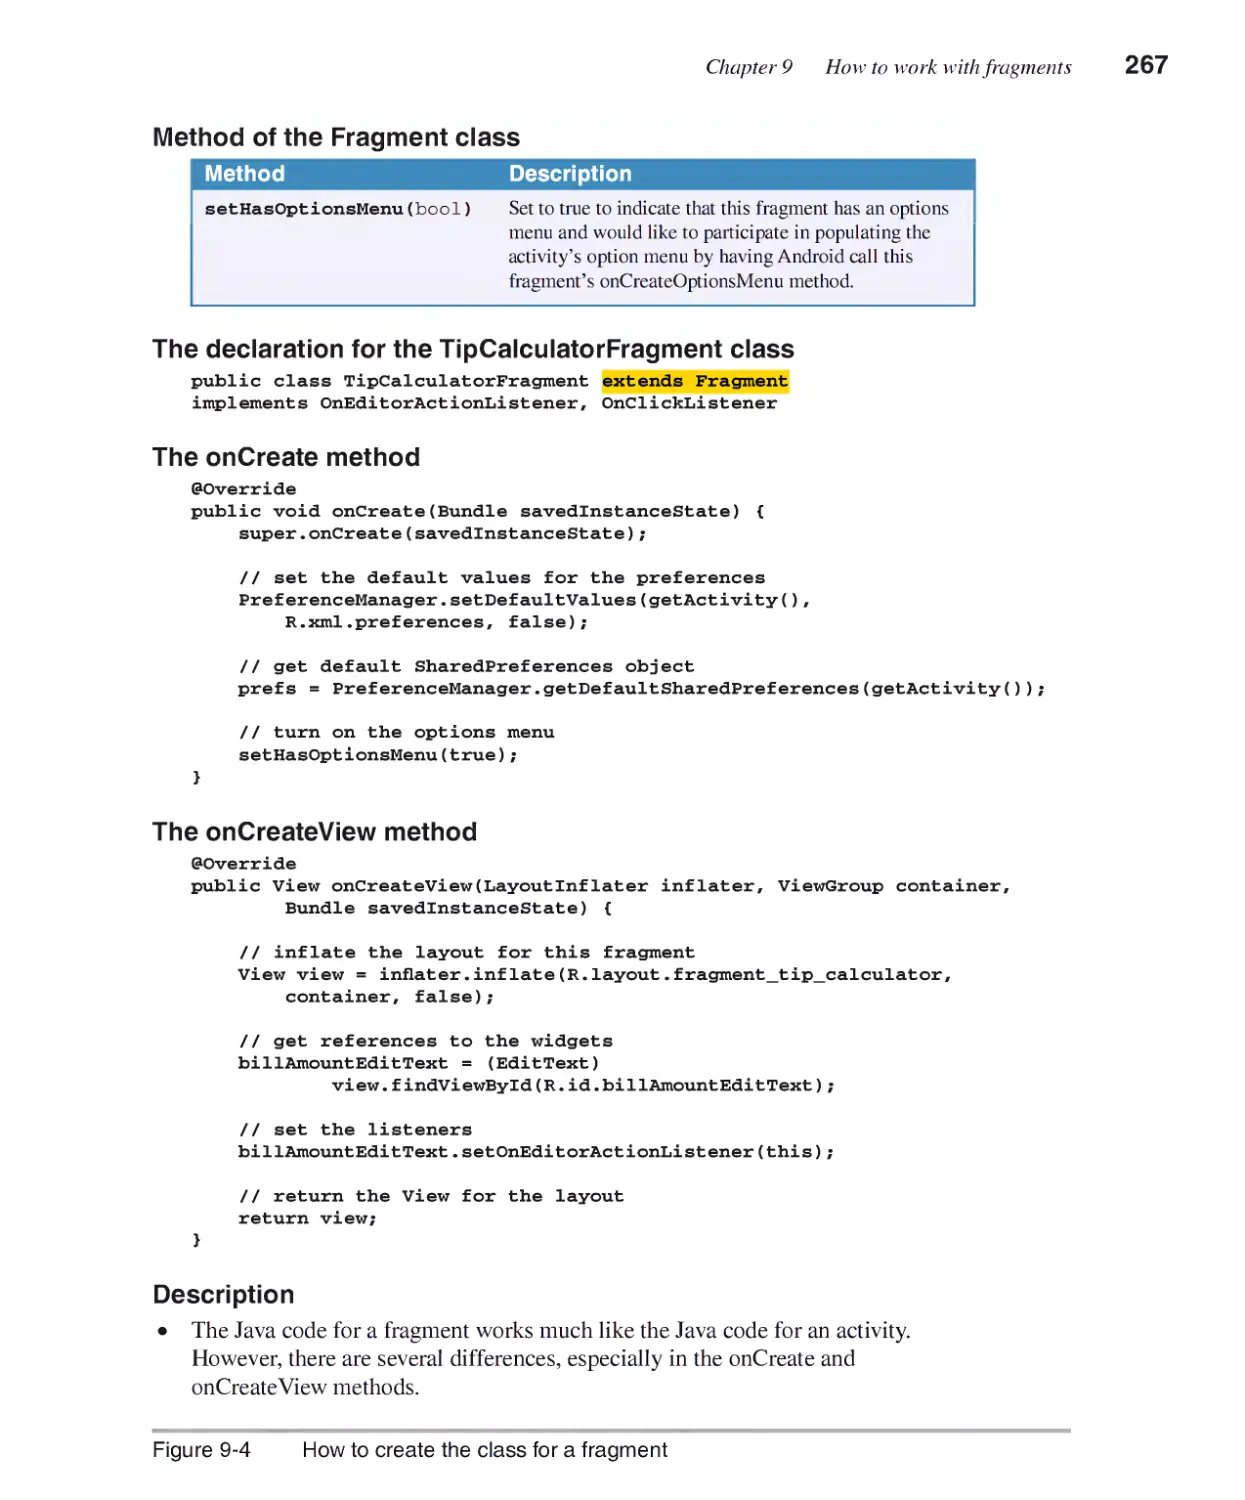
How to create the class for a fragment 266
How to display a fragment in an activity 268
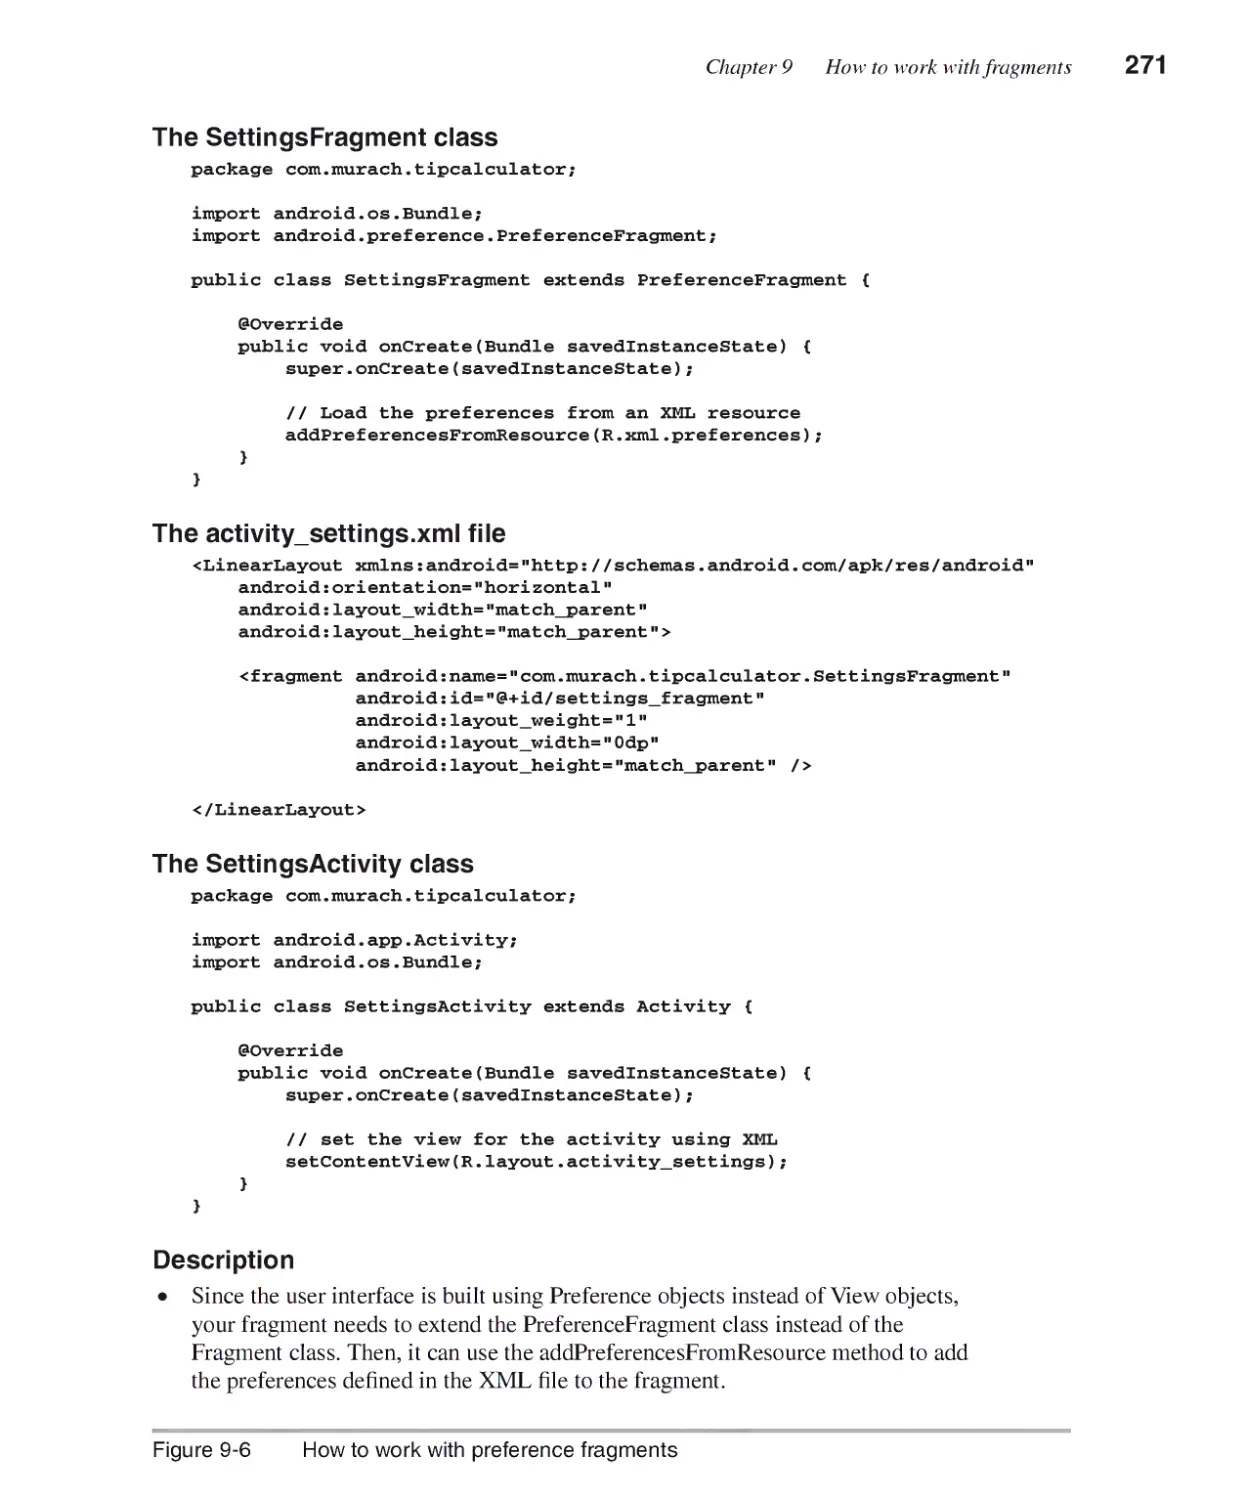
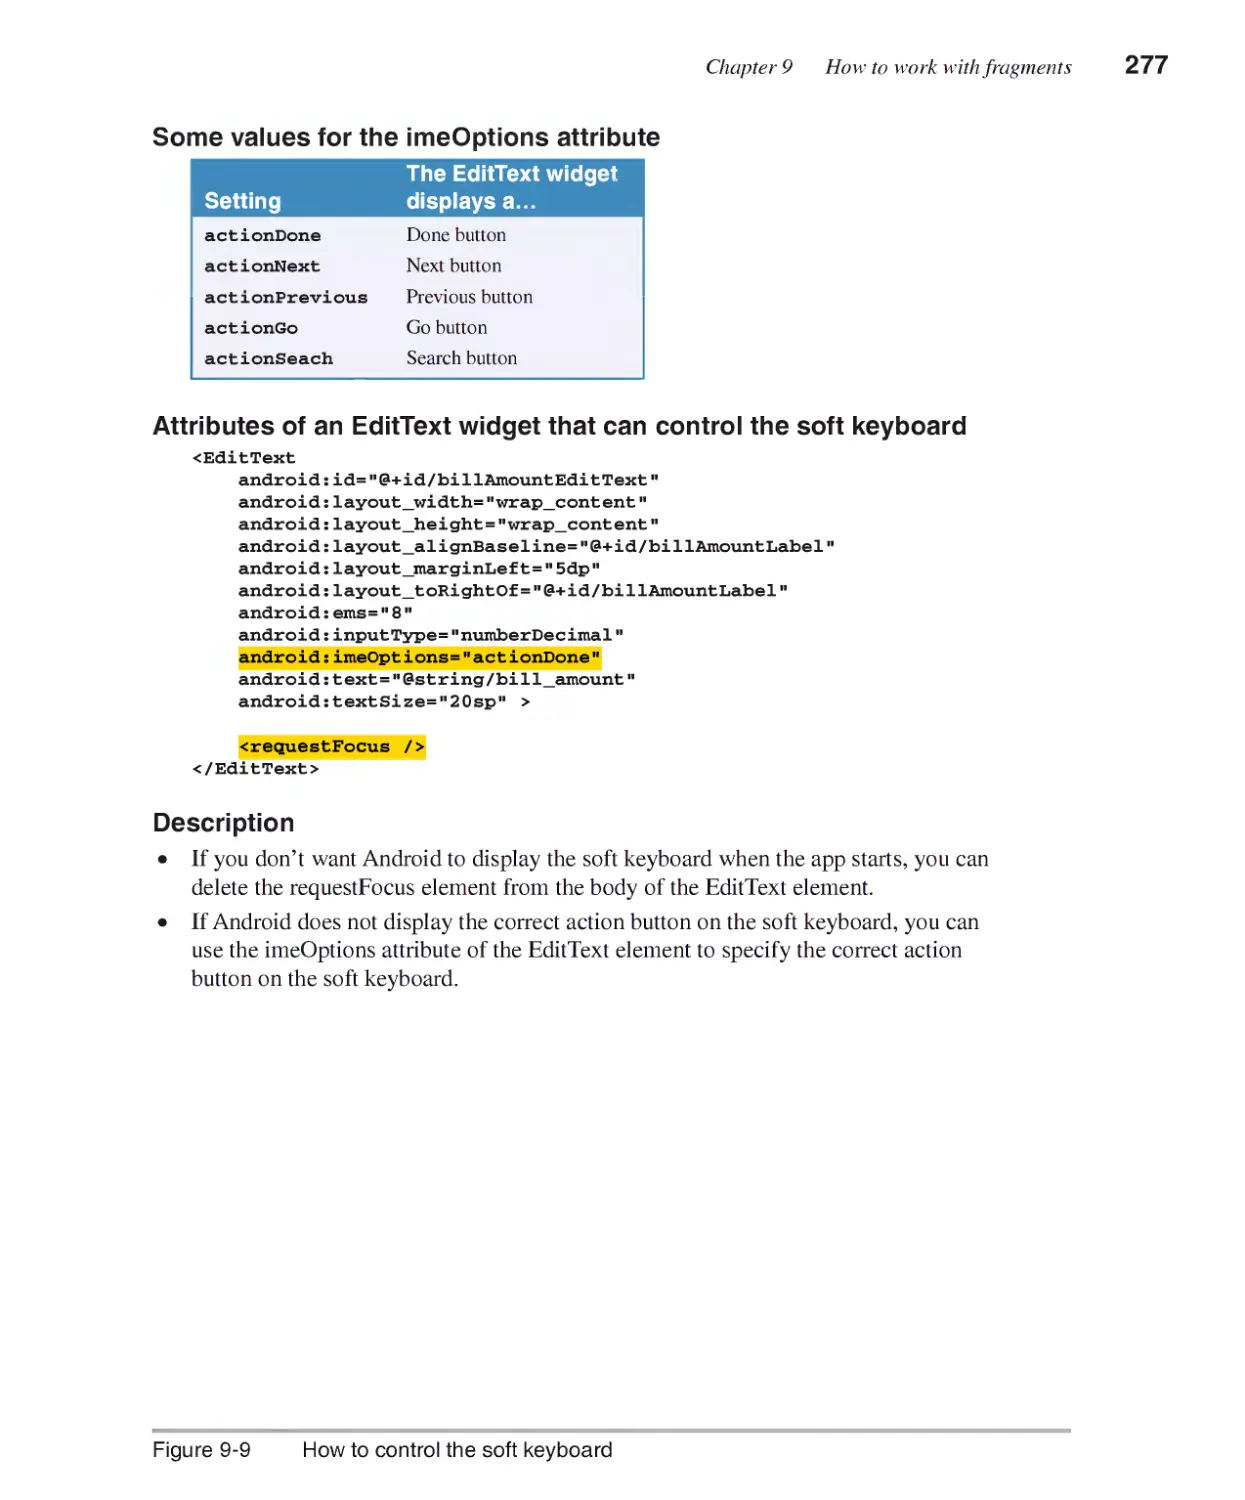
How to create a preference fragment 270
How to display a preference fragment in an activity 270
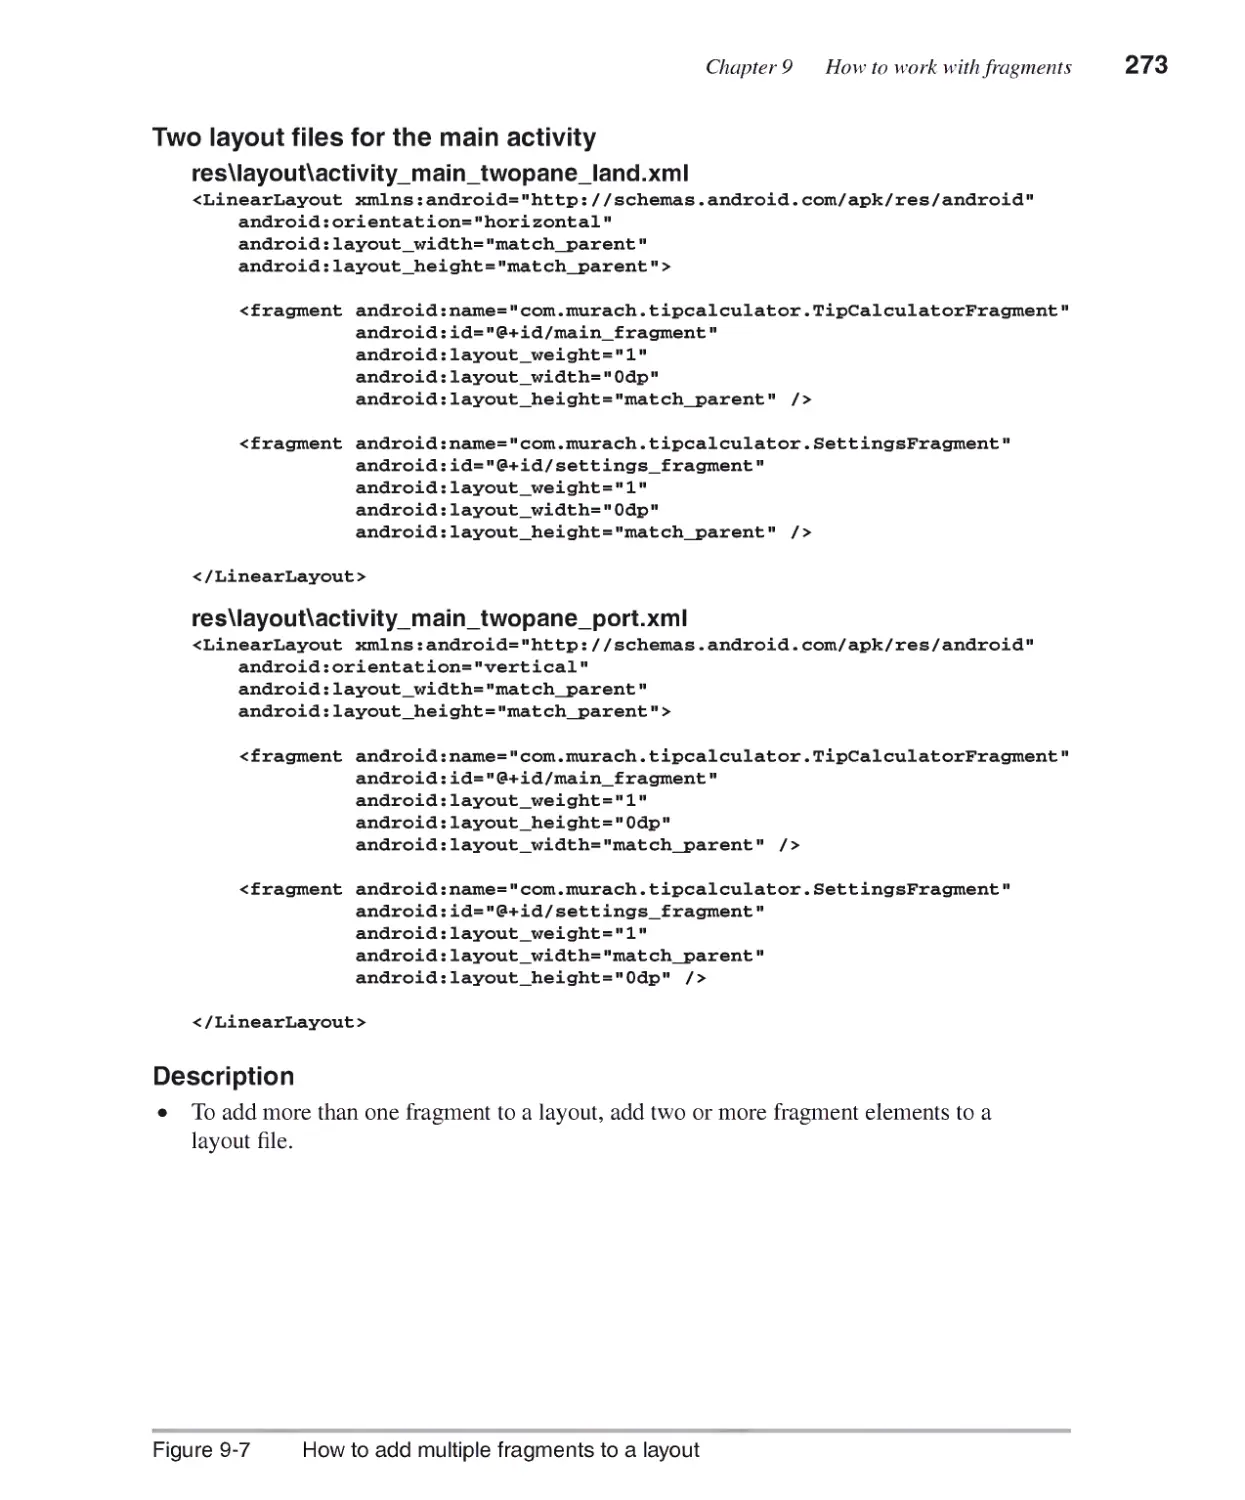
How to use multi-pane layouts for large screens........................272
How to add multiple fragments to a layout 272
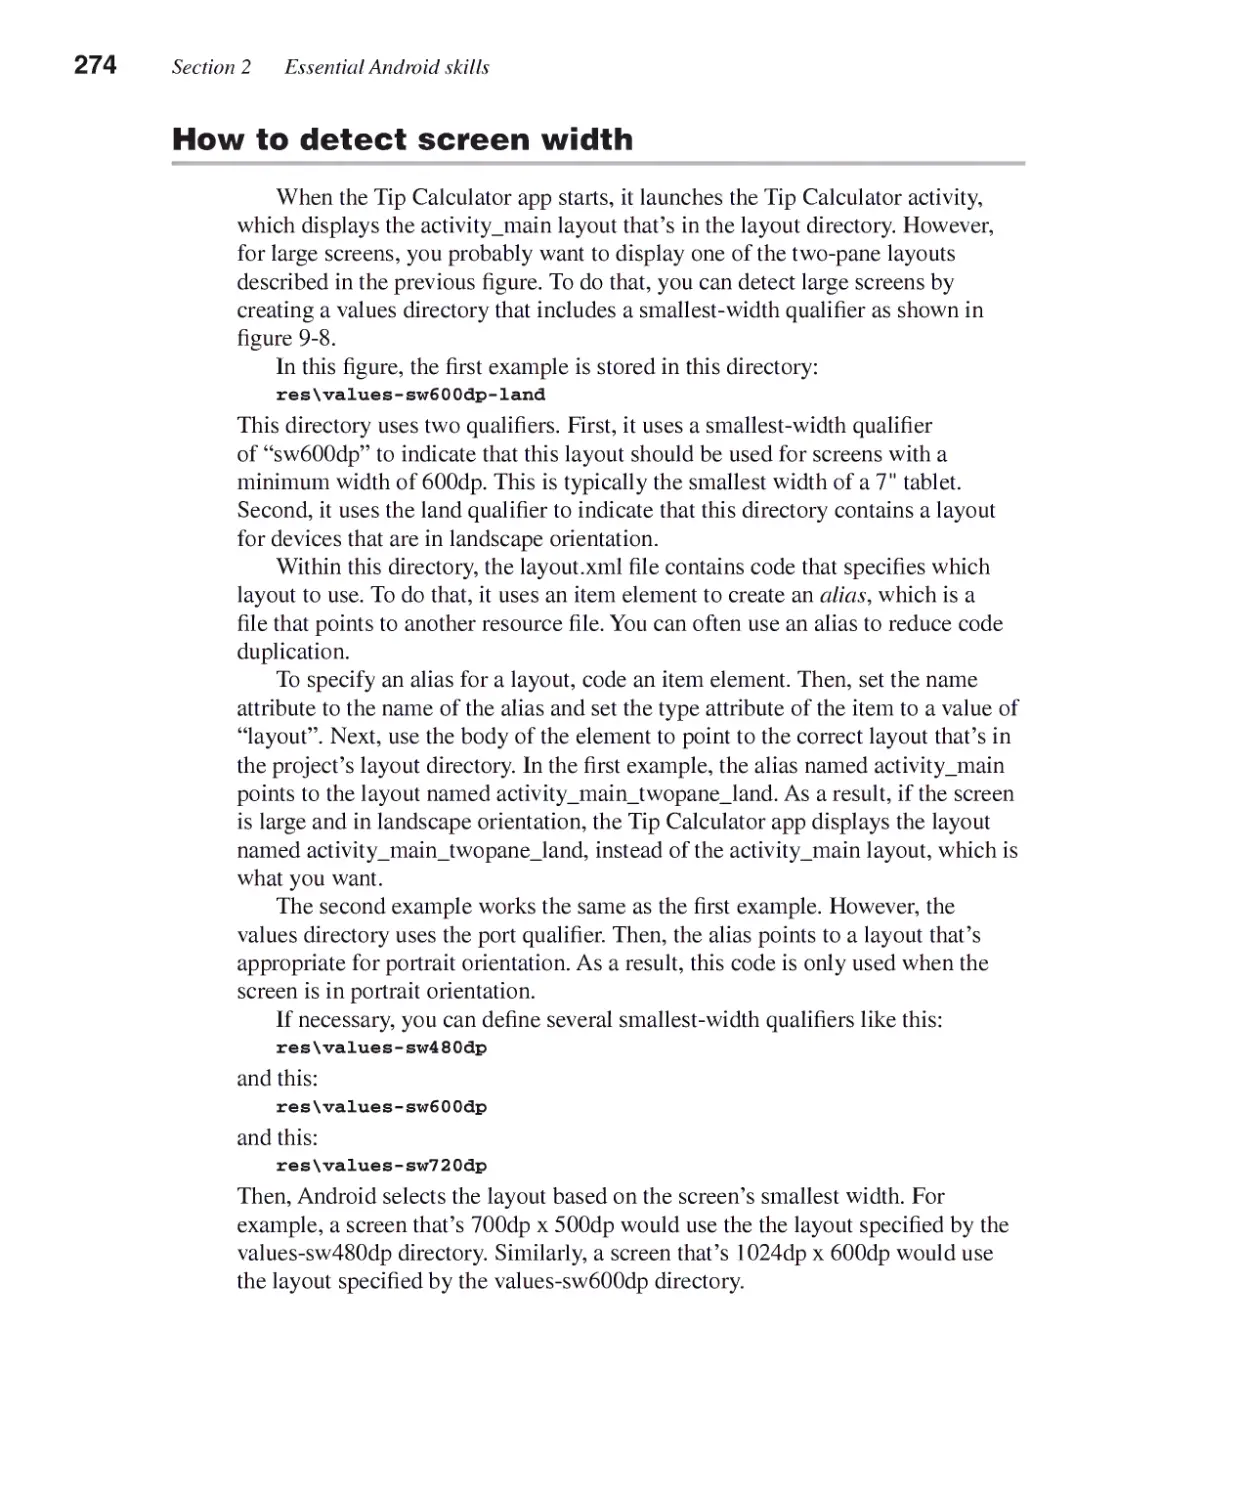
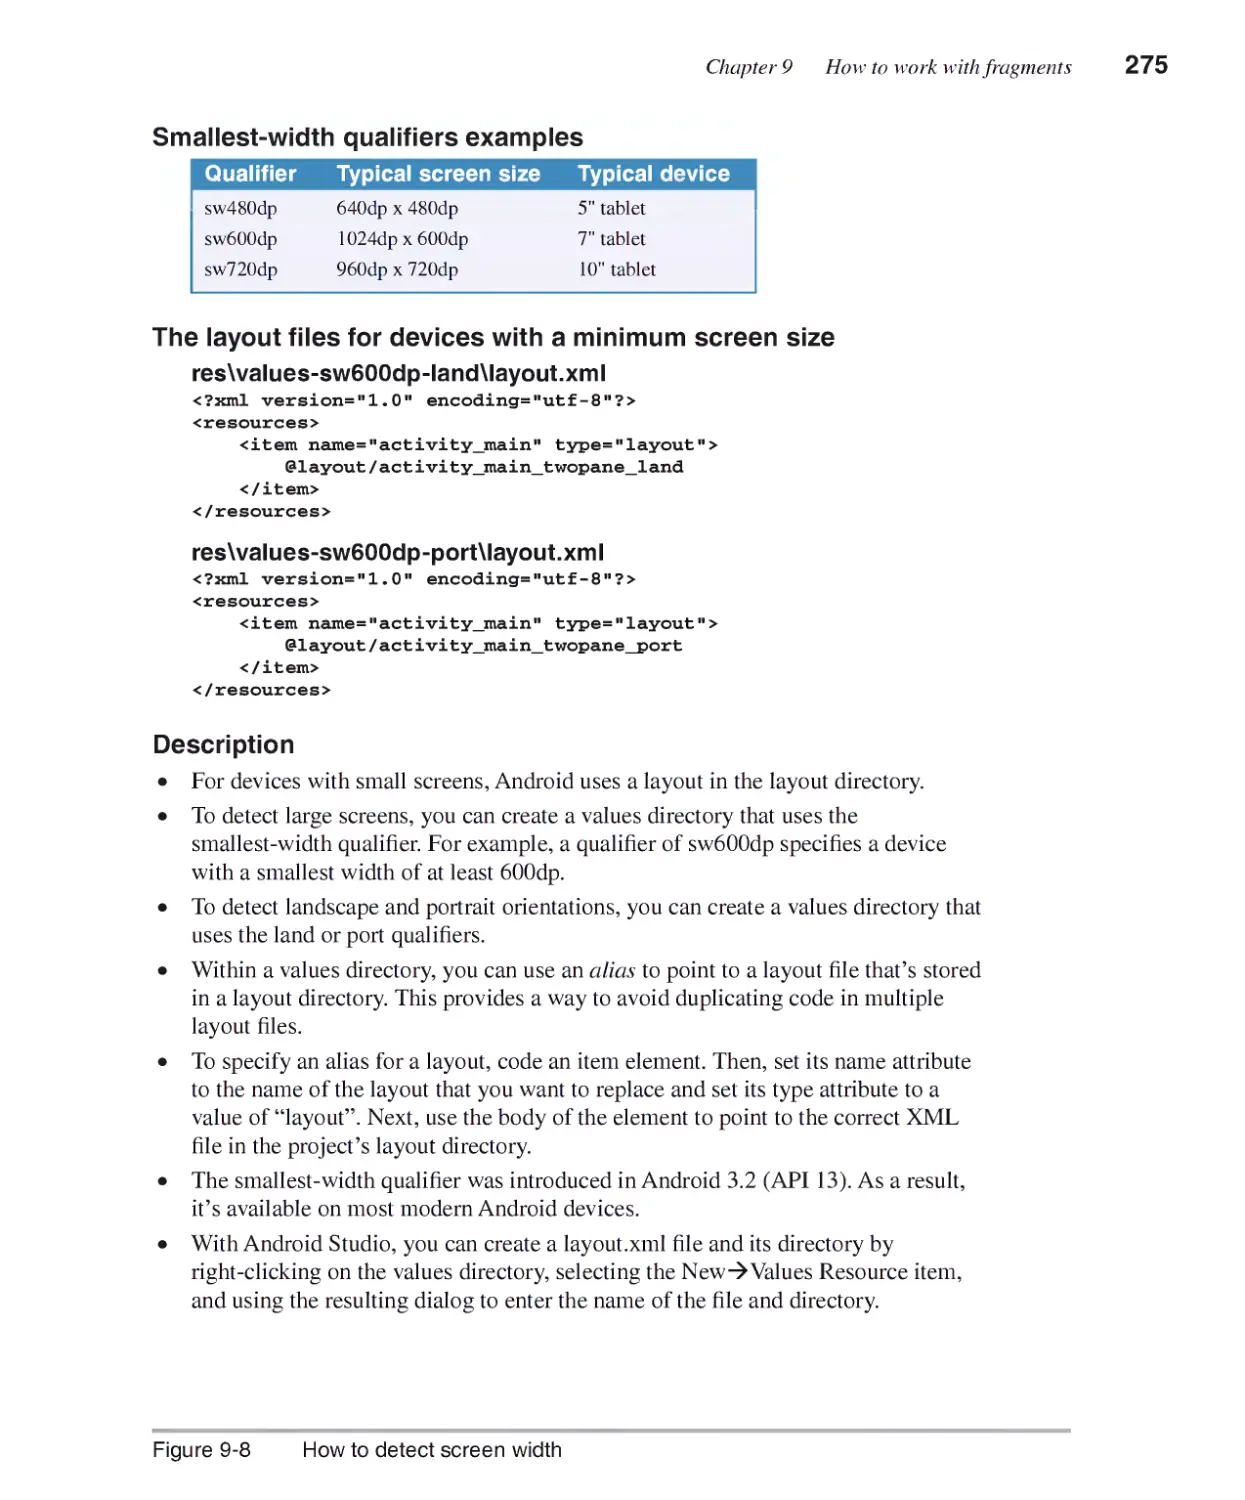
How to detect screen width 274
How to control the soft keyboard 276
Other skills for working with fragments.......................................278
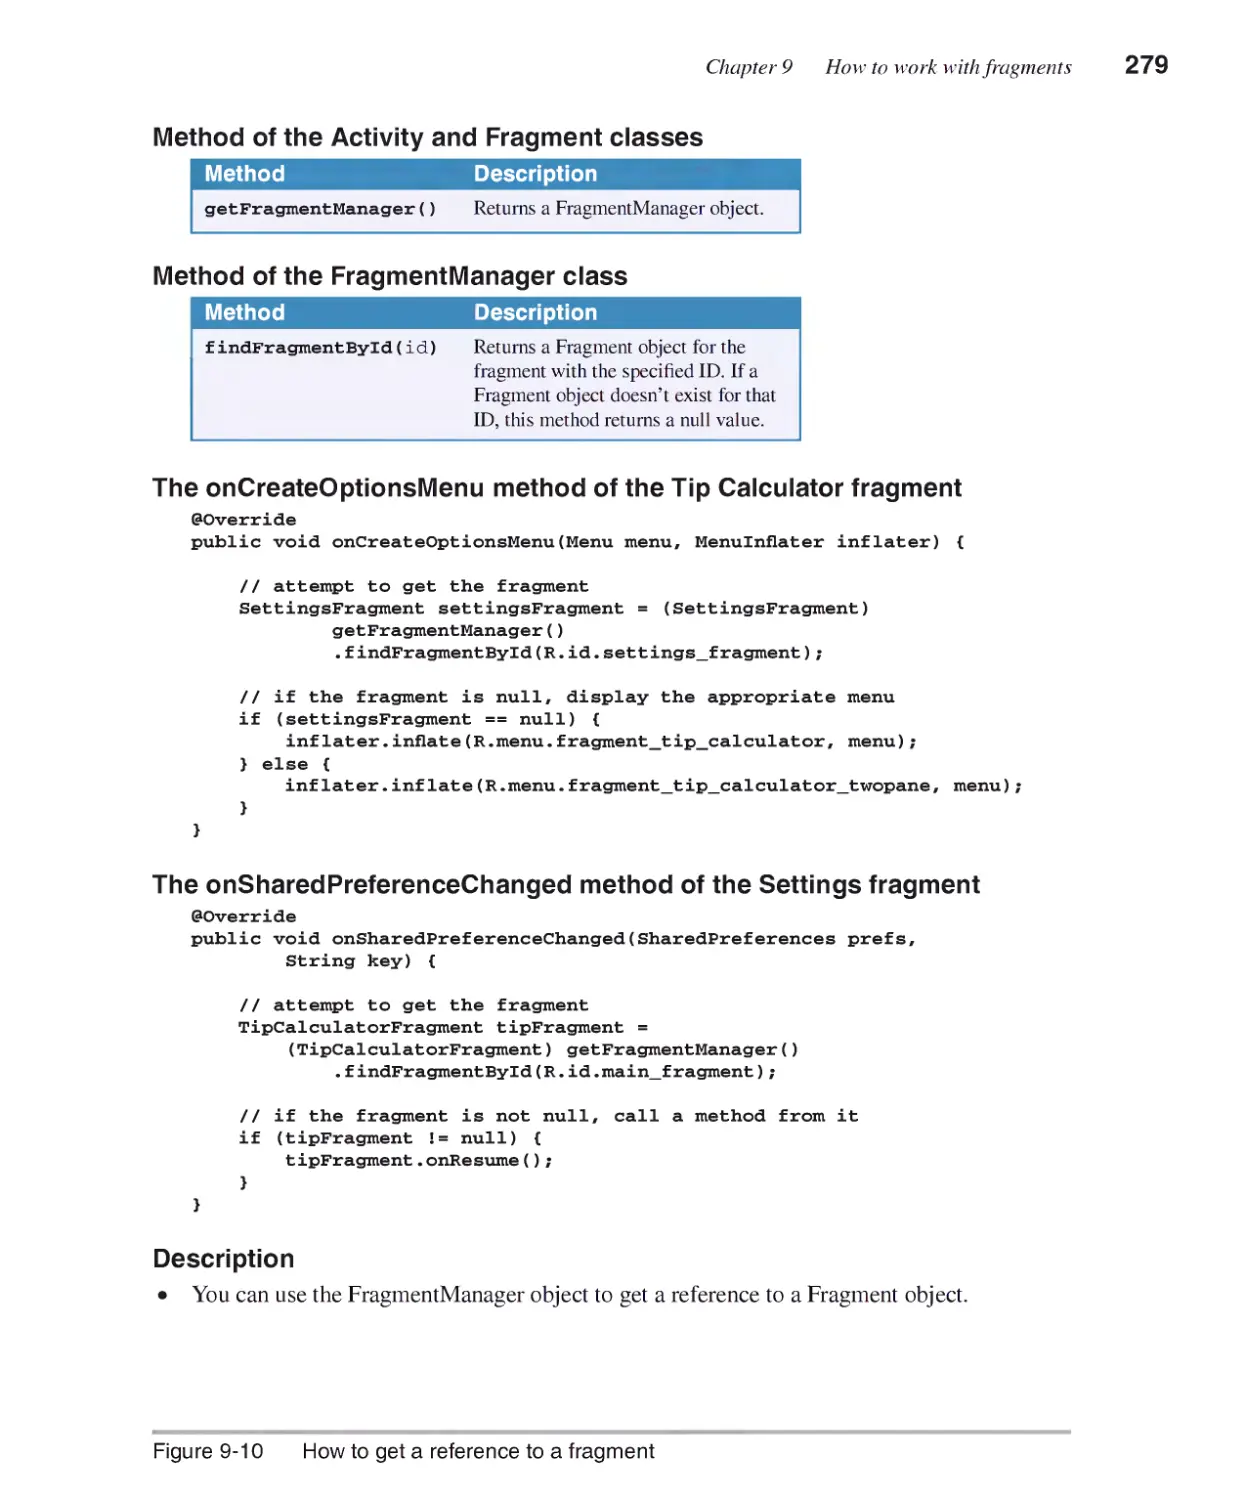
How to get a reference to a fragment 278
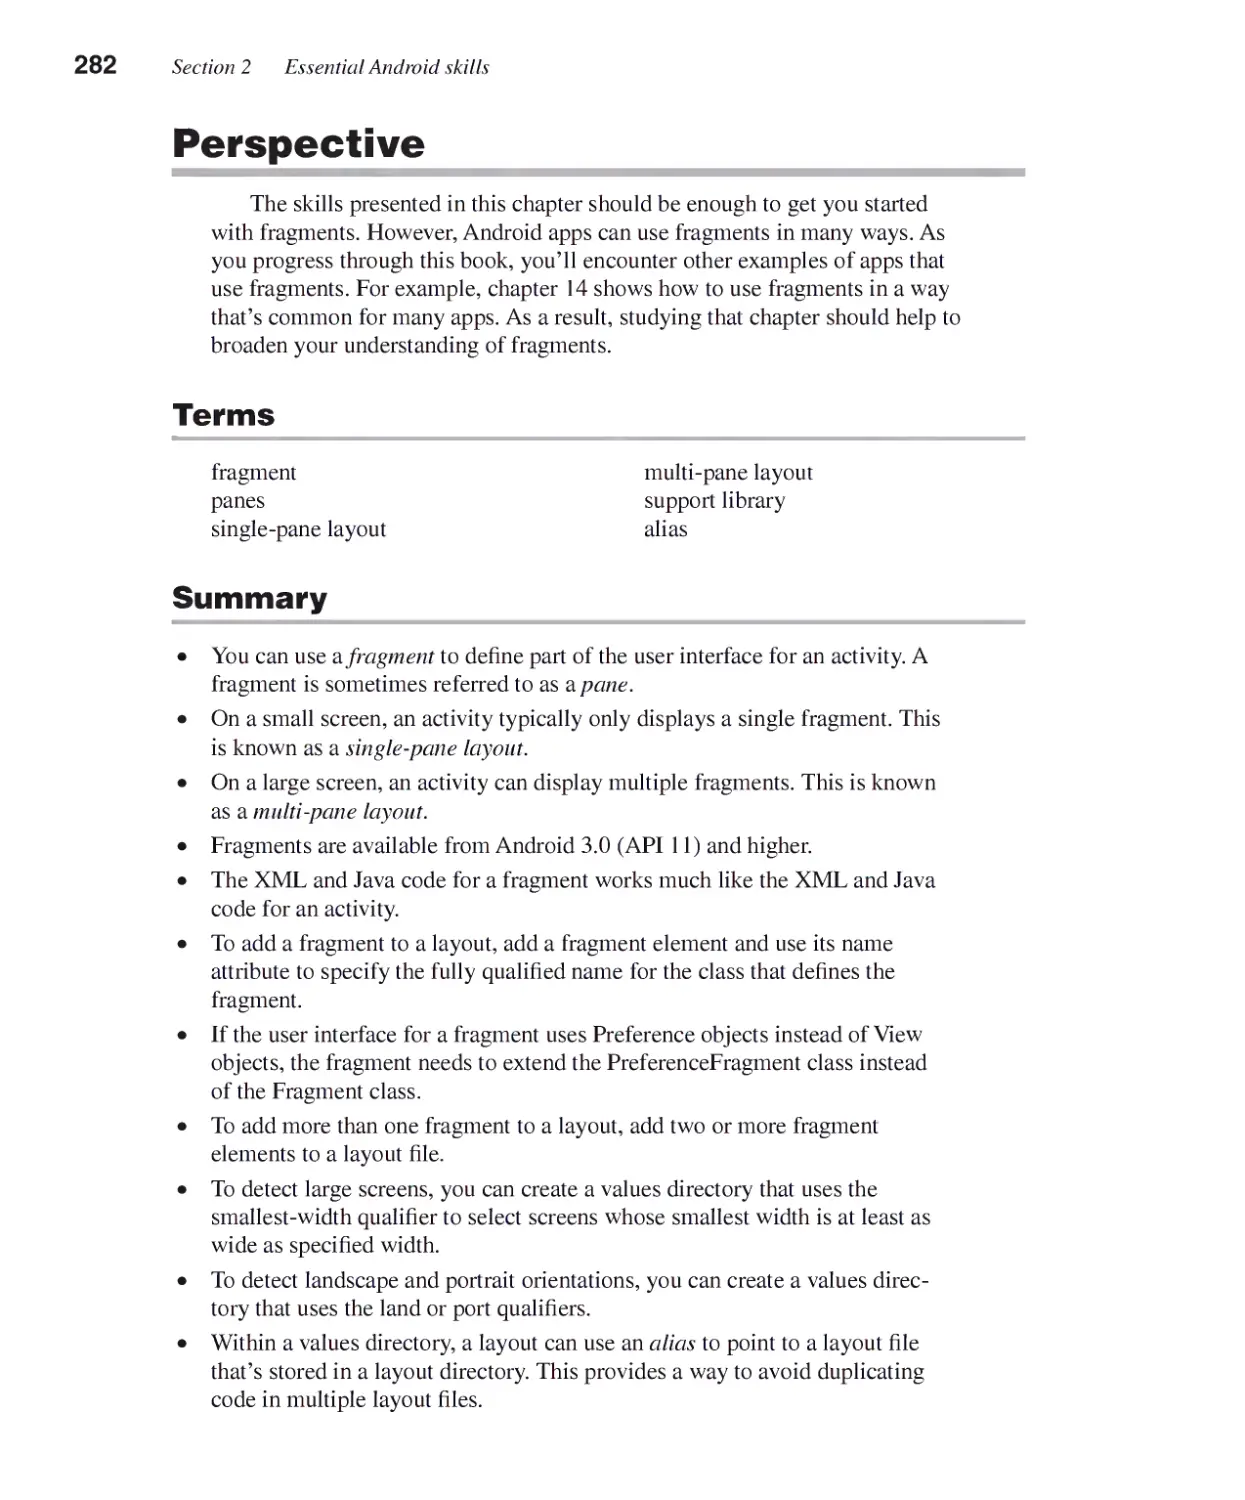
How to replace one fragment with another 280
Section 3 The News Reader app
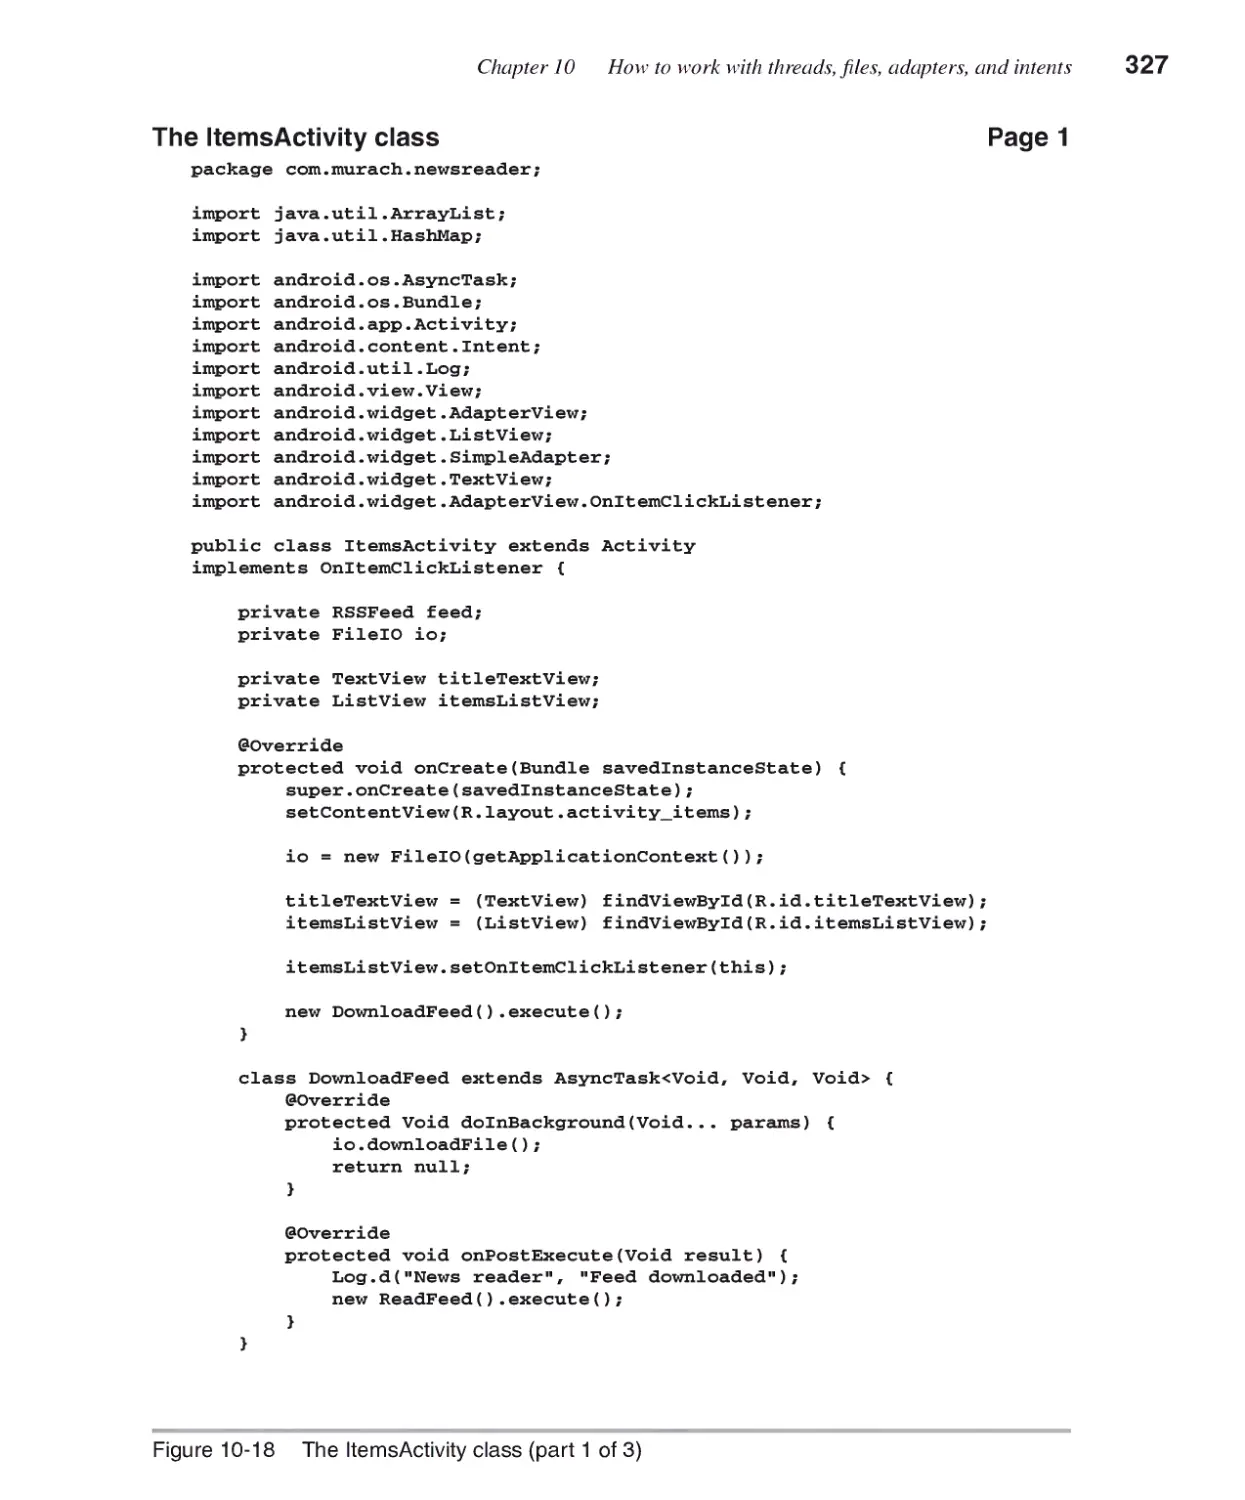
Chapter 10 How to work with threads, files, adapters,
and intents
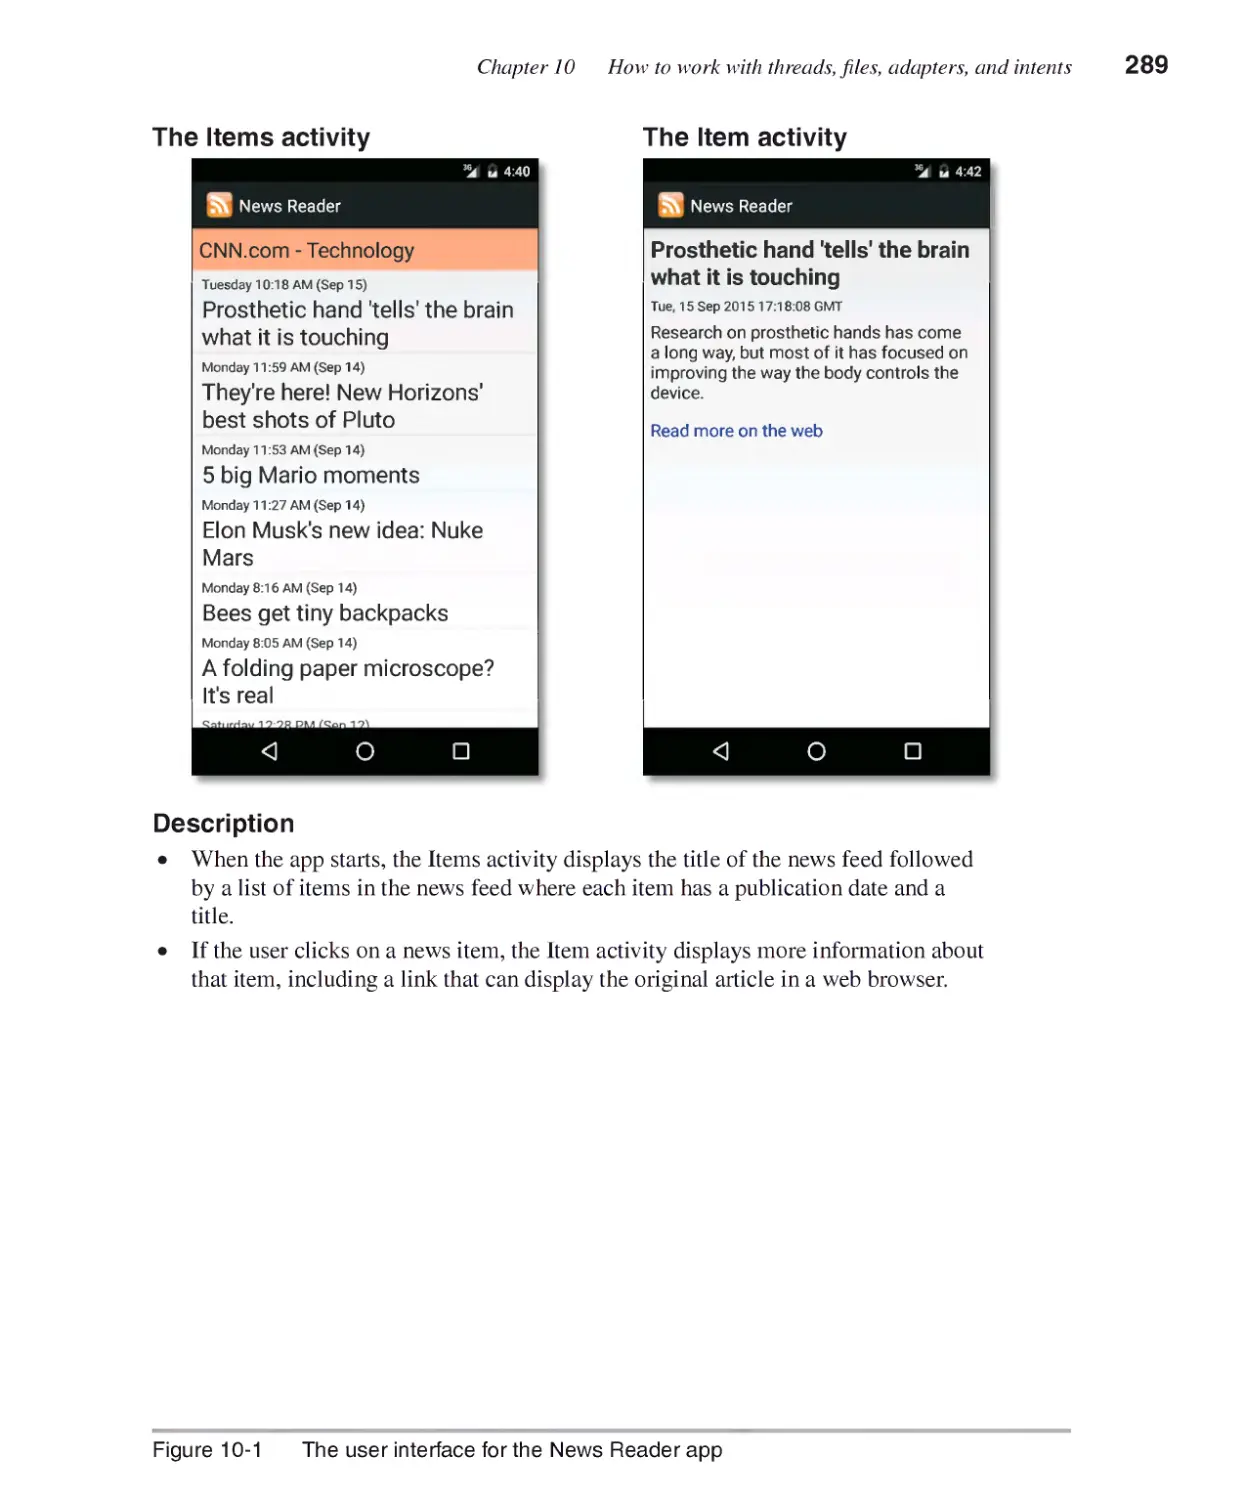
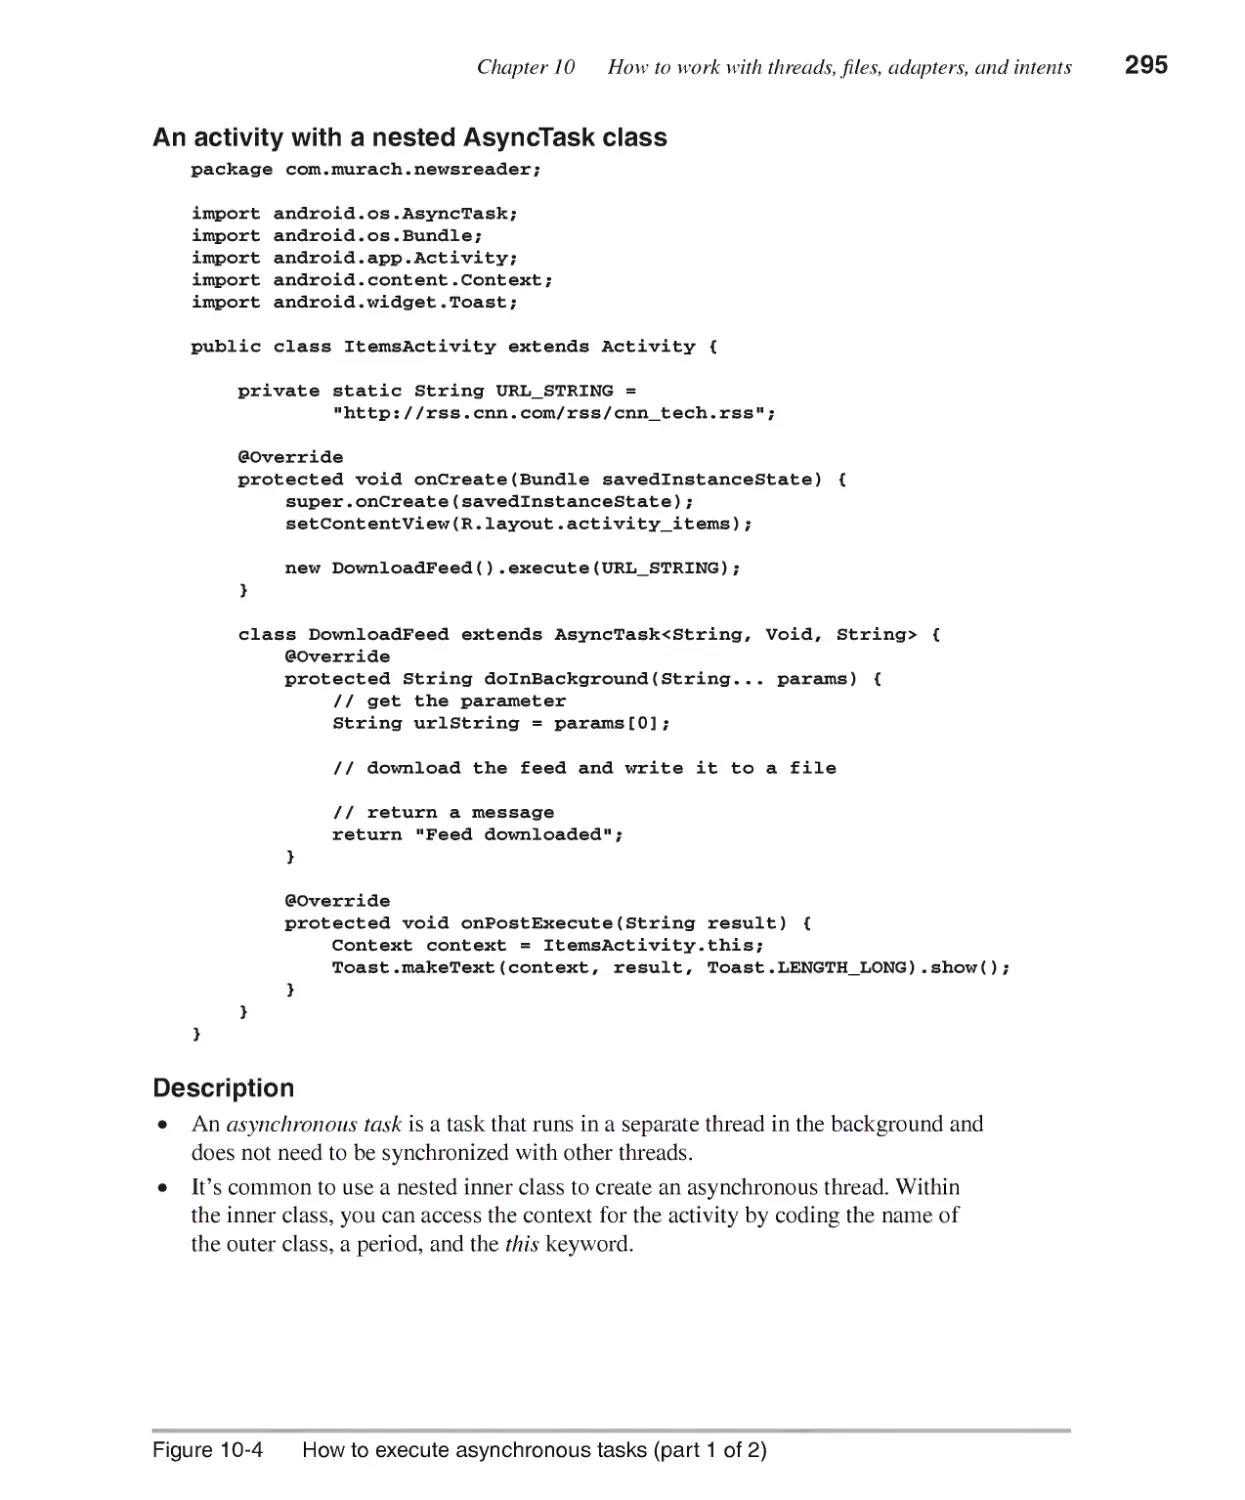
An introduction to the News Reader app.....................................288
The user interface 288
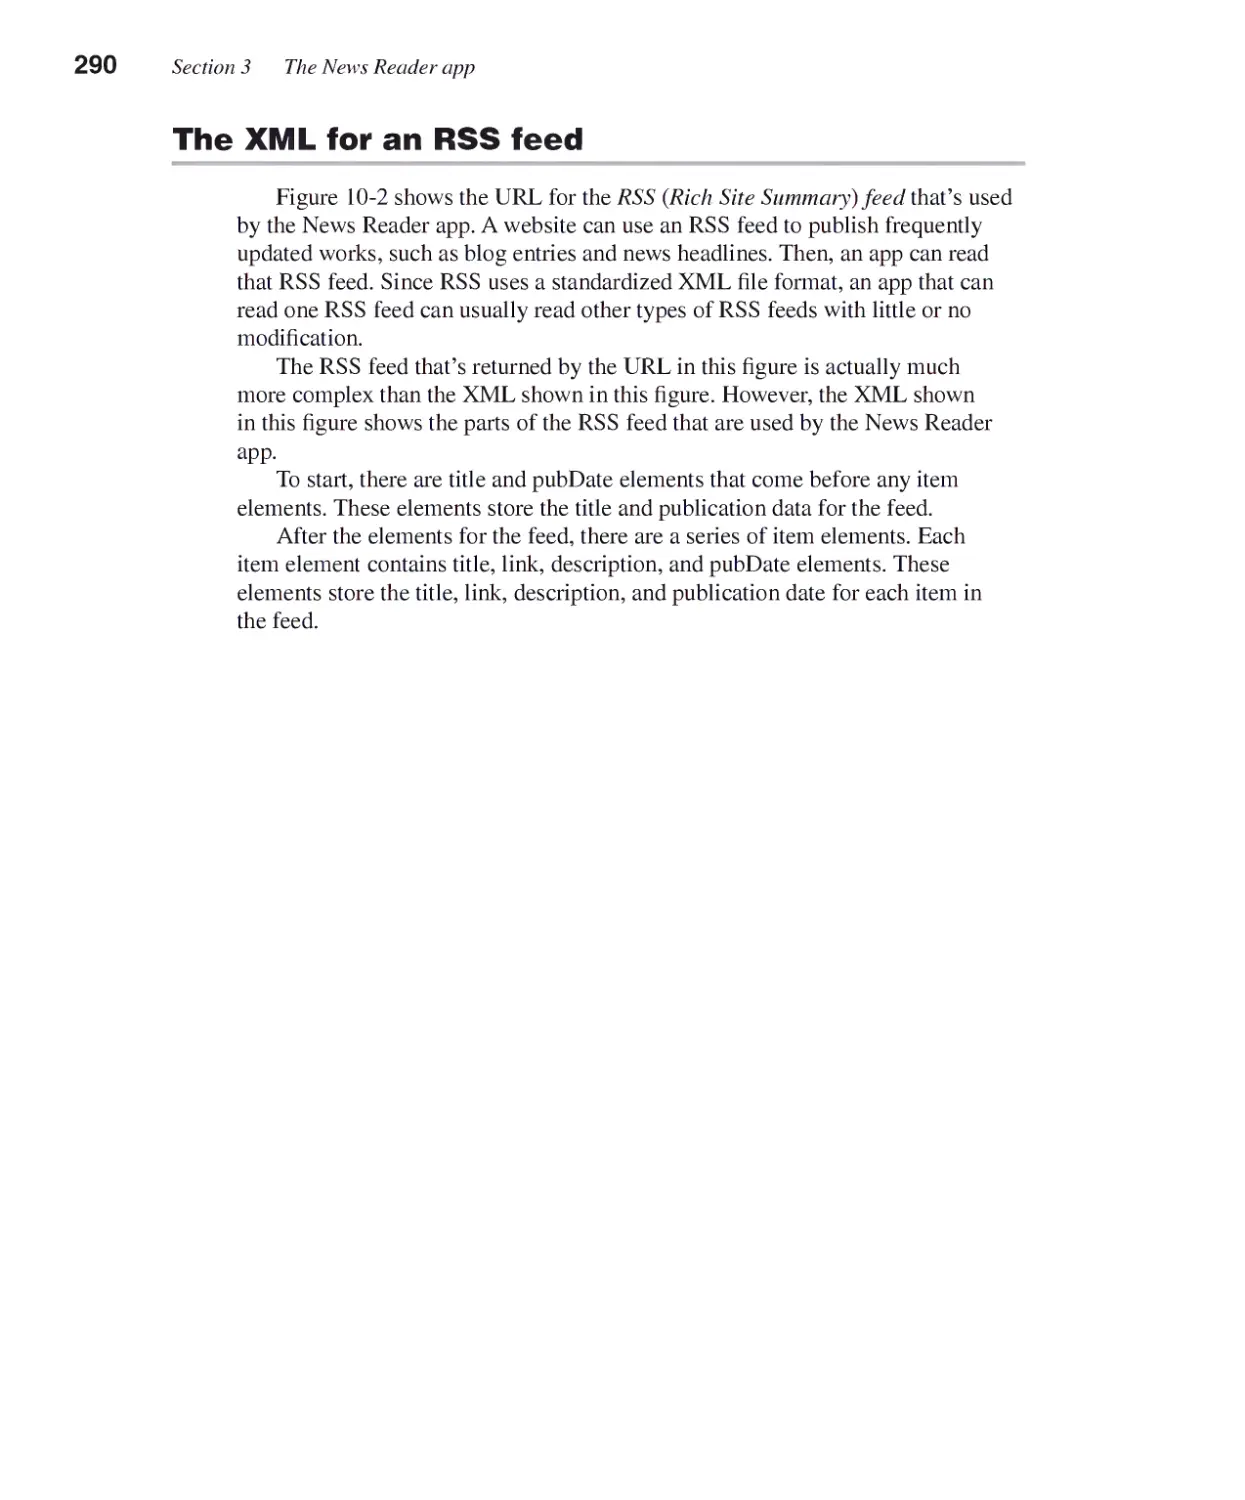
The XML for an RSS feed 290
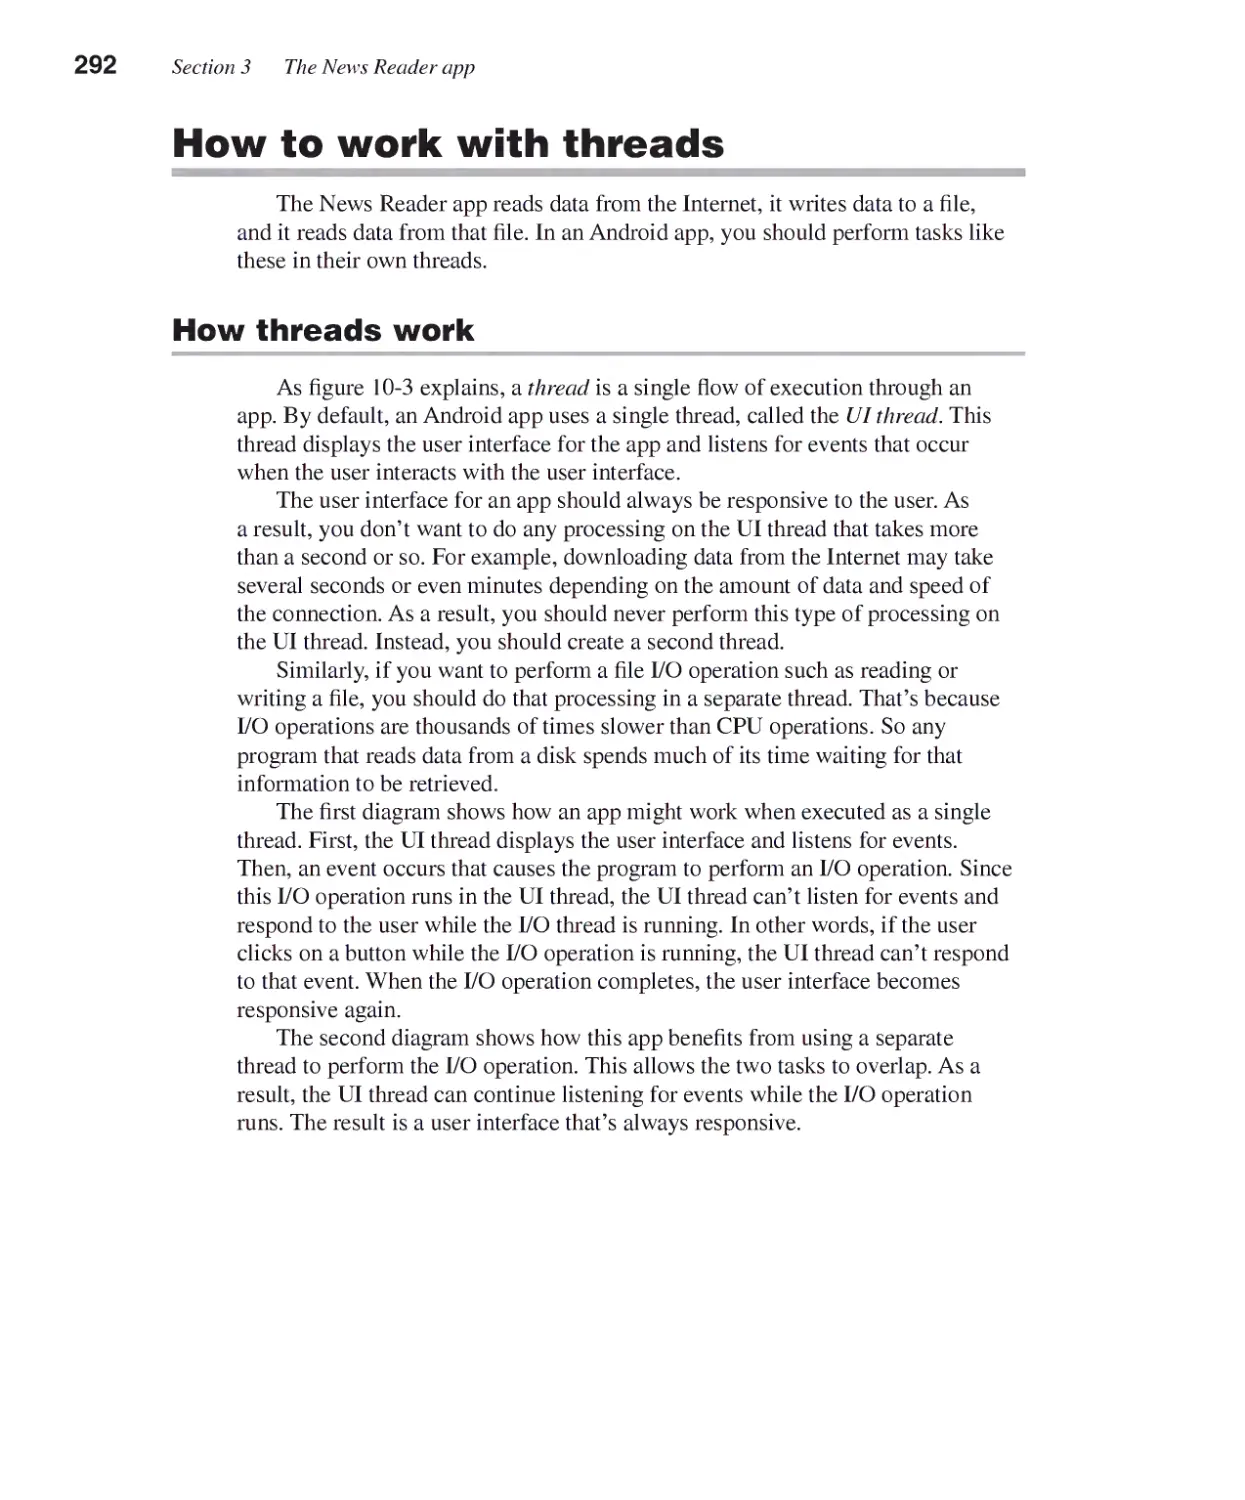
How to work with threads ..............................................................292
How threads work 292
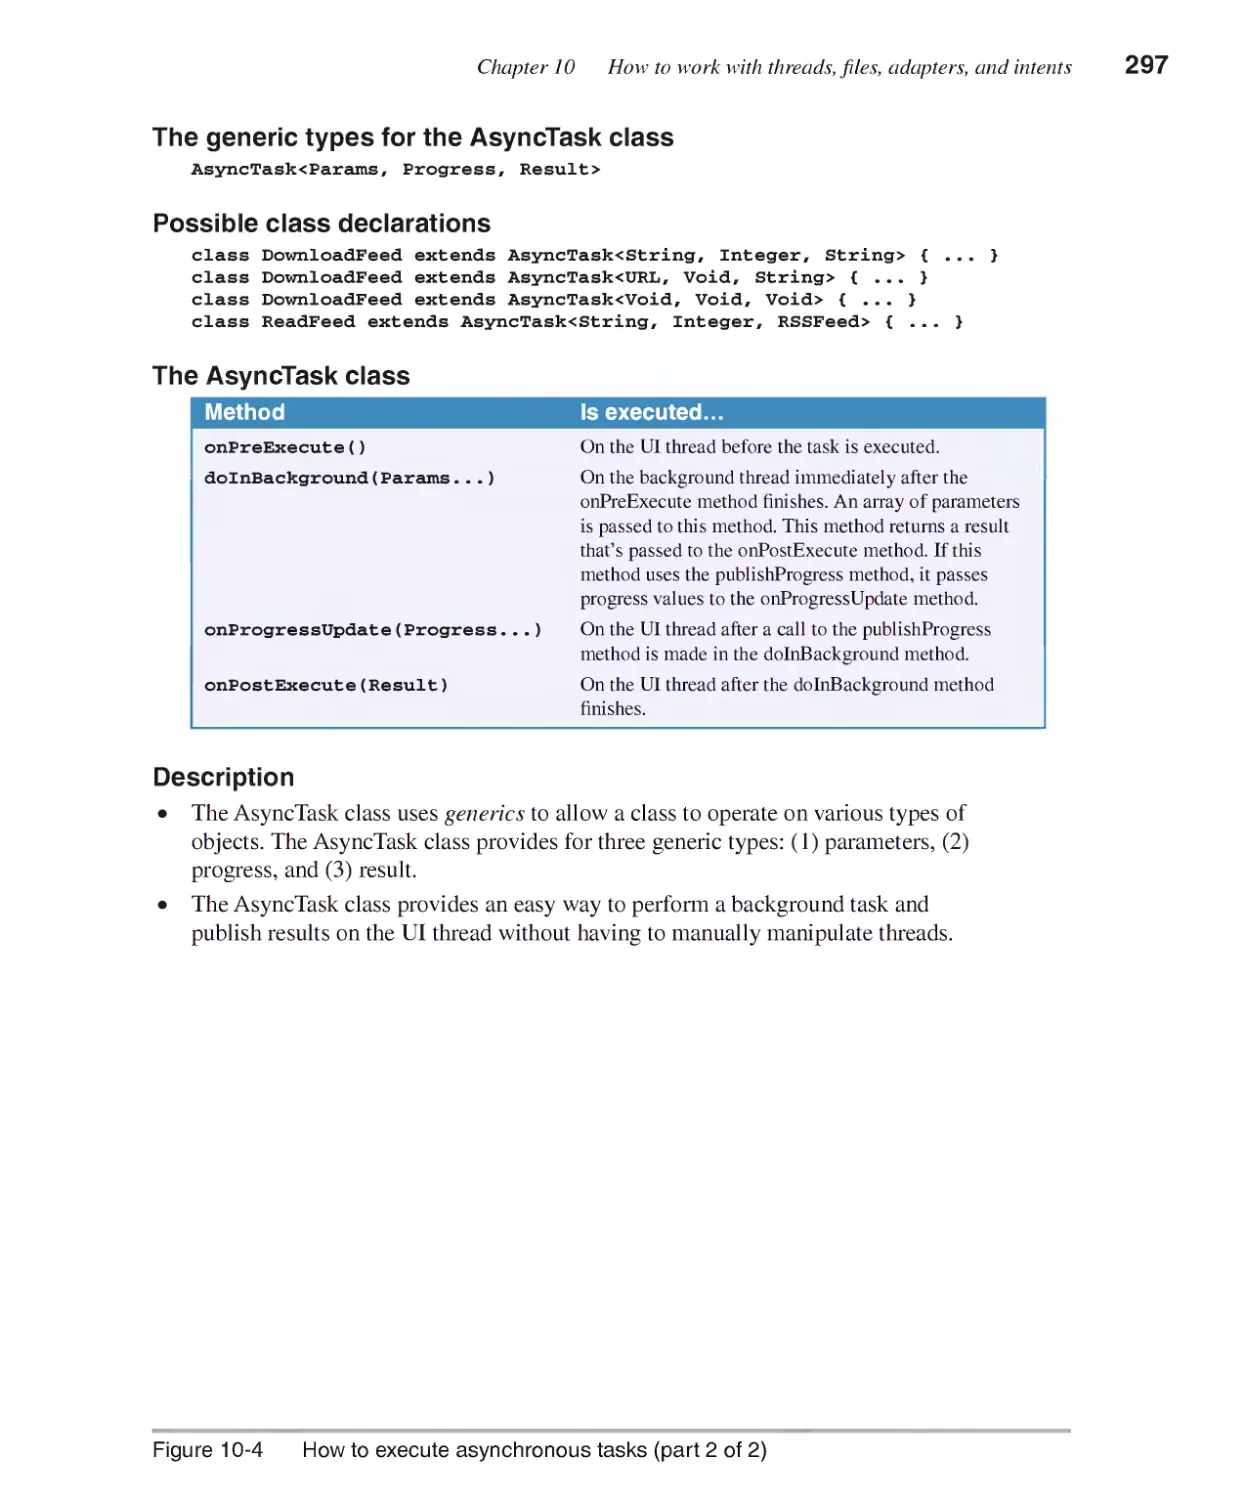
How to execute asynchronous tasks 294
How to execute timed tasks 298
How to update the UI thread 300
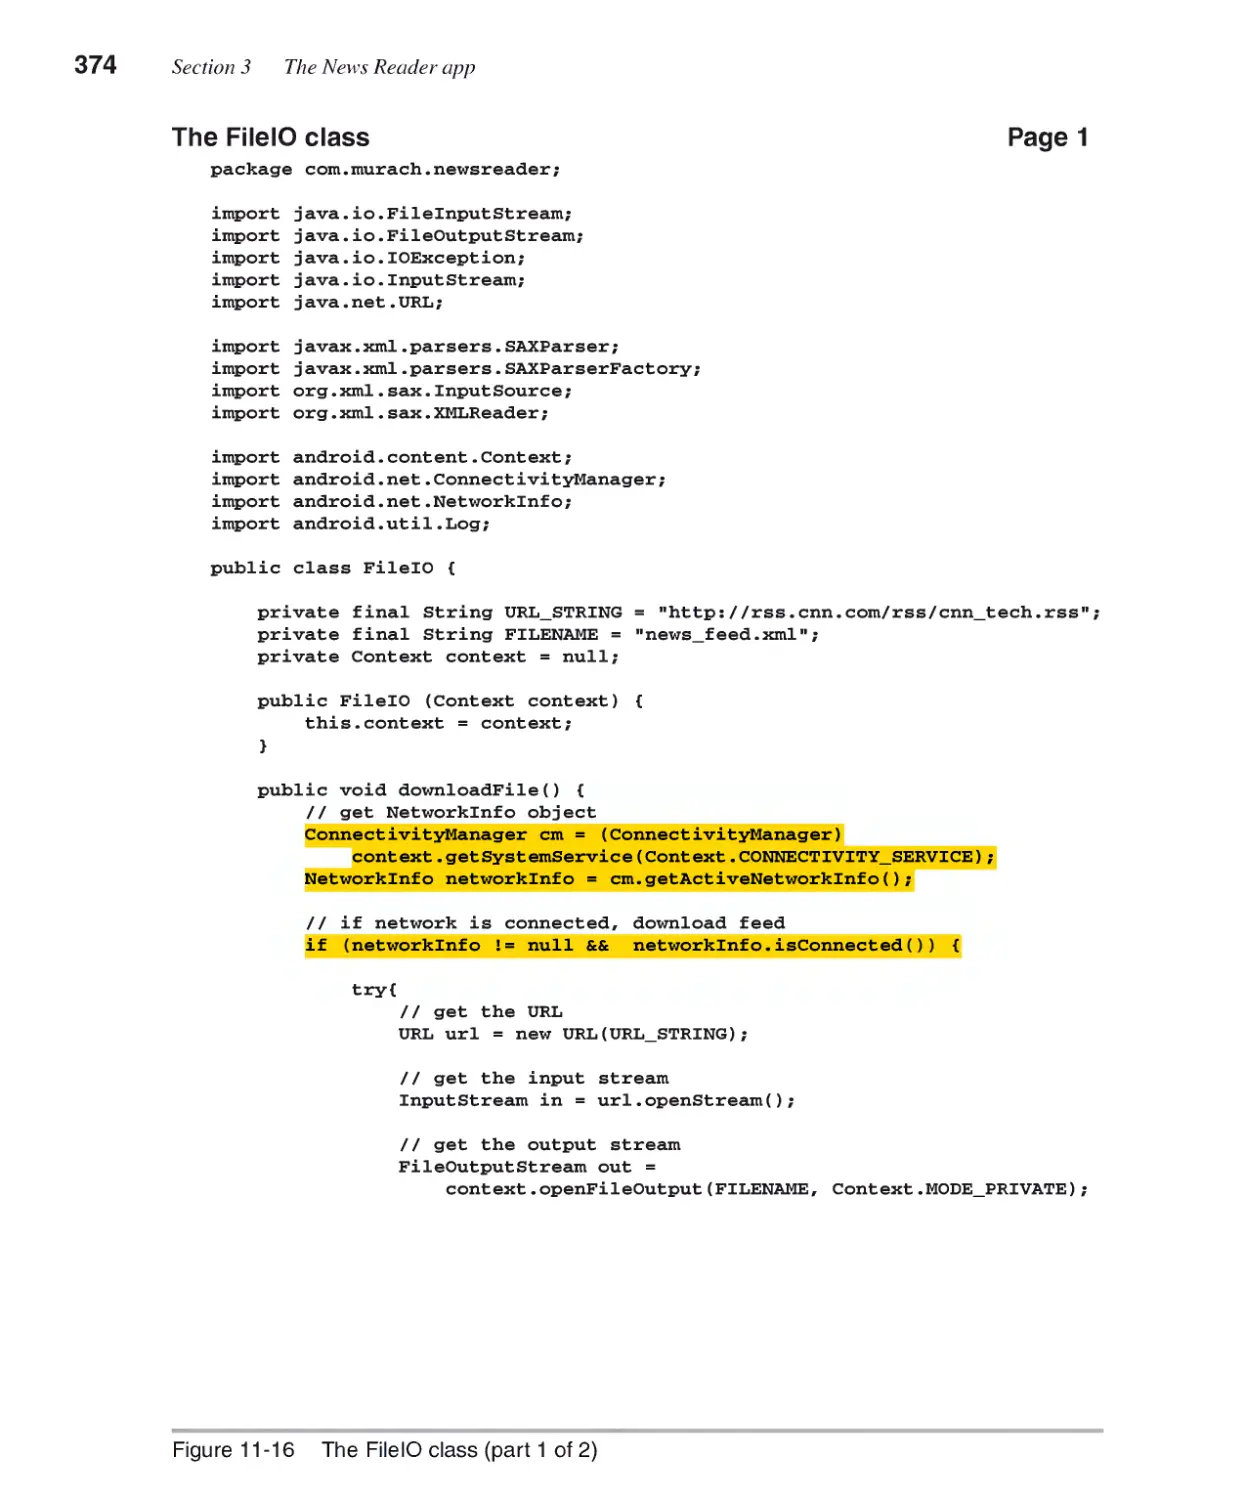
How to work with files ....................................................................302
How to download a file from the Internet 302
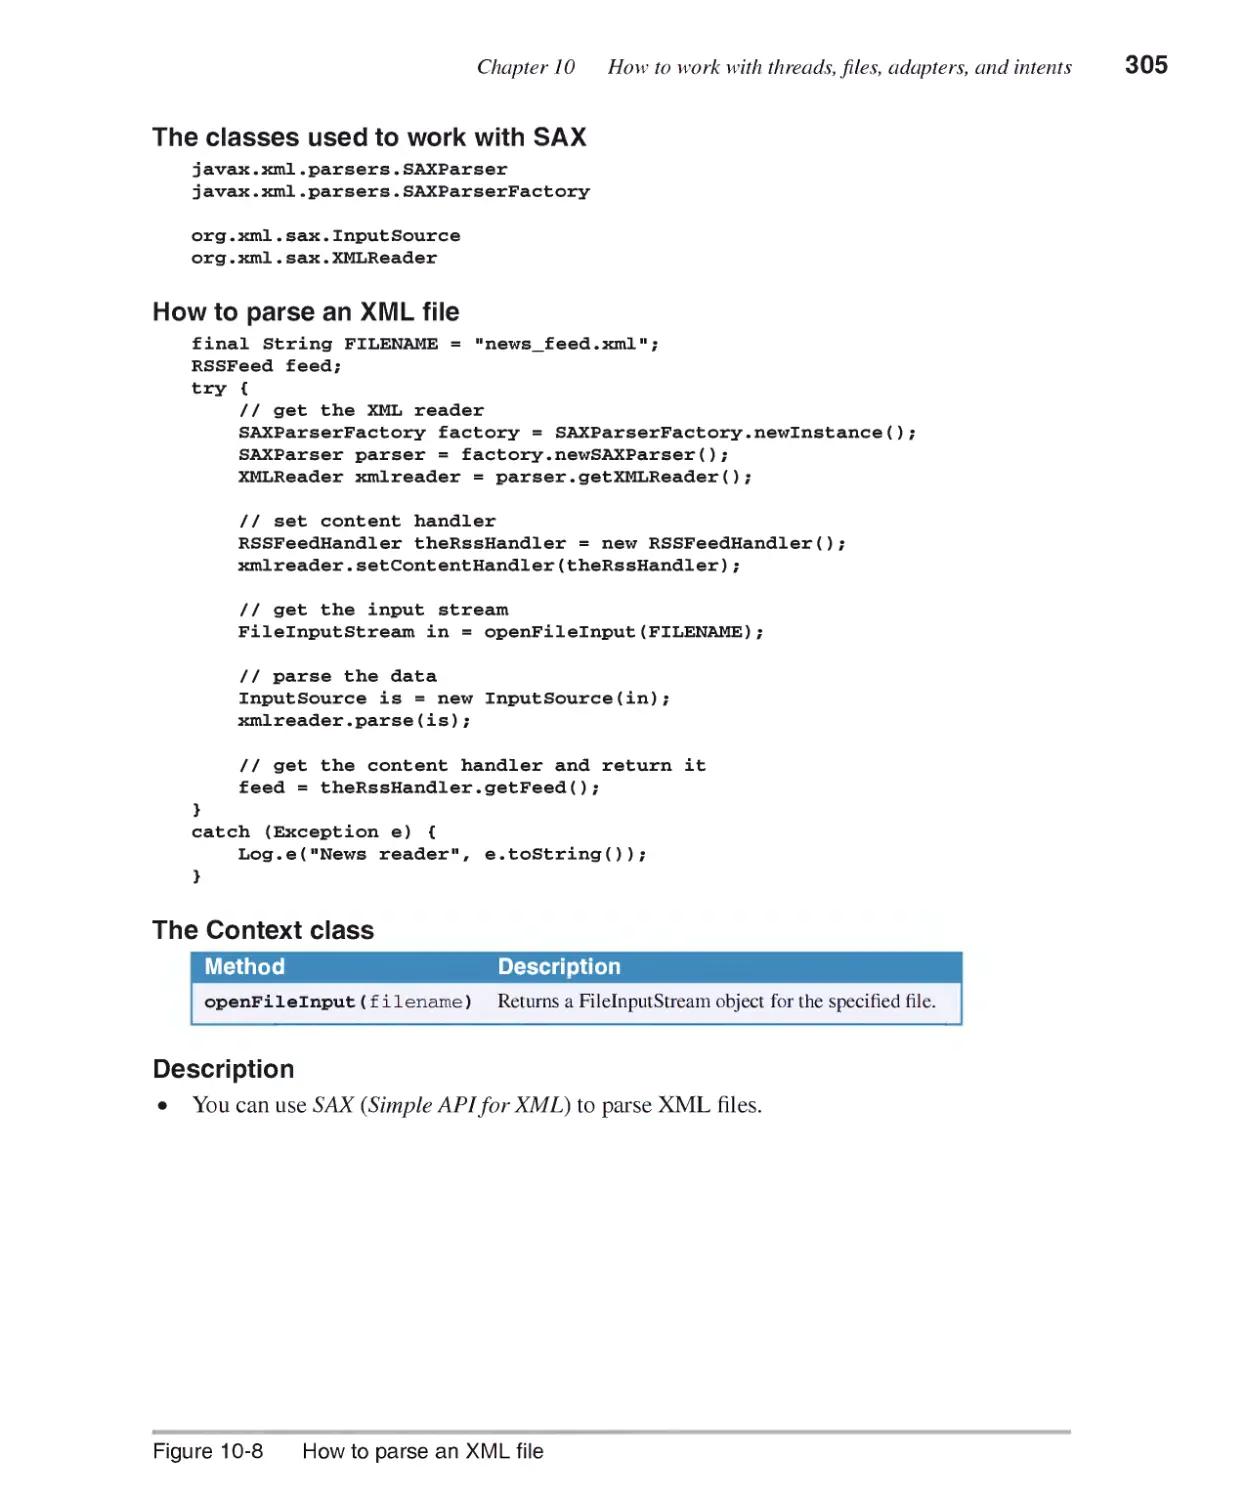
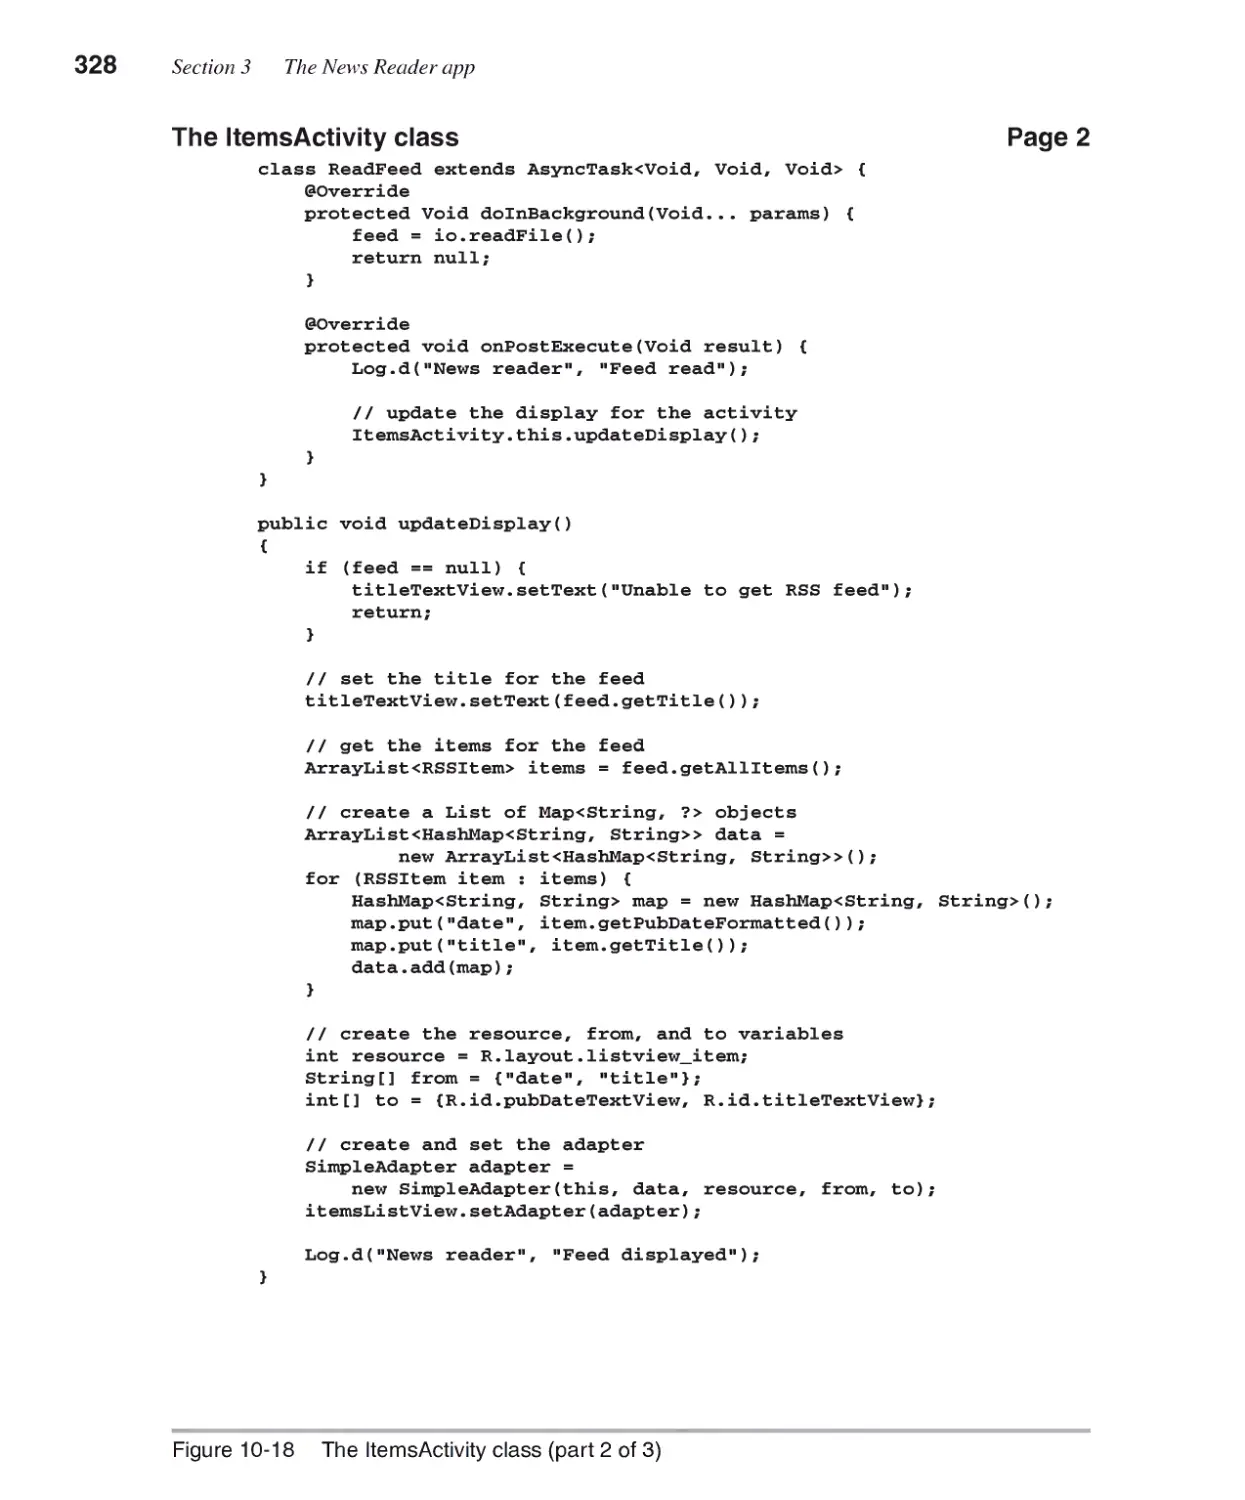
How to parse an XML file 304
The RSSFeedHandler class 306
The RSSFeed class 310
The RSSItem class 310
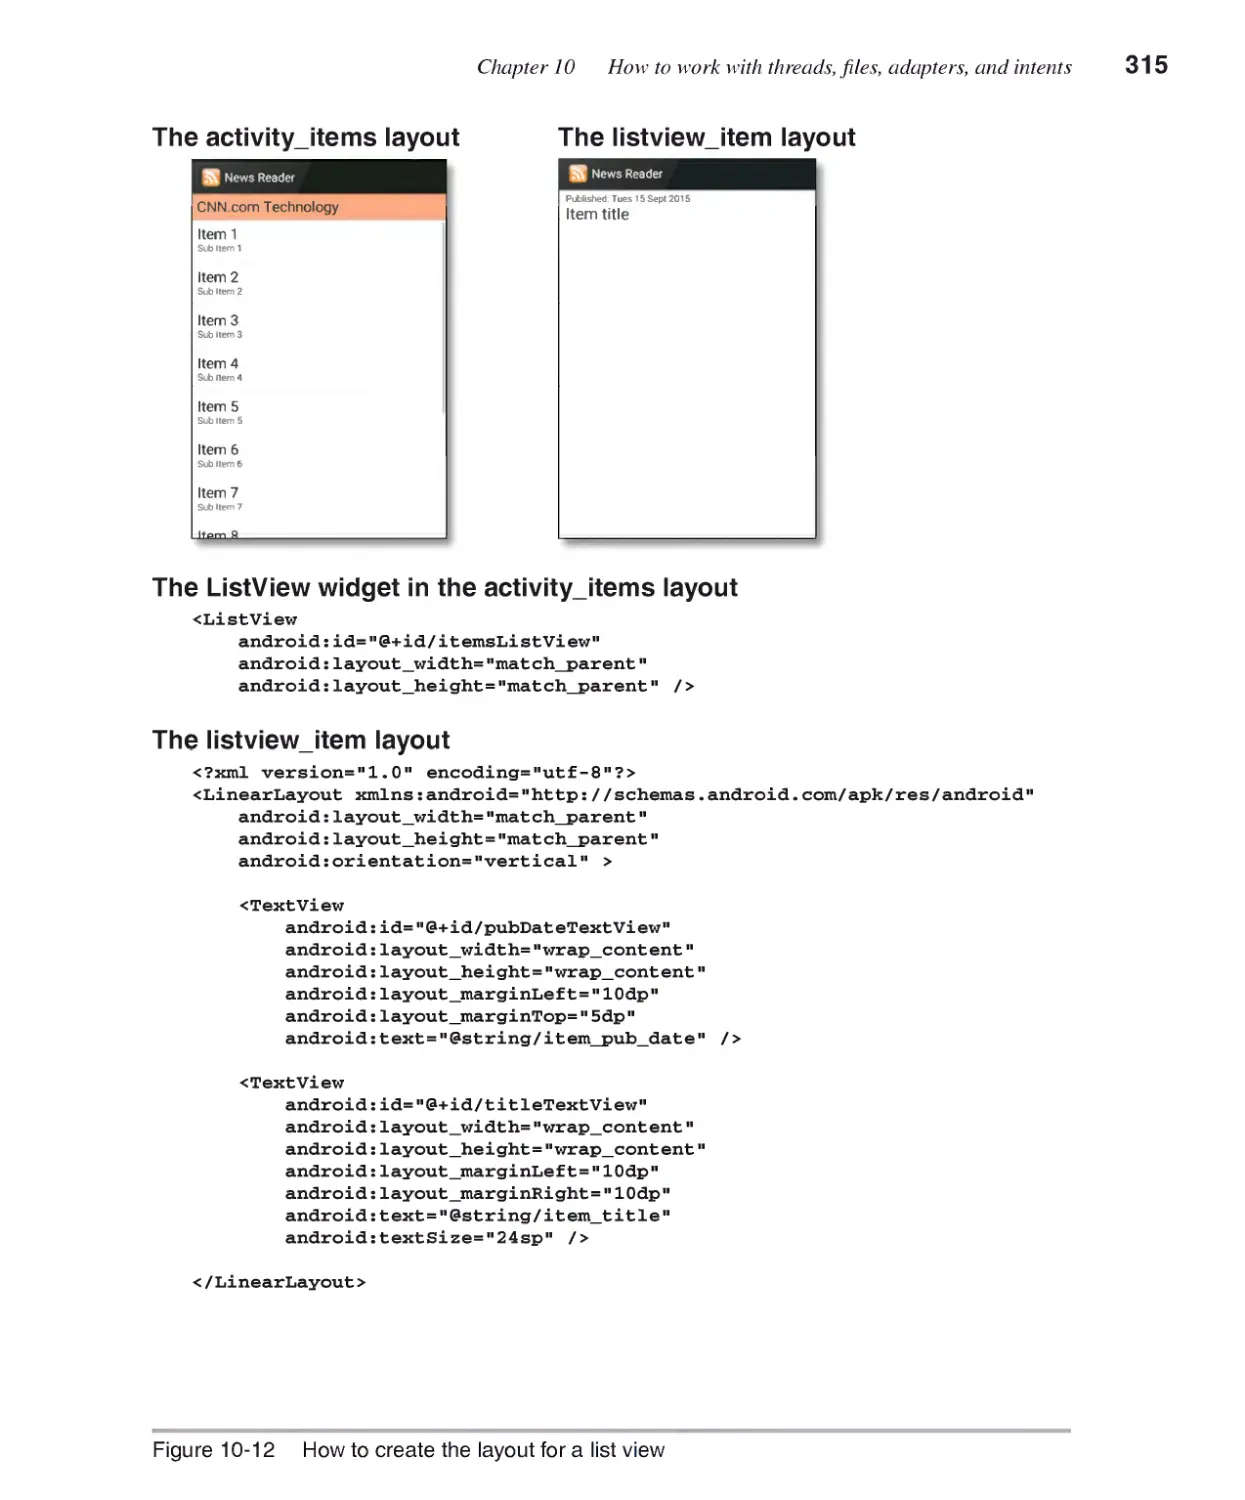
How to work with adapters ............................................................ 314
How to create the layout for a list view 314
How to use an adapter to display data in a list view 316
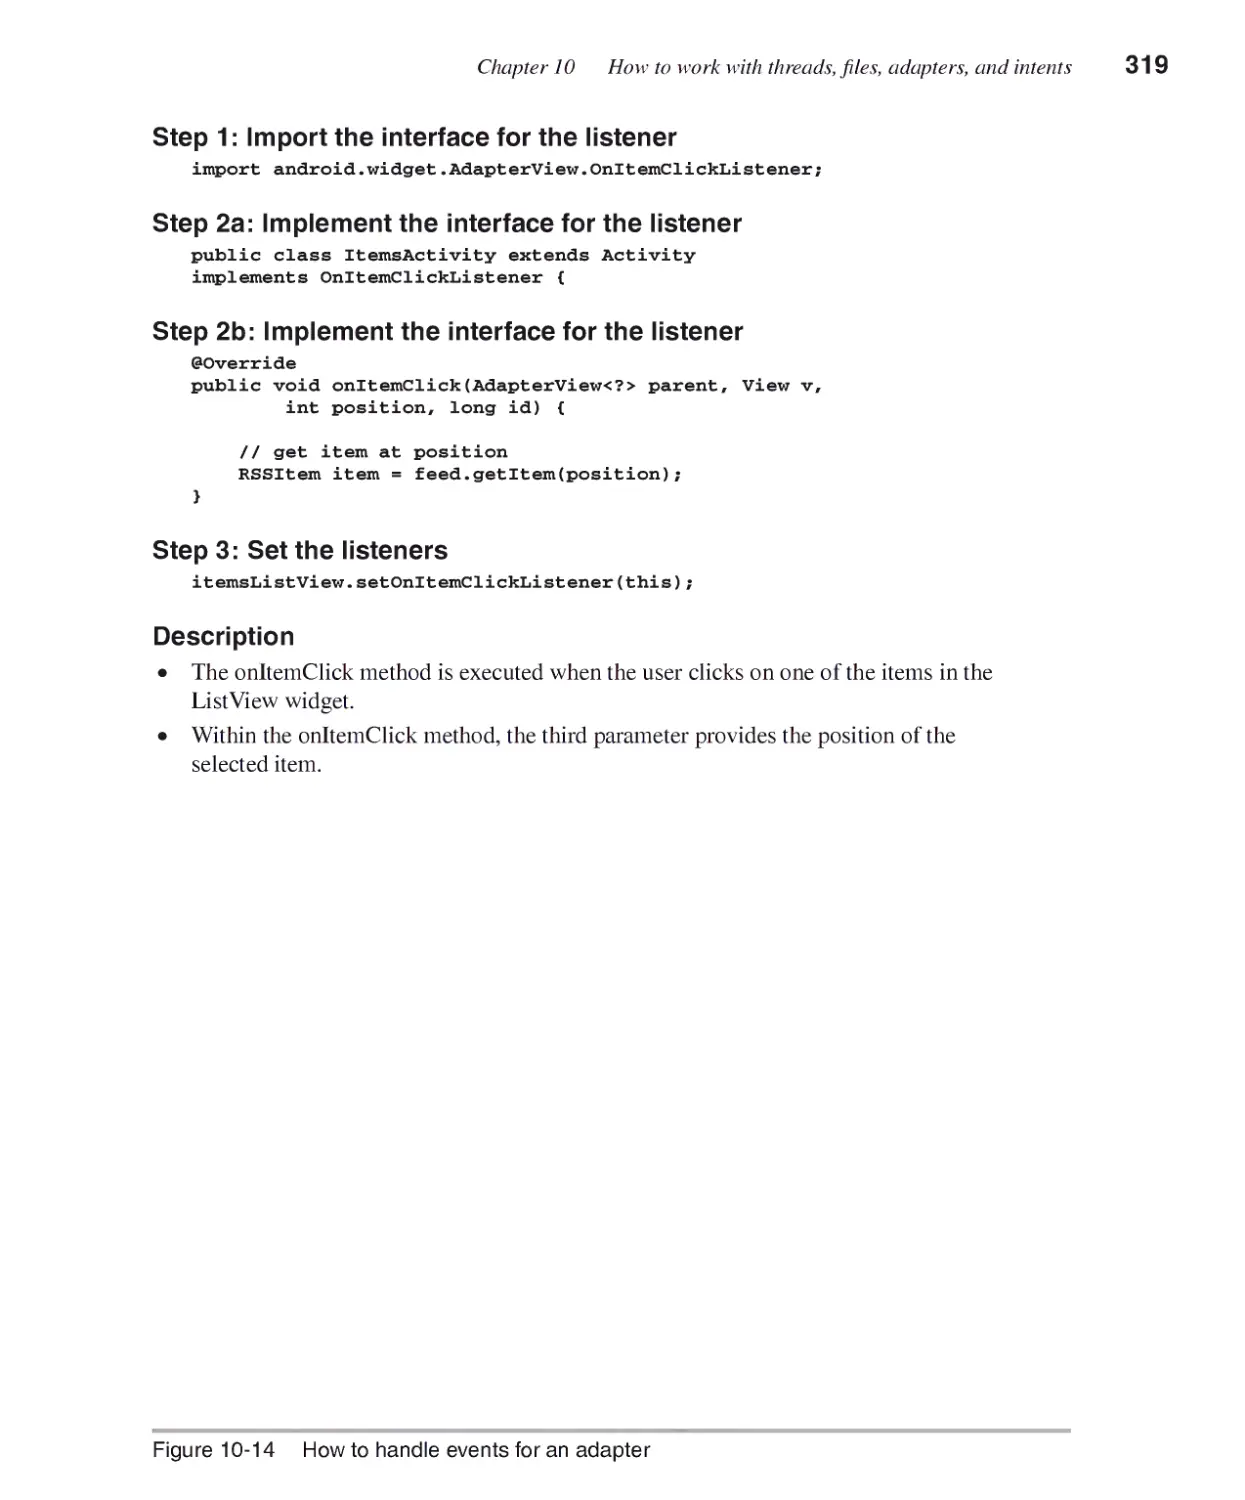
How to handle events for an adapter 318
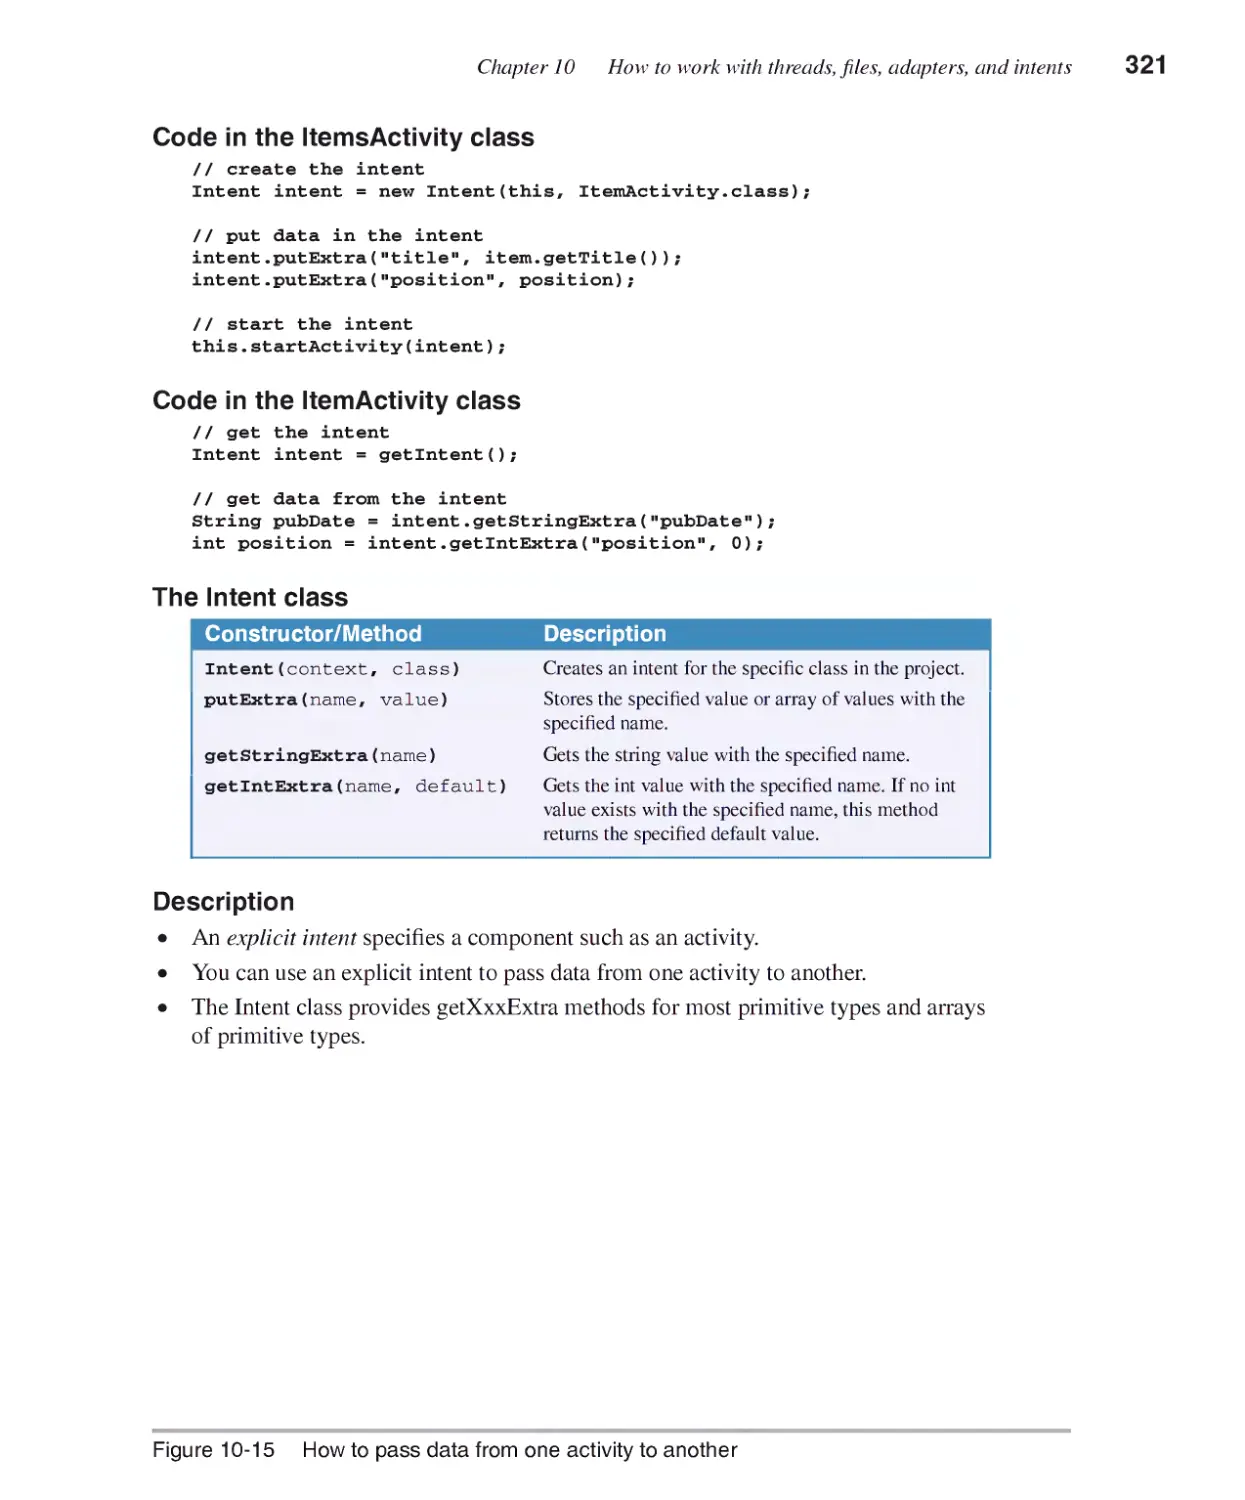
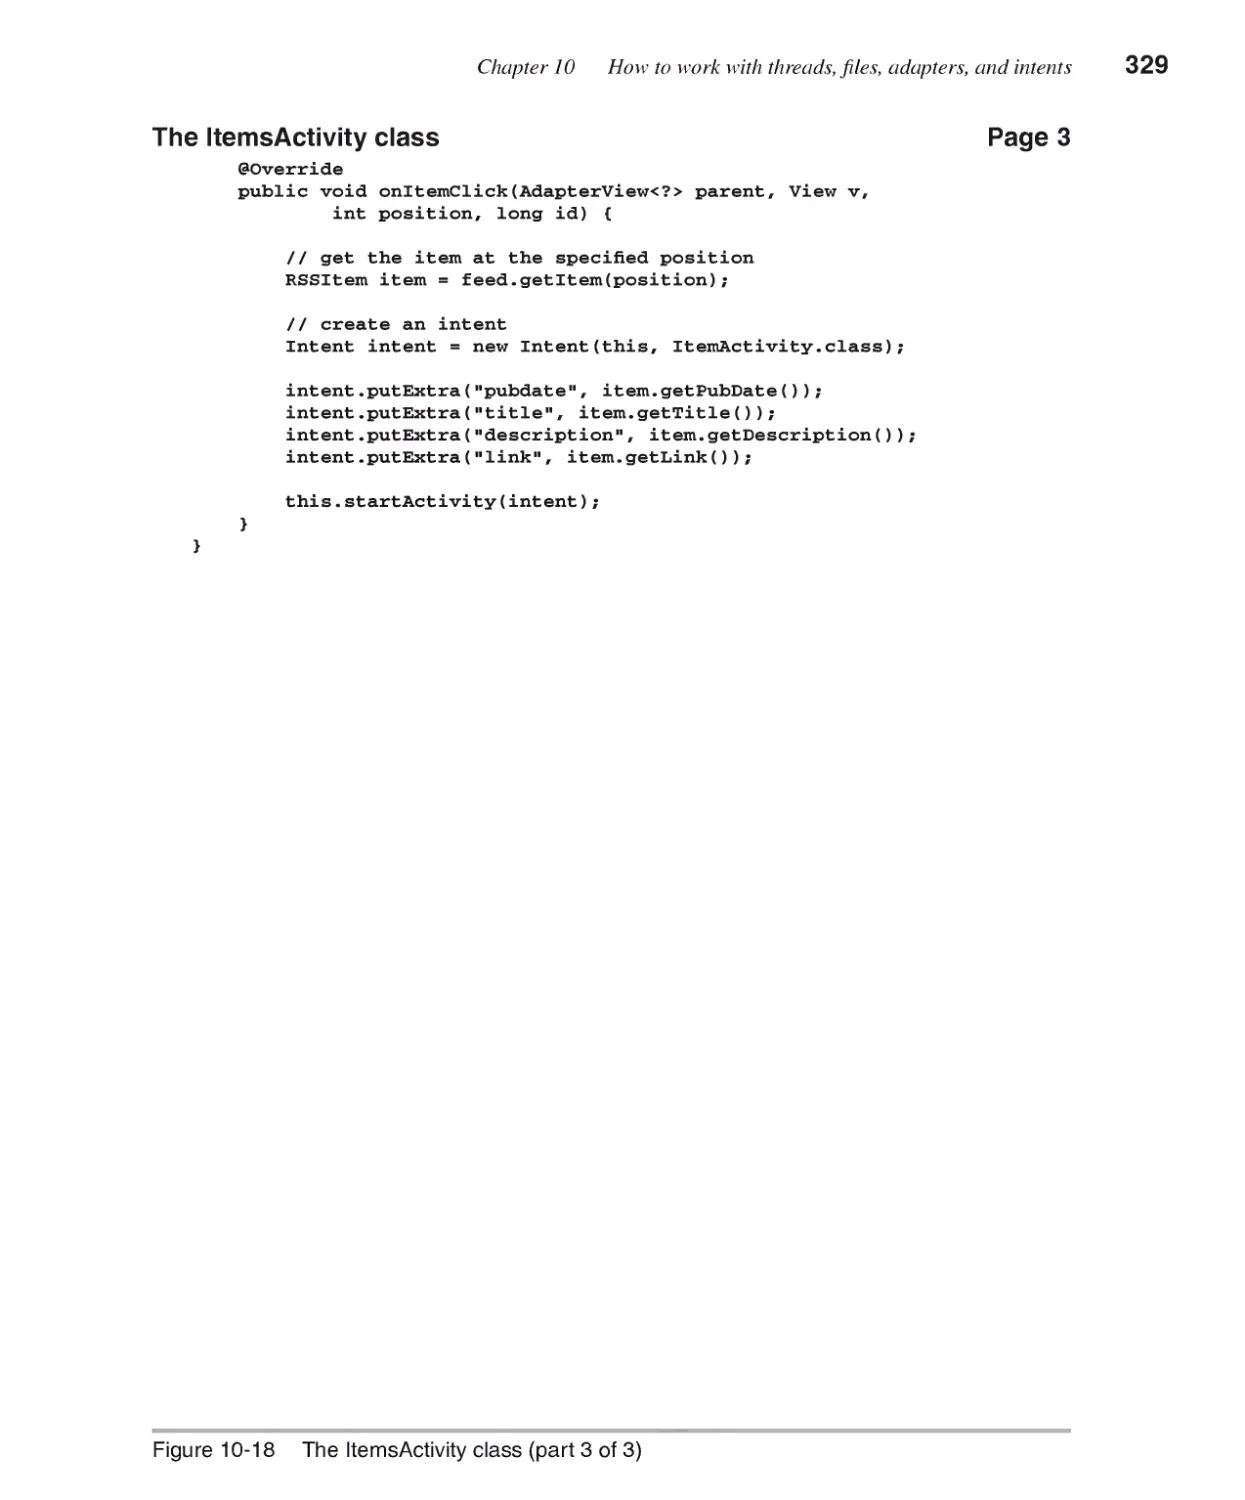
How to work with intents................................................................320
How to pass data between activities 320
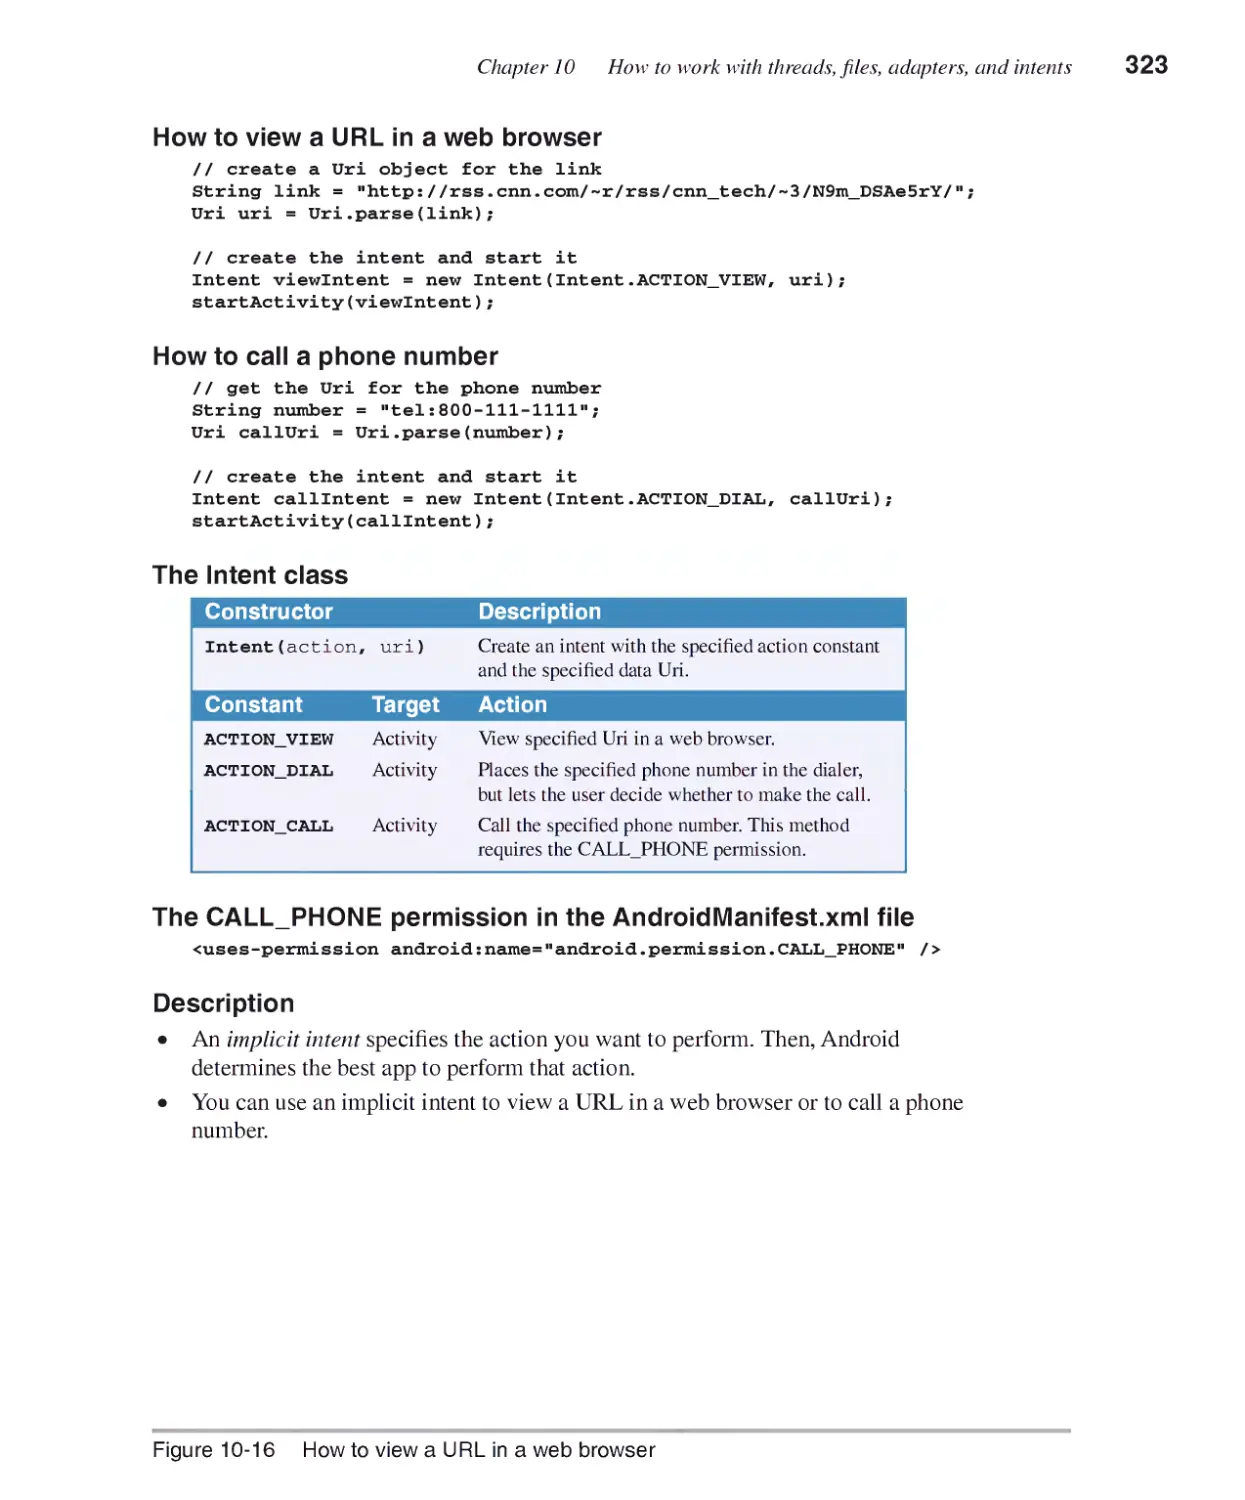
How to view a URL in a web browser 322
How to dial or call a phone number 322
The News Reader app ....................................................................324
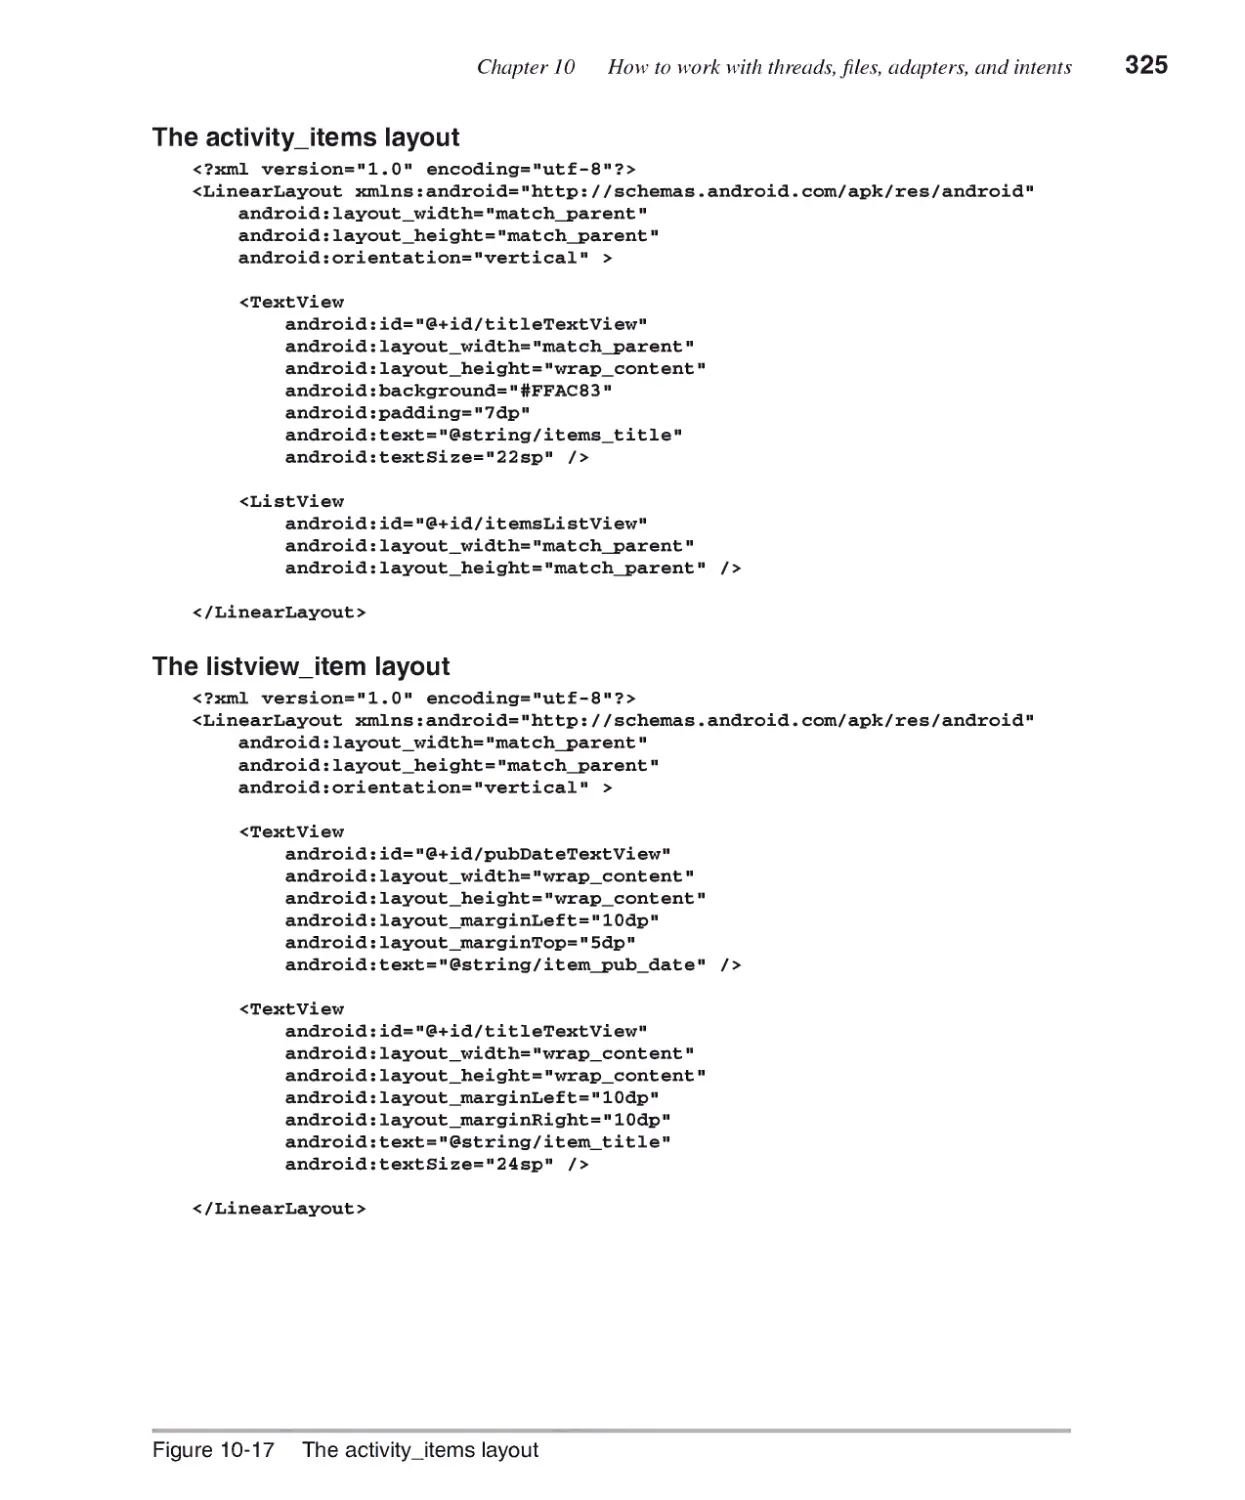
The activity_items layout 324
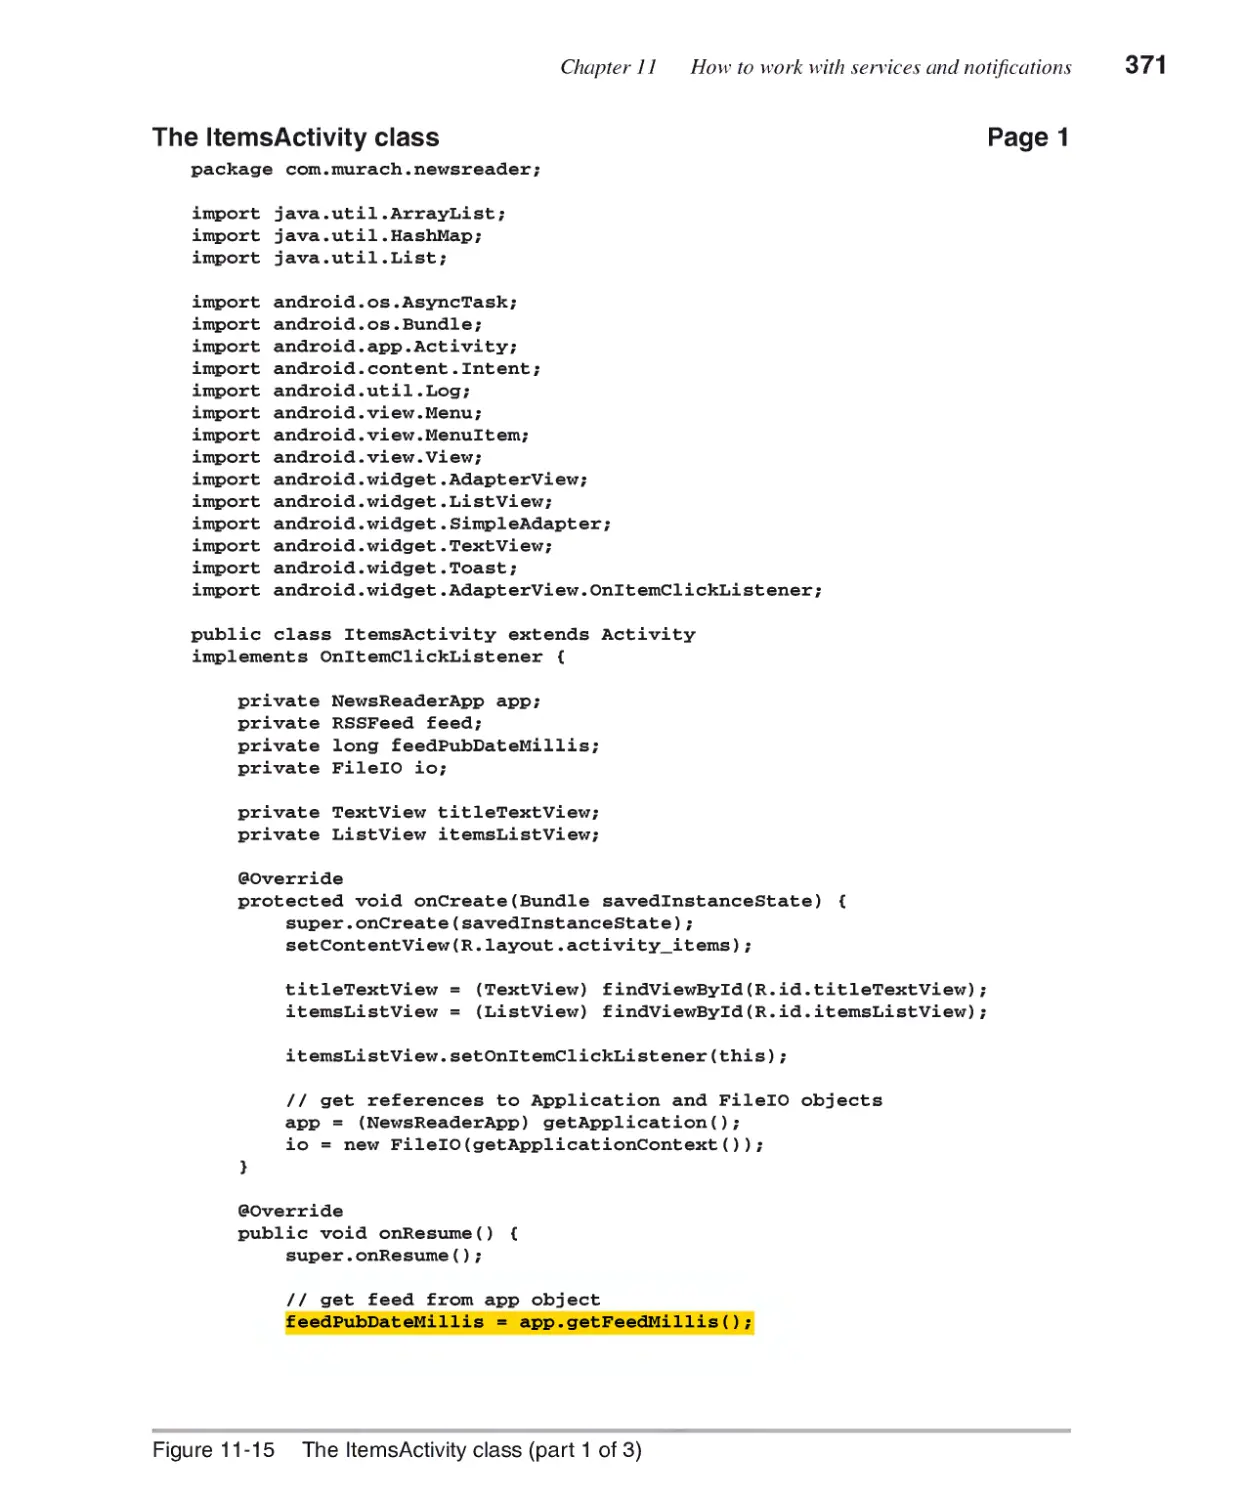
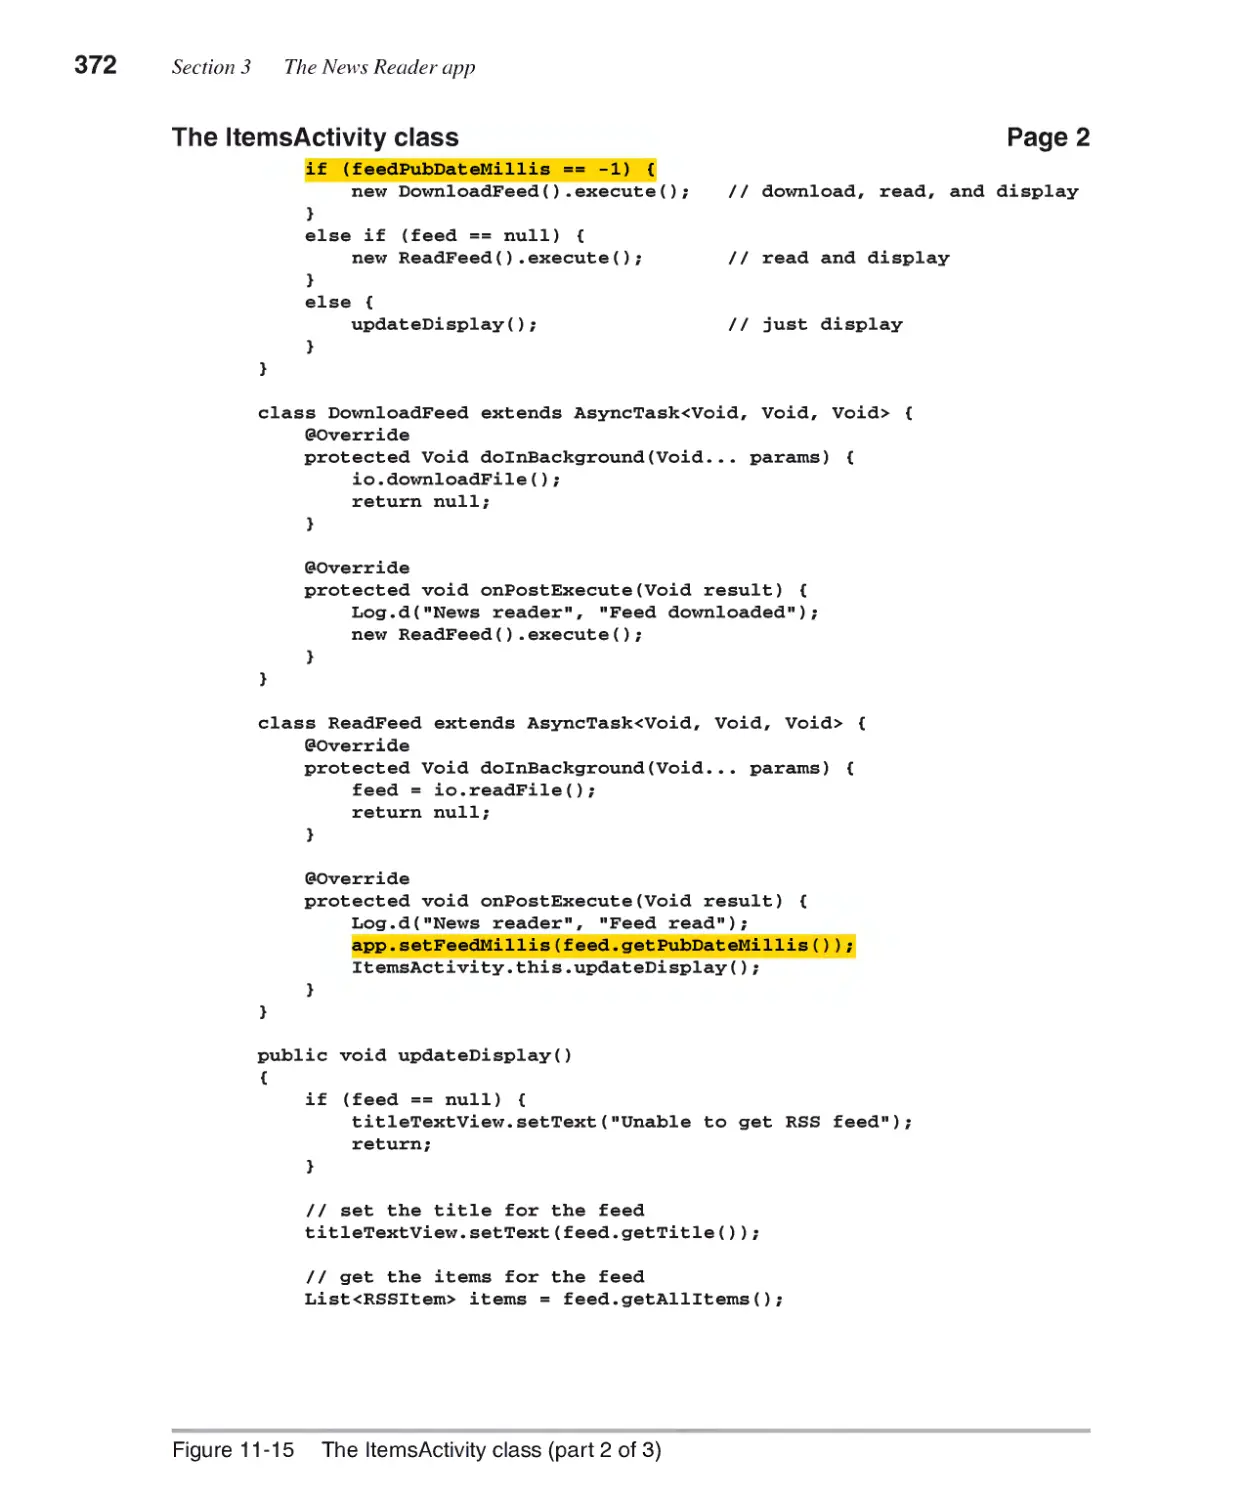
The Items Activity class 326
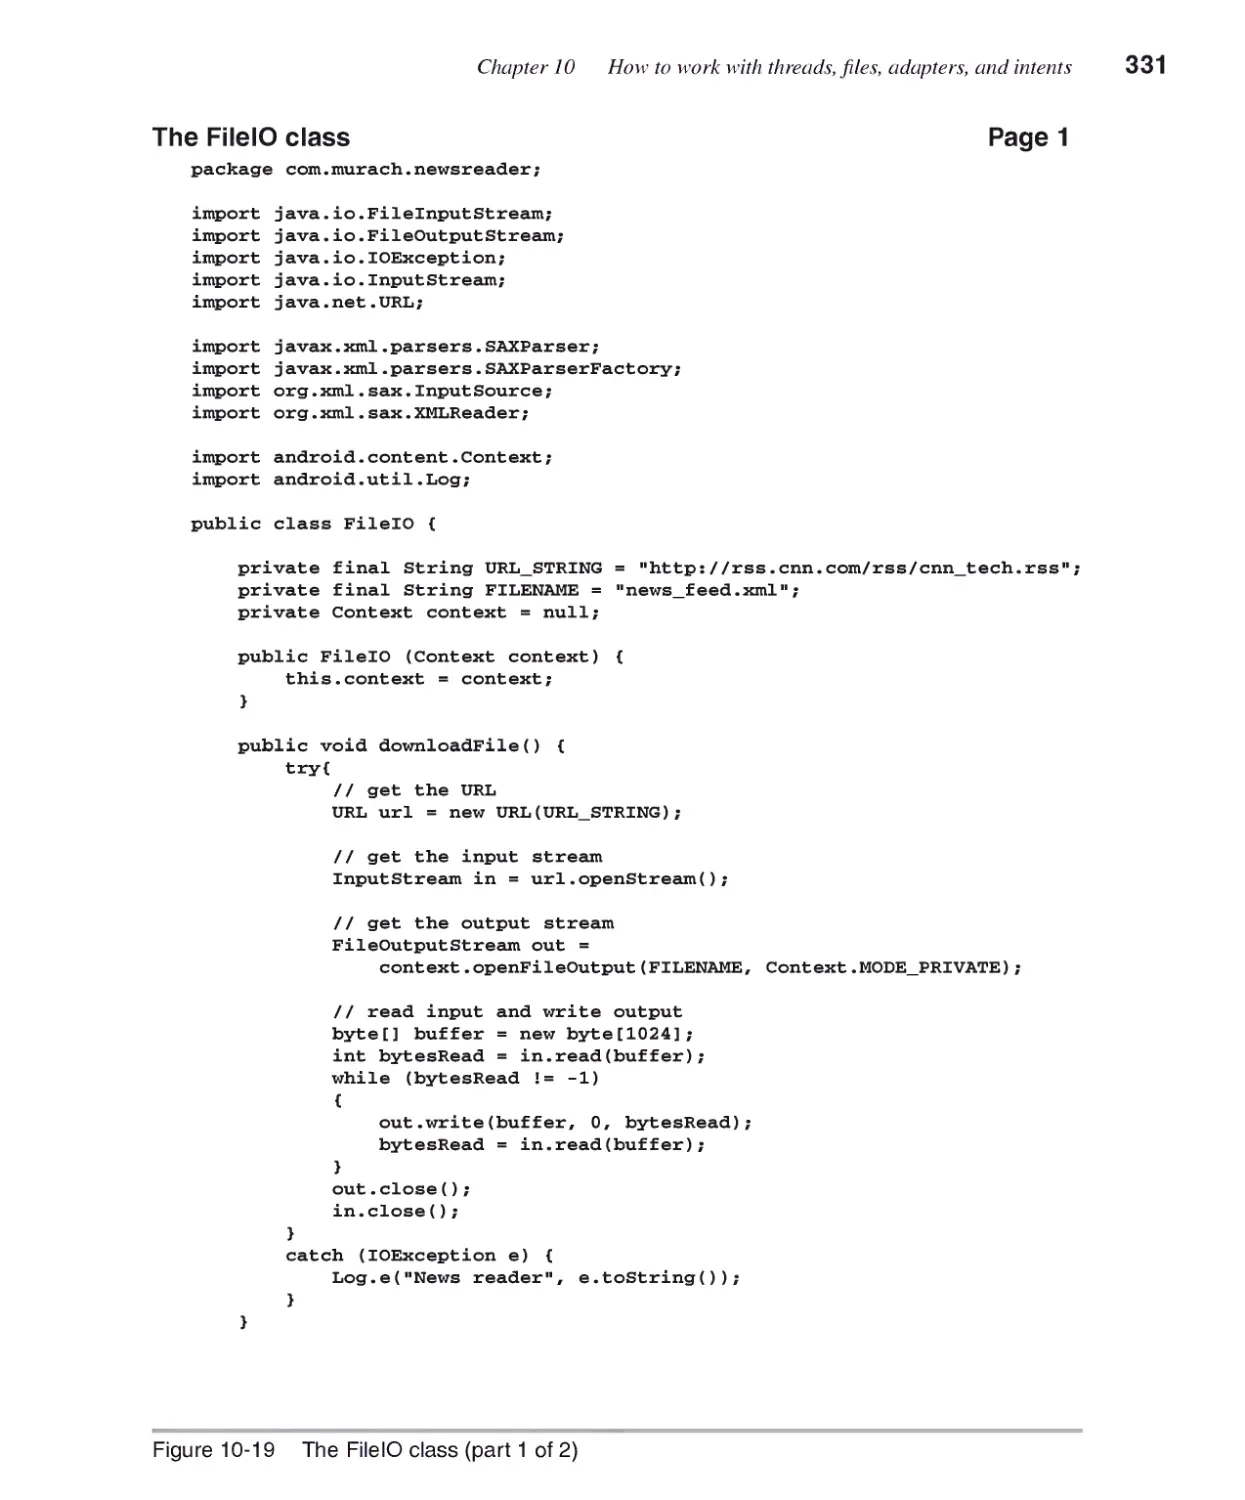
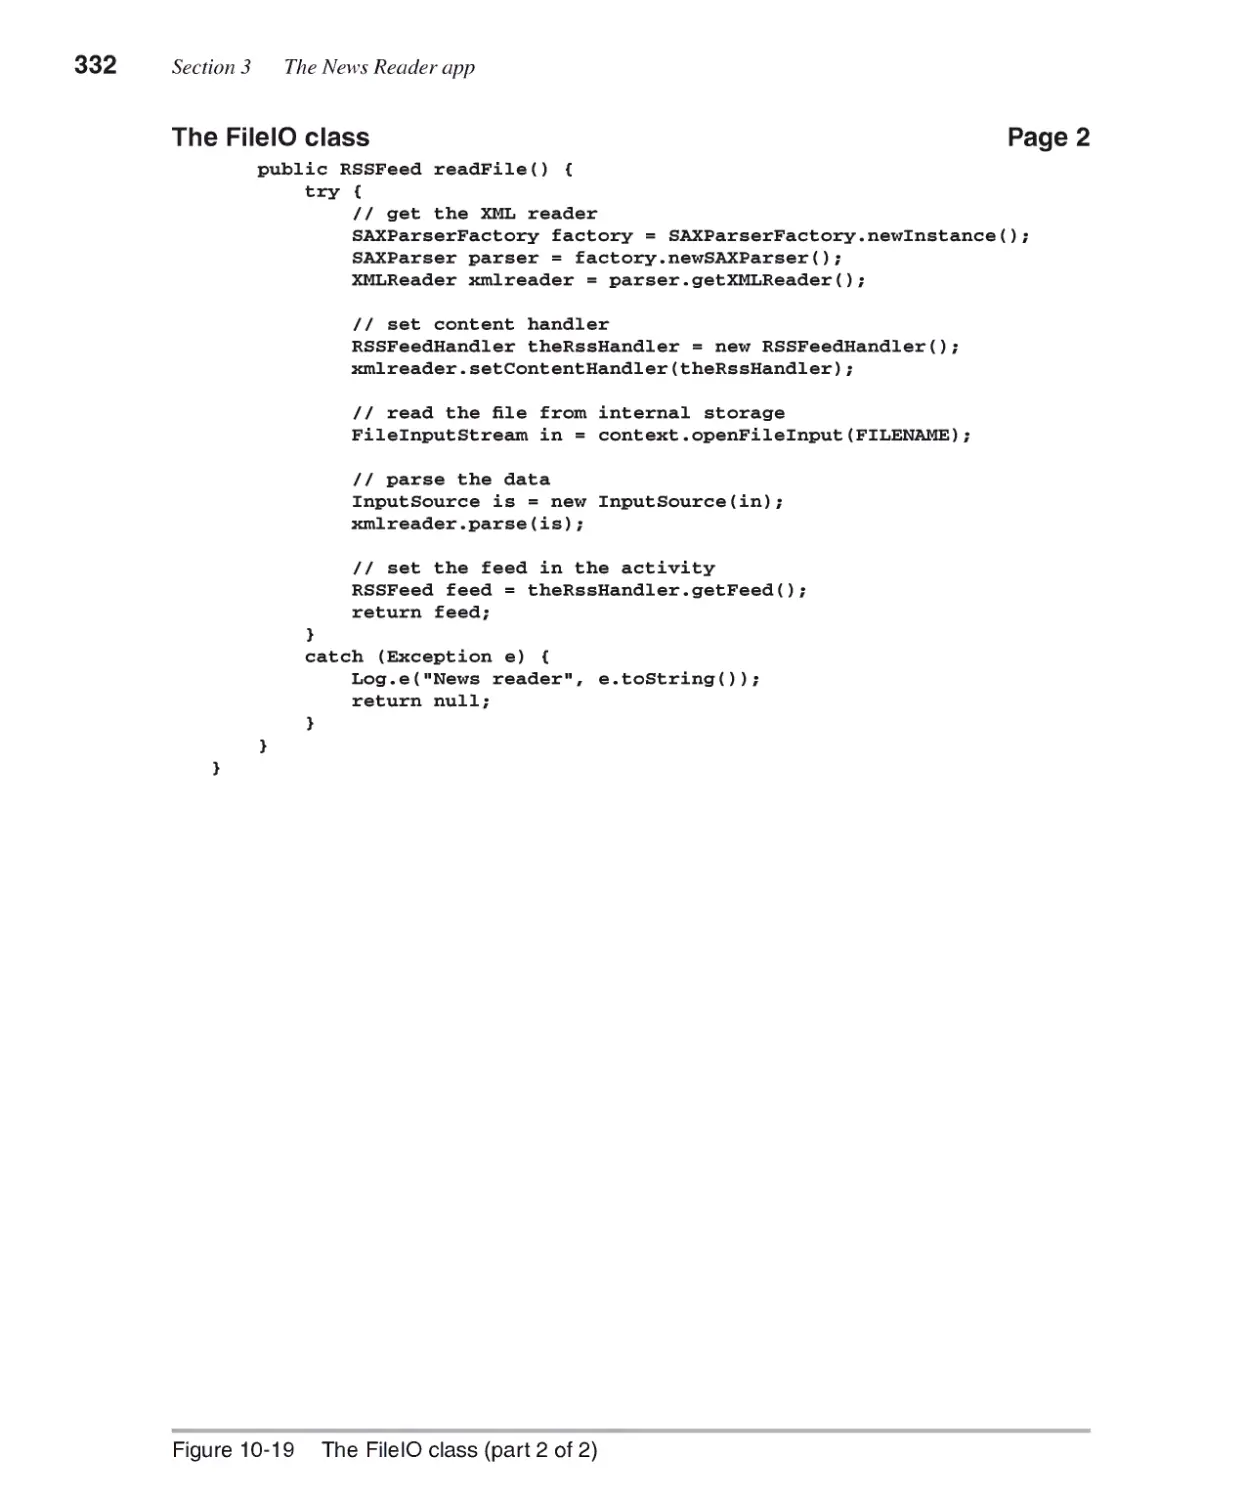
The FilelO class 330
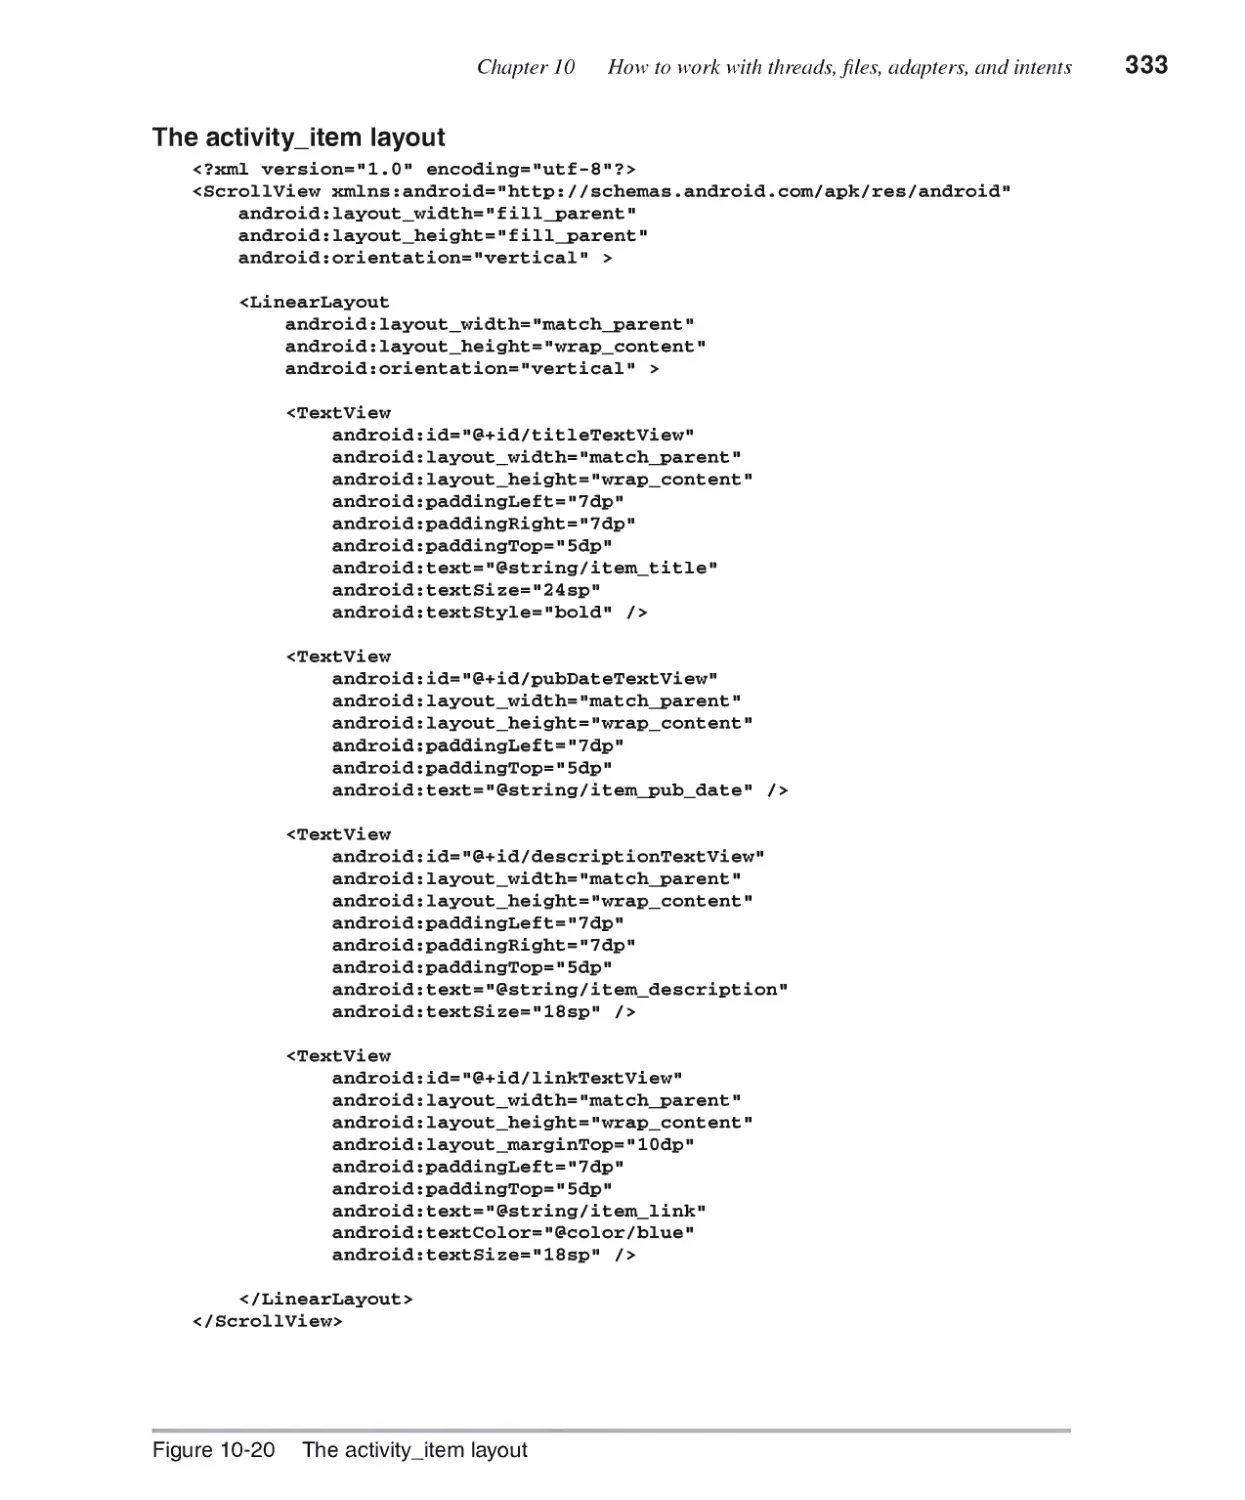
The activity_item layout 330
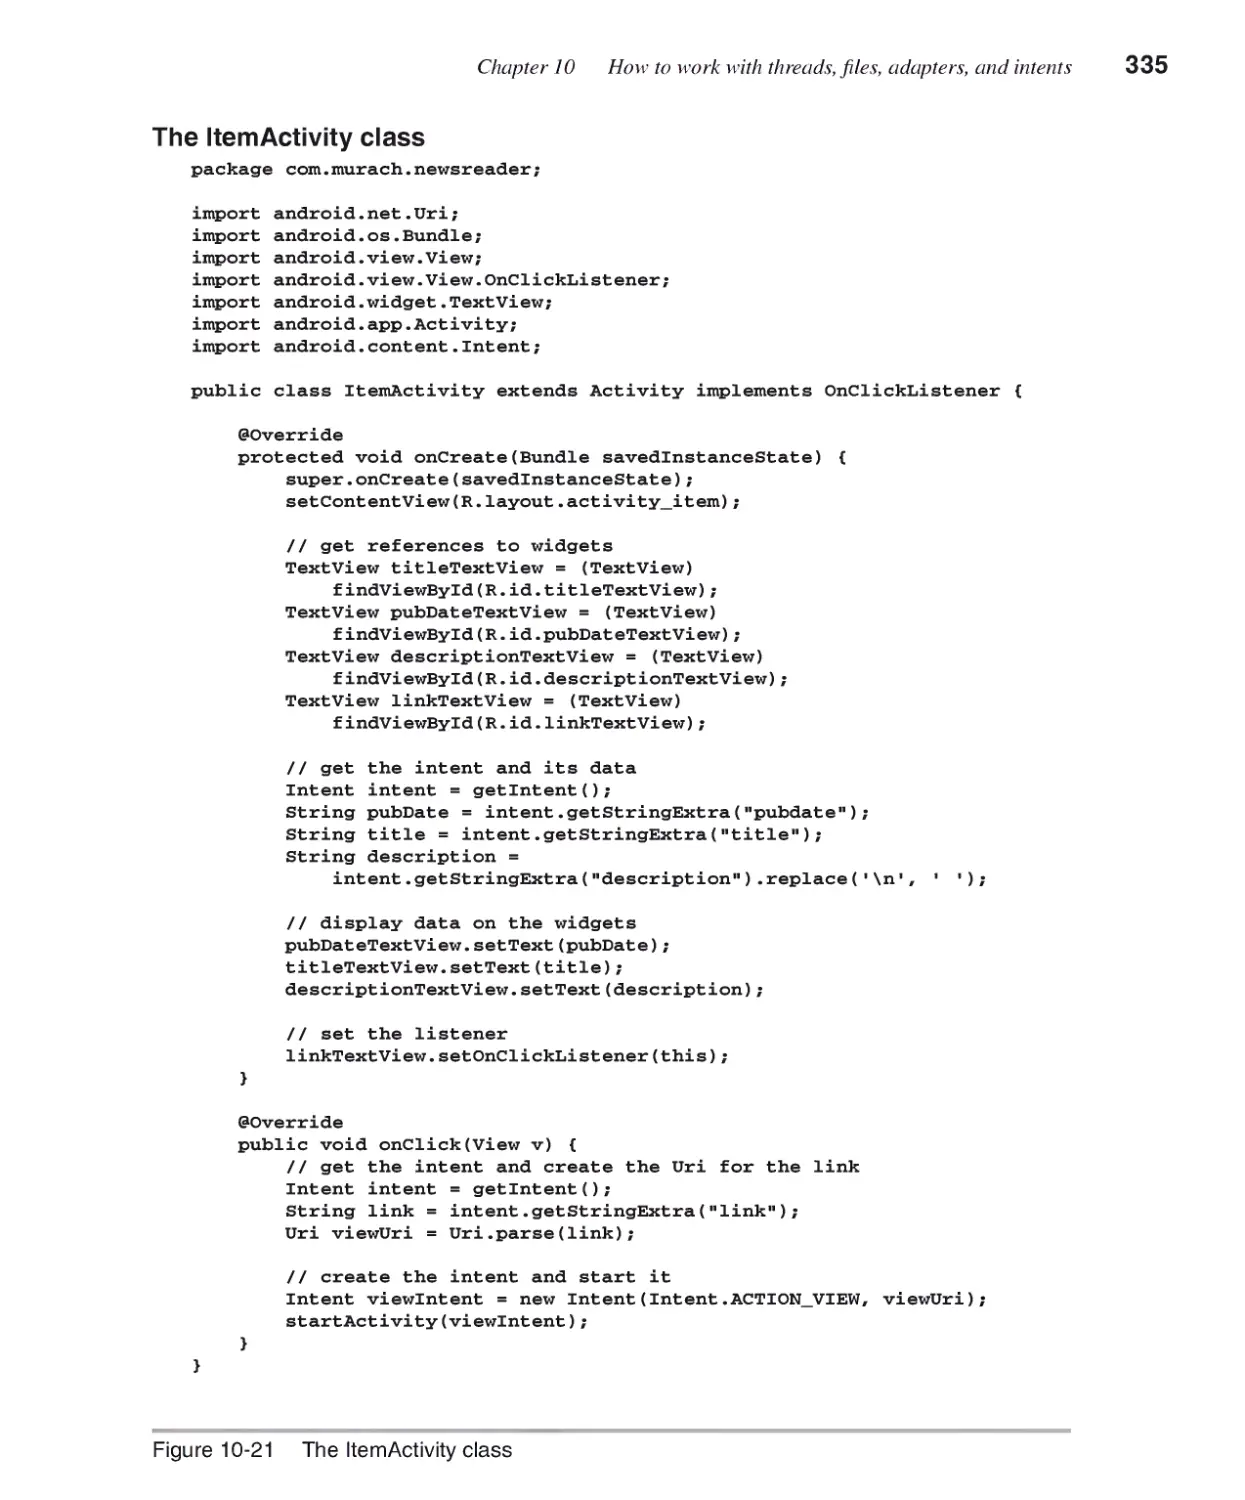
The ItemActivity class 334
Expanded contents
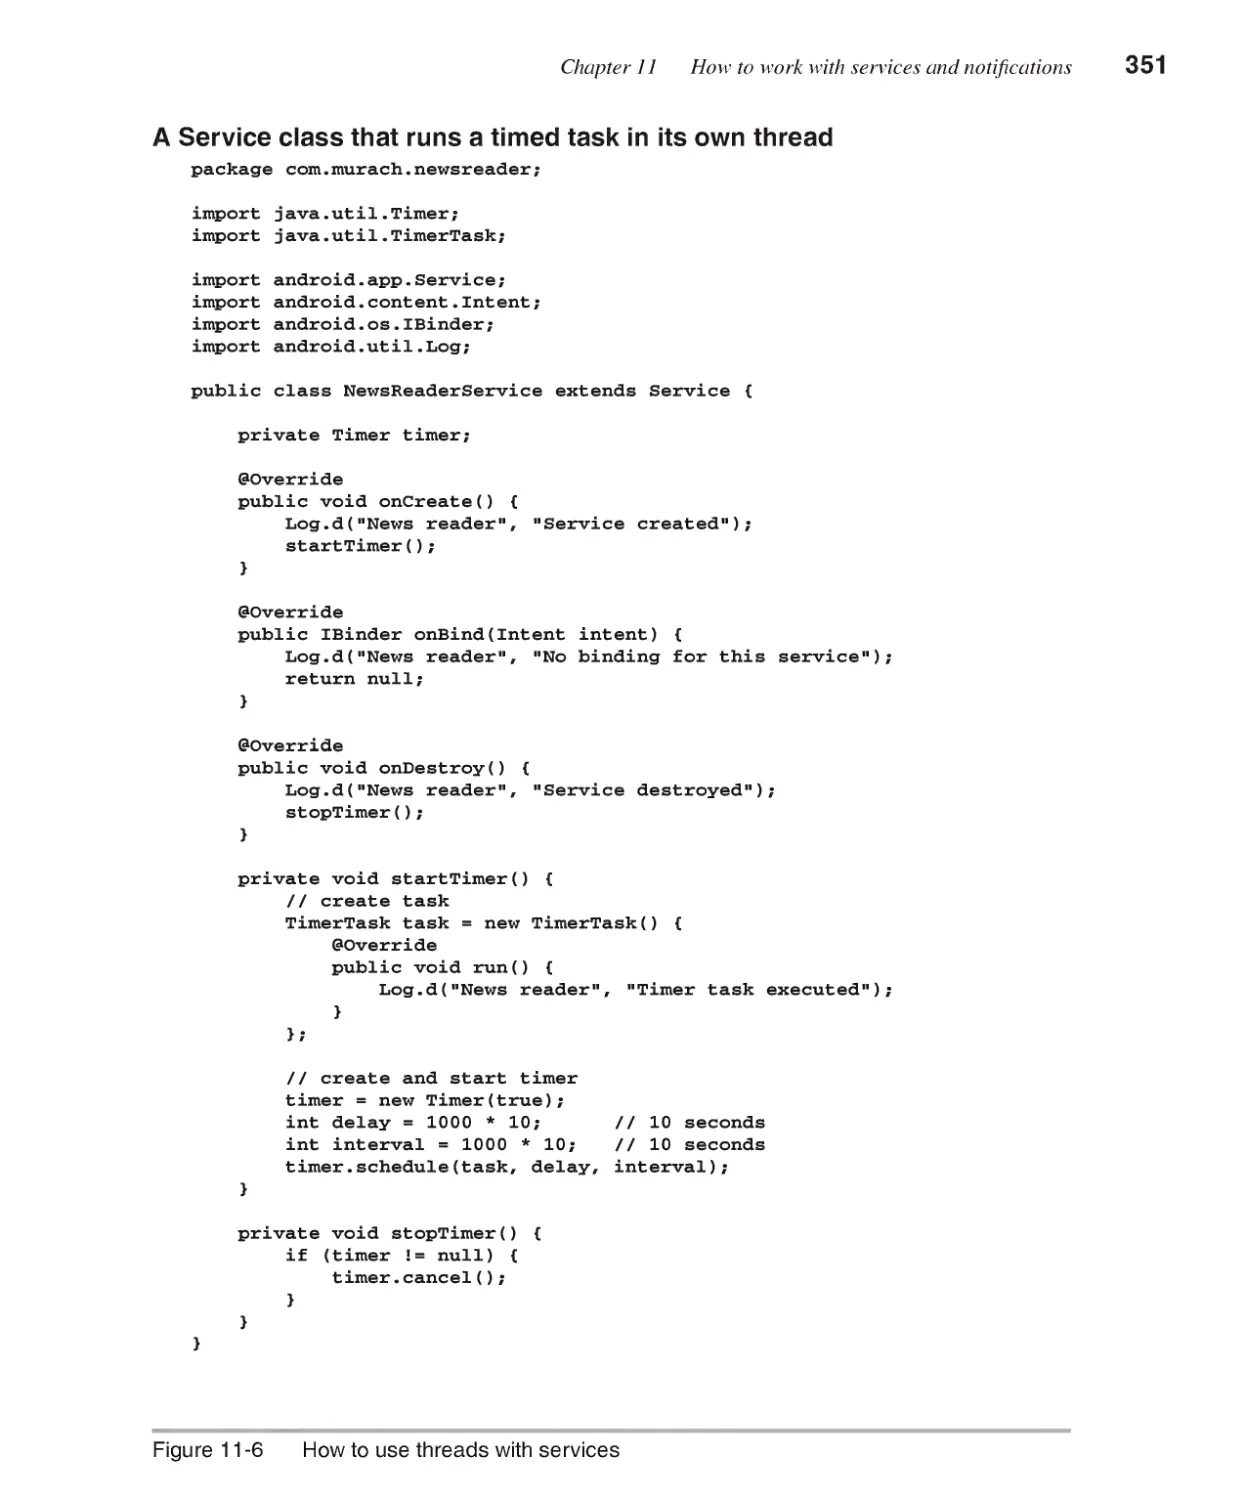
Chapter 11 How to work with services and notifications
How to work with the Application object......................................340
How to define the Application object 340
How to register the Application object 342
How to use the Application object 342
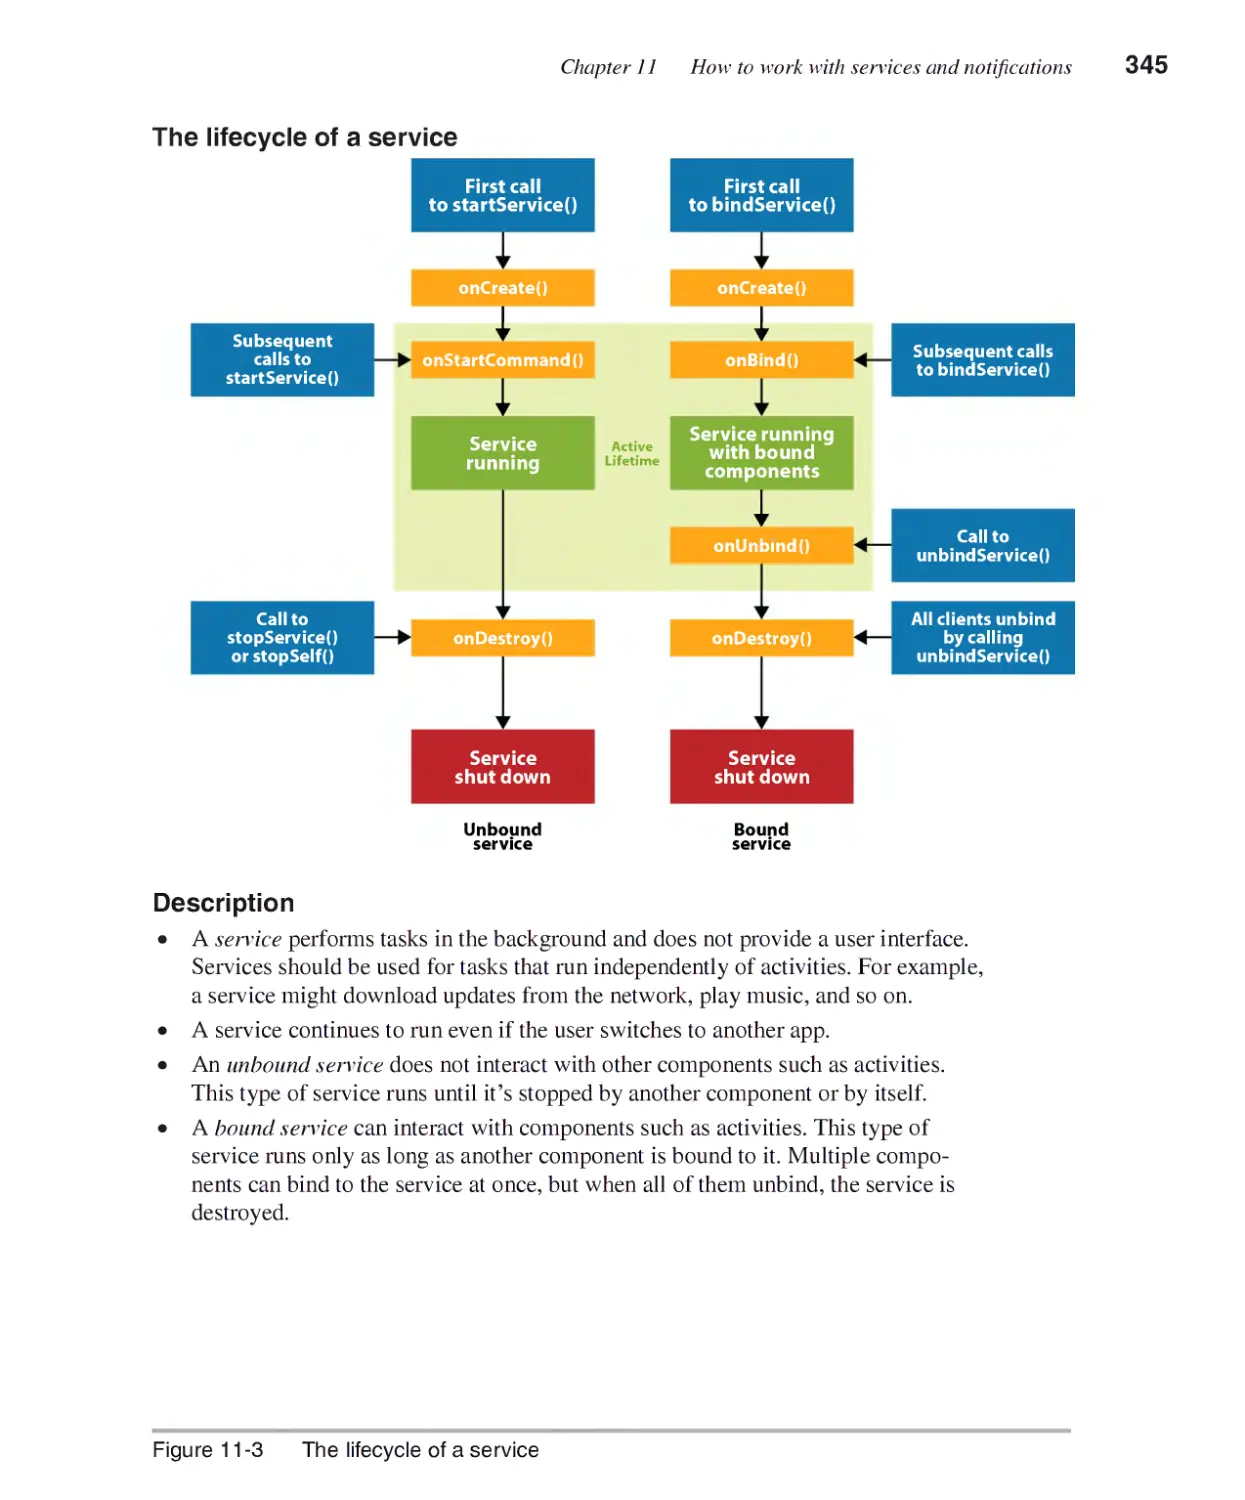
How to work with services.............................................................344
The lifecycle of a service 344
How to create a service 346
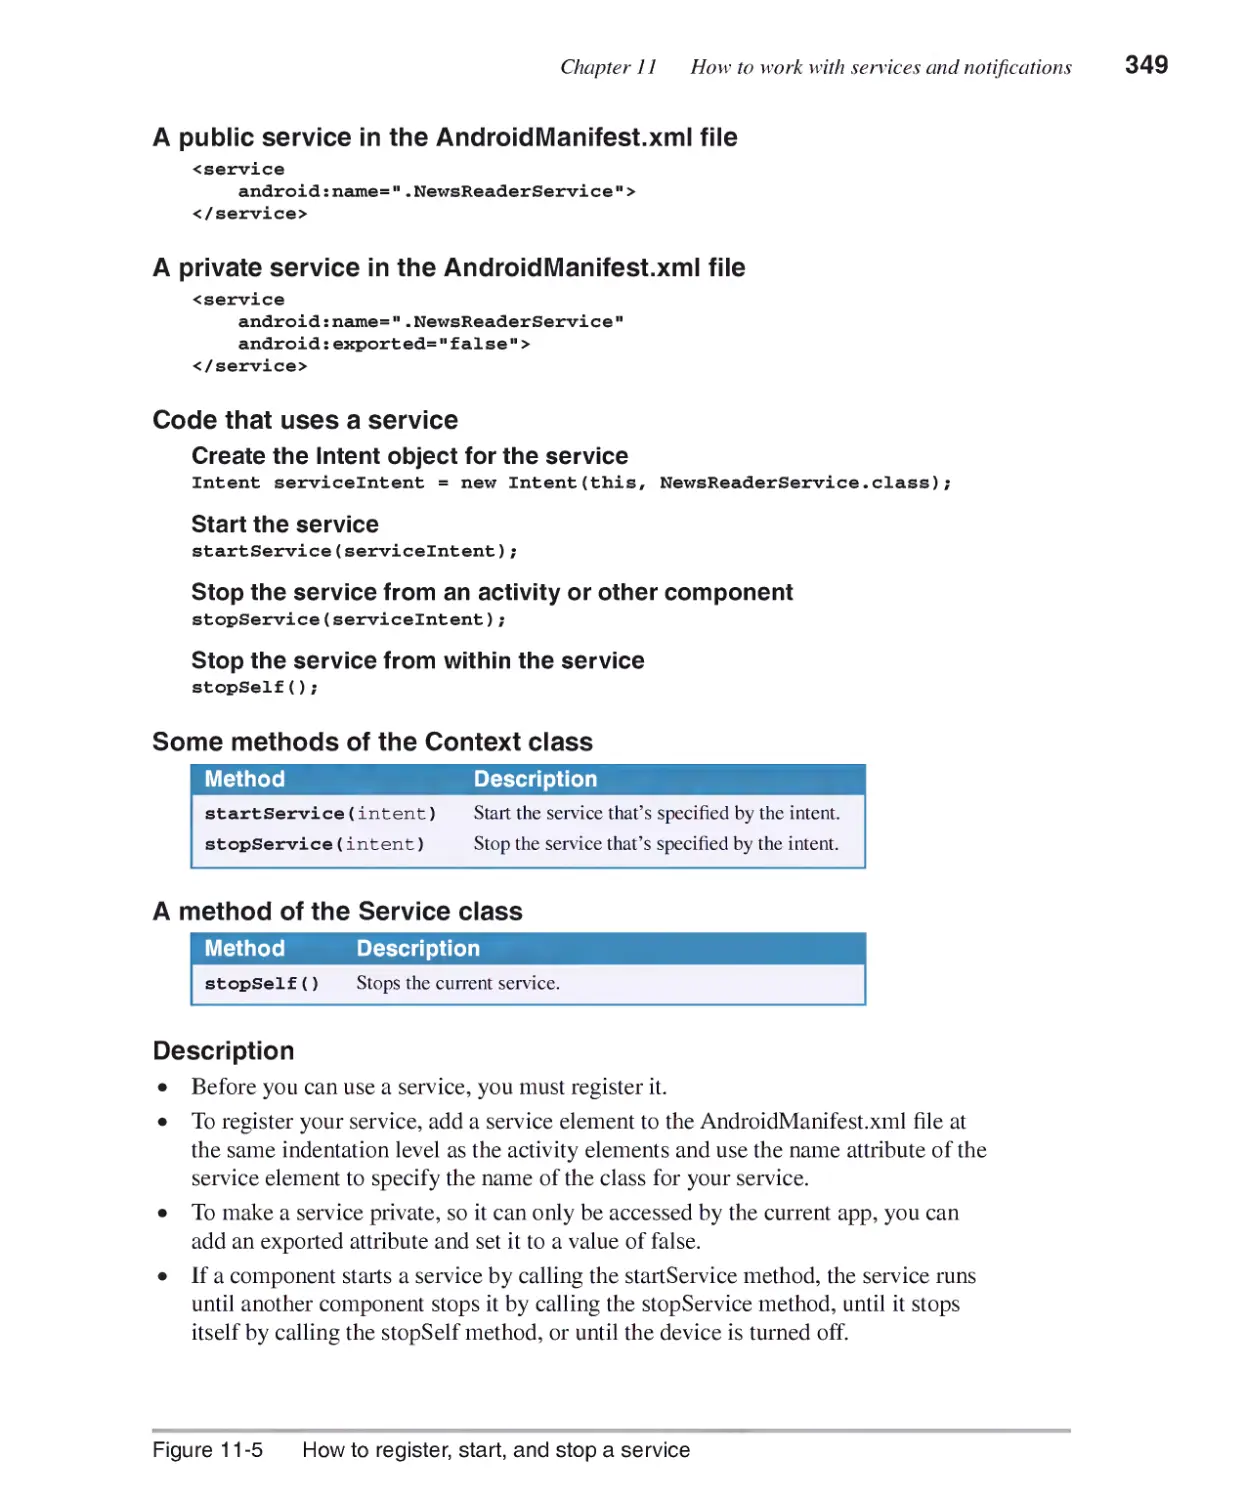
How to register a service 348
How to start and stop a service 348
How to use threads with services 350
How to test a service 352
How to view all services 354
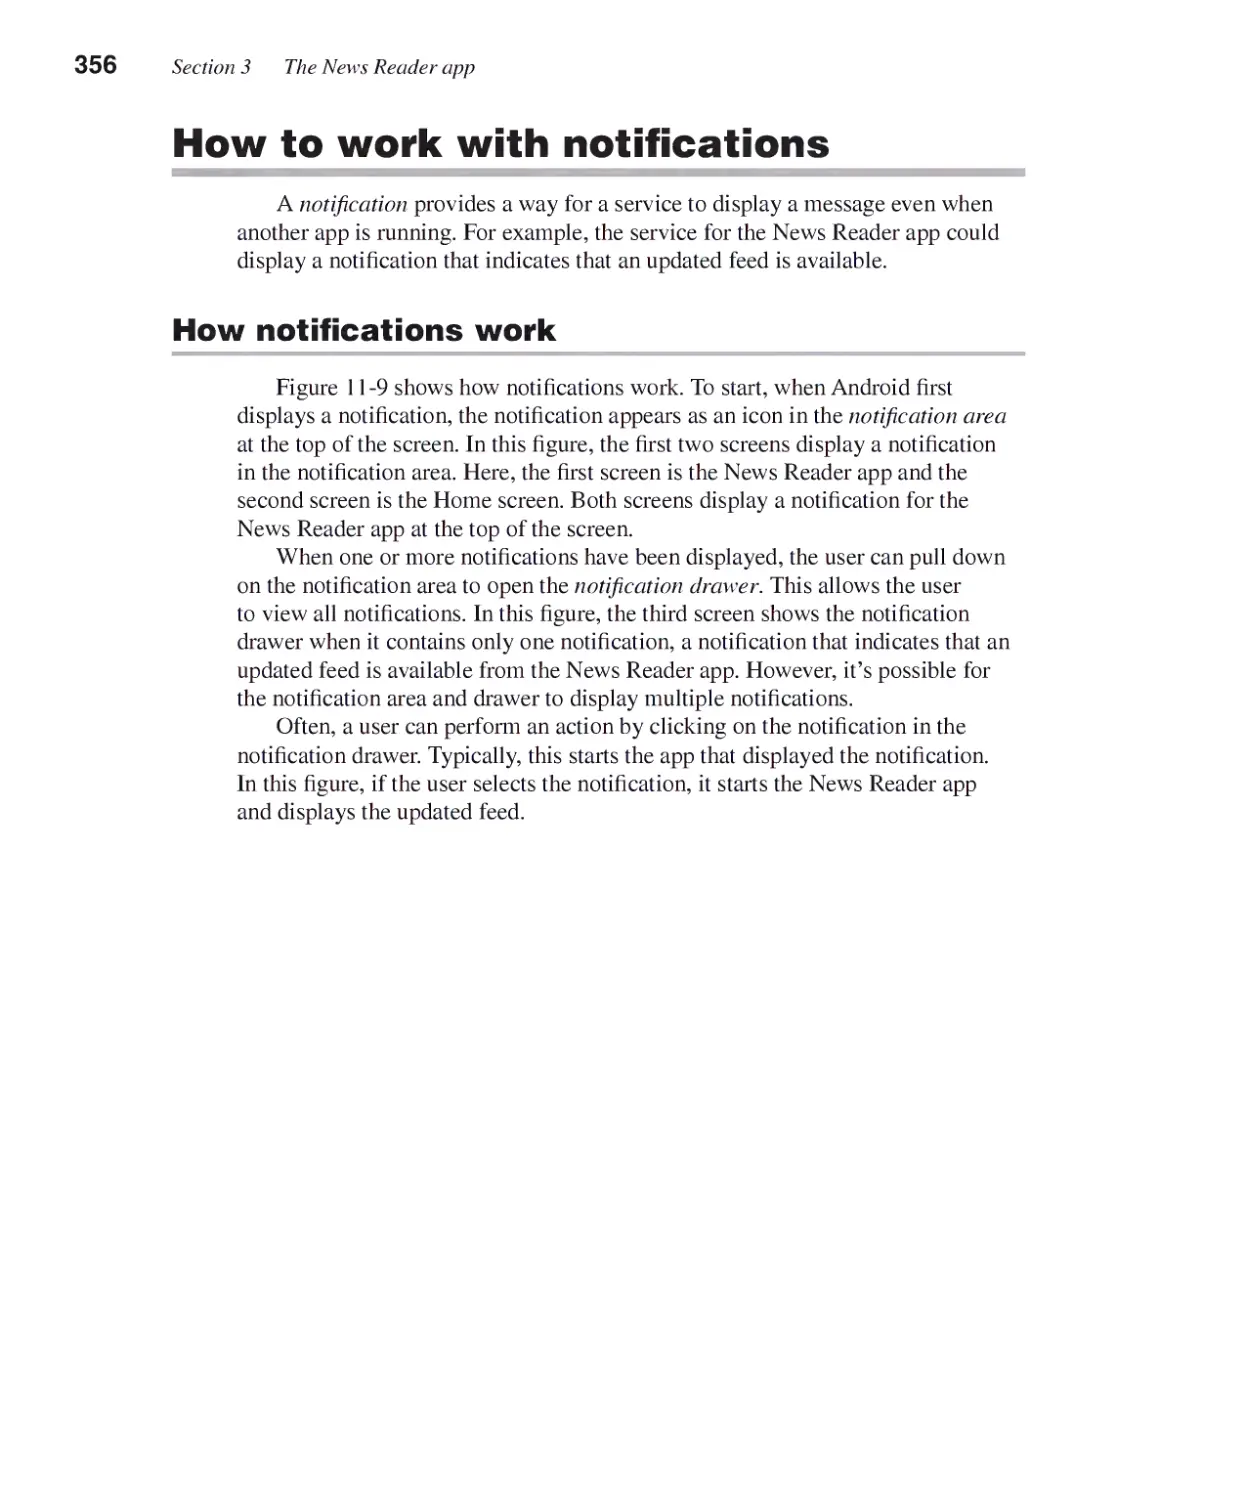
How to work with notifications......................................................356
How notifications work 356
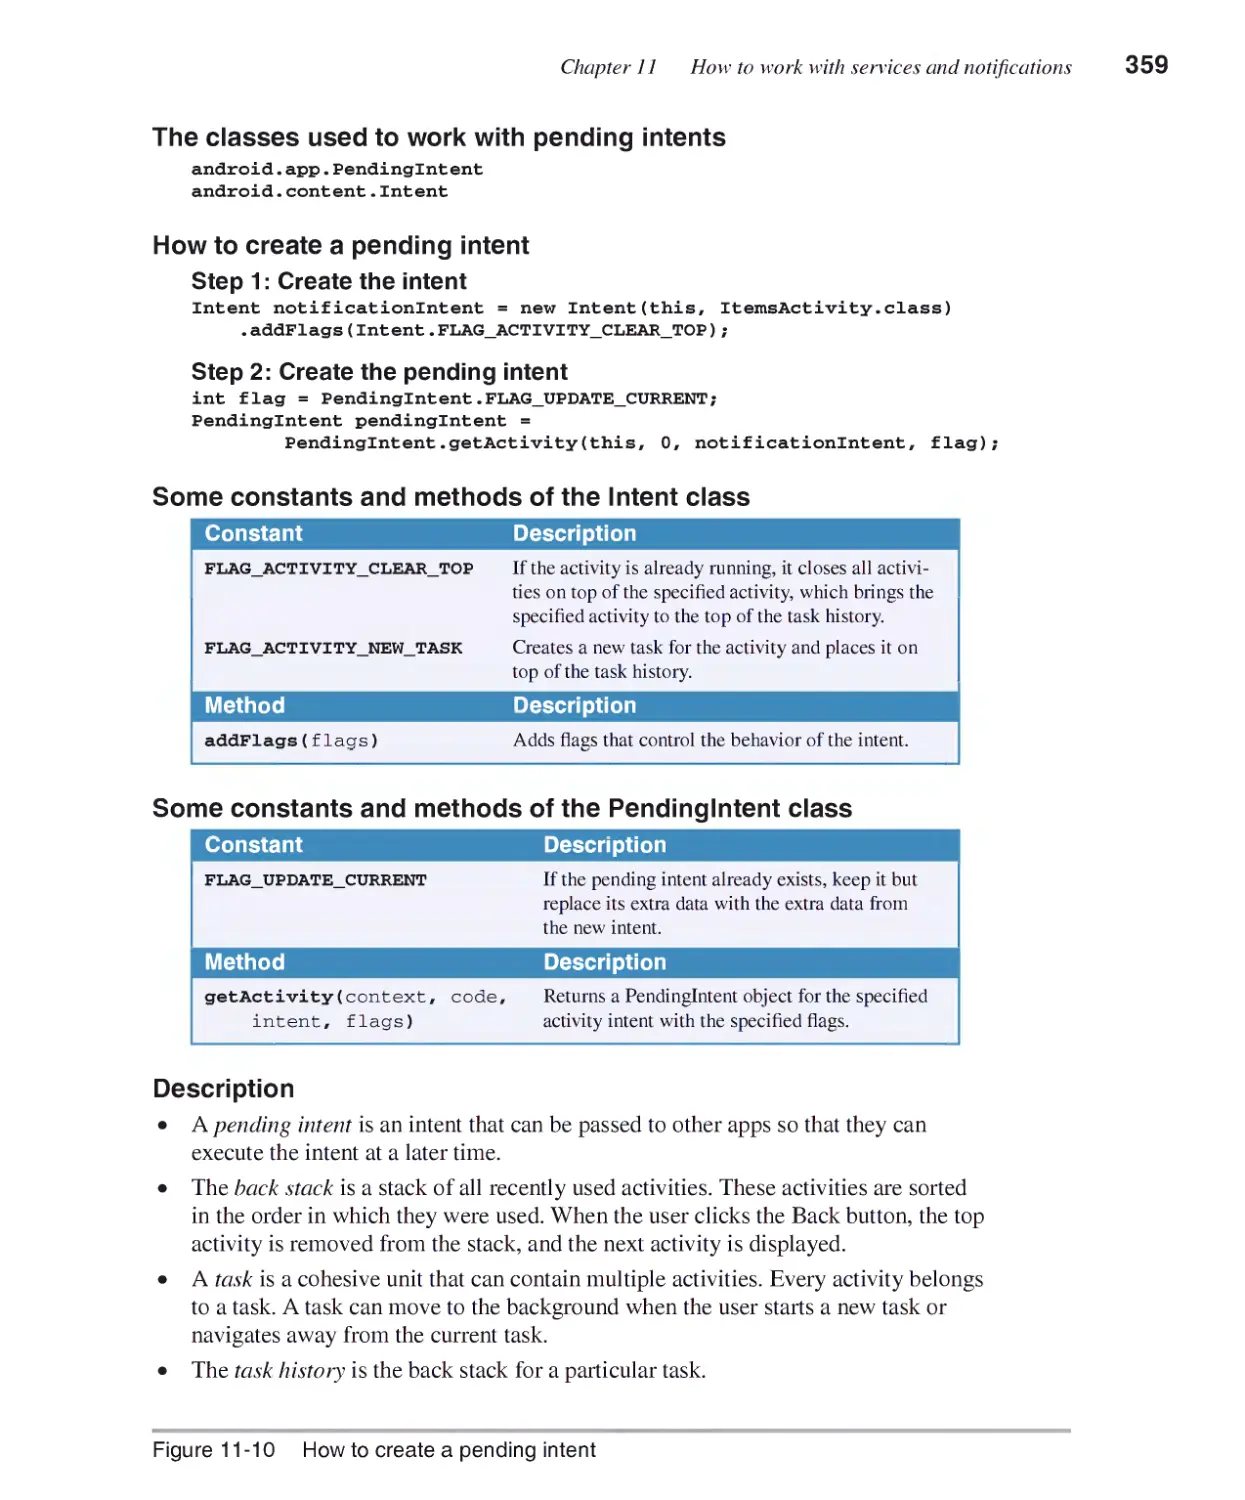
How to create a pending intent 358
How to create a notification 360
How to work with system services................................................362
How to display or remove a notification 362
How to check if a network connection is available 364
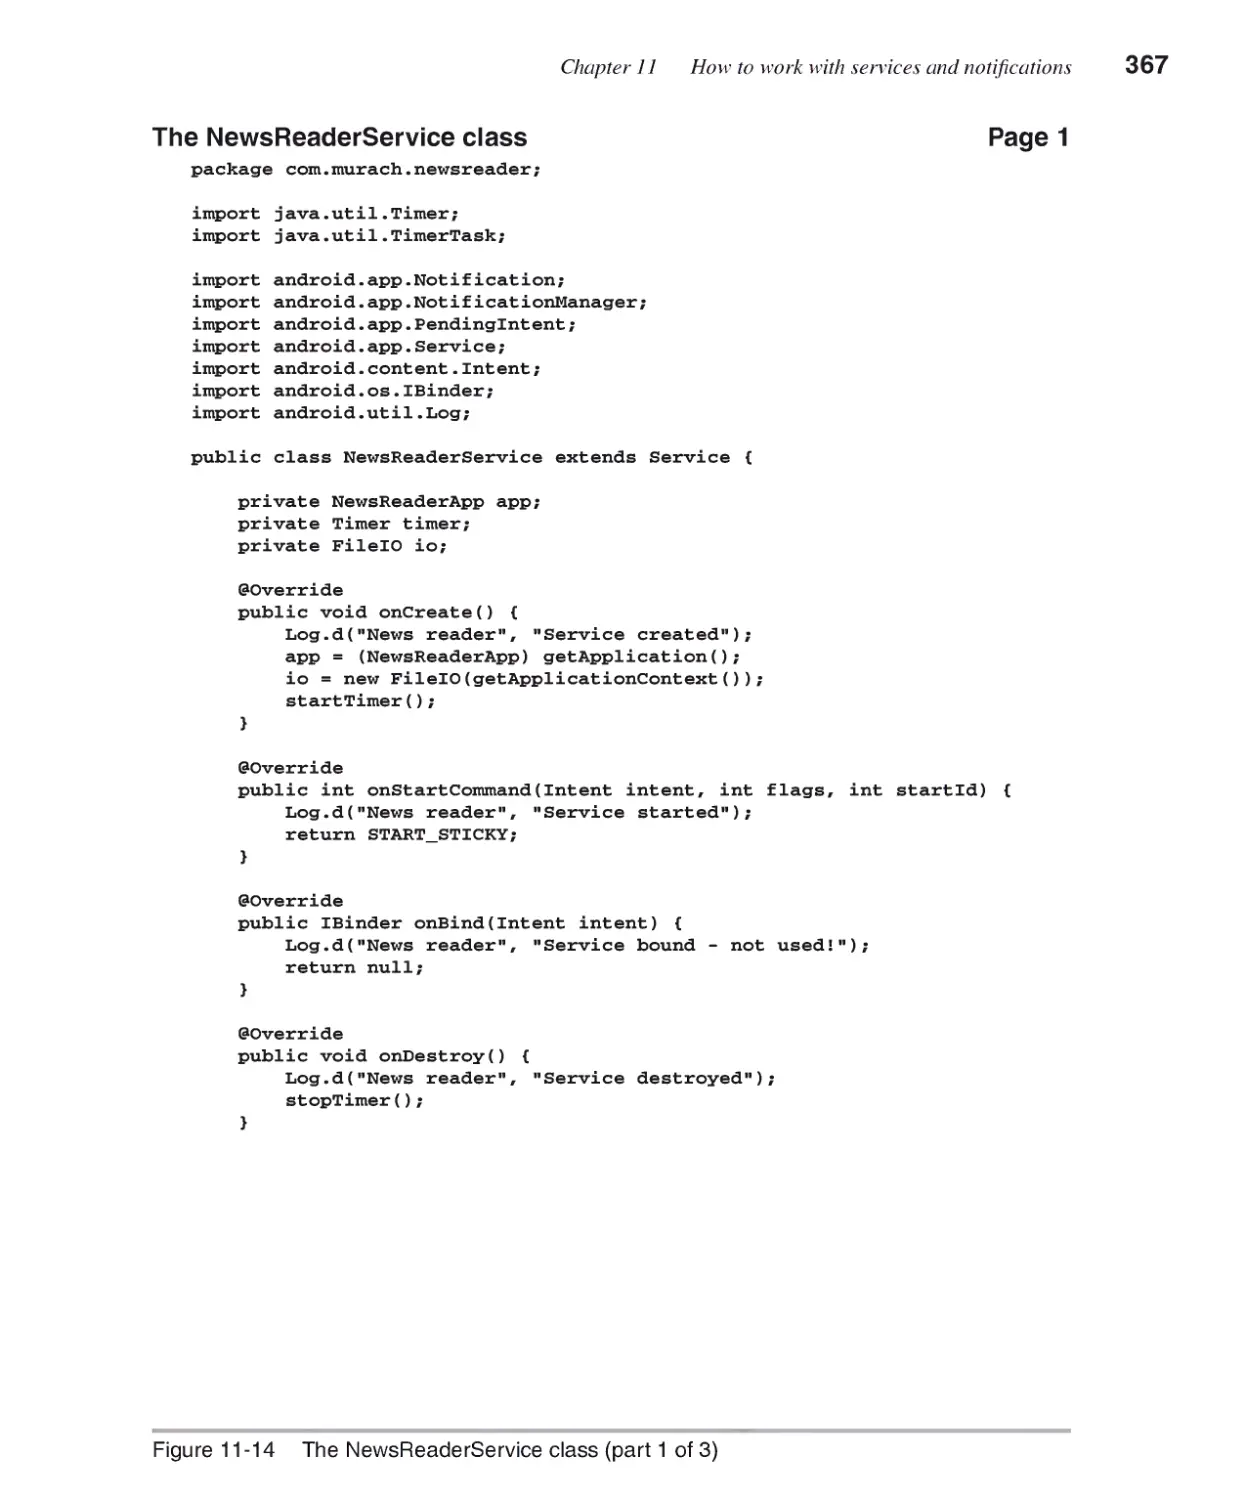
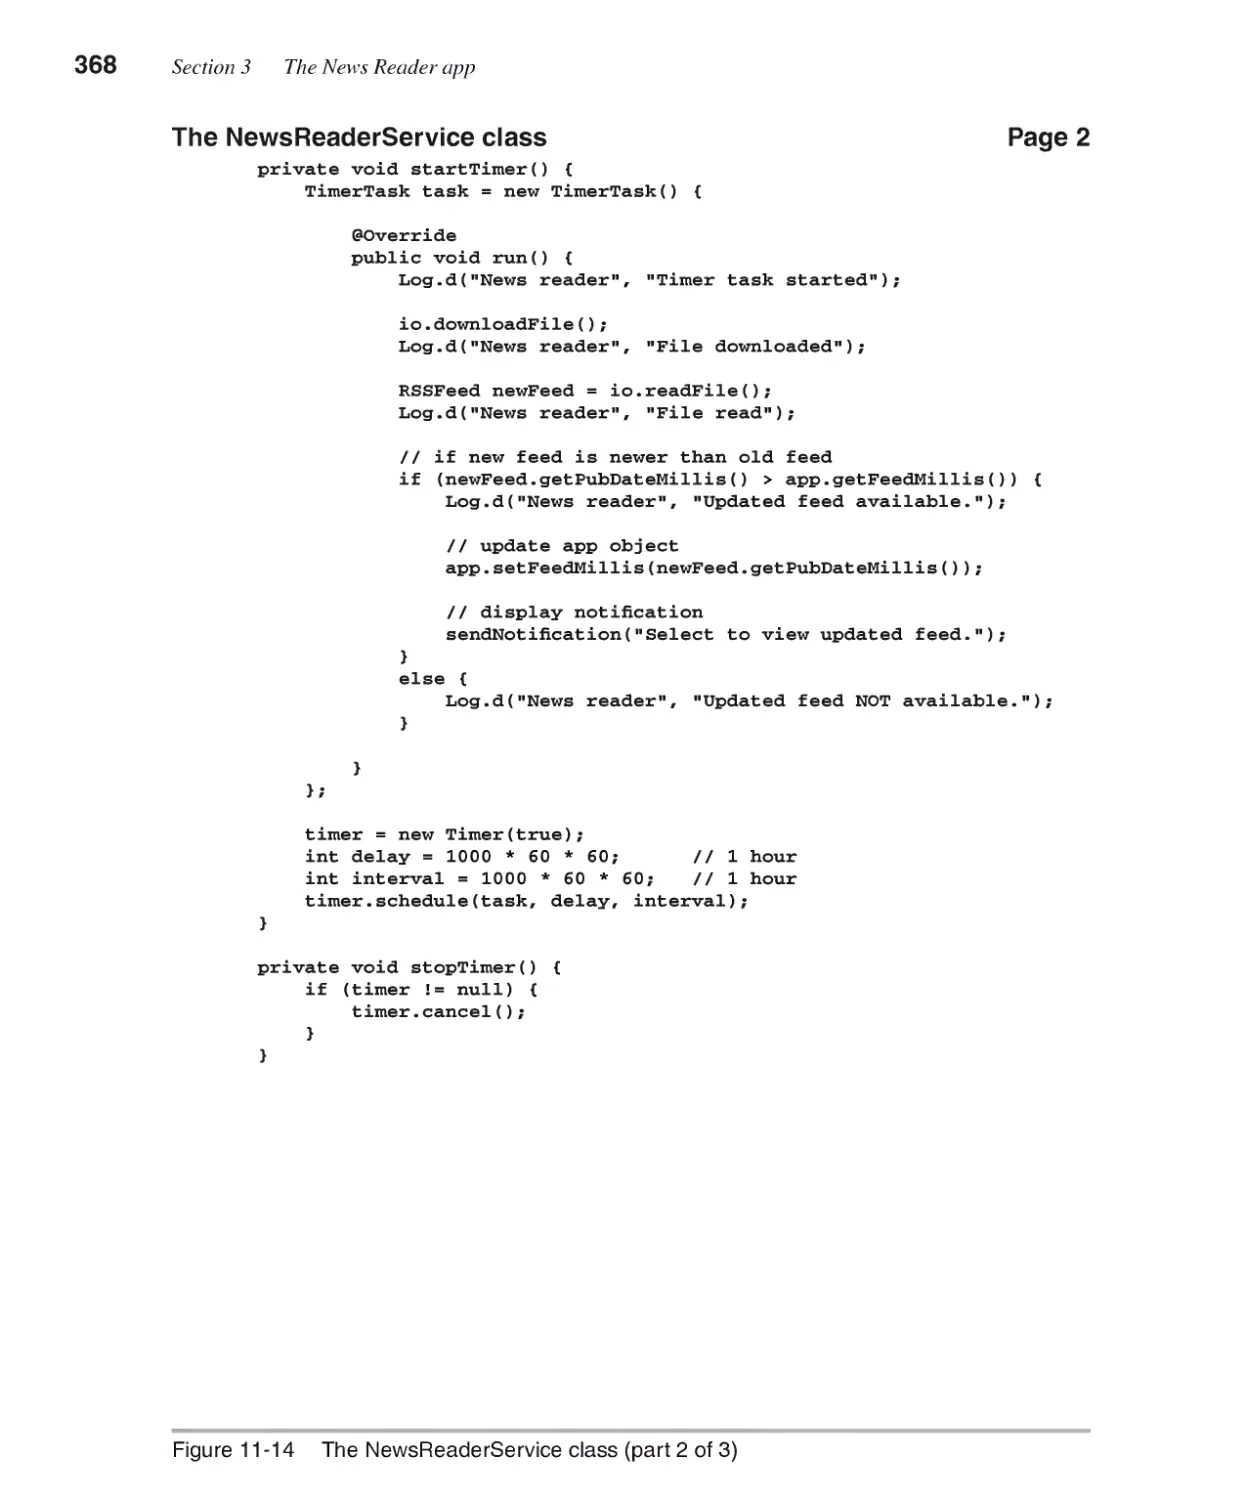
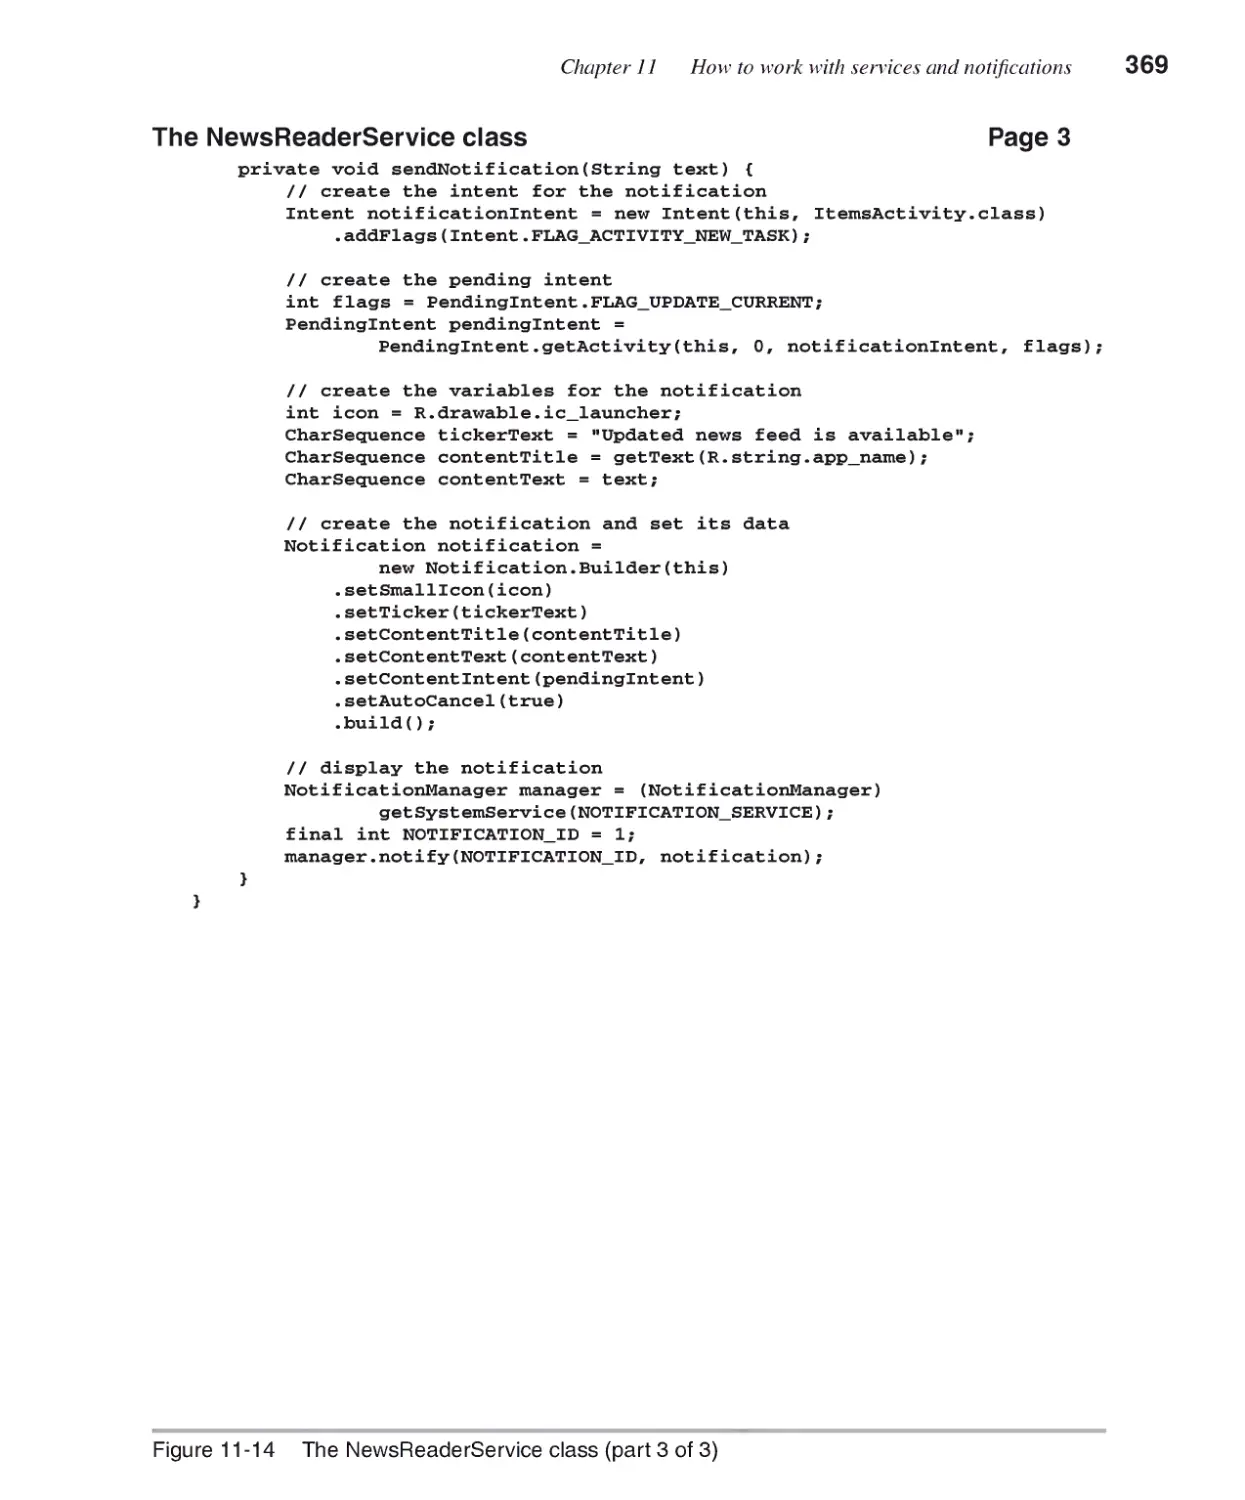
The News Reader app ....................................................................366
The NewsReaderService class 366
The Items Activity class 370
The FilelO class 370
Chapter 12 How to work with broadcast receivers
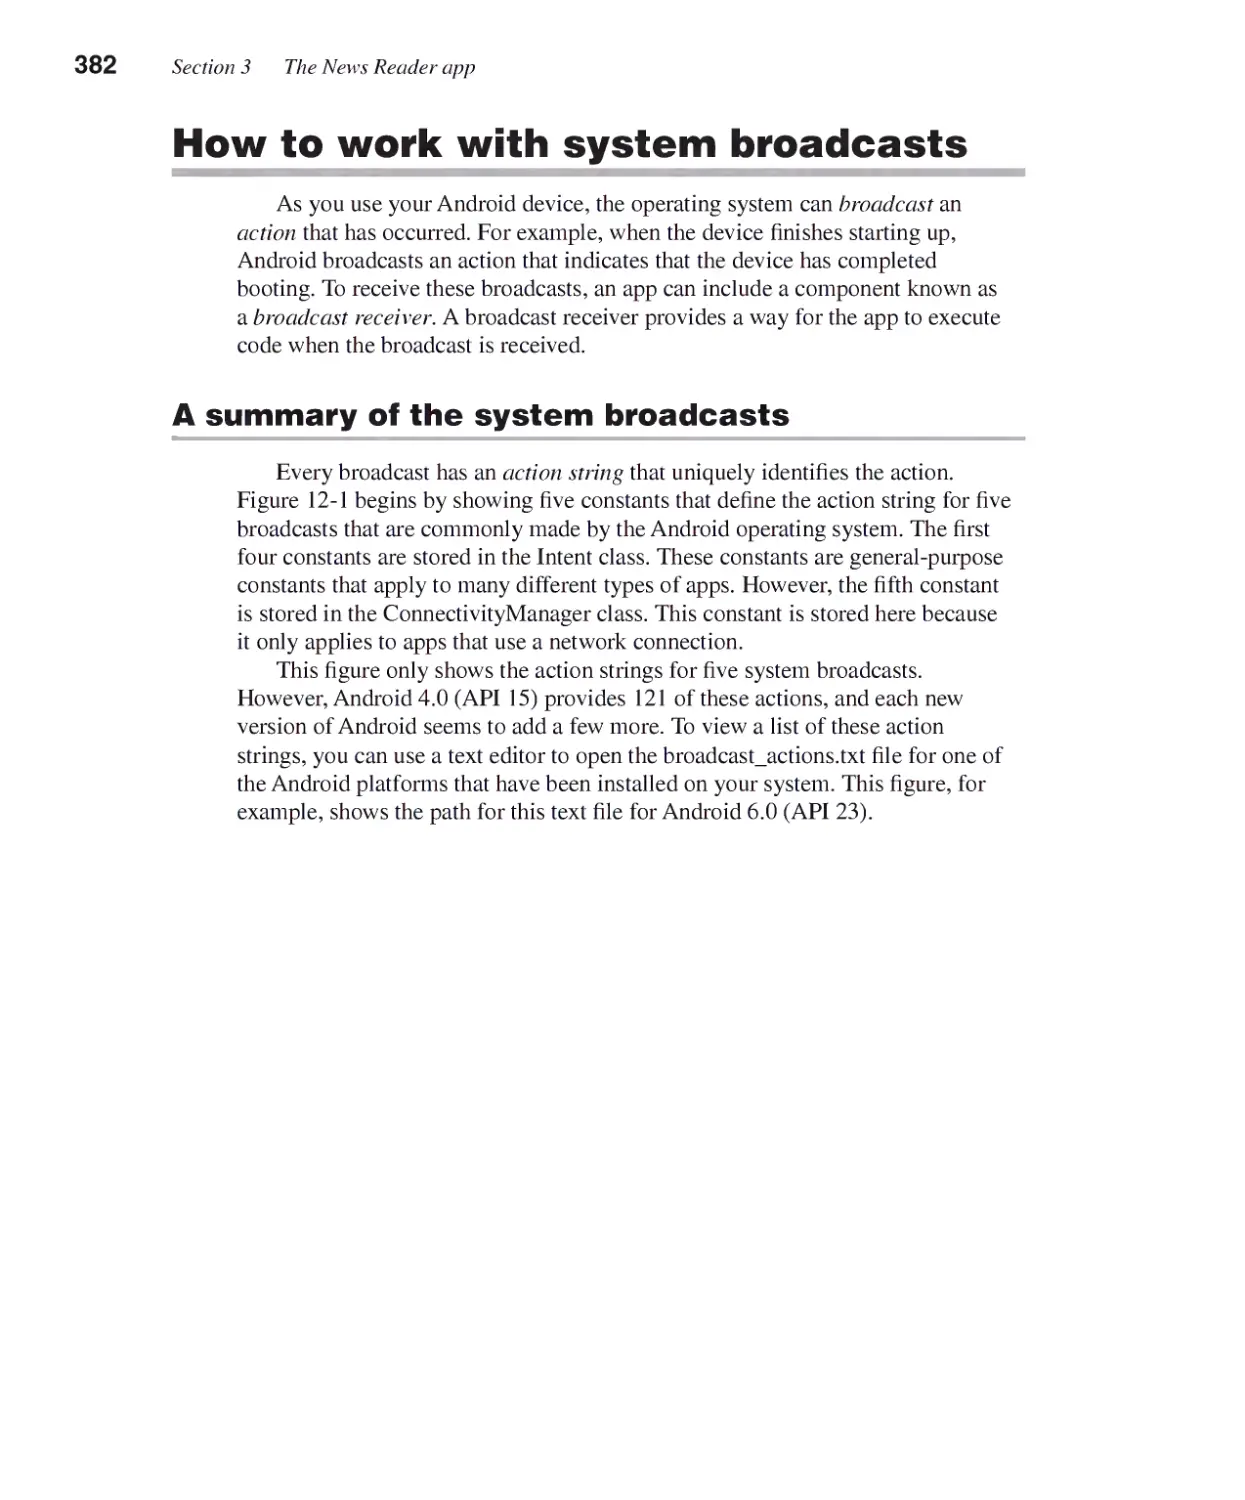
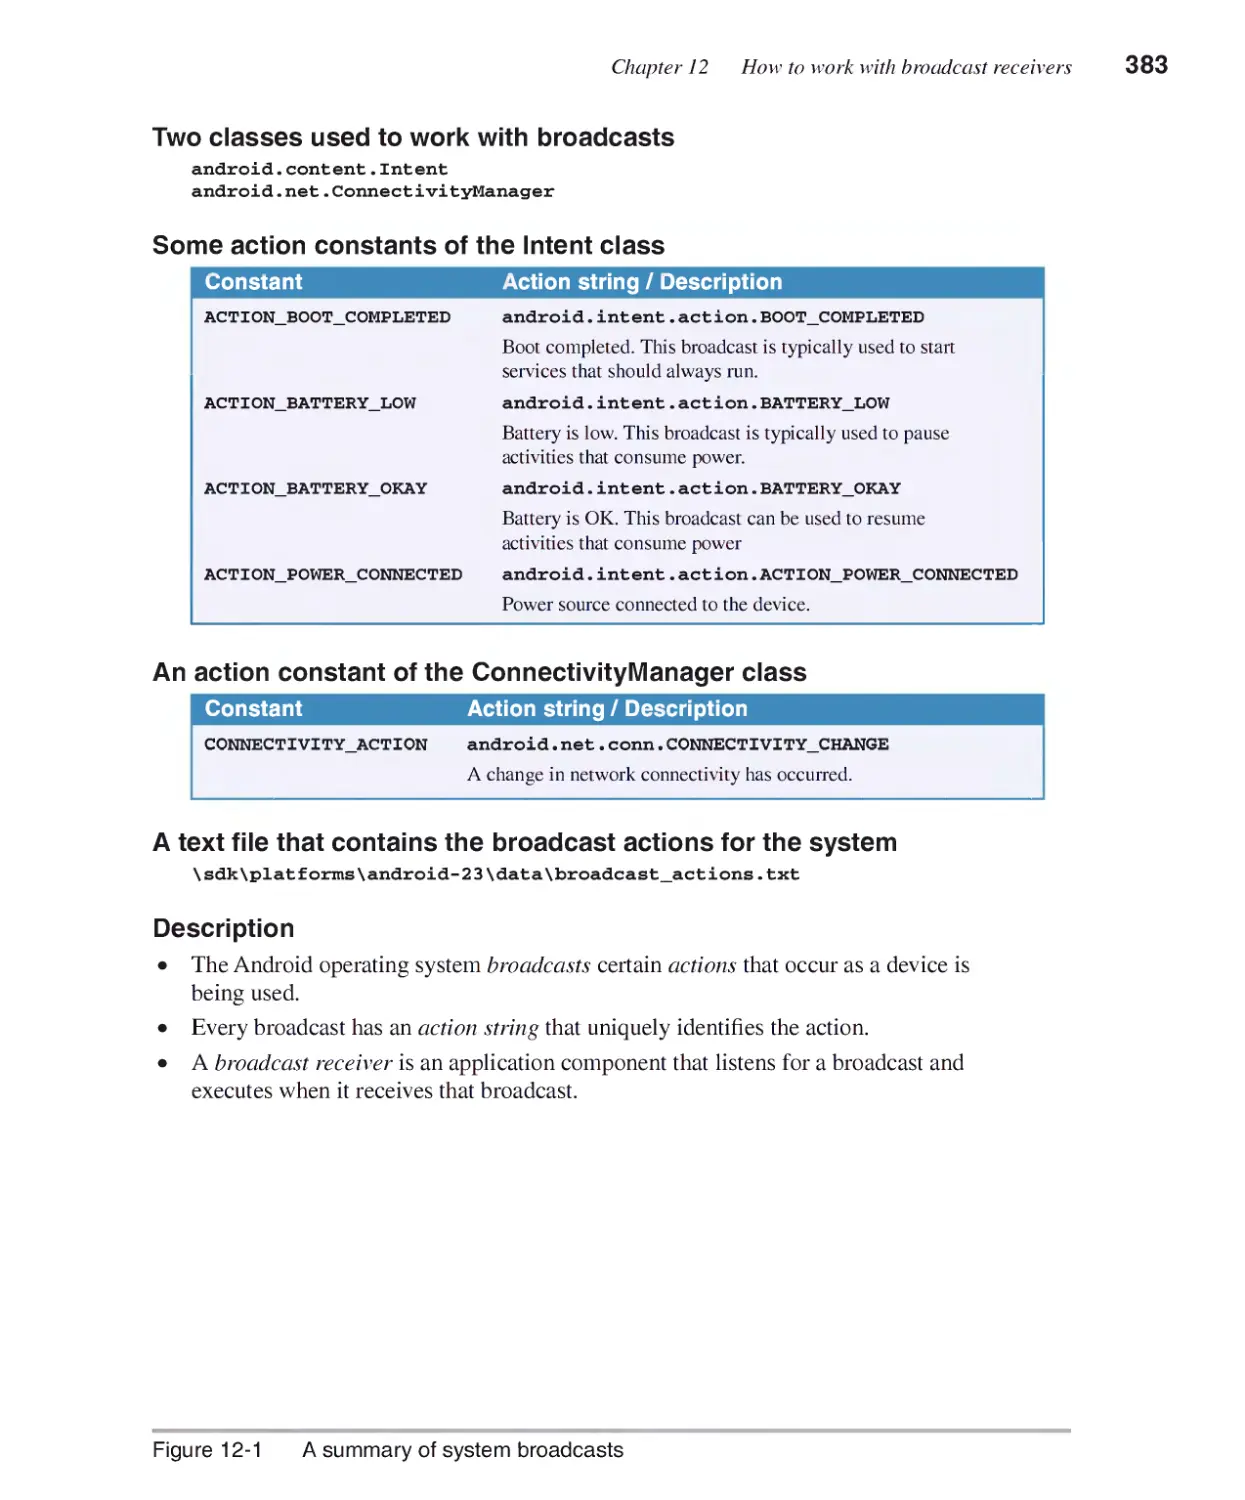
How to work with system broadcasts...........................................382
A summary of the system broadcasts 382
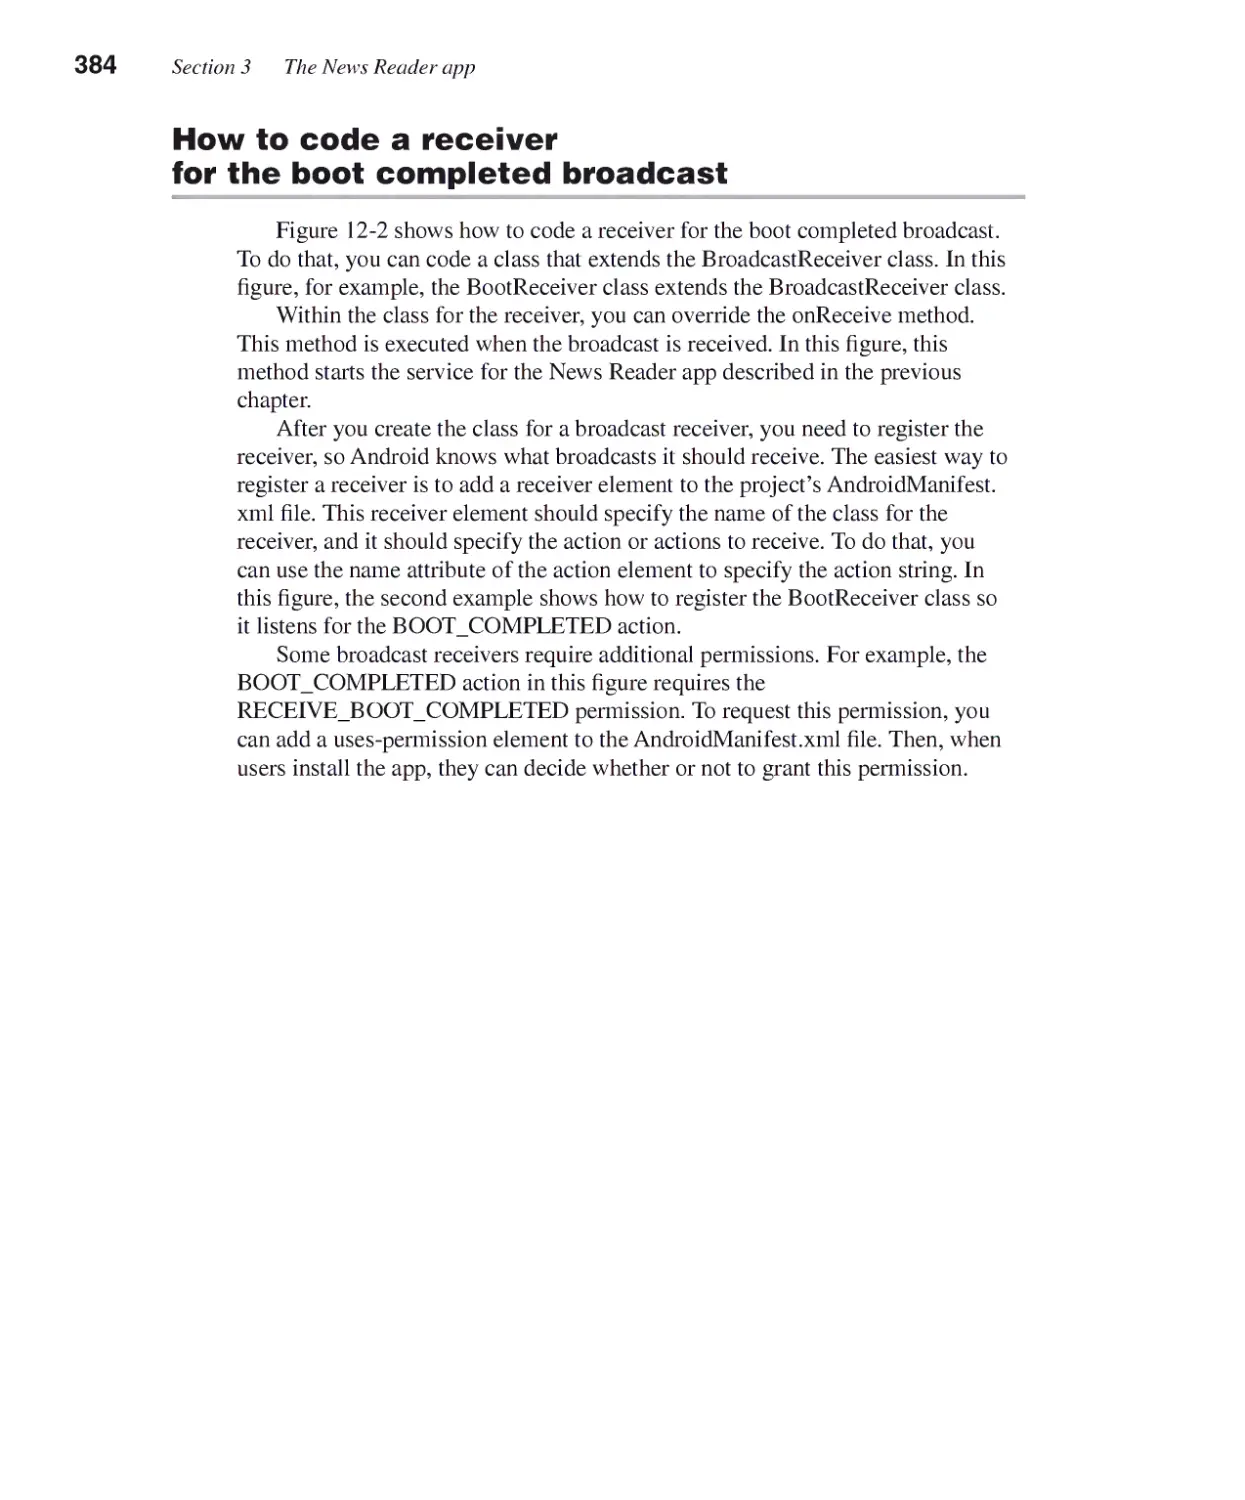
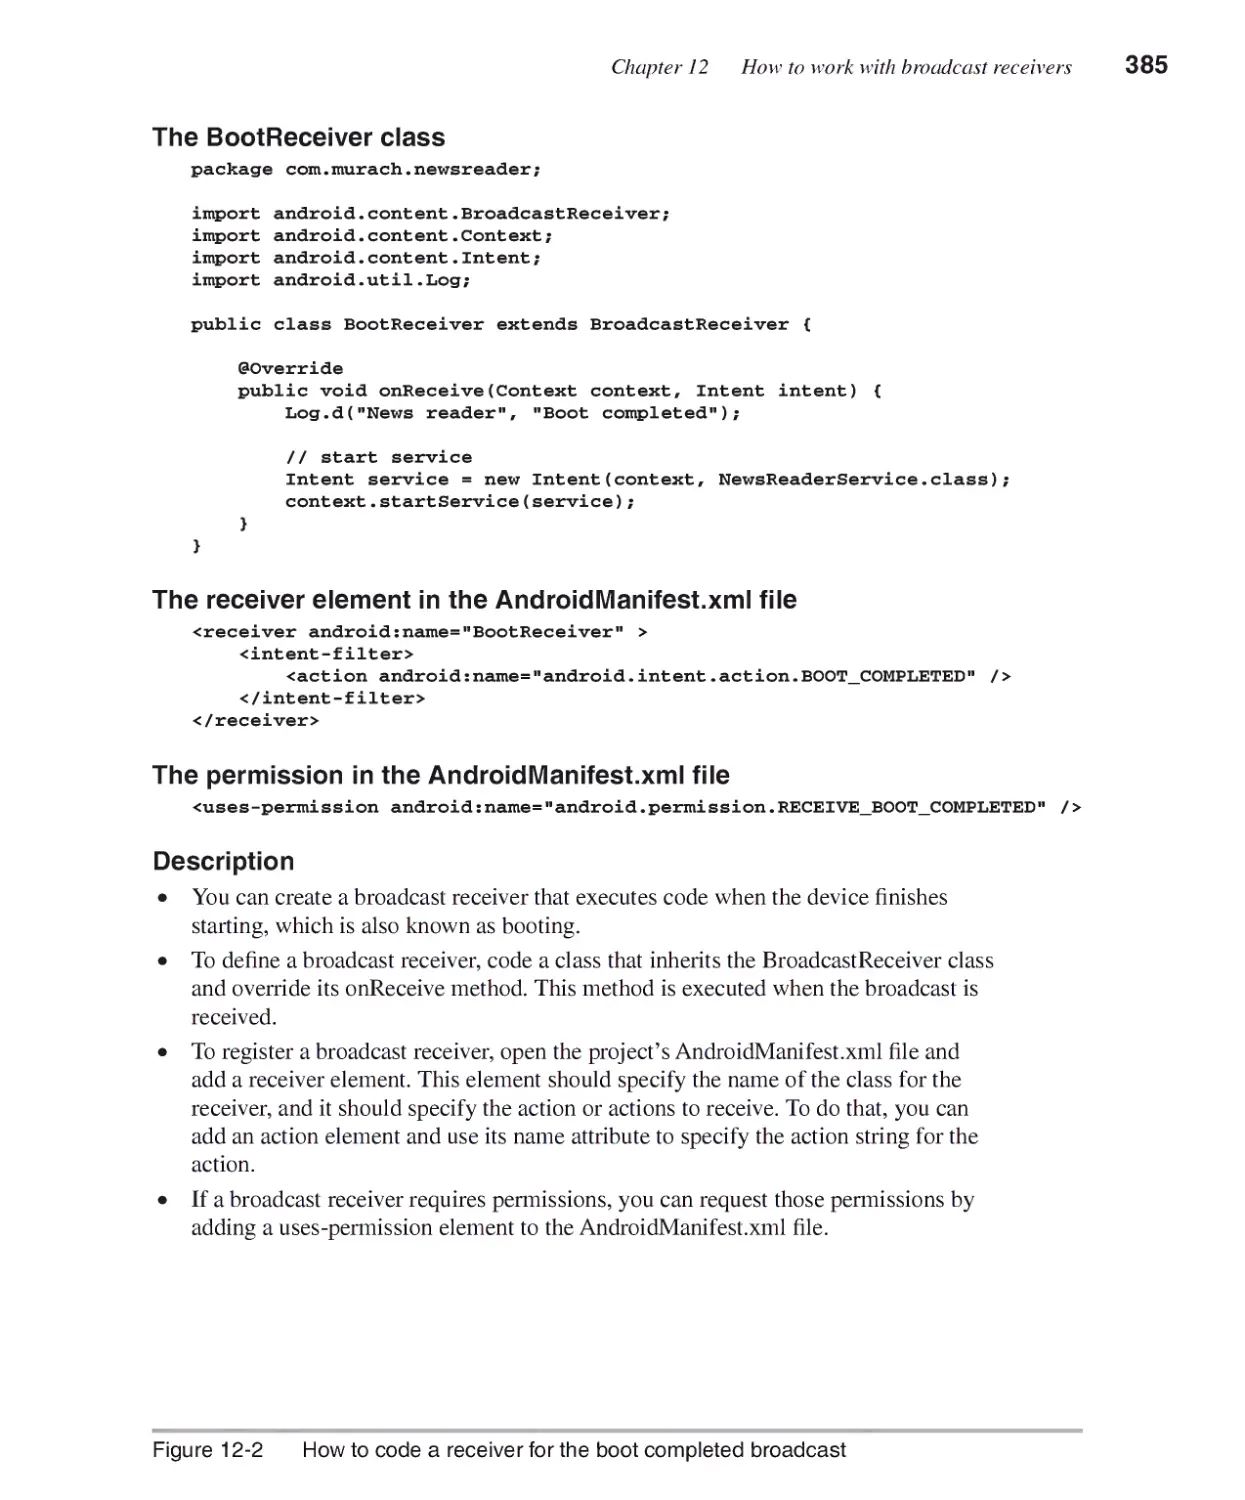
How to code a receiver for the boot completed broadcast 384
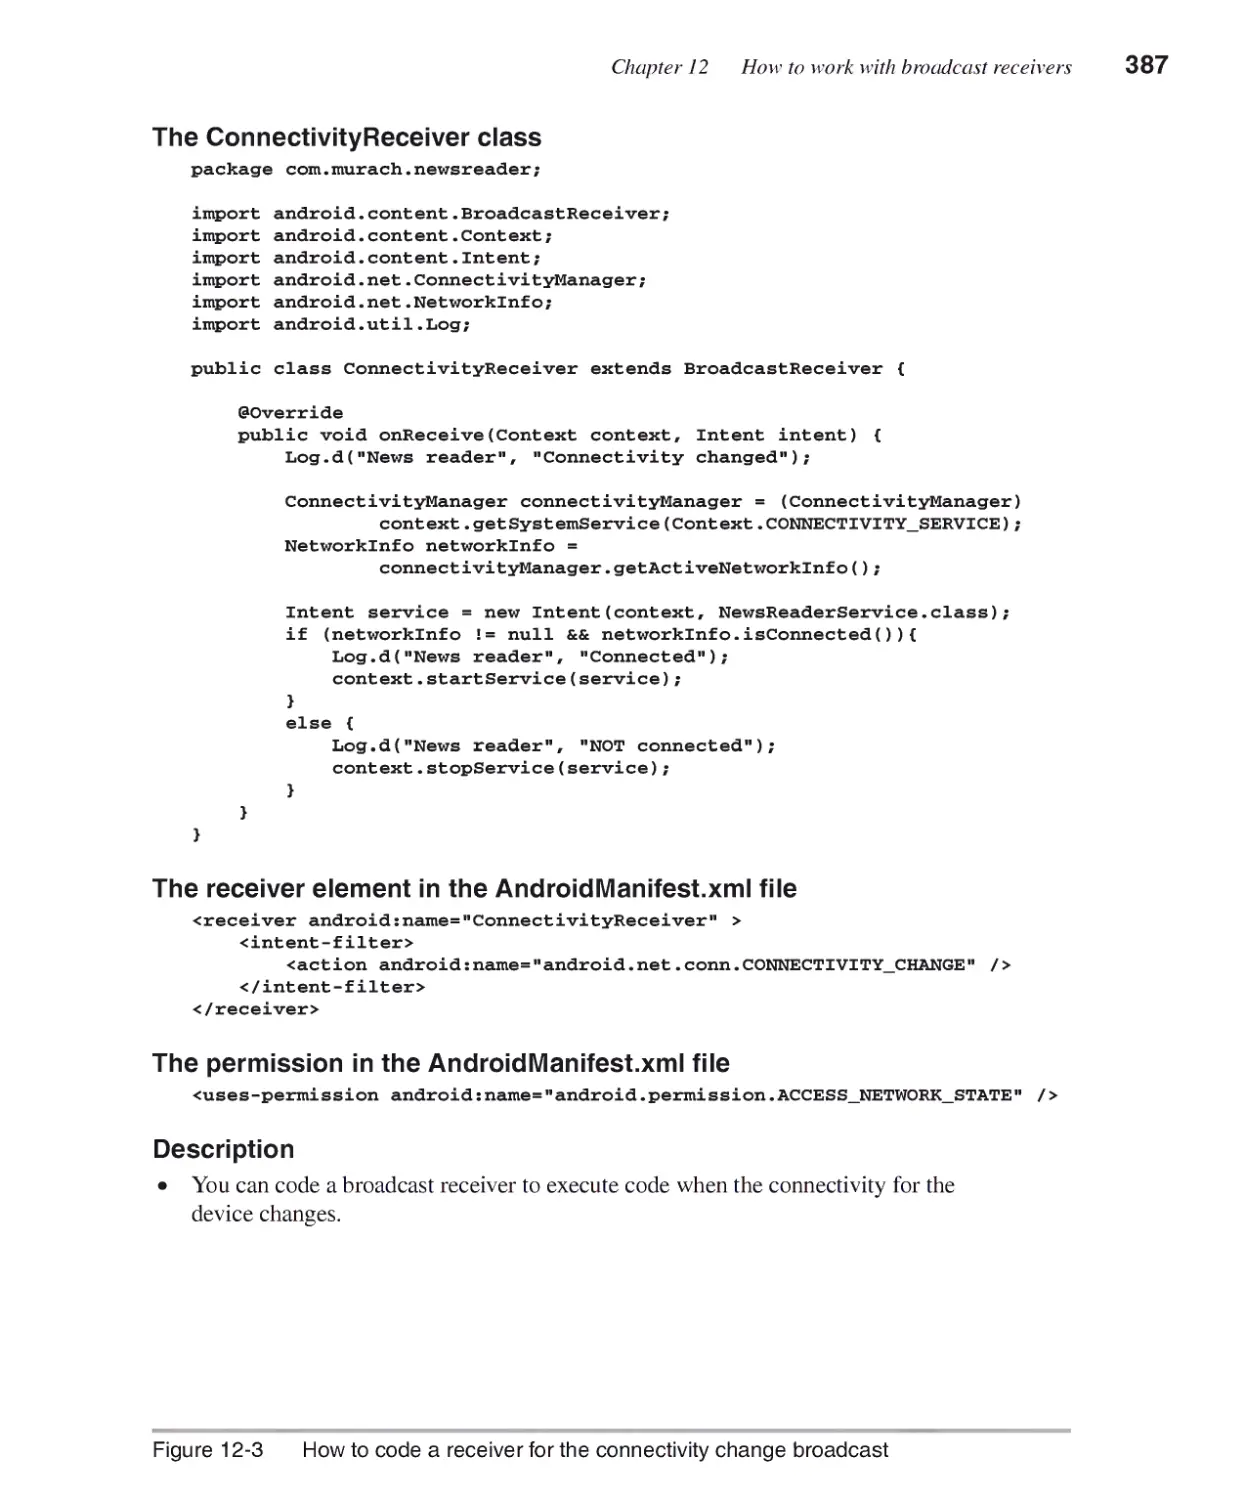
How to code a receiver for the connectivity changed broadcast 386
How to work with custom broadcasts ..........................................388
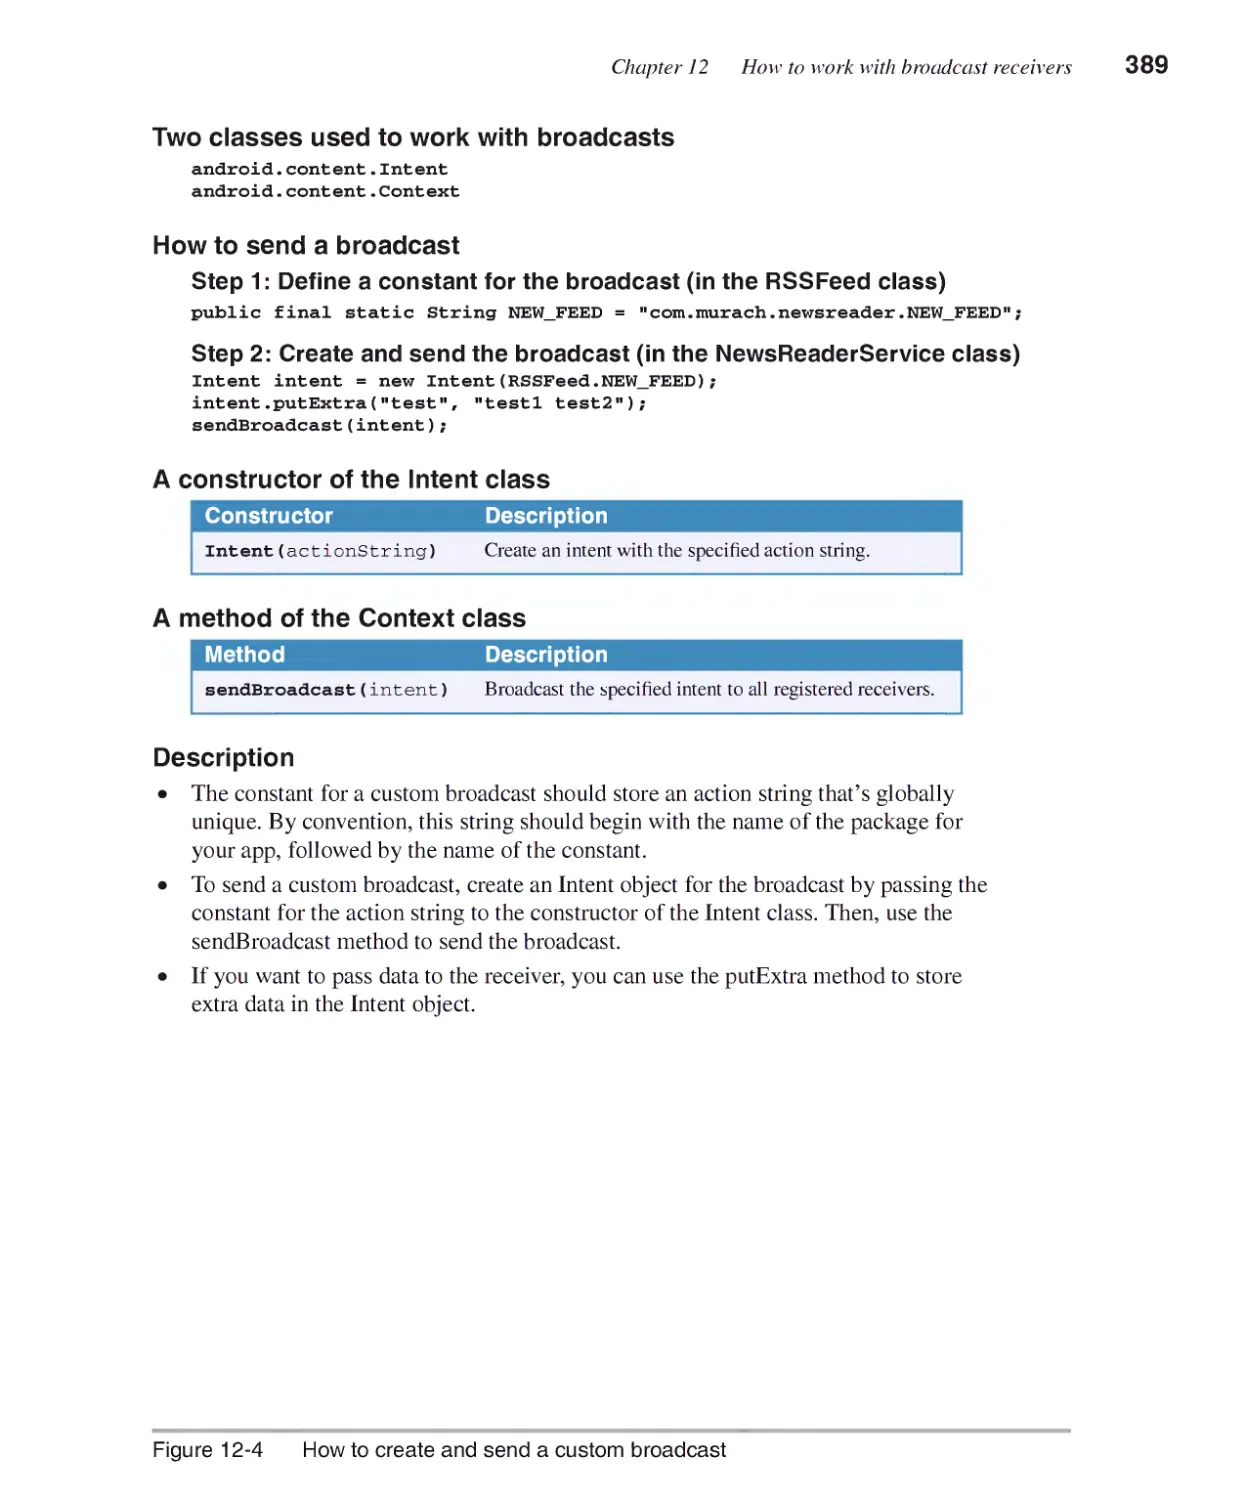
How to create and send a custom broadcast 388
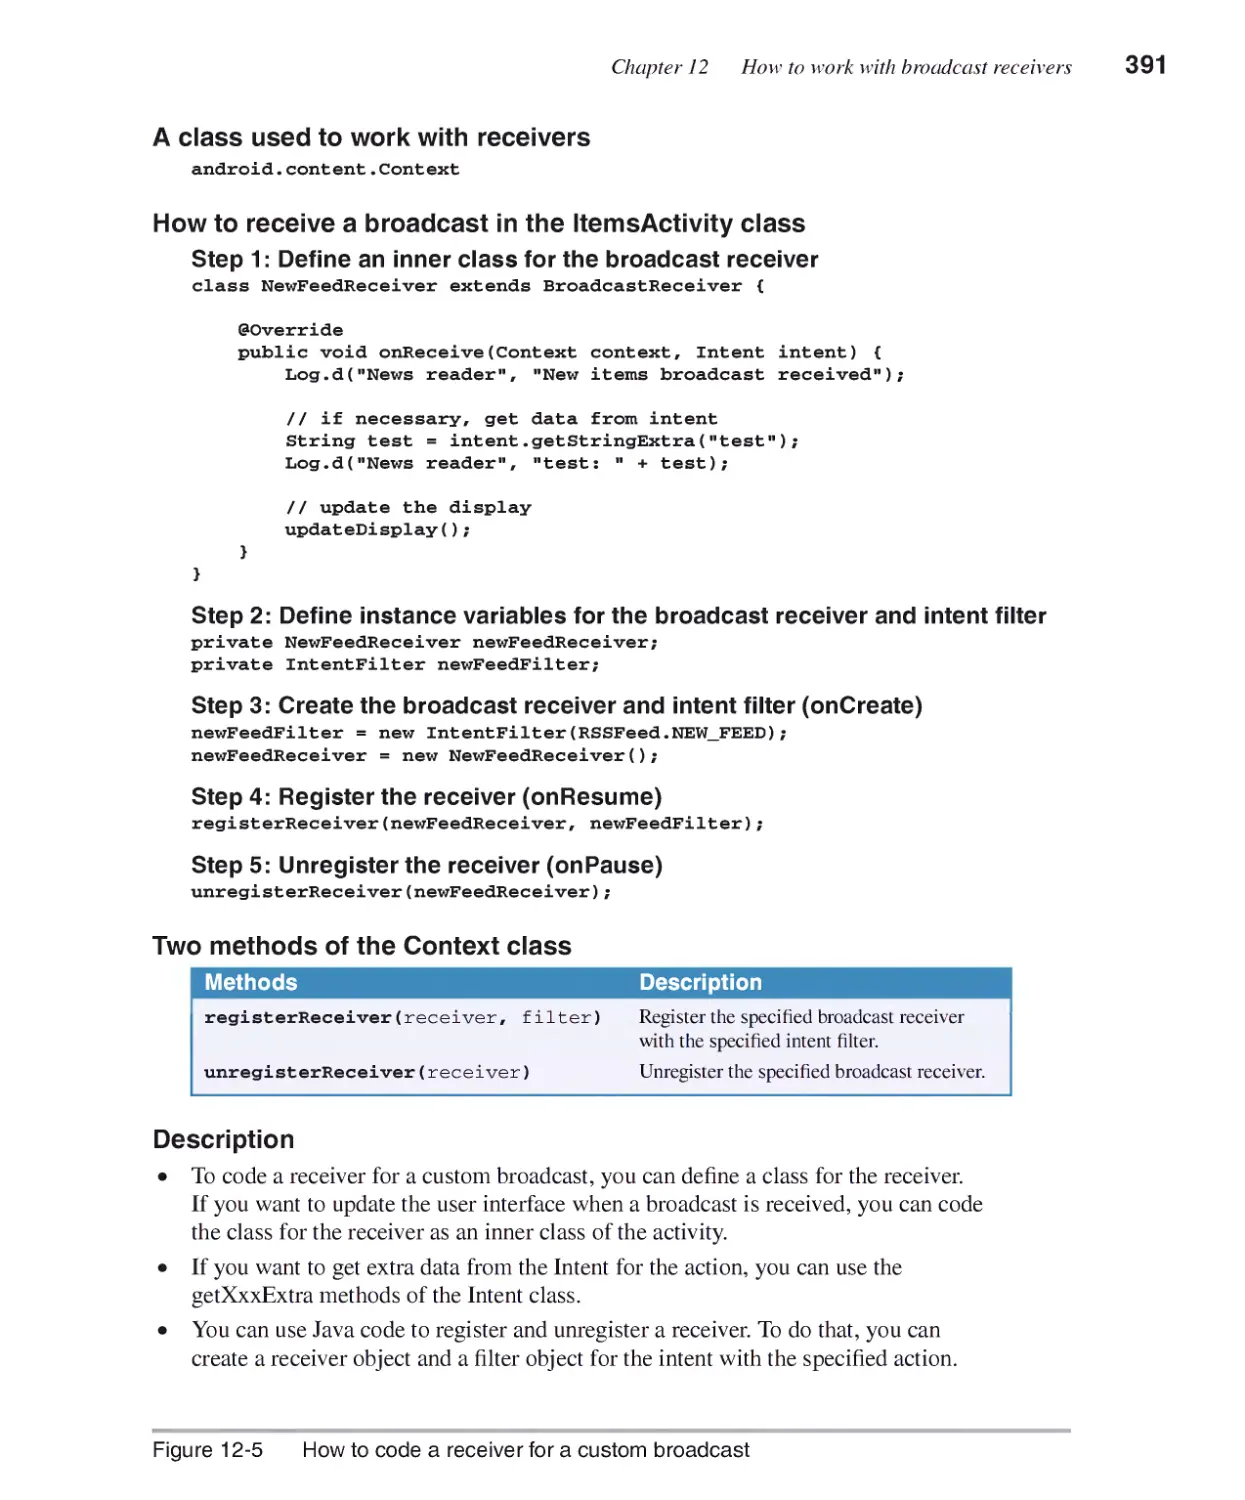
How to code a receiver for a custom broadcast 390
Section 4 The Task List app
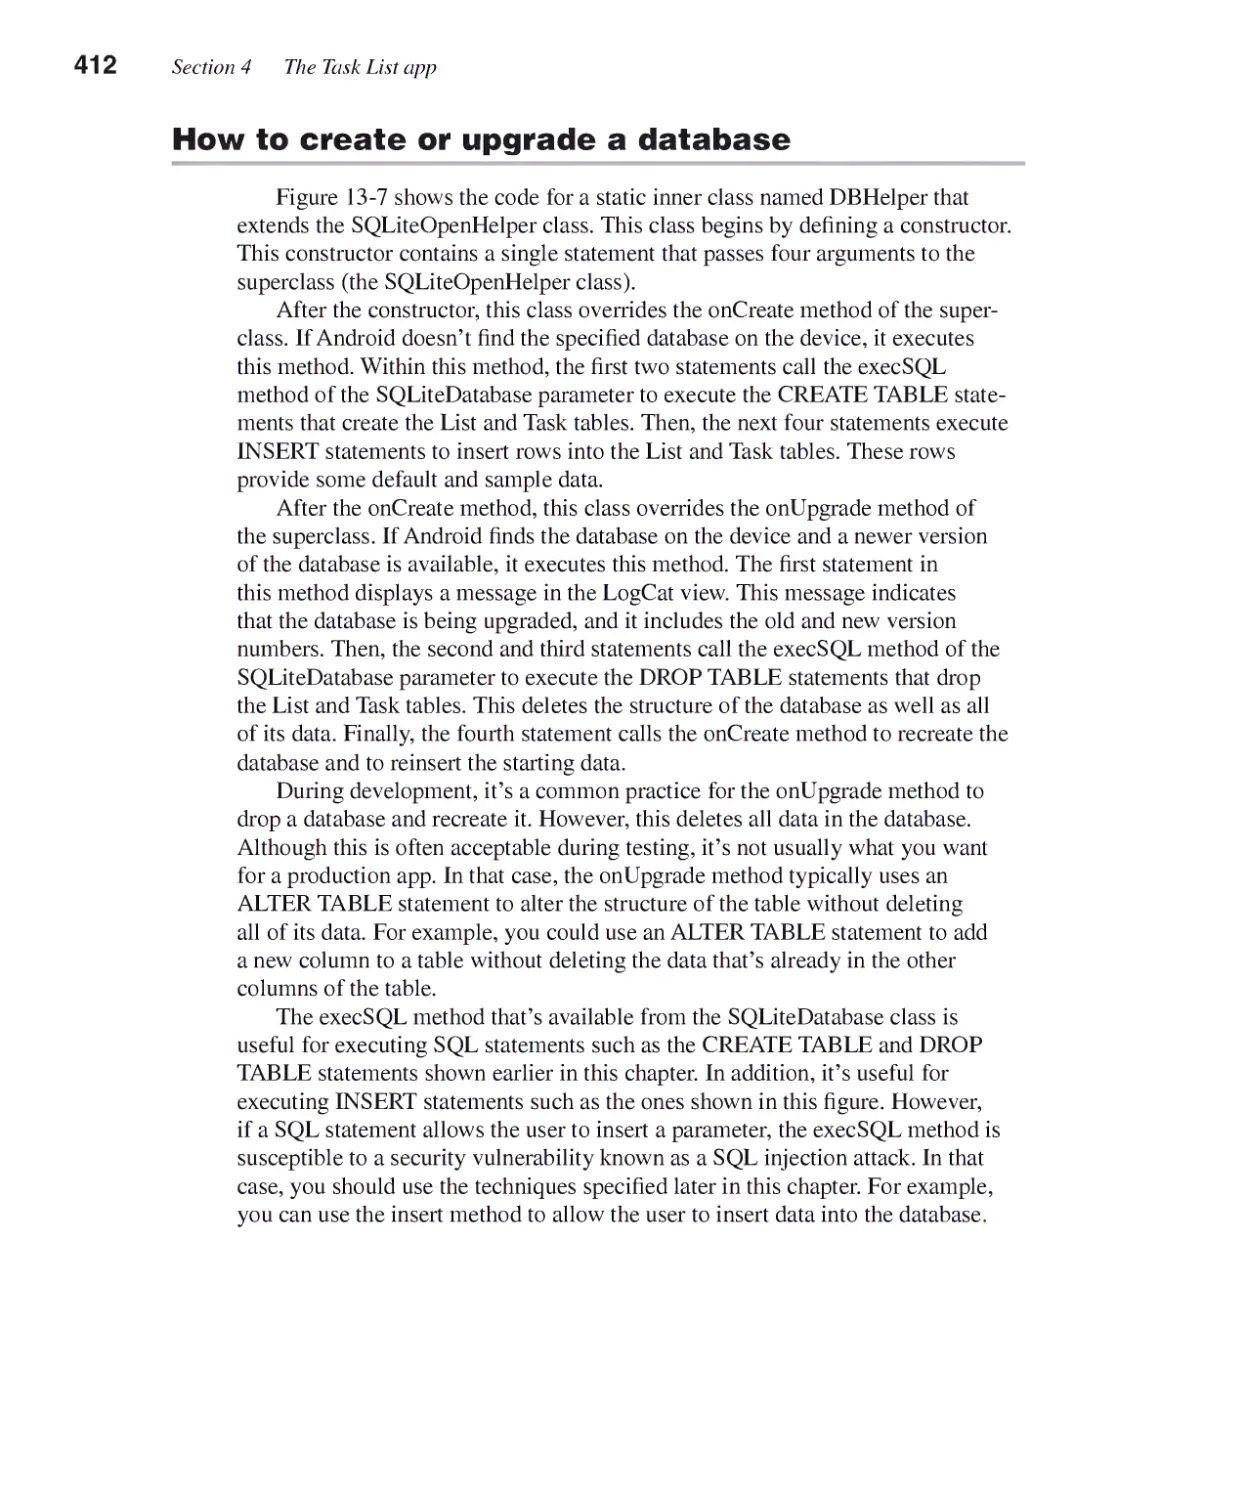
Chapter 13 How to work with SQLite databases
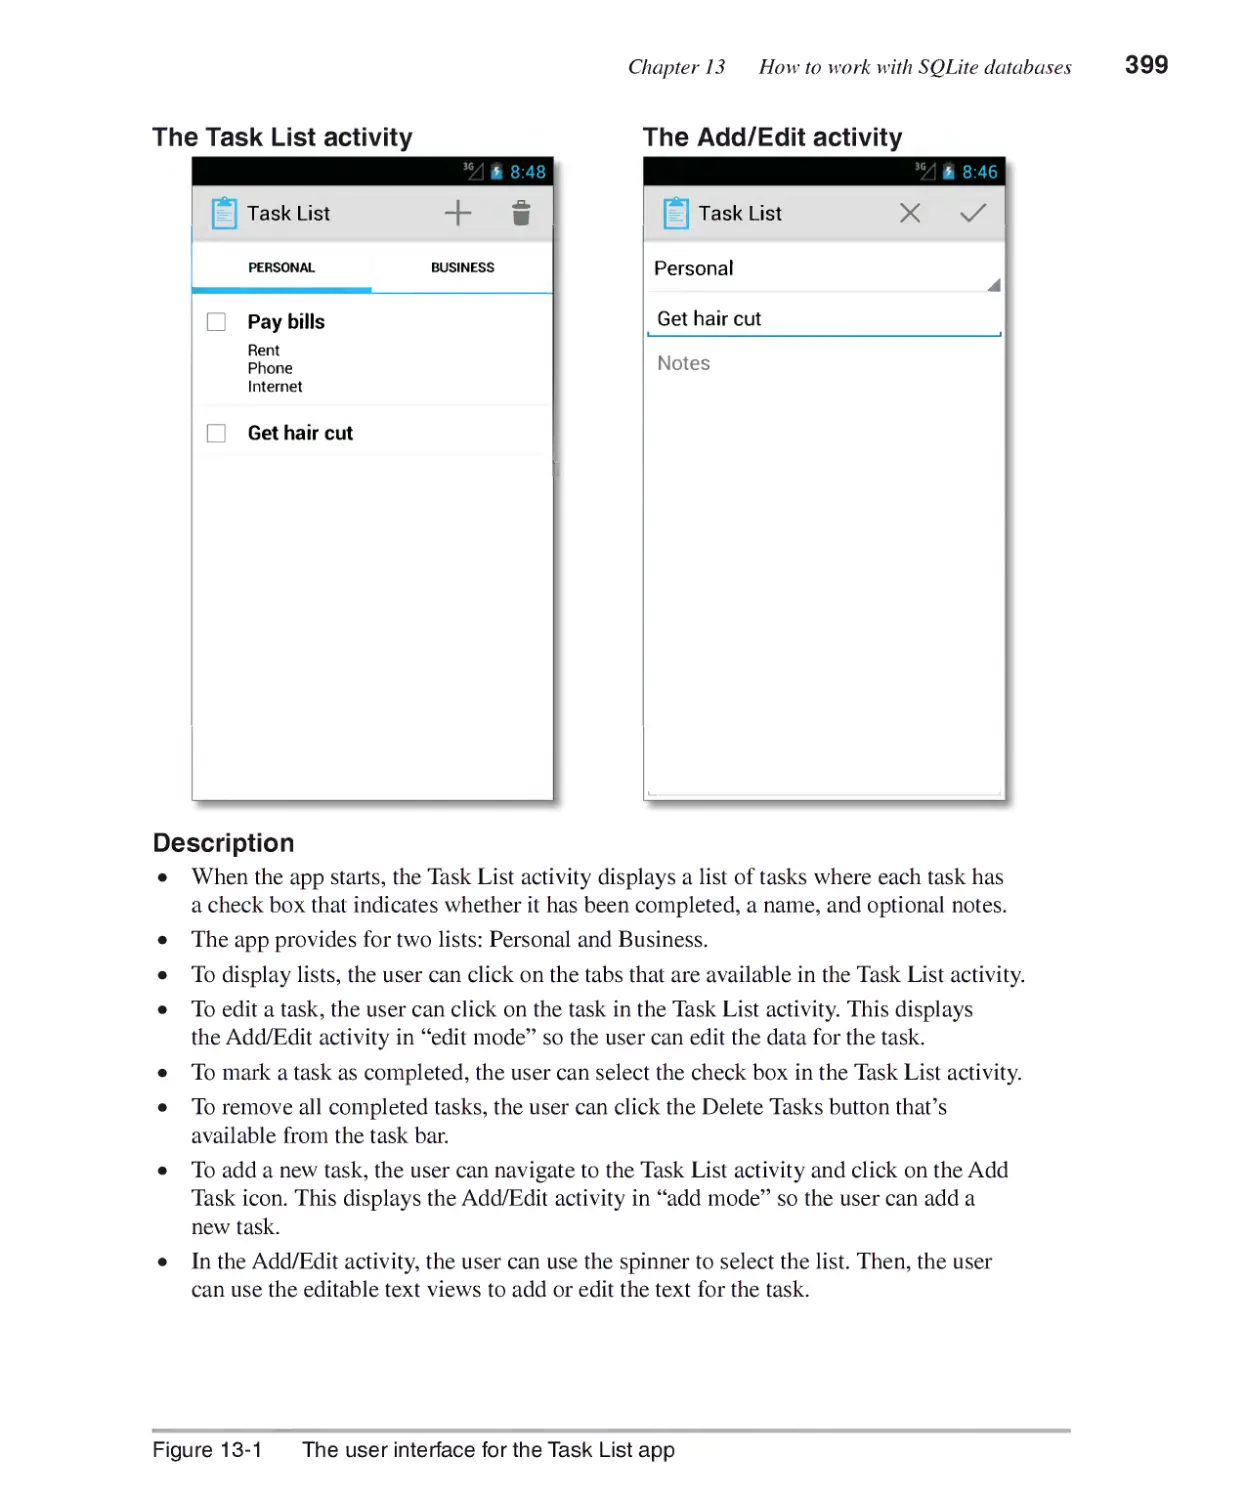
An introduction to databases........................................................398
The user interface for the Task List app 398
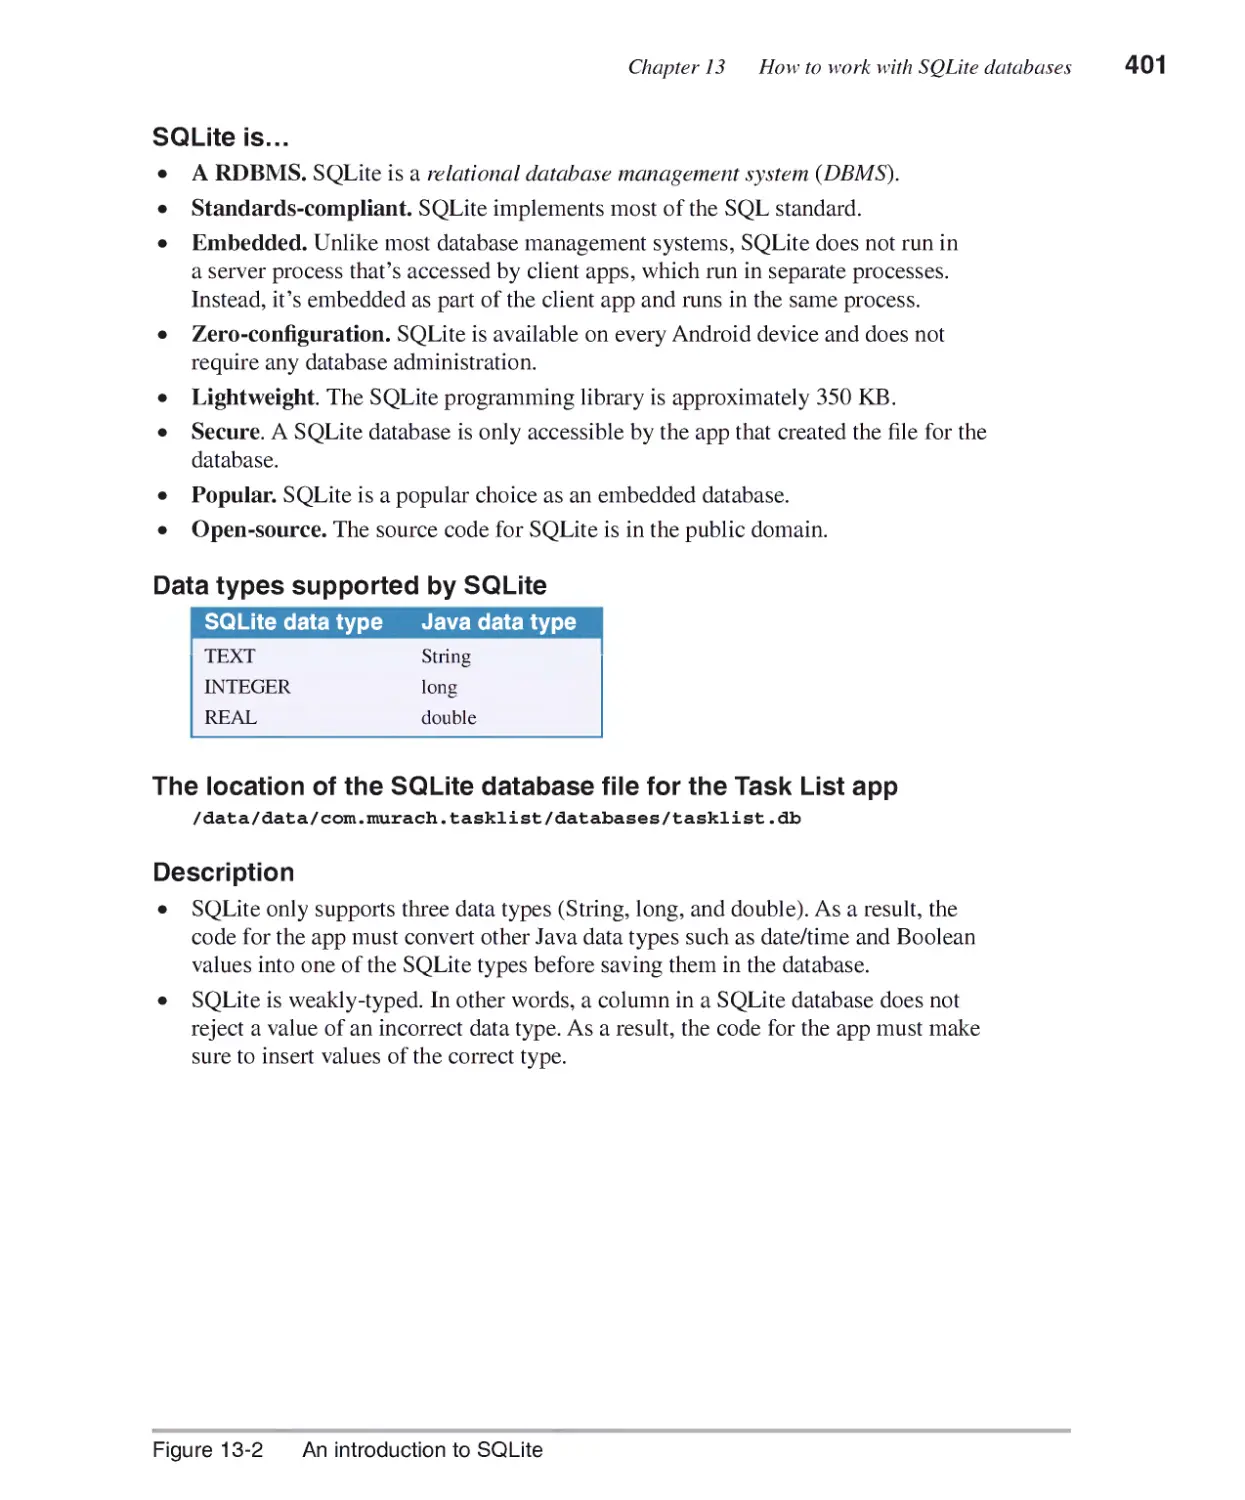
An introduction to SQLite 400
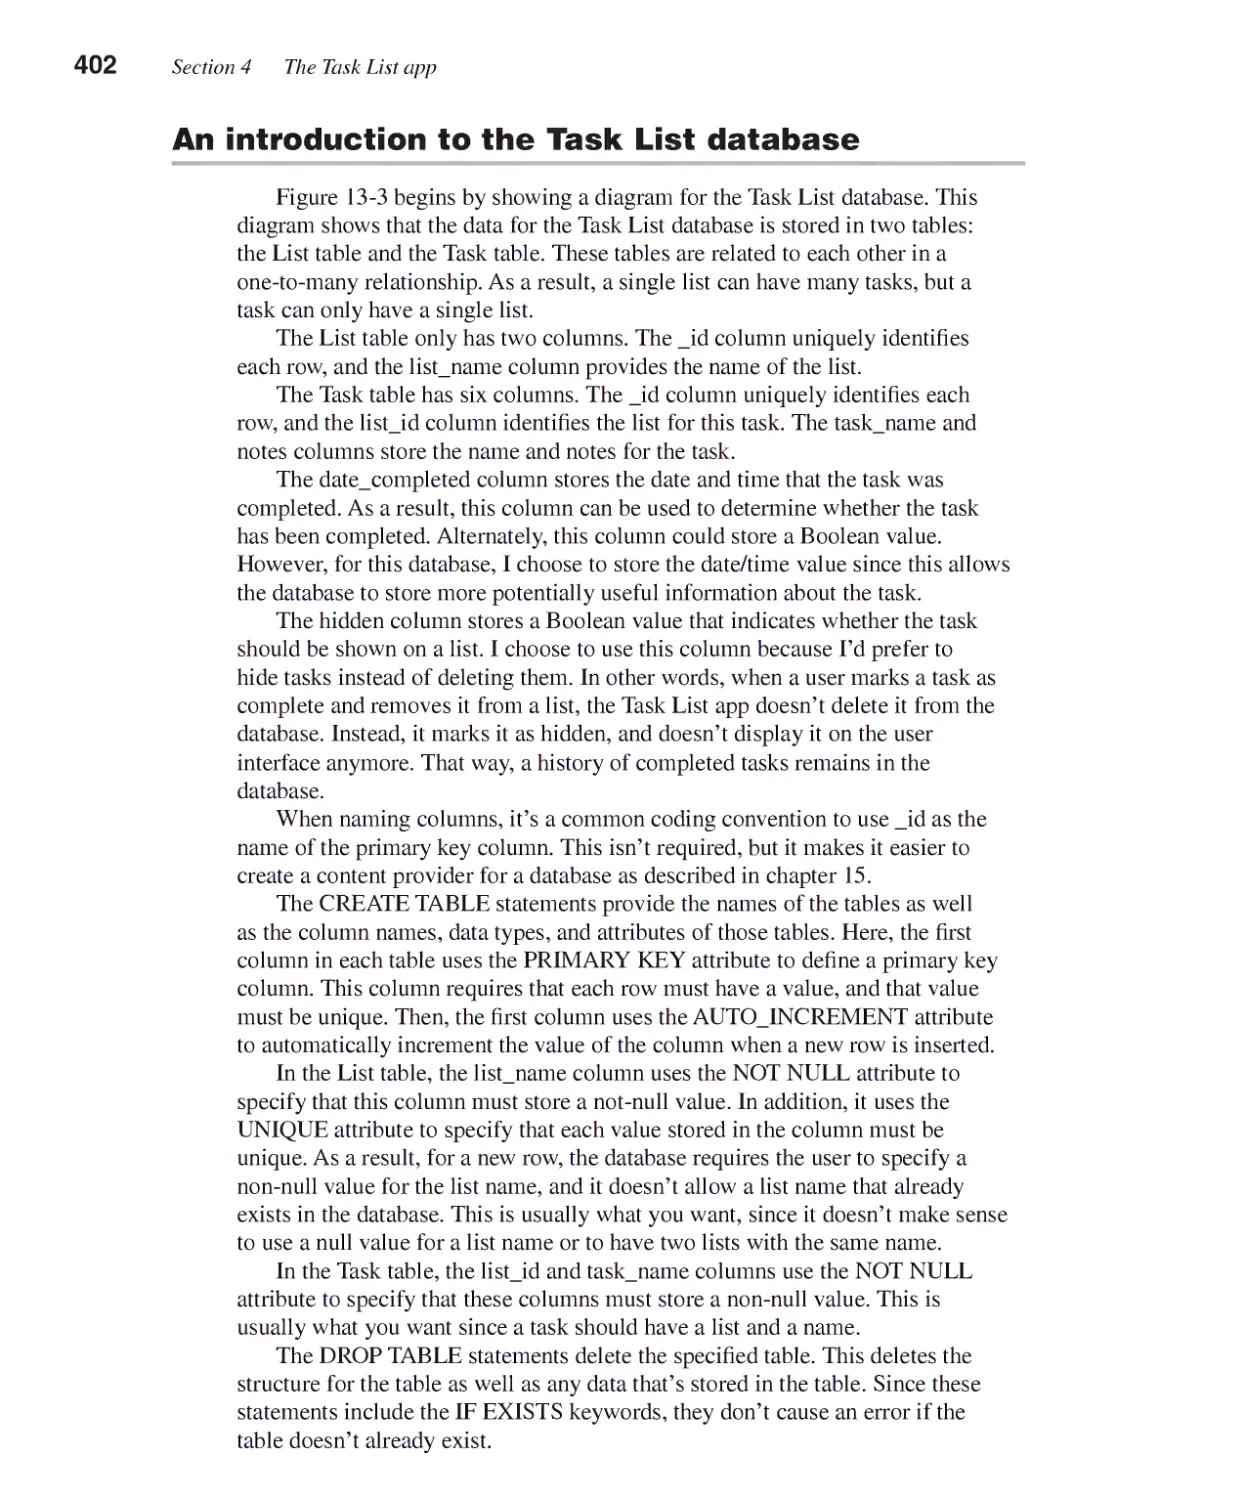
An introduction to the Task List database 402
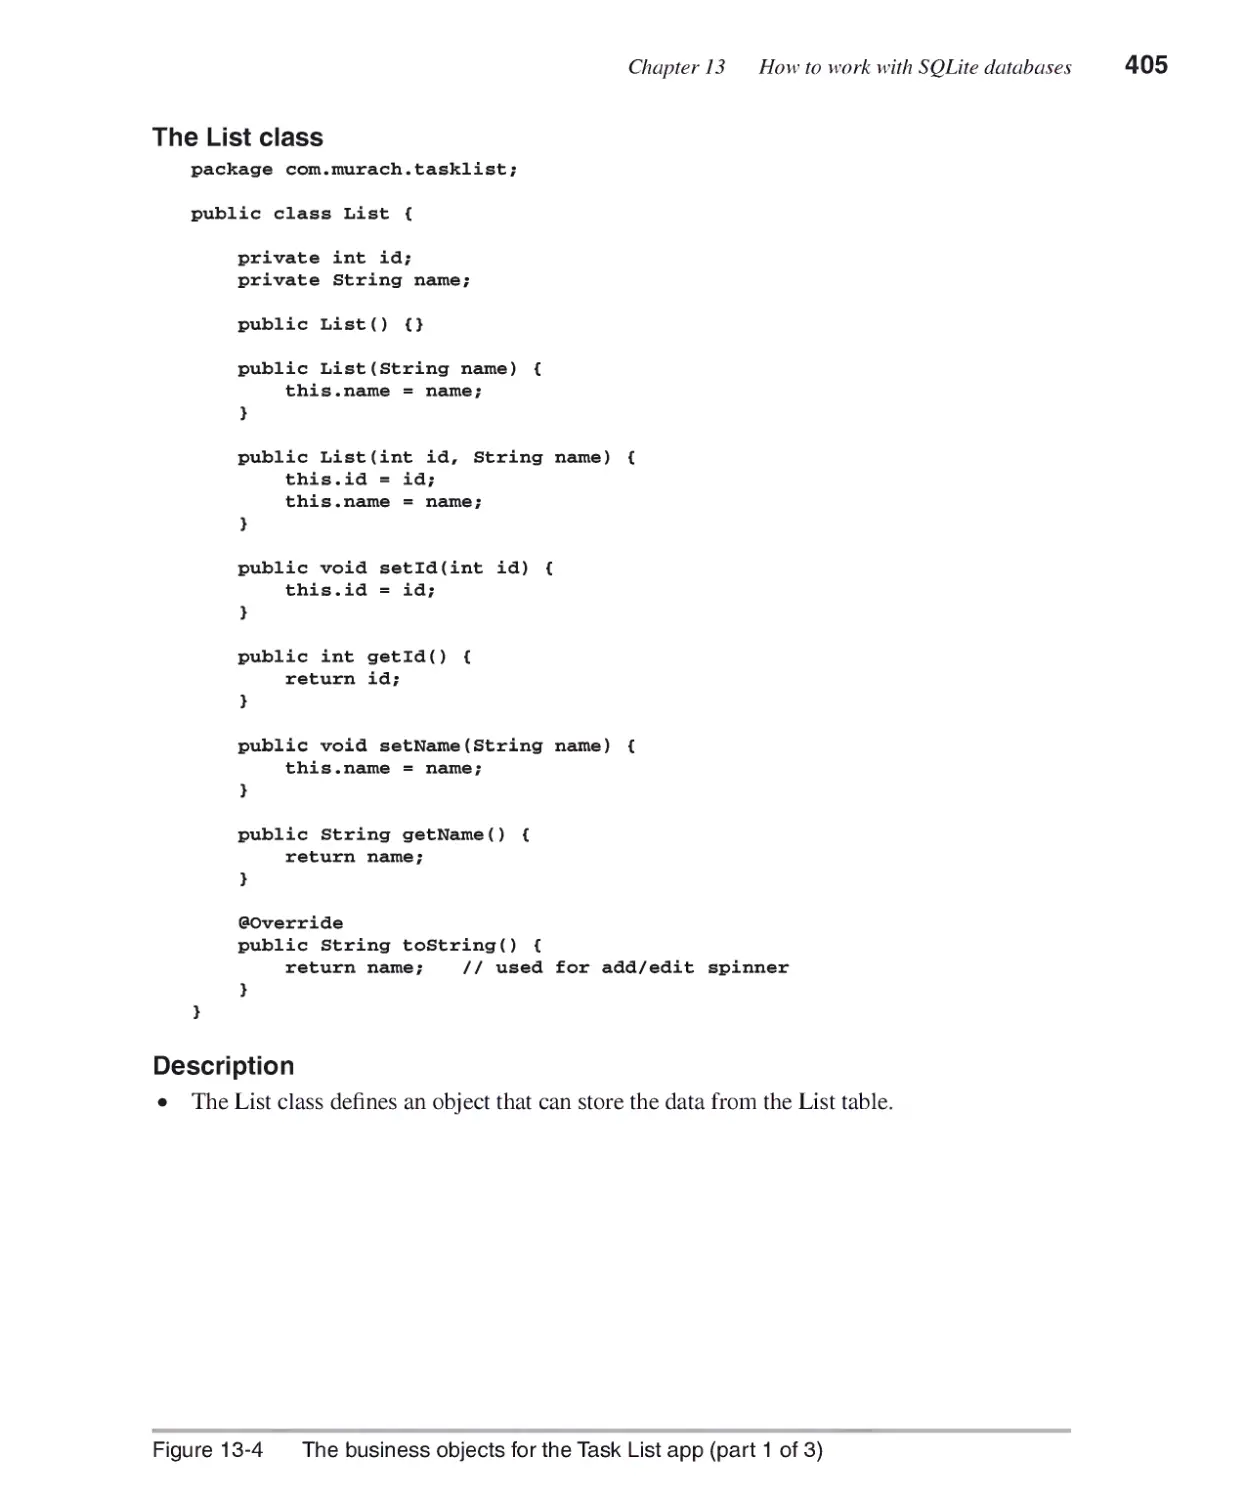
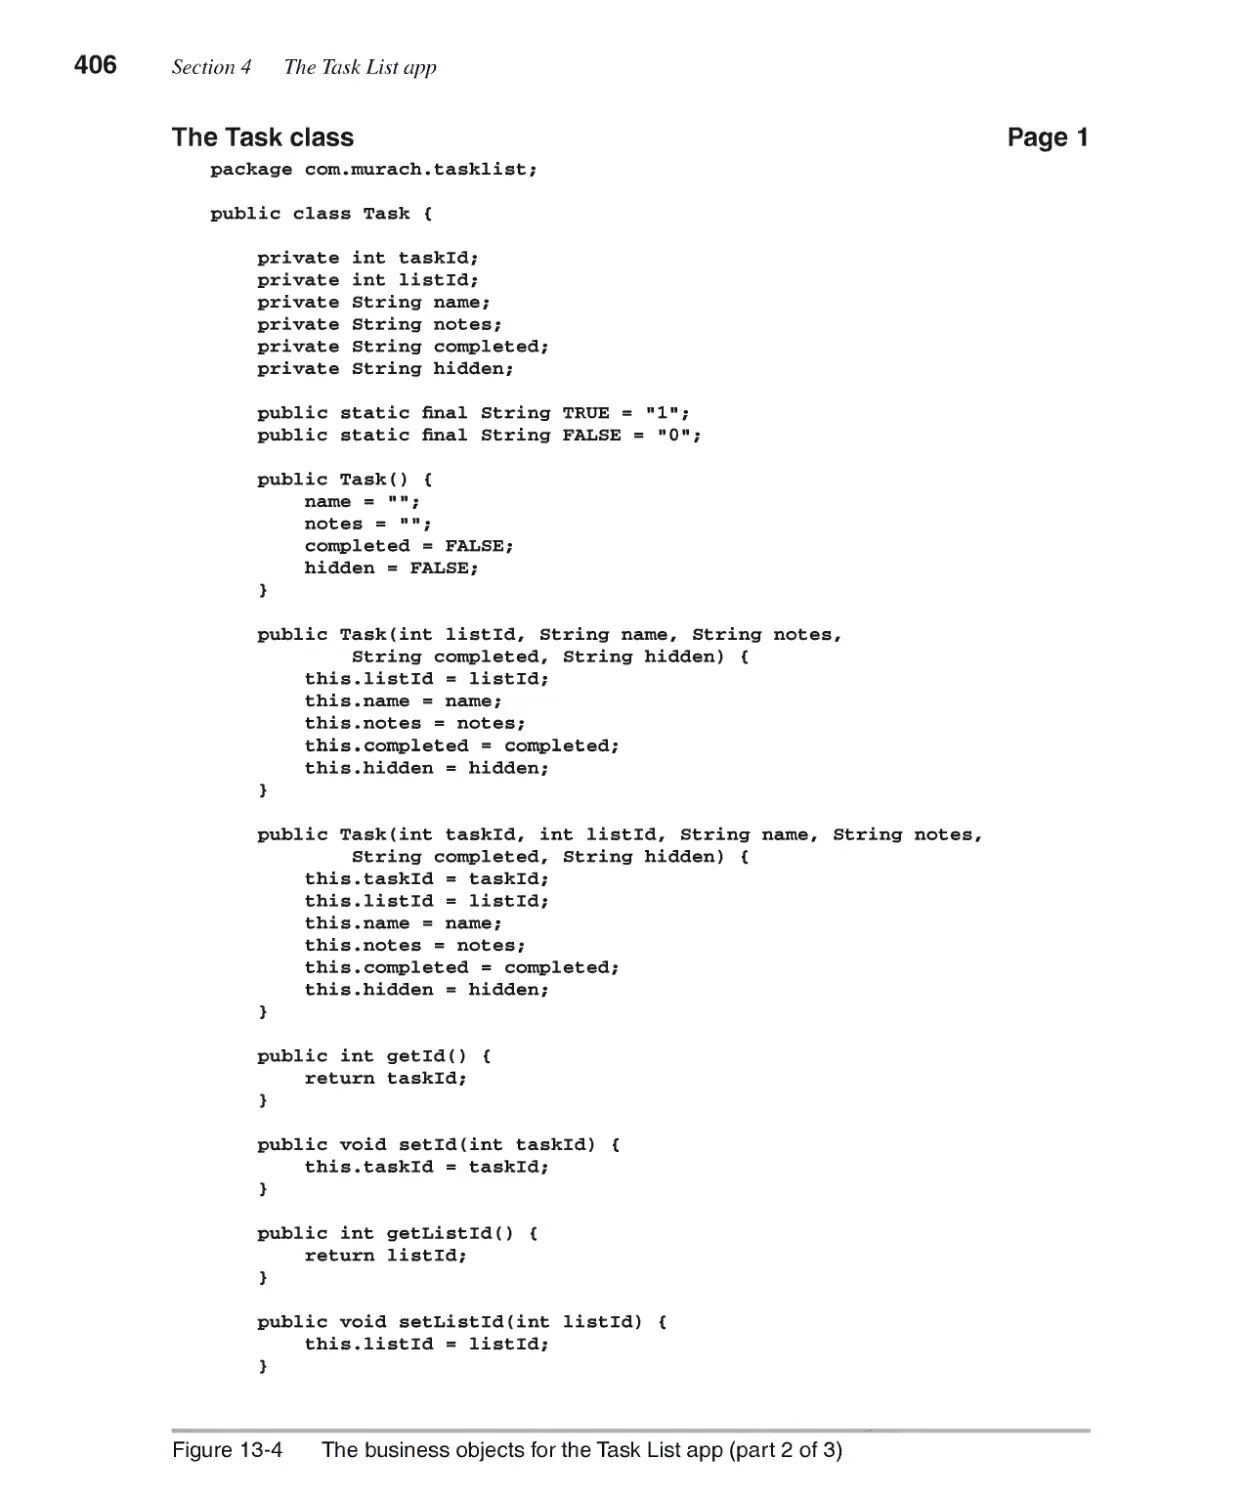
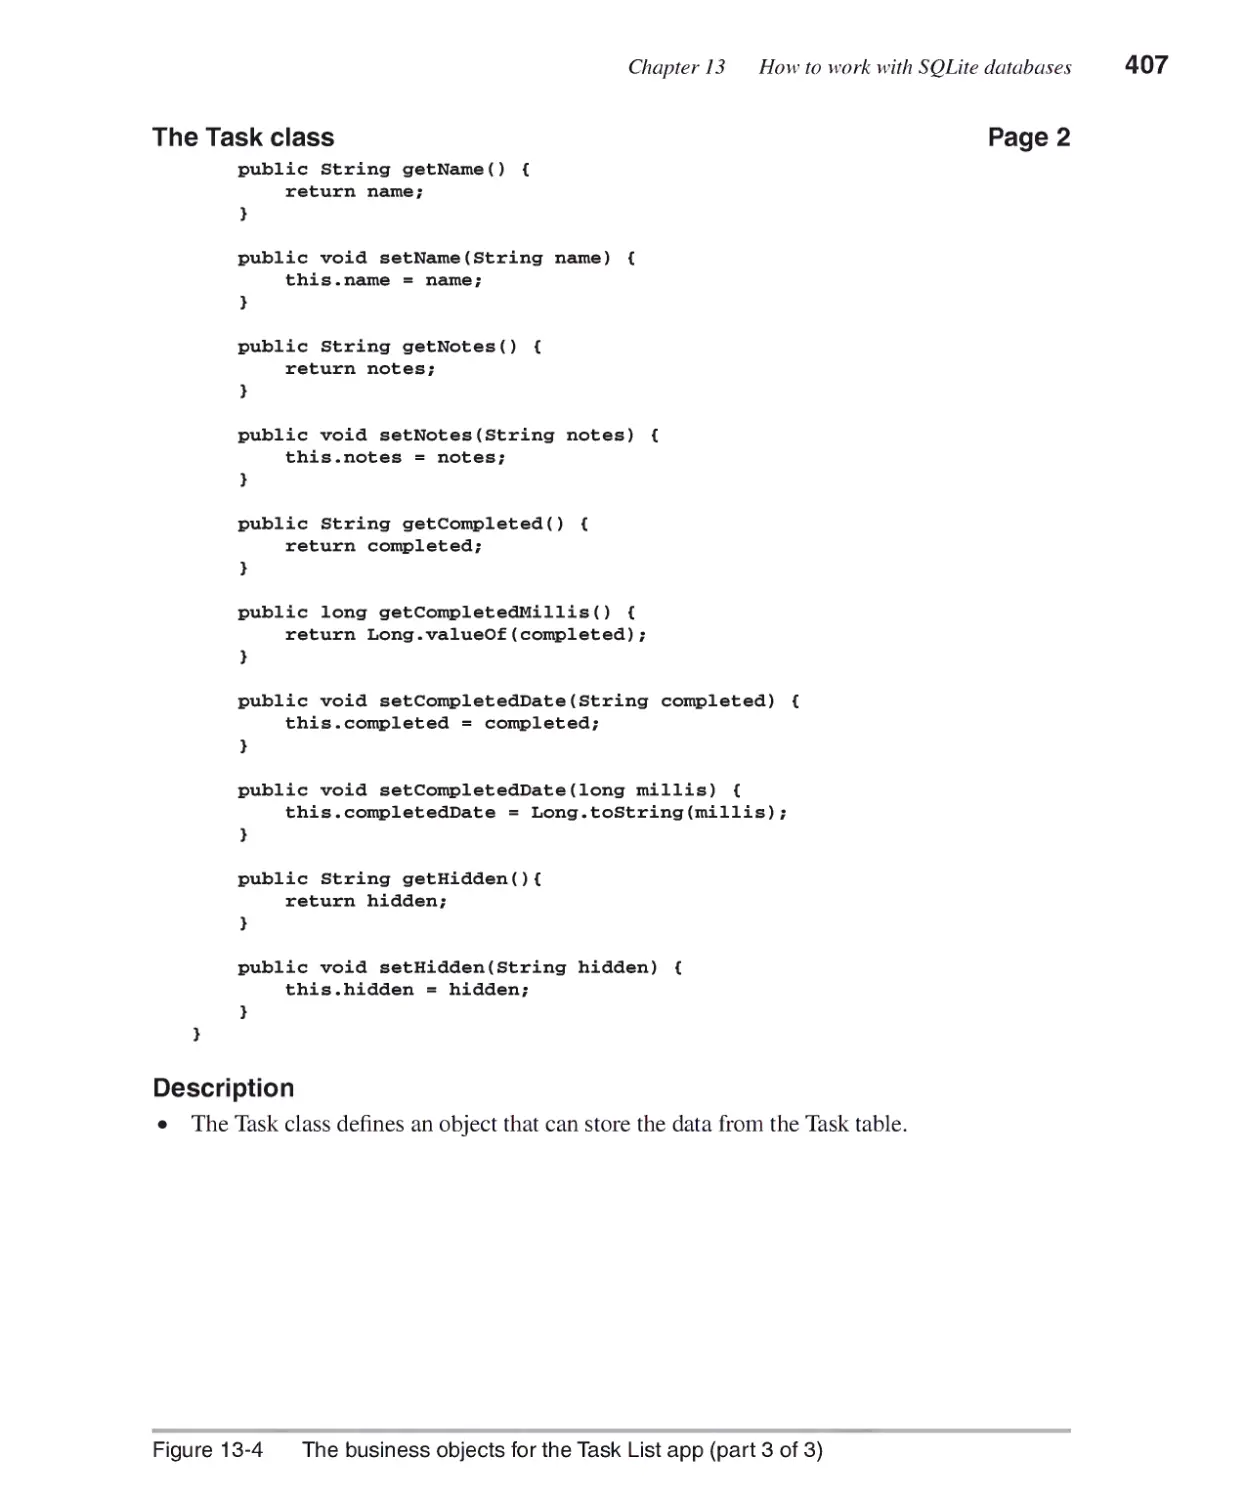
The business objects for the Task List app 404
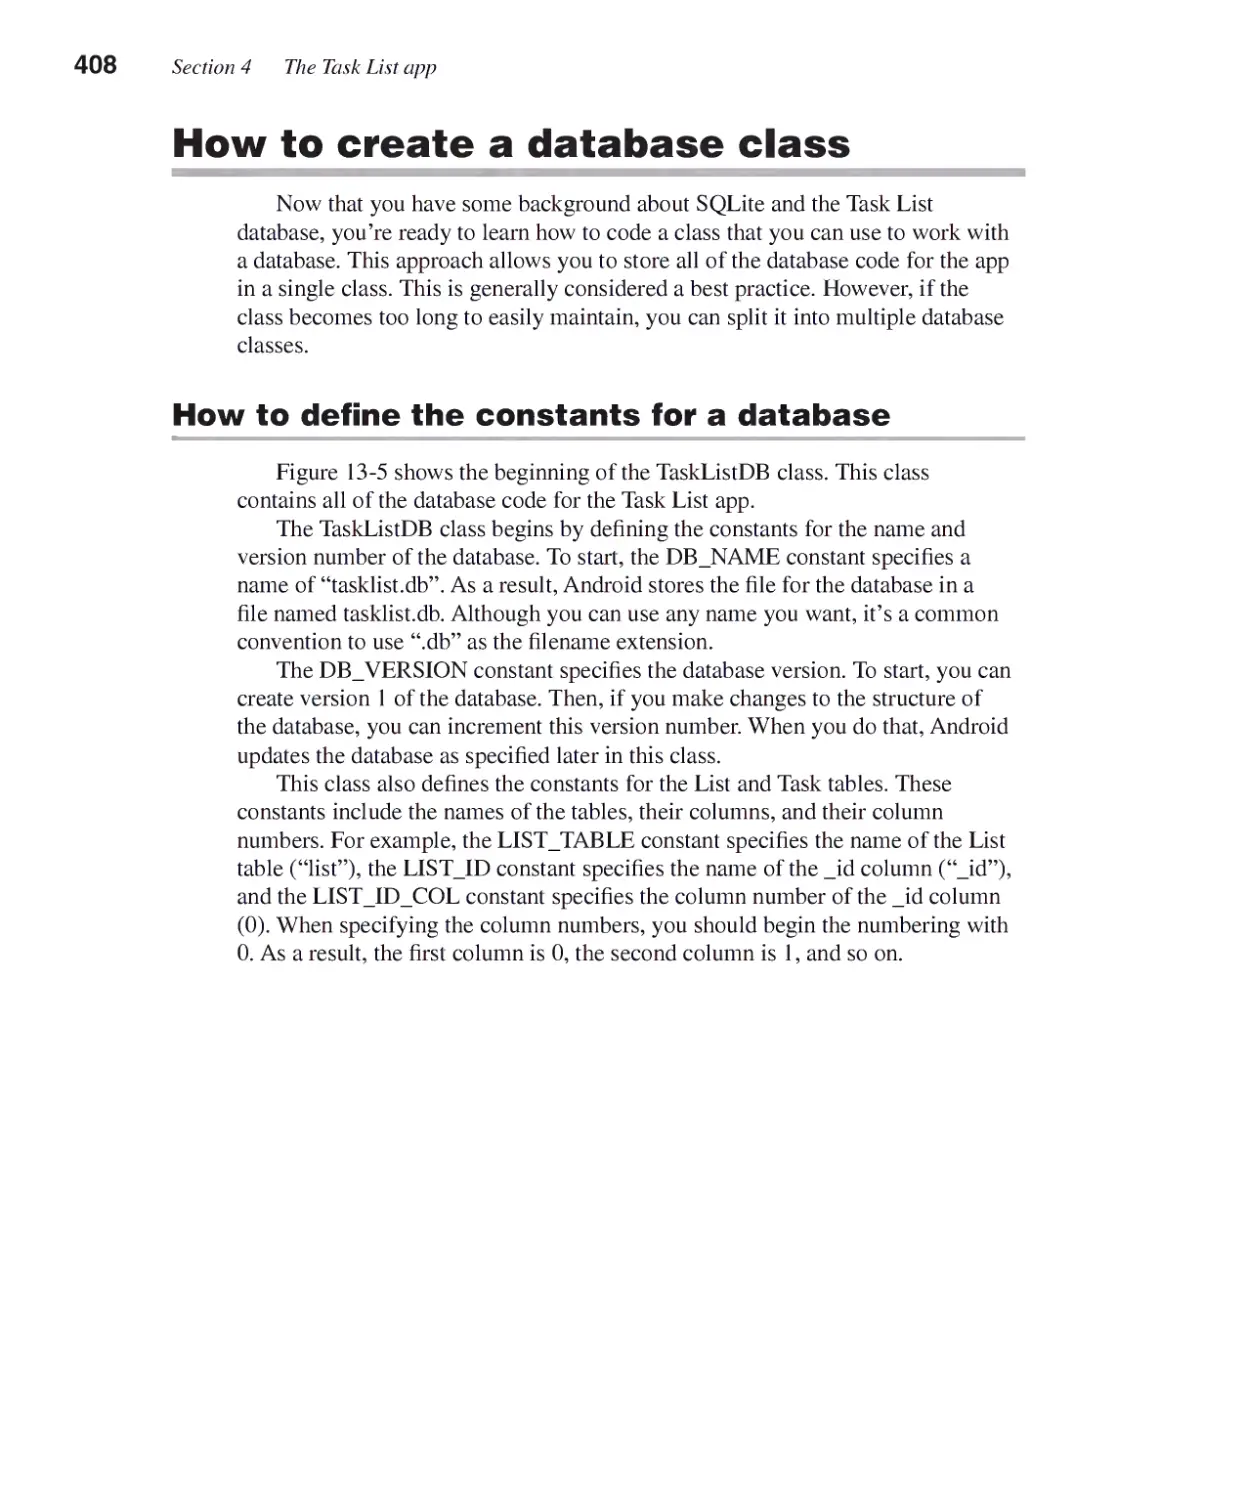
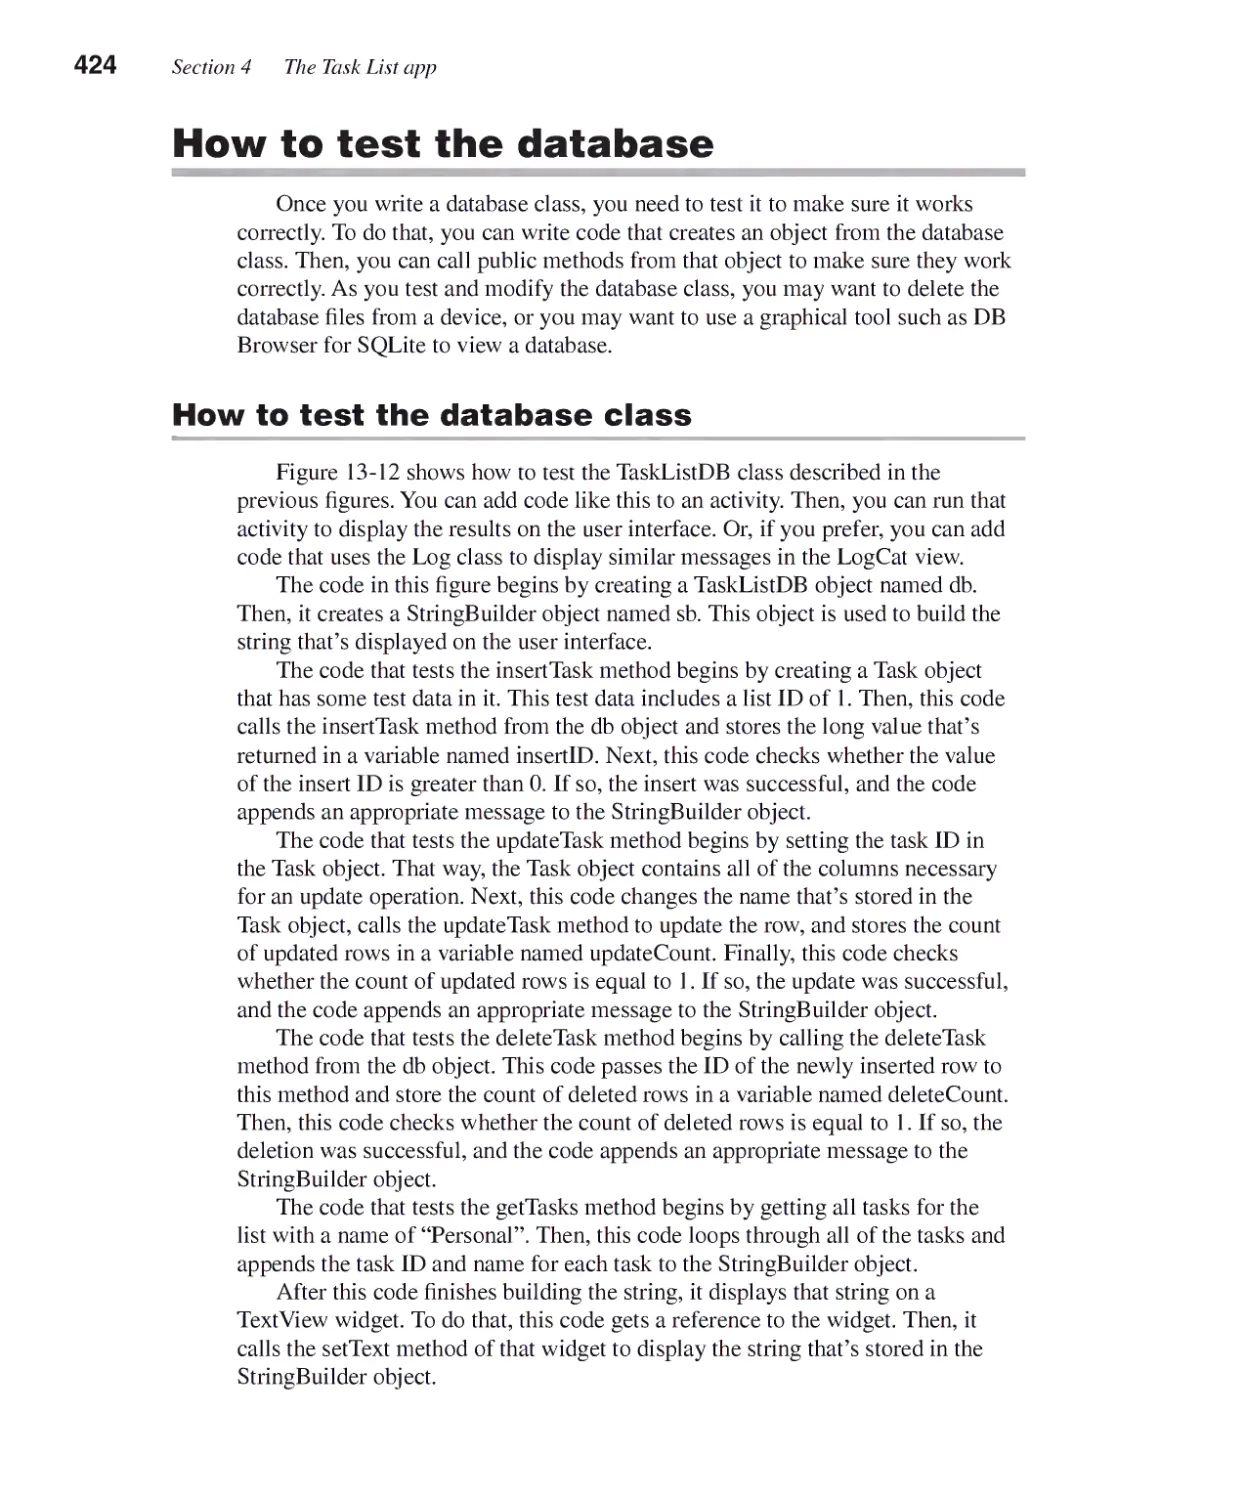
How to create a database class.....................................................408
How to define the constants for a database 408
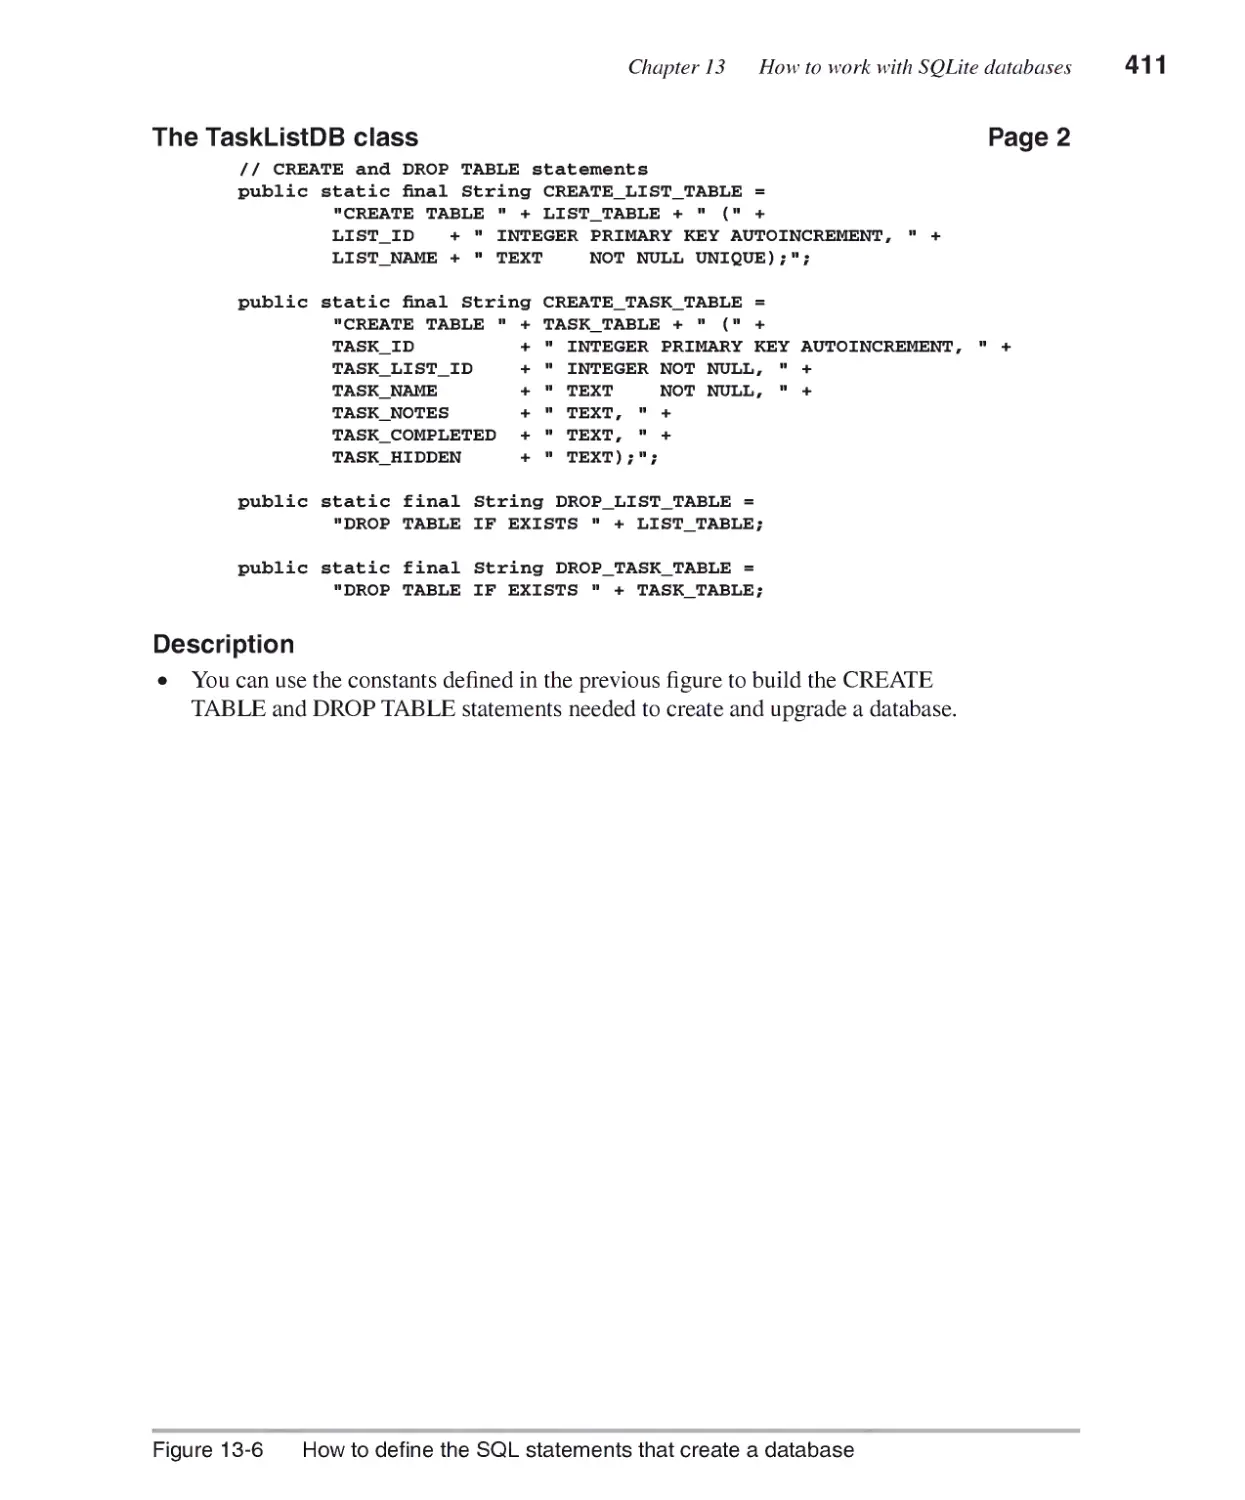
How to define the SQL statements that create a database 410
How to create or upgrade a database 412
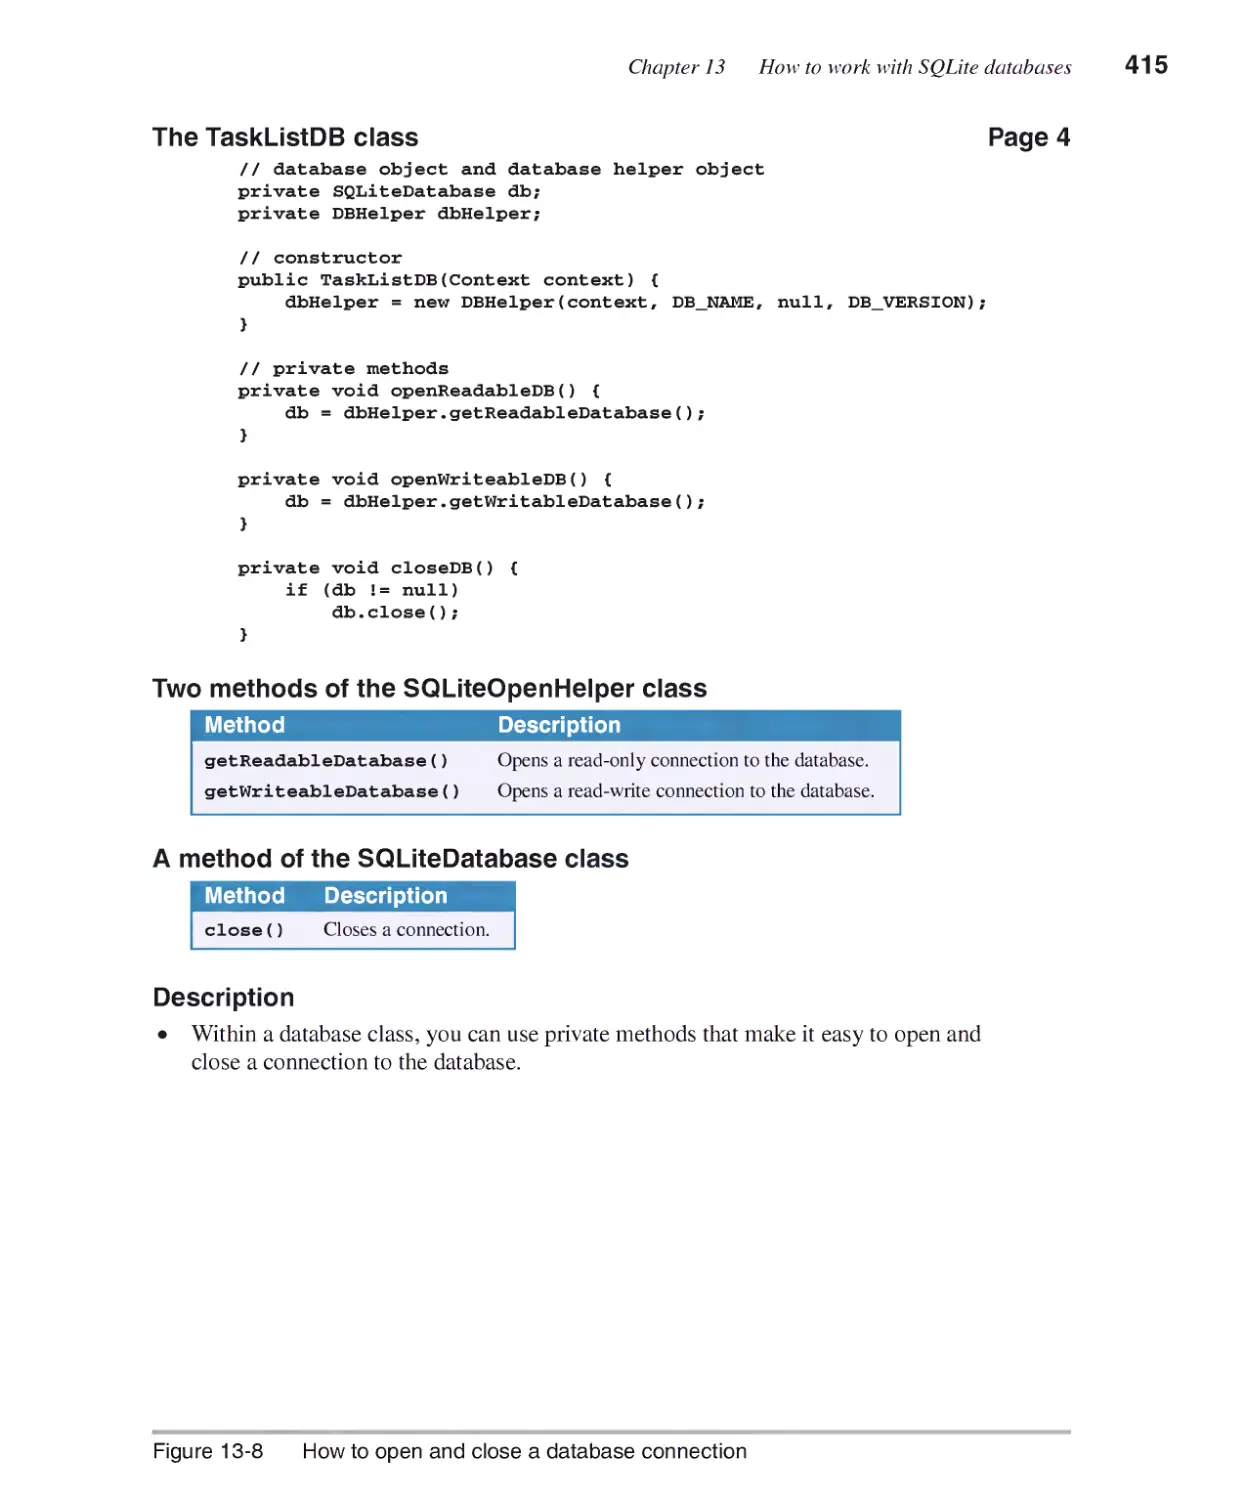
How to open and close a database connection 414
How to add public methods to a database class......................... 416
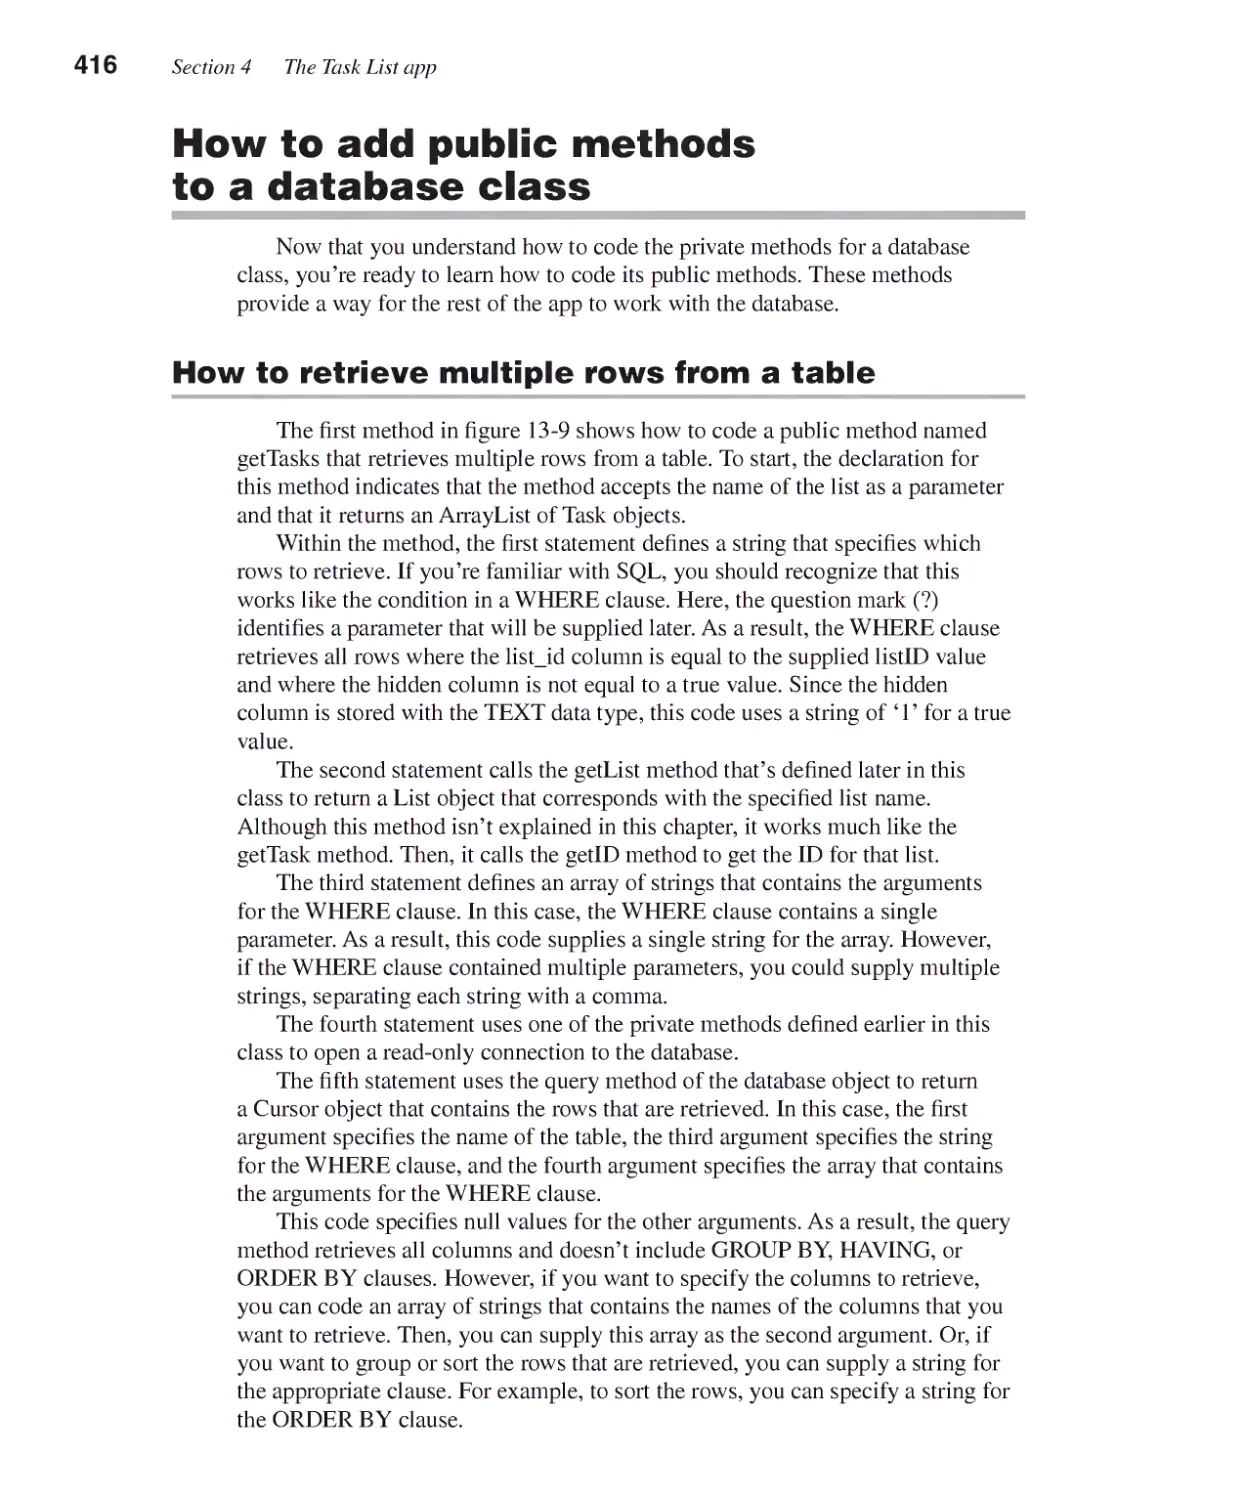
How to retrieve multiple rows from a table 416
How to retrieve a single row from a table 418
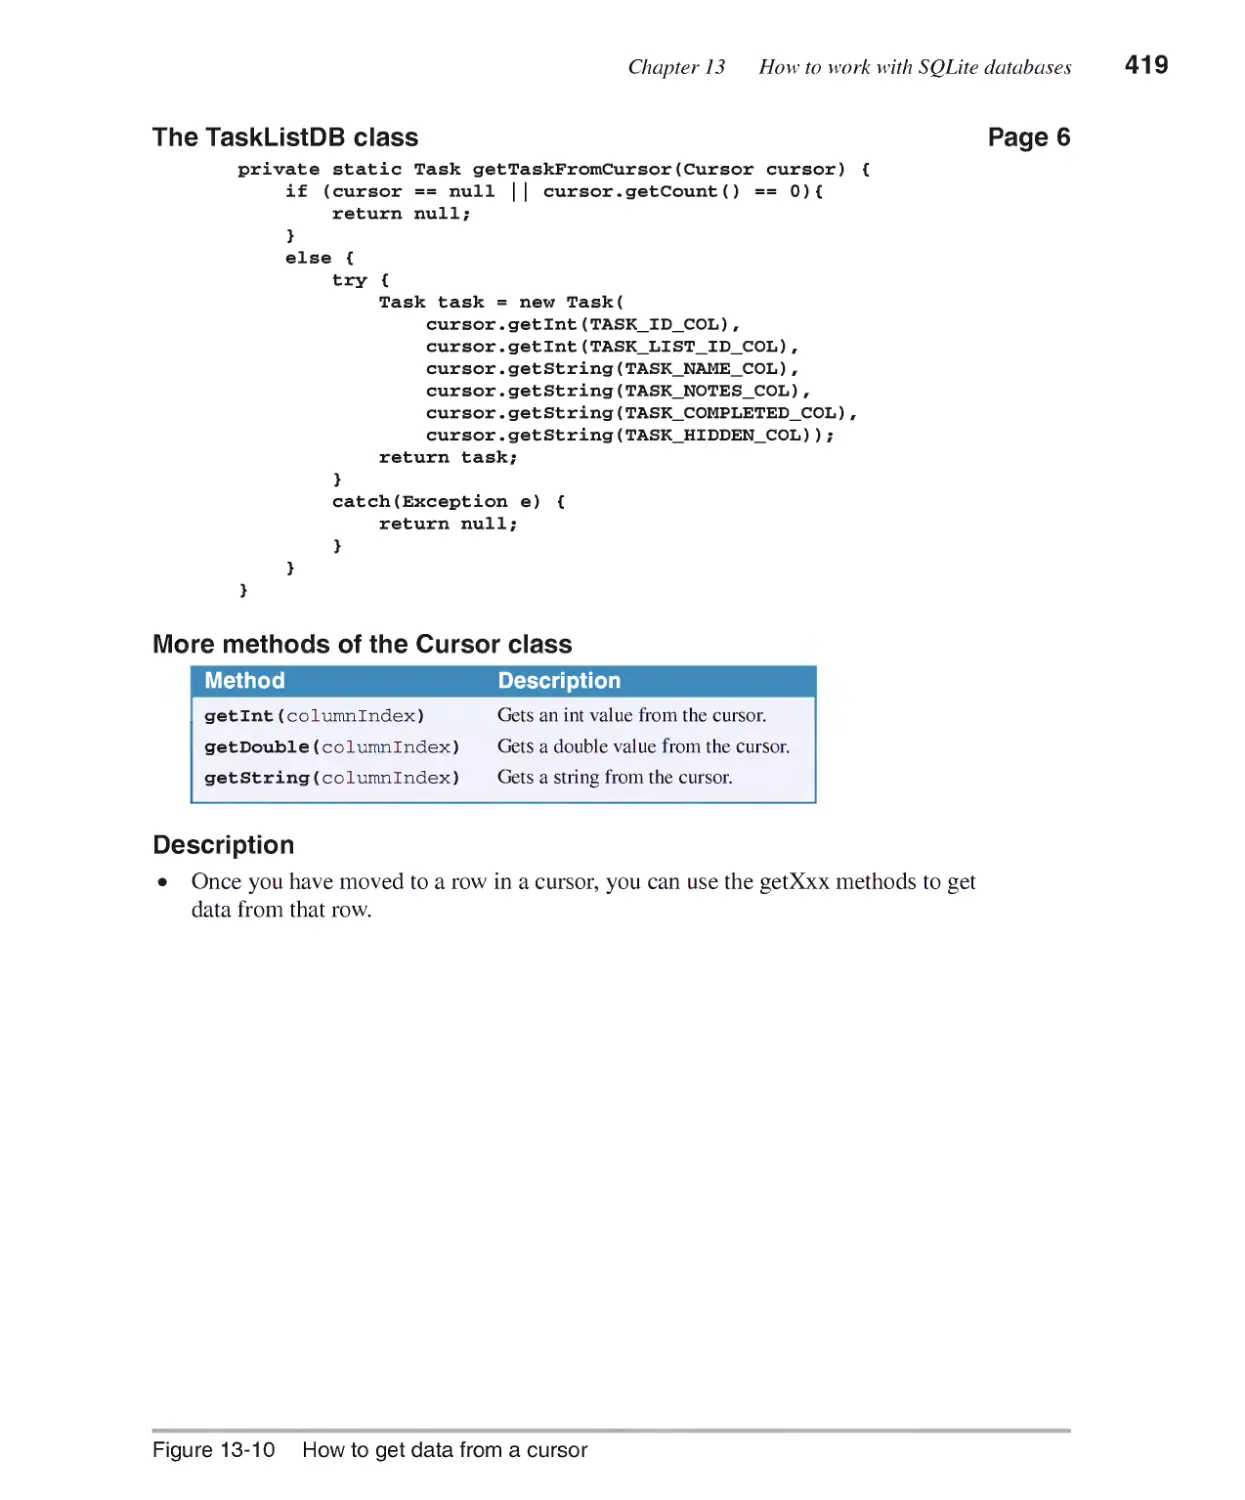
How to get data from a cursor 418
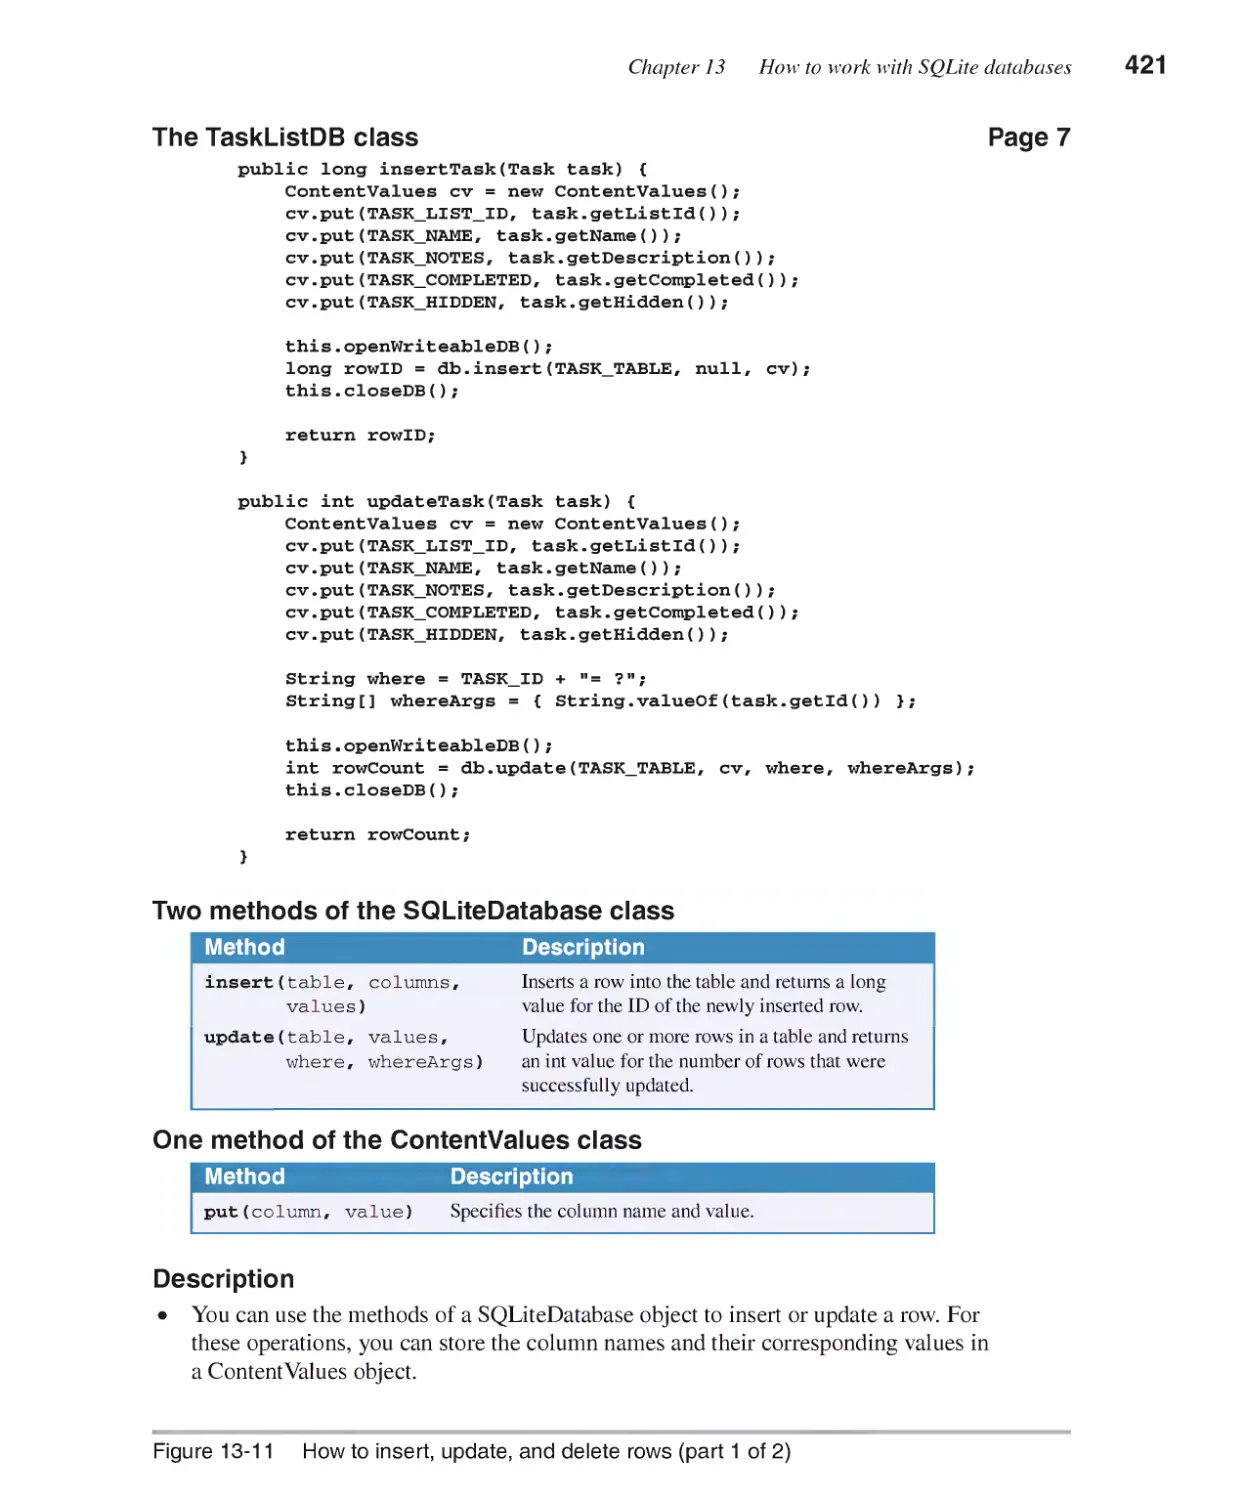
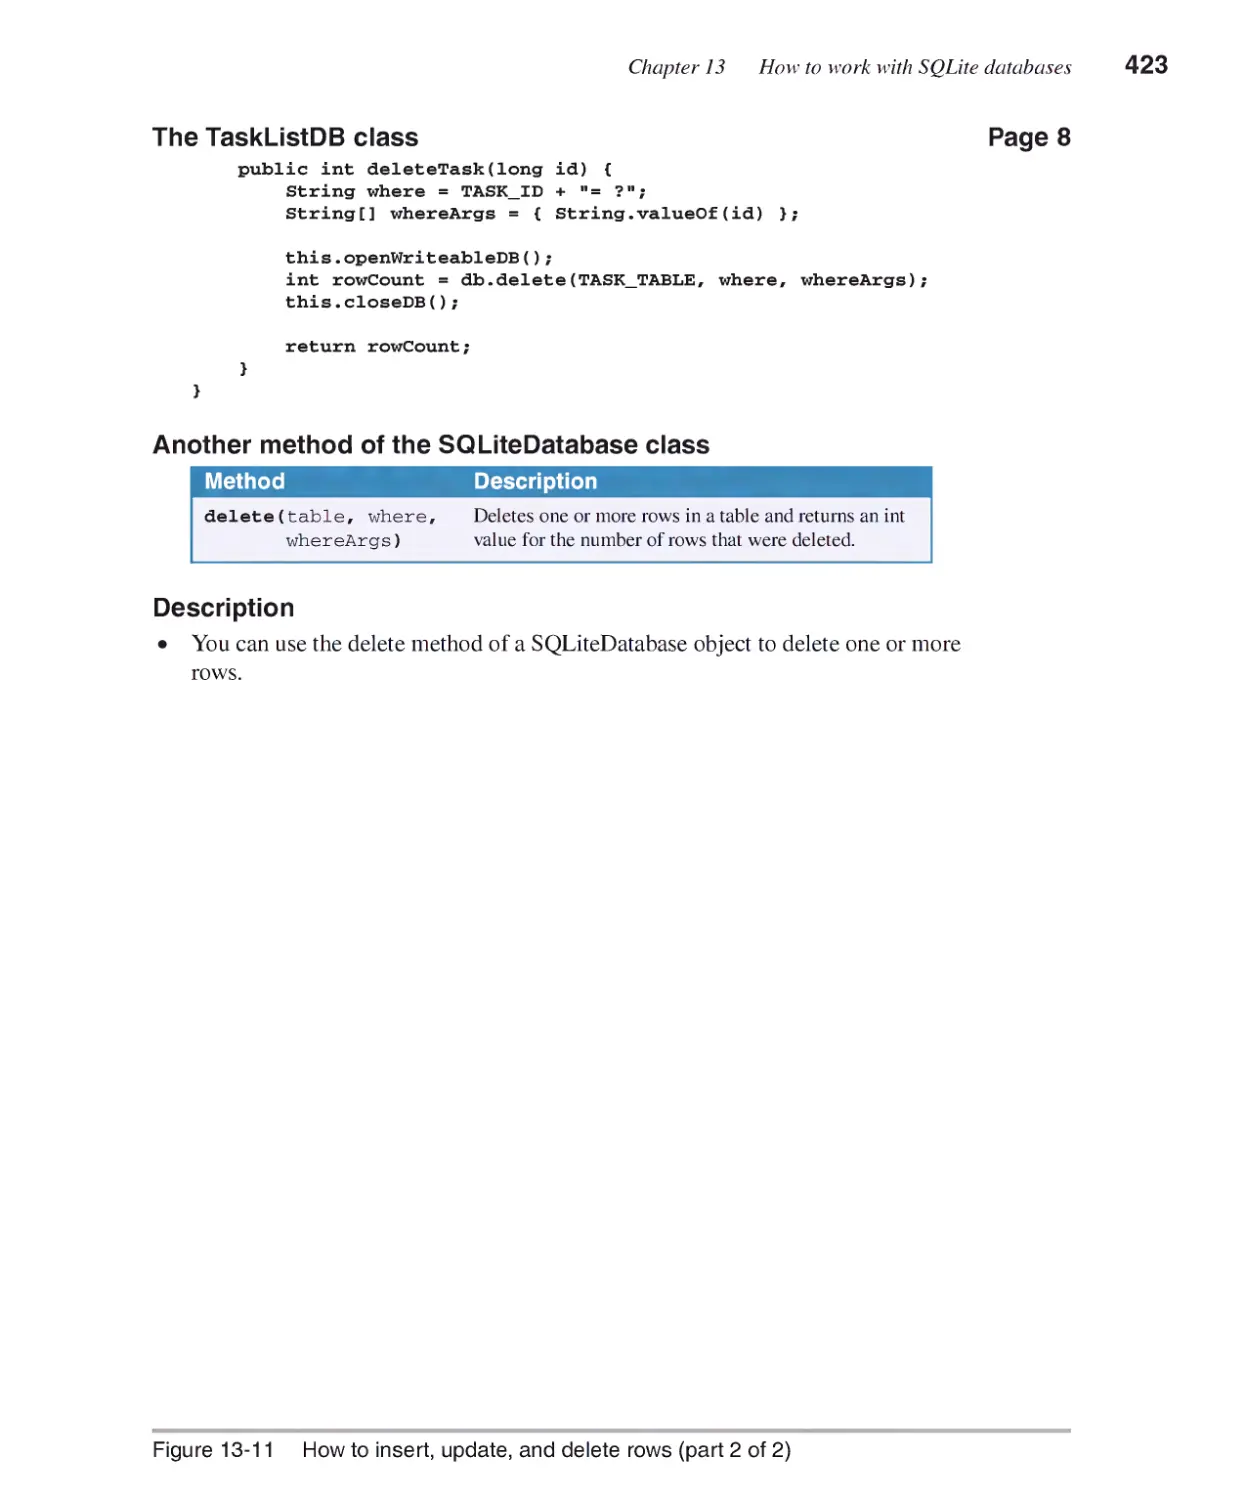
How to insert, update, and delete rows 420
XII Expanded contents
How to test the database ...............................................................424
How to test the database class 424
How to clear test data from a device 426
How to work with the database file 426
How to use DB Browser for SQLite 428
Chapter 14 How to work with tabs and custom adapters
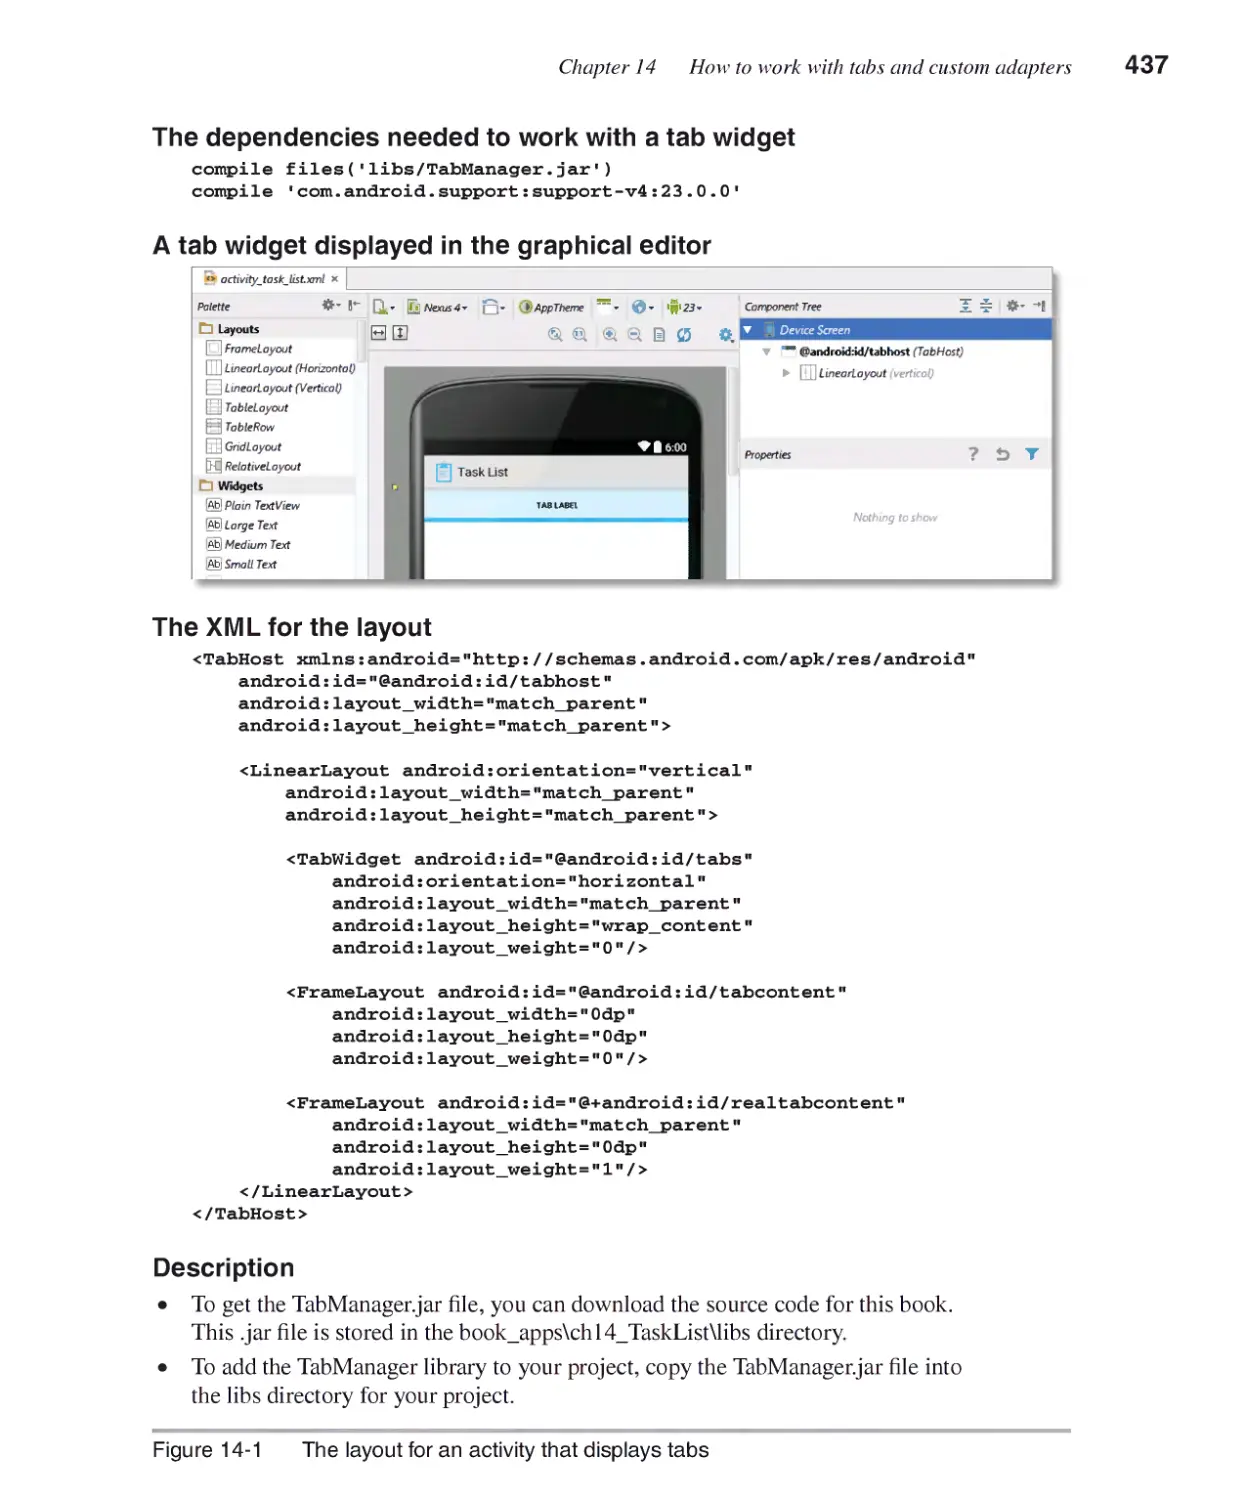
How to use tabs ....................................„^
How to add the TabManager class to your project 436
The layout for an activity that displays tabs 436
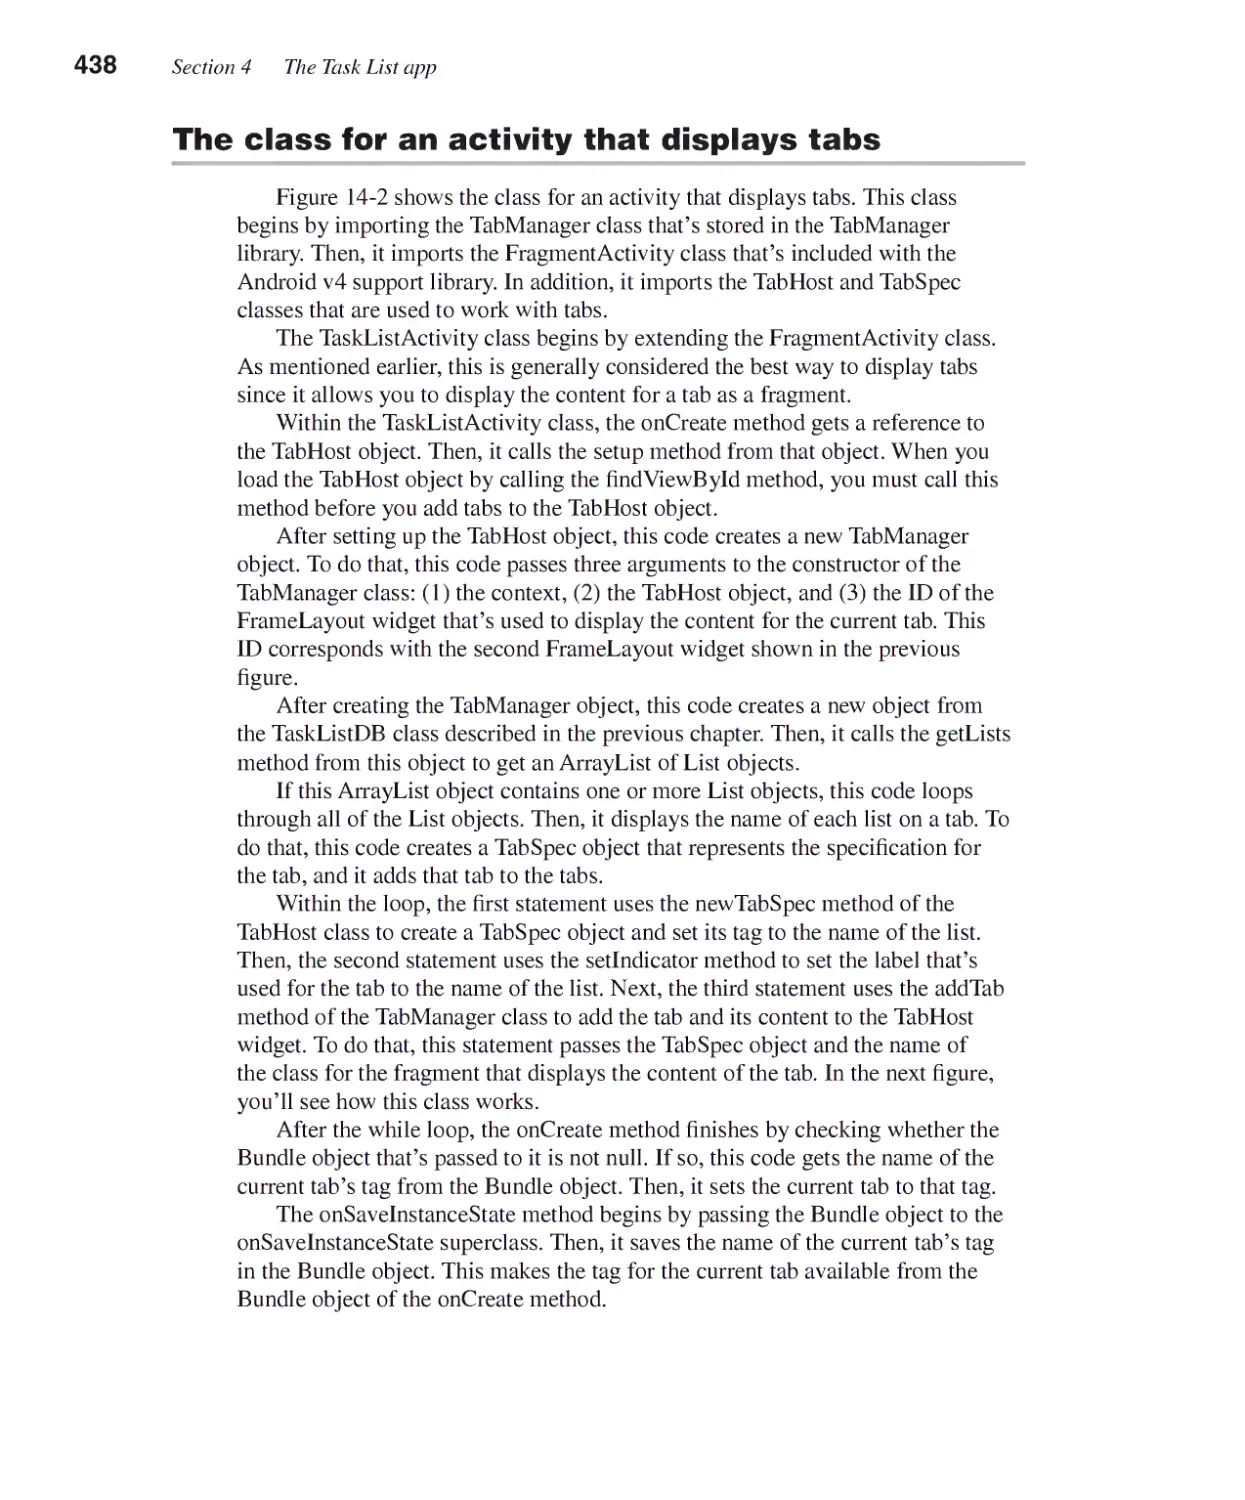
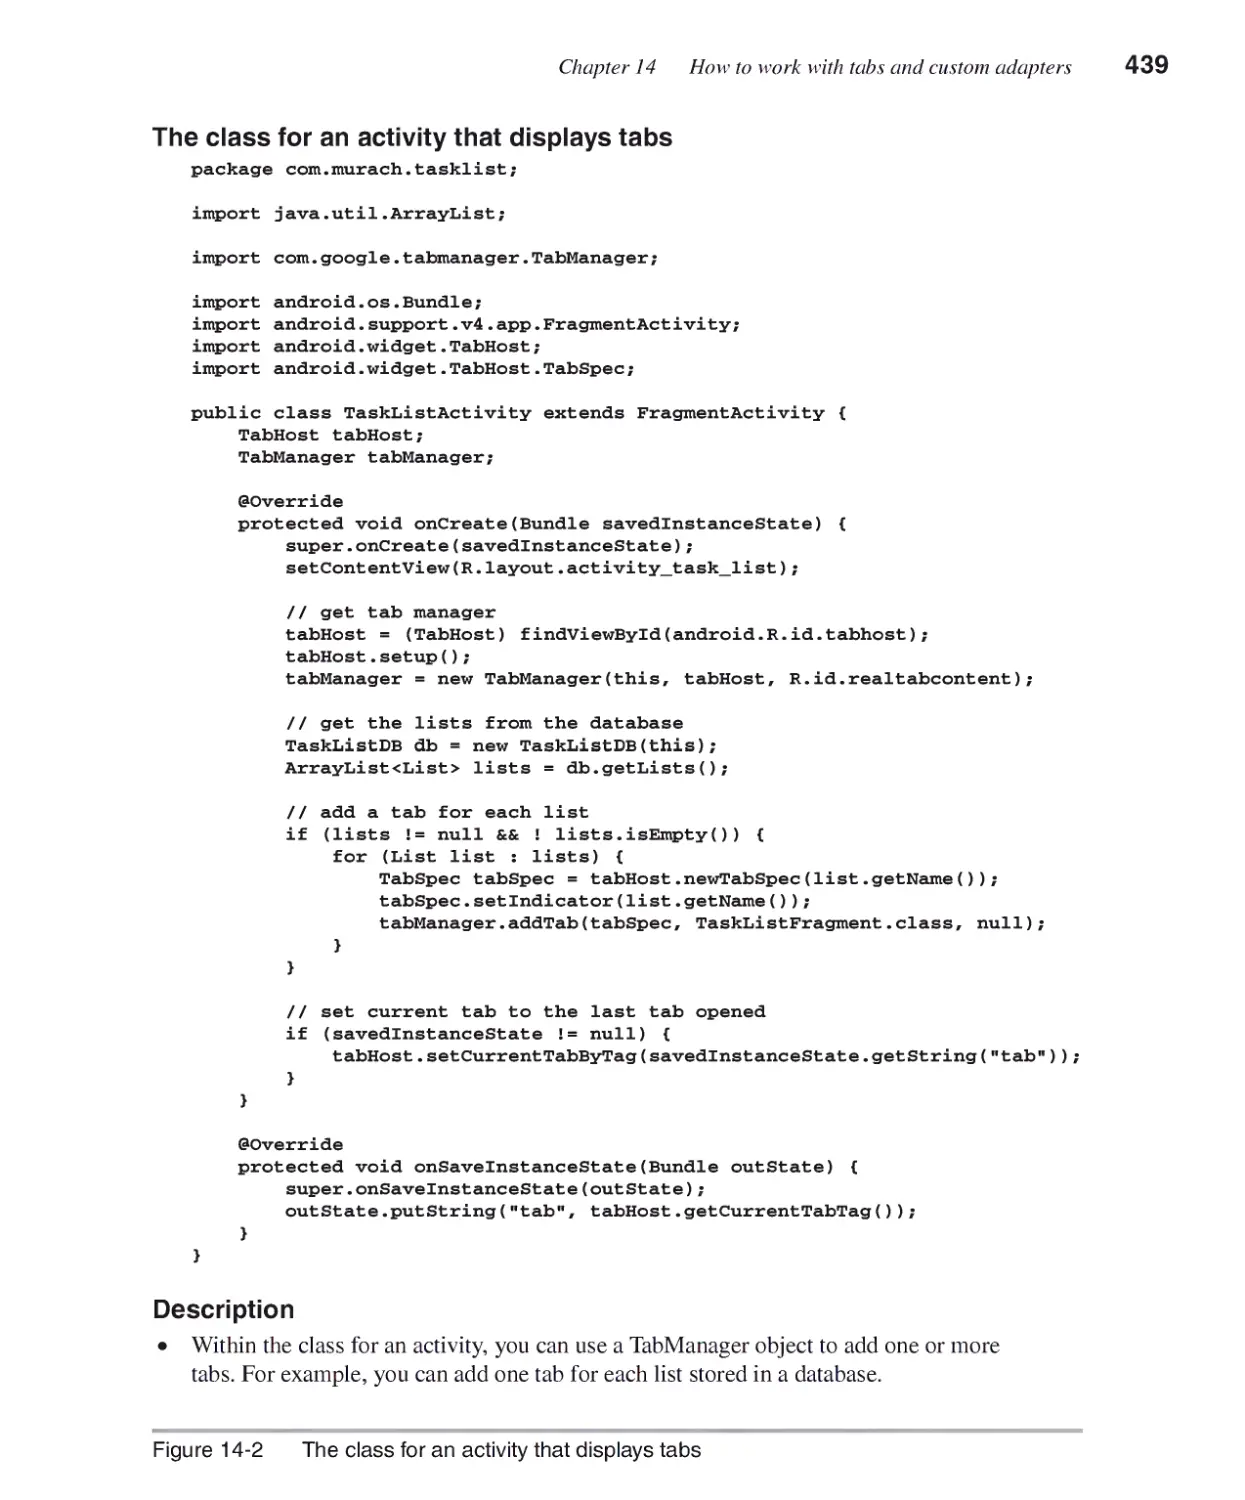
The class for an activity that displays tabs 438
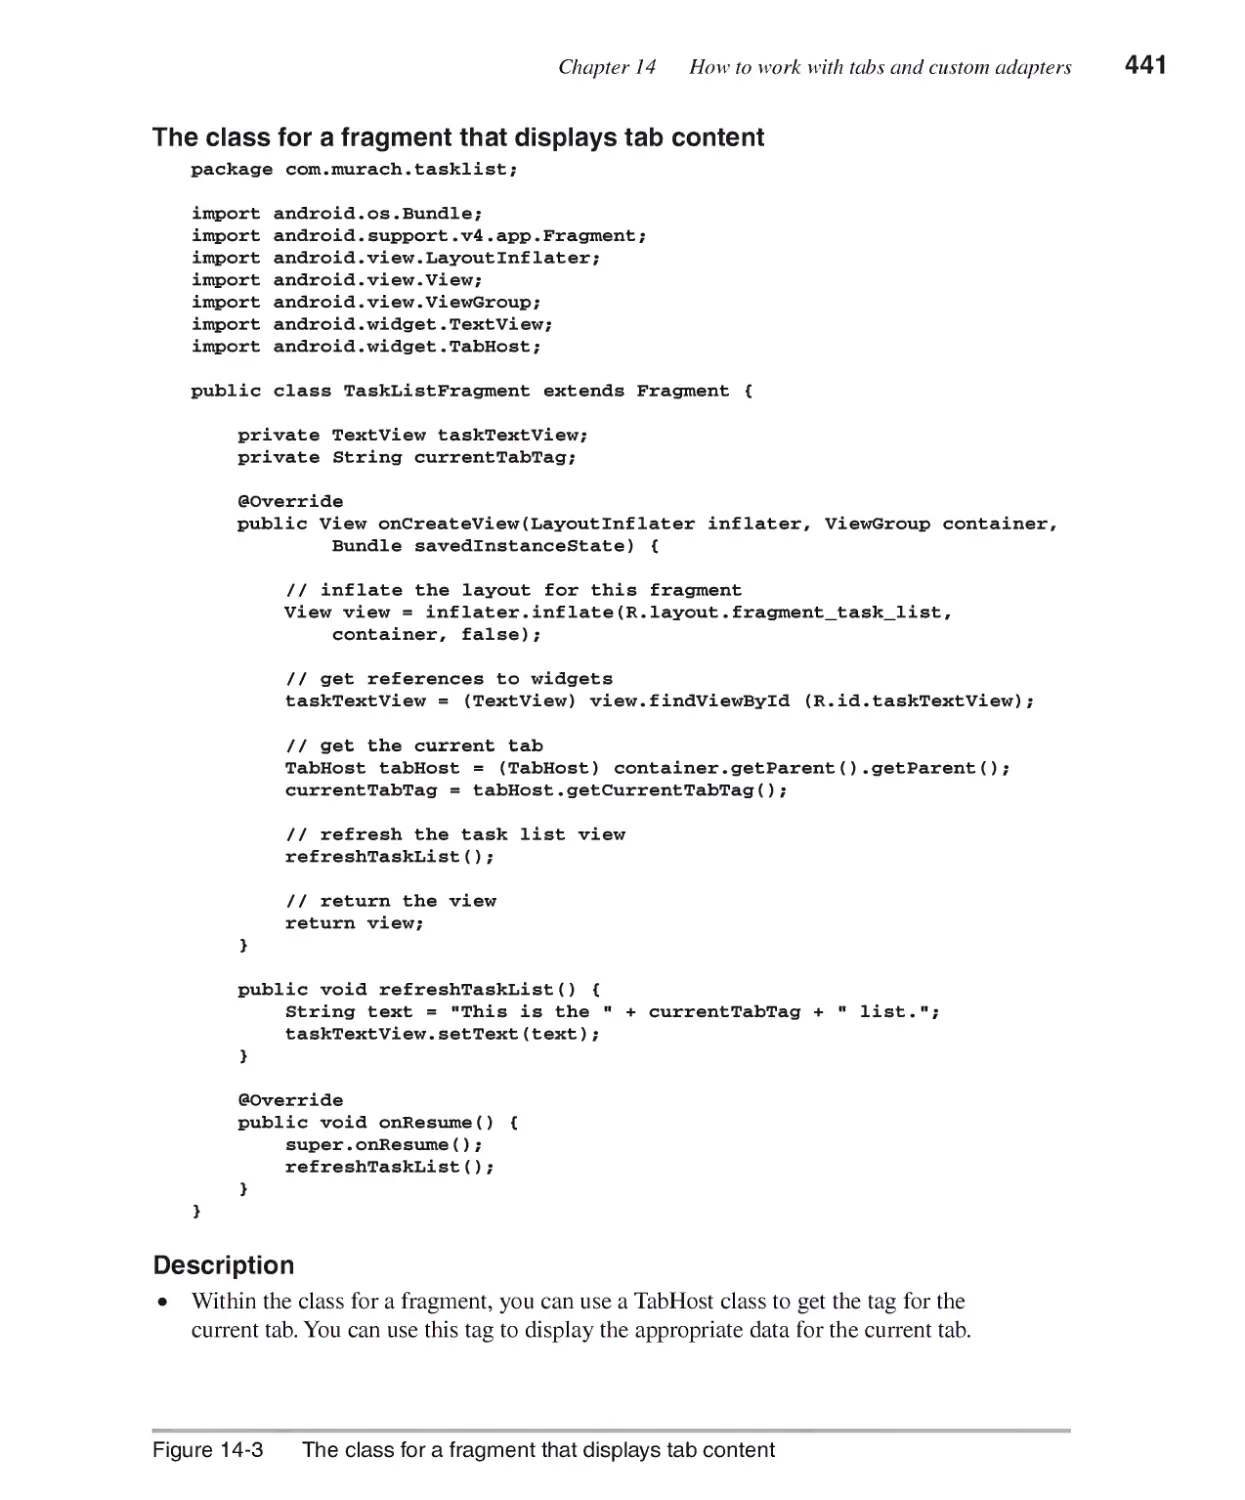
The class for a fragment that displays tab content 440
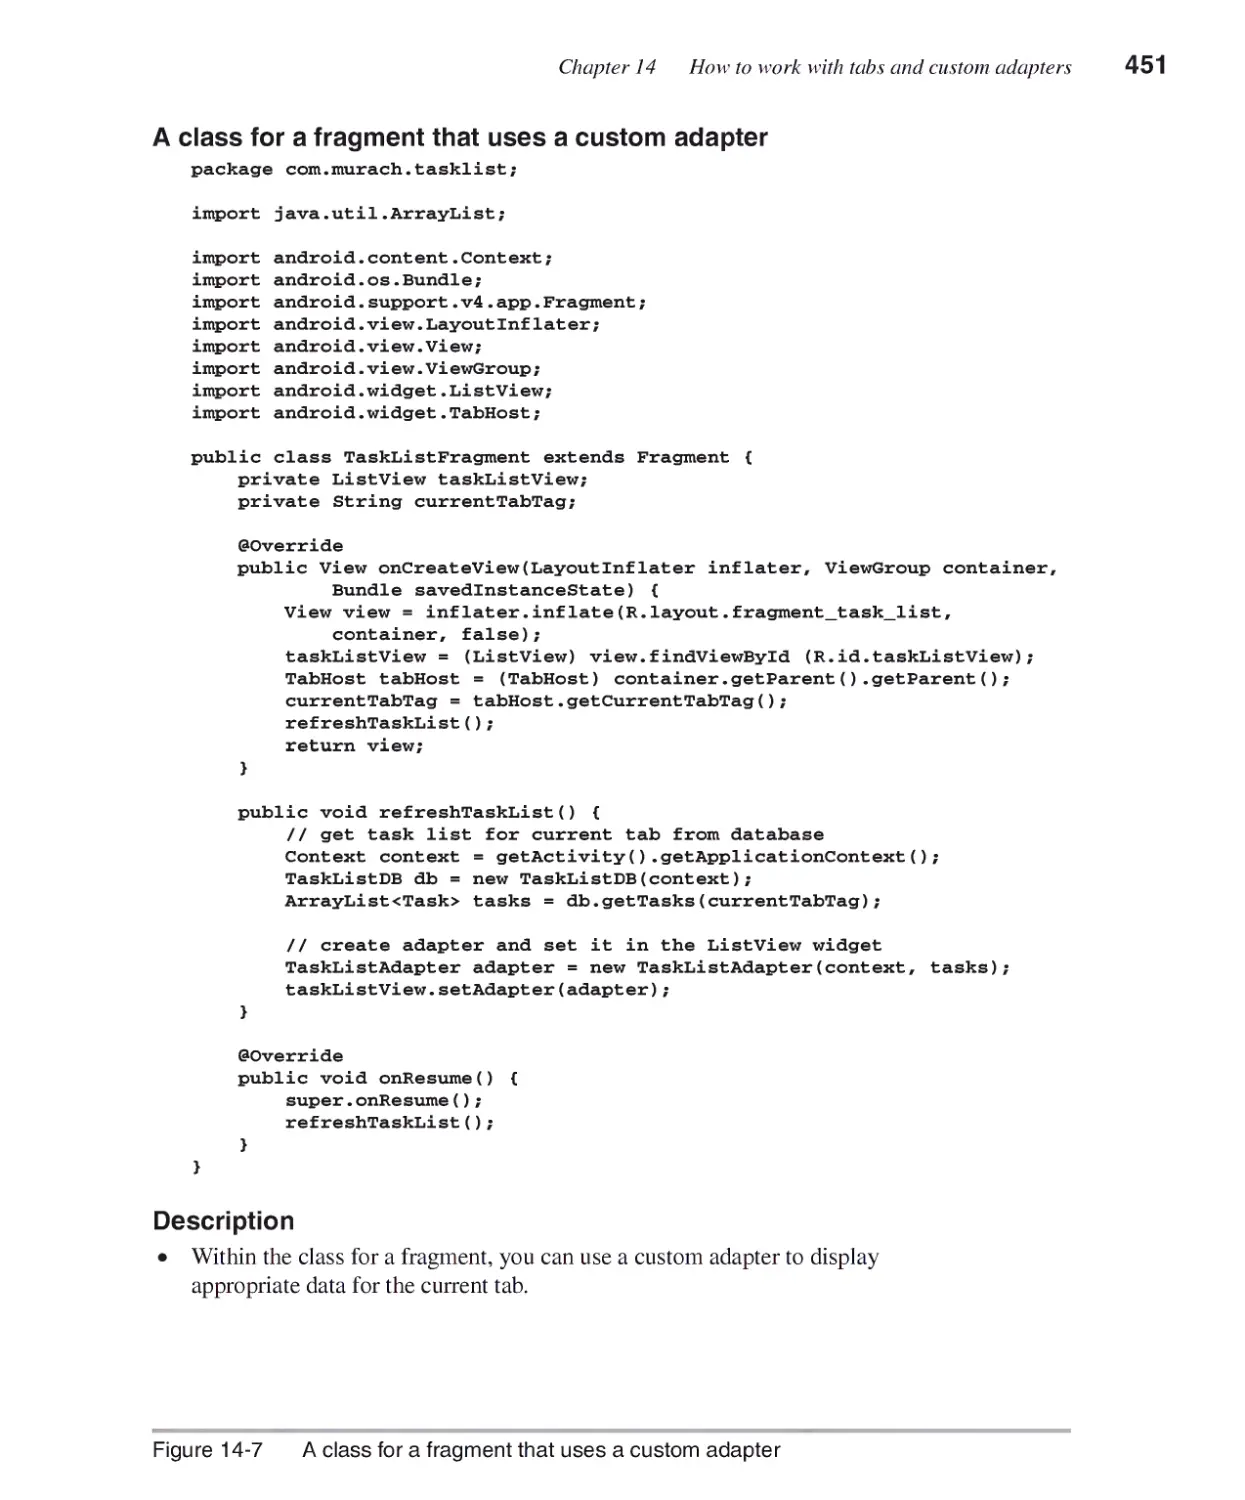
How to use a custom adapter ........................................................442
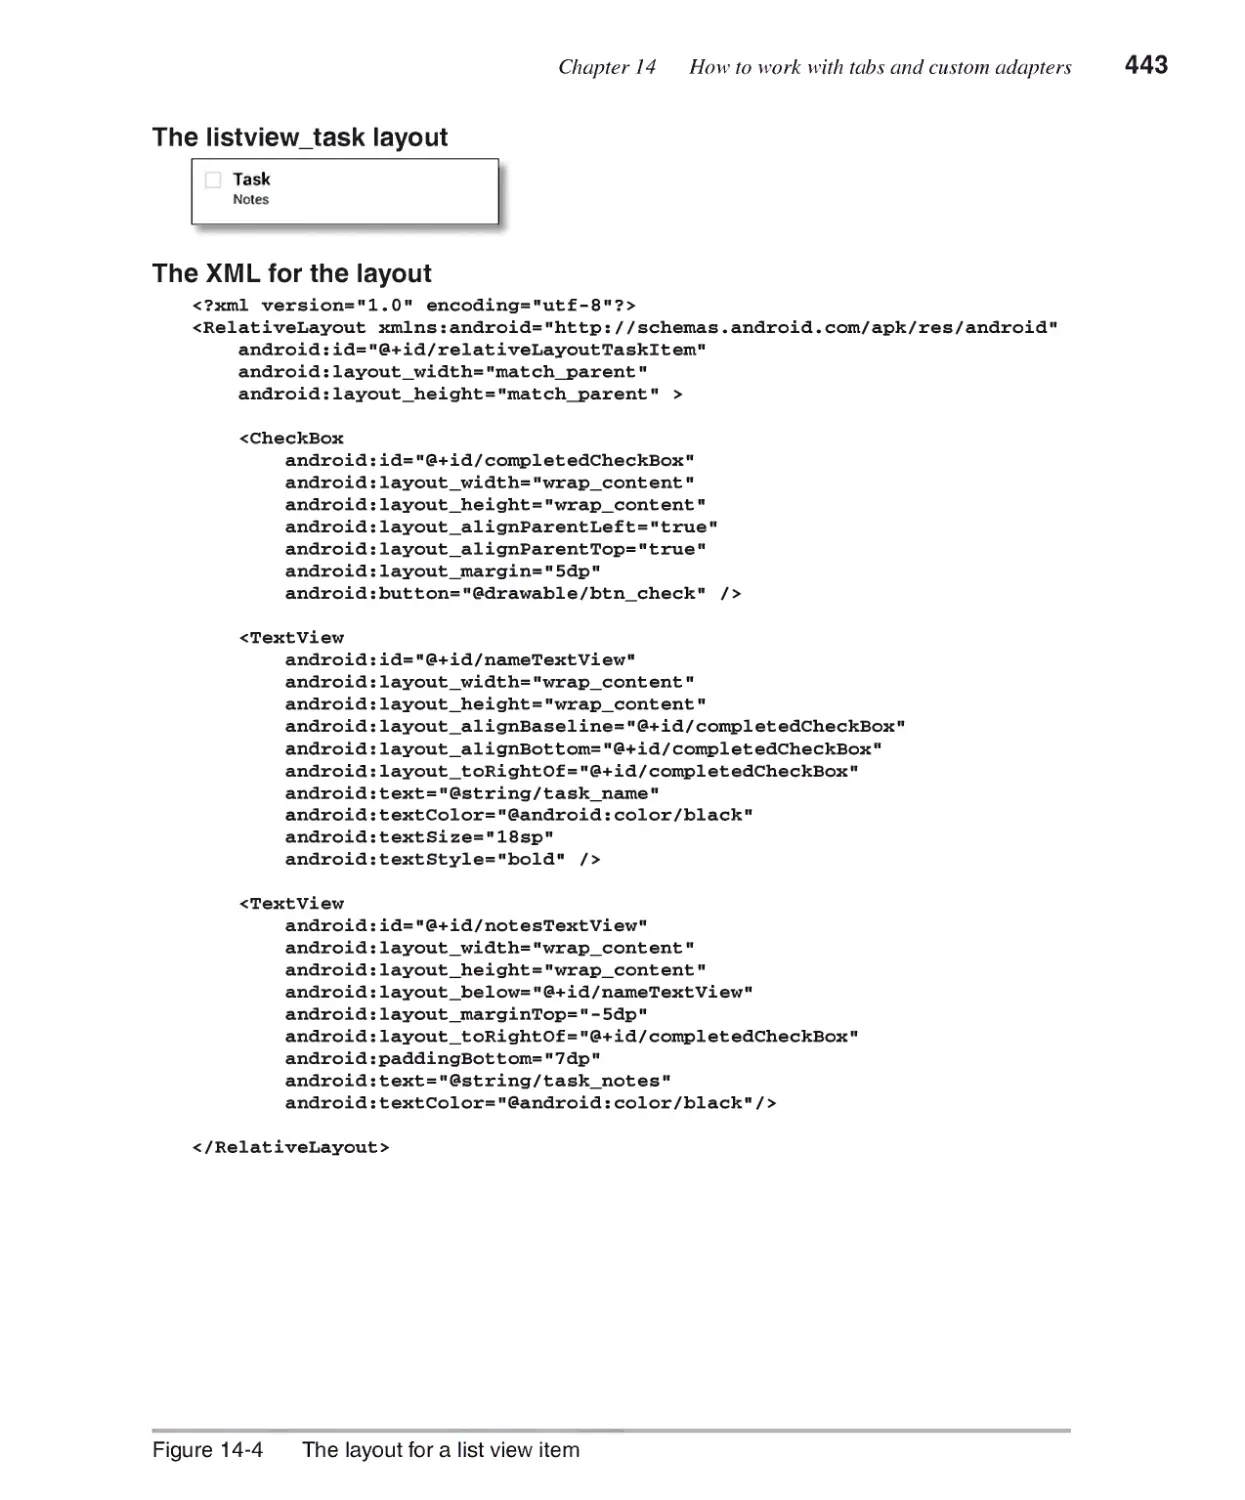
A layout for a list view item 442
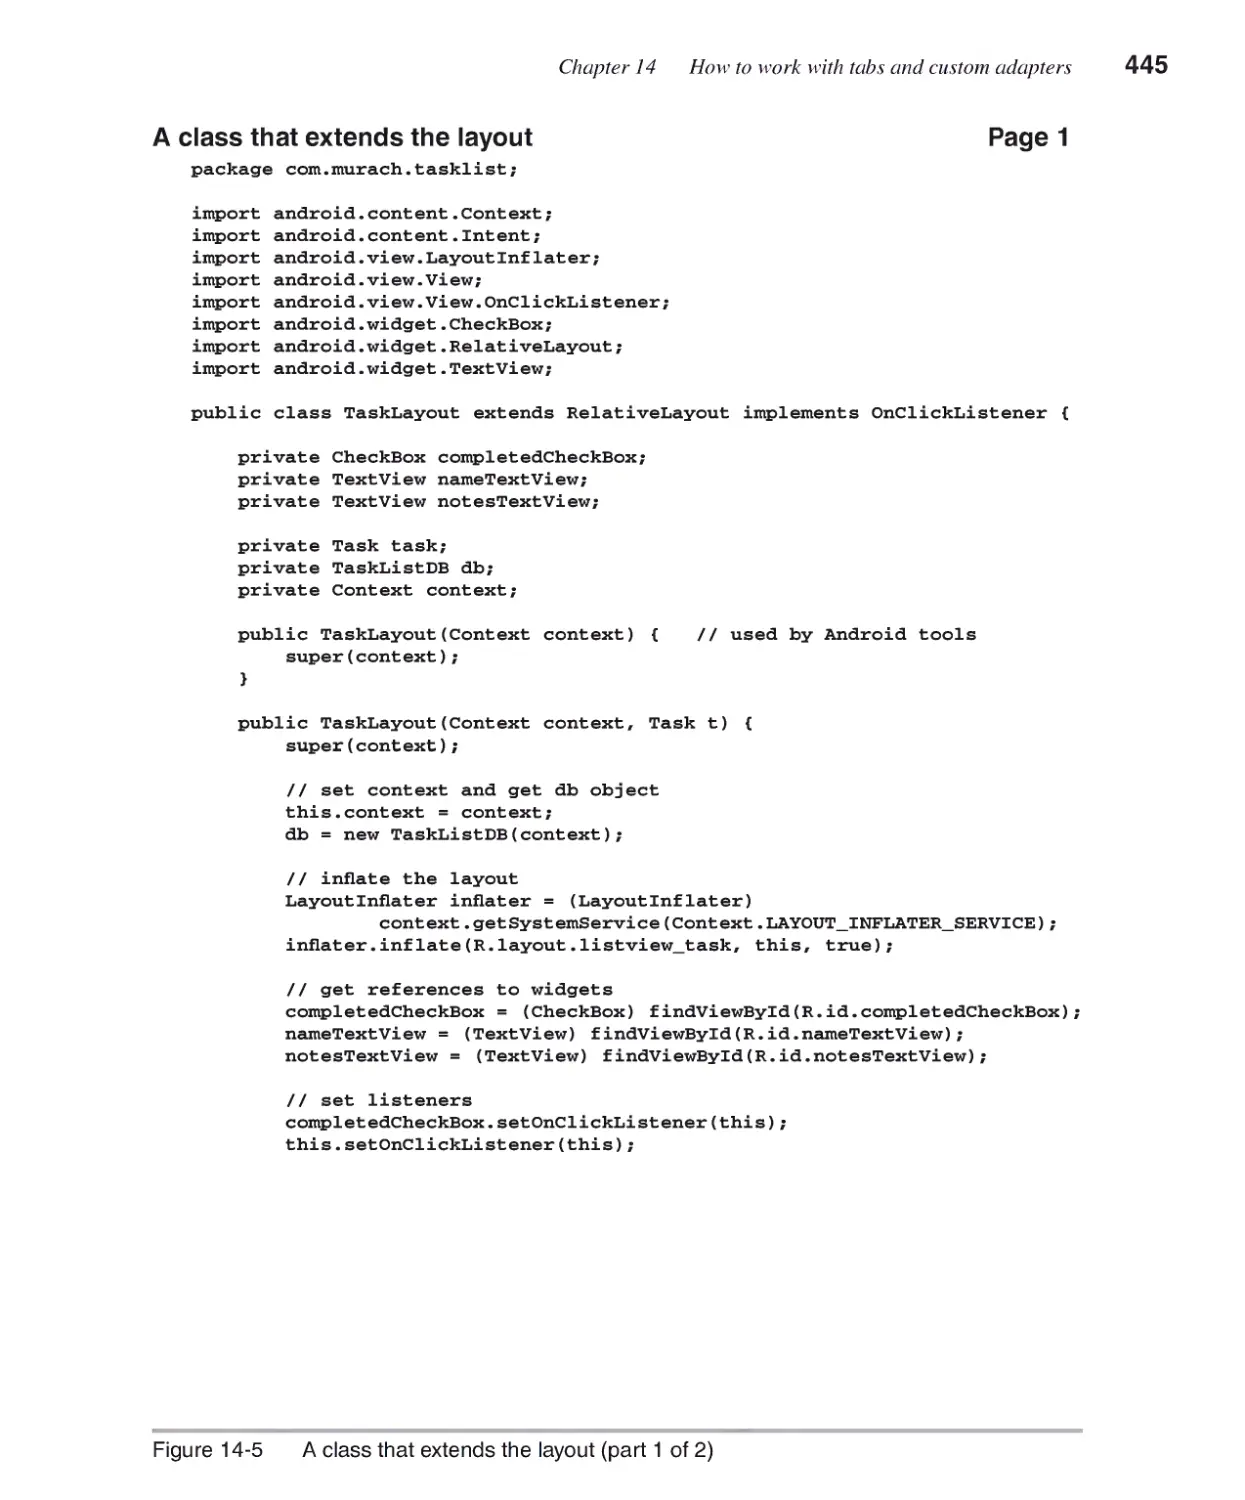
A class that extends the layout for a list view item 444
A class for a custom adapter 448
A class for a fragment that uses a custom adapter 450
The Task List app............................................................................452
The user interface 452
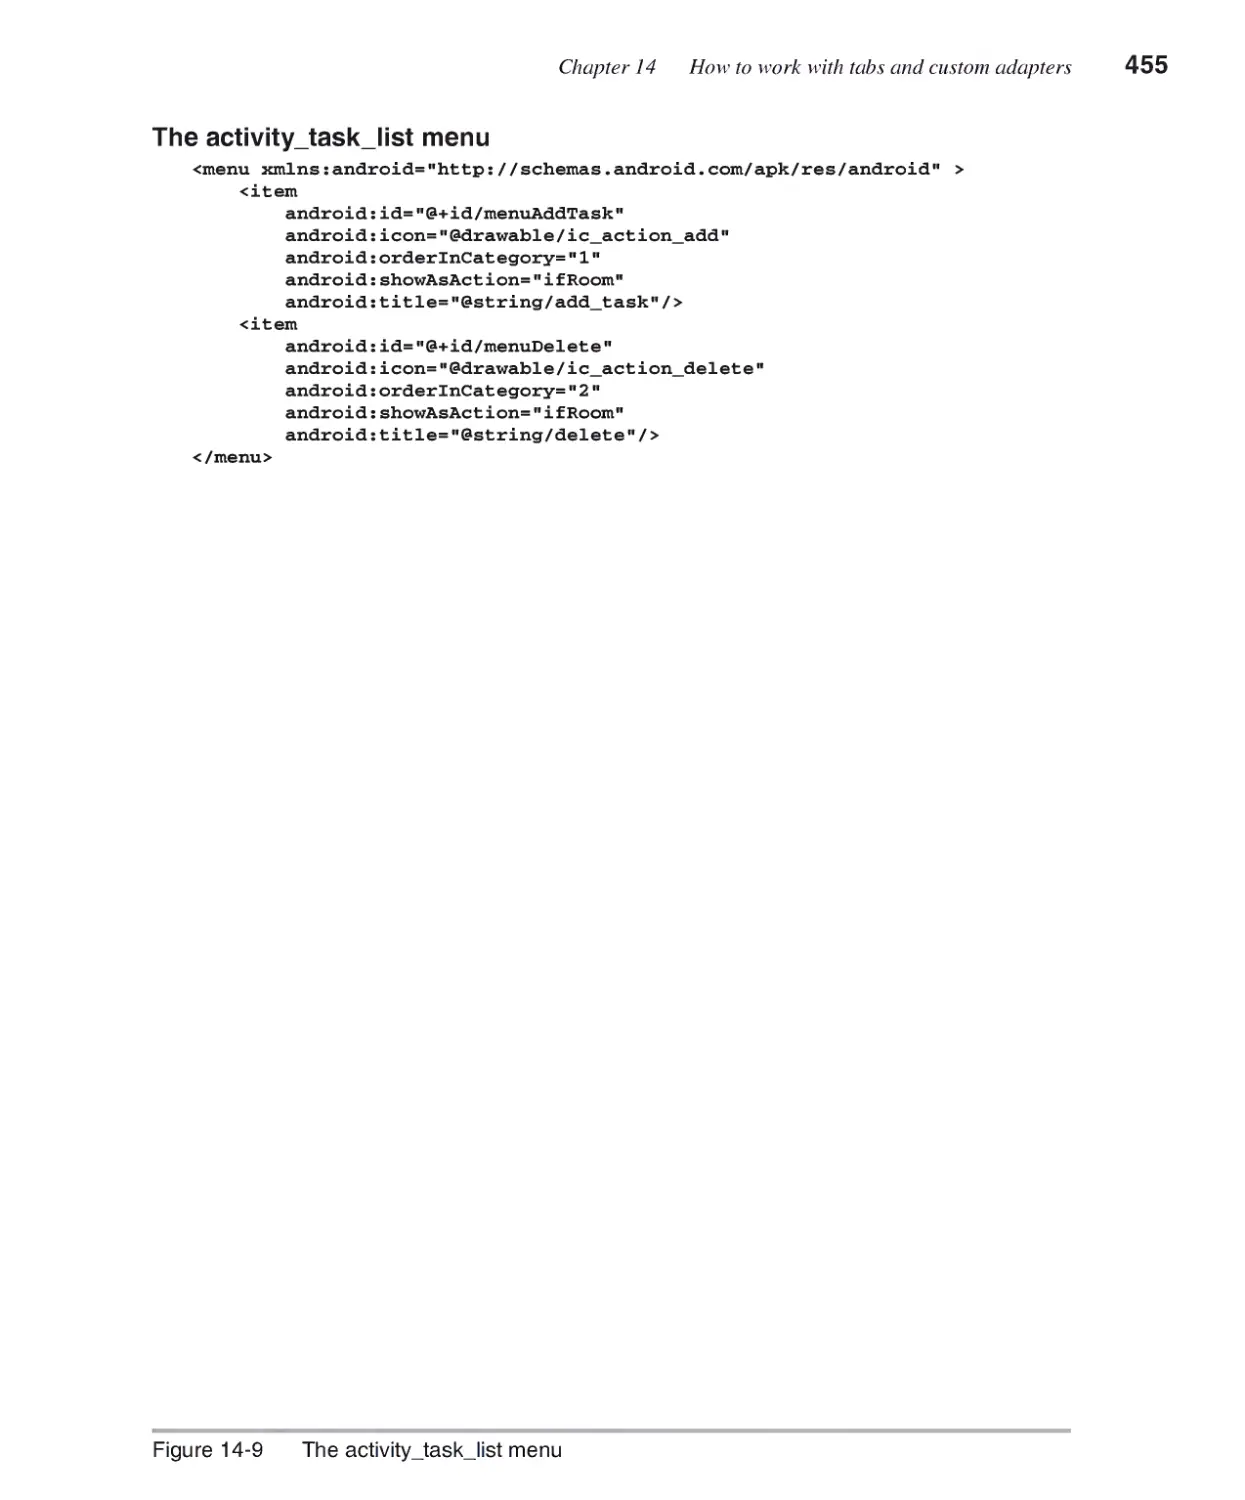
The activity_task_list menu 454
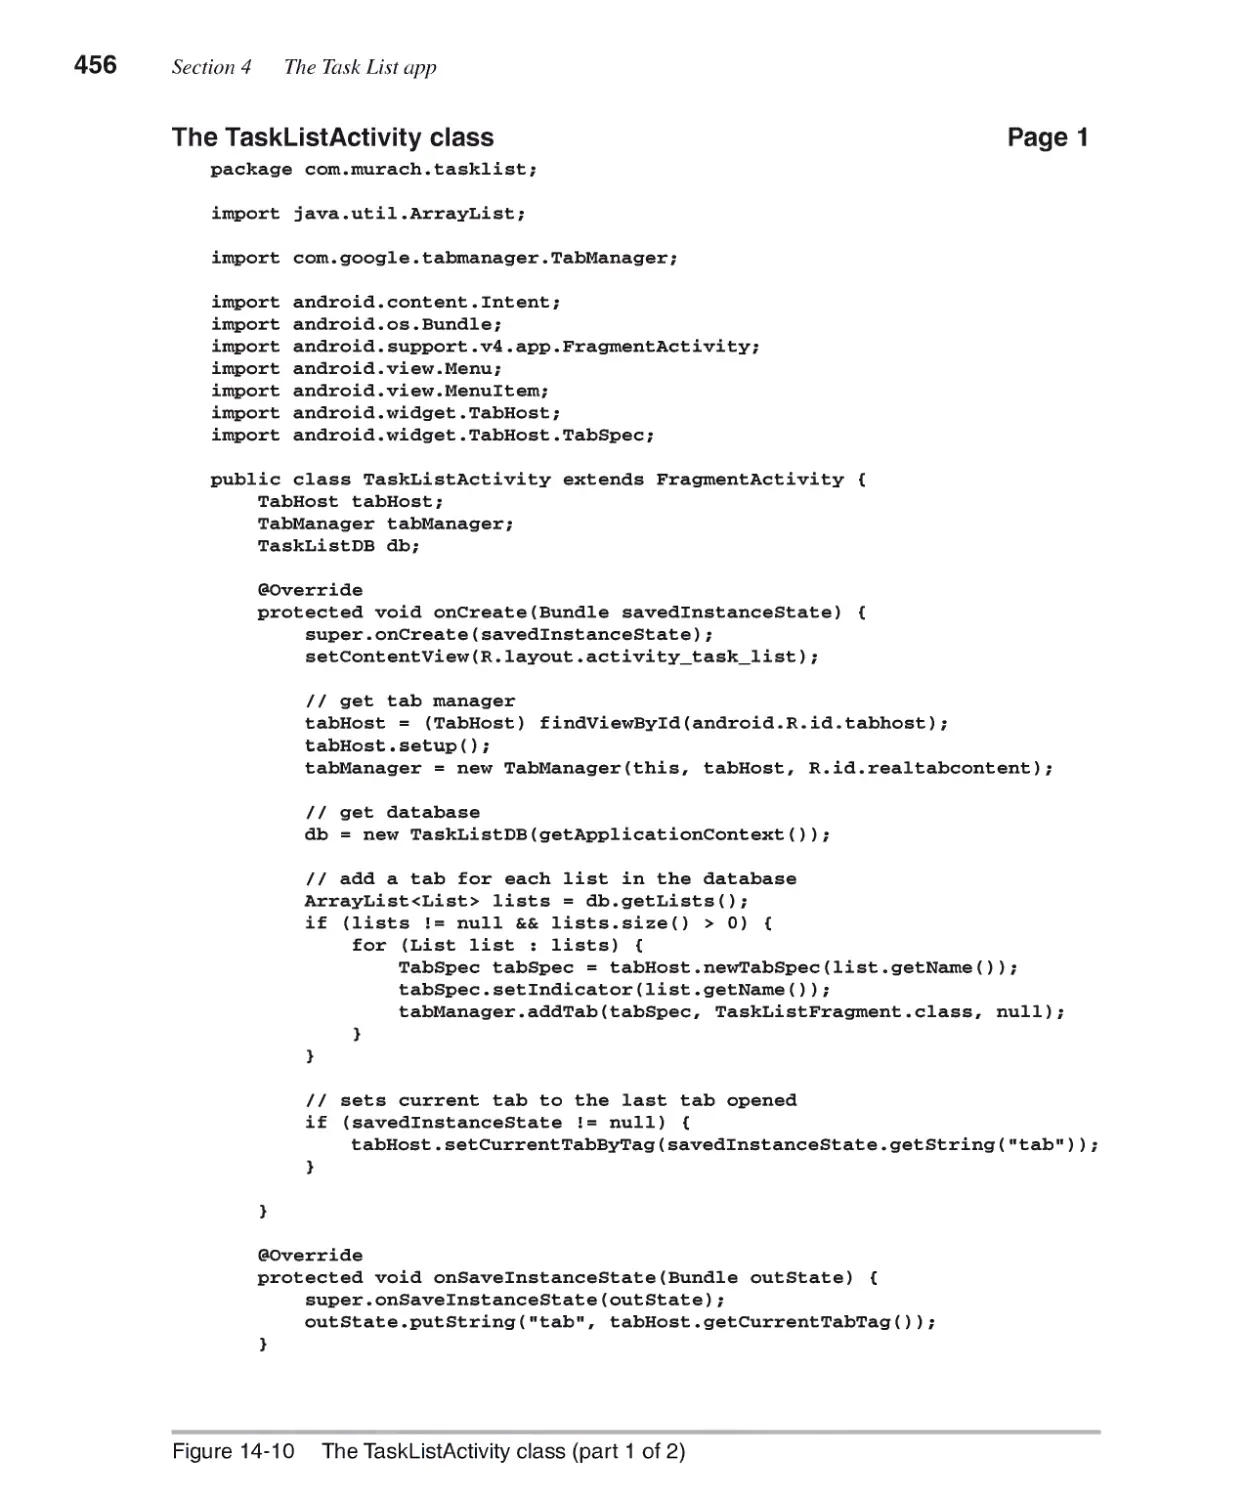
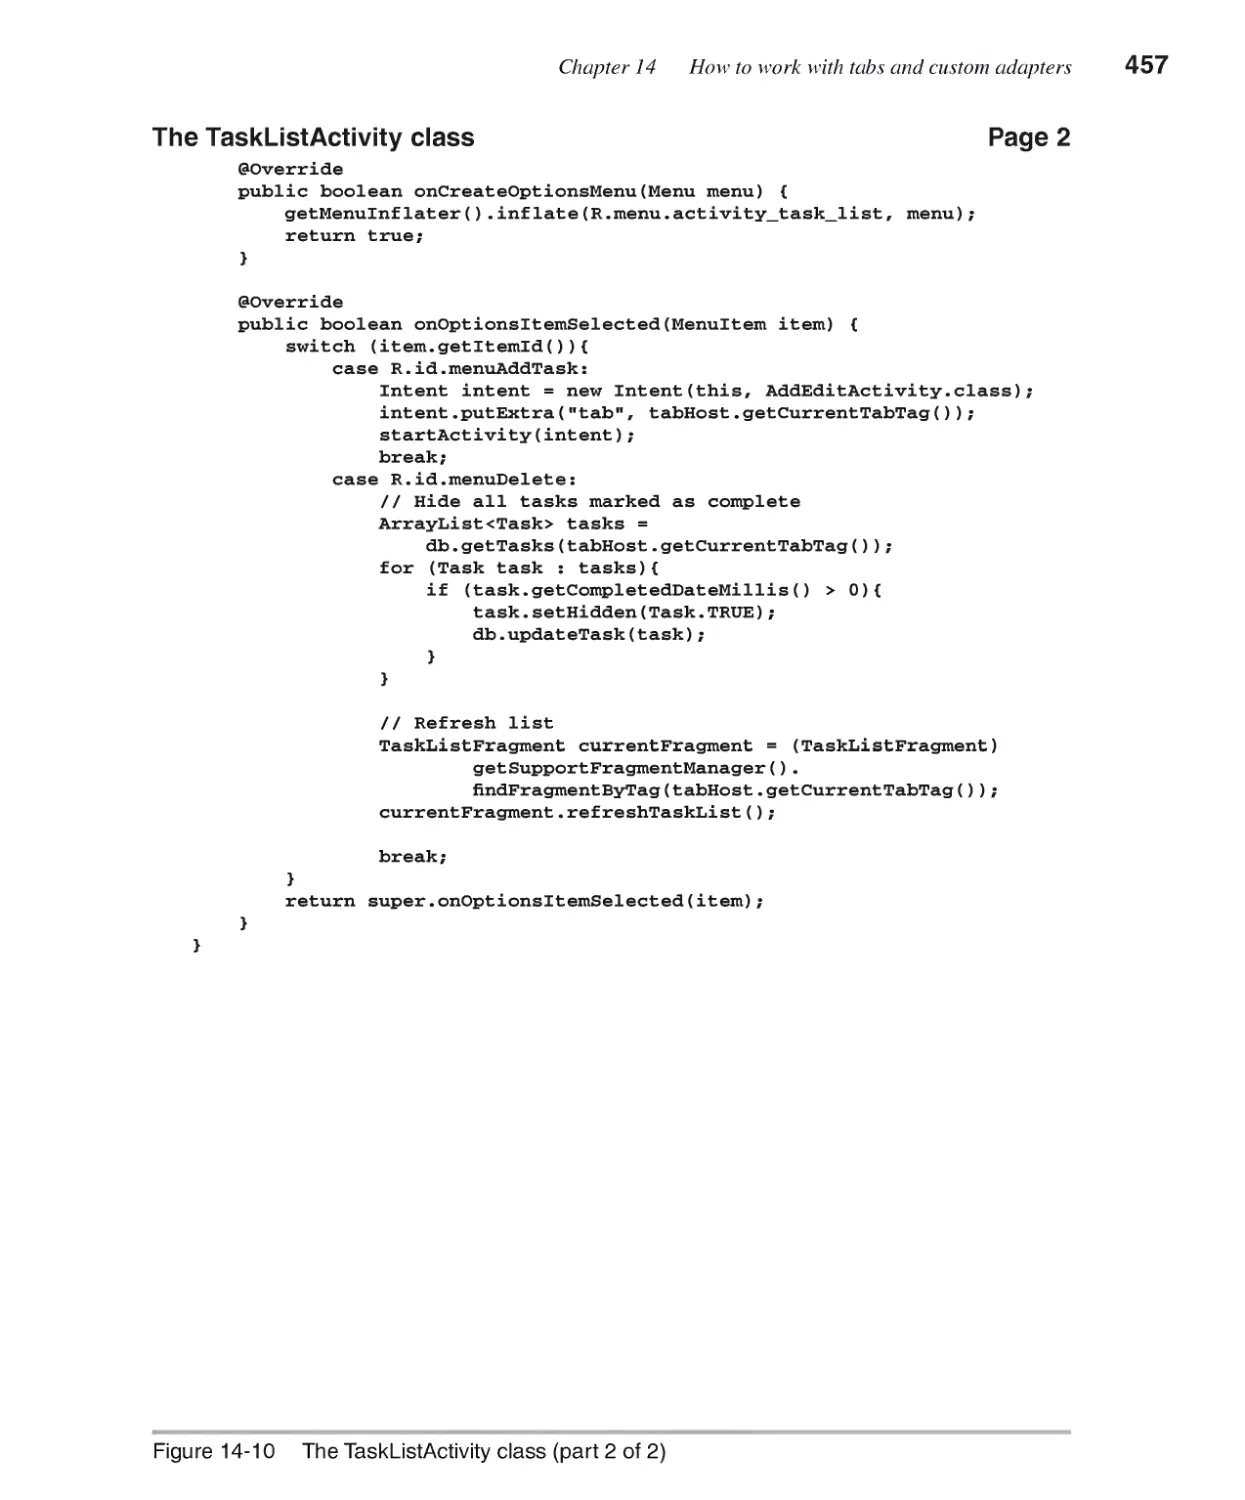
The TaskListActivity class 454
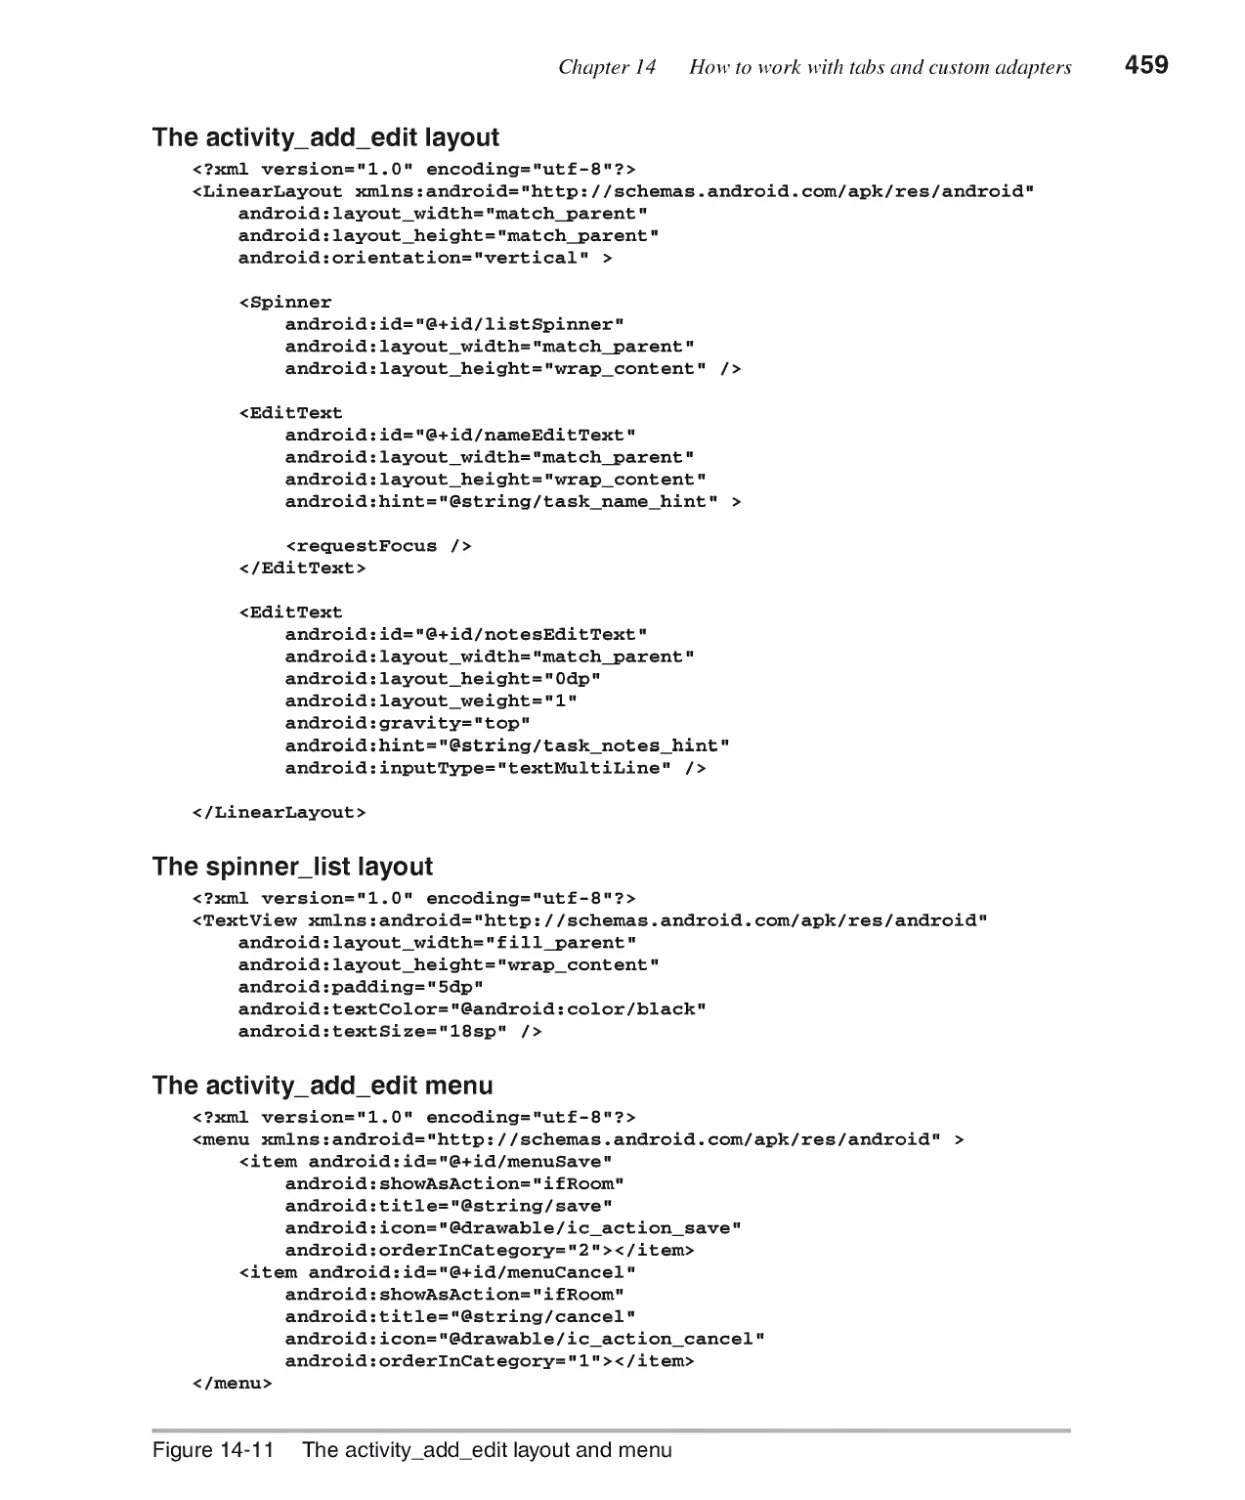
The activity_add_edit and spinner_list layout 458
The activity_add_edit menu 458
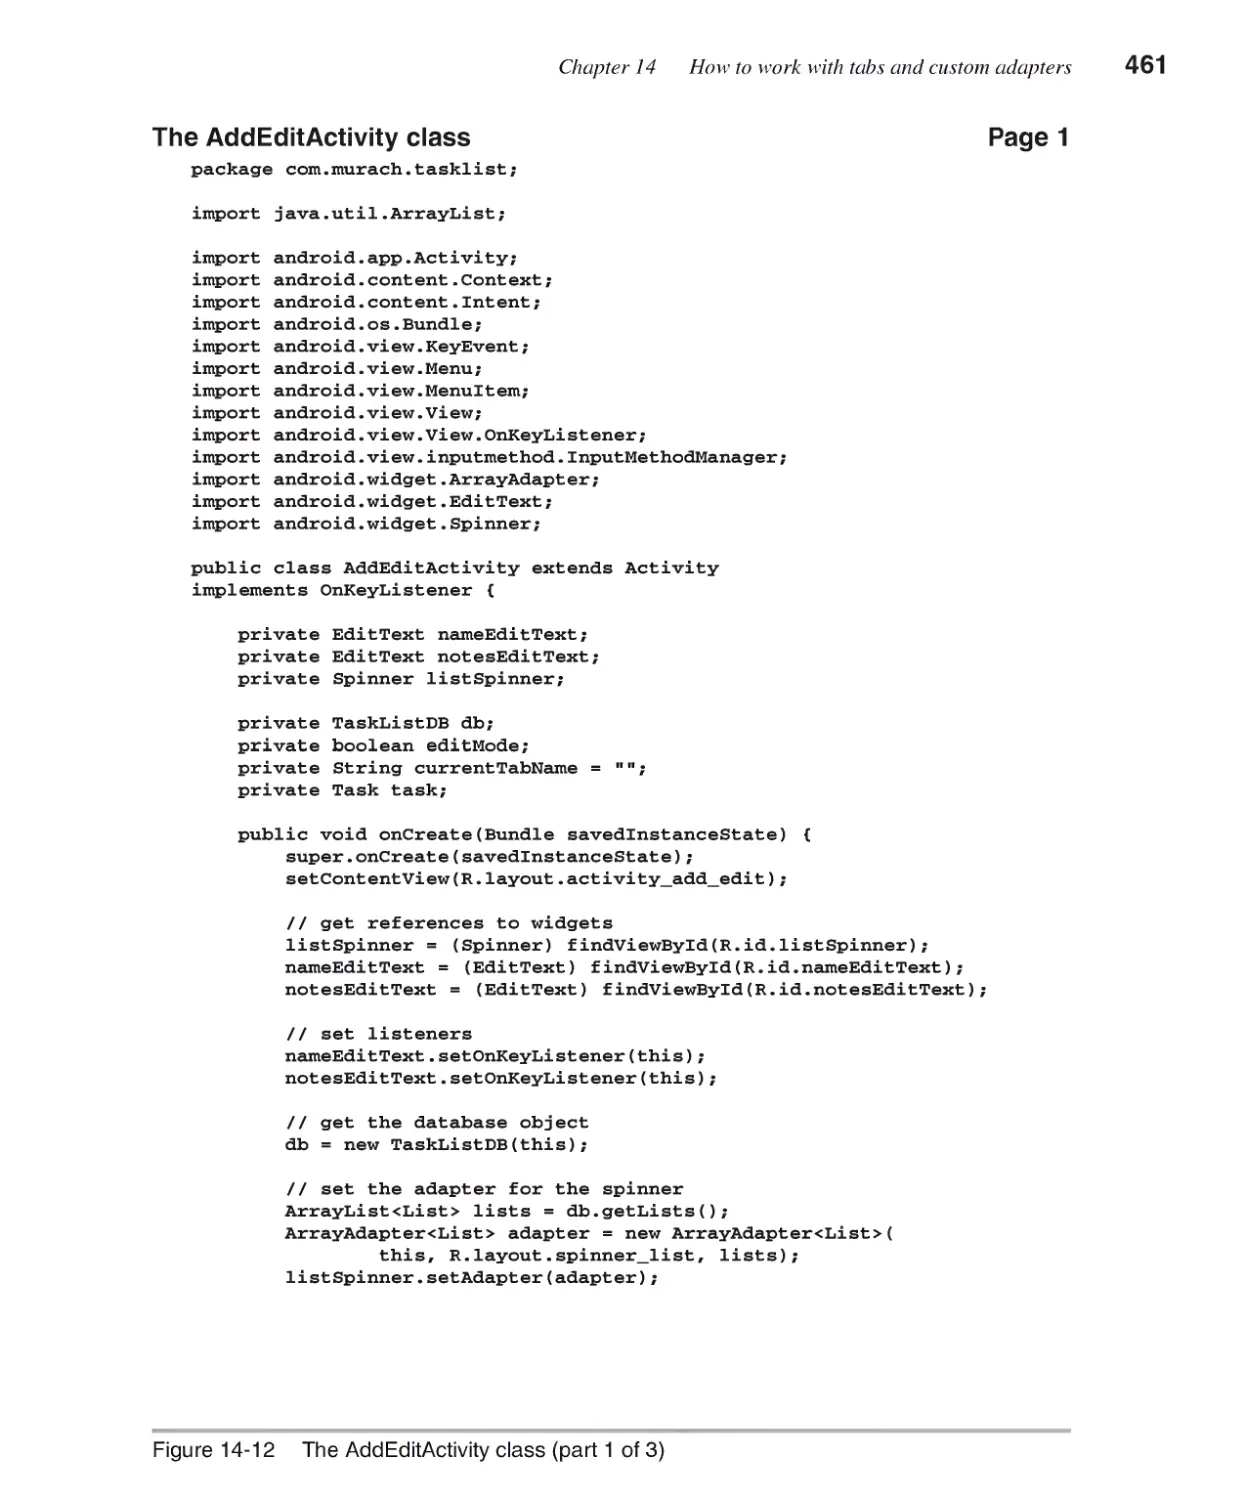
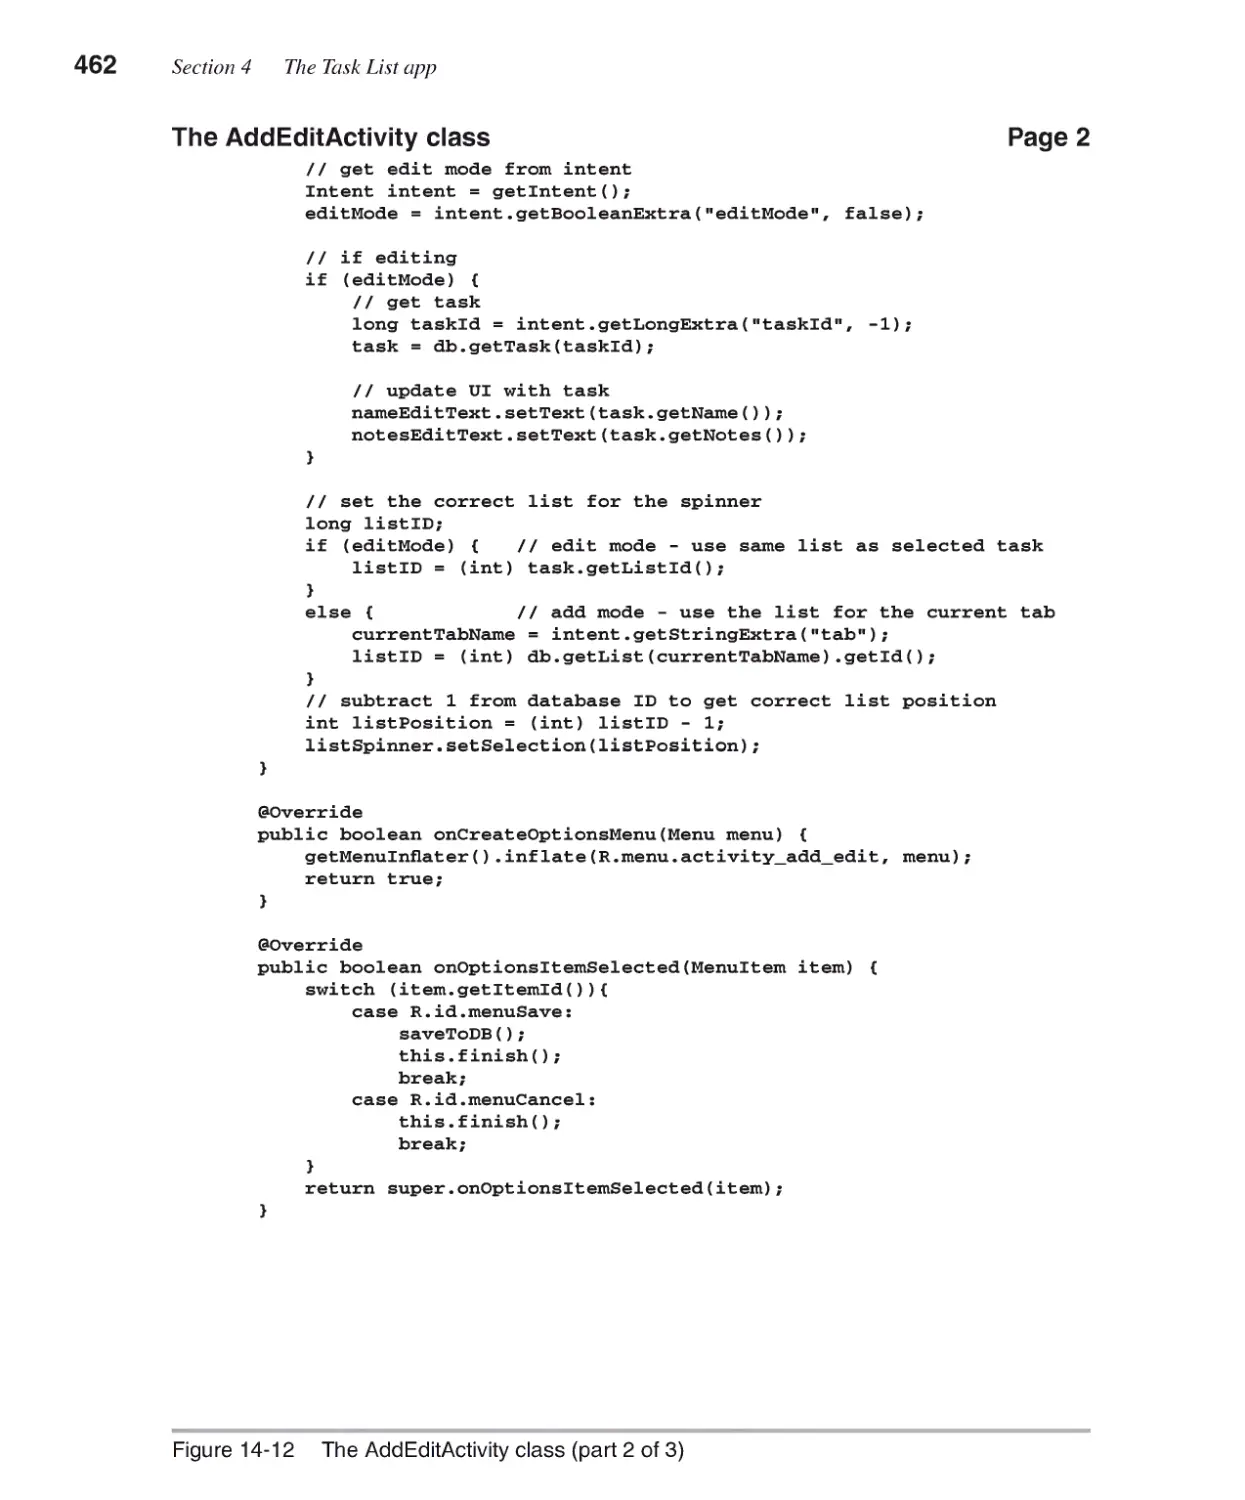
The AddEditActivity class 460
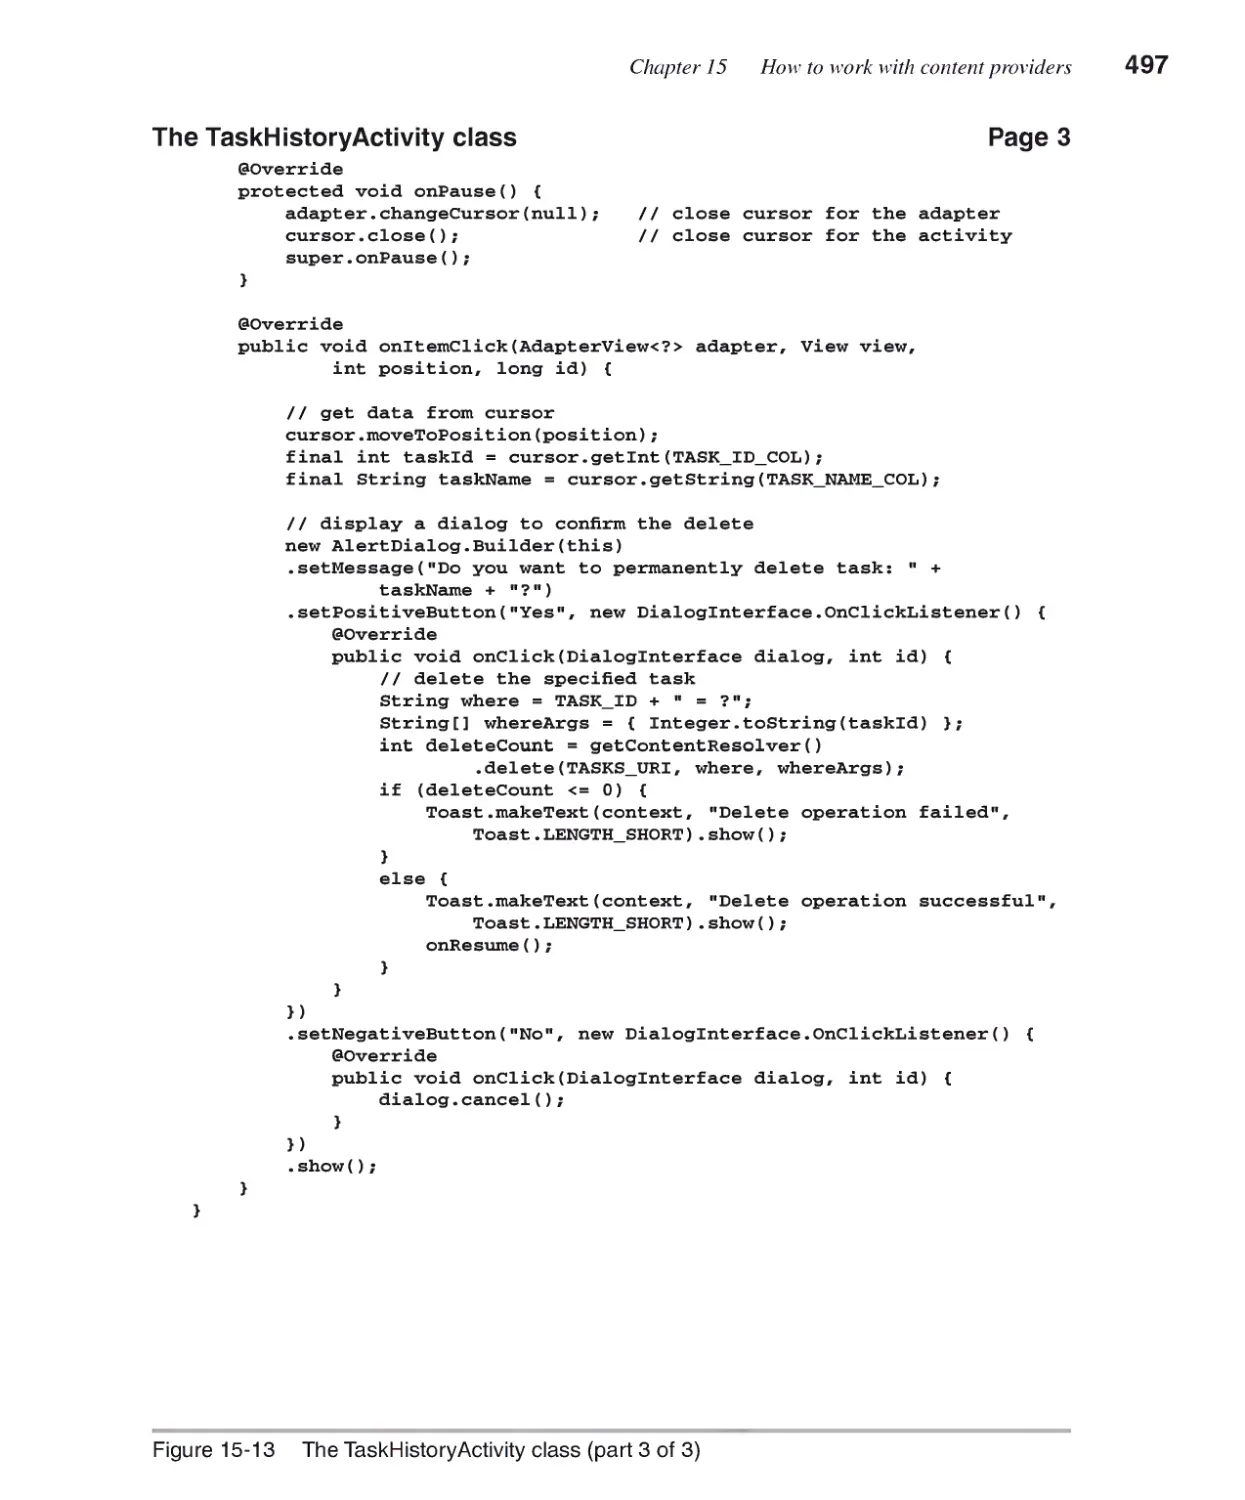
Chapter 15 How to work with content providers
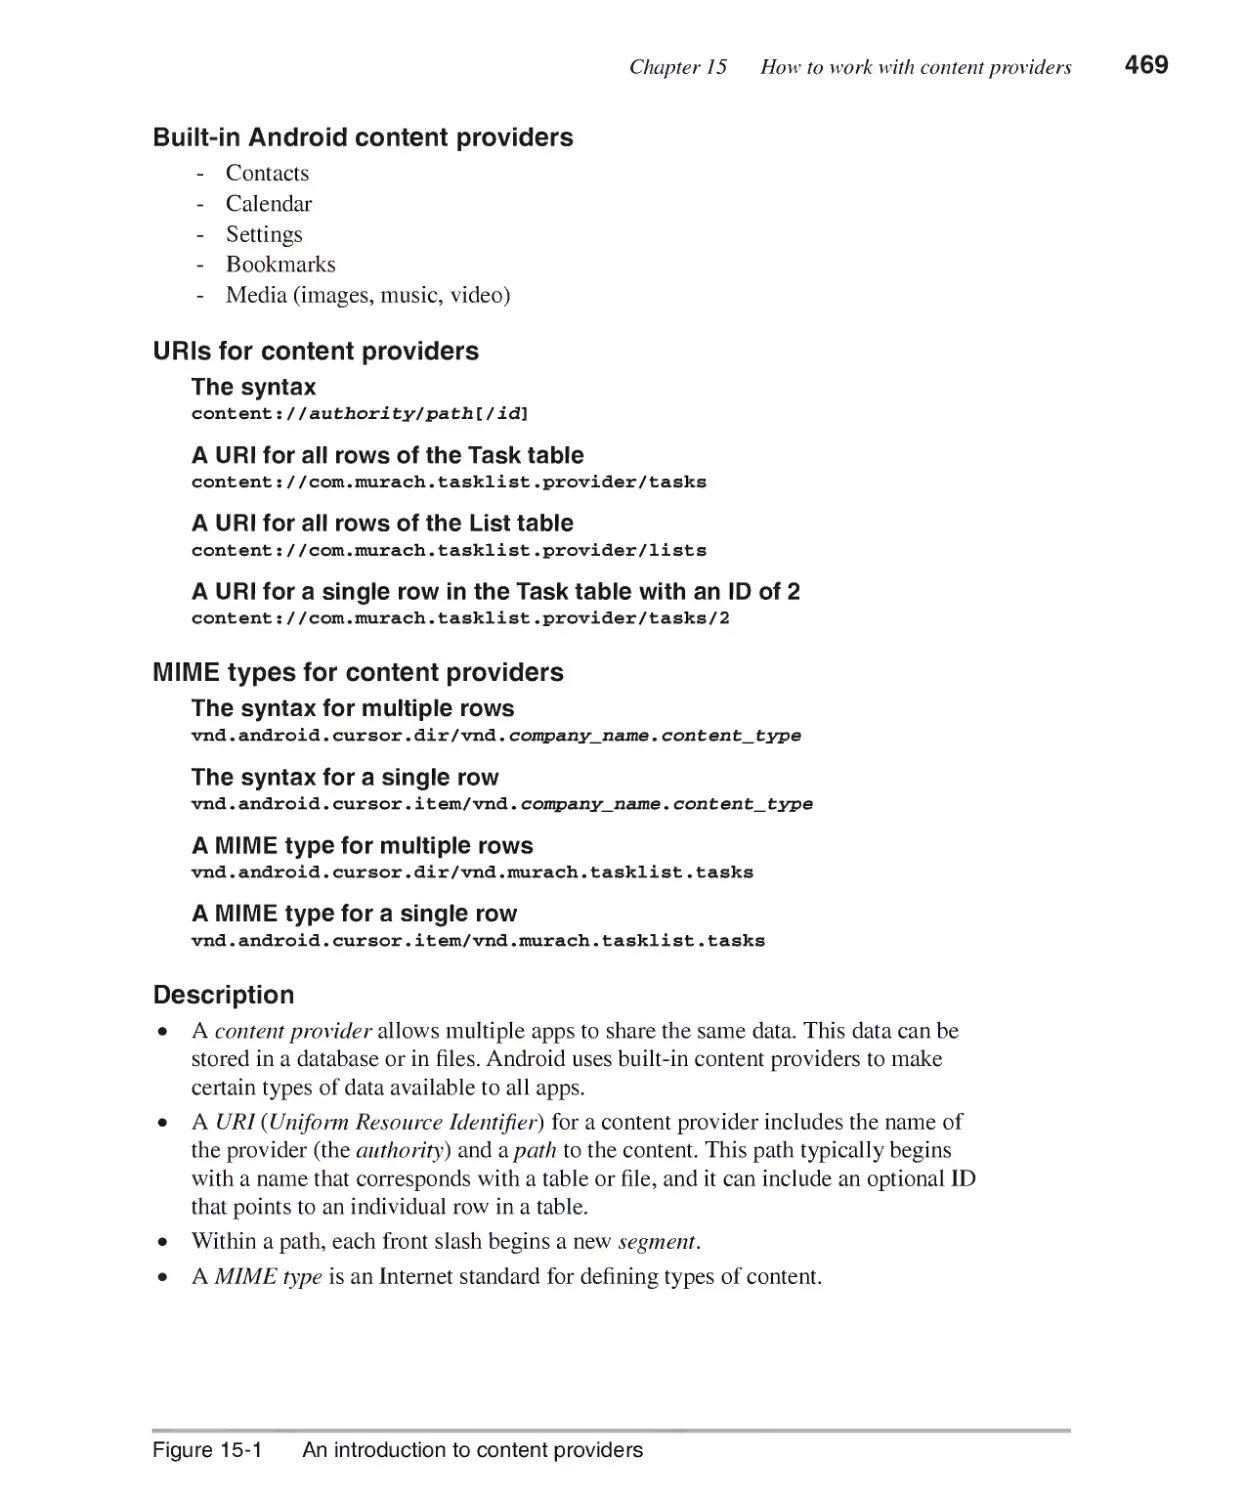
An introduction to content providers...........................................468
URIs for content providers 468
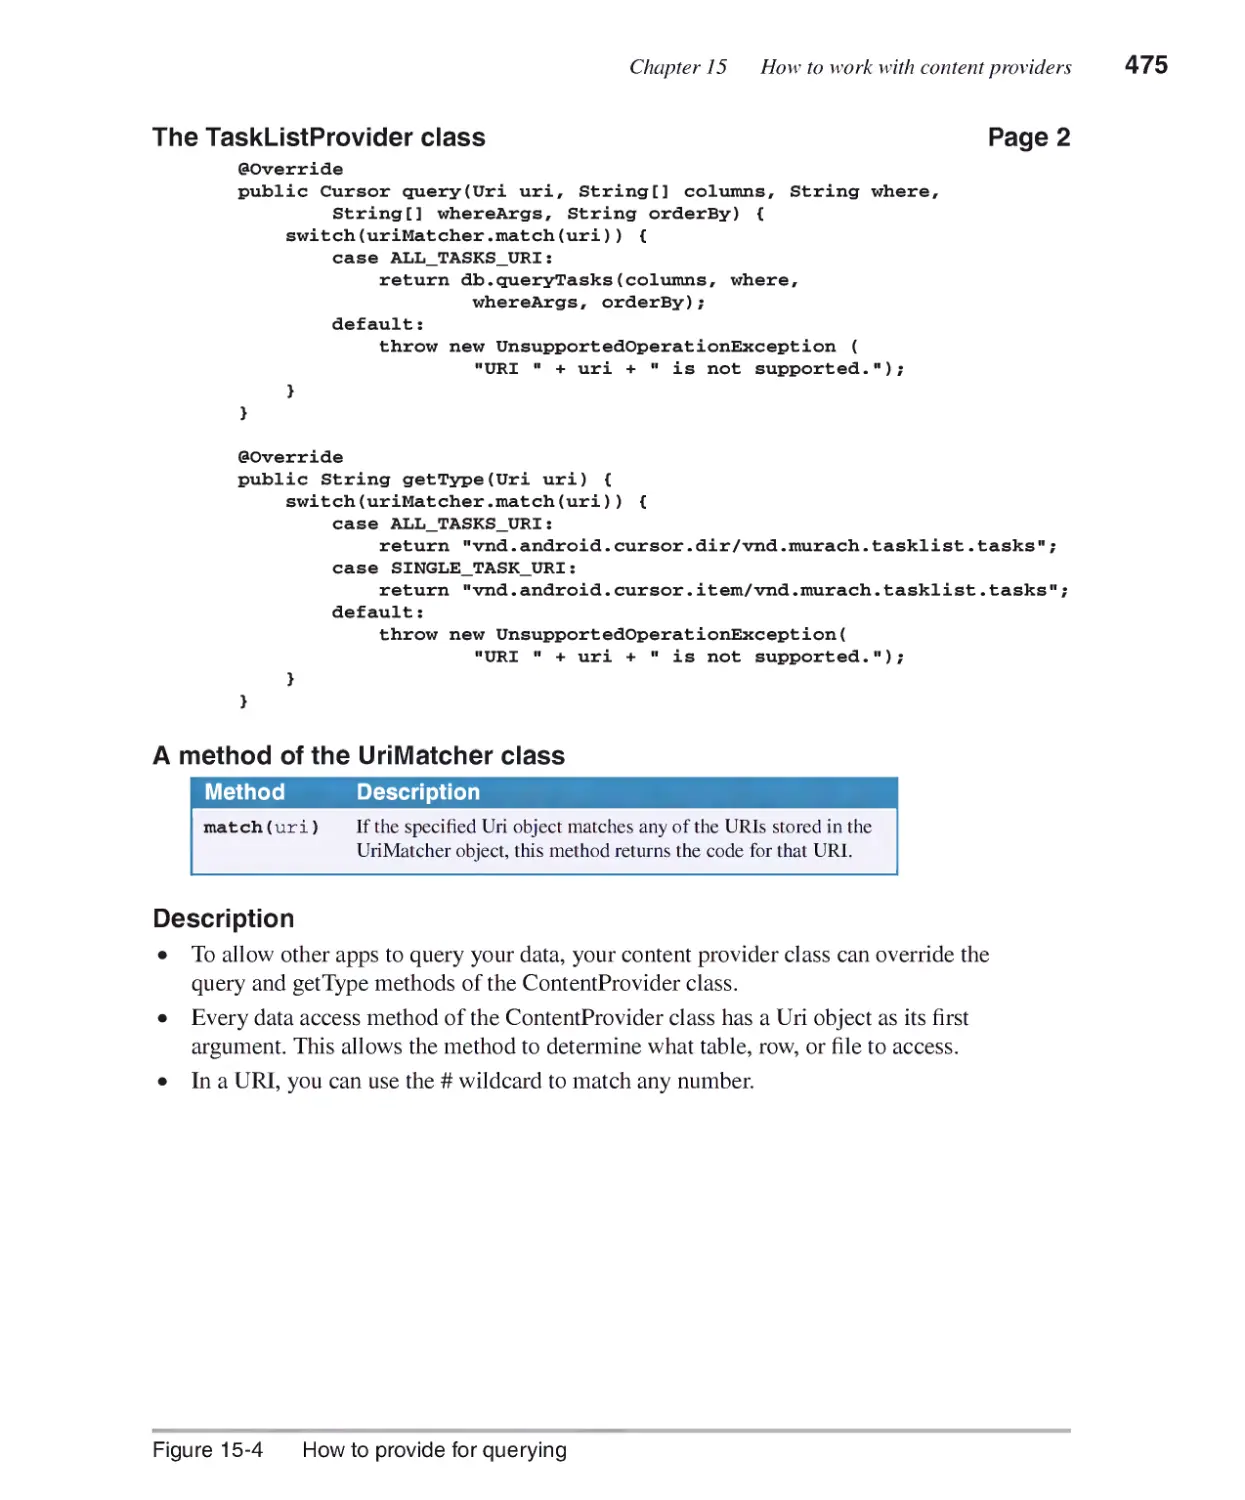
MIME types for content providers 468
How to add supporting methods to the database class 470
How to create a content provider..................................................472
How to start a content provider class 472
How to provide for querying 474
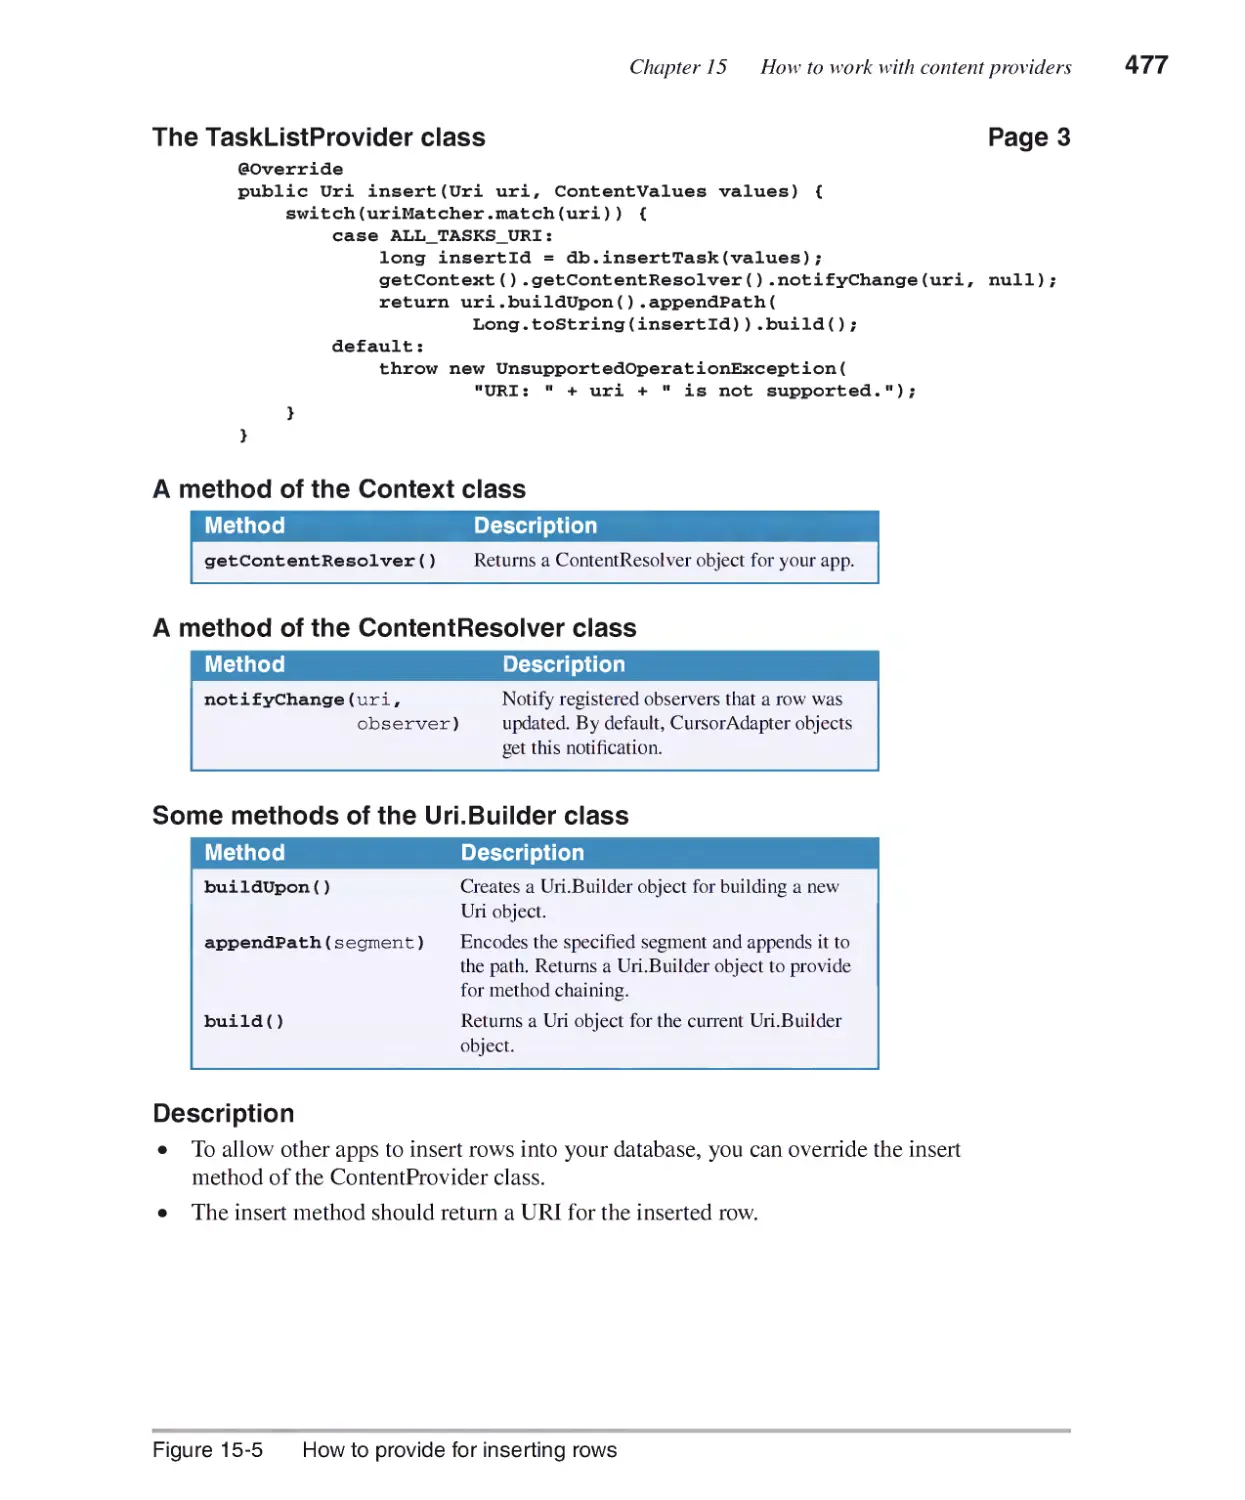
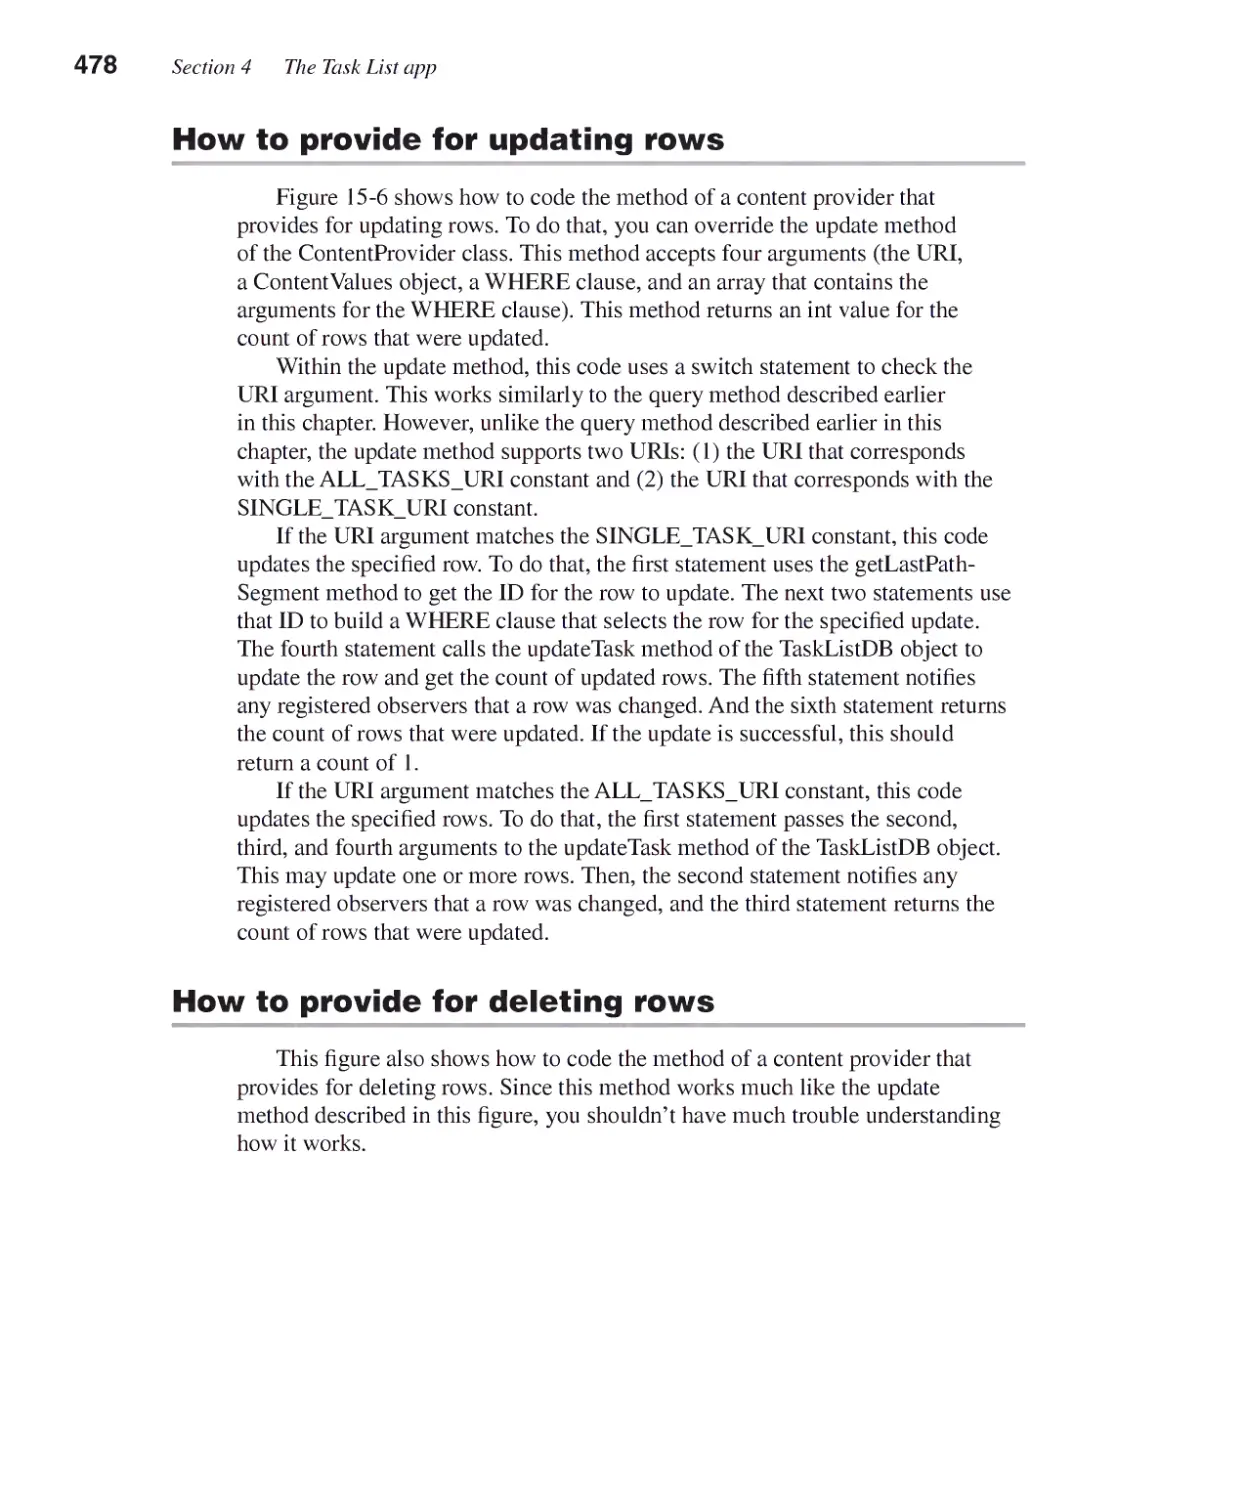
How to provide for inserting rows 476
How to provide for updating rows 478
How to provide for deleting rows 478
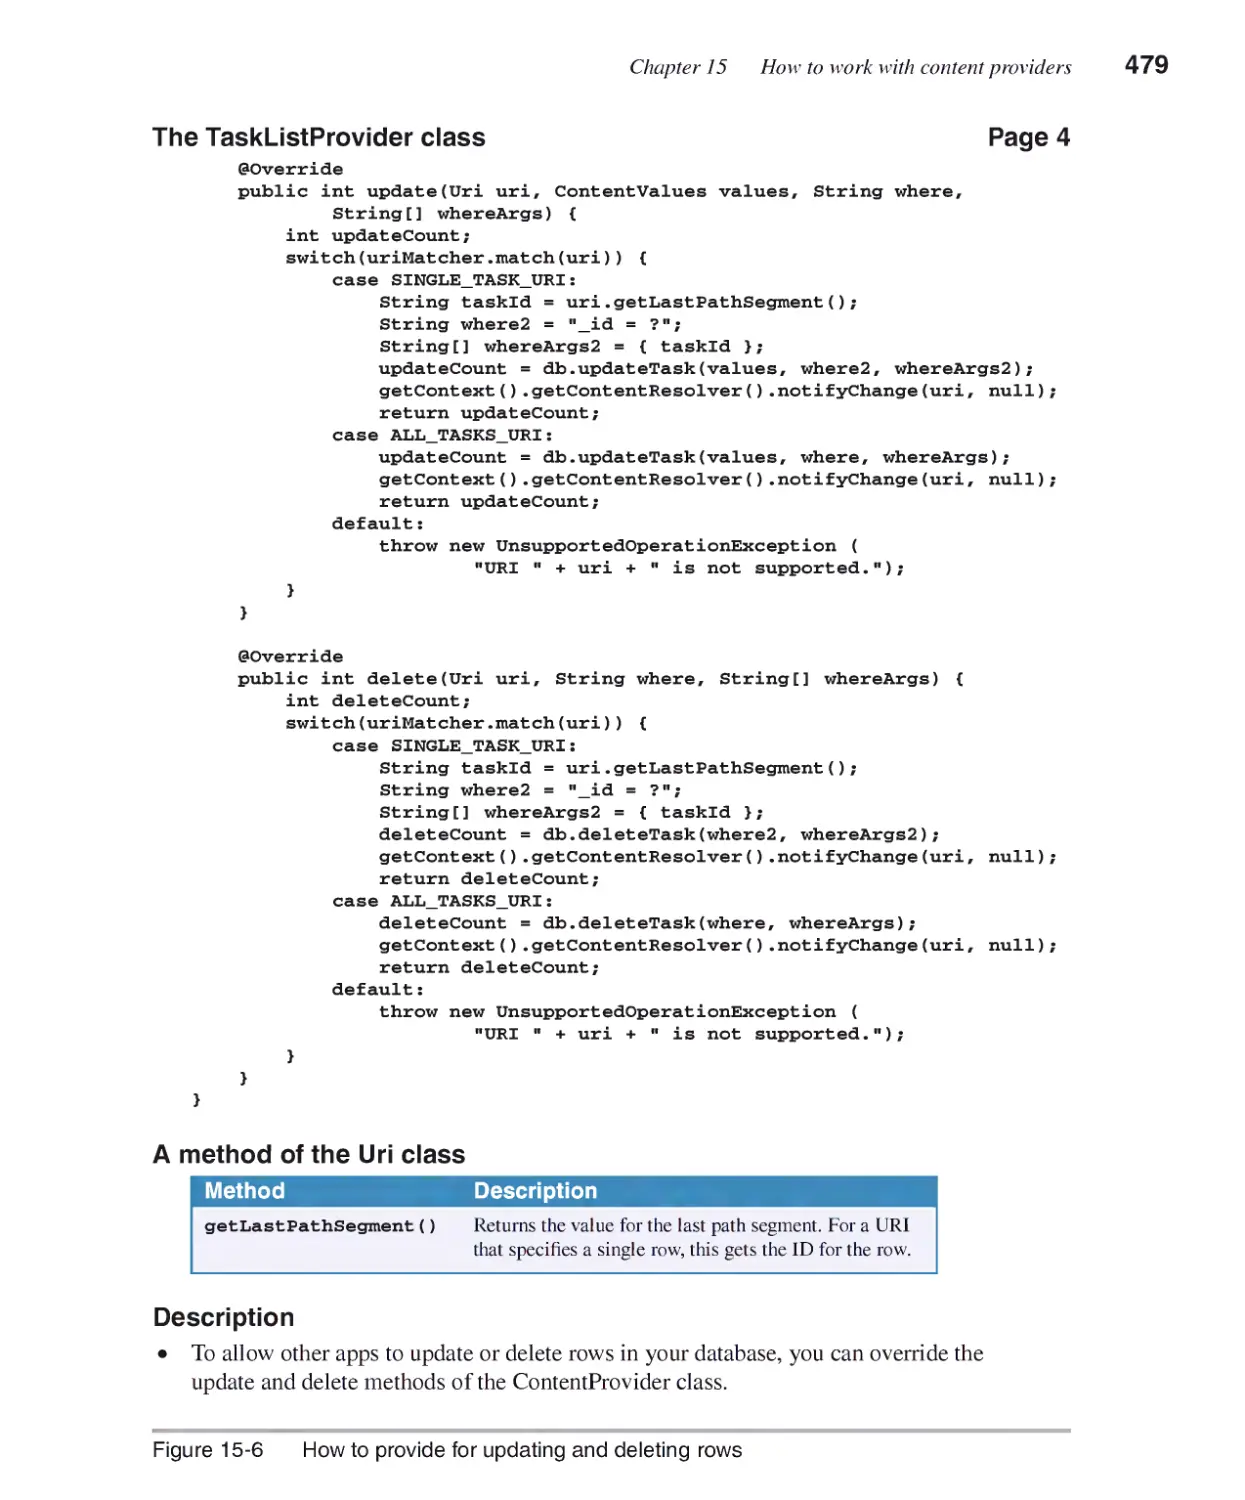
How to register a content provider 480
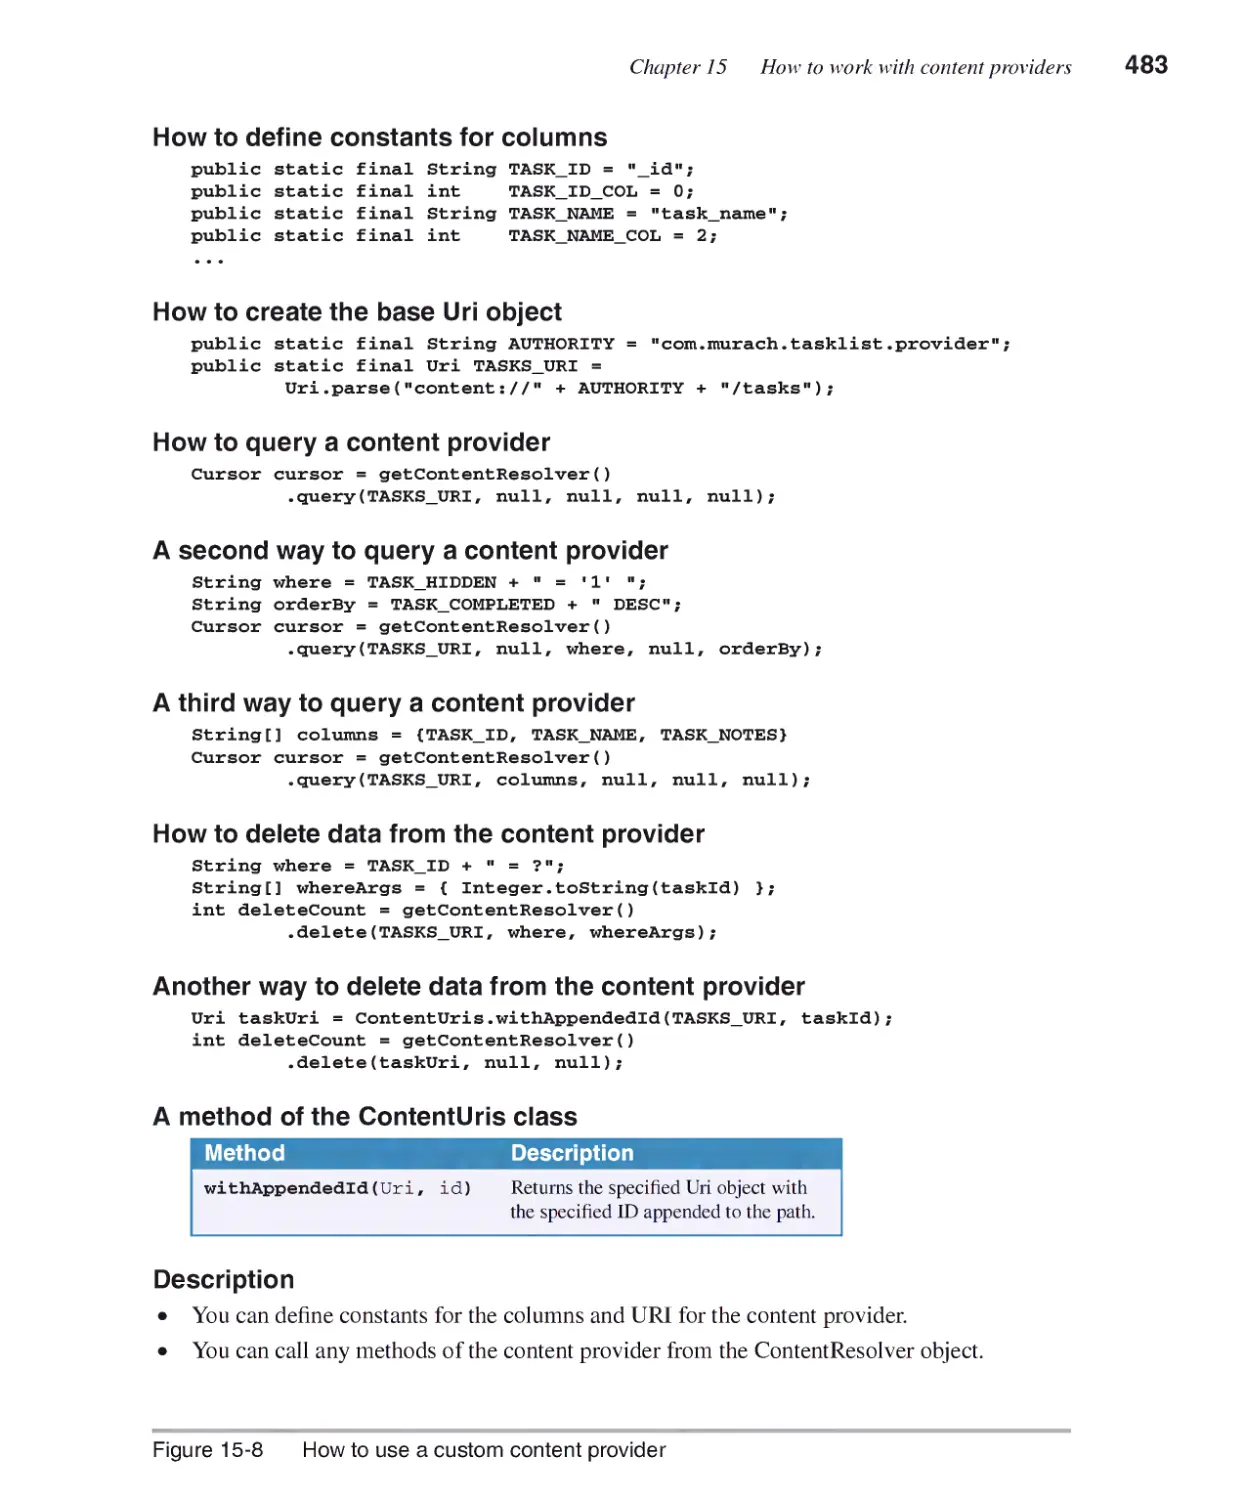
How to use a content provider ......................................................482
How to use a custom content provider 482
How to use a built-in content provider 484
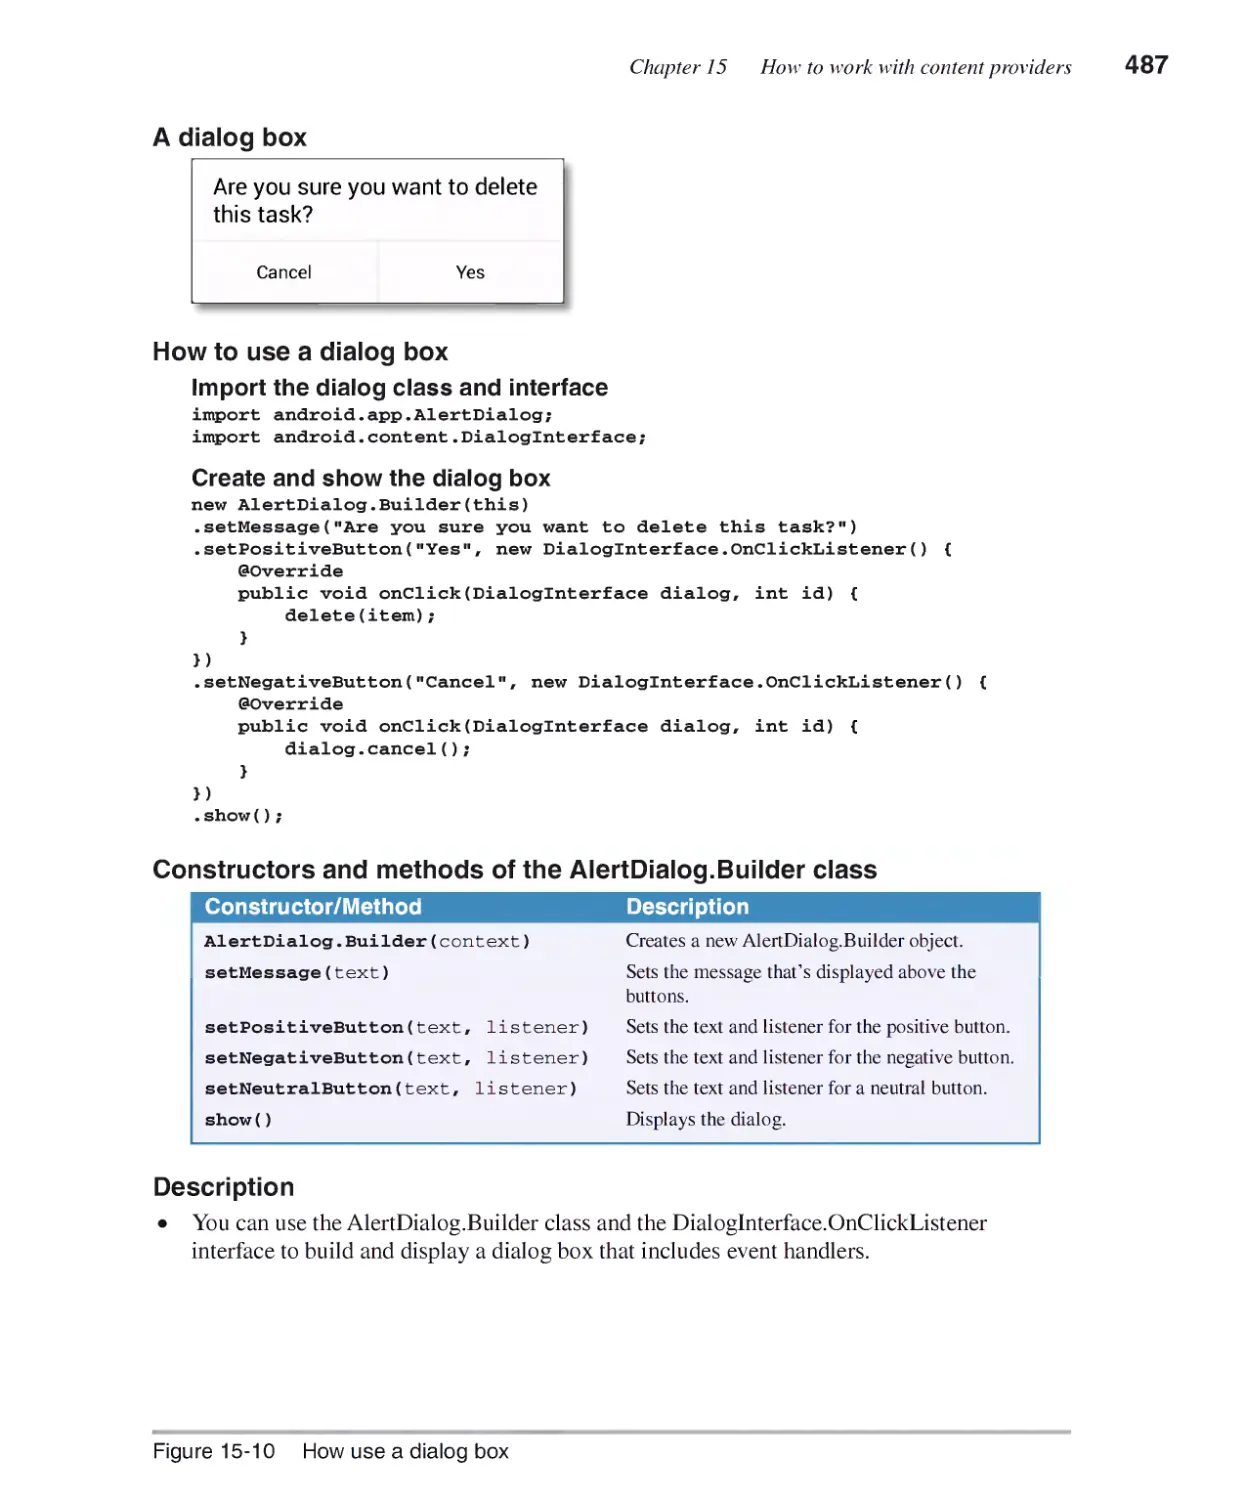
How to work with a dialog box.......................................................486
How to import the dialog class and interface 486
How to build and show the dialos box 486
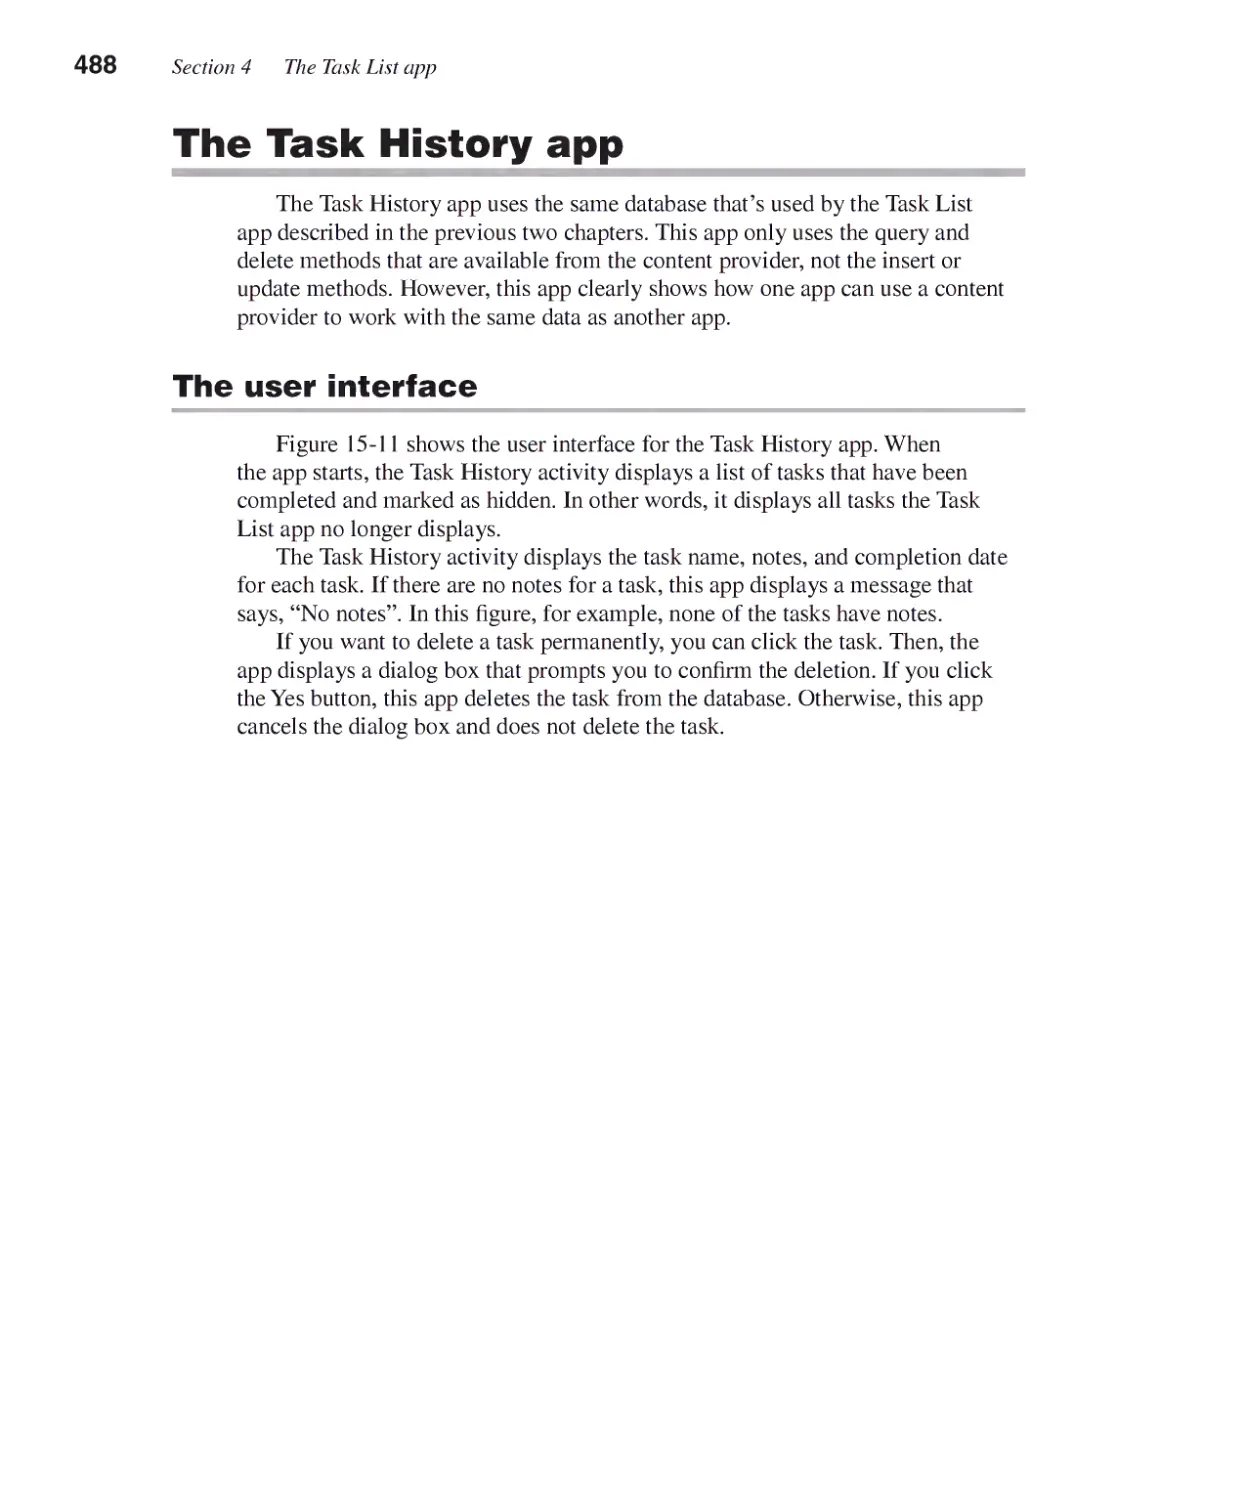
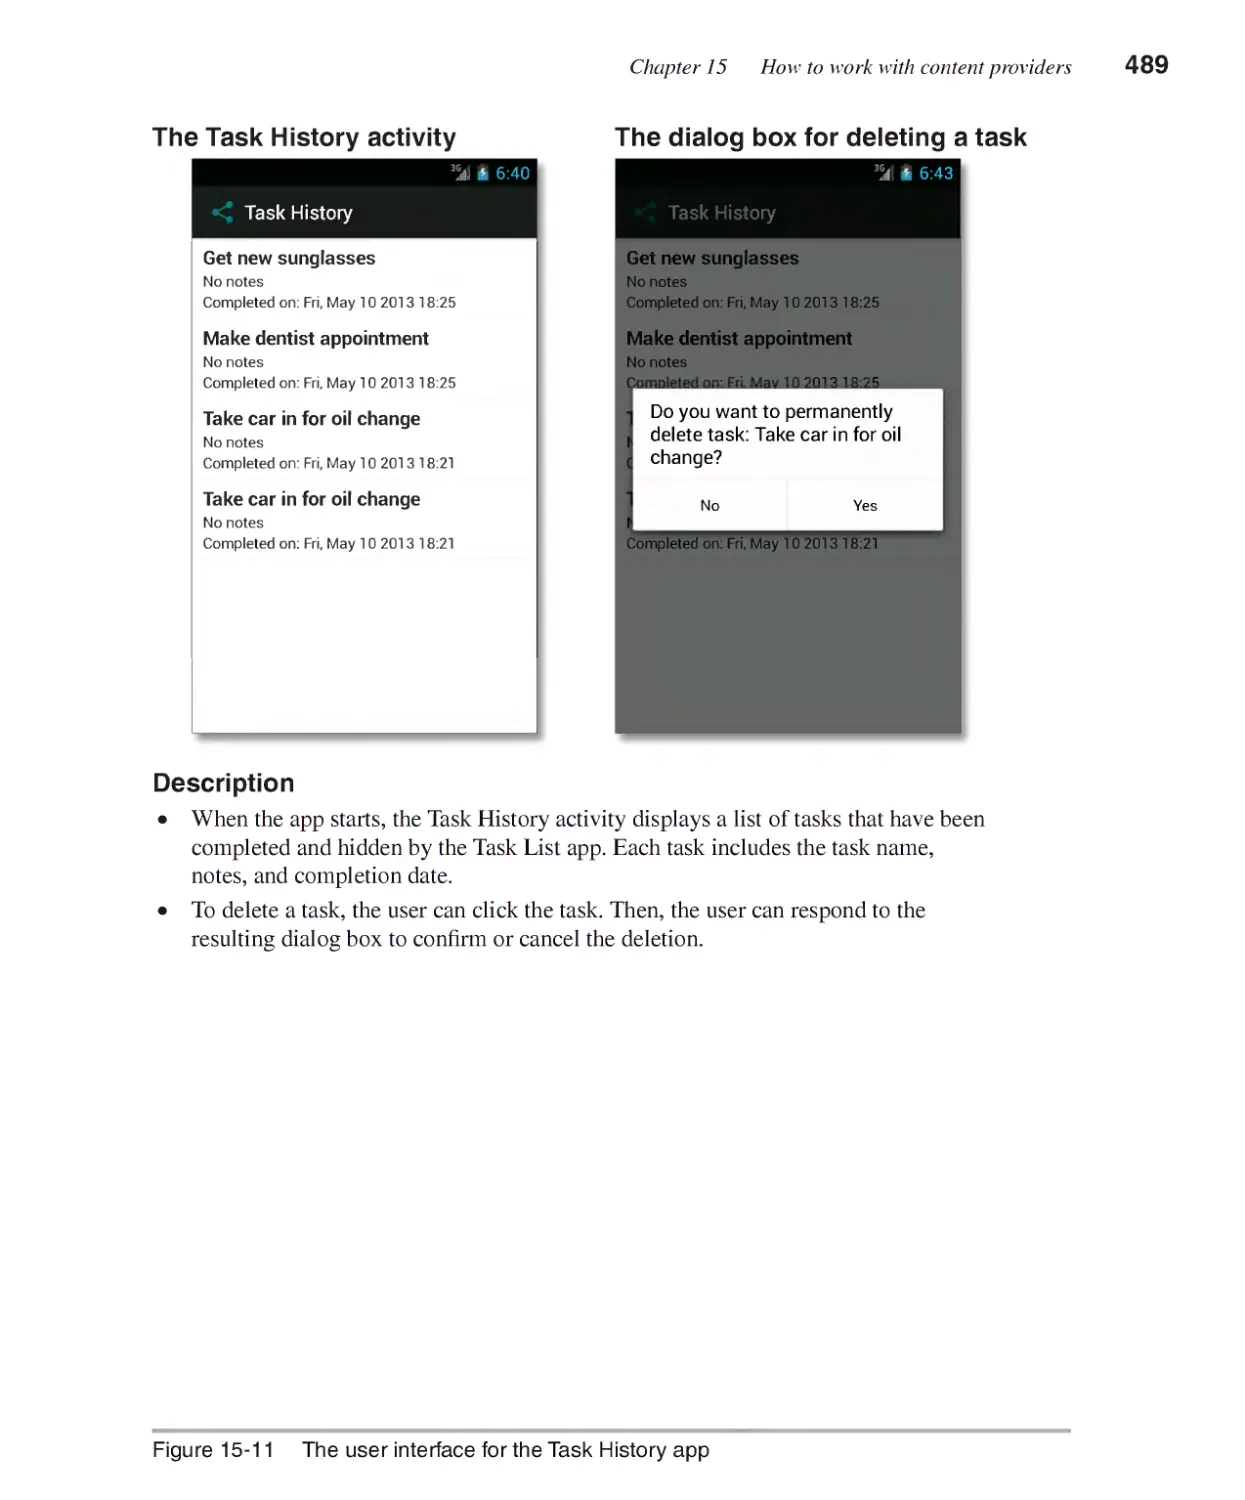
The Task History app......................................................................488
The user interface 488
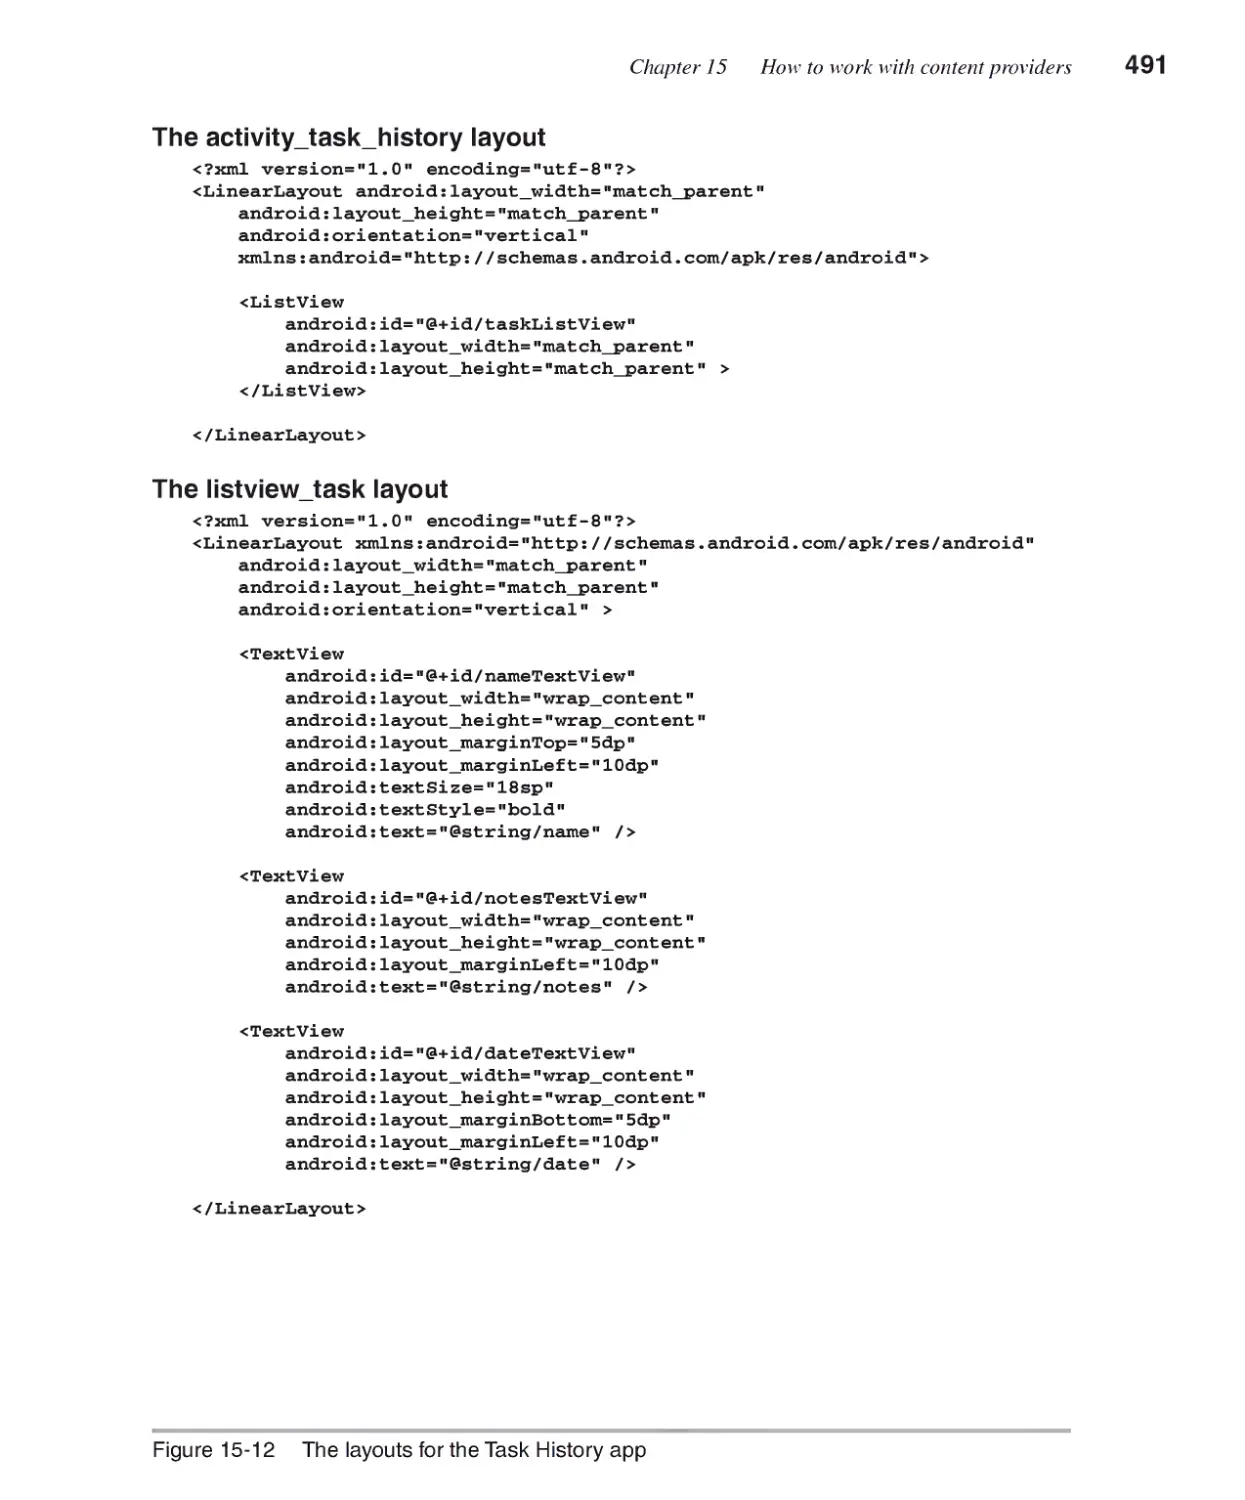
The XML for the layouts 490
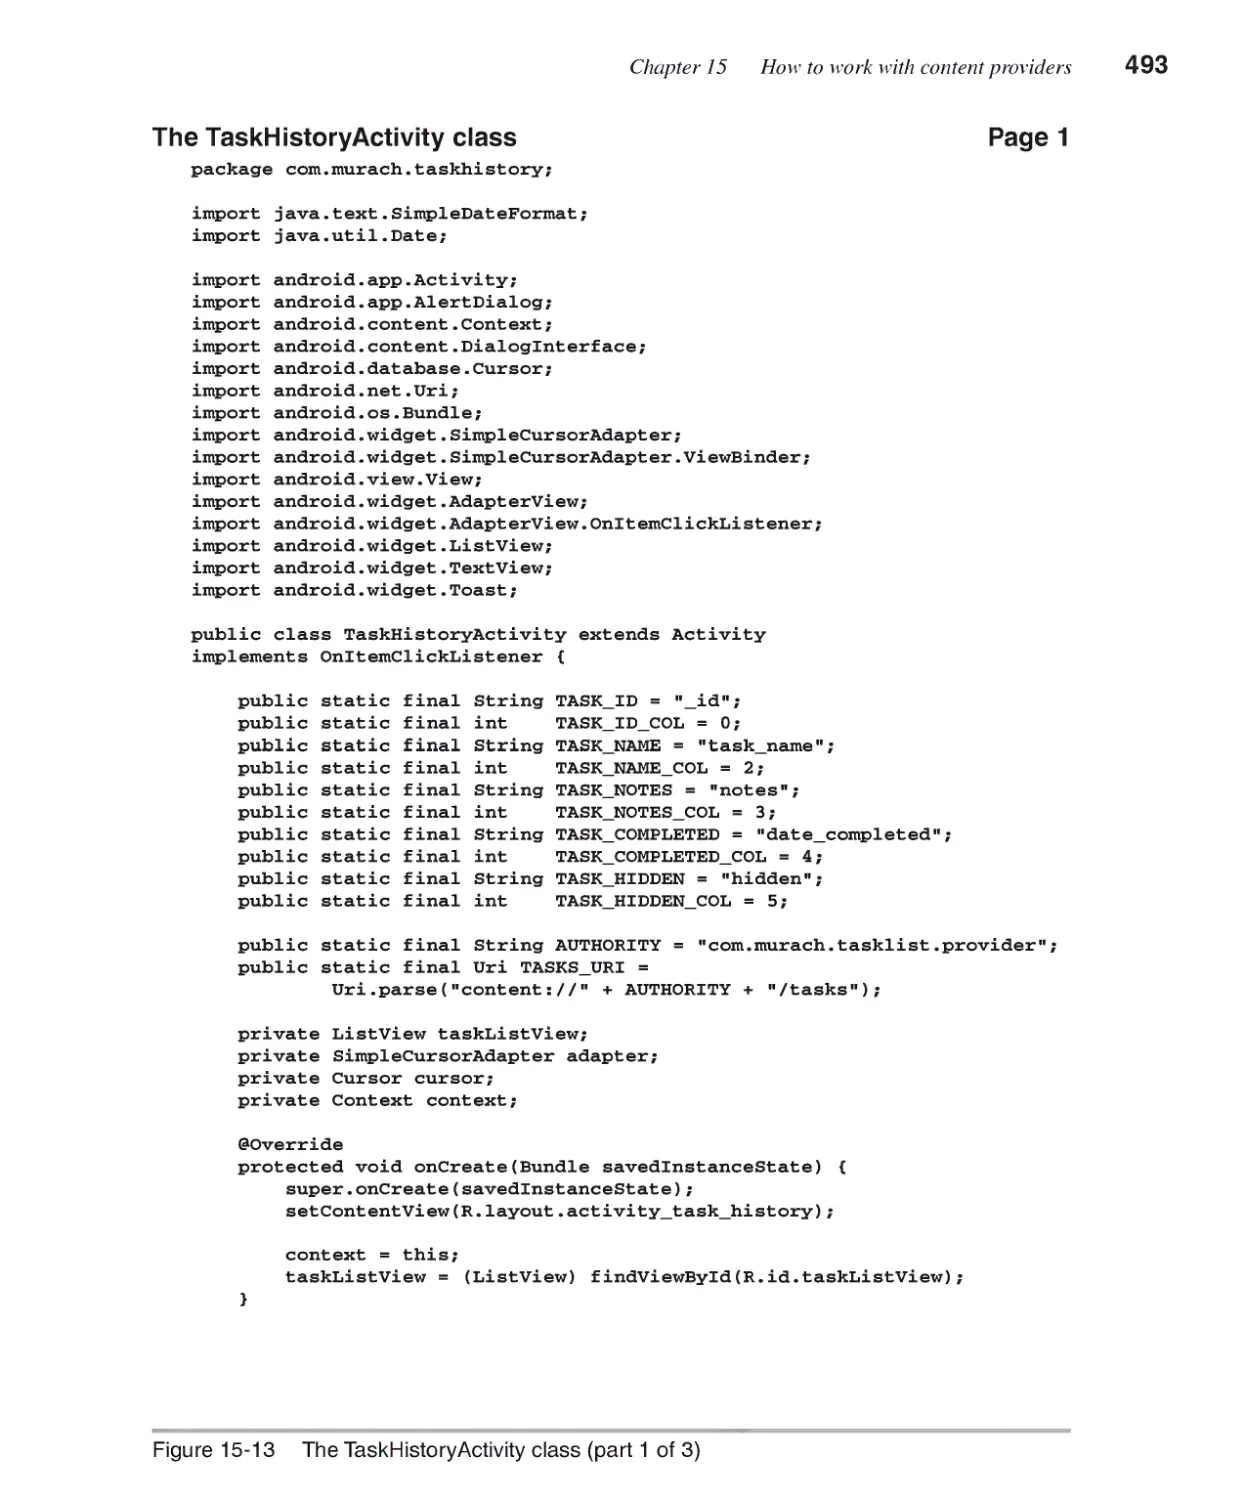
The Java code for the activity 492
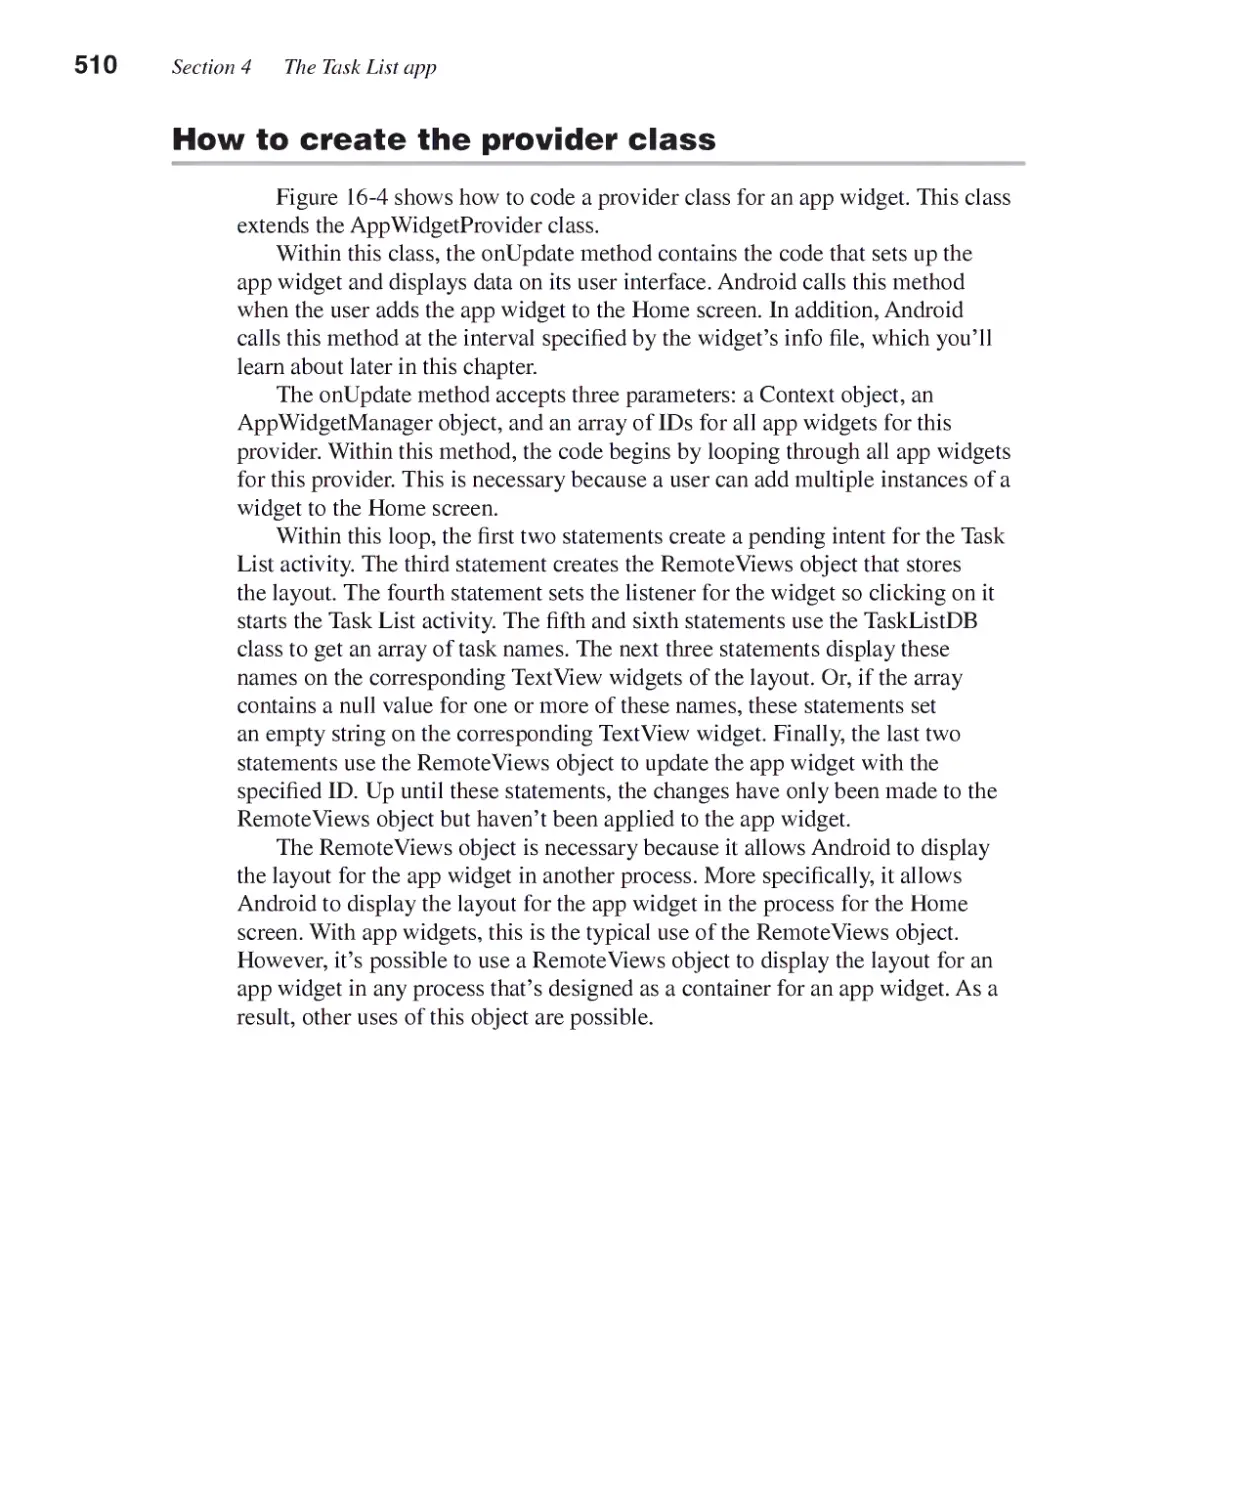
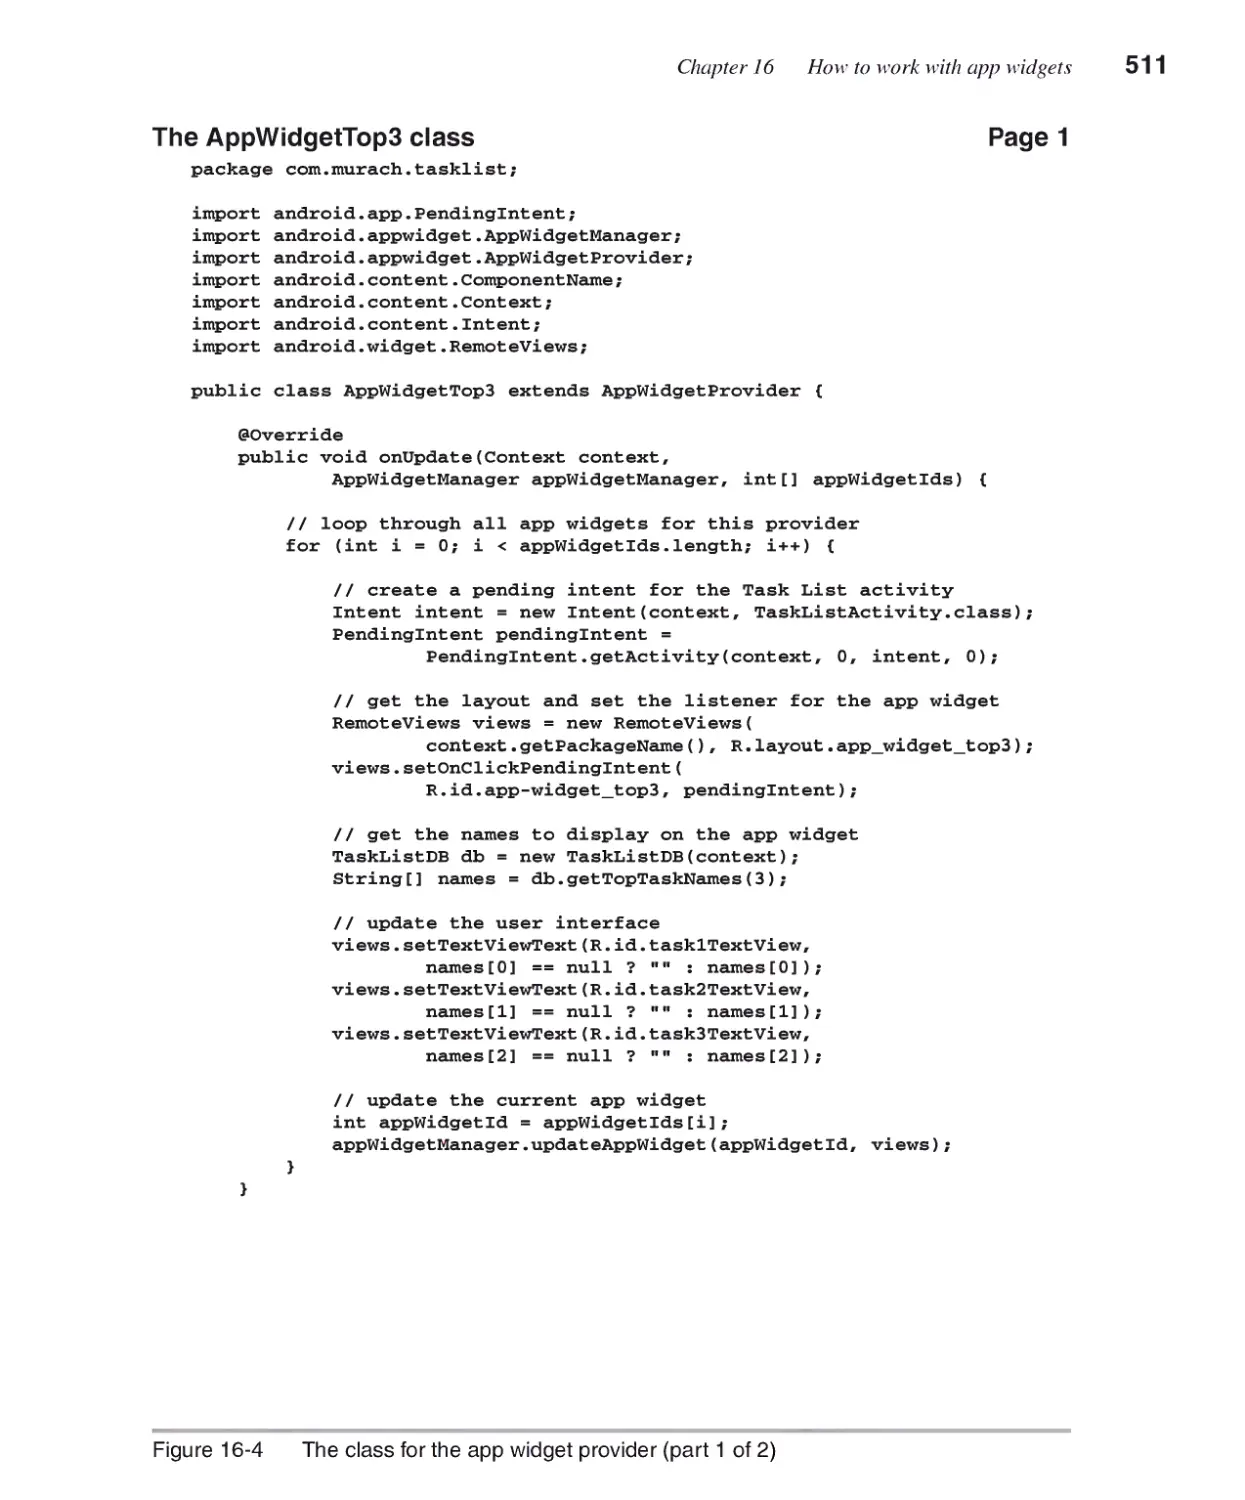
Chapter 16 How to work with app widgets
An introduction to app widgets.....................................................502
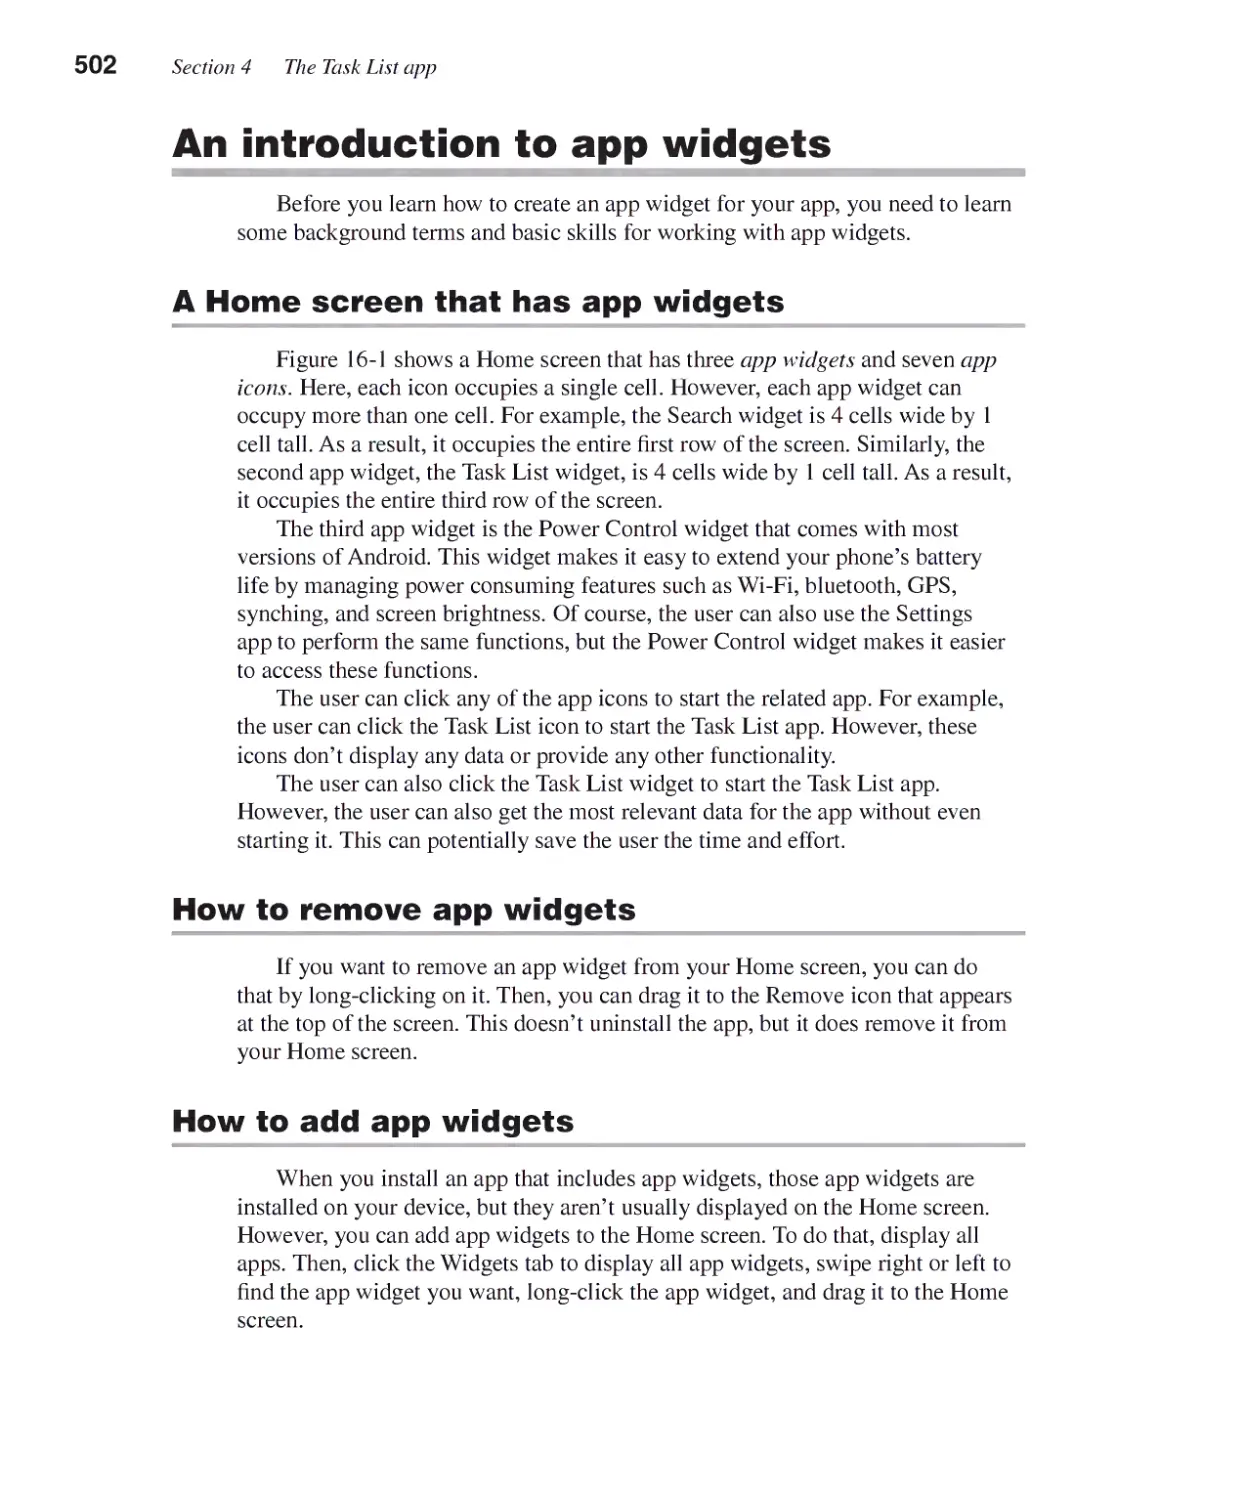
A Home screen that has app widgets 502
How to remove app widgets 502
How to add app widgets 502
Expanded contents XIII
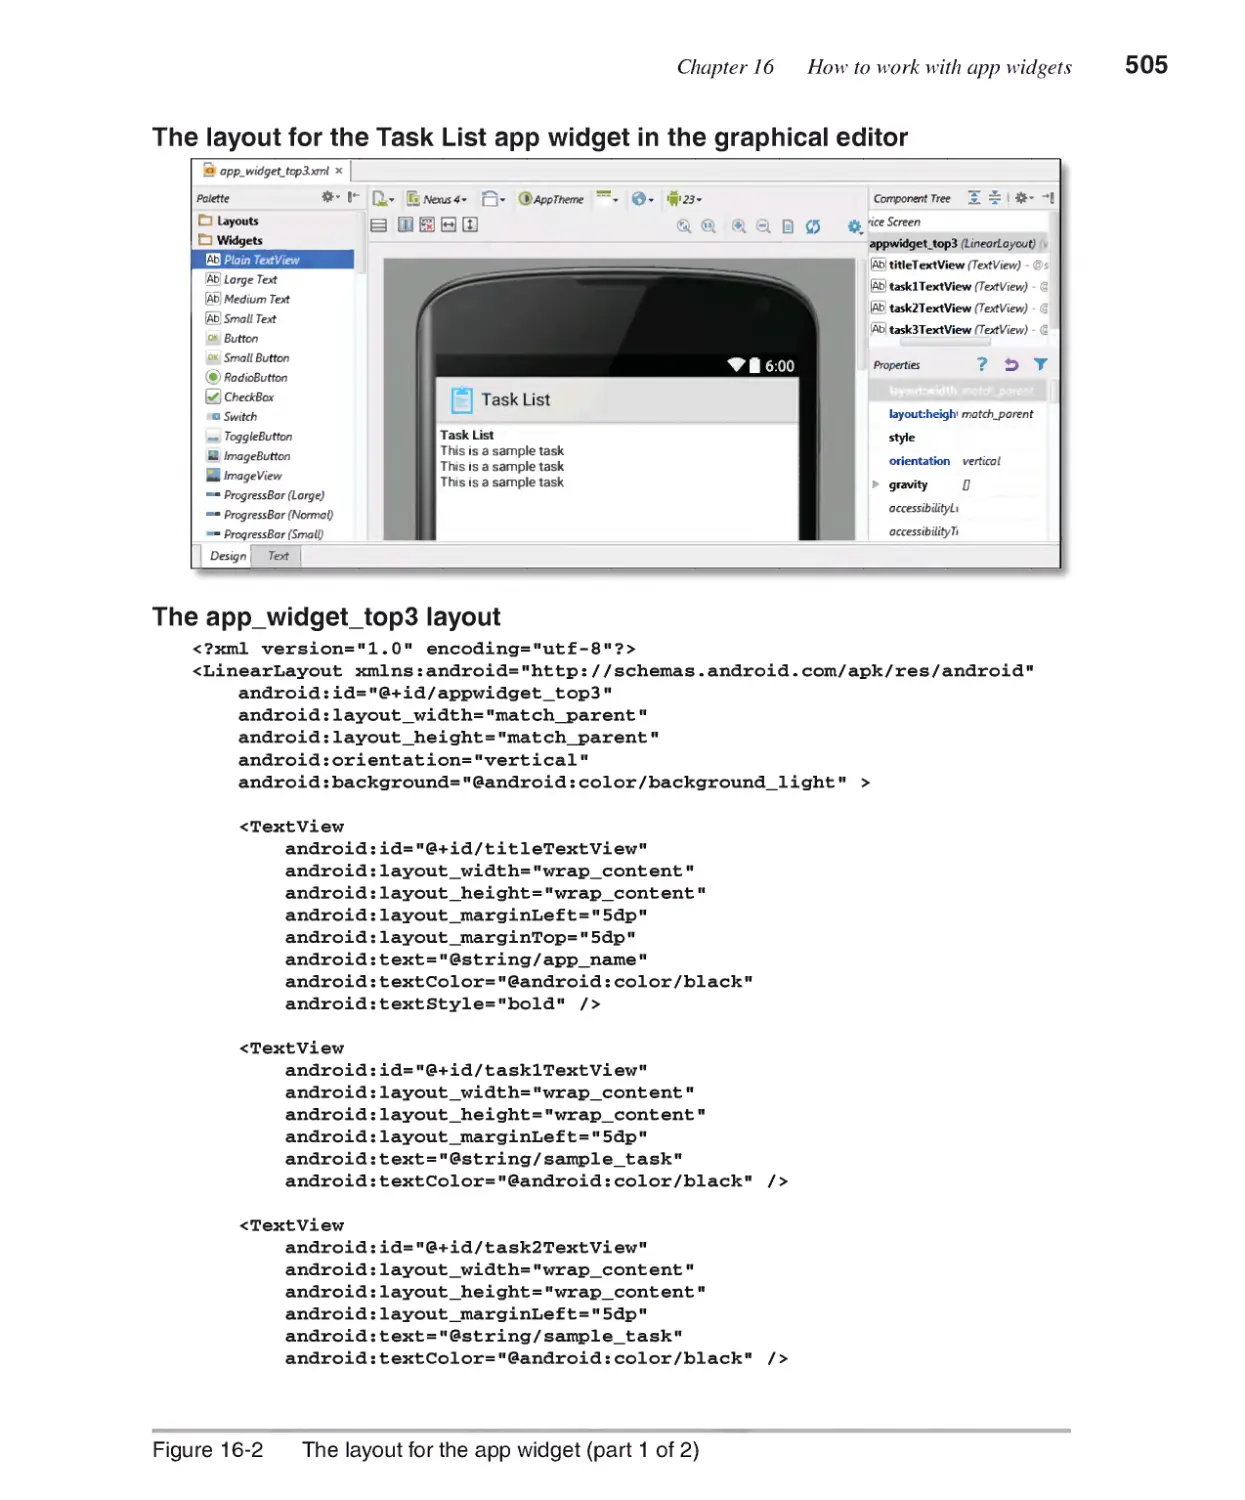
How to create app widgets ............................................................504
How to create the layout 504
How to modify the database class 508
How to create the provider class 510
How to configure an app widget 514
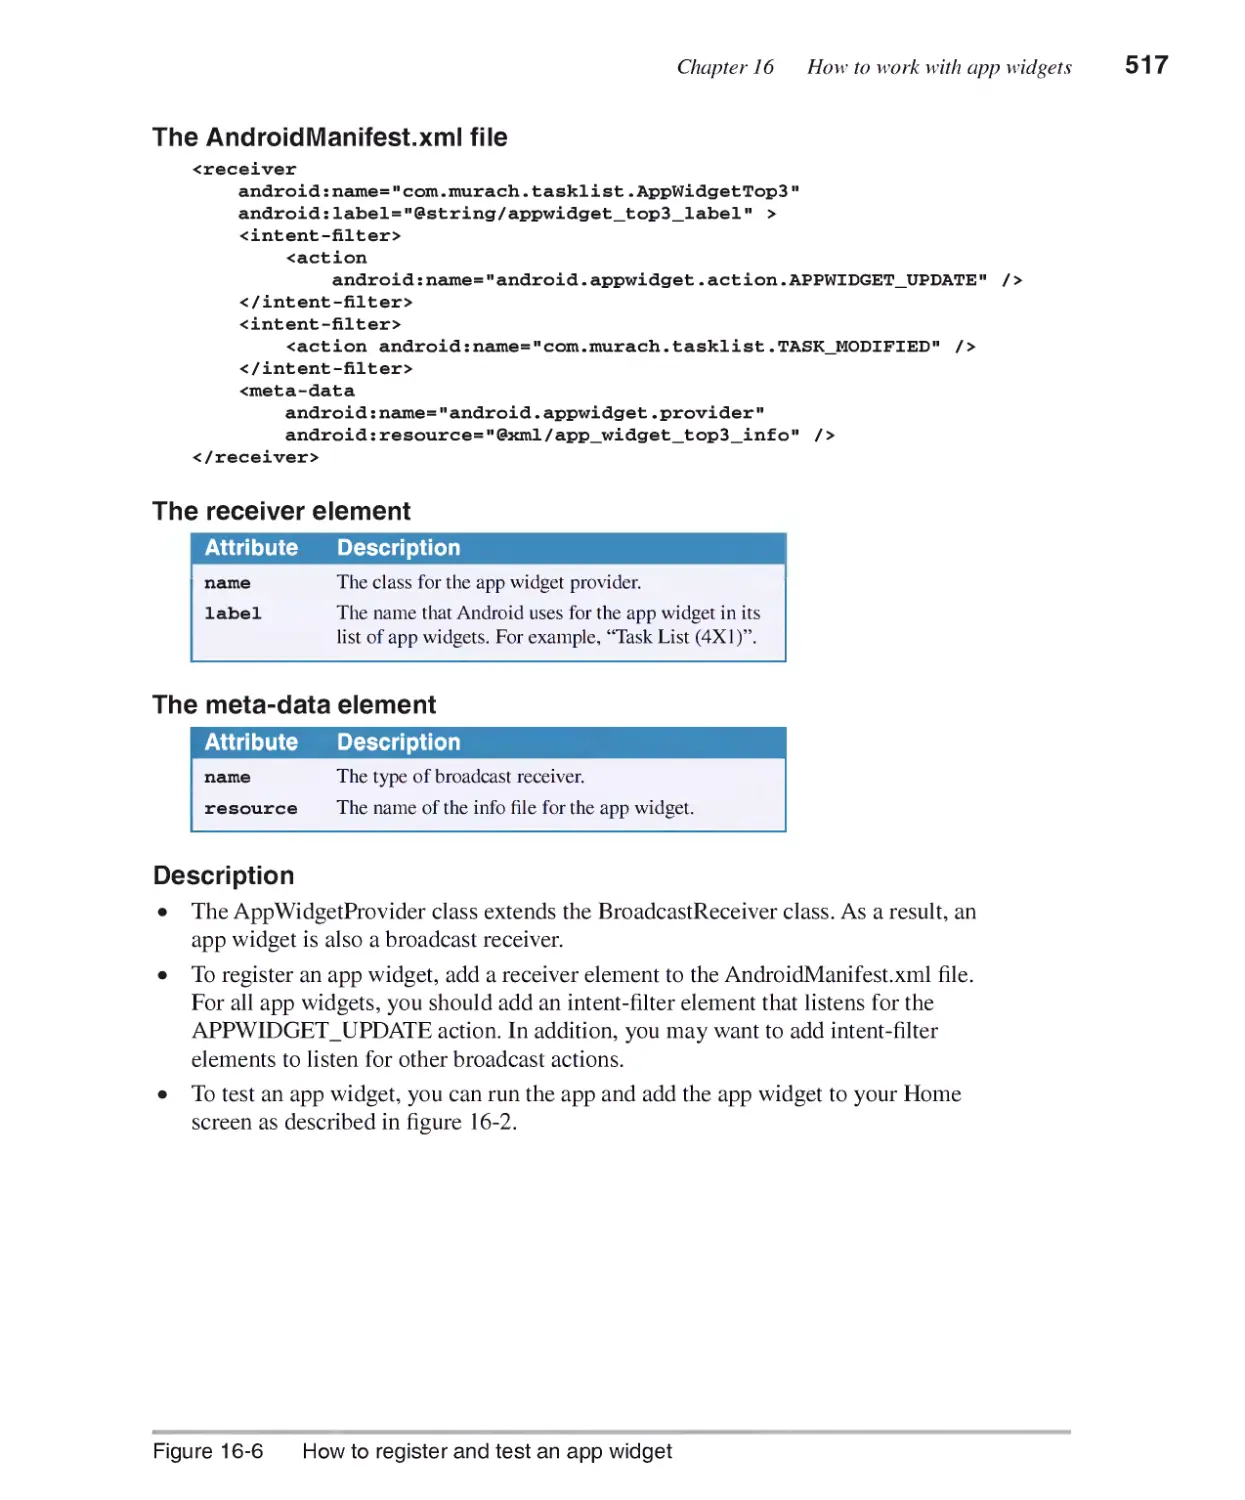
How to register an app widget 516
How to test an app widget 516
Section 5 Advanced Android skills
Chapter 17 How to deploy an app
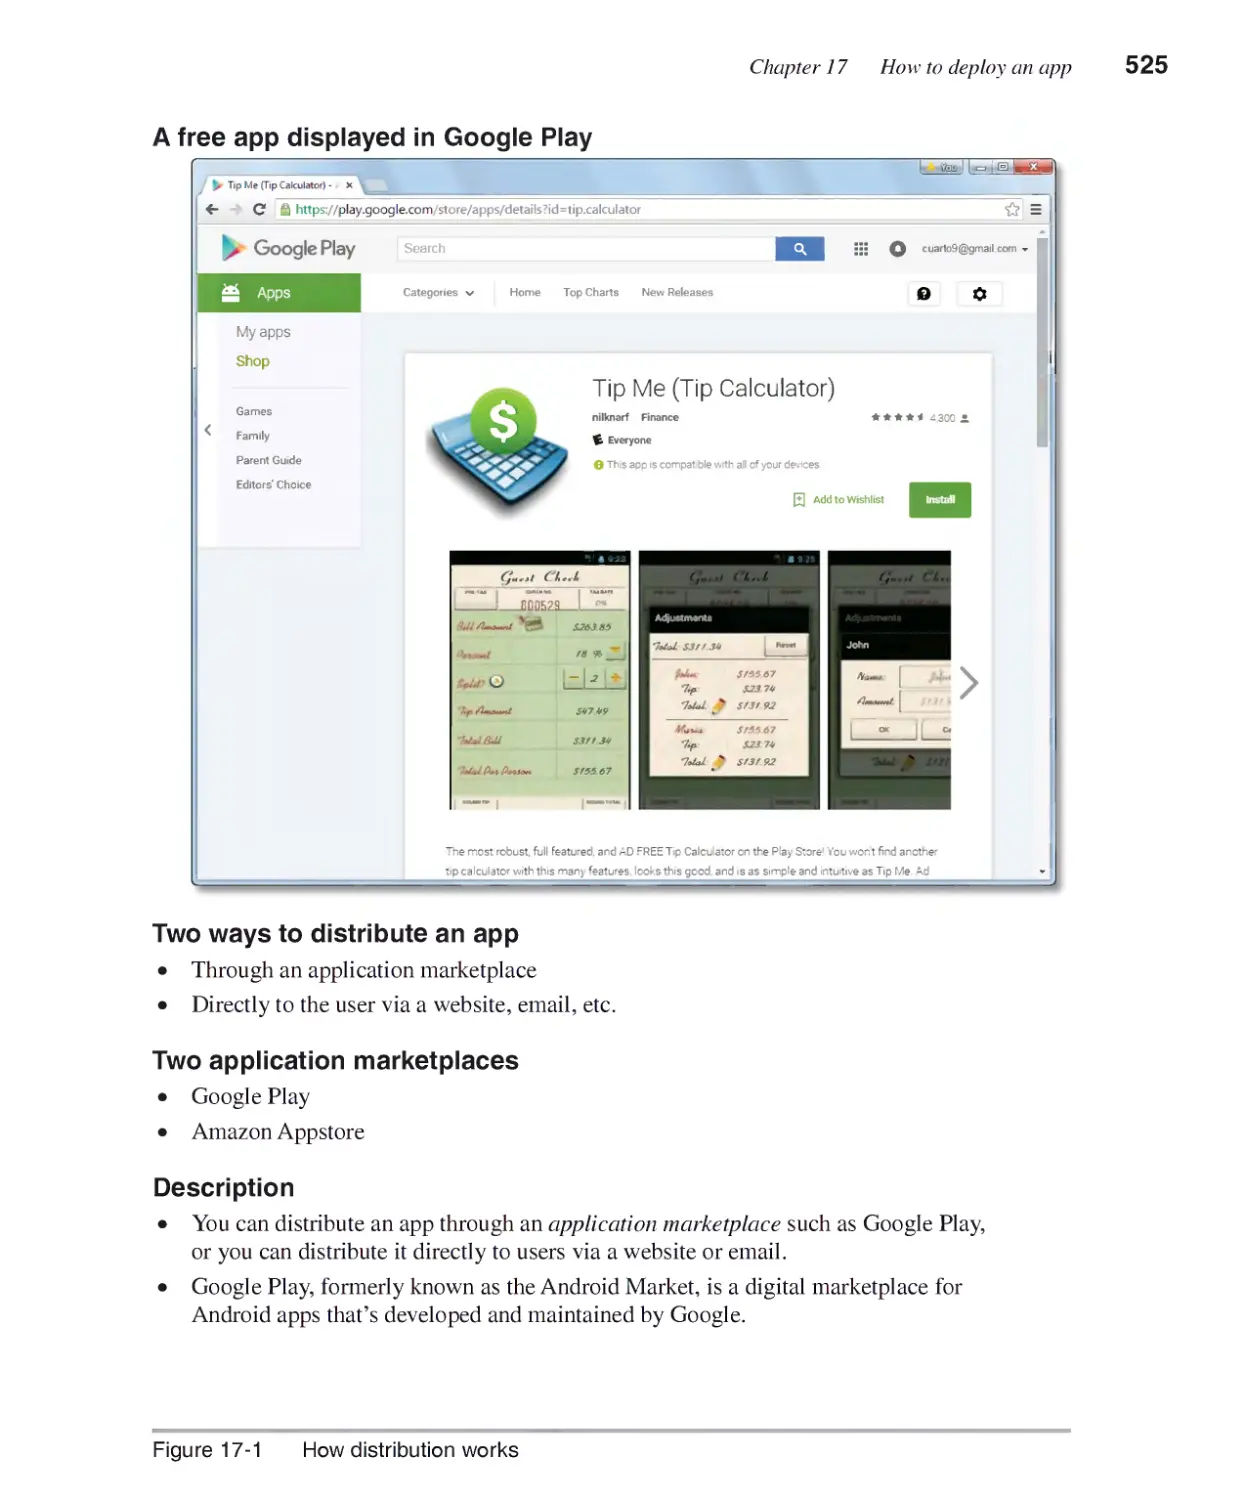
An introduction to distribution and monetization.......................524
How distribution works 524
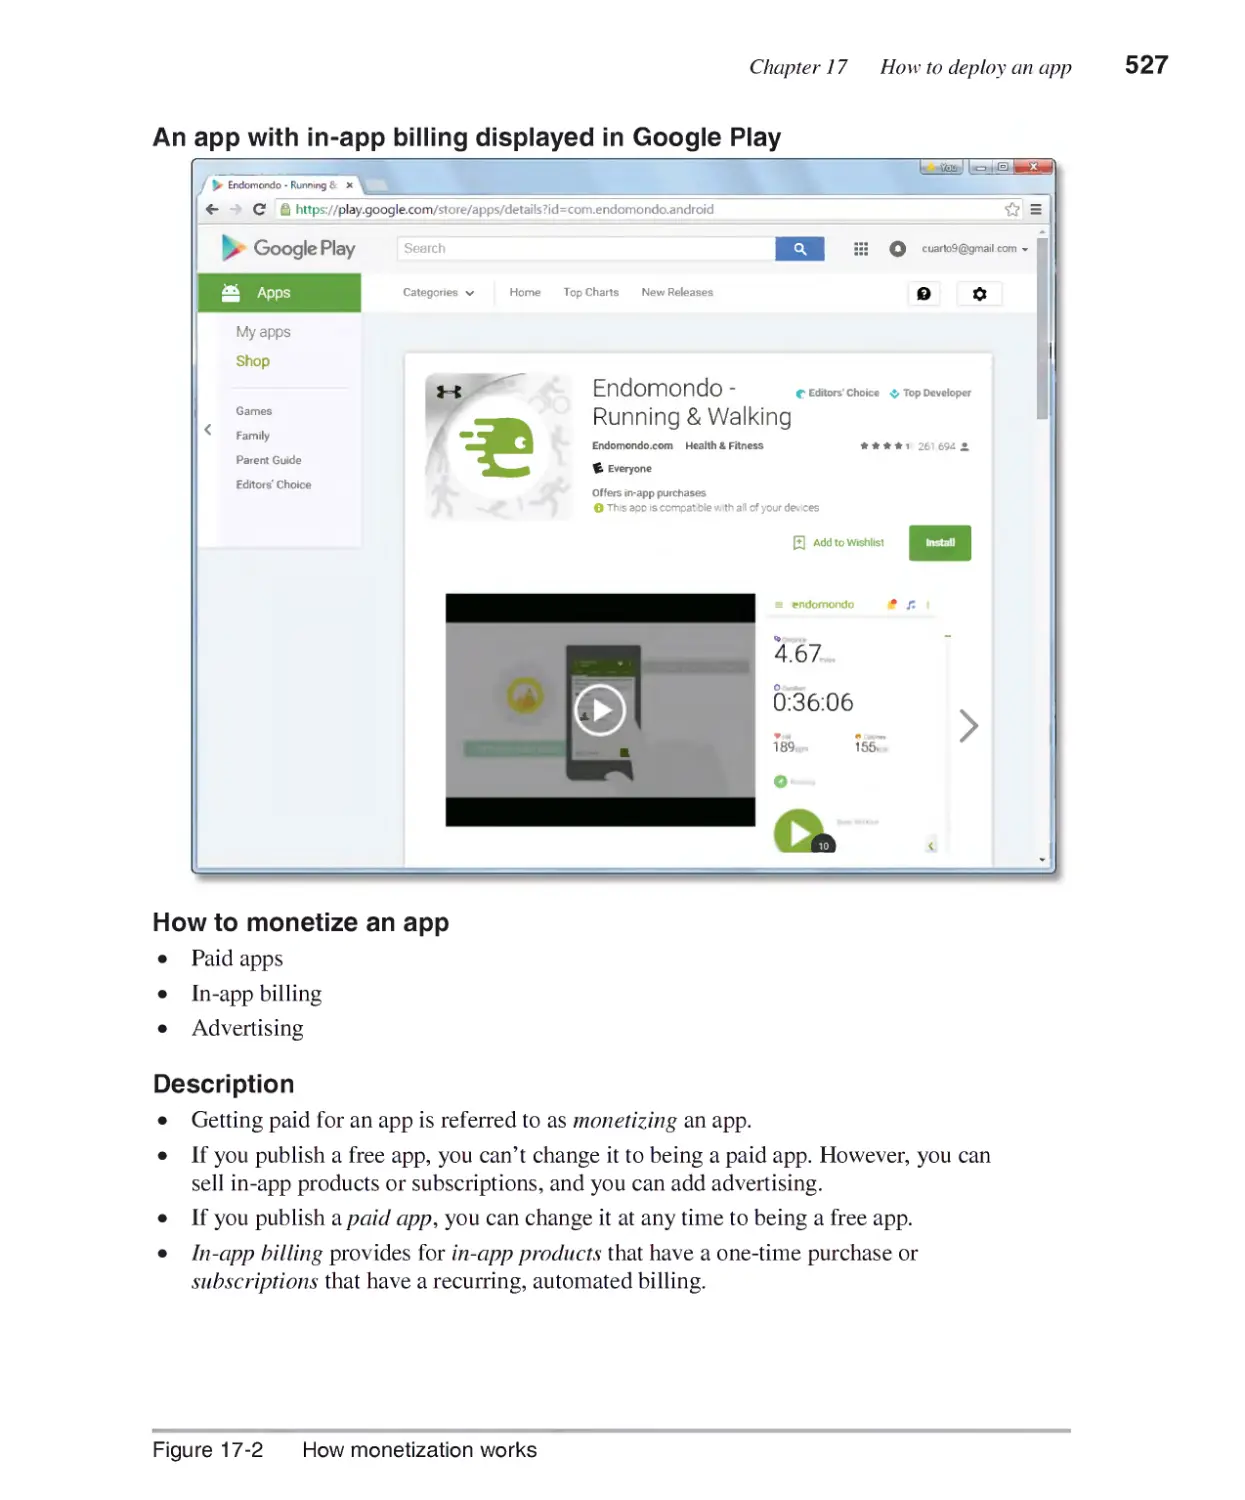
How monetization works 526
How to create a release build ........................................................528
How to prepare an app for release 528
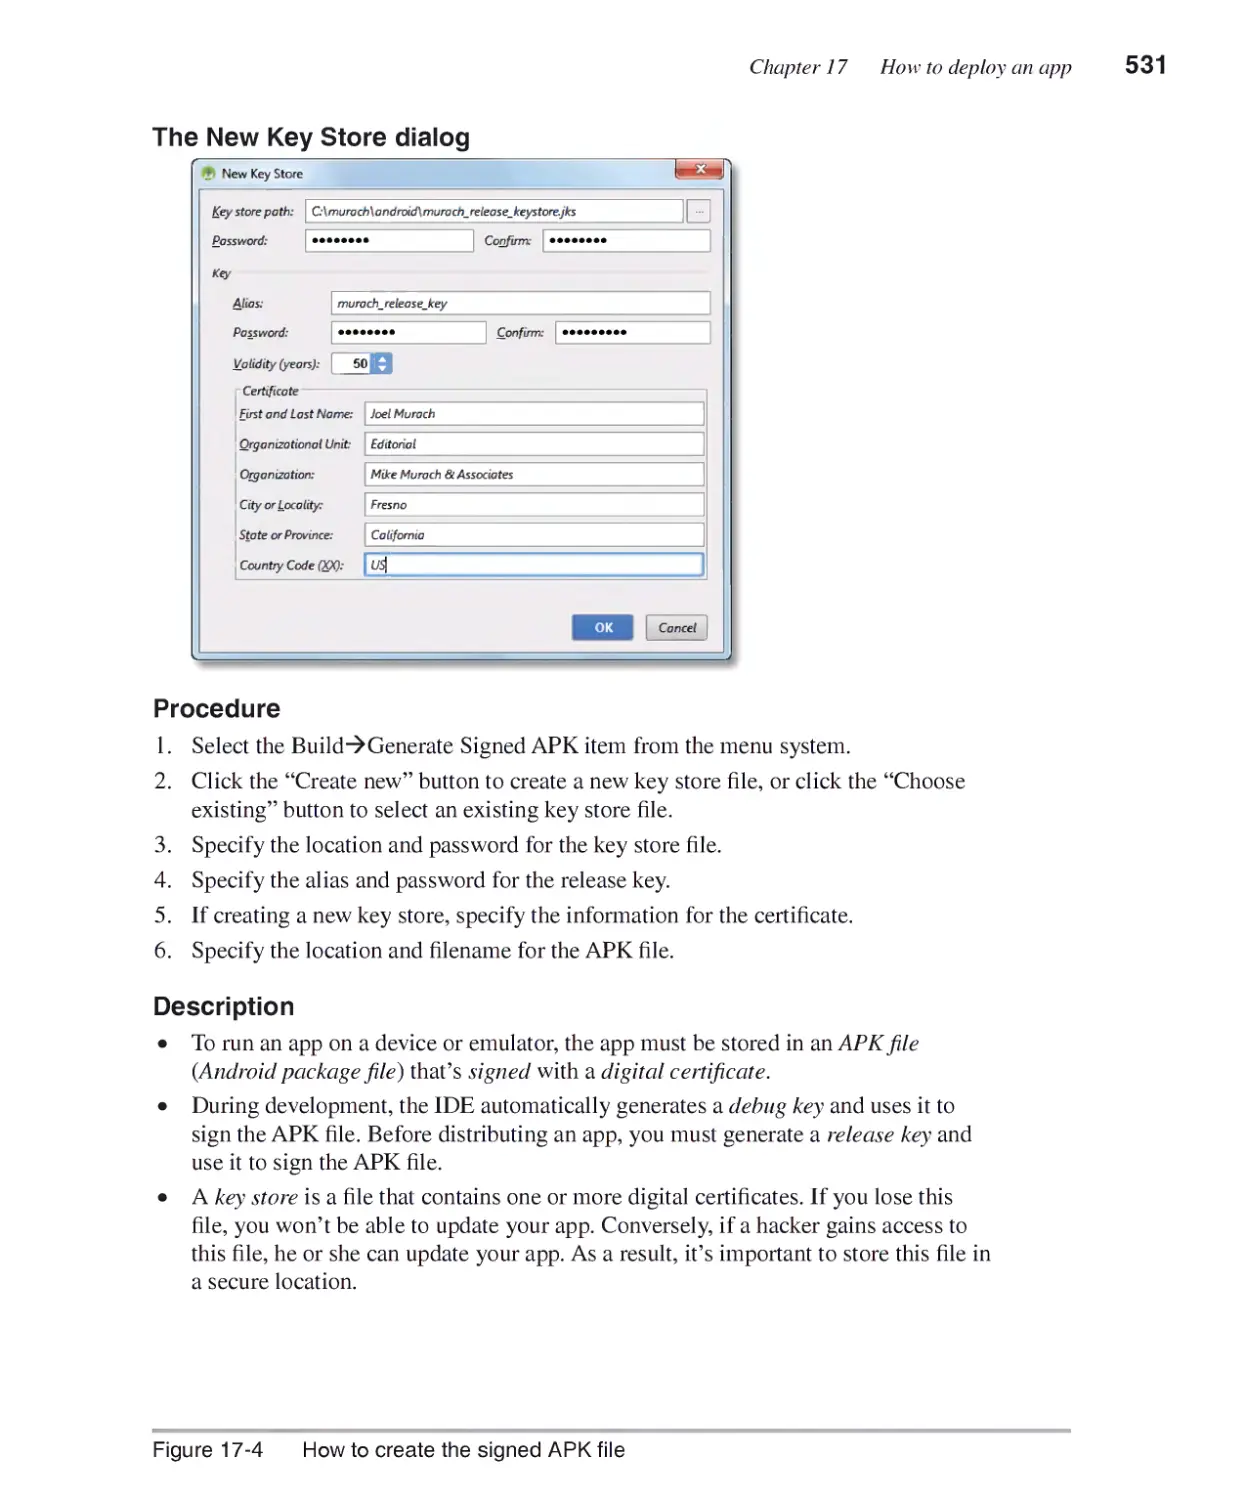
How to create the signed APK file 530
How to distribute directly to the user ...........................................532
How to distribute via a website 532
How distribute via email 532
How to publish on Google Play.....................................................534
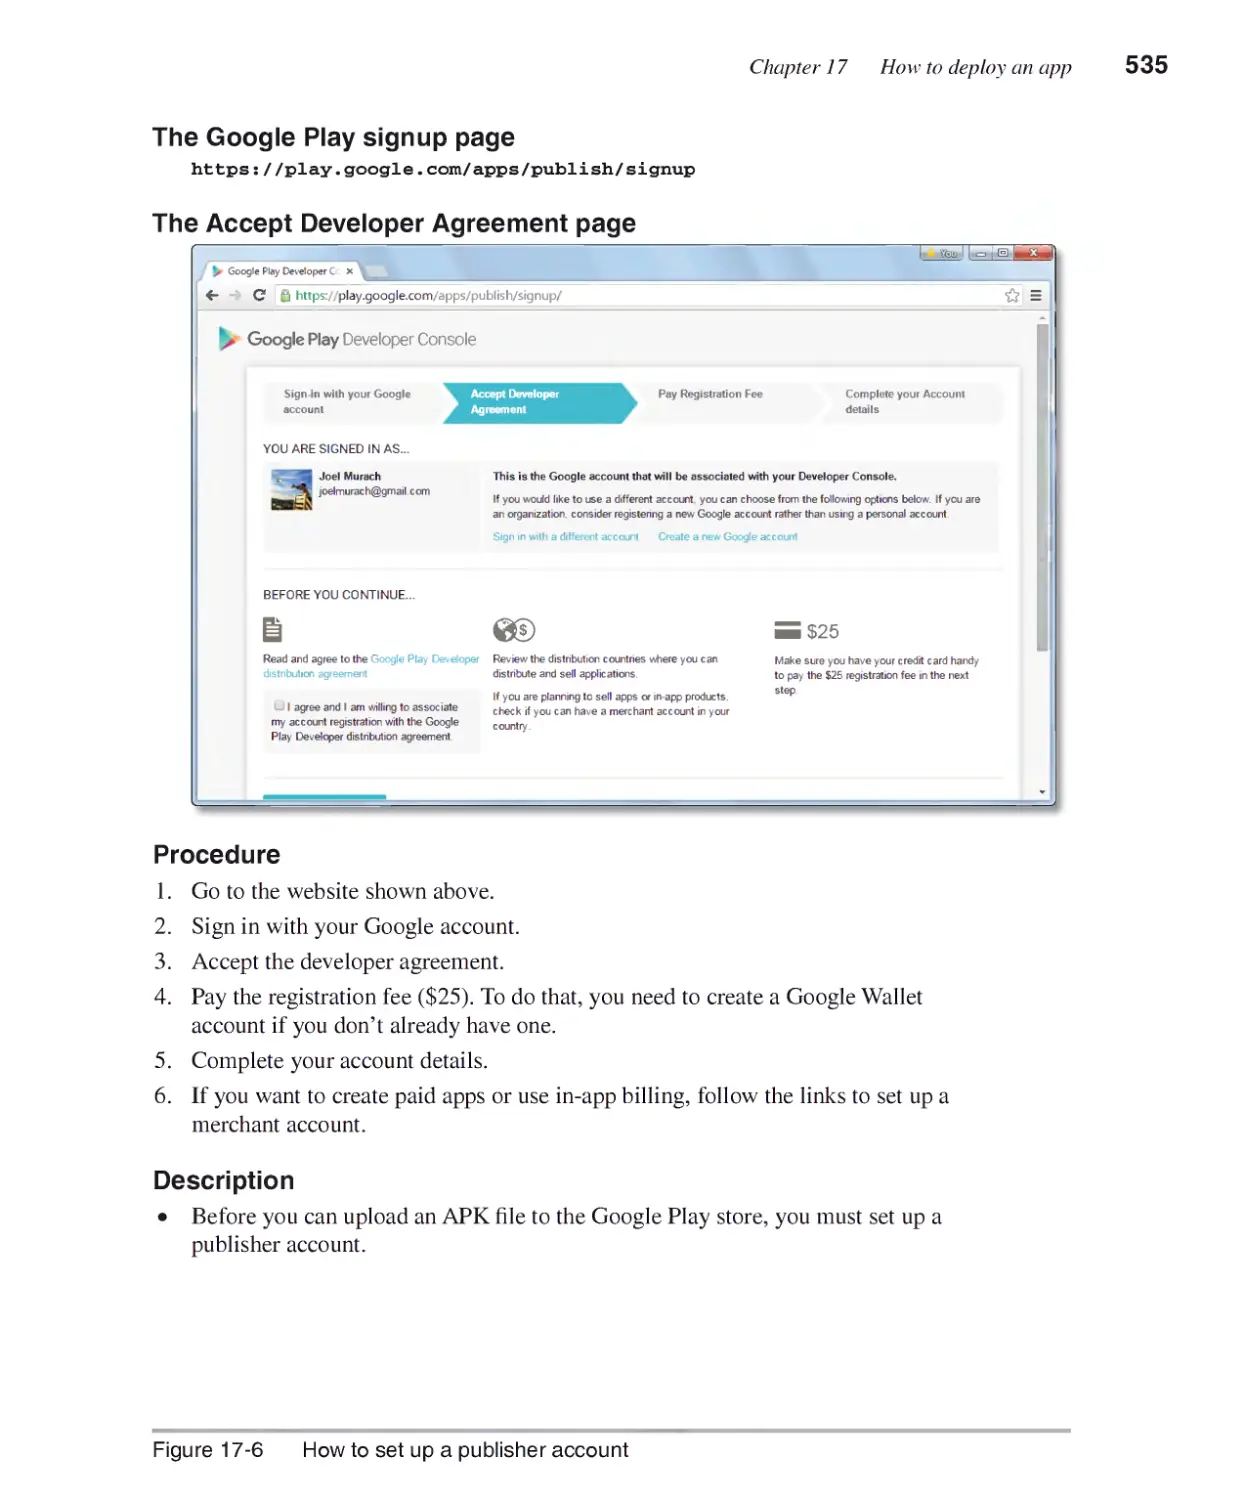
How to set up a publisher account 534
How to use the Developer Console to publish an app 536
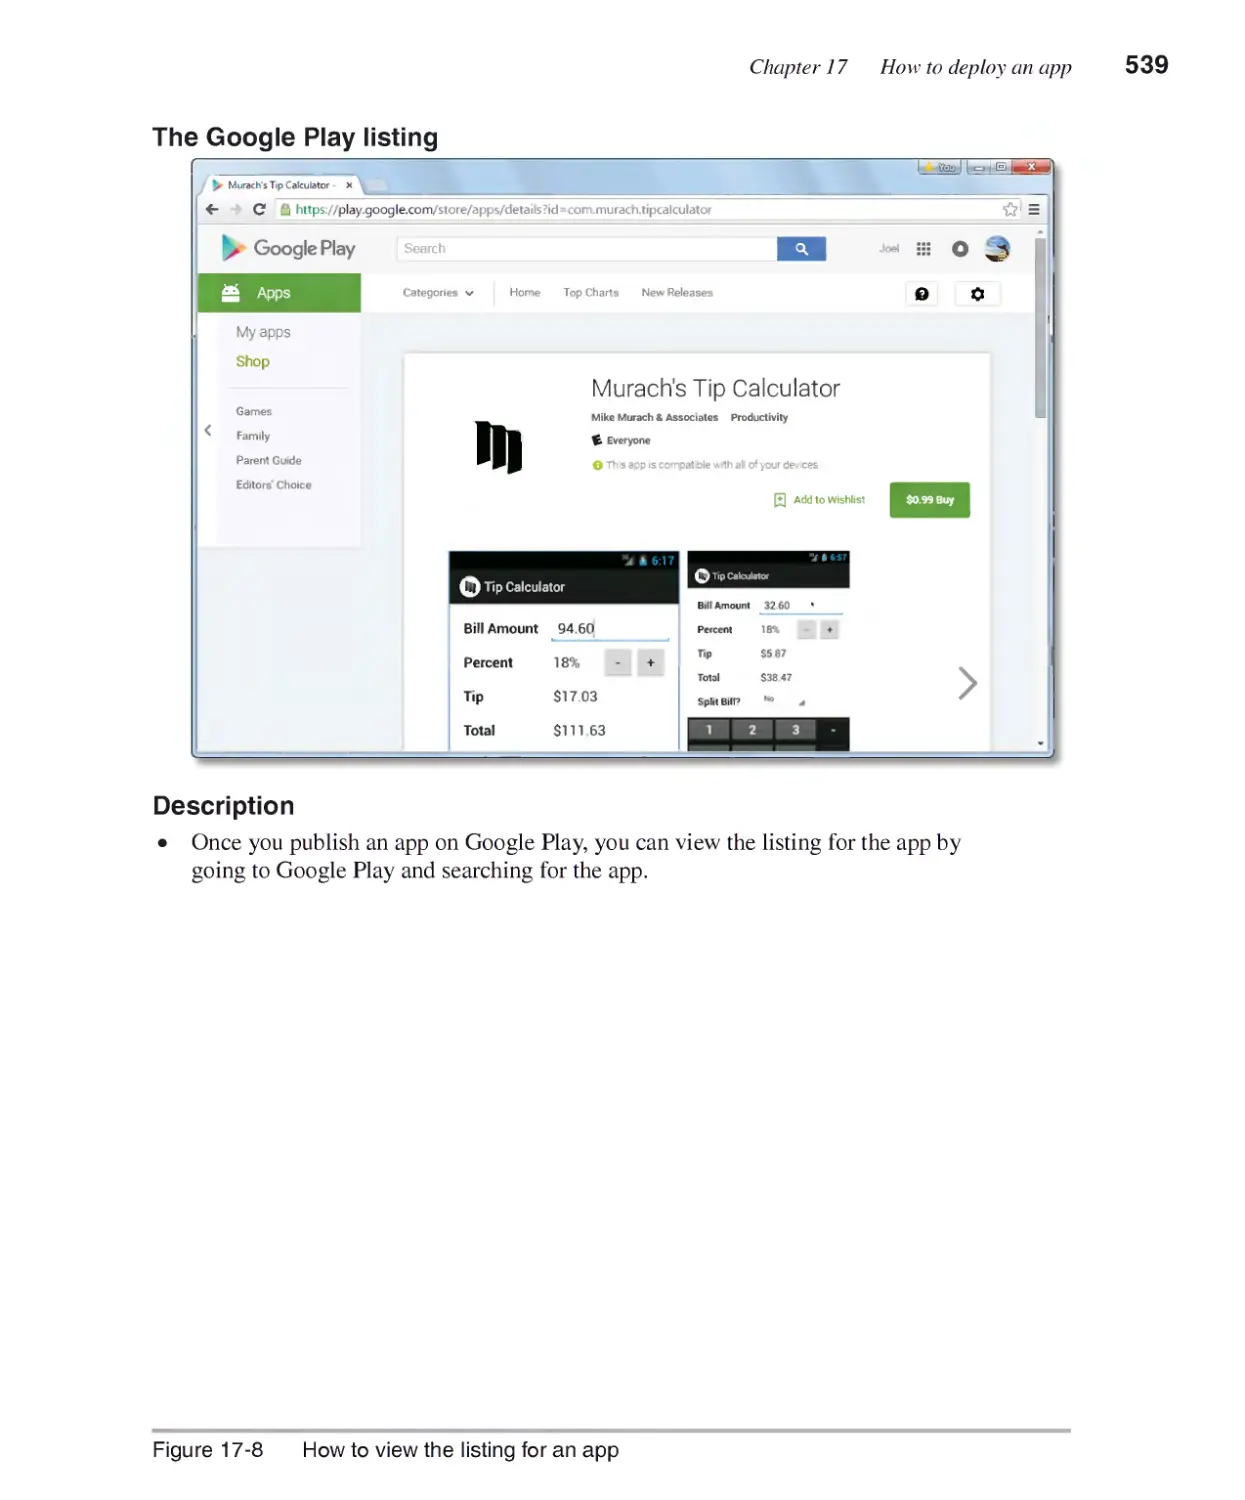
How to view the listing for an app 538
Chapter 18 How to work with locations and maps
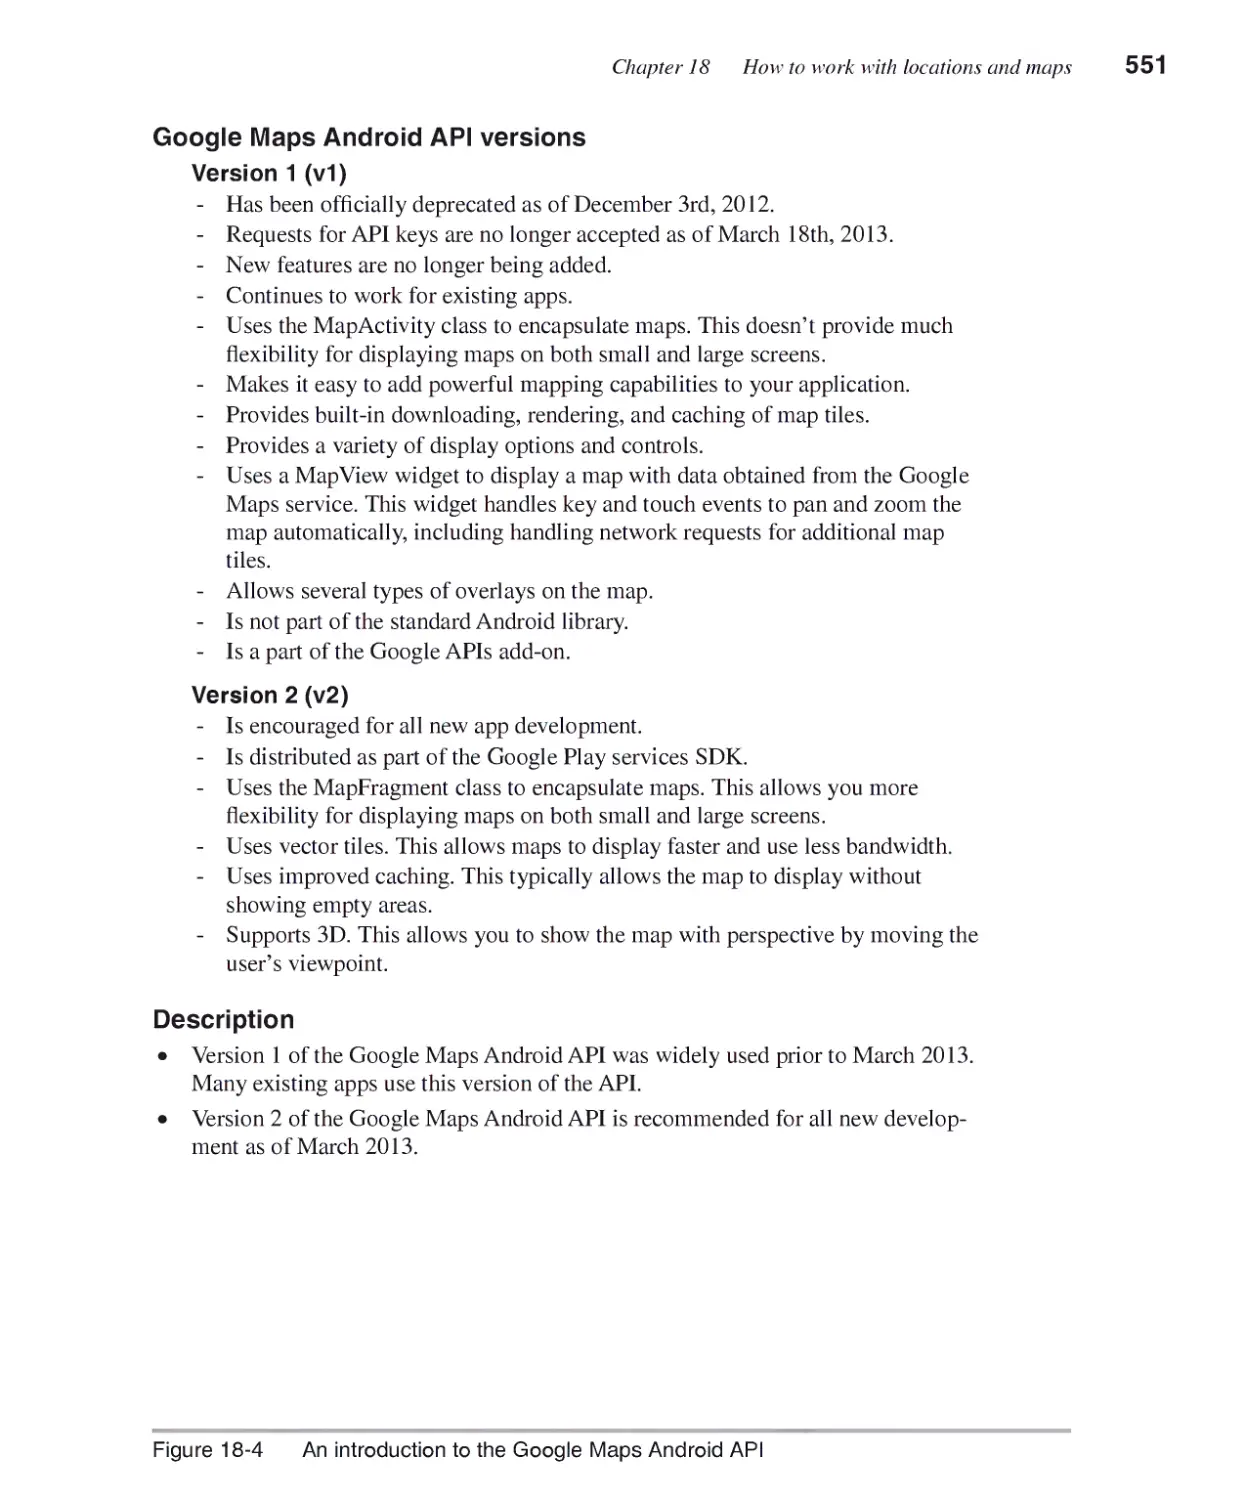
An introduction to locations and maps........................................544
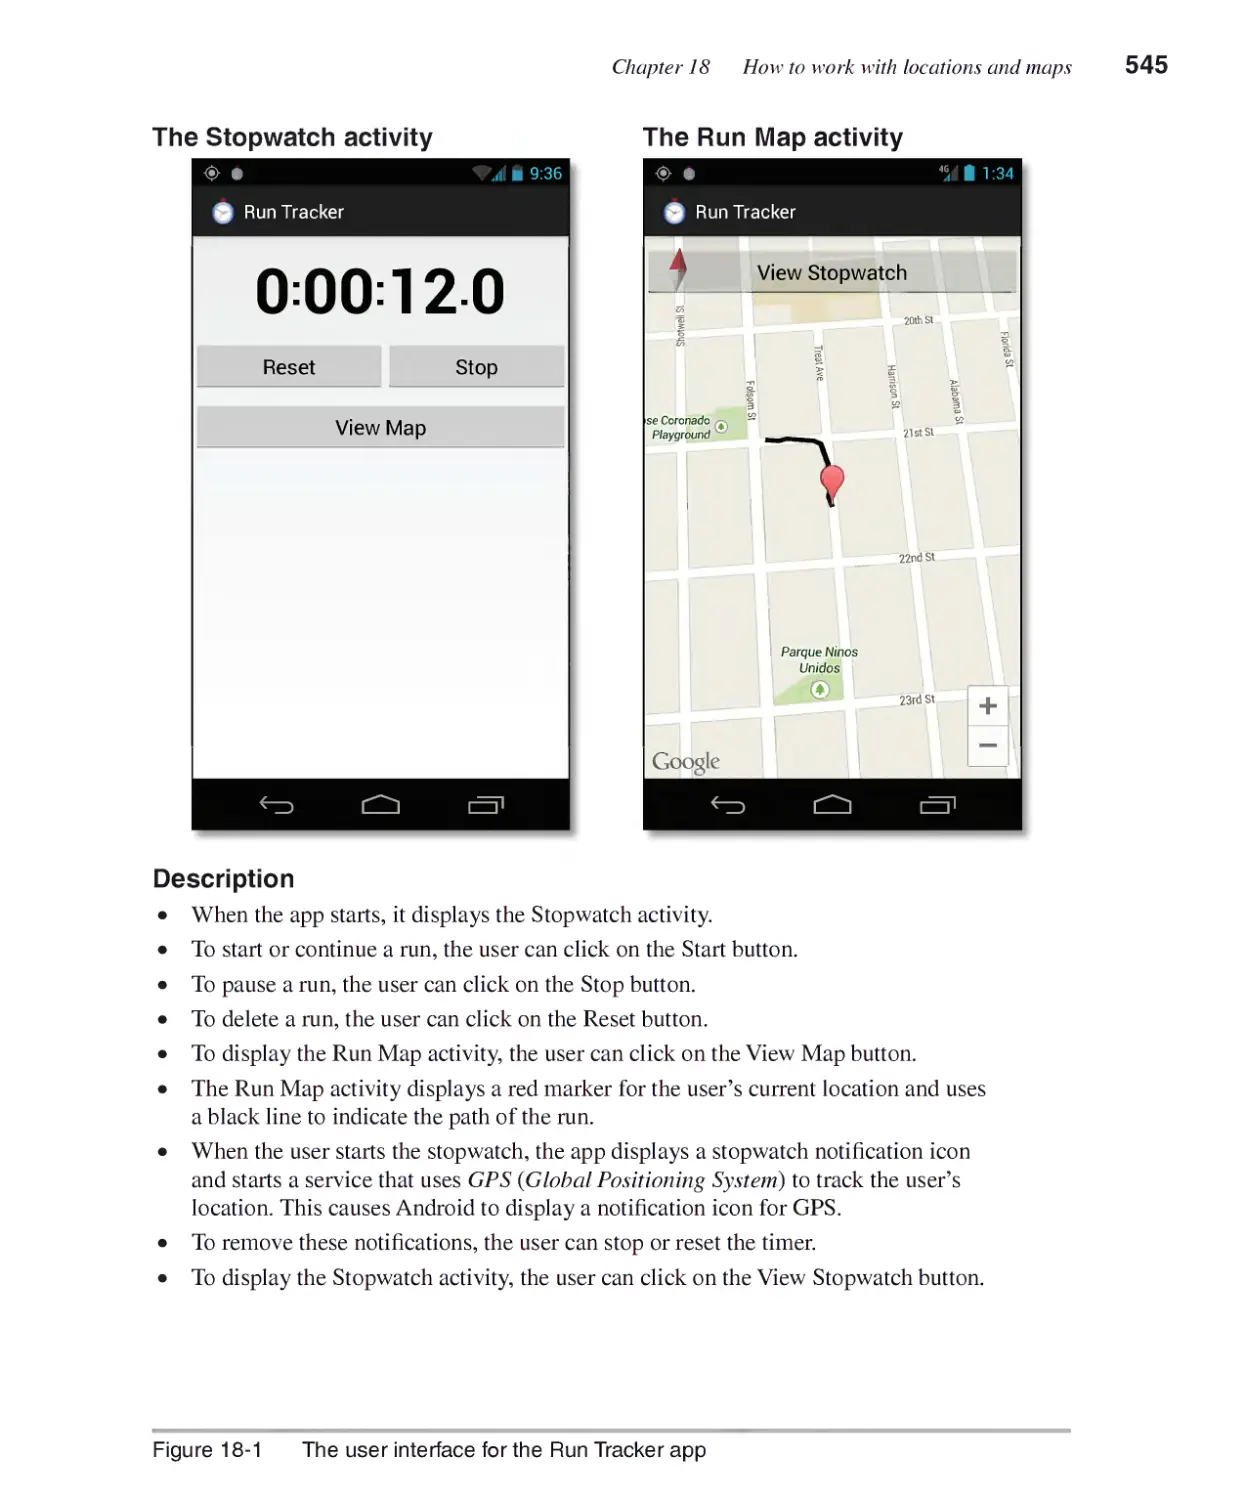
The user interface for the Run Tracker app 544
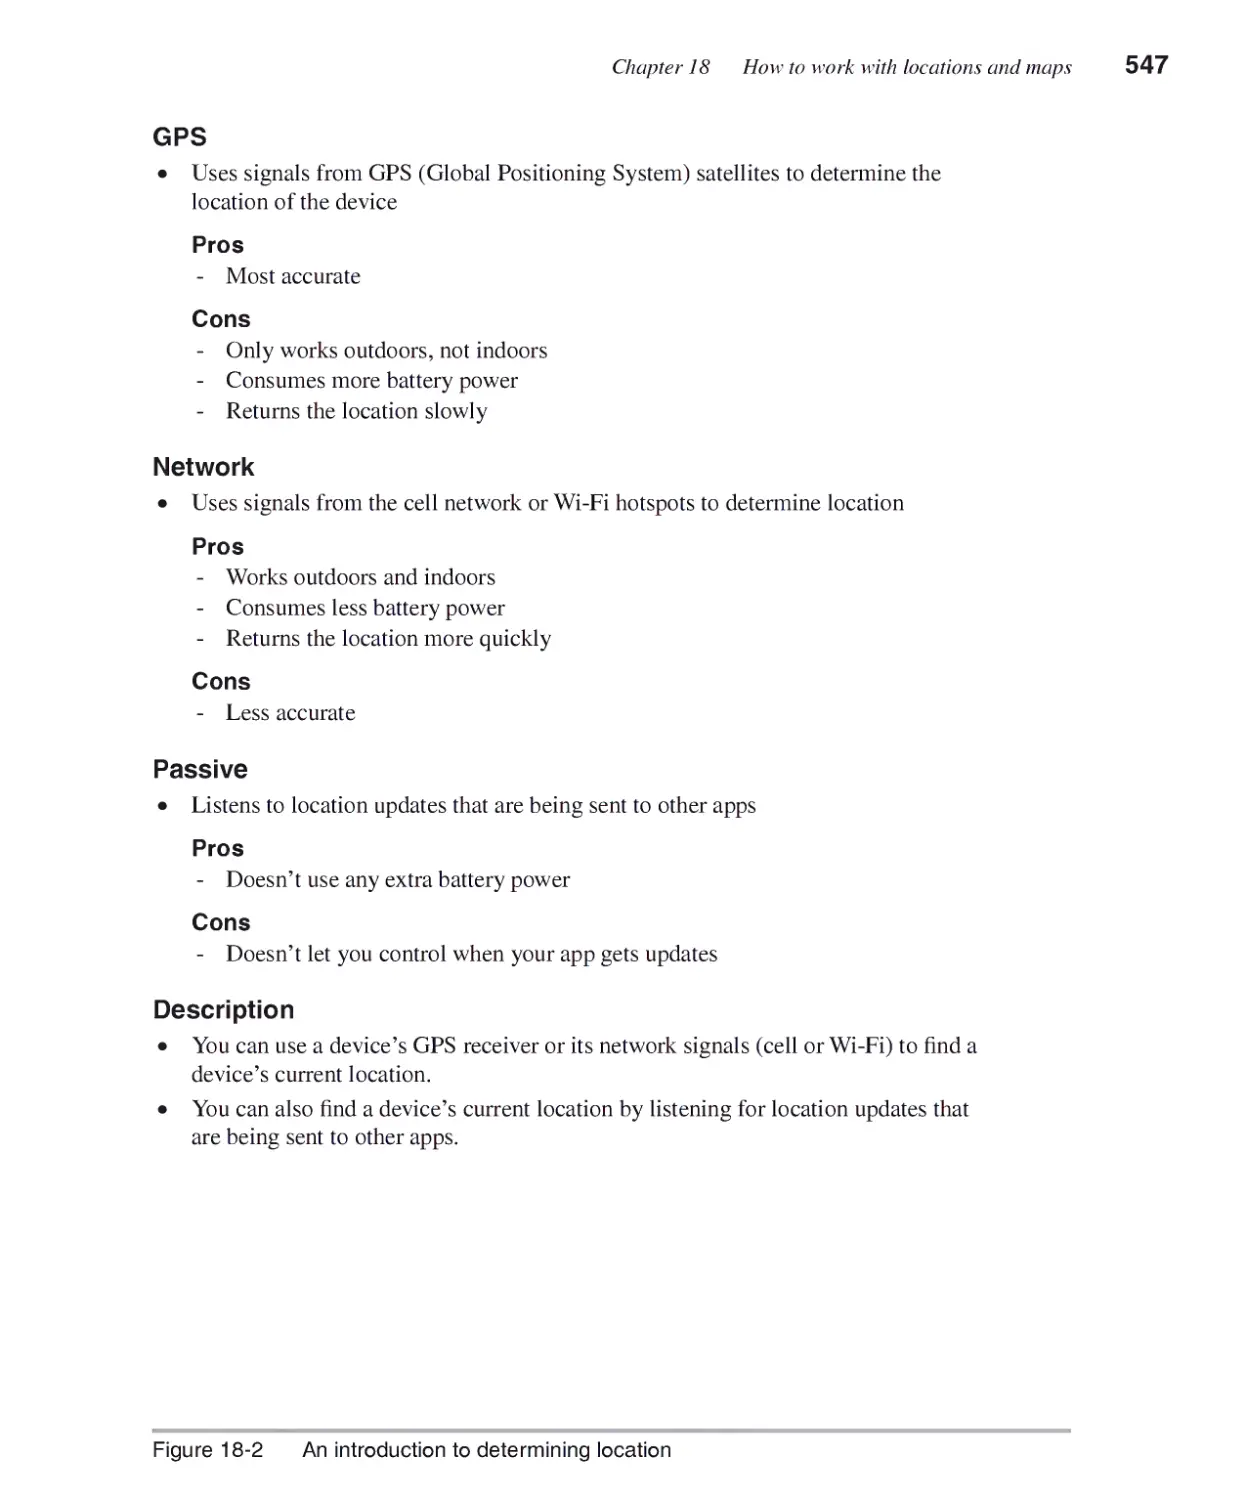
An introduction to determining location 546
An introduction to maps 548
An introduction to the Google Maps Android API 550
How to configure the Google Maps Android API v2 ...................552
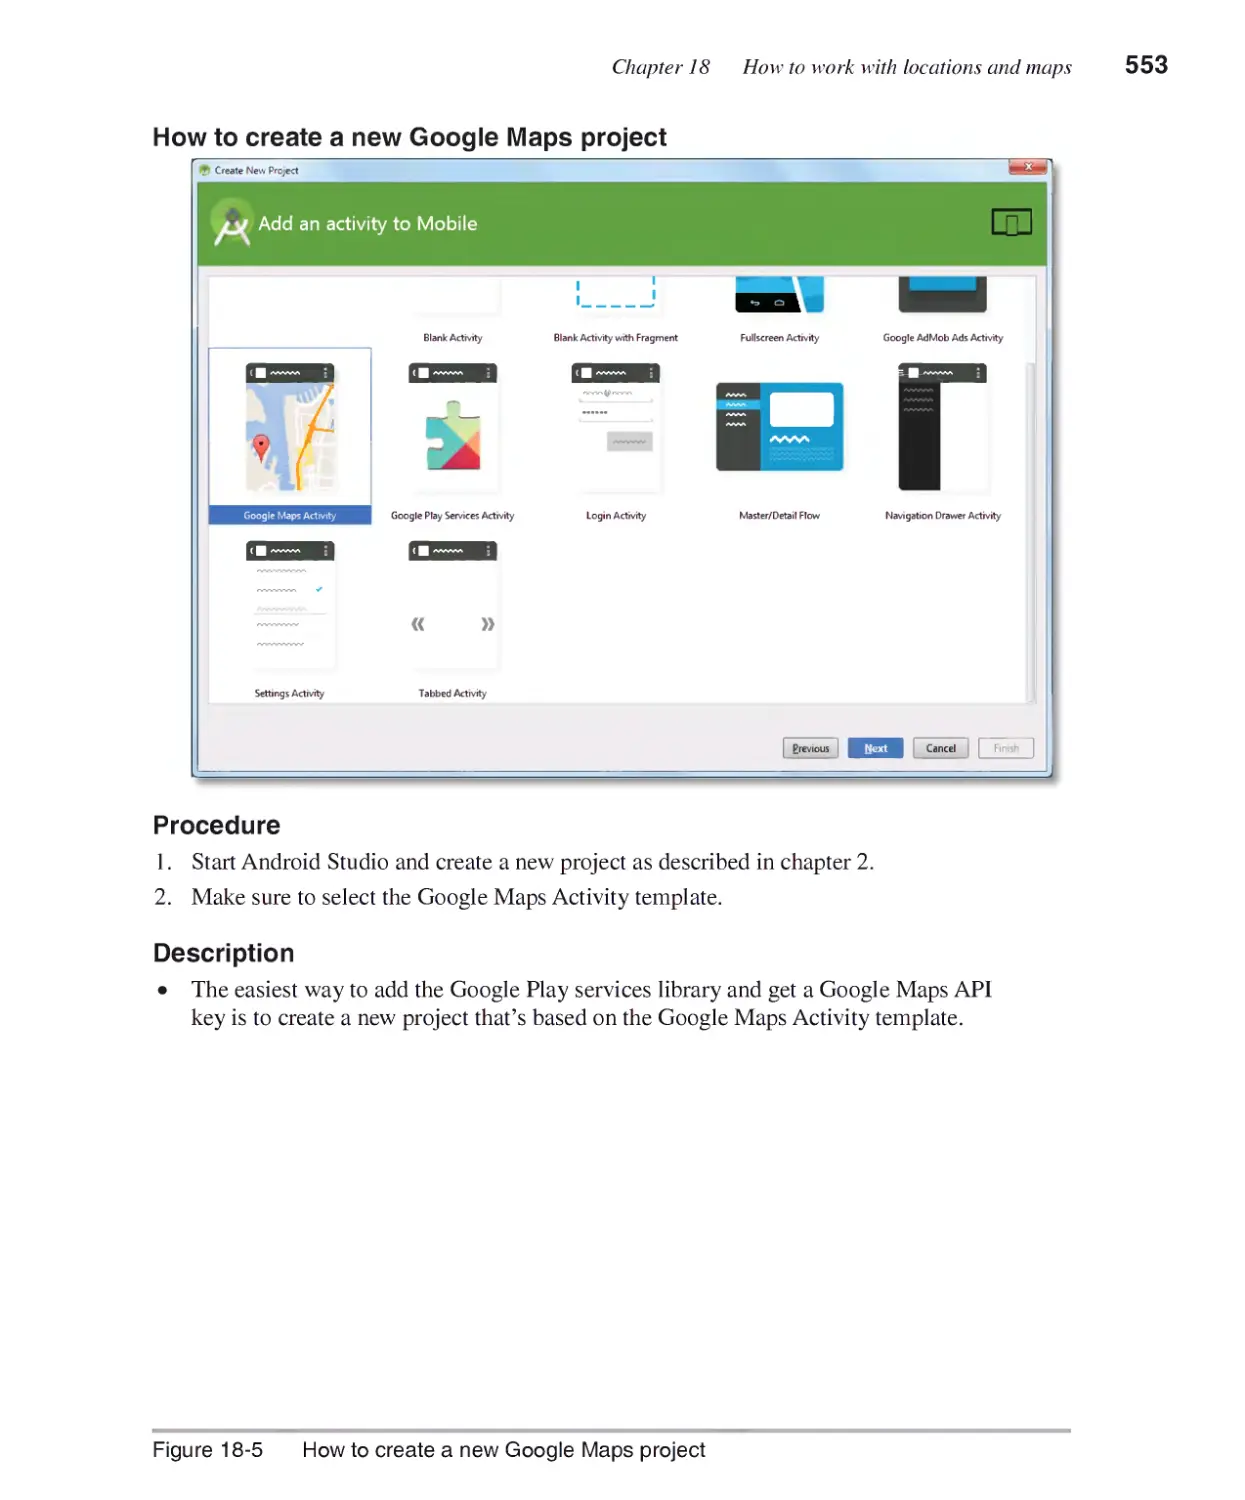
How to create a new Google Maps project 552
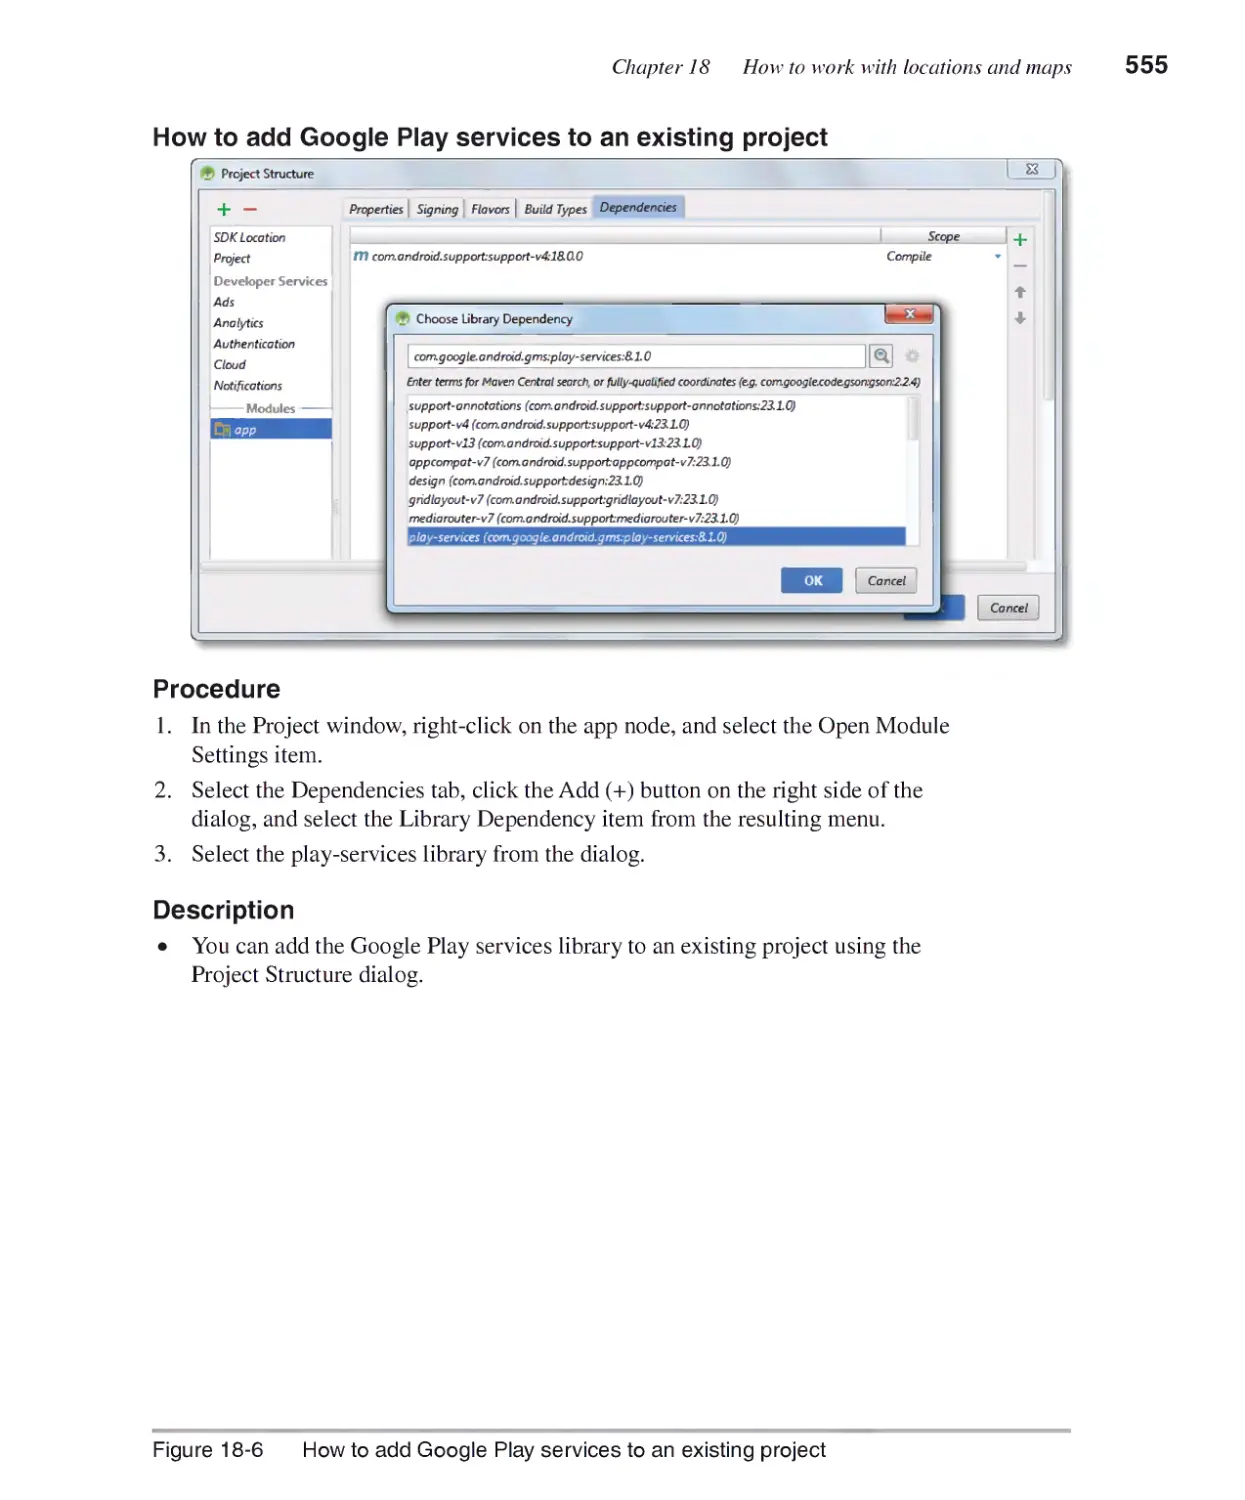
How to add Google Play services to an existing project 554
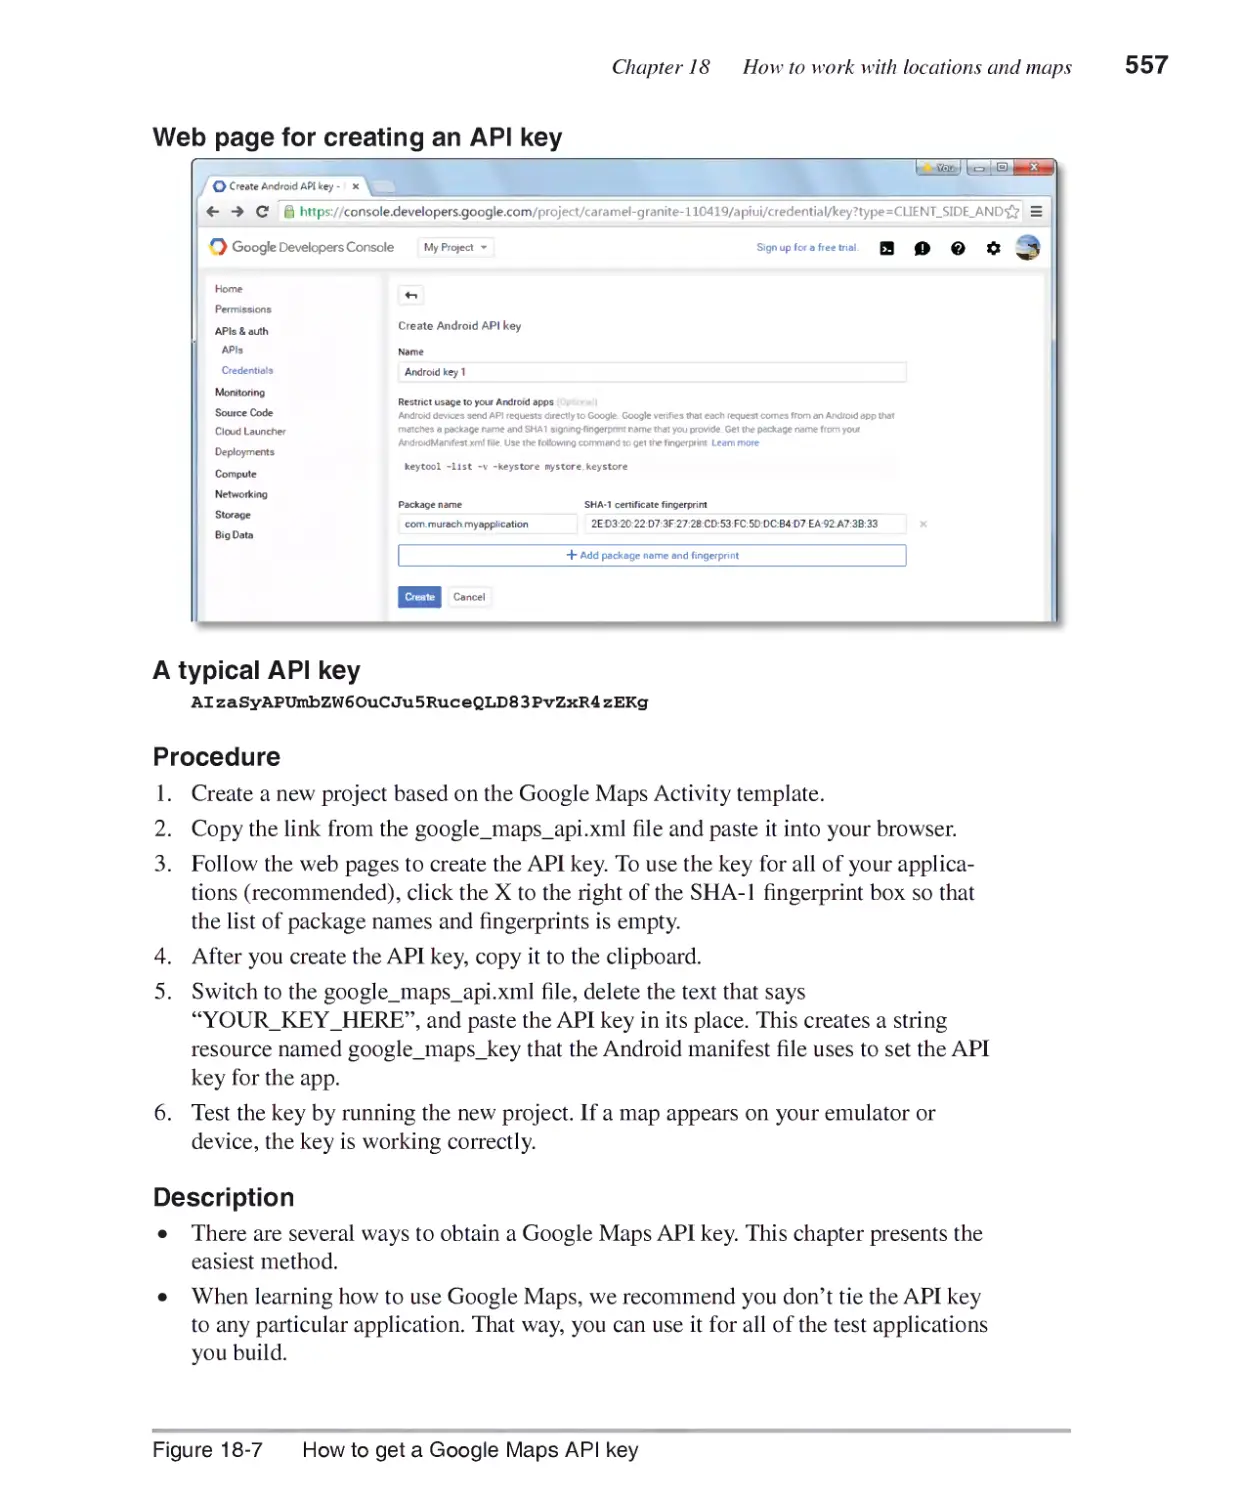
How to get a Google Maps API key 556
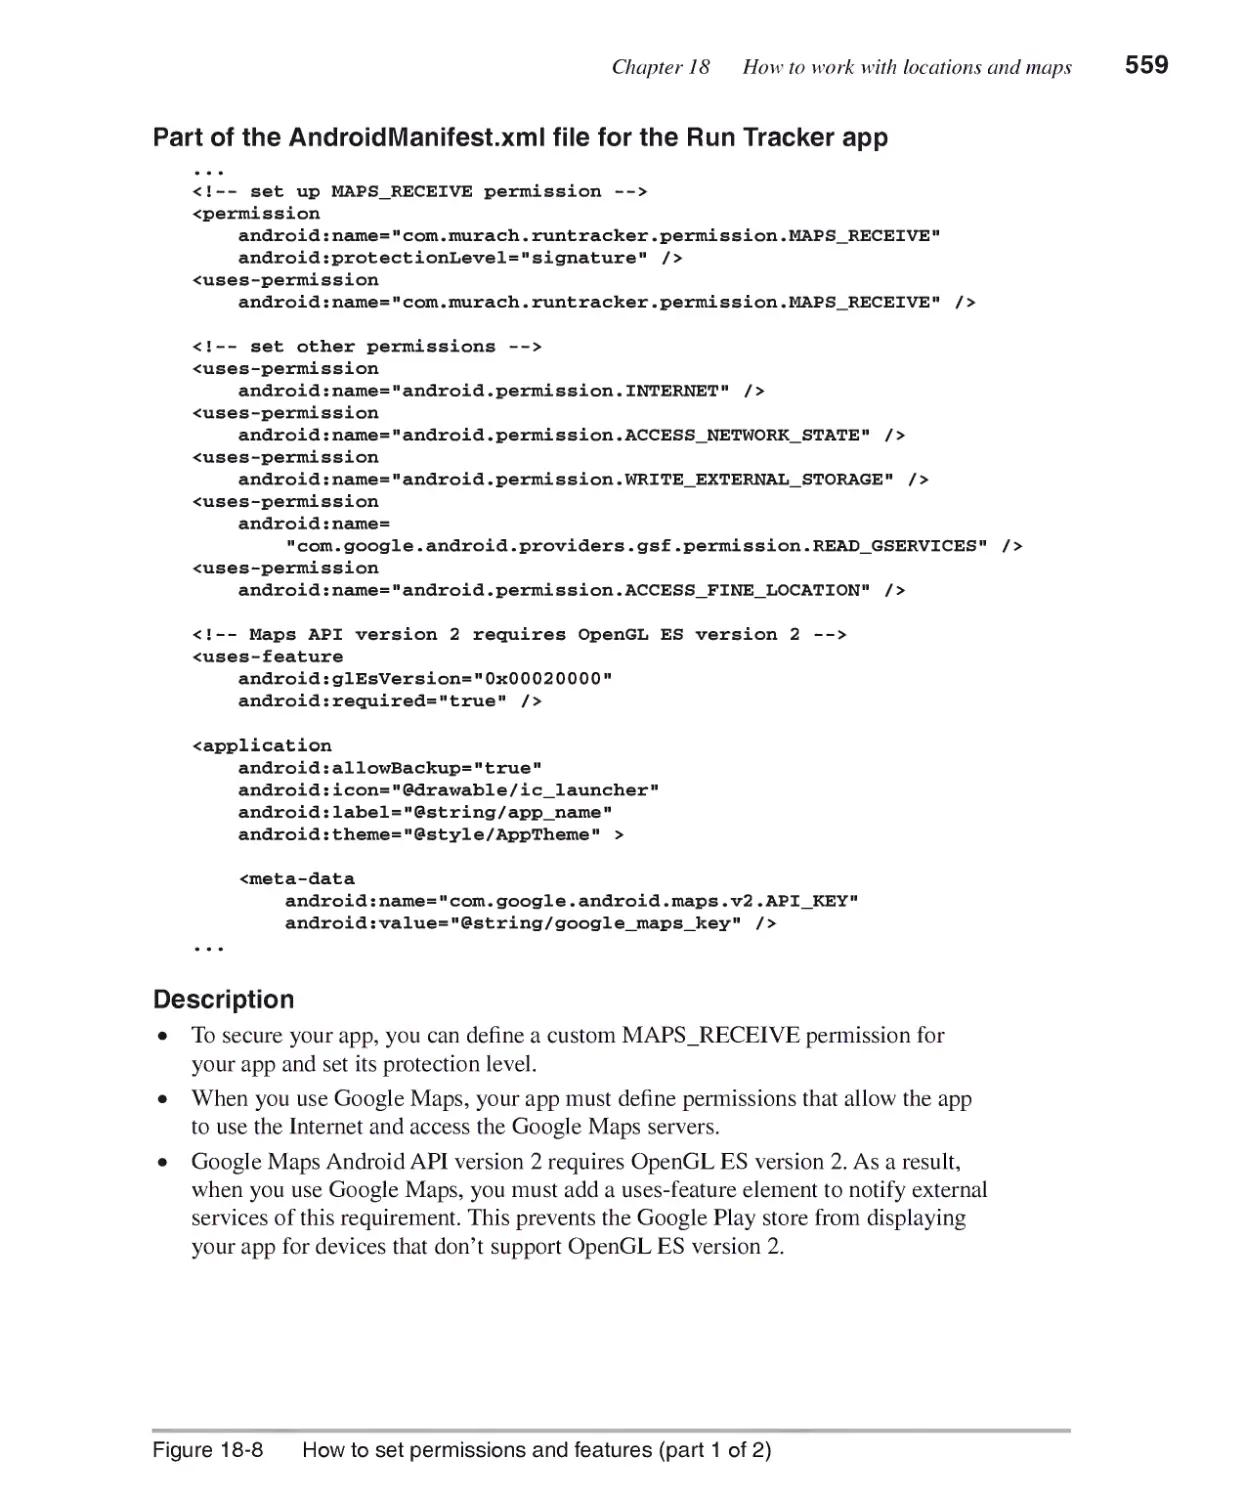
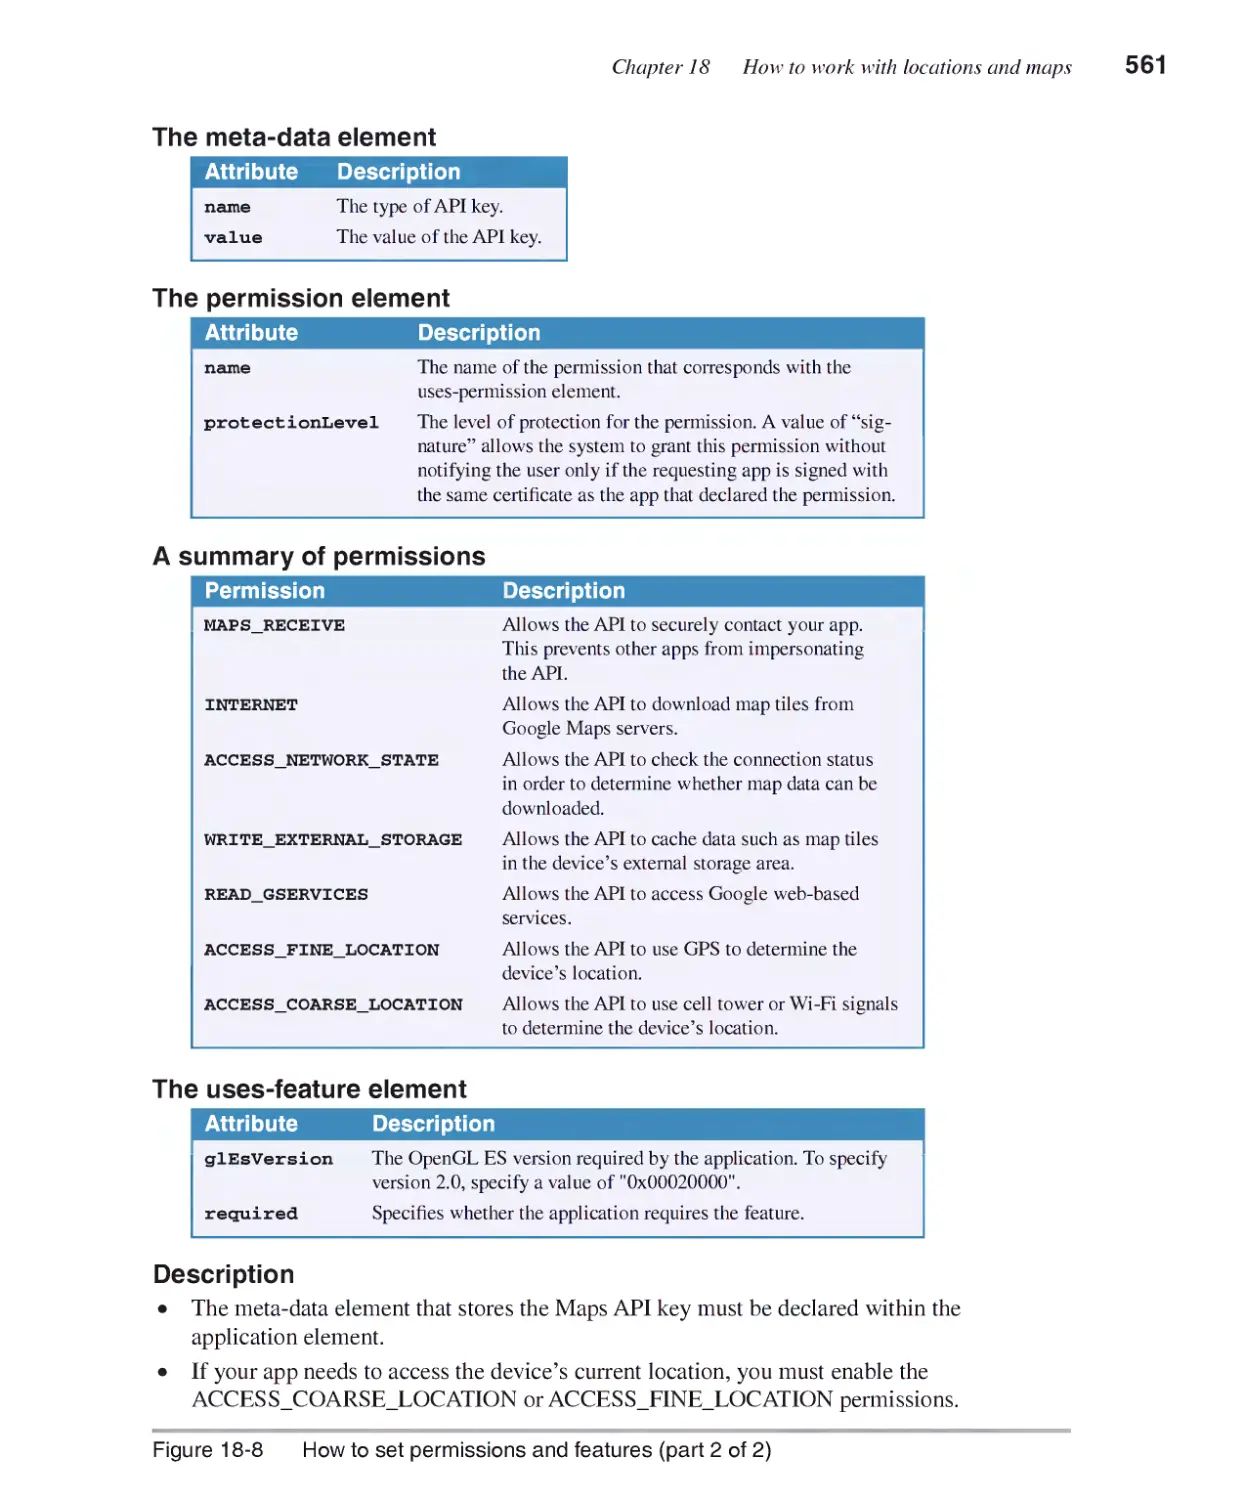
How to set permissions and features 558
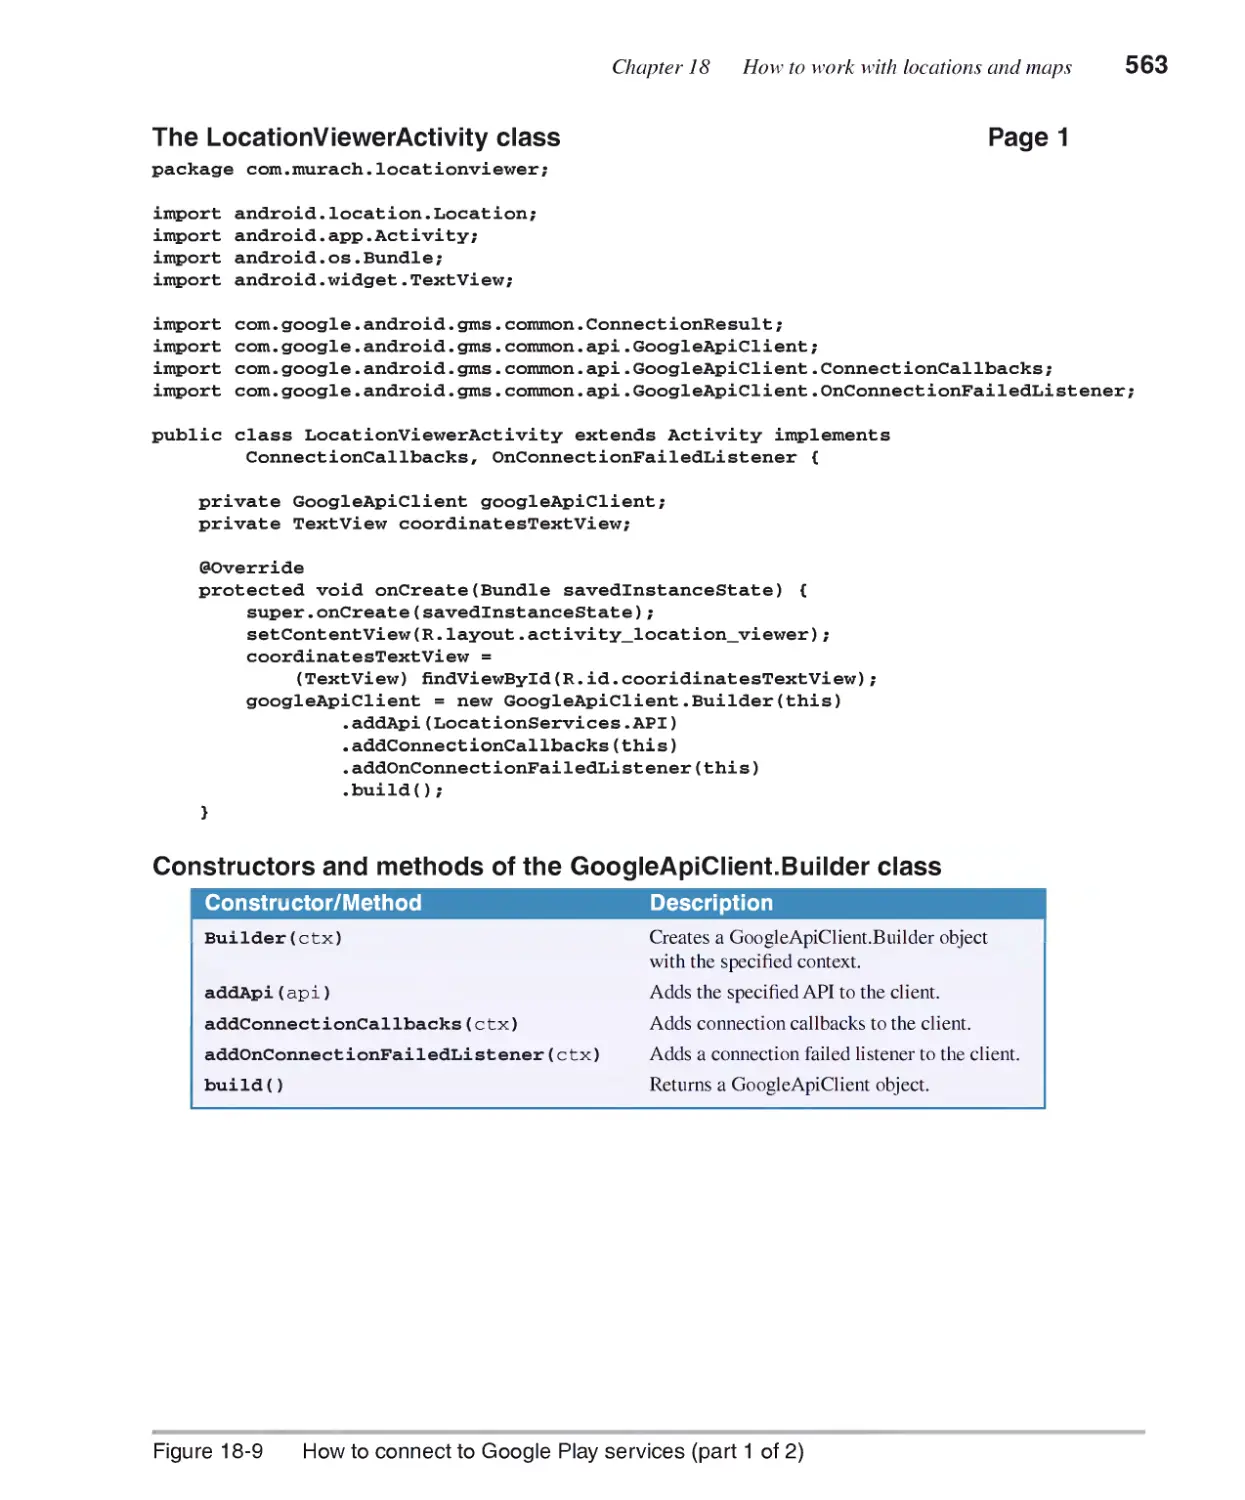
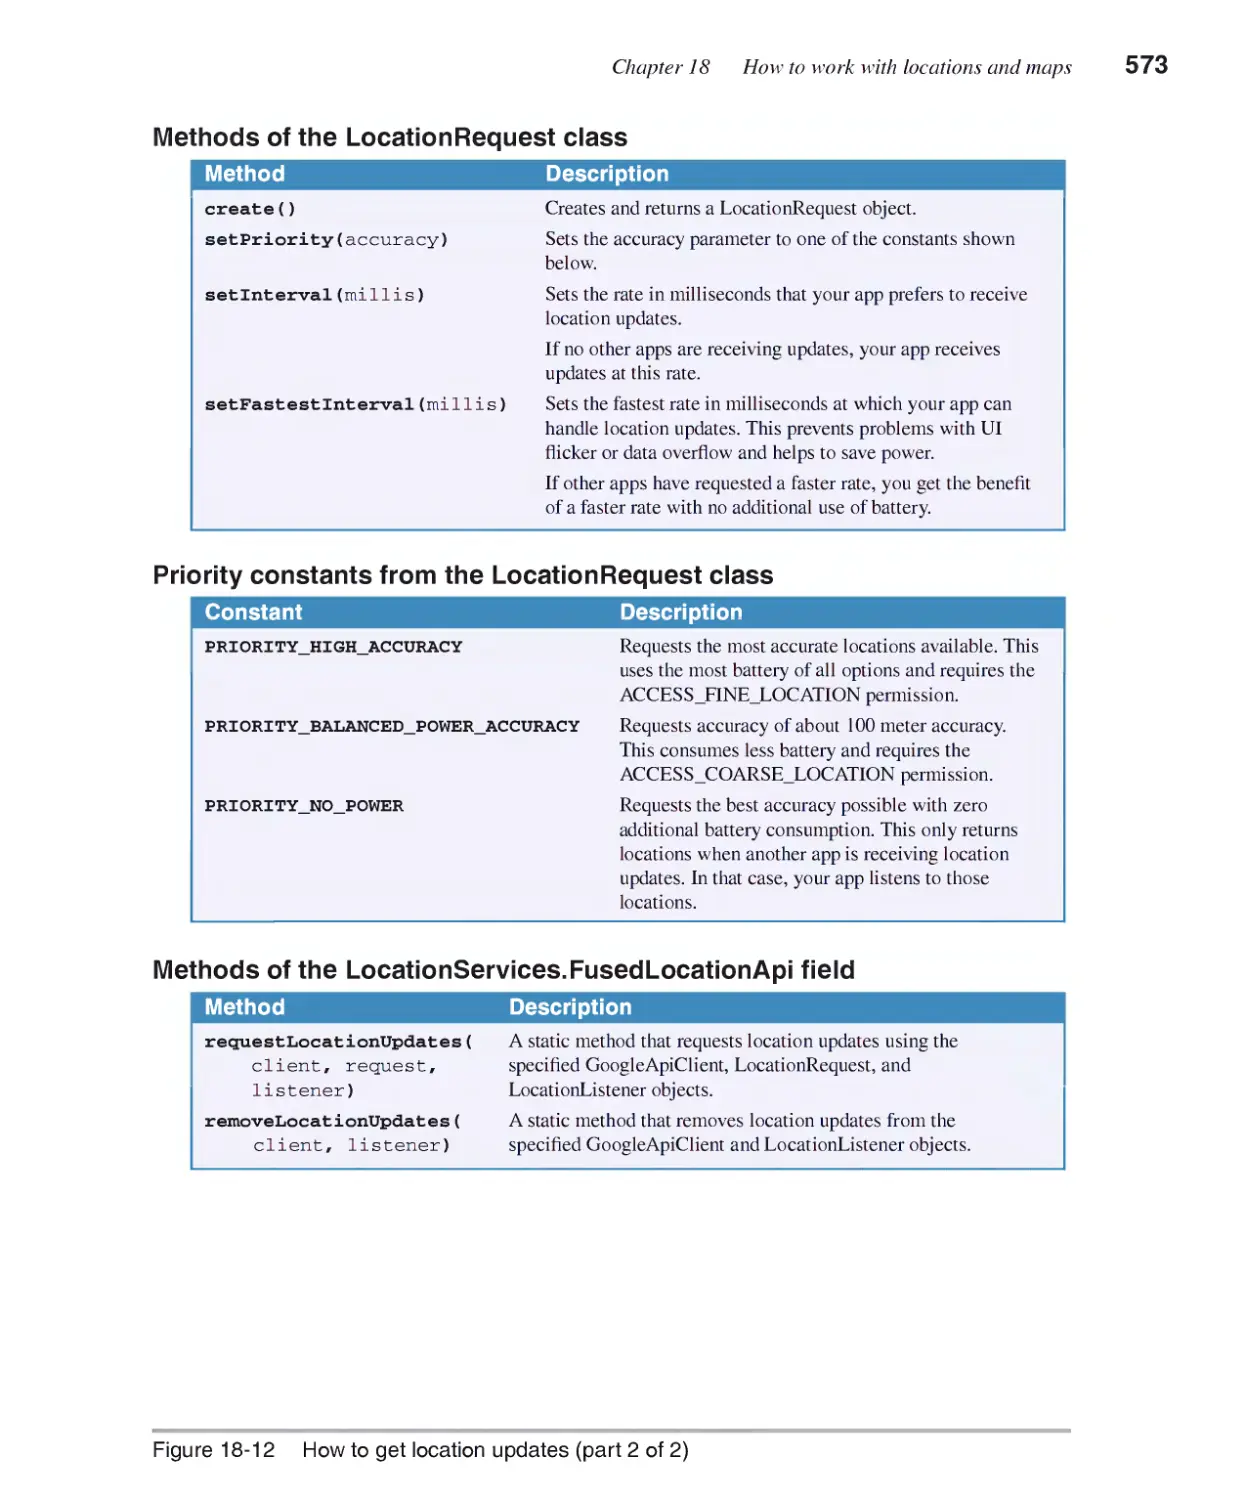
How to work with locations............................................................562
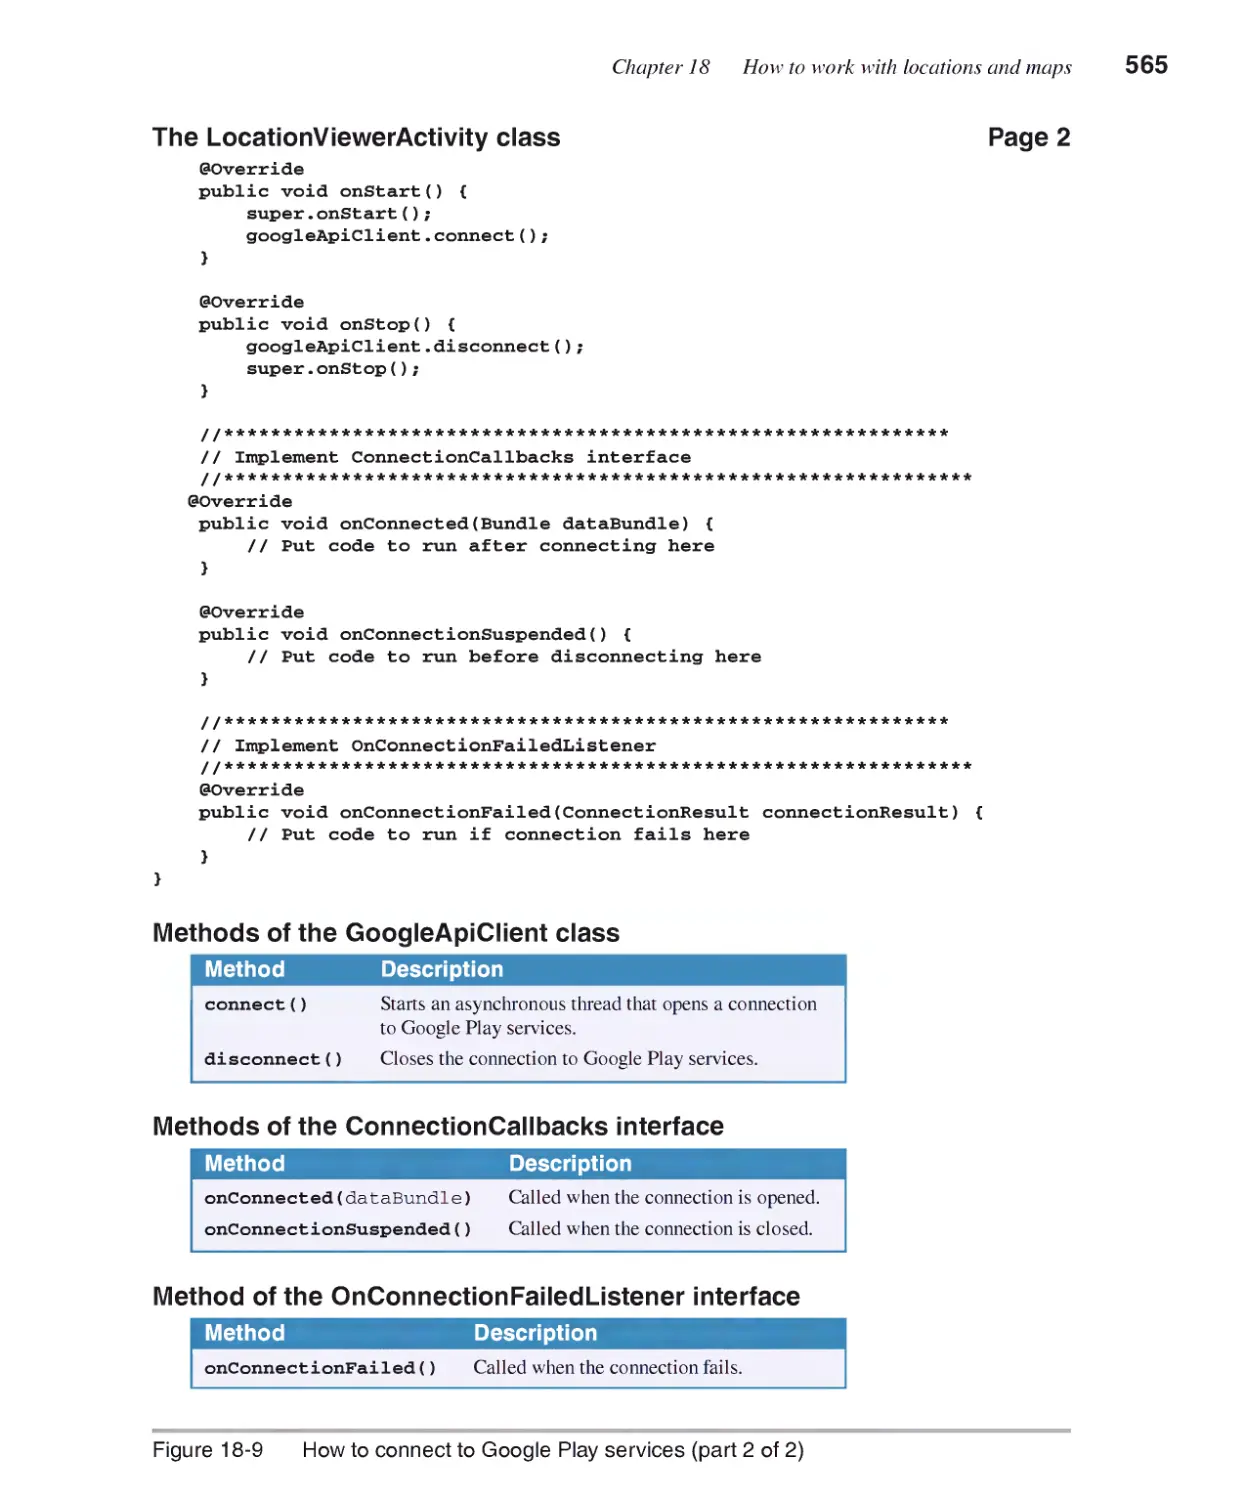
How to connect to Google Play services 562
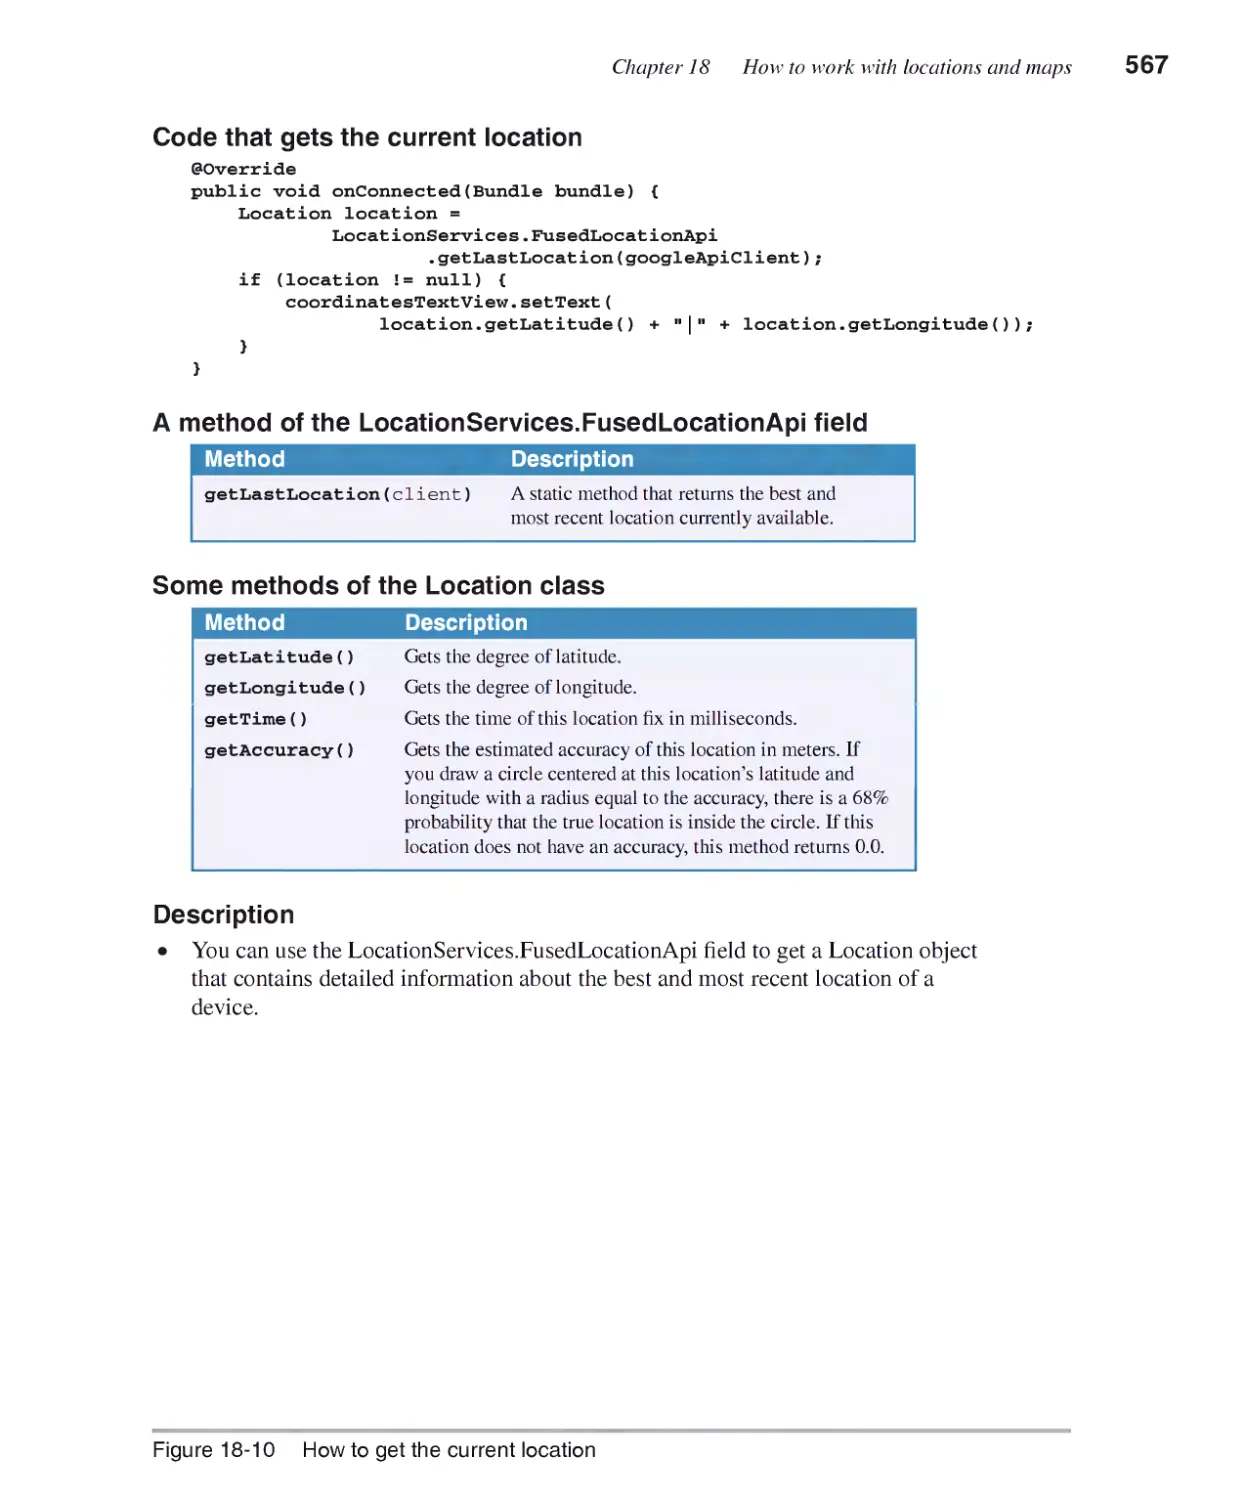
How to get the current location 566
How to handle a failed connection 568
How to get location updates 570
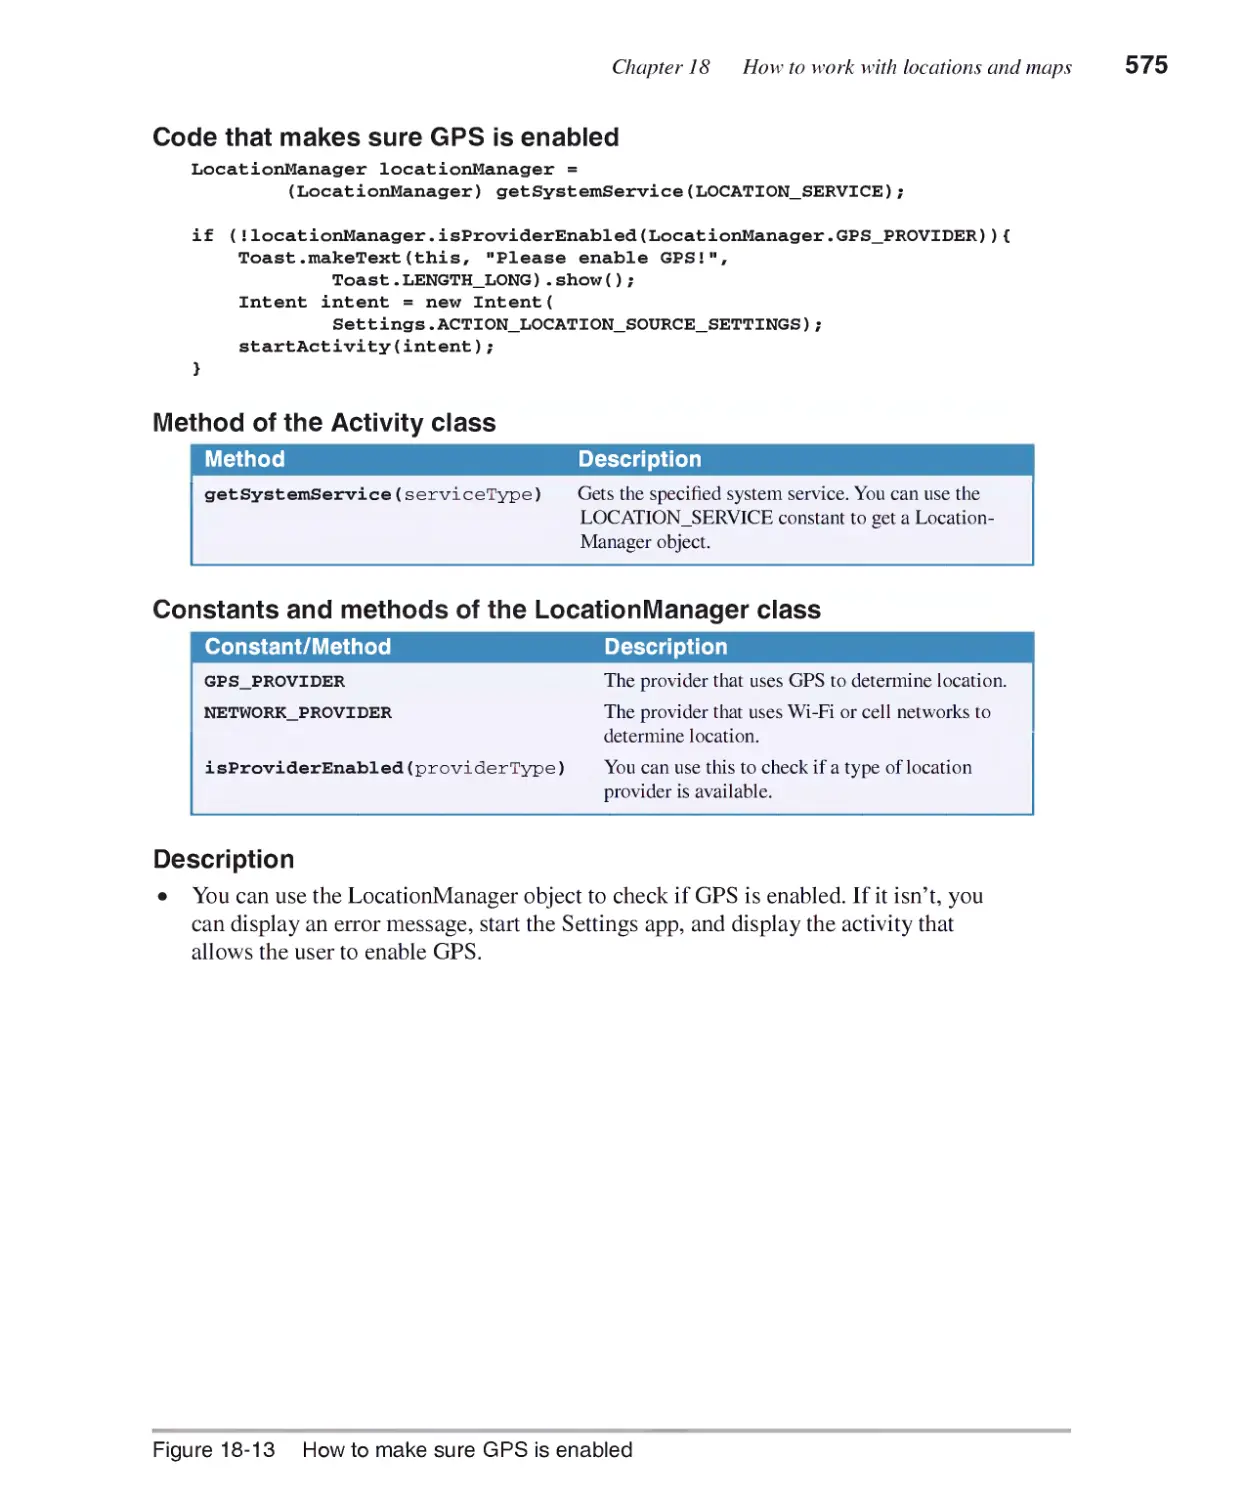
How to make sure GPS is enabled 574
How to work with Google Maps.....................................................576
How to add a map fragment to a layout 576
How to display a map 578
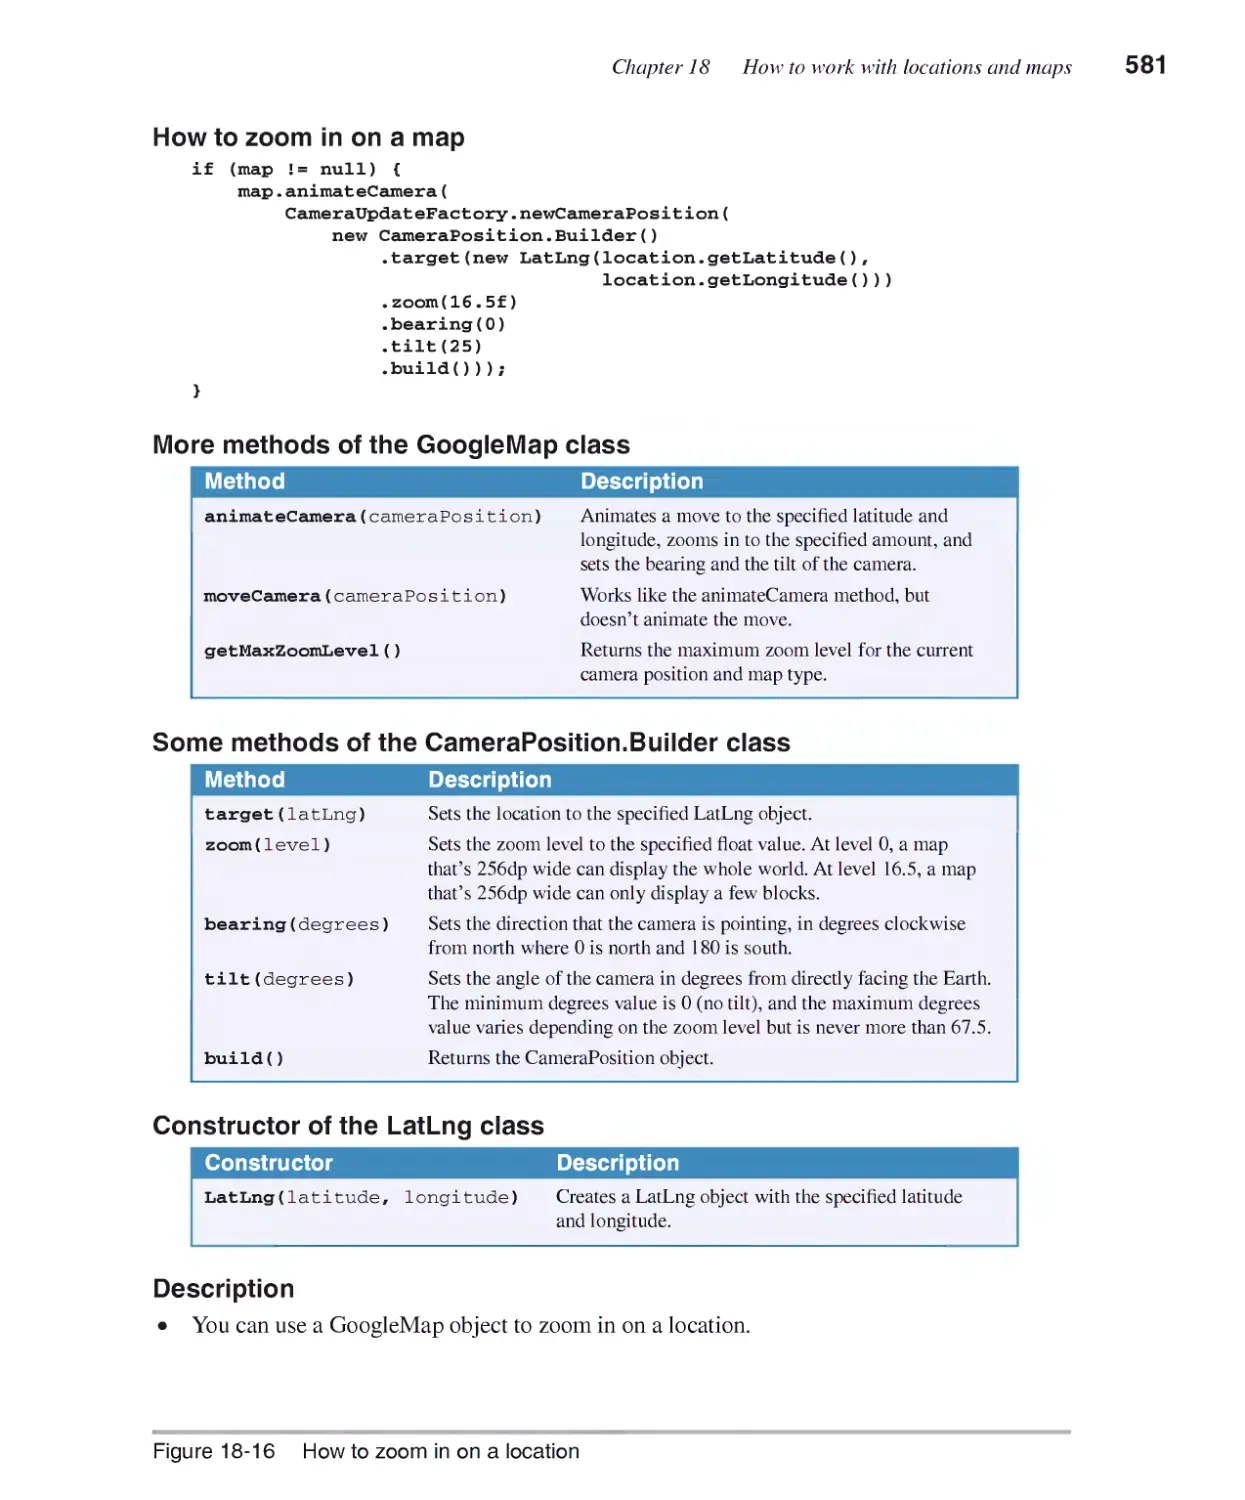
How to zoom in on a location 580
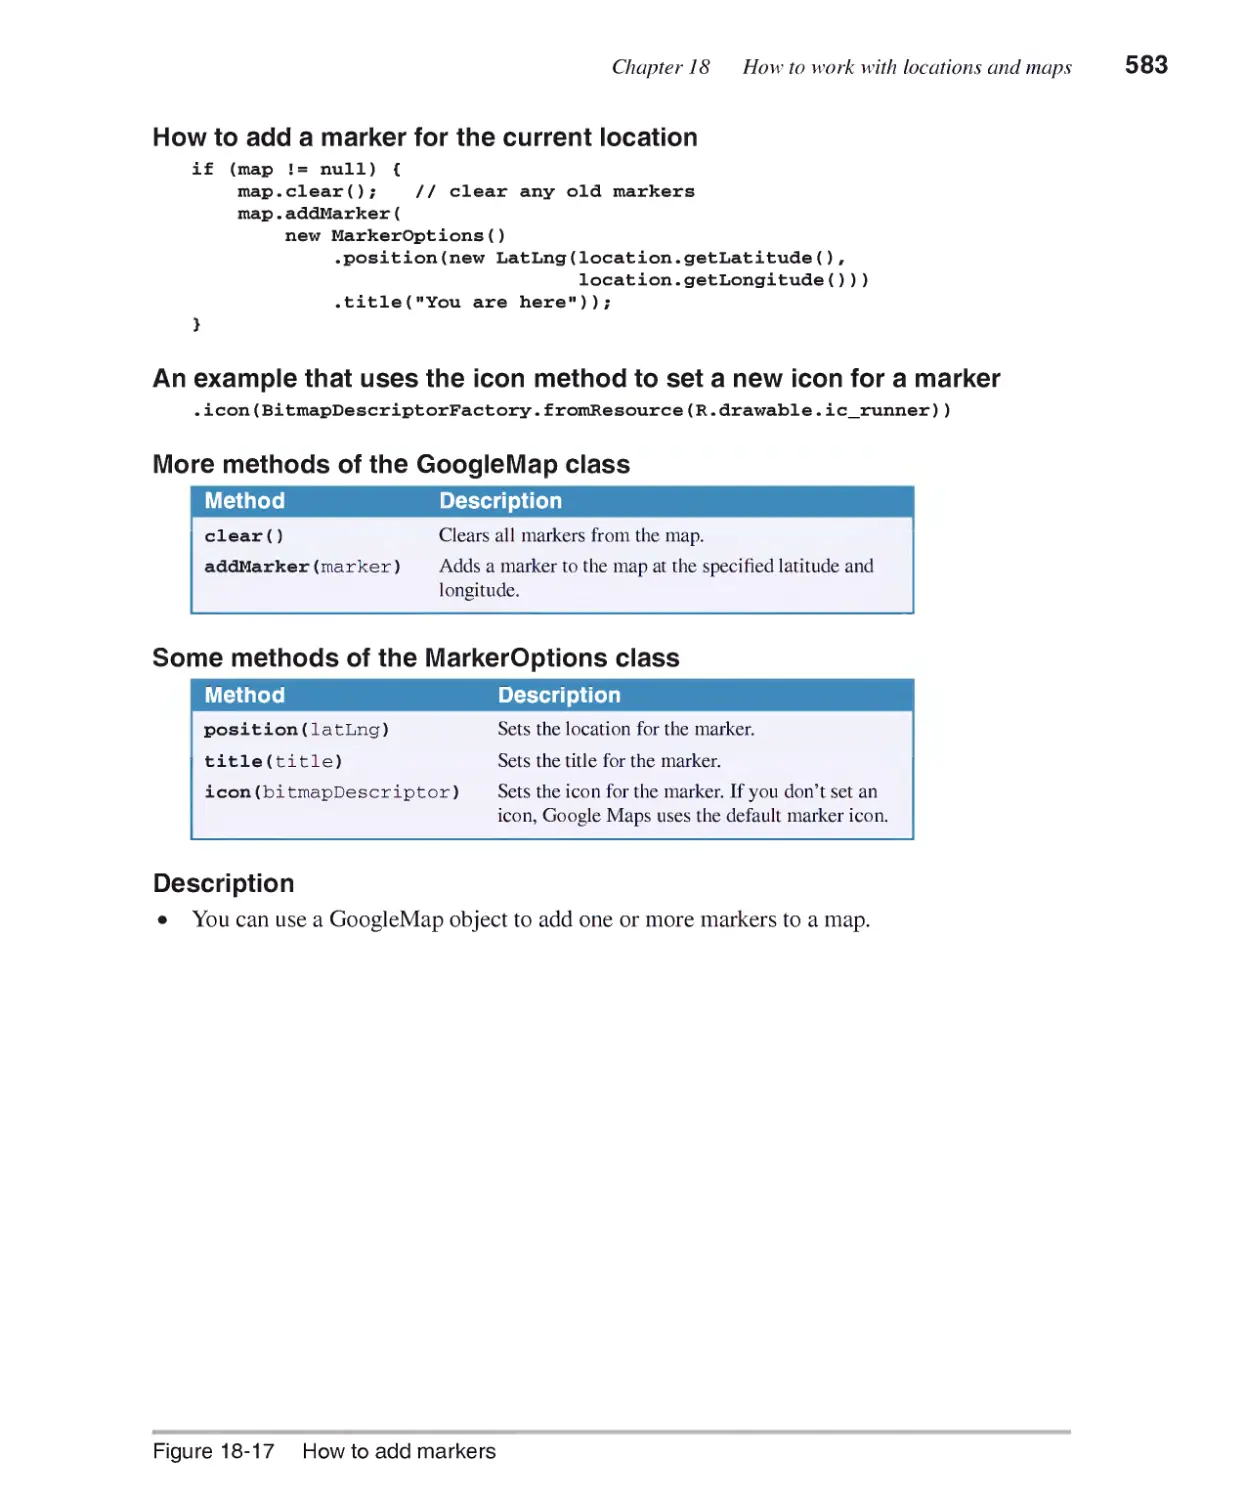
How to add markers 582
How to add lines 584
The Run Tracker app ......................................................................586
The activity_run_map layout 586
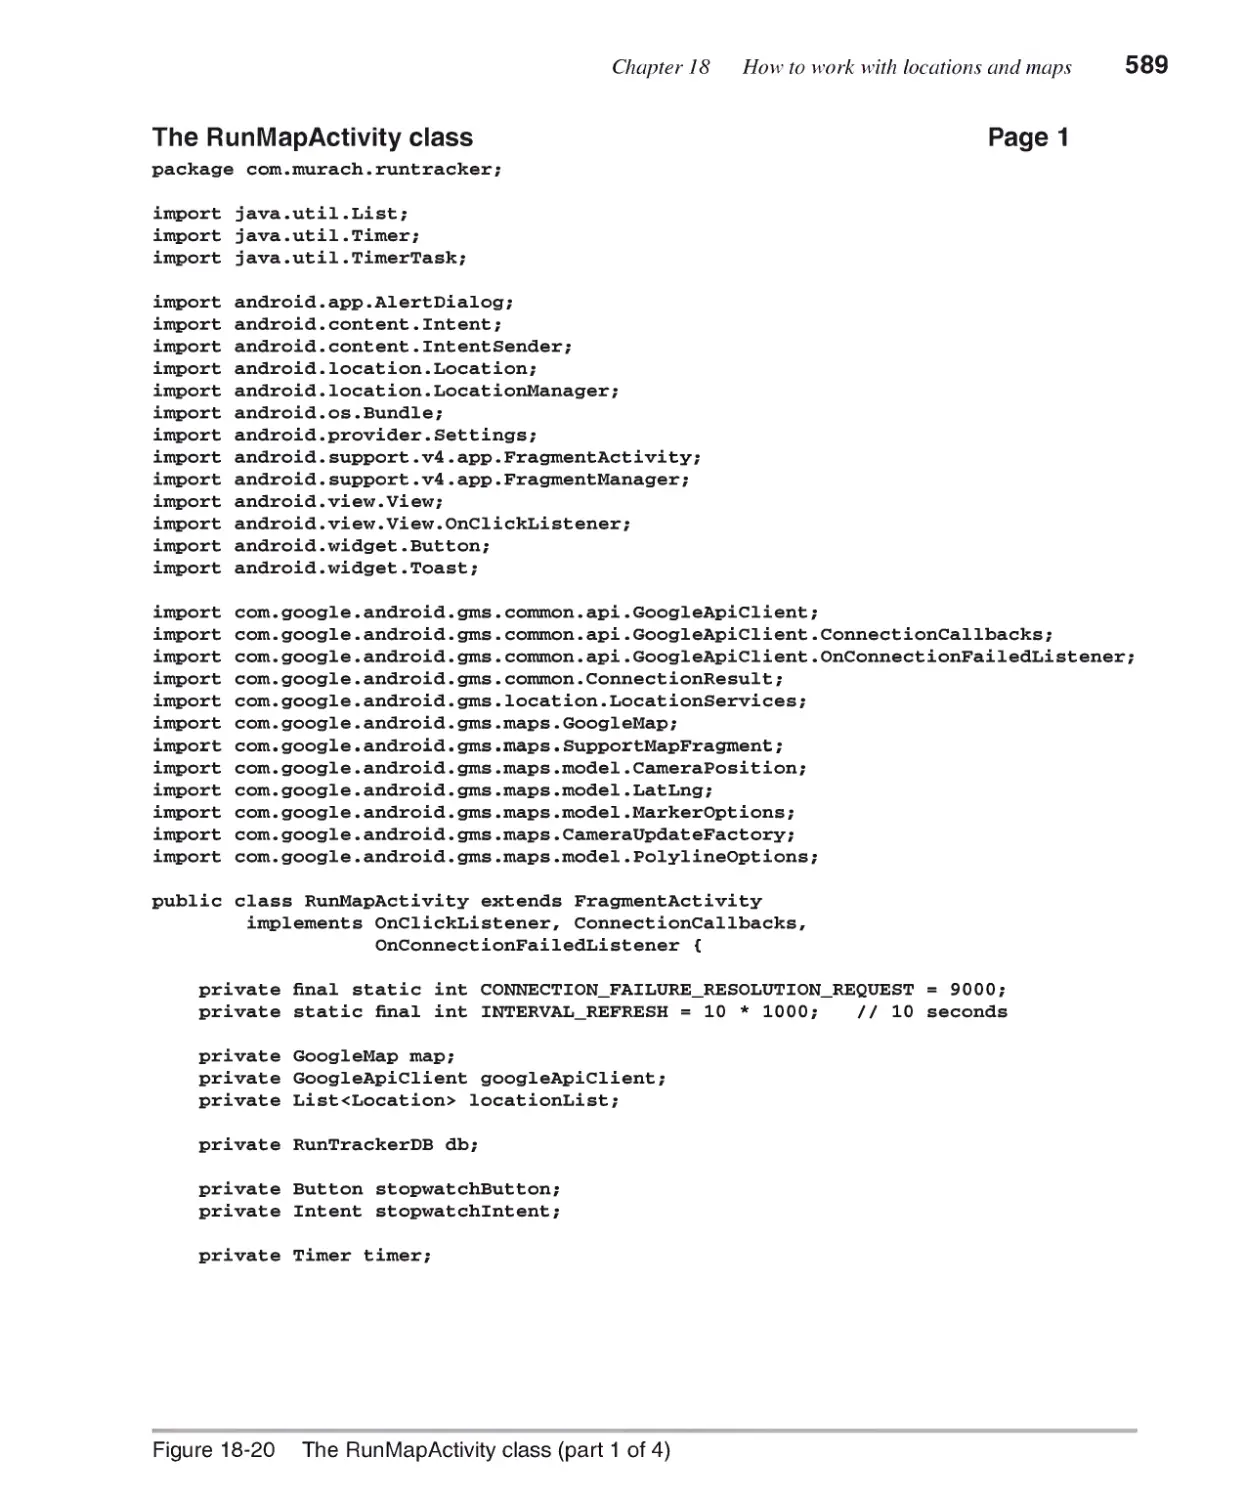
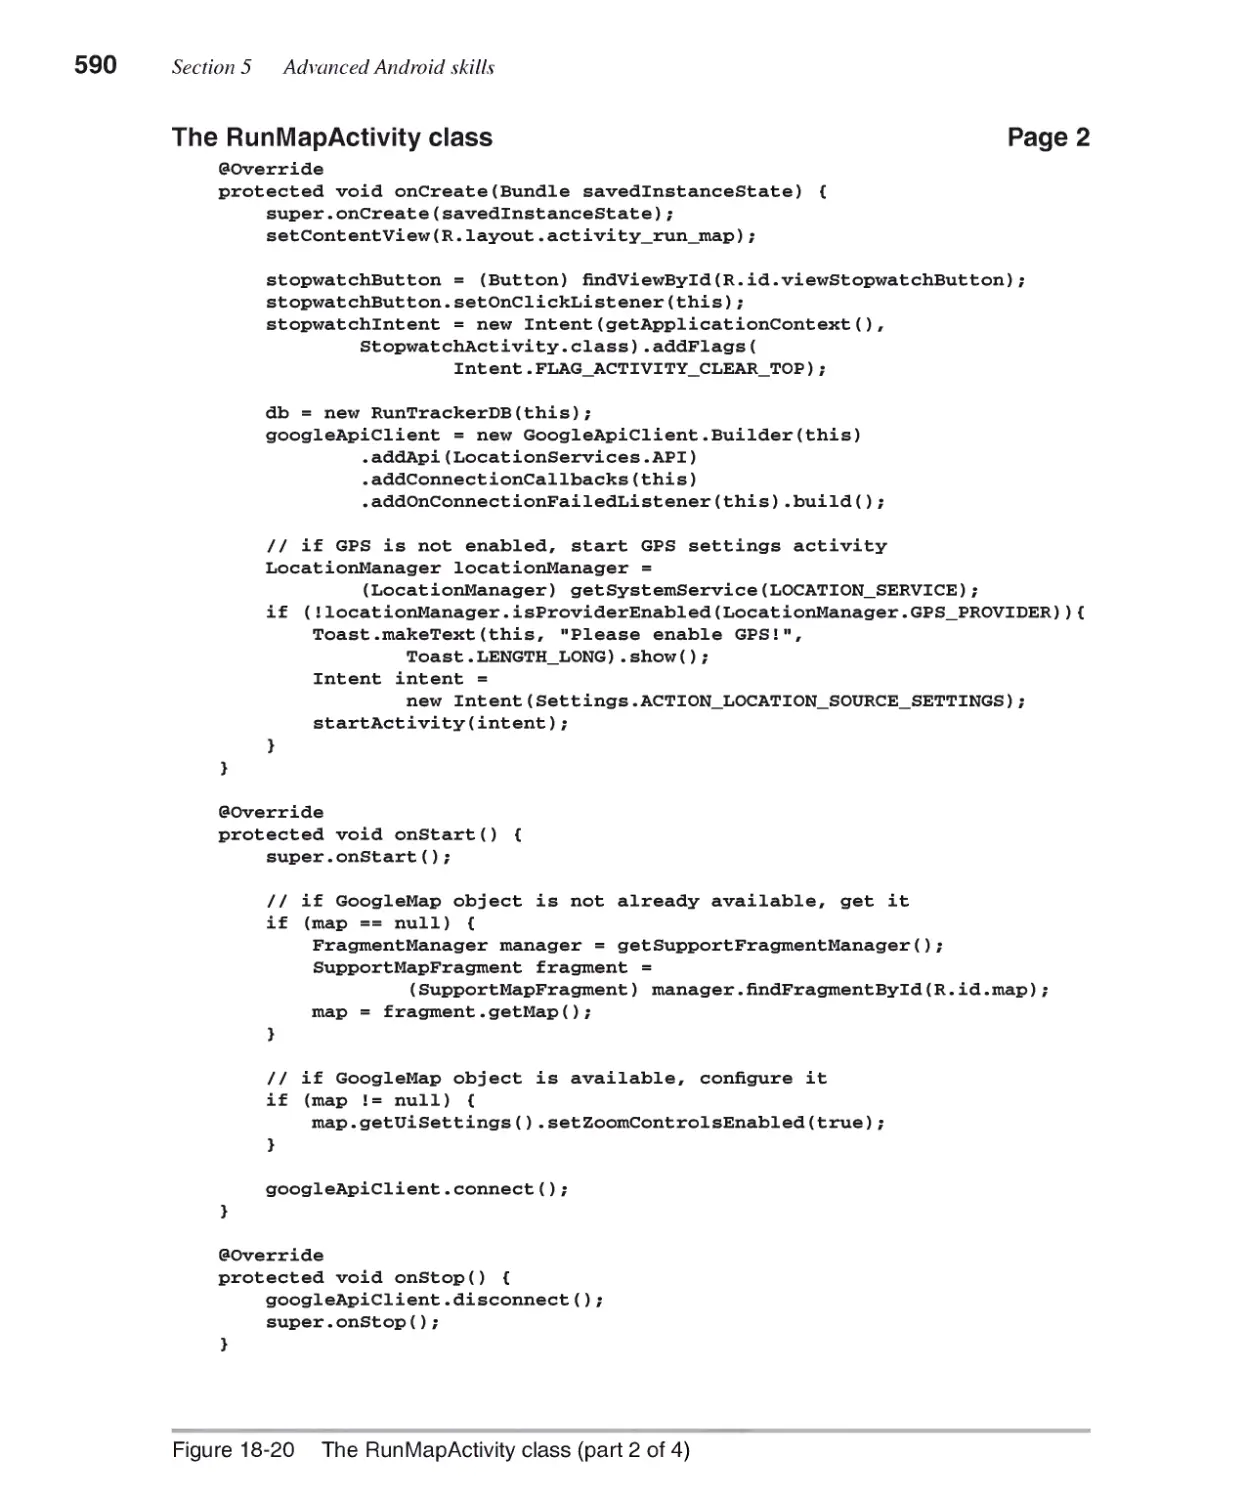
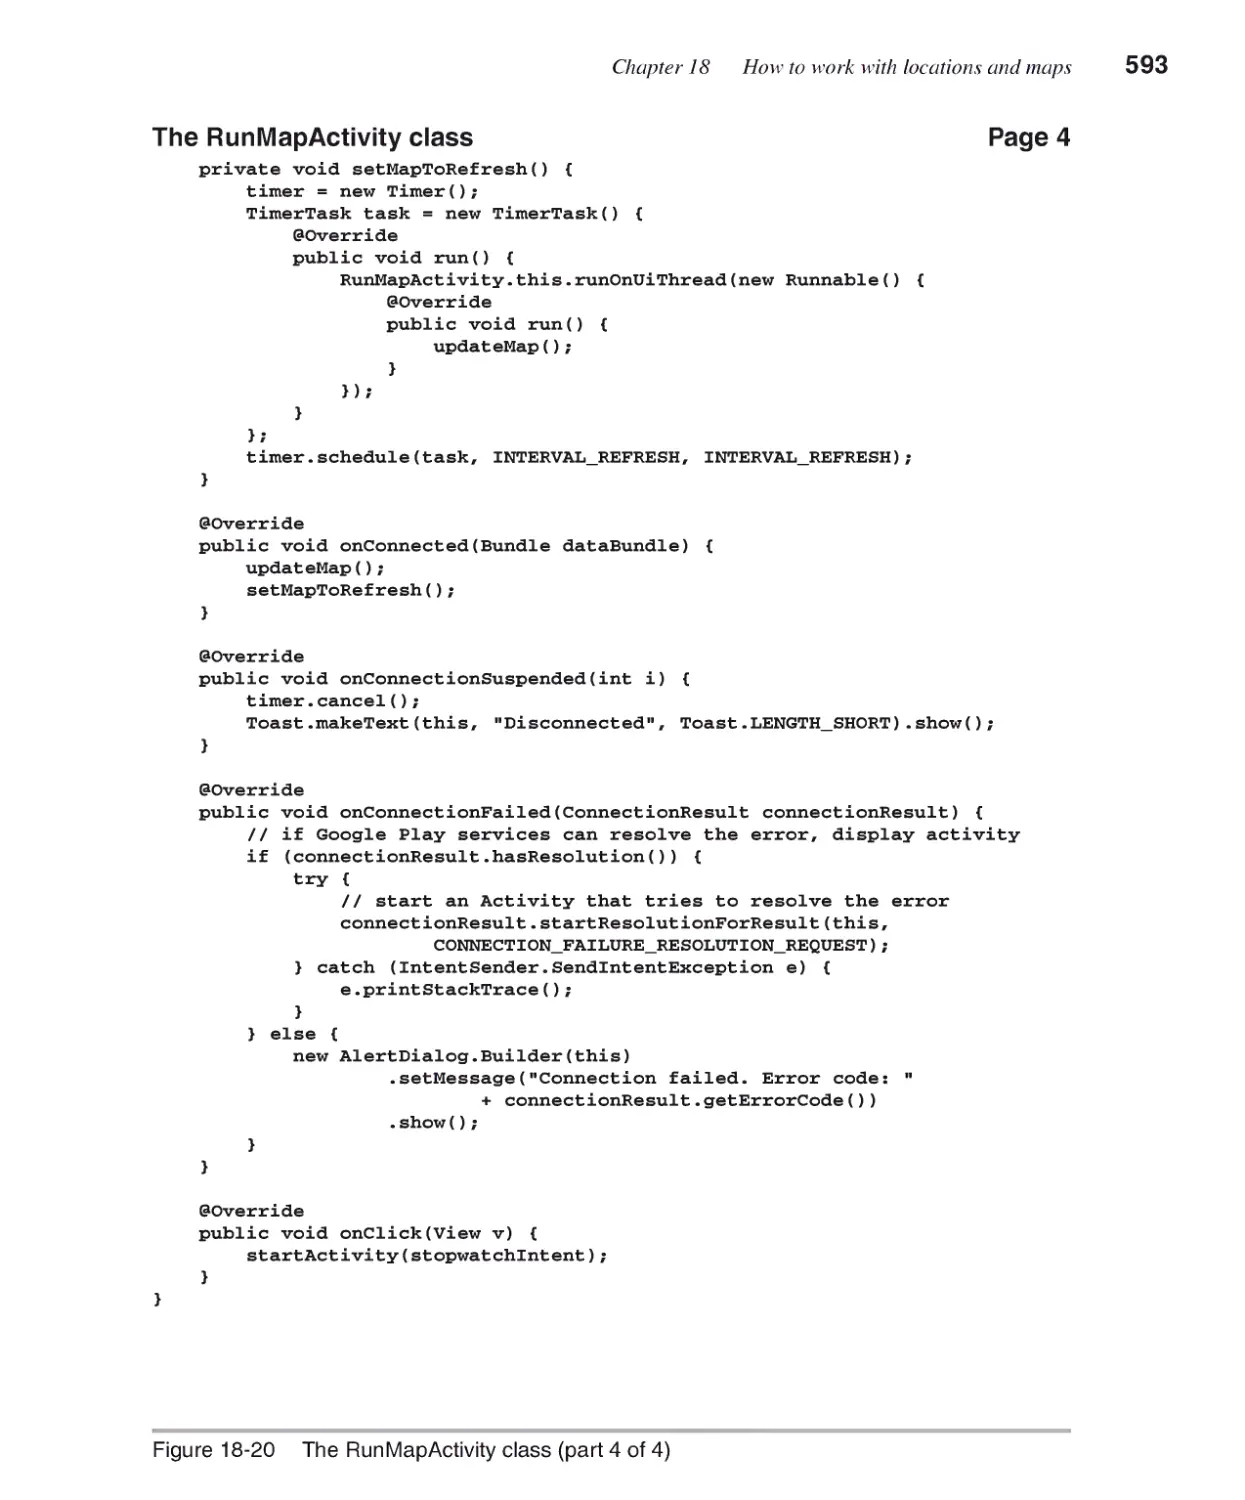
The RunMapActivity class 588
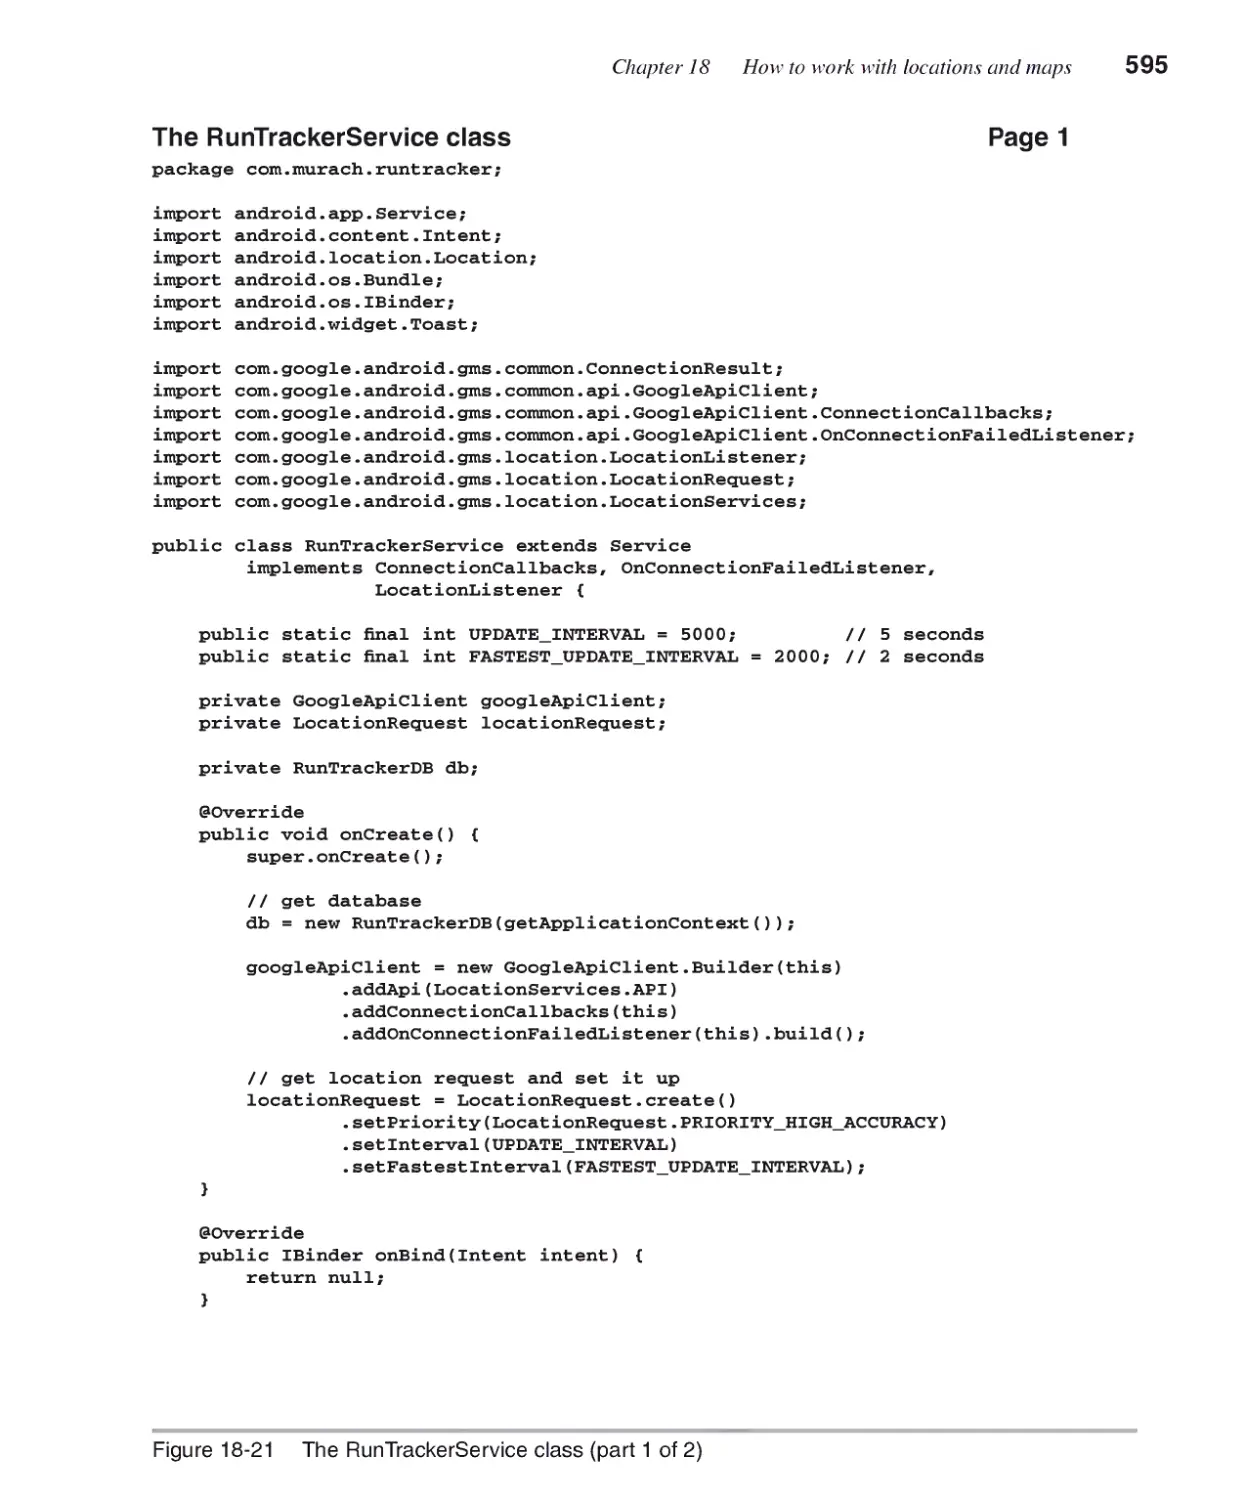
The RunTrackerService class 594
XIV Expanded contents
Appendix A How to set up Windows for this book
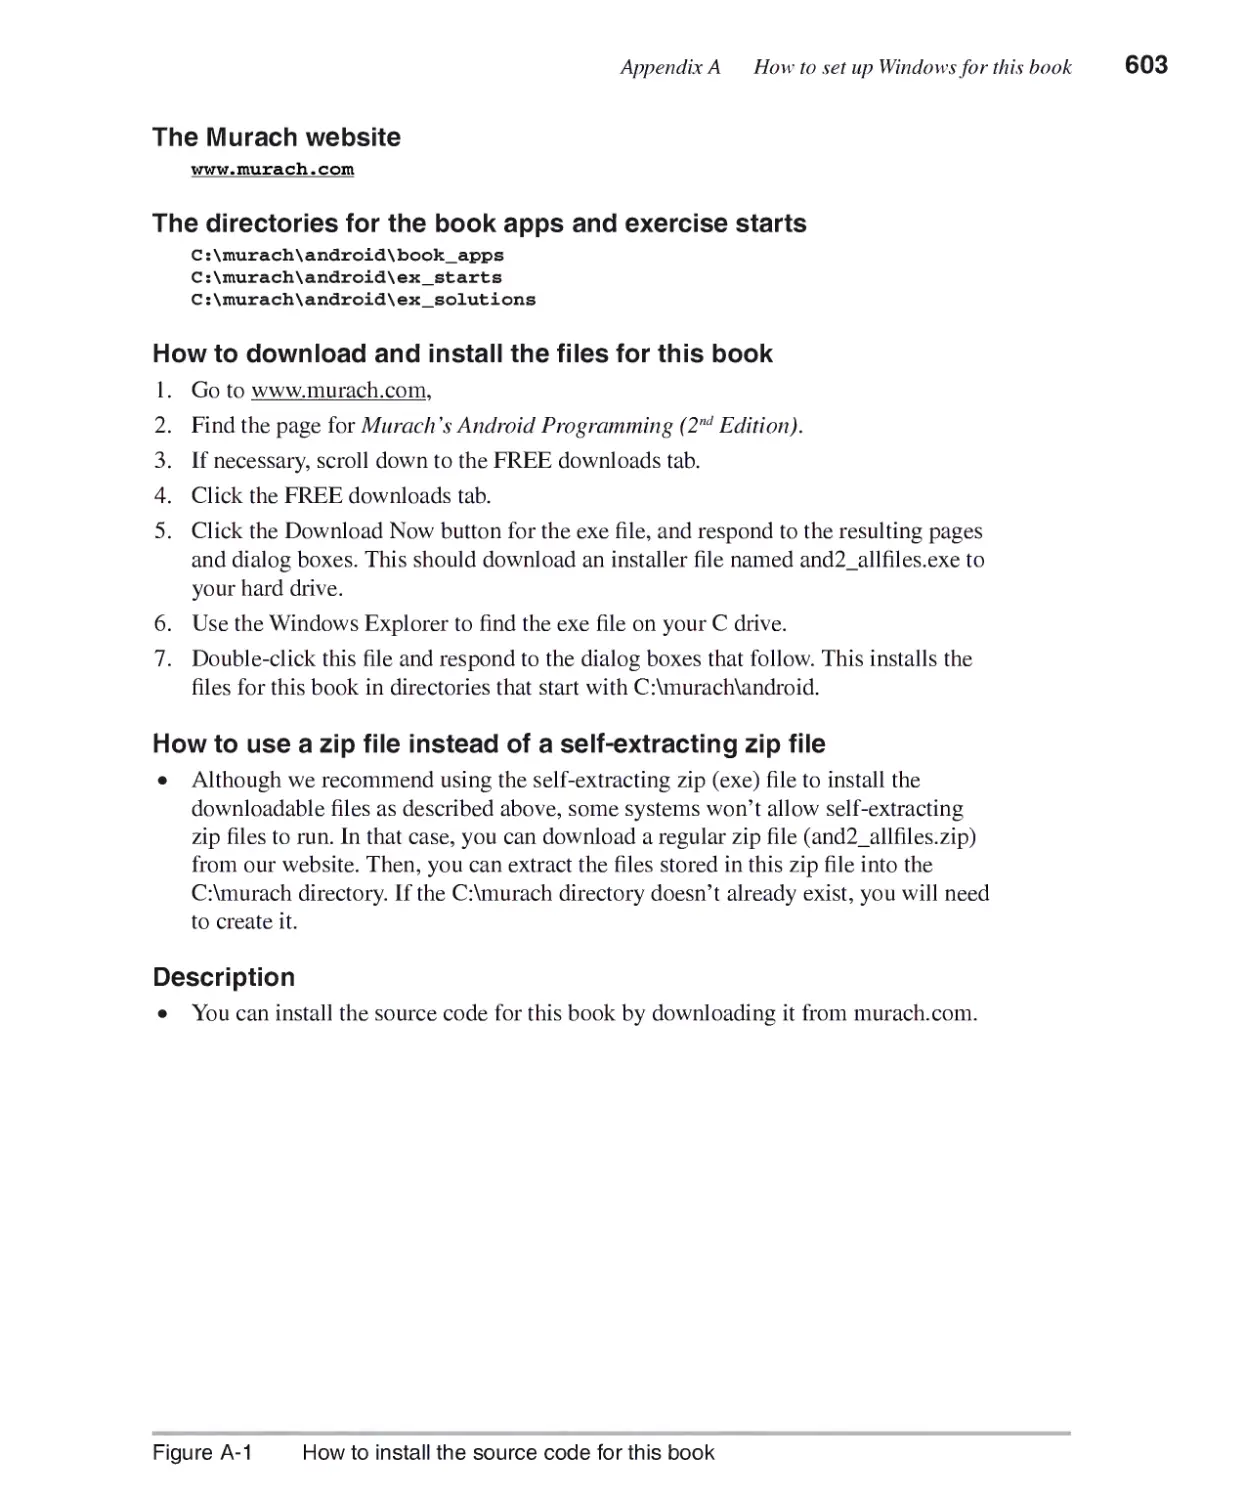
How to install the source code for this book 602
How to install the Java SE JDK 604
How to install Android Studio 606
How to use the Android SDK Manager 608
How to create an emulator 610
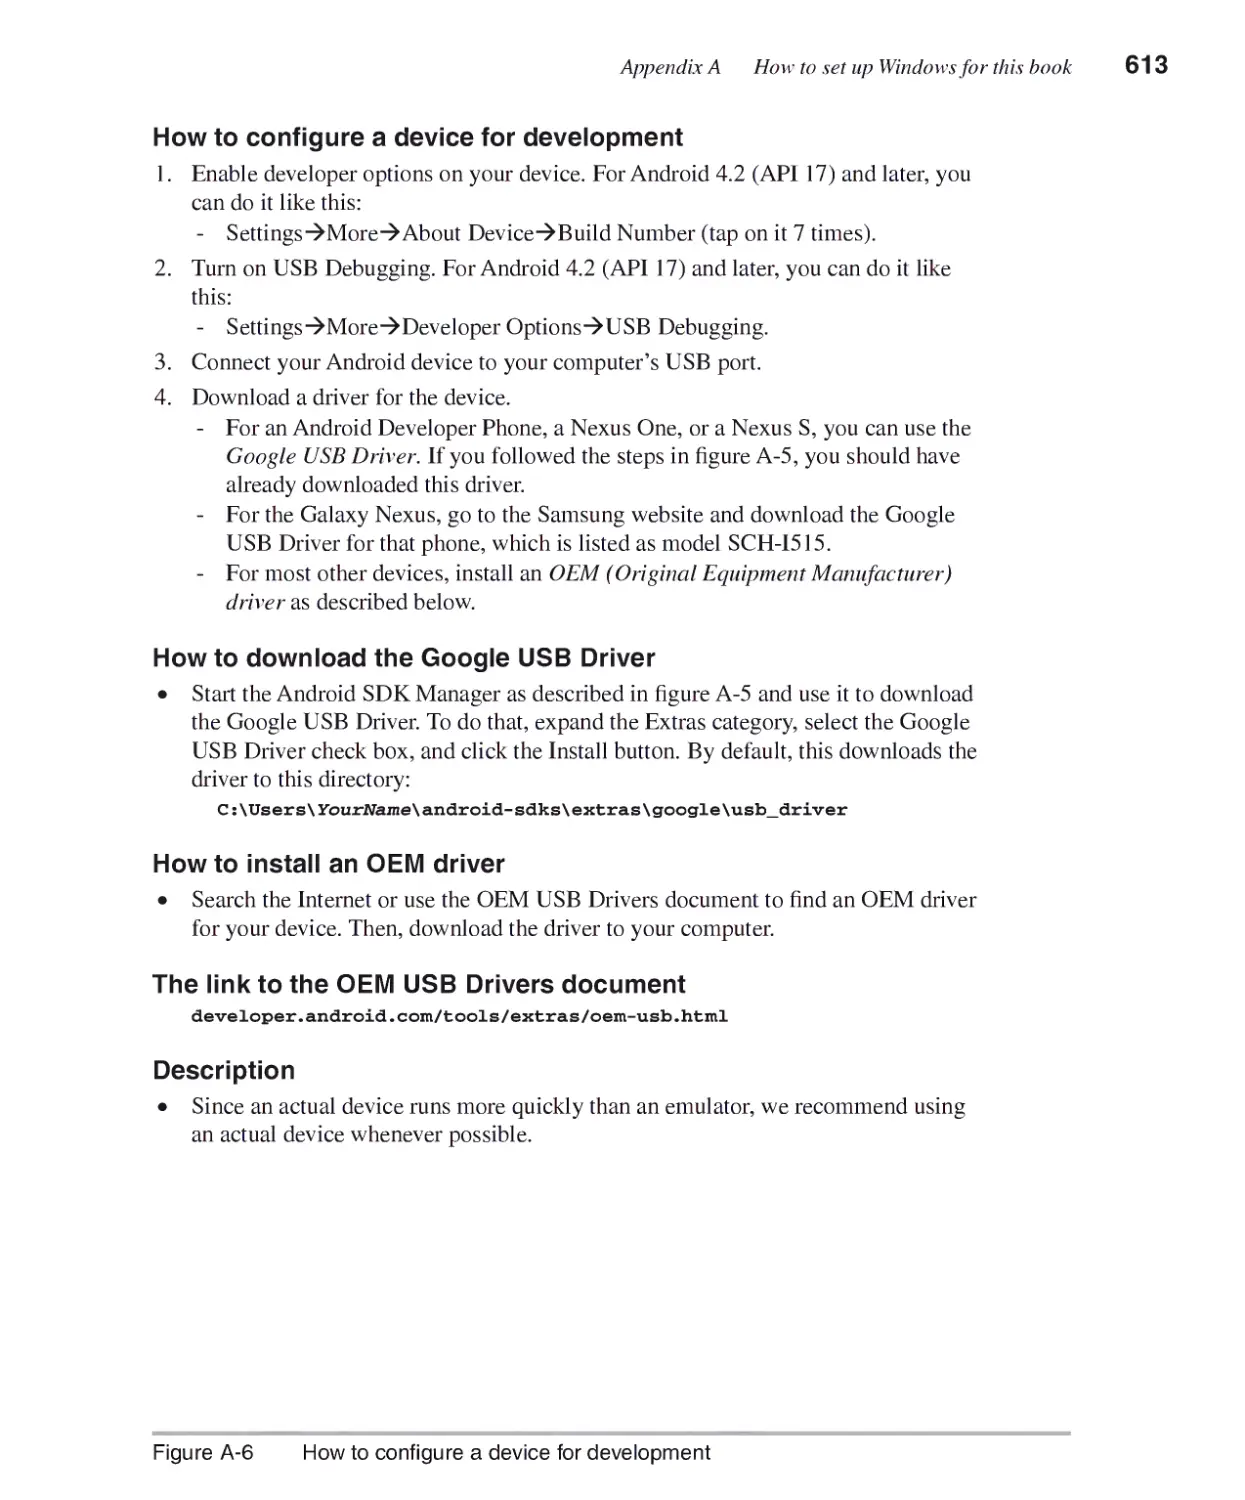
How to configure a device for development 612
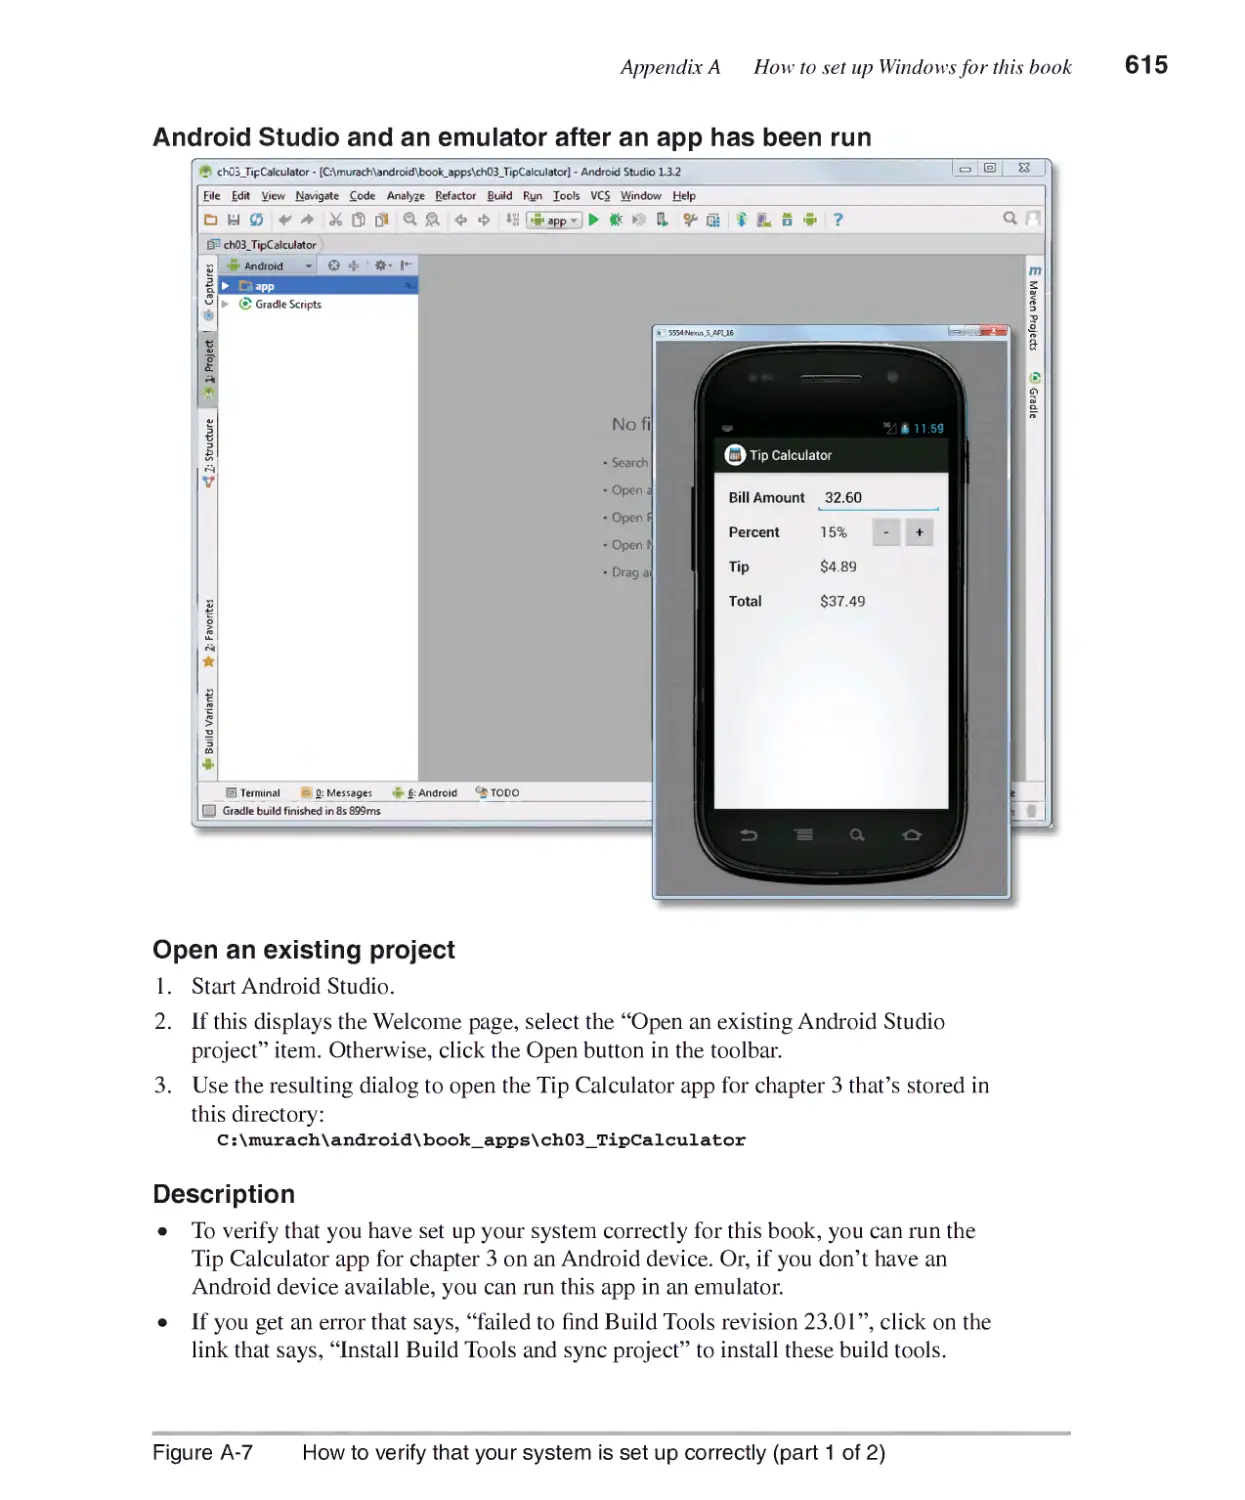
How to verify that your system is set up correctly 614
Appendix B How to set up Mac OS X for this book
How to install the source code for this book 620
How to install the Java SE JDK 622
How to install Android Studio 624
How to use the Android SDK Manager 626
How to create an emulator 628
How to configure a device for development 630
How to verify that your system is set up correctly 632
Appendix C How to set up Linux for this book
How to install the source code for this book 638
How to install the Java SE JDK and required native libraries 640
How to get Android Studio 642
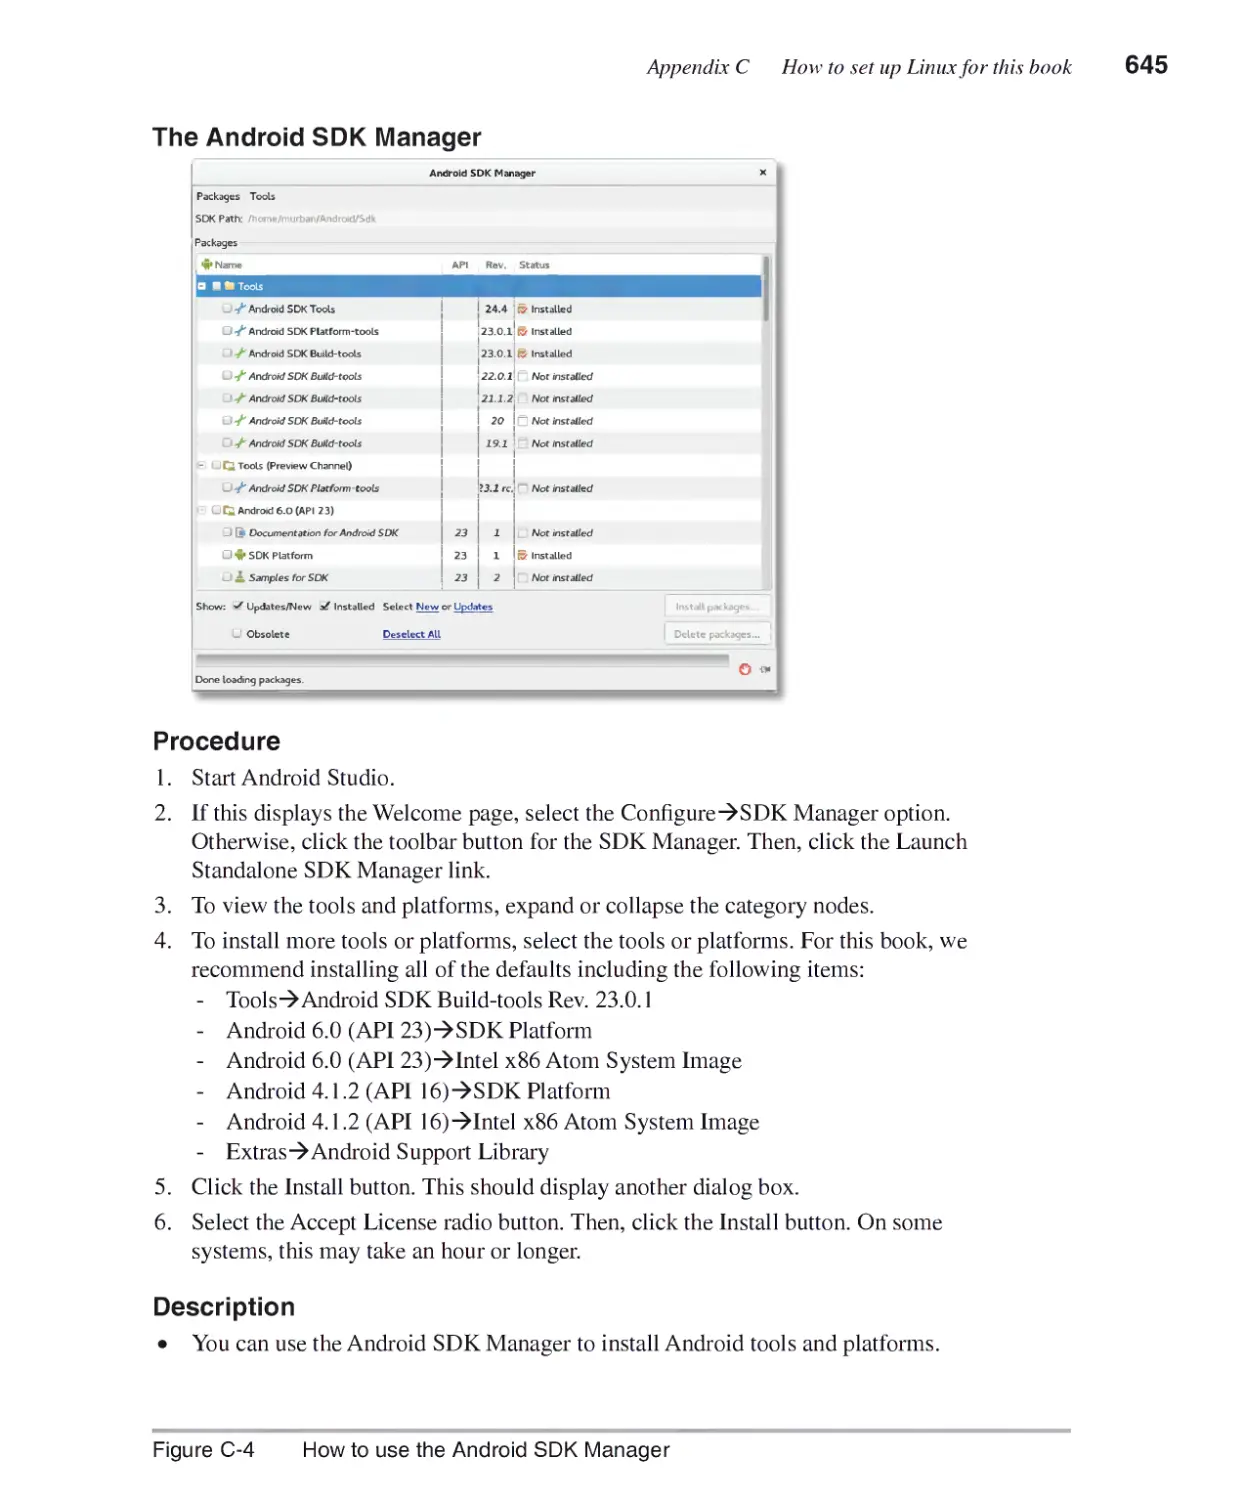
How to use the Android SDK Manaser 644
How to create an emulator 646
How to configure a device for development 648
How to verify that your system is set up correctly 650
Introduction
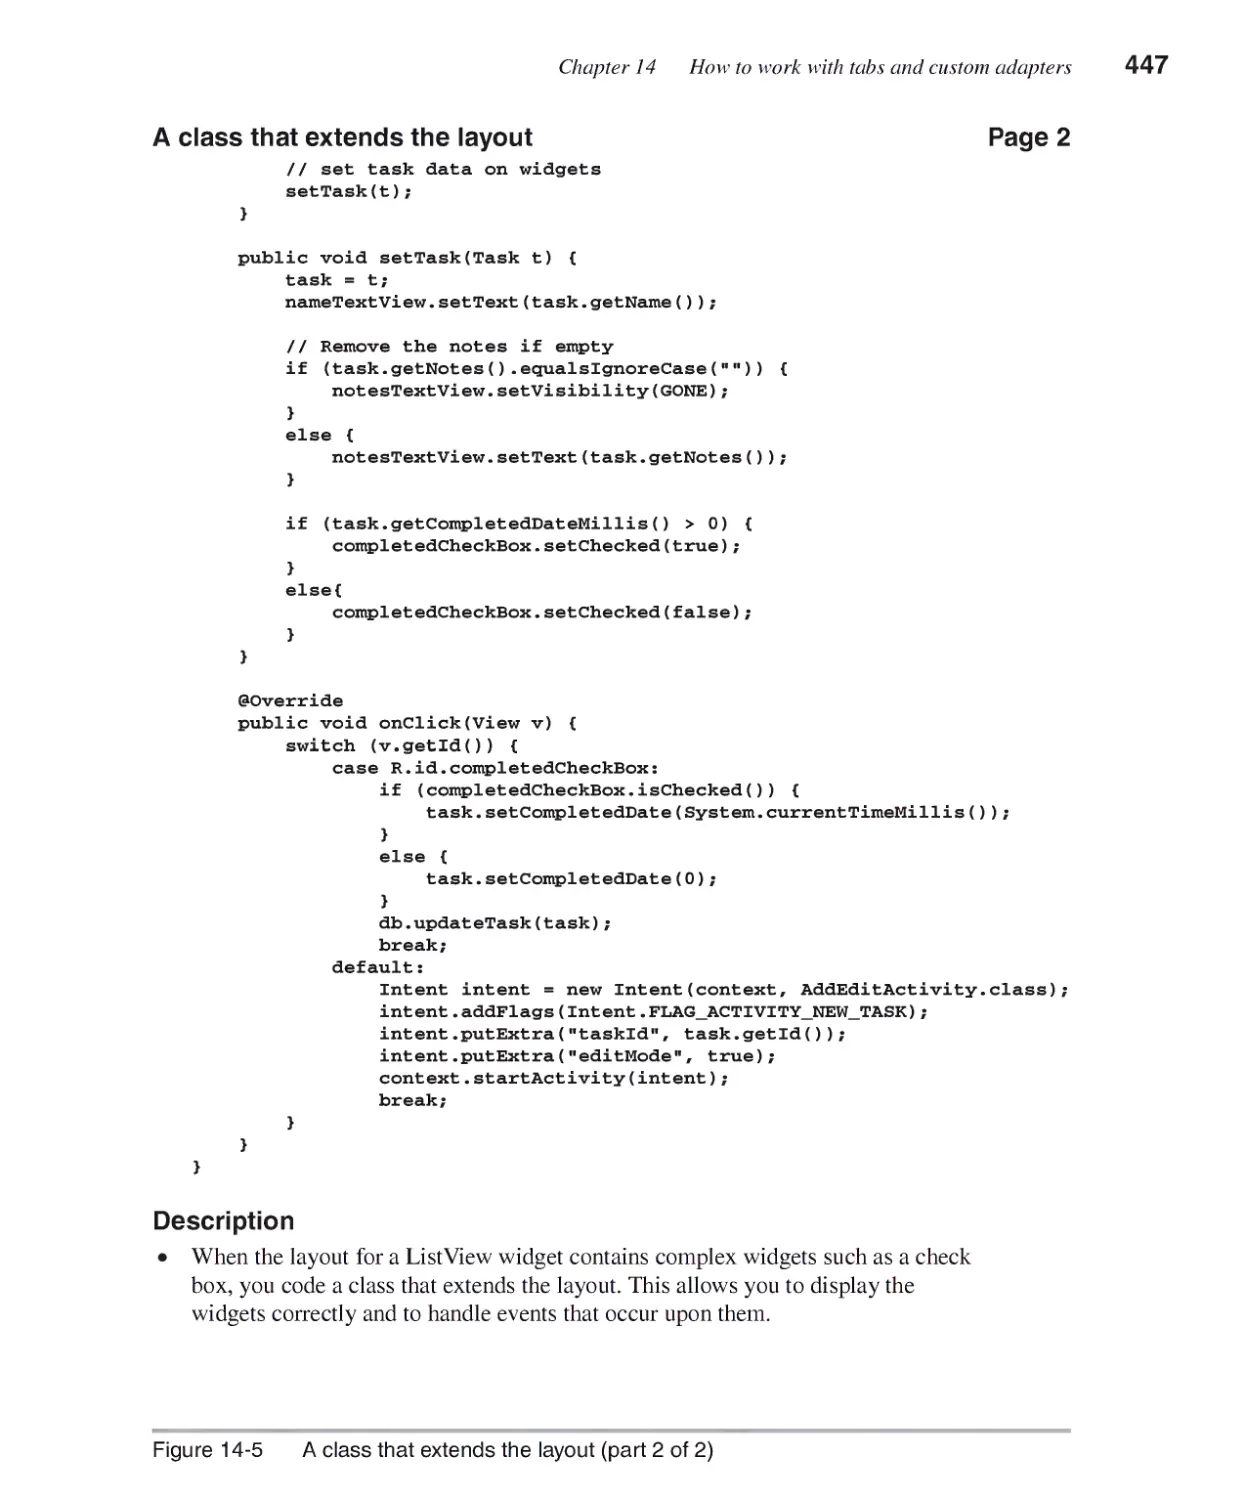
Android is the world's most widely used operating system for mobile
devices such as smartphones and tablets. In the coming years, Android's
popularity is likely to continue for a couple reasons. First, Google releases
Android under an open-source license that allows it to be modified and freely
distributed by device manufacturers. Second, since Android is open-source with
a large community of developers, it is able to evolve according to the needs of
the developers who use it.
Who this book is for
This book is for anyone who wants to learn professional skills for
developing Android apps. The only prerequisite is a basic understanding of the
Java programming language, roughly equivalent to chapters 1 through 18 of our
book, Munich's Beginning Java. Once you have the necessary Java skills, this
book should work for you even if you have absolutely no experience developing
mobile apps.
What you'll learn in this book
As I wrote this book, I did my best to focus on the practical features that
you'll need for developing professional Android applications. Here's a quick
tour:
• In section 1, you'll quickly master the basics of Android programming. In
chapter 1, you'll learn some background terms and concepts, and you'll use
Android Studio to open and run some existing apps. In chapters 2 and 3,
you'll learn how to develop your first Android app, a simple but complete
Tip Calculator app. And in chapter 4, you'll learn how to test and debug
your apps.
• In section 2, you'll learn some essential Android skills by enhancing the Tip
Calculator app that you developed in chapter 3. To start, in chapter 5, you'll
learn how to use different layouts and widgets to develop a sophisticated
user interface. In chapter 6, you'll learn several techniques for handling
high- and low-level events. In chapter 7, you'll learn how to use themes
and styles to improve the appearance of your app. In chapter 8, you'll learn
how to use menus and preferences. And in chapter 9, you'll learn how to
use fragments to allow your app to take advantage of large screens that are
available from some mobile devices such as tablets.
XVI Introduction
• In section 3, you'll learn how to develop a News Reader app. Along the
way, you'll learn more essential Android skills. In chapter 10, for example,
you'll learn how to read an RSS feed from the Internet, save that data in a
file, and display it on the user interface. In chapter 11, you'll learn how to
use a service to download data for an app even when the app isn't running,
and to notify a user when new data is available. And in chapter 12, you'll
learn how to respond to actions that are broadcast by Android and its apps.
• In section 4, you'll learn how develop a Task List app that stores one or
more to-do lists. In chapter 13, you'll learn how to create a database to store
these lists. In chapter 14, you'll learn how to use tabs and a custom adapter
to display these tasks on the user interface. In chapter 15, you'll learn how
to use a content provider to allow other apps to work with the same data as
this app. And in chapter 16, you'll learn how to create an app widget that
can display some of this app's data on a device's Home screen.
• In section 5, you'll learn how to deploy apps to the Google Play store. Then,
you'll learn how to create a Run Tracker app that uses the Google Maps
API.
Why you'll learn faster and better with this book
Like all our books, this one has features to help you learn as quickly and
easily as possible. Here are just three of those features.
• To help you develop applications at a professional level, this book presents
complete, non-trivial apps. For example, chapter 12 presents the final
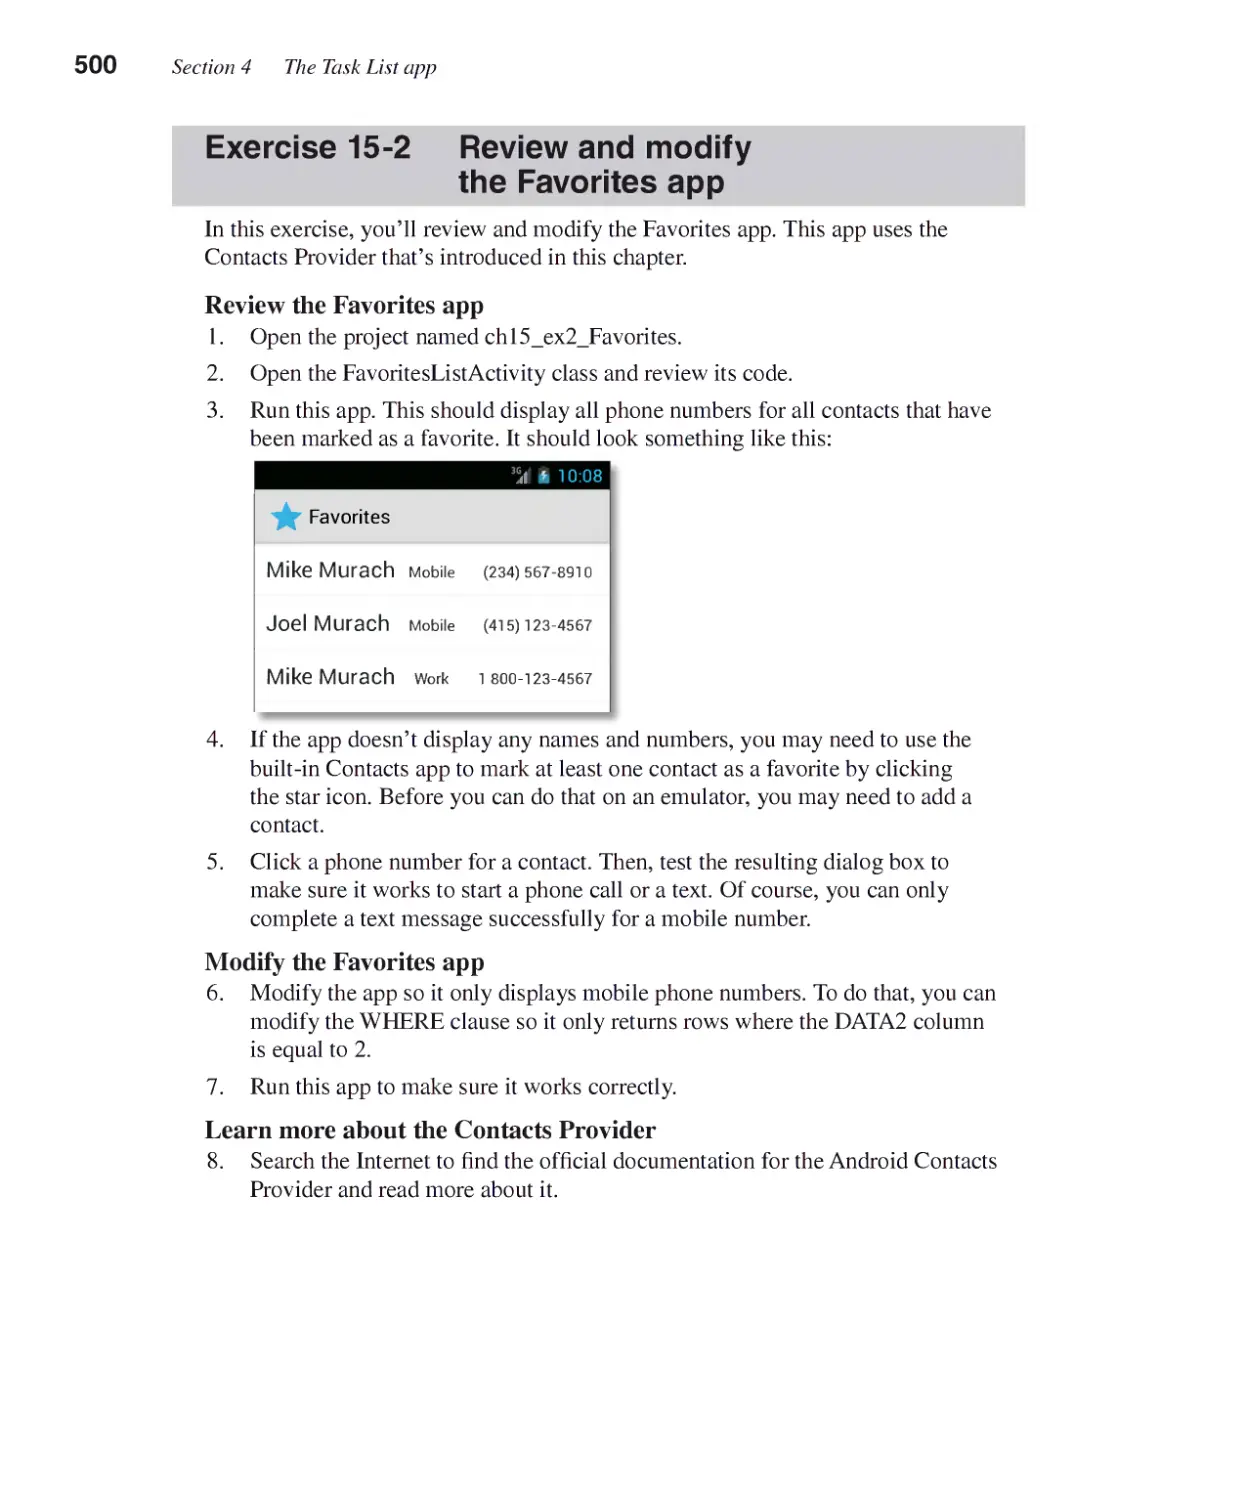
version of the News Reader app, chapter 16 presents the final Task List app,
and chapter 18 presents a Run Tracker app. Studying these apps is a great
way to master Android development.
• All of the information in this book is presented in our unique paired-pages
format, with the essential syntax, guidelines, and examples on the right page
and the perspective and extra explanation on the left page. This helps you
learn more while reading less, and it helps you quickly find the information
that you need when you use this book for reference.
• The exercises at the end of each chapter give you a chance to try out what
you've just learned and to gain valuable, hands-on experience with Android
programming. They guide you through the development of some of the
book's apps, and they challenge you to apply what you've learned in new
ways. And because most of these exercises start from code that you can
download from our website, you'll spend your time practicing new skills
instead of doing busywork.
■ ■
Introduction XVII
How our downloadable files make learning easier
To make learning easier, you can download the source code for all the apps
presented in this book from our website (www.murach.com). Then, you can view
the complete code for these apps as you read each chapter, you can run these
apps to see how they work, and you can copy portions of code for use in your
own apps.
You can also download the starting points and solutions for the exercises
in this book. That way, you don't have to start every exercise from scratch.
This takes the busywork out of doing these exercises. As a result, you get more
practice in less time. In addition, if you encounter a problem, you can easily
check the solution. This helps you to keep moving forward with less chance that
you'll get hung up on a minor issue.
What version of Android this book supports
Most of the apps presented in this book have been designed to work with
Android 4.0 (API 15), also known as Ice Cream Sandwich, through Android 6.0
(API 23), also known as Marshmallow. Since Android is backwards-compatible,
the apps presented in this book should continue to work for future versions of
Android too, though they won't be able to take advantage of the new features
available from those versions of Android.
What operating systems this book supports
This book supports the Windows, Mac OS X, and Linux operating systems.
If you're using Windows, you can use Appendix A to set up your computer for
this book. If you're using Mac OS X, you can use appendix B. And if you're
using Linux, you can use appendix C.
What IDE this book supports
This book shows how to use Android Studio to code, test, and debug
applications. This IDE is available for free and runs on all modern operating
systems. Although it's possible to use other IDEs, Android Studio is now the
official IDE for Android, replacing Eclipse with ADT. As a result, most Android
developers use Android Studio for new development.
How to get the software you need
You can download all of the software that you need for this book for free
from the Internet. This software includes the Java SDK (Software Development
Kit), Android Studio, and the Android SDK, as well as the source code for the
apps that are presented throughout the book. To find out how to download and
install this software, please see the appendixes.
XVI i i Introduction
Support materials for trainers and instructors
If you're a corporate trainer or a college instructor who would like to use
this book for a course, we offer these supporting materials: (1) a complete set of
PowerPoint slides, (2) test banks, (3) additional chapter exercises that aren't in
this book, (4) projects that the students start from scratch, and (5) solutions to
the additional exercises and projects.
To learn more about these materials, please go to our website at
www.murachforinstructors.com if you're an instructor. Or if you're a trainer,
please go to www.murach.com and click on the Courseware for Trainers link,
or contact Kelly at 1-800-221-5528 or kelly@murach.com.
A companion book
As you read this book, you may discover that your Java skills aren't as
strong as they ought to be. In that case, I recommend that you get a copy of
one of our beginning Java books {Murach \s Beginning Java with NetBeans or
Munich's Beginning Java with Eclipse). Either book gets you up to speed with
Java and shows you how to use all of the skills you need for developing Android
apps.
Let us know how this book works for you
When I started writing this book, my goal was (1) to teach you Android
programming as quickly and easily as possible and (2) to teach you the practical
Android concepts and skills that you need for developing professional apps.
Now, I hope I have succeeded. If you have any comments about this book, I
would appreciate hearing from you at murachbooks@murach.com.
Thanks for buying this book. I hope you enjoy reading it, and I wish you
great success with your Android programming.
(J Joel Murach
Author
Section 1
Get started fast with Android
This section gets you started quickly with Android programming. First,
chapter 1 introduces you to some concepts and terms that apply to Android
development. In addition, it shows you how to use Android Studio to open
and run existing projects.
After that, chapter 2 shows you how to use Android Studio to develop
the user interface for an app. Then, chapter 3 shows you how to write the
Java code for an app. And chapter 4 shows you how to test and debug apps.
To illustrate these skills, this section uses a simple but complete Tip
Calculator app. This app calculates the tip you would give based on the
amount of a bill. When you complete these chapters, you'll be able to
write, test, and debug simple applications of your own.
1
An introduction to Android
and Android Studio
This chapter starts by presenting some background information about Android.
This information isn't essential to developing Java applications, so you can
skim it if you want.
This chapter finishes by showing how to use the Android Studio IDE to
work with an existing project. This gives you some hands-on experience using
Android Studio to work with projects such as the projects for this book that
you can download from our website.
An overview of Android .........................................................4
Types of devices 4
Types of apps 6
A brief history 8
Versions 10
System architecture 12
How apps are compiled and run 14
An introduction to Android Studio .....................................16
How to work with the Welcome page 16
How to open an existing project 16
How to view the user interface for an app 18
How to view the code for an app 20
How to run an app on aphysical device 22
How to run an app on an emulator 22
The user interface 24
Perspective...........................................................................26
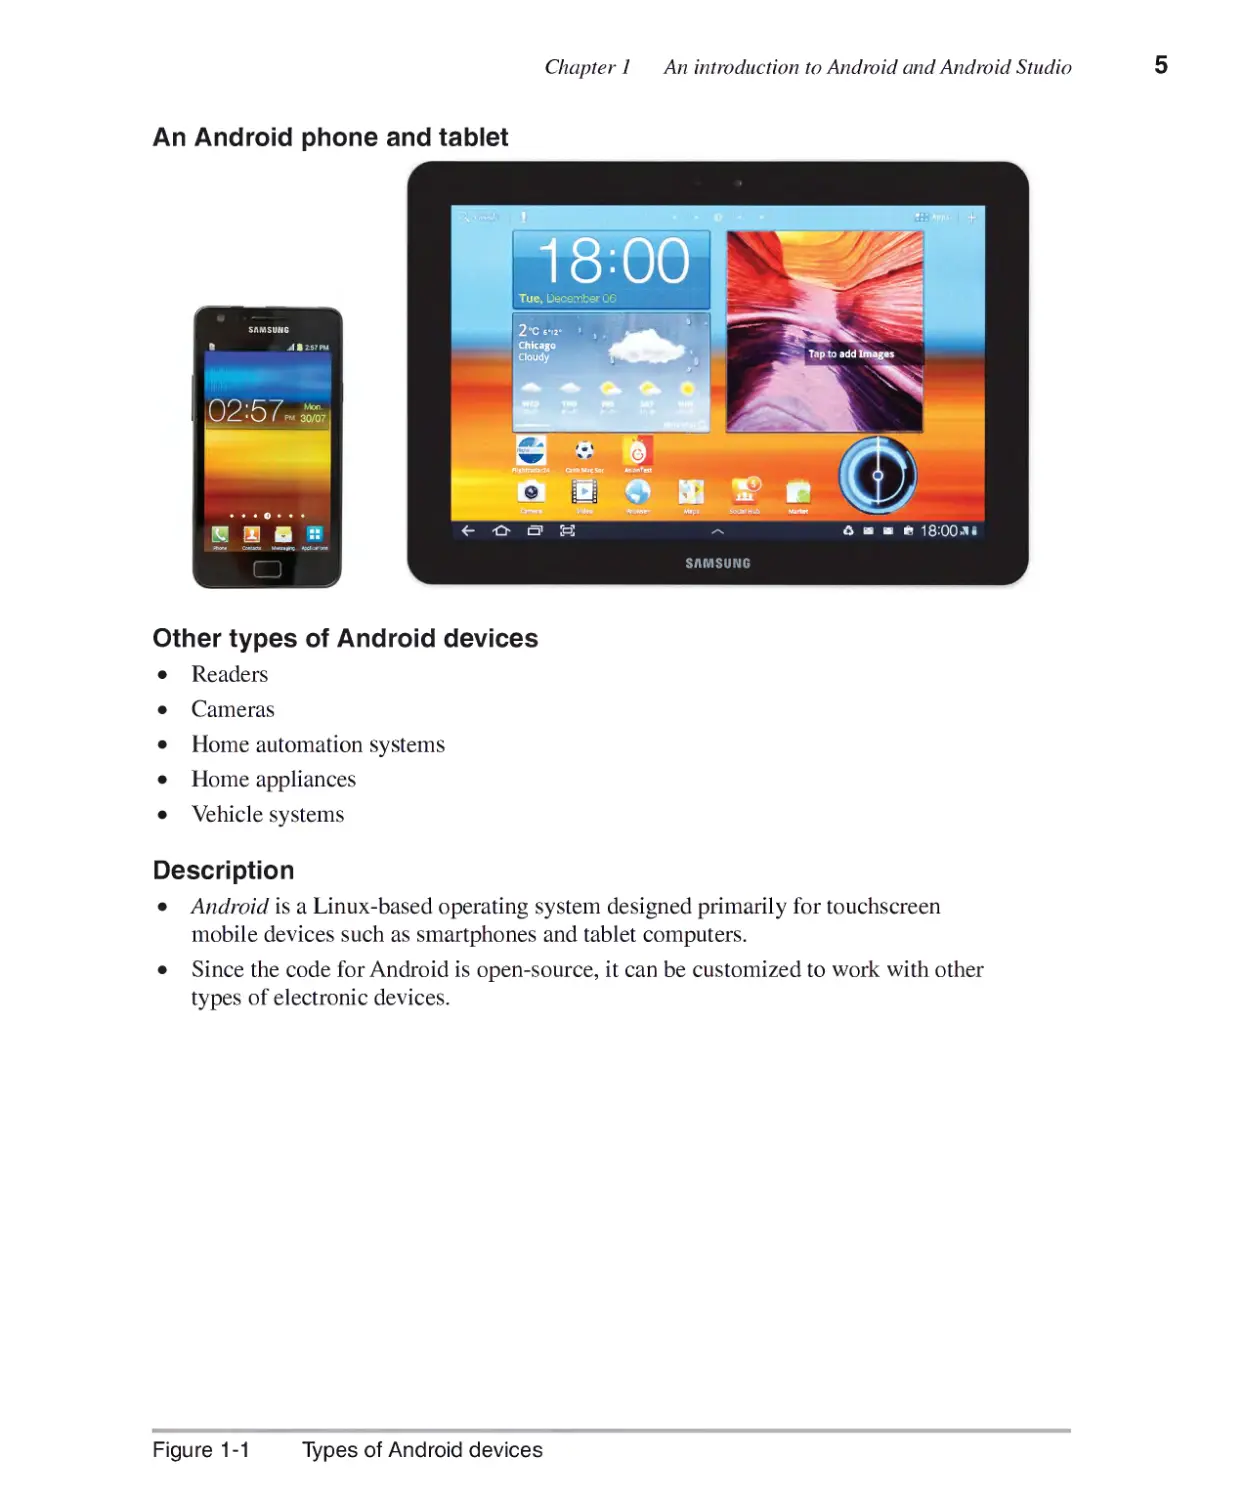
4 Section 1 Get started fast with Android
An overview of Android
Android is a Linux-based operating system designed primarily for
touchscreen mobile devices such as smartphones and tablets. Before you begin
developing apps that run on Android, it's helpful to take a moment to consider
the types of Android devices and apps that are available today. In addition, it's
helpful to understand the history, versions, and architecture of Android.
Types of devices
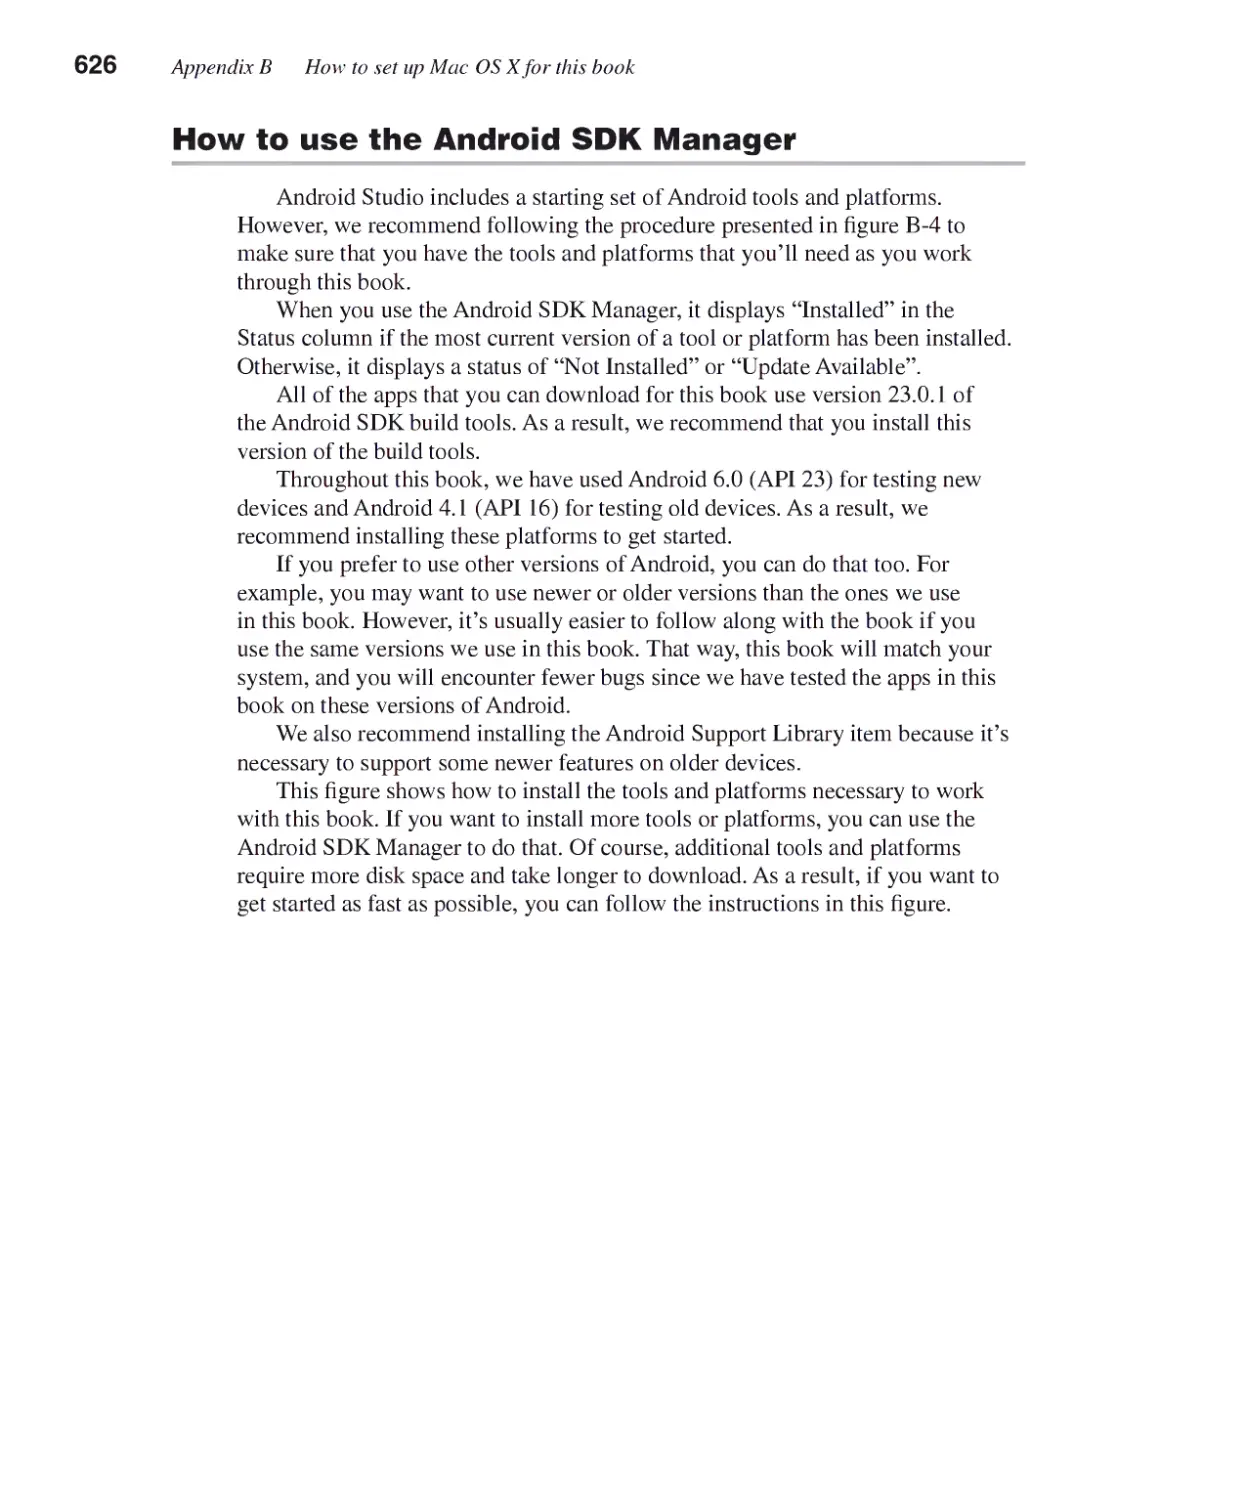
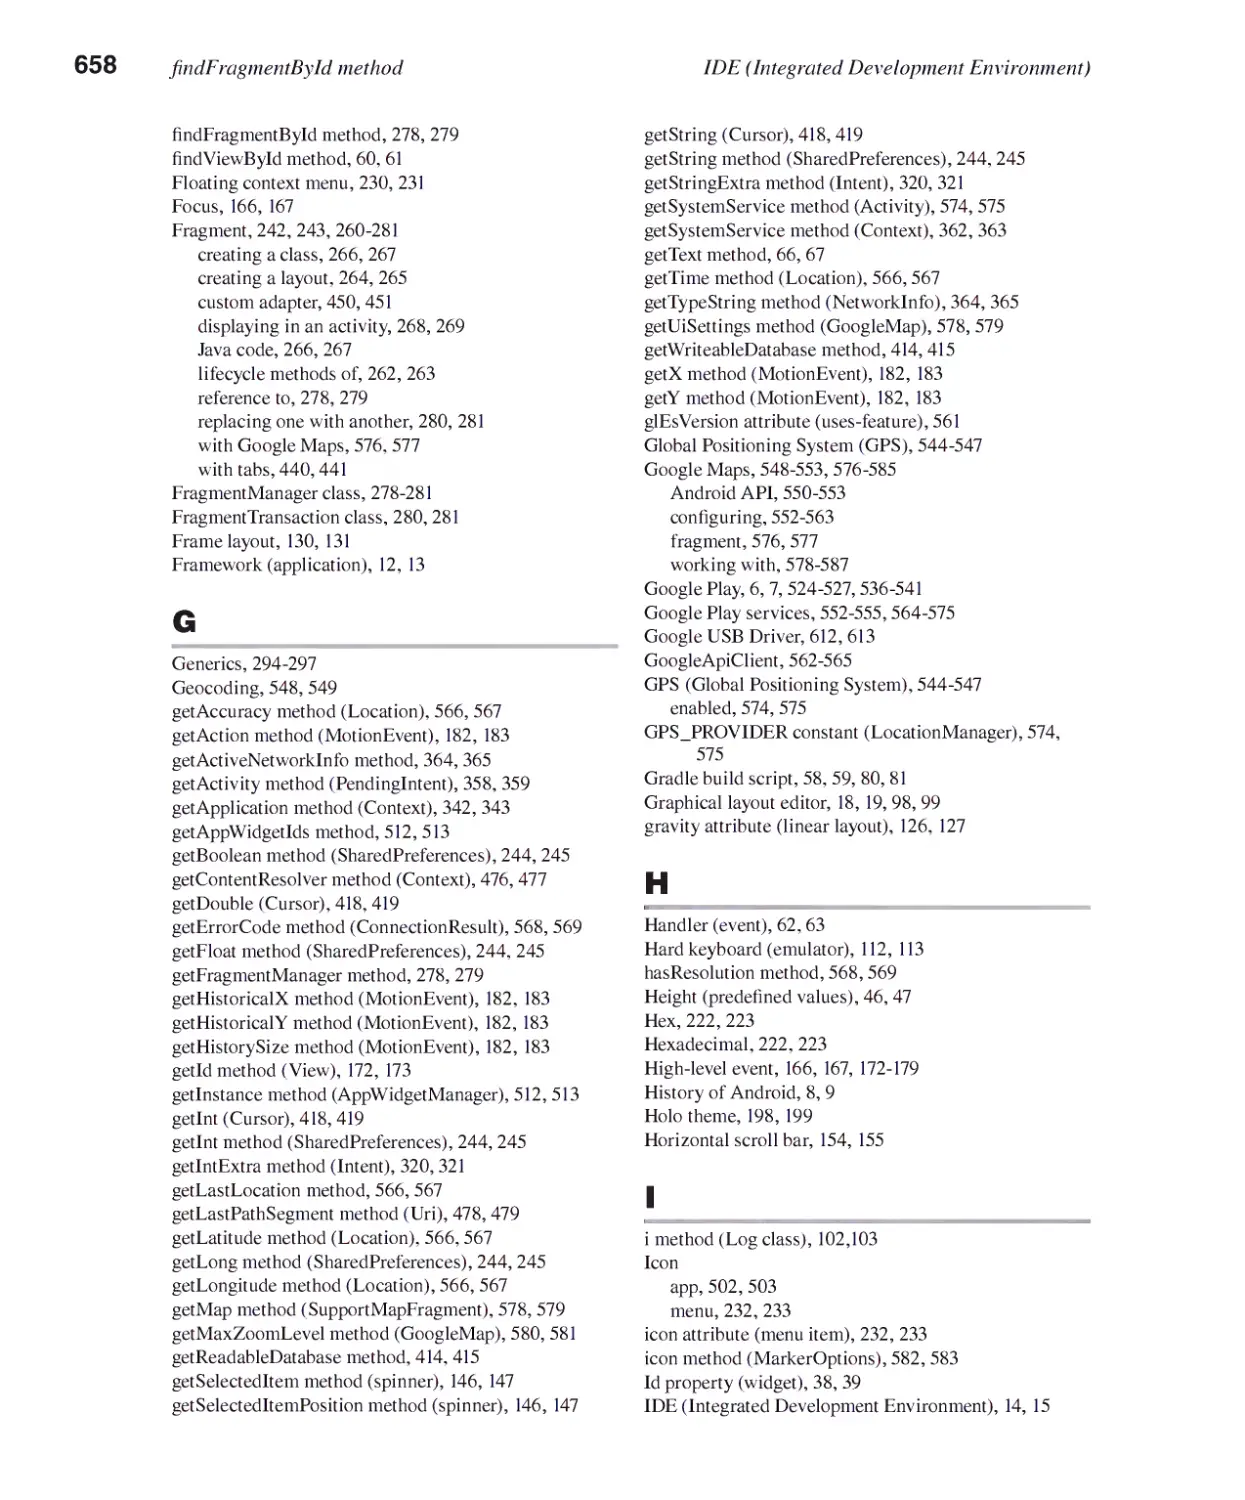
Figure 1-1 starts by showing two of the most popular Android devices, a
smartphone and a tablet. However, the code for Android is open-source. As a
result, it can be customized to work with other types of electronic devices such
as eBook readers, cameras, home automation systems, home appliances, vehicle
systems, and so on.
Chapter 1 An introduction to Android and Android Studio
An Android phone and tablet
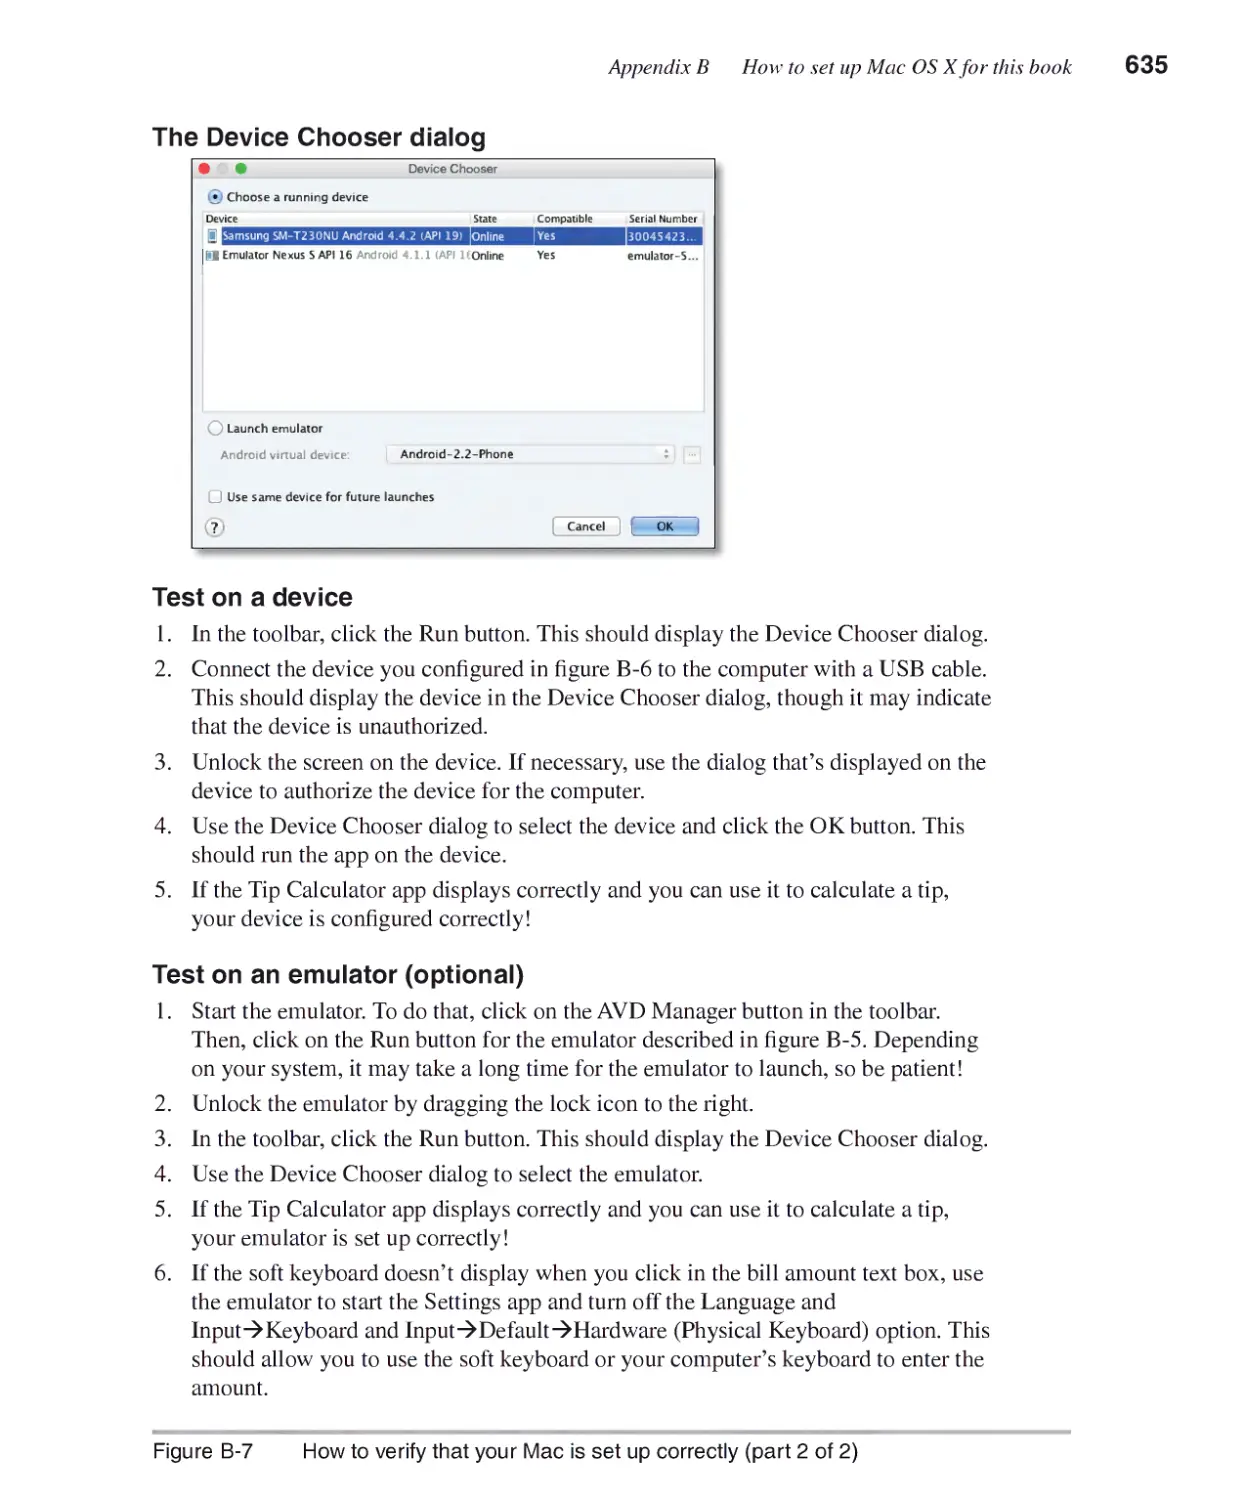
SAMSUNG
I • 2:57 PM
:5
on.
pm 30/0
« • • 0 • • *
v.
□
II - Im-:iiU: I
°C 6°t2°
hicago
loudy
wi
% 9
o
Rl«htradar24 CanliMacSor As net
@
a
<- O O H
add
»^>
v.
Mirtet
G
A 18:00*1
SAMSUNG
Other types of Android devices
• Readers
• Cameras
• Home automation systems
• Home appliances
• Vehicle systems
Description
• Android is a Linux-based operating system designed primarily for touchscreen
mobile devices such as smartphones and tablet computers.
• Since the code for Android is open-source, it can be customized to work with other
types of electronic devices.
Figure 1 -1 Types of Android devices
6 Section 1 Get started fast with Android
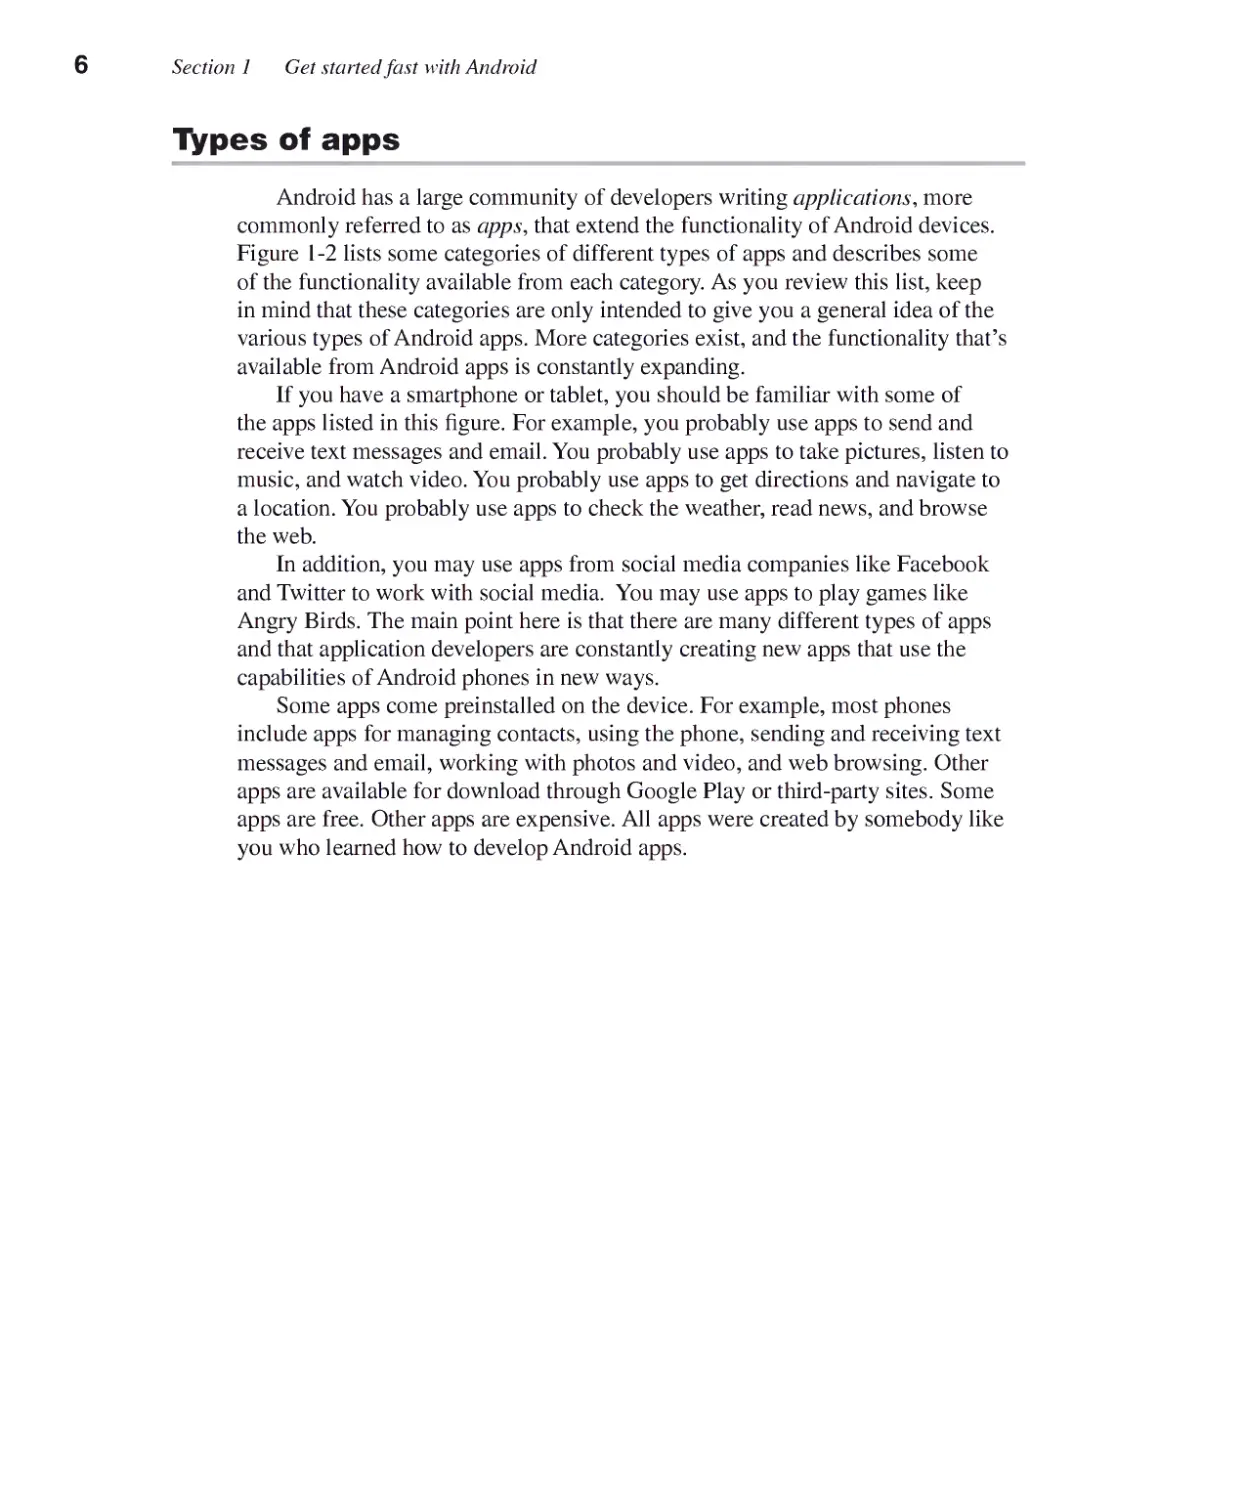
Types of apps
Android has a large community of developers writing applications, more
commonly referred to as apps, that extend the functionality of Android devices.
Figure 1-2 lists some categories of different types of apps and describes some
of the functionality available from each category. As you review this list, keep
in mind that these categories are only intended to give you a general idea of the
various types of Android apps. More categories exist, and the functionality that's
available from Android apps is constantly expanding.
If you have a smartphone or tablet, you should be familiar with some of
the apps listed in this figure. For example, you probably use apps to send and
receive text messages and email. You probably use apps to take pictures, listen to
music, and watch video. You probably use apps to get directions and navigate to
a location. You probably use apps to check the weather, read news, and browse
the web.
In addition, you may use apps from social media companies like Facebook
and Twitter to work with social media. You may use apps to play games like
Angry Birds. The main point here is that there are many different types of apps
and that application developers are constantly creating new apps that use the
capabilities of Android phones in new ways.
Some apps come preinstalled on the device. For example, most phones
include apps for managing contacts, using the phone, sending and receiving text
messages and email, working with photos and video, and web browsing. Other
apps are available for download through Google Play or third-party sites. Some
apps are free. Other apps are expensive. All apps were created by somebody like
you who learned how to develop Android apps.
Chapter 1 An introduction to Android and Android Studio
Types of Android apps
Category Functionality
Communications
Photography
Audio
Video
Weather
News
Personalization
Productivity
Finance
Business
Books
Reference
Education
Shopping
Social
Fitness
Sports
Travel
Games
Send and receive text messages, send and receive email, make and
receive phone calls, manage contacts, browse the web.
Take photos, edit photos, manage photos.
Play audio, record audio, edit audio.
Play video, record video, edit video.
View weather reports.
Read news and bloes.
Organize home screen, customize ringtones, customize wallpaper.
Manaee calendar, manage task list, take notes, make calculations.
Manage bank accounts, make payments, manage insurance policies,
manage taxes, manage investment portfolio.
Read documents, edit documents, track packages.
Read and search eBooks.
Get info from a dictionary, thesaurus, or wiki.
Prepare for exams, learn foreign languages, improve vocabulary.
Buy items online, use electronic coupons, compare prices, keep
grocery lists, read product reviews.
Use social networking apps such as Facebook and Twitter.
Monitor and document workouts.
Track sport scores, manage fantasy teams.
Get directions, use GPS to navigate to a location, get information
about nearby places to visit.
Play games such as arcade games, action games, puzzles, card
games, casino games, sports games.
Description
• Android has a large community of developers writing applications, more
commonly referred to as apps, that extend the functionality of Android devices.
• Android apps are available for download through Google Play or third-party sites
Figure 1 -2 Types of Android apps
8 Section 1 Get started fast with Android
A brief history
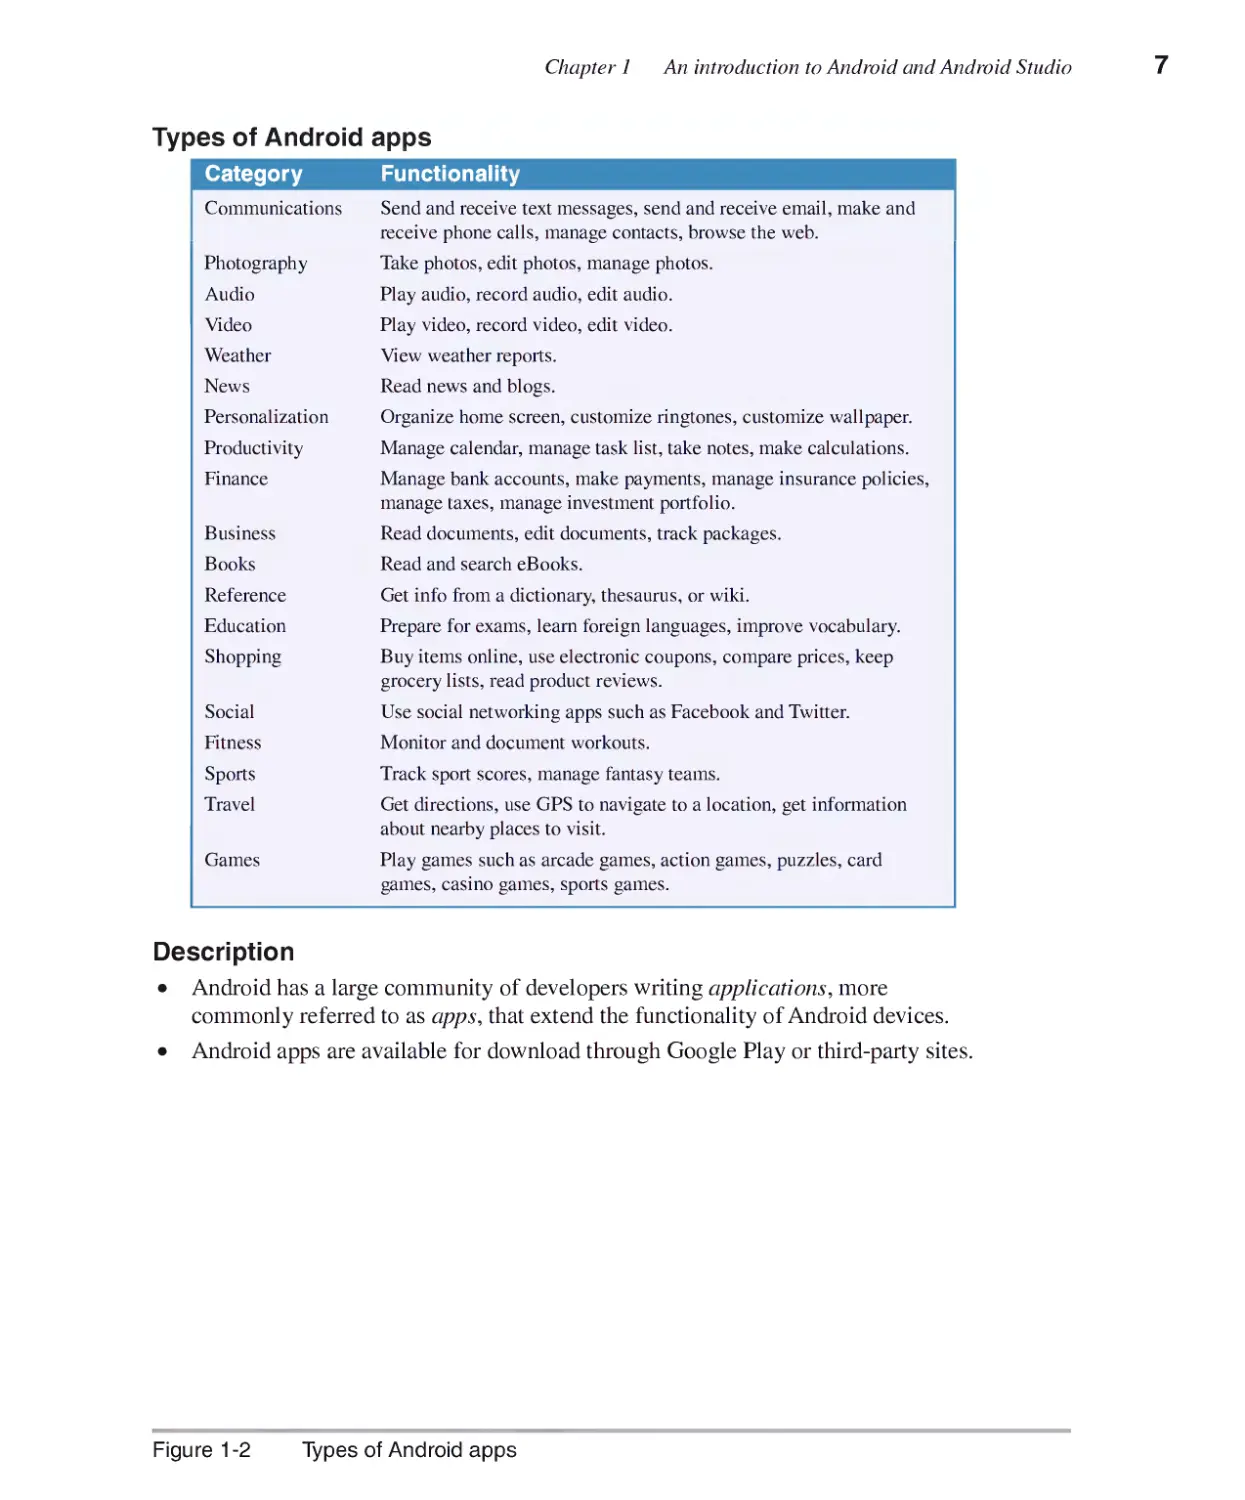
Figure 1-3 summarizes the history of Android. In 2003, a handful of
entrepreneurs in Palo Alto, California, founded Android, Inc. In 2005, Google bought
Android, Inc. Then, in 2007, the Open Handset Alliance was announced. This
alliance consists of a consortium of hardware, software, and telecommunication
companies devoted to advancing open standards for mobile devices. That same
year, Google released Android code as open source under the Apache License. In
addition, Google helped to create the Android Open Source Project (AOSP) and
put it in charge of the maintenance and further development of Android.
In 2008, the first version of the Android Software Development Kit (SDK)
was released. This SDK contains all of the tools that Android developers need to
develop apps. Later in 2008, the first Android phones became available.
Since 2008, new versions of the Android SDK have continued to be released,
and Android devices have continued to proliferate. During that time, millions of
apps have been developed, and billions of apps have been downloaded.
Chapter 1 An introduction to Android and Android Studio
A brief history of Android
Year Event
2003
2005
2007
2008
2009-present
Android, Inc. is founded in Palo Alto, California.
Google buys Android, Inc.
The Open Handset Alliance is announced. This alliance consists of a
consortium of hardware, software, and telecommunication companies
devoted to advancing open standards for mobile devices.
Google releases Android code as open source under the Apache License.
The Android Open Source Project (AOSP\ led by Google, is tasked with
the maintenance and further development of Android.
Android Software Development Kit (SDK) 1.0 is released. This kit
contains all of the tools needed to develop Android apps.
The first Android phones become available.
New versions of the Android SDK continue to be released.
Android devices continue to proliferate.
Millions of apps are developed.
Billions of apps are downloaded.
Description
• Android has experienced tremendous growth since its release in 2008.
Figure 1 -3 A brief history of Android
Section 1 Get started fast with Android
Versions
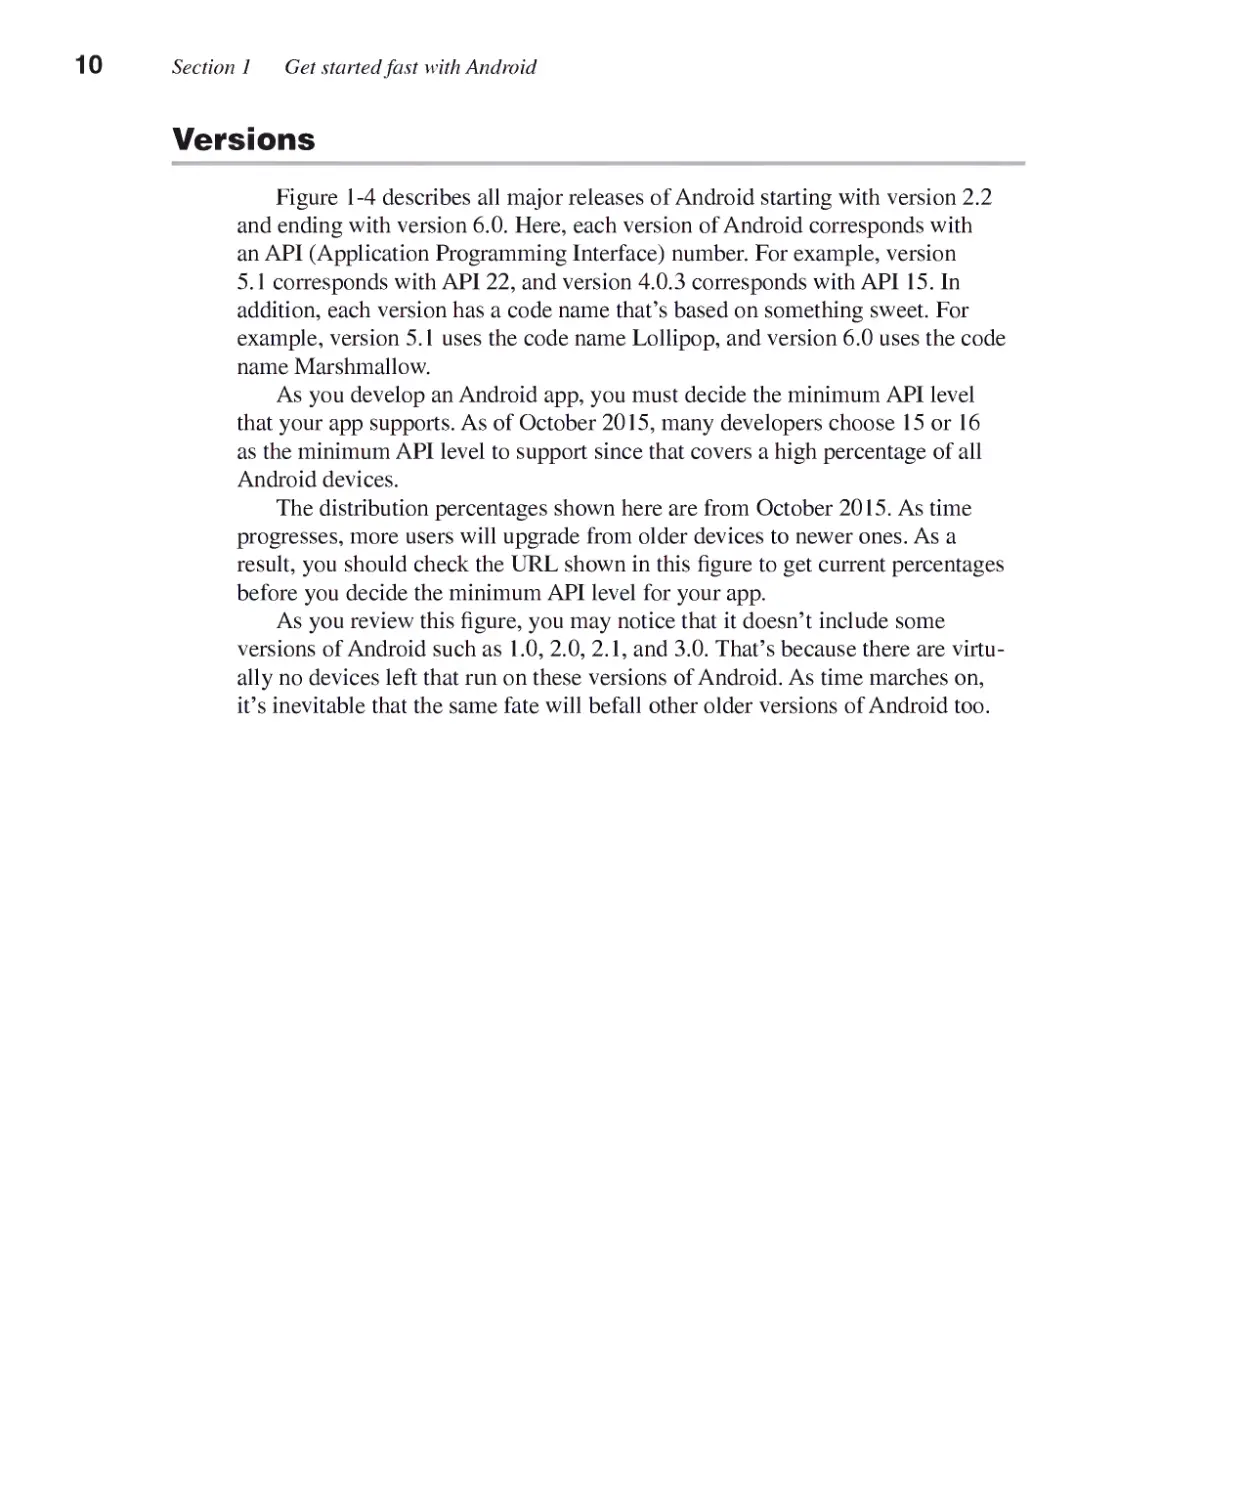
Figure 1-4 describes all major releases of Android starting with version 2.2
and ending with version 6.0. Here, each version of Android corresponds with
an API (Application Programming Interface) number. For example, version
5.1 corresponds with API 22, and version 4.0.3 corresponds with API 15. In
addition, each version has a code name that's based on something sweet. For
example, version 5.1 uses the code name Lollipop, and version 6.0 uses the code
name Marshmallow.
As you develop an Android app, you must decide the minimum API level
that your app supports. As of October 2015, many developers choose 15 or 16
as the minimum API level to support since that covers a high percentage of all
Android devices.
The distribution percentages shown here are from October 2015. As time
progresses, more users will upgrade from older devices to newer ones. As a
result, you should check the URL shown in this figure to get current percentages
before you decide the minimum API level for your app.
As you review this figure, you may notice that it doesn't include some
versions of Android such as 1.0, 2.0, 2.1, and 3.0. That's because there are
virtually no devices left that run on these versions of Android. As time marches on,
it's inevitable that the same fate will befall other older versions of Android too.
Chapter 1 An introduction to Android and Android Studio
11
Android versions
Version
2.2
2.3.3 -
4.0.3 -
4.1.x
4.2.x
4.3
4.4
5.0
5.1
6.0
- 2.3.7
- 4.0.4
Code name
Froyo
Gineerbread
Ice Cream Sandwich
Jelly Bean
KitKat
Lollipop
Marshmallow
API
8
10
15
16
17
18
19
21
22
23
Distribution
0.2%
3.8%
3.4%
11.4%
14.5%
4.3%
38.9%
15.6%
7.9%
A URL for current distribution percentages
http://developer.android.com/about/dashboards/index.html
Description
• The distribution percentages in this figure are from October 2015. To get current
percentages, please visit the URL shown above.
• As you develop an Android app, you must decide the minimum API level that your
app supports. As of October 2015, many developers choose Android 4.0.3 (API 15)
as the minimum API level to support since that covers a high percentage of all
Android devices.
Figure 1-4 Android versions
Section 1 Get started fast with Android
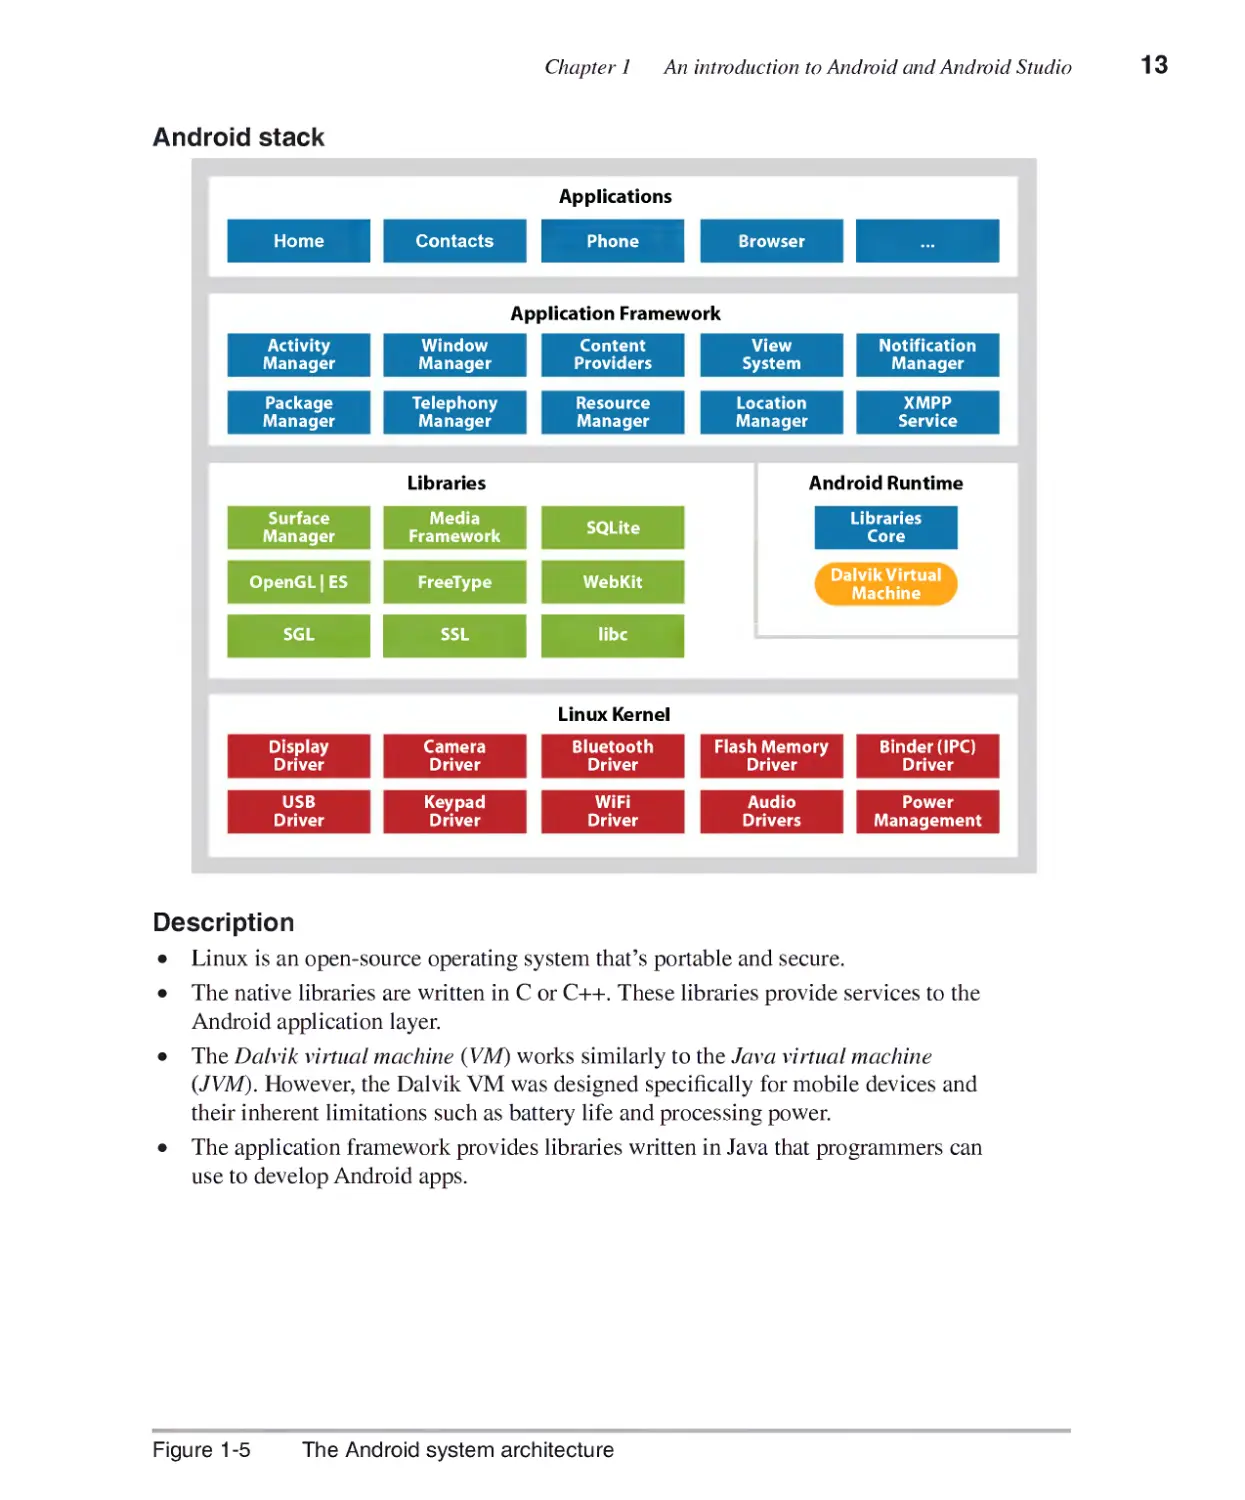
System architecture
Figure 1-5 shows the Android system architecture, which is also known as
the Android stack. This stack has four layers.
The bottom layer of the stack is Linux, an open-source operating system
that's portable and secure. This operating system provides low-level drivers for
hardware, networking, file system access, and inter-process communication
(IPC).
The second layer up in the stack contains the native libraries. These libraries
are written in C or C++. They include the Dalvik virtual machine (VM), which
works similarly to the Java virtual machine (JVM). However, the Dalvik VM
was designed specifically for mobile devices and their inherent limitations, such
as battery life and processing power.
The third layer up in the stack contains the application framework. This
layer is written mostly in Java, and it provides libraries that can be used by
the top layer of the stack. In this book, you'll learn how to use some of these
libraries, such as the libraries for the notification manager, content providers, and
the location manager.
The top layer of the stack contains Android apps. These apps include
pre-installed apps such as the apps that you can use to manage the Home screen,
manage your contacts, make and receive calls, browse the web, and so on. In
addition, you can download and install other apps. These types of apps are
written in Java, and they are the type of apps that you'll learn to develop in this
book.
Android stack
Chapter 1 An introduction to Android and Android Studio
Home
Contacts
Applications
Phone
Browser
Application Framework
Activity
Manager
Package
Manager
Surface
Manager
OpenGL|ES
Window
Manager
Telephony
Manager
Libraries
Media
Framework
FreeType
Content
Providers
Resource
Manager
SQLite
WebKit
View Notification
System Manager
Location XMPP
Manager Service
Android Runtime
Libraries
Core
DalvikVirtual
Machine
SGL
SSL
libc
Display
Driver
USB
Driver
Camera
Driver
Keypad
Driver
Linux Kernel
Bluetooth
Driver
WiFi
Driver
Flash Memory
Driver
Audio
Drivers
Binder (IPC)
Driver
Power
Management
Description
• Linux is an open-source operating system that's portable and secure.
• The native libraries are written in C or C++. These libraries provide services to the
Android application layer.
• The Dcdrik virtual machine (VM) works similarly to the Java virtual machine
(JVM). However, the Dalvik VM was designed specifically for mobile devices and
their inherent limitations such as battery life and processing power.
• The application framework provides libraries written in Java that programmers can
use to develop Android apps.
Figure 1-5 The Android system architecture
Section 1 Get started fast with Android
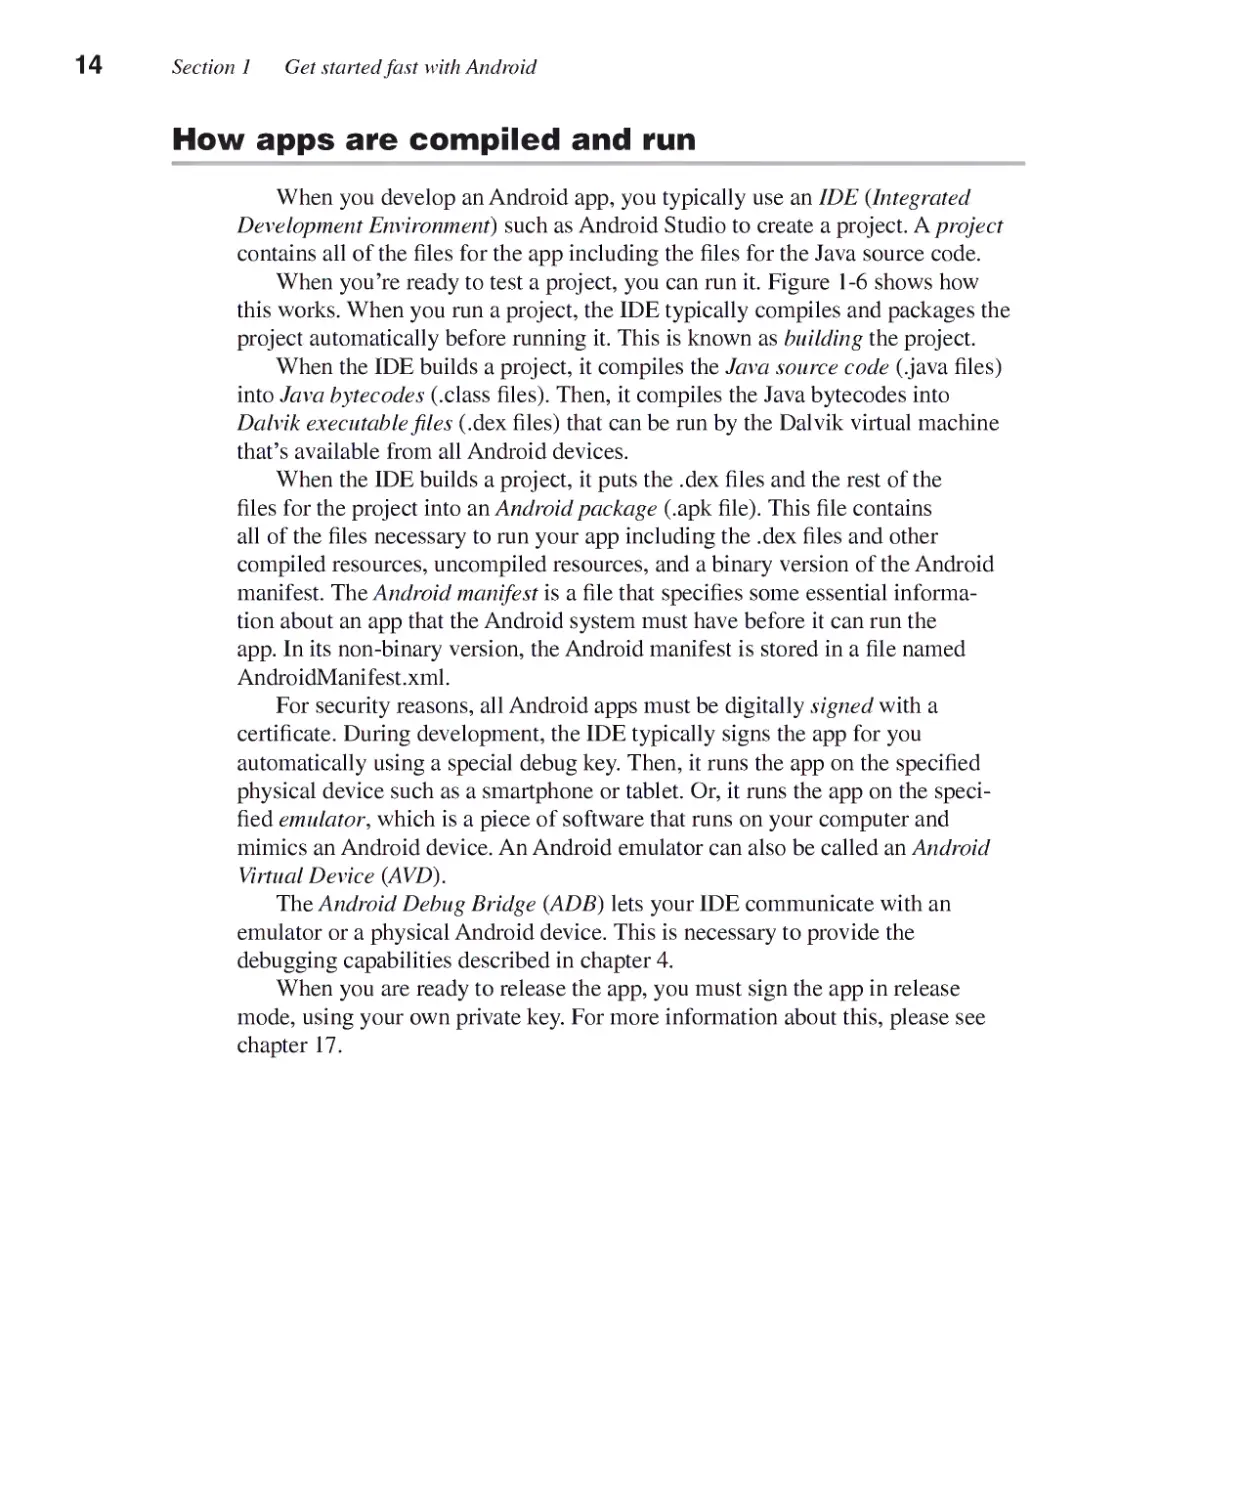
How apps are compiled and run
When you develop an Android app, you typically use an IDE (Integrated
Development Environment) such as Android Studio to create a project. A project
contains all of the files for the app including the files for the Java source code.
When you're ready to test a project, you can run it. Figure 1-6 shows how
this works. When you run a project, the IDE typically compiles and packages the
project automatically before running it. This is known as building the project.
When the IDE builds a project, it compiles the Java source code (Java files)
into Java bytecodes (.class files). Then, it compiles the Java bytecodes into
Dalvik executable files (.dex files) that can be run by the Dalvik virtual machine
that's available from all Android devices.
When the IDE builds a project, it puts the .dex files and the rest of the
files for the project into an Android package (.apk file). This file contains
all of the files necessary to run your app including the .dex files and other
compiled resources, uncompiled resources, and a binary version of the Android
manifest. The Android manifest is a file that specifies some essential
information about an app that the Android system must have before it can run the
app. In its non-binary version, the Android manifest is stored in a file named
AndroidManifest.xml.
For security reasons, all Android apps must be digitally signed with a
certificate. During development, the IDE typically signs the app for you
automatically using a special debug key. Then, it runs the app on the specified
physical device such as a smartphone or tablet. Or, it runs the app on the
specified emulator, which is a piece of software that runs on your computer and
mimics an Android device. An Android emulator can also be called an Android
Virtual Device (AVD).
The Android Debug Bridge (ADB) lets your IDE communicate with an
emulator or a physical Android device. This is necessary to provide the
debugging capabilities described in chapter 4.
When you are ready to release the app, you must sign the app in release
mode, using your own private key. For more information about this, please see
chapter 17.
Chapter 1 An introduction to Android and Android Studio
Android system architecture
Android Package (.apk)
.dex complied
files resources
uncomplied
resources
>> Compilation Signing
Android
Project
Device or
Emulator
Description
• When you develop an Android app, you typically use an IDE (Integrated
Development Environment) such as Android Studio to create a. project, and you
typically use Java as the programming language.
• When you develop an Android app, you can run it on a physical Android device,
such as a smartphone or tablet. Or, you can run it on an emulator, which is a
piece of software that runs on your computer and acts like an Android device. An
Android emulator can also be called an Android Virtual Device (AVD).
• Before you can run a project, you must build the project. Typically, the IDE
automatically builds a project before running it.
• When the IDE builds a project, it compiles the Java source code (Java files) into
Java bytecodes (.class files) and then into Dalvik executable files (.dex files). Dalvik
executable files can be run by the Dalvik virtual machine that's available from all
Android devices.
• When the IDE builds a project, it puts the files for the project into an Android
package (.apk file). This file contains all of the files necessary to run your app on a
device or emulator including the .dex files, compiled resources (the resources.arse
file), uncompiled resources, and a binary version of the AndroidManifest.xml file.
• To run an app on an emulator or device, the app must be signed with a digital
certificate that has a private key. During development, the IDE automatically signs
the app for you in debug mode using a special debug key. Before you release an
app, you must sign the app in release mode, using your own private key. For more
information about this, please see chapter 17.
• The Android Debug Bridge (ADB) lets your IDE communicate with an emulator or
a physical Android device.
Figure 1 -6 How an Android app is compiled and run
Section 1 Get started fast with Android
An introduction to Android Studio
Android Studio is an IDE that you can use to develop Android apps. Android
Studio is based on IntelliJ IDEA. It's open-source, available for free, and runs on
all modern operating systems. Although it's possible to use other IDEs, Android
Studio is currently the official IDE for Android, replacing Eclipse with ADT. As
a result, most Android developers use Android Studio for new development.
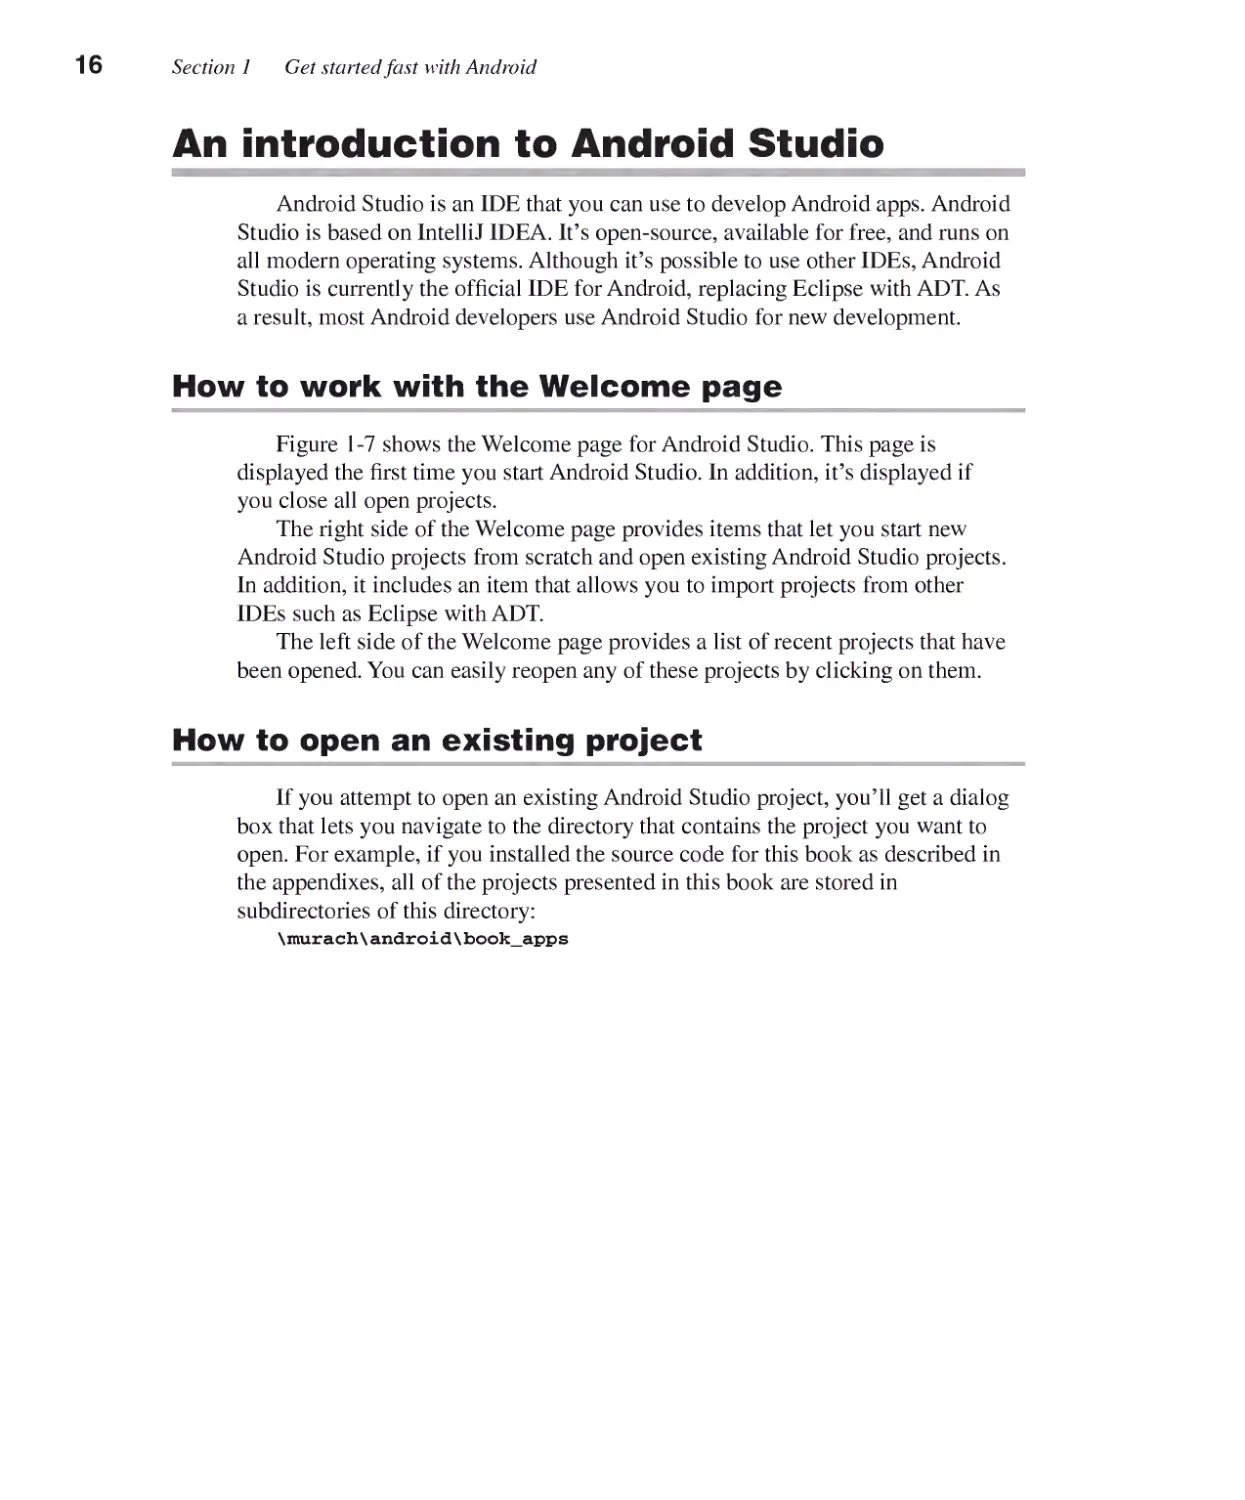
How to work with the Welcome page
Figure 1-7 shows the Welcome page for Android Studio. This page is
displayed the first time you start Android Studio. In addition, it's displayed if
you close all open projects.
The right side of the Welcome page provides items that let you start new
Android Studio projects from scratch and open existing Android Studio projects.
In addition, it includes an item that allows you to import projects from other
IDEs such as Eclipse with ADT.
The left side of the Welcome page provides a list of recent projects that have
been opened. You can easily reopen any of these projects by clicking on them.
How to open an existing project
If you attempt to open an existing Android Studio project, you'll get a dialog
box that lets you navigate to the directory that contains the project you want to
open. For example, if you installed the source code for this book as described in
the appendixes, all of the projects presented in this book are stored in
subdirectories of this directory:
\murach\android\book_apps
Chapter 1 An introduction to Android and Android Studio
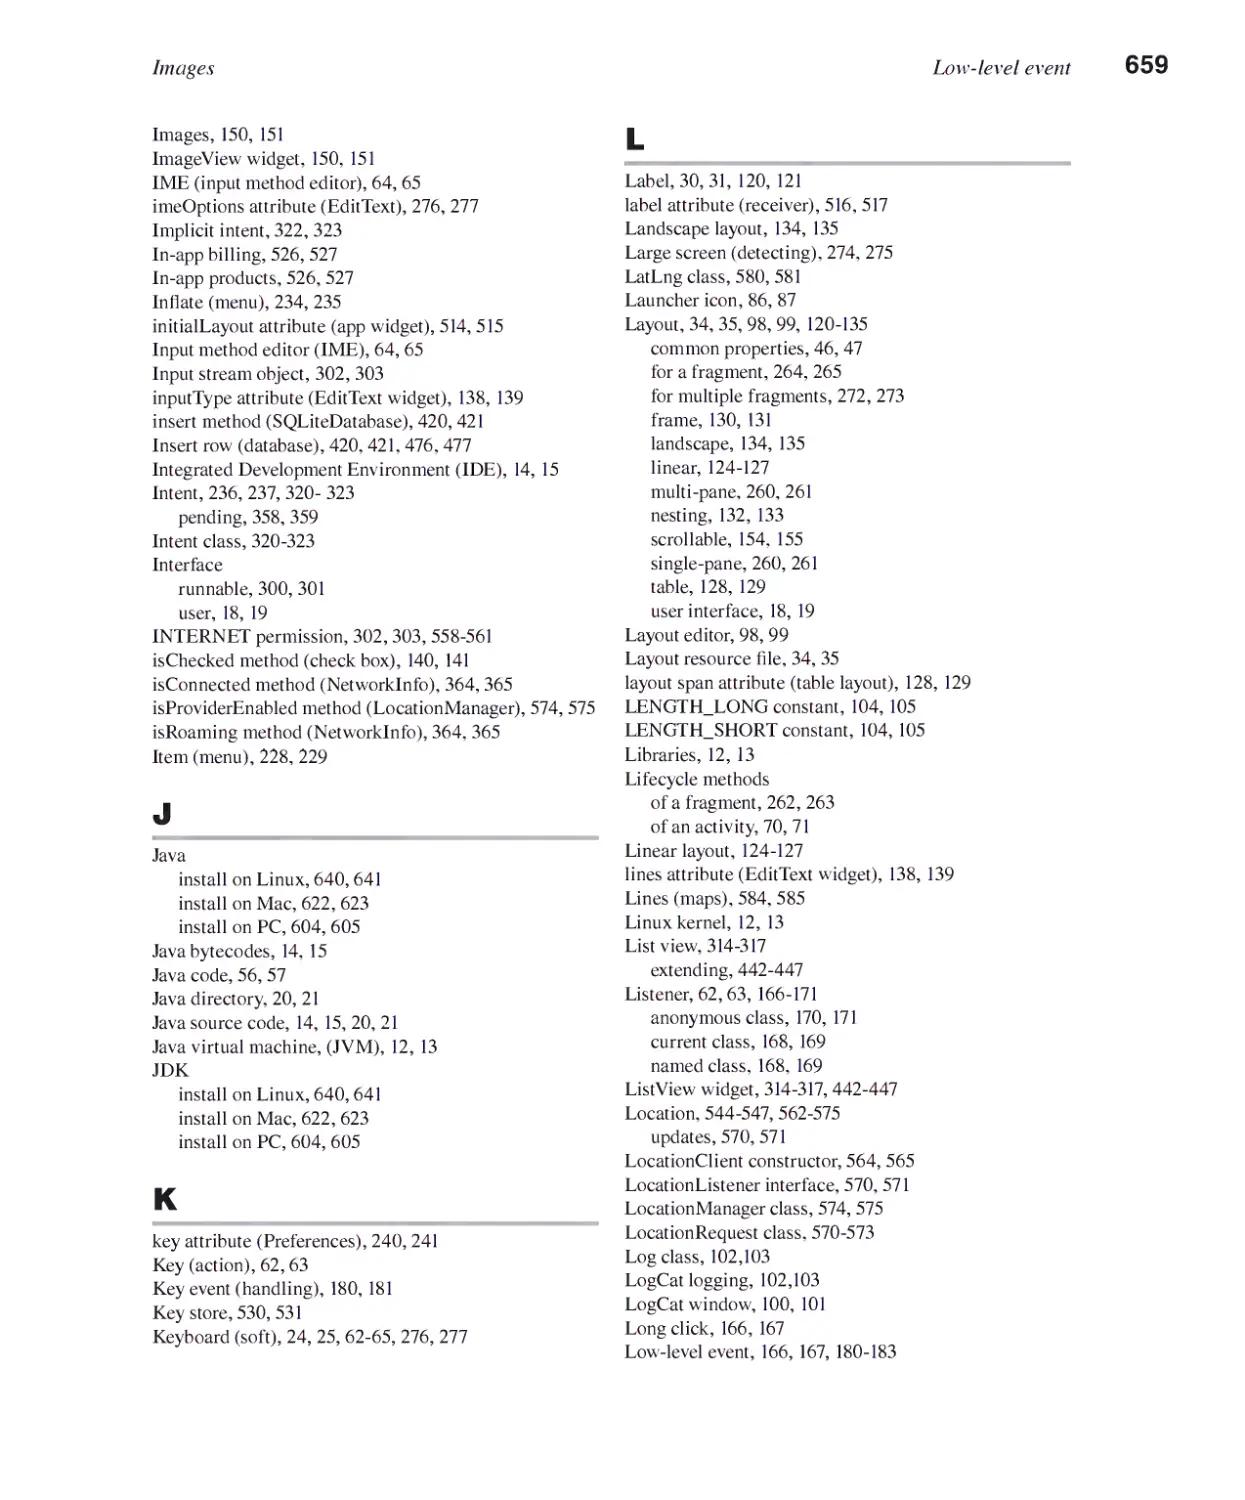
The Welcome page
r
_ Android Studio
Welcome to And
Recent Projects
r
ch03_TipCalculator
C\murach\android\b...s\ch03_TipCalculator
chl2_NewsReader
C vmurach' android...pps\chl2_NewsReader
chll_NewsReader
C:\muraclvandroid...pps^hll_NewsReader
ch09_TipCalculator
C vmurach-.android\b...s ch09_TipCalculator
chlO_NewsReader
C\muracrvandroid...pps\chlO_NewsReader
ch08_TipCalculator
C:\murach,,-android\b...s\ch08_TipCalculator
ch07_TipCalculator_styles
Ar
C vmurach\androidvb..._TipCalculator_styles
ch07_TipCalculator_themes
C \murach,android\...TipCalculator_themes
ch06_TipCalculator
bdro'td Studio L31 Build 14L2135290 Chec* for updates rx»
^
u
^^^™ f *
IE
©
vcs
♦
P'
IE.
V.
__£v2_
roid Studio
Quick Start
Start a new Android Studio project
Open an existing Android Studio project
Import an Android code sample
Check out project from Version Control
Import project (Eclipse ADT, Gradle, etc.)
Configure ^
Docs and How-Tos ^
^
Description
• An Android Studio project consists of a top-level directory that contains the
directories and files for an app.
• When you start Android Studio for the first time, it displays a Welcome page.
Android Studio also displays this page if you close all open projects.
• The left side of the Welcome page displays recently opened projects. You can
reopen them by clicking on them.
• The right side of the Welcome page displays options that you can use to start a
new project, open an existing project, or import a project from another IDE such as
Eclipse with the ADT bundle.
Figure 1-7 The Welcome page
Section 1 Get started fast with Android
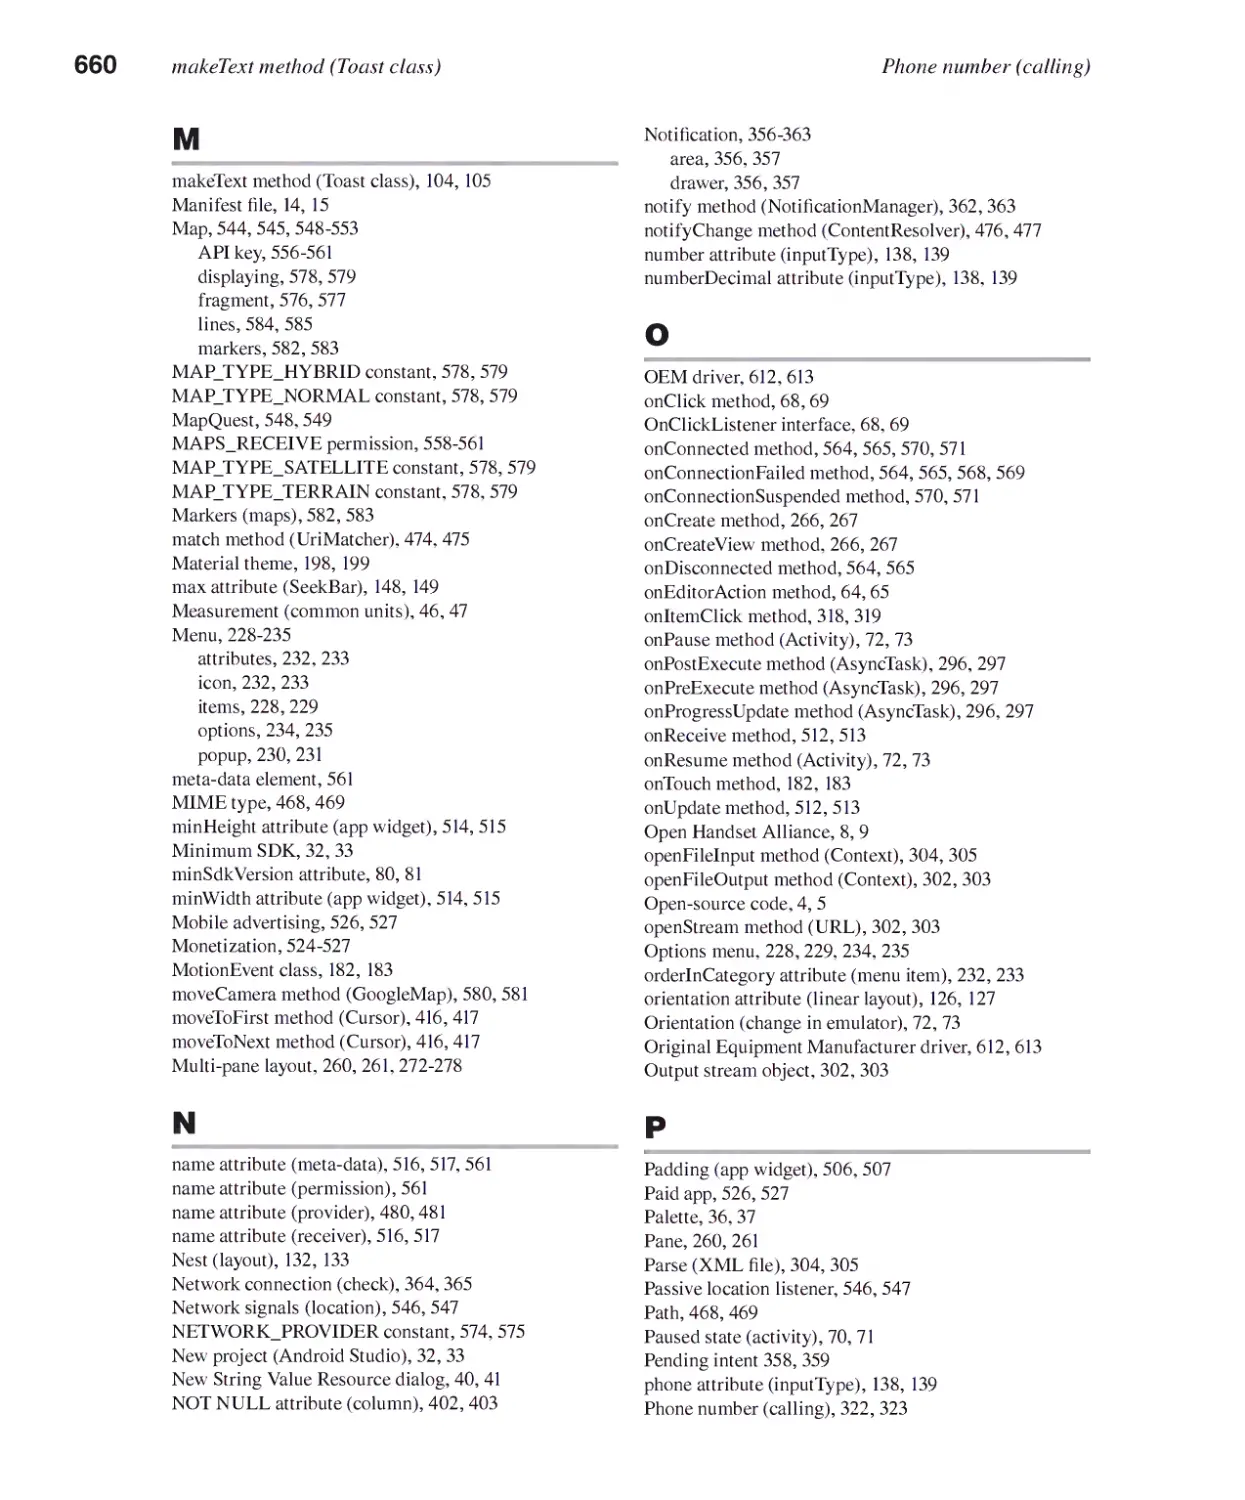
How to view the user interface for an app
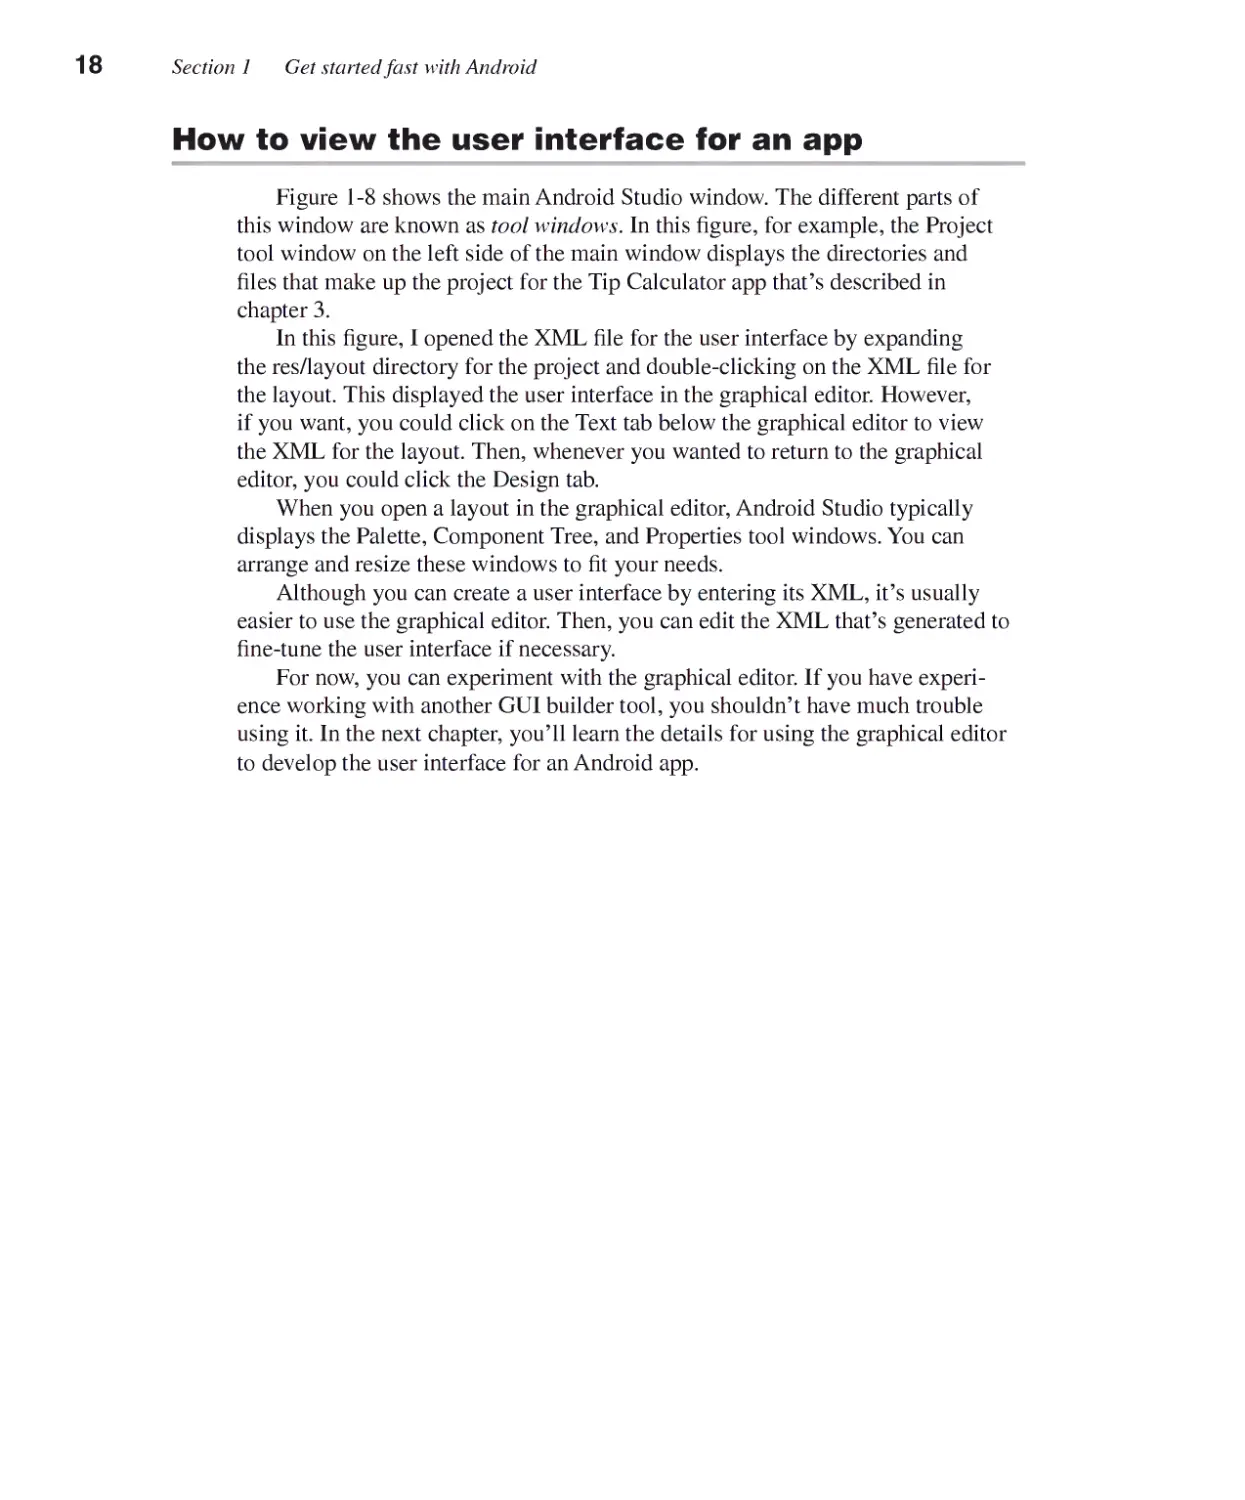
Figure 1-8 shows the main Android Studio window. The different parts of
this window are known as tool windows. In this figure, for example, the Project
tool window on the left side of the main window displays the directories and
files that make up the project for the Tip Calculator app that's described in
chapter 3.
In this figure, I opened the XML file for the user interface by expanding
the res/layout directory for the project and double-clicking on the XML file for
the layout. This displayed the user interface in the graphical editor. However,
if you want, you could click on the Text tab below the graphical editor to view
the XML for the layout. Then, whenever you wanted to return to the graphical
editor, you could click the Design tab.
When you open a layout in the graphical editor, Android Studio typically
displays the Palette, Component Tree, and Properties tool windows. You can
arrange and resize these windows to fit your needs.
Although you can create a user interface by entering its XML, it's usually
easier to use the graphical editor. Then, you can edit the XML that's generated to
fine-tune the user interface if necessary.
For now, you can experiment with the graphical editor. If you have
experience working with another GUI builder tool, you shouldn't have much trouble
using it. In the next chapter, you'll learn the details for using the graphical editor
to develop the user interface for an Android app.
Chapter 1 An introduction to Android and Android Studio
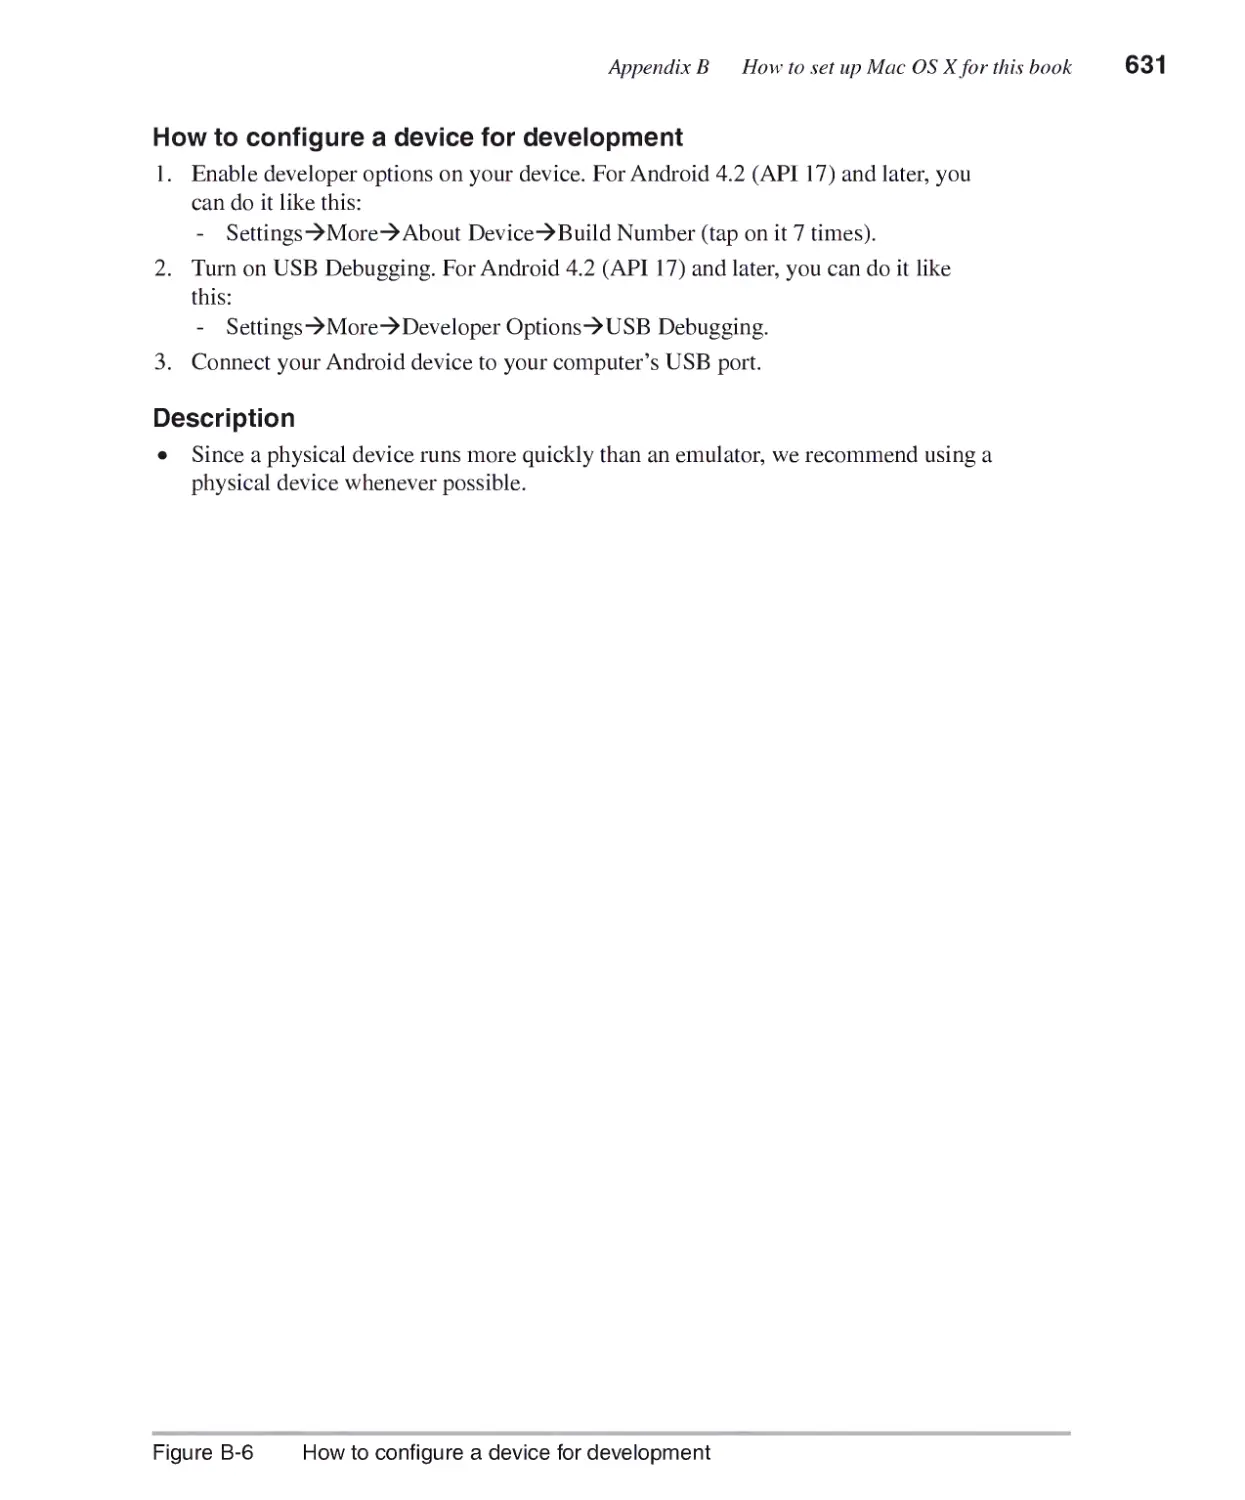
The layout for the Tip Calculator activity in the graphical editor
_ ch03_TipCalculator - [C:\murach\android\book_apps\ch03JTipCalculator] - [app] - ...\app\src\main\res\layout\activity_tip_calculator.xml - An...
s
File Edit View Navigate Code Analyze Refactor Build Ru_n Tools VCS Window Help
■■■ app »
► «c ►:
n l=j G> + * & 0) tf Q & ♦♦ *S
Cf ch03_TipCalcu!ator ■■ Cl app > t src Q main C™ res ■ S layout . i« activity_tip_calculator.xml
j ■, 1 1
I r%
TipCalculatorActivity.java * p activity_tip_calculator.xml *
** "*" d' 10;Nexus4' □- OAppTheme !
*■ a i il
□ lW
CL
*'*-!'
-t!
3
f"--l
c
IE
>
"5
Ciapp
► D manifests
► Q Java
▼ Cares
► B drawable
▼ B layout
^ activrt
► S menu
► S values
^ Gradle Scripts
3 build.gradle (I
•* build.gradle (l|
■* settings.gradU
[ti local.propertie
Palette
C] Widgets
L^D* Plain TextView
|Ab, Large Text
iAb, Medium Text
(Ag Small Text
k Button
ok Small Button
•' RadioButton
@CheckBox
o Switch
_ ToggleButton
u ImageButton
ImageView
™ ProgressBar (L«
■ ProgressBar (N
BSIkI-
Component Tree
T ^ RelativeLayout
z # * -*«
ill*
■n ^ El C5 «t
(j Tip Calculator
I
JHJill Amount #-
Properties
T
□3 bilAmountLabel (TextView) - @stn
IT? billAmountEditText(EditText) @s
iiSl percentLabel (TextView) - ©string/
At:1 percentTextView (TextView) ©st
? U T
Perceint J5% ±
Tip $0.00
Total $0.00
top:top
top:bottom
left:left
left:right
bottom:bottom
Design
Text
m
<
n
\
Q.
^ TODO ■$* 6: Android M Terminal j^ 0: Messages
Event Log W] Gradle Console
□
n a n a Conte*+ *no conte^
Description
• In Android development, an activity defines one screen of an app.
• In Android development, a layout stores the XML that defines the user interface for
an activity.
• In Android Studio, the different parts of the main window are known as tool
windows.
• The Project tool window displays the directories and files that make up a project. If
this window isn't visible, you can display it by clicking the Project tab on the left
side of the main window.
• You can expand and collapse the nodes of the Project window by clicking on the
triangles to the left of each node.
• To work with the user interface, expand the resUayout directory for the project, and
double-click on a layout file to open it. Then, you can click on the Design tab to use
the graphical editor to work with the user interface. Or, you can click on the Text
tab to work directly with the XML that defines the user interface.
• When using the graphical editor, the Palette, Component Tree, and Properties
tool windows typically open to the left and the right of the user interface. These
windows can be pinned to either side of the main window if you need more visual
space.
Figure 1 -8 How to view the user interface for an app
Section 1 Get started fast with Android
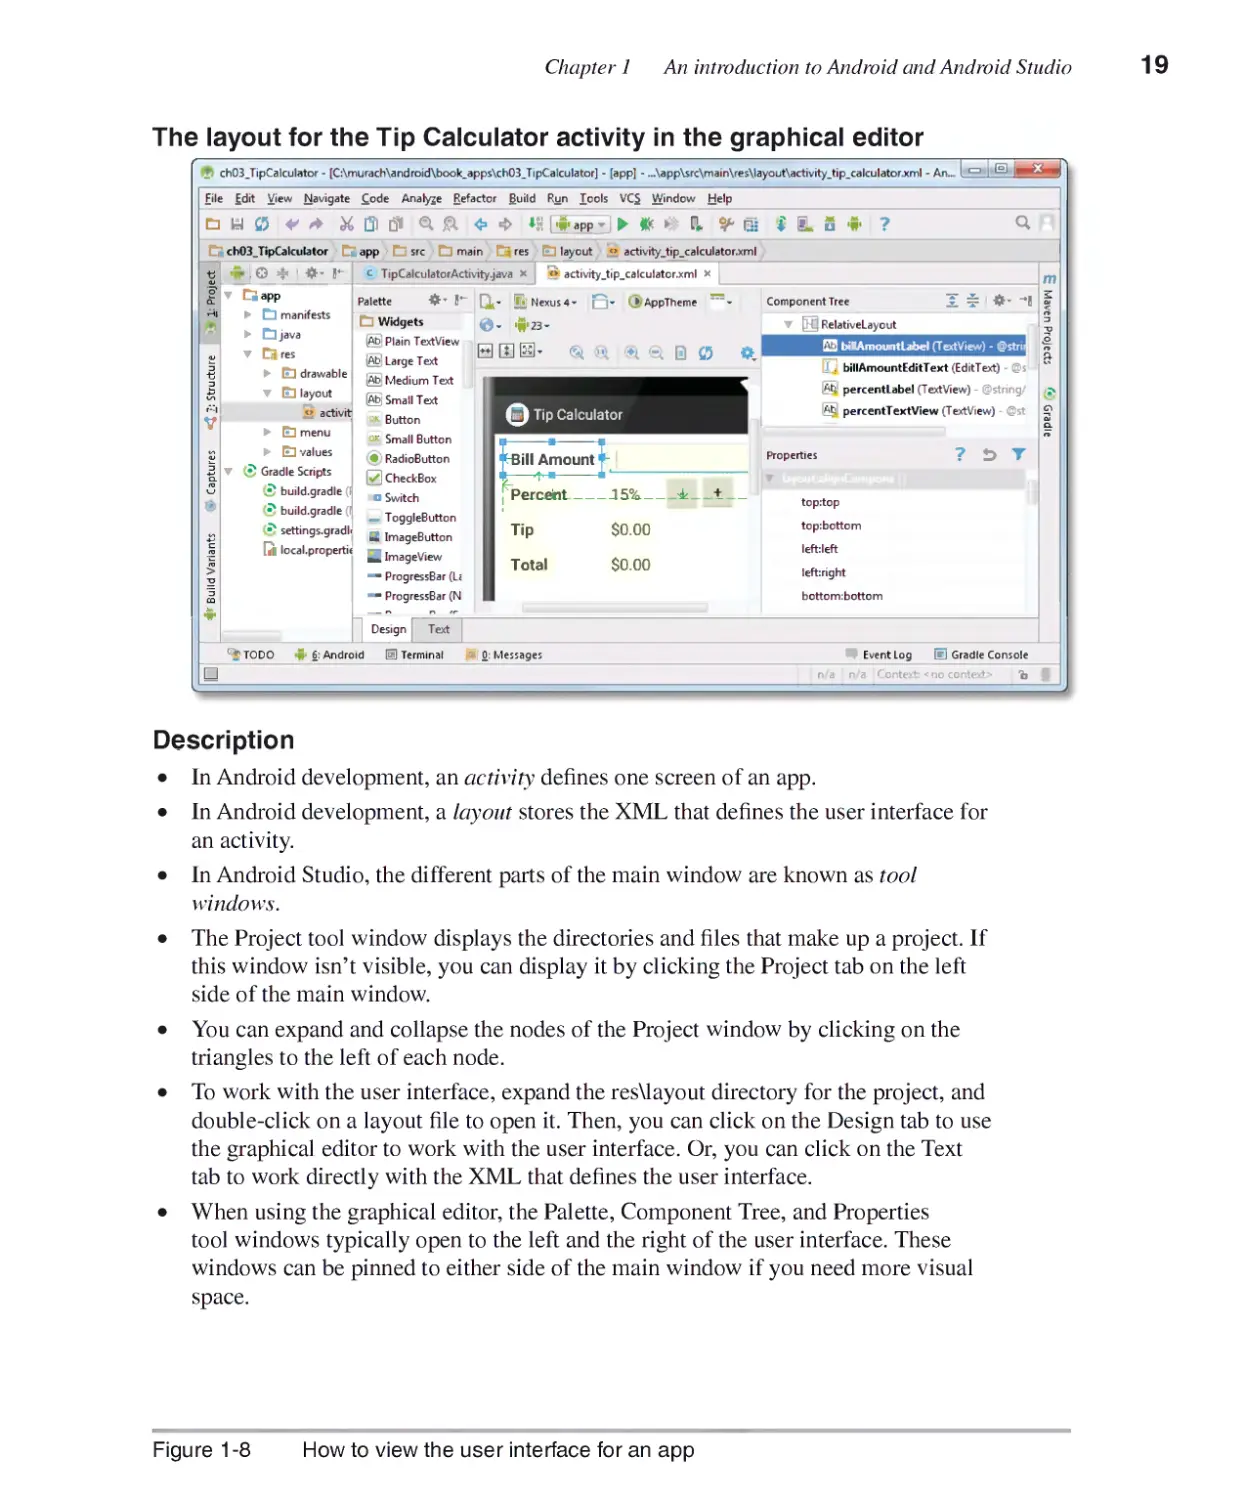
How to view the code for an app
To work with the Java source code for an app, you can use the Project
window to expand the Java directory and expand the package that contains the
Java file. Then, you can double-click on that file to open it in the code editor. In
figure 1-9, for example, the Java file for the Tip Calculator activity is open in the
code editor. This file is stored in the com.murach.tipcalculator package of the
Java directory.
You can also rename or delete a Java file from the Project window. To
delete a file, right-click on the file and select Delete from the resulting menu.
To rename a file, right-click on the file and select Refactor->Rename from the
resulting menu. If you rename a file, Android Studio automatically changes both
the name of the Java file and the name of the class. Since the name of the Java
file must match the name of the class, this is usually what you want.
For now, don't worry if you don't understand all of this code. In chapter 3,
you'll learn the skills that you need to develop this kind of code.
Chapter 1 An introduction to Android and Android Studio
The Java code for the Tip Calculator activity
_ ch03_TipCalculator - [C:\murach\android\book_apps\ch03_TipCalculator] - [app] - „.\app\src\main\java\com\murach\tipcalc...
@
£ile Edit View Navigate £ode Analyze Refactor Build Run Tools VCS Window Help
DHC5^^J6Ql5i€iA^**
W app
H ► * ►-■ & ^ HT-
C"* ch03_TipCalculator Cfiapp O src D main Cjava Bcom B murach > B tipcalculator ■ c TipCalculatorActivity
cl
on
r"l
Vt
CL
m
■W1 ndroid
T C^app
c
m
m
>
3
CO
- © £
#- I
c TipCalculatorActivity.java * _o activity_tip_calculator.xmI *
o
D manifests
__ AndroidManifest.xml
Ojava
▼ B com.murach.tipcalculi
Qfc TipCakulatorA
Cires
► El drawable
▼ B layout
activity_tip_calcula
► B menu
▼ B values
<> strings.xml
► B styles.xml (3)
Gradle Scripts
£ build.gradle (Project: ch03
£ build.gradle (Module: app
public class TipCalculatorActivity extends Activity
implements OnEditcrActionListener, OnClickListener {
// define variables for the vidgets
private EditText billAmountEditText;
private TextView percentTextView;
private Button percentUpButton;
private Button percentDownButton;
private TextView tipTextView;
private TextView totalTextView;
// define the SharedPreferences object
private SharedPreferences savedValues;
// define instance variables tnat snould be saved
private String bilLAmountString = "";
private float tipPercent = .15f;
(^Override
public void cnCreate(Bundle savedlnstanceState) {
super.cnCreate(savedlnstanceState);
m
<
n
n
QJ
n
&*
* TODO >n< 6: Android _J 0: Messages E Terminal
Event Log [El Gradle Console
I I Gradle build finished in 5s 805ms (a minute ago)
LFc UTF-8: Context: < no context>
Description
• To work with the Java code for an app, use the Project window to expand the Java
directory, expand the package that contains the code, and double-click on the file.
• To rename a Java file, right-click on the file, select the Re factor-> Rename item, and
enter a new name for the file. This automatically renames the class that corresponds
with the file.
• To delete a Java file, right-click on the file, select the Delete item, and use the
resulting dialog to confirm the deletion.
• To delete a package, right-click on the package, select the Delete item, and use the
resulting dialog to confirm the deletion.
Figure 1 -9 How to view the Java code for an activity
Section 1 Get started fast with Android
How to run an app on a physical device
Figure 1-10 begins by showing how to run an app on a connected device.
To do that, select the Run button in the toolbar. This typically displays a Choose
Device dialog box. If it doesn't, you can display this dialog by clicking on the
Run->Edit Configurations item from the menus. Then, you can use the resulting
dialog box to select the "Show chooser dialog" option.
From the Choose Device dialog, you can select the device and click the OK
button. In this figure, for example, this would allow you to select the Samsung
Android 4.4.4 device.
If the Choose Device dialog doesn't display the physical device, make sure a
compatible physical device is connected to your computer. Typically, you use a
USB cable to connect your device to your computer.
Once your app is running on the physical device, you can test that app using
any of the hardware that's available on that device. For example, you can rotate
the device to test how it handles screen orientation changes.
By default, Android Studio automatically compiles an app before running it.
Since this saves a step in the development process, this is usually what you want.
Sometimes, though, Android Studio gets confused and doesn't compile a class
that's needed by your project. For example, Android Studio sometimes doesn't
compile the R class that contains the compiled resources needed by your project.
In that case, you can usually fix this issue by selecting the Build->Clean Project
item from the menu bar. This cleans the project and rebuilds it from scratch.
How to run an app on an emulator
This figure also shows how to run an app on an emulator. To do that, you
use the same technique for running an app on a physical device. However, from
the Choose Device dialog, you can select an emulator that's already running. Or,
you can start a new emulator, by selecting the "Launch emulator" option and
selecting the emulator you want.
Once your app is running in an emulator, you can use the emulator to test
your app. To do that, you can use your mouse to interact with the touchscreen to
test the app.
When you're done testing an app in an emulator, you can leave the emulator
open. That way, the next time you run the app, Android Studio won't need to
start the emulator, which can take a frustratingly long time on most systems. As
a result, Android Studio will be able to run your app much more quickly the next
time.
Chapter 1 An introduction to Android and Android Studio
The Choose Device dialog
Choose Device
O Choose a running device
Device I Senat Number \ State Corn...*
H Emulator Galaxy Nexus APi 23 Android 6.0 emulator-5554
i Samsung SGH-M919Android 444 (API 19) d4dl720e
Online Yes
Online Yes
O tounc/i emulator
Android virtual device:
Galaxy Nexus API 23
D Use same device for future launches
Cancel
Help
Description
• To run any app, click the Run button in the toolbar. This typically displays the
Choose Device dialog to let you pick the device.
• To run on a physical device or emulator that's already running, select the device or
emulator and click the OK button.
• To start an emulator, select the "Launch emulator" option, select the emulator from
the drop-down list, and click the OK button.
• On a device or emulator, you need to unlock the screen to allow the app to run.
• By default, a project is compiled automatically before it is run, which is usually
what you want.
• To clean and rebuild a project, select the Build->Clean Project item from the menu
bar and respond to the resulting dialog.
Notes
• If the Choose Device dialog isn't displayed when you run an app, you can display
it by clicking on the Run->Edit Configurations item from the menus. Then, you can
use the resulting dialog to select the "Show chooser dialog" option.
• If your device isn't displayed in the Choose Device dialog, you can disconnect it
and reconnect it. This should display the device.
• If you haven't authorized a device to work with the current computer, the device
displays a dialog when you unlock the screen. You can use this dialog to authorize
the device.
Figure 1-10 How to run an app
Section 1 Get started fast with Android
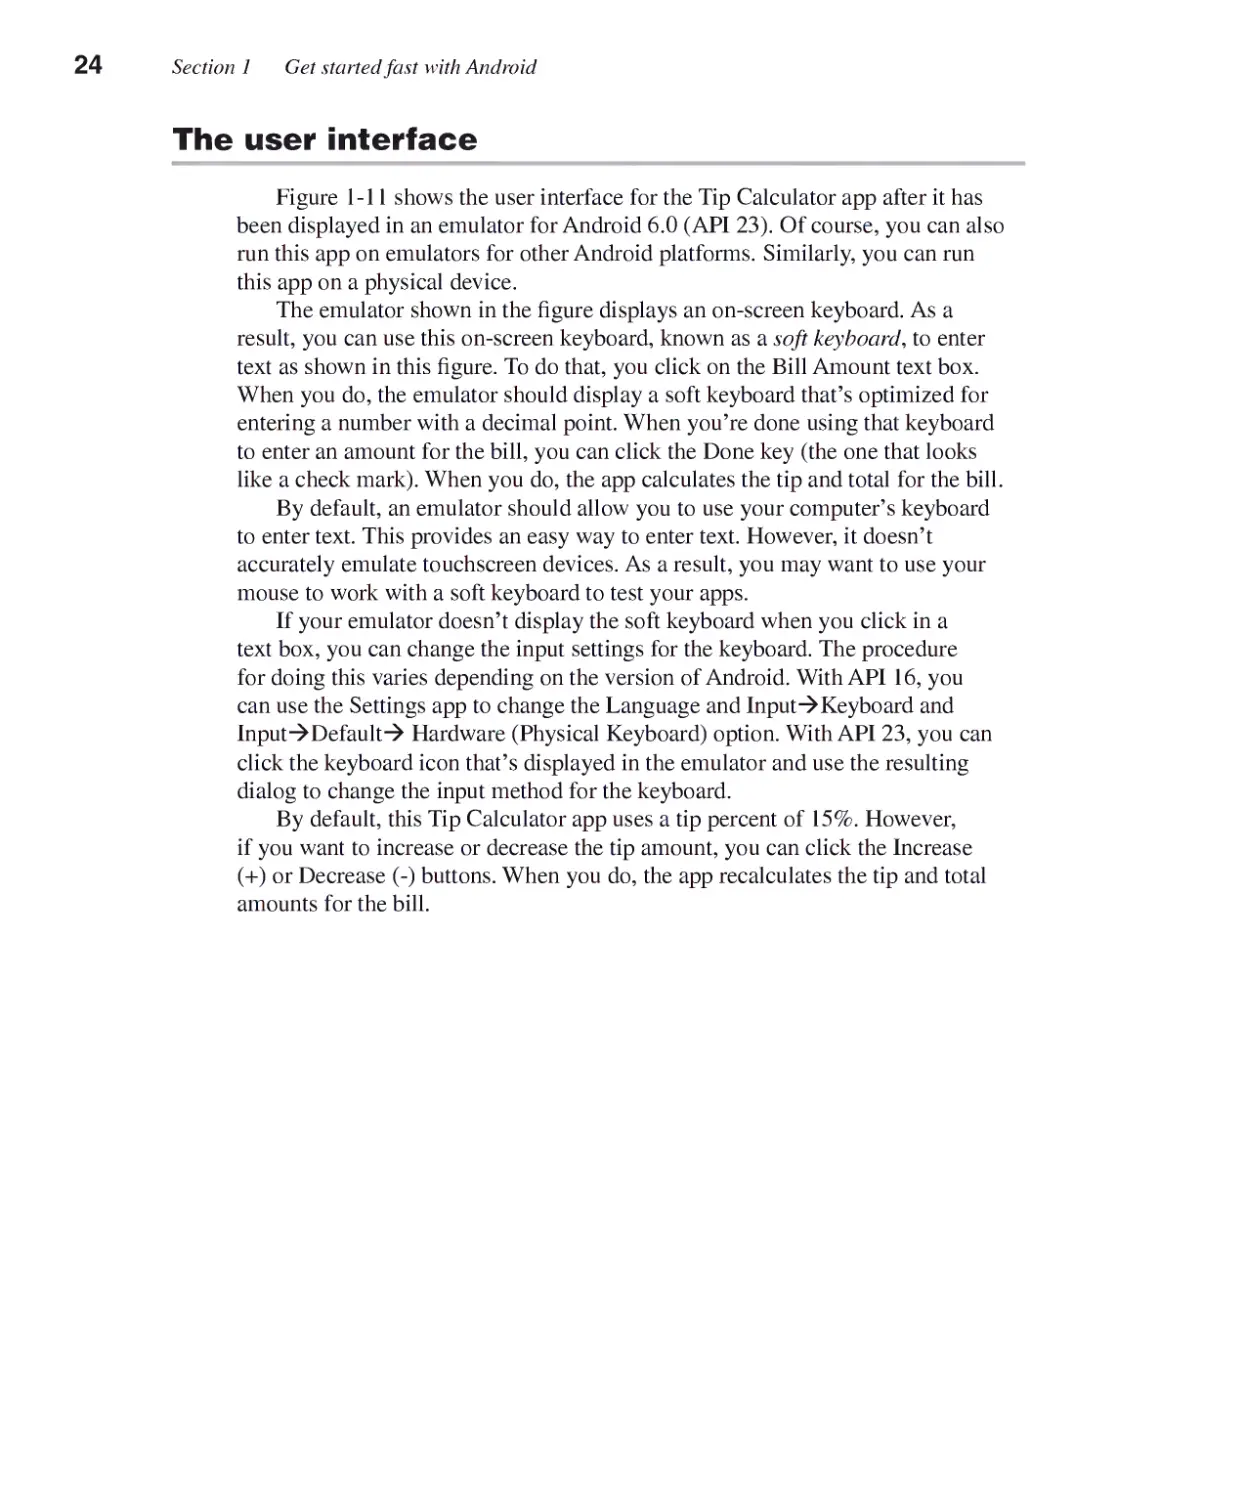
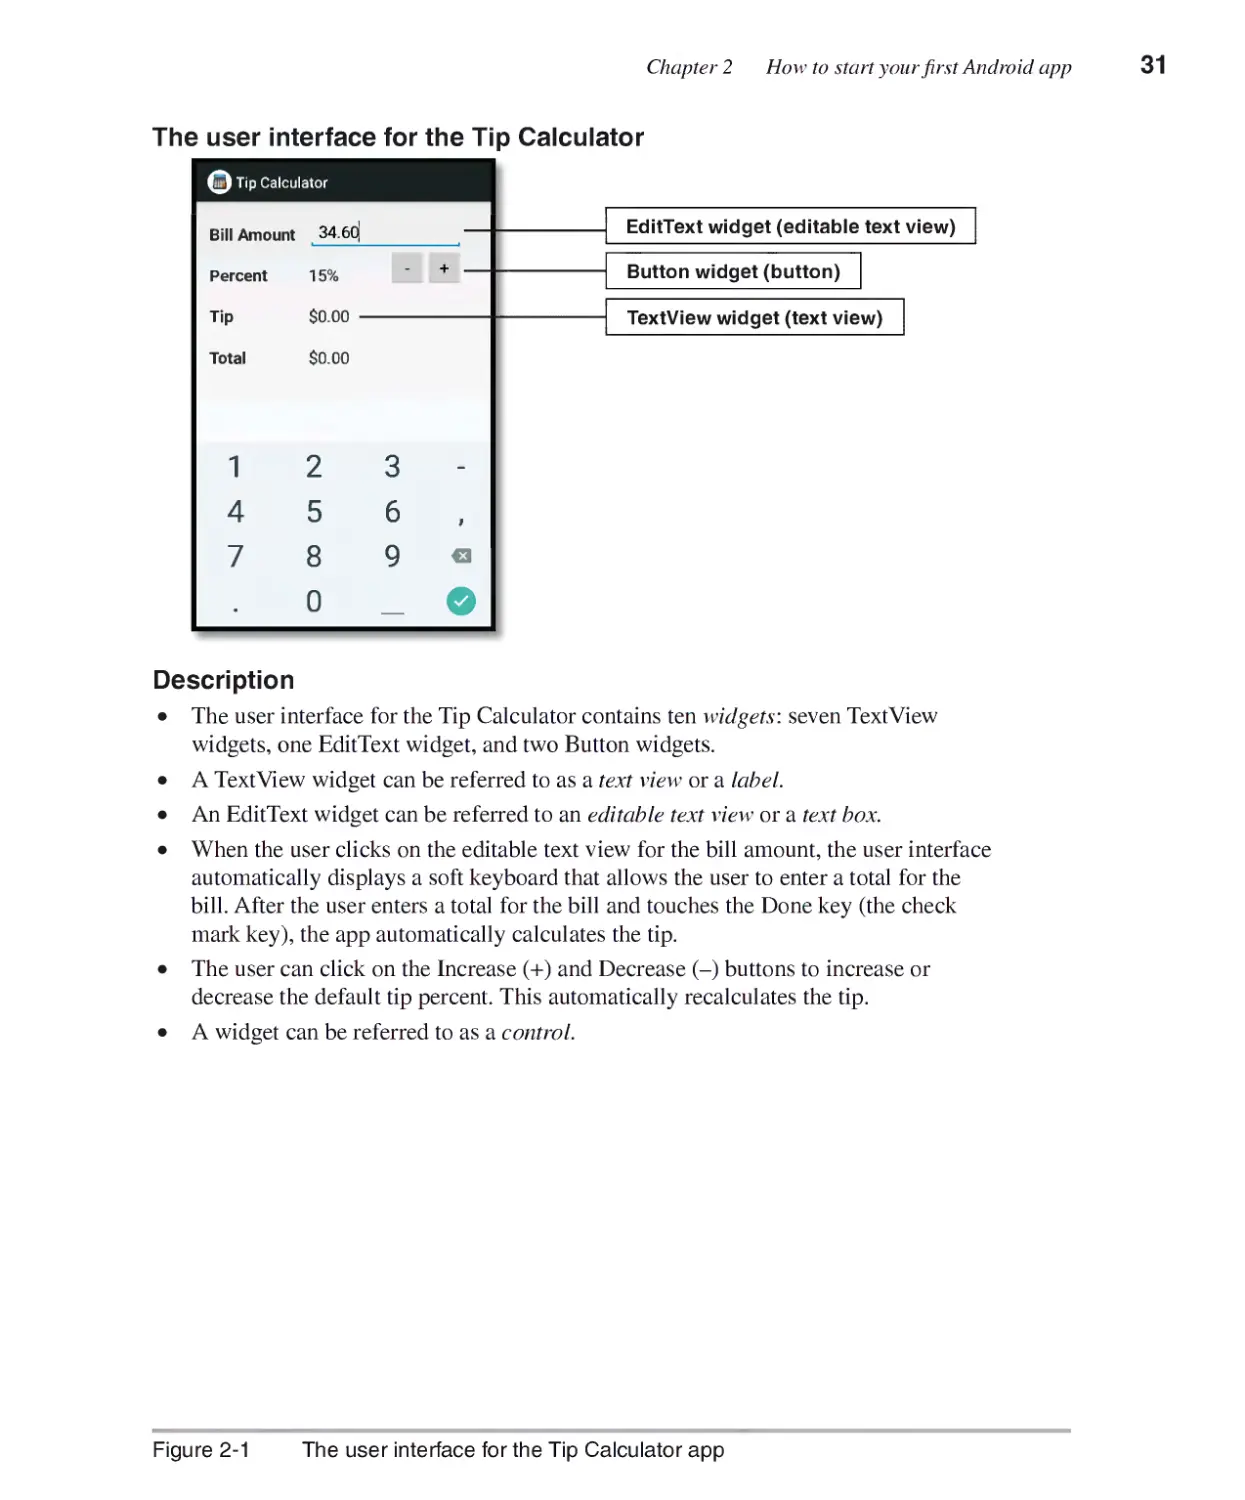
The user interface
Figure 1 — 11 shows the user interface for the Tip Calculator app after it has
been displayed in an emulator for Android 6.0 (API 23). Of course, you can also
run this app on emulators for other Android platforms. Similarly, you can run
this app on a physical device.
The emulator shown in the figure displays an on-screen keyboard. As a
result, you can use this on-screen keyboard, known as a soft keyboard, to enter
text as shown in this figure. To do that, you click on the Bill Amount text box.
When you do, the emulator should display a soft keyboard that's optimized for
entering a number with a decimal point. When you're done using that keyboard
to enter an amount for the bill, you can click the Done key (the one that looks
like a check mark). When you do, the app calculates the tip and total for the bill.
By default, an emulator should allow you to use your computer's keyboard
to enter text. This provides an easy way to enter text. However, it doesn't
accurately emulate touchscreen devices. As a result, you may want to use your
mouse to work with a soft keyboard to test your apps.
If your emulator doesn't display the soft keyboard when you click in a
text box, you can change the input settings for the keyboard. The procedure
for doing this varies depending on the version of Android. With API 16, you
can use the Settings app to change the Language and Input->Keyboard and
Input->Default-> Hardware (Physical Keyboard) option. With API 23, you can
click the keyboard icon that's displayed in the emulator and use the resulting
dialog to change the input method for the keyboard.
By default, this Tip Calculator app uses a tip percent of 15%. However,
if you want to increase or decrease the tip amount, you can click the Increase
(+) or Decrease (-) buttons. When you do, the app recalculates the tip and total
amounts for the bill.
Chapter 1 An introduction to Android and Android Studio
The Tip Calculator app with the soft keyboard displayed
5554:Galaxy_Nexus_API_23
* a 4:04
£) Tip Calculator
Bill Amount 34.6Q
Percent
Tip
Total
15%
$0.00
$0.00
1
4
7
2
5
8
0
3
6
9
o
o
D
Soft keyboard
Keyboard icon
Description
• To calculate a tip, click the Bill Amount text box and enter the bill amount. When
you're done, press the Done key.
• To increase or decrease the tip amount, click the Increase (+) or Decrease (-)
buttons.
• The app automatically recalculates the tip and total amounts whenever the user
changes the bill amount or tip percent.
• On most emulators, you can enter text with your computer's keyboard or with the
on-screen keyboard known as a soft keyboard.
• If your emulator doesn't display a soft keyboard when you click in a text box, you
can change the input settings for the keyboard on your emulator. To do that, you
may need to use your emulator's Settings app.
Figure 1 -11 The Tip Calculator app running in an emulator
Section 1 Get started fast with Android
Perspective
In this chapter, you learned some background information about Android.
In addition, you learned how to use Android Studio to open and run existing
Android Studio projects. With that as background, you're ready to learn how to
create your first Android app.
Terms
Android
application
app
Open Handset Alliance
Android Open Source Project (AOSP)
Software Development Kit (SDK)
Android stack
Dalvik virtual machine (VM)
Java virtual machine (JVM)
Integrated Development Environment
(IDE)
project
building
Summary
• Android is a Linux-based operating system designed primarily for
touchscreen mobile devices such as smartphones and tablet computers. It was first
released in 2008. Android code is open-source.
• Applications, more commonly referred to as apps, extend the functionality
of Android devices.
• Android system architecture, known as the Android stack, consists of four
layers: Linux, native libraries, the application framework, and Android apps.
• An Android app is typically developed using an IDE (Integrated
Development Environment) like Android Studio, using Java as the
programming language.
• Android apps can be run on a physical Android device or on an emulator,
also called an Android Virtual Device (AVD).
• An Android project must be built before it is run, compiling the Java source
code (Java files) into Java bytecodes (.class files) and then into Dalvik
executable files (.dex files).
• All of the files for an Android project are put into an Android package
(.apk file), which includes a binary version of the AndroidManifest.xml file.
Java source code
Java bytecodes
Dalvik executable files
Android package
Android manifest
signed app
emulator
Android Virtual Device (AVD)
Android Debug Bridge (ADB)
activity
layout
tool window
soft keyboard
Chapter 1 An introduction to Android and Android Studio
To run an app on an emulator or device, it must be digitally signed with a
certificate.
The Android Debug Bridge (ADB) lets your IDE communicate with an
emulator or a physical Android device.
Android Studio is the official IDE for Android development. It's
open-source, available for free, and runs on all modern operating systems.
A project is a directory that contains all of the files for an app.
In Android development, an activity defines one screen of an app.
In Android development, a layout contains XML that defines the user
interface.
In Android Studio, the different parts of the main window are known as tool
windows.
A soft keyboard is an on-screen keyboard that you can use to enter text on
touchscreen devices and emulators.
Before you do the exercises for this chapter
Before you do any of the exercises in this book, you need to install the JDK for
Java SE, the Android SDK, and Android Studio. In addition, you need to install
the source code for this book. This may take several hours, so plan accordingly.
See the appendixes for details.
Exercise 1-1 Open an existing project and run it
Open a project and review its code
1. Start Android Studio. Then, open the project that's stored in this directory:
\murach\book_apps\ch03_TipCalculator
2. Open the layout for the activity. This should open the layout in the graphical
editor. If it doesn't, click the Design tab to display the graphical editor. Note
the widgets displayed in this editor.
3. Click on the Text tab to view the XML for this layout. Note that the XML
corresponds with the widgets displayed in the graphical editor.
4. Open the Java class for the activity. Review this code. Note how it works with
the widgets displayed in the corresponding layout.
Run the app on a device
5. In the toolbar, click the Run button. This should display the Choose Device
dialog. If it doesn't, edit your run configuration so it displays this dialog.
6. Connect the device you configured in the appendix. This should display the
device in the Choose Device dialog, though it may indicate that the device is
unauthorized.
Section 1 Get started fast with Android
7. Unlock the screen on the device. If you get a dialog that indicates that the
device is unauthorized for the computer, use the dialog to authorize the
device.
8. Use the Choose Device dialog to select the device.
9. Test the Tip Calculator app by using the soft keyboard to enter a bill amount
and by clicking on the Increase (+) and Decrease (-) buttons to modify the tip
percent.
Run the app on an emulator (optional)
10. Start the emulator. To do that, click on the AVD Manager button in the
toolbar, and click on the Run button for the emulator that you created in the
appendix. Depending on your system, it may take a long time for the emulator
to launch, so be patient! After loading, you need to unlock the emulator screen
by dragging the lock icon to the right or up.
11. In the Android Studio toolbar, click the Run button.
12. Use the Choose Device dialog to select the emulator. This should run the app
on that emulator.
13. Test the Tip Calculator app by using the soft keyboard to enter a bill amount
and by clicking on the Increase (+) and Decrease (-) buttons to modify the tip
percent. If the soft keyboard isn't displayed, you can change the Hardware
(Physical Keyboard) option. To do that, start the Settings app, click the
Language and Input option, scroll down to the Keyboard and Input category,
click the Default option, and turn off the Hardware (Physical Keyboard)
option.
14. In the emulator, click the Home button to navigate away from the app.
15. Run the Tip Calculator app on the emulator again. This time, the app should
run more quickly since the emulator is already running.
2
How to start your first
Android app
In the previous chapter, you learned how to open and run an existing project
for an Android app. In this chapter, you'll learn how to start developing such an
app from scratch. First, this chapter shows how to use Android Studio to start
a new project for an app. Then, it shows how to use Android Studio to develop
the user interface for the app.
The Tip Calculator app 30
The user interface 30
How to create a new project 32
How to develop the user interface 34
How to work with a layout 34
How to add widgets to a layout 36
How to set the display text 38
How to work with resource files 42
How to set properties 44
Common properties 46
The XML for the user interface 48
Perspective 52
Section 1 Get started fast with Android
The Tip Calculator app
This chapter begins by reviewing the user interface of the Tip Calculator
app. Then, it shows how to use Android Studio to create a new project for this
app.
The user interface
Figure 2-1 shows the user interface for the Tip Calculator app. In Android
development, the components that make up the user interface are known as
widgets. Widgets can also be referred to as controls. The Tip Calculator contains
ten widgets: seven Text View widgets, one EditText widget, and two Button
widgets.
A Text View widget can be referred to as a text view or a label. It especially
makes sense to refer to a Text View as a label when that widget provides text
that labels another widget. For example, the Text View widget that displays "Bill
Amount" on the left side of the Tip Calculator labels the EditText widget on
the right side of the user interface. Similarly, the Text View widget that displays
"Percent" labels the TextView widget that displays the value for the tip percent.
An EditText widget can be referred to as an editable text view or a text box.
When the user touches the editable text view for the Tip Calculator, the user
interface automatically displays a soft keyboard that allows the user to enter a
total for the bill. After the user enters a total for the bill and touches the Done
key, the app automatically calculates the tip.
The two Button widgets in the Tip Calculator allow the user to increase or
decrease the tip percent. This automatically recalculates the tip.
Chapter 2 How to start your first Android app
The user interface for the Tip Calculator
^^ Tip Calculator
Bill Amount 34.60|
Percent
Tip
Total
1
4
7
15%
$0.00
$0.00
2
5
8
0
3
6
9
o
EditText widget (editable text view)
Button widget (button)
TextView widget (text view)
Description
• The user interface for the Tip Calculator contains ten widgets: seven TextView
widgets, one EditText widget, and two Button widgets.
• A TextView widget can be referred to as a text view or a label.
• An EditText widget can be referred to an editable text view or a text box.
• When the user clicks on the editable text view for the bill amount, the user interface
automatically displays a soft keyboard that allows the user to enter a total for the
bill. After the user enters a total for the bill and touches the Done key (the check
mark key), the app automatically calculates the tip.
• The user can click on the Increase (+) and Decrease (-) buttons to increase or
decrease the default tip percent. This automatically recalculates the tip.
• A widget can be referred to as a control.
Figure 2-1 The user interface for the Tip Calculator app
Section 1 Get started fast with Android
How to create a new project
If Android Studio displays the Welcome page when you start it, you can
create a new project for an app by selecting the "Start a new Android Studio
project" item. Otherwise, you can select the File->New->New Project item from
the menu system.
Either way, Android Studio displays a Create New Project dialog box like
the one shown in figure 2-2. This dialog box displays a series of steps that allow
you to create a new project for an app like the Tip Calculator.
In the first step, you can enter a name for the application as well as a name
for the project and package. For the Tip Calculator app, I entered a name of
"TipCalculator", and a company domain of "murach.com". This generated a
package name of "com.murach.tipcalculator".
In the second step, you can select a minimum SDK for the application. For
the Tip Calculator app, I accepted the default value for the minimum SDK. In this
case, that happened to be Android 4.0.3 (API 15).
In the third step, you can select a template for the type of activity you want
the project to start with. In Android development, an activity defines a screen. For
the Tip Calculator app, I selected the Blank Activity template. This is the simplest
template, and it's usually what you want when you're getting started.
In the fourth step, you can enter a name for the activity. For the Tip Calculator
app, I entered a name of "TipCalculatorActivity" for the activity. This is the name
of the Java class for the activity. When I did that, Android Studio automatically
set the name of the corresponding layout to "activity_tip_calculator". This is the
name of the file that stores the XML that defines the user interface for the activity.
In Android development, a layout is a container that contains one or more child
elements such as widgets and determines how they are displayed.
When you finish all four steps, you can click the Finish button. When you
do, Android Studio creates a directory that corresponds with the project name,
and it creates some additional directories and files that it uses to configure the
project.
Chapter 2 How to start your first Android app
33
The New Android Application dialog box
Create New Project
«■ j
Customize the Activity
Creates a new blank activity with on action bar.
Activity Nome:
Layout Name:
Title:
Menu Resource Nome:
Blank Activity
The name of the activity
\ TipCalculotorActivity\
>
LnJ
i
activity_tip_calculotor
TipCalculatorActtvtty
menu_tip_calculator
doss to create
Previous
Next
Cancel
^
Finish
j
How to create a new project
1. Start Android Studio.
2. If the Welcome page is displayed, select the "Start a new Android Studio project"
item. Otherwise, select the File->New->New Project item from the menu system
3. Enter a name for the application, project, and package and click the Next button.
4. Select minimum SDK for your project and click the Next button.
5. Select the Blank Activity template and click the Next button.
6. Enter a name for the activity and click the Finish button.
Figure 2-2 How to create a new project
Section 1 Get started fast with Android
How to develop the user interface
The first step in developing an Android app is to develop the user interface.
The easiest way to do this is to use the graphical layout editor that's provided by
Android Studio to develop most of the user interface. This generates most of the
XML for the user interface. Then, if necessary, you can review and modify this
code.
How to work with a layout
Figure 2-3 shows the default layout of the activity that Android Studio
generates when you create a new Android project that's based on the Blank
Activity template as described in the previous figure.
Android provides several different types of layouts that you'll learn about
later in this book. For now, you'll learn how to use the relative layout to create
the interface for the Tip Calculator app. In this figure, the relative layout contains
a single Text View widget that displays a message of "Hello world!"
Since a new project typically generates at least one layout file for you, you
can usually begin by opening an existing layout. To do that, display the Project
window, expand the res (resources) directory, expand the layout directory, and
open the XML file for the layout.
Once you've opened a layout, you can view its appearance in the graphical
layout editor. Then, you can use the techniques described in the next few figures
to add widgets to the layout, to align those widgets, and to set their properties.
Then, if you want to review or edit the XML code that's generated for the layout,
you can click on the Text tab. Whenever you want, you can click the Design tab
to return to the graphical layout editor.
When you first open a layout, you may get an error message that indicates
that the graphical editor is having problems rendering the layout. In that case,
you can often solve the problem by clicking the Refresh button that's displayed
in the toolbar above the graphical editor.
If you want to add layouts to a project, you can do that by right-clicking
on the layout directory in the Project window and selecting the New->Layout
Resource File item. Then, you can enter the name of the file and the type of
layout. For now, you can accept the default layout.
Conversely, if you want to delete a layout from a project, you can do that by
right-clicking on the layout in the Project window and selecting the Delete item
Chapter 2 How to start your first Android app
The default layout for an activity in a new project
TlpCalcuiator - [C:\murach\android\book appsMlpCalcuiator] - [app] - ...\app\src\main\res\layout\actrvity tip calculatorxml - Android Studio 1.3.2 D 1 ^
™ r ^ ■ ■ * — tw ■ r * i r r* rr ./ y—- r—-
File Edit View Navigate Code Analyze Refactor Build Run Tools VCS Window Help
DBC5 r * & Q G» d » ♦♦ *8 #<wtJ
C TipCalculator C app t sir Q motn ■■ D| res > E layout
1
3
fc
'S' drxfroitf | Q ^ ' #- B*-
▼ E«app
► D manifests
▼ Canes
*u —
£ B drowable
— il ^^^
▼ Eltoyout
c TipCalculatorActivity.java *
Artette #' I*"
► * » i pa ;li» ?
<> activity_tip_catculator.xml
_ crtiVity_fiy3_cofru/otorjo77/ x
Q F
^" IS Atorus 4^ r~." AppTheme ripCofarutotor'
C] Layouts ©* 'ff1^-*
I . | LinearLayout (Horizontal)
Fh LinearLayout (Vertical)
r (] Tofctetoyout
■ 1 « ccriw r cat i—n
V
5
^■jl
•
t*l
I
"5
*
|—H lableKow
Ftl GridLayout
► EJ mipmap
▼ B ^o/ues
* Ej dimens.xmt (2)
strings.xml
_ styles.xml
► ^J Grodle Scripts
|?Q RelativeLayout
D Widgets
▼ |6O0
TfpCalculator
lAbl p/otn TextView
■y Hello wof Id!
IADJ to/^e Text
(Ab) Medium Text
W Small Text
ok Butfon
SJmotf Bufton
(•) RadioButton
0 CheckBox
_ ToggleButton
ImageButton
ImageView
^ ProgressBar (Large)
mm ProgressBar (Normal)
mm ProgressBar (Small)
mm ProgressBar (Horizontal)
■©■ SeekBar
Rating Bar
A - .
= Spinner
<d WebView
D Text Fields
|T] Plain Text
Design Text
[3] Terminal - 0: Messages ■ 6: Android ^ 7
□
Gradle build finished in 14s 150m
s (13 minutes ago)
< O D
x '
Component Tree i. ^ ' "ft" "*l
▼ H| Device Screen
▼ C1 RelativeLa out
lAb] 7extView - Wstring/ht
Properties ? S ^
layou *wk.
layout:heighl match_parent
style
occess("6(7if)//.(
cccessibftfyT/
accessibilityTi
alpha
background
backgrounds
background^
d \
clickable \_J
contentDescri
contextClickai \_\
elevation
ODO
n a
m
1
3
1
^
ft
^ Event Log E Cradle Console
n/a Content cnoconte*t> 'h ft
Description
• To open an existing layout, open the Project window, expand the res (resources)
directory, expand the layout directory, and double-click the name of the XML file.
• To view the layout in the graphical editor, click the Design tab.
• To view the XML for the layout, click on the Text tab.
• If you get an error message that indicates that the graphical editor is having
problems rendering the layout, click the Refresh button that's displayed in the
toolbar above the graphical layout.
• To create a new layout, right-click on the layout directory in the Project window
and select the New->Layout Resource File item. Then, enter the name of the file
and the type of layout. For now, you can accept the default layout.
• To delete a layout, right-click on the layout in the Project window and select the
Delete item.
Figure 2-3 How to work with a layout
Section 1 Get started fast with Android
How to add widgets to a layout
Figure 2-4 shows how to add widgets to a layout. To do that, you just drag a
widget from the Palette onto the layout. This figure, for example, shows the ten
widgets for the Tip Calculator after they have been added to the layout but before
all of their properties have been set correctly.
As you add widgets to a layout, you often need to scroll through the
categories in the Palette to help you find the widget you want to add. If necessary,
you can click on the category for the widget to collapse or expand it. The Widgets
category contains a variety of useful widgets including the Text View and Button
widgets. The Text Fields category, on the other hand, only contains variations of
the EditText widget. For this figure, I used the widget named Number (Decimal).
When you use the relative layout, it's a good practice to set the id property
for the widget as soon as you add it to the layout to identify each widget. In this
figure, for example, I set the id property of the last Text View widget to
totalTextView. This ID clearly indicates that this widget is a Text View widget
for the total amount. If you modify the id property for a widget after you have
aligned other widgets relative to that widget, Android Studio needs to update all
references to the id property that you modified. Fortunately, it can do that for
you automatically.
By default, Android Studio displays the Properties window on the right side
of the main window. If it isn't displayed there, you can display it by clicking on
the Properties tab that's on the right side of the window.
In most cases, you can align a widget by dragging it to where you want it.
This sets properties of the widget that begin with "layout:align" such as the
layout:alignTop property, the layout:alignLeft property, and so on.
As you add widgets to a layout, you may need to set its theme, which is a
group of styles that define the look of the layout. To set the theme, select it from
the toolbar that's displayed above the layout when it's in the graphical editor. In
this figure, the AppTheme has been selected, which is usually what you want.
Chapter 2 How to start your first Android app
A layout after some widgets have been added to it
_ TipCalculator - [C:\murach\android\book_apps\HpCalculator] - [app] - ..Aapp\src\main\res\layout\acth/ityJip_calculator.xml - Android Studio 1.3.2
(s)
File Edit View Navigate Code Analyze Refactor Build Run Tools VCS Window Help
n & a * + & a di ei& o ♦ »»fw^] ► # n n V- m I i« 3 * ?
C TipCalculator • C app ^ sir D motn ■■ C^ nes ■■ E layout <> activity_tip_calcutator.xmt
QF
<Q . c TtpCalculatorActivity.java x i* ocfiVrty_f^p_co/cu/ofor.xm/ x
"*" ■" Q,- AppTheme
Q Palette
I
1
V
i
I
RelativeLoyout
E] Widgets
,Ab| Ptoin TextView
Ab| £c/ge Text
Ab| Medium Text
£dj Smotf Text
Button
Smotf Button
• RadioButton
0 CheckBox
n Sivrtc/j
_ ToggleButton
k. I mage Button
ImageView
mm ProgressBar (targe)
mm ProgressBar (Normal)
mm ProgressBar (SmatQ
mm ProgressBar (Horizontal)
■©■ SeekBar
Rating Bar
= Spinner
d WebWeiv
D Text Fields
|T] Ptotn Text
ft- 8*~ Q^ Uterus*-
'hEIEN
TipCalculator »
©' #23-
Component Tree
▼ H Device Screen
I ffefotiVetoyout
I ft- -I
| 6:00
TipCalculator
New Text
New Text
New Text
NeWteir
New Text
toewText
I
P&fcTeJ
NEWB NEW BUTTON
Properties
\t% bUIAmountLabel (TextView) - t
(fits tipLabei (TextView) - 'New Text
\M£ textView3 New Text'
(A§1 totalLabel (TextView) - 'New Te.
IT? billAmountEditText (EditText)
6S percentTextView (TextView) -
|Atl tipTextView fTextWeiy) "A/eiv
lAt5 totalTextView (TextView) Ne
percentUpButton (Button) - *N
01. percentDownButton (Button)
? t> T
otatTextView
Design
importontForAcces.
inDutMethod
Text
m
I
3
I
Terminal
0: Messages ■#• 6: Android ^ZTODO
£»
f vent toff E Grodfe Console
Q Grodte build finished in 14s 150ms (26 minutes ago)
a Cont < nocont * >
Description
• To add a widget, drag the widget from the Palette onto the layout. TextView and
Button widgets are in the Widgets category, and EditText widgets are in the Text
Fields category.
• When you use the relative layout, it's a good practice to set the id property for the
widget as soon as you add it to the layout. To do that, you can click on the widget
and use the Properties window to set the id property.
• By default, the Properties window is displayed below the Component Tree window.
If it isn't, you can display it by clicking on the Component Tree tab on the right
side of the main window.
• To align a widget, you can drag it to where you want it to be aligned. This sets
properties of the widget that begin with "layout:" such as the layout:alignTop and
layout:alignLeft properties.
• To delete a widget, click on the widget in the graphical editor or the Component
Tree window and press the Delete key.
• A theme is a group of styles that define the look of the layout. To set the theme for
the layout, select the theme from the toolbar.
Figure 2-4 How to add widgets to a layout
Section 1 Get started fast with Android
How to set the display text
The Android development environment encourages separating the display
text from the rest of the user interface. The advantage of this approach is that it's
easier to create international apps that work in multiple languages. The
disadvantage is that it takes a little extra work to set the display text for the user
interface.
However, figure 2-5 shows a technique that makes it easy to set the display
text, and this extra step shouldn't slow down your development much once
you get used to it. In this figure, for example, I set the text property for the first
Text View widget to a string named bill_amount_label that's stored in the
strings.xml file. This is indicated by the value for the text property which is set
to:
@string/bill_amount_label
This string contains a value of "Bill Amount", and this value is displayed in the
layout when it's in the graphical editor.
Chapter 2 How to start your first Android app
A layout after the text has been set for the widgets
_ TipCalculator - [C:\murach\android\book_apps\HpCalculator] - [app] - ..Aapp\src\main\res\layout\acth/ity_tip_calculator.xml - Android Studio 1.3.2
(s)
File Edit View Navigate Code Analyze Refactor Build Run Tools VCS Window Help
C TipCalculator • C app ^ sir D main ■■ C^ nes ■■ E layout j» ocf(Vrty_f^p_co/cu/ofor.xm/
QF
<Q . c TtpCalculatorActivity.java * i* ocfiVrty_f^p_co/cu/ofor.xm/ x <> strings.xmt x
■g I
Q Palette
I
m
V
i
I
TipCalculator
RelativeLayout 0 E EH'
E] Widgets
,Ab| Ptoin TextWeiv
Ab| targe Text
Ab| Medium Text
£D| Smotf Text
Buff on
Smotf Button
• RadioButton
0 CheckBox
n Sivrtc/j
_ ToggleButton
k. I mage Button
ImageView
mm ProgressBar (targe)
mm ProgressBar (Normal)
mm ProgressBar (SmatQ
mm ProgressBar (Horizonta
■©■ SeekBar
Rating Bar
= Spinner
d WebWeiv
E] Text Fields
|T] Ptotn Text
AppTheme TipCalculator* © - ■||,23-
Component Tree i.
▼ H Device Screen
Retativetayout
,Abl billAmountLabel fTextWeiyJ
I #- -I
5 &'-J
| 6:00
Bill Ajiourt
m >\"■"■■■
Percent 15%
Total $0 00
Total $0 00
Ab) tipLabel (TextView) @string/tip_percent_k *
,^Di textView3 @stnng/totol_omountjobel
Ab| totalLabel f7iextWeivJ - @string/totaLamou
[Q bUIAmountEditText (EditText)
_Abi percentTextView (TextView) @stnng/tip_
Ab| tipTextView (TextView) - @string/tip_amot
!Ab| totalTextView (TextWeivJ @string/total_c
percentUpButton (Button) - @stnng/incre
percentDownButton (Button) @string/di
Properties
shadowColor
single tine
statetistAnimator
textA/^nrwent
textAppeorance
textColor
? t> T
D
fatring/bitt_amountJabel
Design
Text
m
I
3
I
Terminal
0: Messages ■#• 6: Android ^ZTODO
£»
l fwent log E Grodfe Consofe
Q ConcurrentModificationException: null (4 minutes ago)
_on
io conte
How to set the text property for a widget
1. In the graphical editor for the layout, select the widget.
2. In the Properties window, click the button (...) to the right of the text property.
3. In the Resources dialog box, click the New Resource button and select the New
String Value item. Or, if the string value is already available, select the string and
click the OK button.
4. In the New String Value Resource dialog box, enter a name and value for the string
and click the OK button.
Description
• It's generally considered a best practice to store the display text for your app in
a separate XML file. This makes it easy to create international apps that work in
multiple languages.
Figure 2-5 How to set the display text for a widget (part 1 of 2)
40 Section 1 Get started fast with Android
After you click the button (...) to the right of the text property, Android
Studio displays the Resources dialog box. If the string you want to display is
available from this dialog box, you can select it and click the OK button. This
sets the display text to the selected string.
However, if you need to enter a new string, you can click the New Resource
button and select the New String Value item to display the New String Value
Resource dialog box. Then, you can enter the string you want to display and a
name for the string. In this figure, for example, I entered a name of
bill amount label and a string of "Bill Amount".
Chapter 2 How to start your first Android app
41
The Resources dialog box
_ Resources
Project System \
▼ D String
abc_action_bar_home_descnption
P abc_action_bar_home_descrip tion_forma t
P obc_oction_bar_home_sub title_descrip tion_forma t
P abc_action_bor_up_description
abc_action_menu_overflow_description
P abc action mode done
No Preview
w New Resource
New String Value...
OK
Cancel
The New String Value Resource dialog box
_ New String Value Resource
Resource name: bill amount label
Resource value: \ BillAmounq
Source set:
File name:
I mat
strings.xml
Create the resource in directories:
Q values
I I values-w820dp
0
a
Cancel
Figure 2-5 How to set the display text for a widget (part 2 of 2)
Section 1 Get started fast with Android
How to work with resource files
When you use the technique shown in the previous figure to set the display
text for your app, Android Studio stores the text in a strings.xml file like the one
that's shown in figure 2-6. If you want, you can open the strings.xml file and edit
it just as you would edit any other XML file.
This figure shows the strings.xml file for the Tip Calculator app. Here, the
first string is set to "Tip Calculator". This string is displayed in the taskbar for
the main activity of the app. In addition, it's used in the manifest file to identify
the name of the app.
The second string is for a Settings item in the options menu. Since this app
doesn't display an options menu, this string isn't displayed anywhere in the app.
However, since this string is referred to by the unused options menu, deleting
this string causes an error that prevents the project from compiling. As a result, I
decided to leave this string and the unused menu in the project for now.
The last ten strings are used for the widgets. The strings that provide labels
for widgets have names that end with "_label". Other strings provide default
values for the bill amount, tip percent, tip amount, and total. These default values
make it easier to use the graphical editor to set the properties for the widgets
that display these values. In addition, they can make it easier to test an app. For
example, when the app starts, it displays a value of 34.60 in the editable text
view for the bill amount. As a result, you don't have to enter a bill amount to test
the app.
However, before you put the app into production, you can modify the app so
it sets these values to appropriate starting values for the app. For example, you
probably want to supply an empty string for the bill amount. That way, when the
app starts, the editable text view for the bill amount will be blank.
If you want to supply a strings.xml file for another country, you can create a
values-jcc directory within the res directory where xx is the ISO two-letter code
for the country. For example, fr is the two-letter country code for France. Then,
you can supply a strings.xml file within that directory that uses French instead of
English. To find a list of these two-letter codes, you can search the Internet for
"ISO two-letter country code".
When you use Android Studio to create a project, it stores some dimensions
in a dimens.xml file like the one shown in this figure. If you want, you can open
this file and edit it.
This figure shows the dimens.xml file for the Tip Calculator app. By default,
Android Studio uses these dimensions to set the amount of space between the
edge of the screen and the widgets contained by the layout.
Here, both dimensions are set to 16 density-independent pixels (dp). A
density-independent pixel is a virtual pixel that you should use when defining
a layout. Then, at runtime, Android scales these virtual pixels to make sure it
displays your layout properly for the density of the screen of the device that your
app is running on.
Chapter 2 How to start your first Android app
The location of the strings.xml file
res/values/strings.xml
The strings.xml file for the Tip Calculator app
<resources>
<string name=,,app_name">Tip Calculator</string>
<string name=,,action_settings">Settings</string>
<string name^'bil^amount^abel">Bill Amount</string>
<string name="bil^amount">34.60</string>
<string name="tip percent label">Percent</string>
<string name="tip percent">15%</string>
<string name="increase">+</string>
<string name="decrease">-</string>
<string name="tip_amount_label">Tip</string>
<string name="tip_amount">$0.00</string>
<string name="total_amount_label">Total</string>
<string name="total_amount">$0.00</string>
</resources>
The location of a strings.xml file for France
res/values-fr/strings.xml
The location of the dimens.xml file
res/values/dimens.xml
The dimens.xml file for the Tip Calculator app
<resources>
<!-- Default screen margins, per the Android Design guidelines. -->
<dimen name="activity_horizontal_margin">16dp</dimen>
<dimen name="activity_vertical_margin">16dp</dimen>
</resources>
Description
• When you use the technique shown in the previous figure to set the display text for
your app, Android Studio stores the text in the strings.xml file.
• If you want, you can open the strings.xml file and edit it just as you would edit any
XML file.
• To provide a strings.xml file for a country that uses another language, you can
create a values-jar directory within the res directory to store the strings.xml file.
Here, you can replace xx with the ISO two-letter country code.
Figure 2-6 How to work with resource files
44 Section 1 Get started fast with Android
How to set properties
Figure 2-7 shows how to use the Properties window to set the properties of
a widget. To do that, select the widget and use the Properties window to change
the property. After you change a property from its default value, the Properties
window displays the property in blue. In this figure, for example, the Properties
window shows that the textStyle property has been set to bold.
Chapter 2 How to start your first Android app
A layout after some properties of the widgets have been set
_ TlpCalcuiator - [C:\murach\android\book_apps\HpCalculator] - [app] - ...\app\src\main\res\layout\actrvity_tip_calculator.xml - Android Studio 1.3.2
(s)
File Edit View Navigate Code Analyze Refactor Build Run Tools VCS Window Help
n & a * + & a ni ei& o ♦ *s fw^n ► * n n v- m l il. s * ?
C TlpCalcuiator • C app ^ sir D motn ■■ C^ nes ■■ E layout j» ocf(Vrty_f^p_co/cu/ofor.xm/
QF
<Q . c TtpCalculatorActivity.java x i* ocfiVrty_f^p_co/cu/ofor.xm/ * <> strings.xmt x
^ Artette
I
m
V
i
I
Tip Calculator
RelativeLayout 0 E EH'
El Widgets
,Ab| Ptoin TextView
Ab| £c/ge Text
Abj Medium Text
£D| Smotf Text
Button
Small Button
• RadioButton
0 CheckBox
n Sivrtc/j
_ ToggleButton
k. I mage Button
ImageView
mm ProgressBar (targe)
mm ProgressBar (Normal)
mm ProgressBar (SmatQ
mm ProgressBar (Horizonta
■©■ SeekBar
Rating Bar
= Spinner
d WebWeiv
E] Text Fields
|T] Ptotn Text
AppTheme ^Calculator* © - ■||,23-
si fii .tt ei i 0 a,
i #- -i
| 6:00
Component Tree j.
▼ H Device Scneen
/?e/ohVetoyout
.Abl billAmountLabel (TextView) g bt
Abj percentLabel (TextView) ■ @string/tip_p\
(adi tipLabel (TextView) @string/tip_amoun
Ab| totalLabel (TexMewJ - @string/totaLam\
[Q bUIAmountEditText (EditText)
.Abi percentTextView (TextView) @stnng/t
Ab| tipTextView (TextView) - @string/tip_an
!Ab| totaTTextView (TextWeivJ @string/tota
percentUpButton (Button) - @stnng/inc
I &
fill Apiounf
Percent 15%
Tip $0.00
Total $0.00
Properties
textlsSelectabte
textSize
▼ textStyle
normal
bold
italic
theme
tronsitionName
? t> t
D
20sp
D
□
D
Design
Text
m
I
3
I
Terminal
0: Messages ■#• 6: Android ^ZTODO
£»
l f went log E Cradle Console
Q ConcurrentModificationException: null (yesterday 1:54 PM)
*2ontc l loconte
Description
• To set a property for a widget, select the widget and use the Properties window to
change the property.
• The Properties window displays the properties that have been changed from their
default in blue.
Figure 2-7 How to set properties
Section 1 Get started fast with Android
Common properties
Figure 2-8 shows some of the properties that are used by the Tip Calculator
app. These properties are commonly used by most apps.
For a layout, the width and height properties are typically set to a
pre-defined value of "match_parent". This expands the layout so it takes up the
entire parent minus padding. In most cases, this causes the layout to take up the
entire screen.
For the Tip Calculator app, the padding properties of the layout begin with a
prefix of @dimen/. This indicates that you are specifying a dimension value that's
stored in the dimens.xml file. The dimension named activity_vertical_margin is
set to a value of "16dp". As a result, the layout includes 16 density-independent
pixels (dp) of space between the edge of the screen and the widgets contained by
the layout. Although Android supports other units of measurement such as inches,
it's a best practice to use density-independent pixels whenever possible.
When you specify the id property for a widget, you begin the value of the
id property with a prefix of @+id/. This indicates that you are specifying an ID
value for the widget. Then, you can specify the ID for the widget. In this figure,
the id property shows how to set the ID for a widget to billAmountLabel.
For a widget, the width and height properties are typically set to a predefined
value of "wrap_content". This forces the width and height to be just big enough
to contain the widget and its content. However, if you want, you can use
density-independent pixels (dp) to specify the height or width.
For the text property, you begin with a prefix of ©string/. This indicates that
you are specifying a value that's stored in the strings.xml file. In this figure, the
text property shows how to set the display text for the widget to the string in the
strings.xml file that's named bill_amount_label.
For the textSize property, it's generally considered a best practice to use
scale-independent pixels (sp) whenever possible. In this figure, the textSize
property specifies a value of "20sp". Scale-independent pixels (sp) work much
like density-independent pixels. However, scale-independent pixels provide a
way for Android to adjust the size of the text so it scales correctly for different
screen densities.
The last two properties are typically used with an EditText widget. Here, the
ems property sets the width of the EditText widget so it's wide enough to contain
the specified number of the letter m.
The inputType property sets the type of input that the EditText widget should
accept. In this figure, the inputType property specifies a value of
"numberDecimal". This indicates that the EditText widget should only accept
numeric characters and the decimal point character. Of course, an EditText
widget can accept many other types of input too such as plain text, email
addresses, telephone numbers, passwords, and so on.
To specify a density-independent pixel, it's possible to use an abbreviation of
dip instead of dp. For example, you could use "lOdip" instead of "lOdp". In this
book, I use dp for two reasons. First, it's shorter. Second, it's more consistent
with the sp abbreviation that's used for scale-independent pixels.
Chapter 2 How to start your first Android app
Common properties for layouts
Property Example settings
width
height
paddingTop
paddingLeft
mat ch parent
mat ch parent
@dimen/activity_vertical_margin
@dimen/activity_horizontal_margin
Common properties for widgets
Property Example settings
id
@+id/billAmountLabel
width
height
layout:alignParentLeft
layout:alignParentStart
layout:alignParentTop
layout:padding
text
textsize
textStyle
layoutimarginLeft
ems
inputType
wrap_cont ent
wrap_cont ent
true
true
true
lOdp
@string/bill_amount_label
20sp
bold
130dp
8
numberDecimal
Pre-defined values for setting height and width
Value Description
wrap_content Wraps the height or width so it is large enough to
display the widget.
match_parent Stretches the height or width to match the parent
container.
Common units of measurement
Name
Density-independent pixels
Scale-independent pixels
Abbreviation Typical uses
dp or dip
sp
margins, padding, etc.
font sizes
Description
• For the text property, you begin with a prefix of ©string/ to indicate that you are
specifying a value that's stored in the strings.xml file.
• Although Android supports other units of measurement, such as inches, it's a
best practice to use density-independent and scale-independent pixels whenever
possible.
Figure 2-8 Common properties
Section 1 Get started fast with Android
The XML for the user interface
Figure 2-9 shows the XML for the user interface. This code is stored in the
file named activity_tip_calculator.xml file. Most of this code is generated when
you use the graphical editor to work with the widgets of the user interface.
However, you can edit the XML for the user interface whenever you want. For
example, you may want to do this to make minor adjustments that are difficult to
make in the graphical layout editor.
To start, the RelativeLayout element defines a relative layout that contains
the widgets for the user interface. Here, the layout_width and layout_height
attributes use a value of match_parent to specify that the layout should use the
whole screen. And the padding attributes use the values stored in the dimens.xml
file to specify the amount of space between the edge of the layout and its child
elements.
The XML for this user interface includes comments to identify each row of
widgets. These comments use the same syntax as an HTML comment (start with
<!-- and end with -->).
The first TextView element sets the layout_width and layout_height
attributes to a value of wrap_content to specify that the widget should be just wide
enough and tall enough to fit its content. The text attribute sets the text that's
displayed on the widget to the value that's stored in the bill_amount string of the
strings.xml file. The id attribute defines an ID of billAmountLabel. The textSize
attribute sets the size of the text to 20 scale-independent pixels (20sp). The
textStyle attribute sets the style of the text to bold. And the paddingTop attribute
sets the padding at the top of the attribute to 10 density-independent pixels
(lOdp).
The EditText element displays the widget that allows the user to enter a
bill amount. By now, you should understand how most of the attributes of the
EditText element work. Within a relative layout, the alignment attributes align
the editable text view relative to other widgets. In this case, the alignment
attributes align the editable text view to the right of the TextView element for the
bill amount label with a margin of 16dp between the two elements. Also, the ems
attribute specifies that the editable text view should be wide enough to fit 8 ems
(8 of the letter m). And the inputType element specifies that the soft keyboard
should only allow the user to enter decimal numbers.
The next two TextView elements define the widgets that display the tip
percent. The Button elements define the buttons that allow the user to increase or
decrease the tip percent.
The last four TextView elements define the widgets that display the tip and
total amounts.
Chapter 2 How to start your first Android app
The XML for the user interface Page 1
<RelativeLayout
xmlns:android="http://schemas.android.com/apk/res/android"
xmlns:tools="http://schemas.android.com/tools"
android:layout_width="match parent"
android:layout height="match parent"
android:paddingLeft="@dimen/activity_horizontal_margin"
android:paddingRight="@dimen/activity_horizontal_margin"
android:paddingTop="@dimen/activity_vertical_margin"
android:paddingBottom="@dimen/activity_vertical_margin"
tools:context=".TipCalculatorActivity">
<!-- The bill amount -->
<TextView
android:layout_width="wrap_content"
android:layout_height="wrap_content"
android:text="@string/bill_amount_label"
android:id="@+id/billAmountLabel"
android:textSize="2Osp"
android:textStyle="bold"
android:layout_alignParentTop="true"
android:layout_alignParentLeft="true"
android:layout_alignParentStart="true"
android:paddingTop="lOdp" />
<EditText
android:layout_width="wrap_content"
android:layout_height="wrap_content"
android:inputType="numberDecimal"
android:ems="8"
android:id="@+id/billAmountEditText"
android:text="@string/bill_amount"
android:textsize="2Osp"
android:layout_alignTop="@+id/billAmountLabel"
android:layout_toRightOf="@+id/billAmountLabel"
android:layout_toEndOf="@+id/billAmountLabel"
android:layout_marginLeft="16dp" />
Figure 2-9 The XML for the user interface (part 1 of 3)
Section 1 Get started fast with Android
The XML for the user interface Page 2
<!-- The tip percent -->
<TextView
android:layout_width="wrap_content"
android:layout_height="wrap_content"
android:text="@string/tip percent label"
android:id="@+id/percentLabel"
android:textSize="2Osp"
android:textStyle="bold"
android:layout_alignBottom="@+id/percentDownButton"
android:layout_alignParentLeft="true"
android:layout_alignParentStart="true" />
<TextView
android:layout_width="wrap_content"
android:layout_height="wrap_content"
android:text="@string/tip percent"
android:id="@+id/percentTextView"
android:layout_alignTop="@+id/percentLabel"
android:layout_alignLeft="@+id/billAinountEditText"
android:layout_alignStart="@+id/billAinountEditText"
android:textSize="2Osp" />
<Button
android:layout_width="45dp"
android:layout_height="45dp"
android:text="©string/decrease"
android:id="@+id/percentDownButton"
android:layout_below="@+id/billAmountEditText"
android:layout_toLeftOf="@+id/percentUpButton"
android:layout_toStartOf="@+id/percentUpButton"
android:textSize="2Osp" />
<Button
android:layout_width="45dp"
android:layout_height="45dp"
android:text="@string/increase"
android:id="@+id/percentUpButton"
android:layout_alignTop="@+id/percentDownButton"
android:layout_alignRight="@+id/billAmountEditText"
android:layout_alignEnd="@+id/billAmountEditText"
android:textSize="2Osp" />
Figure 2-9 The XML for the user interface (part 2 of 3)
Chapter 2 How to start your first Android app
The XML for the user interface Page 3
<!-- The t ip amount -->
<TextView
android:layout_width="wrap_content"
android:layout_height="wrap_content"
android: text="@string/tip_amount_label"
android:id="@+id/tipLabel"
android:textsize="2Osp"
android:textStyle="bold"
android:layout_marginTop="23dp"
android:layout_below="@+id/percentDownButton"
android:layout_alignParentLeft="true"
android:layout_alignParentStart="true" />
<TextView
android:layout_width="wrap_content"
android:layout_height="wrap_content"
android:text="@string/tip_amount"
android:id="@+id/tipTextView"
android:layout_alignTop="@+id/tipLabel"
android:layout_alignLeft="@+id/percentTextView"
android:layout_alignStart="@+id/percentTextView"
android:textsize="2Osp" />
<!-- The total amount -->
<TextView
android:layout_width="wrap_content"
android:layout_height="wrap_content"
android:text="@string/total_amount_label"
android:id="@+id/totalLabel"
android:textsize="2Osp"
android:textstyle="bold"
android:layout_below="@+id/tipLabel"
android:layout_alignParentLeft="true"
android:layout_alignParentStart="true"
android:layout_marginTop="24dp" />
<TextView
android:layout_width="wrap_content"
android:layout_height="wrap_content"
android:text="@string/total_amount"
android:id="@+id/totalTextView"
android:textsize="2Osp"
android:layout_alignTop="@+id/totalLabel"
android:layout_alignLeft="@+id/tipTextView"
android:layout_alignStart="@+id/tipTextView" />
</RelativeLayout>
Figure 2-9 The XML for the user interface (part 3 of 3)
52 Section 1 Get started fast with Android
Perspective
In this chapter, you learned how to use Android Studio to develop the
user interface for an Android app. However, if you run this app, it displays the
user interface, but it doesn't do anything else. That's because you still need to
write the Java code that adds the functionality to the user interface. In the next
chapter, you'll learn how to do that.
Terms
widgets
controls
text view
label
editable text view
text box
Summary
• In Android development, the components that make up the user interface are
known as widgets.
• In Android, an activity stores the code for a screen of an app.
• In Android, a layout stores the XML that defines the user interface of an app.
• In Android Studio, you can use the graphical editor to add widgets to a
layout by dragging them from the Palette window onto the layout.
• It's generally considered a best practice to store the display text for your app
in a separate XML file. This makes it easy to internationalize the text for
your application.
• Although Android supports other units of measurement, such as inches,
it's a best practice to use density-independent and scale-independent pixels
whenever possible.
Exercise 2-1 Develop a Tester app
Create the app
1. Start Android Studio.
2. Create a project for an Android app named Tester and store it in this directory:
\murach\android\ex_starts
This project should be stored in a package named com.murach.tester, and it
should be based on the Blank Activity template.
3. If you have an Android device, run the app on that device. Otherwise, run it
in an emulator. This should display a message that says "Hello world!" in the
center of the screen.
activity
layout
theme
density-independent pixels (dp)
scale-independent pixels (sp)
Chapter 2 How to start your first Android app
Modify the app
4. Open the layout for the activity. If necessary, click on the Design tab to
display the layout in the graphical editor.
5. Drag the Text View widget to the top left corner of the screen.
6. Change the text size of the Text View widget to 40sp.
7. Change the text of the Text View widget from "Hello World!" to "Success!".
To do that, you may want to modify the strings.xml file.
8. Click the Text tab to view the XML for the user interface.
9. Modify the XML for the layout so the text size of the Text View widget is
80sp.
10. Click the Design tab to switch back to the graphical editor. Note that the
graphical editor shows the changes that were made to the XML for the layout.
11. If you have an Android device, run the app on your device. Otherwise, run the
app in an emulator. This should display a message that says "Success!" at the
top left corner of the screen.
Exercise 2-2 Create the user interface
for the Invoice Total app
In this exercise, you'll create the Invoice Total app. When you're done, a test run
should look something like this:
Invoice Total
Subtotal —
Discount Percent 10%
Discount Amount $15.00
Total $135.00
Create the project
1. Start Android Studio.
2. Create a new project for an Android app and store it in a project named
Invoice in this directory:
\murach\android\ex_starts
This project should be stored in a package named com.murach.invoice, and it
should be based on the Blank Activity template.
Create the user interface
3. Open the layout for the activity that's stored in the resUayout directory. If
necessary, click the Design tab to display the graphical editor.
4. Delete the Text View widget that displays the "Hello world!" message.
Section 1 Get started fast with Android
5. Add the seven TextView widgets and one EditText widget to the layout. Set
the id and text properties of each widget. When you're done, the user interface
should have the widgets and text shown above. However, these widgets should
look different since you haven't set their properties yet.
6. Set the textSize property for all eight widgets to 20sp.
7. Set the textStyle property for the four widgets in the left column to bold.
8. Click the Text tab to review the XML for this layout. Note how the XML
attributes correspond with the properties that you have set with the graphical
editor.
9. Open the strings.xml file that's in the res/values directory. Then, review the
code.
10. Change the value of the string named app_name to "Invoice Total".
11. Test the user interface by running the app on a physical device. Or, if you
don't have a physical device, run the app on an emulator. The app should
allow you to enter a subtotal, but that shouldn't cause the discount percent,
discount amount, or total values to change.
3
How to finish your first
Android app
In the previous chapter, you learned how to develop the XML for the user
interface of an app. Now, this chapter shows how to write the Java code that
adds the functionality to this user interface. In addition, it shows some more
skills that you can use to put the final touches on an app.
How to write the Java code 56
How to work with an activity 56
How to remove the v7 appcompat support library 58
How to get references to wideets 60
How to handle the EditorAction event 62
How to get and set the text for wideets 66
The lifecycle of an activity 70
How to save and restore values 72
The Java code for the app 74
More skills for finishing an app ..........................................80
How to work with the Gradle build script 80
How to work with dependencies 82
How to work with the Android manifest 84
How to set the launcher icon for an app 86
How to use the documentation for the Android API 88
Perspective...........................................................................90
Section 1 Get started fast with Android
How to write the Java code
Once you have the user interface working the way you want, you can write
the Java code for the app. This is the code that provides the functionality for the
app.
How to work with an activity
When you create an Android project based on the Blank Activity template,
Android Studio automatically creates a class for an activity like the one shown
in figure 3-1. This class inherits the AppCompatActivity class, which in turn
inherits the Activity class. Then, this class overrides the onCreate method of the
AppCompatActivity class. Android runs this method when the activity is started.
Within the onCreate method, the first statement passes the Bundle
parameter to the onCreate method of the superclass (the Activity class). This Bundle
parameter contains the activity's previously saved state if it exists. Then, the
second statement displays the user interface for the activity. To do that, it calls
the setContentView method of the superclass. Within the parentheses for this
method, the code specifies the resource for the layout. To do that, this code uses
the R (resources) class.
The R class is created automatically when you build your project, and
it provides a way to access the compiled resources for your project. In the
onCreate method, for example, this code:
R.layout.activity_tip_calculator
refers to a compiled version of this resource:
res\layout\activity_tip_calculator.xml
By default, the activity class includes an onCreateOptionsMenu method that
displays an options menu, and an onOptionsItemSelected method that provides
some starting code for working with this menu. If your app doesn't need an
options menu, you can delete both of these methods.
If you're creating an app like Tip Calculator that only uses a single activity,
you can usually modify the generated class to get it to work the way you want.
However, if you need to add an additional screen to your app, you need to add a
new activity. To do that, you can right-click on a package directory in the Project
window and select the New-> Activity->Blank Activity item. Then, respond to
the resulting dialog. This adds an XML file for the layout as well as a Java file
that's similar to the one shown in this figure.
Chapter 3 How to finish your first Android app
The default Java code for an activity
package com.murach.tipcalculator;
import android.support.v7.app.AppCompatActivity;
import android.os.Bundle;
import android.view.Menu;
import android.view.MenuItern;
public class TipCalculatorActivity extends AppCompatActivity {
©Override
protected void onCreate(Bundle savedlnstanceState) {
super.onCreate(savedlnstanceState);
setContentView(R.layout.activity_tip_calculator);
}
©Override
public boolean onCreateOptionsMenu(Menu menu) {
getMenuInflater().inflate(R.menu.menu_tip_calculator, menu);
return true;
}
©Override
public boolean onOptionsItemSelected(MenuItem item) {
int id = item.getltemld();
if (id == R.id.action_settings) {
return true;
}
return super.onOptionsItemSelected(item);
}
}
Description
• When you create an Android project that's based on the Blank Activity template, it
automatically creates a class for the first activity in your app. This class displays the
user interface for the activity.
• To create a new activity, you can right-click a package in the Project window, select
the New->Activity->Blank Activity item, and respond to the resulting dialog.
• The AppCompatActivity class is designed to make your app compatible with most
versions of Android. This class inherits the Activity class, which is the base class
for all activities.
• Android runs the onCreate method when the activity is started.
• The onCreate method usually passes the Bundle parameter to the onCreate method
of the superclass and uses the setContentView method to specify the layout.
• The R class provides a way to access the compiled resources for your project. This
class is created automatically when you build your project.
• The onCreateOptionsMenu and onOptionsItemSelect methods contain some
starting code for the options menu.
• To remove the options menu from an app, delete these methods.
Figure 3-1 The default code for an activity
Section 1 Get started fast with Android
How to remove the v7 appcompat support library
For the code in the previous figure to work, your project must include
the v7 appcompat library. This provides support for the action bar and the
Material theme, which was introduced with Android 5.0 (API 21), all the way
back to Android 2.1 (API 7). To provide this support, this library includes
the AppCompatActivity class shown in the previous figure as well as the
AppCompat theme, which supports most features of the Material theme.
However, there also are a couple drawbacks to using this support library.
First, it makes your app larger and dependent on a support library. Second, it
makes your code more complex. For example, to create a class for an activity,
you inherit the AppCompatActivity class instead of just inheriting the Activity
class.
Because of this, you can remove this library from your project whenever
you decide that you don't need it. To do that, you can use a procedure like the
one shown in figure 3-2. This removes a dependency from your project, and it
allows you to use simpler code such as inheriting the Activity class and using the
built-in Holo theme.
So, when would you want to remove the v7 appcompat support library?
Well, if your project specifies a minimum API of 14 or higher and you want to
use the built-in Holo theme, you don't need the v7 appcompat support library.
Also, if you want to keep things simple while you're learning Android
programming, it makes sense to remove this support library. As a result, we've removed
this library from most of the apps described in this book.
And when would you want to keep the v7 appcompat support library? Well,
if your project specifies a minimum API that's below API 14, or if you want to
use the Material theme, you should keep the v7 appcompat support library. In
that case, your app can support the action bar and use the Material theme on
virtually all Android devices. For an example of an app that keeps this support
library and uses the AppCompat (Material) theme, please see chapter 7.
Chapter 3 How to finish your first Android app
The v7 appcompat support library
General description
- Provides support back to Android 2.1 (API 7).
Features
- Supports the action bar, which was introduced with Android 4.0 (API 14).
- Supports the Material theme, which was introduced with Android 5.0 (API 21).
The Gradle build script dependency
com.android.support:appcompat-v7:2 3.0.0
How to remove the v7 appcompat support library
1. Open the Gradle build script for the app. To do that, open the Project window,
expand the Gradle Scripts directory, and double-click on the "build.gradle (Module:
app)" item.
2. In the Gradle build script, remove the dependency for the v7 appcompat support
library. For most projects, you can do that by deleting the following code from the
end of the file:
dependencies {
compile fileTree(dir: 'libs', include: ['*.jar'])
compile 'com.android.support:appcompat-v7:23.0.0'
}
3. Open the class for the activity.
4. In the class for the activity, replace the import statement for the
AppCompatActivity class with an import statement for the Activity class like this:
import android.app.Activity;
5. In the class for the activity, modify the class declaration so it extends the Activity
class, not the AppCompatActivity class, like this:
public class TipCalculatorActivity extends Activity
6. Open the res/values/styles.xml file. Then, modify the style named AppTheme so it
uses a Holo theme as the parent like this:
<style name="AppTheme" parent="android:Theme.Holo.Light.DarkActionBar">
<!-- Customize your theme here. -->
</style>
Description
• If a project doesn't need the v7 appcompat support library, you can make the
project smaller and simpler by removing it.
Figure 3-2 How to remove the v7 appcompat support library
Section 1 Get started fast with Android
How to get references to widgets
Figure 3-3 shows how to get references to the widgets on the user interface.
This is the first step to adding functionality to a user interface.
To make it easy to work with widgets, you typically start by adding import
statements that import the classes for the widgets. Most widgets are stored in the
android.widgets package. In this figure, for example, the Text View and EditText
classes are both stored in this package.
After you import the classes for the widgets, you typically declare the
widgets as private instance variables of the activity. In this figure, for example,
three widgets have been declared as private instance variables. Here, the first
widget is an EditText widget, and the other two are Text View widgets.
In the onCreate method, you can use the findViewByld method to get
references to the widgets that are declared in the layout. To do that, you can use the
R (resources) class to access compiled resources. In this figure, for example, the
first findViewByld method specifies an argument of:
R.id.billAmountEditText
This gets a reference to a compiled resource with an ID of billAmountEditText.
If you look at the XML file for the user interface, you'll find that this ID
corresponds with the ID of the EditText widget on the user interface. Similarly,
the other two IDs specified in this figure correspond with the IDs of two of the
Text View widgets.
The findViewByld method returns a View object that can be cast to the
correct type for each widget. In this figure, for instance, the first statement casts
the View object for the bill amount to the EditText type. Then, the next two
statements cast the View object that's returned to the Text View types. This works
because the View class is the superclass for all widgets.
Chapter 3 How to finish your first Android app
An activity that gets references to the widgets
package com.murach.tipcalculator;
import android.app.Activity;
import android.os.Bundle;
import android.widget.EditText; 1. Import the classes for the widgets
import android.widget.TextView;
public class TipCalculatorActivity extends Activity {
// a ' a • ~ • t e "dg
private EditText billAmountEditText;
private TextView tipTextView;
private TextView totalTextView;
©Override
public void onCreate(Bundle savedlnstanceState) {
super.onCreate(savedlnstanceState);
setContentView(R.layout.activity_tip_calculator);
// 3. Get references to the widaets
billAmountEditText = (EditText) findViewById(R.id.billAmountEditText);
tipTextView = (TextView) findViewByld(R.id.tipTextView);
totalTextView = (TextView) findViewById(R.id.totalTextView);
}
}
Description
• You can add import statements to import the classes for the widgets from the android,
widgets package.
• You can declare widgets as private instance variables of the activity.
• You can use the findViewByld method to get references to the widgets that are declared
in the layout.
• The findViewByld method accepts an argument for the ID of the widget. The R class
provides a way to get the ID for any of the compiled resources for your project.
• The findViewByld method returns a View object for the widget with the specified ID.
This View object can be cast to the correct type of the widget.
Figure 3-3 How to get references to the widgets
Section 1 Get started fast with Android
How to handle the EditorAction event
Now that you have references to some of the widgets on the user interface,
you're ready to learn how to code an event handler. An event handler is a special
type of method that's executed when an event occurs. Typically, an event occurs
when a user interacts with widgets. In figure 3-4, for example, you'll learn how
to handle the EditorAction event. This event typically occurs when a user
interacts with the EditText widget to display a soft keyboard and presses an action
key such as the Done key.
In general, there are three steps to handling an event. First, you need
to import the interface that defines a listener, which is an object that
listens for an event. In this figure, the sixth import statement imports the
OnEditorActionListener interface.
Second, you need to create a listener. To do that, you can implement
the listener interface. In this figure, the class declares that it implements the
OnEditorActionListener interface, and then it implements the method that's
defined by the interface: the onEditorAction method. This method contains the
code that's executed when the listener detects that an action event occurred on
the widget.
Third, you must connect, or wire, the listener to a widget. In this figure,
the last statement in the onCreate method wires the EditText widget for the bill
amount to the onEditorAction listener that's defined by the current class. To do
that, this code calls the setOnEditorActionListener method from the EditText
widget for the bill amount. Then, it uses the keyword named this to pass the
object for the current class to that method.
When you're implementing interfaces, Android Studio can automatically
generate the method or methods defined by the interface for you, which is
usually what you want. To do that, you can code the implements keyword
followed by the name of the interface. Then, you can click within the name of
the interface, click the error icon that Android Studio displays to the left of this
code, select the "Add methods" item, and respond to the resulting dialog. When
you do, Android Studio generates the method or methods for you. If
necessary, you can modify the names of the arguments. In this figure, for example, I
changed the default names of the arguments to make them more readable.
Within the onEditorAction method, you can handle the events that occur on
specific action keys such as the Done key by comparing the second parameter
(the ID of the action key) with the constants of the Editorlnfo class. In this
figure, this method begins by checking whether the Done button was clicked or
whether an unspecified action occurred such as an Enter key being pressed on
an older device. If either condition is true, this code sets the tip to $10 and the
amount to $110. If not, the tip and amount are left at their default values. Either
way, this method returns a false value, which causes the soft keyboard to be
hidden, which is usually what you want.
If you review the onEditorAction method, you'll notice that the first and
third parameters aren't used in this code. That's because the first parameter
is used to determine which widget triggered the event. For this code, there is
Chapter 3 How to finish your first Android app
An activity that handles the EditorAction event
package com.murach.tipcalculator;
import android.app.Activity;
import android.os.Bundle;
import android.view.KeyEvent;
import android.view.inputmethod.Editorlnfo;
import android.widget.EditText;
import android.widget.TextView;
import android.widget.TextView.OnEditorActionListener; 1. Import listener
public class TipCalculatorActivity extends Activity
implements OnEditorActionListener { //2a. Implement the listener
private EditText billAmountEditText;
private TextView tipTextView;
private TextView totalTextView;
©Override
public void onCreate(Bundle savedlnstanceState) {
super.onCreate(savedlnstanceState);
setContentView(R.layout.activity_tip_calculator);
billAmountEditText = (EditText) findViewById(R.id.billAmountEditText);
tipTextView = (TextView) findViewByld(R.id.tipTextView);
totalTextView = (TextView) findViewById(R.id.totalTextView);
// 3. Set the listener
billAmountEditText.setOnEditorActionListener(this);
}
// 2b. Implement the listener
©Override
public boolean onEditorAction(TextView v# int actionld, KeyEvent event) {
if (actionld == EditorInfo.IME_ACTION_DONE ||
actionld == Editorlnfo.IME_ACTION_UNSPECIFIED)
{
tipTextView.setText("$10.00");
totalTextView.setText("$110.00");
}
return false;
}
}
Description
• An event handler is a special type of method that's executed when an event occurs.
Typically, an event occurs when a user interacts with widgets.
• A listener is an object that listens for an event. To create a listener, import the interface
for the listener and implement that interface. After you create a listener, connect, or
wire, the listener to an event that's available from a widget.
• The EditorAction event typically occurs when the user uses a soft keyboard to enter
text into an editable text view.
Figure 3-4 How to handle the EditorAction event (part 1 of 2)
Section 1 Get started fast with Android
only one widget that has been wired to the event, so that widget is the only one
that could possibly trigger the event. The third parameter, on the other hand, is
used to determine whether the Enter key triggered the event. For now, this app
assumes that the device is a touchscreen device that doesn't have a physical
Enter key. As a result, this app doesn't handle the Enter key.
Part 2 of figure 3-4 shows a few of the constants that are available from the
Editorlnfo class. All of these constants begin with IME, which stands for input
method editor. An input method editor (IME) is a user control such as a soft
keyboard that enables users to input data, often text.
The first constant shown in this figure is used in part 1 of this figure to check
whether the Done key was pressed. The next three constants can be used to
check for the Go, Next, and Search keys. Although these keys aren't available
from the soft keyboard for the Tip Calculator shown in this chapter, they are
available from other types of soft keyboards. For example, the Go key is
available from the soft keyboard for entering a URL. Finally, the last constant can be
used to check for an unspecified action such as an Enter key that's available from
an older device.
As you review this code, you should be aware that there are several possible
ways to define a class that implements the interface for a listener. In this figure,
I decided to use the class for the activity to implement this interface. That way,
that class defines the activity, and it acts as the listener for the EditorAction
event. However, in some cases, it makes sense to define a separate class for the
listener. You'll learn more about how this works in chapter 6.
Chapter 3 How to finish your first Android app
A few constants from the Editorlnfo class
Constant
IME_ACTION_
IME_ACTION_
IME_ACTION_
IME_ACTION_
IME_ACTION_
DONE
_GO
_NEXT
.SEARCH
.UNSPECIFIED
The action key performs...
A "done" operation, typically closing the soft keyboard.
A "go" operation, typically taking the user to the target
specified by the user.
A "next" operation, typically taking the user to the next
field that needs text input.
A "search" operation, typically searching for the text
specified by the user.
No specified operation, typically an action key on an
older device such as an "enter" key.
Description
• After you declare the interface for the listener, you can automatically generate the
declaration for the method by clicking on the error icon and selecting the "Add
unimplemented methods" item.
• An input method editor (IME) is a user control such as a soft keyboard that enables
users to input data, often text.
• To determine which widget triggered the event, you can use the first argument of
the onEditorAction method.
• To determine which action key triggered the event, you can use the second
argument of the onEditorAction method. To do that, compare the second argument
with the constants of the Editorlnfo class.
• To determine whether the action was trigged by pressing the Enter key, you can use
the third argument of the onEditorAction method.
• To hide the soft keyboard, you can return a false value from the onEditorAction
method.
• To keep the soft keyboard displayed, you can return a true value from the
onEditorAction method.
Figure 3-4 How to handle the EditorAction event (part 2 of 2)
Section 1 Get started fast with Android
How to get and set the text for widgets
Figure 3-5 shows how to get and set the text that's displayed on a widget.
Typically, you need to get the text from widgets such as editable text views that
allow the user to enter text. Conversely, you often need to set the text on widgets
that display text such as labels. However, these techniques work for most types
of widgets.
You can use the getText method to get the text that's displayed on a widget.
To do that, you call the getText method from the widget. This returns an Editable
object. In most cases, you want to call the toString method from the Editable
object to convert it to a String object. In this figure, for instance, the first
example gets the text from the editable text view for the bill amount and converts
that text to a string.
You can use the setText method to set the text that's displayed on a widget.
To do that, you call the setText method from the widget and you pass a string
argument that contains the display text. In this figure, for instance, the second
example sets the display text for the Text View widget to "Test 1".
The calculateAndDisplay method shown in this figure uses both the getText
and setText methods. To start, the first statement gets the display text from the
editable text view for the bill amount and converts that text to a string. Then,
this code uses the parseFloat method of the Float class to convert that string to
a float value. Since the editable text view for the bill amount only allows the
user to enter an empty string or a string for a decimal number, this code doesn't
include a try statement that handles the exception that occurs if the user enters
non-numeric data. However, this code does use an if statement to convert an
empty string to a zero.
After getting a float value for the bill amount, this code calculates the tip
and total amount for the bill. Here, the code assumes that the tip is a float value
of 15%, and it uses the float type for all of these variables. To specify the literal
value for the tip percent, this code appends an f to the number to indicate that it
is a float value.
Before this code can display the tip and total amounts, it must convert them
to string values. To do that, this code uses the NumberFormat class. First, it calls
the static getCurrencylnstance method of the NumberFormat class to return a
NumberFormat object for currency formatting. Then, it uses the format method
of the NumberFormat object to convert numeric values to strings that have
currency formatting, and it displays these strings on the Text View widgets for
the tip and total amounts.
Although the code in this figure shows how to work with float values, you
can use a similar technique to work with double and integer values. For example,
you can use the parselnt method of the Integer class to convert a string to an int
value.
Although the code in this figure shows how to work with currency
formatting, you can use a similar technique to work with percent formatting. In
particular, you can use the static getPercentlnstance method of the NumberFormat
class to return a NumberFormat object that you can use to convert numbers to
strings that have percent formatting.
Chapter 3 How to finish your first Android app
Two methods for working with widgets
Method Description
getText () Returns an Editable object that represents the text
that the widget is displaying. You can use the toString
method to convert the Editable object to a string.
setText (string) Sets the text that's displayed on the widget.
Examples
How to get text
String billAmountString = billAmountEditText.getText().toString();
How to set text
tipTextView.setText("Test 1");
A method that gets input, calculates amounts, and displays output
public void calculateAndDisplay() {
// get the bill amount
billAmountString = billAmountEditText.getText().toString();
float billAmount;
if (billAmountString.equals("")) {
billAmount = 0;
}
else {
billAmount = Float.parseFloat(billAmountString);
}
// calculate tip and total
float tipPercent = .15f;
float tipAmount = billAmount * tipPercent;
float totalAmount = billAmount + tipAmount;
// display the results with formatting
NumberFormat currency = NumberFormat.getCurrencylnstance();
tipTextView.setText(currency.format(tipAmount));
totalTextView.setText(currency.format(totalAmount));
}
Description
• For most widgets, you can use the getText and setText methods to get and set the
text that's displayed on the widget.
• If necessary, you can use the Integer, Double, and Float classes to convert the
strings that are returned by widgets to int, double, and float values.
• If necessary, you can use the NumberFormat class to convert numeric values to
string values that have currency or percent formatting so they can be displayed on
widgets.
Figure 3-5 How to get and set the text for widgets
Section 1 Get started fast with Android
How to handle the Click event
Figure 3-6 shows how to handle the Click event. This event is available from
most widgets, but it's almost always handled for buttons, which are designed to
be clicked. The steps for handling the Click event are the same as the steps for
handling the EditorAction event that you saw earlier in this chapter.
First, you import the interface for the listener. Often, Android Studio does
this for you automatically when you declare the interface. As a result, you can
often skip this step.
Second, you implement the interface by declaring it and by implementing
any methods declared by the interface. In this figure, the class for the Tip
Calculator activity declares that it implements the OnClickListener interface, and
it includes the onClick method that's defined by this interface.
Third, you wire the listener to a widget. In this figure, the two statements
wire the event handler shown in this figure to both of the buttons on the Tip
Calculator app. To do that, this code calls the setOnClickListener method from
each button and passes the object for the current class to that method.
Since the onClick method is wired to two buttons, the code in the onClick
method includes a switch statement that checks which button was clicked and
executes the appropriate code. To do that, the switch statement gets the ID of the
widget by calling the getld method from the View object that's the first and only
argument of the onClick method. Then, it compares this value to the IDs of the
Button widgets. To get these IDs, this code uses the R class to access
information about the compiled resources for the project. For instance, to get the ID for
the button named percentDownButton, it uses this code:
R.id.percentDownButton
Earlier in this chapter, the onEditorAction method didn't need to include code
like this because that event handler was only wired to a single widget.
Since a class can implement multiple interfaces, a class can handle multiple
events. In this figure, for instance, step 2a shows that the class implements both
the OnClickListener and OnEditorActionListener interfaces.
Chapter 3 How to finish your first Android app
How to handle the Click event
Step 1: Import the interface for the listener
import android.view.View.OnClickListener;
Step 2a: Implement the interface for the listener
public class TipCalculatorActivity extends AppCompatActivity
implements OnEditorActionListener, OnClickListener {
Step 2b: Implement the interface for the listener
©Override
public void onClick(View v) {
switch (v.getld()) {
case R.id.percentDownButton:
tipPercent = tipPercent - .Olf;
calculateAndDisplay();
break;
case R.id.percentUpButton:
tipPercent = tipPercent + .Olf;
calculateAndDisplay();
break;
}
}
Step 3: Set the listeners
percentUpButton.setOnClickListener(this);
percentDownButton.setOnClickListener(this);
Description
• The steps for handling the Click event are the same as the steps for handling the
EditorAction event. However, since the Click event is wired to two buttons, the
code in the onClick method includes a switch statement that checks which button
was clicked and executes the appropriate code.
• To specify a literal value for the float type, you can append an f or an F to the
number.
Figure 3-6 How to handle the Click event
Section 1 Get started fast with Android
The lifecycle of an activity
The Activity class defines methods that are called by the Android operating
system at different points in the lifecycle of an activity. This is shown by figure
3-7.
When you create an activity, you create a class that inherits the Activity
class. Then, to get your app to work the way you want, you override the lifecycle
methods to control the lifecycle of the activity. For example, you have already
seen how you can override the onCreate method to display and prepare the user
interface for an activity. However, you often need to override other methods
to make sure that your app doesn't lose its progress if the user leaves the app
and returns to it later. Similarly, you often need to make sure that your app
doesn't lose its progress when the user switches between landscape and portrait
orientation.
When an app starts for the first time, Android calls the onCreate, onStart,
and onResume methods. As this happens, the activity quickly passes through the
created state and the started state. Of these three methods, the onCreate method
is typically used to create the user interface and prepare it for display. In the Tip
Calculator activity, for example, this method displays the user interface, gets
references to important widgets, and wires the event handlers.
After the onResume method executes, the app is in the running state, which
is also known as the active state or resumed state. In this state, the app is visible
and has the focus. Unlike the created and started states, an app may remain in the
running state for a long time.
If the running activity loses the focus, becomes partially covered by another
activity, or if the device goes to sleep, Android calls the onPause method. This
causes the activity to go into the paused state. Android attempts to maintain the
state of all activities in the paused state. As a result, if the activity regains the
focus or the device wakes up, Android can call the onResume method and return
to the running state without losing any of the user's progress.
If the user gets a phone call or navigates to another activity, Android calls
the onPause method followed by the onStop method. This causes the activity to
go into the stopped state. In the stopped state, Android attempts to maintain the
state of the activity for as long as possible. However, an activity in the stopped
state has a lower priority than an activity in the running or paused states. As a
result, Android often kills activities that are in the stopped state.
Most lifecycle states have a corresponding method. If you implement one
method, it often makes sense to implement the other. For example, if you use
the onPause method to save data when the activity goes into the paused state,
you typically want to use the onResume method to restore the data when the
activity returns to the running state. Similarly, if you use the onStop method, you
typically want to use the onStart method, and possibly the onRestart method.
Although this diagram shows the most commonly used lifecycle methods for
an activity, it doesn't show them all. For example, in chapter 8, you'll learn more
about working with the lifecycle methods for displaying menus. Or, you can
learn more about other lifecycle methods by looking up the Activity class in the
documentation for the Android API.
Chapter 3 How to finish your first Android app
The lifecycle of an activity
r
onCreate()
I
Android
operating
system
r
onStart()
I
Created
r
onResume()
I
Started
+
onStartQ
Resume
(visible)
onResumeQ
onPause()
Paused
onRestartQ
onStopO
Stopped
(hidden)
onDestroyO
Destroyed
Three common states
State
Resumed
Paused
Stopped
ion
This state is also known as the active state or the running state. A running activity is
visible and has the focus. Android only destroys a resumed activity in extreme
situations, such as if the activity tries to use more memory than is available on the device.
A paused activity has lost the focus and may be partially hidden by other activities, or
the device has gone to sleep. A paused activity typically maintains all states. Android
only destroys a paused activity if necessary to keep the activity that's in the running
state stable and responsive.
The activity has lost the focus and is completely hidden by another activity. Android
tries to retain the state for a stopped activity for as long as possible. However, stopped
activities have a lower priority than the other two states. As a result, Android destroys
activities in the stopped state whenever it's necessary to allow activities with higher
priorities to run.
Description
• When you create an activity, Android calls the methods of the Activity class at
different points in its lifecycle. To get your app to work the way you want, you can
override these methods.
• An activity passes through the created state and the started state quickly, but it can
spend a long time in the resumed state, the paused state, and the stopped state.
• Although this diagram shows the most commonly used lifecycle methods for an
activity, it doesn't show them all. To learn more about other lifecycle methods
available to an activity, you can look up the Activity class in the documentation for
the Android API.
Figure 3-7 The lifecycle of an activity
Section 1 Get started fast with Android
How to save and restore values
Android doesn't always save the data of an activity when the activity moves
from the running state into the paused or stopped states. These states occur when
the user navigates to another activity or when the user changes the orientation of
the screen.
For the Tip Calculator app, this means that the activity won't always save
the bill amount and the tip percent. As a result, if you only implement the
onCreate method, the tip percent will be reset to its default value of 15% every
time the user changes the orientation of the screen. Worse, the bill amount and
the tip percent will be reset to their default values every time the user navigates
to another activity and returns to the current activity. Since you usually want
to save a user's progress, you typically want to save and restore these values as
described in figure 3-8.
To start, you need a way to permanently save values. Fortunately, the
SharedPreferences class provided by the Android API makes this easy to
do. First, you import the SharedPreferences class and its Editor class. Then,
you declare a SharedPreferences object as an instance variable, and you use
the onCreate method to create an instance of this object. In this figure, for
example, the onCreate method uses the getSharedPreferences method to get a
SharedPreferences object named savedValues. This object saves values to a file
named SavedValues, and this file is only available to this activity.
Once you have created a SharedPreferences object, you can override the
onPause method and use the SharedPreferences object to save values. To do
that, you can call the edit method of the SharedPreferences object to get an
Editor object. Then, you can use the methods of the Editor object to store the bill
amount string and the tip percent, which are both instance variables. Next, this
code calls the commit method from the Editor object to save the values in the
editor object to disk. Finally, the last statement calls the onPause method of the
superclass, which is necessary for the superclass to work correctly.
To restore values that you have saved, you can override the onResume
method. Within this method, the first statement calls the onResume method of
the superclass, which is required for the superclass to work correctly. Then,
the next two statements use the get methods of the SharedPreferences object to
restore the instance variables for the bill amount string and tip percent.
When you work with the Editor and SharedPreferences objects, you can use
them to put and get values for strings and most primitive types. In this figure, for
example, the instance variable for the bill amount variable is a string value, and
the instance variable for the tip percent is a float value. However, the Editor and
SharedPreferences objects don't allow you to work directly with double values.
So, if you want to use a double value, you must first cast it to a float value.
To test the onPause and onRestore methods in an emulator, you can run the
Tip Calculator activity and navigate to an activity in another app. Then, you can
navigate back to the Tip Calculator activity. Or, if you want, you can change the
orientation of the Tip Calculator activity in your emulator by pressing Ctrl+Fl 1
or Numpad 7.
Chapter 3 How to finish your first Android app
How to import the SharedPreferences class and its Editor class
import android.content.SharedPreferences;
import android.content.SharedPreferences.Editor;
How to set up the instance variables
// define SharedPreferences object
private SharedPreferences savedValues;
©Override
public void onCreate(Bundle savedlnstanceState) {
// other code goes here
// get SharedPreferences object
savedValues = getSharedPreferences("SavedValues"# MODE_PRIVATE);
}
How to use the onPause method to save values
©Override
public void onPause() {
// save the instance variables
Editor editor = savedValues.edit();
editor.putString("billAmountString", billAmountString);
editor.putFloat("tipPercent", tipPercent);
editor.commit();
super.onPause();
}
How to use the onResume method to restore values
©Override
public void onResume() {
super.onResume();
// get the instance variables
billAmountString = savedValues.getstring("billAmountString"# "");
tipPercent = savedValues.getFloat("tipPercent", 0.15f);
}
Description
• Android doesn't always save the data of an activity when you change orientation or
when you navigate away from an activity to another activity or app.
• To save data for an activity, you can override the onPause method.
• To restore data for an activity, you can override the onResume method.
• You can use a SharedPreferences object and its Editor class to save and restore
data.
• To change orientation in an emulator, you can press Ctrl+Fl 1 or Numpad 7.
Figure 3-8 How to save and restore values
Section 1 Get started fast with Android
The Java code for the app
Figure 3-9 shows the Java code for the Tip Calculator app. By now, you
should be able to understand how this code works.
To start, the package statement stores the class for the Tip Calculator activity
in the package named com.murach.tipcalculator. Then, it imports all Java and
Android classes and interfaces that are needed for this class. If you review these
classes and interfaces, you should be familiar with all of them.
The TipCalculatorActivity class inherits the Activity class that's provided
by Android. In addition, this class implements the listener interfaces for the
EditorAction and Click events. As a result, this class must implement the
onEditorAction and onClick methods.
Within the class, the first six statements define the instance variables for the
widgets that the class needs to work with. Then, the seventh statement defines
the SharedPreferences object that's used to save and restore values, and the next
two statements define instance variables for the bill amount string and the tip
percent.
The onCreate method begins by calling the onCreate method of the
superclass, which is necessary for the superclass to work correctly. Then, it uses the
setContentView method that's available from the superclass to display the user
interface that's defined in the XML file for the activity.
After displaying the user interface, the onCreate method gets references
to the six widgets that it declared earlier. To do that, it calls the flndViewByld
method for each widget. Then, it casts the View object that's returned to the
appropriate type for the widget.
After getting references to the widgets, this code sets the listeners. First, it
sets the current class as the listener for the EditorAction event on the editable
text view for the bill amount. Then, this code sets the current class as the listener
for the Click event on both of the buttons.
Chapter 3 How to finish your first Android app
The Java code Page 1
package com.murach.tipcalculator;
import java.text.NumberFormat;
import android.app.Activity;
import android.os.Bundle;
import android.view.KeyEvent;
import android.view.View;
import android.view.View.OnClickListener;
import android.view.inputmethod.Editorlnfo;
import android.widget.Button;
import android•widget•EditText;
import android.widget.TextView;
import android.widget.TextView.OnEditorActionListener;
import android•content•SharedPreferences;
import android•content•SharedPreferences.Editor;
public class TipCalculatorActivity extends Activity
implements OnEditorActionListener, OnClickListener {
// define variables for the widgets
private EditText billAmountEditText;
private TextView percentTextView;
private Button percentUpButton;
private Button percentDownButton;
private TextView tipTextView;
private TextView totalTextView;
// define SharedPref erences object
private SharedPreferences savedValues;
// define an instance variable for the tip percent
private String billAmountString = "";
private float tipPercent = 15f;
©Override
public void onCreate(Bundle savedlnstanceState) {
super.onCreate(savedlnstanceState);
setContentView(R.layout.activity_tip_calculator);
// get references to the widgets
billAmountEditText = (EditText) findViewById(R.id.billAmountEditText);
percentTextView = (TextView) findViewById(R.id.percentTextView);
percentUpButton = (Button) findViewById(R.id.percentUpButton);
percentDownButton = (Button) findViewById(R.id.percentDownButton);
tipTextView = (TextView) findViewByld(R.id.tipTextView);
totalTextView = (TextView) findViewById(R.id.totalTextView);
// set the listeners
billAmountEditText.setOnEditorActionListener(this);
percentUpButton.setOnClickListener(this);
percentDownButton.setOnClickListener(this);
Figure 3-9 The Java code (part 1 of 3)
Section 1 Get started fast with Android
The onPause method saves both of this activity's instance variables: the bill
amount string and the tip percent. These instance variables need to be saved for
the app to work correctly when orientation changes and when the user navigates
away from and back to this activity.
The onResume method restores both of the activity's instance variables.
Then, it sets the bill amount string as the display text on the bill amount EditText
widget. This is necessary because Android sets the display text to its default
value if the user navigates away from and back to this activity. Finally, this code
calls the calculateAndDisplay method.
The calculateAndDisplay method calculates the tip and total amounts for
the bill and displays all current data on the user interface. First, this method gets
the bill amount from the EditText widget and converts this string to a float value.
Then, it calculates the tip and total amounts and stores them as float values.
Finally, it formats these float values and displays them on their corresponding
widgets.
Chapter 3 How to finish your first Android app
The Java code
Page 2
// get SharedPreferences object
savedValues = getSharedPreferences("SavedValues"# MODE_PRIVATE);
}
©Override
public void onPause() {
// save the instance variables
Editor editor = savedValues.edit();
editor.putString("billAmountString", billAmountString);
editor.putFloat("tipPercent", tipPercent);
editor.commit();
super.onPause();
}
©Override
public void onResume() {
super.onResume();
// get the instance variables
billAmountString = savedValues.getstring("billAmountString"# "");
tipPercent = savedValues.getFloat("tipPercent", 0.15f);
// set the bill amount on its widget
billAmountEditText.setText(billAmountString);
// calculate and display
calculateAndDisplay();
}
public void calculateAndDisplay() {
// get the bill amount
billAmountString = billAmountEditText.getText().toString();
float billAmount;
if (billAmountString.equals("")) {
bi11Amount = 0;
}
else {
billAmount = Float.parseFloat(billAmountString);
}
// calculate tip and total
float tipAmount = billAmount * tipPercent;
float totalAmount = billAmount + tipAmount;
// display the other results with formatting
NumberFormat currency = NumberFormat.getCurrencylnstance();
tipTextView.setText(currency.format(tipAmount));
totalTextView.setText(currency.format(totalAmount));
NumberFormat percent = NumberFormat•getPercentlnstance();
percentTextView.setText(percent.format(tipPercent));
}
Figure 3-9 The Java code (part 2 of 3)
Section 1 Get started fast with Android
The onEditorAction method is executed whenever the user presses an action
key on a soft keyboard such as the Done key. This method begins by using an
if statement to check whether the action key is the Done key. If so, it calls the
calculateAndDisplay method to perform the calculation and display the results
on the user interface.
The onClick method is executed whenever the user clicks on either of
the buttons. Within this method, a switch statement checks which button was
clicked. Then, if the Decrease (-) button is clicked, this code decreases the tip
percent by 1 percent and calls the calculateAndDisplay method to perform
the calculation and display the results on the user interface. Conversely, if the
Increase (+) button is clicked, this code increases the tip percent by 1 percent
and calls the calculateAndDisplay method to perform the calculation and display
the results on the user interface.
Chapter 3 How to finish your first Android app 79
The Java code
Page 3
©Override
public boolean onEditorAction(TextView v# int actionld, KeyEvent event) {
if (actionld == EditorInfo.IME_ACTION_DONE)
{
calculateAndDisplay();
}
return false;
}
©Override
public void onClick(View v) {
switch (v.getld()) {
case R.id.percentDownButton:
tipPercent = tipPercent - .Olf;
calculateAndDisplay();
break;
case R.id.percentUpButton:
tipPercent = tipPercent + .Olf;
calculateAndDisplay();
break;
}
}
}
Figure 3-9 The Java code (part 3 of 3)
Section 1 Get started fast with Android
More skills for finishing an app
Now that you understand the event handlers for the Tip Calculator app
shown in this chapter, you may want to put a few final touches on it. To do that,
you may need to modify the Gradle build script or the Android manifest file. Or,
you may need to use the documentation for the Android API to learn more about
the classes and methods that are available to you.
How to work with the Gradle build script
Android Studio uses an automated build tool known as Gradle to build its
projects. This tool builds upon the concepts introduced by other build tools such
as Apache Ant and Apache Maven.
When you use Android Studio to create a project, it automatically generates
a Gradle build script like the one shown in figure 3-10. This generated script
is usually adequate to get started. However, as you work on a project, you may
want to view or modify the attributes in this script.
The minSdkVersion attribute specifies the minimum Android API for your
app. A device running a lower API should refuse to install your app. And if
you deploy your app to Google Play, Google Play won't display it for devices
running a lower API. For most of the apps in this book, we've set the minimum
API to 15 since that covered over 95% of all devices as this book went to press.
As a result, devices running API 14 or lower should refuse to install the apps in
this book.
The targetsdkVersion attribute specifies the version of Android that your
app is designed to run on. For this book, we've set the target version to API 23
since that was the newest API available when this book went to press, and we
were able to test all apps in this book against this API. A device running a higher
version of Android should ignore any new features that change the appearance
or behavior of the app. In other words, when a new API becomes available, the
apps in the book should look and behave correctly on it, though they can't take
advantage of its new features.
The compiles dk Vers ion attribute specifies the version of Android to use
when building your app. This controls the features that are available to your app
when you're developing it. For this book, we set the compile version for all apps
to API 23. That way, we can use the latest API features that were available as this
book went to press.
But what happens if you attempt to use a new feature from API 23 that isn't
available from an older API that's supported by your app such as API 19? In that
case, Android Studio should warn you. Then, you can decide how to handle this
compatibility issue so that your app can run on all APIs from your minimum API
to your target API. This is generally considered a best practice.
Another approach would be to set the compile and target APIs to the same
level as the minimum API. However, this would prevent your app from using any
features introduced by later APIs, which would prevent it from being as good as
it could be. As a result, this is not considered a good practice.
Chapter 3 How to finish your first Android app
The Gradle build script
apply plugin: 'com.android.application'
android {
compileSdkVersion 23
buildToolsVersion "23.0.1"
defaultConfig {
applicationld "com.murach.tipcalculator"
minSdkVersion 15
targetSdkVersion 23
versionCode 1
versionName "1.0"
}
buildTypes {
release {
minifyEnabled false
proguardFiles
getDefaultProguardFile('proguard-android.txt'),
'proguard-rules.pro'
}
}
}
Description
• You can use the Gradle build script to control how Android Studio builds the
project.
• To open the Gradle build script, open the Project window, expand the Gradle
Scripts directory, and double-click on the "build.gradle (Module: app)" item.
• The minSdkVersion attribute specifies the minimum Android API for your app. A
device running a lower API should refuse to install your app.
• The targets dk Version attribute specifies the Android API that your app is designed
to run on. A device running a higher API should not use any new features that
change the look or behavior of your app.
• The compileSdkVersion attribute specifies the Android API to use when building
your app. This controls the Android features that are available to you as you
develop your app.
• Whenever you change the Gradle build script, Android Studio prompts you to
synchronize the build files with the new script. To do that, you can click on the
Synch Now link that's displayed at the top of the text editor.
Figure 3-10 How to work with the gradle build script
Section 1 Get started fast with Android
Whenever you change the Gradle build script, Android Studio prompts you
to synchronize the build files with the new script. To do that, you can click on
the Synch Now link that's displayed at the top of the text editor. This rebuilds the
project.
How to work with dependencies
A dependency specifies a library or file that your project depends on.
The easiest way to add a dependency is to use Android Studio to display the
Dependencies tab shown in figure 3-11. Once you display this Dependencies tab,
you can use the Add button to add a dependency to your project. When you do
this, Android Studio adds the corresponding compile attribute to the dependencies
block at the end of the Gradle build script.
You can also use the Dependencies tab to remove a dependency. To do that,
select the dependency and click the Remove button. However, it's also easy
to remove a dependency by opening the Gradle build script and deleting the
compile attribute for the dependency from the dependencies block at the end
of the Gradle build script. Or, if you want to remove all dependencies, you can
delete the entire dependencies block.
In this figure, the first compile attribute in the dependencies block specifies
that each jar file in the project's libs directory is a dependency. As a result, you
can add a library as a dependency by copying its jar file into this directory. This
approach works well for any custom libraries that aren't maintained as part of
the Android API.
The second compile attribute specifies that the v7 appcompat library is
a dependency. This dependency specifies a library that hasn't been copied
into your project folder. As a result, when you build this app, Gradle finds,
downloads, and includes this dependency. This works well for standard libraries
that are maintained as part of the Android API.
Chapter 3 How to finish your first Android app
The dialogs for adding a dependency
_ Project Structure
* J
+ "
SDK Location
Project
Developer Services
Ads
Analytics
Authentication
Notifications
Modules
Properties \ Signing \ Flavors \ Build Types Dependencies
{inctude=[*Jor]r dir=libs}
til com.android.support:appcompat-v7:23>Q.O
I Sco*e
Compile
Compile
T
n=l WP
+
*
_ Choose Library Dependency
<x
Enter terms for Maven Central search, or fully-qualified coordinates (eg. comgoogle.code.gson:gsorv22.4)
support-annotations (comandroid.support:support-annotations:23.0.0)
support-v4(cornandroid.support:support-v4:23*0.0)
support-vl3(cornandroid.support:support-vl3:23.Q.O)
appcompat-v7(com.android.support:appcompat-v7:23>Q.O)
design (com.android.support:design:23*0.0)
gridlayout-v7(cornandroid.support:gridlayout-v7:23.(X0)
mediarx)uter-v7(cornandroid.support:mediarx)uter-v7:23>QQ
play-services (com.google.android.gms:play-services:7.&0)
Cancel
Cancel
A dependencies block
dependencies {
compile fileTree(dir: 'libs', include: ['*.jar'])
compile 'com.android.support:appcompat-v7:23.0.0'
}
Description
• A dependency typically specifies a library or file that your project depends on.
• To add or remove a dependency, you can select the File->Project Structure
item from the menu system. Then, you can click on the app module and the
Dependencies tab.
• Once you display the Dependencies tab, you can use the Add and Remove buttons
to add or remove a dependency.
• When you use the Dependencies tab to add or remove a dependency, Android
Studio adds or removes the corresponding compile attribute from the dependencies
block that's at the end of the Gradle build script.
Figure 3-11 How to work with dependencies
Section 1 Get started fast with Android
How to work with the Android manifest
When you use Android Studio to create a project, it automatically generates
an Android manifest (the AndroidManifest.xml file) like the one shown in figure
3-12. This file specifies some essential information about an app that the Android
system must have before it can run the app, including the first activity to launch
when the app is started.
In most cases, Android Studio generates a manifest that's adequate for
getting started. However, as you work on a project, you may want to modify
the manifest. For example, if you don't want an app to respond to orientation
changes, you can add a screenOrientation attribute to the activity element.
Then, you can set the screenOrientation attribute to a value of "portrait" or
"landscape". This may work better for your users who may not want the app to
change orientation. Also, if you use this approach, you don't have to write the
code that handles the orientation changes.
If you're working on an existing app, the Android manifest may include a
uses-sdk element. This element typically includes minSdkVersion and target-
SdkVersion attributes that specify the minimum and target APIs for the app.
However, these attributes are overridden by the minSdk Version and targets dk-
Version attributes in the Gradle build script. As a result, when you use Android
Studio, you typically delete the uses-sdk element from the Android manifest and
use the Gradle build script to set these attributes. That way, your project only
specifies these settings in one location. This should reduce confusion and make
the app easier for other programmers to understand and maintain.
Chapter 3 How to finish your first Android app
The AndroidManifest.xml file
< ?xml version="1.0" encoding="utf-8"? >
<manifest xmlns:android="http://schemas.android.com/apk/res/android"
package="com.murach.tipcalculator" >
<application
android:allowBackup="true"
android:icon="@mipmap/ic_launcher"
android:label="@string/app_name"
android:theme="@style/AppTheme" >
<activity
android:name=".TipCalculatorActivity"
android:label="@string/app_name" >
<intent-filter>
<action android:name="android.intent.action.MAIN" />
<category android:name="android.intent.category.LAUNCHER" />
</intent-filter>
</activity>
</application>
</manifest>
An activity element that only allows portrait orientation
<activity
android:name=".TipCalculatorActivity"
android:label="@string/app_name"
android:screenOrientation="portrait">
The element that sets the minimum and target SDKs
<uses-sdk
android:minSdkVersion="8"
android:targetSdkVersion="17" />
Description
• The Android manifest (the AndroidManifest.xml file) specifies some essential
information about an app that the Android system must have before it can run the
app, including the first activity to launch when the app is started.
• If you don't want an activity to respond to orientation changes, you can add a
screenOrientation attribute to the activity element. Then, you can set the screenOri-
entation attribute to a value of "portrait" or "landscape".
• With some older apps, the Android manifest may include a uses-sdk element. This
element typically includes minSdkVersion and targetSdkVersion attributes that
specify the minimum and target APIs for the app. However, the corresponding
attributes in the Gradle build script override these attributes. As a result, when you
use Android Studio, you typically delete the uses-sdk element.
Figure 3-12 How to work with the Android manifest file
Section 1 Get started fast with Android
How to set the launcher icon for an app
When you use Android Studio to create a project, it automatically generates
a launcher icon that displays the Android logo. Once you install an app on a
device or emulator, you can use this icon to restart it. In addition, Android uses
this icon in various places to identify the app. Although the Android logo is
fine for getting started, you should set a custom launcher icon for your app as
described in figure 3-13 before you distribute it.
To set the launcher icon, you begin by using a browser to find the web
pages for the Android Asset Studio. Within these web pages, you navigate to the
page for generating launcher icons. Then, after using that page to generate the
icons, you can download a zip file that contains the icons and unzip them. The
unzipped icon files should be stored in a directory structure that's similar to the
one shown in this figure. Then, you can copy these directories and files into the
res directory of your app.
In most cases, this will overwrite the default launcher icons generated by
Android Studio. As a result, your app will use the new icons. However, if this
isn't the case, you can open the Android manifest, and modify the
application element so that its icon attribute points to the correct launcher icon. In
this figure, for example, the icon attribute points to the launcher icons named
ic_launcher that are stored in the mipmap directories as shown in this figure.
If you're working with older Android apps, you may find that they store the
launcher icons in a series of directories that start with "layout" like this:
app/src/main/res/layout-hdpi/ic_launcher.png
layout-mdpi/ic_launcher.png
layout-xhdpi/ic_launcher.png
In that case, the Android manifest file points to the layout directories like this:
android:icon="©layout/ic_launcher"
For new development, it's preferable to use the mipmap directories for the
launcher icons. However, the layout directories work fine for existing apps.
Chapter 3 How to finish your first Android app
The Android Asset Studio web page for generating launcher icons
[ Baa J 1 cdT^
Q] Android Asset Studio - Ic x
(
G fi https:/ romannurik.githubJo AndroidAssetStudio/icons-launcher.html#foreground.type=image&fc^ =
DOWNLOAD ZIP GENERATE WEB ICON
xxxhdpi xxh- •' Khdpi dpi mdpi web, hi-res
\
See the source on GitHub.
All generated art is licensed under a Creative Commons Attribution 3.0 Unported License. Attribution info
The directory structure for launcher icons
app/src/main/res/mipmap-hdpi/ic_launcher.png
mipmap-mdpi/ic_launcher.png
mipmap-xhdpi/ic_launcher.png
mipmap-xxhdpi/ic_launcher.png
mipmap-xxxhdpi/ic_launcher.png
A few attributes from the AndroidManifest.xml file
<application
android:allowBackup="true"
android:icon="©mipmap/ic_launcher"
android:label="@string/app_name"
Procedure
1. Use a browser to find the Android Asset Studio by searching the Internet.
2. Navigate to the page for generating launcher icons.
3. Generate the launcher icons, download them, and unzip them.
4. Copy the generated mipmap directories and their files into the res directory of your
app. This should overwrite any existing launcher icons.
5. If necessary, modify the Android manifest file so it points to the correct icon files.
Figure 3-13 How to set the launcher icon for an app
Section 1 Get started fast with Android
How to use the documentation
for the Android API
One of the most difficult aspects of learning Android is mastering the
hundreds of classes and methods that your apps will require. To do that, you
frequently need to study the documentation for the Android API. If you've used
the documentation for the Java API, you'll find that the Android API works
similarly.
Figure 3-14 summarizes some of the basic techniques for navigating through
the documentation for the Android API. This shows one screen of the
documentation available from the Activity class, which has many screens. To view the
documentation for the Activity class, you click on the package name (android,
app) in the upper left frame and then on the class name (Activity) in the lower
left frame.
If you scroll through the documentation for this class, you'll get an idea
of the scale of the documentation that you're dealing with. After a few pages
of overview information, you come to a summary of the constants, fields, and
constructors available from the class. After that, you come to a summary of
the dozens of public and protected methods that the class offers. That in turn is
followed by more detail about these constants, fields, constructors, and methods.
One of the goals of this book is to introduce you to the dozens of classes
and methods that you'll use in most of the Android apps that you develop. Once
you've learned those, you'll have the background you need to understand the
documentation for the Android API, and you'll be able to use that documentation
to research classes and methods that aren't presented in this book.
It's never too early to start using the documentation, though. So by all means
use the documentation to get more information about the methods that are
presented in this book and to research the other methods that are offered by the
classes that are presented in this book. After you learn how to use the Activity
class, for example, take some time to do some research on that class.
Chapter 3 How to finish your first Android app
The documentation for the Activity class
■pi Activity | Android Develwj x 1
Cea cd (°)
f i
<" -> G D developer.android.com/reference/android/app/Activity.html <£f S
Ml Developers
Android APIs API level: 23 *
android
android, accessibilityservice
android.accounts
android.animation
android-annotation
android.app
android.app.admin
android.app.assist
android.app.backup
android.app.job
androidaoo usaoe
* * •
ActionBar
ActionBar.LayoutParams
ActionBar.Tab ■
Activity
Activity Group
ActivityManager
ActivityManager.AppTask
ActivityManager.Memorylnfo
ActivityManager.ProcessErro
ActivityManager RecentTaskl
ActivityManager.RunningApp
Use Tree Navigation |**H
-
Develop
Protect e<
void
void
void
void
Dialog
Dialog
void
void
> Reference > Activity Q^ | earch
d Methods Console
onActivityResult(int requestCode, int resultCode, Intent data)
Called when an activity you launched exits, giving you the requestCode you
started it with, the resultCode it returned, and any additional data from it ■
onApplyThemeResource (Resources Theme theme, int resid, boolean first)
Called by setTheme(int) and getTheme() to apply a theme resource to the
current Theme object.
onChildTitleChanged (Activity childActivity, CharSequence title)
onCreate (Bundle savedlnstanceState)
Called when the activity is starling.
onCreateDialog(int id Bundle args)
This method was deprecated in API level 13. Use the new DialogFragment
class with FragmentManager instead; this is also available on older platforms
through the Android compatibility package
onCreateDialog(int id)
This method was deprecated in API level 8 Old no-arguments version of
onCreateDialog(intJ Bundle)
onDestroyO
Perform any final cleanup before an activity is destroyed.
onNewlntent (Intent intent)
This is called for activities that set launchMode to "singleTop" in their package
or if a client used the flag_activity_single_top flag when calling
Description
• The Android API contains thousands of classes and methods that you can use in
your apps.
• You can use a browser to view the documentation for the Android API by going to
this address:
http://developer.android.com/reference/
• You can select the name of the package in the top left frame to display information
about the package and the classes it contains. Then, you can select a class in the
lower left frame to display the documentation for that class in the right frame.
• Once you display the documentation for a class, you can scroll through it or click
on a hyperlink to get more information.
Figure 3-14 How to use the documentation for the Android API
90 Section 1 Get started fast with Android
Perspective
We designed the previous chapter and this chapter to get you off to a fast
start with Android development. Now, if you understand the Tip Calculator app,
you should also be able to develop simple Android apps of your own. Keep in
mind, though, that this chapter is just an introduction to the Android essentials
described in section 2 of this book.
Terms
event handler
event
action key
listener
action event
wire
input method editor
created state
started state
Summary
• An event handler is a special type of method that's executed when an event
occurs.
• A listener is an object that listens for an event.
• An Editor Action event typically occurs when the user presses an action key,
such as the Done key, on a soft keyboard.
• A Click event typically occurs when the user clicks a widget such as a
button.
• You can use the SharedPreferences class to permanently save values in your
app.
• To save values, you can override the onPause method.
• To restore values you have saved, you can override the onResume method.
• The Gradle build script controls how Android Studio builds the project. This
includes specifying any dependencies for the project.
• The Android manifest (the AndroidManifest.xml file) specifies some
essential information about an app that the Android system must have before it
can run the app, including the first activity to launch when the app is started
• Once you install an app on a device or emulator, you can use its launcher
icon to restart it.
running state
active state
resumed state
paused state
stopped state
Gradle build script
Android manifest
launcher icon
Chapter 3 How to finish your first Android app
Exercise 3-1 Create the Invoice Total app
In this exercise, you'll add functionality to an Invoice Total app. When you're
done, a test run should look something like this:
3id 4:22
r Invoice Total
Subtotal 150|
Discount Percent 10%
Discount Amount $15.00
Total $135.00
Open the app and test it
1. Start Android Studio and open the project named ch03_exl_Invoice that's in
this directory:
\murach\android\ex_starts
2. Run this project and test the app with a valid subtotal like 100. The app
should accept this input, but it shouldn't perform any calculations or display
any results.
Handle the Editor Action event
3. Open the InvoiceTotalActivity class that's in the Java directory of the project.
4. Use the onCreate method to get references to the EditText widget and the
three Text View widgets that display data.
5. Create a method named calculateAndDisplay. This method should get the
subtotal value. Then, it should calculate the discount amount and total. It
should give a 20% discount if the subtotal is greater than or equal to 200, a
10% discount if the subtotal is greater than or equal to 100, and no discount if
the subtotal is less than 100.
6. Add code to the end of the calculateAndDisplay method that displays the
results of the calculation on the widgets for the discount percent, discount
amount, and total.
7. Handle the Editor Action event for the EditText widget so that it executes the
calculateAndDisplay method when the Done key is pressed.
8. Test the app. It should display the starting values that are coded in the strings,
xml file.
Set the starting values correctly
9. Modify the strings.xml file so it doesn't display a starting value for the
subtotal.
Section 1 Get started fast with Android
10. Test the app again. This time, it shouldn't display a starting value for the
subtotal. Enter some values for the subtotal and make sure it works correctly.
Handle orientation changes
11. Override the onResume method and use it to call the calculateAndDisplay
method.
12. Test the app again. Make sure to change the orientation of the activity. The
activity should retain all of its data.
Handle navigation
13. Press the Back key to navigate away from the app. Then, navigate back to the
app. In an emulator, you can do this by clicking on the Apps icon and clicking
on the Invoice Total app. The activity should lose all of its data.
14. Override the onPause method so it saves the string for the subtotal. Then,
modify the onResume method so it gets the string for the subtotal. To get
these methods to work correctly, you need to set up instance variables for the
subtotal string and for a SharedPreferences object that you can use to save and
get this string.
15. Test the app again. This time, the app should always remember the last
subtotal that you entered even if you navigate away from the app and return to
it. In addition, the app should always calculate and display the correct values
for the discount percent, discount amount, and total.
Set a launcher icon (optional)
16. Set a launcher icon for the app. You should be able to download possible icons
by searching the Internet. When you do that, make sure you have permission
to use the image or that it is available under a license that allows you to use it
legally.
17. Test the app again. Note that the launcher icon is available from your device
or emulator, just like the launcher icon for any other app.
Exercise 3-2 Use the documentation
for the Android API
This exercise steps you through the documentation for the Android API. This
should give you an idea of how extensive the Android API is.
1. Open a browser and display the documentation for the Android API.
2. Click the android.app package in the upper left frame and the Activity class in
the lower left frame to display the documentation for the Activity class. Then,
scroll through this documentation to get an idea of its scope.
3. Skim through the overview information for the Activity class.
4. Scroll through the public methods. These methods include the findViewByld
and setContentView methods that you learned how to use in this chapter.
Chapter 3 How to finish your first Android app 93
5. Scroll through the protected methods. These methods include the onCreate,
onPause, and onResume methods that you learned how to override in this
chapter.
6. Go to the documentation for the Text View class, which is in the
android.widget package. Review the attributes for this class as well as the
public methods for this class. The public methods include the getText and
setText methods you learned about in this chapter.
7. Go to the documentation for the SharedPreferences interface, which is in the
android.content package. Then, review the public methods. These methods
provide a way to get strings as well as values of the boolean, int, long, and
float types. However, they don't provide a way to get values of the double
type.
4
How to test and debug
an Android app
As you develop an Android app, you need to test it to make sure that it
performs as expected. Then, if there are any problems, you need to debug your
app to correct any problems. This chapter shows how to do both.
Basic skills for testing and debugging ..............................96
Typical test phases 96
How to check the layout 98
How to handle runtime errors 100
How to trace code execution.............................................102
How to use LogCal 102
How to use toasts 104
How to use the debugger ..................................................106
How to set and remove breakpoints 106
How to step through code 108
How to inspect variables 108
How to inspect the stack trace 108
How to create emulators.................................................... 110
How to create an emulator for a tablet 110
How to create an emulator for a phone with a hard keyboard and DPad.... 112
Perspective.........................................................................114
Section 1 Get started fast with Android
Basic skills for testing and debugging
When you test an app, you run it to make sure that it works correctly. As you
test the app, you try every possible combination of input data and user actions to
be certain that the app works in every case. In other words, the goal of testing is
to find errors (bugs) and make an app fail.
When you debug an app, you fix the bugs that you discover during testing.
Each time you fix a bug, you test again to make sure that the change you made
didn't affect any other aspect of the app.
Typical test phases
When you test an app, you typically do so in phases, like the four that are
summarized in figure 4-1.
In the first phase, you should test the user interface. To start, you can use the
graphical layout editor to check the widgets to make sure they display properly.
As you do this, you should test portrait and landscape orientation, all target
screen sizes, and all target platforms. You'll learn how to do that in the next
figure. Then, you should run the app on a device or emulator to make sure that
all the widgets work correctly.
In the second phase, you should test the app with valid data. To start, you
can run the app and enter data that you would expect a user to enter. Then, you
should enter valid data that tests the limits of the app. You should change the
orientation of the app to make sure it works correctly when the user switches
between portrait and landscape orientation. And you should test other changes
in the lifecycle of each activity. For instance, you should navigate away from an
activity and return to it.
In the third phase, you should try to make the app fail by testing every
combination of invalid data and user action that you can think of. For instance, if
possible, you should try entering letters where numbers are expected.
In the first three phases, you can test the app on a single device or emulator.
If possible, this device should be the primary target device. For example, if you
primarily want your app to run on a current touchscreen smartphone, you can
begin by testing on that device or an emulator that emulates that device.
In the fourth phase, the app should be working correctly on the primary
target device or emulator. However, in this phase, you test the app on all other
target devices or on emulators for those devices.
If possible, you should use physical devices since this is the only true way
to test your app. However, whenever necessary, you can use an emulator instead
of a physical device. As you test on various target devices, you will usually find
some bugs that you'll need to fix. This is one of the most difficult aspects of
Android programming.
Chapter 4 How to test and debug an Android app 97
Four test phases
1. Check the user interface to make sure that it works correctly.
- Check in portrait and landscape orientation.
- Check on all target screen sizes.
- Check on all target platforms.
2. Test the app with valid input data to make sure the results are correct.
- Test changing the orientation.
- Test other changes in the lifecycle of the activity.
3. Test the app with invalid data or unexpected user actions. Try everything you can
think of to make the application fail.
4. Test on all target devices. If possible, use a physical device. Otherwise, use an
emulator.
Description
• The goal of testing is to find all errors (bugs) in the app.
• The goal of debugging is to fix all of the bugs that you find during testing.
Figure 4-1 An introduction to testing and debugging
Section 1 Get started fast with Android
How to check the layout
Figure 4-2 shows how to use the graphical editor to check the layout. To
start, you can use the buttons on the toolbar to zoom in or out. These buttons
can help you view the widgets on the user interface and make sure that they are
being displayed correctly.
If you are going to allow the app to switch orientations, you need to make
sure the layout works for both portrait and landscape orientation. To do that,
you can click on the "Go to Next State" button in the toolbar to switch between
portrait and landscape orientation. Then, you can check to make sure the layout
displays correctly in both orientations. If it doesn't, you can tweak it until it
does, or you can create a separate layout for each orientation as described in the
next chapter.
Once the layout displays correctly in both orientations, you should test it for
different screen sizes. To do that, you can use the drop-down list in the toolbar
to select a device with a different screen size. In this figure, the Nexus S smart-
phone is selected. This device has a 4-inch screen. However, if you want you can
select a tablet with a 7- or 10-inch screen.
Once you are satisfied with the layout in different screen sizes, you should
test it on different platforms. To do that, you can select any platform that's
installed on your system from the drop-down list in the toolbar. In this figure,
for example, eleven platforms are installed on the user's system. When you do
this, it may take your system a minute or so to render the user interface, so be
patient. When the device is displayed on the new platform, the widgets may look
different, but the layout should still display correctly.
Chapter 4 How to test and debug an Android app
A layout in the graphical editor displayed by Android 4.1.2 (AP116)
Palette #' I4" H- || Nexus S- £- ,
C3 Layouts [EK 0 Q]
C] Widgets
__ ■
Ab| Plain TextView
Ab1 Large Text _-„ .
•a m a- t^ Bill Amount
Ab Medium Text
,Ab| Small Text
ok Button Percent
'ok Small Button
(•; RadioButton Tip
@ CheckBox
a switch Total
— ToggleButton
ImageButton
M ImageView
i-AppTheme »
15%
$0.00
$0.00
El
£
iff L6 Component Tree
Automatically Pick Best
API 23: Android 6.0
API 22: Android 5.1.1
API 21: Android 5.0.1
API 20: Android 4.4W.2
API 19: Android 4.4.2
API 18: Android 4.3.1
API 17: Android 4.2.2
V API 16: Android 4.1.2
API 15: Android 4.0.3
API 10: Android 2.3.3
API 8: Android 2.2
Preview Android Versions
1 # ' *- -1
ntLabel (TextView) @s1
■nt TextView (TextView)
ntDownButton (Button
ntUpButton (Button) - C
>el (TextView) - ©strinq/-
? U T
match_parent
n
1 Design Text 1
Description
• To zoom in or out, use the buttons on the toolbar to change the zoom level.
• To view on a different screen size, select a device with a different screen size from
the drop-down list in the toolbar.
• To change the orientation, click on the "Go to next state" button in the toolbar.
• To change platforms, select a different platform from the drop-down list in the
toolbar. This drop-down list only displays the platforms that are installed on your
system.
• To change the theme, select a different theme from the drop-down list in the
toolbar.
Figure 4-2 How to check the layout
100 Section 1 Get started fast with Android
How to handle runtime errors
When Android encounters a runtime error, the emulator or device displays
an error message like the one in figure 4-3, and Android Studio prints some
information about the error to its LogCat window. This information includes the
name of the exception. In this figure, for example, a NumberFormatException
caused the app to crash. If the LogCat window isn't visible in Android Studio,
you can display it by clicking on the Android tab at the bottom left of the main
window.
By examining the LogCat window closely, you can often figure out the cause
of the bug, which is the first step in fixing the bug. In this figure, for example,
the LogCat data indicates that there was a problem parsing a float value. As a
result, you can begin by looking at the code that parses the float value to see if
you can figure out what's causing the bug. If that doesn't work, you can use the
debugging skills that are presented in the rest of this chapter to figure out what's
causing the bug. Once you figure out what's causing the bug, fixing the bug is
often the easy part.
Chapter 4 How to test and debug an Android app
101
The error that's displayed when an app crashes
Unfortunately, Tip Calculator
has stopped.
OK
The LogCat window after a crash
_ ch03_TipCalculator- [C:\murach\android\book_apps\ch03_TipCalculator] - [app] -,.Aapp\src\main\java\com\murach\tipcalculator\Tip...
S
File Edit View Navigate £ode Analyze Refactor Build Run Tools VCS Window Help
DHJC5 ¥ * & S tf d & ♦♦ *
s
W app
^►* & a ^a
& □
QF
t!
D
t!
D
i_
r--l
irt
v
£1
ch03_TipCalculator C« app D src
—— : r1
"P" Android ▼ O 4s #~ 1*"
▼ D manifests
AndroidManifest.xml
▼ Q java
▼ B com.murach.tipcalculat
main C"1 Java '■ It com B murach .-■ E tipcalculator c TipCalculatorActivity
_<> activity_tip_calculator.xml x
TipCalculatorActivity.java *
// get the 2?2ll dmouct"
billAmountString = billAmountEditText.getTextO .toStringf);
float bilLAmount= Float.parseFloat(billAi&ountString);
// calculate tip and total
float tipAmount = billAmount * tipPercent;
float totalAmount = billAmcunt + tipAmount;
ITT
at
I <
n
D
n
1.
c
m
m
>
"5
. n
Android
^ L £
B Samsung SM-T230NU android 4.42 (API 19}
com.murach.tipcakuLator (11722) [DEAD]
19:
n
®
■f« logcat
ADB logs -*' M Memory
CPU ■+"
Verbose
&
:>
Show only selected application
C3
»
09-01 09:47:50.625 11722-11722/com.murach.tipcalculator E/AndroidRuntune: FATAL EXCEPTION: main
Process: com.murach.tipcalculator, PID: 11722
java.lang.NumberFormatException: Invalid float: **"
at java-lang.String!oReal.invalidReal(StringToReal.java:€3)
at java.lang.StringToReal.parseFloat(StringToReal.java:2E9)
at lava.lang.Float.parseFloat(Float.lava:300)
at com.murach.tipcalculator.TipCalculatorActivity.calculateAndPisplavfripCalculatorActivitv
at ccm.murach.tipcalculator.TipCalculatorActivity.onEditorAction(TipCalculatorActivitY.iava
at android.widget.TextView. onEditorAction (TextViev.iava:5334)
► 4: Run ,J* TODO
6: Android [S) Terminal
0: Messages
8 Event Log B Gradle Console
I I Session 'app': running (12 minutes ago)
30:1 LF: UTF-8: Context <no context*
Description
• When an app encounters an error that causes it to end, the emulator or device
displays an error message that indicates that the app has stopped, and Android
Studio displays some information about the error in the LogCat window.
• If the LogCat window isn't displayed, you can display it by clicking the Android
tab at the bottom of the main window. Then, if necessary, you can click the LogCat
tab.
• When an error occurs, the LogCat window includes the name of the exception that
caused the error.
Figure 4-3 How to handle runtime errors
102 Section 1 Get started fast with Android
How to trace code execution
When you trace the execution of an app, you add statements to your code
that display messages or variable values at key points in the code. This is
typically done to help you find the cause of a bug.
How to use LogCat
One way to trace code execution is to use the LogCat logging as shown in
figure 4-4. To do that, you begin by importing the Log class that's in the android,
util package. Then, you use one of the methods of the Log class to send data to
the LogCat window.
When you use LogCat for debugging, you typically use the d method to send
a debug message to the log. However, if necessary, you can use other methods
to send other types of messages such as an error, warning, or informational
message. Each type of message displays in a different color in the LogCat
window, which makes it easy to distinguish between the types of errors.
All of the methods in this figure have two parameters. The first parameter
is for a tag that's used to identify the message in the LogCat window. Often, the
name of the activity is used as the tag for a message. As a result, it's a common
practice to define a constant named TAG for each activity that includes the
name of the activity. Then, you can use this constant as the first argument for
all logging statements in the activity, and you can code any string as the second
argument.
In this figure, the first Log statement prints a message that indicates that the
calculateAndDisplay method is starting. Then, the second statement prints the
value of the variable named bill Amount. Printing the values of variables like this
can often help you find a bug. Then, when you fix the problem, you can remove
the logging statements.
When you use this technique, you usually start by adding just a few logging
statements to the code. Then, if that doesn't help you find and fix the bug, you
can add more. Once you find and fix the bug, you typically remove these logging
statements from your code.
When you run the app, Android Studio displays the messages in the LogCat
window. By default, Android Studio selects the "Show only selected application"
option to make sure that the LogCat window is only showing information for the
current application. You can also filter LogCat messages by different types of
parameters from this drop down menu.
Chapter 4 How to test and debug an Android app
103
Android Studio with the LogCat window displayed
_ ch03_TipCalculator - [C:\murach\android\book_apps\ch03_TipCalculator] - [app] - ...\app\src\main^ava\com\murach\tipcalculator\Tip... ,
E
File Edit View Navigate Code Analyze Refactor Build Run Tools VCS Window hHelp
nmC5<'*&ei[!iei&«»^*
*.apP!J ► # ►& P* V IF" ♦ Eli 5
Cl ch03_TipCakulator E2app/ D src ■ t main Djava '■ E] com Q murachy E tipcalculator c TipCalculatorActivity
I »~. ! ! I
t!
'5*
D
t!
D
r--l
£1
■If1 Android
'! O 4*
#- l<
c
m
m
>
'5
O
>
rsj|
Clapp
T D manifests
^> AndroidManifest.xml
▼ Q Java
▼ B com.murach.tipcalculat
c % TipCalculatorAct
▼ Cires
► B drawable
▼ Q layout
activity_tip_calculator.xml *
TipCalculatorActrvity.java *
float totalAmount = billAmount + tipAmount;
//debuggirg statemerts
Log.d(TAG, "calculateAndDisplay method started");
Log. d {TAG, "billAmount: " + billAmount);
Log. d (TAG, ■ tipAmount: " + t ipAmount);
Log.d{TAG, '■ totalAmount: " + totalAmount);
// display the other results vith formatting
Number Format currency = NumberFormat ■ getCurrencylnstance {);
tipTextView. setText (currency. format (tipAmount));
Android
i Samsung SM-T230NU Vidroid 4.4.2 (API 19} Q com.murach.tipcalculator (18172)
■fi logcat
ADB logs ■*■ ii Memory ■+'
I
CPU -"
Verbose
€
D
Show only selected application
■ m i
»
2-18172/com.murach
2-18172/conumurach
2-18172/com.murach
2-18172/conumurach
2-18172/com.murach,
2-18172/conumurach,
tipcalculator
tipcalculator
tipcalculator
tipcalculator
tipcalculator
tipcalculator
D/TipCalculatorActivity
D/TipCalculatorActivity
D/TipCalculatorActivity
D/TipCalculatcrActivity
D/TipCalculatorActivity
D/TipCalculatorActivity
QF
m
l<
D
n
ft
J
en
Cl
#- i
► 4: Run ^ TODO 6: Android
I I Session 'app': running (2 minutes ago)
|51 Terminal _j 0: Messages
tipAmount: 0.0
totalAmount: 0.0
calculateAndDisplay method started
billAmount: 0.0
tipAmount: 0.0
totalAmount: 0.0
^11 Event Log B Gradle Console
19:1 LF: UTF-8: Context <no context* fc
A few methods of the Log class
Method Message type
Display color
d(tag, message)
e(tag, message)
w (tag # mes sage)
i(tag, message)
Debus
Error
Warn
Info
Black
Red
Blue
Black
How to use the Log class
Import the Log class
import android.util.Log;
Declare a constant for the tag parameter
private static final String TAG = "TipCalculatorActivity";
Send messages to the log
Log.d(TAG, "calculateAndDisplay method started");
Log.d(TAG, "billAmount: " + billAmount);
Description
• A simple way to trace the execution of an app is to use methods of the Log class
to send messages to the log at key points in the code. In Android Studio, these
messages are shown in the LogCat window.
Figure 4-4 How to use LogCat to trace code execution
104 Section 1 Get started fast with Android
How to use toasts
Another way to trace code execution is to use toasts, which are messages
that are briefly displayed on the user interface. In figure 4-5, for example, the
bottom of the Tip Calculator app is displaying a toast that says, "onCreate
method". Since toasts are only displayed briefly, they're only useful for certain
situations. If you experiment with them, you'll quickly discover when they can
be helpful.
The first step in displaying a toast is to import the Toast class. This class is
stored in the android, widget package.
The second step is to create a Toast object. To do that, you call the static
makeText method of the Toast class and pass this object three parameters. The
first parameter is the context, and it determines where the toast is displayed. In
most cases, you can use the this keyword to identify the current activity as the
context. The second parameter is the message. You can specify any string you
want for this parameter, including strings that display the value of a variable as
shown in the previous figure. The third parameter is the length of time that the
toast is displayed. You can use the LENGTH_SHORT and LENGTH_LONG
constants of the Toast class for this parameter.
The third step is to call the show method from the Toast object that you
created. There are two ways to do this. If you have created a variable for the
object, you can call the method from that variable as shown in the second to last
example. However, it's more common to use method chaining to call the show
method directly from the makeText method as shown in the last example.
When you use toasts for debugging, you typically only use a toast or two.
Then, when you're done debugging, you need to remove these statements.
Although it's common to use toasts for debugging, you can also use a toast
in an app to display a message to the user. In an email app, for example, you may
want to use a toast to display a message that says, "Message deleted" whenever
a user deletes a message. As you progress through this book, you'll see some
examples of this.
Chapter 4 How to test and debug an Android app
105
A toast displayed in an emulator
£) Tip Calculator
Bill Amount 34.60
Percent
Tip
Total
15%
$5.19
$29.41
GA 6:49
onCreate method
Two methods of the Toast class
Method
ion
makeText(context.
message, length)
show()
Returns a Toast object with a message
that can be displayed in the specified
context for the specified length.
Displays the toast.
Two constants of the Toast class
Constant
LENGTH_SHORT
LENGTH LONG
Description
A short length of time.
A long length of time.
How to display a toast
Import the Toast class
import android.widget.Toast;
Use two statements
Toast t = Toast.makeText(this, "onCreate method". Toast.LENGTH_SHORT);
t.show();
Use a single statement (method chaining)
Toast.makeText(this, "onCreate method "# Toast.LENGTH_SHORT).show();
Figure 4-5 How to use toasts to trace code execution
106 Section 1 Get started fast with Android
How to use the debugger
When you use LogCat logging or toasts for debugging, you have to add
statements to your code. Then, when you're done debugging, you need to
remove these statements. This creates extra work for you. Fortunately, Android
Studio includes a powerful tool known as a debugger that you can use to debug
an app without having to add or remove statements.
However, the debugger is a complex tool, and you may find it easier to use
LogCat logging or toasts for some types of bugs. As a result, you'll have to
choose the debugging technique that you prefer for any given situation.
How to set and remove breakpoints
The first step in debugging an app is to find the cause of the bug. To do that,
it's often helpful to view the values of the variables at different points in the
execution of the app.
The easiest way to view the variables while an app is running is to set
a breakpoint as shown in figure 4-6. Then, when you run the app with the
debugger, execution stops just prior to the statement at the breakpoint, and you
can view the variables that are in scope at that point in the app.
To set a breakpoint, you click to the left of the line of code on the vertical
bar that's on the left side of the code editor. Then, the breakpoint is marked by
a red circle to the left of the line of code. Note, however, that you can only set a
breakpoint on a line of code that can be executed, not on a declaration, comment,
brace, or parenthesis.
When debugging, it's important to set the breakpoint before the line in the
app that's causing the bug. Often, you can figure out where to set that breakpoint
just by knowing which statement caused the crash. However, sometimes you
need to experiment a little before finding a good location for a breakpoint.
After you set one or more breakpoints, you need to run the app with the
debugger. To do that, you can use the Debug button that's available from the
toolbar (just to the right of the Run button).
When you run an app with the debugger, Android Studio displays the Debug
window. If it doesn't, you can display it by clicking the Debug tab at the bottom
of the main window.
After you run an app with the debugger, the breakpoints remain where you
set them. If you want to remove a breakpoint, you can do that by clicking on the
red circle for the breakpoint.
Chapter 4 How to test and debug an Android app
107
Java code with a breakpoint
_ ch03_TipCalculator - [C:\murach\android\book_apps\ch03_TipCalculator] - [app] - ,..\app\src\main\java\com\murach\tipcalculator\TipCalcu...
(°)
File Edit View Navigate £ode Analyze Refactor Build Run Tools VCS Window Help
Qiao^^ttQSeift***
W app
h ► * ■# & v- a i & a «• ?
C~ ch03_TipCalculator Ejapp Q src ■ C" main tMava '■ It com B murach B tipcalculator c TipCalculatorActivity
_ -m. * ' £—. , ^m c ^ c r
t!
If1 Android »
£ ▼ Clapp
▼ D manifests
o +
#-1-
^1
D
t!
D
r'--l
V
£1
m
<> activrty_tip_calculator.xml *
_ AndroidManifestxml
▼ Q java
▼ B com.murach.tipcalculatorl
c *b TipCalculatorActivh
► Cires
► *£ Gradle Scripts
c TipCalculatorActivity.java *
billAmountString = billAmountEditText.getText().toString(); bxllAmountEM
float billAmount; billAmount: 34€0.0
if (billAmountString.equalsC1*")) { —
billAmount =0; «
} ""
else {
billAmount = Float.parseFIoat(billAiftountString); billAmountString: "3
}
// calculate tip and total
float tipAmount = billAmount * tipPercent; tipPercent: 0.13 tipAmount: 4
float totalAmount = billAmount + tipAmount; tipAmount; 449.8 billAmount:
-th
d2~■*£- the -fc er re-'^s
- -r- — *- i
m
<
n
D
^
a.
NumberFormat currency = NumberFormat.getCurrencyTnstance{);
tipTextView.setText (currency, format (tipAmount));
totalTextView. setText (currency. format (totalAmount));
—
>
"5
O
>
rsj|
Debug ■app
#- i
!►
II
G
»
Debugger. [^ Console
W Logcat -»'
h=
* ^ Z £i **
»
local path: C: \murach\android\book_apps\ch03_TipCalculator\app\build\outputs\aplc\app-clebug- apk
remote path: /data/local/tmp/com.inurach.tipcalculatcr
No apk changes detected. Skipping file upload, force stopping package instead.
DEVICE SHELL COMMAND: am force-stop com.murach.tipcalculator
Launching application: com.murach.tipcalculator/com.murach.tipcalculator,TipCalculatorActivity,
DEVICE SHELL COMMAND: am start -D -n "com.murach.tipcalculator/com.murach.tipcalculator.TipCalculatorActivi
Starting: Intent { act=android*intent.action.MAIN cat=[android.intent.category.LAUNCHER] cmp=com.murach.tip
► 4: Run
5: Debug
J ^
TODO
6: Android
151 Terminal
0: Messages
^25 Event Log H Gradle Console
I I Session "app: running (2 minutes ago)
108:1 LF; UTF-8: Context: <no context*
* £
Description
• A breakpoint is indicated by a red circle icon that's placed to the left of the line of
code. When an application is run in debug mode, it stops just before executing the
statement at the breakpoint.
• To set a breakpoint, click on the vertical bar to the left of a line of code in the code
editor. To remove a breakpoint, click on it.
• When the app arrives at the breakpoint, the red icon will turn into an orange circle
icon with a checkmark.
• Once you set a breakpoint, you click the Debug button on the toolbar to begin
debugging. This works much like the Run button described in chapter 1, except that
it lets you debug the application. When the application encounters the breakpoint,
Android Studio opens the Debug window as shown in the next figure.
Figure 4-6 How to set and remove breakpoints
108 Section 1 Get started fast with Android
How to step through code
When you run an app with the debugger and it encounters a breakpoint,
execution stops before the statement at the breakpoint. In addition, Android
Studio displays the Debug window, which contains several other windows such
as the Variables and Frames windows shown in figure 4-7.
Along its top, the Debug window displays some toolbar buttons such as
the Step Over button and Step Into buttons. You can use these buttons to step
through the statements in the app, one statement at a time. This lets you observe
exactly how and when the variable values change as the app executes, and that
can help you determine the cause of a bug.
Along its left side, the Debug window displays some buttons that you can
use when you're done stepping through code. For example, you can click the
Resume Program button to continue execution until the next breakpoint. Or, you
can click the Stop button to stop the app and end the debugging session.
How to inspect variables
When you set breakpoints and step through code, the Variables window
automatically displays the variables that are in scope. In this figure, the
execution point is in the calculateAndDisplay method of the TipCalculatorActivity
class. Here, the bill Amount variable is a local variable that's declared to store
the amount of the bill. In addition, even though they aren't shown in this figure,
the instance variables of this class are in scope. To view these variables, you can
expand the variable named this.
For numeric variables and strings, the value of the variable is shown in
the Variables window. However, you can also view the values for an object by
expanding the variable that refers to the object. In this figure, for example, you
can expand the variable named this by clicking on the arrow to its left. Then,
you can view the values of its variables. Similarly, you can expand the variable
named tipTextView by clicking on the arrow to its left.
How to inspect the stack trace
Within the Debug window, the Frames window shows the stack trace, which
is a list of methods in the reverse order in which they were called. You can click
on any of these methods to display the method and highlight the line of code that
called the next method. This opens a class in a new code editor if necessary.
Chapter 4 How to test and debug an Android app
109
The Debug window
_i ch03_TipCalculator- [C:\murach\android\book_apps\ch03_TipCa1culator] - [app] - ...\app\src\main\java\com\murach\tipcatculator\TipCalcutatorActivity.java - An... .
E
File Edit View Navigate £ode Analyze Refactor Build Run Toots VCS Window Help
CdHC5 « + & 0) [ji et & ♦ * »» QS^pJ ► ft r 1 y- ir» 11,8 * ?
C ch03_TipCakulator C app D src D main B Java B com > B murach > B tipcalculator c TipCakulatorActivity
c TipCalculatorActivity.java x
QF
■b
I'
3
■b
ll
V
Q.
■H1 Android T ©
#- e<
Clapp
▼ D manifests
<> AndroidManifestjemI
▼ D Java
▼ & com.murach.tipcalculator,
c "6 Ti*CalculatorActivh
► C3 res
•* Gradle Scripts
o activity_tip_calculatorjcml *
float tipAmount = billAmount * tipPercent; tipPercent: 0.13 tipAmount: 4.2379994
float totalAmount = billAmount + tipAmount; billAaount: 32. € tipAmount: 4.2379994
// di"^ls" the other results vith formattir-
NumberFonnat currency =■ NuntoerFormat.getCurrencylnstduceO;
tipTextView.setText(currency.format(tipAmount));
totalTextView.setText(currency.format(totalAmount));
NumberFormat percent = NumberFormat.getPercent!nstance{);
percentTextView.setText(percent.format(tipPercent));
totals
m
n
^
Debug app
#- i
at
n
c
>
"5
CD
Ml
II
Debugger E] Console ■*' w Log cat ■*'
►_=
5t% Z6 h
#
Rl Frames
-»■ = Variables
-+■ 57 Watches
"<1> rr\<i\ri'@$30S&0,961r92...
cakulateAndDisplayO:10S, TipCakulatorActivity 0
□□
ft
»
onResume0^9, TipCakulatorActivity commurach.
call Act ivrtyOnResumeO:1198, Instrumentation (and
performResumeO:5530, Activity (androtd.app)
performResumeActivrtyO:3066# ActivrtyThread (one
handleResumeActivityO:3105, ActivrtyThread (andr
handleLaunchActivrtyv):^©, ActivrtyThread (andrc
accessS9000:175, ActivrtyThread (android.app)
^ J ► 5 this = (TipCalculatorActivrty@830038200344}
M bilfAmount = 32.6
M tipAmount = 4.2379994
M totalAmount =r 36.837997
► ^tipTe^view = {Te^View@830X)383396%}nandroid.widgetJe^View[4223...View
► ^totalTe^view = {Te^View@830X)38343584},,android.widget.TextView[4Z.. View
+ - -r *
No watches
► 4: Run
5: Debug ^ TODO »8> 6: Android lih Terminal
0: Messages
29 Event Log @ Gradle Console
O Gradle build finished in 3s 674ms (a minute ago)
13:1 LF; UTF-8; Context <no context>
Description
• When program execution reaches a breakpoint, Android Studio typically displays
the Debug window. This window has all the tools you need to debug your code.
• To display or hide the Debug window, click the Debug tab at the bottom of the
main window.
• Within the Debug window, the Frames window shows the stack trace, which is a
list of methods in the reverse order in which they were called. You can click on one
of these methods to display it in the code editor.
• Within the Debug window, the Variables window shows the values of the variables
that are in scope for the current method. This includes static variables, instance
variables, and local variables. If a variable refers to an object, you can view
the values for that object by expanding the object and drilling down through its
variables.
• To step through code one statement at a time, click the Step Over button or the Step
Into button.
• To execute the code until the next breakpoint, click the Resume Program button.
• To stop debugging the app, click the Stop button.
Figure 4-7 How to work with the Debug window
110 Section 1 Get started fast with Android
How to create emulators
Even after you've tested and debugged your app for your primary target
device, you need to test and debug your app for the rest of your target devices.
If possible, you should test and debug your app on physical devices. However,
since it's not always possible to use physical devices to test all target devices,
you'll probably need to use emulators to test some target devices.
In the appendix, you learned how to create an emulator for a Nexus S phone
that's running Anroid 4.1 (API 16). Now, figure 4-8 shows how to create two
more emulators.
How to create an emulator for a tablet
Part 1 of this figure shows how to create an emulator for a tablet. This
provides a way to test your app on a device that has a large screen. In this figure,
the emulator uses the built-in hardware profile for a Nexus 7 (2012) tablet. This
device has a 7-inch screen with 800 by 1280 pixels, which provides for
approximately the same number of dots per inch as a TV (tvdpi), which is somewhere
between a medium density (mdpi) and high density (hdpi).
If the Android version you want isn't available from the dialog, you can
download a system image for the Android version that you want. To do that, you
can use this dialog or the SDK Manager described in the appendix. When you do
that, you can select an image that runs efficiently on your CPU. For example, an
x86 image runs more efficiently on a computer that has a CPU that uses the x86
architecture. As a result, you typically want to match the system image to your
CPU as closely as possible.
Since emulators tend to run slowly on many systems, we recommend
creating emulators that use fewer system resources when you're getting started.
This helps the emulators to run a little faster. That's why we recommend
selecting a hardware profile that has a relatively low density such as mdpi or
hdpi. And that's why we recommend selecting a system image for an older
version of Android that doesn't include extra Google APIs.
Of course, if your system is so powerful that it can run emulators without
degrading performance to an unacceptable level, feel free to use whatever
hardware profile and Android API that you like. Also, before you put an app
into production, you will probably need to test on emulators that use extra high
density (xhdpi) screens and the latest Android APIs. But at least you can wait to
do that until you've finished basic testing on physical devices or emulators like
the ones described in this figure.
Chapter 4 How to test and debug an Android app
111
A built-in hardware profile for a tablet
i
_ Virtual Device Configuration
Select Hardware
Choose a device definition
&
Category
TV
Phone
Wear
Tablet
Name w
Size
Nexus 9
8.86'
Nexus 7(2012) 7.0*
Nexus 7
Nexus 10
7.0?
laos
T VfcVGA {la... 7.0'
iarwxGA(T.„ mi
New Hardware Profile
J Resolution | Density
2048x1536 xhdpi
1
□ Nexus 7 (2012)
import Hardware Profiles
800x1290
1200x1920
2560x1600
600x1024
800x1280
tvdpi
xhdpi
xhdpi
mdpi
mdpi
a
800 px
7.0'
Size: large
Ratio: notlong
Density: tvdpi
1280px
Clone Device.
Fi sh
An emulator for a tablet
• Category: Tablet
• Hardware profile name: Nexus 7 (2012)
• System image: Jelly Bean (API 16) x86
• Emulator name: Nexus 7 (2012) API 16
How to create an emulator
1. Start Android Studio.
2. In the toolbar, click the button for the AVD Manager. This should start the Android
Virtual Device Manager and show all available emulators.
3. Click the Create Virtual Device button.
4. Select a category such as phone or table.
5. Select one of the available hardware profiles. If necessary, you can create a new
hardware profile.
6. Select one of the available system images. If necessary, you can download
additional system images.
7. Enter a name for the emulator.
Figure 4-8 How to create emulators (part 1 of 2)
112 Section 1 Get started fast with Android
How to create an emulator for a phone
with a hard keyboard and DPad
Part 2 of this figure shows how to create an emulator that has a hard
keyboard and a DPad (directional pad), which provides up, down, left, right, and
center buttons, much like a TV remote. This provides a way to test devices that
aren't touchscreen devices and rely on hardware such a keyboard or a DPad.
The procedure for doing this is the same as for creating an emulator for
a tablet as described in part 1 of this figure. However, at the Select Hardware
screen, you need to create a new hardware profile for the emulator. To do
that, you can click the New Hardware Profile button and specify a profile that
includes a hard keyboard and a DPad. In this figure, for example, the hardware
profile has a name of "Phone with keyboard and DPad". It specifies a 4-inch
screen with 480x800 pixels (hdpi density). It specifies that the device has a hard
keyboard. And it specifies that it uses a DPad for navigation.
Chapter 4 How to test and debug an Android app
113
A new hardware profile for a phone with keyboard and DPad
_ Hardware Profile Configur
Configur
Device Name
Device Type
Screen
Memory
input
Supported
device states
-
ation
e Hardware Profile
Phone with keyboard and DPad
r ^
1 Phone:
Screens
Resolut
RAM:
/Tablet Q
ize: 40 inch
Ion: 480 x
2
Q Has Hardware Buttons (E
Q Has Hardware Keyboard
Navigation Style;
Q Portrait
Q Landscape
D-pad
800 px
GB B
ack/Home/Menu)
D
u*.
[31 Phone with keyboard and DPad
480 px
1 1 Size: normal
1 4.o- Isoopx Ratio: long
1 1 Density: hdpi
Wo Navigation - No navigational controb
Directional Pad - Enables direction pad support in emulator
Trackball - Enables trackball support in emulator
Cancel J ^^^|
i
An emulator for a phone with a keyboard and a DPad
• Category: Phone
• Hardware profile name: Phone with keyboard and DPad
• System image: Jelly Bean (API 16) x86
• Emulator name: Phone with keyboard and DPad API 16
Description
• If the built-in device definitions aren't adequate for you, you can click the New
Hardware Profile button to create your own hardware profile.
• If the Android version you want isn't available, you can download a system image
for the Android version that you want. When you do that, you can select an image
that runs efficiently on your CPU.
• If performance is your main consideration, you can select a hardware profile that
has a relatively low density such as hdpi or mdpi. In addition, you can select a
system image for an older version of Android that doesn't include extra Google
APIs.
Figure 4-8 How to create emulators (part 2 of 2)
114 Section 1 Get started fast with Android
Perspective
Before you release an app, it should be thoroughly tested and debugged.
Now that you've completed this chapter, you should be able to thoroughly test
your apps. And if you find bugs during testing, you should be able to use the
skills presented in this chapter to fix those bugs.
As your apps grow more complex, you may need testing and debugging
skills that go beyond the skills covered in this chapter. For example, you may
want to experiment with some of the other debugging windows and toolbar
buttons. If you do, you can probably learn a few new debugging skills.
Terms
test
bugs
debug
trace
toasts
Summary
• To test an app, you run it to make sure that it works properly no matter what
combinations of valid or invalid data you enter.
• When you debug an app, you find and fix all of the errors (bugs) that you
find when you test the app.
• A simple way to trace the execution of an app is to insert LogCat logging
statements at key points in the code.
• Another way to trace code execution is to use toasts, which are messages
that are briefly displayed on the user interface.
• Android Studio includes a powerful tool known as a debugger that can help
you find and fix errors.
• You can set a breakpoint on a line of code to stop code execution just before
that line of code. Then, you can step through the code and view the values of
the variables as the code executes.
• A stack trace is a list of methods in the reverse order in which they were
called.
debugger
breakpoint
step through
stack trace
Chapter 4 How to test and debug an Android app 115
Exercise 4-1 Test and debug
the Tip Calculator app
This exercise guides you through the process of using Android Studio to test
and debug an app.
Test the app with invalid data
1. Start Android Studio and open the project named ch04_exl_TipCalculator
that's in this directory:
\murach\android\ex_starts
2. Run this project and test the app with a valid subtotal like 100. This should
work correctly.
3. Test the app with an invalid subtotal by leaving the bill amount blank and
pressing the Done key. This should cause the app to crash with a run-time
error, and it should display an error message in the LogCat window.
4. Study the error message that's displayed in red. You can focus on the first
few lines of this message. These lines give information about the exception
that caused the app to crash. Based on this information, you should be able
to figure out that the app crashed because an empty string isn't a valid float
value.
5. Fix the bug by using a try/catch statement to handle the exception. The catch
clause for the exception should set the billAmount variable to zero.
Use LogCat logging
6. At the end of the onCreate method, add a logging statement that prints
"onCreate executed" to the LogCat window.
7. Add logging statements that print "onPause executed" and "onResume
executed" to the ends of the onPause and onResume methods.
8. Run the app and view the logging statements as you change orientation.
Note that this causes the onPause, onCreate, and onResume methods to be
executed. This shows that the activity is destroyed and recreated when you
change orientation.
9. Run the app and view the logging statements as you navigate away from
and back to the app. Note that this only causes the onPause and onResume
methods to be executed. This shows that the activity is paused when you
navigate away from it and resumed when you navigate back to it.
Test on different emulators
10. Create an emulator for a tablet.
11. Run the app in that emulator. It should work as before.
12. Create an emulator for a phone with a hard keyboard and a DPad.
13. Run the app in that emulator. You should be able to use your computer's
keyboard to enter a bill amount and press the Enter key to submit this entry
116 Section 1 Get started fast with Android
Use toasts
14. Add a toast to the onEditorAction method that displays the value of the
actionID parameter.
15. Run the app, use the soft keyboard to enter a bill amount, and press the Done
key. Make a note of the value of the actionID parameter.
16. Run the app in an emulator that supports a hard keyboard. Then, use the hard
keyboard to enter a bill amount and press the Enter key to submit this entry.
Make a note of the value of the actionID parameter.
Use the debugger
17. In the calculateAndDisplay method, set a breakpoint on this line of code:
billAmountString = billAmountEditText.getText().toString();
18. Click on the Debug button in the toolbar. This runs the project with the
debugger.
19. When execution stops at the breakpoint, use the Variables window to examine
the variables that are in scope. Then, expand the variable named this and view
the value for the instance variable named billAmountString. Next, collapse the
variable named this so you can easily view other variables.
20. Click the Step Into button in the toolbar 4 times to step through the app one
statement at a time. After each step, review the values in the Variables window
to see how they have changed. Note how the app steps through the try/catch
statement based on the value of the bill amount string.
21. Click the Resume Program button in the toolbar to continue the execution of
the app.
22. Switch to the emulator, enter a new bill amount, and click the Done button.
23. Switch back to Android Studio and use the Variables window to view the
value of the instance variable named billAmountString.
24. When you're done inspecting the variables, click the Stop button to stop the
app and end the debugging session. This should give you some idea of how
useful the Android Studio debugging tools can be.
Section 2
Essential Android skills
Most of the chapters in this section expand upon the basic Android skills
that you learned in section 1. In chapter 5, for example, you'll learn more
about getting input from the user and displaying output. In chapter 6, you'll
learn more about handling events. In chapter 7, you'll learn more about
controlling the appearance of your app. And so on.
In addition, some of the chapters in this section present new skills.
In chapter 8, for example, you'll learn how to work with menus and
preferences. Then, in chapter 9, you'll learn how to work with fragments.
To illustrate these skills, this section adds new features to the Tip
Calculator app that you learned about in section 1. This allows you to
expand your skills while still working with an app that's familiar to you.
When you're done with this section, you'll be ready to learn how to work
with some more complicated apps such as the News Reader and Task List
apps.
5
How to work with layouts
and widgets
In chapter 3, you learned how to use a relative layout with three different types
of widgets: text views, editable text views, and buttons. Now, this chapter
shows you how to use some other types of layouts. In addition, this chapter
shows you some new skills for working with widgets including how to use
check boxes, radio buttons, spinners, and seek bars.
An introduction to layouts and widgets 120
A summary of layouts 120
A summary of widgets 120
The View hierarchy 122
How to work with layouts 124
How to use a linear layout 124
How to use a table layout 128
How to use a frame layout 130
How to nest layouts 132
How to provide a landscape layout 134
How to work with widgets........................................... 136
How to use editable text views 136
How to use check boxes 140
How to use radio buttons 142
How to use spinners 144
How to use seek bars 148
How to display images 150
How to show and hide widgets 152
How to add scroll bars 154
How to display web content 156
Perspective 160
120 Section 2 Essential Android skills
An introduction to layouts and widgets
This chapter begins by summarizing some of the layouts and widgets that
are available from the Android API and by presenting the inheritance hierarchy
for the classes for layouts and widgets.
A summary of layouts
Figure 5-1 begins by summarizing six layouts that are available from the
Android API. Of these layouts, the relative layout described in chapter 3 is one
of the most powerful since it provides a way to align widgets relative to one
another. However, it is also one of the most difficult layouts to use.
That's why this chapter briefly presents three other layouts that can be
useful. If you need to create a user interface that displays widgets in a vertical
or horizontal line, you may want to use a linear layout. If you want to display
widgets in rows and columns, you may want to use a table layout. Or, if you
want to display widgets on top of each other in a stack, you may want to use the
frame layout.
The grid layout was introduced with Android 4.0 (API level 14). As a result,
it works for most modern Android devices without having to include a support
library. However, you can usually get the same results with the relative layout or
the table layout. That's why this book doesn't show how to use the grid layout.
Still, if you're developing an app that needs to lay out components in a grid, you
might want to learn more about the grid layout as it provides some nice
improvements over the relative and table layouts.
This chapter doesn't present the absolute layout because this layout was
deprecated in Android 1.5 (API level 3). As a result, you shouldn't use this
layout for new development.
A summary of widgets
Figure 5-1 also summarizes some of the widgets that are available from the
Android API. Keep in mind that this is just a summary, not a complete list. The
Android API provides many other useful widgets.
You already learned about the Text View, EditText, and Button widgets
in chapter 3. Now, you'll learn about the CheckBox, RadioButton, Spinner,
SeekBar, Image View, and Scroll View widgets.
Some of the widgets in this figure are often referred to using other
terminology. For example, a Text View widget is often called a label. An EditText
widget is often called an editable text view, a text box, or a text field. And a
spinner is often called a drop-down list.
Once you understand how to use the widgets presented in this chapter, you
should be able to learn about other widgets on your own. For example, once
you learn how to use the Button and Image View widgets, you should be able
to use the ImageButton widget. Then, if you need help, you can look up the
ImageButton class in the Android API documentation.
Chapter 5 How to work with layouts and widgets
121
A summary of layouts
Layout Description
RelativeLayout Lays out widgets relative to one another. This layout is described in chapter 3.
LinearLayout Lays out widgets in a vertical or horizontal line. This layout is described in
figure 5-3.
Lays out widgets in a table. This layout is described in figure 5-4.
Lays out widgets in a stack where one widget is displayed on top of the other.
This layout is described in figure 5-5.
Lays out widgets in a grid. This layout was introduced with Android 4.0 (API
level 14). This layout is not covered in this book.
This layout was deprecated in Android 1.5 (API level 3). This layout is not
covered in this book.
TableLayout
FrameLayout
GridLayout
AbsoluteLayout
A summary of widgets
Widget Description
TextView Also known as a label, this widget displays text.
EditText Short for editable text view, this widget is also known as a text box or text field.
This widget allows the user to enter text such as names, email addresses,
passwords, phone numbers, dates, times, and numbers.
Performs an action when the user clicks it.
Button
CheckBox
RadioButton
Spinner
ProgressBar
SeekBar
RatingBar
ImageView
ImageButton
DatePicker
TimePicker
CalendarView
ScrollView
WebView
Allows the user to check or uncheck an option.
Allows the user to select a single option from a group that's defined with a
RadioGroup widget.
Also known as a drop-down list, this widget allows the user to select an option
from a list.
Displays a visual indicator of the progress of an operation.
Allows the user to select a value by draeeine a thumb to the left or rieht.
Allows the user to rate something by selecting one or more stars.
Displays an image.
Works like a regular button but displays an image instead of text.
Allows the user to select a date.
Allows the user to select a time.
Allows the user to select a date.
Automatically displays a vertical scroll bar if the layout doesn't fit on the screen
vertically.
Uses a built-in browser to display web content such as a web page that contains
HTML, CSS, and JavaScript.
Figure 5-1 A summary of layouts and widgets
122 Section 2 Essential Android skills
The View hierarchy
Figure 5-2 shows the inheritance hierarchy for the classes that define
Android widgets and layouts. To start, the View class is the superclass for all
widgets. As a result, any methods of this class are available to all widgets.
Under the View class, the ViewGroup class is the superclass for widgets that
can contain other widgets. This includes layouts such as the RelativeLayout,
LinearLayout, TableLayout, and FrameLayout classes. In addition, it includes
the RadioGroup class that's used to group widgets created from the RadioButton
class.
Under the View class, the Text View class is the superclass for widgets that
display text such as the EditText and Button widgets. From the Button class, the
CompoundButton class is the superclass for the CheckBox and RadioButton
classes. As a result, any methods of the CompoundButton class are available to
both CheckBox and RadioButton widgets.
The View class is also the superclass for other widgets that don't display
text. For example, the View class is the superclass for the ProgressBar class,
which is the superclass for the AbsSeekBar class, which is the superclass for the
SeekBar and RatingBar classes. Similarly, the View class is the superclass for the
Image View class.
Chapter 5 How to work with layouts and widgets
1
The View hierarchy
View
I— ViewGroup —
TextView
— ProgressBar
— ImageView
FrameLayout
LinearLayout
RelativeLayout
EditText
Button
CheckedTextView
AbsSeekBar
ImageButton
i— ScrollView
— DatePicker
— TimePicker
'— CalendarView
TableLayout
RadioGroup
ompoundButto
RatingBar
SeekBar
CheckBox
RadioButton
Description
• The View class is the superclass for all widgets.
• The ViewGroup class is the superclass for most widgets that can contain other
widgets such as the RelativeLayout widget.
• The TextView class is the superclass for widgets that display text such as the
EditText and Button widgets.
Figure 5-2 The View hierarchy
124 Section 2 Essential Android skills
How to work with layouts
In chapter 3, you learned how to use a relative layout. Now, this chapter
shows how to use three more layouts that are available from Android. In
addition, it shows how to nest layouts and how to provide for separate landscape
layouts.
How to use a linear layout
If you need to create a user interface that displays widgets in a vertical or
horizontal line, you may want to use a linear layout as shown in figure 5-3. Here,
the width and height attributes of the layout have been set to "match_parent". As
a result, this layout stretches across the entire screen.
The orientation attribute of this layout has been set to "vertical". As a result,
this layout displays the two buttons in a vertical line. In other words, this layout
displays the two buttons in a column, one above the other.
Chapter 5 How to work with layouts and widgets 125
A linear layout with vertical orientation and two buttons
36j- 6:48
^J Tip Calculator
Calculate
Settings
The XML for the linear layout
< ?xml version="1.0" encoding="utf-8"? >
<LinearLayout xmlns:android="http://schemas.android.com/apk/res/android"
android:layout_width="match parent"
android:layout height="match parent"
android:orientation="vertical" >
<Button
android:id="@+id/calculateTipButton"
android:layout_width="match parent"
android:layout_height="wrap_content"
android:text="@string/calculate_tip" />
<Button
android:id="@+id/settingsButton"
android:layout_width="match parent"
android:layout_height="wrap_content"
android:text="©string/settings" />
</LinearLayout >
Description
• A linear layout displays a column or row of child widgets.
Figure 5-3 How to use a linear layout (part 1 of 2)
126 Section 2 Essential Android skills
Part 2 of figure 5-3 shows some more examples for working with a linear
layout. For all of these examples, the width of the buttons has been set to
"wrap_content". That way, the buttons are only wide enough to display their
text.
In the first example, the orientation attribute for the layout is set to a value of
"horizontal". As a result, the buttons are displayed in a horizontal line. In other
words, they are displayed in a row.
In the second example, the weight attribute for both buttons has been set
to "1". As a result, both buttons are stretched so they take up the width of the
layout, with each button taking half of the layout since both buttons have equal
weight. If you want to have one button be wider than the other, you can
experiment with the weight attributes of the buttons. For example, if you set the weight
of the first button to 2 and the second button to 1, the first button takes 2/3 of the
width, and the second button takes 1/3 of the width. Put another way, the first
button expands at a rate twice that of the second button.
In the third example, the gravity attribute of both buttons has been set to
"center". As a result, both buttons are centered horizontally in the layout, which
has been set to vertical orientation.
Chapter 5 How to work with layouts and widgets 127
Common attributes for working with linear layouts
Attribute Description
orientation Controls whether the linear layout uses vertical or horizontal orientation
weight Determines how much space Android allocates to a widget.
gravity Aligns a widget with the top, bottom, center, left, or right of its layout.
A horizontal layout where the buttons have no weight
Calculate Settings
The orientation attribute for the layout
android:orientation="hori zontal"
A horizontal layout where the buttons have equal weight
i
Calculate Settings
The weight attribute for both buttons
android:weight="1"
A vertical layout where the buttons are centered horizontally
Calculate
Settings
The gravity attribute for both buttons
android:gravity="center"
Description
• The attributes of a linear layout and its child widgets control the appearance of the
user interface.
Figure 5-3 How to use a linear layout (part 2 of 2)
128 Section 2 Essential Android skills
How to use a table layout
If you need to create a user interface that displays controls in a grid, you
may want to use the table layout as shown in figure 5-4. Here, the table layout
displays the first two rows of the Tip Calculator app. To do that, this layout
uses four columns. In the first row, the Text View widget is displayed in the first
column, and the EditText widget is displayed in the next three columns. In the
second row, one widget is displayed in each column.
To create a table layout, you use the TableRow element to define each row.
Within each row, you can put as many widgets as you'd like. Then, if you need
a widget to span multiple columns, you can use the layout_span attribute to
specify the number of columns to span. In this figure, for example, the
layout_span attribute of the EditText widget has been set to "3". As a result, this
widget spans 3 columns.
A table layout has a couple of advantages over a relative layout. To start,
when you use a table layout, you only have to provide the id attribute for the
widgets that you need to use with your Java code. In this figure, for example, the
widgets that just display text don't have id attributes. In addition, you don't have
to provide layout attributes for positioning the widget relative to other widgets.
Instead, you just use the layout_span attribute wherever necessary. As a result,
you don't need to set as many attributes when you use a table layout.
However, a relative layout has a couple advantages over a table layout. To
start, it gives you more control over the positioning and alignment of widgets.
Second, a relative layout typically runs faster than a table layout.
Chapter 5 How to work with layouts and widgets
129
A table layout with two rows and four columns
Bill Amount
Percent
100
■ ■
15%
—
+
Common attribute for working with table layouts
Attribute
layout_span
Description
Specifies the number of columns that the widget should use.
The XML for the table layout
< ?xml version="1.0" encoding="utf-8"? >
<TableLayout xmlns:android="http://schemas.android.com/apk/res/android"
android:layout_width="match parent"
android:layout height="match parent" >
<TableRow>
<TextView
android:text="@string/bill_amount_label"
<!-- TextView widget attributes --> />
<EditText
android:id= "@+id/billAmountEditText"
android:text="@string/bill_amount"
android:layout_span="3"
<!-- EditText widget attributes -->
<requestFocus />
</EditText>
</TableRow>
<TableRow>
<TextView
android:text="@string/tip percent label"
<!-- TextView widget attributes -->
<TextView
android:id="@+id/percentTextView"
android:text="@string/tip percent"
<!-- TextView widget attributes -->
<Button
android:id="@+id/percentDownButton"
android:text="©string/decrease"
<!-- Button widget attributes --> />
<Button
android:id="@+id/percentUpButton"
android:text="©string/increase"
<!-- Button widget attributes --> />
</TableRow>
/>
/>
</TableLayout >
Description
• A table layout displays widgets in rows and columns.
Figure 5-4 How to use a table layout
130 Section 2 Essential Android skills
How to use a frame layout
A frame layout is one of the simplest and most efficient types of layouts. You
can use this type of layout to display one widget over another widget as shown in
figure 5-5. Or, you can use a frame layout as a placeholder within another layout
for displaying a single child layout or widget.
If a frame layout contains multiple child widgets, it stacks them on top of
each other. This displays the first widget added to the layout on the bottom of
the stack and the last widget added on the top. In this figure, for example, the
first child widget is an Image View widget that displays an image of a restaurant.
Then, the second child widget is a Text View widget that displays white text. The
result is that white text is displayed over an image.
The ImageView widget in this figure displays an image of a restaraunt. For
now, don't worry about the details of how this widget works. These details are
explained later in this chapter.
The Text View widget in this figure works like the Text View widgets
presented in chapter 3. However, it uses the gravity attribute to center it
horizontally. In addition, it uses the textColor attribute to set the text color to a
hexadecimal color of "#ffffff', which is white.
If you're familiar with HTML, you may already be familiar with hexadecimal
colors, which are a way of represeting RGB color values using the base 16
number system. In this case, "ff is the hexadecimal representation of the value
255, so #ffffff, translates into red 255, green 255, blue 255, which produces a
solid white color. A discussion of how to convert between hexadecimal notation
and decimal notation is beyond the scope of this book. However, it's easy to
find calculators online that can convert from RGB color notation to hexadecimal
notation. Also, you can find charts and tables online that provide hexadimal
notations for many of the most commonly used colors.
Interestingly, the DatePicker, TimePicker, and CalendarView classes
inherit the FrameLayout class. That's because the DatePicker, TimePicker, and
CalendarView widgets consist of different widgets stacked on each other.
Chapter 5 How to work with layouts and widgets 1 31
A frame layout that displays an image behind some text
*A 9:08
^j Tip Calculator
\
-lc
^•1
•II
\ II
The XML for the frame layout
< ?xml version="1.0" encoding="utf-8"? >
<FrameLayout xmlns:android="http://schemas.android.com/apk/res/android"
android:layout_width="match parent"
android:layout height="match parent" >
<ImageView
android:layout_width="match parent"
android:layout_height="wrap_content"
android:contentDescription="©string/photo"
android:src="@drawable/restaurant" />
<TextView
android:layout_width="match parent"
android:layout_height="wrap_content"
android:gravity="center"
android:text="©string/welcome"
android:textColor="#ffffff"
android:textSize="3Osp" />
</FrameLayout >
Description
• A frame layout is one of the simplest and most efficient types of layouts.
• A frame layout often displays only a single child layout or widget.
• If a frame layout contains multiple child widgets, it stacks them on top of each
other displaying the first widget added to the layout on the bottom of the stack and
the last widget added on the top.
Figure 5-5 How to use a frame layout
132 Section 2 Essential Android skills
How to nest layouts
When working with linear layouts, it's common to nest one linear layout
within another to align widgets in columns and rows as shown in figure 5-6.
Here, two linear layouts with horizontal orientation are nested within a linear
layout that has vertical orientation. This creates two rows, which can be filled
with widgets. In this figure, the first row has a Text View and an EditText widget,
and the second row has a Button widget.
If a layout only has a few levels of nested layouts, the nested layout probably
won't degrade performance so much that it's noticeable to the user. However,
nesting multiple levels can degrade performance significantly. As a result, if you
are using multiple levels of nesting, and you notice that your app is taking too
long to display, you should consider reducing the number of nested levels. One
way to do that is to use a relative layout as described in chapter 3. When you use
a relative layout, you typically don't need to nest any layouts, and that usually
improves performance.
Interestingly, the table layout is a type of linear layout. If you look back
to figure 5-2, you can see that the LinearLayout class is the superclass for the
TableLayout class. As a result, the table layout uses nested layouts behind the
scenes even though you don't explicitly specify nested layouts in the XML code
for the layout.
Chapter 5 How to work with layouts and widgets 1 33
Nested linear layouts
36
10:24
(3 Tip Calculator
Email:
Save
The XML for nested linear layouts
<?xml version="1.0" encoding="utf-8"? >
<LinearLayout xmlns:android="http://schemas.android•com/apk/res/android"
android:layout_width="match parent"
android:layout height="match parent"
android:orientation="vertical"
android:padding="10dp" >
<!-- the first row -->
<LinearLayout
android:layout_width="match parent"
android:layout_height="wrap_content"
android:orientation="horizontal" >
<!-- widgets go here -->
</LinearLayout >
<!-- the second row -->
<LinearLayout
android:layout_width="match parent"
android:layout_height="wrap_content"
android:orientation="horizontal" >
<!-- widgets go here -->
</LinearLayout >
</LinearLayout >
Description
• You can nest one layout within another layout.
• Nesting multiple levels can degrade performance.
Figure 5-6 How to nest layouts
134 Section 2 Essential Android skills
How to provide a landscape layout
By now, you should know that an Android activity needs to handle screen
orientation changes. One way to do that is to prevent the activity from changing
orientation. An easy way to do that is to edit the AndroidManifest.xml file for
the app, and add a screenOrientation attribute to the activity that sets the screen
orientation to portrait or landscape like this:
android:screenOrientation="portrait"
This forces the activity to display only in portrait orientation even if the user
rotates the device to attempt to change to landscape orientation. This approach is
shown in the Android manifest file from chapter 1.
Another way to handle screen orientation changes is to use the same layout
for both portrait and landscape. This is the approach that's used for the Tip
Calculator app in chapter 3.
However, there are times when you want to provide one layout for portrait
orientation and another layout for landscape orientation. For example, you may
want to rearrange the widgets on the activity to make better use of the space
that's available in landscape orientation. To do that, you can create a directory
named res/layout-land as shown in figure 5-7. Then, you can copy the layout for
the portrait version of the layout into this directory. After that, you can modify
the layout so it makes better use of the space that's available from landscape
orientation. In this figure, for example, the two buttons from figure 5-3 have been
rearranged to take advantage of landscape orientation.
Chapter 5 How to work with layouts and widgets 1 35
The layout from figure 5-3 displayed in landscape orientation
3G 10:41
^j Tip Calculator
Calculate Settings
The location of the XML files
Portrait
res/layout/settings_activity.xml
Landscape
res/layout-land/settings_activity.xml
The XML for landscape orientation
<?xml version="1.0" encoding="utf-8"? >
<LinearLayout xmlns:android="http://schemas.android•com/apk/res/android"
android:layout_width="match parent"
android:layout height="match parent"
android:orientation="horizontal" >
<Button
android:id="@+id/calculateTipButton"
android:layout_width="match parent"
android:layout_height="wrap_content"
android:layout_weight="1"
android:text="@string/calculate_tip" />
<Button
android:id="@+id/settingsButton"
android:layout_width="match parent"
android:layout_height="wrap_content"
android:layout_weight="1"
android:text="©string/settings" />
</LinearLayout >
Description
• To provide a separate XML file for landscape orientation, create the layout-land
directory if necessary. Then, copy the XML file for the layout into this directory
and modify it so it works correctly for landscape orientation.
Figure 5-7 How to provide a custom landscape layout
136 Section 2 Essential Android skills
How to work with widgets
In chapter 3, you learned how to use three kinds of widgets: text views,
editable text views, and buttons. Now, this chapter introduces several more
widgets that are commonly used, and it presents some new skills for working
with editable text views.
How to use editable text views
Figure 5-8 shows some new skills for working with editable text views. To
start, this figure shows two editable text views. The first is for getting an email
address from a user, and the second is for getting a password from a user. Here,
the characters entered into the editable text view for the password are displayed
as bullets, which is usually what you want for a password.
The XML for these two editable text views is mostly the same. However, for
the first editable text view, the inputType attribute has been set to
"textEmailAddress". For the second editable text view, the inputType attribute
has been set to "textPassword". As a result, the first editable text view displays a
soft keyboard like the one shown in this figure. This soft keyboard is optimized
for entering an email address, and it only provides characters that are valid for
an email address, which is usually what you want from an editable text view for
an email address. Similarly, the second editable text view automatically displays
bullets instead of characters, which is what you want from an editable text view
for a password.
Chapter 5 How to work with layouts and widgets 1
Two text views and two editable text views
Email: joel@murach.com ■
Password:
The soft keyboard for an editable text view for an email address
m
?123 @
The XML for an editable text view for an email address
<EditText
android:id="@+id/emailEditText"
android:layout_width="wrap_content"
android:layout_height="wrap_content"
android:ems="10"
android:inputType="textEmailAddress">
<requestFocus />
</EditText>
The XML for an editable text view for a password
<EditText
android:id="@+id/passwordEditText"
android:layout_width="wrap_content"
android:layout_height="wrap_content"
android:ems="10"
android:inputType="textPassword" />
Figure 5-8 How to use editable text views (part 1 of 2)
138 Section 2 Essential Android skills
Part 2 of figure 5-8 begins by summarizing two commonly used attributes
of an EditText widget. Of these, the inputType attribute is the most commonly
used since you set this for almost every editable text view. However, you may
occasionaly want to use the lines attribute to change the number of lines that
are displayed by the editable text view. If you don't include this attribute, the
editable text view only displays one line. The user can still use the Return key
to enter more lines but will have to scroll up or down to view those lines. To
allow the editable text view to display more than one line at a time, you can set
the lines attribute to a value of 2 or higher. Then, the editable text view always
displays the specified number of lines.
The common values of the inputType attribute show that Android provides
for many types of editable text views. For example, you can change the input
type so it's appropriate for a person's name, email address, password, number,
decimal number, phone number, date, or time. In general, you should select
an inputType attribute that's as specific as possible for the text that you want
the user to enter. That way, Android can present a soft keyboard that's optimal.
However, if you don't find an inputType attribute setting that's right for your
app, you can always set this attribute to "text". This allows the user to enter any
kind of text. Or, you can set this attribute to "textMultiline". This provides a soft
keyboard that includes a Return key that you can use to start new lines.
When working with editable text views, the soft keyboard is sometimes
displayed every time the user enters the activity. This typically happens because
the activity gives the focus to the editable text view when the user enters the
activity, which causes the soft keyboard to be displayed. In other words, every
time you start an activity or change the orientation of an activity, Android
displays the soft keyboard. Often, this isn't what you want. Instead, when the
user enters the activity, you want the activity to display with no soft keyboard.
That way, the user can view all of the widgets on the activity. Then, if the user
moves the focus to the editable text view, you want to display the soft keyboard
to the user.
To prevent the soft keyboard from being displayed automatically when the
user enters an activity, you can edit the AndroidManifest.xml file. In this figure,
for example, an attribute named windowSoftlnputMode has been added to the
activity element for the Tip Calculator activity. This attribute has been set to
"stateUnchanged". As a result, Android only shows the keyboard if the keyboard
was previously opened by the user. This is typically what you want. However, if
you always want to hide the soft keyboard when entering an activity, you can set
this attribute to "stateHidden".
In some rare cases, you may want to always show the soft keyboard when
the user enters an activity. For example, if the widgets only fill the top half of the
activity, you may always want to display the soft keyboard on the bottom half. In
that case, you can change the windowSoftlnputMode attribute to "stateVisible".
That way, the user doesn't have to take any action to display the soft keyboard.
Chapter 5 How to work with layouts and widgets
139
Two attributes of an EditText widget
Attribute Description
inputType
lines
The type of data for the editable text view. This
typically determines the type of soft keyboard
that's displayed for the user.
The number of lines that are displayed by the
editable text view. By default, this is set to l.
Some common values for the inputType attribute
Value Description
text Any kind of text.
text Per sonName A person's name.
textEmailAddress
textPassword
textMultiline
number
numberDecimal
phone
date
time
An email address.
A password.
Multiple lines of text.
Any kind of number.
A number that has a decimal.
A phone number.
A date.
A time.
Some common values for the windowSoftlnputMode attribute
Value Description
stateHidden
stateVisible
stateUnchanged
Always hide the soft keyboard when
entering the activity.
Always show the soft keyboard when
entering the activity.
Only show the keyboard when entering
the activity if it was
previously opened by the user.
The activity element in the AndroidManifest.xml file
<activity
android:name=".TipCalculatorActivity"
android:label="@string/title_activity_tip_calculator"
android:windowSoftInputMode="stateUnchanged" >
Description
• An editable text view lets the user enter text with a keyboard. A editable text view is
also known as a text field or text box.
Figure 5-8 How to use editable text views (part 2 of 2)
140 Section 2 Essential Android skills
How to use check boxes
Figure 5-9 shows show to use a check box, which is a widget that allows
the user to check or uncheck an option. If you look at the XML for this widget,
you should already be familiar with most of its attributes. The only new
attribute is the checked attribute, which determines whether the box is checked or
unchecked. In this figure, for example, the checked attribute has been set to
"true", so the box is checked. However, you could set this attribute to "false" to
uncheck the box.
When working with check boxes, you can use Java to work with a check box
when the app runs. For example, it's common to need to set the checked
attribute as shown in the first Java example. To do that, you can use the setChecked
method to check or uncheck the box.
To determine whether the box is checked or not, you can use the isChecked
method. In this figure, for example, the second Java example uses an if statement
to determine whether the box is checked.
As you review this figure, note that the checked attribute and setChecked
method both accomplish the same task. In Android, there's typically a
corresponding set method for an attribute. As a result, you often have a choice as to
whether you want to use XML or Java to work with a widget. Of course, you can
only use XML to set attributes before the app is running. If you want to work
with a widget dynamically, as the app is running, you need to use Java.
Chapter 5 How to work with layouts and widgets
141
A check box
BT Remember Tip Percent
A common XML attribute for check boxes
Attribute Description
checked
Checks or unchecks the box.
The XML code
<CheckBox
android:id="@+id/rememberPercentCheckBox"
android:layout_width="wrap_content"
android:layout_height="wrap_content"
android:checked="true"
android:text="©string/remember_percent" />
Two common Java methods for check boxes
Method
setChecked(boolean)
isChecked()
Description
Checks or unchecks the box.
Returns a Boolean value that indicates
whether the box is checked.
Java examples
Check or uncheck the box
rememberPercentCheckBox.setChecked(true);
Execute code if the box is checked
if (rememberPercentCheckBox.isChecked()) {
// code to execute when the box is checked
}
else {
// code to execute when the box is NOT checked
}
Description
• A check box allows the user to check or uncheck an option.
Figure 5-9 How to use check boxes
142 Section 2 Essential Android skills
How to use radio buttons
Figure 5-10 shows how to use a radio button, which is a widget that lets the
user select one option of several options. Selecting a radio button automatically
deselects all other radio buttons in the same group.
When you add radio buttons, you typically begin by adding two or more
radio buttons to a radio group. In this figure, for example, there are three radio
buttons in a radio group.
When working with a radio group, you often need to set the orientation for
the group. In this figure, for example, the first group of buttons has a vertical
orientation, and the second group of buttons has a horizontal orientation.
The XML in this figure defines a radio group that displays three radio
buttons in vertical orientation. Here, the orientation attribute of the RadioGroup
element has been set to "vertical". Then, three RadioButton elements have been
coded within the RadioGroup element. Here, the first radio button has a checked
attribute that has been set to true. As a result, the first radio button is selected
when the activity is first displayed.
The Java code for working with radio buttons is similar to the code for
working with check boxes. For example, you can use the setChecked method to
check a radio button, and you can use the isChecked method to determine which
button is checked. The main difference is that only one radio button in a group
can be checked. As a result, if you use the setChecked method to check one radio
button, Android automatically unchecks all of the other radio buttons in that
group.
Chapter 5 How to work with layouts and widgets 143
Three radio buttons in a radio group with vertical orientation
■•■ No Rounding I
(~ Round Tip
C, Round Total
Three radio buttons in a group with horizontal orientation
O No Rounding '•' Round Tip (J Round Total
The XML code
<RadioGroup
android:id="@+id/roundingRadioGroup"
android:layout_width="wrap_content"
android:layout_height="wrap_content"
android:orientation="vertical" >
<RadioButton
android:id="@+id/noRoundingRadioButton"
android:layout_width="wrap_content"
android:layout_height="wrap_content"
android:checked="true"
android:text="@string/round_no" />
<RadioButton
android:id="@+id/roundTipRadioButton"
android:layout_width="wrap_content"
android:layout_height="wrap_content"
android:text="@string/round_tip" />
<RadioButton
android:id="@+id/roundTotalRadioButton"
android:layout_width="wrap_content"
android:layout_height="wrap_content"
android:text="@string/round_total" />
</RadioGroup>
Java examples
Check or uncheck the radio button
roundTipRadioButton.setChecked(true);
Execute code if a radio button is checked
if (roundTipRadioButton.isChecked()) {
// code to execute when the button is checked
}
Description
• A radio button lets the user select one option of several options. Selecting a radio
button automatically deselects all other radio buttons in the same group.
Figure 5-10 How to use radio buttons
144 Section 2 Essential Android skills
How to use spinners
Figure 5-11 shows how to use a spinner, which is a widget that allows the
user to select an item from a drop-down list. This type of widget is also known
as a drop-down list. The top of this figure shows a spinner that allows the user
to select how many ways to split a bill. The first item doesn't split the bill, the
second item splits the bill 2 ways, the third item splits the bill 3 ways, and so on.
The XML for this spinner is simple. That's because most of the work for
setting up a spinner is done with Java code as shown in part 2 of this figure.
An array adapter provides the list that a spinner should display. One easy
way to provide a list is to store it in an array in the strings.xml file. In this figure,
for example, the strings.xml file includes an element named split_array that
provides the 4 items that are displayed in the spinner.
Chapter 5 How to work with layouts and widgets
1
A spinner
Split the bill?-
Split the bill?
Split the bill?
Split the bill?
No A |
I
-No
- 2 ways
- 3 ways
Split the bill?-4 ways
The XML code
<Spinner
android:id="@+id/splitSpinner"
android:layout_width="wrap_content"
android:layout_height="wrap_content" />
The array in the strings.xml file
<string-array name="split_array">
<item>Split the bill? - No</item>
<item>Split the bill? - 2 ways</item>
<item>Split the bill? - 3 ways</item>
<item>Split the bill? - 4 ways</item>
</string-array>
Description
• A spinner, also known as a drop-down list, allows the user to select an item from a
list.
• An array adapter provides the list that a spinner should display.
Figure 5-11 How to use spinners (part 1 of 2)
146 Section 2 Essential Android skills
In part 2 of figure 5-11, the first Java example sets up the spinner. To start,
it gets a reference to the Spinner object defined by the XML. Then, it creates
an array adapter for the specified array and layout. To do that, it specifies the
current activity as the context, it specifies an array from the strings.xml file as
the array, and it specifies this layout for the spinner:
android.R.layout.simple_spinner_item
This is a built-in Android resource that's commonly used to specify the layout
for a spinner.
After creating the array adapter, this code sets the layout for the drop-down
list of the spinner. To do that, it specifies this layout:
android.R.layout.simple_spinner_dropdown_item
This is another built-in Android resource that's commonly used to specify the
layout for the items in the drop-down list of a spinner.
The second Java example selects the item at the specified position. Here, 0
is the position of the first item, 1 is the second item, and so on. As a result, this
code selects the first item.
The third Java example gets the position of the selected item from the
spinner. Again, 0 is the position of the first item, 1 is position of the second item,
and so on.
The fourth Java example gets the selected text from the selected item. To do
that, it uses the getSelectedltem method to return a generic object. Then, it casts
the generic object to a String object.
Chapter 5 How to work with layouts and widgets 147
Common methods of the ArrayAdapter class
Method Description
createFromResource (context. Creates an array adapter for the specified
arraylD, layout ID) array and layout for the widget.
setDropDownViewResource Sets the layout for the items in the drop-down list.
(resourcelD)
Common methods for spinners
Method Description
setAdapter (arrayAdapter) Sets the array adapter for the spinner.
setSelection (index) Selects an item from the spinner.
getSelectedltemPosition () Returns an int value for the position of the selected item
where 0 is the first item, l is the second item, and so on.
getSelectedItem() Returns an Object type for the selected item.
Two Android resources for spinner layouts
android.R.layout.simple_spinner_item
android.R.layout.simple_spinner_dropdown_item
Java examples
Code that sets up the spinner
// get a reference to the spinner
splitSpinner = (Spinner) findViewByld(R.id.splitSpinner);
// create array adapter for specified array and layout
ArrayAdapter<CharSequence> adapter = ArrayAdapter.createFromResource(
this, R.array.split_array# android.R.layout.simple_spinner_item);
// set the layout for the drop-down list
adapter•setDropDownViewResource(
android.R.layout.simple_spinner_dropdown_item);
// set the adapter for the spinner
splitSpinner.setAdapter(adapter);
Code that selects an item
splitSpinner•setSelection(0); // select the first item
Code that gets the position of the selected item
int position = splitSpinner•getSelectedltemPosition();
Code that gets the selected text from the selected item
String selectedText = (String) splitSpinner.getSelectedItem();
Description
• You can use built-in Android resources to specify the layouts for the spinner and
the items in the drop-down list of a spinner.
Figure 5-11 How to use spinners (part 2 of 2)
148 Section 2 Essential Android skills
How to use seek bars
Figure 5-12 shows a seek bar, which is a widget that lets the user specify
a value by dragging a thumb to the right or left. In this figure, the thumb of the
seek bar is identified by a round circle. This thumb is set at a progress of 15 out
of a total of 30, and the value for this progress is displayed in a label to the right
of the seek bar.
By default, the max attribute of a seek bar is set to 100. As a result, a seek
bar typically provides progress values from 0 to 100, which is usually what you
want.
In this figure, however, the XML sets the max attribute for the seek bar to
30. As a result, the seek bar provides progress values from 0 to 30, which are
more appropriate for a tip percent. Then, this XML sets the progress attribute to
15. As a result, when the seek bar is first displayed, the thumb is halfway across
the seek bar.
The first Java example sets the progress of the seek bar to a value of 20. To
do that, it passes an int value of 20 to the setProgress method.
The second Java example gets the progress of the seek bar. To do that, it uses
the getProgress method to return an int value for the progress.
Chapter 5 How to work with layouts and widgets
149
A seek bar and a text view
15%
Two common XML attributes for seek bars
Attribute Description
max Sets the maximum value to the specified int value-
progress Sets the value of the seek bar to the specified int value,
The XML code
<SeekBar
android:id="@+id/percentSeekBar"
android:layout_width="2 0 Odp"
android:layout_height="wrap_content"
android:max="30"
android:progress="15" />
<TextView
android:id="@+id/percentTextView"
android:layout_width="Odp"
android:layout_height="wrap_content"
android:text="@string/percent" />
Two common Java methods for seek bars
Method
Description
setProgress (int) Sets the value of the seek bar to the specified int value.
getProgress () Gets the current value of the seek bar.
Java examples
How to set progress
percentSeekBar.setProgress(20);
How to get progress
int percent = percentSeekBar.getProgress();
Description
• A seek bar lets the user specify a value by dragging a thumb to the right or left
Figure 5-12 How to use seek bars
150 Section 2 Essential Android skills
How to display images
The ImageView widget in figure 5-13 displays an image of a restaraunt.
Here, the contentDescription attribute points to a string in the strings.xml file.
Android displays this text instead of the image if there's a problem displaying
the image. Then, the src attribute points to an image in one of the drawable
directories of the project.
An image that can be drawn on the screen is known as a drawable resource.
Drawable resources are stored in one of the res/drawable directories of the
project. When you work with image files, you typically store them in a directory
that corresponds with the density of the screen. For example, you store images
for extra high-density screens in this directory:
res/drawable-xhdpi
Extra high-density screens use approximately 320 dots per inch (dpi).
For this example, I put a JPG file for the image in the medium-density
(mdpi) directory because medium-density is the baseline size for Android. Then,
if there's no corresponding image for screens of other densities, Android does its
best to scale the medium-density image for screens of other densities.
If you need more control over the size of your image on various screens, you
can create image files for screens of different densities. For example, let's say
you have a 300x300 pixel image that displays correctly on a high-density screen.
Then, you can put the file for that image in this directory:
res/drawable-hdpi
For a medium-density screen, you can resize that image so its 200x200 pixels
and put it in this directory:
res/drawable-mdpi
This works because, to be displayed at the same size, an image for a high-density
(240dpi) screen should be 50% larger than the same image for a medium density
(160dpi) screen.
To help automate the resizing of images, you can go to the Android Asset
Studio web page and use it to generate images of the correct size for the different
density screens. Then, you can put those images in the correct directories.
Although this web page isn't an official Google tool, it's widely used by Android
developers, and you should be able to find it by searching the Internet.
Android supports PNG, JPG, and GIF images. It's generally considered a
best practice to use PNG images for illustrations or drawings and JPG images
for photographs. In general, it's considered a best practice to avoid using GIF
images.
Chapter 5 How to work with layouts and widgets 151
An image
3G
54 4:02
(j Tip Calculator
\
::
i
i
\ i
The location of the image file
res/drawable-mdpi/restaurant.jpg
Two attributes of an ImageView widget
Value Description
contentDescription A string that describes the image. This string is only
displayed if Android isn't able to display the image.
src The location of the draw able resource, which is an
imaee that can be drawn on the screen.
Four qualifiers for the drawable folder
Qualifier Description
xhdpi Extra high-density screen (approximately 320dpi)
hdpi High-density screen (approximately 240dpi).
mdpi Medium-density screen (approximately 160dpi).
ldpi Low-density screen (approximately 120dpi).
The XML code
<ImageView
android:layout_width="match parent"
android:layout_height="wrap_content"
android:contentDescription="@string/photo"
android:src="@drawable/restaurant" />
Description
• Android supports PNG, JPG, and GIF images. However, its API documentation
discourages using GIF images.
Figure 5-13 How to display an image
152 Section 2 Essential Android skills
How to show and hide widgets
Figure 5-14 shows how to use Java code to show or hide widgets. To start,
this figure shows a layout with three rows. Here, the second row is the "Per
Person" label and amount. The code in this figure shows this row when the bill is
being split between multiple people, but hides this row when the bill is not being
split.
In the Java code example, the first statement gets the position of the selected
item from the Spinner widget. Then, the second statement adds an int value of 1
to the selected position and stores the result in a variable named split. That way,
the split variable is equal to 1 if the bill is not being split, 2 if the bill is being
split by two people, and so on. After that, an if statemement checks whether
the bill is being split. If not, this code uses the set Visible method to hide both
widgets in the "Per Person" row. Otherwise, this code calculates the amount per
person and uses the set Visible method to show both widgets in the "Per Person"
row.
Chapter 5 How to work with layouts and widgets
153
A layout with three rows
Split The Bill? 3 ways
Per Person $13.26
2T Remember Tip Percent
The same layout with the per person amount hidden
Split The Bill? No k
W Remember Tip Percent
A method of the View class
Method
setVisibility(visibility)
ion
Hides the wideet when set to the GONE constant
of the View class.
Shows the wideet when set to the VISIBLE
constant of the View class.
Code that shows and hides the per person amount
int splitPosition = splitSpinner.getSelectedltemPosition();
int split = splitPosition + 1;
float perPersonAmount = 0;
if (split == 1) { // no split - hide widgets
perPersonLabel.setVisibility(View.GONE);
perPersonTextVi ew.setVisibility(View.GONE);
}
else { // split - show widgets
perPersonAmount = totalAmount / split;
perPersonLabel.setVisibility(View.VISIBLE);
perPersonTextVi ew.setVisibility(View.VISIBLE);
}
Description
• You can use Java code to dynamically show or hide widgets.
Figure 5-14 How to show and hide widgets
154 Section 2 Essential Android skills
How to add scroll bars
Figure 5-15 shows how to add scroll bars to a layout. To do that, you
typically add a layout within a ScrollView element. Then, if the layout doesn't fit
on the screen, Android displays a vertical scroll bar so you can scroll through it.
In this figure, the XML begins by declaring a ScrollView element as the root
element of a layout file. This ScrollView element contains a single TableLayout
element. In turn, this layout can contain multiple TableRow elements, which can
contain elements for other widgets. Then, if these widgets become too tall for the
screen to display, the user can scroll up or down through these widgets.
In most cases, you only need to provide a vertical scroll bar for your layouts.
However, you may occasionally need to provide a horizontal scroll bar that
lets the user scroll right or left. To do that, you can use a HorizontalScrollView
element. Since this element works similarly to the ScrollView element, you
shouldn't have much trouble figuring out how to use it.
Chapter 5 How to work with layouts and widgets
155
A scrollable layout
M Tip Calculator
Total 0.00
Rounding
None
O Tip
r Total
Split The Bill? No
_ Remember Tip Percent
3G
11:22
A
The XML
<ScrollView xmlns:android="http://schemas.android.com/apk/res/android"
android:layout_width="wrap_content"
android:layout_height="wrap_content">
<TableLayout
android:layout_width="match parent"
android:layout_height="wrap_content"
android:padding="10dp" >
<!-- All table rows and widgets go here -->
</TableLayout >
</Scrol1View>
Description
• A ScrollView widget can only have one child element, typically a layout that
contains other elements.
• A ScrollView widget displays a vertical scroll bar that lets the user scroll up or
down the child element.
• To display a horizontal scroll bar that lets the user scroll right or left across the
child element, use a HorizontalScrollView element.
Figure 5-15 How to display scroll bars
156 Section 2 Essential Android skills
How to display web content
Figure 5-16 shows a web view, which is a widget that you can use to display
web content. To do that, you typically add a Web View widget to an activity. This
widget uses a built-in browser to display web content. As a result, it can display
any type of content that a web browser can display.
One common use of a web view is to create an app whose only purpose is
to display a website that has been designed to work with mobile devices. This
creates an app that works much like using the browser app on your Android
device to open a website. However, it includes a title bar for the app, and it
makes it possible for you to deploy the app to the Google Play store. When
you create such an app, you typically want the web view to stretch across the
entire screen. In this figure, for example, the app uses a web view to display the
website for murach.com.
It's also possible to use a web view to display web content on part of the
screen. For example, you might want to display widgets on the top of the screen
that let you determine what web content to display on the bottom part of the
screen.
When you use a web view to load a URL from the web, you often use a
ProgressBar widget to display a progress bar while the Web View widget loads
the URL. In this figure, for example, the app displays a circular progress bar
on top of the Web View widget while content is loading. This occurs when the
app starts and when the user clicks on a link that loads another URL within the
website.
Before you can use a web view to load content from the web, you must add
the INTERNET permission to the Android manifest. To do that, you must make
sure to add a uses-permission element like the one shown in this figure after the
manifest element but before the application element. If you add this element
anywhere else, such as just before the activity element, Android doesn't give the
Web View widget permission to access the Internet.
When an activity only displays a web view and a progress bar as shown
in this figure, you typically want to add a conflgChanges attribute like the one
shown in this figure to the activity element. If you don't, the web view has
to completely reload the page each time the user changes orientation, which
can slow down your app significantly. However, if you include this attribute,
the activity automatically handles the change when the user opens or closes
a physical keyboard, changes orientation, or changes the screen size (which
happens when the user changes orientation). This is usually what you want for
an activity like the one shown in this figure, but it isn't usually what you want
for other types of activities such as the Tip Calculator activity described earlier
in this book.
Chapter 5 How to work with layouts and widgets 1 57
An activity that displays web content
*d\ 11:02
Q Murach Books
Vf My Cart (0)
||| Murach Books — Q,
^^crt* '*'s JavaScript month at
J^aS —- Murach Books!
J^v^C/iij Murach'* jQuery
J^ Murach** JavaScript
The Android manifest
An element that must be added just before the application element
<uses-permission android:name="android.permission.INTERNET" />
An attribute that you often want to add to the activity element
<activity
android:name="com.murach.books.MainActivity"
android:label="©string/title_activity_main"
android:configChanges="keyboardHidden|orientation|screenSize">
The layout of the activity
<FrameLayout xmlns:android="http://schemas.android.com/apk/res/android"
xmlns:tools="http://schemas.android.com/tools"
android:layout_width="match parent"
android:layout height="match parent"
tools:context="com.murach.books.MainActivity">
<WebView
android:layout_width="match parent"
android:layout height="match parent"
android:id="@+id/webView" />
<ProgressBar
android:layout_width="wrap_content"
android:layout_height="wrap_content"
android:id="@+id/progressBar"
android:layout_gravity="center" />
</FrameLayout >
Figure 5-16 How to display web content (part 1 of 2)
158 Section 2 Essential Android skills
Part 2 of this figure shows the Java code that works with the web view and
progress bar shown in part l. To start, the top of this figure shows the package
that stores the classes for working with a web view, the android.webkit package.
This differs from the package for working with most other widgets, the
android.widget package.
Most of the code for working with the web view and progress bar is stored
in the onCreate method of the activity. To start, this code gets references to
these widgets. Then, this code enables JavaScript for the web view. By default,
JavaScript is disabled. As a result, if you want to allow JavaScript to run, you need
to add the line of code shown in this figure. This line calls the getSettings method
to get the settings for the web view. Then, it calls the setJavaScriptEnabled
method to enable JavaScript.
After enabling JavaScript, this code specifies what to do if the user clicks on
a link within the web view that loads another URL. By default, this would start
a browser app on the device and load the URL in that browser. However, for a
web view like the one in this figure, you want the web view to load the URL. To
do that, this code creates a new WebViewClient object and overrides the method
that controls URL loading so that it returns a false value. Then, it uses the
setWebViewClient method to set that WebViewClient object in the web view.
After setting the URL loading option, this code specifies when to display
the progress bar. To do that, this code creates a new WebChromeClient object
and overrides the method that's executed when the progress of loading a URL
changes. Within this method, an if statement begins by checking the progress
parameter. If this parameter is equal to 100, the URL has finished loading.
As a result, the code hides the progress bar. Otherwise, the code displays the
progress bar. Finally, this code uses the setWebChromeClient method to set the
WebChromeClient object in the web view.
The WebViewClient and WebChromeClient classes provide other methods
that you can override to control other aspects of how the web view works.
However, you only need to override the methods shown in this figure to create an
app for a website that's designed to work with a mobile device.
After specifying when to display the progress bar, this code finishes by using
the loadURL method to load the URL. Here, the URL is for our company's
website fwww.murach.com). For this statement to work correctly, it must be
coded after the statements that configure the web view. In other words, it must be
coded last.
If you aren't familiar with anonymous inner classes or event handling, you
might have trouble understanding some of this code. However, most of this code
is boilerplate code that you can copy into your apps to get started. Then, you can
learn more about anonymous inner classes and events in the next chapter.
Chapter 5 How to work with layouts and widgets 1 59
The package that stores the classes for working with web views
android.webkit
Code from the onCreate method of the activity
Get references to the web view and progress bar
WebView webView =
(WebView) findViewById(R.id.webView);
final ProgressBar progressBar =
(ProgressBar) findViewById(R.id.progressBar);
Enable JavaScript for the web view
webView.getSettings().setJavaScriptEnabled(true);
Load URLs in the web view instead of in a separate browser app
webView.setWebViewClient(new WebViewClient() {
©Override
public boolean shouldOverrideUrlLoading(WebView view. String url) {
return false;
}
});
Display the progress bar until the page is 100% loaded
webView.setWebChromeClient(new WebChromeClient() {
public void onProgressChanged(WebView view, int progress) {
if (progress == 100) {
progressBar.setVisibility(View.GONE);
}
else {
progressBar.setVisibility(View.VISIBLE);
}
}
});
Load the content from the specified URL into the web view
webView.loadUrl("http://www.murach.com/");
Description
• A web view uses a built-in browser to display web content. As a result, it can
display any type of content that a web browser can display such as a web page that
includes HTML, CSS, and JavaScript.
• A progress bar displays a visual indicator of the progress of an operation.
Figure 5-16 How to display web content (part 2 of 2)
160 Section 2 Essential Android skills
Perspective
Now that you've finished this chapter, you should understand how to work
with widgets on a layout. Although this chapter presented some of the most
commonly used widgets, you'll learn how to use more widgets as you progress
through this book. For example, in chapter 10, you'll learn how to work with
the List View widget.
In addition, once you learn how to use the widgets presented in this
chapter, it should become easier to learn how to use other widgets. In general,
you can use the same process to work with most widgets. To start, you can drag
a widget from the Palette onto a layout. Then, you use the graphical layout
editor to set the properties of the widget. Finally, you write Java code that uses
the methods of the widget to work with it. To learn more about a widget, you
can use the Android API documentation, or you can search the Internet for
other information such as tutorials.
To get started with the widgets presented in this chapter, you can handle
events like the Click event described in chapter 3. Then, you can use the
methods shown in this chapter to work with the widgets when a Click event
occurs. However, to provide a more responsive user interface, you often need to
handle other events such as the ones described in the next chapter. That's why
the next chapter starts by describing how to handle high-level events that occur
when the user interacts with some of the widgets presented in this chapter.
Terms
label
editable text view
text box
text field
drop-down list
nest
check box
radio button
spinner
Summary
• The View class is the superclass for all widgets.
• A linear layout displays a column or row of child widgets.
• The attributes of a linear layout and its child widgets control the appearance
of the user interface.
• A table layout displays widgets in rows and columns.
• A frame layout is one of the simplest and most efficient types of layouts, and
often displays only a single child layout or widget.
array adapter
seek bar
thumb
drawable resource
vertical scroll bar
horizontal scroll bar
web view
progress bar
Chapter 5 How to work with layouts and widgets 1 61
You can nest one layout within another layout, but it can degrade
performance.
An editable text view lets the user enter text with a keyboard. An editable
text view is also known as a text box or text field.
A check box allows the user to check or uncheck an option.
A radio button lets the user select one option of several options.
A spinner, also known as a drop-down list, allows the user to select an item
from a list.
An array adapter provides the list that a spinner should display.
A seek bar lets the user specify a value by dragging a thumb to the right or
left.
Android supports PNG, JPG, and GIF images.
You can use Java code to dynamically show or hide widgets.
A Scroll View widget displays a vertical scroll bar that lets the user scroll up
or down the child element.
To display a horizontal scroll bar that lets the user scroll right or left across
the child element, use a HorizontalscrollView element.
A web view uses a built-in browser to display web content such as a web
page that's designed for mobile devices.
A progress bar displays a visual indicator of the progress of an operation
Exercise 5-1 Modify the layout
for the Tip Calculator app
In this exercise, you'll modify the Tip Calculator app so it uses a table layout
instead of a relative layout.
Test the relative layout version of the app
1. Open the project named ch05_exl_TipCalculator that's in the ex_starts
directory.
2. Test the Tip Calculator app. It should work as it did in previous chapters.
3. Open the layout for the activity and view it in the graphical editor.
Use a table layout
4. Click on the Text tab to view the XML for the layout.
5. Change the RelativeLayout element to a TableLayout element.
6. Add TableRow elements to identify the rows of the table.
7. Review the XML for each widget and delete any old attributes that were
needed for a relative layout but aren't needed for a table layout. Many of these
will be marked as invalid by the XML editor.
8. Switch to the graphical editor to see if the widgets are being displayed
correctly. Note that the buttons for setting the tip percent aren't displayed
correctly.
162 Section 2 Essential Android skills
9. Add the layout_span attribute to any widgets that should span multiple
columns. For example, the EditText widget should span 3 columns. This
should result in a grid that has four rows and four columns.
10. Switch to the graphical layout editor to view the widgets. They should be
displayed correctly.
11. Test the new layout by running the app. The app should work correctly.
Exercise 5-2 Add radio buttons and a spinner
In this exercise, you'll modify the Tip Calculator app so that it uses radio
buttons and a spinner. When you're done, the bottom of the layout should look like
this:
Total $37.60
Rounding ® None
O Tip
O Total
Split Bill? 2 wavs a
Per Person $18.80
Apply
Test the app
1. Open the project named ch05_ex2_TipCalculator that's in the ex_starts
directory.
2. Test this app to see how it works. Note that the Apply button doesn't do
anything yet.
Add radio buttons
3. Open the layout and add a radio group that contains the three radio buttons
shown above.
4. Open the class for the activity and modify the calculateAndDisplay method so
it uses the selected radio button to determine whether to round the tip, total, or
nothing. To round the tip, you can use code like this:
tipAmount = StrictMath.round(billAmount * tipPercent);
totalAmount = billAmount + tipAmount;
To round the total, you can use code like this:
float tipNotRounded = billAmount * tipPercent;
totalAmount = StrictMath.round(billAmount + tipNotRounded);
tipAmount = totalAmount - billAmount;
Chapter 5 How to work with layouts and widgets 1 63
5. Test this change to make sure it works correctly. Note that the rounding is
only displayed when you click the Apply button.
6. Modify the code so it automatically selects the None radio button when the
user clicks on the increase (+) or decrease (-) buttons.
Add a spinner
7. Add a Text View widget and Spinner widget to the layout so the user can
select the number of ways to split the bill as shown above.
8. Add Text View widgets to the layout that can display the amount per person
when the bill is split.
9. Open the strings.xml file and add the array for the spinner.
10. Open the class for the activity and add the code that loads the spinner with the
array.
11. Test this change to make sure it works correctly.
12. Modify the calculateAndDisplay method so it calculates and displays the
correct amount per person when the bill is split. However, when the bill isn't
split, this code should hide the Text View widgets that display the amount per
person.
13. Test this change to make sure it works correctly.
6
How to handle events
In chapter 3, you learned one technique for handling events that occur on
EditText and Button widgets. Now, this chapter expands on that knowledge
to show you several techniques for handling events. In addition, it shows
how to work with different types of events including events that occur on the
CheckBox, RadioButton, RadioGroup, Spinner, and SeekBar widgets described
in the previous chapter.
A summary of listeners......................................................166
High-level events 166
Low-level events 166
Four techniques for handling events ...............................168
How to use the current class as the listener 168
How to use a named class as the listener 168
How to use an anonymous class as the listener 170
How to use an anonymous inner class as the listener 170
When to use each technique 170
How to handle high-level events.......................................172
How to handle events for check boxes and radio buttons 172
How to handle events for radio groups 174
How to handle events for spinners 176
How to handle events for seek bars 178
How to handle low-level events........................................180
How to handle Key events 180
How to handle Touch events 182
The Tip Calculator app.......................................................184
The user interface 184
The Java code for the activity 186
Perspective.........................................................................194
166 Section 2 Essential Android skills
A summary of listeners
A listener is an object that listens for events that can occur on a widget.
When an event occurs on a widget, the appropriate method of the listener is
executed. Figure 6-1 summarizes some common listeners and divides them into
two groups. Although this summary is far from complete, it shows how listeners
work.
High-level events
High-level events only occur on specific types of widgets. For example, the
EditorAction event only occurs on certain types of widgets such as an EditText
widget. However, this event can't occur on other types of widgets such as a
Button widget.
An interface that defines a listener for a high-level event is typically
nested in the class for its corresponding widget. For example, the
OnEditorActionListener interface is nested within the Text View class. As a
result, this listener can work with Text View widgets or other widgets that inherit
the Text View class such as the EditText widget.
Most listener interfaces define a single method for the event handler. For
example, the OnEditorActionListener interface defines a single method named
onEditorAction. However, some listener interfaces define multiple methods. For
example, the OnltemSelectedListener interface defines two methods.
Low-level events
Low-level events occur on all types of widgets. The listeners for low-level
events are nested within the View class. Since this class is the superclass for all
widgets, these listeners can be wired to any type of widget. For example, the
OnClickListener can be wired to any widget. This is necessary because a user
can click on any type of widget.
Besides clicking on a widget and quickly releasing, it's common to click
on a widget and hold the click for more than a second. This is known as a long
click. You can use the OnLongClickListener to handle this type of event.
For phones that have hardware such as a keyboard or a DPad, it's common to
use that hardware to enter text or to navigate through an app by moving the focus
from one widget to another. Typically, Android handles these low-level events
the way you want. However, if you need to modify Android's default behavior,
you can use the OnKeyListener or OnFocusChangedListener to control how the
hardware works with your app.
For some apps, such as games, you need more control over what happens
when the user touches the screen. To get this control, you can implement the
OnTouchListener.
Chapter 6 How to handle events
167
Listeners for high-level events in the android.widget package
Class Nested Interface Methods
EditText
CompoundBut t on
RadioGroup
AdapterView
SeekBar
OnEditorActionListener
OnCheckedChangedListener
OnCheckedChangedListener
OnltemSelectedListener
OnSeekBarChangeListener
onEditorAction
onCheckedChanged
onCheckedChanged
onltemSelected
onNothingSelected
onProgressChanged
onStartTrackingTouch
onStopTrackingTouch
Listeners for low-level events in the android.view package
Class Nested Interface Methods
View
OnClickListener
onclick
OnLongClickListener
OnKeyListener
OnFocusChangeListener
OnTouchListener
onLongClick
onKey
onFocusChange
onTouch
Description
• A listener listens for events that can occur on a widget. When an event occurs on a
widget, the appropriate method of the listener is executed.
• High-level events are events that occur on a specific type of widget. An interface
that defines a listener for a high-level event is typically nested within the class that
defines the widget. These listeners can only be wired to an appropriate widget.
• Low-level events are events that occur on all types of widgets. An interface that
defines a listener for a low-level event is typically nested within the
android, view. View class. These listeners can be wired to any type of widget.
Figure 6-1 A summary of listeners
168 Section 2 Essential Android skills
Four techniques for handling events
In chapter 3, you learned one technique for handling an event. Now, figure
6-2 reviews that technique. Then, it shows three other techniques for handling
the same event.
Regardless of the technique you choose, you usually start by importing the
class for the listener. That's why this is shown as step 1 for all four techniques.
How to use the current class as the listener
The first example shows how to handle the Click event for two buttons
using the current class as the listener. By now, you should be familiar with this
code since it's the same code that was presented in chapter 3. This code uses the
current class (the TipCalculator Activity class) to implement the onClick method
defined by the OnClick listener interface. Then, it wires the listener to the two
buttons. To do that, it uses the keyword named this to identify the current class
as the listener.
How to use a named class as the listener
The second example shows how to handle the Click event for two buttons by
creating a separate class named ButtonListener that handles the event. To do that,
the ButtonListener class implements the listener interface. This class is stored
in the same file as the class for the activity. Then, the code in the activity class
creates a listener object from the listener class and assigns it to a variable named
buttonListener. Finally, the activity class wires the listener to the two buttons.
Chapter 6 How to handle events 1 69
Step 1: Import the interface for the listener
import android.view.View•OnClickListener;
Use the current class as the listener
Step 2a: Implement the interface for the listener
public class TipCalculatorActivity extends Activity
implements OnClickListener {
Step 2b: Implement the interface for the listener
©Override
public void onClick(View v) {
switch (v.getld()) {
case R.id.percentDownButton:
tipPercent = tipPercent - .Olf;
calculateAndDisplay();
break;
case R.id.percentUpButton:
tipPercent = tipPercent + .Olf;
calculateAndDisplay();
break;
}
}
Step 3: Set the listeners
percentUpButton.setOnClickListener(this);
percentDownButton.setOnClickListener(this);
Use a separate named class as the listener
Step 2: Code a separate class that implements the listener
class ButtonListener implements OnClickListener {
©Override
public void onClick(View v) {
switch (v.getld()) {
case R.id.percentDownButton:
tipPercent = tipPercent - .Olf;
calculateAndDisplay();
break;
case R.id.percentUpButton:
tipPercent = tipPercent + .Olf;
calculateAndDisplay();
break;
}
}
}
Step 3: Create an instance of the listener
ButtonListener buttonListener = new ButtonListener();
Step 4: Set the listeners
percentUpButton.setOnClickListener(buttonListener);
percentDownButton.setOnClickListener(buttonListener);
Figure 6-2 Four techniques for handling events (part 1 of 2)
170 Section 2 Essential Android skills
How to use an anonymous class as the listener
The third example shows how to handle the Click event for two buttons
without specifying a name for the class that implements the listener. In other
words, this code uses an anonymous class as the listener. Here, step 2 defines a
private instance variable for an OnClickListener object named buttonListener.
Then, it uses the new keyword to create the listener object, and it supplies all
code for the class that defines the object within the braces ({}). Next, step 3 uses
the name of the instance variable to wire the listener to the two buttons.
How to use an anonymous inner class
as the listener
The fourth example shows how to handle the Click event for two buttons
without assigning the listener object to an instance variable. To do that, you can
create the object for the listener within the parentheses for the method that wires
the widget to the listener. This is known as an anonymous inner clas.
An anonymous inner class is useful when you want to use a different event
handler for each widget. In this figure, for example, the onClick method must
be coded for both buttons. Here, the first onClick method is for the button that
increases the tip percent, and the second onClick method is for the button that
decreases the tip percent. When you use this technique, you know that the code
for the onClick method will only be executed for a specific widget. As a result,
you don't need to begin this method by using a switch statement to check which
widget was clicked.
Conversely, the first three techniques described in this figure are useful
when you want to use one event handler to handle an event for multiple widgets.
In this figure, for example, the code for the first three examples uses a single
onClick method to handle the Click event for two buttons.
When to use each technique
In most cases, you can use any of these four techniques for your app.
So, which technique should you use? In most cases, that's largely a matter of
personal preference. However, if you need to wire the exact same event handler
to multiple widgets, you should reduce code duplication by using one of the first
three techniques.
In general, I recommend using the technique that results in the most readable
and maintainable code. I also recommend using the same technique throughout
an app whenever possible for the sake of consistency. Throughout this book, I
have used the first technique because I think it's the easiest to understand when
you're getting started with Android. However, all four techniques are commonly
used by professional Android programmers.
Chapter 6 How to handle events 1 71
Use an anonymous class as the listener
Step 2: Create an instance variable for the listener
private OnClickListener buttonListener = new OnClickListener() {
©Override
public void onClick(View v) {
switch (v.getld()) {
case R.id.percentDownButton:
tipPercent = tipPercent - .Olf;
calculateAndDisplay();
break;
case R.id.percentUpButton:
tipPercent = tipPercent + .Olf;
calculateAndDisplay();
break;
}
}
};
Step 3: Set the listeners
percentUpButton.setOnClickListener(buttonListener);
percentDownButton.setOnClickListener(buttonListener);
Use an anonymous inner class as the listener
Step 2: Set the listeners and implement the interfaces for the listeners
percentUpButton.setOnClickListener(new OnClickListener() {
©Override
public void onClick(View v) {
tipPercent = tipPercent + .Olf;
calculateAndDisplay();
}
});
percentDownButton.setOnClickListener(new OnClickListener() {
©Override
public void onClick(View v) {
tipPercent = tipPercent - .Olf;
calculateAndDisplay();
}
});
Description
• You can create an instance variable that creates an object from a class that
implements the listener interface. Since this class doesn't have a name, it's known as an
anonymous class.
• You can create an instance of a listener interface without assigning it to an instance
variable. This is known as an anonymous inner class.
Figure 6-2 Four techniques for handling events (part 2 of 2)
172 Section 2 Essential Android skills
How to handle high-level events
In chapter 3, you learned how to handle the EditorAction event, which is
a high-level event. Now, you'll learn how to handle high-level events for a few
other widgets including check boxes, radio buttons, radio groups, spinners, and
seek bars.
How to handle events for check boxes
and radio buttons
Figure 6-3 shows how to handle the CheckedChanged event that
occurs when a check box or radio button is checked or unchecked. To do
that, you implement the OnCheckedChangedListener that's nested in the
CompoundButton class and wire it to a check box or radio button. In this figure,
for example, the onCheckedChanged method is executed when the user checks
or unchecks the Remember Tip Percent check box.
The first code example shows how to use both parameters of the
onCheckedChanged method. Here, the first parameter is a CompoundButton object for the
check box or radio button that was clicked. As a result, you can call the getld
method from this object to get its ID. Then, you can use a switch statement
to execute the appropriate code for each widget. In this figure, there's only
one check box, so this switch statement isn't necessary. However, if you have
multiple check boxes or radio buttons, this statement is usually necessary.
The second parameter of the onCheckedChanged method is a Boolean
value that indicates whether the widget is checked. As a result, you can use an if
statement to determine whether the widget is checked. Then, you can execute the
appropriate code. In this figure, the code just sets the value of a Boolean variable
named rememberTipPercent.
The second code example shows simplified code for the event handler. This
event handler assumes that it is only wired to a single check box. As a result,
it doesn't use a switch statement to determine which widget was checked.
Similarly, this code doesn't use an if statement to execute different code
depending on whether the check box is checked. Instead, it uses the second
parameter to set the value of the variable named rememberTipPercent.
Although the code in this figure is for check boxes, you can use similar
skills for working with radio buttons whenever that's necessary. However, when
you work with radio buttons, you often handle the CheckedChanged event that
occurs on a radio group as described in the next figure instead of handling this
event for individual buttons.
Chapter 6 How to handle events
173
A check box
BT Remember Tip Percent
An event handler for a check box
©Override
public void onCheckedChanged(CompoundButton widget, boolean isChecked) {
switch (widget.getId()) {
case R.id.rememberPercentCheckBox:
if (isChecked) {
rememberTipPercent = true;
}
else {
rememberTipPercent = false;
}
break;
}
}
Another event handler for a check box
©Override
public void onCheckedChanged(CompoundButton widget, boolean isChecked) {
rememberTipPercent = isChecked;
}
A method of the View class
Method Description
getldO
Gets the ID of the wideet on which the event occurred.
Description
• The CheckedChanged event of a check box or radio button occurs when a check
box or radio button is checked or unchecked.
• The first parameter of the onCheckedChanged method is a CompoundButton
object. This object can be cast to a CheckBox or RadioButton object.
• The second parameter of the onCheckedChanged method is a Boolean value that
indicates whether the check box or radio button is checked.
Figure 6-3 How to handle events for check boxes and radio buttons
174 Section 2 Essential Android skills
How to handle events for radio groups
Figure 6-4 shows how to handle the CheckedChanged event that occurs
when a new radio button within a radio group is checked. To do that, you
implement the OnCheckedChangedListener that's nested in the RadioGroup
class and wire it to a radio group. In this figure, for example, the onChecked-
Changed method is executed when the user selects a new radio button from the
radio group.
The first code example shows how to use the second parameter of this
onCheckedChanged method, which provides the ID of the new button that is
checked. This code example uses the second parameter in a switch statement
to execute the appropriate code depending on which radio button was clicked.
Here, the code in the switch statement sets the value of a variable named
rounding to a constant. After the switch statement, this code calls the
calculateAndDisplay method. Although this method isn't shown here, it
performs a calculation using the round variable and displays the results of the
calculation on the user interface. As a result, the calculation is made whenever
the user selects a new radio button from the group.
Chapter 6 How to handle events 1 75
Three radio buttons in a group
J No Rounding 'f1 Round Tip C Round Total
An event handler for a radio group
©Override
public void onCheckedChanged(RadioGroup group, int checkedld) {
switch (checkedld) {
case R.id.noRoundingRadioButton:
rounding = ROUND_NONE;
break;
case R.id.roundTipRadioButton:
rounding = ROUND_TIP;
break;
case R.id.roundTotalRadioButton:
rounding = ROUND_TOTAL;
break;
}
calculateAndDisplay();
}
Another event handler for a radio group
©Override
public void onCheckedChanged(RadioGroup group, int checkedld) {
calculateAndDisplay();
}
Description
• The CheckedChanged event of a radio group occurs when a new button within that
group is checked.
• The first parameter of the onCheckedChanged method is the RadioGroup object for
the radio group.
• The second parameter of the onCheckedChanged method is the ID of the radio
button within the group that is checked.
Figure 6-4 How to handle events for radio groups
176 Section 2 Essential Android skills
How to handle events for spinners
Figure 6-5 shows how to handle the events that occur when a spinner is
first displayed and when a new item is selected from a spinner. To do that, you
implement the OnltemSelectedListener that's nested in the AdapterView class
and wire it to a spinner. In this figure, for example, the onltemSelected method is
executed when the user selects a new item from the spinner.
Within the onltemSelected method, the third parameter provides the position
of the selected item. In most cases, this is the only parameter that you need.
However, if necessary, the first parameter provides the AdapterView object for
the list of items, the second parameter provides a View object for the selected
item, and the fourth parameter provides the ID of the selected item.
Within the onltemSelected method, the first statement adds 1 to the position
of the selected item and stores this value in a variable named split. That way, the
split variable stores a value of 1 for the first item, 2 for the second item, and so
on. This is necessary because the first item in a spinner has a position of 0. Then,
the second statement calls the calculateAndDisplay method to perform a
calculation that uses the split variable and to display the results to the user.
Since the onNothingSelected method is defined by the interface for the
listener, you must implement this method. However, the onNothingSelected
method is only executed if the selection disappears. For example, the selection
can disappear when the adapter for the spinner becomes empty. Since this rarely
happens, you typically don't need to include code for this method.
Chapter 6 How to handle events 177
A spinner
Split the bill?-No ~A \
Split the bill?-No
Split the bill?- 2 ways
Split the bill?-3 ways
Split the bill?-4 ways
An event handler for a spinner
©Override
public void onltemSelected(AdapterView<?> parent. View v, int position,
long id) {
split = position + 1;
calculateAndDisplay();
}
©Override
public void onNothingSelected(AdapterView<?> parent) {
// You typically don't need to include any code here
}
Description
• The onltemS elected method is executed when the spinner is first displayed and
whenever a new item is selected. However, it isn't executed when the user selects
an item that was already selected.
• Within the onltemS elected method, the third parameter provides the position of the
selected item.
• The onNothingSelected method is only executed when the selection disappears.
Since this rarely happens, you typically don't need to include code for this method.
Figure 6-5 How to handle events for spinners
178 Section 2 Essential Android skills
How to handle events for seek bars
Figure 6-6 shows how to handle the events that occur on a seek bar. To do
that, you implement the OnSeekBarChangeListener that's nested in the SeekBar
class and wire it to a seek bar.
The interface for this listener specifies three methods: onStartTrackingTouch,
onProgressChanged, and onStopTrackingTouch. The onStartTrackingTouch
method is executed when the user begins to change the progress of the seek bar,
the onProgressChanged method is executed as the user changes the progress of
the seek bar, and the onStopTrackingTouch method is executed when the user
finishes changing the progress of the seek bar. Since all three methods are
specified by the interface, you must implement all three of these methods.
However, you only need to provide code for the methods that you intend to use.
In this figure, for example, the onStartTrackingTouch method doesn't contain any
code.
The onProgressChanged method contains a single statement. This statement
uses the second parameter to get the progress value for the seek bar. Then, it
creates a string by appending a percent sign (%) to the progress value, and it uses
the setText method of a Text View widget named percentTextView to display this
string. As a result, users get immediate feedback on the progress value as they
change the value of the seek bar. This is necessary to provide a responsive user
interface.
The seek bar can also be used as a progress tracking bar that's updated by
the app instead of by the user. For example, the app could use a seek bar to
display the progress of a download. As a result, you might need to determine
whether the user updated the seek bar by moving the slider, or whether the seek
bar was updated programmatically. To do this, you can check the value of the
fromUser parameter. If the user updated the seek bar, this parameter is true.
Otherwise, it's false.
The onStopTrackingTouch method contains three statements. The first
statement uses the getProgress method of the SeekBar parameter to get the final
progress value for the seek bar. The second statement converts that int value to
a float value by dividing it by 100 and uses the result to set the new tip percent.
And the third statement calls the calculateAndDisplay method. As a result, the
calculation is made and displayed when the user is done changing the value of
the seek bar.
Chapter 6 How to handle events
179
A seek bar and a label
15%
An event handler for a seek bar
©Override
public void onProgressChanged(SeekBar seekBar, int progress,
boolean fromUser) {
percentTextView.setText(progress + "%");
}
©Override
public void onStartTrackingTouch(SeekBar seekBar) {
// TODO Auto-generated method stub
}
©Override
public void onStopTrackingTouch(SeekBar seekBar) {
int progress = seekBar.getProgress();
tipPercent = (float) progress / 100;
calculateAndDisplay();
}
Description
• The onStartTrackingTouch method is executed when the user begins to change the
value of the seek bar.
• The onProgressChanged method is executed as the user changes the value of the
seek bar.
• The onStopTrackingTouch method is executed when the user finishes changing the
value of the seek bar.
• Within the onProgressChanged method, the second parameter provides the progress
value for the seek bar.
• To determine whether the user updated the progress value, or whether it was
updated programmatically, you can check the fromUser parameter of the
onProgressChanged method.
Figure 6-6 How to handle events for seek bars
180 Section 2 Essential Android skills
How to handle low-level events
In chapter 3, you learned how to handle the Click event, which is a low-level
event. Now, you'll learn how to handle some other low-level events including the
Key and Touch events.
How to handle Key events
Most Android devices are touchscreen devices that the user can interact
with by touching the screen. However, some Android devices include hardware
components. This hardware may be a keyboard, a DPad, or a trackball. Or,
it may be other buttons such as Power, Home, or Back buttons. When a user
presses a hardware button, a Key event occurs.
Figure 6-7 shows how to handle a Key event. To do that, you implement
the OnKeyListener that's nested in the View class and wire that listener to any
widget. For example, the listener in this figure is wired to an EditText widget. As
a result, when the EditText widget has the focus and the user presses a hardware
key, the onKey method in this figure is executed.
Within this method, the code begins by using a switch statement to
determine which hardware key was pressed by the user. To do that, the switch
statement checks the key code value that's stored in the method's second
parameter and compares that key code to the constant values that are stored in the
KeyEvent class.
If the user presses the Enter key or the Center key on a DPad, this code
calls the calculateAndDisplay method to perform a calculation and display the
results to the user. Then, the next two statements hide the soft keyboard if it is
displayed. To do that, the first statement uses the getSystemService method to
get an InputMethodManager object. Then, the second statement uses that object
to hide the soft keyboard. For now, don't worry if you don't understand this
code. You can learn more about working with system services in chapter 11.
After hiding the soft keyboard, this code returns a true value for the onKey
method. This indicates that this method has consumed the event. As a result, the
event is not passed on to the parents of the current widget. In other words, if the
user presses the Center or Enter keys, the processing of this event stops and isn't
passed on to the EditText widget or any of its parent widgets.
If the user presses the Left or Right keys on a DPad, this code begins by
checking which widget the Key event occurred on. If the event occurred on the
SeekBar widget, this code calls the calculateAndDisplay method. Then, the
break statement exits the switch statement.
Outside the switch statement, this code returns a false value for the onKey
method. This indicates that this method has not consumed the event. As a result,
the event is passed on to the parents of the current widget. In other words, when
the user presses most keys, such as the number or letter keys, the Key event is
passed on to the EditText widget and its parents so it can be processed normally,
which is usually what you want.
Chapter 6 How to handle events 1 81
An event handler for the Key event
©Override
public boolean onKey(View view, int keyCode, KeyEvent event) {
switch (keyCode) {
case KeyEvent.KEYCODE_ENTER:
case KeyEvent.KEYCODE_DPAD_CENTER:
calculateAndDisplay();
// hide the soft keyboard
InputMethodManager imm = (InputMethodManager)
getSystemService(Context.INPUT_METHOD_SERVICE);
imm.hideSoftInputFromWindow(
billAmountEditText.getWindowToken(), 0);
// consume the event
return true;
case KeyEvent.KEYCODE_DPAD_RIGHT:
case KeyEvent.KEYCODE_DPAD_LEFT:
if (view.getld() == R.id.percentSeekBar) {
calculateAndDisplay();
}
break;
}
// don't consume the event
return false;
}
Some constants from the KeyEvent class
Constant Description
KEYCODE_ENTER The Enter key on a hard keyboard.
KEYCODE_DPAD_CENTER The Center key on the DPad.
KEYCODE_DPAD_LEFT The Left key on the DPad.
KEYCODE_DPAD_RlGHT The Right key on the DPad.
KEYCODE_SPACE The Space key on a hard keyboard.
Description
• The KeyEvent class contains constants for almost every possible hardware key on a
device including the keys on a hard keyboard or a DPad.
• The onKey method returns a Boolean value that indicates whether this method has
consumed the event. If this method returns a true value, the event is not passed on
to the parents of the current widget.
• If you don't want to wire an event handler for a Key event to multiple child
widgets, you can wire the Key event to a parent widget such as the root layout.
Then, the event handler handles any Key events that aren't consumed by child
widgets.
• You can use the getSystemService method to get an InputMethodManager object.
Then, you can use that object to hide the soft keyboard. For more information about
how system services work, see chapter 11.
Figure 6-7 How to handle Key events
182 Section 2 Essential Android skills
If you don't want to wire an event handler for a Key event to multiple child
widgets, you can wire the Key event to a parent widget such as the root layout.
Then, the event handler handles any Key events that aren't consumed by child
widgets.
Figure 6-7 only shows five constants from the KeyEvent class. However, the
KeyEvent class contains constants for almost every possible hardware key on a
device.
How to handle Touch events
When a user touches a widget on a touchscreen device, a Touch event occurs
on the widget. Most of the time, you don't need to know how to handle this
event. Instead, you can use another event such as a Click event to get your app to
work the way you want.
Sometimes, though, you may need to handle a Touch event. To do that, you
implement the OnTouchListener that's nested in the View class and wire that
listener to any widget. In figure 6-8, for example, the onTouch method includes
code that sends data to the LogCat view.
Within the onTouch method, the first statement declares four float variables
for the X and Y values when the user presses down and lifts up. Then, the
second statement gets an int value for the type of MotionEvent action that has
occurred. Next, an if statement compares this int value to some constants of the
MotionEvent class to determine what type of event occurred.
If the user presses down, the if statement sets the values of the downX and
downY variables. Then, it sends these variables to the LogCat view. These X and
Y values indicate the location of the down touch on the horizontal and vertical
axis of the widget.
If the user lifts up, the if statement sets the values of the upX and upY
variables. Then, it sends these variables to the LogCat view. Although this type
of logging doesn't perform a useful task, it's often helpful when you're getting
started with Touch events.
Like the onKey method, the onTouch method returns a Boolean value
that indicates whether this method has consumed the event. In this figure, the
onTouch method returns a value of true if the user presses down or lifts up to
indicate that it has consumed the event. However, for all other touch actions, this
method returns a false value to indicate that it has not consumed the event and
that other elements can continue processing this event.
When the user touches the screen and moves the touch, it's common that
the device can't process events quickly enough. In that case, Android stores the
Touch events in a batch. Then, if necessary, you can use the "history" methods
of the MotionEvent object to access these Touch events. To start, you can use
the getHistorySize method to get the number of Touch events in the batch. Then,
you can create a loop that loops through these events, and you can use the
getHistoricalX and getHistoricalY methods to get the X and Y values for each
event.
Chapter 6 How to handle events
183
"downX =
"downY =
II
II
+ downX);
+ downY);
An event handler for a Touch event
©Override
public boolean onTouch(View v# MotionEvent event)
float downX, downY, upX# upY;
int action = event.getAction();
if (action == MotionEvent.ACTION_DOWN) {
Log.d("MotionEvent", "ACTION_DOWN");
downX = event.getX();
downY = event.getY();
Log.d("MotionEvent"#
Log.d("MotionEvent"#
return true;
}
else if (action == MotionEvent.ACTION_UP){
Log.d("MotionEvent", "ACTION_UP");
upX = event.getX();
upY = event.getY();
Log.d("MotionEvent"#
Log.d("MotionEvent"#
return true;
}
else {
return false;
}
}
{
"upX =
"upY =
ii
ii
+ upX);
+ upY);
Some constants of the MotionEvent class
Constant
ACTION_MOVE
ACTION UP
ion
ACTION DOWN The start of the touch.
The touch has moved between the down and up actions
The end of the touch.
Some methods of the MotionEvent class
Method
ion
getAction()
getxo
getYO
getHistorySize()
getHistoricalX(int i)
getHistoricalY(int i)
Gets an int value for the type of action.
Gets a float value for the location of the X
axis of the touch.
Gets a float value for the location of the Y
axis of the touch.
The number of historical events.
Gets a float value for the X axis at the
specified position of the stored historical values.
Gets a float value for the Y axis at the
specified position of the stored historical values.
Description
• The onTouch method returns a Boolean value that indicates whether this method
has consumed the event.
Figure 6-8 How to handle Touch events
184 Section 2 Essential Android skills
The Tip Calculator app
This chapter finishes by showing a new and improved Tip Calculator app
that uses one seek bar, three radio buttons, a radio button group, and a spinner.
The code for this app handles the events that occur on these widgets.
The user interface
Figure 6-9 shows the user interface for the new and improved Tip Calculator
app. When you use this app, you can set a new tip percent by dragging the thumb
on the seek bar to the right or left.
If you want, you can round the tip or total to the nearest dollar by selecting
the appropriate radio button. Similarly, you can split the bill between multiple
people by selecting the item for the number of people from the spinner. When
you do that, the user interface displays the Per Person label and amount.
Otherwise, it hides this label and amount.
Chapter 6 How to handle events
1
The user interface
(~) Tip Calculator
Bill Amount 32.6o|
"j 4:40
Percent
Tip
Total
Rounding
Split Bill?
Per Person
°n0/ . -* .a
$6.52
$39.12
® None
OTip
O Total
3 ways .
$13.04
Description
• This version of the Tip Calculator includes a seek bar, a radio group, three radio
buttons, and a spinner.
• To set a new tip percent, you can drag the thumb on the seek bar to the right or left
• To round the tip or the total to the nearest dollar, you can select the appropriate
radio button.
• To split the bill, you can select the appropriate item from the spinner.
Figure 6-9 The user interface
186 Section 2 Essential Android skills
The Java code for the activity
Figure 6-10 shows the Java code for the new and improved Tip Calculator
app. Since this code expands upon the Tip Calculator app described in chapter 3,
I'll focus on the code that handles the events for the new widgets.
To start, this code imports the classes for all of the new widgets. In addition,
it imports the five listeners needed to handle the events for this app. Then, the
class declares that it implements all five of these listeners.
Within the class, the code defines instance variables for the widgets. Then,
the onCreate method gets references to all necessary widgets and wires the
five listeners to the appropriate widgets. Here, the listener for the Key event is
wired to multiple widgets. In particular, it's wired to the EditText, SeekBar, and
RadioGroup widget.
The onPause and onResume methods work much like they did in chapter
3. However, the onPause method contains new code that saves the instance
variables that can be used to set the state of the widgets. Similarly, the onResume
method contains new code that gets these variables and uses them to set the state
of the widgets. Here, the event handlers for the RadioGroup and Spinner widgets
are triggered by the code that sets the selected radio button and the position of
the spinner. These event handlers both execute the calculateAndDisplay method.
Chapter 6 How to handle events 1 87
The Java code for the activity Page 1
package com.murach.tipcalculator;
import java.text.NumberFormat;
import android.os.Bundle;
import android.view.KeyEvent;
import android.view.View;
import android.view.View.OnKeyListener;
import android•view•inputmethod•Editorlnfo;
import android.view.inputmethod.InputMethodManager;
import android.widget.AdapterView;
import android.widget.AdapterView.OnltemSelectedListener;
import android.widget.ArrayAdapter;
import android.widget.EditText;
import android.widget.RadioButton;
import android.widget.RadioGroup;
import android.widget.RadioGroup.OnCheckedChangeListener;
import android.widget.SeekBar;
import android.widget.SeekBar.OnSeekBarChangeListener;
import android.widget.Spinner;
import android.widget.TextView;
import android.widget.TextView.OnEditorActionListener;
import android.app.Activity;
import android•content•Context;
import android•content•SharedPreferences;
import android.content.SharedPreferences.Editor;
public class TipCalculatorActivity extends Activity
implements OnEditorActionListener, OnSeekBarChangeListener,
OnCheckedChangeListener, OnltemSelectedListener, OnKeyListener {
// define variables for the widgets
private EditText billAmountEditText;
private TextView percentTextView;
private SeekBar percentSeekBar;
private TextView tipTextView;
private TextView totalTextView;
private RadioGroup roundingRadioGroup;
private RadioButton roundNoneRadioButton;
private RadioButton roundTipRadioButton;
private RadioButton roundTotalRadioButton;
private Spinner splitSpinner;
private TextView perPersonLabel;
private TextView perPersonTextView;
// define the SharedPreferences object
private SharedPreferences savedValues;
// define rounding constants
private final int ROUND_NONE = 0;
private final int ROUND_TIP = 1;
private final int ROUND_TOTAL =2;
Figure 6-10 The Java code for the activity (part 1 of 6)
188 Section 2 Essential Android skills
The Java code for the activity Page 2
// define instance variables
private String billAmountString = "";
private float tipPercent = .15f;
private int rounding = ROUND_N0NE;
private int split = 1;
©Override
public void onCreate(Bundle savedlnstanceState) {
super•onCreate(savedlnstanceState);
setContentView(R.layout.activity_tip_calculator);
// get references to the widgets
billAmountEditText = (EditText) findViewById(R.id.billAmountEditText);
percentTextView = (TextView) findViewByld(R.id.percentTextView);
percentSeekBar = (SeekBar) findViewByld(R.id.percentSeekBar);
tipTextView = (TextView) findViewById(R.id.tipTextView);
totalTextView = (TextView) findViewById(R.id.totalTextView);
roundingRadioGroup = (RadioGroup)
f indViewByld(R.id.roundingRadioGroup);
roundNoneRadioButton = (RadioButton)
findViewByld(R.id.roundNoneRadioButton);
roundTipRadioButton = (RadioButton)
findViewByld(R.id.roundTipRadioButton);
roundTotalRadioButton = (RadioButton)
findViewByld(R.id.roundTotalRadioButton);
splitSpinner = (Spinner) findViewByld(R.id.splitSpinner);
perPersonLabel = (TextView) findViewByld(R.id.perPersonLabel);
perPersonTextView = (TextView) findViewByld(R.id.perPersonTextView);
// set array adapter for spinner
ArrayAdapter<CharSequence> adapter = ArrayAdapter•createFromResource(
this, R.array.split_array# android.R.layout.simple_spinner_item);
adapter•setDropDownViewResource(
android.R.layout.simple_spinner_dropdown_item);
splitSpinner.setAdapter(adapter);
// set the listeners
billAmountEditText.setOnEditorActionListener(this);
billAmountEditText.setOnKeyListener(this);
percentSeekBar•setOnSeekBarChangeListener(this);
percentSeekBar•setOnKeyListener(this);
roundingRadioGroup.setOnCheckedChangeListener(this);
roundingRadioGroup.setOnKeyListener(this);
splitSpinner.setOnltemSelectedListener(this);
}
// get SharedPreferences object
savedValues = getSharedPreferences("SavedValues"# MODE_PRIVATE);
Figure 6-10 The Java code for the activity (part 2 of 6)
Chapter 6 How to handle events 1 89
The Java code for the activity Page 3
©Override
public void onPause() {
// save the instance variables
Editor editor = savedValues.edit();
editor.putString("billAmountString", billAmountString);
editor.putFloat("tipPercent", tipPercent);
editor.putInt("rounding", rounding);
editor.putlnt("split"# split);
editor.commit();
super.onPause();
}
©Override
public void onResume() {
super•onResume();
// get the instance variables
billAmountString = savedValues.getString("billAmountString", "");
tipPercent = savedValues.getFloat("tipPercent", 0.15f);
rounding = savedValues.getInt("rounding"# ROUND_N0NE);
split = savedValues.getInt("split", 1);
// set the bill amount on its widget
billAmountEditText.setText(billAmountString);
// set the tip percent on its widget
int progress = Math.round(tipPercent * 100);
percentSeekBar•setProgress(progress);
// set rounding on radio buttons
// NOTE: this executes the onCheckedChanged method,
// which executes the calculateAndDisplay method
if (rounding == R0UND_N0NE) {
roundNoneRadioButton•setChecked(true);
}
else if (rounding == ROUND_TIP) {
roundTipRadioButton•setChecked(true);
}
else if (rounding == ROUND_TOTAL) {
roundTotalRadioButton•setChecked(true);
}
// set split on spinner
// NOTE: this executes the onltemSelected method,
// which executes the calculateAndDisplay method
int position = split - 1;
splitSpinner.setSelection(position);
}
Figure 6-10 The Java code for the activity (part 3 of 6)
190 Section 2 Essential Android skills
The calculateAndDisplay method works much like it did in chapter 3.
However, it contains new code that rounds the tip and total if necessary. In
addition, it contains new code that calculates the split amount, shows or hides
the Per Person label and amount when necessary, and formats the Per Person
amount.
The event handler for the EditText widget is executed when the user clicks
the Done button on the soft keyboard that's displayed for the EditText widget.
This works as described in chapter 3.
The event handler for the SeekBar widget is executed when the user moves
the thumb on the seek bar. Here, the onProgressChanged method displays
immediate feedback to the user by updating the tip percent whenever the
user changes the progress value on the seek bar. Then, when the user finishes
changing the progress value on the seek bar, the onStopTrackingTouch method
calculates a new tip percent and calls the calculateAndDisplay method. This
method uses the new tip percent to calculate and display new tip and total
amounts.
The event handler for the RadioGroup widget is executed when the user
selects a new radio button. Here, the onCheckedChanged method begins by
using the second parameter to check which radio button is selected. Then, it sets
the rounding variable to the appropriate constant value. For example, if the No
Rounding radio button is selected, this code sets the rounding variable to the
ROUND_NONE constant. After it sets the rounding variable, this code calls the
calculateAndDisplay method. This method uses the rounding variable to
determine what type of rounding the app uses for the calculation.
The event handler for the Spinner widget is executed when the user selects a
new item. Here, the onltemSelected method begins by using the second
parameter of the method to set the value of the split variable. Since the position
of the first item is 0, this code adds a value of 1 to get the value for the split
variable. After that, this event handler calls the calculateAndDisplay method.
This method uses the split variable to determine how many ways to split the bill.
The event handler for the Key event is executed when the user presses a
hardware key and the focus is on the EditText, SeekBar, or RadioGroup widgets.
Here, the onKey method begins by using the second parameter of the method to
execute code depending on the hardware key. If the user pressed the Enter key on
a hard keyboard or the Center key on a DPad, this code hides the soft keyboard,
calls the calculateAndDisplay method, and consumes the event.
If the user presses the Right or Left keys on a DPad and the focus is on the
SeekBar widget, this code calls the calculateAndDisplay method. However, in
this case, it does not consume the event. As a result, Android can use this event
to update the user interface accordingly.
Chapter 6 How to handle events 1 91
The Java code for the activity
public void calculateAndDisplay() {
// get the bill amount
billAmountString = billAmountEditText.getText().toString();
float billAmount;
if (billAmountString.equals("")) {
bi11Amount = 0;
}
else {
billAmount = Float.parseFloat(billAmountString);
}
// get tip percent
int progress = percentSeekBar•getProgress();
tipPercent = (float) progress / 100;
// calculate tip and total
float tipAmount = 0;
float tota1Amount = 0;
if (rounding == ROUND_N0NE) {
tipAmount = billAmount * tipPercent;
totalAmount = billAmount + tipAmount;
}
else if (rounding == ROUND_TIP) {
tipAmount = StrictMath.round(billAmount * tipPercent);
totalAmount = billAmount + tipAmount;
}
else if (rounding == ROUND_TOTAL) {
float tipNotRounded = billAmount * tipPercent;
totalAmount = StrictMath.round(billAmount + tipNotRounded);
tipAmount = totalAmount - billAmount;
}
// calculate split amount and show/hide split amount widgets
float splitAmount = 0;
if (split ==1) { // no split - hide widgets
perPersonLabel.setVisibility(View.GONE);
perPersonTextView.setVisibility(View.GONE);
}
else { // split - calculate amount and show widgets
splitAmount = totalAmount / split;
perPersonLabel.setVisibility(View.VISIBLE);
perPersonTextVi ew.setVisibility(View.VISIBLE);
}
// display the results with formatting
NumberFormat currency = NumberFormat.getCurrencylnstance();
tipTextView.setText(currency.format(tipAmount));
totalTextView.setText(currency.format(totalAmount));
perPersonTextView.setText(currency.format(splitAmount));
NumberFormat percent = NumberFormat.getPercentInstance();
percentTextView.setText(percent.format(tipPercent));
}
Figure 6-10 The Java code for the activity (part 4 of 6)
Page 4
192 Section 2 Essential Android skills
The Java code for the activity Page 5
// Event handler for the EditText
©Override
public boolean onEditorAction(TextView v, int actionld, KeyEvent event) {
if (actionld == EditorInfo.IME_ACTION_DONE ||
actionld == EditorInfo.IME_ACTION_UNSPECIFIED) {
calculateAndDisplay();
}
return false;
}
// Event handler for the SeekBar
©Override
public void onStartTrackingTouch(SeekBar seekBar) {
// TODO Auto-generated method stub
}
©Override
public void onProgressChanged(SeekBar seekBar, int progress,
boolean fromUser) {
percentTextView.setText(progress + "%");
}
©Override
public void onStopTrackingTouch(SeekBar seekBar) {
calculateAndDisplay();
}
// Event handler for the RadioGroup
©Override
public void onCheckedChanged(RadioGroup group, int checkedid) {
switch (checkedid) {
case R.id.roundNoneRadioButton:
rounding = ROUND_NONE;
break;
case R.id.roundTipRadioButton:
rounding = ROUND_TIP;
break;
case R.id.roundTotalRadioButton:
rounding = ROUND_TOTAL;
break;
}
calculateAndDisplay();
}
Figure 6-10 The Java code for the activity (part 5 of 6)
Chapter 6 How to handle events 1 93
The Java code for the activity
// Event handler for the Spinner
©Override
public void onltemSelected(AdapterView<?> parent. View v, int position,
long id) {
split = position + 1;
calculateAndDisplay();
}
©Override
public void onNothingSelected(AdapterView<?> parent) {
// Do nothing
}
// Event handler for the keyboard and DPad
©Override
public boolean onKey(View view, int keyCode, KeyEvent event) {
swi t ch (keyCode) {
case KeyEvent.KEYCODE_ENTER:
case KeyEvent.KEYCODE_DPAD_CENTER:
calculateAndDisplay();
// hide the soft keyboard
InputMethodManager imm = (InputMethodManager)
getSystemService(Context.INPUT_METHOD_SERVICE);
imm.hideSoftInputFromWindow(
billAmountEditText.getWindowToken(), 0);
// consume the event
return true;
case KeyEvent.KEYCODE_DPAD_RIGHT:
case KeyEvent.KEYCODE_DPAD_LEFT:
if (view.getld() == R.id.percentSeekBar) {
calculateAndDisplay();
}
break;
}
// don■t consume the event
return false;
}
}
Figure 6-10 The Java code for the activity (part 6 of 6)
Page 6
194 Section 2 Essential Android skills
Perspective
Now that you've finished this chapter, you should understand how
high-level and low-level events work. In addition, you should be able to handle
events that occur on the widgets described in this chapter. More importantly,
you should have all the skills you need to figure out how to handle events that
occur on other kinds of widgets. To do that, you can search the Android API
or the Internet to find the event listener that you need. Then, you can use the
techniques described in this chapter to handle the event by implementing that
listener.
Terms
listener long click
events focus
high-level events anonymous class
low-level events anonymous inner class
Summary
A listener listens for events that can occur on a widget. When an event
occurs on a widget, the appropriate method of the listener is executed.
High-level events are events that occur on a specific type of widget. An
interface that defines a listener for a high-level event is typically nested
within the class that defines the widget. These listeners can only be wired to
an appropriate widget.
Low level events are events that occur on all types of widgets. An interface
that defines a listener for a low-level event is typically nested within the
android, view. View class. These listeners can be wired to any type of widget.
You can create an instance variable that creates an object from a class that
implements the listener interface. Since this class doesn't have a name, it's
known as an anonymous class.
You can create an instance of a listener interface without assigning it to an
instance variable. This is known as an anonymous inner class
The CheckedChanged event of a check box or radio button occurs when a
check box or radio button is checked or unchecked.
For a spinner, the onltemSelected method is executed when the spinner is
first displayed and whenever a new item is selected. The onNothingSelected
method is only executed when the selection disappears.
For a seek bar, the onStartTrackingTouch method is executed when the user
begins to change the value of the seek bar. The onProgressChanged method
is executed as the user changes the value of the seek bar. The
onStopTrackingTouch method is executed when the user finishes changing
the value of the seek bar.
Chapter 6 How to handle events 1 95
• The KeyEvent class contains constants for almost every possible hardware
key on a device including the keys on a hard keyboard or a DPad.
• The onKey and onTouch methods both return a Boolean value that indicates
whether the method has consumed the event. If this method returns a true
value, the event is not passed on to the parents of the current widget.
Exercise 6-1 Use anonymous classes
for event listeners
In this exercise, you'll modify the Tip Calculator app that's presented in this
chapter so it uses anonymous classes for event listeners.
1. Open the project named ch06_exl_TipCalculator that's in the ex_starts
directory.
2. Open the class for the activity and review its code. Note that the activity class
implements five listener interfaces.
3. Test the app to make sure the EditText, SeekBar, RadioGroup, and Spinner
widgets all work correctly.
4. Modify the code so it uses an anonymous class (not an anonymous inner
class) for the OnEditorActionListener. To do that, modify the declaration for
the class so it doesn't implement this interface, create an instance variable for
an object that implements this interface, and set that object as the listener.
5. Test the app to make sure the EditText widget still works correctly.
6. Repeat steps 4 and 5 for the listeners for the SeekBar, RadioGroup, and
Spinner widgets.
Exercise 6-2 Improve the listener
for the Key events
In this exercise, you'll modify the Tip Calculator app that's presented in this
chapter so it uses the OnKeyListener interface to handle Key events instead of
using the OnEditorActionListener interface to handle Key events.
To test this exercise, you '11 need to be able to run an emulator on your computer.
Test the Enter key and DPad keys
1. Open the project named ch06_ex2_TipCalculator that's in the ex_starts
directory.
2. Run the app on an emulator that has a hard keyboard and a DPad like the one
shown at the end of chapter 4.
3. Enter a bill amount and use the Enter key on the keyboard and the Center key
on the DPad to finish the entry. This should work correctly.
4. Use the DPad to move the focus to the seek bar for the tip percent. Then, use
the Left and Right keys on the DPad to increase or decrease the tip amount.
This should work correctly.
196 Section 2 Essential Android skills
Improve the listener for the Key events
5. Enter a new bill amount and use the Down key on the DPad to move the focus
to the seek bar. Note that this does not update the tip and total amounts or hide
the soft keyboard.
6. Modify the code for the onKey method so the Down key on the DPad
executes the calculateAndDisplay method, hides the soft keyboard, and moves
the focus to the next widget. To get this to work correctly, the Down key
should not consume the event, but the Center key should continue to consume
the event.
7
How to work with themes
and styles
In chapter 3, you learned how to manually set the properties of the widgets in
your app to control how they look. For example, you set the textSize property
for every widget in the app so that each widget uses the same text size. Now,
this chapter shows how to use themes and styles to automatically set the
properties for widgets.
Themes and styles allow you to separate the design from the content,
which is generally considered a best practice. In addition, they can help you
keep the appearance of your app consistent, they can help you reduce code
duplication, and they can make your app easier to develop and maintain.
An introduction to themes and styles 198
Three common themes 198
How to supply different themes for different APIs 200
How to convert an existing project to the AppCompat theme 202
How to work with styles 204
How to define a style 204
How to apply a style 206
How to create a style sheet 208
How to work with themes 210
How to modify a built-in theme 210
How to modify the AppCompat theme 212
How to modify a theme depending on the API 214
How to modify the text appearance for a theme 216
A summary of built-in themes 218
How to apply themes 220
How to work with colors 222
How to define colors 222
How to apply colors 222
Perspective 224
198 Section 2 Essential Android skills
An introduction to themes and styles
By default, an Android app uses themes and styles that are built-in to the
operating system or available from a support library. This topic begins by
examining a few of these themes. But first, you should know that a style is a
collection of properties that apply to a widget, and a theme is a collection of
styles that apply to an entire activity or app. In other words, the main difference
between a style and a theme is where it is applied: a style is applied to a widget,
and a theme is applied to an app or activity.
Three common themes
Figure 7-1 shows three themes that are commonly used. Each theme
provides the look for the title bar and widgets of the app. The first is the Holo
theme. More specifically, it's the Holo.Light.DarkActionBar variation of the
Holo theme. Here, the Light modifier specifies that the screen should use a white
background. Then, the DarkActionBar modifier specifies that the screen should
include a dark action bar, which is a title bar that can display buttons that allow
the user to perform actions. Although the action bar shown in this figure doesn't
include buttons, you'll learn how to add buttons to the action bar in the next
chapter. Note that this theme is available with Android 4.0 (API 14) and later. As
a result, it's available on most Android devices.
The second theme is the Material theme. More specifically, it's the Material.
Light.DarkActionBar variation of the Material theme. This theme works much
like the Holo theme shown in this figure. However, the Material theme is only
available on Android 5.0 (API 21) and later. As a result, it's not directly
available on most Android devices. The Material theme provides a new appearance
that includes informative touch animations for widgets and transitions between
activities that can make an app easier and more enjoyable to use.
The third theme is the AppCompat theme. This theme is available from the
v7 appcompat support library. It looks like the Material theme, and it provides a
way to port the appearance of the Material theme all the way back to Android 2.1
(API 7). As a result, if you use the v7 appcompat support library, you can make
the appearance of the Material theme available to virtually all Android devices.
However, these devices won't be able to support the animations and transitions
of the Material theme.
Until now, most of the applications in this book have used the Holo.Light.
DarkActionBar theme for two reasons. First, this theme is available for all
devices supported by the apps in this book, which specify a minimum API of 15
or 16. Second, this theme doesn't depend on any support libraries. This keeps the
apps in this book clean and simple.
However, if this isn't what you want, you can use another approach. One
approach is to use the Material theme for API 21 and later and fall back on the
Holo theme for older devices as described in the next figure. Another approach is
to use the AppCompat theme as described in figure 7-3.
Chapter 7 How to work with themes and styles 1 99
The Holo theme (light with dark action bar)
Q Tip Calculator
Bill Amount
■ ■
Percent 14% >
Description
- Is available from Android 4.0 (API 14) and later.
The Material theme (light with dark action bar)
Tip Calculator
Bill Amount |
Percent 14% •
Description
- Is available from Android 5 (API 21) and later.
- Provides a new appearance that includes animations and transitions.
The AppCompat theme (light with dark action bar)
Tip Calculator
Bill Amount |
Percent 14% •
Description
- Is available with Android 2.1 (API 7) and later if you use the v7 appcompat
support library.
- Provides the same appearance as the Material theme but without animations and
transitions.
Description
• A style is a collection of properties that are applied to a widget.
• A theme is a collection of styles that are applied to an entire activity or app. Several
themes are available from Android and its support libraries. When a theme is
applied, every widget applies each style of the theme that it supports.
• With Android 4.0 (API 14) and later, an activity can include an action bar that
displays the activity's title and, optionally, buttons that perform actions.
Figure 7-1 Three common themes
200 Section 2 Essential Android skills
How to supply different themes for different APIs
If you want to use the Material theme for API 21 and later and fall back on
the Holo theme for older devices, you can use one styles.xml file for API 21 and
later and another for earlier APIs. In figure 7-2, for example, the styles.xml file
in the res\values-v21 directory applies to API 21 (Android 5.0) and later. Then,
the styles.xml file in the res\values directory applies to all earlier API levels. For
example, if the minimum API for the app is set to 15, this styles.xml file would
apply to APIs 15 through 20.
Developers often used this technique in the early days of Android
programming. As a result, you may see this technique if you're working with an older
Android app. If so, this technique may specify styles.xml files for API levels that
you no longer need to support. In that case, you can delete any styles.xml files
that are below the minimum API for your app.
Within the styles.xml files, a style element can specify a theme or a style.
Within a style element, the name attribute specifies the name for the style or
theme, and the parent attribute specifies the style or theme that the current style
element inherits. In this figure, both of the style elements define themes.
In the styles.xml file in the res\values directory, the style element defines
a theme named AppTheme that inherits the theme named Holo.Light.
DarkActionBar. As a result, this is the default theme for all APIs.
In the styles.xml file in the res\values-v21 directory, the first style element
defines a theme named AppTheme that inherits the theme named Material.Light.
DarkActionBar. Since this theme has the same name (AppTheme) as the theme
in the previous styles.xml file, this theme overrides the theme in the previous
styles.xml file. As a result, API 21 and later use the Material theme, not the Holo
theme.
In the AndroidManifest.xml file, the application element specifies the
theme for the app. In this figure, the theme attribute specifies the theme named
AppTheme. This applies an appropriate built-in theme for each API level.
For this to work, the activities in your app need to extend the Activity class,
not the AppCompatActivity class described in the next figure. If your activity
inherits the AppCompatActivity class, it will crash when it tries to load a Holo or
Material theme.
Chapter 7 How to work with themes and styles 201
The application element of the AndroidManifest.xml file
<application
androi d:i con="@drawable/i c_launcher"
android:label="@string/app_name"
android:theme="@st le/A Theme"
android:allowBackup="true">
Two styles.xml files
In the resWalues directory (prior to API 21)
<resources>
<style name="AppTheme"
parent="android:Theme.Holo.Light.DarkActionBar" />
</resources>
In the res\values-v21 directory (API 21 and later)
<resources>
<style name="AppTheme"
parent="android:Theme.Material.Light.DarkActionBar" />
</resources>
Description
• If necessary, you can use multiple styles.xml files to set appropriate themes for the
different API levels.
• The AndroidManifest.xml file uses its application element to specify the theme for
the application.
• The styles.xml file in the resWalues directory is applied to all API levels unless it is
overridden by a styles.xml file in a res\values-vXX directory.
• A style element can specify a theme or a style.
• The name attribute of a style element specifies the name for the style or theme.
• The parent attribute of a style element specifies the style or theme that the current
style element inherits.
• The style element named AppTheme inherits a theme that's appropriate for the API
level.
• To add a styles.xml file and create a directory for it, right-click on the values
directory, select the New-> Values Resource File item, and use the resulting dialog
to add a new file named styles.xml to the directory with the specified name.
Figure 7-2 How to supply different themes for different APIs
202 Section 2 Essential Android skills
How to convert an existing project
to the AppCompat theme
When you use Android Studio to create a project based on the Blank Activity
template, it automatically sets the theme of the app to the AppCompat theme.
However, if you're working with an older app and you want to convert it so it
uses the AppCompat theme, you can use the procedure shown in figure 7-3 to do
that.
To start, you can add the v7 appcompat library to your app. To do that,
right-click on the app node of your project and select the Open Module
Settings item. This should display the Project Structure dialog. Then, click the
Dependencies tab, click the Add (+) button on the right side of the main window,
and use the resulting dialog to add the appcompat-v7 library.
After you add the library, Gradle should automatically rebuild your project.
However, if the version of the v7 appcompat support library isn't set correctly,
you may get dozens of errors about missing widget styles when Gradle attempts
to rebuild your project. To fix this, you may need to modify the Gradle build
script, so the dependency for the v7 appcompat library matches the version
that's available on your system. To check which version of the support library
is available on your system, you can use the SDK Manager as described in the
appendixes. Once the support library version is set correctly, Gradle should build
the project with no errors.
After you import the v7 appcompat library, you can modify the classes for
the activities so they extend the AppCompatActivity class instead of the Activity
class. Then, you can change the theme for your app so it uses an AppCompat
theme such as the AppCompat.Light.DarkActionBar theme shown in the figure.
Since the AppCompat theme is available from the support library, not from
the Android operating system, you don't prefix the name of the theme with the
android: namespace. In other words, you specify a theme like this:
parent="Theme.AppCompat.Light.DarkActionBar"
However, for a built-in theme such as Holo, you must prefix the name of the
theme with the android: namespace like this:
parent="android:Theme.Holo.Light.DarkActionBar"
This indicates that the theme is available from the Android operating system.
If an activity extends the AppCompatActivity class, you can only use
AppCompat themes. Otherwise, your app will crash when the activity tries to
display a built-in theme such as the Material or Holo theme. As a result, when
you convert an app to use the AppCompat theme, you should make sure you
remove any styles that use built-in themes. Or, you should update them so they
use an AppCompat theme instead.
Chapter 7 How to work with themes and styles
203
How to add a dependency for the v7 appcompat library
1. In Android Studio, right-click on the app node of your project and select the Open
Module Settings item.
2. Click the Dependencies tab, click the Add (+) button, and use the resulting dialog
to add the v7 appcompat library as shown here:
4
_ Project Structure
fZ
+ -
Properties | Signing ' Flavors | Build Types Dependencies
SDK Location
Project
Developer Services
Ads
Analytics
Authentication
Notifications
Modules
ope.
Choose Library Dependency
Qil app
r
com.android.supportappcompat-v7:23.0.1
Q
Enter terms for Maven Central search, orfully-qualified coordinates (e.g. comgoogle.code.gsQiTgsQn£.2.4)
support-annotations (com.android.support:support-annotations:23.0.1)
support-v4 (com.android.supportsupport-v4:23.0.1)
sup port-vl3 (com.android.support:support-vl3:23.0.1)
appcompat-v7 (com.android.supportappcompat-v7:23.GJ.)
design (com.android.support:design:23.0.1)
gridlayout-v7 (com.android.support:gridlayout-v7:23.0.1)
mediarouter-v7 (com.android.support:mediarouter-v7:23.01)
play-services (com.google.android.gms:play-services:7.8.0)
*
This should add a dependency to the end of the Gradle build script like this:
dependencies {
compile 'com.android.support:appcompat-v7:23.0.1'
}
Open the class for the activity. Then, replace the import statement for the Activity
class with an import statement for the AppCompatActivity class like this:
import android.support.v7.app.AppCompatActivity;
In the class for the activity, modify the class declaration so it extends the
AppCompatActivity class, not the Activity class, like this:
public class TipCalculatorActivity extends A*•Com«atActivit
Open the res/values/styles.xml file. Then, modify the style named AppTheme so it
inherits an AppCompat theme like this:
<style name="AppTheme" parent="Theme.AppCompat.Light.DarkActionBar">
<!-- Customize your theme here. -->
</style>
Description
• If you are working with a project that uses an older theme such as the Holo theme,
you can convert that project so it uses the AppCompat theme to port some features
of the Material theme back to Android 2.1 (API 7).
Figure 7-3 How to convert an existing project to the AppCompat theme
204 Section 2 Essential Android skills
How to work with styles
Now that you have a general idea of how three common themes work, you're
ready to learn how to work with styles. To start, you can define a style. Then,
you can apply that style to a widget.
How to define a style
Figure 7-4 shows how to define a style. To start, you typically add a style
element to the XML file named styles.xml in the res/values/ directory of your
project. If necessary, you can create this file.
The first example uses a style element to create a style named Text View.
This name is appropriate for a style that's going to be applied to most Text View
widgets in the app. Within the style element, this style uses a single item element
to specify a property of the style. More specifically, this item element sets the
textSize property of the style to 20sp.
The second example uses a style element to create a style named EditText.
This style inherits the Text View style that was defined in the first example. As a
result, the EditText style also specifies a text size of 20sp.
The third example uses a style element to create a style named Label. This
style inherits the style named Text View that was defined in the first example. In
addition, it uses two item elements to specify lOdp of padding and to make the
text bold.
The fourth example uses a style element to create a style named Text View.
Label. Since this name begins with Text View followed by a period, it
automatically inherits the Text View style defined in the first example. When you use this
syntax, you should be aware that you can only use it with user-defined styles. In
other words, you can't use it to inherit built-in Android styles.
The fifth example shows how to use the syntax in the fourth example to
inherit multiple styles. This style inherits the Text View and Label styles and adds
another style named Indent that indents the left margin by lOdp.
When you work with styles, you can set the same properties that are
available from the Properties window in the graphical layout editor. As a result, if
you have already used the Properties window to set the properties for your app,
you can look in the XML file for the layout to find the names of the properties
and their settings. Then, if you want, you can create styles to set those properties
more consistently. In this figure, for instance, the examples show how to use a
style to set the textSize, textStyle, padding, and layout_marginLeft properties.
However, you can use a style to set any of the properties that are available from
the Properties window.
When a style inherits another style, its properties override the properties of
the inherited style. Let's assume, for example, that I create a style that inherits
the Label style. And let's assume that this new style has only a single item
element setting the textSize property to 15sp. This would override the textSize
property of the Label style, but it wouldn't override the textStyle and padding
properties of the Label style.
Chapter 7 How to work with themes and styles 205
A style that overrides one property
<style name="TextView">
<item name="android:textSize">20sp</item>
</style>
A style that inherits a user-defined style
<style name="EditText" parent="©style/TextView" />
A style that inherits a user-defined style and overrides two properties
<style name="Label" parent="@style/TextView">
<item name="android:textStyle">bold</item>
<item name="android:padding">10dp</item>
</style>
Another way to code the previous style
<style name="TextView.Label">
<item name="android:textStyle">bold</item>
<item name="android:padding">10dp</item>
</style>
How to inherit multiple user-defined styles
<style name="TextView.Label.Indent">
<item name="android:layout_marginLeft">10dp</item>
</style>
Description
• To define a style, you typically add a style element to the XML file named styles,
xml in the res/values/ directory of your project. If necessary, you can create this
file.
• The name attribute of a style element is required and must specify the name of the
style.
• The parent attribute of a style element is optional. However, it can be used to
specify a style that the current style inherits. The inherited style can be a built-in
Android style or a user-defined style.
• A style element can contain one or more item elements. Each item element
specifies a property of the style. If a style inherits another style, its properties
override the properties of the inherited style.
• A style can specify any properties that are available from the graphical layout
editor, such as textSize, textStyle, padding, margin, textColor, and background.
• When working with user-defined styles, you can also inherit other styles by coding
the name of the inherited style, followed by a period, followed by the name of your
new style.
Figure 7-4 How to define a style
206 Section 2 Essential Android skills
How to apply a style
Figure 7-5 shows how to apply styles like the ones that were defined in the
previous figure. One way to do that is to display a layout in the graphical editor,
click the widget, and click the button to the right of the style property in the
Properties window. When you do, Android Studio displays a dialog box like the
one shown in this figure. Then, you can select the style you want to apply. In this
figure, for example, I have selected the style named TextView.Label.
Another way to apply a style is to edit the XML for the layout. To do that,
you just add a style attribute to the widget and use it to specify the name of
the style that's in the styles.xml file. In this figure, for instance, the first XML
example applies the style named TextView.Label to a Text View widget. Then,
the second XML example applies the style named Text View to the Text View
widget.
Unlike most attributes, the style attribute does not use the android:
namespace prefix. In this figure, for example, the id and text attributes use that
prefix, but the style attribute doesn't.
Chapter 7 How to work with themes and styles
207
The Resources dialog for a style
Resources
Proect System\
TextAppearance.StatusBar.EventContent.lnfo
TextAppearance.StatusBar.EventContent.Line2
TextAppearance.StatusBar.EventContent.Time
TextAppearance.StatusBar.EventContentTitle
TextAppeQrance.WidgeLAppCompQtExpQndedMenu.ltem
TextAppearance. Widget AppCompat Tootbar.Subtitle
P TextAppearance. Widget AppCompat. TootbanTitle
P TextView
D TextView.Labet
P TextView.Labeilndent
P Theme.AppCompat
P Theme.AppCompatCompactMenu
P Theme.AppCompat.Dialog
<style name="TextView.Label">
<item name="android:textStyle">bold</item>
<item name="android:padding">10dp</item>
</style>
^ New Resource
Cancel
A TextView widget with the TextView.Label style
<TextView
android:id="@+id/percentLabel"
android:layout_width="wrap_content"
android:layout_height="wrap_content"
android:layout_alignLeft="@+id/billAmountLabel"
android:layout_below="@+id/billAmountLabel"
android;text="@string/tip percent label"
st le="@st le/TextView.Label" />
A TextView widget with the TextView style
<TextView
android
android
android
android
android
android
android
s y ~ = "
id="@+id/percentTextView"
layout_width="wrap_content"
layout_height="wrap_content"
layout_alignBaseline="@+id/percentLabel"
layout_alignLeft="@+id/billAmountEditText"
padding="5dp"
text="@string/tip_percent"
y / -. " - />
Description
• From the graphical layout editor, you can specify a style for a widget by using the
Properties window to select a style.
• In XML, you can apply a style by using the style attribute to specify the name of
the style in the styles.xml file. This attribute doesn't use the android: namespace
prefix.
Figure 7-5 How to apply a style
208 Section 2 Essential Android skills
How to create a style sheet
A style sheet is a collection of styles that can be applied throughout an
application. To create a style sheet, you store the styles for your application in a
styles.xml file like the one shown in figure 7-6.
The first element defines the custom theme named AppTheme. This theme
inherits the AppCompat theme described earlier in this chapter.
The next four style elements define the custom styles that are used to apply
formatting to all of the widgets of the Tip Calculator app. To start, the styles
named Text View, EditText, and Button are designed to be applied to their
corresponding widgets. Then, the style named TextView.Label is designed to be
applied to the Text View widgets that label other widgets.
Chapter 7 How to work with themes and styles 209
A styles.xml file in the resWalues directory with four user-defined styles
<resources>
<!-- The theme -->
<style name="AppTheme"
parent="Theme.AppCompat.Light.DarkActionBar" />
<!-- Four custom styles -->
<style name="TextView">
<item name="android:textSize">20sp</item>
</style>
<style name="EditText" parent="@style/TextView" />
<style name="Button" parent="@style/TextView">
<item name="android:textStyle">bold</item>
</style>
<style name="TextView.Label">
<item name="android:textStyle">bold</item>
<item name="android:padding">10dp</item>
</style>
</resources>
Description
• A style sheet is a collection of styles that can be applied throughout an application
Figure 7-6 How to create a style sheet
210 Section 2 Essential Android skills
How to work with themes
Now that you know how to work with styles, you're ready to take another
look at themes. For example, you're ready to learn how to modify a theme.
How to modify a built-in theme
Figure 7-7 shows how to modify a built-in theme such as the Holo theme.
Here, the theme named AppTheme is a custom theme that contains three item
elements. Each of these item elements uses its name attribute to specify an
attribute that corresponds with a style from the inherited theme, the Holo.Light.
DarkActionBar theme.
After specifying the style that you want to override, each of these item
elements uses its body to specify the custom style that overrides the inherited
style. In this figure, the first item element overrides the Text View style in the
Holo theme with the custom TextView style defined in this styles.xml file.
This custom TextView style inherits the built-in style named Widget.
TextView. As a result, you only need to override the properties that you want
to change. In this case, the custom TextView style only overrides the textSize
property. Similarly, the custom styles named EditText and Button inherit their
corresponding built-in styles.
Since the first three custom styles defined in this figure override the
corresponding styles in the Holo theme, they're applied automatically to any
TextView, EditText, or Button widgets in the app. In other words, you don't need
to manually apply these styles. The fourth custom style, on the other hand, needs
to be applied manually.
If you want to modify a theme, you often need to do some research and
experimentation to figure out which attributes and styles to modify. When
working in Android Studio, you can often use the autocomplete feature to view
lists of available attributes, styles, and properties. Often, this is all you need.
However, if you need more information, you can view the standard attributes
for a theme by viewing the API documentation for the Theme array that's defined
in the R.styleable class. Then, you can find the styles that you want to inherit
by viewing the styles.xml file that's available from the Android SDKs on your
computer. This file is available from the data\res\values directory that corresponds
with each Android API. Alternately, you can view the API documentation for the
R.styles class. However, since styles aren't well documented, it's often helpful to
view the styles.xml file that contains the source code for the styles.
Chapter 7 How to work with themes and styles 211
A styles.xml file that customizes the built-in Holo theme
<resources>
<style name="AppTheme"
parent="android:Theme•Holo•Light.DarkActionBar">
<!-- Set new styles for three widgets in the theme -->
<item name="android:textViewStyle">@style/TextView</item>
<item name="android:editTextStyle">@style/EditText</item>
<item name="android:buttonStyle">@style/Button</item>
</style>
<!-- These styles are applied automatically -->
<style name="TextView" parent="©android:style/Widget.TextView">
<item name="android:textSize">20sp</item>
</style>
<style name="EditText" parent="@android:style/Widget.EditText">
<item name="android:textSize">20sp</item>
</style>
<style name="Button" parent="©android:style/Widget.Button">
<item name="android:textSize">20sp</item>
<item name="android:textStyle">bold</item>
</style>
<!-- This style needs to be applied manually -->
<style name="TextView.Label">
<item name="android:textStyle">bold</item>
<item name="android:padding">10dp</item>
</style>
</resources>
The API documentation for the standard attributes in a theme
https://developer.android•com/reference/android/R.styleable•html#Theme
The styles.xml file for Android 6.0 (API 23)
\android\sdk\platforms\android-23\data\res\values\styles.xml
Description
• Within a theme, the name attribute of an item element can specify an attribute that
corresponds to a style in the theme. Then, the body of the item element can specify
a custom style that overrides the inherited style.
• When you create a custom style, you typically begin your style by inheriting
another style. Then, you can use the custom style to override only the properties
that you want to change.
• When you work with a built-in theme or style, such as a Holo theme or style, you
typically prefix the name of the theme or style with android: namespace. This
shows that the theme is built-in to the Android operating system.
Figure 7-7 How to modify a built-in theme
212 Section 2 Essential Android skills
How to modify the AppCompat theme
Figure 7-8 shows how to modify the AppCompat theme. This works much
like modifying a built-in theme such as the Holo theme. However, it's a little
trickier since you need to specify whether to override a style from the appcompat
support library or a style from Android operating system. Often, this requires
some trial and error.
In this figure, the theme named AppTheme contains three item elements.
Each of these item elements uses its name attribute to specify an attribute that
corresponds with a style. Here, the first attribute overrides a style that's available
from the Android operating system. To do that, it prefixes the name of the style
with the android: namespace. Then, the second and third styles override a style
that's available form the support library. Note that these styles don't include the
android: namespace.
In this figure, the first style inherits the built-in style named Widget.
Text View. However, the custom styles named EditText and Button inherit a style
from the support library. More specifically, the second style inherits the Widget.
AppCompat.EditText style, and the third style inherits the Widget.AppCompat.
Button style.
If you want to modify the AppCompat theme, you can use the techniques
described in the previous figure to research and experiment with the attributes
and styles that you want to modify. However, when you view the attributes of the
AppCompat theme, you'll see that this theme doesn't include attributes for all
widgets.
For example, the AppCompat theme doesn't include the textViewStyle
attribute. This indicates that the AppCompat theme is using the attribute that's
built-in to the Android operating system. As a result, you need to override the
attribute that's built-in to the Android system.
However, the AppCompat theme does provide editTextStyle and
buttonTextStyle attributes. As a result, you can override the attributes that are
stored in the appcompat support library.
Chapter 7 How to work with themes and styles 213
A styles.xml file that customizes the AppCompat theme
<resources>
<style name="AppTheme"
parent="Theme.AppCompat.Light.DarkActionBar">
<!-- Set new styles for three widgets in the theme -->
<item name="android:textViewStyle">@style/TextView</item>
<item name="editTextStyle">@style/EditText</item>
<item name="buttonSt le">@style/Button</item>
</style>
<!-- These styles are applied automatically -->
<style name="TextView" parent="©android:style/Widget.TextView">
<item name="android:textSize">20sp</item>
</style>
<style name="EditText" parent="Widget.AppCompat.EditText">
<item name="android:textsize">20sp</item>
</style>
<style name="Button" parent="Widget.AppCompat.Button">
<item name="android:textsize">20sp</item>
<item name="android:textStyle">bold</item>
</style>
<!-- This style needs to be applied manually -->
<style name="TextView.Label">
<item name="android:textStyle">bold</item>
<item name="android:padding">10dp</item>
</style>
</resources>
The API documentation for the attributes from the AppCompat theme
https://developer.android.com/reference/android/support/v7/appcompat
/R.attr.html
The styles.xml file for the v7 appcompat support library
\android\sdk\extras\android\support\v7\appcompat\res\values\styles.xml
Description
• When you work with a theme or style from a support library, such as an
AppCompat theme or style, you don't prefix the name of the theme or style. This
shows that the theme or style is available from a support library, not from the
Android operating system.
Figure 7-8 How to modify the AppCompat theme
214 Section 2 Essential Android skills
How to modify a theme depending on the API
If you use the AppCompat theme, you can modify it as shown in the
previous figure. However, if you want to use the Material theme for API 21 and
later and fall back on the Holo theme for older APIs, you can modify the themes
by using a similar technique like the one shown in figure 7-9.
In the styles.xml file in the res\values directory, the first style element defines
a theme named AppTheme that inherits the theme named AppBaseTheme.
Within this style element, you can put any customizations that are not specific to
an API. For example, this style element contains three item elements that specify
the custom styles that override the built-in styles for the Text View, EditText, and
Button widgets.
The second style element defines a theme named AppBaseTheme that
inherits the Holo.Light.DarkActionBar theme. As a result, this is the default
theme for all APIs.
In the styles.xml file in the res\values-v21 directory, the first style element
defines a theme named AppBaseTheme that inherits the Material.Light.
DarkActionBar theme. Since this theme has the same name as the theme in the
styles.xml file in the res\values directory, this theme overrides the theme in the
res\values directory. As a result, API 21 and later use the Material theme instead
of the Holo theme.
In this figure, the three theme customizations apply to all APIs. However, if
you want to add customizations that apply only to certain API ranges, you can
add the customization to the appropriate style element.
Chapter 7 How to work with themes and styles 215
The styles.xml file in the...
resWalues directory
<resources>
<style name="AppTheme"
parent="AppBaseTheme">
<!-- Theme customizations NOT specific to a particular API -->
<item name="android:textViewStyle">@style/TextView</item>
<item name="android:editTextStyle">@style/EditText</item>
<item name="android:buttonStyle">@style/Button</item>
</style>
<style name="AppBaseTheme"
parent="android:Theme•Holo•Light.DarkActionBar">
<!-- API 15-20 theme customizations go here -->
</style>
<!-- These styles are applied automatically -->
<style name="TextView"
parent="©android:style/Widget.TextView">
<item name="android:textsize">20sp</item>
</style>
<style name="EditText" parent="@android:style/Widget.EditText">
<item name="android:textsize">20sp</item>
</style>
<style name="Button" parent="@android:style/Widget.Button">
<item name=,fandroid:textSize,f>20sp</item>
<item name="android:textStyle">bold</item>
</style>
<!-- This style needs to be applied manually -->
<style name="TextView.Label">
<item name="android:textStyle">bold</item>
<item name="android:padding">10dp</item>
</style>
</resources>
res\values-v21 directory
<resources>
<style name="AppBaseTheme"
parent="android:Theme.Material•Light.DarkActionBar">
<!-- API 21+ theme customizations go here. --
</style>
<!-- Custom styles go here -->
</resources>
Description
• The theme named AppTheme inherits the theme named AppBaseTheme.
• The theme named AppBaseTheme inherits a theme that's appropriate for the API
level.
• Within each theme, you can specify custom styles for different APIs.
Figure 7-9 How to modify a theme depending on the API
216 Section 2 Essential Android skills
How to modify the text appearance for a theme
Android uses a series of built-in styles to control the appearance of
the text for a theme. For example, by default, a Text View widget uses the
TextAppearance.Small style that's displayed in figure 7-10. If you want to
change the text appearance for a single widget, you can set its text Appearance
property to a new TextAppearance style. However, if you want to modify the text
appearance for multiple widgets, you may want to customize the TextAppearance
styles for a theme as shown in this figure.
To start, this figure lists some of the built-in text appearance styles. Android
primarily uses these styles to control the size and color of the text. Here, the
Small, Medium, and Large styles can be appended to the TextAppearance
style to change the size of the text. Or, the Inverse style can be applied to the
TextAppearance style to use the inverse color scheme.
The styles.xml file in this figure works much like the styles.xml file in
figure 7-7. However, it uses the TextAppearance styles instead of the styles for
the different types of widgets. Here, the code overrides the TextAppearance.
Small and Text Appearance. Small.Inverse styles and sets the textSize property
to 20sp. Since the text Appearance property of the Text View widget is set to the
TextAppearance. Small style by default, this automatically sets all Text View
widgets to a text size of 20sp.
However, the textAppearance property of other widgets might not be
set to the TextAppearance.Small style by default. As a result, if you want
one of these widgets to use the TextAppearanceSmall style that you defined,
you can manually set the textAppearance property of the widget. In this
figure, for instance, the last example sets the textAppearance property to the
TextAppearanceSmall style that's available from the styles.xml file shown in this
figure.
Chapter 7 How to work with themes and styles 217
Some built-in styles for controlling text appearance
Name Description
TextAppearance Displays standard text appearance and color scheme.
TextAppearance. Inverse Displays standard text appearance with inverse color
scheme.
TextAppearance. Small Displays small font size.
TextAppearance. Small. Inverse Displays small font size and inverse color scheme.
TextAppearance .Medium Displays medium font size.
Text Appearance. Large Displays large font size.
A styles.xml file that modifies the TextAppearance styles
<resources>
<style name="AppTheme" parent="Theme.AppCompat.Light.DarkActionBar">
<!-- Set two new text appearance styles in the theme -->
<item name="android:textAppearanceSmall">
@style/TextAppearanceSmall</item>
<item name="android:textAppearanceSmallInverse">
@style/TextAppearanceSmallInverse</item>
</style>
<!-- These text appearance styles are applied automatically -->
<style name="TextAppearanceSmall"
parent="©android:style/TextAppearance.Small">
<item name=,fandroid:textsize,f>20sp</item>
</style>
<style name="TextAppearanceSmallInverse"
parent="©android:style/TextAppearance•Small•Inverse">
<item name="android:textsize">20sp</item>
</style>
</resources>
An EditText widget that uses a TextAppearance style
<EditText
android:id="@+id/billAmountEditText"
android:layout_width="wrap_content"
android:layout_height="wrap_content"
android:inputType="numberDecimal"
android:text="@string/bill_amount"
android:textAppearance="@style/TextAppearanceSmall">
</EditText>
Description
• Android themes use a series of styles to control the appearance of the text on all
widgets in the theme.
Figure 7-10 How to modify the text appearance for a theme
218 Section 2 Essential Android skills
A summary of built-in themes
Figure 7-11 lists some of the built-in themes that are available from Android.
If you want to view a complete list of all built-in themes for an activity, display
the activity in the graphical layout editor. Then, click on the Themes button
available from the toolbar above the graphical editor to display a dialog that
allows you to browse through all available themes. This list includes the themes
shown in this figure as well as many other themes, including any user-defined
themes that are available.
If you select a theme from the graphical layout editor, it allows you to
preview a theme for your project. However, this doesn't change the theme that's
used when you run the app on a device or emulator. To do that, you typically
need to change the theme that's specified in the project's Android manifest or
styles.xml files as shown in the next figure.
Android 4.0 (API 14) introduced a family of DeviceDefault themes. These
themes provide a way for manufacturers to inherit and override a built-in Android
theme without changing the built-in theme itself. For example, Google's Nexus
devices use the DeviceDefault themes to override the Holo themes. As a result,
the unmodified Holo themes are available on the device, and the customized
DeviceDefault themes are also available on the device.
This provides the app developer with a choice. On one hand, the app
developer can choose the DeviceDefault themes. This makes the appearance of
the app more consistent with other apps on that device. However, the appearance
of the app may vary when viewed on different devices.
On the other hand, the app developer can choose one of the Holo or
AppCompat themes. This makes the appearance of the app more consistent
across multiple devices. However, the appearance of the app might not be
consistent with other apps on the same device since those apps might use one of
the DeviceDefault themes.
Chapter 7 How to work with themes and styles
219
Some old themes
Name
Theme.Light
Theme.Black
Theme•Light.NoTitleBar
Theme.Black.NoTitleBar
Theme.Dialog
Displays the activity...
With a white background.
With a black background.
With a white background and no title bar.
With a black background and no title bar.
As a dialog box with a black background.
Some Holo themes
Name
Theme.Holo
Theme•Holo.Dialog
Theme•Holo•NoActionBar
Theme•Holo•Light
Theme•Holo•Light•Dialog
Theme.Holo•Light.NoActionBar
Theme.Holo.Light.DarkActionBar
Displays the activity....
With a black background.
With a black background as a dialoe.
With a black background and no action bar.
With a white background.
With a white background as a dialoe.
With a white background and no action bar.
With a white background and a dark action bar.
Some Material themes
Name
Theme•Material
Theme.Material.Dialog
Theme.Material.NoActionBar
Theme•Material.Light
Theme.Material.Light.Dialog
Theme.Material.Light.NoActionBar
Theme.Material.Light.DarkActionBar
Displays the activity...
With a black background.
With a black background as a dialoe.
With a black background and no action bar.
With a white background.
With a white background as a dialoe.
With a white background and no action bar.
With a white background and a dark action bar.
Description
• To view a list of all built-in themes available to an activity, display the activity in
the graphical layout editor and use the drop-down list that's available from the
Themes button to view the themes.
• Android 4.0 (API 14) introduced the family of DeviceDefault themes. The
DeviceDefault themes provide a way for manufacturers to provide a default theme
for a device without having to modify the other built-in Android themes such as the
Holo theme.
Figure 7-11 A summary of built-in themes
220 Section 2 Essential Android skills
How to apply themes
You can use the AndroidManifest.xml file to apply themes to an entire
applicaton or to a specific activity. To apply a theme to the entire application,
you use the theme attribute of the application element to specify the theme. For
instance, the first example in figure 7-12 shows how to specify a custom theme
named AppTheme for the entire application.
To apply a theme to a specific activity, you use the theme attribute of the
activity element to specify the theme. For instance, the second example specifies a
built-in theme named Holo.Light.Dialog for an activity. This displays the activity
as a dialog box like the one shown in this figure.
The third example in this figure works similarly to the first. However, it
specifies a custom theme named DialogTheme. This custom theme uses the
built-in theme named Holo.Light.Dialog for APIs prior to Android 5.0 (API 21),
and it uses a newer built-in theme named Material.Light.Dialog for Android 5.0
(API 21) and later. For API 21 and later, this displays the activity as a dialog
box like the one shown in this figure, but using the Material theme instead of the
Holo theme.
Once again, for these themes to work, your activity needs to extend the
Activity class rather than AppCompatActivity class. Otherwise, your application
will crash when it attempts to use these built-in themes.
When you specify a theme at both the application and activity levels, the
theme at the activity level overrides the theme at the application level. In fact, it's
common to specify a default theme at the application level that applies to most
of the activities in the app. Then, you can specify a theme at the activity level for
any activities that need to override the default theme for the app.
When you apply a style to a widget, that style's properties override the
properties that are specified at the application or activity level. Similarly, if you
set a property directly on a widget, it overrides any properties that are specified
by a style.
Chapter 7 How to work with themes and styles 221
Theme.Holo.Light.Dialog
About
Tip Calculator was developed by Mike
Murach & Associates. All rights reserved.
An AndroidManifest.xml file that's used to...
Apply a user-defined theme to the entire application
<application
android:icon="@drawable/ic_launcher"
android:label="@string/app_name"
android:theme="©style/A pTheme"
android:allowBackup="true">
Apply a built-in theme to a single activity
<activity
android:name="com.murach.dialogtest.DialogActivity"
android:theme="©android:style/Theme.Holo.Light.Dialog"
android:label="@string/about_title" >
Apply a user-defined theme to a single activity
<activity
android:name="com.murach.dialogtest.DialogActivity"
android:theme="@st le/DialogTheme"
android:label="@string/about_title" >
Two styles.xml files for a user-defined theme
In the resWalues directory (prior to API 21)
<style name="DialogTheme" parent="android:Theme.Holo.Light.Dialog"/>
In the res\values-v21 directory (API 21 and later)
<style name="DialogTheme" parent="android:Theme.Material.Light.Dialog"/>
Description
• You can use the AndroidManifest.xml file to apply a theme to the entire application
or to a specific activity.
• To apply a theme to the entire application, use the theme attribute of the application
element to specify the theme as shown in figure 7-2.
• To apply a theme to a specific activity, use the theme attribute of the activity
element to specify the theme.
• You can use the theme attribute to specify a built-in theme or a custom theme.
• When you specify a theme for the application and activity levels, the theme at the
activity level overrides the theme at the application level.
Figure 7-12 How to apply themes
Section 2 Essential Android skills
How to work with colors
As you work with themes and styles, you'll find that some properties allow
you to specify colors. For example, you can specify a color for the textColor
and background properties of most widgets. Most of the time, the colors in the
default theme are appropriate for your app. However, if you need to modify the
colors in your app, figure 7-13 shows how.
How to define colors
If you want to work with colors, it's generally considered a best practice
to begin by adding a colors.xml file to the res/values directory. Then, you can
add a color element for each color that you want to define as shown in the first
example. Within the color element, you can use the name attribute to specify a
name for the color. In this figure, for example, the colors.xml file creates colors
named primary, secondary, tertiary, background, dark, and light. Together these
colors provide a color scheme that you can use for your app.
Within the body of a color element, you can use a hexadecimal, or hex, value
to specify an RGB value for the color. This works very similarly to using hex
values to specify RGB colors with HTML and CSS. If you aren't familiar with
how this works, you can search the Internet to learn more about it.
How to apply colors
The second example shows three ways to apply a color to the textColor
property of a widget. First, you can use a hex value to specify a color. Second,
you can use a name for a custom color. Third, you can use a name for a built-in
Android color. Of these techniques, using a custom color can make it easier to
apply colors consistently, and it can make your app easier to maintain if you
decide to change colors later.
The third example shows how to use a style to apply a color. To do that, you
use an item element within a style to set the color for a property. When you use
this technique, you can use hex values or named styles, though it's generally
preferable to use named styles whenever possible.
The fourth example shows how to apply a color by overriding the default
colors of a theme. To do that, you use an item element within a theme to override
one of the color attributes for the theme. When you use this technique, you must
use a named style, not a hex value.
If you want to learn more about the colors that Android uses in its built-in
themes, you can view the attrs.xml and colors.xml files that define the default
attributes and colors for Android. To find these files, you can look in the data\res\
values directories for the Android APIs on your computer.
Chapter 7 How to work with themes and styles 223
A colors.xml file in the res/values directory
<?xml version="1.0" encoding="utf-8"? >
<resources>
<color name="primary">#141315</color>
<color name="secondary">#736C6B</color>
<color name="tertiary">#DDE0CE</color>
<color name="background">#A6D39D</color>
<color name="dark">#000000</color>
<color name="light">#FFFFFF</color>
</resources>
How to apply colors to a widget
Using a hexadecimal value
android:textColor="#141315"
Using a name from the colors.xml file
android:textColor="@color/primary"
Using the name of a built-in Android color
android:textColor="©android:color/darker_gray"
How to apply colors to a style
<style name="TextView" parent="©android:style/Widget.TextView">
<item name="android:textColor">@color/primary</item>
</style>
How to apply colors to a theme
<style name="AppTheme" parent="AppBaseTheme">
<!-- Set new colors for the theme -->
<item name="android:windowBackground">@color/background</item>
<item name="android:textColorPrimary">@color/primary</item>
<item name="android:textColorSecondary">@color/secondary</item>
</style>
The colors.xml file for Android 6.0 (API 23)
\android-sdks\platforms\android-23\data\res\values\colors.xml
Description
• To define names for colors, you can add a colors.xml file to the res/values directory.
• To specify a color, you can use hexadecimal, or hex, values to specify an RGB
value.
• To apply a color, you can use a hex value, a name for a user-defined color, or a
name for a built-in Android color.
• To learn more about built-in Android colors, view the colors.xml file for one of the
Android SDKs that are installed on your system.
Figure 7-13 How to work with colors
224 Section 2 Essential Android skills
Perspective
Now that you've finished this chapter, you should understand how to work
with themes and styles. For small apps, you may decide that the default themes
and styles are adequate. In that case, you can manually format each widget on
the app.
For larger apps, you may want to create a style sheet to apply formatting.
Or, you may want to use a custom theme to override some properties of a
built-in theme. Both of these techniques separate the design from the content,
which is generally considered a best practice. In addition, they help to apply
formatting consistently, reduce code duplication, and make it easier to develop
and maintain an app.
Although this chapter shows you the basics for working with colors, there's
more to learn about them. For example, you can use XML to define color
gradients. In addition, you can specify colors that include a level of
transparency.
Terms
style
theme
action bar
Summary
• A style is a collection of properties that specify formatting for a widget.
• A theme is a collection of styles that apply to an entire activity or app.
Android includes several built-in themes.
• With Android 4.0 (API 14) and later, an activity can include an action bar,
which is a title bar that can also display buttons.
• A style element can specify a theme or a style.
• The AndroidManifest.xml file uses its application element to specify the
theme for the application.
• A style sheet is a collection of styles that can be applied throughout an
application.
• To define names for colors, you can add a colors.xml file to the res/values
directory.
• To specify a color, you can use hexadecimal, or hex, values to specify an
RGB value.
• To apply a color, you can use a hex value, a name for a user-defined color, or
a name for a built-in Android color.
style sheet
hexadecimal
hex
Chapter 7 How to work with themes and styles
Exercise 7-1 Use built-in themes
In this exercise, you'll modify the Tip Calculator app so it uses built-in themes
to display a dark background.
1. Open the project named ch07_exl_TipCalculator.
2. Open the styles.xml files in the values and values-v21 directories. These files
each specify a built-in theme for the API level.
3. Open the AndroidManifest.xml file and review its code. It sets the custom
theme named AppTheme as the theme for the application.
4. Open the layout for the app and view it in the graphical layout editor. Use
the Android Version button to view the layout for API levels 16 and 23. This
theme should look different for both of these APIs.
5. Edit the two styles.xml files so the app uses the theme named Theme.Holo
prior to API 21 and uses Theme.Material for API 21 and later.
6. Open the layout for the app and view it in the graphical layout editor. These
themes should display a dark background for all APIs.
Exercise 7-2 Use styles
In this exercise, you'll modify the styles for the Tip Calculator app presented in
this chapter.
1. Open the project named ch07_ex2_TipCalculator.
2. Open the Gradle build script for this file. Note that it includes a dependency
for the v7 appcompat library.
3. Open the class for the activity. Note that it extends the AppCompatActivity
class.
4. Open the styles.xml file in the values directory. Note that this style uses the
AppCompat theme. Note also that it defines several custom styles.
5. Open the layout for the activity and view its XML. Each widget applies one of
the custom styles specified in the styles.xml file.
6. For the first Text View widget, delete the style attribute that applies the style.
This should remove the style's formatting from that widget. Then, restore this
style attribute.
7. For the last Text View widget, change the style from TextView.Label to
TextView.Label.Indent. This should indent the Total label. Then, change the
style back to the TextView.Label style.
8. In the styles, xml file, change the textSize attribute of the Text View style to
16sp. This should change the text size for all widgets on the layout.
226 Section 2 Essential Android skills
9. In the styles, xml file, modify the Text View style so it sets the layout_ width,
layout_height, and padding attributes for Text View and EditText widgets to
the values that are currently stored in the XML file for the layout. Then, delete
these attributes from the XML file for the layout. This should reduce code
duplication.
10. In the styles.xml file, change the padding attribute of the Text View style to
lOdp. This should set the space between the widgets.
11. In the styles.xml file, modify the Button style so it sets the layout_width and
layout_height attributes to 40dp. Then, switch to the XML for the layout and
delete these attributes from that file. This should make both buttons a little
smaller, and it should reduce code duplication.
12. Add two new Text View widgets to the form for a Per Person label and amount.
Set the id, text, and alignment attributes for these widgets appropriately.
Then, apply the TextView.Label style to the label and the Text View style to
the amount. This is an easy way to apply consistent formatting to these new
widgets.
Exercise 7-3 Modify a theme
In this exercise, you'll modify the theme that's used by the Tip Calculator app
presented in this chapter.
1. Open the project named ch07_ex3_TipCalculator.
2. Open the styles.xml file in the values directory. This file modifies the theme
to automatically apply custom styles for the Text View, EditText, and Button
widgets. This file also includes a custom style named TextView.Label that can
be applied manually.
3. Open the layout for the app and view its XML. This XML only applies the
TextView.Label style.
4. Add a RadioGroup widget to the layout. Note that the radio buttons within the
group use a different text size than the other widgets in the layout.
5. Modify the styles.xml file so it modifies the Text Appearance styles for the
theme instead of modifying the styles for individual widgets. This should
set the textS ize property to 20sp for the Text Appearance style and its Small,
Medium, and Inverse variations. When you're done, all widgets should use a
textS ize of 20sp.
8
How to work with menus
and preferences
An Android app often includes menus that allow users to perform common
tasks and preferences that allow users to customize its settings. Often, a
menu includes an item that allows users to display the preferences screen for
changing settings. In this chapter, you'll learn how to add menus and
preferences to an app.
How to work with menus ...................................................228
An introduction to menus 228
How to define a menu 232
How to display an options menu 234
How to handle option menu events 234
How to start anew activity 236
How to work with preferences ..........................................238
An introduction to preferences 238
How to define preferences 240
How to display preferences 242
How to get preferences 244
How to use preferences 246
More skills for working with preferences ........................248
How to group preferences 248
How to enable and disable preferences 250
How to use Java to work with preferences 252
Perspective.........................................................................254
228 Section 2 Essential Android skills
How to work with menus
A menu can contain one or more items. These items often provide a way for
the user to perform actions and navigate through an app. Since a menu is hidden
until the user activates it, menus can improve an app by hiding functionality that
isn't typically needed. This frees screen space and reduces clutter on the screen.
An introduction to menus
In Android, the most common type of menu is known as the options menu.
This type of menu can be displayed by an activity as shown in figure 8-1.
If a device has a physical Menu button, the user can use that button to
display the options menu across the bottom of the activity. In this figure, for
example, the first activity displays a menu with two items across the bottom of
the activity.
If a device doesn't have a physical Menu button, an action overflow icon is
displayed on the right side of the action bar to display the options menu. In this
figure, for example, the second activity displays an action overflow icon that
provides a way to display the options menu on the top right side of the activity.
Chapter 8 How to work with menus and preferences
229
An activity with an options menu that has two items
^j Tip Calculator
5 7:39
Bill Amount
Percent
Tip
Total
Settings
About
32.61
1 5%
$4.89
$37.50
+
The same options menu displayed from an action overflow icon
3G
1:36
Q Tip Calculator
Bill Amou
Percent
Settings
About
Tip
$4.89
Description
• An activity can include an options menu that includes one or more menu items.
• If the device has a physical Menu button, the user can use that button to display the
options menu across the bottom of the screen.
• If a device doesn't have a physical Menu button, an action overflow icon is
displayed on the right side of the action bar to display the options menu.
Figure 8-1 An introduction to menus (part 1 of 2)
230 Section 2 Essential Android skills
The action bar can display some or all of the items from the options menu
as action items. It's generally considered a good design guideline to use action
items for a small number of commonly used actions. For example, it's common
to add action items such as search, refresh, add, edit, delete, and so on.
Action items can be displayed as text or as icons. In part 2 of figure 8-1, for
example, the first activity displays both of the items in the options menu as text.
Then, the second activity displays both of the items in the options menu as icons.
If you specify an icon for an item, Android uses that icon in the action bar, but it
uses text for that item in the options menu.
Any menu items that aren't displayed on the action bar are displayed in the
options menu. In this figure, for example, the last activity shows the Settings
icon and the overflow icon in the action bar, and it shows the About icon in the
options menu.
It's generally considered bad design to put items that the user doesn't
commonly use in the action bar. For example, it's not good design to put
functions such as settings, about, and help in the action bar. In this chapter, 1 use
these items to show how action items work. However, to improve the design, I
eventually move these items back into the options menu.
Although they aren't shown in this figure, Android also provides two other
types of menus. First, a. floating context menu can be displayed when a user
performs a long click on a widget. This menu appears as a floating list of menu
items. However, it's generally considered a better practice to use contextual
action mode. This mode displays action items that apply to the selected item or
items. Second, a. popup menu can be displayed when a user clicks on a widget or
action item.
Chapter 8 How to work with menus and preferences 231
A task bar with two action items displayed as text
1 7:57
Q Tip Calculator settings about
Bill Amount
A task bar with two action items displayed as icons
3G 4:14
Q Tip Calculator <£- O
Bill Amount 32.60
A task bar with one action icon and an overflow action icon
3G 10:24
^J Tip Calculator <£-
BillAmou About
Percent 15%
Description
• The action bar can include menu items. Typically, these items are for a small
number of actions that are important to the app.
• Any items that aren't displayed on the action bar are displayed in the options menu.
• By default, if you specify an icon for an item, Android uses that icon in the action
bar, but it uses text for that item in the options menu.
• A floating context menu appears as a floating list of menu items when a user
performs a long click on the widget. Alternately, contextual action mode can
display action items that apply to the selected item or items.
• A popup menu usually appears as a list below a widget or action item.
Figure 8-1 An introduction to menus (part 2 of 2)
232 Section 2 Essential Android skills
How to define a menu
Figure 8-2 shows how to define a menu. To do that, you add an XML file
for the menu to the project's res\menu directory. In this figure, for example, the
menu is stored in an XML file with a name that clearly indicates that the menu is
for the Tip Calculator activity.
The XML file for the menu begins with a root element named menu. Within
the menu element, the XML can specify one or more item elements that define
the items in the menu. In this figure, for example, the XML defines a menu with
the two items shown in the previous figure.
Both item elements define four attributes. To start, the id attribute specifies
an ID that can be used to access the item. Then, the title attribute specifies the
text for the item that's displayed in the menu. This text is stored in the strings,
xml file. Next, the icon attribute specifies an icon for the item that's usually
displayed in the action bar. The file for this icon is stored in the res\drawable-
xhdpi directory.
The showAsAction attribute specifies whether the item is shown in the
action bar. For the first item, this attribute has been set to a value of "ifRoom".
As a result, this item is shown in the action bar if there is room. If there isn't
enough room, this item is shown in the options menu. For the second item, this
attribute has been set to "never". As a result, this item is never shown in the
action bar, even if there is room.
When an item is displayed in the action bar, Android's default behavior is
to display the icon for the item. Conversely, when an item is displayed on the
options menu, Android's default behavior is to display the text for the item, not
the icon. Most of the time, that's what you want. As a result, you don't usually
need to override Android's default behavior.
If you want to use your own icons, you should start by copying the file for
the icon into the appropriate res\drawable directory in your project. In this figure,
for example, both icons are for extra-high density screens, so they are stored
in the res\drawable-xhdpi directory. Here, both icons are PNG files, and their
names begin with a prefix of "ic_" to indicate that they are icons. This prefix
isn't required, but it's commonly used.
To find an icon for your item, you can search through the standard icons that
are available from the different versions of Android. To do that, you can look
through the Android SDKs that are installed on your system, find the Android
platform you want to use, and browse through its data\res\drawable folders. Or,
you can search the Internet for the appropriate icons.
For this project, I have only supplied icons for the drawable-xhdpi folder.
This works because Android automatically scales the icons for other densities.
However, for a production app, you typically provide icons that are sized
appropriately for all screen densities (1dpi, mdpi, hdpi, and xhdpi).
Chapter 8 How to work with menus and preferences 233
The file that contains the XML for the menu
res\menu\activity_tip_calculator.xml
The XML for the menu
<menu xmlns:android="http://schemas•android•com/apk/res/android">
<item android:id="@+id/menu_settings"
android:title="@string/menu_settings"
android:icon="@drawable/ic_settings"
android:showAsAction="ifRoom" />
<item android:id="@+id/menu_about"
android:title="@string/menu_about"
androi d:i con="@drawable/i c_about"
android:showAsAction="never" />
</menu>
Some attributes of a menu item
Name Description
title Specifies the text for the item.
icon Specifies the icon for the item.
showAsAction Specifies whether the item is shown on the action bar. Typically
this attribute is set to a value of "always", "never", or "ifRoom".
orderlnCategory Specifies an int value for the sequence of the item where the lowest
number is displayed first.
The location of the icon files for the items
res\drawable-xhdpi\ic_settings.png
res\drawable-xhdpi\ic_about.png
A directory that has standard icons for Android 6.0 (API 23)
\sdk\platforms\android-23\data\res\drawable-xhdpi
Description
• To provide an icon for a menu item, copy the icon file into the appropriate
res\drawable directories in your project. Then, use the icon attribute to identify the
name of the icon file.
Figure 8-2 How to define a menu
234 Section 2 Essential Android skills
How to display an options menu
The first code example in figure 8-3 shows how to display an options menu.
To do that, this code overrides the onCreateOptionsMenu method. This method
is a lifecycle method of an activity that Android calls before it needs to display
the menu for the first time.
Within the onCreateOptionsMenu method, the first statement gets a
Menulnflater object and uses that object to convert, or inflate, the XML for the
menu items into Java objects. This stores these Java objects in the Menu
parameter. Then, the second statement returns a true value to display the menu.
Android only calls the onCreateOptionsMenu method the first time it
displays the options menu. As a result, you can't use this method to update the
menu each time it's displayed. For most apps, you don't need to do that anyway.
However, if you need to update the menu every time it's displayed, you can
override the onPrepareOptionsMenu method to do that. To learn more about
that method, you can look it up in the API documentation or you can search the
Internet.
How to handle option menu events
The second code example in figure 8-3 also shows how to handle the events
that occur when a user selects an item from the options menu. To do that, this
code overrides the onOptionsItemSelected method. Android calls this method
when the user selects an item from the options menu.
Within the onOptionsItemSelected method, this code uses a switch
statement to determine which menu item was selected. In this figure, for example,
the switch statement gets the ID of the menu item and uses it to determine which
menu item was selected.
If the ID of the menu item matches one of the menu items shown earlier
in this chapter, this code displays a toast that indicates the name of the item. In
addition, it returns a true value. This indicates that the method has consumed the
event and stops further processing of the event.
If the ID of the menu item doesn't match one of the menu items shown
earlier in this chapter, this code passes the menu item to the
onOptionsItemSelected method of the superclass. This allows the superclass to processes the
menu item.
Chapter 8 How to work with menus and preferences 235
The code that displays the menu
©Override
public boolean onCreateOptionsMenu(Menu menu) {
getMenuInflater().inflate(R.menu.activity_tip_calculator, menu);
return true;
}
The code that handles the menu item events
©Override
public boolean onOptionsItemSelected(MenuItem item) {
switch (item.getItemld()) {
case R.id.menu_settings:
Toast.makeText(this, "Settings", Toast.LENGTH_SHORT).show();
return true;
case R.id.menu_about:
Toast.makeText(this, "About", Toast.LENGTH_SHORT).show();
return true;
default:
return super.onOptionsItemSelected(item);
}
}
Description
• To display an options menu, you can override the onCreateOptionsMenu method.
• Within the onCreateOptionsMenu method, you typically use a Menulnflater object
to convert, or inflate, the XML for the menu items into Java objects and store them
in the Menu parameter.
• The onCreateOptionsMenu method must return a true value to display the menu.
• To handle the event that's generated when a user selects an item from the options
menu, you can override the onOptionsItemSelected method.
• Within the onOptionsItemSelected method, you can use a switch statement to
determine which menu item was selected.
• The onOptionsItemSelected method can return a true value to indicate it has
consumed the event and to stop further processing. Or, it can return a false value to
allow processing to continue.
• Android only calls the onCreateOptionsMenu method the first time it displays the
options menu. To update the menu every time it is displayed, you can override the
method named onPrepareOptionsMenu.
Figure 8-3 How to display an options menu and handle its events
236 Section 2 Essential Android skills
How to start a new activity
When an app contains more than one activity, menus are often used to
navigate between those activities. To do that, you need to create an intent, which
is an object that provides a description of an operation to be performed. In this
case, you need to create an intent for an activity. Then, you can pass this intent to
the startActivity method to start the activity as shown in figure 8-4.
The first code example shows two techniques for starting a new activity. The
first technique uses two statements. Here, the first statement creates an Intent
object by passing two arguments to the constructor of the Intent class. The first
argument specifies the application context, and the second argument specifies the
name of the class for the activity. Then, the second statement passes the Intent
object to the startActivity method that's available from the Activity class.
The second technique for starting an activity works the same as the first, but
it uses a single statement. Since this yields shorter code that's still easy enough
to read, the second technique is commonly used.
The second code example shows how to use menu items to start activities.
Here, the first item starts the Settings activity. This activity allows the user to
change the settings for an app, and you'll learn about it later in this chapter.
Then, the second item starts an About activity. This activity uses a dialog box to
display some information about the app. For this to work, both of these
activities must be declared in the project's AndroidManifest.xml file, just as the Tip
Calculator activity is declared in this file.
Chapter 8 How to work with menus and preferences 237
Code that starts a new activity
Two statements
Intent settings =
new Intent(getApplicationContext()# SettingsActivity.class);
startActivity(settings);
One statement
startActivity(new Intent(getApplicationContext()#
SettingsActivity.class));
Code that uses menu items to start new activities
©Override
public boolean onOptionsItemSelected(MenuItem item) {
switch (item.getItemld()) {
case R.id.menu_settings:
s tActivity(new Intent(getApp " - ' • i • i -• ()#
SettingsActivity.class));
return true;
case R.id.menu_about:
s tActivity(new Intent(g~ *pp " - ' • i • i -• ()#
AboutActivity.class));
return true;
default:
return super.onOptionsItemSelected(item);
}
}
Description
• An intent provides a description of an operation to be performed. Intents are
commonly used with the startActivity method to start activities.
• To create an intent for an activity within the app, pass two arguments to the
constructor of the Intent class. The first argument specifies the application context,
and the second argument specifies the name of the class for the activity.
• To start a new activity, create an Intent object for the activity and pass that object to
the startActivity method.
Figure 8-4 How to start a new activity
238 Section 2 Essential Android skills
How to work with preferences
Preferences, or settings, provide a way for users to customize how an app
works. Android provides Preference APIs that allow you to build an interface
that's consistent with the user experience in other Android apps including
built-in apps such as the system settings.
An introduction to preferences
Figure 8-5 shows a Settings activity that provides two preferences. The
first preference has a name, a description, and a box that allows you to check or
uncheck the preference. The second preference also has a name and a
description. If you click on this preference, it displays a dialog box like the one shown
in this figure that allows you to select one of three options.
Chapter 8 How to work with menus and preferences
239
The Settings activity
Q Settings
3G
11:44
Remember Tip Percent
Remembers the tip percent for the
most recent calculation.
Rounding?
Sets the rounding option for the
calculation.
The dialog for the "Rounding?" item
Rounding?
None
Tip
Total
/".
o
o
Cancel
Description
• An app often allows the user to change preferences, or settings, for the app.
• Android provides Preference APIs that allow you to build an interface that's consis
tent with the user experience in other Android apps including built-in apps such as
the system settings.
Figure 8-5 An introduction to preferences
240 Section 2 Essential Android skills
How to define preferences
For most activities, you use subclasses of the View class to build the
user interface. In this book, for example, the Tip Calculator activity uses the
Text View, EditText, and Button classes to build its user interface. When working
with preferences, you use subclasses of the Preference class to build the user
interface as shown in figure 8-6.
To start, you add an XML file to the res\xml directory. This XML file is
typically named preferences.xml, but you can use any name you want. In this
figure, the root element for the XML file is a Preference Screen element. This
element defines a screen that displays one or more preferences.
Within the Preferences creen element, the CheckBoxPreference element
defines the first preference shown in the previous figure. Here, the key attribute
specifies the key that's used to access the preference. Then, the next three
attributes specify the name, description, and default value for the preference.
The values for the title and summary attributes are strings that are stored in the
strings.xml file.
The ListPreference element defines the second preference shown in the
previous figure. Here, the key, title, summary, and default Value attributes
work the same as they do for the CheckBoxPreference element. However, the
ListPreference element includes three more attributes. Here, the dialogTitle
attribute specifies the title for the dialog box that's used to display the list of options.
Then, the entries and entryValues attributes specify the names and values for the
list. These arrays are also stored in the strings.xml file.
When you use the Preference API, each preference has a corresponding
key-value pair that Android saves in a default shared preferences file, which is
available to other activities in the app. When a user changes a setting, Android
automatically updates this file. Then, you can read these settings from other
activities and use them to modify the behavior of the app.
Although this chapter only shows how to use the CheckBoxPreference
and ListPreference classes, other subclasses of the Preference class exist. For
example, it's common to use an EditTextPreference element to allow the user to
enter text such as a username or password. For more information, about these
subclasses, look up the Preference class in the API documentation and follow the
links to view its subclasses.
Chapter 8 How to work with menus and preferences
241
The file that contains the XML for the preferences
res\xml\preferences.xml
The XML for the preferences
<?xml version="1.0" encoding="utf-8"? >
<PreferenceScreen
xmlns:android="http://schemas.android•com/apk/res/android">
<CheckBoxPreference
android:key="pref remember percent"
android;title="@string/remember percent title"
android:summary="@string/remember_percent_summary"
android:defaultValue="true" />
<ListPreference
android:key="pref_rounding"
android:title="@string/rounding_title"
android:summary="@string/rounding_summary"
android:dialogTitle="@string/rounding_titie"
android:entries="@array/rounding_keys"
android:entryValues="@array/rounding_values"
android:defaultValue="@string/rounding_default" />
</PreferenceScreen>
Some attributes that apply to all Preference elements
Name Description
key Specifies the ID that's used to access the preference.
title Specifies the title for the preference,
summary Specifies the summary for the preference,
def aultValue Specifies the default value for the preference.
Some attributes that apply to a ListPreference element
Name Description
dialogTitle
entries
entryValues
Specifies the title of the dialog box that sets the value
of the preference.
Specifies the names of the entries in the list.
Specifies the values of the entries in the list.
Description
• Instead of using View objects to build the user interface, settings are built using
various subclasses of the Preference class that you declare in an XML file. This file
is typically named preferences.xml, but you can use any name you want.
• For a list of commonly used Preference objects, see the API documentation for the
Preference class.
• Each preference has a corresponding key-value pair that the system saves in the
default shared preferences file. Whenever the user changes a setting, the system
automatically updates that file.
Figure 8-6 How to define preferences
242 Section 2 Essential Android skills
How to display preferences
In the early days of Android, it was common to display preferences directly
within an activity. As of Android 3.0 (API 11), this technique has been
deprecated. As a result, for most modern apps, you should use the technique described
in figure 8-7 to display preferences in a. fragment, which is a class that you can
use to define part of a user interface. Then, you can use an activity to display
one or more fragments. Also, if necessary, you can reuse a fragment in multiple
activities.
Fragments were introduced in Android 3.0 (API 11). They make it possible
to provide flexible user interfaces that can work on both smaller screens
available from phones and larger screens available from tablets and other devices.
The first code example shows a fragment named SettingsFragment that
inherits the PreferenceFragment class. This class only includes a single method,
the onCreate method. Within this method, the second statement calls the
addPreferencesFromResource method of the Fragment class. This method adds
the preferences defined in the XML file shown in the previous figure to the
fragment defined by this class.
The second code example shows how to add a fragment to an activity.
Here, the fragment named SettingsFragment is added to the activity named
SettingsActivity. To do that, this code uses the getFragmentManager method to
get a FragmentManager object. From that object, this code calls the beginTrans-
action, replace, and commit methods. These methods start a transaction, replace
the content of the activity with the fragment, and commit the transaction. Here,
the replace method uses this Android resource:
android.R.id.content
to identify the content of the activity, and it creates a new SettingsFragment
object to replace that content.
Chapter 8 How to work with menus and preferences 243
The SettingsFragment class
package com.murach.tipcalculator;
import android.os.Bundle;
import android.preference.PreferenceFragment;
public class SettingsFragment extends PreferenceFragment {
©Override
public void onCreate(Bundle savedlnstanceState) {
super.onCreate(savedlnstanceState);
// Load the preferences from an XML resource
addPreferencesFromResource(R.xml.preferences);
}
}
The Settings Activity class
package com.murach.tipcalculator;
import android.app.Activity;
import android.os.Bundle;
public class SettingsActivity extends Activity {
©Override
public void onCreate(Bundle savedlnstanceState) {
super.onCreate(savedlnstanceState);
// Display the fragment as the main content
getFragmentManager().beginTransaction()
.replace(android.R.id.content, new SettingsFragment())
.commit();
}
}
Description
• You can use a. fragment to define part of the user interface for an activity.
• An activity can display one or more fragments.
• A fragment can be reused in multiple activities.
• Fragments are available from Android 3.0 (API 11) and higher.
• For a user-interface that's built using Preference objects instead of View objects, a
fragment needs to extend the PreferenceFragment class.
• From a fragment that extends the PreferenceFragment class, you can use the
addPreferencesFromResource method to add the preferences defined in the XML
file to the fragment.
• From an activity, you can use a FragmentManager object to replace the content of
the activity with the specified fragment.
• You must declare all activities in the AndroidManifest.xml file.
Figure 8-7 How to display preferences
244 Section 2 Essential Android skills
How to get preferences
Figure 8-8 shows how to get preferences that have automatically been
written to a file by the Preference API. In the Tip Calculator activity, for
example, you need to be able to get preferences so you can use them to modify
that app's behavior.
The first example shows how to define the instance variables for the
preferences. Here, the first instance variable is for the SharedPreferences object, and
the next two are for the Remember Tip Percent and Rounding preferences.
The second example shows how to set the default values in the
preferences file the first time the app starts on a device. To do that, this code calls the
setDefault Values method of the PreferenceManager class. This writes the default
values that are stored in the XML file that defines the preferences to the default
file for shared preferences. Here, the third parameter controls whether to reset
the default values that are specified in the XML file. If false, the default values
are set only if this method has never been called on this device, which is usually
what you want. Since you only need to run this code once, it's often stored in the
onCreate method of the activity.
The third example shows how to get the SharedPreferences object.
To do that, this code calls the getDefaultSharedPreferences method of the
PreferenceManager class. Here, the parameter uses the this keyword to specify
the current activity as the context. This code is often stored in the onCreate
method of an activity.
The fourth example shows how to get the values for the preferences from
the SharedPreferences object. To do that, this code calls the appropriate getXxx
method from the object and passes a key for the preference that matches the
key specified in the XML file that defines the preferences. In addition, this code
specifies a default value that's only used if the preference can't be retrieved. To
make sure that your preferences are current, you typically store this code in the
activity's onResume method.
In the fourth example, the first statement calls the getBoolean method and
passes the key for the Remember Tip Percent preference. In most cases, this
returns a Boolean value that indicates whether this preference is checked or
unchecked. However, if this method isn't able to get a value from the object, the
default value of true is returned.
Then, the second statement calls the getString method and passes the key for
the Rounding preference. In most cases, this returns a string that indicates the
selected option. Since the Tip Calculator activity uses an int value to keep track
of rounding, this code converts the string for the rounding option to an int value.
Chapter 8 How to work with menus and preferences 245
Step 1: Define the instance variables for the preferences
private SharedPreferences prefs;
private boolean rememberTipPercent = true;
private int rounding = ROUND_NONE;
Step 2: Set the default values in the preferences file (onCreate)
PreferenceManager.setDefaultValues(this, R.xml.preferences, false);
Step 3: Get the SharedPreferences object (onCreate)
prefs = PreferenceManager.getDefaultSharedPreferences(this);
Step 4: Get the preferences (onResume)
rememberTipPercent = prefs.getBoolean("pref remember percent", true);
rounding = Integer.parselnt(prefs.getString("pref_rounding", "0"));
Some get methods of the SharedPreferences object
Name Description
getBoolean (key, def aul t) Gets a Boolean value for the specified key. If the value
doesn't exist, it gets the specified default value.
get St ring (key, default) Gets a String value for the specified key.
get Int (key, default) Gets an int value for the specified key.
get Long (key, def aul t) Gets a long value for the specified key.
getFloat (key, def aul t) Gets a float value for the specified key.
Description
• You can use the default SharedPreferences object to get preferences that have been
automatically saved by the Preferences API.
• To set the default values the first time the app starts on a device, you can use the
setDefaultValues method of the PreferenceManager class. Here, the third parameter
controls whether to reset the default values that are specified in the XML file. If
false, the default values are set only if this method has never been called in the past
• To get the default SharedPreferences object, you can call the
getDefaultSharedPreferences method of the PreferenceManager class.
• To get a preference from a SharedPreferences object, you can use the appropriate
getXxx method for that preference. When you do, you specify a key that
corresponds with the key in the XML file for the preferences. In addition, you
specify a default value that's used if no value is retrieved for that preference.
Figure 8-8 How to get preferences
246 Section 2 Essential Android skills
How to use preferences
Once you get preferences, you can use them to change the way your app
works as shown in figure 8-9. Typically, you begin by using an if/else statement
to check the value for the preference. Then, you execute the code that's
appropriate for the value of the preference.
The first code example checks the value of the Remember Tip Percent
preference, which has been stored in a variable named rememberTipPercent.
If this variable contains a true value, this code remembers the tip percent by
reading the last saved tip percent from a SharedPreferences object named prefs.
Otherwise, it does not remember the tip percent by setting the tip percent to a
default value of 15%.
The second code example checks the value of the Rounding preference,
which has been stored in a variable named rounding. If this variable is equal
to the constant named ROUND_NONE, the code calculates the tip and total
without any rounding. If this variable is equal to the constant named
ROUND_TIP, the code rounds the tip. If this variable is equal to the constant
named ROUND_TOTAL, the code rounds the total.
The code in the second example may change the tip percent when the tip or
total is rounded. However, this code shouldn't change the tip percent that's
specified by the user. To provide for that, this code uses a variable named tipPercent-
ToDisplay to store the tip percent that's displayed by the calculation. That way,
the tip percent that's specified by the user is stored separately in the tipPercent
variable. When there is no rounding, these variables contain the same value, but
they may contain different values after the rounding is applied.
Chapter 8 How to work with menus and preferences 247
Use the "Remember Tip Percent" preference in the onResume method
if (rememberTipPercent) {
tipPercent = prefs.getFloat("tipPercent"# 0.15f);
}
else {
tipPercent = 0.15f;
}
Use the "Rounding" preference in the calculateAndDisplay method
float tipPercentToDisplay = 0;
if (rounding == ROUND_NONE) {
t ipAmount = bi11Amount * t ipPercent;
totalAmount = billAmount + tipAmount;
tipPercentToDisplay = tipPercent;
}
else if (rounding == ROUND_TIP) {
tipAmount = StrictMath.round(billAmount * tipPercent);
totalAmount = billAmount + tipAmount;
tipPercentToDisplay = tipAmount / billAmount;
}
else if (rounding == ROUND_TOTAL) {
float tipNotRounded = billAmount * tipPercent;
totalAmount = StrictMath.round(billAmount + tipNotRounded);
tipAmount = totalAmount - billAmount;
tipPercentToDisplay = tipAmount / billAmount;
}
Description
• Once you get the preferences from the default preference file, you can use them to
change the way your app works.
Figure 8-9 How to use preferences
248 Section 2 Essential Android skills
More skills for working
with preferences
So far in this chapter, you have learned some basic skills for working with
preferences. These skills apply to most apps. Now, you're ready to learn some
more skills for working with preferences. These skills may apply to apps that
have more preferences, or apps that have more complex requirements for how
their preferences work.
How to group preferences
If your app has a large number of preferences, you may want to organize
them in groups as shown in figure 8-10. Here, the Settings activity has three
preferences that have been grouped in two categories. The first category has
a title of TIP PERCENT, and it contains the Remember Tip Percent and the
Default Tip Percent preference. The second category has a title of ROUNDING,
and it contains the Rounding preference.
The code example shows how to create the TIP PERCENT category. To
do that, this code nests a CheckBoxPreference element and a ListPreference
element within a PreferenceCategory element. These preferences are for
the Remember Tip Percent and Default Tip Percent preferences. Here, the
PreferenceCategory has a title attribute that specifies the title for the category.
As usual, this string is stored in the project's strings.xml file.
Chapter 8 How to work with menus and preferences 249
A Settings activity that uses categories
3lj 12:39
^J Settings
TIP PERCENT
Remember Tip Percent
Remembers the tip percent for the
□
most recent calculation.
Default Tip Percent
Sets the default tip percent that's used if
the tip percent is not remembered.
ROUNDING
Rounding?
Sets the rounding option for the
calculation.
The XML for the preferences
<?xml version="1.0" encoding="utf-8"? >
<PreferenceScreen
xmlns:android="http://schemas.android.com/apk/res/android">
<PreferenceCategory
android:title="@string/percent_category_title"
android:key="pref_percent_category">
<CheckBoxPreference
android:key="pref remember percent"
android:title="©string/forget_remember_title"
android:summary="@string/forget_remember_summary"
android:defaultValue="false" />
<ListPreference
android:key="pref default percent"
android;title="@string/default percent title"
android:summary="@string/default_percent_summary"
android:dialogTitle="@string/default_percent_titie"
android;entries="@array/default percent keys"
android;entryValues="@array/default percent values"
android:defaultValue="@string/default percent default" />
</PreferenceCategory>
• • •
</PreferenceScreen>
Description
• You can group preferences by nesting one or more Preference elements within a
PreferenceCategory element.
Figure 8-10 How to group preferences
250 Section 2 Essential Android skills
How to enable and disable preferences
For some apps, you may want to disable a preference when a corresponding
CheckBoxPreference element is unchecked. To do that, you can use a
preference's dependency attribute to link it to the corresponding preference as shown
in figure 8-11. Here, the Settings activity has two preferences where the second
preference is disabled when the first preference is unchecked. Conversely, the
second preference is enabled when the first preference is checked.
Chapter 8 How to work with menus and preferences 251
A Settings activity that uses dependencies
"A 12:35
@ Settings
TIP PERCENT
Forget Tip Percent
Forgets the tip percent for the
most recent calculation.
□
Default Tip Percent
Sets the default tip percent that's used if
the tip percent is forgotten.
The XML for the preferences
<?xml version="1.0" encoding="utf-8"? >
<PreferenceScreen
xmlns:android="http://schemas•android•com/apk/res/android">
<PreferenceCategory
android:title="@string/percent_category_title"
android:key="pref_percent_category">
<CheckBoxPreference
a iC* ey="p e _fo g t_p "
android:title="©string/forget_percent_title"
android :summary="@st ring/ forget_percent_summary,f
android:defaultValue="false" />
<ListPreference
android:key="pref default percent"
android;title="(^string/default percent title"
android:summary="@string/default_percent_summary"
android:dependency="pref forget percent"
android:dialogTitle="@string/default_percent_titie"
android;entries="@array/default percent keys"
android:entryValues="@array/default percent values"
android:defaultValue="@string/default percent default" />
</PreferenceCategory>
• • •
</PreferenceScreen>
The dependency attribute
Name Description
dependency Specifies the key of the preference that the current preference depends upon.
Description
• You can enable or disable a preference by using its dependency attribute to link the
preference to a corresponding CheckBoxPreference element.
Figure 8-11 How to enable or disable a preference
Section 2 Essential Android skills
How to use Java to work with preferences
So far in this chapter, you've used the default behavior provided by the
Preference API. Now, figure 8-12 presents a Java class that shows how to work
with preferences. This is often useful if you need to override the default behavior
of the Preference API. For example, the last figure showed how to use the
default behavior to disable the Default Tip Percent preference when the Forget
Tip Percent preference is unchecked. Now, this figure shows how to disable the
Default Tip Percent preference when the Remember Tip Percent preference is
checked.
The SettingsFragment class in this figure handles the event that occurs when
the user changes any of the preferences defined by the XML file. To do that, this
class implements the OnSharedPreferenceChangeListener. Then, it registers this
listener in the onResume method, and it unregisters this listener in the onPause
method. As a result, Android executes the onSharedPreferenceChanged method
whenever the user changes a preference.
The onCreate method gets the default SharedPreferences object. Then, the
onResume method uses this object to get the Boolean value for the Remember
Tip Percent preference. Finally, the onResume method passes this Boolean value
to the setDefaultPercentPreference method.
The setDefaultPercentPreference method enables or disables the preference.
To start, the first statement uses the findPreference method that's available from
the current class to get a Preference object for the Default Tip Percent
preference. Then, an if/else statement checks whether the rememberPercent parameter
is true. If so, this statement uses the setEnabled method to disable the Default
Tip Percent preference. Otherwise, it uses the setEnabled method to enable this
preference.
The onSharedPreferenceChanged method begins by checking if the
Remember Tip Percent preference was changed. If so, this code gets the value of
this preference and passes it to the setDefaultPercentPreference method, which
enables or disables the Default Tip Percent preference.
Chapter 8 How to work with menus and preferences 253
A class that works with preferences
package com.murach.tipcalculator;
import android•content.SharedPreferences;
import android•content.SharedPreferences.OnSharedPreferenceChangeListener;
import android•os•Bundle;
import android.preference.Preference;
import android•preference•PreferenceFragment;
import android.preference.PreferenceManager;
public class SettingsFragment extends PreferenceFragment
implements OnSharedPreferenceChangeListener {
private SharedPreferences prefs;
private boolean rememberPercent;
©Override
public void onCreate(Bundle savedlnstanceState) {
super.onCreate(savedlnstanceState);
addPreferencesFromResource(R.xml.preferences);
prefs = PreferenceManager.getDefaultSharedPreferences(getActivity());
}
©Override
public void onResume() {
super.onResume();
rememberPercent = prefs.getBoolean("pref remember percent"# true);
this•setDefaultPercentPreference(rememberPercent);
prefs•registerOnSharedPreferenceChangeListener this ;
}
private void setDefaultPercentPreference(boolean rememberPercent) {
Preference defaultPercent = findPreference "pref default percent");
if (rememberPercent) {
defaultPercent.setEnabled(false);
} else {
defaultPercent•setEnabled true *
}
}
©Override
public void onPause() {
prefs•unregisterOnSharedPreferenceChangeListener(this);
super.onPause();
}
©Override
public void OnSharedPreferenceChanged(SharedPreferences prefs.
String key) {
if (key.equals("pref remember percent")) {
rememberPercent = prefs.getBoolean(key, true);
}
this•setDefaultPercentPreference(rememberPercent);
}
}
Figure 8-12 How to use Java to work with preferences
254 Section 2 Essential Android skills
Perspective
The skills presented in this chapter should be enough to get you started
with menus and preferences. However, Android provides many more features
for working with menus and preferences. If necessary, you can use the Menu
and Preference APIs to create more complex menus and preferences. With
menus, for example, you can group menu items, and you can use Java code to
work with menus dynamically. With preferences, you can create a preference
that leads to another screen of preferences, and you can build custom
preferences by extending one of the Preference classes.
Terms
menu
items
options menu
action overflow icon
action items
floating context menu
popup menu
Summary
• An activity can include an options menu that includes one or more menu
items.
• If the device doesn't have a physical Menu button, an action overflow icon is
displayed on the right side of the action bar to display the options menu.
• The action bar can include menu items.
• Any items that aren't displayed on the action bar are displayed in the options
menu.
• By default, if you specify an icon for an item, Android uses that icon in the
action bar, but it uses text for that item in the options menu.
• Within the onCreateOptionsMenu method, you typically use a Menulnflater
object to convert, or inflate, the XML for the menu items into Java objects
and store them in the Menu parameter.
• To handle the event that's generated when a user selects an item from the
options menu, you can override the onOptionsItemSelected method and use
a switch statement to determine which menu item was selected.
• An intent provides a description of an operation to be performed. Intents are
commonly used with the start Activity method to start activities.
• Android provides Preference APIs that allow you to build an interface that's
consistent with the user experience in other Android apps.
contextual action mode
inflate
intent
preferences
settings
fragment
Chapter 8 How to work with menus and preferences
Each preference has a corresponding key-value pair that the system saves in
the default shared preferences file. Whenever the user changes a setting, the
system automatically updates that file.
You can use a. fragment to define part of the user interface for an activity.
You can use the default SharedPreferences object to get preferences that
have been automatically saved by the Preferences API.
You can group preferences by nesting one or more Preference elements
within a PreferenceCategory element.
You can enable or disable a preference by using its dependency attribute to
link the preference to a corresponding CheckBoxPreference element.
Exercise 8-1 Experiment with menus
and settings
In this exercise, you'll experiment with the menus and settings that are available
from the Tip Calculator app.
1. Open the project named ch08_exl_TipCalculator.
2. Run the app. If the device or emulator has a physical Menu button, use it
to display the menu. Otherwise, use the action overflow icon to display the
menu. This menu should have two items: Settings and About.
3. Select the Settings item to display the Settings activity. Then, click the Back
button to return to the main activity.
4. Select the About item to display the About activity. This activity should
appear as a dialog box. Then, click outside of the dialog box to return to the
main activity.
5. Open the XML file in the menu directory and modify it so the Settings item
is displayed in the action bar if there is enough room. This should display an
icon for the Settings item in the action bar, but the About item should remain
in the options menu.
6. Run the app. Then, use the main activity to set the tip percent to 17%.
7. Select the Settings action item to display the Settings activity. Then, remove
the check from the Remember Tip Percent box. Next, click the Back button to
return to the main activity. The tip percent should be reset to its default value
of 15%.
8. Use the main activity to set the tip percent to 17%.
9. Change the orientation of the activity. Since the app isn't remembering the tip
percent, this should reset the tip percent to 15%.
10. Select the Settings action item to display the Settings activity.
11. Use the Settings activity to select the "Remember Tip Percent" check box.
12. Use the Settings activity to change the default rounding for the app so that the
total is always rounded.
256 Section 2 Essential Android skills
13. Use the main activity to increase or decrease the tip. To do that, you may
need to click on the Increase (+) and Decrease (-) buttons several times. This
should automatically round the total and adjust the tip percent accordingly.
14. Open the XML file for the menu and delete the icon attribute from the
Settings item. This should display text for the Settings item in the action bar.
15. View the files in the res\drawable-xhdpi directory of the project. This
directory should include a second Settings icon.
16. Open the XML file for the menu and modify it so the Settings item uses the
new Settings icon. This should display the new Settings icon in the action bar.
Exercise 8-2 Work with menus
In this exercise, you'll modify the menus used by the Tip Calculator app
presented in this chapter.
1. Open the project named ch08_ex2_TipCalculator.
2. Open the XML file in the menu directory. Then, add a Help item to the end of
this menu.
3. Open the class for the Tip Calculator activity. Then, modify the code so it
displays a toast that indicates that the Help feature has not been implemented.
4. Add a Refresh item to the beginning of the menu. This item should display
the icon named ic_refresh that's in the project's res\drawable-xhdpi directory,
but only if there's enough room on the action bar.
5. Modify the class for the Tip Calculator activity so the Refresh item calls the
calculateAndDisplay method.
6. Modify the onClick method so it does not call the calculateAndDisplay
method. Instead, add some code that updates and displays the tip percent,
but not the tip amount or total. That way, you need to use the Refresh item to
update the tip amount and total after you click on the buttons.
7. Create an XML file for a menu for the Preferences activity. This menu should
have two items: Tip Calculator and About.
8. Modify the Preferences activity so it displays the menu.
9. Modify the Preferences activity so it handles the two items. The Tip
Calculator item should display the Tip Calculator activity, and the About item
should display the About activity.
Chapter 8 How to work with menus and preferences 257
Exercise 8-3 Work with preferences
In this exercise, you'll add another setting to the Tip Calculator app presented in
this chapter.
1. Open the project named ch08_ex3_TipCalculator.
2. Open the preferences.xml file in the xml directory. Add a ListPreference for
a setting named Default Tip Percent. This setting should allow the user to
specify a default tip percent of 10%, 15%, or 20%.
3. Open the class for the Tip Calculator activity. Modify this code so it gets the
default tip percent and uses it if the user has decided not to remember the tip
percent.
4. Switch to the preferences.xml file. Modify this code so it puts the Remember
Tip Percent and Default Tip Percent preferences in a category named Tip
Percent. Also, create a category named Rounding for the Rounding
preference.
5. Run the app. It should work correctly. However, the default tip percent is only
used if the app does not remember the tip percent. As a result, there's no need
to set the default tip percent unless you uncheck the Remember Tip Percent
box.
6. Open the class for the Settings fragment. Modify this code so it disables the
Default Tip Percent preference when the Remember Tip Percent preference is
unchecked.
9
How to work
with fragments
Android introduced fragments in version 3.0 (API 11). As a result, they're
available on most modern Android devices. You can use fragments to create
user interfaces that work well on both small and large screens. For example,
fragments allow you to create a user interface that works well on a small screen
such as a phone while also taking advantage of the extra space that's available
from a large screen such as a tablet.
An introduction to fragments............................................260
Single-pane and multi-pane layouts 260
The lifecycle methods of a fragment 262
How to use single-pane layouts for small screens.........264
How to create the layout for a fragment 264
How to create the class for a fragment 266
How to display a fragment in an activity 268
How to create a preference fragment 270
How to display a preference fragment in an activity 270
How to use multi-pane layouts for large screens ...........272
How to add multiple fragments to a layout 272
How to detect screen width 274
How to control the soft keyboard 276
Other skills for working with fragments ..........................278
How to get a reference to a fragment 278
How to replace one fragment with another 280
Perspective.........................................................................282
260 Section 2 Essential Android skills
An introduction to fragments
A fragment is a class that you can use to define part of a user interface.
Then, you can use an activity to display one or more fragments. In this context,
fragments are sometimes referred to as panes.
Single-pane and multi-pane layouts
On a small screen, an activity typically only displays a single fragment. This
is known as a single-pane layout. In the first example of figure 9-1, for instance,
the Tip Calculator activity displays the Tip Calculator fragment, and the Settings
activity displays a Settings fragment. At this point, the app looks and acts as if it
was not using fragments.
However, on a large screen, an activity can display multiple fragments. This
is known as a multi-pane layout. In the second example, for instance, a large
screen is in portrait and landscape orientation. As a result, the Tip Calculator
activity displays both the Tip Calculator and Settings fragments.
In landscape orientation, the Tip Calculator activity displays the Tip
Calculator fragment on the left side of the screen. Then, it displays the Settings
fragment on the right side of the screen.
In portrait orientation, the Tip Calculator activity displays the Tip Calculator
fragment at the top of the screen. Then, it displays the Settings fragment below
the Tip Calculator fragment. This makes both fragments immediately available
to the user.
On both of the large screens in this figure, there's plenty of room to display
the soft keyboard. As a result, Android often displays this keyboard
automatically. If there is enough room, Android displays an enhanced version of the
soft keyboard that includes a separate keypad for some special characters. This
makes it easier for the user to enter the bill amount.
Chapter 9 How to work with fragments
261
Two activities displaying two fragments
*4\ 10:32
Q Tip Calculator
Bill Amount 32.60
Percent
Tip
Total
15%
$4.89
$37 49
*j\ 10:36
Q Settings
Remember Tip Percent
Remembers the tip percent for the
most recent calculation
Rounding?
Sets the rounding option for the
calculation
One activity displaying two fragments in both landscape
and portrait orientation
10:39
|-f Tip Calculator
Bill Amount 32.60
Percent 15%
Tip $4.89
Total $37 49
Remember Tip Percent
Remembers the tip percent for tfie
+
most receni calculation
Rounding?
Sets the rounding option lor the calculation
■
■
f^f Tip Calculator
Bill Amount
Percent
r.P
Total
32.60
15% - +
$4 89
$37 49
+
* /
Remember Tip Percent
Remembers the tip percent tor the most recent
calculation
Rounding?
Sets (he rounding option for the calculation
«
* i •
M 1 10.37
■
■
■
•
( )
C23
□1
* / .
( )
Done
C23
Description
• You can use a. fragment to define part of the user interface for an activity. A
fragment is sometimes referred to as a. pane.
• On a small screen, an activity typically only displays a single fragment. This is
known as a single-pane layout.
• On a large screen, an activity can display multiple fragments. This is known as a
multi-pane layout.
• A fragment can be reused in multiple activities.
Figure 9-1 Single-pane and multi-pane layouts
262 Section 2 Essential Android skills
The Hfecycle methods of a fragment
The Fragment class defines methods that are called by the Android operating
system at different points in the Hfecycle of an activity. This is shown by the
diagram in figure 9-2. Most of these methods are similar to the lifecycle methods
of an activity. For example, a fragment includes the onCreate, onPause, and
onResume methods that are available from an activity.
The lifecycle of the activity that contains the fragment affects the lifecycle
of the fragment. In other words, when Android calls a lifecycle method for an
activity, it also calls a similar lifecycle method for each fragment within that
activity. For example, when Android calls the onPause method of an activity, it
also calls the onPause method for each fragment within that activity. However, a
fragment has some extra lifecycle methods that aren't available from an activity.
Of these methods, the most commonly used method is the onCreateView
method.
Android calls the onCreateView method when it's time to display the layout
for the fragment. This occurs after the onCreate method but before the onStart
method. Conversely, Android calls the onDestroyView method when it's time
to remove the fragment's layout from the activity. This occurs after the onStop
method but before the onDestroy method.
The on Attach and onDetach methods are another pair of lifecycle methods
that are occasionally used to work with a fragment. Android calls the on Attach
method when the fragment has been associated with an activity, and it calls the
onDetach method when the fragment has been disassociated from the activity.
The onActivityCreated method does not have a corresponding lifecycle
method. Android calls this method after it has returned from its call to the
onCreate method of the activity.
When an activity is in the resumed state, it can add and remove fragments.
However, when the activity leaves the resumed state, any fragments within
the activity must respond to the lifecycle methods of the activity such as the
onPause, onStop, and onDestroy methods.
Chapter 9 How to work with fragments
263
The lifecycle methods of a fragment
onResume()
t
onStartO
t
onActivit Created()
t
onCreateView() <4
t
onCreate()
t
on Attach ()
Fragment is
active
The fragment returns
to the layout from
the back stack
The frag mentis
added to the back
stack, then
removed/replaced
User navigates
backward or
fragment is
removed/replaced
i
onPauseQ
i
i
onStopO
on Destroy View()
onDestroyO
i
onDetach()
Fragment is
added
Fragment is
destroyed
Description
• A fragment has lifecycle methods that are similar, but not identical to the lifecycle
methods of an activity.
Figure 9-2 The lifecycle methods of a fragment
264 Section 2 Essential Android skills
How to use single-pane layouts
for small screens
Now that you understand how fragments work, you're ready to learn how to
use them in a single-pane layout. This type of layout is useful for small screen
devices such as phones. Since many devices have small screens, you often
begin by creating a single-pane layout. Then, once you have that layout working
correctly, you can add one or more multi-pane layouts for devices that have
larger screens as shown later in this chapter.
How to create the layout for a fragment
Figure 9-3 shows how to create the layout for a fragment. To start, the XML
code for a fragment works the same as the XML code for an activity. As a result,
if you want to convert an existing layout for an activity to a fragment, you can
rename the XML file. Then, you can use the graphical editor to work with the
layout of a fragment just as you can use the graphical editor to work with the
layout for an activity. In this figure, for instance, the graphical editor shows the
layout for the Tip Calculator fragment.
Chapter 9 How to work with fragments
265
The layout for a fragment
ch09 TipCalculator - [C:\murach\android\book apps\ch09 TipCalculator] - [app] - <..\apn\src\main\res\layout\fraoment tin calculators ml - Android Studi... CD 1 ^
Filt
r Edit View Navigate Code Analyze Refactor Build Run Tools VCS Window H_elp
naC5 + * & Q d*
CmchD9_TipCakuktor/ F app Dj
Captures
! 7.' Structure * 1: Project
V
s
"C!
I*
.2 fragment_tip_catcuiator.xml x
ei a ♦ * *s>*«pp'JI> * ►.- tl y* ins i
»rc D main C3 res ' El layout <Z fragment_tip_calculator.xmt
& H # ? ^ F
Palette ft* I4" Q,- [l| Nexus4* Q- 1 AppTheme ™- © - 'fl'23-
O Layouts
[ET FrameLayout
I-01B <5l Q <*i a B 0 *t
IHI Lineariayout (Horizontal)
r—1 LinearLayout (Vertical)
fa] TableLayout
Fh TableRow
^GridLayout *|6:00
E /?etot^t0youf Q ^p calculator
Cl Widgets
£ri, Plain TextView
|Ab| iorge Text
tftbj Medium Text
Bill Amount 1
Percent 15% +
mSmallText Jjp $Q 0Q
ok Button
ok SmoH Button Total S0.00
^ RadioButton
0 CheckBox
n Switch
5
(Nil _ ToggteButton
•
-t2
c
I
"5
ImageButton
ImageView
mm ProgressBar (Large)
mm ProgressBar (Normal)
~" ProgressBar (Small)
Design. Text
Component Tree At ft" ~*l
n?
1
T [3 Device Screen ^
▼ E flefo ' toy P[
lAbl billAmountLabel (TextView; - @string/bill_
E^ billAmountEditText (EditText) - @stnng/t
AQ percentLabel (TextView) - @string/tipjpe*
l£bi percentTextView (TextVietvJ - @string/ti)
0 percentDownButton (Button) @string/t
percentUpButton (Button) @string/incr
Properties ? ^ ▼
hi
layout:height matchjparent
style
occesstb tfrtyi. iveReg ion
accessibilityTraversalAfte
access ib ilityTra versa IBefc
alpha
background
backgroundTmt
backgroundTintMode
IH Terminal *=. 0; Messages «6:Androta ^ 7DDO
□ Gradle build finished in 7s 758ms (13 minutes ago)
^ fvenr Log B Gradle Console
~ a n/a 'Conte ■ noconte~t> *h
Description
• The XML for a fragment works the same as the XML for an activity.
• You can use the graphical layout editor to work with the layout for a fragment.
Figure 9-3 How to create the layout for a fragment
266 Section 2 Essential Android skills
How to create the class for a fragment
Figure 9-4 shows how to create the class for a fragment. In general, this class
works much like the class for an activity. However, there are a few differences.
To start, the class for a fragment extends the Fragment class, not the Activity
class.
Within the class for the fragment, the onCreate method typically
initializes components of the fragment that aren't related to the layout for the user
interface. In this figure, for example, the first two statements work with the
preferences for the app. Both of these statements were described in the previous
chapter, so you should understand how they work. Then, the third statement uses
the setHasOptionsMenu method to indicate that this fragment has an options
menu with items that should be added to the options menu for the activity. This
is necessary because an activity that contains multiple fragments may need to
combine the menu items from multiple fragments in its options menu.
The onCreate View method for a fragment typically contains the code that's
used to create and initialize the layout for the fragment. Here, the first parameter
of this method is a Layoutlnflater object that you can use to inflate a layout. And
the second paramter is a ViewGroup object for the parent layout. The layout for
the fragment should be attached to this layout.
Within the method, the first statement calls the inflate method from this
object to return a View object for the layout. To do that, this statement passes
three arguments to the inflate method. The first argument specifies the ID for the
layout of the fragment, the second argument specifies the container parameter
of the method, and the third argument specifies a false value to indicate that the
layout is not the root layout.
After inflating the layout, the code in the onCreate View method can get
references to the widgets on the layout. To do that, you can call the findViewByld
method from the View object that was created by the first statement. In this
figure, for example, the second statement gets a reference to the EditText widget
for the bill amount.
The onCreate View method can also set listeners for widgets. This code
works like the code in the onCreate method of an activity. As a result, you should
already understand how it works.
If you need to convert an existing activity to a fragment, you can usually
start by cutting code from the activity class and pasting it into the fragment class.
For example, to convert the Tip Calculator activity described in the previous
chapter to the Tip Calculator fragment described in this chapter, you can begin
by creating the class for the Tip Calculator fragment. Then, you can cut and
paste the instance variables and methods from the activity into the fragment.
Next, you can modify the onCreate and onCreate View methods so they work as
shown in this figure.
Chapter 9 How to work with fragments 267
Method of the Fragment class
Method Description
setHasOptionsMenu (bool) Set to true to indicate that this fragment has an options
menu and would like to participate in populating the
activity's option menu by having Android call this
fragment's onCreateOptionsMenu method.
The declaration for the TipCalculatorFragment class
public class TipCalculatorFragment extends Fragment
implements OnEditorActionListener, OnClickListener
The onCreate method
©Override
public void onCreate(Bundle savedlnstanceState) {
super•onCreate(savedlnstanceState);
// set the default values for the preferences
PreferenceManager.setDefaultValues(getActivity()#
R.xml.preferences, false);
// get default SharedPreferences object
prefs = PreferenceManager.getDefaultSharedPreferences(getActivity());
// turn on the options menu
setHasOptionsMenu(true);
}
The onCreateView method
©Override
public View onCreateView(LayoutInflater inflater, ViewGroup container.
Bundle savedlnstanceState) {
// inflate the layout for this fragment
View view = inflater.inflate(R.layout.fragment_tip_calculator,
container, false);
// get references to the widgets
billAmountEditText = (EditText)
view.findViewByld(R.id.billAmountEditText);
// set the listeners
billAmountEditText.setOnEditorActionListener(this);
// return the View for the layout
return view;
}
Description
• The Java code for a fragment works much like the Java code for an activity.
However, there are several differences, especially in the onCreate and
onCreateView methods.
Figure 9-4 How to create the class for a fragment
268 Section 2 Essential Android skills
How to display a fragment in an activity
Figure 9-5 shows how to display a fragment in an activity. To start, you can
create an XML file that contains the layout for the activity. In this figure, for
example, that file is named activity_main.xml. This XML begins by defining
a linear layout that matches the width and height of the parent. Within the
LinearLayout element, this code contains a single fragment element. The name
attribute of this element specifies the name of the package and the class for the
Tip Calculator fragment shown in the previous figure.
After creating the XML file for the layout, you can use the activity class to
display the layout as shown in the second example. In this figure, for instance,
the activity class displays the layout named activity_main that was created in the
first example. Since the event handling has been moved into the fragment class,
this activity class just needs to display the layout.
Chapter 9 How to work with fragments 269
The activity_main.xml file
<LinearLayout xmlns:android="http://schemas•android•com/apk/res/android"
android:orientation="hori zontal"
android:layout_width="match parent"
android:layout height="match parent">
<fragment android:name="com.murach.tipcalculator.TipCalculatorFragment"
android:id="@+id/main_fragment"
android:layout_weight="1"
android:layout_width="Odp"
android:layout height="match parent" />
</LinearLayout >
The TipCalculatorActivity class
package com.murach.tipcalculator;
import android.app.Activity;
import android•os•Bundle;
public class TipCalculatorActivity extends Activity {
©Override
public void onCreate(Bundle savedlnstanceState) {
super.onCreate(savedlnstanceState);
setContentView(R.layout.activity_main);
}
}
Description
• To add a fragment to a layout, add a fragment element and use its name attribute to
specify the fully qualified name for the class that defines the fragment
Figure 9-5 How to display a fragment in an activity
270 Section 2 Essential Android skills
How to create a preference fragment
Figure 9-6 shows how to create a fragment that displays preferences. Since
this user interface is built using Preference objects instead of View objects, your
fragment needs to extend the PreferenceFragment class instead of the Fragment
class.
The first code example shows a fragment named SettingsFragment that
inherits the PreferenceFragment class. This code is the same as the code for the
SettingsFragment class shown in the previous chapter.
How to display a preference fragment in an activity
Once you've created a preference fragment like the one shown in the first
example, it's easy to display it in an activity. To do that, you can define a layout
for the activity that uses a fragment element to display the fragment as shown
in the second example. Then, you can define an activity class that displays that
layout as shown in the third example.
Chapter 9 How to work with fragments 271
The SettingsFragment class
package com.murach.tipcalculator;
import android•os•Bundle;
import android•preference•PreferenceFragment;
public class SettingsFragment extends PreferenceFragment {
©Override
public void onCreate(Bundle savedlnstanceState) {
super.onCreate(savedlnstanceState);
// Load the preferences from an XML resource
addPreferencesFromResource(R.xml.preferences);
}
}
The activity_settings.xml file
<LinearLayout xmlns:android="http://schemas•android•com/apk/res/android"
android:orientation="hori zontal"
android:layout_width="match parent"
android:layout height="match parent">
<fragment android:name="com.murach.tipcalculator.SettingsFragment"
android:id="@+id/settings_fragment"
android:layout_weight="1"
android:layout_width="Odp"
android:layout height="match parent" />
</LinearLayout >
The SettingsActivity class
package com.murach.tipcalculator;
import android.app.Activity;
import android•os•Bundle;
public class SettingsActivity extends Activity {
©Override
public void onCreate(Bundle savedlnstanceState) {
super•onCreate(savedlnstanceState);
// set the view for the activity using XML
setContentView(R.layout.activity_settings);
}
}
Description
• Since the user interface is built using Preference objects instead of View objects,
your fragment needs to extend the Pref erenceFragment class instead of the
Fragment class. Then, it can use the addPreferencesFroniResource method to add
the preferences defined in the XML file to the fragment.
Figure 9-6 How to work with preference fragments
Section 2 Essential Android skills
How to use multi-pane layouts
for large screens
Now that you understand how to use fragments in a single-pane layout,
you're ready to learn how to use them in a multi-pane layout. This type of layout
is commonly used for devices that have large screens such as tablets.
How to add multiple fragments to a layout
Figure 9-7 shows how to add multiple fragments to a layout. To do that, you
can add two or more fragment elements to a layout file.
The first code example is designed to display two fragments when the
screen is in landscape mode. To do that, this code uses a linear layout with its
orientation set to horizontal. Then, it uses two fragment elements to display
the Tip Calculator and Settings fragments. Both of these fragments have their
layout_weight attributes set to a value of 1. As a result, they split the width of the
screen equally.
The second code example is designed to display two fragments when the
screen is in portrait mode. To do that, this code uses a linear layout with its
orientation set to vertical. Then, it uses two fragment elements to display the
Tip Calculator and Settings fragments. Both of these fragments have their
layout_weight attributes set to a value of 1. As a result, they split the height of
the screen equally.
Chapter 9 How to work with fragments 273
Two layout files for the main activity
res\layout\activity_main_twopane_land.xml
<LinearLayout xmlns:android="http://schemas•android•com/apk/res/android"
android:orientation="hori zontal"
android:layout_width="match parent"
android:layout height="match parent">
<fragment android:name="com.murach.tipcalculator.TipCalculatorFragment"
android:id="@+id/main_fragment"
android:layout_weight="1"
android:layout_width="Odp"
android;layout height="match parent" />
<fragment android:name="com.murach.tipcalculator.SettingsFragment"
android:id="@+id/settings_fragment"
android:layout_weight="1"
android:layout_width="Odp"
android:layout height="match parent" />
</LinearLayout >
res\layout\activity_main_twopane_port.xml
<LinearLayout xmlns:android="http://schemas.android.com/apk/res/android"
android:orientation="vertical"
android:layout_width="match parent"
android:layout height="match parent">
<fragment android:name="com.murach.tipcalculator.TipCalculatorFragment"
android:id="@+id/main_fragment"
android:layout_weight="1"
android:layout_height="Odp"
android:layout_width="match parent" />
<fragment android:name="com.murach.tipcalculator.SettingsFragment"
android:id="@+id/settings_fragment"
android:layout_weight="1"
android:layout_width="match parent"
android:layout_height="Odp" />
</LinearLayout >
Description
• To add more than one fragment to a layout, add two or more fragment elements to a
layout file.
Figure 9-7 How to add multiple fragments to a layout
274 Section 2 Essential Android skills
How to detect screen width
When the Tip Calculator app starts, it launches the Tip Calculator activity,
which displays the activity_main layout that's in the layout directory. However,
for large screens, you probably want to display one of the two-pane layouts
described in the previous figure. To do that, you can detect large screens by
creating a values directory that includes a smallest-width qualifier as shown in
figure 9-8.
In this figure, the first example is stored in this directory:
res\values-sw600dp-land
This directory uses two qualifiers. First, it uses a smallest-width qualifier
of "sw600dp" to indicate that this layout should be used for screens with a
minimum width of 600dp. This is typically the smallest width of a 7" tablet.
Second, it uses the land qualifier to indicate that this directory contains a layout
for devices that are in landscape orientation.
Within this directory, the layout.xml file contains code that specifies which
layout to use. To do that, it uses an item element to create an alias, which is a
file that points to another resource file. You can often use an alias to reduce code
duplication.
To specify an alias for a layout, code an item element. Then, set the name
attribute to the name of the alias and set the type attribute of the item to a value of
"layout". Next, use the body of the element to point to the correct layout that's in
the project's layout directory. In the first example, the alias named activity_main
points to the layout named activity_main_twopane_land. As a result, if the screen
is large and in landscape orientation, the Tip Calculator app displays the layout
named activity_main_twopane_land, instead of the activity_main layout, which is
what you want.
The second example works the same as the first example. However, the
values directory uses the port qualifier. Then, the alias points to a layout that's
appropriate for portrait orientation. As a result, this code is only used when the
screen is in portrait orientation.
If necessary, you can define several smallest-width qualifiers like this:
res\values-sw480dp
and this:
res\values-sw600dp
and this:
res\values-sw720dp
Then, Android selects the layout based on the screen's smallest width. For
example, a screen that's 700dp x 500dp would use the the layout specified by the
values-sw480dp directory. Similarly, a screen that's 1024dp x 600dp would use
the layout specified by the values-sw600dp directory.
Chapter 9 How to work with fragments 275
Smallest-width qualifiers examples
Qualifier
sw480dp
sw600dp
sw720dp
Typical screen size
640dp x 480dp
1024dp x 600dp
960dp x 720dp
Typical device
5"tablet
7"tablet
10" tablet
The layout files for devices with a minimum screen size
res\values-sw600dp-land\layout.xml
<?xml version="1.0" encoding="utf-8"?>
<resources>
<item name="activity_main" type="layout">
©layout/activity_main_twopane_land
</item>
</resources>
res\values-sw600dp-port\layout.xml
<?xml version="1.0" encoding="utf-8"?>
<resources>
<item name="activity_main" type="layout">
@layout/activity main twopane port
</item>
</resources>
Description
• For devices with small screens, Android uses a layout in the layout directory.
• To detect large screens, you can create a values directory that uses the
smallest-width qualifier. For example, a qualifier of sw600dp specifies a device
with a smallest width of at least 600dp.
• To detect landscape and portrait orientations, you can create a values directory that
uses the land or port qualifiers.
• Within a values directory, you can use an alias to point to a layout file that's stored
in a layout directory. This provides a way to avoid duplicating code in multiple
layout files.
• To specify an alias for a layout, code an item element. Then, set its name attribute
to the name of the layout that you want to replace and set its type attribute to a
value of "layout". Next, use the body of the element to point to the correct XML
file in the project's layout directory.
• The smallest-width qualifier was introduced in Android 3.2 (API 13). As a result,
it's available on most modern Android devices.
• With Android Studio, you can create a layout.xml file and its directory by
right-clicking on the values directory, selecting the New-> Values Resource item,
and using the resulting dialog to enter the name of the file and directory.
Figure 9-8 How to detect screen width
276 Section 2 Essential Android skills
How to control the soft keyboard
In figure 9-9, the EditText element contains a requestFocus element. As a
result, when the app starts on a device with a large screen, Android moves the
focus into this EditText widget. Then, if there is enough room, Android displays
the soft keyboard for that EditText widget. If that isn't what you want, you can
delete the requestFocus element.
Another common problem is that Android doesn't always display the correct
action button on the soft keyboard by default. For example, it may display a Next
button instead of a Done button. To fix this problem, you can use the imeOptions
attribute of an EditText element to specify the correct action button for the soft
keyboard. In this figure, for example, the imeOptions attribute specifies a Done
button for the EditText wideet.
Chapter 9 How to work with fragments 277
Some values for the imeOptions attribute
The EditText widget
Setting displays a...
actionDone Done button
actionNext Next button
actionPrevious
actionGo
actionSeach
Previous button
Go button
Search button
Attributes of an EditText widget that can control the soft keyboard
<EditText
android:id="@+id/billAmountEditText"
android:layout_width="wrap_content"
android:layout_height="wrap_content"
android:layout_alignBaseline="@+id/billAmountLabel"
android:layout_marginLeft="5dp"
android:layout_toRightOf="@+id/billAmountLabel"
android:ems="8"
android:inputType="numberDecimal"
android:imeOpt ions="act ionDone"
android:text="@string/bill_amount"
android:textSize="2Osp" >
<reauestFocus />
</EditText>
Description
• If you don't want Android to display the soft keyboard when the app starts, you can
delete the requestFocus element from the body of the EditText element.
• If Android does not display the correct action button on the soft keyboard, you can
use the imeOptions attribute of the EditText element to specify the correct action
button on the soft keyboard.
Figure 9-9 How to control the soft keyboard
278 Section 2 Essential Android skills
Other skills for working with fragments
So far, this chapter has presented the skills that you typically need for
working with fragments. However, in some situations, you may need the skills
presented in the next two figures to work with fragments.
How to get a reference to a fragment
Figure 9-10 shows how to get a reference to a fragment object. Once you
have a reference to a fragment object, you can call any of its public methods. Or,
if you aren't able to get a reference, you can take the appropriate action such as
displaying the appropriate menu.
The onCreateOptionsMenu of the Tip Calculator fragment displays the
appropriate options menu depending on whether the Settings fragment has been
created. To do that, the first statement calls the getFragmentManager method
to return a FragmentManager object. This method can be called from within an
activity or a fragment. In this case, it's called from within a fragment.
After getting the FragmentManager object, this code calls the
findFragmentByld method from that object to find the Settings fragment. Then,
it casts the Fragment object that's returned to the SettingsFragment type.
After the first statement, this code checks whether the manager was able to
get the fragment. If so, this code displays a menu that includes a Settings item.
Otherwise, it displays a menu that does not include a Settings item, which is
usually what you want if the Settings fragment is already displayed.
The onSharedPreferenceChanged method of the Settings fragment calls a
method from the Tip Calculator fragment. To do that, the first statement attempts
to get the Tip Calculator fragment. Since this code works like the code in the
first example, you shouldn't have much trouble understanding it.
After the first statement, this code checks whether the manager was able to
get the fragment. If so, it calls the onResume method of this fragment to refresh
the user interface so it reflects the latest changes to the settings. Without this
statement, the user interface of the Tip Calculator fragment won't refresh when
you use the Settings fragment to change settings.
Chapter 9 How to work with fragments
279
Method of the Activity and Fragment classes
Method
Description
getFragmentManager () Returns a FragmentManager object.
Method of the FragmentManager class
Method Description
findFragmentByld(id)
Returns a Fragment object for the
fragment with the specified ID. If a
Fragment object doesn't exist for that
ID, this method returns a null value.
The onCreateOptionsMenu method of the Tip Calculator fragment
©Override
public void onCreateOptionsMenu(Menu menu, Menulnflater inflater) {
// attempt to get the fragment
SettingsFragment settingsFragment = (SettingsFragment)
getFragmentManager()
•findFragmentByld(R.id.settings_fragment);
// if the fragment is null, display the appropriate menu
if (settingsFragment == null) {
inflater.inflate(R.menu.fragment_tip_calculator, menu);
} else {
inflater.inflate(R.menu.fragment_tip_calculator_twopane, menu);
}
}
The onSharedPreferenceChanged method of the Settings fragment
©Override
public void onSharedPreferenceChanged(SharedPreferences prefs.
String key) {
// attempt to get the fragment
TipCalculatorFragment tipFragment =
(TipCalculatorFragment) getFragmentManager()
.findFragmentByld(R.id.main_fragment);
// if the fragment is not null,
if (tipFragment != nul1) {
tipFragment.onResume();
}
call a method from it
}
Description
• You can use the FragmentManager object to get a reference to a Fragment object.
Figure 9-10 How to get a reference to a fragment
280 Section 2 Essential Android skills
How to replace one fragment with another
Figure 9-11 shows how to use Java code to replace the content of a container
with a fragment. Here, the fragment named SettingsFragment replaces any other
fragments that might be in the content container for the activity.
To do that, this code uses the getFragmentManager method to get a
FragmentManager object. From that object, this code calls the beginTransaction,
replace, and commit methods. These methods start a transaction, replace the
content of the activity with the fragment, and commit the transaction. Here, the
replace method uses this Android resource:
android.R.id.content
to identify the container for the content of the activity, and it creates a new
SettingsFragment object to replace that content.
The code in this figure accomplishes the same task as the code shown in
the second and third examples of figure 9-6. So, which approach is better? This
is largely a matter of personal choice. In this book, I use the approach taken in
figure 9-6 because I think XML is easier to understand when you're first getting
started. However, this figure shows you often have a choice between using XML
or Java to accomplish the same task. As your applications grow more complex,
you may want or need to use Java to manage your fragments.
Chapter 9 How to work with fragments
281
Method of the FragmentManager class
Method
Description
beginTransaction () Begins a transaction and returns a FragmentTransaction object,
Methods of the FragmentTransaction class
Method Description
replace(id# fragment)
commit()
Replaces the fragment in the container with the specified
ID with an instance of the specified Fragment object.
Finishes the transaction.
The SettingsActivity class
package com.murach.tipcalculator;
import android.app.Activity;
import android•os•Bundle;
public class SettingsActivity extends Activity {
©Override
public void onCreate(Bundle savedlnstanceState) {
super•onCreate(savedlnstanceState);
// display the fragment as the main content
getFragmentManager().beginTransaction()
•replace(android.R.id.content# new SettingsFragment())
.commit();
}
}
Description
• You can use a FragmentManager object to replace one fragment with another
fragment.
Figure 9-11 How to replace one fragment with another
282 Section 2 Essential Android skills
Perspective
The skills presented in this chapter should be enough to get you started
with fragments. However, Android apps can use fragments in many ways. As
you progress through this book, you'll encounter other examples of apps that
use fragments. For example, chapter 14 shows how to use fragments in a way
that's common for many apps. As a result, studying that chapter should help to
broaden your understanding of fragments.
Terms
fragment
panes
single-pane layout
Summary
• You can use a. fragment to define part of the user interface for an activity. A
fragment is sometimes referred to as a. pane.
• On a small screen, an activity typically only displays a single fragment. This
is known as a single-pane layout.
• On a large screen, an activity can display multiple fragments. This is known
as a multi-pane layout.
• Fragments are available from Android 3.0 (API 11) and higher.
• The XML and Java code for a fragment works much like the XML and Java
code for an activity.
• To add a fragment to a layout, add a fragment element and use its name
attribute to specify the fully qualified name for the class that defines the
fragment.
• If the user interface for a fragment uses Preference objects instead of View
objects, the fragment needs to extend the PreferenceFragment class instead
of the Fragment class.
• To add more than one fragment to a layout, add two or more fragment
elements to a layout file.
• To detect large screens, you can create a values directory that uses the
smallest-width qualifier to select screens whose smallest width is at least as
wide as specified width.
• To detect landscape and portrait orientations, you can create a values
directory that uses the land or port qualifiers.
• Within a values directory, a layout can use an alias to point to a layout file
that's stored in a layout directory. This provides a way to avoid duplicating
code in multiple layout files.
multi-pane layout
support library
alias
Chapter 9 How to work with fragments 283
• From a fragment or activity, you can call the getFragmentManager method
to get a FragmentManager object that you can use to find and work with the
fragments in your app.
Exercise 9-1 Test the app
In this exercise, you'll experiment with the fragments that are available from the
Tip Calculator app.
1. Open the project named ch09_exl_TipCalculator.
2. In the Project view, expand the src directory. This directory should contain the
source code for three activities and two fragments.
3. Expand the resMayout directory. This directory should contain five activity
layouts. Of these layouts, three are for the "main" activity, the Tip
Calculator activity. These layouts include both two-pane layouts described in this
chapter.
4. Expand the res\values directory. Then, expand the layout.xml file. This
should show two versions of the layout.xml file. Both use the smallest-width
modifier.
5. Open the layout.xml file that uses the sw600dp and port modifiers. This file
should use an alias to display the two-pane portrait layout for the Tip
Calculator activity.
6. Run the app on a phone or an emulator for a phone. This should use the Tip
Calculator activity to display the Tip Calculator fragment, and it should use
the Settings activity to display the Settings fragment.
7. Run the app on a tablet or an emulator for a tablet. If necessary, you can
create an emulator for a tablet as described in chapter 4. This should use
the Tip Calculator activity to display both the Tip Calculator and Settings
fragments.
8. Switch the orientation. This should still display both fragments, but it should
use a different layout.
9. Test the app to make sure it works correctly when displayed in a tablet. It
should. If it doesn't, fix any problems you encounter.
Exercise 9-2 Create a new fragment
In this exercise, you'll create a third fragment (the About fragment) and display
it.
1. Open the project named ch09_ex2_TipCalculator.
2. In the resMayout directory add a layout named fragment_about. Then, copy
the XML from the activity_about layout into the layout for the fragment.
3. Add a class to the src directory named AboutFragment. Then, write the code
for this activity so it displays the fragment_about layout. This class should be
a regular fragment, not a preference fragment.
284 Section 2 Essential Android skills
4. Open the activity_about layout in the resMayout directory and modify it so it
uses a fragment element to display the AboutFragment class. This fragment
element's height and width should wrap the content.
5. Run the app. It should work just as it did before.
6. Open the activity_main_twopane_port layout in the resMayout directory and
modify it so it displays the About fragment after the other two fragments.
7. Run the app on a tablet that has a large screen. In portrait orientation, the app
should display all three fragments.
8. Open the activity_main_twopane_land layout and modify it so it displays the
About fragment below the Settings fragment. To do that, you can nest both of
these fragments in a linear layout that has vertical orientation.
9. Run the app on a tablet. The app should display all three fragments in both
orientations. In addition, both orientations should allow you to access an
Options menu that contains an About item.
10. Open the Java code for the TipCalculatorFragment. In the onCreateOptions-
Menu method, modify the code so it doesn't inflate a menu if you're using
one of the "two-pane" layouts.
Exercise 9-3 Use the fragment manager
In this exercise, you'll use a different technique to display a fragment in an
activity.
1. Open the project named ch09_ex3_TipCalculator.
2. Open the class for the Tip Calculator activity. Modify this code so it uses the
FragmentManager object to display the Tip Calculator fragment.
3. Run the app to make sure it still works correctly.
4. Open the class for the Settings activity. Modify this code so it uses the
FragmentManager object to display the Settings fragment.
5. Run the app to make sure it still works correctly.
Section 3
The News Reader app
In sections 1 and 2, you learned the essential skills for developing a simple
Android app, the Tip Calculator app. Now, this section shows how to
develop another app, the News Reader app.
Along the way, this section presents many essential Android skills
that can be applied to other apps. To start, chapter 10 shows how to build
a simple version of a News Reader app that uses threads, files, a simple
adapter, and intents. Then, chapter 11 shows how to modify this app so it
uses services and notifications. Finally, chapter 12 shows how to modify
this app so it uses broadcast receivers.
10
How to work with threads,
files, adapters, and intents
In this chapter, you'll learn how to create a News Reader app that downloads
news items from the web and displays them so they can be read by the user.
To be able to create such an app, you need to learn several new skills including
how to work with threads, files, adapters, and intents.
An introduction to the News Reader app.........................288
The user interface 288
The XML for an RSS feed 290
How to work with threads..................................................292
How threads work 292
How to execute asynchronous tasks 294
How to execute timed tasks 298
How to update the UI thread 300
How to work with files........................................................302
How to download a file from the Internet 302
How to parse an XML file 304
The RSSFeedHandler class 306
The RSSFeed class 310
The RSSItem class 310
How to work with adapters................................................314
How to create the layout for a list view 314
How to use an adapter to display data in a list view 316
How to handle events for an adapter 318
How to work with intents ...................................................320
How to pass data between activities 320
How to view a URL in a web browser 322
How to dial or call a phone number 322
The News Reader app........................................................324
The activity_items layout 324
The ItemsActivity class 326
The FilelO class 330
The activity_item layout 330
The ItemActivity class 334
Perspective.........................................................................336
288 Section 3 The News Reader app
An introduction
to the News Reader app
The skills presented in this chapter are necessary to create the News Reader
app. To put these skills in context, this chapter begins by showing the user
interface for this app. Then, it shows the XML file that contains the data for this app.
The user interface
Figure 10-1 shows the user interface for the News Reader app. When the app
starts, the top of the Items activity displays the title of the news feed. Below that,
the Items activity displays a list of items in the news feed. Here, each item has a
publication date and a title.
If the user clicks on an item in the Items activity, the app displays the Item
activity, which displays more information about the clicked item. Here, each
item has a title, a publication date, a description, and a link to the original article
that says "Read more on the web".
If the user clicks on this link, the app starts the default web browser for the
device. Then, it displays the link in that browser. Although this exits the News
Reader app, the user can easily use the Back button to navigate back to the News
Reader app.
Chapter 10 How to work with threads, files, adapters, and intents
289
The Items activity
36
4:40
> News Reader
CNN.com - Technology
Tuesday 10:18 AM (Sep 15)
Prosthetic hand 'tells' the brain
what it is touching
Monday 11:59 AM (Sep 14)
They're here! New Horizons'
best shots of Pluto
Monday 11:53 AM (Sep 14)
5 big Mario moments
Monday 11:27 AM (Sep 14)
Elon Musk's new idea: Nuke
Mars
Monday 8:16 AM (Sep 14)
Bees get tiny backpacks
Monday 8:05 AM (Sep 14)
A folding paper microscope?
It's real
The Item activity
36
4:42
"\ News Reader
Prosthetic hand 'tells' the brain
what it is touching
Tue. 15 Sep 2015 17:18:08 GMT
Research on prosthetic hands has come
a long way, but most of it has focused on
improving the way the body controls the
device.
Read more on the web
<
o
□
<
o
□
Description
• When the app starts, the Items activity displays the title of the news feed followed
by a list of items in the news feed where each item has a publication date and a
title.
• If the user clicks on a news item, the Item activity displays more information about
that item, including a link that can display the original article in a web browser
Figure 10-1 The user interface for the News Reader app
290 Section 3 The News Reader app
The XML for an RSS feed
Figure 10-2 shows the URL for the RSS (Rich Site Summary) feed that's used
by the News Reader app. A website can use an RSS feed to publish frequently
updated works, such as blog entries and news headlines. Then, an app can read
that RSS feed. Since RSS uses a standardized XML file format, an app that can
read one RSS feed can usually read other types of RSS feeds with little or no
modification.
The RSS feed that's returned by the URL in this figure is actually much
more complex than the XML shown in this figure. However, the XML shown
in this figure shows the parts of the RSS feed that are used by the News Reader
app.
To start, there are title and pubDate elements that come before any item
elements. These elements store the title and publication data for the feed.
After the elements for the feed, there are a series of item elements. Each
item element contains title, link, description, and pubDate elements. These
elements store the title, link, description, and publication date for each item in
the feed.
Chapter 10 How to work with threads, files, adapters, and intents 291
The URL for the RSS feed
http://rss.cnn.com/rss/cnn_tech.rss
Simplified XML for the RSS feed
<rss xmlns:media="http://search.yahoo.com/mrss/"
xmlns:feedburner="http://rssnamespace.org/feedburner/ext/1.0"
version="2.0">
<channel>
<title>CNN.com - Technology</title>
<pubDate>Tue, 15 Sep 2015 17:18:54 GMT</pubDate>
<item>
<title>Prosthetic hand 'tells' the brain what it is touching</title>
<link>http://rss.cnn.com/c/35492/f/676960/s/story01.htm</link>
<description>Research on prosthetic hands has come a long way, but
most of it has focused on improving the way the body controls the
device.</description>
<pubDate>Tue, 15 Sep 2015 17:18:08 GMT</pubDate>
</item>
<item>
<title>They're here! New Horizons' best shots of Pluto</title>
<link>http://rss.cnn.com/c/35492/f/676960/storyOl.htm</link>
<description><br clear='all'/></description>
<pubDate>Mon, 14 Sep 2015 18:59:52 GMT</pubDate>
</item>
<item>
<title>5 big Mario moments</title>
<link>http://rss.cnn.com/c/35492/storyO1.htm</link>
<description><br clear='all■/></description>
<pubDate>Mon, 14 Sep 2015 18:53:03 GMT</pubDate>
</item>
</channel>
</rss>
Description
• An RSS (Rich Site Summary) feed can be used to publish frequently updated works,
such as blog entries and news headlines.
• Since RSS uses a standardized XML file format, the feed can be published once
and viewed by many different apps.
Figure 10-2 The XML for an RSS feed
292 Section 3 The News Reader app
How to work with threads
The News Reader app reads data from the Internet, it writes data to a file,
and it reads data from that file. In an Android app, you should perform tasks like
these in their own threads.
How threads work
As figure 10-3 explains, a thread is a single flow of execution through an
app. By default, an Android app uses a single thread, called the UI thread. This
thread displays the user interface for the app and listens for events that occur
when the user interacts with the user interface.
The user interface for an app should always be responsive to the user. As
a result, you don't want to do any processing on the UI thread that takes more
than a second or so. For example, downloading data from the Internet may take
several seconds or even minutes depending on the amount of data and speed of
the connection. As a result, you should never perform this type of processing on
the UI thread. Instead, you should create a second thread.
Similarly, if you want to perform a file I/O operation such as reading or
writing a file, you should do that processing in a separate thread. That's because
I/O operations are thousands of times slower than CPU operations. So any
program that reads data from a disk spends much of its time waiting for that
information to be retrieved.
The first diagram shows how an app might work when executed as a single
thread. First, the UI thread displays the user interface and listens for events.
Then, an event occurs that causes the program to perform an I/O operation. Since
this I/O operation runs in the UI thread, the UI thread can't listen for events and
respond to the user while the I/O thread is running. In other words, if the user
clicks on a button while the I/O operation is running, the UI thread can't respond
to that event. When the I/O operation completes, the user interface becomes
responsive again.
The second diagram shows how this app benefits from using a separate
thread to perform the I/O operation. This allows the two tasks to overlap. As a
result, the UI thread can continue listening for events while the I/O operation
runs. The result is a user interface that's always responsive.
Chapter 10 How to work with threads, files, adapters, and intents
293
How using threads improves user interface responsiveness
One thread
UI thread
Time
Listen
Perform I/O
Listen
Two threads
UI thread
I/O thread
Time
Listen
Start
thread
Listen
Listen
Update
UI
Perform I/O
Description
• A thread is a single sequential flow of control within a program. A thread often
completes a specific task.
• By default, an Android app uses a single thread, called the UI thread, to display the
user interface. Any task that can slow or stop the responsiveness of the UI thread
should be run in a separate thread.
Figure 10-3 How threads work
294 Section 3 The News Reader app
How to execute asynchronous tasks
An asynchronous task is a task that runs in a separate thread in the
background and does not need to be synchronized with other threads. Since
Android apps often need to perform asynchronous tasks, the Android framework
includes a class named AsyncTask that makes it easy to perform these types of
tasks. This class handles the code that creates and manages the thread for you.
As a result, you just need to create a class that inherits the AsyncTask class and
override the appropriate methods.
Since an asynchronous class is usually closely related to an activity class,
it's usually coded as a nested inner class of the activity class. In part 1 of figure
10-4, for example, the DownloadFeed class defines an asynchronous task that's
closely related to the ItemsActivity class. As a result, the DownloadFeed class is
nested within the ItemsActivity class.
The ItemsActivity class begins by defining a constant for a string that
contains the URL for the RSS feed described earlier in this chapter. Then, this
class defines an onCreate method. This method starts by displaying the layout
for the news items. Then, it creates an instance of the DownloadFeed object and
calls its execute method to start its thread. In addition, this code uses the execute
method to pass the URL string to the DownloadFeed object.
The DownloadFeed class extends the AsyncTask class. This class uses
generics, which is a feature of Java that allows a class to operate on various
types of objects. In particular, the declaration of the AsyncTask class allows it
to work with three generic types: (1) parameters, (2) progress, and (3) result. As
the programmer, you can decide what types of objects you want to use with this
class. In this figure, the DownloadFeed class uses an AsyncTask class like this:
AsyncTask<String# Void, String>
to indicate that it accepts one or more string parameters, doesn't handle progress
values, and returns a string.
Within the DownloadFeed class, the dolnBackground method contains the
code that runs in the background thread. This method accepts the array of String
objects as specified by the first generic type. Since this activity only passes one
string value, the first statement in this method gets that string from the params
variable. At this point, you are ready to download the data from the feed
specified by the URL. You'll learn how to do that later in this chapter. Finally, this
method returns a message in a String object as specified by the third generic
type.
After the dolnBackground method finishes, the onPostExecute method runs.
This method accepts a String object as specified by the third generic type. This
method contains code that updates the user interface. For now, this method uses
a toast to display the result string that's returned by the dolnBackground method.
Later in this chapter, you'll see how this method can be used to update the user
interface.
Chapter 10 How to work with threads, files, adapters, and intents 295
An activity with a nested AsyncTask class
package com.murach.newsreader;
import android.os.AsyncTask;
import android.os.Bundle;
import android.app.Activity;
import android.content.Context;
import android.widget.Toast;
public class ItemsActivity extends Activity {
private static String URL_STRING =
"http://rss.cnn.com/rss/cnn_tech.rss";
©Override
protected void onCreate(Bundle savedlnstanceState) {
super.onCreate(savedlnstanceState);
setContentView(R.layout.activity_iterns);
new DownloadFeed().execute(URL_STRING);
}
class DownloadFeed extends AsyncTask<String, Void, String> {
©Override
protected String doInBackground(String... params) {
// get the parameter
String urlString = params[0];
// download the feed and write it to a file
// return a message
return "Feed downloaded";
}
©Override
protected void onPostExecute(String result) {
Context context = ItemsActivity.this;
Toast.makeText(context, result. Toast.LENGTH_LONG).show();
}
}
}
Description
• An asynchronous task is a task that runs in a separate thread in the background and
does not need to be synchronized with other threads.
• It's common to use a nested inner class to create an asynchronous thread. Within
the inner class, you can access the context for the activity by coding the name of
the outer class, a period, and the this keyword.
Figure 10-4 How to execute asynchronous tasks (part 1 of 2)
296 Section 3 The News Reader app
When you nest one class within another, the inner class can access the object
for the outer class by coding the name of the outer class, a period, and the this
keyword. In this figure, for example, the onPostExecute method of the inner
class uses this code:
ItemsActivity.this
to get the Items Activity object. Then, it stores the Items Activity object in a
Context object, which is later used by the makeText method of the Toast object.
Part 2 of this figure shows more details about how the AsyncTask class
works. To start, it shows several examples for how you could declare a class that
extends the AsyncTask class.
The first example declares a DownloadFeed class that extends the AsyncTask
class. This class accepts one or more string parameters, uses int values to update
the progress of the thread, and returns a string. In this case, the doInBackground
method would accept an array of String objects and return a String object.
Similarly, the onPostExecute method would accept the String object returned by
the doInBackground method. For primitive types such as the int type, you must
use the corresponding wrapper class such as the Integer class.
The second example accepts a URL object as a parameter, doesn't update
the progress of the thread, and returns a string. This shows that you can use
any object type as a generic type. In addition it shows that you can use the Void
keyword if your class doesn't use one of the generic types.
The third example shows that you can use the Void keyword for all three
generic types. This can make sense when the class for the asynchronous task
works with instance variables. In that case, it often doesn't need to accept
parameters or return data. In this case, the doInBackground method would accept an
array of Void objects and return a Void object. To do that, this method can return
a null value.
The fourth example declares a ReadFeed class that extends the AsyncTask
class. This class accepts one or more string parameters, uses int values to update
the progress of the thread, and returns an RSSFeed object. The code for the
RSSFeed class is shown later in this chapter.
This figure also shows the four methods of the AsyncTask class that you can
override. Of these four methods, the code within the doInBackground method
executes in a background thread. As a result, you should put any network or I/O
code in this thread.
The other three methods execute in the UI thread. As a result, you can use
them to update the user interface. Typically, you use the onPreExecute method
to display a ProgressBar widget that displays the progress of the background
thread. Then, you can use the onProgressUpdate method to update the
ProgressBar widget every time the background thread uses the publishProgress
method to update its progress. Finally, you can use the onPostExecute method to
update the user interface when the background thread finishes.
Chapter 10 How to work with threads, files, adapters, and intents
297
The generic types for the AsyncTask class
AsyncTask<Params, Progress, Result>
Possible class declarations
class DownloadFeed extends AsyncTask<String, Integer, String> {
class DownloadFeed extends AsyncTask<URL, Void, String> { ... }
class DownloadFeed extends AsyncTask<Void, Void, Void> { ... }
class ReadFeed extends AsyncTask<String, Integer, RSSFeed> { ..
}
}
The AsyncTask class
Method
onPreExecute()
doInBackground(Params...)
onProgressUpdate(Progress...)
onPostExecute(Result)
Is executed...
On the UI thread before the task is executed.
On the background thread immediately after the
onPreExecute method finishes. An array of parameters
is passed to this method. This method returns a result
that's passed to the onPostExecute method. If this
method uses the publishProgress method, it passes
progress values to the onProgressUpdate method.
On the UI thread after a call to the publishProgress
method is made in the doInBackground method.
On the UI thread after the doInBackground method
finishes.
Description
• The AsyncTask class uses generics to allow a class to operate on various types of
objects. The AsyncTask class provides for three generic types: (1) parameters, (2)
progress, and (3) result.
• The AsyncTask class provides an easy way to perform a background task and
publish results on the UI thread without having to manually manipulate threads.
Figure 10-4 How to execute asynchronous tasks (part 2 of 2)
298 Section 3 The News Reader app
How to execute timed tasks
Android apps sometimes need to start a separate thread to execute a timed
task, which is a task that executes after a specified delay or at a specified
interval. For the News Reader app, for example, you may want to check for
updates every hour. For a Stopwatch app, you may want to update the user
interface every second. To do that, you can use the Timer and TimerTask classes
as shown in figure 10-5. These Java classes provide a way to start a thread that
executes tasks at a specified interval.
The code example in this figure shows a startTimer method that you can use
to start a timed task. This method begins by creating a variable named startMillis
that stores the number of milliseconds for the current time. To get these
milliseconds, this code calls the currentTimeMillis method from the System class.
After getting the starting time, this code creates a new TimerTask object
named task. To be able to create this object, you must override the abstract run
method that's declared in the TimerTask class. Then, you can store the code that
executes the task within this method. In this figure, for example, the run method
contains two statements. The first statement gets the number of milliseconds that
have elapsed since the timer was started. Then, the second statement passes the
number of elapsed milliseconds to a method named update View. This method
updates the user interface and is shown in the next figure.
After creating the TimerTask object, this code creates a Timer object and
uses it to execute the TimerTask object. To start, the first statement creates a
Timer object that starts a daemon thread, which is a thread that ends when the
app ends. This is the most common type of thread for Android apps. However,
you can also start a regular thread that would continue running even if the app
ended. Then, the second statement calls the schedule method of the Timer object
to execute the task immediately (after 0 milliseconds) and to continue executing
it every second (1000 milliseconds). As a result, the task continues to execute
every second until the timer is cancelled or until the app ends.
Sometimes, you may want to execute a task only once. To do that, you don't
specify a repeat interval for the schedule method. For example, to execute a task
once after a delay of 2 hours, you could use this code:
task.schedule(task, 1000 * 60 * 60 * 2);
This code calculates the number of milliseconds for 2 hours by multiplying the
number of milliseconds in 1 second (1000) by the number of seconds in a minute
(60) by the number of minutes in an hour (60) by the number of hours (2).
Chapter 10 How to work with threads, files, adapters, and intents
299
The classes used to work with timed tasks
java.util.Timer
java.util.TimerTask
A method that starts a timed task
private void startTimer() {
final long startMillis = System.currentTimeMillis();
TimerTask task = new TimerTask() {
©Override
public void run() {
long elapsedMillis =
System.currentTimeMillis() - startMillis;
updateView(elapsedMillis);
}
};
Timer timer = new Timer(true);
timer.schedule(task, 0, 1000); // execute every second
}
The TimerTask class
Constructor/Method
TimerTask()
run()
Description
Creates a new TimerTask object.
An abstract method of the TimerTask class. You can override this
method and execute the code for the task within it.
The Timer class
Constructor/Method
Timer(isDaemon)
schedule(task, delay)
schedule(task, delay,
interval)
cancel()
Description
Creates a Timer object and specifies whether its thread is a daemon
thread that ends when the app ends.
Executes the specified TimerTask object once, after the specified
delay in milliseconds.
Executes the specified TimerTask object repeatedly, after the
specified delay in milliseconds at the specified interval in milliseconds.
Cancels this timer, discarding any currently scheduled tasks.
Description
• You can use the TimerTask and Timer classes to create a thread that executes tasks
after a specified delay or at a specified interval
Figure 10-5 How to execute timed tasks
300 Section 3 The News Reader app
How to update the Ul thread
If you create a timed task, that task runs in its own thread in the background.
As the background thread runs, you need a way to update the Ul thread. To do
that, you can use the post method that's available from a View object as shown
in figure 10-6. This method accepts any object that implements the Runnable
interface.
The updateView method in this figure begins by declaring that it accepts
a parameter for a long value. This parameter contains the number of elapsed
milliseconds. In addition, this parameter must be declared as final so it can be
used within the Ul thread.
Within this method, the first statement calls the post method on a Text View
widget. Within the parentheses for this method, this code uses an anonymous
class to create an instance of a Runnable object.
This anonymous class begins by calculating the number of elapsed seconds
by dividing the number of elapsed milliseconds by 1000. Then, the anonymous
class implements the run method of the Runnable interface. This method
contains a single statement that uses the setText method of a Text View widget to
update the text that's displayed on the widget. This text includes the number of
seconds that have elapsed since the timed task was started.
Chapter 10 How to work with threads, files, adapters, and intents
301
A method that updates the Ul thread
private void updateView(final long elapsedMillis) {
// UI changes need to be run on the UI thread
messageTextView.post(new Runnable() {
int elapsedSeconds = (int) elapsedMillis/1000;
}
©Override
public void run() {
messageTextView.setText("Seconds
}
" + elapsedSeconds);
});
The View class
Method
Description
post (runnable) Executes the specified Runnable object.
The Runnable interface
Method Description
run()
Contains the statements that are run within the thread.
Description
• You can use the post method of a View object to execute any Runnable object on
the UI thread.
Figure 10-6 How to update the UI thread
302 Section 3 The News Reader app
How to work with files
Now that you know how to create and execute a thread, you're ready to learn
how to write the code that's executed by the thread. This code often reads and
writes files. For example, the News Reader app needs to read an RSS feed from
the Internet and write that data to an XML file. Then, it needs to read that XML
file and parse its data into a series of Java objects.
How to download a file from the Internet
Figure 10-7 shows how to download data from the Internet and store it in a
file on an Android device. To do that, you get an input stream from the Internet,
you get an output stream to a file on your device, and you use standard Java
I/O methods to read data from the input stream and write that data to the output
stream.
The code example begins by declaring a constant that stores the name, but
not the path, of the XML file that stores the data for the news feed. Then, this
code uses a try/catch statement to handle any I/O exceptions that may be thrown
by the I/O code. If an IOException is thrown, the catch clause handles the
exception by displaying it in the LogCat view.
Within the try clause, the first statement creates a URL object from a string
that points to the URL for the RSS feed described earlier in this chapter. Then,
the second statement calls the openStream method on the URL object to return
an InputStream object that you can use to read the input stream.
To be able to read data from the Internet, you must include the INTERNET
permission in the manifest file for your app. To do that, you can add a permission
like the one shown in this figure at the same indentation level as the application
element.
After getting the InputStream object, this code calls the openFileOutput
method to get a FileOutputStream object. Calling the openFileOutput method
is an application-level operation. However, you can call this method from an
activity and Android automatically calls the method from the application level.
This is true even if you call this method from an inner class of an activity.
The openFileOutput method accepts two parameters. The first parameter
specifies the filename, but not the path, of the file. You can't specify a path
because Android automatically uses the default path for the app. This path uses
the package name of the app to give each app its own directory for storing files.
If the filename doesn't exist in this directory, Android automatically creates the
file for you and opens it. Otherwise, it opens the existing file.
The second parameter specifies the mode that Android uses when it opens
the file. For this parameter, you can use any of the MODE_XXX constants that
are available from the Context class. However, the MODE_PRIVATE constant
is used in most cases. This constant only allows the current app to work with the
file, which is what you want for a file like news_feed.xml. In addition, if a file
with the specified name already exists, this mode overwrites the existing file,
which is also what you want for a file like news_feed.xml.
Chapter 10 How to work with threads, files, adapters, and intents
303
The classes used to download a file from the Internet
java.net.URL
android.content.Context
How to download a file
final String FILENAME = "news_feed.xml";
try{
// get the input stream
URL url = new URL("http://rss.cnn.com/rss/cnn_tech.rss");
InputStream in = url.openStream();
// get the output stream
FileOutputStream out =
openFileOutput(FILENAME, Context.MODE_PRIVATE);
// read input and write output
byte[] buffer = new byte[1024];
int bytesRead = in.read(buffer);
while (bytesRead != -1)
{
out.write(buffer, 0, bytesRead);
bytesRead = in.read(buffer);
}
out.close();
in.close();
}
catch (IOException e) {
Log.e("News reader"# e.toString());
}
The URL class
Method
Description
openStream() Returns an InputStream object for the specified URL.
The INTERNET permission in the AndroidManifest.xml file
<uses-permission android:name="android.permission.INTERNET" />
The Context class
Method
openFileOutput(
filename, mode)
Description
Returns a FileOutputStream object for the
specified file. If the file doesn't already exist,
this method creates it. For the second parameter,
use MODE_PRIVATE to overwrite any existing
files.
Description
• You can use Java and Android APIs to download a file by reading input from the
Internet and writing output to the file system.
Figure 10-7 How to download a file from the Internet
304 Section 3 The News Reader app
The MODE_PRIVATE constant stores a value of 0. As a result, the code in
figure 10-7 can also be written like this:
FileOutputStream out = openFileOutput(FILENAME, 0);
Although this code is shorter, using the MODE_PRIVATE constant is a better
practice because it makes the code easier to read and because it will work even if
the value of the constant changes in a future version of Android.
How to parse an XML file
Figure 10-8 shows how to read the XML file that was written in the previous
figure and how to use SAX (Simple API for XML) to parse this XML into a series
of Java objects. To do that, the code in this figure uses Java classes from the
javax.xml.parsers and org.xml.sax packages.
The code example in this figure begins by declaring a constant for the name
of the XML file that stores the data for the news feed. Then, the second statement
declares an RSSFeed object named feed. The RSSFeed class is a custom class
that's used to store the data for the news feed. The code for this class is shown
later in this chapter. For now, all you need to know is that an RSSFeed object can
store the data for a news feed.
After declaring the RSSFeed object, this code uses a try/catch statement to
handle any exceptions that may be thrown by the code. If an exception is thrown,
the catch block displays it in the LogCat view.
Within the try block, the first three statements get an XMLReader object that
can be used to read an XML file. This is boilerplate code that you can cut and
paste to get an XMLReader object. Then, this code creates an object from the
RSSFeedHandler class. This class is another custom Java class that's shown later
in this chapter. For now, all you need to know is that it contains the code that's
used to parse the XML file. After creating the RSSFeedHandler object, the next
statement sets this object as the content handler in the XMLReader object.
After setting up the content handler, this code uses the openFilelnput method
to get an input stream for the file. This method works much like the openFile-
Output method described in the previous figure. However, it only requires one
parameter, the filename.
Now that the XMLReader object and the input stream have been created,
this code can parse the data. To do that, it creates an InputSource object from the
FilelnputStream object. Then, it calls the parse method from the XMLReader
object and passes the InputSource object to it. This parses the data in the XML
file and stores it in an RSSFeed object. Finally, this code calls the getFeed
method of the RSSHandler class to return the RSSFeed object.
Chapter 10 How to work with threads, files, adapters, and intents 305
The classes used to work with SAX
javax•xml.parsers•SAXParser
javax.xml.parsers.SAXParserFactory
org.xml.sax.InputSource
org•xml.sax.XMLReader
How to parse an XML file
final String FILENAME = "news_feed.xml";
RSSFeed feed;
try {
// get the XML reader
SAXParserFactory factory = SAXParserFactory.newlnstance();
SAXParser parser = factory.newSAXParser();
XMLReader xmlreader = parser.getXMLReader();
// set content handler
RSSFeedHandler theRssHandler = new RSSFeedHandler();
xmlreader.setContentHandler(theRssHandler);
// get the input stream
FilelnputStream in = openFilelnput(FILENAME);
// parse the data
InputSource is = new InputSource(in);
xmlreader.parse(is);
// get the content handler and return it
feed = theRssHandler.getFeed();
}
catch (Exception e) {
Log.e("News reader"# e.toString());
}
The Context class
Method Description
openFilelnput (filename) Returns a FilelnputStream object for the specified file.
Description
• You can use SAX (Simple API for XML) to parse XML files.
Figure 10-8 How to parse an XML file
306 Section 3 The News Reader app
The RSSFeedHandler class
Figure 10-9 shows the RSSFeedHandler class. This class begins by
extending the DefaultHandler class, which contains methods that you can
override to handle the events that occur when the XML file is parsed. In
particular, the DefaultHandler class defines the startDocument, endDocument,
startElement, endElement, and characters methods that are overridden in the
RSSFeedHandler class.
Within the RSSFeedHandler class, the first two statements define instance
variables for the RSSFeed and RSSItem objects that are used to store the data
for the feed and for the items within the feed. The code for the RSSFeed and
RSSItem classes is presented in the next two figures. For now, all you need
to know is that both classes have a default constructor as well as get and set
methods that allow you to store data.
The next six statements define the Boolean instance variables that this class
uses to determine when the various elements of the XML file are being parsed.
The getFeed method returns the RSSFeed object. This method can be called
after the parser finishes parsing the XML file.
The startDocument method is executed when the parser starts reading the
XML document. The code in this method creates the RSSFeed and RSSItem
objects. As a result, you can use these objects in the other methods of this class.
The endDocument method is executed when the parser finishes reading this
document. In this class, this method doesn't include any statements. However,
if you needed to perform some processing when the parser finishes reading the
document, you could add it here.
The startElement method is executed after the parser reads a start element
such as <item>. The third parameter of this method contains the qualified name
of the element. Within this method, an if/else statement checks whether the
element is needed by the News Reader app. If so, this code takes the appropriate
action. For the element named item, this code creates a new RSSItem object
that can be used to store the data for the item. Then, it exits this method. For
the element named title, this code sets isTitle variable to true. Then, it exits the
method. And so on.
Chapter 10 How to work with threads, files, adapters, and intents 307
The RSSFeedHandler class Page 1
package com.murach.newsreader;
import org.xml.sax.helpers•DefaultHandler;
import org.xml.sax.*;
public class RSSFeedHandler extends DefaultHandler {
private RSSFeed feed;
private RSSItem item;
private boolean feedTitleHasBeenRead = false;
private boolean feedPubDateHasBeenRead = false;
private boolean isTitle = false;
private boolean isDescription = false;
private boolean isLink = false;
private boolean isPubDate = false;
public RSSFeed getFeedO {
return feed;
}
public void startDocument() throws SAXException {
feed = new RSSFeed();
item = new RSSItem();
}
public void endDocument() throws SAXException { }
public void startElement(String namespaceURI, String localName,
String qName, Attributes atts) throws SAXException {
if (qName.equals("item")) {
item = new RSSItem();
return;
}
else if (qName.equals("title")) {
isTitle = true;
return;
}
else if (qName.equals("description")) {
isDescription = true;
return;
}
else if (qName.equals("link")) {
isLink = true;
return;
}
else if (qName.equals("pubDate")) {
isPubDate = true;
return;
}
}
Figure 10-9 The RSSFeedHandler class (part 1 of 2)
308 Section 3 The News Reader app
The endElement method is executed after the parser reads an end element
such as </item>. Like the startElement method, the third parameter contains
the qualified name of the element. Within this method, an if statement checks
whether the element is named item. If so, it adds the current RSSItem object to
the RSSFeed object.
The characters method is executed when the parser reads the characters
within an element. This method contains three parameters. Within this method,
the first statement converts these three parameters into a string. Then, a nested
if/else statement stores this string in the appropriate RSSFeed or RSSItem
object.
This code is a little tricky because both the feed and each item have elements
named title and pubDate. As a result, the code for the title element begins by
checking whether the feed title has already been read. If not, it sets the title in the
RSSFeed object. Then, it sets the appropriate Boolean variable to indicate that
the feed title has been read. Otherwise, this code sets the title in the RSSItem
object. Finally, this code sets the isTitle variable to a false value to indicate that
the title element is no longer being parsed.
The code for the pubDate element works similarly to the code for the title
element.
The code for the link and description elements are simpler since they only
exist in the item element. However, many description elements don't store
simple text. Instead, they store links to other URLs. For these elements, this code
sets the description to indicate that it isn't available directly from the feed.
Chapter 10 How to work with threads, files, adapters, and intents 309
The RSSFeedHandler class Page 2
public void endElement(String namespaceURI, String localName,
String qName) throws SAXException {
if (qName.equals("item")) {
feed.addltem(item) ;
return;
}
}
public void characters(char ch[], int start, int length) {
String s = new String(ch, start, length);
if (isTitle) {
if (feedTitleHasBeenRead == false) {
feed.setTitie(s);
feedTitleHasBeenRead = true;
}
else {
item.setTitie(s);
}
isTitle = false;
}
else if (isLink) {
item.setLink(s);
isLink = false;
}
else if (isDescription) {
if (s.startsWith("<")) {
item.setDescriptionC'No description available.");
} else{
item.setDescription(s);
}
isDescription = false;
}
else if (isPubDate) {
if (feedPubDateHasBeenRead == false) {
feed.setPubDate(s);
feedPubDateHasBeenRead = true;
}
else {
item.setPubDate(s);
}
isPubDate = false;
}
}
}
Figure 10-9 The RSSFeedHandler class (part 2 of 2)
310 Section 3 The News Reader app
The RSSFeed class
Figure 10-10 shows the code for the RSSFeed class. This class stores the
data for the RSS feed. This data includes the feed's title and publication date as
well as an ArrayList object that stores RSSItem objects. Most of the code for
this class is standard Java code that lets you set and get data. As a result, you
shouldn't have much trouble understanding it.
However, the code within the getPubDateMillis method uses the
SimpleDateFormat object to parse the string for the date into a Date object.
Here, the parse method accepts a string in this format:
Fri, 18 Dec 2015 14:11:56 EST
and converts that string into a Date object. Then, this code calls the getTime
method of the Date object to return the milliseconds for the time.
The RSSItem class
Figure 10-11 shows the code for the RSSItem class. This class stores the data
for each item in the RSS feed. This data includes the item's title, description,
link, and publication date. Most of the code for this class is standard Java code
that lets you set and get this data. As a result, you shouldn't have much trouble
understanding it.
However, the code within the getPubDateFormatted method uses two
SimpleDateFormat objects to change the format for the date. To start, the parse
method of the first SimpleDateFormat object converts the string for the date into
a Date object. Then, the format method of the second SimpleDateFormat object
formats the Date object so it uses this format:
Friday, 5:56 AM (Dec 18)
As a result, the News Reader app can use this user-friendly date format instead
of the unwieldy date format that's stored in the XML file.
Chapter 10 How to work with threads, files, adapters, and intents 311
The RSSFeed class
package com.murach.newsreader;
import Java.text.ParseException;
import Java•text.SimpleDateFormat;
import java.util.ArrayList;
import j ava.ut i1.Dat e;
public class RSSFeed {
private String title = null;
private String pubDate = null;
private ArrayList<RSSItem> items;
private SimpleDateFormat datelnFormat =
new SimpleDateFormat("EEE# dd TflWM yyyy HH:mm:ss Z");
public RSSFeed() {
items = new ArrayList<RSSItem>();
}
public void setTitle(String title) {
this.title = title;
}
public String getTitleO {
return title;
}
public void setPubDate(String pubDate) {
this.pubDate = pubDate;
}
public long getPubDateMillis() {
try {
Date date = datelnFormat.parse(pubDate.trim());
return date.getTime ();
}
catch (ParseException e) {
throw new RuntimeException(e);
}
}
public int addItem(RSSItem item) {
items•add(item);
return items•size();
}
public RSSItem getltem(int index) {
return iterns.get(index);
}
public ArrayList<RSSItem> getAllItems () {
return items;
}
}
Figure 10-10 The RSSFeed class
312 Section 3 The News Reader app
The RSSItem class Page 1
package com.murach.newsreader;
import Java.text.ParseException;
import java•t ext•SimpleDateFormat;
import j ava.ut i1.Dat e;
public class RSSItem {
private String title = null;
private String description = null;
private String link = null;
private String pubDate = null;
private SimpleDateFormat dateOutFormat =
new SimpleDateFormat("EEEE h:mm a (MMM d)");
private SimpleDateFormat datelnFormat =
new SimpleDateFormat("EEE# dd TflWM yyyy HH:mm:ss Z");
public void setTitle(String title) {
this.title = title;
}
public String getTitleO {
return title;
}
public void setDescription(String description) {
this.description = description;
}
public String getDescription() {
return description;
}
public void setLink(String link) {
this•link = link;
}
public String getLink() {
return link;
}
public void setPubDate(String pubDate) {
this.pubDate = pubDate;
}
public String getPubDate() {
return pubDate;
}
Figure 10-11 The RSSItem class (part 1 of 2)
Chapter 10 How to work with threads, files, adapters, and intents 313
The RSSItem class Page 2
public String getPubDateFormatted() {
try {
Date date = datelnFormat.parse(pubDate.trim());
String pubDateFormatted = dateOutFormat.format(date);
return pubDateFormatted;
}
catch (ParseException e) {
throw new RuntimeException(e);
}
}
}
Figure 10-11 The RSSItem class (part 2 of 2)
314 Section 3 The News Reader app
How to work with adapters
After the News Reader app reads the RSS feed and parses it into a series
of Java objects, it needs to display the data that's stored in those objects. To do
that, you can store the data in an adapter. Then, you can use a ListView widget to
display the data that's stored in the adapter.
How to create the layout for a list view
Figure 10-12 shows the activity_items layout as it's displayed in the
Graphical Layout editor. This layout begins by using a TextView widget to
display the title of the news feed. Then, it uses a ListView widget to display the
items of the news feed.
This figure also shows the listview_item layout as it's displayed in the
Graphical Layout editor. This layout uses two TextView widgets to display the
publication date and title for each item. The first TextView widget displays the
item's publication date in the default font size. The second TextView widget
displays the item's title with a larger font size of 24sp. In addition this layout
sets the margins for these widgets to control the alignment and spacing of these
wideets.
Chapter 10 How to work with threads, files, adapters, and intents
315
The activity_items layout
The listview_item layout
> News Reader
CNN.com Technology
Iteml
Sub item 1
Item 2
Sub Item 2
Item 3
Sub Item 3
Item 4
Sub liem 4
Item 5
Sub Item 5
Item 6
Sub Item 6
Item 7
Sub Item 7
News Reader
Published: Tues 15 Sept 2015
Item title
The ListView widget in the activity_items layout
<ListView
android:id="@+id/itemsListView"
android:layout_width="match parent"
android:layout height="match parent" />
The listview_item layout
<?xml version="1.0" encoding="utf-8"? >
<LinearLayout xmlns:android="http://schemas.android.com/apk/res/android"
android:layout_width="match parent"
android:layout height="match parent"
android:orientation="vertical" >
<TextView
android
android
android
android
android
android
id="@+id/pubDateTextView"
layout_width="wrap_content"
layout_height="wrap_content"
layout_marginLeft="10dp"
layout_marginTop="5dp"
text="@string/item pub date"
/>
<TextView
android
android
android
android
android
android
android
id="<a+id/titleTextView"
layout_width="wrap_content"
layout_height="wrap_content"
layout_marginLeft="10dp"
layout_marginRight="10dp"
text="@string/item_titie"
textSize="24sp" />
</LinearLayout >
Figure 10-12 How to create the layout for a list view
316 Section 3 The News Reader app
How to use an adapter to display data
in a list view
In chapter 5, you learned how to use an adapter to display an array of strings
in a Spinner widget. Now, figure 10-13 shows how to use another type of adapter
to display data in a List View widget. More specifically, it shows how to use the
SimpleAdapter class to display data in the List View widget described in the
previous figure.
The code example begins by calling the getAHItems method of the RSSFeed
object to get an ArrayList object that contains RSSItem objects. Then, this code
creates an ArrayList object that contains HashMap objects. Here, each HashMap
object stores the data for each item in the list. In this figure, for example, each
HashMap object stores the publication date and title for each item.
After storing the data for the adapter in the ArrayList variable named data,
this code gets the ID for the listview_item layout and stores it in the variable
named resource. This resource defines the layout for each item in the ListView
widget.
Then, this code creates an array of strings that contain the names of the keys
that get the data from the HashMap objects. This is where the data comes from.
These keys correspond with the keys that are used to store data in the HashMap
objects.
Next, it creates an array of int values that contain the IDs of the widgets in
the listview_item layout. This is where the data goes to. As a result, these IDs
should exist in the listview_item layout.
After setting up all of the necessary variables, this code creates the
SimpleAdapter object. Here, the first parameter uses the this keyword to specify
the context for the adapter. Then, the next four parameters use the data, resource,
from, and to variables that were set up earlier.
Finally, the last statement calls the setAdapter method to set the
SimpleAdapter object in the ListView widget. This causes the ListView widget
to display the data stored in the SimpleAdapter object.
As you review this figure, you may notice that the adapter accepts a
List object that contains Map objects. However, the code in this figure uses
an ArrayList object that contains HashMap objects. This works because an
ArrayList object is a type of List object, and a HashMap object is a type of Map
object.
Chapter 10 How to work with threads, files, adapters, and intents
317
Code that creates and sets the adapter
// get the items for the feed
ArrayList<RSSItem> items = feed.getAllltems();
// create a List of Map<String# ?> objects
ArrayList<HashMap<String# String>> data =
new ArrayList<HashMap<String, String>>();
for
(RSSItem item :
HashMap<String,
map.put("dat e"#
map.put("title"
data.add(map);
items) {
String> map = new HashMap<String, String>();
item.getPubDateFormatted());
item.getTitle());
}
// create the resource, from, and to variables
int resource = R.layout.listview_itern;
String[] from = {"date", "title"};
int[] to = {R.id.pubDateTextView, R.id.titleTextView};
// create and set the adapter
SimpleAdapter adapter =
new SimpleAdapter(this, data, resource,
itemsListView.setAdapter(adapter);
from, to);
context
data
The constructor for the SimpleAdapter class
Parameter Description
The context of the View associated with this SimpleAdapter object.
A List object that contains Map objects. The Map objects contain
the data for the items in the list. The Map objects should include
all keys specified in the parameter named from.
The ID of a layout for each item in the list. The layout file should
include the views defined in the parameter named to.
An array of column names that are in the Map objects.
An array of IDs for the widgets that should display the columns in
the parameter named from.
resource
from
to
Description
• You can use the SimpleAdapter class to display data in a List View widget.
Figure 10-13 How to use an adapter to display data in a list view
318 Section 3 The News Reader app
How to handle events for an adapter
Figure 10-14 shows how to handle the events that occur when the user clicks
on one of the items in a list. To do that, you implement the OnltemClickListener
interface that's nested in the Adapter View class. Then, you wire this event
handler to the appropriate widget. In this figure, for example, the onltemClick
method is executed when the user clicks on one of the items in the List View
widget.
Within the onltemClick method, the third parameter provides the position
of the selected item. In most cases, this is the only parameter that you need.
However, if necessary, the first parameter provides the AdapterView object for
the list of items, the second parameter provides a View object for the selected
item, and the fourth parameter provides the ID of the selected item.
Within the onltemClick method, the first statement uses the position
parameter to get the RSSItem object at the specified position. At this point, you
can write additional code that processes the data stored in the RSSItem object. In
this next figure, for example, you'll learn how to pass this data to another activity
so it can be displayed.
Chapter 10 How to work with threads, files, adapters, and intents 319
Step 1: Import the interface for the listener
import android.widget.AdapterView.OnltemClickListener;
Step 2a: Implement the interface for the listener
public class ItemsActivity extends Activity
implements OnltemClickListener {
Step 2b: Implement the interface for the listener
©Override
public void onltemClick(AdapterView<?> parent. View v,
int position, long id) {
// get item at position
RSSItem item = feed.getltem(position);
}
Step 3: Set the listeners
itemsListView.setOnltemClickListener(this);
Description
• The onltemClick method is executed when the user clicks on one of the items in the
List View widget.
• Within the onltemClick method, the third parameter provides the position of the
selected item.
Figure 10-14 How to handle events for an adapter
320 Section 3 The News Reader app
How to work with intents
In the News Reader app, the Items activity displays a list of items. If you
click on one of these items, you need to display the data for that item in the Item
activity. To do that, you can use an intent to pass data from the Items activity to
the Item activity.
Within the Item activity, you can click on a link to display it in the default
browser on your device. To do that, you can use an intent to tell your device that
you want to view the link in a web browser.
How to pass data between activities
As you learned in chapter 8, an intent is an object that provides a description
of an operation to be performed. When an intent specifies a specific component
within an app such as an activity, it can be referred to as an explicit intent. If you
want, you can use an explicit intent to pass data from one component to another.
In figure 10-15, for example, the code in the Items Activity class creates an
explicit intent for the ItemActivity class. Then, it uses the putExtra method of the
Intent object to store some data in the intent. Here, it stores a string named title
and an int value named position. Next, this code uses the startActivity method to
start the activity specified by the intent.
The code in the ItemActivity class begins by using the getlntent method
to get the Intent object that was passed to it. Then, it uses the getStringExtra
method to get the string named title, and it uses the getlntExtra method to get the
int value named position.
Although the code example only shows how to work with a string and an
int value, the putExtra method of the Intent class works for most primitive types
and arrays of primitive types. In addition, the Intent class includes an appropriate
getXxxExtra method for most primitive types. As a result, you can use an Intent
object to pass most types of data between activities.
Chapter 10 How to work with threads, files, adapters, and intents
321
Code in the ItemsActivity class
// create the intent
Intent intent = new Intent(this, ItemActivity.class);
// put data in the intent
intent.putExtra("title"# item.getTitle());
intent.putExtra("position"# position);
// start the intent
this.startActivity(intent);
Code in the ItemActivity class
// get the intent
Intent intent = getlntent();
// get data from the intent
String pubDate = intent.getStringExtra("pubDate");
int position = intent.getIntExtra("position"# 0);
The Intent class
Constructor/Method
Intent(context# class)
putExtra(name# value)
getStringExtra(name)
getIntExtra(name, default)
Description
Creates an intent for the specific class in the project.
Stores the specified value or array of values with the
specified name.
Gets the string value with the specified name.
Gets the int value with the specified name. If no int
value exists with the specified name, this method
returns the specified default value.
Description
• An explicit intent specifies a component such as an activity.
• You can use an explicit intent to pass data from one activity to another.
• The Intent class provides getXxxExtra methods for most primitive types and arrays
of primitive types.
Figure 10-15 How to pass data from one activity to another
322 Section 3 The News Reader app
How to view a URL in a web browser
Figure 10-16 shows how to view a URL in a web browser. To do that, you
can use an implicit intent, which is an intent that specifies the action you want to
perform. Then, Android determines the best app to perform that action.
The first example in this figure begins by creating a string for a URL that
links to a news article on the Internet. Then, it uses the parse method of the Uri
class to create a Uri object for this link.
After creating the Uri object, this example creates an Intent object. This code
passes the ACTION_VIEW constant as the first argument of the constructor,
and it passes the Uri object as the second argument. As a result, the Intent object
specifies that you want to view the specified URI in a web browser. Then, after
you use the startActivity method to start the Intent object, Android determines
which web browser to start and uses that browser to view the specified URI.
How to dial or call a phone number
This figure also shows how to use an implicit intent to dial or call a phone
number. This is similar to viewing a page in a web browser.
However, there are three primary differences. First, the string that specifies
the URI must begin with "tel:", not "http:". Second, the first parameter that's
passed to the constructor for the Intent must be the ACTION_DlAL or
ACTION_CALL constant. Third, if you use the ACTION_CALL constant, you
must add the CALL_PHONE permission to the AndroidManifest.xml file for
your project. As with all permissions, this permission must be coded at the same
indentation level as the application element.
Chapter 10 How to work with threads, files, adapters, and intents
323
How to view a URL in a web browser
// create a Uri object for the link
String link = "http://rss.cnn.com/-r/rss/cnn_tech/-3/N9m_DSAe5rY/";
Uri uri = Uri.parse(link);
// create the intent and start it
Intent viewlntent = new Intent(Intent.ACTION_VIEW# uri);
startActivity(viewlntent);
How to call a phone number
// get the Uri for the phone number
String number = "tel:800-111-1111";
Uri callUri = Uri.parse(number);
// create the intent and start it
Intent calllntent = new Intent(Intent.ACTION_DIAL# callUri);
startActivity(calllntent);
The Intent class
Constructor
Intent(action, uri)
Constant Target
ACTIONJVTEW Activity
ACTION_DIAL Activity
ACTION CALL
Activity
Description
Create an intent with the specified action constant
and the specified data Uri.
Action
View specified Uri in a web browser.
Places the specified phone number in the dialer,
but lets the user decide whether to make the call.
Call the specified phone number. This method
requires the CALL_PHONE permission.
The CALL_PHONE permission in the AndroidManifest.xml file
<uses-permission android:name="android.permission•CALL_PHONE" />
Description
• An implicit intent specifies the action you want to perform. Then, Android
determines the best app to perform that action.
• You can use an implicit intent to view a URL in a web browser or to call a phone
number.
Figure 10-16 How to view a URL in a web browser
324 Section 3 The News Reader app
The News Reader app
Now that you've learned the skills necessary to create the News Reader app,
you're ready to see how all the pieces fit together.
The activityitems layout
Figure 10-17 shows the XML for the activity_items layout. This layout
uses a linear layout with vertical orientation. It begins by displaying a TextView
widget for the title of the feed. Then, it uses a List View widget to display the
items of the feed. In turn, the List View widget uses the listview_layout to display
each item. Since this was described earlier in this chapter, you shouldn't have
much trouble understanding how it works.
Chapter 10 How to work with threads, files, adapters, and intents 325
The activity_items layout
<?xml version="1.0" encoding="utf-8"? >
<LinearLayout xmlns:android="http://schemas.android.com/apk/res/android"
android:layout_width="match parent"
android:layout height="match parent"
android:orientation="vertical" >
<TextView
android:id="@+id/titleTextView"
android:layout_width="match parent"
android:layout_height="wrap_content"
android:background="#FFAC83"
android:padding="7dp"
android:text="@string/items_titie"
android:textSize="22sp" />
<ListView
android:id="@+id/itemsListView"
android:layout_width="match parent"
android:layout height="match parent" />
</LinearLayout >
The listview_item layout
<?xml version="1.0" encoding="utf-8"? >
<LinearLayout xmlns:android="http://schemas.android.com/apk/res/android"
android:layout_width="match parent"
android:layout height="match parent"
android:orientation="vertical" >
<TextView
android:id="@+id/pubDateTextView"
android:layout_width="wrap_content"
android:layout_height="wrap_content"
android:layout_marginLeft="10dp"
android:layout_marginTop="5dp"
android:text="@string/item_pub_date" />
<TextView
android:id="@+id/titleTextView"
android:layout_width="wrap_content"
android:layout_height="wrap_content"
android:layout_marginLeft="10dp"
android:layout_marginRight="10dp"
android:text="@string/item_titie"
android:textSize="24sp" />
</LinearLayout >
Figure 10-17 The activityjtems layout
326 Section 3 The News Reader app
The ItemsActivity class
Figure 10-18 shows the Java code for the ItemsActivity class. This class uses
most of the skills presented in this chapter.
The onCreate method begins by creating a FilelO object from the FilelO
class that's shown in the next figure. Then, it gets references to the Text View
and List View widgets for the Items activity. Next, it sets the listener for the
List View widget. Finally, it creates a new object from the inner class named
DownloadFeed, and it calls the execute method from that object to start it.
The inner class named DownloadFeed uses a background thread to
download the XML file for the RSS feed. After the background thread finishes
executing, this class displays a message in the LogCat view. Then, it creates
a new object from the inner class named ReadFeed, and it calls the execute
method from that object to start it.
The inner class named ReadFeed uses a background thread to read the XML
file for the RSS feed and parse it into an RSSFeed object that contains multiple
RSSItem objects. After the background thread finishes executing, this class
displays a message in the LogCat view. Then, it calls the updateDisplay method
of its outer class to update the user interface.
Both of these inner classes specify the Void type for all three generic types
of the AsyncTask class. As a result, the doInBackground and onPostExecute
methods both use the Void type.
The updateDisplay method uses an adapter to display the items in the feed in
the List View widget. When it finishes, it displays a message in the LogCat view.
The onltemClick method handles the event that occurs when the user clicks
on one of the items in the List View widget. To handle this event, this code starts
the Item activity and uses an explicit intent to pass all of the data for the item to
that activity.
Chapter 10 How to work with threads, files, adapters, and intents 327
The ItemsActivity class Page 1
package com.murach.newsreader;
import java.util.ArrayList;
import j ava.ut i1.HashMap;
import android.os.AsyncTask;
import android.os.Bundle;
import android.app.Activity;
import android•content•Intent;
import android.uti1.Log;
import android.view.View;
import android.widget.AdapterView;
import android.widget.ListView;
import android.widget.SimpleAdapter;
import android.widget.TextView;
import android.widget.AdapterView.OnltemClickListener;
public class ItemsActivity extends Activity
implements OnltemClickListener {
private RSSFeed feed;
private FilelO io;
private TextView titleTextView;
private ListView itemsListView;
©Override
protected void onCreate(Bundle savedlnstanceState) {
super.onCreate(savedlnstanceState);
setContentView(R.layout.activity_iterns);
io = new FilelO(getApplicationContext());
titleTextView = (TextView) findViewById(R.id.titleTextView);
itemsListView = (ListView) findViewById(R.id.itemsListView);
itemsListView.setOnltemClickListener(this);
new DownloadFeed().execute();
}
class DownloadFeed extends AsyncTask<Void, Void, Void> {
©Override
protected Void doInBackground(Void... params) {
io.downloadFile();
return null;
}
©Override
protected void onPostExecute(Void result) {
Log.d("News reader", "Feed downloaded");
new ReadFeed().execute();
}
}
Figure 10-18 The ItemsActivity class (part 1 of 3)
328 Section 3 The News Reader app
The ItemsActivity class Page 2
class ReadFeed extends AsyncTask<Void, Void, Void> {
©Override
protected Void doInBackground(Void... params) {
feed = io.readFile();
return null;
}
©Override
protected void onPostExecute(Void result) {
Log.d("News reader", "Feed read");
// update the display for the activity
ItemsActivity.this.updateDisplay();
}
}
public void updateDisplay()
{
if (feed == null) {
titleTextView.setText("Unable to get RSS feed");
return;
}
// set the title for the feed
titleTextView.setText(feed.getTitle());
// get the items for the feed
ArrayList<RSSItem> items = feed.getAllltems();
// create a List of Map<String# ?> objects
ArrayList<HashMap<String# String>> data =
new ArrayList<HashMap<String, String>>();
for (RSSItem item : items) {
HashMap<String, String> map = new HashMap<String, String>();
map.put("date", item.getPubDateFormatted());
map.put("title"# item.getTitle());
data•add(map);
}
// create the resource# from, and to variables
int resource = R.layout.listview_itern;
String[] from = {"date", "title"};
int[] to = {R.id.pubDateTextView, R.id.titleTextView};
// create and set the adapter
SimpleAdapter adapter =
new SimpleAdapter(this, data, resource, from, to);
itemsListView.setAdapter(adapter);
Log.d("News reader", "Feed displayed");
}
Figure 10-18 The ItemsActivity class (part 2 of 3)
Chapter 10 How to work with threads, files, adapters, and intents 329
The ItemsActivity class Page 3
©Override
public void onItemClick(AdapterView<?> parent. View v,
int position, long id) {
// get the item at the specified position
RSSItem item = feed.getltem(position);
// create an intent
Intent intent = new Intent(this, ItemActivity.class);
intent.putExtra("pubdate", item.getPubDate());
intent.putExtra("title", item.getTitle());
intent.putExtra("description", item.getDescription());
intent.putExtra("link", item.getLink());
}
}
this.startActivity(intent);
Figure 10-18 The ItemsActivity class (part 3 of 3)
330 Section 3 The News Reader app
The FilelO class
Figure 10-19 shows the Java code for the FilelO class. This class begins by
defining a constant named URL_STRING for a string that specifies the URL
for the RSS feed. Then, it defines a constant named FILENAME that specifies
the name of the file that stores the current RSS feed. Next, it defines a Context
object that can store the context for the app.
The constructor for the FilelO class accepts a Context object. Within the
constructor, a single statement sets the variable named context for this class to
the Context object parameter. That way, the context variable can be used by the
downloadFile and readFile methods of this class.
The downloadFile method downloads the XML for the RSS feed from the
Internet and stores it in the specified file. Conversely, the readFile method reads
the specified file and returns an RSSFeed object. To do that, these methods use
the techniques described earlier in this chapter for downloading, writing, and
reading a file. However, both of these methods use the FILENAME constant
defined earlier in this class. As a result, you can be sure that both of these
methods are working with the same file, which is what you want.
The activityitem layout
Figure 10-20 shows the XML for the activity_item layout. This layout uses
a scroll view to make sure that the user can scroll up and down if the item is too
tall to fit on the screen. Then, it uses a linear layout with vertical orientation to
display four Text View widgets for the title, publication date, description, and
link of the item. This code sets the color of the fourth Text View widget to blue to
indicate to the user that it is a link that can be clicked.
Chapter 10 How to work with threads, files, adapters, and intents 331
The FilelO class Page 1
package com.murach.newsreader;
import java.io.FilelnputStream;
import java.io.FileOutputStream;
import Java.io.IOException;
import Java.io.InputStream;
import java.net.URL;
import javax.xml.parsers•SAXParser;
import j avax.xml.parsers.SAXParserFactory;
import org.xml.sax.InputSource;
import org.xml.sax.XMLReader;
import android.content.Context;
import android.uti1.Log;
public class FilelO {
private final String URL_STRING = "http://rss.cnn.com/rss/cnn_tech.rss";
private final String FILENAME = "news_feed.xml";
private Context context = null;
public FilelO (Context context) {
this.context = context;
}
public void downloadFile() {
try{
// get the URL
URL url = new URL(URL_STRING);
// get the input stream
InputStream in = url.openStream();
// get the output stream
FileOutputStream out =
context.openFileOutput(FILENAME# Context.MODE_PRIVATE);
// read input and write output
byte[] buffer = new byte[1024];
int bytesRead = in.read(buffer);
while (bytesRead 1= -1)
{
out.write(buffer, 0, bytesRead);
bytesRead = in.read(buffer);
}
out.close();
in.close();
}
catch (IOException e) {
Log.e("News reader"# e.toString());
}
}
Figure 10-19 The FilelO class (part 1 of 2)
332 Section 3 The News Reader app
The FilelO class
Page 2
public RSSFeed readFileO {
try {
// get the XML reader
SAXParserFactory factory = SAXParserFactory.newlnstance();
SAXParser parser = factory.newSAXParser();
XMLReader xmlreader = parser.getXMLReader();
// set content handler
RSSFeedHandler theRssHandler = new RSSFeedHandler();
xmlreader.setContentHandler(theRssHandler);
// read the file from internal storage
FileInputStream in = context.openFileInput(FILENAME);
// parse the data
InputSource is = new InputSource(in);
xmlreader.parse(is);
// set the feed in the activity
RSSFeed feed = theRssHandler.getFeed();
return feed;
}
catch (Exception e) {
Log.e("News reader"# e.toString());
return null;
}
}
}
Figure 10-19 The FilelO class (part 2 of 2)
Chapter 10 How to work with threads, files, adapters, and intents 333
The activity_item layout
<?xml version="1.0" encoding="utf-8"? >
<ScrollView xmlns:android="http://schemas.android.com/apk/res/android"
android:layout_width="fill parent"
android:layout height="fill parent"
android:orientation="vertical" >
<LinearLayout
android:layout_width="match parent"
android:layout_height="wrap_content"
android:orientation="vertical" >
<TextView
android:id="@+id/titleTextView"
android:layout_width="match parent"
android:layout_height="wrap_content"
android:paddingLeft="7dp"
android:paddingRight="7dp"
android:paddingTop="5dp"
android:text="@string/item_titie"
android:textSize="24sp"
android:textstyle="bold" />
<TextView
android:id="@+id/pubDateTextView"
android:layout_width="match parent"
android:layout_height="wrap_content"
android:paddingLeft="7dp"
android:paddingTop="5dp"
android:text="@string/item_pub_date" />
<TextView
android:id="@+id/descriptionTextView"
android:layout_width="match parent"
android:layout_height="wrap_content"
android:paddingLeft="7dp"
android:paddingRight="7dp"
android:paddingTop="5dp"
android:text="@string/item_description"
android:textSize="18sp" />
<TextView
android:id="@+id/linkTextView"
android:layout_width="match parent"
android:layout_height="wrap_content"
android:layout_marginTop="10dp"
android:paddingLeft="7dp"
android:paddingTop="5dp"
android:text="@string/item_link"
android:textColor="©color/blue"
android:textSize="18sp" />
</LinearLayout >
</ScrollView>
Figure 10-20 The activityjtem layout
334 Section 3 The News Reader app
The ItemActivity class
Figure 10-21 shows the Java code for the ItemActivity class. When this
activity is started, its onCreate method gets all necessary data from the Intent
object and displays it on the four Text View widgets defined by the layout for this
activity.
If the user clicks on the Text View widget for the link, the onClick method
is executed. This method starts by creating a Uri object for the link that's stored
in the Intent object. Then, it uses an implicit intent to view the URI in a web
browser.
Chapter 10 How to work with threads, files, adapters, and intents 335
The ItemActivity class
package com.murach.newsreader;
import android•net•Uri;
import android.os.Bundle;
import android.view.View;
import android.view.View.OnClickListener;
import android.widget.TextView;
import android.app.Activity;
import android•content•Intent;
public class ItemActivity extends Activity implements OnClickListener {
©Override
protected void onCreate(Bundle savedlnstanceState) {
super.onCreate(savedlnstanceState);
setContentView(R.layout.activity_item);
// get references to widgets
TextView titleTextView = (TextView)
findViewByld(R.id.titleTextView);
TextView pubDateTextView = (TextView)
findViewByld(R.id.pubDateTextView);
TextView descriptionTextView = (TextView)
findViewByld(R.id.descriptionTextView);
TextView linkTextView = (TextView)
findViewByld(R.id.linkTextView);
// get the intent and its data
Intent intent = getlntent();
String pubDate = intent.getStringExtra("pubdate");
String title = intent.getStringExtra("title");
String description =
intent.getStringExtra("description").replace(■\n"# ■ ■);
// display data on the widgets
pubDateTextView.setText(pubDate);
titleTextView.setText(title);
descriptionTextView.setText(description);
// set the listener
linkTextView.setOnClickListener(this);
}
©Override
public void onClick(View v) {
// get the intent and create the Uri for the link
Intent intent = getlntent();
String link = intent.getStringExtra("link");
Uri viewUri = Uri.parse(link);
// create the intent and start it
Intent viewlntent = new Intent(Intent.ACTION_VIEW# viewUri);
startActivity(viewlntent);
}
}
Figure 10-21 The ItemActivity class
336 Section 3 The News Reader app
Perspective
Now that you've finished this chapter, you should be able to create an
app like the News Reader app that uses threads, files, adapters, and intents.
However, there are many possible ways to improve this app. In the next chapter,
you'll learn how to use services and notifications to improve this app.
Terms
RSS (Rich Site Summary) feed
thread
UIthread
asynchronous task
generics
Summary
• An RSS (Rich Site Summary) feed can be used to publish frequently updated
works, such as blog entries and news headlines. Since RSS uses a
standardized XML file format, the feed can be published once and viewed by many
different apps.
• A thread is a single sequential flow of control within a program that often
completes a specific task.
• By default, an Android app uses a single thread, called the UI thread, to
display the user interface. Any task that can slow or stop the responsiveness
of the UI thread should be run in a separate thread.
• An asynchronous task is a task that runs in a separate thread in the
background and does not need to be synchronized with other threads.
• The AsyncTask class uses generics to allow a class to operate on various
types of objects, and provides for three generic types: (1) parameters, (2)
progress, and (3) result. It provides an easy way to perform a background
task and publish results on the UI thread without having to manually
manipulate threads.
• You can use the TimerTask and Timer classes to create a thread that executes
tasks after a specified delay or at a specified interval.
• You can use Java and Android APIs to download a file by reading input from
the Internet and writing output to the file system.
• You can use SAX (Simple API for XML) to parse XML files.
• You can use the SimpleAdapter class to display data in a List View widget.
• An explicit intent specifies a component such as an activity, and can be used
to pass data from one activity to another.
• An implicit intent specifies the action you want to perform, and can be used
to view a URL in a web browser or to call a phone number.
daemon thread
SAX (Simple API for XML)
intent
explicit intent
implicit intent
Chapter 10 How to work with threads, files, adapters, and intents 337
Exercise 10-1 Review the News Reader app
In this exercise, you'll take the News Reader app for a test drive to see how it works.
1. Open the project named ch 10_ex 1 _NewsReader that's in the ex_starts directory.
2. Run the app. The Items activity should display a list of news items, and the
LogCat view should display messages indicating that the RSS feed has been
downloaded, read, and displayed. Scroll down through this list of items to its
end.
3. Click on a news item. This should display the news item in the Items activity,
but it shouldn't display any new messages in the LogCat view.
4. Click on the "Read more" link. This should start a web browser and display
the web page for the news item in that browser.
5. Click on the Back button twice to return to the Items activity. This should not
display any new messages in the LogCat view.
6. Change the orientation of the emulator or device. This should display
messages in the LogCat view that indicate that the RSS feed has been
downloaded, read, and displayed. On the good side, this provides a way for
you to refresh the news feed so it has the latest news items. On the other hand,
this isn't the best way to check for updates. In the next chapter, you'll learn a
better way to handle this issue.
Exercise 10-2 Work with asynchronous tasks
In this exercise, you'll modify the DownloadFeed and ReedFeed classes used
by the News Reader app presented in this chapter so they accept parameters and
return results.
Modify the DownloadFeed class
1. Open the project named ch 10_ex2_NewsReader that's in the ex_starts directory.
2. Open the class for the Items activity. Then, modify the code for the
DownloadFeed class so it uses this declaration:
class DownloadFeed extends AsyncTask<String, Void, Void>
3. Save the file. When you do, Android Studio should display an error that
shows that the declaration for the doInBackground method doesn't specify the
correct types.
4. Modify the declaration for the doInBackground method so it accepts multiple
String objects as a parameter.
5. Modify the code for the doInBackground method so it gets the first String
object that's passed to it and uses that string to create the URL object. In other
words, this method should not use the URL_STRING constant.
6. Modify the code that creates and executes the DownloadFeed class so it
passes the String object for the URL to the doInBackground method.
338 Section 3 The News Reader app
7. Run the app to make sure this code works correctly.
Modify the ReadFeed class
8. Modify the code for the ReadFeed class so it uses this declaration:
class ReadFeed extends AsyncTask<Void, Void, RSSFeed>
9. Save the file. When you do, Android Studio should show that there are errors
with both the dolnBackground and onPostExecute methods.
10. Modify the declaration for the dolnBackground method so it returns an
RSSFeed object.
11. Modify the declaration for the onPostExecute method so it accepts an
RSSFeed object as a parameter.
12. Modify the code for the dolnBackground method so the end of the try clause
returns an RSSFeed object instead of setting it in the activity. Also, modify
the end of the catch clause so it returns a null value.
13. Modify the code for the onPostExecute method so it sets the feed instance
variable in the activity to the RSSFeed parameter. Make sure to set the feed
before this method calls the updateDisplay method of the activity.
14. Run the app to make sure this code works correctly.
Exercise 10-3 Modify the News Reader app
In this exercise, you'll make some enhancements to the News Reader app so it
reads a different RSS feed and formats it differently.
1. Open the project named ch 10_ex3_NewsReader that's in the ex_starts directory.
2. Change the URL for the RSS feed to:
http://rss.cnn.com/rss/cnn_world.rss
3. In the activity_items layout, add a TextView widget for the publication date
just below the TextView widget for the title.
4. In the ItemsActivity class, add code that uses the TextView widget you just
added to display the publication date for the feed.
5. Modify the feed's publication date so it's displayed in this format:
Thursday 9:12 AM (Feb 28)
To do that, add a getPubDateFormatted method to the RSSFeed class that
works like one that's in the RSSItem class.
6. In the listview_item layout, add a TextView widget to display the description
for the feed.
7. In the ItemsActivity class, modify the code for the adapter so it also stores the
description and displays it in the list of items. When you're done, the Items
activity should display the publication date, title, and description for each item.
8. Modify the code that's executed when you click on an item so that clicking
on an item displays the item in a web browser. When you're done, the News
Reader app should never display the Item activity.
11
How to work
with services
and notifications
Some types of Android apps need to execute a task in the background, even
when the app isn't running. To do that, you can use an Android component
known as a service. When a service completes a task, it may want to notify the
user. To do that, you can use an Android feature known as a notification.
How to work with the Application object .........................340
How to define the Application object 340
How to register the Application object 342
How to use the Application object 342
How to work with services ................................................344
The lifecycle of a service 344
How to create a service 346
How to register a service 348
How to start and stop a service 348
How to use threads with services 350
How to test a service 352
How to view all services 354
How to work with notifications .........................................356
How notifications work 356
How to create a pending intent 358
How to create a notification 360
How to work with system services ...................................362
How to display or remove a notification 362
How to check if a network connection is available 364
The News Reader app........................................................366
The NewsReaderService class 366
The ItemsActivity class 370
The FilelO class 370
Perspective.........................................................................376
340 Section 3 The News Reader app
How to work
with the Application object
Before you learn how to work with services, you should learn how to create
a custom Application object for your app. This provides two benefits. First, it
allows you to store data that applies to the entire app in a central location that's
always available to all components of the app including all of the app's activities
and services. Second, it allows you to execute code when the application starts,
as opposed to executing code each time an activity starts.
How to define the Application object
Figure 11-1 shows how to define a custom Application object. Here, the
NewsReaderApp class extends the Application class. Then, it defines an instance
variable that can store the milliseconds that correspond with the publication date
for the current RSS feed for the app. Next, it defines get and set methods for this
variable.
After defining the methods that store the application's data, this class
overrides the onCreate method of the Application class. Android calls this
method when the app starts, but not when an activity starts. As a result, this
method is a good place to put any code that should only be run once, when
the app starts. For now, this method just prints a message to the LogCat view.
However, later in this chapter, you'll learn how to modify this method so it starts
a service.
When storing data in the Application object, keep in mind that the
Application object is created when the app starts and remains available as long
as any component of the app is running. As a result, you should avoid storing
large amounts of data in this object whenever possible. For the News Reader
app, for example, you could store an RSSFeed object in the Application object.
That way, the current feed would always be available to all components in the
app. Since the RSSFeed object only contains text and isn't too large, this might
be OK in most cases. However, since the News Reader app only needs to store
the milliseconds for the feed, it's probably a better design to only store a long
value for the milliseconds as shown in this figure.
Chapter 11 How to work with services and notifications 341
A starting point for the NewsReaderApp class
package com.murach.newsreader;
import android.app.Application;
import android.uti1.Log;
public class NewsReaderApp extends Application {
private long feedMillis = -1;
public void setFeedMillis(long feedMillis) {
this.feedMillis = feedMillis;
}
public long getFeedMillis() {
return feedMillis;
}
©Override
public void onCreate() {
super.onCreate();
Log.d("News reader"# "App started");
}
}
Description
• To store data and methods that apply to the entire application, you can extend the
Application class and add instance variables and methods. The Application object
is created when the app starts and remains available until the app ends.
• To run code only once when the application starts, you can override the onCreate
method of your custom Application class.
Figure 11-1 How to define the Application object
342 Section 3 The News Reader app
How to register the Application object
When you extend the Application class, you must register that class. Then,
when the application starts, Android creates the Application object from your
custom Application class. If you don't register the custom Application class,
Android creates the Application object from the Application class, not from your
custom class.
To register your custom Application class, open the AndroidManifest.xml
file. Then, edit the application element so its name attribute specifies the name of
your custom Application class. In figure 11-2, for example, the name attribute of
the application element specifies the NewsReaderApp class.
How to use the Application object
Once you have registered your custom application class, you can use the
Application object. To do that, you can start by using the getApplication method
to get a reference to the Application object. In this figure, the first example
declares a variable of the NewsReaderApp type. Then, the second example uses
the getApplication method to get a reference to the Application object, and it
casts this Application object to the NewsReaderApp type.
Once you have a reference to the Application object, you can use it just
as you would use any other object. In this figure, the third example calls the
getFeedMillis method from the Application object to get the milliseconds for the
publication date of the current RSS feed object for the app.
Chapter 11 How to work with services and notifications
343
The application element of the AndroidManifest.xml
<application
a iC*
_ ii
PP'
android:allowBackup="true"
android:icon="@drawable/ic_launcher"
android :label=,,@string/app_name"
android:theme=,,@style/AppTheme" >
How to use the Application object
Step 1: Declare a variable for the Application object
NewsReaderApp app;
Step 2: Get a reference to the Application object
app = (NewsReaderApp) getApplication();
Step 3: Use the object
long feedMillis = app.getFeedMillis();
A method of the Context class
Method
Description
getApplication () Returns the Application object for your app. You can cast
this object to the custom Application class for your app.
Description
• When you extend the Application class, you must register that class. Then, when
the application starts, Android creates the Application object from your custom
Application class.
• To register your custom Application class, open the AndroidManifest.xml file and
edit the application element so its name attribute specifies the name of your custom
Application class.
• To get a reference to the Application object, you can use the getApplication method
of the Context class.
• Once you have a reference to the Application object, you can use it just as you
would use any other object.
Figure 11 -2 How to register and use the Application object
344 Section 3 The News Reader app
How to work with services
A service is an Android component that does not provide a user interface.
Instead, it performs a task that runs in the background. Since a service continues
to run even if the user switches to another application, services should be used
for tasks that should run independently of activities. For example, the News
Reader app could use a service to download updates from the network, even
when another app is running. Similarly, a Music Player app could use a service
to play music even while another app is running.
The lifecycle of a service
Figure 11 -3 shows two possible lifecyles of a service. The service on the
left is an unbound service, which is a service that does not return a result to the
caller. This type of service is created and started when a component such as an
activity calls the startService method to start it. Then, the service runs until it's
stopped.
An unbound service is typically stopped in one of three ways. First, another
component such as an activity can call the stopService method to stop it. Second,
the service can call the stopSelf method to stop itself. Third, Android can stop
the service when the user turns off the device or if the device runs low on
memory.
The service on the right is a bound service, which is a service that can
interact with one or more components. This type of service is started when a
component calls the bindService method to bind to it. Then, other components
can bind to the service at the same time. The service runs as long as at least one
component is bound to it. However, when the last component unbinds, Android
stops the service.
Although a service runs in the background, a service does not run in a
background thread. On the contrary, it runs in the same thread as the component
that started it. As a result, if your service is going to perform any long running
tasks such as networking or file I/O, you should create a new thread within the
service to perform those tasks. Otherwise, your user interface may become
unresponsive.
In this chapter, you'll learn how to use an unbound service, which is the
most common type of service. However, if you need a service to interact with
an activity, you can search the Internet to learn more about how to do this. Also,
a service can be both bound and unbound. To create such a service, you can
implement all necessary lifecycle methods. For example, you can implement
the onStartCommand and onBind methods. Then, you can call the startService
method to run the service indefinitely, and you can call the bindService command
to bind components to the service.
Chapter 11 How to work with services and notifications
345
The lifecycle of a service
First call
to startService()
First call
to bindService()
Subsequent
calls to
start Service()
onCreate()
I
onStartCommandO
i
Service
running
Active
Lifetime
onCreate()
I
onBind()
Service running
with bound
components
i
onUnbindO
Subsequent calls
to bindServiceO
Call to
unbindServiceO
Call to
stopServiceO
orstopSelf()
onDestroyO
onDestroyO
All clients unbind
by calling
unbindServiceO
Service
shut down
Service
shut down
Unbound
service
Bound
service
Description
• A service performs tasks in the background and does not provide a user interface.
Services should be used for tasks that run independently of activities. For example,
a service might download updates from the network, play music, and so on.
• A service continues to run even if the user switches to another app.
• An unbound service does not interact with other components such as activities.
This type of service runs until it's stopped by another component or by itself.
• A bound service can interact with components such as activities. This type of
service runs only as long as another component is bound to it. Multiple
components can bind to the service at once, but when all of them unbind, the service is
destroyed.
Figure 11 -3 The lifecycle of a service
346 Section 3 The News Reader app
How to create a service
Figure 11 -4 shows the starting code for an unbound service. This service
implements all four methods that you typically need for an unbound service.
To start, this code imports the three classes that are needed to implement
a service: the Service, Intent, and IBinder classes. Then, the code declares that
the NewsReaderService class extends the Service class. Within this class, the
onCreate method is called when the service is first created. As a result, it's a
good place to put code that's only executed once.
The onStartCommand method is executed each time a component uses the
startservice method to start this service. As a result, it's a good place to put code
that may need to be executed multiple times.
The onStartCommand method returns an int value that tells Android what to
do if the device runs low on memory and Android needs to kill the thread for the
service. The Service class provides three constants that you can return from this
method.
The START_STICKY constant tells Android to leave the service in the
started state. Then, when more memory becomes available, restart the service by
calling the onStartCommand method with a null intent for the intent parameter.
In other words, the "start" for the service is "sticky", so the service should be
restarted as soon as possible. This constant is appropriate for services that should
always be running in the background. For example, if a service is started once
and executes a task at specified intervals, you probably want to restart it.
The START_NOT_STICKY constant tells Android to stop the service and to
not restart it. In other words, the "start" is not "sticky", so the service should not
be restarted when memory becomes available. This constant is appropriate for
a service that doesn't need to be completed and is called by the app at specified
intervals. For example, an app might start a service every 15 minutes to perform
a task. If the service gets destroyed while doing that task, it's probably best to let
it stay stopped since the app will start it again anyway when the app is restarted.
The START_REDELIVER_INTENT constant tells Android to stop the
service. However, when more memory becomes available, Android should restart
the service by calling the onStartCommand method with the last delivered intent
as the intent parameter. In other words, Android calls the onStartCommand
method and "redelivers" the last intent. This constant is appropriate for a service
that performs a task that needs to be completed. Android continues to redeliver
the intent until the service calls its stopSelf method, which indicates that the
service has completed.
The onBind method is executed when another component attempts to bind
to the service. This method returns an IBinder object that the component can use
to interact with the service. For an unbound service, such as the service shown
in this chapter, you can return a null value. However, the onBind method is an
abstract method that must be implemented. As a result, you can't completely
omit this method, even for an unbound service.
The onDestroy method is executed when the service is no longer in use and
is being destroyed. As a result, it's a good place to clean up any resources that
need to be cleaned up.
Chapter 11 How to work with services and notifications 347
The NewsReaderService class with its lifecycle methods implemented
package com.murach.newsreader;
import android.app.Service;
import android•content•Intent;
import android•os•IBinder;
public class NewsReaderService extends Service {
©Override
public void onCreate() {
// Code that's executed once when the service is created.
}
©Override
public int onStartCommand(Intent intent, int flags, int startid) {
// Code that's executed each time another component
// starts the service by calling the startService method,
return START_STICKY;
}
©Override
public IBinder onBind(Intent intent) {
// Code that's executed each time another component
// binds to the service by calling the bindService method.
// This method is required.
// For an unbound service, you can return a null value.
return null;
}
©Override
public void onDestroy() {
// Code that's executed once when the service
// is no longer in use and is being destroyed.
}
}
Some constants of the Service class
Constant If Android destroys the thread for the service due
to lack of memory, Android should...
START_STICKY Leave the service in the started state. When memory becomes
available, restart the service by calling the onStartCommand
method with a null value for the intent parameter.
START_NOT_STICKY Stop the service and do not restart it. As a result, the service will
only restart if the app resumes and executes a method that restarts
the service.
START_REDELIVER_INTENT Stop the service. When memory becomes available, restart the
service by calling the onStartCommand method with the last
delivered intent for the intent parameter.
Figure 11 -4 How to create a service
348 Section 3 The News Reader app
How to register a service
Before you can use a service, you must register it. The first example in figure
11-5 shows how to do that. To start, you open the manifest file and add a service
element at the same indentation level as the activity elements. Then, use the
name attribute of the service element to specify the name of the class for your
service.
By default, a service is public and can be started by other applications.
However, if you want to make a service private, you can add an export attribute
to the service element and set it to false as shown in the second example.
How to start and stop a service
Before you can start a service, you must create an Intent object for the
service. In this figure, for instance, the third example creates an Intent object for
the service that's defined by the NewsReaderService class.
You can start a service by calling the startService method and passing the
intent for the service to it. In this figure, the fourth example starts the service.
Since the startService method belongs to the Context class, you can call it from
any component, including an activity or the Application object.
When you use the startService method to start a service, the service runs
indefinitely. In some cases, that's what you want. In other cases, you may want
to stop the service.
For instance, if you want to allow the user to stop a service, you can provide
a menu item that stops the service. Then, when the user selects that menu item,
you can use the stopService method to stop the service as shown in the fifth
example.
Or, if you have a service that performs a task, you may want to stop the
service after it finishes its task. To do that, you can call the stopS elf method from
within the class for the service as shown in the sixth example.
Chapter 11 How to work with services and notifications
349
A public service in the AndroidMamfest.xml file
<service
android:name=".NewsReaderService">
</service>
A private service in the AndroidMamfest.xml file
<service
android:name=".NewsReaderService"
android:exported="false">
</service>
Code that uses a service
Create the Intent object for the service
Intent servicelntent = new Intent(this, NewsReaderService.class);
Start the service
startService(servicelntent);
Stop the service from an activity or other component
stopService(servicelntent);
Stop the service from within the service
stopSelf();
Some methods of the Context class
Method
Description
startService (intent) Start the service that's specified by the intent.
stopService (intent) Stop the service that's specified by the intent.
A method of the Service class
Method
Description
stopSelf () Stops the current service.
Description
• Before you can use a service, you must register it.
• To register your service, add a service element to the AndroidMamfest.xml file at
the same indentation level as the activity elements and use the name attribute of the
service element to specify the name of the class for your service.
• To make a service private, so it can only be accessed by the current app, you can
add an exported attribute and set it to a value of false.
• If a component starts a service by calling the startService method, the service runs
until another component stops it by calling the stopService method, until it stops
itself by calling the stopSelf method, or until the device is turned off.
Figure 11 -5 How to register, start, and stop a service
350 Section 3 The News Reader app
How to use threads with services
As mentioned earlier in this chapter, a service does not run in its own thread
by default. As a result, if you want a service to perform a long running task such
as accessing a network or file I/O, you should create a new thread within the
service. If, for example, you want a thread to execute a single task, you can use
the AsyncTask class to create a background thread for that class. Or, if you want
a thread to execute a task at a specified interval, you can use the TimerTask and
Timer classes to create and schedule a thread as shown in figure 11-6.
The NewsReaderService class shown in this figure begins by extending the
Service class. Within the class, the first statement declares an instance variable
for the Timer class. This instance variable is used to schedule when the timer
task is executed.
Android calls the first three methods of this class at various times in the
lifecycle of this service. This code sends messages to the LogCat view to show
that they have been executed. However, since no components in the app attempt
to bind to this service, the onBind method should never be called. Of these
metods, the onCreate method calls the startTimer method, and the onDestroy
method calls the stopTimer method.
The startTimer method begins by creating a TimerTask object and overriding
its run method. This method creates the thread for the task. As a result, all of the
long running code for the task should be placed within this method. For now,
this example just sends a message to the LogCat view that indicates that the
timer task has been executed. After creating the TimerTask object, the startTimer
method creates a Timer object and uses it to schedule the TimerTask object to
run after a delay of 10 seconds and to continue to run every 10 seconds after that.
The stopTimer method begins by checking to make sure the Timer object is
not null. If so, it uses the Timer object to cancel the thread for the timer task.
Chapter 11 How to work with services and notifications 351
A Service class that runs a timed task in its own thread
package com.murach.newsreader;
import java.util.Timer;
import java.util.TimerTask;
import android.app.Service;
import android•content•Intent;
import android•os•IBinder;
import android.uti1.Log;
public class NewsReaderService extends Service {
private Timer timer;
©Override
public void onCreate() {
Log.d("News reader", "Service created");
startTimer();
}
©Override
public IBinder onBind(Intent intent) {
Log.d("News reader", "No binding for this service");
return null;
}
©Override
public void onDestroy() {
Log.d("News reader", "Service destroyed");
stopTimer();
}
private void startTimer() {
// create task
TimerTask task = new TimerTask() {
©Override
public void run() {
Log.d("News reader", "Timer task executed");
}
};
// create and start timer
timer = new Timer(true);
int delay = 1000 * 10; // 10 seconds
int interval = 1000 * 10; // 10 seconds
timer.schedule(task, delay, interval);
}
private void stopTimer() {
if (timer != null) {
timer.cancel();
}
}
}
Figure 11 -6 How to use threads with services
352 Section 3 The News Reader app
How to test a service
In the next chapter, you'll learn how to start a service when the device boots.
For now, you can test a service by starting it when the app starts. To do that, you
can call the startService method from the onCreate method of the Application
object as shown in figure 11-7. That way, Android starts the service once when
the app starts. For now, this a logical place to start the News Reader service.
Since a service doesn't have a user interface, you can test it by using the
Log class to print messages to the LogCat view. Then, after you start the service,
you can check the LogCat view to make sure that the service is running and
performing its task correctly.
In this figure, the first two messages show that the app has started and the
service has been created. Then, the next few messages show that the timer task
has been executed. Finally, if the last message is shown, it indicates that the
service has been destroyed. This message is typically displayed when the service
is stopped because the stopService method has been called by another component,
or the stopSelf method has been called by the service after it has completed its
task.
Chapter 11 How to work with services and notifications 353
The onCreate method of the Application object
©Override
public void onCreate() {
super.onCreate();
Log.d("News reader"# "App started");
// start service
Intent service = new Intent(this, NewsReaderService.class);
startService(service);
}
The messages that are displayed in the LogCat view
App started
Service created
Timer task executed
Timer task executed
Timer task executed
• • •
Service destroyed
Description
• To start a service when the app starts, you can call the startService method from the
onCreate method of the Application object. That way, the service is started once,
when the app starts.
• To test a service, you can use the Log class to print messages to the LogCat view.
Figure 11 -7 How to test a service
354 Section 3 The News Reader app
How to view all services
Figure 11 -8 shows how to use the Settings app to view all of the apps
and services that are running on a device or emulator. To start, you can start
the Settings app on the device or emulator. From there, the procedure differs
depending on the Android API that's running on the device. This figure shows
how to view the apps and services for APIs 23 and 19. However, you should be
able to use a similar procedure for most APIs. If necessary, you can search the
Internet to learn how to view the apps and services for your device.
In this figure, the screen shows that three apps and two services are running.
The Settings app is the app that's currently being used to display the apps
and services. However, it doesn't use a service. The News Reader app is also
running, and it uses a service. Similarly, the Android Keyboard app is running,
and it uses a service as well.
For most devices, it would be unusual for only three apps to be running. To
get an idea of how many apps and services typically run on a device, you should
take a moment to browse through the apps on a phone or tablet that has been
running for a while. Most likely, you'll see a long list of apps and services.
Chapter 11 How to work with services and notifications
355
The apps and services that are running on the
3C
4:22
Runnin... show cached processes
Device memory
H System
■ Apps
H Free
App RAM usage
—. Settings
^ 1 process and 0
News Reader
1 process and 1
services
service
181 MB of RAM
46 MB of RAM
654 MB of RAM
28 MB
8 4 MB
01:26
Android Keyboard (AOSP) 9.0 MB
1 process and 1 service 06:09
o
D
Procedure (API 23)
1. Start the Settings app.
2. Select the Developer Options item.
3. Select the Running Services item.
4. View the apps and services.
Procedure (AP119)
1. Start the Settings app.
2. Select the More tab.
3. Select the Application Manager item.
4. If necessary, display the Running tab. To do that, you may need to scroll to the
right.
5. View the apps and services.
Description
• You can use the Settings app to view all of the apps and services that are running
on a device or emulator. The procedure for doing this varies depending on the API
version.
Figure 11 -8 How to view services
356 Section 3 The News Reader app
How to work with notifications
A notification provides a way for a service to display a message even when
another app is running. For example, the service for the News Reader app could
display a notification that indicates that an updated feed is available.
How notifications work
Figure 11 -9 shows how notifications work. To start, when Android first
displays a notification, the notification appears as an icon in the notification area
at the top of the screen. In this figure, the first two screens display a notification
in the notification area. Here, the first screen is the News Reader app and the
second screen is the Home screen. Both screens display a notification for the
News Reader app at the top of the screen.
When one or more notifications have been displayed, the user can pull down
on the notification area to open the notification drawer. This allows the user
to view all notifications. In this figure, the third screen shows the notification
drawer when it contains only one notification, a notification that indicates that an
updated feed is available from the News Reader app. However, it's possible for
the notification area and drawer to display multiple notifications.
Often, a user can perform an action by clicking on the notification in the
notification drawer. Typically, this starts the app that displayed the notification.
In this figure, if the user selects the notification, it starts the News Reader app
and displays the updated feed.
Chapter 11 How to work with services and notifications 357
The News Reader app after it has started a notification
4: 2
""N News Reader O
CNN.com - Technology
Tuesday 10:18 AM (Sep 15)
Prosthetic hand 'tells' the brain
what it is touching
A notification displayed in the notification area
36 4:33
Qj> GOO^I.
The notification drawer
4:37 PM
Wednesday, September 16
" n ©
News Reader 4:33 pm
Select to view updated feed.
Description
• A notification provides a way for a service to display a message even when another
app is running.
• When it's first displayed, a notification appears as an icon in the notification area at
the top of the screen.
• To view a notification, the user can pull down on the notification area to open the
notification drawer. Then, the user can often execute an action by clicking on the
notification. Typically, this starts the app that displayed the notification.
Figure 11 -9 How notifications work
358 Section 3 The News Reader app
How to create a pending intent
To create the action for a notification, you can create a pending intent, which
is a special type of intent that can be passed to another app and executed by that
app at a later time. That way, you can pass this intent to Android, so it can use
the intent in its notification system.
Before you learn how to create a pending intent for a notification, you need
to understand some terminology. To start, the back stack is a stack of all recently
used activities. These activities are sorted in the order in which they were used.
When the user clicks the Back button, the top activity is removed from the stack,
and the next activity is displayed.
All activities in the back stack belong to a task, which is a cohesive unit that
can contain multiple activities. For example, the News Reader task contains any
Items or Item activities that are in the back stack. When the user clicks the Home
button or the Task button to the right of that button, the current task moves to the
background. However, all of the activities for that task remain on the back stack
for that task. This back stack can be referred to as the task history. That way, if
you navigate back to the task, you can continue the task where you left off.
The code examples in figure 11-10 show how to create a pending intent for a
notification. The first step is to create a regular intent for an activity as described
in the previous chapter. However, when starting an activity from a notification,
it's common to use the addFlags method to control how the activity is displayed
in the back stack. In most cases, you want to set the "activity clear top" flag as
shown in step 1. That way, if the activity is already in the task, the other activities
in the task that are on top of the specified activity are cleared from the stack. This
brings the specified activity to the top of the stack, which is usually what you
want.
If you don't set this flag, Android creates a new instance of the activity
and adds it to the top of the stack for the task. If the task already contains this
activity, this creates multiple instances of the same activity. Sometimes this is
what you want. For example, you may want to place the same activity in the
stack twice if it displays different data.
The second step is to create the pending intent. To do that, you typically
create a flag that tells Android what to do if an intent with the same name already
exists but hasn't yet been executed. In most cases, you want to use an "update
current" flag to keep the current intent but update its data with any data in the
new intent. (This is the "extra" data that you can set with the putExtra method.)
Then, you pass that flag and the intent you created in step 1 to the getActivity
method of the Pendinglntent class. This returns a Pendinglntent object that you
can use in a notification. Here, the second parameter specifies a code that isn't
currently used by Android. As a result, you can specify any int value you want
for this parameter.
Chapter 11 How to work with services and notifications
359
The classes used to work with pending intents
android.app.Pendinglntent
android.content.Intent
How to create a pending intent
Step 1: Create the intent
Intent notificationlntent = new Intent(this, ItemsActivity.class)
.addFlags(Intent.FLAG_ACTIVITY_CLEAR_TOP);
Step 2: Create the pending intent
int flag = Pendinglntent.FLAG_UPDATE_CURRENT;
Pendinglntent pendinglntent =
Pendinglntent.getActivity(this, 0, notificationlntent, flag);
Some constants and methods of the Intent class
Constant
FLAG ACTIVITY CLEAR TOP
FLAG ACTIVITY NEW TASK
Method
addFlags(flags)
Description
If the activity is already running, it closes all
activities on top of the specified activity, which brings the
specified activity to the top of the task history.
Creates a new task for the activity and places it on
top of the task history.
Description
Adds flaes that control the behavior of the intent.
Some constants and methods of the Pendinglntent class
Constant Description
FLAG UPDATE CURRENT
Method
getActivity(context, code,
intent, flags)
If the pending intent already exists, keep it but
replace its extra data with the extra data from
the new intent.
Description
Returns a Pendinglntent object for the specified
activity intent with the specified flags.
Description
• A pending intent is an intent that can be passed to other apps so that they can
execute the intent at a later time.
• The back stack is a stack of all recently used activities. These activities are sorted
in the order in which they were used. When the user clicks the Back button, the top
activity is removed from the stack, and the next activity is displayed.
• A task is a cohesive unit that can contain multiple activities. Every activity belongs
to a task. A task can move to the background when the user starts a new task or
navigates away from the current task.
• The task history is the back stack for a particular task.
Figure 11-10 How to create a pending intent
360 Section 3 The News Reader app
How to create a notification
Once you've created a pending intent for a notifcation, you can create the
notification as shown in figure 11-11. When you do, you set the pending intent in
the notification.
The first step in creating a notification is to declare all of the variables that
you need. In this figure, the first step declares four variables. These variables
specify (1) the icon, (2) the ticker text that's displayed when the notification first
appears, (3) the title of the notification when it's displayed in the drawer, and (4)
the text for the notification when it's displayed in the drawer. Here, the icon is the
same launcher icon that's used for the app. Similarly, the title of the notification
is the same as the name of the app.
The second step in creating a notification is to create the Notification object.
To do that, you create an object from the Builder class that's nested in the
Notification class. Then, you use the various set methods of the Builder object
to set the various components of the notification. For example, you can use the
setContentlntent method to set the pending intent for the notification. Similarly,
you can use the setSmalllcon method to set the icon for the notification. In
addition, if you pass a true value to the setAutoCancel method, Android
automatically removes the intent if the user selects it in the drawer, which is usually what
you want. Finally, you use the build method to build the Notification object.
Since all of these methods are designed to be chained, you can chain them
together as shown in this figure.
After creating a Notification object like the one shown in this figure, you
typically display it. To do that, you use a system service as shown in the next
figure.
With Android 4.1 (API 16) and later, you can use the Builder class that's
nested within the Notification class to create a Notification object as shown in
this figure. In this book, the News Reader app uses this technique. As a result, it
specifies a minimum API of 16. Fortunately, that includes most Android devices.
However, if you want to support older versions of Android, you can use the
Builder class that's nested within the NotificationCompat class that's available
from the v4 support library. To do that, you start by adding a dependency for
the v4 support library to your project. Then, you import the NotificationCompat
class from the android.support.v4.app package. Finally, you use the Builder
class that's nested within the NotificationCompat class to create the Notification
object. This Builder class works the same as the Builder class that's nested
within the Notification class shown in this figure.
Chapter 11 How to work with services and notifications
361
The class used to work with notifications
android.app.Notification
How to create a notification
Step 1: Create the variables for the notification
int icon = R.drawable.ic_launcher;
CharSeguence tickerText = "Updated news feed is available";
CharSequence contentTitle = getText(R.string.app_name);
CharSeguence contentText = "Select to view updated feed.";
Step 2: Create the Notification object
Notification notification =
new Notification.Builder(this)
•setSmallIcon(icon)
.setTicker(tickerText)
.setContentTitle(contentTitle)
.setContentText(contentText)
.setContentlntent(pendinglntent)
.setAutoCancel(true)
.buildO;
Constructors and methods of the Notification.Builder class
Constructor
Notification.Builder(context)
Method
ion
Creates an object from the class with the
specified context.
ion
setSmallIcon(int)
setTicker(string)
setContentTitle(string)
setContentText(string)
setContentlntent(pendinglntent)
setAutoCancel(boolean)
build()
Set the resource ID of the icon for the
notification.
Set the ticker text that's briefly displayed
when the notification is first displayed.
Sets the title of the notification.
Sets the text of the notification.
Sets the intent of the notification.
If true, Android automatically removes
the intent after it is selected.
Returns a Notification object.
Description
• With Android 4.1 (API 16) and later, you can use the Notification.Builder class to
create a Notification object.
• To support older versions of Android, you can use the NotiflcationCompat.Builder
class that's available from the v4 support library.
Figure 11-11 How to create a notification
362 Section 3 The News Reader app
How to work with system services
A system service is a service that's provided by the Android operating
system. Android provides system services that allow you to work with
notifications, locations, network connections, soft keyboards, and so on.
In chapter 6, for example, you learned how to use the input method service
to get an InputMethodManager object, and you learned how to use that object
to hide a soft keyboard. In this chapter, you'll learn how to use two services: the
notification service and the network connection service. Both of these system
services can be used by the News Reader app.
How to display or remove a notification
Figure 11-12 shows how to use a system service to display or remove
a notification. To start, you can call the getSystemService method to get a
NotificationManager object. Since this method is available from the Context
class, you can call it directly from any component such as an activity or service.
Once you have a NotificationManager object, you can call its notify method
to display the notification. But first, you should declare an ID for the notification
so you can pass it to the notify method. This ID should be unique within your
app. That way, your app can uniquely identify that notification later. For example,
if you want to remove a notification later, you can pass this ID to the cancel
method of the NotificationManager object.
Chapter 11 How to work with services and notifications
363
Some constants and methods of the Context class
Method
getSystemService(name)
Constant
ion
Returns the appropriate object for the specified
system-level service.
ion
NOTIFICATION_SERVICE
LOCATION_SERVICE
CONNECTIVITY_SERVICE
WIFI_SERVICE
INPUT_METHOD_SERVICE
Returns a NotificationManager object for
displaying and removing notifications.
Returns a LocationManager object for working
with GPS updates.
Returns a ConnectivityManager object for
working with network connections.
Returns a WifiManager object for working with
Wi-Fi connectivity.
Returns an InputMethodManager object for
displaying and hiding soft keyboards.
The classes used to work with notifications
android.app.Not i f icat ionManager
Some methods of the NotificationManager class
Method Description
notify(id, notification)
cancel(id)
Displays the specified notification and sets
its ID to the specified ID. This ID should be
unique within your application.
Cancels the notification with the specified ID,
How to get a NotificationManager object
NotificationManager manager = (NotificationManager)
getSystemService(NOTIFICATION_SERVICE);
How to display a notification
final int NOTIFICATION_ID = 1;
manager.notify(NOTIFICATION_ID, notification);
How to remove a notification
manager.cancel(NOTIFICATION_ID);
Description
• A system service is a service that's provided by the Android operating system.
• You can use the NotificationManager object to display or remove a notification.
Figure 11-12 How to display and remove notifications
364 Section 3 The News Reader app
How to check if a network connection
is available
Figure 11-13 shows how to use a system service to check if a network
connection is available to the device. This is often helpful since attempting to
connect to the network when the network isn't available uses the battery
unnecessarily. As a result, most apps should check if a connection is available before
connecting to the network. In particular, the News Reader app should check if
a connection is available before attempting to download the news feed from the
Internet.
The first statement in the example calls the getSystemService method of
the Context class to get a ConnectivityManager object. Then, the second
statement calls the getActiveNetworklnfo method to get a Networklnfo object that
contains data about the active network for the device. If this object is not null,
the example calls its isConnected method to determine whether it's possible for
the device to connect to a network. If so, it downloads the news feed from the
Internet.
Chapter 11 How to work with services and notifications
365
The classes used to work with connectivity
android.app.ConnectivityManager
android.net.Networklnfo
How to check if you have a connection to the network
// get Networklnfo object
ConnectivityManager connectivityManager = (ConnectivityManager)
getSystemService(Context.CONNECTIVITY_SERVICE);
Networklnfo networklnfo =
connectivityManager.getActiveNetwork!nfo();
// if network is connected, download feed
if (networklnfo != null && networklnfodisconnected())
new DownloadFeed().execute();
}
{
A method of the ConnectivityManager class
Method
getActiveNetworklnfo()
Description
Returns a Networklnfo object that contains info
about the active network for the device.
Some methods of the Networklnfo class
Method
isConnected()
isRoaming()
getTypeString()
ion
Returns a boolean value that indicates whether it's possible
for the device to connect to the network.
Returns a boolean value that indicates whether the device
is roaming on the network and whether the connection may
incur additional costs.
Returns a string for the type of the network such as "WIFI"
or "MOBILE'C
The permission in the AndroidManifest.xml file
<uses-permission android:name="android.permission.ACCESS_NETWORK_STATE" />
Description
• You can use a ConnectivityManager object to check if a network connection is
available to the device.
Figure 11-13 How to check if a network connection is available
366 Section 3 The News Reader app
The News Reader app
At this point, you've learned the skills necessary to make three
improvements to the News Reader app. First, you can add a service that periodically
downloads a new feed and checks for an updated feed. Second, you can have
that service display a notification whenever an updated feed is available. Third,
you can add a custom Application object to store the milliseconds for the current
news feed and to start the service.
To make these improvements, you can add a custom Application class like
the one shown in figure 11-1. In addition, you can add a NewsReaderService
class like the one shown in figure 11-14. Finally, you can make some changes to
the Items Activity and FilelO classes as shown in figures 11-15 and 11-16.
The NewsReaderService class
Figure 11-14 shows the code for the NewsReaderService class. Part 1 shows
the lifecycle methods for the service. Here, the onCreate method gets references
to the Application and FilelO objects and calls the startTimer method that starts
the thread that performs the tasks for the service. The onStartCommand doesn't
perform any tasks, but it returns the START_STICKY constant so Android can
automatically restait the service if necessary. The onBind method isn't used, so it
returns a null value. And the onDestroy method stops the thread for the service.
Part 2 begins by showing the startTimer method. This method creates the
thread that executes the task for the service. This thread begins by downloading
the file for the feed from the Internet. Then, it reads the file and parses it into an
RSSFeed object.
After reading the RSSFeed object, this code checks whether the publication
date of the new feed is newer than the current publication date that's stored in
the Application object. If so, this code updates the Application object with the
milliseconds for the publication date of the new feed. Then, it uses the
sendNotiflcation method to display a notification that indicates that an updated
feed is available.
The stopTimer method stops the timer thread for the service. Since this
method is called from the onDestroy method, this only occurs if the service
is being destroyed. And since this app doesn't call the stopService or stopSelf
methods, the service is typically only destroyed when the user turns the device
off.
Part 3 shows the sendNotiflcation method. This method creates a pending
intent for the notification. It creates the variables for the notification. It creates
the notification. And it uses a system service to display the notification.
This class contains many statements that display messages to the LogCat
view. That provides a way for you to verify that the service is working as
expected. Once you're sure the service is working correctly, you can remove
some or all of these statements.
Chapter 11 How to work with services and notifications 367
The NewsReaderService class Page 1
package com.murach.newsreader;
import java.util.Timer;
import java.util.TimerTask;
import android.app.Notification;
import android.app.NotificationManager;
import android.app.Pendinglntent;
import android.app.Service;
import android.content.Intent;
import android.os.IBinder;
import android.uti1.Log;
public class NewsReaderService extends Service {
private NewsReaderApp app;
private Timer timer;
private FilelO io;
©Override
public void onCreate() {
Log.d("News reader", "Service created");
app = (NewsReaderApp) getApplication();
io = new FilelO(getApplicationContext());
startTimer();
}
©Override
public int onStartCommand(Intent intent, int flags, int startid) {
Log.d("News reader", "Service started");
return START_STICKY;
}
©Override
public IBinder onBind(Intent intent) {
Log.d("News reader", "Service bound - not used!");
return null;
}
©Override
public void onDestroy() {
Log.d("News reader", "Service destroyed");
stopTimer();
}
Figure 11-14 The NewsReaderService class (part 1 of 3)
368 Section 3 The News Reader app
The NewsReaderService class Page 2
private void startTimer() {
TimerTask task = new TimerTask() {
©Override
public void run() {
Log.d("News reader", "Timer task started");
io.downloadFile() ;
Log.d("News reader", "File downloaded");
RSSFeed newFeed = io•readFile();
Log.d("News reader", "File read");
// if new feed is newer than old feed
if (newFeed.getPubDateMillis() > app.getFeedMillis()) {
Log.d("News reader", "Updated feed available.");
// update app object
app.setFeedMillis(newFeed.getPubDateMillis());
// display notification
sendNotification("Select to view updated feed.");
}
else {
Log.d("News reader", "Updated feed NOT available.");
}
}
};
timer = new Timer(true);
int delay = 1000 * 60 * 60; // 1 hour
int interval = 1000 * 60 * 60; // 1 hour
timer.schedule(task, delay, interval);
}
private void stopTimer() {
if (timer != null) {
timer.cancel();
}
}
Figure 11-14 The NewsReaderService class (part 2 of 3)
Chapter 11 How to work with services and notifications 369
The NewsReaderService class Page 3
private void sendNotification(String text) {
// create the intent for the notification
Intent notificationlntent = new Intent(this, ItemsActivity.class)
.addFlags(Intent.FLAG_ACTIVITY_NEW_TASK);
// create the pending intent
int flags = Pendinglntent.FLAG_UPDATE_CURRENT;
Pendinglntent pendinglntent =
Pendinglntent.getActivity(this, 0, notificationlntent, flags);
// create the variables for the notification
int icon = R.drawable.ic_launcher;
CharSeguence tickerText = "Updated news feed is available";
CharSeguence contentTitle = getText(R.string.app_name);
CharSeguence contentText = text;
// create the notification and set its data
Notification notification =
new Notification.Builder(this)
•setSmallIcon(icon)
.setTicker(tickerText)
.setContentTitle(contentTitle)
.setContentText(contentText)
.setContentlntent(pendinglntent)
.setAutoCancel(true)
.build();
// display the notification
NotificationManager manager = (NotificationManager)
getSystemService(NOTIFICATION_SERVICE);
final int NOTIFICATION_ID = 1;
manager.notify(NOTIFICATION_ID, notification);
}
}
Figure 11-14 The NewsReaderService class (part 3 of 3)
370 Section 3 The News Reader app
The ItemsActivity class
Figure 11-15 shows the ItemsActivity class. For the most part, this class is
the same as the ItemsActivity class described in the previous chapter. As a result,
you should already understand most of the code for this class.
However, this class has a few new statements that work with the Application
object. These statements are highlighted. In the onResume method, the second
statement gets the milliseconds for the publication date of the feed from the
Application object. Then, an if statement checks whether the milliseconds for the
publication date of the feed are equal to -1. If so, the app is being started for the
first time. As a result, this code downloads the feed, reads the feed, and displays
it. Otherwise, this code reads and displays the feed, or just displays it.
In the onPostExecute method of the ReadFeed class, the second statement
sets the milliseconds for the publication date of the feed in the Application
object. In other words, every time the app reads the feed, it sets the milliseconds
in the Application object. As a result, the milliseconds for the feed are only equal
to -1 the first time the app starts.
The FilelO class
Figure 11-16 shows the FilelO class. For the most part, this class is the same
as the FilelO class described in the previous chapter. As a result, you should
already understand most of the code for this class.
However, the downloadFile method of this class uses a system service
to check if a network connection is available before it attempts to download
the file. These statements are highlighted. Here, the first two statements get
a Networklnfo object. Then, this code uses the Networklnfo object to check
whether a network connection is available. If so, this code downloads the file
from the Internet. If not, this code does not attempt to connect to the network,
which is good since that conserves the battery of the device.
Chapter 11 How to work with services and notifications 371
The ItemsActivity class Page 1
package com.murach.newsreader;
import java.util.ArrayList;
import java.util.HashMap;
import java.util.List;
import android.os.AsyncTask;
import android•os.Bundle;
import android.app.Activity;
import android.content.Intent;
import android.uti1.Log;
import android•vi ew.Menu;
import android.view.MenuItern;
import android.view.View;
import android.widget.AdapterView;
import android.widget.ListView;
import android.widget.SimpleAdapter;
import android.widget.TextView;
import android.widget.Toast;
import android.widget.AdapterView.OnltemClickListener;
public class ItemsActivity extends Activity
implements OnltemClickListener {
private NewsReaderApp app;
private RSSFeed feed;
private long feedPubDateMillis;
private FilelO io;
private TextView titleTextView;
private ListView itemsListView;
©Override
protected void onCreate(Bundle savedlnstanceState) {
super.onCreate(savedlnstanceState);
setContentView(R.layout.activity_iterns);
titleTextView = (TextView) findViewById(R.id.titleTextView);
itemsListView = (ListView) findViewById(R.id.itemsListView);
itemsListView.setOnltemClickListener(this);
// get references to Application and FilelO objects
app = (NewsReaderApp) getApplication();
io = new FilelO(getApplicationContext());
}
©Override
public void onResume() {
super.onResume();
// get feed from app object
feedPubDateMillis = app.getFeedMillis();
Figure 11-15 The ItemsActivity class (part 1 of 3)
372 Section 3 The News Reader app
The ItemsActivity class Page 2
if (feedPubDateMillis == -1) {
new DownloadFeed().execute(); // download, read, and display
}
else if (feed == null) {
new ReadFeed().execute(); // read and display
}
else {
updateDisplay(); // just display
}
}
class DownloadFeed extends AsyncTask<Void# Void, Void> {
©Override
protected Void doInBackground(Void... params) {
io.downloadFile() ;
return null;
}
©Override
protected void onPostExecute(Void result) {
Log.d("News reader", "Feed downloaded");
new ReadFeed().execute();
}
}
class ReadFeed extends AsyncTask<Void# Void, Void> {
©Override
protected Void doInBackground(Void... params) {
feed = io.readFile();
return null;
}
©Override
protected void onPostExecute(Void result) {
Log.d("News reader", "Feed read");
app.setFeedMillis feed.getPubDateMillis ;
ItemsActivity.this.updateDisplay();
}
}
public void updateDisplay()
{
if (feed == null) {
titleTextView.setText("Unable to get RSS feed");
return;
}
// set the title for the feed
titleTextView.setText(feed.getTitle());
// get the items for the feed
List<RSSItem> items = feed.getAllltems();
Figure 11-15 The ItemsActivity class (part 2 of 3)
Chapter 11 How to work with services and notifications 373
The ItemsActivity class Page 3
// create a List of Map<String# ?> objects
ArrayList<HashMap<String# String>> data =
new ArrayList<HashMap<String, String>>();
for (RSSItem item : items) {
HashMap<String, String> map = new HashMap<String, String>();
map.put("date", item.getPubDateFormatted());
map.put("title"# item.getTitle());
data.add(map);
}
// create the resource, from, and to variables
int resource = R.layout.listview_item;
String[] from = {"date", "title"};
int[] to = { R.id.pubDateTextView, R.id.titleTextView};
// create and set the adapter
SimpleAdapter adapter =
new SimpleAdapter(this, data, resource, from, to);
itemsListView.setAdapter(adapter);
Log.d("News reader", "Feed displayed");
}
©Override
public void onItemClick(AdapterView<?> parent. View v,
int position, long id) {
RSSItem item = feed.getltem(position);
Intent intent = new Intent(this, ItemActivity.class);
intent.putExtra("pubdate", item.getPubDate());
intent.putExtra("title", item.getTitle());
intent.putExtra("description", item.getDescription());
intent.putExtra("link", item.getLink());
this.startActivity(intent);
}
©Override
public boolean onCreateOptionsMenu(Menu menu) {
getMenuInflater().inflate(R.menu.activity_iterns, menu);
return true;
}
©Override
public boolean onOptionsItemSelected(MenuItem item) {
switch (item.getItemld()) {
case R.id.menu_refresh:
new DownloadFeed().execute();
Toast.makeText(this, "Feed refreshed!".
Toast.LENGTH_SHORT).show();
return true;
default:
return super.onOptionsItemSelected(item);
}
}
}
Figure 11-15 The ItemsActivity class (part 3 of 3)
374 Section 3 The News Reader app
The FilelO class Page 1
package com•murach.newsreader;
import java.io.FilelnputStream;
import java.io.FileOutputStream;
import Java.io.IOException;
import Java.io.InputStream;
import java.net.URL;
import j avax.xml.parsers.SAXParser;
import javax.xml.parsers.SAXParserFactory;
import org.xml.sax.InputSource;
import org.xml.sax.XMLReader;
import android.content.Context;
import android•net•ConnectivityManager;
import android.net.Networklnfo;
import android.uti1.Log;
public class FilelO {
private final String URL_STRING = "http://rss.cnn.com/rss/cnn_tech.rss";
private final String FILENAME = "news_feed.xml";
privat e Cont ext cont ext = nul1;
public FilelO (Context context) {
this.context = context;
}
public void downloadFile() {
// get Networklnfo object
ConnectivityManager cm = (ConnectivityManager)
context.getSystemService(Context.CONNECTIVITY_SERVICE);
Networklnfo networklnfo = cm.getActiveNetworkInfo();
// if network is connected, download feed
if networklnfo != null && networklnfodisconnected
try{
// get the URL
URL url = new URL(URL_STRING);
// get the input stream
InputStream in = url.openStream();
// get the output stream
FileOutputStream out =
context.openFileOutput(FILENAME, Context.MODE_PRIVATE);
Figure 11-16 The FilelO class (part 1 of 2)
Chapter 11 How to work with services and notifications 375
The FilelO class
Page 2
// read input and write output
byte[] buffer = new byte[1024];
int bytesRead = in.read(buffer);
while (bytesRead != -1)
{
out.write(buffer, 0# bytesRead);
bytesRead = in.read(buffer);
}
out.close();
in.close();
}
catch (IOException e) {
Log.e("News reader"# e.toString());
}
}
}
public RSSFeed readFileO {
try {
// get the XML reader
SAXParserFactory factory = SAXParserFactory.newlnstance();
SAXParser parser = factory.newSAXParser();
XMLReader xmlreader = parser•getXMLReader();
// set content handler
RSSFeedHandler theRssHandler = new RSSFeedHandler();
xmlreader•setContentHandler(theRssHandler);
// read the file from internal storage
FileInputStream in = context.openFileInput(FILENAME);
// parse the data
InputSource is = new InputSource(in);
xmlreader.parse(is);
// set the feed in the activity
RSSFeed feed = theRssHandler.getFeed();
return feed;
}
catch (Exception e) {
Log.e("News reader"# e.toString());
return null;
}
}
}
Figure 11-16 The FilelO class (part 2 of 2)
376 Section 3 The News Reader app
Perspective
The skills presented in this chapter should be enough to get you started
with services and notifications. However, this chapter doesn't show how to
work with bound services. As a result, if you need to use bound services, you
can search the Internet for more information about working with them.
In this chapter, the service is started when the app starts, which is
appropriate for some apps. However, you may also want to start a service when the
device boots or when the network becomes available. In the next chapter, you'll
learn how to do that.
Terms
service
unbound service
bound service
notification
notification area
notification drawer
Summary
• To store data and methods that apply to the entire application, you can
extend the Application class and add instance variables and methods.
• A service performs tasks in the background, does not provide a user
interface, and continues to run even if the user switches to another app.
• An unbound service does not interact with other components such as
activities, and runs until it's stopped by another component or by itself.
• A bound service can interact with components such as activities. This type
of service runs only as long as another component is bound to it. Multiple
components can bind to the service at once, but when all of them unbind, the
service is destroyed.
• To test a service, you can print messages to the LogCat view.
• You can use the Settings app to view all of the apps and services that are
running on a device or emulator.
• Before you can use an Application object or a service, you must register it.
• A notification provides a way for a service to display a message even when
another app is running.
• When it's first displayed, a notification appears as an icon in the notification
area at the top of the screen.
• To view a notification, the user can pull down on the notification area to
open the notification drawer.
pending intent
back stack
task
task history
system service
Chapter 11 How to work with services and notifications 377
• A pending intent is an intent that can be passed to other apps so that they can
execute the intent at a later time.
• The back stack is a stack of all recently used activities. These activities are
sorted in the order in which they were used.
• A task is a cohesive unit that can contain multiple activities. Every activity
belongs to a task.
• The task history is the back stack for a particular task.
• A system service is a service that's provided by the Android operating
system.
• You can use the NotiflcationManager object to display or remove a
notification, and you can use the ConnectivityManager object to check if a network
connection is available to the device.
Exercise 11-1 Work with a service
In this exercise, you'll create, register, and test a service. Then, you'll modify
the service so it stops itself.
Test the app
1. Open the project named ch 1 l_exl_Tester that's in the ex_starts directory.
2. Run the app. This should launch an activity that displays a message that
indicates that you should start this exercise by adding a service.
Create a service that runs indefinitely
3. Add a class named TesterService to the product. Modify this class so it
extends the Service class.
4. Add code that implements all four methods as described in figure 11-4.
Within each method, add a statement that displays a message in the LogCat
view. For the onCreate method, for example, add a statement like this:
Log.d("Test service", "Service created");
5. Open the AndroidMamfest.xml file for the project and register this service as
described in figure 11-5.
6. Open the Tester Activity class, and add a statement to its onCreate method that
starts the service.
7. Run the app. This should launch the activity described earlier in this exercise,
and it should display these messages in the LogCat view:
Service created
Service started
8. Change the orientation for the app one or more times. This should display
additional "Service started" messages in the LogCat view.
9. Navigate to another app. Then, navigate back to the Tester app. Note that this
does not display the "Service destroyed" message. As a result, this approach
is useful for services that you want to continue running.
378 Section 3 The News Reader app
10. Use the Settings app to view the service for the Tester app. This app should be
using 1 process and 1 service.
Create a service that stops itself
11. Open the TesterService class, and add two statements to the onStaitCommand
method. The first statement should display a message in the LogCat view
that says, "Task completed". The second statement should call the stopSelf
method.
12. Run the app. This should display these messages in the LogCat view:
Service created
Service started
Task completed
Service destroyed
This approach is useful for a service that you want to stop after it completes
a task. For long-running tasks, it's generally considered a best practice to use
the AsyncTask class to execute the task in a separate thread.
13. Comment out the two statements that you added to the onStaitCommand
method in step 11.
Add a timer that performs a task at specified intervals
14. Open the TesterService class, and add the startTimer and stopTimer methods
shown in figure 11-6.
15. Modify the startTimer method so it displays the first message after a delay of
1 second. Then, it should display the message every 10 seconds.
16. Modify the onCreate method so it calls the startTimer method.
17. Modify the onDestroy method so it calls the stopTimer method.
18. Run the app. This should display these messages in the LogCat view:
Service created
Service started
Timer task executed
Timer task executed
Timer task executed
• • •
19. Comment out the statements that call the startTimer and stopTimer methods.
20. Run the app. This should stop the timer from displaying a new message in the
LogCat view every 10 seconds.
Chapter 11 How to work with services and notifications 379
Exercise 11-2 Modify the notification
for the News Reader app
In this exercise, you'll modify the notification used by the News Reader app
presented in this chapter.
1. Open the project named ch 11 _ex2_NewsReader that's in the ex_starts
directory.
2. Open the NewsReaderService class. Then, review the code, and note how the
various methods display messages in the LogCat view.
3. In the startTimer method, modify the code so it only delays for 5 seconds
(instead of 1 hour) before it runs the timer task. Then, in the if/else statement,
add a statement that displays a notification even when no update is available.
The text for this notification should be: "Updated feed NOT available."
4. Run the app. After a delay of 5 seconds, it should display a notification in the
notification area. Pull down on this area to display the drawer and select the
notification. This should display the News Reader app.
5. Press the Back button to remove the current News Reader activity from the
stack and return to the previous activity such as the Home screen.
6. Modify the sendNotification method so it uses the "new task" flag instead of
the "clear top" flag.
7. Repeat step 4.
8. Press the Back button to remove the current activity from the stack. This
should exit the News Reader activity displayed by the notification, but it
should leave the original News Reader activity on the stack.
9. Press the Back button again to remove that activity from the stack. This
should remove the original News Reader activity from the stack and display
the previous activity such as the Home screen.
12
How to work
with broadcast receivers
Some Android apps need to respond to actions that are broadcast by the system.
For example, an app may need to start a service after the user turns the device
on. To do that, you can use an Android component known as a broadcast
receiver.
Other apps need to broadcast an action. For example, the service for the
News Reader app may want to broadcast an action when a new RSS feed is
available. Then, other components within the News Reader app, such as the
Items activity, can use a broadcast receiver to respond to that action. Or, other
apps can use a broadcast receiver to respond to that action.
How to work with system broadcasts 382
A summary of the system broadcasts 382
How to code a receiver for the boot completed broadcast 384
How to code a receiver for the connectivity changed broadcast 386
How to work with custom broadcasts 388
How to create and send a custom broadcast 388
How to code a receiver for a custom broadcast 390
Perspective 392
382 Section 3 The News Reader app
How to work with system broadcasts
As you use your Android device, the operating system can broadcast an
action that has occurred. For example, when the device finishes starting up,
Android broadcasts an action that indicates that the device has completed
booting. To receive these broadcasts, an app can include a component known as
a broadcast receiver. A broadcast receiver provides a way for the app to execute
code when the broadcast is received.
A summary of the system broadcasts
Every broadcast has an action string that uniquely identifies the action.
Figure 12-1 begins by showing five constants that define the action string for five
broadcasts that are commonly made by the Android operating system. The first
four constants are stored in the Intent class. These constants are general-purpose
constants that apply to many different types of apps. However, the fifth constant
is stored in the ConnectivityManager class. This constant is stored here because
it only applies to apps that use a network connection.
This figure only shows the action strings for five system broadcasts.
However, Android 4.0 (API 15) provides 121 of these actions, and each new
version of Android seems to add a few more. To view a list of these action
strings, you can use a text editor to open the broadcast_actions.txt file for one of
the Android platforms that have been installed on your system. This figure, for
example, shows the path for this text file for Android 6.0 (API 23).
Chapter 12 How to work with broadcast receivers
383
Two classes used to work with broadcasts
android.content.Intent
android.net .Connectivity-Manager
Some action constants of the Intent class
Constant
ACTION BOOT COMPLETED
ACTION BATTERY LOW
ACTION BATTERY OKAY
ACTION POWER CONNECTED
Action string /
ion
android.intent.action.BOOT_COMPLETED
Boot completed. This broadcast is typically used to start
services that should always run.
android.intent.action.BATTERY_LOW
Battery is low. This broadcast is typically used to pause
activities that consume power.
android.intent.action.BATTERY_OKAY
Battery is OK. This broadcast can be used to resume
activities that consume power
android.intent.action.ACTION_POWER_CONNECTED
Power source connected to the device.
An action constant of the ConnectivityManager class
Constant Action string / Description
CONNECTIVITY ACTION
android.net.conn.CONNECTIVITY_CHANGE
A change in network connectivity has occurred.
A text file that contains the broadcast actions for the system
\sdk\platforms\android-23\data\broadcast_actions.txt
Description
• The Android operating system broadcasts certain actions that occur as a device is
being used.
• Every broadcast has an action string that uniquely identifies the action.
• A broadcast receiver is an application component that listens for a broadcast and
executes when it receives that broadcast.
Figure 12-1 A summary of system broadcasts
384 Section 3 The News Reader app
How to code a receiver
for the boot completed broadcast
Figure 12-2 shows how to code a receiver for the boot completed broadcast.
To do that, you can code a class that extends the BroadcastReceiver class. In this
figure, for example, the BootReceiver class extends the BroadcastReceiver class.
Within the class for the receiver, you can override the onReceive method.
This method is executed when the broadcast is received. In this figure, this
method starts the service for the News Reader app described in the previous
chapter.
After you create the class for a broadcast receiver, you need to register the
receiver, so Android knows what broadcasts it should receive. The easiest way to
register a receiver is to add a receiver element to the project's AndroidManifest.
xml file. This receiver element should specify the name of the class for the
receiver, and it should specify the action or actions to receive. To do that, you
can use the name attribute of the action element to specify the action string. In
this figure, the second example shows how to register the BootReceiver class so
it listens for the BOOT_COMPLETED action.
Some broadcast receivers require additional permissions. For example, the
BOOT_COMPLETED action in this figure requires the
RECEIVE_BOOT_COMPLETED permission. To request this permission, you
can add a uses-permission element to the AndroidMamfest.xml file. Then, when
users install the app, they can decide whether or not to grant this permission.
Chapter 12 How to work with broadcast receivers 385
The BootReceiver class
package com.murach.newsreader;
import android.content.BroadcastReceiver;
import android.content.Context;
import android.content.Intent;
import android.util.Log;
public class BootReceiver extends BroadcastReceiver {
©Override
public void onReceive(Context context. Intent intent) {
Log.d("News reader", "Boot completed");
// start service
Intent service = new Intent(context, NewsReaderService.class);
context.startService(service);
}
}
The receiver element in the AndroidManifest.xml file
<receiver android:name="BootReceiver" >
<intent-filter>
<action android:name="android.intent.action.BOOT_COMPLETED" />
</intent-filter>
</receiver>
The permission in the AndroidManifest.xml file
<uses-permission android:name="android.permission.RECEIVE_BOOT_COMPLETED" />
Description
• You can create a broadcast receiver that executes code when the device finishes
starting, which is also known as booting.
• To define a broadcast receiver, code a class that inherits the BroadcastReceiver class
and override its onReceive method. This method is executed when the broadcast is
received.
• To register a broadcast receiver, open the project's AndroidManifest.xml file and
add a receiver element. This element should specify the name of the class for the
receiver, and it should specify the action or actions to receive. To do that, you can
add an action element and use its name attribute to specify the action string for the
action.
• If a broadcast receiver requires permissions, you can request those permissions by
adding a uses-permission element to the AndroidManifest.xml file.
Figure 12-2 How to code a receiver for the boot completed broadcast
386 Section 3 The News Reader app
How to code a receiver
for the connectivity changed broadcast
Figure 12-3 shows how to code a receiver for the connectivity changed
broadcast. This works similarly to coding a receiver for the boot completed
broadcast as shown in the previous figure. As a result, you shouldn't have much
trouble understanding how this works.
The ConnectivityReceiver class shown in this figure extends the
BroadcastReceiver class and overrides its onReceive method. Within this
method, the second and third statements get a Networklnfo object as described
in the previous chapter. Then, the fourth statement creates an intent that can be
used to start or stop the service for the News Reader class. After that, this code
checks whether a network connection is available. If so, this code starts the
service. Otherwise, it stops the service.
Since this receiver makes sure that the service doesn't attempt to connect
to the network when a connection isn't available, it conserves the battery of the
device. In the previous chapter, you learned another technique for conserving
battery life. Although these techniques work differently, both accomplish the
same goal of conserving battery life.
Like the BootReceiver class, you can register the ConnectivityReceiver
class by adding a receiver element to the AndroidManifest.xml file. Similarly,
you can add a uses-permissions element to request permissions for the
ACCESS_NETWORK_STATE privilege that's required to allow this class to
access information about the network. This permission isn't required by the
CONNECTIVITY_CHANGE action. However, it is required by the
getActiveNetworklnfo method that's used by the onReceive method.
Chapter 12 How to work with broadcast receivers 387
The ConnectivityReceiver class
package com•murach•newsreader;
import android.content.BroadcastReceiver;
import android•content•Context;
import android•content•Intent;
import android.net.ConnectivityManager;
import android.net.Networklnfo;
import android.uti1.Log;
public class ConnectivityReceiver extends BroadcastReceiver {
©Override
public void onReceive(Context context. Intent intent) {
Log.d("News reader", "Connectivity changed");
ConnectivityManager connectivityManager = (ConnectivityManager)
context.getSystemService(Context.CONNECTIVITY_SERVICE);
Networklnfo networklnfo =
connectivityManager.getActiveNetworkInfo();
Intent service = new Intent(context, NewsReaderService.class);
if (networklnfo != null && networklnfo.isConnected()){
Log.d("News reader"# "Connected");
context.startService(service);
}
else {
Log.d("News reader", "NOT connected");
context.stopService(service);
}
}
}
The receiver element in the AndroidManifest.xml file
<receiver android:name="ConnectivityReceiver" >
<intent-filter>
<action android:name="android.net.conn.CONNECTIVITY_CHANGE" />
</intent-filter>
</receiver>
The permission in the AndroidManifest.xml file
<uses-permission android:name="android.permission.ACCESS_NETWORK_STATE" />
Description
• You can code a broadcast receiver to execute code when the connectivity for the
device changes.
Figure 12-3 How to code a receiver for the connectivity change broadcast
388 Section 3 The News Reader app
How to work with custom broadcasts
In some cases, you may want to send a custom broadcast that other
components within your app can receive. Or, you may want to send a custom broadcast
that other apps can receive. Then, you can code a receiver for that broadcast.
In the News Reader app, for example, you may want to automatically update
the display for the Items activity if a new feed becomes available. That way, if a
user is viewing the Items activity and a new update becomes available, the News
Reader app will automatically update the display. To accomplish this, the service
for this app can send a custom broadcast that indicates that a new feed is
available. Then, the Items activity can receive that broadcast and update the display.
How to create and send a custom broadcast
Figure 12-4 shows how to create and send a custom broadcast. To start, you
can define a constant for the action string for the broadcast. By convention, this
string should begin with the name of the package for your app, followed by the
name of the constant. This should create an action string that's globally unique.
In addition, you should typically code this constant in a class that's related to
the action. In this figure, for example, the first step defines a constant named
NEW_FEED in the RSSFeed class. This constant indicates that a new feed is
available.
Once you create a constant for a broadcast, you can add code that creates
the intent for the broadcast and sends the broadcast. To start, you can create an
Intent object for the broadcast by passing the constant for the broadcast to the
constructor of this class. Then, if necessary, you can use the putExtra method to
store data in the Intent object. In this figure, the example puts a test string in the
Intent object. However, you can use the putExtra method to store most types of
data that you want to pass to the receiver. Finally, you can use the sendBroadcast
method to send the broadcast.
Chapter 12 How to work with broadcast receivers 389
Two classes used to work with broadcasts
android.content.Intent
android.content.Context
How to send a broadcast
Step 1: Define a constant for the broadcast (in the RSSFeed class)
public final static String NEW_FEED = "com.murach.newsreader.NEW_FEED";
Step 2: Create and send the broadcast (in the NewsReaderService class)
Intent intent = new Intent(RSSFeed.NEW_FEED);
intent.putExtraC'test", "testl test2");
sendBroadcast(intent);
A constructor of the Intent class
Constructor Description
Intent (actionString) Create an intent with the specified action string.
A method of the Context class
Method Description
sendBroadcast (intent) Broadcast the specified intent to all registered receivers.
Description
• The constant for a custom broadcast should store an action string that's globally
unique. By convention, this string should begin with the name of the package for
your app, followed by the name of the constant.
• To send a custom broadcast, create an Intent object for the broadcast by passing the
constant for the action string to the constructor of the Intent class. Then, use the
sendBroadcast method to send the broadcast.
• If you want to pass data to the receiver, you can use the putExtra method to store
extra data in the Intent object.
Figure 12-4 How to create and send a custom broadcast
390 Section 3 The News Reader app
How to code a receiver for a custom broadcast
Figure 12-5 shows how to code a receiver for a custom broadcast. The steps
for coding a receiver for a custom broadcast are similar to the steps for coding
a receiver for a system broadcast. As a result, you shouldn't have much trouble
understanding how to code the receiver shown in this figure.
However, if you want to update the user interface when a broadcast is
received, you can code the receiver as an inner class of the activity. That way,
you can easily access elements of the user interface, including any methods that
update the user interface. In this figure, for example, the NewFeedReceiver class
is coded as an inner class of the ItemsActivity class. As a result, it can access the
updateDisplay method that's available from the ItemsActivity class.
If you want to get extra data from the Intent for the action, you can use the
getXxxExtra methods of the Intent class. In this figure, the second statement in
the onReceive method uses the getStringExtra method to get the test string that
was set by the code that broadcast the action. Then, the third statement sends this
data to the LogCat view. Although this doesn't do anything useful for the News
Reader app, it illustrates how a broadcast can be used to pass data from one
component to another.
When you code a receiver as an inner class of an activity, you typically use
Java code to register and unregister the receiver. To do that, you create a receiver
object and a filter object for the intent that has the specified action string. To
create an IntentFilter object, you can pass the constant for the action string to the
constructor of the IntentFilter class.
After you create these objects, you can use the methods of the Context class
to register and unregister the receiver. Typically, you add these methods to the
onResume and onPause methods of the activity. In this figure, the code examples
register and unregister the receiver defined by the NewFeedReceiver class.
Since the NEW_FEED action that's broadcast and received by the News
Reader app doesn't contain any sensitive information, I decided to not require
privileges to broadcast or receive this action. As a result, it may be possible
for another app to broadcast or receive this action. However, it's unlikely that
another app (even a malicious one) would want to do this, and it wouldn't be too
harmful if it did.
However, if your app broadcasts or receives an action that should be secure,
you can use permissions to secure the broadcast. To do that, you can define the
send and receive permissions in the manifest file for your project. Then, you can
modify the sendBroadcast and registerReceiver methods so they enforce these
permissions. For more information, you can search the Internet.
Chapter 12 How to work with broadcast receivers 391
A class used to work with receivers
android.content.Context
How to receive a broadcast in the ItemsActivity class
Step 1: Define an inner class for the broadcast receiver
class NewFeedReceiver extends BroadcastReceiver {
©Override
public void onReceive(Context context. Intent intent) {
Log.d("News reader", "New items broadcast received");
// if necessary, get data from intent
String test = intent.getStringExtra("test");
Log.d("News reader", "test: " + test);
// update the display
updateDisplay();
}
}
Step 2: Define instance variables for the broadcast receiver and intent filter
private NewFeedReceiver newFeedReceiver;
private IntentFilter newFeedFilter;
Step 3: Create the broadcast receiver and intent filter (onCreate)
newFeedFilter = new IntentFilter(RSSFeed.NEW_FEED);
newFeedReceiver = new NewFeedReceiver();
Step 4: Register the receiver (onResume)
registerReceiver(newFeedReceiver, newFeedFilter);
Step 5: Unregister the receiver (onPause)
unregisterReceiver(newFeedReceiver);
Two methods of the Context class
Methods Description
registerReceiver (receiver, filter) Register the specified broadcast receiver
with the specified intent filter.
unregisterReceiver (receiver) Unregister the specified broadcast receiver.
Description
• To code a receiver for a custom broadcast, you can define a class for the receiver.
If you want to update the user interface when a broadcast is received, you can code
the class for the receiver as an inner class of the activity.
• If you want to get extra data from the Intent for the action, you can use the
getXxxExtra methods of the Intent class.
• You can use Java code to register and unregister a receiver. To do that, you can
create a receiver object and a filter object for the intent with the specified action.
Figure 12-5 How to code a receiver for a custom broadcast
392 Section 3 The News Reader app
Perspective
The skills presented in this chapter should be enough to get you started
with broadcast receivers. However, Android broadcasts actions that you can
use to execute code due to changes in the battery, text messages, phone state,
external hardware devices, and so on.
If you are developing an app that needs to receive and work with these
types of broadcasts, you can search the Internet for more information. To do
that, you can begin by using the broadcast_actions.txt described in figure 12-1
to find the action string for the broadcast. Then, you can search the Internet
to find the API documentation for that broadcast action. This documentation
should include a description of the action, a description of any extra data that's
stored in the intent for the action, and a description of any permissions that are
required by the action.
Terms
broadcast
action
broadcast receiver
action string
Summary
• The Android operating system broadcasts certain actions that occur as a
device is being used.
• Every broadcast has an action string that uniquely identifies the action.
• A broadcast receiver is an application component that listens for a broadcast
and executes code when it receives that broadcast.
• You can code a broadcast receiver to execute code when the connectivity for
the device changes.
• To code a receiver for a custom broadcast, you can define a class for the
receiver.
• If you want to get extra data from the Intent for the action, you can use the
getXxxExtra methods of the Intent class.
• You can use Java code to register and unregister a receiver.
Chapter 12 How to work with broadcast receivers 393
Exercise 12-1 Work with broadcast receivers
In this exercise, you'll experiment with the broadcast receivers that are available
from the News Reader app.
Test the existing broadcast receivers
1. Open the proj ect named ch 12_ex 1 _NewsReader.
2. Open the BootReceiver and ConnectivityReceiver classes. Then, review the
code for these classes.
3. Open the AndroidMamfest.xml file. Note that it registers both of the broadcast
receivers described in the previous step and that it requests all permissions
required by those receivers.
4. Run the app. If you're using an actual device, test the Connectivity receiver by
turning on airplane mode. This should display messages in the LogCat view
that say:
Connectivity changed
NOT connected
NOTE: This might not work correctly on an emulator.
5. Turn off airplane mode. This should display messages in the LogCat view that
say:
Connectivity changed
Connected
NOTE: Again, this might not work correctly on an emulator.
6. Open the broadcast_actions.txt file for one of the Android SDKs that's
installed on your system. Then, review the various broadcasts that your
application can receive.
Add a new broadcast receiver
7. Add a broadcast receiver that displays a message on the LogCat view that
says "Battery low!". This receiver should also stop the service for the app.
8. Use the AndroidMamfest.xml file to register this receiver. Unfortunately,
there's no easy way to test this receiver. As a result, don't test this receiver
yet. Instead, review the code and make sure that it seems right.
Modify a broadcast
9. Open the RSSFeed class. Then, change the name of the constant for the
broadcast from NEW_FEED to ACTION_UPDATE_AVAILABLE. Also,
change the name of the action string so it matches the name of the constant.
10. Open the ItemsActivity and NewsReaderService classes. Then, make sure
the statement that creates the IntentFilter object uses the new name for the
constant.
Section 4
The Task List app
This section shows how to develop the Task List app. As you learn to
develop this app, you'll also learn many important Android skills that can
be applied to other apps. To start, chapter 13 shows how to use SQLite to
create and work with the database for an app. Then, chapter 14 shows how
to use tabs and custom adapters to display data on the user interface for the
app. Next, chapter 15 shows how to use a content provider to make the data
for an app available to other apps. Finally, chapter 16 shows how to create
an app widget than can display the app's data on a device's Home screen.
13
How to work
with SQLite databases
Some types of Android apps need to store data in a local database. For
example, a Contacts app needs to store contact information such as names and
phone numbers in a database. Fortunately, Android includes libraries that make
it easy to create and use local databases. In this chapter, you'll learn how to
create and use a database for a Task List app.
An introduction to databases............................................398
The user interface for the Task List app 398
An introduction to SQLite 400
An introduction to the Task List database 402
The business objects for the Task List app 404
How to create a database class ........................................408
How to define the constants for a database 408
How to define the SQL statements that create a database 410
How to create or upgrade a database 412
How to open and close a database connection 414
How to add public methods to a database class ............416
How to retrieve multiple rows from a table 416
How to retrieve a single row from a table 418
How to get data from a cursor 418
How to insert, update, and delete rows 420
How to test the database...................................................424
How to test the database class 424
How to clear test data from a device 426
How to work with the database file 426
How to use DB Browser for SQLite 428
Perspective.........................................................................430
398 Section 4 The Task List app
An introduction to databases
The skills presented in this chapter are necessary to create the Task List app.
To put these skills in context, this chapter begins by showing the user interface
for this app.
The user interface for the Task List app
Figure 13-1 shows the interface for the Task List app. When the app starts,
the Task List activity displays a list of tasks where each task has a check box that
indicates whether it has been completed, a name, and optional notes.
In addition, the Task List activity provides tabs for two lists: Personal and
Business. To display lists, the user can click on the tabs that are available from
the Task List activity. In this figure, for example, the Personal tab is selected
and the tasks for that tab are displayed. However, the user could click on the
Business tab to display the tasks for that list.
From the Task List activity, the user can mark a task as completed by
selecting a check box. Then, the user can remove all tasks that have been marked
as completed by clicking on the Delete Tasks icon (the small trash can). This
icon is available from the task bar. However, older versions of Android don't
provide for the task bar. As a result, on older devices, the user can display the
options menu and select the Delete Tasks item.
The user can add a task by clicking on the Add Task icon (the + sign) that's
available from the task bar. Or, if the device is too old to display a task bar, the
user can display the options menu and select the Add Task item. This displays
the Add/Edit activity in "add mode". At this point, the user can use the spinner
to select the list. Then, the user can use the editable text views to add or edit the
text for the task.
Similarly, the user can edit a task by clicking on the task in the Task List
activity. This displays the Add/Edit activity in "edit mode" so the user can edit
the data for the task. In this figure for example, I clicked on the "Get hair cut"
task in the Task List activity. As a result, this task is displayed in the Add/Edit
activity and is ready to be edited.
Take a moment to reflect on the data this app needs. First, it needs the names
of the lists. Second, it needs at least four pieces of data about a task: its list, its
name, its notes, and whether it has been completed. In this chapter, you'll learn
how to store this type of data in a local database.
Chapter 13 How to work with SQLite databases
399
The Task List activity
El Task List
PERSONAL
□ Pay bills
Rent
Phone
Internet
□ Get hair cut
3G
*A 8:48
+
BUSINESS
The Add/Edit activity
3G
*A 8:46
El Task List
Personal
Get hair cut
X s/
Notes
Description
• When the app starts, the Task List activity displays a list of tasks where each task has
a check box that indicates whether it has been completed, a name, and optional notes.
• The app provides for two lists: Personal and Business.
• To display lists, the user can click on the tabs that are available in the Task List activity.
• To edit a task, the user can click on the task in the Task List activity. This displays
the Add/Edit activity in "edit mode" so the user can edit the data for the task.
• To mark a task as completed, the user can select the check box in the Task List activity.
• To remove all completed tasks, the user can click the Delete Tasks button that's
available from the task bar.
• To add a new task, the user can navigate to the Task List activity and click on the Add
Task icon. This displays the Add/Edit activity in "add mode" so the user can add a
new task.
• In the Add/Edit activity, the user can use the spinner to select the list. Then, the user
can use the editable text views to add or edit the text for the task.
Figure 13-1 The user interface for the Task List app
400 Section 4 The Task List app
An introduction to SQLite
Figure 13-2 describes the SQLite database that's available from Android.
What is SQLite? To start, SQLite is a relational database management system
(RDBMS) that implements most, but not all, of the SQL standard. SQLite is a
lightweight (approximately 350KB) programming library. This library is
available on every Android device and does not require any configuration or database
administration.
When you create a SQLite database, that database is stored in a single file on
a device. In this figure, for example, you can see where the file for the Task List
app is stored on a device. Since that file is only accessible by the app that created
the file, a SQLite database is relatively secure.
SQLite is a popular choice as an embedded database. It is used today by
several browsers and operating systems, including the Android operating system.
One of the reasons that SQLite is used so widely is because it is open-source. As
a result, it's free for most purposes.
If you're familiar with other database management systems such as MySQL
or Oracle, you shouldn't have much trouble learning to work with SQLite.
However, SQLite is different than other database systems in a few ways.
First, SQLite does not run in a server process that's accessed by client apps,
which run in separate processes. Instead, it's embedded as part of the client app
and runs in the same process.
Second, SQLite only supports three data types (TEXT, INTEGER, and
REAL). These data types correspond with these three Java data types: String,
long, and double. As a result, other Java data types such as date/time and
Boolean values must be converted into one of the SQLite types before saving
them in the database. For example, a Date type can be converted to a TEXT type
before it's stored in the database. Then, when it's retrieved from the database, it
can be converted from a TEXT type to a Date type.
Third, SQLite is weakly-typed. In other words, a column in a SQLite
database does not reject a value of an incorrect data type. For example, if you
define a database column to accept the INTEGER type, you could still store a
string value in this column and it would not be rejected by the database. Usually,
this isn't a problem as the code for the app shouldn't attempt to store a string in
an INTEGER column. However, you should be aware of this as it means that
the code for your app must make sure to insert values of the correct type in each
column.
Chapter 13 How to work with SQLite databases 401
SQLite is...
• A RDBMS. SQLite is a relational database management system (DBMS).
• Standards-compliant. SQLite implements most of the SQL standard.
• Embedded. Unlike most database management systems, SQLite does not run in
a server process that's accessed by client apps, which run in separate processes.
Instead, it's embedded as part of the client app and runs in the same process.
• Zero-configuration. SQLite is available on every Android device and does not
require any database administration.
• Lightweight. The SQLite programming library is approximately 350 KB.
• Secure. A SQLite database is only accessible by the app that created the file for the
database.
• Popular. SQLite is a popular choice as an embedded database.
• Open-source. The source code for SQLite is in the public domain.
Data types supported by SQLite
SQLite data type Java data type
TEXT String
INTEGER lone
REAL double
The location of the SQLite database file for the Task List app
/data/data/com.murach.tasklist/databases/tasklist.db
Description
• SQLite only supports three data types (String, long, and double). As a result, the
code for the app must convert other Java data types such as date/time and Boolean
values into one of the SQLite types before saving them in the database.
• SQLite is weakly-typed. In other words, a column in a SQLite database does not
reject a value of an incorrect data type. As a result, the code for the app must make
sure to insert values of the correct type.
Figure 13-2 An introduction to SQLite
402 Section 4 The Task List app
An introduction to the Task List database
Figure 13-3 begins by showing a diagram for the Task List database. This
diagram shows that the data for the Task List database is stored in two tables:
the List table and the Task table. These tables are related to each other in a
one-to-many relationship. As a result, a single list can have many tasks, but a
task can only have a single list.
The List table only has two columns. The _id column uniquely identifies
each row, and the list_name column provides the name of the list.
The Task table has six columns. The _id column uniquely identifies each
row, and the list_id column identifies the list for this task. The task_name and
notes columns store the name and notes for the task.
The date_completed column stores the date and time that the task was
completed. As a result, this column can be used to determine whether the task
has been completed. Alternately, this column could store a Boolean value.
However, for this database, I choose to store the date/time value since this allows
the database to store more potentially useful information about the task.
The hidden column stores a Boolean value that indicates whether the task
should be shown on a list. I choose to use this column because I'd prefer to
hide tasks instead of deleting them. In other words, when a user marks a task as
complete and removes it from a list, the Task List app doesn't delete it from the
database. Instead, it marks it as hidden, and doesn't display it on the user
interface anymore. That way, a history of completed tasks remains in the
database.
When naming columns, it's a common coding convention to use _id as the
name of the primary key column. This isn't required, but it makes it easier to
create a content provider for a database as described in chapter 15.
The CREATE TABLE statements provide the names of the tables as well
as the column names, data types, and attributes of those tables. Here, the first
column in each table uses the PRIMARY KEY attribute to define a primary key
column. This column requires that each row must have a value, and that value
must be unique. Then, the first column uses the AUTO_INCREMENT attribute
to automatically increment the value of the column when a new row is inserted.
In the List table, the list_name column uses the NOT NULL attribute to
specify that this column must store a not-null value. In addition, it uses the
UNIQUE attribute to specify that each value stored in the column must be
unique. As a result, for a new row, the database requires the user to specify a
non-null value for the list name, and it doesn't allow a list name that already
exists in the database. This is usually what you want, since it doesn't make sense
to use a null value for a list name or to have two lists with the same name.
In the Task table, the list_id and task_name columns use the NOT NULL
attribute to specify that these columns must store a non-null value. This is
usually what you want since a task should have a list and a name.
The DROP TABLE statements delete the specified table. This deletes the
structure for the table as well as any data that's stored in the table. Since these
statements include the IF EXISTS keywords, they don't cause an error if the
table doesn't already exist.
Chapter 13 How to work with SQLite databases
403
The diagram for the Task List database
task
id •-
list name
"1 -id
I—4 listjd
task name
notes
date_completed
hidden
The SQL statement that creates the List table
CREATE TABLE list (
_id INTEGER PRIMARY KEY AUTOINCREMENT,
list_name TEXT NOT NULL UNIQUE
)
The SQL statement that creates the Task table
CREATE TABLE task (
_id
list_id
task_name
notes
date_completed
hidden
)
INTEGER PRIMARY KEY AUTOINCREMENT,
INTEGER NOT NULL,
TEXT NOT NULL,
TEXT,
TEXT,
TEXT
The SQL statement that drops the List table
DROP TABLE IF EXISTS list
The SQL statement that drops the Task table
DROP TABLE IF EXISTS task
NOT NULL
UNIQUE
Common column attributes
Attribute
PRIMARY KEY
AUTO INCREMENT
ion
Defines a primary key column. A primary key column requires
that each row must have a value, and that value must be unique,
Identifies a column whose value is automatically incremented
by SQLite when a new row is inserted. An auto increment
column is typically defined with the INTEGER data type.
Specifies that the column can't store NULL values.
Specifies that each value stored in the column must be unique.
Description
• The CREATE TABLE statement creates a table based on the column names, data
types, and attributes that you specify.
• The DROP TABLE statement deletes the specified table.
Figure 13-3 An introduction to the Task List database
404 Section 4 The Task List app
The business objects for the Task List app
Figure 13-4 shows the classes that define the business objects for the Task
List app. These business objects map to the tables of the database. As a result,
the data for a row can be stored in its corresponding business object. For
example, a row from the List table can be stored in a List object. Similarly, a
row from the Task table can be stored in a Task object. Then, if necessary, the
business object can provide additional methods for working with the data.
When working with databases, it's usually considered a good practice to
map rows to Java objects like this. This allows you to store all database code in
a class or a series of classes that's known as the database layer. Since this layer
provides access to plain old Java objects (sometimes called POJOs), it separates
the database layer from the user interface.
The List class defines an instance variable for each column in the List table.
Then, it defines three conductors that can be used to create a List object. Next,
it defines get and set methods for the instance variables. Finally, it defines a
toString method that provides a way to convert a List object to a string. In this
case, it does that by returning the name of the list.
The Task class works similarly. However, it provides TRUE and FALSE
constants that define two strings that can be used to represent Boolean values.
Here, a string of "0" represents a false value, and a string of "1" represents a
true value. Within this class, the first constructor uses the FALSE constant to set
default values for the completed and hidden variables.
Of the get and set methods, the getCompletedDate method returns the string
for the completed_date column. This string stores the number of milliseconds for
the date. However, the getCompletedDateMillis method converts the string for
the date_completed column from its string value to a long value and it returns
that long value. Similarly, the setCompletedDate method is overridden so it
can accept a string value or a long value. If the user passes a long value to this
method, it converts the long value to a string value.
Chapter 13 How to work with SQLite databases 405
The List class
package com.murach.tasklist;
public class List {
private int id;
private String name;
public List() {}
public List(String name) {
this•name = name;
}
public List(int id. String name) {
this.id = id;
this.name = name;
}
public void setld(int id) {
this.id = id;
}
public int getld() {
return id;
}
public void setName(String name) {
this•name = name;
}
public String getName() {
return name;
}
©Override
public String toString() {
return name; // used for add/edit spinner
}
}
Description
• The List class defines an object that can store the data from the List table
Figure 13-4 The business objects for the Task List app (part 1 of 3)
406 Section 4 The Task List app
The Task class Page 1
package com.murach.tasklist;
public class Task {
private int taskid;
private int listld;
private String name;
private String notes;
private String completed;
private String hidden;
public static final String TRUE = "1";
public static final String FALSE = "0";
public Task() {
name = "" ;
notes = "";
completed = FALSE;
hidden = FALSE;
}
public Task(int listld. String name. String notes.
String completed. String hidden) {
this.listld = listld;
this•name = name;
this.notes = notes;
this.completed = completed;
this.hidden = hidden;
}
public Task(int taskid, int listld. String name. String notes.
String completed. String hidden) {
this.taskid = taskid;
this.listld = listld;
this•name = name;
this.notes = notes;
this.completed = completed;
this.hidden = hidden;
}
public int getld() {
return taskid;
}
public void setld(int taskid) {
this.taskid = taskid;
}
public int getListldO {
return listld;
}
public void setListld(int listld) {
this.listld = listld;
}
Figure 13-4 The business objects for the Task List app (part 2 of 3)
Chapter 13 How to work with SQLite databases 407
The Task class Page 2
public String getName() {
return name;
}
public void setName(String name) {
this.name = name;
}
public String getNotes() {
return notes;
}
public void setNotes(String notes) {
this.notes = notes;
}
public String getCompleted() {
return completed;
}
public long getCompletedMillis() {
return Long.valueOf(completed);
}
public void setCompletedDate(String completed) {
this.completed = completed;
}
public void setCompletedDate(long millis) {
this.completedDate = Long.toString(millis);
}
public String getHidden(){
return hidden;
}
public void setHidden(String hidden) {
this.hidden = hidden;
}
}
Description
• The Task class defines an object that can store the data from the Task table.
Figure 13-4 The business objects for the Task List app (part 3 of 3)
408 Section 4 The Task List app
How to create a database class
Now that you have some background about SQLite and the Task List
database, you're ready to learn how to code a class that you can use to work with
a database. This approach allows you to store all of the database code for the app
in a single class. This is generally considered a best practice. However, if the
class becomes too long to easily maintain, you can split it into multiple database
classes.
How to define the constants for a database
Figure 13-5 shows the beginning of the TaskListDB class. This class
contains all of the database code for the Task List app.
The TaskListDB class begins by defining the constants for the name and
version number of the database. To start, the DB_NAME constant specifies a
name of "tasklist.db". As a result, Android stores the file for the database in a
file named tasklist.db. Although you can use any name you want, it's a common
convention to use ".db" as the filename extension.
The DB_VERSION constant specifies the database version. To start, you can
create version 1 of the database. Then, if you make changes to the structure of
the database, you can increment this version number. When you do that, Android
updates the database as specified later in this class.
This class also defines the constants for the List and Task tables. These
constants include the names of the tables, their columns, and their column
numbers. For example, the LIST_TABLE constant specifies the name of the List
table ("list"), the LIST_ID constant specifies the name of the _id column ("_id"),
and the LIST_ID_COL constant specifies the column number of the _id column
(0). When specifying the column numbers, you should begin the numbering with
0. As a result, the first column is 0, the second column is 1, and so on.
Chapter 13 How to work with SQLite databases 409
The TaskListDB class Page 1
package com.murach.tasklist;
import java.util.ArrayList;
import android.content.ContentValues;
import android.content.Context;
import android•database.Cursor;
import android.database.sglite.SQLiteDatabase;
import android.database.sglite.SQLiteDatabase.CursorFactory;
import android.database.sglite.SQLiteOpenHelper;
import android.uti1.Log;
public class TaskListDB {
// database constants
public static final String DB_NAME = "tasklist.db";
public static final int DB_VERSION = 1;
// list table constants
public static final String LIST_TABLE = "list";
public static final String LIST_ID = "_id";
public static final int LIST_ID_COL =0;
public static final String LIST_NAME = "list_name";
public static final int LIST_NAME_COL = 1;
// task table constants
public static final String TASK_TABLE = "task";
public static final String TASK_ID = "_id";
public static final int TASK_ID_COL =0;
public static final String TASK_LIST_ID = "list_id";
public static final int TASK_LIST_ID_COL = 1;
public static final String TASK_NAME = "task_name";
public static final int TASK_NAME_COL = 2;
public static final String TASK_NOTES = "notes";
public static final int TASK_NOTES_COL =3;
public static final String TASK_COMPLETED = "date_completed";
public static final int TASK_COMPLETED_COL = 4;
public static final String TASK_HIDDEN = "hidden";
public static final int TASK_HIDDEN_COL = 5;
Description
• It's generally considered a good practice to define constants for the name and
version number of the database.
• It's generally considered a good practice to define constants for the table names,
column names, and column numbers.
Figure 13-5 How to define the constants for the database
410 Section 4 The Task List app
How to define the SQL statements
that create a database
Now that the class has defined the constants for the table and column names,
it can build the CREATE TABLE statements needed to create the List and Task
tables. In figure 13-6, for example, the first constant contains the CREATE
TABLE statement needed to create the List table. This statement uses the
LIST_TABLE constant to specify the name of the table, and it uses the LIST_ID
and LIST_NAME constants to specify the names of the columns.
Similarly, the second constant contains the CREATE TABLE statement
needed to create the Task table. These constants create the same CREATE
TABLE statements described earlier in this chapter.
This code also defines the constants for the DROP TABLE statements
that are needed to delete the List and Task tables. These constants are used to
upgrade a database as shown in the next figure.
Chapter 13 How to work with SQLite databases 411
The TaskListDB class Page 2
// CREATE and DROP TABLE statements
public static final String CREATE_LIST_TABLE =
"CREATE TABLE " + LIST_TABLE + " (" +
LIST_ID + " INTEGER PRIMARY KEY AUTOINCREMENT, " +
LIST_NAME + " TEXT NOT NULL UNIQUE);";
public static final String CREATE_TASK_TABLE =
"CREATE TABLE " + TASK_TABLE + " (" +
INTEGER PRIMARY KEY AUTOINCREMENT, " +
INTEGER NOT NULL, " +
TEXT NOT NULL, " +
TEXT, " +
TEXT, " +
TEXT);";
public static final String DROP_LIST_TABLE =
"DROP TABLE IF EXISTS " + LIST_TABLE;
public static final String DROP_TASK_TABLE =
"DROP TABLE IF EXISTS " + TASK_TABLE;
Description
• You can use the constants defined in the previous figure to build the CREATE
TABLE and DROP TABLE statements needed to create and upgrade a database.
TASK_ID
TASK_LIST_ID
TASK_NAME
TASK_NOTES
TASK_COMPLETED
TASK HIDDEN
+ "
+ "
+ "
+ "
+ "
+ "
Figure 13-6 How to define the SQL statements that create a database
412 Section 4 The Task List app
How to create or upgrade a database
Figure 13-7 shows the code for a static inner class named DBHelper that
extends the SQLiteOpenHelper class. This class begins by defining a constructor.
This constructor contains a single statement that passes four arguments to the
superclass (the SQLiteOpenHelper class).
After the constructor, this class overrides the onCreate method of the
superclass. If Android doesn't find the specified database on the device, it executes
this method. Within this method, the first two statements call the execSQL
method of the SQLiteDatabase parameter to execute the CREATE TABLE
statements that create the List and Task tables. Then, the next four statements execute
INSERT statements to insert rows into the List and Task tables. These rows
provide some default and sample data.
After the onCreate method, this class overrides the onUpgrade method of
the superclass. If Android finds the database on the device and a newer version
of the database is available, it executes this method. The first statement in
this method displays a message in the LogCat view. This message indicates
that the database is being upgraded, and it includes the old and new version
numbers. Then, the second and third statements call the execSQL method of the
SQLiteDatabase parameter to execute the DROP TABLE statements that drop
the List and Task tables. This deletes the structure of the database as well as all
of its data. Finally, the fourth statement calls the onCreate method to recreate the
database and to reinsert the stalling data.
During development, it's a common practice for the onUpgrade method to
drop a database and recreate it. However, this deletes all data in the database.
Although this is often acceptable during testing, it's not usually what you want
for a production app. In that case, the onUpgrade method typically uses an
ALTER TABLE statement to alter the structure of the table without deleting
all of its data. For example, you could use an ALTER TABLE statement to add
a new column to a table without deleting the data that's already in the other
columns of the table.
The execSQL method that's available from the SQLiteDatabase class is
useful for executing SQL statements such as the CREATE TABLE and DROP
TABLE statements shown earlier in this chapter. In addition, it's useful for
executing INSERT statements such as the ones shown in this figure. However,
if a SQL statement allows the user to insert a parameter, the execSQL method is
susceptible to a security vulnerability known as a SQL injection attack. In that
case, you should use the techniques specified later in this chapter. For example,
you can use the insert method to allow the user to insert data into the database
Chapter 13 How to work with SQLite databases 413
The TaskListDB class Page 3
private static class DBHelper extends SQLiteOpenHelper {
public DBHelper(Context context. String name,
CursorFactory factory, int version) {
super(context, name, factory, version);
}
©Override
public void onCreate(SQLiteDatabase db) {
db.execSQL(CREATE_LIST_TABLE);
db.execSQL(CREATE_TASK_TABLE);
// insert default lists
db.execSQL("INSERT INTO list VALUES (1, 'Personal')");
db.execSQL("INSERT INTO list VALUES (2, 'Business')");
// insert sample tasks
db.execSQL("INSERT INTO task VALUES (1, 1, 'Pay bills', " +
"'Rent\nPhone\nInternet', '0', '0')");
db.execSQL("INSERT INTO task VALUES (2, 1, 'Get hair cut', " +
" ' ', ' 0 ', ' 0 ' ) " ) ;
}
©Override
public void onUpgrade(SQLiteDatabase db,
int oldVersion, int newVersion) {
Log.d("Task list", "Upgrading db from version "
+ oldVersion + "to " + newVersion);
db.execSQL(TaskLi StDB.DROP_LIST_TABLE);
db.execSQL(TaskListDB.DROP_TASK_TABLE);
onCreate(db);
}
}
A method of the SQLiteDatabase class
Method Description
execSQL (sqlString) Executes the specified SQL string.
Description
• If Android doesn't find the database on the device, it executes the onCreate method.
• If Android finds the database on the device and a newer version of the database is
available, it executes the onUpgrade method.
• During development, it's a common practice for the onUpgrade method to use a
DROP TABLE statement to drop a database and to call the onCreate method to
recreate the database. This deletes all data in the database.
• For a production app, the onUpgrade method typically uses an ALTER TABLE
statement to alter a table without deleting all of its data.
Figure 13-7 How to create or upgrade a database
414 Section 4 The Task List app
How to open and close a database connection
Figure 13-8 shows how to code the private methods that make it easy to open
and close a connection to the database. These private methods are used by the
public methods shown in the next few figures.
The code in this figure begins by declaring the SQLiteDatabase and
DBHelper objects as instance variables. The SQLiteDatabase object defines a
connection to the database, and the DBHelper object contains the methods that
can open that connection.
The constructor of the TaskListDB class creates an instance of the DBHelper
object. To do that, this code passes the constants for the database name and
version to the DBHelper class.
The openReadableDB method calls the getReadableDatabase method from
the DBHelper object to return a SQLiteDatabase object for a read-only
connection to the database. As a result, you can't use this connection to write data to the
database.
The openWriteableDB method works like the openReadableDB method.
However, the openWriteableDB method returns a SQLiteDatabase object for a
read-write connection to the database. As a result, you can use this connection to
read or write data.
The closeDB method begins by checking to make sure the SQLiteDatabase
object exists. If so, it calls the close method of this object to close the
connection. In general, it's considered a best practice to close the database connection
after you're done using it.
Chapter 13 How to work with SQLite databases
415
The TaskListDB class
// database object and database helper object
private SQLiteDatabase db;
private DBHelper dbHelper;
// constructor
public TaskListDB(Context context) {
dbHelper = new DBHelper(context, DB_NAME# null, DB_VERSION);
}
// private methods
private void openReadableDB() {
db = dbHelper.getReadableDatabase();
}
private void openWriteableDB() {
db = dbHelper.getWritableDatabase();
}
Page 4
private void closeDB()
if (db != null)
db.close();
}
{
Two methods of the SQLiteOpenHelper class
Method
Description
getReadableDatabase () Opens a read-only connection to the database.
getWriteableDatabase () Opens a read-write connection to the database.
A method of the SQLiteDatabase class
Method Description
close()
Closes a connection.
Description
• Within a database class, you can use private methods that make it easy to open and
close a connection to the database.
Figure 13-8 How to open and close a database connection
416 Section 4 The Task List app
How to add public methods
to a database class
Now that you understand how to code the private methods for a database
class, you're ready to learn how to code its public methods. These methods
provide a way for the rest of the app to work with the database.
How to retrieve multiple rows from a table
The first method in figure 13-9 shows how to code a public method named
getTasks that retrieves multiple rows from a table. To start, the declaration for
this method indicates that the method accepts the name of the list as a parameter
and that it returns an ArrayList of Task objects.
Within the method, the first statement defines a string that specifies which
rows to retrieve. If you're familiar with SQL, you should recognize that this
works like the condition in a WHERE clause. Here, the question mark (?)
identifies a parameter that will be supplied later. As a result, the WHERE clause
retrieves all rows where the list_id column is equal to the supplied listID value
and where the hidden column is not equal to a true value. Since the hidden
column is stored with the TEXT data type, this code uses a string of '1' for a true
value.
The second statement calls the getList method that's defined later in this
class to return a List object that corresponds with the specified list name.
Although this method isn't explained in this chapter, it works much like the
getTask method. Then, it calls the getID method to get the ID for that list.
The third statement defines an array of strings that contains the arguments
for the WHERE clause. In this case, the WHERE clause contains a single
parameter. As a result, this code supplies a single string for the array. However,
if the WHERE clause contained multiple parameters, you could supply multiple
strings, separating each string with a comma.
The fourth statement uses one of the private methods defined earlier in this
class to open a read-only connection to the database.
The fifth statement uses the query method of the database object to return
a Cursor object that contains the rows that are retrieved. In this case, the first
argument specifies the name of the table, the third argument specifies the string
for the WHERE clause, and the fourth argument specifies the array that contains
the arguments for the WHERE clause.
This code specifies null values for the other arguments. As a result, the query
method retrieves all columns and doesn't include GROUP BY, HAVING, or
ORDER BY clauses. However, if you want to specify the columns to retrieve,
you can code an array of strings that contains the names of the columns that you
want to retrieve. Then, you can supply this array as the second argument. Or, if
you want to group or sort the rows that are retrieved, you can supply a string for
the appropriate clause. For example, to sort the rows, you can specify a string for
the ORDER BY clause.
Chapter 13 How to work with SQLite databases 417
The TaskListDB class Page 5
public ArrayList<Task> getTasks(String listName) {
String where =
TASK_LIST_ID + "= ? AND " +
TASK_HIDDEN + "!='1'";
int listID = getList(listName).getId();
String[] whereArgs = { Integer.toString(listID) };
this.openReadableDB();
Cursor cursor = db.query(TASK_TABLE, null,
where, whereArgs,
null, null, null);
ArrayList<Task> tasks = new ArrayList<Task>();
while (cursor.moveToNext()) {
tasks.add(getTaskFromCursor(cursor));
}
if (cursor != null)
cursor.close();
this.closeDB();
return tasks;
}
public Task getTask(int id) {
String where = TASK_ID + "= ?";
String[] whereArgs = { Integer.toString(id) };
this•openReadableDB();
Cursor cursor = db.query(TASK_TABLE,
null, where, whereArgs, null, null, null);
cursor.moveToFirst();
Task task = getTaskFromCursor(cursor);
if (cursor != null)
cursor.close();
this•closeDB();
return task;
}
A method of the SQLiteDatabase class
Method Description
query (table, columns, Queries the specified table and returns a cursor
where, whereArgs, for the result set. All arguments are a string
groupBy, having, or an array of strings. If you don't want to use
orderBy) an argument, you can specify a null value.
Some methods of the Cursor class
Method Description
moveToFirst()
moveToNext()
close ()
Moves to the first row in the cursor.
Moves to the next row in the cursor.
Closes the cursor.
Figure 13-9 How to retrieve rows from a table
418 Section 4 The Task List app
The sixth statement declares an ArrayList of Task objects. Then a while loop
uses the moveToNext method of the Cursor object to loop through all rows in the
cursor. Within the while loop, the statement uses the getTaskFromCursor method
shown in figure 13-10 to create a Task object from the current row and to add
that task to the array of tasks.
After the while loop, the last statement in the method cleans up resources by
closing the cursor as well as the connection to the database. Then, it returns the
array of tasks.
How to retrieve a single row from a table
The second method in figure 13-9 shows how to code the public getTask
method. This method works similarly to the getTasks method, but it retrieves
a single row. To start, the declaration for the getTask method indicates that it
returns a Task object for the task with the specified ID.
Within the method, the first two statements define the condition for the
WHERE clause and its arguments. Once again, the WHERE clause only contains
a single parameter. This time, the parameter is for the task ID instead of the list
ID.
After defining the arguments for the WHERE clause, this method opens a
read-only connection and uses the query method to retrieve a cursor for a single
row. Then, it uses the moveToFirst method to move the cursor to the first (and
only) row in the cursor. Next, it uses the getTaskFromCursor method to get the
Task object from the row. Finally, it closes the cursor and the database
connection and returns the Task object.
How to get data from a cursor
Figure 13-10 shows the getTaskFromCursor method that's used by the
getTasks and getTask methods shown earlier. This method accepts a Cursor
object and returns a Task object.
The getTaskFromCursor method begins by checking whether the cursor
is null or doesn't contain any rows. If so, it returns a null value and exits the
method. Otherwise, it attempts to create a Task object from the current row.
To do that, this code creates a new Task object and uses the getXxx methods
to get the data from the current row and passes that data to the constructor of the
Task class. For example, this code uses the getlnt method to get the value for the
task ID, and it uses the getString method to get the value for the task name. Both
of these methods accept a parameter for the column index, not the column name.
As a result, this code uses the constants for column indexes, not the column
names.
If the method successfully creates the Task object, the try clause returns that
object and exits. Otherwise, the catch clause returns a null value.
Chapter 13 How to work with SQLite databases
419
The TaskListDB class
private static Task getTaskFromCursor(Cursor cursor) {
if (cursor == null || cursor.getCount() == 0){
return null;
}
else {
try {
Task task = new Task(
cursor.getInt(TASK_ID_COL),
cursor.getInt(TASK_LIST_ID_COL),
cursor.getString(TASK_NAME_COL),
cursor.getString(TASK_NOTES_COL),
cursor.getString(TASK_COMPLETED_COL),
cursor.getString(TASK_HIDDEN_COL));
return task;
Page 6
catch(Exception e)
return null;
}
{
}
}
More methods of the Cursor class
Method
getlnt(columnIndex)
getDouble(columnIndex)
getString(columnlndex)
ion
Gets an int value from the cursor.
Gets a double value from the cursor.
Gets a string from the cursor.
Description
• Once you have moved to a row in a cursor, you can use the getXxx methods to get
data from that row.
Figure 13-10 How to get data from a cursor
420 Section 4 The Task List app
How to insert, update, and delete rows
Figure 13-11 shows how to code the public methods that insert, update,
and delete rows. Although these methods work with the Task table, you can use
similar techniques to work with the List table and other tables.
The insert Task method provides a way to insert a row into the database. This
method accepts a Task paramter and returns a long value for the ID of the newly
inserted row.
Within the method, the first statement creates a Content Values object that's
used to store the column names and their corresponding values. Then, the next
five statements use the column constants to specify the column names, and they
use the methods of the Task object to get the corresponding values. Since the
task_id column is defined with the AUTO_INCREMENT attribute, the database
automatically generates a value for this column. As a result, you don't have to
supply one.
After creating the ContentValues object, this code calls the openWriteableDB
method defined earlier in this class to open a read-write connection to the
database. Then, it calls the insert method from the database object to insert the
row and to store the ID of the newly inserted row. Here, the first argument
specifies the name of the table, and the third argument specifies the column
names and values. Since the second argument isn't needed, this code passes a null
value for this argument.
After inserting the row, this method calls the closeDB method defined earlier
in this class to close the connection to the database. Finally, it returns the ID of
the newly inserted row.
The updateTask method provides a way to update an existing row in the
database. This method accepts a Task parameter and returns an int value for the
count of updated rows. If the update is successful, this should return a value of 1.
Otherwise, it should return a value of 0.
Like the insertTask method, the updateTask method begins by creating
a ContentValues object to store the column names and their corresponding
values. Then, it creates a string for the WHERE clause and an array of strings
that contains its argument. This works similarly to the WHERE clause for the
getTask method.
After creating the WHERE clause and its arguments, this code opens a
read-write connection to the database. Then, it calls the update method from the
database connection to update the row and return the count of updated rows.
Here, the first argument specifies the name of the table, the second argument
specifies columns and their values, the third argument specifies the condition
for the WHERE clause, and the fourth argument specifies the argument for the
WHERE clause. Finally, this code closes the database connection and returns the
count of updated rows.
Chapter 13 How to work with SQLite databases
421
The TaskListDB class
public long insertTask(Task task) {
ConteritValues cv = new ContentValues () ;
cv.put(TASK_LIST_ID# task.getListld());
cv.put(TASK_NAME# task.getName());
cv.put(TASK_NOTES# task.getDescription());
cv.put(TASK_COMPLETED# task.getCompleted());
cv.put(TASK_HIDDEN, task.getHidden());
this.openWriteableDB();
long rowID = db.insert(TASK_TABLE# null, cv);
this•closeDB();
Page 7
return rowID;
}
public int updateTask(Task task) {
ContentValues cv = new ContentValues();
cv.put(TASK_LIST_ID, task.getListld());
cv.put(TASK_NAME# task.getName());
cv.put(TASK_NOTES# task.getDescription());
cv.put(TASK_COMPLETED# task.getCompleted());
cv.put(TASK_HIDDEN, task.getHidden());
String where = TASK_ID + "= ?";
String[] whereArgs = { String.valueOf(task.getId()) };
this.openWriteableDB();
int rowCount = db.update(TASK_TABLE# cv# where# whereArgs);
this•closeDB();
return rowCount;
}
Two methods of the SQLiteDatabase class
Method
insert(table, columns,
values)
ion
Inserts a row into the table and returns a lone
value for the ID of the newly inserted row.
update(table.
where.
values.
whereArgs)
Updates one or more rows in a table and returns
an int value for the number of rows that were
successfully updated.
One method of the ContentValues class
Method
Description
put (column, value) Specifies the column name and value.
Description
• You can use the methods of a SQLiteDatabase object to insert or update a row. For
these operations, you can store the column names and their corresponding values in
a ContentValues object.
Figure 13-11 How to insert, update, and delete rows (part 1 of 2)
422 Section 4 The Task List app
The deleteTask method provides a way to delete a row from the database.
This method accepts the ID of the task to delete and returns an int value for the
count of deleted rows. If the deletion is successful, this should return a value of
1. Otherwise, it should return a value of 0.
Within the method, the first two statements define the condition and
arguments for the WHERE clause. Then, the third statement opens a read-write
connection to the database.
The fourth statement calls the delete method from the database connection
to delete the row and return the count of deleted rows. Here, the first argument
specifies the name of the table, the second argument specifies the condition
for the WHERE clause, and the third argument specifies the argument for the
WHERE clause. Finally, this code closes the database connection and returns the
count of deleted rows.
Chapter 13 How to work with SQLite databases 423
The TaskListDB class
Page 8
public int deleteTask(long id) {
String where = TASK_ID + "= ?";
String[] whereArgs = { String.valueOf(id) };
this.openWriteableDB();
int rowCount = db.delete(TASK_TABLE, where, whereArgs);
this.closeDB();
return rowCount;
}
}
Another method of the SQLiteDatabase class
Method
Description
delete (table, where. Deletes one or more rows in a table and returns an int
whereArgs) value for the number of rows that were deleted.
Description
• You can use the delete method of a SQLiteDatabase object to delete one or more
rows.
Figure 13-11 How to insert, update, and delete rows (part 2 of 2)
424 Section 4 The Task List app
How to test the database
Once you write a database class, you need to test it to make sure it works
correctly. To do that, you can write code that creates an object from the database
class. Then, you can call public methods from that object to make sure they work
correctly. As you test and modify the database class, you may want to delete the
database files from a device, or you may want to use a graphical tool such as DB
Browser for SQLite to view a database.
How to test the database class
Figure 13-12 shows how to test the TaskListDB class described in the
previous figures. You can add code like this to an activity. Then, you can run that
activity to display the results on the user interface. Or, if you prefer, you can add
code that uses the Log class to display similar messages in the LogCat view.
The code in this figure begins by creating a TaskListDB object named db.
Then, it creates a StringBuilder object named sb. This object is used to build the
string that's displayed on the user interface.
The code that tests the insert Task method begins by creating a Task object
that has some test data in it. This test data includes a list ID of 1. Then, this code
calls the insertTask method from the db object and stores the long value that's
returned in a variable named insertlD. Next, this code checks whether the value
of the insert ID is greater than 0. If so, the insert was successful, and the code
appends an appropriate message to the StringBuilder object.
The code that tests the updateTask method begins by setting the task ID in
the Task object. That way, the Task object contains all of the columns necessary
for an update operation. Next, this code changes the name that's stored in the
Task object, calls the updateTask method to update the row, and stores the count
of updated rows in a variable named updateCount. Finally, this code checks
whether the count of updated rows is equal to 1. If so, the update was successful,
and the code appends an appropriate message to the StringBuilder object.
The code that tests the deleteTask method begins by calling the deleteTask
method from the db object. This code passes the ID of the newly inserted row to
this method and store the count of deleted rows in a variable named deleteCount.
Then, this code checks whether the count of deleted rows is equal to 1. If so, the
deletion was successful, and the code appends an appropriate message to the
StringBuilder object.
The code that tests the getTasks method begins by getting all tasks for the
list with a name of "Personal". Then, this code loops through all of the tasks and
appends the task ID and name for each task to the StringBuilder object.
After this code finishes building the string, it displays that string on a
Text View widget. To do that, this code gets a reference to the widget. Then, it
calls the setText method of that widget to display the string that's stored in the
StringBuilder object.
Chapter 13 How to work with SQLite databases 425
Code that tests the database class
// get db and StringBuilder objects
TaskListDB db = new TaskListDB(this);
StringBuilder sb = new StringBuilder();
// insert a task
Task task = new Task(l# "Make dentist appointment", "", "0", "0");
long insertld = db.insertTask(task);
if (insertld > 0) {
sb.append("Row inserted! Insert Id: " + insertld + "\n");
}
// update a task
task.setld((int) insertld);
task.setName("Update test");
int updateCount = db.updateTask(task);
if (updateCount ==1) {
sb.append("Task updated! Update count: " + updateCount + "\n");
}
// delete a task
int deleteCount = db.deleteTask(insertld);
if (deleteCount == 1) {
sb.append("Task deleted! Delete count: " + deleteCount + "\n\n");
}
// display all tasks (id + name)
ArrayList<Task> tasks = db.getTasks("Personal");
for (Task t : tasks) {
sb.append(t.getId() + "|" + t.getNameO + "\n");
}
// display string on UI
TextView taskListTextView = (TextView)
findViewByld (R.id.taskListTextView);
taskListTextView.setText(sb.toString());
Sample text displayed on the user interface
Task inserted! Insert Id: 3
Task updated! Update count: 1
Task deleted! Delete count: 1
l|Pay bills
2|Get hair cut
Description
• To test the database class, you can write code that creates an instance of the
database class and uses its public methods. Then, you can display data on the user
interface. Alternately, you can display the data in the LogCat view.
• If you make changes to the structure of the database, you can increment the version
number for the database.
Figure 13-12 How to test the database class
426 Section 4 The Task List app
As you test an app, you may decide that you need to change the structure
of the database. To do that, you can modify the code in the on Upgrade method
of the DBHelper class. However, to get Android to execute this method on each
device, you need to increment the version number for the database. Then, the
next time you run the app, Android calls the onUpgrade method of the helper
class and upgrades the database to the most current version.
How to clear test data from a device
If you don't want to continue to increment the version number for a
database, you can delete all data for the app from your test devices. The easiest
way to do this is to uninstall the app on your device. To do that, you can
long-click on the app and drag it onto the Uninstall icon that appears. This
should uninstall the app and delete its data. Then, when you run the app, Android
executes the onCreate method of the DB Helper class since no database exists
on the device. This allows you to keep the database version at 1 or to reset the
database version to 1.
When you use this technique, keep in mind that it also deletes all other data
for the app including any shared preferences. As a result, if you want to keep
shared preferences or any other test data that has been stored on the device, you
shouldn't use this technique.
How to work with the database file
As you test a database, you may want to view the database file that's created
on a device. To do that, you can use the standalone Android Device Monitor
tool shown figure 13-13 to select an emulator or a physical device that has been
rooted. Then, you can use the File Explorer tab shown in this figure to navigate
to the databases directory for your app. In this figure, for example, the File
Explorer tab shows the databases directory for the Task List app. This
directory shows the tasklist.db file that's used by the TaskListDB class. For security
reasons, this technique doesn't work for a physical device that hasn't been
rooted. In that case, the database files are stored in a private area that the Android
Device Monitor can't view.
If you want to copy the database file from the device to your computer,
you can select the file and click the "Pull a file" button. Then, you can use the
resulting dialog box to specify the directory on your computer where you'd like
to store the file. This can be useful if you want to use an app like the one shown
in the next figure to work with a database.
If you want to copy a file from your computer to a device, you can select the
directory on the device and click the "Push a file" button. Then, you can use the
resulting dialog box to specify the file that you want to put on the device. This
can be useful if you have a SQLite database on your computer that you want to
use for testing and you need to copy it onto a device.
Chapter 13 How to work with SQLite databases
427
The file for the Task List database
Android Device Monitor
El
File Edit Run Window Help
Quick Access
[£f I [C DDMS
^aB4^
Q Devices 23
#1 § m i
-^
\-%\ ® £3 <!B w v
Name
t> Q Samsung-
0 Q emulator
sgh_m919-d4dl720e Online
5554 Online
m
"^Threads @ Heap Q Allocation... *?* Networks... iff i File Explorer £3
Emulator...
Q System In...
Name
t> & com.android.wallpaper.livepicker
t> & com.android.widgetpreview
t> & com.example.android.apis
0 & com.example.android.livecubes
t> & com.example.android.softkeyboard
0 & com.murach.newsreader
a & com.murach.tasklist
> & cache
a & databases
12 tasklist.db
2] tasklist.db-journal
t> & lib
t> & com.murach.tipcalculator
0 & com.svox.pico
Size Date
2015-08-31
2015-08-31
2015-08-31
2015-08-31
2015-08-31
2015-09-15
2015-09-28
2015-09-28
_2015-09-28
28672" 2015-09-28"
12824 2015-09-28
2015-09-28
2015-09-09
2015-08-31
Time
08:48
08:48
08:48
08:48
08:48
13:39
11:47
11:47
11:47
Permissions
drwxr-x—x
drwxr-x—x
drwxr-x—x
drwxr-x—x
drwxr-x—x
drwxr-x—x
drwxr-x—x
drwxrwx—x
drwxrwx—x
%
- +
Pull a file from the device
c
11:47 -rw-rw
11:47
11:47
14:09
09.01
-rw
drwxr-xr-x
drwxr-x—x
drwxr-x—x
i
EUogCat S3
r
Saved Fitters + — [Ji Search for messages. Accepts Java regexes. Prefix with pid:, app:, tag: or text to limit scope.
verbose ▼
HiidLC
30Mof525M
1
How to view the file for a database
1. Start Android Studio.
2. Open the standalone Android Device Monitor tool by selecting the
Tools->Android->Android Device Monitor item.
3. In the Devices view, select the device.
4. In the main window, click on the File Explorer tab.
5. Navigate to the databases directory for the app.
The directory and file for the Task List database
/data/data/com.murach.tasklist/databases/tasklist.db
Description
• To copy a file from the device to your computer, select the file and click on the
"Pull a file" button. Then, use the resulting dialog box to locate the file that you
want to get from the device.
• To copy a file from your computer to a device, select the directory on the device
and click the "Push a file" button. Then, use the resulting dialog box to specify the
file that you want to put on the device.
Figure 13-13 How to work with the database file
428 Section 4 The Task List app
How to use DB Browser for SQLite
Figure 13-14 shows how to install and use an app known as the DB Browser
for SQLite. This often makes it easier to test the SQL statements for your app.
For a new database, for example, you can use the New Database button
to create the new database. Then, you can use the Execute SQL tab to test the
CREATE TABLE statements that create the tables for the database. After that,
you can use the Database Structure tab to verify that each table has been created.
Similarly, you can use this tab to test the INSERT statements that insert test
data into the database. Then, you can use the Browse Data tab to view this data.
Once you're sure that your SQL statements are working correctly, you can use
Java statements to build the SQL statements in the database class.
If you want to work with an existing database that's on a device or emulator,
you need to start by pulling the file from the device or emulator onto your
computer as described in the previous figure. Then, you can use the Open
Database button to open that database. After that, you can view the structure or
data for the database, and you can quickly and easily test SQL statements against
that database.
Chapter 13 How to work with SQLite databases
429
The DB Browser for SQLite app
DB Browser for SQLite - C:/murach/android/book_apps/chl3_DatabaseFile/tasklist.db
El
File Edit View Help
£ New Database £ Open Database £j Write Changes
Revert Changes
f Database Structure | Browse Data j Edit Pragmas J_ Execute SQl[
Table:
L task
[^Q
R*
New Record
Delete Record
1
2
<
taskjd
Filter
1
2
L_
listjd
Filter
1
1
task_name
Filter
Pay bills
Get hair cut
m
notes
Filter
RentPhone
date_completed
Filter
0
0
E 0 l-2of2(7] E[)
Goto:
DB Schema
SQL Log | Plot | DB Schema
& x
Name
' J Tables (4)
t> l_J android_metadata
0 G list
0 □ sqlite sequence
* L] task
3 taskjd
Z| listjd
Ll task_name
L| notes
L| date_completed
Q hidden
* 1- nr -J
Type *
INTEGER
INTEGER
TEXT
-
LJ
TEXT
TEXT
TEXT
y
UTF-8
The URL for downloading DB Browser for SQLite
http://sqlitebrowser.org/
Description
• You can use a tool like the DB Browser for SQLite to work with a database that's
on your computer (not on a device or emulator).
• To install the DB Browser for SQLite, you can search the Internet and follow the
instructions to download and install it.
• To create a new database, click the New Database button in the toolbar and respond
to the resulting dialog boxes.
• To open an existing database, click the Open Database button in the toolbar and
respond to the resulting dialog boxes.
• To view the structure of the database, use the Database Structure tab.
• To view or edit the data for a table, use the Browse Data tab.
• To execute SQL statements, use the Execute SQL tab.
Figure 13-14 How to use DB Browser for SQLite
430 Section 4 The Task List app
Perspective
The skills presented in this chapter should be enough to get you started
with SQLite databases. However, there is much more to learn. For example, the
SQLiteDatabase class provides many more methods for querying a database
and for inserting, updating, and deleting data. In addition, it provides methods
for other features such as working with transactions. To get an idea of the
methods that are available from this class, you can review the documentation
for the SQLiteDatabase class.
Another issue to consider is that it often makes sense to store the data for
a mobile app in the cloud. That way, if you have multiple devices, they can all
work with the same data and that data should always be current. If you store the
data for the Tasks List application in the cloud, for example, you should be able
to update tasks from any of your devices (computer, tablet, phone, and so on)
and the most current tasks should always be available to these devices.
To get this to work correctly, you usually need to store data on the local
device. That way, the data is available even if a connection to the cloud isn't
available. However, when you are able to connect to the cloud, the app should
be able to synch the data on your devices with the data that's stored in the
cloud. There are several Task List apps available from the Android market,
including GTasks, that use this approach.
Although you learned how to work with a SQLite database in this chapter,
you haven't yet learned how to display that data on a user interface. In the next
chapter, you'll learn how to use tabs and a custom adapter to do that.
Terms
relational database management system (RDBMS)
business objects
plain old Java objects (POJOs)
Summary
• SQLite only supports three data types (String, long, and double), and is
weakly-typed, meaning a column in a SQLite database does not reject a
value of an incorrect data type
• It's generally considered a good practice to define constants for the name
and version number of the database, and to define constants for the table
names, column names, and column numbers.
• The SQLiteOpenHelper class provides the onCreate and onUpgrade methods
that are used to create and upgrade the database.
• Within a database class, you can use private methods that make it easy to
open and close a connection to the database.
Chapter 13 How to work with SQLite databases 431
• You can use the methods of a SQLiteDatabase object to insert, update, and
delete rows.
• To test the database class, you can write code that creates an instance of the
database class and uses its public methods. Then, you can display data on
the user interface. Alternately, you can display the data in the LogCat view.
• If you make changes to the structure of the database, you can increment the
version number for the database.
• You can uninstall an app from a device to delete its database. This also
deletes all other data for the app including any shared preferences.
• You can use a tool like the DB Browser for SQLite to work with a database
file that's on your computer (not on a device or emulator).
Exercise 13-1 Review the Task List app
and use its database class
In this exercise, you'll review the code that creates and uses the Task List
database. Then, you'll modify the code that uses the Task List app.
1. Open the project named ch 13_exl_TaskList.
2. Open the Task, List, TaskListDB, and TaskListActivity classes and review
their code.
3. Run the app. This should display a series of messages on the user interface for
the activity.
4. Switch to the TaskListActivity class and add code that inserts a second task
with a list ID of 1 and a name of "Take car in for oil change".
5. Run the app. This should display a similar series of messages as before, but it
should also display the task that you inserted in step 4.
6. Change the orientation of the activity one or more times. This should run the
test code again, which should insert the task from step 4 again. This shows
that the database doesn't use the UNIQUE attribute to require that all names
are unique.
7. Add code that deletes the rows that you added in steps 4-6. To do that, you
can get the IDs for the tasks by viewing the messages on the Task List activity.
Then, you can pass these IDs to the deleteTask method.
8. Run the app. This time the tasks inserted in steps 4-6 should be deleted, but
the task inserted by this step should still be in the database.
432 Section 4 The Task List app
Exercise 13-2 Use the DB Browser for SQLite
In this exercise, you'll use the DB Browser for SQLite app to work with an
existing Task List database.
1. Open the project named ch 13_ex2_TaskList.
2. Run the app in an emulator. This should display a series of messages on the
user interface for the activity.
3. If necessary, install DB Browser for SQLite on your computer.
4. Stail the DB Browser for SQLite app.
5. Use the Android Device Monitor tool to pull the tasklist.db file for the
database from the emulator to the ch 13_ex2_TaskList directory on your
computer.
6. Use the DB Browser for SQLite to open this tasklist.db file.
7. View the database structure for the List and Task tables. You should be able to
view all of the column names and their data types.
8. Browse the data that's stored in the List and Task tables. This should help you
understand how these tables work.
9. Execute the following SQL statement:
INSERT INTO task VALUES (1, 'Test!', ' ', '0', '0')
This should display an error that indicates that the Task table requires 6
columns.
10. Execute the following SQL statement:
INSERT INTO task VALUES (100, 1, 'Test!', ' ', '0', '0')
This should not display any errors.
11. View the data for the Task table to make sure the "Test!" row was inserted.
Exercise 13-3 Modify the database class
for the Task List app
In this exercise, you'll modify the database class for the Task List app.
Modify the data types that are used by the database
1. Open the project named ch 13_ex3_TaskList.
2. Run the app. This should display a series of messages on the user interface for
the activity.
3. Open the TaskListDB class.
4. Modify the CREATE TABLE statement for the Task table so it stores the
date_completed and hidden columns using the INTEGER types instead of
using the TEXT type.
Chapter 13 How to work with SQLite databases 433
5. Modify the INSERT statements for the Task table so they don't include
single quotes around the last two columns. (You don't need to use quotes for
INTEGER values, only for TEXT values.)
6. In the getTasks method, modify the variable named where so it doesn't
include quotes around the 1. (They are no longer needed.)
7. Open the Task class and modify it so it uses the long type for the
completedDate instance variable and the int type for the hidden variable.
To get this to work, you can change the data type for the TRUE and FALSE
constants to the int type. In addition, you need to modify the constructors, and
some of the methods of this class, so they use the correct data types.
8. Switch to the TaskListDB class. Then, modify the getTaskFromCursor method
so it uses the getlnt method to get values from the date_completed and hidden
columns.
9. Open the TaskListActivity class. Then, modify the code that creates that Task
object so that it doesn't include quotes around the completedDate and hidden
values.
10. Increment the database version number to 2.
11. Run the app. It should work the same as before. However, the app is now
storing its data with different types. To verify this, you can check the LogCat
view. It should display a message that indicates that the database has upgraded
from version 1 to 2.
12. Set the database version number to 1 and run the app again. The app should
crash because the database can't be downgraded from 2 to 1.
13. Uninstall the app on the device. This should also delete the database file for
the app.
14. Run the app again. This time, the app should run, and the database version
number should be reset to 1.
Add a private method to the TaskListDB class
15. Switch to the TaskListDB class and scroll down to the closeDB method. After
this method, add a private method named closeCursor that accepts a Cursor
object. This method should check whether the Cursor object exists (is not
null). If so, this method should close the Cursor object.
16. Modify the getLists, getList, getTasks, and getTask methods so they use the
closeCursor method.
17. Run the app again. It should work the same as before, but you have made a
minor improvement to the database class.
14
How to work with tabs
and custom adapters
In the last chapter, you learned how to write the database and business classes
for the Task List app. Now, you'll learn how to use those classes to display data
on the user interface for the Task List app. To do that, you'll learn how to use
tabs and custom adapters.
How to use tabs 436
How to add the TabManager class to your project 436
The layout for an activity that displays tabs 436
The class for an activity that displays tabs 438
The class for a fragment that displays tab content 440
How to use a custom adapter 442
A layout for a list view item 442
A class that extends the layout for a list view item 444
A class for a custom adapter 448
A class for a fragment that uses a custom adapter 450
The Task List app 452
The user interface 452
The activity_task_list menu 454
The TaskListActivity class 454
The activity_add_edit and spinner_list layout 458
The activity_add_edit menu 458
The AddEditActivity class 460
Perspective 464
436 Section 4 The Task List app
How to use tabs
The Task List app displays the name of each list on a tab. To do that, this app
uses the TabManager class that was originally made available by Google. This
class provides a way to use a fragment to display the content for each tab.
How to add the TabManager class to your project
The TabManager class isn't available as part of the Android API. As a result,
before you can use this class, you must add its library to your project. To do that,
you can get the TabManager.jar file for the library by downloading the source
code for this book. Then, you can copy the TabManager.jar file into the libs
directory for your project. Once you have copied the TabManager.jar file into the
libs directory, you can open the Gradle script for the app and add a dependency
to it like the first one shown in figure 14-1.
In addition, the TabManager class uses classes from the Android v4 support
library. This library provides support for the ActivityFragment and Fragment
classes used in this chapter. As a result, you also need to add a dependency for
the android-support-v4.jar file like the second one show in this figure.
The layout for an activity that displays tabs
Figure 14-1 also shows the layout for an activity that displays tabs. If you
want to display tabs across the top of an activity, you can add code like the code
shown in this figure. This code is boilerplate code that you can copy and paste
from the downloadable source code for this book into your activity.
The TabHost widget defines a container for tabs. This container has two
sets of children: (1) a Tab Widget object that can contain one or more tabs (2) a
FrameLayout object that can display the content for the selected tab. The code in
this figure provides a TabHost object named tabhost, a Tab Widget object named
tabs, and two FrameLayout objects named tabcontent and realtabcontent. Here,
the first FrameLayout object is a placeholder that's required by the TabHost
object. However, it isn't used by the app. That's why both its height and width
have been set to Odp. The second FrameLayout object, on the other hand, has
a height of Odp, but a weight of 1. As a result, it takes all of the vertical space
between the Tab Widget object and the bottom of the screen.
Since the tabs aren't added to the Tab Widget object until runtime, the
graphical layout editor doesn't show the tabs. Instead, it shows an area for the
tabs with a label that says "TAB LABEL". Below that, the graphical editor
displays a white area for the content of the selected tab.
Chapter 14 How to work with tabs and custom adapters 437
The dependencies needed to work with a tab widget
compile files('libs/TabManager.jar')
compile 'com.android.support:support-v4:23.0.0'
A tab widget displayed in the graphical editor
<> acttvtty__task__UsLxml x
Palette &~
B-
CD Layouts
Y\ FrameLayout
UJJ Lineartayout (Horizontal)
[ j Lineartayout (Vertical)
f\ TableLayout
~ TableRow
-| |- Grid Layout
TO RelativeLayout
CD Widgets
[AbJ Plain TextView
(fib) Large Text
ftb] Medium Text
,Ab] Small Text
Q," ^Nexus4* □-
0m
-
Q Task List
r
► AppTheme - © - <pj' 23 -
<$ <3t '*i =i El 0
-— -
^ I 6:00
TAB LABCL 1
1
1
1
*
Component Tree ^ -r #~ ~*| 1
T r] Device Screen
T ~ @>android:id/tabhost (TabHost)
► ' | Lineartayout vertical)
Properties ? ^ T
Nothing to show
The XML for the layout
<TabHost xmlns:android="http://schemas•android.com/apk/res/android"
android:id="©android:id/tabhost"
android:layout_width="match parent"
android:layout height="match parent">
<LinearLayout android:orientation="vertical"
android:layout_width="match parent"
android:layout height="match parent">
<TabWidget android:id="©android:id/tabs"
android:orientation="hori zontal"
android:layout_width="match parent"
android:layout_height="wrap_content"
android:layout_weight="0"/>
<FrameLayout android:id="©android:id/tabcontent"
android:layout_width="Odp"
android:layout_height="Odp"
android:layout_weight="0"/>
<FrameLayout android:id="@+android:id/realtabcontent"
android:layout_width="match parent"
android:layout_height="Odp"
android:layout_weight="1"/>
</LinearLayout >
</TabHost>
Description
• To get the TabManager.jar file, you can download the source code for this book.
This .jar file is stored in the book_apps\chl4_TaskList\libs directory
• To add the TabManager library to your project, copy the TabManager.jar file into
the libs directory for your project.
Figure 14-1 The layout for an activity that displays tabs
438 Section 4 The Task List app
The class for an activity that displays tabs
Figure 14-2 shows the class for an activity that displays tabs. This class
begins by importing the TabManager class that's stored in the TabManager
library. Then, it imports the Fragment Activity class that's included with the
Android v4 support library. In addition, it imports the Tab Host and TabSpec
classes that are used to work with tabs.
The TaskList Activity class begins by extending the Fragment Activity class.
As mentioned earlier, this is generally considered the best way to display tabs
since it allows you to display the content for a tab as a fragment.
Within the TaskListActivity class, the onCreate method gets a reference to
the TabHost object. Then, it calls the setup method from that object. When you
load the TabHost object by calling the findViewByld method, you must call this
method before you add tabs to the TabHost object.
After setting up the TabHost object, this code creates a new TabManager
object. To do that, this code passes three arguments to the constructor of the
TabManager class: (1) the context, (2) the TabHost object, and (3) the ID of the
FrameLayout widget that's used to display the content for the current tab. This
ID corresponds with the second FrameLayout widget shown in the previous
figure.
After creating the TabManager object, this code creates a new object from
the TaskListDB class described in the previous chapter. Then, it calls the getLists
method from this object to get an ArrayList of List objects.
If this ArrayList object contains one or more List objects, this code loops
through all of the List objects. Then, it displays the name of each list on a tab. To
do that, this code creates a TabSpec object that represents the specification for
the tab, and it adds that tab to the tabs.
Within the loop, the first statement uses the newTabSpec method of the
TabHost class to create a TabSpec object and set its tag to the name of the list.
Then, the second statement uses the setlndicator method to set the label that's
used for the tab to the name of the list. Next, the third statement uses the addTab
method of the TabManager class to add the tab and its content to the TabHost
widget. To do that, this statement passes the TabSpec object and the name of
the class for the fragment that displays the content of the tab. In the next figure,
you'll see how this class works.
After the while loop, the onCreate method finishes by checking whether the
Bundle object that's passed to it is not null. If so, this code gets the name of the
current tab's tag from the Bundle object. Then, it sets the current tab to that tag.
The onSavelnstanceState method begins by passing the Bundle object to the
onSavelnstanceState superclass. Then, it saves the name of the current tab's tag
in the Bundle object. This makes the tag for the current tab available from the
Bundle object of the onCreate method.
Chapter 14 How to work with tabs and custom adapters 439
The class for an activity that displays tabs
package com.murach.tasklist;
import java.util.ArrayList;
import com.google•tabmanager.TabManager;
import android.os•Bundle;
import android.support.v4.app.FragmentActivity;
import android.widget.TabHost;
import android.widget.TabHost.TabSpec;
public class TaskListActivity extends FragmentActivity {
TabHost tabHost;
TabManager tabManager;
©Override
protected void onCreate(Bundle savedlnstanceState) {
super.onCreate(savedlnstanceState);
setContentView(R.layout.activity_task_list);
// get tab manager
tabHost = (TabHost) f indViewByld(android.R.id.tabhost);
tabHost.setup();
tabManager = new TabManager(this, tabHost, R.id.realtabcontent);
// get the lists from the database
TaskListDB db = new TaskListDB(this);
ArrayList<List> lists = db.getLists();
// add a tab for each list
if (lists != null && ! lists.isEmpty()) {
for (List list : lists) {
TabSpec tabSpec = tabHost.newTabSpec(list.getName());
tabSpec•setlndicator(list.getName());
tabManager.addTab(tabSpec, TaskListFragment.class, null);
}
}
// set current tab to the last tab opened
if (savedlnstanceState != null) {
tabHost.setCurrentTabByTag(savedlnstanceState.getString("tab"));
}
}
©Override
protected void onSavelnstanceState(Bundle outState) {
super.onSavelnstanceState(outState);
outState.putString("tab", tabHost.getCurrentTabTag());
}
}
Description
• Within the class for an activity, you can use a TabManager object to add one or more
tabs. For example, you can add one tab for each list stored in a database.
Figure 14-2 The class for an activity that displays tabs
440 Section 4 The Task List app
The class for a fragment
that displays tab content
Figure 14-3 shows the class for a fragment that displays the content for a
tab. This class begins by extending the Fragment class that's available from the
Android v4 support library. For the most part, this Fragment class works like the
Fragment class described in chapter 9.
The onCreate method begins by inflating the layout for the fragment.
Although it isn't shown here, the layout for this class uses a vertical linear layout
that contains a single Text View widget named taskTextView. The second
statement gets a reference to this Text View widget.
The third statement gets a reference the TabHost object. To do that, this
statement calls the getParent method of the container object twice. The first call
gets the LinearLayout widget that's used by the fragment, and the second call
gets the TabHost widget that's used by the activity.
The fourth statement uses the getCurrentTabTag method of the TabHost
object to get the name of the current tab. Then, the fifth statement calls the
refreshTaskList method. This method displays a message on the Text View
widget that includes the name of the current tab. For example, if the user clicks
on the Personal tab, the content for that tab displays a message that says, "This is
the Personal tab."
The onResume method begins by calling the onResume method of the
superclass. Then, it calls the refreshTaskList method to display a message on the
Text View widget.
Now that you can display a simple message as the content for a tab, you're
just a step or two away from displaying more complex data. For example, you
might want to look up all of the tasks for the current tab and display those tasks
as the content for that tab. In the next few figures, you'll learn how to do that.
Chapter 14 How to work with tabs and custom adapters 441
The class for a fragment that displays tab content
package com.murach.tasklist;
import android.os•Bundle;
import android.support.v4.app•Fragment;
import android.view.Layoutlnflater;
import android.view.View;
import android.view.ViewGroup;
import android.widget.TextView;
import android•widget•TabHost;
public class TaskListFragment extends Fragment {
private TextView taskTextView;
private String currentTabTag;
©Override
public View onCreateView(Layoutlnflater inflater, ViewGroup container.
Bundle savedlnstanceState) {
// inflate the layout for this fragment
View view = inflater.inflate(R.layout.fragment_task_list,
container, false);
// get references to widgets
taskTextView = (TextView) view.findViewByld (R.id.taskTextView);
// get the current tab
TabHost tabHost = (TabHost) container.getParent().getParent();
currentTabTag = tabHost.getCurrentTabTag();
// refresh the task list view
refreshTaskList();
// return the view
return view;
}
public void refreshTaskList() {
String text = "This is the " + currentTabTag + " list.";
taskTextView.setText(text);
}
©Override
public void onResume() {
super.onResume();
refreshTaskList();
}
}
Description
• Within the class for a fragment, you can use a TabHost class to get the tag for the
current tab. You can use this tag to display the appropriate data for the current tab.
Figure 14-3 The class for a fragment that displays tab content
442 Section 4 The Task List app
How to use a custom adapter
After the Task List app reads a list of tasks from the database, it needs to
display those tasks on the user interface. To do that, you could use a simple
adapter to display those tasks in a List View widget as shown in the previous
chapters. However, the Task List app includes a check box in the ListView
widget. To get this check box to work correctly, you can use a custom adapter as
shown in the next few figures.
A layout for a list view item
Figure 14-4 shows the layout for an item in the ListView widget that's used
to display a list of tasks. This layout displays a CheckBox widget that indicates
whether the task has been completed, a Text View widget for the name of the
task, and a Text View widget for any notes for the task. If you've read chapter 5,
you shouldn't have any trouble understanding how this layout works. However,
there are a couple of attributes that haven't been presented yet.
For the CheckBox widget, the button attribute specifies a custom layout for
the button. This layout is stored in a file named btn_check.xml in the
res\drawable directory of the project, and it specifies the .png files for the
checked and unchecked versions of the check box. Although this code isn't
necessary, it provides a way to control the appearance of the check box. By
default, the CheckBox widget was too light to see on some devices, so 1 specified
some slightly darker .png files for these check boxes. These .png files are stored
in the appropriate res\drawable-xxx directories for the project.
For the Text View widgets, the textColor attribute specifies black for the
color of the text. Again, this code isn't necessary. However, the default color was
light gray on some devices, and I think black is easier to read.
Chapter 14 How to work with tabs and custom adapters 443
The listview_task layout
The XML for the layout
< ?xml version="1.0" encoding="utf-8"? >
<RelativeLayout xmlns:android="http://schemas.android.com/apk/res/android"
android:id="@+id/relativeLayoutTaskItem"
android:layout_width="match parent"
android:layout height="match parent" >
<CheckBox
android:id="@+id/completedCheckBox"
android:layout_width="wrap_content"
android:layout_height="wrap_content"
android:layout_alignParentLeft="true"
android:layout_alignParentTop="true"
android:layout_margin="5dp"
android:button="@drawable/btn_check" />
<TextView
android:id="G+id/nameTextView"
android:layout_width="wrap_content"
android:layout_height="wrap_content"
android:layout_alignBaseline="@+id/completedCheckBox"
android:layout_alignBottom="@+id/completedCheckBox"
android:layout_toRightOf="@+id/completedCheckBox"
android:text="©string/task_name"
android:textColor="©android:color/black"
android:textSi ze="18sp"
android:textStyle="bold" />
<TextView
android:id="@+id/notesTextView"
android:layout_width="wrap_content"
android:layout_height="wrap_content"
android:layout_below="@+id/nameTextView"
android:layout_marginTop="-5dp"
android:layout_toRightOf="@+id/completedCheckBox"
android:paddingBottom="7dp"
android:text="©string/task_notes"
android:textColor="©android:color/black"/>
</RelativeLayout>
Figure 14-4 The layout for a list view item
444 Section 4 The Task List app
A class that extends the layout
for a list view item
When the layout for a ListView widget contains complex widgets such as a
check box, you code a class that extends the layout as shown in figure 14-5. This
allows you to display the widgets correctly and to handle events that occur upon
them.
The TaskLayout class begins by extending the RelativeLayout class and
implementing the OnClickListener interface. The first constructor of this class
supports some Android tools. It isn't required for this app to work, but it's
considered a good practice to include it.
The second constructor accepts two parameters: a Context object and a Task
object. Within this constructor, the first statement passes the Context object to
the constructor of the superclass. Then, the next two statements set the context
for the current object and create a TaskListDB object.
The fourth statement uses the getSystemService method of the Context
object to get a Layoutlnflater object. Then, the fifth statement uses that object to
inflate the layout defined in the previous figure. After that, the next three
statements get references to the widgets on the layout.
The eighth and ninth statements set the listeners for the widgets. Here, the
eighth statement sets the listener for the check box, and the ninth statement sets
the listener for the entire layout.
Chapter 14 How to work with tabs and custom adapters 445
A class that extends the layout Page 1
package com.murach.tasklist;
import android.content.Context;
import android.content.Intent;
import android.view.Layoutlnflater;
import android.view.View;
import android.view.View.OnClickListener;
import android.widget.CheckBox;
import android•widget•RelativeLayout;
import android.widget.TextView;
public class TaskLayout extends RelativeLayout implements OnClickListener {
private CheckBox completedCheckBox;
private TextView nameTextView;
private TextView notesTextView;
private Task task;
private TaskListDB db;
private Context context;
public TaskLayout(Context context) { // used by Android tools
super(context);
}
public TaskLayout(Context context. Task t) {
super(context);
// set context and get db object
this•context = context;
db = new TaskListDB(context);
/ / inflate the layout
LayoutInflater inflater = (Layoutlnflater)
context.getSystemService(Context.LAYOUT_INFLATER_SERVICE);
inflater.inflate(R.layout.listview_task# this, true);
// get references to widgets
completedCheckBox = (CheckBox) findViewById(R.id.completedCheckBox);
nameTextView = (TextView) findViewById(R.id.nameTextView);
notesTextView = (TextView) findViewById(R.id.notesTextView);
// set listeners
completedCheckBox.setOnClickListener(this);
this.setOnClickListener(this);
Figure 14-5 A class that extends the layout (part 1 of 2)
446 Section 4 The Task List app
The last statement in the constructor calls the setTask method that's defined
later in this class. This method sets the Task object as an instance variable, and it
displays the data in the Task object on the user interface.
The setTask method begins by setting the instance variable for the Task
object equal to the Task parameter. Then, it updates the user interface. First, it
sets the name of the task on the appropriate Text View widget. Then, it checks
whether the notes for the task are equal to an empty string. If so, it hides the
Text View widget for the notes. Otherwise, it sets the notes for the task on the
appropriate Text View widget.
This code continues by checking whether the milliseconds for the completed
date are greater than zero. If so, the task has been marked as completed. As a
result, this code checks the CheckBox widget. Otherwise, this code removes the
check from the CheckBox widget.
The onClick method begins by using a switch statement to check whether
the CheckBox widget was clicked. If so, this code checks whether the CheckBox
widget was checked. If so, this code sets the completed date for the task to
the number of milliseconds for the current date. Otherwise, this code sets the
completed date for the task to zero. This indicates that the task has not been
completed. Either way, this code uses the database object to update the current
task in the database.
If the CheckBox widget wasn't clicked, some other area of the layout for the
item was clicked. For example, the user may have clicked the name or notes for
the task. If so, this code executes the code for the default case. This code begins
by creating an intent for the Add/Edit activity. Then, it adds a "new task" flag to
the intent and stores two pieces of extra data for the intent: (1) the ID of the task
and (2) a Boolean variable that indicates that the layout is in edit mode. Finally,
this code uses the intent to start the Add/Edit activity.
Chapter 14 How to work with tabs and custom adapters 447
A class that extends the layout Page 2
// set task data on widgets
setTask(t);
}
public void setTask(Task t) {
task = t;
nameTextView.setText(task.getName());
// Remove the notes if empty
if (task.getNotes().equalsIgnoreCase("")) {
notesTextView.setVisibility(GONE);
}
else {
not esText View, set Text (task.getNotes () ) ;
}
if (task.getCompletedDateMillis() > 0) {
completedCheckBox.setChecked(true);
}
else{
completedCheckBox.setChecked(false);
}
}
©Override
public void onClick(View v) {
switch (v.getld()) {
case R.id.completedCheckBox:
if (completedCheckBox.isChecked()) {
task.setCompletedDate(System.currentTimeMillis());
}
else {
task•setCompletedDate(0);
}
db.updateTask(task);
break;
default:
Intent intent = new Intent(context, AddEditActivity.class);
intent.addFlags(Intent.FLAG_ACTIVITY_NEW_TASK);
intent.putExtra("taskld", task.getld());
intent.putExtra("editMode", true);
context.startActivity(intent);
break;
}
}
}
Description
• When the layout for a List View widget contains complex widgets such as a check
box, you code a class that extends the layout. This allows you to display the
widgets correctly and to handle events that occur upon them.
Figure 14-5 A class that extends the layout (part 2 of 2)
448 Section 4 The Task List app
A class for a custom adapter
Figure 14-6 shows a class for a custom adapter. This class begins by
extending the BaseAdapter class. Then, it declares two instance variables: (1)
a Content object and (2) an ArrayList of Task objects. Both of these instance
variables are assigned values in the constructor for this class.
After the constructor, the TaskListAdapter class overrides four methods of
the Adapter class: (1) getCount, (2) getltem, (3) getltemld, and (4) get View.
These methods are needed to display the tasks in the adapter as items on a
List View widget.
The first three methods are easy to understand. The getCount method returns
a count of the number of items in the ArrayList object. The getltem method
returns the Task object that's at the specified position in the ArrayList object.
And the getltemld method returns the position parameter. As a result, this
method uses the same value for position and item ID.
The fourth method, the get View method, is more complicated. This method
returns a TaskLayout object like the one defined by the class shown in the
previous figure. This object corresponds with the data for the task at the specified
position. To start, the get View method defines a variable for a TaskLayout object.
Then, it gets the Task object for the specified position parameter. Next, it checks
whether the View parameter is null. If so, it creates a new TaskLayout object
for the current task. Otherwise, it converts the View parameter to a TaskLayout
object and uses the setTask method of that object to set the current task for the
layout. Either way, this method returns the TaskLayout object.
Chapter 14 How to work with tabs and custom adapters 449
A class for a custom adapter
package com.murach.tasklist;
import java.util.ArrayList;
import android.content.Context;
import android.view.View;
import android.view.ViewGroup;
import android.widget.BaseAdapter;
public class TaskListAdapter extends BaseAdapter {
private Context context;
private ArrayList<Task> tasks;
public TaskListAdapter(Context context, ArrayList<Task> tasks){
this.context = context;
this•tasks = tasks;
}
©Override
public int getCount() {
return tasks.size();
}
©Override
public Object getltem(int position) {
return tasks.get(position);
}
©Override
public long getltemld(int position) {
return position;
}
©Override
public View getView(int position. View convertView, ViewGroup parent) {
TaskLayout taskLayout = null;
Task task = tasks.get(position);
if (convertView == null) {
taskLayout = new TaskLayout(context, task);
}
else {
taskLayout = (TaskLayout) convertView;
taskLayout•setTask(task);
}
return taskLayout;
}
}
Description
• The class for a custom adapter that extends the BaseAdapter class can supply the
data for List View and Spinner widgets.
Figure 14-6 A class for a custom adapter
450 Section 4 The Task List app
A class for a fragment
that uses a custom adapter
Figure 14-7 shows a class for a fragment that uses a custom adapter like the
one shown in the previous figure. This class works much like the class shown in
figure 14-3. However, the refreshTaskList method in figure 14-7 gets the tasks
for a list from the database and uses a custom adapter to display them.
The refreshTaskList method begins by getting the context for the
application. Then, it creates an object from the TaskListDB class and calls the getTasks
method from that object to get the tasks for the current tab.
The refreshTaskList method finishes by creating a TaskListAdapter object
and passing it the application context as well as the tasks. Then, it sets that
object as the adapter for the List View control for the fragment.
Chapter 14 How to work with tabs and custom adapters 451
A class for a fragment that uses a custom adapter
package com.murach.tasklist;
import java.util.ArrayList;
import android.content.Context;
import android.os.Bundle;
import android.support.v4.app•Fragment;
import android.view.Layoutlnflater;
import android.view.View;
import android.view.ViewGroup;
import android.widget.ListView;
import android•widget•TabHost;
public class TaskListFragment extends Fragment {
private ListView taskListView;
private String currentTabTag;
©Override
public View onCreateView(Layoutlnflater inflater, ViewGroup container.
Bundle savedlnstanceState) {
View view = inflater.inflate(R.layout.fragment_task_list,
container, false);
taskListView = (ListView) view.findViewByld (R.id.taskListView);
TabHost tabHost = (TabHost) container.getParent().getParent();
currentTabTag = tabHost.getCurrentTabTag();
refreshTaskList();
return view;
}
public void refreshTaskList() {
// get task list for current tab from database
Context context = getActivity().getApplicationContext();
TaskListDB db = new TaskListDB(context);
ArrayList<Task> tasks = db.getTasks(currentTabTag);
// create adapter and set it in the ListView widget
TaskListAdapter adapter = new TaskListAdapter(context, tasks);
taskListView.setAdapter(adapter);
}
©Override
public void onResume() {
super.onResume();
refreshTaskList();
}
}
Description
• Within the class for a fragment, you can use a custom adapter to display
appropriate data for the current tab.
Figure 14-7 A class for a fragment that uses a custom adapter
452 Section 4 The Task List app
The Task List app
So far, this chapter has presented enough of the code for the Task List app
that you should have a general idea of how it works. Now, this chapter presents
some more of the code to fill in the gaps about how this app works. But first, to
put this code in context, this chapter reviews the user interface for the app, which
was originally presented at the beginning of the previous chapter.
The user interface
Figure 14-8 reviews the interface for the Task List app. When the app starts,
the Task List activity displays a list of tasks where each task has a check box that
indicates whether it has been completed, a name, and optional notes.
In addition, the Task List activity provides tabs for two lists: Personal and
Business. To display lists, the user can click on the tabs that are available from
the Task List activity. In this figure, for example, the Personal tab is selected
and the tasks for that tab are displayed. However, the user could click on the
Business tab to display the tasks for that list.
From the Task List activity, the user can mark a task as completed by
selecting a check box. Then, the user can remove all tasks that have been marked
as completed by clicking on the Delete Tasks icon (the small trash can). This
icon is available from the task bar. However, older versions of Android don't
provide for the task bar. As a result, on older devices, the user can display the
options menu and select the Delete Tasks item.
The user can add a task by clicking on the Add Task icon (the + sign) that's
available from the task bar. Or, if the device is too old to display a task bar, the
user can display the options menu and select the Add Task item. This displays
the Add/Edit activity in add mode. At this point, the user can use the spinner to
select the list. Then, the user can use the editable text views to add or edit the
text for the task.
Similarly, the user can edit a task by clicking on the task in the Task List
activity. This displays the Add/Edit activity in edit mode so the user can edit the
data for the task. In this figure for example, I clicked on the "Get hair cut" task
in the Task List activity. As a result, the Add/Edit activity displays this task in
edit mode.
Chapter 14 How to work with tabs and custom adapters
453
The Task List activity
Q Task List
PERSONAL
□ Pay bills
Rent
Phone
Internet
□ Get hair cut
3G
6A 8:48
+
BUSINESS
The Add/Edit activity
KA 8:46
X s/
Q Task List
Personal
Get hair cut
Notes
Description
• When the app starts, the Task List activity displays a list of tasks where each task
has a check box that indicates whether it has been completed, a name, and optional
notes.
• The app provides for two lists: Personal and Business.
• To display lists, the user can click on the tabs that are available in the Task List
activity.
• To edit a task, the user can click on the task in the Task List activity. This displays
the Add/Edit activity in edit mode so the user can edit the data for the task.
• To mark a task as completed, the user can select the check box in the Task List
activity.
• To remove all completed tasks, the user can click the Delete Tasks button that's
available from the task bar.
• To add a new task, the user can navigate to the Task List activity and click on the
Add Task icon. This displays the Add/Edit activity in add mode so the user can add
a new task.
• In the Add/Edit activity, the user can use the spinner to select the list. Then, the user
can use the editable text views to add or edit the text for the task.
Figure 14-8 The user interface for the Task List app
454 Section 4 The Task List app
The activitytasklist menu
Figure 14-9 shows the code that defines the menu for the TaskListActivity
class. This code displays two menu items: (1) an Add Task item and (2) a Delete
item.
Both of these menu items display icons in the task bar if there is enough
room. These icons are stored in the res\drawable-xxx directory that's appropriate
for the resolution of the icon. Otherwise, they display text in the options menu.
Also, if the device is old and doesn't support the task bar, these menu items are
available from the options menu.
The TaskListActivity class
Figure 14-10 shows the complete code for the TaskListActivity class. Part
1 of this figure works like the class described in figure 14-2. As a result, you
shouldn't have much trouble understanding how it works. However, part 2 of this
figure includes code that handles the events that occur when the user selects an
item from the options menu.
To start, the onOptionsltemSelected method checks which menu item was
selected. If the Add Task item was selected, the first statement creates an intent
for the Add/Edit activity. Then, the second statement stores the current tab in the
extra data for the intent. Finally, the third statement uses the intent to start the
Add/Edit activity. Since this intent doesn't include extra data that specifies edit
mode, this displays the Add/Edit activity in add mode.
If the Delete item was selected, this code hides all tasks that have been
marked as complete. To do that, the first statement gets all tasks for the current
tab. Then, the code loops through all of these tasks. If the milliseconds for the
completed date are greater than 0, the task is marked as hidden, and the database
is updated.
After updating the database, this code refreshes the task list. To do that, this
code gets a reference to the fragment that corresponds with the current tab. Then,
it calls the refreshTaskList method from that fragment to refresh the list of tasks.
As a result, any tasks marked as hidden will no longer be displayed on the list.
Chapter 14 How to work with tabs and custom adapters 455
The activity_task_list menu
<menu xmlns:android="http://schemas•android.com/apk/res/android" >
<item
android:id="@+id/menuAddTask"
android:icon="@drawable/ic_action_add"
android:orderInCategory="1"
android:showAsAction="ifRoom"
android:title="@string/add_task"/>
<item
android:id="@+id/menuDelete"
android:icon="@drawable/ic_action_delete"
android:orderlnCategory="2"
android:showAsAction="ifRoom"
android:title="©string/delete"/>
</menu>
Figure 14-9 The activity_task_list menu
456 Section 4 The Task List app
The TaskListActivity class Page 1
package com.murach.tasklist;
import java.util.ArrayList;
import com.google•tabmanager.TabManager;
import android.content.Intent;
import android.os.Bundle;
import android.support.v4.app.FragmentActivity;
import android.view.Menu;
import android.view.MenuItern;
import android•widget.TabHost;
import android•widget.TabHost.TabSpec;
public class TaskListActivity extends FragmentActivity {
TabHost tabHost;
TabManager tabManager;
TaskListDB db;
©Override
protected void onCreate(Bundle savedlnstanceState) {
super.onCreate(savedlnstanceState);
setContentView(R.layout.activity_task_list);
// get tab manager
tabHost = (TabHost) f indViewByld(android.R.id.tabhost);
tabHost•setup();
tabManager = new TabManager(this, tabHost, R.id.realtabcontent);
// get database
db = new TaskListDB(getApplicationContext());
// add a tab for each list in the database
ArrayList<List> lists = db.getLists();
if (lists != null && lists.size() > 0) {
for (List list : lists) {
TabSpec tabSpec = tabHost.newTabSpec(list.getName());
tabSpec•setlndicator(list.getName());
tabManager.addTab(tabSpec, TaskListFragment.class, null);
}
}
// sets current tab to the last tab opened
if (savedlnstanceState != null) {
tabHost.setCurrentTabByTag(savedlnstanceState.getString("tab"));
}
}
©Override
protected void onSavelnstanceState(Bundle outState) {
super.onSavelnstanceState(outState);
outState.putString("tab", tabHost.getCurrentTabTag());
}
Figure 14-10 The TaskListActivity class (part 1 of 2)
Chapter 14 How to work with tabs and custom adapters 457
The TaskListActivity class Page 2
©Override
public boolean onCreateOptionsMenu(Menu menu) {
getMenuInflater().inflate(R.menu.activity_task_list# menu);
return true;
}
©Override
public boolean onOptionsItemSelected(MenuItem item) {
switch (item.getItemld()){
case R.id.menuAddTask:
Intent intent = new Intent(this, AddEditActivity.class);
intent.putExtra("tab", tabHost.getCurrentTabTag());
startActivity(intent);
break;
case R.id.menuDelete:
// Hide all tasks marked as complete
ArrayList<Task> tasks =
db.getTasks(tabHost.getCurrentTabTag());
for (Task task : tasks){
if (task.getCompletedDateMillis() > 0){
task.setHidden(Task.TRUE);
db.updateTask(task);
}
}
// Refresh list
TaskListFragment currentFragment = (TaskListFragment)
getSupportFragmentManager().
findFragmentByTag(tabHost.getCurrentTabTag());
currentFragment.refreshTaskList();
break;
}
return super.onOptionsItemSelected(item);
}
}
Figure 14-10 The TaskListActivity class (part 2 of 2)
458 Section 4 The Task List app
The activityaddedit and spinnerjist layout
Figure 14-11 begins by showing the layout for the Add/Edit activity. This
activity allows the user to use a spinner to select the name of the list. Then, the
user can use the two editable text views to edit the name and notes of the task.
Both of the editable text views use the hint attribute to specify a hint to the user.
For example, the editable text view for notes specifies a hint of "Notes". That
way, the user knows to enter notes in this editable text view.
Since the layout for the activity uses a custom layout for the spinner, this
figure also shows the spinner_list layout. This layout is used to display the
names of the lists in the spinner. To do that, it uses a Text View widget with black
text color and a text size of 18sp.
The activityaddedit menu
Figure 14-11 also shows the code that defines the menus for the Add/Edit
activity. This displays two items: (1) the Save item and (2) the Cancel item.
Like the menu items for the Task List activity, both of these menu items display
icons in the task bar if there is enough room. Otherwise, they display text in the
options menu.
Chapter 14 How to work with tabs and custom adapters 459
The activity_add_edit layout
< ?xml version="1.0" encoding="utf-8"? >
<LinearLayout xmlns:android="http://schemas.android.com/apk/res/android"
android:layout_width="match parent"
android:layout height="match parent"
android:orientation="vertical" >
<Spinner
android:id="@+id/listSpinner"
android:layout_width="match parent"
android:layout_height="wrap_content" />
<EditText
android:id="@+id/nameEditText"
android:layout_width="match parent"
android:layout_height="wrap_content"
android:hint="©string/task_name_hint" >
<requestFocus />
</EditText>
<EditText
android:id="@+id/notesEditText"
android:layout_width="match parent"
android:layout_height="Odp"
android:layout_weight="1"
android:gravity="top"
android:hint="©string/task_notes_hint"
android:inputType="textMultiLine" />
</LinearLayout >
The spinnerjist layout
< ?xml version="1.0" encoding="utf-8"? >
<TextView xmlns:android="http://schemas.android.com/apk/res/android"
android:layout width="fill parent"
android:layout_height="wrap_content"
android:padding="5dp"
android:textColor="©android:color/black"
android:textSize="18sp" />
The activity_add_edit menu
< ?xml version="1.0" encoding="utf-8"? >
<menu xmlns:android="http://schemas•android.com/apk/res/android" >
<item android:id="@+id/menuSave"
android:showAsAction="ifRoom"
android:title="@string/save"
android:icon="@drawable/ic_action_save"
android:orderlnCategory="2"></item>
<item android:id="@+id/menuCancel"
android:showAsAction="ifRoom"
android:title="©string/cancel"
android:icon="@drawable/ic_action_cancel"
android:orderlnCategory="1"></item>
</menu>
Figure 14-11 The activity_add_edit layout and menu
460 Section 4 The Task List app
The AddEditActivity class
Figure 14-12 shows the code for the AddEditActivity class. In part 1, the
code works like most of the other activities you've seen throughout this book.
However, it also creates a TaskListDB object. Then, it uses that database object
to get an array of lists that are used as the data source for the adapter of the
spinner.
Part 2 begins by getting the edit mode from the intent. Then, this code
checks if the activity is in edit mode. If so, it uses the ID of the task to retrieve
that task from the database. Then, it updates the task name and notes on the
user interface. To do that, this code uses the setText methods of the editable text
views for the name and notes of the task.
After setting the name and notes for the task, this code sets the appropriate
list in the spinner. To do that, it checks if the activity is in edit mode. If so, it gets
the ID for the same list as the selected task. Otherwise, it gets the ID for the list
that was current when the user clicked the Add Task item. Either way, this code
subtracts 1 from the database ID to get the correct position. This is necessary
because the database numbering starts with 1, and the list item positions start
with 0. Then, this code uses the current list item position to select the correct list
from the spinner.
The onOptionsltemSelected method checks which item was selected. If the
Save item was selected, this code saves all data on the activity to the database.
To do that, it calls the saveToDB method shown in part 3 of this figure. Then, it
calls the finish method of the activity to remove the Add/Edit activity from the
stack. This displays the Task List activity.
If the Cancel item was selected, this code calls the finish method of the
activity. This removes the Add/Edit activity from the stack without saving any of
its data to the database.
The saveToDB method shown in part 3 begins by getting data from the three
widgets displayed on the Add/Edit activity. Then, this code checks to make sure
that the user has entered a task name. If the user hasn't entered a task name, this
code exits the method without saving the task. That's because it doesn't make
sense to save a task that doesn't have a name.
After making sure the user has entered a name, this code checks if the
activity is in add mode. If so, this code creates a new Task object. This isn't
necessary if the activity is in edit mode as the Task object should already exist.
After creating the Task object, this code stores the data in the Task object.
Then, it checks if the activity is in edit mode. If so, this updates the task in the
database. Otherwise, the activity is in add mode. As a result, this code adds the
task to the database.
The onKey method hides the soft keyboard if the user presses the Center key
on a DPad. Also, if the user presses the Back key, the onKey method saves the
data to the database before it allows the system to process this key, which causes
the Add/Edit activity to be removed from the stack. That's usually what you want
since it's usually nice to save the user's data even if he or she presses the Back
key.
Chapter 14 How to work with tabs and custom adapters 461
The AddEditActivity class Page 1
package com.murach.tasklist;
import java.util.ArrayList;
import android.app.Activity;
import android.content.Context;
import android.content.Intent;
import android.os•Bundle;
import android.view.KeyEvent;
import android.view.Menu;
import android.view.MenuItern;
import android.view.View;
import android.view.View.OnKeyListener;
import android.view.inputmethod.InputMethodManager;
import android.widget.ArrayAdapter;
import android•widget•EditText;
import android.widget.Spinner;
public class AddEditActivity extends Activity
implements OnKeyListener {
private EditText nameEditText;
private EditText notesEditText;
private Spinner listSpinner;
private TaskListDB db;
private boolean editMode;
private String currentTabName = "";
private Task task;
public void onCreate(Bundle savedlnstanceState) {
super.onCreate(savedlnstanceState);
setContentView(R.layout.activity_add_edit);
// get references to widgets
listSpinner = (Spinner) findViewById(R.id.listSpinner);
nameEditText = (EditText) findViewById(R.id.nameEditText);
notesEditText = (EditText) f indViewByld(R.id.notesEditText);
// set listeners
nameEditText.setOnKeyListener(this);
notesEditText.setOnKeyListener(this);
// get the database object
db = new TaskListDB(this);
// set the adapter for the spinner
ArrayList<List> lists = db.getLists();
ArrayAdapter<List> adapter = new ArrayAdapter<List>(
this, R.layout.spinner_list# lists);
listSpinner.setAdapter(adapter);
Figure 14-12 The AddEditActivity class (part 1 of 3)
462 Section 4 The Task List app
The AddEditActivity class Page 2
// get edit mode from intent
Intent intent = getlntent();
editMode = intent.getBooleanExtra("editMode", false);
// if editing
if (editMode) {
// get task
long taskld = intent.getLongExtra("taskld", -1);
task = db.getTask(taskld);
// update UI with task
nameEditText.setText(task.getName());
notesEditText.setText(task.getNotes());
}
// set the correct list for the spinner
long listID;
if (editMode) { // edit mode - use same list as selected task
listID = (int) task.getListld();
}
else { // add mode - use the list for the current tab
currentTabName = intent.getStringExtra("tab");
listID = (int) db.getList(currentTabName).getId();
}
// subtract 1 from database ID to get correct list position
int listPosition = (int) listID - 1;
listSpinner.setSelection(listPosition);
}
©Override
public boolean onCreateOptionsMenu(Menu menu) {
getMenuInflater().inflate(R.menu.activity_add_edit# menu);
return true;
}
©Override
public boolean onOptionsItemSelected(MenuItem item) {
switch (item.getItemld()){
case R.id.menuSave:
saveToDB();
this•finish();
break;
case R.id.menuCancel:
this•finish();
break;
}
return super.onOptionsItemSelected(item);
}
Figure 14-12 The AddEditActivity class (part 2 of 3)
Chapter 14 How to work with tabs and custom adapters 463
The AddEditActivity class Page 3
private void saveToDB() {
// get data from widgets
int listID = listSpinner.getSelectedltemPosition() + 1;
String name = nameEditText.getText().toString();
String notes = notesEditText.getText().toString();
// if no task name, exit method
if (name == null || name.equals("")) {
return;
}
// if add mode, create new task
if (leditMode) {
task = new Task();
}
// put data in task
task.setListld(listID);
task•setName(name);
task.setNotes(notes);
// update or insert task
if (editMode) {
db.updateTask(task);
}
else {
db.insertTask(task);
}
}
©Override
public boolean onKey(View view, int keyCode, KeyEvent event) {
if (keyCode == KeyEvent.KEYCODE_DPAD_CENTER) {
// hide the soft Keyboard
InputMethodManager imm = (InputMethodManager)
getSystemService(Context.INPUT_METHOD_SERVICE);
imm.hideSoftInputFromWindow(view.getWindowToken(), 0);
return true;
}
else if (keyCode == KeyEvent.KEYCODE_BACK) {
saveToDB();
return false;
}
return false;
}
}
Figure 14-12 The AddEditActivity class (part 3 of 3)
464 Section 4 The Task List app
Perspective
The skills presented in this chapter should be enough to get you started
with tabs and custom adapters. This is a complicated subject. Fortunately, you
can begin by using the Task List app presented in this chapter as a starting
point. Then, you can copy and paste the necessary code into your app and
modify it as necessary to get your tabs and custom adapters to work correctly.
So far, the database that's used by the Task List app is only available to
the Task List app. In the next chapter, you'll learn how make the data in this
database available to other apps. In addition, you'll learn how to work with
other system databases that are available to your apps.
Summary
• To add the TabManager library to your project, copy the TabManager.jar file
into the libs directory for your project. To get the TabManager.jar file, you
can download the source code for this book.
• Within the class for an activity, you can use a TabManager object to add
one or more tabs. For example, you can add one tab for each list stored in a
database.
• Within the class for a fragment, you can use a TabHost class to get the tag
for the current tab. You can use this tag to display the appropriate data for the
current tab.
• When the layout for a List View widget contains complex widgets such as
a check box, you code a class that extends the layout, which allows you to
display the widgets correctly and to handle events that occur upon them.
• The class for a custom adapter that extends the BaseAdapter class can
supply the data for List View and Spinner widgets.
• Within the class for a fragment, you can use a custom adapter to display
appropriate data for the current tab.
Chapter 14 How to work with tabs and custom adapters 465
Exercise 14-1 Work with tabs
In this exercise, you'll work with the tabs that are available from a simplified
version of the TaskList app.
Review the app
1. Open the project named ch 14_exl_TaskList.
2. Open the TaskListActivity and TaskListFragment classes and review the code.
3. Run the app. It should display a Task List app that displays two tabs. The
Personal tab should be selected, and it should display a message that says,
"This is the Personal list."
4. Click on the Business tab. It should display a message that says, "This is the
Business list".
Use a string to display the content for a tab
5. Switch to the TaskListFragment class.
6. Modify the refreshTaskList method so it displays a string that contains all
task names for the current list. To do that, create a TaskListDB object and use
it to get the tasks for the current list from the database. Then, loop through
the tasks and build a string that contains each task on a separate line. Finally,
display the string on the fragment.
7. Run the app. This should display the task names for the selected list. These
names should reflect the data that's in the current Task List database. Since
this data is stored on the device (or emulator), the data that's displayed may
vary from device to device.
Use a simple adapter to display the content for a tab
8. Open the fragment_task_list layout and add a List View widget below the
Text View widget.
9. Switch to the TaskListFragment class and modify the refreshTaskList method
so it uses a simple adapter to display each task as a List View item. To get this
to work, you can use the listview_item layout that's already in the project.
In addition, you may be able to reuse some code from the News Reader app
presented earlier in this book.
10. Run the app. This should display the task names for the selected list in the
Text View and ListView widgets.
466 Section 4 The Task List app
Exercise 14-2 Work with a custom adapter
In this exercise, you'll modify the News Reader app presented earlier in this
book so it uses a custom adapter instead of a simple adapter.
Review the app
1. Open the project named ch 14_ex2_NewsReader.
2. Open the listview_item layout. This layout contains the TextView widgets for
displaying the publication date and title of a news item.
3. Run the app. It should display a list of news items. Then, click on a news
item. It should display more information about the news item.
Add a custom adapter
4. Copy the TaskLayout class from the book_apps\chl4_TaskList project to this
project.
5. Rename this class from TaskLayout to ItemLayout.
6. Modify the newly renamed ItemLayout class so it works with an RSSItem
object and a listview_item layout instead of a Task object and a listview_task
layout. This class should map the data from an RSSItem to the two widgets in
the listview_item layout.
7. Modify the onClick method of the ItemLayout class so it creates an intent for
the ItemActivity class, stores all necessary extra data in that intent, and uses
the intent to start the activity. To do that, you can open the ItemsActivity class
and copy the code that stores the extra data for the intent into this class.
8. Switch to the ItemsActivity class. Then, delete the onltemClick method and
all other code that implements the OnltemClickListener.
9. Copy the TaskList Adapter class from the book_apps\chl4_TaskList project to
this project.
10. Rename this class from TaskList Adapter to Items Adapter.
11. Modify the newly renamed Items Adapter class so it works with a List of
RSSItem objects instead of an ArrayList of Task objects.
12. Switch to the ItemsActivity class. Then, delete all code that's necessary to
create the SimpleAdapter object and replace it with a single statement that
creates the Items Adapter object.
13. Run the app. It should work the same as before. However, the code in the
ItemsActivity class should be shorter and easier to read since the adapter
code has been moved from the ItemsActivity class into the ItemsAdapter and
ItemLayout classes.
15
How to work
with content providers
In Android, a content provider allows multiple apps to share the same data.
Android uses built-in content providers to make certain types of data available
to multiple apps. For example, Android includes a content provider for your
contacts. That way, built-in Android apps such as the phone dialer and text
messaging apps can share this data. Similarly, third-party apps such as a custom
contacts app can share this data.
In this chapter, you'll learn how to add a content provider to the Task
List app from the previous two chapters. This makes the data in the Task List
database available to all apps. Then, you'll learn how to create a Task History
app that uses this content provider. This illustrates most of the concepts you
need to work with content providers. In addition, you'll learn a little about
using Android's built-in content provider for contacts.
An introduction to content providers 468
URIs for content providers 468
MIME types for content providers 468
How to add supporting methods to the database class 470
How to create a content provider 472
How to start a content provider class 472
How to provide for querying 474
How to provide for inserting rows 476
How to provide for updating rows 478
How to provide for deleting rows 478
How to register a content provider 480
How to use a content provider 482
How to use a custom content provider 482
How to use a built-in content provider 484
How to work with a dialog box 486
How to import the dialog class and interface 486
How to build and show the dialog box 486
The Task History app 488
The user interface 488
The XML for the layouts 490
The Java code for the activity 492
Perspective 498
468 Section 4 The Task List app
An introduction to content providers
As mentioned earlier, a content provider allows multiple apps to share the
same data. This data can be stored in a database or in files. Android includes
content providers for your contacts, calendar, settings, bookmarks, and media
including images, music, and video. That way, built-in and third-party apps can
share this data.
URIs for content providers
Figure 15-1 begins by showing the syntax for a URI {Uniform Resource
Identifier) for a content provider. This syntax begins with "content://", followed
by the name of the provider (the authority), followed by a path to the content.
Typically, a path begins with a name that corresponds with a table or file. In
addition, a path can include an optional ID that points to an individual row in a
table. In this figure, the first URI specifies all rows in the Task table of the Task
List database. The second URI specifies all rows in the List table of the Task List
database. And the third URI specifies the row in the Task table that has an ID of
2. In other words, the row with a primary key value of 2.
When you work with URIs, you should know that each front slash in the
path begins a new segment. For the third URI, for example, the first segment is
"tasks" and the second segment is "2". Typically, the URI for a content provider
only has one or two segments. However, a URI for a content provider can have
more segments if that helps organize and structure the data.
MIME types for content providers
When you create a URI for a content provider, you need to specify the type
of content that's returned by that URI. To do that, you use a MIME type, which is
an Internet standard for defining types of content.
This figure shows how to specify the MIME type for a URI. Here, the first
syntax is for a URI that can return multiple rows, and the second syntax is for a
URI that returns a single row. The only difference between these syntaxes is that
the first syntax uses "dir" to indicate that it returns a directory of items, and the
second syntax uses "item" to indicate that it returns a single item. For example,
the first MIME type indicates that the URI can return multiple tasks, and the
second MIME type indicates that the URI only returns a single task.
Chapter 15 How to work with content providers 469
Built-in Android content providers
- Contacts
- Calendar
- Settings
- Bookmarks
- Media (images, music, video)
URIs for content providers
The syntax
content://authority/path[/id]
A UR! for all rows of the Task table
content://com.murach.tasklist.provider/tasks
A URl for all rows of the List table
content://com.murach.tasklist.provider/lists
A URl for a single row in the Task table with an ID of 2
content://com.murach.tasklist.provider/tasks/2
MIME types for content providers
The syntax for multiple rows
vnd. android. cursor. dir/vnd. compa.ny_na.me. content_type
The syntax for a single row
vnd.android.cursor.item/vnd.company_name.content_type
A MIME type for multiple rows
vnd.android.cursor.dir/vnd.murach.tasklist.tasks
A MIME type for a single row
vnd.android.cursor.item/vnd.murach.tasklist.tasks
Description
• A content prorider allows multiple apps to share the same data. This data can be
stored in a database or in files. Android uses built-in content providers to make
certain types of data available to all apps.
• A URl {Uniform Resource Identifier) for a content provider includes the name of
the provider (the authority) and a path to the content. This path typically begins
with a name that corresponds with a table or file, and it can include an optional ID
that points to an individual row in a table.
• Within a path, each front slash begins a new segment.
• A MIME type is an Internet standard for defining types of content.
Figure 15-1 An introduction to content providers
470 Section 4 The Task List app
How to add supporting methods
to the database class
In chapter 13, you learned how to create a database class named TaskListDB.
This class includes methods like getTasks and insert Task that are used by the app
to work with the database. Now, figure 15-2 shows some methods that you can
add to this database class that can be used by the content provider class. These
supporting methods provide basic query, insert, update, and delete operations for
the Task table. In the next few figures, you'll see how these methods are used by
the content provider.
These supporting methods open connections to the database, but they don't
close those connections. That's because the database connections are closed
automatically when the process that hosts the content provider is destroyed.
Chapter 15 How to work with content providers 471
Four supporting methods in the TaskListDB class
public Cursor queryTasks(String[] columns. String where.
String[] whereArgs, String orderBy) {
this•openReadableDB();
return db.query(TASK_TABLE, columns, where, whereArgs,
null, null, orderBy);
}
public long insertTask(ContentValues values) {
this•openWriteableDB();
return db.insert(TASK_TABLE, null, values);
}
public int updateTask(ContentValues values. String where.
String[] whereArgs) {
this•openWriteableDB();
return db.update(TASK_TABLE, values, where, whereArgs);
}
public int deleteTask(String where. String[] whereArgs) {
this.openWriteableDB();
return db.delete(TASK_TABLE, where, whereArgs);
}
Description
• To make it easy to create a content provider, you can include some supporting
methods in your database class that provide for the query, insert, update, and delete
operations.
• These methods should not close the database connection after performing the
operation.
Figure 15-2 How to add supporting methods to the database class
472 Section 4 The Task List app
How to create a content provider
Now that you understand some basic concepts about content providers,
you're ready to learn how to create a content provider. In particular, you're ready
to learn how to add a content provider to the Task List app described in the
previous chapter. This allows other apps to read and write data from the database
that's used by the Task List app.
How to start a content provider class
Figure 15-3 shows how to start a class for a content provider. To begin, you
declare a class like the TaskListProvider class shown in this figure that extends
the ContentProvider class.
Within the TaskListProvider class, the first four statements declare the
constants for the class. The first statement declares the constant for the authority
that's used within the URL Then, the next three statements declare constants
that are used to determine whether the URI matches one of the URIs that are
supported by this class.
After declaring the constants, this class declares two instance variables.
The first instance variable is a TaskListDB object for working with the Task
List database. The second instance variable is a UriMatcher object for checking
whether a URI matches one of the supported URIs.
The onCreate method contains the code that initializes these variables. This
method overrides the onCreate method of the ContentProvider class. As a result,
Android calls this method when it creates the content provider.
Within the onCreate method, the first statement creates the TaskListDB
object. Then, the next three statements create the UriMatcher object. Of these
statements, the first creates the UriMatcher object and uses the NO_MATCH
variable to specify the value that's returned if no matching URI is found. The
second statement adds this URI:
content://com.murach.tasklist.provider/tasks
to the UriMatcher object and uses the ALL_TASKS_URI constant to specify the
value that's returned if a URI matches this URI. The third statement adds this
URI:
content://com.murach.tasklist.provider/tasks/#
and uses the SINGLE_TASK_UR1 constant to specify the value that's returned
if a URI matches this URI. Here, the last segment uses the # wildcard to specify
any number. As a result, this URI pattern matches a URI that specifies a single
row like this:
content://com.murach.tasklist.provider/tasks/5
Chapter 15 How to work with content providers 473
The TaskListProvider class
package com.murach.tasklist;
import android.content.ContentProvider;
import android.content.ContentValues;
import android.content.UriMatcher;
import android.database.Cursor;
import android.net.Uri;
public class TaskListProvider extends ContentProvider {
public static final String AUTHORITY = "com.murach.tasklist.provider";
public static final int NO_MATCH = -1;
public static final int ALL_TASKS_URI =0;
public static final int SINGLE_TASK_URI = 1;
private TaskListDB db;
private UriMatcher uriMatcher;
©Override
public boolean onCreate() {
db = new TaskListDB(getContext());
uriMatcher = new UriMatcher(NO_MATCH);
uriMatcher.addURI(AUTHORITY, "tasks", ALL_TASKS_URI);
uriMatcher.addURI(AUTHORITY, "tasks/*", SINGLE_TASK_URI);
return true;
}
A constructor and method of the UriMatcher class
Constructor/Method Description
UriMatcher (code) Creates a new UriMatcher object and specifies the
code to return when no matching URI is found.
addURI (authority, path, code) Adds a URI to the UriMatcher object and specifies
the code to return when a matching URI is found
for this URL
Description
• The class for a content provider must inherit the ContentProvider class.
• To initialize variables, your content provider class can override the onCreate
method of the ContentProvider class.
Page 1
Figure 15-3 How to start a content provider class
474 Section 4 The Task List app
How to provide for querying
Figure 15-4 shows how to code the methods of a content provider that
provides for querying. To start, you can override the query method of the
ContentProvider class. This method accepts five arguments (the URI, an array of
column names, a WHERE clause, an array of arguments for the WHERE clause,
and an ORDER BY clause), and it returns a Cursor object.
Within the query method, this code uses a switch statement to check the
URI argument. Then, you can execute appropriate code depending on the URI
argument. In this figure, for example, the switch statement checks whether the
URI argument matches the URI that corresponds with the ALL_TASKS_UR1
constant. If so, this code calls the queryTasks method from the TaskListDB
object and passes it the other four arguments of the query method. This returns a
Cursor object that contains the columns and rows specified by those arguments.
If the URI argument doesn't match the URI that corresponds with the
ALL_TASKS_URI constant, this code throws an exception that indicates that
this type of operation isn't supported. In this figure, for example, if you used a
URI that corresponded with the SINGLE_TASK_URI constant, this code would
throw an exception. In other words, this query method doesn't support the URI
for a single task. As a result, if you attempted to use a URI for a single row, it
would throw an exception.
This exception sends an error message to the developers of other apps
that are trying to use this content provider. This message should help the
developer figure out how to use the content provider. In this case, the
exception clearly indicates that the operation being requested by the URI isn't
supported. If you want, you can use a different type of exception object such as
an IllegalArgumentException. However, the goal is to send an error message to
other developers that clearly identifies why the URI that they sent didn't work.
For querying to work, the content provider class must override the getType
method of the ContentProvider class. This method accepts one argument (the
URI) and returns a string that uniquely identifies the content type.
Within the getType method, this code uses a switch statement to check
the URI argument. Then, you can execute the appropriate code depending on
the URI argument. In this figure, for example, the switch statement returns the
appropriate MIME type if the URI argument matches one of the URIs that
correspond with the ALL_TASKS_URI or SINGLE_TASK_UR1 constants. However,
if the URI argument doesn't match either of these URIs, this code throws an
exception to indicate that the operation is not supported for the specified URI.
Chapter 15 How to work with content providers
475
The TaskListProvider class
©Override
public Cursor query(Uri uri. String[] columns. String where.
String[] whereArgs, String orderBy) {
switch(uriMatcher.match(uri)) {
case ALL_TASKS_URI:
return db•gueryTasks(columns, where,
whereArgs, orderBy);
default:
throw new UnsupportedOperationException (
"URI " + uri + " is not supported.11);
Page 2
>
>
©Override
public String getType(Uri uri) {
switch(uriMatcher.match(uri)) {
case ALL_TASKS_URI:
return "vnd.android.cursor.dir/vnd.murach.tasklist.tasks";
case SINGLE_TASK_URI:
return "vnd.android.cursor.item/vnd.murach.tasklist.tasks";
default:
throw new UnsupportedOperationException(
"URI " + uri + " is not supported.");
}
}
A method of the UriMatcher class
Method
match(uri)
Description
If the specified Uri object matches any of the URIs stored in the
UriMatcher object, this method returns the code for that URI.
Description
• To allow other apps to query your data, your content provider class can override the
query and get Type methods of the ContentProvider class.
• Every data access method of the ContentProvider class has a Uri object as its first
argument. This allows the method to determine what table, row, or file to access.
• In a URI, you can use the # wildcard to match any number.
Figure 15-4 How to provide for querying
476 Section 4 The Task List app
How to provide for inserting rows
Figure 15-5 shows how to code the method of a content provider that
provides for inserting rows. To do that, you can override the insert method of
the ContentProvider class. This method accepts two arguments (the URI, and a
Convent Values object that contains the column names and values for the row).
This method returns a URI for the row that's inserted.
Within the insert method, this code uses a switch statement to check the
URI argument. This works similarly to the query method described in the
previous figure. If the URI argument matches the URI that corresponds with the
ALL_TASKS_URI constant, the first statement calls the insertTask method from
the TaskListDB object and passes it the second argument of the insert method.
This returns the ID for the row that was inserted.
The second statement gets a ContentResolver object and calls the
notifyChange method from it to notify registered observers that a row was
changed. That way, the content provider notifies registered observers when
the data changes so those observers can re-requery the provider to keep their
data current. Without this statement, apps that use this provider would have to
re-query the provider manually to make sure that their content is current. By
default, CursorAdapter objects get this notification. As a result, you don't need
to register them.
The third statement uses several methods of the Uri.Builder class to build the
Uri object for the row that was inserted. To do that, it appends the ID for the row
that was inserted to the URI argument. For example, if you insert a row and the
database assigns that row a primary key value of 14, this statement returns this
URI:
content://com.murach.tasklist.provider/tasks/14
Chapter 15 How to work with content providers
477
The TaskListProvider class
Page 3
©Override
public Uri insert(Uri uri. ContentValues values) {
switch(uriMatcher.match(uri)) {
case ALL_TASKS_URI:
long insertld = db•insertTask(values);
getContext().getContentResolver().notifyChange(uri, null);
return uri.buildupon().appendPath(
Long.toString(insertld)).build();
default:
throw new UnsupportedOperationException(
"URI: " + uri + " is not supported.");
}
}
A method of the Context class
Method
Description
getContentResolver () Returns a ContentResolver object for your app.
A method of the ContentResolver class
Method
notifyChange(uri,
observer)
Description
Notify registered observers that a row was
updated. By default, CursorAdapter objects
get this notification.
Some methods of the Uri.Builder class
Method
buildUpon()
appendPath(segment)
build()
ion
Creates a Uri.Builder object for building a new
Uri object.
Encodes the specified segment and appends it to
the path. Returns a Uri.Builder object to provide
for method chaining.
Returns a Uri object for the current Uri.Builder
object.
Description
• To allow other apps to insert rows into your database, you can override the insert
method of the ContentProvider class.
• The insert method should return a URI for the inserted row.
Figure 15-5 How to provide for inserting rows
478 Section 4 The Task List app
How to provide for updating rows
Figure 15-6 shows how to code the method of a content provider that
provides for updating rows. To do that, you can override the update method
of the ContentProvider class. This method accepts four arguments (the URI,
a Content Values object, a WHERE clause, and an array that contains the
arguments for the WHERE clause). This method returns an int value for the
count of rows that were updated.
Within the update method, this code uses a switch statement to check the
URI argument. This works similarly to the query method described earlier
in this chapter. However, unlike the query method described earlier in this
chapter, the update method supports two URIs: (1) the URI that corresponds
with the ALL_TASKS_URI constant and (2) the URI that corresponds with the
SINGLE_TASK_URI constant.
If the URI argument matches the SINGLE_TASK_URI constant, this code
updates the specified row. To do that, the first statement uses the getLastPath-
Segment method to get the ID for the row to update. The next two statements use
that ID to build a WHERE clause that selects the row for the specified update.
The fourth statement calls the updateTask method of the TaskListDB object to
update the row and get the count of updated rows. The fifth statement notifies
any registered observers that a row was changed. And the sixth statement returns
the count of rows that were updated. If the update is successful, this should
return a count of 1.
If the URI argument matches the ALL_TASKS_URI constant, this code
updates the specified rows. To do that, the first statement passes the second,
third, and fourth arguments to the updateTask method of the TaskListDB object.
This may update one or more rows. Then, the second statement notifies any
registered observers that a row was changed, and the third statement returns the
count of rows that were updated.
How to provide for deleting rows
This figure also shows how to code the method of a content provider that
provides for deleting rows. Since this method works much like the update
method described in this figure, you shouldn't have much trouble understanding
how it works.
Chapter 15 How to work with content providers 479
The TaskListProvider class Page 4
©Override
public int update(Uri uri, ContentValues values. String where.
String[] whereArgs) {
int updateCount;
switch(uriMatcher.match(uri)) {
case SINGLE_TASK_URI:
String taskld = uri.getLastPathSegment();
String where2 = "_id = ?";
String[] whereArgs2 = { taskld };
updateCount = db.updateTask(values, where2, whereArgs2);
getContext().getContentResolver().notifyChange(uri, null);
return updateCount;
case ALL_TASKS_URI:
updateCount = db.updateTask(values, where, whereArgs);
getContext().getContentResolver().notifyChange(uri, null);
return updateCount;
default:
throw new UnsupportedOperationException (
"URI " + uri + " is not supported.");
}
}
©Override
public int delete(Uri uri. String where. String[] whereArgs) {
int deleteCount;
switch(uriMatcher.match(uri)) {
case SINGLE_TASK_URI:
String taskld = uri.getLastPathSegment();
String where2 = "_id = ?";
String[] whereArgs2 = { taskld };
deleteCount = db•deleteTask(where2, whereArgs2);
getContext().getContentResolver().notifyChange(uri, null);
return deleteCount;
case ALL_TASKS_URI:
deleteCount = db•deleteTask(where, whereArgs);
getContext().getContentResolver().notifyChange(uri, null);
return deleteCount;
default:
throw new UnsupportedOperationException (
"URI " + uri + " is not supported.");
}
}
}
A method of the Uri class
Method Description
getLastPathSegment () Returns the value for the last path segment. For a URI
that specifies a single row, this gets the ID for the row.
Description
• To allow other apps to update or delete rows in your database, you can override the
update and delete methods of the ContentProvider class.
Figure 15-6 How to provide for updating and deleting rows
480 Section 4 The Task List app
How to register a content provider
After you create the class for a content provider, you need to register the
provider as described in figure 15-7. The easiest way to register a provider is
to add a provider element to the project's AndroidMamfest.xml file. When you
code a provider element, you can code it at the same level as an activity element.
A provider element should use the name attribute to specify the name of the
class for the provider, and it should use the authorities attribute to specify the
authority for the provider. In this figure, for example, the provider element
specifies the name and authority for the content provider for the Task List app.
In addition, a provider element should use the exported attribute to specify
whether other apps can use the content provider. Since content providers are
designed to be used by other apps, you typically set the exported attribute to a
value of "true". However, in some cases, you may only want the current app to
be able to use the content provider. For example, you may want to use a content
provider to allow an app widget to work with the data for an app. For more
information about app widgets, please see the next chapter.
Chapter 15 How to work with content providers 481
The provider element in the AndroidlVlanifest.xml file
<provider
android:name="com.murach.tasklist.TaskListProvider"
android:authorities="com.murach.tasklist.provider"
android:exported="true" >
</provider>
The attributes of the provider element
Attribute Description
name Specifies the package and name of the content provider class.
authorities Specifies the authority for the content provider.
exported Specifies whether the content provider can be used by other apps
Description
• Before other apps can use your content provider class, you must register it by
adding a provider element to the AndroidManifest.xml file.
Figure 15-7 How to register a content provider
482 Section 4 The Task List app
How to use a content provider
Now that you know how to create a content provider, you're ready to learn
how to use a content provider. To start, you'll learn how to use the content
provider for the Task List app that's described in the previous figures. Then,
you'll learn how to use one of the built-in content providers that's available from
Android, the Contacts Provider. This should give you a good idea of how content
providers work.
How to use a custom content provider
Figure 15-8 shows how to use the content provider for the Task List app
that's presented earlier in this chapter. To start, the first code example defines the
constants that this code needs to refer to the columns names and indexes.
To keep things simple, I copied these constants from the TaskListDB class
presented in chapter 13. However, a more elegant approach would be to store
these constants in a library to make it easy to share them between apps. For
this content provider, for example, you could store the constants in a class
named TaskListContract. Then, you could store that class in a library named
TaskListContract.jar. That way, both the Task List and Task History apps could
import this library and use the same set of constants.
The second code example defines the constants for the authority and the
URI for multiple tasks. Again, to keep things simple, 1 copied the code for
the AUTHORITY constant from content provider for the Task History app.
However, to reduce code duplication, these constants could be stored in a library
as described in the previous paragraph.
Once you're done defining the constants that are needed by the code, you
can use the getContentResolver method to get a ContentResolver object. Then,
you can call any of the methods that are available from the content provider from
that object as shown by the rest of the code examples.
The third, fourth, and fifth examples call the query method and pass the URI
for all tasks as the first argument. The third example passes null values for all
other arguments. As a result, it returns a Cursor object that contains all columns
and rows.
The fourth example defines a WHERE clause that only displays tasks that
have been hidden. To do that, the where variable only returns rows where the
TASK_HIDDEN column is equal to value of ' 1', which is how the database
defines a true value. Then, this example passes this variable to the query method.
As a result, this example only returns the rows that have been marked as hidden.
In other words, it returns all old tasks that the Task List app no longer displays.
The fifth example defines an array of three columns, the TASK_ID,
TASK_NAME, and TASK_NOTES columns. Then, it passes this variable to the
query method. As a result, this example only returns these three columns.
Chapter 15 How to work with content providers 483
How to define constants for columns
public static final String TASK_ID = "_id";
public static final int TASK_ID_COL =0;
public static final String TASK_NAME = "task_name";
public static final int TASK_NAME_COL = 2;
How to create the base Uri object
public static final String AUTHORITY = "com.murach.tasklist.provider";
public static final Uri TASKS_URI =
Uri.parse("content://" + AUTHORITY + "/tasks");
How to query a content provider
Cursor cursor = getContentResolver()
.query(TASKS_URI# null# null# null# null);
A second way to query a content provider
String where = TASK_HIDDEN + " = ■ 1 ■ ";
String orderBy = TASK_COMPLETED + " DESC";
Cursor cursor = getContentResolver()
.query(TASKS_URI# null, where, null, orderBy);
A third way to query a content provider
String[] columns = {TASK_ID, TASK_NAME, TASK_NOTES}
Cursor cursor = getContentResolver()
.query(TASKS_URI, columns, null, null, null);
How to delete data from the content provider
String where = TASK_ID +"=?";
String[] whereArgs = { Integer•toString(taskld) };
int deleteCount = getContentResolver()
.delete(TASKS_URI, where, whereArgs);
Another way to delete data from the content provider
Uri taskUri = ContentUris.withAppendedId(TASKS_URI, taskld);
int deleteCount = getContentResolver()
•delete(taskUri, null, null);
A method of the ContentUris class
Method Description
withAppendedld (Uri, id) Returns the specified Uri object with
the specified ID appended to the path.
Description
• You can define constants for the columns and URI for the content provider.
• You can call any methods of the content provider from the ContentResolver object
Figure 15-8 How to use a custom content provider
484 Section 4 The Task List app
The sixth and seventh examples call the delete method of the
ContentResolver object. The sixth example defines a variable for a WHERE
clause that selects the task with the specified ID. Then, this example passes this
variable and the URI for all tasks to the delete method. As a result, this example
deletes the row that matches the specified ID.
The seventh example appends the task ID to the URI for all tasks. Then, this
example passes this URI followed by two null values to the delete method. This
is another way to delete a row for the specified ID.
How to use a built-in content provider
Figure 15-9 shows some code that you can use to work with the Contacts
Provider that comes with Android. This content provider makes it possible for
you to work with your address book: names, phone numbers, email addresses,
and so on.
Since the Contacts Provider is a part of the Android API, you can import the
classes that contain the constants for working with this provider. In this figure,
the first example imports three classes that contain constants. All three of these
classes are inner classes of the ContactsContract class.
Once you import these classes, you can use the constants available from
them to work with the provider. For example, the second example shows how to
use the CONTENTJURI constant that's available from the ContractsContract.
Data class to get the URI for the provider.
The third example shows how to query a content provider. To start, this
example defines four columns for the cursor: _ID, DISPLAY_NAME, DATA1,
and DATA2. To understand the details of these constants, you should view the
documentation for the Contacts Provider. In brief, _ID is the primary key that's
needed by the adapter, DISPLAY_NAME is the name of the person, DATA 1
is the phone number, and DATA2 is the type of phone number (home, mobile,
work, etc.).
This example defines a WHERE clause that selects phone number rows for
contacts that have been marked as favorites. In other words, it selects contacts
where the STARRED constant is true (equal to a value of T).
This example defines an ORDER BY clause that sorts the rows in
descending order by the number of times that they have been contacted. To do
that, this code uses the TIMES_CONTACTED constant. This orders the rows so
the most frequently contacted numbers are at the top of the cursor.
This example finishes by calling the query method from the ContentResolver
object and passing it the DATA_URI constant as well as the columns, where,
and orderBy variables. This returns a Cursor object with the specified columns
and rows. Although it isn't shown in this figure, you can also call the insert,
update, and delete methods to modify the data that's available from the Contacts
Provider.
Chapter 15 How to work with content providers 485
How to import the classes that contain the constants
import android.provider.ContactsContract.Contacts;
import android.provider.ContactsContract.Data;
import android.provider.ContactsContract.CommonDataKinds.Phone;
How to get a base Uri object
private final Uri DATA_URI = Data.CONTENT_URI;
How to query a content provider
String[] columns = {
Data._ID, // primary key
Contacts.DISPLAY_NAME, // person's name
Data.DATAl, // phone number
Data.DATA2 // phone type (mobile, home, work, etc.)
};
String where =
«(» + Data.MIMETYPE + "=,n + Phone.CONTENT_ITEM_TYPE + ■■ AND "
+ Contacts.STARRED + "=■1■ )";
String orderBy = Contacts.TIMES_CONTACTED + " DESC";
Cursor cursor = getContentResolver().query(
DATA_URI, columns, where, null, orderBy);
Description
• When you work with a content provider that's included with Android, you can
import the classes that contain the constants for working with the content provider.
• To learn more about a content provider that's included with Android, you can read
the documentation for the content provider.
Figure 15-9 How to use a built-in content provider
486 Section 4 The Task List app
How to work with a dialog box
At this point, you have all the skills you need to work with a content
provider. However, the Task History app that's presented in the next few figures
requires one more skill: how to work with a dialog box.
How to import the dialog class and interface
When creating apps, you often need to display a dialog box like the one
shown in figure 15-10. To do that, you can begin by importing the AlertDialog.
Builder class and the Dialoglnterface.OnClickListener interface. Then, you can
use this class and interface to build and show a dialog box.
How to build and show the dialog box
To build a dialog box, you can begin by creating a new AlertDialog.Builder
object. Since the AlertDialog.Builder object supports method chaining, you don't
need to provide a name for this object. Instead, you can call a series of methods
from it.
To start, you can call the setMessage method to set the message that's
displayed across the top of the dialog box. In this figure, for example, this
message says, "Are you sure you want to delete this task?"
Then, you can set the buttons on the dialog by calling the setPositiveButton
and setNegativeButton methods. Android displays the positive button on the
right side of the dialog, and it displays the negative button on the left. In this
figure, for example, the Cancel button is the negative button, and the Yes button
is the positive button. If necessary, you can specify one or more neutral buttons.
In that case, Android displays the neutral buttons between the positive and
negative buttons.
When you set a button, you can also specify the event handler that's
executed when the user clicks the button. The easiest way to do that is to create
an anonymous inner class for the listener. In this figure, for instance, the code
that sets the positive button creates an anonymous inner class that implements
the Dialoglnterface.OnClickListener interface. As a result, if the user clicks the
Yes button, this code deletes the task.
The code that sets the negative button also creates an anonymous inner class
that implements the Dialoglnterface.OnClickListener interface. However, this
event handler cancels the dialog by calling the cancel method of the first
parameter of the onClick method. As a result, if the user clicks the Cancel button, this
code cancels the dialog box without deleting the task.
Once this code finishes setting the buttons for this dialog, it calls the show
method to display the dialog. This displays a dialog like the one shown at the top
of this figure.
Chapter 15 How to work with content providers
487
A dialog box
Are you sure you want to delete
this task?
Cance
Yes
How to use a dialog box
Import the dialog class and interface
import android.app•AlertDialog;
import android.content.Dialoglnterface;
Create and show the dialog box
new AlertDialog.Builder(this)
. setMessage ("Are you sure you want to delete this task?11)
•setPositiveButton("Yes", new Dialoglnterface•OnClickListener() {
©Override
public void onclick(Dialoglnterface dialog, int id) {
delete(item) ;
}
})
•setNegativeButton("Cancel", new Dialoglnterface•OnClickListener()
©Override
public void onclick(Dialoglnterface dialog, int id) {
dialog.cancel();
}
})
.show();
Constructors and methods of the AlertDialog.Builder class
Constructor/Method Description
AlertDialog.Builder(context)
setMessage(text)
{
setPositiveButton(text, listener)
setNegativeButton(text, 1i s tener)
setNeutralButton(text, 1i s tener)
show()
Creates a new AlertDialog.Builder object.
Sets the message that's displayed above the
buttons.
Sets the text and listener for the positive button.
Sets the text and listener for the negative button
Sets the text and listener for a neutral button.
Displays the dialog.
Description
• You can use the AlertDialog.Builder class and the Dialoglnterface.OnChckListener
interface to build and display a dialog box that includes event handlers.
Figure 15-10 How use a dialog box
488 Section 4 The Task List app
The Task History app
The Task History app uses the same database that's used by the Task List
app described in the previous two chapters. This app only uses the query and
delete methods that are available from the content provider, not the insert or
update methods. However, this app clearly shows how one app can use a content
provider to work with the same data as another app.
The user interface
Figure 15-11 shows the user interface for the Task History app. When
the app starts, the Task History activity displays a list of tasks that have been
completed and marked as hidden. In other words, it displays all tasks the Task
List app no longer displays.
The Task History activity displays the task name, notes, and completion date
for each task. If there are no notes for a task, this app displays a message that
says, "No notes". In this figure, for example, none of the tasks have notes.
If you want to delete a task permanently, you can click the task. Then, the
app displays a dialog box that prompts you to confirm the deletion. If you click
the Yes button, this app deletes the task from the database. Otherwise, this app
cancels the dialog box and does not delete the task.
Chapter 15 How to work with content providers
489
The Task History activity
3G
:i\ 6:40
<J Task History
Get new sunglasses
No notes
Completed on: Fri, May 10 2013 18:25
Make dentist appointment
No notes
Completed on: Fri, May 10 2013 18:25
Take car in for oil change
No notes
Completed on: Fri, May 10 2013 18:21
Take car in for oil change
No notes
Completed on: Fri, May 10 2013 18:21
The dialog box for deleting a task
3G
:i\ 6:43
Task History
Get new sunglasses
No notes
Completed on: Fri, May 10 2013 18:25
Make dentist appointment
No notes
C • " - THQ1 -"-i;
Do you want to permanently
r delete task: Take car in for oil
( change?
No
Yes
f
Completed on: Fri May 10 2013 18:21
Description
• When the app starts, the Task History activity displays a list of tasks that have been
completed and hidden by the Task List app. Each task includes the task name,
notes, and completion date.
• To delete a task, the user can click the task. Then, the user can respond to the
resulting dialog box to confirm or cancel the deletion.
Figure 15-11 The user interface for the Task History app
490 Section 4 The Task List app
The XML for the layouts
Figure 15-12 shows the XML for the layouts that are used by the Task
History activity. To start, the layout named activity_task_history uses a
LinearLayout container and a List View widget to display the list of tasks. Then,
the listview_task layout uses a LinearLayout and three Text View widgets to
format each task. Since you've seen layouts like these in the previous chapter,
you shouldn't have much trouble understanding how they work by now.
Chapter 15 How to work with content providers 491
The activity_task_history layout
< ?xml version="1.0" encoding="utf-8"? >
<LinearLayout android:layout_width="match parent"
android:layout height="match parent"
android:orientation="vertical"
xmlns:android="http://schemas.android.com/apk/res/android">
<ListView
android:id="@+id/taskListView"
android:layout_width="match parent"
android:layout height="match parent" >
</ListView>
</LinearLayout >
The listview_task layout
< ?xml version="1.0" encoding="utf-8"? >
<LinearLayout xmlns:android="http://schemas•android.com/apk/res/android"
android:layout_width="match parent"
android:layout height="match parent"
android:orientation="vertical" >
<TextView
android:id="G+id/nameTextView"
android:layout_width="wrap_content"
android:layout_height="wrap_content"
android:layout_marginTop="5dp"
android:layout_marginLeft="10dp"
android:textSi ze="18sp"
android:textStyle="bold"
android:text="@string/name" />
<TextView
android:id="@+id/notesTextView"
android:layout_width="wrap_content"
android:layout_height="wrap_content"
android:layout_marginLeft="10dp"
android:text="©string/notes" />
<TextView
android:id="@+id/dateTextView"
android:layout_width="wrap_content"
android:layout_height="wrap_content"
android:layout_marginBottom="5dp"
android:layout_marginLeft="10dp"
android:text="@string/date" />
</LinearLayout >
Figure 15-12 The layouts for the Task History app
492 Section 4 The Task List app
The Java code for the activity
Figure 15-13 shows the Java code for the Task List activity. This class
begins by defining the constants for the columns that it uses. These constants
were copied in from the TaskListDB class presented in chapter 13. Then, this
class defines a constant for the authority. This constant was copied in from the
TaskListProvider class. Next, this class uses the AUTHORITY constant to define
a constant for the URI for all tasks. As mentioned earlier, a more elegant solution
would be to create a library for these constants so they can be shared between
the Task List and Task History apps.
After defining its constants, this class defines four instance variables that
are used throughout the class. The first instance variable is for the list view that
stores the tasks. The second is for the cursor adapter. The third is for the cursor.
And the fourth is for the application's context.
The onCreate method begins by displaying the activity_task_history layout.
Then, it sets the context variable, and gets a reference to the list view.
Chapter 15 How to work with content providers 493
The TaskHi story Activity class Page 1
package com.murach.taskhistory;
import Java•text.SimpleDateFormat;
import java.util.Date;
import android.app.Activity;
import android.app•AlertDialog;
import android.content.Context;
import android.content.Dialoglnterface;
import android.database.Cursor;
import android.net.Uri;
import android.os•Bundle;
import android.widget.SimpleCursorAdapter;
import android.widget.SimpleCursorAdapter.ViewBinder;
import android.view.View;
import android.widget.AdapterView;
import android.widget.AdapterView.OnltemClickListener;
import android.widget.ListView;
import android.widget.TextView;
import android•widget•Toast;
public class TaskHistoryActivity extends Activity
implements OnltemClickListener {
public static final String TASK_ID = "_id";
public static final int TASK_ID_COL =0;
public static final String TASK_NAME = "task_name";
public static final int TASK_NAME_COL = 2;
public static final String TASK_NOTES = "notes";
public static final int TASK_NOTES_COL =3;
public static final String TASK_COMPLETED = "date_completed";
public static final int TASK_COMPLETED_COL = 4;
public static final String TASK_HIDDEN = "hidden";
public static final int TASK_HIDDEN_COL = 5;
public static final String AUTHORITY = "com.murach.tasklist.provider";
public static final Uri TASKS_URI =
Uri.parse("content://" + AUTHORITY + "/tasks");
private ListView taskListView;
private SimpleCursorAdapter adapter;
private Cursor cursor;
private Context context;
©Override
protected void onCreate(Bundle savedlnstanceState) {
super.onCreate(savedlnstanceState);
setContentView(R.layout.activity_task_history);
context = this;
taskListView = (ListView) findViewById(R.id.taskListView);
}
Figure 15-13 The TaskHistoryActivity class (part 1 of 3)
494 Section 4 The Task List app
The onResume method begins by using the query method of the
ContextResolver object to get a cursor for all tasks that have been marked as
hidden. This code also sorts these tasks in descending order by the completed
date of the task. As a result, the most recent tasks are at the top of the cursor.
After getting the cursor, the onResume method defines the variables needed
to create the adapter. More specifically, it gets the ID for the listview_task
layout, it specifies the three columns to get the data from, and it specifies the
three Text View widgets to send the data to. Then, this code uses these variables
to create the adapter. Finally, this code sets the adapter on the List View widget,
and it sets the listener for the adapter.
After setting the listener for the adapter, this code uses the setViewBinder
method to convert column data into readable values. To do that, this code creates
an anonymous class that implements the ViewBinder interface and overrides its
setViewValue method. Within that method, an if/else statement checks whether
the column is the date completed column for the task. If so, it gets the long value
for the date, converts it to a readable date value, sets the date on the appropriate
Text View widget, and returns a true value to indicate that it has bound data to the
view.
Then, the if/else statement checks whether the column is the notes column
for the task. If so, it checks whether the string contained in this column is
equal to a null value or an empty string. If so, it sets a value of "No notes" on
the appropriate Text View widget and returns a true value to indicate that it has
bound data to the view. Otherwise, this code returns a false value, which allows
the default view binding to occur. As a result, the string contained in the name
column is bound to the view.
Chapter 15 How to work with content providers 495
The TaskHistoryActivity class Page 2
©Override
public void onResume() {
super.onResume();
// get cursor
String where = TASK_HIDDEN + "= lll ";
String orderBy = TASK_COMPLETED + " DESC";
cursor = getContentResolver()
.query(TASKS_URI, null, where, null, orderBy);
// define variables for adapter
int layout_id = R.layout.listview_task;
String[] fromColumns = {TASK_NAME, TASK_NOTES,
TASK_COMPLETED};
int[] toViews = {R.id.nameTextView, R.id.notesTextView,
R.id.dateTextView};
// create and set adapter
adapter = new SimpleCursorAdapter(this, layout_id,
cursor, fromColumns, toViews, 0);
taskListView.setAdapter(adapter);
taskListView.setOnltemClickListener(this);
// convert column data to readable values
adapter.setViewBinder(new ViewBinder() {
©Override
public boolean setViewValue(View view. Cursor cursor,
int colIndex) {
if (collndex == TASK_COMPLETED_COL){
long dateMillis = cursor.getLong(collndex);
TextView tv = (TextView) view;
SimpleDateFormat date =
new SimpleDateFormat("EEE, NTCM d yyyy HH:mm");
tv.setText("Completed on: " +
date.format(new Date(dateMillis)));
return true;
}
else if (collndex == TASK_NOTES_COL) {
String notes = cursor.getString(collndex);
if (notes == null || notes.equals("")) {
TextView tv = (TextView) view;
tv.setText("No notes");
return true;
}
}
return false;
}
});
}
Figure 15-13 The TaskHistoryActivity class (part 2 of 3)
496 Section 4 The Task List app
The onPause method closes the cursor that's held by the adapter. Then, it
closes the cursor that's held by the activity. This works because the onResume
method always gets a new cursor.
The onltemClick method is executed when the user clicks on a task. This
method begins by getting the ID and name for the task that was clicked. Then, it
displays a dialog box that confirms the deletion.
If the user clicks the Yes button, this code uses the URI defined earlier in
the class to delete the specified task. Then, it uses a toast to display a message
that indicates whether the task was successfully deleted. In most cases, the task
should be deleted successfully, and the Toast should display a message that says,
"Delete operation successful".
If the user clicks the No button, this code calls the cancel method of the
Dialoglnterface object, which is the first argument of the onClick method. This
closes the dialog and returns to the Task History activity without deleting the
task.
Chapter 15 How to work with content providers 497
The TaskHi story Activity class Page 3
©Override
protected void onPause() {
adapter.changeCursor(null); // close cursor for the adapter
cursor.close(); // close cursor for the activity
super.onPause();
}
©Override
public void onItemClick(AdapterView<?> adapter. View view,
int position, long id) {
// get data from cursor
cursor.moveToPosition(position);
final int taskld = cursor.getInt(TASK_ID_COL);
final String taskName = cursor.getString(TASK_NAME_COL);
// display a dialog to confirm the delete
new AlertDialog.Builder(this)
.setMessage("Do you want to permanently delete task: " +
taskName + "?")
•setPositiveButton("Yes", new Dialoglnterface•OnClickListener() {
©Override
public void onclick(Dialoglnterface dialog, int id) {
/ / delete the specified task
String where = TASK_ID +"=?";
String[] whereArgs = { Integer.toString(taskld) };
int deleteCount = getContentResolver()
.delete(TASKS_URI, where, whereArgs);
if (deleteCount <= 0) {
Toast.makeText(context, "Delete operation failed".
Toast.LENGTH_SHORT).show();
}
else {
Toast.makeText(context, "Delete operation successful".
Toast.LENGTH_SHORT).show();
onResume();
}
}
})
•setNegativeButton("No", new Dialoglnterface•OnClickListener() {
©Override
public void onclick(Dialoglnterface dialog, int id) {
dialog.cancel();
}
})
.show();
}
}
Figure 15-13 The TaskHistoryActivity class (part 3 of 3)
498 Section 4 The Task List app
Perspective
The skills presented in this chapter should be enough to get you started with
content providers. However, there is much more to learn about working with
content providers. For example, you may want to provide access to data that's
stored in files instead of data that's stored in a database. If so, you can search the
Android documentation for more information about how to do that.
Or, you may want to create an app that uses an existing content provider. To
do that, you can begin by searching the Internet or the Android documentation for
more information about the content provider that you want to use. For example,
to learn more about the Contacts Provider, you can search for "android contacts
provider". Then, you can use the documentation for that content provider to find
the URIs and column names that you need to use the content provider.
Terms
content provider
UR1 (Uniform Resource Identifier)
authority
path
segment
MIME type
Summary
• A content provider allows multiple apps to share the same data. This data
can be stored in a database or in files. Android uses built-in content providers
to make certain types of data available to all apps.
• A URI {Uniform Resource Identifier) for a content provider includes the
name of the provider (the authority) and a path to the content. Within a path,
each front slash begins a new segment.
• A MIME type is an Internet standard for defining types of content.
• Every data access method of the ContentProvider class has a Uri object as its
first argument. This allows the method to determine what table, row, or file
to access.
• To allow other apps to query your database, you can override the query and
getType methods of the ContentProvider class.
• To allow other apps to modify the data in your database, you can override
the insert, update, and delete methods of the ContentProvider class.
• Before other apps can use your content provider class, you must register it
by adding a provider element to the AndroidManifest.xml file.
• You can call any methods of a content provider from the ContentResolver
object.
Chapter 15 How to work with content providers 499
• When you work with a content provider that's included with Android,
you can import the classes that contain the constants for working with the
content provider.
• You can use the AlertDialog.Builder class and the Dialoglnterface.
OnClickListener interface to build and display a dialog box that includes
event handlers.
Exercise 15-1 Review and modify the Task List
and Task History apps
In this exercise, you'll review the Task List and Task History apps to see how
they share the same data. Then, you'll modify the code for the Task History app.
Review the Task List app
1. Open the project named ch 15_TaskList that's in the book_apps directory (not
the ex_starts directory).
2. Open the TaskListDB class and scroll down to the end of it to view the last
four methods that support the content provider.
3. Open the TaskListProvider class and review its code. Note that the delete
method supports a UR1 for all tasks and a URI for a single task.
4. Run the app. Add at least 4 tasks to the list and then mark at least 3 of these
tasks as completed, and delete them from the list. This may look like you are
deleting these tasks. However, this code only sets the completed date for these
tasks and hides them for this app. That way, these tasks are stored for future
reference and can be used by other apps such as the Task History app.
Review the Task History app
5. Open the project named chl5_exl_TaskHistory that's in the ex_starts
directory.
6. Open the TaskHistoryActivity class and review its code.
7. Run the app. This should display all tasks that you removed from the Task
List app earlier in this exercise.
8. Click one of the tasks to delete it.
Modify the Task History app
9. Modify the TASKS_URI constant so the path is "task" instead of "tasks".
10. Run the app. The app should crash, and the LogCat view should display an
error that indicates that the URI is not supported.
11. Fix the TASKSJURI constant so the path is "tasks" again.
12. Run the app again. It should run correctly this time.
13. Modify the code that deletes the task so it uses a URI for a single row.
14. Test this change to make sure it works correctly by deleting another task.
500 Section 4 The Task List app
Exercise 15-2 Review and modify
the Favorites app
In this exercise, you'll review and modify the Favorites app. This app uses the
Contacts Provider that's introduced in this chapter.
Review the Favorites app
1. Open the project named chl5_ex2_Favorites.
2. Open the FavoritesListActivity class and review its code.
3. Run this app. This should display all phone numbers for all contacts that have
been marked as a favorite. It should look something like this:
"A 10:08
yf Favorites
Mike Murach Mobile (234)567-8910
Joel Murach Mobile (415)123-4567
Mike Murach work i 800-123-4567
4. If the app doesn't display any names and numbers, you may need to use the
built-in Contacts app to mark at least one contact as a favorite by clicking
the star icon. Before you can do that on an emulator, you may need to add a
contact.
5. Click a phone number for a contact. Then, test the resulting dialog box to
make sure it works to start a phone call or a text. Of course, you can only
complete a text message successfully for a mobile number.
Modify the Favorites app
6. Modify the app so it only displays mobile phone numbers. To do that, you can
modify the WHERE clause so it only returns rows where the DATA2 column
is equal to 2.
7. Run this app to make sure it works correctly.
Learn more about the Contacts Provider
8. Search the Internet to find the official documentation for the Android Contacts
Provider and read more about it.
16
How to work
with app widgets
An app widget can display an app's most important information on a device's
Home screen. This can allow a user to work with an app without even starting
it. Android typically includes several built-in widgets such as the Analog Clock,
Power Control, and Music widgets. In this chapter, you'll learn how to build an
app widget for the Task List app. This app widget will display the three oldest
tasks from the Task List app.
An introduction to app widgets ........................................502
A Home screen that has app widgets 502
How to remove app widgets 502
How to add app widgets 502
How to create app widgets................................................504
How to create the layout 504
How to modify the database class 508
How to create the provider class 510
How to configure an app widget 514
How to register an app widget 516
How to test an app widget 516
Perspective.........................................................................518
502 Section 4 The Task List app
An introduction to app widgets
Before you learn how to create an app widget for your app, you need to learn
some background terms and basic skills for working with app widgets.
A Home screen that has app widgets
Figure 16-1 shows a Home screen that has three app widgets and seven app
icons. Here, each icon occupies a single cell. However, each app widget can
occupy more than one cell. For example, the Search widget is 4 cells wide by 1
cell tall. As a result, it occupies the entire first row of the screen. Similarly, the
second app widget, the Task List widget, is 4 cells wide by 1 cell tall. As a result,
it occupies the entire third row of the screen.
The third app widget is the Power Control widget that comes with most
versions of Android. This widget makes it easy to extend your phone's battery
life by managing power consuming features such as Wi-Fi, bluetooth, GPS,
synching, and screen brightness. Of course, the user can also use the Settings
app to perform the same functions, but the Power Control widget makes it easier
to access these functions.
The user can click any of the app icons to start the related app. For example,
the user can click the Task List icon to start the Task List app. However, these
icons don't display any data or provide any other functionality.
The user can also click the Task List widget to start the Task List app.
However, the user can also get the most relevant data for the app without even
starting it. This can potentially save the user the time and effort.
How to remove app widgets
If you want to remove an app widget from your Home screen, you can do
that by long-clicking on it. Then, you can drag it to the Remove icon that appears
at the top of the screen. This doesn't uninstall the app, but it does remove it from
your Home screen.
How to add app widgets
When you install an app that includes app widgets, those app widgets are
installed on your device, but they aren't usually displayed on the Home screen.
However, you can add app widgets to the Home screen. To do that, display all
apps. Then, click the Widgets tab to display all app widgets, swipe right or left to
find the app widget you want, long-click the app widget, and drag it to the Home
screen.
Chapter 16 How to work with app widgets 503
A Home screen with app icons and widgets
Goo* l
3$ 9:08
Camera Gallery Settings Calendar
Messaging Browser Task List
Search widget
App icons
Task List
Pay bills
Get haircut
Take car in for oil change
Task List widget
0 O
C O
Power Control widget
Description
• App icons occupy a single cell on the Home screen and provide a way for users to
start an app.
• App widgets occupy one or more cells on the Home screen. They can display data
and receive periodic updates.
• Android typically includes several app widgets such as the Search and Power
Control widgets.
• You can create custom app widgets for an app.
• From the Home screen, you can typically start the related app by clicking the app
widget.
• To remove an app widget from the Home screen, long-click it and drag it to the
Remove icon that appears at the top of the screen.
Figure 16-1 An introduction to app widgets
504 Section 4 The Task List app
How to create app widgets
Now that you know how to work with app widgets, you're ready to create
one. In particular, you're ready to create a Task List app widget like the one
shown in the previous two figures.
How to create the layout
Figure 16-2 shows how to create the layout for an app widget. To start,
you can use the graphical editor just as you would use it for any other type of
layout. However, an app widget can only use widgets that are supported by
the Remote Views class. This class supports many common widgets such as
the Text View and Button widgets. However, it doesn't support other common
widgets such as the EditText or CheckBox widgets. For more information about
this class, see the next figure.
The layout for the Task List app widget uses a vertical linear layout to
display four Text View widgets. Here, the first Text View widget displays the title
of the app and the next three Text View widgets display the three oldest tasks.
Chapter 16 How to work with app widgets
505
The layout for the Task List app widget in the graphical editor
app_widget_top3.xml x
Palette #* I
D Layouts
D Widgets
03 Plain TextView
■Abl iorje 7exf
(AbJ Medium Text
[Ab] Sroott 7exf
o Button
"ok" Sroott Button
(•) RadioButton
@ CheckBox
o Switch
'. ToggteButton
*. ImageButton
ImageView
mm ProgressBor (Large)
mm ProgressBor (Normal)
■ ProqressBar (Small)
| Design i Texf |
[^^ [jg] Wexus 4» [^,» AppTheme » ©» 'U'^3^
I 6:00
Q Task List
Task List
This is a sample task
This is a sample task
This is a sample task
Component Tree
A fice Screen
a # I #- -I
appwidget_top3 LineorLoyout
lAb1 titleTextView fTertWewJ @s
[AbJ tasklTextView (TextWew; €
|AbJ task2TextView fTexfWew; @
lAb task3TextView (TextView) - (3
Properties
? s t
layout:heigtv match_parent
style
orientation vertical
► gravity /J
occessibilityb
accessibilityTi
The app_widget_top3 layout
< ?xml version="1.0" encoding="utf-8"? >
<LinearLayout xmlns:android="http://schemas.android.com/apk/res/android"
android:id="@+id/appwidget_top3"
android:layout_width="match parent"
android:layout height="match parent"
android:orientation="vertical"
android:background="©android:color/background_light" >
<TextView
android
android
android
android
android
android
android
android
id="@+id/titleTextView"
layout_width="wrap_content"
layout_height="wrap_content"
layout_marginLeft="5dp"
layout_marginTop="5dp"
text="@string/app_name"
textColor="©android:color/black"
textStyle="bold" />
<TextView
android:id="@+id/tasklTextView"
android:layout_width="wrap_content"
android:layout_height="wrap_content"
android:layout_marginLeft="5dp"
android:text="@string/sample_task"
android:textColor="©android:color/black"
/>
<TextView
android:id="@+id/task2TextView"
android:layout_width="wrap_content"
android:layout_height="wrap_content"
android:layout_marginLeft="5dp"
android:text="@string/sample_task"
android:textColor="©android:color/black"
/>
Figure 16-2 The layout for the app widget (part 1 of 2)
506 Section 4 The Task List app
When creating the layout for a widget, it's generally considered a good
design guideline to add approximately 8dp of padding to an app widget. That
way, there is some padding between the widget, other widgets, and the edge of
the screen. However, Android 4.0 (API 14) and later automatically adds padding
to app widgets. As a result, you don't typically need to add padding to most app
widgets.
Chapter 16 How to work with app widgets 507
The app_widget_top3 layout (continued)
<TextView
android:id="@+id/task3TextView"
android:layout_width="wrap_content"
android:layout_height="wrap_content"
android:layout_marginLeft="5dp"
android:text="@string/sample_task"
android:textColor="©android:color/black" />
</LinearLayout >
Description
• You can use the graphical editor to work with the layout for an app widget.
• The layout for an app widget can only use widgets that are supported by the
Remote Views class. For a list of supported layouts and widgets, view the Android
documentation for "App Widgets".
• It's generally considered a good practice to add padding to an app widget so there
is some padding between the widget, other widgets, and the edge of the screen.
• Android 4.0 (API 14) and later automatically adds padding to app widgets, but if
your app supports older APIs, you may need to manually add this padding.
Figure 16-2 The layout for the app widget (part 2 of 2)
508 Section 4 The Task List app
How to modify the database class
Figure 16-3 shows how to modify the database class (the TaskListDB class)
to support the app widget. To do that, the database class sends a broadcast
whenever it modifies the data in the Task table. That way, the class for the app
widget can receive the broadcast and update the widget accordingly.
To do that, the database class begins by defining the TASK_MODIFIED
constant that uniquely identifies the broadcast action. Then, this class defines
the broadcastTaskModified method that sends the broadcast. Finally, this class
calls the broadcastTaskModified method from each method that modifies data in
the Task table. For example, this figure shows a deleteTask method that deletes
a task and then calls the broadcastTaskModified method. However, all methods
that insert, update, or delete a task should call the broadcastTaskModified
method.
The database class also contains a method named getTopTaskNames that
makes it easy to get the task names that are displayed on the widget. This
method accepts an argument that specifies the number of names to get. Then, the
code within this method gets those names, stores them in an array of strings, and
returns the array.
Chapter 16 How to work with app widgets 509
The constant for the action
public static final String TASK_MODIFIED =
"com.murach.tasklist.TASK_MODIFIED";
A helper method for broadcasting the action
private void broadcastTaskModified () {
Intent intent = new Intent(TASK_MODIFIED);
context.sendBroadcast(intent);
}
A method that modifies a task and broadcasts the action
public int deleteTask(long id) {
String where = TASK_ID + "= ?";
String[] whereArgs = { String.valueOf(id) };
this•openWriteableDB();
int rowCount = db.delete(TASK_TABLE# where, whereArgs);
this.closeDB();
broadcastTaskModified () ;
return rowCount;
}
A method that gets the data for an app widget
public String[] getTopTaskNames(int taskCount) {
String where = TASK_COMPLETED + "= l0l";
String orderBy = TASK_COMPLETED + " DESC";
this•openReadableDB();
Cursor cursor = db.query(TASK_TABLE, null,
where, null, null, null, orderBy);
String[] taskNames = new String[taskCount];
for (int i = 0; i < taskCount; i++) {
if (cursor.moveToNext()) {
Task task = getTaskFromCursor(cursor);
taskNames[i] = task.getName();
}
}
if (cursor != nul1)
cursor.close();
db.close();
return taskNames;
}
Description
• To keep the data on an app widget current, you can broadcast an action when the
app modifies its data. Then, the app widget can receive the broadcast and update
itself.
• To get data for an app widget, you can add a method to a database class for the app.
Figure 16-3 How to modify the database class
510 Section 4 The Task List app
How to create the provider class
Figure 16-4 shows how to code a provider class for an app widget. This class
extends the AppWidgetProvider class.
Within this class, the onUpdate method contains the code that sets up the
app widget and displays data on its user interface. Android calls this method
when the user adds the app widget to the Home screen. In addition, Android
calls this method at the interval specified by the widget's info file, which you'll
learn about later in this chapter.
The onUpdate method accepts three parameters: a Context object, an
AppWidgetManager object, and an array of IDs for all app widgets for this
provider. Within this method, the code begins by looping through all app widgets
for this provider. This is necessary because a user can add multiple instances of a
widget to the Home screen.
Within this loop, the first two statements create a pending intent for the Task
List activity. The third statement creates the RemoteViews object that stores
the layout. The fourth statement sets the listener for the widget so clicking on it
starts the Task List activity. The fifth and sixth statements use the TaskListDB
class to get an array of task names. The next three statements display these
names on the corresponding Text View widgets of the layout. Or, if the array
contains a null value for one or more of these names, these statements set
an empty string on the corresponding Text View widget. Finally, the last two
statements use the RemoteViews object to update the app widget with the
specified ID. Up until these statements, the changes have only been made to the
RemoteViews object but haven't been applied to the app widget.
The RemoteViews object is necessary because it allows Android to display
the layout for the app widget in another process. More specifically, it allows
Android to display the layout for the app widget in the process for the Home
screen. With app widgets, this is the typical use of the RemoteViews object.
However, it's possible to use a RemoteViews object to display the layout for an
app widget in any process that's designed as a container for an app widget. As a
result, other uses of this object are possible.
Chapter 16 How to work with app widgets 511
The AppWidgetTop3 class Page 1
package com.murach.tasklist;
import android.app•Pendinglntent;
import android.appwidget.AppWidgetManager;
import android.appwidget.AppWidgetProvider;
import android.content.ComponentName;
import android.content.Context;
import android.content.Intent;
import android.widget.RemoteViews;
public class AppWidgetTop3 extends AppWidgetProvider {
©Override
public void onUpdate(Context context,
AppWidgetManager appWidgetManager, int[] appWidgetlds) {
// loop through all app widgets for this provider
for (int i = 0; i < appWidgetlds.length; i++) {
// create a pending intent for the Task List activity
Intent intent = new Intent(context, TaskListActivity.class);
Pendinglntent pendinglntent =
Pendinglntent.getActivity(context, 0, intent, 0);
// get the layout and set the listener for the app widget
RemoteViews views = new RemoteViews(
context•getPackageName(), R.layout•app_widget_top3);
views•setOnClickPendinglntent(
R.id.app-widget_top3, pendinglntent);
// get the names to display on the app widget
TaskListDB db = new TaskListDB(context);
String[] names = db•getTopTaskNames(3);
// update the user interface
views.setTextViewText(R.id.tasklTextView,
names[0] == null ? "" : names[0]);
views.setTextViewText(R.id.task2TextView,
names[1] == null ? "" : names[1]);
views.setTextViewText(R.id.task3TextView,
names[2] == null ? "" : names[2]);
// update the current app widget
int appWidgetld = appWidgetlds[i];
appWidgetManager.updateAppWidget(appWidgetld, views);
}
}
Figure 16-4 The class for the app widget provider (part 1 of 2)
512 Section 4 The Task List app
The onReceive method contains code that's executed when the app widget
receives a broadcast. This method accepts two parameters: the application
context and the intent that was broadcast.
Within this method, the code begins by checking whether the intent is
the TASK_MODIFIED intent that's broadcast by the database class. If so,
this code updates the app widget. To do that, the first statement creates an
AppWidgetManager object. The second statement creates a ComponentName
object for the current class, which is the app widget provider class. The third
statement uses these objects to get an array of IDs for all app widgets for this
provider. And the fourth statement passes these objects to the onUpdate method
shown in part 1 of this figure. This updates the data that's displayed on the app
widget. That way, the data that's displayed on the app widget is always
synchronized with the data that's displayed by the app.
For most app widgets, you only need to override the onUpdate and
onReceive methods of the AppWidgetProvider class to get the widget to work
the way you want. However, if you want to execute code when a widget is added
to or removed from the Home screen, you may want to override the onEnabled,
onDeleted, or onDisabled method. Android calls the onEnabled method when
an app widget is added to the Home screen, it calls the onDeleted method when
an instance of an app widget is removed from the Home screen, and it calls the
onDisabled method when the last instance of an app widget is removed from the
Home screen.
Chapter 16 How to work with app widgets
513
The AppWidgetTop3 class
Page 2
>
©Override
public void onReceive(Context context,
super.onReceive(context, intent);
Intent intent) {
}
if
}
(intent.getAction().equals(TaskListDB.TASK_MODIFIED)) {
AppWidgetManager manager =
AppWidgetManager.getInstance(context);
ComponentName provider =
new ComponentName(context, AppWidgetTop3.class);
int[] appWidgetlds = manager.getAppWidgetIds(provider);
onUpdate(context, manager, appWidgetlds);
A constructor and some methods of the RemoteViews class
Constructor/Method
RemoteViews(package, layoutld)
setOnClickPendinglntent(
appWidgetld, intent)
setTextViewText(textviewld, text)
ion
Create a new RemoteViews object that provides
access to the views in the specified layout file.
Sets the pending intent that's executed when a
user clicks on the layout.
Sets the specified text on the specified Text View
widget in the layout.
Some methods of the AppWidgetManager class
Method Description
updateAppWidget(widgetld, views)
getlnstance()
getAppWidgetIds(provider)
Updates the specified widget with the specified
RemoteViews object.
Gets an AppWidgetManager object.
Gets the IDs of the installed app widgets for the
specified provider.
Description
• The class for an app widget must extend the AppWidgetProvider class.
• Android calls the onUpdate method when the user adds the app widget to the Home
screen and at the interval specified by the widget's info file.
• Android calls the onReceive method when an action for the app widget is
broadcast.
• Android uses a RemoteViews object to display a layout in another process such as
the process for the Home screen. The RemoteViews class provides some methods
that you can use to modify the layout that's stored in the RemoteViews object.
• The AppWidgetProvider class also provides the onEnabled, onDeleted, and
onDisabled methods. If necessary, you can override these methods to execute code
when an app widget is added to or removed from the Home screen.
Figure 16-4 The class for the app widget provider (part 2 of 2)
514 Section 4 The Task List app
How to configure an app widget
Figure 16-5 shows how to configure an app widget by adding an info file to
the res\xml directory. The initialLayout attribute specifies the layout for the app
widget.
The minHeight and minWidth attributes specify the minimum height and
width for the app widget. In this figure, the minimum height has been set to
40dp, which is approximately 1 cell, and the minimum width has been set to
250dp, which is approximately 4 cells. As a result, the app widget should be 4
cells wide by 1 cell tall.
The updatePeriodMillis attribute specifies the number of milliseconds for
the update interval. However, if the device is asleep, these types of updates wake
the device to perform the update. As a result, frequent updates of this type can
cause significant problems for the battery life. To minimize this issue, Android
won't perform this type of update more than once every 30 minutes (1800000
milliseconds), and it's generally recommended to not perform this type of update
more than once per hour.
So, if you want to update an app widget more often than once per hour, you
need to use a different approach. On one hand, if you want to update the app
widget when a particular action occurs in the app, you can broadcast an action
from the app that the app widget can receive. Then, you can delete the
updatePeriodMillis attribute or set it to a value of 0. This approach is described in the
previous figures.
On the other hand, if you need to update an app widget at a specified time
interval, you can use an alarm of the ELAPSED_REALTIME or RTC type to
broadcast an update action at a specified time interval. Then, the app widget
can receive the broadcast and update itself. This approach works similarly to
the approach described in this chapter. However, this approach does not wake
the device if the device is sleeping. As a result, it conserves battery life. For
more details about working with alarms, you can view the documentation for
Android's AlarmManager class.
Chapter 16 How to work with app widgets
515
The res\xml\app_widget_top3_info.xml
<appwidget-provider
xmlns:android="http://schemas.android.com/apk/res/android"
android:initialLayout="©layout/app_widget_top3"
android:minHeight="40dp"
android:minWidth="250dp"
android:updatePeriodMillis="21600000" > <!-- every 6 hours
</appwidget-provider>
-->
The appwidget-provider element
Attribute Description
initialLayout
minHeight
minWidth
updatePeriodMillis
Specifies the layout file for the app widget.
Specifies the minimum height for the app widget.
Specifies the minimum width for the app widget.
Specifies the number of milliseconds for the update
interval. These updates are not delivered more than once
every 30 minutes (1800000 milliseconds). In addition, the
actual update is not guaranteed to occur exactly on time.
Approximate
Cell count
for minimum height and width
Approximate size
1
2
3
4
40dp
HOdp
180dp
250dp
Description
• To configure an app widget, you can add an info file for the app widget to the
res\xml directory.
Figure 16-5 How to configure an app widget
516 Section 4 The Task List app
How to register an app widget
Before you can use an app widget, you must register it. To do that, you can
add a receiver element to the AndroidManifest.xml file as shown in figure 16-6.
When you register an app widget, you need to define a label attribute that
specifies the name that Android uses for the app widget in its list of app widgets.
For example, this specifies a value of "Task List (4 x 1)" that's stored in the
strings.xml file for the app.
Since the AppWidgetProvider class extends the BroadcastReceiver class,
registering an app widget is similar to registering a broadcast receiver. In
particular, you must add an intent-filter element for every broadcast action that
your app listens for. Here, the APPWIDGET_UPDATE action is necessary to
update the app widget when it's added to the Home screen and at the interval
specified in the info file. Similarly, the TASK_MODIFIED action is necessary to
update the app widget when the user inserts, updates, or deletes a task.
To finish registering an app widget, you need to use the meta-data element
to specify the type of broadcast receiver and its location. Here, the broadcast
receiver is an app widget provider, and its info file is stored in the directory
shown in the previous figure.
How to test an app widget
After you register an app widget, you should test it. To do that, you can run
the app to install the app widget on a device. Then, you can add the app widget
to your Home screen as described in figure 16-2. At this point, you can test the
app widget to make sure it works correctly. For the Task List app widget, for
example, you can use the Task List app to delete a task. Then, you can make sure
the app widget is updated correctly.
Chapter 16 How to work with app widgets
517
The AndroidMamfest.xml file
<receiver
android:name="com.murach.tasklist.AppWidgetTop3"
android:label="@string/appwidget_top3_label" >
<intent-filter>
<action
android:name="android.appwidget.action.APPWIDGET_UPDATE"
</intent-filter>
<intent-filter>
<action android:name="com.murach.tasklist.TASK_MODIFIED" />
</intent-filter>
<meta-data
android:name="android.appwidget.provider"
android:resource="@xml/app_widget_top3_info" />
</receiver>
/>
The receiver element
Attribute
name
label
ion
The class for the app widget provider.
The name that Android uses for the app widget in its
list of app widgets. For example, "Task List (4X1)".
The meta-data element
Attribute Description
name The type of broadcast receiver.
resource The name of the info file for the app widget.
Description
• The AppWidgetProvider class extends the BroadcastReceiver class. As a result, an
app widget is also a broadcast receiver.
• To register an app widget, add a receiver element to the AndroidMamfest.xml file.
For all app widgets, you should add an intent-filter element that listens for the
APPWIDGET_UPDATE action. In addition, you may want to add intent-filter
elements to listen for other broadcast actions.
• To test an app widget, you can run the app and add the app widget to your Home
screen as described in figure 16-2.
Figure 16-6 How to register and test an app widget
518 Section 4 The Task List app
Perspective
The skills presented in this chapter should be enough to get you started
with app widgets. However, Android provides many more features for working
with app widgets. For example, you can create app widgets that can be added
to the Lock screen. This provides a way for the user to use your app widget
without even unlocking the device. You can add an activity that provides a way
for users to configure an app widget. You can create app widgets that the user
can resize. And so on. To learn more about these features, you can begin by
searching the Android documentation for more information about app widgets.
Terms
app icons
app widgets
Summary
• App icons occupy a single cell on the Home screen and provide a way for
users to start an app.
• App widgets occupy one or more cells on the Home screen and can display
data and receive periodic updates. You can create custom app widgets for an
app.
• Android calls the onUpdate method of an app widget when the user adds the
widget to the Home screen and at the interval specified by the widget's info
file.
• Android calls the onReceive method of an app widget when an action for the
widget is broadcast.
• Android uses a Remote Views object to display a layout in another process
such as the process for the Home screen.
• To register an app widget, add a receiver element to the AndroidManifest.xml
file.
Chapter 16 How to work with app widgets 519
Exercise 16-1 Review and modify the Task List
app widget
In this exercise, you'll review the code for the Task List app widget. Then,
you'll test this app widget to see how it works. Finally, you'll modify this app
widget to improve how it works.
Review the app widget
1. Open the project named ch 16_exl_TaskList.
2. Open the app_widget_top3 layout. Then, view it in the graphical editor, and
view its XML.
3. Open the AppWidgetTop3 class and view its code. This code should call the
getTopTaskNames method from the TaskListDB class, and it should receive
the TASK_MODIFlED action.
4. Open the TaskListDB class. Then, review the code for the getTopTaskNames
method. Also, review the methods of the TaskListDB class that modify the
data in the Task table. Note that some of these methods broadcast the
TASKJVIODIFIED action.
5. Open the app_widget_top3_info.xml file that's in the res\xml folder. This file
should specify that the app widget should be 4 cells wide by 1 cell tall and
that it should be updated every 6 hours.
6. Open the AndroidManifest.xml file and review the receiver element. This file
should specify the actions that the app widget receives, and it should specify
the info file for the app.
Test the app widget
7. Run the app. This should start the Task List app. If this app displays less than
three tasks, add tasks until this app displays at least five tasks.
8. Add the app widget to the Home screen. To do that, you may need to remove
other app icons or widgets to make room for the app widget. Note the three
tasks that the Task List app widget displays.
9. Switch to the Task List app and delete one of the three tasks that's currently
displayed by the app widget.
10. Switch back to the Home screen to make sure the app widget has been
updated to reflect the changed data.
Modify the app widget
11. Open the TaskListDB class. Make sure that all of the methods that modify the
Task table broadcast the TASK_MODIFIED action. This should include the
methods that support the content provider.
12. Open the app_widget_top3_info.xml file that's in the res\xml folder.
13. Modify the info file so it specifies that the app widget should be 3 cells wide
by 1 cell tall.
520
Section 4 The Task List app
14. Modify the info file so Android does not update the app widget at a specified
interval. This should help to conserve battery life.
15. Test the app widget to make sure it still works correctly. To do that, run the
app again. Then, remove the old app widget from the Home screen and add
the modified app widget to the Home screen.
Exercise 16-2
Add an app widget that displays
a count of tasks
In this exercise, you'll add another app widget to the Task List app presented in
this chapter. This app widget should be 1 cell wide by 1 cell tall, and it should
display a count of the total number of incomplete tasks.
1. Open the project named ch 16_ex2_TaskList.
2. Open the TaskListDB class and note that it includes a method named
getTaskCount that gets a count of incomplete tasks.
3. Navigate to the res\drawable-xhdpi directory and view its contents. Note that
it includes an icon file named ic_task_count.png.
4. Create a layout named app_widget_task_count that uses a Text View widget
to display the count of incomplete tasks on the icon named ic_task_count. To
accomplish this, you can set the background property of the Text View to the
icon resource.
5. Create a class named AppWidgetTaskCount that displays the count of task
widgets. This class should update the data on the layout when the widget is
first added to the Home screen and when the TASK_MODlFIED action is
received.
6. Create an info file for the app widget that specifies that the icon is 1 cell wide
by 1 cell tall.
7. Open the Android manifest file and add a receiver element that registers the
app widget.
8. Run the app on an emulator or device. Note the number of tasks that are
displayed by the app.
9. Add the app widget to the Home screen and check the task count to make sure
the app widget is working correctly. If the app displays 3 tasks, the app widget
should look like this:
Section 5
Advanced Android skills
In sections 1 through 4, you learned the skills that you need to develop
many types of Android apps. In this section, chapter 17 shows several ways
to deploy most apps, including how to publish an app on the Google Play
store.
Chapter 18 shows how to develop the Run Tracker app. This app
tracks a device's location and displays it on a map. In this chapter, you'll
learn how to use Android to work with the newest version of Google
Maps. Since this chapter requires some understanding of deployment, I
recommend reading chapter 17 before chapter 18.
17
How to deploy an app
So far in this book, you've learned how to develop, test, and debug an Android
app. Once you finish thoroughly testing and debugging your app, you're ready
to deploy your app. One way to deploy an app is to distribute it directly to your
users by making it available from a website. Another way is to publish it on an
application marketplace. In this chapter, you'll learn how to publish your app
on the most popular application marketplace, Google Play.
An introduction to distribution and monetization 524
How distribution works 524
How monetization works 526
How to create a release build 528
How to prepare an app for release 528
How to create the signed APK file 530
How to distribute directly to the user 532
How to distribute via a website 532
How distribute via email 532
How to publish on Google Play 534
How to set up a publisher account 534
How to use the Developer Console to publish an app 536
How to view the listing for an app 538
Perspective 540
524 Section 5 Advanced Android skills
An introduction to distribution
and monetization
Before you distribute an app, you should examine the various distribution
options. Similarly, if you want to make money from your app, you need to find a
way to get paid for it. This is known as monetization.
How distribution works
Figure 17-1 begins by showing two ways to distribute an app. Typically,
you distribute an app through an application marketplace. Today, Google Play
(formerly known as the Android Market) is the most popular application
marketplace. This figure, for example, shows the Google Play listing for a free Tip
Calculator app. This listing includes descriptive text and images for the app.
If you want to use another application marketplace instead of or in addition
to Google Play, that's possible too. Many other application marketplaces exist,
and they all have their advantages. For example, the Amazon Appstore has some
features that aren't available from Google Play.
Another distribution option is to make an app available directly to users via
a website download or an email attachment. This option is especially appropriate
for a proprietary app that's only used within an organization. However, it can
also be a good way to promote an app, especially a free version of an app.
Chapter 17 How to deploy an app
A free app displayed in Google Play
ttedi
(D
Tip Me (Tip Calculator) - x
C S https://play.google.com store/apps/details?id=tip.calculator
& =
Google Play search
Apps
Myapps
Shop
Games
Family
Parent Guide
Editors' Choice
■■■ ^% cuarto9@gmail com ▼
Categories v
Home Top Charts New Releases
$
Tip Me (Tip Calculator)
nilknarf Finance
£ Everyone
O This app is compat ble with all of your devices
* * * * 4 A 300 i
[+] AddtoWishhst
*v «*2a
m%
CjM + *t C )%*•*
1*1 I OHi U*
! BQU521
on
/ltma*4*U
O
/Jmatttt/
(Ul
Pt+P+MO*
S26JS3
-bl
S*?*9
$3tt 3*
S/33 67
flr.L
Adju«tm«nu
%/al S3//3U
S/33 67
7*p S23 74
7*lal S/3f PJ
uua.
-7*&U %
S/33 67
S23 74
S/3t 92
0
Adfrmnnnn
John
« [
I c*
>
JL
Cf
I ™ I
. he most robust, full featured, and AD FREE Tip Calculaior en the Pla> Store You wont find another
up calculator with this man^ features looks this good, and is as simple and intuitive as Tip Me A '
Two ways to distribute an app
• Through an application marketplace
• Directly to the user via a website, email, etc.
Two application marketplaces
• Google Play
• Amazon Appstore
Description
• You can distribute an app through an application marketplace such as Google Play,
or you can distribute it directly to users via a website or email.
• Google Play, formerly known as the Android Market, is a digital marketplace for
Android apps that's developed and maintained by Google.
Figure 17-1 How distribution works
526 Section 5 Advanced Android skills
How monetization works
Figure 17-2 begins by listing three ways to monetize an app. First, you can
create a paid app. For this type of app, the customer pays a one-time fee before
he or she can install the app.
Second, you can use in-app billing. This provides for in-app products that
have a one-time purchase or subscriptions that have a recurring, automated
billing. To learn how to add in-app billing to your app, you can start by searching
for "in-app billing" in the Android documentation. This figure, for example,
shows a Google Play listing for a Sports Tracker app that's free but includes
in-app billing.
Third, you can add advertising to your app. For example, you can add a
banner ad to your app. To do that, you need to work with a mobile advertising
network that serves ads to mobile devices. AdMob is a popular mobile
advertising network that's owned by Google, but other advertising networks are also
available. To learn how to add advertising to your app, you can start by searching
for "advertising" in the Android documentation.
If you publish a free app on Google Play, you can't change it to being a
paid app. However, you can add in-app billing or subscriptions, and you can add
advertising. On the other hand, if you publish a paid app, you can change it at
any time to being a free app.
A common strategy for monetizing an app is to provide a free version of
an app that includes advertising. Then, you can provide a paid version of that
app that removes the advertising. Or, you can provide a free version of an app
that doesn't include all features. Then, the paid version can provide additional
features. If one of your goals is to make money from the apps that you develop,
you should create a strategy for monetizing your app before you publish it.
Chapter 17 How to deploy an app
527
An app with in-app billing displayed in Google Play
tten
Endomondo - Running & X
(D
C 2 https://play.google.com/store/apps/details?id=com.endomondo.android
fc =
Google Play search
tt
Apps
Categories v
My apps
Shop
Games
Family
Parent Guide
Editors' Choice
■■■ ^% cuarto9@gmail com »
Home Top Charts New Releases
Endomondo - <* Editors1 Choice & Top Developer
Running & Walking
Endomondo.com Health & Fitness * * * * i 261 694 i
^ Everyone
Offers in-app purchases
O This apD is compat ble vl th all of your dev ces
[+] AddtoWishhst
= endomondo
• r.
4.67
tlM
0:36:06
189
m
155.
>
J
How to monetize an app
• Paid apps
• In-app billing
• Advertising
Description
• Getting paid for an app is referred to as monetizing an app.
• If you publish a free app, you can't change it to being a paid app. However, you can
sell in-app products or subscriptions, and you can add advertising.
• If you publish a paid app, you can change it at any time to being a free app.
• In-app billing provides for in-app products that have a one-time purchase or
subscriptions that have a recurring, automated billing.
Figure 17-2 How monetization works
528 Section 5 Advanced Android skills
How to create a release build
Now that you understand the options for distributing and monetizing an app,
you're ready to create a release build for your app. Then, you can distribute this
release build via a website or email. Or, you can publish this release build to a
marketplace such as Google Play.
How to prepare an app for release
Figure 17-3 shows a Tip Calculator app that has been thoroughly tested and
debugged in the development environment and is ready to be released. It also
lists some tasks you should complete before creating the release build. Most
of the time, you complete these tasks as you create, test, and debug the app.
However, if you haven't already completed these tasks, you should complete
them before releasing the app.
To start, you should make sure the package name for the app is unique and
appropriate. That's because Android uses the package name to identify the app.
As a result, no two apps can use the same package. If you plan to create free and
paid versions of an app, you may want to adjust the package names accordingly.
You should make sure to set the final icon for the app. Most of the time, you
set this icon when you create the app, but you may want to switch to a more
professional app icon just before releasing the app.
You should make sure the version numbers are correct for the app and its
components. To set the correct version for the app, you can edit the Android
manifest file for the app. If the app uses another component such as a database,
you can edit the version number for that component too. For example, you can
edit the database class to set the version number for the database.
You should add any copyright info or End User License Agreement (EULA)
you want. To do that, you can add copyright info to an About screen. Similarly,
you can add a starting screen that displays the EULA and requires the user to
accept it or decline it. If the user accepts the EULA, this screen should not be
displayed on subsequent starts.
If you haven't already done it, you should finish localizing the app. This
involves creating resource directories for various countries and adding strings,
xml files to those directories that contain translations for other languages as
described in chapter 3.
You should remove any old files from the project. During development,
it's common to add files such as icon files that don't end up being used by the
release version of that app. To keep the file size of the release build small, you
should delete all unused files.
Finally, you should remove logging statements from the source code. These
statements are useful during development, but you should remove them from a
release build.
Chapter 17 How to deploy an app
529
A Tip Calculator app
^ Tip Calculator
3G
A
7:30
Bill Amount 32.60
Percent
Tip
Total
16%
$5.22
$37.82
Split Bill? 3 ways
Per Person $12.61
Final checklist
1. Set the final package name.
2. Set the final application icon.
3. Set the version numbers for the app and all of its components.
4. Add copyright info.
5. Add an End User License Agreement (EULA).
6. Finish localizing the app.
7. Remove any old files from the project.
8. Remove logging statements from the source code.
Description
• After you have thoroughly tested and debugged your app for all devices and
emulators in your development environment, you can prepare an app for release by
performing some final checks on the app.
Figure 17-3 How to prepare an app for release
530 Section 5 Advanced Android skills
How to create the signed APK file
To run an app on a device or emulator, the app must be stored in an APK file
(Android package file) that's signed with a digital certificate. During
development, Android Studio automatically generates a debug key and uses it to sign the
APK file. Before distributing an app, you must generate a release key and use it
to sign the APK file.
The JDK includes command-line tools that you can use to generate a
release key and sign an app. However, Android Studio provides an easier way to
generate the release key and APK file for an app.
When you use the procedure shown in figure 17-4, you respond to several
dialogs that are displayed by Android Studio. To start, in the first dialog, you
can choose to create a new key store, which is a file that contains one or more
digital certificates. Or, you can choose to use an existing key store. Either
way, you need to specify the location and passwords for the key store and
the release key. In this figure, the dialog shows that the key store is stored in
a file named murach_release_keystore.jks and the release key has a name of
murach_release_key.
Android uses the key store file to verify any updates to an app. If you lose
this file, you won't be able to update your app. Conversely, if a hacker gains
access to this file, he or she can update your app. For example, a hacker could
replace your app with another app that contains malicious code. As a result, it's
important to store this file in a secure location. And, of course, it's important to
store this file in a location that you can remember.
When you create a new key store, you can use the dialog box shown in this
figure to specify the information for a digitial certificate for a release key. When
you do this, you typcially want to specify a number of years that's valid for
the entire life of the app. Since it's hard to predict how long an app might live,
you should specify a large value such as 25 or even 50 years. Another issue to
consider is that Google Play requires the release key to be valid for at least 20
years.
After you finish the dialog shown in this figure, you can use another dialog
to specify the location of the signed APK file. At this point, you can distribute
this APK file directly to your users as described in the next figure, or you can
publish it on Google Play as described after that.
Chapter 17 How to deploy an app 531
The New Key Store dialog
r
New Key Store
~ j
Key store path:
Password:
Key
^_
C:\murach\android\murach_release_keystore.jks
Alias:
Password:
Validity (years):
Certificate
Confirm:
__«o__ l
l-l
murach_release_key
5C
I First and Last Name:
I
Organizational Unit:
I
Organization:
City or Locality:
State or Province:
Country Code (XX):
Confirm:
IB
"I
J
Joel Murach
Editorial
Mike Murach & Associates
Fresno
California
M
OK
^
Cancel
j
Procedure
1. Select the Build->Generate Signed APK item from the menu system.
2. Click the "Create new" button to create a new key store file, or click the "Choose
existing" button to select an existing key store file.
3. Specify the location and password for the key store file.
4. Specify the alias and password for the release key.
5. If creating a new key store, specify the information for the certificate.
6. Specify the location and filename for the APK file.
Description
• To run an app on a device or emulator, the app must be stored in an APK file
(Android package file) that's signed with a digital certificate.
• During development, the IDE automatically generates a debug key and uses it to
sign the APK file. Before distributing an app, you must generate a release key and
use it to sign the APK file.
• A key store is a file that contains one or more digital certificates. If you lose this
file, you won't be able to update your app. Conversely, if a hacker gains access to
this file, he or she can update your app. As a result, it's important to store this file in
a secure location.
Figure 17-4 How to create the signed APK file
532 Section 5 Advanced Android skills
How to distribute directly to the user
Once you have a signed APK file for an app, you can distribute it directly to
your users via a website or email as described in figure 17-5. Then, your users
can install the app without using an established Android marketplace. Since the
user doesn't download the app from a marketplace, this is sometimes referred to
as side loading.
If you are a developer, you need to delete any old versions of the app from
your Android device that use a debug key. Otherwise, when you try to install
the new version of the app that uses the release key, the installation will fail and
Android will display a message that indicates that the installation failed due to
different application signatures.
In addition, you may need to select the Unknown Sources item on your
Android device to allow apps from sources other than Google Play. Some
devices have this item selected by default. However, if this item isn't selected by
default, you need to select it.
Once you have removed any debug versions of the app and selected the
Unknown Sources item, you can install the app by copying the APK file to the
device and clicking on it. Two of the easiest ways to copy the APK file to a
device are to download it from a website or to receive it as an email attachment.
As you review the procedure shown in this figure, note that step 1 only
applies to developers who have installed a version of the app that uses a debug
key. In addition, on some devices, the Unknown Sources item described in step 2
is selected by default. As a result, some users only need to follow steps 3 and 4.
How to distribute via a website
To distribute via a website, you can create a mobile-friendly web page that
includes a link to download the APK file for the app. Then, a user can download
the app by using the browser on the Android device to view that web page and
download the APK file.
How distribute via email
To distribute via email, you can attach the APK file to an email and send it to
your users. Then, a user can click on the attachment to download the APK file.
Although this works seamlessly when your users have a new Android device and
a Gmail account, it might not work at all for older Android devices or other types
of email accounts. In that case, your users need to find another way to copy the
attachment to their device. One easy way to do that is to download the file from
the web.
Chapter 17 How to deploy an app 533
How to install an app from an APK file
1. If you are a developer, delete any old versions of the app from your Android device
that use a debug key.
2. Make sure your Android device allows apps from sources other than Google Play.
- For Android 4.0 and later, start the Settings app and select the
Security ^Unknown Sources item.
3. Copy the APK file to your Android device.
- If the APK file is available from a web page, use the browser on your Android
device to view that web page and download the APK file.
- If the APK file has been sent to you as an email attachment, use your Android
device to open the email and click on the attached APK file. This works
seamlessly with newer Android devices and Gmail. However, this may not work
as well with older devices or other types of email.
4. Click the APK file to install the app.
Description
• Once you have a signed APK file, you can distribute it directly to the user without
using an Android marketplace.
• Installing an app from a source other than an established Android marketplace is
sometimes referred to as side loading.
Figure 17-5 How to distribute directly to the user
534 Section 5 Advanced Android skills
How to publish on Google Play
Once you have a signed APK file for an app, you're just a few steps from
making it available on the Google Play store. To do that, you need to create some
online accounts. Then, you can use the Developer Console for Google Play to
upload your app and manage its listing.
How to set up a publisher account
Before you can upload an APK file to Google Play, you must set up a
publisher account as shown in figure 17-6. To start, you can sign in with the
Google account that you want to use for publishing apps. A Google account is
the same kind of account that you use to work with any Google product such as
Gmail or the Google Calendar.
If you represent an organization, you may want to create a Google account
for the organization. That way, several developers can use that account to publish
the app. In this figure, for example, I am signed in as Joel Murach. However, to
publish this app for an organization such as Mike Murach & Associates, I could
sign in using the Google account for Mike Murach & Associates.
After you sign in with the correct Google account, you can accept the
developer agreement, pay the registration fee ($25) for that account, and
complete the details for that account. This creates a Google Play account that
you can use to publish free apps. However, if you want to create paid apps or use
in-app billing, you also need to set up a merchant account. To do that, you can
follow one of the links that's displayed after you finish creating the Google Play
account.
Chapter 17 How to deploy cm app
535
The Google Play signup page
https://play.google.com/apps/publish/signup
The Accept Developer Agreement page
<m
(D
Google Play Developer C x
-> C Q https:/ play.google.com/apps/publish/signup/
fc 5
Google Play Developer Console
Sign-in with your Google
account
YOU ARE SIGNED IN AS...
r Joel Murach
joelmurach@gmail.com
Accept Developer
Agreement
Pay Registration Fee
Complete your Account
details
This is the Google account that will be associated with your Developer Console.
If you would like to use a different account you can choose from the following options below. If you are
an organization, consider registering a new Google account rather than using a personal account
Sign in with a different account Create a new Google account
BEFORE YOU CONTINUE...
e®
Read and agree to the Google Play Developer Review the distribution countries where you can
distribution agreement distribute and sell applications.
U I agree and I am willing to associate
my account registration with the Google
Play Developer distribution agreement
If you are planning to sell apps or in-app products,
check if you can have a merchant account in your
country
Make sure you have your credit card handy
to pay the $25 registration fee in the next
step.
Procedure
1. Go to the website shown above.
2. Sign in with your Google account.
3. Accept the developer agreement.
4. Pay the registration fee ($25). To do that, you need to create a Google Wallet
account if you don't already have one.
5. Complete your account details.
6. If you want to create paid apps or use in-app billing, follow the links to set up a
merchant account.
Description
• Before you can upload an APK file to the Google Play store, you must set up a
publisher account.
Figure 17-6 How to set up a publisher account
536 Section 5 Advanced Android skills
How to use the Developer Console
to publish an app
When you finish creating a Google Play account, there is a link for
publishing an app on Google Play. You can use this link to navigate to a
Developer Console like the one shown in figure 17-7. Or, you can navigate to the
Developer Console by entering the URL shown at the top of this figure. Either
way, once you display the Developer Console, you can use it to upload your app
to Google Play and manage its listing.
To upload your app, you can click the APK link. Then, you can use the
three tabs to upload the APK for alpha testing, beta testing, or production. If you
upload the Tip Calculator app to the Production tab, this app will be released to
the general public as soon as it is published.
The Developer Console won't let you publish your app until Google
processes your registration fee, and that can take up to 48 hours. Before then,
the app has a status of "Draft". This lets you enter the listing and pricing details
for the app. However, the app isn't published until you select the "Publish app"
item. After you do that, the status of the app changes to "Published".
To modify the listing for the app, you can click the Store Listing link. Then,
you can specify the required text and images for the app. This can include text
and images like the ones shown in the first two figures in this chapter. To create
the required text, you may want to work with someone who specializes in
marketing. Similarly, to create the required images, you may want to work with
someone who specializes in graphic design.
To modify the pricing and distribution for the app, you can click the Pricing
and Distribution link. Then, you can specify whether the app is a free or paid
app. In addition, you can specify the countries where you want to distribute
the app. Of course, you typically want to make sure your app provides for the
primary language of each country.
If the app is a paid app, you need to specify the price for each country. This
is necessary because every country uses a different currency. Fortunately, if you
specify a default price in US dollars, the Developer Console can generate prices
for other countries based on current exchange rates.
Chapter 17 How to deploy an app
537
The Developer Console page
https://play.google.com/apps/publish
The Developer Console page for the Tip Calculator app
f
j Sto
<- ->
1*
it
o
A
□
re Listing - Tip Caicu " X
C S https:/ play.goog
Google Play Develo[
«30 o § -^W
le.com/apps/publish/?dev_acc=17161083236091087250#AppListPlace <& =
Der Con
Tip Calculator
in
DRAFT Delete app
APK
1 Store Listing
Content Rating
Pricing & Distribution
In-app Products
Services & APIs
Optimization Tips
©
r
©
D
sole Q>
STORE LISTING
PRODUCT DETAILS
English (United States) - en-US
Title*
English (United States) - en-US
Short description
English (United States) - en-US
Full description
English (United States) - en-US
A
MiKe iViurdcn ana Associates joeimuracntuJgmaii com ^m
Sign out Q 1
Why cant 1 publish'? |
Save draft Publish app
Fields marked with * need to be filled before publishing
Manage translations ▼
Murach's Tip Calculator
23 of 30 characters
This simple app calculates the tip and total for a bill
56 of 80 characters
This simple app calculates the tip and total for a bill If necessary it can split the
bill between the specified number of people. This handsome and easy-to-use app
doesn't have any unnecessary bells and whistles It just gets the job done!
Procedure
l.
2.
3.
Log in to the Developer Console.
Upload the APK file.
Edit the store listing. This includes specifying a title, a description, screenshots, and
so on.
4.
5.
6.
Edit the pricing and distribution (optional).
Edit the in-app products (optional).
Select the "Publish this app" item from the combo box to the right of the app's
name.
Description
• You can use the Developer Console to publish your app and to manage its listing on
Google Play.
• At a minimum, the listing for an app must include the name of the app, a brief
description of the app, two screenshots of the app, and an image for the app's logo.
• It may take 48 hours for your registration fee to be processed. The Developer
Console won't allow you to publish an app until that fee is processed.
Figure 17-7 How to use the Developer Console to publish an app
538 Section 5 Advanced Android skills
How to view the listing for an app
Once you publish an app on Google Play, you can view the listing for
the app by going to Google Play and searching for the app. Figure 17-8, for
example, shows the listing for the Tip Calculator app. I displayed this listing by
using a browser to navigate to Google Play, searching for "murach's tip
calculator", and clicking on the link for this app.
If you use the Developer Console to edit the listing for your app, the changes
should appear when you reload the Google Play page for your app. For example,
if I used the Developer Console shown earlier in this chapter to edit the text or
images for this app, those changes should appear in this listing.
Chapter 17 How to deploy an app
539
The Google Play listing
tfaa
ID
Murach's Tip Calculator x
-> C Q https://play.google.com/store/apps/details?id=com.murach.tipcalculator
fc'E
Google Play search
Apps
Myapps
Shop
Games
Family
Parent Guide
Editors' Choice
Joel
Categories v Home Top Charts New Releases
Murach's Tip Calculator
Mike Murach & Associates Productivity
£ Everyone
O This app is compat ole with all of your devices
[+] AddtoWishlist
6:17
1ri*A7
Q Tip Calculator
Bill Amount 94 60
Percent
Tip
Total
18%
$17.03
$111 63
(3 Tip Calculator
Bill Amount 32 60
■
Percent 18%
Tip $5 87
Total $38 47
Split Bill? m s
$0.99 Buy
>
Description
• Once you publish an app on Google Play, you can view the listing for the app by
going to Google Play and searching for the app.
Figure 17-8 How to view the listing for an app
540 Section 5 Advanced Android skills
Perspective
The skills presented in this chapter should be enough for you to publish a
free or paid app on Google Play. However, if you want to add in-app billing or
advertising to your app, you'll need to do more research to learn how to do that.
Of course, the skills presented in this chapter and throughout this book should
provide the foundation you need to learn how to accomplish these tasks.
Terms
monetization
application marketplace
paid app
in-app billing
in-app products
subscriptions
mobile advertising network
End User License Agreement (EULA)
Summary
• You can distribute an app through an application marketplace such as
Google Play, or you can distribute it directly to users via a website or email.
• Google Play, formerly known as the Android Market, is a digital
marketplace for Android apps that's developed and maintained by Google.
• Getting paid for an app is referred to as monetizing an app.
• In-app billing provides for in-app products that have a one-time billing or
subscriptions that have a recurring, automated billing.
• To run an app on a device or emulator, the app must be stored in an APKfile
(Android package file) that's signed with a digital certificate.
• During development, the IDE automatically generates a debug key and uses
it to sign the APK file. Before distributing an app, you must generate a
release key and use it to sign the APK file.
• A key store is a file that contains one or more digital certificates. This file is
required to update your app. As a result, it's important to store this file in a
secure location that you can remember.
• Installing an app from a source other than an established Android
marketplace is sometimes referred to as side loading.
APK file (Android package file)
Signed app
digital certificate
debug key
release key
key store
side loading
Chapter 17 How to deploy an app 541
Exercise 17-1 Install the Tip Calculator app
on your device
In this exercise, you'll install the release build of the Tip Calculator app on an
Android device.
1. Select the Android device that you want to use.
2. Uninstall any old versions of the Tip Calculator app that use the debug key.
3. Make sure the Android device allows apps from sources other than Google
Play. To do that, you can start the Settings app and select the Unknown
Sources item.
4. Copy the APK file that's in the ex_starts\ch 17_APK directory to the device.
One easy way to do this is to attach it to an email and send it to a Gmail
account. Then, you can open Gmail on the device, open the email, and click
on the attachment.
5. Click the APK file to install the Tip Calculator app.
6. Start the Tip Calculator app and make sure it's the app presented in this
chapter.
Exercise 17-2 Publish an app on Google Play
In this exercise, you'll publish your first app on Google Play.
1. Design and develop an app that you want to publish on Google Play.
2. Test and debug that app on all devices and emulators in your development
environment.
3. Prepare the app for release.
4. Create the signed APK file for the app.
5. Create a Google Play publisher account. To do that, you must pay the
registration fee ($25).
6. Use the Developer Console to publish your app. To do that, you must upload
the APK file and provide the required text and images for the app.
7. Use Google Play to install the app on one or more devices.
8. Test the installed app on one or more devices and make sure it works the way
you want.
9. Check Google Play for feedback and continue to improve your app.
18
How to work with locations
and maps
Most mobile devices include hardware that can provide the location of the
device to an Android app. As a result, you can use the location of a device to
customize your app so it's appropriate for the user's current location.
Often apps that use a device's location also use maps. For example, they
might display a map and zoom in on the current location. To do that, the app
can use any Android API for mapping. This chapter shows how to use the
newest version of the most popular Android API for mapping, Google Maps
version 2.
An introduction to locations and maps ...........................544
The user interface for the Run Tracker app 544
An introduction to determining location 546
An introduction to maps 548
An introduction to the Google Maps Android API 550
How to configure the Google Maps Android API V2.......552
How to create a new Google Maps project 552
How to add Google Play services to an existing project 554
How to get a Google Maps API key 556
How to set permissions and features 558
How to work with locations ...............................................562
How to connect to Google Play services 562
How to get the current location 566
How to handle a failed connection 568
How to get location updates 570
How to make sure GPS is enabled 574
How to work with Google Maps ........................................576
How to add a map fragment to a layout 576
How to display a map 578
How to zoom in on a location 580
How to add markers 582
How to add lines 584
The Run Tracker app..........................................................586
The activity_run_map layout 586
The RunMapActivity class 588
The RunTrackerService class 594
Perspective.........................................................................598
544 Section 5 Advanced Android skills
An introduction to locations and maps
This chapter begins by presenting the user interface for an app that tracks
a device's location and displays it on a map. Then, it describes two competing
Android APIs for working with maps, Google Maps and MapQuest. Finally, this
topic describes two versions of the Android API for Google Maps.
Although it's possible to use an emulator to test locations and maps, it's
easier to use an actual device. As a result, this chapter doesn't show how to use
an emulator to test locations. Instead, it assumes that you have an actual device
that you can use for testing. If you need to use an emulator for testing, you can
search the Internet for information to learn how to send test location data to an
emulator.
The user interface for the Run Tracker app
The skills presented in this chapter are necessary to create the Run Tracker
app shown in figure 18-1. When the Run Tracker app starts, the Stopwatch
activity displays a stopwatch that you can use to start, stop, and reset a run.
Typically, you begin by clicking the Start button to start a run. Then, the Start
button becomes a Stop button.
If you want to pause the run, you can click on the Stop button. Then,
the Stop button becomes a Start button that you can use to continue the run.
However, if you want to delete the current run, you can click the Reset button to
do that. Then, you can click the Start button to start a new run.
At any time, you can view the map for the run by clicking the View Map
button. This should display a red marker for the user's current location and a
black line to indicate the route of the run. In addition, it should display zoom
controls that you can use to zoom in or out. When you're ready to switch back to
the Stopwatch activity, you can click on the View Stopwatch button. This button
is transparent by default, which is usually what you want since it allows you to
view the map and compass behind it.
When you start the stopwatch, the app starts a service that uses GPS (Global
Positioning System) to get the location of the device. As a result, Android
displays the GPS icon and a stopwatch icon in the notification area. In this
figure, the user has started a run. As a result, it shows both icons in the
notification area above both activities.
To remove these notifications, you can stop or reset the stopwatch. This
stops the service that uses GPS. As a result, Android removes the GPS icon and
the stopwatch icon from the notification area.
Although I designed this app for running or jogging, you can use it for
walking, biking, or even driving. It should work for any activity where you are
moving and your device can access GPS. However, GPS does not usually work
indoors, so you typically need to be outside.
Chapter 18 How to work with locations and maps
545
The Stopwatch activity
O
\i\\ 9:36
Run Tracker
000120
Reset
Stop
View Map
1^1
rzzi
The Run Map activity
O
4G
\i I 1:34
Run Tracker
se Coronado
Playground
i
View Stopwatch
"S
CO
20th St
ID
ID
CO
®
©_
©
3
CO
Google
o
CO
3
CO
21 st St
22nd St
Parque Ninos
Unidos
®
c2a
23rd St
rzzi
Description
• When the app starts, it displays the Stopwatch activity.
• To start or continue a run, the user can click on the Start button.
• To pause a run, the user can click on the Stop button.
• To delete a run, the user can click on the Reset button.
• To display the Run Map activity, the user can click on the View Map button.
• The Run Map activity displays a red marker for the user's current location and uses
a black line to indicate the path of the run.
• When the user starts the stopwatch, the app displays a stopwatch notification icon
and starts a service that uses GPS (Global Positioning System) to track the user's
location. This causes Android to display a notification icon for GPS.
• To remove these notifications, the user can stop or reset the timer.
• To display the Stopwatch activity, the user can click on the View Stopwatch button.
Figure 18-1 The user interface for the Run Tracker app
546 Section 5 Advanced Android skills
An introduction to determining location
From an Android developer's point of view, there are three ways to
determine the location of a device. Figure 18-2 describes their pros and cons.
First, you can determine a device's location by using the device's GPS
receiver to check signals from GPS satellites. The advantage of this approach is
that it's the most accurate. However, for GPS to work, the device must have a
GPS receiver and an unobstructed line of sight to at least three GPS satellites. As
a result, GPS doesn't work well or at all when the device is indoors. Also, GPS
consumes a lot of battery power, significantly more than the other techniques.
Finally, GPS returns the location more slowly than using cell or Wi-Fi signals.
Second, you can determine a device's location by using signals from cell
towers or Wi-Fi hotspots to determine location. Although this technique isn't as
accurate as GPS, it works outdoors and indoors, consumes less battery power,
and returns the location more quickly.
Third, you can listen to location updates that Android is sending to other
apps. The advantage of this approach is that it doesn't use any extra battery
power. The disadvantage is that it doesn't let you control when your app gets
updates. For example, if other apps don't request location updates, your app
doesn't receive any updates at all.
Chapter 18 How to work with locations and maps 547
GPS
• Uses signals from GPS (Global Positioning System) satellites to determine the
location of the device
Pros
- Most accurate
Cons
- Only works outdoors, not indoors
- Consumes more battery power
- Returns the location slowly
Network
• Uses signals from the cell network or Wi-Fi hotspots to determine location
Pros
- Works outdoors and indoors
- Consumes less battery power
- Returns the location more quickly
Cons
- Less accurate
Passive
• Listens to location updates that are being sent to other apps
Pros
- Doesn't use any extra battery power
Cons
- Doesn't let you control when your app gets updates
Description
• You can use a device's GPS receiver or its network signals (cell or Wi-Fi) to find a
device's current location.
• You can also find a device's current location by listening for location updates that
are being sent to other apps.
Figure 18-2 An introduction to determining location
548 Section 5 Advanced Android skills
An introduction to maps
You've probably used more than one Google Map by now on a mobile
device. If so, you know how easy one is to use. As you might expect, Google
Maps is the most popular Android API for mapping. However, there are other
Android APIs for mapping. One of the most prominent is MapQuest, one of the
oldest mapping services. Figure 18-3 describes some of the pros and cons of
these two APIs for mapping.
Google Maps is a complete mapping solution that provides (1) the Android
API, (2) the base maps, and (3) the servers that serve the map tiles to the app. On
the good side, this makes Google Maps easy for developers to use. On the bad
side, this makes it more difficult to use one component of Google Maps without
using another component.
Google Maps is available for free for most apps. At the time of this writing,
for example, Google Maps allows 25,000 free map requests per day before it
starts charging a small fee.
Google Maps also provides many features. It provides for geocoding, which
is the process of converting latitude/longitude coordinates to street addresses and
back. It provides for routing, which is the process of providing directions. And it
provides for other features such as street view, traffic layers, and 3D buildings.
However, Google Maps isn't free for its heaviest users. As a result, if your
app is going to generate more than 25,000 map requests per day, you might
want to investigate alternatives to Google Maps. In addition, Google Maps isn't
open-source. As a result, the developer doesn't have much control over the API
or its pricing.
MapQuest works much like Google Maps, but it has recently embraced
open-source mapping, allowing developers to choose between its proprietary
maps or open maps that use data from the OpenStreetMap project. The goal of
the OpenStreetMap project is to create a free map of the world that's available
under the Open Database License.
Although MapQuest doesn't have as many features as Google Maps, the
open version of its Android API is free for all users. As a result, if your app is
going to generate more than 25,000 map requests per day, you may want to cut
costs by using MapQuest. Similarly, if you want to have more control over the
map API, or if you are an open-source enthusiast, you may want to try using
MapQuest.
Chapter 18 How to work with locations and maps 549
Google Maps
Website
https://developers.google.com/maps/
Description
- Google Maps includes (1) the Android API, (2) the base maps, and (3) the
servers to serve map tiles.
Pros
- Popular and familiar
- Free for most users
- Many features:
• Geocoding
• Routing
• Street view
• Traffic
• 3D Buildings
Cons
- Not free for the heaviest users
- Lack of control
MapQuest
Website
http://developer.mapquest.com/
Description
- MapQuest works much like Google Maps, but it has recently embraced
open-source mapping, allowing developers to choose between its proprietary
maps or open maps that use data from the OpenStreetMap project. The goal of
the OpenStreetMap project is to create a free map of the world that's available
under the Open Database License.
Pros
- Open version is free for all users
Cons
- Not as many features
Description
• Google Maps is the most popular Android API for working with maps. However,
there are several alternatives to Google Maps. One alternative is MapQuest.
• Geocoding is the process of converting latitude/longitude coordinates to street
addresses and back.
• Routing is the process of using map data to provide directions.
Figure 18-3 An introduction to maps
550 Section 5 Advanced Android skills
An introduction to the Google Maps Android API
Figure 18-4 describes two versions of the Google Maps Android API.
Version 1 (vl) was widely used prior to March 2013 because it makes it easy to
add powerful mapping capabilities to an app. As a result, many existing apps use
this version of the API.
However, the Android documentation recommends version 2 (v2) for all
new development. In fact, Google Maps no longer accepts requests for an API
key for version 1. As a result, if you don't already have an API key for version
1, you must use version 2. In addition, as you might expect, version 2 has many
new features that improve upon the features available in version 1. For example,
version 2 uses fragments to provide more flexibility for working with different
screen sizes, displays faster, uses less bandwidth, and supports 3D. For these
reasons, this chapter only covers version 2 of the API.
If you need to work on an app that uses version 1, you shouldn't have much
trouble finding tutorials and documentation for it. There are plenty of books and
online tutorials available for version 1, and the official online documentation for
version 1 is still available too.
Chapter 18 How to work with locations and maps 551
Google Maps Android API versions
Version 1 (v1)
- Has been officially deprecated as of December 3rd, 2012.
- Requests for API keys are no longer accepted as of March 18th, 2013.
- New features are no longer being added.
- Continues to work for existing apps.
- Uses the Map Activity class to encapsulate maps. This doesn't provide much
flexibility for displaying maps on both small and large screens.
- Makes it easy to add powerful mapping capabilities to your application.
- Provides built-in downloading, rendering, and caching of map tiles.
- Provides a variety of display options and controls.
- Uses a Map View widget to display a map with data obtained from the Google
Maps service. This widget handles key and touch events to pan and zoom the
map automatically, including handling network requests for additional map
tiles.
- Allows several types of overlays on the map.
- Is not part of the standard Android library.
- Is a part of the Google APIs add-on.
Version 2 (v2)
- Is encouraged for all new app development.
- Is distributed as part of the Google Play services SDK.
- Uses the MapFragment class to encapsulate maps. This allows you more
flexibility for displaying maps on both small and large screens.
- Uses vector tiles. This allows maps to display faster and use less bandwidth
- Uses improved caching. This typically allows the map to display without
showing empty areas.
- Supports 3D. This allows you to show the map with perspective by moving the
user's viewpoint.
Description
• Version 1 of the Google Maps Android API was widely used prior to March 2013.
Many existing apps use this version of the API.
• Version 2 of the Google Maps Android API is recommended for all new
development as of March 2013.
Figure 18-4 An introduction to the Google Maps Android API
Section 5 Advanced Android skills
How to configure
the Google Maps Android API v2
Now that you understand some of the options for working with maps, you're
ready to learn how to configure version 2 of the Android API for Google Maps.
To do that, you need to add the Google Play services library to your project, get
an API key for your app, register that key, and set the required permissions for
the app.
How to create a new Google Maps project
The easiest way to add the Google Play services library to your app is to use
Android Studio to create a new project that's based on the Google Maps Activity
template in figure 18-5. If you don't have an API key, this is also the easiest way
to get one. Using this approach also creates a skeleton map activity that you can
use as a starting point.
Sometimes, however, you might want to add a map to an app that already
exists. To do that, you can manually add the Google Play services API to your
project as shown in the next figure.
Chapter 18 How to work with locations and maps 553
How to create a new Google Maps project
UaJ
\
_ Create New Project
Add an activity to Mobile
„
+-t
'/
1
Google Maps Activity
Blank Activity
~
Google Play Services Activity
Blank Activity with Fragment
rWM-u-ifii) rwvM-i
L.
Login Activity
Fullscreen Activity
Z M
^w^ ^^^^^^B
•vws
Master/Detail Flow
Google Ad Mob Ads Activity
**++++*
**+*+*+*
**+*+*+*
Navigation Drawer Activity
Settings Activity
« »
Tabbed Activity
Previous
Next
Cancel
Finish
Procedure
1. Start Android Studio and create a new project as described in chapter 2.
2. Make sure to select the Google Maps Activity template.
Description
• The easiest way to add the Google Play services library and get a Google Maps API
key is to create a new project that's based on the Google Maps Activity template.
Figure 18-5 How to create a new Google Maps project
554 Section 5 Advanced Android skills
How to add Google Play services
to an existing project
Figure 18-6 shows how to add Google Play services to an existing project.
To start, right-click on the app node of your project and select the Open Module
Settings item to open the Project Structure dialog. In this dialog, click the
Dependencies tab. If the row of tabs isn't visible, make sure you select the app
module from the list of Modules on the left.
In the Dependencies tab, click the Add (+) button on the right side of the
dialog, and select the Library Dependency item. This should display a dialog that
allows you to add the play-services library to your project. When you add this
library, Gradle should automatically rebuild your project.
Chapter 18 How to work with locations and maps
How to add Google Play services to an existing project
_ Project Structure
* i
+ -
Properties \ Signing \ Flavors \ Build Types Dependencies
SDK Location
Project
Developer Services
Ads
Analytics
Authentication
Cloud
Notifications
Modules
h
tYI com.androtd.support:support-v4;18.0\0
Scope
j+
Compile
Cftapp
r
_ Choose Library Dependency
com.google.android.gms:play-services:8.1.0
€1
Enter terms for Maven Central search, or fully-qualified coordinates (e.g. com.google.codegson:gson2.2.4}
support-annotations (com*android.support:support-annotations:23.L0)
support-v4(com.android.support:support-v4;23.LO)
support-vl3(com.android.support:support-vl3:23.LQ)
appcompat-v7(com.android.support:appcompat-v7:23>1.0)
design (comandroid.support:design:23>LQ)
grid layout- v7 (com.android* support:gridlayou t- v7:23.1.0)
mediarouter-v7(com>android.support:mediarouter-v7:23>1.0)
• la -services (com< ••• le.android.*ms:• la -services:&LO)
Cancel
*
4
Cancel
Procedure
1. In the Project window, right-click on the app node, and select the Open Module
Settings item.
2. Select the Dependencies tab, click the Add (+) button on the right side of the
dialog, and select the Library Dependency item from the resulting menu.
3. Select the play-services library from the dialog.
Description
• You can add the Google Play services library to an existing project using the
Project Structure dialog.
Figure 18-6 How to add Google Play services to an existing project
556 Section 5 Advanced Android skills
How to get a Google Maps API key
There are several ways you can get a Google Maps API key. If you don't
already have one, the easiest way to get one is to use Android Studio to create
a new project that's based on the Google Maps Activity template as described
earlier in this chapter. Once you do that, Android Studio automatically opens a
google_maps_api.xml file that contains a link and directions that make it easy to
get an API key. These directions are summarized in figure 18-7.
To start, you copy the link provided in the google_maps_api.xml file and
paste it into your browser. From here, you can follow the directions to create
the API key. If you aren't logged into a Google account, you'll need to do that
before you can continue. Once you are logged in, there will be a short pause as a
project is created for you.
When the project has been created, your browser should display a message
indicating that the API is enabled, along with a button that says "Go to
credentials." If you click this button, it should display the web page shown in this
figure.
From this web page, you can provide a different name for the key, as well as
restrict usage of the key to certain android apps. For the purposes of this book,
we recommend you don't restrict usage. That way, you'll be able to use the same
key for all of your learning and testing purposes. To remove the restrictions on
the key, click the X to the right side of the SHA-1 certificate fingerprint listing
so that there are no packages and no SHA-1 fingerprints listed. Then, click the
Create button.
After the website creates your new API key, it should display it in a dialog.
This makes it easy for you to select the entire API key and copy it to the
clipboard. Then, you can switch to the google_maps_api.xml file, delete the text
that says "YOUR_KEY_HERE", and replace it with your key. This creates a
string resource named google_maps_key that's used by the Android manifest file
to set the API key as shown in the next figure.
To make sure the API key works, you can run the skeleton app that Android
Studio created for you. If the key is working, you should see a map on the
screen of your emulator or device after the app has started. Since the app has
to download the map data from the Internet, it may take several seconds for the
map to appear.
If you followed the procedure in this figure, this key isn't tied to any
particular app. As a result, you can use it for all of the map apps you develop in this
book, including the Run Tracker project presented at the end of the chapter.
Chapter 18 How to work with locations and maps
557
Web page for creating an API key
&L-J
E)
O Create Android API key - x
C 0 https:/ console.developers.googlexom/project^ =
^} Google Developers Console My Project -
Sign up for a free trial
O © * O
Home
Permissions
APIs & auth
APIs
Credentials
Monitoring
Source Code
Cloud Launcher
Deployments
Compute
Networking
Storage
Big Data
Create Android API key
Name
Android key 1
Restrict usage to your Android apps I
Android devices send API requests directly to Google Google verifies that each request comes from an Android app that
matches a package name and SHA1 signmg-fingerpnnt name that you provide Get the package name from your
AndroidManifest xml file. Use the following command to get the fingerprint Learn more
keytool -list -v -keystore mystore.keystore
Package name
com.murach.myapplication
SHA-1 certificate fingerprint
2ED3:20:22:D7:3F:27:28:CD:53:FC:5D:DC:B4:D7:EA:92A7:3B:33
+ Add package name and fingerprint
Create
Cancel
A typical API key
AIzaSyAPUmbZW60uCJu5RuceQLD83PvZxR4zEKg
Procedure
1. Create a new project based on the Google Maps Activity template.
2. Copy the link from the google_maps_api.xml file and paste it into your browser.
3. Follow the web pages to create the API key. To use the key for all of your
applications (recommended), click the X to the right of the SHA-1 fingerprint box so that
the list of package names and fingerprints is empty.
4. After you create the API key, copy it to the clipboard.
5. Switch to the google_maps_api.xml file, delete the text that says
"YOUR_KEY_HERE", and paste the API key in its place. This creates a string
resource named google_maps_key that the Android manifest file uses to set the API
key for the app.
6. Test the key by running the new project. If a map appears on your emulator or
device, the key is working correctly.
Description
• There are several ways to obtain a Google Maps API key. This chapter presents the
easiest method.
• When learning how to use Google Maps, we recommend you don't tie the API key
to any particular application. That way, you can use it for all of the test applications
you build.
Figure 18-7 How to get a Google Maps API key
558 Section 5 Advanced Android skills
How to set permissions and features
For maps to work properly, your app will need certain permissions. For
example, it will need permission to access the Internet so that it can download
map tiles. Figure 18-8 shows how to use the AndroidManifest.xml file to set
the permissions and features necessary to use the Google Maps Android API
v2 service. To start, you can secure your app by defining a custom permission
named MAPS_RECEIVE and setting its protection level to "signature". Then,
you can request that permission to allow the app to access the Google Maps
servers.
After defining the MAPS_RECEIVE permission, you must request
permissions that allow the app to access the Internet, check the Internet connection,
cache map tiles, and access Google web-based services. In addition, you
typically need to enable the ACCESS_COARSE_LOCATION or
ACCESS_FINE_LOCATION permission to allow your app to access the
device's current location. Part 2 of this figure describes these permissions in
more detail.
Finally, Google Maps Android API version 2 requires OpenGL ES version
2. As a result, you must add a uses-feature element to notify external services of
this requirement. This prevents the Google Play store from displaying your app
for devices that don't support OpenGL ES version 2.
Chapter 18 How to work with locations and maps 559
Part of the AndroidManifest.xml file for the Run Tracker app
• • •
<!-- set up MAPS_RECEIVE permission -->
<permission
android:name="com.murach.runtracker.permission.MAPS_RECEIVE"
android:protectionLevel="signature" />
<uses-permission
android:name="com.murach.runtracker.permission.MAPS_RECEIVE" />
<!-- set other permissions -->
<uses-permission
android:name="android.permission.INTERNET" />
<uses-permission
android:name="android.permission.ACCESS_NETWORK_STATE" />
<uses-permission
android:name="android.permission.WRITE_EXTERNAL_STORAGE" />
<uses-permission
android:name=
"com.google.android.providers.gsf.permission.READ_GSERVICES" />
<uses-permission
android:name="android.permission.ACCESS_FINE_LOCATION" />
<!-- Maps API version 2 requires OpenGL ES version 2 -->
<uses-feature
android:glEsVersion="0x00020000"
android:required="true" />
<application
android:allowBackup="true"
android:icon="@drawable/ic_launcher"
android:label="@string/app_name"
android:theme="@style/AppTheme" >
<meta-data
android:name="com.google.android.maps.v2.API_KEY"
android:value="@string/google_maps_key" />
Description
• To secure your app, you can define a custom MAPS_RECEIVE permission for
your app and set its protection level.
• When you use Google Maps, your app must define permissions that allow the app
to use the Internet and access the Google Maps servers.
• Google Maps Android API version 2 requires OpenGL ES version 2. As a result,
when you use Google Maps, you must add a uses-feature element to notify external
services of this requirement. This prevents the Google Play store from displaying
your app for devices that don't support OpenGL ES version 2.
Figure 18-8 How to set permissions and features (part 1 of 2)
560 Section 5 Advanced Android skills
Part 2 summarizes the elements and permissions used in part 1. For the most
part, these permissions are boilerplate code that you can copy from one app that
uses version 2 of the Google Maps Android API to another. However, if you
want to learn more about how these elements and permissions work, you can
read more about them.
In the permissions, the ACCESS_COARSE_LOCATION permission isn't
used in part 1. That's because the Run Tracker app presented in this figure only
uses GPS to determine a device's location. As a result, this app only needs the
ACCESS_FINE_LOCATION permission. However, if you want to use Wi-Fi or
mobile cell data (or both) to determine a device's location, you need to add the
ACCESS_COARSE_LOCATION permission to your app.
Chapter 18 How to work with locations and maps
561
The meta-data element
Attribute Description
name
value
The type of API key.
The value of the API key.
The permission element
Attribute
name
protectionLevel
ion
The name of the permission that corresponds with the
uses-permission element.
The level of protection for the permission. A value of
"signature" allows the system to grant this permission without
notifying the user only if the requesting app is signed with
the same certificate as the app that declared the permission,
A summary of permissions
Permission
MAPS_RECEIVE
INTERNET
ACCESS_NETWORK_STATE
WRITE_EXTERNAL_STORAGE
READ_GSERVICES
ACCESS_FINE_LOCATION
ACCESS_COARSE_LOCATION
Description
Allows the API to securely contact your app.
This prevents other apps from impersonating
the API.
Allows the API to download map tiles from
Google Maps servers.
Allows the API to check the connection status
in order to determine whether map data can be
downloaded.
Allows the API to cache data such as map tiles
in the device's external storaee area.
Allows the API to access Google web-based
services.
Allows the API to use GPS to determine the
device's location.
Allows the API to use cell tower or Wi-Fi signals
to determine the device's location.
The uses-feature element
Attribute
ion
glEsVersion The OpenGL ES version required by the application. To specify
version 2.0, specify a value of "0x00020000".
required Specifies whether the application requires the feature.
Description
• The meta-data element that stores the Maps API key must be declared within the
application element.
• If your app needs to access the device's current location, you must enable the
ACCESS_COARSE_LOCATION or ACCESS_FINE_LOCATION permissions.
Figure 18-8 How to set permissions and features (part 2 of 2)
562 Section 5 Advanced Android skills
How to work with locations
Now that you have configured version 2 of the Android API for Google
Maps, you're ready to learn how to use it to work with locations. In particular,
you're ready to learn how to get and track the device's location. To do that, you
begin by connecting to Google Play services.
How to connect to Google Play services
Figure 18-9 shows how to connect to Google Play services. To start, you
declare an activity that implements two interfaces: ConnectionCallbacks and
OnConnectionFailedListener. In this figure, the methods for these interfaces are
shown in part 2. At this point, these methods don't contain any code. However,
you'll learn how to add code to these methods in the next few figures.
After implementing these interfaces, you can declare a GoogleApiClient
object as an instance variable. Then, in the onCreate method, you can create a
GoogleApiClient object. To do that, you can create a new Builder object for the
GoogleApiClient class and use the this keyword to indicate that the client object
belongs to this class.
After you create the client builder object, you can specify which Google
APIs you want to add to the client. In addition, you can specifly any listeners
you want to add to the client. To do that, you can use method chaining as shown
in this figure. In this figure, the code adds the LocationServices API. Then, it
adds the callback and listener methods needed to work with a connection to the
LocationServices API. Finally, it calls the build method to create the client object
from the builder object.
Chapter 18 How to work with locations and maps
563
Page 1
The LocationViewerActivity class
package com.murach.locationviewer;
import android•location.Location;
import android.app.Activity;
import android•os•Bundle;
import android.widget.TextView;
import com.google•android•gms•common.ConnectionResult;
import com.google•android•gms•common.api•GoogleApiClient;
import com.google.android.gms.common.api.GoogleApiClient.ConnectionCallbacks;
import com.google•android•gms•common.api•GoogleApiClient.OnConnectionFailedListener;
public class LocationViewerActivity extends Activity implements
ConnectionCallbacks, OnConnectionFailedListener {
private GoogleApiClient googleApiClient;
private TextView coordinatesTextView;
©Override
protected void onCreate(Bundle savedlnstanceState) {
super•onCreate(savedlnstanceState);
setContentView(R.layout.activity_location_viewer);
coordinatesTextView =
(TextView) findViewByld(R.id.cooridinatesTextView);
googleApiClient = new GoogleApiClient.Builder(this)
•addApi(LocationServices.API)
•addConnectionCallbacks(this)
•addOnConnectionFailedListener(this)
.buildO;
}
Constructors and methods of the GoogleApiClient.Builder class
Constructor/Method Description
Builder(ctx)
addApi(api)
addConnectionCallbacks(ctx)
addOnConnectionFailedListener(ctx)
build()
Creates a GoogleApiClient.Builder object
with the specified context.
Adds the specified API to the client.
Adds connection callbacks to the client.
Adds a connection failed listener to the client.
Returns a GoogleApiClient object.
Figure 18-9 How to connect to Google Play services (part 1 of 2)
564 Section 5 Advanced Android skills
After you create the GoogleApiClient object, you typically call its connect
method from within the onStart method as shown in part 2. That way, when the
activity is started, it starts an asynchronous thread that opens a connection to
Google Play services in the background. When the connection is opened, this
calls the onConnected method.
When you aren't using a connection, you should close it. To do that, you
can call the disconnect method of the GoogleApiClient object from within the
onStop method. That way, when the activity is stopped, it closes the connection
to Google Play services. This calls the onConnectionSuspended method.
In addition, part 2 shows the onConnectionFailed method of the
OnConnectionFailedListener interface. This method is called when a connection
to Google Play services fails. That doesn't usually happen, but it can happen
when the network isn't available. It can happen when the client attempts to
connect to the service but the user isn't signed in or is using an invalid account
name. And it can happen when Google Play services is missing on a device or is
out of date.
Chapter 18 How to work with locations and maps
565
The LocationViewerActivity class
©Override
public void onStart() {
super•onStart() ;
googleApiClient.connect();
}
©Override
public void onStopO {
googleApiClient.disconnect();
super.onStop();
}
// Implement ConnectionCallbacks interface
©Override
public void onConnected(Bundle dataBundle) {
// Put code to run after connecting here
}
©Override
public void onConnectionSuspended() {
// Put code to run before disconnecting here
}
// Implement OnConnectionFailedListener
©Override
public void onConnectionFailed(ConnectionResuit connectionResult) {
// Put code to run if connection fails here
}
}
Page 2
Methods of the GoogleApiClient class
Method Description
connect () Starts an asynchronous thread that opens a connection
to Google Play services.
disconnect () Closes the connection to Google Play services.
Methods of the ConnectionCallbacks interface
Method
Description
onConnected (dataBundle) Called when the connection is opened.
onConnectionSuspended () Called when the connection is closed.
Method of the OnConnectionFailedListener interface
Method
Description
onConnectionFailed () Called when the connection fails.
Figure 18-9 How to connect to Google Play services (part 2 of 2)
566 Section 5 Advanced Android skills
How to get the current location
Figure 18-10 shows code that you can add to the onConnected method
shown in the previous figure to get the current location. To start, you can
get a Location object by calling the static getLastLocation method of the
FusedLocationApi field of the LocationServices class. This Location object
contains detailed information about the best and most recent location of a device.
After you get a Location object, you should check to make sure that it is
not null. If that's true, you can call the getLatitude and getLongitude methods
of the Location object to get the degree of latitude and longitude for the current
location. In this figure, for example, the code gets the latitude and longitude
for the current location and displays them on a Text View widget. Later in this
chapter, you'll learn how to use these coordinates to display the device's location
on a map.
If necessary, you can use other methods of the Location object to get more
information about the location. For example, you can use the getTime method to
get the time of the location fix in milliseconds. This might be useful for any app
that's keeping a historical record of a device's location.
Similarly, you can use the getAccuracy method to determine the accuracy of
the location. This might be useful if you want to handle the location differently
depending on its estimated accuracy.
Chapter 18 How to work with locations and maps
567
Code that gets the current location
©Override
public void onConnected(Bundle bundle) {
Location location =
LocationServices.FusedLocationApi
.getLastLocation(googleApiClient);
if (location != null) {
coordinatesTextView.setText(
location.getLatitude() + "|" + location.getLongitude());
}
}
A method of the LocationServices.FusedLocationApi field
Method
getLastLocation(client)
Description
A static method that returns the best and
most recent location currently available.
Some methods of the Location class
Method
getLatitude()
getLongitude()
getTime()
getAccuracyO
ion
Gets the deeree of latitude.
Gets the deeree of longitude.
Gets the time of this location fix in milliseconds.
Gets the estimated accuracy of this location in meters. If
you draw a circle centered at this location's latitude and
longitude with a radius equal to the accuracy, there is a 68%
probability that the true location is inside the circle. If this
location does not have an accuracy, this method returns 0.0.
Description
• You can use the LocationServices.FusedLocationApi field to get a Location object
that contains detailed information about the best and most recent location of a
device.
Figure 18-10 How to get the current location
568 Section 5 Advanced Android skills
How to handle a failed connection
Figure 18-11 shows code that you can add to the onConnectionFailed
method shown earlier in this chapter to handle a failed connection. But first, you
should define a constant for an integer code that uniquely identifies your request
for a resolution. In this figure, the code sets the constant to a value of 9000, but
you can use any integer value that doesn't conflict with other request codes.
After defining this constant, you can add the code to the onConnectionFailed
method like the code shown in this figure. To start, this code calls the
hasResolution method from the ConnectionResult parameter to check whether
Google Play services knows of a possible solution to the problem that caused the
failed connection.
If there is a possible solution, you can call the startResolutionForResult
method to start any intents that require user interaction. When you call this
method, you pass it the current activity and the constant that identifies your
request.
If there is no solution, you can display an error to the user to indicate that the
connection has failed. In this figure, for example, the code uses the AlertDialog.
Builder class to display an error message that includes the code for the error that
caused the connection to fail. To do that, this statement calls the getErrorCode
method from the ConnectionResult parameter.
In some cases, you may want to do additional processing when the user
returns from the activity that attempts to resolve the problem. To do that, you
can add an onActivityResult method like the one shown in this figure. This
method is a lifecycle method of the Activity class that's executed when the user
returns from an activity that returns a result. In this figure, the onActivityResult
method begins by checking if the request code parameter matches the constant
for the request code. If so, it can do additional processing. If necessary, this
processing can include checking the result code against the constants of the
ConnectionResult class to determine the cause of the failed connection.
Chapter 18 How to work with locations and maps 569
Code that handles a failed connection
The constant for the request code
private final static int CONNECTION_FAILURE_RESOLUTION_REQUEST = 9000;
The onConnectionFailed method
©Override
public void onConnectionFailed(ConnectionResult connectionResult) {
if (connectionResult.hasResolution()) {
try {
connectionResult.startResolutionForResult(this,
CONNECTION_FAILURE_RESOLUTION_REQUEST);
} catch (IntentSender.SendlntentException e) {
e.printStackTrace();
}
} else {
new AlertDialog.Builder(this)
•setMessage("Connection failed. Error code: " +
connectionResult.getErrorCode())
.show();
}
}
The onActivityResult method
©Override
protected void onActivityResult(int requestCode, int resultCode,
Intent data) {
super.onActivityResult(requestCode, resultCode, data);
if (requestCode == CONNECTION_FAILURE_RESOLUTION_REQUEST) {
// perform additional processing here
}
}
Methods of the ConnectionResult class
Method Description
hasResolution () Returns true if Google Play services can possibly resolve the
error.
startResolutionForResult ( Attempts to resolve the error by starting any intents requiring
activity, code) user interaction with the specified request code.
getErrorCode () Gets the code for the error that caused the connection to fail.
Description
• In the onConnectionFailed method, you can use the ConnectionResult parameter to
allow Google Play services to attempt to resolve the error that caused the connection
to fail
Figure 18-11 How to handle a failed connection
570 Section 5 Advanced Android skills
How to get location updates
Figure 18-12 shows how to get updates of a device's location at a specified
interval of time. To start, you import the classes for working with locations.
When you do that, it's important to import the correct LocationListener class.
If you import the wrong one, which is a very easy mistake to make, your code
won't compile.
After you import the classes for working with locations, you implement the
LocationListener interface. This interface defines a single method, the
onLocationChanged method.
After you implement the interface, you define the constants and instance
variables for the class. Here, the UPDATE_INTERVAL constant sets the
milliseconds for the requested update interval to 5000, which is 5 seconds. Then,
the FASTEST_UPDATE_INTERVAL sets the milliseconds for the fastest rate
at which the app can update the location to 2000, which is 2 seconds. Next, this
code declares a variable for a LocationRequest object.
In the onCreate method, you can create the LocationRequest object. Then,
you can use one of the constants described in part 2 of this figure to set its
priority. In this figure, the code sets the priority to high accuracy. This uses GPS,
which results in the highest accuracy, but also uses the most battery. In addition,
you can set the update interval and the fastest update interval. In this figure, the
code sets these intervals to the constants defined in step 3.
In the onConnected method, you can turn on location updates. To do that,
you call the static requestLocationUpdates method on the LocationServices.
FusedLocationApi field and pass it the GoogleApiClient object, the
LocationRequest object, and the LocationListener object. In this figure, the
current activity is the LocationListener object.
In the onConnectionSuspended method, you can turn off location
updates. To do that, you call the static removeLocationUpdates method of the
LocationServices.FusedLocationApi field and pass it the GoogleApiClient
object, and the LocationListener object. But first, you should use the
isConnected method of the GoogleApiClient object to make sure the connection
is still available.
In the onLocationChanged method, you can use the Location parameter to
process the current location. In this figure, the code just displays the latitude and
longitude for the location on a Text View widget. Later in this chapter, you'll
learn how to update the device's location on a map.
Chapter 18 How to work with locations and maps 571
Step 1: Import the classes for working with locations
import com.google.android.gms.location.LocationListener;
import com.google.android.gms.location.LocationRequest;
import com.google.android.gms.location.LocationServices;
Step 2: Declare the Location Listener interface
public class LocationViewerActivity extends Activity
implements ConnectionCallbacks, OnConnectionFailedListener,
LocationListener {
Step 3: Declare the constants and instance variables
public static final int UPDATE_INTERVAL = 5000; // 5 seconds
public static final int FASTEST_UPDATE_INTERVAL = 2000; // 2 seconds
private LocationRequest locationRequest;
Step 4: Create the location request in the onCreate method
locationRequest = LocationRequest.create()
.setPriority(LocationRequest.PRIORITY_HIGH_ACCURACY)
.setlnterval(UPDATE_INTERVAL)
.setFastestlnterval(FASTEST_UPDATE_INTERVAL);
Step 5: Request updates in the onConnected method
LocationServices.FusedLocationApi.requestLocationUpdates(
googleApiClient, locationRequest, this);
Step 6: Remove updates in the onConnectionSuspended method
if (googleApiClient.isConnected()) {
LocationServices.FusedLocationApi.removeLocationUpdates(
googleApiClient, this);
}
Step 7: Implement the LocationListener interface
©Override
public void onLocationChanged(Location location) {
coordinatesTextView.setText(
location.getLatitude() + "|" + location.getLongitude());
}
Description
• You can use a LocationRequest object to configure a request for location updates
from Google Play services.
• You can use a LocationListener object to listen for location updates from Google
Play services.
• You can use the static methods of the FusedLocationApi field of the
LocationServices class to turn location updates on and off.
Figure 18-12 How to get location updates (part 1 of 2)
572 Section 5 Advanced Android skills
Part 2 begins by showing some of the methods and constants that you can
use to create and configure the LocationRequest object. In addition, part 2 shows
some more methods of the FusedLocationApi field of the LocationServices
class. If you want to learn more about how these methods and constants work,
you can read more about them.
The setPriority method sets the accuracy parameter to one of the constants
shown in this figure. If your main priority is accuracy, you should use the
PRIORITY_HIGH_ACCURACY constant. This constant uses GPS to request
the most accurate locations available. However, this also uses the most battery
of all options. If your app only needs accuracy of about 100 meters, use the
PRIORITY_BALANCED_POWER_ACCURACY constant instead as it
consumes less battery.
Another option is to use the PR10RITY_NO_POWER constant. This
requests the best accuracy possible with zero additional battery consumption.
This only returns locations when another app is receiving location updates. In
that case, your app listens to those locations.
The setlnterval method sets the interval that your app prefers to receive
location updates. If no other apps are receiving updates, your app receives
updates at this rate.
However, if other apps are receiving updates at a faster rate, your app
can receive updates at that faster rate too with no additional use of battery.
Unfortunately, a faster rate may cause problems with your app. For example, it
may cause UI (user interface) flicker or data overflow. That's why you need to
use the setFastestlnterval method to set the interval at which your app can handle
location updates.
Chapter 18 How to work with locations and maps
573
Methods of the LocationRequest class
Method Description
create()
setPriority(accuracy)
setInterval(millis)
setFastestlnterval(millis)
Creates and returns a LocationRequest object.
Sets the accuracy parameter to one of the constants shown
below.
Sets the rate in milliseconds that your app prefers to receive
location updates.
If no other apps are receiving updates, your app receives
updates at this rate.
Sets the fastest rate in milliseconds at which your app can
handle location updates. This prevents problems with UI
flicker or data overflow and helps to save power.
If other apps have requested a faster rate, you get the benefit
of a faster rate with no additional use of battery.
Priority constants from the LocationRequest class
Constant Description
PRIORITY HIGH ACCURACY
PRIORITY BALANCED POWER ACCURACY
PRIORITY NO POWER
Requests the most accurate locations available. This
uses the most battery of all options and requires the
ACCESS_FINE_LOCATION permission.
Requests accuracy of about 100 meter accuracy.
This consumes less battery and requires the
ACCESS_COARSE_LOCATION permission.
Requests the best accuracy possible with zero
additional battery consumption. This only returns
locations when another app is receiving location
updates. In that case, your app listens to those
locations.
Methods of the LocationServices.FusedLocationApi field
Method Description
requestLocationUpdates ( A static method that requests location updates using the
client, request, specified GoogleApiClient, LocationRequest, and
1 i s tener) LocationListener objects.
removeLocationUpdates ( A static method that removes location updates from the
client, listener) specified GoogleApiClient and LocationListener objects.
Figure 18-12 How to get location updates (part 2 of 2)
574 Section 5 Advanced Android skills
How to make sure GPS is enabled
If your app relies on GPS to get the location, you typically want to make
sure it's enabled on the user's device before you start your app. To do that, you
can use the code shown in figure 18-13.
The code presented in this figure is typically coded within the onCreate,
onStart, or onResume method of an activity. That way, it's executed when the
activity is first created or anytime it's displayed. Here, the first statement uses
the getSystemService method to get a LocationManager object. Then, an if
statement uses the LocationManager object to check whether GPS is enabled. If
not, this code displays a toast that asks the user to enable GPS. Then, it creates
an intent for the activity of the Settings app that allows the user to enable and
disable GPS. Finally, this code calls the startActivity method and passes it that
intent.
Chapter 18 How to work with locations and maps
575
Code that makes sure GPS is enabled
LocationManager locationManager =
(LocationManager) getSystemService(LOCATION_SERVICE);
if
}
(!locationManager.isProviderEnabled(LocationManager.GPS_PROVIDER)){
Toast.makeText(this, "Please enable GPS!",
Toast.LENGTH_LONG).show();
Intent intent = new Intent(
Settings.ACTION_LOCATION_SOURCE_SETTINGS);
startActivity(intent);
Method of the Activity class
Method
getSystemService(serviceType)
ion
Gets the specified system service. You can use the
LOCATION SERVICE constant to eet a Location
Manager object.
Constants and methods of the LocationManager class
Constant/Method Description
GPS PROVIDER
NETWORK PROVIDER
isProviderEnabled(providerType)
The provider that uses GPS to determine location.
The provider that uses Wi-Fi or cell networks to
determine location.
You can use this to check if a type of location
provider is available.
Description
• You can use the LocationManager object to check if GPS is enabled. If it isn't, you
can display an error message, start the Settings app, and display the activity that
allows the user to enable GPS.
Figure 18-13 How to make sure GPS is enabled
576 Section 5 Advanced Android skills
How to work with Google Maps
Now that you know how to track a device's location, you're ready to learn
how to use that information with a Google Map. To do that, the first step is to
add a Google Map widget to your user interface.
How to add a map fragment to a layout
The easiest way to add a Google Map widget to your user interface is to add
a fragment element to a layout as shown in figure 18-14. To do that, you can add
the XML code for the fragment to the layout. This fragment should include a
class attribute that specifies the SupportMapFragment class.
If you switch to the graphical layout editor, Android Studio doesn't display
the map. However, it displays a grayed out area where the map will be displayed
when you run the app.
Chapter 18 How to work with locations and maps
577
A layout that includes a map fragment
-
chlS RunTracker- rC:\murach\android\book aoos\chl8 RunTrackerl - faDDl -
„AannUrr\main\rM\l*vr»ijtVartivitv njn man.xml - AnHrniH ^tuHin 1.4 a | Is
- _ .. _,, _ -..,-r. j. .,__,-
File Edit View Navigate Code Analyze Refactor Build Run Tools VCS Window Help
DHC5 * + & S tf ei£ ♦♦ *»
c
1
"j?
*oprl^ tt^Ity-gflLS*? ^ H
chl8_RunTracker C app ■■ Q srr > Q main Cii res E"1 layout
■If Android -. © ^ ■ *ft" l*~ _ octrVrty_n;n_map.xm/ x
T Q"PP Poleffe #- I*" H
» octrVtty_n;n_map.xm/
-* ^\ Nexus 4^ Fj~ AppTheme - ©^ 'jj1^" Co/rponenf Tree .£. t ' *#"r ""1
► D manifests -^ _ . .
T C2Java layouts 0Ei' <$ <$ Ct} ^ 0 C5 «t
I 1| FrameLayout
T l?l rom.murach.runtracker i—n
i> Ml Lineartavout (Hot
& c *b tfiynMc&AcftVrty □,.
FH ttneofloyouf (Ver
^ *h RunTrackerDB ra „. ,, .
^fcj lableLayout
■ c b Runlrackerbervice c=i
ture
%
.fc
V
£
5?
5
*
a
6
1
5
+
f-"1 JGDteKoiv
c *h SropivofcMctrVfty rn ^ - „ ▼ ■ 6.00
▼ Ld res ft=9 ■ *<un Tracker
[H] RelativeLayout
► EDoWcofe D Widgets
T Eifoyouf (AgPtanTexflteiv
"*> activity run map.xml r—,,
~ " |Ab] Loroe Texf
>' activity stopwatch.xml nm.. -
|Ab] Medium Text
|Ab| Smart Text
T A Gradle Scripts - „
_ ok Burton
V build.grodle (Project: chlS Run - „ „ „
" Small Button
. toa/.9n,db rMod./e: 0PP; ^ RadioButton
View Stopwatch
<fragment>
* Kttngtgradk, Vojert Settags ^ (j^
[jl locatproperties >DK Location) „ .
n Sivtfc/j
— ToggleButton
▼ [■] Device Screen
T [O FrameLayout
Nmap
viewStopwa tc hB utton
Properties ? S ^
1
layout:height match_parent
1 ► Uyout:gravity 0
ImageButton
ImageView
mm ProgressBar (Larg
mm ProgressBar (Nom
mm ProgressBar (Sma\
1 Design. Text
M • ■
r iayouT:margin ^
name
class com.google.andr...
id mop
tag
m
1
In
*
**
*
1
Ei
g
^
S Terminal 0: Messages Jfr 6: Android Monitor ^ 4;Run ^£ TODO JS Event Log E Grod/e Conso/e
1 1 Session app: running (yesterday Lm15 PM) n a n a Context <noi \t> *h
-
The XML for map fragment
<fragment
android:id="@+id/map"
android:layout_width="match parent"
android;layout height="match parent"
class="com.google.android.gms.maps.SupportMapFragment"
/>
Description
• To add a map to a layout, add a fragment element for the SupportMapFragment
class.
Figure 18-14 How to add a map fragment to a layout
578 Section 5 Advanced Android skills
How to display a map
Figure 18-15 shows how to display a map. First, you create an activity that
extends the FragmentActivity class. In this figure, for example, the activity
named LocationViewerActivity extends the FragmentActivity class.
Second, you declare an instance variable for the GoogleMap object. This is
the primary object for working with a Google Map. In this figure, for example,
the code declares an instance variable for a GoogleMap object named map.
Third, you add code to the onStart method of the activity to get the
GoogleMap object. That way, when the activity is displayed, the code gets
the map and displays it. In this figure, the code begins by checking whether
the map is null. If so, it gets a FragmentManager object, and uses it to get the
SupportMapFragment object for the map. Then, it calls the getMap method from
that object to get the GoogleMap object.
Once you have a GoogleMap object, you can call its methods to change
its type or its UI (user interface) settings. In this figure, for example, the code
checks to make sure the GoogleMap object exists. Then, it calls the
getUiSettings method from the GoogleMap object to return a UiSettings object.
From that object, this code calls the setZoomControlsEnabled method to enable
the zoom controls. As a result, the map should include zoom controls (plus and
minus buttons) like the ones shown on the Run Activity in figure 18-1.
In this figure, the code uses the default map type (the normal type). This
displays a map like the one shown on the Run Map activity in figure 18-1.
However, if you want to use a different map type, you can call the setMapType
method from the GoogleMap object to change the map type to one of the
constants shown in this figure. For example, you can change the map type to a
satellite map, a hybrid map, or a terrain map.
Similarly, the code in this figure uses most of the default UI settings for the
map. The only UI setting change this code makes is to enable the zoom controls.
However, if you want, you can call methods from the GoogleMap object to
customize most UI settings of the map so they're appropriate for your app. For
example, you can use the methods of the UiSettings object shown in this figure
to disable the compass or zoom gestures.
At this point, the code should display a map of the world with zoom
controls. In the next figure, you'll learn how to zoom in on a particular location.
Chapter 18 How to work with locations and maps
579
Step 1: Extend the FragmentActivity class
public class LocationViewerActivity extends FragmentActivity
implements ConnectionCallbacks, OnConnectionFailedListener,
LocationListener {
Step 2: Declare the instance variable for the GoogleMap object
private GoogleMap map;
Step 3: Get the GoogleMap object in the onStart method
// if GoogleMap object is not already available, get it
if (map == null) {
FragmentManager manager = getSupportFragmentManager();
SupportMapFragment fragment = (SupportMapFragment)
manager. findFragmentByld (R. id. map) ;
map = fragment.getMap();
}
// if GoogleMap object is available, configure it
if (map != null) {
map.getUiSettings().setZoomControlsEnabled(true);
}
A method of the SupportMapFragment class
Method Description
getMap () Gets a GoogleMap object.
Some constants and methods of the GoogleMap class
Constant/Method Description
MAP_TYPE_NORMAL The default map.
MAP_TYPE_HYBRID A satellite map with a transparent layer of major
MAP_TYPE_SATELLITE
MAP_TYPE_TERRAIN
setMapType(mapType)
getUiSettings()
streets.
A satellite map with no labels.
A terrain map.
Sets the type of map tiles that should be displayed.
Gets a UiSettings object for the user interface
settings for the map.
Some methods of the UiSettings class
Method Description
setCompassEnabled(bool)
setZoomControlsEnabled(bool)
setZoomGesturesEnabled(bool)
Enables or disables the compass.
Enables or disables the zoom controls.
Enables or disables zoom gestures.
Figure 18-15 How to display a map
580 Section 5 Advanced Android skills
How to zoom in on a location
Figure 18-16 shows how to use a GoogleMap object to zoom in on a
location. In this figure, the code begins by checking to make sure the GoogleMap
object exists before calling any methods from that object. This is a good practice
as it prevents a NullPointerException from being thrown.
If the GoogleMap object exists, this code calls the animateCamera method
from it to zoom in on the specified target. To help visualize how this works, you
can think of a virtual camera pointing at the specified target from the specified
position. Here, the target is the latitude and longitude that are stored in the
Location object named location. The zoom level is 16.5, which zooms in so the
map displays a few city blocks. The bearing is 0, which means the camera is
pointing due north. And the tilt is 25, which means that the camera is tilted 25
degrees towards the bearing (as opposed to the default setting of 0, which points
straight down). This displays a map like the one shown in the Run Map activity
in figure 18-1.
When you use the animateCamera method to zoom in on the current
location, the API uses an animation to zoom in as if the camera is flying. If you
don't like that, you can use the moveCamera method. It works the same as the
animateCamera method, but it just displays the map from the camera position
without using any animations to get there.
You may need to experiment a bit to find the best zoom level, bearing, and
tilt for your app. The maximum zoom level is limited by the underlying map,
and varies for the different locations around the world. For example, you can
zoom in more closely on populated areas and can't zoom in as closely on other
areas such as the north pole. Also, the maximum zoom level varies depending on
the map type. If you're curious, you can use the getMaxZoomLevel to return the
maximum zoom level for the current camera position and map type.
The maximum tilt value depends on the zoom level. However, it's never
more than 67.5. Fortunately, if you specify a value that's greater than the
maximum, it doesn't cause an error. Instead, the API just uses the maximum
value.
Chapter 18 How to work with locations and maps
581
How to zoom in on a map
if (map != null) {
map.animateCamera(
CameraUpdateFactory.newCameraPosition(
new CameraPosition.Builder()
•target(new LatLng(location.getLatitude(),
location.getLongitude()))
.zoom(16.5f)
•bearing(0)
•tilt(25)
• buildO));
}
More methods of the GoogleMap class
Method
animateCamera(earneraPo s i t i on)
moveCamera(earneraPo s111on)
getMaxZoomLevel()
ion
Animates a move to the specified latitude and
longitude, zooms in to the specified amount, and
sets the bearing and the tilt of the camera.
Works like the animateCamera method, but
doesn't animate the move.
Returns the maximum zoom level for the current
camera position and map type.
Some methods of the CameraPosition.Builder class
Method
target(latLng)
zoom(level)
bearing(degrees)
tilt(degrees)
build()
ion
Sets the location to the specified LatLng object.
Sets the zoom level to the specified float value. At level 0, a map
that's 256dp wide can display the whole world. At level 16.5, a map
that's 256dp wide can only display a few blocks.
Sets the direction that the camera is pointing, in degrees clockwise
from north where 0 is north and 180 is south.
Sets the angle of the camera in degrees from directly facing the Earth,
The minimum degrees value is 0 (no tilt), and the maximum degrees
value varies depending on the zoom level but is never more than 67.5,
Returns the CameraPosition object.
Constructor of the LatLng class
Constructor
LatLng(latitude, longitude)
ion
Creates a LatLng object with the specified latitude
and longitude.
Description
• You can use a GoogleMap object to zoom in on a location.
Figure 18-16 How to zoom in on a location
582 Section 5 Advanced Android skills
How to add markers
Figure 18-17 shows how to add one or more markers to a map. To do that,
you can use the addMarker method of the GoogleMap class. If necessary, you
can use the clear method of the GoogleMap class to clear any existing markers.
In this figure, the code calls the clear method to clear any old markers from
the map. Then, it uses the addMarker method to add a marker for the device's
current location. To do that, this code creates a new MarkerOptions object, sets
its position to the latitude and longitude that are stored in the Location object
named location, and sets its title to a value of "You are here". Then, this code
passes the newly created MarkerOptions object to the addMarker method. This
displays a default red marker icon like the one shown in the Run Map activity in
figure 18-1.
If you don't want to use the default marker icon, you can use the other
methods of the MarkerOptions class to customize it. For example, you can
use the icon method to change the default icon. To do that, you need to
add an appropriate icon to the project's resources. Then, you can use the
BitmapDescriptorFactory to get a BitmapDescriptor object from that resource.
In this figure, the second code example gets a BitmapDescriptor object from
a resource named ic_runner.png that's stored in the project's res\drawable
directory.
Chapter 18 How to work with locations and maps
583
How to add a marker for the current location
if
(map != null) {
map.clear(); // clear any old markers
map•addMarker(
new MarkerOptions()
•position(new LatLng(location.getLatitude(),
location.getLongitude()))
.title("You are here"));
}
An example that uses the icon method to set a new icon for a marker
.icon(BitmapDescriptorFactory.fromResource(R.drawable.ic_runner))
More methods of the GoogleMap class
Method Description
clear () Clears all markers from the map.
addMarker (marker) Adds a marker to the map at the specified latitude and
loneitude.
Some methods of the MarkerOptions class
Method Description
position(latLng)
title(title)
icon(bitmapDescriptor)
Sets the location for the marker.
Sets the title for the marker.
Sets the icon for the marker. If you don't set an
icon, Google Maps uses the default marker icon,
Description
• You can use a GoogleMap object to add one or more markers to a map.
Figure 18-17 How to add markers
584 Section 5 Advanced Android skills
How to add lines
Figure 18-18 shows how to display a series of connected lines on a map. To
do that, you can call the addPolyline method from the GoogleMap object and
pass it a PolylineOptions object that contains a series of points. Then the API
draws a line that connects these points in the order in which they were added.
In this figure, the code begins by creating a new PolylineOptions object.
Then, an if statement checks whether an ArrayList<Location> object named
locationsList contains any locations. If so, this code loops through this list,
converts each Location object to a LatLng object, and adds each LatLng object
to the PolylineOptions object. After the loop, this code uses the addPolyline
method to add this polyline to the map. This displays a crooked black line that
connects a series of points like the line shown in the Run Map activity in figure
18-1.
If you don't want to use the default settings for the line, you can use the
other methods of the PolylineOptions class to customize it. For example, you
can use the width method to make the line thicker or thinner. In this figure, the
second code example sets the width of a line to 10 pixels. Similarly, you can use
the color method to change the color of the line. In this figure, the third example
sets the color of the line to red. To do that, it uses the RED constant that's
available from the Color class of the android.graphics package.
Chapter 18 How to work with locations and maps
585
How to add lines to a map
if (map != null) {
PolylineOptions polyline = new PolylineOptions();
if (locationList.size() > 0) {
for (Location 1 : locationList) {
LatLng point = new LatLng(
1.getLatitude()# 1.getLongitude());
polyline.add(point);
}
}
map.addPolyline(polyline);
}
An example that sets the width of a line
polyline.width(10);
An example that sets the color of a line
polyline.color(Color.RED);
More methods of the GoogleMap class
Method
Description
addPolyline (polyline) Adds a line that connects the points in the
specified PolylineOptions object.
Constructor/methods of the PolylineOptions class
Constructor/Method Description
PolylineOptions () Creates a PolylineOptions object.
add (latLng) Adds the point specified by the LatLng object.
width (pixels) Specifies the width of the line to the specified
number of pixels.
color (argbCo lor) Sets the color of the polyline as a 32-bit
ARGB color. The default color is black.
Description
• You can use a GoogleMap object to display a series of connected lines on a map.
Figure 18-18 How to add lines to a map
586 Section 5 Advanced Android skills
The Run Tracker app
At this point, you have all the skills you need to understand the code for the
Run Tracker app. Since the Stopwatch activity for this app doesn't contain much
code that works with locations or maps, this chapter doesn't present this activity.
Instead, this chapter presents the layout and class for the Run Map activity. In
addition, it presents the class for the Run Tracker service. These files contain
most of the code that works with locations and maps. Of course, if you want to
see the complete code, you can open the project for this app and view its code.
The activitymnmap layout
Figure 18-19 shows the XML for the activity_run_map layout. This layout
displays the View Stopwatch button over a map. To do that, this XML uses a
frame layout. Within the frame layout, the fragment element adds the map. Then,
the Button element adds a button across the top of the map.
Chapter 18 How to work with locations and maps 587
The activity_run_map layout
<?xml version="1.0" encoding="utf-8"? >
<FrameLayout xmlns:android="http://schemas.android.com/apk/res/android"
android:layout_width="match parent"
android:layout height="match parent" >
<fragment
android:id="@+id/map"
android:layout_width="match parent"
android:layout height="match parent"
class="com•google.android.gms.maps.SupportMapFragment" />
<Button
android:id="@+id/viewStopwatchButton"
android:layout_width="match parent"
android:layout_height="wrap_content"
android:layout_marginTop="10dp"
android:gravity="center"
android:text="©string/stopwatch"
android:textSize="2Osp" />
</FrameLayout >
Figure 18-19 The activity_run_map layout
588 Section 5 Advanced Android skills
The RunMapActivity class
Figure 18-20 shows the code for the RunMapActivity class. To start, this
class imports some classes from the Java API. Then, it imports some classes
from the standard Android API. Finally, this class imports classes from the
Google Maps Android API v2. By now, you should be familiar with all of these
classes.
The RunMapActivity class extends the FragmentActivity class and
implements three interfaces. The first interface is necessary to execute code when the
user clicks on the View Stopwatch button. The next two interfaces are necessary
to connect to Google Play services and get the current location.
After the declaration for the the RunMapActivity class, this code defines
some constants and instance variables that are needed by the class. This includes
a constant named INTERVAL_REFRESH that specifies that the activity should
refresh itself every 10 seconds. In addition, it includes a RunTrackerDB object
named db that can be used to read and write data from a database. Although the
RunTrackerDB class isn't shown in this chapter, it works similarly to the other
database classes presented in this book.
The onCreate method displays the layout for the activity. Then, it
initializes the View Stopwatch button, its intent, and the RunTrackerDB object. Next,
it checks whether GPS is enabled. If not, it displays a toast asking the user to
enable GPS and an activity within the Settings app that allows the user to enable
GPS. Finally, this code initializes a GoogleApiClient object.
The onStart method begins by getting the GoogleMap object if it isn't
already available. Then, it enables the zoom controls on this map object. Finally,
it attempts to connect to Google Play services. If successful, this executes the
onConnected method shown in part 4. In other words, the app should connect to
Google Play services when the user displays the activity.
The onStop method disconnects from Google Play services. This executes
the onConnectionSuspended method shown in part 4. In other words, the app
should disconnect from Google Play services if the user navigates away from
this activity.
The updateMap method begins by checking whether the app is connected to
Google Play services. If so, it calls another method in this class to set the marker
for the current location. Then, it calls another method in this class to display the
route for the run.
The setCurrentLocationMarker method gets the current location, zooms in
on that location, and adds a marker to identify the location.
The displayRun method gets a list of locations from the database and adds a
line that connects those locations to the map.
Chapter 18 How to work with locations and maps 589
The RunMapActivity class Page 1
package com. murach.runtracker;
import java.util.List;
import java.util.Timer;
import java.util.TimerTask;
import android.app.AlertDialog;
import android.content.Intent;
import android•content•IntentSender;
import android.location.Location;
import android•location.LocationManager;
import android.os.Bundle;
import android.provider.Settings;
import android.support.v4.app.FragmentActivity;
import android.support.v4.app.FragmentManager;
import android.view.View;
import android.view.View.OnClickListener;
import android.widget.Button;
import android.widget.Toast;
import com.google.android.gms.common.api.GoogleApiClient;
import com.google.android.gms.common.api.GoogleApiClient.ConnectionCallbacks;
import com.google•android•gms•common•api•GoogleApiClient•OnConnectionFailedListener;
import com.google.android.gms.common.ConnectionResult;
import com.google.android.gms.location.LocationServices;
import com.google.android.gms.maps.GoogleMap;
import com.google•android•gms.maps•SupportMapFragment;
import com.google•android•gms.maps.model•CameraPosition;
import com.google•android•gms.maps.model•LatLng;
import com•google•android•gms•maps•model•MarkerOptions;
import com.google.android.gms.maps.CameraUpdateFactory;
import com.google.android.gms.maps.model.PolylineOptions;
public class RunMapActivity extends FragmentActivity
implements OnClickListener, ConnectionCallbacks,
OnConnectionFailedListener {
private final static int CONNECTION_FAILURE_RESOLUTION_REQUEST = 9000;
private static final int INTERVAL_REFRESH = 10 * 1000; // 10 seconds
private GoogleMap map;
private GoogleApiClient googleApiClient;
private List<Location> locationList;
private RunTrackerDB db;
private Button stopwatchButton;
private Intent stopwatchlntent;
private Timer timer;
Figure 18-20 The RunMapActivity class (part 1 of 4)
590 Section 5 Advanced Android skills
The RunMapActivity class Page 2
©Override
protected void onCreate(Bundle savedlnstanceState) {
super.onCreate(savedlnstanceState);
setContentView(R.layout.activity_run_map);
stopwatchButton = (Button) findViewByld(R.id.viewStopwatchButton);
stopwatchButton.setOnClickListener(this);
stopwatchlntent = new Intent(getApplicationContext(),
StopwatchActivity.class).addFlags(
Intent.FLAG_ACTIVITY_CLEAR_TOP);
db = new RunTrackerDB(this);
googleApiClient = new GoogleApiClient.Builder(this)
•addApi(LocationServices.API)
•addConnectionCallbacks(this)
•addOnConnectionFailedListener(this).build();
// if GPS is not enabled, start GPS settings activity
LocationManager locationManager =
(LocationManager) getSystemService(LOCATION_SERVICE);
if (!locationManager.isProviderEnabled(LocationManager.GPS_PROVTDER)){
Toast.makeText(this, "Please enable GPS!",
Toast.LENGTH_LONG).show();
Intent intent =
new Intent(Settings.ACTION_LOCATION_SOURCE_SETTINGS);
startActivity(intent);
}
}
©Override
protected void onStart() {
super.onStart();
// if GoogleMap object is not already available, get it
if (map == null) {
FragmentManager manager = getSupportFragmentManager();
SupportMapFragment fragment =
(SupportMapFragment) manager. findFragmentByld(R.id.map);
map = fragment.getMap();
}
// if GoogleMap object is available, configure it
if (map != null) {
map.getUiSettings()•setZoomControlsEnabled(true);
}
googleApiClient.connect();
}
©Override
protected void onStopO {
googleApiClient.disconnect();
super.onStop();
}
Figure 18-20 The RunMapActivity class (part 2 of 4)
Chapter 18 How to work with locations and maps
591
The RunMapActivity class Page 3
private void updateMap() {
if (googleApiClient.isConnected()) {
setCurrentLocationMarker();
}
displayRun();
}
private void setCurrentLocationMarker() {
if (map != null) {
// get current location
Location location = LocationServices.FusedLocationApi
•getLastLocation(googleApiClient);
if (location != null) {
// zoom in on current location
map.animateCamera(
CameraUpdateFactory•newCameraPosition(
new CameraPosition.Builder()
•target(new LatLng(location.getLatitude(),
location.getLongitude()))
.zoom(16.5f)
•bearing(0)
•tilt(25)
• buildO));
// add a marker for the current location
map.clear(); // clear old marker(s)
map.addMarker( // add new marker
new MarkerOptions()
•position(new LatLng(location.getLatitude(),
location.getLongitude()))
•title("You are here"));
}
}
}
private void displayRun() {
if (map != null) {
locationList = db.getLocations();
PolylineOptions polyline = new PolylineOptions();
if (locationList.size() > 0) {
for (Location 1 : locationList) {
LatLng point = new LatLng(
1•getLatitude(), 1.getLongitude());
polyline.add(point);
}
}
map.addPolyline(polyline);
}
}
Figure 18-20 The RunMapActivity class (part 3 of 4)
592 Section 5 Advanced Android skills
The setMapToRefresh method starts a timer that updates the map at the
specified refresh interval, which was set to 10 seconds earlier in the class. To do
that, this method uses the Timer and TimerTask classes that were described in
chapter 10. As a result, you shouldn't have much trouble understanding how this
works.
The onConnected method calls the updateMap method to update the map.
Then, it calls the setMapToRefresh method so that map will update every 10
seconds.
The onConnectionSuspended method cancels the timer. This stops the thread
for the timer when this activity isn't displayed, which is what you want.
The onConnectionFailed method attempts to resolve the problem that caused
the connection to fail. If it can't resolve the problem, it displays a dialog box
that displays an error message that includes the code for the error that caused the
connection to fail.
The onClick method is executed when the user clicks on the View Stopwatch
button. The code for this method starts the Stopwatch activity.
Chapter 18 How to work with locations and maps 593
The RunMapActivity class Page 4
private void setMapToRefresh() {
timer = new Timer();
TimerTask task = new TimerTask() {
©Override
public void run() {
RunMapActivity.this.runOnUiThread(new Runnable() {
©Override
public void run() {
updateMap();
}
});
}
};
timer.schedule(task, INTERVAL_REFRESH, INTERVAL_REFRESH);
}
©Override
public void onConnected(Bundle dataBundle) {
updateMap();
setMapToRefresh();
}
©Override
public void onConnectionSuspended(int i) {
timer.cancel();
Toast.makeText(this, "Disconnected", Toast.LENGTH_SHORT).show();
}
©Override
public void onConnectionFailed(ConnectionResult connectionResult) {
// if Google Play services can resolve the error, display activity
if (connectionResult.hasResolution()) {
try {
// start an Activity that tries to resolve the error
ConnectionResult.startResolutionForResult(this,
CONNECTION_FAILURE_RESOLUTION_REQUEST);
} catch (IntentSender.SendlntentException e) {
e.printStackTrace();
}
} else {
new AlertDialog.Builder(this)
.setMessage("Connection failed. Error code: "
+ ConnectionResult.getErrorCode())
.show();
}
}
}
©Override
public void onClick(View v) {
startActivity(stopwatchIntent);
}
Figure 18-20 The RunMapActivity class (part 4 of 4)
594 Section 5 Advanced Android skills
The RunTrackerService class
Figure 18-21 shows the code for the RunTrackerService class. This class
defines a service that continues running as long as the stopwatch is running, even
if the user navigates away from the Stopwatch activity. However, the user can
stop this service from running by clicking on the Stop or Reset buttons.
To start, this class imports some classes from the Android API. Then, this
class imports classes from the Google Maps Android API v2. If you read chapter
10 and this chapter, you should understand how these classes work.
The RunTrackerService class implements three interfaces. The first two are
necessary to connect to Google Play services and get the current location, and
the third is necessary to track the device's location.
After declaring the RunTrackerService class, this code defines some
constants and instance variables that are needed by the class. To start, this code
defines the constant that's used to request location updates every 5 seconds.
Then, it defines the constant that indicates that the app can handle location
updates every 2 seconds if necessary. Next, it defines three instance variables
including a RunTrackerDB object named db that can be used to work with a
database. Although the RunTrackerDB class isn't shown in this chapter, it works
similarly to the other database classes presented in this book. To see the code for
this class, you can view the downloadable source code for this app.
The onCreate method initializes the RunTrackerDB object, the
GoogleApiClient object, and the LocationRequest object. Here, the
LocationRequest object specifies that its priorty is high accuracy. As a result,
this app uses GPS to determine the location of the device. In addition, the
LocationRequest object uses the constants defined earlier in this class to specify
the requested update interval and the fastest allowable update interval.
Chapter 18 How to work with locations and maps 595
The RunTrackerService class Page 1
package com.murach.runtracker;
import android.app.Service;
import android.content.Intent;
import android.location.Location;
import android.os.Bundle;
import android.os.IBinder;
import android.widget.Toast;
import com.google.android.gms.common.ConnectionResult;
import com.google.android.gms.common.api.GoogleApiClient;
import com.google.android.gms.common.api.GoogleApiClient.ConnectionCallbacks;
import com.google•android•gms•common•api•GoogleApiClient.OnConnectionFailedListener;
import com.google.android.gms.location.LocationListener;
import com.google.android.gms.location.LocationRequest;
import com.google.android.gms.location.LocationServices;
public class RunTrackerService extends Service
implements ConnectionCallbacks, OnConnectionFailedListener,
LocationListener {
public static final int UPDATE_INTERVAL = 5000; // 5 seconds
public static final int FASTEST_UPDATE_INTERVAL = 2000; // 2 seconds
private GoogleApiClient googleApiClient;
private LocationRequest locationRequest;
private RunTrackerDB db;
©Override
public void onCreate() {
super.onCreate();
// get database
db = new RunTrackerDB(getApplicationContext());
googleApiClient = new GoogleApiClient.Builder(this)
.addApi(LocationServices.API)
•addConnectionCallbacks(this)
•addOnConnectionFailedListener(this)•build();
// get location request and set it up
locationRequest = LocationRequest•create()
.setPriority(LocationRequest.PRIORITY_HIGH_ACCURACY)
.setlnterval(UPDATE_INTERVAL)
.setFastestlnterval(FASTEST_UPDATE_INTERVAL);
}
©Override
public IBinder onBind(Intent intent) {
return null;
}
Figure 18-21 The RunTrackerService class (part 1 of 2)
596 Section 5 Advanced Android skills
The onStartCommand method is executed when the service is started. The
first statement in this method attempts to connect to Google Play services. This
causes the onConnected method shown later in this class to be executed.
The onDestroy method is executed when the service is stopped. The
statements in this method attempt to disconnect from Google Play services. This
causes the onConnectionSuspended method shown later in this class to be
executed.
The onConnected method is executed when the device connects to Google
Play services. This method begins by getting the current location for the user.
Then, it writes that location to the database. Next, it requests location updates.
The onConnectionSuspended method is executed when the device
disconnects from Google Play services. This method removes its request for location
updates, which is what you want when you disconnect.
The onConnectionFailed method is executed if the connection fails. Since
it's difficult to display a dialog box from a service, this method displays a toast
that indicates that the connection has failed. This works differently than the code
for the same method that's in the Run Map activity where it's easy to display a
dialog box.
The onLocationChanged method is executed every time Android gets a fix
on a new location. The code within this method writes some of the data that's
stored in the Location object to the database for this app. That way, the Run Map
activity can read this data from the database.
Chapter 18 How to work with locations and maps 597
The RunTrackerService class Page 2
©Override
public int onStartCommand(Intent intent, int flags, int startId) {
googleApiClient.connect();
return super.onStartCommand(intent, flags, startId);
}
©Override
public void onDestroy() {
if (googleApiClient.isConnected()) {
googleApiClient.disconnect() ;
}
super.onDestroy();
}
©Override
public void onConnected(Bundle dataBundle) {
Location location =
LocationServices.FusedLocationApi.getLastLocation(googleApiClient);
if (location != null){
db.insertLocation(location);
}
LocationServices.FusedLocationApi
.requestLocationUpdates(googleApiClient,
locationRequest, this);
}
©Override
public void onConnectionSuspended(int i) {
if (googleApiClient.isConnected()) {
LocationServices•FusedLocationApi
.removeLocationUpdates(googleApiClient, this);
}
}
©Override
public void onConnectionFailed(ConnectionResult connectionResult) {
Toast.makeText(this, "Connection failed! " +
"Please check your settings and try again.".
Toast.LENGTH_SHORT).show();
}
©Override
public void onLocationChanged(Location location) {
if (location != null){
db.insertLocation(location);
}
}
}
Figure 18-21 The RunTrackerService class (part 2 of 2)
598 Section 5 Advanced Android skills
Perspective
The skills presented in this chapter should be enough to get you started
with locations and maps. However, this is a huge topic, and there's plenty more
to learn about it. For example, you may want to learn more about the exciting
features that are available from version 2 of the Android API for Google Maps.
One feature is geofencing. This feature lets your app specify a boundary
around a location. Then, your app can receive notifications when users enter or
leave that boundary.
Another feature is activity recognition. This feature lets you determine
the user's current activity. For example, you can determine whether the user is
walking, cycling, or riding in a vehicle.
On the other hand, you may need to learn more about less exciting
features that have been available for years. For example, you may need to use
geocoding to convert latitude and longitude to a street address. You may need
to use routing to get directions for your users. Or, you may need to learn how
to test an app that uses locations in an emulator. To do that, you can search the
Internet for more information.
Terms
GPS (Global Positioning System)
Geocoding
Routing
Summary
• You can use a device's GPS (Global Positioning System) receiver or its
network signals (cell or Wi-Fi) to find a device's current location.
• Google Maps is the most popular Android API for working with maps. One
alternative is MapQuest.
• Geocoding is the process of converting latitude/longitude coordinates to
street addresses and back.
• Routing is the process of using map data to provide directions.
• Version 2 of the Google Maps Android API is recommended for all new
development as of March 2013.
• To add the Google Play services library to your project, you can import it
into your workspace, and add a reference to it from your project.
• A Maps API key is necessary to access the Google Maps servers.
• You can use a GoogleApiClient object to open and close a connection to
Google Play services and to get a Location object that contains detailed
information about the best and most recent location of a device.
Chapter 18 How to work with locations and maps 599
You can use a LocationRequest object to configure a request for location
updates from Google Play services.
You can use a LocationListener object to listen for location updates from
Google Play services.
You can use the LocationManager object to check if GPS is enabled.
You can use a GoogleMap object to zoom in on a location, add one or more
markers to a map, and to display a series of connected lines on a map.
Exercise 18-1 Test and modify
the Run Tracker app
In this exercise, you'll test the Run Tracker app on a physical device. To do that,
you'll need to get your own Google Maps API key so you can display a map.
Then, you'll modify some of the settings for the map to change its appearance.
This exercise only describes how to test on an actual device, not on an emulator.
In addition, this device must have a valid version of Google Play installed, and
it must support OpenGL ES version 2.
Test the Run Tracker app on your device
1. Start Android Studio and import the project named chl 8_exl_RunTracker.
2. Open the Project Structure dialog and make sure that the play-services library
is a dependency. If it's not, add it.
3. Connect the device you want to use for testing. If you have already installed
the Run Tracker app on this device, uninstall it now.
4. Run the Run Tracker app on this device. Then, click on the View Map button.
This should display a blank map, and the LogCat view should display an error
message for an authentication error. That's because the app hasn't registered a
valid API key for Google Maps.
5. Get an API key for Google Maps.
6. In Android Studio, open the google_maps_api.xml file and replace the
YOUR_KEY_HERE text with your key.
7. Open the Android manifest file and note that it uses the string resource in the
google_maps_api.xml file to set the API key for the app.
8. Run the Run Tracker app with the valid API key on your device. Then, click
on the View Map button. This time, the app should display a map and zoom in
on the current location. If it doesn't, check for error messages in the LogCat
view and do your best to troubleshoot the problem.
9. Click the View Stopwatch button. Then, click on the Start button to start a
run. Go outside and walk for a while. Switch back and forth between the
Stopwatch and Run Map activities. The map should display a marker for
your current location and track your route (or at least somewhat close to your
route).
600 Section 5 Advanced Android skills
10. Click the Stop button to stop the run. At this point, the map should still
display the route of the run.
11. Click the Reset button to delete the run. At this point, the map should only
display your current location, not your route.
Modify the settings for the map
12. Open the RunMapActivity class and review its code.
13. Change the map type from the default type to a hybrid map. Then, run the
app. Note how this changes the appearance of the map.
14. Use the MAP_TYPE_NORMAL constant to change the map type back to the
default type.
15. Use the moveCamera method to change the position of the camera instead of
using the animateCamera method. This should display the current location
without using any animation to zoom in on it.
16. Change zoom level to 18 and change the tilt to 10 degrees. This should zoom
in even further with less tilt.
17. Modify the code so the marker uses the icon named ic_runner that's in the
res\drawable directories instead of using the default icon for the marker. This
should display a blue runner.
18. Change the width of the line that marks the route to 10 pixels.
19. Change the color of the line that marks the route to blue.
Appendix A
How to set up Windows
for this book
This appendix shows how to install and configure the software that we
recommend for developing Android apps on the Windows operating system. This
appendix also shows how to install the source code for this book.
As you read this appendix, please remember that most websites and install
programs are continually updated. As a result, some of the procedures in this
appendix may have changed since this book was published. Nevertheless,
these procedures should still be good guides to installing the software. And if
there are significant changes to these setup instructions, we will post updates
on our website (www.murach.com).
How to install the source code for this book 602
How to install the Java SE JDK 604
How to install Android Studio 606
How to use the Android SDK Manager 608
How to create an emulator 610
How to configure a device for development 612
How to verify that your system is set up correctly 614
602 Appendix A How to set up Windows for this book
How to install the source code for this book
Figure A-1 shows how to download and install the source code for this book.
This includes the source code for the apps presented in this book, the starting
points for the chapter exercises, and the solutions to the exercises.
When you finish this procedure, the book apps as well as the starting points
and solutions for the exercises should be in the directories shown in this figure.
Then, you can review the apps presented in this book, and you're ready to do the
exercises in this book.
Appendix A How to set up Windows for this book 603
The Murach website
www, murach. com
The directories for the book apps and exercise starts
C:\murach\android\book_apps
C:\murach\android\ex_starts
C:\murach\android\ex_solutions
How to download and install the files for this book
1. Go to www.murach.com,
2. Find the page for Murach's Android Programming (2nd Edition).
3. If necessary, scroll down to the FREE downloads tab.
4. Click the FREE downloads tab.
5. Click the Download Now button for the exe file, and respond to the resulting pages
and dialog boxes. This should download an installer file named and2_allfiles.exe to
your hard drive.
6. Use the Windows Explorer to find the exe file on your C drive.
7. Double-click this file and respond to the dialog boxes that follow. This installs the
files for this book in directories that start with C:\murach\android.
How to use a zip file instead of a self-extracting zip file
• Although we recommend using the self-extracting zip (exe) file to install the
downloadable files as described above, some systems won't allow self-extracting
zip files to run. In that case, you can download a regular zip file (and2_allfiles.zip)
from our website. Then, you can extract the files stored in this zip file into the
C:\murach directory. If the C:\murach directory doesn't already exist, you will need
to create it.
Description
• You can install the source code for this book by downloading it from murach.com.
Figure A-1 How to install the source code for this book
604 Appendix A How to set up Windows for this book
How to install the Java SE JDK
For Android development, you need to have the Java Development Kit (JDK)
for Java SE (Standard Edition) installed on your computer. If you've already
done some Java development, you probably already have the JDK installed on
your system.
If not, figure A-2 shows how to install the JDK. To start, you download the
file for the installer program for the most recent version of the JDK from the
Java website. Then, you navigate to the directory that holds the JDK, run the
installer file, and respond to the resulting dialog boxes.
Since the Java website may change after this book is printed, we've kept the
procedure shown in this figure somewhat general. As a result, you may have to
do some searching to find the current version of the JDK. In general, you can
start by searching the Internet for the download for Java SE. Then, you can find
the most current version of the JDK for your operating system.
The Android apps in this book only use Java SE 6 features. As a result, you
can use JDK 1.6 or later. For example, you can use JDK 1.8, which corresponds
with Java SE 8, for this book. This works because Java has a good record of
being backwards compatible.
Appendix A How to set up Windows for this book 605
The download page for Java SE
www.oracle.com/technetwork/-iava/iavase/downloads
Procedure
1. Go to the download page for Java SE. If necessary, you can search the Internet to
find this page.
2. Follow the instructions for downloading the installer program for the JDK for your
operating system.
3. Save the installer program to your hard disk.
4. Run the installer program by double-clicking on it.
5. Respond to the resulting dialog boxes. When you're prompted for the JDK folder,
use the default folder.
The default folder for the JDK for Java SE 8
C:\Program Files\Java\jdkl.8.0_45
Description
• For Android development, you need to install Java SE (Standard Edition). To do
that, you can download and install the JDK (Java Development Kit).
• For more information about installing the JDK, you can refer to the Oracle website.
Figure A-2 How to install Java
606 Appendix A How to set up Windows for this book
How to install Android Studio
Before you can develop Android apps, you need to install the Android SDK
(Software Development Kit). Fortunately, this SDK is installed automatically
when you install Android Studio as shown in figure A-3.
Appendix A How to set up Windows for this book 607
The download page for Android Studio
http; //developer .android. com/sdk
How to install Android Studio
1. Go to the download page for Android Studio. The easiest way to find this page is to
search the Internet for "Android Studio download".
2. Click on the link to download Android Studio and follow the instructions on the
website. This should download an exe file.
3. Double-click on the exe file to start the installation.
4. Follow the dialogs to install Android Studio.
Description
• For Android development, you need to install Android Studio. This also installs the
Android SDK (Software Development Kit).
Figure A-3 How to install Android Studio
608 Appendix A How to set up Windows for this book
How to use the Android SDK Manager
Android Studio includes a starting set of Android tools and platforms.
However, we recommend following the procedure presented in figure A-4 to
make sure that you have the tools and platforms that you'll need as you work
through this book.
When you use the Android SDK Manager, it displays "Installed" in the
Status column if the most current version of a tool or platform has been installed.
Otherwise, it displays a status of "Not Installed" or "Update Available".
All of the apps that you can download for this book use version 23.0.1 of
the Android SDK build tools. As a result, we recommend that you install this
version of the build tools.
Throughout this book, we have used Android 6.0 (API 23) for testing new
devices and Android 4.1 (API 16) for testing old devices. As a result, we
recommend installing these platforms to get started.
If you prefer to use other versions of Android, you can do that too. For
example, you may want to use newer or older versions than the ones we use
in this book. However, it's usually easier to follow along with the book if you
use the same versions we use in this book. That way, this book will match your
system, and you will encounter fewer bugs since we have tested the apps in this
book on these versions of Android.
We also recommend installing two more items. First, we recommend
installing the Google USB Driver item because you may need it to configure
Android devices for testing and debugging. Second, we recommend installing
the Android Support Library item because it's necessary to support some newer
features on older devices.
This figure shows how to install the tools and platforms necessary to work
with this book. If you want to install more tools or platforms, you can use the
Android SDK Manager to do that. Of course, additional tools and platforms
require more disk space and take longer to download. As a result, if you want to
get started as fast as possible, you can follow the instructions in this figure.
Appendix A How to set up Windows for this book
609
The Android SDK Manager
£j Android SDK Manager
(£)
Packages Tools
SDK Path: C:\Users\Joel\AppData\Local\Android\sdkl
Packages
■jji Name
* Q|U Tools"
O^ Android SDK Tools
d^ Android SDK Platform-tools
O*/' Android SDK Build-tools
O^ Android SDK Build-tools
O'/' Android SDK Build-tools
O z/' Android SDK Build-tools
□ ^ Android SDKBuild-tools
□ ^ Am/rotf SDK Build-tools
t> [r] [^ Tools (Preview Channel)
* DGl Android 6.0 (API 23)
[rl [■ Documentation for Android SDK
O '8' SDK Platform
API
23
23
Rev.
24.4.1
23.0.1
23.0.1
23
22.0.1
21.1.2
20
19.1
1
1
Status
^ Installed
^ Installed
[3f Installed
^ Installed
B? Installed
Q A/ot installed
Q A/ot installed
Q A/ot installed
B^ Installed
^ Installed
>
0
^
Show: V| Updates/New [^Installed Select New or Updates
Install packages...
□ Obsolete
Deselect All
Delete packages...
■ f^ *m
Done loading packages.
Procedure
1. Start Android Studio.
2. If this displays the Welcome page, select the Configure->SDK Manager option.
Otherwise, click the toolbar button for the SDK Manager. Then, click the Launch
Standalone SDK Manager link.
3. To view the tools and platforms, expand or collapse the category nodes.
4. To install more tools or platforms, select the tools or platforms. For this book, we
recommend installing all of the defaults including the following items:
- Tools-*Android SDK Build-tools Rev. 23.0.1
- Android 6.0 (API 23)^SDK Platform
- Android 6.0 (API 23)->Intel x86 Atom System Image
- Android 4.1.2 (API 16)^SDK Platform
- Android 4.1.2 (API 16)->Intel x86 Atom System Image
- Extras-> Android Support Library
- Extras-> Google USB driver
5. Click the Install button. This should display another dialog box.
6. Select the Accept License radio button. Then, click the Install button. On some
systems, this may take an hour or longer.
Description
• You can use the Android SDK Manager to install Android tools and platforms.
Figure A-4 How to use the Android SDK Manager
610 Appendix A How to set up Windows for this book
How to create an emulator
Figure A-5 shows how to create an Android Virtual Device (AVD) that you
can use to test your apps. Since an AVD emulates a physical device, an AVD
can also be called an emulator. If necessary, you can create an emulator for each
platform that you want to test. Unfortunately, emulators tend to run extremely
slowly on all but the most powerful computers. As a result, we recommend
avoiding using emulators whenever possible.
If you do need to use an emulator, we recommend creating one that uses a
low resolution such as hdpi or mdpi and an older version of the Android API.
That way, the emulator should use fewer resources on your system, which should
allow it to start and run more quickly.
When you create an emulator, you must provide a name for the emulator and
the target platform. In this figure, I created an emulator named "Nexus S API
16".
This emulator is based upon a Nexus S device that has a 4-inch screen that's
480 by 800 pixels. As a result, this screen uses a high number of dots per inch
(hdpi), which runs more quickly than an extra high number of dots per inch
(xhdpi).
This emulator uses a system image for the Android 4.1 (API 16) platform.
Since this API doesn't have as many features as later APIs, this also helps the
emulator to run more quickly. In addition, this system image uses an x86
processor, which runs faster on a Windows system than an ARM processor. Most
smartphones use ARM processors, so this emulation isn't completely accurate,
but the improved performance usually makes this tradeoff worthwhile. For
this to work, you must download the x86 system image for the corresponding
platform as described in the previous figure.
Appendix A How to set up Windows for this book
611
The dialog box for creating an emulator
_ Virtual Device Configuration
Select Hardware
Choose a device definition
<£
J
Category
rv
Phone
Wear
Tablet
Name T
Size
1 Resolution '
Density
13] Nexus S
Nexus One 3.7'
Nexus 6
Nexus 5
Nexus 4
556M
4.95"
4.7'
Galaxy Nexus 4.65"
Android 4.7... 5.0'
5.4" FWVGA 5.4'
480x800
1440x2560
1080x1920
768x1280
720x1280
1080x1920
480x854
hdpi
560dpi
xxhdpi
xhdpi
xhdpi
xxhdpi
mdpi
48C
< Opx
Size: normal
Ratio: long
Density: hdpi
New Hardware Profile
Import Hardware Profiles
£5
Clone Device...
Finish
Procedure
1. Start Android Studio.
2. If this displays the Welcome page, open an existing project as described in the stait
of figure A-7.
3. Click the toolbar button for the AVD Manager. This should stait the Android Virtual
Device Manager and show all existing virtual devices.
4. Click the Create Virtual Device button. This should display the dialog box shown
above. Follow the prompts to create a virtual device. For this book, we recommend
creating a virtual device named "Nexus S API 16" with these properties:
- Category: Phone
- Hardware profile: Nexus S
- System image: Jelly Bean (API 16) x86
- Emulator name: Nexus S API 16
Description
• To test your Android apps, you can create an Android Virtual Device (AVD) for each
platform that you wish to test. An Android Virtual Device can also be referred to as
an emulator.
Figure A-5 How to create an emulator
612 Appendix A How to set up Windows for this book
How to configure a device for development
Figure A-6 shows how to configure a physical device so that you can test
Android apps on it. Although you can also test Android apps on an emulator,
we recommend testing on a physical device for two reasons. First, apps install
and run much more quickly on a physical device than on an emulator. Second,
testing on a physical device is the only way to truly see how an app works on
that device.
To configure a physical device for development, you must connect your
device to the computer with a USB cable and turn on the "USB debugging"
option on your device. The procedure for doing this varies depending on the
version of Android that's running on the device. As a result, you may need to
search the Internet to learn how to enable this option for your device.
With Android 4.2 (API 17) and later, the developer options are hidden. This
makes sense because most users aren't developers and don't need these options.
As a result, if your device uses API 17 or later, you must start by enabling
developer options on your device.
In addition, you must install a driver for the device. Again, the procedure for
doing this varies depending on the device. For some devices, you can install the
Google USB Driver. For other devices, you need to install an OEM (Original
Equipment Manufacturer) driver. To determine what type of driver you need
for your device, you can search the Internet. Or, you can consult the OEM USB
Drivers document by going to the link shown at the bottom of this figure.
Appendix A How to set up Windows for this book 613
How to configure a device for development
1. Enable developer options on your device. For Android 4.2 (API 17) and later, you
can do it like this:
- Settings->More->About Device->Build Number (tap on it 7 times).
2. Turn on USB Debugging. For Android 4.2 (API 17) and later, you can do it like
this:
- Settings->More->Developer Options->USB Debugging.
3. Connect your Android device to your computer's USB port.
4. Download a driver for the device.
- For an Android Developer Phone, a Nexus One, or a Nexus S, you can use the
Google USB Driver. If you followed the steps in figure A-5, you should have
already downloaded this driver.
- For the Galaxy Nexus, go to the Samsung website and download the Google
USB Driver for that phone, which is listed as model SCH-I515.
- For most other devices, install an OEM (Original Equipment Manufacturer)
driver as described below.
How to download the Google USB Driver
• Start the Android SDK Manager as described in figure A-5 and use it to download
the Google USB Driver. To do that, expand the Extras category, select the Google
USB Driver check box, and click the Install button. By default, this downloads the
driver to this directory:
C:\Users\youirWajne\android-sdks\extras\google\usb_driver
How to install an OEM driver
• Search the Internet or use the OEM USB Drivers document to find an OEM driver
for your device. Then, download the driver to your computer.
The link to the OEM USB Drivers document
developer.android.com/tools/extras/oem-usb.html
Description
• Since an actual device runs more quickly than an emulator, we recommend using
an actual device whenever possible.
Figure A-6 How to configure a device for development
614 Appendix A How to set up Windows for this book
How to verify that your system is set up correctly
At this point, you have installed all of the software and source code that you
need to work with this book, but you haven't tested it to make sure it's working
correctly. To do that, you can run the Tip Calculator app for chapter 3 as shown
by the procedure in figure A-7.
To begin, you can start Android Studio and open the project for the Tip
Calculator app as shown in part l of the figure. At this point, the name of the
project appears in Android Studio. However, the emulator doesn't appear on
your screen until you've gone through the steps in part 2.
Appendix A How to set up Windows for this book
615
Android Studio and an emulator after an app has been run
_ ch03_TipCalculator - [C:\murach\android\book_apps\ch03_TipCalculator] - Android Studio 1.3.2
Lb) , S3
File Edit View Navigate Code Analyze Refactor Build Run Tools VCS Window Help
DBC5 + * & 0) 3 ei& ♦■> *» I-frapp-] ► ft ►:
OP ch03_TipCalculator
r* v- us i j
a *
an
VP1 Android
£ ► Qapp
► 0 Gradle Scripts
^'o*
#- r
re
O
CL
k.
3
V
o
>
re
C
re
"k.
re
>
"5
CO
Nofi
Search
Open i.
Open F
Open t
Drag ai
@ Terminal
0: Messages
□ Gradle build finished in 8s 899ms
6: Android ^TODO
■ 5554:Nexus_S_API_16
J^Tl
\ '
*A 11:55
(3 Tip Calculator
Bill Amount 32.60
Percent
Tip
Total
15%
$4.89
$37.49
m
<
n
n
ft
OJ
= a
Open an existing project
1. Start Android Studio.
2. If this displays the Welcome page, select the "Open an existing Android Studio
project" item. Otherwise, click the Open button in the toolbar.
3. Use the resulting dialog to open the Tip Calculator app for chapter 3 that's stored in
this directory:
C:\murach\android\book_apps\ch03_TipCalculator
Description
• To verify that you have set up your system correctly for this book, you can run the
Tip Calculator app for chapter 3 on an Android device. Or, if you don't have an
Android device available, you can run this app in an emulator.
• If you get an error that says, "failed to find Build Tools revision 23.01", click on the
link that says, "Install Build Tools and sync project" to install these build tools.
Figure A-7 How to verify that your system is set up correctly (part 1 of 2)
616 Appendix A How to set up Windows for this book
After opening the project in Android Studio, you can run the app as shown
in part 2. This verifies that your system is set up correctly.
If you didn't download version 23.0.1 of the Android SDK build tools as
described in figure A-4, you may get an error when you attempt to run the Tip
Calculator app that says:
failed to find Build Tools revision 23.0.1
To fix this issue, you can install version 23.0.1 of the Android SDK build
tools. Fortunately, Android Studio typically provides a link just below the error
message that you can use to install the correct version of the build tools.
If you have an Android device that you have configured for development,
you can run the app on that device. When you do this, you should display
the Choose Device dialog before you connect your device to the computer.
Otherwise, this dialog might not display your device.
Also, the first time you use a device with your computer, you need to
authorize that device to work with your computer. To do that, you can use the
authorization dialog that's displayed after you connect your device and unlock
its screen. After you authorize your device, you should be able to keep your
device connected to the computer, and the Choose Device dialog should display
your device every time you run the app.
If you don't have access to an Android device, you'll need to test the app on
an emulator. This provides a way for you to test your apps on devices even if you
don't have that type of device. However, on most systems, emulators take a long
time to start, consume a lot of system resources, and run slowly. As a result, we
recommend testing on an actual device whenever possible.
If you are able to complete either of these tasks, you have set up your system
correctly for this book. Congratulations!
Appendix A How to set up Windows for this book
617
The Choose Device dialog
_ Choose Device
Q Choose a running device
Device ' Serial Number
1 Samsung SM-T230NU Android 4.42 (API 19) 300454235567bl00
H Emulator Nexus S API 16 Android 4.1.1 (API 16) emulator-5554
1 State
Online
Online
Compatible
Yes
Q Launch emulator
Android virtual device:
Galaxy Nexus API 23
D Use same device for future launches
Cancel
Help
Test on a
4. In the toolbar, click the Run button. This should display the Choose Device dialog.
5. Connect the device you configured in figure A-6 to the computer with a USB cable.
This should display the device in the Choose Device dialog, though it may indicate
that the device is unauthorized.
6. Unlock the screen on the device. If necessary, use the dialog that's displayed on the
device to authorize the device for the computer.
7. Use the Choose Device dialog to select the device and click the OK button. This
should run the app on the device.
8. If the Tip Calculator app displays correctly and you can use it to calculate a tip,
your device is configured correctly!
Test on an emulator (optional)
9. Start the emulator. To do that, click on the AVD Manager button in the toolbar.
Then, click on the Run button for the emulator described in figure A-5. Depending
on your system, it may take a long time for the emulator to launch, so be patient!
10. Unlock the emulator by dragging the lock icon to the right.
11. In the toolbar, click the Run button. This should display the Choose Device dialog.
12. Use the Choose Device dialog to select the emulator. This should run the app on
that emulator.
13. If the Tip Calculator app displays correctly and you can use it to calculate a tip,
your emulator is set up correctly!
14. If the soft keyboard doesn't display when you click in the bill amount text box, use
the emulator to start the Settings app and turn off the Language and
Input->Keyboard and Input->Default->Hardware (Physical Keyboard) option. This
should allow you to use the soft keyboard or your computer's keyboard to enter the
amount.
Figure A-7 How to verify that your system is set up correctly (part 2 of 2)
Appendix B
How to set up Mac OS X
for this book
This appendix shows how to install and configure the software that we
recommend for developing Android apps on Mac OS X. This appendix also
shows how to install the source code for this book.
As you read this appendix, please remember that most websites are
continually updated. As a result, some of the procedures in this appendix may
have changed since this book was published. Nevertheless, these procedures
should still be good guides to installing the software. And if there are
significant changes to these setup instructions, we will post updates on our
website (www.murach.com).
How to install the source code for this book 620
How to install the Java SE JDK 622
How to install Android Studio 624
How to use the Android SDK Manager 626
How to create an emulator 628
How to configure a device for development 630
How to verify that your system is set up correctly 632
620 Appendix B How to set up Mac OS Xfor this book
How to install the source code for this book
Figure B-l shows how to download and install the source code for this book.
This includes the source code for the apps presented in this book, the starting
points for the exercises, and the solutions to the exercises.
When you finish this procedure, the book apps as well as the starting points
and solutions for the exercises should be in the directories shown in this figure.
Then, you can review the apps presented in this book, and you're ready to do the
exercises in this book.
As you read this book, you'll notice that it often instructs you to right-click,
which is a common technique on Windows. On Mac OS X, right-clicking is not
enabled by default. Instead, you can use the Ctrl-click instead of the right-click.
Or, if you prefer, you can enable right-clicking by editing the system preferences
for your mouse. Then, you can follow the instructions in this book more closely.
Appendix B How to set up Mac OS Xfor this book 621
The Murach website
www, murach. com
The folders for the book apps and exercise starts
/murach/android/book_apps
/murach/android/ex_starts
/murach/android/ex_solutions
How to download and install the files for this book
1. Go to www.murach.com,.
2. Find the page for Murach's Android Programming (2nd Edition).
3. If necessary, scroll down to the FREE downloads tab.
4. Click the "FREE Downloads" tab.
5. Click the Download Now button for the zip file. This should download a zip file
named and2_allfiles.zip onto your hard drive.
6. Use the Finder to browse to this file and double-click on it to unzip it. This creates
the android folder and its sub folders.
7. Use the Finder to create the murach folder directly on the Mac hard drive.
8. Use the Finder to move the android folder into the murach folder.
A note about right-clicking
• This book often instructs you to right-click, because that's common on PCs. On a
Mac, right-clicking is not enabled by default. Instead, you can use the Ctrl-click
instead of the right-click. Or, if you prefer, you can enable right-clicking by editing
the system preferences for your mouse.
Description
• You can install the source code for this book by downloading it from murach.com.
Figure B-1 How to install the source code for this book
622 Appendix B How to set up Mac OS Xfor this book
How to install the Java SE JDK
For Android development, you need to have the Java Development Kit (JDK)
for Java SE (Standard Edition) installed on your computer. If you've already
done some Java development, you probably already have the JDK installed on
your system.
If not, figure B-2 shows how to install the JDK. To start, you download the
file for the installer program for the most recent version of the JDK from the
Java website. Then, you navigate to the directory that holds the JDK, run the
installer file, and respond to the resulting dialog boxes.
Since the Java website may change after this book is printed, we've kept the
procedure shown in this figure somewhat general. As a result, you may have to
do some searching to find the current version of the JDK. In general, you can
start by searching the Internet for the download for Java SE. Then, you can find
the most current version of the JDK for your operating system.
The Android apps in this book only use Java SE 6 features. As a result, you
can use JDK 1.6 or later. For example, you can use JDK 1.8, which corresponds
with Java SE 8, for this book. This works because Java has a good record of
being backwards compatible.
Appendix B How to set up Mac OS Xfor this book 623
The download page for Java SE
www.oracle.com/technetwork/-iava/iavase/downloads
Procedure
1. Go to the download page for Java SE. If necessary, you can search the Internet to
find this page.
2. Follow the instructions for downloading the installer program for the JDK for your
operating system.
3. Save the installer program to your hard disk.
4. Run the installer program by double-clicking on it.
5. Respond to the resulting dialog boxes. When you're prompted for the JDK folder,
use the default folder.
The default folder for the JDK for Java SE 8
/Library/ Java/ JavaVirtualMachines/jdkl. 8.0_45
Description
• For Android development, you need to install Java SE (Standard Edition). To do
that, you can download and install the JDK (Java Development Kit).
• For more information about installing the JDK, you can refer to the Oracle website.
Figure B-2 How to install Java
624 Appendix B How to set up Mac OS Xfor this book
How to install Android Studio
Before you can develop Android apps, you need to install the Android SDK
(Software Development Kit). Fortunately, this SDK is installed automatically
when you install Android Studio as shown in figure B-3.
You may want to create an easier way to start Android Studio for subsequent
sessions. For example, you can dock Android Studio by right-clicking on the app
file for Android Studio and selecting the Options->Keep in Dock item. Or, you
can create an alias for your desktop, by right-clicking on the app file for Android
Studio and selecting the Make Alias item. Then, drag the alias to the desktop.
Appendix B How to set up Mac OS Xfor this book 625
The download page for Android Studio
http; //developer .android. com/sdk
How to install the Android Studio
1. Go to the download page for Android Studio. The easiest way to find this page is to
search the Internet for "Android Studio download".
2. Click on the link to download Android Studio and follow the instructions on the
website. This should download a dmg file.
3. Use the Finder to browse to this file and double-click on it to launch it.
4. Drag the Android Studio icon into the Apps folder.
A typical folder for the Android SDK
User/name/Library/Android/sdk
Description
• For Android development, you need to install Android Studio. This also installs the
Android SDK (Software Development Kit).
Figure B-3 How to install Android Studio
626 Appendix B How to set up Mac OS Xfor this book
How to use the Android SDK Manager
Android Studio includes a starting set of Android tools and platforms.
However, we recommend following the procedure presented in figure B-4 to
make sure that you have the tools and platforms that you'll need as you work
through this book.
When you use the Android SDK Manager, it displays "Installed" in the
Status column if the most current version of a tool or platform has been installed.
Otherwise, it displays a status of "Not Installed" or "Update Available".
All of the apps that you can download for this book use version 23.0.1 of
the Android SDK build tools. As a result, we recommend that you install this
version of the build tools.
Throughout this book, we have used Android 6.0 (API 23) for testing new
devices and Android 4.1 (API 16) for testing old devices. As a result, we
recommend installing these platforms to get started.
If you prefer to use other versions of Android, you can do that too. For
example, you may want to use newer or older versions than the ones we use
in this book. However, it's usually easier to follow along with the book if you
use the same versions we use in this book. That way, this book will match your
system, and you will encounter fewer bugs since we have tested the apps in this
book on these versions of Android.
We also recommend installing the Android Support Library item because it's
necessary to support some newer features on older devices.
This figure shows how to install the tools and platforms necessary to work
with this book. If you want to install more tools or platforms, you can use the
Android SDK Manager to do that. Of course, additional tools and platforms
require more disk space and take longer to download. As a result, if you want to
get started as fast as possible, you can follow the instructions in this figure.
Appendix B How to set up Mac OS Xfor this book 627
The Android SDK Manager
• _ •
SDK Path: A
Packagos
■ff' Name
D Tl_l Tools
D ./'Android SDK Tools
D ^Android SDK Platform-tools
D ./'Android SDK Build-tools
D ,/Android SDK Build-tools
D ,/Android SDK Build-tools
G ./Android SDK Build-tools
D ,/Android SDK Build-tools
□ TC^Tools (Preview Channel)
D <f Android SDK Platform-tools
D ▼C£Android6.0(API23)
D [■ Documentation for Android SDK
G *W SDK Platform
D £ Samples for SDK
D 11 Android TV ARM EABI v7a System Image
Android SDK Manager
API
23
23
23
23
Rev. Status
24.4 ^Installed
23.0.1 Rr Installed
23.0.1 [^Installed
22.0.1 R. Installed
21.1.2 reinstalled
20 ^Installed
19.1 reinstalled
23.1 rc1 (^ Not installed
1 E" Not installed
1 ^Installed
2 E Not installed
2 (^ Not installed
Show: Q Updates/New 0'nstaJled Select New or Updates [ instal 1 package... J
^3 Obsolete Deselect All | Delete 1 package... J
© ■£■
Done loading packages.
Procedure
1. Start Android Studio.
2. If this displays the Welcome page, select the Configure->SDK Manager option.
Otherwise, click the toolbar button for the SDK Manager. Then, click the Launch
Standalone SDK Manager link at the bottom of the window.
3. To view the tools and platforms, expand or collapse the category nodes.
4. To install more tools or platforms, select the tools or platforms. For this book, we
recommend installing all of the defaults including the following items:
- Tools-^Android SDK Build-tools Rev. 23.0.1
- Android 6.0 (API 23)^SDK Platform
- Android 6.0 (API 23)->Intel x86 Atom System Image
- Android 4.1.2 (API 16) ^SDK Platform
- Android 4.1.2 (API 16)->Intel x86 Atom System Image
- Extras->Android Support Library
5. Click the Install button. This should display another dialog box.
6. Select the Accept License radio button. Then, click the Install button. On some
systems, this may take an hour or longer.
Description
• You can use the Android SDK Manager to install Android tools and platforms.
Figure B-4 How to use the Android SDK Manager
628 Appendix B How to set up Mac OS Xfor this book
How to create an emulator
Figure B-5 shows how to create an Android Virtual Device (AVD) that you
can use to test your apps. Since an AVD emulates a physical device, an AVD
can also be called an emulator. If necessary, you can create an emulator for each
platform that you want to test. Unfortunately, emulators tend to run extremely
slowly on all but the most powerful computers. As a result, we recommend
avoiding using emulators whenever possible.
If you do need to use an emulator, we recommend creating one that uses a
low resolution such as hdpi or mdpi and an older version of the Android API.
That way, the emulator should use fewer resources on your system, which should
allow it to start and run more quickly.
When you create an emulator, you must provide a name for the emulator and
the target platform. In this figure, I created an emulator named "Nexus S API
16".
This emulator is based upon a Nexus S device that has a 4-inch screen that's
480 by 800 pixels. As a result, this screen uses a high number of dots per inch
(hdpi), which runs more quickly than an extra high number of dots per inch
(xhdpi).
This emulator uses a system image for the Android 4.1 (API 16) platform.
Since this API doesn't have as many features as later APIs, this also helps the
emulator to run more quickly. In addition, this system image uses an x86
processor, which runs faster on a Mac computer than an ARM processor. Most
smartphones use ARM processors, so this emulation isn't completely accurate,
but the improved performance usually makes this tradeoff worthwhile. For
this to work, you must download the x86 system image for the corresponding
platform as described in the previous figure.
Appendix B How to set up Mac OS Xfor this book
629
The dialog box for creating an emulator
{• •
Select Hardware
Choose a device definition
Category |
TV
Wpar
iicai
Phone
Name ▼ Size
Nexus S 4.0"
Movnr Ann O 7"
Nexus 6P 5.7"
Tablet Nexus 6 5.96"
Nevus 5X 5 2"
Nexus 5 4.95"
Nexus 4 4.7"
Galaxy Nexus 4.65"
5.4" FWVCA 5.4"
5.1"WVCA 5.1"
4.7"WXCA 4.7"
Virtual Device Configuration
Resolution
480x800
4fl0vfl00
Density
hdpi
hrlni
1440x2560 560dpi
1440x2560 560dpi
1080x1920 420dpi
1080x1920 xxhdpi
768x1280 xhdpi
720x1280 xhdpi
480x854 mdpi
480x800 mdpi
720x1280
New Hardware Profile Import Hardware Profiles
xhdpi
<-> \^\ Nexus S
—480px —
1 1 Size: normal
1 1 Ratio: long
1 1 Density: hdpi
1 4.0" 1. )0px
1 1
| |
ll
5 J [ Clone Device...
^^*0 \m
(~~ Cancel ] Previous Next Finish
-
Procedure
1. Start Android Studio.
2. If this displays the Welcome page, open an existing project as described in the start
of figure B-7.
3. Click the toolbar button for the AVD Manager. This should start the Android Virtual
Device Manager and show all existing virtual devices.
4. Click the Create Virtual Device button. This should display the dialog box shown
above. Follow the prompts to create a virtual device. For this book, we recommend
creating a virtual device named "Nexus S API 16" with these properties:
- Category: Phone
- Hardware profile: Nexus S
- System image: Jelly Bean (API 16) x86
- Emulator name: Nexus S API 16
Description
• To test your Android apps, you can create an Android Virtual Device (AVD) for each
platform that you wish to test. An Android Virtual Device can also be referred to as
an emulator.
Figure B-5 How to create an emulator
630 Appendix B How to set up Mac OS Xfor this book
How to configure a device for development
Figure B-6 shows how to configure a physical device so that you can test
Android apps on it. Although you can also test Android apps on an emulator,
we recommend testing on a physical device for two reasons. First, apps install
and run much more quickly on a physical device than on an emulator. Second,
testing on a physical device is the only way to truly see how an app works on
that device.
To configure a device for development, you must connect your device to the
computer with a USB cable and turn on the "USB debugging" option on your
device. The procedure for doing this varies depending on the version Android
that's running on the device. As a result, you may need to search the Internet to
learn how to enable this option for your device.
With Android 4.2 (API 17) and later, the developer options are hidden. This
makes sense because most users aren't developers and don't need these options.
As a result, if your device uses API 17 or later, you must start by enabling
developer options on your device.
Appendix B How to set up Mac OS Xfor this book 631
How to configure a device for development
1. Enable developer options on your device. For Android 4.2 (API 17) and later, you
can do it like this:
- Settings->More->About Device->Build Number (tap on it 7 times).
2. Turn on USB Debugging. For Android 4.2 (API 17) and later, you can do it like
this:
- Settings->More->Developer Options->USB Debugging.
3. Connect your Android device to your computer's USB port.
Description
• Since a physical device runs more quickly than an emulator, we recommend using a
physical device whenever possible.
Figure B-6 How to configure a device for development
632 Appendix B How to set up Mac OS Xfor this book
How to verify that your system is set up correctly
At this point, you have installed all of the software and source code that you
need to work with this book, but you haven't tested it to make sure it's working
correctly. To do that, you can run the Tip Calculator app for chapter 3 as shown
by the procedure in figure B-7.
To begin, you can start Android Studio and open the project for the Tip
Calculator app as shown in part 1 of the figure. At this point, the name of the
project appears in Android Studio. However, the emulator won't appear on your
screen until you've gone through the steps in part 2.
Appendix B How to set up Mac OS Xfor this book
633
Android Studio and an emulator after an app has been run
# # ch03_TipCalculator - [/murach/android/book apps/ch03 TipCalculator]
C3HC5 + * i6 b a - ^ ^ * ■*> *S [?~app - ► * ► 1 ¥ E: 1 jl □ * ? Q,
Cj ch03_TipCalculator
« <p* Android *■ © ^ ' -ft-- I*-
t_ — — ^^—^— ■
| Capt
* L. app
► ^Cradle Scripts
1. Project
cture
7 Stru
V
VI
rian
>
"5
CO
I
Run app
►
■
□0
C3
VI
<u
1 *
■= X
^^ 1 •
•f- DEVICE SHELL COWAND: pm install -r "/data/local/tmp/com.mura
pkg: /data/local/tmp/com.murach.tipcalculator
* Success
• 5554:Nexus_S_APM6
■s.
\
§
H Launching application: com.murach.tipcalculator/com.murach.ti
_j DEVICE SHELL COWAND: am start -n "com.murach.tipcalculator/
^ Starting: Intent { act=android.intent.action.MAIN cat=[androi
I
[5] Terminal 1 0: Messages »$> 6: Android Monitor ^ 4: Run ^ TO DO
r ' Session 'app': running (8 minutes ago)
nA 4:20
H TipCalculator
Bill Amount 32.60
Percent 15% " + ■
Tip $4.89 1
Total $37.49 | '
I
1
\
\^__ _^^y
Waven Proje
t-r
V>
n
die
*- L
i
»
>
3
o.
ntent. action. MAI ~-
pCalculatorActi\. &
2
odel ,
[r] Cradle Console
n nnt- ♦ ■s. '3-
Open an existing project
1. Start Android Studio.
2. If this displays the Welcome page, select the "Open an existing Android Studio
project" item. Otherwise, click the Open button in the toolbar.
3. Use the resulting dialog to open the Tip Calculator app for chapter 3 that's stored in
this folder:
murach/android/book_apps/ch03_TipCalculator
Description
• To verify that you have set up your system correctly for this book, you can run the
Tip Calculator app for chapter 3 on an Android device. Or, if you don't have an
Android device available, you can run this app in an emulator.
• If you get an error that says, "failed to find Build Tools revision 23.0.1", click on
the link that says, "Install Build Tools and sync project" to install these build tools.
Figure B-7 How to verify that your Mac is set up correctly (part 1 of 2)
634 Appendix B How to set up Mac OS Xfor this book
After opening the project in Android Studio, you can run the app as shown
in part 2. This verifies that your system is set up correctly.
If you didn't download version 23.0.1 of the Android SDK build tools as
described in figure B-4, you may get an error when you attempt to run the Tip
Calculator app that says:
failed to find Build Tools revision 23.0.1
To fix this issue, you can install version 23.0.1 of the Android SDK build
tools. Fortunately, Android Studio typically provides a link just below the error
message that you can use to install the correct version of the build tools.
If you have an Android device that you have configured for development,
you can run the app on that device. When you do this, you should display
the Device Chooser dialog before you connect your device to the computer.
Otherwise, this dialog might not display your device.
Also, the first time you use a device with your computer, you need to
authorize that device to work with your computer. To do that, you can use the
authorization dialog that's displayed after you connect your device and unlock
its screen. After you authorize your device, you should be able to keep your
device connected to the computer, and the Device Chooser dialog should display
your device every time you run the app.
If you don't have access to an Android device, you'll need to test the app on
an emulator. This provides a way for you to test your apps on devices even if you
don't have that type of device. However, on most systems, emulators take a long
time to start, consume a lot of system resources, and run slowly. As a result, we
recommend testing on an actual device whenever possible.
If you are able to complete either of these tasks, you have set up your system
correctly for this book. Congratulations!
Appendix B How to set up Mac OS Xfor this book
635
The Device Chooser dialog
ft # Device Chooser
i Choose a running device
Device State
| Samsung SM-T230NU Android 4.4.2 (API 19) Online
H Emulator Nexus S API 16 Android 4.1.1 (API 1 Online
O Launch emulator
Android virtual device:
Compatible
Yes
Serial Number
30045423...
emulator-5...
Android-2.2-Phone
D Use same device for future launches
\i
7i
Cancel
OK
Test on a
1. In the toolbar, click the Run button. This should display the Device Chooser dialog.
2. Connect the device you configured in figure B-6 to the computer with a USB cable.
This should display the device in the Device Chooser dialog, though it may indicate
that the device is unauthorized.
3. Unlock the screen on the device. If necessary, use the dialog that's displayed on the
device to authorize the device for the computer.
4. Use the Device Chooser dialog to select the device and click the OK button. This
should run the app on the device.
5. If the Tip Calculator app displays correctly and you can use it to calculate a tip,
your device is configured correctly!
Test on an emulator (optional)
1. Start the emulator. To do that, click on the AVD Manager button in the toolbar.
Then, click on the Run button for the emulator described in figure B-5. Depending
on your system, it may take a long time for the emulator to launch, so be patient!
2. Unlock the emulator by dragging the lock icon to the right.
3. In the toolbar, click the Run button. This should display the Device Chooser dialog.
4. Use the Device Chooser dialog to select the emulator.
5. If the Tip Calculator app displays correctly and you can use it to calculate a tip,
your emulator is set up correctly!
6. If the soft keyboard doesn't display when you click in the bill amount text box, use
the emulator to start the Settings app and turn off the Language and
Input->Keyboard and Input->Default->Hardware (Physical Keyboard) option. This
should allow you to use the soft keyboard or your computer's keyboard to enter the
amount.
Figure B-7 How to verify that your Mac is set up correctly (part 2 of 2)
Appendix C
How to set up Linux
for this book
This appendix shows how to install and configure the software that we
recommend for developing Android apps on the Linux operating system. This
appendix also shows how to install the source code for this book.
Because there are many different distributions of Linux, it isn't possible
for us to provide instructions to cover all of them. Instead, we have chosen to
focus on two of the most popular: Ubuntu, and Fedora. Because most other
popular distributions are based on one of these two, these instructions should
work for most Linux distributions. If they don't, you can search the Internet
for more information.
As you read this appendix, please remember that most websites and install
programs are continually updated. As a result, some of the procedures in this
appendix may have changed since this book was published. Nevertheless,
these procedures should still be good guides to installing the software. And if
there are significant changes to these setup instructions, we will post updates
on our website fwww.murach.com).
How to install the source code for this book 638
How to install the Java SE JDK and required native libraries 640
How to get Android Studio 642
How to use the Android SDK Manager 644
How to create an emulator 646
How to configure a device for development 648
How to verify that your system is set up correctly 650
638 Appendix C How to set up Linux for this book
How to install the source code for this book
Figure C-1 shows how to download and install the source code for this book.
This includes the source code for the apps presented in this book, the starting
points for the chapter exercises, and the solutions to the exercises.
When you finish this procedure, the book apps as well as the starting points
and solutions for the exercises should be in the directories shown in this figure.
Then, you can review the apps presented in this book, and you're ready to do the
exercises in this book.
Appendix C How to set up Linux for this book 639
The Murach website
www, murach. com
The directories for the book apps and exercise starts
/home/username/murach/android/book_apps
/home/username/murach/android/ex_starts
/home/username/murach/android/ex_solutions
How to download and install the files for this book
1. Gotowww.murach.com.
2. Find the page for Murach's Android Programming (2nd Edition).
3. If necessary, scroll down to the FREE downloads tab.
4. Click the FREE downloads tab.
5. Click the Download Now button for the zip file, and respond to the resulting pages
and dialog boxes. This should download an archive file named and2_allfiles.zip to
your hard drive.
6. Open a terminal window to access the Linux command line.
7. Enter the following commands to unarchive the file. Note the period at the end of
the first command. You must include it.
mv Downloads/and2_allfiles.zip .
unzip and2_allfiles.zip
8. Verify that the directories listed above have been created. Then, you can close the
terminal window.
Description
• You can install the source code for this book by downloading it from murach.com.
Figure C-1 How to install the source code for this book
640 Appendix C How to set up Linux for this book
How to install the Java SE JDK
and required native libraries
For Android development, you need to have the Java Development Kit
{JDK) for Java SE {Standard Edition) installed on your computer. If you've
already done some Java development, you probably already have the JDK
installed on your system. In addition, you'll need to install some native libraries
that Android Studio requires to work correctly. Figure C-2 shows how to do this
for both Ubuntu and Fedora.
Appendix C How to set up Linux for this book 641
Procedure for Ubuntu
1. Open a terminal window to access the Linux command line.
2. Enter the following commands to install the JDK and required libraries. You will
probably be prompted for your root password after entering the first command. Go
ahead and enter it.
sudo apt-get update
sudo apt-get install default-jdk
sudo apt-get install lib32zl Iib32ncurses5 Iib32bz2-1.0 lib32stdc++6
3. To verify that the JDK has installed correctly, type "javac" at the command line
and press enter. If Java has been properly installed, this should provide a usage
message. If not, it will inform you that the command could not be found.
Procedure for Fedora
1. Open a terminal window to access the Linux command line.
2. Enter the following commands to install the JDK and required libraries. You will
probably be prompted for your root password after entering the first command. Go
ahead and enter it.
sudo dnf install java-1.8.0-openjdk-devel
sudo dnf install glibc.i686 glibc-devel.i686 zlib-devel.i686
sudo dnf install ncurses-devel.i686 libXll-devel.i686
sudo dnf install libXrender.i686 libXrandr.i686
3. To verify that the JDK has installed correctly, type "javac" at the command line
and press enter. If Java has been properly installed, this should provide a usage
message. If not, it will inform you that the command could not be found.
Description
• Android development requires the Java SE (Standard Edition) development kit.
• You need to install some native libraries that Android Studio requires. If you don't,
Android Studio won't be able to install the Android SDKs correctly.
• If you get an error during the installation that says "Unable to run mksdcard SDK
tool", it probably means you are missing one or more of the native libraries. Install
them as shown above.
• If you get an error that indicates that the dnf command isn't available, you can use
the yum command instead of the dnf command.
Figure C-2 How to install the JDK and required native libraries
642 Appendix C How to set up Linux for this book
How to get Android Studio
Before you can develop Android apps, you need to install the Android SDK
(Software Development Kit). Fortunately, this SDK is installed automatically
when you install Android Studio as shown in figure C-3.
Appendix C How to set up Linux for this book 643
The download page for Android Studio
http; //developer .android. com/sdk
How to get Android Studio
1. Go to the download page for Android Studio. The easiest way to find this page is to
search the Internet for "Android Studio download".
2. Click on the link to download Android Studio for Linux and follow the instructions
on the website. This should download a zip file. Make a note of the zip file name, as
the version number might be slightly different from the one below.
3. If necessary, open a terminal window to access the Linux command line.
4. Enter the following commands to unzip Android Studio. Note that in most cases,
you only need to type the first part of the file name, followed by the Tab key. Linux
will automatically complete the rest of the file name. Make sure to include the two
periods at the end of the first command.
mv Downloads/android-studio-ide-141.2288178-linux.zip ..
unzip android-studio-ide-141.2288178-linux.zip
How to start Android Studio
1. If necessary, open a terminal window to access the Linux command line.
2. Type the following command:
android-studio/bin/studio.sh &
Description
• For Android development, you need to install Android Studio. This also installs the
Android SDK (Software Development Kit).
• Once Android Studio has been installed, you can start it from the command line.
• If you want an icon to start Android Studio, you can search the Internet for how to
launch shell scripts from the desktop for your particular Linux distribution.
Figure C-3 How to get Android Studio
644 Appendix C How to set up Linux for this book
How to use the Android SDK Manager
Android Studio includes a starting set of Android tools and platforms.
However, we recommend following the procedure presented in figure C-4 to
make sure that you have the tools and platforms that you'll need as you work
through this book.
When you use the Android SDK Manager, it displays "Installed" in the
Status column if the most current version of a tool or platform has been installed.
Otherwise, it displays a status of "Not Installed" or "Update Available".
All of the apps that you can download for this book use version 23.0.1 of
the Android SDK build tools. As a result, we recommend that you install this
version of the build tools.
Throughout this book, we have used Android 6.0 (API 23) for testing new
devices and Android 4.1 (API 16) for testing old devices. As a result, we
recommend installing these platforms to get started.
If you prefer to use other versions of Android, you can do that too. For
example, you may want to use newer or older versions than the ones we use
in this book. However, it's usually easier to follow along with the book if you
use the same versions we use in this book. That way, this book will match your
system, and you will encounter fewer bugs since we have tested the apps in this
book on these versions of Android.
We also recommend installing the Android Support Library item because it's
necessary to support some newer features on older devices.
This figure shows how to install the tools and platforms necessary to work
with this book. If you want to install more tools or platforms, you can use the
Android SDK Manager to do that. Of course, additional tools and platforms
require more disk space and take longer to download. As a result, if you want to
get started as fast as possible, you can follow the instructions in this figure.
Appendix C How to set up Linux for this book
645
The Android SDK Manager
Android SDK Manager x
Packages Tools
SDK Path: /home/murban/Android/Sdk
Packages
■p1 Name
API
Rev.
Status
la ■* Tools [I
U V' Android SDK Tools
D V* Android SDK Platform-tools
.J-/ Android SDK Build-tools
D V' Android SDK Build-tools
J-/ Android SDK Build-tools
D V' Android SDK Build-tools
D -/ Android SDK Build-tools
- Gl^ Tools (Preview Channel)
O J* Android SDK Platform-tools
GC Android 6.0 (API 23)
D ft Documentation for Android SDK
O'p'SDK Platform
G £ Samples for SDK
Show: Updates/New >/ Installed Select New
U Obsolete Deselect All
Done loading packages.
23
23
23
or Upda
24.4 & Installed
l_
23.0.1 T9 Installed
■
23.0.1 & Installed
22.0.1 B Not installed
21.1.2 \Z Not installed
1
20 IQ Not installed
1 1
i
19.1' Not installed
i
i
1
?3.I re. m Not installed
i
I
1
_ Wor installed
^ Installed
2 C Not installed
tes Install pac kages
1 I
| Delete packages... |
O *>■
Procedure
1. Start Android Studio.
2. If this displays the Welcome page, select the Configure->SDK Manager option.
Otherwise, click the toolbar button for the SDK Manager. Then, click the Launch
Standalone SDK Manager link.
3. To view the tools and platforms, expand or collapse the category nodes.
4. To install more tools or platforms, select the tools or platforms. For this book, we
recommend installing all of the defaults including the following items:
- Tools^ Android SDK Build-tools Rev. 23.0.1
- Android 6.0 (API 23)^SDK Platform
- Android 6.0 (API 23)->Intel x86 Atom System Image
- Android 4.1.2 (API 16)^SDK Platform
- Android 4.1.2 (API 16)->Intel x86 Atom System Image
- Extras-> Android Support Library
5. Click the Install button. This should display another dialog box.
6. Select the Accept License radio button. Then, click the Install button. On some
systems, this may take an hour or longer.
Description
• You can use the Android SDK Manager to install Android tools and platforms.
Figure C-4 How to use the Android SDK Manager
646 Appendix C How to set up Linux for this book
How to create an emulator
Figure C-5 shows how to create an Android Virtual Device (AVD) that you
can use to test your apps. Since an AVD emulates a physical device, an AVD
can also be called an emulator. If necessary, you can create an emulator for each
platform that you want to test. Unfortunately, emulators tend to run extremely
slowly on all but the most powerful computers. As a result, we recommend
avoiding using emulators whenever possible.
If you do need to use an emulator, we recommend creating one that uses a
low resolution such as hdpi or mdpi and an older version of the Android API.
That way, the emulator should use fewer resources on your system, which should
allow it to start and run more quickly.
When you create an emulator, you must provide a name for the emulator and
the target platform. In this figure, I created an emulator named "Nexus S API
16".
This emulator is based upon a Nexus S device that has a 4-inch screen that's
480 by 800 pixels. As a result, this screen uses a high number of dots per inch
(hdpi), which runs more quickly than an extra high number of dots per inch
(xhdpi).
This emulator uses a system image for the Android 4.1 (API 16) platform.
Since this API doesn't have as many features as later APIs, this also helps the
emulator to run more quickly. In addition, this system image uses an x86
processor, which runs faster on a Linux system than an ARM processor. Most smart-
phones use ARM processors, so this emulation isn't completely accurate, but the
improved performance usually makes this tradeoff worthwhile. For this to work,
you must download the x86 system image for the corresponding platform as
described in the previous figure.
In some cases, you might get an error that says /dev/kvm could not be found.
In that case, you need to install kvm virtual machine support on your Linux
distribution. Most popular Linux distributions include kvm support by default, so
this step isn't usually required. However, if your distribution doesn't come with
kvm support out of the box, you can search the Internet for instructions on how
to install it in your distribution.
Appendix C How to set up Linux for this book
647
The dialog box for creating an emulator
Select Hardware
Choose a device definition
Virtual Device Configuration
£
_ Category I
TV
Wear
Phone
Tablet
NameT
Size
Nexus One 3.7"
Nexus 6P 5.7"
Nexus 6 5.96'
Nexus 5X 5.2"
Nexus 5 4.95*
Nexus 4 4.7"
Galaxy Nexus 4.65'
5.4" FVWGA 5.4"
5.1"WVGA 5.1"
Resolution
480x800
480x800
1440x2560
1440x2560
1080x1920
1080x1920
768x1280
720x1280
480x854
480x800
New Hardware Profile I Import Hardware Profiles
hdpi
560dpi
560dpi
420dpi
xxhdpi
xhdpi
xhdpi
mdpi
mdpi
J
(3) Nexus S
C5
4B0px
4.0"
Size: normal
Ratio: long
800px Density: hdpi
Clone Device...
Previous
Cancel
Finish
Procedure
1. Start Android Studio.
2. If this displays the Welcome page, open an existing project as described in the start
of figure C-7.
3. Click the toolbar button for the AVD Manager. This should start the Android Virtual
Device Manager and show all existing virtual devices.
4. Click the Create Virtual Device button. This should display the dialog box shown
above. Follow the prompts to create a virtual device. For this book, we recommend
creating a virtual device named "Nexus S API 16" with these properties:
- Category: Phone
- Hardware profile: Nexus S
- System image: Jelly Bean (API 16) x86
- Emulator name: Nexus S API 16
Description
• To test your Android apps, you can create an Android Virtual Device (AVD) for each
platform that you wish to test. An Android Virtual Device can also be referred to as
an emulator.
• If you get an error that /dev/kvm cannot be found when trying to launch the
emulator, you need to install kvm support in your Linux distribution. Most popular
Linux distributions already come with this installed.
Figure C-5 How to create an emulator
648 Appendix C How to set up Linux for this book
How to configure a device for development
Figure C-6 shows how to configure a physical device so that you can test
Android apps on it. Although you can also test Android apps on an emulator,
we recommend testing on a physical device for two reasons. First, apps install
and run much more quickly on a physical device than on an emulator. Second,
testing on a physical device is the only way to truly see how an app works on
that device.
To configure a physical device for development, you must connect your
device to the computer with a USB cable and turn on the "USB debugging"
option on your device. The procedure for doing this varies depending on the
version of Android that's running on the device. As a result, you may need to
search the Internet to learn how to enable this option for your device.
With Android 4.2 (API 17) and later, the developer options are hidden. This
makes sense because most users aren't developers and don't need these options.
As a result, if your device uses API 17 or later, you must start by enabling
developer options on your device.
In some cases, you may need to add a udev entry for your device to work
properly, although this step is not required for most popular Linux distributions.
However, if your device doesn't show up in the device list, you may need to do
this. If you need to add udev entries, you can find instructions under the Using
Hardware Devices section of the android developer documentation. At the time
of this writing, these instructions could be found here:
http; //developer .android. com/tools/device .html
Appendix C How to set up Linux for this book 649
How to configure a device for development
1. Enable developer options on your device. For Android 4.2 (API 17) and later, you
can do it like this:
- Settings->More->About Device->Build Number (tap on it 7 times).
2. Turn on USB Debugging. For Android 4.2 (API 17) and later, you can do it like
this:
- Settings->More->Developer Options->USB Debugging.
3. Connect your Android device to your computer's USB port.
Description
• Since an actual device runs more quickly than an emulator, we recommend using
an actual device whenever possible.
• On some Linux distributions, you may need to add a udev rule for any physical
device you want to support, but this isn't necessary on the most popular
distributions. If you need to add udev rules, you can search the Internet for more
information.
Figure C-6 How to configure a device for development
650 Appendix C How to set up Linux for this book
How to verify that your system is set up correctly
At this point, you have installed all of the software and source code that you
need to work with this book, but you haven't tested it to make sure it's working
correctly. To do that, you can run the Tip Calculator app for chapter 3 as shown
by the procedure in figure C-7.
To begin, you can start Android Studio and open the project for the Tip
Calculator app as shown in part 1 of the figure. At this point, the name of the
project appears in Android Studio. However, the emulator doesn't appear on
your screen until you've gone through the steps in part 2.
Appendix C How to set up Linux for this book
651
Android Studio and an emulator after an app has been run
ch03_TipCalcuLator - [-/murach/android/book_apps/ch03 JTipCalculator] - Android Studio 1.4
File Edit View Navigate Code Analyze Refactor Build Run Tools VCS Window Help
DHJ0 * * & ® tf Q £ O ♦ *S (iapp^J ► * fc CL V- m i IL S w ?
QR
CZ ch03_TipCalculator
„ -S'Andr.* © * *- I-
Fapp
0
ft
► .? Gradle Scripts
•HI
V
3
No files are o\
• Search Everywhere
• Open a file by nam*
• Open Recent Files \
• Open Navigation B
• Drag and Drop file(
© Terminal 0: Messages -r 6: Android Monitor ^4: Run ^TODO
D Gradle build finished in lm 22s 34ms (3 minutes ago)
5554:Nexus_S_API_23
(j Tip Calculator
Bill Amount I
Percent 15%
Tip
Total
$0.00
$0.00
IS
a 5:52
m
CD
<
A
Z3
*
£
QJ
Q.
a"
o
>
CL
o
CL
ole
t i
Open an existing project
1. Start Android Studio.
2. If this displays the Welcome page, select the "Open an existing Android Studio
project" item. Otherwise, click the Open button in the toolbar.
3. Use the resulting dialog to open the Tip Calculator app for chapter 3 that's stored in
this directory:
/home/username/murach/android/book_apps/ch03_TipCalculator
Description
• To verify that you have set up your system correctly for this book, you can run the
Tip Calculator app for chapter 3 on an Android device. Or, if you don't have an
Android device available, you can run this app in an emulator.
• If you get an error that says, "failed to find Build Tools revision 23.0.1", click on
the link that says, "Install Build Tools and sync project" to install these build tools.
Figure C-7 How to verify that your system is set up correctly (part 1 of 2)
652 Appendix C How to set up Linux for this book
After opening the project in Android Studio, you can run the app as shown
in part 2. This verifies that your system is set up correctly.
If you didn't download version 23.0.1 of the Android SDK build tools as
described in figure C-4, you may get an error when you attempt to run the Tip
Calculator app that says:
failed to find Build Tools revision 23.0.1
To fix this issue, you can install version 23.0.1 of the Android SDK build
tools. Fortunately, Android Studio typically provides a link just below the error
message that you can use to install the correct version of the build tools.
If you have an Android device that you have configured for development,
you can run the app on that device. When you do this, you should display
the Device Chooser dialog before you connect your device to the computer.
Otherwise, this dialog might not display your device.
Also, the first time you use a device with your computer, you need to
authorize that device to work with your computer. To do that, you can use the
authorization dialog that's displayed after you connect your device and unlock
its screen. After you authorize your device, you should be able to keep your
device connected to the computer, and the Device Chooser dialog should display
your device every time you run the app.
If you don't have access to an Android device, you'll need to test the app on
an emulator. This provides a way for you to test your apps on devices even if you
don't have that type of device. However, on most systems, emulators take a long
time to start, consume a lot of system resources, and run slowly. As a result, we
recommend testing on an actual device whenever possible.
If you are able to complete either of these tasks, you have set up your system
correctly for this book. Congratulations!
Appendix C How to set up Linux for this book 653
The Device Chooser dialog box
Device Chooser
O Choose a running device
Device tate Compatible I ' L mber
El Emulator Nexus S API 23 Android 6.0 (API 23) Online Yes emulator-5554
149734e8
OSamsung SCH-R960 Android 4.4.2 (API 19) Online
O Launch emulator
Android virtual device:
Nexus S API 23
LJ Use same device for future launches
Cancel
Help
Test on a
1. In the toolbar, click the Run button. This should display the Device Chooser dialog.
2. Connect the device you configured in figure C-6 to the computer with a USB cable.
This should display the device in the Device Chooser dialog, though it may indicate
that the device is unauthorized.
3. Unlock the screen on the device. If necessary, use the dialog that's displayed on the
device to authorize the device for the computer.
4. Use the Device Chooser dialog to select the device and click the OK button. This
should run the app on the device.
5. If the Tip Calculator app displays correctly and you can use it to calculate a tip,
your device is configured correctly!
Test on an emulator (optional)
1. Start the emulator. To do that, click on the AVD Manager button in the toolbar.
Then, click on the Run button for the emulator described in figure C-5. Depending
on your system, it may take a long time for the emulator to launch, so be patient!
2. Unlock the emulator by dragging the lock icon to the right.
3. In the toolbar, click the Run button. This should display the Device Chooser dialog.
4. Use the Device Chooser dialog to select the emulator. This should run the app on
that emulator.
5. If the Tip Calculator app displays correctly and you can use it to calculate a tip,
your emulator is set up correctly!
6. If the soft keyboard doesn't display when you click in the bill amount text box, use
the emulator to start the Settings app and turn off the Language and
Input->Keyboard and Input->Default->Hardware (Physical Keyboard) option. This
should allow you to use the soft keyboard or your computer's keyboard to enter the
amount.
Figure C-7 How to verify that your system is set up correctly (part 2 of 2)
AppCompat theme
655
Index
.apkfile, 14, 15
.arse file, 14, 15
.class file, 14, 15
.dexfile, 14, 15
Java file. 14. 15
A
ACCESS_COARSE_LOCATION permission, 558-561
ACCESS_FINE_LOCATION permission, 558-561
ACCESS_NETWORK_STATE permission, 364, 365,
558-561
Action (broadcast), 382, 383
Action bar, 198, 199
Action constants, 322. 323
Action event, 62, 63
Action key, 62-65
Action overflow icon, 228, 229
ACTION_BATTERY_LOW constant, 382, 383
ACTION_BATTERY_OKAY constant. 382. 383
ACTION_BOOT_COMPLETED constant, 382, 383
ACTION_POWER_CONNECTED constant, 382, 383
Active state, 70,71
Activity, 18, 19
Java code for, 56. 57
lifecycle, 70, 71
starting, 236, 237
working with, 56, 57
Activity class, 574, 575
Adapter, 314-319
array, 144-147
custom, 442-451
fragment, 450, 451
ADB (Android debug bridge), 14, 15
add method (PolylineOptions), 584, 585
addApi method, 562, 563
addConnectionCallbacks method, 562. 563
addFlags method (Intent), 358, 359
addMarker method (GoogleMap), 582, 583
addOnConnectionFailedListener method, 562, 563
addPolyline method (GoogleMap), 584, 585
addURl method (UriMatcher), 472, 473
Advertising (mobile), 526, 527
AlertDialog.Builder class, 486, 487
Alias (layout), 274, 275
Amazon Appstore, 524, 525
Android API
documentation, 88, 89
Google Maps v2, 550-553
Android Asset Studio, 86, 87
Android debug bridge (ADB), 14. 15
Android device chooser dialog, 22, 23
Android history, 8, 9
Android manifest, 14, 15, 84, 85
Android Open Source Project (AOSP), 8, 9
Android package file (APK), 530-533
Android phone, 4, 5
Android runtime, 12. 13
Android SDK Manager, 608, 609, 626, 627
on Linux, 642, 643, 644, 645
on Mac, 624, 625
on PC, 606, 607
Android Software Development Kit (SDK), 8. 9
Android stack, 12, 13
Android Studio, 16, 17
install on Linux, 642, 643
install on Mac, 624, 625
install on PC, 606, 607
test on Linux, 650-653
test on Mac, 632-635
test on PC, 614-617
Welcome Paee, 16, 17
Android system architecture, 12, 13
Android tablet, 4, 5
Android versions, 10, 11
Android Virtual Device (AVD), 14, 15
creating on Linux, 646, 647
creating on Mac, 628, 629
creating on PC, 610, 611
AndroidManifest.xml file, 14, 15, 84, 85
animateCamera method (GoogleMap), 580, 581
Animation (maps), 580, 581
Anonymous class, 170, 171
Anonymous inner class, 170, 171
AOSP (Android Open Source Project), 8, 9
API (Application Programming Interface), 10, 11
API level, 10, 11
APK file (Android package file), 530-533
App, 6, 7
categories, 6, 7
distribution, 524-539
icon. 502. 503
listing, 538, 539
run on emulator, 22, 23
run on physical device, 22, 23
App widget, 502-517
configure, 514, 515
create layout, 504-507
register, 516, 517
test, 516, 517
appcompat v7 support library, 58, 59
AppCompat theme, 198, 199, 202, 203
modify, 212, 213
656 AppCompatActivity class
AppCompatActivity class, 56, 57
appendPath method (Uri.Builder), 476, 477
Application, 6, 7
framework, 12, 13
marketplace, 524, 525
object, 340-343
Application Programming Interface (API), 10, 11
AppWidgetManager class, 512, 513
Architecture (system), 12, 13
Array adapter, 144-147
Asynchronous task, 294, 295
AsyncTask class, 296, 297
authorities attribute (provider), 480,481
Authority, 468, 469
AUTO_INCREMENT attribute (column), 402, 403
AVD (Android Virtual Device), 110, 111
creating on Linux, 646, 647
creating on Mac, 628, 629
creating on PC, 610, 611
B
Back stack, 358, 359
bearing method, 580, 581
beginTransaction method (FragmentManager), 280, 281
Blank Activity template, 32, 33
Boot completed broadcast, 384, 385
BOOT_COMPLETED action, 384, 383
Bound service, 344, 345
Breakpoint, 106, 107
Broadcast receiver, 382-391
boot completed, 384, 385
connectivity changed, 386, 387
Broadcast, 382-391
action, 508, 509
custom, 388, 389
Bus, 96, 97
build method
CameraPosition.Builder class, 580, 581
GoogleApiClient.Builder class, 562, 563
Uri.Builder class, 476, 477
Build project, 14, 15, 22, 23
buildUpon method (Uri.Builder), 476, 477
Built-in content provider, 468, 469, 484, 485
Built-in style (modify), 210, 211
Built-in themes
modify, 210. 211
summary, 218, 219
Business object, 404, 405
Button widget, 30, 31
radio, 142, 143
Current class as listener
C
Call a phone number, 322, 323
CALL_PHONE permission, 322, 323
Camera animation (maps), 580, 581
cancel method (NotificationManager), 362, 363
cancel method (Timer class), 298, 299
Categories (apps), 6, 7
Category (preference), 248, 249
Checkbox, 140, 141
event handling, 172, 173
CheckBoxPreference element, 250, 251
Clean project, 22, 23
clear method (GoogleMap), 582, 583
Clear test data, 426, 427
Click event, 68, 69
close method (Cursor), 416, 417
close method (SQLiteDatabase), 414, 415
Code execution (trace), 102-105
color method (PolylineOptions), 584, 585
Colors, 222, 223
Column, 402, 403
commit method (FragmentTransaction), 280, 281
Common properties, 46, 47
Compiled resources, 14, 15
compileSdkVersion attribute, 80, 81
connect method, 564, 565
Connection
database, 414, 415
failed, 568,569
network, 364, 365
ConnectionResult class, 568, 569
Connectivity changed broadcast, 386, 387
CONNECTIVITY_ACTION constant, 382, 383
ConnectivityManager object, 364, 365
ConnectivityReceiver class, 384, 385
Content provider, 468-485
built-in, 468, 469
creatine, 472, 473
custom, 482, 483
registering, 480, 481
using, 482, 483
contentDescription attribute (ImageView), 150, 151
ContentResolver class, 476, 477
ContentUris class, 482, 483
Contextual action mode, 230, 231
Controls, 30, 31
create method (LocationRequest), 570-573
Created state (activity), 70, 71
createFromResource method (ArrayAdapter), 146, 147
Current class as listener, 168, 169
Cursor
File
657
Cursor, 418, 419
Custom adapter. 442-451
class, 448, 449
fragment, 450, 451
Custom broadcast, 388, 389
Custom content provider, 482, 483
D
d method (Log class), 102,103
Daemon thread, 298, 299
Dalvik executable file, 14, 15
Dalvik virtual machine (VM), 12. 13
Database, 398-429
create, 412, 413
delete, 426, 427
upgrade, 412, 413
Database class, 408-423
how to modify, 508, 509
how to test, 424, 425
supporting methods, 470, 471
Database connection, 414, 415
Database management system (DBMS), 400, 401
date attribute (inputType), 138, 139
DB Browser for SQLite app. 428, 429
DBMS (Database Management System), 400, 401
Debug key, 530,531
Debug window, 108, 109
Debueeer, 96-109
Default layout, 34, 35
defaultValue attribute (Preferences), 240, 241
delete method (SQLiteDatabase), 422, 423
Delete
database from device, 426, 427
test data from device, 426, 427
row from content provider, 478, 479
row from database, 422, 423
Density-independent pixels (dp), 42, 43, 46, 47
Dependency, 82, 83
dependency attribute (preference), 250, 251
Design tab (Android Studio), 18, 19, 34, 35
Developer Console (Google Play), 536,537
Device (Android)
configure for Linux, 648, 649
configure for Mac, 630,631
configure for PC, 612, 613
test on Linux, 650-653
test on Mac, 632-635
test on PC, 616, 617
Device chooser dialog box, 22, 23
DeviceDefault themes, 218, 219
Dial a phone number, 322, 323
Dialog box, 486, 487
dialogTitle attribute (ListPreference), 240, 241
Digital certificate, 530-533
Dimens.xml file, 42, 43
disconnect method (GoogleApiClient), 564, 565
disconnect method (LocationClient), 564, 565
Display text, 38, 39
Distribution (app), 524-539
Documentation (Android API), 88, 89
doInBackground method (AsyncTask), 296, 297
dp (density-independent pixels), 46, 47
DPad, 112, 113
Drawable resource, 150, 151
Drop-down list, 121, 144, 145
E
e method (Log class), 102,103
Editable text view, 30, 31, 64, 65, 121, 136-139
EditorAction event, 62, 63
Editorlnfo class, 64, 65
EditText widget, 30, 31, 136-139
Ems property, 46, 47
Emulator, 14, 15
add, 110-113
change orientation, 72, 73
configure, 110-113
create, 110, 111
create on Linux, 646, 647
create on Mac, 628, 629
create on PC, 610, 611
for a tablet, 110, HI
run app on, 22, 23
test on Linux, 650-653
test on Mac, 632-635
test on PC, 614-617
End User License Agreement, 528,529
entries attribute (ListPreference), 240, 241
entry Values attribute (ListPreference), 240, 241
Event, 62,63, 166-193
EditorAction, 62, 63
Event handler, 62,63, 168-193
execSQL method (SQLiteDatabase), 412, 413
Explicit intent, 320, 321
exported attribute (provider), 480, 481
F
Failed connection, 568,569
File
.apk,14, 15
.arse, 14, 15
.class, 14, 15
.dex, 14, 15
Java,14, 15
downloading, 302, 303
658 findFragmentByld method
findFragmentByld method, 278, 279
findViewByld method, 60, 61
Floating context menu, 230, 231
Focus, 166, 167
Fragment, 242, 243, 260-281
creating a class, 266, 267
creating a layout, 264, 265
custom adapter, 450, 451
displaying in an activity, 268, 269
Java code, 266, 267
lifecycle methods of, 262, 263
reference to, 278, 279
replacing one with another, 280, 281
with Google Maps, 576, 577
with tabs, 440,441
FraementManaeer class, 278-281
FragmentTransaction class, 280, 281
Frame layout, 130, 131
Framework (application), 12, 13
G
Generics, 294-297
Geocodine, 548, 549
getAccuracy method (Location), 566, 567
getAction method (MotionEvent), 182, 183
getActiveNetworklnfo method, 364, 365
getActivity method (Pendinglntent), 358, 359
get Application method (Context), 342, 343
getAppWidgetlds method, 512, 513
getBoolean method (SharedPreferences), 244, 245
getContentResolver method (Context), 476, 477
getDouble (Cursor), 418, 419
getErrorCode method (ConnectionResult), 568, 569
getFloat method (SharedPreferences), 244, 245
getFraementManaeer method, 278, 279
getHistoricalX method (MotionEvent), 182, 183
getHistoricalY method (MotionEvent), 182, 183
getHistorySize method (MotionEvent), 182, 183
getld method (View), 172, 173
getlnstance method (AppWidgetManager), 512, 513
getlnt (Cursor), 418, 419
getlnt method (SharedPreferences), 244, 245
getlntExtra method (Intent), 320, 321
getLastLocation method, 566, 567
getLastPathSegment method (Uri), 478, 479
getLatitude method (Location), 566,567
getLong method (SharedPreferences), 244, 245
getLongitude method (Location), 566, 567
getMap method (SupportMapFragment), 578, 579
getMaxZoomLevel method (GoogleMap), 580, 581
getReadableDatabase method, 414, 415
getSelectedltem method (spinner), 146, 147
getSelectedltemPosition method (spinner), 146, 147
IDE (Integrated Development Environment)
getString (Cursor), 418, 419
getString method (SharedPreferences), 244, 245
getStringExtra method (Intent), 320, 321
getSystemService method (Activity), 574, 575
getSystemService method (Context), 362, 363
getText method, 66, 67
getTime method (Location), 566,567
getTypeString method (Networklnfo), 364, 365
getUiSettings method (GoogleMap), 578, 579
getWriteableDatabase method, 414, 415
getX method (MotionEvent), 182, 183
getY method (MotionEvent), 182, 183
glEsVersion attribute (uses-feature), 561
Global Positioning System (GPS), 544-547
Google Maps, 548-553, 576-585
Android API, 550-553
configuring, 552-563
fragment, 576, 577
working with, 578-587
Google Play, 6, 7, 524-527, 536-541
Google Play services, 552-555, 564-575
Google USB Driver, 612, 613
GoogleApiClient, 562-565
GPS (Global Positioning System), 544-547
enabled, 574, 575
GPS_PROVIDER constant (LocationManager), 574,
575
Gradle build script, 58, 59, 80, 81
Graphical layout editor, 18, 19, 98, 99
gravity attribute (linear layout), 126. 127
H
Handler (event), 62,63
Hard keyboard (emulator), 112, 113
hasResolution method, 568,569
Height (predefined values), 46, 47
Hex, 222, 223
Hexadecimal, 222, 223
High-level event, 166, 167, 172-179
History of Android, 8, 9
Holo theme, 198, 199
Horizontal scroll bar, 154, 155
i
i method (Log class), 102,103
Icon
app,502,503
menu, 232, 233
icon attribute (menu item), 232, 233
icon method (MarkerOptions), 582, 583
Id property (widget), 38, 39
IDE (Integrated Development Environment), 14, 15
Images
Low-level event
659
Images, 150, 151
ImageView widget, 150, 151
IME (input method editor), 64, 65
imeOptions attribute (EditText), 276, 277
Implicit intent, 322, 323
In-app billing, 526, 527
In-app products, 526, 527
Inflate (menu), 234, 235
initialLayout attribute (app widget), 514, 515
Input method editor (IME), 64, 65
Input stream object, 302, 303
inputType attribute (EditText widget), 138, 139
insert method (SQLiteDatabase), 420, 421
Insert row (database), 420, 421, 476, 477
Integrated Development Environment (IDE), 14, 15
Intent, 236, 237, 320- 323
pending, 358, 359
Intent class, 320-323
Interface
runnable, 300, 301
user, 18, 19
INTERNET permission, 302, 303, 558-561
isChecked method (check box), 140, 141
isConnected method (Networklnfo), 364, 365
isProviderEnabled method (LocationManager), 574, 575
isRoaming method (Networklnfo), 364, 365
Item (menu), 228, 229
j
Java
install on Linux, 640,641
install on Mac, 622, 623
install on PC, 604, 605
Javabytecodes, 14, 15
Java code, 56, 57
Java directory, 20, 21
Java source code, 14, 15, 20, 21
Java virtual machine, (JVM), 12, 13
JDK
install on Linux, 640, 641
install on Mac, 622, 623
install on PC, 604, 605
L
K
key attribute (Preferences), 240, 241
Key (action), 62,63
Key event (handling), 180, 181
Key store, 530, 531
Keyboard (soft), 24, 25, 62-65, 276, 277
Label, 30, 31, 120, 121
label attribute (receiver), 516, 517
Landscape layout, 134, 135
Large screen (detecting), 274, 275
LatLng class, 580, 581
Launcher icon, 86, 87
Layout, 34, 35, 98, 99, 120-135
common properties, 46, 47
for a fragment, 264, 265
for multiple fragments, 272, 273
frame, 130, 131
landscape, 134, 135
linear, 124-127
multi-pane, 260, 261
nesting, 132, 133
scrollable, 154, 155
single-pane, 260, 261
table, 128, 129
user interface, 18, 19
Layout editor, 98, 99
Layout resource file, 34, 35
layout span attribute (table layout), 128, 129
LENGTH_LONG constant, 104, 105
LENGTH_SHORT constant, 104, 105
Libraries, 12, 13
Lifecycle methods
of a fragment, 262, 263
of an activity, 70, 71
Linear layout, 124-127
lines attribute (EditText widget), 138, 139
Lines (maps), 584, 585
Linux kernel, 12, 13
List view, 314-317
extending, 442-447
Listener, 62, 63, 166-171
anonymous class, 170, 171
current class, 168, 169
named class, 168, 169
ListView widget, 314-317, 442-447
Location, 544-547, 562-575
updates, 570, 571
LocationClient constructor, 564, 565
LocationListener interface, 570, 571
LocationManager class, 574, 575
LocationRequest class, 570-573
Log class, 102,103
LogCat logging, 102,103
LogCat window, 100, 101
Long click, 166, 167
Low-level event, 166, 167, 180-183
660 makeText method (Toast class)
M
makeText method (Toast class), 104, 105
Manifest file, 14, 15
Map, 544, 545, 548-553
API key, 556-561
displaying, 578, 579
fragment, 576, 577
lines, 584, 585
markers, 582, 583
MAP_TYPE_HYBRID constant, 578, 579
MAP_TYPE_NORMAL constant, 578, 579
MapQuest, 548,549
MAPS_RECEIVE permission, 558-561
MAP_TYPE_SATELLITE constant, 578, 579
MAP_TYPE_TERRAIN constant, 578, 579
Markers (maps), 582, 583
match method (UriMatcher). 474. 475
Material theme, 198, 199
max attribute (SeekBar), 148, 149
Measurement (common units), 46, 47
Menu, 228-235
attributes, 232, 233
icon, 232, 233
items, 228, 229
options, 234, 235
popup, 230, 231
meta-data element, 561
MIME type, 468, 469
minHeight attribute (app widget), 514, 515
Minimum SDK, 32, 33
minSdkVersion attribute, 80, 81
minWidth attribute (app widget), 514, 515
Mobile advertising, 526, 527
Monetization, 524-527
MotionEvent class, 182, 183
moveCamera method (GoogleMap), 580, 581
moveToFirst method (Cursor), 416, 417
moveToNext method (Cursor), 416, 417
Multi-pane layout, 260, 261, 272-278
N
name attribute (meta-data), 516, 517, 561
name attribute (permission), 561
name attribute (provider), 480,481
name attribute (receiver), 516, 517
Nest (layout), 132, 133
Network connection (check), 364, 365
Network signals (location), 546, 547
NETWORK_PROVIDER constant, 574, 575
New project (Android Studio), 32, 33
New String Value Resource dialog, 40, 41
NOT NULL attribute (column), 402, 403
Phone number (calling)
Notification, 356-363
area, 356, 357
drawer, 356, 357
notify method (NotificationManager), 362, 363
notifyChange method (ContentResolver), 476, 477
number attribute (inputType), 138, 139
numberDecimal attribute (inputType), 138, 139
o
OEM driver, 612, 613
onClick method, 68,69
OnClickListener interface, 68, 69
onConnected method, 564, 565, 570, 571
onConnectionFailed method, 564, 565, 568, 569
onConnectionSuspended method, 570, 571
onCreate method, 266, 267
onCreateView method, 266, 267
onDisconnected method, 564, 565
onEditorAction method, 64, 65
onltemClick method, 318, 319
onPause method (Activity), 72, 73
onPostExecute method (AsyncTask), 296, 297
onPreExecute method (AsyncTask), 296, 297
onProgressUpdate method (AsyncTask), 296, 297
onReceive method, 512, 513
onResume method (Activity), 72, 73
onTouch method, 182, 183
onUpdate method, 512, 513
Open Handset Alliance, 8, 9
openFilelnput method (Context), 304, 305
openFileOutput method (Context), 302, 303
Open-source code, 4, 5
openStream method (URL), 302, 303
Options menu, 228, 229, 234, 235
orderlnCategory attribute (menu item), 232, 233
orientation attribute (linear layout), 126, 127
Orientation (change in emulator), 72, 73
Original Equipment Manufacturer driver, 612, 613
Output stream object, 302, 303
p
Padding (app widget), 506, 507
Paid app, 526, 527
Palette, 36. 37
Pane, 260, 261
Parse (XML file), 304, 305
Passive location listener, 546, 547
Path, 468, 469
Paused state (activity), 70, 71
Pending intent 358, 359
phone attribute (inputType), 138, 139
Phone number (calling), 322, 323
Physical device (run app on)
sendBroadcast method (Context)
661
Physical device (run app on), 22, 23
PolylineOptions class, 584, 585
Popup menu, 230, 231
position method (MarkerOptions), 582, 583
post method (View), 300, 301
Preference fragment, 270, 271
Preferences, 238-253
attributes, 240, 241
displaying, 242, 243
enabling/disabling, 250, 251
getting, 244, 245
grouping, 248, 249
using, 246, 247
working with Java. 252, 253
PRIMARY KEY attribute (column), 402, 403
PRIORITY_BALANCED_POWER_ACCURACY,
572,573
PRIORITY_HIGH_ACCURACY, 572, 573
PRIORITY_NO_POWER, 572, 573
Private service, 348, 349
progress attribute (SeekBar), 148, 149
Progress bar, 156-159
Project, 14, 15
build, 14, 15
compile, 14, 15
new, 32, 33
run,14, 15
window, 20, 21
Properties
common, 46, 47
layout, 46, 47
widget, 44-47
window, 44, 45
protectionLevel attribute (permission), 561
Provider (content), 468-485
Provider class (app widget), 510, 511
Public service, 348, 349
Publisher account (Google Play), 534,535
put method (ConvertValues), 420, 421
putExtra method (Intent), 320, 321
Q
Query, 416, 417,474, 475
query method (SQLiteDatabase), 416, 417
R
R class, 56, 57
Radio button, 142, 143
event handling, 172, 173
Radio group,142, 143
event handling, 174, 175
RDBMS, 400, 401
READ_GSERVICES permission, 560, 561
RECEIVED_BOOT_COMPLETED permission, 384.
383
Receiver
boot completed, 384, 385
connectivity changed, 386, 387
custom broadcast, 390, 391
References for widgets, 60, 61
Register
app widget, 516, 517
content provider, 480, 481
Relational Database Management System, 400, 401
Release build, 528-533
Release key, 530-533
RemoteViews class, 512, 513
removeLocationUpdates method, 570-573
replace method (FragmentTransaction), 280, 281
requestLocationUpdates method, 570-573
required attribute (uses-feature), 561
resource attribute (meta-data), 516, 517
Resources
compiled, 14, 15
dialog box, 40, 41
editor, 42, 43
resources.arse file, 14, 15
Restore values, 72, 73
Resumed state (activity), 70, 71
Routing, 548,549
RSS (Rich Site Summary) feed, 290, 291
Run a project, 14, 15
Run configuration, 22, 23
run method (TimerTask), 298-301
Runnable interface, 300, 301
Running state (activity), 70, 71
Runtime (Android), 12, 13
Runtime errors, 100, 101
s
Save values, 72, 73
SAX (Simple API for XML), 304, 305
Scale-independent pixels (sp), 46, 47
schedule method (Timer), 298, 299
Screen width
detecting, 274, 275
minimum, 274, 275
Screen (large), 274, 275
Scroll bar, T54, 155
Scrollable layout, 154, 155
SDK (Software Development Kit), 8, 9
Seek bar, 148, 149
event handling, 178, 179
Segment, 468, 469
sendBroadcast method (Context), 388, 389
662 Service
Service, 344-355
register. 348, 349
testing, 352, 353
viewing, 354, 355
Service class, 348, 349
setAdapter method (spinner), 146, 147
setChecked method (check box), 140, 141
setCompassEnabled method, 578, 579
setDropDownViewResource method, 146, 147
setFastestlnterval method (LocationRequest), 570-573
setHasOptionsMenu method (Fragment), 266, 267
setlnterval method (LocationRequest), 570-573
setMapType method (GoogleMap), 578, 579
setMessaee method, 486, 487
setNegativeButton method, 486, 487
setNeutralButton method, 486, 487
setOnClickPendinglntent method, 512, 513
setPositiveButton method, 486, 487
setPriorty method (LocationRequest), 570-573
setSelection method (spinner), 146, 147
setText method, 66, 67
setTextViewText method (RemoteViews), 512, 513
Settings, see Preferences
Settings app, 354, 355
setVisibility method (view), 152, 153
setZoomControlsEnabled method (UiSettings), 578,
SHA-1 fingerprint, 556, 557
Shared Preferences object, 72, 73, 244, 245
show method (AlertDialog.Builder), 486, 487
show method (Toast class), 104, 105
showAsAction attribute (menu item), 232, 233
Side loading, 532,533
Signed app, 14, 15,530-533
Simple API for XML (SAX), 304, 305
SimpleAdapter class, 316, 317
Single-pane layout, 260, 261, 264-271
Smallest-width qualifier, 274, 275
Smartphone, 4, 5
Soft keyboard, 24, 25, 62-65
controlling, 276, 277
Software Development Kit (SDK), 8, 9
Source code
install on Linux, 638. 639
install on Mac, 620, 621
install on PC, 602, 603
Java, 20, 21
sp (scale-independent pixels), 46, 47
Spinner, 144-147
event handling, 176, 177
SQL statement, 402, 403, 410, 411
SQLite, 400, 401
SQLiteDatabase class, 417-423
src attribute (ImageView widget), 150, 151
Stack (Android), JL2, 13
Text field
Stack trace, 108, 109
START_NOT_STICKY constant, 346. 347
START_REDELIVER_INTENT constant, 346, 347
START_STICKY constant, 346, 347
Started state (activity), 70, 71
startResolutionForResult method, 568, 569
startService method (Context), 348, 349
stateHidden attribute, 138, 139
stateUnchanged attribute, 138, 139
stateVisible attribute, 138, 139
Step Into button (debugger), 108, 109
Step Over button (debugger), 108, 109
Step through (debugger), 108, 109
Stopped state (activity), 70, 71
stopSelf method (Service), 348, 349
stopService method (Context), 348, 349
strings.xml file, 42, 43
Styled 198-207
built-in 210, 211
how to apply, 206, 207
user-defined, 204, 205
Style element, 200, 201, 204, 205
Style property, 204, 205
Style sheet, 208, 209
Subscription, 526, 527
summary attribute (Preferences), 240, 241
Supporting method (database class), 470, 471
System architecture, 12, 13
System service, 362-365
T
Tab, 436-441
fragment, 440, 441
Table. 402. 403
Table layout, 128, 129
TabManaeer class, 436-439
TAG constant, 102,103
target method, 580, 581
targetSdkVersion attribute, 80, 81
Task, 358, 359
asynchronous, 294, 295
timed, 298, 299, 350, 351
Task history, 358, 359
Test
a service, 352, 353
app widget, 516, 517
database class, 424, 425
phases, 96, 97
Test data (clearing), 426, 427
Text appearance (modify), 216, 217
text attribute (inputType), 138, 139
Text box, 30, 31, 121, 138, 139
Text field, 121, 138, 139
Text property (widget)
zoom method
663
Text property (widget), 38, 39
Text tab, 34, 35
Text view, 30, 31
Android Studio, 18, 19
editable, 64, 65, 136-139
textEmailAddress attribute (inputType), 138, 139
textMultiline attribute (inputType), 138, 139
textPassword attribute (inputType), 138, 139
textPersonName attribute (inputType), 138, 139
TextView wideet, 30, 31
Theme, 36, 37, 198, 199, 210-215
built-in, 210, 211
for different APIs, 200, 201
how to apply, 220. 221
modify per API, 214, 215
this keyword, 62, 63
Thread, 292, 293
with services, 350, 351
Thumb (seek bar), 148, 149
tilt method (CameraPosition.Builder), 580, 581
time attribute (inputType), 138, 139
Timed task, 298, 299, 350, 351
Timer class, 298, 299
TimerTask class, 298, 299
title attribute (menu item), 232, 233
title attribute (Preferences), 240. 241
Title bar, 198, 199
title method (MarkerOptions), 582, 583
Toast, 104, 105
Tool windows (Android Studio), 18, 19
Touch event (handling), 182. 183
Touchscreen, 4, 5
Trace code execution, 102-105
u
UI thread, 292, 293
updating, 300, 301
Unbound service, 344-347
Uniform Resource Identifier, 468, 469, 472-477
UNIQUE attribute (column), 402, 403
Units of measurement, 46, 47
update method (SQLiteDatabase), 420, 421
Update row (database), 420, 421
updateAppWidget method, 512, 513
updatePeriodMillis attribute (app widget), 514, 515
Updating rows (content provider), 478, 479
URI, 468, 469, 472-477
Uri class, 478, 479
Uri object, 482, 483
Uri.Builder class, 476, 477
UriMatcher class, 472, 473
URL (viewing), 322, 323
URL class. 302. 303
User interface, 18, 19, 24, 25, 30, 31
how to develop, 34, 35
User interface thread, 292, 293
User-defined style, 204, 205
V
v7 appcompat support library, 58, 59
value attribute (meta-data), 561
Variables (debugger), 108, 109
Versions (Android), 10, 11
Vertical scroll bar, 154, 155
View class, 122, 123,300,301
View hierarchy, 122, 123
ViewGroup class, 122, 123
Virtual machine, 12, 13
w
w method (Log class), 102,103
Web content (displaying), 156-159
Web view, 156-159
weight attribute (linear layout), 126, 127
Welcome page (Android Studio), 16, 17
Wideets, 30, 31, 120, 121, 136-155
adding to layout, 36, 37
app, 502-517
common properties, 46, 47
get and set text, 66, 67
Id property, 38, 39
properties, 44, 45
references, 60, 61
showing and hiding, 152, 153
Width
predefined values, 46, 47
screen, 274, 275
width method (PolylineOptions), 584, 585
Wi-Fi signals (location), 546, 547
windowSoftlnputMode attribute, 138, 139
Wire (listener), 62, 63
withAppendedld method (ContentUris), 482, 483
WRITE_EXTERNAL_STORAGE permission, 558-561
X,Y, Z
XML, 18, 19
XML file, 34, 35
parse. 304. 305
XML resources, 42, 43
zoom method, 580, 581