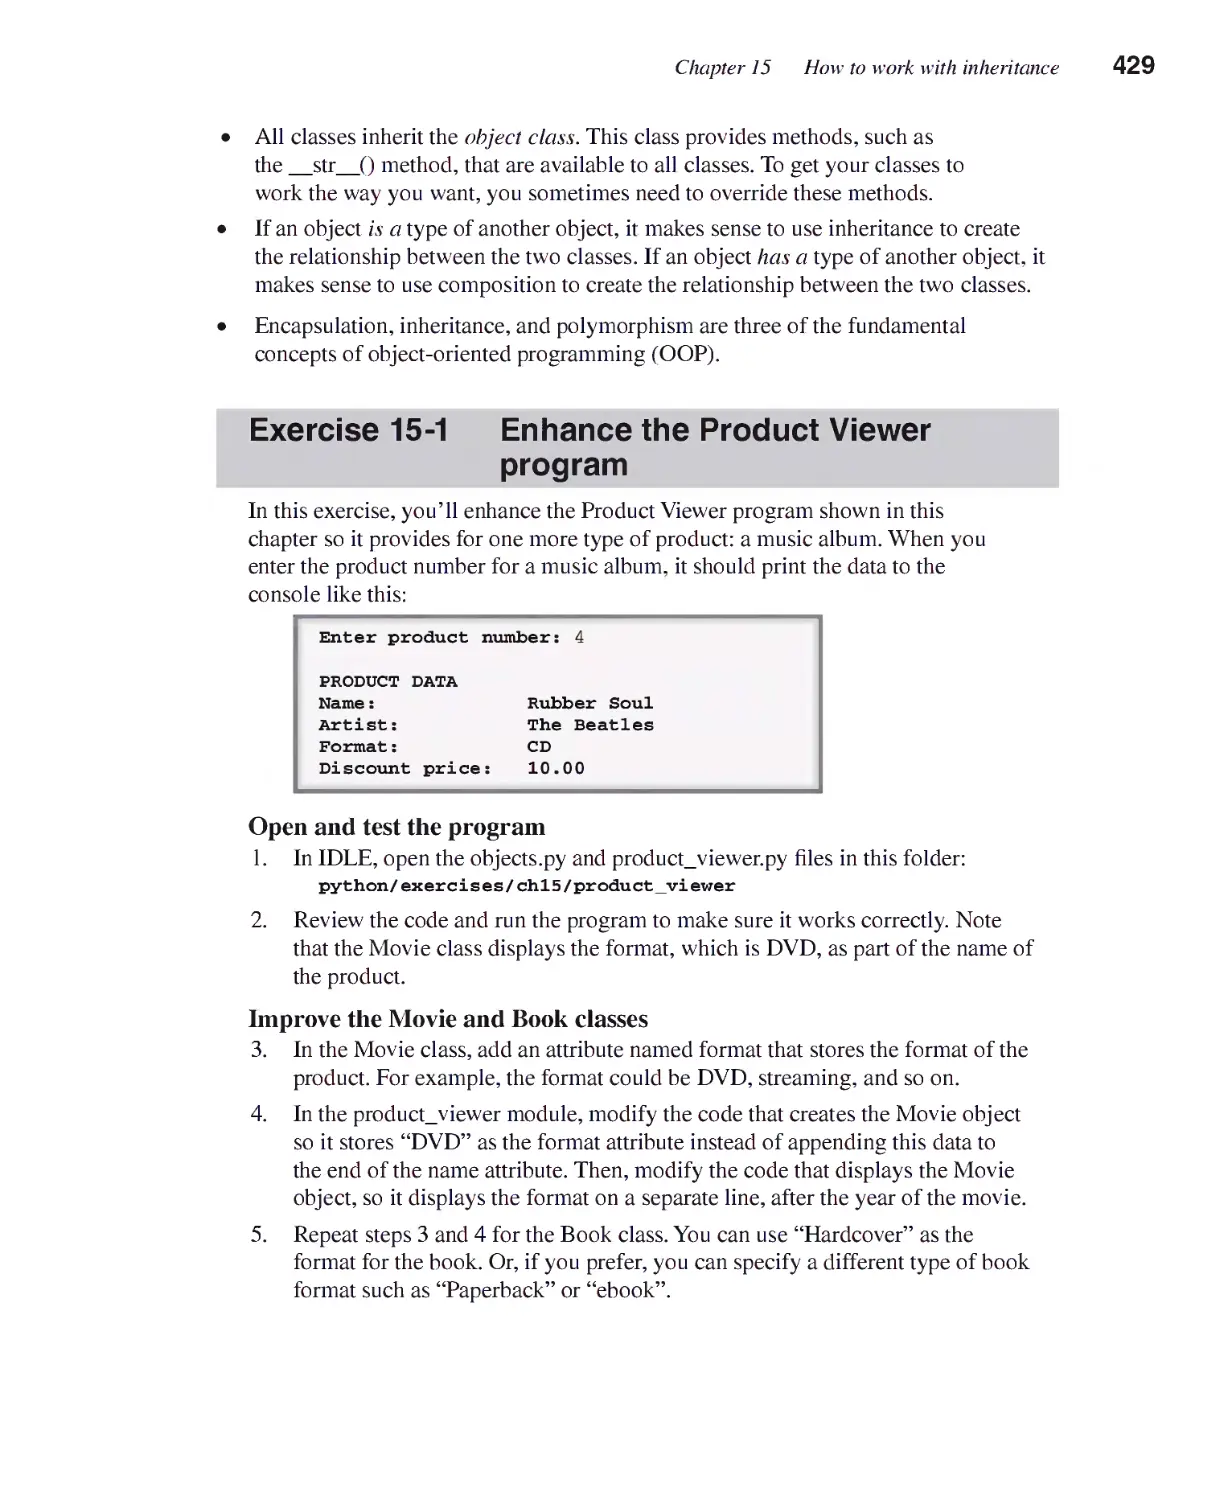
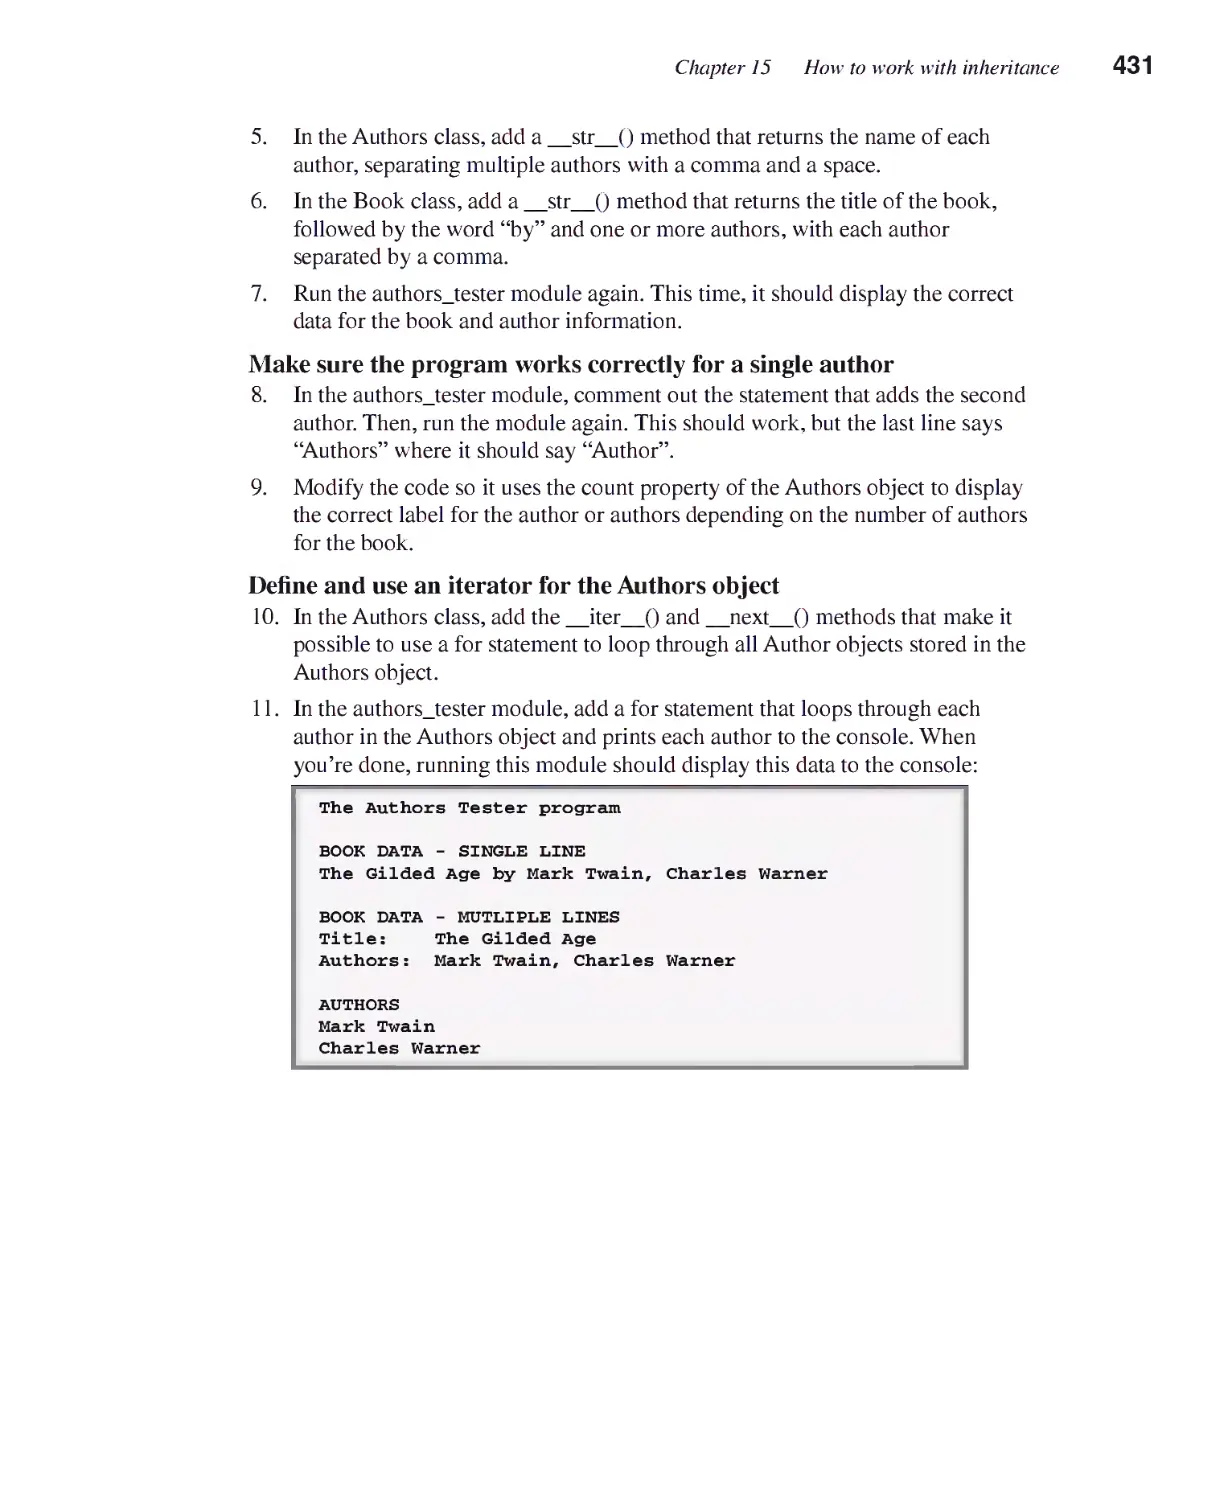
/


Текст
murach
/
• r»
Michael Urban
Joel Murach
BEGINNER TO PRO
murach
/
Michael Urban
Joel Murach
Mike Murach & Associates, Inc.
4340 N. Knoll Ave. • Fresno, CA 93722
www.murach.com • murachbooks@murach.com
Editorial team
Authors: Michael Urban
Joel Murach
Editors: Mike Murach
Elizabeth Drake
Production: Maria Spera
Books for web developers
Murach 's HTML5 and CSS3 (3rd Edition)
Munich 's JavaScript (2nd Edition)
Murach 'sjQuery (2nd Edition)
Murach's PHP and MySQL (2nd Edition)
Murach's Java Servlets and JSP (3rd Edition)
Murach'sASPNET4.6 with Web Programming with C#2015
Murach's ASPNET Web Programming with VB
Books on core Java, C#, and Visual Basic
Murach's Beginning Java with NetBeans
Murach's Beginning Java with Eclipse
Murach's Java Programming (4th Edition)
Murach's C$2015
Murach \s Visual Basic 2015
Books for database programmers
Murach's MySQL (2nd Edition)
Murach's SQL Server 2016 for Developers
Murach \s Oracle SQL and PL/SQL for Developers (2nd Edition)
For more on Murach books,
please visit us at www.murach.com
©2016, Mike Murach & Associates, Inc.
All rights reserved.
Printed in the United States of America
10 98765432 1
ISBN: 978-1-890774-97-4
Content
Introduction
Section 1 Essential concepts and skills
XV
Chapter 1
Chapter 2
Chapter 3
Chapter 4
Chapter 5
Chapter 6
Chapter 7
Chapter 8
An introduction to Python programming
How to write your first programs
How to code control statements
How to define and use functions and modules
How to test and debug a program
How to work with lists and tuples
How to work with file I/O
How to handle exceptions
Section 2 Other concepts and skills
3
27
65
103
141
163
195
225
Chapter 9
Chapter 10
Chapter 11
Chapter 12
Chapter 13
How to work with numbers
How to work
How to work
How to work
How to work
with
with
with
with
stnnes
dates and times
dictionaries
recursion and algorithms
Section 3 Object-oriented programming
Chapter 17
Chapter 18
How to work with a database
How to build a GUI program
Reference aids
249
269
297
321
347
Chapter 14 How to define and use your own classes 365
Chapter 15 How to work with inheritance 405
Chapter 16 How to design an object-oriented program 433
Section 4 Database and GUI programming
461
503
Appendix A How to set up Windows for this book
Appendix B How to set up Mac OS X for this book
Index
523
533
545
Expanded contents
Expanded contents
Section 1 Essential concepts and skills
Chapter 1 An introduction to Python programming
Introduction to Python 4
Why Python works so well as your first programming language 4
Three types of Python applications 6
The source code for a console application 8
How Python compiles and runs source code 10
How7 disk storage and main memory work together 12
How to use IDLE to develop programs 14
How7 to use the interactive shell 14
How7 to work with source files 16
How7 to compile and run a program 18
How7 to fix svntax and runtime errors 20
Chapter 2 How to write your first programs
Basic coding skills 28
How7 to code statements 28
How7 to code comments 30
How7 to use functions 32
How to work with data types and variables 34
How7 to assign values to variables 34
How7 to name variables 36
How to work with numeric data 38
How7 to code arithmetic expressions 38
How7 to use arithmetic expressions in assignment statements 40
How7 to use the interactive shell for testing numeric operations 42
How to work with string data 44
How7 to assign strings to variables 44
How7 to join strings 44
How7 to include special characters in strings 46
How7 to use the interactive shell for testing string operations 48
How to use five of the Python functions 50
How7 to use the print() function 50
How7 to use the input() function 52
How7 to use the int(), float(), and round() functions 54
How7 to chain functions 54
Two illustrative programs 56
The Miles Per Gallon program 56
The Test Scores program 58
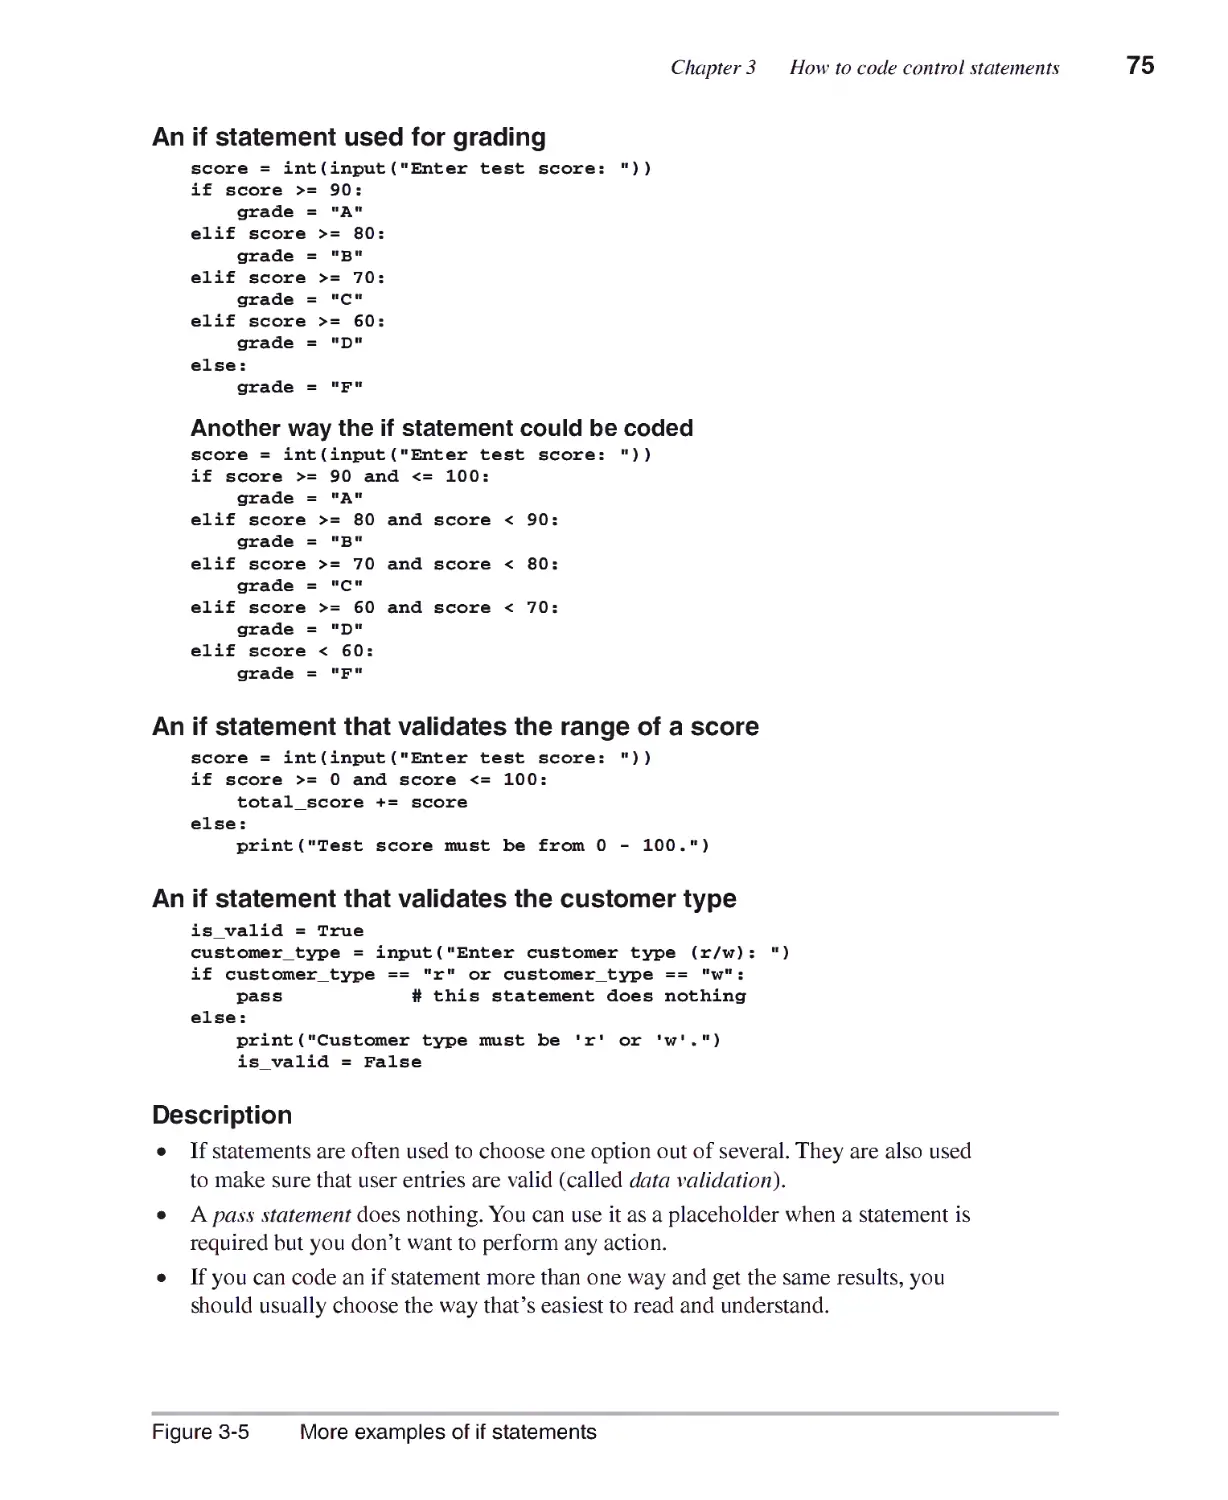
Chapter 3 How to code control statements
How to code Boolean expressions 66
How7 to use the relational operators 66
How7 to use the logical operators 68
How to compare strings 70
■ ■ ■
VIII Expanded contents
How to code the selection structure 72
How to code if statements 72
More examples of if statements 74
How to code nested if statements 76
How7 to use pseudocode to plan if statements 78
Two illustrative programs 80
The Miles Per Gallon program 80
The Invoice program 82
How to use the iteration structure 84
How to code while statements 84
How to code for statements 86
How7 to code break and continue statements 88
More examples of loops 90
How7 to use pseudocode to plan a program 92
Two illustrative programs 94
The Test Scores program 94
The Future Value program 96
Chapter 4 How to define and use functions and modules
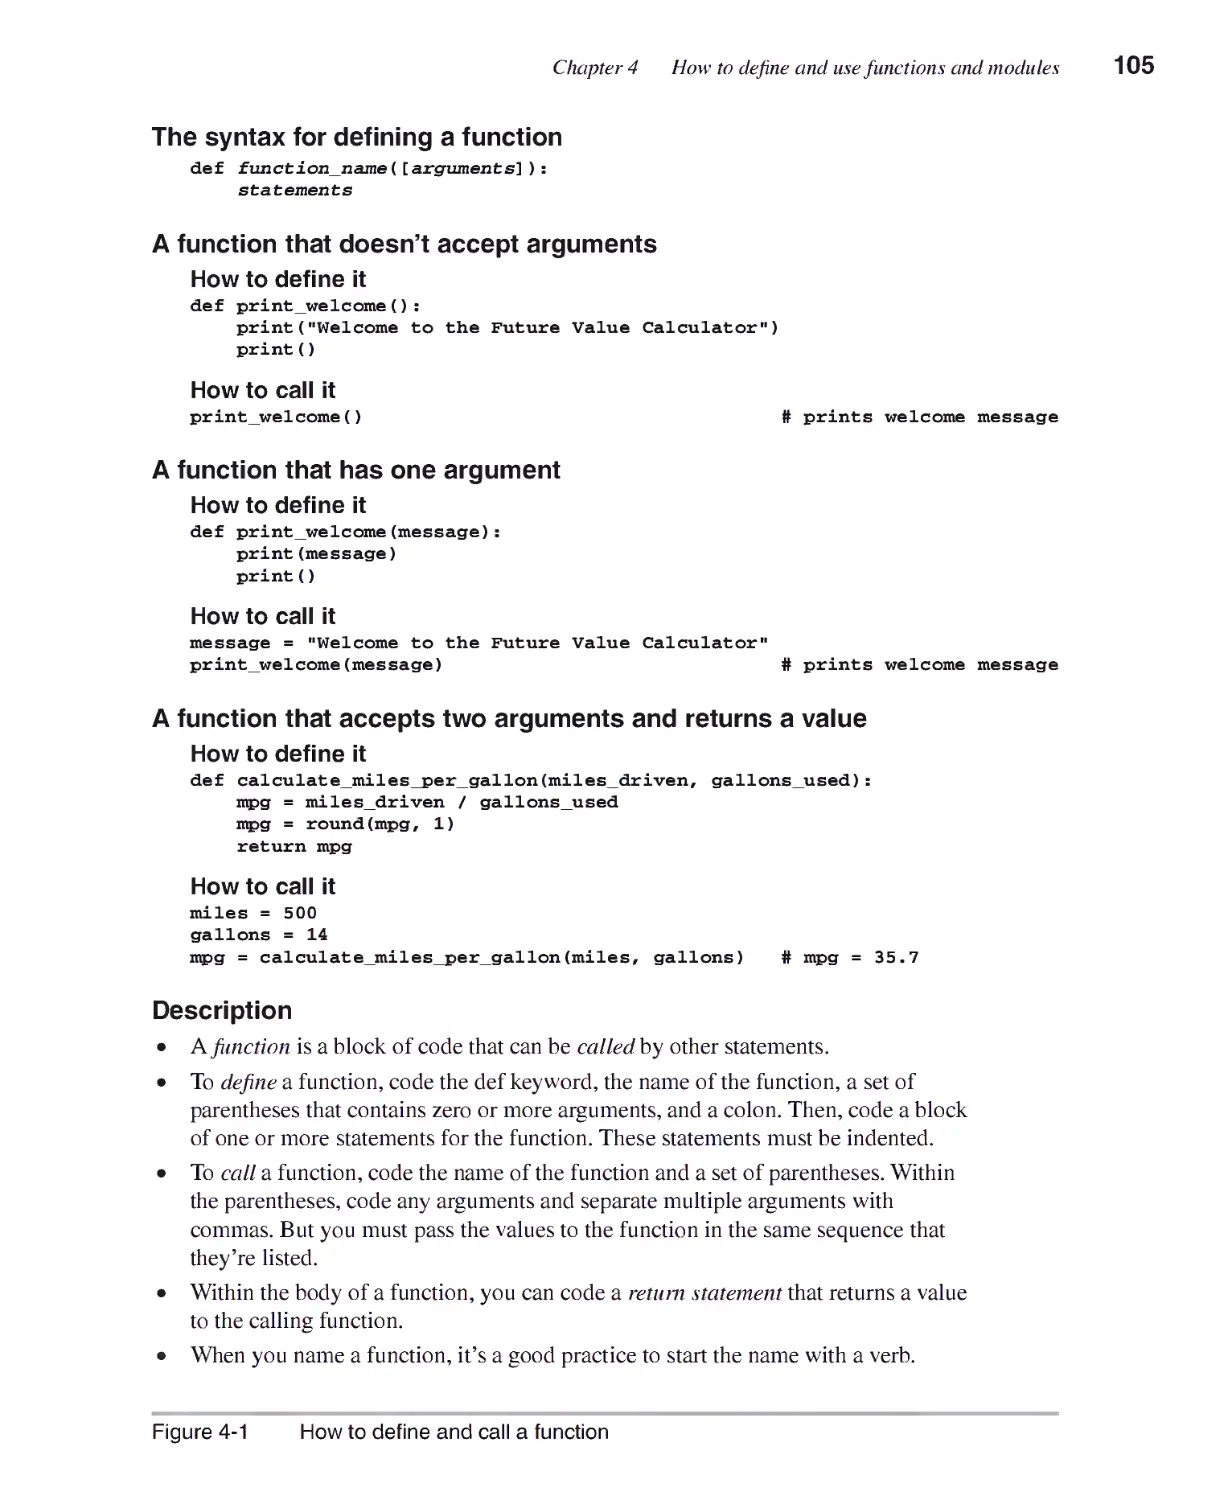
How to define and use functions 104
How7 to define and call a function 104
How7 to define and call a main() function 106
The Future Value program with functions 108
More skills for defining and using functions 110
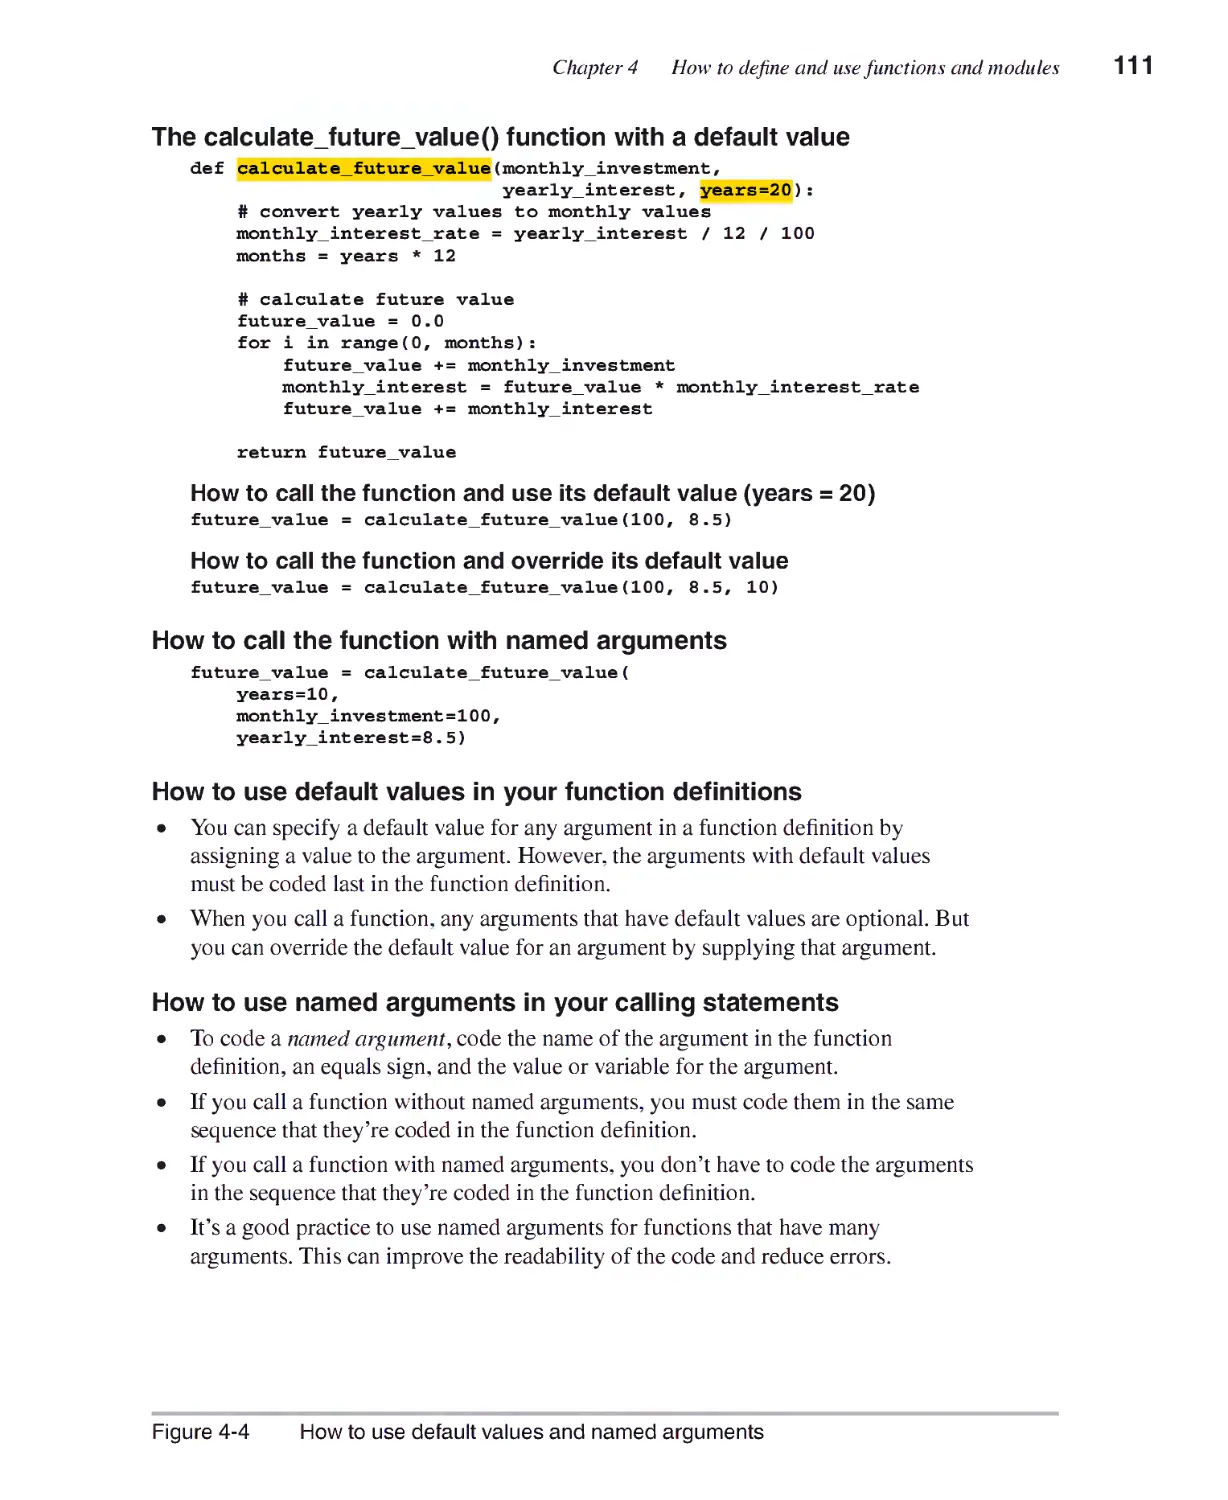
How7 to use default values for arguments 110
How7 to use named arguments 110
When and how to use local and slobal variables 112
How to create and use modules 114
How7 to create a module 114
How7 to document a module 116
How7 to import a module 118
The Convert Temperatures program 120
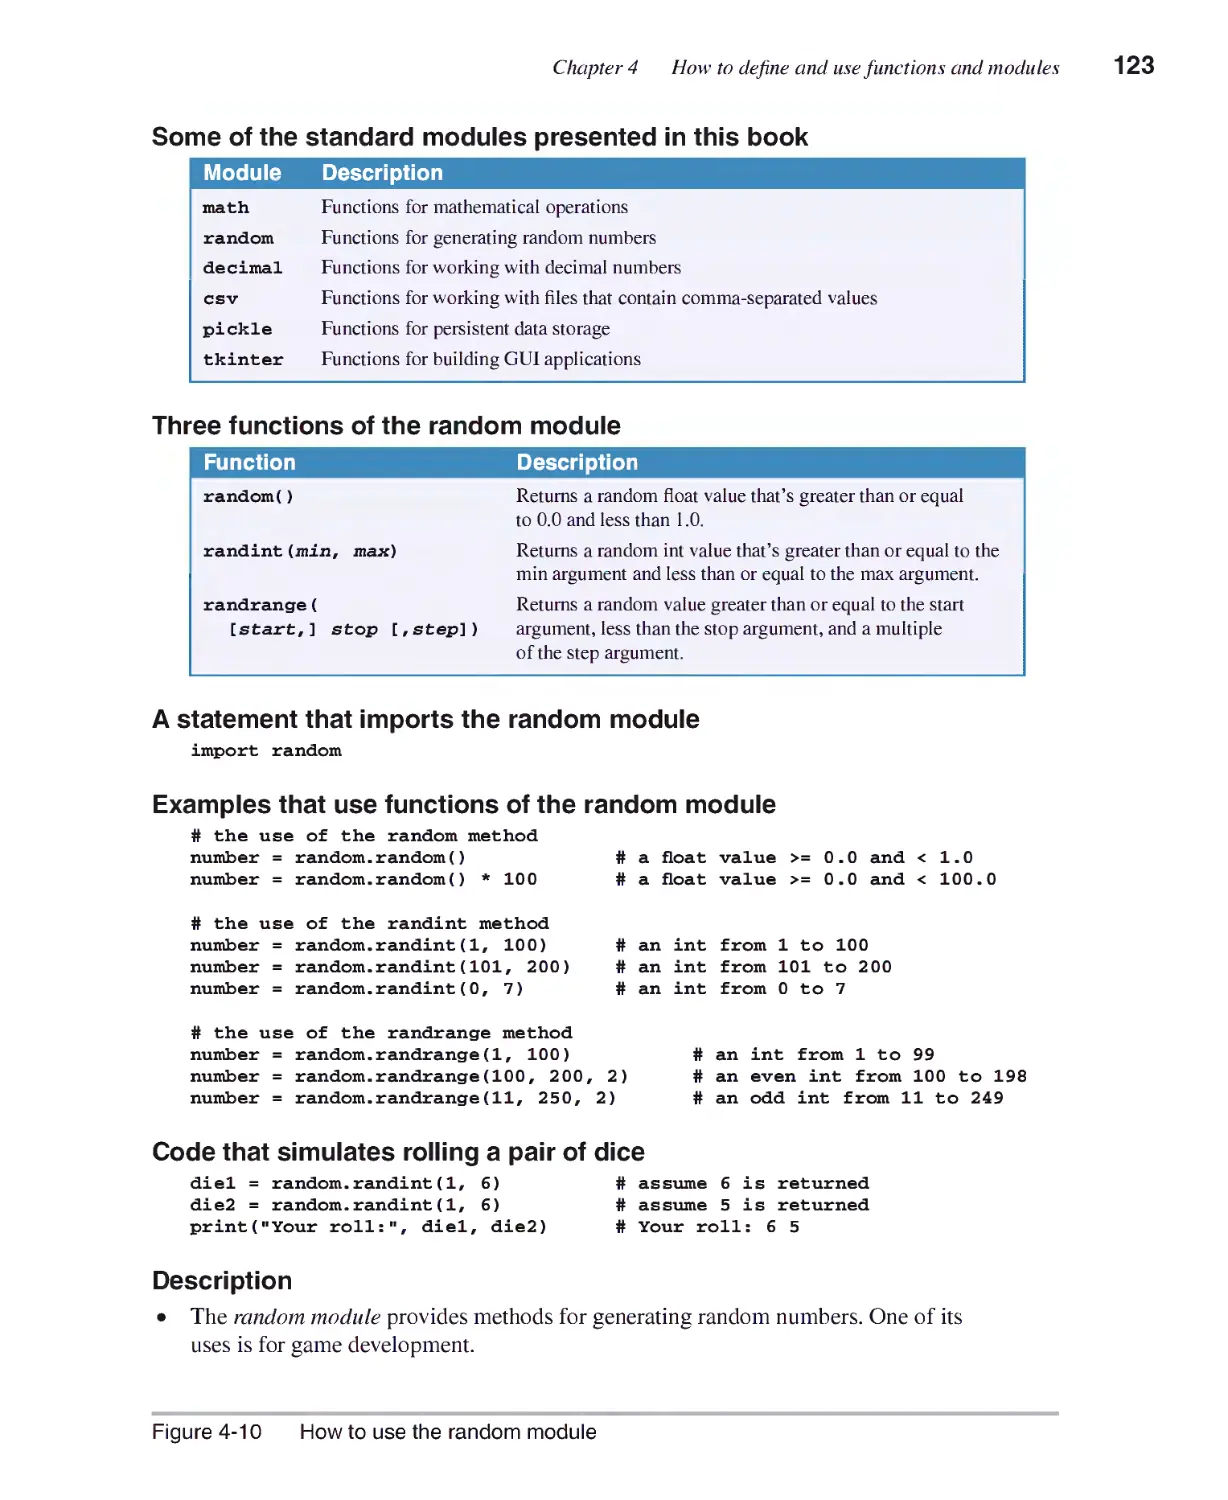
How to use standard modules 122
How7 to use the random module 122
The Guess the Number game 124
How to plan the functions of a program 126
How7 to use a hierarchy chart 126
The hierarchy chart for the Pis Dice same 128
The Pig Dice game with global variables 130
The Pis Dice same with local variables 134
Chapter 5 How to test and debug a program
An introduction to testing and debugging 142
The three types of errors that can occur 142
Common Pvthon errors 144
Four techniques for testing and debugging 146
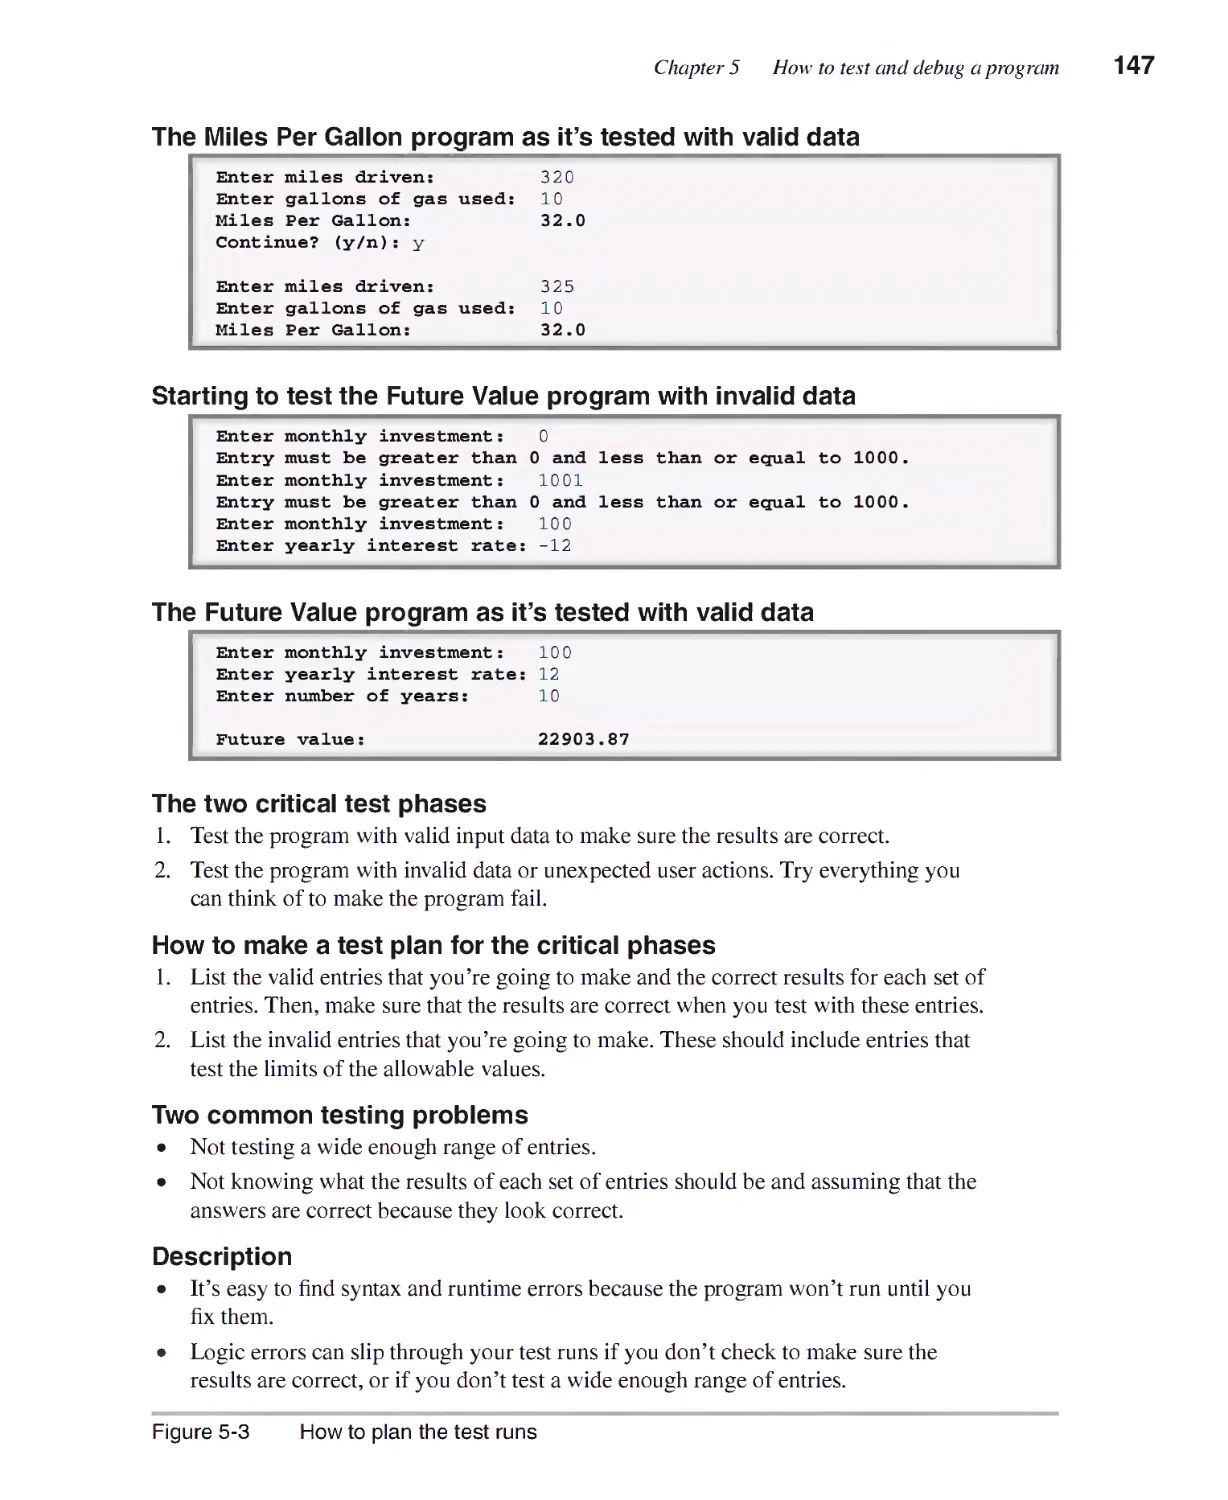
How7 to plan the test runs 146
A simple way to trace code execution 148
How7 to use top-down coding and testing to simplify debugging 150
How to use the IDLE shell to test functions 152
■
Expanded contents IX
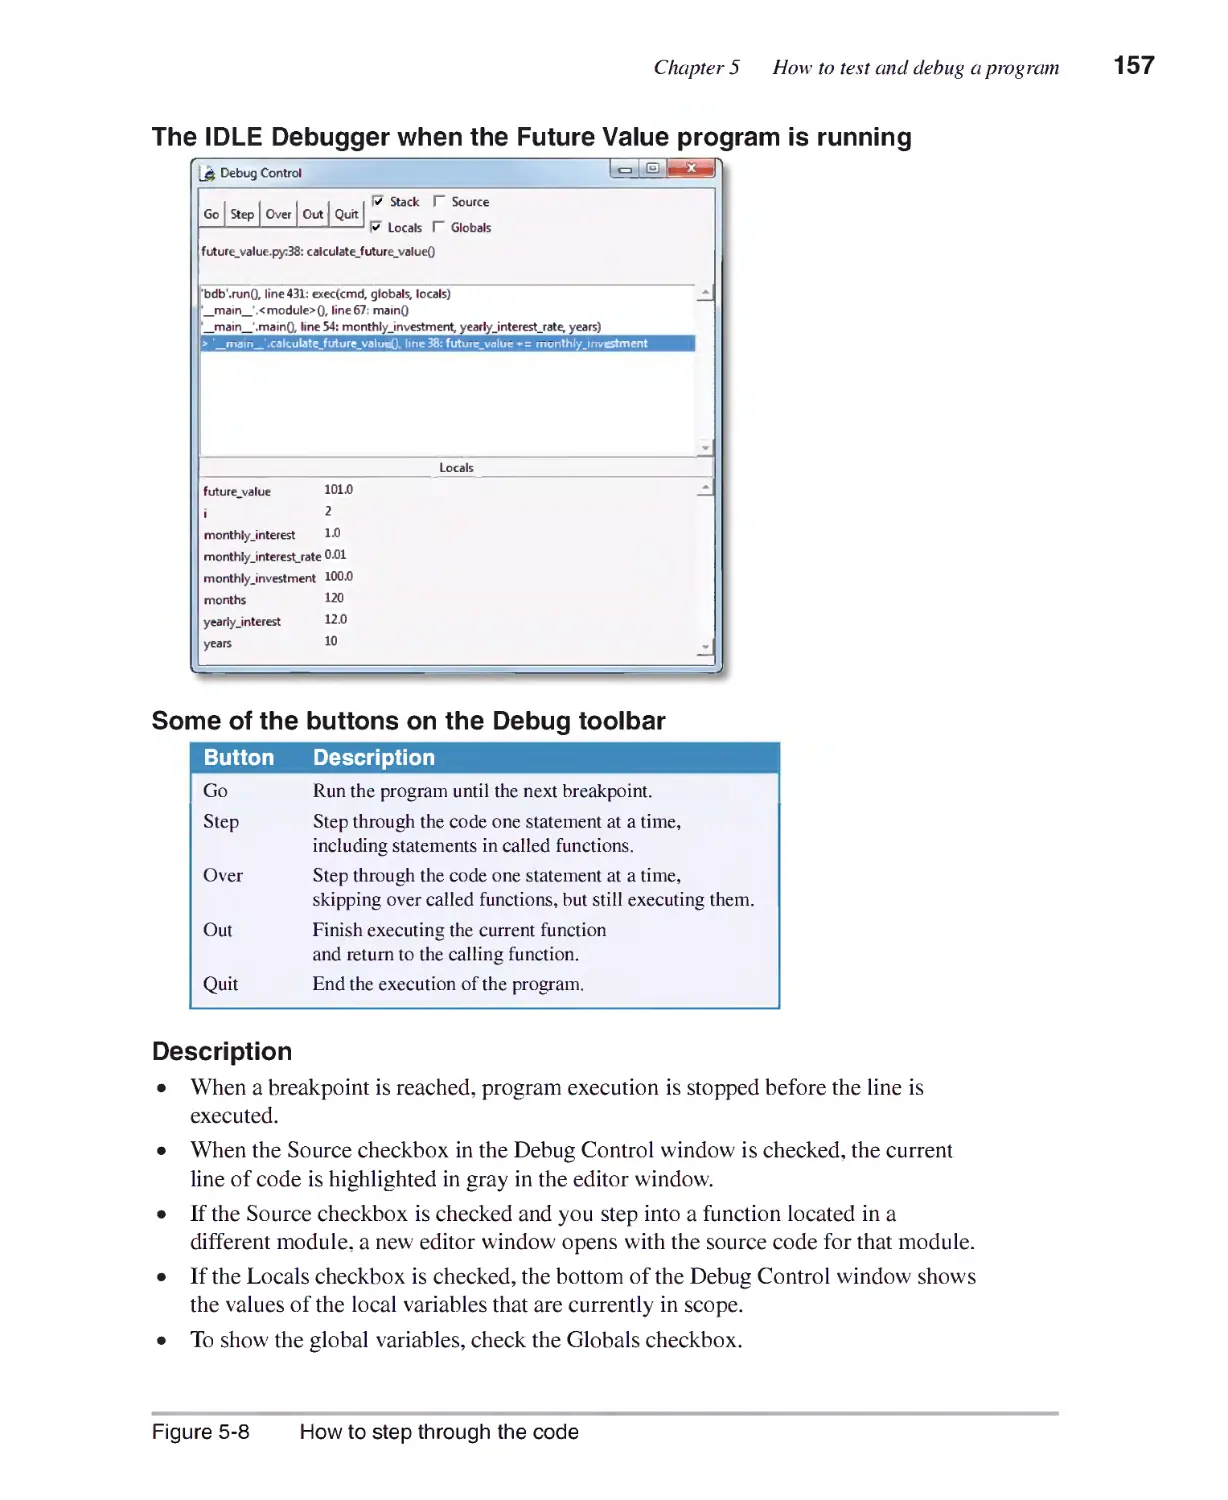
How to use the IDLE debugger 154
How to set and remove breakpoints 154
How to step through the code 156
How7 to view the stack 158
Chapter 6 How to work with lists and tuples
Basic skills for working with lists 164
How7 to create a list 164
How7 to set and set items 164
How7 to add and remove items 166
How7 to process the items in a list 168
How7 lists are passed to functions 170
The Movie List program 172
How to work with a list of lists 176
How7 to create a list of lists 176
How7 to process the items in a list of lists 176
The Movie List 2D program 178
More skills for working with lists 182
How7 to count, reverse, and sort the items in a list 182
How7 to use other functions with lists 184
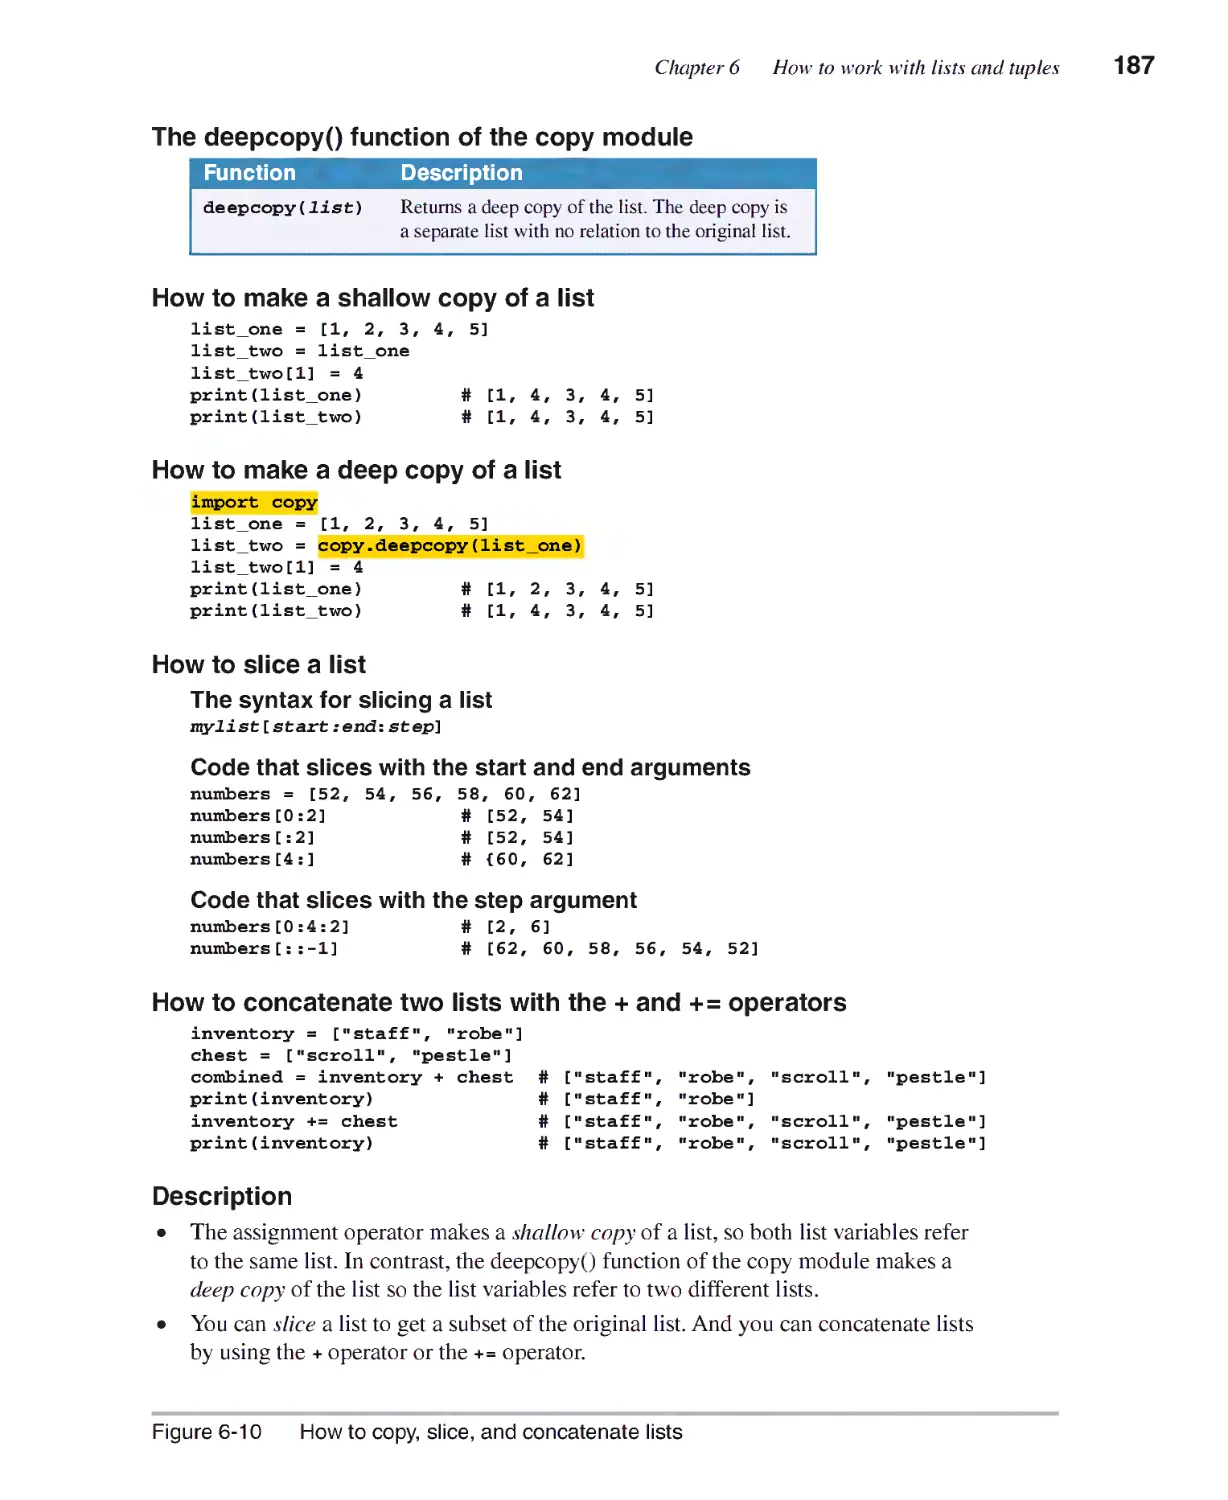
How7 to copy, slice, and concatenate lists 186
How to work with tuples 188
How7 to create a tuple 188
How7 to get items from a tuple 188
The Number Crunching program 190
Chapter 7 How to work with file I/O
An introduction to file I/O 196
How file I/O works 196
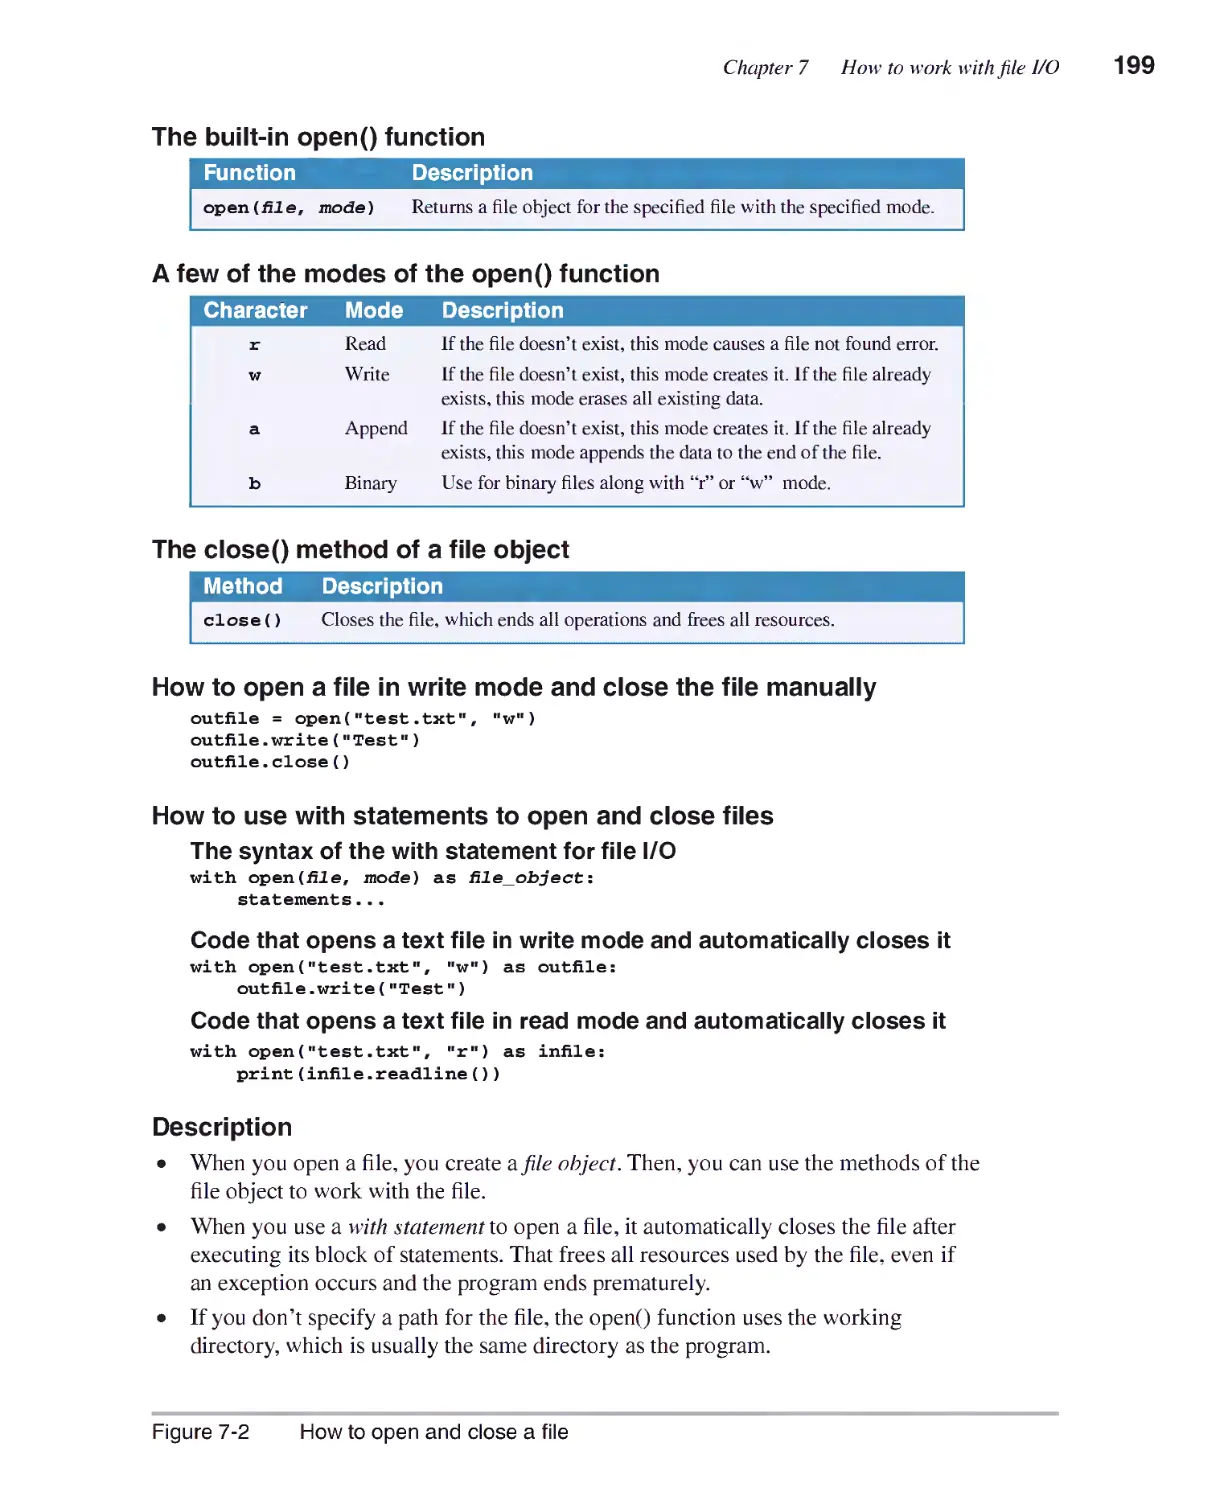
How7 to open and close a file 198
How to use text files 200
How7 to write a text file 200
How7 to read a text file 202
How7 to work with a list in a text file 204
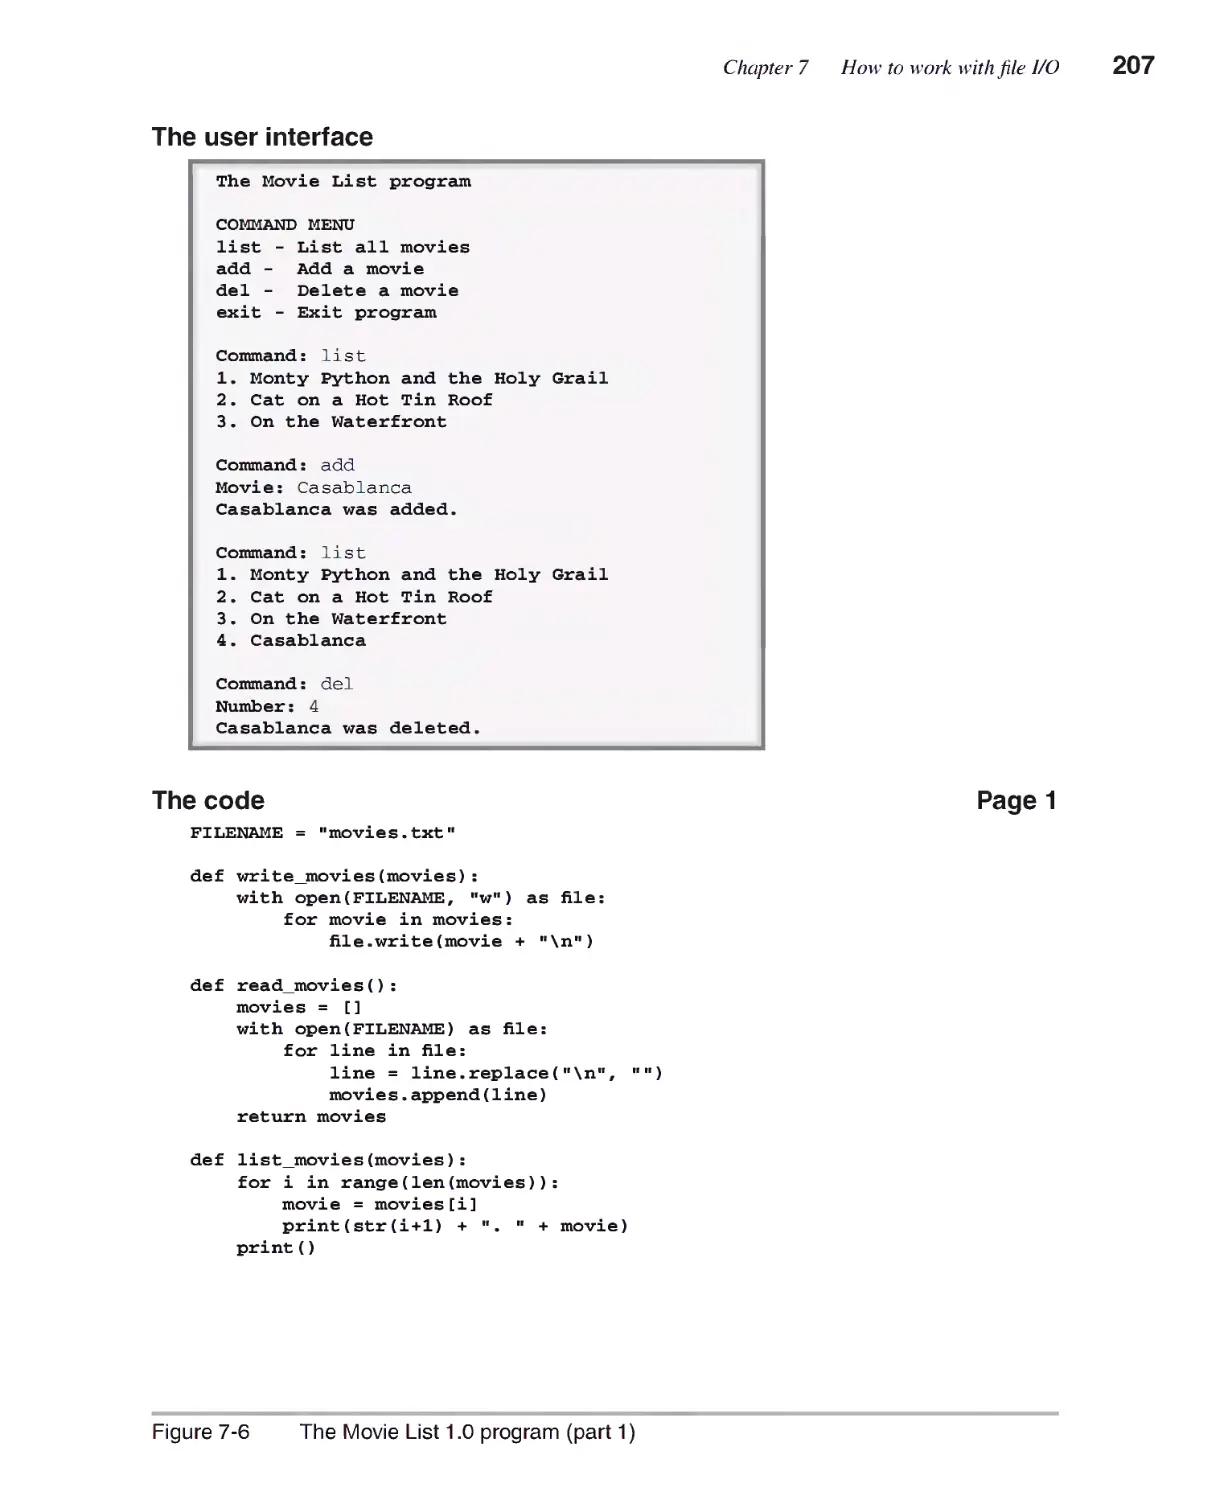
The Movie List 1.0 program 206
How to use CSV files 210
How to write a CSV file 210
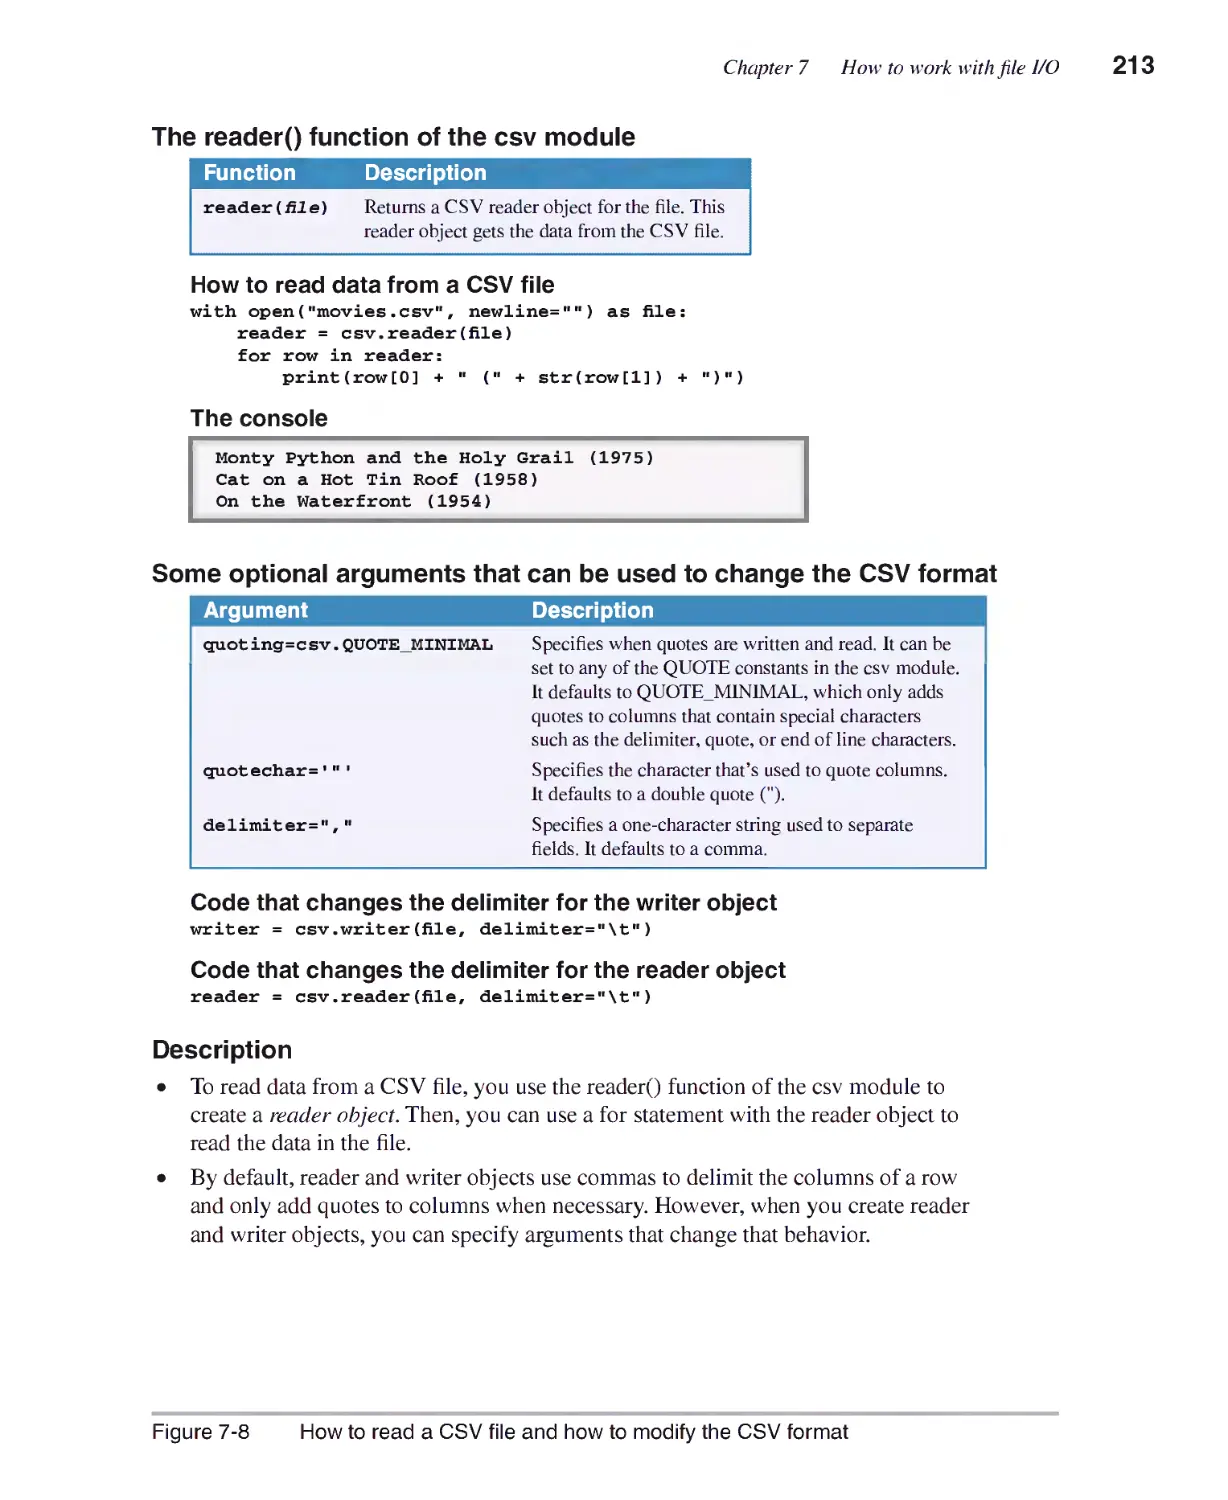
How to read a CSV file 212
How7 to modifv the CSV format 212
The Movie List 2.0 program 214
How to use binary files 218
How7 to work with a binary file 218
The Movie List 3.0 program 220
Chapter 8 How to handle exceptions
How to handle a single exception 226
How exceptions work 226
How7 to use a try statement to handle one type of exception 228
The Total Calculator program 230
X Expanded contents
How to handle multiple exceptions 232
How to use a try statement to handle multiple exceptions 232
How to get the information from an exception object 234
The Movie List 2.0 program 236
Two more skills 240
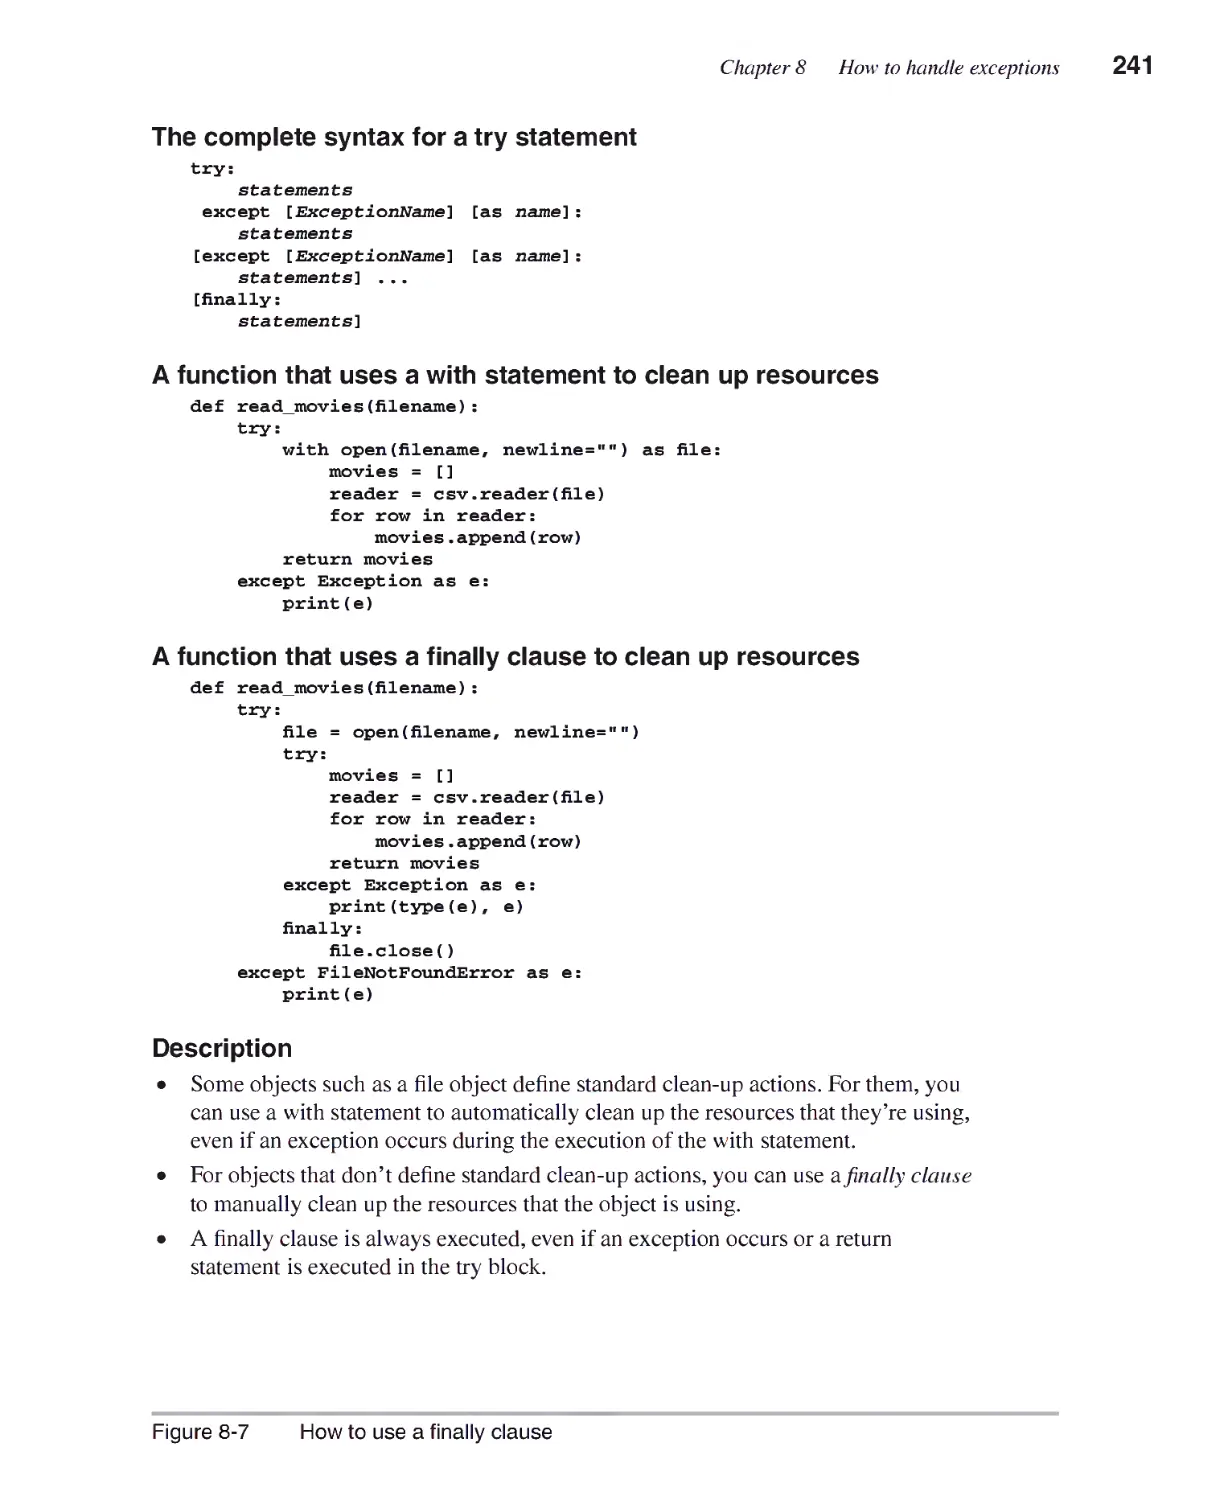
How7 to use a finally clause 240
How to raise an exception 242
Section 2 Other concepts and skills
Chapter 9 How to work with numbers
Basic skills for working with numbers 250
How floating-point numbers work 250
How to use the math module 252
How to format numbers 254
How7 to use the format() method of a string 254
How to use the locale module 256
How7 to fix roundins errors 258
How to work with decimal numbers 260
How7 to use the decimal module 260
The Invoice program with decimal numbers 262
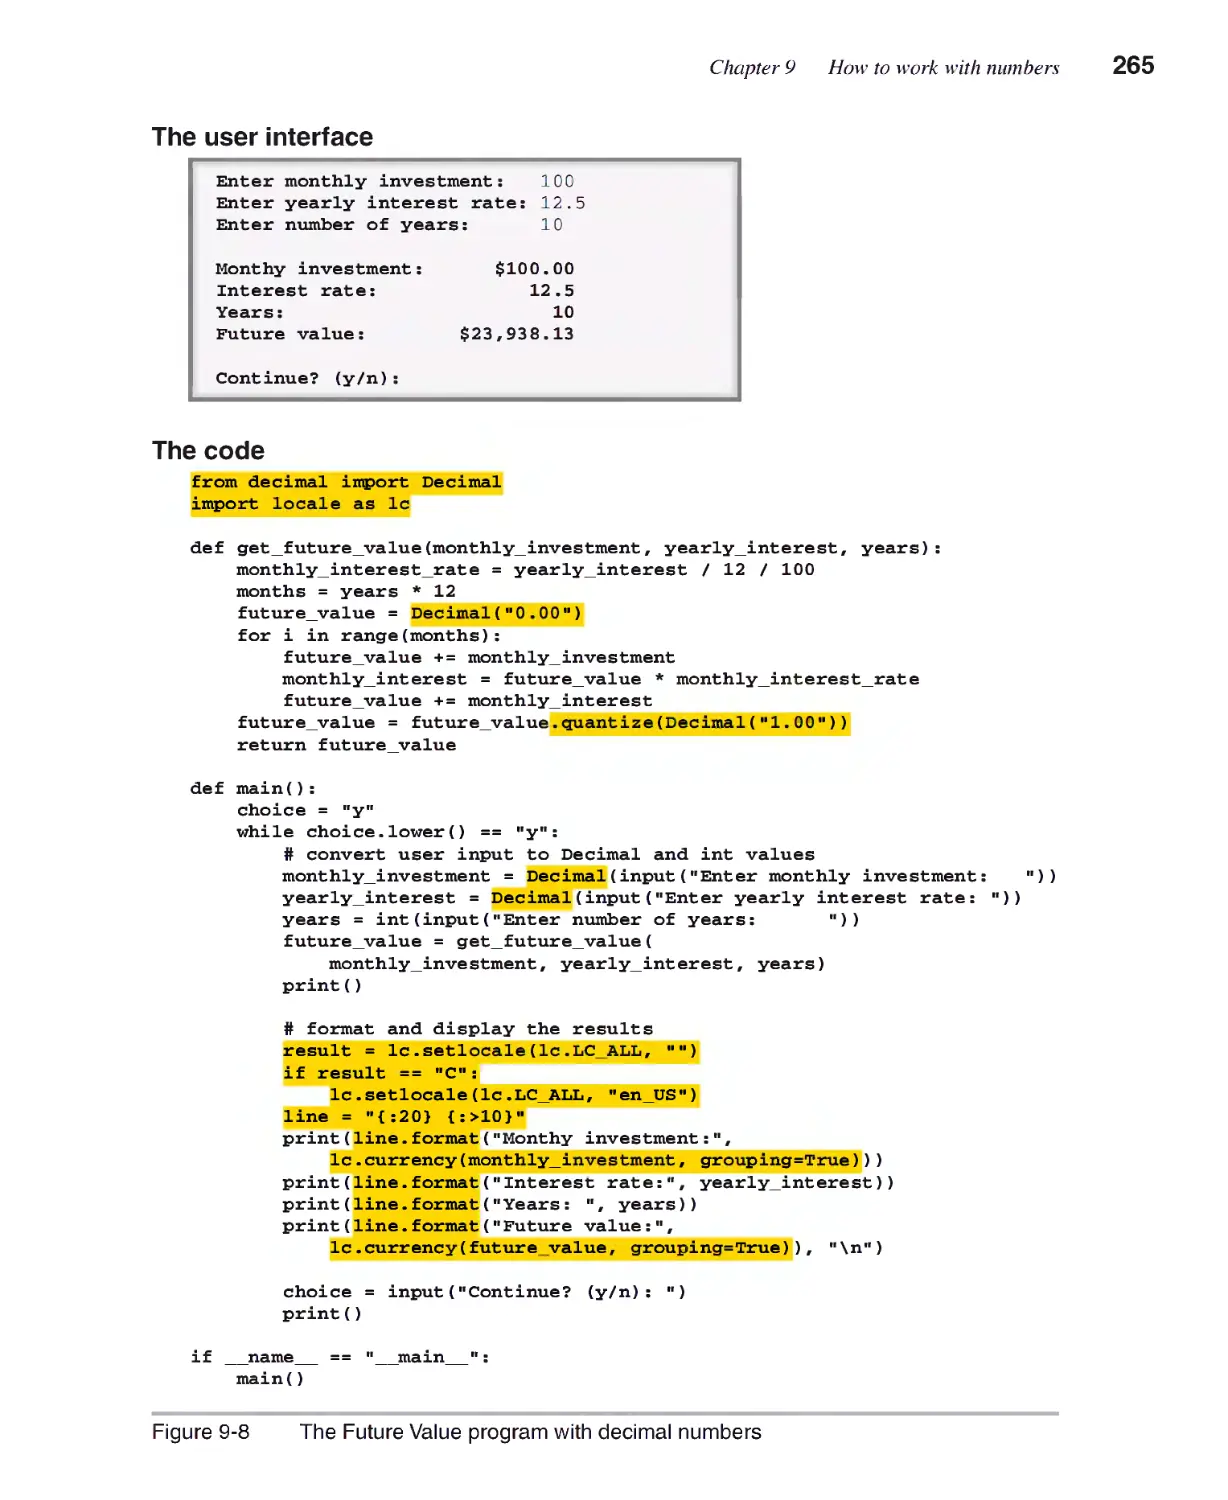
The Future Value program with decimal numbers 264
Chapter 10 How to work with strings
Basic skills for working with strings 270
Unicode, indexes, slicing, duplicating, and multiline strings 270
How7 to search a string 272
How to loop through the characters in a string 272
How7 to use basic strins methods 274
How7 to find and replace parts of a string 276
The Create Account program 278
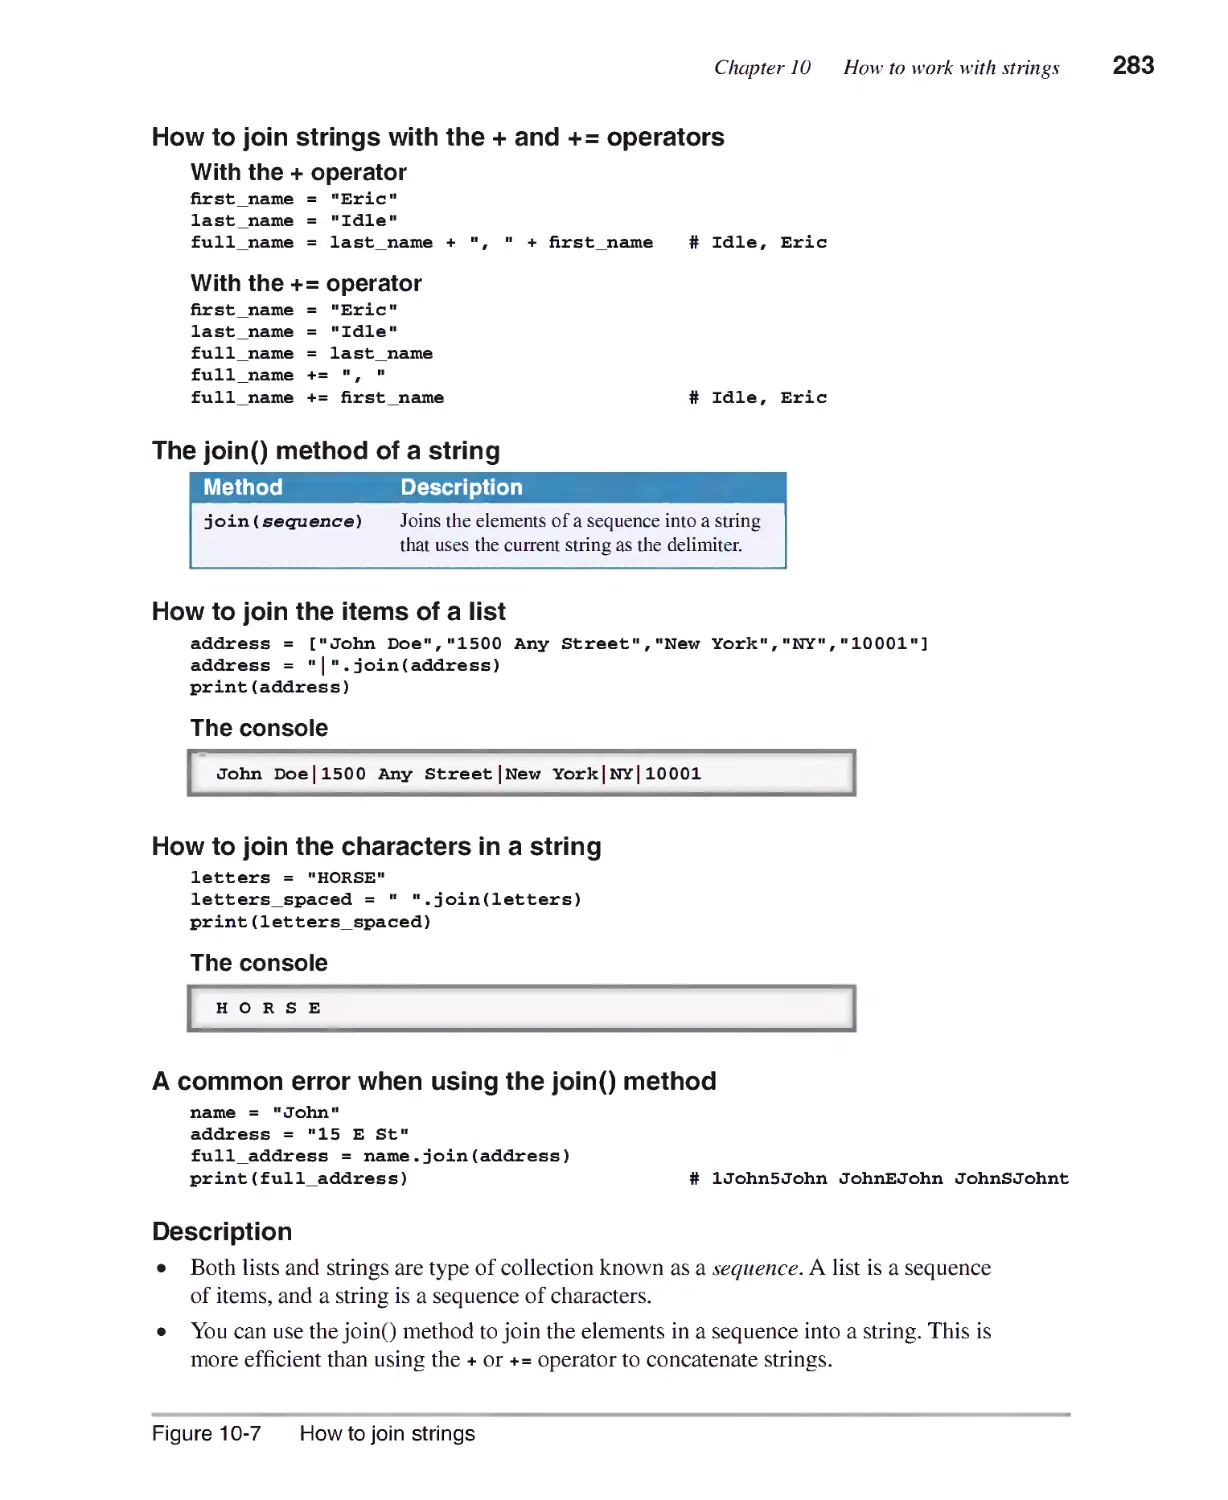
How to split and join strings 280
How7 to split a string into a list of strings 280
How7 to join strings 282
The Movie List 2D program 284
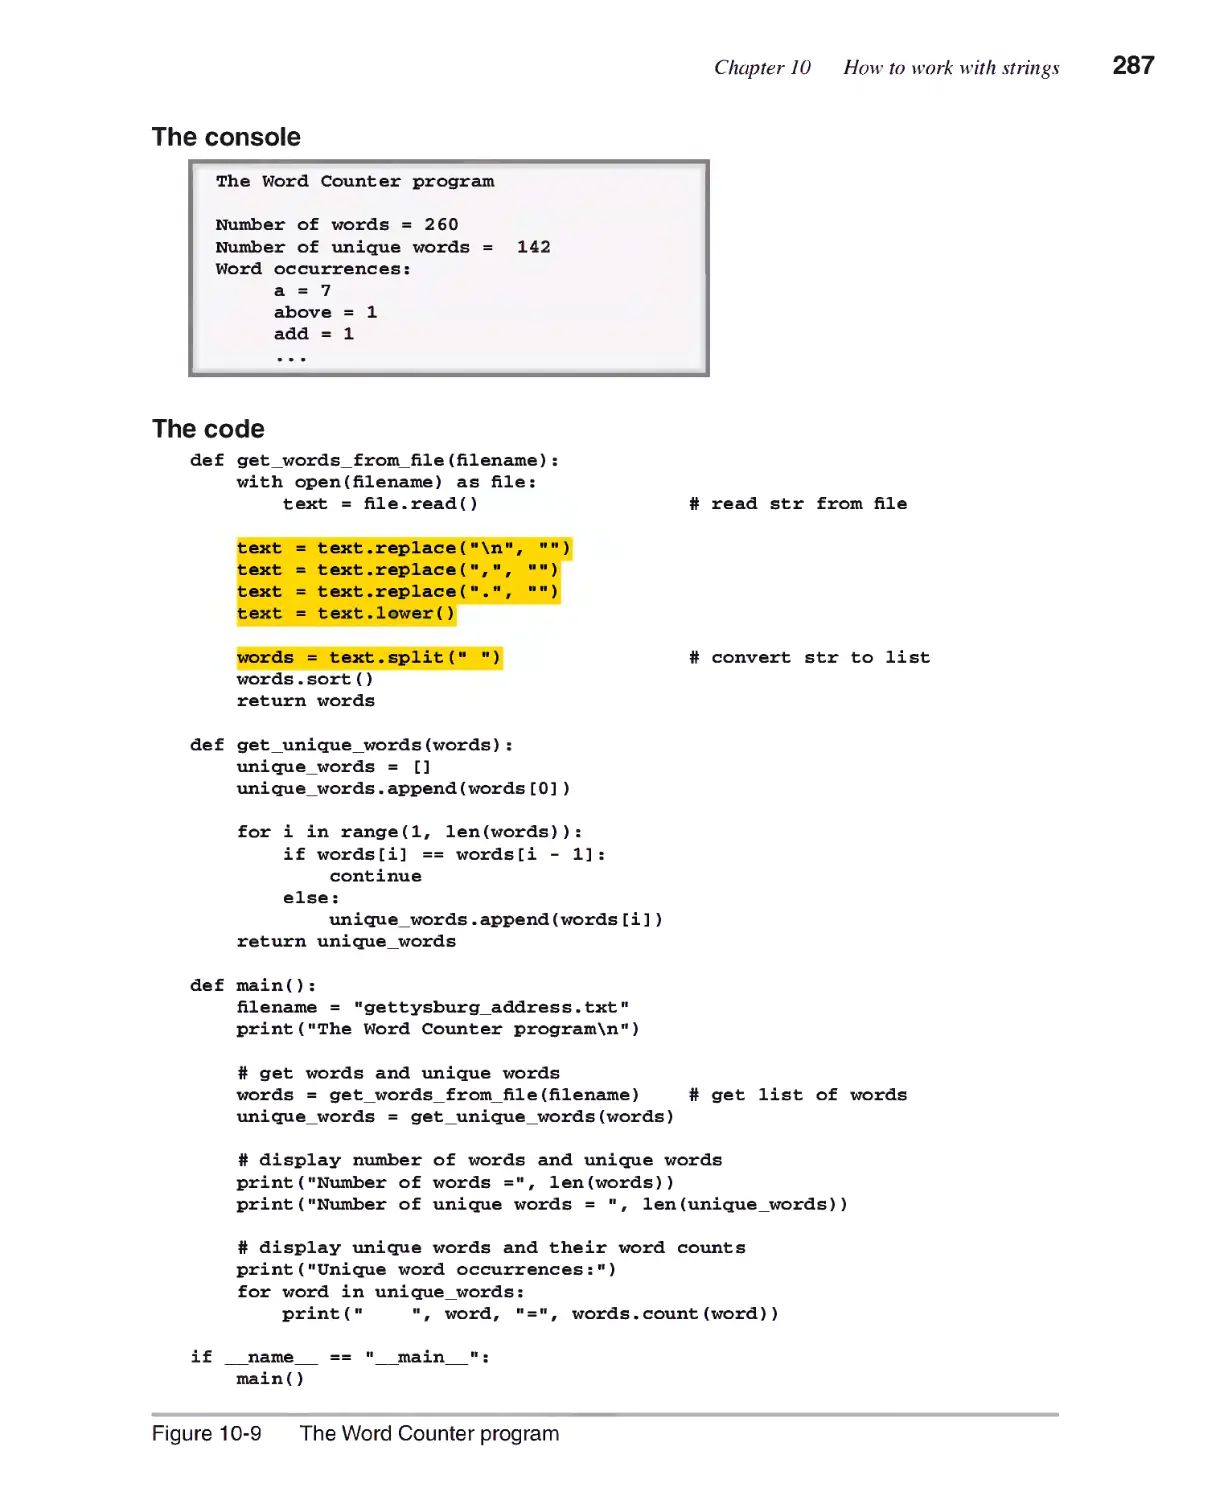
The Word Counter program 286
The Hangman game 288
The user interface 288
The hierarchy chart 288
The wordlist module 290
The hansman module 290
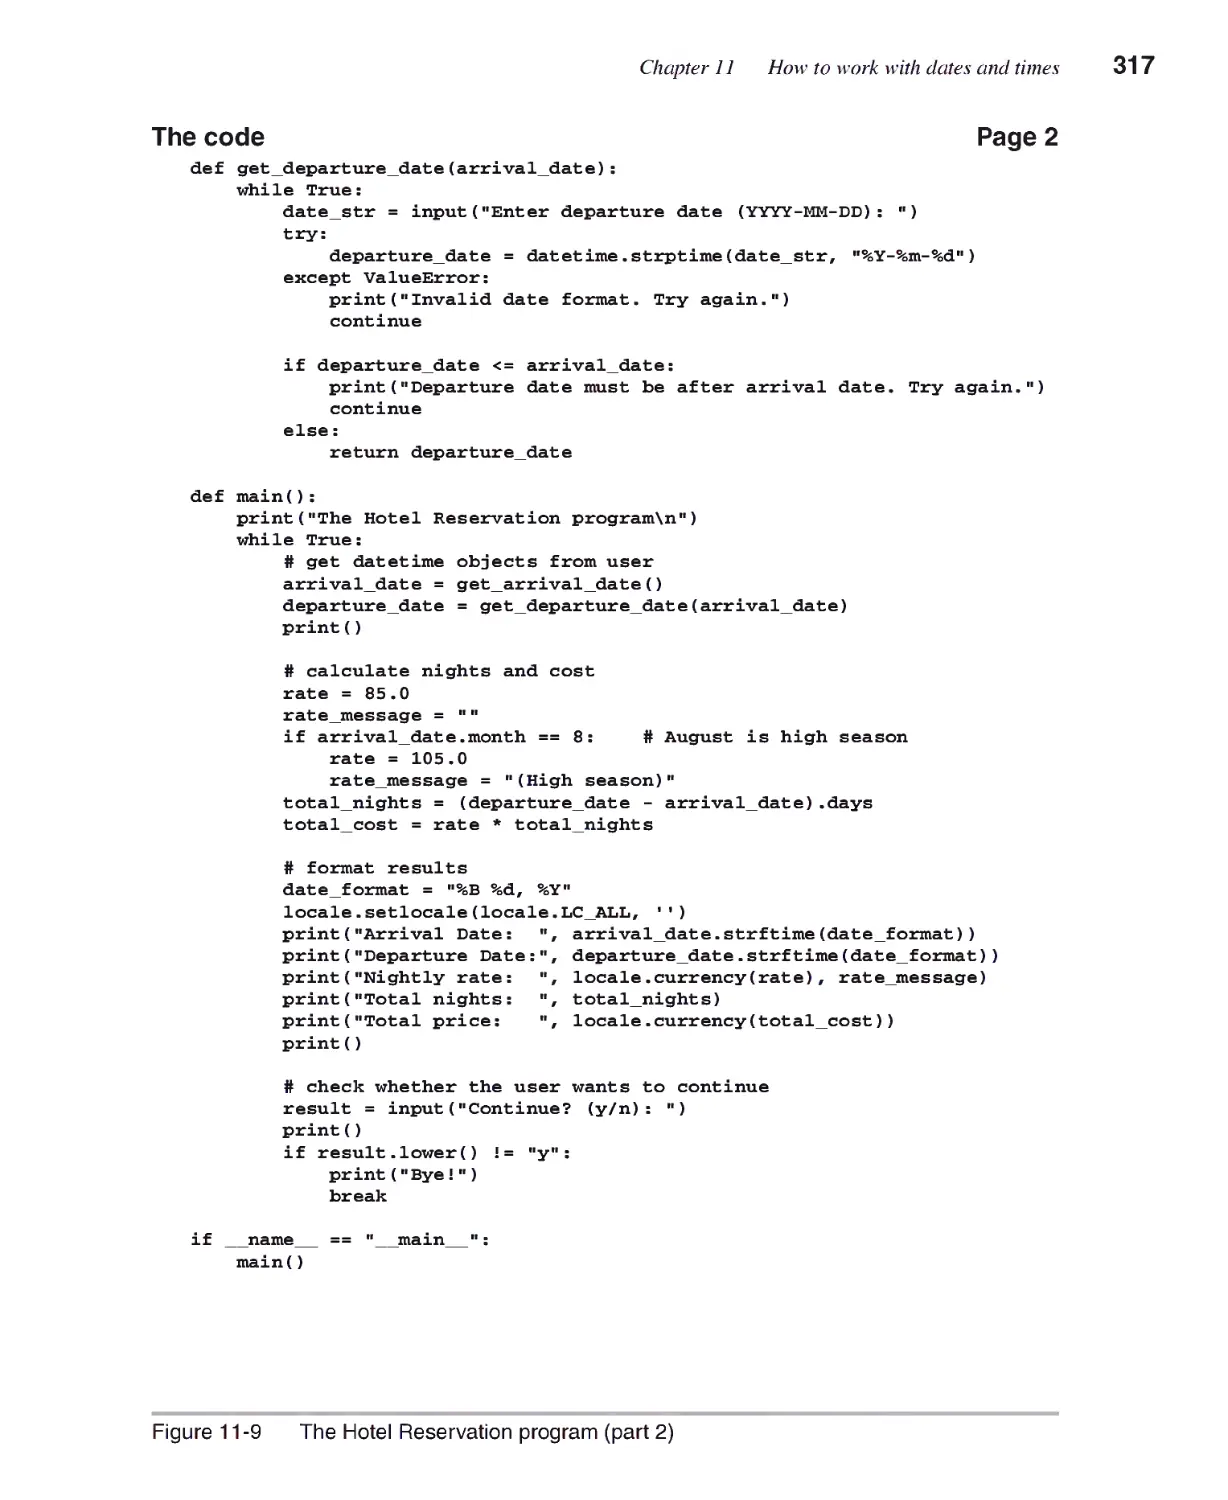
Chapter 11 How to work with dates and times
How to get started with dates and times 298
How to create date, time, and datetime objects 298
How7 to create datetime objects by parsing strings 300
How7 to format dates and times 302
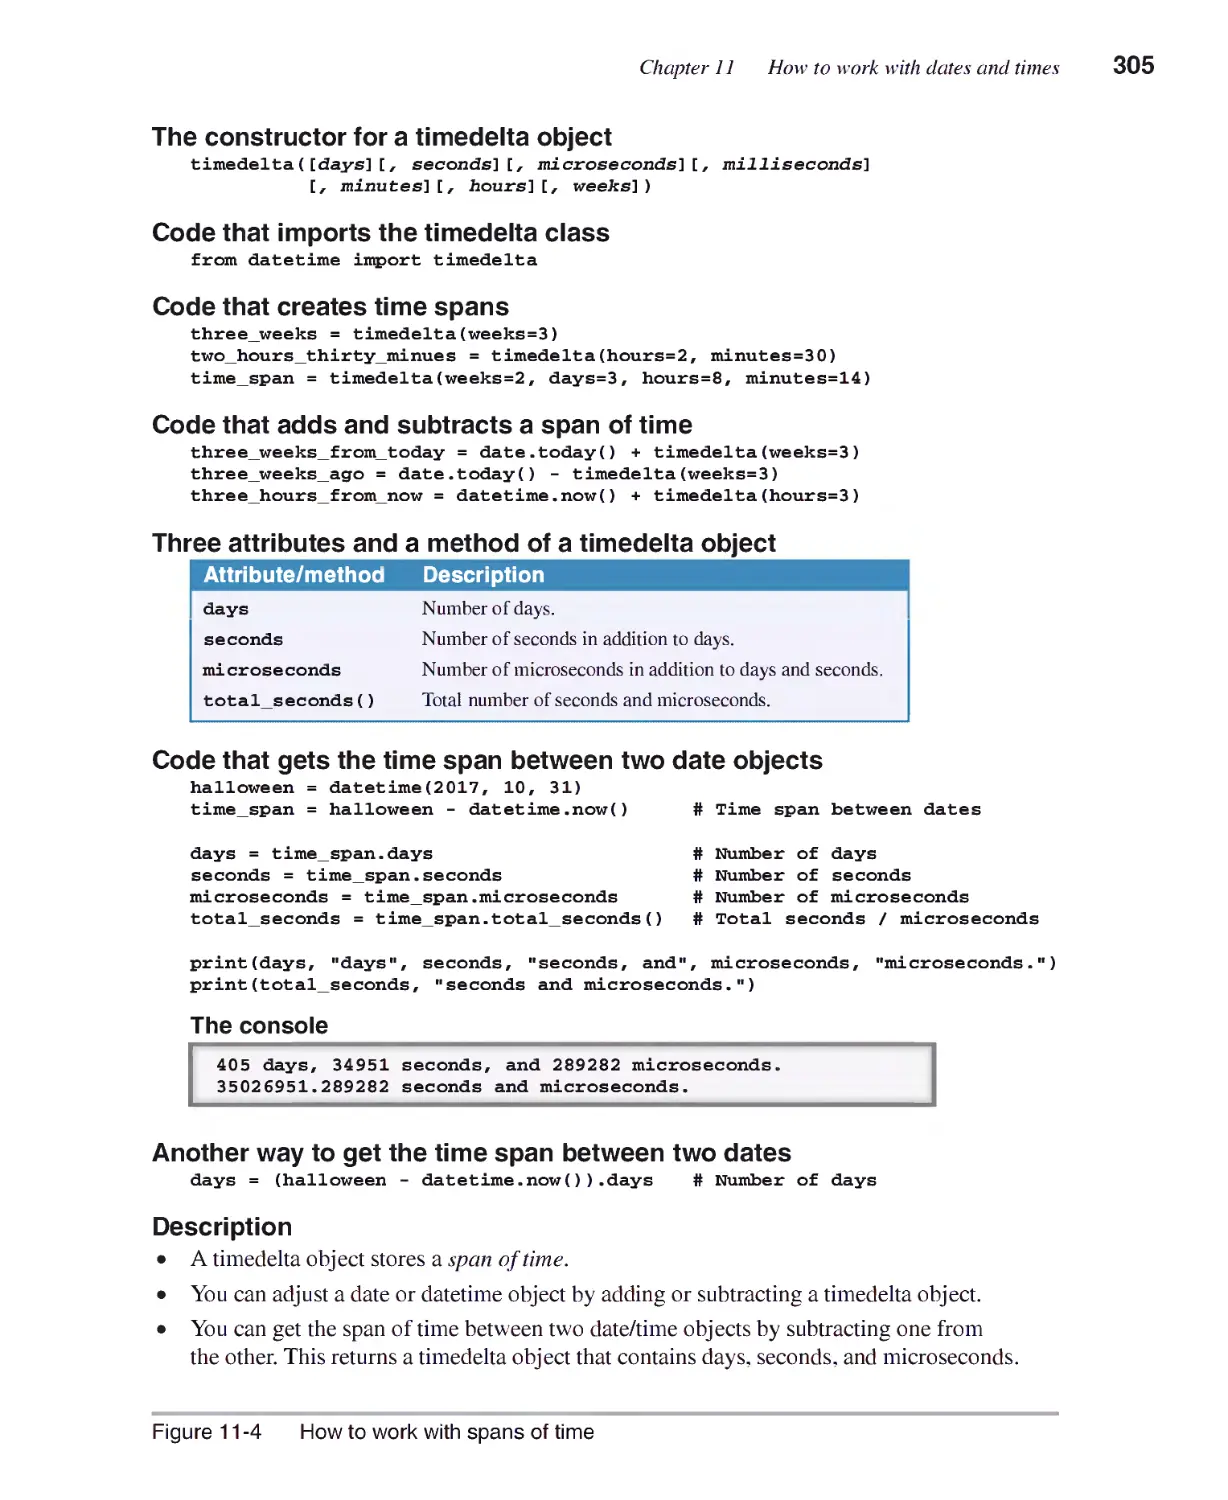
How7 to work with spans of time 304
The Invoice Due Date program 306
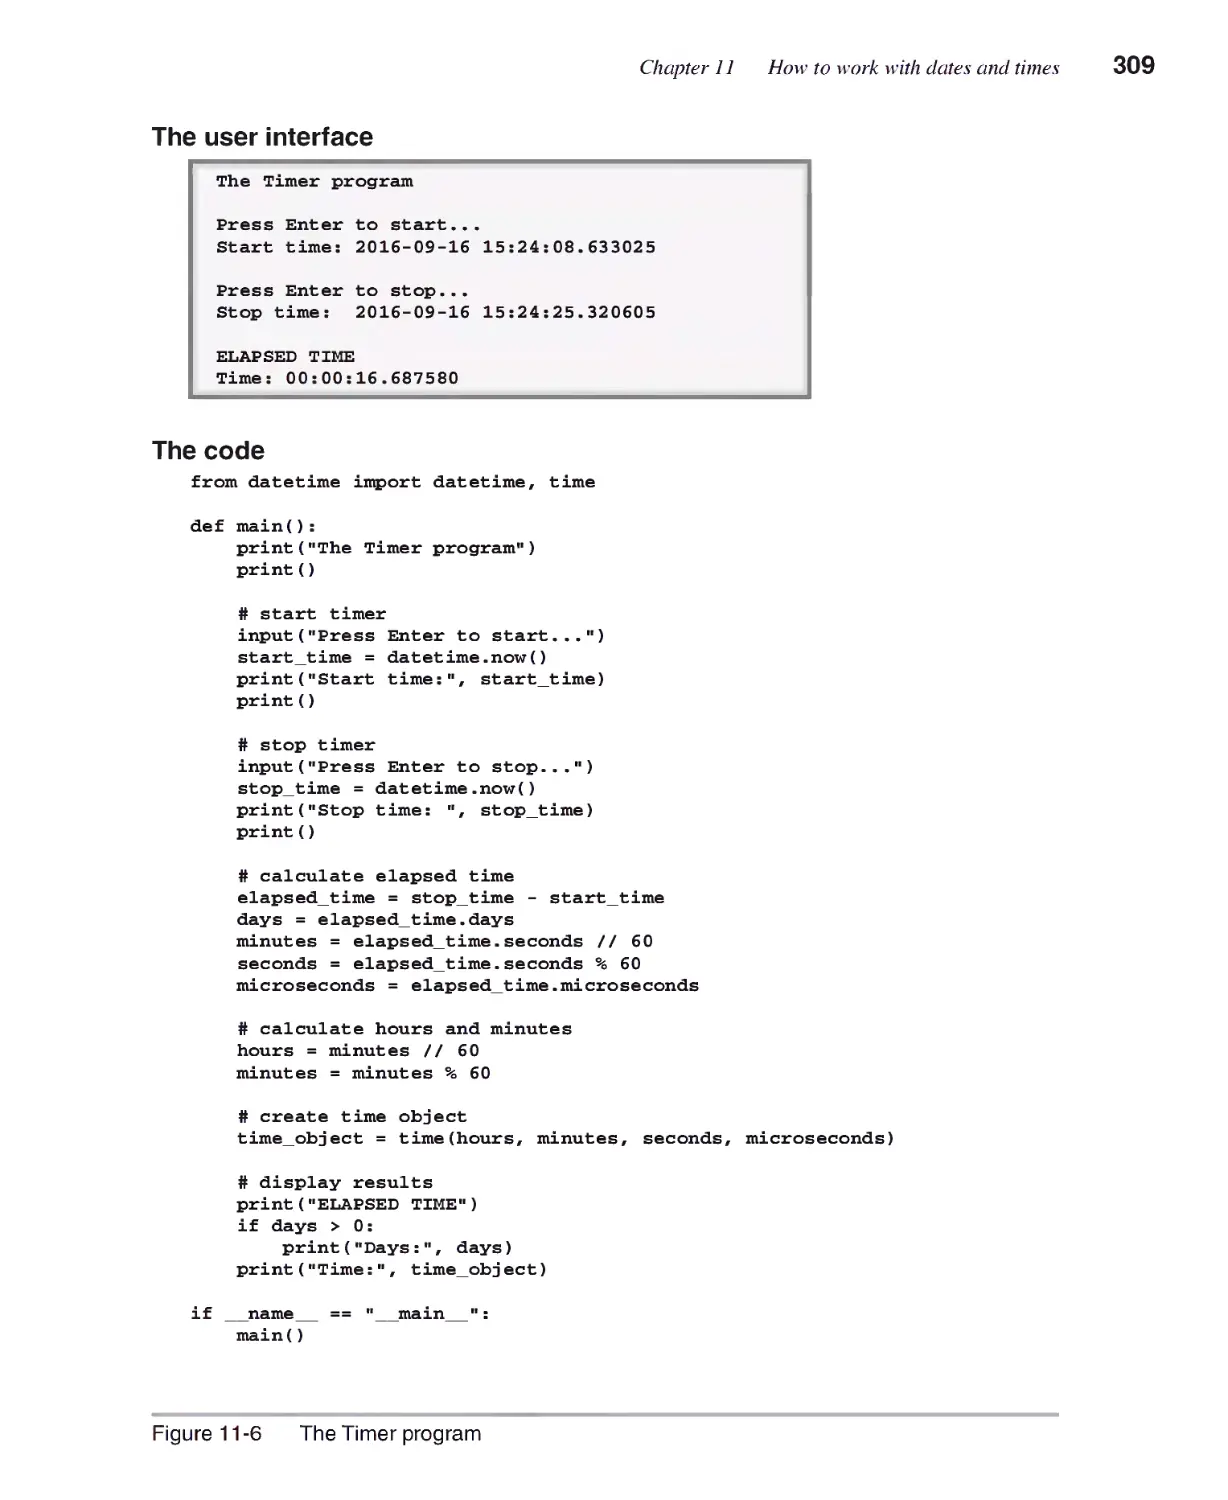
The Timer program 308
Expanded contents
More skills for working with dates and times 310
How to get date and time parts 310
How to compare date/time objects 312
The Hotel Reservation program 314
Chapter 12 How to work with dictionaries
How to get started with dictionaries 322
How7 to create a dictionary 322
How7 to set. set, and add items 324
How7 to delete items 326
How7 to loop through keys and values 328
How7 to convert between dictionaries and lists 330
The Country Code program 332
The Word Counter program 336
More skills for working with dictionaries 338
How7 to use dictionaries with complex objects as values 338
The Book Catalog program 340
Chapter 13 How to work with recursion and algorithms
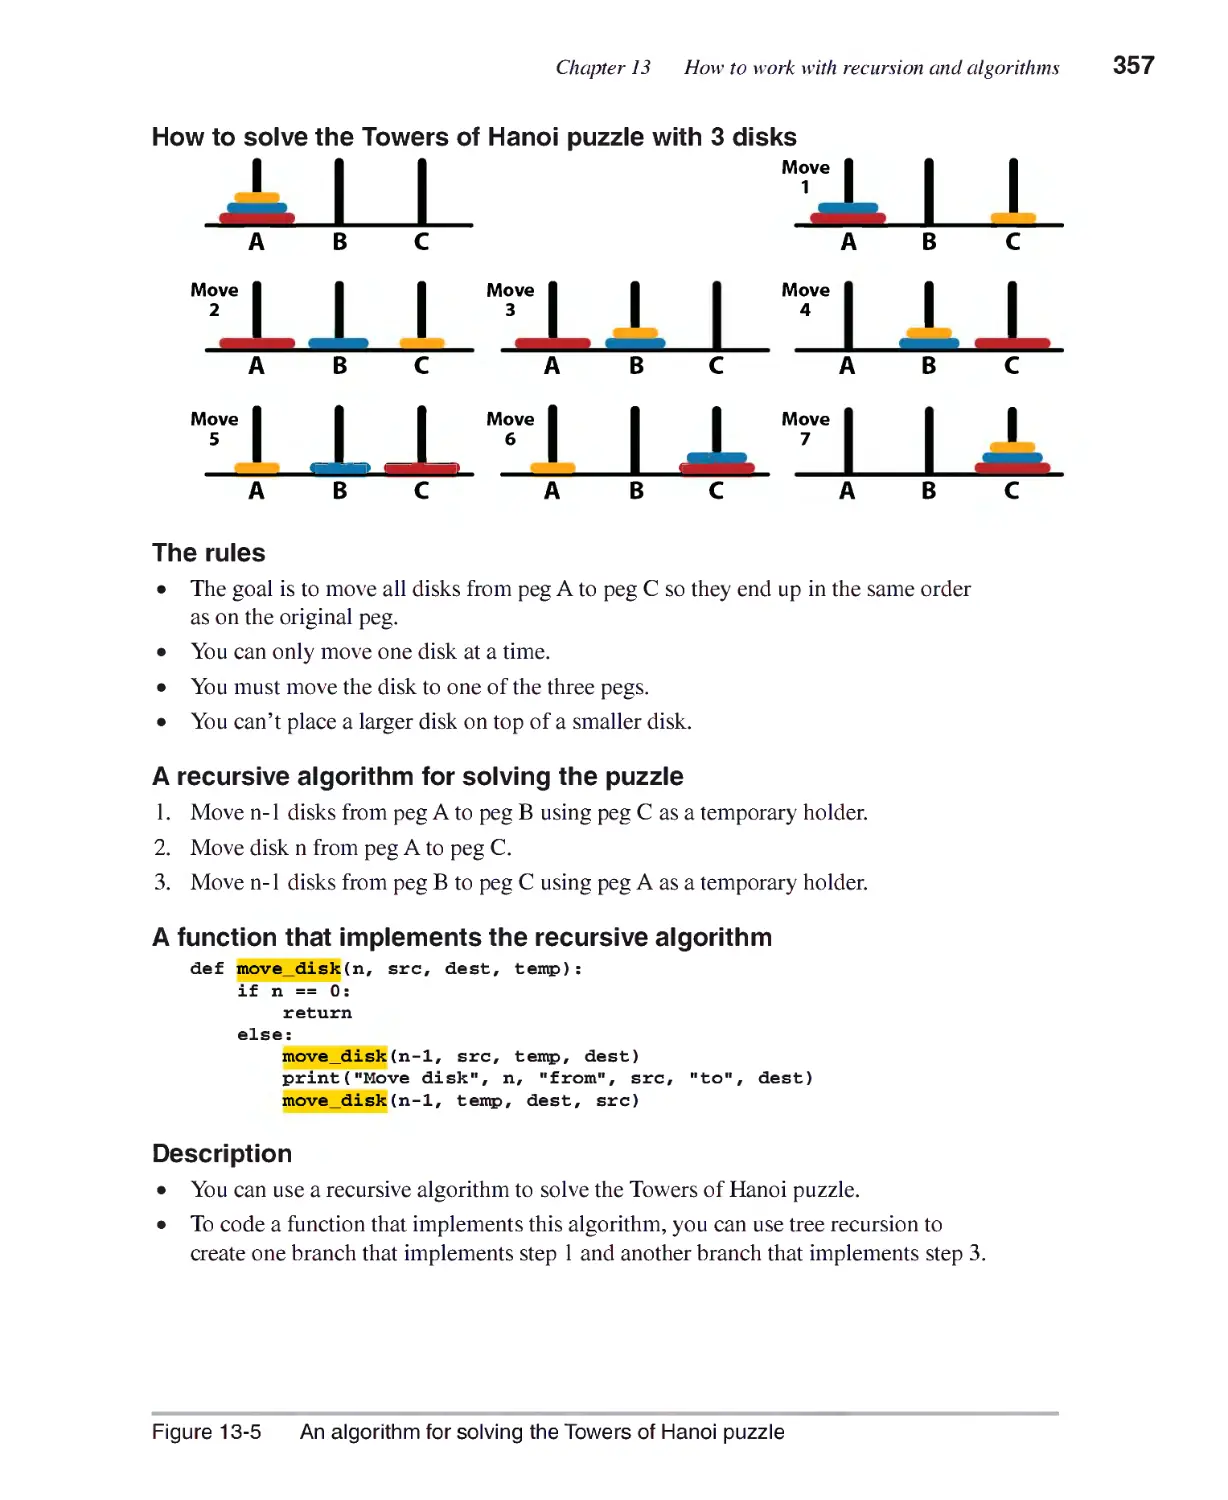
An introduction to recursion 348
How7 recursion works in Pvthon 348
How7 to use recursion to add a range of numbers 350
Some common recursive algorithms 352
How7 to compute the factorial of a number 352
How7 to compute a Fibonacci series 354
An algorithm for solving the Towers of Hanoi puzzle 356
The code for solving the Towers of Hanoi puzzle 358
Section 3 Object-oriented programming
Chapter 14 How to define and use your own classes
An introduction to classes and objects 366
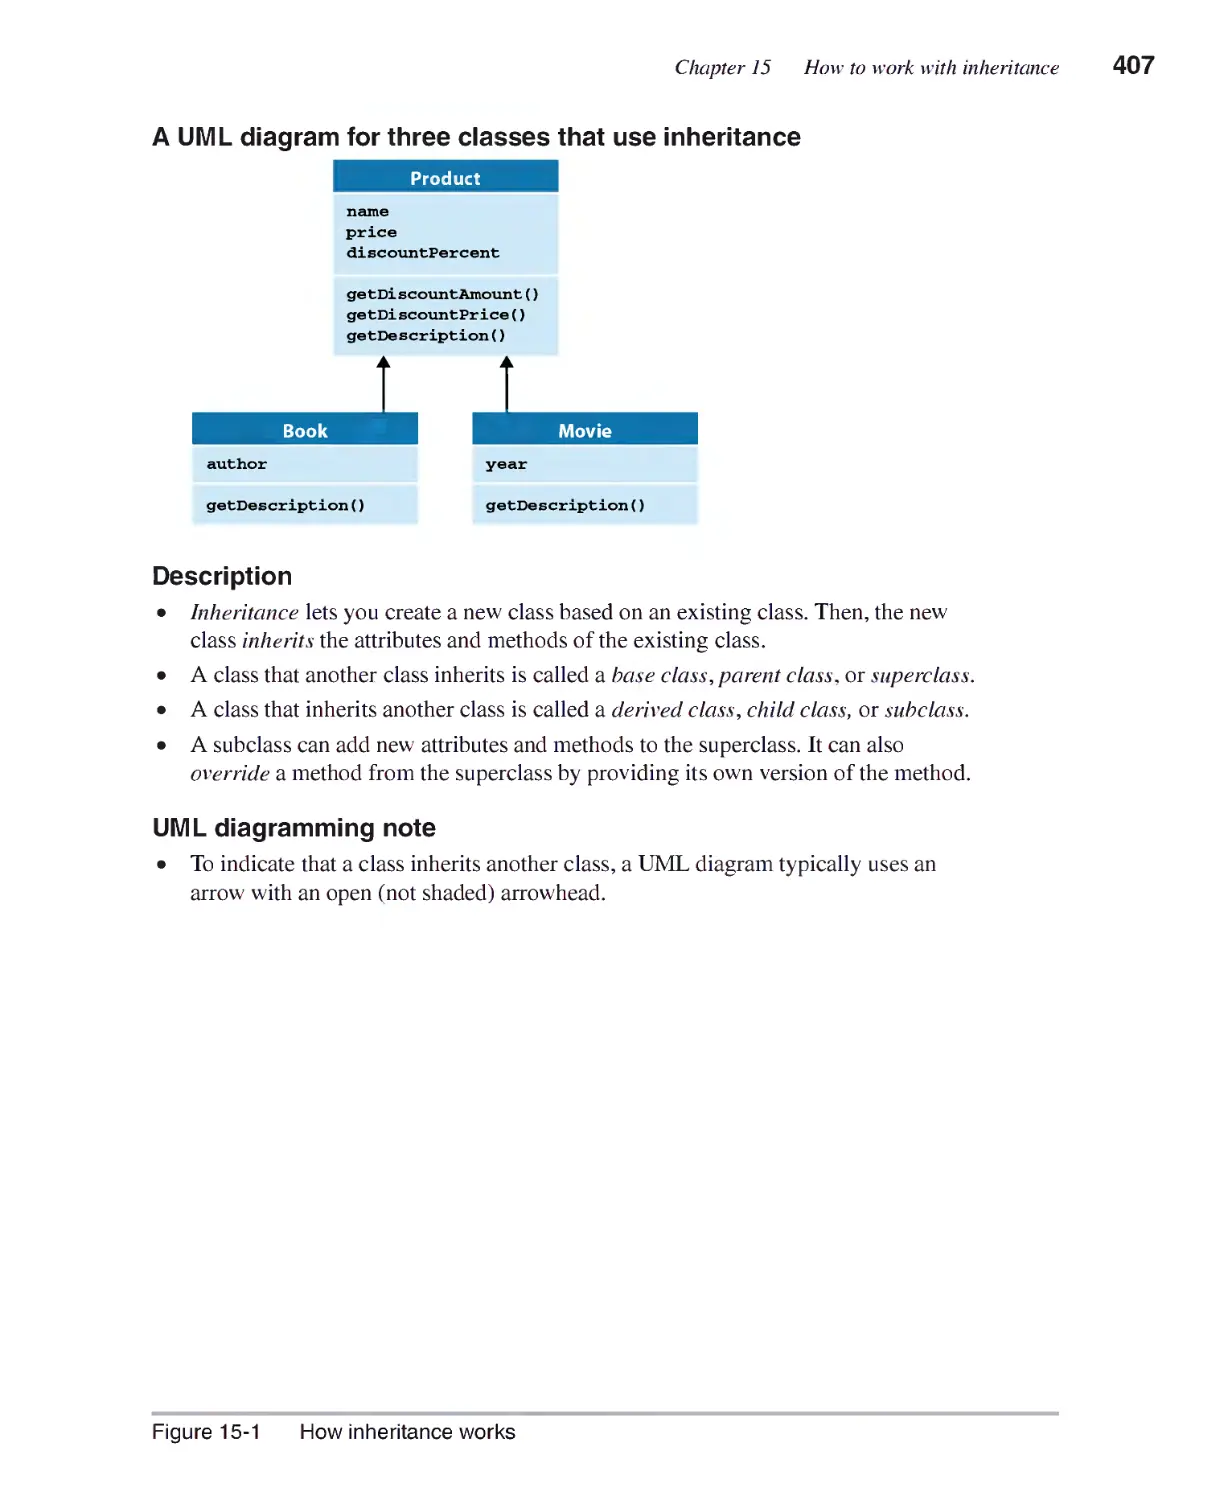
Two UML diagrams for the Product class 366
Code that defines a Product class 368
Code that uses a Product class 368
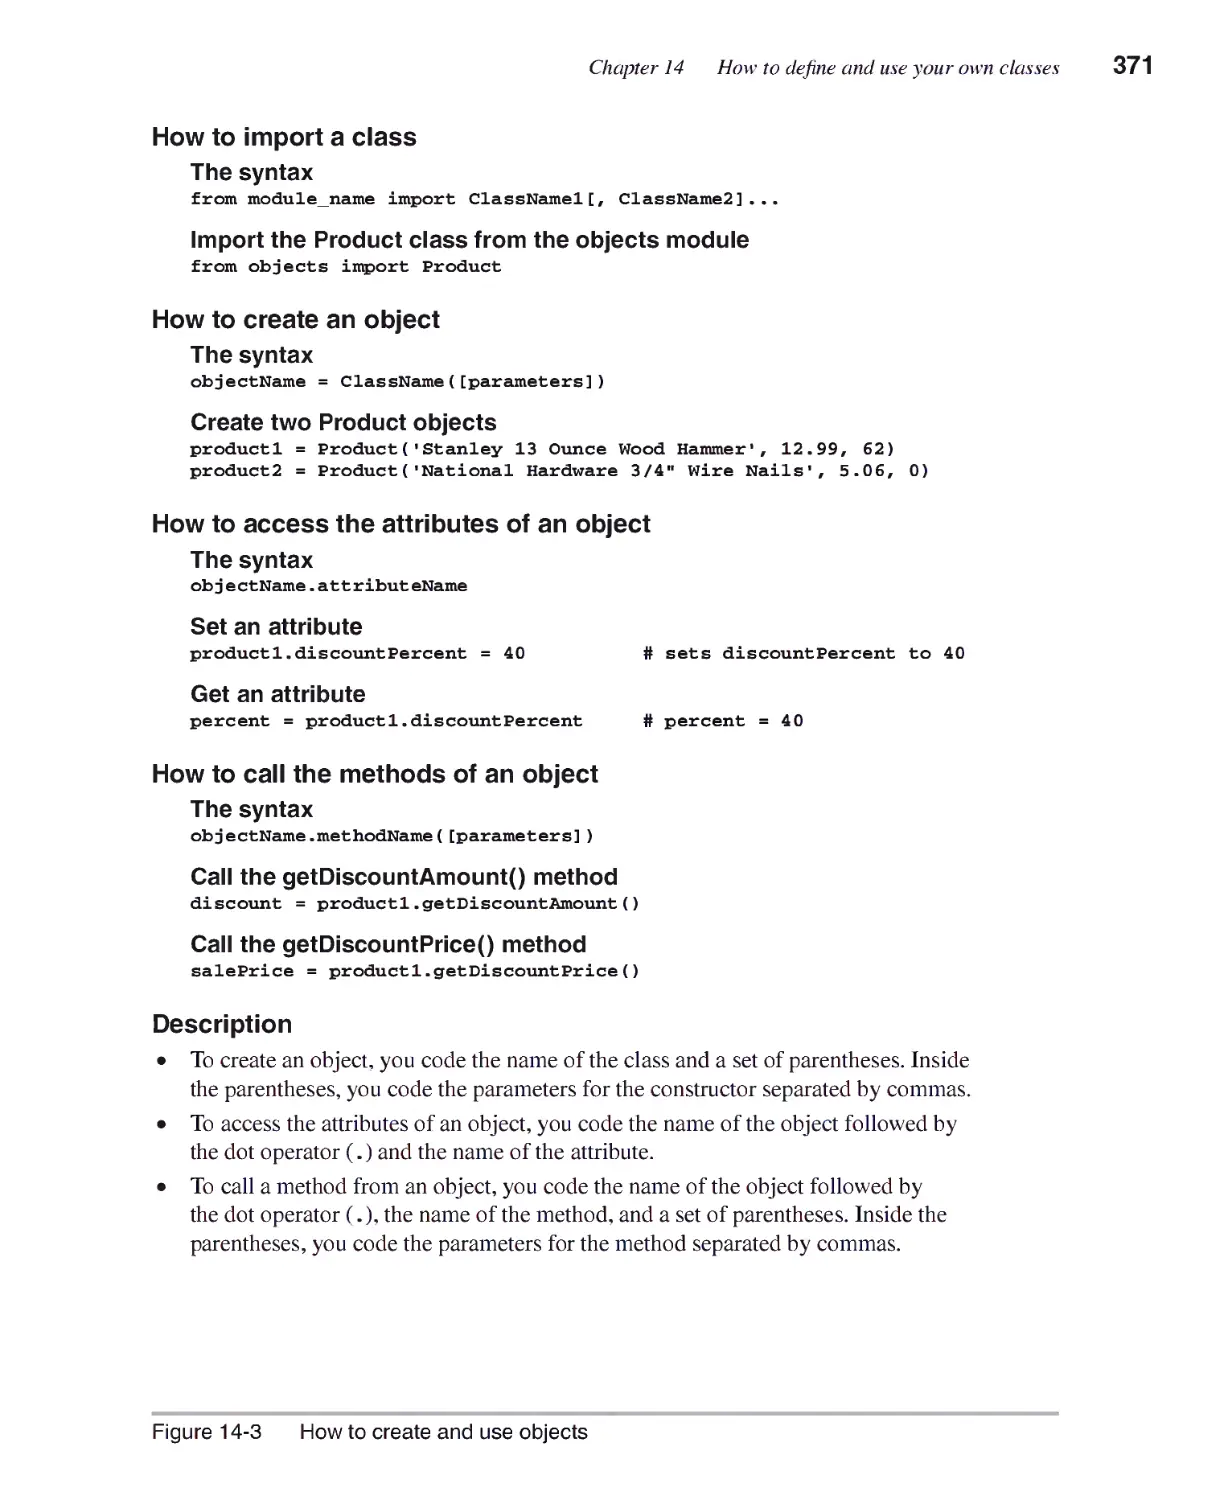
How to create and use objects 370
How to define a class 372
How to code a constructor and attributes 372
How7 to code methods 374
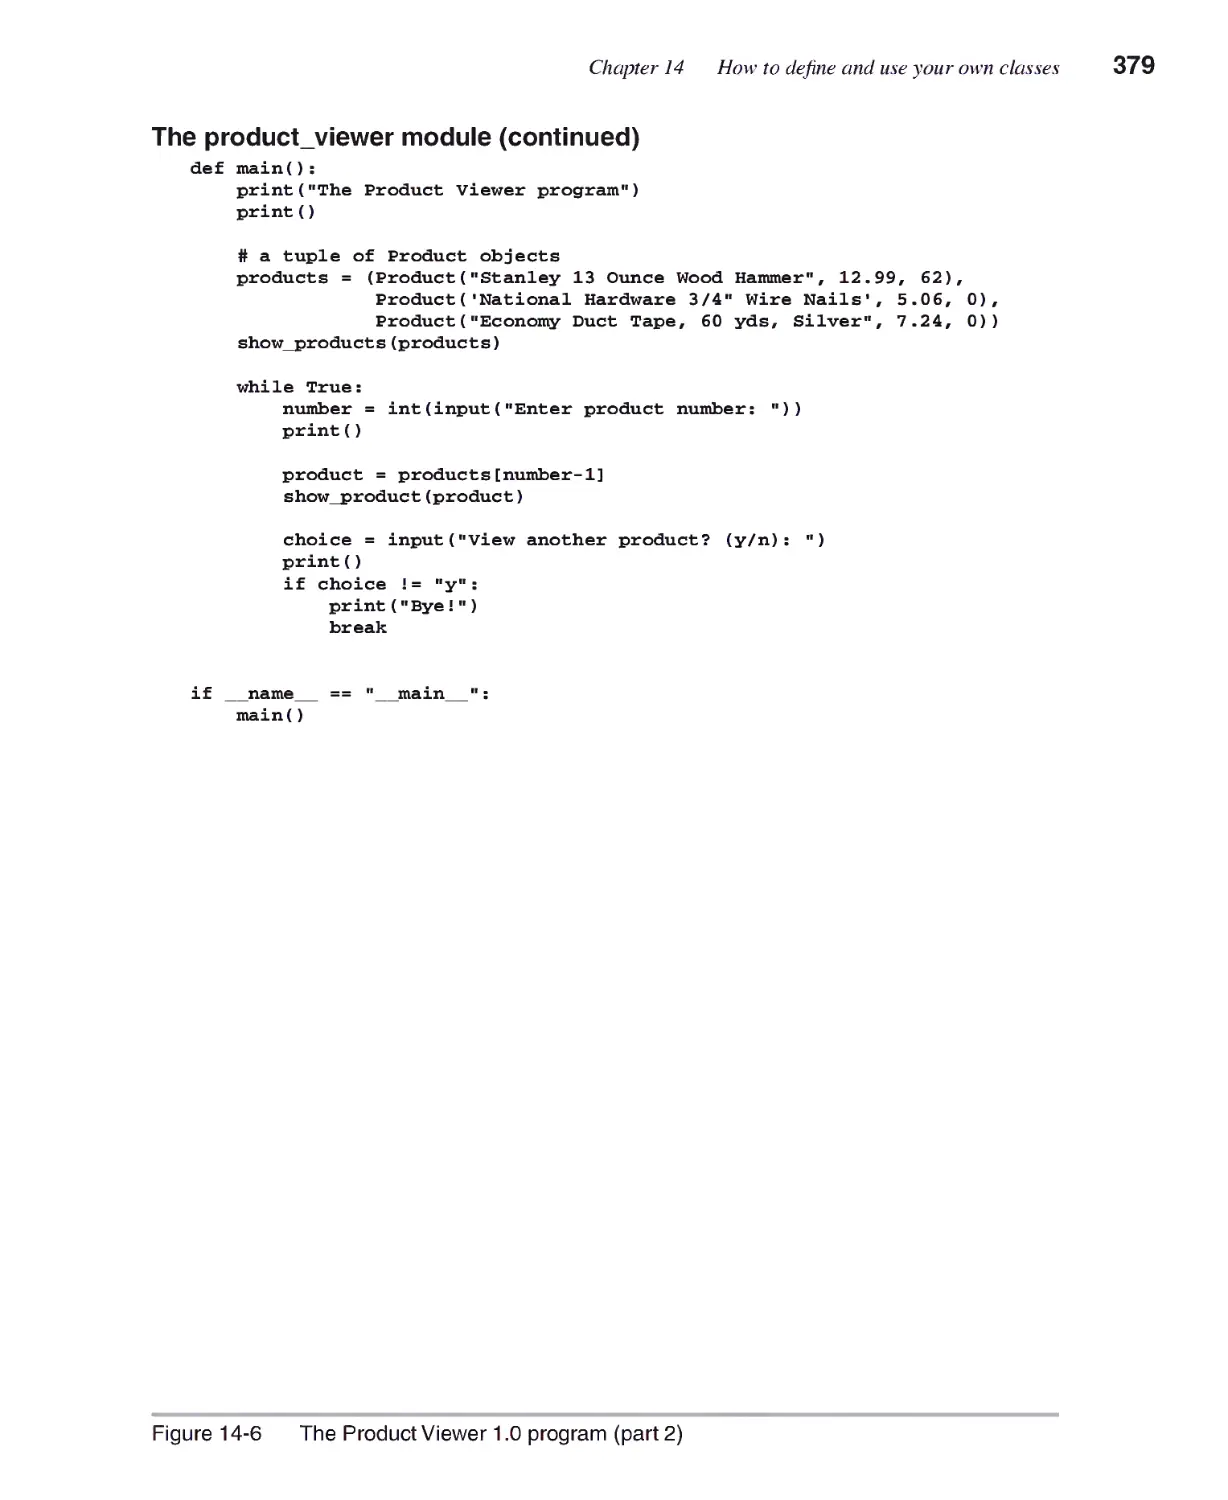
The Product Viewer l.O program 376
How work with object composition 380
How7 object composition works 380
The Die and Dice classes 380
The Dice Roller l.O program 382
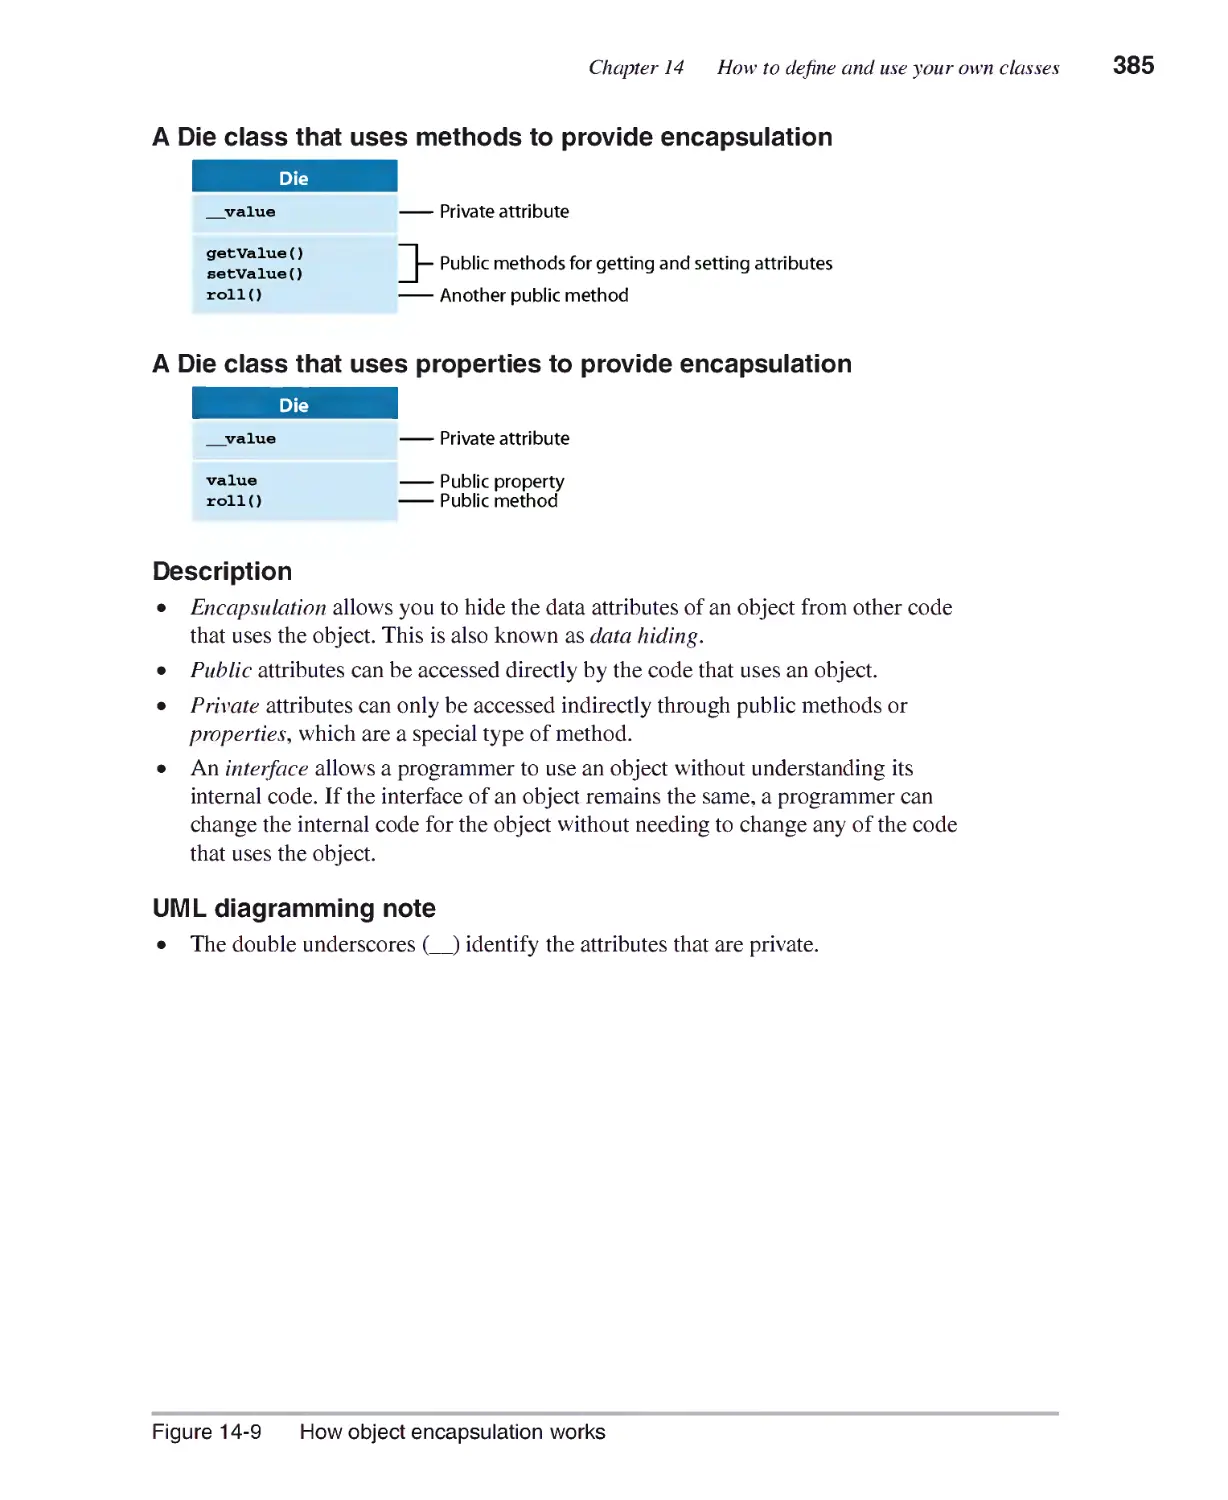
How to work with encapsulation 384
How7 object encapsulation works 384
How7 to hide attributes 386
How7 to access hidden attributes with methods 388
How7 to access hidden attributes with properties 390
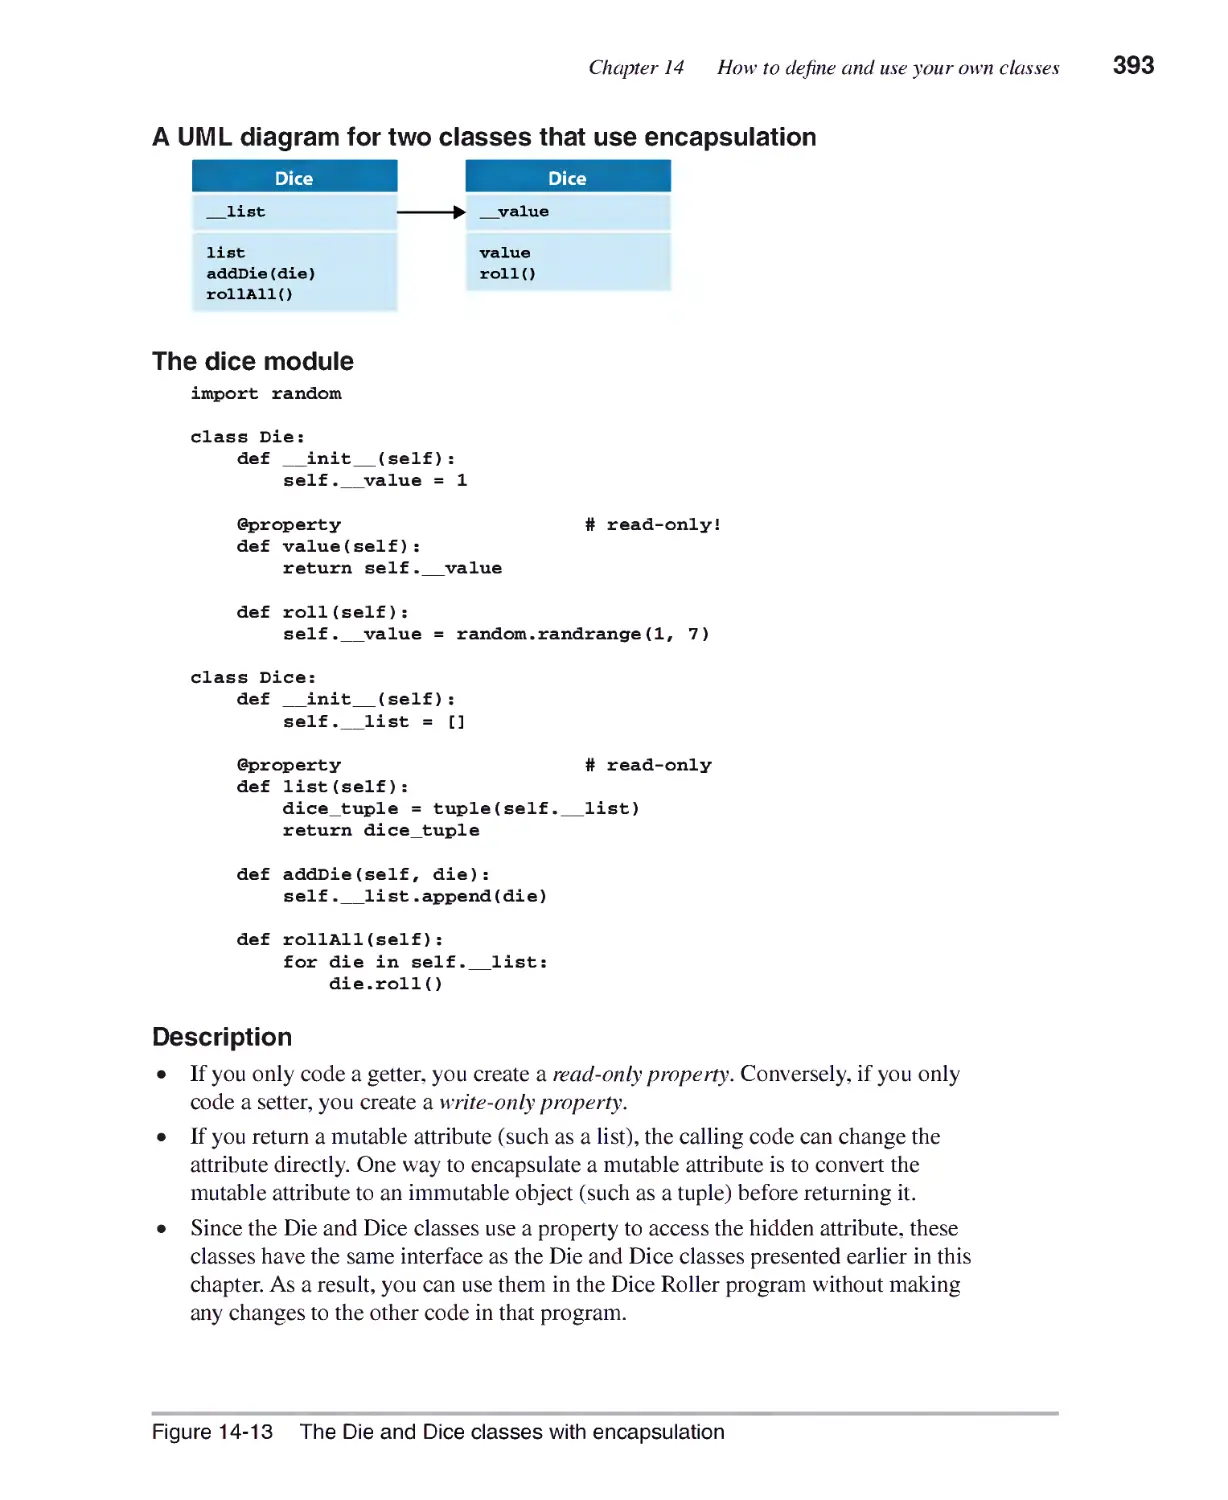
The Die and Dice classes with encapsulation 392
The Product class with some encapsulation 394
Expanded contents
The Pig Dice game 396
The console 396
The code 396
Chapter 15 How to work with inheritance
How to work with inheritance 406
How inheritance works 406
How7 to define a subclass 408
How7 polymorphism works 410
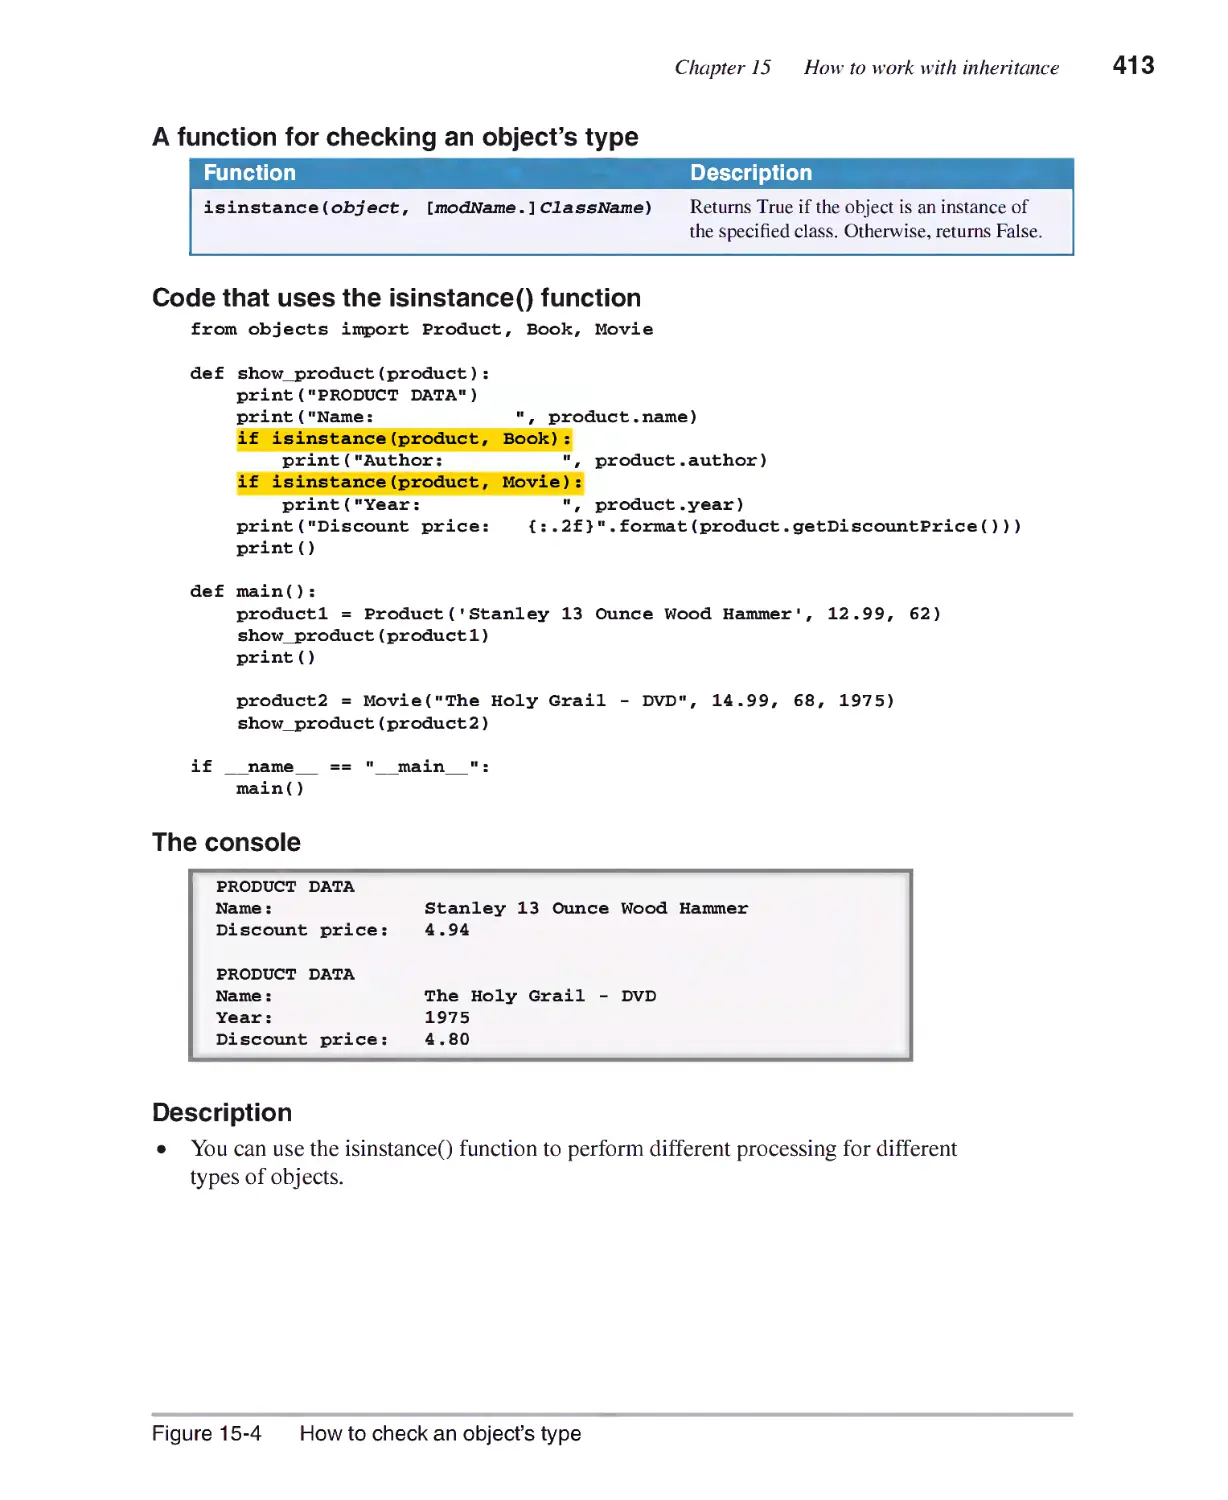
How7 to check an object's type 412
The Product Viewer 2.0 program 414
The objects module 414
The user interface and product_view7er module 416
How to override object methods 418
How7 to define a string representation for an object 418
How7 to define an iterator for an object 420
The Die and Dice classes 422
Two more skills for the road 424
How7 to work with custom exceptions 424
When to use inheritance 426
Chapter 16 How to design an object-oriented program
Techniques for object-oriented design 434
Five steps for designing an object-oriented program 434
How7 to identify the data attributes 436
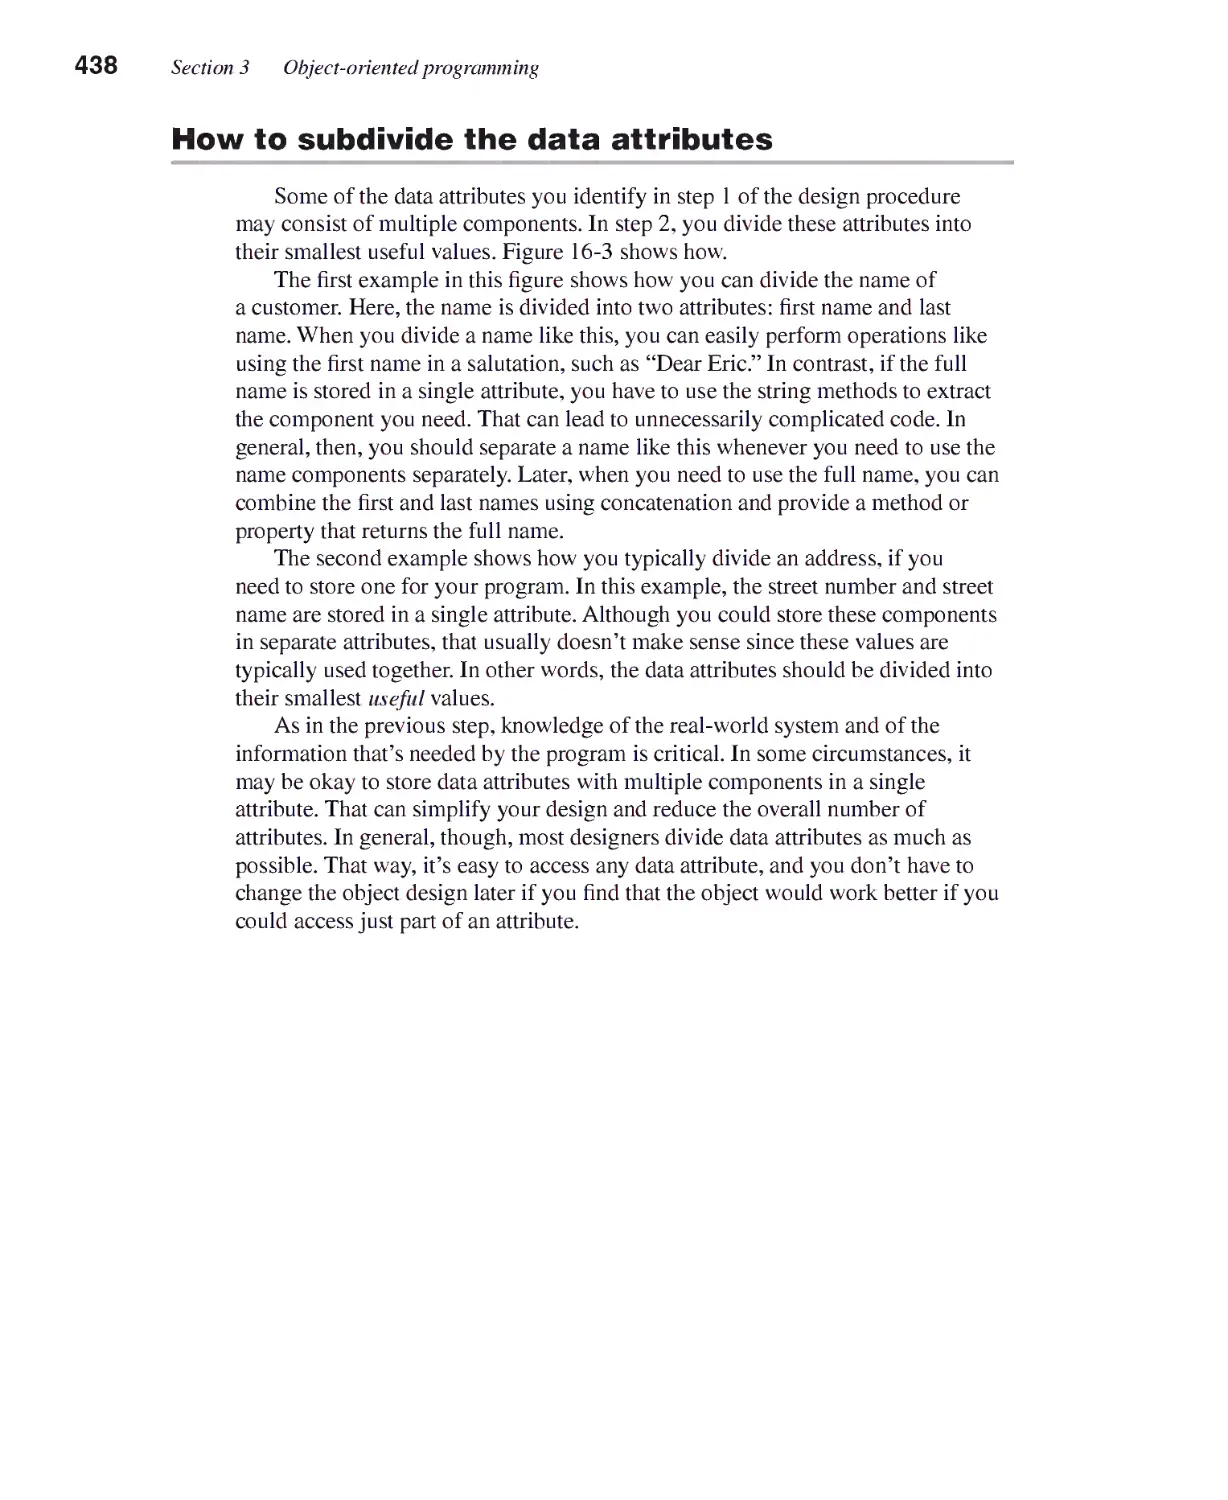
How7 to subdivide the data attributes 438
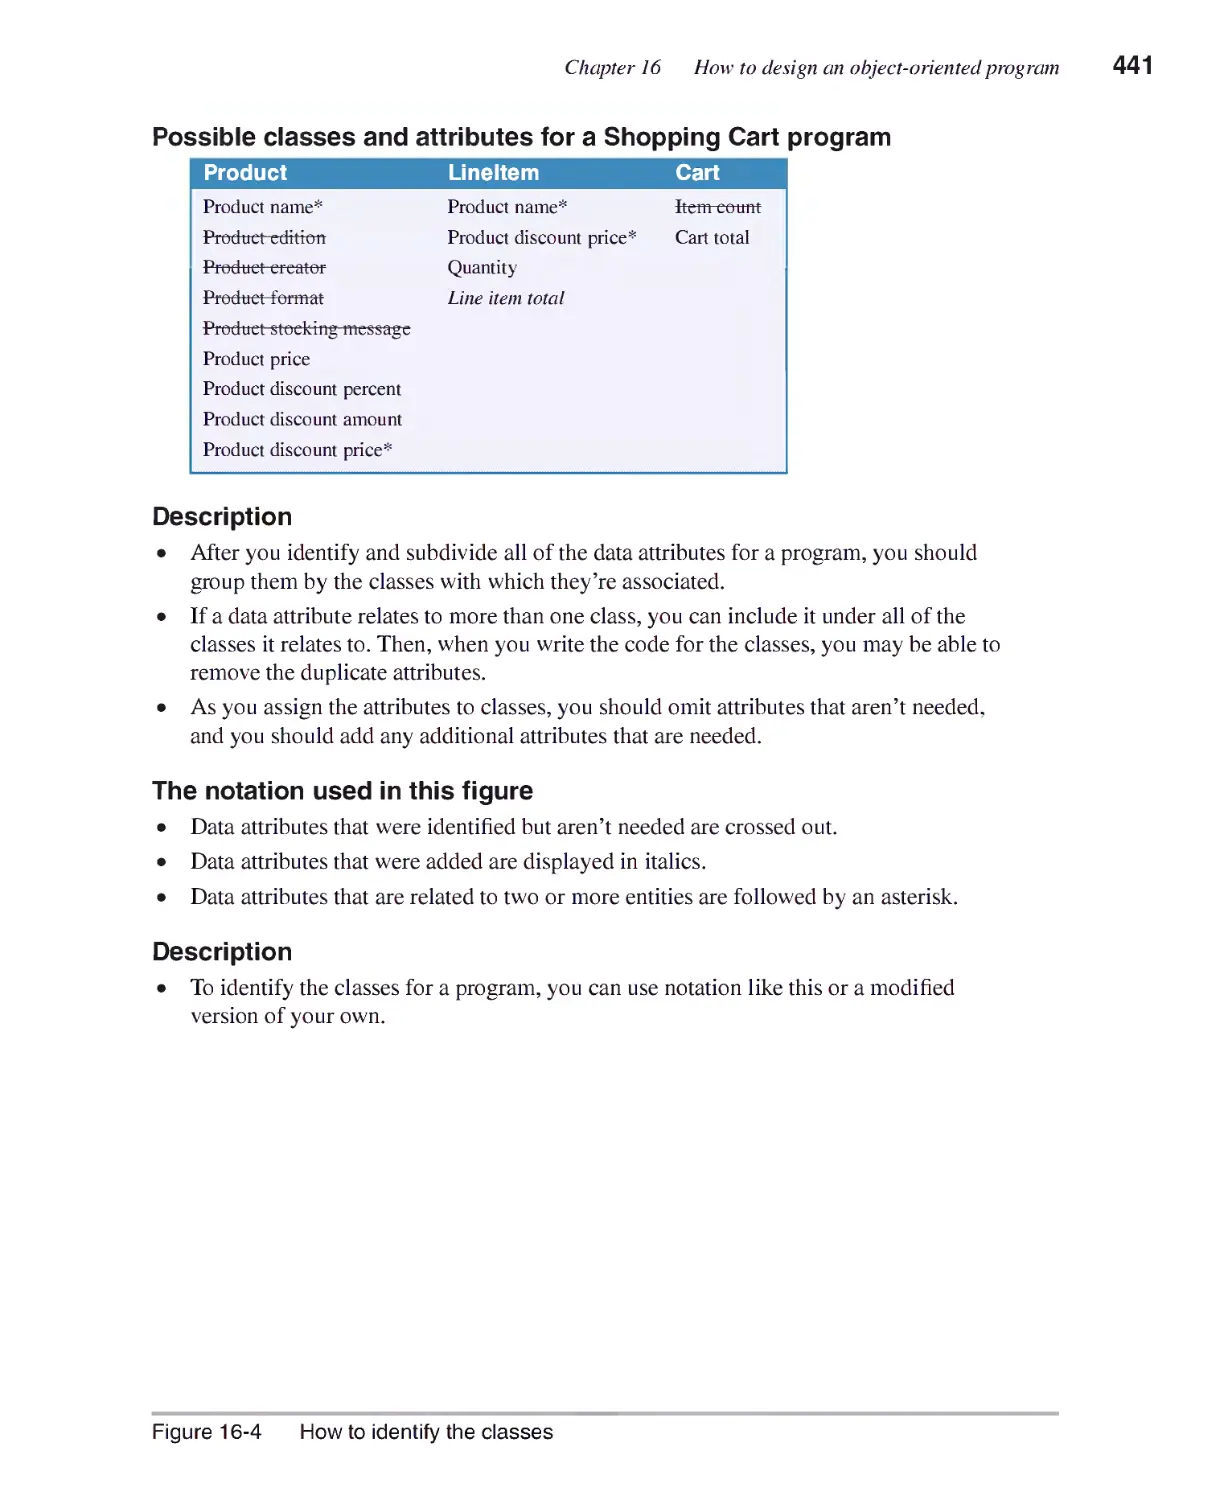
How7 to identify the classes 440
How7 to identify the methods 442
How7 the three-tier architecture works 444
The Shopping Cart program 446
The business tier 446
The database tier 448
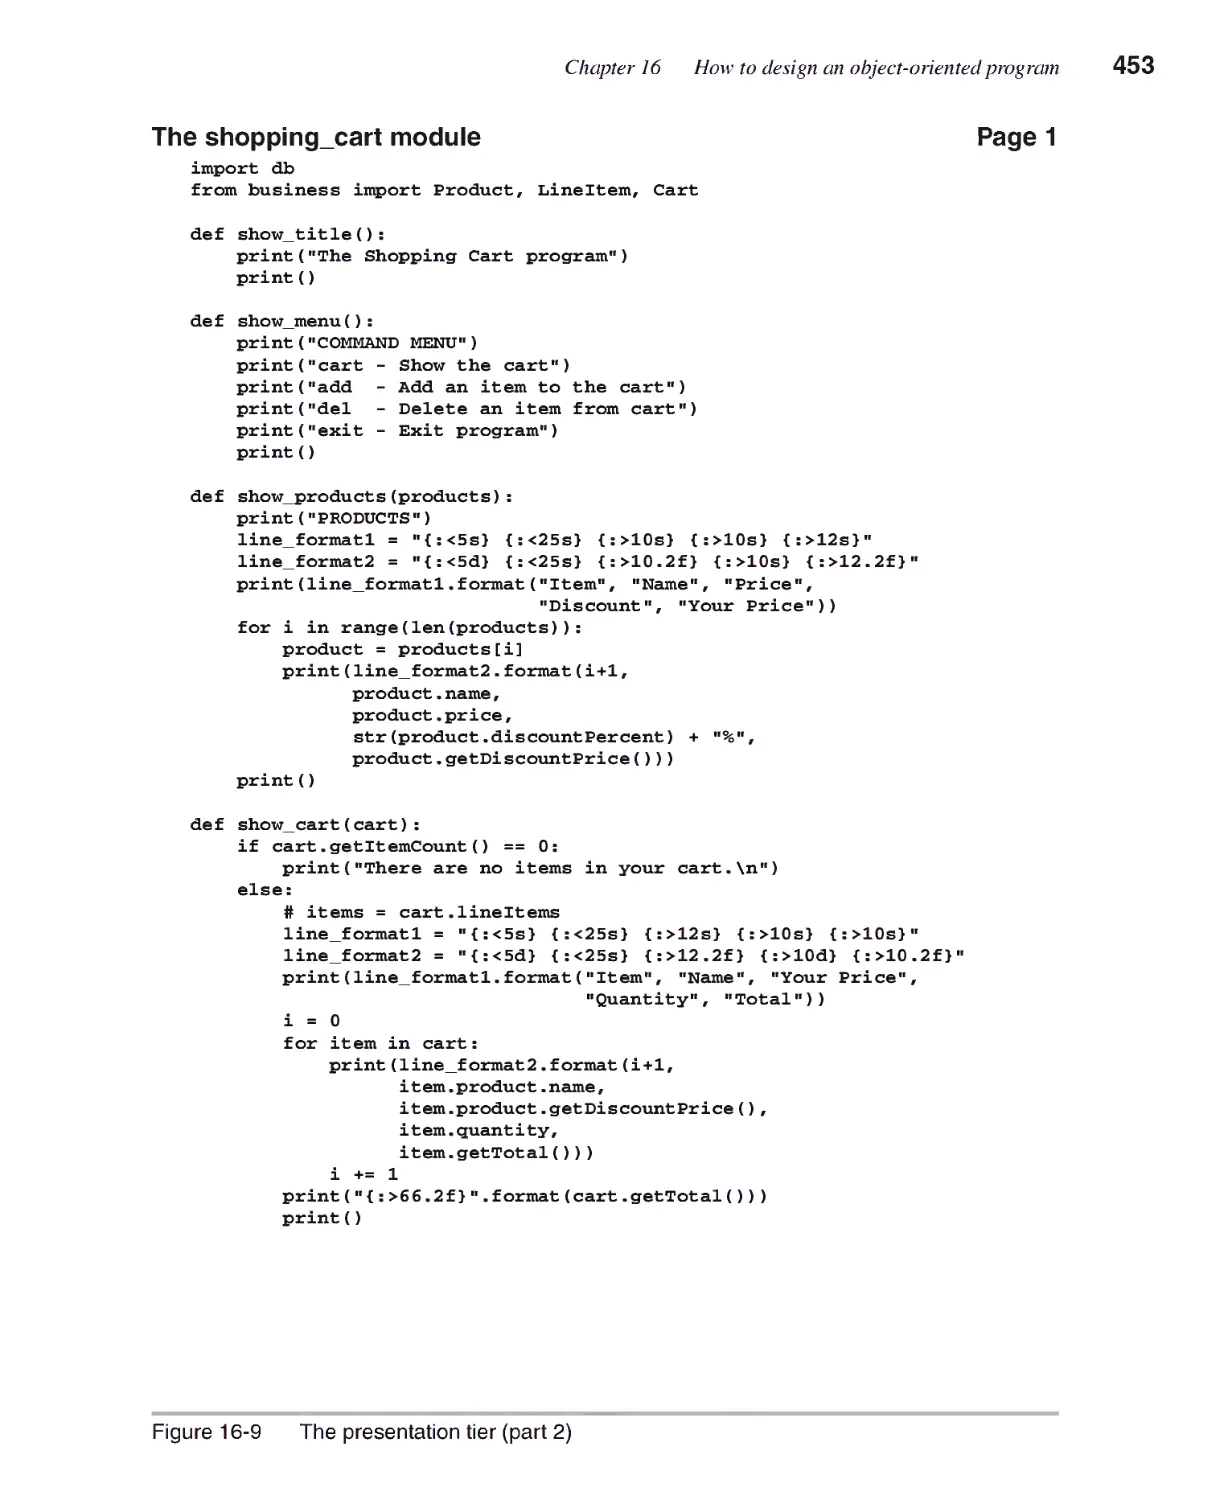
The presentation tier 450
Section 4 Database and GUI programming
Chapter 17 How to work with a database
An introduction to relational databases 462
How7 a database table is organized 462
How7 the tables in a database are related 464
How7 the columns in a table are defined 466
How to use the SQL statements for data manipulation 468
How7 to select data from a single table 468
How7 to select data from multiple tables 470
How7 to insert, update, and delete rows 472
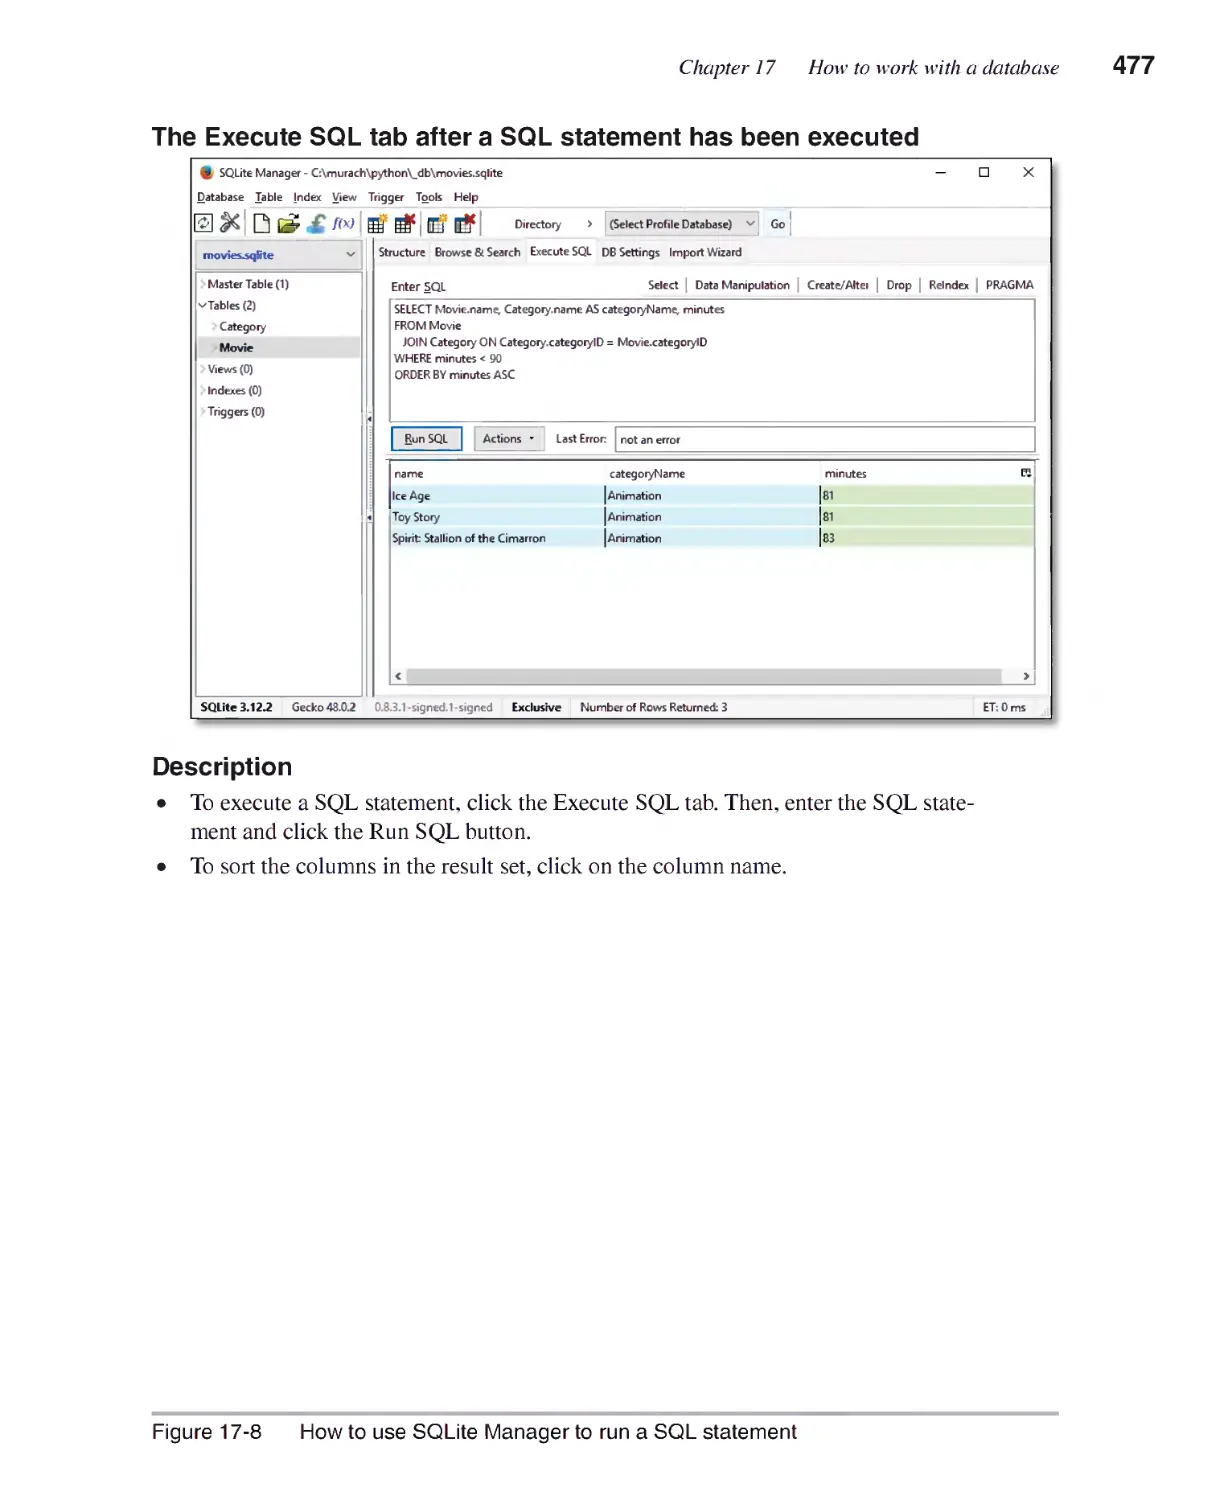
How to use SQLite Manager to work with a database 474
How7 to connect to a SQLite database 474
How7 to execute SQL statements 476
How to use Python to work with a database 478
How7 to connect to a SQLite database 478
How to execute SELECT statements 480
■ ■ ■
Expanded contents XIII
How to set the rows in a result set 482
How to execute INSERT, UPDATE, and DELETE statements 484
How7 to test the database code 486
How7 to handle database exceptions 486
The Movie List program 488
The user interface 488
The business tier 488
The database tier 490
The presentation tier 494
Chapter 18 How to build a GUI program
How to create a GUI that handles an event 504
How7 to display a root window 504
How7 to work with frames and buttons 506
How7 to handle a button click event 508
More skills for working with components 510
How7 to work with labels and text entrv fields 510
How7 to lay out components in a grid 512
How7 to code a class that defines a frame 514
The Future Value program 516
The business module 516
The ui module 516
Appendix A How to set up Windows for this book
How7 to install the source code for this book 524
How to install Pvthon and IDLE 526
How to install Firefox and SQLite Manager 528
How7 to verify that the database is installed correctly 530
Appendix B How to set up Mac OS X for this book
How7 to install the source code for this book 534
How to install Pvthon and IDLE 536
How7 to verifv that Pvthon and IDLE are working correctlv 538
How7 to install Firefox and SQLite Manager 540
How to verifv that the database is installed correctlv 542
Introduction
If you want to learn how to program but have little or no experience, you've
chosen the right language. That's because Python has a simple syntax that makes
it easier to learn than other programming languages. At the same time, it's a
powerful language that provides all of the features that you need to master in any
programming language. So a foundation in Python makes it easier to add other
languages to your resume.
Beyond that, whether you're new to programming or have years of
experience, you've chosen the right book for learning Python programming.
If you're a beginner, our self-paced approach helps you build competence and
confidence at every turn of the page. If you're an experienced programmer, this
same self-paced approach lets you learn Python faster and more thoroughly than
you've ever learned a language before.
Either way, when you're through, you'll have mastered the most
important skills that are needed on the job, including those for object-oriented
programming, database programming, and GUI programming. At that point,
this book becomes a quick reference that you can rely on whenever you need to
refresh your memory about coding details or apply a new feature to your work.
What this book does
To make this book as effective as possible, this book is divided into four
sections:
• Section 1 presents an eight-chapter course in Python that gets you off
to a great start. This section works for both newbies and experienced
programmers because it lets you set your own pace. If you're a beginner,
you'll move slowly and do all the exercises. If you have experience, you'll
move more quickly, skimming through material you already know to focus
on skills that are new to you or that you've never mastered.
• Section 2 presents the other Python essentials that every programmer should
know. That includes expanding on the skills for working with numbers
and strings that were presented in section 1. It also includes new skills like
working with dates and times, dictionaries, recursion, and algorithms.
XVI Introduction
• Section 3 consists of three chapters that show how to design and develop
object-oriented programs. This is a critical skillset in today's world, and
it complements the procedural skills you learned in section 1. When you
complete this section, you'll be able to develop programs that combine the
best procedural practices with the best object-oriented practices.
• The focus of section 4 is to show you how all of the skills that you've
learned in the first three sections are applied to real-world programs. First,
chapter 17 shows you how to use Python for database programming, a
must in businesses large and small. Then, chapter 18 shows you how to use
Python to develop programs with graphical user interfaces (GUIs).
Why you'll learn faster and better with this book
Like all our books, this one has features that you won't find in competing
books. That's why you'll learn faster and better with our book than with any
other. Here are a few of those features.
• As you page through this book, you'll see that all of the information is
presented in "paired pages," with the essential syntax, guidelines, and
examples on the right page and the perspective and extra explanation on the
left page. This helps you learn faster by reading less...and this is the ideal
reference format when you need to refresh your memory about how to do
something.
• To show you how Python works, this book presents 45 complete programs
that build from the simple to the complex. We believe that studying the code
for complete programs is critical to the learning process... and yet you won't
find programs like ours in other Python books.
• Of course, this book also presents hundreds of short examples, so it's easy
to find an example that shows what you want to do. Even better, our paired
pages make it easier to find the example that you're looking for than it is
with traditional books that embed the examples in the text.
• Like all our books, this one has exercises at the end of each chapter that give
you hands-on experience practicing what you've learned. These exercises
also encourage you to experiment and to apply what you've learned in new
ways...just as you'll have to do on the job. Because our exercises start from
partial programs that provide the boilerplate code, you get more practice in
less time because you can focus on the skills you've just learned.
What software you need
To develop Python programs, you just need to download and install Python.
It includes an integrated development environment (IDE) called IDLE that you
can use for coding, testing, and debugging your programs. Chapter 1 shows how
to use IDLE, and appendixes A and B show how to install Python and IDLE on
Windows and Mac OS X systems.
■ ■
Introduction XVII
If you're going to develop programs that use a SQLite database as shown in
chapter 17, you also need to download and install the Firefox web browser and a
Firefox add-on known as SQLite Manager. Appendixes A and B also provide the
instructions for doing that.
How our downloadable files can help you learn
If you go to our website at www.murach.com. you can download all the files
that you need for getting the most from this book. This includes:
• the programs presented in this book
• the starting points for the exercises
• the solutions to the exercises
These files let you test, review, and copy the code. If you have any problems with
the exercises, the solutions are there to help you over the learning blocks, an
essential part of the learning process. And in some cases, the solutions will show
you a more elegant way to handle a problem, even when you've come up with a
solution that works. Here again, appendixes A and B show how to download and
install these files on Windows and Mac OS X systems.
Support materials for instructors and trainers
If you're a college instructor or corporate trainer who would like to use this
book as a course text, we offer a full set of the support materials you need for a
turnkey course. That includes:
• instructional objectives that help your students focus on the skills that they
need to develop
• dozens of projects that let your students prove how well they have mastered
those skills
• test banks that let you measure how well your students have mastered those
skills
• a complete set of PowerPoint slides that you can use to review and reinforce
the content of the book
Instructors tell us that this is everything they need for a course without all the
busywork that you get from other publishers.
To learn more about our instructor's materials, please go to our website at
www.murachforinstructors.com if you're an instructor. Or if you're a trainer,
please go to www.murach.com and click on the Courseware for Trainers link, or
contact Kelly at 1-800-221-5528 or kelly@murach.com.
Please remember, though, that the primary component for a successful
Python course is this book. Because your students will learn faster and more
thoroughly when they use our book, they will have better questions and be more
prepared when they come to class. Because our guided exercises start from
partial programs, your students will get more and better practice in lab. And
because our paired pages are so good for reference, your students will be able to
review for tests and do their projects more efficiently.
■ ■ ■
XVI11 Introduction
Please let us know how this book works for you
From the start of this project, we've had two goals for this book. First, we
wanted to make this the best-ever book for people with no experience who want
to learn how to program. To do that right, we knew we not only had to make
the book easy enough for beginners, but also had to teach all of the skills that a
programmer needs to know.
Second, we wanted to make this the best-ever book for experienced
programmers who want to add Python to their skillsets. To do that right, we've
carefully selected the content, organized it from simple to complex in each
chapter, and packed the book full of code examples and sample programs. That's
why we believe that this book will help experienced programmers learn Python
faster and better than ever. And when they're done, this book will be their
best-ever on-the-job reference.
Now, we hope we've succeeded. We thank you for buying this book. We
wish you all the best with your Python programming. And if you have any
comments, we would appreciate hearing from you.
\J Joel Murach, Author Mike Murach, Publisher
joel@murach.com murachbooks@murach.com
Section 1
Essential concepts
and skills
The eight chapters in this section get you off to a fast start by presenting
a complete subset of the essential concepts and skills that you need for
Python programming. First, chapter ] introduces you to Python and shows
you how to use an integrated development environment (IDE) called IDLE
to develop and run programs. Then, chapters 2, 3, and 4 present skills that
let you develop substantial programs of your own.
At that point, you're going to need to improve your testing and
debugging skills, so that's what chapter 5 shows you how to do. Then,
chapters 6, 7, and 8 continue your development. When you complete this
section, you'll be able to design, code, test, and debug Python programs
that can work with data that's stored in files.
1
An introduction to Python
programming
This chapter starts by showing why Python is considered by many to be the
best language for teaching beginners how to program. Next, this chapter
presents the concepts and terms that you need to know before you start
programming. Then, it shows how to use an integrated development
environment (IDE) called IDLE to develop and test Python programs.
Introduction to Python 4
Why Python works so well as your first programming language 4
Three types of Python applications 6
The source code for a console application 8
How Python compiles and runs source code 10
How disk storage and main memory work together 12
How to use IDLE to develop programs 14
How to use the interactive shell 14
How to work with source files 16
How to compile and run a program 18
How to fix svntax and runtime errors 20
Perspective 22
4 Section 1 Essential concepts and skills
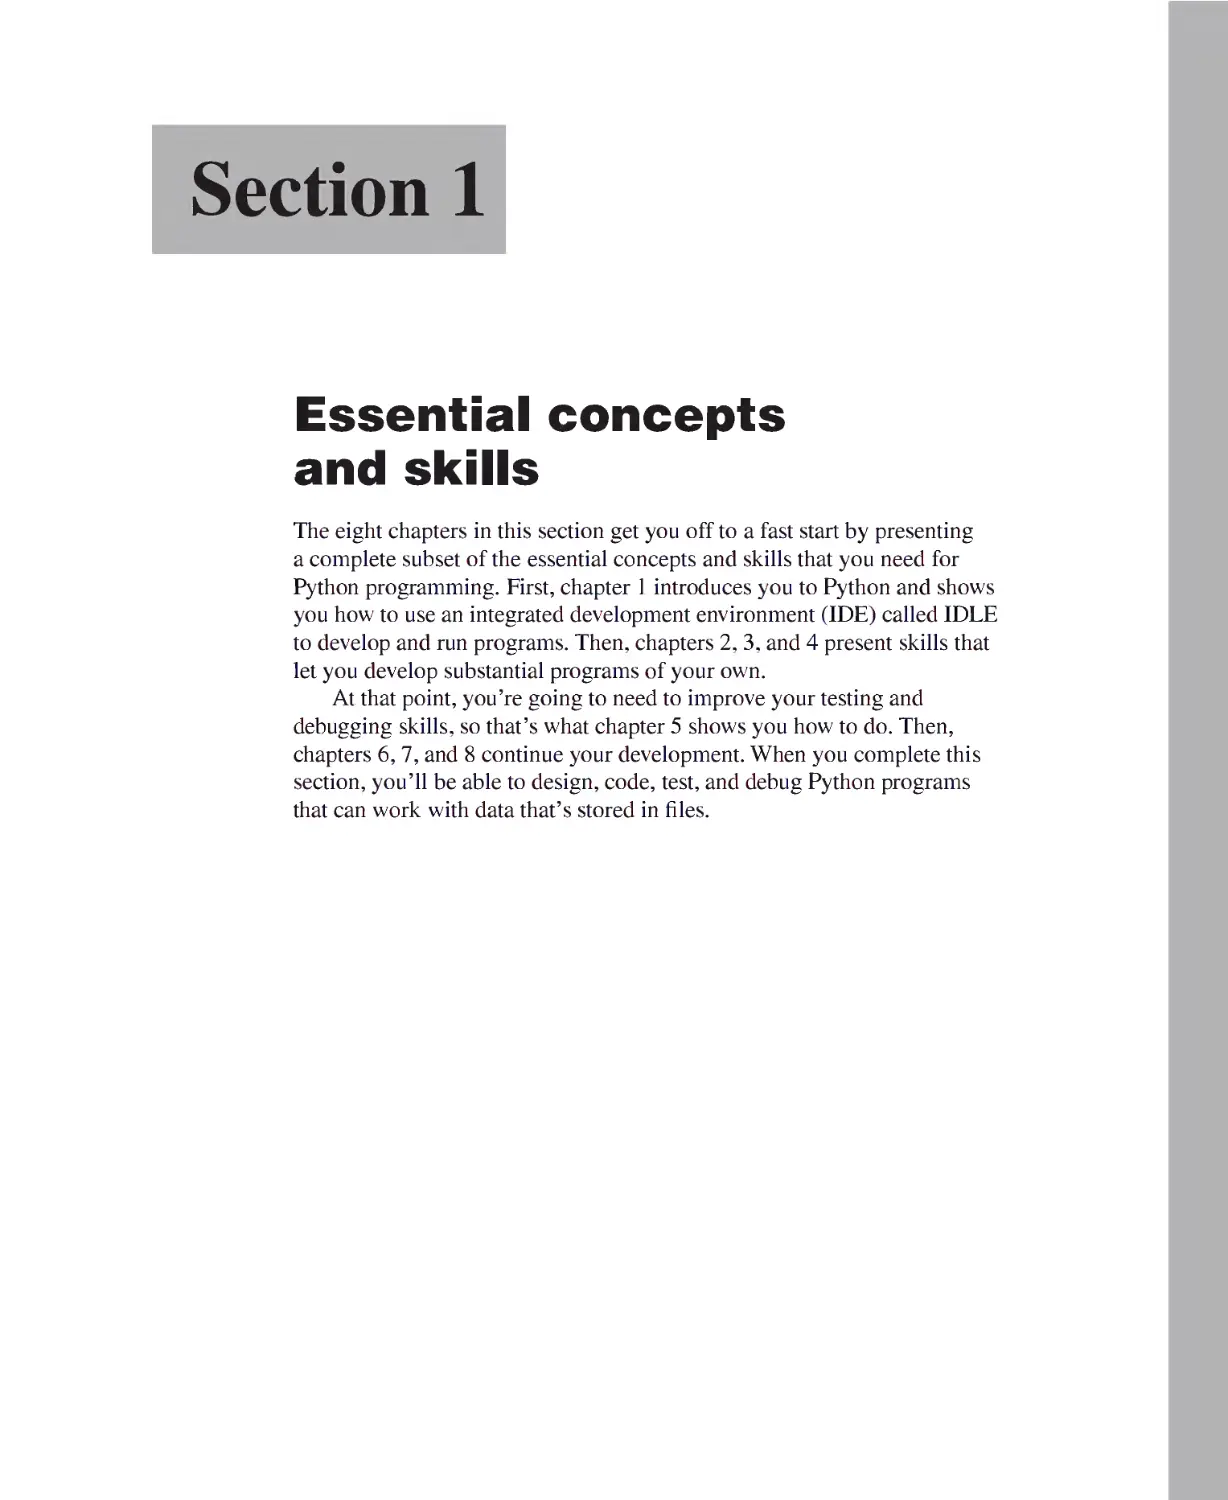
Introduction to Python
The Python programming language was developed in the 1990s by Guido
van Rossum of the Netherlands. It was intended to be a simple, intuitive
language that is as powerful as traditional languages, and it succeeded at that.
Guido named the language Python because he was a big fan of "Monty Python's
Flying Circus" and he continues to be involved in the development of Python. In
fact, some developers in the Python community refer to him as the "Benevolent
Dictator for Life (BDFL)".
Why Python works so well
as your first programming language
Figure 1-1 summarizes the case for learning Python as your first
programming language. Here, you can see a short excerpt from a Java program
and an excerpt from a Python program that does the same thing. This shows
how much closer to plain English Python is and how much simpler the syntax
for Python is. In fact, you'll often be able write a Python program with far less
code than the same program would take in C++, Java, C#, or other traditional
programming languages. And yet, you can learn most of the concepts and skills
that you need for those languages when you learn Python, without getting
slowed down by trivial coding details.
Beyond that, Python supports a wide range of applications. It is used by
many successful companies. And it is open source, which means that its source
code is available to the entire Python community.
In short, Python is a powerful programming language that lets you develop
programs in less time and with less code than other programming languages.
That's why it's a great language for learning how to program. But it's also a
great language if you already know how to use another language or two.
In this figure, the Python timeline shows that Python 2 became available in
the year 2000. This was replaced by Python 3 in 2008. However, Python 3 isn't
backward compatible. That means that Python 3 can't run most programs written
for Python 2. Conversely, Python 2 isn't forward compatible. That means that it
can't run most programs written for Python 3.
In this book, you'll learn how to write programs for Python 3, and you'll
learn how to use Python 3 to run those programs. As a result, compatibility
won't be a problem. That's a great way to learn Python.
Chapter 1 An introduction to Python programming
Four general-purpose programming languages
The
C++
Java
C#
Pvthon
j Pytho
Year
2000
2008
2010
2015
n timeline
Month
October
December
July
September
Release
2.0
3.0
2.7
3.5
Description
First release of Pvthon 2
A redesign of Python that isn't backward compatible
Last release of Python 2 with support until 2020
The latest release at this writing;
Syntax differences between Python and Java
Some Java code
private static double calculateFutureValue(
double monthly-Investment, double monthlyRate, int months)
{
double futureValue = 0.0;
for (int i = 1; i <= months; i++) {
futureValue =
(futureValue + monthlyInvestment) * (1 + monthlyRate);
}
return futureValue;
}
Python code that works the same
def calculateFuture Value (monthly Investment, monthlyRate, months) :
futureValue = 0.0
for i in range(months):
futureValue =
(futureValue + monthlyInvestment) * (1 + monthlyRate)
return futureValue
Why Python is a great first language
• Python has a simple syntax that's easier to read and use than most other languages.
• Python has most of the features of traditional programming languages. As a result,
you can use Python to learn the concepts and skills that apply to those languages
too.
• Python supports the development of a wide range of programs, including games,
web applications, and system administration.
• Python is used by many successful companies, including Google, IBM, Disney, and
EA Games. As a result, knowing Python is a valuable skill.
• Python is open source. There are many advantages to being open source.
Figure 1-1 Why Python works so well as your first programming language
6 Section 1 Essential concepts and skills
Three types of Python applications
An application, or app, is computer software that performs a task or related
set of tasks. However, applications can also be referred to as programs, even
though one application may actually consist of many related programs. In
practice, most people use these terms interchangeably. In this book, we use the
term program to refer to the short applications that it presents.
In any event, figure 1-2 shows three types of applications that you can create
with Python. The first type is a console application. In this type of application,
you enter commands at the command prompt in the console that's available from
your operating system.
In this case, a console application is being run on a Windows system. As a
result, it uses the Command Prompt window that's available from Windows. On
a Mac OS X system, though, a console application runs in the Terminal window.
Because console applications are the easiest type of application to develop,
you'll work with console applications in the first three sections of this book.
The second type of Python application is a GUI application. That's an
application that has a graphical user interface (GUI). In this figure, the GUI
application performs the same tasks as the console application. In other words,
it gets the same input from the user, performs the same calculation, and displays
the same result. However, the GUI application is more user-friendly and
intuitive. You'll learn how to develop this type of application in the last section
of this book.
The third type of application shown in this figure is a web application.
Unlike a desktop application, which runs directly on your computer, a web
application can be called by a web browser that's running on a computer or
mobile device and can use a server to process or store data. In this figure, the
web application performs the same task as the console and GUI applications.
Although this book doesn't show how to develop web applications, you should
know that Python frameworks are available to help you develop that type of
application with Python.
You should also know that you can use Python as a scripting language
to work with other software applications or to develop system administration
programs that perform tasks like automatically backing up a server or rotating
log files. Because programs like this usually run in the background, they don't
always have a user interface. When you finish this book, though, you will have
the skills you need to write this type of program.
Chapter 1 An introduction to Python programming
A console application
rai Command Prompt - python future_value.py
:\>cd \murach\pifthon\book_apps\ch01
:\Piurac)i\pyt)ion\book_apps\c)i01>pyt)ion future _ualue .py
elcome to the Future Ualue Calculator
Is)
inter monthly investment:
i nter yearly interest rate
■ nter number of years:
I'uture ualue:
ontinue? <y/n>:
100
5.0
5
$6,828.94
A GUI application
0 Future Value Calculator
T
Monthly Investment
Yea riy Interest Rate:
Years:
Future Value:
i=]
Is)
100
5.0
5
S6,828S4
! Calculate !
Exit
A web application
Future Value Calculator X +
^j t$ localhost">000/calculate ▼
Future Value Calcu
Monthly Investment:
Yearly Interest Rate:
Years:
Future Value:
lator
C
^ Search
100.0
5.0
5
$6,828.94
Calculate
-
& £
*
□
x III
Description
• A console application is a desktop application that uses the console to interact with
the user.
• A GUI application is an application that uses a graphical user interface (GUI) to
interact with the user.
• A web application typically gets requests from a web browser, processes them on a
web server, and returns the responses to the web browser.
Figure 1-2 Three types of Python applications
8 Section 1 Essential concepts and skills
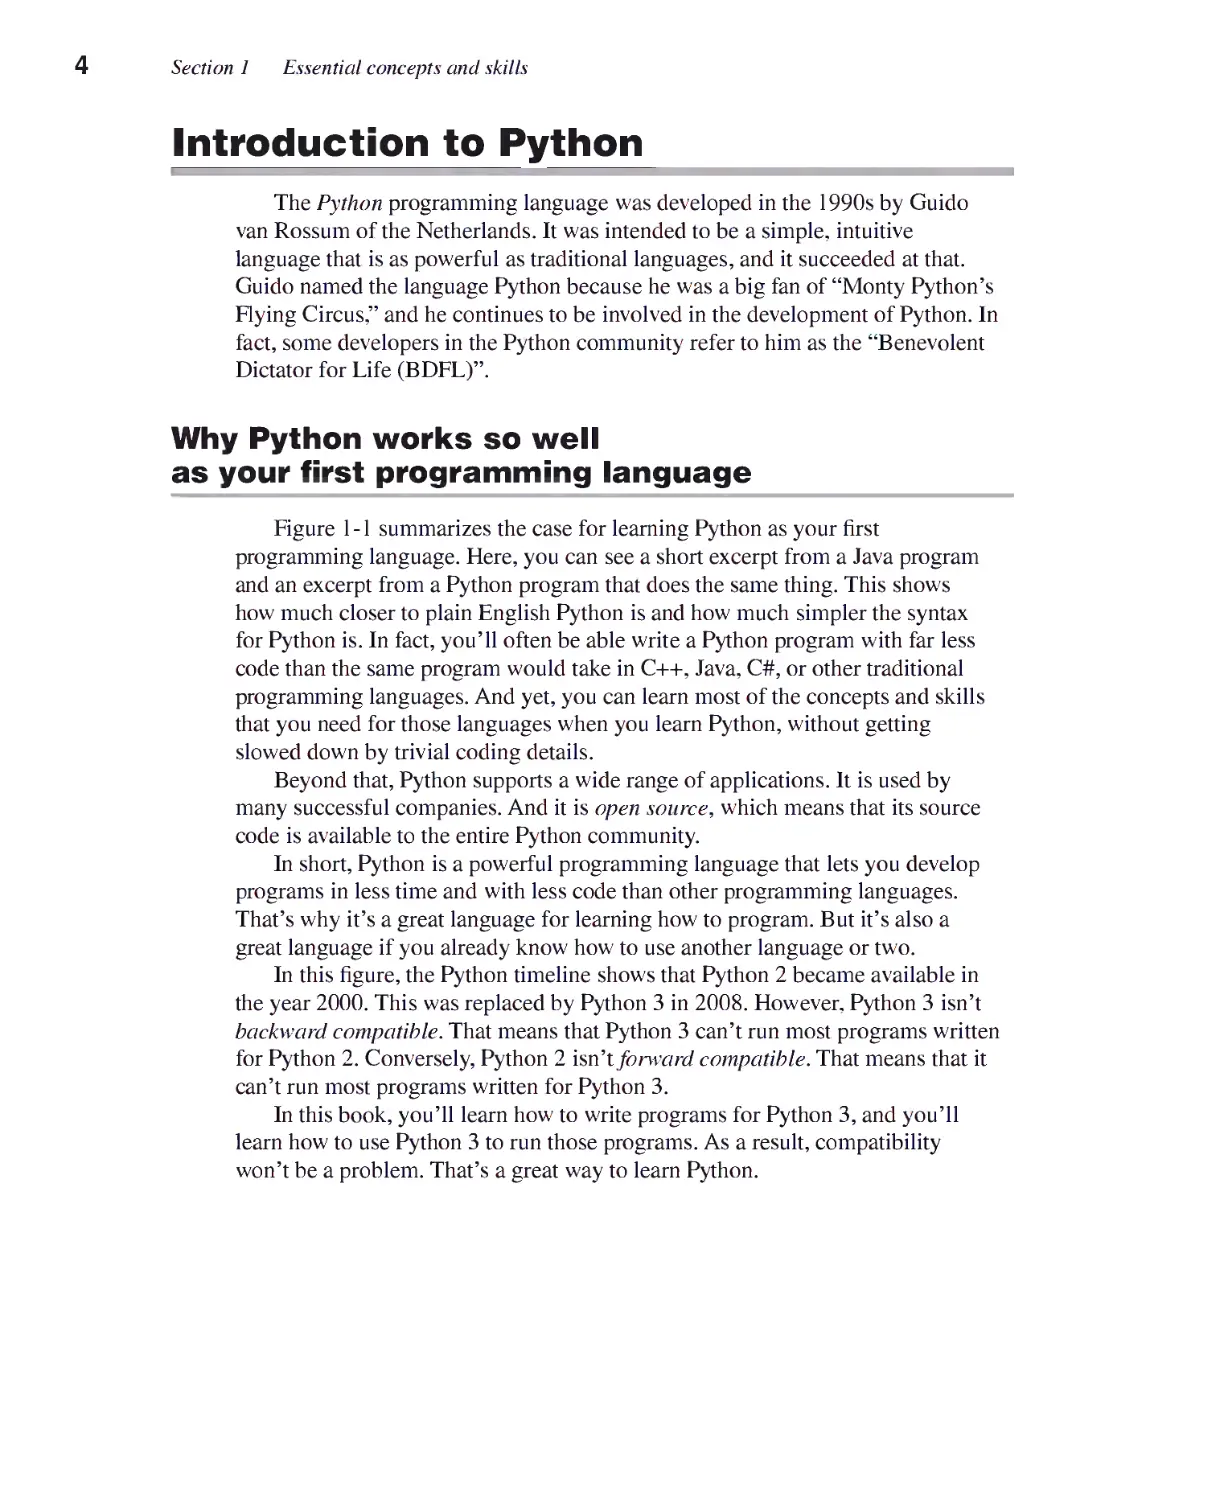
The source code for a console application
To show you what a Python program looks like, figure 1-3 shows the source
code for a console application. This application gets three values from the user: a
monthly investment amount, a yearly interest rate, and a number of years. Then,
the program takes these entries and calculates the future value of the monthly
investments with the interest calculated each month.
For now, just note that the code begins with a line that starts with a hash (#)
and a bang (i). This line is commonly called the shebang line. It is ignored by
Windows, but it's used by Unix-like operating systems, including Mac OS X, to
specify the interpreter for the program. In this case, the shebang specifies that
this program should be run using Python 3. As a result, you can use this shebang
line for all programs in this book.
In the next chapter, you'll start learning how to write the code in this
program. Then, by the time you complete chapter 3, you'll know how most of
the code in this program works, and you'll be able to write comparable programs
of your own.
Chapter 1 An introduction to Python programming
The source code for a console application
#1/usr/bin/env python3
import locale
# set the locale for use in currency formatting
result = locale.setlocale(locale.LC_ALL, ■')
if result == ■C:
locale.setlocale(locale.LC_ALL, 'en_US')
# display a welcome message
print("Welcome to the Future Value Calculator")
print()
choice = "y"
while choice.lower() == "y":
# get input from the user
monthly_investment = float(input("Enter monthly investment:\t"))
yearly_interest_rate = float(input("Enter yearly interest rate:\t"))
years = int(input("Enter number of years:\t\t"))
# convert yearly values to monthly values
monthly_interest_rate = yearly_interest_rate / 12 / 100
months = years * 12
# calculate the future value
future_value = 0
for i in range(months):
future_value = future_value + monthly_investment
monthly_interest_amount = future_value * monthly_interest_rate
future_value = future_value + monthly_interest_amount
# format and display the result
print("Future value:\t\t\t" + locale.currency(
future_value, grouping=True))
print()
# see if the user wants to continue
choice = input("Continue? (y/n): ")
print()
print("Bye!")
Discussion
• This application gets three values from the user: monthly investment amount,
yearly interest rate, and number of years. Then, it calculates and displays the future
value that the investments will erow to.
• The first line in this program is called the shebang line, or shebang. It specifies
the interpreter that should be used to run this program. In this book, all programs
should be run by Python 3.
Figure 1-3 The source code for a console application
Section 1 Essential concepts and skills
How Python compiles and runs source code
The code in a program like the one in the last figure can be referred to
as Python source code. To create the file that contains this source code, the
programmer uses a text editor or integrated development environment (IDE),
which you'll learn more about in a moment.
However, before the Python source code can be run (or executed) on a
computer, the code must be translated into code that the computer can
understand, as shown in figure 1-4. Here, you can see that the files that contain
the source code have the .py extension. Then, the Python interpreter is used to
translate (or compile) the source code into bytecode.
This bytecode can be run by any computer that has the Python virtual
machine installed on it. This virtual machine translates the bytecode so it can be
run by the operating system of the computer.
Since the Python virtual machine is part of the Python interpreter, it is
available on all platforms that support Python. In fact, that's why Python is said
to bt platform-independent. In other words, it is the virtual machine that makes
it possible for Python to run on a wide variety of operating systems.
Although this compilation process is complicated, it's done automatically
with the push of a single key when you're using an IDE to develop your Python
programs as shown later in this chapter. For now, all you need to take away from
this figure is that Python source code is compiled into bytecode that's run by the
computer's operating system.
Chapter 1 An introduction to Python programming
How Python compiles and runs source code
code editor ► source code
(.py files)
Python
interpreter
bytecode
Python virtual operating
machine system
Procedure
Step 1 The programmer uses a text editor or IDE to enter and edit the source
code. Then, the programmer saves the source code to a file with a .py
extension.
Step 2 The source code is compiled by the Python interpreter into bytecode.
Step 3 The bytecode is translated by the Python virtual machine into instructions
that can interact with the operating system of the computer.
Description
• Although this procedure is complicated, it runs behind the scenes when you're
developing Python programs. As a result, it's mostly invisible to the developer.
• Python bytecode can be run on any operating system that has a Python virtual
machine. That's why Python is said to be platform-independent.
• If the program imports modules, the Python interpreter saves the compiled
bytecode for those modules in files that have .pyc or .pyo extensions. This is an
import optimization that can improve the startup time for a program.
Figure 1-4 How Python compiles and runs source code
Section 1 Essential concepts and skills
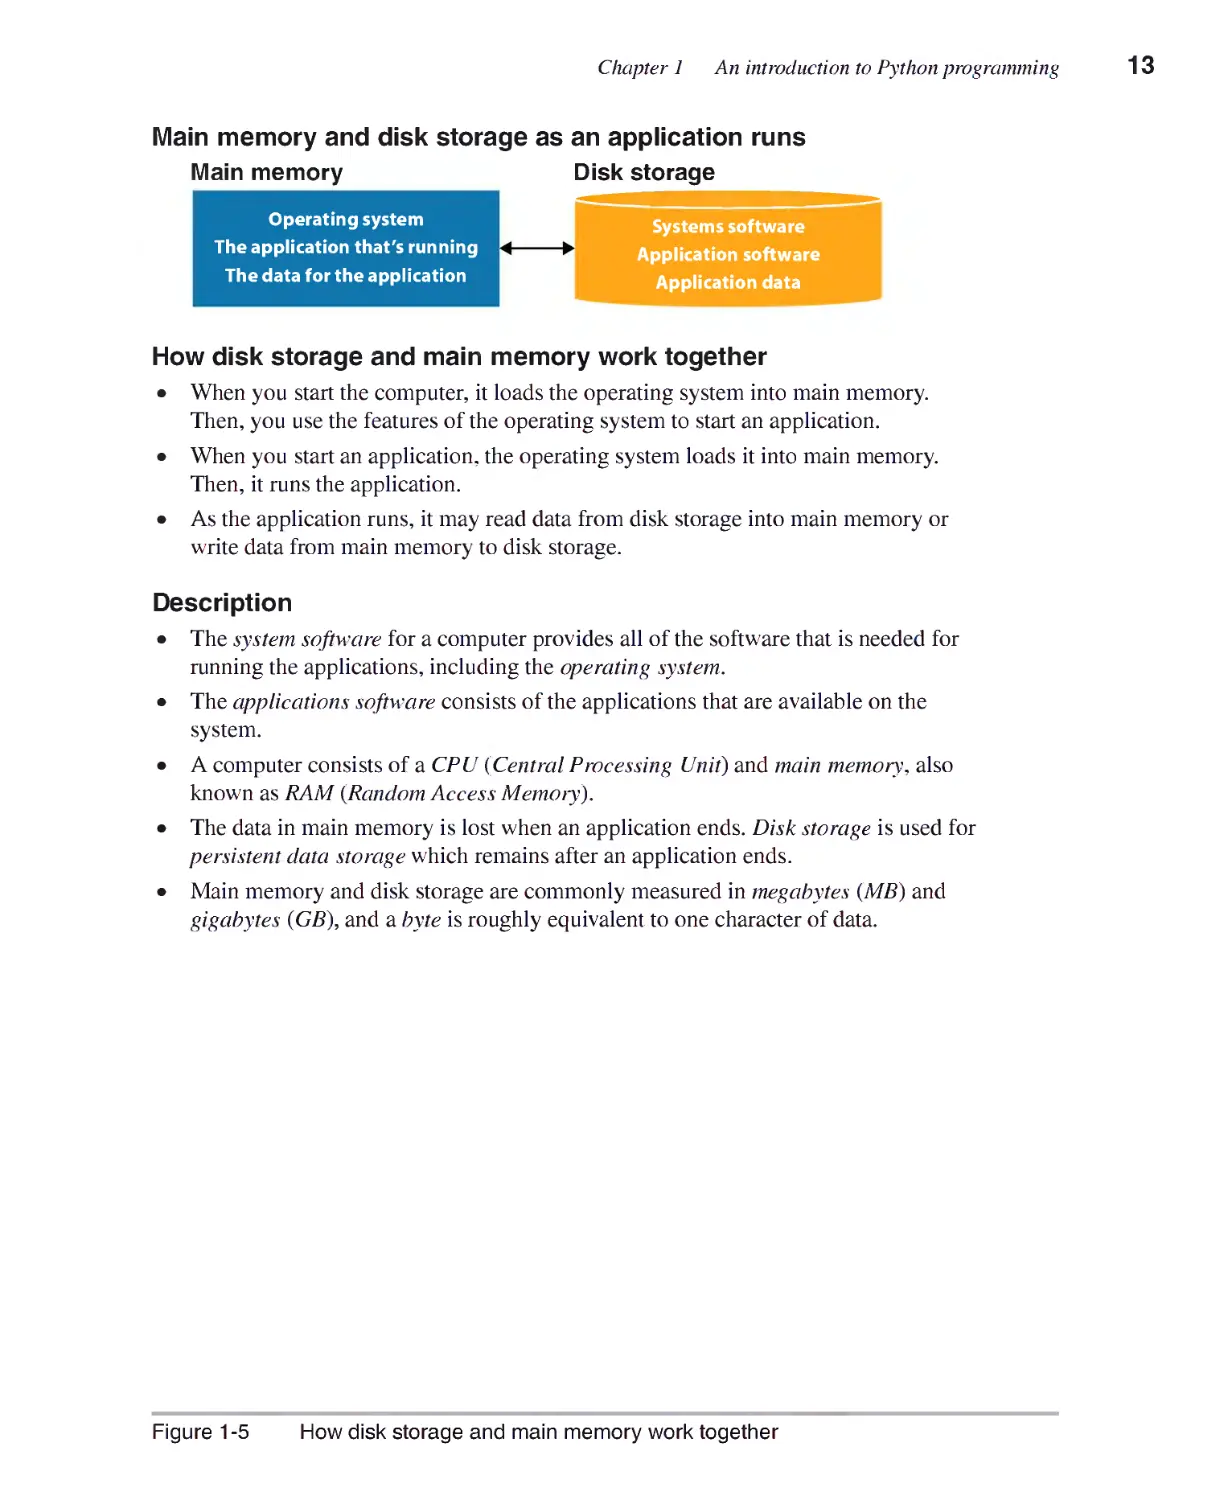
How disk storage and main memory work together
Now that you know how a program is compiled and run, it's worth taking a
minute to go over how the main memory of a computer and the disk storage of a
computer work together as an application runs. This conceptual background can
help you understand what needs to be done when you develop a program that
works with data in disk storage. In addition, figure 1-5 presents the terms that
you need to be familiar with.
To start, you should know that a computer consists of a Central Processing
Unit (CPU) and main memon\ which is often referred to as RAM (Random
Access Memory). When an application runs, its bytecode is stored in main
memory and its instructions are executed by the CPU. In addition, the data that
the application is currently using is stored in main memory. This type of storage
is temporary, however, so the data is lost when the application ends.
To store the data of an application, disk storage is commonly used. This
type of storage remains after the application ends so it is called persistent data
storage. In chapter 7, you'll learn how to work with persistent data that's stored
in a file. Then, in chapter 17, you'll learn how to work with persistent data that's
stored in a database.
In general, two types of software are stored on disk. Systems software
consists of the programs that control the operation of the system. That includes
the operating system for the computer, like Windows for a PC or OS X for
a Mac. In contrast, application software consists of the applications that are
available on the system. That includes applications such as web browsers, word
processors, and spreadsheet programs.
When a computer starts, it loads the operating system from disk storage into
main memory. Then, when you start an application, the operating system loads
the application from disk storage into main memory, and it runs the application.
If the application requires persistent data while it is running, it reads the data
from disk storage into main memory and then processes it. If the application
updates the data or creates new data, it writes the data from main memory back
to disk storage.
The storage capacity of main memory and disk storage is measured in bytes.
For instance, main memory used to be measured in megabytes (MB), which is
millions of bytes, but now it is usually measured in gigabytes (GB), which is
billions of bytes. For the record, a byte consists of eight binary digits, or bits, and
each byte is roughly equivalent to one character of data, like an A or a B.
If you're comfortable with these concepts and terms, you're ready to learn
how to use an IDE to create, test, and debug Python programs as shown in the
next few figures. Otherwise, it's worth taking a few minutes to review the terms
in this figure because they're terms that every programmer should know.
Chapter 1 An introduction to Python programming
Main memory and disk storage as an application runs
Main memory Disk storage
Operating system
The application that's running
The data for the application
How disk storage and main memory work together
• When you start the computer, it loads the operating system into main memory.
Then, you use the features of the operating system to start an application.
• When you start an application, the operating system loads it into main memory.
Then, it runs the application.
• As the application runs, it may read data from disk storage into main memory or
write data from main memory to disk storage.
Description
• The system software for a computer provides all of the software that is needed for
running the applications, including the operating system.
• The applications software consists of the applications that are available on the
system.
• A computer consists of a CPU (Central Processing Unit) and main memory* also
known as RAM {Random Access Memoty).
• The data in main memory is lost when an application ends. Disk storage is used for
persistent data storage which remains after an application ends.
• Main memory and disk storage are commonly measured in megabytes (MB) and
gigabytes (GB\ and a byte is roughly equivalent to one character of data.
Systems software
Application software
Application data
Figure 1-5 How disk storage and main memory work together
Section 1 Essential concepts and skills
How to use IDLE to develop programs
Although you can use a text editor to develop Python programs, most
programmers use an integrated development environment (IDE) because an IDE
usually helps you get more done in less time. One IDE that's popular for Python
programming is PyCharm, which is a free, open-source IDE that runs on most
operating systems. Another is Eclipse, which is a general-purpose IDE that has a
plugin called pyDev for doing Python development.
However, for this book, we recommend using an IDE named IDLE. This
IDE is included with the Python distributions for Windows and Mac OS X
and can be easily installed on Linux. Besides that, it's easy to use. If that's not
enough, the name of this IDE is the same as the last name of Eric Idle, a sly
reference to one of the founding members of the Monty Python comedy group.
How to use the interactive shell
Figure 1-6 shows how to use IDLE's interactive shell. This shell makes it
easy to enter and test Python statements without writing full programs. This is
another feature that makes Python work so well as a first programming language.
When you start the shell, it displays some version and copyright information
followed by its prompt (>»). At this prompt, you can type any Python code
that you want to run. Then, when you press the Enter key, Python runs the code,
displays the results if there are any, and displays another prompt.
In this figure, the first prompt executes a print() function that prints "Hello
out there!" to the console. This displays the characters coded within the
quotation marks immediately after the prompt. Then, the next three prompts
evaluate arithmetic expressions and display the result of each expression
immediately after the prompt.
The fifth prompt executes another printQ function. However, this printQ
function doesn't include quotation marks around the characters, and those
quotation marks are required. As a result, the shell displays an error message for
a SyntaxError that says "invalid syntax".
The next two prompts show what happens when you set a variable named x
equal to 5 and then add 10 to that variable named x. The result is 15.
The last statement attempts to add 15 to X. This displays a NameError
message that says "name 'X' is not defined". That's because variable names are
case sensitive so x and X refer to two different variables. The variable named x
has been defined earlier in this session, but the variable named X has not been
defined yet in this session.
This interactive session shows how the Python shell can help you build your
coding skills. That's why this book encourages you to use it whenever you need
to experiment with Python code. In fact, one of the exercises at the end of this
chapter walks you through your first use of this shell.
Incidentally, when you see a notation like File->Close, it means to pull down
the File menu and select the Close command. Similarly, Run->Python Shell
means to pull down the Run menu and select the Python Shell command. You'll
see this notation throughout the book.
Chapter 1 An introduction to Python programming
IDLE's interactive shell
[£ Python 3.5.0 Shell
(e)
File Edit Shell Debug Options Window Help
Python 3-5-0 (v3-5-0:374f501f4567, Sep 13 2015, 02:16:59) [MSC v.1900 32 bit
tel)] on Win32
Type "copyright", "credits" or "license()" for more information.
>» print ("Hello out there!")
Hello out there!
>» 8 + 5
13
>» 10/3
3 - 3333333333333335
>» (8 + 2) * 3
30
>» print (Hello out there!)
SyntaxError: invalid syntax
>» x = 5
>» x + 10
15
>» X + 15
Traceback (most recent call last):
File "<pyshell#7>", line 1, in <module>
X + 15
NameError: name 'X' is not defined
>»l
(In_lJ
—ii
Ln:21 Cofc4'
How to open, close, and restart the interactive shell
• To start IDLE, use the features of your operating system. This opens an interactive
shell.
• To close the interactive shell, click on its close button or select File->Close.
• To restart an interactive shell, select Run->Python Shell from another IDLE
window.
How to use the interactive shell
• Enter Python code after the >>> prompt. Then, press Enter.
• If you enter valid code that produces a result, the shell displays the results.
• If you enter invalid code, the shell displays an error message.
Description
• The interactive shell makes it easy to experiment with Python code and view the
results right away. This is another feature that makes Python a good first language
for beginning programmers.
Figure 1 -6 How to use the interactive shell
Section 1 Essential concepts and skills
How to work with source files
Figure 1-7 shows IDLE's editor window. In general, this editor works like
a simple word processor. So, to edit the source code for a program, you can use
many of the same techniques that you use with your word processor.
On a Windows system, for example, you can use Ctrl+X or Ctrl+C to cut or
copy the selected characters, Ctrl+V to paste the characters in a new location,
and Ctrl+Z to undo the last change that you made. You can also use Ctrl+Del or
Ctrl+Backspace to delete an entire word at a time. And you can right-click on
a selection to get a shortcut menu with commands that are appropriate for the
selected text.
You can also use the drop-down menus to find the commands that you may
want to use. For instance, you can use the commands in the File menu to create,
open, save, and close source files. You can use the Window menu to switch
between open files. And you can use the Edit and Format menus to edit and
format a selection.
If you want to make a copy of a source file that you're working on, you can
use the Save As command. This command is useful when you want to experiment
with a variation of the same program. It's also useful if you want to start a new
program from an existing program. Then, you can delete the parts of the program
that you don't want, keep the parts that you do want, and get your program off to
a fast start.
Chapter 1 An introduction to Python programming
IDLE's editor with a source file displayed
\j£ future_value.py - C:\murach\python\book_apps\ch01\future_value.py (3.5.0)
(e)
File Edit Format Run Options Window Help
#!/usr/bin/env python3
import locale
# set the locale for use in currency formatting
locale.setlocale(locale -LC_ALL, '')
# display a welcome message
print("Welcome to the Future Value Calculator")
print()
choice = "y"
while choice -lower()
"y"
# get input from the user
monthly_investment = float(input("Enter monthly investment:\t"))
yearly_interest_rate = float(input("Enter yearly interest rate:\t"))
years = int(input("Enter number of years:\t\t"))
# convert yearly values to monthly values
monthly_interest_rate = yearly_interest_rate / 12 / 100
months = years * 12
# calculate the future valu |
future_value = 0
for i in range(months):
future value = future value + monthly investment
Ln: 24 Col: 32
I
How to create, open, save, and close source files
• Use the File menu and common techniques for your operating system.
How to switch between a source file window and its shell window
• Use the Window menu. Or, arrange the windows on your screen so both are visible,
and then click on the window you want to use.
How to enter and edit Python code
• Use the Edit and Format menus, common editing keystrokes, and context menus.
Description
• Like other programs that you've used, IDLE provides menus for working with files,
editing and formatting selected text, and switching from one window to another.
Figure 1 -7 How to work with Python source files
Section 1 Essential concepts and skills
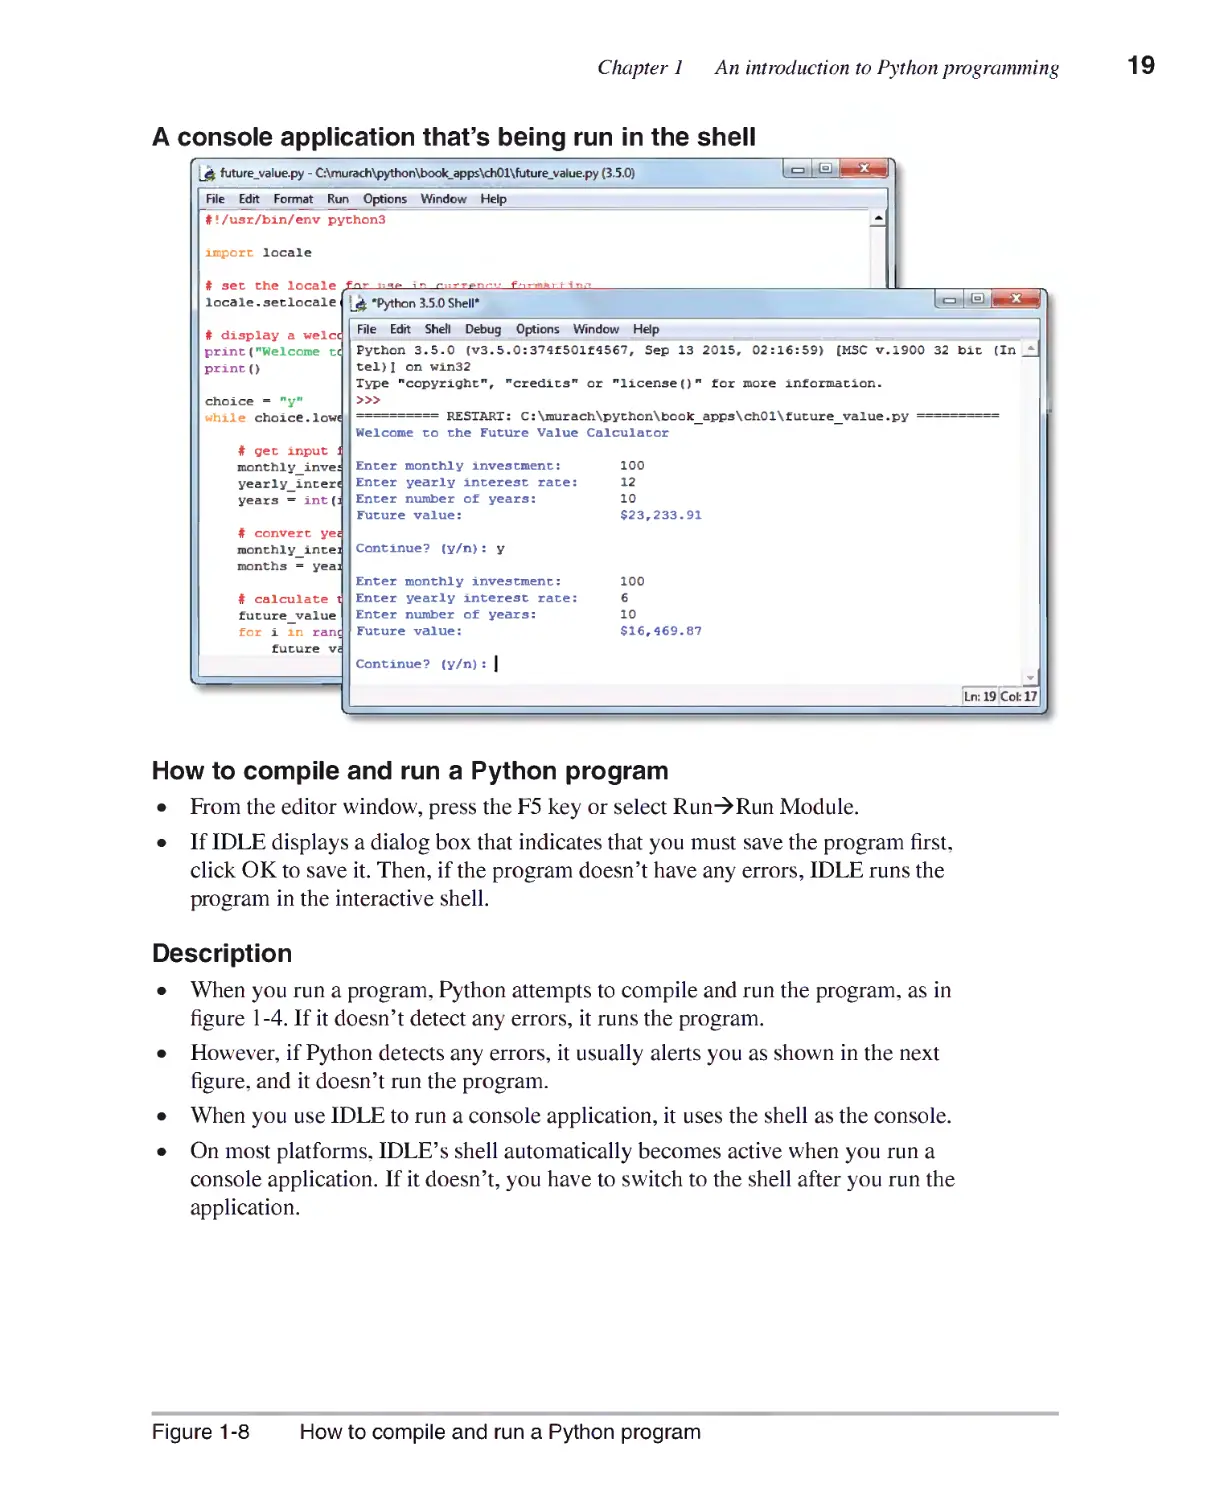
How to compile and run a program
To compile and run a Python program when you're using IDLE, you can just
press the F5 key. Then, Python compiles the source code into bytecode and runs
it. It's that simple. This is summarized in figure 1-8, and you can compare that to
the procedure in figure 1-4, which is done automatically by IDLE.
If you're compiling and running a program that works with the console,
IDLE uses the interactive shell as the console. This makes it easy to test the
program and to switch between the shell and the editor as you do that.
This assumes that the source code doesn't have any errors. However, it's
common for source code to have errors. In that case, you need to fix the errors
before Python can compile and can run the program. The next figure shows how
to do that.
Incidentally, if you're developing a professional program that uses the
console, you have to do the final testing by using the real console of a system.
However, you don't need to do that when you're learning Python with IDLE.
Instead, you can use the IDLE shell as the console for all of your programs.
Chapter 1 An introduction to Python programming
A console application that's being run in the shell
jg)t future_value.py - C:\murach\python\book_apps\ch01\future_value.py (3.5.0)
@
File Edit Format Run Options Window Help
#!/usr/bin/env pyrhon3
import locale
# set the locale fnr :_s£ i" r----e,.,-v f-i-r^rr""i
locale.setlocale *
# display a welc<
print("Welcome t(
print ()
choice = ny"
while choice.low<
# get input J
monthly_invej
yearly_interc
years = int (j
# convert ye«
monthly_intej
months = yeaa
# calculate t
future_value
for i in ranc
future v«
\A *Py*on 3-50 Shel1*
@
File Edit Shell Debug Options Window Help
Python 3.5.0 (v3.5.0:374f501f4567, Sep 13 2015, 02:16:59) [MSC v.1900 32 bit (In ^
tel)I on Win32
Type "copyright", "credits" or "licensee)" for more information.
>»
===== RESTART: C:\murach\python\book_apps\ch01\future_value.py =====
Welcome to the Future Value Calculator
Enter monthly investment:
Enter yearly interest rate:
Enter number of years:
Future value:
Continue? (y/n): y
Enter monthly investment:
Enter yearly interest rate:
Enter number of years:
Future value:
Continue? (y/n): |
100
12
10
$23,233.91
100
6
10
$16,469.87
_d
Ln: 19 Col: 17
How to compile and run a Python program
• From the editor window, press the F5 key or select Run->Run Module.
• If IDLE displays a dialog box that indicates that you must save the program first,
click OK to save it. Then, if the program doesn't have any errors, IDLE runs the
program in the interactive shell.
Description
• When you run a program. Python attempts to compile and run the program, as in
figure 1-4. If it doesn't detect any errors, it runs the program.
• However, if Python detects any errors, it usually alerts you as shown in the next
figure, and it doesn't run the program.
• When you use IDLE to run a console application, it uses the shell as the console.
• On most platforms, IDLE's shell automatically becomes active when you run a
console application. If it doesn't, you have to switch to the shell after you run the
application.
Figure 1 -8 How to compile and run a Python program
Section 1 Essential concepts and skills
How to fix syntax and runtime errors
After you write the code for a program, you need to test the program.
When you do that, your goal is to find all of the errors (or bugs) in the program.
Whenever you find a bug, you need to debug it by fixing it. Then, you need to
test the program again, fix the next bug that's found, and continue this process
until you finish debugging the entire program.
When you're ready to test a program and you try to compile and run it, two
types of errors are likely to be detected. The first type is a syntax error. These are
errors that occur because the Python coding rules have been violated. As a result,
the program can't be compiled.
The first example in figure 1-9 shows the dialog box that's displayed when
a syntax error is detected. In addition, the point at which the error was detected
is highlighted in the source code. Keep in mind, though, that the error may not
be exactly at that point. In fact, it is likely to be in the previous statement. In this
example, the error occurs because the statement before the highlighted statement
should end with another right parenthesis.
The other type of error is a runtime error. This type occurs after all the code
has compiled cleanly and the program is being executed. Then, an error message
is displayed that helps you identify the cause of the error. This type of error is
also known as an exception.
When an exception occurs, the program ends, or "crashes," unless the
exceptions are handled by the program. In chapter 8, you'll learn how to handle
the exceptions that occur so your programs won't crash. However, you can
often prevent exceptions from occurring in the first place by fixing the code that
caused the exception.
The second example in this figure shows a message that's displayed for an
exception. Here, the last line of the message says that a NameError has occurred
because "year" is not defined. If you look at the first example, you can see
that this variable is coded as "years", not "year", which is why the exception
occurred. To fix it, you just add the "s" to "year". Although this may not make
sense to you right now, it will as soon as you start developing programs of your
own.
When you fix the errors for a program, you'll note that IDLE catches just
one error each time. As a result, you need to correct an error, try to run the
program again, fix the next error, and continue until all of the syntax errors have
been fixed. After that, you need to do the same for the runtime errors.
Chapter 1 An introduction to Python programming
A dialog box for a syntax error
[^ future_value.py - C:\murach\python\book_apps\ch01\future_value.py (3.5.0)
(e)i U
File Edit Format Run Options Window Help
# get input from the user
ironthly_investment = float(input("Enter monthly investment:\t"))
yearly_interest_rate = float(input("Enter yearly interest rate:\t")
years = int(input("Enter number of y"*
*k—k.
•?• SyntaxError
# convert yearly values to monthly i
monthly_interest_rate = yearly_intea
months = year " 12
# calculate the future value
future_value = 0
for i in range(months):
future_value = future_value -r it.
monthly_interest_amount = futur
future value = future value + znont
ate
interest amount
Ln: 17,Col: 71
A message that's displayed for a runtime error
\_ Python 3.5.0 Shell
(e)
File Edit Shell Debug Options Window Help
Welcome to the Future Value Calculator
Enter monthly investment: 100
Enter yearly interest rate: 12
Enter number of years: 10
Tracebaclc (most recent call last) :
File "C:\murach\python\boolc_apps\ch01\future_value.py,f, line 22, in <module>
months = year * 12
NameError: name 'year' is not defined
>»l
Ln: 14 Col: 4
Description
• After you write the code for a Python program, you test the program to make sure it
works. As part of that process, you will usually find errors (bugs) so you will have
to debug the program.
• A syntax error violates one of the rules of Python coding so the source code can't
be compiled. In contrast, a runtime error occurs when a Python statement can't be
executed as the program is running.
• When you try to run a program, IDLE detects one syntax error at a time. For each
error, a dialog box is displayed and the point at which the error was detected is
highlighted. Then, you close the dialog box, fix the error, and try again.
• When all of the errors have been fixed, the program will run. But here again, only
one runtime error is detected at a time. So you have to fix the error, run the program
again, and keep going until all of runtime errors have been debugged.
• A runtime error is also known as an exception, and how to handle exceptions is one
of the critical skills that you'll learn in chapter 8 of this book.
Figure 1 -9 How to fix syntax and runtime errors
Section 1 Essential concepts and skills
Perspective
Now that you've finished this chapter, you should understand the concepts
and terms that have been presented. You should also be familiar with the way
IDLE works. At this point, you're ready to start learning how to program. And
that's what you're going to do in the next chapter.
Terms
Python
open source
backward compatible
forward compatible
application
app
program
console application
console
command prompt
GUI application
web application
desktop application
scripting language
shebang line
source code
compile
interpreter
bytecode
virtual machine
platform-independent
CPU (Central Processing Unit)
main memory
RAM (Random Access
Memory)
disk storage
persistent data storage
systems software
operating system
application software
byte
bit
megabyte (MB)
gigabyte (GB)
integrated development
environment (IDE)
IDLE
interactive shell
testing
debugging
syntax error
runtime error
exception
exception handling
Chapter 1 An introduction to Python programming
Summary
• Python is a powerful programming language with a simple syntax that's
easy to read and understand. That's why it's such a good first language for
beginners.
• Python can be used to develop desktop applications such as console
applications and GUI applications. Python can also be used to develop web
applications. And Python can be used as a scripting language for purposes
such as system administration.
• Before the source code for a Python program can be run, it is compiled by
the Python interpreter into bytecode that can be run by the Python virtual
machine for a computer. The bytecode and virtual machine are what makes
Python platform-independent.
• When a program is being run, the operating system, the program, and the
program's data are all stored in the main memoiy of the computer.
• Disk storage provides persistent data storage for the data that's operated
upon by a program. Disk storage also stores all of the systems software and
applications software of the system.
• An integrated development environment (IDE) like IDLE makes it easier to
develop Python programs.
• You can use IDLE's interactive shell to enter and test Python code such as
expressions, functions, and statements. You use its editor to enter and edit
Python source code.
• To run a program with IDLE, you can press the F5 key. If the program uses
the console, the IDLE shell is used as the console.
• The goal of testing is to find all of the errors in a program. The goal of
debugging is to fix all the errors.
• If a program has syntax errors, you need to correct them before the program
can be compiled. If a program has runtime errors, you need to debug each
one until the program runs correctly.
• A runtime error is also known as an exception. To make sure that a program
doesn't crash, you must learn how to handle the exceptions that occur.
Section 1 Essential concepts and skills
Before you do the exercises for this chapter
Before you do any of the exercises in this book, you need to install Python. In
addition, you need to install the source code for this book from our website
(www.murach.com). For details, see the appendix for your operating system.
Exercise 1-1
Experiment with IDLE's interactive
shell
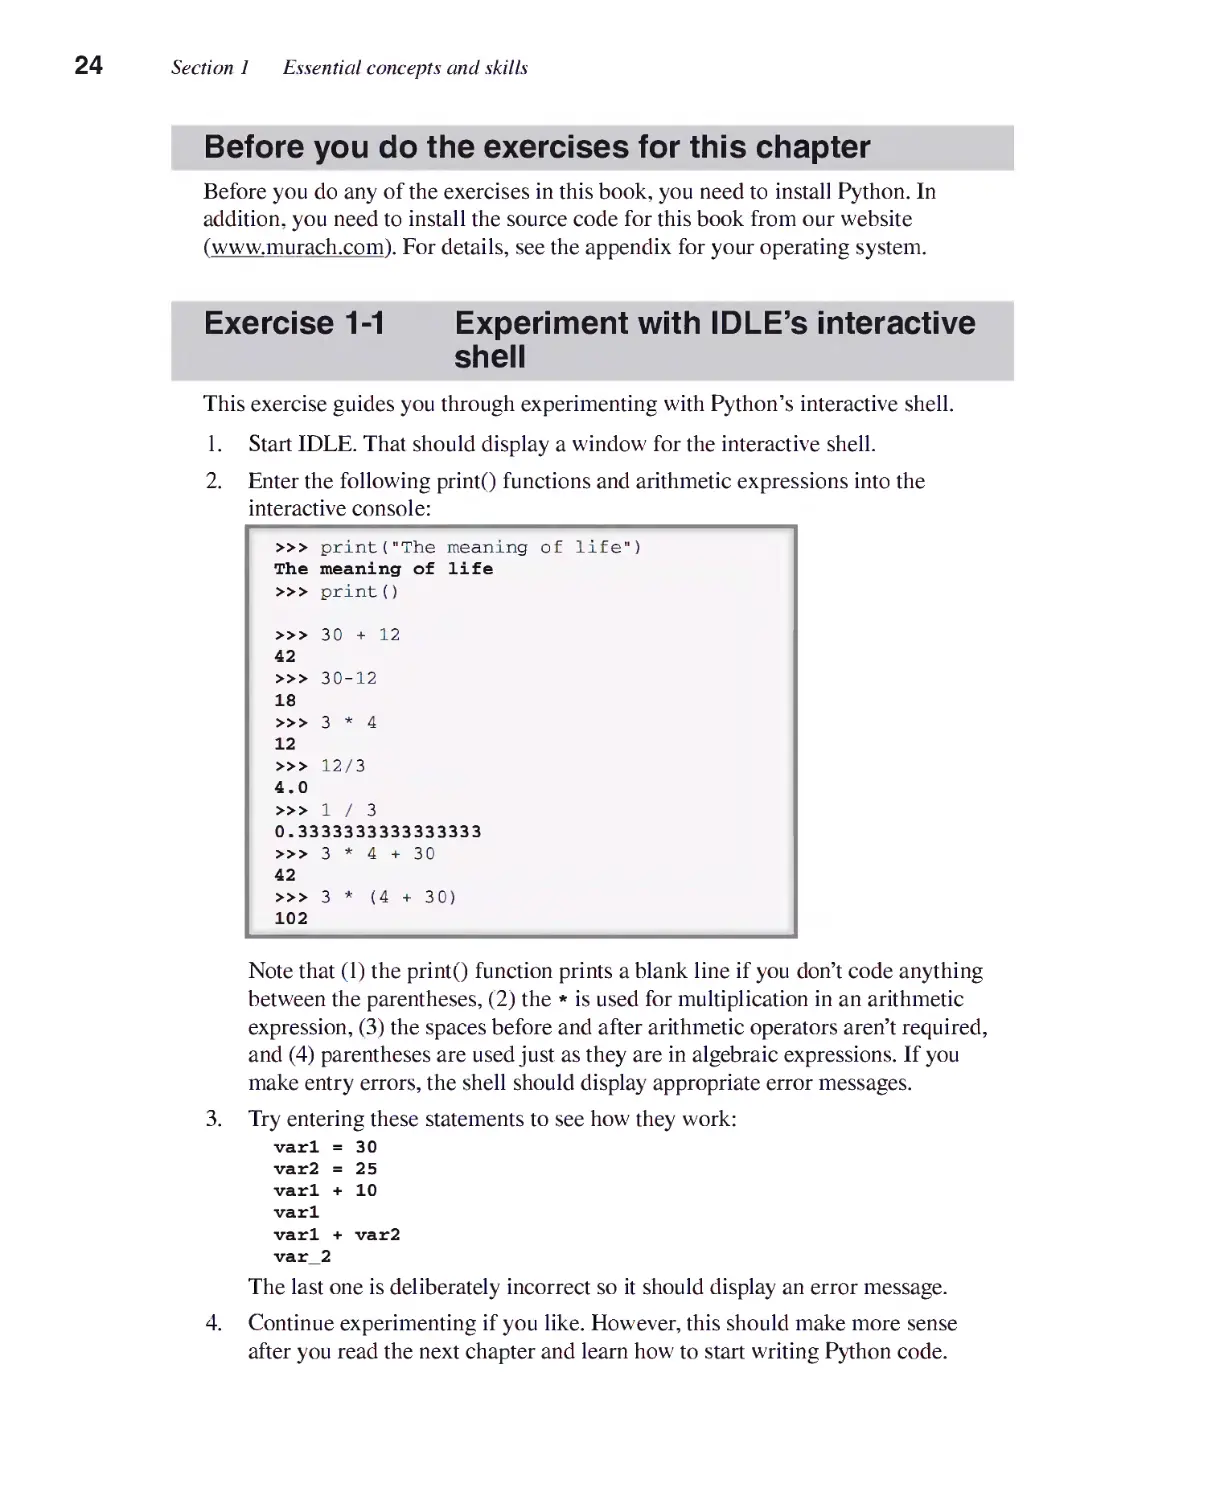
This exercise guides you through experimenting with Python's interactive shell.
1. Start IDLE. That should display a window for the interactive shell.
2. Enter the following printQ functions and arithmetic expressions into the
interactive console:
4.
>>>
The
>>>
>>>
42
>>>
18
>>>
12
>>>
4.0
>>>
print("The meaning of life")
meaning of life
print()
30 + 12
30-12
3*4
12/3
1 / 3
0.3333333333333333
»>
42
>>>
102
3 * 4 + 30
3 * (4 + 30)
Note that (1) the printQ function prints a blank line if you don't code anything
between the parentheses, (2) the * is used for multiplication in an arithmetic
expression, (3) the spaces before and after arithmetic operators aren't required,
and (4) parentheses are used just as they are in algebraic expressions. If you
make entry errors, the shell should display appropriate error messages.
Try entering these statements to see how they work:
varl =30
var2 =25
varl + 10
varl
varl + var2
var_2
The last one is deliberately incorrect so it should display an error message.
Continue experimenting if you like. However, this should make more sense
after you read the next chapter and learn how to start writing Python code.
Chapter 1 An introduction to Python programming
Exercise 1-2 Use IDLE to run programs
This exercise guides you through the process of using IDLE to compile and run
three programs.
Run the console version of the Future Value program
1. Start IDLE and open the future_value.py file that should be in this folder:
murach/python/book_apps/ch01
2. Press F5 to compile and run the program. Then, enter values for monthly
investment, yearly interest rate, and years when you're prompted for them.
This should display the future value that's calculated from your entries.
3. When you're asked if you want to continue, enter "y" if you want to do
another calculation or "n" to exit the program. Then, close the IDLE window
for the source code.
Run the GUI version of the Future Value program
4. Open the future_value_gui.py file that should be in the same folder as the
future_value.py file.
5. Select Run->Run Module to compile and run the program. Then, enter values
for the first three text boxes, and click the Calculate button to view the future
value that's calculated from your entries.
6. If you want to do another calculation, enter new values and click the Calculate
button. When you're through, click the Exit button to exit the program. Then,
close the IDLE window for the source code.
Run the Guess the Number program of chapter 4
7. Open the guess_the_number.py file that's in this folder:
murach/python/book_apps/chO4
8. Compile and run the program. Then, guess the number. This demonstrates the
type of program that you'll be able to write by the time you complete chapter 4
9. Close the window for the source code.
Section 1 Essential concepts and skills
Exercise 1-3 Use IDLE to test
and debug a program
This exercise guides you through the process of using IDLE to test and debug
a program that has one syntax error and one runtime error. This walks you
through the procedure that's shown in figure I-9.
1. Start IDLE and open the future_value_errors.py file that should be in this
folder:
python/exercises/chOl
2. Press F5 to compile and run the program. This should display a dialog box for
a syntax error.
3. Fix this syntax error by adding a right parenthesis at the end of the statement
in the preceding line.
4. Press F5 again, and click OK to save the updated file when the dialog box
is displayed. This time, the program should compile cleanly and run in the
interactive shell.
5. Enter the values for monthly investment, yearly interest rate, and years. This
should cause a NameError exception that says "year" is not defined in this
statement:
months = year * 12
6. Fix this runtime error by changing "year" to "years".
7. Compile and run this program again. This time, the program should be able to
calculate and display a future value for the three values that you enter.
8. To exit this program, enter "n" at the last prompt. Otherwise, the program will
continue running.
2
How to write your first
programs
The quickest and best way to learn Python programming is to do Python
programming. That's why this chapter shows you how to write complete Python
programs that get input, process it, and display output. When you finish this
chapter, you'll have the skills for writing comparable programs of your own.
Basic coding skills 28
How to code statements 28
How to code comments 30
How to use functions 32
How to work with data types and variables 34
How7 to assign values to variables 34
How to name variables 36
How to work with numeric data 38
How to code arithmetic expressions 38
How to use arithmetic expressions in assignment statements 40
How to use the interactive shell for testing numeric operations 42
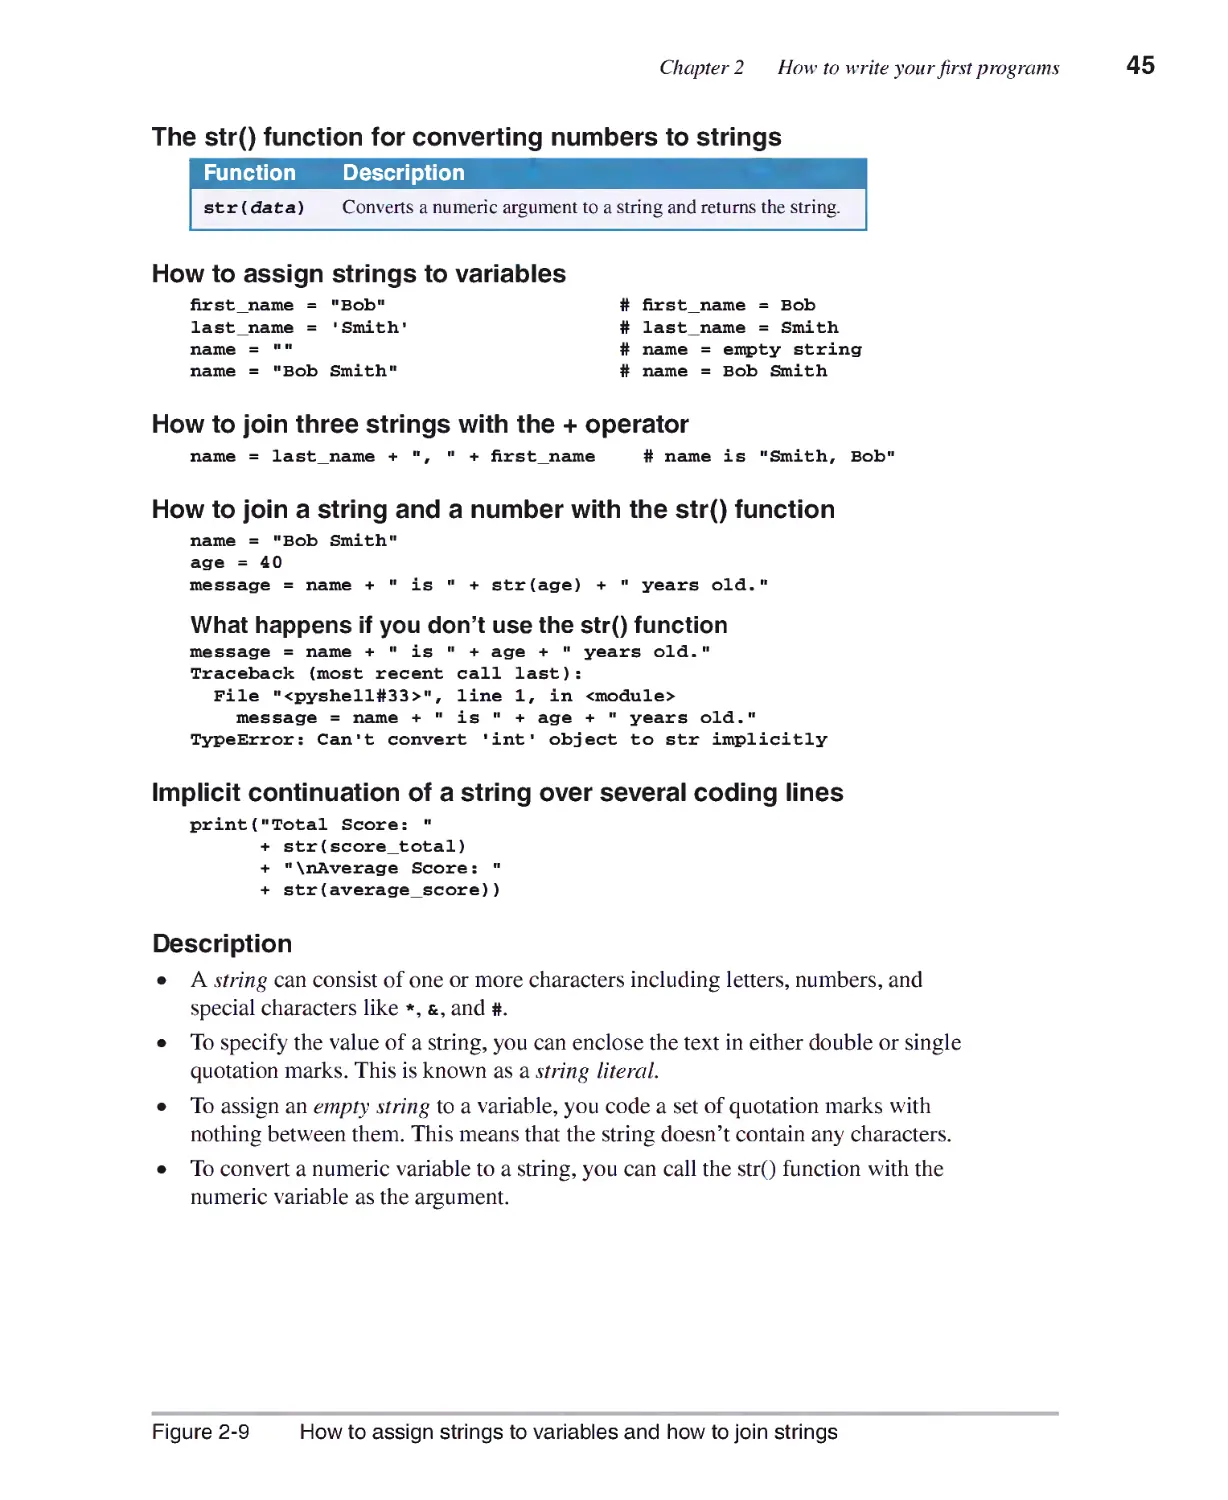
How to work with string data 44
How to assign strings to variables 44
How to join strings 44
How7 to include special characters in strings 46
How to use the interactive shell for testing string operations 48
How to use five of the Python functions 50
How to use the print() function 50
How to use the input() function 52
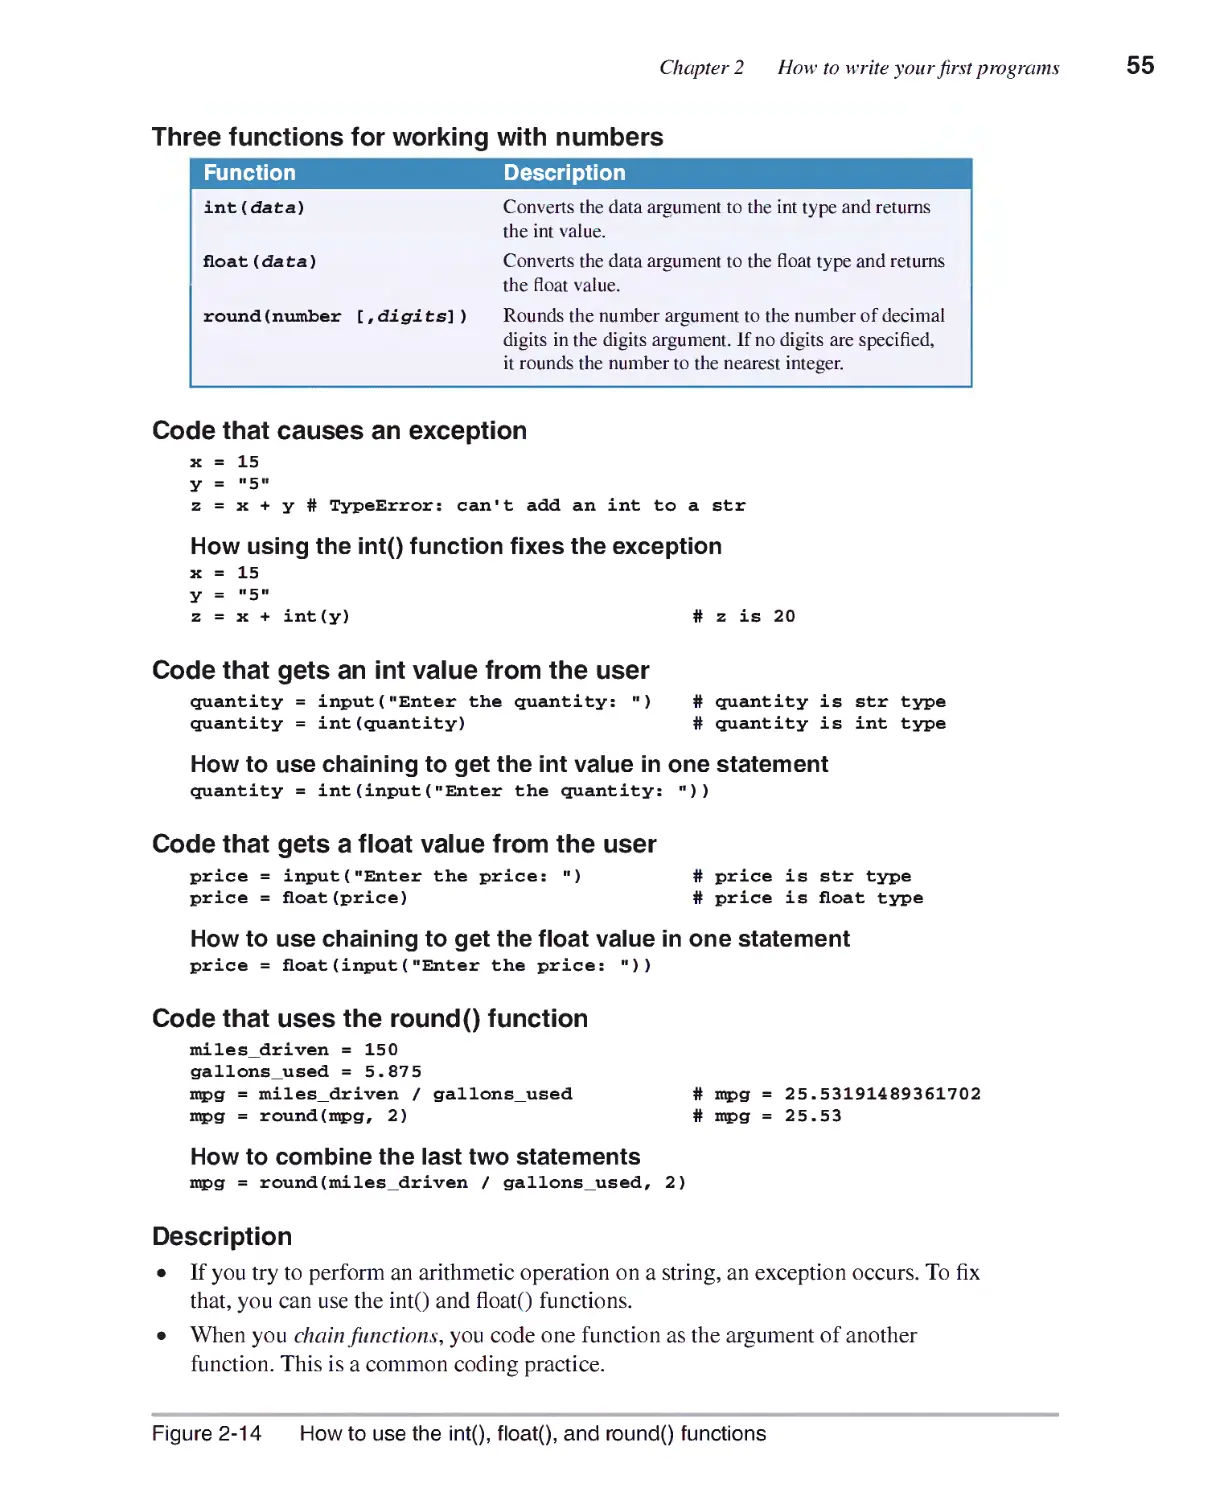
How to use the int(), float(). and round() functions 54
How to chain functions 54
Two illustrative programs 56
The Miles Per Gallon program 56
The Test Scores program 58
Perspective 60
Section 1 Essential concepts and skills
Basic coding skills
This chapter starts by presenting some basic coding skills. You'll use these
skills in every program that you develop.
How to code statements
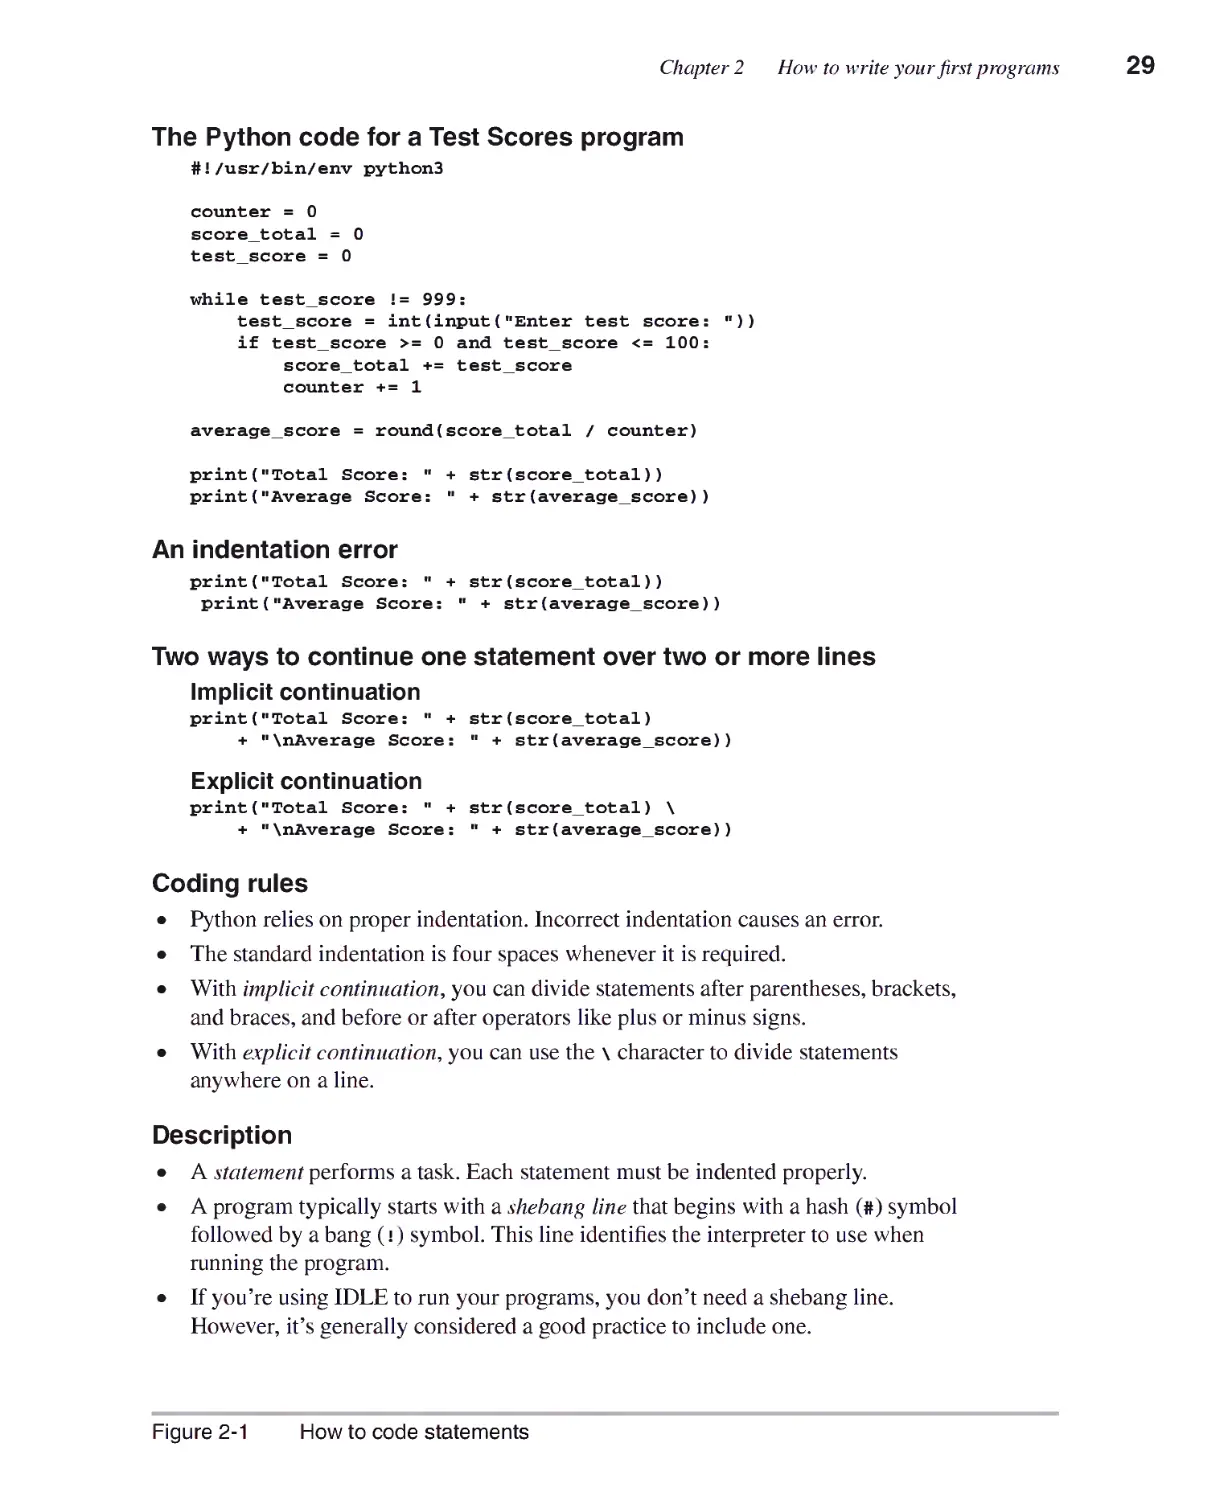
Figure 2-1 presents the rules for coding Python statements. To start, you
should know that, unlike many programming languages, the indentation of each
line matters in a Python program. With Python, the indentation is typically four
spaces, as illustrated in the first example in this figure. As you learn how to code
the various types of Python statements, you'll get the specifics for the indentation
that's required.
In some cases, you'll want to divide a long statement over two or more lines.
Then, you can use implicit continuation. To do that, you divide a statement before
or after an operator like a plus or minus sign. You can also divide a statement
after an opening parenthesis. When you divide the statement, it's a good practice
to indent its continuation lines. This is illustrated by the implicit continuation
example in this figure.
The other way to continue a statement is to use explicit continuation. Then,
you code a backslash to show that a line is continued. In general, this is
discouraged and isn't usually required, so you shouldn't need to use it often.
In this book, you'll see many examples of statements that require indentation.
You'll also see many examples of implicit continuation. For now, you just need to
have a general idea of what's required.
The first line in a Python program is often a shebang line like the one in
this figure. This line is ignored by Windows, but Unix-like systems, including
OS X, use this line to determine what interpreter to use to run the program. In
this example, the shebang line tells the operating system to use Python 3. In this
book, every program has been written for Python 3. As a result, they all use the
shebang line shown in this figure.
If you're using IDLE to develop programs, you don't need to include the
shebang line at all. However, it's generally considered a good practice to include
this line since it clearly indicates what version of Python should be used to run
the program. In addition, it can make it easier to run the program on Unix-like
operating systems.
Chapter 2 How to write your first programs
The Python code for a Test Scores program
#1/usr/bin/env python3
counter = 0
score_total = 0
test_score = 0
while test_score 1= 999:
test_score = int(input("Enter test score: "))
if test_score >= 0 and test_score <= 100:
score_total += test_score
counter += 1
average_score = round(score_total / counter)
print("Total Score: " + str(score_total))
print("Average Score: " + str(average_score))
An indentation error
print("Total Score: " + str(score_total))
print("Average Score: " + str(average_score))
Two ways to continue one statement over two or more lines
Implicit continuation
print("Total Score: " + str(score_total)
+ "\nAverage Score: " + str(average_score))
Explicit continuation
print("Total Score: " + str(score_total) \
+ "\nAverage Score: " + str(average_score))
Coding rules
• Python relies on proper indentation. Incorrect indentation causes an error.
• The standard indentation is four spaces whenever it is required.
• With implicit continuation, you can divide statements after parentheses, brackets,
and braces, and before or after operators like plus or minus signs.
• With explicit continuation, you can use the \ character to divide statements
anywhere on a line.
Description
• A statement performs a task. Each statement must be indented properly.
• A program typically starts with a shebang line that begins with a hash (#) symbol
followed by a bang (i) symbol. This line identifies the interpreter to use when
running the program.
• If you're using IDLE to run your programs, you don't need a shebang line.
However, it's generally considered a good practice to include one.
Figure 2-1 How to code statements
Section 1 Essential concepts and skills
How to code comments
To provide comments that describe portions of a program, you use the
techniques in figure 2-2. To code a block comment, you code a pound sign (#) at
the start of each line. To code an inline comment, you code the pound sign on the
same line but after a Python statement. Since all comments are ignored by the
Python interpreter, they have no effect on the operation of the program.
Most of the time, comments are used to document portions of code that are
difficult to understand. This can be helpful to the programmer who develops the
program as well as to programmers who maintain the program later.
Comments can also be used to disable statements that you don't want to run
when you compile and run a program. This is called commenting out
statements. To do that, you code a pound sign before each statement that you
want to comment out. Then, when you're ready to test those statements, you can
uncomment them by removing the pound signs.
When you're using IDLE, it's easy to comment out or uncomment
statements. To do that, you can select the statements. Then, you can use the
commands available from the Format menu to comment out or uncomment the
selected statements.
Chapter 2 How to write your first programs
The Test Scores program after comments have been added
#1/usr/bin/env python3
# This is a tutorial •ro-ram that illustrates the use of the while
# and if statements
# initialize variables
counter = 0
score_total = 0
test score = 0
Block comments
# get scores
while test_score 1= 999:
test_score = int(input("Enter test score: "))
if test_score >= 0 and test_score <= 100:
score_total += test_score # add score to total
counter +=1 # add 1 to counter
Inline comments
Commented out
statements
# calculate average score
#average_score = score_total / counte
#average_score = round(average_score)
average_score = round( # implicit continuation
score_total / counter) # same results as commented out statements
# dj.splay
print("======================")
print("Total Score: " + str(score_total) # implicit continuation
+ "\nAverage Score: " + str(average_score))
Guidelines for using comments
• Use comments to describe portions of code that are hard to understand, but don't
overdo them.
• Use comments to comment out (or disable) statements that you don't want to test.
• If you change the code that's described by comments, change the comments too.
Description
• Comments start with the # sign, and they are ignored by the compiler. Block
comments are coded on their own lines. Inline comments are coded after statements
to describe what they do.
• Comments are used to document what a program or portion of code does. This can
be helpful not only to the programmer who creates the program, but also to those
who maintain the program later on.
• Comments can also be used to comment out statements so they aren't executed
when the program is tested. Later, the statements can be uncommented so the
statements will be executed when the program is tested. This can be helpful when
debueeine.
• When you're using IDLE, you can use the Format menu to comment out and to
uncomment the statements that you've selected.
Figure 2-2 How to code comments
Section 1 Essential concepts and skills
How to use functions
A function is a group of statements that perform a specific task. Python
provides many built-in functions that you'll use throughout this book. And you'll
learn how to create your own functions in chapter 4.
To use one of the built-in functions, you use the syntax shown at the top of
figure 2-3. In a syntax summary like this, the italicized words are ones that you
have to supply and the brackets indicate portions of the code that are optional.
To call a function, then, you code the function name, a set of parentheses,
and any arguments that are required by the function within the parentheses. If
a function requires more than one argument, you separate the arguments with
commas.
The print() function shows how this works. This function displays the data
that is passed to it as arguments. But note that the arguments are optional. If no
argument is passed to this function, it prints a blank line.
This is illustrated by the calls to the print() function in the example. Here,
the first print() function prints "Hello out there!" to the console. The second
print() function prints a blank line (or skips a line). And the third print() function
displays "Goodbye!".
The main point of this figure, though, is to show you how to call any
function, not just the print() function. In this chapter, you'll learn more about
using the print() function as well as five other functions. And the syntax for
using these functions is always the same.
Chapter 2 How to write your first programs
The syntax for calling any function
function_name{ [arguments] )
The print() function
Function Description
print ([data] ) Prints the data argument to the console followed
by a new line character.
[f the call doesn't include a data argument, this
function prints a blank line to the console.
A script with three statements
print("Hello out thereI")
print()
print("Goodbye I")
The console after the program runs
Hello out therel
Goodbye I
Description
• A function is a reusable unit of code that performs a specific task.
• Python provides many built-in functions that do common tasks like getting input
data from the user and printing output data to the console.
• When you call a function, you code the name of the function followed by a pair
of parentheses. Within the parentheses, you code any arguments that the function
requires, and you separate multiple arguments with commas.
• In a syntax summary like the one at the top of this page, brackets [ 1 mark the
portions of code that are optional. And the italicized portions of the summary are
the ones that you have to supply.
• In this chapter, you'll learn to use the printQ function plus five other functions.
Figure 2-3 How to use functions
Section 1 Essential concepts and skills
How to work with data types
and variables
When you develop a Python program, you work with variables that store
data. In the topics that follow, you'll learn how to work with three of the most
common Python data types.
How to assign values to variables
Figure 2-4 starts by summarizing three of the Python data types. The str (or
string) data type holds any characters like "Mike" or "40". The hit (or integer)
data type holds whole numbers like 21 or -25. And the float {or floating-point)
data type holds numbers with decimal places like 41.3 or -25.78.
When you work with these data types in a program, you normally assign
them to variables. To do that, you code assignment statements like those in the
first group of examples in this figure. These statements consist of a variable
name like first_name or quantity 1, an equals sign, and the value that should
be assigned to the variable. These variables and values are stored in the main
memory of the computer.
In this figure, the first group of examples assigns literal values to the
variables. Here, the string literal is coded within quotation marks, but the
numeric literals aren't. That means that Mike is assigned to the first name
variable, 3 is assigned to the quantity 1 variable, 5 is assigned to the quantity2
variable, and 19.99 is assigned to the list_price variable.
The second group of examples shows how to assign a new value to a variable.
To start, the first statement sets the first_name variable to Joel. The second
statement sets the value of quantity 1 to 10. The third statement sets the value of
the quantity 1 variable to the value of the quantity2 variable, or 5. And the fourth
statement sets the value of the quantity 1 variable to a string value of "15".
The last example shows that the names of variables are case-sensitive. That
means an uppercase (or capital) letter is different than a lowercase letter. As a
result, Quantity2 is different than quantity2. In this example, then, a NameError
exception occurs because you can't set quantity 1 equal to a variable that doesn't
exist.
As you review this code, note that Python determines the data type for a
variable based on the value that's assigned to the variable. For instance, in the
second group of examples, the second statement assigns a numeric literal of
10 to the quantity 1 variable. As a result, Python uses the int data type for this
variable. However, the fourth statement assigns a string literal of "15" to the
quantity 1 variable. As a result, this variable is now assigned to a value of the str
type, not a value of the int type.
Chapter 2 How to write your first programs
Three Python data types
Data type Name
Examples
str
int
float
Strine
lnteeer
Floating-point
"Mike"
21
21.9
"40"
450
450.25
'Please enter name: '
0 -25
0.01 -25.2 3.1416
Code that initializes variables and assigns data to them
first_name =
quantityl =
quantity2 =
list price
"Mike"
3
5
= 19.99
# sets first_name to a str of "Mike"
# sets quantityl to an int value of 3
# sets quantity2 to an int value of 5
# sets list price to a float value of 19.99
Code that assigns new data to the variables above
first_name
quantityl
quantityl
quantity!
= "Joel"
= 10
= quantity2
= "15"
# sets first_name to a str of "Joel"
# sets quantityl to an int of 10
# sets quantityl to an int of 5
# sets quantityl to a str of "15", not an int of 5
Code that causes an error because of incorrect case
quantityl = Quantity2 # NameError: ■Quantity2' is not defined
How to code literal values
• To code a literal value for a string, enclose the characters of the string in single or
double quotation marks. This is called a string literal.
• To code a literal value for a number, code the number without quotation marks. This
is called a numeric literal.
Description
• A variable can change, or vary, as code executes.
• A data type defines the type of data for a value.
• An assignment statement uses the equals sign (=) to assign a value to a variable. The
value can be a literal value, another variable, or an expression like the arithmetic
expressions in the next figure.
• You can assign a value of any data type to a variable, even if that variable has
previously been assigned to a value of a different data type.
• Because variable names are case-sensitive, you must be sure to use the correct case
when coding the names of variables.
Figure 2-4 How to assign values to variables
Section 1 Essential concepts and skills
How to name variables
Figure 2-5 presents the Python rules for creating variable names. It also lists
the Python keywords that should not be used for variable names. That's because
these words are used in other ways by Python.
Besides these rules, though, you should give your variables meaningful
names. That means that it should be easy to tell what a variable name refers to
and easy to remember how to spell the name. To create names like that, you
should avoid abbreviations. If, for example, you abbreviate the name for monthly
investment as mon_inv, it's hard to tell what it refers to and hard to remember
how you spelled it. But if you spell it out as monthly_investment, both problems
are solved.
Similarly, you should avoid abbreviations that are specific to one industry
or field of study unless you are sure the abbreviation is widely understood. For
example, mpg is a common abbreviation for miles per gallon, but cpm could
stand for a number of things and should be spelled out.
To create an identifier that has more than one word in it, most Python
programmers use underscores to separate the words in a variable name. For
example, the variables named tax_rate and monthly_investment use underscores
to separate words. This is known as underscore notation.
However, some programmers use a convention called camel case. With this
convention, the first letter of each word is uppercase except for the first word.
For example, the variables named taxRate and monthlylnvestment use camel
casing.
In this book, sections 1 and 2 use underscore notation for most variable
names. However, since camel case is commonly used with object-oriented
programs, sections 3 and 4 use camel casing for all of the object-oriented
modules. When you're writing your own programs, you can choose the
convention that you prefer. What's most important is to pick one of these
conventions and use it consistently within a module.
Chapter 2 How to write your first programs
Rules for naming variables
• A variable name must begin with a letter or underscore.
• A variable name can't contain spaces, punctuation, or special characters other than
the underscore.
• A variable name can't beein with a number, but can use numbers later in the name.
• A variable name can't be the same as a keyword that's reserved by Python.
Python keywords
and
as
assert
break
class
continue
def
del
elif
else
except
False
finally
for
from
global
if
import
in
is
lambda
None
nonlocal
not
or
pass
raise
return
True
try
Two naming styles for variables
variable_name # underscore notation
variableName # camel case
Recommendations for naming variables
• Start all variable names with a lowercase letter.
• Use underscore notation or camel case.
• Use meaningful names that are easy to remember.
• Don't use the names of built-in functions, such as printQ.
Description
• When naming variables, you must follow the rules shown above. Otherwise, you'll
get errors when you try to run your code.
• It's also a best practice to follow the naming recommendations shown above. This
makes your code easier to read, maintain, and debug.
• With underscore notation, all letters are lowercase with words separated by
underscores.
• With camel case notation, the first word is lowercase and subsequent words start
with a capital letter.
while
with
yield
Figure 2-5 Rules and recommendations for naming variables
Section 1 Essential concepts and skills
How to work with numeric data
The next three figures show you how to work with numeric data. That's
something you will do in just about every program that you write.
How to code arithmetic expressions
Figure 2-6 shows how to code arithmetic expressions. These expressions
consist of two or more operands that are operated upon by arithmetic operators.
The operands in an expression can be either numeric variables or numeric literals.
The first table in this figure summarizes the arithmetic operators. Here, the
+, -, and / operators are the same as those used in basic arithmetic, and the *
operation is used for multiplication.
Python also has an operator for integer division (//) that truncates the
decimal portion of the division. It has a modulo operator (%), or remainder
operator, that returns the remainder of a division. And it has an exponentiation
operator (**) that raises a number to the specified power.
The second table in this figure shows some examples of how these operators
work. For the most part, this is simple arithmetic. Here, the division operator
always returns a floating point number. However, the integer division operator
truncates the result and returns an integer, and the modulo operator returns
just the remainder of an integer division operation. As a result, 25 divided by
4 is 6.25, but 25 divided by 4 with integer division is 6. And 25 modulo 4 is I
because that's the remainder.
When an expression includes two or more operators, the order of precedence
determines which operators are applied first. This order is summarized in the
table in this figure. For instance, Python performs all multiplication and division
operations from left to right before it performs any addition and subtraction
operations.
If you need to override the default order of precedence, you can use
parentheses. Then, Python performs the expressions in the innermost sets of
parentheses first, followed by the expressions in the next sets of parentheses,
and so on. This works the same as it does in algebra, and this is typical of all
programming languages. The examples in the last table show how this works.
Chapter 2 How to write your first programs
Python's arithmetic operators
Operator
+
-
*
/
//
%
**
Name
Addition
Subtraction
Multiplication
Division
Integer division
Modulo / Remainder
Exponentiation
Description
Adds two operands.
Subtracts the right operand from the left operand.
Multiplies two operands.
Divides the right operand into the left operand. The result
is always a floating-point number.
Divides the right operand into the left operand and drops
the decimal portion of the result.
Divides the right operand into the left operand and returns
the remainder. The result is always an integer.
Raises the left operand to the power of the right operand.
Examples with two operands
Example Result
5 + 4
25/4
25 // 4
25 % 4
3 ** 2
9
6.25
6
1
9
The order of precedence for arithmetic expressions
Order Operators
l
2
3
* *
//
^
"■?»
Direction
Left to rieht
Lefttorieht
Lefttorieht
Examples that show the order of precedence and use of parentheses
Example
3 + 4*5
(3 + 4) * 5
Result
23 (the multiplication is done first)
35 (the addition is done first)
Description
• An arithmetic expression consists of one or more operands that are operated upon
by arithmetic operators.
• You don't have to code spaces before and after the arithmetic operators.
• When an expression mixes integer and floating-point numbers, Python converts the
integers to floating-point numbers.
• If you use multiple operators in one expression, you can use parentheses to clarify
the sequence of operations. Otherwise, Python applies its order of precedence.
Figure 2-6 How to code arithmetic expressions
Section 1 Essential concepts and skills
How to use arithmetic expressions
in assignment statements
Now that you know how to code arithmetic expressions, figure 2-7 shows
how to use these expressions with variables and assignment statements. Here, the
first two examples show how you can use the multiplication and addition
operators in Python statements.
This is followed by a table that presents three of the compound assignment
operators. These operators provide a shorthand way to code common assignment
statements. For instance, the += operator modifies the value of the variable on the
left of the operator by adding the value of the expression on the right to the value
of the variable on the left. When you use this operator, the variable on the left
must already exist and have a value assigned to it.
The other two operators in this table work similarly, but the -= operator
subtracts the result of the expression on the right from the variable on the left.
And the *= operator multiples the result of the expression on the right by the
variable on the left.
The first example after this table shows two ways to increment a variable by
adding 1 to it, a common coding requirement. Here, the first statement assigns
a value of 0 to a variable named counter. Then, the second statement uses an
arithmetic expression to add 1 to the value of the counter. This shows how you
can code a variable name on both sides of the = operator. In contrast, the third
statement adds 1 to the counter by using the += operator. When you use the +=
operator, you don't need to code the variable name on the right side of the =
operator, which makes the code more concise.
The second example after the table shows how the += operator can be used
to add variable values to a variable that stores the total of the values. This is a
common programming technique that is used in many of the programs in this
book. It's followed by an example that shows how all three compound assignment
operators work.
The last example illustrates a problem with float values that you should be
aware of. Because float values are stored internally as floating-point numbers,
the results of arithmetic operations aren't exact. In this example, the tax result
is 7.495000000000001, even though it should be 7.495. For now, you just need
to be aware of the potential for inaccuracies like this so you won't be surprised
by them. Later, you'll learn ways to deal with these inaccuracies. One way to do
that is to round the results of calculations as shown later in this chapter.
Chapter 2 How to write your first programs
Code that calculates sales tax
subtotal = 200.00
tax percent = .05
tax_amount = subtotal * tax percent
grand_total = subtotal + tax_amount
#10.0
# 210.0
Code that calculates the perimeter of a rectangle
width =4.25
length = 8.5
perimeter = (2 * width) + (2 * length)
# (8.5 + 17) = 25.5
The most useful compound assignment operators
Operator Description
+ =
* —
Adds the result of the expression to the variable.
Subtracts the result of the expression from the variable.
Multiplies the variable value by the result of the expression.
Two ways to increment the number in a variable
counter = 0
counter = counter + 1
counter += 1
# counter = 1
# counter = 2
Code that adds two numbers to a variable
score_total = 0
score_total += 70
score total += 80
# score_total
# score_total
# score total
0
70
150
More statements that use the compound assignment operators
total = 1000.0
total += 100.0
counter = 10
counter -= 1
price = 100
price *= .8
# total = 1100.0
# counter = 9
# price = 80.0
A floating-point result that isn't precise
subtotal = 74.95
tax = subtotal * .1
# subtotal = 74.95
# tax = 7.495000000000001
Description
• Besides the assignment operator (=), Python provides for compound assignment
operators. These operators are a shorthand way to code common assignment
operations.
• Besides the compound operators in the table. Python offers /=. //=. %=, and **=.
• When working with floating-point numbers, be aware that they are approximations,
not exact values. This can cause inaccurate results.
Figure 2-7 How to use arithmetic expressions in assignment statements
Section 1 Essential concepts and skills
How to use the interactive shell
for testing numeric operations
Remember the IDLE interactive shell that you learned about in the previous
chapter? If you're confused by any of the examples presented in the previous
figures, now is a good time to use it! To do that, open the interactive shell as
described in the previous chapter. Then, start experimenting with the arithmetic
operations as shown in figure 2-8.
In fact, you probably should take a break right now and do some
experimenting, especially if you have any doubts about how the arithmetic
operations work. For instance, test the use of each arithmetic operator. Test the
use of each compound assignment operator. And test the results of floating-point
operations. Along the way, you'll probably get some error messages, but that's
all part of the learning process. Each one should give you a better understanding
of how Python works.
When you get an error, you might want to attempt to fix the entry that caused
the error. To do that, you can start by pressing Alt+p (Windows) or Command+p
(OS X) to retype the previous entry at the prompt. Then, you can attempt to fix
the problem by editing your previous entry and pressing the Enter key to execute
it again.
Chapter 2 How to write your first programs
The Python interactive shell as it's used for numeric testing
[# Python 3.5.1 Shell
(e)
File Edit Shell Debug Options Window Help
>» 25 //
6
>» 25
6-25
>» 25
/ 4
/ 3
8-333333333333334
>» counter = 0
>» counter = counter + 1
>» counter
1
>» counter += 1
>» counter
2
>» subtotal = 250.00
>» tax_percent = -04
>» tax = subtotal * taxpercent
>» tax
10.0
>» total = subtotal -r tax
>» total
260.0
>» total = total - Tax
Traceback (most recent call last):
File n<pyshell#68>", line 1, in <module>
total = total - Tax
Namc^rror: rame "Tax" is not defined
>»l
Ln:498 Col: 4
How to use the shell
• To test a statement, type it at the prompt and press the Enter key. You can also type
the name of a variable at the prompt to see what its value is.
• Any variables that you create remain active for the current session. As a result, you
can use them in statements that you enter later in the same session.
• To retype your previous entry, press Alt+p (Windows) or Command+p (OS X).
• To cycle through all of the previous entries, continue pressing the Alt+p (Windows)
or Command+p (OS X) keystroke until the entry you want is displayed at the
prompt.
Description
• The Python interactive shell that you learned about in chapter 1 is an excellent tool
for learning more about the way numeric operations work. Just enter a statement or
series of statements and see what the results are.
• This type of testing will give you a better idea of what's involved as you work with
integer and floating-point numbers. It will also show your errors when you enter a
statement incorrectly so you will learn the proper syntax as you experiment.
Figure 2-8 How to use the interactive shell for testing numeric operations
Section 1 Essential concepts and skills
How to work with string data
The next three figures show you how to work with string data. That's another
thing that you will do in just about every program you write.
How to assign strings to variables
In figure 2-4, you learned how to assign strings to variables. Now, figure 2-9
expands upon that skill. Here, the first group of examples shows that you can use
single or double quotes to create a string literal. You can also create an empty
string by coding a set of quotation marks with nothing between them. And you
can assign a new value to a string variable. This works the same way it does with
numeric variables.
How to join strings
This figure also shows how to concatenate, or join, strings. To do that,
you use the + operator as shown in the second example in this figure. Here, the
last_name variable is joined with a string literal that contains a comma and a
space and then that's joined with the first_name variable. The resulting value is:
Smith, Bob
The trouble with this is that you can't join a string and a number. Instead,
you need to use the str() function to convert the number to a string before
you can join it. This is illustrated by the next set of examples. Here, the name
variable is joined with " is ", the age variable, and " years old." However, this
code uses the str() function to explicitly convert the age variable to a string
before the join takes place. The resulting string is:
Bob Smith is 40 years old.
The second part of this example shows what happens if you don't explicitly
convert the numeric variable to a string before trying to join it with a string. In
this case, a TypeError exception occurs with a message that says Python can't
implicitly convert an int object to a string.
If you use joins to create long strings, you will sometimes want to code the
statement over two or more lines. To do that, you can use implicit continuation
as shown in the last example in this figure. In this case, the statement can be
divided before or after the plus signs.
Chapter 2 How to write your first programs
The str() function for converting numbers to strings
Function Description
str(data)
Converts a numeric argument to a string and returns the string.
How to assign strings to variables
first_name = "Bob"
last_name = 'Smith'
name = ""
name = "Bob Smith"
# first_name = Bob
# last_name = Smith
# name = empty string
# name = Bob Smith
How to join three strings with the + operator
name = last_name + ", " + first_name
# name is "Smith, Bob"
How to join a string and a number with the str() function
name = "Bob Smith"
age =40
message = name + " is " + str(age) + " years old."
What happens if you don't use the str() function
message = name + " is " + age + " years old."
Traceback (most recent call last):
File "<pyshell#33>", line 1, in <module>
message = name + " is " + age + " years old."
TypeError: Can't convert 'int' object to str implicitly
Implicit continuation of a string over several coding lines
print("Total Score: "
+ str(score_total)
+ "\nAverage Score: "
+ str(average_score))
Description
• A string can consist of one or more characters including letters, numbers, and
special characters like *, &, and #.
• To specify the value of a string, you can enclose the text in either double or single
quotation marks. This is known as a string literal.
• To assign an empty string to a variable, you code a set of quotation marks with
nothing between them. This means that the string doesn't contain any characters.
• To convert a numeric variable to a string, you can call the str() function with the
numeric variable as the argument.
Figure 2-9 How to assign strings to variables and how to join strings
Section 1 Essential concepts and skills
How to include special characters in strings
Figure 2-10 shows how to use escape sequences to include special characters
in a string. To start, the table shows six of the many escape sequences that you
can use with Python. These sequences let you put characters in a string that you
can't put in just by pressing the appropriate key on the keyboard. For instance,
the \n escape sequence is similar to pressing the Enter key in the middle of a
string.
Escape sequences are needed so the Python compiler can interpret the
code correctly. For instance, since single and double quotations marks are used
to identify strings, coding them within the strings can cause syntax errors.
But when the quotation marks are preceded by escape characters, the Python
compiler can interpret them correctly.
The first three examples in this figure show how escape characters work in
print() functions. In the first two examples, the new line sequence is used to start
a new line. In the second example, the tab sequence is also used. And in the third
example, the backslash sequence is used.
The last example shows the four ways that you can put quotation marks in
a string, even though quotation marks are used to identify a string. The first two
statements use escape sequences to insert the marks in a string. The third
statement uses single quotes within a string that's marked by double quotes. And
the last statement does the reverse.
Chapter 2 How to write your first programs
Common escape sequences
Sequence Character
\n New line
\t Tab
\r Return
\" Quotation mark in a double quoted string
\ ' Quotation mark in a single quoted string
\\ Backslash
The new line character
print("Title: Python Programming\nQuantity: 5")
Displayed on the console
Title: Python Programming
Quantity: 5
The tab and new line characters
print("Title:\t\tPython Programming\nQuantity:\t5")
Displayed on the console
Title: Python Programming
Quantity: 5
The backslash in a Windows path
print ("C: WmurachWpython" )
Displayed on the console
C: \murach\python
Four ways to include quotation marks in a string
"Type \"x\" to exit" # String is: Type "x" to exit.
'Type \'x\' to exit' # String is: Type 'x' to exit.
"Type ' x" to exit" # String is: Type 'x' to exit.
■Type "x" to exit1 # String is: Type "x" to exit.
Description
• Within a string, you can use escape sequences to include certain types of special
characters such as new lines and tabs. You can also use escape characters to include
special characters such as quotation marks and backslashes.
• Another way to include quotation marks in a string is to code single quotes within a
string that's in double quotes, or vice versa.
Figure 2-10 How to include special characters in strings
48 Section 1 Essential concepts and skills
How to use the interactive shell
for testing string operations
If you have any doubts about how the string operations work, this is a good
time to take a break and do some experimenting with them. Figure 2-11 shows
how.
As you experiment, you'll probably get a few error messages, but each one
should give you a better understanding of how Python works. For instance,
can you tell what's wrong with the statement that caused the SyntaxError in
this figure? And can you tell what's wrong with the statement that caused the
TypeError exception? If there's any doubt, you can retype the statement that
caused the error, modify it, and press Enter to execute it again. The more you
experiment, the more you'll learn.
Chapter 2 How to write your first programs
The Python interactive shell as it's used for string testing
[# Python 3.5.1 Shell
(e)
File Edit Shell Debug Options Window Help
+ first name
str(age)
+ str(age) +
" years old."
" years old.
>» firstname = "Joel"
>» last_name = "Smith"
>» full_name = last_name + ", "
>» full_name
■Smith, Joel'
>» age = 40
>» iressage = first_name -r " is
SyntaxError: invalid syntax
>» message = first_name + " is
>» message
■Joel is 40 years old.1
>» message = "Age: " + age
Traceback (most recent call last):
File "<pyshell#67>", line 1, in <module>
message = "Age: " -r age
TypeError: Can't convert 'int1 object to str implicitly
>» iressage = "Age: " + str (age)
>» iressage
■Age: 40'
>»l
Ln:323 Col: 4
How to use the shell
• To test a statement, type it at the prompt and press the Enter key. You can also type
the name of a variable at the prompt to see what its value is.
• Any variables that you create remain active for the current session. As a result, you
can use them in statements that you enter later in the same session.
• To retype the previous statement on Windows, press Alt+p. To cycle through all of
the previous statements, continue pressing Alt+p. On OS X, use Command+p.
Description
• The Python interactive shell that you learned about in chapter 1 is an excellent tool
for learning more about the way string operations work.
• To see how string statements work, just enter a statement or series of statements
and see what the results are. This will also show your errors when you enter a
statement incorrectly so you will learn the proper syntax as you experiment.
Figure 2-11 How to use the interactive shell for testing string operations
Section 1 Essential concepts and skills
How to use five of the Python functions
When you program with Python, you will use many of its built-in functions.
So far, you've been introduced to the print() and str() functions. Now, you'll
learn more about the printQ function, and you'll learn how to use four other
functions.
How to use the printQ function
Figure 2-12 starts by showing the syntax for the print() function. In most
cases, you'll just code one or more data items as the arguments when you use
this function. Although you can also code sep and end arguments, you won't
need them in your early programs so don't worry about them right now.
The first group of examples shows print() functions that receive one or more
arguments. In this case, the numbers are printed directly to the console. For
instance, the first function prints a number. The second function prints a string
and a number and automatically puts a space between the two values. And the
third function prints four integers with spaces between them.
The next group of examples shows two different ways to get the same results
when using print() functions. The first print() function receives four arguments
and works like the previous examples. It prints the four values with spaces
between them. Note, however, that the escape sequence for a new line is coded at
the start of the third argument so that argument is displayed on a new line.
The second example gets the same result by passing a single string argument
to the print() function. This string consists of a string, a number, another string,
and another number that have been joined together with + operators. In this case,
though, the numeric variables need to be converted to strings by using the str()
function. Otherwise, this code will cause an exception to occur.
When you start using print() functions, you will probably want to use the
first method of coding because it's easier. But as you get more experience, you'll
find that the second method isn't much harder, and it lets you get results that you
can't eet with the first method.
The last group of examples in this figure shows how to use the sep and end
arguments. Since you must code the names of these arguments, they're called
named arguments. Here, the first statement uses the sep argument to separate the
integers with a bar character that has a space before and after it. And the second
statement uses the end argument to put three exclamation points at the end of the
data, instead of ending the data with a new line character. If necessary, you can
code both the sep and end arguments in the same function call.
Chapter 2 How to write your first programs
The syntax of the print() function
print(data[, sep=■ ■][, end="\n*])
Three print() functions that receive one or more arguments
print(19.99) # 19.99
print("Price:", 19.99) # Price: 19.99
print(1, 2, 3, 4) #12 3 4
Two ways to get the same result
A print() function that receives four arguments
print("Total Score:", score_total,
"\nAverage Score:", average_score)
A print() function that receives one string as the argument
print("Total Score: " + str(score_total) +
"\nAverage Score: " + str(average_score))
The data that's displayed by both functions
Total Score: 240
Average Score: 80
Examples that use the sep and end arguments
print(l,2,3,4,sep=' | ■) # 1 | 2 | 3 | 4
print(l,2,3,4,end=' I I I ' ) #12 3 4III
Description
• The print() function can accept one or more data arguments.
• If you pass a series of arguments to the printQ function, numbers don't have to be
converted to strings.
• If you pass just one string as the argument for a print() function, numbers have to
be converted to strings within the string argument.
• In a syntax summary, an argument that begins with a name and an equals sign (=) is
a named argument. To pass a named argument to a function, you code the name of
the argument, an equals sign (=), and the value of the argument.
• The print() function provides a sep argument that can change the character that's
used for separating the strings from one space to something else.
• The print() function also provides an end argument that can change the ending
character for a printQ function from a new line character (\n) to something else.
Figure 2-12 How to use the printQ function
Section 1 Essential concepts and skills
How to use the input() function
Most programs get input data from the user and then adjust the processing
based on that input. For a program that uses the console, you can use the input()
function to eet that data. Figure 2-13 shows how.
The input() function can take one string argument that prompts the user to
enter data. In the first example, this argument is "Enter your first name:". Then,
when Python executes the function, it displays this prompt on the console, and
the program pauses as it waits for the user to make an entry.
When the user makes that entry and presses the Enter key, the entry is
returned by the function so it can be saved in a variable. In this example, it is
saved in a variable named first_name.
The second example shows how you can get an entry without using the
prompt argument. In this case, you use a print() function to display the prompt.
Then, you use an input() function to get the data for that prompt. When you get
data this way, the prompt is displayed on one line and the entry on the next.
When you use the input() function, remember that all entries are returned
as strings. This is illustrated by the last example. If the user enters 85, and
that number is stored in a variable, it is stored with the str data type. Then, if
the program tries to add that variable to a variable with a numeric data type, a
TypeError exception occurs because you can't add a string to a number.
Chapter 2 How to write your first programs
The input() function for getting data from the console
Function Description
input ([prompt] ) Pauses the program and waits for the user to enter data
at the console. When the user presses Enter, this function
returns the data entered bv the user as a str value.
If the call includes a prompt argument, this function
prints the prompt to the console before pausing to wait
for the user to enter data.
Code that gets string input from the user
first_name = input ("Enter your first name: ")
print ("Hello, " + first_name + "I")
The console
Enter your first name: Mike
Hello, Mike!
Another way to get input from the user
print ("What is your first name? ")
first_name = input ()
print ("Hello, " + first_name + "I")
The console
What
Mike
is your
Hello, Mike!
first
name?
Code that attempts to get numeric input from the user
score_total = 0
score = input("Enter your score: ")
score_total += score # causes an error because score is a string
Description
• You can use the input() function to get user input from the console. Typically, you
assign the string that's returned by this function to a variable.
• The input() function always returns string data, even if the user enters a number.
Figure 2-13 How to use the input() function
Section 1 Essential concepts and skills
How to use the int(), float(), and round() functions
Figure 2-14 presents three more functions. The int() and float() functions
convert the data argument, which is typically a str value, to int or float values.
This is illustrated by the first three groups of examples. In the second and third
examples, the input() function returns strings for numeric entries. Then, the
strings are converted to int and float values.
In contrast, the roundO function rounds a numeric value to the specified
number of digits. This is illustrated by the last example. Here, a floating-point
number is rounded to two decimal places. By rounding a float value, you
can avoid the numeric inaccuracies that can occur when you're working with
floating-point data.
How to chain functions
The second part of the second and third examples in this figure shows how
you can chain functions. To do that, you code one function as the argument of
another function. In the chained part of the second example, the input() function
is coded as the argument of the int() function. As a result, two functions are
chained together in a single statement. In the chained part of the third example,
the input() function is coded as the argument of the float() function.
In the fourth example, an arithmetic expression is coded as the first argument
of the round() function. Since the second argument of the roundQ function is 2,
the result is rounded to two decimal places. This isn't chaining, but it shows how
an arithmetic expression can be coded as the argument of a function.
At first, chaining may seem to make the code more complicated. But
chaining is commonly used by professional programmers, so you need to get
used to it. A good way to do that is to start by coding your programs without
chaining. Then, when you have that working, you can use chaining to combine
statements.
Chapter 2 How to write your first programs
Three functions for working with numbers
Function Description
int (data) Converts the data argument to the int type and returns
the int value.
float {data) Converts the data argument to the float type and returns
the float value.
round (number [, digits] ) Rounds the number argument to the number of decimal
digits in the digits argument. If no digits are specified,
it rounds the number to the nearest integer.
Code that causes an exception
x = 15
y = "5"
z = x + y # TypeError: can't add an int to a str
How using the int() function fixes the exception
x = 15
y = "5"
z = x + int(y) # z is 20
Code that gets an int value from the user
quantity = input ("Enter the quantity: ") # quantity is str type
quantity = int (quantity) # quantity is int type
How to use chaining to get the int value in one statement
quantity = int(input("Enter the quantity: "))
Code that gets a float value from the user
price = input ("Enter the price: ") # price is str type
price = float (price) # price is float type
How to use chaining to get the float value in one statement
price = float (input ("Enter the price: "))
Code that uses the round() function
miles_driven = 150
gallons_used = 5.87 5
mpg = miles_driven / gallons_used
mpg = round (mpg, 2)
How to combine the last two statements
mpg = round(miles_driven / gallons_used, 2)
Description
• If you try to perform an arithmetic operation on a string, an exception occurs. To fix
that, you can use the int() and float() functions.
• When you chain functions, you code one function as the argument of another
function. This is a common coding practice.
Figure 2-14 How to use the int(), floatQ, and roundQ functions
# mpg = 25.53191489361702
# mpg = 25.53
Section 1 Essential concepts and skills
Two illustrative programs
This chapter ends by presenting two programs that illustrate the skills that
have been presented. This is a good checkpoint for you. If you understand all of
the code in these programs, you're on your way.
The Miles Per Gallon program
Figure 2-15 presents a Miles Per Gallon program. In the console, the
user enters two values: the number of miles driven and the gallons of gas that
were used. Then, the program calculates and displays the miles per gallon.
Incidentally, in this console and in all of the console examples in this book, the
user entries aren't boldfaced, but the characters displayed by the program are
boldfaced.
In the Python code for this program, the first line is a shebang line that's
appropriate for programs that are written for Python 3. This is followed by two
print() functions that print a title and a blank line to the console.
Next, the program gets two input values from the user and stores them in
two variables. In the input() functions, the prompts use escape sequences for tab
characters. In addition, each input() function is chained within a float() function.
As a result, both of these variables store float values, not str values.
Then, the program calculates the miles per gallon by dividing miles driven
by gallons used. This is followed by a statement that rounds the miles per gallon
value to two decimal places.
Last, the program uses four print() functions to display the miles per gallon
value and a message that indicates that the program is ending. Here, the second
printQ function uses escape sequences for tab characters. In addition, it uses the
str() function to convert the float value for miles per gallon to a string.
When you test a program like this, you should know that you need to enter
valid numeric data whenever it is called for. Otherwise, the floatQ function won't
be able to convert the strings to float values. That will cause a ValueError
exception, and the program will crash.
For now, you have to accept this weakness of the programs that you write. In
chapter 8, though, you'll learn how to handle exceptions and prevent this type of
error.
Chapter 2 How to write your first programs
The console
The Miles Per Gallon program
Enter miles driven:
Enter gallons of gas used:
Miles Per Gallon:
Bye
150
35.875
4.18
The code
#1/usr/bin/env python3
# display a title
print("The Miles Per Gallon program")
print()
# get input from the user
miles_driven= float (input ("Enter miles driven: \t\t"))
gallons_used = float (input ("Enter gallons of gas used:\t"))
# calculate and round miles per gallon
mpg = miles_driven / gallons_used
mpg = round (mpg, 2)
# display the result
print()
print("Miles Per Gallon:\t\t" + str(mpg))
print()
print("Bye")
Description
• This program uses many of the features presented in this chapter.
• The input() function is chained with the float() function to convert the user entries
from str values to float values.
• This round() function rounds the result of the calculation to 2 decimal places.
• If the user enters a non-numeric value such as "sixty", this program will crash
and display an exception to the console. That's because the input entry can't be
converted to a float value. You'll learn how to fix an exception like that in chapter 8.
Figure 2-15 The Miles Per Gallon program
Section 1 Essential concepts and skills
The Test Scores program
Figure 2-16 presents another program that illustrates the skills that are
presented in this chapter. This time, the user enters three test scores. Then, the
program calculates the average score and displays both the total of the scores
and the average score.
You should be able to understand this program without any further
explanation. So take some time to study it and see whether there's anything you
don't understand. If so, here's a description of what's going on.
The four print statements at the start display the first four lines shown in the
console. Then, a total_score variable is set to zero, and three inputQ functions
are used to get three score entries from the user. These entries are converted
to integers by the chained int() function, and they are added to the total_score
variable by using the += operator.
Next, the average score is calculated by dividing the total score by 3. This
arithmetic expression is coded as the argument of a roundQ function that rounds
to zero decimal places. Last, the results are printed, followed by a blank line and
"Bye".
This time, the printQ function that displays the results receives four
arguments, not one long string argument. As a result, the integer variables don't
need to be converted to strings before they are displayed. You can see how this
print() function formats the data by reviewing the output in the console. You
can also see how implicit continuation is used by dividing the statement after a
comma.
Like the previous program, this one will crash if the user enters data that
can't be converted to integers. So be sure to enter valid integer data when you
test this program.
Chapter 2 How to write your first programs
The console
The Test Scores program
Enter
Enter
Enter
Enter
Total
3 test scores
test score:
test score:
test score:
75
85
95
Score: 255
Average Score: 85
Bye
The code
#1/usr/bin/env python3
# display a title
print("The Test Scores program")
print()
print("Enter 3 test scores")
print("======================")
# get scores from the user and accumulate the total
total_score =0 # initialize the variable for accumulating scores
total_score += int(input("Enter test score: "))
total_score += int(input("Enter test score: "))
total_score += int(input("Enter test score: "))
# calculate average score
average_score = round(total_score / 3)
# format and display the result
print("======================")
print("Total Score: ", total_score,
"\nAverage Score:", average_score)
print()
print("Bye")
Description
• This program shows how you can use a variable named total_score to accumulate
the total for a series of entries. In this case, the program doesn't store the individual
scores in variables. Instead, it just adds them to the total_score variable.
• If the user doesn't enter a valid integer for each test score, this program will crash
and display an exception on the console. You'll learn how to fix that in chapter 8.
Figure 2-16 The Test Scores program
Section 1 Essential concepts and skills
Perspective
The goal of this chapter has been to get you started with Python
programming and to get you started fast. Now, if you understand the Miles Per
Gallon and Test Scores programs, you've come a long way. You should also be
able to write comparable programs of your own.
Keep in mind, though, that this chapter is just an introduction to Python
programming. So in the next chapter, you'll learn how to code the control
statements that drive the logic of your programs. This will take your programs
to another level.
Terms
statement
implied continuation
explicit continuation
shebang line
comment
block comment
inline comment
comment out
uncomment
built-in function
function
call a function
argument
data type
string
str data type
integer
int data type
floating-point number
float data type
variable
assignment statement
literal
string literal
numeric literal
case-sensitive
keyword
underscore notation
camel case
arithmetic expression
operand
arithmetic operator
modulo operator
remainder operator
order of precedence
compound assignment operator
empty string
concatenate
join
escape sequence
named argument
prompt
chain functions
Chapter 2 How to write your first programs
Summary
• A Python statement has a simple syntax that relies on indentation. A
statement can be continued by using implicit continuation.
• Python comments can be block or inline. Comments can also be used to
comment out portions of code so they won't be executed. Later, the code can
be uncommented and executed.
• Python provides many built-in functions that you can call in your programs.
When you call a function, you can include any arguments that are used by
the function.
• Python variables are used to store data that changes as a program runs, and
you use assignment statements to assign values to variables. Variable names
are case-sensitive, and they are usually coded with underscore notation or
camel case.
• The str, int, and float data types store values for strings, integers, and
floating-point numbers.
• When you assign a value to a numeric variable, you can use arithmetic
expressions that include arithmetic operators, variable names, and numeric
lit ends.
• When you assign a value to a string variable, you can use the + operator to
join variables and string literals. Within a string literal, you can use escape
sequences to provide special characters.
• The print() function prints output to the console, and the input() function
gets input from the console. The str(), int(), and float() functions convert data
from one data type to another. And the round() function rounds a number to
the specified number of decimal places.
• To chain functions, you code one function as the argument of another
function. This is a common coding practice.
Section 1 Essential concepts and skills
Before you do the exercises for this book...
Before you do any of the exercises in this book, you need to install Python. In
addition, you need to install the source code for this book from our website
(www.murach.com). For details, see the appendix for your operating system.
Exercise 2-1 Modify the Miles Per Gallon
• rogram
In this exercise, you'll test and modify the code for the Miles Per Gallon
program in figure 2-15. When you're finished, the program will get another user
entry and do two more calculations, so the console will look something like this:
Enter miles driven:
Enter gallons of gas used:
Enter cost per gallon:
Miles Per Gallon: 10.0
Total Gas Cost: 45.0
Cost Per Mile: 0.3
150
15
3
If you have any problems when you test your changes, please refer to figure 1-9
of the last chapter, which shows how to fix syntax and runtime errors.
1. Start IDLE and open the mpg.py file that should be in this folder:
python/exercises/ch02
2. Press F5 to compile and run the program. Then, enter valid values for miles
driven and gallons used. This should display the miles per gallon in the
interactive shell.
3. Test the program with invalid entries like spaces or letters. This should cause
the program to crash and display error messages for the exceptions that occur.
4. Modify this program so the result is rounded to just one decimal place. Then,
test this change.
5. Modify this program so the argument of the round() function is the arithmetic
expression in the previous statement. Then, test this change.
6. Modify this program so it gets the cost of a gallon of gas as an entry from the
user. Then, calculate the total gas cost and the cost per mile, and display the
results on the console as shown above.
Chapter 2 How to write your first programs
Exercise 2-2 Modify the Test Scores program
In this exercise, you'll modify the Test Scores program in figure 2-16. When
you're finished, the program will display the three scores entered by the user in
a single line, as shown in this console:
Enter 3 test scores
Enter test score: 7 5
Enter test score: 85
Enter test score: 9 5
Your Scores: 75 85
Total Score: 255
Average Score: 85
95
If you hare any problems when you test your changes, please refer to figure 1-9
of the last chapter, which shows how to fix syntax and runtime errors.
1. Start IDLE and open the test_scores.py file that should be in this folder:
python/exercises/ch02
2. Press F5 to compile and run the program. Then, enter valid values for the
three scores. This should display the results in the interactive shell.
3. Modify this program so it saves the three scores that are entered in variables
named score 1. score2, and score3. Then, add these scores to the total_score
variable, instead of adding the entries to the total_score variable without ever
saving them.
4. Display the scores that have been entered before the other results, as shown
above.
Section 1 Essential concepts and skills
Exercise 2-3 Create a simple program
Copying and modifying an existing program is often a good way to start a new
program. So in this exercise, you'll copy and modify the Miles Per Gallon
program so it gets the length and width of a rectangle from the user, calculates
the area and the perimeter of the rectangle, and displays the results in the
console, like this:
The Area and
Please
Please
Area =
enter
enter
250
Perimeter program
the
the
Perimeter = 70
Thanks
for using
length:
width:
25
10
this program!
1. Start IDLE and open the mpg_model.py file that is in this folder:
python/exercises/ch02
Then, before you do anything else use the File->Save As command to save the
file as rectangle.py.
2. Modify the code for this program so it works for the new program. Remember
that the area of a rectangle is just length times width, and the perimeter is 2
times length plus 2 times width.
3
How to code control
statements
Like all programming languages, Python provides control statements that let
you control the execution of a program. These statements include if statements
as well as looping statements. Before you can learn how to use these
statements, though, you need to learn how to code Boolean expressions.
How to code Boolean expressions 66
How to use the relational operators 66
How to use the logical operators 68
How to compare strings 70
How to code the selection structure 72
How to code if statements 72
More examples of if statements 74
How7 to code nested if statements 76
How to use pseudocode to plan if statements 78
Two illustrative programs 80
The Miles Per Gallon program 80
The Invoice program 82
How to use the iteration structure 84
How to code while statements 84
How to code for statements 86
How7 to code break and continue statements 88
More examples of loops 90
How to use pseudocode to plan a program 92
Two illustrative programs 94
The Test Scores program 94
The Future Value program 96
Perspective 98
Section 1 Essential concepts and skills
How to code Boolean expressions
Boolean expressions are expressions that evaluate to either True or False
based on a comparison between two or more values. You use these expressions
in if statements as well as in looping statements.
How to use the relational operators
Figure 3-1 shows you how to code Boolean expressions (or conditional
expressions) that use the six relational operators. To start, the table summarizes
the six relational operators. Then, the examples of Boolean expressions show
how these operators work.
In the first expression, for instance, if the value of the variable named age
is equal to 5, the expression evaluates to True. Otherwise, it evaluates to False.
Similarly, in the second expression, if the value of the first_name variable is
equal to "John", the expression evaluates to True. Otherwise, it evaluates to
False.
The rest of the examples are similar, although they use the other operators.
They also show that you can compare a variable with a literal or a variable with
another variable. The last example shows that you can compare an arithmetic
expression with a literal. Not shown is that you can also compare an arithmetic
expression to a variable or another arithmetic expression.
When Python evaluates a Boolean expression, it returns either True or False,
and that value can be assigned to a variable. You can also directly assign True or
False to a variable as shown by the last group of examples.
When you're coding Boolean expressions, you need to make sure that your
expressions compare numbers with numbers and strings with strings. If you
compare a number with a string, it doesn't cause an error to occur, but it might
not yield the result you expect. On the other hand, if you compare an integer
with a floating-point number, the values are compared numerically, so the
expression should yield the result you expect.
When you use the equal to operator, you need to remember to use two equal
signs, not one. That's because the one equal sign is the assignment operator,
not the equal to operator. This is a common mistake when you're learning to
program, and it causes a syntax error.
Last, because floating-point values aren't always exact, you shouldn't use
the equal to or not equal to operators when comparing them. Instead, you should
use the greater than (>) and less than (<) operators.
Chapter 3 How to code control statements
Relational operators
Operator Name
== Equal to
Not equal to
Greater than
Less than
i =
>=
< =
Greater than or equal to
Less than or equal to
Description
Returns True if both operands are equal.
Returns True if the left and right operands are not equal.
Returns True if the left operand is greater than the right
operand.
Returns True if the left operand is less than the right
operand.
Returns True if the left operand is greater than or equal to
the right operand.
Returns True if the left operand is less than or equal to the
right operand.
Boolean expressions
age == 5
first name == "John"
quantity 1= 0
distance > 5.6
fuel_req < fuel_cap
distance >= limit
stock <= reorder point
rate / 100 >= 0.1
# variable equal to numeric literal
# variable equal to string literal
# variable not equal to a numeric literal
# variable greater than a numeric literal
# variable less than a variable
# variable greater than or equal to a variable
# variable less than or equal to a variable
# expression greater than or equal to a literal
How to assign a Boolean value to a variable
active = True
active = False
# variable is set to Boolean True value
# variable is set to Boolean False value
Description
• You can use the relational operators to create a Boolean expression (or conditional
expression) that compares two operands and returns a Boolean value..
• A Boolean value is either True or False. You can use the True and False keywords
to assign a Boolean value to a variable.
• Because the float data type doesn't store floating-point numbers as exact values,
you shouldn't use the equal to (==) or not equal to (i = ) operators to compare them.
• When coding Boolean expressions, be sure to compare numbers with numbers and
strings with strings. Mixed expressions won't work the way you expect them too.
Figure 3-1 How to use the relational operators
Section 1 Essential concepts and skills
How to use the logical operators
To code a compound conditioned expression, you can use the logiccd
operators that are shown in figure 3-2 to combine two or more Boolean
expressions. If you use the AND operator, the compound expression only returns
True if both expressions are True. If you use the OR operator, the compound
expression returns True if either expression is True. If you use the NOT operator,
the value returned by the expression is reversed.
Below the table of operators, you can see their order of precedence. That is
the order in which the operators are evaluated if more than one logical operator
is used in a compound expression. This means that NOT operators are evaluated
before AND operators, which are evaluated before OR operators. Although this
is normally what you want, you can override this order by using parentheses.
The examples in this figure show how these operators work. For instance,
the first example uses the AND operator to connect two Boolean expressions.
As a result, it evaluates to True if the expression on its left and the expression
on its right are both True. Similarly, the second example uses the OR operator
to connect two Boolean expressions. As a result, it evaluates to True if either
the expression on its left <9rthe expression on its right is True. Note in these
examples that the operators must be coded in lowercase letters, even though we
refer to them with uppercase letters in the text.
The third example shows how to use the NOT operator to reverse the value
of an expression. As a result, this expression evaluates to True if the age variable
is not greater than or equal to 65. In this case, using the NOT operator is okay,
but often the NOT operator results in code that's difficult to read. That's why it's
a good practice to rewrite your code so it doesn't use the NOT operator.
The next four examples show that compound conditions aren't limited to
two expressions. For instance, the fourth example uses two AND operators to
connect three Boolean expressions, and the fifth example uses two OR operators
to connect three expressions.
You can also mix AND and OR expressions as in the sixth and seventh
examples. In the sixth example, the parentheses clarify the sequence of operations
since Python would do the AND operation first anyway. In the seventh example,
though, the parentheses change the sequence of operations. As a result, Python
evaluates the two expressions connected by the OR operator before evaluating the
rest of the expression.
When you use the AND and OR operators, Python evaluates them from left to
right, and the second expression is only evaluated if necessary. That's why these
operators are known as short-circuit operators. If, for example, the first
expression in an AND operation is False, the second expression isn't evaluated
because the entire expression is going to be False. Similarly, if the first expression
in an OR operation is True, the second expression isn't evaluated because the
entire expression is going to be True.
For most programs, Boolean expressions are relatively simple so they aren't
hard to code. In the rest of this chapter and book, you'll see many examples of
Boolean expressions.
Chapter 3 How to code control statements
Logical operators
Operator Name Description
and AND Returns a True value if both expressions are True. This operator
only evaluates the second expression if necessary.
or OR Returns a True value if either expression is True. This operator
only evaluates the second expression if necessary.
not NOT Reverses the value of a Boolean expression.
Order of precedence
1. NOT operator
2. AND operator
3. OR operator
Boolean expressions that use logical operators
# The AND operator
age >= 65 and city == "Chicago"
# The OR operator
city == "Greenville" or age >= 65
# The NOT operator
not age >= 65
# Two AND operators
age >= 65 and city == "Greenville" and state == "SC"
# Two OR operators
age >= 65 or age <= 18 or status == "retired"
# AND and OR operators with parens to clarify sequence of operations
(age >= 65 and status == "retired") or age < 18
# AND and OR operators with parens to change sequence of operations
age >= 65 and (status == "retired" or state == "SC")
Description
• You can use the logical operators to join two or more Boolean expressions. This
can be referred to as a compound conditioned expression.
• The order of precedence determines the sequence in which the logical operators are
executed. However, you can use parentheses to clarify or change that sequence.
• The AND and OR operators only evaluate the second expression if necessary. As a
result, they are known as short-circuit operators.
Figure 3-2 How to use the logical operators
Section 1 Essential concepts and skills
How to compare strings
When numbers are compared, they are compared based on their numeric
values. In contrast, the comparison of strings is more complicated. They are
evaluated on a character by character basis from left to right. Thus, "peach"
comes before "pear".
To understand string comparisons, though, you need to know the sort
sequence of the letters and digits. On most systems, the digits are lower than
(come before) all uppercase letters, and uppercase letters are lower than (come
before) all lowercase letters. But that means that "Peach" comes before "apple",
which isn't usually what you want when you sort or compare two strings.
To help you resolve this problem, Python provides two string methods that
are summarized in the table in the middle of figure 3-3. The lower() method
converts a string to all lowercase letters. The upper() method converts a string to
all uppercase letters.
To call a string method, you use the syntax shown after this table. That is,
you code the variable name of the string, a dot (period), and the method name
including the required pair of parentheses. This is illustrated by the examples
that follow.
In the first group of examples, you can see how you could use the IDLE
interactive shell to experiment with string comparisons. First, two variables that
contain "Mary" and "mary" are compared without using the lowerQ or upperQ
method. The result is False.
Then, they are compared after both have been converted to lowercase by the
lowerQ method. Now, the result is True, which is what you want. But note that
using the lowerQ method doesn't change the value of the variable itself.
The last group of examples shows how using the lowerQ method can
simplify a comparison. In the first example, a compound condition is required
to test whether a variable named customer_type is equal to either an upper or
lowercase "r". In the second example, using the lowerQ method simplifies this
comparison.
Of course, the upperQ method could be used instead of the lowerQ method
in these examples. Then, the values would be converted to uppercase before the
comparisons.
Chapter 3 How to code control statements
Some string comparisons
Condition Boolean result
"apple" < "Apple" False
"App" < "App1e" True
"1" < "5" True
"10" < "5" False
The sort sequence of the digits and letters, from lowest to highest
• Digits from 0-9
• Uppercase letters from A-Z
• Lowercase letters from a-z
Two string methods that you can use in string comparisons
Method Description
lower () Converts uppercase letters to lowercase
without changing the string itself.
upper () Converts lowercase letters to uppercase
without changing the string itself.
How to call a string method
variableName .methodName ()
How the lower() method can be used to compare string values
stringl = "Mary"
string2 = "mary"
stringl == string2 # False
stringl.lower() == string2.lower() # True
print(stringl) # prints 'Mary'
print(string2) # prints 'mary1
How the lower() method can simplify code
Without the lowerQ method
customer_type == "r" or customer_type == "R"
With the lowerQ method
customer_type.lower() == "r"
Description
• When strings are compared, the evaluation moves from left to right with numbers
coming before letters, and uppercase letters coming before lowercase letters.
• As the syntax summary shows, you call a method by coding the variable name of
the string, followed by a period (the dot operator), and the method name including
the required set of parentheses after the method name.
Figure 3-3 How to compare strings
Section 1 Essential concepts and skills
How to code the selection structure
All languages provide statements that implement the selection structure. In
Python, this structure is implemented by one type of statement: the if statement.
And this statement is common to most languages.
How to code if statements
An if statement lets you control the execution of statements based on the
results of a Boolean expression. This statement is summarized in figure 3-4.
To start, the syntax summary shows that each if statement must start with an if
clause. Then, the brackets [ ] indicate that the if clause can be followed by one
or more elif clauses (read as else if clauses), but they are optional. And any elif
clauses can be followed by an else clause, but that clause is optional too.
To code an if clause, you code the //keyword followed by a Boolean
expression, followed by a colon. Then, you code a block of one or more indented
statements starting on the next line. That block ends when the indentation ends.
To code an elif clause, you do the same but with the elif keyword. And to code
an else clause, you just code the else keyword, the colon, and the block of
indented statements.
For the record, the official Python documentation uses the term suite, instead
of block. However, since block is a more commonly used term, that's the term
we'll use throughout this book.
The three examples in this figure show how this works. Here, the first
example shows an if statement without an elif or else clause. Then, if the value
of the age variable is greater than or equal to ] 8, the printQ function is executed.
Otherwise, this if statement doesn't do anything.
The second example shows an if statement with an else clause. Then, if the
Boolean expression evaluates to True, the first printQ function is executed. If not,
the print() function in the else clause is executed.
The third example shows an if statement with two elif clauses and an else
clause. When this statement is executed, if the invoice_total variable is greater
than or equal to 500. the discount_percent variable is set to .2. Otherwise, the
first elif clause is executed. Then, if the invoice total variable is greater than or
equal to 250, the discount_percent variable is set to . 1. Otherwise, the second
elif clause is executed. In that clause, if the invoice_total variable is greater
than 0, the discount_percent variable is set to zero. Otherwise, the else clause is
executed and an error message is displayed.
Note in these examples, that only one block of statements can be executed
by each statement. And no statements are executed if none of the conditions in
the if or elif clauses are true and the if statement doesn't have an else clause.
Note too that the sequence of the conditions matters when you use elif
clauses. For instance, the last example wouldn't work correctly if you reversed
the three conditions in the if and elif clauses. That's because the condition in the
if clause would test whether the invoice_amount is greater than zero. As a result,
the conditions in the elif clauses would never be tested.
Chapter 3 How to code control statements
The syntax of the if statement
if boolean_expression:
statements...
[elif boolean_expression;
statements...]...
[else:
statements...]
An if statement with only an if clause
if age >= 18:
print("You may vote.")
An if statement with an if clause and an else clause
if age >= 18:
print("You may vote.")
else:
print ("You are too young to vote.")
An if statement with two elif clauses and an else clause
if invoice_total >= 500:
discount percent = .2
elif invoice_total >= 250:
discount percent = .1
elif invoice_total > 0:
discount percent = 0
else:
print("Invoice total must be greater than zero.")
The operation of an if statement
• An if statement always contains an if clause. In addition, it may contain one or
more elif clauses and one else clause.
• When an if statement is executed, the if clause is evaluated first. If it is true, the
statements in this clause are executed and the if statement ends. Otherwise, the first
elif (else if) clause is executed.
• If the statement in the first elif clause is true, the statements in this clause are
executed. Otherwise, the next elif clause is evaluated. This continues until the
condition in one of the elif clauses is true or the else clause is reached.
• The statements in the else clause are executed if the conditions in all of the
preceding clauses are false.
• Only one block of statements can be run for each time an if statement is executed.
Description
• The statements within a clause end when the indentation ends.
• The if statement ends when the indentation for the statements in the last clause
ends.
Figure 3-4 How to code if statements
Section 1 Essential concepts and skills
More examples of if statements
To give you a better idea of how if statements can be used, figure 3-5
presents more examples. Here, the first example shows how an if statement can
be used to assign letter grades based on numeric scores. It contains three elif
clauses and an else clause, and yet its code should be easy to understand.
The second part of this example shows another way to get the same results.
In this case, the if and elif clauses use compound conditions. This shows the
lower and upper limits for most of the letter grades. One advantage of this
approach is that it's easier for other programmers to understand how the code
works. Another advantage is that the clauses can be coded in any sequence. The
disadvantage of this approach is that it requires more code.
The next example shows how an if statement can be used to check whether
data entered by a user is valid. This is known as data validation. Here, the user
is prompted to enter a test score. Then, the if statement checks to make sure that
the entry is between 0 and 100. If it isn't, the entry isn't valid. As a result, the
code displays an error message.
The last example shows how an if statement can be used to check whether
the user entered an "r" or a "w". Here, the first statement sets a variable named
is_valid to True, and the second statement prompts the user to enter a customer
type of "r" or "w". Then, an if statement checks whether the user entry is valid.
If so, it executes a pass statement. This statement does nothing, but it's required
since an if clause must contain at least one statement. On the other hand, if the
entry is not valid, the else clause displays an error message and sets the is_valid
variable to False.
When you code an if statement, you should try to make it as easy to read
as possible. That makes it easier to debug and maintain. To do that, you should
avoid the use of the NOT operator. This means that you may sometimes need to
use a pass statement as shown in the last example, but it's also a good practice to
avoid the use of pass statements.
For efficiency, you may also want to start by coding the conditions that are
most likely to be true and end with the conditions that are least likely to be true.
As you have seen, however, it may be more important to code the conditions in
the way that's most readable.
Chapter 3 How to code control statements
An if statement used for grading
score = int(input("Enter test score: "))
if score >= 90:
grade = "A"
elif score >= 80:
grade = "B"
elif score >= 70:
grade = "C"
elif score >= 60:
grade = "D"
else:
grade = "F"
Another way the if statement could be coded
score = int(input("Enter test score: "))
if score >= 90 and <= 100:
grade = "A"
elif score >= 80 and score < 90:
grade = "B"
elif score >= 70 and score < 80:
grade = "C"
elif score >= 60 and score < 70:
grade = "D"
elif score < 60:
grade = "F"
An if statement that validates the range of a score
score = int(input("Enter test score: "))
if score >= 0 and score <= 100:
total_score += score
else:
print("Test score must be from 0 - 100.")
An if statement that validates the customer type
is_valid = True
customer_type = input("Enter customer type (r/w): ")
if customer_type == "r" or customer_type == "w":
pass # this statement does nothing
else:
print("Customer type must be 'r' or "w1.")
is_valid = False
Description
• If statements are often used to choose one option out of several. They are also used
to make sure that user entries are valid (called data validation).
• A pass statement does nothing. You can use it as a placeholder when a statement is
required but you don't want to perform any action.
• If you can code an if statement more than one way and get the same results, you
should usually choose the way that's easiest to read and understand.
Figure 3-5 More examples of if statements
Section 1 Essential concepts and skills
How to code nested if statements
In many programs, you will need to code one if statement within a clause of
another if statement in order to eet the loeic rieht. The result is known as nested
if statements. This is illustrated by the first example in figure 3-6.
The outer if statement in this example checks for two customer type codes.
The if clause tests for the "r" code, and the elif clause tests for the "w" code. If
neither test evaluates to True, the else clause sets the discount_percent variable
to zero.
Within the outer if clause, a nested if statement sets the discount percent
based on the value of the invoice_total variable. Similarly, the outer elif clause
uses a nested if statement to set the discount percent variable in a similar way.
When you're coding if statements and the conditions get so complicated that
they're hard to follow, it often helps to create a table that summarizes the
conditions. This is illustrated by the table in this figure. Once that's done, you
can use the table as a guide to the coding of your if statements.
Another option is to consider alternate ways of coding the if statements.
For instance, the second example in this figure gets the same results as the
first example, but it doesn't use nested if statements. Instead, it uses a series of
compound conditions. In addition, it uses comments to describe what the two
main portions of the if statement are doing. This makes it fairly easy for other
programmers to read and understand this if statement.
The problem with the second if statement is that it duplicates the Boolean
expression that checks the customer type in each clause. As a result, it makes
your code more difficult to maintain. If, for example, the code for retail
customers was changed from "r" to "retail", you'd have to make that change in
three places in the second if statement. That's both tedious and error prone. In
contrast, you'd only have to change the code in one place in the first example.
Furthermore, it's debatable as to whether the second if statement is any
easier to read than the first statement. If the first example included comments
similar to the comments for the second if statement, it would probably be easier
to read and maintain.
In the first example, both of the nested if statements could use an else clause
instead of the last elif clause. For example, the second nested if clause could be
coded like this:
if invoice_total < 500:
discount percent = .4
else:
discount percent = .5
The advantage of this approach is that it uses less code and is easier to maintain.
However, the code in this figure is easier for some people to understand when
they're first getting started with programming.
Similarly, in the second example, there's no need to check whether the
invoice total is greater than or equal to 250 for retail customers, and there's
no need to check whether the invoice total is greater than or equal to 500 for
wholesale customers. As a result, you can simplify these statements by cutting
the AND operator and the Boolean expression for these conditions.
Chapter 3 How to code control statements
Nested if statements for applying customer discounts
if customer_type.lower() == "r":
if invoice_total < 100:
discount percent = 0
elif invoice_total >= 100 and invoice_total < 250:
discount percent = .1
elif invoice_total >= 250:
discount percent = .2
elif customer_type.lower() == "w":
if invoice_total < 500:
discount percent = .4
elif invoice_total >= 500:
discount percent = .5
else:
discount percent = 0
A table that summarizes the discount rules
Type code Invoice total Discount percent
R (for Retail)
W (for Wholesale)
< 100
>= 100 and < 250
>= 250
< 500
>= 500
0
.1
.2
.4
• 5
An if statement that gets the same results
ft the discounts for Retail customers
if customer_type.lower() == "r" and invoice_total < 100:
discount percent = 0
elif customer_type.lower() == "r" and (
invoice_total >= 100 and invoice_total < 250):
discount percent = .1
elif customer_type.lower() == "r" and invoice_total >= 250:
discount percent = .2
tt th " es cust iers
elif customer_type.lower() == "w" and invoice_total < 500:
discount percent = .4
elif customer_type.lower() == "w" and invoice_total >= 500:
discount percent = .5
# - »f- • ii -
else:
discount percent = 0
Description
• It's possible to code one if statement within a clause of another if statement. The
result is known as nested if statements.
• In some cases, you can use the logical operators to get the same results that you get
with nested if statements.
• To improve the readability of if statements, you can use comments to describe what
various clauses do.
Figure 3-6 How to code nested if statements
Section 1 Essential concepts and skills
How to use pseudocode to plan if statements
In most cases, the if statements that you need are relatively simple so you
don't need to plan the way you're going to code them. Instead, you can just enter
the if statements directly into your programs and test them to make sure that they
get the results that you want.
When if statements get complicated, though, you may want to do some
planning before you start coding. For that, we recommend the use of pseudocode,
as shown in figure 3-7. Here, the first example of pseudocode is used to plan
the if statements that are used to provide the discount percents for various types
of customers and varying invoice totals. This is similar to but simpler than the
example in the previous figure.
Pseudocode is just your personal shorthand for what needs to be done.
Within the pseudocode, though, you can use the same coding structures that
are required by Python. For instance, the first example clearly shows the IF,
ELSE IF, and ELSE portions of the nested if statements that are used. Then, the
pseudocode is a useful guide to your Python coding.
If you compare the Python code to the pseudocode, you can see how they
relate. The benefit of the pseudocode is that you can plan the logic without
worrying about coding details like parentheses, quotation marks, and colons. As
a result, you can document the logic more quickly and experiment with multiple
approaches before you decide on the best one and use it as your guide to the
Python coding.
In practice, you often write out your pseudocode by hand. Because you're
the only one who is going to use it, it doesn't need to be neat or formal. Then,
after you've coded and tested the Python code, you usually throw away the
pseudocode.
The second example in this figure shows another use of pseudocode for
planning an if statement. Here again, the pseudocode becomes a guide to the
Python coding. As you get more experience with if statements, though, you'll
find less need for pseudocode. That's because Python itself is so easy to read and
understand.
Chapter 3 How to code control statements
Pseudocode for planning customer discounts
Get customer type
IF type = R
IF invoice total < 250
discount = 0
ELSE IF invoice total >= 250
discount = 20%
ELSE IF type = W
discount = 40%
ELSE
print invalid type message
The Python code that's based on the pseudocode
customer_type = input ("Enter customer type (R or W) : ")
if customer_type.lower() == "r":
if invoice_total < 250:
discount percent = 0
elif invoice_total >= 250:
discount percent = .2
elif customer_type.lower() == "w":
discount percent = .4
else:
print("Customer type must be R or W.")
Pseudocode for planning the processing of test score entries
Get test score
IF score is from 0 to 100
add score to total score
add 1 to the number of scores
ELSE IF score = 999
print end of program message
ELSE
print error message
The Python code that's based on the pseudocode
total_score = 0
score_counter = 0
score = int(input("Enter test score: "))
if score >= 0 and score <= 100:
total_score += score
score_counter += 1
elif score == 999:
print("Ending program...")
else:
print("Test score must be from 0 through 100. Score discarded.")
Description
• Pseudocode is just your own shorthand for planning the logic of a program. After
you do the planning with pseudocode, you use it as a guide to your Python coding.
Figure 3-7 How to use pseudocode to plan if statements
Section 1 Essential concepts and skills
Two illustrative programs
Now, to illustrate the use of if statements, this chapter presents the code for
two programs: an enhanced version of the Miles Per Gallon program and a new
Invoice program.
The Miles Per Gallon program
Figure 3-8 presents an enhanced version of the Miles Per Gallon program
that was introduced in the previous chapter. This version uses an if statement to
do some minimal data validation. It just tests to make sure that both user entries
are greater than zero. If they are, the mpg value is calculated and displayed. If
either entry isn't valid, an error message is displayed.
Here, the if statement begins by testing whether the miles driven entry is
greater than zero. If it isn't, an error message is displayed and the if statement
ends. Otherwise, the elif clause is executed. This clause tests whether the eallons
used entry is greater than zero. If it isn't, a different error message is displayed
and the if statement ends. Otherwise, the else clause calculates and displays the
rounded mpg result.
Of course, there are other ways that this if statement could be coded. One
of them is shown in this figure. Here, a compound condition is used to test both
entries for validity in the if clause. As you code your if statements, then, you
should try to code them in the way that's most readable and logical.
The advantage of the second approach is that it uses fewer lines of code. The
disadvantage is that it uses the same error message for both entries. As a result,
this error message isn't as specific as the error messages in the first approach.
Chapter 3 How to code control statements
The user interface with invalid data
The Miles Per Gallon program
Enter miles driven: 15 0
Enter gallons of gas used: 0
Gallons used must be greater than zero. Please try again.
Bye
The user interface with valid data
The Miles
Enter
Enter
Miles
Bye
Per
Gallon
miles driven:
gallons
Per
Gall
of gas
.on:
program
used:
150
30
5.0
The code
# display a welcome message
print("The Miles Per Gallon program")
print()
# get input from the user
miles_driven = float (input ("Enter miles driven: "))
gallons_used = float (input ("Enter gallons of gas used: "))
if miles_driven <= 0:
print("Miles driven must be greater than zero. Please try again.")
elif gallons_used <= 0:
print("Gallons used must be greater than zero. Please try again.")
else:
# calculate and display miles per gallon
mpg = round((miles_driven / gallons_used), 2)
print("Miles Per Gallon: ", mpg)
print()
print("Bye")
Another way the if statement could be coded
if miles_driven > 0 and gallons_used > 0:
mpg = round((miles_driven / gallons_used), 2)
print("Miles Per Gallon: ", mpg)
else:
print("Both entries must be greater than zero. Please try again.")
Description
• This Miles Per Gallon program performs some data validation.
• If either user entry is less than zero, a message is displayed. If both are valid, the
calculation is done and the results are displayed.
Figure 3-8 The Miles Per Gallon program
Section 1 Essential concepts and skills
The Invoice program
Figure 3-9 presents an Invoice program that uses nested if statements to
calculate the discount percent for an invoice. These nested if statements are
similar to the nested if statements presented earlier in this chapter. Here again,
the discount percent is based on the customer type (R or W) and the invoice
total. Both of these values are entered by the user.
To make the nested if statements easier to follow, comments are used before
the if, elif, and else clauses of the outer if statement. In the nested if statements,
compound conditions are used so each discount bracket is obvious. This also
makes the code easier to modify if the brackets change or new brackets are
added.
Once the discount percent is established, the program calculates the discount
amount and the new invoice total. Then, the old and new invoice totals are
displayed along with the discount percent and discount amount.
Chapter 3 How to code control statements
The user interface
The Invoice program
Enter customer type (r/w):
Enter invoice total:
Invoice total: 250.0
Discount percent: 0.2
Discount amount: 50.0
New invoice total: 200.0
R
250
The code
#1/usr/bin/env python3
# display a welcome message
print("The Invoice program")
print()
# get user entries
customer_type = input("Enter customer type (r/w):\t")
invoice_total = float (input ( "Enter invoice total: \t\t") )
print()
# determine discounts for Retail customers
if customer_type.lower() == "r":
if invoice_total > 0 and invoice_total < 100:
discount percent = 0
elif invoice_total >= 100 and invoice_total < 250:
discount percent = .1
elif invoice_total >= 250 and invoice_total < 500:
discount percent = .2
elif invoice_total >= 500:
discount percent = .25
# determine discounts for Wholesale customers
elif customer_type.lower() == "w":
if invoice_total > 0 and invoice_total < 500:
discount percent = .4
elif invoice_total >= 500:
discount percent = .5
ft •" • f • -•" f-'f- ;-,' • |f •
else:
discount percent = 0
# calculate discount amount and new invoice total
discount_amount = round(invoice_total * di scount percent, 2)
new_invoice_total = invoice_total - discount_amount
# display the results
print("Invoice total:\t\t" + str(invoice_total))
print("Discount percent:\t" + str(discount percent))
print("Discount amount:\t" + str(discount_amount))
print("New invoice total:\t" + str(new_invoice_total))
print()
print("Bye")
Figure 3-9 The Invoice program
Section 1 Essential concepts and skills
How to use the iteration structure
Besides the selection structure, most languages provide for an iteration
structure. Since this structure provides a way to repeatedly execute a block of
statements, it's also known as a repetition structure. In Python, the iteration
structure is implemented by while and for statements.
How to code while statements
Figure 3-10 starts by presenting the syntax of the while statement that's used
to create while loops. This statement starts with the while keyword followed by a
Boolean expression and a colon. Then, an indented block of one or more
statements starts on the next line. These are the statements in the loop, and they
end when the indentation ends.
When Python executes a while statement, it executes the statements in
the loop while the Boolean expression evaluates to True. Since a while loop
uses a condition to determine the number of times it executes, it is known as a
condition-controlled loop.
The first example in this figure uses a while loop to continue a program
while a user enters "y" or "Y". Before the loop, this code creates a variable
named choice and sets it to a string of "y". Then, the loop runs while the choice
variable equals "y" or "Y".
The first time through the loop, the choice variable equals "y". As a result,
the loop always runs at least once. Within the loop, the first statement prints
"Hello!" to the console. Then, the second statement asks the user if he or she
wants to say hello again and prompts the user to enter "y" for yes or "n" for no.
If the user enters "y" or "Y", the condition at the top of the loop evaluates to
True. As a result, the loop runs again. This prints "Hello!" to the console again.
Otherwise, the condition at the top of the loop evaluates to False, and the loop
ends. This prints "Bye!" to the console.
The second example uses a while loop to display the numbers 0 through 4.
Before the while statement starts, this code sets a variable named counter to 0.
Within the loop, the first statement prints the value of the counter variable to the
console followed by a space, and the second statement increases the value of the
counter variable by 1. As a result, each time the loop is executed it displays the
new value of the counter variable. When that value reaches 5, the condition (less
than 5) at the top of the loop evaluates to False, so the loop ends. Then, the first
statement after the loop displays a message that indicates that the loop has ended.
If the condition for a while statement doesn't ever become False, the loop
continues indefinitely. This is called an infinite loop. When you first start
programming, it's common to code an infinite loop by mistake. If you do that,
you can use the keystroke combinations shown in this figure to end the loop.
However, it's also a common practice to code an infinite loop on purpose to
continue to execute statements repeatedly for as long as a program is running.
Then, if necessary, you can use a break statement to end the loop as described in
figure 3-12.
Chapter 3 How to code control statements
The syntax of the while statement
while boolean_expressiom
statements...
A while loop that continues as long as the user enters 'y' or 'Y'
choice = "y"
while choice.lower() == "y":
print("HelloI")
choice = input("Say hello again? (y/n): ")
print("ByeI") # runs when loop ends
The console after the loop runs
Hello!
Say hello again?
Hello!
Say hello again?
Bye I
(y/n): y
(y/n): n
A while loop that prints the numbers 0 through 4 to the console
counter = 0
while counter < 5:
print(counter, end=" ")
counter += 1
print("\nThe loop has ended.")
The console after the loop runs
0 1
The
2 3 4
loop
has
ended.
Code that causes an infinite loop
while True:
ft any statements in this loop run forever
# unless a break statement is excecuted as in figure 3-12
How to end an infinite loop
• Press Ctrl+C (Windows) or Command+C (Max OS X).
Description
• In a while statement, Python begins by testing the condition defined by the Boolean
expression at the top of the statement. Then, if this condition is True, Python
executes the statements in the while loop until the condition is False.
• If the condition initially evaluates to False, Python never executes the code in the
loop. If the condition never evaluates to False, the loop never ends. This is known
as an infinite loop.
• Since a while loop uses a Boolean condition to determine the number of times it
executes, it is known as a condition-controlled loop.
Figure 3-10 How to code while statements
Section 1 Essential concepts and skills
How to code for statements
Figure 3-11 shows how to use for statements to define for loops that run
once for each integer in a collection of integers. The integers in the collection are
produced by the range() function that's summarized in the table in this figure.
Since Python's for loop executes once for each item in a collection, it's known as
a collection-controlled loop.
At the top of the figure, the syntax summary shows that the for statement
consists of the for keyword, the name of a variable for the integer, the in keyword,
a range() function, and the colon. Then, the indented block of statements in the
loop start on the next line.
When the for statement is executed, Python stores the first integer returned
by the rangeQ function in the int variable that's defined in the for statement.
Then, each time through the loop, this variable receives the next integer in the
collection that's returned by the range() function. When the loop finishes going
through all of the integers in the collection, it ends.
The first example shows how this works by displaying the integers from 0
to 4. Here, the for statement defines an integer variable named i, and it sets the
argument for the range() function to 5. Within the loop, a print() function prints
the i variable to the console, followed by a space. The first time through the
loop the i variable is 0, the second time it's 1, and so on. This continues until the
loop goes through all of the numbers in the collection returned by the range()
function. Then, the loop ends.
Incidentally, a variable name of i is commonly used for the integer value in
a loop. However, you can use any name you want. For instance, this example
would work equally well if this variable name was changed from i to counter.
The second example uses a for loop to get the sum of the numbers 1 through
4. Before the loop, this example creates a variable named sum_of_numbers and
assigns it a value of 0. Then, this code defines a loop for a rangeQ function that
returns the numbers 1 through 4. In other words, this loop executes 4 times.
Each time through the loop, the statement within the loop adds the integer in the
range() function to the sum_of_numbers variable. When the loop ends, this code
prints the sum_of_numbers variable to the console.
Chapter 3 How to code control statements
The syntax of a for loop that uses the range() function
for int_var in range_functiom
statements...
The range() function
Function Description
range (stop) Returns integer values from 0 to the stop value, but
not including the stop value.
range (start, stop [, step] ) Returns integer values from the start value to the stop
value, but not including the stop value. If the optional
step value is specified, this function increments or
decrements the integers by the step value.
Examples of the range() function
range(5) # 0, 1, 2, 3, 4
ranged, 6) # 1, 2, 3, 4, 5
range(2, 10, 2) # 2, 4, 6, 8
range(5, 0,-1) #5,4,3,2,1
A for loop that prints the numbers 0 through 4 to the console
for i in range(5):
print(i, end=" ")
print("\nThe loop has ended.")
The console after the loop runs
0 1
The
2 3 4
loop
has
ended.
A for loop that gets the sum of the numbers from 1 through 4
sum_of_numbers = 0
for i in range(1,5):
sum_of_numbers += i
print(sum_of_numbers) # displays 10 (1+2+3+4)
Description
• When you use the for statement with the rangeQ function, it executes a for loop
once for each integer in the collection of integers returned by the range() function.
• Each time through the loop, the integer variable at the top of the loop receives the
next integer in the collection that's returned by the rangeQ function. The loop ends
after it executes for the last integer in the collection.
*—-■
• Since Python's for loop executes once for each item in a collection, it's known as a
collection-controlled loop.
Figure 3-11 How to code for statements
Section 1 Essential concepts and skills
How to code break and continue statements
The break and continue statements give you additional control over loops.
The break statement breaks out of a loop by causing program execution to jump
to the statement that follows the loop. This causes the loop to end. The continue
statement continues a loop by causing execution to jump to the top of the loop.
This causes the loop to execute again by reevaluating its condition.
The first example in figure 3-12 shows how the break statement works.
Here, the condition in the while loop is intentionally set to True. This starts an
infinite loop. Within the loop, the first statement asks the user to enter an integer
to square. If the user enters an integer, this example calculates the square of the
integer and displays it. However, if the user enters "exit", this example executes
the break statement and the while loop ends. This breaks out of the current loop
and executes the statement that follows the loop.
The second example in this figure shows how the continue statement works.
This example uses a while loop to calculate the miles per gallon based on two
entries made by the user. To start, this loop gets two entries from the user. Then,
it checks whether these entries are less than or equal to zero. If so, they aren't
valid. As a result, miles per gallon shouldn't be calculated and displayed. In fact,
doing that could cause the program to crash because trying to divide by zero
causes an exception.
To avoid that, the if statement displays a message that indicates that the
entries must be greater than zero. Then, it uses a continue statement to jump to
the start of the while loop. This executes the first statement in the loop, which
prompts the user for the first entry again.
Although it isn't shown in this figure, you can nest one loop within another.
For instance, you can nest a for loop within a while loop. In that case, a break or
continue statement applies only to the loop that it's in. If, for example, you code
a break statement within an inner loop, it ends the inner loop, not the outer loop.
Chapter 3 How to code control statements
A break statement that exits an infinite while loop
print("Enter ■exit■ when you■re done.\n")
while True:
data = input("Enter an integer to square: ")
if data == "exit":
break
i = int(data)
print(i, "squared is", i * i, "\n")
■► print("Okay, byeI")
The console
Enter
Enter
■ exit ■ when
an integer
10 squared is 100
Enter
an integer
23 squared is 529
Enter
Okay,
an integer
bye I
you■re done.
to
to
to
square:
square:
square:
10
23
exit
A continue statement that jumps to the beginning of a while loop
more = "y"
—►while more.lower() == "y":
miles_driven = float (input ("Enter miles driven: \t\t"))
gallons_used = float (input ("Enter gallons of gas used:\t"))
# validate input
if miles_driven <= 0 or gallons_used <= 0:
print("Both entries must be greater than zero. Try again.\n")
continue
mpg = round(miles_driven / gallons_used, 2)
print("Miles Per Gallon:", mpg, "\n")
more = input("Continue? (y/n): ")
print()
print("Okay, byeI")
Description
• You can use the break statement to break out of the current loop by jumping to the
statement that follows the loop.
• You can use the continue statement to continue executing the loop by jumping to
the top of the loop.
Figure 3-12 How to code break and continue statements
Section 1 Essential concepts and skills
More examples of loops
To give you a better idea of how loops can be used, figure 3-13 presents
more examples. To start, the first example answers this question: If you make a
one-time investment of $ 10,000 and you get 5% yearly interest, what will the
value be after 20 years?
The answer is derived by using a for loop that is executed 20 times. Before
this loop is entered, though, an investment variable is set to 10000. Then, within
the loop, the yearly interest is calculated by multiplying the investment variable
by .05, and the yearly interest is added to the investment variable. So after one
year, the investment variable contains 10500 (10000 plus the first year's interest
of 500). After this is repeated 19 times, the loop ends and the investment amount
is rounded to two decimal places.
Note in this example that i is used as the counter variable, but that variable
isn't used in the loop because it isn't needed. That often happens when using a
for loop with the rangeQ function.
The second example shows how to get the same result by using a while
loop instead of a for loop. The difference is that this example requires a counter
variable named year that varies from 0 to 19 as the loop is executed. This
variable is set to zero before the loop starts and is increased by one each time
through the loop. The loop ends when this variable is no longer less than 20.
Because of the extra coding, while loops are not commonly used for this type of
problem.
The third example is similar. The difference is that it calculates the future
value of a monthly investment with interest calculated each month. Before the
loop, this example assigns starting values to four variables. Then, the for loop
executes one time for each month, which in this case is 120. In other words, the
loop is executed 120 times.
Within the loop, the first statement adds the monthly investment amount
to the future value. The second statement calculates the monthly interest. And
the third statement adds the monthly interest to the future value. When the loop
ends, the statement after the loop rounds the future value to two decimal places.
Here again, the counter variable (month) isn't used in the loop.
The fourth example shows how to work with nested loops. Here, the outer
for loop executes three times. Then, the inner while loop executes until a user
enters a valid test score. As a result, this code continues to run until the user
enters three valid test scores.
In this example, the break statement in the if statement jumps out of the
inner while loop. That takes control back to the for loop, so the while statement
can be executed for the next value in the range. Without the break statement, the
inner while loop would never end.
Chapter 3 How to code control statements
A for loop that calculates the future value of a one-time investment
investment = 10000
for i in range(20):
yearly_interest = investment * .05
investment = investment + yearly_interest
investment = round(investment, 2)
A while loop that gets the same result
year = 0
investment = 10000
while year < 20:
yearly_interest = investment * .05
investment = investment + yearly_interest
year += 1
investment = round(investment, 2)
A for loop that calculates the future value of a monthly investment
monthly_investment = 100
monthly_interest_rate = .08 / 12
months = 120
future_value = 0
for month in range(months):
future_value += monthly_investment
monthly_interest_amount = future_value * monthly_interest_rate
future_value += monthly_interest_amount
future_value = round(future_value, 2)
Nested loops that get the total of 3 valid test scores
total_score = 0
for i in range(3):
while True:
score = int(input("Enter test score: "))
if score >= 0 and score <= 100:
total_score += score
break
else:
print("Test score must be from 0 - 100.")
print("Total score:", total_score)
The console
Enter test score: 110
Test score must be from 0
Enter test score: -10
Test score must be from 0
Enter test score: 100
Enter test score: 9 0
Enter test score: 0
Total score: 190
Description
• When one loop is coded within another loop, it is known as nested loops.
Figure 3-13 More examples of loops
100.
100.
Section 1 Essential concepts and skills
How to use pseudocode to plan a program
You have now seen three types of statements that provide the logic of a
program: the if statement, the while statement, and the for statement. This means
that you know enough to plan the code for an entire program. To do that, we
recommend the use of pseudocode, as shown in figure 3-14.
The first example in this figure shows the pseudocode for a program that gets
test scores from a user and then calculates and displays the average of the scores
that have been entered. To do that, the pseudocode begins by starting an infinite
while loop for the program.
Within the while loop, an if statement tests whether the entry is between 0
and 100. If so, the program adds the score to the score total, and it adds 1 to the
number of scores. Then, an else if clause tests to see whether the entry is 999. If
so, the loop ends, and the program calculates the average score and displays the
results. Otherwise, the entry must be invalid. As a result, the program displays an
error message and jumps to the top of the loop.
The second example shows the pseudocode for a program that gets user
entries of a monthly investment amount, a yearly interest rate, and a number
of years. Then, it calculates the future value of these monthly investments with
interest calculated monthly.
In this example, a while loop gets the entries and performs the calculations
until the user no longer wants to continue. This while loop starts by getting
the three user entries, converting the yearly interest rate to a monthly rate,
converting the number of years to months, and setting the future value to zero.
Then, a nested for loop calculates the future value one time for each month.
Within the for loop, the code adds the monthly investment amount to the
future value, calculates the monthly interest, and adds the monthly interest to the
future value. When the for loop ends, the program displays the future value and
checks whether the user wants to continue.
The main benefit that you get from using pseudocode is that you can plan
what needs to be done...and how to get it done...without worrying about coding
details. Then, when you feel good about your plan, you can use the pseudocode
as a guide to your Python code.
Chapter 3 How to code control statements
Pseudocode for a Test Scores program
Display user message
WHILE TRUE
get score
IF score is from 0 to 100
add score to score total
add 1 to number of scores
ELSE IF score is 999
end loop
ELSE
print error message
Calculate average score
Display results
Pseudocode for a Future Value program
Display user message
WHILE user wants to continue
get monthly investment, yearly interest rate, and years
convert yearly interest rate to monthly interest rate
convert years to months
set the future value to zero
FOR each month
add monthly investment amount to future value
calculate interest for month
add interest to future value
display future value
ask if user wants to continue
Display end message
Description
• You can use pseudocode to plan the coding of loops as well as if statements. In fact,
you can use pseudocode to plan all the coding for console programs like the ones in
the first section of this book.
• When you use pseudocode, you don't need to know how you're actually going to
code what you're planning. You can figure that out later. You just need to record
what needs to be done.
• Often, you just sketch out your pseudocode with paper and pencil as a guide to
your coding. Then, after you've coded and tested the program, you throw the
pseudocode away.
Figure 3-14 How to use pseudocode to plan a program
Section 1 Essential concepts and skills
Two illustrative programs
This chapter ends by presenting two more programs. The pseudocode in the
previous figure provides the logic for these programs.
The Test Scores program
Figure 3-15 presents the Test Scores program. If you compare this with the
pseudocode in the previous figure, you can see how the two match up. The logic
is the same, but the Python code has all the implementation details.
The main loop in this program is an infinite while loop that continues until
the test_score variable is 999. To make this work, the test_score variable must be
initialized outside the loop. In this case, it's set to zero.
Within the while loop, an if statement tests for valid entries and for an entry
that's equal to 999. If the entry is a valid score, this code adds the test score to
the score total and adds ] to the counter for test scores. If the entry is 999, a
break statement ends the while loop. Otherwise, the entry must be invalid. As a
result, this code displays an error message.
In this program, the clauses in the if statement are coded in the sequence
in which the conditions are most likely to be true. For instance, a valid entry
is most likely. A 999 entry is second most likely. And an invalid entry is least
likely. Of course, there are many other ways this if statement could be coded.
Chapter 3 How to code control statements
The user interface
The Test Scores program
Enter 999 to end input
Enter test score: 85
Enter test score: 9 5
Enter test score: 155
Test score must be from 0 through 100. Score discarded. Try again.
Enter test score: 7 5
Enter test score: 999
Total Score: 255
Average Score: 85
The code
#1/usr/bin/env python3
# display a welcome message
print("The Test Scores program")
print()
print("Enter 999 to end input")
print("======================")
# initialize variables
counter = 0
score_total = 0
test_score = 0
w
test_score = int(input("Enter test score: "))
if test_score >= 0 and test_score <= 100:
score_total += test_score
counter += 1
elif test_score == 999:
break
else:
print("Test score must be from 0 through 100. "
+ "Score discarded. Try again.")
# calculate average score
average_score = round(score_total / counter)
# format and display the result
print("======================")
print("Total Score:", score_total,
"\nAverage Score:", average_score)
print()
print("Bye")
Figure 3-15 The Test Scores program
Section 1 Essential concepts and skills
The Future Value program
Figure 3-16 presents the Future Value program that matches the pseudocode
in figure 3-14. This illustrates the use of nested loops. Here, a while statement
loops until the user enters "n" for the last inputQ function in the loop. Within the
while loop, a for statement calculates the future value of the investment entries.
When the for loop ends, the future value is displayed.
Before the for loop is started, though, two of the user entries are converted to
monthly values. First, the yearly interest rate entry, which is entered as a whole
number, is converted to a monthly rate by dividing it first by 12 and then by 100
(so an entry of 12 gets converted to .01). Then, the years entry is converted to
months by multiplying it by 12. Within the for loop, these values are used to
perform the calculations for each month.
Note that the argument for the raneeO function is the months variable. So, if
the user enters 10 years, the months variable is 120, and the integers returned by
the rangeQ function are 0 through 119. As a result, the loop is executed once for
each month, or 120 times, which is what you want.
By now, you should be able to understand every line of code in this program.
If you can, you're off to a great start with Python. If you can't, you should
review the figures that show how to use the statements that you don't understand,
even if that means going back to chapter 2.
Chapter 3 How to code control statements
The user interface
Welcome to the Future Value
Enter monthly investment:
Enter yearly interest rate:
Enter number of years:
Future value:
Continue (y/n)?:
Calculator
100
12
10
23233.91
The code
#1/usr/bin/env python3
# display a welcome message
print("Welcome to the Future Value Calculator")
print()
choice = "y"
while choice.lower() == " ":
# get input from the user
monthly_investment = float(input("Enter monthly investment:\t"))
yearly_interest_rate = float(input("Enter yearly interest rate:\t"))
years = int(input("Enter number of years:\t\t"))
# convert yearly values to monthly values
monthly_interest_rate = yearly_interest_rate / 12 / 100
months = years * 12
# calculate the future value
future_value = 0
for i in range(months):
future_value += monthly_investment
monthly_interest_amount = future_value * monthly_interest_rate
future_value += monthly_interest_amount
# display the result
print("Future value:\t\t\t" + str(round(future_value, 2)))
print()
# see if the user wants to continue
choice = input("Continue (y/n)?: ")
print()
print("Bye!")
Figure 3-16 The Future Value program
Section 1 Essential concepts and skills
Perspective
In this chapter, you learned how to use the control statements that drive the
logic of a program. Now, if you understand the programs in this chapter, you're
on your way. Otherwise, you need to study the programs until you understand
every line of code in each program.
Terms
control statement
Boolean expression
conditional expression
relational operator
Boolean value
compound conditional expression
logical operator
order of precedence
short-circuit operator
sort sequence
method
dot operator
selection structure
if statement
if clause
elif clause
else clause
block of statements
suite of statements
data validation
pass statement
nested if statements
pseudocode
iteration structure
repetition structure
while statement
while loop
condition-controlled loop
infinite loop
for statement
for loop
collection-controlled loop
break statement
continue statement
nested loops
Chapter 3 How to code control statements
Summary
• When you code a Boolean (or conditional) expression, you can use
relational operators and logical operators. You can also use parentheses to
override the order of precedence for the logical operators.
• To assign a Boolean value to a variable, you can use the True and False
keywords.
• You can use the lower() and upper() string methods to convert the letters in a
string to all lowercase or uppercase. This is useful when comparing strings.
• An if statement always starts with an if clause. It can also have one or more
elif clauses and a concluding else clause, but those clauses are optional.
• The while statement loops through a block of statements while a condition
evaluates to True. This can be referred to as a condition-controlled loop.
• The for statement can loop through a block of statements once for each
integer in a collection of integers that's specified by the range() function.
This can be referred to as a collection-controlled loop.
• A break statement breaks out of a loop by jumping to the end of it.
• A continue statement continues a loop by jumping to the start of it.
• You can use pseudocode to plan the logic of a program.
100 Section 1 Essential concepts and skills
Exercise 3-1 Enhance the Miles Per Gallon
program
In this exercise, you'll enhance the Miles Per Gallon program in figure 3-8 so
the console display looks something like this:
The Miles Per Gallon program
Enter miles driven:
Enter gallons of gas used:
Enter cost per gallon:
Miles Per Gallon:
Total Gas Cost:
Cost Per Mile:
Get entries for another
Enter miles driven:
150
15.2
4.25
9.87
64.6
0.4
trip (y/n)? y
Enter gallons of gas used:
Enter cost per gallon:
Miles Per Gallon:
Total Gas Cost:
Cost Per Mile:
Get entries for another
225
16
4.25
14.06
68.0
0.3
trip (y/n)?
1. Start IDLE and open the mpg.py file that's in this folder:
murach/python/exercises/ch03
2. Test the program with valid and invalid values.
3. Enhance the program so it lets the user repeat the entries and get the miles per
gallon for more than one trip. To do that, use a while loop.
4. Modify this program so it gets the cost of a gallon of gas as another entry
from the user, and validate this entry before using it in your calculations. If all
three entries are valid, calculate the total gas cost and the cost per mile, and
display the results on the console.
Chapter 3 How to code control statements
Exercise 3-2 Enhance the Test Scores program
In this exercise, you'll enhance the Test Scores program in figure 3-14 so the
console display looks something like this:
The Test Scores program
Enter test scores
Enter 'end1 to end input
Enter test score:
Enter test score:
Enter test score:
Enter test score:
Total Score: 255
Average Score: 85
Enter another set
Enter test scores
75
85
95
end
of test
Enter 'end' to end input
Enter test score:
Enter test score:
95
-85
Test score must be from 0
Enter test score:
Enter test score:
Enter test score:
Total Score: 240
Average Score: 80
Enter another set
85
60
end
of test
scores (y/n)? y
through 100. Try again.
scores (y/n)?
1. Start IDLE and open the test_scores.py file that's in this folder:
murach/python/exercises/ch03
2. Test the program with valid and invalid values.
3. Enhance the program so it lets the user enter two or more sets of scores. Use a
while loop to do that. That nests one while loop within another.
4. Enhance this program so the user enters "end" to end a set of score entries,
but keep the validation of the test scores. To do this, you need to change the
if statement within the inner while loop. In fact, you may want to nest one
if statement within the else clause of another one to get the results that you
want.
102 Section 1 Essential concepts and skills
Exercise 3-3 Enhance the Future Value program
In this exercise, you'll enhance the Future Value program so the console display
looks something like this:
Welcome to
Enter
Entry
Enter
Enter
Entry
the Future Value Calculator
monthly investment:
must
be greater than
monthly investment:
yearly interest rate:
must
Please try
Enter
Enter
Entry
be greater than
again.
yearly interest rate:
number of years:
must
Please try
Enter
Year =
Year =
Year =
Year =
Year =
Year =
Year =
Year =
Year =
Year =
be greater than
again.
number of years:
= 1
= 2
= 3
= 4
= 5
= 6
= 7
= 8
= 9
= 10
Future
Future
Future
Future
Future
Future
Future
Future
Future
Future
Continue (y/n)? n
Value =
Value =
Value =
Value =
Value =
Value =
Value =
Value =
Value =
Value =
0
0. Please try again.
100
; 16
0 and less than or equal to 15.
: 12
100
0 and less than or equal to 50.
10
1280.93
2724.32
4350.76
6183.48
8248.64
10575.7
13197.9
16152.66
19482.15
23233.91
1. In IDLE, open the future_value.py file that's in this folder:
murach/python/exercises/ch03
2. Test the program, but remember that it doesn't do any validation so enter valid
numbers.
3. Add data validation for the monthly investment entry. Use a while loop to
check the validity of the entry and keep looping until the entry is valid. To
be valid, the investment amount must be greater than zero. If it isn't, an error
message like the first one shown above should be displayed.
4. Use the same technique to add data validation for the interest rate and years.
The interest rate must be greater than zero and less than or equal to 15. And
the years must be greater than zero and less than or equal to 50. For each
invalid entry, display an appropriate error message. When you're finished,
you'll have three while loops and a for loop nested within an outer while loop.
5. Modify the statements in the for loop that calculates the future value so one
line is displayed for each year that shows the year number and future value, as
shown above. To do that, you need to work with the integer that's returned by
the range() function.
4
How to define and use
functions and modules
In chapter 2, you learned how to use some of Python's built-in functions, such
as the print() and input() functions. In this chapter, you'll learn how to define
and use your own functions. You'll also learn how to store your functions in
modules and how to use modules that have been created by others.
How to define and use functions 104
How to define and call a function 104
How to define and call a main() function 106
The Future Value program with functions 108
More skills for defining and using functions 110
How7 to use default values for arguments 110
How7 to use named arguments 110
When and how7 to use local and elobal variables 112
How to create and use modules 114
How7 to create a module 114
How7 to document a module 116
How7 to import a module 118
The Convert Temperatures program 120
How to use standard modules 122
How7 to use the random module 122
The Guess the Number game 124
How to plan the functions of a program 126
How7 to use a hierarchy chart 126
The hierarchy chart for the Pie Dice same 128
The Pie Dice same with elobal variables 130
The Pig Dice game with local variables 134
Perspective 136
104 Section 1 Essential concepts and skills
How to define and use functions
A function is a unit of code that performs a task. Functions are useful
because they provide a way to divide the code for a program into manageable
chunks. This makes it easier to maintain, test, and debug your code. Besides that,
functions can be used by more than one program.
How to define and call a function
Figure 4-1 starts by showing the syntax for defining a function. It starts
with a def statement that consists of the function name, a set of parentheses, an
optional list of arguments within the parentheses, and a colon. This is followed
by one or more indented statements that are executed when the function is called.
To call a function, you use the same syntax that you've been using for
calling other functions. That is. you code the function name and a set of
parentheses. Then, if the function requires one or more arguments, you code the
arguments in the same sequence that they are in the function definition and you
use commas to separate the arguments.
This is illustrated by the three examples in this figure. Since the function
in the first example doesn't have any arguments, you call it by coding the name
of the function followed by a set of parentheses. This just prints a welcome
message.
The function in the second example requires one argument, the message that
should be printed. As a result, the statement that calls it provides an argument
that is a variable for the string that should be printed.
The function in the third example requires two arguments. It multiples the
values of the two arguments and then uses a return statement to return the result
of the calculation to the calling statement. In this case, the calling statement sets
a variable named mpg to the result that's returned by the function.
When you code a calling statement, the names that you use for the
arguments don't have to be the same as the names that are used in the function
definition. In the third example, for instance, the calling statement passes
arguments named miles and gallons, but the function defines arguments named
miles_driven and gallons_used. However, the arguments in the calling statement
must be in the same sequence as the arguments in the function definition. You'll
see examples of this in the next few figures.
When you name a function, it's a good practice to start the name with a
verb. In addition, the name should do a reasonable job of describing or implying
what the purpose of the function is. To do that, you can follow the verb with a
noun, with maybe an adjective before the noun. That makes it easier for you to
remember what your functions are doing.
Before you continue, you should know that some programmers refer to the
arguments as parameters. In fact, some programmers use the term parameter
when referring to a function definition, and the term argument when referring to
calling statements. In practice, most programmers use these terms
interchangeably. In this book, we use the term argument for both the function
definition and the calling statement.
Chapter 4 How to define and use functions and modules 105
The syntax for defining a function
def function_name( [arguments! ) :
statements
A function that doesn't accept arguments
How to define it
def print_welcome():
print("Welcome to the Future Value Calculator")
print()
How to call it
print_welcome() ft prints welcome message
A function that has one argument
How to define it
def print_welcome(message):
print(message)
print()
How to call it
message = "Welcome to the Future Value Calculator"
print_welcome(message) # prints welcome message
A function that accepts two arguments and returns a value
How to define it
def calculate miles per gallon(miles driven, gallons_used):
mpg = miles_driven / gallons_used
mpg = round(mpg, 1)
return mpg
How to call it
miles = 500
gallons = 14
mpg = calculate miles per gallon(miles, gallons) # mpg = 35.7
Description
• A function is a block of code that can be called by other statements.
• To define a function, code the def keyword, the name of the function, a set of
parentheses that contains zero or more arguments, and a colon. Then, code a block
of one or more statements for the function. These statements must be indented.
• To call a function, code the name of the function and a set of parentheses. Within
the parentheses, code any arguments and separate multiple arguments with
commas. But you must pass the values to the function in the same sequence that
they're listed.
• Within the body of a function, you can code a return statement that returns a value
to the calling function.
*—-■
• When you name a function, it's a good practice to start the name with a verb.
Figure 4-1 How to define and call a function
106 Section 1 Essential concepts and skills
How to define and call a main{) function
When you use one or more functions in a program, it's a good practice to
put all of the code for the program in functions. To make that work, you put all
of the code that isn't in specific functions in a main() function. Then, the code in
the main() function starts the operation of the program.
This is illustrated by the main() function in figure 4-2. This is a mainQ
function for a Future Value program like the one in the previous chapter. The
difference is that it calls a function named calculate_future_value() to compute
the future value. Thus, as you'll see in the next figure, the code for this program
is divided into two functions: calculate_future_valueO and main().
When all the code of a program is divided into specific functions and a
main() function, you need to call the main() function to start the program. This
figure shows two ways to do that.
The first way just calls the main() function from outside all of the functions.
That works okay as long as no other program imports the program to use its
functions. For the programs in this book, that won't happen so this is an
acceptable way to call the main() function.
The second way, however, is a more professional way to call the mainQ
function. To understand that, you need to know that a module in Python is any
file that contains reusable code like a function. That means that the file that
contains the Future Value program is a module.
Then, if you run the module without importing it, Python sets its internal
name variable to a value of " main ". As a result, you can use an if
statement like the one in this figure to check whether the current module is the
main module. If it is, you call the mainQ function as shown in this program. If it
isn't, this means that the current module is not the main module so you should
not run its main function.
If that's confusing to you, don't worry. This will be easier to understand after
you learn more about importing modules later in this chapter. In the meantime,
you can just code the if statement exactly as shown. Or, you can call the mainQ
function using the simple call statement without the if statement.
Chapter 4 How to define and use functions and modules 107
A main() function that calls another function
#1/usr/bin/env python3
def main():
# display a welcome message
print("The Future Value Calculator\n")
# get input
monthly_investment = float(input("Enter monthly investment: "))
yearly_interest = float (input ("Enter yearly interest rate: "))
years = int (input ( "Enter number of years: "))
# get the future value
future_value = calculate_future_value(
m» f f y_i f m - ft, y-- y_" f - - , y-- s)
# display output
print("Future value: ", round(future_value, 2))
Two ways to call a main() function
Code a simple call statement (not recommended)
main()
Code a call statement within an if statement
that checks whether the current module is the main module
if name == " main ": # if this module is the main module
main() # call the main() function
Description
• When you code programs that use functions, it's a best practice to put all of the
code for the program in functions and to include a function named main(). Then, to
start the program, you call the main() function.
• One way to call the main() function is to code a statement that calls the main()
function after all functions have been defined. The problem with this approach is
that the main() function is also run if you import this module into another program.
• A better way to call the main() function is to code an if statement that checks
whether the current module is being run as the main module. If so, it calls the
main() function. Otherwise, it doesn't call the main() function. This lets other
programs import this module without running the mainQ function.
Figure 4-2 How to define and call a mainQ function
108 Section 1 Essential concepts and skills
The Future Value program with functions
Figure 4-3 should give you a better idea of how to code a program that
consists of multiple functions. It shows the complete Future Value program after
it has been divided into a function that calculates the future value and a main()
function. Here, the program starts by loading the two functions. Then, it executes
an if statement like the one in the last figure. This calls the main() function.
The definition of the calculate_future_value() function shows that it requires
three arguments. Then, the calling statement passes three arguments to it. In this
case, the name of the second argument in the calling statement isn't quite the
same as the second argument in the function definition. Remember, though, that
these names don't have to be the same. However, they have to be in the same
sequence as they are in the function definition.
The last statement in the calculate_future_value() function is a return
statement that returns the future value when the for loop ends. This value is then
stored in the future_value variable in the main() function. After that, the main()
function continues by rounding and displaying this value.
Chapter 4 How to define and use functions and modules 109
The user interface
Enter monthly investment:
Enter yearly interest rate:
Enter number of years:
Future value:
Continue? (y/n): y
100
12
10
23233.91
The code
#1/usr/bin/env python3
def calculate_future_value(monthly_investment, yearly_interest, years):
# convert yearly values to monthly values
monthly_interest_rate = yearly_interest / 12 / 100
months = years * 12
# calculate future value
future_value = 0.0
for i in range(0, months):
future_value += monthly_investment
monthly_interest = future_value * monthly_interest_rate
future_value += monthly_interest
return future_value
def main():
choice = "y"
while choice.lower() == "y":
# get input from the user
monthly_investment = float (input ("Enter monthly investment: \t" ))
yearly_interest_rate = float(input("Enter yearly interest rate:\t"))
years = int(input("Enter number of years:\t\t"))
# get and display future value
future_value = calculate_future_value(
•f f y_"f n-f , y-- y_"f _ - / y - )
print("Future value:\t\t\t" + str(round(future_value, 2)))
print()
# see if the user wants to continue
choice = input("Continue? (y/n): ")
print()
print("Bye!")
if name == " main ":
main()
Description
• All of the code in this program is within functions, except the last if statement that
calls the mainQ function if the current module is the main module.
Figure 4-3 The Future Value program with functions
110 Section 1 Essential concepts and skills
More skills for defining
and using functions
The next two figures present three more skills for working with functions.
To start, the first figure shows how to work with default values and named
arguments. Then, the second figure shows when and how to use local and global
variables.
How to use default values for arguments
When you define a function, you can assign default values to one or more of
the arguments. To do that, you code the name of the argument, the assignment
operator (=), and the default value for the argument. This is illustrated by the
third argument in the first example in figure 4-4. When you assign default values,
though, you need to code the arguments with default values after any arguments
that don't provide default values.
When an argument has a default value, you don't have to code that argument
when you call the function. Then, the function uses the default value for the
argument. However, if you do code the argument in the calling statement, the
argument you pass to the function overrides the default value.
How to use named arguments
The last example in figure 4-4 shows how to use named arguments in your
call statements to pass arguments to a function. To do that, you code the name
of the argument in the function definition, an equals sign (=), and the value or
variable name that should be passed to the function.
When you use named arguments in your call statements, the arguments don't
have to be in the same sequence that they are in the function definition. As a
result, this coding technique can avoid some coding errors, especially when the
list of arguments is lengthy.
Chapter 4 How to define and use functions and modules
The calculate_future_value() function with a default value
def calculate_future_value(monthly_investment/
yearly_interest, years=20):
# convert yearly values to monthly values
monthly_interest_rate = yearly_interest / 12 / 100
months = years * 12
# calculate future value
future_value = 0.0
for i in range(0, months):
future_value += monthly_investment
monthly_interest = future_value * monthly_interest_rate
future_value += monthly_interest
return future_value
How to call the function and use its default value (years = 20)
future_value = calculate_future_value(100, 8.5)
How to call the function and override its default value
future_value = calculate_future_value(100, 8.5, 10)
How to call the function with named arguments
future_value = calculate_future_value(
years=10,
monthly_investment=100,
yearly_interest=8.5)
How to use default values in your function definitions
• You can specify a default value for any argument in a function definition by
assigning a value to the argument. However, the arguments with default values
must be coded last in the function definition.
• When you call a function, any arguments that have default values are optional. But
you can override the default value for an argument by supplying that argument.
How to use named arguments in your calling statements
• To code a named argument, code the name of the argument in the function
definition, an equals sign, and the value or variable for the argument.
• If you call a function without named arguments, you must code them in the same
sequence that they're coded in the function definition.
• If you call a function with named arguments, you don't have to code the arguments
in the sequence that they're coded in the function definition.
• It's a good practice to use named arguments for functions that have many
arguments. This can improve the readability of the code and reduce errors.
Figure 4-4 How to use default values and named arguments
112 Section 1 Essential concepts and skills
When and how to use local and global variables
Scope in a programming language refers to the visibility of variables. That
is, it tells you where in your program you are allowed to use the variables and
functions that you've defined.
When you use Python, global variables are variables that are defined outside
of all functions. These variables have global scope so they can be accessed by
any function without passing them to that function. In contrast, local variables
are variables that are defined within functions. They have local scope, which
means that they can only be used within the functions that define them. In
general, it's considered a good practice to avoid the use of global variables
because they often lead to programming problems.
This is illustrated by the examples in figure 4-5. In the first example, tax is
a local variable in each of the two functions. As a result, the first function needs
to return the tax variable to the main() function that calls it. The main() function
can't refer to the tax variable in the calc_tax() function directly. This is the
preferred way to work with variables that are used by more than one function.
In the second example, though, tax is defined as a global variable. As a
result, the calc_tax() function can access the variable directly. However, if the
function is eoine to chanee the tax variable, it needs to access the elobal variable
by coding the global keyword before the variable, as shown by the first statement
in the first function. If the function isn't going to change the global variable,
though, this isn't necessary.
In the third example, a local variable shadows a global variable. This
happens because the local variable has the same name as a global variable. Then,
the statements in the calc_tax() function refer to the local tax variable because
it's defined there. But the statements in the main() function, refer to the global
variable. This of course can lead to debugging problems so shadowing should
usually be avoided.
With few exceptions, it's a best practice to use local variables and avoid the
use of global variables. This is illustrated by most of the programs in this book.
However, the end of this chapter presents a program where global variables help
to simplify the code.
The last example shows how to use a globed constant. This code uses all caps
for the name of the elobal constant, which is a common naming convention in
Python and other languages. This clearly indicates that TAX_RATE is a constant.
This is considered an acceptable coding practice.
Python doesn't prevent you from changing the value of a global constant.
However, within a function, a global constant is read-only by default, which
is what you want. To change it, you would have to use the global keyword to
access the constant. In most cases, that's a bad practice as it rarely makes sense
for a function to chanee the value of a constant.
Chapter 4 How to define and use functions and modules
113
Functions that use local variables
def calc_tax(amount, tax_rate):
tax = amount * tax_rate # tax is a local variable
return tax # return statement is necessary
def main():
tax = calc_tax(85.0, .05)
print("Tax:", tax)
# tax is a local variable
tt Tax 4.25
A function that changes a global variable (not recommended)
tax =0.0
tt tax is global variable
def calc_tax(amount, tax_rate):
global tax tt access global variable
tax = amount * tax_rate # change global variable
def main():
calc_tax(85.0, .05)
print("Tax:", tax)
ft Tax 4.25 (the global variable)
A local variable that shadows a global variable (not recommended)
tax =0.0
# tax is a global variable
def calc_tax(amount, tax_rate):
tax = amount * tax_rate # tax is a local variable
print("Tax:", tax) # Tax 4.25 (the local variable)
def main():
calc_tax(85.0, .05)
print ( "Tax: ", .)
# Tax 0.0 (the global variable)
A function that uses a global constant (okay)
TAX_RATE = 0.05
def calc_tax(amount):
tax = amount * TAX_RATE
return tax
ft TAX_RATE is a global constant
# the constant is used here
Description
• A variable defined inside a function is known as a local variable. A variable defined
outside of all functions is known as a global variable.
• A local variable can only be used within the function that defines it. Global
variables can be used by all functions.
• Inside a function, a global variable is read-only. To modify its value, you need to
precede the variable name with the globed keyword.
• When a local variable has the same name as a global variable, the local variable
shadows the global variable. In a function that defines the variable, all operations are
done on the local variable. Otherwise, all operations are done on the global variable.
• If you don't use the global keyword to modify a global variable, it becomes a global
constant. To show that, the variable name is often coded in all uppercase letters.
Figure 4-5 When and how to use local and global variables
114 Section 1 Essential concepts and skills
How to create and use modules
As mentioned earlier, a Python module is just a file that contains reusable
code like functions. Now, you'll learn how to create and use modules.
How to create a module
Figure 4-6 shows the code for a module named temperature. It consists of
two functions named to_celsius() and to_fahrenheit(), plus a main() function that
can be used to test the two functions. To create a temperature module from this
code, you just save it in a file named temperature.py.
If you look at the code in this module, you can see that the to_celsius()
function receives the value of a Fahrenheit temperature and returns the value as a
Celsius temperature. And the to_fahrenheit() function does the reverse.
Then, the code in the main() function uses two for statements to call the two
functions multiple times and display the values that are calculated. This can be
used for testing the functions before they are made available for use by others.
But when the module is used by others, you don't want the main() function to be
run.
This illustrates the value of the if statement at the end of this module. If you
run the temperature module, Python calls the main() function. This executes the
code for testing the other functions in the module. However, if you import this
module into another module, Python doesn't run the main() function. Then, you
can call the to_celsius() and to_fahrenheit() functions from the other module.
Chapter 4 How to define and use functions and modules 115
The code in the module that's stored in the temperature.py file
def to_celsius(fahrenheit):
Celsius = (fahrenheit - 32) * 5/9
return Celsius
def to_fahrenheit(celsius):
fahrenheit = celsius * 9/5 + 32
return fahrenheit
ft the main() function is used to test the other functions
# this code isn't run if this module isn't the main module
def main():
for temp in range(0, 212, 40):
print(temp, "Fahrenheit =", round(to_celsius(temp)), "Celsius")
for temp in range(0, 100, 20):
print(temp, "Celsius =", round(to_fahrenheit(temp)), "Fahrenheit")
# if this module is the main module call the main() function
tt • f - »t ct"
if name == " main ":
main()
The console when you run this module
0 Fahrenheit =
40
80
120
160
200
Fahrenheit =
Fahrenheit =
Fahrenheit
Fahrenheit
Fahrenheit
0 Celsius = 32
20
• • •
Celsius = 68
-18 Celsius
; 4 Celsius
: 27 Celsius
= 49 Celsius
= 71 Celsius
= 93 Celsius
Fahrenheit
E Fahrenheit
Description
• A file that contains reusable code such as functions is known as a module.
• To create a module, you store one or more functions in a Python file.
• The name of the module comes from the name of the file. For example, to create a
module named temperature, you store the code in a file named temperature.py.
• The easiest way to make the functions in a module available to other modules is to
store the module file in the same directory as the other modules.
• If you want to store the module file in a central location and access it from multiple
directories, you need to store the module in a directory that's in the search path.
How you set this path varies from system to system, but you can search the Internet
to find out how.
• This example illustrates why the if statement that calls the main() function is useful.
If this module is the main module, its main() function is called to test the other
functions. If this module isn't the main module, the main() function isn't called.
Figure 4-6 How to create a module
116 Section 1 Essential concepts and skills
How to document a module
If a module is going to be used by other programmers, it's good to document
the functions of the module. To do that, you can use docstrings* as shown in
figure 4-7. These strings start and end with three double quotation marks.
Later, to see the documentation for the module, a programmer can first use
the Python Shell to import the module (you'll learn more about importing in
a moment). Then, the programmer can use the help() function with the name
of the module as its argument to see the documentation for the program. This
is especially useful for programmers who didn't develop the module and its
functions, but who want to use them.
Chapter 4 How to define and use functions and modules 117
The temperature module with documentation
■i ii ii
This module contains functions for converting
temperature between degrees Fahrenheit
and degrees Celsius
H ii ii
def to_celsius(fahrenheit):
ii ii ii
Accepts degrees Fahrenheit (fahrenheit argument)
Returns degrees Celsius
H ii ii
Celsius = (fahrenheit - 32) * 5/9
return Celsius
def to_fahrenheit(celsius):
H ii ii
Accepts degrees Celsius (celsius argument)
Returns degrees Fahrenheit
ii ii ii
fahrenheit = celsius * 9/5 + 32
return fahrenheit
How to view the documentation for a module
>>> import temperature
>>> help(temperature)
Help on module temperature:
NAME
temperature
DESCRIPTION
This module
temperature
and degrees
contains functions for converting
between degrees Fahrenheit
Celsius
FUNCTIONS
to_celsius(fahrenheit)
Accepts degrees Fahrenheit
Returns degrees Celsius
(fahrenheit
argument)
to_fahrenheit(celsius)
Accepts degrees Celsius (celsius argument)
Returns degrees Fahrenheit
Description
• A docstring begins and ends with three double quotes.
• Docstrings must start at the proper indentation level.
• It's a good practice to use docstrings to document the purpose of the modules and
functions that might be used by other programmers.
• To display the documentation for a module, start the interactive shell, import the
module, and pass the name of the module to the helpQ function.
Figure 4-7 How to document a module
118 Section 1 Essential concepts and skills
How to import a module
If a program is going to use functions that are stored in another module, it
needs to first import that module. Figure 4-8 shows the several ways that you can
do that.
The first way is to use the import statement. The syntax summary at the
top of this figure shows that you have the option of specifying a namespace
when you use this statement. And the two examples that follow show how to
import the temperature module into the default namespace and into a specified
namespace.
A namespace is just an area in main memory that holds a module. By
default, the import statement imports a module into a namespace that has the
same name as the module. This is illustrated by the first example. Here, the
module is imported into the temperature namespace. Then, to call a function in
this namespace, you code the name of the namespace, a period (or dot), and the
name of the function that you're calling.
If you use the as clause with the import statement, the module is imported
into the namespace with the name that you specify. This is illustrated by the
second example. Here, the namespace is temp. Then, to call the functions in this
namespace, you again code the name of the namespace (temp), the dot, and the
function name.
The second way to import a module is to use the from variation of the
import statement. The syntax for this variation and two examples that use it are
next in this figure. In this case, though, the module is imported into the global
namespace.
The trouble with that is that more than one module can be imported into
the global namespace. In that case, more than one module may use the same
function name. Then, if a program calls a function that's in the global namespace
two or more times, a name collision occurs, and that's when the debugging
problems start. That's why it's a best practice to avoid the use of the global
namespace.
The benefit of using the global namespace is that you don't need to use a
namespace prefix when you're calling a function in that namespace. To reduce
the possibility of name collisions, then, you can import just the functions that
you're going to use. This is illustrated by the first example of the from variation
of the import statement.
The other alternative is to use the * to import all of the functions in the
module. This is illustrated by the last example in this figure. However, since this
increases the possibility of name collisions, this practice should be avoided.
Chapter 4 How to define and use functions and modules 119
The syntax for importing a module into a local namespace
import module_name [as namespace]
Importing the temperature.py module into the default namespace
import temperature
Code that calls its functions
c = temperature.to_celsius(f)
f = temperature.to_fahrenheit(c)
Importing the module into a specified namespace
import temperature as temp
Code that calls its functions
c = temp.to_celsius(f)
f = t ip.to_fahrenheit (c)
The syntax for importing into the global namespace (not recommended)
from module_name import function_namel[, function_name2] . . .
Importing one function into the global namespace
from temperature import to_celsius
Code that calls its functions
c = to_celsius(f)
f = to_fahrenheit(c) # doesn't work; function hasn't been imported
Importing all functions into the global namespace
from temperature import * # use * to get all of the functions
Code that calls its functions
c = to_celsius(f)
f = to_fahrenheit(c)
Description
• Before you can call the functions in a module, you must import the module.
• When you use the import statement. Python imports the functions into a
namespace. By default, this namespace has the same name as the module. Then, to
call a function in this module, you must prefix it with the name of the namespace.
• To import into a specified namespace, you can use the as keyword. Then, you can
use the new namespace as the prefix in your function calls.
• To import into the global namespace, you use the from variation of the import
statement. Then, the function names don't need prefixes in your call statements
• If you import functions from more than one module into the global namespace, two
functions could have the same name. This is known as a name collision, and this
leads to debugging problems.
Figure 4-8 How to import a module
120 Section 1 Essential concepts and skills
The Convert Temperatures program
To show how the temperature module of figure 4-6 can be used by a
program, figure 4-9 shows a Convert Temperatures program. Here, the user
enters a 1 or a 2 to indicate what type of conversion should be done followed by
the number of degrees to be converted. Then, the program displays the result.
The import statement in the code imports the temperature module into a
namespace named temp. Then, that name is used in the statements that call the
to_celsius() and to_fahrenheit() functions. Other than that, you shouldn't have
much trouble understanding the code in this program. But note that all of the
code in this program is in functions except for the import statement and the if
statement that calls the main() function.
In a program like this, it's a common practice to arrange the functions
in the sequence in which they're called, and to put the main() function last
followed by the if statement that calls it. Here, the main() function first calls the
display_menu() function and then calls the convert_temp() function, so that's
the sequence in which they appear in the code listing. Of course, the to_celsius()
and to_fahrenheit() functions don't appear in the code because they're in the
temperature module that's imported.
Chapter 4 How to define and use functions and modules
The user interface
MENU
1. Fahrenheit to Celsius
2. Celsius to Fahrenhit
Enter a menu option: 1
Enter degrees Fahrenheit: 99
Degrees Celsius: 37.2
Convert another temperature? (y/n): n
The code
import temperature as temp
def display_menu():
print("MENU")
print("1. Fahrenheit to Celsius")
print("2. Celsius to Fahrenhit")
print()
def convert_temp():
option = int(input("Enter a menu option: "))
if option == 1:
f = int(input("Enter degrees Fahrenheit: "))
c = tp. to_celsius (f)
c = round(c, 2)
print("Degrees Celsius:", c)
elif option == 2:
c = int(input("Enter degrees Celsius: "))
f = tp. to_fahrenheit (c)
f = round(f, 2)
print("Degrees Fahrenheit:", f)
else:
print("You must enter a valid menu number.")
def main():
display_menu()
again = "y"
while again.lower() == "y":
convert_temp()
print()
again = input("Convert another temperature? (y/n): ")
print()
print("Bye!")
if name == " main ":
main()
Figure 4-9 The Convert Temperatures program
122 Section 1 Essential concepts and skills
How to use standard modules
Python provides many standard modules that include functions that you
can use in your programs. The table at the top of figure 4-10 lists a few of the
standard modules that are presented in this book. To use a standard module, you
import it and call its functions, just as if you had created the module yourself.
How to use the random module
The first standard module that you're going to learn how to use in this book
is the random module that's summarized in figure 4-10. The second table in this
figure summarizes just three of its many functions: the randomQ, randintQ, and
randrange() functions. The examples that follow show how these functions work.
The first group of examples shows how the random() function works. It
returns a float value greater than or equal to 0.0 and less than 1.0. Then, if you
want larger values, you can multiply the value that's returned. If, for instance,
you multiply the returned value by 100, you get a value from 0.0 to less than
100.0. If you multiply it by 70, you get a value from 0.0 to less than 70.0.
The second group of examples shows how the randint function works.
It returns a random integer that's equal to or between the two values that are
supplied as arguments.
The third group shows how the randrange() function works. It works
similarly to the range() function that you learned about in the previous chapter.
However, the randrange() function returns a random integer value within the
range of integers that's specified. The default step value is 1. but you can change
that by coding the optional third argument.
The last example shows how you can simulate rolling a pair of dice. Here,
the first statement eets a random value between ] and 6. and the second does the
same. Then, the third statement prints the values that were rolled.
Chapter 4 How to define and use functions and modules
123
Some of the standard modules presented in this book
Module Description
Functions for mathematical operations
Functions for generating random numbers
Functions for working with decimal numbers
Functions for working with files that contain comma-separated values
Functions for persistent data storage
Functions for building GUI applications
math
random
decimal
CSV
pickle
tkinter
Three functions of the random module
Function
random()
randint (min, max)
randrange(
[start,] stop [,step])
Description
Returns a random float value that's greater than or equal
to 0.0 and less than 1.0.
Returns a random int value that's greater than or equal to the
min argument and less than or equal to the max argument.
Returns a random value greater than or equal to the start
argument, less than the stop argument, and a multiple
of the step argument.
A statement that imports the random module
import random
Examples that use functions of the random module
# the use of the random method
number = random.random()
number = random.random() * 100
# the use of the randint method
number = random.randint(1, 100)
number = random.randint(101, 200)
number = random.randint(0, 7)
# a float value >
# a float value >
0.0 and < 1.0
0.0 and < 100.0
# an int from 1 to 100
# an int from 101 to 200
# an int from 0 to 7
# the use of the randrange method
number = random.randrange(1, 100)
number = random.randrange(100, 200, 2)
number = random.randrange(11, 250, 2)
# an int from 1 to 99
# an even int from 100 to 198
# an odd int from 11 to 249
Code that simulates rolling a pair of dice
diel = random.randint(1, 6)
die2 = random.randint(1, 6)
print("Your roll:", diel, die2)
# assume 6 is returned
# assume 5 is returned
# Your roll: 6 5
Description
• The random module provides methods for generating random numbers. One of its
uses is for game development.
Figure 4-10 How to use the random module
124 Section 1 Essential concepts and skills
The Guess the Number game
To illustrate the use of the random module, figure 4-11 presents a Guess
the Number game. It consists of three functions. The first displays the title.
The second plays the game. And the mainQ function calls those functions as it
controls the playing of the game.
In the play_game() function, the randint() function gets the number that the
player has to guess. It returns a random number between I and 10. Later, a while
statement lets the user euess the number until the euess is correct. Then, a return
statement returns to the statement in the main() function that's after the call to
the play_game() function. This return statement doesn't specify a return value,
but it does end the function.
Here again, you should be able to understand the rest of this code without
any trouble. And here again, the functions are presented in the sequence in which
they are called, followed by the main() function.
Just for fun, this program uses a global constant named LIMIT to set the
limit for the guessing game. This isn't necessary, but it does make it easier to
change the limit if you want to modify the program. Then, all you have to do is
change the global constant, which is easy to find.
Chapter 4 How to define and use functions and modules 125
The user interface
Guess the Number!
I'm thinking of a
Your guess: 5
Too low.
Your guess: 8
You guessed it in
Would you like to
Bye I
number from 1 to 10
2 tries.
play again? (y/n): n
The code
import random
LIMIT = 10
def display_title():
print("Guess the number I")
print()
def play_game():
number = random.randint(1, LIMIT)
print("I'm thinking of a number from 1 to " + str(LIMIT) + "\n")
count = 1
while True:
guess = int(input("Your guess: "))
if guess < number:
print("Too low.")
count += 1
elif guess > number:
print("Too high.")
count += 1
elif guess == number:
print("You guessed it in " + str(count) + " tries.\n")
return
def main():
display_title()
again = "y"
while again.lower() == "y":
play_game()
again = input("Would you like to play again? (y/n): ")
print()
print("Bye!")
# if started as the main module, call the main() function
if name == " main ":
main()
Figure 4-11 The Guess the Number game
126 Section 1 Essential concepts and skills
How to plan the functions of a program
As a program gets larger and requires more functions, it gets more difficult
to decide what the functions should be and how they should relate to each other.
To help you make those decisions, you can use a hierarchy chart to plan the
modules of the program.
How to use a hierarchy chart
Figure 4-12 show how to plan the functions of a program by using a
hierarchy chart. For instance, the first hierarchy chart represents the five
functions that are used by the Convert Temperatures program in figure 4-9.
This shows that the top-level function (the main() function) calls the
display_menu() and convert_temp() functions. The convert_temp() function in
turn calls the to_celsius() and to_fahrenheit() functions. Note that these functions
are on the chart, even though they're stored in a module that's imported. That
makes the hierarchy chart complete.
Similarly, the second chart in this figure shows the functions that are used by
the Guess the Number game. Here, the main() function calls the display_title(J
function and also the play_game() function.
These examples show the chart for an existing program, but you need to
learn how to create a chart like this for a new program before the code is written.
To do that, you can start with the main() function. That's always the top level.
Then, you ask yourself what primary function or functions the main() function
needs to call. In the first example, that's the convert_temp() function. In the
second example, that's the play_game() function. Once you identify the primary
function or functions, you add them to the structure chart.
Next, you ask yourself what functions, if any, need to be called before or
after the primary function or functions of the program. In the first example, that's
the display_menu() function that's called before the convert_temp() function.
After you add those functions to the chart, the first two levels are done: the
top-level with the main() function and the next level.
Then, you continue this process for the next levels down, until you've
divided all of the functions into their component functions. The example that
starts in the next figure shows how this works.
When you add a function to a chart, try to use a name that starts with a verb
and ends with a noun, perhaps with one adjective between the verb and noun.
That name should provide a good indication of what the function does. Later,
when you code the functions of the program, you can create the function names
by connecting the words on the flowchart with underscores, so "play game" on
your chart becomes play_game in your code.
In practice, programmers often draw hierarchy charts by hand and discard
them once the program has been coded and tested. Another alternative is to use
a hierarchy outline like the one in this figure, instead of a hierarchy chart. An
outline like this is a left-to-right view of the structure instead of a top-down view.
Chapter 4 How to define and use functions and modules
127
A hierarchy chart for the Convert Temperatures program
main
display
menu
convert
temp
to celsius
to
fahrenheit
A hierarchy outline for the same program
main
display-
convert
to
to
menu
temp
celsius
fahrenheit
A hierarchy chart for the Guess the Number game
How to build a hierarchy chart
• Start with a box for the main() function.
• At the next level, put boxes for the functions that the mainQ function needs to call.
This usually includes the function that will control the main action of the program,
plus any functions that need to be done before or after that function.
• Continue down the levels by dividing the higher-level functions into their
component functions until there aren't any more components.
Guidelines for creating hierarchy charts
• The names in a chart should start with a verb and eive a eood indication of what the
function does. Then, the names can easily be converted to Python function names.
• Each function should do everything that is related to the function name and nothing
more.
Figure 4-12 How to plan the functions of a program
128 Section 1 Essential concepts and skills
The hierarchy chart for the Pig Dice game
To show how to develop a hierarchy chart for a new program, figure 4-13
presents the rules for a new game called Pig Dice. In brief, a player rolls a die to
try to reach 20 in as few turns as possible. If a player rolls anything but a 1, the
points are added to the points for the turn. If the player holds, all the points for
the turn are added to the total score. But if the player rolls a 1, all points for that
turn are lost.
Now, how would you create the hierarchy chart for this program? Well,
the top-level should consist of the main() function, and the next level should
consist of the play_game() function that controls the playing of the game and the
display_rules() function that displays the rules. But then what?
To play the game, the user has to take a turn. So that's a logical component
of the play_gameQ function. And to take a turn, the player has to either roll the
die or hold, so those are the logical components of the take_turn() function. In
fact, that may be all that this hierarchy chart needs.
That's the general thought process. If only it were that easy! In practice, you
typically have to write some of the code for the top-level functions to get a better
idea of how the functions work. In fact, you typically have to go back and forth
between the code and the chart before you get it right. However, it's still often
helpful to take the time to create a hierarchy chart or outline, especially as your
programs become more complicated.
Chapter 4 How to define and use functions and modules
129
The rules for a Pig Dice game
• For each turn, the player can choose to roll the die or hold.
• A turn ends when the player rolls a I or chooses to hold.
• If the player rolls a l, all points are lost for that turn.
• If the player chooses to hold, all points for that turn are added to the total.
• If the player enters an invalid character, the roll or hold prompt is displayed and the
player can make another entry.
• When a player reaches 20 points, the game ends and the number of turns is
displayed.
A hierarchy chart for the Pig Dice game
main
i
I
display
rules
play
game
take turn
i
I
roll die
hold turn
Description
• The Pie Dice eame uses the console as the user interface.
• In the hierarchy chart, the mainQ function calls the play_game() function. If
this program lets the user play more than one game, the main() function calls it
repeatedly.
• The play_game() function calls the take_turn() function until the game is over.
• The take_turn() function calls the roll_die() function if the user chooses to roll and
the hold_turn() function if the user chooses to hold.
Figure 4-13 How to plan the functions of a Pig Dice game
130 Section 1 Essential concepts and skills
The Pig Dice game with global variables
Figure 4-14 presents the user interface and code for the Pig Dice game
introduced in the previous figure. This game has one function for each function
in the hierarchy chart presented in the previous figure. It also imports the random
module so the game can use the randint() function to simulate the roll of the die.
If you look at the highlighted code in this listing, you can see that the mainQ
function calls the display_rules() and play_gameQ functions, as indicated by
the hierarchy chart. Then, the play_game() function uses a while statement
to call the take_turn() function until the game_over variable is set to true.
This continues as the take_turn() function calls the roll_die() and hold_turn()
functions, just the way it's shown in the hierarchy chart.
Chapter 4 How to define and use functions and modules
The user interface
TURN
Roll
Die:
Roll
1
or
4
or
hold?
hold?
Score for turn
Total score: 4
TURN
Roll
Die:
Turn
• • •
2
or
1
hold?
over. No
• • •
You finished in
(r/h):
(r/h):
: 4
(r/h):
score.
r
h
r
4 turns!
The code
import random
turn = 1
score = 0
score_this_turn = 0
turn_over = False
game_over = False
def main():
display_rules()
play_game()
Page 1
def 'splay_ru s():
print("Let's Play PIG!")
print()
print("* See how many turns it takes you to get to 20.")
print("* Turn ends when you hold or roll a 1.")
print("* If you roll a 1, you lose all points for the turn.")
print("* If you hold, you save all points for the turn.")
print()
def play_game():
while not game_over:
take_turn()
print()
print("Game overI")
Description
• When coding the functions of a program, be sure that each function does eveiything
that its name implies and nothing that isn't implied by its name.
• This program illustrates a possible use for global variables. Otherwise, the five
global variables would be local variables that are passed between the functions.
Figure 4-14 The Pig Dice game with global variables (part 1)
132 Section 1 Essential concepts and skills
When you code a function, you should try to include everything that the
name of the function implies...and nothing that the name of the function doesn't
imply. For instance, all of the code that's required by the take_turn() function
should be included in that function. None of it should be in the play_game()
function. And none of the code for the hold_turn() function should be in either
the play_game() or take_turn() functions.
If you keep this principle in mind, the code in your calling functions
should be relatively simple. In addition, the code in the called modules should
contain most of the code for the program. This should make your code easier to
maintain, test, and debug.
Another feature that makes this program relatively easy to understand is
that it uses five global variables. As a result, none of the functions require that
arguments be passed to them. And none of the functions return values. To make
that work, the three functions on this page of the code use the global keyword
to access the variables that they need to change. That way, those functions can
change the elobal variables. Then, since these variables are elobal, the other
functions can access them without the global keyword as long as they don't need
to change them.
But didn't we say that it was a best practice to avoid the use of global
variables? Well, here's a case that might be an exception. By using global
variables, the code has been simplified considerably. But even then, some
programmers would say that it's better to pass local variables between the
functions as described in the next fieure.
Chapter 4 How to define and use functions and modules 133
The code Page 2
def take_turn():
global turn_over
print("TURN", turn)
turn_over = False
while not turn_over:
choice = input("Roll or hold? (r/h): ")
if choice == "r":
ll_d" ()
elif choice == "h":
hold_turn()
else:
print("Invalid choice. Try again.")
def roll_die():
global turn, score_this_turn, turn_over
die = random.randint(1, 6)
print("Die:", die)
if die == 1:
score_this_turn = 0
turn += 1
print("Turn over. No score.\n")
turn_over = True
else:
score_this_turn += die
def hold_turn():
g turn, score_this_turn, score, turn_over, game_over
print("Score for turn:", score_this_turn)
score += score_this_turn
score_this_turn = 0
print("Total score:", score, "\n")
turn_over = True
if score >= 20:
game_over = True
print ( "You finished in", turn, "turns I")
turn += 1
# if started as the main module, call the main() function
if name == " main ":
main()
Description
• The global keywords in the functions above identify the global variables that would
have to be passed between the functions if only local variables were used.
Figure 4-14 The Pig Dice game with global variables (part 2)
134 Section 1 Essential concepts and skills
The Pig Dice game with local variables
To show what this program looks like with local variables instead of global
variables, figure 14-15 shows the code for the four functions that need to access
the variables for the eame.
To make this work, this code uses a Python feature known as multiple
assignment. This feature allows you to use a single statement to assign multiple
values to multiple variables. For instance, you can assign three int values to three
variables named x, y, and z like this:
x, y, z = 1, 2, 3
Similarly, in this figure, the play_game() function assigns the three values
returned by the take_turn() function to three variables like this:
turn, score, game_over = take_turn(turn, score, game_over)
This calls the take_turn() function and passes it the turn, score, and game_over
variables. Then, it assigns the three variables that are returned by the take_turn()
function to the turn, score, and game_over variables.
To make this work, the take_turn() function returns three values by ending
with a return statement like this:
return turn, score, game_over
This shows that a return statement can return multiple values. Similarly, the
roll_die() and hold_turn() functions also return multiple values.
Now that you've seen this program with and without global variables, you
can make your own decision. Is it worth using global variables in a program
like this? This is largely a matter of personal preference. We think that either
approach is acceptable.
Chapter 4 How to define and use functions and modules 135
The code for the four functions that pass variables
def play_game():
turn = 1
score = 0
game_over = False
while not game_over:
turn, score, game_over = take_turn(turn, score, game_over)
print()
print("Game overI")
def take_turn(turn, score, game_over):
print("TURN", turn)
score_this_turn = 0
turn_over = False
while not turn_over:
choice = input("Roll or hold? (r/h): ")
if choice == "r":
turn, score, score_this_turn, turn_over = \
roll die(turn score, score this turn)
elif choice == "h":
turn, score, turn_over, game_over = \
hold_turn(turn, score, score_this_turn)
else:
print("Invalid choice. Try again.")
r ~ * *, • - # 9"- "e o
def roll_die(turn, score, score_this_turn):
die = random.randint(1, 6)
print("Die:", str(die))
if die == 1:
score_this_turn = 0
turn += 1
print("Turn over. No score.\n")
turn_over = True
else:
score_this_turn += die
turn_over = False
return turn, score, score_this_turn, turn_over
def hold_turn(t n, sc , _ 's_ ):
print("Score for turn:", score_this_turn)
score += score_this_turn
print("Total score:", score, "\n")
turn_over = True
game_over = False
if score >= 20:
print ( "You finished in", turn, "turns I")
game_over = True
return turn, score, turn_over, game_over
turn += 1
return turn, score, turn_over, game_over
Description
• A return statement can return multiple variables.
• An assignment statement can assign multiple values to multiple variables.
Figure 4-15 The Pig Dice game with local variables
136 Section 1 Essential concepts and skills
Perspective
Now that you've finished this chapter, you should have all the skills that
you need for planning, coding, and using the functions and modules that your
programs require. These are critical skills that become increasingly valuable
as your programs get longer and more complex. By applying these skills, you
make your programs easier to understand, test, debug, and maintain.
In section 3 of this book, you'll learn another way to organize the code in
your programs. It's called object-oriented programming. Fortunately, many of
the skills for working with functions and modules also apply to object-oriented
programming. That's why this chapter is so important.
Terms
function
define a function
argument
call a function
return statement
parameter
mainQ function
named areument
scope
global variable
global scope
local variable
local scope
shadowing
global constant
module
docstrings
import a module
import statement
namespace
global namespace
name collision
standard module
random module
hierarchy chart
hierarchy outline
multiple assignment statement
Chapter 4 How to define and use functions and modules 137
Summary
• A function is a reusable unit of code that performs a task.
• A function can accept zero or more arguments that supply data for the
function to operate on. Within the body of a function, a return statement can
return one or more values to the calling code.
• When you define a function, you can set default values for arguments. When
you call a function, you can pass named arguments.
• Global variables are defined outside of the functions of a program so they
have global scope. As a result, they can be accessed by any of the functions.
• Local variables are defined inside functions so they have local scope. As a
result, they can only be accessed from within their functions.
• When a local variable has the same name as a global variable, the local
variable shadows the global variable.
• It's a best practice to avoid the use of global variables and variable
shadowing because that often leads to debugging problems.
• A module is a file that stores reusable code. When you import a module, it is
stored in a namespace.
• If you import two modules into the globed namespace, two functions could
have the same name. Then, a name collision occurs and one function
overrides the other, which leads to debugging problems.
• Python provides many standard modules that contain functions that you can
use in your programs. One of those modules is the random module, which
provides functions that return random numbers.
• To plan the functions for a program, you can use a hierarchy chart. Then,
you code one function for each box on the hierarchy chart.
• In Python, a function can return multiple values. Then, an assignment
statement can assign those return values to multiple variables. This feature is
known as multiple assignment.
138 Section 1 Essential concepts and skills
Exercise 4-1 Enhance the Future Value program
In this exercise, you'll enhance the Future Value program in figure 3-15 so it
validates the three user entries with messages that are something like these:
Welcome to the Future Value Calculator
Enter monthly investment:
Entry must be greater than 0
Enter monthly investment:
Enter yearly interest rate:
Entry must be greater than 0
Enter yearly interest rate:
Enter number of years:
Entry must be greater than 0
Enter number of years:
Future Value =
Continue (y/n)? n
0
and less
100
16
and less
12
100
and less
10
23233.
than
than
than
91
or
or
or
equal
equal
equal
to
to
to
1000
15
50
1. In IDLE, open the future_value.py file that's in this folder:
python/exercises/ch04
2. Test the program, but remember that it doesn't do any validation, so enter
valid numbers.
Add two validation functions to the program
3. In preparation for adding two functions named get_float() and get_int() to
the program, create a hierarchy chart or outline that includes those functions.
The functions will be used to get valid numbers and integers from the user as
described in the next steps.
4. Add a function named get_float() to the program. This function should accept
one argument, which is a prompt like "Enter monthly investment: ". Then, this
function should use the input function to get an entry from the user using the
prompt that's passed to it, and the entry should be converted to a float value.
Next, this function should check this entry to make sure it's greater than 0. If
it is, the entry is valid and the number should be returned to the calling
statement. If it isn't, an appropriate error message should be displayed, and
the user should enter another value. To make this work, the function should
use a while statement that gets an entry until it is valid.
5. Modify the main() function so it uses this function to get the monthly
investment entry. That tests the function.
6. Enhance the get_float() function so it gets three arguments: a prompt, a low
validity value, and a high validity value. This function should work as before,
except the entry must be greater than the low value and less than or equal
to the high value. If the entry is invalid, this function should display error
messages like those above using the low and high arguments. Otherwise, it
should return the value to the calling statement.
Chapter 4 How to define and use functions and modules 139
7. Modify the mainQ function so it uses the get_floatQ function for the first two
entries. The low and high arguments should be 0 and 1000 for the first entry,
and 0 and 15 for the second entry.
8. Add a get_int() function that works like the get_float() function, except that it
gets an integer entry instead of a float entry. Then, call this function from the
mainQ function so it gets the years entry.
Create a validation module
9. Use the File->Save As command to save a copy of the Future Value program
as validation.py. This will be the file for a module that stores the get_float()
and get_int() functions. So, delete the calculate_future_value() function, but
keep the mainQ function and the if statement after the mainQ function.
10. In the mainO function, delete everything inside the while loop except the last
statement that asks whether the user wants to continue. Within this loop, code
two call statements that test the get_float() and get_int() functions.
11. Run the program to test the two functions. When you're through, you can
close the file.
Use the validation module in the Future Value program
12. Go back to the future_value.py file. Then, comment out the get_number and
get_integer() functions.
13. Add an import statement that imports the validation module.
14. Modify the code in the mainQ function so it uses the functions in the
validation module.
5
How to test and debug
a program
If you've been doing the exercises and writing your own programs, you already
have some experience with testing and debugging. Now, this chapter reviews
some of what you've been experiencing and presents some new skills for
testing and debugging. As your programs become more complicated, these
testing and debueeine skills become more valuable.
An introduction to testing and debugging 142
The three types of errors that can occur 142
Common Python errors 144
Four techniques for testing and debugging 146
How to plan the test runs 146
A simple way to trace code execution 148
How7 to use top-down codine and testine to simplify debueeine 150
How7 to use the IDLE shell to test functions 152
How to use the IDLE debugger 154
How7 to set and remove breakpoints 154
How to step through the code 156
How7 to view the stack 158
Perspective 160
142 Section 1 Essential concepts and skills
An introduction to testing
and debugging
When you test a program, you run it to make sure that it works correctly. As
you test the program, you try every possible combination of input data and user
actions to be certain that the program works in every case. In other words, the
goal of testing is to make the program fail.
When you debug a program, you fix the errors (bugs) that you discover
during testing. Each time you fix a bug, you test again to make sure that the
change that you made didn't affect any other aspect of the program.
The three types of errors that can occur
As you test a program, three types of errors can occur. These errors are
described in figure 5-1.
Syntax errors prevent your program from compiling and running. Since
syntax errors occur when Python attempts to compile a program, they're known
as compile-time errors. This type of error is the easiest to find and fix. When you
use IDLE, it highlights the location of the first syntax error that it finds each time
you attempt to run the program. Then, you can correct that error and try again.
Unfortunately, some errors can't be detected until you run a program. These
errors are known as runtime errors, and they throw exceptions that stop the
execution of a program.
Even if a program runs without throwing exceptions, it may contain logic
errors that prevent the program from working correctly. This type of error is
often the most difficult to find and fix. For example, the Future Value program in
this figure has a logic error that results in an incorrect result. In this case, though,
it's hard to tell what the right future value should be. In a moment, though, you'll
learn how to make sure that it's correct.
Chapter 5 How to test and debug a program 143
The Future Value program with a logic error
Enter monthly investment:
Enter yearly interest rate:
Enter number of years:
Future value:
Continue? (y/n):
100
12
10
22903.87
The goal of testing
• To find all errors before the program is put into production.
The goal of debugging
• To fix all errors before the program is put into production.
The three types of errors that can occur
• Syntax errors violate the rules for how Python statements must be written. These
errors, also called compile-time errors, are caught by IDLE and the Python
compiler before you run the program.
• Runtime errors don't violate the syntax rules, but they throw exceptions that stop the
execution of the program. Many of these exceptions are due to programming errors
that need to be fixed. But some exceptions need to be handled by the program so the
program won't crash.
• Logic errors are statements that don't cause syntax or runtime errors, but produce
the wrong results. In the console for the Future Value program above, the future
value isn't correct, which is a logic error.
Description
• To test a Python program, you run it to make sure that it works properly no matter
what combinations of valid or invalid data you enter.
• When you debug a program, you find and fix all of the errors (bugs) that occur
when you test the program.
Figure 5-1 An introduction to testing and debugging
144 Section 1 Essential concepts and skills
Common Python errors
Figure 5-2 presents some of the coding errors that are commonly made as
you write a Python program. By now, you have certainly encountered many of
them. But it's worth taking a quick look at the list to remind yourself to avoid
these errors.
The function at the top of this figure illustrates two of these errors. Here,
the first line of the for statement doesn't end with a colon. That's an error that's
caught by IDLE when you try to run the program.
The second error is in the first statement in the for loop. Here, the first
statement in the loop adds a variable named monthly_investment_amount to the
future_value variable. However, a variable named monthly_investment_amount
has never been defined. Instead, the name should be monthly_investment, the
first argument that's defined by the function. This error causes an exception
when the program is run.
This figure also describes the problem that Python has with floating-point
arithmetic. Near the bottom of this figure, an example shows how floating-point
arithmetic can produce strange results even with simple calculations. One way
to handle this issue is to round numbers. Another is to use the decimal module
so you can work with fixed-point decimal numbers instead of floating-point
numbers. You'll learn how to use this module in chapter 9.
By the way, the function in this figure has one logic error that doesn't cause
a compile-time error or a runtime exception, but does lead to inaccurate results.
You'll learn how to find and fix errors like this in the next two figures.
Chapter 5 How to test and debug a program 145
A Python function that contains errors
def calculate_future_value(monthly_investment, yearly_interest, years):
# convert yearly values to monthly values
monthly_interest_rate = yearly_interest / 12 / 100
months = years * 12
# calculate future value
future_value = 0.0
for i in ranged, months)
future_value += monthly_investment_amount
monthly_interest = future_value * monthly_interest_rate
future_value += monthly_interest
return future_value
Common syntax errors
• Misspelling keywords.
• Forgetting the colon at the end of the opening line of a function definition, if clause,
else clause, while statement, for statement, try clause, or except clause.
• Forgetting an opening or closing quotation mark or parenthesis.
• Using parentheses when you should be using brackets, or vice versa.
• Improper indentation.
Problems with names and values
• Misspelling or incorrectly capitalizing a variable or function name.
• Using a keyword as a variable or function name.
• Not checking that a value is the right data type before processing it. For example,
using a number when it needs to be converted to a string, or vice versa.
Problem with floating-point arithmetic
• The float data type in Python uses floating-point numbers, and that can lead to
arithmetic results that are imprecise. For example,
sales_amount = 74.95;
discount = sales_amount * .1; # result is 7.495000000000001
• One quick way to fix this problem is to round the result to the right number of
decimal places. If necessary, you can also convert it back to a floating-point
number:
discount = round (discount, 2) # result is 7.5
• Another way to fix this problem is to use the standard decimal module, which lets
you work with decimal numbers instead of floating-point numbers. You'll learn
how to use this module in chapter 9.
Figure 5-2 Common Python errors
146 Section 1 Essential concepts and skills
Four techniques for testing
and debugging
With that as background, this chapter now presents four techniques that you
can use to test and debug your programs more efficiently.
How to plan the test runs
When you test a program, you typically do so in at least two phases. In the
first phase, you test the program with valid data. In the second phase, you test
the program with invalid data. This is illustrated in figure 5-3.
As your programs become more complex, it helps to create a test plan for
testing a program. This is simply a table or spreadsheet that shows what test data
you're going to enter and what the results should be.
In the valid testing phase, you should start with test data that produces results
that can be easily verified. This is illustrated by the Miles Per Gallon program in
this figure. Here, the first test data entries are 320 miles driven and 10 gallons of
gas used, so the result should clearly be 32 miles per gallon, and it is.
But don't stop there. You should also use test data that is more likely to
produce an inaccurate result. For example, the next entries are 325 miles driven
and 10 miles per gallon. But this time, the result is still 32 miles per gallon when
it should be 32.5 miles per gallon. This shows the importance of using a range
of valid entries and verifying that the results are accurate, even if they may look
okay.
For the invalid testing phase, your test data should include all varieties of
invalid entries. This is illustrated by the second example in this figure. This
shows the start of a test run for the Future Value program that tests all aspects of
the validation that's done by the program. When you create a test plan for invalid
data, you try to make the program fail by testing every combination of invalid
data and user action that you can think of.
The third example shows the importance of knowing what the results should
be so you can verify the results in your test runs. But what should the result in
this example be? In this case, calculating the result for just 12 months by hand
or with a calculator would be difficult. If you know the formula for calculating
the future value, you could use that. But even then, you have to be sure that the
formula calculates the future value in the way that produces the correct results
for your program. In the next figure, though, you'll learn a simple way to make
sure the results are correct.
Yes. there's a lot more to testing than this. In a program that stores its data
in a file, for instance, you need to make sure that the data has been written
correctly on disk, which creates some new problems. Or, in a GUI program, you
need to make sure that all of the controls like check boxes and drop-down lists
work correctly. But in all programs, what's critical is (1) to test with all of the
possible combinations of data, and (2) to make sure that the results are accurate
by comparing them to results that you know are accurate.
Chapter 5 How to test and debug a program 147
The Miles Per Gallon program as it's tested with valid data
Enter miles driven:
Enter gallons of gas
Miles Per Gallon:
Continue? (y/n): y
Enter miles driven:
Enter gallons of gas
Miles Per Gallon:
used:
used:
320
10
32.0
325
10
32.0
Starting to test the Future Value program with invalid data
Enter monthly investment: 0
Entry must be greater than 0 and less than or equal to 1000.
Enter monthly investment: 1001
Entry must be greater than 0 and less than or equal to 1000.
Enter monthly investment: 10 0
Enter yearly interest rate: -12
The Future Value program as it's tested with valid data
Enter
Enter
Enter
monthly
yearly
number
Future value:
investment:
interest rate:
of years:
100
12
10
22903
.87
The two critical test phases
1. Test the program with valid input data to make sure the results are correct.
2. Test the program with invalid data or unexpected user actions. Try everything you
can think of to make the program fail.
How to make a test plan for the critical phases
1. List the valid entries that you're going to make and the correct results for each set of
entries. Then, make sure that the results are correct when you test with these entries.
2. List the invalid entries that you're going to make. These should include entries that
test the limits of the allowable values.
Two common testing problems
• Not testing a wide enough ranee of entries.
• Not knowing what the results of each set of entries should be and assuming that the
answers are correct because they look correct.
Description
• It's easy to find syntax and runtime errors because the program won't run until you
fix them.
• Logic errors can slip through your test runs if you don't check to make sure the
results are correct, or if you don't test a wide enough range of entries.
Figure 5-3 How to plan the test runs
148 Section 1 Essential concepts and skills
A simple way to trace code execution
When you trace the execution of a program, you add statements to your code
that display messages or variable values at key points in the code. You typically
do this to help find the cause of a logic error.
If, for example, you can't figure out why the future value that's calculated
by the program is incorrect, you can insert printQ functions into the code for the
program as shown in figure 5-4. Here, the first print() function prints a message
that indicates that program execution is entering the calculate_future_value()
function. The second printQ function at the end of the for loop prints the values
of two important variables used by the loop.
After you run the program, the data that's displayed by these print()
functions clearly shows where the calculation is going wrong. Here, the loop is
only executed 11 times for one year, but it should be executed 12 times. That
means that the arguments for the raneeQ function aren't correct.
In this example, tracing helps you find a bug. However, you can also use
tracing to make sure that the results are correct. For instance, you could easily
assume that the future value result is correct without checking further. However,
tracing the execution of the statements in the loop shows that the result can't
possibly be correct.
When you use this tracing technique, you usually start by adding just a few
printQ functions to the code. Then, if that doesn't help you solve the problem,
you can add more. Although this technique is simple, it can help you find the
causes of many types of errors. The primary disadvantage of this technique is
that it takes time to add the printQ functions as you're debugging, and you need
to remove these printQ functions when you're done debugging.
Chapter 5 How to test and debug a program
149
A function that uses print() functions to trace execution
def calculate_future_value(monthly_investment, yearly_interest, years)
print("Entering calculate_future_value()")
# convert yearly values to monthly values
monthly_interest_rate = yearly_interest / 12 / 100
months = years * 12
# calculate future value
future_value = 0.0
for i in ranged, months) :
future_value += monthly_investment
monthly_interest = future_value * monthly_interest_rate
future_value += monthly_interest
print("i =", i, "future value =" future value)
return future_value
The data that's printed to the console
Enter
Enter
Enter
monthly investment
yearly
number
: 100
interest rate: 12
of years:
1
Entering calculate_future_value()
■
■
■
■
■
■
■
■
■
■
■
= 1
= 2
= 3
= 4
= 5
= 6
= 7
= 8
= 9
future
future
future
future
future
future
future
future
future
value =
value =
value =
value =
value =
value =
value =
value =
value =
= 10 future value =
= 11 future value =
Future value:
Continue? (y/n):
101
203
306
410
515
621
728
836
946
.0
.01
.0401
.100501
.20150601
.3535210701
.567056280801
.852726843609
.2212541120451
= 1056.6834666531656
= 1168.2503013196972
1168.25
Description
• A simple way to trace the execution of a program is to insert print() functions at
key points in the code that display messages or data on the console.
• The messages that are printed to the console can indicate what functions are being
executed, or they can display the values of variables.
Figure 5-4 A simple way to trace code execution
150 Section 1 Essential concepts and skills
How to use top-down coding and testing
to simplify debugging
One way to simplify debugging is to code and test just a small portion of a
program at a time. This can be referred to as top-down coding and testing or just
top-down testing.
This is illustrated by the example in figure 5-5. This is for the Future Value
program that consists of the four functions shown in the hierarchy chart. One of
the benefits of dividing a program into functions is that it makes it easy to code
and test the program on a top-down basis.
In the first testing phase for a program like this, you code one or two of the
functions and the code in the mainQ function that uses those functions. In this
example, you code and test the calculate_future_value() function and the code in
the mainQ function that calls that function and displays its results. When that's
fully tested, you go on to phase 2.
In phase 2, you code one of the other functions and adjust the code in the
mainQ function so it uses that function. In this case, you code and test the
get_floatQ function and adjust the mainQ function accordingly. At this point, you
know you that have this program under control and you just need to code and
test the rest of the functions.
So, in phase 3, you code and test the get_int() function along with whatever
adjustments are needed in the mainQ function. And in phase 4, you can test all
aspects of the program and add whatever finishing touches are needed.
The result is that you're testing a small amount of code at a time. That makes
debugging easy because you know that any errors were introduced by functions
and code that you've just added. This also makes programming more enjoyable
because you're making continuous progress without the frustration of complex
debugging problems.
When the hierarchy chart for a program consists of several levels and many
functions, you may want to take a few minutes to plan the sequence that you'll
use for top-down coding and testing. In most cases, you'll want to code and test
the critical functions first so you know that the concept of the program is going
to work. But after that, you can usually add the other functions in whatever
sequence you prefer.
Chapter 5 How to test and debug a program
A hierarchy chart for a Future Value program
calculate
future value
Testing phase 1: The main() function and the calculate function
• Code the calculate_future_value() function.
• Code the main() function or at least the portion that calls the calculate_future_value()
function and uses the result that's returned.
• Test what you've coded so far.
Testing phase 2: Add data validation for float entries
• Code the get_float() function.
• Modify the mainQ function so it uses this function to get the float entries.
• Test what you've coded so far.
Testing phase 3: Add data validation for int entries
• Code the get_int() function.
• Modify the mainQ function so it uses this function to get the integer entries.
• Test what you've coded so far.
Testing phase 4: Add the finishing touches
• Make any refinements to the code like improving the prompt messages or the
display of the results.
Discussion
• When you use top-down coding and testing, you start by coding and testing the
code for one or two functions plus the code in the main() function that uses these
functions. Then, you build on that base by adding the code for one or two functions
at a time.
• Top-down testing simplifies debugging because you know that the errors are caused
by the code that you've just added. As a result, it's relatively easy to find the errors.
Figure 5-5 How to use top-down coding and testing to simplify debugging
152 Section 1 Essential concepts and skills
How to use the IDLE shell to test functions
One of the benefits of using IDLE is that you can use the IDLE shell to test
any of the functions in your programs. This lets you test a function in variety
of ways without running the whole program. Often, that means you can test a
function more thoroughly in less time.
Eigure 5-6 shows you how to test the functions of a program with the IDLE
shell. To do that, you first run the program from IDLE. That loads the program
module into the shell. After that, you can use the shell to run any function in the
program.
This is illustrated by the first two examples in this figure. In the first
example, the Future Value program has been run and thus loaded into the shell.
Then, statements are entered into the shell that call the functions in the program.
First, the get_float() function is tested with the three arguments it requires. Then,
the calculate_future_value() function is executed.
In the second example, the Convert Temperatures program of the last chapter
has been run and loaded into the shell. Then, the convert_temp(J function of the
program is called twice. For each call, this function gets two user entries, and
then displays the result.
The third example in this figure shows that you can also use the shell to test
the functions of a module that isn't a program. To do that, you first import the
module. In this example, the temperature module that's used by the Convert
Temperatures program is imported into the shell. Then, its functions are called.
When you test functions this way, you isolate them from the rest of the
program or module. That makes it easier to see whether they work the way
they're supposed to. As a result, this is an efficient way to test each function of a
program with a variety of arguments.
Chapter 5 How to test and debug a program 153
Testing the functions of the Future Value program in the Python shell
>>> new_value
Enter Number:
Entry must be
Enter Number:
Entry must be
Enter Number:
Entry must be
Enter Number:
>>> new_value
1000.0
>>> new_value
Enter Number:
Entry must be
Enter Number:
>>> new_value
10.0
>>> calculate.
= get_float ("Enter Number:
0
greater than 0 and less than
-1
greater than 0 and less than
1001
greater than 0 and less than
1000
= get_float ("Enter Number: ",
11
greater than 0 and less than
10
_future_value(10 0, 12, 1)
1168.2503013196972
>>> calculate.
_future_value(500, 12, 50)
19528669.849965967
>>>
0,
or
or
or
0,
or
1000)
equal
equal
equal
10)
equal
to
to
to
to
1000.
1000.
1000.
10.
Testing the functions of the Convert Temperatures program in the shell
>>> convert_temp()
Enter a menu option:
1
Enter degrees Fahrenheit: 212
Degrees Celsius: 100
>>> convert_temp()
Enter a menu option:
.0
2
Enter degrees Celsius: 100
Degrees Fahrenheit:
212.0
Testing the functions of the temperature module in the shell
>>>
>>>
100.
>>>
import temperature as t
t.
.0
t.
32.0
>>>
0.0
>>>
212.
t.
t.
.0
to_
to_
to_
to_
_celsius(212)
_fahrenheit(0)
_celsius(32)
_fahrenheit(10 0)
Description
• To test the functions of a program in the IDLE shell, you first run the program. That loads
the program into the IDLE shell. Then, you can call any function in the program from the
prompt in the shell.
• To test the functions in a module, you can import the module into the shell. Then, you can
call any function in the module.
• This lets you test functions one at a time with arguments that produce verifiable results.
Figure 5-6 How to use the IDLE shell to test functions
154 Section 1 Essential concepts and skills
How to use the IDLE debugger
So far in this chapter, you've learned the skills that you'll use to solve most
of your debugging problems. Occasionally, though, you'll run into bugs that are
difficult to isolate. Then, you can use the IDLE debugger to step through the
statements of a program, one at a time, and view the changes in the variables at
each step.
Most modern IDEs include debuggers. In fact, the debuggers for most
modern IDEs are easier to use than the IDLE debugger. So, if you can learn
how to use the IDLE debugger, you shouldn't have any problem using other
debuggers.
How to set and remove breakpoints
The first step in using the IDLE debugger is to set a breakpoint at the point
in the program that precedes the statements that you think are causing the
bug. To set a breakpoint, you right-click on a statement in the IDLE editor and
select Set Breakpoint from the context menu. This highlights the statement in
the editor, as shown in figure 5-7. Later, when you run the program with the
debugger, execution will stop just prior to the statement at the breakpoint.
When debugging, you need to set the breakpoint before the line in the
program that's causing the bug. Often, you can figure out where to set a
breakpoint by reading the exception information that's displayed when your
program crashes. Sometimes, though, you have to experiment before finding a
good location to set a breakpoint.
You also need to know that it doesn't usually make sense to set a breakpoint
on a comment line or on a line that defines a function. That's because these lines
aren't executed, so they don't cause execution to stop. Instead, you typically
want to set the breakpoint on an executable statement within a function.
After you set the breakpoint, you need to start the IDLE debugger. To do
that, you switch to the shell and select Debug-> Debugger. That causes the
Debug Control window to appear. In this window, you usually want to check the
Source box, which isn't on by default. That way, the text editor highlights the
statement that's going to be executed next, and the debugger automatically opens
any modules that are used by the program when they are needed.
Then, you switch back to the editor and run the program. This switches you
back to the Debug Control window with the first line of the program displayed,
as shown in this figure. Next, you click the Co button to run the program until
it reaches the first breakpoint. When you do that, you have to go to the shell to
enter any data that the program prompts you for. When you reach the breakpoint,
you can step through the program as shown in the next figure.
When you're using the debugger, you're actually working with three
different IDLE windows. Your program is in the editor. You respond to prompts
of the program in the shell. And you step through the program in the debugger.
To use the debugger efficiently, it helps to arrange these windows on your
monitor so you can see all three at the same time.
Chapter 5 How to test and debug a program
155
The IDLE editor window with a breakpoint
Ld "ftrture_value.py - C:\python\book_apps\ch08\future_value.py (3.5.1)*
©
File Edrt Format Run Options Window Help
def calculate_future_value (monchly_invesciQeric, yearly_interest, years)
# convert yearly values to monthly values
monthly_interest_rate = yearly_interest / 12 / 100
months = years * 12
# calculate future value
future_value = 0.0
for l ir range(lf months):
future_value += monthly_investment
monthly_interest = future_value " monthly_interest_rate
future_value += monthly_interestJ
return future value
Ln:40 Col:40|
The IDLE Debug Control window when the Future Value program starts
jjj; Debug Control
(3
Go Step Over
Out Quit
y Stack l~~ Source
W Locals r Globals
future_vafue.py:3: < modulo 0
'bdb'.runO, line 431: exec(cmd, globals, locals)
> '_main_'.<module>G, line3: def •et_vahd_number(*rom«tF low, hi-h):
'd
Locals
bu»ltins_ ■cmodule'buiftins' (built-in)>
_doc_ None
file ,C:/python/book_apps/ch08/future_value.py'
loader_ <class '.frozenJmportlib.Builtinlmporter^
_name_ '_main_'
_package_ None
i
_spec_
None
4
Description
• To set a breakpoint for a line, right-click on the line and select Set Breakpoint from the
context menu. This highlights the line that contains the breakpoint as shown above.
• To remove a breakpoint from a line, right-click on the line and select Clear Breakpoint
from the context menu.
• To turn the debugger on, switch to the shell and select Debug->Debugger. This opens
the Debue Control window.
*—-■
• To start debugging, go back to the editor and run the program. That displays the first line
of code for the program in the Debug Control window as shown above.
• To run the program to the breakpoint, click the Go button in the debugger. Along the
way, you have to respond to any prompts that the program issues in the interactive shell
Figure 5-7 How to set and remove breakpoints
156 Section 1 Essential concepts and skills
How to step through the code
When you run a program with the debugger and it encounters a breakpoint,
execution stops just prior to the statement at the breakpoint. Then, you can step
throueh the statements that follow. This is illustrated in figure 5-8. Here, the
debugger is shown after the programmer stepped through the statements in the
loop one time.
When you step through a program, you can click the Step button to execute
every statement, one at a time. Or, you can click the Over button if you want to
execute a function without stepping into it. You can click the Out button to step
out of any function that you don't want to step through. You can click the Go
button to continue normal execution until the next breakpoint is reached. And
you can click the Quit button to end the execution of the program.
As you step through code, the bottom of the debugger shows the local
variables and their values. If you want to view the global variables too, you
can check the Globals box. In this figure, the debugger shows all of the local
variables. That includes the arguments passed to the function, the variables
defined in the function, and the i variable that's used in the for loop. Better yet,
the debugger shows how these variables change as each statement is executed.
These are powerful debugging features that can help you find the cause of
serious programming problems. Stepping through a program is also a good way
to understand how the code in an existing program works. If, for example, you
step through an entire program, you'll step through each function within that
program. That clearly shows how the program works.
Chapter 5 How to test and debug a program
157
The IDLE Debugger when the Future Value program is running
jjj; Debug Control
(3
Go Step Over Out Quit
i*/ Stack l~ Source
* Locals \~ Globals
future_value.py:38: calculate_future_valueO
'bdb .runQ, line 431: exec(cmd, globals, locals;
'_main_'.< modulo 0, line 67: mainQ
'_main_'.mainO, line 54: mo nth ly_in vestment, yearly_interest_rate, years)
> '_main_'.calculate_future_valueO line38:future_value+= monthly_investment
'_d
Locals
future_value 101X)
j 2
monthlyjnterest 1-0
monthly_interest_rate 0-01
monthlyjnvestment 100X)
months 120
yearlyjnterest 12.0
J
U
years
10
4
Some of the buttons on the Debug toolbar
Button Description
Run the program until the next breakpoint.
Step through the code one statement at a time,
including statements in called functions.
Step through the code one statement at a time,
skipping over called functions, but still executing them.
Finish executing the current function
and return to the calline function.
End the execution of the program.
Go
Step
Over
Out
Quit
Description
• When a breakpoint is reached, program execution is stopped before the line is
executed.
• When the Source checkbox in the Debug Control window is checked, the current
line of code is highlighted in gray in the editor window.
• If the Source checkbox is checked and you step into a function located in a
different module, a new editor window opens with the source code for that module.
• If the Locals checkbox is checked, the bottom of the Debue Control window shows
the values of the local variables that are currently in scope.
• To show the global variables, check the Globals checkbox.
Figure 5-8 How to step through the code
158 Section 1 Essential concepts and skills
How to view the stack
When an exception occurs, it's sometimes helpful to view the stack. The
stack is a list of the functions that have just been executed in reverse sequence in
which they were called. This is illustrated in figure 5-9.
The stack in this figure shows a stack when an exception occurred in the
calculate_future_value() function of the Future Value program. To start, IDLE's
built-in function named runcodeQ loaded the module for the Future Value
program as the main module. That loaded all functions for the module and
executed the if statement at the bottom of the module. This if statement called
the mainQ function of the Future Value program. Then, the main() function
called the calculate_future_value() function, and the exception occurred when
Python attempted to execute line 38.
After an exception occurs, you can open the Stack Viewer by selecting
Debug->Stack Viewer from the IDLE shell. That switches you to the Stack
Viewer so you can view the stack. However, if you always want to switch to
the Stack Viewer when an exception occurs, you can select Debug-> Auto-open
Stack Viewer. Then, IDLE automatically switches to the Stack Viewer whenever
an exception occurs.
In the Stack Viewer, you can click on the plus sign next to a function to
expand it. Then, you can view the current values of all local and global variables.
In this figure, the plus sign for the calculate_future_value() function has been
clicked, and you can see all of the local variables. This is helpful because you
can get all this information without running the debugger.
If you want to jump to a function that's listed in the stack, you can
double-click on it. This takes you to the code editor window and highlights the
relevant line of code.
You probably won't need to view the stack often. Usually, when an exception
occurs, you can figure out what caused the problem from the normal exception
information that's displayed in the shell. Then, you can fix the problem and
continue testing and debugging. In some cases, though, the stack gives you the
extra information that you need to find and fix a bug.
Chapter 5 How to test and debug a program
159
A debugging session with the Stack Viewer window displayed
U W"«
Is)
H I NameErron name 'monthlyjnvestmentx' is not defined A|
m-L_J idlelib.run.runcodef...), line351: execfcode, self.locals)
li Q] _main_.<module>(...), Iine67: mainQ
[i Cj _main_.main(.„), line 54: monthlyjnvestment yearlyjnterest
EhQj _main_.calculate_future_value(...), line38:future_value+ = mi
B-Q <locals>
monthly_intere5t_rate = 0.01
yearlyjnterest = 12.0
future_value = 0.0
. 4V years = 10
monthlyjnvestment = 100.0
months = 120
£ ZH <globals>
Description
• When an unhandled exception occurs, the Stack Viewer displays a list of the
functions that were called, leading up to the exception. This list is called the stack.
• To open the Stack Viewer after an exception occurs, select Debug-> Stack Viewer
from the IDLE shell.
• To automatically open the Stack Viewer whenever an exception occurs, select
Debug->Auto-open Stack Viewer.
• To see what the stack looked like when the exception occurred, expand any folder
in the Stack Viewer. This includes all the local and global variables that were in
scope at the time.
• To jump to a line of code in the editor from the Stack Viewer, double-click on the
line. That switches you to the code editor window and highlights the line of code.
Figure 5-9 How to view the stack
160 Section 1 Essential concepts and skills
Perspective
Before you put a program into production, you should test and debug
it thoroughly. If you do a good job of it, your program won't encounter
unexpected errors and crash, and it will deliver correct results. Now that you've
completed this chapter, you should have all the skills you need for testing and
debugging programs like the ones in this book.
Terms
test
debug
bue
syntax error
compile-time error
runtime error
exception
logic error
Summary
• To test a program, you run it to make sure that it works properly no matter
what combinations of valid or invalid data you enter.
• When you debug a program, you find and fix all of the errors (bugs) that you
find when you test the program.
• Syntax errors violate the rules for how Python statements must be written.
Since they are caught when Python attempts to compile your code, they are a
type of compile-time error.
• An exception is a type of error that causes a program to crash if it isn't
handled properly. Since exceptions occur when a program is running, they
are a type of runtime error.
• Logic errors don't cause a program to crash, but they prevent it from
working correctly.
• A test plan is a table or spreadsheet that shows the data entries that you
can use for testing the program as well as the correct results for each set of
entries. That way, you can verify that the program's results are correct.
• A simple way to trace the execution of a program is to insert print()
functions at key points in the code.
• IDLE lets you test one function of a program at a time in the interactive shell.
• IDLE includes a debugger that can help you find and fix errors.
• You can set a breakpoint on a statement to stop the execution of the program
just before that statement. Then, you can step through the code and view the
values of the variables at each step.
• A stack is a list of functions in the reverse order in which they were called.
test plan
trace execution
top-down coding and testing
top-down testing
debugger
breakpoint
step through code
stack
Chapter 5 How to test and debug a program
Exercise 5-1 Test and debug a Test Scores
program
In this exercise, you will test and debug a variation of the Test Scores program
of chapter 3.
1. In IDLE, open the test_scores.py file that's in this folder:
python/exercises/chO5
Then, review the code.
2. Create a test plan that thoroughly tests the program with valid data. This can
be a handwritten table or a spreadsheet that includes the test data for three or
four test runs as well as the expected results.
3. Use your test plan as a guide to testing the program. Then, note any inaccurate
results that you discover during testing.
4. Debug any logic errors.
5. Test the program with the same data to be sure it works correctly.
Exercise 5-2 Trace and test the functions
of the Future Value program
In this exercise, you will trace the operation of the calculate_future_value()
function of a Future Value program. You'll also use the IDLE shell to test the
functions in this program.
Use printO functions to trace the execution of a function
1. In IDLE, open the future_value.py file that's in this folder:
python/exercises/chO5
Then, test the program and note that the future value results are obviously
inaccurate. In fact, the calculate_future_value() function has two logic errors.
2. To debug this problem, scroll down to the calculate_future_value() function,
and add print() functions that show you how the values of the variables
change each time through the for loop.
3. Run the program and review the results.
4. Fix the errors and comment out the printQ functions that you added.
Use the IDLE shell to test the functions of this program
5. Run the Future Value program to make sure its functions are loaded into the
shell.
6. Test its three functions as shown in figure 5-6. This shows you how easy it is
to test a function without running the entire program.
162 Section 1 Essential concepts and skills
Exercise 5-3 Step through a Future Value
program
This exercise guides you through the use of the IDLE debugger as you step
through the Future Value program.
Step through the calculate_future_value() function
1. In IDLE, open the future_value.py file that's in this folder:
python/exercises/chO5
If you did exercise 5-2, this will be a corrected version of this program.
Otherwise, it will still contain two loeic errors that lead to inaccurate results.
2. In the calculate_future_value() function, set a breakpoint on the first
executable statement. Then, eo the IDLE shell and start the debugger. That
should display the Debug Control window. Now, check the Source checkbox.
3. Try to arrange the editor, shell, and Debug Control windows so you can see
all three. That should make it easier for you to switch from one window to
another and to see what's happening.
4. Go to the editor, and run the program. That should take you to the Debug
Control window. Then, click Go to run the program to the breakpoint, and
enter the required values when prompted in the interactive shell.
5. At the breakpoint, click the Step button to step through the function and note
how the values of the local variables change. When you see how this works,
click the Quit button to end the debugging session.
Step through the entire program
6. In the editor window, remove the breakpoint in the calculate_future_value()
function, and set a breakpoint on the first statement of the main module. Then,
run the program to the breakpoint as before.
7. Step through the program. This should take you from the main() function to
the functions that it calls. This may also take you to Python functions that
operate behind the scenes. Since these functions probably won't make much
sense to you, you can step out of them right away. In short, experiment with
the Step, Over, and Out buttons as you step through the code.
8. When you're through experimenting, click on the Quit button to end the
session.
6
How to work with lists
and tuples
So far, you have learned how to work with variables that store a single item
of data such as a number or a string. However, in programming, you often to
need to store a collection of data items. For example, you might need to store a
collection of strings or a collection of numbers. This chapter teaches you how
to work with two of Python's data structures for collections: lists and tuples.
Basic skills for working with lists 164
How to create a list 164
How to set and set items 164
How7 to add and remove items 166
How7 to process the items in a list 168
How lists are passed to functions 170
The Movie List program 172
How to work with a list of lists 176
How7 to create a list of lists 176
How7 to process the items in a list of lists 176
The Movie List 2D program 178
More skills for working with lists 182
How7 to count, reverse, and sort the items in a list 182
How to use other functions with lists 184
How7 to copy, slice, and concatenate lists 186
How to work with tuples 188
How7 to create a tuple 188
How7 to get items from a tuple 188
The Number Crunching program 190
Perspective 192
164 Section 1 Essential concepts and skills
Basic skills for working with lists
As the name implies, a list lets you store a list of items. Since a list stores
these items in the sequence in which they are added to the list, lists are a type of
data structure known as a sequence. In some languages, this structure is referred
to as an array and the items in the array are referred to as elements.
How to create a list
Figure 6-1 shows the syntax for creating a list. To do that, you enclose the
items you want to include in the list inside brackets ([ ]) and separate the items
with commas. Most of the time, a list contains items that have the same data
type. This is illustrated by the first two examples after the syntax summary. The
first example creates a list of floating-point numbers, and the second example
creates a list of strings.
However, you may sometimes need to create a list that contains items of
different data types as shown by the third example. This is useful if you want
to group all of the data for an entity that consists of both string and numeric
data. Finally, you sometimes need to create an empty list as shown by the fourth
example. Then, you can add items to this list later on.
The next example shows how you can use the repetition operator (*) to help
create a list. If. for example, you create a list with one item that contains a zero,
you can use the repetition operator to repeat that item as many times as you
want.
How to get and set items
To refer to an item from a list, you use an index, starting at O.This is
illustrated by the next group of examples. Here, the first item in the temps list
has an index of 0, the second item has an index of 1 m and so on. However, you
can also get items starting from the end of the list by using a negative integer as
the index. Then, the last item in a list has an index of -1, the second to last item
has an index of -2, and so on.
The next group of examples shows how you can get an item in a list and
assign its value to a variable. This includes examples for both the temps and
inventory lists.
Setting an item in a list works similarly. This is illustrated by the last group
of examples. Here, you code the name of the list and the index that accesses the
item on the left of the assignment operator (=). Then, you code the data that you
want to assign to the item on the right side of the assignment operator.
When you get and set items in a list, keep in mind that you can only access
an item if it already exists in the list. If you attempt to access an item that doesn't
exist in the list, you'll get an IndexError that indicates that the index is out of
range.
Chapter 6 How to work with lists and tuples
165
The syntax for creating a list
mylist = [iteml, item2, ...
]
Code that creates lists
temps = [48.0, 30.5, 20.2, 100.0, 42.0]
inventory = ["staff", "hat", "shoes"]
movie = ["The Holy Grail", 1975, 9.99]
test scores = []
# 5 float values
# 3 str values
# str, int, and float values
# an empty list
How to use the repetition operator (*) to create a list
scores = [0] * 5
# test scores = [0, 0, 0, 0, 0}
The positive and negative index values for the 5 items in the temps list
temps[0]
temps[1]
temps[2]
temps[3]
temps[4]
temps[-5]
temps[-4]
temps[-3]
temps[-2]
temps[-1]
# returns 48.0
# returns 30.5
# returns 20.2
# returns 100.0
# returns 42.0
How to get an item in a list
Code that gets items from the temps list
temps = [48.0, 30.5, 20.2, 100.0, 42.0]
temp = temps[0] # temp = 48.0
temp = temps[4] # temp = 42.0
temp = temps[5] # IndexError: index out of range
Code that gets items from the inventory list
inventory = ["staff", "hat", "shoes", "bread", "potion", "scroll"]
item = inventory[5] # item = "scroll "
item = inventory[3] # item = "bread"
item = inventory[6] # IndexError: index out of range
How to set an item in a list
temps[3] =98.0
inventory[4] = "rat ion"
# replaces 100.0 with 98.0
# replaces "potion" with "ration"
Description
• A list contains a collection of items.
• To refer to the items in a list, you use an index where 0 refers to the first item, 1
refers to the second item, and so on.
• You can also use negative values for an index where -1 refers to the last item in the
*—-■
list, -2 refers to the second last item, and so on.
• You can use the repetition operator (*) to repeat the items in a list. This can be a
good way to set the items in new list to default values.
Figure 6-1 How to create a list and access its items
166 Section 1 Essential concepts and skills
How to add and remove items
Figure 6-2 shows how you can add items to a list and remove items from
a list. To do that, you can use some of the methods that are available for a list.
These are summarized in the table at the start of this figure. For instance, the
appendO method lets you add an item to the end of a list. The insert() method
lets you add an item anywhere in a list. And the removeC) method lets you
remove an item from the list.
These methods are illustrated by the first group of examples after the table.
Here, the first example appends the integer value 99.5 to the end of the list. The
second example inserts the string value "robe" at index position 3 in the list and
pushes all of the other items up one index position. The third example removes
the item that has the value "shoes", and the items at the other index positions are
adjusted to fill in that position.
The second group of examples shows how to use the pop() method of a list.
If the calling code doesn't pass an argument to the method, this method removes
the last item in the list. If the calling code specifies an index argument, this
method removes the item at the specified index. When you use this method, it
not only removes the item from the list but also returns it to the calling code. In
this figure, the code assigns the item returned by the method to a variable named
item.
The last group of examples shows how the indexQ and pop() methods can be
used together to remove an item with a specific value. Here, the indexQ method
searches for an item that has a value of "hat". If it finds the item, this method
returns the index of the item, and the example assigns that index to the variable
named i. Then, the popQ method removes the item at that index.
If the remove() and index() methods don't find the item, they cause a
ValueError exception to occur. Since you typically don't want those exceptions
to occur, you should make sure the item exists in the list before you call those
methods. You'll learn how to do that in the next figure.
Chapter 6 How to work with lists and tuples
167
List methods for modifying a list
Method
append(item)
insert (index, item)
remove (item)
index(item)
pop( [index] )
Description
Appends the specified item to the end of the list. This increases
the length of the list by one.
Inserts the specified item at the specified index. This increases
the length of the list by one and shifts all items after the specified
index back by one index.
Removes the first item in the list that is equal to the specified
item. This decreases the length of the list by one and shifts all
items after the found item's index forward. If item isn't found,
this method raises a ValueError.
Returns the index of the first occurrence of the specified item in
the list. If the item isn't found, this method raises a ValueError.
If no index argument is specified, this method gets the last item
from the list and removes it. Otherwise, this method gets the item
at the specified index and removes it.
How to use the append(), insert(), and remove() methods
stats = [48.0, 30.5, 20.2, 100.0]
inventory = ["staff", "hat", "shoes", "bread", "potion"]
st at s.append(99.5)
# stats = [48.0, 30.5, 20.2, 100.0, 99.5]
inventory.insert(3, "robe") # inventory = ["staff", "hat", "shoes",
# "robe", "bread", "potion"]
inventory.remove("shoes")
# inventory = ["staff", "hat", "robe",
# "bread", "potion"]
How to use the pop() method
inventory = ["staff", "hat", "robe", "bread"]
item = inventory.pop() # item = "bread"
# inventory = ["staff", "hat", "robe"]
item = inventory.pop(l) # item = "hat"
# inventory = ["staff", "robe"]
How to remove an item by using the index() and pop() methods
inventory = ["staff", "hat", "robe", "bread"]
i = inventory.index("hat") # i = 1
inventory(pop[i]) # inventory = ["staff", "robe", "bread"]
Description
• You can use the list methods to add and remove the items in a list.
Figure 6-2 How to find, add, and remove items
168 Section 1 Essential concepts and skills
How to process the items in a list
Figure 6-3 shows a variety of ways that you can process the items in a list.
To help you do that, you can use the built-in lenQ function to get the length of
the list, which is the number of items in the list. If, for example, there are 10
items in a list, the indexes range from 0 through 9, but the len() function returns
10.
As the first example shows, you can use the in keyword to search for an item
in a list. This is one way to make sure that an item is in a list before you process
it. In this example, the item is removed after the code makes sure it's in the list.
The next example shows that you can use the print() function to print a list to
the console. This is often useful when testing a program that works with a list.
The third example shows how you can use a for statement to process all of
the items in a list. This type of statement creates a for loop that's executed once
for each item in the list. In this example, the loop just prints each item in the
list. However, it's common for a loop to include multiple statements that process
each item in the list.
As you review the third example, you should realize that this for loop works
the same as the for loop presented in chapter 3. The only difference is that the
for loop presented in chapter 3 processed a collection of int values returned by
the range() function. Now, in this chapter, the for loop processes a collection of
items that are stored in a list.
The last group of examples shows how you can process a list of scores with
a for loop or a while loop. Here, both loops add each score in the list to the total.
This comparison shows that it's easier to perform this processing by coding a for
loop. That's because you don't need to use an index to get each item from the
list, you don't need to use a counter variable, and you don't need to know the
length of the list.
Chapter 6 How to work with lists and tuples
169
A built-in function for getting the length of a list
Function Description
len(Iist) Returns the leneth of the list, which is the number of items in the list.
How to use the in keyword to check whether an item is in a list
inventory = ["staff", "hat", "bread", "pot ion"]
item = "bread"
if item in inventory:
inventory.remove(item) # inventory =
["staff", "hat", "potion"]
How to print a list to the console
inventory = ["staff", "hat", "shoes", "bread", "potion"]
print(inventory)
The console
[■staff', 'hat■, 'shoes', 'bread', 'potion']
The syntax of a for statement that loops through a list
for item in listz
statements
Code that prints each item in a list
inventory = ["staff", "hat", "shoes"]
for item in inventory:
print(item)
The console
staff
hat
shoes
How to process the items in a list
With a for loop
scores = [70, 80, 90, 100]
total = 0
for score in scores:
total += score
print(total)
With a while loop
scores = [70, 80, 90, 100]
total = 0
i = 0
while i < len(scores):
total += scores[i]
i += 1
print(total)
# total = 340
# total = 340
Figure 6-3 How to process the items in a list
170 Section 1 Essential concepts and skills
How lists are passed to functions
In chapter 4, you learned how to pass number, string, and Boolean
arguments to a function. Now, you need to learn more about how this works, and
what the difference is when you pass a list to a function. This is summarized in
figure 6-4.
To start, you need to know that Python uses objects to store data of all data
types including strings, integers, floating-point numbers, Boolean values, and
lists. When you write code, you often create objects without realizing it. For
example, when you code a literal value of "staff, you are using the str type to
create a str object for that value. Similarly, when you code a literal value of 1,
you are using the int type to create an int object for that value.
When you write code, you often assign an object to a variable so you can use
it in your code. In this figure, for instance, the calling code in the first example
assigns an int object to the value 1 variable. Similarly, the calling code in the
second example creates a list object and assigns it to the inventory variable.
Next, you need to know that the str, int, float, and bool data types are
immutable types. This means that you can't change the data that's stored in
these objects. In contrast, a list object is a mutable type. This means that you
can change the data in the list. If, for example, you append an item to a list, it
directly changes the list object.
These concepts come into play when you pass arguments to functions. In
that case, the variable name in the calling code and the argument name in the
function both refer to the same object. But whether or not you have to return the
result of the function depends on whether the argument is immutable or mutable.
This is illustrated by the two examples in this figure.
In the first example, the int object for the variable named valuel, which has
a value of 25, is passed to the double_the_number() function. At this point, the
valuel variable and the value argument both refer to the same object. But then,
the first statement in the function doubles the value argument. This creates a
new int object that's assigned to the value argument. Now, the valuel variable
is still assigned to the original object, but the value argument is assigned to a
new object with a value of 50. So, to make the new value available to the calling
code, this function must return it.
In the second example, you can see the difference when a mutable object
is passed to a function. Here, the calling code creates a list object and assigns it
to a variable named inventory. Next, it passes the list object to the add_to_list()
function alone with a second argument for an item to be added to the list. At this
point, the variable named inventory and the argument named list both refer to the
same list object.
Then, within the add_to_listQ function, the code appends the item argument
to the list. Because the list is mutable, this changes the list object directly. In
other words, there's no need to create a new list object. As a result, this function
doesn't need to return the list. That's because the inventory variable in the calling
code still refers to the list object that has been changed. So, when the calling
code prints the list, it includes the new item that was added by the function.
Chapter 6 How to work with lists and tuples
Four immutable types
str
int
float
bool
One mutable type
list
How to work with arguments of the immutable type
The double_the_number() function
def double_the_number(value) :
value = value * 2 # a new int object is created
return value # the new int object must be returned
The calling code in the main() function
valuel = 25 # an int object is created
value2 = double_the_number(valuel)
print(valuel) # 25
print(value2) # 50
How to work with arguments of the a mutable type
The add_to_list() function
def add_to_list(list, item) :
list.append(item) # the list object is changed
The calling code in the main() function
inventory = ["staff", "hat", "bread"] # the list object is created
add_to_list(inventory, "robe")
print(inventory) # ["staff", "hat", "bread", "robe"]
Description
• Python uses objects to store data of all types including integers, strings,
floatingpoint numbers, and lists. When you write code that creates an object, you typically
assign it to a variable name, so you can work with it.
• An object that's created from an immutable type such as the str or int type can't be
changed, but you can create a new object that's based on it.
• An object that's created from a mutable type such as a list can be changed.
• When you pass an object to a function, the argument name in the function refers to
the same object as the variable name in the calling code.
• When you pass an immutable object to a function, the function can use the
argument name to create a new object. But then, it must return that object to make
it available to the calling code.
*—-■
• When you pass a mutable object like a list to a function, the function can change
the object. In that case, the function doesn't need to return the object to the calling
code because it already has a variable that refers to that object.
Figure 6-4 How lists are passed to functions
172 Section 1 Essential concepts and skills
The Movie List program
Figure 6-5 presents a Movie List program that illustrates many of the skills
that you've just learned. As the console shows, this program maintains a list of
movies, and the user can list all the movies, add a movie to the list, or delete a
movie from the list.
After the console, this figure shows a hierarchy chart for this program. Here,
the mainQ function calls four other functions to display the command menu, list
all the movies, add a movie to the list, or delete a movie from the list.
Chapter 6 How to work with lists and tuples
173
The user interface
COMMAND MENU
list - List all movies
add - Add a movie
del - Delete a movie
exit - Exit program
Command: list
1. Monty Python and the Holy Grail
2 - On the Waterfront
3. Cat on a Hot Tin Roof
Command: add
Name: Casablanca
Casablanca was added.
Command: list
1. Monty Python and the Holy Grail
2. On the Waterfront
3. Cat on a Hot Tin Roof
4. Casablanca
Command: del
Number: 4
Casablanca was deleted.
Command: list
1. Monty Python and the Holy Grail
2. On the Waterfront
3. Cat on a Hot Tin Roof
The hierarchy chart
Figure 6-5 The Movie List program (part 1)
174 Section 1 Essential concepts and skills
Part 2 of this figure shows the Python code for this program. To start, look
at the main() function that's last in this listing. It starts by creating a list of three
movies. Then, it calls the display_menu() function to display the commands
that the user can use. This is followed by a while statement that gets the user's
commands.
Within this while statement, an if statement determines which command
has been entered and calls the appropriate function for the list, add, and del
commands. In each of these calls, the movie list is passed as the argument. Then,
for the exit command, the main() function issues the break statement to end the
while loop. Otherwise, it prints an error message because the entry is invalid.
This shows how the use of functions can make the coding of the main()
function easier to understand. It just directs the processing to one of the other
functions.
By now, you should be able to understand the code in the other functions. In
the list() function, the loop uses the variable named i to number the movies in the
list. In the addQ function, the appendQ method adds a movie to the end of the
list.
In the delete() function, the if statement uses the len() function to make sure
the index for the movie to be deleted is within valid limits. Then, to delete the
movie, the pop() method removes the movie that has an index that's one less
than the number of the movie in the list. That's because the movie numbers on
the console start with 1, but the indexes for the movies in the list start with 0.
Finally, the delete() function prints the name of the movie returned by the pop()
method in a message that indicates that the movie was deleted.
What's most interesting, though, is that the addQ and deleteQ functions in
this program don't return the movie list after they change it. That's because a list
is a mutable type, and the variable in the main() function still refers to it. Then,
the mainQ function can pass that updated list to the other functions.
You might also notice that the names for three of the functions are list(),
add(), and delete(), not the longer names that are on the hierarchy chart. That's
acceptable in a simple program like this that has only a few functions. However,
in a more complex program, you might want to avoid confusion by using longer
names such as list_movies(), add_movie(), and delete_movie().
That's especially true because the listQ function shown in this figure
overrides the built-in list() function that's described in chapter 9. Since the
Movie List program presented in this chapter doesn't use the built-in list()
function, it doesn't cause any problems for this program. However, it's a bad
practice to override built-in functions with your own functions.
You should also know that del() can't be used for the name of the delete()
function. That's because Python has a built-in del operator. As a result, del is a
keyword, and you can't use a keyword as the name for a variable or function. If
do that, you'll get a syntax error when you attempt to compile the program.
Chapter 6 How to work with lists and tuples 175
The code
def display_menu():
print("COMMAND MENU")
print("list - List all movies")
print("add - Add a movie")
print("del - Delete a movie")
print("exit - Exit program")
print()
def list(movie_list):
i = 1
for movie in movie_list:
print(str(i) + ". " + movie)
i += 1
print ()
def add(movie_list):
movie = input("Name: ")
movie_list.append(movie)
print(movie + " was added.\n")
def delete(movie_list):
number = int(input("Number: "))
if number < 1 or number > len(movie_list):
print("Invalid movie number.\n")
else:
movie = movie_list .pop (number-1)
print(movie + " was deleted.\n")
def main():
movie_list = ["Monty Python and the Holy Grail",
"On the Waterfront",
"Cat on a Hot Tin Roof"]
display_menu()
while True:
command = input("Command: ")
if command.lower() == "list":
list(movie_list)
elif command.lower() == "add":
add(movie_list)
elif command.lower() == "del":
delete(movie_list)
elif command.lower() == "exit":
break
else:
print("Not a valid command. Please try again.\n")
print("Bye!")
if name == " main ":
main()
Figure 6-5 The Movie List program (part 2)
176 Section 1 Essential concepts and skills
How to work with a list of lists
You can create a list of lists by storing a list in each item of another list.
Since this lets you store data in two dimensions that you can think of as rows and
columns, a list of lists is also referred to as a two-dimensional list.
How to create a list of lists
Figure 6-6 shows how to create and use a list of lists. This takes what you
learned about lists and applies it to a list of lists. For instance, to create a list of
lists, you code another list within each item of a first list. This is illustrated by
the first two examples in this figure.
The first example consists of a list that contains three items, and each of
those items contains a list of four items. As a result, it can be thought of as a list
with three rows and four columns. Similarly, the second example can be thought
of as a list with three rows and three columns.
The third example shows how you can add to a list of lists through
programming. This example starts with a statement that creates a movies list
that contains the lists for two movies. Then, to add a movie, the next statement
creates an empty list for the movie. This is followed by three statements that
append three items to the empty list: the movie name, year, and price. The last
statement adds the movie list to the movies list. So at this point, the movies list is
the same as the one defined by the first example.
How to process the items in a list of lists
To refer to the items in a list of lists, you use two indexes as illustrated by
the fourth example. If necessary, you can also use negative indexes to work from
the end of each list, but you usually don't need to do that. In addition, you get an
IndexError exception if either index isn't valid.
If you want to display all of the items in a list of list, you can use the printQ
function as in the fifth example. This is often useful when you're testing a
program.
You can also use nested loops to process the items in list of lists. In the last
example in this figure, nested for loops are used to display the items in a list of
lists, but you can of course use other types of loops with a list of lists. In this
example, the end argument is coded with a pipe character (I) as its value so the
columns in each row are separated by that character.
In general, then, the skills are the same whether you're working with a list
or a list of lists. Applying them, however, is conceptually more difficult because
of the second dimension. Also, if you need to, you can extend this syntax so it
provides for a third dimension.
Chapter 6 How to work with lists and tuples 177
How to define a list of lists with 3 rows and 4 columns
students = [["Joel", 85, 95, 70],
["Anne", 95, 100, 100],
["Mike", 77, 70, 80, 85]]
How to define a list of lists with 3 rows and 3 columns
movies = [["The Holy Grail", 197 5, 9.99],
["Life of Brian", 1979, 12.30],
["The Meaning of Life", 1983, 7.50]]
How to add to a list of lists through programming
movies = [["The HolyGrail", 1975],
["Life of Brian", 1979]]
movie = [] # Create empty list for next movie
movie.append("The Meaning of Life") # Add movie name to movie list
movie.append(1983) # Add movie year to movie list
movie.append(7.5) # Add movie price to movie list
movies.append(movie) # Add movie list to movies list
How to access the items in the list of movies
movies[0][0] # "The Holy Grail"
movies[0][2] # 9.99
movies[0][3] # IndexError: index out of range
movies[1][0] # "Life of Brian"
movies[3][0] # IndexError: index out of range
How to print a two-dimensional list
print (movies)
The console
[['The Holy Grail1, 1975, 9.99], ['Life of Brian', 1979,
12.3], ['The Meaning of Life', 1983, 7.5]]
How to loop through the rows and columns of a 2-dimensional list
for movie in movies:
for item in movie:
print(item, end=" | ")
print()
The console
The Holy Grail | 1975 | 9.99
Life of Brian | 1979 | 12.3
The Meaning of Life | 1983 | 7.5
Description
• A Python list of lists is a list in which the items are other lists. Then, to access the
items in the list of lists, you use two indexes.
• This can also be referred to as a two-dimensional list, and you can think of the data
as columns within rows.
Figure 6-6 How to work with a list of lists
178 Section 1 Essential concepts and skills
The Movie List 2D program
Figure 6-7 presents a Movie List program like the one in figure 6-5.
However, this movie list uses a two-dimensional list to store two columns of data
for each movie. Otherwise, the programs are similar because they let the user
list, add, and delete movies. As a result, this program has the same hierarchy
chart and the same functions as the earlier program.
In the list() function, an if statement checks the length of the list to make
sure that the list contains at least one item before it displays the movies. That's
an enhancement that isn't in the first Movie List program. Then, if there are
movies in the list, the for loop displays a numbered list of movies. To do that,
this loop uses the i variable to number each row. In addition, it uses the indexes 0
and 1 to get the movie name and year from each column in each row.
In the add() function, the first two statements use inputQ functions to get
the movie and year entries from the user. Then, the next three statements create
an empty list for a movie, and append the values of the two user entries to that
list. This creates the list that stores the data for the movie. Next, the second to
last statement appends the list for the new movie to the list of all movies. In
other words, it adds another row to the list of movies. Finally, the last statement
displays a message that includes the name of the movie that was added.
Chapter 6 How to work with lists and tuples 179
The user interface
COMMAND MENU
list - List all movies
add - Add a movie
del - Delete a movie
exit - Exit program
Command: list
1. Monty Python and the Holy Grail
2. On the Waterfront(1954)
3. Cat on a Hot Tin Roof (1958)
Command: add
Name: Gone with the Wind
Year: 193 9
Gone with the Wind was added.
Command: list
1. Monty Python and the Holy Grail
2. On the Waterfront (1954)
3. Cat on a Hot Tin Roof (1958)
4. Gone with the Wind (1939)
Command: del
Number: 2
On the Waterfront was deleted.
Command: list
1. Monty Python and the Holy Grail
2. Cat on a Hot Tin Roof (1958)
3. Gone with the Wind (1939)
(1975)
(1975)
(1975)
The code Page 1
def list(movie_list):
if len(movie_list) == 0:
print("There are no movies in the list.\n")
return
else:
i = 1
for row in movie_list:
print (str(i) + ". " + row[0] + " (" + str(row[l]) + ")")
i += 1
print()
def add(movie_list):
name = input("Name: ")
year = input("Year: ")
movie = []
movie.append(name)
movie.append(year)
movie_list.append(movie)
print(movie[0] + " was added.\n")
Figure 6-7 The Movie List 2D program (part 1)
180 Section 1 Essential concepts and skills
The deleteQ function works like the deleteQ function in the earlier program.
Here, the number of the movie to be deleted is one higher than the index of the
movie in the list. Then, if that number is between 1 and the length of the movie
list, the movie is deleted. To delete the movie, the popQ method uses an index of
the movie number minus 1. Then, the print() function uses an index of 0 to get
the name of the movie that was just deleted and returned by the pop() method.
The display_menu() and mainQ functions also work the same as in the
earlier program. Here again, the main() function passes the movie list to the
list(), add(), and del() functions when it calls those functions. But since a list is
mutable, the addQ and deleteQ functions don't need to return the updated list.
That's because the movie_list variable in the main() function is assigned to the
same list. As a result, it reflects the changes that were made by the add() and
deleteQ functions.
Chapter 6 How to work with lists and tuples
The code Page 2
def delete(movie_list):
number = int(input("Number: "))
if number < 1 or number > len(movie_list):
print("Invalid movie number.\n")
else:
movie = movie_list .pop (number-1)
print(movie[0] + " was deleted.\n")
def display_menu():
print("COMMAND MENU")
print("list - List all movies")
print("add - Add a movie")
print("del - Delete a movie")
print("exit - Exit program")
print()
def main():
movie_list = [["Monty Python and the Holy Grail", 1975],
["On the Waterfront", 1954],
["Cat on a Hot Tin Roof", 1958]]
display_menu()
while True:
command = input("Command: ")
if command == "list":
list(movie_list)
elif command == "add":
add(movie_list)
elif command == "del":
delete(movie_list)
elif command == "exit":
break
else:
print("Not a valid command. Please try again.\n")
print("Bye!")
if name == " main ":
main()
Figure 6-7 The Movie List 2D program (part 2)
182 Section 1 Essential concepts and skills
More skills for working with lists
The next three figures present more skills for working with lists. Many of
these skills are useful for processing the items in a list.
How to count, reverse, and sort the items in a list
The first table in figure 6-8 presents three more methods that you can use
with a list. The second table presents a built-in function for sorting the items
in the list. Then, the first set of examples shows how the count(), reverseQ, and
sort() methods can be used with a list of numbers. That's easy enough.
Although the countQ and reverseQ methods work the same with a list of
strings, the sort() method requires a second argument if the list contains strings
with mixed cases. That's because uppercase letters come before lowercase letters
when strings are compared. Thus, "Pear" comes before "apple" in a simple sort.
This is illustrated by the second set of examples.
To fix this, you need to supply a key argument that specifies a function that
makes the sort work correctly. In this example, the key argument is set equal to
str.lower. which is the string function that converts a string to lowercase letters.
Then, the sort works correctly even though the string values in the list haven't
been changed.
The same approach is required by the built-in sorted() function. In the
third set of examples, this function requires a key argument, just like the sort()
method. The difference between the sorted() function and the sort() method is
that the sortedQ function creates a new list but the sort() method doesn't.
Chapter 6 How to work with lists and tuples
183
Three more list methods
Method
count(item)
reverse(list)
sort([key=function])
Description
Returns the number of occurrences of an item in the list. If
the item isn't found in the list, this method returns 0.
Reverses the order of the items in the list.
Sorts the list items in place. The optional key argument
specifies a function to be called on each item before sorting.
A built-in function for sorting the items in a list
Method
sorted(list[, key=function])
Description
Returns a new list consisting of the sorted items of
the original list. The optional key argument specifies
a function to be called on each item before sortine.
How to use the count()5 reverse()5 and sort() methods
numlist = [5, 15, 84, 3, 14, 2, 8, 10, 14, 25]
count = numlist.count(14) # count = 2
numlist.reverse() # [25, 14, 10, 8, 2, 14, 3, 84, 15, 5}
numlist.sort() # [2, 3, 5, 8, 10, 14, 14, 15, 25, 84]
How to use the sort() method with mixed-case lists
What happens in a simple sort
foodlist = ["orange", "apple", "Pear", "banana"]
foodlist.sort() # ["Pear", "apple", "banana", "orange"]
How to use the key argument to fix the sort order
foodlist.sort(key=str.lower)
# result: ["apple", "banana", "orange", "peach", "Pear"]
How to use the sorted() function with mixed-case lists
What happens in a simple sort
foodlist = ["orange", "apple", "Pear", "banana"]
sorted_foodlist = sorted(foodlist)
print(sorted_foodli st) # ["Pear", "apple", "banana", "orange"]
How to use the key argument to fix the sort order
sorted_foodlist = sorted(foodlist, key=str.lower)
print(sorted_foodli st) # ["apple", "banana", "orange", "Pear"]
Description
• Note that the sortedQ function creates a new list, but the sort() method doesn't.
Figure 6-8 How to count, reverse, and sort the items in a list
184 Section 1 Essential concepts and skills
How to use other functions with lists
Figure 6-9 presents two more built-in functions that can be used with lists,
and two functions of the random module that you can use to work with lists. The
examples in this figure show how these functions work.
The first example uses the min() function to get the lowest value in the list
and the max(function) to get the highest value.
The second example uses the choiceQ function to get a randomly selected
item from the list named numlist. Here, choice is used as the variable name even
though it is also the name of the function. This is okay because choice isn't one
of the Python keywords and the choice() function is in the random module. The
last statement in this example uses the shuffle() function to shuffle the numbers
in the list named numlist.
Chapter 6 How to work with lists and tuples
185
Two built-in functions for working with lists
Method
Description
rain( list) Returns the minimum value in the list,
max (list) Returns the maximum value in the list.
Two functions of the random module that work with lists
Function
Description
choice (list) Returns a randomly selected item from the list,
shuffle (list) Shuffles the items in the list on a random basis.
How to use the min() and max() functions
numlist = [5, 15, 84, 3, 14, 2, 8, 10, 14, 25]
minimum = min(numlist) # 2
maximum = max (numlist) # 84
How to use the choice() and shuffle() functions
import random
numlist = [5, 15, 84, 3, 14, 2, 8, 10, 14]
choice = random.choice(numlist) # returns random item from numlist
random, shuffle (numlist) # shuffles numlist items randomly
Description
• For working with lists, Python provides some built-in functions, and its random
module provides some random functions.
Figure 6-9 How to use other functions with lists
186 Section 1 Essential concepts and skills
How to copy, slice, and concatenate lists
Figure 6-10 presents three more skills that you may occasionally need when
you're working with lists. Here, the first example shows how to make a shallow
copy of a list. To do that, you assign a variable that contains a list to another
variable. Since a list is a mutable type, this causes both variables to refer to the
same list. As a result, if you use one variable to change the list, those changes are
also available to the other variable.
If that's not what you want, you can use the deepcopyO function to make a
deep copy of a list. This is illustrated by the second example in this figure. Since
this function is in the copy module, you have to import this module in order
to use this function. Then, after you use the deepcopyO function, you end up
with two variables that refer to two different lists. As a result, you can use one
variable to change items in one list, and you can use the other variable to change
the items in the other list.
The next set of examples shows the syntax for slicing a list plus a few
statements that show how that works. If you only want to supply start and end
arguments, you only need to code one colon. If you want to start slicing at the
beginning of the list, you can omit the start argument. Or, if you want to continue
slicing to the end of the list, you can omit the end argument.
If you include the step argument, it specifies which items in the list should
be included. If, for example, you want to get every other item in the list, you can
supply a step argument of 2. Or, if you want to reverse the items, you can supply
a step argument of -1.
The last set of examples shows how you can concatenate or join two lists by
using the + or += operators. This is occasionally useful.
Chapter 6 How to work with lists and tuples
187
The deepcopyO function of the copy module
Function
deepcopy( list)
Description
Returns a deep copy of the list. The deep copy is
a separate list with no relation to the original list.
How to make a shallow copy of a list
i A e.4- A-i-iA - n o -a a ci
list_one = [1, 2, 3, 4, 5]
list_two = list_one
list_two[l] = 4
print(list_one)
print(list_two)
# [1, 4, 3, 4, 5]
# [1, 4, 3, 4, 5]
How to make a deep copy of a list
import copy
list_one = [1, 2, 3, 4, 5]
1i st_two = copy.deepcopy(1i st_one)
list_two[l] = 4
print(1ist_one) # [1, 2, 3, 4, 5]
print(list_two) # [1, 4, 3, 4, 5]
How to slice a list
The syntax for slicing a list
mylist[start:endzstep]
Code that slices with the start and end arguments
numbers = [52, 54, 56, 58, 60, 62]
numbers[0:2] # [52, 54]
numbers[:2] # [52, 54]
numbers[4:] # {60, 62]
Code that slices with the step argument
numbers[0:4:2] #[2,6]
numbers [: :-l] # [62, 60, 58, 56, 54, 52]
How to concatenate two lists with the + and += operators
inventory = ["staff", "robe"]
chest = ["scroll", "pestle"]
combined = inventory + chest
print(inventory)
inventory += chest
print(inventory)
# ["staff", "robe", "scroll", "pestle"]
# ["staff", "robe"]
# ["staff", "robe", "scroll", "pestle"]
# ["staff", "robe", "scroll", "pestle"]
Description
• The assignment operator makes a shallow copy of a list, so both list variables refer
to the same list. In contrast, the deepcopyO function of the copy module makes a
deep copy of the list so the list variables refer to two different lists.
• You can slice a list to get a subset of the original list. And you can concatenate lists
by using the + operator or the += operator.
Figure 6-10 How to copy, slice, and concatenate lists
188 Section 1 Essential concepts and skills
How to work with tuples
A tuple is a sequence that works much like a list. As a result, you can use
many of the same skills that you learned for working with lists when you're
working with tuples. The difference is that tuples are immutable, so they can't
be changed. As a result, you can't use any of the skills for adding, modifying, or
removing items. Figure 6-11 shows how to work with tuples.
How to create a tuple
To create a tuple, you use a syntax that's similar to the one for creating a list.
The difference is that you use parentheses to enclose the items in a tuple, not
brackets.
Most of the time, you'll need to create tuples that contain multiple items like
the ones shown in the first example. However, if you need to create a tuple that
contains a single item, you must follow that item with a comma like this:
scores = (99,)
This creates a tuple named scores that contains one int value. Without the
comma, this code would not create a tuple. Instead, it would create an int value.
How to get items from a tuple
To access the items in a tuple, you use indexes within brackets, just as you
do for the items in a list. However, since a tuple is immutable, you can only use
this syntax to get items, not to set them.
The next example shows how you can unpack the items in a tuple by using
a multiple assignment statement. To do that, you code as many variables as there
are items in the tuple and then assign the tuple to those items.
The last example shows a function that returns three values. In this case, the
function automatically creates a tuple that contains the three values specified by
the return statement. Then, the function returns that tuple to the calling code so it
can be unpacked.
If you remember, the Pig Dice game presented at the end of chapter 4 used
code like this to return multiple values. Note, however, that most languages don't
let you return multiple values in this way.
Chapter 6 How to work with lists and tuples 189
How to create a tuple
mytuple = (iteml, item2, . . .)
Code that creates tuples
# a tuple of 5 floating-point numbers
stats = (48.0, 30.5, 20.2, 100.0, 48.0)
# a tuple of 6 strings
herbs = ("lavender", "pokeroot", "chamomile",
"valerian", "nettles", "oatstraw")
# a tuple that stores the data for a movie
movie = ("Monty Python and the Holy Grail", 197 5, 9.99)
Code that accesses items in a tuple
herbs[0] # lavender
herbs[-1] # oatstraw
herbs[1:4] # ('pokeroot', 'chamomile', 'valerian1)
herbs[1] = "red clover"
# TypeError: 'tuple' object does not support item assignment
Code that unpacks a tuple
tuple_values = (1, 2, 3)
a, b, c = tuple_values # a = 1, b=2, c=3
A function that returns a tuple
def get_location():
# the code that computes the values for x, y, and z goes here
return x, y, z
Code that calls the get_location() function and unpacks the returned tuple
x, y, z = get_location()
Description
• Like lists, tuples are data structures that can contain multiple items.
• Unlike lists, tuples are immutable. In other words, after a tuple has been created,
you can't add, remove, or set items.
• You can unpack the values of a tuple into multiple variables by using a multiple
assignment statement.
• Because tuples are immutable, they are more efficient than lists. As a result, you
should use a tuple whenever you know the items won't be changed.
Figure 6-11 How to work with tuples
190 Section 1 Essential concepts and skills
The Number Crunching program
To show how some of skills you've just learned can be applied, figure 6-12
presents a Number Crunching program that works with a tuple and a list. In
the mainQ function, the tuple consists of 11 integers from 0 to 50 counting by
fives. In contrast, the list consists of 11 integers where each integer is a random
number from 0 to 50. To create this list, the code creates a list that contains 11
items that are initialized to 0. Then, a for loop sets a random number from 0
through 50 in each of the 11 items. Next, the sort method sorts the list so the
random numbers are in sequence.
The rest of the main() function prints the items in the tuple and calls the
crunch_numbers() function to get and display the statistics for the tuple. Then,
it does the same for the list of random numbers. Note that the crunch_numbers()
function processes the numbers in both the tuple and the list.
When it's done processing the numbers, the crunch_numbers() function
displays the statistics for the tuple and the list: average, median, min, max, and
duplicate values (if any). To get those statistics, this function begins by using a
for loop to calculate the total of all items in the tuple or list. Then, it calculates
the average. Next, it calculates the index for the median value by dividing the
number of items by 2 and using the // operator to truncate the result. Then, it
uses that index to get the median value, which is the value that half the values
are below and half are above. That's followed by two statements that get the
minimum and the maximum values.
The get_duplicates() function returns any duplicate values contained by the
tuple or list. Of course, the tuple created by this code doesn't contain any
duplicate numbers. Although the statements for this function could have been
coded in the crunch_numbers() function, there are a couple benefits to breaking
this code out into its own function. To start, it breaks a large task down into
smaller and more manageable tasks. In addition, the function name clearly
identifies what the code does without having to use comments.
In any case, the get_duplicates() function starts by creating an empty list
named dups that stores the duplicates, if any, in the list. Then, a for loop cycles
through the numbers from 0 to 50, gets the count for each number, and appends
the number to the dups list if the count is greater than or equal to 2. When the
loop finishes, the return statement returns the dups list to the crunch_numbers()
function, which prints the statistics for the tuple or list.
Both of these functions are coded so they work with any odd number of
items in the tuple or list. This should give you some idea of how useful lists can
be for processing real data. To take this to another level, for example, you can
slice the list into four parts and then process the data for each quartile. You can
also build a random list with more items. That more items you use, the more the
medians and averages should level out.
Chapter 6 How to work with lists and tuples
The user interface
TUPLE DATA: (0, 5, 10, 15, 20, 25, 30, 35, 40, 45, 50)
Average = 25 Median = 25 Min = 0 Max = 50 Dups = []
RANDOM DATA: [4, 6, 19, 22, 26, 29, 29, 39, 42, 45, 47]
Average = 28 Median = 29 Min = 4 Max = 47 Dups = [29]
The code
import random
def crunch_numbers(data) :
total = 0
for number in data:
total += number
average = round(total / len(data))
median_index = len(data) // 2
median = data[median_index]
minimum = min (data)
maximum = max (data)
dups = get_duplicates(data)
print("Average =", average,
"Median =", median,
"Min =", minimum,
"Max =", maximum,
"Dups =", dups)
def get_duplicates(data):
dups = []
for i in range(51):
count = data.count(i)
if count >= 2:
dups.append(i)
return dups
def main():
fixed_tuple = (0,5,10,15,20,25,30,35,40,45,50)
random_list = [0] * 11
for i in range(len(random_list)):
random_li st[i] = random.randint(0, 50)
random_list.sort()
print ( "TUPLE DATA: ", fixed_tuple)
crunch_numbers (fixed_tuple)
print ()
pri nt("RANDOM DATA:", random_li st)
crunch_numbers(random_list)
# if started as the main module, call the main() function
if name == " main ":
main()
Figure 6-12 The Number Crunching program
192 Section 1 Essential concepts and skills
Perspective
A list is a data structure that is supported by all programming languages.
That's why this chapter is important to your development as a programmer. As
you progress through this book, you'll see that lists are used in a wide variety
of programs.
Terms
sequence
list
item
array
element
index
empty list
in keyword
for statement
for loop
immutable
mutable
list of lists
two-dimensional list
shallow copy
deep copy
tuple
unpack a tuple
multiple assignment statement
Summary
• A sequence is an ordered collection of items such as a list or tuple.
• A list contains a collection of items that can be accessed by index values.
• To modify a list by adding items or deleting items, you can use the methods
of a list including the appendQ, insertQ, removeQ, and pop() methods.
• To search for an item in a list, you can use the in keyword or the index()
method of a list.
• To process the items in a list, you typically use for loops, but you can also
use while loops.
• An object that's created from an immutable type such as the str or int type
can't be changed, but you can create a new object that's based on it.
• An object that's created from a mumble type such as a list can be changed.
• You can use a list of lists to store data in a erid of rows and columns. This is
also known as a two-dimensional list.
• When you make a shallow copy of a list, both variables refer to the same list.
As a result, any changes to one variable are reflected in the other variable.
• When you make a deep copy of a list, both variables refer to their own copy of the
list. As a result, changes to one variable aren't reflected in the other variable.
• A tuple works much like a list but is immutable instead of mutable. As a result,
after you create it, you can't add, set, or remove items.
Chapter 6 How to work with lists and tuples 193
Exercise 6-1 Use a list for the Test Scores
program
In this exercise, you'll modify a Test Scores program that gets the test scores
that a user enters and then calculates and displays the average test score. You'll
enhance this program by storing the test scores in a list and then getting and
displaying other statistics for the test scores, like this:
The Test Scores program
Enter ' x1 to exit
Enter test score:
Enter test score:
Enter test score:
Enter test score:
Total:
Number of Scores:
Average Score:
Low Score:
High Score:
Median Score
75
85
95
X
255
3
85
75
95
85
1. In IDLE, open the test_scores.py file that's in this folder:
python/exercises/chO6
2. Review the code, and test the program.
3. Modify the get_scoresO function so the test scores are stored in a list named
scores. This list should be returned by the function when all scores have been
entered. The function should still make sure that the entries are valid, but the
score_total and count variables aren't needed and shouldn't be updated.
4. Modify the process_scores() function so the scores list is its only argument.
Then, this function should use a for statement to total the scores in the list.
It should use the len() function to get the number of scores in the list. And it
should get the average by dividing the total scores by the length.
5. Modify the mainQ function so the list that's returned by the get_scores()
function is stored in a variable. Then, modify the call to the process_scores()
function so it passes just the scores list to it.
6. Test this program to make sure everything is working right.
7. Enhance this program by getting and displaying all of the other statistics
shown above. For an odd number of scores, the median score is the score that
has the same number of scores below it as above it. For an even number of
scores, calculate the median by taking the average of the two middle numbers.
194 Section 1 Essential concepts and skills
Exercise 6-2 Enhance the Movie List 2D
program
In this exercise, you'll modify the Movie List 2D program in figure 6-7 so it
provides a third column for each movie. Otherwise, this program should work
the same way it did before:
COMMAND MENU
list - List all movies
add - Add a movie
del - Delete a movie
find - Find movies by year
exit - Exit program
Command: add
Name: Gone with the Wind
Year: 193 9
Price: 14.95
Gone with the Wind was added.
Command: list
1. Monty Python and the Holy Grail (197 5) @
2. On the Waterfront (1954) @ 5.59
3. Cat on a Hot Tin Roof (1958) @ 7.95
4. Gone with the Wind (1939) @ 14.95
Command: find
Year: 1954
On the Waterfront was released in 1954
Command:
9.95
1. In IDLE, open the movie_list_2d.py file that's in this folder:
python/exercises/chO6
2. Enhance the program so it provides for the price column that's shown above.
3. Enhance the program so it provides a find by year function that lists all of the
movies that were released in the year that the user requests, as shown above.
7
How to work with file I/O
So far in this book, you've learned how to work with data in the main memory
of your computer. But when the program ends, that data is lost. Now, you'll
learn how to save that data in a file and how to read that data from the file. This
is known as file input and output, or file I/O.
An introduction to file I/O 196
How file I/O works 196
How7 to open and close a file 198
How to use text files 200
How7 to write a text file 200
How7 to read a text file 202
How7 to work with a list in a text file 204
The Movie List 1.0 program 206
How to use CSV files 210
How to write a CSV file 210
How to read a CSV file 212
How7 to modify the CSV format 212
The Movie List 2.0 program 214
How to use binary files 218
How7 to work with a binary file 218
The Movie List 3.0 program 220
Perspective 222
196 Section 1 Essential concepts and skills
An introduction to file I/O
The first two figures in this chapter show you how file I/O (input and output)
works and how to open and close files so you can access their data.
How file I/O works
To start, you should know that Python supports dozens of different file types.
These file types can be broken down into the two general types that are
summarized at the top of figure 7-1. A text file stores all of its data as characters
and each line ends with a new line character. Like a text file, a binary file can
store character data. However, it can also store numeric data types such as the int
and float types.
A CSV {comma-separated values) file is a type of text file that stores
multiple values in each line. Typically, a CSV file uses commas to separate each
value.
In this figure, the first example shows what a text file looks like when it's
opened by a text editor. More specifically, it shows what a CSV file looks like
when it's opened by Notepad. Here, there's one line for each of the three records
in the file, and each record contains two values that are separated by commas.
The second example shows what a binary file that contains the same data
looks like when it's opened by Notepad. Here, Notepad displays all of the data
in a single line since there aren't any new line characters. Also, the values for the
years look like gibberish because of the way numbers are stored.
When you use Python to work with one of these file types, you need to
follow a sequence of operations. First, you open the file. Then, you can read
the data from the file, or you can write data to the file. When you're through
processing the file, you need to close the file so the resources that are being used
are released to the system.
When a program writes data to a file, it saves the data that's in main
memory (or RAM) to disk. Then, when the program ends, it doesn't lose that
data. Instead, when it restarts, it can read the data from the disk file into main
memory. Since this allows data to persist across program restarts, this is known
as persistent data storage.
When you open, read, write, or close a file, an error called an exception
can occur. If, for example, you try to open a file that doesn't exist, an exception
occurs and the program crashes. In the next chapter, you'll learn how to handle
exceptions so you can prevent your program from crashing.
Incidentally, the extension for a plain text file is often txt, and the extension
for a CSV file is usually csv. In contrast, the extension for a binary file that
contains data is often bin or dat. When you're using Python, though, you can use
any extension for any type of file.
Chapter 7 How to work with file I/O
197
Two types of files
Type Description
Text
Binary
Contains one or more lines that contain text characters. In a text file, each line
ends with a new line character (\n). On Windows, this character is sometimes
preceded by a carriage return character (\r).
Common types include CSV files, JSON files, XML files, and HTML files.
Any file that isn't a text file. Many binary file formats contain parts that can be
interpreted as text. However, binary files typically contain a sequence of bytes
that are intended to be interpreted as something other than text characters.
Common types include compiled program files, image files, audio files, video
files, database files, and compressed files.
A CSV text file that's opened by a text editor
JD mov?es.csv - Notepad
(3
File Edit Format View Help
^onty Python and the Holy Grail,1975
Cat on a Hot Tin Roof,1958
On the Waterfront,1954
A binary file with the same data that's opened by a text editor
J\ movies.bin - Notepad
l~|E|
File Edit Format View Help
£-]q (]q (X Monty Python and the Holy Grailq-M-«e]q-(x-
Cat on a Hot Tin Roofq-X- *
The sequence of file operations
1. Open the file.
2. Write data to the file or read data from the file.
3. Close the file.
Description
• Data that's in main memory (RAM) is lost when a program ends. But data that's
saved in files on disk is available the next time a program needs to access it. Since
this data persists across program restarts, this is known as persistent data storage.
• A CSV (comma-separated values) file is a type of text file that stores multiple
values per line, typically using commas to separate each value.
• When I/O operations like opening, reading, or writing data to a file fail, an
exception occurs. In the next chapter, you'll learn how to handle these exceptions.
Figure 7-1 How file I/O works
198 Section 1 Essential concepts and skills
How to open and close a file
Figure 7-2 shows how to open a file. To do that, you can use the built-in
openQ function to create a file object. This function accepts both a file and a
mode argument.
The file argument specifies a path for a file. In this book, the examples only
specify the filename. As a result, the openQ function looks for the file in the
working directory, which is usually the same directory as the program file. If,
for example, the program file is in a directory named book_apps/ch07, the open
command usually looks in that directory.
The mode argument specifies the mode for the file, and four of these modes
are summarized in the second table in this figure. Typically, a program uses read
mode to read data from a file, and write mode to write data to a file. However,
you can also use append mode to add a line to the end of an existing file. As you
will see in figure 7-10, you use binary mode in combination with read or write
mode when you're working with binary files.
One of the main differences between the read, write, and append modes is
what they do if the open() function can't find the file. In that case, the read mode
causes a file not found error to occur. However, the write and append modes
create the file and write the appropriate data to the file.
When you open a file object, some of the operating system's resources are
used to work with that object. As a result, when you're done working with the
file object, you should close the file object. This frees the resources that the file
object is using and prevents problems that can occur if you don't close the file.
To close a file object, you can call the closeQ method of the file object as
shown in the first example in this figure. But if an exception occurs between the
opening and closing of the file, the close statement is never executed and the
resources aren't released.
To avoid this, you should use a with statement to automatically close a file
when you're done using it, even if an error occurs. In this figure, the syntax
summary shows that you code the open() function for a file in the first line of the
with statement. Then, you code the block of statements that you want to execute
while the file is open. When Python finishes executing that block of statements,
it automatically closes the file.
This is illustrated by the last two examples in this figure. The first one opens
a file in write mode, and it closes the file after it executes the one statement in
the block. The second example opens a file in read mode, and it closes the file
after it executes the printQ function. In both cases, this code automatically closes
the file, even if the statements in the block result in an error that causes the
program to crash. For that reason, you should use with statements to open the
files in all of your programs.
Chapter 7 How to work with file I/O
199
The built-in open() function
Function
Description
open (file, mode) Returns a file object for the specified file with the specified mode.
A few of the modes of the open() function
Character Mode Description
w
Read If the file doesn't exist, this mode causes a file not found error.
Write [f the file doesn't exist, this mode creates it. If the file already
exists, this mode erases all existing data.
Append If the file doesn't exist, this mode creates it. If the file already
exists, this mode appends the data to the end of the file.
Binary Use for binary files along with "r" or "w" mode.
The close() method of a file object
Method Description
close () Closes the file, which ends all operations and frees all resources.
How to open a file in write mode and close the file manually
outfile = open ("test .txt", "w" )
outfile.write ("Test")
outfile. close ()
How to use with statements to open and close files
The syntax of the with statement for file I/O
with open (file, mode) as file_objectz
statements...
Code that opens a text file in write mode and automatically closes it
with open ("test -txt", "w") as outfile:
outfile.write("Test")
Code that opens a text file in read mode and automatically closes it
with open("test.txt", "r") as infile:
print (infile.readline ())
Description
• When you open a file, you create a file object. Then, you can use the methods of the
file object to work with the file.
• When you use a with statement to open a file, it automatically closes the file after
executing its block of statements. That frees all resources used by the file, even if
an exception occurs and the program ends prematurely.
• If you don't specify a path for the file, the openQ function uses the working
directory, which is usually the same directory as the program.
Figure 7-2 How to open and close a file
200 Section 1 Essential concepts and skills
How to use text files
Now that you know how to open and close files, you're ready to learn how to
read and write data to a plain text file. This is the simplest type of text file.
How to write a text file
When you open a file object in write or append mode, you can use its write()
method to write or append data to a text file as shown in figure 7-3. With either
mode, you pass one string as an argument. However, you can convert other data
types such as the int and float types to the str type before you write them to the
file. In addition, you can include a new line character to end each line in the text
file.
The two examples in this figure show how that works. The first example uses
write mode to create a new file and write one line to it. The second example uses
append mode to append a line to the file. However, both examples pass a string
that ends with a new line character.
The third example shows the contents of a text file that contains the data that
was written by the first two examples. This data consists of a name, a new line
character, another name, and another new line character. However, if you open
this text file in a text editor, the editor doesn't display the new line characters.
Instead, it starts a new line after each new line character as shown by the last
example in this figure.
Chapter 7 How to work with file I/O
201
The write() method of a file object
Method
Description
write (str) Writes the specified string to the file. If you want to start
a new line, you must include the new line character.
How to write one line to a text file
with open ("members, txt", "w") as file
file.write( "John CleeseXn")
How to append one line to a text file
with open("members.txt", "a") as file
file.write ("Eric Idle\n")
The contents of the text file after the two lines have been written
John CleeseXnEric IdleXn
The contents of the text file when viewed in a text editor
John Cleese
Eric Idle
Description
• To write data to a text file, you can use the writeQ method of its file object.
• When you write data to a file, the data is written from main memory (RAM) to a
file on a disk drive.
Figure 7-3 How to write a text file
202 Section 1 Essential concepts and skills
How to read a text file
After you open a file and create a file object, you can use the three methods
in the table in figure 7-4 to read data from the file. Or, you can use a for
statement to get the data from the lines in the file object.
In this figure, the four examples show how this work. All of these omit the
mode argument of the openQ method. Then, since read mode is the default, the
files are opened in read mode.
In the first example, a for loop gets and prints each line of the file to the
console. Since each line already ends with a new line character, this code sets
the end argument of the print() method to an empty string. That way, the print()
method doesn't add a second new line character to each line. In this example,
the code doesn't call any of the read methods in the table. That's because the for
loop automatically calls the readline() method to get the next line in the file.
In contrast, the next three examples do call the read methods. For instance,
the second example uses the read() method to read the entire file and return its
contents as a string. Then, it prints that string to the console.
The third example uses the readlines() method to read the entire file and
return its contents as a list. Then, it prints the first two items in the list to the
console.
The fourth example uses the readline() method to read the first two lines of
the file and print them to the console. This works like the third example, except
that it doesn't read the entire file at once. Instead, it reads the first line and prints
it to the console. Then, it reads the second line and prints it to the console.
For a small file like the one in this figure, all of the read methods work
equally well. However, for a large file, you'll probably want to use the readline()
method since it only reads one line into memory at a time. Conversely, the read()
and readlines() methods read the entire file into memory at once, which could
have a negative impact on performance if the computer doesn't have enough
memory to store the entire file.
Chapter 7 How to work with file I/O
203
Three read methods of a file object
Method
read()
readlines()
readline()
Description
Reads the entire file and returns its contents as a string.
Reads the entire file and returns it as a list.
Reads the next line in the file and returns its contents as a string.
How to use a for statement to read each line of the file
with open("members.txt") as file:
for line in file:
print(1ine, end="")
print()
How to read the entire file as a string
with open ("members, txt") as file:
contents = file.read()
print(contents)
How to read the entire file as a list
with open ("members, txt") as file:
members = file.readlines () ;
print(members[0], end="")
print(members[1])
How to read each line of the file
with open ("members. txt") as file
memberl = file .readline();
print(memberl, end="")
member2 = file .readline() ;
print (member2)
The result that's printed to the console by all four examples
John Cleese
Eric Idle
Description
• To read data from a text file, you can use a for statement to iterate through the lines
in the file object. Or, you can call the read methods of the file object.
• When you read data from a file, the data is read from the file on disk into main
memory (RAM).
Figure 7-4 How to read a text file
204 Section 1 Essential concepts and skills
How to work with a list in a text file
Because it's common for a program to store its data in a list, figure 7-5
shows how to write a list to a text file and how to read a list from a text file. In
the first set of examples, two names are stored in a members list. Then, a for
loop uses the write() method of the file object to write each member in the list to
the file. To make that work, this code adds a new line character to the end of the
string for each member.
To read that file, a for loop gets the string for each line in the file. Then, the
replace() method of the string replaces the new line character with an empty
string. After that, this code appends the string to the members list. When the loop
finishes, a print() function prints the members list to the console.
The second set of examples in this figure shows how this works with integer
data. The writing example works the same as before, except that the integer for
the year must be converted to a string before the string can be written to the file.
The reading example works the same as before, except that the year string must
be converted to an integer.
In these examples, the replace() method of a string object removes the new
line character from each string. You'll learn more about string methods like this
in chapter 10.
Chapter 7 How to work with file I/O 205
How to write and read a list of strings
How to write the items in a list to a file
members = ["John Cleese", "Eric Idle"]
with open ("members, txt", "w") as file:
for m in members:
file.write (m + "\n") # adds new line character
How to read the lines in a file into a list
members = []
with open("members.txt") as file:
for line in file:
line = line.replace("\n", "") # removes new line character
members.append(1ine)
print(members)
The result that's printed to the console
['John Cleese', 'Eric Idle']
How to write and read a list of numbers
How to write the items in a list to a file
years = [1975, 1979, 1983]
with open("years.txt", "w") as years_file:
for year in years:
years_file.write(str(year) + "\n") # converts int to str
How to read the items in a list from a file
years = []
with open("years.txt") as file:
for line in file:
line = line.replace("\n", "")
years.append(int(line)) # converts str to int
print(years)
The result that's printed to the console
[1975, 1979, 1983]
Description
• When you read a text file into a list, you typically want to remove the new line
character that's at the end of each line. To do that, you can use the replace() method
of a string object.
• Before you can write a non-string value to a text file, you must convert it to a string
value. Later, when you read that string value, you can convert it back to its original
data type.
Figure 7-5 How to work with a list in a text file
206 Section 1 Essential concepts and skills
The Movie List 1.0 program
Figure 7-6 presents a Movie List program that stores a list of movies in a
text file. Like the Movie List program in the previous chapter, this one lets you
list the movies, add movies to the list, and delete movies from the list. However,
the program in this chapter saves the movie list in a file on disk. As a result, you
don't lose your changes to the movie list when you exit the program.
As you review the code for this program, keep in mind that it only works
if the file already exists. In practice, you can create a file like this by writing a
separate program that writes the starting set of lines to the file. Or, you can use
a text editor to do that. Once that's done, a program like this can read the file
without causing an exception.
With that in mind, the Python code begins by defining a global constant
named FILENAME that stores the name of the text file. Then, the code defines
two functions that use this elobal constant to write and read this file. Since this
constant only specifies the name of the file, not the path, the file must be in the
working directory, which is usually the same directory as the program file.
The write_movies() function gets the list that contains movies as its
argument. Then, it writes each movie in the list to the file by using the writeQ
method of the file object. But first, it adds a new line character to the end of each
movie name.
The read_movies() function reads each line in the file and appends it to the
movies list. But first, it replaces the new line character with an empty string.
When all of the movies have been read into the list, the function returns the list.
You should be able to follow the rest of this code since it's so similar to the
code in the previous chapter. The main difference is that the program calls the
write_movies() function whenever the user updates the movies list. As a result,
the add_movie() and delete_movie() functions call the write_movies() function
after they've updated the movies list.
Chapter 7 How to work with file I/O 207
The user interface
The Movie List program
COMMAND MENU
list - List all movies
add - Add a movie
del - Delete a movie
exit - Exit program
Command: list
1. Monty Python and the
2. Cat on a Hot Tin Roof
3. On the Waterfront
Command: add
Movie: Casablanca
Casablanca was added.
Command: list
1. Monty Python and the
2. Cat on a Hot Tin Roof
3. On the Waterfront
4. Casablanca
Command: del
Number: 4
Casablanca was deleted.
Holy Grail
Holy Grail
The code
FILENAME = "movies.txt"
def write_movies(movies):
with open (FILENAME, "w") as file:
for movie in movies:
file.write (movie + "\n" )
def read_movies():
movies = []
with open (FILENAME) as file:
for line in file:
line = line.replace("\n", "")
movie s.append(1ine)
return movies
def list_movies(movies):
for i in range(len(movies)):
movie = movies[i]
print(str(i+l) + ". " + movie)
print()
Page 1
Figure 7-6 The Movie List 1.0 program (part 1)
208 Section 1 Essential concepts and skills
In the second part of this figure, you should note that the mainQ function
calls the read_movies() function to read the movies list before it calls any of the
other functions. If the file doesn't exist, an exception occurs and the program
crashes.
However, if the file exists, the main() function reads the data into a movies
list, and it passes the list to the list_movies(), add_movie(), and delete_movie()
functions whenever it calls those functions. This works because the movies list is
mutable. As a result, the add_movie() and delete_movie() functions can add and
remove items in the list, and these changes are available to the main() function
because it has a variable that's assigned to the same list.
Chapter 7 How to work with file I/O 209
The code Page 2
def add_movie(movies):
movie = input("Movie: ")
movies.append(movie)
write_movies(movies)
print(movie + " was added.\n")
def delete_movie(movies):
index = int(input("Number: "))
movie = movies.pop(index - 1)
write_movies(movies)
print(movie + " was deleted.\n")
def display_menu():
print("The Movie List program")
print()
print ( "COMMAND MENU" )
print("list - List all movies")
print("add - Add a movie")
print("del - Delete a movie")
print("exit - Exit program")
print()
def main():
display_menu()
movies = read_movies()
while True:
command = input("Command: ")
if command == "list":
list_movies (movies)
elif command == "add":
add_mov i e(movi e s)
elif command == "del":
delete_movie (movies)
elif command == "exit":
print ("Bye!")
break
else:
print("Not a valid command. Please try again.")
if name == " main ":
main()
Figure 7-6 The Movie List 1.0 program (part 2)
210 Section 1 Essential concepts and skills
How to use CSV files
When you use a plain text file to store data, the only separators are the new
line characters. So, if you want to store several items of data on a single line, you
can use CSV files for your data. Then, each line is a row (or record) that ends
with a new line character, and each row consists of one or more columns (or
fields) that are typically separated by commas. To make it relatively easy to work
with this type of file, Python provides a csv module.
How to write a CSV file
Figure 7-7 shows how to write a movies list with three rows and two
columns to a CSV file. Before you can write the list to disk, though, you need
to import the csv module. Then, you can use the functions and objects available
from the csv module.
The third example shows how to write the data in the list to the CSV file.
Here the with statement begins by using the open() function to open the CSV
file. This works much like opening a text file, but the openQ function specifies
a third argument named newline with a value of an empty string This enables
universal newlines mode, which allows the csv module to read and write new
lines correctly for all operating systems.
Inside the with statement, the first statement calls the writerQ function of
the csv module to get a CSV writer object. Then, the second statement calls the
writerows() method of that object to write the movies list to the CSV file. This
creates a CSV file with the format shown in this figure.
Chapter 7 How to work with file I/O
211
The writerQ function of the CSV module
Function
Description
writer (file) Returns a CSV writer object for the file. This writer object
converts the data into comma-separated vales.
The writerowsQ method of the CSV writer object
Method
Description
writerows (rows) Writes all specified rows to the file specified by the writer
object using the CSV format specified by the writer object.
A 2-dimensional list with 3 rows and 2 columns
movies = [["Monty Python and the Holy Grail", 1975],
["Cat on a Hot Tin Roof", 1958],
["On the Waterfront", 1954]]
How to import the csv module
import csv
How to write the list to a CSV file
with open ("movies .csv" , "w", newline="") as file
writer = csv.writer (file)
writer.writerows(movies)
The contents of the CSV file
Monty Python and the Holy Grail,1975
Cat on a Hot Tin Roof,1958
On the Waterfront,1954
Description
• A comma-separated values (CSV) file stores tabular data in a text file. Within this
file, each line is a row that ends with a new line character, and each row contains
one or more columns that are typically separated by commas.
• Rows and columns can also be referred to as records and fields.
• To write data to a CSV file, you use the writerQ function of the csv module to get a
writer object. Then, you use the methods of the writer object to write data.
• When you open a CSV file for reading or writing, you typically specify an
argument named newline with a value of an empty string. This enables universal
newlines mode, so the reading and writing operations work correctly for all
operating systems.
Figure 7-7 How to write a CSV file
212 Section 1 Essential concepts and skills
How to read a CSV file
The first example in figure 7-8 shows how to read the CSV file that was
created by the code in the previous figure. To start, it opens the CSV file. Here
again, since this code doesn't specify the mode for opening the file, Python uses
the default mode, which is read mode.
Inside the with statement, the first statement calls the readerQ function of
the csv module to get a CSV reader object for the file. Then, a for loop gets each
row in the reader object. Within this loop, a print() function displays the name of
the movie followed by its year in parentheses. Since the year value in the movies
list was stored as an integer, that integer has to be converted to a string before it
can be displayed by the print() function.
How to modify the CSV format
Historically, one of the problems with the CSV format has been that it
doesn't work correctly if the data itself contains commas, quotation marks, or
new line characters. If, for example, an address field contains a comma, the
comma is interpreted as the end of the field and the start of another field.
With Python, though, the csv module automatically handles this by adding
double quotes around any columns that contain special characters such as
commas and new line characters. It does that before writing the data to disk,
and it doesn't enclose any other fields with double quotes. Then, when the csv
module reads this data, it interprets the data correctly.
Occasionally, though, you may have to read a file that has been created in
a slightly different format. For example, all of the fields might be enclosed in
double quotation marks. Or, single quotation marks might be used to enclose the
fields. Or. tab characters might be used as the field separators instead of commas.
To handle these variations, the csv module lets you customize the file
formatting by using optional arguments when you read and write files. To
illustrate, the table in this figure summaries a few of the formatting arguments.
As the examples after the table show, you code these arguments when you create
a reader or writer object. Both of these examples change the field separator from
commas to tabs.
Chapter 7 How to work with file I/O
213
The reader() function of the csv module
Function
Description
reader (file) Returns a CSV reader object for the file. This
reader object gets the data from the CSV file.
How to read data from a CSV file
with open ("movies .csv", newline="") as file:
reader = csv. reader (file)
for row in reader:
print(row[0] + " (" + str(row[l]) + ")")
The console
Monty Python and the Holy Grail (1975)
Cat on a Hot Tin Roof (1958)
On the Waterfront (1954)
Some optional arguments that can be used to change the CSV format
Argument Description
quoting=csv.QUOTE_MINIMAL
quotechar=■"'
delimiter=","
Specifies when quotes are written and read. It can be
set to any of the QUOTE constants in the csv module.
It defaults to QUOTE_MINIMAL, which only adds
quotes to columns that contain special characters
such as the delimiter, quote, or end of line characters.
Specifies the character that's used to quote columns.
It defaults to a double quote (").
Specifies a one-character string used to separate
fields. It defaults to a comma.
Code that changes the delimiter for the writer object
writer = csv.writer (file, delimiter="\t" )
Code that changes the delimiter for the reader object
reader = csv.reader (file, delimiter="\t" )
Description
• To read data from a CSV file, you use the readerQ function of the csv module to
create a reader object. Then, you can use a for statement with the reader object to
read the data in the file.
• By default, reader and writer objects use commas to delimit the columns of a row
and only add quotes to columns when necessary. However, when you create reader
and writer objects, you can specify arguments that change that behavior.
Figure 7-8 How to read a CSV file and how to modify the CSV format
214 Section 1 Essential concepts and skills
The Movie List 2.0 program
Figure 7-9 presents a Movie List 2.0 program that stores a two-dimensional
list of movies in a text file. Here, the data for each movie consists of the movie
name and the year that it was released. Like the Movie List 2D program in the
previous chapter, this one lets you list the movies, add movies to the movies list,
and delete movies from the movies list. However, the program in this chapter
stores this data in a file. As a result, any changes the user makes to the list are
available even if the user exits and restarts the program.
Like the Movie List 1.0 program presented earlier in this chapter, the Movie
List 2.0 program only works if the file already exists. In practice, you can create
a file like this by writing a separate program that writes the starting set of rows
to the file. Or, you can use a spreadsheet program like Excel to create the starting
file and save it in CSV format. Once that's done, a program should be able to
read the file without causing an exception.
With that in mind, the Python code for this program begins by defining a
global constant named FILENAME that stores the name of the CSV file. Then,
the code defines two functions that use this elobal constant to write and read
this file. Since this constant only specifies the name of the file, not the path, the
file must be in the working directory, which is usually the same directory as the
program file.
The write moviesO function eets the list that contains the movies as its
argument. Then, it writes each movie in the list to the file by using the writerows
() method of the writer object. This automatically handles the formatting of the
CSV records that are written to the disk.
The read_moviesQ function starts by creating an empty movies list. Then,
it uses a for statement to read each row in the reader object and append it to the
movies list. When it finishes appending all of the movies to the movies list, this
function returns the list.
Chapter 7 How to work with file I/O 21 5
The user interface
The Movie List program
COMMAND MENU
list - List all movies
add - Add a movie
del - Delete a movie
exit - Exit program
Command: list
1. Monty Python and the Holy Grail
2. Cat on a Hot Tin Roof (1958)
3. On the Waterfront (1954)
Command: add
Name: Gone with the Wind
Year: 193 9
Gone with the Wind was added.
Command: list
1. Monty Python and the Holy Grail
2. Cat on a Hot Tin Roof (1958)
3. On the Waterfront (1954)
4. Gone with the Wind (1939)
Command: del
Number: 4
Gone with the Wind was deleted.
(1975)
(1975)
The code Page 1
import csv
# a file in the current directory
FILENAME = "movies.CSV"
def write_movies(movies):
with open (FILENAME, "w", newline="") as file:
writer = csv.writer (file)
writer .writerows (movies)
def read_movies():
movies = []
with open (FILENAME, newline="") as file:
reader = csv. reader (file)
for row in reader:
movies.append(row)
return movies
Figure 7-9 The Movie List 2.0 program (part 1)
216 Section 1 Essential concepts and skills
You should be able to follow the rest of the code in this program since
it's so similar to the code in the previous chapter. The main difference is that
this program calls the write_movies() function whenever the user updates the
movies list. To do that, the add_movie() and delete_movie() functions call the
write_movies() function after they update the movies list. That way, the program
always saves changes to the file and never loses data even if the program crashes
later.
You should also note that the main() function calls the read_movies()
function to get the movies list before any of the other functions are called. Then,
it passes that list to the list(), add(), and deleteQ functions whenever it calls
them. This works because the movies list is mutable. As a result, the main()
function, the add_movie() function, and the delete_movie() function all work
with the same movie list.
Chapter 7 How to work with file I/O 217
The code Page 2
def list_movies(movies):
for i in range(len(movies)):
movie = movies[i]
print(str(i+l) + ". " + movie[0] + " (" + movie[l] + ")")
print()
def add_movie(movies):
name = input("Name: ")
year = input("Year: ")
movie = []
movie.append(name)
movie.append(year)
movies.append(movie)
write_movies(movies)
print(name + " was added.\n")
def delete_movie(movies):
index = int(input("Number: "))
movie = movies.pop(index - 1)
write_movies(movies)
print(movie[0] + " was deleted.\n")
def display_menu():
print("The Movie List program")
print()
print("COMMAND MENU")
print("list - List all movies")
print("add - Add a movie")
print("del - Delete a movie")
print("exit - Exit program")
print()
def main():
display_menu()
movies = read_movies()
while True:
command = input("Command: ")
if command.lower() == "list":
list_movies(movies)
elif command.lower() == "add":
add_mov i e(movi e s)
elif command.lower() == "del":
delete_movie (movies)
elif command.lower() == "exit":
break
else:
print("Not a valid command. Please try again.\n")
print("Bye!")
if name == " main ":
main()
Figure 7-9 The Movie List 2.0 program (part 2)
218 Section 1 Essential concepts and skills
How to use binary files
To make it easier to work with binary files, Python provides a standard pickle
module. This module automates the process of storing an object in a binary file.
Although this module works with most Python objects, it's commonly used with
lists.
How to work with a binary file
Figure 7-10 shows how to work with a binary file. As the table in this figure
shows, the pickle module provides a dump() method that saves an object such as
a list in a binary file. It also provides a loadQ method that reads an object such as
a list from a binary file.
Before you can use the pickle module to write an object to a file, you must
import it as shown in the second example in this figure. Then, the third example
shows how to write the movies list in this figure to a binary file. To do that, you
need to add b to the mode argument of the open() function to indicate that you
want to open a binary file. In this case, the code sets the mode to "wb" or "write
binary" mode.
Once this code opens the binary file in write binary mode, the dump()
method of the pickle module writes the movies list to a binary file. In Python,
this is known as pickling an object, but it's more generally known as serializing
an object.
The fourth example shows how to read the movies list from a binary file. To
start, it opens the binary file named movies.bin in "rb" or "read binary" mode.
Then, it calls the load() method of the pickle module and passes it the file object.
This causes the pickle module to read the list that's stored in the specified file. In
Python, this is known as un-pickling an object, but it's more generally known as
de-serializing an object.
The fourth example also prints the list to the console. Note that the console
doesn't include quotes around the movie's year. This shows that the binary file
stores the year as an int value, not as a str value as it would be in a text file.
Chapter 7 How to work with file I/O
219
Two methods of the pickle module
Description
Method
dump (object, bfile) Writes the specified object to the binary file.
load (bfile) Reads an object from the specified binary file.
A 2-dimensional list with 3 rows and 2 columns
movies = [["Monty Python and the Holy Grail", 1975],
["Cat on a Hot Tin Roof", 1958],
["On the Waterfront", 1954]]
How to import the pickle module
import pi ckle
How to write an object to a binary file
with open ("movies .bin" , "wb") as file:
pickle.dump (movies, file)
# use wb mode for write binary
How to read an object from a binary file
with open ("movies .bin" , "rb") as file:
movie_list = pickle, load (file)
print(movie_list)
# use rb mode for read binary
The console
[['Monty Python and the Holy Grail', 1975], ['Cat on a Hot
Tin Roof, 1958], ['On the Waterfront', 1954]]
Description
• You can use methods of the pickle module to work with binary files. It can be used
to dump (write) an object like a list to a file and to load (read) an object like a list
from a binary file.
• Storing an object in a binary file is known as object serialization, and reading an
object from a binary file is known as de-serialization.
Figure 7-10 How to work with a binary file
220 Section 1 Essential concepts and skills
The Movie List 3.0 program
Figure 7-11 presents the Movie List 3.0 program. This program works like
the Movie List 2.0 program, but it stores the list of movies in a binary file instead
of a CSV file. Since the user interface is the same for both programs, the
difference in file type is transparent to the user of the program. Also, because
most of the code for the Movie List 3.0 program is the same as the code for the
Movie List 2.0 program, this figure only shows the code that's different.
Here again, this program only works if the file already exists. If necessary,
you can create a file like this by writing a separate program that writes the
starting list to the file. Once that's done, a program can read the file without
causing an exception because the file doesn't exist.
In the Python code, the write_movies() and read_movies() functions use the
pickle module to write and read the list of movies in a binary file. To make that
possible, the code for this program begins by importing the pickle module. Then,
it defines a FILENAME constant for a binary file named movies.bin.
The write_movies() function accepts the list of movies that's created by the
program as an argument. Then, it uses the dumpO method of the pickle module
to write this list to the binary file. But since this program uses a binary file, this
code doesn't need to convert the year for each movie from an int value to a str
value. Instead, the binary file just stores the int value.
Similarly, the read_movies() function uses the pickle module to read the list
object from the binary file. Since this program writes the list to a binary file, it
reads the year for each movie as an int value, not as a str value. As a result, the
list_movies() function must convert this int value to a str value before it can
display it on the console. To do that, the list_moviesQ function uses the str()
function.
Chapter 7 How to work with file I/O 221
The user interface
The Movie List program
COMMAND MENU
list - List all movies
add - Add a movie
del - Delete a movie
exit - Exit program
Command: list
1. Monty Python and the Holy Grail
2. Cat on a Hot Tin Roof (1958)
3. On the Waterfront (1954)
Command: add
Name: Gone with the Wind
Year: 193 9
Gone with the Wind was added.
(1975)
The code for the two file I/O functions
import pi ckle
FILENAME = "movies.bin"
def write_movies(movies):
with open (FILENAME, "wb") as file:
pickle, dump (movies, file)
def read_movies():
movies = []
with open (FILENAME, "rb") as file:
movies = pickle, load (file)
return movies
The code for the list_movies() function
def list_movies(movies):
for i in range(len(movies)):
movie = movies[i]
print(str(i+l) + ". " + movie[0] + " (" + str(movie[1]) + ")")
print()
Description
• The user interface for the Movie List 3.0 program is the same as the interface for
the Movie List 2.0 program, and most of the code for these programs is the same.
That's why this figure presents only the functions that have been changed.
• The write_movies() and read_movies() functions use the pickle module to write the
list of movies to a binary file and to read the list from the binary file.
• The list_movies() function must convert the movie's year from an int value to a
string in order to display it because the binary file stores the year as an int value.
Figure 7-11 The Movie List 3.0 program
222 Section 1 Essential concepts and skills
Perspective
In this chapter, you learned how to store data in plain text, CSV, and binary
files. To do that, you learned how to use file objects, as well as the csv and
pickle modules.
But you should also know that Python provides modules for working
with other types of files such as JSON and XML files. In addition, third-party
modules exist for working with other types of files such as spreadsheet files.
Beyond that, you should know that most serious applications store their
data in databases. That's why chapter 17 shows how to use Python to work with
a database.
Terms
file I/O
text file
binary file
CSV (comma-separated values) file
main memory (RAM)
persistent data storage
exception
file object
with statement
row
column
record
Summary
• Data that's stored in main memory (RAM) is lost when the program ends.
But if you save that data to a file, you provide persistent data storage. Then,
that data is available the next time the program runs.
• Python supports several different types of text files, including CSV
(comma-separated values) files. Python also supports several different types
of binary files.
• You can use a with statement to open a file object that's only available for
its block of statements. After Python executes the block of statements, it
automatically closes the file object, even if an error occurs.
• In a CSV file, each line in the file is a row. and each row consists of one or
more columns that are typically separated by commas. Rows and columns
can also be referred to as records and fields.
• You can use the pickle module to write a Python object to a binary file or to
read a Python object from a binary file. In Python, this is known as pickling
and un-pickling an object. It's more generally known as serializing and
de-serializing an object.
field
universal newlines mode
writer object
reader object
pickle module
dump a binary file
load a binary file
pickling
un-pickling
serializing
de-serializing
Chapter 7 How to work with file
Exercise 7-1 Create a CSV file for trip data
In this exercise, you'll modify the Miles Per Gallon program so it stores the
data for each calculation in a CSV file. Then, the program that you develop for
exercise 7-2 should be able to display the data like this:
Distance
225
1374
2514
Gallons
17
64
79
MPG
13.24
21.47
31.82
1. In IDLE, open the mpg_write.py file that's in this folder:
python/exercises/ch07
2. Review the code, and run the program so you remember how it works.
3. Enhance the program so it stores the data for each calculation, or trip, in a
two-dimensional list. For each calculation, these values should be put in the
list: miles driven, gallons of gas used, and the calculated MPG value.
4. Enhance the program so it saves the data in the list to a file named trips.csv
when the user wants to exit from the program.
5. Test the program to make sure it works. To do that, you can open the CSV file
with a spreadsheet program like Excel.
Exercise 7-2 Keep tri data in a CSV file
In this exercise, you'll modify the Miles Per Gallon program so it adds to the
data in the file that you created in exercise 7-1. This program should display the
data for each trip that's entered in a CSV file as shown here:
The Miles
Distance
225
1374
2514
Per Gallon
Gallons
17
64
79
Enter miles driven:
Enter gallons of gas:
Miles Per
Distance
225
1374
2514
274.0
Gallon:
Gallons
17
64
79
18.5
program
MPG
13.24
21.47
31.82
274
: 18.5
14.81
MPG
13.24
21.47
31.82
14.81
More entries? (y or n):
1. In IDLE, open the mpg.py file that's in this folder:
python/exercises/ch07
224 Section 1 Essential concepts and skills
2. Add a write_trips() function that writes the data from a two-dimensional list
named trips that's passed to it as an argument. This list contains the data for
each trip that's entered, and it should be written to a CSV file named trips.csv.
As the console above shows, the data for each trip consists of miles driven,
gallons of gas used, and the calculated MPG value.
3. Add a read_trips() function that reads the data from the trips.csv file and
returns the data for the trips in a two-dimensional list named trips.
4. Add a list_trips() function that displays the data in the trips list on the console,
as shown above.
5. Enhance the mainQ function so it starts by getting the data from the CSV file
and listing it as shown above.
6. Enhance the mainQ function so it adds the last trip that's entered to the trips
list after it calculates the MPG. Then, display the data for the updated trips
list.
7. Test all aspects of the program until you're sure that it works correctly.
Exercise 7-3 Keep trip data in a binary file
In this exercise, you'll modify the programs that you created for exercises 7-1
and 7-2 so they create and use a binary file instead of a CSV file. Otherwise,
everything should work the same.
Modify the CSV version of the write program
1. Open the mpg_write.py file that you created in exercise 7-1. Then, save it as
mpg_write_binary.py in the same directory.
2. Modify this program so it saves the list as a binary file instead of a CSV file.
The file should be named trips.bin.
3. Test the program to make sure it works. To do that, add statements that read
the file at the end of the program and display the list that has been read.
Modify the CSV version of the trip program
4. Open the mpg.py file that you created in exercise 7-2. Then, save it as
mpg_binary.py.
5. Modify this program so it works the same as it did with the CSV file.
6. Test this program to make sure it works.
8
How to handle exceptions
In chapter L you were introduced to exceptions. By now, you have most likely
experienced many of them as you developed and tested your programs. In this
chapter, you will learn how to handle exceptions so your programs don't crash
when an exception occurs.
How to handle a single exception 226
How exceptions work 226
How to use a try statement to handle one type of exception 228
The Total Calculator program 230
How to handle multiple exceptions 232
How to use a try statement to handle multiple exceptions 232
How7 to get the information from an exception object 234
The Movie List 2.0 program 236
Two more skills 240
How to use a finally clause 240
How7 to raise an exception 242
Perspective 244
226 Section 1 Essential concepts and skills
How to handle a single exception
For some statements, only one kind of error can occur. In that case, you only
need to handle that kind of error. The next three fieures show how.
How exceptions work
Figure 8-1 shows how an exception can occur. In this example, the first
statement uses the int() function to convert a user entry, which is always a string,
to an integer value. But if the user enters a value that the int() function can't
convert to an integer, an exception is thrown (occurs) and an error message like
the one in the second console is displayed.
The information that's displayed typically includes the line of code that
caused the exception, the name of the exception, and a brief message about the
exception. In this figure, for example, the second console shows the name of the
file that stores the code, the number of the line that caused the exception, and
the line of code itself. Then, this information displays the type of the exception
(ValueError) and a brief description of the exception.
In some cases, an exception is thrown because of a programming error like
using a variable name that doesn't exist. You need to fix this type of error before
your program is ready for use. In other cases, like the entry error in this example,
the exception should be handled by the program so it doesn't cause the program
to crash. That's called exception handling, and that's what this chapter is about.
Chapter 8 How to handle exceptions
227
Code that can cause a ValueError exception
number = int(input("Enter an integer: "))
print("You entered a valid integer of " + str(number) + ".")
print("Thanks I")
The console for a valid integer
Enter an integer: 5
You entered a valid integer of 5
Thanks I
The console for an invalid integer
Enter an integer: five
Traceback (most recent call
last):
File "C:\murach\python\book_
number = int(input("Ent er
ValueError: invalid literal
_figs\ch07\figl
a valid
for int()
• PY",
integer:
with
base
line
"))
10:
1, in
'five'
<module>
Two functions that can cause a ValueError exception
Function Reason for exception
int (data) Can't convert the data argument to an int value.
float (data) Can't convert the data argument to a float value.
Description
• When an error occurs at runtime, it can be referred to as throwing an exception.
• When an exception is thrown, Python ends the program and prints information
about the exception to the console. The last line of this information includes the
type of the exception and a brief description of the exception.
• Some exceptions occur due to programming errors. You need to fix those errors
before the program is ready for use.
• Some exceptions occur due to causes outside of the program. These exceptions
need to be handledhy your Python code so the program doesn't crash when they
occur.
Figure 8-1 How exceptions work
228 Section 1 Essential concepts and skills
How to use a try statement to handle one type
of exception
To handle exceptions, you use a try statement, as shown in figure 8-2. As the
syntax summary shows, you start by coding a try clause that contains a block of
one or more statements that may cause an exception. Then, you code an except
clause that contains a block of one or more statements that should be executed if
an exception is thrown in the try block.
The first example in this figure shows how this works for a user entry that
can't be converted to a valid integer. Here, the int() function is coded within a try
clause, and an except clause is coded for the exception named ValueError. Then,
if the user enters a valid int value, the intQ function converts the input to the int
value, the first print statement prints a message to the console, and the program
continues with the print(J function after the try statement.
However, if the user enters an invalid integer so a ValueError is thrown,
program execution skips the print() function in the try clause and continues with
the statements in the except clause. In this case, the except clause just displays
an error message. Then, execution continues with the print statement after the try
statement.
In this example, the except clause specifies the ValueError so it is only
executed if that type of exception occurs. In contrast, the second example
doesn't specify the name of the exception. As a result, Python not only executes
the except clause if a ValueError occurs, but also if any other type of exception
occurs.
In general, it's a good practice to code the name of the exception in the
except clause. That way, your code can handle the exception in the way that's
best for that type of exception. You'll learn more about this in a moment.
Chapter 8 How to handle exceptions 229
The syntax for a try statement that catches an exception
try:
statements
except [ExceptionName] :
statements
How to handle a ValueError exception
try:
number = int(input("Enter an integer: "))
print("You entered a valid integer of " + str(number) + ".")
-► except ValueError:
print("You entered an invalid integer. Please try again.")
print("Thanks I")
The console for a valid integer
Enter an
integer: 5
You entered
Thanks I
a valid
integer
of
5.
The console for an invalid integer
Enter an integer: five
You entered an invalid integer. Please try again.
Thanks I
How to handle all exceptions
try:
number = int(input("Enter an integer: "))
print("You entered a valid integer of " + str(number) + ".")
■► except:
print("You entered an invalid integer. Please try again.")
print("Thanks I")
Description
• In a try statement, you code any statements that may throw an exception in the try
clause. Then, you can code an except clause that handles any exceptions that occur.
• If you don't code the name of an exception type in the except clause, the except
clause handles all types of exceptions that can occur.
• When an exception occurs, Python skips any remaining statements in the try clause
and executes the statements in the except clause.
• This is known as an exception handling.
Figure 8-2 How to use a try statement to handle one type of exception
230 Section 1 Essential concepts and skills
The Total Calculator program
To show how you can use a try statement in a program, figure 8-3 presents
the Total Calculator program. This program handles the ValueError exceptions
that can occur when the program tries to convert the strings that the user enters
for price and quantity to float and int values.
In the get_price() function for this program, a while loop gets an entry
from the user until it successfully converts the entry to a float value. When that
happens, the function returns the price to the calling statement and the while
loop ends. Otherwise, the except clause displays an error message, and the while
loop continues. This prompts the user for another entry.
The get_quantity() function works the same way, except that it prompts the
user for a quantity instead of a price. In addition, the entry must be a valid int
value, not a valid float value.
The main() function uses the get_price() and get_quantity() functions to get
the price and quantity from the user. Then, it uses the values that are returned in
a calculation knowing that both values are valid. Last, it displays the results.
In this program, the get_price() and get_quantity() function do a type of data
validation. However, this validation could be enhanced by checking to make
sure that both values are ereater than zero. These functions could also check to
make sure these entries don't exceed maximum values. You'll see enhanced data
validation like this later in this chapter.
Chapter 8 How to handle exceptions 231
The user interface
The Total Calculator program
Enter price: ten
Invalid decimal number.
Enter price: 9.99
Enter quantity: 2.5
Invalid integer. Please
Enter quantity: 3
PRICE: 9.99
QUANTITY: 3
TOTAL: 29.97
Please
try again.
try again.
The code
def get price():
while True:
try:
price = float (input ("Enter price: "))
return price
except ValueError:
print("Invalid decimal number. Please try again.")
def get_quantity():
while True:
try:
quantity = int(input("Enter quantity: "))
return quantity
except ValueError:
print("Invalid integer. Please try again.")
def main():
print("The Total Calculator program\n")
# get the price and quantity
price = get_price()
quant ity = get_quant ity()
# calculate the total
total = price * quantity
# display the results
print()
print("PRICE: ", price)
print("QUANTITY: ", quantity)
print("TOTAL: ", total)
if name == " main ":
main()
Figure 8-3 The Total Calculator program
232 Section 1 Essential concepts and skills
How to handle multiple exceptions
For some programs, such as the file I/O programs in the previous chapter, a
block of code could cause several different types of exceptions to occur. In that
case, it often makes sense to provide different exception handling code for each
of type of exception.
How to use a try statement
to handle multiple exceptions
Figure 8-4 starts by showing the Python hierarchy for five of the common
exceptions. Each of these exceptions is defined by a class, and you'll learn more
about classes in section 3 of this book. For now, you just need to know that a
class defines a type of exception object.
The Exception class is the most general type of exception and the parent
class of the child OSError and ValueError classes, which define more specific
exceptions. The OSError class in turn is the parent class of two even more
specific child classes: FileExistsError and FileNotFoundError.
In this figure, the example shows a try statement that uses three except
clauses to handle three different types of exceptions. When you code a statement
like this, the except clauses must be coded in sequence from the most specific
exception to the most general exception. Here, the try block contains some file
I/O code that could cause a FileNotFoundError or an OSError to occur. As a
result, except clauses are coded for both types of exceptions. The third exception
clause is for any other type of exception.
The benefit of using multiple except clauses is that you can handle each
type of exception in an appropriate way. Here, the code just displays a different
message for each type of exception, but the code could do more than that. In
some cases, for example, you might want to save as much data as possible and
shut down the program as gracefully as possible.
Keep in mind that some exceptions are caused by programming errors like
attempting to use an invalid index to access an item in a list. Although these
errors cause exceptions, you typically don't want to handle these exceptions with
try statements. Instead, you should fix your code to prevent these exceptions
from occurring in the first place.
Chapter 8 How to handle exceptions 233
The hierarchy for five common exceptions
Exception
OSError
FileExistsError
FileNotFoundError
ValueError
The syntax for a try statement with multiple except blocks
try:
statements
except Except ionNamei
statements
[ exc ept Except i onName:
statements] ...
Code that handles multiple exceptions
filename = input ("Enter filename: ")
movies = []
try:
with open (filename) as file:
for line in file:
line = line.replace("\n", "")
movies.append(1ine)
except FileNotFoundError:
print ("Could not find the file named " + filename)
except OSError:
print ("File found - error reading file")
except Exception:
print("An unexpected error occurred")
The console when a FileNotFoundError occurs
Could not find the file named films.txt
The console when an OSError occurs
File found - error reading file
The console when any Exception occurs
An unexpected error occurred.
Description
• In the hierarchy of the five common exceptions, Exception is the parent class of the
OSError and ValueError classes. These classes in turn can be referred to as child
classes of the Exception class.
• Similarly, the OSError class is the parent class of two child classes, the
FileExistsError and FileNotFoundError classes.
• The except clauses must be coded in sequence starting with the most specific
exception and ending with the least specific.
Figure 8-4 How to handle multiple exceptions
234 Section 1 Essential concepts and skills
How to get the information
from an exception object
The exception object for each type of exception contains some information
about the exception like the name of the exception class and its error message. In
figure 8-5, the code gets this information from the exception object. In addition,
it uses the exit() function of the sys module to terminate a program.
To get the information from the exception object, you start by coding the
as keyword in the except clause followed by a name that you can use for the
exception object. Then, you can use that name in a printQ function to display
the error message for the exception. In this figure, the code does that for the
FileNotFoundError and OSError exceptions.
You can also use the built-in type() function to get the class of the exception
object. In this figure, the code does that for the Exception class in the last except
clause. Here, the printQ function displays the class name, followed by the error
message for the exception object. This isn't illustrated by a console in this figure,
because it's hard to predict what type of exception will be caught by this clause.
Remember that an except clause for the Exception class is executed for any
exception that isn't handled by the preceding except clauses. In this case, the
type() function of the exception object is useful because it provides a way to
display the exception class. In contrast, the other except clauses know the classes
of the exceptions that they are going to handle so they don't need to use the
type() function.
In all three clauses, the exitQ function of the sys module stops the execution
of a program. This is something you'll frequently want to do for file I/O errors
when the program can't continue due to the type of exception that has occurred.
This is illustrated by the OSError that's handled by the second except clause.
Here, the message is "permission denied". So before the program can continue,
the permissions problem has to be resolved.
When you're coding the exception handling routines in your programs, you
could handle all exceptions with one except clause for the Exception class. Then,
you could use the same code to handle each type of exception. For example, the
write_movies() function in the Movie List program that's presented later in this
chapter uses one except clause to handle all exceptions that might occur.
In general, though, it's a better practice to code one except clause for each
type of exception that is likely to occur because you will often want to do more
than just display an error message and end the program. Then, you can finish
with an except clause for the Exception class that handles any unexpected
exceptions.
Chapter 8 How to handle exceptions
235
The built-in type() function
Description
Function
type (object) Returns the class for the specified object.
The exit() function of the sys module
Function
exit ()
Description
Exits the Python program.
The complete syntax for the except clause
except [Except ionName] [as name] :
statements
Code that handles multiple exceptions
import sys
filename = input ("Enter filename: ")
movies = []
try:
with open (filename) as file:
for line in file:
line = line.replace("\n", "")
movies.append(1ine)
except FileNotFoundError as e:
print("FileNotFoundError:", e)
sys.exit()
except OSError as e:
print("OSError:", e)
sys.exit()
except Exception as e:
print(type(e), e)
sys.exit()
The console when a FileNotFoundError occurs
FileNotFoundError: [Errno 2] No such file or directory: 'films
The console when an OSError occurs
OSError: [Errno 13] Permission denied: "movies.csv'
Description
• When an exception occurs, an exception object is created. Then, you can use the as
keyword in an except clause to provide a name for accessing that object.
• To cancel a program as part of your exception handling routine, you can use the
exitQ function of the sys module.
Figure 8-5 How to get the information from an exception object
236 Section 1 Essential concepts and skills
The Movie List 2.0 program
Figure 8-6 presents another version of the Movie List 2.0 program in the
previous chapter. But this version handles the exceptions that may occur when
the user enters data, and it handles the exceptions that may occur if the program
isn't able to read or write the file that stores the data.
The first console in this figure shows how the program handles invalid user
input. If the user attempts to delete a movie, but enters an invalid integer such
as "x", the program displays an appropriate error message and lets the user try
again. Or, if the user attempts to delete a movie, but enters a number that doesn't
correspond with a movie, the program displays an appropriate error message and
lets the user try again.
The second console in this figure shows how the program handles the file
I/O exceptions that might occur. Since the program can't function properly if it
can't read and write the file that stores its data, it displays a message and exits
the program.
Because the code for this program is mostly the same as the Movie List 2.0
program in the previous chapter, this figure only presents the code that has been
added or changed. To make it easy to see the differences, this figure highlights
the changes.
The read_movies() function includes a try statement that handles the
exceptions that might occur when the code in the try block attempts to read the
movies.csv file. If a FileNotFoundError is thrown, its except clause prints an
error message to the console. Then, it calls the exit_program() function.
If any other type of exception is thrown, the except clause for the Exception
class prints the type of the exception and its error message to the console. Then,
it calls the exit_program() function to exit the program. This prints a relatively
user-friendly error message to the console. However, it hides a lot of the useful
debugging information that's in the stack trace that's printed to the console if
you don't handle the exception.
Chapter 8 How to handle exceptions 237
A console that handles user input exceptions
COMMAND MENU
list - List all movies
add - Add a movie
del - Delete a movie
exit - Exit program
Command: list
1. Monty Python and the Holy Grail
2. Cat on a Hot Tin Roof (1958)
3. On the Waterfront (1954)
4. Gone with the Wind (1939)
5. Wizard of Oz (1939)
Command: del
Number: x
Invalid integer. Please try again.
Number: 6
There is no movie with that number.
Number: 4
Gone with the Wind was deleted.
(1975)
Please try again.
A console that handles a file I/O exception
COMMAND MENU
list -
add -
del -
exit -
Could
- List all movies
Add a movie
Delete a movie
■ Exit program
not find movies.csv
Terminating program.
file.
The code Page 1
import csv
impo t y
FILENAME = "movies.csv"
def read_movies():
try:
movies = []
with open (FILENAME, newline="") as file:
reader = c sv. reader (fil e)
for row in reader:
movies.append(row)
return movies
exc ept FileNotFoundError:
print ("Could not find " + FILENAME + " file.")
exit program ()
e p xcep "o e-
print(type(e), e)
exit program ()
Figure 8-6 The Movie List 2.0 program with exception handling (part 1)
238 Section 1 Essential concepts and skills
The write_movies() function gets the movies list as an argument, and it uses
a try statement to handle the exceptions that might occur when the code in the
try block attempts to write the movies.csv file from the list. Since an exception
isn't raised if the movies.csv file can't be found, this function doesn't need to
include an except clause for a FileNotFoundError. Instead, it just includes an
except clause for the Exception class, which displays a message and calls the
exit_program() function.
The exit_program() function prints a message and uses the exit() function
of the sys module to exit the program. As a result, the sys module has to be
imported at the start of the program.
The delete_movie() function gets the movies list as an argument, and it uses
a try clause to get an integer entry from the user. If the entry can't be converted
to an integer, the except clause for a ValueError is executed. That displays an
error message and executes the continue statement, which causes the loop to
be repeated. If the user enters a valid integer, the function continues with the if
statement that's after the try statement.
This if statement checks whether the integer that the user entered is within a
range that corresponds to one of the movie numbers. If not, it prints an
appropriate error message, and the loop continues by executing the try statement
again. This is complete data validation.
When the entry is valid, a break statement ends the loop and the rest of the
statements in the function are executed. Those statements remove the movie
from the list, call the write_movies() function to update the file on disk, and
display a message that shows the movie was deleted.
This figure shows the main() function too. However, it's the same as the
main() function in the Movie List 2.0 program in the previous chapter.
Chapter 8 How to handle exceptions 239
The code Page 2
def write_movies(movies):
try:
with open (FILENAME, "w", newline="") as file:
writer = csv. writer (file)
writer.writerows(movies)
except Exception as e:
print(type(e), e)
exit program ()
def exit program():
print("Terminating program. ")
sys.exit()
def delete_movie(movies):
while True:
try:
number = int(input("Number: "))
except ValueError:
print("Invalid integer. Please try again.")
continue
if number < 1 or number > len(movies):
print("There is no movie with that number. " +
"Please try again.")
else:
break
movie = movies.pop(number - 1)
write_movies(movies)
print(movie[0] + " was deleted.\n")
def main():
display_menu()
movies = read_movies()
while True:
command = input("Command: ")
if command == "list":
list_movies(movies)
elif command == "add":
add_mov i e(movi e s)
elif command == "del":
delete_movie(movies)
elif command == "exit":
break
else:
print("Not a valid command. Please try again.\n")
print("Bye!")
Figure 8-6 The Movie List 2.0 program with exception handling (part 2)
240 Section 1 Essential concepts and skills
Two more skills
The skills you've learned so far are the only ones you'll need for most of the
programs that you develop. But this chapter finishes with two more skills that
you may need if you continue with programming.
How to use a finally clause
After its except clause or clauses, a try statement can include & finally
clause, as shown in figure 8-7. A finally clause is executed even if the code in the
try clause executes a return statement or causes an exception to occur. Typically,
a finally clause is used to clean up the system resources that an object in the try
block is using, but it can be used for other purposes too.
When you use Python 3 or later, you typically don't need to code a finally
clause because you can use a with statement to automatically clean up the
resources that an object is using. This works because some objects, such as a file
object, define standard clean-up actions. As a result, the with statement
automatically executes those clean-up actions when it finishes executing its
block of statements, even if the block of statements causes an exception to occur.
In this figure, the first example shows a function that uses a with statement
to automatically clean up the resources used by the file object. In this function,
there is one try clause that contains all of the file I/O code, and one except clause
that displays a message if an exception is thrown. But whether or not an
exception occurs, the with statement automatically calls the closeQ function of
the file object to clean up its resources.
The second example performs the same task as the first example. However,
this example doesn't use a with statement. Instead, it uses a finally clause to
close the file and clean up the system resources. As a result, it's significantly
more complicated. In fact, it requires nested try statements.
The outer try statement handles the FileNotFoundError that occurs if the
file can't be found. In this case, the file can't be opened so there's no need for
a finally clause to close the file object. However, if the code finds the file and
opens it, an exception could occur when the code tries to read the file. That's
why the inner try statement contains an except clause and a finally clause. Then,
if an exception is thrown, the except clause prints a message to the console. But
whether or not an exception occurs, the finally clause is executed, and it calls the
closeQ function of the file object to clean up its resources.
Chapter 8 How to handle exceptions 241
The complete syntax for a try statement
try:
statements
except [ExceptionName]
statements
[except [ExceptionName]
statements] ...
[finally:
statements]
A function that uses a with statement to clean up resources
def read_movies(filename) :
try:
with open (filename, newline="") as file:
movies = []
reader = c sv. reader (fil e)
for row in reader:
movies.append(row)
return movies
except Exception as e:
print(e)
A function that uses a finally clause to clean up resources
def read_movies(filename) :
try:
file = open (filename, newline="")
try:
movies = []
reader = c sv. reader (fil e)
for row in reader:
movies.append(row)
return movies
except Exception as e:
print(type(e), e)
finally:
file.close()
except FileNotFoundError as e:
print(e)
Description
• Some objects such as a file object define standard clean-up actions. For them, you
can use a with statement to automatically clean up the resources that they're using,
even if an exception occurs during the execution of the with statement.
• For objects that don't define standard clean-up actions, you can use a finally clause
to manually clean up the resources that the object is using.
• A finally clause is always executed, even if an exception occurs or a return
statement is executed in the try block.
[as name] :
[as name] :
Figure 8-7 How to use a finally clause
242 Section 1 Essential concepts and skills
How to raise an exception
When you define a function, you sometimes need to raise an exception
(force an exception to occur). For example, you may want to raise exceptions for
testing your exception handling routines. Or, you may want to raise an exception
if your function isn't passed the correct arguments. Or, you may want to handle
an exception, perform some processing, and then raise the exception again so it
can be handled by the calling function.
Figure 8-8 shows how to use a raise statement to raise an exception. After
the raise keyword, you code the name of the exception class that you want to
use and an error message in parentheses. This is illustrated by the first example,
which raises a ValueError exception with a message that says: "Invalid value".
The second example shows how you can raise an exception to test an
exception handler. This technique is especially useful for exceptions that are
difficult to produce otherwise. For example, you can test a handler for the
FileNotFoundError by providing a file name that doesn't exist. However, testing
a handler for an OSError can be difficult. Sometimes, the easiest way to test
exceptions like that is to use raise statements. Of course, when you use a raise
statement for testing, you must remember to remove it when you finish your
testing.
The third example shows a function that accepts one argument and raises a
ValueError exception if this argument contains an empty string. This is a good
coding practice for a function that's going to be used by other programmers. The
exception tells the other programmers that they're passing arguments that are
unacceptable so they need to fix their calling statements.
The fourth example shows a function that handles an exception by writing
its error message to a log file. A log file is a file that keeps a record of the events
that occur during the execution of a program. In this case, the function calls a
function named log_exception() to record the error message. Then, it raises that
exception again so it can be handled by the calling function.
Chapter 8 How to handle exceptions 243
The syntax for the raise statement
raise ExceptionName("Error message")
Raising a ValueError exception
raise ValueError("Invalid value")
Raising an exception for testing an exception handler
def get_movies (filename) :
try:
with open (filename, newline="") as file:
raise OSError("OSError") # for testing
movies = []
reader = c sv. reader (fil e)
for row in reader:
movies.append(row)
return movies
except Exception as e:
print(type(e), e)
Raising an exception that should be handled by the calling function
def get_movies (filename) :
if len(filename) == 0:
raise ValueError ("The filename argument is required.")
with open (filename, newline=" ") as file:
movies = []
reader = csv. reader (file)
for row in reader:
movies.append(row)
return movies
Logging an exception and raising it for the calling function
def get_movies (filename) :
try:
with open (filename, newline="") as file:
movies = []
reader = c sv. reader (fil e)
for row in reader:
movies.append(row)
return movies
except Exception as e:
log_exception(e)
raise e
Description
• To raise an exception, you can use a raise statement that creates an exception
object.
• You can raise an exception for the Exception class or any class that's a child class
of the Exception class.
Figure 8-8 How to raise an exception
244 Section 1 Essential concepts and skills
Perspective
In this chapter, you have learned some of the best practices for handling
exceptions in Python. As a result, you should now be able to write programs
that handle exceptions so your programs don't crash. And that's what you need
to do in a professional program.
Now that you've finished this chapter, you're done with the first section of
this book. That means you have developed a complete subset of skills that you
will use for most of the programs you write.
At this point, you can go on to section 2 to learn more concepts and skills
for developing procedural programs like the ones presented in this section. Or,
you can skip to section 3 to learn how to develop object-oriented programs. Of
course, you should eventually study both sections, but if you're eager to get
into object-oriented programming, you have all the skills you need to do that
now.
Terms
exception
throw an exception
exception handling
try statement
try clause
except clause
data validation
Summary
• When an error occurs at runtime, an exception is thrown.
• In a try statement, you code any statements that may throw an exception in
the try clause. Then, you can code an except clause for each type of error
that is likely to occur. This is known as exception handling.
• When you code multiple except clauses in a try statement, they must be
coded from the most specific to the least specific. This is determined by the
Python hierarchy of parent and child exception classes.
• When an exception occurs, Python creates an exception object. To get
information from the object, you can access the object in an except clause.
• If necessary, you can code a finally clause at the end of a try statement. The
code in a finally block is always executed, even if the code in the try block
executes a return statement or causes an exception to occur.
• You can use a raise statement to raise an exception that can be handled by
the calling code.
exception class
exception object
parent class
child class
finally clause
raise an exception
raise statement
Chapter 8 How to handle exceptions 245
Exercise 8-1 Add exception handling
to the Future Value program
In this exercise, you'll modify the Future Value program so the user can't cause
the program to crash by entering an invalid int or float value.
1. In IDLE, open the future_value.py file that's in this folder:
python/exercises/chO8
2. Review the code and study the get_valid_number() and get_valid_integer()
functions. Note that they receive three arguments: the prompt for a user entry,
the low value that the entry must be greater than, and the high value that the
entry must be less than or equal to. Then, review the calling statements in the
mainQ function and note how these functions are used.
3. Test the program. Note that you can cause the program to crash by entering
values that can't be converted to float and int values.
4. Add exception handling to the get_valid_number() and get_valid_integer()
functions so the user has to enter valid float and int values. Then, test these
changes to make sure the exception handling and the data validation work
correctly.
Exercise 8-2 Enhance the Movie List 2.0
program
In this exercise, you'll modify the Movies List 2.0 program so it does more
exception handling. You'll also use a raise statement to test for exceptions.
1. In IDLE, open the movies2.py file that's in this folder:
python/exercises/chO8
2. Add data validation to the add_movie() function so the year entry is a valid
integer that's greater than zero. Then, test this change, and note that this
creates a problem in the list_movies() function because the year needs to be
converted to a string before it can be displayed. So, fix this and test again.
3. Modify the write_movies() function so it also handles any OSError exceptions
by displaying the class name and error message of the exception object and
exiting the program.
4. Test this by using a raise statement in the try block that raises a
BlockinglOError. This is one of the child classes of the OSError. Then,
comment out the raise statement.
5. In the read_movies() function, comment out the two statements in the except
clause for the FileNotFoundError. Instead, use this except clause to return
the empty movies list that's initialized in the try block. This should cause
the program to continue if the file can't be found by allowing the program to
create a new file for the movies that the user adds.
246 Section 1 Essential concepts and skills
6. Test this by first running the program with the same CSV file. That should
work as before. Then, change the file name in the global constant to
movies_test.csv, run the program again, and add a movie. That should create a
new file. If that works, run the program again to check whether it works with
the new file.
Section 2
Other concepts and skills
This section is designed to add to the skillset that you developed in section
1 of this book. The chapters in this section are designed so you can read
them in the sequence that you prefer. In other words, you don't have to read
them in sequence.
If, for example, you want to learn more about working with strings,
you can skip to chapter 10. Or if you want to learn how to work with dates
and times, you can skip to chapter 11. Eventually, though, you'll want to
read all of the chapters. This includes chapters on working with numbers,
dictionaries, and recursion.
9
How to work with numbers
In previous chapters, you learned the basics of working with numbers,
including how to initialize numeric variables, how to use arithmetic
expressions, and how to compare numeric values. In this chapter, you'll learn
more about working with numbers, including how to format them and how to
avoid floating-point errors by using decimal numbers.
Basic skills for working with numbers 250
How floating-point numbers work 250
How7 to use the math module 252
How to format numbers 254
How7 to use the format() method of a string 254
How to use the locale module 256
How to fix roundins errors 258
How to work with decimal numbers 260
How to use the decimal module 260
The Invoice program with decimal numbers 262
The Future Value program with decimal numbers 264
Perspective 266
250 Section 2 Other concepts and skills
Basic skills for working with numbers
To start, this chapter gives you more information about floating-point
numbers and how they can lead to programming errors. Then, you'll learn how
to use the standard math module.
How floating-point numbers work
Figure 9-1 begins by reviewing two data types for storing numbers. The
int type uses 4 bytes to store an integer. And the float type uses 8 bytes to store
floating-point numbers that can include a decimal point. These floating-point
numbers can be much larger or smaller than the integers stored by the int type.
However, the float type can only use 16 significant digits to store the number.
To express the value of a floating-point number, you can use scientific
notation, as shown by the second group of examples in this figure. This notation
consists of an optional plus sign or a required minus sign, a decimal value for
the significant digits, the letter e or E, and a positive or negative exponent. For
example:
2.302e+5
In this example, the number contains four significant digits (2.302), and the
exponent specifies how many places the decimal point should be moved to the
right or to the left. Here, the exponent is positive so the point is moved to the
rieht and the value is:
230,200
But if the exponent was negative (e-5), the point would be moved to the left and
the value would be:
.00002302
As its name implies, scientific notation is typically used for scientific
programs that work with very large and small numbers. So, if you're not
developing these types of programs, you might never need to use it.
More importantly, the third example shows that floating-point numbers
are approximate values, not exact values. As a result, they sometimes cause
floating-point errors that yield unexpected results as shown in this example.
Here, the result of the first three statements should be 300.3. Instead, it is
300.2999999999999995. By contrast, integers are exact values. As a result, you
don't have to worry about unexpected results when you're working with integers.
You can easily fix the floating-point error shown in the third example by
rounding to 2 decimal places as shown in the fourth example. Still, if you
aren't aware of this issue, these approximate values can lead to errors in your
programs. Later in this chapter, you'll learn another way to fix this issue that's
appropriate for programs such as financial programs that typically need to use
exact values, not approximate values.
Chapter 9 How to work with numbers
251
Two numeric data types
Type Bytes Use
int
float
4
8
Integers from -2,147,483,648 to 2,147,483,647.
Floating-point numbers from -1.7E308 to +1.7E308
with up to 16 significant digits.
Examples of float values
21.5 //a positive float value
-124.82 // a negative float value
-3.7e-9 // floating-point notation for -0.0000000037
Variables that are set with scientific notation
valuel = 2.382E+5
value2 = 3.25E-8
# 2.382 * 105 (or 238,200)
# 3.25 * 10"8 (or .0000000325)
An example of a floating-point error
balance = 100.10
balance += 100.10
balance += 100.10
print("Balance =", balance)
The result
Balance = 300.29999999999995
Code that fixes the floating-point error
balance = round(balance, 2)
print("Balance =", balance)
The result
Balance = 300.3
Description
• A floating-point number consists of a positive or negative sign, a decimal value for
the significant digits, and an optional exponent.
• Floating-point numbers provide for very large and very small numbers, but with a
limited number of significant digits.
• To express the value of a floating-point number, you can use scientific notation.
• An integer is an exact value that yields expected results.
• A floating-point number is an approximate value that can yield unexpected results
known as floating-point errors.
Figure 9-1 How floating-point numbers work
252 Section 2 Other concepts and skills
How to use the math module
The standard math module for Python provides many functions for
mathematical, trigonometric, and logarithmic operations. Figure 9-2 begins by
presenting four of the functions that you're most likely to use. In addition, it
presents the pi constant that's available from this module.
To use these functions, you begin by importing the math module as shown in
the first example. Then, you can call functions from this module and use the pi
constant. This is illustrated by the examples that follow.
The second group of examples shows how to use the pow() and sqrtQ
functions. Remember, though, that you can also use the exponentiation operator
(**) to raise a number to a power like this:
2**3
This returns 8 just as the first statement in this group of examples does.
The third statement in this group shows how you can use the pow() function
to get the cube root of 125. To do that, you pass 1/3 to the pow() function. This
should return a value of 5, but instead it returns a value of 4.999999999999999.
This is another example of a floating-point error.
The third example shows how to use the pi constant to calculate the
circumference and area of a circle. To calculate the circumference, the second
statement multiplies the pi constant by the radius multiplied by two. To calculate
the area, the third statement multiples the pi constant by the radius squared. The
fourth statement performs the same calculation, but it uses the exponentiation
operator (**) instead of the pow() function. This shows that the exponentiation
operator is more concise and easier to read.
The fourth example shows how to use the floor and ceil operators. This
shows that you can use the ceil() function if you always want to round up
(towards the ceiling). And you can use the floor() function if you always want to
round down (towards the floor).
However, these functions return int values, no matter how many decimal
places the argument has. As a result, if you want to round to a specified number
of decimal places, you can use the trick shown in the last two examples. Here,
you multiply the argument by 10 for each decimal place that you want, pass the
result of that calculation to the function, and divide the return value by 10 for
each decimal place that you want.
Chapter 9 How to work with numbers
253
Some common functions of the math module
Function
pow (num, pow)
sgrt (num)
ceil(num)
floor (num)
Description
Raises the number to the specified power.
Returns the square root of the specified number.
Rounds the floating-point number up to the nearest integer.
Rounds the floating-point number down to the nearest integer.
A constant of the math module
Constant Description
pi
The value of pi to 15 decimal positions.
How to import the math module
import math as m
How to use the pow() and sqrt() functions
result = m.pow(2, 3)
result = m.sgrt(16)
result = m.pow(125, 1/3)
# 8.0 (the cube of 2)
# 4.0
# 4.999999999999999 (cube root of 125)
How to use the pi constant
radius = 12
circumference = m.pi * radius * 2
area = m.pi * m.pow(radius, 2)
area = m.pi * radius**2
# 75.39822368615503
# 452.3893421169302
# 452.3893421169302
How to use the floor() and ceil() functions
result = m.floor (12. 545)
result = m. ceil(12.545)
result = m.floor (-3 .432 )
result = m.ceil(-3.432)
# 12
# 13
# -4
# -3
How to use the ceil() function to work with decimal places
m.ceil(2.0083)
m.ceil(2.0083 *
m.ceil(2.0083 *
10) / 10
100) / 100
# 3
# 2.1
# 2.01
How to use floor() function to work with decimal places
m.floor (2. 0083)
m. floor (2. 008 3 * 10) / 10
m. floor (2. 008 3 * 1000) / 1000
# 2
# 2.0
# 2.008
Description
• The math module contains functions for commonly used mathematical operations.
• The ceil() and floorQ functions return integers. But if you want to use them with
decimal numbers, you can multiply and then divide by multiples of 10.
Figure 9-2 How to use the math module
254 Section 2 Other concepts and skills
How to format numbers
So far, you've learned how to use the built-in round() function to round
numbers to the correct number of decimal places. Now, you'll learn other ways
to format numbers.
How to use the format() method of a string
Figure 9-3 shows how to use the format() method of a string to format
numbers with commas and decimal places. To start, this figure presents the
syntax for working with the format() method. The best way to understand this
syntax is to study the examples in this figure. Once you do that, the syntax
should make sense.
In the first group of examples, the statements format and print the
floating-point value that's stored in a variable named fp_number. Here, the
argument of each print() function starts with a string that contains the format
specification for the value to be formatted. For instance, the string that contains
the format specification in the first print statement is:
"{:.2f}"
In this case, the format specification is .2f, which means to format the floating
point number with two decimal places. Note that the specification starts with
{: and ends with }, which are enclosed in quotes. That's true for all format
specifications.
The format specification, which is a string, is then followed by a period and
the formatO method of the string. The argument for this method is the value
to be formatted. So the first format() method formats the value stored in the
variable named fp_number and returns a result of 12345.68, which shows that
the value has been rounded to two decimal places.
If you understand how the first format() method works, you should be able
to understand the other examples in this group. For instance, the second format()
method specifies four decimal positions. The third one specifies two decimal
positions and uses a comma to separate thousands. And the fourth one specifies
a field width of 15. This adds 6 spaces to the left of the 9-character result for a
total of 15 characters.
The examples that follow show how format specifications can be used for
integers, percentages, and scientific notation. For these specifications, you need
to know that percent values are multiplied by 100 and followed by a percent
sign, so a value of .125 becomes 12.5%.
The last group of examples shows how you can use a single format() method
to format multiple values. In this case, each format string includes three format
specifications. Then, the code passes one value for each specification to the
formatO method.
In addition, this shows how you can use field widths to align values in
columns. When you do that, numbers are right aligned and strings are left
aligned by default. However, you can use the < and > operators to change this as
in the second and third string values in the first statement.
Chapter 9 How to work with numbers 255
The syntax for the string format() method
" { : format_specification} . . . " . format (data_item. . . )
The syntax for the format specification
[field_width] [comma] [ ,decimal_places] [type_code]
Common type codes
Code Meaning Description
d Integer Decimal positions can't be specified.
f
9^
Is 11
Floating-point number Decimal positions can be specified.
Percent Multiplies the value by 100 and puts a percent sign after it.
Scientific notation Converts the number to scientific notation
Examples
fp_number = 12345.6789
print("{:.2f}".format(fp_number))
print("{:. 4f}".format(fp_number))
print("{:,.2 f}".format(fp_number))
print("{:15#.2f}".format(fp_number))
int_number = 12345
print("{:d}".format(int_number))
print("{:,d}".format(int_number))
fp_number = .12345
print("{:.0%}".format(fp_number))
print("{:.1%}".format(fp_number))
fp_number = 12345.6789
print("{:.2e}".format(fp_number))
print("{:.4e}".format(fp_number))
How to use field widths to align results
print("{:15} {:>10} {:>5}".format("Description", "Price", "Qty"))
print("{:15} {:10.2f} {:5d}".format("Hammer", 9.99, 3))
print("{:15} {:10.2 f} {:5d}".format("Nails", 14.5, 10))
The console
#
#
#
#
#
#
#
#
#
#
12345.68
12345.6789
12,345.68
12,345.68
12345
12,345
12%
12.3%
1.23e+04
1.2346e+04
Description Price Qty
Hammer 9.99 3
Nails 14.50 10
Description
• You can use the formatQ method of a string to format a single value or a series of
values by converting them into strings. But that doesn't change the values of the
variables that are being formatted.
• When you use a field-width specification, numbers are right aligned and strings are
left aligned by default. However, you can use the < and > symbols to override that.
Figure 9-3 How to use the formatQ method of a string
256 Section 2 Other concepts and skills
How to use the locale module
As you probably know, the formatting for currency varies from one country
to another. In the United States, for example, you format a currency value of
1002.5 as $1,002.50. But in some parts of Europe, you format that same value as
+ 1.002,50. To provide for these variations, Python provides the locale module.
Figure 9-4 shows how to use the locale module. To start, of course, you need
to import the module as shown in the examples. Then, you can use the three
functions in the table at the top of this figure.
Before you can call the currencyO or formatQ function, you need to set the
locale using the setlocaleQ function. Here, the category argument determines the
type of values that the setting applies to. In the examples, all of the setlocale()
functions use the LC_ALL constant to apply this locale to all categories. As a
result, it applies to both the currencyO and format() functions. However, you can
also use the LC_NUMERIC constant to apply this locale only to numbers, or
you can use the LC_MONETARY constant to apply this locale only to monetary
values.
The second argument for the setlocale() function is a code that specifies the
locale that should be used for formatting. On most Windows systems, you can
set this explicitly by specifying its ISO two-letter country code, like "us" for
the United States, "uk" for United Kingdom, or "de" for Germany. However,
on most Mac OS X systems, you need to use a longer code that specifies the
language and the country, like "en_US" for English/United States.
If you set the second argument to an empty string, Python attempts to use
the default locale for the user's computer. However, this fails on most Mac OS
X systems, and the setlocaleO function returns a code of "C". To prevent your
program from crashing, you can check whether the setlocaleO function has
returned a code of "C". If so, you can set the locale to the most likely locale for
your program. In this figure, for instance, the third example sets the locale to
Enelish/United States.
Once the locale is set, you can use the currencyO function to format specific
values. For this function, the first argument specifies the monetary value and is
the only required argument. However, it's common to set the optional grouping
argument to True to separate the thousands in large numbers as shown by the
fourth example.
The formatO function works similarly to the currencyO function. However,
the first argument specifies a string that you can use to specify the format for the
number. This works much like the format specification shown in the previous
figure. However, the format specification begins with a percent sign (%).
The fifth example shows how this works. Here, the first formatO function
uses a format specification of "%d" to format an integer, and the second formatO
function uses a format specification of "%.2f' to format a floating-point value
with two decimal places.
Chapter 9 How to work with numbers
257
Commonly used functions of the locale module
Function
setlocale(category, locale)
currency (mun[, grouping] )
format (forma t, num [, grouping] )
Description
Sets the locale for the specified category to the locale
for the specified country code and returns a string for
the locale. If category is set to LC_ALL, the locale is
applied to all categories.
If locale is an empty string, it attempts to set the locale
to the user's default locale. If this isn't possible, it
returns a code of "C".
Returns the specified number formatted as currency.
If grouping is set to True, the number includes
thousands separators.
Returns the specified number formatted for the current
locale. If grouping is set to True, the number includes
thousands separators.
Codes for working with locales
Locale
English/United States
Enelish/United Kingdom
German/Germany
Short code
us
uk
de
Long code
en_US
en_UK
de_DE
Currency Format
$12,345.15
£12,345.15
+ 12.345,15
How to import the locale module into the Ic namespace
import locale as lc
How to set the locale to English/United States
lc.setlocale(lc.LC_ALL# "us")
lc.setlocale(lc.LC_ALL# "en_US")
# works on most Windows systems
# works on most Mac OS X systems
How to set the locale on most systems
result = lc.setlocale(lc.LC_ALL# "")
if result == "C":
lc.setlocale(lc.LC_ALL# "en_US")
# works on most Windows systems
# if 'C code is returned,
# set default for Mac OS X systems
How to use the currency() function
print(lc.currency(12345.15, grouping=True))
How to use the format() function
print(lc.format("%d", 12345, grouping=True))
print(lc.format("%.2f", 12345.15, grouping=True))
# $12,345.15 (for US)
# 12,345 (for US)
# 12,345.15 (for US)
Description
• The convention for formatting numbers varies depending on the user's locale.
• Python's locale module allows you to format numbers properly for a user's locale.
Figure 9-4 How to use the locale module
258 Section 2 Other concepts and skills
How to fix rounding errors
Figure 9-5 begins by showing the user interface for a program that has
rounding errors. Here, the discount is 10.01 and that's subtracted from 100.05,
so the subtotal should be 90.04. But instead, it's 90.05!
The code in the first example allows this error to occur because it doesn't
round the results after each calculation. Instead, it allows the code that displays
the results to round each value. But by then, it's too late.
To start, the user enters an order total of 100.05. Next, the program calculates
a discount of 10%. This yields a discount of 10.005. Then, it subtracts that amount
from the order total. This yields a subtotal of 90.045. Then, when the program
displays the results, the format method rounds the discount up to 10.01, and it
rounds the subtotal up to 90.05.
So, to fix this bug, you need to round any results that can have more than
two decimal places immediately after they are calculated as shown in the second
example. Here, the discount and the sales tax can have more than two decimal
positions. As a result, this code rounds those values to two decimal places. That
way, the code rounds the discount to 10.01 before it subtracts it from the order
total of 100.05, yielding a subtotal of 90.04, which is correct.
The trouble with this solution is that it isn't always easy to figure out
which values to round and when they need to be rounded. That's partly because
floating-point numbers sometimes yield unexpected results. For example, figure
9-1 showed that adding together three floating-point numbers that have two
decimal places can yield a number that has more than two decimal places.
For most programs, you can fix these errors easily enough by using the
round() function as shown in this figure. However, for some programs, including
some financial programs, it's better to eliminate unexpected results by using the
decimal module as shown in the next few figures.
Chapter 9 How to work with numbers
259
The user interface with incorrect results
Enter order total:
Order total:
Di scount amount:
Subtotal:
Sales tax:
Invoice total:
100
.05
100.05
10.01
90.05
4.50
94.55
The code that yields incorrect results
# get user entry
order_total = float (input ("Enter order total: ") )
print()
# determine discount percent
if order_total > 0 and order_total < 100:
discount percent = 0
elif order_total >= 100 and order_total < 250:
discount percent = .1
elif order_total >= 250:
discount percent = .2
# calculate the results
discount = order_total * discount percent
subtotal = order_total - discount
sales_tax = subtotal * .05
invoice total = subtotal + sales tax
# display the results
print("Order total:
print("Di scount amount:
print("Subtotal:
print("Sales tax:
print("Invoice total:
print()
{:
{:
{:
{:
{:
:10#.2f}"
:10,.2f}"
:10#.2f}"
:10#.2f}"
:10,.2f}"
.format (order_tota 1) )
.format(di scount))
.format(subtotal))
.format(sales_tax))
.format(invoice total))
The code that fixes this problem
# calculate results with rounding
discount = round(order_total * discount percent, 2)
subtotal = order_total - discount
sales_tax = round(subtotal * .05, 2)
invoice_total = subtotal + sales_tax
Description
• When you use decimal numbers for financial calculations, you can get rounding
errors if you don't round the results to two decimal places after any calculation that
can result in more than two decimal places.
Figure 9-5 How to fix rounding errors
260 Section 2 Other concepts and skills
How to work with decimal numbers
As you have learned, floating-point numbers are approximate values, not
exact values. As a result, working with floating-point numbers sometimes
yields unexpected results. One way to cope with that is to use rounding, but a
more reliable way is to use the decimal module to work with decimal numbers.
Decimal numbers work like a floating-point numbers, except that they are exact
values, not approximate values.
How to use the decimal module
Figure 9-6 shows how to use the decimal module. When you use this
module, you don't have to worry about the unexpected results that can be
introduced by floating-point numbers.
The first example shows how you can use this module to create decimal
numbers. To start, you import the Decimal class from the decimal module. Then,
you use the constructor of the Decimal class to construct Decimal objects from
string values. To do that, you code a set of parentheses after the Decimal class,
and you supply the string for the decimal number within those parentheses.
Once you create Decimal objects, you can use most of the standard
arithmetic operators on them. You can even code expressions that mix decimal
numbers with integers. That's because both data types represent exact values.
However, you can't code expressions that mix decimal numbers with
floating-point numbers. Because floating point numbers don't represent exact
values, that would introduce the type of unexpected results that the decimal
module is intended to fix.
Whenever necessary, you can use the quantizeQ method to round decimal
values to the specified number of decimal places. To do that, the first argument
specifies a Decimal object that has the correct number of decimal places. For
example, you can specify two decimal places like this:
Decimal("1.00")
Here, 1.00 specifies two decimal positions, 1.000 specifies three decimal places,
and so on. This is a good way to code this argument, but you should know
that you can get the same results with any values that have the right number of
decimal places, like 9.99 and 9.999.
By default, the quantize() method uses the ROUND_HALF_EVEN rounding
constant as shown in the second example. Here, the value of 10.005 is rounded
down to 10.00 because the 5 is preceded by a 0, which is an even number.
However, a value of 10.015 would be rounded up to 10.01.
For business math, you often want to use the ROUND_HALF_UP constant
to round a value like 10.005 up to 10.01 regardless of whether the 5 is preceded
by an even or odd number. To do that, you can import this constant and use it to
specify the rounding mode as shown in the third example.
Chapter 9 How to work with numbers 261
How to create Decimal objects and use them in calculations
from decimal import Decimal
order_total = Decimal("100.05")
discount percent = Decimal(".1")
discount = order_total * discount percent # 10.005
subtotal = order_total - discount # 90.045
tax_percent = Decimal(".05")
sales_tax = subtotal * tax percent # 4.50225
invoice_total = subtotal + sales_tax # 94.54725
testl = subtotal * 2 # Legal. You can mix Decimal and int
test 2 = subtotal * 3.5 # Error I You can't mix Decimal and float
The syntax of the quantize() method of a Decimal object
object.quantize(Decimal("positions_code")[, rounding_constant])
Three of the rounding constants for the quantize() method
Constant Description
ROUND_HALF_UP Round up if the neighbors are equidistant. This is the constant
that's used for most business math.
ROUND_HALF_DOWN Round down if the nearest neighbors are equidistant.
ROUND_HALF_EVEN When the nearest neighbors are equidistant, round up for odd
numbers, round down for even numbers. This is the default.
How to specify the number of decimal places
discount = Decimal("10.005")
discount = discount.quantize(Decimal("1.00")) # 10.00
How to override the default rounding mode
from decimal import ROUND_HALF_UP
discount = Decimal("10.005")
discount = discount.quantize(Decimal("1.00"), ROUND_HALF_UP) # 10.01
Description
• You can use the decimal module to create decimal numbers that are exact values
and don't yield unexpected results.
• When you work with decimal numbers, you usually import the Decimal class and
any rounding constants you need from the decimal module.
• To create a Decimal object that stores a decimal number, pass a string for the
decimal number to the constructor of the Decimal class.
• You can use most arithmetic operators with Decimal objects. In addition, it's legal
to code expressions that mix Decimal objects with int values. However, it's illegal
to code expressions that mix Decimal objects with float values.
Figure 9-6 How to use the decimal module
262 Section 2 Other concepts and skills
At this point, you might be asking, "If decimal numbers are more accurate
than floating-point numbers, why don't we use them all the time?" First,
floating-point calculations are faster than decimal calculations. Second, the code
for working with floating-point numbers is simpler. Third, floating-point
calculations are accurate enough for most programs. As a result, decimal
numbers are typically used for financial calculations.
The Invoice program with decimal numbers
Figure 9-7 shows a version of the Invoice program that uses the decimal
module so it works with decimal numbers instead of floating-point numbers. To
start, the Decimal class and the ROUND_HALF_UP constant are imported from
the decimal module.
The body of this program begins by using the constructor of the Decimal
class to convert the user's entry into a decimal number. Then, it uses the
quantize() method to make sure the user entry contains two decimal places. As a
result, if the user enters 100, this stores a value of 100.00. Conversely, if the user
enters 100.005, this stores a value of 100.01.
After getting the user entry, this code uses an if statement to create a decimal
number for the discount percentage. Since the constructor of the Decimal class
can't convert floating-point numbers to decimal numbers, this code uses strings
to specify the discount percentage as a decimal number.
The next group of statements calculates the results. To do that, this code uses
normal arithmetic operators for multiplication (*), subtraction (-), and addition
(+). In addition, this code uses the quantize() method to round the results to
two decimal positions whenever a multiplication operation might yield a result
that has more than two decimal places. That means that all values used in the
addition and subtraction calculations have two decimal places. So, all of the
results of these calculations also have two decimal places.
To finish, this program uses printQ functions and the string format() method
to display the results. Here, the format specifies that each field should have a
width of 10 characters, and that commas should be used to separate thousands.
As a result, the decimal values are aliened on the rieht. However, the format
string doesn't specify the number of decimal places. This shows that all of the
results calculated by this program have two decimal places.
Chapter 9 How to work with numbers
263
The user interface with correct results
Enter order total:
Order total:
Di scount amount:
Subtotal:
Sales tax:
Invoice total:
Continue? (y/n):
100
.05
100.05
10.01
90.04
4.50
94.54
The code
from decimal import Decimal
from decimal import ROUND HALF UP
choice = "y"
while choice =
= "y"
# get the user entry
order_total = c" (input("Enter order total: "))
order_total = order_total.quantize(Decimal("1.00"), ROUND_HALF_UP)
print()
# determine the discount percent
if order_total > 0 and order_total < 100:
discount_percent = Decimal("0")
elif order_total >= 100 and order_total < 250:
discount percent = Decimal(".1")
elif order_total >= 250:
discount percent = (". ")
# calculate the results
discount = order_total * discount percent
discount = discount.quantize(Decimal("1.00") ROUND HALF UP)
subtotal = order_total - discount
tax percent = Decimal(".05")
sales_tax = subtotal * tax percent
sales_tax = sales_tax.quantize(Decimal("1.00"), ROUND_HALF_UP)
invoice total = subtotal + sales tax
# display the results
print("Order total: {
print("Discount amount: {
print("Subtotal: {
print("Sales tax: {
print("Invoice total: {
print()
10,}" .format(order_total))
10,}" .format(discount))
10,}".format(subtotal))
10,}".format(sales_tax))
10,}".format(invoice_total))
choice = input("Continue? (y/n): ")
print()
print("Bye")
Figure 9-7 The Invoice program with decimal numbers
264 Section 2 Other concepts and skills
The Future Value program with decimal numbers
Figure 9-8 presents another program that uses decimal numbers. This time,
it's a version of the Future Value program that also uses the locale module to
format the currency values. This program begins by importing the locale module
and the Decimal class from the decimal module.
The main() function of this program prompts the user to enter a monthly
investment, a yearly interest rate, and the number of years. Then, this code
creates Decimal objects for both the monthly investment and the yearly interest.
However, because the number of years is an integer, which is an exact type, this
code doesn't need to convert it to a Decimal object.
After getting the user input, the main() function calls the get_future_value()
function and passes it the values entered by the user. This function begins by
converting the yearly values entered by the user to monthly values. Then, it
initializes the future_value variable to a decimal value of 0.00. Next, the code
enters a loop that's executed once for each month.
Within this loop, the second statement calculates the interest for the month.
This results in a number that has more than two decimal places. Then, the third
statement adds the monthly interest to the future value, which uses as many
decimal places as needed to store the result.
When the loop finishes, the function returns the future value to the main()
function. But first, it uses the quantize() method to round the future value to two
decimal places. Note here that the rounding isn't done in the loop because that
might impact the accuracy of the final result.
Back in the main() function, the code continues by setting all categories of the
locale to the user's default locale if that's possible. Otherwise, it sets the locale
to English/United States. Then, a series of print() functions display the monthly
investment, interest rate, years, and future value. Within those printQ functions,
the currencyO function applies currency formatting to the monthly investment
amount and future value.
In addition, the formatQ method right aligns the numeric values. To do that,
this code calls the format() method from a variable named line that's initialized
before the print() functions. This variable contains the format specifications that
left alien the first column and rieht alien the second column. Since this stores the
format specification in one location, it reduces code duplication, which makes
the code easier to maintain. If, for example, you want to make the right column
wider, you only need to change the number of characters in one place, not four.
Chapter 9 How to work with numbers
265
The user interface
Enter monthly investment: 100
Enter yearly interest rate: 12.5
Enter number of years: 10
Monthy investment:
Interest rate:
Years:
Future value:
Continue? (y/n):
$100.00
12.5
10
$23,938.13
The code
from decimal import Decimal
impo t • -
def get_future_value(monthly_investment, yearly_interest, years):
monthly_interest_rate = yearly_interest / 12 / 100
months = years * 12
f uture_value = ii (" ")
for i in range(months):
future_value += monthly_investment
monthly_interest = future_value * monthly_interest_rate
future_value += monthly_interest
future_value = future_value • -f -(•- 'w- (" ••"))
return future_value
def main():
choice = "y"
while choice.lower() == "y":
# convert user input to Decimal and int values
monthly_investment = Decimal(input("Enter monthly investment: "))
yearly_interest = Decimal(input("Enter yearly interest rate: "))
years = int(input("Enter number of years: "))
future_value = get_future_value(
monthly_investment, yearly_interest, years)
print()
# format and display the results
result = lc.setl* - ( C_- , "")
if result == "C":
lc.setlocale(lc.LC_ALL, "en_US")
line = "{:20} {:>10}"
print(line.format("Monthy investment:",
lc.currency(monthly_i t, gr p" ig= ■ e)))
print(line.format("Interest rate:", yearly_interest))
print(line.format("Years: ", years))
print(line.format("Future value:",
lc.currenc (future value •rou»in»=True)), "\n")
choice = input("Continue? (y/n): ")
print()
if
name
__ ii
main
■i
main()
Figure 9-8 The Future Value program with decimal numbers
266 Section 2 Other concepts and skills
Perspective
Now that you've completed this chapter, you should be able to use the
functions of the math module. You should be able to format and alien numbers
and currency values. And you should be able to use the decimal module and
decimal numbers to avoid the errors that can occur when you use floating-point
numbers. These are skills that you won't use in every program, but they come
in handy when you do need them.
Terms
floating-point number
significant digits
scientific notation
approximate value
exact value
Summary
• A floating-point number provides for very large and very small decimal
numbers, but with a limited number of significant digits. To express the
value of a floating-point number, you can use scientific notation.
• A floating-point number is an approximate value that can yield unexpected
results known as floating-point errors. An integer is an exact value that
yields expected results.
• The math module contains functions and constants for common
mathematical, trigonometric, and logarithmic operations.
• The formatQ method of a string lets you format and align numbers.
• The locale module provides functions for formatting numbers and monetary
values so they're appropriate for locales throughout the world.
• When you use Python for financial calculations, you can get rounding errors
if you don't round the results to two decimal places after any calculation that
can result in more than two decimal places.
• You can use the decimal module to create decimal numbers that are
exact values and don't yield unexpected results. To do that, you use the
constructor of the Decimal class to create a Decimal object that stores a
decimal number.
rounding error
decimal number
Decimal class
constructor
Decimal object
Chapter 9 How to work with numbers 267
Exercise 9-1 Enhance the Invoice program
In this exercise, you'll enhance a version of the Invoice program so two of the
currency values are formatted correctly. You'll also add a shipping cost to the
invoice:
Enter order total:
Order total:
Di scount amount:
Subtotal:
Shipping cost:
Sales tax:
Invoice total:
Continue? (y/n):
10554.23
$10,554.23
2110.85
8443.38
717.69
422.17
$9,583.24
Use the locale module for the currency values
1. In IDLE, open the invoice_decimal.py file that's in this folder:
python/exercises/chO9
2. Modify this program so it displays the order total and invoice total as currency
values in the United States.
Add a shipping cost
3. Add a shipping cost as shown in the console data above. This charge should
be .085 of the subtotal. As a result, it could cause a rounding error. To prevent
this error from occurring, use the decimal module to make sure each monetary
value has the correct number of decimal places.
4. Test and debug this program and make sure that it works with all input values.
10
How to work with strings
In chapter 2, you learned some basic skills for working with strings, including
how to create a string, how to concatenate strings, and how to work with escape
characters. Now, in this chapter, you'll expand that set of skills.
Basic skills for working with strings 270
Unicode, indexes, slicing, duplicating, and multiline strings 270
How to search a strine 272
How to loop through the characters in a string 272
How7 to use basic strine methods 274
How to find and replace parts of a string 276
The Create Account program 278
How to split and join strings 280
How7 to split a string into a list of strings 280
How to join strings 282
The Movie List 2D program 284
The Word Counter program 286
The Hangman game 288
The user interface 288
The hierarchy chart 288
The wordlist module 290
The haneman module 290
Perspective 294
270 Section 2 Other concepts and skills
Basic skills for working with strings
The figures that follow present some basic skills for working with strings.
Many of these are similar to the basic skills for working with lists.
Unicode, indexes, slicing, duplicating,
and multiline strings
Figure 10-1 presents some of the basic skills for working with strings. To
start, you should know that a string consists of Unicode characters. Unicode
maps each character to an integer, or ordinal, value. For instance, the first
example uses the built-in ord() function to show that the character "5" maps to
the ordinal value of 53, "A" maps to 65, and "a" maps to 97.
The ordinal value determines the sort order for the characters. As a result,
digits come before uppercase letters and uppercase letters come before lowercase
letters.
To refer to a character in a string, you can use an index, as shown by the
second example. This shows that positive indexes start from the left side of a
strine and beein with 0, and negative indexes start from the rieht side of a strine
and begin with -1. These indexes work the same as the indexes for the items in
a list. However, unlike a list, a string is immutable. As a result, if you attempt to
assign a new character to a string index, a TypeError occurs, as shown by the last
statement in this example.
Just as you can slice a list, you can slice a string. This is illustrated by the
third example. You can also use the repetition operator with a string, as shown in
the fourth group.
The last example shows that you can use three single quotes to create a
multiline string. This technique is commonly used to create string constants
that are used within the program, not for display in a console or GUI interface.
When you use this technique, the string includes any new line characters or
other whitespace that's included between the triple quotes. In this example, this
technique is used for coding a SQL statement like the ones you'll learn about in
chapter 17.
Chapter 10 How to work with strings
271
Two built-in functions
Function Description
ord(char)
len(str)
Returns the integer (ordinal) value for the Unicode character.
Returns an integer for the length of the specified string.
How to get the ordinal value of a Unicode character
print("5 =", ord("5"))
print("A =", ord("A"))
print("a =", ord("a"))
# 5 = 53
# A = 65
# a = 97
How to use an index to access a character in a string
message = "Hello out there!"
message[0]
message[1]
message[-1]
message[16]
message[0] =
"H"
»e"
II _T II
#
#
# " I "
# IndexError: string index out of range
# TypeError: string is immutable
How to slice a string
stringl start: end: step]
Examples
message = "Hello out there!"
message[:5]
message[6:9]
message[10:]
message[:-1]
# "Hello"
# "out"
# "thereI"
# "Hello out there"
How to use the repetition operator (*)
print("=" * 20)
print("A horse I
ii
2)
# ===================
# "A horseI A horse I"
How to use triple quotes to create a multiline string
query = ' ' "SELECT categorylD, name AS categoryName
FROM Category WHERE categorylD = ?'■■
Description
• With version 3.0 and later, Python uses Unicode to store the characters in strings.
Unicode maps each character to an integer (ordinal) value and provides for most
characters in most of the world's languages.
*—-■ *—-■
• A string is immutable, which means that you can't change its characters. If you
attempt to do that, Python raises a TypeError.
• If you use an index that doesn't exist in the string, Python raises an IndexError that
indicates that the index is out of range.
• Slicing and duplicating a string works the same as slicing or duplicating a list.
• Triple quotes are used for strings that are used within programs, not for display.
Figure 10-1 Unicode, indexes, slicing, duplicating, and multiline strings
272 Section 2 Other concepts and skills
How to search a string
Figure 10-2 shows how you can use the in keyword to search for a substring
within a string. To start, you can use this keyword in an if statement to test
whether a string contains a specific substring. Then, you can execute a block of
code depending on whether the condition is True or False.
How to loop through the characters in a string
This figure also shows how to loop through the characters in a string. This
is similar to looping through the items in a list. Here, the second to last example
loops over the three characters in a string of "Hi!" and prints each one on its
own line. Then, the last example uses a loop with the ord() function to print the
Unicode ordinal value for each character in the string.
Chapter 10 How to work with strings 273
The syntax for using the in keyword to search a string
term in string
Some examples that use the in keyword to search a string
spam = "Congratulations. You've won a million dollars."
'million" in spam # True
■Million" in spam # False - search is case-sensitive
■on" in spam # True - doesn't need to be whole word
' million " in spam # True - uses spaces to find a whole word
' dollars " in spam # False - ends with a period, not a space
Code that uses an if statement to check a search
search_term = input("Enter search term: ")
if search_term in spam:
print("Term foundI")
The console
Enter search term: dollar
Term foundI
The syntax for looping over each character in a string
for character in stringi
statements
Code that loops over each character in a string
message = "Hi I"
for char in message:
print(char)
The console
Code that prints the ordinal value for each character in a string
message = "0123 ABCD abed"
for char in message:
print(ord(char), end=" ")
The console
48 49 50 51 32 65 66 67 68 32 97 98 99 100
Figure 10-2 How to search a string and loop through its characters
274 Section 2 Other concepts and skills
How to use basic string methods
To make it easier to work with strings, Python provides many methods that
you can call from strings. Figure 10-3 summarizes some of the ones that are both
useful and easy.
The first example shows how you can use the isdigit() method to determine
whether all of the characters in a string are digits. The isalphaQ, ispperQ, and
islowerQ methods work similarly.
The second example shows how you can use the startswith() method to
determine whether a string starts with a specific substring. The endswithQ
method works similarly.
The third example shows how you can use the title() method to convert
a string to title case. As you can see, this method converts the first letter of
each word to uppercase and the other characters in each word to lowercase.
The upper() and lower() methods work similarly, but they convert all letters to
uppercase or lowercase.
The fourth example shows how you can use the strip() method to remove
whitespace from the start and end of a string. Whitespace consists of characters
that aren't visible such as spaces, tabs, new line characters, and other characters.
The strip() method is commonly used to remove whitespace at the start and
end of a user entry. However, whenever necessary, you can use the IstripO and
rstripQ methods to remove whitespace from just the left or right side of a string.
The last example shows how you can use the ljust() and rjust() methods to
align the data in print statements. Here, the code left justifies the string in the
left column by adding spaces to the right side of the string until the column is
14 characters wide, and it right justifies the string in the right column by adding
spaces to the left side of the string until it is 10 characters wide. In some cases,
these methods work better for aligning data than using the format() method
presented in chapter 9.
Chapter 10 How to work with strings
275
Basic string methods
Method Description
isalpha{str)
islower(str)
isupper(str)
isdigit(str)
Returns True if all characters are alphabetic letters; otherwise False.
Returns True if all characters are lowercase letters; otherwise False.
Returns True if all characters are uppercase letters; otherwise False.
Returns True if all characters are digits (0 through 9); otherwise False.
startswith (str)
endswith(str)
Returns True if the string starts with the specified string; otherwise False.
Returns True if the string ends with the specified string; otherwise False.
lower()
upper()
title()
Converts the string to lowercase and returns it.
Converts the string to uppercase and returns it.
Converts the string to title case and returns it.
lstrip()
rstrip()
strip()
Strips whitespace from the left and returns the string.
Strips whitespace from the right and returns the string.
Strips whitespace from both sides and returns the string.
ljust (width)
rjust (width)
center (width)
Returns a left-justified string with spaces added to fill out the width.
Returns a right-justified string with spaces added to fill out the width.
Returns a centered string with spaces added to fill out the width.
How to check if a string contains all digits
entry = "12345"
is_integer = entry.isdigit()
# True
How to check the if a string starts with a substring
title = "The Meaning of Life"
starts_with_the = title.startswith("The") # True
How to change a string to title case
movie = "the meaning of life"
movie = movie.title()
# "The Meaning Of Life"
How to strip whitespace from the start and end of a string
ssn = " 392 55 7722 "
ssn = ssn.strip()
# "392 55 7722"
How to align strings by using left and right justification
print ("Hammer" .ljust (14) , "$9 .99" .rjust (10))
print("Nails".ljust(14), "$14.50".rjust(10))
The console
Hammer
Nails
$9.99
$14.50
Figure 10-3 How to use basic string methods
276 Section 2 Other concepts and skills
How to find and replace parts of a string
In many programs, you need to find or replace parts of a string. Figure 10-4
shows how to use string methods to do that.
The first two examples show how to use the findQ method. The first example
shows how you can use this method to do some simple validation of an email
address entry. Here, the first find() method gets the index of the @ sign. Then,
the second findQ method starts from that index and looks for a period. That's
because a period must come after the @ sign in an email address. Otherwise, the
address is invalid.
After these findQ methods, this example uses an if statement to check
whether either find() method returns -1. If so, the email address is invalid. In this
example, the @ sign in the email address is after the period, so the second findQ
method doesn't find a period and returns -1. As a result, this code displays a
message that says the address is invalid.
Of course, this example doesn't identify all invalid email addresses. For
instance, joel@.com is an invalid email address, but this example wouldn't catch
that. Still, this should give you a good idea of how you can use the find() method
for data validation.
The second example of the find() method shows how to get the first word in
a string. Here, the find() method gets the index of the first space in a title. Then,
if a space is found, the code uses slicing to get the characters from the beginning
of the string to the index of the space.
The next three examples show how to use the replace() method. The first
example replaces dashes with spaces in a credit card number. The second
example removes dashes from a phone number by replacing them with empty
strings. And the third example replaces just the first dash with an empty string
and keeps the second dash. Then, it uses slicing and concatenations to add
parentheses around the first three digits, which is a common way to format
phone numbers in North America.
Chapter 10 How to work with strings
277
The find() and replace() methods of a string
Method
fLnd(str[, start] [, end])
replace(old, new[, mun] )
Description
Searches for the specified substring and returns the index
of the first occurrence or -1 if the string isn't found. The
optional start and end parameters let you set the starting
and ending indexes for the search.
Returns a new string with occurrences of the old substring
replaced by the new substring. The optional third parameter
allows you to specify the number of occurrences to replace.
Find examples
How to search for specific characters
email = "joel.murach@com"
at_index = email.find("@" )
dot_index = email.find( " . ", at_index)
if at_index == -1 or dot_index == -1:
print("Invalid email address:", email)
# at_index = 11
# dot_index = -1
# True
# i = 3
How to get the first word in a string
title = "The Meaning of Life"
i = title.find(" ")
if i == -1:
first_word = "This title doesn't contain a space."
else:
first word = title [0:i] # "The"
Replace examples
How to replace dashes with spaces in a credit card number
cc_number = "4012-881022-88810"
cc_number = cc_number.replace("-",
ii
")
# 4012 881022 88810
How to remove dashes from a phone number
phone_number = "555-555-1234"
phone_number = phone_number.replac e("-", "")
# 5555551234
How to replace the first dash in a phone number and then add parentheses
phone_number = "555-555-1234"
# replace the first dash
phone_number = phone_number.replace("-", "", 1) # 555555-1234
# add parentheses to the area code
phone_number = "(" + phone_number [ :3] + ") " + phone_number [3: ]
print(phone_number) # (555) 555-1234
Figure 10-4 How to use the findQ and replaceQ methods of a string
278 Section 2 Other concepts and skills
The Create Account program
To show you how the skills presented in the previous figures can be used in a
larger program, figure 10-5 presents the Create Account program. This program
asks the user to enter a full name and a password until both are valid. In the real
world, of course, a user would need to enter more data to create an account, but
this shows how string-handling skills can be used to validate user entries.
The main() function in this program calls the get_full_name() and
get_password() functions to get valid user entries. Then, the main() function
calls the get_first_name() function to get the first name from the full name, and it
displays a thank you message.
The get_full_name() function begins by defining a while loop that runs until
the entry is valid. Within this loop, the first statement prompts the user to enter a
full name, and it uses the strip() method to strip any accidental whitespace from
the front or back of the entry. Then, the code checks whether the entry contains
a space. If so, the code returns the name, which exits the loop and the function.
Otherwise, the code displays a message that indicates that the entry isn't valid
and execution continues at the top of the loop.
The get_password() function gets a password entry and checks it for validity.
For this program, a valid password must have at least 8 characters, including at
least one uppercase letter and one digit. When the entry is valid, this function
returns the entry.
This function begins by defining a while loop that runs until the entry is
valid. Here again, the first statement prompts the user for the entry and strips any
whitespace from the front or back of the entry. Then, it uses a for statement to
loop through the characters in the entry and to check each character for a digit
and an uppercase letter. If it finds a digit, it changes the digit variable from False
to True. Similarly, if it finds an uppercase letter, it changes the cap_letter variable
from False to True.
After the for loop, this code checks whether the digit variable is False, the
cap_letter variable is False, or the entry contains less than 8 characters. If so, it
displays an error message and execution continues at the top of the while loop.
Otherwise, the code returns the password.
The get_first_name() function accepts the full name as an argument. Within
the function, the first statement gets the index of the first space in full name.
Then, the second statement uses slicing to get the first name, and the third
statement returns the first name.
Chapter 10 How to work with strings 27'9
The user interface
Enter
full name:
Eric
You must enter your full name.
Enter
Enter
full name:
password:
Password must be
with at least one
Enter
password:
Hi Eric, thanks f
Eric Idle
sesame
8 characters or
digit and one
sesaMel23
or creating an
more
uppercase
account.
letter.
The code
def main():
full_name = get_full_name ()
print ()
pas sword = get password()
print()
first_name = get_first_name (full_name)
print ("Hi " + first_name + ", thanks for creating an account.")
def get_full_name():
while True:
name = input("Enter full name: ").strip()
if " " in name:
return name
else:
print("You must enter your full name.")
def get password():
while True:
password = input("Enter password: ").stri ()
digit = False
cap_letter = False
for char in password:
if char•isdigit():
digit = True
elif i upp ()•
cap_letter = True
if digit == False or cap_letter == False or len(password) < 8:
print("Password must be 8 characters or more \n" +
"with at least one digit and one uppercase letter.")
else:
return password
def get_first_name (full_name) :
indexl = f ull_name .find( " ")
first_name = 1_ - n -[•'••- . ]
return first_name
if name == " main ":
main()
Figure 10-5 The Create Account program
280 Section 2 Other concepts and skills
How to split and join strings
The next two figures show how to split a string into a list of strings. In
addition, it shows how to join strings. This includes how to join a list of strings
into a single string.
How to split a string into a list of strings
Figure 10-6 shows how you can use the split() method to split a string into
a list of strings. By default, the delimiter for this method is a space or other
whitespace character. Then, the method uses this delimiter to split the string into
the items of a list.
The first example shows how this works. Here, the second statement splits
a sentence into a list that contains eight strings. Then, the next five statements
show how you can access these strings with an index. For instance, you can use
an index of 0 to access the first item in the list, the word "These". You can use
an index of 3 to access the fourth item in the list, the word "times". And you can
use an index of 7 or -1 to access the last item. Note, however, that the last item in
the list is "souls." with a period at the end. Note too that an IndexError occurs if
the index is out of range.
The second example shows how you can specify the delimiter. In this
case, the first statement specifies a date in the MM/DD/YYYY format that's
commonly used in the United States. Then, the second statement splits this date
using a front slash (/) as the delimiter. This returns a list that contains strings for
the month, day, and year of the date. When working with dates, you often need
to convert strings like these into integers as shown in this example. In chapter 11,
you'll learn more about how to work with dates like this one.
The third example shows how you can split a row of data that's separated by
a delimiter into a list that stores each column as an item. Here, the first statement
defines a row of data that stores a person's name and address using the vertical
bar (|) as the delimiter. Then, the second statement splits this row into columns,
and the next three statements display the person's name and address on the
console.
Chapter 10 How to work with strings
281
The split() method of a string
Method
split ( [delimiter] [, num] )
Description
Uses a delimiter to split a string into substrings
and returns a list of those substrings. By default,
the delimiter is any whitespace.
The second parameter lets you specify the
number of occurrences to replace.
How to split a string on whitespace
quotation = "These are the times that try men's souls."
words = quotation.split()
print(words[0])
print(words[3])
print(words[7])
print(words[-1])
print(words[8])
i/v to split a date on a
date = "11/9/1972"
date = date.split("/")
month = int(date[0])
day = int(date[l])
year = int(date[2])
year = int(date[3])
# 'These'
# 'times'
# ■souls.■
# 'souls.'
# IndexError:
delimiter
# ii
# 9
# 1972
# IndexError:
list index out of range
list index out of range
How to split a row of data on a delimiter
address = "John Doe|1500 Any Street|New York|NY|10001"
address = address.split("|")
print(addres s[0])
print(addres s[1])
print(address[2] + ", " + address[3] + " " + address[4])
The console
John
1500
New '
Doe
Any
rork,
Street
NY
10001
Description
• A delimiter is a character that's used to divide a string into multiple parts.
Figure 10-6 How to split a string into a list of strings
282 Section 2 Other concepts and skills
How to join strings
The first two examples in figure 10-7 show how to join strings with the +
and += operators. Although chapter 2 showed how to use the + operator with
strings, this book has only shown how to use the += operator used with numbers,
not strings. That's because the += operator usually isn't as efficient as the other
techniques for joining strings, especially the join() method.
The third example shows how to use the joinQ method to join a list of strings
into a single string. Here, the second statement specifies the vertical bar (I) as the
delimiter for the strings in the list. As a result, the joined string consists of each
item in the list separated by the vertical bar.
The fourth example shows how you can use the join() method to join the
characters in a string. This method works on both lists and strings because both
lists and strings are a type of collection known as a sequence. A list is a sequence
of items, and a string is a sequence of characters. In this example, the second
statement specifies a single space as the delimiter. As a result, the characters in
the joined string are separated by spaces.
The fifth example shows an error that Python programmers sometimes
make because it seems like the joinQ method would join one string to another.
However, if you attempt to use the join() method to join two strings, it doesn't
join the two strings together. Instead, it uses the first string as the delimiter
between each character in the second string. Obviously, that's not what you
typically want. The solution, of course, is to use the + operator instead as shown
in the first example.
Chapter 10 How to work with strings
283
How to join strings with the + and += operators
With the + operator
first_name = "Eric"
last_name = "Idle"
full_name = last_name + ", " + first_name # Idle, Eric
With the += operator
first_name = "Eric"
last_name = "Idle"
full_name = last_name
full_name += ", "
full_name += first_name # Idle, Eric
The join() method of a string
Method
Description
join (sequence) Joins the elements of a sequence into a string
that uses the current string as the delimiter.
How to join the items of a list
address = ["John Doe","1500 Any Street","New York","NY","10001"]
address = "|".join(address)
print(addres s)
The console
How to join the characters in a string
letters = "HORSE"
letters_spaced = " ".join(letters)
print(letters_spaced)
The console
HORSE
A common error when using the join() method
name = "John"
address = "15 E St"
full_address = name.join(address)
print(full_addres s)
# Uohn5John JohnEJohn JohnSJohnt
Description
• Both lists and strings are type of collection known as a sequence. A list is a sequence
of items, and a string is a sequence of characters.
• You can use the joinQ method to join the elements in a sequence into a string. This is
more efficient than using the + or += operator to concatenate strings.
Figure 10-7 How to join strings
284 Section 2 Other concepts and skills
The Movie List 2D program
To show how to use the split() and join() methods in a larger program, figure
10-8 shows how to use them in the Movie List program that was presented in
chapter 7. But this time, instead of storing its data in a CSV file, the Movie List
program stores its data in a plain text file and uses a vertical bar to separate each
column.
Most of the code for this program is the same as the Movie List program
from chapter 7. In fact, the write_movies() and read_movies() functions are the
only functions affected by this change. As a result, this figure only shows the
code for these functions.
The write_movies() function uses the join() method to join the columns for
each movie into a line using the vertical bar as the delimiter. Then, it writes this
line to the text file.
The read_movies() function begins by reading each line in the file. For each
line, this function replaces the new line character with an empty string, and uses
the splitQ method to split the line into a list of strings. To do that, it uses the
vertical bar as the delimiter. Then, it appends the list for the movie to the list of
all movies.
Chapter 10 How to work with strings 285
The console
COMMAND MENU
list - List all
movies
add - Add a movie
del - Delete a
movie
exit - Exit program
Command: list
1. Monty Python
and the Holy
2. On the Waterfront (1954)
3. Cat on a Hot
Command: add
Name: Gone with
Year: 193 9
Grail (1975)
Tin Roof (1958)
the Wind
Gone with the Wind was added.
The data in the text file after one record has been added to it
-•
T) movies.txt - Notepad
= s - \]
File Edit Format View Help
Vionty Python and the Holy Grail |1975
On the waterfront|1954
Cat on a Hot Tin Roof|1958
Gone with the wind|1939
4
■-
feJ
-
The code
# a file in the current directory
FILENAME = "movies.txt"
def write_movies(movies):
with open (FILENAME, "w") as file:
for movie in movies:
line = "|".join(movie)
file.writedine + "\n")
def read_movies():
movies = []
with open (FILENAME) as file:
for line in file:
line = line.replace("\n", "")
movie = line.split(" ")
movies. append (movie)
return movies
Figure 10-8 The Movie List 2D program with a plain text file for I/O
286 Section 2 Other concepts and skills
The Word Counter program
Just for fun, figure 10-9 presents another program that uses some of the
skills that you've just learned to count the words in some text that's read from
a text file. First, it displays the number of words in the file and the number of
unique words. Then, it displays each unique word and the number of times it is
used in the text.
In the get_words_from_file() function, the first statement reads the text from
the file. Then, the next three statements remove the new line characters, commas,
and periods from the text. This is followed by a statement that converts all of the
letters to lowercase. The last three statements split the text into a list of words,
sort the words alphabetically, and return the list.
The get_unique_words() function starts by creating a new list named
unique_words to store the unique words. Then, it sets the first item in the unique
words list to the first item in the words list. After that, it defines a for loop that
executes once for each word in the words list. However, this loop starts with the
second word in the list, the word that's at the index of 1.
Within the loop, an if statement checks whether the current word is equal to
the previous word. If so, the unique list already contains that word. That's true
because the words list has been sorted alphabetically. As a result, if the current
word is equal to the previous word, the code continues at the top of the loop,
which processes the next word in the list. Otherwise, the code appends the word
to the unique list. Once the loop processes all words, this function returns the
unique words list.
The main() function begins by calling the get_words_from_file() and
get_unique_words() functions to get the lists for the words and unique words.
Then, it displays the number of words and unique words. To do that, this code
uses the len() function to get the number of items in each list.
The main() function continues by using a for statement to display each word
in the unique list and the number of times it is used. However, to get the number
of times each unique word is used, the statement in the loop uses the countQ
method of the words list, not the unique words list. This method returns the
number of times an item is in the list.
Although this program shows how to work with lists as much as it shows
how to work with strings, it should give you some ideas about how you can
apply both skillsets to solve a programming problem. In chapter 12, you'll learn
how using a dictionary instead of a list makes this type of problem easier to
solve.
Chapter 10 How to work with strings
287
The console
The Word Counter program
Number of words =2 60
Number of unique words =
Word occurrences:
a = 7
above = 1
add = 1
...
142
The code
def get_words_from_file (filename) :
with open (filename) as file:
text = file, read ()
# read str from file
text = text.replace("Xn", "")
text = text.replace(",", "")
text = text.replace(". )
t- . = - . • - ()
words = text.split(" ")
words.sort()
return words
# convert str to list
def get_unique_words(words):
unique_words = []
unique_words.append(words[0])
for i in ranged, len(words) ) :
if words[i] == words[i - 1]:
continue
else:
unique_words . append (words [ i ] )
return unique_words
def main():
filename = "gettysburg_address. txt"
print("The Word Counter program\n")
# get words and unique words
words = get_words_from_file(filename) # get list of words
unique_words = get_unique_words(words)
# display number of words and unique words
print("Number of words =", len(words))
print ("Number of unique words = ", len(unique_words))
# display unique words and their word counts
print("Unique word occurrences:")
for word in unique_words:
print(" ", word, "=", words.count(word))
if
name
__ ii
main
■i
main()
Figure 10-9 The Word Counter program
288 Section 2 Other concepts and skills
The Hangman game
To conclude this chapter, the next two figures present a program that lets you
play a console version of the Hangman game. This program uses many of the
string-handling skills that you've learned in this chapter. Beyond that, it should
give you some insights into game programming.
The user interface
Figure 10-10 presents the console for the Hangman game. Although it
doesn't draw the hangman like you might have done as a child, it works the same
otherwise. First, the program picks a word that the player needs to guess. Then,
the player guesses the letters that might be in the word. If a guess is correct,
the program displays all occurrences of the letter in the word. Otherwise, the
program increments the wrong count. If the player makes 10 wrong guesses
before getting the word, the player loses. Otherwise, the player wins.
The hierarchy chart
This figure also presents the hierarchy chart for this program. Here, the
main() function calls the play_game() function each time the player starts a new
game. Then, the play_game() function calls the get_word() function to get the
word that the player has to guess. It calls the draw_screen() function to draw
the screen that shows the number of letters in the word with the correct letters
(if any) filled in, the number of guesses, the number of wrong guesses, and the
letters that have already been tried. And it calls the get_letter() function to get
each guess from the player.
At the next level, the get_random_word() function gets the word for the
game. Here, the function name is italicized to show that it is in a separate
module. You can use a convention like this to distinguish the functions that aren't
in the main module from those that are.
At the same level, the add_spaces() function adds spaces after the letters in
the word as shown in the console. This function is called by the draw_screen()
function.
Chapter 10 How to work with strings 289
The user interface for the Hangman game
Play the HAN
Word:
Enter
Word:
Enter
Word:
Enter
Word:
Enter
a
a
a
a
letter:
letter:
letter:
letter:
G M A N game
Guesses:
a
A Guesses:
e
A Guesses:
i
A Guesses:
o
0
1
2
3
Wrong: 0
Wrong: 0
Wrong: 1
Wrong: 2
Tried:
Tried: A
Tried: A E
Tried: A E I
(The game continues)
Word:
L M R
Enter
Word:
L M R
B
Y
a
B
Y
O U N _
B
letter:
O U N D
B D
Congratulations
Do you want to ;
A R Y Guesses:
d
A R Y Guesses:
13
14
Wrong: 6
Wrong: 6
I You got it in 14 guesses,
play again (y/n)?:
Tried: AEIOUSNC
Tried: AEIOUSNC
The hierarchy chart for the Hangman game
get word
get random
word
main
playgame
draw screen
add spaces
Description
• To show that a function is in another module, you can italicize the function name. In
this example, this convention is used for the get_random_word() function.
Figure 10-10 The user interface and hierarchy chart for the Hangman game
290 Section 2 Other concepts and skills
The wordlist module
Figure 10-11 presents the wordlist module that contains the
get_random_word() function. This module starts by defining a list of words that
were downloaded from the website shown in the comment. Then, the
get_random_word() function uses the choice() function of the random module
to eet a random word from the list. After that, it returns the word to the calling
module.
The hangman module
In the haneman module, the eet wordO function calls the
get_random_word() function of the wordlist module to get the word for the
game. Then, it returns this word after it converts it to uppercase letters.
The add_spaces function accepts a word as an argument. Then, it uses the
join() method to add spaces after each letter in that word, and it returns the word
with spaces.
The draw_screen() function begins by printing a line of 79 dashes.
That's what separates each drawing of the screen. Then, it draws the screen
by displaying the four arguments that are passed to it. To display the fourth
argument, which represents the current status of the word to be guessed
including the correct letters, this code calls the add_spaces() function. It also
calls the add_spaces(J function to display the third argument, which contains the
letters that the player has guessed.
The get_letter() function accepts an argument that contains the guessed
letters. This function begins by getting a letter from the player. Then, it checks
to make sure that the player has only entered one letter and that the player hasn't
already guessed that letter. If so, this function converts the letter to uppercase
and returns it. Otherwise, it displays an appropriate message and gives the player
another chance to enter a letter.
Chapter 10 How to work with strings 291
The wordlist module
import random
# List of words from http://www.free-teacher-worksheets.com/
words = [
"aardvark",
"air",
"zipper",
"zoo"
]
def get_random_word():
word = random.choice(words)
return word
The hangman module
import wordli s t
# Get a random word from the word list
def get_word():
word = wordli st.get_random_word()
return word.upper()
# Add spaces between letters
def add_spaces(word):
word_with_spaces = " ".join(word)
return word_with_spaces
# Draw the display
def draw_screen(num_wrong, num_guesses, guessed_letters, displayed_word)
print("-" * 79)
print("Word:", add spaces(displa ed word),
Guesses:", num_guesses,
Wrong:", num_wrong,
Tried:", add_spaces(guessed_letters))
# Get next letter from user
def get_letter(guessed_letters):
while True:
guess = input("Enter a letter: ").strip().upper()
# Hake sure the user enters a letter and only one letter
if guess == "" or len(guess) > 1:
print("Invalid entry. " +
"Please enter one and only one letter.")
continue
# Don't let the user try the same letter more than once
elif guess in guessed_letters:
print("You already tried that letter.")
continue
else:
return guess
Figure 10-11 The code for the Hangman game (part 1)
292 Section 2 Other concepts and skills
As the hierarchy chart shows, the play_game() function drives the logic of
the Haneman game. After it gets the random word for the eame, it sets up the
variables for the game. That includes the displayed_word variable, which starts
as one underscore character for each letter in the word. Then, this function calls
the draw_screen() function to draw the screen for the game. For a word that has
eight letters, the first screen should look like this:
Word: ________ Guesses: 0 Wrong: 0 Tried:
At this point, the player hasn't guessed any letters so the word is all underscores
and the guessed letters string is empty.
After drawing the first screen, the play_game() function enters a while loop
that continues as long as the player has less than 10 wrong guesses and there
are some remaining letters that the player hasn't guessed. Within that loop,
the first two statements get a letter from the player and concatenate it to the
euessed letters variable.
**- —
The next statement uses the find() method to check whether the guessed
letter is in the word. If so, it sets the displayed_word variable to an empty string
and sets the remaining_letters variable to the length of the word. Then, it loops
through each character in the word and adjusts the values of these variables.
Within this loop, if the letter is in the guessed_letters variable, the code
concatenates that letter to the displayed_word variable and subtracts 1 from
the remaining letters variable. Otherwise, the code concatenates an underscore
to the displayed_word variable. When the loop finishes, the displayed_word
variable contains the correct letters interspersed with the underscores for the
remaining letters, and the remaining letters variable contains the number of
letters that haven't been guessed yet.
If the guessed letter isn't in the word, the code adds 1 to the variable that
stores the number of wrong guesses. That ends the if statement in the loop. Then,
whether or not the letter is in the word, the code adds 1 to the variable that stores
the total number of guesses. Next, this code calls the draw_screen() function to
draw the screen with the new variables.
When the player makes 10 wrong guesses or guesses all of the letters in the
word, the while loop ends. Then, the code prints a line of 79 dashes and uses an
if statement to check whether the remaining_letters variable equals zero. Then, it
either prints a "Congratulations!" message or a "Sorry, you lost" message.
This module ends with the main() function and the statement that calls it.
Here, the main() function enters a while loop that lets the players play one or
more games.
Chapter 10 How to work with strings 293
The hangman module (continued)
# The input /process /draw technique is common in game programming
def play_game():
word = et word()
word_length = len(word)
remaining_letters = word_length
displayed_word = "_" * word_length
num_wrong = 0
num_guesses = 0
guessed_letters = ""
draw screen(num wron«, num -uesses, • essed letters dis la ed word)
while num_wrong < 10 and remaining_letters > 0:
guess = get_letter(guessed_letters)
guessed_letters += guess
pos = word, find (guess, 0)
if pos 1= -1:
displayed_word = ""
remaining_letters = word_length
for char in word:
if char in guessed_letters:
displayed_word += char
remaining_letters -= 1
else:
displayed_word += "_"
else:
num_wrong += 1
num_guesses += 1
d - _ - - ( _ * • g# * < _• _ #•" d_l- , • ' sp -yd_w» •)
print("-" * 79)
if remaining_letters == 0:
print("Congratulations I You got it in",
num_guesses, "guesses.")
else:
print("Sorry, you lost.")
print("The word was:", word)
def main():
print("Play the HANGMAN game")
while True:
play_game()
print()
again = input("Do you want to play again (y/n)?: ").lower()
if again 1= "y":
break
if name == " main ":
main()
Figure 10-11 The code for the Hangman game (part 2)
294 Section 2 Other concepts and skills
Perspective
In this chapter, you've learned the string-handling skills that are often
used for validating user entries. You've learned how to split a string into a list
of strings and how to join the items in a list into a string, which can be useful
when you're working with text files. You've also seen how these skills can be
used for getting statistics from strings and for writing game programs.
Terms
Unicode
ordinal
immutable
Summary
• In Python 3 and later. Unicode maps each character to an integer (ordinal)
value that also determines the sort order of the characters. To get the ordinal
value for a character, you can use the built-in ord() function.
• To access the characters in a string, you can use positive and negative
indexes starting with index 0 for the first character and -1 for the last
character. You can also use the len() function to get the length of a string.
• You can use the in operator to search for a substring within a string, and you
can use a for loop to loop through the characters in a string.
• Python provides many methods for working with strings, including the find()
and replace() methods.
• You can use the split() method to split a string into a list of strings based on
a specified delimiter. You can use the join() method to join a list of strings
into a single string that separates the list items with the specified delimiter.
• Strings are immutable, which means they can't be changed. So if you want
to keep the changes made by a string method, you need to assign the string
that's returned to a new variable.
delimiter
sequence
Chapter 10 How to work with strings 295
Exercise 10-1 Enhance the Create Account
program
In this exercise, you'll enhance the Create Account program in figure 10-5 so it
gets a valid email address and a valid phone number, as shown here:
Enter
Enter
Enter
full name:
password:
email address:
Please enter a valid
Enter
email address:
Please enter a valid
Enter
Enter
email address:
phone number:
Joel Murach
Extra54321
j oelmurach.com
email address.
joel.murachScom
email address.
j oel©murach.com
(555) 555-555
Please enter a 10-digit phone number.
Enter
phone number:
(555) 555-SPAM
Please enter a 10-digit phone number.
Enter
phone number:
(555) 555-5555
Hi Joel, thanks for creating an account.
We'll
text your confirmation code to this number: 555.555.5555
1. In IDLE, open the create_account.py file that's in this folder:
python/exercises/chlO
2. Create and use a function to get a valid email address. To be valid, the address
has to contain an @ sien and end with ".com".
3. Create and use a function to get a valid phone number. To do that, remove all
spaces, dashes, parens, and periods from the number. Then, check to make
sure it the phone number consists of 10 characters that are digits.
4. When all of the entries are valid, display the message shown above, including
the phone number format that uses dots to group the digits.
Exercise 10-2 Enhance the Word Counter program
In this exercise, you'll enhance the Word Counter program in figure 10-9 so it
also displays the number of sentences in the text string, as shown here:
The Word Counter program
Number of sentences = 11
Number of words =2 60
Number of unique words =
Unique word occurrences:
a = 7
• • •
142
1. In IDLE, open the word_counter.py file that's in this folder:
python/exercises/chlO
2. Create and use a function to get the number of sentences. To keep this simple,
this function can read the text file just as the function for eettine the number
of words does. Then, the main() function should display the number of
sentences as shown above.
296
Section 2 Other concepts and skills
Exercise 10-3 Enhance the Hangman game
In this exercise, you'll enhance the Hangman game in figure 10-11 so it displays
a graphic hangman as shown here:
Play
the HANGMAN game
1
O
\ /
/ \
Word:
Ente:
(
Word:
Ente:
: _ _ _ _ Guesses: 0
r a letter: b
: _ _ _ _ Guesses: 1
r a letter: f
Wrong: 0
Wrong: 1
Tried:
Tried: B
(The game continues)
(
\
/
Word:
/
\
: _ A _ E Guesses: 9
Wrong: 7
Tried: BFAEICDGH
Sorry, you lost.
The word was: RAKE
In IDLE, open the hangman.py file that's in this folder:
python/exercises/chlO
Enhance this program so it displays a hangman graphic when the program
starts as shown above. This hangman consists of the letter O, bars, slashes,
and backslashes. To display it, create a draw_hangman() function that is called
from the mainQ function.
Enhance this program so it adds one character to the hangman each time the
player guesses wrong, starting with O for the head. To do this, enhance the
draw_hangman() function so it gets the number of wrong guesses as its only
argument. Then, it should display that many hangman characters. This function
should be called by the draw_screenQ function as well as the main() function.
In this version of the game, the player only gets 7 wrong guesses. So, make
sure to modify the program accordingly.
11
How to work with
dates and times
In the last two chapters, you learned how to work with two of the essential data
types: numbers and strings. Now, you'll learn how to work with a third
essential type: dates and times. These skills are important because you use
dates and times in most applications, from business applications to games.
Although Python provides several modules for working with dates and
times, this chapter shows you how to use the datetime module. That's because
it's the most useful module. Note, however, that this module is somewhat
different than most of the other modules you have been using because it is an
object-oriented module. As a result, you will work with classes, constructors,
methods, and attributes.
The good news is that the syntax is similar to what you're familiar with so
you shouldn't have any trouble using this module. That will be especially true
if you've already read chapter 14 on object-oriented programming.
How to get started with dates and times 298
How to create date, time, and datetime objects 298
How to create datetime objects by parsing strings 300
How7 to format dates and times 302
How to work with spans of time 304
The Invoice Due Date program 306
The Timer program 308
More skills for working with dates and times 310
How7 to get date and time parts 310
How to compare date/time objects 312
The Hotel Reservation program 314
Perspective 318
298 Section 2 Other concepts and skills
How to get started with dates
and times
This topic shows you how to get started with dates and times. As you might
expect, the first step is to create an object that stores a date, a time, or a date and
a time.
How to create date, time, and datetime objects
Figure 11-1 begins by showing two methods and three constructors that
you can use to create a date object, a time object, or a datetime object. As you
will learn in chapter 14, a constructor is a special type of method that is used to
create objects.
Collectively, the objects created by the constructors in this figure can be
referred to as date/time objects. You can use the date() constructor to create
a date object that contains a date, but not a time. You can use the timeQ
constructor to create a time object that contains a time, but not a date. And you
can use the datetime() constructor to create a datetime object that contains a date
and a time.
Before you create a date/time object, you import one or more classes from
the datetime module. As you will also learn in chapter 14, a class contains the
constructors and methods that can be used to create and work with objects.
In the first group of examples in this figure, the statements import the date,
time, and datetime classes. Then, the second example shows another way to
import all three of these classes. Of course, you only need to import the classes
that you're going to use.
The third example uses the today() and now() methods to create date/time
objects. Here, the first statement calls the today() method directly from the date
class to get a date object for the current date. Then, the second statement calls
the now() method directly from the datetime class to get a datetime object for the
current date and time.
The fourth example uses the constructors of the date, time, and datetime
classes to create date/time objects. Here, the first statement creates a date object
for October 31, 1988. The second statement creates a time object for 2:30 PM by
using the 24-hour notation to supply the hour (2 PM is 14 hours into the 24-hour
day). And the third statement creates a datetime object. Since this code doesn't
set the seconds, they default to 0. Finally, the fourth statement creates a datetime
object that sets seconds.
Note that none of the examples set the milliseconds or microseconds. Since
a millisecond is one thousandth of a second and a microsecond is one millionth
of a second, few applications need to track time that precisely.
You should also know that all of the objects in this chapter are naive. This
means that they are not aware of time zones or daylight savings time. If you
want to create datetime and time objects that are aware, you can set the optional
tzinfo parameter of the datetime() and time() constructors, but you won't need to
do that for most applications.
Chapter 11 How to work with dates and times
299
Two common methods of the date and datetime classes
Method
date.today()
datetime. now ()
Description
Returns a date object for the current date.
Returns a datetime object for the current date and time.
The constructors for creating date, time, and datetime objects
Constructor
date (year, month, day)
time ( [hour] [, min] [, sec] [,
datetime (year, month, day
[,hotur] [, min] [, sec] [,
microsec])
f microsec] )
Description
Returns a date object set to the specified
date.
Returns a time object set to the specified
time. All time arguments are optional and
default to 0.
Returns a datetime object for the specified
date and time. All time arguments are
optional and default to 0.
Code that imports the date, time, and datetime classes
from datetime import date
from datetime import time
from datetime import datetime
Another way to import the date, time, and datetime classes
from datetime import date, time, datetime
Code that uses methods to create date and datetime objects
invoice_date = date.today()
invoice date = datetime.now()
# Current date
# Current date and time
Code that uses constructors to create naive date/time objects
halloween = date(1988, 10, 31)
meeting = time (14, 30)
appointment = datetime(2016, 10, 28, 14, 30)
entry_time = datetime(2017, 10, 28, 14, 32, 48)
# 10/31/1988
# 2:30 PM
# 10/28/2016 2:30 PM
# 10/28/2017 2:32:48 PM
Description
• The datetime module contains constructors for constructine dates and times. To use
constructors, you pass arguments to them in the same way that you pass arguments
to methods.
• Both datetime objects and time objects can be either aware or naive. Aware objects
account for time zones and daylight savings time. Naive objects do not.
• By default, datetime objects and time objects are naive. However, you can make
them aware by providing an optional tzinfo argument that you can learn about in
the documentation for the datetime module.
• You can't make date objects aware because they don't store time info.
• A millisecond is one thousandth of a second. A microsecond is one millionth of a
second, or one thousand milliseconds.
Figure 11 -1 How to create date, time, and datetime objects
300 Section 2 Other concepts and skills
How to create datetime objects by parsing strings
When creating date/time objects, it's common to need to create a datetime
object from a string. For example, in a console application, you may want to
prompt the user to enter a string for a date or time. Then, you may want to
convert the string entered by the user to a datetime object. To do that, you can
use the strptimeQ method of the datetime class as shown in figure 11-2. Here, the
p stands for parse. In other words, you can use this method to create a datetime
object by parsing a string.
The strptimeQ method accepts two arguments: (1) the string representation
of the date and time and (2) a format string that specifies what each part of the
input string represents. The table in this figure shows the most commonly used
formatting codes for the format string, although the datetime module provides
many more.
The first example shows how this works. Here, the first statement sets a date
usine the common U.S. format of MM/DD/YYYY. In other words, the month
goes first, followed by a slash, followed by the day, followed by another slash,
followed by the year. Since this doesn't specify a time, all of the time values
default to 0.
The second and third statements work similarly. However, the second
statement sets a date using the common European format of DD-MM-YYYY,
and the third statement sets a date usine the ISO format of YYYY-MM-DD.
The fourth statement sets both a date and a time. In this case the format
string specifies the date in the common U.S. format of MM/DD/YYYY, and it
specifies the time in the normal format of hours and minutes, where the hours
and minutes are separated by a colon, and the hours are in 24-hour format.
The second example shows how to get a date from a user. Here, the first
statement prompts the user to enter a date in the MM/DD/YYYY format. Then,
the second statement parses the string entered by the user into a datetime object.
Next, the third statement prints the datetime object to the console. This displays
the date usine the default format of YYYY-MM-DD HH:MM:SS. Since this
code didn't prompt the user to enter a time, it probably doesn't make a lot of
sense to display the hours, minutes, and seconds here. Fortunately, you can
format date/time objects as described in the next figure so they only display the
parts that you want to display.
Chapter 11 How to work with dates and times
301
The strptime() method of the datetime class
Method
datetime. strptime (datetime_str„
format str)
Description
Uses the specified format string to convert
the date/time string to a datetime object.
Common format string codes
Code Description
%d
%m
%y
%Y
%H
%M
%S
Day of month as a number
Month as a number
2-digit year
4-digit year
Hour of day in 24 hour format
Minute as number
Second as number
Code that creates datetime objects using format strings
halloween
halloween
halloween
halloween
datetime.strptime("10/31/1988", "%m/%d/%Y")
datetime.strptime("31-10-1988", "%d-%m-%Y")
datetime.strptime("1988-10-31", "%Y-%m-%d")
datetime.strptime("10/31/1988 22:30", "%m/%d/%Y %H:%M")
Code that gets a date from the user and prints it to the console
date_str = input("Enter date of birth (MM/DD/YYYY): ")
birth_date = datetime.strptime(date_str, "%m/%d/%Y")
print("Date of birth:", birth_date)
The console
Enter date of birth (MM/DD/YYYY): 2/4/1968
Date of birth: 1968-02-04 00:00:00
Description
• The p in the strptimeO method stands for parse. You can use this method to create a
datetime object by parsing a string. To specify the format of the string, you can use
format string codes.
Figure 11 -2 How to create datetime objects by parsing strings
302 Section 2 Other concepts and skills
How to format dates and times
Figure 11 -3 shows how to use the strftime() method of a date/time object to
format a date/time object. This method accepts a single argument that specifies
a format string. This string works similarly to the format string for the strptime()
method described in the previous figure.
The table in the figure shows some of the most common formatting codes
that you can use in formatting strings. Many are the same as in the previous
figure. Most are self-explanatory, except for the last three.
The %c specifier prints the current date and time according to what is
common in the locale for the current computer. For example, in the United
States, this would print the abbreviated day of the week, followed the abbreviated
month, followed by the day, and then the time. In other locales, the output might
look different.
The %x format character gets the shorthand notation for the current date
according to the current locale. For example, in the U.S, it gets 10/31/88. In most
European countries, where it's conventional to list the day before the month, it
would print 31-10-16. Finally, the %X format character prints the current time
according to local formatting conventions.
The first example creates a datetime object for a date of October 31, 1988
and a time of 22:48. Then, the next two examples format this date.
The second example shows six statements that format a datetime object.
Here, the statements show that you don't have to include the time in the format,
even though the datetime object stores hours and minutes. They show how to use
names for the month and the day. And they show how to work with the 24-hour
and 12-hour formats.
The third example shows two statements that print the date and time
according to conventions used in a locale. Here, the first statement prints the date
and time according to the local conventions, and the second statement prints the
date only.
Although the table in this figure contains the most common formatting
codes, many other format codes are available. For more information, you can
view the documentation for the strftimeQ method.
Chapter 11 How to work with dates and times
303
The strftimeQ method of all date/time objects
Method
strftime (format str)
Description
Uses the specified format string to convert
a date/time object to a formatted string.
Some commonly used formatting codes
Code
%SL
%h
%b
%B
%d
%m
%Y
%y
%H
%T
%M
%S
%p
%t
%c
%x
%X
Description
Abbreviated weekday name
Full weekday name
Abbreviated month name
Full month name
Zero-padded day of month as a number
Zero-padded month as a number
4-digit year
2-digit year
Hour of day in 24-hour format
Hour of day in 12-hour format
Minute as number
Second as number
AM/PM specifier
Microsecond
Date and time formatted for locale
Date formatted for locale
Time formatted for locale
Example
Sat
Saturday
Oct
October
01
01
1977
77
13
01
59
59
AM
0153219
Mon Oct 31 01:15:15 2016
10/31/16
01:15:15
Code that creates a datetime object that has a date and time
halloween = datetime(1988, 10, 31, 22, 48)
Code that uses format codes to specify format
halloween
halloween
halloween
halloween
halloween
halloween
strf time ( "S&Y-Ssm-S&d" )
strf time ( "%ra/%a/%Y" )
strf time ( "%m/%d/%y" )
strf time ("%B %&, %Y (%K)n)
strftime("%B %&, %H:%M")
strftime("%B %&, %T:%M %p")
Code that formats for locale
halloween. strf time ( "%c ")
halloween. strf time ( "%x")
# 1988-10-31
# 10/31/1988
# 10/31/88
# October 31,
# October 31,
# October 31,
1988 (Monday)
22:48
10:48 PM
# Mon Oct 31 22:48:00 1988
# 10/31/88
Description
• The f in the strftime() method stands for format. You can use this method to get a
string for the datetime object with the specified format.
Figure 11 -3 How to format dates and times
304 Section 2 Other concepts and skills
How to work with spans of time
Figure 11 -4 shows how you can use a timedelta object to work with a span
of time. This allows you to add a span of time to a date/time object or to subtract
a span of time from date/time object. In addition, it allows you to store the span
of time that's returned when you subtract one date/time object from another.
The constructor of the timedelta class accepts seven possible arguments.
Typically, since you only need to specify one or two of these arguments, you use
named arguments. That's also a good coding practice since it makes your code
easier to read and understand.
The first example shows how to import the timedelta class from the datetime
module. Then, the second example shows how to create three time spans. This
shows how you can use one or more arguments to specify time spans of different
lengths.
The third example shows how to add and subtract a time span from a
date/time object. Here, the first statement adds a time span to create a new
date object that's exactly 3 weeks from the current date. The second statement
subtracts a time span to create a new date object that's exactly 3 weeks before
the current date. And the third statement creates a new datetime object that's
exactly 3 hours from now. Depending on the current time, this may or may not
cause the date to change. For example, if the current date and time is December
31, 2017 22:00, this causes the new datetime object to be January 1, 2018 01:00.
The fourth example shows how to get the time span between two different
date/time objects. To do that, you can subtract one date from the other. This
returns a timedelta object that stores the time span. In this example, the first
statement creates a datetime object for Halloween 2017. Then, the second
subtracts the current date and time from the first datetime object to get a
timedelta object. Note, however, that you will get a negative time span if the
current date is after Halloween 2017.
After that, the next four statements use three of the attributes and one
method of the timedelta object to get the days, seconds, microseconds, and total
seconds including microseconds. Here, the seconds and microseconds are added
to the days value. In other words, the seconds attribute doesn't store the total
number of seconds. If you want to get the total number of seconds, including
microseconds, you can call the total_seconds() method of the timedelta object.
The last two statements print representations of the time span. To start, the
first statement prints the number of days, seconds, and microseconds between
the two datetime objects. Then, the second statement prints the total number of
seconds. You can see the results in the console below these statements.
The last example shows another way to get the time span between two dates.
It works like the fifth example, but it doesn't create a variable name for the result
of the calculation. Instead, it encloses the calculation in parentheses and gets the
days attribute of the timedelta object directly from the result of the calculation.
Chapter 11 How to work with dates and times 305
The constructor for a timedelta object
timedelta ( [days] [, seconds] [, microseconds] [, milliseconds]
[, minutes] [, hour's] [, weeJcs] )
Code that imports the timedelta class
from datetime import timedelta
Code that creates time spans
three_weeks = timedelta(weeks=3)
two_hours_thirty_minues = timedelta(hours=2, minutes=30)
time_span = timedelta(weeks=2, days=3, hours=8, minutes=14)
Code that adds and subtracts a span of time
three_weeks_from_today = date.today() + timedelta(weeks=3)
three_weeks_ago = date.today() - timedelta(weeks=3)
three_hours_from_now = datetime.now() + timedelta(hours=3)
Three attributes and a method of a timedelta object
Attribute/method Description
days Number of days.
seconds Number of seconds in addition to days.
microseconds Number of microseconds in addition to days and seconds.
total seconds () Total number of seconds and microseconds.
Code that gets the time span between two date objects
halloween = datetime(2017, 10, 31)
time_span = halloween - datetime .now() # Time span between dates
days = time_span.days # Number of days
seconds = time_span.seconds # Number of seconds
microseconds = time_span.microseconds # Number of microseconds
total_seconds = time_span.total_seconds() # Total seconds / microseconds
print(days, "days", seconds, "seconds, and", microseconds, "microseconds.")
print(total_seconds, "seconds and microseconds.")
The console
405 days, 34951 seconds, and 289282 microseconds.
3502 6951.289282 seconds and microseconds.
Another way to get the time span between two dates
days = (halloween - datetime.now() ) .days # Number of days
Description
• A timedelta object stores a span of time.
• You can adjust a date or datetime object by adding or subtracting a timedelta object.
• You can get the span of time between two date/time objects by subtracting one from
the other. This returns a timedelta object that contains days, seconds, and microseconds
Figure 11 -4 How to work with spans of time
306 Section 2 Other concepts and skills
The Invoice Due Date program
Figure 11-5 presents a program that uses some of the skills presented so far
in this chapter. The user interface for this program prompts the user to enter an
invoice date in the MM/DD/YY format. Then, it displays the invoice date, the
due date, and the current date. In this case, the program calculates the due date
as 30 days after the invoice date. If the invoice is overdue, the program displays
a message that indicates the number of days overdue. Otherwise, the program
displays a message that indicates the number of days until due.
The code for this program begins by importing the datetime and timedelta
classes from the datetime module. These are the only two classes needed by this
program.
This is followed by the get_invoice_date() function. The first statement in
this function prompts the user to enter an invoice date in MM/DD/YY format
and stores the user entry as a string. The second statement uses the strptime()
method to parse the string into a datetime object. This object is then returned to
the mainQ function.
The main() function contains a while loop that executes until the user exits
the program. The first statement in this loop calls the get_invoice_date() function
to get the datetime object for the invoice date.
After getting the invoice date object, the main() function calculates the
due date by adding 30 days to the object. Next, the code gets the current date.
Then, it calculates the number of days between the two dates by subtracting
the due date from the current date and storing the result in a variable named
days_overdue.
After calculating the days overdue, this code prints the dates to the console.
To do that, it uses the strftime() method to return a string for each datetime object
that's in a user-friendly format. Then, the code checks whether the days_overdue
variable stores a value that's greater than 0. If so, the code prints a message that
indicates the number of days overdue. Otherwise, the days_overdue variable
stores a negative value or a value of 0. In that case, the code multiplies the
days_overdue variable by -1 to convert it to a positive number that represents
the number of days until the invoice is due. Then, it prints a message that
indicates the number of days until due.
As you review this code, note that it stores all of the dates as datetime
objects. In other words, even though the user interface only displays the date part
of the object, the program stores the time part too. For the invoice date, the user
doesn't enter a time part, so it's set to 00:00:00.0000000. Similarly, since the due
date is calculated by adding 30 days, its time part is also 00:00:00.0000000.
Chapter 11 How to work with dates and times 307
The user interface
The Invoice Due Date program
Enter the invoice date (MM/DD/YY): 7/14/17
Invoice Date: July 14, 2017
Due Date: August 13, 2017
Current Date: September 12, 2017
This invoice is 30 day(s) overdue.
Continue? (y/n):
The code
from datetime import datetime, timedelta
def get_invoice_date():
invoice_date_str = input("Enter the invoice date (MM/DD/YY): ")
invoice_date = datetime.strptime(invoice_date_str, "%m/%d/%y»)
return invoice_date
def main():
print("The Invoice Due Date program")
print()
while True:
invoice_date = get_invoice_date()
print()
# calculate due date and days overdue
due_date = invoice_date + timedelta(days=30)
current_date = datetime.now()
days_overdue = (current_date - due_date).days
# display results
print("Invoice Date: " + invoice_date.strftime("%B %d, %Y"))
print("Due Date: " + due_date.strftime("%B %&, %Y"))
print("Current Date: " + current_date.strftime("%B %d, %Y"))
if days_overdue > 0:
print("This invoice is", days_overdue, "day(s) overdue.")
else:
days_due = days_overdue * -1
print("This invoice is due in", days_due, "day(s).")
print()
# ask if user wants to continue
result = input("Continue? (y/n): ")
print()
if result.lower() 1= "y":
print("Bye!")
break
if name == " main ":
main()
Figure 11-5 The Invoice Due Date program
308 Section 2 Other concepts and skills
The Timer program
Now that you've seen a program that works with dates, you're ready to see a
program that works with times like the Timer program presented in figure 11-6.
The user interface for this program begins by prompting the user to press Enter
to start the timer. When the user presses Enter, the program displays the date and
time for the start time. Then, it prompts the user to press Enter to stop the timer.
When the user presses Enter the second time, the program displays the date and
time for the stop time. In addition, it displays the amount of time that has elapsed
between the start and stop times.
The code begins by importing the datetime and time classes from the
datetime module. These are the only classes used by this program.
Then, this code gets the start time. To do that, it uses an input statement to
prompt the user to press Enter. This pauses the program until the user presses
Enter. When the user presses that key, the code gets the current date and time,
stores it in the start_time variable, and prints it to the console. Incidentally, an
empty string is returned when the user presses the Enter key, but there's no need
to store it in a variable.
The code that gets the stop time works similarly. Then, after getting the start
and stop times, the program calculates the elapsed time. To do that, it subtracts
the start time from the stop time. This returns a timedelta object that stores the
days, seconds, and microseconds for the elapsed time. Then, to convert the
seconds to minutes, this code uses integer division (//) to divide the seconds by
60. To get the leftover seconds, it uses the remainder operator. And to get the
microseconds, it uses the microsecond attribute,
The next two statements use a similar technique to break down the minutes
into hours and leftover minutes. Then, the code creates a time object from the
hours, minutes, seconds, and microseconds. Last, it displays the elapsed time by
printing the time object to the console. But first, it checks whether the number of
days is greater than 1. If so, it prints the number of elapsed days to the console
before it prints the elapsed time to the console. Of course, it would be unusual
for a user to wait more than a day to press Enter the second time, but this
provides for that possibility.
As you review this code, note that it uses the default display format for the
datetime objects for the start time and end time, and it uses the default display
format for the time object for the elapsed time. For this program, these formats
are adequate. If necessary, though, you could use the strftime() method to change
the formatting for these objects.
Chapter 11 How to work with dates and times 309
The user interface
The Timer program
Press
Start
Enter
time:
Press Enter
Stop time:
to start..
2016-09-16
to stop...
2016-09-16
ELAPSED TIME
Time: 00:00:16.687580
•
15
15
:24:
:24:
:08.
:25.
.633025
.320605
The code
from datetime import datetime, time
def main():
print ("The Timer program" )
print ()
# start timer
input("Press Enter to start...")
start_time = datetime.now()
print("Start time:", start_time)
print()
# stop timer
input("Press Enter to stop...")
stop_time = datetime.now()
print("Stop time: ", stop_time)
print()
# calculate elapsed time
elapsed_time = stop_time - start_time
days = elapsed_time.days
minutes = elapsed_time.seconds // 60
seconds = elapsed_time.seconds % 60
microseconds = elapsed_time.microseconds
# calculate hours and minutes
hours = minutes // 60
minutes = minutes % 60
# create time object
time_object = time(hours, minutes, seconds, microseconds)
# display results
print("ELAPSED TIME")
if days > 0:
print("Days:", days)
print("Time:", time_obj ect)
if name == " main ":
main()
Figure 11 -6 The Timer program
310 Section 2 Other concepts and skills
More skills for working with dates
and times
If you understand the Invoice Due Date program and the Timer programs,
you have already learned the most useful skills for working with dates and times.
However, there's always more to learn. That's why this chapter continues by
presenting two more skills that you commonly need when you work with dates
and times.
How to get date and time parts
Earlier in this chapter, you learned how to use the constructors of the
date/time classes to create date/time objects by specifying int values for the year,
month, day, hour, minute, second, and microsecond. Now, figure 11-7 shows
how to get those values from a date/time object. To do that, you can call the
attributes summarized at the top of this figure. However, date objects only
provide the year, month, and day attributes. Similarly, time objects only provide
the hour, minute, second, and microsecond attributes.
The first example shows how to access each attribute. To start, the first
statement creates a datetime object for October 31, 1988 14:32:30. Since this
statement doesn't set the microsecond attribute, it defaults to 0.
When you work with dates and times, you sometimes need to use an if
statement to check part of the object as shown in the second example. Here, the
first statement gets a date object for the current day. Then, the second statement
checks whether the month is 10 and the day is 31. If so, it prints a message that
says, "Happy Halloween!". Otherwise, it prints a message that indicates that it's
not Halloween.
Other times, you may need to create a new date/time object that's based on
the parts of an existing date/time object as shown in the third example. Here, the
first statement gets a date object for the current date. Then, the second statement
gets the previous year by subtracting 1 from the current year. Finally, the third
statement creates a new date object that uses the same month and day as the
current date, but uses the previous year as the year. In other words, it creates a
date object for one year ago today.
The fourth example works like the third example. However, it adjusts the
datetime object by adding 1 to the year. In addition, it creates a datetime object
that includes non-default values for the hour and minute.
Chapter 11 How to work with dates and times
311
Attributes that return the parts of a date/time object
Attribute
year
month
day-
hour
minute
second
microsecond
Description
Returns the year as a four-digit number
Returns the month as a number from 1 to 12
Returns the day as a number from I to 31
Returns the hour as a number from 0 to 23
Returns the minute as a number from 0 to 59
Returns the second as a number from 0 to 59
Returns the microsecond as a number from 0 to 9999999
Code that gets the parts of a datetime object
halloween = datetime(1988, 10, 31, 14, 32, 30)
year = halloween.year
month = halloween.month
day = halloween.day
hour = halloween.hour
minute = halloween.minut e
second = halloween.second
microsecond = halloween.microsecond
# 1988
# 10
# 31
# 14
# 32
# 30
# 0
Code that checks parts of a date object
today = date.today()
if (today.month == 10 and today.day == 31) :
print("Happy HalloweenI")
else:
print("Dang, it■s not Halloween today.")
Code that creates a new date based on the current date
today = date.today()
last year = today.year - 1
one_year_ago_today = date(last year, today.month, today.day)
Code that creates a new date and time based on the current date and time
now = datetime.now()
this time next year = datetime (now.year + 1, now.month, now.day,
now.hour, now.mi nut e)
Description
• You can get the various parts of a date/time object by accessing its attributes.
However, these attributes are read-only, so you can't set them.
Figure 11 -7 How to get date and time parts
312 Section 2 Other concepts and skills
How to compare date/time objects
Figure 1 ] -8 shows how you can compare date/time objects. In Python, this
is easy to do because you can use the same comparison operators that you use to
compare numbers.
The first example begins by getting a date object for the current day. Then, it
creates a date object for Halloween 2017. Next, an if statement checks whether
the current date is greater than, less than, or equal to Halloween 2017. Each
clause within the statement prints an appropriate message.
In the first example, checking for equality works because both objects are
date objects. As a result, this example checks whether the year, month, and day
are equal. However, if you were using datetime objects, the equality checking
would only work if the time parts were also equal.
The second example prints the number of days until Halloween. Here, the
first statement gets a date object for the current date. Then, the second statement
creates a date object for the Halloween that's in the same year as the current
date. Next, an if statement checks whether Halloween is after the current date,
which is true for all dates in November and December. In that case, this code
adjusts the date object for Halloween by creating a new date object that's one
year later. Then, it gets and displays the number of days until Halloween.
The third example works much like the first example. However, it checks
whether the current date and time are within the specified start and end times for
the meeting, which is an hour long. In addition, it checks whether the current
time is less than the start time or greater than the end time.
The fourth example uses the comparison operators to automatically adjust a
two-digit year so it's correct for the program. Here, the first statement prompts
the user to enter a birth date in this format MM/DD/YY. This makes it easy for
the user to enter a year. Then, the second statement parses the string and converts
it to a datetime object. Unfortunately, if the user enters a year in the 1900s, this
converts the year into the 2000s. For example, if the user enters 2/4/68, this
returns a year of 2068, not 1968, which would be correct for a birth date.
To fix this issue, this code checks whether the birth date year is greater than
the current year. If so, it subtracts 100 from the birth date year. For example, it
would subtract 100 from 2068 to return a value of 1968. Then, it creates a new
datetime object for the correct birth date. Finally, this example prints the birth
date to the console with a 4-digit year format, so you can make sure that the code
has corrected the date.
Of course, this code doesn't work correctly for people who are over 100
years old. For example, if you were born in 1915, this program would not adjust
the two-digit year correctly.
Chapter 11 How to work with dates and times 313
Code that compares two date objects
today = date .today ()
halloween = date(2017, 10, 31)
if today > halloween:
print("Halloween 2017 has come and gone.")
elif today < halloween:
print("Halloween 2017 is coming soon.")
elif today == halloween:
print("Happy Halloween 2017 I")
Code that prints the number of days until Halloween
today = date.today()
halloween = date(today.year, 10, 31)
if today > halloween:
next_year = today.year + 1
halloween = date(next year, 10, 31)
days_until = (halloween - today).days
print(days_until, "day(s) until Halloween.")
Code that compares two datetime objects
meeting_start = datetime (2017, 12, 2, 9, 30)
meeting_end = meeting_start + timedelta(hours=l)
now = datetime.now()
if now > meeting_start and now < meeting_end:
print("This meeting is happening now.")
elif now < meeting_start:
print("This meeting is coming up.")
elif now > meeting_end:
print("This meeting already took place.")
Code that automatically adjusts a two-digit year to be correct
# get input and convert to a datetime object
birth_date = input ("Enter birth date (MM/DD/YY) : ")
birth_date = datetime.strptime(birth_date, "%m/%d/%y")
# if necessary, subtract 100 to fix birth year
if birth_date > datetime.now():
fixed birth year = birth_date .year-100
birth_date = datetime(fixed_birth_year, birth_date.month,
birth_date.day)
print("Birth date: " + birth_date.strftime("%m/%d/%Y"))
The console
Enter date of birth (MM/DD/YY): 2/4/68
Date of birth: 02/04/1968
Description
• You can use the comparison operators to compare date/time objects just like you
can use them to compare numbers.
Figure 11 -8 How to compare date/time objects
314 Section 2 Other concepts and skills
The Hotel Reservation program
To illustrate the use of many of the skills presented so far, this chapter
ends with a Hotel Reservation program. As the user interface shows, it
begins by prompting the user for an arrival date and a departure date in the
YYYY-MM-DD format. Once the user enters those dates, the user interface
prints the arrival date, the departure date, and the price per night in user-friendly
formats. In addition, it prints the total number of nights and the total price, also
in user-friendly formats.
If the arrival date is in August, the price per night is $ 105 and the user
interface displays a message that indicates that August is high season. Otherwise,
the price per night is $85 and the user interface doesn't display any message
about the price per night.
The code for this program begins by importing the datetime class from the
datetime module. This is the only class needed to work with the dates and times
in the program. In addition, the code imports the locale module that is presented
in chapter 9. This is the module that's used to format the currency values. This is
followed by the code for the two functions that are called by the main() function.
The get_arrival_date() function gets a valid arrival date. It begins by entering
a loop that continues as long as the arrival date isn't valid. Within this loop, the
first statement prompts the user to enter the arrival date in the YYYY-MM-DD
format. However, if the strptime() method isn't able to parse the string entered
by the user into a datetime object, a ValueError occurs. As a result, a try
statement is used to catch this error, print an error message, and let the
execution continue at the top of the loop. If the user enters a date in the valid
format, though, the code creates a datetime object for the arrival date.
At this point, the code checks whether the arrival date is today or later. To
do that, this code creates a datetime object named today that stores the current
year, month, and day. However, since this code doesn't set the time values, they
all default to 0. As a result, all of the dates used by this program are actually
datetime objects with the time values set to 0. This allows the comparisons and
calculations of this program to work correctly.
If the arrival date is less than today, this code displays an error message
and code execution continues at the top of the loop, which prompts the user for
another arrival date. Otherwise, this code returns the arrival date, which ends the
loop.
Chapter 11 How to work with dates and times 315
The user interface
The Hotel Reservation program
Enter arrival date (YYYY-MM-DD): 2017-8-
Enter departure date (YYYY-MM-DD): 2017-
Arrival Date: August 15, 2017
Departure Date: August 19, 2017
Nightly rate: $105.00 (High season)
Total nights: 4
Total price: $420.00
Continue? (y/n): y
Enter arrival date (YYYY-MM-DD): 2017-9-
Enter departure date (YYYY-MM-DD): 2017-
Arrival Date: September 15, 2017
Departure Date: September 19, 2017
Nightly rate: $85.00
Total nights: 4
Total price: $340.00
Continue? (y/n): n
Bye I
-15
-8-19
-15
-9-19
The code Page 1
from datetime import datetime
import locale
def get_arrival_date () :
while True:
date_str = input("Enter arrival date (YYYY-MM-DD): ")
try:
arrival_date = datetime.strptime (date_str, "%Y-%m-%d")
except ValueError:
print("Invalid date format. Try again.")
continue
# strip non-zero time values from datetime object
now = dat et ime. now ()
today = datetime (now.year, now.month, now.day)
if arrival_date < today:
print("Arrival date must be today or later. Try again.")
continue
else:
return arrival date
Figure 11-9 The Hotel Reservation program (part 1)
316 Section 2 Other concepts and skills
The get_departure_date() function works like the get_arrival_date() function,
but with a few minor differences. To start, it accepts a parameter for the arrival
date. This is necessary because this function checks to make sure the departure
date is after the arrival date.
In the main() function, a while statement starts the main program loop.
Within this loop, the first two statements use the get_arrival_date() and
get_departure_date() functions to get valid arrival and departure dates. For the
get_departure_date() function, the argument specifies the arrival_date because a
valid departure date must be after the arrival date.
After getting the dates from the user, the program gets the nightly rate and
its corresponding message. To do that, it sets a default rate to 85.0 and it sets a
default message of an empty string. However, if the month of the arrival date is
August, this code sets the nightly rate to 105.0 and it sets a message of "(High
Season)".
After getting the nightly rate and its message, the program calculates the
total nights by subtracting the departure date from the arrival date and accessing
the days attribute. Then, it calculates the total cost by multiplying the rate by the
total niehts.
Now that the program has calculated the results, it can format them. To
do that, this code defines a date format string that specifies the full name of
the month, the day of the month, a comma, and then the year. Then, it uses the
setlocale() function of the locale module to set the locale so the currency values
will be formatted the way the user would expect them for his or her locale. Next,
it uses a series of print() functions to print the date to the console. These print()
functions use the strftimeQ method of the datetime objects to format the dates,
and they use the currencyO function of the locale module to format the currency
values.
Note that the print() function for the nightly rate also prints the message
that's associated with the nightly rate. Of course, for most months, this message
is an empty string. As a result, printing it to the console doesn't do anything.
As you review this program, you might wonder why it uses datetime objects
instead of date objects. The main reason is that the strptimeQ method returns
datetime objects, not date objects. As a result, there's no built-in way to parse a
string into date objects. However, if you wanted to, you could build your own
function to parse the user entry into a date object. Then, you could refactor this
program to use date objects instead of datetime objects with the time values set
to zero.
Chapter 11 How to work with dates and times 317
The code Page 2
def get_departure_date (arrival_date) :
while True:
date_str = input("Enter departure date (YYYY-MM-DD): ")
try:
departure_date = datetime. strptime (date_str, "%Y-%m-%d" )
except ValueError:
print("Invalid date format. Try again.")
continue
if departure_date <= arrival_date:
print("Departure date must be after arrival date. Try again.")
continue
else:
return departure_date
def main():
print("The Hotel Reservation program\n")
while True:
# get datetime objects from user
arrival_date = get_arrival_date()
departure_date = get_departure_date(arrival_date)
print()
# calculate nights and cost
rate = 85.0
rate_message = ""
if arrival_date.month ==8: # August is high season
rate = 105.0
rate_message = "(High season)"
total_nights = (departure_date - arrival_date).days
total_cost = rate * total_nights
# format results
date_format = "%B %&, %Y"
locale.setlocale(locale.LC_ALL, ■')
print("Arrival Date:
print("Departure Date
print("Nightly rate:
print("Total nights:
print("Total price:
print()
#
arrival_date.strftime(date_format))
departure_date.strftime(date_format))
locale.currency(rate), rate_message)
total_nights)
locale.currency(total_cost))
# check whether the user wants to continue
result = input("Continue? (y/n): ")
print()
if result.lower() 1= "y":
print("Bye!")
break
if name == " main ":
main()
Figure 11-9 The Hotel Reservation program (part 2)
318 Section 2 Other concepts and skills
Perspective
Now that you've completed this chapter, you should be able to use the
datetime module to work with dates and times. For most applications, this
module provides all of the functionality that you need.
You should know, however, that Python provides several other modules
for working with dates and times. For instance, the calendar module provides
functionality for displaying and working with calendars. And the time module
provides much of the same functionality as the datetime module, but it is
procedural, not object-oriented.
Terms
constructor
class
object
date object
time object
datetime object
date/time object
Summary
• A date object stores the year, month, and day for a date. A time object stores
the hours, minutes, seconds, and microseconds for a time. A datetime object
stores both a date and a time.
• A date/time object is a generic term for a date object, a time object, or a
datetime object.
• When you use the datetime module to work with dates and times, you import
the classes that you need like the date, time, or datetime classes. Then, you
can use the constructors in those classes to create date, time, and datetime
objects.
• Aware date/time objects account for time zones and daylight savings time.
Naive date/time objects do not.
• The p in the strptime() method stands for parse. You can use this method to
parse a string to create a datetime object.
• The f in the strftime() method stands for format. You can use this method to
format a datetime object.
• A timedelta object stores a span of time that's measured in days, seconds,
and microseconds. Once created, you can use the attributes of the object to
get the values of the days, seconds, and microseconds.
millisecond
microsecond
naive object
aware object
timedelta object
span of time
attribute
Chapter 11 How to work with dates and times 319
Exercise 11-1 Modify the Invoice Due Date
program
In this exercise, you'll modify the Invoice Due Date program so it uses date
objects, not datetime objects. In addition, you'll add some code that makes sure
the user enters a valid date.
The Invoice Due Date program
Enter the
invoice date (MM/DD/YYYY):
Invalid date
Enter the
Date must
Enter the
format I Try again.
invoice date (MM/DD/YYYY):
be
7-14-
-2017
7/14/2099
today or earlier. Try again.
invoice date (MM/DD/YYYY):
Invoice Date:
Due Date:
Current Date:
This invoice
Continue?
: July 14, 2017
August 13, 2017
: September 12, 2017
is 30 day(s) overdue.
(y/n):
7/14/2017
Review the code and make sure it works correctly
1. In IDLE, open the invoice.py file that's in this folder:
python/exercises/chll
2. Review the code and run the program to see how it works.
Use date objects to store the three dates
3. Modify the get_invoice_date() function so it uses a four-digit year.
4. Modify the program so it uses date objects, not datetime objects, to store
the three dates. To do that, you can create a date object from the parts of the
datetime object that's created in the get_invoice_date() function.
Add validation
5. Run the program, and enter an invalid date. This should cause the program
to crash. Then, add code to the get_invoice_date() function that prevents the
program from crashing and makes sure the user enters a valid date.
6. Add code to the get_invoice_date() function that makes sure the user enters a
date that's either today or in the past.
320 Section 2 Other concepts and skills
Exercise 11-2 Modify the Timer program
In this exercise, you'll modify the Timer program so it displays the time like this:
The Timer program
Press Enter
Start time:
Press Enter
Stop time:
to
15
to
15
ELAPSED TIME
Hours/minutes:
Seconds: 31,
start.
:09:53.
stop.,
: 12:24.
00:02
.776315
» • •
.206009
► •
.982324
This makes it easier to read the timer for elapsed times that are less than one day.
Review the code and test it
1. In IDLE, open the timer.py file that's in this folder:
python/exercises/chll
2. Review the code and run the program to see how it works.
Modify the way the elapsed time is displayed
3. Modify the code that displays the start and stop times so it only displays the
time part, not the date part.
4. Modify the code that displays the elapsed time so it only shows hours/minutes
and seconds. Also, the program should only display the hours/minutes data if
it contains a non-zero value.
12
How to work
with dictionaries
In chapter 6, you learned how to work with a type of data structure called a list.
In this chapter, you'll learn how to work with another type of data structure
called a dictionary. In other languages, dictionaries are often called associative
arrays.
How to get started with dictionaries 322
How to create a dictionary 322
How to eet. set, and add items 324
How7 to delete items 326
How to loop through keys and values 328
How7 to convert between dictionaries and lists 330
The Country Code program 332
The Word Counter program 336
More skills for working with dictionaries 338
How7 to use dictionaries with complex objects as values 338
The Book Catalog program 340
Perspective 344
322 Section 2 Other concepts and skills
How to get started with dictionaries
Like a list, a dictionary stores a collection of items. However, a list stores
a collection of ordered items, and a dictionary stores a collection of unordered
items. In other words, when you work with a list, the items always stay in the
sequence in which you insert them. That's why a list is known as a sequence.
However, when you work with a dictionary, the items typically don't stay in the
sequence in which you insert them.
How to create a dictionary
Figure 12-1 shows how to create a dictionary. To do this, you enclose the
dictionary inside braces ({}). Within these braces, each dictionary entry consists
of a key, followed by a colon, and a value that corresponds with the key. This is
known as a key/value pair. In other words, unlike lists, which are accessed by an
integer index, dictionaries are accessed by a key that's typically a string but can
be any immutable data type.
The examples in this figure show how this works. The first example uses a
string as the key. This string contains a two-letter code for a country. Each key
corresponds with the name of the country, which is also stored as a string.
The second example uses numbers as keys. But even when you use
numbers as keys, Python doesn't guarantee that it will maintain the sequence
of the numbers. In fact, for efficiency, Python may reorder the key/value pairs
in a dictionary at any time. As a result, you can't loop through the items in a
dictionary and expect them to be in the same order in which you inserted them
into the dictionary.
The third example creates a dictionary that stores the data for a movie. This
dictionary uses a string as the key, but it uses different data types to store the
values for each key. Here, the value for the name key is a string, the value for the
year key is an integer, and the value for the price key is a floating-point number.
The fourth example shows how to create an empty dictionary. To do that,
you just code a set of braces with nothing in between. Then, you can add items
to the dictionary later as shown in the next figure.
When you create dictionaries. Python ignores the whitespace between items.
As a result, you can format your code to make the structure of the dictionary
obvious as shown in these examples.
The last example prints the dictionary created by the first example to the
console. This is often useful when debueeine code that uses dictionaries. In the
console, note that the whitespace has been removed from the dictionary. Note
also that the items are in a different order than they are in the statement that
created the dictionary. This shows that Python doesn't maintain the sequence of
the items in a dictionary.
Chapter 12 How to work with dictionaries 323
The syntax for creating a dictionary
dictionary_name = {keylivaluel, key2zvalue2 ... }
Code that creates dictionaries
# strings as keys and values
countries = {"CA": "Canada",
"US": "United States",
"MX": "Mexico"}
# numbers as keys, strings as values
numbers = {1: "One", 2: "Two", 3: "Three", 4: "Four", 5: "Five"}
# strings as keys, values of mixed types
movie = {"name": "The Holy Grail",
"year": 1975,
"price": 9.99}
# an empty dictionary
book_catalog = {}
Code that prints a dictionary to the console
print(countries)
The console
{'MX': 'Mexico', 'CA': 'Canada', 'US': 'United States'}
Description
• Unlike a list, which is an ordered collection of items, a dictionary is an unordered
collection of items. As a result, there's no guarantee that the items in a dictionary
remain in the same order.
• In a dictionary, each item consists of a key/value pair where each value in the
dictionary is indexed by a unique key.
• The key can be any immutable data type, but it's usually a string.
• The value for a key can be a simple data type such as number or a string. On it can
be a complex data type such as a list or another dictionary.
• Whitespace is ignored between dictionary items. As a result, you can use
whitespace to format a dictionary so the code is easier to read.
• In some languages, dictionaries are called associative arrays.
Figure 12-1 How to create a dictionary
324 Section 2 Other concepts and skills
How to get, set, and add items
Figure 12-2 shows how to get, set, and add dictionary items. After the code
for creating a dictionary named countries, this figure shows three ways to access
items.
The first way is to use a key as shown by the syntax summary for accessing
a value. In other words, you just code the key within brackets after the name
of the dictionary. This is similar to coding an index to access an item in a list.
Then, if the key exists in the dictionary, its value is returned. If the key doesn't
exist, a KeyError occurs. This is illustrated by the first example after the syntax
summary.
Then, the second example shows how to set a value for a key. To do that, you
again use brackets to specify the key. Then, you can assign a new value to that
key. If the key exists in the dictionary, it sets the key to the new value.
The third example shows how you can use this syntax to add a key/value pair
to a dictionary. Here, if the key doesn't exist in the dictionary, the key and value
are added to the dictionary.
The second way to access an item is to use the in keyword, as shown by
the second syntax summary in this figure. This lets you check whether the key
already exists in the dictionary, which can help you prevent a KeyError. It also
lets you know whether you're updating or adding an item when setting values. In
the example after the syntax summary, the if statement checks whether a key of
"IE" is in the dictionary named countries. If so, it prints the name of the country
to the console. Otherwise, it prints a message that there is no country for that
key.
The third way to access an item is to use the get() method of a dictionary.
This method takes a key as an argument and returns the value for that key.
The advantage of the get() method is that it doesn't raise a KeyError if the key
doesn't exist. Instead, by default, the getQ method returns a value of None if the
key doesn't exist. However, you can use the optional second argument if you
want a different value returned if the key doesn't exist.
This is illustrated by the fourth example in this figure. Here, the second
statement returns a value of None, which is not a string, but the third statement
returns a value of "Unknown", which is a string.
Chapter 12 How to work with dictionaries
325
The countries dictionary
countries = {"CA": "Canada",
"US": "United States",
"GB": "Great Britain",
"MX": "Mexico"}
The syntax for accessing a value
dictionary_name[key]
Code that gets a value from a dictionary
country = countries["MX"]
country = countries["IE"]
# "Mexico"
# KeyError: Key doesn't exist
Code that sets a value if the key is in the dictionary
countries["GB"] = "United Kingdom"
Code that adds a key/value pair if the key isn't in the dictionary
countries["FR"] = "France"
The syntax for checking whether a key is in a dictionary
key in dictionary
Code that checks if a key is in a dictionary before getting its value
code = "IE"
if code in countries:
country = countries[code]
print(country)
else:
print("There is no country for this code: " + code)
The get() method of a dictionary object
Method
get (key[, default_value] )
Description
If the specified key exists, this method returns
its value. Otherwise, this method returns None
or the default value if it is supplied.
Code that uses the get() method
country = countri es.get("MX")
country = countries-get("IE")
country = countries-get("IE", "Unknown")
# "Mexico"
# None
# "Unknown"
Description
• Attempting to get a value for a key that isn't in the dictionary causes a KeyError.
• If you set a value for an existing key, Python updates the old value with the new
value.
• If you set a value for a key that doesn't exist, Python adds a new key/value pair to
the dictionary.
• To prevent a KeyError from occurring, you can use the get() method of a dictionary.
Figure 12-2 How to get, set, and add dictionary items
326 Section 2 Other concepts and skills
How to delete items
Figure 12-3 begins by showing how to delete an item from a dictionary. To
do that, you can code the del keyword, followed by the variable that contains the
dictionary, and the key you want to delete within brackets. In the first example,
the first statement deletes the country with a code of "MX". If the key doesn't
exist in the dictionary, the del keyword causes a KeyError to occur as shown in
the second statement.
To prevent the KeyError from occurring, you can check if the key exists
before attempting to delete its corresponding item as shown in the second
example. This works much like the if statement in the previous figure that
prevents the KeyError when getting an item. However, this if statement deletes
the item if its key exists.
Alternately, you can delete an item by using the popQ method of a
dictionary. This method returns the value for the specified key, and it deletes the
key/value pair from the dictionary. If the key doesn't exist, this method causes
a KeyError to occur. However, you can prevent this error from occurring by
supplying the optional second argument of the pop() method. In that case, the
pop() method returns the value specified by the second argument instead of
causing a KeyError to occur.
So which approach should you use to remove items from a dictionary? If
you don't need to store the deleted value in a variable, they both work equally
well. If you need to store the deleted value in a variable, you should use the
pop() method. That's especially true if you want to prevent a KeyError from
occurring. For instance, the fourth example in this figure gets the same results as
the second example but with fewer lines of code.
If you want to delete all items from a dictionary, you can use the clear()
method. This method deletes all key/value pairs from the dictionary, leaving an
empty dictionary.
You might wonder if you can accomplish the same thing by assigning an
empty dictionary to the variable like this:
countries = {}
Although this may appear to have the same effect, assigning an empty dictionary
to the countries variable just causes the variable to refer to a new dictionary.
It doesn't actually delete any items from the old dictionary. Since this causes
problems if you have more than one variable referencing the same dictionary,
you should use the clear() method to delete all items from the dictionary.
Chapter 12 How to work with dictionaries 327
The syntax for deleting an item
del dictionary_name [key"]
Code that uses the del keyword to delete an item
del countries["MX"]
del countries["IE"] # KeyError: Key doesn't exist
Code that checks if a key is in a dictionary before deleting the item
code = "IE"
if code in countries:
country = countries[code]
del countries[code]
print(country + " was deleted.")
else:
print("There is no country for this code: " + code)
Two dictionary methods for deleting items
Method Description
pop(Jcey[, default_value] ) Returns the value of the specified key and deletes the
key/value pair from the dictionary. The optional second
argument is a value to return if the key doesn't exist.
clear () Deletes all items.
Code that uses the pop() method to delete an item
country = countries-pop("US") # "United States"
country = countries-pop("IE") # KeyError: Key doesn't exist
country = countries-pop("IE", "Unknown") # "Unknown"
Code that uses the pop() method to prevent a KeyError from occuring
code = "IE"
country = countries-pop(code, "Unknown country")
print(country + " was deleted.")
Code that uses the clear() method to delete all items
countries.clear()
Description
• You can use the del keyword or the pop() and clearQ methods to delete items from
a dictionary.
Figure 12-3 How to delete items from a dictionary
328 Section 2 Other concepts and skills
How to loop through keys and values
Figure 12-4 begins by showing three dictionary methods for getting keys and
values. All of these methods return a view object that contains the keys or values
of the dictionary. Since a view object is an iterator, you can use a loop to iterate
over the values contained in the object.
A view object is also linked to the dictionary. As a result, if you modify the
items in the dictionary, Python automatically updates the view object to reflect
the changes.
The first example shows how you can use the keysQ method to loop through
all keys in a dictionary. Within the loop, the statement uses the key to get the
value for each item. However, since the default iterator for a dictionary contains
its keys, you can get the same result with the code in the example that follows. In
other words, you don't need to explicitly call the keysQ method.
The second example shows how the items() method can make it easier to
loop through all keys and values. This method returns a view object that contains
a tuple for each item, and the for statement unpacks this tuple into two variables.
Within the for loop, the statements can use these variables to access the key and
value for each item.
The third example shows how to use the values() method to loop through all
of the values in a dictionary. This is useful if you want to work with the values
for a dictionary but don't need to work with the corresponding keys.
The consoles for these examples show once again that dictionaries are
unordered. For instance, all of the consoles display Mexico first even though
Canada was added first when the dictionary was created.
If you want to sort the items for a list or keep them in some other order, you
can convert a view object to a list as shown in the next figure. However, if you
do this, you should realize that the list object isn't linked to the dictionary like
a view object is. As a result, if the dictionary changes, the list isn't updated and
vice versa.
Chapter 12 How to work with dictionaries 329
Three dictionary methods for getting all keys and values
Method Description
keys () Returns a view object that contains all of the keys in the dictionary.
This is the default iterator for a dictionary.
items () Returns a view object that contains a tuple for each key/value pair
in the dictionary.
values () Returns a view object that contains all of the values in the dictionary.
Code that loops through all keys and values
for code in countries•keys():
print(code + " " + countries[code])
Another way to get the same result since the default iterator contains keys
for code in countries:
print(code + " " + countries[code])
The console
MX
US
CA
Mexico
United States
Canada
Code that unpacks a tuple as it loops through all keys and values
for code, name in countries .items :
print(code + " " + name)
The console
MX
US
CA
Mexico
United States
Canada
Code that loops through all values
for name in countries.values() :
print (name)
The console
Mexico
United
Canada
States
Description
• These methods return a view object. Since a view object is an iterator, you can
iterate over its contents with a for loop.
• You can use tuple unpacking to loop over each key/value pair in the view object.
• If a dictionary is updated, the corresponding keys or values in the view object are
also updated. If you don't want these automatic updates, you can use the built-in
list() constructor to convert the view object to a list as shown in the next figure.
Figure 12-4 How to loop through keys and values
330 Section 2 Other concepts and skills
How to convert between dictionaries and lists
If you need to convert a view object to a list, you can use the list()
constructor as shown in the first example of figure 12-5. Here, the first
statement uses the list() constructor to create a list object from the view object
that's returned by the keys() method. Then, the second statement calls the sort()
method of the list object to sort the keys alphabetically. Finally, the for statement
loops through all of the keys in the list and displays the key from the list and the
value for that key in the dictionary.
When you write code like this, remember that the list object is not linked to
the dictionary as a view object would be. As a result, Python won't automatically
update the list if the dictionary changes. In this example, this shouldn't cause any
problems since the list is only used for a short time. However, if a long list stays
in scope for a long time and is used by other parts of the program, this could
cause problems if you expect it to always contain updated keys.
If you need to convert a list of lists to a dictionary, you can use the dict()
constructor as shown in the second example. However, the lists within the
list can only contain two items: one for the key and one for the value. In this
example, the list contains three more lists, and each one contains two values.
If any of the lists contain fewer or more than two values, the dict() constructor
causes a ValueError that says the length of the sequence isn't correct. As you
would expect, this is also true for a list of tuples or a tuple of tuples.
Chapter 12 How to work with dictionaries 331
Built-in constructors for creating dictionaries and lists
Constructor Description
list (view) Converts the specified view object to a list.
diet {list) Converts the specified two-dimensional list or tuple
to a dictionary. In the two-dimensional list or tuple,
each row must contain exactly two values.
Code that converts the keys of a dictionary to a list and sorts them
countries = {"CA": "Canada",
"US": "United States",
"MX": "Mexico"}
codes = list(countries.keys())
codes.sort()
for code in codes:
print(code + " " + countries[code])
The console
CA Canada
MX Mexico
US United States
Code that converts a two-dimensional list to a dictionary
countries = [["GB", "United Kingdom"],
["NL", "Netherlands"],
[»DE", "Germany"]]
countries = diet(countries)
print(countries)
The console
{'NL': "Netherlands', 'GB': 'United Kingdom', 'DE': 'Germany'}
Description
• You can use two built-in constructors to convert between dictionaries and lists.
Figure 12-5 How to convert between dictionaries and lists
332 Section 2 Other concepts and skills
The Country Code program
Now that you have the basic skills for working with a dictionary, you're
ready to see those skills used within the context of a program. That's why figure
12-6 presents the Country Code program.
The console for this program shows that the user can enter four commands
to work with the program. If, for example, the user enters the view command,
the program displays an alphabetical list of two-letter country codes. Then, it
prompts the user to enter a country code. After the user enters a country code,
the program displays the country name that corresponds with the code.
The add and del commands work similarly. However, they prompt the user
for the required data. Then, they display a message that indicates whether the
command was successful.
The code begins by defining two of the functions of the program.The
display_menu() function displays the command menu for the program. The
display_codesO function displays an alphabetical list of the country codes in
single line, separating each code with a space.
Chapter 12 How to work with dictionaries 333
The user interface
COMMAND MENU
view - View country name
add - Add a country
del - Delete
a country
exit - Exit program
Command: vi ew
Country codes:
Enter country
Country name:
Command: add
Enter country
Enter country
: CA MX US
code: mx
Mexico.
code: nl
name: netherlands
Netherlands was added.
Command: vi ew
Country codes:
Enter country
Country name:
Command: del
Enter country
United States
Command: exi t
Bye I
: CA MX NL US
code: nl
Netherlands.
code: us
was deleted.
The code Page 1
def display_menu():
print ( "COMMAND MENU" )
print("view - View country name")
print("add - Add a country")
print("del - Delete a country")
print("exit - Exit program")
print()
def display_codes(countries):
codes = list(countries.keys())
codes.sort()
line = "Country codes: "
for code in codes:
line += code + " "
print(line)
Figure 12-6 The Country Code program (part 1)
334 Section 2 Other concepts and skills
The viewQ function begins by calling the display_codesQ function to
display the country codes on a single line. Then, it prompts the user to enter one
of these codes. Next, it uses the upper() method of the string to convert the code
to uppercase. That way, even if the user enters "mx", the program uses "MX" as
the key for the dictionary. This is necessary because a search done with the in
keyword is case-sensitive.
After making sure that the country code is uppercase, the viewQ function
uses an if statement to check if the specified code is in the countries dictionary.
If so, it gets the name from the dictionary and displays it. Otherwise, it displays
a message that indicates that there's no country for that code.
The add() function begins by getting a country code from the user and by
converting that code to uppercase. Then, it checks whether the code is in the
countries dictionary. If so, it prints a message that indicates that another country
is already using that code. Otherwise, it gets a country name from the user, uses
the title() method described in chapter 10 to convert that name to title case, adds
the name to the dictionary, and displays an appropriate message.
The delete() function also begins by getting a country code from the user,
converting that code to uppercase, and checking whether that code exists in the
countries dictionary. If so, this code deletes the country from the dictionary and
displays an appropriate message. Otherwise, this code displays a message that
indicates that there's no country with that code.
The mainQ function begins by creating a dictionary named countries that
contains the codes and names for three countries. Then, it displays the command
menu and enters the main loop for the program.
The only other thing to note is that this code passes the countries dictionary
to the add() and deleteQ functions. But since a dictionary is a mutable type, these
functions can make changes to the countries dictionary directly. As a result, these
changes are also available to the mainQ function.
Chapter 12 How to work with dictionaries 335
The code Page 2
def view(countries):
display_codes(countries)
code = input("Enter country code: ")
code = code.upper()
if code in countries:
name = countri es[code]
print("Country name: " + name + ".\n")
else:
print ("There is no country with that code.Xn")
def add(countries):
code = input("Enter country code: ")
code = code.upper()
if code in countries:
name = countri es[code]
print(name + " is already using this code.Xn")
else:
name = input("Enter country name: ")
name = name.title()
countries[code] = name
print(name + " was added.\n")
def delete(countries):
code = input("Enter country code: ")
code = code.upper()
if code in countries:
name = countri es.pop(code)
print(name + " was deleted.\n")
else:
print ("There is no country with that code.Xn")
def main():
countries = {"CA": "Canada",
"US": "United States",
"MX": "Mexico"}
display_menu()
while True:
command = input("Command: ")
c ommand = c ommand.1ower()
if command == "view":
view(countries)
elif command == "add":
add(countries)
elif command == "del":
delete(countries)
elif command == "exit":
print("Bye I")
break
else:
print("Not a valid command. Please try again.\n")
if name == " main ":
main()
Figure 12-6 The Country Code program (part 2)
336 Section 2 Other concepts and skills
The Word Counter program
To show another use of a dictionary, figure 12-7 presents a Word Counter
program that counts the number of times a word occurs in a text file. This is a
variation of the Word Counter program in chapter 10 that shows how using a
dictionary can make this easier. This program begins by converting a text file
into a list of words and then creating a dictionary with a key for each word and a
value that stores the number of times the word occurs in the text file.
The code for this program starts with the get_words_from_file() function
that opens the text file and reads its contents into a string named text. Then, this
function uses some of the string-handling skills of chapter 10 to work with the
text string. To start, it uses the replace() method to replace new line characters
with a space and to replace commas and periods with empty strings. Next, it
uses the lower() method to convert all of the letters to lowercase. Then, it uses
the split() method to split the text string into a list of words. Last, this function
returns the list of words.
The count_words() function accepts the list of words as an argument. Then,
it uses the techniques in this chapter to create a dictionary that has a key for each
word in the list and a value that stores the number of times that the word occurs
in the list.
Within this function, the first statement defines an empty dictionary named
word_count. Then, the second statement defines a loop that loops through each
word in the list of words. Within the loop, the code checks whether the word (the
key) is in the dictionary. If so, this code increments the count (the value) of the
word by 1. Otherwise, it adds the word to the dictionary and sets its count to 1.
Finally, this function returns the word count dictionary.
The display_word_count() function accepts the word count dictionary as an
argument. Within this method, the first statement gets a view object for the keys
of the word count dictionary and converts it to a list of words. Then, the second
statement sorts the list of words alphabetically. Next, the code loops through
each word in the sorted list and prints the word (the key) and its count (the
value).
The main() function just sets the filename for the file that stores the text.
Then, it calls the functions to get the words from the file, to count them, and to
display the word counts.
Chapter 12 How to work with dictionaries 337
The user interface
The
a =
Word
7
above
add
• • •
=
= 1
1
Counter
program
The code
def get_words_from_file (filename) :
with open (filename) as file:
text = file.read() # read str from file
text = text.replace("\n", "")
text = text.replace(",", "")
text = text.replace(".", "")
text = text.lower()
words = text.split(" ") # convert str to list
print(words)
return words
def count_words(words):
# define a diet to store the word count
word_count = {}
for word in words:
if word in word_count:
word_count[word] += 1
else:
word_count[word] = 1
return word_count
def display_word_count(word_count):
words = list(word_count.keys())
words.sort(key=str.lower)
for word in words:
count = word_count[word]
print(word, "=", count)
def main():
print("The Word Counter program")
print()
# change filename to switch text file
filename = "gettysburg_address. txt"
# get words, count, and display
words = get_words_from_file(filename) # get list of words
word_count = count_words(words) # create diet from list
display_word_count(word_count)
if name == " main ":
main()
# increment count for word
# add word with count of 1
Figure 12-7 The Word Counter program
338 Section 2 Other concepts and skills
More skills for working
with dictionaries
So far, you've learned the basic skills for working with dictionaries.
However, you may also need to work with dictionaries that store lists, tuples, or
other dictionaries as their values.
How to use dictionaries with complex objects
as values
So far, all of the examples in this chapter use dictionaries to store values of
simple data types such as the str, int, and float types. However, dictionaries can
also store values of complex data types such as lists, tuples, and other
dictionaries. This works similarly to working with lists of lists as described in chapter 6.
In figure 12-8, the first example creates a dictionary named contacts that
contains three more dictionaries. Here, each embedded dictionary contains the
street address, city, state, postal code, and phone number for a contact.
When you store complex objects in a dictionary, you can use multiple keys
to access the values in the embedded dictionary. In the second example, the first
statement gets the phone number for Anne. Then, the second statement attempts
to get the email address for Anne. However, since the "email" key doesn't exist,
this statement causes a KeyError to occur.
If you want to check whether a key exists within an embedded dictionary,
you can use bracket notation as shown in the third example. This example checks
whether the "email" key exists within the dictionary for Anne.
If you want to use the get() method to get a value from an embedded
dictionary, you can use method chaining as shown in the fourth example. The
advantage of this technique is that it doesn't cause a KeyError to occur if the key
doesn't exist.
However, if the first key doesn't exist in the dictionary, it causes an
AttributeError to occur because the first get() method returns a value of None,
and None doesn't have a get() method. To work around this problem, you can
use the optional second argument of the get() method to specify an empty
dictionary as shown in the fourth statement. That way, if the first key doesn't
exist, the first get() method returns an empty dictionary, and the second get()
method returns a value of None.
The last set of examples shows a dictionary that stores a list of scores for
three students. Here, the key is the student's name, and the value is a list of
scores. As a result, you can use the dictionary key to get a list of scores for each
student, and you can use the list index to get each score from the list. This is
illustrated by the last example.
Chapter 12 How to work with dictionaries 339
A dictionary that contains other dictionaries as values
contacts = {
"Joel":
{"address": "1500 Anystreet", "city": "San Francisco",
"state": "California", "postalCode": "94110",
"phone": "555-555-1111"},
"Anne":
{"address": "1000 Somestreet", "city": "Fresno",
"state": "California", "postalCode": "93704",
"phone": "125-555-2222"},
"Ben"
{"address": "1400 Another Street", "city": "Fresno",
"state": "California", "postalCode": "93704",
"phone": "125-555-4444"}
}
Code that gets values from embedded dictionaries
phone = contacts["Anne"]["phone"] # "555-555-1111"
email = contacts["Anne"]["email"] # KeyError
Code that checks whether a key exists within another key
key = "email"
if key in contacts["Anne"]:
email = contacts["Anne"][key]
print(email)
else:
print("Sorry, there is no email address for this contact.")
Code that uses the get() method with embedded dictionaries
phone = contacts.get("Anne").get("phone") # "555-555-1111"
phone = contacts.get("Anne").get("email") # None
phone = contacts.get("Mike").get("phone") # AttributeError
phone = contacts.get("Mike", {}).get("phone") # None
A dictionary that contains lists as values
students = {"Joel":[85, 95, 70],
"Anne":[95, 100, 100],
"Mike":[77, 70, 80, 85]}
Code that gets a value from an embedded list
scores = students["Joel"] # [85, 95, 70]
joel_scorel = students["Joel"][0] # 85
Description
• The value for a key can be a complex data type such as another dictionary, a tuple,
or a list.
• You can use two sets of brackets to access an item in an embedded dictionary or
list.
• You can also use setQ method chaining to access an item in an embedded
dictionary.
Figure 12-8 How to use dictionaries with complex objects as values
340 Section 2 Other concepts and skills
The Book Catalog program
To show how you can use a dictionary of dictionaries, figure 12-9 presents a
Book Catalog program. This program lets you look up a book by title, add books,
edit books, and delete books from the catalog.
As the code in the main() function in the next figure shows, this dictionary of
dictionaries has this structure:
book_catalog = {
"Moby Dick": {"author":"Herman Melville", "pubyear":"1851"},
"The Hobbit": {"author":"J. R. R. Tolkien", "pubyear":"1937"}
}
Here, the main dictionary has book titles as the keys and embedded dictionaries as
the values. Then, each embedded dictionary has key/value pairs for the author and
publication year.
The code for this program starts with the show_book() function. This function
accepts the book_catalog dictionary as its only argument. Within this function,
the code prompts the user to enter a book title. Then, it checks whether the title
exists in the catalog. If so. the code gets the embedded dictionary for the book,
and stores it in the book variable. Then, it displays the title, author, and
publication year. However, if the title doesn't exist in the catalog, the program displays a
message that indicates that the book doesn't exist in the catalog.
The add_edit_book() function provides the code for adding or editing a book.
This code is all stored in a single function because most of the code for adding
and editing a book is identical. To make this possible, this function accepts a
second argument named mode that indicates whether the function is adding or
editing a book. When the main() function calls the add_edit_book() function, this
argument is set to "add" if the program is adding a book, and it is set to "edit" if
the program is editing a book.
To start, the add_edit_book() function prompts the user for a book title. Then,
an if clause checks whether the program is in "add" mode and whether the title
is already in the catalog. If both conditions are true, the user is attempting to
add a book that already exists in the catalog. In that case, the program informs
the user that the title already exists and asks the user if he or she wants to edit it
instead. If the user enters "y" to answer yes, the function continues and allows the
user to edit the book instead of adding it. Otherwise, this code executes a return
statement.
The elif clause works similarly to the if clause. However, the elif clause
checks whether the program is in "edit" mode and the title is not in the catalog. If
this is true, the user can enter "y" for yes to add the title instead of editing it. Or,
the user can enter "n" for no to return to the main() function.
After the elif clause, the program prompts the user for an author and
publication year. Then, it creates a new dictionary and sets the "author" and "pubyear"
keys to the values entered by the user. Next, the code accesses the book catalog
dictionary using the title as the key and sets its value to the book dictionary. Since
adding a new key to the dictionary and editing an existing key are done the same
way, this code works for both adding and editing book.
Chapter 12 How to work with dictionaries 341
The user interface
COMMAND MENU
show - Show book info
add - Add book
edit - Edit book
del - Delete book
exit - Exit program
Command: show
Title: Heart of Darkness
Sorry, Heart of Darkness doesn't
Command: add
Title: Heart of Darkness
Author name: Joseph Conrad
Publication year: 1890
Command: edi t
Title: Heart of Darkness
Author name: Joseph Conrad
Publication year: 1899
Command:
exist in the catalog.
The code Page 1
def show_book(book_catalog):
title = input("Enter the title for the book: ")
if title in book_catalog:
book = book_catalog[title]
print("Title: " + title)
print("Author: " + book["author"])
print("Pub year: " + book["pubyear"])
else:
print ("Sorry, " + title + " doesn't exist in the catalog.")
def add_edit_book(book_catalog, mode):
title = input("Enter title of the book: ")
if mode == "add" and title in book_catalog:
print(title + " already exists in the catalog.")
response = input ("Would you like to edit it? (y/n): ").lower()
if(response 1= "y"):
return
elif mode == "edit" and title not in book_catalog:
print(title + " doesn't exist in the catalog.")
response = input("Would you like to add it? (y/n): ").lower()
if (response 1= "y"):
return
# Get book data and create a dictionary for the data
author = input("Enter author name: ")
pubyear = input("Enter publication year: ")
book = {"author": author, "pubyear": pubyear}
# Add the book data to the catalog using title as key
book_catalog[title] = book
Figure 12-9 The Book Catalog program (part 1)
342 Section 2 Other concepts and skills
Like the previous two functions, the delete_book() function accepts the
book catalog dictionary as an argument. Then, it prompts the user for the title
of the book he or she wants to remove. Next, this code checks whether the title
is in the book catalog. If so, it deletes the book from the catalog and displays an
appropriate message. Otherwise, it displays a message that indicates that the title
doesn't exist in the catalog.
Skip now to the main() function. It starts with the code for a dictionary
within dictionaries that consists of three books.
Next, the main() function calls the function that displays the menu
commands. That is followed by a while loop that gets the commands from
the user until the user enters "exit". However, to make sure the user can enter
commands in either upper or lowercase, the user entry is converted to lowercase
before it is tested by the if statement.
As you review this code, note that the main() function passes the book
catalog dictionary to the add_edit_book() and delete_book() functions. However,
these functions don't return the modified dictionary to the main() function. Here
again, this isn't necessary because a dictionary is a mutable type. As a result, any
changes that the add_edit_book() and delete_book() functions make to the book
catalog dictionary are also available to the main() function.
Chapter 12 How to work with dictionaries 343
The code Page 2
def delete_book(book_catalog):
title = input("Title: ")
if title in book_catalog:
del book_catalog[title]
print(title + " removed from catalog.")
else:
print (title + " doesn't exist in the catalog.")
def display_menu():
print("The Book Catalog program")
print()
print("COMMAND MENU")
print("show - Show book info")
print("add - Add book")
print("edit - Edit book")
print("del - Delete book")
print("exit - Exit program")
def main():
book_catalog = {
"Moby Dick":
{"author" : "Herman Melville",
"pubyear" : "1851"},
"The Hobbit":
{"author" : "J. R. R. Tolkien",
"pubyear" : "1937"},
"Slaughterhouse Five":
{"author" : "Kurt Vonnegut",
"pubyear" : "1969"}
}
display_menu()
while True:
print()
command = input("Command: ").lower()
if command == "show":
show_book(book_catalog)
elif command == "add":
add_edit_book(book_catalog, mode="add")
elif command == "edit":
add_edit_book(book_catalog, mode="edit")
elif command == "del":
delete_book(book_catalog)
elif command == "exit":
print("Bye!")
break
else:
print("Unknown command. Please try again.")
if name == " main ":
main()
Figure 12-9 The Book Catalog program (part 2)
344 Section 2 Other concepts and skills
Perspective
In this chapter, you learned how to work with simple dictionaries as well as
dictionaries of dictionaries, lists, or tuples. But you should also know that you
can store a dictionary in a list. In fact, a list of dictionaries is a common data
structure when working with databases.
Terms
dictionary
associative array
key/value pair
key
Summary
• A dictionary is an unordered collection of items. In other languages, diction-
> *—-■ *—-■
aries are often called associative arrays.
• In a dictionary, each item consists of a key/value pair in which each value in
the dictionary is indexed by a unique key.
• You can use brackets that contain keys to access the items in a dictionary.
But if you attempt to access an item with a key that doesn't exist, a KeyError
occurs.
• You can use the in keyword to check if an item exists in a dictionary, and
you can use the get() method of a dictionary object to both check whether an
item exists and get the item if it does.
*—-■
• You can use the del keyword as well as the pop() and clear()methods of a
dictionary to remove items from a dictionary.
• View objects are iterators that allow you to loop over the keys and values
of a dictionary. View objects are automatically updated if the dictionary
changes.
*—-■
• You can use the built-in list() and dict(j constructors to convert a list to a
dictionary and vice versa. When you convert a list to a dictionary, though,
the list must be two-dimensional with exactly two items in each row.
• The value for a dictionary can be a simple data type such as a string or a
complex data type such as a dictionary, list, or tuple.
value
view object
iterator
Chapter 12 How to work with dictionaries
345
Exercise 12-1
Add a list method to the Book
Catalog program
In this exercise, you'll enhance the Book Catalog program so it offers a list
command that will list all of the books in the catalog, as shown here:
1.
2.
3.
COMMAND MENU
list - List all books
show - Show book info
add - Add book
edit - Edit book
del - Delete book
exit - Exit program
Command: list
Title: Slaughterhouse Five
Author: Kurt Vonnegut
Pub year: 1969
Title: The Hobbit
Author: J. R. R. Tolkien
Pub year: 1937
Title: Moby Dick
Author: Herman Melville
Pub year: 1851
Command:
In IDLE, open the book_catalog.py file that's in this folder;
python/exercises/chl2
Review the code and run it.
Add the list command.
Exercise 12-2
Enhance the Movie List 2D
program
In this exercise, you'll enhance the Movie List program of chapter 6 so it uses a
list of dictionaries instead of a list of lists to store the data for the movies. This
is similar to how the movie data would be stored if you were retrieving it from a
database as shown in chapter 17.
Open and test the program
1. In IDLE, open the movie_list_2d.py file that's in this folder:
python/exercises/chl2
2. Review the code and run it to refresh your memory about how it works.
Modify the code so it uses a dictionary
3. In the main() function, modify the code so it stores a list of dictionaries where
each dictionary stores the data for a movie. Use "name" as the key for the
movie's name and "year" as the key for the movie's year
346 Section 2 Other concepts and skills
4. In the listQ function, modify the code in the loop that displays each movie so
it uses the correct key to get the name and year of the movie. Note that this
makes the code easier to read and understand.
5. In the add() function, modify the code that stores the data for the movie so
that it uses a dictionary instead of a list. Note that you should still use a list to
store the list of movies, but you should use a dictionary to store the data for
each movie.
6. In the deleteQ function, modify the code so it works correctly now that the
data for the movie is stored in a dictionary.
7. Run the program. It should work as it did before. However, it's now using a
dictionary to store the data for each movie.
13
How to work with recursion
and algorithms
In chapter 3, you learned how to use loops, or iteration, to execute a block of
statements multiple times. Now, this chapter shows how to use recursion to
execute a block of statements multiple times. This will give you some insight
into how recursion can be used to solve complex problems that are difficult to
solve in other ways. Keep in mind, though, that an iterative solution will almost
always perform more efficiently than a recursive solution.
An introduction to recursion 348
How recursion works in Python 348
How7 to use recursion to add a ranee of numbers 350
Some common recursive algorithms 352
How7 to compute the factorial of a number 352
How7 to compute a Fibonacci series 354
An algorithm for solving the Towers of Hanoi puzzle 356
The code for solving the Towers of Hanoi puzzle 358
Perspective 360
348 Section 2 Other concepts and skills
An introduction to recursion
In simple terms, recursion occurs when a function calls itself. As a result,
recursion can be used to execute the same action repeatedly until a certain
condition is reached. As you will see, however, there are some important differences
between recursive functions and functions that use while and for loops.
How recursion works in Python
Figure 13-1 begins with an iterative function that contains an infinite while
loop. This loop prints the message "Press Ctrl+C to stop!" repeatedly until the
user interrupts the program by pressing Ctrl+C (or Command+C on a Mac).
In the second example, though, a recursive function gets the same result by
calling itself. Here, the first statement prints the message, and the second
statement calls the function again. Then, this process continues infinitely until
the user interrupts the program. In other words, from the perspective of a user,
this function behaves the same as the first one.
Under the surface, however, these two programs behave differently. To
start, these functions differ in the ways that they use the stack. In chapter 5, you
learned that the stack stores all function calls that are in scope in the reverse
order in which they were called. So each time a function is called, Python pushes
it onto the stack. Then, when the function ends. Python pops the function call off
the stack.
In these examples, when the iterative function is called, Python only pushes
one function call onto the stack. In contrast, Python pushes a call to the recursive
function onto the stack each time the function is called. Also, since the recursive
function never ends, Python doesn't ever pop any function calls off the stack.
Since each function on the stack requires memory, the recursive function
will eventually use up all available memory in the system, at which point, it will
stop. In contrast, the iterative function will theoretically run forever (as long as
nothing interrupts it).
If you interrupt either of these functions, you can see how this works. For
the iterative function, you'll see just one function call. For the recursive function,
you'll see numerous calls. This shows that Python pushes a new copy of the
function onto the stack each time it is called.
Chapter 13 How to work with recursion and algorithms 349
An iterative function that loops infinitely
def display_message():
while True:
print("Press Ctrl+C to stop!")
The console
Press
Press
Press
• • •
Ctrl+C
Ctrl+C
Ctrl+C
to
to
to
stop I
stopl
stop I
The stack after you interrupt the iterative function
display message()
A recursive function that loops until memory runs out
or the user interrupts the program
def display_message ):
print("Press Ctrl+C to stopl")
dis la messa e()
The console
Press
Press
Press
• • •
Ctrl+C
Ctrl+C
Ctrl+C
to
to
to
stopl
stopl
stopl
The stack after you interrupt the recursive function
display.
display.
display.
• • •
message
message
message
()
()
()
Description
• Recursion occurs when a function calls itself.
• Each time a recursive function calls itself, Python adds the function call to the
stack, which is the list of the function calls that are waiting to be called in the
reverse order in which they were called.
• Each time an iterative function is called, Python puts one function call on the stack.
• In IDLE, you can stop an infinite loop by pressing Ctrl+C on a Windows system or
Command+C on a Mac. Then, IDLE displays an exception message on the console
that includes the current stack.
Figure 13-1 How recursion works in Python
350 Section 2 Other concepts and skills
How to use recursion to add a range of numbers
In the previous figure, you learned that a recursive function uses the stack
differently than an iterative function. Now, figure 13-2 shows some other ways
that recursion differs from iteration. To do that, it presents an iterative function
and a recursive function that eet the sum of a range of numbers.
To start, the first example shows a function that uses a loop to sum all
numbers from 0 to the upper limit. By now, you shouldn't have any trouble
understanding how this function works. In short, it uses a loop to add all of the
numbers in the range to the total before it returns the total. So, for an upper limit
of 5, the function adds 0, 1,2, 3,4, and 5 and gets a total of 15.
The second example uses a recursive function to do the same thing. This
function breaks the problem down into smaller problems until it reaches the
simplest possible form of the problem. This simplest form of the problem is
known as the base case. In this example, the simplest form of the problem is if
the upper limit is 0. In that case, there's no need to do any addition. Instead, the
function can just return the upper limit. Otherwise, the upper limit is greater than
0, and the function needs to call itself to perform the addition.
To understand how this works, it's helpful to walk through an example.
Suppose the call to the function supplies an upper limit of 5. The function begins
by checking whether the upper argument is equal to 0. At this point, it isn't.
In other words, the base case hasn't been reached. As a result, the code breaks
down the problem by returning the result of adding the upper limit to the result
of calling the function with an argument of the upper limit minus 1.
The key here is that the addition operation can't be performed yet because it
depends on the result of a function call, and the result of that function call isn't
known yet. That means the first addition operation has to be performed later.
This known as a deferred action. You can think of a deferred action as being like
a note telling the program that it must come back and perform this action later.
And this note is stored on the stack.
The second call to the function supplies an upper argument of 4. Because
this argument still isn't equal to 0, the function makes another call to itself,
once again adding the upper argument to the result of the function call with an
argument of upper minus 1. But once again, the first addition operation in the
return statement can't be performed because the result of the function call isn't
known yet. And so another deferred action is created and stored on the stack.
This process continues until the upper variable equals 0. At that point, the
function returns the upper variable, which ends the recursion. This pops all of the
previous recursive function calls off the stack, one at a time, in the reverse order
from which they were pushed onto it. This causes Python to add the return value
of each recursive function call to the upper variable. When it's done performing
all of those deferred actions, it returns the final result of the upper variable.
In this case, Python pushes the recursive function call onto the stack 6 times
before it begins executing those calls. This can be referred to as recursion depth.
If you exceed Python's maximum recursion depth, a RecursionError occurs. This
limits the types of calculations you can perform with recursion.
Chapter 13 How to work with recursion and algorithms 351
An iterative function that sums all numbers from zero to an upper limit
def add_numbers(upper):
total = 0
for number in range(upper + 1):
total += number
return number
A recursive function that does the same thing
def add_r s(upp ):
if upper == 0:
return upper
else:
return upper + add numbers (u« «er 1)
Code that calls the above functions
def main():
total = add_numbers(5) # total = 15
The stack for the recursive function
main()
add_numbers()
upper = 5
add_numbers()
upper = 4
add_numbers()
upper = 3
add_numbers()
upper = 2
add_numbers()
upper = 1
add_numbers()
upper = 0
#
#
#
#
#
#
puts
puts
puts
puts
puts
sums
add_numbers (4)
add_numbers (3)
add_numbers (2)
add_number s (1)
add_numbers (0)
on
on
on
on
on
all return values
stack
stack
stack
stack
stack
and returns the result
Description
• A recursive function breaks down a complex problem that it can't solve yet into
smaller problems that it can solve when it reaches the simplest form of the problem.
The simplest form of the problem is known as the base case.
• Each call to a recursive function that can't be performed yet is known as a deferred
action. In other words, Python puts the function call on the stack, which allows it to
"remember" that it has to go back and complete that call later.
• When a function call is added to the stack, it includes the arguments that were
passed to the function as local variables.
• Each call to the recursive function moves closer to the base case. When execution
reaches the base case, the recursion ends. Then, Python combines the return values
from each function call to solve the larger problem.
• The number of recursive function calls that are on the stack at the same time can be
referred to as recursion depth. If you exceed the maximum recursion depth that's
allowed by Python, a RecursionError occurs. Typically, Python's maximum
recursion depth is set to less than 1000.
Figure 13-2 How to use recursion to add a range of numbers
352 Section 2 Other concepts and skills
Some common recursive algorithms
An algorithm is a step-by-step series of operations that perform calculations,
process data, or automate reasoning tasks. There are often multiple algorithms
for performing a task, and it's up to the programmer to use the algorithm that
works best for the task at hand.
In the rest of this chapter, you'll see two mathematical problems and a
puzzle that are commonly solved with recursive algorithms. For these tasks,
using recursion allows you to write code that's clean and concise. However,
you can almost always improve the performance by using iteration instead of
recursion.
How to compute the factorial of a number
The factorial of a number is defined as the product of all numbers that are
equal to or less than that number, with the special case that the factorial of 0 is
1. As a result, the factorial of 5 is 120. This is shown by the first set of examples
in figure 13-3. These examples use the traditional mathematical notation of an
exclamation point (i) to indicate the factorial of a number.
Given the definition of a factorial, you can create an algorithm for computing
the factorial of a number as shown in the second example. Here, the factorial
of 5 can be recursively defined as 5 times the factorial of 4. The factorial of 4
can be defined as 4 times the factorial of 3. And so on until the factorial of 0,
which is defined as 1. In other words, this algorithm breaks down the problem of
computing the factorial of 5 into smaller problems until it reaches the simplest
possible case, the base case.
Using this algorithm, you can write a recursive function for computing
factorials as shown in the third example. Since the factorial of 0 is 1. that's the
base case. As a result, if the number equals 0, the function returns 1. Otherwise,
it returns the number multiplied by the factorial of the number minus one.
Here, the multiplication step is a deferred action because it needs the result of a
function call, and the result of that function call isn't known until later.
The last example shows an iterative function that calculates the factorial of
a number by looping over the range of numbers. If the specified number is 0.
the loop isn't executed, and the function returns the fact variable, which is set
to a starting value of 1. However, if the specified number is greater than 0, the
function loops over the range of numbers. Within the loop, the code updates the
fact variable by multiplying it by the next number in the sequence. Then, when
the loop finishes, it returns the final value of the fact variable.
Chapter 13 How to work with recursion and algorithms 353
How to calculate the factorial of a number
01 = 1
II = 1 * 1 = 1
21 = 2 * 1 = 2
31 =3*2*1=6
41 =4*3*2*1= 24
51 =5*4*3*2*1*1= 120
An algorithm for calculating the factorial of a number
if n = 0, return 1
if n > 0, return n * (n-1)I
A recursive function that calculates the factorial of a number
def factorial(num):
if num == 0:
return 1
else:
return num * factorial(num - 1)
The stack for the recursive function
factorial()
num = 5
factorial()
num = 4
factorial()
num = 3
factorial()
num = 2
factorial()
num = 1
factorial()
num = 0
#
#
#
#
#
#
puts
puts
puts
puts
puts
factorial(4)
factorial(3)
factorial(2)
factorial(1)
factorial(0)
performs multiplit
on
on
on
on
on
stack
stack
stack
stack
stack
cation and returns the result
An iterative function that calculates the factorial of a number
def factorial(num):
fact = 1
for number in ranged, num+1):
fact = number * fact
return fact
Description
• An algorithm is a step-by-step series of operations that performs calculations,
processes data, or automates reasoning tasks. Algorithms are commonly used in
mathematics and computer science.
• Usually, more than one algorithm can provide a solution to a problem. Then, the
programmer should try to pick the algorithm that works best for the problem.
• All problems that can be solved recursively can also be solved iteratively. In Python,
an iterative solution almost always runs faster and uses less memory. However, for
some problems, a recursive solution may be more apparent and easier to code.
• To get the factorial of a number, you multiply all the numbers that are less than or
equal to that number. By definition, the factorial of 0 is 1.
Figure 13-3 How to compute the factorial of a number
354 Section 2 Other concepts and skills
How to compute a Fibonacci series
A Fibonacci series is a series of numbers named after the Italian
mathematician Leonardo Fibonacci. Calculating the numbers in this series lends
itself to a recursive algorithm that is used as an example of recursion in many
mathematics and computer science textbooks.
Figure 13-4 begins by showing the first 16 numbers of the Fibonacci series.
In this series, the first number is 0, the second number is 1, and every other
number in the sequence is the sum of the previous two numbers. So, this series
has two base cases.
The recursive function named fib() presented in the second example uses
those two base cases. If the number equals 0, it returns a value of 0. If the
number equals 1, it returns a value of 1. However, for any numbers larger than 1,
the function uses recursion to add the previous two Fibonacci numbers.
From a readability point of view, this is an elegant way to solve the problem.
It requires seven lines of code, and it's easy to understand. However, from a
performance point of view, this code has a serious problem.
To illustrate the source of the problem, this figure shows a diagram of the
recursive calls. To start, the top-level function calls the fibO function with an
argument of 5. Since 5 is greater than 1, the fib(J function makes two recursive
calls. This causes the function calls to branch into a tree. The left side of the
tree (n-1) is called with 4, and the right side (n-2) is called with 3. On both sides
of the tree, the number is still greater than 1, and the function makes two more
recursive calls. As a result, the tree splits again. This continues until the base
cases are reached. If this seems confusing, remember that each function call has
its own local variables and that changes to local variables in one function call do
not change the values of local variables in any the other calls.
So, the problem is that the fib() function gets called with the same values and
duplicates an enormous amount of work. For example, the diagram in this figure
calls the fib() function with value of 2 three times. Furthermore, the number of
recursive calls increases exponentially. As it turns out, this way of computing a
Fibonacci series is so inefficient, that it becomes virtually unusable with values
much larger than 32.
The last example shows an iterative function that solves the same problem.
This code isn't as elegant as the code for the recursive function, but it works
much more efficiently.
If you call these two functions with an argument of 5, you probably won't
notice much difference in the efficiency. However, if you use a number such as
32, the iterative version executes much more quickly than the recursive version.
If you call both versions with a number like 100, the iterative version finishes
almost instantly, but the recursive version takes an unreasonably long time to
execute. The takeaway lesson here is that some recursive algorithms rapidly
grow to the point of being unusable.
So, if you had to code a function to calculate a Fibonacci number, which
algorithm would you use? Well, if you want to allow your users to calculate
more than the first 30 or so numbers of this series, and you probably do, you
should almost certainly use the iterative algorithm.
Chapter 13 How to work with recursion and algorithms 355
The Fibonacci series
0, 1, 1, 2, 3, 5, 8, 13, 21, 34, 55, 89, 144, 233, 377, 610, ...
A recursive function that calculates a Fibonacci series
def fib(n) :
if n == 0:
return 0
elif n == 1:
return 1
else:
return fib n - 1 + fib n - 2
A statement that prints the first 10 numbers of the Fibonacci series
for i in range(10):
print (fib (i), end=" , ")
The tree of function calls that calculate the 5th number in the series
fib(5)
fib(4) + ~~fib(3)
fib(3) + fib(2) fib(2) + fib(l)
/ \ / \ / \
fib(2) + fib(l) fib(l) + fib(0) fib(l) + fib(0)
/ \
fib(l) + fib(0)
An iterative function that computes a Fibonacci sequence
def fib(n) :
if n == 0:
return 0
elif n == 1:
return 1
nl = 0
n2 = 1
fib = 0
for i in range(2, n+1):
fib = nl + n2
nl = n2
n2 = fib
return fib
Description
• A recursive Fibonacci algorithm uses two recursive calls that split off in two
directions. This is known as tree recursion because each recursive call is like the
branch of a tree.
• With tree recursion, the number of recursive calls grows exponentially.
• Tree recursion can be extremely inefficient because it needlessly computes some
branches multiple times.
• Two functions can work identically from a user's standpoint, but have very different
performance depending on the algorithm used to obtain the results.
Figure 13-4 How to compute a Fibonacci series
356 Section 2 Other concepts and skills
An algorithm for solving the Towers
of Hanoi puzzle
This chapter ends by showing a common example of recursion known as the
Towers of Hanoi puzzle. This puzzle consists of three pegs (A, B, and C) and a
number of different sized disks that fit onto each peg as shown in figure 13-5. To
start, all of the disks are stacked on peg A with the largest one at the bottom and
the smallest one at the top.
To solve the puzzle, you must move all of the disks to peg C so that they
are in the same order as they were on peg A. However, when you're moving the
disks, you can only move one disk at a time, you must move the disk to one of
the pegs, and you can't place a larger disk on top of a smaller disk.
This figure starts by showing the seven moves necessary to solve the Towers
of Hanoi puzzle with 3 disks. If you follow the steps in order, a recursive pattern
begins to emerge that you can apply to any number of disks. Solving this puzzle
for 10 disks might seem daunting. But it's not so bad once you notice the pattern.
This puzzle can be solved for more disks by using the recursive algorithm
that's described next. This algorithm moves n-1 disks from peg A to peg B, uses
peg C as a temporary peg, moves the remaining disk from peg A to peg C, and
then moves n-1 disks from peg B to peg C using peg A as a temporary peg.
The function that follows shows how this algorithm can be implemented in
Python. It accepts the number of disks as its first argument and the names of the
three pegs as its next three arguments. It begins by checking to see if the number
of disks is equal to 0. In other words, the base case is reached when there are no
disks left to move. In that case, the function uses a return statement to end the
function.
If there are disks left to move, the function calls itself to move the disks.
Here, the first statement is a recursive call that says "Move all disks except the
largest one (disk n) from peg A to peg B, using peg C as a temporary holder."
This places one branch of recursive functions on the stack. Then, the second
statement prints the message for moving the largest disk (disk n).
The third statement is a recursive call that says "move all disks except for
the largest one from peg B to peg C, using peg A as a temporary holder." This
places the second branch of recursive functions on the stack. When the number
of disks reaches 0. Python begins popping the branches off the recursive tree.
This results in a symmetric pattern on each side of the number n.
This puzzle is based on a legend. Although there are many versions of this
legend, most versions state that a group of monks has been following rules of
this puzzle since ancient times to move a stack of 64 gold disks from one tower
to another. According to the legend, when the monks complete this task, the
world will end in a clap of thunder. Fortunately, even if the monks could move
one disk per second, it would still take them over 500 billion years to complete
this task!
Chapter 13 How to work with recursion and algorithms
357
How to solve the Towers of Hanoi puzzle with 3 disks
I
Move
2
Move
5
B
B
< >
B
Move
3
Move
6
I
B
B
I
Move
1
I
Move
4
Move
7
B
I
B
B
I
The rules
• The goal is to move all disks from peg A to peg C so they end up in the same order
as on the original peg.
• You can only move one disk at a time.
• You must move the disk to one of the three pegs.
• You can't place a larger disk on top of a smaller disk.
A recursive algorithm for solving the puzzle
1. Move n-1 disks from peg A to peg B using peg C as a temporary holder.
2. Move disk n from peg A to peg C.
3. Move n-1 disks from peg B to peg C using peg A as a temporary holder.
A function that implements the recursive algorithm
def move_disk(n, src, dest, temp) :
if n == 0:
return
else:
move_disk(n-l, src, temp, dest)
print("Move disk", n, "from", src, "to", dest)
move_disk(n-l, temp, dest, src)
Description
• You can use a recursive algorithm to solve the Towers of Hanoi puzzle.
• To code a function that implements this algorithm, you can use tree recursion to
create one branch that implements step 1 and another branch that implements step 3
Figure 13-5 An algorithm for solving the Towers of Hanoi puzzle
358 Section 2 Other concepts and skills
The code for solving the Towers of Hanoi puzzle
Figure 13-6 presents the Python code for solving the Towers of Hanoi puzzle.
In the user interface, you can see that the program starts by prompting the user
to enter the number of disks. Then, it displays the instructions necessary to move
all disks from peg A to peg C. When it finishes printing these instructions, the
program prints a message before exiting.
The Python code begins with a move_disk() function that's the same as
the function described in figure 13-5. Then, the main() function prompts the
user to enter the number of disks. Next, it begins the recursion by calling the
move_disk() function and passing it the number of disks and the names for the
pegs. There's nothing special about the names of the pegs. They're just used to
display a user-friendly message to the console.
When Python finishes making all of the recursive calls to the move_disk()
function, execution returns to the main() function. Then, it prints a message and
exits.
To test this program, run it with different numbers of disks. Start with a
small number of disks and gradually increase to larger values. Also, try odd
and even numbers of disks. Note that the series of moves is different depending
on whether there are an odd or even number of disks. Also, note how fast the
number of recursive calls grows. For example, solving the puzzle for 4 disks
takes 15 moves, 5 disks takes 31 moves, 6 disks takes 63 moves, and so on. From
this, you can determine that each additional disk doubles the required number of
moves, plus 1. So, solving the puzzle for 32 disks takes 4,294,967,295 moves.
Because the number of recursive calls grows so rapidly, using larger numbers
of disks can quickly make it so the program won't finish in a reasonable amount
of time. That's true even if you remove the print statement from the move_disk()
function, which slows the function considerably.
Chapter 13 How to work with recursion and algorithms 359
The user interface
** **
TOWERS
OF HANOI ****
Enter number of disks:
Move
Move
Move
Move
Move
Move
Move
Move
Move
Move
Move
Move
Move
Move
Move
disk
disk
disk
disk
disk
disk
disk
disk
disk
disk
disk
disk
disk
disk
disk
All disks
1
2
1
3
1
2
1
4
1
2
1
3
1
2
1
from
from
from
from
from
from
from
from
from
from
from
from
from
from
from
A
A
B
A
C
C
A
A
B
B
C
B
A
A
B
to
to
to
to
to
to
to
to
to
to
to
to
to
to
to
: 4
B
C
C
B
A
B
B
C
C
A
A
C
B
C
C
have been moved.
The code
def move_disk(n, src, dest, temp):
if n == 0:
return
else:
move_disk(n-l, src, temp, dest)
print("Move disk", n, "from", src, "to", dest)
move_disk(n-l, temp, dest, src)
def main():
print("**** TOWERS OF HANOI ****»)
print()
num_disks = int(input("Enter number of disks: "))
print()
move_disk(num_disks, "A", "C", "B")
print()
print("All disks have been moved.")
if name == " main ":
main()
The pattern for 4 disks (15 moves)
121312141213121
The pattern for 5 disks (31 moves)
1213121412131215121312141213121
Figure 13-6 The code for solving the Towers of Hanoi puzzle
360 Section 2 Other concepts and skills
Perspective
In this chapter, you learned how to work with recursion. You also learned
that you can use different algorithms to solve the same problem. In particular,
you learned that any problem that can be solved with recursion can also be
solved with a loop.
So, when should you use loops and when you should you use recursion?
In short, you should almost always use loops. The only time you might want
to use recursion is when a recursive algorithm is more obvious and easier
to code and when performance isn't a primary concern. With the Towers of
Hanoi puzzle, for example, it's easy to code a recursive algorithm, and it works
adequately for a small number of disks. Although an iterative algorithm would
perform better, it would be more difficult to code.
Terms
recursion
interative function
recursive function
stack
base case
Summary
• Recursion occurs when a function calls itself.
• Each time a recursive function calls itself. Python adds the function call to
the stack, which is the current list of the called functions in the reverse order
from which they were called. This function call includes the arguments that
were passed to it so it can be executed properly later on.
• A recursive function breaks down a complex problem that it can't solve yet
into smaller problems that it can solve when it reaches the simplest form of
the problem. This simplest form is known as the base case.
• Each call to a recursive function that can't is known as a deferred action.
Then, when the base case is reached and the recursion ends, all the deferred
actions are completed.
• The number recursive function calls that are on the stack at the same time
can be referred to as recursion depth.
• An algorithm is a step-by-step series of operations that performs calculations,
processes data, or automates reasoning tasks. Algorithms are commonly
used in mathematics and computer science.
• A recursive algorithm that uses two recursive calls splits off in two directions.
This is known as tree recursion because each recursive call is like the branch
of a tree. With tree recursion, the number of recursive calls increases
exponentially.
deferred action
algorithm
Fibonacci series
recursion depth
tree recursion
Chapter 13 How to work with recursion and algorithms 361
Exercise 13-1 Test the Fibonacci program
In this exercise, you'll test the recursive function that prints part of the
Fibonacci series. Then, you'll test an iterative function that does the same thing,
but more efficiently.
Open and test the recursive Fibonacci program
1. In IDLE, open the fibonacci_recursion.py file that's in this folder:
python/exercises/chl3
2. Review the code and run it to make sure it works correctly. It should print the
first 16 numbers of the Fibonacci series.
3. Modify the code so it calculates a Fibonacci series for 32 numbers, and run it
again. Note how slowly it runs.
View the stack for the program
4. Modify the code so it calculates a Fibonacci series for 100 numbers, and run it
again. While it's running press Ctrl+C on a Windows system or Command+C
on a Mac to interrupt the calculation and view the stack trace. Note that the
fib() function has been placed on the stack numerous times.
5. From the IDLE shell, select Debug->Stack Viewer. In the Stack Viewer,
expand a few of the fib() functions and note that they include the values for
the local variable named n.
Open and test the iterative Fibonacci program
6. Open the fibonaccijoop.py file that's in the same folder.
7. Review the code and run it to make sure it works correctly.
8. Modify the code so it calculates a Fibonacci series for 100 numbers, and run
it. Note how quickly it runs compared to the recursive program.
362 Section 2 Other concepts and skills
Exercise 13-2 Test the Towers of Hanoi puzzle
In this exercise, you'll test the Towers of Hanoi puzzle.
Open and test the program
1. In IDLE, open the towers_of_hanoi.py file that's in this folder:
python/exercises/chl3
2. Review the code and run it for 3, 4, and 5 disks. Note that the pattern is
slightly different depending on whether the number is even or odd.
3. Continue testing with larger numbers until the program begins running too
slowly to be acceptable.
Add a print statement that traces the calls on the stack
4. Add a statement to the start of the move_disk() function that prints the name
of the function and the values of the arguments that are being passed to it.
When you're done, the console should look like this for 4 disks:
**** TOWERS OF HANOI ****
Enter number of disks: 4
move_disk(n=4,
move_disk(n=3,
move_disk(n=2,
move_disk(n=l,
move_disk(n=0,
Hove disk 1 from A
move_disk(n=0,
Hove disk 2 from A
move_disk(n=l,
move_disk(n=0,
Hove disk 1 from B
move_disk(n=0,
Hove disk 3 from A
move_disk(n=2,
move_disk(n=l,
move_di s k (n= 0,
• • •
src=A,
src=A,
src=A,
src=A,
src=A,
to B
src=C,
to C
src=B,
src=B,
to C
src=A,
to B
src=C,
src=C,
src=C,
dest=C,
dest=B,
dest=C,
dest=B,
dest=C,
dest=B,
dest=C,
dest=A,
dest=C,
dest=B,
dest=A,
dest=B,
temp=B)
temp=C)
temp=B)
temp=C)
temp=B)
temp=A)
temp=A)
temp=C)
temp=B)
temp=A)
temp=B)
temp=A)
5. Study the console and note how the move_disk() functions are pushed onto
the stack and popped off the stack.
Section 3
Object-oriented
programming
So far in this book, you have learned how to create objects from the built-in
classes that are provided by Python. This includes the int, float, stn and list
classes. In addition, you have learned how to organize your programs into a
series of functions that process the data of your program. This is known as
procedural programming.
In the next three chapters, you'll learn how to define your own classes.
In addition, you'll learn how to create and use objects from your own
classes. This allows you to group the data for your programs and the
procedures for operating on that data into an object. This is known as
object-oriented programming, and it can speed the development of large
programs and make your code more reusable.
Because each chapter in this section builds on the previous chapter, we
recommend that you read these chapters in sequence. We also recommend
that you read at least chapters 14 and 15 in this section before going on
to section 4. That's because the chapters in section 4 expect you to have a
basic understanding of how object-oriented programming works.
14
How to define and use your
own classes
So far in this book, you have learned how to create and use objects from the
built-in classes that are provided by Python. Now, you'll learn how to define
your own classes. In addition, you'll learn how to create objects from those
classes and use them in your programs. Fortunately, this works the same as
creating and using objects from the built-in classes provided by Python.
An introduction to classes and objects 366
Two UML diagrams for the Product class 366
Code that defines a Product class 368
Code that uses a Product class 368
How to create and use objects 370
How to define a class 372
How7 to code a constructor and attributes 372
How7 to code methods 374
The Product Viewer 1.0 program 376
How work with object composition 380
How7 object composition works 380
The Die and Dice classes 380
The Dice Roller 1.0 program 382
How to work with encapsulation 384
How7 objects encapsulation works 384
How7 to hide attributes 386
How7 to access hidden attributes with methods 388
How7 to access hidden attributes with properties 390
The Die and Dice classes with encapsulation 392
The Product class with some encapsulation 394
The Pig Dice game 396
The console 396
The code 396
Perspective 400
366 Section 3 Object-oriented programming
An introduction to classes and objects
This chapter starts by introducing classes and objects. This introduction
includes two diagrams for a Product class, the complete code for a Product
class, and code that creates objects from this class and uses them. As you read
this topic, remember that it's only an overview and that the details for defining a
class are presented in the next topic. However, if you have experience with other
object-oriented programming languages, you might understand many of the
details of this code.
Two UML diagrams for the Product class
Figure 14-1 begins by showing a class diagram for a class named Product.
This diagram uses a simplified version of Unified Modeling Language {UML), a
modeling language that is the industry standard for working with all
object-oriented programming languages including Python.
In this diagram, the class contains three attributes named name, price, and
discountPercent. In addition, it contains three methods named init ,
getDiscountAmount, and getDiscountPrice.
Of these methods, the init () method is a special method that creates
an object from the class and initializes its attributes. This method accepts three
parameters that are used to set the values of the three attributes. On the other
hand, the getDiscountAmount() method doesn't accept any parameters. Instead,
it calculates the discount amount from the data that's stored in the object and
returns the resulting value.
This shows how objects allow you to group related variables (attributes) and
functions (methods) into data structures called objects. This is the foundation
of object-oriented programming (OOP), and it's fundamentally different than
procedural programming, which passes data between a series of functions.
The second diagram shows that a class can be thought of as a template or
blueprint from which one or more objects can be created. Here, the diagram
shows only the attributes, not the methods, of the class and its objects. In this
case, two objects named product 1 and product2 are created from the Product
class. Within these objects, each attribute contains some data. In other words, an
object is an instance of a class. As a result, the process of creating an object from
a class is sometimes called instantiation.
Once you create an object from a class, the object has an identity (a unique
address), a state (the data that it stores), and behavior (the methods that it
contains). As a program runs, an object's state may change.
Chapter 14 How to define and use your own classes 367
A diagram of the Product class
Product
name
price
discount Percent
init (name, price, discountPercent)
- Attributes
getDiscountAmount ()
getDiscountPrice()
- Methods
The relationship between a class and its objects
Product
name
price
discountPercent
productl
name = 'Stanley 13 Ounce Wood Hammer'
price = 12.99
discountPercent = 62 product2
name = 'National Hardware 3/4" Wire Nails'
price = 5.06
discountPercent = 0
Description
• Object-oriented programming (OOP) groups related variables and functions into
data structures called objects.
• A class can be thought of as a template or blueprint from which objects are made.
• The attributes of a class define the type of data that an object can store.
• The methods of a class define the tasks that an object can perform. Often, these
methods provide a way to modify the attributes of the object.
• Once you create an object from a class, the object has an identity (a unique
address), a state (the data that it stores), and behavior (the methods that it contains)
As a program runs, an object's state may change.
• An object is an instance of a class. In other words, you can create more than
one object from a single class. The process of creating an object from a class is
sometimes called instantiation.
UML diagramming notes
• UML (Unified Modeling Language) is the industry standard used to describe the
classes and objects of an object-oriented application.
• A UML class diagram describes the attributes and methods of one or more classes.
Figure 14-1 Two UML diagrams for the Product class
368 Section 3 Object-oriented programming
Code that defines a Product class
Figure 14-2 shows the code for the Product class. Here, the class definition
starts with the class keyword followed by the name of the class and a colon. By
convention, it's common to start user-defined class names with an uppercase
letter. However, many of the built-in class names (such as int, float, and str) start
with a lowercase letter.
After defining the name of the class, this code defines the init Q
method for the Product class. This is a special method that's known as the class
constructor, and it's automatically called whenever a Product object is created
from the Product class.
In this example, the constructor takes four parameters. Of these parameters,
the first parameter is a reference to the object itself. This is required for all
methods, including the constructor. By convention, this reference is named self.
We recommend that you follow that convention, although you can use another
name if you want.
Within the body of the constructor, the first statement creates the name
attribute and initializes it to the value that's stored in the name parameter. The
second statement creates and initializes the price attribute in a similar fashion.
And so on. In other words, the last three parameters of the constructor initialize
the three attributes of the object. You can think of these attributes as variables
that store the data for an object.
For now, these attributes are public. As a result, code outside the class can
get and set the values of these attributes. This is a good way to get started with
attributes. Later in this chapter, you'll learn how to make them private and
control access to them.
After the constructor method, the class defines two public methods. Both of
these methods perform calculations on the data that's stored in the attributes and
return the result. For example, the getDiscountAmountQ method calculates the
discount amount from the price and discountPercent attributes and returns the
result.
Code that uses a Product class
The code that uses the Product class begins by importing the Product class
from the objects module. As a result, this code doesn't need to prefix the name
of the class with the name of the module. This is often a good way to import
classes.
After importing the Product class, this code creates two product objects.
Here, the constructor sets the values for all three attributes of each object. Then,
this code prints the data for the first product object to the console. To do that,
the first three statements use the attributes of the object to get the values for the
three attributes. Then, the last two statements use methods to eet the data that's
calculated from the attributes.
Chapter 14 How to define and use your own classes
369
The Product class in the module named objects
class Product:
# a constructor that initializes 3 attributes
def init (self, name, price, discountPercent):
self .name = name # attribute 1
self.price = price # attribute 2
self.discountPercent = discountPercent # attribute 3
# a method that uses two attributes to perform a calculation
def getDiscountAmount(self):
return self.price * self.discountPercent / 100
# a method that calls another method to perform a calculation
def getDiscountPrice(self):
return self.price - self.getDiscountAmount()
A script that creates two Product objects and uses one of them
from objects import Product
# create two product objects
productl = Product("Stanley 13 Ounce Wood Hammer", 12.99, 62)
product2 = Product("National Hardware 3/4" Wire Nails', 5.06, 0)
# print data for productl to console
print("Name: {
print("Price: {
print("Di scount percent: {
print("Di scount amount: {
print("Discount price: {
s}".format(productl.name))
.2f}".format(productl.price))
d}%".format(productl.discountPercent))
.2f}".format(product1.getDiscountAmount()))
.2f}".format(productl.getDiscountPrice()))
The console
PRODUCT DATA
Name:
Price:
Discount percent:
Di scount amount:
Discount price:
Stanley 13 Ounce Wood Hammer
12.99
62%
8.05
4.94
Description
• Coding and calling methods works similarly to coding and calling a function.
• A constructor is a special method named init that defines the attributes for an
object and initializes the values of those attributes.
• All methods, including the constructor, must take a reference to the object itself as
their first parameters. By convention, this reference is named self.
• When writing object-oriented code, it's common to use camel case notation for
names such as method names. However, underscore notation works too.
Figure 14-2 Code that defines and uses the Product class
370 Section 3 Object-oriented programming
How to create and use objects
Figure 14-3 presents the coding details for creating objects from a user-
defined class. In particular, it shows how to create objects from the Product
class defined in the previous figure. Then, it shows how to use the attributes and
methods of these objects. These skills are the same as the skills for working with
built-in objects, so this should mostly be review.
To start, if the class is in a different module, you must import the module.
When working with classes, it often makes sense to import the class from the
module as shown in the first example.
Then, you can create an object from the class by coding the name of the
class followed by a set of parentheses as shown in the second example. These
parentheses call the constructor for the object, so you must code any parameters
required by the constructor within these parentheses.
For this to work correctly, you must specify the correct number of parameters,
in the correct sequence, and with compatible data types. In this example, for
instance, the first statement creates a Product object with a name of "Stanley 13
Ounce Wood Hammer", a price of 12.99, and a discount of 62 percent. This works
since the constructor for the Product class accepts three parameters: a string for
the name, a number for the price, and a number for the discount percent.
Once you create an object, you can get or set its attributes as shown in the
third example. To do that, you code the object name, followed by the dot operator,
followed by the attribute name. In this example, both statements work with the
Product object named product 1. The first statement sets the discountPercent
attribute to a value of 40. The second statement gets the value stored in the
discountPercent attribute and assigns it to a variable named percent.
Similarly, you can call the methods of an object as shown in the fourth
example. Calling a method is similar to accessing an attribute. However, you
must code a set of parentheses after the name of the method. Then, if the method
requires parameters, you code the parameters within the parentheses, separating
multiple parameters with commas. In this example, the first statement calls
the getDiscountAmountO method to get the discount amount and assign it to
a variable named discount. The second statement calls the getDiscountPrice()
method to get the discount price and assign it to a variable named salePrice.
Neither of the methods shown in this figure accept parameters. As a
result, you just code an empty set of parentheses after the name of the method.
However, if the method accepted parameters, you would code the parameters
within the parentheses, just as you do for functions. In fact, calling a function
is similar to calling a method. The main difference is that you must preface the
method with the name of the object and the dot operator. That way, the method
can work with the attributes of the object.
Chapter 14 How to define and use your own classes 371
How to import a class
The syntax
from module_name import ClassNamel [, ClassName2] . . .
Import the Product class from the objects module
from objects import Product
How to create an object
The syntax
objectName = ClassName([parameters])
Create two Product objects
productl = Product('Stanley 13 Ounce Wood Hammer', 12.99, 62)
product2 = Product('National Hardware 3/4" Wire Nails', 5.06, 0)
How to access the attributes of an object
The syntax
objectName.attributeName
Set an attribute
productl.discountPercent =40 # sets discountPercent to 40
Get an attribute
percent = productl.discountPercent # percent =40
How to call the methods of an object
The syntax
objectName.methodName( [parameters] )
Call the getDiscountAmountQ method
discount = productl.getDiscountAmount()
Call the getDiscountPrice() method
salePrice = productl.getDiscountPrice()
Description
• To create an object, you code the name of the class and a set of parentheses. Inside
the parentheses, you code the parameters for the constructor separated by commas
• To access the attributes of an object, you code the name of the object followed by
the dot operator (.) and the name of the attribute.
• To call a method from an object, you code the name of the object followed by
the dot operator (.), the name of the method, and a set of parentheses. Inside the
parentheses, you code the parameters for the method separated by commas.
Figure 14-3 How to create and use objects
372 Section 3 Object-oriented programming
How to define a class
The next few figures show the coding details for defining a class. This
includes how to code a constructor that initializes data attributes. In addition,
it includes how to code methods that process the data that's stored in those
attributes.
How to code a constructor and attributes
Figure 14-4 shows how to code a constructor, which is the special method
that's automatically executed when a new object is created from a class. The
syntax for coding a constructor is similar to the syntax for coding a function.
However, there are two significant differences. First, the constructor must be
named init (with two underscores before and after). Second, within the
parentheses, the first parameter must be a reference to the object itself.
By convention, the reference to the object itself is named self. This parameter
provides a way for the programmer to access the attributes and methods of an
object from within the class. To do that, you code the self parameter, followed
by a dot operator, followed by the name of the attribute or method. However, the
self parameter isn't visible to other programmers who use the class. As a result,
code that calls a constructor shouldn't supply a parameter that corresponds with
the self parameter.
In Python, a class can only contain one constructor. However, there are
many different ways to code that constructor. To give you a clearer idea of how
constructors work, this figure shows three possible ways to code the constructor
for the Product class.
The first example shows a constructor that doesn't accept any parameters
from the calling code. However, it does specify the parameter that's a reference to
the object itself. As mentioned earlier, this is required for all methods of a class,
including the constructor. Then, the body of this constructor defines three
attributes and sets them to default values. As a result, when you use this
constructor to create an object, you typically need to set the attributes of the
object.
When you code a constructor, it's a common practice to code parameters that
supply the initial values for the attributes of the object as shown in the second
example. Here, the constructor accepts three parameters from the calling code.
Then, the body of this constructor uses these three parameters to set the initial
values for the three attributes. As a result, when you use this constructor to create
an object, you typically don't need to set the attributes of the object.
If you need more flexibility in the number of parameters that the calling code
can supply to a constructor, you can use named parameters as shown in the third
example. Here, the constructor provides default values for all three parameters.
As a result, the code that creates an object can supply all three parameters. Or.
it can supply zero, one, two, or three parameters. To do that, this code can use
named parameters whenever that's necessary or whenever it makes the code easier
to read. Then, the constructor uses the default value for any parameter that isn't
supplied.
Chapter 14 How to define and use your own classes 373
The syntax
def init (self [, parameters! ) :
self.attrNamel = attrValuel
self.attrName2 = attrValue2
a a a
A constructor with no parameters
def init (self):
self.name = ""
self.price = 0.0
self.discountPercent = 0
Code that uses this constructor to create an object
product = Product()
Code that sets the attributes of the object
product.name = "Stanley 13 Ounce Wood Hammer"
product.price = 12.99
product.discountPercent = 62
A constructor with three parameters
def init (self, name, price, discountPercent):
self, name = name
self.price = price
self.discountPercent = discountPercent
Code that uses this constructor to create an object and set its attributes
product = Product("Stanley 13 Ounce Wood Hammer", 12.99, 62)
A constructor with default values for its parameters
def init (self, name="", price="0.0", discountPercent=0):
self, name = name
self.price = price
self.discountPercent = discountPercent
Code that supplies all three parameters
product = Product("Stanley 13 Ounce Wood Hammer", 12.99, 62)
Code that supplies just two parameters
so the default value is used for discountPercent
product = Product(name="Stanley 13 Ounce Wood Hammer", price=12.99)
Description
• The constructor for a class is executed when an object is created from the class.
It typically defines and initializes the attributes of the object, but it can run other
initialization code too.
• The constructor must take a reference to the object itself as its first parameter. By
convention, this reference is named self.
• You can only code one constructor per class.
# the constructor
# first attribute
# second attribute
Figure 14-4 How to code a constructor and attributes
374 Section 3 Object-oriented programming
How to code methods
Figure 14-5 shows how to code the methods of a class. The syntax for
coding a method is almost identical to the syntax for coding a function. The only
difference is that the first parameter for the method must be a reference to the
object itself. This lets a method access the attributes of the class, and this works
just as it does for the constructor of a class. As a result, if you understand how to
code functions, and you understand the previous figure, you shouldn't have any
trouble coding methods.
The first example shows how to code and call a method named
getDiscountAmountO, and this. Since this method doesn't accept any parameters
from the calling code, it just supplies the self parameter that's a reference to the
object itself. Within the body of this method, the first statement uses the self
parameter to access the object's price and discountPrice attributes; it uses those
attributes to calculate the discount amount; and it stores the discount amount in
a local variable named discountAmount. Then, the second statement returns this
value to the calling code.
The second example shows a more concise way to code the
getDiscountAmountO method. Here, the body of the method skips the
intermediate step of storing the discount amount in a variable. If you compare
the calling code in these first two examples, you'll notice that it's exactly the
same. This shows that you can change the code in the body of a method without
having to change the code that calls the method.
The third example shows how to code and call a method named
getDiscountPrice. Like the getDiscountAmountO method, this method doesn't
accept any parameters from the calling code and returns a calculated value.
To do that, the getDiscountPrice() method uses the self parameter to call the
getDiscountAmountO method of the object. This shows that you can use the self
parameter to access the attributes or call the methods of the current object.
The fourth example shows how to code a method named getPriceStr. This
method accepts one parameter, which is a 2-letter country code that identifies
a country. Within the body of this method, the first statement converts the price
attribute to a string named priceStr that displays two decimal places. Then, this
code checks the country code and appends an appropriate three-letter currency
code to the priceStr.
When coding methods, many programmers who are new to Python forget
to include the self argument. If you do that, you'll get an error message like the
one shown in this figure when you call the method. At first, this error message
might be confusing because it says that the getPriceStr() method "only takes one
positional argument, but two were given". It says this even though the calling
code only supplies one parameter. The explanation is that Python automatically
passes a reference to the object itself as the first parameter. As a result, even
though the calling code only supplies one parameter, Python is actually passing
two parameters to the method.
Another common mistake made by new Python programmers is to forget to
prefix attribute names with the self parameter. If you do this, you create a local
Chapter 14 How to define and use your own classes 375
The syntax
def methodName(self[, parameters]):
statements
A method that returns a value
def getDiscountAmount(self):
discountAmount = self.price * self.discountPercent / 100
return discountAmount
Code that calls this method
discountAmount = product.getDiscountAmount()
A more concise way to code this method
def getDiscountAmount(self):
return self.price * self.discountPercent / 100
Code that calls this method
discountAmount = product.getDiscountAmount()
A method that calls another method of the class
def getDiscountPrice(self):
return self.price - self.getDiscountAmount()
Code that calls this method
discountPrice = product.getDiscountPrice()
A method of the Product class that accepts a parameter
def getPriceStr(self, country):
priceStr = "{:.2f}".format(self.price)
if country == "US":
priceStr += " USD"
elif country == "DE":
priceStr = priceStr + " EUR"
return priceStr
Code that calls this method
print("Price: " + product.getPriceStr("US"))
The error that's displayed if you forget to code the self parameter
TypeError: getPriceStr() takes 1 positional argument but 2 were given
Description
• To code a method in a class, you code the def keyword followed by the name of the
method, an optional parameter list in a set of parentheses, a colon, and then a block
of statements to execute.
• A method must take a reference to the object itself as its first parameter. By
convention, this reference is named self.
Figure 14-5 How to code methods
376 Section 3 Object-oriented programming
variable instead of accessing the attribute. This local variable behaves like any
other local variable. In other words, it's only available inside the current method
and loses its value when the method returns. It's perfectly legal and common
to use local variables inside methods. However, if you want to work with an
attribute of the object instead of a local variable, you need to remember to prefix
the attribute name with the self parameter.
The Product Viewer 1.0 program
Figure 14-6 shows a simple but complete program named Product Viewer
1.0 that uses objects created from a Product class. This program begins by
displaying a numbered list of three products. Then, the user can view the data for
a product by entering its number.
The code for the Product class is stored in a module named objects. In other
words, it's stored in a file named objects.py. This code defines a constructor that
initializes the attributes that store the name, price, and discount percent for the
object. Then, it defines two methods that get the discount amount and price for
the object. To do that, these methods access the object's attributes and methods.
The product_viewer module contains the code for the program. To start, this
code imports the Product class from the objects module. Then, this code defines
the functions that make up the program.
The show_products() function displays a numbered list of products. It
accepts a parameter that's a list or tuple that contains one or more Product
objects. To display these Product objects, a for loop iterates through each
Product object. Within the loop, the first statement uses the index to get a
Product object from the list. Then, the second statement displays a number that's
one greater than the index followed by the name of the Product object.
The show_product() function displays the data that's available from a
product. To do that, it accepts a parameter that's a Product object. Then, it
uses the three attributes of the product to display the name, price, and discount
percent. Finally, it uses the two methods of the product to display the discount
amount and discount price.
Chapter 14 How to define and use your own classes
377
The console
The Product Viewer program
PRODUCTS
1. Stanley 13 Ounce Wood Hammer
2. National Hardware 3/4" Wire Nails
3. Economy Duct Tape, 60 yds, Silver
Enter product number: 1
PRODUCT DATA
Name:
Price:
Discount percent:
Di scount amount:
Discount price:
Stanley 13 Ounce Wood Hammer
12.99
62%
8.05
4.94
View another product? (y/n):
The objects module
class Product:
def init (self, name, price, discountPercent):
self .name = name
self.price = price
self.discountPercent = discountPercent
def getDiscountAmount(self):
return self.price * self.discountPercent / 100
def getDiscountPrice(self):
return self.price - self.getDiscountAmount()
The product_viewer module
from objects import Product
def show products(products):
print("PRODUCTS")
for i in range(1en(products)):
product = products[i]
print(str(i+l) + ". " + product.name)
print()
def show product(product):
print("PRODUCT DATA")
print("Name:
print("Price:
print("Discount percent:
print("Discount amount:
print("Discount price:
print()
s}".format(product.name))
.2f}".format(product.price))
d}V.format(product.discountPercent))
.2f}".format(product.getDiscountAmount()))
.2f}".format(product.getDiscountPrice())
Figure 14-6 The Product Viewer 1.0 program (part 1)
378 Section 3 Object-oriented programming
The mainQ function begins by displaying the title of the program. Then, it
creates a tuple of Product objects. Note that this code doesn't provide a variable
that refers to these Product objects. Instead, it calls the constructor of the Product
class to create each object, and it stores each object in the tuple without going
through the intermediate step of creating a variable name that refers to the
object.
After creating the tuple of product objects, this code passes that tuple to
the show_products() function defined earlier in the module. This displays the
numbered list of products. Then, this code prompts the user to enter a number
that corresponds with a product. Next, this code gets the corresponding Product
object from the tuple of Product objects, and passes that Product object to the
show_product() function. This displays the data for the product object.
Chapter 14 How to define and use your own classes 379
The product_viewer module (continued)
def main():
print("The Product Viewer program")
print()
# a tuple of Product objects
products = (Product("Stanley 13 Ounce Wood Hammer", 12.99, 62),
Product('National Hardware 3/4" Wire Nails', 5.06, 0),
Product("Economy Duct Tape, 60 yds, Silver", 7.24, 0))
show products(products)
while True:
number = int(input("Enter product number: "))
print()
product = products[number-1]
show product(product)
choice = input("View another product? (y/n): ")
print()
if choice 1= "y":
print("Bye!")
break
if name == " main "
main()
Figure 14-6 The Product Viewer 1.0 program (part 2)
380 Section 3 Object-oriented programming
How work with object composition
Object composition is a way to combine simple objects into more complex
data structures. In the last few figures, you learned how to define a class that has
attributes that store built-in objects such as str, float, and int objects. Now, you'll
see how to define a class that stores one or more user-defined objects.
How object composition works
Figure 14-7 presents a diagram that shows how object composition works.
More specifically, this diagram shows that the Dice object uses one or more
Die objects. To show this relationship, this diagram uses an arrow with a closed
(shaded) arrowhead to point from the Dice class to the Die class. However, a Die
object doesn't use the Dice object. As a result, there's no arrow pointing from the
Die class to the Dice class. It may not seem like much, but being able to define
an object that can contain other user-defined objects is a powerful feature that
allows you to create complex data structures that you can customize for each
program that you develop.
The Die and Dice classes
This figure also shows the dice module that contains the code for the Die and
Dice classes. This module begins by importing the random module that's used
by the Die class.
The Die class has a single attribute, the value attribute. When you create a
Die object, the constructor sets the value attribute to 1. However, since the value
attribute is public, the calling code can set it to another value if necessary. In
addition, the calling code can call the rollQ method to set the value attribute to a
random value from 1 to 6.
The Dice class also has a single attribute, the list attribute. When you create
a Dice object, it initializes this attribute to an empty list. Then, you can use the
addDie() method to add a Die object to this list. To do that, this method calls the
append() method of the list object to add the die parameter to the end of the list.
After you have added one or more Die objects to the list attribute, you can
use the rollAll() method to roll all of the Die objects. To do that, this code loops
through each Die object in the list attribute and calls the roll() method on each
one.
Chapter 14 How to define and use your own classes 381
A UML diagram for two classes that use composition
list ► value
addDie(die) roll()
rollAHO
The dice module
import random
class Die:
def init (self) :
self .value = 1
def roll(self):
self.value = random.randrange(1, 7)
class Dice:
def init (self) :
self.list = []
def addDie(self, die):
self.list.append(die)
def rollAll(self):
for die in self.list:
die.roll()
Description
• Object composition is a way to combine simple objects into more complex ones.
For example, one Dice object can store multiple Die objects.
Figure 14-7 How object composition works
382 Section 3 Object-oriented programming
The Dice Roller 1.0 program
Figure 14-8 shows a program named Dice Roller l.O that's stored in a
module named dice_roller. To start, this module imports the Die and Dice classes
from the dice module.
The main() function of this module starts by printing the title of the program.
Then, it prompts the user to enter the number of dice to roll. Next, it creates a
Dice object and uses a loop to create the correct number of Die objects and add
them to the Dice object.
After creating the Dice object, the code enters an infinite loop that's the main
loop for the program. This loop begins by calling the rollAll() method of the
Dice object to roll all of the dice. Then, it loops through each of the Die objects
and prints the value of each Die object to the console.
After displaying the roll, this code asks the user if he or she wants to roll
again. If the user enters "y" for yes, program execution jumps back to the top of
the loop, which rolls the dice and displays the result again. Otherwise, this code
prints a goodbye message and uses a break statement to cause execution to jump
out of the loop, which ends the program.
At this point, you may realize that you could accomplish the same results
with less code by accessing the random module directly and not using the Die
and Dice objects. So, why bother creating these objects?
One advantage of using these objects is that it shields the programmer who
uses these classes from the technical details of how the class works. In this case,
the Die class shields the programmer who uses that class from how the random
value is generated. In other words, the programmer doesn't need to know how to
use the random module to be able to create a Die object that can be rolled to get
a random value from l to 6. That might not be a big selling point for a simple
class like the Die class, but it is for more complex classes where the underlying
technical details are more complex.
Another advantage is that these objects promote code reusability. In other
words, the Dice Roller program isn't the only program that can use Die and Dice
objects. Other programs that need to roll six-sided dice can also use this module,
especially if you continue to add functionality to this module and to make the
other improvements that are described later in this chapter.
Chapter 14 How to define and use your own classes 383
The console
The Dice Roller program
Enter the number of dice to roll: 5
YOUR
Roll
YOUR
Roll
YOUR
Roll
Bye I
ROLL: 15 12
again? (y/n):
ROLL: 114 3
again? (y/n):
ROLL: 5 4 6 2
again? (y/n):
6
y
4
y
2
n
The dice_roller module
from dice import Dice, Die
def main():
print("The Dice Roller program")
print()
# get number of dice from user
count = int(input("Enter the number of dice to roll: "))
# Dice object and add Die objects to it
dice = Dice()
for i in range(count):
die = Die()
dice.addDie(die)
while True:
# roll the dice
dice.rollAHO
print("YOUR ROLL: ", end="")
for die in dice.list:
print(die.value, end=" ")
print("\n")
choice = input("Roll again? (y/n): ")
if choice 1= "y":
print("Bye!")
break
if name == " main ":
main()
Description
• The Dice Roller program uses one Dice object to store multiple Die objects.
Figure 14-8 The Dice Roller 1.0 program
384 Section 3 Object-oriented programming
How to work with encapsulation
So far, all of the user-defined objects in this chapter have used public
attributes to store their data. As a result, the code that uses these objects can
directly access their attributes. This is a good way to get started with
object-oriented programming, and it's an approach that's adequate for many
programs.
Unfortunately, this approach can allow other programmers to use your
user-defined objects in ways that may cause them to not work properly. In
addition, it can make it more difficult for other programmers to figure out how
to use your objects, which makes your objects less user-friendly and reusable.
If you encounter these types of problems, you can use object encapsulation to
control access to your data attributes.
How object encapsulation works
Encapsulation is a fundamental concept of object-oriented programming.
It allows you to prevent direct access to the data attributes of an object. In other
words, it allows you to hide the object's data from the calling code. As a result,
encapsulation is also known as data hiding.
To hide data, you code private attributes that other code can't access
directly. After you code private attributes, you must provide an indirect way to
access them. To do that, you can code public methods or properties, which are a
special type of method.
So far in this chapter, the Die class has used a public attribute named value
to store its value. The first step in encapsulating the Die object is to change this
public attribute to a private attribute. In Python, you can do that by beginning the
attribute name with two underscores as shown in the diagrams in figure 14-9.
In other words, both of these diagrams use a private attribute named value.
Then, in the first diagram, the getValueQ and setValue() methods provide an
indirect way to get the private value attribute or to set it to a specified value.
In the second diagram, on the other hand, the value property provides an indirect
way to get the private value attribute or to set it to a specified value. In both
diagrams, the roll(J method provides an indirect way to set the private value
attribute to a random value.
An interface allows a programmer to use an object without understanding
its internal code. If the interface of an object remains the same, a programmer
can change the internal code for the object without needing to change any of the
code that uses the object. For example, since the second diagram uses a property
named value to get and set the value attribute, it has the same interface as the Die
object presented earlier in this chapter that directly accesses a public attribute
named value.
When you're using Python to code classes, you can often start by coding
public attributes. Later, if you determine that you need to encapsulate these
attributes, you can convert them to properties.. Since the interface of the object
doesn't change, there is little or no impact on any calling code.
Chapter 14 How to define and use your own classes 385
A Die class that uses methods to provide encapsulation
value Private attribute
I— Public methods for getting and setting attributes
getValue()
setValueO
roiio Another public method
A Die class that uses properties to provide encapsulation
value Private attribute
value Public property
roiio Public method
Description
• Encapsulation allows you to hide the data attributes of an object from other code
that uses the object. This is also known as data hiding.
• Public attributes can be accessed directly by the code that uses an object.
• Private attributes can only be accessed indirectly through public methods or
properties, which are a special type of method.
• An interface allows a programmer to use an object without understanding its
internal code. If the interface of an object remains the same, a programmer can
change the internal code for the object without needing to change any of the code
that uses the object.
UML diagramming note
• The double underscores ( ) identify the attributes that are private.
Figure 14-9 How object encapsulation works
386 Section 3 Object-oriented programming
How to hide attributes
Figure 14-10 begins by showing the Die class that's been used so far in this
chapter. The constructor for this class creates a public attribute named value and
sets it to 1. Then, the roll() method sets this value to a random number from 1 to
6.
This class works fine in most cases. But what happens if the calling code
directly accesses the value attribute and sets it to an illegal number such as 10 or
-1 ? In that case, the Die object doesn't work correctly.
To solve this problem, you can make the attribute private as shown in the
second example. In this example, the constructor creates a private attribute
named value and sets it to 1. Then, the getValue() method provides an indirect
way to get the number that's stored in the value attribute, and the roll()
method provides an indirect way to set the number that's stored in the value
attribute. Since there's no setValue() method that provides an indirect way to set
the value attribute, there's no way to set this attribute to an invalid value.
But what happens if code attempts to access the value attribute directly?
In that case, Python display an error message that says that the Die object has no
such attribute. This shows that the attribute is hidden from the calling code.
It's important to note that making an attribute private doesn't make it secure.
It's possible, through programming tricks, to access private attributes directly.
However, making an attribute private clearly tells other programmers that they
shouldn't access or modify the variable directly because the object might not
work correctly if they do.
Chapter 14 How to define and use your own classes 387
The Die class with a public attribute named value
class Die:
def init (self) :
self .value = 1
def roll(self):
self.value = random.randrange(1, 7)
Code that directly sets and gets the public attribute
die = Die()
die.value =10 # illegal valuel
print("Die:", die.value)
The message that's displayed on the console
Die: 10
The Die class with a private attribute named value
class Die:
def init (self) :
self, value = 1
def getValue(self):
return self, value
def roll(self):
s- v- - = - t • • n -t» - ge(l, 7)
Code that attempts to directly access a private attribute
die = Die()
die. value = 10
The error message that's displayed on the console
AttributeError: 'Die' object has no attribute ■ value"
Code that indirectly sets and gets the private attribute
die = Die()
die.roll()
print("Die:", die.getValue())
Description
• To make an attribute private, prefix the name of the attribute with a double
underscore ( ).
• Attempting to directly access a private attribute from outside the class causes an
AttributeError that indicates that the field does not exist. However, you can use
methods to indirectly access a private attribute.
Figure 14-10 How to hide attributes
388 Section 3 Object-oriented programming
How to access hidden attributes with methods
Figure 14-11 begins by showing a Die class that implements the first
diagram in figure 14-9. To start, the constructor defines a hidden attribute
named value and initializes it to 1. Then, the getValue(), setValue(), and rollQ
methods provide a way to indirectly access that attribute.
The getValueO method gets the value that's stored in the value attribute
and returns it to the calling code. As a result, it's known as a getter method. By
convention, getter methods begin with the word get. Since a getter accesses data,
it's also known as an accessor.
The setValue() method sets the value that's stored in the value attribute.
As a result, it's known as a setter method. By convention, setter methods begin
with the word set. Since a setter changes data, it's also known as a mutator.
However, before the setValue() method changes the value that's stored in the
value attribute, it performs some data validation. To start, it checks whether
the value parameter is less than 1 or greater than 6. If so, it raises a ValueError
that contains a message that indicates that the value must be from 1 to 6.
Otherwise, this method sets the value attribute to the value parameter.
The roll() method also sets the value that's stored in the value attribute. To
do that, it calls the randrange() function of the random module.
As you review this code, note that there are three ways to set the value
attribute. When a programmer creates an object, the constructor sets this attribute
to 1. Then, if necessary, the programmer can use the setValue() method to set
this attribute to a specified value. Or, the programmer can use the roll() method
to set this attribute to a random value.
At this point, you may be wondering, is the setValue() method even
necessary? The answer is that it depends on how this object is going to be used.
If you don't include this method in the Die class, the rollQ method is the only
one way to change the value attribute. That's a simple and elegant design
that's easy for other programmers to understand and use. It certainly works well
enough for the Dice Roller program. But maybe that design doesn't provide
enough flexibility for other programs that the Die object might be used in.
You might also be wondering whether it makes sense for the constructor
to initialize the value attribute to 1 ? Again, the answer depends on how this
object is going to be used. Setting the value attribute to 1 is a simple approach
that's easy for other programmers to understand, and it works for the Dice Roller
program. But maybe the Die object would work better for other programs if
the value attribute was initialized to a random integer from 1 to 6. Or maybe
it would work better if the constructor included a named parameter for the value
that specified a default value of 1.
Chapter 14 How to define and use your own classes 389
The Die class with methods that access a private attribute
class Die:
def init (self) :
self, value = 1
def getValue(self):
return self, value
def setValue(self, value):
if value < 1 or value > 6:
raise ValueError("Die value must be from 1 to 6.")
else:
self. value = value
def roll(self):
self. value = random.randrange(1, 7)
Code that uses the getter and setter methods
die = Die()
die.setValue(6)
print("Die:", die.getValue())
The message that's displayed on the console
Die: 6
Code that attempts to use the setValue() method to set invalid data
die = Die()
die.setValue(-1)
The error message that's displayed on the console
ValueError: Die value must be from 1 to 6.
Description
• You can use public methods to get and set the value of a private attribute.
• The method that gets the value of the attribute is known as a getter method, and the
method that sets the value of the attribute is known as a setter method.
• Since a getter accesses data, it's also known as an accessor. Since a setter changes
data, it's also known as a mutator.
• By convention, getter and setter methods begin with get and set respectively.
Figure 14-11 How to access hidden attributes with methods
390 Section 3 Object-oriented programming
How to access hidden attributes with properties
The previous figure showed how to use methods to access hidden attributes.
However, Python supports a special type of method known as & property that
provides a more elegant way for other programmers to access hidden attributes.
To create a property, you use a special language feature known as an annotation.
Figure 14-12 begins by showing the two annotations used to specify the
methods for getting or setting properties. To designate a method for getting a
property, you code the ©property annotation just above the method definition.
To designate a method for setting a property, you code the @ sign, followed by
the name of the property, followed by a period, followed by the word setter.
The Die class shows how this works by implementing the second diagram in
figure 14-9. First, the ©property is coded above the method named value. This
method gets the value by returning the value attribute. Second, the ©value.
setter annotation is coded above another method named value that accepts one
parameter from the calling code: the value. The body of this method works like
body of the setValue() method shown in the previous figure. In short, it performs
some data validation and only sets the value attribute to the value parameter if
the data is valid.
Now that you've seen how to access hidden attributes with methods or
properties, take a moment to consider the benefits of using properties. To start,
the code for accessing a property is typically more concise than the code for
accessing a method. More importantly, properties allow you to use the same
interface for accessing attributes indirectly as you do for accessing attributes
directly. This allows you to start coding a class by using the simplest and easiest
way to access its data: public attributes.
Later, if you need more control over the access to these attributes, you can
change them to private attributes and code properties to access them. And you
can do that without having to change the interface. As a result, this should have a
little if any impact on any code that uses these objects.
Chapter 14 How to define and use your own classes
391
Two annotations for getting and setting properties
Annotation
©property
©propertyName.setter
Description
Coded above the getter method for the property.
Coded above the setter method for the specified property.
A Die class that uses a property to access a private attribute
class Die:
def init (self) :
self. value = 1
©property
def value(self):
return self. value
©value.setter
def value(self, value):
if value < 1 or value > 6:
raise ValueError("Die value must be from 1 to 6.")
else:
self. value = value
Code that uses the value property to get and set data
die = Die()
die.value = 6
print("Die:", die.value)
The message that's displayed on the console
Die: 6
Code that attempts to use the value property to set invalid data
die = Die()
die.value = -1
The error message that's displayed on the console
ValueError: Die value must be from 1 to 6.
Description
• A property is a type of method that's commonly used to get and set a private
attribute.
• To code a property, you must code the appropriate annotation above the method. In
Python, an annotation begins with the @ symbol.
• The property that gets the value of the attribute is known as the getter property, and
the property that sets the value of the attribute is known as the setter property.
Figure 14-12 How to access hidden attributes with properties
392 Section 3 Object-oriented programming
The Die and Dice classes with encapsulation
Figure 14-13 shows encapsulated versions of the Die and Dice classes. By
now, you should be familiar with the Die class. However, this version of the class
doesn't provide a setter method for the value property. In other words, the value
property is a read-only property. That's fine because most programs will use the
roll() method to set the value attribute. As a result, the name property only
needs to provide a way to get the value attribute.
In contrast, if you only provide a setter method for a property, it becomes a
write-only property. In this figure, though, there aren't any write-only properties.
The Dice class begins with a constructor that creates a private attribute
named list to store the list of Die objects. To get the list, this code provides
a read-only property named list. However, lists are mutable. As a result, if you
return this list, the calling code can change the attribute. For example, the calling
code could call any of the methods of the list object to add, remove, or sort Die
objects. Clearly, this would break the encapsulation of the Dice object.
To prevent direct access to this list, this code converts the list to a tuple,
which is an immutable object. Then, it returns the tuple to the calling code. As
a result, the calling code can use this tuple to get the Die objects. Since these
Die objects are mutable, the calling code could call the roll() method to change
their values. However, it can't add, remove, or replace any of the Die objects of
the list attribute. This approach implements encapsulation reasonably well.
However, in the next chapter, you'll learn how to improve the encapsulation for
this class even further.
Note that the Die and Dice classes in this figure use public properties that
have the same names as the public attributes of the Die and Die classes in figure
14-7. In other words, these classes have the same interface as the Die and Dice
classes that were presented earlier. As a result, you can use these encapsulated
versions of the Die and Dice objects in the Dice Roller program presented in
figure 14-8 without making any changes to the code in that program. All you
need to do is replace the old dice module with the new one.
Chapter 14 How to define and use your own classes
393
A UML diagram for two classes that use encapsulation
Dice
Dice
list
addDie(die)
rollAHO
The dice module
import random
class Die:
def init
self.
w
(self):
value = 1
VCLJ.U
value
roll()
©property
def value(self):
return self, value
# read-onlyI
def roll(self):
self. value = random.randrange(1, 7)
class Dice:
def init (self):
self. list = []
©property
def list(self):
dice_tuple = tuple(self
return dice_tuple
def addDie(self, die):
self. list-append(die)
def rollAll(self):
for die in self. list:
die.roll()
# read-only
list)
Description
• If you only code a getter, you create a read-only property. Conversely, if you only
code a setter, you create a write-only property.
• If you return a mutable attribute (such as a list), the calling code can change the
attribute directly. One way to encapsulate a mutable attribute is to convert the
mutable attribute to an immutable object (such as a tuple) before returning it.
• Since the Die and Dice classes use a property to access the hidden attribute, these
classes have the same interface as the Die and Dice classes presented earlier in this
chapter. As a result, you can use them in the Dice Roller program without making
any changes to the other code in that program.
Figure 14-13 The Die and Dice classes with encapsulation
394 Section 3 Object-oriented programming
The Product class with some encapsulation
To round out your understanding of encapsulation, figure 14-14 shows the
Product class presented earlier in this chapter with some encapsulation. So far,
this class only encapsulates the product's price. To do that, it uses a private
attribute named price to store the price of the product.
However, the Product class provides two ways to set a product's price. First,
you can set the price by passing a price parameter to the constructor. Second,
you can set the price by passing a price parameter to the price property. To make
sure that the same data validation is applied to both ways of setting the price, the
second statement of the constructor sets the price by passing the price parameter
to the setter for the price property. Then, the price property checks the price
parameter to make sure it's valid. If so, it sets the price attribute to the price
parameter.
Alternately, you could include the data validation code in the constructor
like this:
def init (self, name="", price=0.0, discountPercent=0):
self .name = name
# same data validation code as the setter property
if price < 0:
raise ValueError("Price can't be less than 0")
else:
self. price = price
self.discountPercent = discountPercent
This might be easier to understand when you're first getting started. However,
duplicating this code violates the DRY (Don't Repeat Yourself) principle, and
makes this class more difficult to maintain. For example, if you later need to
change the data validation code, you need to change it in two places, which is
both tedious and error-prone.
Note that you could use a similar approach to provide data validation for the
discount percent, which must be greater than or equal to 0 and less than or equal
to 100. You could also provide data validation code for the name attribute so that
it's not more than a specified number of characters. However, there's often no
need to provide this kind of data validation.
When you use Python, you can wait to implement encapsulation until
the need for it becomes clear. However, with other languages that don't
support properties, it's more important to implement encapsulation early since
implanting encapsulation in those languages typically changes the interface for
the object.
Chapter 14 How to define and use your own classes 395
A UML diagram for a Product class that uses some encapsulation
Product
price Private attribute
name I « . •-
—Public attributes
discountPercent
price Public property
getDiscountAmount ()
getDiscountPrice()
I— Public methods
The code for the Product class
class Product:
def init (self, name="", price=0.0, discountPercent=0):
self .name = name
self.price = price passes price param to price setter
self.discountPercent = discountPercent
©property
def price(self):
return self. price
©price.setter
def price(self, price):
if price < 0:
raise ValueError("Price can't be less than 0")
else:
self. rice = price
def getDiscountAmount(self):
return self.price * self.discountPercent / 100
def getDiscountPrice(self):
return self.price - self.getDiscountAmount()
Code that attempts to use the price property to set invalid data
product = Product()
product.price = -11.50
Code that attempts to use the constructor to set invalid data
product = Product("Hammer", -11.50)
The error message that's displayed on the console
ValueError: Price can't be less than 0
Description
• If you want to allow the constructor to set a private attribute and you also want to
provide a setter property for that attribute, you can call the setter property from the
constructor. That way, the constructor and the setter perform the same processing.
Figure 14-14 The Product class with some encapsulation
396 Section 3 Object-oriented programming
The Pig Pice game
This chapter finishes by presenting a version of the Pig Dice game that uses
an object to store all variables related to the state of the game. This makes it easy
to pass the game state from one function to another.
In addition, this Pig Dice game uses the Die object of the dice module
described in figure 14-13. This shows that the Die class can be used in multiple
programs. You just import it into your program and use it as you would use any
other object.
The console
Figure 14-15 begins by showing the console for the PIG game. If you read
chapter 4, you should already be familiar with how this game works. As a result,
you can focus on the coding changes.
The code
The game module begins by importing the Die class from the dice module.
This is the Die class shown in figure 14-13. To make this class available to the
Pig Dice game, the dice.py file is in the same directory as the game.py file.
After importing the Die class, the game module defines the Game class.
This class only contains a constructor that doesn't accept any arguments from
the calling code. Within the constructor, the code defines six public attributes
to store the state of the game, and it initializes these attributes to values that
are appropriate for a new game. For example, the turn attribute is set to 1, the
score is set to 0, and the isGameOver attribute is set to False. In addition, this
constructor creates a Die object and assigns it to the die attribute.
As a result, the calling code can get any of these attributes to check the state
of the game, and it can set any of these attributes to change the state of the game
In addition, the calling code can get a Die object and call its rollQ method to
change the state of the Die object.
The pig_dice module begins by importing the Game class from the game
module. Then, it defines a function that displays a welcome message that
includes the rules of the game.
Chapter 14 How to define and use your own classes 397
The console
Let's Play PIGI
* See how many turns
* Turn ends when you
* If
* If
TURN
Roll
Die:
Roll
Die:
Roll
Die:
Roll
it takes you to get to 20.
hold or roll a 1.
you roll a 1, you lose all points for the turn.
you hold, you save all points for the turn.
1
or hold? (r/h):
5
or hold? (r/h):
4
or hold? (r/h):
5
or hold? (r/h):
Score for turn: 14
Total score: 14
TURN
Roll
Die:
Roll
2
or hold? (r/h):
6
or hold? (r/h):
Score for turn: 6
Total score: 20
r
r
r
h
r
h
You finished in 2 turns I
Play
again? (y/n):
The game module
from dice import Die
class Game:
def init (self) :
self.turn = 1
self.score = 0
self.scoreThisTurn = 0
self.isTurnOver = False
self.isGameOver = False
self.die = Die()
The pig_dice module
from game import Game
def display_welcome():
print("Let's Play PIG!")
print()
print("* See how many turns it takes you to get to 20.")
print("* Turn ends when you hold or roll a 1.")
print("* If you roll a 1, you lose all points for the turn.")
print("* If you hold, you save all points for the turn.")
print()
Figure 14-15 The Pig Dice game (part 1)
398 Section 3 Object-oriented programming
In part 2 of figure 14-15, the play_game() function contains the code that's
called when the game is started. Here, the first statement creates a Game object.
Then, this code starts the main loop for the game. This loop continues until the
isGameOver attribute of the Game object is set to True. Within this loop, a single
statement calls the take_turn() function and passes it the Game object.
The take_turn() function begins by printing the turn number. To do that,
it gets the turn from the Game object. Then, it resets the scoreThisTurn and
isTurnOver attributes. This isn't necessary on the first turn but is necessary for
subsequent turns. Next, it begins a while loop that continues until the isTurnOver
attribute is set to True.
Within the loop, the first statement prompts the user to choose whether to
roll or hold. If the user chooses to roll, this code calls the roll_dice() function
and passes the Game object to it. If the user chooses to hold, this code calls the
hold_turn() function and passes the Game object to it.
The roll_die() function begins by getting the Die object from the Game
object. Then, it calls the rollQ method of the Die object. As you should know by
now, this changes the value that's stored in the Die object. Next, this code prints
the value that's stored in the Die object to the conole.
After that, the roll_die() function checks whether the die is 1. If so, it
changes several attributes of the Game object. More specifically, it sets the
scoreThisTurn attribute to 0, it increments the turn attribute by 1, and it sets the
isTurnOver attribute to True. In other words, it discards all points for this turn
and ends the turn. Then, it prints a message to the console that indicates that the
turn is over and that there was no score for this turn. However, if the die is not 1,
this code increments the scoreThisTurn attribute by the value of the die.
The hold_turn() function begins by changing two attributes of the Game
object. The first statement increments the score attribute by the scoreThisTurn
attribute, and the second statement sets the isTurnOver attribute to True. In other
words, this code saves the score for the turn and ends the turn. Then, the code
prints the score for the turn and the total score to the console.
After that, the hold_turn() function checks whether the score is greater
than or equal to 20. If so, it sets the isGameOver variable to True, and prints
a message that indicates how many turns it took you to finish the game. To do
that, this message accesses the turn attribute of the Game object. However, if
the score is not greater than or equal to 20, this code just increments the turn
attribute by I.
The mainQ function calls the display_welcome() function to display the
welcome message and rules for the game. Then, it calls the play_game() function
from within a loop that lets the user play more than one game.
If you compare this code with the code for the Pig Dice program that's in
chapter 4, you should see how creating a Game object makes it easier to work
with the state of the game. For a simple program like this, you can use global
variables as shown in chapter 4. But using objects to organize the data works a
lot better.
Chapter 14 How to define and use your own classes 399
The pig_dice module (continued)
def play_game():
game = Game ()
while not game.isGameOver:
take_turn(game)
def take_turn(game):
print("TURN", game.turn)
game.scoreThi sTurn = 0
game.isTurnOver = False
while not game.isTurnOver:
choice = input("Roll or hold? (r/h): ")
if choice == "r":
ro1l_di e(game)
elif choice == "h":
hold_turn(game)
else:
print("Invalid choice. Try again.")
def roll_die(game):
game.die.roll()
print("Die:", game.die.value)
if game.die.value == 1:
game.scoreThisTurn = 0
game.turn += 1
game.i sTurnOver = True
print("Turn over. No score.\n")
else:
game.scoreThisTurn += game.die.value
def hold_turn(game):
game.score += game.scoreThisTurn
game.i sTurnOver = True
print("Score for turn:", game.scoreThisTurn)
print("Total score:", game.score, "\n")
if game.score >= 20:
game.i sGameOver = True
print ( "You finished in", game, turn, "turns I")
else:
game, turn += 1
def main():
display_welcome()
while True:
play_game()
choice = input("Play again? (y/n): ")
print()
if choice 1= "y":
print("Bye!")
break
# if started as the main module, call the main function
if name == " main ":
main()
Figure 14-15 The Pig Dice game (part 2)
400 Section 3 Object-oriented programming
Perspective
This chapter has presented the most useful skills for working with classes
and objects. In addition, it has presented two of the most important principles
of object-oriented programming: object composition and encapsulation. In the
next chapter, you'll learn about two more important principles of OOP:
inheritance and polymorphism.
When you're first getting started with OOP, it can be hard to see its
advantages over procedural programming. For now, you can focus on just two. First,
dividing the code into classes often makes it easier to reuse code. For example,
the Die and Dice classes presented in this chapter could possibly be reused by
many programs. Second, using classes helps you separate the different layers
of a program. That can simplify the development of the program and make the
program easier to maintain and enhance later on. For example, one common
design pattern is to use classes to structure a program so it has three layers as
explained in chapter 16.
Terms
procedural programming
object-oriented programming (OOP)
class
class diagram
Unified Modeling Language (UML)
attribute
method
data structure
object
instance of a class
instantiation
identity of an object
state of an object
behavior of an object
constructor
Summary
• Object-oriented programming (OOP) groups related variables and functions
into data structures called objects. A class can be thought of as the template
or blueprint from which the objects are made.
• UML {Unified Modeling Language) is the industry standard used to describe
the classes and objects of an object-oriented application. A UML class
diagram describes the attributes and methods of one or more classes.
object composition
encapsulation
public method
public attribute
data hiding
private attribute
property
interface
getter method
accessor
setter method
mutator
annotation
read-only property
write-only property
Chapter 14 How to define and use your own classes 401
The attributes of a class define the data that an object can store. The methods
of a class define the tasks that an object can perform. Often, these methods
provide a way to modify the attributes of the object.
Once you create an object from a class, the object has an identity (a unique
address), a state (the data that it stores), and behavior (the methods that it
contains). As a program runs, an object's state may change.
An object is an instance of a class. In other words, you can create more than
one object from a single class. The process of creating an object from a class
is sometimes called instantiation.
A constructor is a special method that defines the attributes for an object and
initializes the values of those attributes.
In Python, all methods, including constructors and properties, must take a
reference to the object itself as their first parameters. By convention, this
reference is named self.
Object composition is a way to combine simple objects into more complex
ones.
Encapsulation allows you to hide the data attributes of an object from other
code that uses the object. This is also known as data hiding.
Public attributes can be accessed directly by the code that uses an object.
Private attributes can only be accessed indirectly through public methods,
including constructors and properties.
A property is a special type of method that can be used to provide access to a
hidden attribute.
An annotation is a line of code that begins with the @ symbol and tells
Python something about the code that follows. For example, the ©property
annotation tells Python that the method that follows gets the value for a
property.
An interface allows a programmer to use an object without understanding its
internal code.
A method that gets the value of the attribute is known as a getter or accessor
method. A method that sets the value of the attribute is known as a setter or
mutator method.
When you create a property, if you only code a getter method, you create a
read-only property. If you only code a setter method, you create a write-only
property.
402 Section 3 Object-oriented programming
Exercise 14-1 Enhance the Dice Roller program
In this exercise, you'll enhance the Dice Roller program by making some
improvements to its classes. When you're done, rolling two dice should look
something like this:
Enter the number of dice to roll: 2
YOUR ROLL:
o
o o
o
o o
TOTAL: 6
Open and test the program
1. In IDLE, open the dice.py and dice_roller.py files that are in this folder:
python/exercises/chl4/dice_roller
2. Review the code and run the program to make sure it works correctly. Note
that it starts by displaying an image for each of the 6 possible die values.
Improve the Die class
3. In the Die class, modify the roll() method so it returns the value attribute
after it sets it to a random number from 1 to 6.
4. In the Die class, modify the constructor so it sets the value attribute by
calling the roll() method. This makes sure that the value attribute for a new
Die object stores a valid number for the die.
5. In the Die class, modify the setter for the value property so it doesn't allow a
value greater than 6.
*—-■
6. Run the dice module and use Python's interactive shell to make sure these
changes work correctly.
7. In the Die class, add a read-only property named image that gets a string for
the image that represents the die's current value.
Improve the Dice Roller program
8. Open the dice_roller.py file and run it to make sure the Dice Roller program
still works correctly. Since you didn't change the interface for the Die class, it
should.
9. Modify the code that displays the roll so it uses the new image property to
display an image for each die instead of displaying the value.
10. At the start of the program, modify the code that displays the 6 die images so
it uses a loop to create a Die object for each valid number and to display its
image. This reduces code duplication since the code that defines the image is
only stored in one place now, in the Die class.
Chapter 14 How to define and use your own classes 403
Improve the Dice class
11. In the Dice class, add a method named getTotal() that gets the total value of
all Die objects currently stored in the Dice object.
12. In the dice_roller.py file, add the code that displays the total each time the
user rolls the dice.
Exercise 14-2 Create an object-oriented
Movie List program
In this exercise, you'll convert the Movie List program presented in chapter 6 so
it uses objects instead of storing the data for the movie in a list.
Open and test the program
1. In IDLE, open the movie_list.py file that's in this folder:
python/exercises/chl4/movies
2. Review the code and note how it uses a list to store the data for each movie.
3. Run the code to make sure it works correctly.
Define a Movie object that can store the data for each movie
4. Add a module named objects to the program's folder.
5. In the object module, write the code for a class named Movie that defines
a Movie object that stores the name and year of a movie. This class should
include a getStr() method that returns the name of the movie followed by its
year in parentheses.
6. Run the module. This should display the interactive shell. Then, use the shell
to test the class by creating a Movie object and printing it to the console.
Modify the program so it uses the Movie object
7. Switch back to the movie_list.py file, and add a statement that imports the
Movie class.
8. Modify the main() function so it creates a list of Movie objects instead of a
list of lists.
9. Modify the list() function so it uses the getStr() method to display each movie.
Note how this simplifies the code.
10. Modify the add() function so it creates a Movie object from the user input.
Note how this simplifies the code.
11. Modify the delete() function so it uses the Movie object to display the name
of the movie that's deleted. Note how this makes the code easier to read and
understand.
404 Section 3 Object-oriented programming
Exercise 14-3 Create an object-oriented
Temperature Converter
In this exercise, you'll modify the Temperature Converter program presented
in chapter 4 so it uses object-oriented programming instead of procedural
programming.
Open and test the program
1. In IDLE, open the two files stored in this folder:
python/exercises/chl4/temperature
2. Review the code for the program and note how it uses the functions in the
temperature module to convert the temperatures.
3. Run the code to make sure it works correctly.
Define a Temp object that can store a temperature
4. Switch to the temperature.py file. At the top of this module, define a class
named Temp that defines two hidden attributes to store the degrees Fahrenheit
and Celsius.
5. In the Temp class, define the methods that set the hidden attributes. When you
set one unit of temperature, it should also calculate and set the other unit of
temperature. For example, when you set degrees Fahrenheit, it should also
calculate and set degrees Celsius.
*—-■
6. In the Temp class, define the methods that get the hidden attributes. These
methods should round the number that it returns to 2 decimal places.
7. Delete the to_fahrenheitQ and to_celsius() functions.
8. In the temperature module, modify the code in the mainQ function so it tests
the Temp class.
9. Run the temperature module. It should successfully convert the temperatures
specified by the loops.
Modify the program so it uses the Temp object
10. Switch back to the convert_temperatures.py file, and modify the import
statement so it imports the Temp class from the temperature module.
11. In the convert_temp() function, create a Temp object and use it to set and get
the temperatures.
15
How to work
with inheritance
In the previous chapter, you learned how to work with encapsulation, one of the
fundamental concepts of object-oriented programming. In this chapter, you'll
learn how to work with two more fundamental concepts of object-oriented
programming: inheritance and its cousin, polymorphism.
Inheritance is typically used by the developers of large programs to
develop a consistent set of classes. When used correctly, inheritance can
simplify the design of a program and reduce code duplication. However, when
used incorrectly, inheritance can violate encapsulation and create unwanted
dependencies between classes.
In this chapter, you'll begin by learning how inheritance works. Then, at
the end of this chapter, you'll learn when it makes sense to use inheritance.
How to work with inheritance 406
How inheritance works 406
How7 to define a subclass 408
How polymorphism works 410
How7 to check an object's type 412
The Product Viewer 2,0 program 414
The objects module 414
The user interface and product_viewer module 416
How to override object methods 418
How7 to define a string representation for an object 418
How7 to define an iterator for an object 420
The Die and Dice classes 422
Two more skills for the road 424
How7 to work with custom exceptions 424
When to use inheritance 426
Perspective 428
406 Section 3 Object-oriented programming
How to work with inheritance
Inheritance allows you to create a new class that's based on an existing
class. Along with encapsulation, it is a fundamental concept of object-oriented
programming. This chapter starts by presenting an overview of how inheritance
works. Then, it shows the coding details.
How inheritance works
When inheritance is used, a subclass inherits the public attributes and
methods of a superclass as shown by the diagram in figure 15-1. Then, when
you create an object from the subclass, that object can use these attributes and
methods. The subclass can also add new attributes and methods to the superclass,
and it can change the way the attributes and methods of the superclass work by
overriding them and providing new code for them.
The three classes in the UML diagram in this figure show how this works.
Here, the superclass is the Product class. This class has three public attributes
and three public methods. The attributes and the first two methods are the same
as the Product class presented in the previous chapter. However, the
getDescription() method is a new method that's described in the next figure.
In this diagram, there are two subclasses: Book and Movie. These classes
inherit the three attributes and the three methods from the Product superclass.
Then, each subclass adds a new attribute. The Book class adds the author
attribute, and the Movie class adds the year attribute. In addition, both classes
change the way the getDescription() method of the Product class works by
overriding it.
In this book, we use superclass to refer to a class that another class inherits
and subclass to refer to a class that inherits another class. However, a superclass
can also be called a base or parent class, and a subclass can also be called a
derived or child class.
Chapter 15 How to work with inheritance 407
A UML diagram for three classes that use inheritance
Product
name
price
discountPercent
get Discount Amount ()
getDiscountPrice()
getDescription()
Book ^^H Movie
author year
getDescription() getDescription()
Description
• Inheritance lets you create a new class based on an existing class. Then, the new
class inherits the attributes and methods of the existing class.
*—-■
• A class that another class inherits is called a base class, parent class, or superclass.
• A class that inherits another class is called a derived class, child class, or subclass.
• A subclass can add new attributes and methods to the superclass. It can also
override a method from the superclass by providing its own version of the method.
UML diagramming note
• To indicate that a class inherits another class, a UML diagram typically uses an
arrow with an open (not shaded) arrowhead.
Figure 15-1 How inheritance works
408 Section 3 Object-oriented programming
How to define a subclass
Figure 15-2 shows how to define a subclass. To start, the first example
shows the code for the superclass, the Product class. This class is the same as the
Product class presented in the previous chapter, except that it includes a method
named getDescription that returns the description for the product.
For this superclass, the getDescriptionQ method just returns the name of the
product. As a result, any subclasses of this class can use this getDescription()
method too. Or, they can override the getDescription() method to provide their
own code for that method.
The second example shows how to create a subclass, the Book class. To
indicate that a class is a subclass, you follow the name of the class with a set of
parentheses. Then, within the parentheses, you code the name of the class that
you want to inherit. Here, the Book class inherits the Product class. In other
words, the Book class is a subclass of the Product superclass.
After you declare the subclass, you can add functionality to it by adding
attributes, constructors, and methods. For example, the Book subclass adds a
new attribute and a new constructor. The Book class also overrides the
getDescriptionQ method defined by the Product class.
The constructor for the Book subclass accepts four parameters. The first
three are the same as the Product class, but the fourth provides the value for
the public attribute named author. Within this constructor, the first statement
calls the constructor of the Product class. This initializes the name, price, and
discountPercent attributes that are defined by the Product class. Then, the second
statement defines and initializes the author attribute.
To override a method of the superclass, you begin by coding a method with
the same name as the method in the superclass. In this case, the getDescription()
method of the Book class overrides the getDescriptionQ method of the Product
class. The code within this method returns a string that's created by concatenating
the string that's returned by the getDescriptionQ method of the Product object
with "by" and the author attribute of the Book object.
When you override a method, it often makes sense to begin by calling the
method in the superclass as shown in this example. That way, if you change
the method in the superclass later, the method in the subclass will reflect that
change. However, in Python, it's legal to code the method in the subclass like
this:
def getDescription(self):
return self.name + " by " + self.author
In this case, the getDescription() method of the Book class completely overrides
the getDescriptionQ method of the Product class and no longer reflects any
changes made to it. That might be what you want in some situations, but you
should think twice before doing this as it could make your code harder to
maintain.
Chapter 15 How to work with inheritance 409
The syntax for working with subclasses
To define a subclass
class SubClassName(SuperClassName) :
To call a method or constructor of the superclass
SuperClassName.methodNameiself [, argumentList] )
The code for the Product superclass
class Product:
def init (self, name="", price=0.0, discountPercent=0):
self .name = name
self.price = price
self.discountPercent = discountPercent
def getDiscountAmount(self):
return self.price * self.discountPercent / 100
def getDiscountPrice(self):
return self.price - self.getDiscountAmount()
def getDescription(self):
return self.name
The code for the Book subclass
class Book(Product):
def init (self, name="", price=0.0, discountPercent=0, author=H"):
# call the constructor of the superclass
Product. init (self, name, price, discountPercent)
# set the author
self.author = author
# override the getDescription method
def getDescription(self):
return Product.-etDescri»tion(self) + " by " + self.author
When coding a subclass...
• You can directly access public attributes of the superclass.
• You can add new attributes and methods that aren't in the superclass.
• You can call methods of the superclass (including constructors and properties) by
coding the name of the superclass, the dot operator, and the name of the method.
• You can override existing methods in the superclass by coding methods that have
the same name.
Figure 15-2 How to define a subclass
410 Section 3 Object-oriented programming
How polymorphism works
Polymorphism lets you treat objects of different types as if they were the same
type by referring to a superclass that's common to the objects. In figure 15-3, for
example, the show_products() function treats Book and Movie objects as if they
were Product objects. Like encapsulation and inheritance, polymorphism is a
fundamental feature of object-oriented programming.
One benefit of polymorphism is that you can write generic code that's
designed to work with a superclass. Then, you can use that code with objects
that are created from any class that inherits the superclass. For instance, the
first example in this figure shows the getDescriptionQ methods for the Product,
Book, and Movie classes. The Book version of the getDescription() method adds
the author to the end of the product's description. Similarly, the Movie version
adds the year to the end of the product's description.
The second example shows how polymorphism works with these classes.
This code begins by importing the Product, Book, and Movie classes from the
objects module. Then, it defines two functions that show how polymorphism
works.
The show_productsO function accepts a list or tuple of Product objects.
Within this function, the code shows the products by printing the string that's
returned by the getDescription() method to the console.
The main() function shows how this works. To start, the first statement
creates a tuple of three Product objects. Here, the first object is a Product object,
the second is a Book object, and the third is a Movie object. Then, the second
statement passes this tuple to the show_products() function.
When you run this code, Python uses polymorphism to call the correct
getDescription() method from each object. The console in this figure shows that
this works correctly. The key to polymorphism is that Python decides which
method to call based on the inheritance hierarchy at runtime.
Chapter 15 How to work with inheritance 411
Three versions of the getDescription() method
In the Product superclass
def getDescription(self):
return self.name
In the Book subclass
def getDescription(self):
return Product.getDescription(self) + " by " + self.author
In the Movie subclass
def getDescription(self):
return Product.getDescription(self) + " (" + str(self.year) + ")"
Code that uses the overridden methods
from objects import Product, Book, Movie
def show products(products):
print("PRODUCTS")
for product in products:
print(product.getDescription())
print()
def main():
# a tuple of Product objects
products = (Product("Stanley 13 Ounce Wood Hammer', 12.99, 62),
Book("The Big Short", 15.95, 34, "Michael Lewis"),
Movie("The Holy Grail - DVD", 14.99, 68, 1975))
show products(products)
if name == " main ":
main()
The console
PRODUCTS
Stanley 13 Ounce Wood Hammer
The Big Short by Michael Lewis
The Holy Grail - DVD (1975)
Description
• Polymorphism is a feature of inheritance that lets you treat objects of subclasses as
if they were objects of the superclass.
• If you access a method of a superclass object and the method is overridden in the
subclasses of that class, polymorphism determines which method is executed based
on the object's type.
Figure 15-3 How polymorphism works
412 Section 3 Object-oriented programming
How to check an object's type
When working with objects, you sometimes need to check an object's type
and perform different processing depending on the type. To do that, you can use
the built-in isinstance() function as shown in figure 15-4.
The example in this figure begins by importing the Product, Book, and
Movie classes from the objects module. Then, it defines a show_product()
function that accepts Product, Book, or Movie objects. This function performs
different processing depending on the object's type.
Within this function, the second statement prints a line to the console that
displays the product's name. To do that, this code accesses the name attribute of
the Product object. This works because the Book and Movie objects inherit this
attribute from the Product object.
The if statement that follows checks whether the product is a Book object.
If so, it prints a line to the console that displays the author's name. Since this
module has imported the Book class, there's no need to prefix the Book class
with the name of the module. However, if you imported the module, but not the
class, you would have to prefix the name of the Book class like this:
isinstance(product, objects.Book)
The second if statement works like the first one, but it checks whether the
Product object is a Movie object. If so, it prints a line to the console that displays
the movie's year.
The next statement prints a line to the console that displays the product's
discount price. To do that, this code calls the public getDiscountPrice() method
that's defined by the Product superclass and inherited by the Book and Movie
subclasses.
The mainQ function shows that the isinstanceQ functions in the
show_product() function work correctly. First, the main() function creates a
Product object. Then, it passes that object to the show_product() function. Since
this Product object is not a Book or Movie object, this prints two lines of product
data to the console.
Then, the main() function creates a Movie object and passes it to the
show_product() function. Since this object is a Movie object, this prints three
lines of product data to the console, including the movie's year.
Chapter 15 How to work with inheritance
413
A function for checking an object's type
Function
isinstance(object, [modName.] ClassName)
Description
Returns True if the object is an instance of
the specified class. Otherwise, returns False.
Code that uses the isinstance() function
from objects import Product, Book, Movie
def show product(product):
print("PRODUCT DATA")
print("Name: ", product.name)
if isinstance(product, Book):
print("Author: ", product.author)
if isinstance(product Movie):
print("Year: ", product.year)
print("Discount price: {:.2f}".format(product.getDiscountPrice()))
print()
def main():
productl = Product('Stanley 13 Ounce Wood Hammer1, 12.99, 62)
show product(product1)
print()
product2 = Movie("The Holy Grail
show product(product2)
- DVD", 14.99, 68, 1975)
if name_
main()
__ ii
main
■i
The console
PRODUCT DATA
Name:
Discount price:
PRODUCT DATA
Name:
Year:
Discount price:
Stanley 13 Ounce Wood Hammer
4.94
The Holy Grail - DVD
1975
4.80
Description
• You can use the isinstance() function to perform different processing for different
types of objects.
Figure 15-4 How to check an object's type
414 Section 3 Object-oriented programming
The Product Viewer 2,0 program
To show how all of the pieces work together in a Product Viewer program,
the next two figures present the objects module and product_viewer module.
The objects module
Figures 15-5 shows all the code for the Product superclass and two of its
subclasses: Since you've already seen the code for the Product and Book classes
you can focus on the Movie class.
The Movie class works like the Book class. To start, it inherits the Product
class. Then, the constructor of the Movie class defines and initializes a public
attribute named year. Next, it defines a getDescription() method that overrides
the getDescription() method of the Product class. This method returns a string
that includes the string that's returned by the getDescription() method of the
Product class as well as the year attribute of the Movie class.
Chapter 15 How to work with inheritance 415
The objects module
class Product:
def init (self, name="", price=0.0, discountPercent=0):
self.name = name
self.price = price
self.discountPercent = discountPercent
def getDiscountAmount(self):
return self.price * self.discountPercent / 100
def getDiscountPrice(self):
return self.price - self.getDiscountAmount()
def getDescription(self):
return self.name
class Book(Product):
def init (self, name="", price=0.0, discountPercent=0, author=""):
Product. init (self, name, price, discountPercent)
self.author = author
def getDescription(self):
return Product.getDescription(self) + " by " + self.author
class Movie(Product):
def init (self, name="", price=0.0, discountPercent=0, year=0):
Product. init (self, name, price, discountPercent)
self.year = year
def getDescription(self):
return Product.getDescription(self) + " (" + str(self.year) + ")"
Figure 15-5 The Product, Book, and Movie classes in the objects module
416 Section 3 Object-oriented programming
The user interface and product_viewer module
Figure 15-6 presents the user interface and the code for the product_viewer
module. In the interface, you can see the data that's displayed by the
show_products() and show_productQ functions.
The code in the product_viewer module uses the Product, Book, and Movie
classes presented in the previous figure. Here, the show_products() function calls
the getDescription() method of the current product object in the loop to print the
data for the product. Thanks to polymorphism, this calls the correct
getDescriptionQ method depending on the type of the current product.
In the show_product() function, the if statements use the isintance() method
to determine what type of object is being displayed. Then, the display is varied
based on that object type.
Like the Product Viewer program in the previous chapter, the mainQ
function creates a tuple of Product objects. To do that, it calls the constructor
of the Product class to create each object, and it stores each object in the tuple
without going through the intermediate step of creating a variable name that
refers to the object.
After creating the tuple of product objects, this code passes that tuple to the
show_products() function, which displays the numbered list of products. Next,
this function prompts the user to enter a number that corresponds with a product.
It then gets the corresponding Product object from the tuple of Product objects,
and passes that Product object to the show_product() function. This displays the
data for the product object, which varies based on the object type.
Chapter 15 How to work with inheritance 417
The user interface
PRODUCTS
1. Stanley 13 Ounce Wood Hammer
2. The Big Short
3. The Holy Grail
by Michael Lewis
- DVD (1975)
Enter product number: 2
PRODUCT DATA
Name:
Author:
Discount price:
The Big Short
Michael Lewis
10.53
The product_viewer module
from objects import Product, Book, Movie
def show products(products):
print("PRODUCTS")
for i in range(len(products)):
product = products[i]
print(str(i+1) + ". " + product.getDescription())
print()
def show product(product):
print("PRODUCT DATA")
print("Name:
if isinstance(product,
print("Author:
if isinstance(product
print("Year:
print("Discount price:
print()
def main():
print("The Product Viewer program")
print()
products = (Product("Stanley 13 Ounce Wood Hammer", 12.99, 62),
Book("The Big Short", 15.95, 34, "Michael Lewis"),
Movie("The Hoi Grail - DVD" 14.99 68 1975))
show products(products)
while True:
number = int(input("Enter product number: "))
print()
product = products[number-1]
show product(product)
choice = input("Continue? (y/n): ")
print()
if choice 1= "y":
break
if name == " main ":
main()
Figure 15-6 The Product Viewer 2.0 program
", product.name)
Book):
", product.author)
Movie):
", product.year)
{:.2f}".format(product.getDiscountPrice()))
418 Section 3 Object-oriented programming
How to override object methods
With Python 3 and later, a class named object is the superclass for all
classes. In other words, every class automatically inherits the object class. As
a result, the methods of the object class are available from every object. Then,
to get your objects to work the way you want, you sometimes need to override
some of these methods.
How to define a string representation for an object
One of the most used methods of the object class is the str () method.
That's because Python automatically calls this method when it needs a string
representation of an object. For example, when you supply an object as the
argument of the print method, Python calls the str () method of the object
class.
So. when you code a class, it's generally a good practice to override
the str () method of the object class to provide more detailed information
about the object. If possible, this information should be concise, informative, and
easy to read. Otherwise, the str () method that's provided by the object class
returns a string that includes the name of the class and its identifier.
The first example in figure 15-7 shows a str 0 method for the Product
class. It returns a string that includes the three public attributes of the Product
class, separated by a pipe character (I). This provides all of the data that's stored
in the Product object in a format that's easy to read.
The second example shows some code that automatically calls the str ()
method of the Product object. Here, the first statement creates a Product object.
Then, the second statement passes the Product object to the print() function. This
causes the console to display the data that's stored in the three attributes of the
Product object. However, if the Product class didn't contain a str () method,
this code would call the str () method from the object class. And that would
cause the console to display a message that includes the Product object's class
and identifier.
When you're developing an object-oriented program, it's often helpful to
have a string representation like the one in the first example. That way, if you
want to view the data for an object, you can print the object to the console.
Alternately, you might want to provide a default string representation that's
appropriate for the user interface of a program to display. In that case, the
str () method would probably return a string more like the string that's
returned by one of the getDescriptionQ methods shown earlier in this chapter.
One way to do that is to call the getDescription() method from the str ()
method like this:
def str (self):
return self-getDescription()
Chapter 15 How to work with inheritance
419
A method of the object class
Description
Method
str (self) Returns a string for the object that includes
the name of its class and its identifier.
The syntax for overriding the str () method
def str (self):
return stringForObject
A str () method in the Product class
def str (self):
return self.name + "|" + str(self-price) + "|" + \
str(self.discountPercent)
Code that automatically calls the str () method
product = Product(■Stanley 13 Ounce Wood Hammer', 12.99, 62)
print(product)
The console if the Product class overrides the str method
The console if the Product class doesn't override the str () method
<objects.Product object at 0x03769930>
Description
• The object class is the superclass for all classes. In other words, every class inherits
the object class. As a result, the methods defined by the object class are available to
all classes.
• The str () method is a special method that's automatically called whenever an
object needs to be converted to a string such as when the print statement prints an
object to the console or when the strQ function attempts to convert an object to a
string.
*—-■
• The str () method in the object class returns a message that includes the name
of the class for the object as well as its identifier. If that's not what you want, you
can override this behavior by defining your own str () method.
• When coding classes, you often want to override the str () method so it returns
a string that's concise, informative, and easy to read.
Figure 15-7 How to define a string representation for an object
420 Section 3 Object-oriented programming
How to define an iterator for an object
When you use a for loop to iterate through each object in a list of objects,
Python automatically calls the iter () and next () methods to initialize
the loop and to get the next object in the sequence of objects. As a result, if your
object contains multiple objects and you want to use a for loop to iterate through
those objects, you can override the iter 0 and next () methods as shown
in figure 15-8.
The first example in this figure presents a constructor for a Dice class. It
creates a private attribute named list with a value of an empty list. This list
will be used to hold one or more Die objects.
The second example shows one way to code the iter () and next ()
methods for the Dice class. To start, the iter () method defines a private
attribute named index and initializes that attribute to -1. Then, the second
statement returns the self object to indicate that the current object is the iterator.
In other words, the current Dice object contains the next () method that's
needed to iterate through each Die object that's stored in the Dice object.
This example continues by defining the next () method. This method
begins by checking whether the index attribute is greater than or equal to the
length of the private list attribute that stores the list of Die objects. If so, this
code raises a Stoplteration exception, which causes the loop to end.
Otherwise, this code increments the index attribute by 1. As a result, the
first time through the loop this attribute is equal to 0, which is the index for the
first item in the list. After incrementing the index, this code gets the Die object
that's at the specified index from the list, and it returns that object to the calling
code. This is how this class makes the Die objects that are stored in the private
list attribute available to the for statement in the calling code.
The third and fourth examples show how easy it is to loop through all of the
Die objects in the Dice object after you've added the iter () and next Q
methods. Here, the third example creates a Dice object that contains five Die
objects. Then, the fourth example uses a for loop to print the value of each Die
object to the console with a space between each value. This works just as if the
Dice object was a list or any other built-in container object that allows you to
iterate over each object in the container. However, if you don't code the
iter 0 and next Q methods for the Dice class, the third and fourth
examples display an error that indicates that the object is not iterable.
As you review this code, note that all methods of the class begin and end
with double underscores. This clearly shows that the methods are private
methods that Python can call from an object but that you can't call directly.
Instead, Python calls these methods when it needs them.
The str (), iter (), and next Q methods are just a few of the many
methods available from the object class. If, for example, you want the built-in
len() function to work correctly on a container object, you can override the
len () method to return the number of objects in the container. If you want to
use the + operator to add two objects together, you can override the add ()
method. And so on. This is known as operator overloading, and it provides a way
to make your user-defined objects work more like built-in objects.
Chapter 15 How to work with inheritance
421
Two more methods of the object class
Method
Description
iter (self) Returns the iterator for the object and initializes the index for the iterator.
next (self) Returns the next object in the sequence of objects. If there are no more
objects, this method should raise the Stoplteration exception.
The constructor for a Dice class with a list for one or more Die objects
class Dice:
def init (self) :
self . list =
Two methods that define an iterator for the Dice class
def iter (self):
se • i dex = -
return self
# initialize index for each iteration
def next (self):
if self. index >= 1en(self. list)-1:
raise Stoplteration()
self. index += 1
die = self. list[self. index]
return die
Code that creates a Dice object that contains five Die objects
dice = DiceO
for i in range(5):
die = Die()
dice.addDie(die)
Code that automatically calls the iter () and next () methods
for die in dice:
print(die.value, end=" ")
The console if the Dice class defines an iterator
11111
The console if the Dice class doesn't define an iterator
TypeError: "Dice" object is not iterable
Description
• When coding container classes, you often want to override the iter () and
next () methods so you can iterate through the objects within the container.
This improves the encapsulation of the object and makes it easier for other
programmers to use the object.
• It's common to use an iterator to provide a public way to access the objects that are
stored in a private attribute of an object.
Figure 15-8 How to define an iterator for an object
422 Section 3 Object-oriented programming
The Die and Dice classes
Figure 15-9 shows the Die and Dice classes from the previous chapter after
they've been modified to override the str (), iter (), and next ()
methods. Since these classes are mostly the same as the Die and Dice classes
presented in the previous chapter, this figure highlights the code that's new.
The Die class overrides the str Q method to provide a string
representation for the object. This class only defines one attribute, the value
attribute. As a result, the obvious string representation for this object is to return
the value attribute after it has been converted from an integer to a string. This
makes it easier for other programmers to get a string representation of the value
attribute.
The Dice class overrides the iter () and next () methods to make it
possible to use a for loop to iterate through each Die object stored in the list
attribute. As a result, this class no longer needs a getTupleO method to provide a
way to loop through the Die objects as it did in the previous chapter. Instead, you
can loop through the Dice object itself. This makes it easier for other
programmers to use this class.
In the previous chapter, the Dice Roller 1.0 program needed to call the
getTuple() method of the Dice object to get an iterable object. It also needed
to call the value method of each Die object to get the value of the object. As a
result, the code that displayed the values of the dice looked like this:
for die in dice-getTuple():
print(die.value, end="")
Now, however, with the Die and Dice classes shown in this figure, the code
that displays the values of the dice can be simplified to the code at the bottom of
this figure:
for die in dice:
print(die, end="")
This isn't a huge difference if you're only going to use the Die and Dice classes
for a single program. But it could be a significant difference if you reuse these
classes in many programs. Also, this change makes your objects work more
intuitively, which is nice for you and for other programmers who might use this
class.
Chapter 15 How to work with inheritance
423
The dice module
import random
class Die:
def init (self) :
self. value = 1
©property # read-onlyI
def value(self):
return self. value
def roll(self):
self. value = random.randrange(1, 7)
# t as'er • ge t-
def str (self) :
return str(self. value)
class Dice:
def init (self) :
self. list = []
def addDie(self, die):
self. list.append(die)
def rollAll(self):
for die in self. list:
die.roll()
# define the Dice obj -
def iter (self) :
self. index = -1
return self
initialize index for each iteration
# define the method t - g- ft-. ■' -
def next (self) :
if self. index == len(self. list)-1:
raise Stoplteration
self. index += 1
die = self. 1" [ . t • - -]
return die
Code that displays the value of each die
for die in dice:
print(die, end=" ")
Figure 15-9 The Die and Dice classes
424 Section 3 Object-oriented programming
Two more skills for the road
To develop simple programs like the ones in this book, you typically don't
need to use inheritance. However, if you continue with programming, you'll
eventually need to use inheritance. In addition, if you ever design a larger or
more complex program, you'll need to learn when it makes sense to use
inheritance and when you should use composition instead.
How to work with custom exceptions
Figure 15-10 shows how to create a custom exception. To do that, you can
code a subclass that inherits one of the classes in the Exception hierarchy. This is
a good example of when it makes sense to use inheritance in your programs.
To start, this figure shows the hierarchy for some common exceptions. By
now, you should have a pretty good idea of how this inheritance hierarchy works.
For example, it should be clear to you that the FileNotFoundError is a subclass
of the OSError, which is a subclass of the Exception class.
The first example in this figure defines a class named DataAccessError that
inherits the Exception class. The body of this class contains a single pass
statement. As a result, the DataAccessError class works the same as the
Exception class. However, it has a different name and a different position in the
inheritance hierarchy. This is important because the name of the error gives the
programmer information about the error. In addition, the position in the
inheritance hierarchy gives the programmer the flexibility to handle a
DataAccessError differently than other types of exceptions.
The second example shows how to use the DataAccessError class. Here,
the first statement imports the DataAccessError class from the objects module.
Then, this code attempts to read movie data from a CSV file and return a list of
movie data. However, if an exception occurs, this code raises a DataAccessError
with an appropriate message.
At this point, you may be wondering, why bother raising this exception? If
Python encounters an error, it will raise the FileNotFoundError or the OSError.
Why not just let the calling code handle those exceptions?
The problem with that approach is that it exposes the implementation details
of the read_movies() function to the calling code. For example, the calling code
may need to include code that handles the FileNotFoundError or the OSError
exceptions. Then, if you later decide to change the implementation details of this
function, the calling code will need to handle different exceptions. For example,
if you change this function so it reads data from a database instead of a file, the
calling code needs to handle database exceptions, not file exceptions.
The advantage of raising the DataAccessError is that it hides the
implementation details of the read_movies() function from the calling code. This
allows you to use the same exception regardless of the implementation details
of the function. As result, changing the implementation details of the function
doesn't change the type of exception that the function might raise.
Chapter 15 How to work with inheritance 425
The hierarchy for six common exceptions
Exception
NameError
OSError
FileExistsError
FileNotFoundError
ValueError
The syntax for creating your own exceptions
class CustomErrorName(ExceptionClassName) :
pass
A Data Access Error class that defines a custom exception
class DataAccessError(Exception):
pass
A module that uses the DataAccessError class
from objects import DataAccessError
def read_movies():
try:
movies = []
with open("movies.csv", newline="") as file:
reader = csv. reader (fil e)
for row in reader:
movies.append(row)
return movies
except FileNotFoundError:
raise DataAccessError("Data source not found.")
except Except ion:
raise DataAccessError("Error accessing data source.")
Code that handles a custom exception
f •,, • • j - p» t • - •
try:
movies = db.read_movies()
except DataAccessError as e:
print("DataAccessError:", e)
The console when the FileNotFoundError occurs
DataAccessError: Data source not found.
The console if you don't use the DataAccessError class
FileNotFoundError: [Errno 2] No such file or directory:
■movies.csv'
Description
• To define a custom exception, you can code a class that inherits one of the built-in
exception classes. Then, you can use that exception as you would any other exception
Figure 15-10 How to work with custom exceptions
426 Section 3 Object-oriented programming
When to use inheritance
Figure 15-11 begins by listing three guidelines for when it makes sense to
use inheritance in your programs. First, it makes sense to use inheritance when
the subclass is a type of the superclass. For example, this chapter has presented a
Book object that is a type of a Product object.
Second, it makes sense to use inheritance when both classes are part of the
same logical domain. For example, the Product, Book, and Movie objects shown
in this chapter are all in the same domain. In other words, they're all part of a
domain that's attempting to define the different types of products for a system.
Third, it makes sense to use inheritance when the subclass primarily adds
features to the superclass. In other words, it makes sense when a subclass adds
new attributes, properties, or methods to the superclass that are only needed
in the subclass. In addition, a subclass may override some methods to change
the behavior of the subclass. However, if the subclass needs to override many
methods, or if you find yourself wishing that you could remove some methods
from the superclass, you are probably better off using composition instead of
inheritance.
To illustrate, this figure shows a Dice class that inherits the built-in list
class. When coding a container class like the Dice class, this type of approach
is tempting because it's so easy. You just inherit the list class, add the rollAll()
method, and you can use all the features of the list class to work with a list of
Die objects. However, this approach breaks several of the guidelines for when it
makes sense to use inheritance and leads to several problems.
First, the Dice object presented in this figure is not a type of list object.
A list stores an ordered list of any data type. A Dice object stores one or more
Die objects and provides methods for working with them. It's more accurate to
say that the Dice object has a list object that it uses to work with multiple Die
objects. As a result, the Dice object should use composition as shown in the
previous chapter, not inheritance.
Second, the Dice class is not part of the same logical domain as the list class.
The Dice and Die objects are part of a logical domain that's used to model dice
objects that programmers can use in games. The list class is an implementation
class that provides core functionality for all Python programmers.
Third, the interface for the Dice object is too complex. Ideally, this object
would only provide the methods necessary to use it. This helps to make the Dice
object easy for other programmers to use. Instead, this object includes all of
the operators and methods for working with the list class, which provides more
functionality, but also makes it harder for other programmers to use it.
Fourth, it violates encapsulation. That's because it allows other programmers
to directly access the list that stores the Die objects. But this is an
implementation detail that should be hidden from other programmers. Instead, you should
be able to change the list to another collection such as a dictionary without
changing the interface of the Dice object. That way, other programmers could
continue to use the Dice object without needing to modify any of their code.
Chapter 15 How to work with inheritance 427
It makes sense to use inheritance when...
• One object is a type of another object.
• Both classes are part of the same logical domain.
• The subclass primarily adds features to the superclass.
A Dice class that inherits the list class (not recommended)
class Dice(list):
def rollAll(self) :
for die in self:
die.roll()
Code that uses this Dice class
dice = DiceO
dice.append(Diet) ) # uses append method from list class
dice.append(Die())
dice.rollAlK)
die = dice[0] # uses operators from list class
dice.insert(0, DieO) # uses insert method from list class
dice-pop() # uses pop method from list class
print("Die value:", die.value)
print("Dice count:", 1en(dice))
A few of the problems with this approach
• The Dice object is not a type of list object. A list object stores any type of object
and provides a wide variety of methods for working with those objects. A Dice
object stores Die objects and provides specialized methods for working with them.
• Both classes are not part of the same logical domain. The list class is an
implementation class that provides a general-purpose object that all Python
programmers can use to work with lists of objects. The Dice class is part of a
specific logical domain that creates a model that programmers can use to store and
roll multiple dice.
• The interface is too complex. The Dice object should only provide the methods
necessary to use it. This makes it easy for other programmers to use.
• It violates encapsulation. The Dice object allows other programmers to access the
list that stores the Die objects. But the list is an implementation choice that should
be hidden from other programmers in case you want or need to change the
implementation later.
Description
• If an object is a type of another object, it typically makes sense to use inheritance
to create the relationship between the two classes.
• If an object has a type of another object, it typically makes sense to use
composition to create the relationship between the two classes.
Figure 15-11 When to use inheritance
428 Section 3 Object-oriented programming
Perspective
Conceptually, this is one of the most difficult chapters in this book.
Although the basic idea of inheritance is easy enough to understand, figuring
out how to use it to benefit your programs can be difficult. So if you find
yourself a bit confused right now, don't be disheartened.
Fortunately, when you're getting started, you typically don't need to code
classes that inherit other classes. As you learn more about programming, you'll
see more examples of how to use it and your understanding of it should grow.
For example, the classes in Python's Exception hierarchy might have been a
bit confusing when they were first presented in chapter 7. But now, you should
understand how these classes work a little better.
The good news is that you don't have to understand every nuance of how
inheritance works to use it. In fact, since all classes automatically inherit the
object class, you've already been using inheritance without even knowing it.
If you continue with programming, you'll learn how to inherit other classes
to create graphical user interfaces (GUIs), web programs, and mobile apps.
For example, chapter 18 shows how you can use inheritance to create a GUI.
In addition, as you learn more about object-oriented design, you'll learn more
about when it makes sense to use inheritance.
Terms
inheritance
superclass
subclass
base class
parent class
Summary
• Inheritance lets you create a new class based on an existing class. The
existing class is called the superclass, base class, or parent class, and the
new class is called the subclass, derived class, or child class.
• A subclass inherits all of the public attributes and methods of its superclass.
The subclass can add new attributes and methods, and it can override
existing methods with new versions of the methods.
• In a subclass, you can use the name of the superclass to call its methods.
• Polymorphism lets you treat objects created from a subclass as if they were
objects of the superclass.
• You can use the built-in instanceof() function to check if an object is an
instance of a particular class.
derived class
child class
override a method
polymorphism
object class
Chapter 15 How to work with inheritance 429
• All classes inherit the object class. This class provides methods, such as
the str () method, that are available to all classes. To get your classes to
work the way you want, you sometimes need to override these methods.
• If an object is a type of another object, it makes sense to use inheritance to create
the relationship between the two classes. If an object has a type of another object, it
makes sense to use composition to create the relationship between the two classes.
• Encapsulation, inheritance, and polymorphism are three of the fundamental
concepts of object-oriented programming (OOP).
Exercise 15-1 Enhance the Product Viewer
program
In this exercise, you'll enhance the Product Viewer program shown in this
chapter so it provides for one more type of product: a music album. When you
enter the product number for a music album, it should print the data to the
console like this:
Enter product
PRODUCT DATA
Name:
Artist:
Format:
Di scount pri ce
number: 4
Rubber Soul
The Beatles
CD
.: 10.00
Open and test the program
1. In IDLE, open the objects.py and product_viewer.py files in this folder:
python/exercises/chl5/product_vi ewer
2. Review the code and run the program to make sure it works correctly. Note
that the Movie class displays the format, which is DVD, as part of the name of
the product.
Improve the Movie and Book classes
3. In the Movie class, add an attribute named format that stores the format of the
product. For example, the format could be DVD, streaming, and so on.
4. In the product_viewer module, modify the code that creates the Movie object
so it stores "DVD" as the format attribute instead of appending this data to
the end of the name attribute. Then, modify the code that displays the Movie
object, so it displays the format on a separate line, after the year of the movie.
5. Repeat steps 3 and 4 for the Book class. You can use "Hardcover" as the
format for the book. Or, if you prefer, you can specify a different type of book
format such as "Paperback" or "ebook".
430 Section 3 Object-oriented programming
Add an Album class
6. In the objects module, add a class named Album that inherits the Product
class. The Album class should add two attributes: one for storing the artist and
another for storing the format.
7. In the product_viewer.py file, modify the code that creates the objects so it
includes a fourth object, an Album object. This object should contain the
data for a music album that you like. Then, add code that displays the Album
object as shown at the beginning of this exercise.
Add a Media class
8. In the objects module, add a class named Media that inherits the Product
class. This class should add a format attribute to the Product class.
9. Modify the Movie, Book, and Album classes so they inherit the Media class,
not the Product class. This should create a class hierarchy that looks like this:
Product
Media
Movie
Book
Album
10. Modify the Movie, Book, and Album classes so the constructor of each class
accepts a format argument and passes that argument on to the constructor of
the Media class. In other words, these classes should set the format attribute
by calling the constructor of the Media class. Note how this reduces code
duplication.
11. In the product_viewer.py file, modify the code that displays the products so
it only displays the format attribute for Media objects. Note how this reduces
code duplication.
Exercise 15-2 Work with Author and Authors
objects
In this exercise, you'll work with a Book object that uses an Authors object to
store one or more Author objects.
Open and test the program
1. In IDLE, open the objects.py and authors_test.py files that are in this folder:
python/exercises/chl5/authors
2. Review the code and note how the Book object uses an Authors object to store
one or more Authors.
3. Run the code to see how it works. At this point, it doesn't display the book or
author information correctly, but you'll fix that later in this exercise.
Improve the Author, Authors, and Book classes
4. In the Author class, add a str () method that returns the first and last name
of the author, separated by a space.
Chapter 15 How to work with inheritance 431
5. In the Authors class, add a str () method that returns the name of each
author, separating multiple authors with a comma and a space.
6. In the Book class, add a str Q method that returns the title of the book,
followed by the word "by" and one or more authors, with each author
separated by a comma.
7. Run the authors_tester module again. This time, it should display the correct
data for the book and author information.
Make sure the program works correctly for a single author
8. In the authors_tester module, comment out the statement that adds the second
author. Then, run the module again. This should work, but the last line says
"Authors" where it should say "Author".
9. Modify the code so it uses the count property of the Authors object to display
the correct label for the author or authors depending on the number of authors
for the book.
Define and use an iterator for the Authors object
10. In the Authors class, add the iter () and next () methods that make it
possible to use a for statement to loop through all Author objects stored in the
Authors object.
11. In the authors_tester module, add a for statement that loops through each
author in the Authors object and prints each author to the console. When
you're done, running this module should display this data to the console:
The Authors Tester program
BOOK DATA - SINGLE LINE
The Gilded Age by Hark Twain,
BOOK DATA - MUTLIPLE LINES
Title: The Gilded Age
Authors: Hark Twain, Charles
AUTHORS
Hark Twain
Charles Warner
Charles Warner
Warner
16
How to design an
object-oriented program
Now that you understand how to code an object-oriented program, you're ready
to learn how to design one. This chapter presents some of the most useful skills
for doing that. To illustrate this process, this chapter presents a console version
of a Shopping Cart program. If you've ever bought something from a website,
you should be familiar with how a shopping cart works, and that should make it
easy for you to focus on the design techniques that are presented in this chapter.
Techniques for object-oriented design 434
Five steps for designing an object-oriented program 434
How to identify the data attributes 436
How to subdivide the data attributes 438
How to identify the classes 440
How to identify the methods 442
How the three-tier architecture works 444
The Shopping Cart program 446
The business tier 446
The database tier 448
The presentation tier 450
Perspective 456
434 Section 3 Object-oriented progrcnnining
Techniques for object-oriented design
The objects for a program are often designed by developers who specialize
in object-oriented design. This is especially true for large systems that have
many programmers working on them. How well this is done can directly affect
your job as a programmer. In general, well-designed objects are easy to work
with, while poorly-designed objects are difficult to work with. In fact, when you
work with poorly-designed objects, you often need to figure out how they are
designed before you can use them appropriately.
This topic starts by showing how to create a model of the objects for an
object-oriented program. Then, this topic presents an architecture that's often
used for object-oriented programs.
Five steps for designing
an object-oriented program
In many cases, you can base the model for an object-oriented program on an
existing real-world system. The illustration at the top of figure 16-1 presents a
conceptual view of how this works. Here, you can see that the information about
the people, documents, and facilities within a real-world system is mapped to the
classes and objects of an object-oriented system.
As you design your model, each class represents one object, or entity, in the
real-world system. Then, each object created from the class stores one instance
of the entity, and each attribute of the object stores one item of information
about the entity.
This figure presents five steps you can follow to design a model for your
objects. Step 1 is to identify all the data attributes that need to be stored in
your objects. Step 2 is to break complex attributes down into smaller attributes
whenever that makes sense. Step 3 is to identify the classes of the system and
determine the attributes that they define. Step 4 is to identify the methods that
each class should provide. And step 5 is to refine the classes, attributes, and
methods. The next few figures describe each of these steps in more detail.
Chapter 16 How to design an object-oriented program 435
An object-oriented program is modeled after a real-world system
Real-world system Object-oriented program
Classes
People
Documents
Facilities
Objects Objects
Other
systems
Five steps for designing an object-oriented program
Step 1
Step 2
Step 3
Step 4
Step 5
Identify the data attributes
Subdivide each attribute into its smallest useful components
Identify the classes
Identify the methods
Refine the classes, attributes, and methods
Description
• An object-oriented program should model a real-world system. The job of the
designer is to analyze the real-world system and then map it onto the
object-oriented program.
• A class in an object-oriented program typically defines an object that corresponds
with an object, or entity, in the real world.
Figure 16-1 Five steps for designing an object-oriented program
436 Section 3 Object-oriented programming
How to identify the data attributes
The first step in designing your objects is to identify the data attributes of
the system. You can use several techniques to do that, including analyzing an
existing system if there is one, evaluating comparable systems, and interviewing
anyone who will be using the system. If an existing system uses documents, such
as printed invoices or forms, that's an excellent source of information.
Figure 16-2 shows two screen captures of a website that implements a
shopping cart. This chapter uses these screen captures as the main source of
information for the data attributes of our Shopping Cart program. Keep in mind,
though, that you should use all available resources when you identify the data
attributes for a program.
These screen captures contain information about three different entities:
products, line items, and shopping carts. The first screen contains information
about a product such as its list price, discount percent, savings, and discount
price. In addition, it allows you to specify the quantity, which is part of the line
item entity.
The second screen contains some of the same information. However, it
shows the data that's stored in the cart entity and the line item entity. To start, the
cart displays one line for each item. This is the line item entity, and it includes
the product description, discount price, and quantity. Although each line item
contains the same type of information, each cart can contain multiple line items.
In addition, the second screen includes some general information about the
cart that doesn't apply to a single line item. This includes the number of items in
the cart and the total cost of the items in the cart.
One of the things you need to consider as you review screen captures like
these is how much data your system needs to store. If, for example, you're
creating a shopping cart for a company that only provides a few simple products,
you might not need to store data about whether the item is in stock, the format of
the product, and so on.
Chapter 16 How to design an object-oriented program
437
A screen capture that can be used to identify data attributes
<•!
Buy New
Qty: 1 [3j
$4.75
List Price $14 99
You Save- $10.24
(68%)
Add to Cart
Another screen capture that can be used to identify data attributes
Shopping Cart
Monty Python's Life Of Brian - The
Immaculate Edition by Graham Chapman
DVD
In Stock
Delete Save for later
Monty Python and the Holy Grail
(Special Edition) by Graham Chapman
DVD
In Stock
Delete Save for later
Price
$8.97
Quantity
$4.75
Subtotal (3 items): $18.47
The data attributes identified from the screen captures
Product name
Product creator
Product format
Stocking message
List price
Discount percent
Discount amount
Discount price
Item count
Cart total
Quantity
Description
• Depending on the nature of the system, you can identify data attributes in a variety
of ways, including interviewing users, analyzing existing systems, and evaluating
comparable systems.
Figure 16-2 How to identify the data attributes
438 Section 3 Object-oriented programming
How to subdivide the data attributes
Some of the data attributes you identify in step 1 of the design procedure
may consist of multiple components. In step 2, you divide these attributes into
their smallest useful values. Figure 16-3 shows how.
The first example in this figure shows how you can divide the name of
a customer. Here, the name is divided into two attributes: first name and last
name. When you divide a name like this, you can easily perform operations like
using the first name in a salutation, such as "Dear Eric." In contrast, if the full
name is stored in a single attribute, you have to use the string methods to extract
the component you need. That can lead to unnecessarily complicated code. In
general, then, you should separate a name like this whenever you need to use the
name components separately. Later, when you need to use the full name, you can
combine the first and last names using concatenation and provide a method or
property that returns the full name.
The second example shows how you typically divide an address, if you
need to store one for your program. In this example, the street number and street
name are stored in a single attribute. Although you could store these components
in separate attributes, that usually doesn't make sense since these values are
typically used together. In other words, the data attributes should be divided into
their smallest useful values.
As in the previous step, knowledge of the real-world system and of the
information that's needed by the program is critical. In some circumstances, it
may be okay to store data attributes with multiple components in a single
attribute. That can simplify your design and reduce the overall number of
attributes. In general, though, most designers divide data attributes as much as
possible. That way, it's easy to access any data attribute, and you don't have to
change the object design later if you find that the object would work better if you
could access just part of an attribute.
Chapter 16 How to design an object-oriented program 439
A product name that's divided into name and edition
Customer name
Eric Idle
Customer first name Customer last name
Eric Idle
An address that's divided into street address, city, state, and zip code
Customer address
1234 West Industrial Way, East Los Angeles, California 90022
j * J i
State
Street and number
1234 West Industrial Way East Los Angeles California 90022
Description
• If a data attribute contains two or more components, you should consider
subdividing the attribute into multiple attributes. That way, you won't need to parse
the attribute each time you use it.
• The extent to which you subdivide a data attribute depends on how it will be used.
Because it's difficult to predict all future uses for data, most designers subdivide
data attributes as much as possible.
• When you subdivide a data attribute, you can easily rebuild it when necessary by
concatenating the attributes.
Figure 16-3 How to subdivide the data attributes
440 Section 3 Object-oriented programming
How to identify the classes
Figure 16-4 presents the three main entities for the Shopping Cart program
that's presented in this chapter, and it lists the possible data attributes that can
be associated with each one. In most cases, you'll start to recognize the main
entities that need to be included in a data structure as you identify the data
attributes. For example, the data attributes identified in the two screens in figure
16-2 can be grouped into the three entities shown in this figure: product, line
item, and cart. Although you may identify additional entities later on in the
design process, it's sufficient to identity the main entities at this point. These
entities become the classes for your programs.
After you identify the main classes, you need to determine which data
attributes are associated with each class. In many cases, the associations are
obvious. For example, it's easy to determine that the product name and price
attributes should be stored in the Product class. It's easy to determine that the
quantity attribute should be stored in the Lineltem class. And it's easy to
determine that the cart total attribute should be stored in the Cart class.
However, some associations aren't so obvious. In that case, you may need
to list a data attribute under two or more entities. In this figure, for example,
you can see that the product discount price is listed in the Product and Lineltem
classes. Later, as you refine your design, you may be able to remove these
repeated attributes. For now, though, it's okay to include them.
As you identify the classes, you may decide that you don't need some of the
data attributes you identified in previous steps. In this figure, for example, the
attributes that aren't needed are crossed out.
Similarly, although you should be able to identify most of the data
attributes in the first two steps of the design process, you may occasionally think
of additional attributes during the third step. If that happens, you can add them
in the third step. In this figure, for example, italics are used to identify the only
attribute that was added in this step, the line item total attribute.
Finally, you may want to mark any data attributes that are included in two or
more classes. In this figure, for example, asterisks are used to mark four of the
attributes. Then, you can decide later which of the classes should be used to store
these attributes.
Although you can use any notation you like for this step of the design
process, it's a good practice to document your design decisions. Although you
can go directly to the use of UML diagrams for this step, it often makes sense to
use a simpler notation until you have identified the classes that you're going to
need and have a good idea of which attributes belong to each class.
Chapter 16 How to design an object-oriented program
441
Possible classes and attributes for a Shopping Cart program
Product
Product name*
r rociuct coition
Product creator
Product format
rrOQUCt Stocking messcme
Product price
Product discount
Product discount
Product discount
percent
amount
price*
Line Item
Product name*
Product discount price*
Quantity
Line item total
Cart
Item count
Cart total
Description
• After you identify and subdivide all of the data attributes for a program, you should
group them by the classes with which they're associated.
• If a data attribute relates to more than one class, you can include it under all of the
classes it relates to. Then, when you write the code for the classes, you may be able to
remove the duplicate attributes.
• As you assign the attributes to classes, you should omit attributes that aren't needed,
and you should add any additional attributes that are needed.
The notation used in this figure
• Data attributes that were identified but aren't needed are crossed out.
• Data attributes that were added are displayed in italics.
• Data attributes that are related to two or more entities are followed by an asterisk.
Description
• To identify the classes for a program, you can use notation like this or a modified
version of your own.
Figure 16-4 How to identify the classes
442 Section 3 Object-oriented programming
How to identify the methods
Figure 16-5 presents a UML diagram that shows the classes and attributes
that were identified in the previous figure. In addition, this UML diagram
identifies some of the methods that define the behavior of each object. For
example, the Product class includes attributes for name, price, and discount
percent. However, it uses methods to calculate and return the attributes for the
discount amount and discount price.
On the other hand, the Lineltem class includes an attribute for a Product
object. This provides access to all of the Product object's attributes and methods.
In addition, the Lineltem class includes a getTotalQ method that calculates and
returns the line item total. To do that, this method can get the discount price from
the Product object and multiply it by the quantity.
Finally, the Cart class begins by using a private attribute to store Lineltem
objects. Since this attribute is private, the methods of the Cart class provide the
only ways to add and remove items from this list. This is considered a good
practice since it keeps the user interface for the Cart object simple and allows
you to limit the behaviors that are provided by the Cart object. Besides providing
methods for adding and removing Lineltem objects, the Cart class provides
methods for getting a count and total for all Lineltem objects in the cart.
At this point, you should realize that you could use getter properties instead
of the getter methods shown in this figure. In the Product class, for example,
you could use a getter property named discount Amount that calculates and
returns the discount amount for the product. This would make it easier for other
programmers to access the discount amount.
However, all three classes in this figure use methods to eet the values that are
calculated from attributes. This provides a consistent user interface that clearly
shows the difference between the state and behavior of an object. When you're
getting started with object-oriented design, this consistency can be helpful, but
you can use whichever approach makes the most sense to you.
As you work on this step, you can add methods that are necessary for the
object to work correctly. For example, as you test the system, you may find that
you need to provide a way to update a line item that's in the cart with a new
item. In that case, you could add a method to do that.
Similarly, you can add convenience methods that make it easier for other
programmers to work with the object. For example, if you find that you often
need to convert the discount price from a float value to a string value that
displays two decimal digits, you could add a method named getDiscountPriceStr
to do that.
As you work on this step, you need to keep in mind that the public
attributes, properties, and methods of your objects define the object's user
interface. Remember too that you want to keep this user interface consistent,
intuitive, and easy for other programmers to use. One way to do that is to limit
the number of methods that are available from an object to the ones that are
absolutely necessary.
Chapter 16 How to design an object-oriented program
443
The UML diagram for the classes of the Shopping Cart program
Cart
linel terns
addltem (item)
removeItem( index)
getltemCount ()
getTotal()
Lineltem
■► product
quantity
getTotaK)
Product
-► name
price
discountPercent
get Discount Amount ()
getDiscountPrice()
Description
• After you identify the data attributes for an object, you can attempt to identify the
methods that define the behavior of an object.
• If a data attribute can be calculated from other data attributes in the class, you can
add a property or method that calculates the value for that attribute.
• As you work on this step, you can add methods that are necessary for the object to
work correctly or convenience methods that make it easier for other programmers
to work with the object.
• Since methods perform actions, their names typically begin with a verb such as get,
calculate, add. remove, and so on.
• To model the relationships between the classes in an object-oriented system, you
can use UML (Unified Modeling Language) diagrams.
Figure 16-5 How to identify the methods
444 Section 3 Object-oriented programmbig
How the three-tier architecture works
Figure 16-6 shows how you can use classes to simplify the design of a
business program using a multi-tier architecture. In a multi-tier program, the
developer separates the classes that perform different functions of the program
into two or more layers, or tiers.
A three-tier architecture like the one in this figure consists of a presentation
tier, a business tier, and a database tier. This is the most common architecture for
structuring programs.
The presentation tier handles the details of the program's user interface.
So far, all of the programs presented in this book have been console programs.
In these programs, most of the code for the presentation tier is stored in the
main() function for the program and other functions that the mainQ function
calls. In other words, the code for the presentation tier of a console application is
typically procedural, not object-oriented.
In chapter 18, though, you'll learn how to create a graphical user interface
(GUI) for a program. In these programs, the code for the presentation tier is
typically stored in a class that defines the objects needed to display the user
interface. In other words, the code for a GUI is typically object-oriented, not
procedural.
The database tier stores the code that provides the data access that's required
by the program. Typically, this requires retrieving, adding, updating, and deleting
data. Although this tier typically works with data that's stored a database, it can
also work with data that's stored in files or other data sources. To work with this
data, the database tier can define classes and methods. With Python, though, it's
also common to use functions to provide the database access.
The business tier provides an interface between the database tier and the
presentation tier. This tier often includes classes that correspond to business
entities such as products and customers. It may also include classes that
implement business rules, such as discount or credit policies. The classes in this
tier are often referred to as business classes, and the objects that are created from
these classes are often called business objects.
One advantage of developing programs with a multi-tier architecture is that
you should be able to swap out one tier without having to modify the other tiers.
For example, you should be able to swap out the presentation tier so it uses a
GUI instead of using the console without having to modify any classes in the
business or database tiers.
A second advantage of developing programs with a multi-tier architecture
is that it allows programmers to divide work among members of a development
team. For example, one group of developers might work on the database tier,
another group on the business tier, and still another group on the presentation
tier.
A third advantage is that it allows developers of a program to share classes.
In particular, developers working on different parts of a program can all use the
classes that make up the business tier. That's one of the reasons that it's
important to do a good job of designing the objects in the business tier.
Chapter 16 How to design an object-oriented program 445
The three-tier architecture of an application
Presentation tier
Presentation
classes
Business tier
Business
classes
Database tier
Database _ ± .
classes Database
Description
• To simplify development and maintenance of large programs, many applications
use a three-tier architecture to separate the application's user interface, business
rules, and database processing. Each tier of the architecture may consist of one or
more modules that contain classes or functions.
• The classes or functions in the presentation tier control the application's user
interface. For a console application, the presentation tier typically uses a series of
functions to provide console input and output. For a GUI application, the
presentation tier typically consists of one class for each type of window in the GUI.
• The classes or functions in the database tier handle all of the application's file or
database processing.
• The classes in the business tier define the business objects and rules for the
application. These classes act as an interface between the classes in the presentation
and database tiers.
Figure 16-6 How the three-tier architecture works
446 Section 3 Object-oriented programming
The Shopping Cart program
When you create an object-oriented program, you typically structure it so
it's divided into the three tiers you just learned about. Then, you can store each
tier in one or more modules. To show how this works, this chapter presents an
object-oriented version of a Shopping Cart program. This program should give
you a good idea of how to structure a three-tier program.
The business tier
Figure 16-7 shows the classes for the business tier. To clearly identify these
classes as part of the business tier, they're stored in a file named business.py. As
a result, they're available from the business module.
The code in this figure implements the UML diagram presented in figure
16-5. To start, the Product class defines three attributes (name, price, and
discountPercent), two methods (getDiscountAmount and getDiscountPrice),
and a constructor that initializes all three attributes. Similarly, the Lineltem
class defines two attributes (product and quantity), one method (getTotal), and a
constructor that initializes both attributes.
The Cart class, on the other hand, is more complicated. To start, it uses a
private attribute to store a list of line items. Then, it provides a constructor that
initializes this attribute to an empty list. After that, this class provides methods
for adding or removing items from the cart (addltem and removeltem). These
methods define the interface that other programmers can use to add or remove
items from the cart.
The getTotal() method returns the total of all items in the cart. To do that,
this code loops through each item in the cart and adds the total for each item to
the total for the cart.
The getltemCountO method returns the total number of items in the cart. To
do that, this code uses the built-in len() function to return the number of items in
the private line items attribute.
The iter () and next () methods provide a way for other programs
to use a for loop to iterate over each item in the cart. This is a feature that most
programmers would expect from an object like the Cart object.
As you review this code, you might wonder why you can't just use the
built-in len() function to get the count of items in the Cart object. The answer is
that you can. but first the Cart class needs to override the len () method of
the object class. Then, other programmers could use the len() function on a Cart
object to get the count of line items instead of using the getltemCountQ method.
Both approaches work, and the Cart class could implement both approaches.
In general, though, you can make your classes easier to maintain and use
by limiting the number of ways other programmers can use your objects. That's
why you should make sure a method is both helpful and needed before you add
it to a class.
Chapter 16 How to design an object-oriented program 447
The business module
class Product:
def init (self, name="", price=0.0, discountPercent=0):
self.name = name
self.price = price
self.discountPercent = discountPercent
def getDiscountAmount(self):
discountAmount = self.price * self.discountPercent / 100
return round(discountAmount, 2)
def getDiscountPrice(self):
discountPrice = self.price - self.getDiscountAmount()
return round(discountPrice, 2)
class Lineltem:
def init (self, product=None, quantity=l):
self.product = product
self.quantity = quantity
def getTotal(self):
total = self.product.getDiscountPrice() * self.quantity
return total
class Cart:
def init (self) :
self . lineltems = []
def addltem(self, item) :
self . lineltems .append(item)
def removeItem(self, index):
self. lineltems.pop(index)
def getTotal(self):
total =0.0
for item in self. lineltems:
total += item.getTotal()
return total
def getltemCount(self):
return len(self. 1ineltems)
def iter (self) :
self. index = -1
return self
def next (self) :
if self. index == len(self. lineltems)-1:
raise Stoplteration
self. index += 1
lineltem = self. lineltems[self. index]
return lineltem
Figure 16-7 The business tier
448 Section 3 Object-oriented programming
The database tier
Figure 16-8 shows the database tier for the Shopping Cart program. To start,
it shows a CSV file named products.csv that stores the data for the program,
which in this case is the data for three products. Each product is a DVD for a
movie that has a list price and a discount percent. In other word, this file stores
the data for each Product object.
The db module stores the code for the database tier. This code does not
define a class. Instead, it provides a single function that gets data from the CSV
file. However, this class uses the Product class from the business module. This
shows that some tiers of an application can define functions that work with
objects that are defined by the classes and methods in other tiers.
The db module begins by importing the csv module. Then, it imports the
Product class from the business module. Next, it defines a constant that stores
the filename of the CSV file.
Finally, the db module defines the get_products() function that returns a list
of Product objects. This function begins by opening the CSV file. Then, it loops
through each row of the file. Within this loop, the first line stores the data from
the current row in a Product object. The second line stores the Product object in
the list of product objects.
In other words, this code maps each line of the CSV file to an object. If you
store your data in a relational database instead of a file, as shown in chapter 17,
the code that converts a row in the relational database to an object and vice versa
is known as object-relational mapping, O/R mapping, or just ORM.
This figure also shows code that does some simple testing of the database
and business layers. To start, this code imports the db module and all three
classes of the business module. Then, the first statement calls the get_products()
function of the db module to get a list of Product objects. The second statement
gets the second Product object in the list. The third statement creates a Lineltem
object that stores this Product object with a quantity of 2. The fourth statement
creates a Cart object. The fifth statement adds that Lineltem object to the Cart
object. And the remaining statements print some of the data that's available from
these objects to the console. This testing isn't thorough, but it shows that these
objects work.
For a complete Shopping Cart application, of course, the database tier would
do more than provide methods for retrieving the Product objects from a file.
For instance, it would provide methods for saving and retrieving Cart objects. It
would also use a database instead of files. In chapter 17, you'll learn more about
how that would work.
Chapter 16 How to design an object-oriented program 449
The products.csv file
The Holy Grail (DVD),4.75,30
Life of Brian (DVD),8.97,20
The Meaning of Life (DVD),6.50,15
The db module
import csv
from business import Product
FILENAME = "products.CSV"
def get products():
products = []
with open (FILENAME, newline="") as file:
reader = csv.reader (file)
for row in reader:
# convert row to Product object
product = Product (row [ 0 ] , float (row [ 1 ] ), int (row [ 2 ] ))
product s.append(product)
return products
Code that tests the database and business layers
import db
from business import Product, Lineltem, Cart
products = db.get products()
product = product s[1]
lineltem = Lineltem(product, 2)
cart = Cart()
cart.addltem(lineltem)
print("Product: ", product.name)
print("Price: ", product.getDiscountPrice())
print("Quantity: ", lineltem. quantity)
print("Total: ", cart.getTotal())
The console
Product:
Price:
Quantity:
Total:
Life of Brian (DVD)
7.18
2
14.36
Description
• In a complete Shopping Cart application, the database tier would also provide for
retrieving and saving Cart objects.
• If you store your data in a relational database instead of a file, the code that
converts a row in the relational database to an object is known as object-relational
mapping. O/R mapping, or just ORM.
Figure 16-8 The database tier
450 Section 3 Object-oriented programming
The presentation tier
Part 1 of figure 16-9 shows the user interface for the Shopping Cart program.
This user interface is a console, and it should give you a good idea of how
the presentation tier works with the business and database tiers. However, a
Shopping Cart program like this would typically use a GUI interface, not a
console interface.
In this interface, the program starts by displaying the program title, a
command menu, and a numbered list of products. Then, it prompts the user for a
command. When working with these commands, the user can select a product by
entering the number that corresponds with the product.
Note, however, that to add an item to the cart, you use the number of the
item in the Products list. But to delete an item from the cart, you use the number
in the cart display.
Chapter 16 How to design an object-oriented program 451
The user interface
The Shopping Cart program
COMMAND MENU
cart - Show the cart
add - Add an item to the cart
del - Delete an item from cart
exit - Exit program
PRODUCTS
Item Name
1 The Holy Grail (DVD)
2 Life of Brian (DVD)
3 The Meaning of Life (DVD)
Command: add
Item number: 1
Quantity: 2
Item 1 was added.
Command: add
Item number: 3
Quantity: 1
Item 2 was added.
Command: car t
Item Name
1 The Holy Grail (DVD)
2 The Meaning of Life (DVD)
Command: del
Item number: 1
Item 1 was deleted.
Command: car t
Item Name
1 The Meaning of Life (DVD)
Command: exi t
Bye I
Price
4.75
8.97
6.50
Your Price
3.32
5.53
Your Price
5.53
Di scount Your
30%
20%
15%
Quantity
2
1
Quantity
1
Price
3.32
7.18
5.53
Total
6.64
5.53
12.17
Total
5.53
5.53
Description
• To implement this interface, this program uses functions as shown in parts 2 and 3
of this figure.
• Normally, however, the user interface for a Shopping Cart application would be a
GUI, not a console, and it would be implemented with classes and objects as shown
in chapter 18.
Figure 16-9 The presentation tier (part 1)
452 Section 3 Object-oriented programming
Parts 2 and 3 show the code for the user interface. This code is a series of
functions, not a class that defines an object. However, this code imports all three
objects from the business module and uses them in its functions. By now, you
should be able to understand most of the code presented in this figure. However,
there are a few tricky spots.
To start, the show_products() and show_cart() functions use two format
strings to alien columns of data on the console. In both methods, the first format
string aligns the strings that provide the column names, and the second format
string aligns the different types of data for each column.
The show_productsQ function loops through a list of Product objects and
uses the attributes and methods of these objects to display the data that's
available from them. Similarly, the show_cart() function loops through each
Lineltem object in the Cart object and uses the attributes and methods of these
objects to display the data that's available from them. In this function, you can
use a for loop because the Cart class overrides the iter () and next ()
methods of the object class.
Chapter 16 How to design an object-oriented program 453
The shopping_cart module Page 1
import db
from business import Product, Lineltem, Cart
def show_title():
print("The Shopping Cart program")
print()
def show_menu():
print ( "COMMAND MENU" )
print("cart - Show the cart")
print("add - Add an item to the cart")
print("del - Delete an item from cart")
print("exit - Exit program")
print()
def show products(products):
print("PRODUCTS")
line_formatl = "{:<5s} {:<25s} {:>10s} {:>10s} {:>12s}"
line_format2 = "{:<5d} {:<25s} {:>10.2f} {:>10s} {:>12.2f}"
print(line_formatl.format("Item", "Name", "Price",
"Discount", "Your Price"))
for i in range(len(products)):
product = products[i]
print(line_format2.format(i+1,
product.name,
product.price,
str(product.discountPercent) + "V,
product.getDiscountPrice()))
print()
def show_cart(cart):
if cart.getltemCount() == 0:
print("There are no items in your cart.\n")
else:
# items = cart.lineIterns
line_formatl = "{:<5s} {:<25s} {:>12s} {:>10s} {:>10s}"
line_format2 = "{:<5d} {:<25s} {:>12.2f} {:>10d} {:>10.2f}"
print(line_formatl.format("Item", "Name", "Your Price",
"Quantity", "Total"))
i = 0
for item in cart:
print (line_format2 .format (i+1,
i t em.product.name,
item.product.getDiscountPrice(),
item.quantity,
item.getTotal()))
i += 1
print ("{:>66.2f} ".format (cart .getTotalO ) )
print()
Figure 16-9 The presentation tier (part 2)
454 Section 3 Object-oriented programming
In part 3, the add_item() function begins by getting an item number and
quantity from the user. If that item number matches one of the items in the
Products list that's displayed by the program, this function gets the corresponding
Product object from the list of products, creates a Lineltem object with the
specified product and quantity, and adds that Lineltem object to the Cart object
that's referred to by the cart parameter.
The remove_item() function begins by getting the number of the line item to
delete. If the line item number matches one of the line items in the cart, this code
removes the corresponding line item from the cart.
Before the main() function enters the main loop for the program, it calls the
get_products() method of the db module to get the list of Product objects for the
program. In addition, it creates a Cart object that can store the Lineltem objects
for the program.
As you review this code, note how it uses the Product, Lineltem, and Cart
objects that are defined by the business tier. Also note that it contains a single
line of code that accesses the database tier to return a list of Product objects.
This shows how the business tier acts as the interface between the other tiers of
the program.
Chapter 16 How to design an object-oriented program 455
The shopping_cart module Page 2
def add_itern(cart, products):
number = int(input("Item number: "))
quantity = int(input("Quantity: "))
if number < 1 or number > len(products):
print("No product has that number.\n")
else:
# Get Product object, store in Lineltem object,
# and add to Cart object
product = products[number-1]
item = LineItem(product, quantity)
cart.addltem(item)
print("Item " + str(cart.getltemCount()) + " was added.\n")
def remove_item(cart):
number = int(input("Item number: "))
if number < 1 or number > cart.getltemCount():
print("The cart does not contain an item " +
"with that number.\n")
else:
# Remove Lineltem object at specified index from cart
cart.removeltem(number-l)
print("Item " + str(number) + " was deleted.\n")
def main():
show_title()
show_menu()
# get a list of Product objects and display them
products = db.get products()
show products(products)
# create a Cart object to store Lineltem objects
cart = Cart()
while True:
command = input("Command: ")
if command == "cart":
show_cart(cart)
elif command == "add":
add_itern(cart, products)
elif command == "del":
remove_item(cart)
elif command == "exit":
print("Bye I")
break
else:
print("Not a valid command. Please try again.\n")
if name == " main ":
main()
Figure 16-9 The presentation tier (part 3)
456 Section 3 Object-oriented programming
Perspective
Object-oriented design is a complicated subject. Because of that, it's
impossible to teach everything you need to know in a single chapter. However,
with the skills you've learned in this chapter, you should be able to design the
business tier for object-oriented programs of your own. Then, in chapter 17,
you'll learn how to work with databases, which should shed more light on how
the database tier should work. And in chapter 18, you'll learn how to build a
GUI, which should shed more light on how the presentation tier should work.
Terms
entity
instance
attribute
UML (Unified Modeling Language)
multi-tier architecture
three-tier architecture
presentation tier
Summary
• You can use UML diagrams (Unified Modeling Language diagrams)
to model the relationships between the classes in an object-oriented
application.
• A three-tier architecture divides a program into three layers, or tiers.
• The presentation tier consists of the classes or functions for the user
interface.
• The database tier consists of the database and the database classes that work
with it.
• The business tier consists of the business classes that define the business
objects and rules of the program.
• If you store your data in a relational database instead of a file, the code that
converts a row in the relational database to an object and vice versa is known
as object-relational mapping, O/R mapping, or just ORM.
database tier
business tier
business class
business object
object-relational mapping
O/R mapping (ORM)
Chapter 16 How to design an object-oriented program
457
Exercise 16-1
Design a Task List program
and implement your design
In this exercise, you'll design the business objects for a program that stores one
or more lists of tasks. It should be a simplified version of the following screen
captures:
Q New List
Task lists:
S Business
S Personal
All saved Show tips Help
Trash
Personal
Clear completed View: My order Sort by date Completed tasks
+ New task Edit details ±1 f± "T 4- fjjl Refresh
□ pay bills >
□ Get groceries
□ Make dentist appointment
Note that this program shows two task lists (Business and Personal), but the
user could add more lists, and each list can contain zero or more tasks.
For the first three steps, you can use a word processor or text editor. The only
deliverable will be the UML diagram that you prepare in steps 4 and 5.
Design the business objects for the program
1. Identify the data attributes.
2. Subdivide each attribute into its smallest useful components.
3. Identify the classes by sorting the data attributes into categories.
4. Identify the methods by drawing a UML diagram for the class. To do that, you
can use a software tool (many are available for free), or you can sketch the
diagram on a piece of paper.
5. Refine the classes, attributes, and methods. When you're done, you should be
ready to start coding and testing the business objects for the program.
Implement the business objects and test them
6. Write the code for the business objects.
7. Test the business objects. To do that, you can use the interactive shell, or you
can write code that tests these objects.
8. As you work on the previous two steps, you can further refine the classes,
attributes, and methods for the business objects.
458
Section 3 Object-oriented prograrnining
Implement the user interface and test it
9. Write the code that implements the user interface. When you're done, it
should look something like this:
COMMAND
list
add
MENU
- List all
tasks
- Add a task
complete - Complete
delete
exit
- Delete a
a task
task
- Exit program
TASK LISTS
1. Personal
2. Business
Enter number to select task list: 1
Personal task list was selected.
Command: add
Description: Pay bills
Command: add
Description: Get groceries
Command: list
1. Pay bills
2. Get groceries
Command: complete
Number: 1
Command: list
1. Pay bills (DONE!)
2• Get groceries
Command:
To get this to work, you can hard code a list that stores the names of the two
task lists (Personal and Business).
Implement the persistence layer and test it
10. Write the code that writes and reads the business objects to one or more files.
For now, you can store the names of the task lists in one file, and you can
store the data for each task list in a separate file. In the next chapter, you'll
learn how to store data in a database, which has many advantages over storing
it in one or more files.
Section 4
Database and GUI
programming
To this point in the book, you've been developing programs that store
their data in files if they store their data at all. You've also been developing
programs that get data from the console and display the results on the
console. In the real-world, though, most programs store their data in
databases and use graphical user interfaces (GUIs) to get user entries and
display results.
That's why this section shows you how to do both. In chapter 17, you'll
learn how to develop programs that store their data in databases. In chapter
18, you'll learn how to develop programs that have GUIs. You can read
these chapters in whichever sequence you prefer since they aren't related,
and you don't have to read section 2 before you read these chapters.
However, we do recommend that you read all three chapters in section
3 on object-oriented programming before you read chapters 17 and 18.
Then, in chapter 17, you'll study a program that uses business objects
and has a three-tier architecture. And in chapter 18, you'll see how GUI
programming depends on inheritance. In short, chapters 17 and 18 will
enhance your understanding of how object-oriented programming is used
in the real world.
17
How to work
with a database
In chapter 7, you learned how to work with programs that store data in files. In
the real world, though, most programs store data in databases. That's because
storing data in a database provides many advantages over storing data in a file.
In this chapter, you'll learn how to work with a database. More specifically,
you'll learn how to use Python to work with a SQLite database. Note, however,
that most of these skills also apply to working with other types of databases
such as MySQL, Oracle, and SQL Server databases.
An introduction to relational databases 462
How a database table is organized 462
How the tables in a database are related 464
How the columns in a table are defined 466
How to use the SQL statements
for data manipulation 468
How to select data from a sinsle table 468
How to select data from multiple tables 470
How to insert, update, and delete rows 472
How to use SQLite Manager to work with a database ....474
How to connect to a SQLite database 474
How to execute SQL statements 476
How to use Python to work with a database 478
How to connect to a SQLite database 478
How to execute SELECT statements 480
How to set the rows in a result set 482
How to execute INSERT, UPDATE, and DELETE statements 484
How to test the database code 486
How to handle database exceptions 486
The Movie List program 488
The user interface 488
The business tier 488
The database tier 490
The presentation tier 494
Perspective 498
462 Section 4 Database and GUI programming
An introduction to relational databases
In 1970, Dr. E. F. Codd developed a model for a new type of database called
a relational database. This type of database eliminated some of the problems
that were associated with standard files and other database designs. By using the
relational model, you can reduce data redundancy, which saves disk storage and
leads to efficient data retrieval. You can also view and manipulate data in a way
that is both intuitive and efficient. Today, relational databases are the de facto
standard for database applications.
To facilitate the use of relational databases, a database management system
(DBMS) like MySQL or SQL Server is used. The DBMS not only lets you create
and maintain databases, it also maintains the integrity of the databases and helps
them run as efficiently as possible.
How a database table is organized
In a relational database, data is stored in one or more tables that consist of
rows and columns. This is illustrated by the relational Movie table in figure 17-1.
Rows and columns can also be referred to as records and fields, and a value that
is stored at the intersection of each row and column is sometimes called a cell.
In this example, each row contains information about a single movie. Then,
each column in the row provides data about that movie, including name, year,
and running time in minutes. In addition, the first column in this table provides a
unique ID for each movie, and the second column provides an ID that associates
each movie row with a movie category. For example, the third row in this table is
for a movie named Aladdin that was released in 1992 and has a running time of
90 minutes. It also has a movie ID of 3 and a category ID of 1.
Most tables in a relational database have a primary key column that uniquely
identifies each row in the table. In this example, the movielD column is the
primary key for the table. In other words, two movies in the table can't have the
same ID. Often, the DBMS generates the primary keys for the records as they
are added to the table, which is the case for this table. Also, the DBMS won't
allow a record to be added to the table if it has the same (a duplicate) primary
key.
In general, each table in a database is modeled after a real-word entity such
as a product, customer, or movie. Then, if the entities for a table provide their
own unique keys like product number or invoice number, those columns can be
used for the primary key so they don't need to be generated. A primary key can
also consist of two or more columns.
Chapter 17 How to work with a database
463
The Movie table
Primary key
Columns
movielD categorylD name year
1
2
3
4
5
6
7
8
9
10
11
12
13
2
2
2
3
3
3
3
3
Spirit: Stallion of the Cimarron
Spirited Away
Aladdin
Ice Age
Toy Story
Monty Python and the Holy Grail
Monty Python's Life of Brian
Monty Python's The Meaning of Life
Gandhi
Jinnah
Lawrence of Arabia
Hotel Rwanda
Twelve Years a Slave
2002
2001
1992
2002
1995
1975
1979
1983
1982
1998
1962
2004
2013
minutes
83
125
90
81
81
9
94
107
191
110
216
121
134
Rows
Concepts
• A relational database consists of tables. Tables consist of rows and columns, which
can also be referred to as records and fie Ids.
• A table is typically modeled after a real-world entity, such as a product or customer,
but it can also be modeled after an abstract concept, such as the data for a game.
• A column represents an attribute of the entity, such as a movie's name.
• A row contains a set of values for one instance of the entity, such as one movie.
• Most tables have a primary key that uniquely identifies each row in the table.
• The primary key is usually a single column, but it can also consist of two or more
columns.
Figure 17-1 How a database table is organized
464 Section 4 Database and GUI programming
How the tables in a database are related
The tables in a relational database can be related to other tables by values
in specific columns. The two tables shown in figure 17-2 illustrate this concept.
Here, each row in the Category table is related to one or more rows in the Movie
table. This is called a one-to-many relationship. In other words, a category can
have many movies, but a movie can only belong to one category.
Typically, relationships exist between the primary keys in one table and
foreign keys in another table. A foreign key is simply one or more columns in a
table that refer to a primary key in another table.
In this example, the categorylD column in the Movie table is a foreign key
that refers to the categorylD column in the Category table, which is the primary
key for that table. For example, the first row in the Movie table has a categorylD
of 1 that relates to the first row in the Category table, which is the Animation
category.
You should know that the Movie table in this figure is unrealistic because its
rows are in sequence by both movielD and categorylD. As soon as records are
added to the Movie table, though, the cateogerylDs won't be in sequence. If, for
example, a 14th record is added to the table with a categorylD of 2, the categorylD
sequence will be broken.
Although a one-to-many relationship is the most common type of
relationship, two tables can also have a one-to-one or many-to-many relationship.
If a table has a one-to-one relationship with another table, the data in the two
tables could be stored in a single table. Because of that, one-to-one relationships
are used infrequently.
In contrast, a many-to-many relationship is usually implemented by using
an intermediate table that has a one-to-many relationship with the two tables. In
other words, a many-to-many relationship can usually be broken down into two
or more one-to-many relationships.
Chapter 17 How to work with a database
465
The relationship between a Category table and a Movie table
Primary key
categorylD name - 1
2
3
Animation
Comedy
| History
Foreic
jn key
movielD categorylD name
i
■»
i_
■+►
.^
J »-
r- k.
^^^^^^S
6
7
8
9
10
11
12
13
2
2
2
3
3
3
3
3
Spirit: Stallion of the Cimarron
Spirited Away
Aladdin
Ice Age
Toy Story
Monty Python and the Holy Grail
Monty Python's Life of Brian
Monty Python's The Meaning of Life
Gandhi
Jinnah
Lawrence of Arabia
Hotel Rwanda
Twelve Years a Slave
year
2002
2001
1992
2002
1995
1975
1979
1983
1982
1998
1962
2
2013
minutes
83
125
90
81
81
91
94
107
191
110
216
121
134
Concepts
• The tables in a relational database are related to each other through their key
columns. For example, the Category and Movie tables in this figure use the
categorylD column to create the relationship between the two tables.
• The categorylD column in the Movie table is called a foreign key because it
identifies a related row in the Category table. A table may contain one or more
foreign keys.
• When you define a foreign key, you can't add rows to the table with the foreign key
unless there's a matching primary key in the related table.
• The relationships between the tables in a database correspond to the relationships
between the entities they represent. The most common type of relationship is a
one-to-many relationship as illustrated by the Category and Movie tables.
• A table can also have a one-to-one relationship or a many-to-many relationship
with another table.
Figure 17-2 How the tables in a relational database are related
466 Section 4 Database and GUI programming
How the columns in a table are defined
When you define a column in a table, you assign properties to it as indicated
by the design of the Movie table in figure 17-3. First, you need to define a name
for the column, which should generally reflect the type of information that the
column stores. Then, you need to define a data type for the column, which
determines the type of data that the column stores. In this table, all of the
columns use the INTEGER type to store integer numbers, except for the name
column, which uses the TEXT type to store the name of the movie.
In addition to choosing a data type, you must identify whether the column
can store a null value. The NULL keyword represents a value that's unknown,
unavailable, or not applicable. If you don't allow null values, then you must
provide a value for the column or you can't store the row in the table. In this
figure, none of the columns can be NULL.
You can also assign a default value to a column. Then, the column uses
the default value if no value is provided when adding the row. In this example,
the default value is NULL for all columns. When a default value of NULL is
combined with a column that doesn't allow null values, it forces the user to
provide a value for that column when saving a row.
When you define a column as the primary key, its value must be unique. One
way to assure that is to let the DBMS generate the primary key when a new row
is added to the database.
When you define a column as a foreign key, you also specify which column
it refers to in another table. In this example, the categorylD column in the Movie
table refers to the categorylD column in the Category table. When a column
is a foreign key, its value must exist in a row of the table that it references.
In addition, the DBMS won't let you delete a row from a table if other tables
contain foreign key values that refer to that row.
If, for example, there are any movies in the Movie table that belong to
category 1, the DBMS won't let you delete the category 1 row from the Category
table. If the DBMS didn't enforce this constraint, you would end up with movies
that have foreign keys that refer to a category that doesn't exist. These keys can
be referred to as orphaned keys.
Chapter 17 How to work with a database
467
The columns of the Category table
Name
categorylD
name
Data
Type
INTEGER
TEXT
Not
Null?
Default Primary Foreign
Value Key? Key?
Y
Y
NULL
NULL
Y
N
N
N
The columns of the Movie table
Data Not
Name Type Null?
Default
Value
Primary
Key?
Foreign
Key?
movielD
categorylD
name
year
minutes
INTEGER
INTEGER
TEXT
INTEGER
INTEGER
Y
Y
Y
Y
Y
NULL
NULL
NULL
NULL
NULL
Y
N
N
N
N
N
Y
N
N
N
Common SQLite data types
Type Description
TEXT
INTEGER
REAL
BLOB
A variable-length Unicode string.
Integer values of various sizes.
Decimal values that can contain an integer portion and a decimal portion.
The data is stored exactly as entered. Can contain binary data such as images.
Description
• The data type that's assigned to a column determines the type of data that can be
stored in the column.
• Each column definition also indicates whether or not it can contain null values. The
NULL keyword indicates that the value of the column is unknown.
• A column can also be defined with a default value. Then, that value is used if
another value isn't provided when a row is added to the table.
• If a column is defined as a primary key, some databases automatically generate its
value when a new row is added to the table.
• When you define a column as a foreign key, you specify the column in another
table that the key refers to.
• To avoid creating orphaned keys, a database typically prevents you from deleting a
row if one of its values is being used as a foreign key in another table.
Figure 17-3 How the columns in a table are defined
468 Section 4 Database and GUI programming
How to use the SQL statements
for data manipulation
Structured Query Language, or SQL, is a standard language for working
with databases. In conversation, SQL is pronounced "S-Q-L" or "sequel". In
this book, we use "sequel" as the pronunciation so we refer to a SQL statement,
instead of an SQL statement.
The SELECT, INSERT, UPDATE, and DELETE statements that you'll
learn about next make up SQL's Data Manipulation Language (DML). These
statements work with the data in a database, and they are the statements that
programmers use every day in their programs. As a result, these are the
statements that you'll learn how to use in this chapter.
In contrast, the CREATE DATABASE, DROP DATABASE, CREATE
TABLE, and DROP TABLE statements are part of SQL's Data Definition
Language (DDL). These statements are typically used by database administrators
to create and delete databases and tables, and they aren't presented in this book.
How to select data from a single table
The SELECT statement is the most commonly used SQL statement. It is used
to retrieve data from one or more tables in a database. When you run a SELECT
statement, it is commonly referred to as a query. The result of a query is a table
known as a result set, or result table.
Figure 17-4 shows the syntax for a SELECT statement that gets all of the
columns of a table, and it shows the syntax for a SELECT statement that gets only
selected columns. In the syntax summaries for SQL statements, the capitalized
words are SQL keywords, and the lowercase words are the ones that you supply.
Also, the brackets indicate optional components of a statement, and the bar (|)
indicates a choice between two options.
The first example in this figure shows how to get all columns and selected
rows from the Movie table. Here, the SELECT clause uses the asterisk (*)
wildcard to indicate that all of the columns in the table should be retrieved,
and the FROM clause specifies that these columns should be retrieved from the
Movie table. Then, the WHERE clause indicates that each row should have a
categorylD column that's equal to 2. As a result, this query returns three rows
and five columns.
The second example shows how to get selected columns and rows from the
Movie table. This time, the SELECT clause identifies the name and minutes
columns, and the FROM clause identifies the Movie table. Then, the WHERE
clause specifies that each row that's returned by the statement should have a
running time that's less than 90 minutes.
Last, the ORDER BY clause indicates that the retrieved rows should be
sorted in ascending order by the minutes column. This sorts the rows from the
shortest movie to the longest movie. However, if you wanted to switch the sort
order, you could use the DESC keyword instead of the ASC keyword. Then, the
rows would be sorted in descending sequence instead of ascending sequence.
Chapter 17 How to work with a database
469
The syntax for a SELECT statement that gets all columns
SELECT *
FROM table
[WHERE selection-criteria!
[ORDER BY column-1 [ASCIDESC]
[, column-2 [ASCIDESC] ...]]
A SELECT statement that gets all columns
SELECT * FROM Movie
WHERE categoryID = 2
' movielD categorylD name
6 2
7 2
8 2
Monty Python and the Holy Grail
Monty Python's Life of Brian
Monty Python's The Meaning of Life
year
1975
1979
1983
minutes
91
94
107
The syntax for a SELECT statement that gets selected columns
SELECT column-l[, column-2] ...
FROM table
[WHERE selection-criteria]
[ORDER BY column-1 [ASC|DESC][, column-2 [ASC|DESC] ...]]
A SELECT statement that gets selected columns and rows
SELECT name, minutes
FROM Movie
WHERE minutes < 90
ORDER BY minutes ASC
name
Ice Age
Toy Story
Spirit: Stallion of the Cimarron
minutes
81
81
83
Description
• A SELECT statement is a SQL statement that returns a result set (or result table)
that consists of the specified rows and columns.
• To specify the columns to select, use the SELECT clause.
• To specify the table that the data should be retrieved from, use the FROM clause.
• To specify the rows to select, use the WHERE clause.
• To specify how the result set should be sorted, use the ORDER BY clause. Within
this clause, use the ASC keyword to sort a column in ascending order or the DESC
keyword to sort a column in descending order.
Figure 17-4 How to select data from a single table
470 Section 4 Database and GUI programming
How to select data from multiple tables
Figure 17-5 shows how to use the SELECT statement to retrieve data from
two tables. This is commonly known as a join. The result of any join is a single
result set.
An inner join is the most common type of join. When you use an inner join,
the data from the rows in two tables are included in the result set only if their
related columns match. In this figure, the SELECT statement joins the data
from the rows in the Movie and Category tables, but only if the value of the
categorylD column in the Movie table is equal to the categorylD column in the
Category table. In other words, if there isn't any data in the Movie table for a
category, that category isn't added to the result set. This join results in a
user-friendly result set because the category now has a name instead of a
numerical ID.
To code an inner join, you use the JOIN clause to specify the second table
and the ON clause to specify the columns to be used for the join. Then, if a
column in one table has the same name as a column in the other table, you must
qualify the column name by coding the table name, a dot, and the column name.
This is illustrated by both columns in the ON clause. This is also illustrated by
the first two columns in the SELECT clause.
When a column in one table of a join has the same name as a column in the
other table, you can use the AS clause to create an alias for the column name.
In this example, an alias of categoryName is assigned to the Category table's
name column. So that's the name that's displayed at the top of the column in the
result set, and that's the name that you can use in your Python code to access this
column.
Although there are other types of joins besides inner joins, inner joins are
so common that they are the default type of join. That's why you don't have to
code the INNER keyword before the JOIN keyword when you code your SQL
statement.
Although this figure only shows how to join data from two tables, you can
extend this syntax to join data from additional tables. If, for example, you want
to create a result set that includes data from three tables named Category, Movie,
and Actor, you can code the FROM clause of the SELECT statement like this:
FROM Movie
JOIN Category ON Category.categorylD = Movie.categorylD
JOIN Actor ON Actor.movielD = Movie.movielD
Then, you can include any of the columns from the three tables in the column
list of the SELECT statement.
Chapter 17 How to work with a database
471
The syntax for a SELECT statement that joins two tables
SELECT column-2 [AS alias-1] [[, column-2] [AS alias-2]]...
FROM table-1
[INNER ]JOIN table-2 ON table-1.column-1 = table-2.column-2
A statement that gets data from two related tables
SELECT Movie.name. Category.name AS categoryName, minutes
FROM Movie
JOIN Category ON Category.categorylD = Movie.categoryID
WHERE minutes < 90
ORDER BY minutes ASC
name
Ice Age
Toy Story
Spirit: Stallion of the Cimarron
categoryName
Animation
Animation
Animation
minutes
81
81
83
Description
• To return a result set that contains data from two tables, you join the tables. To do
that, you can use a JOIN clause.
• Most of the time, you'll want to code an inner join so that rows are only included
when the key of a row in the first table is equal to (matches) the key of a row in the
second table.
• If you don't specify the join type you want, an inner join is used by default.
• If the two tables you want to join contain duplicate column names, you have to
qualify the column by prefixing each column name with its table name. Otherwise,
the column name is ambiguous, and the database doesn't know which column to
retrieve.
• When you qualify a name, you often want to provide a new name, or alias, for the
column name so each column in the result set has a unique name. To do that, you
can code the AS keyword followed by the aliases for the columns.
• When you're getting started with joins, you may want to prefix every column with
its table name so it's clear which table the column is coming from. However, this is
only required for the column names that are the same in both tables.
Figure 17-5 How to select data from multiple tables
472 Section 4 Database and GUI programming
How to insert, update, and delete rows
figure 17-6 shows how to use the INSERT, UPDATE, and DELETE
statements to add, update, or delete one or more rows in a database. Note that
none of these statements return a result set. Instead, they change the data in the
database.
The INSERT statement is used to add a row to a database table. As the syntax
and examples show, you can do that in two ways. Here, the INTO clause in the
first INSERT statement provides a list of the columns that data will be provided
for. Then, the VALUES clause provides the values for those columns in the
same sequence as the columns. Note here that you don't have to provide values
for columns like the MovielD column that will have their values generated by
the DBMS. And you don't have to provide values for columns that have default
values. For the Movie table, though, none of the columns provide default values.
The second INSERT statement shows that the column list in the INTO
clause is optional. In other words, you don't need to supply the list of column
names after the table name. In this case, though, you must code the values in
the order in which the columns are defined for the table, and you must supply a
value for every column, even ones that SQLite generates automatically.
The syntax and example for the UPDATE statement show how to use that
statement to update the data in one or more columns of one or more rows. Here,
the SET clause specifies the columns and values that are to be updated, and the
WHERE clause specifies which rows should be updated. In the example, the
UPDATE statement updates the minutes column in the row where the movielD
column is equal to 4, so only one row is updated.
Last, the syntax and examples for the DELETE statement show how to
delete one or more rows in a table. Here, the WHERE clause identifies the row
or rows to be deleted. As a result, the first DELETE statement deletes the row
from the Movie table where the movielD equals 12, so only one row is deleted.
But the second DELETE statement deletes all rows in the Movie table that have
a year that's equal to 1979, so more than one row is deleted.
When you use DELETE statements, you need to be aware of how dangerous
they can be. That's because a coding error in the WHERE clause can delete far
more rows than you intended. So use DELETE statements with care, especially
when you're deleting rows based on columns that don't contain unique values.
When you specify a value within a SQL statement, you must enclose string
values in single quotes. However, you aren't required to enclose numeric values
in single quotes. This is illustrated by the INSERT, UPDATE, and DELETE
statements in this figure, but it's also true for SELECT statements.
Chapter 17 How to work with a database 473
The syntax for the INSERT statement
INSERT INTO table-name [ (column-list) ]
VALUES (value-list)
A statement that uses a column list to add one row
INSERT INTO Movie (name, year, minutes, categorylD)
VALUES ('Juno1, 2007, 96, 2)
A statement that doesn't use a column list to add one row
INSERT INTO Movie
VALUES (14, 2, ■Juno■, 2 007, 96)
The syntax for the UPDATE statement
UPDATE table-name
SET expression-1 [, expression-2] ...
WHERE selection-criteria
A statement that updates a column in one row
UPDATE Movie
SET minutes = 84
WHERE movielD = 4
The syntax for the DELETE statement
DELETE FROM table-name
WHERE selection-criteria
A statement that deletes one row from a table
DELETE FROM Movie
WHERE movielD = 14
A statement that deletes multiple rows from a table
DELETE FROM Movie
WHERE year = 1979
Description
• The INSERT, UPDATE, and DELETE statements modify the data that's stored in a
database. These statements don't return a result set.
• Be careful when deleting or updating based on columns that might not be unique,
since you could inadvertently delete or update more rows than intended.
• When you specify a value within a SQL statement, you must enclose string values
in single quotes. However, you aren't required to enclose numeric values in single
quotes.
Figure 17-6 How to insert, update, and delete data
474 Section 4 Database and GUI programming
How to use SQLite Manager to work
with a database
SQLite is a popular open-source relational database that can be embedded
into programs. Many software products use SQLite including the Firefox web
browser, the Civilization V game, and many other games. This chapter shows
how to use SQLite because it's easy to set up and because Python includes
built-in support for working with SQLite.
To work with a SQLite database, you can use a Firefox add-on called SQLite
Manager. If you haven't already installed it, the appendix for your operating
system will show you how.
How to connect to a SQLite database
Figure 17-7 begins by showing how to use SQLite Manager to connect
to a database and view one of its tables. First, you start Firefox and then you
start SQLite Manager. If you've added the SQLite Manager icon to the Firefox
toolbar, you can just click on the icon to start the SQLite Manager in a separate
window.
Then, to connect to the database you want to work with, you select
Database ^Connect Database from the Manager's menu. In the resulting dialoe
box, you just navigate to the file for the SQLite database. In this figure, SQLite
Manager has opened the SQL database that you get when you install the source
code for this book.
Once you connect to the database, you can view one of its tables by clicking
the Browse & Search tab in SQLite Manager's main panel. Then, in the left
panel, you can expand the Tables node and click the table you want to view. This
displays the table in the main panel, along with all of its rows and columns. In
this figure, SQLite Manager shows the Movie table and its data.
As you view a table, you can click on a row to select it, and you can use the
buttons at the top of the table to add, edit, or delete rows. In this figure, the first
row is selected. As a result, you could click the Edit button to edit its data, or you
could click the Delete button to delete the row.
After you expand the Tables node, you can work with a table by right-clicking
on it (Ctrl-clicking on Mac) and selecting a command from the resulting menu.
For example, you could select the Rename command to rename the table, or you
could select the Delete command to delete the table.
Chapter 17 How to work with a database
475
SQLite Manager after using the Browse & Search tab to view a table
SQLite Manager - C:\murach\python\jdb\movies.sqlite
Database Table Index View Trigger Tools Help
I ~~ ~~
|2^ /W I §| !§* I ID iff Directory > (Select Profile Database) v Go
movies-sqfite
Master Table (1)
^Tables (2)
Category
Movie
Views (0)
Indexes (0)
Triggers (0)
J
I
Structure Browse & Search Execute SQL DB Settings Import Wizard
TABLE i Movie
movielD
1
I.
Search
Show All
Add
Duplicate
category ID
name year
Spirit: StalSon of the... • >
2
'
4
5
6
'
8
9
10
11
12
13
1
1
1
1
2
2
2
3
3
3
3
3
Spirited Away
Aladdin
Ice Age
Toy Story
Monty Python and the...
Monty Python's Life o...
Monty Python's The ...
Gandhi
Jinnah
Lawrence of Arabia
Hotel Rwanda
Twelve Years a Slave
2001
1992
2002
1995
1975
1979
1983
1982
1998
1962
2004
2013
1 to 13 of 13
SQLite 3.12.2 Gecko 48.0.2 0.8.3.1 -signed.1 -signed Exclusive Number of Rows Returned: 3
Edit
minutes
E
125
90
81
81
91
94
107
191
110
216
121
134
□
X
Delete
K
ET:0ms
How to connect to a SQLite database and view a table
1. Start Firefox.
2. If you added the SQLite Manager icon to the Firefox toolbar, as shown in the
appendix, you can click on the icon to start SQLite Manager. Otherwise, you can
use Tools->SQLite Manager to start SQLite Manager, or you can press Alt+T
(Option+T on Mac) to access the Tools menu and then select SQLite Manager.
3. Select Database ^Connect Database. Then, use the dialog box to select the SQLite
database you want to open. The database for this chapter should be located here:
python\_db\movies.sqlite
4. In the main panel, click the Browse & Search tab.
5. In the left panel, expand the Tables node and click the table you want to view.
Description
• To install the Firefox browser and the SQLite Manager, use the instructions in the
appendix for your operating system.
• To connect to a database and view one of its tables, use the procedure above.
• As you view a table, you can click on a row to select it, and you can use the buttons
at the top of the table to add, edit, or delete rows.
• After you expand the Tables node, you can right-click (Ctrl-click on Mac) on a table's
name. Then, you can use the resulting menu to copy, rename, or delete the table.
Figure 17-7 How to use SQLite Manager to connect to and work with a database
476 Section 4 Database and GUI programming
How to execute SQL statements
After you use SQLite Manager to connect to a database, you can use it to
execute SQL statements against that database. This can help you test your SQL
statements before you use them in your Python code, and it can help you debug
SQL statements that aren't working correctly.
Figure 17-8 shows how to use SQLite Manager to execute a SQL statement.
To start, you click on the Execute SQL tab. Then, you enter a SQL statement and
click the Run SQL button. When you do, SQLite Manager displays the result set
just below the Run SQL button. In this example, SQLite Manager has executed a
SELECT statement successfully and displayed a result set. However, if the SQL
statement isn't valid, SQLite Manager displays an error message that can help
you find and fix the problem.
Of course, the INSERT, UPDATE, or DELETE statements, don't return a
result set. So, for those statements, SQLite Manager doesn't display a result set.
However, it still executes the statement, which modifies the data in the database.
It also displays an error message if the statement causes an error to occur.
To make it easy to identify the keywords in a SQL statement, the examples
in this book capitalize the keywords. You should realize, however, that this
capitalization is optional. So, if you want to use lowercase letters in the
keywords when you type them into SQLite Manager, you can do that.
Chapter 17 How to work with a database
477
The Execute SQL tab after a SQL statement has been executed
SQLite Manager - C:\murach\python\jdb\movies.sqlite
Database Table index View Trigger Tools Help
I ~~ ~~
□
X
0K D^_ _flwla SFiBEj n3F
movies-sqfite s
Master Table (1)
^Tables (2)
Category
Movie
Views (0)
Indexes (0)
Triggers (0)
I LLJ LLJ I Directory > (Select Profile Database)
Structure Browse & Search Execute SQL DB Settings Import Wizard
v Go
Enter SQL
Select | Data Manipulation | Create/Altei | Drop | Relndex | PRAGMA
SELECT Movie.name. Category.name AS categoryName, minutes
FROM Movie
JOIN Category ON Category, category ID = Movie, category ID
WHERE minutes < 90
ORDER BY minutes ASC
Run SQL
Actions
Last Error
not an error
name
Ice Age
Toy Story
Spirit Stallion of the Cimarron
categoryName
Animation
Animation
Animation
SQLite 3.12.2 Gecko 48.0.2 0.8.3.1 -signed.1 -signed Exclusive Number of Rows Returned: 3
minutes
81
81
83
R
ET:0ms
Description
• To execute a SQL statement, click the Execute SQL tab. Then, enter the SQL
statement and click the Run SQL button.
• To sort the columns in the result set, click on the column name.
Figure 17-8 How to use SQLite Manager to run a SQL statement
478 Section 4 Database and GUI programming
How to use Python to work
with a database
Now that you know how to code SQL statements and how to use SQLite
Manager to test those statements, you're ready to learn how you can use those
statements in Python as you develop programs that work with a database.
How to connect to a SQLite database
Figure 17-9 shows you how to connect to a SQLite database from Python.
To begin, you import the sqlite3 module as shown in the first example. This
module allows you to work with SQLite databases.
Once you've imported the sqlite3 module, you need to open a connection to
the database. To do that, you call the connect() method from the sqlite3 module
to create a connection object. This method accepts an argument that specifies the
path to the database file. If the database file is in the working directory, which is
usually the same directory as the program file, you only need to specify the name
of the database file as shown in the second example. Here, the database file has a
name of movies.sqlite.
Although this technique is adequate for programs like the ones in this book,
it may not be adequate for real-world programs. That's why the next example
shows how to connect to a database that isn't in the working directory. To start,
this example imports the sys and os modules. Then, it uses the sys module to
determine whether the platform is Windows, Mac OS X, or Linux. If the platform
attribute is "win32", the operating system is Windows. That's true even if you are
running on a 64-bit version of Windows. If the platform attribute isn't "win32",
it's safe to assume that the operating system is OS X or some variant of Linux or
Unix.
On a Windows system, this example connects to the movie database that's
in the _db directory by supplying a complete path to its file. However, on OS X
and Linux, normal users can't store files outside of their own home directory.
As a result, if you are running as a normal user (and you should be for security
reasons), the database file is most likely installed in the home directory.
Then, to get the user's home directory, this code accesses the environ
dictionary that's available from the os module and uses the HOME key to get the
home directory of the user who is running the program. Next, it appends the path
to the database file to the path to the home directory. The last statement in this
example gets a connection object by passing the path to the database file to the
connect() method of the sqlite module.
When your program is through with a connection object, your program
should close it so its resources are returned to the system. That last example in
this figure shows how to use the close() method of a connection object to do that.
Here, the if statement checks whether the connection object named conn exists.
If it does, the closeQ method is called.
Chapter 17 How to work with a database 479
How to import the module that supports SQLite databases
import sqlite3
The syntax for connecting to a database and returning a connection object
conn = sqlite3 .connect (path_to_database_file)
How to connect to a database that's in the working directory
conn = sqlite3-connect("movies.sqlite")
How to connect to a database that's not in the working directory
import sys
import os
if sys.platform == "Win32": # Windows
DB_FILE = "/murach/python/_db/movies.sqlite"
else: # Mac OS X and Linux
HOME = os.environ["HOME"]
DB_FILE = HOME + "/Documents/murach/python/_db/movies.sqlite"
conn = sqlite3.connect(DB_FILE)
How to use the close() method to close a connection object
if conn:
conn.close()
Description
• To work with a SQLite database in Python, you need to import the sqlite3 module.
• To connect to a database, call the connect() method on the sqlite3 module with the
path to the database. This returns a connection object that you can use to access the
database.
• If the database file is in the working directory, which is usually the same
directory as the program, the path to the database is just the name of the database
file. Otherwise, you can specify a complete path to the database file.
• If you need to get the home directory of the current user, you can import the os
module and use its environ dictionary.
• Because a SQLite database runs locally and isn't accessible over a network, you
don't need a username or password to connect to it.
• When you're through with a database connection, you need to close it so it frees up
the resources that it's using.
Figure 17-9 How to use Python to connect to a SQLite database
480 Section 4 Database and GUI programming
How to execute SELECT statements
Eigure 17-10 shows how to execute SELECT statements with Python. But
first, in order to execute any SQL statement on a database, you need to get a
cursor object for the database. To do that, you call the cursor() method from
the connection object. Then, to execute a SQL statement, you call the execute()
method from the cursor object. If the method requires any values as arguments,
you pass a tuple argument that supplies the values to the method.
The first example in this figure shows how to get a cursor object named c.
Then, the second example shows how to execute a simple SELECT statement
for the database that's represented by the cursor object. Here, the first statement
creates a variable named query that stores a SELECT statement that gets all rows
from the Movie table. Then, the next statement runs the query by calling the
execute() method from the cursor object and passing the query variable as the
first argument.
When you code a SQL statement in Python, you can enclose it in single or
double quotes. However, since SQL statements often span multiple lines, it's
often better to use three single quotes as shown in this example. That way, you
don't have to concatenate multiple lines of code.
The third example in this figure shows how to run a query based on input
provided by the user of the program. Here, the query selects all movies with a
running time of less than a parameter value that will get passed to the query. In
a query like this, a question mark (?) is used as a placeholder for each parameter
that's needs to be supplied by the calling statement. Then, when you call the
execute() method, you pass a tuple that contains the required placeholder values
as the second argument for the method.
When you use this technique, remember that you must include a comma at
the end of a tuple that contains only one value. In this example, the SELECT
statement has only one placeholder so the tuple has a comma after the value 90.
That means that the statement will return a result set that contains all movies
with a running time of less than 90 minutes.
When your program is through with a cursor, it should close it so its
resources are released to the system. That's why the last example in this figure
shows how to do that. First, you need to import the closingQ function from
the Python contextlib module. Then, you need to code a with statement for the
closingO function that contains the statements that use the cursor. This code will
close the cursor object whether or not an exception is thrown.
Chapter 17 How to work with a database
481
The cursorQ method of the connection object
Method Description
cursor () Returns a cursor object that you can use to execute SQL statements.
The execute() method of the cursor object
Description
Method
execute (sql [params_tuple] )
Executes the SQL statement. If the statement
includes question mark placeholders, you supply
the values for the placeholders in a tuple parameter.
How to get a cursor object from the connection object
c = conn.cursor()
How to execute a SELECT statement that doesn't have parameters
query = ■■'SELECT * FROM Movie'''
c.execute(query)
How to execute a SELECT statement that has a parameter
query = '''SELECT * FROM Movie
WHERE minutes < ?''■
c.execute(query, (90,))
How to automatically close the cursor object
The code for importing the closingQ function
from contextlib import closing
The syntax for automatically closing the cursor object
with closing(resource) as name:
statements
How to automatically close the cursor object
with closing(conn.cursor()) as c:
query = ''"SELECT * FROM Movie'''
c.execut e(query)
Description
• To execute a SELECT statement in Python, you use the cursor() method of the
connection object to get a cursor object. Then, you use the execute() method of the
cursor object to execute the SQL statement.
• To mark a variable in a SQL statement, you code a question mark (?) placeholder.
Then, you provide a tuple parameter for the execute() method that provides the
values for the placeholders. But remember that a tuple with only one item must end
with a comma.
• When you are done with a cursor, you should close it to make sure its resources are
released. To make sure that happens, even if an exception occurs, you can code the
database operations in a with statement that uses the closingQ function.
Figure 17-10 How to use Python to execute SELECT statements
482 Section 4 Database and GUI programming
How to get the rows in a result set
After you execute a query, the cursor object contains a result set with the
rows returned by the query. Then, to access a row or rows, you can use the
fetchone() or fetchall() methods of the cursor object. These methods are
summarized and illustrated in figure 17-11.
The first example begins by getting a cursor and executing a query that
selects the movie in the Movie table that has an ID of 5. Then, it uses the
fetchone() method to get the row that's in the result set and store it in a variable
named movie. Because this code is within a with statement for the closingO
function, the cursor is closed after the statements are executed.
After a row is stored in the movie variable, you can access the columns of
the row using an index. For instance, the second example prints the name, year,
and running time for the movie by specifying indexes of 2, 3, and 4 for those
columns. This works because movielD and categorylD are in the columns with
the indexes 0 and 1.
Because indexes don't clearly identify the data that's stored in the columns,
the third example shows how to access the columns by name. To do that, you set
the row_factory attribute of the connection object to sqlite3.Row. Once that's
done, you can access the columns of a row by name, which makes your code
easier to read and less prone to errors. In addition, your code won't break if you
add a column to the table later on that changes the indexes.
If you want to access all of the rows in a result, you can use the fetchallQ
method as shown in the last example. Here again, the query returns all rows
in the Movie table that have a running time of less than 90 minutes. Then, the
fetchall() method stores all of these rows in a list named movies. At this point,
you can use a for loop to access each movie in the list. In this example, this loop
prints the movie's name, year of release, and running time.
Chapter 17 How to work with a database
483
The fetchone() and fetchallQ methods of the cursor object
Method
fetchone()
fetchalK)
Description
Returns a tuple containing the next row from the result set. If there
is no next row in the result set, this method returns None.
Returns a list containing all of the rows in the result set.
How to use the fetchone() method to get a row from of a table
with closing(conn.cursor()) as c:
query = ■■"SELECT * FROM Movie
WHERE movielD = ?'■■
c.execute(query, (5,)
movie = c.fetchone()
How to access columns by index
print ("Name: " + movie [2 ] )
print("Year: " + str(movie[3]))
print("Minutes: " + str(movie[4]))
How to access columns by name
How to use the row_factory attribute to enable name access
conn.row_factory = sqlite3.Row # Row is a SQLite constant
How to access columns by name
pr int (" Name: " + movi e [" name " ] )
print("Year: " + str(movie["year"]))
print("Minutes: " + str(movie["minutes"]))
How to use the fetchall() method to retrieve all rows in the cursor
with closing(conn.cursor()) as c:
query = ■■"SELECT * FROM Movie
WHERE minutes < ?'■■
c.execute(query, (90,))
movies = c.fetchall()
How to loop through all rows
for movie in movies:
print (movie [ "name" ] , " | ", movie [ "year" ] , " | ", movie [ "minutes"] )
The console
Spirit: Stallion of the Cimarron | 2002
Ice Age | 2002 | 81
Toy Story I 1995 I 81
83
Description
• If you access columns by index, your code can break if the database structure
changes. When you access columns by name, your code is more durable and easier
to read.
• Before you can access columns by name, you need to set the the row_factory attribute
of the connection object to the SQLite constant named Row (sqllite.Row).
Figure 17-11 How to use Python to get the rows in a result set
484 Section 4 Database and GUI programming
How to execute INSERT, UPDATE,
and DELETE statements
Eigure 17-12 shows how to use Python to execute INSERT, UPDATE, and
DELETE statements. This works much like executing a SELECT statement, but
these statements don't return a result set. Instead, they modify the data in the
database.
Also, when you execute one of these SQL statements, the database is
changed but it isn't saved to the database. To save the changes, you must call the
commitO method of the connection object. Otherwise, the changes are lost.
The first example in figure 17-12 shows how to use an INSERT statement to
add a new movie to the database. First, it sets four variables to the name, year,
running time, and category ID of the movie to be added to the database. Next, it
uses a with statement to open a cursor object named c.
Inside the with statement, the code creates a string named sql that stores
the INSERT statement. This statement uses question mark placeholders for four
values. Then, the execute() method is called with a tuple argument that supplies
the values for these placeholders. As a result, the INSERT statement that the
database actually runs becomes:
INSERT INTO Movie (name, year, minutes, categorylD)
VALUES ('Juno1, 2007, 96, 2)
After this statement is executed, the commit() method is called to save the new
row to the database.
The second example shows an UPDATE statement that changes the running
time to 84 minutes for the movie with an ID of 4. Here again, note the use of the
parameterized SQL statement, and the tuple that supplies the values for the two
placeholders in the SQL statement.
The last example shows a DELETE statement that deletes the movie with an
ID of 12 from the database. This SQL statement is similar to the previous two
statements, but note the comma in the tuple argument that passes just one value
to the DELETE statement.
Chapter 17 How to work with a database 485
The commit() method of the connection object
Method Description
commit () Commits the changes to the database.
How to execute an INSERT statement
name = "Juno"
year = 2007
minutes = 96
categorylD = 2
with closing(conn.cursor()) as c:
sql = ■'■INSERT INTO Movie (name, year, minutes, categorylD)
VALUES (?, ?, ?, ?) ' ' '
c.execute(sql, (name, year, minutes, categorylD))
conn.commit
How to execute an UPDATE statement
id = 4
minutes = 84
with closing(conn.cursor()) as c:
sql = ■■"UPDATE Movie
SET minutes = ?
WHERE movielD = ?'■■
c.execute(sql, (minutes, id))
conn.commit()
How to execute a DELETE statement
id = 12
with closing(conn.cursor()) as c:
sql = ''■DELETE FROM Movie
WHERE movielD = ?''■
c.execute(query, (id,))
conn.commit
Description
• As with the SELECT statement, you use question marks (?) to identify the
parameters in the INSERT, UPDATE, and DELETE statements. Then, you use the
execute() method to supply the values for those parameters.
• After you execute an INSERT, UPDATE, or DELETE statement, you need to
commit the changes by calling the commit() method from the connection object. If
you don't, the changes aren't saved in the database.
Figure 17-12 How to execute INSERT, UPDATE, and DELETE statements
486 Section 4 Database and GUI programming
How to test the database code
To give you a better idea of how the Python skills that you've just learned
work, figure 17-13 presents an example that works with the movies database. To
start, this code imports the sqlite3 module for working with a SQLite database.
Then, it imports the closingO function that automatically closes the cursor object
when you're done with it.
The next statement connects to the movies database. Here, the code only
specifies the name of the file for the database, not its complete path. As a result,
the database file must be in the working directory. So, if you use IDLE to open
the db_tester.py file and run it, it should connect to the movies database.
This is followed by a statement that sets the row factory attribute for the
connection object. As a result, the statements that follow can use names instead
of indexes to refer to the columns in the result sets.
The next block of code executes a SELECT statement that gets all columns
from the Movie table for all movies that are less than 90 minutes long. Then, it
uses a loop to print the name, year, and minutes for these movies to the console.
After the SELECT statement, this code executes an INSERT statement that adds
a new movie to the database, and a DELETE statement that removes that movie
from the database.
When you're new to database programming, experimenting with code like
this is a good way to get started. As you experiment, you will not only see how
the statements work, but also what errors can occur.
How to handle database exceptions
When you write the code that works with a database, the database may throw
exceptions if it can't execute the code successfully. For example, SQLite raises
an exception if you try to execute a query on a table that isn't in the database, or
if you attempt to add a row to a table that has the same primary key as another
row in the table.
However, unlike a traditional database like MySQL or SQL Server, SQLite
doesn't raise exceptions for some types of operations that may result in bad data
such as orphaned keys. For example, SQLite doesn't raise an exception if you
attempt to insert a row that has an invalid foreign key value, or if you attempt to
delete a row that has a foreign key value that's being used by other rows.
If you need to handle database exceptions, you can use try statements to
handle the exceptions just as you would handle any other exception. In this
figure, for example, the code that executes the SELECT statement may raise
an OperationalError. That might happen, for example, if the connect() method
doesn't find the movies.sqlite database. In that case, SQLite creates a new
database that's empty and doesn't have a Movie table. Then, the except clause
prints an error message and sets the movies variable to None. That way, the code
that follows can check whether the SELECT statement executed successfully.
Before you add exception handling to your programs, though, you should try
to write your code so it avoids the operations that could throw exceptions. That's
always a good practice, and that's illustrated by the program in the next figure.
Chapter 17 How to work with a database 487
Code that tests the database
# import the sglite module and closing function
import sglite3
from contextlib import closing
# connect to the database and set the row factory
conn = sqlite3-connect("movies.sqlite")
conn.row_factory = sqlite3.Row
# execute a SELECT statement - with exception handling
try:
with closing(conn.cursor()) as c:
query = ■''SELECT * FROM Movie
WHERE minutes < ?■■■
c.execute(query, (90,))
movies = c.fetchall()
except sqlite3-OperationalError as e:
print("Error reading database -", e)
movies = None
# display the results
if movies 1= None:
for movie in movies:
print(movie["name"], "|", movie["year"], "|", movie["minutes"])
print()
# execute an INSERT statement
name = "A Fish Called Wanda"
year = 1988
minutes = 108
categorylD = 1
with closing(conn.cursor()) as c:
sql = ■■■INSERT INTO Movie (name, year, minutes, categorylD)
VALUES (?, ?, ?, ?) ■ ■ ■
c.execute(sql, (name, year, minutes, categorylD))
conn.commit()
print(name, "inserted.")
# execute a DELETE statement
with closing(conn.cursor()) as c:
sql = ■''DELETE FROM Movie
WHERE name = ?■■■
c.execute(sql, (name,))
conn.commit()
print(name, "deleted.")
The console
Spirit: Stallion of the Cimarron
Ice Age | 2002 | 81
Toy Story | 1995 | 81
A Fish Called Wanda inserted.
A Fish Called Wanda deleted.
2002
| 83
Figure 17-13 How to test the database code
488 Section 4 Database and GUI programming
The Movie List program
In chapter 7, you learned how to code a Movie List program that stores its
data in a text file. However, a real-world program would store this information in
a database. That's why this chapter finishes by presenting a three-tier version of
the Movie List program that stores its data in a SQLite database.
The user interface
Figure 17-14 begins with the user interface for another version of the Movie
List program. In contrast to the Movie List program in chapter 7, though, this
program groups movies by category and stores more data for each movie. It also
stores its data in a SQLite database.
When this program starts, it displays a list of commands followed by a list
of categories that includes the IDs for the categories. Then, the users have to use
these IDs as they use some of the commands. For instance, the cat command
requires the ID of the category so it can display just the movies in that category.
And the add command requires a category ID that specifies the type of movie
that's being added.
The business tier
The business tier of the Movie List program defines two business objects:
a Movie object and a Category object. For simplicity, both of these objects use
public attributes to store their data. These attributes correspond to the columns of
the Movie and Category tables in the movies database.
The Movie class begins with a constructor that assigns default values to all
of its public attributes. Here, the category attribute is assigned a default value of
None. This indicates that this attribute is designed to store a Category object, not
an ID for the category.
The Category class works like the Movie class. However, it only provides
two public attributes: id and name.
In both classes, the constructors provide default values for all of the
arguments. This isn't necessary, but this makes these classes easier to use.
For example, when the code adds a movie to the database, the Movie object
doesn't need to have an ID because the database generates the ID automatically.
However, when the code creates a Movie object from data that it retrieves from
the database, it needs to set the ID to the value that's stored in the database. By
providing default values for all of the arguments, you provide for both cases.
Chapter 17 How to work with a database 489
The user interface
The Movie List program
COMMAND MENU
cat - View movies by category
year - View movies by year
add - Add a movie
del - Delete a movie
exit - Exit program
CATEGORIES
1. Animation
2. Comedy
3. History
Command: add
Name: The Lion King
Year: 1994
Minutes: 89
Category ID: 1
The Lion King was added to database.
Command: cat
Category ID: 1
MOVIES - ANIMATION
ID Name
1 Spirit: Stallion of the Cimarron
2 Spirited Away
3 Aladdin
4 Ice Age
5 Toy Story
14 The Lion King
Command: exi t
Bye I
Year
2002
2001
1992
2002
1995
1994
Mins
83
125
90
81
81
89
Category
Animation
Animation
Animation
Animation
Animation
Animation
The objects module for the business tier
class Movie:
def init (self, id=0, name=None, year=0, minutes=0, category=None):
self.id = id
self.name = name
self.year = year
self.minutes = minutes
self.category = category
class Category:
def init (self, id=0, name=None) :
self.id = id
self.name = name
Figure 17-14 The Movie List program (part 1)
490 Section 4 Database and GUI programming
The database tier
Part 2 of figure 17-14 presents the code for the database tier, which is stored
in a module named db. To begin, this code imports the modules, functions, and
classes that this code uses. This includes the Category and Movie classes from
the objects module. Then, it sets a global variable for a connection object to
None. This is followed by six functions.
The connect() function sets the global conn variable to the connection object.
To do that, the first statement declares that the conn variable is global, which
is required if this variable is going to be modified. Then, the first if statement
creates a new connection object if the conn variable doesn't already contain one.
The if statement within the outer if statement is needed because the database
file isn't in the same directory as the program file. As a result, the nested if
statement sets a different path to the database file depending on the operating
system that the program is running on. Once that's done, the connection object
is created and the row factory attribute is set to allow the use of column names
when accessing the result sets.
The close() function that follows closes the connection. To do that, this
function first checks if the conn variable refers to a connection object. If so, it
calls the close() method of the conn variable. Because this code only accesses
the conn object and doesn't change it, it doesn't need to declare the conn
variable as global.
The make_category() function is a utility function that accepts a row from a
result set as an argument. This function contains a sinele line of code that creates
a Category object from the data that's in the row and returns that object. This
function is called by the three functions that follow
The make_movie() function works similarly, but it creates a Movie object
from a row. However, the category attribute of the Movie object stores a Category
object. As a result, this code calls the make_category() function to create a new
Category object that's set as the category attribute of the Movie object.
The eet cateeoriesO function returns a list of all of the available categories in
the database. To do that, it creates a query that selects the category ID and name
from the Category table, using an alias of categoryName for the column that
contains the name of the category. This is necessary because the make_category()
function uses this alias to get the name of the category. After defining the query,
this function executes the query and fetches all of the results. Then, it creates an
empty list called categories, and loops over each row in the the result set. Within
this loop, the code appends a Category object for each row to the list. To do that,
it calls the make_category() function.
The get_category() function works similarly, but it only gets one Category
object that corresponds with a single category ID. After this function accepts
an argument for the category ID, it uses the fetchone() method to fetch the row
for the specified category. Then, it calls the make_category() function to make a
Category object from the row, and it returns the Category object.
Chapter 17 How to work with a database 491
The db module for the database tier
import sys
import os
import sglite3
from contextlib import closing
from objects import Category
from objects import Movie
conn = None
def connect():
global conn
if not conn:
if sys.platform == "Win32":
DB_FILE = "/murach/python/_db/movies.sqlite"
else:
HOME = os.environ["HOME"]
DB_FILE = HOME + "/Documents/murach/python/_db/movies.sqlite"
conn = sqlite3.connect(DB_FILE)
conn.row_factory = sqlite3.Row
def close():
if conn:
conn.close()
def make_category(row):
return Category(row["categorylD"], row["categoryName"])
def make_movie (row) :
return Movie (row ["movielD"] , row["name"] , row["year"] , row ["minutes"] ,
make_category(row))
def get_categories():
query = '■'SELECT categorylD, name as categoryName
FROM Category'''
with closing(conn.cursor()) as c:
c.execute(query)
results = c.fetchall()
categories = []
for row in results:
categories.append(make_category(row))
return categories
def get_category(category_id):
query = '''SELECT categorylD, name AS categoryName
FROM Category WHERE categorylD = ?■■■
with closing(conn.cursor()) as c:
c.execute(query, (category_id,))
row = c.fetchoneO
category = make_category(row)
return category
Figure 17-14 The Movie List program (part 2)
492 Section 4 Database and GUI programming
The get_movies_by_category() function accepts a category ID as an
argument. Then, it creates a query that joins the Movie and Category tables on
the categorylD column that's in both tables. Because both tables have a column
named name, this code uses an alias of categoryName for the name column of
the Category table. This prevents a name collision between the name columns
that are in both the Movie and Category tables.
After defining the query, this code executes the query and fetches all of the
rows in the result set. Then, it creates an empty list named movies, and loops
over each row in the result set. Within the loop, the code uses the make_movie()
function to create a Movie object from each row, and it appends that object to the
movies list. After the loop, this function returns the list of Movie objects.
The get_movies_by_year function works similarly, except that it selects the
movie by year instead of by category_id. As a result, the only difference between
these two functions is the WHERE clause in the SELECT statement, and the
argument that the code supplies to the execute() method of the cursor object.
The add_movie() function accepts a Movie object as an argument. Within
this function, the first statement creates a parameterized SQL statement that adds
a row to the Movie table. Then, this code executes the SQL statement and uses
the Movie object to provide the parameters for the SQL statement. Finally, this
function commits the changes to the database.
The delete_movie() function accepts a movie ID as an argument. Within this
function, the first statement creates a SQL statement that deletes a row from the
Movie table. Then, this code executes the SQL statement with the movie ID of the
record to be deleted as the argument. This function also finishes by committing
the changes to the database.
Chapter 17 How to work with a database 493
The db module for the database tier (continued)
def get_movies_by_category(category_id):
query = '''SELECT movielD, Movie.name, year, minutes.
Movie.categorylD as categorylD,
Category.name as categoryName
FROM Movie JOIN Category
ON Movie.categoryID = Category.categorylD
WHERE Movie.categorylD = ?''■
with closing(conn.cursor()) as c:
c.execute(query, (category_id,))
results = c.fetchalK)
movies = []
for row in results:
movies .append(make_movie (row) )
return movies
def get movies by year(year):
query = ■''SELECT movielD, Movie.name, year, minutes.
Movie.categorylD as categorylD,
Category.name as categoryName
FROM Movie JOIN Category
ON Movie.categoryID = Category.categorylD
WHERE year = ?■■■
with closing(conn.cursor()) as c:
c.execute(query, (year,))
results = c.fetchalK)
movies = []
for row in results:
movies .append(make_movie (row) )
return movies
de f add_movi e(movi e):
sql = '''INSERT INTO Movie (categorylD, name, year, minutes)
VALUES (?, ?, ?, ?)'''
with closing(conn.cursor()) as c:
c.execute(sql, (movie.category.id, movie.name, movie.year,
movie.minutes))
conn.commit()
def delete_movie(movie_id) :
sql = '''DELETE FROM Movie WHERE movielD = ?'''
with closing(conn.cursor()) as c:
c.execute(sql, (movie_id,))
conn.commit()
Figure 17-14 The Movie List program (part 3)
494 Section 4 Database and GUI programming
The presentation tier
Part 4 of figure 17-14 presents the code for the presentation tier, which is
stored in the ui module. This class begins by importing the db module and by
importing the Movie class from the objects module. Then, the first two functions
display a title and a command menu. This is followed by four more functions.
The display_categories() function prints a list of categories, along with
their IDs. To do that, this function calls the eet cateeoriesO function from the
db module to get a list of Category objects. Then, it loops over each Category
object in the list and print its id and name to the console. Here, the strQ function
converts the category ID from an integer to a string.
The display_movies() function accepts an argument for a list of Movie
objects and an argument for a title term. Within this function, the first statement
prints a title that begins with "MOVIES -" and ends with the title term. The
second statement defines a format string that's used to alien the data in columns.
The third statement prints the column names for the result set. And the fourth
statement prints a separator line that's 64 characters long. Then, the code loops
through each Movie object in the list. Within this loop, the statement aligns and
prints the data that's stored in each Movie object.
The display_movies_by_category() function prompts the user to enter a
category ID and converts the entry to an int value. Then, it passes the category
ID to the get_category() function of the db module, which returns a Category
object for the specified category. Next, an if statement checks whether a
Category object has been returned. If so, it passes the category ID to the
get_movies_by_category() function of the db module, which returns a list of
Movie objects. Last, this code passes this list and the uppercase name of the
specified category to the display_movies() function.
The display_movies_by_year() function works much like the
display_movies_by_category() function. However, it accepts the movie's year
as an argument instead of the category. Then, it passes this argument to the
get_movies_by_year() function of the db module. This returns a list of Movie
objects. Finally, this code calls the display_moviesQ function and passes it the
list of Movie objects and the year argument after it has been converted to a
string.
Chapter 17 How to work with a database 495
The ui module for the presentation tier
#1/usr/bin/env/python3
import db
from objects import Movie
def display_title():
print("The Movie List program")
print()
display_menu()
def display_menu():
print("COMMAND MENU")
print("cat - View movies by category")
print("year - View movies by year")
print("add - Add a movie")
print("del - Delete a movie")
print("exit - Exit program")
print()
def display_categories():
print("CATEGORIES")
cat egori es = db.get_cat egori es()
for category in categories:
print(str(category.id) + ". " + category.name)
print()
def display_movies(movies, title_term) :
print("MOVIES - " + title_term)
line_format = "{:3s} {:37s} {:6s} {:5s} {:10s}"
print(line_format.format("ID", "Name", "Year", "Mins", "Category"))
print("-" * 64)
for movie in movies:
print (line_f ormat .format (str (movie, id), movie, name,
str(movie.year), str(movie.minutes),
movi e.cat egory.name))
print()
def display_movies_by_category():
category_id = int(input("Category ID: "))
cat egory = db.get_category(cat egory_id)
if category == None:
print("There is no category with that ID.\n")
else:
print()
movies = db.get_movies_by_category(category_id)
display_movies(movies, category.name.upper())
def display_movies_by_year():
year = int(input("Year: "))
print()
movies = db.get movies by year(year)
display_movies(movies, str(year))
Figure 17-14 The Movie List program (part 4)
496 Section 4 Database and GUI programming
The add_movie() function begins by prompting the user for the data for a
new movie including its name, year, minutes, and category ID. Then, this code
calls the get_category() function of the db module to get the Category object for
the specified category ID. Next, an if statement checks to make sure a Category
object has been returned. If it hasn't been returned, an error message is displayed
to the user and the function ends.
If it has been returned, this code creates a Movie object and passes it the
appropriate data, including the Category object. But note that this code doesn't
assign a value to the id attribute of the Movie object. This isn't necessary since
the database generates the ID value automatically when it adds the movie to the
database.
After the Movie object has been created, this code calls the add_movie()
function of the db module and passes it the new Movie object. Then, it displays a
message that indicates that the movie was added.
The delete_movie() function is much simpler. To start, it prompts the user
for a movie ID. Then, it calls the delete_movie() function of the db module with
the movie ID as the argument, and it prints a message that indicates that the
movie was deleted. This code could be improved by first making sure that the
ID entered by the user is actually in the database table. But when you're using
SQLite, if the ID isn't in the table, nothing is done.
The main() function begins by calling the connect() function in the db
module to open a connection to the database. Then, it displays the title, the
command menu, and a list of categories, including the category IDs.
After displaying this information, the function enters a loop where it waits
for the user to enter a command. Once the user enters a command, this code calls
the appropriate function depending on the command entered by the user. For
example, if the user enters the cat command, the code calls the
display_movies_by_category() function. But if the user enters the exit command,
this code executes a break statement, which causes the loop to end. Then, this
code calls the close() function of the db module to close the database connection.
Last, it prints a message that indicates that the program is exiting.
Chapter 17 How to work with a database 497
The ui module for the presentation tier (continued)
def add_movie():
name = input ("Name: ")
year = int(input("Year: "))
minutes = int(input("Minutes: "))
category_id = int(input("Category ID: "))
cat egory = db.get_category(cat egory_id)
if category == None:
print("There is no category with that ID. Movie NOT added.\n")
else:
movie = Movie(name=name, year=year, minutes=minutes,
category=category)
db.add_movi e(movie)
print(name + " was added to database.\n")
def delete_movie():
movie_id = int(input("Movie ID: "))
db.delete_movie (movie_id)
print ("Movie ID " + str (movie_id) + " was deleted from database.\n")
def main():
db.connect()
display_title()
display_categories()
while True:
command = input("Command: ")
if command == "cat":
display_movies_by_category()
elif command == "year":
display movies by year()
elif command == "add":
add_movie()
elif command == "del":
delete_movie()
elif command == "exit":
break
else:
print("Not a valid command. Please try again.\n")
display_menu()
db.close()
print("Bye!")
if name == " main ":
main()
Figure 17-14 The Movie List program (part 5)
498
Section 4 Database and GUI programming
Perspective
The goal of this chapter is to prepare you for developing programs that
use a database. To that end, this chapter has introduced you to the SELECT,
INSERT, UPDATE, and DELETE statements that you'll use in most database
programs. This chapter has also shown you how to use Python to execute these
SQL statements and to work with the result sets that are returned. Now, if you
understand the Movie List program that's presented in this chapter, you've
developed a useful set of database programming skills.
You should know, however, that there's a lot more to learn about database
programming. In contrast to SQLite databases, for example, MySQL, Oracle,
and SQL Server are full-blown Database Management Systems. These
databases are designed to run on a server and be accessed by remote clients, so
you need to provide for more types of errors. They also offer more functionality
than SQLite.
When you work with one of these Database Management Systems, you're
eoine to want to learn skills like how to use the Data Definition Language
(DDL) to create your own databases; how to handle the exceptions that are
thrown by these systems; how to use views, stored programs, and triggers; and
much more. So when you're ready to start adding these skills to your skillset,
please remember our best-selling books on MySQL, SQL Server, and Oracle.
Terms
relational database
database management system
(DBMS)
table
row
column
record
field
cell
primary key
foreign key
one-to-many relationship
one-to-one relationship
many-to-many relationship
data type
null value
default value
orphaned key
SQL (Structured Query Language)
DML (Data Manipulation Language)
DDL (Data Definition Language)
SQL statement
SELECT statement
query
result set
result table
join
inner join
alias
INSERT statement
UPDATE statement
DELETE statement
SQLite
SQLite Manager
connection object
cursor object
Chapter 17 How to work with a database 499
Summary
• A relational database consists of tables. Tables consist of rows and columns,
which can also be referred to as records and fields.
• A primary key is used to identify each row in a table.
• The tables in a relational database are related by foreign keys in one table
that have the same values as primary keys in another table. Usually, these
tables have a one-to-many relationship.
• Each column in a database table is defined with a data type that determines
what type of data can be stored in that column. In addition, the column
definition specifies whether the column allows null values or has a default
value.
• To work with the data in a database, you use SQL {Structured Queiy
Language). To access and update the data in a database, you use SQL
statements.
• The SELECT statement returns a result set from one or more tables. To
return data from two or more tables, you join the tables based on the data in
related columns. An inner join returns a result set that includes data only if
the related columns match.
• To update the data in a database, you use the INSERT, UPDATE, and
DELETE statements. These statements don't return a result set.
• SQLite is a popular open-source relational database that can be embedded
into programs so they can use it to store their data. To review the structure
and data of a SQLite database and to execute SQL statements against it, you
can use a Firefox add-on known as SQLite Manager.
• To execute a SQL statement in Python, you use the cursorQ method of a
connection object to get a cursor object, and then the executeQ method of
the cursor object to execute the SQL statement.
• To work with the result set of a SELECT statement in Python, you use the
fetchoneQ or fetchallQ methods of the cursor object.
500 Section 4 Database and GUI programming
Exercise 17-1 Review a SQLite database
and test some SQL statements
This exercise gives you a chance to use SQLite Manager to review the SQLite
database that's used by the Movie List program that's presented in this chapter.
You will also use SQLite Manager it to test some SQL statements against this
database.
Use SQLite Manager to connect to the movies database
1. If you haven't already installed the Firefox browser and the SQLite Manager
add-on, do that now. For instructions, please see the appendix for your
operating system.
2. Start Firefox, and start SQLite Manager. Then, use SQLite Manager to
connect to the database named movies.sqlite that's in this directory:
murach/python/_db
Review the tables in the movies database
3. In the left panel of the Manager window, expand the Tables node. Then, click
the Movie table. If necessary, click the Browse & Search tab. This should
display the data for the Movie table.
4. In the left panel of the window, click the Category table. This should display
the data for that table.
Run SQL statements against the movies database
5. In the left panel of the window, click the Execute SQL tab. Then, enter a
query that selects all columns from the Movie table where the category ID is
2, and click the Run SQL button to execute this statement. This should display
a result set.
6. Modify the value for the category ID in the query so it only selects movies
that have a category ID of 3. Then, run this query and view the result set.
7. Modify the query so it only returns the name and year columns. Then, run this
query and view the result set.
8. Modify the query so it sorts the result set by year in descending order.
9. Enter an INSERT statement that inserts a new row into the Movie table. Then,
run this SQL statement. This shouldn't display a result set, but it should add a
new row to the Movie table.
10. Use the Browse & Search tab to browse the Movie table and view the new
row.
11. Use the Execute SQL tab to run a DELETE statement that deletes the new
row.
12. Use the Browse & Search tab to make sure the row was deleted.
13. Continue to experiment until you're sure that you understand the SQL
statements that are used by the Movie List program in this chapter.
Chapter 17 How to work with a database 501
Exercise 17-2 Enhance the Movie List program
In this exercise, you will enhance the Movie List program by improving its delete
command and by adding a min command that lets the user view movies with run
times that are less than a specific number of minutes.
Command: del
Movie ID: 14
Are you sure you want to delete 'Juno':
'Juno1 was deleted from database.
Command: min
Maximum number of minutes: 10 0
MOVIES - LESS THAN 100 MINUTES
ID Name
4 Ice Age
5 Toy Story
1 Spirit: Stallion of the Cimarron
3 Aladdin
6 Monty Python and the Holy Grail
7 Monty Python's Life of Brian
> (y/n):
Year
2002
1995
2002
1992
1975
1979
y
Mins
81
81
83
90
91
94
Category
Animation
Animation
Animation
Animation
Comedy
Comedy
Open and test the program
1. In IDLE, open the objects.py, db.py, and ui.py files that are in this folder:
python/exercises/chl7/movies
2. Review the code and note how the ui module uses the db module and the Movie
class from the objects module. Then, run the program. If necessary, modify the
path to the database file so it's correct for your system.
Improve the del command
3. In the db module, add a get_movie() function that gets a Movie object for the
specified movie ID.
4. In the ui module, modify the delete_movie() function so it gets a
Movie object for the specified ID and asks whether you are sure you
want to delete the movie as shown above. This code should only
delete the movie if the user enters "y" to confirm the operation.
Add the min command
5. In the db module, add a get_movies_by_minutes() function that gets
a list of Movie objects that have a running time that's less than the
number of minutes passed to it as a parameter.
6. In the ui module, add a display_movies_by_minutes() function that prompts
the user to enter the maximum number of minutes and displays all selected
movies. This should sort the movies by minutes in ascending order.
7. Modify the mainQ function and the display_menu() function so they provide for
the min command.
18
How to build a GUI
program
So far in this book, you have learned how to create a console interface for a
program. However, most modern programs such as web browsers, word
processors, and spreadsheets use a graphical user interface (GUI). In this
chapter, you'll learn the basics of using Python to build a GUI program.
This chapter shows how to use object-oriented programming techniques
to build a GUI, which is generally considered a best practice. As a result,
you should be familiar with the concepts and skills presented in chapters 14
and 15 before you read this chapter. Then, the object-oriented techniques
presented in this chapter will reinforce those concepts and skills.
How to create a GUI that handles an event 504
How to display a root window 504
How7 to work with frames and buttons 506
How to handle a button click event 508
More skills for working with components 510
How7 to work with labels and text entry fields 510
How7 to lay out components in a grid 512
How7 to code a class that defines a frame 514
The Future Value program 516
The business module 516
The ui module 516
Perspective 520
504 Section 4 Database and GUI programming
How to create a GUI
that handles an event
Most programs today use a graphical user interface (GUI).To create one
with Python, you use a toolkit that makes it easier to create the components of a
GUI such as windows, buttons, and entry fields. Although many GUI toolkits are
available for Python, this chapter shows how to use tkinter, which is a commonly
used tookit that's included with Python.
How to display a root window
With the tkinter toolkit, a GUI begins with a component that's typically
called the root window. Once you've created a root window, you can add
components to it such as buttons, labels, and text entry fields. In figure 18-1, for
example, the first window contains ten components: four labels, four text entry
fields, and two buttons. These components can also be called widgets.
To create a root window, you import the tkinter module, usually into a
shorter namespace such as tk as shown in the first example. Then, you can call
the Tk constructor that's available from the tk namespace to create the root
window and assign it to a variable as shown in the second example. By
convention, this variable is named root.
After you create the variable for the root window, you can set up the
window. For example, you can set its title by calling its title() method. Or,
you can set its width and height by calling its geometry() method with a string
argument that specifies the width and height in pixels.
After you set up the root window, you call its mainloopO method. This
displays the GUI and causes the program to enter an event processing loop that
listens for events such as the user clicking on a button. Later, you can write the
code that responds to the events.
If you forget to call the mainloopO method, your program will never enter
the event processing loop. As a result, it executes the code in the script in
sequence and then exits. This is a common mistake that beginning GUI
programmers make. So if you attempt to run a GUI program and the program
ends right away, make sure that your code calls the mainloopO method.
You must also be sure that all the code that sets up the window comes before
the call to the mainloopO method. If, for example, the call to the title() method is
coded after the call to the mainloopO method, the call to the titleQ method will
never run. This is another common mistake that beginning GUI programmers
make.
Chapter 18 How to build a GUI program
505
A window with ten components
/ Future Value Calculator —
Monthly Investment
Yearly Interest Rate
Years:
Future Value:
□ X
100
5.0
5
S6,828.94
! Calculate
Jf *t I
The constructor and some methods of the root window
Constructor Description
Tk () Creates a Tk object that defines the root window.
Method Description
title(title)
geometry (str)
mainloop()
Sets the title of the root window to the specified title.
Sets the width and heieht of the root window to the number
of pixels specified by the string.
Makes the root window visible and starts an event processing
loop that allows a program to handle events that occur on the
window. You need to call this method after all other code that
sets up the root window.
How to import the tkinter module
import tkinter as tk
How to create an empty root window
root = tk.TkO
root.title("Future Value Calculator")
root.geometry("300x200")
How to make the root window visible
root.mainloop()
An empty root window
/ Future Value Calculator — □
X
Description
• The top level window of a tkinter GUI is a Tk object that's typically known as the
root window.
• Once you've created a root window, you can add components to it such as buttons,
labels, and text entry fields. Components can also be referred to as widgets.
Figure 18-1 How to display a root window
506 Section 4 Database and GUI programming
How to work with frames and buttons
Once you've created a root window, you typically add one or more frames to
it. A frame is an invisible container that you can use to group components. Then,
you add other components such as buttons to the frame as shown in figure 18-2.
To work with frames and buttons, you start by importing the ttk module from
the tkinter module, as shown in the first example in this figure. Then, you can
use the classes in the ttk module to create a frame and two buttons.
The second example creates a frame by calling the Frame constructor in the
ttk module and passing it two arguments. The first argument specifies the parent
component, which is the component that contains this component. In this case,
the code adds the frame to the root window that was created in the previous
figure.
The second argument of the Frame constructor is optional, but you'll often
want to provide it. It sets the padding between the frame and the edge of the
parent component. In this case, it sets 10 pixels of padding between each of the
sides of the frame and the sides of the root window. If you don't set any padding,
the frame and any components in the frame push up against the sides of the
window.
After the first statement in the second example creates the frame, the second
statement displays it by calling its pack() method. By default, the pack() method
automatically sizes the frame to be just large enough to hold the components it
contains. However, you can pass arguments to the packQ method to change this
behavior.
In this example, the fill argument is set so it fills all of the available
horizontal and vertical space in the parent container. In addition, the expand
argument is set to True. This tells the frame that if the size of the parent
container changes (if, for example, the user resizes the window), the frame
should expand and contract so it continues to fill all of the available space.
After you create a frame, you usually add components to it. In this figure,
the third example creates two Button objects and adds them to the Frame object.
Like the Frame class, the Button class takes the parent component as its first
argument. In this case, the parent component is the frame.
For a button, the second argument sets the text that's displayed by the button.
In this example, the first button displays the text "Click me!", and the second
button displays the text "No, click me!".
After you create the buttons, you need to call the packQ method to display
them as shown in the fourth example. If you forget to call the pack() method, the
buttons aren't displayed when you run the code.
Chapter 18 How to build a GUI program
507
Two constructors of the ttk module
Constructor
Frame {parent [, padding] )
Button (parent, text)
Description
Creates a Frame object and adds it to the specified parent
component with the specified padding in pixels between
the edge of the frame and its parent component.
Creates a Button object with the specified text and adds
it to the specified parent component.
A method for working with all components
Method
pack( [fill] [, expand] )
Description
Makes the component visible. To make a component
automatically resize itself vertically and horizontally to
fill the parent component, you can set the fill argument to
BOTH and the expand argument to True.
How to import the ttk module from the tkinter module
from tkinter import ttk
How to create a frame and add it to the root window
frame = ttk.Frame(root, padding="10 10 10 10")
frame, pack (fill =tk. BOTH, expand=True)
How to create two buttons and add them to the frame
buttonl = ttk.Button(frame, text="Click me!")
button2 = ttk.Button(frame, text="No, click me!")
How to display the buttons
buttonl.pack()
button2.pack()
Two buttons in a frame
/ Future Value Calculator — □
X
Click me!
No, click me!
Description
• A frame is an invisible container that's used to group other components.
• Most tkinter components, including frames and buttons, have a constructor that
accepts the parent component as its first argument.
Figure 18-2 How to work with frames and buttons
508 Section 4 Database and GUI programming
How to handle a button click event
When you click one of the buttons that are defined in the previous figure, an
event is generated that informs the toolkit that the button has been clicked. Then,
to perform an action, you need to handle this event by connecting it to a function
that contains the code that should be executed when the event occurs. This
function is called a callback function or an event handler.
To illustrate, figure 18-3 presents a user interface that handles two button
click events. Here, clicking the first button changes the title displayed in the title
bar, and clicking the second button exits the root window.
To connect the buttons to the functions that are executed when the buttons
are clicked, you code the command argument of the button constructor. This
is illustrated by the first example. Here, the first statement connects the button
named button 1 to the click_buttonl() function. Then, when a user clicks this
button, the program calls the click_buttonl() function. Similarly, the second
button calls the click_button2() function when it is clicked.
The second example in this figure defines the two callback functions. Here,
the click_buttonl() function changes the title of the root window. Then, the
click_button2() function calls the destroyQ method of the root window. That
closes the root window and causes the main loop for the GUI to end, which ends
the program.
Note that you could specify the root.destroyQ method instead of the
click_button2() function in the command argument for the second button. In
most programs, though, you would want to perform some tasks before calling
the destroyO method. For example, you could display a closing message or
prompt the user to save any unsaved data. In a case like that, you could add code
to the click_button2() function before it calls the destroyO method.
Chapter 18 How to build a GUI program
509
The GUI after the user clicks the first button
/ You clicked the button! —
; Click me j
No, click me!
□
X
An argument of the Button constructor
Argument Description
command
Specifies the function that's executed when a user clicks on the button.
How to create two buttons that are connected to callback functions
buttonl = ttk.Button(frame, text="Click me", command=click_buttonl)
button2 = ttk.Button(frame, text="No, click me!", command=click_button2)
The destroy() method of the root window
Method
destroy ()
Description
Closes the root window and causes its event processing loop to end,
which ends the program.
The callback functions that the buttons are connected to
def click_buttonl():
root.title("You clicked the buttonl")
def click_button2():
root.destroy()
Description
• To make a button execute a function when a user clicks on it, you use the command
argument of the Button constructor to connect it to a function. Then, when the user
clicks on the button. Python calls that function.
• A function that's called by a component such as a button is commonly known as a
callback function or an event handler.
Figure 18-3 How to handle a button click event
510 Section 4 Database and GUI programming
More skills for working
with components
Now that you've learned how to create frames and buttons and how to
handle a button click event, you're ready to learn more skills for working with
components.
How to work with labels and text entry fields
Most programs get data from the user. To do that, they use components like
the labels and text entry fields that are shown in figure 18-4.
As the name suggests, labels typically label other components to show what
they do. In this figure, for example, the first label tells the user what to enter in
the first entry field, and the second label describes the value that's displayed in
the second entry field.
To create a label and add it to a frame, you call the Label constructor of the
tkk module and pass it the parent component and the text that the label should
display. This is illustrated by the first example. Then, you call the pack() method
to display the label.
Unless you need to work with a label after you create it, though, you don't
need to assign the label to a variable. In that case, you can use code like the
second part of the first example to display a label. This code chains the creation
of the label with the pack() method so the label is never assigned to a variable.
A text entry field is a component that allows a user to enter text. This type of
component is also known as a text box, text field, or entry field. Before you create
a text entry field, you typically create a StringVar object that you can use to get
and set the text that's available in the text entry field.
To illustrate, the first statement of the next example creates a StringVar
object named investmentText. Then, the second statement creates a text entry
field named investmentEntry by calling the constructor of the Entry class. This
sets the width of the Entry field in characters. More importantly, it uses the
textvariable argument to bind the StringVar object to the Entry component.
When the Entry constructor binds a text entry field to a StringVar object, that
object is automatically updated when the user changes the text in the entry field.
As a result, you can use the get() method of a StringVar object to get the value
that the user enters into the Monthly Investment field, and the set() method to set
its value.
The third example in this figure shows how to create a read-only text entry
field. This is similar to the previous example except the state argument is set to
"readonly". ". As a result, the user can't enter a value in the text field, but the code
can use the set() method of the StringVar object to set a value in the text field.
The last example shows how the get() and set() methods can be used.
Here, the first statement gets the value that has been entered into the Monthly
Investment field. The second statement sets the value in the Future Value field,
which displays a new text value in the field.
Chapter 18 How to build a GUI program
511
A window that contains labels and text entry fields
/ Future Value Calculator — □
Monthly Investment
text entry field
text entry field(read-only)
Constructors for creating labels and text entry fields
Constructor
Label (parent, text)
Entry (parent, width,
textvariable[, state])
Description
Creates a label with the specified text and adds it to the
specified parent component.
Creates an entry field with the width in characters, adds it
to the parent component, and binds it to a StringVar object.
For a read-only field, set the state argument to "readonly".
The StringVar class of the tkinter module
Constructor/Method Description
StringVar () Creates a StringVar object.
get () Gets the string in the StringVar object.
set (str) Sets the string in the StringVar object.
How to create a label and display it
investmentLabel = ttk.Label(frame, text="Monthly Investment")
investmentLabel-pack()
Another way to create a label and display it
ttk.Label(frame, text="Monthly Investment").pack()
How to create a text entry field and bind it to a StringVar object
investmentText = tk.StringVar()
investmentEntry = ttk.Entry(frame, width=25, textvariable=investmentText)
How to create a read-only text entry field and bind it to a StringVar object
fvText = tk.StringVar()
fvEntry = ttk.Entry(frame, width=25, textvariable=fvText, state="readonly")
How to get or set a string in a text entry field
investment = investmentText.get()
fvText.set("$2,000")
Description
• A label is a component that displays text. It can be used to identify another
component such as an entry field.
• A text entry field is a component that displays text and lets the user enter text. This
type of component is also known as a text box, text field, or entry field.
• When the state of an entry field is set to "readonly", it can only display text.
Figure 18-4 How to work with labels and text entry fields
512 Section 4 Database and GUI programming
How to lay out components in a grid
Until now, you've been using the pack() method to add components to a
frame. However, the pack() method doesn't give you much control over how the
components are laid out in the frame. To gain more control, you can replace the
pack() method with the grid() method, as shown in figure 18-5.
To start, this figure shows a frame that aligns four labels and four text entry
fields in a grid of four rows and two columns. This creates eight cells for eight
components. Normally, this frame wouldn't display the grid lines, but the lines
are shown in this figure so you can clearly see the rows, columns, and cells.
When you call the grid() method, the first two arguments specify the column
and row for the component. In addition, you often supply other arguments.
The first example in this figure creates the layout for the first two rows
shown at the top of this figure. Here, the first statement creates the first label and
calls its grid() method to set its column and row arguments to 0. This displays
the label in the first column of the first row. Next, it sets the sticky argument to
the E constant of the tkinter module. This aligns the text within the component
with the right (East) side of the cell.
The second statement creates an Entry field and calls its grid() method to
specify a column of 1 and a row of 0. This displays the text entry field in the
second column of the first row. Since this code doesn't set the sticky argument,
it uses the default value of the W constant. This causes the component to stick to
the left (West) side of the cell. The next two statements work similarly, but they
add the components to the second row instead of the first row.
By default, when you lay out the components in a grid, there is no padding
between the cells. Then, you can use the padx and pady arguments of the grid()
method for each component to add horizontal and vertical padding. Although
that gives you complete control over the formatting, that is typically tedious and
often unnecessary.
Another alternative is illustrated by the second example in this figure. Here,
the same padding is added to each component in the frame. To do that, the
winfo_children() method of the frame is used to get all of the components in
the frame. Then, a for loop is used to add the same padding to each component.
Within the loop, the grid_configure() method of each component is used to apply
the padding. This technique not only makes it easier to set the padding for all of
the components, but it also makes it easier to change the padding if you decide
that the frame would look better with more or less padding.
Note that the grid_configure() method is used in the loop instead of the
grid() method. That's because the grid_configure() method lets you modify the
settings for the components after you have added them to the frame and used the
grid() method to format them. You should also know that the grid_configure()
method accepts the same arguments as the grid() method.
Chapter 18 How to build a GUI program
513
Eight components in a grid of two columns and four rows
/ Future Value Calcula
Monthly Investment
Yearly Interest Rate:
Years:
Future Value:
tor - □ X
Il00
5.0
5
S6,828.94
Some of the arguments of the grid() method of a component
Argument Description
column
row
sticky
padx
pady
columnspan
rowspan
The column index where the component should be added, starting
with an index of 0.
The row index where the component should be added, starting with
an index of 0.
A value that determines which side of the container the component
should stick to. Valid values are the N (North), W (West), E (East),
and S (South) constants of the tkinter module. Optionally, you can
specify a tuple of values for multiple directions. For example, if you
specify a tuple of W and E, the component is stretched horizontally.
Specifies the horizontal padding in pixels between this component
and the next component in the grid.
Specifies the vertical padding in pixels between this component and
the next component in the grid.
Specifies the number of columns the component should span.
Specifies the number of rows the component should span.
How to use a grid to lay out the components in a frame
ttk.Label(frame, text="Monthly Investment:").grid(
column=0, row=0, sticky=tk.E)
ttk.Entry(frame, width=25, textvariable=investmentText).grid(
column=l, row=0)
ttk.Label(frame, text="Yearly Interest Rate:").grid(
column=0, row=l, sticky=tk.E)
ttk.Entry(frame, width=25, textvariable=rateText).grid(
column=l, row=l)
How to add padding to all components in a frame
for child in frame.winfo_children():
chi Id. gr id_configure (padx= 5, pady= 3)
# gets all child components
# pads each child component
Description
• To lay out components in a grid, you use the grid() method for each component.
• To pad all of the components in frame, you can use the winfo_children method of
the Frame object to get all of the child components in the frame, and the
grid_configure() method of each component to add the padding.
Figure 18-5 How to lay out components in a grid
514 Section 4 Database and GUI programming
How to code a class that defines a frame
So far in this chapter, you've been building a GUI by coding a series of
statements that create objects from the classes that are available from the ttk
module. That's an easy way to get started. However, as your programs grow
larger, you typically want to organize this code by creating a class that defines a
frame. To do that, you can create a class that inherits the ttk.Frame class. Then,
you can add all of the components and event handlers for that frame to the class.
Figure 18-6 starts by showing a window that contains a frame that's defined
by a class. Then, it shows the code for the InvestmentFrame class that defines
this frame. This class inherits the Frame class that's available from the ttk
module. In other words, the InvestmentFrame class is the subclass, and the
Frame class is the superclass.
After the class definition, the code defines the constructor of the subclass. In
this constructor, the first line calls the constructor of the superclass, passing itself
as the first argument and the parent window as the second argument. In addition,
it passes a padding argument that sets the padding to 10 pixels on all four sides
of the frame.
The second statement of the constructor calls the packQ method of the
subclass object. That's possible because this subclass inherits the pack() method
from the superclass.
The third statement of the constructor creates a StringVar object for the text
entry field and stores it as a public attribute. This makes it easy to access this
attribute from event handlers such as the clear() method that's defined later in the
class.
After creating the StringVar object, this code creates the three components
that the frame contains. All three of these components supply the self keyword as
the first argument. This passes an InvestmentFrame object to the constructors for
these components. As you learned in chapter 15, this works because you can use
a subclass object anywhere a superclass object is required. As a result, you can
use your frame subclass as the parent object for these components.
Note that the code that creates the button passes a command argument of
"self.clear". As a result, clicking the Clear button executes the clear() method
that's defined in this class.
This clear() method works much like the callback function described earlier
in this chapter. However, since it's a method of a class, not a function of a
module, it's easy to access the data that's stored in the attributes of the class.
Here, the first statement uses a public attribute to get the string from the text
entry field and print it to the console. Then, the second statement uses the public
attribute to clear the text entry field by setting it to an empty string.
After the class, the code in the if statement starts by creating a root window
and setting its title. Then, it creates an InvestmentFrame object by passing the
root window as the parent argument. This adds the InvestmentFrame object to
the root window. Finally, it calls the mainloopQ method on the root window to
display the root window and start the event processing loop.
Chapter 18 How to build a GUI program 515
A window that contains a frame that's defined by a class
/ Future Value Calculator — □ X
Monthly Investment 100]
Clear
A class that defines a frame
import tkinter as tk
from tkinter import ttk
class InvestmentFrame (ttk.Frame) :
def init (self, parent):
ttk.Frame. init (self, parent, padding="10 10 10 10")
self .pack(fill=tk.BOTH, expand=True)
# Define string variable for the entry field
self .monthly-Investment = tk.StringVar ()
# Create a label, an entry field, and a button
ttk.Label(self, text="Monthly Investment:").grid(
column=0, row=0, sticky=tk.E)
ttk.Entry(self, width=25, textvariable=self.monthlyInvestment).grid(
column=l, row=0)
ttk.Button(self, text="Clear", command=self.clear).grid(
column=2, row=0)
# Add padding to all child components
for child in self.winfo_children():
child.grid_configure(padx=5, pady=3)
# Define the callback method for the Clear button
def clear(self):
print("Monthly Investment:", self.monthlyInvestment.get())
self.monthlylnvestment.set("")
if name == " main ":
root = tk.Tk() # Create the root window
root.title("Future Value Calculator")
InvestmentFrame(root) # Create the frame
root.mainloop() # Display the frame
Description
• To create a class that defines a frame, you can inherit the ttk.Frame class.
• When coding a subclass of the ttk.Frame class, the constructor of the subclass must
call the constructor of the superclass and pass it a reference to the parent component.
The subclass constructor can also pass other arguments to the superclass constructor.
• When coding a subclass of the ttk.Frame class, you can use the self keyword
anywhere you need a reference to the current frame object. For example, you can use
the self keyword as the first argument of a component's constructor.
Figure 18-6 How to code a class that defines a frame
516 Section 4 Database and GUI programming
The Future Value program
In section ], you learned how to create a console version of a Future Value
program that computes the future value of a monthly investment amount. Now,
figure 18-7 presents a GUI version of this program.
The business module
The business module for this program consists of one business class named
Investment. If you've read chapter 14, you shouldn't have any trouble
understanding how this code works. In short, it defines three public attributes for
storing the monthly investment, the yearly interest rate, and the number of years.
Then, it defines a method called calculateFutureValueQ that calculates the future
value based on the data in the three attributes and returns that value.
The ui module
The ui module for this program starts by importing the tkinter and ttk
modules. Then, it imports the locale module that's presented in chapter 9 so the
values can be formatted as currency, and it imports the Investment class from the
business module.
Next, this code defines a class named FutureValueFrame that inherits the ttk.
Frame class. Here, the constructor for the subclass calls the constructor of the
superclass to pass the parent component to the superclass and to add 10 pixels of
padding to all sides of the frame.
After calling the constructor of the superclass, this code stores a reference to
the parent component in a public attribute named parent. This makes it possible
for the Exit button to call the destroyQ method of the parent component. This
works because the parent component is the root window. Then, the constructor
creates a new Investment object and assigns it to the attribute named investment.
If possible, it also sets the locale to the current region for the user's computer. If
that isn't possible, it sets the locale to the United States.
The constructor continues by defining four StringVar objects that will store
the data for the investment. After setting up the StringVar objects, the last line
of the constructor calls the initComponents() method shown on the next page to
initialize the components that are displayed on the frame. As part of that
initialization, this method binds the four StringVar objects to the four text entry
fields.
Chapter 18 How to build a GUI program
517
The user interface
/ Future Value Calculator —
□ X
Monthly Investment: 100
Yearly Interest Rate: 5.0
Years: 5
Future Value: S6,828.94
i Calculate
::ir &*n
The business module
class Investment():
def init (self) :
self .monthly-Investment = 0
self.yearlyInterestRate = 0
self.years = 0
def calculateFutureValue(self):
monthlylnterestRate = self.yearlylnterestRate / 12 / 100
months = self.years * 12
futureValue = 0
for i in range(months):
futureValue += self.monthlyInvestment
monthlyInterestAmount = futureValue * monthlylnterestRate
futureValue += monthlyInterestAmount
return futureValue
The ui module
import tkinter as tk
from tkinter import ttk
import locale
from business import Investment
class FutureValueFrame(ttk.Frame):
def init (self, parent):
ttk.Frame. init (self, parent, padding="10 10 10 10")
self.parent = parent
self.investment = Investment()
result = locale.setlocale(locale.LC_ALL, '' )
if result == ■C:
locale.setlocale(locale.LC_ALL, ■en_US")
# Define string variables for text entry fields
self .monthlylnvestment = tk.StringVar ()
self.yearlylnterestRate = tk.StringVar()
self.years = tk.StringVar()
self.futureValue = tk.StringVar()
self.initComponents()
Figure 18-7 The Future Value program (part 1)
518 Section 4 Database and GUI programming
The initComponentsQ method begins by calling the packQ method of the
FutureValueFrame class to add it to the parent component. Then, it displays the
four labels and text entry fields in a grid. To do that, it creates a label with the
text "Monthly Investment" and displays it in the first row of the first column of
the grid for the frame. It also sets the sticky argument to tk.E so the labels are
right-aligned.
After creating this label, this code creates a text entry field to get the
monthly investment and binds that entry field to the StringVar object stored as
the monthlylnvestment attribute of the current object. As a result, if the user
changes the value of the text in the component, the monthlylnvestment attribute
is automatically updated to the new value. The code then displays this
component in the second column of the first row.
The code continues in this fashion until all labels and text entry fields have
been added to the grid for the frame. The only variation is that the text entry field
for the future value is in a read-only state so it can only be used to display text.
After the initComponentsQ method finishes adding the labels and entry
fields, it calls the makeButtons() method to create and display the two buttons
for the user interface. Then, it loops over of the child components of the frame
and adds some padding to make the user interface visually pleasing.
The makeButtons() method begins by creating a frame for the buttons using
the self keyword to specify the parent component. As a result, the button frame is
a child of the future value frame. Then, this code displays the button frame in the
first column of the fifth row. However, this code specifies that the frame should
span both columns of the row and be aligned with the right (East) side of the
row.
After creating and displaying the button frame, the makeButtons() method
creates the Calculate and Exit buttons and adds them to the frame. For the
Calculate button, this code sets the command argument to call the calculateQ
method of the current object and adds some horizontal padding between the
two buttons. For the Exit button, this code sets the command argument to the
destroyQ method of the parent component. Since this program sets the parent
component to the root window, this closes the root window and exits the
program.
The calculateQ method is executed when the Calculate button is clicked.
This method begins by setting the attributes of the Investment object to the
values stored in the text entry fields. To do that, it gets strings from the StringVar
attributes and converts those strings to the appropriate numeric types. Then,
this code displays the future value of the investment in the appropriate field. To
do that; it uses the calculateFutureValueQ method of the Investment object to
calculate the future value; it formats that value as currency for the current locale;
and it sets the formatted value in the appropriate StringVar attribute.
After the Future ValueFrame class, the code in the if statement creates a root
window and sets its title. Then, it creates new Future ValueFrame object, passing
it the root window as the parent component. Finally, it starts the program and
enters the main event processing loop.
Chapter 18 How to build a GUI program 519
The ui module (continued)
def initComponents(self):
self.pack()
ttk.Label(self, text="Monthly Investment:").grid(
column=0, row=0, sticky=tk.E)
ttk.Entry(self, width=25, textvariable=self.monthlylnvestment).grid(
column=l, row=0)
ttk.Label(self, text="Yearly Interest Rate:").grid(
column=0, row=l, sticky=tk.E)
ttk.Entry(self, width=2 5,
textvariable=self.yearlylnterestRate).grid(
column=l, row=l)
ttk.Label(self, text="Years:").grid(
column=0, row=2, sticky=tk.E)
ttk.Entry(self, width=25, textvariable=self.years).grid(
column=l, row=2)
ttk.Label(self, text="Future Value:").grid(
column=0, row=3, sticky=tk.E)
ttk.Entry(self, width=25, textvariable=self.futureValue,
state="readonly").grid(column=l, row=3)
self.makeButtons()
for child in self.winfo_children():
child. grid_configure (padx=5, pady=3 )
def makeButtons(self):
# Create a frame to store the two buttons
buttonFrame = ttk.Frame(self)
buttonFrame.grid(column=0, row=4, columnspan=2, sticky=tk.E)
ttk.Button(buttonFrame, text="Calculate",
command=self.calculate).grid(column=0, row=0, padx=5)
ttk.Button(buttonFrame, text="Exit",
command=self.parent.destroy).grid(column=l, row=0)
def calculate(self):
self. investment .monthlylnvestment = float (
self .monthlylnvestment .get ())
self, investment .yearlylnterestRate = float (
self .yearlylnterestRate.get () )
self.investment.years = int(self.years.get())
self.futureValue.set(locale.currency(
self.investment.calculateFutureValue(), grouping=True))
if name == " main ":
root = tk.TkO
root.title("Future Value Calculator")
FutureValueFrame(root)
root.mainloop()
Figure 18-7 The Future Value program (part 2)
520 Section 4 Database and GUI programming
Perspective
In this chapter, you learned all of the skills you need to use the tkinter
toolkit to create a GUI for the Future Value program. Along the way, you saw a
good example of how object-oriented programming is used in the real world.
Of course, there's still plenty more to learn about creating GUIs. For
example, you may want to learn how to use tkinter module to work with other
types of controls such as check boxes, radio buttons, combo boxes, and lists.
You may want to learn how to use tkinter to display photographs or other
graphics. You may even want to learn how to use a different GUI toolkit. But
whatever you decide to learn next, you'll have a skillset that you can build on.
Terms
graphical user interface (GUI)
toolkit
root window
component
widget
event processing loop
frame
button
event
Summary
• Python programs that have graphical user interfaces (GUIs) are created by using a
toolkit such as the tkinter toolkit that's included with Python.
• The top level window of a tkinter GUI is a Tk object that's typically known
as the root window.
• After you create a root window, you can add components to it such as
buttons and labels. Components can also be referred to as widgets.
• The mainloopO method of the root window makes the window visible and
starts an event processing loop that lets a program handle the events that
occur on the window and on its child components.
• A callback function is called when an event such as a click occurs on a
component such as a button. A callback function is also known as an event
handler.
• A label is a component that displays text. A text entry field is a component
that displays text and lets the user enter text. A text entry field is also known
as a text box, text field, or entry field.
• A frame is an invisible container that's used to group other components.
To lay out the components within a frame in a grid pattern, you can use the
grid() method of each component.
callback function
event handler
label
text entry field
text box
text field
entry field
bind
Chapter 18 How to build a GUI program 521
Exercise 18-1 Modify the Future Value program
In this exercise, you'll create a Future Value program that allows you to make
two side-by-side calculations in the same window. When you're done, the GUI
should look like this:
/ Future Value Calculator
Monthly Investment: 100
Yearly Interest Rate 3
Years: 10
Future Value: S14,009.08
|_ Clear _| |_Calculate J
Monthly Investment:
Yearly Interest Rate:
Years:
Future Value:
—
100
4
10
'S14 774.06
|_ Clear J
□ X
i Calculate j
Exit
Review the code for the application
1. Open the ui.py file that's in this folder:
python/exercises/chl8/future_value_gui
2. Review the code in this ui module. Note that the if statement at the end of
this module creates one Future ValueFrame object and displays it in the root
window. Then, run this module to make sure it works correctly.
Use another frame to display two Future ValueFrame objects
3. At the end of the ui module, edit the if statement so it creates two
Future ValueFrame objects and adds them both to the root window.
4. Run the program. This should display two Future ValueFrame objects in the
window, but they won't be side by side, and they'll both have Exit buttons.
Add and use a new class named FutureValueFramess
5. At the start of the ui module, add a new class named Future ValueFrames. This
class should define a frame that displays two Future ValueFrame objects side
by side with an Exit button below.
6. Since the Future ValueFrames class should use the grid() method to add the
Future ValueFrame objects, you need to delete the pack() method from the
initComponents() method of the Future ValueFrame class. Do that now.
7. Modify the code in the if statement at the end of the ui module so it displays
a root window that contains one Future ValueFrames object. Then, test these
changes.
8. Modify the code for the makeButtonsO method in the Future ValueFrame class
so it displays a Clear button instead of an Exit button. This function should be
connected to a clear() method. Then, define a clear() method that sets all four
entry fields to empty strings, and test this change.
522 Section 4 Database and GUI programming
Exercise 18-2 Develop a GUI version
of the MPG program
In this exercise, you'll develop a GUI version of the MPG program that you
worked with as a console program in section ] of this book. When you're done,
the GUI should look like this:
0 Miles Per Gallon Calculator
Miles Driven:
Gallons of Gas Used:
Miles Per Gallon:
- □ X
150
35.875
4.18
i Calculate j
Review the code for the console program
1. Open the mpg_gui.py file that's in this folder:
python/exercises/chl8/mpg
This provides some starting code for the application.
2. Review the code and run it to see what it does. It should display a root
window with one label and an empty text entry field.
Create the GUI for this program
3. Modify the code for this program so it displays the correct title for the root
window.
4. Modify the code so it creates StringVar objects for all three text entry fields.
5. Modify the code so it displays all seven components as shown above.
6. Run the program. This should display a window that looks like the window
above. However, if you click the Calculate button, it won't do anything.
Handle the event that occurs when the user clicks the button
7. Add a calculate() method that does the MPG calculation. It should divide
the Miles Driven entry by the Gallons of Gas Used entry and round it to two
decimal places. This method should also display the result of the calculation
in the Miles Per Gallon field.
8. If you haven't done so already, add the code that connects the Calculate
button to the calculate() method.
9. Test the program to make sure the Calculate button works.
Appendix A
How to set up Windows
for this book
This appendix shows how to install and configure the software that we
recommend for developing Python programs on a Windows system. For the
first 16 chapters of this book, you only need to install Python and the source
code for this book.
Chapter 17, however, requires the use of a database. As a result, you'll
need to install the Firefox browser and the SQLite Manager Add-on for
Firefox. In addition, you may want to verify that the database has been
installed correctly.
As you read this appendix, please remember that most websites change
frequently. As a result, some of the procedures in this appendix may have
changed since this book was published. Nevertheless, these procedures should
still serve as good guides to installing the software.
How to install the source code for this book 524
How to install Python and IDLE 526
How to install Firefox and SQLite Manager 528
How7 to verify that the database is installed correctly 530
524 Appendix A How to set up Windows for this book
How to install the source code for this book
Figure A-l shows how to download and install the source code for this book.
This includes the source code for the programs presented in this book, the starting
programs for the chapter exercises, and the solutions to the exercises.
When you finish this procedure, the book programs as well as the exercise
and solution files should be in the folders shown in this figure. Then, you can run
the programs presented in this book, and you're ready to do the exercises for this
book.
Appendix A How to set up Windows for this book 525
The Murach website
www.murach.com
The folders for the book programs, exercises, and solutions
\murach\python\book_apps
\murach\python\ exercises
\murach\python\ solutions
How to download and install the files for this book
1. Go to www.mnrach.com,
2. Find the page for Munich's Python Programming.
3. If necessary, scroll down to the FREE downloads tab.
4. Click the FREE downloads tab.
5. Click the Download Now button for the exe file, and respond to the resulting pages
and dialog boxes. This should download an installer file named python_allfiles.exe
to your hard drive.
6. Find the exe file on your computer and double-click on it. Then, respond to the
dialog boxes that follow. This installs the files for this book in folders that start with
\murach\python
If you prefer to use a zip file instead of the exe file...
1. Find the book and FREE downloads tab on our website as in steps 1-4 above.
2. Click the Download Now button for the zip file (python_allfiles.zip).
3. Find the zip file on your computer, and double-click on it to extract the files for this
book into the \murach\python folder.
Description
• We recommend that you store the files for this book in folders that start with
\murach\python. That way, you will be able to find them more easily.
• By default, the python_allfiles.exe file that you download from our website will
install all of the files on your C: drive in the \murach\python folder. However, the
first dialog box lets you change that before the installation takes place.
• If you change the location of the python folder, all of the programs will still work,
with one exception. That is the Movie List program of chapter 17, which specifies
the \murach\python path for the database file. To fix that, though, you can change
the database path in the Python code.
• After you install the folders and files on your computer, you can move or copy
them to another device or another location.
• You may also want to make a second copy of the exercises folder as a backup.
Then, if you want to go back to the original version of the starting code for an
exercise, you'll have it.
Figure A-1 How to install the source code for this book
526 Appendix A How to set up Windows for this book
How to install Python and IDLE
Figure A-2 shows how to install Python. To make this easy, the Python
website provides an installer that installs everything you need to start developing
Python programs. That includes IDLE which is an integrated development
environment for editing and testing Python programs.
When you install Python, be sure to download the latest Python 3 release.
Although Python 2 is still available, the programs in this book were developed
with Python 3. As a result, you should use Python 3 to run these programs.
After you install Python, you can use the second procedure in this figure to
make sure that you've correctly installed Python, IDLE, and the programs for
this book. If you prefer to wait, though, the exercises for chapter 1 walk you
through a similar procedure.
Appendix A How to set up Windows for this book ^2."7
The Install Python dialog box
<* Python 3.5.2 (32-bit) Setup - n
Install Python 3.5.2 (32-bit)
Select Install Now to install Python with default settings, or choose
Customize to enable or disable features.
• Install Now
C:\Users\Robert\AppData\Local\Programs\Python\Python35-32
Includes IDLE, pip and documentation
Creates shortcuts and file associations
^ Customize installation
Choose location and features
python
for /i Install launcher for all users (recommended)
windows -^ Add py*™3-5 to path
Cancel
How to install Python and IDLE
1. Go to the download page for Python. The easiest way to find this page is to search
the Internet for "Python download".
2. Click on the link for downloading the installer file for the latest version of Python 3
that's available for your system.
3. Find and double-click on the downloaded file. This file should have a name like
python-3.5.2.exe.
4. In the Install Python dialog box. be sure to check the Add Python 3.5 to PATH box.
5. Click Install Now to install Python and IDLE, its integrated development
environment.
How to run IDLE to make sure everything is working
1. Find and start IDLE. When IDLE starts, the window for the interactive shell is
displayed.
2. Use the File->Open command to open this file:
\murach\python\book_apps\ch01\future_value.py
3. Press F5 to run the program in the IDLE shell. Enter the data that you're prompted
for. and enter "n" for the final prompt when you're ready to exit from the program.
4. Close both of the IDLE windows to end the program.
Description
• IDLE is the integrated development environment that gets installed with Python.
• In chapter I, you'll learn how to use IDLE, but you can start it right after you
install Python to make sure everything is working.
Figure A-2 How to install Python and IDLE
528 Appendix A How to set up Windows for this book
How to install Firefox and SQLite Manager
Remember that the only chapter that uses SQLite Manager and the SQLite
database is chapter 17. So you don't need to install SQLite if you aren't going
to read that chapter or use the book programs, exercises, and solutions for that
chapter.
If you are going to read that chapter, figure A-3 shows how to install the
software that you'll need. Although several management tools are available for
SQLite, the one we recommend for this book is SQLite Manager, which is an
add-on for the Firefox web browser.
If you haven't already done so, you start by installing Firefox. Then, you
install the SQLite Manager add-on for Firefox. Because Python includes built-in
support for SQLite databases, that's all you have to do.
Appendix A How to set up Windows for this book 529
The download page for Firefox
www.mozilla.org/download
How to install Firefox
1. Find the download page for Firefox. The easiest way to do that is to search the
Internet for "Firefox download".
2. Follow the instructions on that web page to download the installer file.
3. Find the installer file on your system and run it.
4. Accept the default options.
How to install the SQLite Manager Add-on
1. Start Firefox.
2. Press Ctrl+Shift+A to open the Firefox Add-ons page. Or, select Tools-> Add-ons
from the Firefox menu bar.
3. In the search box, search for ''SQLite Manager".
4. Click the Add to Firefox button for SQLite Manager.
5. Click Restart Now to restart Firefox.
How to add the SQLite Manager icon to the toolbar
1. Right-click in the toolbar area of Firefox and select Customize from the popup
menu.
2. Drag the SQLite Manager icon from the Additional Tools and Features panel up
into the toolbar and drop it.
Two ways to start SQLite Manager
• Click the SQLite Manager icon in the Firefox toolbar.
• Use the File->Tools-> SQLite Manager command.
Description
• SQLite is used for the database that's used by the program in chapter 17.
• If you aren't going to use the book programs, exercises, or solutions for chapter 17,
you don't need to install SQLite Manager.
Figure A-3 How to install Firefox and SQLite Manager
530 Appendix A How to set up Windows for this book
How to verify that the database
is installed correctly
Figure A-4 shows how to verify that the database that's used by the program
in chapter 17 of this book is installed correctly. To do that, you use SQLite
Manager to connect to the movies database and view the Movie table as shown
in the first procedure in this figure.
The only problem you're likely to have is that the database isn't in the folder
that's shown in this figure. If that's the case, you can either move the database
into the correct folder, or you can use SQLite Manager to select it from the
folder that it's in.
If you ever need to restore the database to its original state, the second
procedure in this figure shows how to do that. To start, you use SQLite Manager
to connect to the movies database. Then, you run the SQL script named
create_movie_db.sql. Of course, another alternative is to start by making a
backup copy of the original database file.
Appendix A How to set up Windows for this book
531
SQLite Manager after viewing the Movie table of the movies database
SQLite Manager - C:\rnurach\python\_db\movies.sqlite
—
Database Table Index View Trigger Tools Help
0^C Ql^ /M | ffi 8? [£| [ff | Directory > (Select
movies^qlite v
Master Tabled)
v Tables (2)
Category
7 J
Movie ,
Views (0)
Indexes (0)
Triggers (0)
SQLite 3.12.2 Gecko 48.0.2
Structure Browse & Search
TABLE | Movie
movielD
1
4
2
B
4
5
6
\ i7
! 8
■
1
« 9
10
11
12
13
<
Profile Database) v C
- 1
J°l
» Execute SQL DB Settings Import Wizard
Search 1
Show All ! ' Add
I Duplicate
£dit I
category ID name year minutes
Spirit StalBoo of the „. i >2
1
1
1
1
2
2
2
3
3
3
3
3
Spirited Away
Aladdin
Ice Age
Toy Story
Monty Python and the...
Monty Python's Life o...
Monty Python's The...
Gandhi
Jinnah
Lawrence of Arabia
Hotel Rwanda
Twelve Years a Slave
2001
1992
2002
1995
1975
1979
1983
1982
1998
1962
2004
2013
125
90
81
81
91
94
107
191
110
216
121
134
1 to 13 of 13
0.8.3.1 -signed.1 -signed Exclusive Number of Rows Returned: 3
□
Delete
X
m
>
ET: 1 ms
How to verify that the database is installed correctly
1. Start Firefox and use it to start SQLite Manager.
2. In the menu system, select Database->Connect Database. Then, use the resulting
dialog box to select the SQLite database that's located here:
\murach\python\_db\movies. sqlite
3. In the main panel, click the Browse & Search tab.
4. In the left panel, expand the Tables node and click the Movie table. If SQLite
Manager displays the data for the movies, the database was installed successfully.
How to restore the database
1. Use SQLite Manager to connect to the movies database as described above.
2. In the menu system, select Database->Import, select the SQL tab if necessary,
click the Select File button, and use the resulting dialog to select the SQL file that's
located here:
\ mura ch\py t hon\ _db\ cr eat e_mo vi e_db. sql
3. Click the OK button to execute this file.
Description
• You can use SQLite Manager to verify that the movies database has been installed
correctly.
• If necessary, you can also use SQLite Manager to restore the original database.
Figure A-4 How to verify that the database is installed correctly
Appendix B
How to set up Mac OS X
for this book
This appendix shows how to install and configure the software that we
recommend for developing Python programs on a Mac OS X system. For the
first 16 chapters of this book, you only need to install Python and the source
code for this book.
Chapter 17, however, requires the use of a database. As a result, you'll
need to install the Firefox browser and the SQLite Manager add-on for
Firefox. In addition, you may want to verify that the database has been
installed correctly.
As you read this appendix, please remember that most websites change
frequently. As a result, some of the procedures in this appendix may have
changed since this book was published. Nevertheless, these procedures should
still serve as good guides to installing the software.
How to install the source code for this book 534
How to install Python and IDLE 536
How to verify that Python and IDLE are working correctly 538
How7 to install Firefox and SQLite Manager 540
How7 to verify that the database is installed correctly 542
534 Appendix B How to set up Mac OS Xfor this book
How to install the source code for this book
Figure B-l shows how to download and install the source code for this book.
This includes the source code for the programs presented in this book, the
starting programs for the chapter exercises, and the solutions to the exercises.
When you finish this procedure, the book programs as well as the exercise
and solution files should be in the folders shown in this figure. Then, you can run
the programs presented in this book, and you're ready to do the exercises for this
book.
Appendix B How to set up Mac OS Xfor this book 535
The Murach website
www.murach.com
The folders for the book programs and exercises
/Document s/murach/python/book_apps
/Document s/murach/python/exercises
/Document s /mur ach/py thon/ solut ions
How to download and install the files for this book
1. Go to www.murach.com,
2. Find the page for Munich's Python Programming.
3. If necessary, scroll down to the FREE downloads tab and click it.
4. Click the Download Now button for the zip file. This will download a file named
python_allfiles.zip.
5. Move this zip file from your Downloads folder into your Documents folder.
6. Double-click on the python_allfiles.zip file to extract the book_apps, exercises, and
solutions folders for this book into the /murach/python folder.
Description
• After you install the folders and files on your computer, you can move or copy
them to another device or another location.
• Remember, though, that this book assumes that the book_apps, exercises, and
solutions folders are in the /Documents/murach/python folder.
• If you change the location of the python folder, all of the programs will still work,
with one exception. That is the Movie List program of chapter 17, which
specifies the /Documents/murach/python path for the database file. To fix that, you
can change the database path in the Python code.
• You may also want to make a backup copy of the exercises folder. Then, if you
want to go back to the original version of the starting code for an exercise, you'll be
able to do that.
Figure B-1 How to install the source code for this book
536 Appendix B How to set up Mac OS Xfor this book
How to install Python and IDLE
Figure B-2 shows how to install Python. To make this easy, the Python
website provides an installer that installs everything you need to start
developing Python programs. That includes IDLE, which is an integrated
development environment for editing and testing Python programs.
When you install Python, be sure to download the latest Python 3 release
for your system. Although Python 2 is still available, the programs in this book
were developed for Python 3. As a result, you should use Python 3 to run these
programs.
Appendix B How to set up Mac OS Xfor this book
537
The Install Python dialog box
o o o
Install Python
a
© Introduction
• Read M
• License
->*' .**'
In
In-- -'.
n
ry
Welcome to the Python Installer
This package wil install Python 3.5.2 for Mac OS X 10.6 or later
Python for Mac OS X consists of the Python programming language
interpreter, plus a set of programs to allow easy access to it for Mac OS X
sers including an integrated development environment IDLE.
IMPORTANT: IDLE and other programs using the tklnter graphical user
interface toolkit require specific versions of the TcL/Tk platform
independent windowing toolkit Visit https:/Avww.python,orq/download/
macftcltk/ for current information on supported and recommended
versions of Tcl/Tk for this version of Python and Mac OS X.
Co Back
Continue
How to install Python and IDLE
1. Go to the download page for Python. The easiest way to find this page is to search
the Internet for "Python download".
2. Download the installer file for the latest version of Python 3 that's available for
your system.
3. Find and double-click on the downloaded file. This file should have a name like
python-3.5.2-macrosxl0.6.pkg. That will start the installation.
4. Continue by accepting the defaults that are offered.
Description
• IDLE is the integrated development environment that gets installed with Python.
Figure B-2 How to install Python and IDLE
538 Appendix B How to set up Mac OS Xfor this book
How to verify that Python
and IDLE are working correctly
After you install Python, you can use the procedure in figure B-3 to make
sure that you've correctly installed Python, IDLE, and the programs for this
book. In short, if you can run the Future Value program that's presented in
chapter 1, you're ready to get started with this book. However, there are a few
issues to be aware of.
When you first start IDLE, you may get a warning message that indicates
that the version of Tcl/Tk may be unstable. Fortunately, this only impacts
chapter 18 of this book, and the program for chapter 18 typically runs without
any problems, even with the "unstable" version of Tcl/Tk. So, if you want, you
can ignore this warning message. However, if you want to stop this message
from being displayed, you can download and install a stable version of Tel/
Tk for your operating system. Then, this version overrides the version that was
installed with Python.
After you open the code for the Future Value program, you can run it by
pressing the F5 key. However, on many Mac keyboards, especially laptop
keyboards, you must hold down the Fn key to be able to access function keys
such as the F5 key. As a result, when this book instructs you to press the F5 key,
you may actually need to press the Fn+F5 keys.
Similarly, right-clicking isn't enabled on most Macs. As a result, when this
book instructs you to right-click, you may need to press Ctrl-click (hold down
the Ctrl key while you click).
For both of these issues, you can edit your system preferences if you
prefer. For example, you can edit the preferences for your keyboard so you can
access the function keys (Fl, F2, etc.) without having to hold down the Fn key.
Similarly, you can edit the preferences for your mouse to enable right-clicking.
Appendix B How to set up Mac OS Xfor this book 539
The IDLE shell with the Tcl/Tk WARNING message
~ _^ Python 3.5.2 Shell
Python 3.5.2 Cv3.5.2:4def2o2901a5f Jun 26 2016, 10:47:25)
[GCC 4.2.1 (Apple inc. build 5666) (dot 3)] on darwin
Type "copyright", "credits" or "licenseO" for more information.
>» WARNING: The version of Tcl/Tk (8.5.9) in use may be unstable.
Visit http://www.python.org/download/mac/tcltk/ for current information.
- RESTART: /Users/MurachMac/Docuraents/python/book_apps/ch01/future_value.py -
Welcome to the Future Value Calculator
Enter monthly investment: 100
Enter yearly interest rate: 12
How to run IDLE to make sure everything is working
1. Start IDLE. To do that, you can select Applications->Python 3.5-> IDLE from
Finder.
2. When IDLE starts, the window for the interactive shell is displayed. If the Tcl/Tk
WARNING message is shown, you can ignore it by pressing the Enter key. or you
can fix it as described below.
3. Use the File->Open command to open this file:
/Document s/murach/python/book_apps/ch01/future_value.py
4. Press F5 or Fn+F5 to run the program in the IDLE shell. Enter the data that you're
prompted for, and enter "n" for the final prompt when you're ready to exit from the
program.
5. Close both of the IDLE windows to end the program.
How to fix the Tcl/Tk WARNING message
• Go to the link in the WARNING message of the IDLE window. Then, download
and install the version of Tcl/Tk that's recommended for your operating system.
• Make sure to install the recommended version of Tcl/Tk that corresponds with the
version that's already installed on your system. In this figure, for example, Tcl/Tk
8.5.9 is already installed on your system, so you should install the recommended
version of Tcl/Tk 8.5, not Tcl/Tk 8.6.
A note about function keys (F1, F2, etc.)
• This book often instructs you to press the F5 key to run the program. On most
laptop keyboards, you need to hold down the En key to be able to access the
function keys (El, F2, etc.). So, you must press Fn+F5 to access the F5 key.
However, you can change this behavior by editing the system preferences for your
keyboard.
A note about right-clicking
• This book occasionally instructs you to right-click, because that's common on
Windows. On a Mac, right-clicking is not enabled by default. However, you can get
the same result by Ctrl-clicking (holding down the Ctrl key and clicking). Or, you
can enable right-clicking by editing the system preferences for your mouse.
Figure B-3 How to verify that Python and IDLE are working correctly
540 Appendix B How to set up Mac OS Xfor this book
How to install Firefox and SQLite Manager
The only chapter that uses SQLite Manager and the SQLite database is
chapter 17. So you don't need to install SQLite if you aren't going to read that
chapter or use the book programs, exercises, and solutions for that chapter.
If you are going to read that chapter, figure B-4 shows how to install the
software that you'll need. Although several management tools are available for
SQLite, the one we recommend for this book is SQLite Manager, which is an
add-on for the Firefox web browser.
If you haven't already done so, you start by installing Firefox. Then, you
install the SQLite Manager add-on for Firefox. Because Python includes built-in
support for SQLite databases, that's all you have to do.
Appendix B How to set up Mac OS Xfor this book 541
How to install Firefox
1. Find the download page for Firefox. The easiest way to do that is to search the
Internet for "Firefox download".
2. Download Firefox for your system.
3. Find the installer file on your system and run it.
How to install the SQLite Manager Add-on
1. Start Firefox.
2. Press Shift+Command+A to open the Firefox Add-ons page. Or, select
Tools->Add-ons from the Firefox menu bar.
3. In the search box for the Add-ons, search for "SQLite Manager".
4. Click the Add to Firefox button for SQLite Manager.
5. Click Restart Now to restart Firefox.
How to add the SQLite Manager icon to the toolbar
1. Select View->Toolbars->Customize to display the Customize page.
2. Drag the SQLite Manager icon from the Additional Tools and Features panel up
into the toolbar area and drop it.
Two ways to start SQLite Manager
• Click the SQLite Manager icon in the Firefox toolbar.
• Select File->Tools->SQLite Manager.
Description
• SQLite is used for the database that's used by the program in chapter 17.
• If you aren't going to use the book programs, exercises, or solutions for chapter 17,
you don't need to install SQLite Manager.
Figure B-4 How to install Firefox and SQLite Manager
542 Appendix B How to set up Mac OS Xfor this book
How to verify that the database
is installed correctly
Figure B-5 shows how to verify that the database that's used by the program
in chapter 17 is installed correctly. To do that, you use SQLite Manager to
connect to the movies database and view the Movie table as shown in the first
procedure in this figure.
The only problem you're likely to have is that the database isn't in the folder
that's shown in this figure. If that's the case, you can either move the database
into the correct folder, or use SQLite Manager to select it from the folder that it's
in.
If you ever need to restore the database to its original state, the second
procedure in this figure shows how to do that. To start, you use SQLite Manager
to connect to the movies database. Then, you run the SQL script named
create_movie_db.sql.
Appendix B How to set up Mac OS Xfor this book
543
SQLite Manager after viewing the Movie table of the movies database
GOO
L3^ Ob;
movies.sqlite
I
► Master Table (1)
T Tables (2)
► Category
* Movta
movie IO
categorylD
name
year
minutes
► Views (0)
► Indexes (0)
► Triggers (0)
f(x)
SQLite 3.13.0 Gecko -49.0.2
SQLite Manager - /Users MurachMac Documents
ffi
*l
i
4
4
SF LTj
n¥
TABLE Movie
movielD
1
2
3
4
5
6
7
8
9
10
11
12
13
<<
0.8.3.1-sjgned-l-
signed
Directory ►
Structure
murach/. hon db movies.
(Select Profile Database) t , Co
Browse & Search Execute SQL
1 Search [
categorylD
|l
|l
jl
|l
|l
|2
|2
|2
|3
|3
|3
|3
|3
< 1 to
11 of
Show All ] Ago ] [ I
name yeai
|Spirit Stallion of the Ci... |20O2
|Spirited Away |2001
|Aladdm |l992
| ice Age |20O2
|Toy Story 1199)5
|Monty Python and the 11975
|Monty Python's Life of . |l979
|Monty Python's The Me... |l983
|Gandhi |l982
|jinnah |l99B
Lawrence of Arabia 1962
|Hotel Rwanda |20O4
|Twelve Years a Slave |2013
13 > »
Shared Number o| hies in selected directory. 7
sqlite
DB Sett in. s
3upiicaie ] (
Edit J [ Deieie
minutes
I8*
|l25
|90
jei
I81
I91
|94
|l07
|l91
|no
|216
|l21
jl34
ET; 0 ms
How to verify that the database has been installed correctly
1. Start Firefox and use it to start SQLite Manager.
2. In the menu system, select Database->Connect Database. Then, use the resulting
dialog box to select the SQLite database that should be located here:
/Documents/murach/python/_db/movies. sqlite
3. In the main panel, click the Browse & Search tab.
4. In the left panel, expand the Tables node and click the Movie table. If SQLite
Manager displays the data for the movies, the database was installed successfully.
How to restore the database
1. Use SQLite Manager to connect to the movies database as described above.
2. In the menu system, select Database-> Import, select the SQL tab if necessary,
click the Select File button, and use the resulting dialog to select the SQL file that's
located here:
/Document s/murach/python/_db/create_movie_db.sql
3. Click the OK button to execute this file.
Description
• You can use SQLite Manager to verify that the movies database is installed
correctly.
• If necessary, you can use SQLite Manager to restore the original database.
Figure B-5 How to verify that the database is installed correctly
Comparison
545
Index
? placeholder (SQL statement), 480-481
init () method, 368-369, 372-373
_iter_() method, 420-423
_next_() method, 420-423
_str_() method, 418-419, 422-423
2-dimensional list. 176-177
Access
character in strine. 270-271
item in list. 164-165
value in dictionary, 324-325
Accessor, 388-389
Add a key/value pair, 324-325
Add a ranee of numbers with recursion, 350-351
Add time spans. 304-305
Algorithm, 352
Alias (database column), 470-471
Annotation. 390-391
appendO method (list), 166-167
Application
Python, 6-7
software. 12-13
types, 6-7
Approximate values, 250
Argument, 32-33, 50-51, 104-105
default. 110-111
named, 110-111
Arithmetic expression, 38-39. 40-41
Arithmetic operator, 38-39
Array, 164-165
Assignment statement. 34-35. 40-41
for strings, 44-45
multiple! 188-189
Associative array, 321, 323
Attribute, 366-367, 384-391
date/time object, 310-311
OO desien. 434-437
timedelta object. 304-305
aware (time zone), 298-299
B
Backward compatible, 4
Base case, 350-351
Base class, 406-407
Behavior of an object, 366-367
Binary file, 196-197,218-221
Bind StringVar object, 510-511
Block comment, 30-31
Block of code, 72
Book Catalog program, 340-343
Boolean expression, 66-71
Boolean value, 66-67
Break statement. 88-89
Breakpoint, 154-155
Bug, 20-21
Built-in function. 32-33
Business class, 444-445
Business object, 444-445
Business tier. 444-447
GUI program, 516-517
Movie List program, 488-489
Button() constructor, 506-507
Bvte. 12-13
Bytecode, 10-11
calendar module, 318
Call
a function, 32-33, 104-105, 110-111
a main() function, 106-107
a method. 70-71
Callback function, 508-509
Camel case, 36-37, 368-369
Case-sensitive. 34-35
ceil() function, 253
Cell, 462-463
centerQ method, 274-275
Central Processing Unit (CPU), 12-13
Chaining functions, 54-55
Child class. 232-233. 406-409
choice() function (list), 184-185
Class, 366-367
business, 444-445
definine, 368-369, 372-373
exception, 232-233
OO design, 440-441
clear() method (dictionary), 326-327
Click event (button), 508-509
close() function (for files), 198-199
Codd, Dr. E. F, 462
Collection-controlled loop. 86-87
Column
CSV file, 210-211
database, 462-463, 466-467
Comma-separated values (CSV). 211
Comment, 30-31
Comment out, 30-31
commit() method (connection object), 484-485
Compare date/time objects, 312-313
Comparison
floating-point, 66-67
string, 70-71
546 Compile-time error
Compile-time error, 142-143
Compiling a program, 10-11, 18-19
Complex data types. 338-339
Component (GUI), 504-505
Compound assignment operator, 40-41
Compound conditional expression. 68-69
Concatenate
lists. 186-187
strings, 44-45, 282-283
Conditional expression. 66-71
Condition-controlled loop, 84-85
Connect to database, 474-475, 478-479
connect() method (sqlite3 module), 478-479
Connection object, 478-479
Console application, 6-7
Constructor. 368-371
date/time object, 298-299
Decimal class, 258-259
root window. 504-505
context lib module, 480-481
Continuation, 28-29, 44-45
Continue statement, 88-89
Control statements, 65-97
Convert between lists and dictionaries, 330-331
Convert Temperatures program. 120-121
copy module, 186-187
Copying a list, 186-187
count() method (list). 182-183
Country Code program, 332-335
CPU, 12-13
Creatine
dictionary, 322-323
list, 164-165
list of lists. 176-177
module, 114-115
object, 370-371
tuple. 188-189
CSV file, 196-197,210-217,236-239
CSV format, 212-213
csv module, 210-211
currencyO function, 256-257
cursor() method (connection object), 480-481
Custom exception. 424-425
D
Data attribute (OO design), 436-439
Data Definition Language (DDL), 468
Data hidine, 384-389
Data Manipulation Language (DML), 468
Data structure, 366
Data type, 34-35
database type, 466-467
Data validation, 74-75, 80-81
Database, 462-467
dumpO method (pickle module)
Database Management System (DBMS), 462
Database programming, 461-498
Database tier. 444-445. 448-449
Movie List program, 490-493
Date and time parts, 310-311
date class, 298-299
Date formatting codes, 301-303
date object. 298-299
date() constructor, 298
Date/time object, 298-299
datetime() constructor, 298-299
datetime class, 298-299
datetime module, 298-299
datetime object, 298-299
day attribute, 310-311
Daylieht savings time. 298-299
days attribute. 304-305
DBMS, 462
Debugging. 20-21. 142-159
Decimal class, 258-259
decimal module, 258-259
Decimal numbers, 258
Decimal object. 258-259
Deep copy (list), 186-187
deepcopy() function (copy module), 186-187
Default argument. 110-11 ]
Default namespace, 118-119
Default value (database), 466-467
Deferred action. 350-351
Defining
class~, 368-369, 372-373
function, 104-105, 110-111
del keyword (dictionary), 326-327
Delete items (dictionary), 326-327
DELETE statement, 472-473
Python, 484-485
Delimiter (split() method), 280-281
Derived class. 406-409
De-serializing an object, 218-219
Design (object-oriented), 433-456
Desktop application. 6-7
destroyQ method (root window7), 508-509
Dice class, 392-393, 422-423
Dice Roller program, 382-383
dict() constructor, 330-331
Dictionary, 322-323
Dictionary methods. 328-329
dictionary object, 325
Die class, 392-393, 422-423
Disk storage. 12-13
DML, 468
Docstrine. 116-117
Documenting a module. 116-117
dumpQ method (pickle module), 218-219
Element
hangman module (Hangman game)
547
Element, 164-165
Embed dictionaries in a dictionary, 338-339
Empty list, 164
Empty string, 44-45
Encapsulation, 384-395
endswithQ method, 274-275
Entity (OO design), 434-435
Entry() constructor, 510-511
Entry field, 510-511
Error
runtime, 20-21
syntax, 20-21
types, 142-143
Escape sequence, 46-47
Event (GUI), 504-505, 508-509
Event handler, 508-509
Event processing loop, 504-505
Exact values, 250
Exception, 20-21, 56-57, 142-143
classes, 232-233
custom, 424-425
database, 486-487
file I/O, 196-197
handling. 225-244
hierarchy, 424-425
object, 232-235
execute() method (cursor object), 480-481
Execute (SQL statement)
SQLite Manager, 476-477
Python, 478-487
exit() function (sys module), 234-235
Explicit continuation, 28-29
Firefox, 474-475
Mac OS X install. 540-541
Windows install, 528-529
float data type. 34-35
floatQ function, 54-55
Floating-point, 34-35, 40-41, 250-251
arithmetic problems, 144-145
comparisons. 66-67
errors, 250-251
floor() function. 253
for loop, 86-87
for statement, 86-87, 90-91
list, 168-169
list of lists, 176-177
Foreign key, 464-465
Format (a date string), 302-303
format() method (string). 254-255
Forward compatible, 4
Frame() constructor, 506-507
Function. 32-33, 104-113
calling. 104-105
chaining, 54-55
defining. 104-105
Python, 50-55
Future Value program. 96-97
decimal, 264-^265
functions, 108-109
GUL516-519
Factorial, 352-353
fetchallO method (cursor object), 482-483
letchoneO method (cursor object), 482-483
Fibonacci series, 354-355
field width, 254-255
Field. 462-463
CSV file, 210-211
File I/O, 195-222
modes, 198-199
File input and output. 195-222
File object, 198-199
File operation sequence, 196-197
File types. 196-197
FileExistsError, 232-233, 424-425
FileNotFoundError, 232-233, 424-425
finally clause (try statement), 240-241
findQ method, 276-277
get() method
dictionary object. 324-325. 338-339
StringVar object, 510-511
Get (list item), 164-165
Get, set, and add items (dictionary)* 324-325
Getter method, 388-389
Getter property. 390-391
Gigabyte, 12-13
Global
constant, 112-113
namespace. 118-119
scope, 112
variable, 112-113, 130-133
Graphical user interlace (GUI), 6-7, 504
Grid layout. 512-513
grid() method (GUI component), 512-513
grid_configure() method (child component), 512-513
Guess the Number program. 124-125
GUI, 6-7, 504
H
Hangman game program. 288-293
haneman module (Haneman eame), 290-293
548
Hidden attribute
Ijiistf) method
Hidden attribute, 386-389
Hiding data, 384-389
Hierarchy chart. 126-129. 150-151
Hangman game program. 288-289
Movie List program, 172-173
Hierarchy outline, 126-127
Hotel Reservation program. 314-317
hour attribute, 310-311
I
Identity of an object, 366-367
IDLE, 14-21
debugger, 154-157
Mac OS X install, 536-539
shebane line, 28-29
stack view, 158-159
testing functions, 152-153
testing numeric operations, 42-43
testing string operations, 48-49
Windows install, 526-527
if statement, 72-79
Immutable, 188-189
Immutable type, 170-171
Implicit continuation, 28-29, 44-45
import statement. 118-119
in keyword
for dictionary, 324-325
for list, 168-169
Increment, 40-41
Indentation, 28-29
Index
database column, 482-483
list, 164-165
list of lists, 176-177
string, 270-271
tuple, 188-189
index() method (list), 166-167
IndexError, 271, 280-281
Infinite loop. 84-85, 349
Inheritance, 405-428
Frame class, 514-515
when to use, 426-427
Initialize a variable, 34-35
Inline comment, 30-31
Inner join, 470-471
inputQ function. 52-53
INSERT statement, 472-473
Python, 484-485
insert() method (listj, 166-167
Instance, 366-367
for OO design, 434-435
Instantiation, 366-367
int data type, 34-35
int() function, 54-55
Integer, 34-35
Integrated development environment, 10-11, 14
Interactive shell (IDLE), 14-15
debuseer, 154-157
stack view, 158-159
testing functions. 152-153
testing numeric operations, 42-43
testing string operations, 48-49
Interface (for object), 384-385, 392-393
Interpreter. 10-11
Invoice Due Date program, 306-307
Invoice program, 82-83, 262-263
isalpha() method. 274-275
isdigit() method, 274-275
isinstanceO function, 412-413
islower() method. 274-275
isupperO method, 274-275
Item in list, 164-165
items() method. 328-329
Iteration structure, 84-93
Iterative function, 348-349
Iterator. 328-329
Join
database tables. 470-471
lists, 186-187
strings. 44-45, 282-283
join() method, 282-283
K
Key, 322-323
Key/value pair, 322-323
KeyError. 324-327, 338-339
keys() method, 328-329
Keyword, 36-37
Label (GUI). 510-511
Label() constructor, 510-511
len() function
list, 168-169
string, 270-271
Leonardo Fibonacci, 354
List, 163-192
with text file, 204-205
list() constructor, 329-331
List methods. 166-167. 182-183, 184-185
List of lists, 176-181
Literal, 34-35
ljust() method, 274-275
load() method (pickle module)
Operand
549
loadQ method (pickle module), 218-219
Local
namespace, 118-119
scope. 112
variable, 112-113, 134-135
locale module. 256-257
Loops
for, 86-87. 90-91. 168-169. 176-177
while, 84-85
Loeic error, 142-143
Loop through keys and values, 328-329
lower() method, 70-71, 274-275
lstrip() method. 274-275
Mac OS X
database connection, 478-479
setup for this book, 533-541
Main memory. 12-13. 196-197
main() function, 106-107, 114-115
mainloop() method, 504-505
Many-to-many relationship. 464-465
math module, 252-253
max() function (list), 184-185
Megabyte. 12-13
Method, 366-367
defining, 374-375
OO design, 442-443
Microsecond, 298-299
microsecond attribute, 310-311
microseconds attribute, 304-305
Miles Per Gallon program. 56-57, 80-81
Millisecond, 298-299^
min() function (list), 184-185
minute attribute, 310-311
Mode
file I/O, 198-199
universal newlines, 210-211
Module, 114-125
calendar, 318
contextlib, 480-481
copy, 186-187
creating, 114-115
csv, 210-211
datetime, 298-299
decimal, 258-259
documentation, 116-117
locale, 256-257
math, 252-253
os, 478-479
pickle, 218-219
random, 122-125, 184-185
sqlite3, 478-479
standard, 122-125
sys, 234-235, 478-479
tkinter, 504-505
ttk. 506-507
Modulo operator, 38-39
month attribute, 310-311
Movie List program. 172-175
Movie List T.0, 206-209
Movie List 2.0 (CSV file), 214-217
Movie List 2.0 (exceptions), 236-239
Movie List 2D, 178-181
Movie List 2D (split and join strings), 284-285
Movie List 3.0 (binary file), 220-221
Movie List (database), 488-497
Multiline string, 270-271
Multiple assignment statement, 188-189
Multi-tier architecture, 444-455
Mutable. 188-189
Mutable type, 170-171
Mutator, 388-389
naive (time zone), 298-299
Name collision, 118-119
Named argument. 50-51, 110-111
NameError. 424-425
Namespace, 118-119
Naming variables. 36-37
Nested if statements, 76-77
Nested for statements (2D list), 176-177
Nested loops, 90-91
New line character, 47
now() method, 298
Null value (database), 466-467
Number Crunching program (tuple). 190-191
Numeric literal. 34-35
O/R mapping, 448-449
Object, 366-367, 370-371
business, 444-445
class, 418-419
composition, 380-383
type checking, 412-413
Object-oriented design, 433-456
Object-oriented module, 297
Object-oriented programming, 366-367
Object-relational mapping, 448-449
One-to-many relationship, 464-465
One-to-one relationship, 464-465
OOP (see Object-oriented programming)
Open source, 4
open() function (for files), 198-199
Operand, 38-39
550
Operating system
Reader object (csv module)
Operating system, 12-13
Operator
arithmetic, 38-39
logical. 68-69
relational, 66-67
repetition (lists), 164-165
repetition (strings). 270-271
ord() function, 270-271
Order of precedence
arithmetic operators, 38-39
logical operators. 68-69
relational operators, 66-67
Ordered items. 322
Ordinal value, 270-271
Orphaned key, 466-467
os module. 478-479
OS X (see Mac OS X)
OSError, 232-233, 424-425
Override a method. 418-423
pack() method (component), 506-507
Padding (GUI component), 512-513
Parameter, 104
Parent class, 232-233, 406-407
Parse (a date string), 300-301
Pass statement, 74-75
Passing lists to functions. 168-169
Persistent data storage. 12-13. 196
pi constant. 252-253
pickle module, 218-219
Pickling an object, 218-219
Pie Dice same. 396-399
Placeholder (SQL statement), 480-481
Planning
hierarchy chart, 126-135
pseudocode, 78-79, 92-93
test runs, 146-147
Platform-independent, 10-11
Polymorphism, 410-411
pop() method (dictionary), 326-327
pop() method (list), 166-167
pow() function, 252-253
Presentation tier, 444-445, 450-455
GUI program, 516-517
Movie List program, 494-497
Primary key, 462-463
print() function, 32-33, 40-51
for tracing, 148-149
Private attribute, 384-389
Product Viewer 1.0 program, 376-379
Product Viewer 2.0 program, 414-417
Programs
Book Catalog, 340-343
Convert Temperatures, 120-121
Country Code, 332-335
Dice Roller. 382-383
Future Value, 96-97
Future Value (decimal), 264-265
Future Value (functions), 108-109
Future Value (GUI), 516-519
Guess the Number, 124-125
Haneman eame, 288-293
Hotel Reservation, 314-317
Invoice, 82-83, 262-263
Invoice Due Date. 306-307
Miles Per Gallon, 56-57, 80-81
Movie List, 172-175
Movie List 1.0 (text file), 206-209
Movie List 2.0 (exceptions), 236-239
Movie List 2.0, 214-217
Movie List 2D, 178-181, 284-285
Movie List 3.0 (binary file), 220-221
Movie List (database), 488-497
Number Crunching (tuple). 190-191
Pig Dice game, 126-135, 396-399
Product Viewer 1.0, 376-379
Product Viewer 2.0, 414-417
Shopping Cart, 446-455
Test Scores, 58-59, 94-95
Timer. 308-309
Total Calculator, 230-231
Towers of Hanoi, 358-359
Word Counter. 286-287, 336-337
Property, 384-385, 390-391
Pseudocode,78-79, 92-93
Public attribute, 368-369, 384-385
Public method, 368-369, 384-385
PyCharm, 14
Python, 3-13
as a first language. 4-5
language, 4
Mac OS X install. 536-539
timeline, 5
Windows install. 526-527
quantizeQ method, 258-259
Raise exception, 242-243
raise statement, 242-243
RAM. 12-13, 196-197
randintQ function, 122-125
Random Access Memory, 12-13
random module, 122-125. 184-185
randomO function, 122-123
randrangeO function, 122-123
read() method (text file), 202-203
Reader object (csv module), 212-213
readerf) function (csv module)
String
551
readerQ function (csv module), 212-213
readline() method (text file), 202-203
readlinesO method (text file), 202-203
Read-only
entry field. 510-511
property, 392-393
Record, 462-463
CSV file, 210-211
Recursion. 348-359
Recursion depth, 352-351
RecursionError, 350-351
Recursive algorithm, 352-359
Fibonacci series, 354-355
Towers of Hanoi, 356-357
Recursive function, 348-349
Relational database. 462-467
Relational operator, 66-67
Remainder operator, 38-39
remove() method (list), 166-167
Repetition operator
lists. 164-165
strings, 270-271
replace() method, 276-277
Result set, 468-469
Result table, 468-469
Return character, 47
return statement, 104-105
reverse() method (list), 182-183
rjust() method. 274-275
Root window, 504-505
round() function, 54-55
ROUND_HALF_DOWN constant, 259
ROUND_HALF_EVEN constant, 258-259
ROUND_HALF_UP constant, 258-259
Rounding errors. 258-259
Row
CSV file, 210-211
database, 462-463
rstrip() method. 274-275
Running a program, 18-19
Runtime error. 20-21. 142-143
Scientific notation, 250-251
Scope, 112
Scripting laneuaee. 6
Search (a string), 272-273
Search path (for module), 115
second attribute, 310-311
seconds attribute, 304-305
SELECT statement, 468-471
Selection structure, 72-79
Sequence. 164, 188
Serializing an object, 218-219
Set
item (list), 164-165
value (dictionary), 324-325
set() method (StringVar object), 510-511
setlocaleQ function, 256-257
Setter method, 388-389
Setter property. 390-391
Shadowing, 112-113
Shallow copy (list), 186-187
Shebane line. 8-9. 28-29
Shopping Cart program, 446-455
Short-circuit operator, 68-69
shuffle() function (list). 184-185
Significant dieit. 250-251
Slice
list, 186-187
string, 270-271
Sort sequence, 70-71, 182-183
sort() method (list), 182-183
sorted() function (list). 182-183
Source code, 10-11
for book. 524-525. 534-535
Python, 7-8
Source file. 16-17
Span of time, 304-305
Split
date, 280-281
row. 280-281
string, 280-281
split() method. 280-281
SQL, 468
SQL statement, 468-473
SQL statement execution
Python, 478-487
SQLite Manager, 476-477
SQLite, 474
database, 530-531, 542-543
exception. 486-487
SQLite Manager, 474-477
Mac OS X^install. 540-543
Windows install, 528-529
sqlite3 module. 478-479
sqrt() function, 252-253
Stack, 158-159,348-349
Standard module. 122-125
startswithQ method, 274-275
State of an object, 366-367
Statement. 28-29
Step through a program, 156-157
str data type, 34-35
str() function, 44-45
strftimeQ method, 302-303
String. 45
as a sequence, 283
comparisons. 70-71
literal, 34-35, 44-45
552 String (continued)
String fcont.)
methods. 254-255, 274-277
working with. 44-49
StringVar class. 510-511
StringVar() constructor, 510-511
strip() method, 274-275
strptimeO method. 300-301
Structured Query Language (SQL), 468
Subclass, 406-407, 408-409
Substring, 272
Subtract time spans, 304-305
Suite of code, 72
Superclass. 406-407
Syntax error, 20-21, 142-143, 144-145
sys module, 234-235, 478-479
Systems software. 12-13
T
Tab character, 47
Table (database), 462-463
Test phases. 146-147. 150-151
Test plan, 146-147
Test Scores program, 58-59, 94-95
Testing. 20-21. 142-153
Testing functions. 152-153
Text box, 510-511
Text editor, 10-11
Text entry field, 510-511
Text file, 196-197,200-209
Three-tier architecture, 444-455
Throwing an exception, 226-227
time object, 298-299
Time zones, 298-299
time() constructor, 298-299
timedelta
class, 304-305
constructor, 304-305
object, 304-305
Timer program, 308-309
title() method, 274-275
tkinter module, 504-505
ttk module, 506-507
today() method, 298
Toolkit (GUI), 504
Top-down coding and testing, 150-151
Total Calculator program, 230-231
total_seconds() method, 304-305
Towers of Hanoi puzzle. 356-359
Tracing execution. 148-149
Tree of function calls (Fibonacci series), 354-355
Tree recursion, 355, 357
Triple quotes, 270-271
try statement, 228-243
Writer object (CSV)
Tuple, 188-191,378-379
Two-dimensional list, 176-177
type codes, 255
typeO function, 234-235
TypeError, 270-271
tzinfo argument. 299
U
UML class diagram, 366-367, 380-381, 392-395,
406-407, 442-443
Uncomment. 30-31
Underscore notation, 36-37
Unicode, 270-271
Unified Modeling Language (UML). 366-367. 442-443
Universal newlines mode, 210-211
Unordered items, 322-323
Unpacking a tuple, 188-189
Un-pickling an object, 218-219
UPDATE statement, 472-473
Python, 484-485
upper() method, 70-71, 274-275
V
ValueError, 56, 226-229, 232-233, 314-315, 317, 330,
424-425
values() method, 328-329
Variable
global. 112-113. 130-133
local, 112-113, 134-135
Variable names, 36-37
View object, 328-329
View the stack, 158-159
Virtual machine. 10-11
w
Web application, 6-7
while loop, 84-85
while statement, 84-85, 90-91
Widget (GUI), 504-505
Windows
database connection, 478-479
setup for this book, 523-531
winfo_children() method. Frame object, 512-513
with statement
for database, 480-481
for file. 198-199
Word Counter program, 286-287, 336-337
wordlist module (Hangman game), 290-291
writeQ method (text file). 200-201
Write-only property, 392-393
Writer object (CSV), 210-211
writerf) function (csv module) 553
writer() function (csv module), 210-211
writerows() function (writer object), 210-211
XYZ
year attribute, 310-311
100% Guarantee
When you order directly from us, you must be satisfied. Our books must work better than
any other programming books you've ever used...both for training and reference...or you can send
them back within 60 days for a prompt refund. No questions asked!
mk
o^
Mike Murach, Publisher
Ben Murach, President
TRAINING &
REFERENCE
MUIMM
murach's m
A
i
L *•
2nd Edition
-SiS-ESSS'
For web
programmers
7^—,—<«k»J *******
"ZESSSZL..
Learn another of the
top 10 languages
If you're programming for
the web, you need to know
JavaScript. And our JS book
offers you the same practical
content, clarity, paired pages,
sample code, and exercises
that have been such a help
in learning Python.
Core programming language books
Murach's Python Programming $57.50
Murach's Beginning Java with NetBeans 57.50
Murach's Beginning Java with Eclipse 57.50
Murach's Java Programming (4th Ed.) 57.50
Murach's C# 2015 57.50
Murach's Visual Basic 2015 57.50
Web development books
Murach's HTML5 and CSS3 (3rd Ed.) $54.50
Murach's JavaScript (2nd Ed.) 54.50
Murach's jQuery (2nd Ed.) 54.50
Murach's PHP and MySQL (2nd Ed.) $54.50
Murach's Java Servlets and JSP (3rd Ed.) 57.50
Murach's ASP.NET 4.6 Web Programming with C# 2015 59.50
Database/SQL books
Murach's MySQL (2nd Ed.) $54.50
Murach's Oracle SQL and PL/SQL for Developers (2nd Ed.) 54.50
Murach's SQL Server 2016 for Developers 57.50
"Prices and availability are subject to change. Please visit our website or call for current information
We want to hear from you
Do you have any comments, questions, or compliments to pass on to us? It would be great
to hear from you! Please share your feedback in whatever way works best.
www.murach.com
twitter.com/MurachBooks
1-800-221-5528
(Weekdays, 8 am to 4 pm Pacific Time)
murachbooks@murach.com
03
facebook.com/murachbooks
linkedin.com/company/
mike-murach-&-associates