/


Похожие


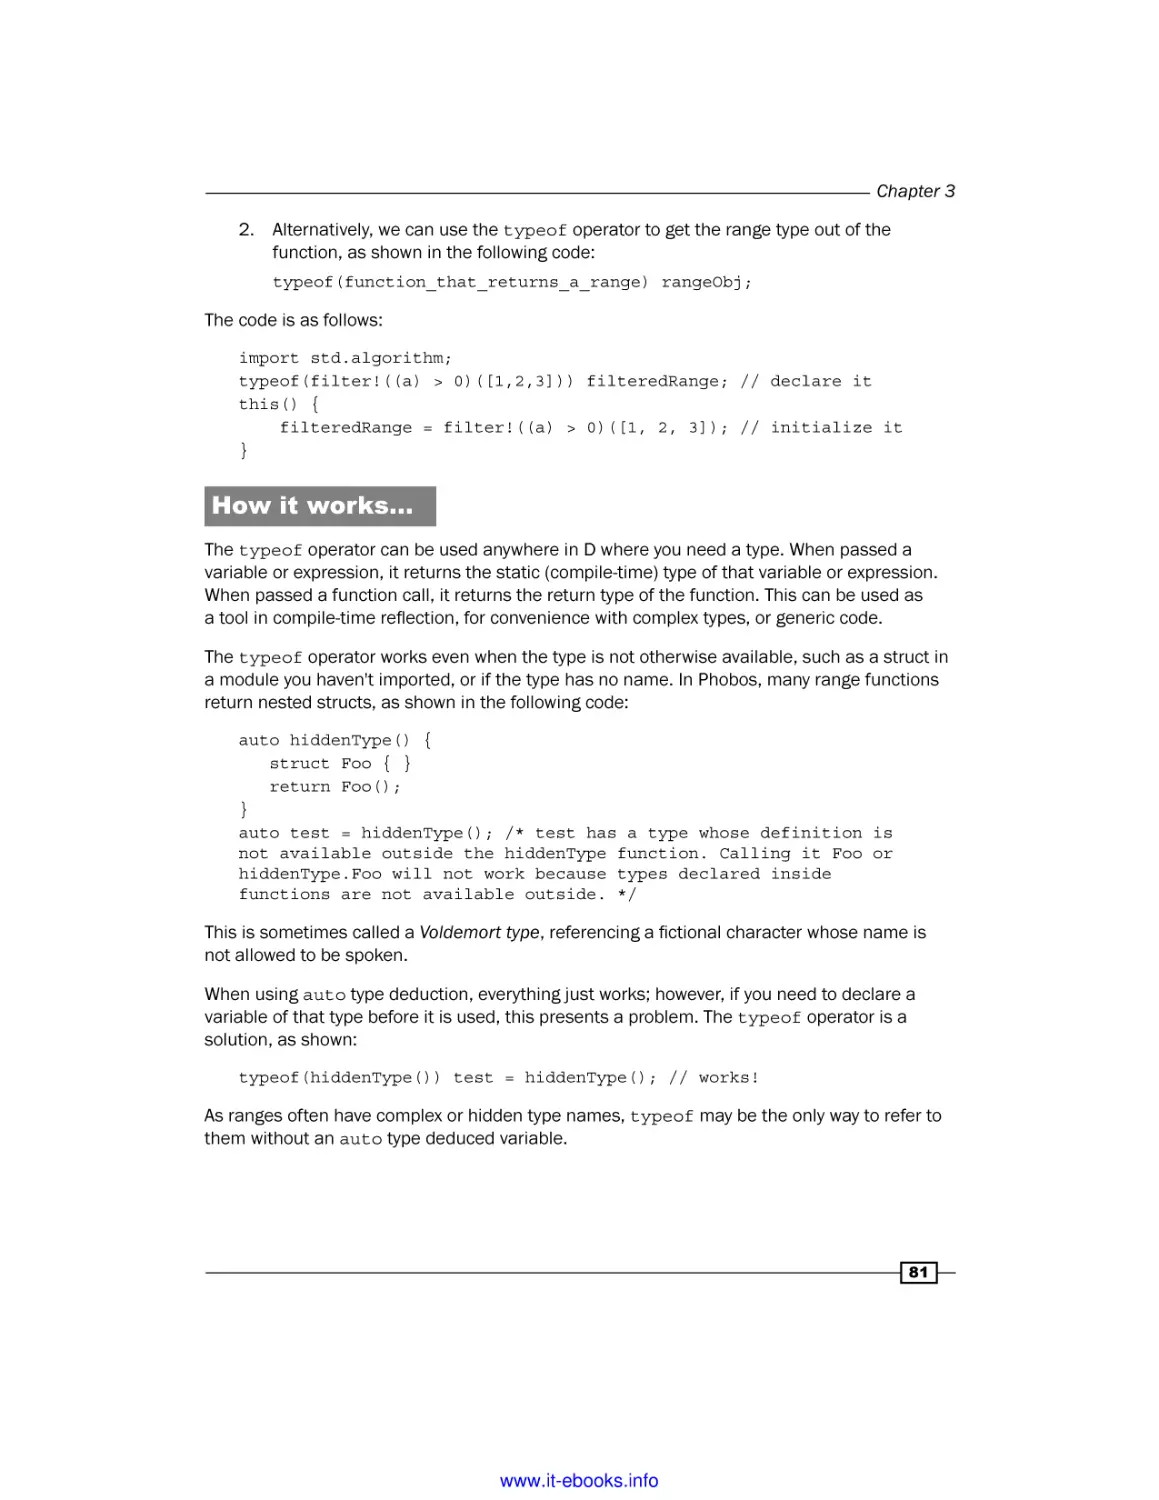
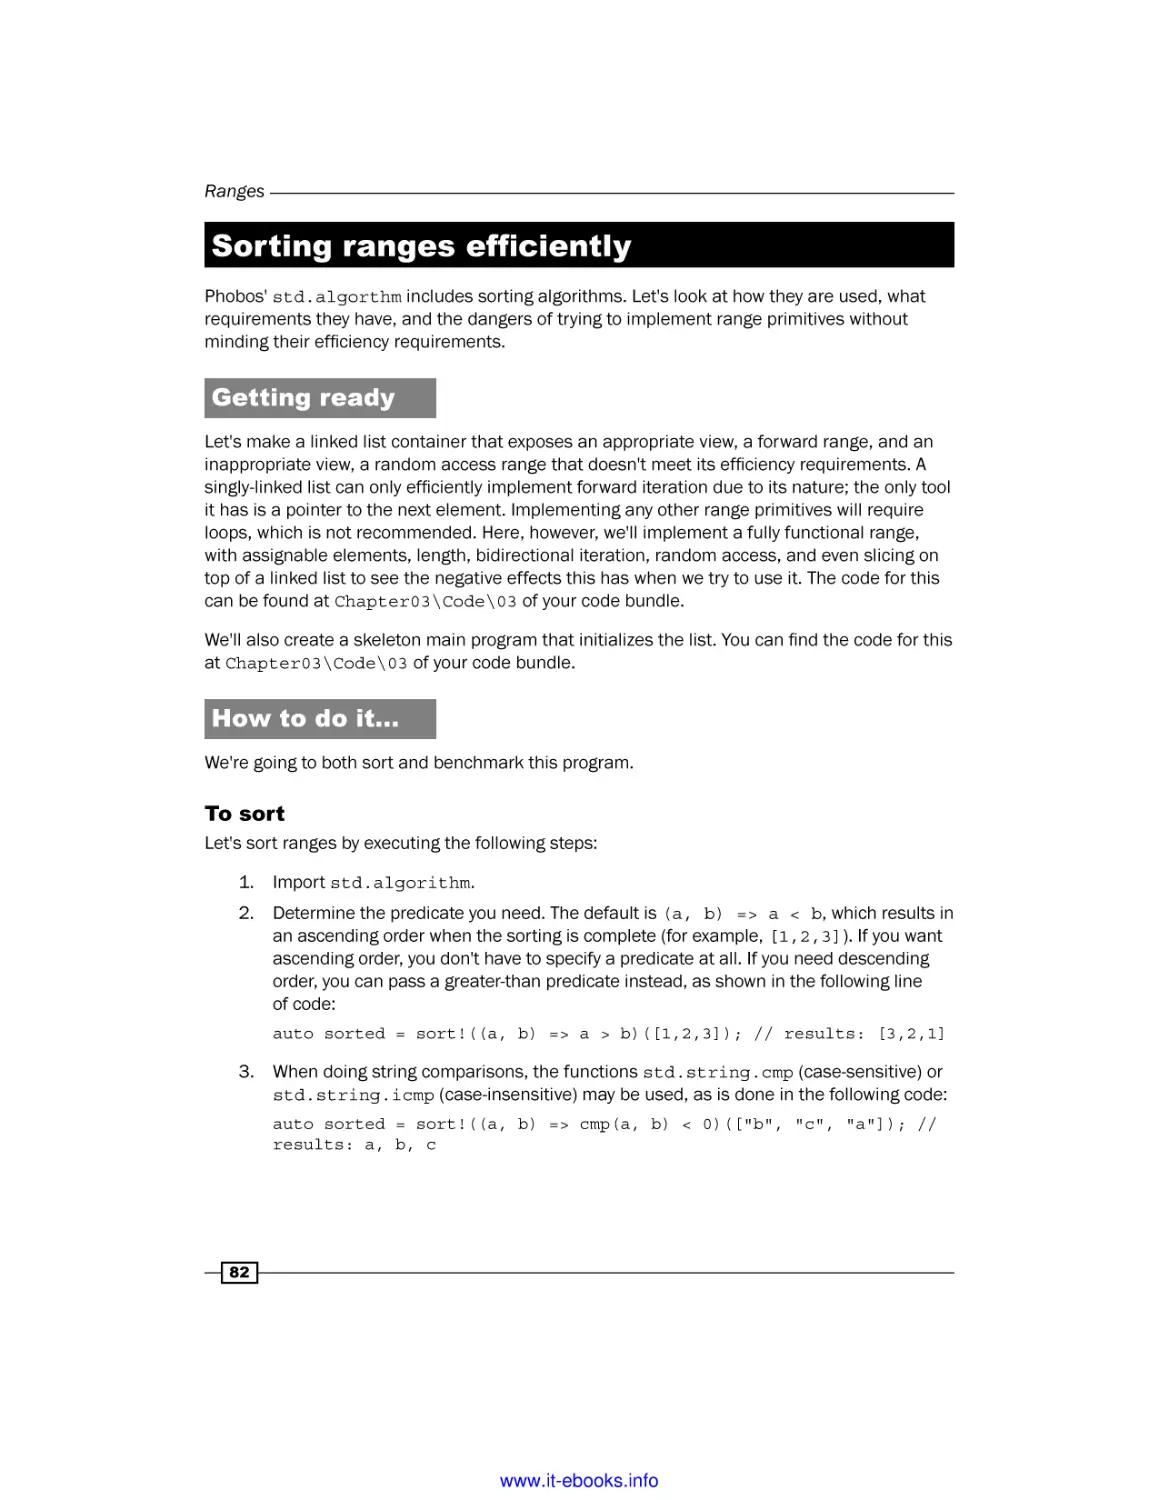
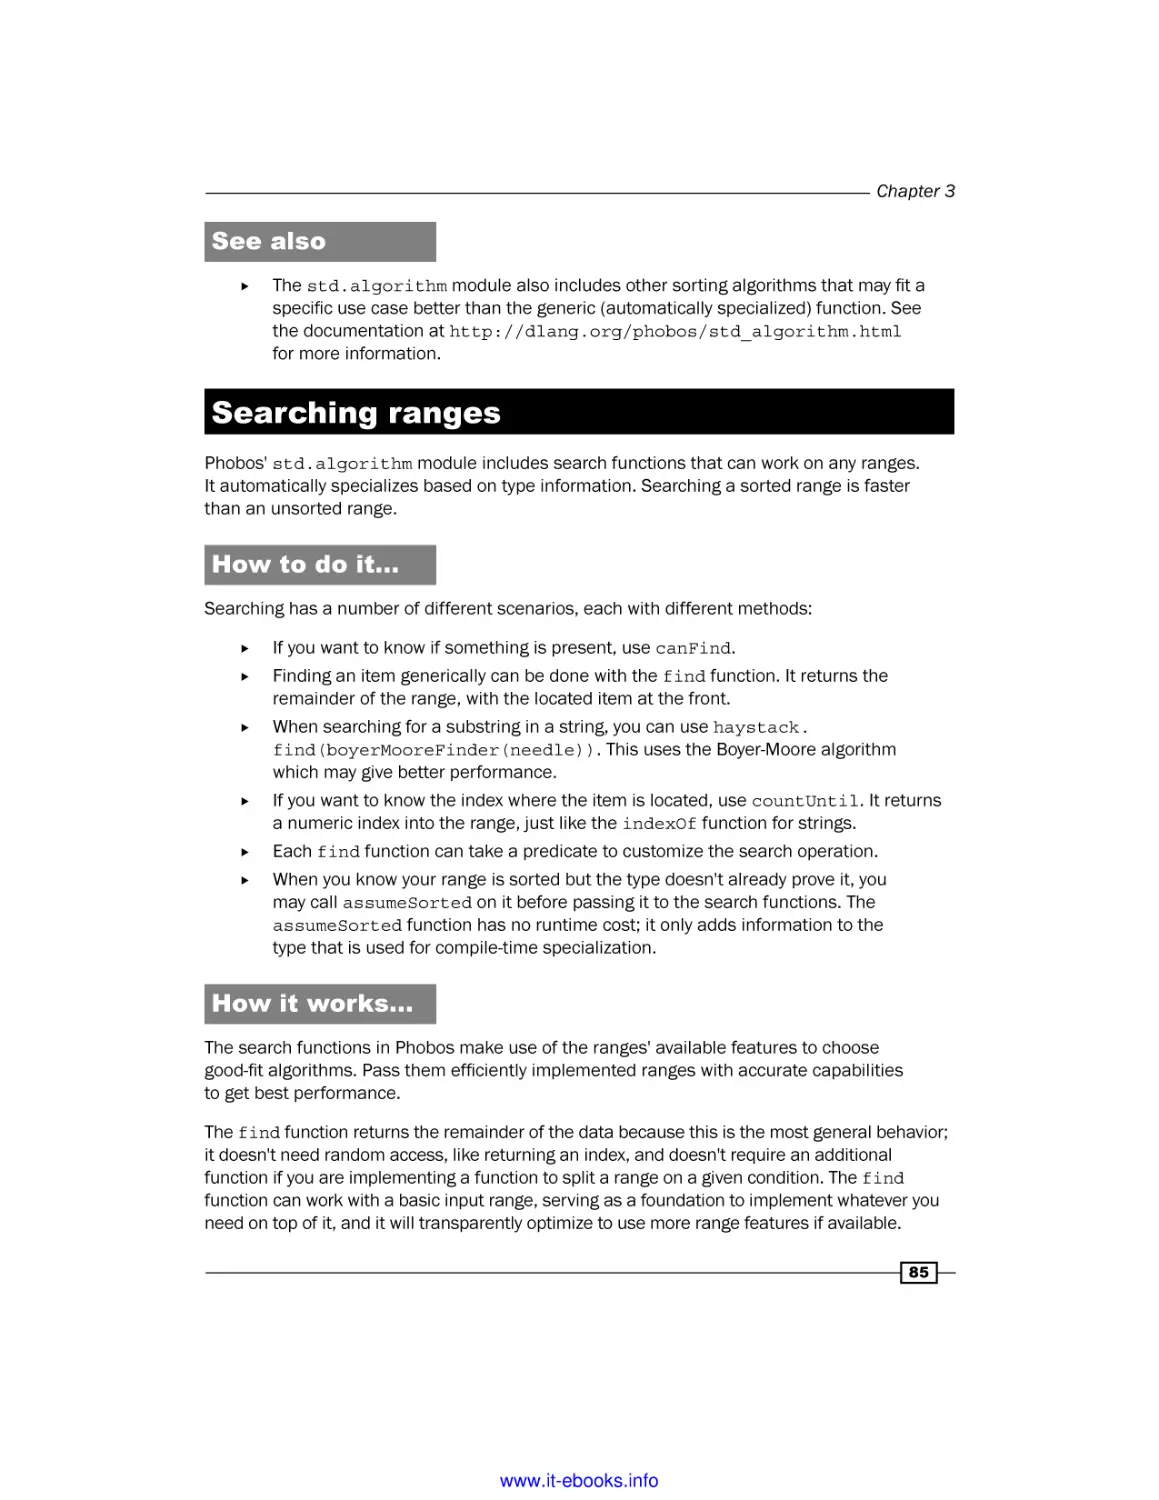
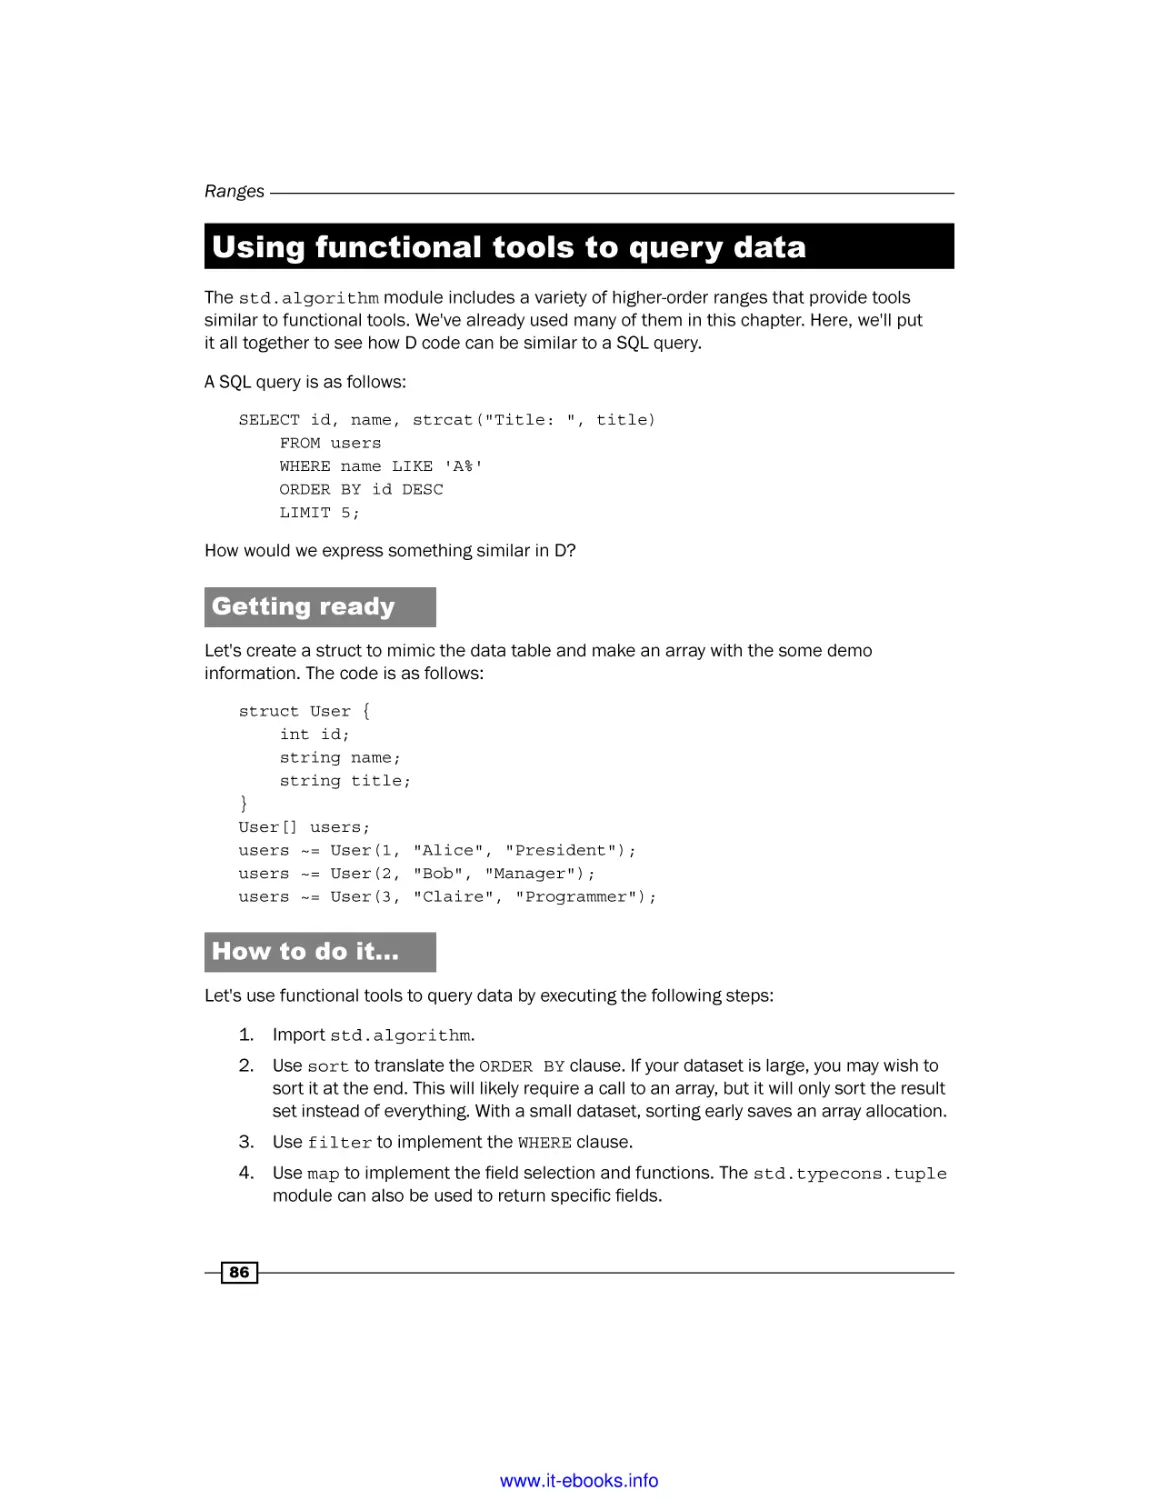
Текст
www.it-ebooks.info
D Cookbook
Discover the advantages of programming in D with
over 100 incredibly effective recipes
Adam D. Ruppe
BIRMINGHAM - MUMBAI
www.it-ebooks.info
D Cookbook
Copyright © 2014 Packt Publishing
All rights reserved. No part of this book may be reproduced, stored in a retrieval system,
or transmitted in any form or by any means, without the prior written permission of the
publisher, except in the case of brief quotations embedded in critical articles or reviews.
Every effort has been made in the preparation of this book to ensure the accuracy of the
information presented. However, the information contained in this book is sold without
warranty, either express or implied. Neither the author, nor Packt Publishing, and its
dealers and distributors will be held liable for any damages caused or alleged to be
caused directly or indirectly by this book.
Packt Publishing has endeavored to provide trademark information about all of the
companies and products mentioned in this book by the appropriate use of capitals.
However, Packt Publishing cannot guarantee the accuracy of this information.
First published: May 2014
Production Reference: 1190514
Published by Packt Publishing Ltd.
Livery Place
35 Livery Street
Birmingham B3 2PB, UK.
ISBN 978-1-78328-721-5
www.packtpub.com
Cover Image by Dennis Ruppe (dennis.ruppe@gmail.com)
www.it-ebooks.info
Credits
Author
Copy Editors
Adam D. Ruppe
Alisha Aranha
Roshni Banerjee
Reviewers
Mradula Hegde
Andrei Alexandrescu
Brad Anderson
Project Coordinator
Maxim Fomin
Amey Sawant
Kai Nacke
Proofreaders
Simran Bhogal
Commissioning Editor
Sam Birch
Paul Hindle
Acquisition Editor
Indexer
Sam Birch
Priya Subramani
Content Development Editor
Sriram Neelakantan
Production Coordinators
Manu Joseph
Nitesh Thakur
Technical Editors
Krishnaveni Haridas
Monica John
Cover Work
Manu Joseph
Edwin Moses
Shiny Poojary
www.it-ebooks.info
Foreword
There is an immediacy and a delicious sense of urgency running through Adam's book that
makes the very notion of its foreword almost offensive. "Let's go implement some great ideas",
the book seems to rejoice at every page; "I know you don't have the patience but read me first,
this may help." I wouldn't want to hold you much with a fluffy, needless opener for a book that
in turn frames itself as a prelude to many enjoyable hours of spinning code. I'll try to keep this
short and to the point—much in the spirit of the book itself.
D Cookbook aims at enabling you to get work done using D, and it is written from the
perspective of one who's clearly walking the walk. I know that Adam has leveraged D for years in
his consulting gigs, but even if I didn't, I would have inferred this easily. He writes in the factual,
no-nonsense tone of the senior engineer who wants to bring a n00b up to speed so they can
get good work done together. Adam's use of "you" and "we" nicely orients himself and the reader
toward solving a problem together. He's not coy to just tell the reader what to do to accomplish
a task, but never comes across as patronizing. Simple explanations pepper the recipes, and
there's always an implied "here's something I tried and works well, you may find that useful"
lurking in the subtext.
The book covers a variety of topics that appear to be only loosely connected: what do (to quote
a few consecutive chapter titles) "Ranges", "Integration" (with platforms and other languages),
"Resource Management", and "Wrapped Types" have in common? Usefulness, that's what.
Such topics, and everything else that the book sets out to explain, are likely to be important in
real-world D applications. Of these, a few are "canon". At the other extreme there'd be borderline
apocryphal stuff such as the Kernel in D chapter. Finally, the bulk of it is annotated folklore
(idioms and patterns known by D's early adopters but not yet by the wider community), mixed
with the author's own insights for good measure. Such a collection of relevant, high-impact
topics is difficult to find collected, let alone in book format. You should read this book if you
want to ramp up to using D in industrial-strength applications.
www.it-ebooks.info
Adam's style is refreshing for someone like me; I've been involved in a mix of language design
and language advocacy for years now, both fields of considerable subjectivity and fervor. Adam's
dispassionate take on language advocacy is a breath of fresh air. His passion is expended on
building great systems, and the language is but a means to that end. If Adam likes a language
feature, he does primarily because he can use it to good effect, and proceeds to illustrate that.
If, on the contrary, he finds a shortcoming, he simply discusses possible workarounds; that, and
the missing lamentations, wonderfully imply that the point of it all is to get work done. "There is
one disadvantage", Adam notes in a sidebar, "to operator overloading being implemented with
templates, though: the operator overload functions cannot be virtual." Before even finishing
that sentence, I've evoked in my mind enough pros and cons for a lively talk show debate.
He's unfazed: "To work around this, write the overload implementation as a final method
which merely forwards the request to a virtual method."
Last but not least, I took pleasure with the varying "zoom level" of the book. Like a philosopher
who also knows his way around a welding machine, Adam can discuss esoteric code generation
topics and show code disassembly, sometimes within the same chapter (see for example, "Code
Generation") and all in style, while illustrating a good point. Wherever you dwell on the high-level/
low-level continuum, it's likely you'll find ways to expand your range by reading D Cookbook.
Many years ago, while in the military, I learned to shoot the famed Kalashnikov AK47. I was
bad at shooting from the hip (which is odd because everybody in the movies is great at it) until
one day I learned a trick that was doing the rounds—wrap the weapon's strap tightly around
the left arm at the elbow. The extra tension increases hand stability. That hack worked great;
yet it was not to be found in any doctrine or manual, and in fact I couldn't find much about it
today on the Internet. D Cookbook reminds me of that hack—it contains advice that's hard to
find in the official documentation, and of immense practical utility. If you want to work in D,
you'll find this book a great companion.
Andrei Alexandrescu, PhD
Research Scientist, Facebook
Author of The D Programming Language
San Francisco, CA, 12th May 2014
www.it-ebooks.info
About the Author
Adam D. Ruppe is a professional software developer living in Watertown, New York. He
started programming PCs in high school, writing assembly language, and later C and C++,
using the Digital Mars compiler to build programs based on MS DOS on a hand-me-down
computer. Programming in the DOS environment with the slow computer gave him early
practical experience in low-level and efficient code—skills he carries on developing today.
After finishing school, he started doing web programming—initially with PHP. While he'd
make it work, he often found himself longing for the good old days. One day, he decided
to check back with the vendor of his old compiler and discovered the D programming
language (well before it reached 1.0!).
He was enamored with it and used it to write some games, and then started writing
web libraries to use it for work too, to replace PHP. He found success in this endeavor
in early 2009.
Combining his pioneering spirit with his blend of low-level and high-level programming
experience, he was able to forge ahead with D, taking it to places many people didn't
believe possible.
www.it-ebooks.info
About the Reviewers
Andrei Alexandrescu coined the colloquial term "modern C++", which is used today
to describe a collection of important C++ styles and idioms. His book on the topic, Modern
C++ Design: Generic Programming and Design Patterns Applied (Addison-Wesley, 2001),
revolutionized C++ programming and produced a lasting influence not only on subsequent work
on C++, but also on other languages and systems. With Herb Sutter, he is also the co-author of
C++ Coding Standards: 101 Rules, Guidelines, and Best Practices (Addison-Wesley Professional,
2010). He has garnered a solid reputation in both industrial and academic circles through his
varied work on libraries and applications, as well as research in machine learning and natural
language processing. From 2006, he worked on the D programming language together with
Walter Bright, the inventor and initial implementer of the language. He co-designed many
important features of D, authored a large part of D's standard library, and wrote the book
The D Programming Language (Addison-Wesley Professional, 2010). Andrei holds a PhD
in Computer Science from the University of Washington and a B.Sc. in Electrical Engineering
from University Politehnica of Bucharest. He works as a research scientist for Facebook.
Brad Anderson is a computer programmer living in Salt Lake City. He has been writing
software professionally for over 10 years and is currently a Lead Developer at Phoenix Project
Management Systems.
www.it-ebooks.info
Maxim Fomin is a programmist who is currently living and working in St. Petersburg,
Russia. Coming with a background in other languages, he quickly recognized D programming
language for its convenience, efficiency, and power synthesis. He helped a company to apply
D language in writing software in an area of his professional interest—Finance.
I would like to thank my family for helping and encouraging me in times of
difficulties and pessimism. I would also like to thank all the mentors that
I've had over the years. Without their assistance, I would not have acquired
knowledge and skills that I possess today.
Kai Nacke is the current maintainer of LDC, the LLVM-based D compiler. He has a strong
interest in compiler construction and is also a contributor to the LLVM framework. In 1998,
he received his Master of Computer Science degree. He is an IT architect at IBM and has
over 10 years of experience in architecturing solutions and developing custom applications.
www.it-ebooks.info
www.PacktPub.com
Support files, eBooks, discount offers, and more
You might want to visit www.PacktPub.com for support files and downloads related to
your book.
Did you know that Packt offers eBook versions of every book published, with PDF and ePub
files available? You can upgrade to the eBook version at www.PacktPub.com and as a print
book customer, you are entitled to a discount on the eBook copy. Get in touch with us at
service@packtpub.com for more details.
At www.PacktPub.com, you can also read a collection of free technical articles, sign up
for a range of free newsletters and receive exclusive discounts and offers on Packt books
and eBooks.
TM
http://PacktLib.PacktPub.com
Do you need instant solutions to your IT questions? PacktLib is Packt's online digital book
library. Here, you can access, read and search across Packt's entire library of books.
Why Subscribe?
ff
Fully searchable across every book published by Packt
ff
Copy and paste, print and bookmark content
ff
On demand and accessible via web browser
Free Access for Packt account holders
If you have an account with Packt at www.PacktPub.com, you can use this to access
PacktLib today and view nine entirely free books. Simply use your login credentials for
immediate access.
www.it-ebooks.info
www.it-ebooks.info
Table of Contents
Preface
Chapter 1: Core Tasks
Introduction
Installing the compiler and writing a "Hello World" program
Adding additional modules (files) to your program
Using external libraries
Building and processing arrays
Using associative arrays to translate input
Creating a user-defined vector type
Using a custom exception type
Understanding immutability
Slicing a string to get a substring
Creating a tree of classes
Chapter 2: Phobos – The Standard Library
Introduction
Performing type conversions
Finding the largest files in a directory
Creating a network client and server
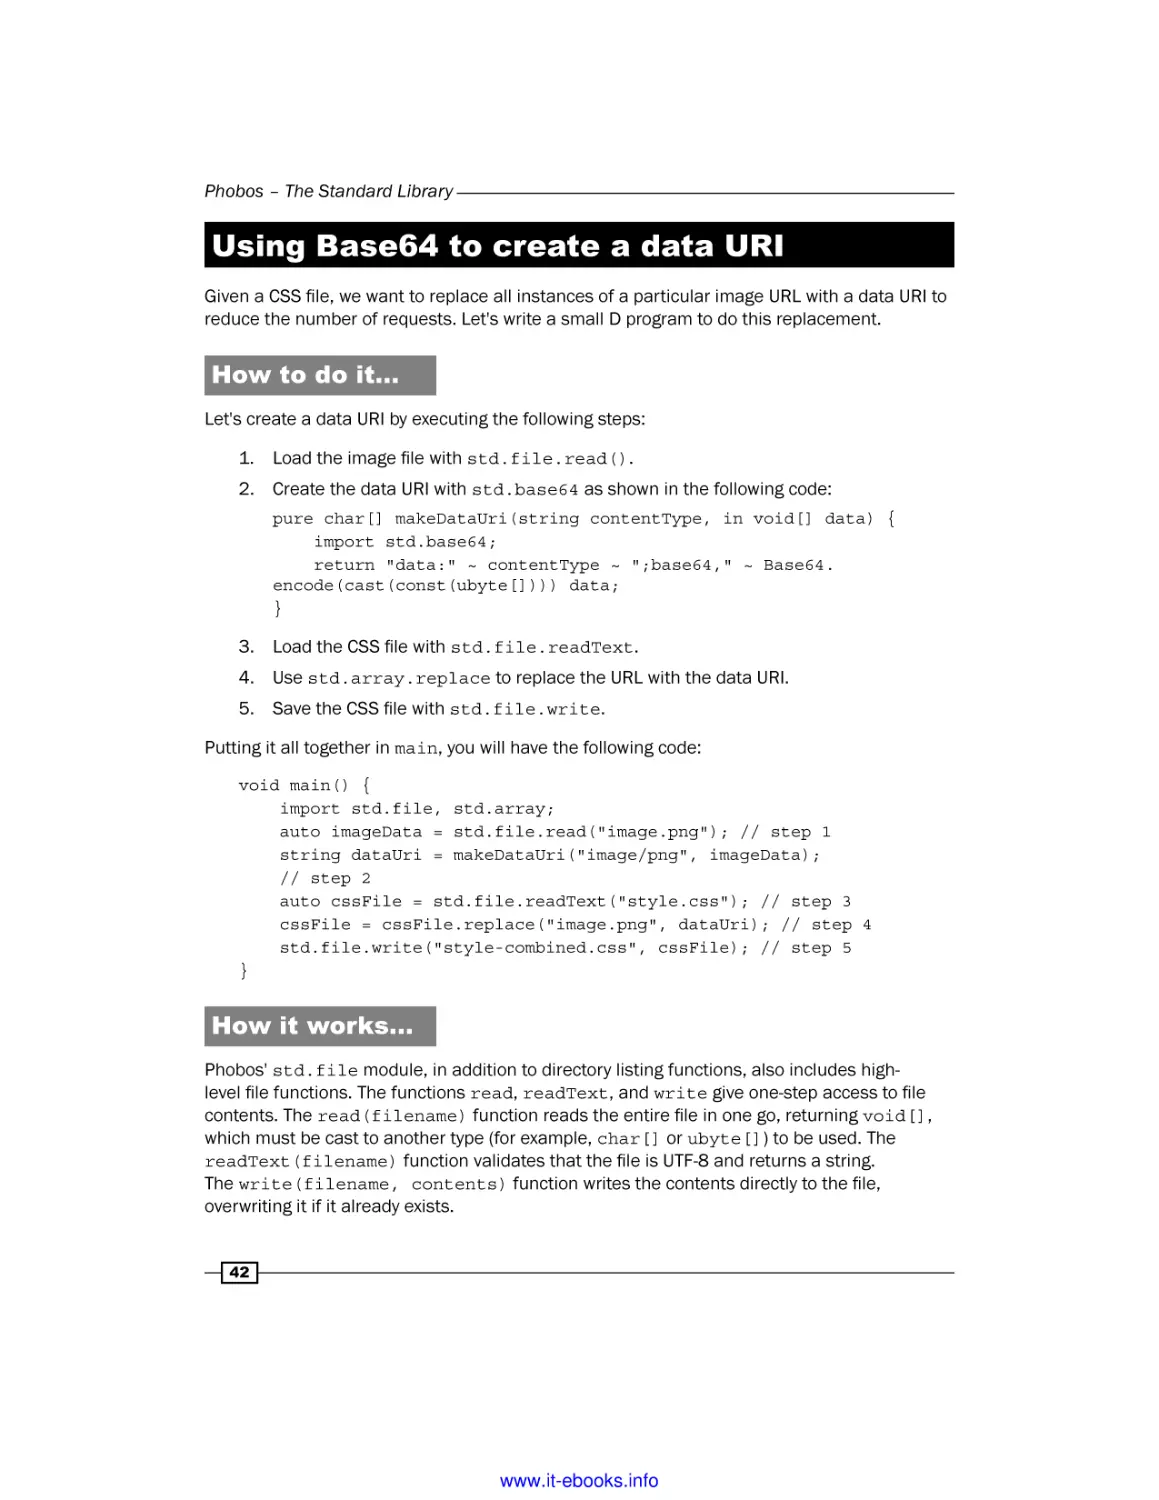
Using Base64 to create a data URI
Generating random numbers
Normalizing a string and performing Unicode comparisons
Searching with regular expressions
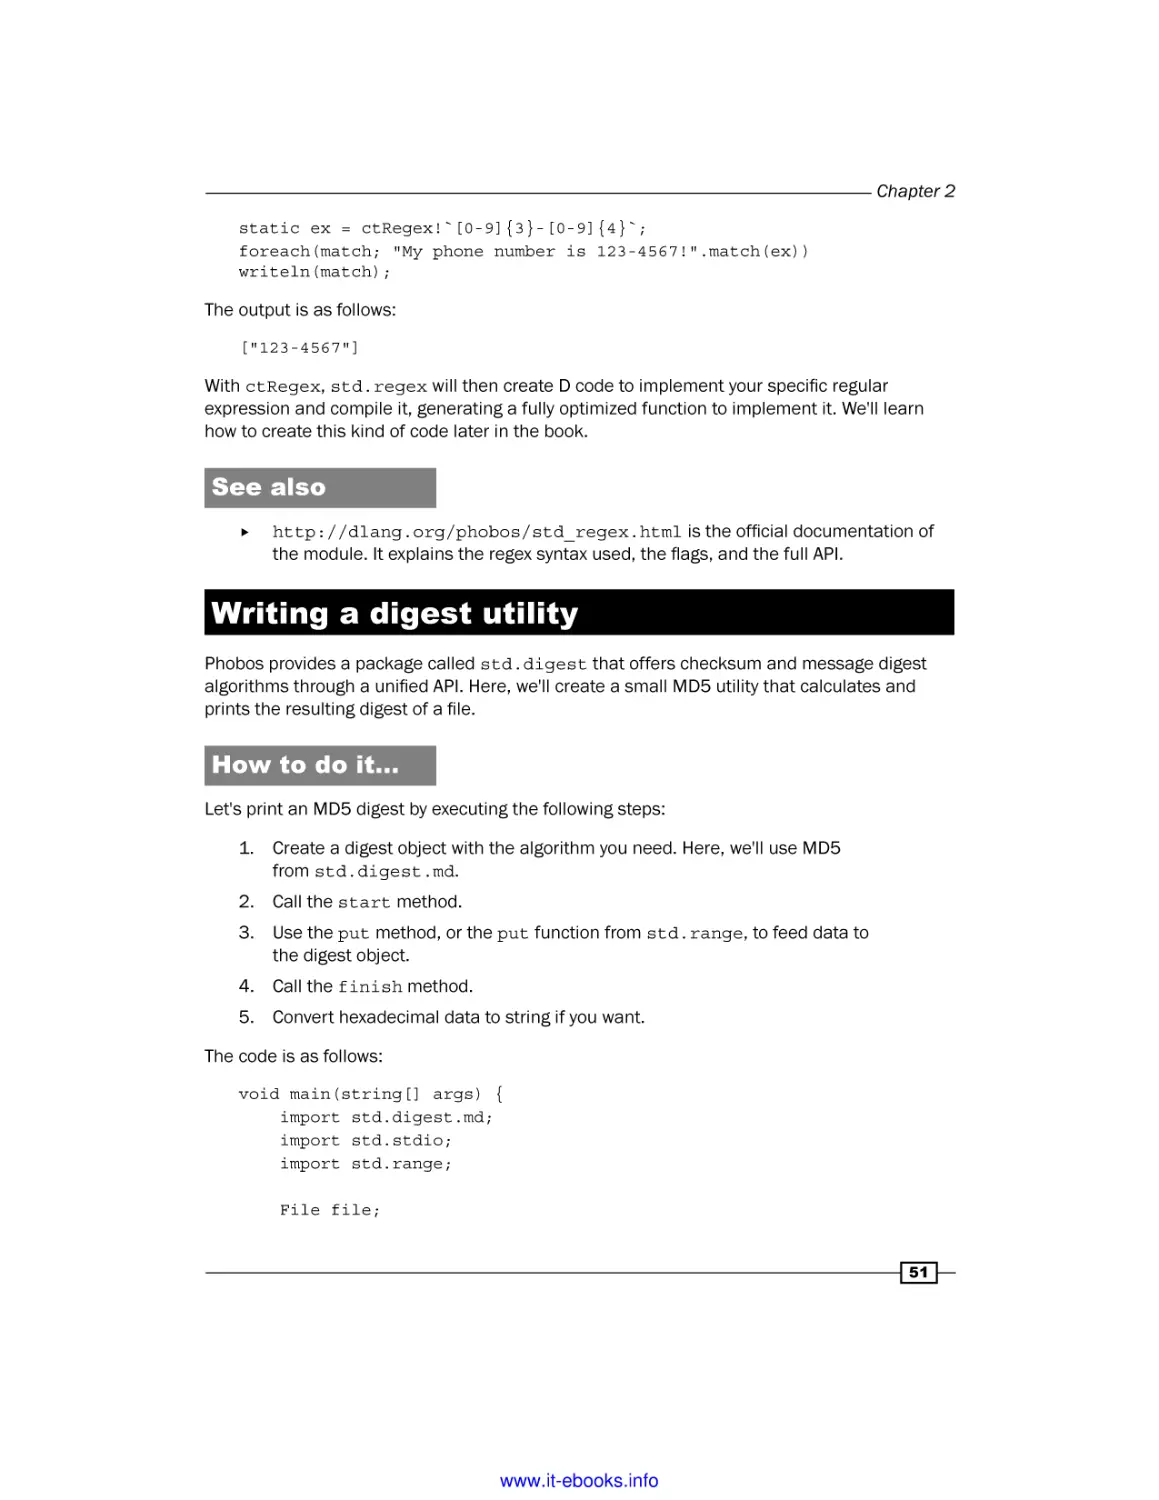
Writing a digest utility
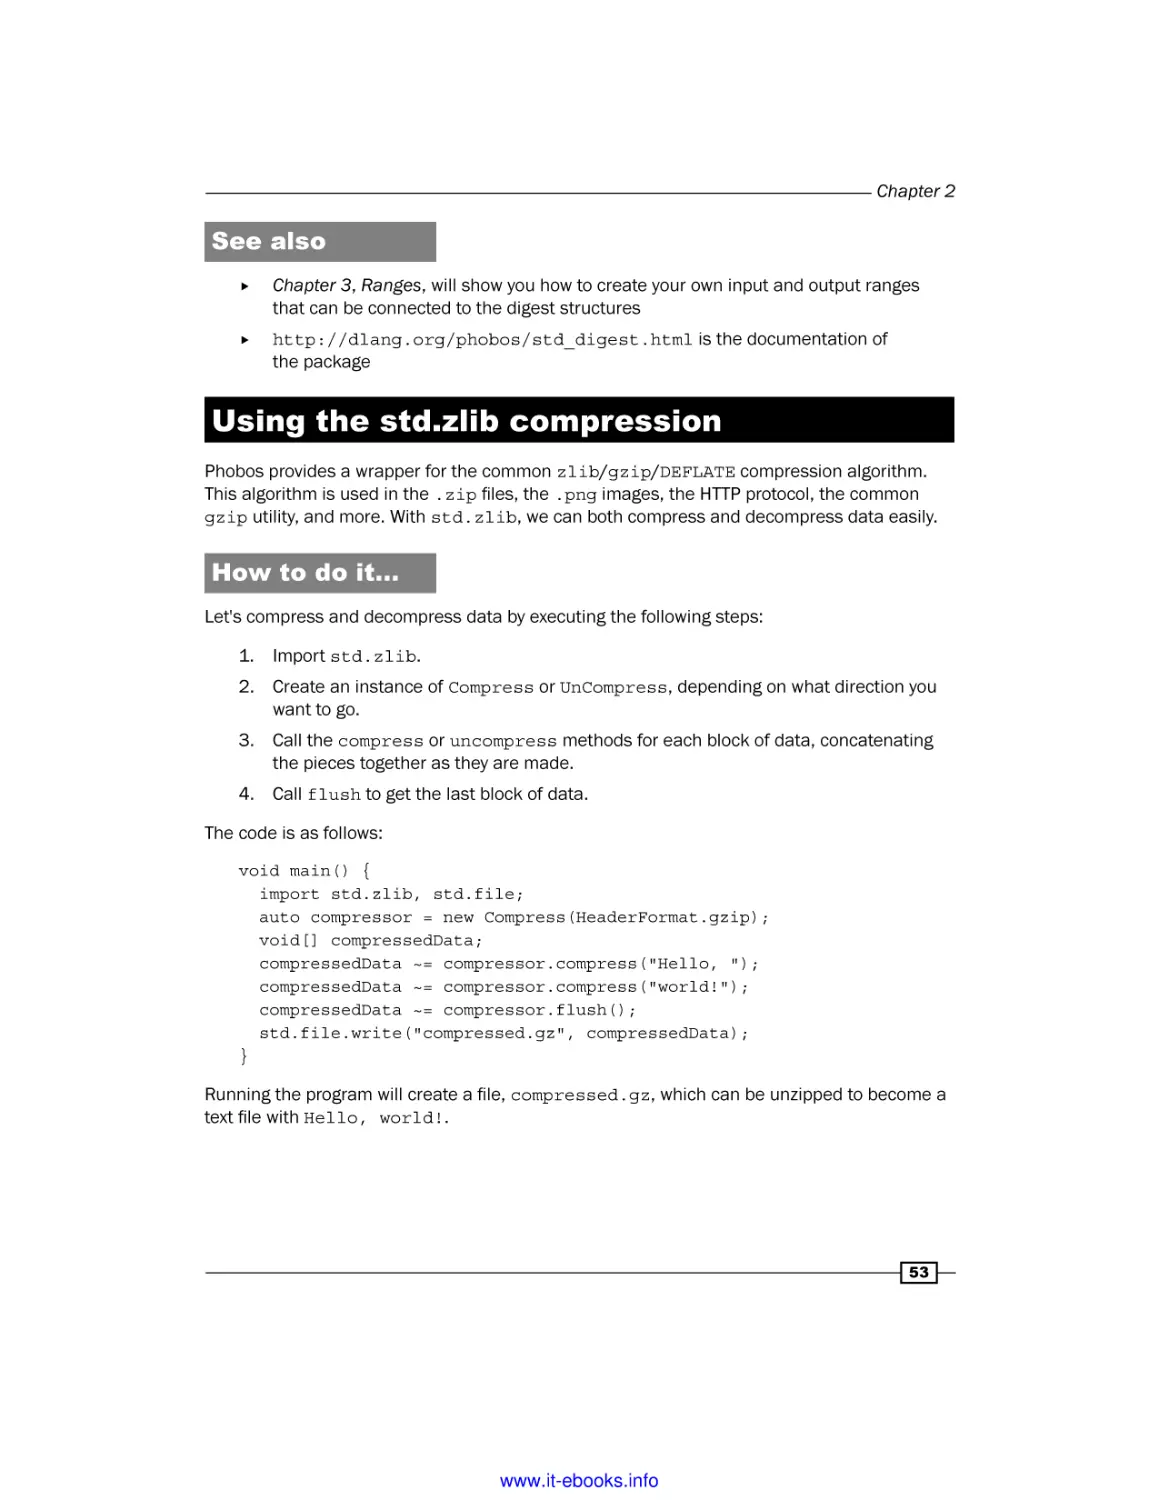
Using the std.zlib compression
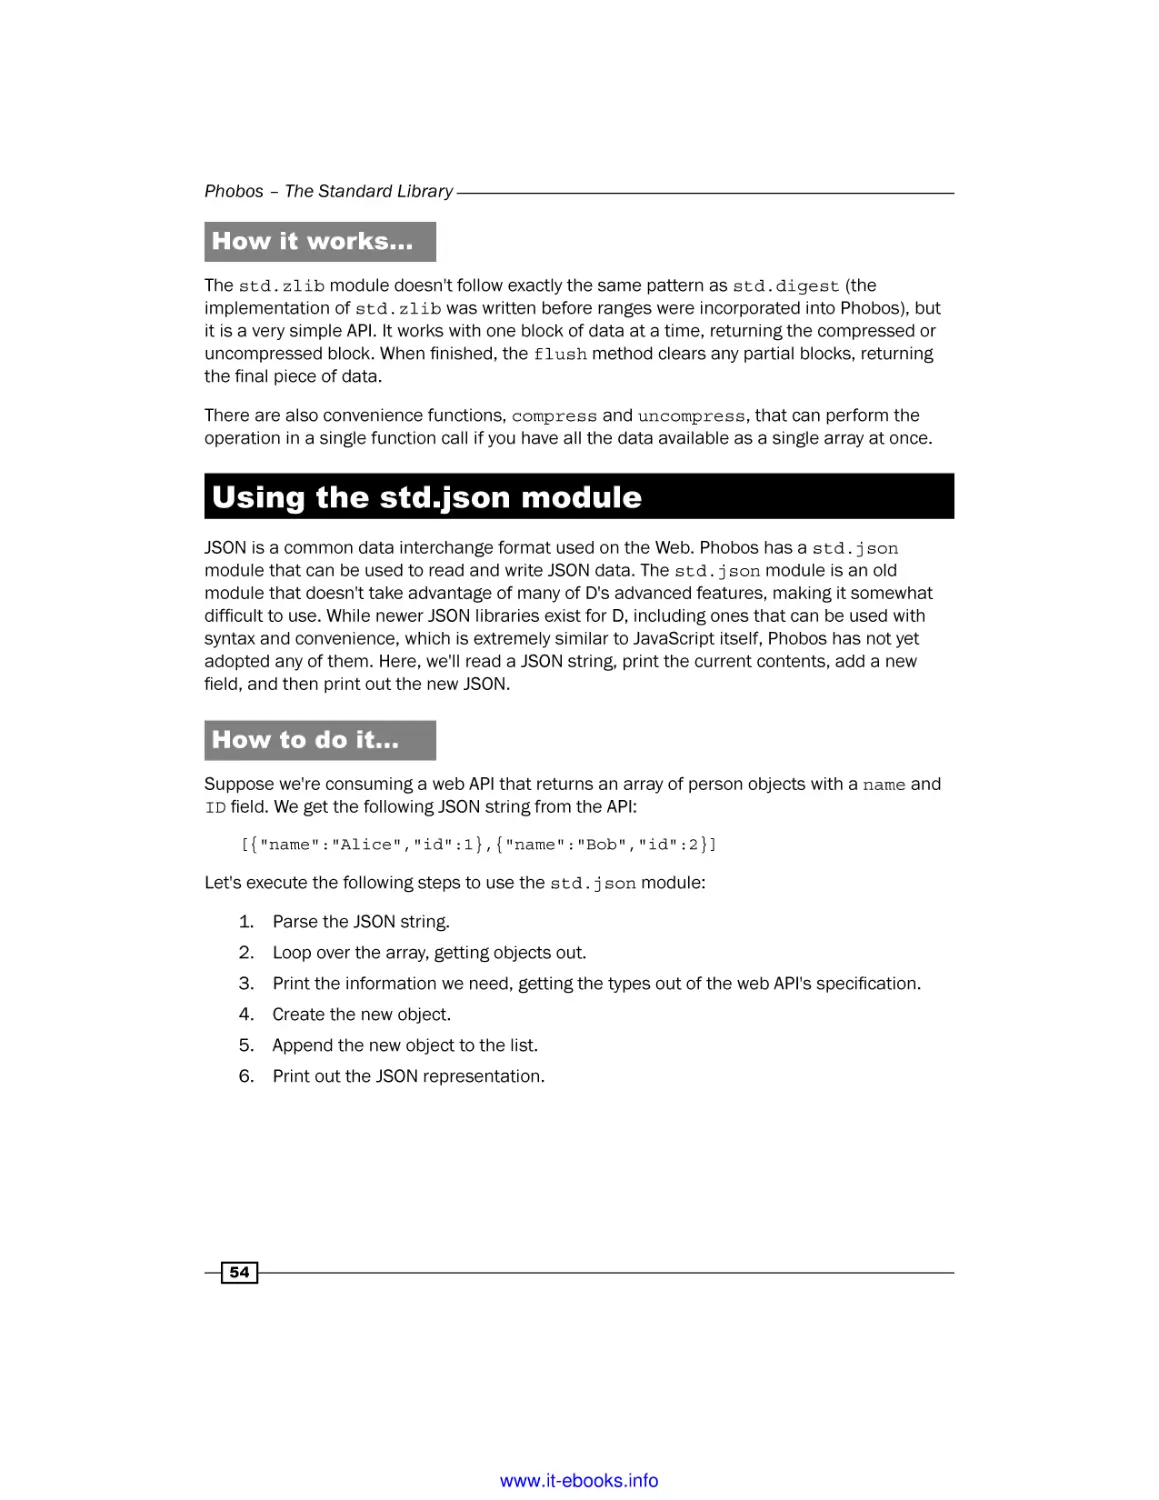
Using the std.json module
www.it-ebooks.info
1
5
5
6
8
10
13
15
18
21
23
26
28
33
34
34
35
38
42
44
47
49
51
53
54
Table of Contents
Chapter 3: Ranges
57
Chapter 4: Integration
89
Introduction
Using ranges when implementing an algorithm
Creating an input range
Creating an output range
Creating a higher-order range
Putting a range interface on a collection
Creating an input range over a tree structure
Using runtime polymorphic (class) ranges
Storing a range as a data member
Sorting ranges efficiently
Searching ranges
Using functional tools to query data
Introduction
Calling the Windows API functions
Removing the Windows console
Making Linux system calls
Writing part of a C program in D
Interfacing with C++
Using structs to mimic the C++ object structure
Communicating with external processes
Communicating with a dynamic scripting language
Using Windows' COM
57
58
62
66
69
72
75
79
80
82
85
86
89
90
92
93
96
99
104
107
108
112
Chapter 5: Resource Management
117
Chapter 6: Wrapped Types
137
Introduction
Avoiding the garbage collector
Making a reference-counted object
Manually managing class memory
Using scope guards to manage transactions
Creating an array replacement
Managing lent resources
Creating a NotNull struct
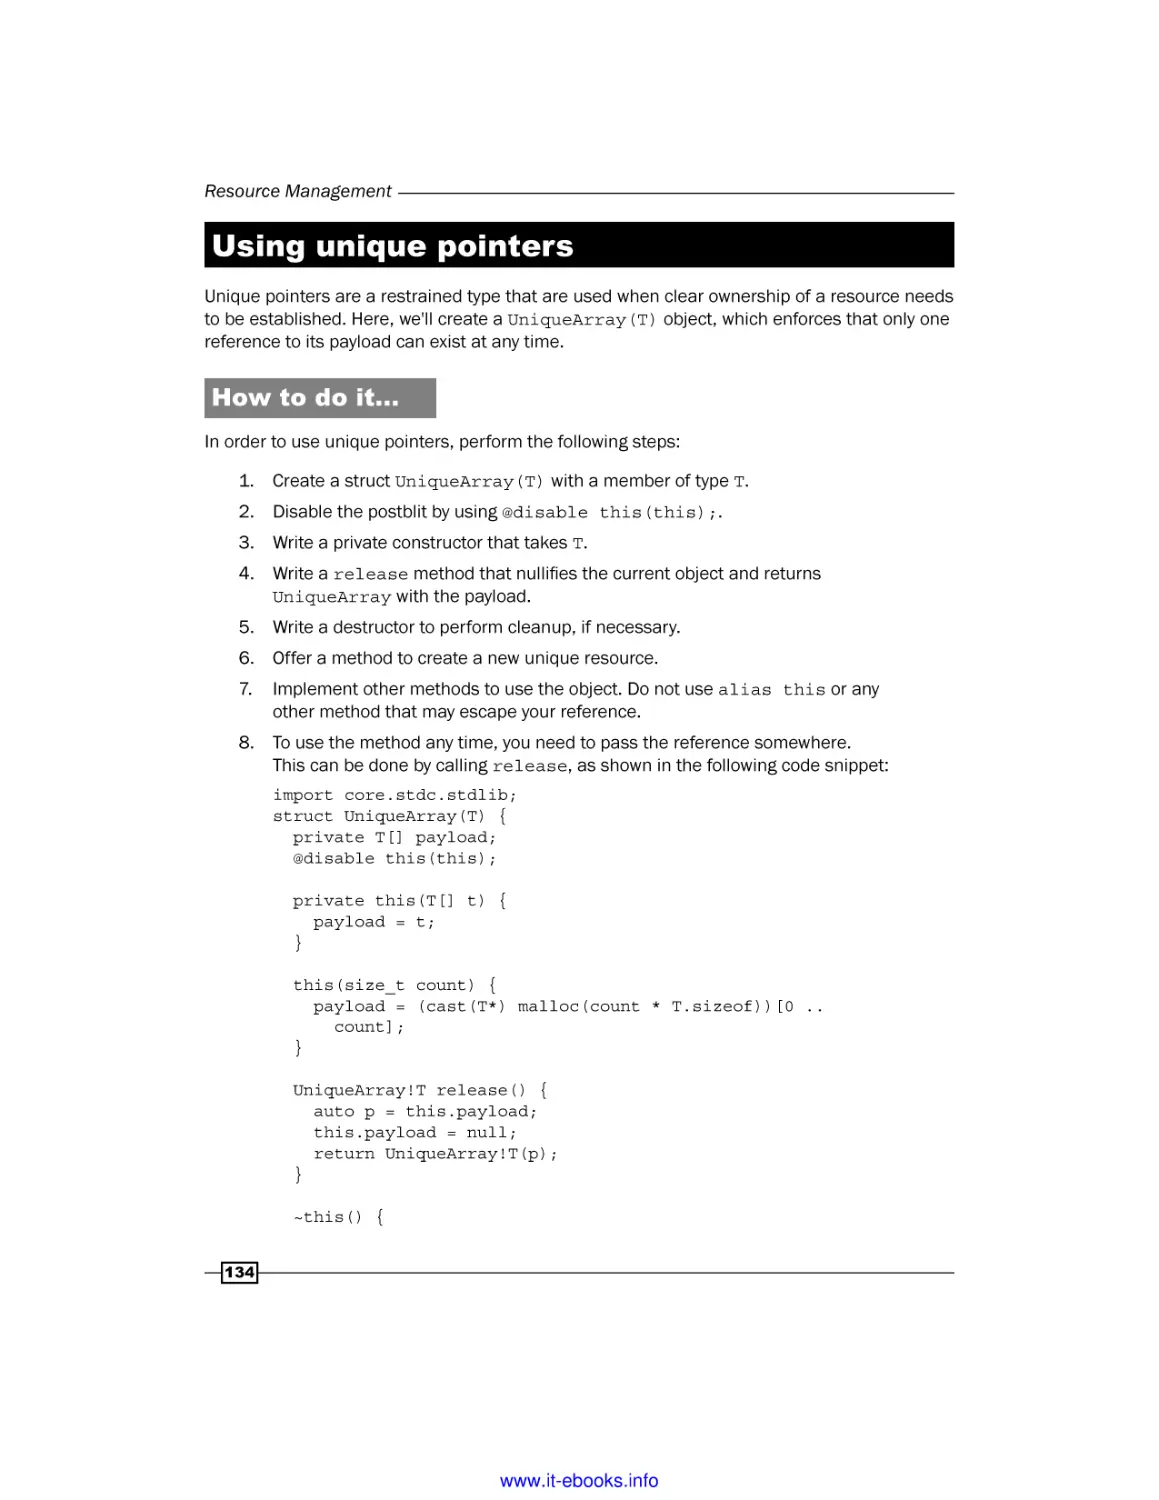
Using unique pointers
Using RAII and handling the limitations of class destructors
Introduction
Creating a struct with reference semantics
Simulating inheritance with structs
Creating a ranged integer
ii
www.it-ebooks.info
117
117
119
121
123
125
130
130
134
136
137
138
139
140
Table of Contents
Creating an opaque handle type
Creating a subtyped string for i18n
Forwarding methods with opDispatch
Creating a tagged dynamic type
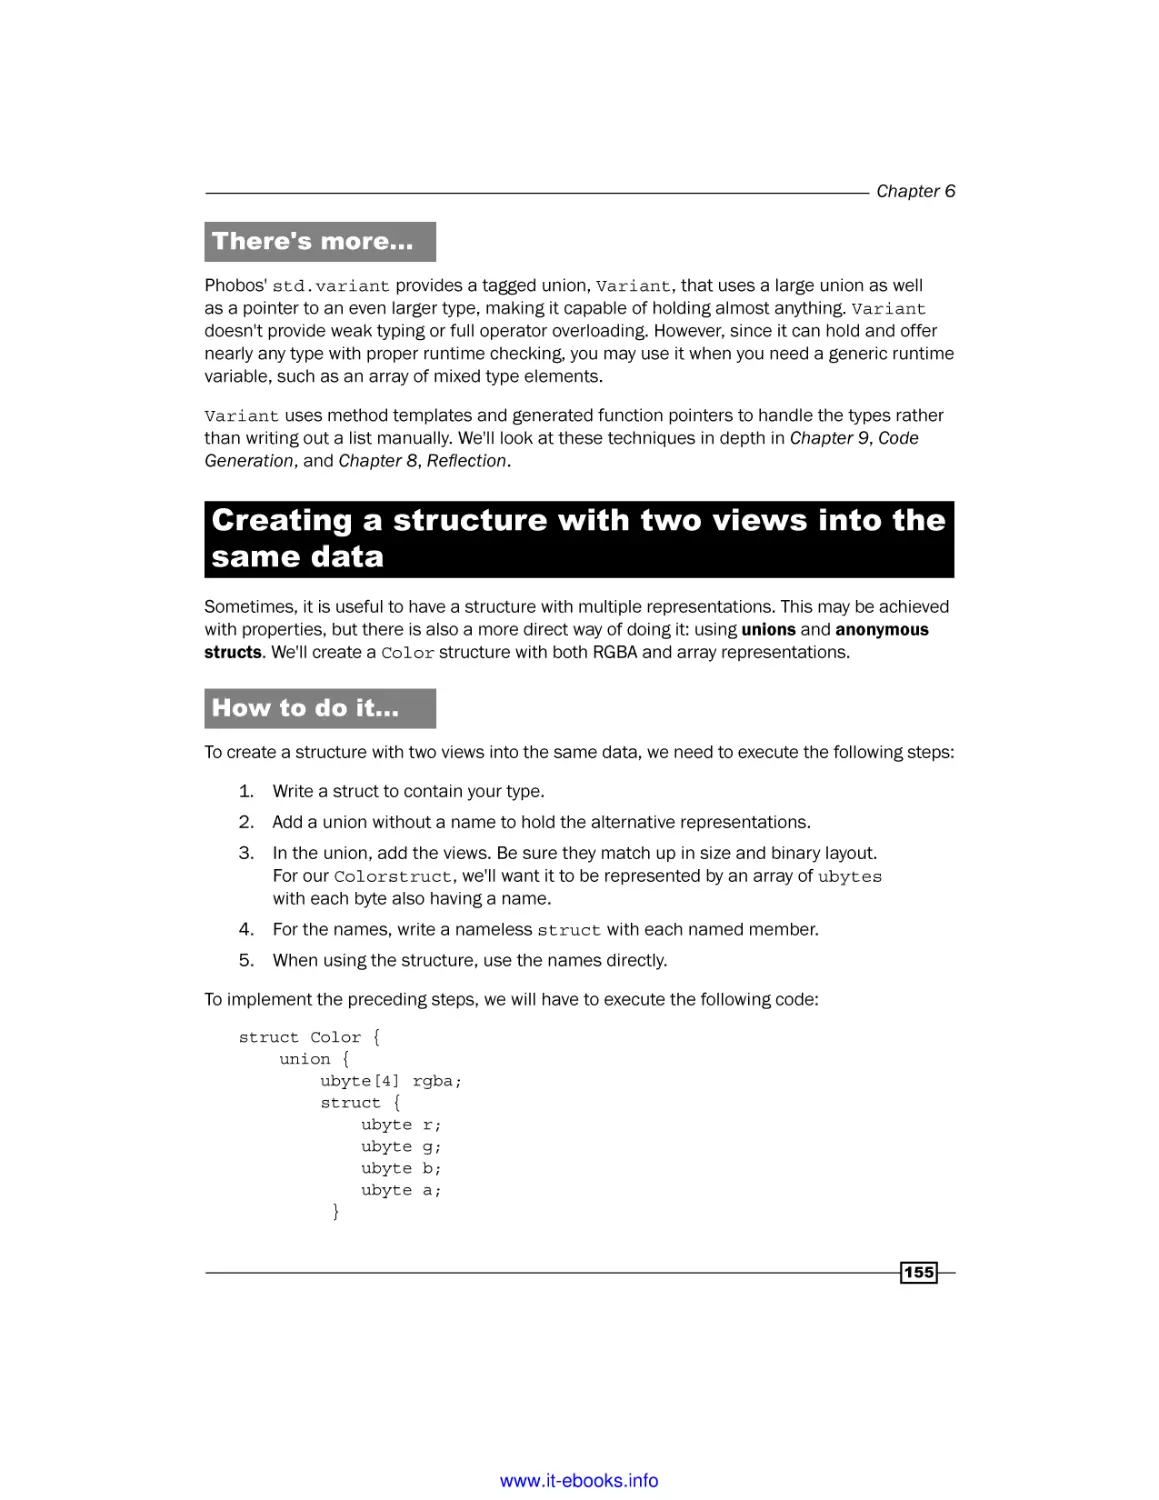
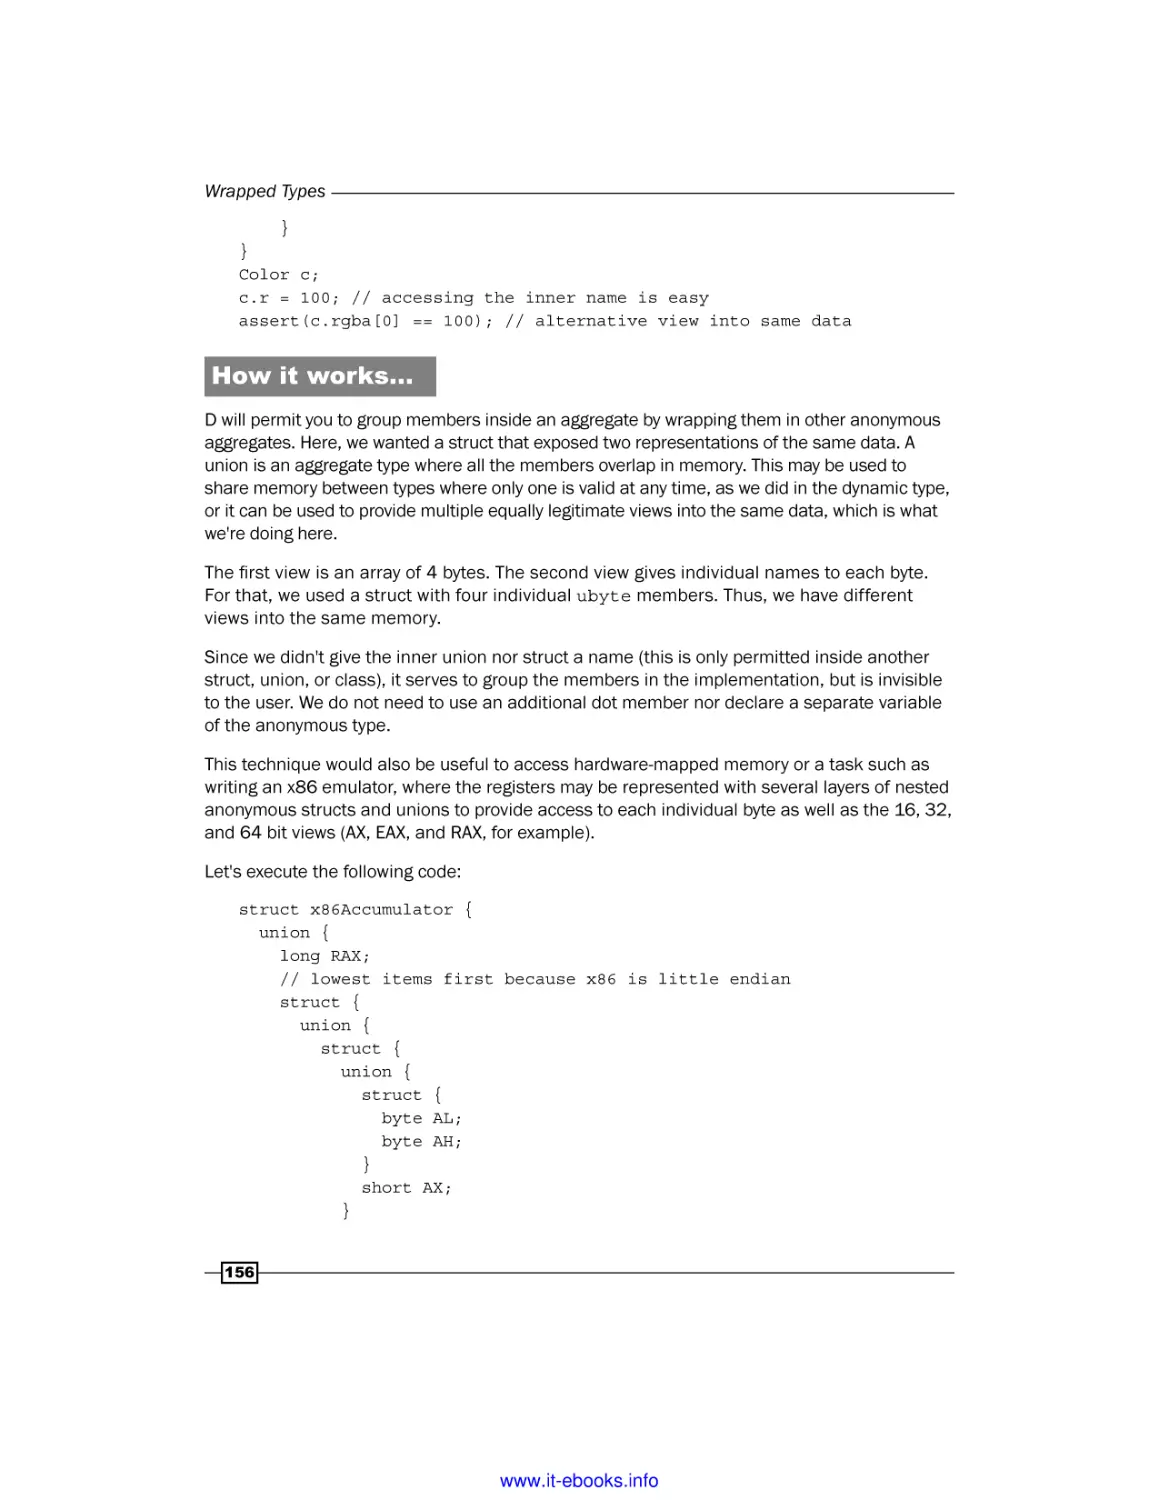
Creating a structure with two views into the same data
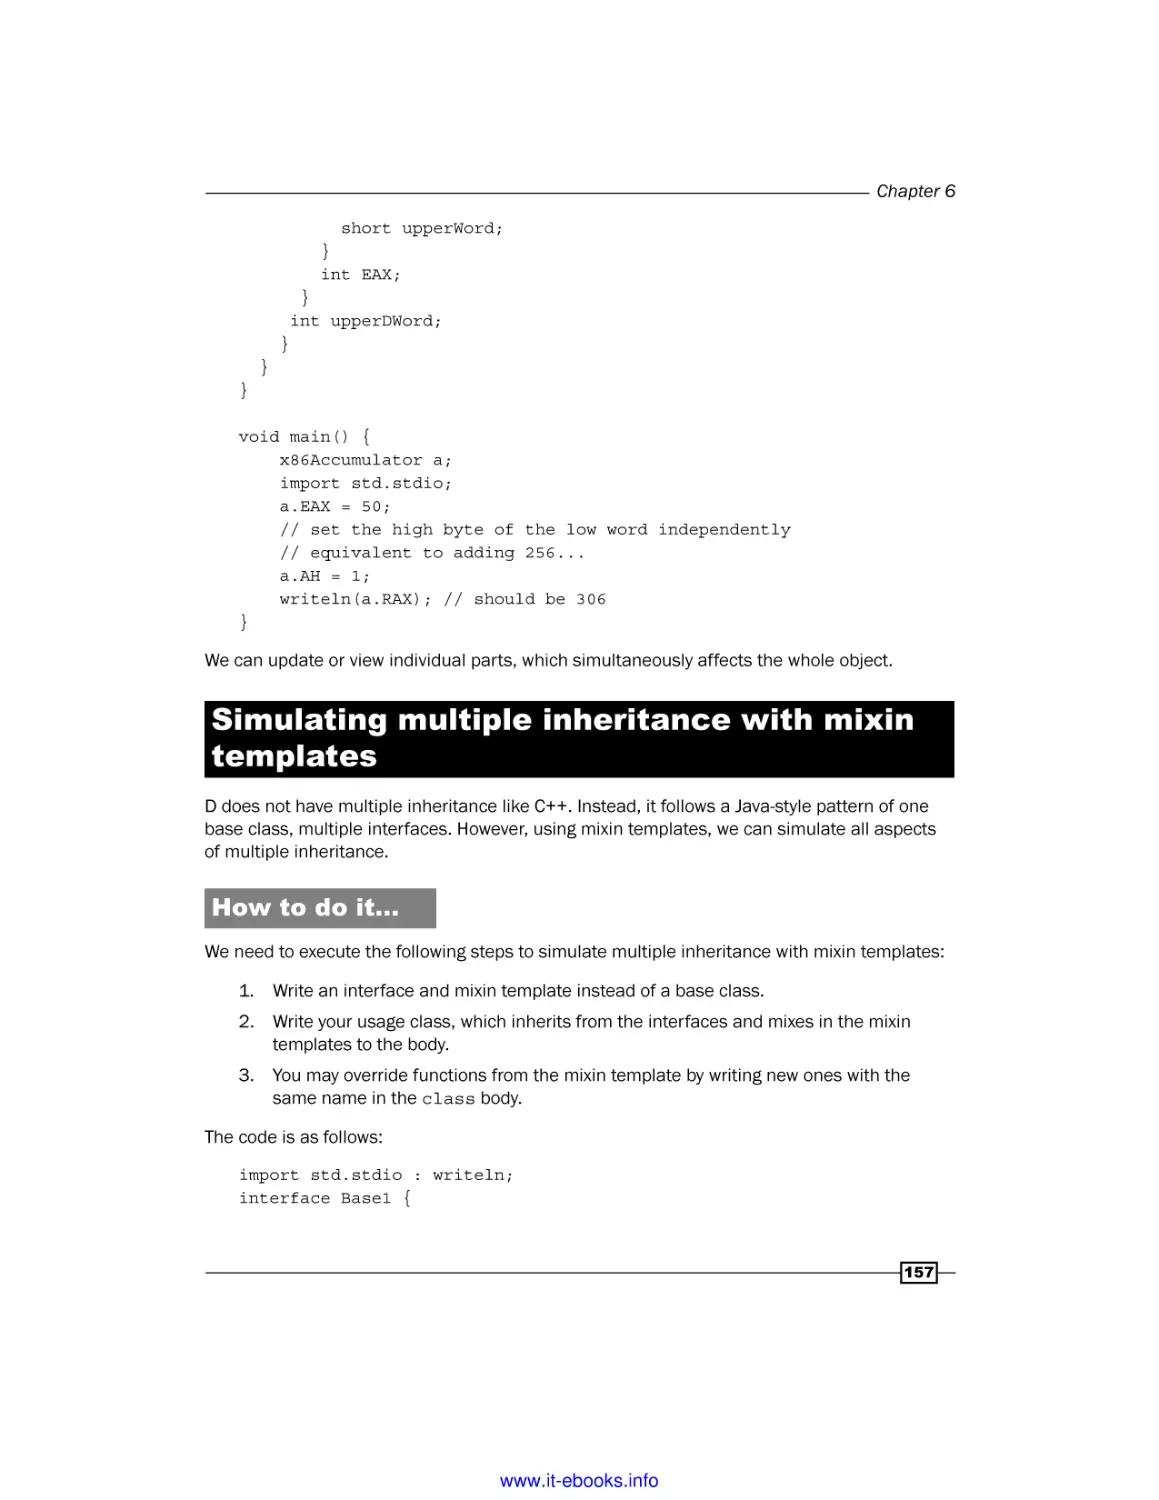
Simulating multiple inheritance with mixin templates
Chapter 7: Correctness Checking
Introduction
Using assertions and exceptions
Using static asserts
Using template constraints and static if
Preventing memory corruption bugs with @safe
Leveraging const-correctness
Avoiding side effects of pure functions
Verifying object invariants and pre- and post-conditions
Unit testing your code
Documenting your code with Ddoc
Writing platform-specific code (versions) and per-client
configuration modules
145
148
150
152
155
157
161
161
162
164
167
173
176
180
181
183
185
189
Chapter 8: Reflection
193
Chapter 9: Code Generation
231
Introduction
Getting dynamic runtime type information
Getting a list of child classes
Determining whether a module is available
Getting a list of all methods or fields in a module or an object
Inspecting function overloads
Determining names, types, and default values of function parameters
Getting components of complex types
Using user-defined attributes
Implementing a custom lint-style check for virtual functions
Extending the runtime type information
Creating a command-line function caller
Introduction
Creating user-defined literals
Parsing a domain-specific language
Generating data structures from text diagrams
Automating dynamic calls with multiple dispatch
Building a lookup table
Using string parameters to change functions
193
194
196
198
200
206
207
210
214
216
219
223
231
232
235
239
242
246
247
iii
www.it-ebooks.info
Table of Contents
Wrapping instance methods
Using opDispatch to generate properties
Duck typing to a statically-defined interface
248
252
254
Chapter 10: Multitasking
261
Chapter 11: D for Kernel Coding
279
Chapter 12: Web and GUI Programming
297
Appendix: Addendum
327
Index
337
Introduction
Using threads
Passing messages with std.concurrency
Processing parallel data with std.parallelism
Using fibers
Creating new processes
Exploring thread-safe, single-locking singletons
Using asynchronous I/O
Introduction
Running D on bare metal x86 with a stripped runtime
Adding interrupt handling to the bare metal x86 code
Introduction
Creating a dynamic website with cgi.d
Creating a web API with web.d
Parsing and modifying an HTML page with dom.d
Accessing a SQL database
Sending an e-mail
Writing colored output to the console
Getting real-time input from the terminal
Working with image files
Creating a graphics window to show a TV static demo
Creating an OpenGL window
Compiling D for ARM/Linux Raspberry Pi
Running D on bare metal ARM
Using the exponentiation operator
Getting a stack trace without throwing an exception
Finding more information about D
iv
www.it-ebooks.info
261
262
265
267
269
271
274
276
279
279
288
297
298
301
303
308
312
315
316
318
320
324
327
329
332
333
334
Preface
The D programming language's popularity is growing rapidly. With its seamless blending of
high-level convenience with low-level power and efficiency, D is suitable for tackling almost
any programming task productively. This book comes out of years of experience of using D
in the real world and closely following the language and libraries' development. It will also
help you get up to speed with this exciting language and burgeoning ecosystem.
What this book covers
Chapter 1, Core Tasks, will get you started with D and cover the tasks you can perform
with D's core language features that differ from other popular programming languages.
Chapter 2, Phobos – The Standard Library, introduces you to the standard D library to
perform common tasks, including generating random numbers, writing a network client
and server, and performing type conversions.
Chapter 3, Ranges, covers the range concept, which is central to D algorithms. Ranges
allow you to write and consume generators, views on various collections, and perform
generic transformations of data.
Chapter 4, Integration, explores integrating D with the outside world, including creating
Windows-based applications, using C libraries, and extending C++ applications with D.
Chapter 5, Resource Management, discusses how to manage memory and other resources
in D, including tips on why, when, and how to use the garbage collector effectively.
Chapter 6, Wrapped Types, dives into the world of user-defined types, showing you how to
extend and restrict types via cheap wrapper abstractions.
Chapter 7, Correctness Checking, shows how to use D's bug-hunting features such as
testing, assertions, and documentation, and the correct way to do conditional compilation.
Chapter 8, Reflection, teaches you about the rich introspection capabilities D provides,
including tips learned through years of experience which stretch the limits of the language.
www.it-ebooks.info
Preface
Chapter 9, Code Generation, demonstrates several techniques to automate the creation
of new code to write efficient, generic, and specialized code, including a primer on creating
your own mini languages inside D.
Chapter 10, Multitasking, introduces you to the options D offers for concurrency and parallelism.
Chapter 11, D for Kernel Coding, will get you started with writing bare metal code in D, stripping
out the runtime library to say hello directly through the PC's video hardware and then handling
interrupts sent back by the keyboard with D's low-level features.
Chapter 12, Web and GUI Programming, showcases some of the libraries I've written over
the years that show how to make a dynamic website and desktop graphics windows while
discussing my practical experience from writing these libraries, which will give you a leg up
when you write your own code.
Appendix, Addendum, briefly shows how to use D on ARM processors, including systems
without an operating system, and other small topics that didn't fit elsewhere in the book.
What you need for this book
You need to have a Windows or Mac PC that is capable of running the DMD compiler, which is
available at http://dlang.org/.
Who this book is for
This book is for programmers who want to continue their professional development by learning
more about D. Whether you are looking at D for the first time or have used it before and want to
learn more, this book has something to offer you.
Conventions
In this book, you will find a number of styles of text that distinguish between different kinds of
information. Here are some examples of these styles, and an explanation of their meaning.
Code words in text, database table names, folder names, filenames, file extensions, pathnames,
dummy URLs, user input, and Twitter handles are shown as follows: "Add a struct to test.d,
which uses alias this to activate subtyping."
A block of code is set as follows:
import project.foo;; // disambiguate with project.foo
import bar; // you can disambiguate calls with the name bar
2
www.it-ebooks.info
Preface
Any command-line input or output is written as follows:
coffimplib myfile.lib
New terms and important words are shown in bold. Words that you see on the screen, in
menus or dialog boxes for example, appear in the text like this: "Running the program will
print Hello, world! in green text on a red background."
Warnings or important notes appear in a box like this.
Tips and tricks appear like this.
Reader feedback
Feedback from our readers is always welcome. Let us know what you think about this
book—what you liked or may have disliked. Reader feedback is important for us to develop
titles that you really get the most out of.
To send us general feedback, simply send an e-mail to feedback@packtpub.com, and
mention the book title via the subject of your message.
If there is a topic that you have expertise in and you are interested in either writing or
contributing to a book, see our author guide on www.packtpub.com/authors.
Customer support
Now that you are the proud owner of a Packt book, we have a number of things to help you
to get the most from your purchase.
Downloading the example code
You can download the example code files for all Packt books you have purchased from your
account at http://www.packtpub.com. If you purchased this book elsewhere, you can
visit http://www.packtpub.com/support and register to have the files e-mailed directly
to you.
3
www.it-ebooks.info
Preface
Errata
Although we have taken every care to ensure the accuracy of our content, mistakes do happen.
If you find a mistake in one of our books—maybe a mistake in the text or the code—we would be
grateful if you would report this to us. By doing so, you can save other readers from frustration
and help us improve subsequent versions of this book. If you find any errata, please report them
by visiting http://www.packtpub.com/submit-errata, selecting your book, clicking on
the errata submission form link, and entering the details of your errata. Once your errata are
verified, your submission will be accepted and the errata will be uploaded on our website, or
added to any list of existing errata, under the Errata section of that title. Any existing errata
can be viewed by selecting your title from http://www.packtpub.com/support.
Piracy
Piracy of copyright material on the Internet is an ongoing problem across all media. At Packt,
we take the protection of our copyright and licenses very seriously. If you come across any
illegal copies of our works, in any form, on the Internet, please provide us with the location
address or website name immediately so that we can pursue a remedy.
Please contact us at copyright@packtpub.com with a link to the suspected pirated material.
We appreciate your help in protecting our authors, and our ability to bring you valuable content.
Questions
You can contact us at questions@packtpub.com if you are having a problem with any
aspect of the book, and we will do our best to address it.
4
www.it-ebooks.info
1
Core Tasks
In this chapter, we will get started with D and explore some of its core features. You will learn
the following recipes:
ff
Installing the compiler and writing a "Hello World" program
ff
Adding additional modules (files) to your program
ff
Using external libraries
ff
Building and processing arrays
ff
Using associative arrays to translate input
ff
Creating a user-defined vector type
ff
Using a custom exception type
ff
Understanding immutability
ff
Slicing a string to get a substring
ff
Creating a tree of classes
Introduction
The D language borrows from several other programming languages, including statically typed
languages such as C, C++, and Java, as well as dynamic languages such as Ruby, Python, and
JavaScript. The overall syntax is very similar to C; the use of curly braces to denote blocks,
declarations in the form of typename initializer, and more. In fact, a lot of, but not all, C code
will compile in D too.
www.it-ebooks.info
Core Tasks
D also is aimed at convenience, productivity, and modeling power. These principles can be
illustrated with D's type inference feature. Type inference means you can write code without
explicitly thinking of and repeating a variable's type. This gives the convenience of using a
dynamic language, without sacrificing the compile-time checks of static typing. You'll use
type inference throughout your programs. Any variable declared without a type (typically, the
keyword auto is used to declare a variable without an explicit type) has an inferred type,
where the type is automatically determined by the right-hand side of the assignment. D is
one of the fastest compiling languages available, and it gives quick edit-run cycles that help
rapid development in dynamic languages. Modeling power comes in the form of D's rich code
generation, introspection, and user-defined types, which you'll start exploring in this chapter
when you look at structs and classes.
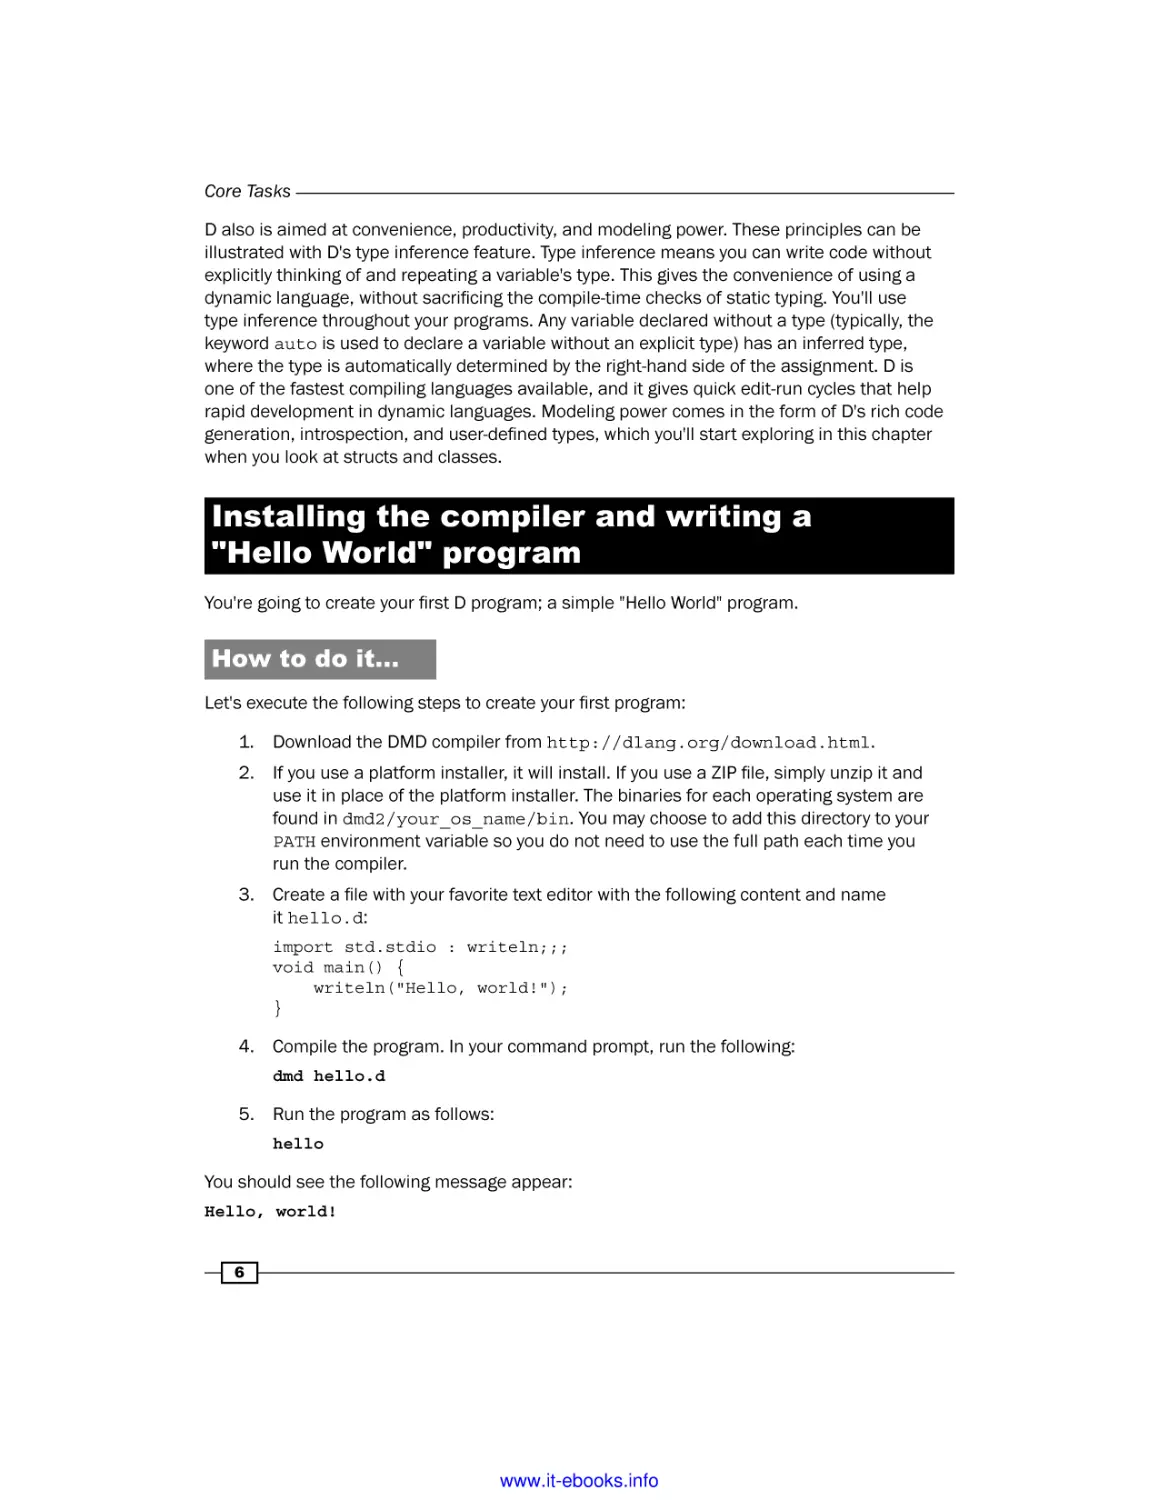
Installing the compiler and writing a
"Hello World" program
You're going to create your first D program; a simple "Hello World" program.
How to do it…
Let's execute the following steps to create your first program:
1. Download the DMD compiler from http://dlang.org/download.html.
2. If you use a platform installer, it will install. If you use a ZIP file, simply unzip it and
use it in place of the platform installer. The binaries for each operating system are
found in dmd2/your_os_name/bin. You may choose to add this directory to your
PATH environment variable so you do not need to use the full path each time you
run the compiler.
3. Create a file with your favorite text editor with the following content and name
it hello.d:
import std.stdio : writeln;;;
void main() {
writeln("Hello, world!");
}
4. Compile the program. In your command prompt, run the following:
dmd hello.d
5. Run the program as follows:
hello
You should see the following message appear:
Hello, world!
6
www.it-ebooks.info
Chapter 1
Downloading the example code
You can download the example code files for all Packt books you have
purchased from your account at http://www.packtpub.com. If you
purchased this book elsewhere, you can visit http://www.packtpub.
com/ support and register to have the files e-mailed directly to you.
How it works…
The DMD compiler is the key tool needed to use D. Although IDEs exist, you won't be using
them in this book. So, you'll learn how to use the compiler and be better equipped to handle
problems encountered during the build process.
D source files are Unicode text, which are compiled into executable programs. The DMD
compiler, by default, generates an executable file with the same base name as the first file
passed to it. So here, when you called dmd hello.d, it created a file named hello.exe on
Windows or hello on Unix systems. You can change the output file with the dmd –of option,
for example dmd –oftest hello.d will create a file named test.exe. You'll learn more
about the options of dmd as and when they'll be required.
Next, let's look at each of the lines of hello.d, beginning with the following import statement:
import std.stdio;
A D program is composed of modules. Each module is a file, but unlike C or C++, where you
use textual #include directives, D uses a symbolic import. When you import a module, its
public members become available for use. You can import the same module multiple times
without any negative effect, and the order of top-level imports does not matter.
In this case, you're importing the module std.stdio, which is a part of the standard library
that provides input and output functions, including the writeln function you'll use later in
the code. Next, let's discuss the following main() function:
void main()
D programs typically begin execution at the main() function. D's main() function can
optionally take command-line arguments of type string[], and they may return either
void or integer values. All forms are equally valid.
It is possible to write D programs that start somewhere other
than main(), which allows you to bypass D runtime initialization.
You'll see this in Chapter 11, D for Kernel Coding.
7
www.it-ebooks.info
Core Tasks
Here, you're returning void because you aren't returning any specific value. The runtime will
automatically return zero to the operating system upon normal termination, and it will return
an error code automatically if the program is terminated by an exception. Now, let's look at
the following output function:
writeln("Hello, world!");
Finally, you'll call the function writeln from the std.stdio module to say Hello, World!.
The writeln function can take any number of arguments of any type, and it will automatically
convert them to string for printing. This function automatically adds a newline character to the
end of the output.
There's more…
Here, you used the DMD compiler. There are two other major D compilers available: GDC and
LDC. You can learn more about these at http://gdcproject.org/ and http://github.
com/ldc-developers/ldc, respectively.
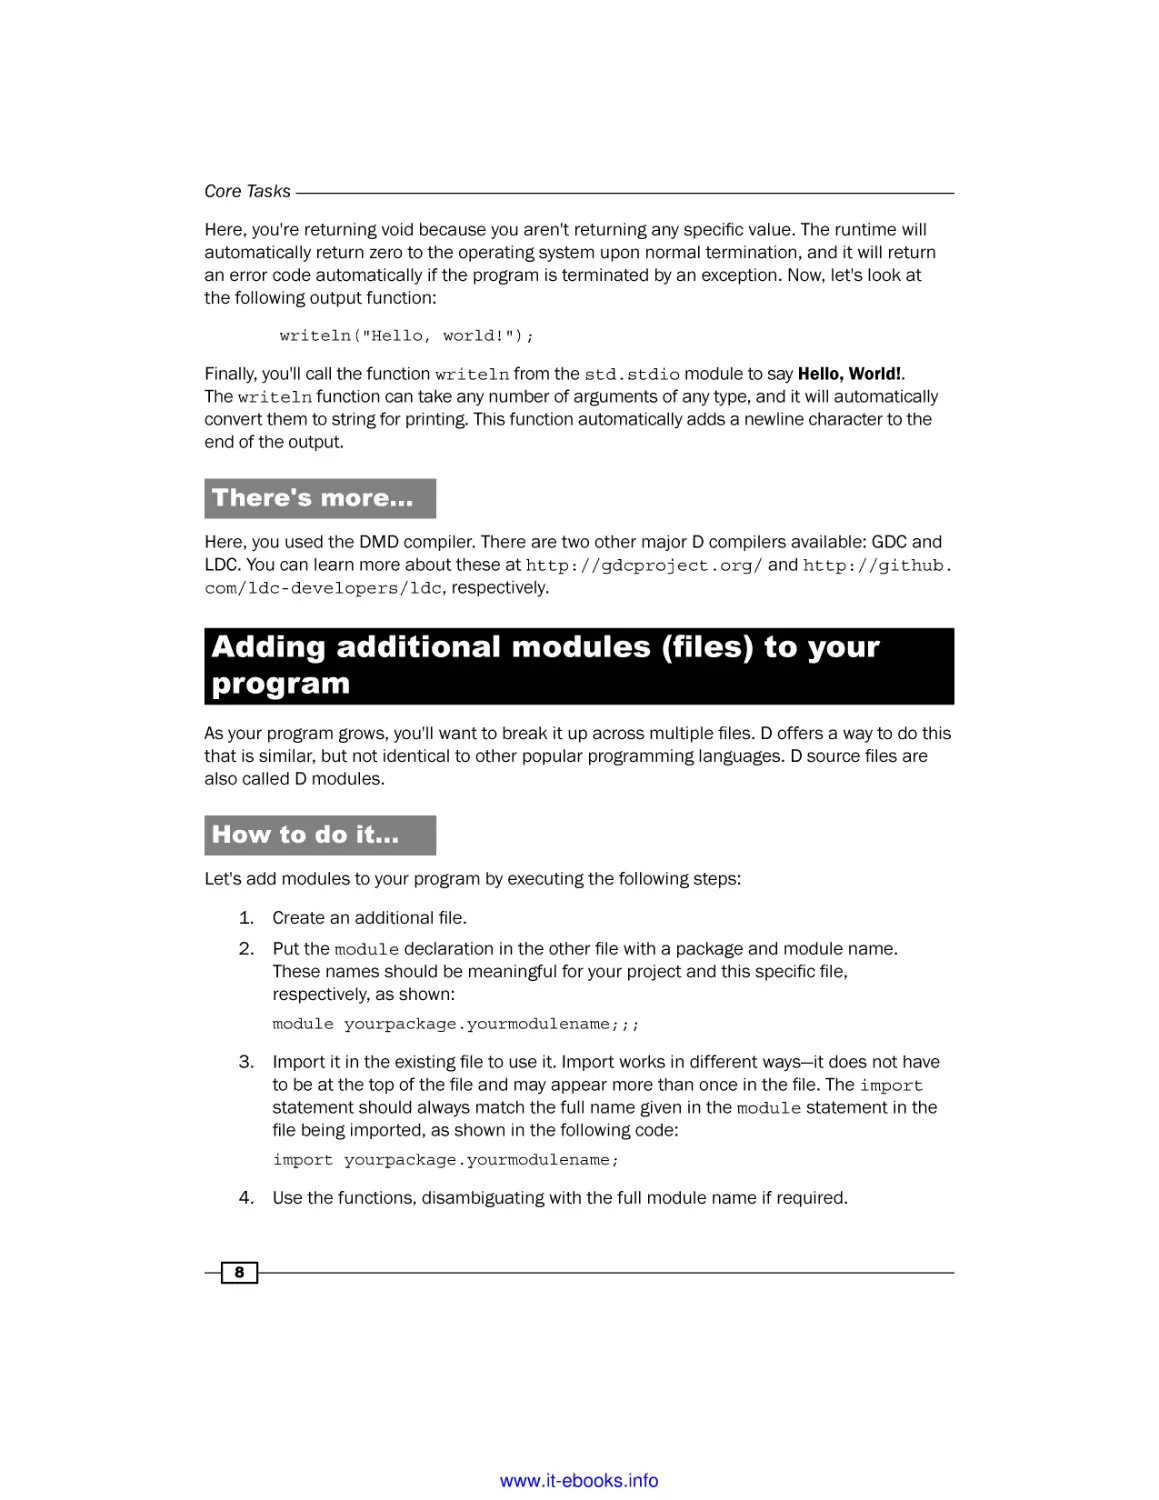
Adding additional modules (files) to your
program
As your program grows, you'll want to break it up across multiple files. D offers a way to do this
that is similar, but not identical to other popular programming languages. D source files are
also called D modules.
How to do it…
Let's add modules to your program by executing the following steps:
1. Create an additional file.
2. Put the module declaration in the other file with a package and module name.
These names should be meaningful for your project and this specific file,
respectively, as shown:
module yourpackage.yourmodulename;;;
3. Import it in the existing file to use it. Import works in different ways—it does not have
to be at the top of the file and may appear more than once in the file. The import
statement should always match the full name given in the module statement in the
file being imported, as shown in the following code:
import yourpackage.yourmodulename;
4. Use the functions, disambiguating with the full module name if required.
8
www.it-ebooks.info
Chapter 1
5. Compile with all files listed on the command line using the following syntax:
dmd file1.d file2.d
6. This will produce a single executable file out of the passed files. The name of the
executable is, by default, the same as the first file passed. So here, the executable
file will be named file1.
How it works…
In D, code is organized into modules. There is a one-to-one correspondence between files
and modules—every D source file is a module, and every D module is a file. Using a module
involves importing it into the current scope, accessing its members in code, and adding it to
the build command when compiling.
If you forget to add a module to the build command, you'll see
an error such as cannot find module of name NAME
or undefined symbol _D6module.
Modules are conceptually similar to static classes with a single instance; they can have
constructors, destructors, fields, and so on. Each declaration inside a module may have
attributes and protection qualifiers. In D, unlike C++, modules (not classes) are the unit
of encapsulation. Therefore, any code can access any entity within the same module
(regardless of the entity's protection qualifier).
Modules have logical names that do not need to match the filename. This is set with the
module statement, which must appear at the top of the file. The module statement is
not strictly required. If you leave it off, it will default to the filename. However, it is strongly
recommended that you write it, including a package name, (the first part of the dot-separated
full name) in every module that may ever be imported, because relying on the default module
name will cause trouble if you organize your code into directories. The common error module
foo.bar must be imported as the foo module is caused by a missing module statement in
the imported module. The typical organization of modules into packages mirrors the source
files' directory structures. You are to match package and module names with directory and
filenames, but doing so will help other users and build tools understand your project layout.
The import statement may appear at any point. In module scope, it may appear anywhere
and any number of times without changing anything. It can also be used in local scopes,
where it must appear before the member is used and visibility is limited to that scope.
9
www.it-ebooks.info
Core Tasks
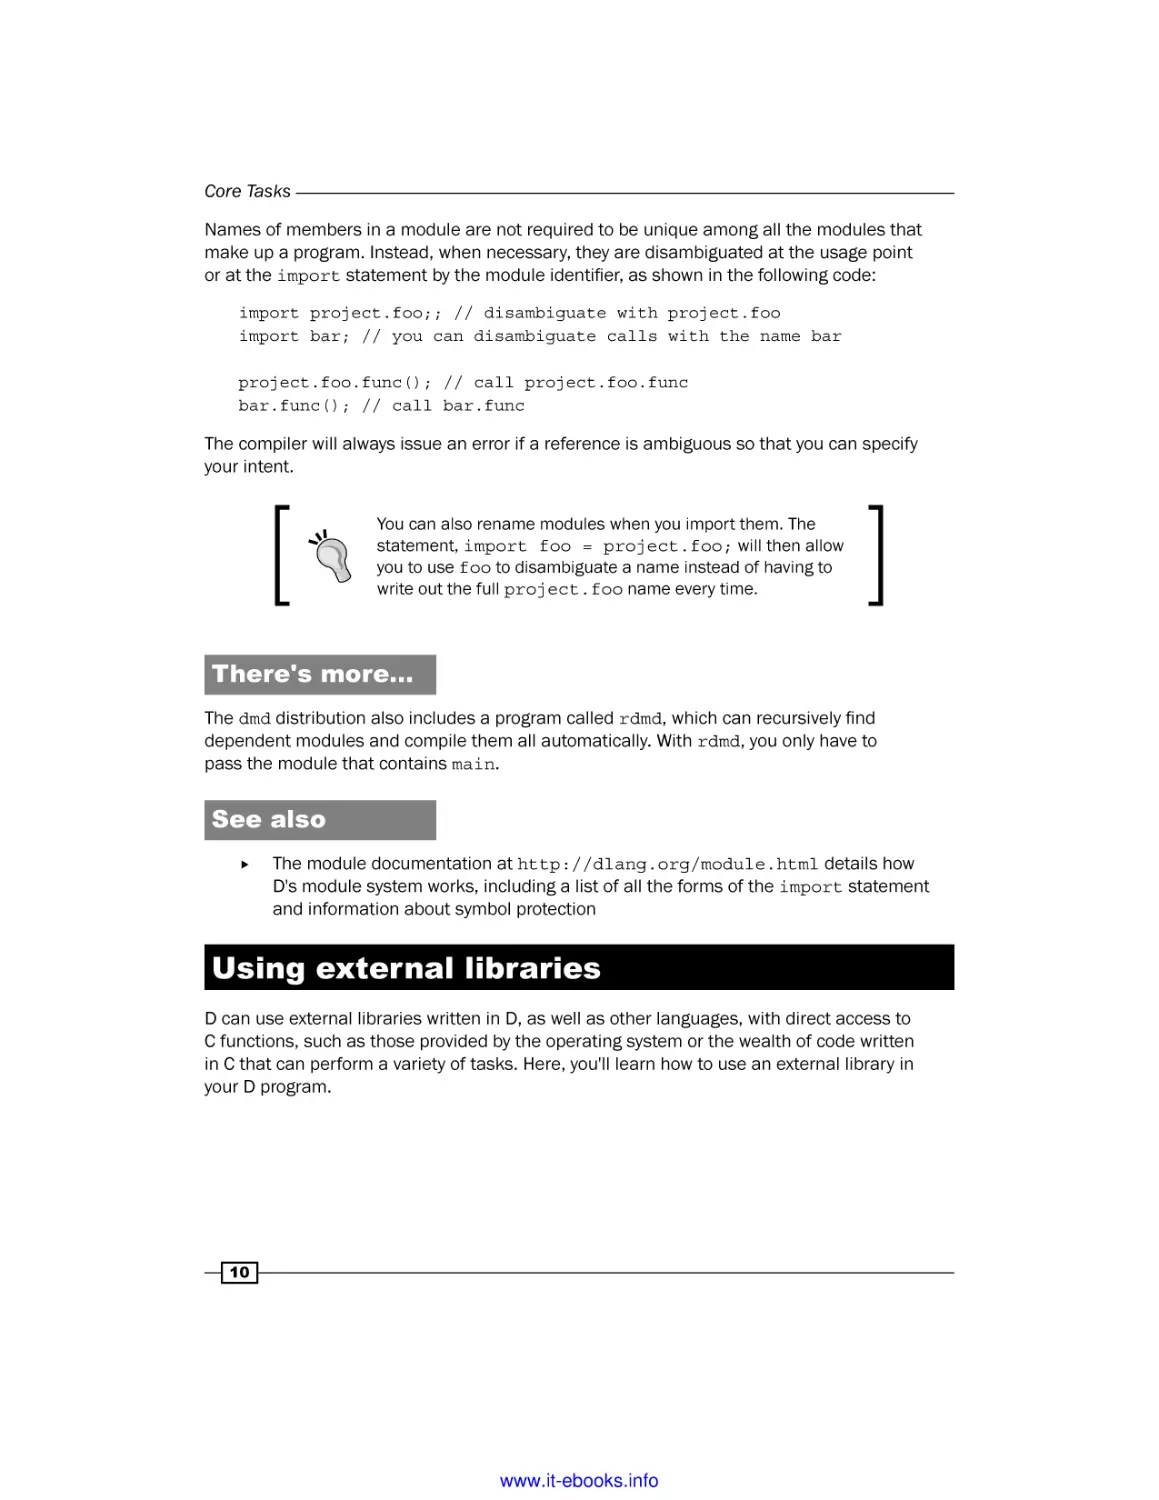
Names of members in a module are not required to be unique among all the modules that
make up a program. Instead, when necessary, they are disambiguated at the usage point
or at the import statement by the module identifier, as shown in the following code:
import project.foo;; // disambiguate with project.foo
import bar; // you can disambiguate calls with the name bar
project.foo.func(); // call project.foo.func
bar.func(); // call bar.func
The compiler will always issue an error if a reference is ambiguous so that you can specify
your intent.
You can also rename modules when you import them. The
statement, import foo = project.foo; will then allow
you to use foo to disambiguate a name instead of having to
write out the full project.foo name every time.
There's more…
The dmd distribution also includes a program called rdmd, which can recursively find
dependent modules and compile them all automatically. With rdmd, you only have to
pass the module that contains main.
See also
ff
The module documentation at http://dlang.org/module.html details how
D's module system works, including a list of all the forms of the import statement
and information about symbol protection
Using external libraries
D can use external libraries written in D, as well as other languages, with direct access to
C functions, such as those provided by the operating system or the wealth of code written
in C that can perform a variety of tasks. Here, you'll learn how to use an external library in
your D program.
10
www.it-ebooks.info
Chapter 1
How to do it…
Let's use external libraries by executing the following steps:
1. Create or download bindings, a list of function prototypes, and a data structure
definition from the library.
2. On 32-bit Windows with dmd only, get or create an import library (.lib file).
3. If you have a .lib file, you can use coffimplib.
4. If you only have a DLL file, you can use implib.
5. Import the binding by using the following statement:
import package.module.name;
6. Compile with the library. For Linux, pass –L-llibname to dmd. On Windows, pass
the .lib file to dmd when compiling your program. This will link the file with the
generated executable, producing a working program.
How it works…
D is binary compatible with C, but not source compatible. This means you can link directly
to C libraries, including most operating system libraries, without any wrapper or invoker code.
You do need, however, to port the header files, the function prototypes, and the variable
declarations, to D. This process is called binding.
While you can use a library by only providing the prototypes for the functions you need, being
minimally type-safe, the recommended way is to port the C header as closely as possible.
This will minimize bugs and maximize the ease of use for programmers who are familiar
with the usage and documentation of C.
In your code, using the library is the same as using any other module; you import the
module, call the functions, and disambiguate the names by using fully-qualified package
and module names.
When compiling, the –L flag to dmd passes the rest of the argument straight to the linker.
On 32-bit Windows, using an existing library may be difficult because dmd uses an old library
file format called OMF that is incompatible with the newer and more common COFF format.
This is where implib and coffimplib come into play—these programs generate the format
that the linker, optlink, expects from the more common formats available. The implib
command creates a .lib file that you can use with D directly from a .dll file. The implib
command's invocation format is as follows:
implib /s myfile.lib myfile.dll
11
www.it-ebooks.info
Core Tasks
The coffimplib command converts the more common COFF .lib format to the format
D requires. The coffimplib command's invocation format is as follows:
coffimplib myfile.lib
These programs can be separately downloaded from Digital Mars, the small company behind
the D programming language and DMD compiler. They are not necessary when building 64-bit
Windows programs, or programs on any other operating system.
There's more…
The DMD compiler supports pragma(lib, "name");, which will automatically handle the
linker flag while building, if you pass the module to dmd's command line. This pragma is not
fully supported on GDC, but it doesn't necessarily hurt either. It will issue a warning about an
unsupported pragma.
You can also create D interface files for D libraries, the extension .di is used traditionally.
The .di files can be automatically generated with the dmd –H option. The D interface files
are similar to header files in C or C++; they list the interface definitions, but omit function
bodies. The use of D interface files is optional.
See also
ff
Sometimes, using other libraries isn't as simple as calling their function, or you want
to improve upon the API somehow. Chapter 4, Integration, explains how to address
these issues.
ff
Deimos (https://github.com/d-programming-deimos) is the official
repository for translated bindings and common C libraries. It makes no attempt
to change the API; it is simply a collection of ports of C library headers that can
be used in D, saving you the trouble of recreating the prototypes yourself.
ff
Dub (http://code.dlang.org) is the semi-official D package manager,
and code.dlang.org lists community libraries that are available through it.
This includes C bindings as well as pure D libraries.
ff
If you are developing for 32-bit Windows, the Basic Utilities Package from Digital
Mars (http://digitalmars.com/download/freecompiler.html) contains
the implib tool as well as others to build advanced Windows .exe files.
ff
The directory dmd2/src/druntime/import in the dmd's ZIP file has various
D interface files for the D runtime library and the C standard library.
12
www.it-ebooks.info
Chapter 1
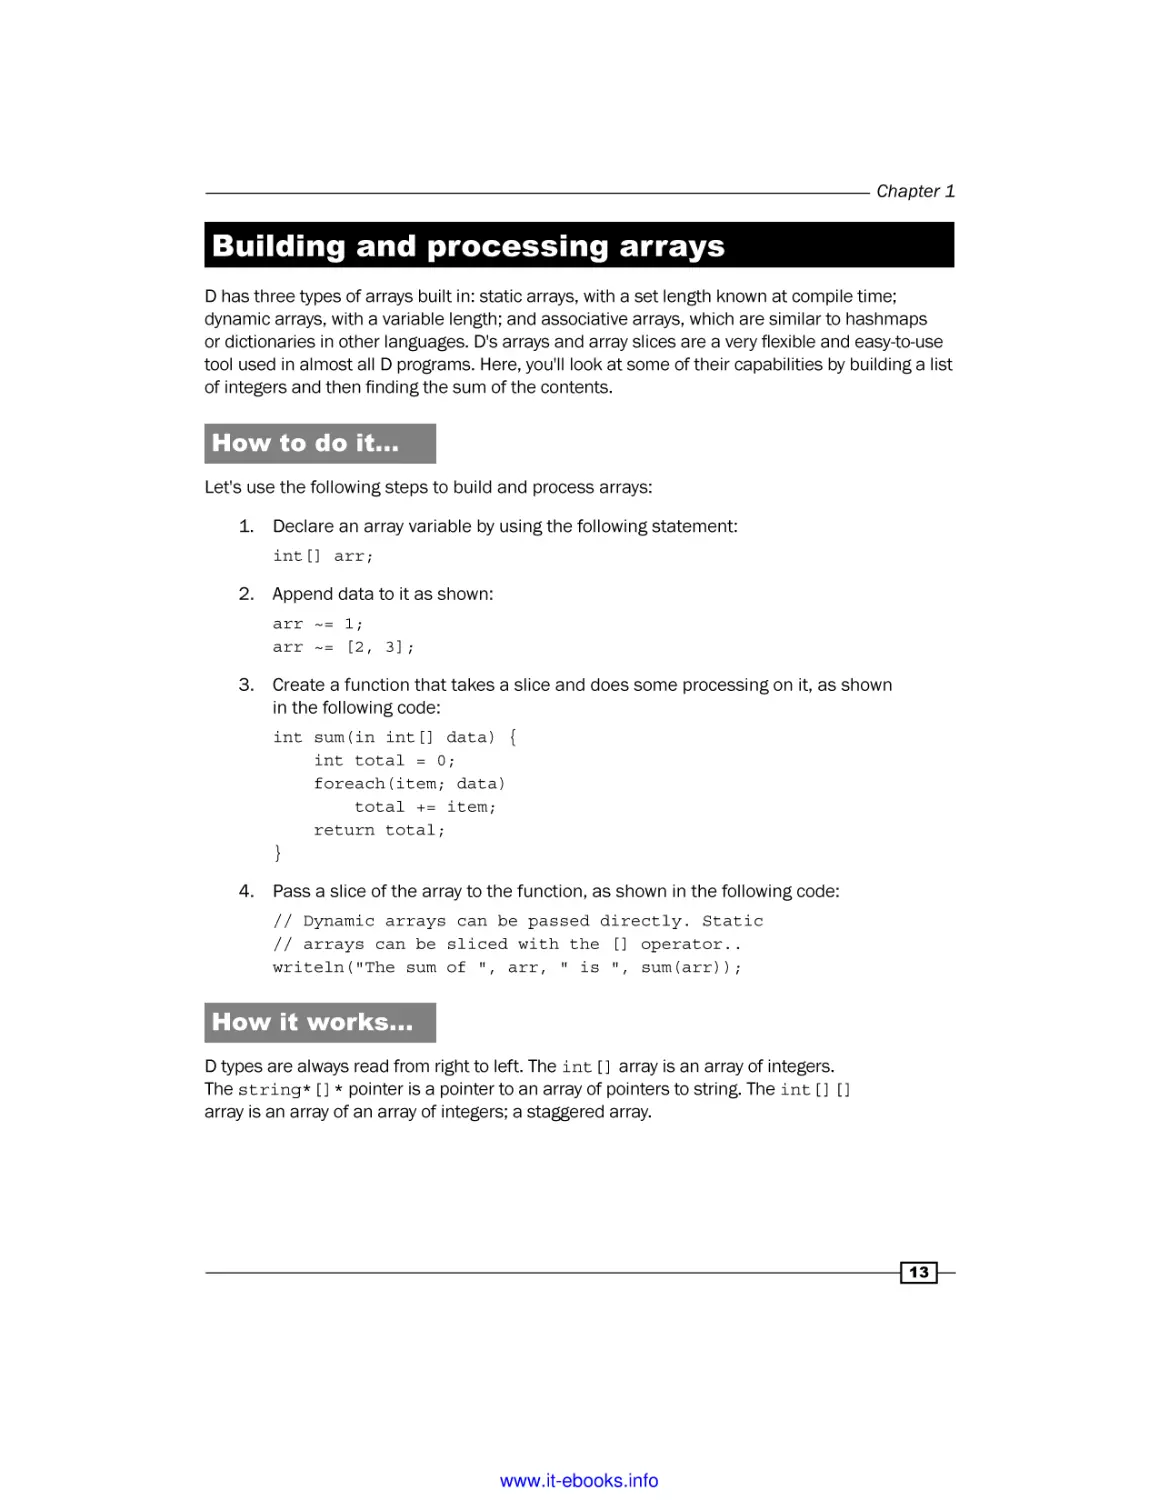
Building and processing arrays
D has three types of arrays built in: static arrays, with a set length known at compile time;
dynamic arrays, with a variable length; and associative arrays, which are similar to hashmaps
or dictionaries in other languages. D's arrays and array slices are a very flexible and easy-to-use
tool used in almost all D programs. Here, you'll look at some of their capabilities by building a list
of integers and then finding the sum of the contents.
How to do it…
Let's use the following steps to build and process arrays:
1. Declare an array variable by using the following statement:
int[] arr;
2. Append data to it as shown:
arr ~= 1;
arr ~= [2, 3];
3. Create a function that takes a slice and does some processing on it, as shown
in the following code:
int sum(in int[] data) {
int total = 0;
foreach(item; data)
total += item;
return total;
}
4. Pass a slice of the array to the function, as shown in the following code:
// Dynamic arrays can be passed directly. Static
// arrays can be sliced with the [] operator..
writeln("The sum of ", arr, " is ", sum(arr));
How it works…
D types are always read from right to left. The int[] array is an array of integers.
The string*[]* pointer is a pointer to an array of pointers to string. The int[][]
array is an array of an array of integers; a staggered array.
13
www.it-ebooks.info
Core Tasks
There are two kinds of arrays in D: static and dynamic. A static array is a value type that
represents a solid, fixed-size block of memory (this corresponds to an array in C). A dynamic
array is conceptually a struct with two members: a pointer to the data and the length of the
data. Thus, unlike a static array, dynamic arrays and slices have reference semantics. You
can access the pointer and length components with the .ptr and .length properties,
respectively. In the example here, you used a dynamic array, which has the same syntax
as a slice.
There are three major operations on an array: appending, indexing, and slicing.
ff
Appending: This is done with the ~= operator. There's also the binary ~ operator (not
to be confused with the unary ~ operator, which inverts bits), which concatenates two
arrays to form a new one. You can append an individual element or another static or
dynamic array of compatible type.
ff
Indexing: This is done with the [expr] operator, for example, arr[0]. This is very
similar to C, but a key difference in D is that arrays know their own length, enabling
automatic bounds checking. If you attempt to access an out-of-bounds index, you will
see a RangeError.
ff
Slicing: This is done with the [] operator, for example, arr[] or arr[0 .. 2].
This is done to get a view into an array starting at the left-hand index (inclusive)
and ending at the right-hand index (exclusive, which means you can use the array's
length as an ending bound, which also has a shorthand syntax $). [][][] gets a
slice into the whole thing, and it is useful to pass static arrays or user-defined array
types to functions expecting slices or dynamic arrays. Slicing is a fast, constant-time
operation.
You can iterate over an array or slice using the foreach loop. You put the iteration
variable, then a semicolon, and then the variable you want to iterate over. You do not
have to explicitly name the variable's type, for example, foreach(item; array) or
foreach(int item; array).
In the example code, the function parameter is defined as an in variable. The in variable is
shorthand keyword to give the parameter the storage classes of const and scope. What this
means in practice is that you must not modify the array or its contents (this will be a compile
error), nor should you keep a copy of or return a reference to the passed array.
There's more…
D also supports array vector operations like the following:
arr[] = arr[] + 5;;;
This code will add five to every element of the array. You can also create array copies this way:
arr2[] = arr[]. This will copy arr into arr2. For this to work, the lengths of the two arrays
must already match. To do an array copy without matching lengths, you can write array.dup.
14
www.it-ebooks.info
Chapter 1
See also
ff
http://dlang.org/d-array-article.html for details of array memory
management and the difference between a dynamic array and a slice.
ff
http://dlang.org/arrays.html for a more complete listing of what D's
arrays can do.
ff
The Creating an array replacement recipe in Chapter 5, Resource Management.
This will show you how to create a new array type that has the same capabilities
as the built-in arrays, with custom behavior or memory allocation strategies.
ff
The Avoiding the garbage collector recipe in Chapter 5, Resource Management.
This will discuss the built-in array's memory allocation habits and what to avoid
if you don't want to use the garbage collector.
Using associative arrays to translate input
D also has associative arrays, sometimes called maps or dictionaries. An associative array
maps arbitrary keys to values. Unlike a regular array, the keys do not need to be sequential
and do not need to be integers. Here, you'll explore their functionality by creating a program
that translates input strings to other strings.
How to do it…
Let's translate an input by using the following steps:
1. Declare the associative array with string keys and string values.
2. Initialize it with initial data.
3. Loop over input lines. If the line is in the array, show the value and remove it.
If not, add this line with a replacement.
4. When you're done, loop over the array to show your changes.
The code is as follows:
void main() {
import std.stdio, std.string;
string[string] replacements =
["test" : "passed", "text" : "replaced"];
replacements["foo"] = "bar";
assert(replacements["test"] == "passed");
foreach(line; stdin.byLine()) {
15
www.it-ebooks.info
Core Tasks
line = line.strip(); // cut off whitespace
// see if the given line is in the mapping…
if(auto replacement = line in replacements) {
// if yes, show the replacement, then unmap it
writeln(line, " => ", *replacement);
replacements.remove(line.idup);
} else
{
// if no, add it to the map
writeln(line);
replacements[line.idup] = "previously inserted!";
}
}
foreach(line, replacement; replacements)
writeln("Mapping ", line, " => ", replacement););
}
When the program runs out of lines to process, it will print out the current array contents,
showing you what has been added and removed as you entered data.
How it works…
First, you declared your main function and then imported the std.stdio and std.string
modules, which contain the I/O and whitespace stripping functions that you used later.
Next, you declared an associative array that maps strings to other strings. The syntax is
ValueType[KeyType], and both sides can be of any D type. You also initialized the
replacements with an associative array literal.
It is also possible to use user-defined types as associative array
keys. Using custom types as key types requires that they implement
opHash, opCmp, and opEquals.
The syntax of an associative array (AA) literal is [Key:Value, Key:Value, …]. AA literals
can have both compile-time constant and runtime data; ["foo":x] is legal too.
Next, you can set a value outside the literal and check the value of a key, just for
demonstration purposes. Associative arrays have similar syntax to regular arrays: you use the
same bracket syntax to get and set elements.
16
www.it-ebooks.info
Chapter 1
Then, you can enter the replacement loop, reading the standard input by line and then
stripping off whitespace and looking for the line in the replacements array. Let's look at this
line in more detail, as follows:
if(auto replacement = line in replacements) {
On the right-hand side, you can use the in operator to do a key lookup. This operator returns
a pointer to the element if it is found, and null if it is not found.
You don't have to use the pointer returned by the in operator. if(line
in replacements) works just as well. There's also the inverse of in,
which is !in. The if(line !in replacements) statement is true
if line is not in the replacements array.
On the left-hand side, you can declare and assign the variable right inside the if statement.
This keeps the newly declared variable limited in scope. If the variable replacement is available,
you can be certain that it is not null, since the if statement will not execute otherwise!
In the next example, you'll proceed into the true branch of the if statement. This branch
uses the dereference operator, *replacement, to print out the value. The * operator is
necessary because the in operator returns a pointer to the element rather than the element
itself. Then you'll remove this key from the mapping by using the built-in associative array
property remove. Next time you insert that line, it will not be replaced.
After that, the false branch of the if statement does not have the null pointer stored in
the variable replacement available to use. Any attempt to access it will be a compile error.
Instead, you can add the new line to the replacement map. The .idup property is required
because associative array keys must be immutable, and stdin.byLine returns a mutable
buffer. Array.idup creates a new, immutable copy of the data.
Finally, once the input has been exhausted, you can loop over the associative array with a
foreach loop. The syntax is foreach(index, value; array), and you can print out
the current state. The index parameter is optional if you only need the values.
There's more…
You can also get a list of all keys and values with the .keys and .values properties on the
associative array. The std.traits.KeyType and std.traits.ValueType variables can
be used to do compile-time reflection of generic AA types.
17
www.it-ebooks.info
Core Tasks
Creating a user-defined vector type
User-defined types are used everywhere in D to group data, model objects, provide compile-time
checks, and more. Here, you'll create a simple vector type with a length and direction to look at
some basic capabilities.
Getting ready
Whenever you create a user-defined collection in D, the first decision to make is whether it
should be a class, struct, mixin template, or union. Mixin templates are great for code reuse.
They define code that can be copied (or mixed in) to another type, with parameterization. Unions
are for the cases when you need the same block of memory to have multiple types, and are the
least common in typical D code. Classes and structs are the backbone of user-defined types
in D, and they have the most in common. The key difference is polymorphic inheritance; if you
need it, you probably want a class. Otherwise, structs are lighter weight and give maximum
flexibility. Using them, you can precisely define the layout of each byte with no hidden data,
overload all operators, use deterministic destruction (the RAII idiom from C++), and use both
reference or value semantics depending on your specific needs. D's structs also support a form
of subtyping, though not virtual functions, which you'll see in Chapter 6, Wrapped Types.
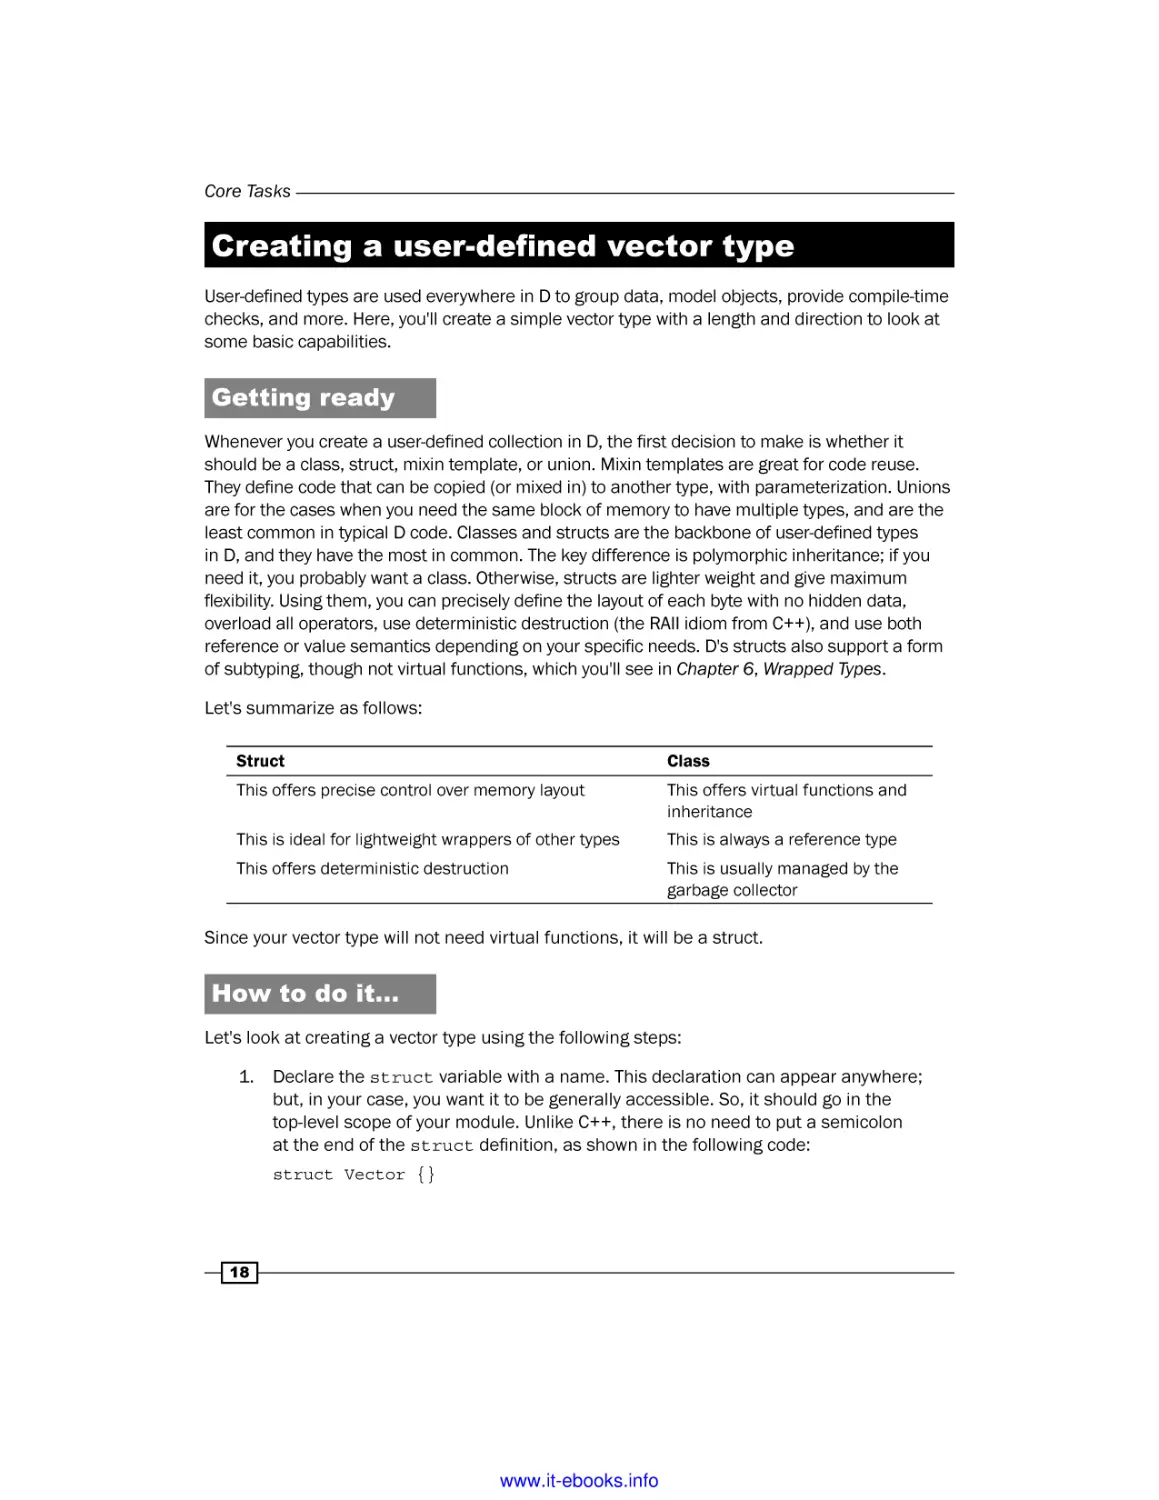
Let's summarize as follows:
Struct
Class
This offers precise control over memory layout
This offers virtual functions and
inheritance
This is ideal for lightweight wrappers of other types
This is always a reference type
This offers deterministic destruction
This is usually managed by the
garbage collector
Since your vector type will not need virtual functions, it will be a struct.
How to do it…
Let's look at creating a vector type using the following steps:
1. Declare the struct variable with a name. This declaration can appear anywhere;
but, in your case, you want it to be generally accessible. So, it should go in the
top-level scope of your module. Unlike C++, there is no need to put a semicolon
at the end of the struct definition, as shown in the following code:
struct Vector {}
18
www.it-ebooks.info
Chapter 1
2. Determine which data members are needed and add them to the struct. Here, you
need a magnitude and direction, and they will be floating point types:
struct Vector {
float magnitude;
float direction;
}
3. Add methods that operate on the data to the struct. In this case, you want to be able
to add vectors together and convert from (x, y) coordinates. The complete code is
as follows:
struct Vector {
// the data
float magnitude;
float direction;
// the methods
/// create a Vector from an (x, y) point
static Vector fromPoint(float[2] point) {
import std.math;
Vector v;
float x = point[0];
float y= point[1];
v.magnitude = sqrt(x ^^ 2 + y ^^ 2);
v.direction = atan2(y, x);
return v;
}}}
/// converts to an (x,y) point. returns in an array.
float[2] toPoint() const {
import std.math;
float x = cos(direction) * magnitude;
float y = sin(direction) * magnitude;
return [x, y];
}
/// the addition operator
Vector opBinary(string op : "+")(Vector rhs) const {
auto point = toPoint(), point2 = rhs.toPoint();
point[0] += point2[0];
point[1] += point2[1];];];
return Vector.fromPoint(point););
}
}
19
www.it-ebooks.info
Core Tasks
4. Use the new type as follows:
auto origin = Vector(0, 0);
import std.math;
auto result = origin + Vector(1.0, PI);
import std.stdio;
writeln("Vector result: ", result);
writeln(" Point result: ", result.toPoint());
It will print Vector(1.0, 3.14) and [-1, 0], showing the vector sum as magnitude and
direction, and then x, y. Your run may have slightly different results printed due to differences
in how your computer rounds off the floating point result.
How it works…
Structs are aggregate types that can contain data members and function methods.
All members and methods are defined directly inside the struct, between the opening
and closing braces. Data members have the same syntax as a variable declaration: a
type (which can be inferred, if there is an initializer), a name, and optionally, an initializer.
Initializers must be evaluated at compile time. When you declare a struct, without an explicit
initializer, all members are set to the value of their initializers inside the struct definition.
Methods have the same syntax as functions at module scope, with two differences; they can
be declared static and they may have const, immutable, or inout attached, which applies
to the variable this. The this variable is an automatically declared variable that represents
the current object instance in a method. The following recipe on immutability will discuss
these keywords in more detail.
Operator overloading in D is done with methods and special names. In this section, you
defined opBinary, which lets you overload the binary operators such as the addition and
subtraction operators. It is specialized only on the + operator. It is also possible to overload
casting, assignment, equality checking, and more.
At the usage point, you declared a vector with auto, using the automatically defined
constructor.
Finally, when you write the result, you use the automatic string formatting that prints the
name and the values, in the same way as the automatic constructor. It is also possible to
take control of this by implementing your own toString method.
See also
ff
Chapter 6, Wrapped Types, will show more advanced capabilities, including how to
use structs to make a reference type and to use constructors, destructors, postblits,
and so on.
20
www.it-ebooks.info
Chapter 1
ff
Inheritance and dynamic class casting will show how to make the most of classes.
ff
Visit http://dlang.org/operatoroverloading.html for the language
documentation on operator overloading. It details all the operators available for
overloading and how to do it.
Using a custom exception type
D uses exceptions to handle errors, just like many other programming languages. In D,
exceptions are always implemented as classes that derive from the class Throwable,
and they are differentiated by their type. So, it is best to generate a new exception subclass
for different types of errors your code can generate. This way, users of your code will get the
most information and control out of your exceptions.
How to do it…
Let's use a custom exception type by using the following steps:
1. Declare a class that inherits from Exception.
2. Make a constructor that takes, minimally, two parameters: string file and
size_t line, with default values of __FILE__ and __LINE__, respectively.
3. Have the constructor forward the arguments to the constructor of Exception.
4. Use your exception.
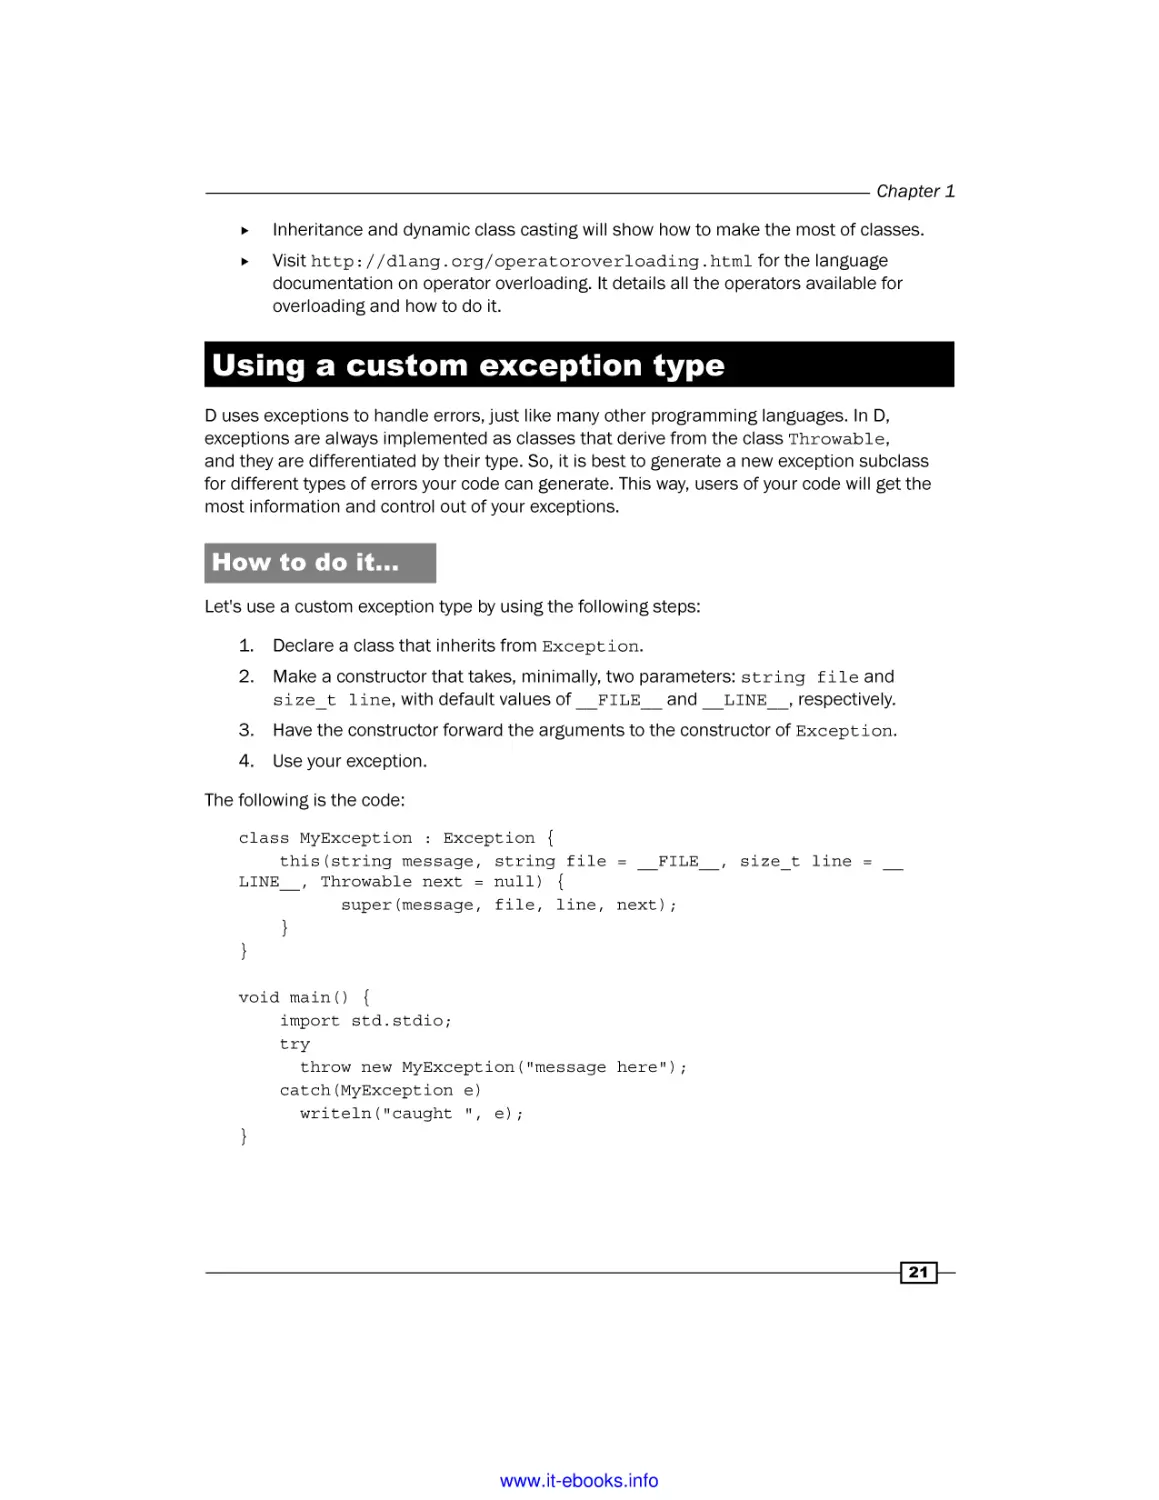
The following is the code:
class MyException : Exception {
this(string message, string file = __FILE__, size_t line = __
LINE__, Throwable next = null) {
super(message, file, line, next);
}
}
void main() {
import std.stdio;
try
throw new MyException("message here");
catch(MyException e)
writeln("caught ", e);
}
21
www.it-ebooks.info
Core Tasks
How it works…
D uses exceptions to handle errors. All throwable objects inherit from either Exception,
for recoverable events, or Error for unrecoverable errors, which generally ought not be
caught. The common base class is Throwable.
Typically, a custom exception inherits from Exception, then declares, minimally, a
constructor that forwards the functionality to super(). You may also store additional
information specific to your use case.
The constructor of Exception (here, called with super()) takes four arguments: a string
message, a filename, a line number, and optionally, a reference to another exception. The
message, filename, and line number are used to construct a message for the user, which is
printed to the console if the exception is not caught.
You don't have to specify the file and line number at the throw site; any default argument of
__FILE__ or __LINE__ is automatically expanded at the function's call site. This is useful
to make the error message more useful by showing exactly where the exception came from.
The fourth parameter, Throwable next, is used if an exception handler throws an
exception. It references the exception that was being handled when this one was generated.
To get full stack trace symbols in the printed exception,
you may need to compile with the debug information
enabled by using dmd –g.
There's more…
You should check error codes when using the C functions and turn them into exceptions.
If it sets errno for error details, the std.exception module has a subclass called
ErrnoException that is perfect for the following code:
import core.sys.posix.unistd; // for the low-level Posix functions
import core.sys.posix.fnctl // for more low-level Posix functions
import std.exception; // for ErrnoException
auto fd = open("myfile.txt", O_RDONLY);
// open() returns -1 if it was unable to open the file,
// and sets errno with error details. Check for that failure.
if(fd == -1)
throw new ErrnoException("Couldn't open myfile.txt");
// close the file automatically at the end of the scope
scope(exit) close(fd);
/* read the file here */
22
www.it-ebooks.info
Chapter 1
See also
Scope guards, discussed in Chapter 5, Resource Management, are convenient for use
with exceptions. They let you put clean-up or recovery code near the creation point in an
exception-safe way. In the preceding example, you used a scope guard to ensure the file
is properly closed when the function returns, even if an exception is thrown.
Understanding immutability
Here, you'll look at how to use immutability in your functions and data types. Immutability
helps us to write code that is easier to understand and maintain because it limits the places
where things can change.
Getting ready
First, write a function. Then, look at it and determine what it needs to do. Does it just look at
the data passed to it? Does it store or return a reference to data passed in? We'll use these
facts about how the function uses its arguments to determine the best-fit qualifiers.
How to do it…
The use of const and immutable is slightly different on free functions and object methods.
Writing functions
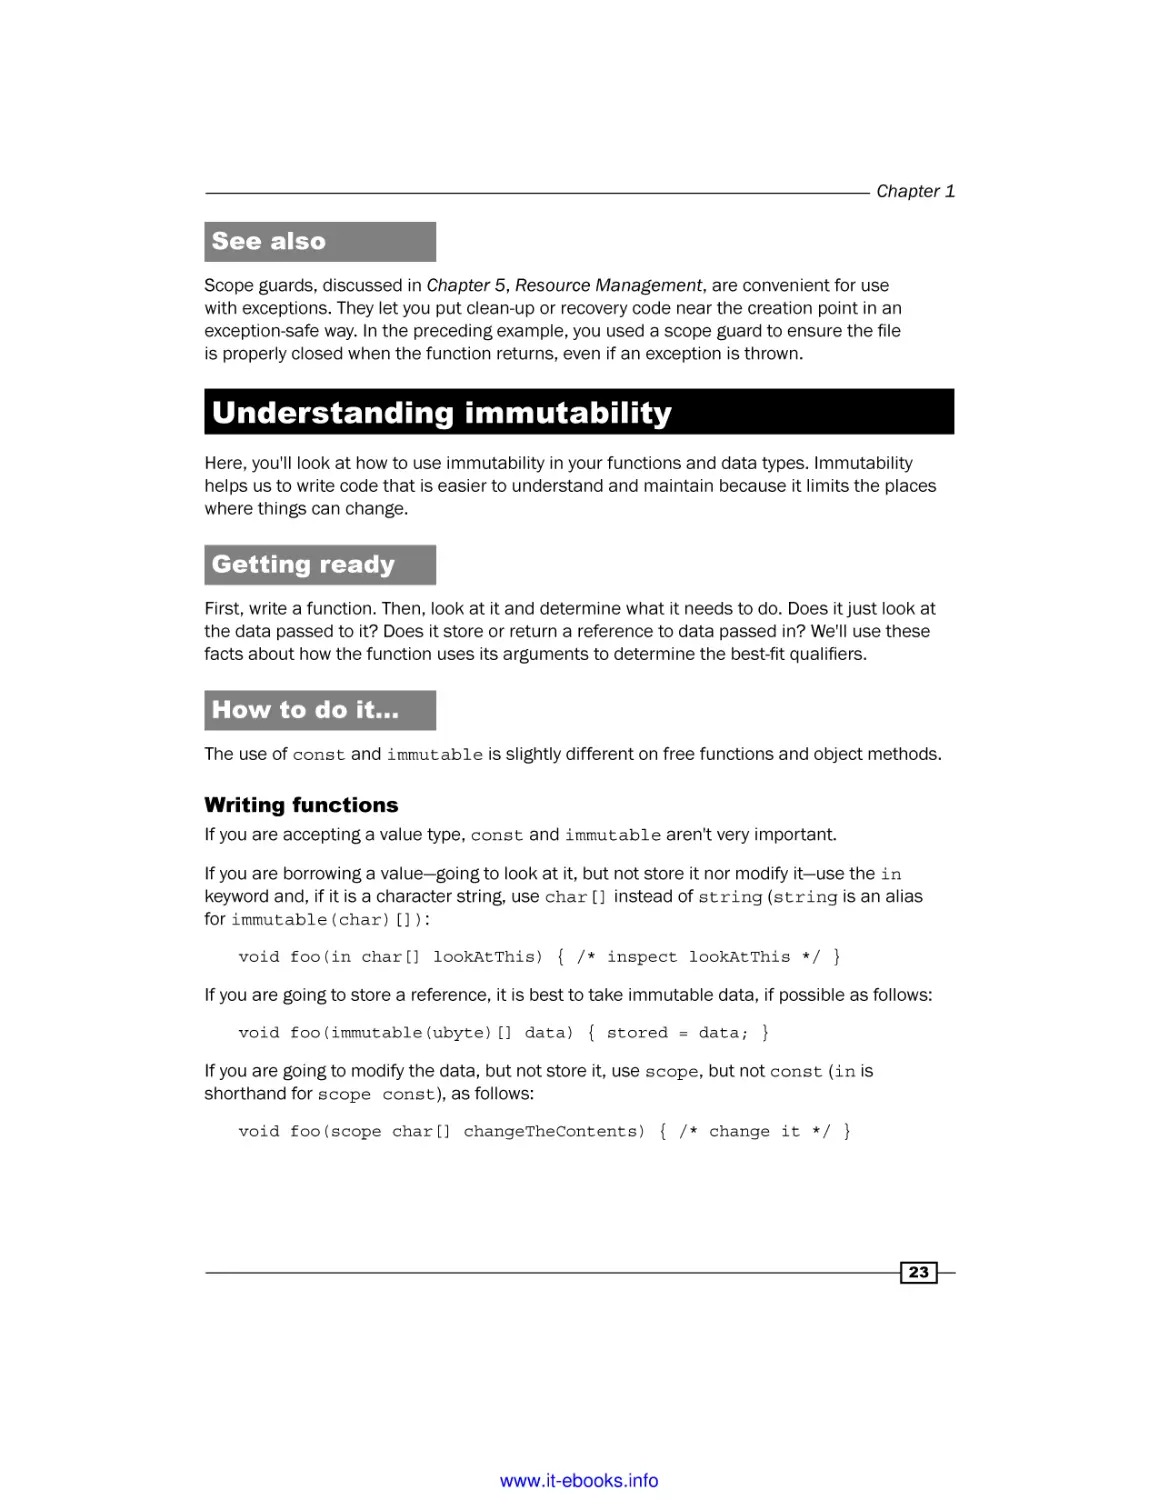
If you are accepting a value type, const and immutable aren't very important.
If you are borrowing a value—going to look at it, but not store it nor modify it—use the in
keyword and, if it is a character string, use char[] instead of string (string is an alias
for immutable(char)[]):
void foo(in char[] lookAtThis) { /* inspect lookAtThis */ }
If you are going to store a reference, it is best to take immutable data, if possible as follows:
void foo(immutable(ubyte)[] data) { stored = data; }
If you are going to modify the data, but not store it, use scope, but not const (in is
shorthand for scope const), as follows:
void foo(scope char[] changeTheContents) { /* change it */ }
23
www.it-ebooks.info
Core Tasks
If you are not going to modify or store the contents, but will return a reference to it, use inout
as follows:
inout(char)[] substring(inout(char)[] haystack, size_t start, size_t
end) {
return haystack[start .. end];
}
If you are going to change the value itself (not just the contents it references), use ref
as follows:
void foo(ref string foo) { /* change foo itself */ }
Writing object methods
When writing object methods, all of the preceding functions still apply, in addition to putting a
qualifier on the this parameter. The qualifier for this goes either before or after the function
as follows:
int foo() const { return this.member; } /* this is const */
const int foo() { return this.member; } /* same as above */
Since the second form can be easily confused with returning a const value (the correct
syntax for that is const(int) foo() { …}), the first form is preferred. Put qualifiers
on this at the end of the function.
How it works…
D's const qualifiers is different than that of C++ in two key ways: D has immutable
qualifiers, which means the data will never change, and D's const and immutable
qualifiers are transitive, that is, everything reachable through a const/immutable
reference is also const/immutable. There is no escape like the mutable keyword of C++.
These two differences result in a stronger guarantee, which is useful, especially when
storing data.
When storing data, you generally want either immutable or mutable data—const usually isn't
very useful on a member variable; although it prevents your class from modifying it, it doesn't
prevent other functions from modifying it. Immutable means nobody will ever modify it. You
can store that with confidence that it won't change unexpectedly. Of course, mutable member
data is always useful to hold the object's own private state.
The guarantee that the data will never change is the strength of immutable data. You can get
all the benefits of a private copy, knowing that nobody else can change it, without the cost of
actually making a copy. The const and immutable qualifiers are most useful on reference
types such as pointers, arrays, and classes. They have relatively little benefit on value types
such as scalars (int, float, and so on) or structs because these are copied when passed to
functions anyway.
24
www.it-ebooks.info
Chapter 1
When inspecting data, however, you don't need such a strong guarantee. That's where const
comes in. The const qualifier means you will not modify the data, without insisting that
nobody else can modify it. The in keyword is a shorthand that expands to scope const.
The scope parameters aren't fully implemented as of the time of this writing, but it is a useful
concept nonetheless. A scope parameter is a parameter where you promise that no reference
to it will escape. You'll look at the data, but not store a reference anywhere. When combined
with const, you have a perfect combination for input data that you'll look at. Other than that
you have the short and convenient in keyword.
When you do return a reference to const data, it is important that the constancy is preserved,
and this should be easy. This is where D's inout keyword is used. Consider the standard C
function strstr:
char *strstr(const char *haystack, const char *needle);
This function returns a pointer to haystack where it finds needle, or null if needle is not
found. The problem with this prototype is that the const character attached to haystack is
lost on the return value. It is possible to write to constant data through the pointer returned by
strstr, breaking the type system.
In C++, the solution to this is often to duplicate the function, one version that uses const,
and one version that does not. D aims to fix the system, keeping the strong constancy
guarantee that C loses and avoiding the duplication that C++ requires. The appropriate
definition for a strstr style function in D will be as follows:
inout(char)* strstr(inout(char)* haystack, in char* needle);
The inout method is used on the return value, in place of const, and is also attached to one
or more parameters, or the this reference. Inside the function, the inout(T) data is the
same as const(T) data. In the signature, it serves as a wildcard that changes based on the
input data. If you pass a mutable haystack, it will return a mutable pointer. A const haystack
returns a const pointer. Also, an immutable haystack will return an immutable pointer.
One function, three uses.
D also has the ref function parameters. These give a reference to the variable itself, as
shown in the following code:
void foo(int a) { a = 10; }
void bar(ref int a) { a = 10; }
int test = 0;
foo(test);
assert(test == 0);
bar(test);
assert(test == 10);
In this example, the variable test is passed to foo normally. Changes to a inside the function
is not seen outside the function.
25
www.it-ebooks.info
Core Tasks
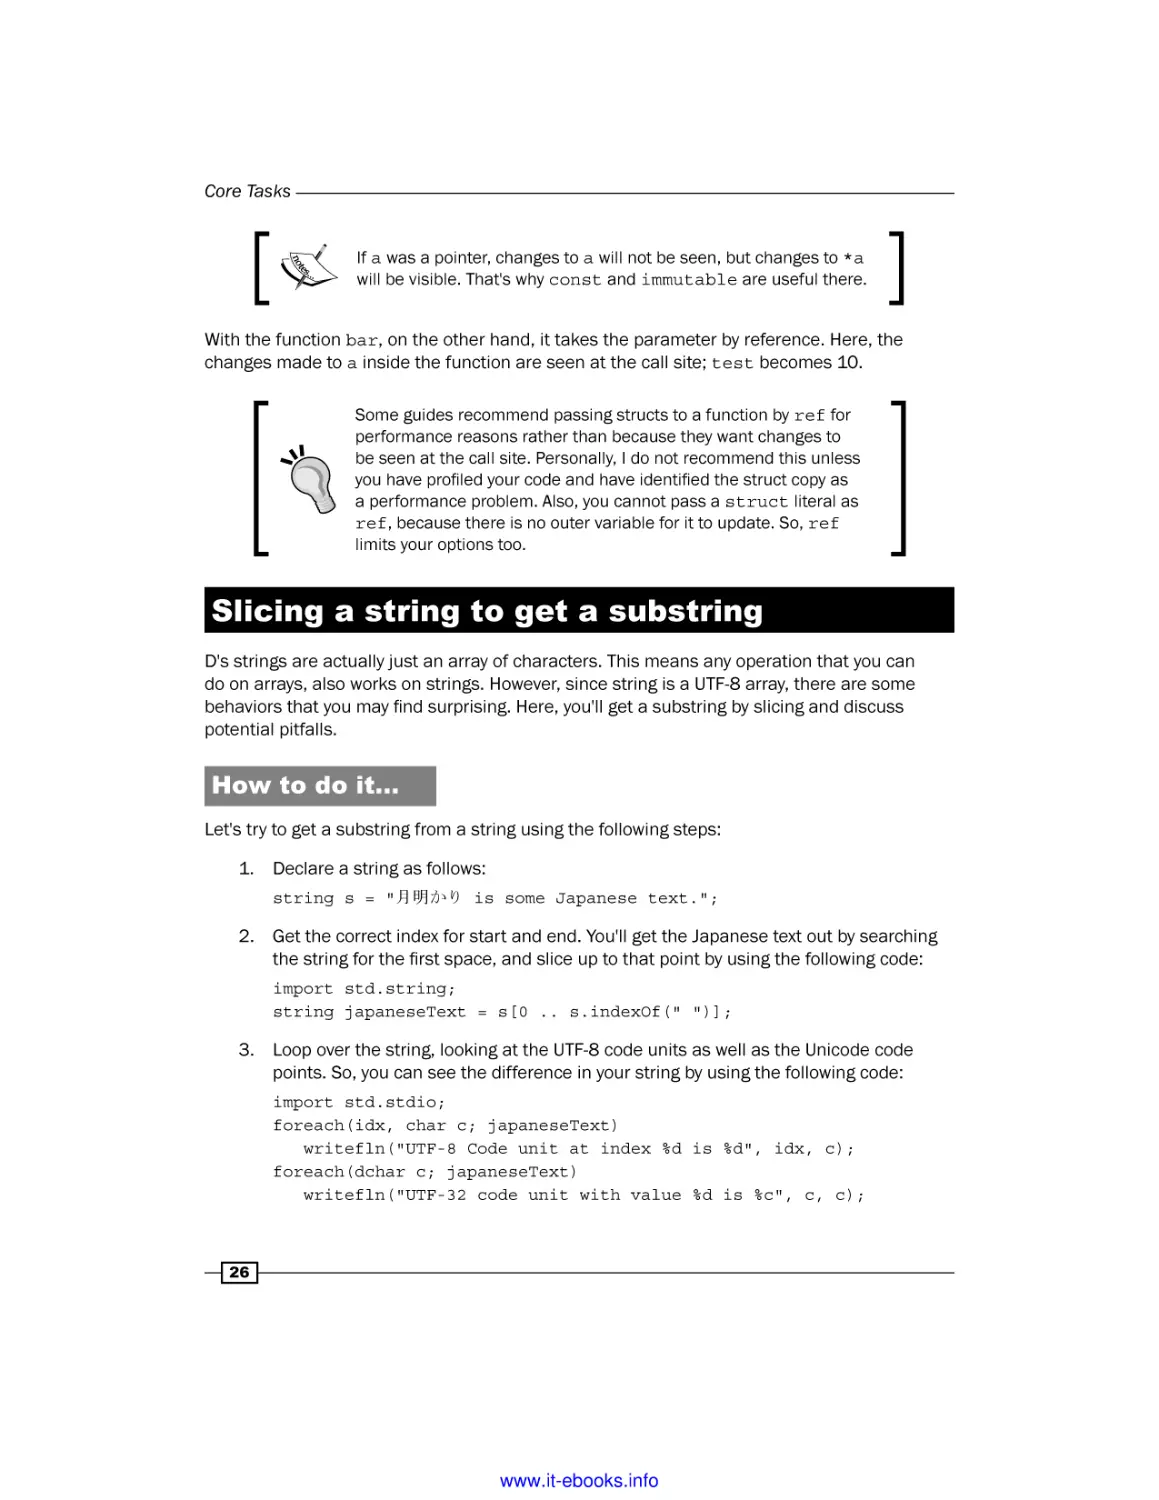
If a was a pointer, changes to a will not be seen, but changes to *a
will be visible. That's why const and immutable are useful there.
With the function bar, on the other hand, it takes the parameter by reference. Here, the
changes made to a inside the function are seen at the call site; test becomes 10.
Some guides recommend passing structs to a function by ref for
performance reasons rather than because they want changes to
be seen at the call site. Personally, I do not recommend this unless
you have profiled your code and have identified the struct copy as
a performance problem. Also, you cannot pass a struct literal as
ref, because there is no outer variable for it to update. So, ref
limits your options too.
Slicing a string to get a substring
D's strings are actually just an array of characters. This means any operation that you can
do on arrays, also works on strings. However, since string is a UTF-8 array, there are some
behaviors that you may find surprising. Here, you'll get a substring by slicing and discuss
potential pitfalls.
How to do it…
Let's try to get a substring from a string using the following steps:
1. Declare a string as follows:
string s = "月明かり is some Japanese text.";
2. Get the correct index for start and end. You'll get the Japanese text out by searching
the string for the first space, and slice up to that point by using the following code:
import std.string;
string japaneseText = s[0 .. s.indexOf(" ")];
3. Loop over the string, looking at the UTF-8 code units as well as the Unicode code
points. So, you can see the difference in your string by using the following code:
import std.stdio;
foreach(idx, char c; japaneseText)
writefln("UTF-8 Code unit at index %d is %d", idx, c);
foreach(dchar c; japaneseText)
writefln("UTF-32 code unit with value %d is %c", c, c);
26
www.it-ebooks.info
Chapter 1
The program will print out more code units in UTF-8 than in dchars, because the Japanese
text is composed of multibyte characters, unlike English text.
How it works…
D's implementations of strings uses Unicode. Unicode is a complicated standard that could
take up a whole book on its own, but you can use it in D knowing just some basics. D string,
as well as D source code, uses UTF-8 encoding. This means you can paste in text from any
language into a D source file and process it with D code.
However, UTF-8 has a complication; the length of a single code point is variable. Often, one
code point is one character, though Unicode's complexity means graphemes (that is, what you
might also call a visible character) may consist of more than one code point! For English text,
UTF-8 beautifully maps directly to ASCII, which means that one code unit is one character.
However, for other languages, there are too many characters to express in one byte. Japanese
is one example where all the characters are multibyte in UTF-8.
So, while there are only four characters in your program, if you slice from s[0 .. 4], you
won't get all four characters. D's slice operator works on code units. You'll get a partial result
here, which may not be usable.
Instead, you found the correct index by using the standard library function indexOf. This
searches the string for the given substring and returns the index, or -1 if it could not be found.
The slice [start .. end] goes from start, including it, to the end, not including that. So, [0
.. indexOf(…)] goes from the start, up to, but not including, the space. This slice is safe to
use, even if it contains multibyte characters.
Finally, you looped over the Japanese text to examine the encodings. The foreach loop
understands UTF encoding. The first variant asks for characters, or UTF-8 code units, and
yields them without decoding. The second variant asks for dchars, which are UTF-32 code
units that are numerically equivalent to Unicode code points. Asking for dchars is slower than
iterating over chars, but has the advantage of removing much of the complexity of handling
multibyte characters. The second loop prints only one entry per Japanese character, or any
other character that cannot be encoded in a single UTF-8 unit.
There's more…
D also supports UTF-16 and UTF-32 strings. These are typed wstring and dstring,
respectively. Let's look at each of these as follows:
ff
wstring: This is very useful on Windows, because the Windows operating system
natively works with UTF-16.
ff
dstring: This eats a lot of memory, about 4 times more than strings for English text,
but sidesteps some of the issues discussed here. The reason is that each array index
corresponds to one Unicode code point.
27
www.it-ebooks.info
Core Tasks
Creating a tree of classes
Classes are used to provide object-oriented features in D. To explore how they work, you're going
to write a small inheritance hierarchy to evaluate basic addition and subtraction operations.
Getting ready
Before writing a class, step back and ask yourself whether it is the best tool for the job. Will
you be using inheritance to create objects that are substitutable for their parent? If not,
a struct may be more appropriate. If you plan to use inheritance for code reuse without
substitutability, a mixin template may be more appropriate. Here, you'll use classes for
substitutability, and a mixin template for some code reuse.
How to do it…
Let's create a tree of classes by executing the following steps:
1. Create a class, with the data and methods it needs. For your expression evaluator,
you'll create two classes: AddExpression and SubtractExpression. They will
need variables for the left and right-hand side of the expression, and a method to
evaluate the result.
2. Move common methods from substitutable classes out to an interface, and make
the classes inherit from it by putting a colon after the class name, followed by the
interface name. In both AddExpression and SubtractExpression, you will
have an evaluate method. You'll move this function signature, but not the function
body, to the interface, called Expression.
3. If there is still a lot of code duplication, move the identical code out to a mixin
template, and mix it in at the usage point.
If you want to use most, but not all, of a mixin template, you
can override specific declarations by simply writing your own
declaration below the mixin statement.
4. Functions should operate on interface parameters, if possible, instead of classes,
for maximum reusability.
The following is the code you have so far:
interface Expression {
// this is the common method from the classes we made
int evaluate();
}
mixin template BinaryExpression() {
28
www.it-ebooks.info
Chapter 1
// this is the common implementation code from the classes
private int a, b;
this(int left, int right) { this.a = left; this.b= right; }
}
// printResult can evaluate and print any expression class
// thanks to taking the general interface
void printResult(Expression expression) {
import std.stdio;
writeln(expression.evaluate());
}
class AddExpression : Expression { // inherit from the interface
mixin BinaryExpression!(); // adds the shared code
int evaluate() { return a + b; } // implement the method
}
class SubtractExpression : Expression {
mixin BinaryExpression!();
int evaluate() { return a - b; }
}
5. Let's also add a BrokenAddExpression class that uses inheritance to override the
evaluate function of AddExpression:
class BrokenAddExpression : AddExpression {
this(int left, int right) {
super(left, right);
}
// this changes evaluate to subtract instead of add!
// note the override keyword
override int evaluate() { return a - b; }
}
6. Finally, you'll construct some instances and use them as follows:
auto add = new AddExpression(1, 2);
printResult(add);
auto subtract = new SubtractExpression(2, 1);
printResult(subtract); // same function as above!
The usage will print 3 and 1, showing the different operations. You can also create a
BrokenAddExpression function and assign it to add as follows:
add = new BrokenAddExpression(1, 2);
printResult(add); // prints -1
29
www.it-ebooks.info
Core Tasks
How it works…
Classes in D are similar to classes in Java. They are always reference types, have a single
inheritance model with a root object, and may implement any number of interfaces.
Class constructors are defined with the this keyword. Any time you create a new class,
it calls one of the constructors. You may define as many as you want, as long as each has
a unique set of parameters.
Classes may have destructors, but you typically should not use them. When
a class object is collected by the garbage collector, its child members may
have already been collected, which means that they cannot be accessed
by the destructor. Any attempt to do so will likely lead to a program crash.
Moreover, since the garbage collector may not run at a predictable
time (from the class' point of view), it is hard to know when, if ever, the
destructor will actually be run. If you need a deterministic destruction,
you should use a struct instead, or wrap your class in a struct and call the
destructor yourself with the destroy() function.
Object instances are upcasted implicitly. This is why you could assign BrokenAddException
to the add variable, which is statically typed as AddExpression. This is also the reason
why you can pass any of these classes to the printResult function, since they will all be
implicitly cast to the interface when needed. However, going the other way, when casting from
interface or a base class to a derived class, you must use an explicit cast. It returns null if the
cast fails. Use the following code to better understand this:
if(auto bae = cast(BrokenAddExpression) expression) {
/* we were passed an instance of BrokenAddExpression
and can now use the bae variable to access its specific
members */
} else { /* we were passed some other class */ }
In classes, all methods are virtual by default. You can create non-virtual methods with the
final keyword, which prevents a subclass from overriding a method. Abstract functions,
created with the abstract keyword, need not to have an implementation, and they must be
implemented in a child class if the object is to be instantiated. All methods in an interface that
are not marked as final or static are abstract and must be implemented by a non-abstract class.
When you override a virtual or abstract function from a parent class, you must use
the override keyword. If a matching function with any method marked override cannot be
found, the compiler will issue an error. This ensures that the child class's method is actually
compatible with the parent definition, ensuring that it is substitutable for the parent class. (Of
course, ensuring the behavior is substitutable too is your responsibility as the programmer!)
30
www.it-ebooks.info
Chapter 1
The mixin template is a feature of D that neither C++ nor Java have. A mixin template is a
list of declarations, variables, methods, and/or constructors. At the usage point, use the
following code:
mixin BinaryExpression!();
This will essentially copy and paste the code inside the template to the point of the mixin
statement. The template can take arguments as well, given in the parenthesis. Here, you
didn't need any parameterization, so the parentheses are empty. Templates in D, including
mixin templates, can take a variety of arguments including values, types, and symbols.
You'll discuss templates in more depth later in the book.
There's more…
Using interfaces and mixin templates, like you did here, can also be extended to achieve a
result similar to multiple inheritance in C++, without the inheritance of state and avoiding
the diamond inheritance problem that C++ has.
See also…
ff
The Simulating inheritance with structs recipe in Chapter 6, Wrapped Types, shows
how you can also achieve something subtyping and data extension, similar to
inheritance with data, using structs.
ff
The official documentation can be found at http://dlang.org/class.html
and it goes into additional details about the capabilities of classes.
31
www.it-ebooks.info
www.it-ebooks.info
2
Phobos – The Standard
Library
In this chapter, we will learn how to use the D standard library and explore the language
concepts used in the implementation. You will learn the following recipes:
ff
Performing type conversions
ff
Finding the largest files in a directory
ff
Creating a network client and server
ff
Using Base64 to create a data URI
ff
Generating random numbers
ff
Normalizing a string and performing Unicode comparisons
ff
Searching with regular expressions
ff
Writing a digest utility
ff
Using the std.zlib compression
ff
Using the std.json module
www.it-ebooks.info
Phobos – The Standard Library
Introduction
The D standard library, Phobos, provides a variety of modules that do a variety of tasks. This
chapter will only cover a portion of its ever-growing capabilities.
Performing type conversions
D is a strongly typed language, which means converting between types often has to be done
explicitly. The language's built-in cast operator only works when the types are already mostly
compatible, for example int to short, or in cases where the user has defined an opCast
function. This doesn't cover the very common need of converting strings to integers and vice
versa. That's where Phobos' std.conv module is helpful.
How to do it…
Now it's time to perform type conversions by executing the following steps:
1. Import std.conv.
2. Use the to function as follows:
import std.conv;
auto converted = to!desired_type(variable_to_convert);
This is pretty simple, and it works for a lot of types.
3. To convert a string to an integer, use the following line of code:
auto a = to!int("123"); // a == 123
That's all you have to do!
How it works…
The std.conv.to function strives to be a one-stop shop for type conversions. The to
function isn't just one function. It is actually a family of functions from a template, one body
that is parameterized on a list of compile-time arguments. That's why it has the ! operator
in the name. In D, you pass two sets of arguments to a function template: a compile-time
argument list and a normal runtime argument list. The syntax is as follows:
function_name!(compile, time, arguments)(run, time, arguments);
If you're familiar with C++, this is similar to the function_name<type, list,
here>(arguments, here); function of that language. D chose !() over <> because
it has less lexing ambiguity. Compile-time arguments are similar to runtime arguments,
so they look similar too.
34
www.it-ebooks.info
Chapter 2
If there is only one compile-time argument and it is syntactically simple
(made up of only one token, for example, int, string, or object,
but not const(int) or mymodule.Something), the parentheses
around the compile-time argument are not necessary. The to!int
function is equivalent to to!(int).
The compiler can often figure out compile-time arguments automatically if a runtime list is
provided. This is called implicit function template instantiation (IFTI). In fact, this is how
std.stdio.writeln works; you can pass it any arguments you want, and it automatically
converts them to strings and prints them out. Try the following line of code:
writeln!(int)(10); // works!
The reason writeln converts variables to string is that like to, it is a template function.
D's templates let you write functions that generically handle a variety of types at once with
convenient syntax. Phobos uses them extensively.
There's also a function called std.conv.text() that works in
the same way as writeln, but returns the string instead of printing
it out. You can use this to convert several variables to string at once,
for example, string s = text(10, " is ten!");.
There's more…
To enable to on custom types, either implement a constructor that takes the target
type or implement T opCast(T:Target)(). Converting a type to string can also be
done with a member function: string toString() const { return "string
representation"; }.
Finding the largest files in a directory
Suppose you're out of disk space. A solution may be to delete old, large files from a directory.
Let's write a D program to perform this task.
How to do it…
Execute the following steps to find the largest files in a directory:
1. Use the std.file.dirEntries function to get a listing of all files.
2. Define the DirEntry variable as an array.
3. Sort the array by size in descending order by using std.algorithm and
a lambda function.
35
www.it-ebooks.info
Phobos – The Standard Library
4. Filter out the newer files with std.algorithm.filter.
5. Delete the top 10 files with the std.file.remove function.
The code is as follows:
void main() {
import std.file, std.algorithm, std.datetime, std.range;
DirEntry[] allFiles;
foreach(DirEntry entry; dirEntries("target_directory",
SpanMode.depth))
allFiles ~= entry;
auto sorted = sort!((a, b) => a.size > b.size)(allFiles);
auto filtered = filter!((a) =>
Clock.currTime() - a.timeLastModified >> 14.days)(sorted);
foreach(file; filtered.take!(10))
remove(file.name);
}
How it works…
Phobos provides the std.file module for high-level operations on files and directories.
With it, we can read and write files, list files in a directory, get file information, and perform
common operations such as deleting and copying files.
The dirEntries function returns an object that works with foreach. Depending on the
type you request in the loop, it will provide different information. The foreach(string
name; dirEntries()) function gives you just the filenames. The foreach(DirEntry
entry; dirEntries()) function gives details.
This is implemented with a function called opApply. D's foreach loop understands four
kinds of items: a numeric interval, arrays (or slices), input ranges, and objects with a member
function called opApply. These are explained in detail in the following paragraphs.
Numeric intervals are a simple start-to-finish progression of integers, as shown in the
following line of code:
foreach(num; 0 .. 10) { /* loops from num = 0 up to, but not
including, num = 10 */ }
Input ranges are iterable objects that are used throughout much of Phobos. Indeed, the sort,
filter, and take functions we use here from std.algorithm both consume and return
input ranges. Ranges will be covered in greater depth later in this book.
36
www.it-ebooks.info
Chapter 2
While input ranges are useful for a variety of tasks, they aren't ideal for everything. The
opApply function is used for these cases. It is a special member function on a struct or
a class that takes a delegate. The arguments to the delegate are the foreach iteration
variable types, and the body of the delegate is automatically set to be the inner code of
the loop. The delegate's return value gives flow control, similar to blocks in Ruby.
After gathering the data, we use std.algorithm to sort, filter, and limit the size of the
results. These functions show the power of input ranges and lambda functions. The syntax
(a) => a; is a lambda function. First, there is a parameter list in parentheses. Types are
optional here; if excluded, the lambda function is implemented as a template with implicit
types from context. Then, the symbol => is the key indicator of a lambda function, and finally
you have the return value. The short lambda syntax is only usable for a single expression
and cannot return void.
The (a) => a function is actually a function template. The compile-time
parameters it needs for its parameter list are determined from context by
the compiler.
The (a) => a function, in this context, could alternatively be written as a => a. If it has only
one argument, the parentheses are optional. It could also be written as int delegate(int
a) { return a; }, function(int a) { return a; }, or even (int a) { return
a; }. The delegate and function options make two separate but related types. The
difference between a delegate and a function is that a delegate has a context pointer whereas
a function does not. The context pointer gives the delegate access to variables from the
surrounding scope. A function can only access global variables, data through its arguments,
and static data. If you do not specify one of the two keywords, delegate is usually the default;
the compiler will give you what you require.
With that background information, let's look at the following line of code in more detail:
sort!((a, b) => a.size > b.size)(allFiles);
The std.algorithm.sort function takes two arguments: an optional comparison function,
given as a compile-time argument for maximum efficiency, and a random access range to sort.
A random access range is any iterable object from where you can jump around to different
indexes. The most common random access range is an array or a slice. This is why we built an
array of DirEntry. Firstly, because the dirEntries function uses the opApply iteration, so
it isn't a range, and secondly, to sort, we need the whole list ready at once.
The next line is very similar. Again, we use a function from std.algorithm that takes a
range and a function (called a predicate in the std.algorithm documentation). The filter
returns a new range with all the properties of the sorted list except items that don't match
the filter requirement. For example, the file that was last modified more than 14 days before
the current time is removed.
37
www.it-ebooks.info
Phobos – The Standard Library
Let's also look at the syntax of 14.days. The days function is a function in the module
core.time with the @property Duration days(int a); signature. This uses a D
feature called Uniform Function Call Syntax (UFCS). With UFCS, a call to foo.bar may be
rewritten as bar(foo). This lets us extend any type, including built-in types such as integers
and arrays in our code, adding new pseudomembers and properties. When used properly,
this gives extensibility, readability, and can even help encapsulation, allowing you to write
extension methods outside the original module, thus limiting access to private data.
Finally, we complete our task by using take(10) (via a UFCS call), which takes the first 10
items off the filtered list, and calling remove from std.file to remove (delete) the file.
Creating a network client and server
Networking is a common requirement in modern applications. Phobos offers a module, std.
socket, which provides a foundation for networked applications. We'll write a client and
server pair to demonstrate how to use it. The client will send lines from standard input to the
server. The server will accept any number of connections, say hello to new clients, and then
echo back whatever it received.
How to do it…
We'll be building two separate applications: the client and the server.
Client
Let's create a client by executing the following steps:
1. Create a Socket object.
2. Connect to the server.
3. Declare a buffer to hold the received data. The buffer must be preallocated to
the maximum amount of data you want to handle in a single call to receive the
data. Here, we'll use a static array of length 1024; it will have plenty of room to
hold our message.
4. Receive the hello message we sent in the server.
5. Then, send each line of the message to the server, wait for the response,
and print it out.
The code is as follows:
void main() {
import std.socket, std.stdio;
auto socket = new Socket(AddressFamily.INET,
SocketType.STREAM);
38
www.it-ebooks.info
Chapter 2
char[1024] buffer;
socket.connect(new InternetAddress("localhost", 2525));
auto received = socket.receive(buffer);
// wait for the server to say hello
writeln("Server said: ", buffer[0 .. received]);
foreach(line; stdin.byLine) {
socket.send(line);
writeln("Server said: ",
buffer[0 .. socket.receive(buffer)]);
}
}
Server
Let's create a server by executing the following steps:
1. Create a Socket object.
2. Bind it to the listening address.
3. Call the listen() method to start listening.
4. Create a list of connectedClients objects and a SocketSet object
for multiplexing.
5. Enter a main loop.
6. Reset the SocketSets object.
7.
Add your listener and all connected clients to the readSet function.
8. Call Socket.select() and pass your SocketSet objects to it.
9. If any client is ready to read, receive its data with the socket’s receive method
and reply to the client with the socket’s send method.
10. If your listener was set in the readSet function, call accept to accept a new
connection and send our welcome message.
The code is as follows:
void main() {
import std.socket;
auto listener = new Socket(AddressFamily.INET,
SocketType.STREAM);
listener.bind(new InternetAddress("localhost", 2525));
listener.listen(10);
auto readSet = new SocketSet();
Socket[] connectedClients;
char[1024] buffer;
bool isRunning = true;
while(isRunning) {
39
www.it-ebooks.info
Phobos – The Standard Library
readSet.reset();
readSet.add(listener);
foreach(client; connectedClients) readSet.add(client);
if(Socket.select(readSet, null, null)) {
foreach(client; connectedClients)
if(readSet.isSet(client)) {
// read from it and echo it back
auto got = client.receive(buffer);
client.send(buffer[0 .. got]);
}
if(readSet.isSet(listener)) {
// the listener is ready to read, that means
// a new client wants to connect. We accept it here.
auto newSocket = listener.accept();
newSocket.send("Hello!\n"); // say hello
connectedClients ~= newSocket; // add to our list
}
}
}
}
How it works…
Phobos' std.socket module is a wrapper of the BSD socket API available on all major
operating systems. The std.socket module is a thin wrapper. If you've used sockets in
other languages, you'll feel at home with Phobos.
Clients simply connect and then send and receive data. The send and receive functions
both take a buffer as their argument instead of returning a newly allocated array. This
provides maximum performance by allowing you to reuse memory. Note that they may not
use the whole buffer. These methods will wait until they can do something (unless you set the
blocking property to false), and then they will do as much as they can immediately before
returning. If only one byte is available on the network connection, receive will write that byte
to the buffer and return the value; it won't wait to fill the buffer entirely. This lets you handle
partial and variable size messages as soon as possible. Similarly, send may not send your
whole message at once. A robust socket code should check the return value to ensure that
all the data actually made it out.
On the server side, instead of connecting, you bind the Socket object to an address and then
listen for connections. The argument to listen is the maximum number of clients to queue.
This is typically a relatively small number, for example, 10.
40
www.it-ebooks.info
Chapter 2
There are several techniques to handle multiple connections. You can use threads, processes,
or various event-based checks. Each technique has pros and cons in simplicity and speed. In
the example, we used std.socket, an easy-to-use and portable function to multiplex several
connections in an application. The select function doesn't scale well to large numbers of
connections because it must loop through each one to check isSet, but for small numbers of
connections, it performs adequately and is fairly simple to use.
The SocketSet class in std.socket is used to pass collections of sockets to select. You
can create it outside your loop and then add your connections to it. Don't forget to add the
listening socket too when it is ready to read. This means that a new client is trying to connect.
When select indicates that a socket is set in the SocketSet object, it is ready to be used
immediately. You should handle the data as quickly as possible to minimize the wait time for
other clients. The server simply continues these same steps in a loop until it is terminated.
There's more…
Here, we created a socket that uses TCP, the Internet protocol upon which many common
application protocols are built, including HTTP for the Web, SMTP for e-mail, and more. You can
also create UDP and Unix sockets with std.socket. To create a Unix socket (not available on
Windows operating systems), pass AddressFamily.UNIX to the Socket constructor instead
of AddressFamily.INET. Then, when connecting or binding, use the new UnixAddress
instead of InternetAddress. Other than that, the API is the same as the TCP socket. Unix
sockets only work with clients on the same computer, so they provide more security and speed
than a TCP socket. However, they are only useful for specialized purposes. To use UDP—a
connectionless protocol that is faster but less reliable than TCP—you can create the socket with
SocketType.DGRAM and then use the sendTo and receiveFrom methods instead of send,
receive, and connect.
See also
ff
http://vibed.org/ is a server framework that is inspired by Node.js and
written in D
41
www.it-ebooks.info
Phobos – The Standard Library
Using Base64 to create a data URI
Given a CSS file, we want to replace all instances of a particular image URL with a data URI to
reduce the number of requests. Let's write a small D program to do this replacement.
How to do it…
Let's create a data URI by executing the following steps:
1. Load the image file with std.file.read().
2. Create the data URI with std.base64 as shown in the following code:
pure char[] makeDataUri(string contentType, in void[] data) {
import std.base64;
return "data:" ~ contentType ~ ";base64," ~ Base64.
encode(cast(const(ubyte[]))) data;
}
3. Load the CSS file with std.file.readText.
4. Use std.array.replace to replace the URL with the data URI.
5. Save the CSS file with std.file.write.
Putting it all together in main, you will have the following code:
void main() {
import std.file, std.array;
auto imageData = std.file.read("image.png"); // step 1
string dataUri = makeDataUri("image/png", imageData);
// step 2
auto cssFile = std.file.readText("style.css"); // step 3
cssFile = cssFile.replace("image.png", dataUri); // step 4
std.file.write("style-combined.css", cssFile); // step 5
}
How it works…
Phobos' std.file module, in addition to directory listing functions, also includes highlevel file functions. The functions read, readText, and write give one-step access to file
contents. The read(filename) function reads the entire file in one go, returning void[],
which must be cast to another type (for example, char[] or ubyte[]) to be used. The
readText(filename) function validates that the file is UTF-8 and returns a string.
The write(filename, contents) function writes the contents directly to the file,
overwriting it if it already exists.
42
www.it-ebooks.info
Chapter 2
Phobos' std.array module includes several generic functions to operate on arrays that
are callable with member-style syntax thanks to UFCS. Since a string in D is simply an array
of characters, all these functions also work on strings. The replace function searches the
haystack for all occurrences of the needle and replaces them with the replacement argument,
returning the new data without modifying the original.
Our makeDataUri function uses std.base64 to create a data URI that is usable in CSS
files. The std.base64 module uses a template with value parameters to customize the
behavior from the following source:
alias Base64Impl!('+', '/') Base64;
alias Base64Impl!('-', '_') Base64URL;
template Base64Impl(char Map62th, char Map63th, char Padding = '=')
D's templates can take values as compile-time parameters, which can be used the same
way as regular runtime parameters in the code. Here, the implementation can have three
characters swapped out so the code can be easily used by other Base64 variants. The
alias lines give a convenient name to different parameterizations. The aliases are different
types, similar to subclasses of Base64, which parameterize it with virtual functions or in the
constructor. However, unlike classes, there's no runtime cost here. The compile-time values
are exactly equivalent to character literals in the generated code.
As Base64.encode takes ubyte[] and our makeDataUrl function takes the generic array
type void[], we had to cast the data to use it. We take the parameter of type in void[]
because we inspect the data but don't store or modify it, and it can be any type. All arrays
implicitly cast to const(void)[], making it (or in void[]) ideal for functions that just
generically need data. The data argument of std.file.write is also const(void)[].
Finally, you might have noticed that makeDataUrl returns a mutable reference yet was
assigned to a string, which is an immutable character array. Normally, that wouldn't compile,
so why does it work here? The key is because makeDataUri is marked pure. Pure functions
are not allowed to modify anything outside their own arguments. This means the return value
can be assumed to be unique. A related function is assumeUnique from std.exception,
which is used in a Phobos idiom to convert mutable data to immutable data. It should only be
used when you are sure that the reference is indeed unique and that no other pointers exist
into the data. After calling it, you should stop using the original reference. Pure functions use
this same principle implicitly: as long as the reference was not passed in through its argument
list (the function would be called strongly pure in D), there can be no other references. So,
it is safe to assume that it is unique. This means if you stop using the old reference, it is
guaranteed to be immutable! We'll learn more about pure functions later in this book.
43
www.it-ebooks.info
Phobos – The Standard Library
Generating random numbers
Random numbers are commonly necessary in computer programs. Phobos' std.random
module offers a variety of random number generators and other functions related to
randomization. Here, we'll create a little number guessing game with a replay function. The
user guesses the generated number, and then the program tells them if they were high or low.
How to do it…
Let's generate random numbers by executing the following steps:
1. Create a random number generator, seeding it with the replay value, if given,
or unpredictableSeed for a new game.
2. Generate a random number between 0 and 100.
3. Ask the user for their guess. Tell them if they were low or high and let them
continue trying until they get it. Save each line of user input to the replay file.
4. When the user is done playing, let them know how many tries they took to get
the correct number.
The code is as follows:
import std.random, std.conv, std.string, std.stdio;
int playRound(ref Random generator, File userInput, File saveFile) {
int tries = 0;
auto value = uniform(0, 100, generator);
writeln("Guess the number between 0 and 100:");
while(true) {
tries++;
auto guess = userInput.readln().strip().to!int;;;
if(saveFile.isOpen) saveFile.writeln(guess);
// save in the replay file
if(guess == value) break; // correct!
writefln("Your guess of %s was too %s, please try again,",
guess, guess > value ? "high" : "low");
}
writefln("Correct! You guessed %d in %d tries.", value,
tries);
return tries;
}
void main(string[] args) {
Random gen;
44
www.it-ebooks.info
Chapter 2
File userInput, saveFile;
// prepare input and seed the generator
if(args.length > 1) {
// use the given replay file
userInput = File(args[1], "rt");
gen.seed(to!uint(userInput.readln().strip()));
// using the saved seed = same game
} else {
// new game, use an unpredictable seed and
//create a replay file
userInput = stdin; // take input from the keyboard
auto seed = unpredictableSeed;; // a random game
gen.seed(seed);
saveFile = File("replay.txt", "wt");
saveFile.writeln(seed);
// save the seed so we can reproduce the game later
}
int totalTries = 0;
foreach(round; 0 .. 3)
totalTries += playRound(gen, userInput, saveFile);
writefln("You guessed three numbers in %s tries!", totalTries);
}
How it works…
The overall idea of the game is to create numbers that look random, but can actually be
reproduced for the replay. To achieve this goal, we used Phobos' std.random module
and created our own random number generator, logging the seed we use for each game.
The user's input is also logged. Given the random seed and user input, we can reliably
recreate a game.
If you don't need precise control over the random number generator,
you can use the default settings by calling the functions without the
final argument. For example, auto randomNumber = uniform(0,
100); gives a number from a preselected and automatically seeded
default random number generator.
Let's look at the code, starting from main. The first thing you'll notice is that this main
function took arguments. These are passed to the program on the command line. The
args[0] variable will be set to the name of the program, then args[1 .. $] are the
other arguments the user passed, if any. For example, if the program is executed with
the following command line:
game replay.txt arg2
45
www.it-ebooks.info
Phobos – The Standard Library
Then, the args variable passed to main would have the following content: ["game",
"replay.txt", "arg2"]. That's why we use if(args.length > 1) instead of
args.length > 0. There's always at least one command-line argument: the name of
the program in args[0].
There are two File variables. File is the file I/O of std.stdio. It wraps C's I/O which
is based upon FILE* to provide maximum C compatibility while presenting a more D-like
interface. Our two files are userInput and saveFile. The userInput file is used to
feed the user input to the program. The saveFile file is used to save the user input for
later use in the replay.
If the replay file is provided on the command line, we use it as user input. The first line of this
is the random seed, so we immediately load that. If no replay file is provided, we use stdin,
the keyboard, for user input and open a new file called replay.txt, which is opened as
a writable text (wt) file, for saveFile. We also make an unpredictableSeed, use it to
initialize the random number generator, and save it to the file for future use.
The stdin file is readable and the stdout file is writable. All the methods that you can use
on these files can also be used on any other file and vice versa. In fact, the global writeln
function simply forwards to stdout.writeln.
Once we're set up, we used foreach over a numeric interval to run playRound three times
and then write out the results. The writefln function, unlike writeln, uses a format
string instead of printing out each argument in order. The format string, which comes from
C's printf function, can get very complex. Here, we only used a simple one. The text in the
string is printed, with %s instances being replaced with the value of the next argument to
writefln. Unlike in C, in D you can always use the %s specifier for any argument and it will
be automatically converted to string for you. Other specifiers, such as %d, can be used to give
more control over formatting, such as leading zeroes, field length, precision, and more. Look
up the options for printf, including Posix positional parameters, to see more options.
Next, let's look at the playRound function. The first thing to note is that it takes the random
number generator by ref. This is important; since Random is a struct, passing it to a function
means the function would work on a copy. When we called playRound the second time,
since the variable in main would not be updated, it would always create the same random
number! Passing the random number generator by reference ensures that it gets updated
and won't repeat the same values. You will almost always want to pass random number
generators to functions by reference.
Let's also look at the following line of code in more detail:
userInput.readln().strip().to!int;
46
www.it-ebooks.info
Chapter 2
The readln method is a method of the File object that reads the next line, including the
new line character at the end. To get rid of the new line character, we call strip, a function
from std.string. The strip function removes whitespace from both the beginning and the
end of a string. Finally, we convert the string to an integer by using std.conv.to. Thanks
to UFCS, we can write this using left-to-right dot syntax. There's no parentheses at the end
of to!int because empty parentheses on a function call are optional. This is part of D's
property syntax, which we'll discuss in more depth later.
The final piece of syntax that may be new to you is guess > value ? "high" : "low".
This is called the ternary operator, inherited from C. The syntax is condition ? ifTrue:
ifFalse. It is essentially a miniature if statement.
There's more…
The best way to win this game is to use a binary search algorithm. First, guess 50. If you are
too high, try 25. If too low, try 75. For each guess, you can cut the possibilities in half until you
land at the solution. You should be able to consistently guess each number in about six tries.
In Phobos' std.algorithm module, there are specializations on the search algorithms for
sorted ranges that use this same technique to very rapidly search even large sets of data.
Phobos' std.random function is not cryptographically secure.
While it is useful for games and other insensitive tasks, if you need
to protect your data, a better source of randomness is required.
Third-party cryptographic libraries such as OpenSSL provide
functions for these tasks. Bindings can be found in the Deimos
collection at http://github.com/d-programming-deimos.
Normalizing a string and performing Unicode
comparisons
We want to make a filename or URL based on an article title. To do this, we'll have to limit the
size to an appropriate number of characters, strip out improper characters, and format the
string in a consistent way. We also want it to remain in the valid UTF-8 format.
How to do it…
Let's normalize a string by executing the following steps:
1. Use std.uni.normalize to get Unicode characters into a consistent format.
2. Use std.string.toLower to convert everything to lowercase for consistency.
3. Use std.regex to strip out all but a small set of characters.
47
www.it-ebooks.info
Phobos – The Standard Library
4. Use std.string.squeeze to collapse consecutive whitespace.
5. Use std.array.replace to change spaces into dashes.
6. Use std.range.take to get the right number of characters, then convert the
result back to string.
The code is as follows:
void main(){
string title = "The D Programming Language: Easy Speed!";
import std.uni, std.string, std.conv, std.range,std.regex;
title = normalize(title);
title = title.toLower();
title = std.regex.replaceAll(title, regex(`[^a-z0-9 \-]`), "");
title = title.squeeze(" ")
.replace(" ", "-")
.take(32).to!string;
import std.stdio;
writeln("The title is: ", title);
}
How it works…
D has excellent facilities to work with strings. Functions from all over Phobos are useful
while performing string operations. The std.string function contains functions such
as toLower, indexOf, strip, and other functions that are specific to string processing.
D's strings are essentially arrays of immutable characters. This means array functions work
too. The replace, repeat, join, and other functions from std.array work, as well as
the built-in concatenation and append operators (a ~ b and a ~= b).
Where things might be surprising is if you use strings as ranges with std.algorithm.
As strings are arrays, you might expect them to be a full random access range, and thus
be usable in all the algorithms, including sort. However, this is not the case, but why? D
and Phobos try to reach a happy compromise on Unicode strings that work correctly in
all cases and have top performance.
The D language itself works on a low level. A string is simply an array of immutable UTF-8 code
units (bytes). It also offers wstring for UTF-16 and 2 bytes per code unit, which allows one
index to cover most written language's characters. The wstring type is the default Unicode
string type in the Windows operating system. Finally, there is dstring, an array of dchars,
which are UTF-32 code units. In the current Unicode specification, a single dchar can hold any
code point, which, after calling normalize on the string, brings us as close as we can get to one
index being one character. This is at the cost of about four times the memory consumption of a
UTF-8 string. D gives you the choice of using the string type appropriate for your own use case.
48
www.it-ebooks.info
Chapter 2
However, if a string is an array of characters, why doesn't take return a string? First, std.
algorithm returns new types that do their calculations lazily. However, there is a function,
std.range.array, that eagerly evaluates a range result, converting it from a lazy type back
to the underlying array type. If we try this here, we would find the result is dchar[] instead
of string.
This is because the Phobos library builds on top of the D language's flexibility to choose a
generally correct trade-off of speed for correctness. It avoids expensive full normalization,
translating various compatible forms into a single representation, for example, combining
characters (though this is available upon request through the std.uni.normalize
function). However, it does perform UTF decoding, yielding dchars. This insulates user
code from the complexity of explicit multibyte code point decoding—each code point as
a single item, instead of one to six, as is the case with raw chars.
The downside of this choice is that computation needs to be done. When decoding the
string, it is impossible to perform random access because each UTF-8 point has variable
length. You can't jump ahead because you don't know how far to jump!
The std.algorithm.sort function doesn't work on strings without an additional step, either
converting to dstring or casting to an array of bytes (std.string.representation is the
idiomatic function for performing this cast). This is a good thing because sorting an array of
characters probably doesn't do what you want anyway. It would break apart multibyte characters,
yielding an invalid string!
However, since many algorithms do not require random access, this is mostly a net win.
Things that work efficiently also work correctly, and things that don't work correctly can be
made to work. It's your choice whether you want to work on the bytes or convert to dstring.
Getting back to the example, once we perform the algorithm, we can simply convert the final
result back to string with std.conv.to.
Searching with regular expressions
Regular expressions are a common tool to perform advanced operations on text, including
complex searches, replacements, splitting, and more. Unlike JavaScript or Perl, D does not
have regular expressions built into the language, but it has all the same power—and more—as
those languages through the std.regex Phobos module. To explore regular expressions in
D, we'll write a small program that searches stdin for a particular regex that is given on the
command line and prints out the matching lines.
49
www.it-ebooks.info
Phobos – The Standard Library
How to do it…
Let's use the search operation with regular expressions by executing the following steps:
1. Create a Regex object. If you are using string literals, D's r"" or `` syntax makes it
much more readable.
2. Loop over the matches and print them out.
Pretty simple! The code is as follows:
void main(string[] args) {
import std.regex, std.stdio;
auto re = regex(args[1], "g");
foreach(line; stdin.byLine)
if(line.match(re)) writeln(line, " was a match!");
}
How it works…
Regular expressions in D are a library type instead of a built-in type, but this doesn't
affect their usability, their speed, or their simplicity. Declare a regular expression with the
regex(pattern, flags) helper function. If you are using a string literal for the pattern,
it will look nicer if you use one of D's raw string syntaxes, either r"pattern here" or
`pattern here`. In those strings, the backslash doesn't have to be escaped, allowing
the regular expression to look natural. The pattern syntax in D is almost similar to the
syntax used in JavaScript.
After the regex is declared, you can use methods from std.regex to do all the basic tasks.
The string.matchAll(pattern) function returns a list of matches in the string. You can
check it in an if statement to see if it matches at all, or you can perform a foreach loop
over it to get the details of the match.
The std.regex function also provides methods to replace instances, including a callback
function, or to split a string. These functions work in the same way as replace and split
from std.string.
There's more…
D's regular expressions are able to outperform most other regex engines by being processed
at compile time. Instead of writing regex, write ctRegex! and make sure that the variable
is static. The regular expression and the usage code do not have to be changed, as shown
in the following code:
50
www.it-ebooks.info
Chapter 2
static ex = ctRegex!`[0-9]{3}-[0-9]{4}`;
foreach(match; "My phone number is 123-4567!".match(ex))
writeln(match);
The output is as follows:
["123-4567"]
With ctRegex, std.regex will then create D code to implement your specific regular
expression and compile it, generating a fully optimized function to implement it. We'll learn
how to create this kind of code later in the book.
See also
ff
http://dlang.org/phobos/std_regex.html is the official documentation of
the module. It explains the regex syntax used, the flags, and the full API.
Writing a digest utility
Phobos provides a package called std.digest that offers checksum and message digest
algorithms through a unified API. Here, we'll create a small MD5 utility that calculates and
prints the resulting digest of a file.
How to do it…
Let's print an MD5 digest by executing the following steps:
1. Create a digest object with the algorithm you need. Here, we'll use MD5
from std.digest.md.
2. Call the start method.
3. Use the put method, or the put function from std.range, to feed data to
the digest object.
4. Call the finish method.
5. Convert hexadecimal data to string if you want.
The code is as follows:
void main(string[] args) {
import std.digest.md;
import std.stdio;
import std.range;
File file;
51
www.it-ebooks.info
Phobos – The Standard Library
if(args.length > 1)
file = File(args[1], "rb");
else
file = stdin;
MD5 digest;
digest.start();
put(digest, file.byChunk(1024));
writeln(toHexString(digest.finish()));
}
How it works…
The std.digest package in Phobos defines modules that all follow a common API. The
digest structures are output ranges, which means you feed data to them by calling their put
method. Each digest algorithm is in a separate module, but they all follow the same pattern:
you create the object, call start(), put your data into it, and then call finish() to get the
result. If you want it as a printable string, call toHexString on the result.
If you pass a digest structure to a function, be sure to pass it as a
reference, because they are value types. So, without a reference, data
added to it inside a function won't be visible outside the function!
The put method on the structure itself offers only one form, accepting one array of data at
a time. However, the std.range module includes additional helper functions to expand the
capabilities of any output range. The std.range.put function can also accept input ranges.
The end result is we build something very similar to a Unix pipeline; put(digest, file.
byChunk(1024)) will read a file, one kilobyte chunk at a time, and feed that data into the
digest algorithm. The std.range.put method looks like the following:
foreach(chunk; input) output.put(chunk);
It is a generic function that works to connect any kind of output range to any kind of input
range with a matching element type.
There's more…
Phobos' digest API also provides two other ways to get digests: a convenience function if all
the data is available at once, md5Of, and the OOP API (an interface and classes) if you need
to swap out implementations at runtime.
writeln("The MD5 hash of 'test' is ", toHexString(md5Of("test")));
There are also other algorithms available in std.digest with the same API, including SHA1
and CRC.
52
www.it-ebooks.info
Chapter 2
See also
ff
Chapter 3, Ranges, will show you how to create your own input and output ranges
that can be connected to the digest structures
ff
http://dlang.org/phobos/std_digest.html is the documentation of
the package
Using the std.zlib compression
Phobos provides a wrapper for the common zlib/gzip/DEFLATE compression algorithm.
This algorithm is used in the .zip files, the .png images, the HTTP protocol, the common
gzip utility, and more. With std.zlib, we can both compress and decompress data easily.
How to do it…
Let's compress and decompress data by executing the following steps:
1. Import std.zlib.
2. Create an instance of Compress or UnCompress, depending on what direction you
want to go.
3. Call the compress or uncompress methods for each block of data, concatenating
the pieces together as they are made.
4. Call flush to get the last block of data.
The code is as follows:
void main() {
import std.zlib, std.file;
auto compressor = new Compress(HeaderFormat.gzip);
void[] compressedData;
compressedData ~= compressor.compress("Hello, ");
compressedData ~= compressor.compress("world!");
compressedData ~= compressor.flush();
std.file.write("compressed.gz", compressedData);
}
Running the program will create a file, compressed.gz, which can be unzipped to become a
text file with Hello, world!.
53
www.it-ebooks.info
Phobos – The Standard Library
How it works…
The std.zlib module doesn't follow exactly the same pattern as std.digest (the
implementation of std.zlib was written before ranges were incorporated into Phobos), but
it is a very simple API. It works with one block of data at a time, returning the compressed or
uncompressed block. When finished, the flush method clears any partial blocks, returning
the final piece of data.
There are also convenience functions, compress and uncompress, that can perform the
operation in a single function call if you have all the data available as a single array at once.
Using the std.json module
JSON is a common data interchange format used on the Web. Phobos has a std.json
module that can be used to read and write JSON data. The std.json module is an old
module that doesn't take advantage of many of D's advanced features, making it somewhat
difficult to use. While newer JSON libraries exist for D, including ones that can be used with
syntax and convenience, which is extremely similar to JavaScript itself, Phobos has not yet
adopted any of them. Here, we'll read a JSON string, print the current contents, add a new
field, and then print out the new JSON.
How to do it…
Suppose we're consuming a web API that returns an array of person objects with a name and
ID field. We get the following JSON string from the API:
[{"name":"Alice","id":1},{"name":"Bob","id":2}]
Let's execute the following steps to use the std.json module:
1. Parse the JSON string.
2. Loop over the array, getting objects out.
3. Print the information we need, getting the types out of the web API's specification.
4. Create the new object.
5. Append the new object to the list.
6. Print out the JSON representation.
54
www.it-ebooks.info
Chapter 2
The code is as follows:
void main() {
import std.json, std.algorithm, std.stdio;
auto list = parseJSON(`[{
"name":"Alice","id":1},{"name":"Bob","id":2}]);
foreach(person; list.array.map!(a => a.object)) {
writeln("ID #", person["id"].integer, " is ",
person["name"].str);
}
JSONValue newPerson;
JSONValue[string] obj;
obj["name"].str = "Charlie";
obj["id"].integer = 3;
newPerson.object = obj;
list.array = list.array ~ newPerson;; // append it to the list
writeln(toJSON(&list)); // print out the new json
}
It will print the following output:
[{"name":"Alice","id":1},{"name":"Bob","id":2},{
"name":"Charlie","id":3}]
How it works…
Phobos' std.json module provides a tagged union to represent a dynamic JSONValue.
To use it, you can explicitly check the type with the type property, or simply access the type
you need through its str, object, array, integer, and other properties. It will throw an
exception if you try to access a property of the wrong type. You can query the current type
with the type property.
Array elements in std.json are also JSONValues, which means they need to be accessed
through the type properties. That is why we called map on the array. We can't work directly
with JSONValue, so mapping it to an object gives something we can immediately use. The
map function is a function from std.algorithm that calls the given predicate on each
element in the array.
JSONValue properties are either read or write. We cannot modify them in-place. Instead, we
read the data or create a temporary file to do our edits then set the finished data back to it.
Finally, toJSON takes a pointer to a root element and returns the JSON string it represents.
55
www.it-ebooks.info
Phobos – The Standard Library
See also
ff
http://dlang.org/phobos/std_json.html is the documentation of the
std.json module.
ff
http://dlang.org/phobos/std_variant.html is the documentation of
Phobos' other dynamic type: Variant. Unlike JSONValue, Variant can store
any type, but it does not do serialization to and from string.
ff
http://wiki.dlang.org/Jsvar describes a module that provides a var
struct with convenient syntax and a similar type model to JavaScript. We'll also
learn some of the techniques that are used in that module later in this book.
56
www.it-ebooks.info
3
Ranges
In this chapter, we will investigate the concept of ranges, which is used throughout the D code.
We'll look at the following recipes:
ff
Using ranges when implementing an algorithm
ff
Creating an input range
ff
Creating an output range
ff
Creating a higher-order range
ff
Putting a range interface on a collection
ff
Creating an input range over a tree structure
ff
Using runtime polymorphic (class) ranges
ff
Storing a range as a data member
ff
Sorting ranges efficiently
ff
Searching ranges
ff
Using functional tools to query data
Introduction
This chapter goes into the details of an artefact central to the Phobos standard library with a
little core language support: ranges. Ranges are user-defined objects used to build iterators
over a collection of items. The collection may be pre-existing, such as an array, or it may be
generated on the fly by the range object.
Ranges are defined in a way that they can be plugged together like building blocks with
generic algorithms and other transformations. Command-line pipelines and range code
can be very similar.
www.it-ebooks.info
Ranges
The Unix command-line command cat file.txt | sort | uniq can be expressed
similarly in D, using ranges from std.stdio and std.algorithm and a helper function
from std.range, as shown in the following code:
foreach(line; File("file.txt").byLine.map!(a=>a.idup).array.sort.uniq)
writeln("Unique line: ", line);
Each range feeds into the next, building a system of generic building blocks that can be
combined to perform a variety of tasks. In this chapter, we'll look at how to use ranges and
how to create our own.
Using ranges when implementing an
algorithm
D code favors the use of ranges when implementing algorithms because ranges are a natural
abstraction for operating on sequences of elements. We'll implement a function that takes a
range and calculates the average of the values.
Getting ready
First, we need to sketch out our algorithm and determine what functions and types we'll need
from the range. The algorithm should accept a range as generic as possible for element types
that make sense for us, without sacrificing efficiency. Since our algorithm is taking an average
value, the elements should be numeric. We'll also need to be able to iterate over each individual
item. However, we don't need to know the length ahead of time (we can keep a count while
calculating the sum); we don't need random access and we don't need to save our position. All
we need to know is whether it is empty, the current item, and be able to advance the iteration.
The result is we need an input range, nothing more. Other types of ranges are as follows:
ff
Forward ranges: These are input ranges where a particular point can be saved and
used later. You'll want a forward range when you need to look ahead and return the
part of the range already passed for review.
ff
Bidirectional ranges: These offer backward iteration as well as forward iteration.
ff
Random access ranges: These are input ranges that also offer fast access
to any index. You'll want a random access range when your algorithm needs
to jump around rapidly.
ff
Output ranges: These are ranges that receive data instead of iterating over data.
You can go to http://dlang.org/phobos/std_range.html
for the official documentation on ranges and detailed definitions of
each type.
58
www.it-ebooks.info
Chapter 3
There are also additional features you may offer on top of the core range primitives. These
include infiniteness, slicing, length, and there may be more in the future. They are checked
independently of the range type and are used, if available, for added efficiency in algorithms.
It is also important to look at what kind of ranges our algorithm cannot handle. Our simple
average algorithm will loop over all the values, which is impossible if we have passed an
infinite range—an input range that is never empty. Thus, we will reject infinite ranges in
our function signature when implementing the average algorithm.
It is possible to use additional facilities if and only if they are actually
available. For example, std.range.walkLength has two constraints;
it needs to be iterable, so it needs to be an input range, and it must not
be infinite. However, the function body of std.range.walkLength
starts with the following code:
static if(hasLength!Range) return range.length;
The hasLength function is a function from std.range that checks for
the presence of a length member. If a length member is available
from this range, it returns that value instead of looping over the values
and calculating a count, increasing the efficiency of the algorithm.
How to do it…
The following steps show how to use ranges when implementing an algorithm:
1. Import the std.range and std.traits modules. They have functions to help
perform compile-time checks on range capabilities.
2. Create a function that takes the range we need, with a constraint for both the
range type and the range's element type.
3. Determine a good type for the return value. For our average, we want a type that
can hold a large sum of the range's elements. So, if the range we received has
an element type of floating point, we'll use double. Otherwise, we'll use long.
4. Implement your algorithm in terms of the range primitives you required in the
constraint. For our average function, we'll loop through the values and add them
to a running total and count, and then we'll calculate the arithmetic average by
dividing the sum by the count.
5. Return the result. The result should be as useful as possible. The code is as follows:
import std.range, std.traits;
auto average(Range)(Range range)
59
www.it-ebooks.info
Ranges
if(isInputRange!Range && !isInfinite!Range &&
isNumeric!(ElementType!Range))
{
static if(isFloatingPoint!(ElementType!Range))
double sum = 0;
else
long sum = 0;
int count = 0;
foreach(item; range) {
count++;
sum += item;
}
return sum / count;
}
6. Test it by passing it an array (or any other numeric range object!), as shown in the
following line of code:
writeln(average([1, 2, 3])); // prints 2
How it works…
Ranges are generally used by constrained function templates. That's what the first few lines
of code are: a function template declaration and the constraint. The syntax is as follows:
return_type name(compile, time, args)(run, time, args)
if(constraint_condition)
The compile-time arguments are all available in the constraint condition. If the constraint fails,
the template is not considered a match for the arguments. This allows you to be specific about
what you will and won't accept, and also to overload your templates on different conditions.
For example, we could write a separate function with the same name and same arguments,
but leave out the !isInfinite!Range condition. Then, if we try to call the function with an
infinite range, it would use the second function instead of the first.
The constraint condition's contents are just like any other if statement. You can call functions;
combine conditions with &&, ||, or parenthesis; and you can reference the compile-time
arguments along with any literals or manifest constants (enum values defined elsewhere in
the module). Here, we used three functions from std.range and tone from std.traits to
describe exactly what we need. These functions perform type checks to ensure that the passed
object conforms to the range interface we need. When accepting a generic input range, this
does not mean to accept anything. It simply means to accept the most generic input that makes
sense for you. If data transformation is required to get it into the form you need, don't accept
that data—let the user do the transformation if they choose to. This keeps the cost of your
algorithm predictable.
60
www.it-ebooks.info
Chapter 3
It is also possible to write unconstrained templates that match types
with pure duck typing. Duck typing is named from the saying "if it quacks
like a duck, it's a duck". In code, it means if duck.quack() compiles,
it will be used as a duck, regardless of whether it explicitly implements
the duck interface or not. In fact, this is exactly how isInputRange
and friends are implemented. However, it is generally considered bad
practice to write an unconstrained template in D. This is because figuring
out what their requirements are can be difficult and it is easy to miss
bugs in the implementation, since it may be passed objects that it has
no idea how to handle.
Once the compile-time arguments are validated by the constraint, they can also be used in the
runtime arguments or inside the function as types or values, depending on the compile-time
argument. That's what (Range range) is. The compile-time argument Range is used as a
wildcard type for the runtime argument range.
The other notable aspect of this function's signature is the return type. Here, we returned auto.
This means, like with auto local variables, that the compiler will automatically determine the
return type by looking at the first return statement in the function body. An auto template
function must return one specific type—it is illegal to try to return both a string and an integer,
for example—but you don't have to specify the type yourself. This is useful for more than just
convenience. Here, we used the auto return type because the specific type returned depends
on the result of the static if statement in the function body. Automatic type deduction lets
us have more complex logic inside the function to return the best possible type for any particular
input type. Functions returning auto are also useful to return nested struct types whose
name may not be accessible outside the function's scope. Phobos uses this pattern when
implementing some higher order ranges.
Our function's body is pretty straightforward, with one exception: the use of static if.
The static if function works like regular if, but with two key differences that are
given as follows:
ff
It runs at compile time, meaning only compile-time information, such as variable
types or compile-time template arguments, is available to it.
ff
It does not introduce a new scope. Variables declared inside the static if
function are still available outside the static if function. This is why we were
able to use sum in the rest of the function.
The static if function is very useful when specializing functions and looking at information
received by compile-time reflection. As you can customize just part of a template, it helps with
code reuse. There is no need to write a whole new function when the only difference in sum
is a float value instead of an int value. The branch of static if that is not true does
not get compiled into the program at all. It must have valid syntax, but the code isn't actually
compiled. So, you can safely use static if for conditional compilation or to filter out code
that does not work with a given set of arguments.
61
www.it-ebooks.info
Ranges
Finally, we can look at how the function is called. Note how simple it is. The caller doesn't have
to worry about the specifics of compile-time arguments, as they are 100 percent automatically
deduced, nor does the caller need to worry about passing it a specific type, since the function
is very generic! It just works.
There are times when the user may have to care about the specifics.
The most frequent case is when they pass the function types it
doesn't support. The D compiler's error messages may be difficult to
read and may falsely place the error in a library function instead of
the user's code. If this happens to you, the key information to watch
for is the constraint the compiler says does not match. If your call says
no matching template[…] candidates are: foo(T)
if(isInputRange!T), look at where you called foo and be sure
it is actually being passed an input range. Note that static arrays are
not input ranges; they need to be sliced with the [] operator.
Creating an input range
Input ranges are D's improvement to the iterators of C++ that are safer, potentially more
efficient, and can also generate their own data. Here, we'll create an input range that generates
numbers in a Fibonacci sequence to see how it can be done and briefly explore how well it
integrates with std.algorithm automatically.
How to do it…
Let's execute the following steps to create an input range that generates numbers in a
Fibonacci sequence:
1. Create a struct with, minimally, the three core input range members: the properties
front, the properties of empty, and the function popFront. It should also hold
whatever state is necessary for iteration with successive calls to popFront.
2. Add all other functionality as possible without breaking the complexity guarantee.
Our Fibonacci generator can also implement a simple save property, so we will
add it, upgrading it to a forward range.
3. Test it with static assert for the interface you need and perform unit tests.
4. Write a helper method to create it.
5. Use it! We'll print out the first several entries with std.range.take and writeln.
The code is as follows:
import std.range;
struct FibonacciRange {
62
www.it-ebooks.info
Chapter 3
// input range required methods
// Fibonacci is an infinite sequence, so it is never empty
enum bool empty = false;
@property int front() { return current; }
void popFront() {
previous = current;
current = next;
next = current + previous;
}
// data members for state between calls
private {
int previous = 0;
int current = 0;
int next = 1;
}
// other range functions we can implement cheaply
@property FibonacciRange save() { return this; }
}
// explicit check that it fulfils the interface we want
static assert(isForwardRange!FibonacciRange);
// helper function to create the range
FibonacciRange fibonacci() {
return FibonacciRange();
}
void main() {
import std.stdio;
auto numbers = fibonacci();
writeln(numbers.take(15));
}
Running it will print the first 15 Fibonacci numbers as follows:
[0, 1, 1, 2, 3, 5, 8, 13, 21, 34, 55, 89, 144, 233, 377]
How it works…
Input ranges are defined in terms of two required properties and one required function, and
they can be extended with a number of optional functions and properties. Any object that
implements the functions and properties is considered an input range.
The three required members are front, empty, and popFront. The front property is the
current item at the front at the list. The empty property is true when there are no more items
left. The popFront member advances to the next item.
63
www.it-ebooks.info
Ranges
The front property should always be valid unless the range is empty,
including immediately after construction. For some ranges, this means
you should prime it by calling popFront in the constructor, or you can
do what we did here and set up valid data with the variable's initializers.
As they can be called multiple times in a single loop, front and empty should always be very
fast properties or, when appropriate, direct data members. The popFront property should
execute as fast as possible, but it is also permitted to perform expensive computations to
prepare the next value if necessary.
The optional range primitives, such as save, which returns a new range that is a copy of the
current range and can be advanced independently, or opIndex, which offers random access
to the range's contents, should only be implemented if you can do so quickly (O(1) algorithmic
complexity). As a general rule, if your design for save has to perform a large memory copy or
allocation, don't implement it. The typical save property does exactly what we did here: return
this inside a struct. Assigning a struct automatically performs a shallow copy—a fast operation.
A struct copy will be usable independently as long as there are no mutable references. Here,
our only members are integers, so the copy works.
Generally, if you are writing a loop inside a range primitive, you should rethink if your range
really supports that function. Range primitives are typically used in loops, so a loop inside
these functions risks higher algorithmic complexity than the consumer expects, and that will
make the function slow. We'll experiment with this later in this chapter.
While implementing the range properties, you may implement them as a data member, an
enum, or a @property function. The @property functions are the most common. The @
property function is a function that can be replaced with a data member, ideally without
breaking any code. They aren't quite interchangeable as the @property function can restrict
access to the variable (for example, a getter function without a corresponding setter results
in a read-only variable to which references cannot exist—something impossible with regular
data members). However, for the most part, the goal of a @property function is to look like
a variable to the outside world.
The enum storage class in D is also similar to a data member, but is different in one important
way; an enum variable, at the usage point, is identical to a data literal and not a variable. If
you write enum a = 10; int b = a;, the compiler will translate that into int b = 10;.
It is impossible to get a reference or pointer to an enum type, just like it is impossible to get
a pointer to an integer literal; neither have an address in memory.
64
www.it-ebooks.info
Chapter 3
The enum variables are interesting because their value is always accessible at compile time
and the fact that they are enum variables is also apparent at compile time. This means an
enum variable can be tested in a static if statement, in a template constraint or any other
compile-time context. It also means their initializer is always evaluated at compile time, giving
a key gateway into the world of compile-time function evaluation (CTFE). Here, however, we
didn't need to evaluate any function. Our Fibonacci range is simply never empty, since the
Fibonacci sequence is infinite. The enum bool empty = false; statement (or simply
enum empty = false; as the type could be automatically deduced) advertises this fact,
and unlike bool empty = false, the enum version can always be tested at compile time.
Thus, our range would pass the std.range.isInfinite test; a fact our average function
in the previous recipe tested. It is impossible to get the average of all Fibonacci numbers.
The enum keyword is also used to create enumerations; this is a new type that has members
associated with a literal, similar to enum variables in other languages. The implementation
of these two features is mostly the same, which is why they share a keyword, though the two
usages are generally separate.
If you were writing a range that wasn't infinite, the empty or @property function should be
a data member, just like front.
The Fibonacci struct is our range. It is customary, however, to write at least two other pieces
of code: the static assert(s) to ensure the range actually fulfils the required interface and a
helper instantiator function to help create the range. You will often also wish to write unit tests
for your range, testing it with a variety of input and ensuring it generates correct outputs.
A static assert is given a condition and, optionally, a message that is tested at compile
time. If the test fails, the compiler prints the location of the failed assertion, the message (if
provided), and the call stack of any template instantiation. A failing static assert will result in
a failed build with a compile error. Static asserts are flexible tools used to test code, compile
flags, and the supported platforms by generating user-defined compile errors. Here, we use
it to ensure our code does what it needs to do to implement the interface. It isn't strictly
necessary, but helps us to ensure that we didn't make any mistakes that otherwise wouldn't
appear until a user tried to actually create our range.
Finally, the helper function, fibonacci, serves as a convenience constructor. Here, we didn't
really need it, since our range is fairly simple. However, with more complex ranges, the helper
function gives us a chance to enforce our invariants (for example, ensure the constructor that
primes the range—ensuring front is always valid unless empty—is called) and can significantly
simplify the creation due to implicit function template instantiation. Recall how compile-time
arguments are often automatically deduced when calling a function. Let's start with the
following code:
to!string(10) == to!(string, int)(10)
65
www.it-ebooks.info
Ranges
Deductions don't happen with the struct constructors, but do happen with helper functions,
as shown in the following code:
struct Test(T) { T t; }
auto test = Test(10); // compile error!
auto test = Test!int(10); // this is needed instead
When you use the auto helper function, you can save the user from having to list out the
exact types by doing it for them just once, as shown in the following code:
auto helper(T)(T t) { return Test!T(t); }
auto test = helper(10); // works!
auto test2 = helper("foo"); // also works!
Helper functions' ability to deduce types simplifies the use of complex ranges considerably.
This, combined with the ability to call the constructor on your terms, makes ranges and helper
functions often go hand-in-hand.
There's more…
Many algorithms from std.algorithm work with our Fibonacci range. Experiment with them
to see the possibilities! It is interesting to note that even complex functions such as std.
algorithm.map and std.algorithm.filter will work with our range, despite the fact
that it is infinite. This is accomplished because they use lazy evaluation. They only evaluate a
result upon request, so passing them an infinite amount of data does not mean they must do
an infinite amount of work.
If you need to pass it to a function that cannot work with infinite data, such as writeln
or our average function, std.range.take can be used to limit the size to something
more manageable.
Creating an output range
As input ranges serve as generators or iterators over data, output ranges serve as sinks for
data. Output ranges may print data, perform one-way algorithms (such as message digests
or hashes), collect data, or whatever else you can achieve with its required put method.
Here, we'll write an output range that prints the arrays it receives out in hexadecimal format.
We'll write sixteen bytes per line, always ending with a new line.
66
www.it-ebooks.info
Chapter 3
How to do it…
Let's create an output range by executing the following steps:
1. Create a struct with a put method that takes the data we want to consume.
As our hex dumper takes any kind of array and doesn't store it, we want in
void[]. The put method will perform the printing we need.
2. Add any data we need to preserve between calls to put. To format our lines,
we'll need to keep a count of how many items we've outputted so far.
3. Add other functions we need, such as destructors, constructors, or other methods.
We want to ensure there's always a new line at the end, so we'll add a writeln
function in the destructor.
4. Test the function with a static assert for isOutputRange for the types it must accept.
The code is as follows:
import std.range;
import std.stdio;
struct HexDumper {
int outputted;
void put(in void[] data) {
foreach(b; cast(const ubyte[]) data) {
writef("%02x ", b);
outputted++;
if(outputted == 16) {
writeln();
outputted = 0;
}
}
}
~this() {
if(outputted)
writeln();
}
}
static assert(isOutputRange!(HexDumper, ubyte));
static assert(isOutputRange!(HexDumper, char));
void main() {
HexDumper output;
output.put("Hello, world! In hex.");
}
67
www.it-ebooks.info
Ranges
Run it and you'll see the following output:
48 65 6c 6c 6f 2c 20 77 6f 72 6c 64 21 20 49 6e
20 68 65 78 2c
How it works…
An output range is much simpler than an input range. It only has one required method: put.
An output range has no required invariant; you are not required to set anything up in the
constructor.
The put method doesn't have to do anything in particular. Its only requirement is to accept a
single argument of the type the range can handle. Typically, the put method does one of the
following three things:
ff
Consume the received data with an algorithm. The std.digest provides output
ranges of this style.
ff
Collect the data, for example, by building an array. The std.array.Appender is
an output range of this style.
ff
Display the received data. This is what our example does.
Using an output range at the core consists only of creating the object and calling the put
method to feed the object with data. Some ranges, such as the std.digest ranges, also
require calls to methods such as start and finish to inform the object that you have
finished the process so that it can perform finalization. In our case, we used the destructor
to finalize.
A destructor is declared in a struct with the syntax ~this() { /* code */ }. The
destructor runs immediately when the struct object goes out of scope.
Destructors are not run when a pointer to a struct goes out of scope,
which means a dynamic array of structs will not necessarily do a clean
up as soon as possible, since a dynamic array uses a pointer.
Destructors are used for clean up—freeing memory, releasing resources, or finalizing an
operation, with the limitation that the object is no longer available.
The std.digest cannot use a destructor as its finish method changes the data and
returns the final result. A destructor cannot return a value; by the time the destructor runs,
the object is no longer available, so it would be impossible to get the results. Our HexDumper
method can output a new line in the destructor, as that does not need to return data.
68
www.it-ebooks.info
Chapter 3
The implementation of our put method loops over the data and writes it in hexadecimal using
std.stdio.writef. The loop includes a cast to const ubyte[] because the function
accepts generic data in the form of in void[]. Any array will implicitly cast to void[],
allowing us to pass anything to the put method, including strings and other arrays. However,
a void[] array is only usable if it is explicitly casted to something else first. We want to print
out the individual bytes, so we casted to const ubyte[]. Then, the foreach loop will go
one byte at a time.
Finally, the writef function works like writefln, but does not print an automatic new line
at the end. The writef function is D's version of the classic C printf function. The first
argument is a format string. Our format string, "%02x", means pad with zeroes to at least
two digits wide, and then put out the argument in hexadecimal, followed by a space.
There's more…
The std.range.put function is a generic function that extends the ability of your output
range to accept data. You only need to implement the core data type your function needs.
Let other transformations such as accepting generic input ranges be handled by the standard
library. An example of this can be seen in the Creating a digest recipe in Chapter 2, Phobos –
The Standard Library.
See also
ff
http://dlang.org/phobos/std_format.html has the documentation on the
writef function's format string
Creating a higher-order range
Analogous to a higher-order function that is a function that returns a function, a higher-order
range is a range that returns another range. This technique allows the lazy evaluation of results
and maximum propagation of range features (for example, random access or bidirectionality) for
best efficiency and type safety as you compose algorithms. Phobos' std.algorithm module
has several higher-order ranges. Here, we'll create a simplified version of std.algorithm.map
to explore the implementation and usage of this flexible concept.
How to do it…
Let's create a higher-order range by executing the following steps:
1. Make a struct template that stores another struct.
2. Do your transformation in relevant places.
3. Forward all possible methods of the input range via static if.
69
www.it-ebooks.info
Ranges
4. Create a helper method to create it conveniently.
5. Use a static assert to ensure it properly fulfils the interfaces.
6. Try using the interfaces!
The code is as follows:
import std.range;
import std.traits;
struct OurMap(alias transformation, T)
if(isInputRange!T)
{
this(T range) {
this.range = range;
}
T range;
// forward infiniteness
static if(isInfinite!T)
enum bool empty = false;
else
@property bool empty() { return range.empty; }
// forward the basic functions
void popFront() { range.popFront(); }
@property auto front() { return transformation(range.front); }
// forward advanced functions, if available…
static if(isForwardRange!T)
@property auto save() {
return OurMap!(transformation, T)(range.save);
}
static if(isBidirectionalRange!T) {
@property auto back() {
return transformation(range.back);
}
void popBack() {
range.popBack();
}
}
static if(isRandomAccessRange!T)
70
www.it-ebooks.info
Chapter 3
auto opIndex(size_t idx) {
return transformation(range[idx]);
}
static if(hasLength!T)
@property auto length() { return range.length; }
}
// check the basics with InputRange from std.range
static assert(isInputRange!(OurMap!((a) => a, InputRange!int)));
// check the forwarding with an array - a fully functional range
static assert(isRandomAccessRange!(OurMap!((a) => a, int[])));
// the helper function
auto map(alias transformation, T)(T t) {
return OurMap!(transformation, T)(t);
}
void main() {
import std.stdio;
// try using it!
foreach(item; map!((a) => a*2)([1,2,3]))
writeln(item);
}
This will print the following output:
2 4 6
How it works…
Here, we created a struct template. It works just like a function template. We write a struct,
add a list of compile-time parameters, we add a constraint (if desired), and then use the
compile-time parameters at any point inside the definition.
One of our compile-time parameters, transformation, is listed as an alias parameter.
The alias parameters in D take some other compile-time entity as argument. It might be a
variable, a function, a template, or any other D symbol. Inside the template, when the alias
parameter is used, it refers directly to the passed-in entity. Unlike a value parameter, which
receives a copy of or reference to a variable's contents, an alias parameter refers to the
variable itself.
If you used reflection capabilities on an alias parameter, it would tell
you about the original item. We use it here to provide maximum speed
access to the function passed by the user. It isn't a function pointer,
which would need to be dereferenced at run time; it is the function
and is called directly by the generated code.
71
www.it-ebooks.info
Ranges
A higher-order range, in the same way as a range-consuming function, takes a range as input
to its constructor and is constrained by the most general type you can handle. A higher-order
range also is a range, so it has the same methods and properties as any other range.
The OurMap struct is a higher-order range that takes a transformation function and an input
range and applies the transformation function to all the data within, upon request (lazily). Using
static if, it presents the same interface as the inner range, ensuring that no capabilities
are lost. The helper functions used in the static if, hasLength, isInfinite, and other
functions are found in the std.range module. If we did a transformation that could no longer
present part of an interface efficiently (filter, for example) we would leave the slower parts
out because efficiency guarantees are an important part of the conceptual range interface.
With filter, random access would be impossible at full speed, since it wouldn't know how many
elements were filtered without looking at all of them. So, even if the input range offered random
access, we couldn't present it in our range. OurMap, however, has all functions that could be
forwarded without a loss of efficiency.
After the struct definition, we used two static asserts to test. When given an input range, we
need to ensure our range is also an input range. As we can forward random access efficiently,
we also ensured that our range correctly implemented a random access range when given an
array (arrays provide random access).
Finally, the helper function is important here to make our range usable without hassle and
thus has the presentable name of map. As functions allow implicit type deduction, the helper
function saves the user the lengthy, repetitive boilerplate of listing the type of each range they
pass to the function when calling the constructor. With the helper function, they can simply
pass it a transformation and some data and it just works.
Putting a range interface on a collection
A range is a view into a collection. Ranges are typically mutable (though the individual
elements may be immutable), so you can advance their position with popFront, but
collections may be immutable. Here, we'll implement a stack data structure that exposes
ranges to inspect it.
Getting ready
First, let's implement our stack type. A stack is a data type that fundamentally only needs two
operations: push and pop. You push data on to the stack, and then pop data off in reverse
order to which it was pushed. Popped data is removed from the stack. If we push 1 and then
2, we should pop 2 then 1. Popping from an empty stack is an error.
72
www.it-ebooks.info
Chapter 3
It is possible to use a built-in array directly as a stack, using slicing and the append operator
(a ~ b), but this is woefully inefficient. Instead, we'll use a static buffer that can grow, if
necessary, with a companion position variable. We can slice into a statically sized buffer to
get started, and if this proves to be too small, we can simply grow the length. This allows the
runtime to be reallocated as required on the garbage collected memory heap—a somewhat
slow but infrequent step. Otherwise, the code is pretty straightforward as shown:
struct Stack(T, size_t expectedMaxSize = 32) {
T[expectedMaxSize] initialBuffer;
T[] buffer;
size_t currentPosition;
bool isEmpty() { return currentPosition == 0; }
void push(T item) {
// initialization
if(buffer is null) buffer = initialBuffer[];
// growth if needed
if(currentPosition == buffer.length) buffer.length += 64;
// the actual push operation
buffer[currentPosition++] = item;
}
T pop() {
if(currentPosition == 0)
throw new Exception("Empty stack cannot pop.");
return buffer[--currentPosition];
}
}
Our stack can be used as shown:
Stack!int stack;
stack.push(1);
stack.push(2);
writeln(stack.pop()); // prints 2
writeln(stack.pop()); // prints 1
assert(stack.isEmpty()); // passes, we've used all the data
Now, let's look at how to put a range interface on it.
How to do it…
Let's put a range interface on a collection by executing the following steps:
1. Write a range by using the data members of your collection to implement the range
primitives you can write efficiently. The range can use private members, but since
it is part of the public interface, be careful not to break encapsulation and expose
something you don't want to commit to.
73
www.it-ebooks.info
Ranges
2. Try to avoid modifying the original data. A data member that keeps the current
position will be useful. For our stack, we'll take a slice into the stack buffer and
keep this private so that our implementation details don't leak out.
3. Make the range's constructor private. The code for the viewing range is as follows:
struct StackView(T) {
// we'll start with the data members and constructors that
peek into the collection
private const(T)[] data; // our read-only view into the data
private this(const(T)[] data) {
this.data = data;
}
// and our range primitives
@property bool empty() const {
return data.length == 0;
}
@property const(T) front() const {
return data[$ - 1]; // the stack pops backwards in the
array
}
void popFront() {
data = data[0 .. $ - 1];
}
}
4. Add a method to the collection that returns the range. The method should have
a relevant name for the kind of range it returns. Inside our Stack struct, add the
following code:
@property auto view() const {
return StackView!T(buffer[0 .. currentPosition]);
}
How it works…
Whenever possible, a range should operate independently of a collection. Ranges provide
their own interface and keep track of their own position. Thus, typically, ranges and collections
are two separate types, but they are located in the same module so that the range can take
advantage of the collection's private implementation for maximum efficiency.
The name of the method the collection provides to return a range can be anything. Here, we're
using view because the range lets us look into the data, nothing more. The analogous range
methods on std.stdio.File are called byLine and byChunk, as they iterate over the file
by lines and chunks, respectively. A collection may have multiple ranges that work with it in
different ways.
74
www.it-ebooks.info
Chapter 3
Many containers use opSlice as the function to get a range, including
built-in arrays, for example, auto viewer = container[]; // calls
opSlice. You may use this too if there's one range that works best for
your entire container.
If it is impossible to advance a range without modifying the underlying collection or stream,
you may still provide a range interface. For example, the ranges on a file must read more
data from the file to get the next lines. This is a necessary cost in that situation. Additional
stream-based functions, such as seeking, are not exposed in the range. While, in theory,
using file seeking and buffering, File.byLine could provide primitives such as save or
bidirectionality, in practice, these would break the efficiency guarantees of the range interface
and thus are not exposed. Stream or collection-specific functions are implemented on their
native type.
With a different implementation of Stack, we may have been forced to use the primitive pop
instead of view into its internal buffer. This would have been acceptable, but not ideal since
pop modifies the underlying data as you look through it.
Creating an input range over a tree structure
Using ranges in cases where you would typically use a recursive function can be a bit tricky. As
the function flow when using ranges is controlled externally, you can't use recursion. Instead,
you must maintain a stack of state inside your range structure. Here, we'll implement an input
range that iterates over a tree structure of arbitrary depth.
Getting ready
First, let's look at the most straightforward way to implement this loop, which is with a
recursive function. This is shown in the following code:
struct TreePart {
string payload;
TreePart[] children;
}
void walkTree(void delegate(string) visitor, TreePart root) {
visitor(root.payload);
foreach(child; root.children)
walkTree(visitor, child);
}
This function lends itself easily to the opApply iteration, which is great for foreach loops,
but internal iteration doesn't interact well with the other algorithms and ranges in Phobos and
other libraries. How can we make a range that does this same iteration?
75
www.it-ebooks.info
Ranges
The first thing to observe is that a recursive function makes use of stack space to store local
variables, including function arguments. We'll need a stack too. Phobos doesn't yet have a
stack container, so let's reuse the Stack struct we wrote in the previous recipe.
How to do it…
Let's create an input range over a structure tree by executing the following steps:
1. Write an input range skeleton with the three required members.
2. Look at the recursive implementation; which variables do we need? There are
two variables: the root TreePart and the iteration position on children. The
visitor function isn't explicitly needed, since our range will be usable in a
foreach loop instead.
3. Create an inner struct with the required variables.
4. Add two members to our range: a stack of the inner struct and a current
variable. These represent the local variables and call the stack of the recursive
implementation.
5. Write our constructor. Take the argument the recursive function needed to get
started and also set up local variables.
6. Implement front by looking at where the visitor was called in the recursive
implementation. As visitor was only called on the current root's payload,
we'll return current.root.payload as front here too.
7.
Implement empty by determining the position where the recursive implementation
would return. It returns when the loop is completed, which happens when the current
index is equal to the length of the children. We also aren't complete until all the child
calls have completed, which happens when the stack is empty.
8. Implement popFront. What happens after each call to the visitor in the recursive
implementation? It increments the child position to continue the foreach loop. If the
loop is empty, the function returns, and if the next step is also empty, it continues to
return. If not, we proceed into the child's subtree. Calling a function means pushing
the current state onto the stack and resetting the variables. Let's do exactly this.
9. Finally, put in the usual tests and try using it.
The code is as follows:
struct TreeVisitor { // step one, the skeleton
// steps two and three, struct with our variables
struct Position {
TreePart root;
int childPosition;
}
76
www.it-ebooks.info
Chapter 3
// step four, create the required locals and stack
Stack!(Position) stack;
Position current;
// step five, constructor
this(TreePart root) {
current.root = root;
// we use childPosition == -1 to indicate that
// we haven't entered the child loop yet
current.childPosition = -1;
}
// step six
@property string front() {
return current.root.payload;
}
// step seven
@property bool empty() {
return
// if we're at the end of the children…
current.childPosition + 1 == current.root.children.length
// …and the stack is empty, we're done
&& stack.isEmpty;
}
// step eight
void popFront() {
current.childPosition++; // advance position
if(current.childPosition == current.root.children.length) {
// the foreach loop would have just returned, so we
// start walking back up the tree…
current = stack.pop();
// picking up where we left off, if possible
if(!empty)
popFront();
} else {
// we're still inside the loop,
// proceed deeper into the tree
stack.push(current);
// and reset our variables for the next part
current.root = current.root.children[current.
childPosition];
77
www.it-ebooks.info
Ranges
current.childPosition = -1;
}
}
}
// step nine
static assert(isInputRange!TreeVisitor);
void main() {
import std.stdio;
void visitor(string part) {
writeln(part);
}
// initialize our test tree
TreePart root;
root.payload= "one";
root.children = [TreePart("two", [TreePart("three", null)]),
TreePart("three", null)];
// first, walk it recursively
walkTree(&visitor, root);
writeln("****"); // separator for easy viewing
// then use our range to do the same thing
foreach(part; TreeVisitor(root))
visitor(part);
}
The output will be as follows:
one
two
three
****
one
two
three
Both the methods matched and showed the entire structure. The range works!
How it works…
The code is fairly straightforward once you have an approach. The local variables and internal
call stack of the recursive function translated directly into the struct variables and stack member
of our range. All we did is change the internal iteration to external iteration. This same process
could be used for almost any function.
78
www.it-ebooks.info
Chapter 3
There's more…
D also supports internal iteration with the foreach syntax. This is done by providing a
method called opApply in your object. It works in the same way as the visitor function
we wrote. If we add this function to TreePart, you will have the following code:
int opApply(int delegate(string) visitor) {
if(auto result = visitor(this)) return result;
foreach(child; this.children)
if(auto result = child.opApply(visitor))
return result;
return 0;
}
Then, we'd be able to run foreach(part; root) writeln(part); and once again
repeat our result from the preceding code.
The way opApply works is the code the user puts in the foreach body is passed to you as
a delegate, with the arguments being the loop variables. The opApply object's job is to loop
what it needs to and call the delegate for each item.
The compiler-provided delegate returns int to signify if and how the user code tried to break
out of the loop. Your opApply function must always test this value, and immediately return
it unmodified if it is nonzero. When you finish iterating, it always return zero. Otherwise, this
code is the same as the recursive implementation. Use this in place of an explicitly passed
starting parameter.
The downside of the opApply iteration is that it doesn't interact well with external tools such
as ranges and algorithms in Phobos and other libraries.
Using runtime polymorphic (class) ranges
The std.range module also provides interfaces for many of the range types. These are
slower than using ranges with structs and templates directly, but have the advantage of
using a single type for any object that matches the interface, This means that you can swap
out the range implementation at runtime. It also has the advantage of providing a common
application binary interface for cases such as class interfaces and building DLLs.
How to do it…
Let's make use of runtime polymorphic ranges by executing the following steps:
1. Use the inputRangeObject or outputRangeObject functions, passing an
instance of any range to them.
79
www.it-ebooks.info
Ranges
2. Store and use the returned object by using the InputRange!type or
OutputRange!type interfaces. The type there is the type returned by front.
3. You can pass it to a function by using the element type and the interface, or cast it
to a more specific range type (for example, cast(RandomAccessRange)) if more
capabilities are needed.
4. Remember to check for null whenever casting class objects.
The code is as follows:
import std.range;
InputRange!int myRange = inputRangeObject([1, 2, 3]);
foreach(int item; myRange) /* use item */
How it works…
The range interfaces are parameterized on the type of front, but otherwise work like any
other class hierarchy. The implementation of the interface is automatically generated by
inputRangeObject or outputRangeObject using reflection and code generation to
build the most specific object possible from the given type.
As interfaces use virtual functions, including for all the (usually cheap) range properties,
there's a performance penalty to polymorphic ranges. Typically, runtime polymorphic ranges
run at about half the speed as their compile-time counterparts, and thus they should be
avoided unless your use case requires them.
Storing a range as a data member
Storing a range instance in a non-template class or struct can be difficult because the type isn't
always obvious and is sometimes completely unavailable. Ranges are typically for temporary
use, and thus they don't need to be stored for long and are usually eligible for auto type
deduction, but if you do need to store it, there are two options.
How to do it…
We can store a range as a data member by executing the following steps:
1. The first option is to use one of the object-oriented wrappers as follows:
import std.range;
InputRange!int rangeObj;
rangeObj = inputRangeObject(your_range);
Remember, there is a performance penalty for this method, but it does have the
advantage of being reassignable by different types of ranges as needed.
80
www.it-ebooks.info
Chapter 3
2. Alternatively, we can use the typeof operator to get the range type out of the
function, as shown in the following code:
typeof(function_that_returns_a_range) rangeObj;
The code is as follows:
import std.algorithm;
typeof(filter!((a) > 0)([1,2,3])) filteredRange; // declare it
this() {
filteredRange = filter!((a) > 0)([1, 2, 3]); // initialize it
}
How it works…
The typeof operator can be used anywhere in D where you need a type. When passed a
variable or expression, it returns the static (compile-time) type of that variable or expression.
When passed a function call, it returns the return type of the function. This can be used as
a tool in compile-time reflection, for convenience with complex types, or generic code.
The typeof operator works even when the type is not otherwise available, such as a struct in
a module you haven't imported, or if the type has no name. In Phobos, many range functions
return nested structs, as shown in the following code:
auto hiddenType() {
struct Foo { }
return Foo();
}
auto test = hiddenType(); /* test has a type whose definition is
not available outside the hiddenType function. Calling it Foo or
hiddenType.Foo will not work because types declared inside
functions are not available outside. */
This is sometimes called a Voldemort type, referencing a fictional character whose name is
not allowed to be spoken.
When using auto type deduction, everything just works; however, if you need to declare a
variable of that type before it is used, this presents a problem. The typeof operator is a
solution, as shown:
typeof(hiddenType()) test = hiddenType(); // works!
As ranges often have complex or hidden type names, typeof may be the only way to refer to
them without an auto type deduced variable.
81
www.it-ebooks.info
Ranges
Sorting ranges efficiently
Phobos' std.algorthm includes sorting algorithms. Let's look at how they are used, what
requirements they have, and the dangers of trying to implement range primitives without
minding their efficiency requirements.
Getting ready
Let's make a linked list container that exposes an appropriate view, a forward range, and an
inappropriate view, a random access range that doesn't meet its efficiency requirements. A
singly-linked list can only efficiently implement forward iteration due to its nature; the only tool
it has is a pointer to the next element. Implementing any other range primitives will require
loops, which is not recommended. Here, however, we'll implement a fully functional range,
with assignable elements, length, bidirectional iteration, random access, and even slicing on
top of a linked list to see the negative effects this has when we try to use it. The code for this
can be found at Chapter03\Code\03 of your code bundle.
We'll also create a skeleton main program that initializes the list. You can find the code for this
at Chapter03\Code\03 of your code bundle.
How to do it…
We're going to both sort and benchmark this program.
To sort
Let's sort ranges by executing the following steps:
1. Import std.algorithm.
2. Determine the predicate you need. The default is (a, b) => a < b, which results in
an ascending order when the sorting is complete (for example, [1,2,3]). If you want
ascending order, you don't have to specify a predicate at all. If you need descending
order, you can pass a greater-than predicate instead, as shown in the following line
of code:
auto sorted = sort!((a, b) => a > b)([1,2,3]); // results: [3,2,1]
3. When doing string comparisons, the functions std.string.cmp (case-sensitive) or
std.string.icmp (case-insensitive) may be used, as is done in the following code:
auto sorted = sort!((a, b) => cmp(a, b) < 0)(["b", "c", "a"]); //
results: a, b, c
82
www.it-ebooks.info
Chapter 3
4. Your predicate may also be used to sort based on a struct member, as shown in
the following code:
auto sorted = sort!((a, b) => a.value < b.value)(structArray);
5. Pass the predicate as the first compile-time argument. The range you want to sort is
passed as the runtime argument.
6. If your range is not already sortable (if it doesn't provide the necessary capabilities),
you can convert it to an array using the array function from std.range, as shown in
the following code:
auto sorted = sort(fibanocci().take(10)); // won't compile, not
enough capabilities
auto sorted = sort(fibanocci().take(10).array); // ok, good
7.
Use the sorted range. It has a unique type from the input to signify that it has
been successfully sorted. Other algorithms may use this knowledge to increase
their efficiency.
To benchmark
Let's sort objects using benchmark by executing the following steps:
1. Put our range and skeleton main function from the Getting ready section of this
recipe into a file.
2. Use std.datetime.benchmark to test the sorting of an array from the appropriate
walker against the slow walker and print the results at the end of main. The code is
as follows:
auto result = benchmark!(
{
auto sorted = sort(list.walker.array);
{
auto sorted = sort(list.slowWalker);
)(100);
writefln("Emulation resulted in a sort
that was %d times slower.",
result[1].hnsecs / result[0].hnsecs);
},
}
3. Run it. Your results may vary slightly, but you'll see that the emulated, inappropriate
range functions are consistently slower. The following is the output:
Emulation resulted in a sort that was 16 times slower.
4. Tweak the size of the list by changing the initialization loop. Instead of 1000 entries,
try 2000 entries. Also, try to compile the program with inlining and optimization
turned on (dmd –inline –O yourfile.d) and see the difference. The emulated
version will be consistently slower, and as the list becomes longer, the gap will widen.
83
www.it-ebooks.info
Ranges
On my computer, a growing list size led to a growing slowdown factor, as shown in the
following table:
List size
Slowdown factor
500
13
1000
16
2000
29
4000
73
How it works…
The interface to Phobos' main sort function hides much of the complexity of the
implementation. As long as we follow the efficiency rules when writing our ranges, things either
just work or fail, telling us we must call an array in the range before we can sort it. Building an
array has a cost in both time and memory, which is why it isn't performed automatically (std.
algorithm prefers lazy evaluation whenever possible for best speed and minimum memory
use). However, as you can see in our benchmark, building an array is much cheaper than
emulating unsupported functions.
The sort algorithms require a full-featured range and will modify the range you pass to it
instead of allocating memory for a copy. Thus, the range you pass to it must support random
access, slicing, and either assignable or swappable elements. The prime example of such
a range is a mutable array. This is why it is often necessary to use the array function when
passing data to sort.
Our linked list code used static if with a compile-time parameter as a configuration tool.
The implemented functions include opSlice and properties that return ref. The ref value
can only be used on function return values or parameters. Assignments to a ref value are
forwarded to the original item. The opSlice function is called when the user tries to use the
slice syntax: obj[start .. end].
Inside the beSlow condition, we broke the main rule of implementing range functions: avoid
loops. Here, we see the consequences of breaking that rule; it ruined algorithm restrictions
and optimizations, resulting in code that performs very poorly. If we follow the rules, we at
least know where a performance problem will arise and can handle it gracefully.
For ranges that do not implement the fast length property, std.
algorithm includes a function called walkLength that determines
the length by looping through all items (like we did in the slow length
property). The walkLength function has a longer name than length
precisely to warn you that it is a slower function, running in O(n) (linear
with length) time instead of O(1) (constant) time. Slower functions are
OK, they just need to be explicit so that the user isn't surprised.
84
www.it-ebooks.info
Chapter 3
See also
ff
The std.algorithm module also includes other sorting algorithms that may fit a
specific use case better than the generic (automatically specialized) function. See
the documentation at http://dlang.org/phobos/std_algorithm.html
for more information.
Searching ranges
Phobos' std.algorithm module includes search functions that can work on any ranges.
It automatically specializes based on type information. Searching a sorted range is faster
than an unsorted range.
How to do it…
Searching has a number of different scenarios, each with different methods:
ff
ff
ff
ff
ff
ff
If you want to know if something is present, use canFind.
Finding an item generically can be done with the find function. It returns the
remainder of the range, with the located item at the front.
When searching for a substring in a string, you can use haystack.
find(boyerMooreFinder(needle)). This uses the Boyer-Moore algorithm
which may give better performance.
If you want to know the index where the item is located, use countUntil. It returns
a numeric index into the range, just like the indexOf function for strings.
Each find function can take a predicate to customize the search operation.
When you know your range is sorted but the type doesn't already prove it, you
may call assumeSorted on it before passing it to the search functions. The
assumeSorted function has no runtime cost; it only adds information to the
type that is used for compile-time specialization.
How it works…
The search functions in Phobos make use of the ranges' available features to choose
good-fit algorithms. Pass them efficiently implemented ranges with accurate capabilities
to get best performance.
The find function returns the remainder of the data because this is the most general behavior;
it doesn't need random access, like returning an index, and doesn't require an additional
function if you are implementing a function to split a range on a given condition. The find
function can work with a basic input range, serving as a foundation to implement whatever you
need on top of it, and it will transparently optimize to use more range features if available.
85
www.it-ebooks.info
Ranges
Using functional tools to query data
The std.algorithm module includes a variety of higher-order ranges that provide tools
similar to functional tools. We've already used many of them in this chapter. Here, we'll put
it all together to see how D code can be similar to a SQL query.
A SQL query is as follows:
SELECT id, name, strcat("Title: ", title)
FROM users
WHERE name LIKE 'A%'
ORDER BY id DESC
LIMIT 5;
How would we express something similar in D?
Getting ready
Let's create a struct to mimic the data table and make an array with the some demo
information. The code is as follows:
struct User {
int id;
string name;
string title;
}
User[] users;
users ~= User(1, "Alice", "President");
users ~= User(2, "Bob", "Manager");
users ~= User(3, "Claire", "Programmer");
How to do it…
Let's use functional tools to query data by executing the following steps:
1. Import std.algorithm.
2. Use sort to translate the ORDER BY clause. If your dataset is large, you may wish to
sort it at the end. This will likely require a call to an array, but it will only sort the result
set instead of everything. With a small dataset, sorting early saves an array allocation.
3. Use filter to implement the WHERE clause.
4. Use map to implement the field selection and functions. The std.typecons.tuple
module can also be used to return specific fields.
86
www.it-ebooks.info
Chapter 3
5. Use std.range.take to implement the LIMIT clause.
6. Put it all together and print the result.
The code is as follows:
import std.algorithm;
import std.range;
import std.typecons : tuple; // we use this below
auto resultSet = users.
sort!((a, b) => a.id > b.id). // the ORDER BY clause
filter!((item) => item.name.startsWith("A")).
// the WHERE clause
take(5).
map!((item) => tuple(item.id, item.name,
"Title: " ~ item.title)); // the field list and transformations
import std.stdio;
foreach(line; resultSet)
writeln(line[0], " ", line[1], " ", line[2]);
It will print the following output:
1 Alice Title: President
How it works…
Many SQL operations or list comprehensions can be expressed in D using some building
blocks from std.algorithm. They all work generally the same way; they take a predicate as
a compile-time argument. The predicate is passed one or two items at a time and you perform
a check or transformation on it. Chaining together functions with the dot syntax, like we did
here, is possible thanks to uniform function call syntax. It could also be rewritten as take(5,
filter!pred(map!pred(users))). It depends on author's preference, as both styles
work exactly the same way.
It is important to remember that all std.algorithm higher-order ranges are evaluated lazily.
This means no computations, such as looping over or printing, are actually performed until
they are required. Writing code using filter, take, map, and many other functions is akin
to preparing a query. To execute it, you may print or loop the result, or if you want to save it
to an array for use later, simply call .array at the end.
87
www.it-ebooks.info
Ranges
There's more…
The std.algorithm module also includes other classic functions, such as reduce. It works
the same way as the others.
D has a feature called pure functions, which we'll look at in more depth later in the book.
The functions in std.algorithm are conditionally pure, which means they can be used
in pure functions if and only if the predicates you pass are also pure. With lambda functions,
like we've been using here, the compiler will often automatically deduce this for you. If you
use other functions you define as predicates and want to use it in a pure function, be sure
to mark them pure as well.
See also
ff
Visit http://dconf.org/2013/talks/wilson.html where Adam Wilson's
DConf 2013 talk on porting C# to D showed how to translate some real-world
LINQ code to D
88
www.it-ebooks.info
4
Integration
In this chapter, we will look at how to integrate D with other environments and programming
languages. We'll learn about the following:
ff
Calling the Windows API functions
ff
Removing the Windows console
ff
Making Linux system calls
ff
Writing part of a C program in D
ff
Interfacing with C++
ff
Using structs to mimic the C++ object structure
ff
Communicating with external processes
ff
Communicating with a dynamic scripting language
ff
Using Windows' COM
Introduction
D has direct access to functions that use the C, Windows, or C++ conventions as well as
the C++ interfaces and low-level control over memory layouts. D also has syntax sugar that
can make accessing dynamic interfaces easy and beautiful. This allows a high degree of
interoperability with almost any environment. Generally, if you can integrate something
with a C program, you can also integrate it with D.
www.it-ebooks.info
Integration
Calling the Windows API functions
The Windows API provides a rich set of functionalities for applications. The entire Windows
API is directly accessible from D. Here, we'll demonstrate this by popping up an information
message box and a file chooser dialog box using the standard Win32 API functions.
Getting ready
First, make sure you have correctly installed the DMD compiler for Windows. If you want
to build 64-bit applications, you must download and install Visual Studio (any version that
supports C++ development, including Express) first because dmd on 64-bit Windows uses
the Microsoft linker and libraries for better cross-language compatibility.
You'll also want to create or download the Windows API bindings since the Windows bindings
that come with dmd are quite incomplete. You can create your own, as required, by copying
and pasting the function and struct prototypes from MSDN.
If you are on 32 bit, you might also want to get the newer .lib files from Microsoft and
convert them to the OMF format that the 32-bit dmd uses. This often isn't necessary, but if
you want to use features from Windows Vista and newer versions, it likely will be. To do this,
first download the Windows SDK from http://www.microsoft.com/en-us/download/
details.aspx?id=8279, and then get the Basic Utilities Package (BUP) from http://
digitalmars.com/ (you can purchase it for $15). Use coffimplib from the BUP on the
.lib files from the SDK to generate the OMF-format libraries for dmd.
How to do it…
Let's call the Windows API functions by executing the following steps:
1. Import core.sys.windows.windows.
2. Create an OPENFILENAME structure and fill in the required fields.
3. Call GetOpenFileName to pop up the file dialog.
4. Use the MessageBox function to give feedback to the user.
5. Link the file with comdlg32.lib by adding it to the dmd command line.
The code is as follows:
import core.sys.windows.window;
void main() {
wchar[256] filenameBuffer;
filenameBuffer[0] = 0;
OPENFILENAMEW info;
90
www.it-ebooks.info
Chapter 4
info.lStructSize = OPENFILENAMEW.sizeof;
info.lpstrFilter =
"Text Files\0*.txt\0ImageFiles\0*.png;*.jpg\0\0"w.ptr;
info.lpstrFile = filenameBuffer.ptr;
info.nMaxFile = filenameBuffer.length;
if(GetOpenFileNameW(&info)) {
MessageBoxW(null, info.lpstrFile,
"You picked"w.ptr, 0);
}
}
How it works…
D understands the Windows calling convention. Calling any Windows function is possible by
simply declaring the function prototype with extern(Windows).
You may see extern(System) in the preceding code. The
extern(System) function signifies the calling convention
of system libraries on the current platform. In practice, this
means extern(Windows) will be used on 32-bit Windows
and extern(C) will be used everywhere else.
Windows functions that deal with strings come in two variants: ASCII and Unicode. These are
denoted by the suffix A or W on the function names. In C and some D bindings, a UNICODE
macro aliases the names to the appropriate suffix as needed. Here, we called the W functions
explicitly for maximum compatibility and demonstration purposes.
MSDN often references TCHAR, TSTR, and so on. Like with the function prototypes, the meaning
of TCHAR is different if you are using Unicode or ASCII macros. With ASCII, it should be char in
D, whereas with Unicode, it should be wchar.
As D strings are Unicode, it is best to use the W versions of functions (it will let you pass strings
to the A function, and it will work if the strings are all ASCII; however, if they include any nonASCII characters, the string will be corrupted.) D has built-in support for wide-character strings
(UTF-16) that can be used on Windows. The UTF-16 character type is wchar. An immutable
array of wchar types is also called wstring, analogously to how arrays of UTF-8 characters are
called string literals. The wstring literals are denoted with the w suffix, for example, this is a
wstring literal, w. The wstring literals, like the string literals, are zero terminated. However,
unlike string literals, they do not automatically convert to pointers; so, to pass a wstring
literal to a Windows function, use the .ptr property. To pass a non-literal string to a Windows
function, use std.utf.toUTFz!(wchar*)(your_string). This works both for wstring
literals and UTF-8 strings—it appends the zero, converting the format only if necessary.
91
www.it-ebooks.info
Integration
The GetOpenFileName uses a common pattern in Windows programming; it takes a struct,
which knows its own size, as an argument. In C or C++, declaring these structs would typically
be followed with a call to memset or ZeroMemory. This is not normally necessary in D because
D, unlike C, initializes variables automatically. However, it is still important to initialize any static
char/wchar array or float members since D initializes them by default to invalid values
instead of zero (it does this in such a way that the use of an uninitialized value triggers an error
as soon as possible). This is why we set filenameBuffer[0] = 0 to ensure it is properly
terminated as an empty string. Pointers to strings and floats are by default initialized to null
and may not have to be explicitly set.
See also
ff
Several Windows programming samples translated to D at https://github.com/
AndrejMitrovic/DWinProgramming
ff
Bindings to the Windows API to replace and expand the minimal set found in core.
sys.windows.windows can be found at http://dsource.org/projects/
bindings/wiki/WindowsApi
Removing the Windows console
When you write a GUI program on Windows, you'll often want to suppress the automatic
allocation of a console window while building the release executable.
How to do it…
Let's remove the Windows console by executing the following steps:
1. Write your program normally.
2. While compiling, pass –L/subsystem:windows to dmd.
How it works…
A D program compiles the program to an .exe file, which means it can use all the same
linker capabilities as a program in C, including subsystems, 16-bit stubs (though D itself
cannot be compiled to 16 bits), resources, and manifests.
The –L option of dmd forwards the given option to the linker. This can be used to pass any
command to the linker, including the platform-specific ones, such as /subsystem, seen
here. By choosing the Windows subsystem, the operating system will not allocate a console.
92
www.it-ebooks.info
Chapter 4
There's more…
It is also possible to write a WinMain function in D. If you write WinMain instead of main, the
linker will automatically mark it as using the Windows subsystem, without having to use the /
subsystem switch. If you do, be sure to call Runtime.initalize() before doing anything.
However, it is generally better to write programs with a normal main function and use the
linker switch since this ensures the runtime functions are always called correctly without
the boilerplate. If you need the module handle or command line in a main function, use
GetModuleHandle(null) and GetCommandLineW, respectively.
See also
ff
The dmd ZIP file that contains dmd2/samples/d/winsamp.d has a sample of how
to write a WinMain function
Making Linux system calls
Linux system calls are typically performed via a C interface. D can call these just like any
other C library functions (see the Using external libraries recipe in Chapter 1, Core Tasks).
Here, we'll write a "Hello World" program using the standard C function for the system call,
and say "hello" using inline assembly to demonstrate how that can be done as well.
How to do it…
Making Linux system calls with inline assembly is quite different than making them with
the C interface. First, we will look at how it is done with the function, then we'll translate
it to the assembly.
With the C interface
Let's make Linux system calls by executing the following steps:
1. Import the appropriate header from the core.sys.posix package, or if it is not
present, write the prototype with extern(C).
2. Call the function like you would call any other function.
The code is as follows:
import core.sys.posix.unistd; // analogous to #include <unistd.h>
string hello = "Hello, world!";
write(1 /* stdout file descriptor */, hello.ptr, hello.length);
93
www.it-ebooks.info
Integration
With inline assembly
1. Decompose the arrays you need into separate variables for their pointer and lengths.
2. Use version blocks for each supported architecture and OS.
3. Write the code using the Linux reference documentation for the appropriate registers
and numerical arguments.
4. End each group of versions with static assert(0) to trigger a compile error on
unsupported systems.
The code is follows:
string hello = "Hello, world!";
auto hptr = hello.ptr;
auto hlength = hello.length;
version(linux) {
version(D_InlineAsm_X86)
asm {
mov ECX, hptr;
mov EDX, hlength;
mov EBX, 1; // stdout
mov EAX, 4; // sys_write
int 0x80; // perform the operation
} else version(D_InlineAsm_X86_64)
asm {
mov RSI, hptr;
mov RDX, hlength;
mov RDI, 1; // stdout
mov RAX, 1; // sys_write
syscall; // perform the operation
} else static assert(0, "Unsupported Processor for inline asm");
} else static assert(0, "Unsupported OS for this function");
When you run the program, it will print Hello, world!.
Inline assembly with the syntax given here only works with the DMD and
1DC compilers on x86 processors (32 or 64 bit). The GDC compiler has
different and changing support for the assembly language.
How it works…
Standardized C headers are available in druntime under the core package. The core.stdc.*
package has the standard C library headers. The core.sys module has standard headers for
the operating system.
94
www.it-ebooks.info
Chapter 4
The following table has some illustrative examples of a header file and its corresponding D
module names:
C header
#include <stdio.h>
#include <stdlib.h>
#include <unistd.h> /* Unix header */
#include <sys/socket.h>
#include <epoll.h> /* Linux specific */
D module
import core.stdc.stdio;
import core.stdc.stdlib;
import core.sys.posix.
unistd;
import core.sys.posix.
sys.socket;
import core.sys.linux.
epoll;
If you are unsure whether a header is standardized in Posix or is specific to a particular
system such as Linux, you can check the man page for a Conforming to section, or simply
try to import the module from core.sys.posix first, and if that doesn't work, try again
with core.sys.linux.
If you need a function that is not provided in any core module, you can still call it by copying
the function and struct prototypes into your D program, marking them extern(C), as shown
in the following code:
/* import the basic type definitions */
import core.sys.posix.sys.types;
/* Copy the function prototype from the system documentation */
extern(C) ssize_t write(int fd, const void* buf, size_t count);
// we can now call write!
D also has built-in support for the inline assembly code. While the main compilers currently
have differing support for inline assembly, here, we're using the syntax for the DMD compiler,
which is based on the Intel assembly syntax.
A block of assembly code is denoted by the asm { } structure. Inside, the syntax remains similar
to D—comments remain in the same D forms, instructions must be separated by semicolons,
and D identifiers are still usable. Unlike most assemblers, D's inline asm syntax is case sensitive.
Instruction names must be in lowercase and register names must be in uppercase.
The assembly language code is rarely portable, so it is also advisable to always put asm blocks
inside version blocks, and be as specific as you can be, at least based on the processor
family. Here, we broke it down by the operating system, then by 32-bit and 64-bit asm on the x86
processor because the code needs to be different in each case. The else static assert
function at the end of each group of versions ensures that an unimplemented configuration
results in a compilation error rather than the silently buggy or incomplete code. Any time you
use version statements, consider terminating the group with else static assert(0,
"message") for future maintenance.
95
www.it-ebooks.info
Integration
See also
ff
Go to http://dlang.org/iasm.html to read the inline assembly
documentation for DMD
ff
Additional documentation for using inline assembly with the LDC compiler
at http://wiki.dlang.org/LDC_inline_assembly_expressions
ff
Search the Web for a Linux system call reference to learn more about the
numbers and arguments of the available functions
Writing part of a C program in D
C and D can link together. This lets us use C functions in D and also lets us use D functions
from C. Here, we'll integrate some of the code in D into a C project. This knowledge is also
useful for writing callback functions in D while using a C library from the D code, and can be
used for the JNI or P/Invoke code in Java and .NET as well. Thanks to extern(C), anything
that can interface with C can also interface with D.
Getting ready
If you are using DMD on 32-bit Windows, you'll also want to get DMC for Windows—the Digital
Mars C compiler. DMC is automatically installed by the D installer. If you are using DMD from
the ZIP file distribution, you can get DMC as a ZIP file from http://digitalmars.com/.
How to do it…
Let's execute the following steps to write a part of a C program in D:
1. Before calling any D function from C, be sure to call rt_init(). You can declare this
to be extern int rt_init();. Don't forget to check the return value—it returns 0
if initialization fails.
2. In your D file, write the functions you want as extern(C), taking and returning only
the types known to C (for example, integers, structs, pointers, and so on) and not
throwing exceptions back to C. The D program can also call functions from the C
program by declaring the function prototypes with extern(C).
3. In the C file, copy the function prototype of the D functions and call them.
4. Call rt_term() before terminating so that you can terminate the D runtime.
5. Compile and link the programs. Don't forget to link the Phobos library as well.
96
www.it-ebooks.info
Chapter 4
The following is our C program, program.c:
#include <stdio.h>
int rt_init(); // prototypes of standard D runtime functions
void rt_term();
void helloD(); // the prototype of own our D function
void helloC() { // an existing C function we'll call from D
printf("Hello from C!\n");
}
int main() {
if(!rt_init()) { // init the D runtime
fprintf(stderr, "D rt init failed.\n");
return 1;
}
helloD(); // call the D function
rt_term(); // end the D runtime
return 0;
}
The following is our D file, test.d:
import std.stdio, core.stdc.stdio : stderr;
extern(C) void helloC() nothrow; // a function from C
extern(C)
void helloD() nothrow {
helloC();
try {
writeln("hello from D!");
} catch(Throwable t) {
fprintf(stderr, "writeln threw an exception.\n");
}
}
Compile the program on 32-bit Windows system using the following commands:
dmc -c program.c
dmd test.d program.obj phobos.lib
97
www.it-ebooks.info
Integration
Compile the program on Linux using the following commands:
gcc –c program.c
dmd test.d program.o
You may also choose to compile the D file separately with dmd –c test.d, then link both
object files together in a separate step. This method may be easier to integrate into a more
complex C program build process. Add the D object files in the same way you add any other C
object file, and don't forget to link them in the Phobos library as well. You may have to add the
location of the Phobos library to your linker command line; for example, adding the –Lpath/
to/dmd2/linux/bin32/lib argument to ld on Linux.
How it works…
D functions with the extern(C) linkage follow the C calling convention, and D compilers
produce standard object files—just like C compilers. This works both ways; D can access C
functions and C can access D functions. While integrating D into a C program, it is important
to initialize the D runtime before calling most D functions. The druntime library provides the
C interface functions, rt_init and rt_term, to do this for you—just be sure to call them and
check for failure, and the D runtime library will handle the other details of its initialization.
D and C cannot read each other's source code directly. This makes it necessary to reproduce
the data structure and function prototype declarations in both languages. Often, this isn't
much work, but care is required to ensure they remain in sync. If the definitions get out of
sync, the code may still compile, but then crash at runtime due to an inconsistency between
over what data goes where. This process can often be automated in both directions; dstep
is a utility that reads C header files and generates a matching D interface module, and dtoh
reads a D file and generates a corresponding C header file.
The D language will allow extern(C) functions to do everything any other function can do,
and in many cases, you can make them work in C as well. However, it is recommended to
follow the following rules while interfacing with C:
ff
Don't pass immutable data to or from a C program because C cannot guarantee
that it will not be changed. If immutable data is changed, the result is undefined
behavior in D.
ff
Don't throw exceptions of any type that pass through the C program. The C compiler
knows nothing about exceptions and may not generate the correct code to continue
stack unwinding—the exception may be silently lost and the C code almost certainly
is not exception-safe, putting it at risk for resource leaks even if the code does
work. Note that D's nothrow annotation does not apply to unrecoverable errors
that, nevertheless, use the exception mechanism. So, it is important to wrap
the outermost interface functions in a try/catch block, catching the generic
Throwable superclass to cover both errors and exceptions.
98
www.it-ebooks.info
Chapter 4
ff
Don't pass the garbage collector (GC) allocated data that may be stored by the C code.
If no reference exists on the D heap—even though C might still hold a reference to the
object—the garbage collector will consider it unused and may free it. If your C program
stores any pointers, be sure the resource is managed in a way that is compatible with C;
for example, passing pointers to buffers created with malloc to receive data instead of
storing the dynamic array pointers in D).
Once, I was writing an event loop program using the self-pipe technique.
The pipe pair was created with an operating system function. The event
loop wrote pointers to event structures of the pipe and read them back
out on the other side. Under heavier use, it started to crash at random.
The reason was that for the split second between writing an event and
reading it back out, the garbage collector ran and found no reference to
the event object (since the only existing reference was the pointer sitting
in the operating system's pipe buffer), thus freeing it. I fixed the problem
by allocating the event objects with malloc and freeing them with free
when they were consumed, instead of relying on the garbage collector.
To help with the passing data, it is useful to pass pointer+length pairs instead of arrays
and pointers to structs instead of classes, similar to how you'd write the functions in C.
Internally, your D program may use any features, just mind the interface.
See also
ff
For the source of the dstep program, refer to http://github.com/Jacobcarlborg/dstep
ff
For the source of the dtoh program, refer to http://github.com/adamdruppe/
dtoh
Interfacing with C++
If you have an existing C++ program and want to start using D, it probably isn't practical to
rewrite the entire application. However, it may be possible to start writing new components
of the application in D. Let's look at how this can be done.
Getting ready
Review how D interfaces with C. Any extern functions of C work exactly the same way in
C++. You'll also need to get the appropriate C++ compiler. On 32-bit Windows, you'll need
the Digital Mars C compiler to pair with DMD. On 64-bit Windows, the Microsoft Visual C++
compiler will work. On Linux, use g++.
99
www.it-ebooks.info
Integration
How to do it …
Let's interface D with C++ by executing the following steps:
1. Use C++ functions by marking them extern(C++); otherwise, use them in the same
way as you use C functions. You can also write a D function with the extern(C++)
linkage and use it from C++ by writing the prototype.
2. Use interfaces marked extern(C++) to access objects or to implement objects.
Any virtual function in the C++ class should have a corresponding method in the D
interface, appearing in exactly the same order. If possible, use pure virtual functions
in an abstract class in C++; this will exactly match the D interface. If not, you can
make it work with a careful listing of all virtual functions.
3. If you implement a C++ object in D, inherit it from the interface and mark each method
extern(C++). If you had to define unusable entries to make the virtual table match
(for example, a virtual destructor), implement these as do-nothing methods.
4. Pass object references between the languages and access the methods. In addition,
create factory and destruction functions that deal with the interface. Manage all
memory that is stored across language boundaries manually. Failure to do this
may cause an object to get accidentally garbage collected while being used by
the C++ code.
The following is some example code. First, we'll look at the C++ code. We won't use header
files for brevity:
#include<stdio.h>
#include<stdlib.h>
// our C++ class
class Animal {
public:
// ideally, we would prefer to use classes
// with no member variables and no additional
// functions. D and C++ don't understand each
// other's constructors and destructors and will
// have different ideas as to where members will be found.
// But, perfection may not be realistic with
// existing code, so we'll see how to possibly work with it.
int member; // we must not use this on a D object *at all*
virtual ~Animal() {}
// this is what we really want: abstract virtual
100
www.it-ebooks.info
Chapter 4
// functions we can implement with an interface.
virtual void speak() = 0;
};
// A concrete C++ class we'll use in D via the interface
class Dog : public Animal {
void speak() {
printf("Woof\n");
}
};
// Our
extern
extern
extern
D functions
"C++" void useAnimal(Animal* t);
"C++" Animal* getCat();
"C++" void freeCat(Animal* cat);
// D Runtime functions from the library
extern "C" int rt_init();
extern "C" void rt_term();
// RAII struct for D runtime initialization and termination
struct DRuntime {
DRuntime() {
if(!rt_init()) {
// you could also use an exception
fprintf(stderr, "D Initialization failed");
exit(1);
}
}
~DRuntime() {
rt_term();
}
};
void main() {
// be sure to initialize the D runtime before using it
DRuntime druntime;
Dog dog;
// use a C++ class in a D function
useAnimal(&dog);
101
www.it-ebooks.info
Integration
// use a D class from C++
// you may use a smart pointer or RAII struct here too
// so the resource is managed automatically.
Animal* cat = getCat(); // use a factory function
cat->speak(); // call the function!
// it was created in D, so it needs to be destroyed by D too
freeCat(cat);
}
Now, let's have a look at the code at the D side, which is as follows:
import std.stdio;
import core.stdc.stdlib; // for malloc
extern(C++)
interface Animal {
// since the C++ class had a virtual destructor
// we must define an entry, but we don't want to use it
void _destructorDoNotUse();
void speak();
}
class Cat : Animal {
// Note that we did *not* copy the C++ member variable.
// Doing so would be futile; the layouts will not match.
// Creating D child classes of a C++ class with member
// variables should be avoided if at all possible.
extern(C++)
void _destructorDoNotUse() {}
extern(C++)
void speak() { try {writeln("Meow!");}catch(Throwable) {} }
}
// We'll implement a factory function for getting Cats
extern(C++)
Animal getCat() {
// Manage the memory with malloc and free for full control
import std.conv;
enum size = __traits(classInstanceSize, Cat);
auto memory = malloc(size)[0 .. size];
return emplace!Cat(memory);
}
102
www.it-ebooks.info
Chapter 4
extern(C++)
void freeCat(Animal animal) {
auto cat = cast(Cat) animal;
if(cat !is null) {
destroy(cat);
free(cast(void*) cat);
}
}
// This can also use an object from C++
extern(C++)
void useAnimal(Animal t) {
t.speak();
}
Compile and run the program separately, just like with C, remembering to link it in Phobos.
It will print the result of the Dog and Cat objects speaking to each other.
How to do it…
Always create and destroy objects using methods from the same language where it was
created, and always use them through pointers (in C++) or interfaces (in D). Remember to
keep a reference to D objects somewhere in D, or manage the memory manually so that
the garbage collector doesn't reap it prematurely.
To create and destroy the D class instances with malloc, we must not use the built-in new
operator. Instead, we will allocate memory and initialize the object separately. We learn the
number of bytes needed by using __traits(classInstanceSize, ClassName). Then, we
allocate the memory to the block using malloc and immediately slice it to the appropriate size.
This lets D functions know the size of the block (which they would not know with a pointer).
Finally, the std.conv.emplace function constructs the given argument in the specified
memory buffer, returning the reference to it. After the memory block argument, emplace
will also take constructor arguments for the class, if any.
Complementing destruction is the free function. Similar to construction, this is done in two
steps: first destroying the object, then freeing the memory.
Memory management can be improved by also using other C++ techniques such as a
smart pointer, and/or the D functions could provide reference counting. Use C++ practices
consistent with the rest of your project for best integration.
103
www.it-ebooks.info
Integration
The preceding example neglected a C++ member variable. If it's
possible, do not implement child classes of a C++ class with members
in D. You may use a C++ class with members, but inheriting from it is
potentially risky because if the member is used by any C++ function on
the D object, it may corrupt your memory. It is strongly recommended to
refactor the C++ code to use abstract interface-style classes and inherit
from them in D, instead of trying to match it.
All the rules that apply to the writing part of a C program in D also apply here, with the
biggest difference being that you can use some C++ or D classes. In particular, despite
C++ supporting exceptions, you should not throw exceptions across language boundaries,
since the two language's exception models may not be compatible. This is why our speak
method swallows any exception thrown by writeln.
Keeping two sets of definitions in sync is bug-prone work. The dtoh and dstep tools that
work with the C code also work with C++; try to use them when you can.
See also
ff
You can view Manu Evans' talk from DConf 2013, where he discussed integrating D
with a C++ game engine, at http://dconf.org/2013/talks/evans_1.html
Using structs to mimic the C++ object
structure
With D's low-level control, we can access any kind of data structure and paint nice types over
it. To demonstrate this, we'll access a C++ object from D. The same technique can also be
used for memory-mapped hardware.
You need to take caution that this is not portable. It may not work even
across different versions of the same C++ compiler. If you use this trick,
make sure it is in an environment where you know the binary layout.
How to do it…
Let's mimic the C++ object structure by executing the following steps:
1. Investigate the C++ ABI on your system. Typically, but not necessarily, a C++ object
consists of a pointer to the virtual function table, the members of the parent class
(recursively), and the members of the child class. If the C++ object has no virtual
functions, it does not have a virtual table; the layout is then compatible with a C
struct with the same data members.
104
www.it-ebooks.info
Chapter 4
2. Create an extern(C++) interface for the virtual table, like we did for the regular
interaction between D and C++. The interface should inherit from the parent class'
virtual function table interface.
3. Make a struct to represent the C++ object. First, put a void* member that
represents the virtual table.
4. Write a property that returns the this pointer casted to the virtual interface type.
5. Use alias this with the property we wrote in step 4.
6. List the data members in the same order in which they appear with compatible types
as the C++ object.
7.
Write a function prototype, which is a placeholder for the C++ object's constructors,
and use pragma(mangle) to assign it a matching name. You may have to figure
out the C++ mangles experimentally; compile the C++ application and inspect its
object file.
8. Write D constructors that forward to the C++ constructors.
9. Rewrite C++ destructors—calling it directly tends to attempt deallocating the object,
which will result in a crash.
10. List non-virtual functions normally.
11. Use the object and hope it doesn't crash! Here, I used dmd 2.065 and g++ 4.4.4 on
32-bit Linux.
The following is the C++ code to define the object:
class Class {
public:
Class(int n);
virtual void add(int a);
void print();
int number;
};
void Class::print() { printf("Number = %d\n", number); }
Class::Class(int n) { printf("constructed\n"); number = number; }
void Class::add(int a) { number += a; }
The following is the D code to access the C++ object:
struct Class {
extern(C++) interface Vtable {
void add(int a);
}
void* vtbl;
@property Vtable getVirtuals() {
alias getVirtuals this;
return cast(Vtable) &this; }
105
www.it-ebooks.info
Integration
extern(C++) void print();
int number;
pragma(mangle, "_ZN5ClassC2Ei")
extern(C++) void ctor(int a);
this(int a) { ctor(a); }
}
void main() {
Class c = Class(0);
c.num = 10;
c.add(10);
c.print();
}
It will print the following output:
constructed
Number = 20
How it works…
Data is data as far as the computer hardware is concerned. If we can map a type to the same
bits in memory and use it in the appropriate places, it will work, irrespective of whether that
type declaration is written in C++, D, or any other language.
In addition to D's built-in C++ support and other similar features, such as constructors and
destructors, we can use a few other features to make this smoother to use.
The first one is alias this. When a member that is is requested is not in the object itself,
or when an implicit conversion is requested, it attempts substituting the alias this value
instead. This allows method forwarding and controlled implicit conversion, which implements
a kind of subtyping—this is very similar to class inheritance.
The second is pragma(mangle). This changes the name of the function in the object file.
If we match calling convention, arguments, return value, and name, we can call the code.
The computer doesn't care about anything beyond that! It would also be possible to write
code that automatically mangles D functions with C++ names and passes the return value
of that function to pragma(mangle). The function would be evaluated at compile time
to build the name string. We'll look at these techniques later in the book. Here, we got the
mangled name experimentally (in this case, it is correct for my version of g++ on Linux;
your results may vary).
We also used a nested interface for the virtual function table. This simply keeps the outer
namespace clean; it has no functionality difference.
106
www.it-ebooks.info
Chapter 4
Communicating with external processes
If you are performing a task and encounter a stage where another program does an excellent
job, is it possible to call that program and use the results in your D program? The answer is
yes. Here, we'll look at using std.process to run another program and send it input and
read its output.
How to do it…
Let's communicate with external processes by executing the following steps:
1. Import std.process.
2. Call pipeProcess to start the program you want, storing the return value.
You may want to put the external process name in a version block, as the
same program might not be available on other operating systems.
3. Use the returned handles to communicate with the process as though it was a file.
4. Close the handles when you are finished.
5. Wait for the process to exit.
The code is as follows:
import std.process, std.stdio;
auto info = pipeProcess("child_program");
scope(exit) wait(info.pid);
info.stdin.writeln("data to send to the process");
info.stdin.close();
foreach(line; stdout.byLine)
writeln("Received ", line, " from child.");
The child program may be anything that writes to its stdout handle. For example, have a look
at the following code:
import std.stdio;
void main() {
writeln("Hello!");
writeln("Second line.");
}
Calling the function from the preceding program will print the following:
Received Hello! from child.
Received Second line. from child.
107
www.it-ebooks.info
Integration
How it works…
Phobos' std.process module includes several cross-platform functions to communicate
with other processes. It can run programs, spawn shells, and create pipes on standard
handles. Once created, the resultant pipes are presented as std.stdio.File objects and
can be written to (in the case of the stdin handle, you write to the child program's input) the
input and read from (for stdout and stderr, reading the child process' output) the output
like any other file.
You can also access the operating system or C functions yourself, bypassing the Phobos
functions. This is necessary if you need asynchronous I/O with the process.
You may also wish to define an RPC protocol to use over your pipes, to call functions as well
as pass data. Any network application protocol can be adapted to work with local processes
and pipes. For example, there are D bindings to Apache Thrift that may be of use.
See also
ff
The D bindings to Apache Thrift can be accessed at http://code.dlang.org/
packages/thrift
Communicating with a dynamic scripting
language
D's features also lead to easy integration with dynamic languages. It can host a dynamic type
as well as dynamic objects.
Getting ready
To begin, download bindings to a scripting language. Here, we'll use the one I wrote whose
syntax is inspired by both D and JavaScript. It was written with the goal to blur the line
between the D code and the script code—the scripting language's dynamic type can also
be used in D itself. Download jsvar.d and script.d from the following website:
ff
http://github.com/adamdruppe/script
Build your program with all three files on the command line, as follows:
dmd yourfile.d jsvar.d script.d
108
www.it-ebooks.info
Chapter 4
How to do it…
Let's execute the following steps to communicate with JavaScript:
1. Create an object to wrap the script engine with a friendlier API.
2. Prepare the script engine by passing data and function references to it. It may
be necessary to wrap D functions in transforming functions to match the script
engine's layout.
3. Use opDispatch and variadic arguments to forward the D function call syntax
to the script to use user functions.
4. Evaluate the user script.
5. Call a user-defined script function.
The code is as follows:
struct ScriptEngine { // step 1
import arsd.script;
this(string scriptSource) { // step 2
scriptGlobals = var.emptyObject;
// add a function, transforming functions and returns
import std.stdio;
scriptGlobals.write = delegate var(var _this, var[] args) {
writeln(args[0]);
return var(null);
};
// run the user's script code (step 4)
interpret(scriptSource, scriptGlobals);
}
var scriptGlobals;
auto opDispatch(string func, T...)(T t) { // step 3
if(func !in scriptGlobals)
throw new Exception("method \"" ~ func ~ "\" not found in
script");
var[] args;
foreach(arg; t)
args ~= var(arg);
return scriptGlobals[func].apply(scriptGlobals, args);
}
}
109
www.it-ebooks.info
Integration
void main() {
// step 5
auto scriptContext = ScriptEngine(q{
// this is script source code!
function hello(a) {
// call the D function with the argument
write("Hello, " ~ a ~ "!");
// and return a value too
return "We successfully said hello.";
}
});
// call a script function and print out the result
import std.stdio;
writeln("The script returned: ", scriptContext.hello("user"));
}
How it works…
If a method isn't found in an object, and the object implements a member called
opDispatch, D will rewrite the missing method as follows:
obj.name(args…); // if obj doesn't have a method called
nameobj.opDispatch!"name"(args…); // it is rewritten into this
The method name is passed as a compile-time argument. The opDispatch implementation
may thus be able to handle this without a runtime cost. If the lookup must happen at runtime,
as is the case here, we can use the compile-time argument in the same way that we'd use a
runtime argument, including forwarding it to a runtime lookup function.
The opDispatch function, like any other function, can also take both additional compiletime and runtime arguments. Here, we defined it as a variadic template with T…, which is
an arbitrary length list of types. The exact list is determined automatically when you call the
function. In short, this function can accept any number of arguments of any types. This is
perfect for forwarding to a dynamic function, like a user-defined script method.
The writeln function of std.stdio is also a variadic template in
this form. That is why you can pass it a mixed list of strings, integers,
or any other types and it knows how to handle them all, even with a
generic format string.
In a (T…)(T t) template argument list, T is the list of types and t is the list of values.
Both T and t can be looped over with foreach, similar to an array.
110
www.it-ebooks.info
Chapter 4
Inside the loop, we will build an array of dynamic variables to pass to the script engine.
The constructor of var automatically handles conversions from arbitrary types by using
std.traits to categorize them into basic categories, and keeps a flag internally that
says which category it is currently holding. The following code is an excerpt:
this(T)(T t) {
static if(isIntegral!T) {
this._type = Type.Integral;
this._payload._integral = to!long(t);
} else static if(isSomeString!T) {
this._type = Type.String;
this._payload._string = to!string(t);
} else static assert(0, "Unsupported type: " ~ T.stringof);
}
The constructor takes an argument of any type T. Using static if, it checks whether the
type is a type of integer or a type of string. For these types, the code stores the internal flag
and the value, which is converted to one uniform type that can represent the whole category.
This lets us automatically handle as many D types as possible with the least amount of script
glue code. The full implementation in jsvar checks every supported category it can handle,
including objects, floating point values, functions, and arrays. They all follow a pattern similar
to this.
The script engine has already provided an implementation of
various operators, including calling functions. You can simply write
scriptGlobals["hello"]("user") using either the opIndex
function written in jsvar or scriptGlobals[name](t) written in our
opDispatch—forwarding the variadic argument list—and it would build
the args array for us. The var type—a user-defined dynamic type from the
jsvar module you downloaded—also implements opDispatch, though
calling functions with it currently requires a second set of parenthesis to
disambiguate function calling from property assignment.
We also return a value from this function. In some cases, you'd have to write a converter for
the script engine's return value, checking its type flag type and offering an opCast, to, or get
function, which works in the reverse of the preceding constructor example, or perhaps convert
it to a string with toString. The var type used here implements a get function using the
type family check like the constructor as well as a toString function, which makes it just
work in writeln.
We also made the writeln function available to the script by wrapping it in a helper function
that accepts script variables, calls the D function, and then returns an appropriate variable
back to the script. Like with calling functions, this can be (and is, in jsvar) automated so that
nothing is necessary beyond writing scriptGlobals.write = &writeln!var;, but we did
it the long way here to show how it is done. The automatic generator implementation works in
the same way using a bit of compile-time reflection to get the details right for each function.
We'll cover the reflection features later in the book.
111
www.it-ebooks.info
Integration
Why would we have to write &writeln!var instead of just
&writeln? As writeln has compile-time arguments—though they
are typically deduced automatically while calling writeln (they are
always there)—we have to specify which ones we want at compile
time before it is possible to get a runtime function pointer. Different
compile-time arguments may mean a different function pointer. If the
function didn't have compile-time arguments, then &func would work.
Lastly, we used a peculiar type of a string literal for the source, that is, a q{ string
literal }. This works the same as any other string literal, with one difference; the
q{} literal needs to superficially look like the valid D code (technically, it must pass the
D tokenizer). It must not have unterminated quotes and unmatched braces. As far as the
consuming function is concerned though, it is just a string, like any other. We could have
also loaded the script from a file. We used q{} here because the script source looks like D
source. Most syntax-highlighting editors continue to highlight q{} strings like regular code,
giving us colorization for the script as well. However, which kind of string literal you use
comes down to the circumstances and personal preference.
Using Windows' COM
Component Object Model (COM) is a Microsoft technology used for interoperability between
Windows programs. D has built-in support for basic COM, and using its features, we can also
automate the implementation of advanced COM features.
Here, we'll write a COM server and client with the help of a library and look at the
implementation.
Getting ready
Download the Win32 bindings from http://dsource.org/projects/bindings and the
comhelpers.d file from http://github.com/adamdruppe/com.
How to do it…
COM, like shared libaries, uses a client-server model. First, we'll write a COM server and then
write its corresponding COM client.
COM server
Let's write a COM server by executing the following steps:
1. Generate GUIDs for your interface and class using a GUID generation tool.
2. Import win32.unknwn and comhelpers.
112
www.it-ebooks.info
Chapter 4
3. Write your interface definition, inheriting from IUnknown and marking all methods
extern(Windows). Attach the IID (interface's GUID) to the interface with the
ComGuid attribute. Each method should return HRESULT.
4. Add the CLSID to the interface file as a constant.
The code for the preceding steps is as follows:
import win32.basetyps;
import win32.unknwn;
import comhelpers;
@ComGuid(GUID(0x00421140, 0, 0,
[0xC0, 0, 0, 0, 0, 0, 0, 0x46]))
interface IHello : IUnknown {
extern (Windows) :
int Print();
}
// this is the class id that we can use to instantiate in the
client and attach to the
// class in the implementation
enum GUID CLSID_Hello = GUID(0x30421140, 0, 0,
[0xC0, 0, 0, 0, 0, 0, 0, 0x46]);
5. Create a separate file with the class definition. Inherit this class from the interface
you defined and attach the CLSID to the class using the ComGuid attribute.
6. Use the mixin ComObject!() method in your class and implement your interface.
7.
To enable COM automation on your object, for example, to make it usable from
VBScript or JScript, also inherit from IDispatch when defining your class and
add mixin IDispatchImpl!() to the class body.
8. At the bottom of the file, add mixin ComServerMain!(YourClass, "ProgId",
"1.0") class, where "ProgId" is your desired Program ID (for example, "MSXML2.
XmlHttp") and 1.0 is your version number. The program ID and version number are
used by clients to locate your object.
9. You may have to compile with dmd –d to enable deprecated features because the
Win32 bindings are infrequently updated. The code for this is as follows:
import win32.winuser;
import comhelpers;
import ihello;
@ComGuid(CLSID_Hello)
class CHello : IHello, IDispatch {
113
www.it-ebooks.info
Integration
mixin ComObject!();
mixin IDispatchImpl!();
extern(Windows)
public override HRESULT Print() {
import std.stdio; writeln("cool?");
MessageBoxA(null, "CHello.Print()", null, MB_OK);
return NOERROR;
}
}
mixin ComServerMain!(CHello, "Hello", "1.0");
10. Create a module definition file (yourname.def) with the following contents:
LIBRARY
yourname
EXETYPE
NT
SUBSYSTEM
WINDOWS
EXPORTS
DllGetClassObject
DllCanUnloadNow
DllRegisterServer
DllUnregisterServer
=
=
=
=
_DllGetClassObject@12
_DllCanUnloadNow@0
_DllRegisterServer@0
_DllUnregisterServer@0
11. Compile your interface file, class file, module definition file, and the downloaded
comhelpers.d file together to generate your DLL.
12. Register your server with regsvr32 yourdll.dll (this will require administrator
access on the computer), or use a manifest file to enable registration-free COM in
your client application.
COM client
Let's write a COM client by executing the following steps:
1. Import comhelpers.d and the interface file you created for the server.
2. Create the object with createObject!interface(CLSID). If you are using an
object without the ComGuid attribute, you can specify it manually in the compile-time
argument list after the interface. Alternatively, you may call CoCreateInstance
from the Windows API directly.
3. Use it. The createObject object of comhelper returns a wrapper object that
automatically handles calling AddRef and Release.
The code is as follows:
import comhelpers;
import ihello;
114
www.it-ebooks.info
Chapter 4
void main() {
auto obj = createObject!(IHello)(CLSID_Hello);
obj.Print();
}
How it works…
D has some built-in understanding of COM—it recognizes the IUnknown interface. Anything
derived from it is known to be a COM object. This is a bit rudimentary and D can do better
with the help of a library—that's where comhelpers.d comes in. It is not necessary, nor
part of the standard library; you can always call the Windows functions yourself. It handles
some boilerplate code (with mixin templates) and binds GUIDs to interfaces and classes
with a D feature called user-defined attributes to make the code easier to write.
There's more…
If you are on a 64-bit Windows system and building a 32-bit DLL, you'll have to register the
COM server using the 32-bit version of regsrv32.
115
www.it-ebooks.info
www.it-ebooks.info
5
Resource Management
In this chapter, we will look at the resource management techniques of D. We'll learn
the following:
ff
Avoiding the garbage collector
ff
Making a reference-counted object
ff
Manually managing class memory
ff
Using scope guards to manage transactions
ff
Creating an array replacement
ff
Managing lent resources
ff
Creating a NotNull struct
ff
Using unique pointers
ff
Using RAII and handling the limitations of class destructors
Introduction
Resource management is an important aspect of most programs. D's rich abstraction support
makes it possible to use a variety of techniques, from script-like quick coding with the garbage
collector to low-level manual control.
Avoiding the garbage collector
D programs typically use a garbage collector that can make memory management both
easier and more efficient. With the garbage collector, you don't have to keep track of object
ownership and can defer free memory to a later point, which can boost performance.
www.it-ebooks.info
Resource Management
However, while the garbage collector is useful, it doesn't absolve you of all thought in the area
of memory management, especially when performance is important. In tight loops, you'll want
to avoid the garbage collector. The way to do this is to avoid garbage collection allocations. No
garbage collection allocation means no garbage collection cycle.
How to do it…
In order to avoid the garbage collector, perform the following steps:
1. Find the hotspots in your application. Typically, this means focusing on your
innermost loops.
2. Remove functions and operations that call into the GC:
Array literals, except the ones initializing a variable marked static
Array append or concatenation
Array length assignment
Any associative array operation or literal
The new expression
Closures, except the ones marked scope in the function's parameter list
Nested structs that use local variables that are returned from a function
Any function that does one of these things
3. Move the allocations outside the hotspot or replace them with alternatives:
Make static and immutable array literal initializers
Use static array buffers when possible instead of dynamically allocated arrays
Use stack-allocated classes
Mark delegate arguments scope in the function definition
If you load your program in a debugger and set a break point at the
beginning of your hotspot, you can then break on the gc_alloc and gc_
qalloc functions to find allocations at runtime. Also, if you use the ldc
compiler, try the –nogc command-line switch when compiling a module.
How it works…
The D garbage collector only runs at program termination and when a garbage collector
allocation is attempted. It doesn't have enough available memory to fulfil the request. Garbage
collector allocations are not necessarily easy to find. The syntax may not stand out or they may
be hidden behind library functions; however, if you successfully avoid these language constructs,
you will successfully avoid the garbage collector.
118
www.it-ebooks.info
Chapter 5
You'll still have to manage your resources. We'll look at various techniques to help with this
throughout the rest of this chapter.
Can we write a program without a garbage collector at all? Yes, in fact,
we can write D programs that use the majority of the language, yet don't
use the full D runtime or standard library at all and will even work on
bare metal without an operating system. However, since this severely
limits your library choices, it isn't always a practical option.
Making a reference-counted object
A common technique to manage resources is reference counting. D's structs provide the
necessary infrastructure to automate reference counting.
How to do it…
In order to make a reference-counted object, perform the following steps:
1. Write a struct with its only data member being a pointer to the object. You may write
a nested struct to hold the data, or it may be a pointer to a library.
2. Add alias this to the pointer so that operations will be automatically forwarded to it.
3. Make a constructor, if possible, or a static factory method that acquires the object
and increases the reference count.
4. Write a postblit that increases the reference count.
5. Write a destructor that decreases the reference count and frees the object if
necessary.
6. Keep in mind that the data pointer may be null, and check for that in each function.
Consider the following code:
struct RefCountedObject {
private struct Implementation {
/* other contents here */
int refcount;
}
Implementation* data;
alias data this;
static RefCountedObject create() {
119
www.it-ebooks.info
Resource Management
RefCountedObject o = void;
o.data = new Implementation();
o.data.refcount = 1;
writeln("Created."); // so we can see it in action
return o;
}
this(this) {
if(data is null) return;
data.refcount++;
writeln("Copied.
Refcount = ", data.refcount);
}
~this() {
if(data is null) return;
data.refcount--;
writeln("Released. Refcount = ", data.refcount);
if(data.refcount == 0)
writeln("Destroyed.");
}
}
How it works…
The general idea of reference counting is to increment the count every time the reference
is copied and decrement it every time a reference ceases to exist. D's structs provide two
functions that can do exactly this: postblits and destructors.
When a struct object is copied, the data is first blitted (bit-block transfer; a straightforward
copy of the object's memory) to the new location (a shallow copy operation). Then the postblit
function, if present, is called on the recipient object. The postblit is defined with the syntax
this(this) { /* code */ }.
Whenever struct provably ceases to exist—goes out of scope after being left behind by a
thrown exception, being written over, or being collected by the garbage collector—its destructor
is called, if present. The destructor is defined with the syntax ~this() { /* code */ }.
It is important that the reference count is stored separately from struct. If the count were
a regular member variable, it would be copied along with the reference, making it useless.
A static member variable would be shared across all instances of the struct, which makes
it unsuitable to manage distinct objects as well. Instead, we use a pointer to the object with
the reference count.
If we were using a C object with functions to add and remove references,
we could hold the pointer to the C object and simply call those functions
in the postblit and destructor, respectively.
120
www.it-ebooks.info
Chapter 5
Since our key member is a pointer, we need to remember that it may be null and offer a way
to initialize it. Since D's structs cannot have default constructors, we instead use a factory
function. The factory function acquires the function and initializes the reference count to one.
Afterward, we can use the object normally, thanks to alias this. All method calls will be
forwarded to the inner object. The alias this declaration also allows implicit conversion
to the inner object's type, which could break the reference counting encapsulation. This is
why we made Implementation private. If it is not possible to make the inner object private,
avoid this situation by either writing forwarding functions yourself (this can be automated
with code generation, which we'll cover later in the book) or implement a code review policy,
prohibiting the direct declaration of the inner object's type.
See also
ff
http://dlang.org/phobos/std_typecons.html#RefCounted is a standard
library wrapper that adds reference counting to an existing object. It will not (at the
time of writing this book) work with class objects, nor will it give you the same level
of control as doing it yourself.
Manually managing class memory
The new operator in D uses the garbage collector, but it isn't the only option. When interfacing
with other languages' code or working in a constrained-resource environment (possibly including
tight loops on fast PCs!), it is useful to avoid the new operator. Let's see how.
How to do it…
In order to manage class memory manually, perform the following steps:
1. Get the size of the memory block you need to use:
__traits(classInstanceSize, ClassName).
2. Allocate the memory, slicing it to get a sized array.
3. Use std.conv.emplace to construct the class in place and cast the memory
to the new type.
4. Stop using the untyped memory block. Instead, use only the class reference.
5. When you are finished, use destroy() to call the object's destructor, then free
the memory.
6. Be careful not to store the reference where it might be used after the memory
is freed. You may want to create a reference counting struct to help manage
the memory.
121
www.it-ebooks.info
Resource Management
How it works…
The __traits function retrieves information about a type that uses compile-time reflection.
The first argument is the data you want and the subsequent arguments are specific to each
query. Typically, the second argument is an identifier or a type and the third argument, if
necessary, is a member name string to drill down to more details. The __traits function
returns data in the same way as a function call.
Here, we use __traits(classInstanceSize), which takes a class type as an argument
and returns the number of bytes needed by the instantiated object. We cannot use
ClassName.sizeof directly because objects are always reference types in D; ClassName.
sizeof returns the size of a pointer to the data (a constant), not the size of the data itself.
Once we get the size of the object, we can allocate the memory. This can be done by any
method. We could use the C standard libraries: import core.stdc.stdlib; and void*
buffer = malloc(size). We could also define a static array ubyte[size] buffer;.
Here, size would need to be available at compile time for the static array method. To achieve
that, use enum: enum size = __traits(classInstanceSize, ClassName); or we
could use any other method.
After getting the memory block, we need to slice it to the right size. Slicing it ties a length
to the pointer, which used by the emplace function to ensure the buffer is large enough.
Consider the following code snippet:
auto bufferSlice = buffer[0 .. size];
Finally, we pass the slice to std.conv.emplace. Consider the following code snippet:
import std.conv;
auto classReference = emplace!ClassName(bufferSlice,
args_to_constructor…);
This casts the memory block to the correct type (that is why it is in std.conv—it converts
untyped memory into typed memory via in-place construction), copies the initial memory
image to the block, and calls the appropriate constructor to initialize the object.
The implementation of std.conv.emplace performs two of the three
steps of the new operator. The new operator allocates memory of the class
size, copies the initial contents (typeid(Class).init) to the newly
allocated memory, and calls the requested class constructor on the new
object. The emplace function does the latter two steps, but not the first,
thereby giving you control over the memory allocation strategy.
122
www.it-ebooks.info
Chapter 5
Once the object is created, accessing its memory directly is undefined behavior. Thus, you
shouldn't use the buffer variables again, except to free them (if necessary) once you are sure
no more references will be used. You can use it normally through the reference to call methods,
perform dynamic casts, or do anything else that you could do through any other reference.
The destroy function, which is located in the automatically imported object.d module,
calls the class' destructor but does not attempt to free the memory. After destroying the object
and making sure that no more references to it exist, you may free the memory using the pair
function with your allocator (for example, free if you allocated with malloc). If necessary, you
may cast the reference back to void*:
MyClass c = myMallocAllocator!MyClass(); // allocate with malloc
free(cast(void*) c); // cast the reference back to a pointer
See also
ff
Check out http://dlang.org/traits.html for a complete list of all
trait arguments
ff
Also, have a look at http://dlang.org/phobos/std_traits.html for library
wrappers and enhancements for the compile-time reflection built into the language
Using scope guards to manage transactions
D doesn't require you to make wrapper types or write try/catch statements all the time. You can
also use scope guards. They can be triggered by three conditions: exit, success, or failure.
Here, we'll perform a multistep transaction with scope guards to ensure exception safety.
How to do it…
In order to use scope guards to manage transactions, perform the following steps:
1. Begin your transaction.
2. Write a scope(success) guard to commit the transaction immediately after
starting it (if committing isn't implicit).
3. Write a scope(failure) guard to roll back the transaction immediately after
starting it. You may use multiple blocks to rollback multiple steps.
4. Write a scope(exit) guard to free any resources. Write the free code immediately
after the acquisition code. You may use multiple blocks to free multiple resources.
123
www.it-ebooks.info
Resource Management
5. Write the following code for your transaction:
{
// performing a SQL transaction
database.query("START TRANSACTION");
scope(success) database.query("COMMIT");
scope(failure) database.query("ROLLBACK");
database.query(step_one); // these should throw on failure
database.query(step_two);
}
{
// performing a multi-part file download
auto connection = Connection.acquire();
scope(exit) connection.close(); // release code immediately
after acquisition
connection.download("file1");
scope(failure) std.file.remove("file1"); // undo code
immediately after perform code
connection.download("file2");
scope(failure) std.file.remove("file2");
}
How it works…
D's scope guards are very useful to manage resources in an exception-safe way at the point
of use. Each scope statement registers the code to be run on the given condition; success
if the function returns without throwing an exception, failure if it exits by exception, or
exit, which is unconditional. The code is executed in the reverse order of registration and
registration happens with regular flow control, as shown in the following code snippet:
scope(exit) writeln("Running scope exit");
scope(success) writeln("Running scope success");
return;
scope(exit) writeln("This is never run since the function returned
before it was registered.")
Running this code will print Running scope success and then Running scope exit.
Implementation wise, scope(exit) is rewritten into a finally{} block,
scope(success) is rewritten into code appended to the end of a try {}
block, and scope(failure) is implemented at the end of a try catch
{} block, which rethrows the original exception after running the handler.
The advantage of scope(success) over putting the commit code at the end of the function
is that scope(success) is written once, but always run, even if you have multiple exit points
(return statements) from the function.
124
www.it-ebooks.info
Chapter 5
Creating an array replacement
Many operations on D's built-in array slices use the garbage collector. If you want to use
alternate resource management strategies, you'll want a replacement type, which implements
operators that can be used with the other strategy and disables those that cannot be used.
It is possible to avoid all allocations using a static stack buffer, which can give a considerable
performance improvement. We'll create an array replacement, which uses a static buffer for
a predicted size and grows into a dynamically allocated buffer, if required.
How to do it…
To create an array replacement, perform the following steps:
1. Define a struct that takes an element type and expected size.
2. Define variables with the key components: a static buffer with the expected size,
a slice to the current buffer, and the current length.
3. Write a destructor to free the memory, if you are managing it manually.
4. Overload the convenience operators you want on the array: length, capacity, reserve,
append, and slice.
5. Disable the operators you do not want to use. For example, concatenation or copying
may be disabled because those operations are inconvenient and error prone without
the garbage collector's help.
6. Use alias this if you want implicit slicing. Consider the following code:
struct MyArray(T, size_t expectedSize = 0) {
private T[expectedSize] staticBuffer;
private T[] activeBuffer;
private size_t currentLength;
/+
// if you want to use malloc instead of gc
// don't copy this; we own our own memory
// note that if you slice this, that is a borrowed
reference;
// don't store it.
@disable this(this); // disable copying
~this() {
// frees the memory if it was malloced
if(activeBuffer.ptr !is staticBuffer.ptr)
free(activeBuffer.ptr);
}
+/
125
www.it-ebooks.info
Resource Management
public void reserve(size_t s) {
if(s > activeBuffer.length)
activeBuffer.reserve(s); // GC operation.
alternatively, you could use realloc
}
public @property size_t length() {
return currentLength;
}
public @property void length(size_t newLength) {
// make sure we're using the static buffer first
if(activeBuffer is null)
activeBuffer = staticBuffer[];
// then if we don't have enough room, we'll reallocate
with
// the GC (its own capacity should optimize this)
if(newLength > activeBuffer.length) {
activeBuffer.length = newLength; // GC operation
// alternatively, you could use realloc
}
if(newLength < currentLength)
activeBuffer[newLength .. currentLength] = T.init;
currentLength = newLength;
}
public void clear() { length = 0; }
// disable concatenation
@disable void opBinary(string op : "~")(T t){}
@disable void opBinary(string op : "~")(T[] t){}
// but customize appending
public T opOpAssign(string op : "~")(T t) {
length = currentLength + 1;
return activeBuffer[currentLength - 1] = t;
}
public T[] opOpAssign(string op: "~")(T[] t) {
auto start = currentLength;
length = start + t.length;
126
www.it-ebooks.info
Chapter 5
return activeBuffer[start .. start + t.length] = t[];
}
public T[] opSlice() {
return activeBuffer[0 .. currentLength];
}
alias opSlice this;
}
// test usage
void main() {
// declare your array of ints with an optimized size of
ten
MyArray!(int, 10) intArray;
myArray ~= 1; // populate it
myArray.length = 3; // change the length
import std.stdio;
writeln(myArray[]); // print the current contents
}
How it works…
This array replacement serves two purposes; it optimizes the number of allocations and gives
us control over the allocation method. To understand why this is valuable, we need to compare
it against similar operations with built-in dynamic (garbage collection allocated) arrays.
Garbage collection arrays do contain appending and preallocation optimizations, including
a reserve method that, like our reserve method, preallocates space up to at least the given
capacity so that the subsequent append operations perform faster.
However, slice semantics are very conservative. To avoid the possibility of stomping over
another slice's memory, reducing the length of a slice always zeroes out its capacity:
int[] a = [1, 2, 3]; // a.capacity == 3; appending will not
realloc
int[] b = a[0 .. 2]; // b.capacity == 0
If you were to write b ~= 4, you can expect b == [1,2,4], but you can also still expect a
== [1,2,3]. To ensure this is the case, appending to a partial slice will always reallocate—it
will copy the array to a new location and append it there, leaving the original memory alone.
While this gives predictable and generally useful slice semantics, it isn't always best for
performance. Consider the following code snippet:
a ~= 4; // append a 4
a.length = 0; // reset the array…. but this also clears the
capacity
a ~= 1; // this reallocates a brand new array
127
www.it-ebooks.info
Resource Management
Capacity is not stored with the slice. It is stored with the memory block
returned by the garbage collector. Querying capacity thus is more than
a simple member lookup—it must walk a garbage collector structure.
The garbage collector implementation contains a cache of most
recently used capacities to accelerate this process, allowing multiple
appends on one array to perform well.
If you are adding and removing elements often, this becomes a serious bottleneck.
(Refer to the recipe in Chapter 3, Ranges, where we used these same techniques in
the stack collection.)
By keeping a separate length variable, MyArray is a bit more heavyweight than a basic
slice, but the benefit is that our array gives precision control. It owns its own memory, so it
doesn't have to worry about stomping on another function's data. As a result, changing the
length, appending or clearing, only reallocates when strictly necessary.
A further optimization—again at the expense of additional variables in the structure—is the
static array. Using a compile-time parameter, we let the user tweak this to their specific use
case. If you know you are working with a small data set, using stack memory (a static array)
to hold it avoids all allocations. This gives the best possible speed.
The rest of the implementation of MyArray is aimed towards making it convenient to use while
minimizing the likelihood of writing buggy code with it. We implement the ~= operator:
public T opOpAssign(string op : "~")(T t);
public T[] opOpAssign(string op: "~")(T[] t);
Operator overloading in D is done by implementing functions with a particular name:
opBinary for a op b operators, opAssign for a = b, opOpAssign for a op= b, and
others. Visit http://dlang.org/operatoroverloading.html for a complete list.
The compile-time parameter is the operator that is passed as a string. Here, we used template
specialization syntax to only implement op == "~". In a compile-time parameter list, any
parameter may be followed by a colon, then a specific value for that argument. If the template
is instantiated with that argument, this function is used instead of any other overloads. This lets
us write special implementations for particular arguments or to only implement the function for
those particular arguments.
We implement the operator twice, once for a single element so that array ~= 1 works, and
then again for an array so that we can efficiently implement array ~= [1,2,3] as well.
128
www.it-ebooks.info
Chapter 5
We also used operator overloading syntax to disable the binary ~ operator:
@disable void opBinary(string op : "~")(T t){}
The @disable annotation can be attached to any function to statically disallow its use.
Any attempt to write our_array ~ value will cause a compilation failure. The reason
we disabled this is that the concatenation operator makes it very easy to hide allocations
and lose references. Consider a = b ~ c; here, we would allocate a new array, copy b
into it, append c into it, and assign it to a. It may not append into the existing memory block
of b due to the conservative nature of the concatenation operator. It does not modify its
arguments; instead it returns a new array. Since this custom array is meant to control
memory allocations, this is undesirable.
Another worry with binary concatenation is b ~ c ~ d. Here, b~c is evaluated first, which
returns a new array (we'll call it tmp). Then, tmp ~ d is evaluated, returning another new
array, which is the value of the expression. The problem is that the tmp array reference
is completely lost! When using garbage collector arrays, this is OK (convenient, though
somewhat inefficient); the garbage collector will clean it up. However, with manual memory
management, a lost array reference results in a memory leak. The safest thing to do here
is to disable the operator entirely and force the user to explicitly manage their arrays.
Why do we have to explicitly disable the operator instead of simply leaving
it unimplemented? Since we wrote alias opSlice this, any operator
that isn't found on the object itself will be attempted on the return value of
opSlice, which returns a built-in slice. Since ~ is implemented on built-in
slices, in terms of the garbage collector, this would succeed; however, this
isn't what we wanted.
Lastly, we implemented opSlice without arguments—the [] operator—and used that
with alias this. The alias this declaration allows the transparent forwarding of
unimplemented operations as well as implicit conversion to the child type. This is known
as subtyping. This lets our array conveniently interact with other D functions that aren't
familiar with our implementation. However, it does have a downside; the other D functions
may escape references to our data, which would become invalid when we free the memory.
If you pass a slice to a function, whether explicitly with the [] operator or via implicit
conversion with alias this, be sure the function manages it as a lent resource and
does not keep the reference.
129
www.it-ebooks.info
Resource Management
Managing lent resources
A lent resource is conceptually any reference to memory that you do not own and is not
garbage collected. D does not have ownership or borrowed concepts in its type system,
but there are techniques that we can use to make our job a little easier.
How to do it…
In order to manage lent resources, perform the following steps:
1. Use the garbage collector whenever possible. Avoid garbage collector allocations
in your application's hotspots, but take advantage of its convenience and general
correctness throughout the rest of your application.
2. When writing functions, mark references you intend not to store with the scope
storage class.
3. If you do intend to store a reference, accept immutable data, if possible.
4. Make private copies of mutable data you intend to store.
5. It may be useful to write reference-counted objects.
6. Implement a code review policy to ensure other resources are managed correctly.
How it works…
The scope storage class is not fully implemented at the time of writing this; however, there
are places where it helps. The scope delegate arguments will not allocate a heap closure
and as the compiler improves, it will help to statically catch escaping references.
In the D type system, immutable is another feature that helps with resource management.
A reference to immutable data can be used just like value types—they are cheap to pass
around and can be stored with confidence.
Otherwise, unless you rely on the garbage collector, D is essentially in the same boat as
C++ with regard to managing lent resources. Code reviews, private copies, and wrapper
structs will form the tools you use to keep track of your manually managed resources.
Creating a NotNull struct
By disabling default construction, we can force initialization of a type. Using this feature,
we'll make an object reference that will force the user to check for null before using it.
130
www.it-ebooks.info
Chapter 5
How to do it…
To create a NotNull struct, perform the following steps:
1. Create struct NotNull(T) with a private member of type T.
2. Disable default construction with @disable this();.
3. Write a private constructor that takes T and assert(t !is null);.
4. Write a property function that returns the payload and use it with alias this.
5. Write a helper struct CheckNull(T), with a member T. The member T is a
property that returns NotNull!T and has opCast(T : bool), which checks
the payload for null and returns true if it is not null.
6. Write a helper function, checkNull, which takes a T member and returns
CheckNull!T.
7.
Write your functions to accept and return NotNull!T whenever possible.
8. Optionally, write a generic factory function that returns NotNull!T.
9. Use the function with if(auto nn = test.checkNull) {}.
The following is the code:
struct NotNull(T) {
private T notNullPayload;
@disable this();
private this(T t) {
assert(t !is null);
notNullPayload = t;
}
inout(T) getNotNullPayload() inout {
return notNullPayload;
}
alias getNotNullPayload this;
}
struct CheckNull(T) {
private T payload;
bool opCast(T : bool)() { return payload !is null; }
inout(NotNull!T) getNotNullPayload() inout {
return NotNull!T(cast(T) payload);
}
alias getNotNullPayload this;
}
131
www.it-ebooks.info
Resource Management
CheckNull!T checkNull(T)(T t) {
return CheckNull!T(t);
}
// test usage in a function
void test(NotNull!(int*) nn) {
import std.stdio;
writeln(*nn, " was not null");
}
void main() {
import std.stdio;
int item;
int* ptr = &item;
// how to do the test, also try if ptr is null
if(auto nn = ptr.checkNull) {
test(nn);
} else {
writeln("Null");
}
}
How it works…
There are three key points in this implementation: alias this, which allows us to control
implicit conversions; the disabled default constructor, which forces initialization of any NotNull
member or local variable; and the helper type with opCast(T:bool), which enables the type
transformation inside the if statement.
We use a getter property with alias this instead of going directly to the member, because
the getter property prohibits assignment. If we used alias this directly with the property,
it would allow the assigning of null:
NotNull!Object o = …;
o = null; // this would be allowed because alias this would
rewrite it to o.payload = null, bypassing our check!
The getter property uses inout to provide a start to const-correctness.
We use @disable this(); to force initialization of the object. The syntax for a default
constructor is this(). While D's structs cannot have default constructors, the language
nevertheless lets you write a prototype specifically to disable it. All variables in D are initialized
to default values upon declaration (unless you specifically skip initialization with =void at the
declaration point). The default value of a reference is null. Thus, to ensure that a NotNull
structure is never null, we must force explicit initialization. The language will require an
initializer at any local variable declaration and an initializer in the constructor if NotNull
is used as an object member.
132
www.it-ebooks.info
Chapter 5
Moreover, we made the constructor private, forcing the initialization process to go through
our helper functions and type. This gives us control similar to languages with special nullable
types built into the language. It forces a check and gives us an opportunity to limit the scope
of the not null type to the correct if branch.
Next, the CheckNull type and the helper constructor serves as an intermediate between
normal, nullable types and the NotNull type, with its guarantees. On using alias this,
it allows implicit conversion to NotNull upon request (which then performs an additional
check for null at assignment time via assert in non-release mode). However, first, the
opCast allows it to be checked inside an if statement.
The compiler converts if(a) to if(cast(bool) a). The opCast method gives us
control over explicit casting to any type, which is given as a compile-time parameter. Here,
we specialize on the argument of bool since that is the only operation we care about with
this type. It returns true if the object is not null. Then, using a variable declaration inside
the if statement, we assign the new type to a local variable and can then use it or pass
it to functions as NotNull!T. This, in turn, implicitly converts back to the original type T,
allowing easy access to all the original type's methods and operations. A not null reference
is always substitutable for a possibly null reference.
The CheckNull type is necessary in addition to the NotNull type
because CheckNull might be null, whereas NotNull is guaranteed
not to be. Adding opCast to NotNull is tempting to simplify the code,
but then we'd have to remove the assertions for the if branching to work,
thereby breaking the not-null invariant. It would let you write NotNull!T
test = checkNull(a_null_reference) without compile-time
and runtime null checking.
It is possible to write Object o = null; NotNull!Object obj = checkNull(o);.
This will compile despite the lack of an if statement to test null, triggering a runtime
assertion failure. This is the best we can do with a library type, but note that this is easy to
catch upon code review and it is still an improvement over not using NotNull at all, since
it will trigger the error immediately at assignment time instead of some indeterminate
point later in the code when the reference is finally used. The difficult part of debugging
null dereference errors is often figuring out why the value was null in the first place.
The assertion failure at assignment time will significantly narrow down the possibilities.
There's more…
A const-correctness implementation of NotNull is in Phobos' std.typecons module.
The FIXME comment is not true right now, but should be by the time this is published.
Confirm that is the case.
133
www.it-ebooks.info
Resource Management
Using unique pointers
Unique pointers are a restrained type that are used when clear ownership of a resource needs
to be established. Here, we'll create a UniqueArray(T) object, which enforces that only one
reference to its payload can exist at any time.
How to do it…
In order to use unique pointers, perform the following steps:
1. Create a struct UniqueArray(T) with a member of type T.
2. Disable the postblit by using @disable this(this);.
3. Write a private constructor that takes T.
4. Write a release method that nullifies the current object and returns
UniqueArray with the payload.
5. Write a destructor to perform cleanup, if necessary.
6. Offer a method to create a new unique resource.
7.
Implement other methods to use the object. Do not use alias this or any
other method that may escape your reference.
8. To use the method any time, you need to pass the reference somewhere.
This can be done by calling release, as shown in the following code snippet:
import core.stdc.stdlib;
struct UniqueArray(T) {
private T[] payload;
@disable this(this);
private this(T[] t) {
payload = t;
}
this(size_t count) {
payload = (cast(T*) malloc(count * T.sizeof))[0 ..
count];
}
UniqueArray!T release() {
auto p = this.payload;
this.payload = null;
return UniqueArray!T(p);
}
~this() {
134
www.it-ebooks.info
Chapter 5
if(payload !is null)
free(payload.ptr);
}
auto opDispatch(string method)() {
return mixin("payload." ~ method);
}
T opIndex(size_t idx) { return payload[idx]; }
T opIndexAssign(T t, size_t idx) { return payload[idx] =
t; }
// You may also choose to implement other operators
}
// testing use
void main() {
auto ptr = UniqueArray!int(5);
// use release since plain assign will fail to compile
auto ptr2 = ptr.release;
import std.stdio;
// ensure the first reference is indeed null
writeln(ptr.ptr is null);
// and that the second reference is correct
writeln(ptr2.length);
}
Running the program will print true and 5, confirming the correct operation.
Try writing auto ptr2 = ptr; as well to get the error message Error: struct unique.
UniqueArray!int.UniqueArray is not copyable because it is annotated with @disable.
This error will force you to think about where the reference lives and explicitly release it,
if required.
How it works…
Postblits are only run on the recipient objects, making them useless to implement unique
move semantics. However, the ability to disable them opens a new possibility; a disabled
postblit will force the users toward another method of your choosing if they want to reassign
it. We forced them to use release, which nullifies the sending object, maintaining the
reference's uniqueness.
Apart from that, we used all the same techniques we've seen before, with one major
difference; we did not rely upon alias this here to forward operations to the payload.
Since alias this allows implicit conversion, it would let the user bypass the disabled
postblit, escaping a reference to the data:
int[] arr = ptr;
// this would work with alias this
135
www.it-ebooks.info
Resource Management
Instead, we do all forwarding internally. For brevity, in this example we didn't implement all
possible operators, opting to implement only basic indexing and partial method forwarding.
String mixins and opDispatch are incredibly flexible tools in D, which we'll explore in greater
detail in a later chapter. Here, we just scratched the surface of what they can do by building
a code string, "payload." ~ member and then compiling it as the function body with the
mixin expression. This gives us easy access to most of the payload members, letting us
inspect that the code worked as expected.
Using RAII and handling the limitations of
class destructors
D can use the Resource Acquisition Is Initialization (RAII) idiom from C++. This is when
resources are acquired when the variable is initialized and automatically released when
the variable goes out of scope.
How to do it…
Perform the following steps:
1. Write a struct that performs cleanup operations in the destructor.
2. If you use a class destructor, be certain that you don't access any memory
external to the object or manually manage the class memory.
How it works…
Structs with destructors are called deterministically, just like in C++. Class destructors are
less reliable. D's garbage collector may be implemented with a variety of strategies, so the
language semantics are flexible. The garbage collector is free to release memory referenced
by the object's pending finalization. This means accessing child objects or arrays in a class
destructor risks a crash. Accessing manually managed objects or shallow class references
(value types embedded in the instance) is safe. You may use a class destructor to free C
resources when the garbage collector runs, for example.
You may manually call destroy(obj) to destroy any object immediately. Together with
a scope(exit) guard, you can deterministically call a class destructor. The destroy
function does not free memory, it merely finalizes the object.
In modern D, there is no delete operator. D used to have a delete operator, like C++;
however, it was deprecated because it limits the garbage collector implementation and is not
memory safe. If you want to manually release memory, you should also manually allocate it.
Given these limitations of class destructors, implementing the RAII idiom in D is typically done
with structs. Struct destructors always run immediately when the struct ceases to exist and
have full access to all child memory.
136
www.it-ebooks.info
6
Wrapped Types
In this chapter, we will explore D's rich abstraction capabilities to wrap, extend, or constrain
other types. We'll learn about:
ff
Creating a struct with reference semantics
ff
Simulating inheritance with structs
ff
Creating a ranged integer
ff
Creating an opaque handle type
ff
Creating a subtyped string for i18n
ff
Forwarding methods with opDispatch
ff
Creating a tagged dynamic type
ff
Creating a structure with two views into the same data
ff
Simulating multiple inheritance with mixin templates
Introduction
D's struct has a wealth of possibilities. It is defined by the D spec as a way to "paint a data
structure over hardware or an external type", and thus gives us various modeling tools that
come without runtime or memory cost. We've already used or seen some of the techniques
from this chapter earlier in the book.
www.it-ebooks.info
Wrapped Types
Creating a struct with reference semantics
D structs are typically a value type (different variables are always different objects), as
opposed to D's classes, which are always a reference type (different variables may refer to
the same object). Sometimes, we want the struct that has reference semantics to ensure
that assignment is cheap, for example.
How to do it…
To create a struct with reference semantics, we will execute the following steps:
1. Create a struct with a single data member that is itself a reference type, such as
a pointer.
2. You may choose to use a private nested struct to hold the implementation, using
alias this to forward methods automatically. The reference counted object in
the previous chapter is a reference-type struct that uses this technique.
3. Use the struct normally—you should not use the ref storage class when passing
it to functions.
How it works…
Structs are a compile-time collection of their contents. If a struct has only one member, it
works almost exactly the same way as that member; if a struct's only member is a reference
type, the struct works like a reference type too. Assigning a struct to another variable of the
same type performs a simple memory copy of the contents:
struct Foo { char[] c; }
Foo a, b;
a = b; // conceptually performs memcpy(&a, &b, Foo.sizeof);
This is a shallow copy, and this has exactly the same semantics as assigning the members
individually. This property builds the flexible foundation on which we can build all kinds
of wrapped types with structs. Using structs with only one data member incurs little to no
runtime cost compared to using a variable of the member's type directly.
There's more…
There is one major exception to the general rule that structs with one member are the
same as the value they wrap: when you are returning a struct from a function. Consider
the following functions:
int* returnPointer();
struct Ptr { int* p; }
Ptr returnWrapperPointer();
138
www.it-ebooks.info
Chapter 6
These two functions are not compatible on the ABI level despite the fact that both types have
the same binary layout, because the struct wrapper may be subject to return value optimization
(though it isn't actually an optimization in this case, which is why the D calling convention on
32-bit doesn't use it). This is a common compiler optimization to avoid the excess copying of
object values by taking a pointer to the recipient object as a function argument, allowing the
function to fill in the data directly instead of copying it through the return value to the destination.
This is permitted by the C++ spec even when the optimization may change the behavior of the
function and is implemented across most C, C++, and D compilers for any struct passed with
the C calling conventions and many structs passed by other conventions.
Since return value optimization may be performed by a C compiler, use caution when trying to
substitute wrapped types for basic types in the extern(C) functions. It is likely that they will
not work the way you expect when returned from a function. In these cases, stick to what you
did in the C declarations and use wrappers once you are fully into D code.
Simulating inheritance with structs
Class inheritance can be broken up into three concepts: subtyping, composition, and
polymorphism. With alias this, subtyping and composition are easy, providing a
nonpolymorphic type of inheritance.
How to do it…
We will execute the following steps to simulate inheritance with structs:
1. Write a struct to use as the base object type.
2. Write the extended struct with a member of the base type.
3. Use alias this with the base type to allow easy access to base members
and implicit conversion.
The code is as follows:
struct Base {
int x;
int y;
}
struct Derived {
int dx;
int dy;
Base base; // a member of the base type - composition
alias base this; // then use alias this for subtyping
}
139
www.it-ebooks.info
Wrapped Types
void operateOnBase(Base base) {}
void operateOnDerived(Derived derived) {}
Derived d;
operateOnBase(d); // works
How it works…
The alias this method is invoked in two places: if a member is requested and not found
in the outer struct and if implicit conversion to a specific type is attempted. alias this is
implemented as a rewrite of the expression to automatically add a reference to the member.
For example, when you write derived.x, x is not found in the outer structure, so the
compiler attempts to rewrite it as derived.base.x. Similarly, implicit conversion is
implemented by the compiler rewriting it in terms of the alias this member—when
you pass it to the operateOnBase function, the compiler rewrites the argument d into the
alias this member. It works exactly as it would if you write operateOnBase(d.base).
If the alias this member is a value type, the rewrite also yields a value. Thus, our call
to operateOnBase will not update d—it will be passed by a value. If you want reference
semantics in the function, you may write ref Base base in the function declaration.
alias this has no runtime cost.
Creating a ranged integer
We saw in the previous chapter how we can make a not null type. We can use similar
techniques to make an integer that is forced to stay in a particular range.
How to do it…
To create a ranged integer, execute the following steps:
1. Create a struct with an integer member.
2. Disable the default constructor.
3. Overload the arithmetic operators by using string mixins to automate most
of the code generation process.
4. Insert range checks into the overloaded functions.
5. Use a getter property with alias this to allow implicit conversion to int.
Execute the following code:
struct RangedInt(int min, int max) {
private int _payload;
140
www.it-ebooks.info
Chapter 6
@disable this();
this(int value) {
_payload = value;
check();
}
RangedInt check() {
assert(_payload >= min);
assert(_payload < max);
return this;
}
RangedInt opUnary(string op)() {
RangedInt tmp = _payload;
mixin("tmp= " ~ op ~ "_payload;");
return tmp.check();
}
RangedInt opBinary(string op)(int rhs) {
mixin("return RangedInt(_payload " ~ op ~ "rhs);");
}
RangedInt opOpAssign(string op)(intrhs) {
mixin("_payload " ~ op ~ "= rhs;");
return check();
}
RangedInt opAssign(intrhs) {
_payload = rhs;
return check();
}
string toString() {
import std.conv;
return to!string(_payload);
}
@property int getPayload() { return _payload; }
alias getPayload this;
}
141
www.it-ebooks.info
Wrapped Types
void main() {
import std.stdio;
RangedInt!(50, 100) r = 80;
r += 19;
r++; // this will trigger an assertion failure
}
How it works…
Here, we wrapped and subtyped an integer while also changing its behavior with operator
overloading. Before going to alias this, D will attempt to use member functions on the
wrapped type, including operator overloads and constructors. By offering custom functions,
we can hook or disable individual capabilities.
We can disable individual operators, too. For example, add @disable
void opUnary(string op:"-")() {} to the definition of
RangedInt. Then, if you try to negate RangedInt, the compile will
fail with the following message: Error: functionsimpleranged.
RangedInt!(0, 100).RangedInt.opUnary!"-".opUnary is
not callable because it is annotated with @disable.
The check function performs the range checks. We call it on every overloaded method to
ensure that the result remains valid. To ensure that any mutation goes through one of the
checked methods, we made _payload private and only exposed conversion to the base
type of int through a getter property. To retain the operations expected from an integer,
we implemented several operators:
ff
opUnary: This operator implements unary operators, that is, those with just
one argument, for example, -a, a++, or --a. The postfix unary operators are
automatically implemented in terms of the prefix forms, so we don't have to
implement a++ separately from ++a. The operator is passed as the compile-time
argument as a string.
ff
opBinary: This operator implements operators with two arguments, for example,
a + b or a / b, this, the left-hand side of the expression a and the right-hand
side of the expression b is passed as an argument. We could have also implemented
opBinaryRight, where this is the right-hand side argument. The operator is
passed as the compile-time argument as a string.
142
www.it-ebooks.info
Chapter 6
ff
opAssign: This operator implements a = b, where a is this in the function and b
is given as an argument. The b argument can be of any type except typeof(this),
which is always handled automatically (a reference assignment for classes or a
memory copy—optionally with postblit— for structs). The opAssign operator differs
from constructors. Moreover, constructors are only called at the declaration point,
even if you initialize it with Foo f = 10 /* calls the constructor */. The
opAssign operator is called when you assign to it after the variable is declared: f =
10. We implemented both for RangedInt for easy interoperability with integer literals.
ff
opOpAssign: This operator is used for expressions such as a += b. Here, a is
this, + is the operator, and b is passed as the argument. The operator is passed
as the compile-time argument as a string.
Despite taking the operator as a compile-time string argument, operator overloading only
allows us to implement operators predefined in the D language; it is not possible to define
your own operators. This is because user-defined operators would break the D design goal of a
context-free grammar—it would require the D lexer and parser to be aware of the user-defined
context to identify the operator tokens and parse them with correct precedence. This would
have an adverse impact on compile speeds.
Taking the operator as a compile-time string argument does have two advantages. We can
use the symbol instead of having to remember a name and without using special syntax in
the language, and we can use the string directly to form code to mix in.
There is one disadvantage of operator overloading being implemented with templates,
though the operator overload functions cannot be virtual. In general, an interface or class
may have a templated method, but they must always be final. This is because the compiler
doesn't know what combination of compile-time arguments it may accept, and thus does
not know how many slots to reserve in the virtual function table. To work around this, write
the overload implementation as a final method that merely forwards the request to a virtual
method, intopBinary(string op : "+")(intrhs) { return add(rhs); }, and
then implement add in the subclass as a regular method. Now, the operator overload will
work with the interface, which can be overridden by the child class!
We used the second property to concisely implement all the arithmetic operators for our
wrapped type. Let's look at our implementation of opBinary:
mixin("return RangedInt(_payload " ~ op ~ "rhs);");
The mixin expression takes one argument: a string. It may also be a function that returns a
string. The argument is evaluated at compile time, then pasted into the code and compiled
normally. It is similar to eval in languages such as JavaScript, but with the important
difference that the code is not interpreted at runtime—mixin() is wholly a compile time
operation. The string passed to the mixin expression is not like C macros where the code
must form a complete, compliable declaration, statement, or expression. It cannot mix an
incomplete code fragment.
143
www.it-ebooks.info
Wrapped Types
After performing the operation with the mixed-in code, we run the check. In opBinary,
we depend on the RangedInt constructor to perform the range checking. In the other
functions, we call it explicitly. If any operation upon the number causes it to go out of
bounds, we will get an assertion failure.
There's more…
The RangedInt constructor presented here only performs limited checks. Since we used
assert, the checks will disappear when the program is compiled with the –release switch.
We could instead throw an exception or use the enforce function from std.exception
to insert a check which will always be present. We may also accept default file and line
arguments all the way up the call chain, so our thrown exception will tell where the out-ofrange condition was entered in the user code instead of the library code.
The checks will not work if the limits are close to int.min or int.max because they do not
handle wraparound. With the two's complement arithmetic mandated by the D spec (and, in
practice, used by hardware on which D runs), int.max + 1 == int.min. This condition is
called integer overflow. On x86, we can handle this with inline assembly, checking the overflow
flag after performing the operation (or, the carry flag if we were using an unsigned type).
Since the flags can be lost in the process of a function call, we'd have to change two things
to handle integer overflow with inline assembly: the check function itself and where the check
is called. To avoid an actual function call, we'd use a mixin. The check function would be
changed to return a string of code, and the usage site would be changed to mix in that code:
string check() {
// returning a code string
return q{
asm {
// this code is x86 and dmd specific
jo overflowed; // check the overflow flag…
}
if(_payload < min) goto overflowed; // check min
if(_payload > max) goto overflowed; // and max
return this; // still return the value
overflowed: throw new Exception("Value out of bounds.");
};
}
Each usage would be changed to the following code:
mixin(check());
144
www.it-ebooks.info
Chapter 6
Try using RangedInt!(int.min, int.max) and you will notice that it will throw an
exception if you set the method to int.max, and then you can try to add a number greater
than 1 to it. Why must we add a number greater than one? Adding just one may be optimized
by the compiler into the inc instruction rather than add, which does not set the overflow flag!
For a complete solution, we would also want to implement these operators and assembly
language (asm) code ourselves to ensure we get exactly the behavior we want.
Creating an opaque handle type
Opaque handles are used to refer to an object, but are themselves not an object. They are
often implemented in terms of pointers to a type that user code knows nothing about or a
wrapped integer and can only be used by passing the handle to library-provided functions.
How to do it…
We will execute the following steps to create an opaque handle type:
1. Create a private struct with no data members and no methods in the interface
to represent the opaque type. If you are implementing the library, you may use
members and methods internally, but do not expose them to the public interface.
2. Either use alias Impl* Handle; or create a public struct with only one data
member—a pointer to the private struct or the handle ID if you use integers—to
represent the handle. Mark this member private. The alias method works better
when interfacing with C libraries that do not use a handle struct. Otherwise, the
struct gives more control.
3. Disable built-in functions on the public struct as desired to force the user to go
through your library. You may disable the default constructor if it needs special
initialization and/or postblit if you don't want the handle copied.
4. Provide public functions in the module that operate upon the only handle in their
interface. Whenever possible, make the handle the first argument to the function.
5. Be certain that the same method, handle or pointer, is used in the library too.
If the library is implemented with a naked pointer instead of a handle struct, also
use the naked pointer at the usage point.
The code is as follows:
private struct OpaqueImpl{} // step 1
alias OpaqueImpl* OpaqueHandle; // step 2, pointer method
// or step 2, struct method
// struct OpaqueHandle{ private OpaqueImpl* item; }
// interface functions
145
www.it-ebooks.info
Wrapped Types
OpaqueHandle createObject();
void freeObject(OpaqueHandleimpl);
void add(OpaqueHandleimpl, int);
void print(OpaqueHandleimpl);
void main() {
// usage:
auto handle = createObject();
scope(exit) freeObject(handle);
handle.add(10); // call using UFCS
handle.print();
}
How it works…
Opaque handles are a technique to maximize binary compatibility. Since the user code doesn't
need to know anything about the size or layout of the data, the library is free to change its
implementation details at any time. It can add functions, add data, or remove data without
breaking the client code. Opaque handles are also useful for interlanguage compatibility,
since they only require an agreed method to pass basic data and call functions.
With D, we can use this technique directly and also build upon it, while maintaining similar
syntax to other library writing techniques. There are four D features used here: alias, UFCS,
an empty struct, and wrapper structs.
alias is a feature to give an entity an alternative name. It comes in two mostly equivalent
forms: alias oldnamenewname; or alias newname = oldname;. Aliases can hide
implementation details (the handle is a pointer, but this is not immediately visible at the
usage point) and provide more specific names for your entities, but do not create a new type.
This is why we defined the empty struct instead of simply alias void* OpaqueHandle;—
the latter form would allow undesired implicit conversions since it does not define a unique
type. This is similar to typedef in C++. D used to have typedef too, but it was deprecated
in favor of the struct+alias combination to give better control over details. In Phobos,
std.typecons.Typedef encapsulates this pattern in the standard library.
Next, we used an empty struct. On the implementation side, this struct would be populated
with data; however, on the user interface side, it is empty to hide its details. In D, the
implementation and interface may be separated logically using protection attributes or
physically by writing two files, one with just declarations and the other with implementations
(similar to header files in C or C++). The interface file may be automatically generated with
dmd –H. Of course, the implementation may also be written in another language.
146
www.it-ebooks.info
Chapter 6
The .di files, meaning D interface files, may be hand-written or automatically
generated with dmd –H. As far as the compiler is concerned, there is no
difference between the .d and .di files—you may write implementations
in a .di file or just write interfaces in a .d file. Partially as a result of this,
an implementation file cannot import its corresponding interface file. The
compiler will think the module is attempting to import itself.
Your first thought when declaring an opaque struct might be to write it without a body: struct
OpaqueImpl; instead of struct OpaqueImpl {}. We chose the latter here because then
the compiler will believe it to have no members instead of being a forward declaration of a struct
with an unknown number of members. The advantage of this is we will avoid compiler errors
when we try to pass it to functions using method call syntax (UFCS). The compiler will confidently
believe it has no members and let you call other functions through it without error. The downside
is that a user could also declare OpaqueImpl when it has an empty body, but we are able to
prohibit that by simply making the structure private.
Lastly, if we can use a wrapper struct instead of an alias, we have the advantage of being able
to add or disable methods, making the handle automatically reference counted, destroyed, or
not null, as we've already done with other types in this chapter. If you are writing a library, use
a wrapper struct. There's little runtime cost and it has the most potential for growth and control.
If you are accessing an existing library, however, be sure to match the method they used. While
wrapper structs are almost identical to the wrapped type on a binary level, there are subtle
differences in passing them in return values. If you wrap a type you do not control, you should
also wrap the functions that use that type.
There's more…
We looked briefly at the preceding alias syntax. There are two forms; what are the
differences between them? Both work the same way; the only difference is the alias
old new syntax (inherited from C) has slightly more compatibility with the function pointer
attributes and the alias new = old syntax also functions as shorthand for a template,
which lets you easily do pass-through or transformations of an argument list. This can be
seen in the following code:
// the following two lines are equivalent
alias TemplateArgList(T…) = T;
template TemplateArgList(T…) { alias TemplateArgList = T; }
This is not possible with the other syntax. On the other hand, the C syntax allows you to define
names that include function linkage and other attributes:
// this line will not compile with the equals based syntax
alias extern(C) void function() CallbackType;
147
www.it-ebooks.info
Wrapped Types
When interfacing with C, this syntax can help define function pointers with the right linkage
(calling convention) and attributes like nothrow. These differences may disappear with time.
Currently, outside of these two cases, the syntax you use comes down to personal preference.
Creating a subtyped string for i18n
A specialized string is a type with a text representation. For example, user-visible text is a string,
but not every string is user-visible text. When adding internationalization (often shortened to
i18n) to an application, using a string subtype can help ensure that all messages are available
to translators. Moreover, we'll use D's templates and compile-time string imports to efficiently
load the translation file.
How to do it…
Execute the following steps to create a subtyped string for i18n:
1. Create a struct with a private string member and a public getter property for that string.
2. Add alias this to the string getting property.
3. Write a private function that loads the translation table and returns the string
wrapped in our struct.
4. Write a template that takes a key, file, and line number that assigns the result
of the translation function to a member with the same name. You may also use
pragma(msg) to print out the whole list of translatable strings.
5. When you write functions to print strings to the user, accept the TranslatedString
type rather than string.
6. Write a message using the translation template.
On Windows, if you get garbled content in the console, you may need
to enable UTF-8 output with SetConsoleOutputCP(65001);
from the Windows API.
The following is the code to create a subtyped string for i18n:
struct TranslatedString {
private string value;
@property string getValue() { return value; }
alias getValue this;
}
private TranslatedString localize(string key, bool requireResult =
true) {
148
www.it-ebooks.info
Chapter 6
// we'll use an associative array for the translation
// it would also be possible to load from a file, at
// compile time
enum string[string] translations =
[
"Hello!" : "¡Hola!"
];
if(auto value = key in translations)
return TranslatedString(*value);
if(requireResult)
throw new Exception(key ~ " is not translated");
return TranslatedString(null);
}
template T(string key, string file = __FILE__, size_t line = __LINE__)
{
version(gettext) {
// prints messages at compile time with all strings
// in the program, if requested
import std.conv;
pragma(msg, "#: " ~ file ~ ":" ~ to!string(line));
pragma(msg, "msgid \"" ~ key ~ "\"");
pragma(msg, "msgstr \""~localize(key, false)~"\"");
pragma(msg, "");
}
enum T = localize(key);
}
void main() {
auto p = T!"Hello!"; // translated string literal
import std.stdio;
writeln(p);
}
How it works…
Here, we utilize the type system to help us catch untranslated strings that are to be printed to
the user and the compile-time features to help us translate them.
The TranslatedString type, if used throughout the library, would provide a degree of
type safety to printing. Using alias this subtyping, it will easily convert back to string
for integration with other functions without allowing implicit conversions from string to
TranslatedString, which would defeat the purpose.
149
www.it-ebooks.info
Wrapped Types
The T template provides concise syntax to access the localization function (without runtime
cost; this pattern is how we can do user-defined literals in D, a topic we'll cover in greater
depth in a later chapter) as well as a place to track all translatable strings in the application.
Using the version statement, we provide an optional code path that prints the locations,
strings, and current translations of all the instantiations of this template. The version
statement takes a single identifier. Unless that identifier is specialized on the compiler's
command line or is predefined for the given target platform (for example, Windows or
OS X), the code inside is not compiled. Here, we used version(gettext), so the code
inside is only compiled if dmd is passed the –version=gettext argument.
If this code is compiled, it will run the pragma(msg) instructions. This will print out the
given string at compile time. It is meant to give a compilation message to the user. The
argument need not be a literal because it will be evaluated using compile-time function
evaluation; ordinary D code will be run and the result printed.
The arguments to T, (string key, string file = __FILE__, size_t line = __
LINE__), include another bit of D magic: the default arguments to file and line. Just like
we saw with runtime function arguments back in Chapter 1, Core Tasks, when we looked at
creating a custom exception type, the special tokens __FILE__, __LINE__, and a few others
are automatically inserted at the call site. It works the same way with compile-time arguments.
Using these, we can print out the list of strings (including the location of their appearance) for
the translator to examine, without writing an external tool to parse the code to find the strings.
Once we have the strings, we put them into an associative array literal inside the localize
function, which is wrapped in the TranslatedString type, and use that to get the
translation to print to the user.
Forwarding methods with opDispatch
When writing wrapped types, you might want to forward methods without subtyping.
The opDispatch method lets that happen with very little code.
How to do it…
To forward methods with opDispatch, we need to execute the following steps:
1. Write the wrapped struct.
2. Write a method called opDispatch, which takes variadic arguments:
auto opDispatch(string name, T…)(T t).
3. In the body, write return mixin("member." ~ s ~ "(t)");.
150
www.it-ebooks.info
Chapter 6
The code has to be executed as follows:
class Foo {
int test() { return 0; }
void nop() {}
}
struct Wrapped {
Foo f;
this(Foo f) { this.f = f; }
auto opDispatch(string s, T...)(T t) {
return mixin("f." ~ s ~ "(t)");
}
}
void main() {
Wrapped w = new Foo();
Int i = w.test();
w.nop();
}
How it works…
We've been using alias this throughout the chapter to provide easy access to a wrapped
data member or property. However, since this also enables implicit casting to the wrapped
type, we don't always want it. Using opDispatch, we can provide access to a wrapped
method without offering subtyping.
The opDispatch method works similar to the other operator overloads; it is a function
with a special name that takes a compile-time string argument. Any time you try to
access a nonexistent member with the dot operator, the compiler will try to instantiate
opDispatch!"name" to handle the missing member. Execute the following code:
struct Foo {
void test() {}
void opDispatch(string s)() {}
}
Foo f;
f.test(); // it finds test in the object, so it is called normally
f.disp(); // disp is NOT found in the object, so it tries to call
// f.opDispatch!"disp"(); before issuing an error
Once opDispatch is tried, the arguments are forwarded as well. Since we wanted to capture
all possible arguments here to pass on to the wrapped type, we declared opDispatch as an
unrestricted variadic template with T…. This will accept a list of any length, zero or more, of
anything that can be passed as a compile time argument, including types.
151
www.it-ebooks.info
Wrapped Types
Then, the runtime argument list, (T t), is also variadic and may consist of several types.
It accepts anything (given that the function body compiles).
Just like with RangedInt we implemented earlier, we will use a string mixin to concisely
implement the forwarding. With the auto return value, the compile takes care of forwarding
returns for us too, including returning void. The function just works.
Wrapping the type might break some code that would otherwise work
thanks to UFCS. Since the mixin is evaluated in the scope of the
wrapped function and UFCS is evaluated at the call site, they may see
different functions. The call site can import different modules than the
wrapper function, thus enabling some functionality that doesn't work at
the wrap site. This is a necessary consequence of using this method.
We can also forward to an array of objects with this same technique:
struct Wrapped {
Foo[] fs; // an array instead of just one object
this(Foo[] fs) { this.fs = fs; }
Wrapped opDispatch(string s, T...)(T t) {
foreach(f; fs) // simply loop over them
mixin("f." ~ s ~ "(t)");
return this; // for chaining
}
}
This lets us work with arrays in the same way as jQuery's element collections:
Wrapped getElements() { return Wrapped([array, of, items]); }
getElements().addClass("foo").innerHTML("baz");
That code would compile, provided an Element class is wrapped and provides the individual
addClass and innerHTML methods. You would not have to write wrapped methods manually
to perform the looping.
Creating a tagged dynamic type
D's structs are a good foundation to create a dynamic type. We'll create a tagged union
to serve as a starting dynamic type. This is the technique used to implement the library
jsvar type that we used in a previous chapter. Here, we'll only support int and string.
152
www.it-ebooks.info
Chapter 6
How to do it…
We will execute the following steps to create a tagged dynamic type:
1. Write a struct with two members: a tag that holds the current type and a union
that holds the possible types.
2. Make the data private and add checked getter and setter functions.
3. Add a constructor that takes the possible types. You may write it in terms of
opAssign.
4. Add type coercion if you want weak typing in the getter function; otherwise,
throw an exception on type mismatches.
5. Implement other methods or operators you want.
The following is the code to create a tagged dynamic type:
struct Dynamic {
enum Type { integer, string }
private Type type;
private union {
int integer;
string str;
}
this(T)(T t) { // easy construction
this = t;
}
// assignment of our supported types
Dynamic opAssign(inti) {
type = Type.integer;
integer = i;
return this;
}
Dynamic opAssign(string i) {
type = Type.string;
str = i;
return this;
}
// getting our types back out into static variables
// here, we used the coercion option instead of throwing if
153
www.it-ebooks.info
Wrapped Types
// we had the wrong type
int asInteger() {
final switch(type) {
case Type.integer:
return integer;
case Type.string:
import std.conv;
return to!int(str);
}
}
string asString() {
final switch(type) {
case Type.string:
return str;
case Type.integer:
import std.conv;
return to!string(integer);
}
}
// we may also implement other operators for more integration
}
How it works…
Dynamic types are usually implemented using the tagged union technique used here. A union
is a group of variables which share a block of overlapped memory. Unless all the variables of
the union are valid simultaneously (which we'll look at in the following recipe), it is important
to know which member is currently active. That's where the type member comes into play.
The other parts of the code are things we've already seen. The opAssign function implements
the = operator with other types. The constructor implements by declaring the struct with an
argument list of other types. The asInteger and asString methods are just regular functions.
There's one interesting bit we use in those methods: the final switch. A final switch is
guaranteed at compile time to cover every member of the enum. With an enum, this means
the build will fail if a member is not handled by a case, making the final switch resilient to
changes. If a new member is added to the enum, the compiler will help you remember to
add a handling case to each and every switch that uses it.
154
www.it-ebooks.info
Chapter 6
There's more…
Phobos' std.variant provides a tagged union, Variant, that uses a large union as well
as a pointer to an even larger type, making it capable of holding almost anything. Variant
doesn't provide weak typing or full operator overloading. However, since it can hold and offer
nearly any type with proper runtime checking, you may use it when you need a generic runtime
variable, such as an array of mixed type elements.
Variant uses method templates and generated function pointers to handle the types rather
than writing out a list manually. We'll look at these techniques in depth in Chapter 9, Code
Generation, and Chapter 8, Reflection.
Creating a structure with two views into the
same data
Sometimes, it is useful to have a structure with multiple representations. This may be achieved
with properties, but there is also a more direct way of doing it: using unions and anonymous
structs. We'll create a Color structure with both RGBA and array representations.
How to do it…
To create a structure with two views into the same data, we need to execute the following steps:
1. Write a struct to contain your type.
2. Add a union without a name to hold the alternative representations.
3. In the union, add the views. Be sure they match up in size and binary layout.
For our Colorstruct, we'll want it to be represented by an array of ubytes
with each byte also having a name.
4. For the names, write a nameless struct with each named member.
5. When using the structure, use the names directly.
To implement the preceding steps, we will have to execute the following code:
struct Color {
union {
ubyte[4] rgba;
struct {
ubyte r;
ubyte g;
ubyte b;
ubyte a;
}
155
www.it-ebooks.info
Wrapped Types
}
}
Color c;
c.r = 100; // accessing the inner name is easy
assert(c.rgba[0] == 100); // alternative view into same data
How it works…
D will permit you to group members inside an aggregate by wrapping them in other anonymous
aggregates. Here, we wanted a struct that exposed two representations of the same data. A
union is an aggregate type where all the members overlap in memory. This may be used to
share memory between types where only one is valid at any time, as we did in the dynamic type,
or it can be used to provide multiple equally legitimate views into the same data, which is what
we're doing here.
The first view is an array of 4 bytes. The second view gives individual names to each byte.
For that, we used a struct with four individual ubyte members. Thus, we have different
views into the same memory.
Since we didn't give the inner union nor struct a name (this is only permitted inside another
struct, union, or class), it serves to group the members in the implementation, but is invisible
to the user. We do not need to use an additional dot member nor declare a separate variable
of the anonymous type.
This technique would also be useful to access hardware-mapped memory or a task such as
writing an x86 emulator, where the registers may be represented with several layers of nested
anonymous structs and unions to provide access to each individual byte as well as the 16, 32,
and 64 bit views (AX, EAX, and RAX, for example).
Let's execute the following code:
struct x86Accumulator {
union {
long RAX;
// lowest items first because x86 is little endian
struct {
union {
struct {
union {
struct {
byte AL;
byte AH;
}
short AX;
}
156
www.it-ebooks.info
Chapter 6
short upperWord;
}
int EAX;
}
int upperDWord;
}
}
}
void main() {
x86Accumulator a;
import std.stdio;
a.EAX = 50;
// set the high byte of the low word independently
// equivalent to adding 256...
a.AH = 1;
writeln(a.RAX); // should be 306
}
We can update or view individual parts, which simultaneously affects the whole object.
Simulating multiple inheritance with mixin
templates
D does not have multiple inheritance like C++. Instead, it follows a Java-style pattern of one
base class, multiple interfaces. However, using mixin templates, we can simulate all aspects
of multiple inheritance.
How to do it…
We need to execute the following steps to simulate multiple inheritance with mixin templates:
1. Write an interface and mixin template instead of a base class.
2. Write your usage class, which inherits from the interfaces and mixes in the mixin
templates to the body.
3. You may override functions from the mixin template by writing new ones with the
same name in the class body.
The code is as follows:
import std.stdio : writeln;
interface Base1 {
157
www.it-ebooks.info
Wrapped Types
void foo();
}
mixin template Base1_Impl() {
void foo() { writeln("default foo impl"); }
}
interface Base2 {
void bar();
void baz();
}
mixin template Base2_Impl() {
int member;
void bar() { writeln("default bar impl"); }
void baz() { writeln("default bazimpl"); }
}
classMyObject : Base1, Base2 {
mixin Base1_Impl!();
mixin Base2_Impl!();
void baz() {
writeln("custom bazimpl");
}
}
void main() {
MyObjectobj = new MyObject();
Base1 base1 = obj; // works on all interfaces
Base2 base2 = obj; // works on all interfaces
obj.foo(); // call methods through object
obj.baz(); // note that the custom one is called
base2.bar(); // or through interface
base2.baz();
}
On running the preceding program, we will get the following output:
default foo impl
custombazimpl
default bar impl
custombazimpl
158
www.it-ebooks.info
Chapter 6
If you override one member of an overload set, you must overload them all.
How it works…
Inheriting and implementing multiple interfaces will allow your object to implicitly convert to
the various interface types. The problem is they cannot have default virtual implementations.
That's where the mixin template comes in.
A mixin template (not to be confused with the mixins string we used before) is a
parameterized list of declarations which is inserted into the mixin site, almost as if you
copied and pasted the code and compiled it.
Here, we paired a mixin template with each interface, putting the interface implementation
in the template. An interesting feature of these templates is that they will not conflict with
names written in the object. As a result, we can selectively override functions from the mixin
template, as we did with the custom baz implementation.
Since the customization is done by name, if you want to customize
one member of an overload set, you must customize them all. That
is, if we had baz(int) in addition to baz(), we'd have to write
custom implementations of both.
When customizing functions, you may also wish to call the default implementation. To do this,
give the mixin template a name and then refer to it by that name:
mixin Base2_Impl!() b2; // name it
void baz() {
writeln("custom bazimpl");
b2.baz(); // refer to the function by full name
}
The other functions will still appear in the object—you will not have to refer to them by the full
b2.bar name. The name is only used when disambiguating.
159
www.it-ebooks.info
www.it-ebooks.info
7
Correctness Checking
In this chapter, we will explore D's correctness checking and documentation features.
We'll look at the following recipes:
ff
Using assertions and exceptions
ff
Using static asserts
ff
Using template constraints and static if
ff
Preventing memory corruption bugs with @safe
ff
Leveraging const-correctness
ff
Avoiding side effects of pure functions
ff
Verifying object invariants and pre- and post-conditions
ff
Unit testing your code
ff
Documenting your code with Ddoc
ff
Writing platform-specific code (versions) and per-client configuration modules
Introduction
D is designed to help make programs with fewer bugs. Its built-in support for assertions,
contract programming, and unit tests help you verify your program at runtime. D's exception
based error model helps us to ensure no runtime errors go unnoticed, without requiring
return code to be checked after every function call.
D also provides numerous features to help you to prove correctness at compile time, from
built-in function annotations to custom compile checks with static assert, which is capable
of running D code with compile-time reflection to implement complex checks.
We'll also look at D's built-in support for documentation and platform versioning, which helps
you to communicate that the code does what you intended, not just what you programmed.
www.it-ebooks.info
Correctness Checking
Using assertions and exceptions
D has two features dedicated to error handling: exceptions and assertions. Exceptions are
used to handle errors external to the program and assertions are used to verify assumptions
inside the program. In other words, assertions are a debugging tool while exceptions handle
situations that are beyond your control as a programmer.
How to do it…
Perform the following steps by using assertions and exceptions:
1. Any time you make an assumption about program state, explicitly express it with
assert.
2. Whenever environmental or user data prevents your function from doing its job,
throw an exception.
3. Write assert(0); on any branch that you believe ought to be unreachable code.
The code is as follows:
struct MyRange {
int current = 0;
@property bool empty() { return current < 10; }
@property int front() {
// it is a programming error to call front on an empty
range
// we assume current is valid, so we'll verify with
assert.
assert(!empty);
return current;
}
void popFront() {
// it is always a bug to call popFront on an empty
range
assert(!empty);
current++;
}
}
void appendToFile() {
import core.stdc.stdio;
auto file = fopen("file.txt", "at");
scope(exit) fclose(file);
// Files if not opening is not a bug – it is an outside
condition
162
www.it-ebooks.info
Chapter 7
// so we will throw an exception instead of asserting.
if(file is null)
throw new Exception("Could not open file");
fprintf(file, "Hello!\n");
}
You can never have too many asserts. If your code has a
bug, you'll be thankful for all the assertions helping you
narrow down the places it could be.
If you want to easily trigger the exception, try running this program in a read-only directory.
How it works…
The key factor to consider when deciding whether you should use assert or throw is: did this
failure occur due to a program bug? Assertions are debugging tools. A correctly written
program should never experience an assertion failure under any circumstances. Indeed,
when compiled with the –release switch to dmd, assertions are removed from the
generated code. Exceptions, on the other hand, do not indicate a bug in the program.
You can use version(assert) to compile code on the
condition that asserts are enabled.
Generally, exceptions should be thrown only when a program fails to complete its operation.
For example, a function that checks whether a file exists should not throw an exception if the
file is not found. Instead, it should simply return false. However, a function to copy or append
to a file should throw an exception if the file is not found because it is impossible to copy a file
that doesn't exist. The function could not do its job due to factors beyond the programmer's
control, thus an exception is appropriate.
Any time you make an assumption about the state when programming, you should write
it out explicitly with an assertion. Having too many asserts won't hurt you. They are removed
from the release build so that there's no cost in your final build, and you can save a lot of
debugging time if one of your assumptions proves to be invalid! For example, we demonstrated
assert with a range earlier. Suppose we didn't correctly check empty before calling front. This
would result in our program reading corrupted data, a problem that might not be discovered
until it ruins a file or causes some other bug in production.
That's the power of assert; when used frequently, they help to find bugs as soon as the
program's state becomes invalid. A failing assertion gives a location (file and line number
in the source code), a stack trace, and optionally, a string message (the second argument
to assert). An undetected bug gives a crash or corrupted result.
163
www.it-ebooks.info
Correctness Checking
Avoid functions that have side effects in assertions. Your program may
inadvertently rely on those side effects when debugging, then break in
release mode when those function calls are removed.
Exceptions are used for everything outside your control. If the condition can still fail even
if you did a perfect job programming, use an exception instead of an assertion. Exceptions
ought to use different types (child classes derived from Exception) to indicate different
classes of problem. Phobos does not provide a generic exception hierarchy, instead opting
to create Exception subclasses as needed. You should also do this because handling
exceptions with the catch statement differentiates them by dynamic type; using subclasses
will let the consumer of your function choose which types of exception they can handle,
while leaving the others unchanged.
It isn't wrong to throw an exception instead of using assert. It is
slightly less efficient and may surprise the user. When writing a library,
some people opt to use exceptions instead of assertions even when it
is a programmer bug, since the user code is beyond the control of the
library author. This defensive programming is not wrong, but typically,
D style encourages assertions, even in libraries. However, if you are in
doubt, exceptions are always a safe choice.
See also
ff
See the Using a custom exception type recipe in Chapter 1, Core Tasks
Using static asserts
A static assert is the main language feature for implementing custom compile-time checks. It
can check any condition. If the static assert is compiled, the condition must be true; otherwise,
it will issue a compile-time error. Here, we'll use it to verify whether our struct is of the correct
size to interface with hardware.
How to do it…
Perform the following steps:
1. Write static assert(condition, message); in the code.
2. If your condition is too complex to represent as a simple condition, you may write a
helper function and call it for the condition.
3. Remember that static assert must pass if the code is compiled, even if the path
is not actually executed.
164
www.it-ebooks.info
Chapter 7
The code is as follows:
align(1) struct IDTLocation {
align(1):
ushort length;
uint offset;
}
static assert(IDTLocation.sizeof == 6, "An IDTLocation must be exactly
six bytes with no padding.");
How it works…
The compile-time partner to assert is static assert. It functions in the same way, but
instead of checking a runtime execution path, it checks a compile-time path. Whenever a
static assert is compiled (specifically, this check occurs during the semantic analysis phase
of compilation), its condition must pass or else a compile error will be triggered.
Compile errors do not necessarily cause the build to fail. Whether something compiles or
not can be checked by the program. In these conditions, a compile failure is delivered to the
program rather than being displayed to the user. Also, if a template fails to instantiate, the
compiler may just use an alternate path, hiding the error. For example, if you are writing a
wrapped type with overloaded operators and alias this and have a compile error inside
the overloaded operator. Then, the compiler will see it as unsuitable and fall back on alias
this, silently hiding your mistake! If you are in doubt that your code path is being attempted
to compile, you can double-check by adding pragma(msg, "any message here");
somewhere near your static assert.
Your compile-time assumptions should be checked by static assert, especially when
interfacing with hardware or outside programs when binary layouts must be precisely correct
to avoid memory corruption and other crashes. In our preceding example, we used it to verify
the size of an IDTLocation struct that is loaded by the processor so that it can find interrupt
handlers. If this is not loaded correctly, the CPU will almost immediately triple-fault when it
tries to run the program, causing the computer to restart! These low-level bugs can
be difficult to trace down and if driving real hardware, it could be physically damaging.
It is considerably cheaper and easier to double-check your assumptions at compile time. Even
though this data structure looks simple enough to verify by simply looking at it, hidden issues
such as data padding and alignment may catch you by surprise. If you remove align(1)
from this structure, you'll see the assertion will fail because the compiler will align struct
data members on native machine word boundaries by default. In this case, it would add an
additional 2 bytes of padding.
165
www.it-ebooks.info
Correctness Checking
One similar problem that can be caught by static assert is comparing struct sizes for
C interoperation across platforms. For example, the Linux xlib library uses structs with
C's long type to represent GUI events. C's long is not the same as D's long. In D, long
is always a 64-bit integer. In C, long is 32 bits on all 32-bit platforms as well as 64-bit
Windows; however, on 64-bit Linux, C's long is itself a 64 bit type.
When writing C bindings, binary compatibility is a must. A simple copy-and-paste of the C
code will work on 64-bit Linux, but will crash on 32-bit systems! If we use a static assert to
verify the size matches the C compiler's requirements (write a small program that simply
prints sizeof(The_Type) and be sure to build and run it on the same platform to get the
correct expected value). Our mistake will be caught at compile time instead of causing a
crash. This may feel like tedium when checking it, but believe me, it will all be worth it the
first time it catches a mistake.
When writing bindings to C libraries, import core.stdc.config;
and use the types c_long and c_ulong to do the correct translation.
However, while this issue can be fairly easily fixed, the static assert
still serves as a valuable sanity check to ensure you did do this correctly
and to be a first line of defense against other translation mistakes.
Checking structure sizes is not the only thing done by static assert. It can check anything
that can be run at compile time. We've used it before to verify our range objects adhere to a
particular compile-time interface. Phobos' std.random also uses it to ensure parameters
to a random number engine are good for pseudorandom number generation by checking the
greatest common denominator and number of factors the integer parameters have.
It achieves these checks by simply writing regular functions to check the numbers and calling
them in a series of static assert statements in the object as shown as follows:
struct LinearCongruentialEngine(UIntType, UIntType a, UIntType c,
UIntType m) {
private static bool properLinearCongruentialParameters(
ulong m, ulong a, ulong c)
{
/* snip some implementation */
if (a == 0 || a >= m || c >= m) return false;
// c and m are relatively prime
if (c > 0 && gcd(c, m) != 1) return false;
// a - 1 is divisible by all prime factors of m
if ((a - 1) % primeFactorsOnly(m)) return false;
// if a - 1 is multiple of 4, then m is a multiple of 4 too.
if ((a - 1) % 4 == 0 && m % 4) return false;
// Passed all tests
return true;
}
166
www.it-ebooks.info
Chapter 7
static assert(c == 0 || properLinearCongruentialParameters(m, a,
c), "Incorrect instantiation of LinearCongruentialEngine");
/* Snip remaining object implementation */
}
The one thing to be aware of is that static assertions are run if they are compiled.
Even if it is put in a part of a function which is unreachable at run time, it still must pass.
Consider the following code snippet:
void foo() {
return;
// the following line is unreachable code, but still must
// compile. Since the condition of zero is always false, this
// assert will fail, and thus this function will not compile.
static assert(0);
}
Using template constraints and static if
We saw template constraints and static if used in our range consuming functions in
Chapter 3, Ranges. There, they were used to selectively use range functionality for the
purpose of optimization and explicitly documenting our interface requirements. These
same features can also be used for producing custom compile-time errors.
Getting ready
To understand the problem we're trying to solve, compile the following simple program:
void main() {
import std.conv;
struct Foo {}
Foo f;
int i = to!int(f);
}
Also, observe the long error message with most of the locations being reported as inside
Phobos! (If you look at the very last line of the message, it will finally report the location in
your code.) It also doesn't tell you why it didn't match.
Similarly, try to call std.algorithm.sort with a range that lacks one of the requirements. It
may fail to provide swappable or assignable elements or might have a typo in a property name
like emptty instead of empty. The error message tells you no function matches, but it doesn't
say what, specifically, the problem is. (The typo problem is why we used static assert to verify
we correctly implemented the interface on every range we wrote in Chapter 3, Ranges. However,
even there, we would be informed of a problem early on to narrow the scope, but it was still up
to us to find what, specifically, the problem was.)
167
www.it-ebooks.info
Correctness Checking
Also, try to compile this program:
string toString(T)(T t) {
return t;
}
string toString(T)(T t) {
return cast(string) t;
}
void main() {
string s = toString(0.0);
}
Despite these functions not being semantically valid for the given type (double), which
produces compilation errors (here, we're interested in the matching, not the specifics of
actually implementing a conversion to string algorithm), it also produces an error that the
given arguments match two different functions.
For simple templates or a small number of overloads or constraint requirements, the
error message helps get to the point quickly. However, for a complex function with multiple
requirements, the error messages can be of very little help at all. How can we improve the
error message situation for our users?
How to do it…
Perform the following steps:
1. Write two functions for your constraints: one that returns a bool result and one
that executes a series of static assert with appropriate error messages.
2. Use if(!__ctfe) {} to keep the code from actually running in the test.
3. Keep template constraints simple so that the error messages are readable.
If required, refactor complex conditions into helper functions.
4. Use the template constraints for coarse requirements.
5. Perform other checks with argument specialization.
6. If the requirements still lead to complex error messages, use individual static if
or static assert statements inside the function to customize the errors.
An improvement to Phobos' default isInputRange is shown as follows:
bool checkInputRange(T)() {
if(!__ctfe) {
// notice that this portion is the same as
std.range.isInputRange
T t = void;
if(t.empty) {}
168
www.it-ebooks.info
Chapter 7
t.popFront();
auto f = t.front;
}
return true;
}
template isInputRange(T) {
enum isInputRange = is(typeof(checkInputRange!T));
}
struct Test {
int[] s;
bool eempty() { return s.length == 0; } // typo intentional!
int front() { return s[0]; }
void popFront() { s = s[1 .. $]; }
}
// this tells it failed, but not why…
//static assert(isInputRange!Test);
// the error message here points out the typo!
static assert(checkInputRange!Test);
Compilation results with the two styles are shown as follows:
cte.d(33): Error: static assert
(isInputRange!(Test)) is false
cte.d(4): Error: no property 'empty' for type 'Test', did you mean
'eempty'?
These messages aren't perfect, but they do point you in the right direction, toward the
property empty on the type Test.
How it works…
Getting compilation errors is a great time saver compared to runtime problems; however,
if they are difficult to read, they can be needlessly frustrating. D's metaprogramming
capabilities enable a lot of patterns, but at the same time, can lead to complex or unhelpful
error messages. By separating our concerns, we can help the compiler provide more help,
or failing that, clean up the error messages ourselves.
To do this, we need to understand the way templates are chosen and how code can be testcompiled inside the program. There are two ways to try to compile code: with is(typeof(
/* a function that tries to use the code */)) and __traits(compiles,
the_code);. Both return true if the code can be successfully compiled and false if
the compilation failed. These return values may be checked in template constraints or the
static if statements.
169
www.it-ebooks.info
Correctness Checking
A template, unless it has obviously invalid syntax (such as a missing semicolon or
mismatched parenthesis, in other words, it must successfully lex and parse) is not
considered to have failed compilation until a particular set of compile-time arguments
is passed to it and they fail semantic analysis.
The is() expression is a versatile tool for compile-time introspection. We'll explore it
in detail in Chapter 8, Reflection. Here, we're using it to check whether a given type is valid.
A function, if it compiles, is always a valid type, and if it does not compile, is an error
type. The is(typeof()) expression, thus, can be used to check if a function compiles.
This is a very common pattern to check compile-time interfaces in Phobos.
Alternatively, we could use __traits(compiles, some_code_here);. This can be given
in any block of code and simply sees if it compiles in-context or not, allowing us to achieve the
same task as is(typeof()). __traits(compiles) is less often seen in Phobos simply
because it was added to the D language after is(). Both patterns are acceptable to perform
these interface checks. However, is() works better when comparing specific types,
and __traits(compiles) is a better choice when checking whether a single
expression compiles.
Now that we know how to check whether a piece of code is valid, we need to understand
how templates (including types and functions with a compile-time parameter list) are chosen
by the compiler.
Templates are matched based on their argument signature and constraint condition. If a given
set of compile-time arguments matches the template's signature, it will be compiled, even if
one overload doesn't actually work for the given arguments. This leads to the two errors we
saw in the second exercise while getting ready. Although the function body was correct, the
signature was and so the compilation was attempted.
This is where template constraints (or, in this case, argument specializations) come into play.
When a template constraint fails, that template is taken out of the running entirely as a valid
overload. Consider the following code snippet:
// this overload is only considered when the argument is NOT
convertible to double
string toString(T)(T t) if(!is(T : double)) {
return t;
}
// this one is only considered when it IS convertible to double
string toString(T)(T t) if(is(T : double)) {
return cast(string) t;
}
Attempting to compile will now only complain that our function doesn't actually implement
a correct algorithm (with a specific line number of the problem and usage point!). The error
about matching both functions is gone. Now, there is only one valid choice for the given type
of double.
170
www.it-ebooks.info
Chapter 7
Our code now can be made to work and gives useful error messages. In this case, we could
have also alternatively used argument specializations:
string toString(T)(T t) { /* the generic implementation */
string toString(T:double)(T t) { /* a specialized implementation for
double */}
With argument specializations, the compiler considers the best match for a given set of
arguments, just like the traditional runtime overloaded functions, but with the option of a
generic implementation to act as a catch-all.
The advantage of argument specialization is they are typically easier to write than template
constraints, especially when the number of overloads becomes large. Since one and only one
signature must match the given arguments, a list of specializations with constraints quickly
becomes if(cond_1 && !cond_2 && !cond_3) on one, if(!cond_1 && cond_2 &&
!cond_3), and so on to keep each option valid for only one condition. With specializations,
on the other hand, you just write your requirements for this implementation in this signature.
The advantage of template constraints is they can become arbitrarily complex and serve as
a gateway to remove an option entirely in order to ensure it isn't attempted to be compiled
even if all other requirements is set. While specializations are limited to looking at one
argument at a time and may not call helper functions to perform the matching, the condition
in a constraint may call any number of functions by using any compile-time reflection options
available in the language. These also inspect as many compile-time arguments as it wants,
including looking at a combination of arguments.
You may mix constraints and specializations together. A coarse constraint with a fine-grained
specialization, when possible, tends to give the best balance of control, concise code, and
readable error messages.
The final tool we'll look at gives even finer control over compilation and is necessary to
produce custom error messages: static if paired with static assert. This is the
technique we can use to help clean up the error messages with std.conv.to.
The std.conv.to expression is even more complex than our example
here. The reason the error messages haven't been improved in Phobos
is because it was not written with these concerns in mind and would now
require a massive refactoring with care to ensure none of its complex
functionality is broken in the process. At the time this book was written
nobody had the time to do the work. In your code, you may wish to
consider using these techniques from the start to prevent the problem
from becoming so massive down the line.
171
www.it-ebooks.info
Correctness Checking
Both specializations and constraints depend on the compiler to produce the error message,
which will come in the form of either cannot deduce function from argument types or
function called with argument types (list) matches both <options>. If we want to customize
it, we need to be permissive in the signature to get past the compiler gate. For example,
consider the following code:
string toString(T)(T t) { /* no constraint here, no specialization */
static if(is(T : double)) {
return null; // implementation not important
}
/* after doing our list of supported arguments, end with a custom
error message: */
else static assert(0, "toString only works on floating point types,
not " ~ T.stringof);
The following shows what happens if we try to compile while passing a string:
test.d(2): Error: static assert
types, not string"
test.d(5):
"toString only works on floating point
instantiated from here: toString!string
The custom error message is tailored for the function's needs, giving a custom error and a
succinct location, in user code, where it originated.
Finally, in the checkInputRange function we wrote earlier, we used if(!__ctfe){}
to compile our code but not actually run it. The __ctfe variable is a magic variable that
the compiler sets to true if the code is being run at compile time, and it is set to false
once compilation is completed (allowing that code to be immediately removed from code
generation). It can be used to do the following:
ff
Provide a special implementation for compile-time evaluation versus runtime
evaluation. For example, using a generic algorithm at compile time and a handoptimized assembler algorithm at runtime. The asm functions cannot be run at
compile time at all.
ff
Remove the code generation functions from the compiled program (we'll see this
in the following chapter).
ff
Provide a semantic check via compile-time evaluation without requiring the code
to be run successfully, which is why we used it here.
By enclosing the implementation in if(!__ctfe){}, we are saying that the function must
compile, but it doesn't need to actually process any data.
172
www.it-ebooks.info
Chapter 7
Preventing memory corruption bugs with
@safe
Memory corruption bugs are one of the most frustrating problems a C programmer can
encounter. Memory corruption is writing to what you believed was memory owned by one
object; it affects another object in unpredictable ways, leading to crashes. D aims to reduce
the scope and occurrence of these bugs by providing a statically checked memory-safe subset
which, ideally, exhibits no undefined behavior. In practice, @safe isn't perfect due to bugs in
the specification and the implementation, but it nevertheless helps to significantly reduce the
probability of memory corruption bugs.
How to do it…
Perform the following steps by using @safe:
1. Mark as many functions as possible with the @safe annotation and try to compile.
The compiler will tell you which functions failed the test.
2. Use high-level constructs, such as foreach, references, and D array slices instead
of low-level features such as pointers wherever possible.
3. Instead of pointer arithmetic, use array slicing. For example, replace ptr++; with
slice = slice[1 .. $];.
4. Avoid the cast operator.
5. Delegate arguments to be used in the @safe functions must also be marked @safe.
6. If a function must perform prohibited actions, but can be manually verified to be
correct, you may mark that function as @trusted.
7.
Trust the garbage collector. Freeing memory manually is difficult to verify; if you free
memory while there's still a reference to it, using that reference will result in memory
corruption. So, unless all references are very carefully encapsulated, they should not
be marked @trusted. The garbage collector will never free a reference prematurely.
8. To turn off @safe, mark functions @system. These attributes work on the function
level, so you may have to re-factor code into additional functions to reach the level
of granularity you need.
You may add @safe: to the top of your module and aggregate
definitions to apply the annotation to all functions that follow,
instead of writing it on each individual function.
173
www.it-ebooks.info
Correctness Checking
Consider the following code snippet:
@safe void foo() {}
How it works…
The @safe annotation (sometimes called SafeD because that was the first-draft name of the
concept) is an opt-in set of restrictions that aim to make D code have no undefined behavior
and be memory safe, ensuring that memory is never unexpectedly corrupted.
The @safe annotation prohibits the use of several of D's lower-level features:
ff
Pointer manipulation is one such feature, since a pointer mistake is the most likely
cause of memory corruption
ff
D's lower-level feature also include inline assembly, since the compiler cannot
guarantee it is used correctly
ff
Casting between pointer types and using unions with pointers because type
safety is lost
ff
Calling functions not marked @safe or @trusted, since the compiler cannot verify
whether they are implemented correctly
ff
Taking the address of a local variable, since returning an address of a local can lead
to stack corruption
ff
Catching any exception not derived from Exception, since the Throwable tree
derived from Error signify unrecoverable errors
ff
Accessing globally shared data, since a race condition between threads may cause
undefined behavior
ff
Explicitly casting between immutability or shared, since this potentially breaks type
system guarantees by allowing modification of immutable data as well as violations
of thread safety
@safe does not prevent null pointer dereferences. Since the
program is terminated by a null pointer (through a segmentation
fault or an unrecoverable Error being thrown), no memory
corruption will occur. A crashing program might be annoying and
may fail to release resources or leave a file half-written, but since
the behavior of immediate termination is well-defined, it is not
prevented by restrictions of @safe. It is recommended that you
use early-and-often assertions and/or NotNull types to aid
in debugging null reference issues.
174
www.it-ebooks.info
Chapter 7
The recurring theme is that @safe is about guarantees. If the compiler cannot guarantee it is
correct, it is prohibited. What about the times when the compiler cannot make a guarantee,
but the programmer can? This is where @trusted comes into play.
The @trusted functions violate one of the @safe rules, but is manually verified to do
it correctly; the compiler trusts you to get it right. For example, using pointer arithmetic
is memory safe, if and only if kept within bounds. If you can manually verify this is done
correctly, you may mark the function @trusted. If you do, the function should be limited
to returning a strongly-typed D slice (whose bounds are known to the D compiler and/or
runtime and managed automatically), which is then worked with inside a fully @safe
function. A @trusted function should be as small and as simple as possible.
Array bound checks may be turned off with the –noboundscheck
flag to dmd, but only in non-@safe functions. In @safe functions,
array bound checks are always present to ensure memory cannot
be corrupted by writing past the array length.
It is a mistake to mark too many functions @trusted. It is better to rewrite functions to use
higher level features whenever possible. Pointer arithmetic can be translated into array slice
operations: slice = slice[1 .. $] generates the same code as ++ptr; (although with
range boundary checks inserted when the compiler cannot statically ensure the operation is
in bounds). The slice[0] = 0; statement generates the same code as *ptr = 0;.
The --ptr; value is a bit trickier to convert, since slice = slice[-1 .. $]; will
generate an out-of-bounds error. To solve this problem, use two variables: a buffer slice
and an index integer. Manipulate the integer instead of the slice or pointer.
The @system functions have no restrictions. It is the default safety level because of D's
heritage from C. If you want to ensure your entire program is memory-safe, you may mark
main @safe; though @safe is opt-in, this may limit your usage of libraries.
See also
ff
http://dlang.org/function.html#function-safety for the official
specification of @safe, @system, and @trusted
ff
http://dlang.org/safed.html for a rationale of the feature
175
www.it-ebooks.info
Correctness Checking
Leveraging const-correctness
As we saw in Chapter 1, Core Tasks, D's const and immutable methods provide strong
guarantees. Sometimes, these strong guarantees make them difficult to use. Here, we'll
look at how to make the most of const without letting it get in our way.
Getting ready
First, let's create a class to demonstrate the problem as shown in the following code:
class CachingObject {
private int cache;
private bool cacheSet;
int getExpensiveComputation() {
if(!cacheSet)
cache = 31415927; // suppose this was an expensive calculation…
return cache;
}
}
We can use this method without trouble by simply passing the object around as a mutable
instance. However, what happens if we want or have to use const? For example, while
implementing the toString method, this is forced to be const by the base class signature
as shown in the following code:
override
override
import
return
compile
}
string toString() { … } // compile error, it must be const
string toString() const { // this signature works…
std.conv;
to!string(getExpensiveComputation()); // but this won't
How can we get the best benefits from caching while still being able to leverage the benefits
of const and immutable?
How to do it…
Perform the following steps:
1. Mark as many member functions const as possible. Work from the inside out—start
with methods that do not call other methods.
2. Whenever possible, also mark function arguments const or immutable, but do not
try to force the issue. It is normal that const and immutable in D are less common
than const in C++. When you want your code to break if the data is ever changed,
use immutable. Otherwise, use const.
176
www.it-ebooks.info
Chapter 7
3. When consuming a const object cache expensive computations in a local variable
because the object will likely not cache it internally.
4. Avoid casting to and from const or immutable. Casting away const in a method
to modify a data member is undefined behavior in D and may lead to crashes, stale
caches, or threading problems. Similarly, casting a mutable object to immutable
may leave behind a mutable reference, thereby violating the immutability guarantee
you just promised to uphold.
5. Overload the const and non-const methods to provide alternate implementations.
6. If a method returns a reference to a member variable, use inout instead of const.
7.
To use immutable classes, provide an immutable constructor and create it with
new immutable.
The code is as follows:
class ConditionalCaching {
// support mutable construction
this() {}
// support immutable construction
this() immutable {
// we'll eagerly cache when immutable
// since lazy caching is completely impossible
cache = performExpensiveComputation();
cacheFilled = true;
}
// our cache...
private int cache;
private bool cacheFilled;
// helper function to perform the computation
// this must be refactored into a const method to be
// usable from all other methods.
private int performExpensiveComputation() const {
return 314159265;
}
// const getter: use the cache if we can, but if it isn't
// already filled, we can't fill it now, so just perform the
// computation now.
int getExpensiveComputation() const {
if(cacheFilled)
return cache;
177
www.it-ebooks.info
Correctness Checking
else
return performExpensiveComputation();
}
// mutable getter: we can fill in the cache, so we will.
int getExpensiveComputation() {
if(!cacheFilled) {
cache = performExpensiveComputation();
cacheFilled = true;
}
return cache;
}
}
You may also use a normal (mutable thread-local) associative array
to cache values in a const method, but you should prefer to use a
member cache variable for efficiency and purity. You may also pass
a cache helper to the method as a function argument.
How it works…
D's strong immutability guarantees to provide benefits, but also prohibit some patterns from
C++, necessitating new patterns in their place and some wholly new ones. A major difference
is the lack of anything like C++'s mutable keyword and the lack of a logical const member
field, which is commonly used to cache an expensive computation inside a const method.
There are three potential solutions. First, a global cache or a cache passed to the method as a
mutable argument, which works because the data is not reached through the reference; it isn't a
member variable so the restriction does not reply. The second potential solution is to cast to and
from const as needed. This invokes undefined behavior and thus is strongly discouraged. The
third potential solution is to use D's ability to overload methods based on constness to cache
internally when possible, and recommend the user to cache externally otherwise.
The idea is to break up the implementation into separate computing and conditional caching
functions. The computing method must be const so it can be called from other const or
immutable methods. Then, we implement the getter functions: one const that returns
the cache (if available) but is unable to update it, and one mutable, which does update
the cache.
While this will not cache as eagerly as a C++ mutable field, it does cache when possible
and does not break D's stronger guarantees. The D version will still be fully thread-safe and
may be usable in read-only memory. At the usage point, we can still conservatively assume
it does not cache and keep a copy of the result in a local variable instead of calling the
method multiple times when we know the object is const.
178
www.it-ebooks.info
Chapter 7
D never has const references to mutable data, unless you bypass the
type system with cast or union. Anything reachable through a const
or immutable reference must itself be const or immutable. If you
want an unchangeable reference to mutable data, use a getter property
that returns a mutable item without a corresponding setter property.
On the other hand, a mutable reference to const data does exist,
const(int)* or immutable(char)[], for example, but there is
no such syntax for classes! Instead, import std.typecons and use
Rebindable!ObjectType.
Another time overloading on constantness is useful in constructors. The default constructor
(when you don't write one at all) works for both mutable and immutable objects, but once
you write a constructor, you'll find it only works on mutable objects.
The usage-site code to create mutable or immutable objects is as follows:
// create a mutable object
ConditionalCaching c = new ConditionalCaching();
// this won't compile: we have to construct an immutable
// instance specially
// immutable(ConditionalCaching) i = new ConditionalCaching();
// create an immutable object properly. This calls the
// immutable constructor
immutable(ConditionalCaching) d = new immutable
ConditionalCaching();
Notice that there are two different forms of the new operator and they call different constructors.
Here, since caching is impossible for immutable objects, we added a special immutable
constructor to pregenerate the expensive computation for us.
You can share one constructor for both immutable and mutable
construction if you mark that constructor as pure.
179
www.it-ebooks.info
Correctness Checking
Avoiding side effects of pure functions
A general principle of good programming is encapsulation. Functions should only access what
they need to accomplish their task and should minimize side effects and action at a distance.
How to do it…
Perform the following steps to avoid side effects of pure functions:
1. Mark as many functions as possible with the pure annotation. It may go before
or after the return type, name, and argument list.
2. Try to compile. The compiler will tell you which functions need your attention.
3. Take const or immutable objects whenever possible. Use the in or scope
keywords on your parameters if you will not store a reference to them.
4. To enable the most functions to be pure, avoid the use of global (module-level or
locals marked with static) variables.
5. If a function is conditionally pure based on compile-time arguments, you do not
have to explicitly mark it with the pure keyword. Follow the rules and the compiler
will infer its purity based on the purity of its arguments at the usage point.
6. If you need to call an impure function inside a pure function, for example, to debug,
you may do so with the debug statement: debug writeln("debug printing");.
Consider the following code snippet:
int foo(int a) pure {
return a + 50;
}
As with other annotations, you may also write pure: at the top of a module
to have it apply to all functions or use curly braces to mark several functions
pure at once. However, there is no impure keyword, so if you do this, you'll
be locked into purity for the rest of the module!
How it works…
Pure functions in D are prohibited from accessing non-immutable global data or calling
impure functions. There are two exceptions to these general rules: GC memory allocations
with new are always allowed inside pure functions, and impure functions are allowed in
debug statements. Other language features, including mutation of local variables, are
allowed, the same as any other function. D treats functional programming as a big-picture
design, not an in-function implementation style.
180
www.it-ebooks.info
Chapter 7
While pure functions may not modify global state, they may modify local variables, including
its arguments. A pure function with all immutable arguments is called a strongly pure function.
Like in many other programming languages, a strongly pure function may not modify any data
external to the implementation and have no side effects.
A pure function with one or more mutable arguments is called a weakly pure function. Weakly
pure functions are often a surprise for programmers coming from other languages because
they allow mutation to data passed to it.
The benefit of pure functions is to statically enforce that the pure function's result is dependent
only on the data you explicitly pass to it, making all its requirements obvious at the call point and
limiting the amount of code you have to look at to understand the program's current state.
Verifying object invariants and pre- and
post-conditions
D supports contract programming, which can help you ensure an object's state is always valid
and object methods are passed with correct parameters and returns valid values, including
while using class inheritance. Here, we'll see how to use these features and why they work
the way they do.
How to do it…
Perform the following steps:
1. When writing an interface, class, or struct, add in and out blocks to methods,
right after the signatures, and also add invariant blocks to the aggregate.
2. Put assertions in the in blocks to verify your preconditions.
3. Put assertions in the out blocks to verify your postconditions. The out block may
take an argument to access the method's return value.
4. Add the body keyword before your method's body but after its in and out blocks
(if it has them).
5. In child classes, also use in contracts to reassert your input requirements, even if
they are the same as the parent class.
6. Put assertions in the invariant blocks to verify object conditions that are always
true. The invariant must be valid as soon as the constructor returns.
7.
Unless your data members may validly hold any value, make them private and only
accessible through getter and setter properties.
8. Test your application by building without the –release switch and running
the program.
181
www.it-ebooks.info
Correctness Checking
The code is as follows:
interface Example {
int negate(int a)
in { assert(a >= 0); }
out(ret) { assert(ret <= 0); }
// note: no body since this is an interface
}
class ExampleImplementation : Example {
int negate(int a)
in { assert(a >= 0); } // same input restriction
body { // note the body keyword following the contracts
return –a;
}
invariant() {
// we have no data, so no need for any invariant
assertions
}
}
void main() {
auto e = new ExampleImplementation();
e.negate(-1); // throws an assertion failure
}
How it works…
D supports contract programming, inspired by the Eiffel language, with three constructs: the
in and out blocks on methods and invariant blocks in objects.
All contracts are run at runtime. Running contracts at compile time is not possible in D today.
Like other assert statements, contracts are compiled out when compiling in release mode.
It's preferable to use the in and out blocks instead of writing assertions inside the function
itself, because the in and out blocks understand inheritance. When overriding an inherited
method in a class, the following points must be considered:
ff
Any one of the in blocks in the inheritance tree must pass (it may weaken
preconditions by providing alternate checks). If there is no in block on a method,
it is assumed to accept any input, and thus always pass. This is why child classes
have to reassert their input requirements, even if they are the same as the interface.
ff
All of the out blocks in the inheritance tree must pass (it may strengthen
postconditions by providing additional checks).
ff
All of the object invariants on the inheritance tree must pass (it must honor the
parent's invariants).
182
www.it-ebooks.info
Chapter 7
These rules realize the Liskov substitution principle of object-oriented programming; a
subclass should always be substitutable for its superclass or interface without breaking
any code. When using an object through its interface, only the interface's in blocks
are considered and it must pass (this is because the interface doesn't know which
implementation it is forwarding to).
A limitation of contracts on methods in D is the lack of a pre-state in the out contract.
There is no easy way to work around this limitation at this time. Instead, focus your out
contracts on ensuring that your return value alone meets some requirements, such as
not being null.
The current D spec does not permit contracts on abstract class methods as well (though
they are permitted on interfaces). This limitation may be removed in the future.
Since contracts are logically part of the interface, when you write a library, you should also
write your contracts in your D interface file (a .di file, which includes function prototypes
but not the whole implementation bodies), if you choose to use them. This way, the user
or compiler may choose to insert them in a debug build of a program, even when using a
release build of the library. However, at this time, the compiler does not keep contracts.
The common solution is to provide both debug and release builds of your library or to
distribute full source code and let the user build it themselves.
Unit testing your code
Unit tests are blocks of code that verify the correct output of one small part of your code
(a unit) at a time, such as an individual function or class. D has a built-in support for basic
unit testing. Here, we'll see what we can do with it.
How to do it…
Perform the following steps:
1. Add unittest {} blocks to your modules, under your functions and inside
your classes.
2. Put any imports needed by the test inside the unittest block.
3. You should write helper function and class definitions inside the unittest block.
4. Write assertions to perform your tests.
5. Use std.exception for additional helper functions.
6. Compile with dmd –unittest yourfiles.d.
7.
Run the program.
183
www.it-ebooks.info
Correctness Checking
Design your classes with dependency injection for easier mocking
of tests. This is when instead of constructing child objects yourself,
you accept them as arguments to the constructor. The unit test may
then pass a dummy object to the class instead of, for example, a live
network connection to test the code.
Consider the following code snippet:
unittest {
assert(myFunction() == expected_value);
}
How it works…
D's specialized syntax for unit testing was added with a modest goal; to make writing
basic unit tests so easy that there's just no excuse not to. They don't aim to do everything
possible—there are third-party libraries to extend unit testing capabilities—but do aim to
set a usable foundation.
Using them is very simple; you write a unittest {} block and fill it with assert statements
to test your code. Use an alternate implementation or manual to figure out the expected
values of your functions and compare the results.
Any types or imports you need should be local to the unittest block. This ensures you don't
accidentally use these types or imports in non-tested code, which would cause the tests to
pass, but the regular build to fail!
Outside the unittest block, you can use version(unittest)
to conditionally compile code only if unit testing is enabled. This can
be useful to provide an empty main function to allow your module
to be used as a library import or be compiled alone to run its tests.
You can also compile with –unittest –main for the compiler to
automatically insert an empty main function for you.
You may also use any construct, including loops, conditionals, and exceptions. The unit testing
code is just normal D code that is run upon request.
The Phobos module std.exception includes some helper functions to test functions in
error conditions. For example, assertThrown can be used to ensure a function throws the
proper exception when deliberately given invalid data.
184
www.it-ebooks.info
Chapter 7
See also
ff
http://github.com/nomad-software/dunit is an add-on unit testing library to
extend D's built-in functionality
ff
https://github.com/bgertzfield/deject is a dependency injection and
mock object library for D
ff
http://dconf.org/2013/talks/gertzfield.html is Ben Gertzfield's talk
from Dconf 2013 about writing testable code in D
Documenting your code with Ddoc
To verify your code is working correctly, you must know what it is supposed to do. Like with
unit testing, D has a built-in documentation generator called Ddoc. Ddoc is fairly simple,
but it gets the job done and is always available.
How to do it…
Perform the following steps to document your code:
1. Attach documentation comments to declarations by writing /** Docs */ or /++
Docs +/ above them or /// short description directly after them.
2. Put documentation comments on both collections and members. For example,
if you document a class member, ensure that there's a doc comment on the
class itself too.
3. Document unit tests that you want to serve as usage examples.
4. Document function parameters by writing lines in the format: name = meaning
under a section Params:.
5. Compile the module with the –D flag to dmd to generate the documentation's
HTML file.
6. You may define and use macros. They are defined in a special section named
Macros: with a name=value syntax and used with $(name) syntax to extend
the textual capabilities of Ddoc.
7.
Move macros that you use across several modules to a separate file with the
.ddoc extension and pass it to the compiler when generating the documentation.
185
www.it-ebooks.info
Correctness Checking
The following is an example of how to use Ddoc to document an object:
/++
Example is a structure meant to demonstrate Ddoc
documentation.
In addition to the first one-line short description, we
can also write
longer multi-line descriptions to expand on the object's
functionality.
+/
struct Example {
int a; /// This integer is documented briefly.
/**
This function has documented parameters.
We document all the parameters in a params section.
The return value and exceptions can also be documented.
Params:
x = The x coordinate
Returns:
The y coordinate
Throws:
Exception if x is negative.
*/
int getY(int x) { return 0; /* implementation irrelevant
*/ }
}
If you name the file ddoc.d, compile with:
dmd –D –c ddoc.d
The generated HTML (ddoc.html) looks like the following in a browser:
186
www.it-ebooks.info
Chapter 7
This screenshot uses the default HTML body and no CSS style sheet. You may customize
the website's appearance with HTML and CSS by changing the DDOC macro to link to an
external file.
How it works…
The D language and compiler has a built-in documentation tool that has a simple syntax, is
easy to use, and has knowledge of the language. Thanks to the integration with the language,
Ddoc comments do not need to repeat information that is already obvious from the code.
187
www.it-ebooks.info
Correctness Checking
Ddoc has very little built-in syntax. A documentation comment consists of up to four parts:
ff
ff
ff
ff
A one line summary, which is always the first line.
A multiline description, which is any content after the first line, but before any
labelled sections.
The third part is the sections, starting with a label and a colon. Of the sections,
Params: is special, because in that it also parses name=description
lines. Macros: is special because it parses new macros in the format of
name=replacement. Other section names serve to organize content without
changing Ddoc's parsing.
The fourth part is macros, which are sprinkled throughout.
Macros are Ddoc's tool for extension and customization. A macro works via textual replacement
and is used with the syntax: $(MACRO_NAME arg1, arg2, …). Macros may span multiple
lines. All of Ddoc's default output is defined as macros. You can see the defaults in the source
code distributed with the dmd zip. The file is dmd2/src/dmd/doc.c, for example, the default
HTML body is defined in the macro DDOC.
You may override this macro in your individual file (make a Macros: section at the top of
your module) or with a separate file with the extension of .ddoc that you pass to dmd when
generating the documentation.
Leading stars or plusses are allowed and ignored:
/**
*
The summary will not include the leading star.
*/
This will let you format your comments how you want without impacting
the content.
Ddoc does not properly encode special characters for the output format. To work around
this, you may replace special characters with macros, for example, $(GT) instead of >
when generating HTML.
Macro syntax has three special forms in the replacement text: $0, which is all the arguments
as a single string; $1 .. $n, which is one specific argument; and $+, which is all arguments
beyond the first. Using $1 and $+, we can create recursive macros to simulate loops:
Macros:
LIST_ITEM=<li>$0</li>
LIST_TAIL=$(LIST_ITEM $1)$(LIST_TAIL $+)
LIST=<ul>$(LIST_ITEM $1)$(LIST_TAIL $+)</ul>
If you write $(LIST 1, 2, 3) in your documentation somewhere, this will be generated:
<ul><li>1</li><li>2</li><li>3</li></ul>, a well-formed HTML list with fairly
concise syntax in the D code.
188
www.it-ebooks.info
Chapter 7
There's more…
As in the case of unit testing, the built-in facility is deliberately minimal to provide a baseline
that there's just no excuse not to use. When additional features are needed, we'll turn to
third-party documentation tools.
A pair of switches is possessed by dmd to help us with these:-X and -D. The -X switch
generates a JSON file that lists all declarations it compiled. The -D switch generates the
documentation. If you combine the two of them, the JSON file also includes the documentation
comment attached to each declaration. This makes them easy to parse—no need to write a
new compiler, as a JSON parser will suffice.
Writing platform-specific code (versions) and
per-client configuration modules
Different platforms often need specialized code. D provides the version statement for this
case, which is similar to but cleaner than C's #ifdef directives. In addition to platforms, special
code may be needed when building customized versions of an application for a specific client or
other special case. While version can do that job, it isn't ideal. So, we'll use another technique:
configuration modules.
How to do it…
Writing platform-specific code and writing client-specific code is best done with two
different techniques.
Platform-specific code
Perform the following steps:
1. Write version statements for all supported platforms.
2. Write else static assert(0, "Unsupported platform"); at the end of
the version list.
3. Don't try to mix partial declarations for different platforms together, it will be more
trouble than it is worth.
The code is as follows:
version(Windows)
void writeToFile(HANDLE file, in void[] data) {
if(!WriteFile(file, data.ptr, data.length, null, null))
throw new Exception("WriteFile failed");
}
189
www.it-ebooks.info
Correctness Checking
else version(Posix)
void writeToFile(int file, in void[] data) {
if(write(file, data.ptr, data.length) < 0))
throw new Exception("write failed");
}
else static assert(0, "Unsupported platform");
Client-specific code
Perform the following steps:
1. Write separate files for each client, with all the files having the same module name.
2. Import the module by its module name in the rest of the application.
3. When compiling, explicitly pass the correct configuration file for the client you are
building to the dmd command line:
// company_x_config.d
module myapp.config;
enum bool wantFeatureX = false;
enum string companyName = "FooBar, Ltd.";
// company_y_config.d
module myapp.config;
enum bool wantFeatureX = true;
enum string companyName = "Acme, Inc.";
// yourapp.d
import myapp.config;
static if(wantFeatureX) { void implementFeatureX() {} }
pragma(msg, "Compiling for client " ~ companyName);
On compiling you will get the following output:
dmd yourapp.d company_x_config.d # build for Company X
dmd yourapp.d company_y_config.d # build for Company Y
How it works…
D supports conditional compilation with its version statement. A single simple argument
is taken by version: a number or an identifier. Conditions cannot be combined. Version
identifiers may be set in a module or on the command line, or preset for the compiler
environment and target architecture. If the version is set, the code within is compiled.
Otherwise, the code must be syntactically valid but is not actually compiled, and thus
does not have to be semantically valid.
190
www.it-ebooks.info
Chapter 7
You may use version(none) to quickly disable a block
of code. It may come directly before a declaration without
curly braces, making it convenient to comment out a function
without needing to trace down the end of the function.
The version statement has several limitations that make it less than ideal to customize an
application for a client:
ff
It cannot cross module boundaries, so all client customizations must be present in
the same file. This makes for messy code and may leak private details if one client
buys a source license.
ff
Data cannot be passed on the command line. Custom strings and other values have
to be done with another file of some sort.
ff
Boolean conditions cannot be expressed with version. For example, version(a ||
b) will not compile.
These limitations prompt us to look for alternatives. D presents two easily accessible
options: data file imports or code imports. Data file imports are enabled with the –J switch
to dmd. You must pass it a directory to search for the files. Then, in your code, you write
import("filename"). The file's contents are brought into the code just like a string
literal and may be manipulated. We'll use this facility later in the book.
Here, we'll use a regular module import instead. A regular module can consist of any code
(since it is just code!), which gives us all the compile-time correctness checking possible in
the rest of D.
The module system feature that enables this technique is the fact that the file name need not
match the module name, as long as you pass the module explicitly to the compiler. By having
multiple files with the same module name, we can use them the same way in the rest of your
code, but swap them out at compile time in the make file or on the command line.
This also is preferable to versions because a missing configuration entry will result in a
compile-time error, instead of silent acceptance.
See also
ff
http://dlang.org/version.html is the official specification for the version
statement. The complete list of predefined version identifiers is available on this page.
191
www.it-ebooks.info
www.it-ebooks.info
8
Reflection
D supports limited runtime reflection out of the box as well as rich compile-time reflection that
can be used in code generation efforts, custom semantic checks, building additional runtime
reflection information, and more. In this chapter, we'll be covering the following recipes:
ff
Getting dynamic runtime type information
ff
Getting a list of child classes
ff
Determining whether a module is available
ff
Getting a list of all methods or fields in a module or an object
ff
Inspecting function overloads
ff
Determining names, types, and default values of function parameters
ff
Getting components of complex types
ff
Using user-defined attributes
ff
Implementing a custom lint-style check for virtual functions
ff
Extending the runtime type information
ff
Creating a command-line function caller
Introduction
Reflection is commonly associated with virtual machines of interpreted languages, but D
proves it can work well with a natively compiled language too. D provides some built-in runtime
reflection, a lot of compile-time reflection, and ways to make the compile-time information
available at runtime to bridge the gap while only paying for what you use.
www.it-ebooks.info
Reflection
Getting dynamic runtime type information
The simplest form of reflection available in D is runtime type information, which is available
through the typeid() operator. It is used extensively by the druntime implementation and
is integral to the safe dynamic casting of classes.
How to do it…
Let's execute the following steps to get dynamic runtime type information:
1. In most cases, you only need to write typeid(variable_or_type).
2. If you want to get a dynamic class type through an interface, first cast it to Object,
check for null, and then use typeid(the_casted_object).
The code is as follows:
TypeInfo typeInfoAboutInt = typeid(int);
typeInfoAboutInt = typeid(1); // also works
How it works…
The compiler and the runtime library automatically define type information for all types. This
information is found in static TypeInfo objects, which is retrieved by reference using the
typeid() operator. The definition of the TypeInfo interface is found in the automaticallyimported object.d module of druntime, and thus it is always available to D programs.
TypeInfo is tailored for druntime's needs. It contains functions for:
ff
ff
ff
ff
Hashing, equality, and comparison (needed for associative arrays).
Construction, destruction, copying, and garbage collection flags (needed for the
new operator and built-in array operators).
Getting the next type out of a compound type. For example, typeid(int*).next
is typeid(int). typeid(int*) gives information about a pointer, which points
to the next type.
An internal extension hook, intended for future garbage collection improvements.
Classes and interfaces have to get additional functions:
ff
ff
ff
ff
ff
The class' name
The class' base class and interfaces
The class' virtual function table
The class' initial memory image
Searching and creating the class, if it has a simple constructor
194
www.it-ebooks.info
Chapter 8
These methods are vital to the proper functioning of classes. They enable safe dynamic casting
from base class to derived class, proper object construction, and automatic implementation of
toString, which works without being explicitly overridden in every class you write.
The TypeInfo references are only stored with the data of class objects (specifically, the
first hidden virtual function entry for each object stores a reference to the correct TypeInfo
reference). With all other types, typeid yields a reference based on the static type. This
means that you cannot retrieve the runtime type information from a void* or void[], as
shown in the following code:
void main() {
int[] a;
arrayType(a);
}
void arrayType(void[] arr) {
// assert(typeid(arr) == typeid(int[])); // FAILS
// The following passes because non-class typeid is based on
static type
assert(typeid(arr) == typeid(void[]));
}
If you want to work with void* in a type-safe way, it is important to explicitly pair a TypeInfo
object with it. This is how the druntime functions work, also some of the language features'
non-template D variadic functions work in the same way.
Templates are generally better at both type safety and efficiency than
runtime information. You should only use TypeInfo based typing in
functions when you have special ABI requirements. The void* and
TypeInfo pairs are used in druntime primarily for legacy reasons;
the library was designed before D had templates.
Static types are also used with interfaces: typeid(some_object_via_interface) and
is typeid(the_interface_you_are_using);. In order to get the dynamic type of the
object behind the interface, you will have to first cast it to an object, and then cast it from the
object to the derived class.
Casting an interface to the object might fail because not all interfaces
are D objects. It might also be a C++ or COM object. Thus, any time
you cast an interface to object, you ought to check for the null value.
To compare types at runtime, you may use either the == operator or the is operator on
TypeInfo. Since there's only one instantiation for each type, you can always rely on the
comparison operators.
195
www.it-ebooks.info
Reflection
See also
ff
Refer to the documentation on TypeInfo's members at http://dlang.org/
phobos/object.html#TypeInfo. Also, scroll down to TypeInfo_Class to
see additional members available on classes.
Getting a list of child classes
Another form of runtime information available in D is a list of all classes in the program. Using
this information, we can achieve tasks that will be impossible at runtime, such as getting a list
of all child classes of a particular class. A potential use of this capability will be to load game
objects, defined as classes inheriting a common base, from an XML file at runtime.
How to do it…
Let's execute the following steps to get a list of child classes:
1. Get the typeid of the parent class you're interested in.
2. Loop over ModuleInfo with the foreach loop.
3. Loop over the localClasses member of each loop value.
4. Add recursion if you want to get all descendants, including the children's children.
The code is as follows:
ClassInfo[] getChildClasses(ClassInfo c) {
ClassInfo[] info;
foreach(mod; ModuleInfo) {
foreach(cla; mod.localClasses) {
if(cla.base is c)
info ~= cla;
}
}
return info;
}
class A {}
class B : A {}
class C : A {}
void main() {
foreach(cla; getChildClasses(A.classinfo)) {
196
www.it-ebooks.info
Chapter 8
import std.stdio;
writeln(cla.name); // you could also create the class with
cla.create();
}
}
Running the program will give the following output:
test.B
test.C
Notice that test is the name of the module containing this program. Also, try adding more
modules to inherit from class A and observe that they still work.
How it works…
Similar to TypeInfo, the D compiler also automatically creates static instances of a type
called ModuleInfo, tailored to the needs of druntime, which provides limited runtime
reflection across the entire program. The definition is in object.d, so no explicit import
is required to use it.
Since ModuleInfo is undocumented on the official website,
its interface may be subject to change without notice.
The members of ModuleInfo include pointers to the module constructor, destructor, unit
tests, a list of imported modules, a list of local classes, and the module name. It also has a
static opApply function that lets us perform a foreach loop over it.
The primary use of ModuleInfo is for the internal druntime code. The druntime is
responsible for calling your main function. Before it runs your function, it loops over all
modules in the application to run their module constructors, using the list of imported
modules to run them in the proper order. So, dependencies are initialized before the
modules that use them. If unit tests are enabled, druntime also runs those tests through
ModuleInfo before running main.
A secondary use of ModuleInfo is to find and inspect classes present in the program.
This is how the Object.factory function is implemented, and it is through these facilities
that we achieved our task to find all the child classes.
Getting a list of all the available child classes is impossible at compile time. While a list of
base classes is possible, the compiler must be aware of all base classes to form a working
inheritance hierarchy—a list of child classes is a runtime task because two modules or shared
libraries may both provide child classes and may be compiled separately, with no knowledge
of one another.
197
www.it-ebooks.info
Reflection
The foreach(mod; ModuleInfo) loops over each module in the program, yielding
ModuleInfo* on each iteration. Then, for each module, we loop over the localClasses
member. The localClasses array is an array of the TypeInfo_Class objects (sometimes
known by its alias, ClassInfo), the same type we retrieved with typeid in the previous
recipe. The base member of this object also points to a TypeInfo_Class instance, and it
may be null in the case of Object, which is the root of all D classes.
By comparing these TypeInfo instances with the is identity operator, we will build a list
of each type we're interested in. It can be used with further runtime reflection operations,
including to call the create method to construct a default object of that class type.
It is impossible to declare a variable, cast to, or to use any other compile-time operation on
a ClassInfo object to learn more about or manipulate the class because compile time is
longer than the time we're in this function. The ClassInfo objects aren't special in any sense
other than the fact that they are automatically created at runtime; they are just another block
of data. We'll cover a technique to enable extended runtime reflection later in this chapter.
Note that the names returned are the full name of the class, including
module and package name. All the runtime class functions work with full
names, the most common mistake when trying to use Object.factory
is forgetting to use the module name as well as the class name.
Determining whether a module is available
We might want to compile some extension features if and only if another module is
available at compile-time to gracefully degrade when a dependency isn't installed. The most
straightforward solution is to use the version statement, passing the appropriate identifier
to the dmd command line. Can we also do it without extra compiler options from the user?
How to do it…
Let's execute the following steps to determine whether a module is available:
1. Try to compile an anonymous function that does nothing other than import a module.
2. Use it conditionally by wrapping any use of the module inside the static if statement.
3. Instruct the user to enable the module by placing it at a location where the
compiler can find it automatically, or by adding the following module to the
compile command line.
198
www.it-ebooks.info
Chapter 8
The code is as follows:
static if(__traits(compiles, { import test.foo; })) {
import test.foo; /* safe to use */
} else {
// module not available, work around
}
How it works…
This is an example of a common strategy to poke around D: conditional compilation. Instead
of trying to find metadata, we can often simply try to compile a block of code to attempt the
task we're interested in. If that compilation fails, assume the task cannot be done with the
arguments we're given. Anything we can encapsulate in a small function can be tested with
__traits(compiles).
This principle is also how the duck-typed interface checking for
ranges works, as discussed in Chapter 3, Ranges, and Chapter 7,
Correctness Checking.
Since imports can be local to a function, we can wrap it in an anonymous function (the
{ code } syntax expands to void delegate() { code }) and see if it compiles.
Once it does, the compiler has already loaded the module, so we can immediately use it.
Generally, any time you might get a compilation error and do not wish for it to be fatal, you
may wrap the code in static if(__traits(compiles)) to selectively enable or disable
iffy features. However, be careful not to overuse this. It is easy to hide minor mistakes and
completely disable the code that never actually compiles! Keep the conditional code as simple
as possible and always run it normally when you change it. This ensures that it actually does
work when it is supposed to.
The __traits function is a built-in language construct for special communication with the
compiler. It always takes an operation identifier as the first argument, for example: compiles,
isSame, allMembers, getMember, and others that can be found in the documentation.
Subsequent arguments are specific to the operation. The compiles identifier takes only one
argument; an expression that it attempts to compile.
The __traits function returns values in the form of compile-time constants that can be
tested in static if, stored in enums or aliases, or used directly. In the generated code,
they will be indistinguishable from data literals. When __traits returns a list, it does it as
a TemplateArgumentList (sometimes also called a TypeTuple, though it can hold more
things other than types). These lists may be looped over with the foreach loop at compile
time to inspect individual elements with all compile-time tools.
199
www.it-ebooks.info
Reflection
See also
ff
Refer to the documentation for __traits at http://dlang.org/traits.html.
It has a list of all the available operations, their arguments, and their return values.
ff
Refer to the specific documentation for the compiles trait at http://dlang.org/
traits.html#compiles.
Getting a list of all methods or fields in a
module or an object
To dig into an aggregate, the first step is to get a list of members. Then, we'll be able to look at
each individual member and dig as deeply as we need to.
How to do it…
Let's execute the following steps to get a list of all methods or fields in a module or object:
1. Get a reference to the aggregate. For a struct, class, or enum type, you may
use its name directly (or if it is passed to a template, the corresponding template
parameter). To get a reference to a module, use mixin("yourmodule.name").
2. Get a list of the names of all members with __traits(allMembers).
3. Retrieve the member with __traits(getMember). Use a helper template in the
form of alias helper(alias T) = T; and an alias member in the loop to
make referring to the member easier.
4. Using static if and the is expression, filter out any types: static
if(is(member)) { /* type */ }.
5. Then, check for functions with the is expression on typeof(member): else
static if(is(typeof(member) == function)) { /* function */ }.
6. If the member is neither a type nor a function, it may still be a template, a module,
a variable, or some other construct added to the language later. If it has a valid
.init type, it is a variable; otherwise, some guesswork is needed. If the string
value starts with module, you can tell it is a module. If nothing else matches,
it is most likely a template.
7.
You may use __traits(compiles) on the getMember function to filter out
private variables if you need to.
The following is a program that defines some test structures and then drills down using the
preceding steps to show details about all the members of the module:
struct S {
// variables
200
www.it-ebooks.info
Chapter 8
int a;
int b;
void delegate() c;
string d;
alias e = d;
// functions
void foo() {}
int bar() { return 0; }
// types
struct Bar {}
enum Foo { a, b }
}
template TestTemplate(string s) {
enum TestTemplate = to!int(s);
}
// the helper for easier aliasing we'll need in step 3
alias helper(alias T) = T;
// This function writes details about all members of what it
// is passed. The string before argument is related to
// indenting the data it prints.
void inspect(alias T)(string before) {
import std.stdio;
import std.algorithm;
// step 2
foreach(memberName; __traits(allMembers, T)) {
// step 3
alias member = helper!(__traits(getMember, T, memberName));
// step 4 - inspecting types
static if(is(member)) {
string specifically;
static if(is(member == struct))
specifically = "struct";
else static if(is(member == class))
specifically = "class";
else static if(is(member == enum))
201
www.it-ebooks.info
Reflection
specifically = "enum";
writeln(before, memberName, " is a type (", specifically, ")");
// drill down (step 1 again)
inspect!member(before ~ "\t");
} else static if(is(typeof(member) == function)) {
// step 5, inspecting functions
writeln(before, memberName, " is a function typed ",
typeof(member).stringof);
} else {
// step 6, everything else
static if(member.stringof.startsWith("module "))
writeln(before, memberName, " is a module");
else static if(is(typeof(member.init)))
writeln(before, memberName, " is a variable typed ",
typeof(member).stringof);
else
writeln(before, memberName, " is likely a template");
}
}
}
void main() {
// step 1: we'll start with a reference
// to the current module, gotten with mixin.
// Note: __MODULE__ is a special symbol the
// compiler replaces with the current module name.
inspect!(mixin(__MODULE__))("");
}
When you run the program, you can see that it reflects the full structure of our code, including
indented child members. This is shown in the following output:
object is a module
S is a type (struct)
a is a variable typed int
b is a variable typed int
c is a variable typed void delegate()
d is a variable typed string
e is a variable typed string
foo is a function typed void()
bar is a function typed int()
Bar is a type (struct)
202
www.it-ebooks.info
Chapter 8
Foo is a type (enum)
a is a variable typed Foo
b is a variable typed Foo
TestTemplate is likely a template
helper is likely a template
inspect is likely a template
main is a function typed void()
The output will also include the module object, which is automatically
imported by all D modules.
How it works…
The __traits method and the is expression aren't limited to conditional compilation.
Each feature has several operations to perform in-depth compile-time reflection. Moreover,
the .stringof and .mangleof properties of the most D symbols can be used for a variety
of purposes, including reparsing them to gather even more information.
The first and the foremost among them is __traits(allMembers, Aggregate),
which returns the names of each member of an aggregate (struct, class, union, enum,
or module). Once we have the name of a member, we use __traits(getMember,
Aggregate, name) to turn it into a symbol. A symbol is a specific name in the code,
a class name, a variable name, and so on.
Working with symbols is different than working with variables. If you declared a new variable
(for example, with auto or const), that will create a new symbol instead of working with the
existing one. Instead, we alias the new names to the existing symbol. The alias term works in
compile-time parameter lists or anywhere a declaration is allowed, including inside functions.
Due to a limitation of the D grammar and parser, we use a simple alias helper to enable
its use with more parameters. For example, alias a = __traits(getMember, Foo,
bar); will fail with a parse error saying basic type expected, not __traits. The alias
helper allows us to easily work around this limitation, saving us from repeating the whole
getMember expression every time we want to use it.
The alias keyword also works when renaming the complex
types, for example, binding compile-time parameters to a single
name alias toInt = to!int; would let you use toInt
anytime you would have used to!int.
203
www.it-ebooks.info
Reflection
Once we have the symbol aliased to a convenient name, we can start to learn more about it.
First, we categorize it into three broad areas: types, functions, and others, using static if
and the is expression. The first test, static if(is(member)), simply tests if a member
represents a valid type, that is, it doesn't check whether it has a valid type; it checks if it is a
valid type. This is an important distinction because it is how we differentiate types, including
aggregate definitions that are types and can be drilled into directly with the is expression, from
variables and functions, which have types that can be retrieved with typeof() to drill in to.
The next major category we test for is functions, with is(typeof(member) == function).
Functions get their own category because various special details are available for them that
aren't available for other variables, such as parameter information.
Finally, we consider everything else to be other and use a variety of techniques to break it down.
To differentiate modules from everything else, we perform a simple check on .stringof to
see whether the name starts with the module keyword. If it isn't a module, we test the next
broad category by checking if it has a validly typed .init property, which is a feature of all the
D variables. If nothing has matched yet, we can assume it is most likely a template by process
of elimination. Currently, reflection of templates is very limited, so we can't drill any more into it.
Once we break a symbol into one of the following broad categories, we can dig even deeper
with consistent techniques:
ff
Types can be further categorized with the is expression, for example, is(member
== class) tests whether it is a class declaration, and can also be tested for
additional members with __traits(allMembers).
ff
Functions can be drilled into by using the std.traits functions, or the prototype
can simply be displayed to the user with .stringof.
ff
Modules can be drilled into by recursively calling __traits(allMembers) upon
it. Keep in mind that the hidden import of objects is listed. So, if you drill down every
member, you will also see D runtime code.
ff
Variables can be drilled into by examining their name or type at compile time
or by value at runtime. Phobos' std.traits module has several members to
categorize types as well, for example, isIntegral!(typeof(member)) or
isSomeString!(typeof(member)).
The categories have some overlap in techniques, but since there are several differences in
what details are available and how to get to them. Categorizing before trying to dig into the
reflection will help avoid compile errors.
You can also call the getMember function on an instance if you
want a directly usable reference, such as a member to call with a
valid this pointer.
204
www.it-ebooks.info
Chapter 8
There's more…
Another way to get members of some types, mainly structs and classes, is with the
tupleof property. The tupleof property yields a list of all the variables in the type in the
same order that they appear in memory, including a hidden context pointer in the case of
nested structures. The .tupleof property can be written to and looped over with foreach.
Some code written before __traits(allMembers) was added to the language used
.stringof in a loop over obj.tupleof to get the names of member variables.
The .tupleof property does not include child types or functions, but does, like other D
tuples, have the interesting characteristic of automatically expanding function argument
lists, as shown in the following code:
struct Test {
int a;
string b;
}
void test(int a, string b) {
import std.stdio;
writeln(a, " ", b);
}
void main() {
Test t;
t.a = 10;
t.b = "cool";
// test(t); // won't compile, Test is not int, string
test(t.tupleof);// WILL compile!
}
So, while you can use the .tupleof property for reflection, its main strength is in variable
manipulation and expansion.
See also
ff
Refer to the documentation for the Phobos std.traits module at
http://dlang.org/phobos/std_traits.html, which encapsulates
and expands upon many of the compile-time reflection capabilities provided
by the compiler, often with more readable syntax. Check this first when trying
to perform a new reflection-related task. It contains many more useful functions
other than the ones mentioned here.
205
www.it-ebooks.info
Reflection
ff
Refer to the documentation for the is expression at http://dlang.org/
expression.html#IsExpression. Notice that it has seven forms, each
with unique capabilities.
ff
Refer to the documentation for the __traits feature of the language at
http://dlang.org/traits.html.
Inspecting function overloads
When we handle functions by name, an important detail is left out; overloaded functions with
the same name, but different arguments. How can we drill down into these overloads?
How to do it…
Let's execute the following steps to inspect function overloads:
1. Get the function name, whether from a string or by inspecting
__traits(allMembers).
2. Use __traits(getOverloads, Aggregate, memberName) to get a list
of symbols.
3. Inspect the symbols with a loop and is(typeof(overload)).
The code is as follows:
struct S {
void foo() {}
void foo(int a) {}
}
void main() {
import std.stdio;
foreach(overload; __traits(getOverloads, S, "foo"))
writeln(typeof(overload).stringof);
}
The following is the result of the preceding code:
void()
void(int a)
It doesn't hurt to call __traits(getOverloads) on a name that
isn't a function. It will simply return an empty set.
206
www.it-ebooks.info
Chapter 8
How it works…
The __traits(getOverloads) function works similar to __traits(getMember), which
we used in the previous recipe. However, instead of returning only one symbol, it returns a list
of all the overloads in symbolic form. We may use these symbols individually with all the same
reflection tools if we loop over the list.
Determining names, types, and default
values of function parameters
In the previous two recipes, we got a list of functions, including overloads and signatures in
the form of types. To do really interesting things with function reflection, we need to dig into
the details, isolating the return type and function parameters.
How to do it…
Let's execute the following steps to determine names, types, and default values of
function parameters:
1. Import std.traits. The Phobos module makes the task easier and is much
more readable than the direct implementation.
2. Get the function symbol. You may use the name directly (do not take the address
of it, as we want to work on the function itself, and not on the pointer) by using
__traits(getMember) or __traits(getOverloads).
3. Isolate the return value with ReturnType!func. You may use this in any context
in which you will use a type.
4. Get the parameter types with ParameterTypeTuple!func. You may declare a
variable with this type and fill arguments with it.
5. Get the parameter names with ParameterIdentifierTuple!func. You may
alias this to a shorter name if you like.
6. Get the parameter default values with ParameterDefaultValueTuple!func.
As with the identifiers, you may not declare a variable of this type, but you may
alias it to another name.
7.
Loop over or index the parameter tuples to inspect individual parameters.
The code is as follows:
import std.traits;
void showFunctionDetails(alias func)() {
207
www.it-ebooks.info
Reflection
import std.stdio;
writeln("
Name: ",
__traits(identifier, func));
writeln("
Returns: ",
ReturnType!func.stringof);
writeln("
Arguments: ",
ParameterTypeTuple!func.stringof);
writeln("
Arg names: ",
ParameterIdentifierTuple!func.stringof);
writeln("Arg defaults: ",
ParameterDefaultValueTuple!func.stringof);
}
int testFunction(int arg1, string str = "value") { return 0; }
void main() {
showFunctionDetails!testFunction();
}
Running the program will print the following output:
Name:
Returns:
Arguments:
Arg names:
Arg defaults:
testFunction
int
(int, string)
tuple("arg1", "str")
tuple((void), "value")
Inside a function, you may use typeof(return) to get the return
type, even if it is inferred.
How it works…
Here, we drill into functions with four helpers from Phobos' std.traits module:
ReturnType, ParameterTypeTuple, ParameterIdentifierTuple, and
ParameterDefaultValueTuple.
ReturnType and ParameterTypeTuple both yield types with which you can declare
variables (if the type is not void). All the tuple methods yield a loopable and indexable
entity, but aside from ParameterTypeTuple, they give a list of symbols. Thus, they must
be treated like a symbol, renamed, and passed around as aliases. The order of entries is
the same as the order of parameters.
208
www.it-ebooks.info
Chapter 8
The implementation of these methods use combinations of advanced is expressions and
__traits functions to get their information. First, they extract the specific type of the callable
function given to it with a series of is expressions and static if/else statements, similar
to how we categorized types in the earlier recipe. This is to support regular functions, delegates,
and function objects (for example, structs that implement opCall) uniformly. The function
type it extracts is not the same as the function pointer. It instead extracts a particular function
symbol because that gives most of the information for future compile-time reflection.
Then, the methods use a special form of the is expression to extract data. For example,
the ReturnType template's source code is as follows:
template ReturnType(func...)
if (func.length == 1 && isCallable!func)
{
static if (is(FunctionTypeOf!func R == return))
alias R ReturnType;
else
static assert(0, "argument has no return type");
}
First, it accepts any one symbol as long as it is callable. Then, it extracts the function type and
gets the return value out of it.
This form of the is expression is similar to what we used previously, for example, is(foo
== class), but there's one item added here; the R parameter. In this form, if the condition
passes, forming a valid type, then an alias named R will be introduced for the specific type
that passed the test. Since we're checking for a return value, the type that passes is the
return type, and as such, R becomes an alias for it.
The alias R ReturnType; line is an example of the eponymous template trick. If a
template has one member (a function, a type, an alias, or anything else) with the same name
as the template itself, that item acts like the template's return value. At the usage point, the
template is replaced with that member. Thus, here, the usage of ReturnType!func will
refer to the alias R, the return type extracted with the is expression.
The other methods have similar implementations, though ParameterIdentifierTuple
and ParameterDefaultTypeTuple are a little more complex because they both extract
specific data from the same source: is(typeof(func) P == __parameters), which
contains the names, types, and default values. The std.traits functions filter them out
to one concern at a time to make the consuming code easier to read.
We'll return to these methods in the final recipe of this chapter, where we'll use them to build
a dynamic function caller.
209
www.it-ebooks.info
Reflection
There's more…
Other information about functions is available through the std.traits module. For example,
ParameterStorageClassTuple will tell you if arguments are scope, out, or ref. The
functionLinkage method returns a string identifying the calling convention (for example,
"C" or "D"). The functionAttributes method tells you whether the function is nothrow,
safe, @property, and so on. You can also create new functions based on the old functions
by using SetFunctionAttributes. Check the documentation at http://dlang.org/
phobos/std_traits.html to learn more.
Getting components of complex types
We've seen how the is expression lets us match simple types, and how Phobos used it
to extract function details previously. What about more complex types such as arrays or
template instantiations? How do we break them down into details?
Getting ready
Let's define a concrete goal to accomplish. We'll make an arithmetic wrapper that should follow
the same type conversion rules as built-in types, but only work with other members of the same
wrapped family.
Such a type might be useful when creating a scientific units library, for example, where you
want to use the type system to decorate the otherwise plain numbers with maximum flexibility.
The following is an example of a complex type:
struct Number(T) if(__traits(isArithmetic, T)) {
T value;
this(T t) { value = t; }
this(N)(N n) if(isSomeNumber!N) {
this.value = cast(T) n.value;
}
}
// convenience constructor
auto number(T)(T t) { return Number!T(t); }
template isSomeNumber(N) {
// what's the correct implementation?
210
www.it-ebooks.info
Chapter 8
enum isSomeNumber = !__traits(isArithmetic, N);
}
void main() {
int b1 = 1;
double b2 = 2.5;
static assert(is(typeof(b1 + b2) == double));
Number!int n1 = number(1);
Number!double n2 = number(2.5);
//Number!double n3 = n1 + n2; // how do we make this work?
}
There are two concrete challenges here; how can we tell if any random type is indeed an
instantiation of the Number type, and how can we cause the addition operator to yield the
same type we expect from the plain numbers, where double + int = double as shown
by our static assert function? To do this correctly, we need to get the components of a
complex type.
How to do it…
Let's execute the following steps to get components of complex types:
1. To determine the syntax of breaking down the type, write the declaration with as
many or as few placeholders as you want. If we want to accept any instantiation
of the Number type, we'll write Number!T.
2. Put a comma after it and list all the placeholders you used, optionally restraining
them with : specialization or requesting for the alias symbol. So, in our case,
we now have Number!T, T.
3. Put this together in an is expression with the type we have on the left-hand side, :
or == as the operator (the : operator if you want implicit conversions to be allowed,
and == if you want an exact match), and the type we wrote in the previous step on
the right-hand side to form the matching condition. So, we can write isSomeNumber
by using is(N : Number!T, T)) to pattern-match the template instantiation,
as shown in the following code:
template isSomeNumber(N) {
enum isSomeNumber = is(N : Number!T, T);
}
4. Write an opBinary method inside Number, which pattern-matches the template
with the same syntax as isSomeNumber and returns the result using the convenient
constructor.
211
www.it-ebooks.info
Reflection
The code is as follows:
auto opBinary(string op, N: Number!T, T)(N rhs) {
return(number(mixin("this.value " ~ op ~ " rhs.value")));
}
After adding the preceding code, both the required tasks will be complete. The compiler
does the arithmetic calculation and yields the correct type for us automatically if we give
the right input.
When writing the pattern, keep your placeholders simple. If you want to
match, say, an associative array of templates, first match an associative
array. Then, inside that static if block, match the template separately.
This will help to make your is expressions readable.
How it works…
Deconstructing complex types is done with the full form of the is expression. The full syntax
of the is expression form we are using is as follows:
is(Check MatchAlias op SearchPattern, list, of, placeholders);
In the preceding code, the Check parameter is the type you are checking or deconstructing.
The MatchAlias parameter is always optional. If you choose to provide it, the type that
matches the search pattern will be aliased to that name. Often, this is the same as what you
passed in (the Check parameter). However, depending on the value of the SearchPattern
parameter, it may extract details instead (see the previous recipe for the ReturnType
implementation for an example).
The comparison operation is op. It can be either the == or : operator. The == operator
checks for an exact match while the operator : checks for implicit conversions as well.
You may think of the : operator as being related to inheritance, for example, class Foo :
Interface will implicitly cast to Interface, so is(Foo : Interface) will be true.
If you do not provide an operator, you must also not provide a SearchPattern parameter.
This yields the simplest form of the is expression; it checks only if the type is valid without
any specific requirements.
The SearchPattern parameter is what you're looking for. There might be a keyword such
as class, function, or return if you are looking for those categories and details, or it
may be a type, with as many or as few wildcard placeholders as you want to use.
212
www.it-ebooks.info
Chapter 8
Finally, you need to declare all the placeholders you used in the SearchPattern parameter
in a comma-separated list. If you forget these, the compiler will issue an error about an
undefined identifier. Since a template name is not a type itself, a template name must put
the alias keyword before the placeholder name. Other types only need to list the name.
The placeholders will be available for further inspection to find what they matched in the
given Check type.
You may also specialize on placeholder types with a colon followed by
a type, but this can get to be difficult to read and lack the flexibility of
subsequent expressions. Since they can be replaced by the nested
static if statements that handle one step at a time, you may
choose to rarely use this particular option.
Let's look at some examples. Previously, we used the is(N : Number!T, T) expression.
Here, Check is N, the argument we passed in the template. We want to see if it implicitly
converts to Number!T, which is a specific template with a placeholder parameter. If we used
this expression with static if, inside that statement, we could also refer to T to see what
exactly the parameter is on the type we're inspecting.
It is also instructive to look at a longer-form implementation of isSomeNumber type, which
deconstructs any template, and then checks each piece for our match. This is shown in the
following code:
static if(is(N : Template!Args, alias Template, Args...))
enum isSomeNumber = __traits(isSame, Template, Number);
else
enum isSomeNumber = false;
}
Here, we decomposed the entire template, which will work with any template's instantiation
and not just the Number template. Then, we compared the deconstructed alias name to
the original name by using __traits(isSame), which tells us whether the two names are
aliases for the same symbol. If Template is an alias for Number, that's a match. We also put
an else branch on the static if statement because if the checked type didn't match the
pattern at all, we know it certainly isn't what we're interested in here.
The is expression is not limited to templates. Another common use is to match or deconstruct
arrays and associative arrays, as shown in the following code:
template isArray(T) {
static if(is(T == E[], E)) {
// Note: E is the element type of the array
}
enum isArray = true;
else
213
www.it-ebooks.info
Reflection
enum isArray = false; // didn't match the E[] pattern
}
template isAssociativeArray(T) {
static if(is(T == K[V], K, V)) {
// Here, K and V are the key and value types, respectively
enum isAssocativeArray = true;
} else
enum isAssociativeArray = false;
}
We can get as complex as we want to match. You could write is(T == K[V][][V2], K,
V, V2) if you wanted to match an associative array of arrays of associative arrays, and
inspect each individual type (through K, V, and K2). However, if you specifically wanted V2,
for example, to be an instance of Number!T, you should use a nested static if block to
check that condition individually.
Back to our Number type, the other challenge we achieved was making opBinary work. In
the opBinary compile-time argument list, we specialized out the right-hand side type using
the syntax very similar to the is expression. Many pattern-matching capabilities of the is
expression also work in a template argument list.
The implementation of opBinary is a bit anticlimactic. Since we wanted to match the language
rules for arithmetic calculation of the constituent types, instead of trying to recreate those rules
with a series of static if statements (which is possible, though tedious), we simple performed
the operation and used the result. We could have also checked the result with typeof if we
didn't want to use it immediately.
While compile-time reflection and static if statement give you the option of digging into
the details, don't let them make you do more work than you have to. If the language itself can
perform a task, let it perform that task and then simply inspect or use the result as required.
See also:
ff
Refer to the documentation for the is expression at http://dlang.org/
expression.html#IsExpression
Using user-defined attributes
D supports user-defined attributes (sometimes called annotations), which are a way to add
custom compile-time information to declarations that can be retrieved later by reflection.
Here, we'll look at their capabilities and their limitations.
214
www.it-ebooks.info
Chapter 8
How to do it…
Let's execute the following steps to use user-defined attributes:
1. Create a struct or enum to use as the attribute. A struct attribute should have
data members, as shown in the following code. An enum attribute is best used for
a simple flag:
struct MyNote { string note; }
2. Attach the attribute to a declaration with the @ sigil, as shown in the following code:
@MyNote("this is my note on foo") void foo() {}
3. Retrieve attributes by using the __traits(getAttributes, symbol) function.
To pass the symbol to a function or template, use a compile-time parameter with the
alias keyword.
4. Loop over the attributes, retrieving the one you want by identifying the type with the
basic form of the is expression. For flags, check for the validity of the type and return
true if it is present. For data annotations, such as MyNote, check the typeof
parameter and then return the actual annotation so the data can be checked.
The code is as follows:
MyNote getMyNoteAnnotation(alias F)() {
foreach(attr; __traits(getAttributes, F)) {
static if(is(typeof(attr) == MyNote))
return attr;
}
assert(0); // the annotation wasn't there
}
// get the note and print out the value
// (the member note is of the MyNote struct)
pragma(msg, getMyNoteAnnotation!(foo).note);
How it works…
D's user-defined attributes never modify a type or generate new code, but do allow you to
attach data to declaration that you can use later through the compile-time reflection for code
generation if you wish.
The attributes are regular D types, holding regular D data. Once you retrieve them, you use
the value like any other variable. To attach them, you can write @some_expression, where
some_expression can be almost anything, as long as it gives a result at compile time.
Typically, the expression is a struct constructor @MyNote("string"), which attaches
a value to the declaration similar to the auto a = MyNote("string") statement that
assigns a value to a variable.
215
www.it-ebooks.info
Reflection
It is also legal to attach plain data to a declaration, such as @1 int
foo; will have an int annotation with the value of 1. Since int is not a
unique type and attributes are retrieved by type comparison, using naked
attributes like this will lead to conflicts where one module interprets int
in one way and another sees it as something entirely different. To avoid
this situation, always declare a new type for your attributes.
The __traits(getAttributes) function returns a list of all the attributes attached to
a symbol. Since the attributes may include data from other libraries about which you know
nothing, it is best to loop through them and find only the ones that match your type. Once
you have your data, you may do anything with it; but remember, it is just data. We'll look at
a concrete example of a user-defined attribute flag in the next recipe.
A common question is how to modify a type with an attribute.
This is not possible in D. You may loop over a module, looking for
types with an annotation, and then declare a new one with the
transformation. However, there's already a tool in the language to
modify types: templates and compile-time parameters! So, instead
of trying to write @NotNull Object, use NotNull!Object
and you'll find easier success.
Implementing a custom lint-style check for
virtual functions
D's reflection capabilities can be used to perform some checks that the lint tools are needed
to perform for the C or C++ code. Here, we'll implement the code to warn the user at compile
time whether their class has an unmarked virtual function.
How to do it…
Let's execute the following steps to implement a custom lint-style check for virtual functions:
1. Define a plain enum called Virtual to use as the annotation to silence the warning.
2. Find classes in your program to test, either manually or with reflection.
3. Use __traits(derivedMembers, Class) to get all the members, excluding the
base class members.
4. Use __traits(isVirtualMethod, member) to determine whether it is a
virtual function.
5. Write a helper function that uses __traits(getAttributes, member) in a loop
with static if(is(Virtual)) to look for the annotation.
216
www.it-ebooks.info
Chapter 8
6. If it is not found, use pragma(msg) to warn the user.
7.
Optionally, return a failure flag from your check function. The user may check this
flag with static assert to turn the warning into an error. Alternatively, the user
can write enum virtualPassed = virtualCheck!item_of_interest;
to get warnings without errors.
The code is as follows:
// the UDA we should put on authorized virtuals
enum Virtual;
// alias helper for looping over members
alias helper(alias T) = T;
// Helper function to test for presence of @Virtual
bool isAuthorizedVirtual(alias member)() {
foreach(attr; __traits(getAttributes, member))
if(is(attr == Virtual))
return true;
return false;
}
// Loop over all members, looking for classes to drill
// into and virtual functions to test.
bool virtualCheck(alias T)() {
bool passes = true;
foreach(memberName; __traits(derivedMembers, T)) {
static if(memberName.length) {
alias member = helper!(__traits(getMember, T, memberName));
// drill down into classes
static if(is(member == class))
passes = passes && virtualCheck!member;
// check overloaded functions (if any) for
// unmarked virtuals
foreach(overload; __traits(getOverloads, T, memberName))
static if(__traits(isVirtualMethod, overload)) {
static if(!isAuthorizedVirtual!overload) {
// and warn if we find any
pragma(msg, T.stringof ~ "." ~ memberName
~ " " ~ typeof(overload).stringof
~ " is virtual");
passes = false;
}
217
www.it-ebooks.info
Reflection
}
}
}
return passes;
}
class Test {
@Virtual void foo() {} // specifically marked, ok
void foo(int) {} // virtual but not marked = problem
final void f() {} // final, ok
}
// We'll use static assert to run the test and cause a compile
// error if any tests fail.
static assert(virtualCheck!(mixin(__MODULE__))); // test all classes
in the module
The following is the compilation result of the preceding code:
Test.foo void(int) is virtual
virt.d(51): Error: static assert
(virtualCheck!(virt)) is false
How it works…
D's reflection gives us access to other information about items beyond their name and type.
We can also retrieve other details, such as whether a function is virtual, its calling convention,
and other attributes.
The rest of the implementation is a fairly straightforward application of what we already
learned. We use compile-time reflection to drill down into all members of the module, check
the information we're interested in, and then use pragma(msg, "string") to print the
warning, if necessary. Since it is currently impossible to get the exact file and line numbers
of a declaration with reflection, we instead print the full name and type so that the user can
identify the function from the message. Finally, we return a flag instead of using the static
assert statement in the test so that compilation doesn't fail immediately with the first note.
If you need to perform checks that cannot be fully completed
at the compile time, consider calling the check functions in a
unit test block so they run at runtime.
218
www.it-ebooks.info
Chapter 8
Extending the runtime type information
D's built-in TypeInfo doesn't provide nearly as much information as we can get from the
compile-time reflection tools. Here, we'll create an extended type info with custom data.
How to do it…
Let's execute the following steps to extend the runtime type information:
1. Create an interface with methods exposing the information you want to make
available at runtime.
2. If your method works with the data, remember that RTTI is typically used with
very little compile-time type information. Thus, methods should take a generic
runtime type, such as Object or void* in the generic interface.
3. Create an associative array of your interface keyed on TypeInfo.
4. Write helper functions to retrieve the information from the associative array. Use
typeid() to get the lookup key from a given variable or type.
5. Write a template class that will implement your generic interface for each supported
type. The std.traits Phobos module will help with our implementation.
6. Write a mixin template that loops over all the types to which you wish to add support
for extended type information. Alternatively (or additionally), you could provide a
registerType function to be called explicitly or on request in the extended info
lookup functions.
7.
On the user side, register the types you wish to support and use the information.
The code is as follows:
/// stores the information
immutable MoreInfo[TypeInfo] moreTypeInfo;
/// Gets extended info from a value
public immutable(MoreInfo) extTypeInfo(T)(T t) {
if(auto ptr = typeid(t) in moreTypeInfo)
return *ptr;
return null;
}
/// Gets extended info from a type
public immutable(MoreInfo) extTypeInfo(T)() {
if(auto ptr = typeid(T) in moreTypeInfo)
return *ptr;
219
www.it-ebooks.info
Reflection
return null;
}
/// The interface we provide to more info
public interface MoreInfo {
immutable:
/// is it an integral type?
bool isIntegral();
/// given a pointer to this type, return it as a string
/// Be sure the pointer is actually the correct type!
string getAsString(in void*);
}
/// The implementation of the interface for any type
private class MoreInfoImpl(T) : MoreInfo {
immutable:
// std.traits offers reflection helpers
import trait = std.traits;
bool isIntegral() {
return trait.isIntegral!T;
}
string getAsString(in void* ptr) {
import std.conv;
auto t = cast(T*) ptr;
return to!string(*t);
}
}
/// This creates all the instances we want to enable
public mixin template EnableMoreInfo(types...) {
/// A static constructor is run at thread startup
shared static this() {
foreach(type; types)
moreTypeInfo[typeid(type)] = new immutable MoreInfoImpl!type();
}
}
/* User code */
class A { } // a random custom class
// enable more info for built-in ints and our class
220
www.it-ebooks.info
Chapter 8
mixin EnableMoreInfo!(int, A);
void main() {
import std.stdio;
// test
writeln(extTypeInfo(1).isIntegral()); // true
writeln(extTypeInfo!(A).isIntegral()); // false
int a = 34;
writeln(extTypeInfo(a).getAsString(&a)); // prints 34
}
How it works…
We used three features to make information from compile-time reflection available at
runtime: classes with interfaces, static module constructors, and associative arrays with
the TypeInfo keys.
First, the interfaces were used to provide a consistent base type that always works at runtime.
Sometimes, it is tempting to think of templates as being almost magical—if we could only
write cast(runtime_type) it will all work. However, this is impossible because templates
and types only exist at compile time. If you had enough information to successfully perform
a downcast, you'd have enough information to use compile-time reflection and thus have no
need for runtime information anyway!
So, while the class that implements the interface is a template, allowing us to use compiletime reflection to fill in the information, saving a lot of manual work. The interface itself is
what must be used at runtime and it must all work with generic types. To get a type's value
generically, we put getAsString in the interface. No matter what the underlying data is,
we can convert it to one uniform type, string, and use that. Since the interface itself isn't
a member of the type we're converting, getAsString must take a pointer to the data so
it knows what to convert. Given the limitations of the generic MoreInfo interface, the data
pointer must also be generic, so we use void*.
Other interface methods that operate on the data will need to work the same way; return a
consistent type and take a generic pointer to the data.
Once we've defined and implemented the interface, we need some way to access it at
runtime. That's where the associative array comes in. Using TypeInfo as a key, we can
look up our extended information any time we are given a TypeInfo+void* pair elsewhere
in the code, including generic classes. We can work with classes with a generic base type of
Object instead of void* if you prefer, and we can always retrieve their TypeInfo with the
typeid operator, but that only works on class objects. Remember, class objects are unique
and they always carry their TypeInfo reference with the actual data.
221
www.it-ebooks.info
Reflection
However, how do we populate the associative array with data coming from several sources,
possibly across modules and compilation units? That's where the static module constructor
comes in.
A static module constructor is declared with one of two syntaxes: static this() or shared
static this(), both in module scope. The static this() constructor declares a
thread-local module constructor. Each new thread spawned will run its code to initialize thread
variables. The shared static this() constructor declares a module constructor for the
data shared across all threads, including the immutable data. A shared static constructor
is run only once, automatically upon program start-up, before main is run.
You can also write static constructors for your classes and complex
types by using the same syntax in the object's scope. It is important that
you write the definition exactly as it is seen here; the literal keywords
static this or shared static this must appear, in that order,
for the compiler to recognize the constructor.
Since our extended type info never changes, we made it immutable. Immutable data normally
cannot be modified, but the compiler makes an exception for constructors to allow them to be
initialized. Since it is immutable, it can also be shared across threads, so we initialized it in a
shared static constructor. Thus, the cost of initialization is minimized because it is done
once and only once.
What happens if you have multiple calls to EnableTypeInfo in the same module? Try it, you'll
find it works. The compiler will combine multiple module constructors together automatically.
Once the array is built, we can use it like any other collection of data. The extTypeInfo
helper functions give us an easy interface to use a given type or variable, or we can access
the array directly with a TypeInfo key. Since our extended type information is opt-in, these
functions may return a null value, indicating that the extended information is not available
for the given type. Here, we used a small manually curated list of types that will be enabled.
We could have also used compile-time reflection to search the module for all types it defines.
Why don't we construct the extended information lazily in the helper
function? Immutability of the array notwithstanding, that will actually
work for some types. The problem is lazy construction only works where
compile-time reflection will work anyway, defeating the point of enabling
runtime reflection. An example where it will not work correctly is when
you give it an instance of a child class through a base class. The lazy
function will construct information for the base class, unaware of the
child class.
222
www.it-ebooks.info
Chapter 8
There's more…
The D runtime and compiler also includes a feature we could use to make extended type
information for all user-defined types automatically. In the documentation of TypeInfo at
dlang.org, you might have noticed a member rtInfo, which provides implementationspecific type extensions for the garbage collector.
Every time the compiler encounters a new type definition, it invokes a template called RTInfo
on that type. The RTInfo template is found in the automatically imported core library file,
object.d. The RTInfo template can return a pointer to the implementation-defined data
that is accessible through TypeInfo, and it can also define new module constructors to build
additional lists, exactly as we did here.
The same feature could, in theory, be used for user-defined type extensions too. However,
since customizing it means customizing your core runtime library, it isn't very practical today.
There's ongoing work in the D community to make this feature more accessible to end users.
Creating a command-line function caller
One useful application of reflection is that it builds dynamic interfaces automatically.
Reflection can be used to help the code that interacts with a scripting language, a network
protocol, and more. Here, we'll write a command-line program that calls functions and displays
information about them when help is requested. We'll need to be able to add new functions
without needing any boilerplate code to be added along with it.
How to do it…
We can create a command-line function caller by performing the following steps:
1. Loop over all members of the module.
2. Find functions with a protection level of export (alternatively, you may look for
the presence of a user-defined attribute).
3. If the user requested help, list the possible functions or details about a particular
function, by performing the following steps:
1. Use a user-defined attribute for documentation.
2. Use std.traits' Parameter*Tuple family of functions to get details
about the function.
223
www.it-ebooks.info
Reflection
4. If the user wants to run a function, prepare a function call as follows:
1. Use std.traits.ParameterTypeTuple to build the argument list.
2. Check std.traits.ReturnType to see if the function has a return value
(in other words, if it doesn't return void). If it does, store the return value as
a string. Otherwise, call the function without trying to store the return value.
5. Format the result or the error message for presentation to the user, as shown in the
following code:
// The functions we want to make available
export {
@doc("Say hello to the user", ["the user's name to greet"])
string hello(string name = "user") {
return "Hello, " ~ name ~ "!";
}
@doc("Adds two numbers together.")
int sum(int a, int b) {
return a+b;
}
}
// alias helper for reflection
alias helper(alias T) = T;
// Our user-defined attribute for documentation
struct doc {
string value;
string[] argDocs;
}
// Helper function to find a generic value UDA
auto getAttribute(alias mem, T)() {
foreach(attr; __traits(getAttributes, mem))
static if(is(typeof(attr) == T))
return attr;
return T.init;
}
// Function to do the reflection and call
int runWithArgs()(string[] args) {
import std.traits, std.conv, std.stdio;
string name;
if(args.length) {
name = args[0];
224
www.it-ebooks.info
Chapter 8
args = args[1 .. $];
}
// look over the whole module for callable functions
alias mod = helper!(mixin(__MODULE__));
foreach(memberName; __traits(allMembers, mod)) {
alias member = helper!(__traits(getMember, mod, memberName));
static if(
// Is it a function marked with export?
is(typeof(member) == function) &&
__traits(getProtection, member) == "export")
{
if(name == "--help") {
// user requested help
if(args.length) {
if(memberName == args[0]) {
// print the details of this function
writef("Usage: %s", memberName);
foreach(argName; ParameterIdentifierTuple!member)
writef(" %s", argName);
writefln("\n\t%s", getAttribute!(member, doc).value);
if(ParameterTypeTuple!member.length)
writeln("Arguments:");
auto argDocs = getAttribute!(member, doc).argDocs;
foreach(idx, argName; ParameterIdentifierTuple!member)
{
string defaultValue;
bool hasDefaultValue;
static if(!is(ParameterDefaultValueTuple!member[idx]
== void)) {
defaultValue = to!string(ParameterDefaultValueTupl
e!member[idx]);
hasDefaultValue = true;
}
string argDoc = "?";
if(idx < argDocs.length)
argDoc = argDocs[idx];
writefln("\t%s (%s): %s %s",
argName,
ParameterTypeTuple!member[idx].stringof,
225
www.it-ebooks.info
Reflection
argDoc,
hasDefaultValue ? "[default=" ~ defaultValue ~
"]" : "");
}
}
} else {
// no details requested, just show the full listing
writefln("%16s -- %s", memberName, getAttribute!(member,
doc).value);
}
// the user did NOT ask for help, call the function if
// we have the correct name
} else if(memberName == name) {
// Prepare arguments
ParameterTypeTuple!member arguments;
alias argumentNames = ParameterIdentifierTuple!member;
alias defaultArguments = ParameterDefaultValueTuple!member;
try {
foreach(idx, ref arg; arguments) {
// populate arguments, with user data if available,
// default if not, and throw if no argument provided.
if(idx < args.length)
arg = to!(typeof(arg))(args[idx]);
else static if(!is(defaultArguments[idx] == void))
arg = defaultArguments[idx];
else
throw new Exception("Required argument " ~
argumentNames[idx] ~ " is missing.");
}
string result;
// We have to check the return type for void
// since it is impossible to convert a void return
// to a printable string.
static if(is(ReturnType!member == void))
member(arguments);
else
result = to!string(member(arguments));
writeln(result); // show the result to the user
return 0;
} catch(Exception e) {
226
www.it-ebooks.info
Chapter 8
// print out the error succinctly
stderr.writefln("%s: %s", typeid(e).name, e.msg);
return 1;
}
}
}
}
return 0;
}
int main(string[] args) {
return runWithArgs(args[1 .. $]);
}
6. Run it with the following options to look at the results:
$ ./command --help
hello -- Say hello to the user
sum -- Adds two numbers together.
$ ./command --help hello
Usage: hello name
Say hello to the user
Arguments:
name (string): the user's name to greet [default=user]
$ ./command hello "D fan"
Hello, D fan!
Also, try adding new functions and see how they work with no additional boilerplate code.
Since Ddoc comments are not currently available through
compile-time reflection, we had to define our own doc
structure to use as an attribute instead.
How it works…
We brought together the following techniques we learned earlier in the chapter to form a
complete program:
ff
Looping over the module using __traits(allMembers) and finding functions
with the is expression
ff
Locating the user-defined attributes with a helper function and then using the value
like a regular data type
227
www.it-ebooks.info
Reflection
ff
Getting function details with the std.traits module from Phobos and __
traits(getProtection), which returns a string with the protection level
(for example, private, public, protected, export, or package)
ff
Using runtime type information to get the dynamic name of the Exception
subclass used to print errors
The new part is using the reflection data to actually locate and call the function's given
information at runtime.
The first thing to notice is that the compile-time reflection is done the same way, as if the
name of the function we want to call doesn't even exist. The reason is that at compile time,
the name indeed doesn't exist yet—it comes from the user at runtime! All the reflection
information needs to be there just in case the user wants to call it.
Another consequence of this is that we need to make sure that all the possible function
calls compile. If name != memberName, the code won't run, but it will be still compiled
just in case it does run the next time.
The next new thing is actually calling the function. We learned about ParameterTypeTuple
previously and saw how to get information from it. Here, we're using ParameterTypeTuple
to actually declare a variable that holds the function arguments. We loop over it, by reference,
filling in those arguments from our runtime strings. Using typeof in the loop, we can determine
what type of value the function expects and automatically convert our strings appropriately.
Notice that we checked the length of the runtime args argument against the index of the
parameter loop instead of looping over the runtime arguments and assigning them to the
parameters. It is important to always loop over compile-time constructs when available,
since that maximizes the potential for compile-time reflection.
If we try to write foreach(idx, arg; args) arguments =
to!(typeof(arguments[idx]))(arg), the compiler will complain about not being able
to index a compile-time construct with a runtime variable—it won't even know the limits until
the user provides an arguments' string! Remember, compile-time data can always be used at
runtime, but runtime data can never be used at compile time.
Once the arguments are prepared, we pass them to the function. As we saw in the discussion
of .tupleof previously, compile-time tuples or template argument lists have the special
ability to expand to fill argument lists.
The last notable aspect of the function call is checking the return value. We want to assign it
to a string so that we can print it to the user. Almost any type can be converted to a string, but
there is one major exception: void. When a function doesn't have a return value, we cannot
do the conversion! If we want to store the return value in a variable, we will have to perform
this check too, since variables cannot have no type or void type.
A simple call to ReturnType inside static if lets us handle the special case without
breaking the build.
228
www.it-ebooks.info
Chapter 8
There's more…
The generated code for these loops looks like the following:
if(name == "hello")
hello(to!string(args[0]);
if(name == "add")
add(to!int(args[0]), to!int(args[1]);
It is a linear list of function names. If you had a very large number of functions, searching this
list for the right function to call may be slow. A potential optimization for this program will be
to put each function call into a helper function or a switch case statement, and then generate
the code to perform a hash table lookup with a mixin expression. We'll learn about code
generation in the next chapter.
229
www.it-ebooks.info
www.it-ebooks.info
9
Code Generation
In this chapter, we will explore D's code generation capabilities and cover the
following recipes:
ff
Creating user-defined literals
ff
Parsing a domain-specific language
ff
Generating data structures from text diagrams
ff
Automating dynamic calls with multiple dispatch
ff
Building a lookup table
ff
Using string parameters to change functions
ff
Wrapping instance methods
ff
Using opDispatch to generate properties
ff
Duck typing to a statically-defined interface
Introduction
Code generation is a central feature of the D programming language. In fact, it is so
important that we've already used it extensively throughout this book! Templates perform
code generation. They are a block of code with placeholders which are filled in to form the
generated code. With compile-time function evaluation and the mixin expression, we can
build D code out of strings and have them compiled.
Here, we'll look at some specific examples of how to use these techniques to generate code
from various inputs.
www.it-ebooks.info
Code Generation
Creating user-defined literals
D doesn't have specialized syntax for user-defined literals, but using the template syntax with
the right implementation, we can generate the same code as if it did. A distinguishing factor
of user-defined literals is that there must be zero runtime cost to use them. Here, we'll write
the code to enable integer literals written in octal, a simplified version of the implementation
of octal in Phobos' std.conv module.
Getting ready
First, let's write an octal number parser, converting from string to integer. The algorithm
is simple: read a digit, multiply our accumulator by eight, and then add the value to the
accumulator until we're out of digits. Any invalid digit is an exception. All these steps are
shown in the following code:
int readOctalString(string n) {
int sum = 0;
foreach(c; n) {
if(c < '0' || c > '7')
throw new Exception("Bad octal number " ~ n);
sum *= 8;
sum += c - '0';
}
return sum;
}
unittest {
assert(readOctalString("10") == 8);
assert(readOctalString("15") == 13);
assert(readOctalString("4") == 4);
import std.exception;
assertThrown!Exception(readOctalString("90"));
}
How to do it…
Let's execute the following steps to create user-defined literals:
1. Write a regular function to get the value you want from a string.
2. Write a template that takes a string parameter and whose body consists of one line:
enum myname = yourFunction(s);.
232
www.it-ebooks.info
Chapter 9
3. Write templates that take other types of literal, if appropriate, and convert them to
string to forward them to the template discussed in the preceding step.
The code is as follows:
// step 2:
template octal(string s) {
enum octal = readOctalString(s);
}
// step 3: octals also make sense with some int literals
template octal(int i) {
import std.conv;
enum octal = octal!(to!string(i));
}
// usage test:
void main() {
import std.stdio;
writeln(octal!10);
writeln(octal!"15");
writeln(octal!4);
}
It prints 8, 13, and 4, matching our preceding unit test. Let's also confirm the compiler outputs
the same code as it will for a normal integer literal by looking at the following disassembly:
$ objdump -d -M intel simpleoctal | grep _Dmain -A 30
0808f818 <_Dmain>:
808f818:
55
push
ebp
808f819:
8b ec
mov
ebp,esp
808f81b:
b8 08 00 00 00
mov
eax,0x8
808f820:
e8 e3 7d 00 00
call
<_D3std5stdio14__T7writelnTiZ7writelnFiZv>
808f825:
b8 0d 00 00 00
mov
808f82a:
e8 d9 7d 00 00
call
<_D3std5stdio14__T7writelnTiZ7writelnFiZv>
808f82f:
b8 04 00 00 00
mov
808f834:
e8 cf 7d 00 00
call
<_D3std5stdio14__T7writelnTiZ7writelnFiZv>
8097608
eax,0xd
8097608
eax,0x4
8097608
808f839:
31 c0
xor
eax,eax
808f83b:
5d
pop
ebp
808f83c:
c3
ret
The relevant lines are mov eax, 0x8, mov eax, 0xd, and mov eax, 0x4.
They are indistinguishable from any other integer literals, and there are no calls to
octal or readOctalString in sight! (The calls after those lines are to writeln.)
233
www.it-ebooks.info
Code Generation
How it works…
This is an example of the general pattern we'll be exploring in this chapter. We will write a
regular function to convert input from one form to another, and then use D to evaluate that
function at compile time to generate code or data.
The enum keyword is central to our result. In D, the enum keyword is used for all
named constants that do not have a memory address. This, of course, includes traditional
enumerations such as enum Color { red, green, blue }, and it also works as a
single value. In both cases, the value works just like a literal value at the usage site, as if
you copied and pasted the value straight to the usage point.
An enum structure is similar to a #define statement in C. The difference
is that the value of an enum structure is always determined at compile
time, even if it is assigned to a function, and enum values in D always
have a specific type; they are not just text to be transplanted into code.
When you declare an enum structure with a value, the right-hand side of the equation
is immediately evaluated at compile time, regardless of complexity, and it will cause a
compile-time error if this is unsuccessful for any reason. This is an extension of constant
folding as seen in almost all the compiled languages, where if you write 1 + 2, the compiler
automatically translates that to 3 instead of a literal adding an instruction in the compiled
program. D simply takes that concept much farther.
Therefore, the enum keyword is the D idiom to force a compile-time function evaluation to
create a literal in the generated code.
The enum keyword is not the only way to trigger compile-time
evaluation, and it is not always the best way. It is also run for a static
initializer, such as a static variable or an initializer in a class or
a struct definition, or anywhere else where the regular code can
not be immediately run. Since the enum array literals always allocate
at the usage point, they are often better represented as a static
immutable variable.
The next task is to ensure we get the enum keyword's behavior without being forced to do the
following tedious two-step process:
enum ourOctalPermissionLiteral = readOctalString("755");
chmod("my_file", ourOctalPermissionLiteral);
234
www.it-ebooks.info
Chapter 9
Since the compile-time evaluation and literal behavior only happens in specific contexts like
enum, trying to call the readOctalString function directly will produce a plain runtime
function call. We need to use the enum keyword as an intermediary. That's where the short
octal template comes into play.
A template is fundamentally a block of code with parameters which act as placeholders
that are replaced at the usage point to generate new code. We've used them extensively
throughout this book to create new types and functions. Here, we're using a template to
create an enum value from a string placeholder.
When the octal template is used, the enum structure is created on the spot and substituted
for the template, giving us the convenience of template usage syntax with the behavior of
enum literals, achieving our goal.
See also
ff
A blog post by Walter Bright describing this technique after it was first discovered can
be found at http://www.drdobbs.com/tools/user-defined-literals-inthe-d-programmi/229401068. Templates and compile-time function evaluation
with enum were both designed features, but the usefulness of the combination was
only realized later.
ff
The documentation for Phobos' octal template can be found at http://dlang.
org/phobos/std_conv.html#octal. It is similar to but more complex than the
one we did here because it also obeys the language's typing rules across several
types of integers and their edge cases.
Parsing a domain-specific language
D can embed domain-specific languages as strings. By writing a compiler for your specialized
language to D in D, you can convert code in any language to a D code string, which can then
be mixed in and compiled to the optimized machine code by the D compiler.
To demonstrate the technique, we'll write a small stack-based arithmetic program here.
How to do it…
Let's execute the following steps to parse a domain-specific language:
1. Write a regular parser for the language, making it work when compiled normally at
runtime. For the stack language, this is very simple: we just need to split the string. For
a more complex language, we will need to build abstract syntax trees out of classes.
2. Ensure the parser works at runtime by creating a main function that outputs
its result.
235
www.it-ebooks.info
Code Generation
3. Write methods that return strings of the D code from your language's data
structures. The stack language will output calls to D functions for push, pop,
and calling an operation.
4. Write the generated code out at runtime to make the debugging easier.
5. Once you are happy with the results, use the mixin expression to compile the
code as D.
The code is as follows:
import std.stdio, std.string;
string[] parse(string code) {
return code.split(" ");
}
string convertToD(string[] pieces) {
string code;
foreach(piece; pieces) {
if(isNumeric(piece)) {
code ~= "push(" ~ piece ~ ");\n";
} else {
code ~= "push(call!'"~piece~"'(pop(), pop()));\n";
}
}
return code;
}
void runDslCode(string code)() {
int[16] stack;
int stackPosition;
void push(int p) {
stack[stackPosition++] = p;
}
int pop() {
return stack[--stackPosition];
}
int call(string op)(int a, int b) {
return mixin("b"~op~"a");
}
mixin(convertToD(parse(code)));
236
www.it-ebooks.info
Chapter 9
writeln(stack[0 .. stackPosition]);
}
void main() {
enum code = "5 5 + 3 - 2 * 1 + 3 /";
// writeln(parse(code)); // to aid with debugging
// writeln(convertToD(parse(code)); // debugging aid
// usage:
runDslCode!"5 5 + 3 - 2 * 1 + 3 /"();
}
The intermediate debugging aid will print the generated D code as follows:
push(5);
push(5);
push(call!'+'(pop(),
push(3);
push(call!'-'(pop(),
push(2);
push(call!'*'(pop(),
push(1);
push(call!'+'(pop(),
push(3);
push(call!'/'(pop(),
pop()));
pop()));
pop()));
pop()));
pop()));
The end result of the program is to print [5], the result of our DSL expression. If you
disassemble the generated binary, you will see that the compiler was able to optimize the DSL.
With dmd, the calls to the push, pop, and call operations can all be inlined. With gdc, the
GNU D compiler, and ldc, the LLVM D compiler, their full optimizations go even further, doing the
calculations at compile time and simply filling in the final values directly to the result buffer!
How it works…
There's nothing special about the compile-time D code. It is often literally the very same code
you will write for any program, including complex cases such as parsing another programming
language. Unlike with a regular compiler or interpreter though, the goal of a domain-specific
language in D is simply to generate the D code, neither to directly run or necessarily to analyze
or optimize it—because the D compiler can do those tasks for you.
The majority of the D language and library works at compile time, enabling straightforward
implementations of DSL lexers and parsers. In our stack language example, the bulk of the
work was done by simply calling the Phobos split function.
237
www.it-ebooks.info
Code Generation
Generating the actual D code can be messy work. Adding white space to the generated code
will help when debugging.
If you need to refer to a type in a mixin expression, always refer to
the local alias. For example, void generateCodeForT(T)() {
mixin("return T.sizeof"); } is always preferable to "return "
~ T.stringof ~ " .sizeof"; because otherwise the name may be
ambiguous at the usage location.
Sometimes, we can cut corners on our language implementation knowing that the D compiler
can make up the gaps, or in the worst case, it will cause a compile-time error with a difficultto-read error message.
If you have a lot of code written in DSL or any other kind of datafile that
you want to be available at compile time or embedded in your executable,
you may use the string s = import("filename"); expression
instead of using string literals. The file's contents will be available just as
if you copied the content into your D code and fixed any needed escaping
yourself. Enable the import expression by passing –Jpath to dmd, where
path is the directory where the datafiles can be located.
There's more…
The std.regex Phobos module uses this technique with its ctRegex function. The result is
a regular expression engine that performs exceptionally well because it generates customized
and optimized code for each pattern it is given at compile time.
I also wrote a small Lisp translator to show how the technique can be used with a more
complex language, but it was too long to reprint in this book. You can see that code at
https://github.com/adamdruppe/book/blob/master/lisp.d.
It implements a four-stage compiler by performing the following steps:
1. First, it tokenizes the input string.
2. Then, it parses it (a simple job for a Lisp-like language).
3. Next, it performs semantic transformations, handling special forms like
defining functions.
4. Finally, each AST node has a method to generate the D code, completing
the transformation.
238
www.it-ebooks.info
Chapter 9
See also
ff
http://dlang.org/function.html#interpretation is the official
documentation on the rules for compile-time function evaluation
Generating data structures from text
diagrams
Data structures are often defined with text diagrams. Like domain-specific languages,
D can parse these strings and generate data structure definitions at compile time.
We'll briefly demonstrate the technique by writing a parser for a simple diagram.
How to do it…
Let's execute the following steps to generate data structures from text diagrams:
1. Start by writing a regular program to parse the diagram into structured fields.
For our diagram, we'll want to split it into lines and then split the data lines into
individual fields. The name will be the text within and the length will be one byte
per four characters.
2. Take the structured data and generate the D code from it with string concatenation.
Here, we'll build an anonymous structure with each field from the diagram, using
simple integral types to match the size. Write out your code with pragma(msg)
or at runtime while debugging until the code looks right.
3. Use the mixin expression to compile your code in a struct block. If you use this
pattern often, you may encapsulate it in a struct block with a compile-time string
parameter and then alias that parameter to a final name.
This is shown in the following code:
enum diagramString = '
+------------------+
|LEN | ID | MSG
|
+------------------+
';
struct DiagramField {
string name;
int length;
}
239
www.it-ebooks.info
Code Generation
DiagramField[] readDiagram(string diagram) {
DiagramField[] fields;
import std.string;
auto lines = diagram.splitLines();
foreach(line; lines) {
if(line.length == 0) continue; // blank line
if(line[0] == '+') continue; // separator line
auto parts = line.split("|");
foreach(part; parts) {
if(part.length == 0) continue;
DiagramField field;
field.name = part.strip;
field.length = part.length / 4;
fields ~= field;
}
}
return fields;
}
string toStructDefinition(DiagramField[] fields) {
string code = "struct {\n";
foreach(field; fields) {
string type;
switch(field.length) {
case 1: type = "ubyte"; break;
case 2: type = "ushort"; break;
case 4: type = "uint"; break;
case 8: type = "ulong"; break;
default: assert(0);
}
code ~= "\t" ~ type ~ " " ~ field.name ~ ";\n";
}
code ~= "\n}";
return code;
}
struct StructFromDiagram(string diagram) {
mixin(toStructDefinition(readDiagram(diagram)));
}
240
www.it-ebooks.info
Chapter 9
alias Message = StructFromDiagram!diagramString;
/*
// an alternative way to form to the struct
struct Message {
mixin(toStructDefinition(readDiagram(diagramString)));
}
*/
void main() {
import std.stdio;
debug writeln(toStructDefinition(readDiagram(diagramString)));
Message m;
m.ID = 5;
writeln(m);
}
The output will be as follows:
StructFromDiagram!("\x0a+------------------+\x0a|LEN | ID | MSG
x0a+------------------+\x0a")(0, 5, 0)
|\
Since we used the alias method, the internal type name (used in the automatic toString
implementation) is made from compile-time arguments, including the diagram. The alternate
way results in a different name, but the same data.
How it works…
Whereas we made data and code in the previous two recipes, here we finished our
demonstration of the technique discussed in the previous recipes by creating a data structure
from a string at compile time. The pattern is similar: parse the string and then output what it
represents in D with the help of templates and mixins. We simply generate a struct definition
with appropriate data members. This definition can be mixed into an existing struct type or
aliased to a more convenient name and used directly. While parsing a diagram looks different,
the code is basically the same as any other domain-specific language.
See also
ff
A D solution that uses this technique on a more complex diagram to generate
bit fields is available at http://rosettacode.org/wiki/ASCII_art_
diagram_converter
241
www.it-ebooks.info
Code Generation
Automating dynamic calls with multiple
dispatch
Multiple dispatch is an extension of the concept of virtual functions. With a virtual function,
the exact function called depends on the runtime type of the this object. With multiple
dispatch, the exact function called depends on the runtime type of two or more objects.
D does not have support for multiple dispatch built into the language, but with some code
generation, we can add it ourselves.
Getting ready
Let's consider how we will do it manually. Given two or more class objects and a list of
functions, we will need to call the most specific function possible for their dynamic type.
To determine if a class is more specific than another, we look at the inheritance hierarchy.
If class A is a parent or an ancestor of class B, class B is more specific than class A. This
makes the generic root class, Object, which has no parents, the least specific of all.
To determine if an object is an instance of a more specific class, we attempt to cast it and
test for the null type.
What if there are two matching functions of equal specificity? You should avoid writing
functions like that, but ultimately, the choice is pretty arbitrary. Just pick one.
Now, we'll see how we can automate this process.
How to do it…
Let's execute the following steps to automate dynamic calls with multiple dispatch:
1. Get a list of overloads with compile-time reflection.
2. Ensure the input arguments are not null, since null objects have no runtime type and
checking for them may crash the system.
3. Declare a delegate to hold the current best match. The return type should be the
common type of all possible function overloads so that there's a consistent return
value for any dynamic type combination. Use std.traits.CommonType and std.
typetuple.staticMap to extract the common return value from all overloads.
4. Loop over each argument, determining the specificity and attempting a dynamic cast.
5. If and only if all the arguments cast successfully, consider this as a successful match.
6. Call the best match after examining all possibilities.
242
www.it-ebooks.info
Chapter 9
The code is as follows:
class A {}
class B : A {}
class C : A {}
import std.stdio;
void test(Object
void test(A b, C
B test(B b, C c)
void test(B b, B
void test(C b, C
b, Object c) { writeln("Object, Object"); }
c) { writeln("A, C"); }
{ writeln("B, C"); return b; }
c) { writeln("B, B"); }
c) { writeln("C, C"); }
/*
The goal is to call the overload of func that best
matches the *dynamic types* of the passed argument.
*/
auto dynamicDispatch(alias func, T...)(T t) {
import std.traits;
import std.typetuple;
// step 1: getting all overloads of the given function
alias overloads = TypeTuple!( /* TypeTuple is like our alias helper
but it works with multiple arguments and is found in the standard
library module std.typetuple */
__traits(getOverloads, // get all overloads…
__traits(parent, func), // from the parent of the function…
__traits(identifier, func))); // that share a name with it.
// step 2: ensure we weren't given null
foreach(a; t)
assert(a !is null);
// step 3: the variable that will hold our match
CommonType!(staticMap!(ReturnType, overloads)) delegate() dg;
int bestSpecificity = int.min; // and the best match's score
overloads:
foreach(overload; overloads) {
// step 4: loop over each one and find a match
ParameterTypeTuple!overload args;
static if(T.length == args.length) {
int specificity = 0;
bool isExactMatch = true;
foreach(idx, ref arg; args) {
arg = cast(typeof(arg)) t[idx];
243
www.it-ebooks.info
Code Generation
if(arg is null)
continue overloads;
// We check for an exact match – where the typeid we have
// is a perfect match for the typeid we need
if(isExactMatch && typeid(typeof(arg)) !istypeid(t[idx]))
isExactMatch = false;
// The specificity is the distance from Object; the number
// of base classes. We multiply by the argument length to
// help get an average of all arguments.
specificity += BaseClassesTuple!(typeof(arg)).length * args.
length;
}
specificity /= args.length; // average specificity
// Debugging info, printing out the options we found
writeln("specificity of ", typeof(overload).stringof, " = ",
specificity);
if(specificity > bestSpecificity) {
// If it is a better match than we have, it becomes the
// new best
bestSpecificity = specificity;
// the cast ensures we get a consistent type
dg = { return cast(ReturnType!dg) overload(args); };
// found an exact match, no point continuing to search
if(isExactMatch)
break overloads;
}
}
}
// if a suitable function was found, call it
if(dg)
return dg();
// otherwise, throw an exception
throw new Exception("no dynamic match found");
}
void main() {
Object a = new A();
Object b = new B();
dynamicDispatch!test(a, b);
}
Play with the new lines in the main function to see how it works with other combinations too.
244
www.it-ebooks.info
Chapter 9
How it works…
We once again visit compile-time reflection over functions to automate a task that
requires working with individual function arguments. With the help of std.traits.
ParameterTypeTuple, we can inspect the types of arguments as well as build an
argument list to pass to the function.
The cast operator on class objects when going from a base class or interface to a more
derived class attempts a dynamic cast. It uses runtime type information attached to the
object itself to see if it is a good match, returning null if it is not.
The rest of the code implements the algorithm we figured out while getting ready: find the
best matching function by looking for arguments that work with the most specificity by looking
at the number of base classes. The determination is done at runtime using the compile-time
data, which is possible because a new dispatch function will be automatically generated by
the compiler for each overload set it is passed with.
The trickiest part of the algorithm's implementation is defining the delegate that holds the
current best match. The arguments are left empty because we generated a simple wrapper
in the loop previously, which captures the arguments from the outer function in a closure.
The return type needs to be consistent, even if the return types of the overloads are not,
because the type needs to be known at compile time, and the exact function chosen will
not be known until runtime.
To solve this problem, we use CommonType from std.traits to extract the best common
type from all the possibilities. CommonType takes a list of types. Since we needed the
common return type, we couldn't just pass it the list of overloads. Instead, we had to extract
the return type from each overload. Phobos has the magic we need in the std.typetuple
module: staticMap. staticMap. Like its runtime partner function, std.algorithm.
map, it takes two arguments: a transformation function and a list of inputs. It applies the
transformation to each item in the input list, generating a new output list.
staticMap!(ReturnType, list…) thus generates a new list of just the return types
of the input functions, all at compile time, giving us exactly what we need to determine the
common return type for our delegate. Inside the wrapper function, we force the use of the
common type with an explicit cast object completing the implementation.
See also
ff
The official documentation on the std.typetuple module is found at
http://dlang.org/phobos/std_typetuple.html
245
www.it-ebooks.info
Code Generation
Building a lookup table
In the final recipe of the previous chapter on reflection, we built a command-line function
caller that did a linear search through all the available functions to find the right one for
the command. Here, we'll revisit that concept and generate more efficient code.
How to do it…
Let's execute the following steps to build a lookup table:
1. Create a switch statement.
2. If you are looping over a tuple of strings, such as one from a template argument
list or returned from __traits, you can write the case statements inside the
foreach loop.
3. Otherwise, build the code as a string and use the mixin expression to add it to
your switch statement.
4. Let the compiler optimize the switch statement.
All the preceding steps are mentioned in the following code:
void callFunction(string functionName) {
s: switch(functionName) {
default: assert(0); // can add defaults or cases outside the loop
foreach(methodName; __traits(allMembers, mixin(__MODULE__))) {
case methodName:
// implement the call
break s; // break the switch specifically to clarify intent
inside loop
}
}
}
If you want a custom hash function, you can use CTFE by calling regular
hash functions in the case statements: int hash(string s) { … }
switch(hash(s)) { case hash("foo"): /* … */ break; case
hash("bar"): /* … */ }. Ensure that your hash is well-distributed,
because switch will not handle collisions automatically.
246
www.it-ebooks.info
Chapter 9
How it works…
When a switch statement is compiled, all possible case values are known to the compiler,
allowing it to generate more efficient code than a plain list. All the possible string cases are
sorted by length and by content at compile time. This list is sent to a runtime function which
performs a binary search to find the case that handles a given input value.
We can often take advantage of these optimizations by creating a switch statement and
populating the cases with compile-time foreach loops. The code is pretty straightforward.
Another strategy to make lookup tables is with compile-time function evaluation. CTFE is often
used with enums, but it also works with static immutable arrays to create data tables. To do
this, write a function that calculates the data and returns a table. Then, use that function to
initialize the table. It is important that you mark the table static immutable to ensure it is
only initialized once, at compile time, and can be shared across all threads implicitly.
Using string parameters to change functions
Suppose you have two functions that are identical in most respects but differ in some minor
aspects. You need them to be separate functions, but would like to minimize code duplication.
There's no obvious type parameterization, but you can represent the difference with a value.
How to do it…
Let's execute the following steps to use string parameters to change functions:
1. Add a compile-time parameter to your function.
2. Use static if or mixin to modify the code based on that parameter.
3. Then add alias specific sets of parameters to user-friendly names using
alias friendlyVariation = foo!"argument";.
The code is as follows:
void foo(string variation)() {
import std.stdio;
static if(variation == "test")
writeln("test variation called");
else
writeln("other variation called");
}
alias testVariation = foo!"test";
alias otherVariation = foo!"";
void main() {
247
www.it-ebooks.info
Code Generation
testVariation();
otherVariation();
}
How it works…
This is a very straightforward application of the static if block. Since a different function
is generated for each set of compile-time parameters, we can change the code with compiletime functions and get pointers or call each individual one with certain bound compile-time
parameters, which is similar to a partial application in functional programming languages.
Be careful not to write difficult-to-understand code with this technique. It may often be better
to split the function into smaller, more reusable pieces.
Wrapping instance methods
Earlier, we looked at a dynamic type in D which included the capability to wrap native
functions with dynamic typing and property replacement. Now, it is time to see exactly
how that works and how automated code generation makes it a lot easier.
By unifying types, we enable both dynamic transformations as well
as create an array of delegates to access functions of varying types.
We cannot declare an array of function pointers that all take different
arguments, but we can declare an array of pointers to helper functions
that take one input array and transform the values for use.
How to do it…
Let's execute the following steps to wrap instance methods:
1. Write a generic conversion function to and from your consistent type. You should
use std.variant.Variant or std.conv.to directly, if possible, and use type
families with std.traits if working with a custom type.
2. Write a helper function generator that takes an existing function as a runtime
delegate and returns the wrapped type. Constrain the compile-time argument
with std.traits.isDelegate.
3. Use std.traits.ParameterTypeTuple to loop over the function arguments
and set them from the input data, using your conversion function to set the types.
4. Use static if(is(ReturnType!func == void)) to branch on the presence
of a return value. If it is of the void type, call the function with the args argument.
If it is not of the void type, transform the return value.
248
www.it-ebooks.info
Chapter 9
5. Pass methods to the helper with &__traits(getMember, object,
memberName). Do not use an alias helper in this step, and be sure to
get the member of an object and not the type.
6. Test it by building an associative array of all the methods on an object and
try calling them through it.
The code is as follows:
import std.traits;
// this alias represents the unified type our wrapper yields
alias WrapperFunctionType = string delegate(string[]);
// step 2: this returns the wrapped function, given the original
WrapperFunctionType wrap(Func)(Func func) if(isDelegate!Func) {
// it immediately returns the wrapped function here
return delegate string(string[] args) {
import std.conv;
ParameterTypeTuple!Func funcArgs;
// step 3: populating the arguments
foreach(idx, ref arg; funcArgs) {
if(idx >= args.length) break;
// the cast allows us to write to const
// arguments. to!() performs conversions.
cast() arg = to!(typeof(arg))(args[idx]);
}
// step 4: call the function, handling the
// return value.
string ret;
static if(is(ReturnType!func == void))
func(funcArgs);
else
ret = to!(typeof(return))(func(funcArgs));
return ret;
}; // remember, this is a return statement, needing ;
}
WrapperFunctionType[string] wrapAll(T)(ref T obj) {
WrapperFunctionType[string] wrappers;
foreach(memberName; __traits(allMembers, T)) {
// only wrapping methods
static if(is(typeof(__traits(getMember, T,
memberName)) == function))
// wrap with a delegate from obj
wrappers[memberName] = wrap(&__
traits(getMember, obj, memberName));
249
www.it-ebooks.info
Code Generation
}
return wrappers;
}
// a test structure with various method types
struct Test {
int a;
void foo() {
import std.stdio; writeln("foo called");
}
int setA(int a) { return this.a = a; }
int getA() { return this.a; }
}
void main() {
Test t;
// Wrap functions into a uniform array with string keys
auto functions = wrapAll(t);
// call foo with no arguments
functions["foo"](null);
functions["setA"](["10"]); // calls t.setA(10);
import std.stdio;
// confirm we can get the value and that it matches
// the original object too.
writeln(functions["getA"](null), " == ", t.getA());
}
Running the program will confirm that foo is called and the getter and setter functions
work correctly.
How it works…
The code generation here barely looks like code generation. It works very similar to any
regular closure that you can write in D and many other languages. The difference is that
the wrapper here is aware of the specific type of the delegate passed to it, and thus it can
customize its behavior. A separate wrapper will be automatically generated for each different
type passed to it, allowing us to use all the compile-time features such as static if,
introspection on types, and generic functions such as std.conv.to.
250
www.it-ebooks.info
Chapter 9
The function wrapper uses ParameterTypeTuple and ReturnType to perform the
transformations needed to present a uniform interface. ParameterTypeTuple yields a list of
all the function's arguments in a form that we can use to declare a variable. Looping over it with
foreach and ref lets us set each value from the input array. Using typeof with the generic
function to, the type conversion is performed quickly, easily, and generically. The cast on the
left-hand side of the assignment is used to remove const. Generally, casting away const is a
bad idea, but here it can be necessary to populate the full argument list on some functions.
The ReturnType check is necessary because void can never be converted to any other
type. If a function returns void, we must not try to use its return value. This is the same
as we did in the compile-time function caller previously.
The major difference between wrapping an object method and the compile-time function
caller we wrote in the previous chapter is that the object wrapper needs an object which
is only available at runtime. Thus, this function needs to work with compile-time data and
runtime data together. It works with delegates instead of the alias arguments, while still
templating the outer function on the type of the delegate given.
Not all information about a function is available through a delegate type.
If we needed more information such as the parameter names or default
values, they will need to be passed to the wrapper function from the
outside along with the delegate.
If we tried to use an alias argument, the compiler will issue an error saying need this to
access member foo when we tried to call it. An alias parameter doesn't include a pointer
to the this object; it will only be a reference to the function itself. A delegate, on the other
hand, includes both the necessary pieces of information to call an object method.
Similarly, we have often used an alias helper function in the past to refer to a member
when doing compile-time reflection. Here, it is not important because the alias helper
function will also lose the reference to this, yielding a plain function instead of a delegate. The
plain function that it gives doesn't know that the this pointer is even necessary, so while the
code may compile, it will crash when it tries to actually use the object! This is also why wrap is
specifically constrained to the isDelegate method instead of the isCallable method, to
catch this mistake at compile time by means of a type mismatch error. We specifically need a
delegate because only delegates keep a reference to the object instance.
Once the wrapper is working, we can use it to populate arrays. Here, we used compile-time
reflection to get all the methods on a struct type and populate an associative array. Since
the wrapper interface is the same for all functions, this can now be used to consistently call
any method on the given object.
251
www.it-ebooks.info
Code Generation
See also
ff
The Creating a command-line function caller recipe in Chapter 8, Reflection
ff
The Creating a dynamic type recipe in Chapter 5, Resource Management
Using opDispatch to generate properties
opDispatch is a good hook for code generation of all kinds. Here, we'll use it to generate
properties to access an associative array of keys in a different format in order to mimic the
style property in the JavaScript DOM, which translates foo.style.backgroundColor,
for example, to the background-color CSS property.
How to do it…
Let's execute the following steps to use opDispatch to generate properties:
1. Write a function to transform the camelCase string to a dash-separated string.
2. Create a struct type with two opDispatch @property methods: a getter that
takes no runtime arguments and a setter which takes a string runtime argument.
Both the opDispatch methods should take one compile-time string argument.
3. Use the enum keyword with the transformation function to ensure it is done
at compile time.
4. Constrain opDispatch to work only on the properties you want to enable, or if
you want it to work on everything, set it minimally to not work on popFront.
5. Add a member and constructor that points to the associative array it will manipulate.
6. Test it by creating a small DomElement class with a style property that returns the
Style struct and a main function which tries to use it.
The code for the preceding steps is as follows:
// transformation function
string unCamelCase(string a) {
import std.string;
string ret;
foreach(c; a)
if((c >= 'A' && c <= 'Z'))
ret ~= "-" ~ toLower("" ~ c);
else
ret ~= c;
return ret;
}
252
www.it-ebooks.info
Chapter 9
private struct Style {
// pointer to the associative array we'll modify
string[string]* aa;
this(string[string]* aa) {
this.aa = aa;
}
// getter
@property string opDispatch(string name)() if(name != "popFront") {
enum n = unCamelCase(name); // step 3
return (*aa)[n];
}
// setter
@property string opDispatch(string name)(string value) if(name !=
"popFront") {
enum n = unCamelCase(name); // step 3
return (*aa)[n] = value;
}
}
class DomElement {
string[string] styles;
// step 6
@property Style style() {
return Style(&styles);
}
}
void main() {
auto element = new DomElement();
element.style.backgroundColor = "red";
element.style.fontSize = "1em";
import std.stdio;
writeln(element.styles);
writeln(element.style.backgroundColor);
}
By running the preceding program, we will get the following output:
["background-color":"red", "font-size":"1em"]
red
This shows that the properties transformed properly for both reading and writing.
253
www.it-ebooks.info
Code Generation
How it works…
opDispatch is invoked whenever a non-existent member is requested of an aggregate
with the dot syntax. It is passed with the name of the requested member as a compile-time
parameter. Otherwise, it is just a regular template and may provide code or data.
It is strongly recommended to always put a constraint on
opDispatch, because without it, the compile-time duck typing will
be completely thrown off. For example, the isInputRange function
will return true because the missing methods of empty, popFront,
and front will be provided by opDispatch. This will result in
functions such as writeln trying to iterate over the object as a
range and print its contents. However, since they weren't intentionally
written, it is unlikely that the object will actually work as a range.
Since the name is passed as a compile-time parameter, it can be used for all kinds of
compile-time transformations, including changing the string into a new kind of literal
and even mixing it in as a domain-specific language.
Here, we used it to change the format of a string to generate thin accessor properties.
The code is very straightforward; a regular function manipulates the string. Then, we use
the enum keyword to force the manipulation to be done at compile time for maximum
runtime performance and use it to look up data in the associative array.
We also wanted the generated properties to work on the child property, style. Since
opDispatch only works with one level at a time, we created a helper object and property
function to expose it. The helper object needs a reference to the data it modifies, which
we pass in the constructor as a pointer. We could have also passed a reference to the
DomElement class. Even if the Style struct were nested inside the DomElement class,
it will still be necessary to explicitly pass it a reference to avoid compile errors.
When dot syntax is used on the style property, the child properties are generated
transparently and on demand by opDispatch.
Duck typing to a statically-defined interface
A distinguishing feature of the Go programming language is static interfaces that do not need
to be explicitly inherited. Using D's compile-time reflection and code generation capabilities,
we can do something similar.
254
www.it-ebooks.info
Chapter 9
Getting ready
Let's start by defining a goal. We'll write an interface and a struct block that could
implement the interface, but which does not explicitly inherit from it (the struct blocks in
D can not inherit from the interfaces at all). We'll also write the following brief function that
uses the interface to perform a task:
interface Animal {
void speak();
void speak(string);
}
struct Duck {
void speak() {
import std.stdio;
writeln("Quack!");
}
void speak(string whatToSay) {
import std.stdio;
writeln("Quack! ", whatToSay);
}
}
void callSpeak(Animal a) {
a.speak();
a.speak("hello");
}
void main() {
Duck d;
// callSpeak(wrap!Animal(&d)); // we want to make this line work
}
The callSpeak function will not work out of the box with Duck, because Duck does not
statically inherit from the interface. If we wanted to do this manually, we could write a small
class that implements the interface by forwarding all the required methods to a member,
Duck. Let's see how to do this automatically.
255
www.it-ebooks.info
Code Generation
How to do it…
Let's execute the following steps to use duck typing in a statically-defined interface:
1. Write a wrap function that loops over all the virtual methods of the interface and
builds code based on it.
2. Use std.traits or .stringof to extract the signature of each method and
reproduce it as a code string.
3. Write the body of each method as a string which calls the corresponding method
on the struct block.
4. Print out the code with pragma(msg) or writeln (running it at runtime) to check
it against what you write manually to help while debugging.
5. Create a class which inherits from the static interface and use mixin to compile your
generated code inside that class.
6. Return the new object for use.
The code related to the preceding steps is as follows:
T wrap(T, R)(R* r) {
static string wrapperImpl() {
if(__ctfe) {
// this helper function will find matching parentheses
// to navigate the string. It does not handle parentheses
// in string literals, which may occur with a default
// argument (which be seen in this string too), but
// that's rare enough that we can ignore it for many cases
int matchParens(string s, int idx) {
if(s[idx] == '(') {
// search forward for match
int count;
for(int i = idx; i < s.length; i++) {
if(s[i] == '(') count++;
else if(s[i] == ')') count--;
if(count == 0)
return i;
}
assert(0); // unbalanced
} else if(s[idx] == ')') {
// search backward for match
int count;
for(int i = idx; i >= 0; i--) {
if(s[i] == '(') count++;
256
www.it-ebooks.info
Chapter 9
else if(s[i] == ')') count--;
if(count == 0)
return i;
}
assert(0); // unbalanced
} else assert(0);
}
// loop over the interface and find functions…
string code;
foreach(memberName; __traits(allMembers, T)) {
static if(is(typeof(__traits(getMember, T, memberName)) ==
function)) {
foreach(overload; __traits(getOverloads, T, memberName)) {
// the string gives the return value, arguments list, and
attributes
// const pure @safe const(char)*(int, string)
auto str = typeof(overload).stringof;
// pragma msg can help a lot to see the strings
// you're working with
//pragma(msg, typeof(overload).stringof);
auto argIdx = matchParens(str, str.length - 1);
string argList = "";
string argsStr;
int count = 0;
// we'll build strings to make the class code
// and forwarding function call
argsStr = "(";
const argStrInput = str[argIdx + 1 .. $ - 1];
// loops each character, looking for commas which
// separate arguments
foreach(idx, argc; argStrInput) {
if(argc != ',')
argsStr ~= argc;
if(argc == ',' || idx == argStrInput.length - 1) {
import std.conv;
auto part = " a" ~ to!string(count++);
argsStr ~= part;
257
www.it-ebooks.info
Code Generation
if(argList.length)
argList ~= ",";
argList ~= part;
}
if(argc == ',')
argsStr ~= argc;
}
argsStr ~= ")";
code ~= str[0 .. argIdx] ~ " " ~ memberName ~ " " ~
argsStr;
code ~= "{ return r." ~ memberName ~ "(" ~ argList ~ ");
}\n";
}
}
}
return code;
} else return null;
}
//pragma(msg, wrapperImpl()); // for debugging help
// create a class that statically inherits the interface
static class Wrapped : T {
R* r;
this(R* r) {
this.r = r;
}
// finally, add the code we generated above to the class
mixin(wrapperImpl());
}
return new Wrapped(r); // pass it a reference to the object
}
How it works…
The most difficult part of the wrap function's implementation is reproducing the same function
signatures the interface uses. Here, we took the shortest path: as simply as possible, using the
string the compiler provides with the .stringof property of each method.
The .stringof property on a function gives its signature, including the return type,
arguments, and any modifiers that affect its type. To successfully override the method,
all these details need to be correct—except argument names, which do not need to match
(indeed, function arguments don't need names at all, especially in the interfaces where the
names are not referenced anyway).
258
www.it-ebooks.info
Chapter 9
Since the string returned by the compiler is always well-formed, we can depend on matching
parentheses to navigate to the string. The only thing that can complicate this is the presence
of a default string argument value containing the unmatched parentheses. We could also
watch for quotes to handle this case. The example skipped this to keep the code shorter,
since it is not needed for most of the functions.
Starting from the right-hand side, we match the parentheses to isolate the argument list.
The .stringof property always puts modifiers on the left-hand side, so we know the last
character is always the closing parenthesis of the argument list. While this kind of assumption
could be labelled a hack, it also gets the job done with the minimum of hassle.
Once the argument list, return type, and attributes are isolated, we start to build the string
that implements the interface. The code generation method here is to build the D code as a
string. This can result in a very messy implementation, but focus on just one part at a time:
split the interface argument string using commas to get the types of each argument, and then
build the new function's argument list by piecing them back together with new commas and
a consistent pattern of argument names. Simultaneously, build a call argument list by putting
together only the names. Here's what we aim to generate:
void foo(int, string); // the interface we need to match
// the implementation must match types in the argument list,
// but the names need not match. So we'll use a simple numbered
// pattern
override void foo(int arg1, string arg2) {
// when calling the function, we only want the names, no types
// in this string.
return r.foo(arg1, arg2);
}
The constructed strings build this code, one piece at a time.
While the void values cannot be assigned to values or used as function
arguments, they can be used in a return statement. When forwarding
to another function, we can therefore always use return f() and the
compiler will do the right thing without error, even if f() returns void.
This greatly simplifies the generation process.
Once the code is built, we use the mixin expression to compile it into our implementation
class. This works like copying and pasting the string into the class at compile time. While the
mixin expression cannot create partial declarations, it can create a list of complete methods
to be added to an incomplete class.
259
www.it-ebooks.info
Code Generation
Here, we created a static nested class with a constructor that takes a pointer to the object
we're wrapping and mixes in the methods needed to implement the interface. Finally, the
instance of that class is returned via the interface. As far as the outside world is concerned,
the specifics of this class aren't important, it just needs to implement the interface.
If it is impossible to implement the interface successfully by wrapping the input object,
the class will not compile, causing the build to fail. It is still static compile-time duck typing,
and not a dynamic type wrapper.
There's more…
Phobos' std.typecons.wrap function does this same job more thoroughly than we do here;
however, it has the caveat that it currently only works on classes. With our wrap function, we
took the structure by pointer, allowing the wrapped class to operate on the original data and
matching most user expectations since interfaces are expected to be able to act on the object.
However, this has a potential trade-off that the struct block might go out of scope and be
destroyed while an instance of the wrapped class still exists, leaving a dangling reference.
A solution to that problem would be to have a private copy of the struct block in the
generated class. However, this no longer updates the original data, limiting the potential
of duck typing to several interfaces at once. Neither solution is perfect, but both can be
automatically generated, so you may pick the strategy that is right for your use case.
260
www.it-ebooks.info
10
Multitasking
In this chapter, we will look at D's multitasking capabilities with threads, fibers, and processes.
We'll learn about the following:
ff
Using threads
ff
Passing messages with std.concurrency
ff
Processing parallel data with std.parallelism
ff
Using fibers
ff
Creating new processes
ff
Exploring thread-safe, single-locking singletons
ff
Using asynchronous I/O
Introduction
Multitasking has several uses in modern computer programs. It can accelerate speed by
utilizing multiple processor cores or continuing to crunch numbers while waiting on a file
to load from secondary storage, such as a slow hard drive. It can improve scalability by
spreading a task across several servers. Also, it can improve reliability by putting buggy
components in separate processes that will crash independently of the main application.
D has support in the language and library for various forms of multitasking, including processes,
threads, fibers, and single-instruction and multiple-data CPU features. By accessing operating
system APIs, D can also utilize asynchronous I/O, among other features.
www.it-ebooks.info
Multitasking
Using threads
Threads are a common building block for multitasking inside a single process. A thread is an
independent stream of program execution that has access to the memory of other threads.
How to do it…
To start using threads, we will have to execute the following steps:
1. Write the command import core.thread;.
2. Write a function to perform your independent task.
3. If the thread needs to pause, use the static method Thread.sleep from the
thread to be paused.
4. Create an additional thread with auto thread = new Thread, passing it
as a pointer to your function.
5. Call thread.start to begin execution.
Take a look at the following code:
import core.thread;
import core.atomic;
import std.stdio;
int count = 0;
shared(int) sharedCount = 0;
// this is the function that will run in our threads
void threadedFunction() {
foreach(i; 0 .. 5) {
writeln("thread running ", count++, " global: ", sharedCount);
Thread.sleep(1.seconds);
atomicOp!"+="(sharedCount, 1);
}
}
void main() {
auto thread = new Thread(&threadedFunction);
thread.start();
Thread.sleep(1500.msecs);
auto thread2 = new Thread(&threadedFunction);
thread2.start();
}
262
www.it-ebooks.info
Chapter 10
Running the program will result in the following interleaved output:
thread
thread
thread
thread
thread
thread
thread
thread
thread
thread
running
running
running
running
running
running
running
running
running
running
0
1
0
2
1
3
2
4
3
4
global:
global:
global:
global:
global:
global:
global:
global:
global:
global:
0
1
1
2
3
4
5
6
7
9
How it works…
The D runtime library encapsulates threads in a Thread class, one of which is created
automatically when a program starts up, representing the program's main thread of
execution. So, any operation that can be done by a child thread can also be done by the
main thread, such as Thread.sleep, which pauses execution for the specified duration.
A thread's constructor takes a pointer to a function, which they execute to completion. This
is similar to how the program as a whole runs main and terminates when it returns. A new
thread is created in the paused state. To begin its execution, we must call its start method.
All started threads will run simultaneously and automatically spread out across multiple
processor cores, if available. Multiple threads running simultaneously means nonatomic
operations (that is, operations that consist of more than one machine instruction) may be
interrupted at any time. Thus, working with shared data must be done carefully.
To alleviate the difficulty of working with shared data, D takes a different approach than most
other languages. Whereas in C, for example, all global and static variables are assumed to
be shared unless specifically marked as __thread, in D, all global and static variables are
assumed to be thread-local unless specifically marked as shared. Shared then becomes part
of the variable's type, forcing you to think about the ramifications of sharing data between
threads before you use it.
You can also declare nontyped shared data with the __gshared storage
class, which creates globally shared data without using the separate
shared type. However, you should avoid this whenever possible because
it gives up the additional checks that shared provides.
263
www.it-ebooks.info
Multitasking
Our example program had both count and sharedCount to illustrate the difference.
The count variable is thread-local, so each thread has an independent count and the variable
can be used normally. The sharedCount variable, on the other hand, is shared across all
threads and needs to be properly synchronized to avoid race conditions (where one thread
reads a value, another thread writes a value, and the first thread writes back the old value,
saving over the second thread's write).
To address this problem, instead of using the regular increment operator, we used core.
atomic.atomicOp. An atomic operation is one that cannot be broken down into interruptible
pieces—it is done all at once, without giving another thread a chance to intervene before it is
finished. atomicOp takes an operation as a compile-time string argument, a piece of shared
data to act upon, and the value by which to modify it.
In the next recipe, we'll look at a higher level of abstraction on top of the low-level threads
seen here, which simplifies some of the details of data sharing.
There's more…
Threads in D, by default, are known to the garbage collector and will prevent the termination
of the program until they are all completed.
To create a thread that doesn't prevent process termination, you want a daemon thread.
Creating a daemon thread is easy: simply create a regular Thread and then set the
isDaemon property to true, as shown in the following snippet:
auto thread = new Thread(&threadedFunction);
thread.isDaemon = true; // make it a daemon thread
thread.start();
Now, if main returns before this thread is complete, the process will terminate immediately
without waiting for the thread to finish.
Creating a thread that is not known to the garbage collector is more difficult and very tricky to
get right. To do this, you will have to create a thread using operating system primitives like you
would in C instead of the D library. Doing this is not recommended and should only be used
when you are certain about what you are doing.
See also
ff
The concurrency chapter of the book The D Programming Language by Andrei
Alexandrescu, who explains the language features and library in greater depth
ff
The official documentation of the core thread module is http://dlang.org/
phobos/core_thread.html
264
www.it-ebooks.info
Chapter 10
ff
The official documentation of the atomic operations used for lock-free programming
is http://dlang.org/phobos/core_atomic.html
ff
The official documentation of the time types, including the durations used by
Thread.sleep, is http://dlang.org/phobos/core_time.html
Passing messages with std.concurrency
Passing data to and from threads correctly can be difficult to get right. Phobos provides an
abstraction to make passing messages much simpler.
How to do it…
Execute the following steps to pass messages with std.concurrency:
1. Use the command import std.concurrency;.
2. Spawn a thread with an independent function. You may pass arguments to the
function as long as they can be safely shared across threads. You can pass an
instance of thisTid to the child thread so that it knows who its parent is for
communication, or the child can use std.concurrency.ownerTid to get
the handle of the thread that spawned it.
3. Define a struct to serve as a message to communicate across threads.
4. Send a message with the send function and your struct from the child thread
when it has completed its task.
5. In the parent thread, use receive with a delegate to handle your message type.
6. Add additional threads to the program as needed or more message handlers to the
receive call if you want to receive more messages.
Review the following code:
import std.concurrency;
struct MyMessage {
int a;
}
void writeToFile(string filename, string text) {
import std.stdio;
auto file = File(filename, "wt");
file.write(text);
}
265
www.it-ebooks.info
Multitasking
void doSomething(Tid parent, Duration sleepDuration) {
import core.thread; // for sleep
Thread.sleep(sleepDuration);
send(parent, MyMessage(sleepDuration));
}
void main() {
// writing to files can be slow, let's spawn a thread
// so the rest of the program doesn't have to wait
spawn(&writeToFile, "text.txt", "writing some text");
// we'll also make another worker thread to do a slow
// operation
auto tid = spawn(&doSomething, thisTid, 3.seconds);
// we'll now wait until the child sends us a message
receive((MyMessage msg) {
import std.stdio;
writeln("Got my message: ", msg.a);
});
}
How it works…
The std.concurrency feature builds on the core.thread model to provide an easy-to-use
and correct-by-default message passing API. The key functions for the basic operation are
spawn, send, receive, and thisTid.
The spawn function takes a pointer to a function, just like new Thread(), and then takes
a list of arguments to pass to that function. Among the arguments we passed was thisTid,
a reference to the current thread for use with message passing. Remember, the main thread
is created automatically, so a Tid is always available, even before spawning any new thread.
The spawn function automatically starts the new thread and returns its Tid, which can be
used to send messages to it from the parent thread.
The spawn function will statically reject any data that may be written from two threads at a
time. This rejects mutable arrays, but does not include any immutable data or value types
such as integers. To spawn a thread with a mutable array, it must be explicitly marked as
shared in both the variable declaration and the function argument lists.
The send function sends a message to the specified thread, identified by its Tid. The
message is plain data, identified by its type. The implementation will append the message
to a thread-local mailbox in the target thread until it is handled by calling receive.
266
www.it-ebooks.info
Chapter 10
Similar to user-defined attributes, you can also send plain data, such
as built-in strings; however, I recommend against this because a basic
type can mean anything without looking at the context. By always using
a user-defined struct for messages, the intended usage can be made
clear on both the send and receive sides.
The receive function performs type matching against a list of delegates. You give it a list
of handlers for various message types. The type of the argument is the message it handles.
Message type matching is performed from the first delegate given to receive to the last,
with the first match being called. Any unreachable handler, for example, a repeated type or
a more specific type after a more generic handler, will cause a compile-time error. A handler
that takes an argument of type std.variant.Variant acts as a catch-all for messages.
If you want two-way communication, you can include a Tid from; field in the message
struct, which the receive handler can then use to send a reply. The parent thread may
run receive in a loop to process several messages.
See also
ff
The documentation for the module can be found at http://dlang.org/phobos/
std_concurrency.html, which covers the functions we saw here as well as many
others; these include variants for receiving with a timeout value, receiving only a
specific message, using out-of-band communication, and more.
ff
The free chapter on concurrency from Andrei Alexandrescu's book,
The D Programming Language, is available at http://www.informit.com/
articles/article.aspx?p=1609144
Processing parallel data with std.parallelism
Concurrency can be thought of as doing several tasks in the same time frame, hiding
the implementation of putting one task on hold while it waits for something and another
task is running concurrently. Parallelism, by contrast, is spreading a task out across
several processors to be executed simultaneously. Parallelism is ideally suited to numeric
computations, where one portion of the result does not immediately depend on another, for
example, when multiplying several smaller factors to divide and conquer the multiplication
of a large number or performing one calculation on several independent values of an array.
267
www.it-ebooks.info
Multitasking
How to do it…
To process parallel data with std.parallelism, execute the following steps:
1. Use the command import std.parallelism;.
2. Write a normal foreach loop that works on an array.
3. Make sure that each loop iteration is independent.
4. Call parallel() on the array you're looping.
Take a look at the following code:
import std.parallelism;
import std.math;
// just to populate the initial array
int[] generateNumbers() {
int[] a;
a.length = 50000;
foreach(idx, ref i; a)
i = cast(int) idx; // cast needed for 64 bit compiles
return a;
}
static int[] numbers = generateNumbers();
void main() {
foreach(i; 0 .. 1000) // run several times for benchmarking
// foreach(ref num; numbers) // linear loop
foreach(ref num; parallel(numbers)) // parallel loop
num *= sqrt(abs(sin(num) / cos(num))); // arbitrary per-item work
import std.stdio;
writeln(numbers[0 .. 20]); // display some results
}
The execution time for this program will be cut by approximately the number of processor
cores your computer has when you switch to the parallel loop. On my dual-core computer,
the execution time was cut from six seconds down to three, giving the same results.
268
www.it-ebooks.info
Chapter 10
How it works…
The std.parallelism feature provides functions and objects that easily spreads a loop
across multiple processors, automatically selecting a recommended number of threads
based on the number or processor cores detected.
The std.parallelism feature's implementation utilizes objects with
opApply overloaded to take input data and spread it out across a task
pool using the user-friendly foreach syntax. It uses opApply instead
of implementing an input range because it needs to change the looping
structure itself, not just the data and advancement method.
The std.parallelism feature has limited checks to ensure that your code is correct;
your loops are subject to low-level data issues without compile-time errors. While adding
parallelism to your foreach loop is a very easy way to parallelize it, it is still your
responsibility to ensure that each iteration of the loop is indeed independent. Taking the
argument by ref and operating only on the current element in the loop, reading or writing
to no other data, is an easy way to accomplish this.
The std.parallelism feature also has the map and reduce functions, which are
automatically parallelized versions of the map and reduce functions in std.algorithm.
With these, you can succinctly and efficiently implement many parallel algorithms without
necessarily writing any explicit loops.
See also
ff
The official documentation of the parallelism module can be found at
http://dlang.org/phobos/std_parallelism.html
Using fibers
Fibers are similar to threads, but are more lightweight and cooperative rather than pre-emptive.
That is, a fiber must explicitly yield to pass control to another fiber, either by calling the yield
function directly or through a function that yields for you (such as an I/O function). On the other
hand, threads will be scheduled automatically by the operating system and may be interrupted
at any time.
269
www.it-ebooks.info
Multitasking
How to do it…
Let us execute the following steps:
1. Create a fiber with new Fiber. You do not have to create a special storage
location for your state because fibers automatically save and restore their
own stacks, so regular local variables will work.
2. Call Fiber.yield periodically inside your fiber to let other fibers run. The yield
function will return control to the function that called the fiber.
3. Pass messages to worker threads to perform long computations.
4. The main function is responsible for scheduling the fibers. It should call the call
function on the fibers when it is ready to resume their execution.
Take a look at the following code:
import core.thread;
int count;
void testFunction() {
import std.stdio;
count++;
writeln("Fiber run count: ", count);
Fiber.yield();
writeln("Fiber recalled after yielding!");
}
void main() {
auto fiber1 = new Fiber(&testFunction);
auto fiber2 = new Fiber(&testFunction);
// Call the fiber, this will return when it calls Fiber.yield
fiber1.call();
fiber2.call();
// now it will resume execution from the last yield call
fiber1.call();
fiber2.call();
}
Running the program will print the following:
Fiber
Fiber
Fiber
Fiber
run count: 1
run count: 2
recalled after yielding!
recalled after yielding!
270
www.it-ebooks.info
Chapter 10
How it works…
A Fiber represents the execution context of a function that can be paused and resumed.
It is created similar to a Thread, by first importing core.thread and then creating the
Fiber by passing the constructor a pointer to the function.
However, after creation, Fibers and Threads work very differently. Whereas a Thread is started
and then executes concurrently with other threads, a Fiber is called, like a function, with the
flow of execution transferring to it. Unlike just any function though, a fiber can call Fiber.
yield(), which returns the execution to the caller while remembering the exact state it had
when it yielded. Next time the fiber is called, it picks up where it left off the last time.
Since fibers are cooperative when multitasking, they yield rather than being interrupted
by the operating system. There is no need for memory synchronization or shared data.
In the example, we used a thread-local variable, count, to represent a value across two
separate fibers, and it was effortlessly updated by both. The downside to this model is
that they do not utilize multiple CPU cores the way threads can, and thus do not help with
parallelism. Nevertheless, fibers can sometimes outperform threads depending on the task.
Asynchronous I/O is an example where fibers shine because they are not bound by the CPU.
See also
ff
The official documentation of the Fiber class can be found at
http://dlang.org/phobos/core_thread.html#Fiber
ff
To see the use of fibers with a scheduler geared toward asynchronous
input and output, visit http://vibed.org/
Creating new processes
Processes are the main isolation unit in a multitasking operating system. Separate program
instances run in separate processes, giving each one an isolated memory space and
execution context which can never accidentally step on the toes of another.
Processes can also be a useful concept in the context of a single logical program. Creating a
child process can allow you to use a separate program to help you complete your task or can
isolate a subtask inside your program from the rest of it, giving you resiliency against crashes
as well as concurrency and parallelization across several processors, even across several
different physical computers in some cases.
271
www.it-ebooks.info
Multitasking
How to do it…
Here, we'll briefly explore using processes for two tasks: creating crash-resistant plugins,
which will work well across platforms, and forking execution to handle independent tasks,
which uses Posix functions.
To create a crash-resistant plugin, we need to execute the following steps:
1. Write the plugin as a separate program that communicates with the parent through
the stdin and stdout streams.
2. In the parent program, use the command import std.process;.
3. Call pipeProcess to spawn the plug-in program.
To fork execution to handle independent tasks, we need to execute the following steps.
These steps will not work in Windows.
1. Use the command import core.sys.posix.unistd, core.sys.posix.
sys.wait;.
2. Call fork in an if statement.
3. If fork returns zero, proceed with your task, terminating the process when you
are finished.
4. If fork returns nonzero, you are in the parent process. Perform your independent
task, then wait for the child thread to finish before terminating.
The following is the code:
import core.sys.posix.unistd;
import core.sys.posix.sys.wait;
void main() {
if(auto pid = fork()) {
if(pid < 0) throw new Exception("fork failed");
// this is the parent, continue doing
// work here
int statusCode;
wait(&statusCode); // wait for the child to finish
} else {
// this is the child, it can do independent work
// here
}
}
272
www.it-ebooks.info
Chapter 10
How it works…
Crash-resistant plugins are separate programs that adhere to a communication protocol.
Since they are separate processes and have totally isolated memory spaces and execution
flows, a bug in the plugin will not be able to overwrite the memory or otherwise crash into
the parent program.
The fork function is the main multitasking function in the Unix family of operating systems.
When it runs, the process immediately splits into two: parent and child. Each is fully independent
after the call, using separate copy-on-write memory spaces and execution contexts.
The fork function is not efficiently implemented on Windows, so it
should not be used on that operating system. Instead, use threads
and minimize shared data to get the same result.
The return value of fork tells you if you are in the parent or the child process. If it returns 0,
you are in the child branch. If it returns a negative number, an error has occurred, and if it
returns a positive number, you are in the parent branch and the return value is the ID of the
new process. The processes execute independently, but the parent can keep track of the
child's progress and wait for its termination. The child process will inherit data and open files
from its parent, allowing them to communicate.
There's more…
Using reflection and code generation, we can automate most of the communication process
between the two cooperating programs. Serializing and deserializing data can be automated
with the reflection facilities, such as tupleof, and the messages may be represented by the
functions' names (like we did in the command-line function caller in Chapter 8, Reflection)
or numbers (using facilities such as __traits(getVirtualIndex)), called automatically
with __traits(getMember).
Memory can be shared across processes using the operating system functions, such as
shmget on Posix located in core.sys.posix.sys.shm. These functions work the same
way in D as they do in C; however, ensure that the shared resources are properly released
upon abnormal program termination. Using a destructor alone is not enough—you must
also install signal handlers to ensure that the program is not terminated without giving
your destructors a chance to run.
Use the sigaction function from core.sys.posix.signal to install signal handlers
for any signal that can terminate the process, such as SIGINT and SIGPIPE. In the signal
handler, set a flag or send a message for your event loop, which should reply with a normal
return or by throwing an exception. If the program is terminated by a signal, the scoped
cleanup functions will not run, but when an exception is thrown, all cleanup code is run
before the program ends.
273
www.it-ebooks.info
Multitasking
See also
ff
The Communicating with external processes recipe from Chapter 4, Integration,
discusses how to create processes for separate programs and communicate with
them through pipes using the Phobos standard library
ff
The official documentation of the process module can be found at
http://dlang.org/phobos/std_process.html
ff
To see the D implementation of Apache Thrift, a cross-language remote procedure
call and serialization framework that can be used to simplify communication across
processes, visit http://klickverbot.at/blog/2012/03/thrift-nowofficially-supports-d/
Exploring thread-safe, single-locking
singletons
Lazy initialization in a multithreaded environment poses an interesting problem: how do you
avoid a race condition where the variable is initialized by two different threads, which would
defeat the purpose of using a singleton in the first place?
The most straightforward solution is to always use synchronization when getting the singleton
instance. This correctly solves the race condition, but comes with a significant performance
cost. Clever programmers devised a way to avoid synchronization with a double-checked
locking mechanism, checking if the object needs initialization both before and after entering
a synchronized block. This has good performance, but has a major problem: it is buggy.
Optimizing compilers or different memory models across platforms meant that the double
check cannot be relied upon to do the right thing in all cases.
D's built-in thread-local variables offer an elegant solution to the problem that brings the
correctness of the straightforward solution and the performance of the double-checked
solution together, without the need for complicated code.
How to do it…
To explore thread-safe, single-locking singletons, execute the following steps:
1. Define a singleton class with a shared instance.
2. Define a thread-local initialized variable.
3. In the get function, if it is not initialized, enter a synchronized block that creates
the instance, if necessary.
4. Set the initialized value to true.
5. Return the shared instance.
274
www.it-ebooks.info
Chapter 10
The following is the code:
class ThreadLocalSingleton {
private static bool initialized;
private static shared(ThreadLocalSingleton) instance;
static shared(ThreadLocalSingleton) getInstance() {
if(!initialized) {
synchronized(ThreadLocalSingleton.classinfo) {
if(instance is null) {
instance = new shared ThreadLocalSingleton();
}
}
initialized = true;
}
return instance;
}
int count = 0;
void foo() shared {
import std.stdio;
count++;
writeln("foo ", count);
}
}
void useSingleton(shared(ThreadLocalSingleton) s) {
s.foo();
}
void main() {
auto i = ThreadLocalSingleton.getInstance();
useSingleton(i);
// you can also spawn new threads that use the singleton
}
The program will compile and run, printing a count. You can add additional threads and see
that it continues to work efficiently.
How it works…
Since locking is expensive, avoiding synchronized blocks can often improve performance.
Using D's built-in thread-local storage, we can efficiently bypass all but the first lock for any
thread, without using bug-prone double-locking mechanisms.
275
www.it-ebooks.info
Multitasking
See also
ff
David Simcha's DConf 2013 discourse is available at http://dconf.org/2013/
talks/simcha.html, where he presented the pattern used here. He discusses
it at about 28 minutes into the video.
Using asynchronous I/O
The D standard library does not include asynchronous I/O functions, but we can still use them
by calling C functions or with third-party libraries.
How to do it…
We will execute the following steps to use asynchronous I/O:
1. Find a C API you like, either the operating system functions or a third-party
library such as libuv or libevent, bindings to which can be found at
http://code.dlang.org/.
2. Use the C functions instead of the Phobos functions.
Here's an example of how to get an asynchronous input from a text file on Windows using
the Win32 API:
import core.sys.windows.windows; // basic Windows headers
import std.conv;
// Not all necessary functions are defined in core.sys.windows.
windows
// but that's never a dealbreaker: we can just define the prototypes
ourselves
// ReadFileEx is specialized for asynchronous reading
extern(Windows)
BOOL ReadFileEx(HANDLE, LPVOID, DWORD, OVERLAPPED*, void*);
// SleepEx will pause the program, allowing our async handler to be
called when the data is ready
extern(Windows)
DWORD SleepEx(DWORD, BOOL);
// This function will be called when the operation is complete
extern(Windows) void readCallback(DWORD errorCode, DWORD
numberOfBytes, OVERLAPPED* overlapped) {
// hEvent carries user-defined data. We load it with a pointer to
the buffer below.
276
www.it-ebooks.info
Chapter 10
auto data = (cast(ubyte*) overlapped.hEvent)[0 .. numberOfBytes];
import std.stdio;
writeln("Received: ", cast(string) data);
// we may issue another read here to get more data
}
void main() {
// We need to open the file with the Windows API too, so we can set
the
// required FILE_FLAG_OVERLAPPED for asynchronous access
auto handle = CreateFileA("test.txt", GENERIC_READ, 0, null, OPEN_
EXISTING, FILE_FLAG_OVERLAPPED, null);
if(handle is null) throw new Exception("Couldn't open file.");
scope(exit) CloseHandle(handle); // always cleanup C resources with
scope guards
OVERLAPPED overlapped;
ubyte[1024] buffer;
overlapped.hEvent = buffer.ptr; // This is allowed to be userdefined data, we'll fill it with a pointer to the buffer for use in
the callback
// issue the async read request
if(ReadFileEx(handle, buffer.ptr, buffer.length, &overlapped,
&readCallback) == 0)
throw new Exception("ReadFileEx failed " ~
to!string(GetLastError()));
/* Do other things while the operating system loads the data for
us…. */
SleepEx(500, true); // wait for the operation to complete
}
If you create a file called test.txt and then run the program, it will display its contents.
How it works…
Since D has full access to C libraries and operating system APIs, we can use functionality that
is not yet available in Phobos when we need it. Asynchronous I/O is an example where this
is necessary. The example is virtually identical to what you might see in an example in the
C language.
277
www.it-ebooks.info
Multitasking
On Windows, a flag must be set when the handle is created to enable asynchronous operations
(called overlapped operations in the Microsoft documentation). On Posix, a flag may be set with
fnctl after the file is opened, or you may use an event loop that triggers on file readiness to
avoid blocking operations.
These operations require full access to the file handle, which limits the amount of Phobos
calls you can use. For example, std.process.pipeProcess conveniently creates the pipes
for you, but that precludes setting the overlapped flag. If you want to use asynchronous I/O on
a pipe to communicate with another process, it will be necessary to perform all the operations
yourself at the operating system API level. (Indeed, on Windows, you cannot even use the
CreatePipe function that the std.process implementation uses to create the pipes
because it does not allow you to set the overlapped flag either; you must use the lower-level
CreateNamedPipe function instead.)
In some cases, you can create a Phobos object from an operating system handle. For example,
you can create std.socket.Socket from an existing low-level handle, but in most cases, you
are on your own to write the code as you would in C. When in doubt, you can search the Internet
for C asynchronous I/O documentation and examples and apply that same knowledge to D.
See also
ff
The website http://code.dlang.org/ has wrappers for C libraries
to ease the use of cross-platform asynchronous I/O
ff
To see the D framework that uses asynchronous I/O internally, visit
http://vibed.org/
278
www.it-ebooks.info
11
D for Kernel Coding
Let's turn our attention to using D to start writing bare metal code—the origin of an x86
kernel in D and laying some groundwork for bare metal in other environments. We'll start
with the following:
ff
Running D on bare metal x86 with a stripped runtime
ff
Adding interrupt handling to the bare metal x86 code
Introduction
Most D users today use D to program traditional computers with operating systems such
as Windows, OS X, or Linux. However, with custom runtime code and the open source GRUB
bootloader (a program which boots the computer and loads our program), we can also run
D programs compiled with an unmodified copy of the DMD compiler on Linux with bare metal
to form the basis of writing an operating system kernel in D.
Running D on bare metal x86 with a stripped
runtime
D can do most of what C can, including writing bare metal code (without an operating system)
with minimal runtime library requirements. While most D libraries (including the Phobos
standard library) will not work in such a minimal environment, we can still use the majority of
the core language if we opt for enough library support.
www.it-ebooks.info
D for Kernel Coding
Getting ready
Running experimental bare metal programs on physical hardware is a slow and time
consuming process. Instead, I recommend that you set up an emulator or virtual machine. In
this book, we'll use QEMU; this may be available in your Linux distribution's package manager,
or you can build it from a source by downloading the code from http://qemu.org/. We'll
also use Linux to build the application. To follow along, you'll need a Linux computer with the
DMD compiler installed.
How to do it…
To run D on bare metal x86 with a stripped runtime, we need to execute the following steps:
1. Create a new directory for the project.
2. Create a multiboot.S file that declares a section of the executable file, .multiboot,
containing the multiboot magic ID number, multiboot flags, and multiboot checksum (in
that order). It should have the following contents:
.section .multiboot
# Multiboot magic ID number
.set MAGIC,
0x1BADB002
# request alignment and memory map
.set FLAGS,
1 | 2
.align 4
.long MAGIC
.long FLAGS
.long -(FLAGS + MAGIC) # Checksum
3. Create a linker.ld file that sets the program entry point to _d_run_main, starts
placing sections at the 1 megabyte point, and puts the .multiboot section first.
The following contents will do the job:
ENTRY(_d_run_main)
SECTIONS {
. = 1M;
.text BLOCK(4K) : ALIGN(4K) {
*(.multiboot)
*(.text)
}
}
280
www.it-ebooks.info
Chapter 11
4. Create a Makefile that assembles the multiboot header, compiles the D code with
no default library and minimal runtime checking, and links them all together using the
linker script. Ensure that the commands use a leading tab, not a space. The following
is the content:
all:
gcc -m32 -c multiboot.S -o multiboot.o
dmd -c -m32 test.d object.d –defaultlib
= -noboundscheck -release
gcc -m32 –omy_kernel test.o object.o
multiboot.o -T linker.ld –nostdlib
5. Create a file, test.d, to say hello. To write on the screen, we will directly access the
video memory through a pointer. Use the following contents:
void main() {
clearScreen();
print("Hello, world, from bare metal!");
}
void clearScreen() {
ubyte* videoMemory = cast(ubyte*) 0xb8000;
foreach(idx; 0 .. 80*25) {
videoMemory[idx * 2] = ' ';
videoMemory[idx * 2 + 1] = 0b111;
}
}
void print(string msg) {
ubyte* videoMemory = cast(ubyte*) 0xb8000;
foreach(char c; msg) {
*videoMemory = c;
videoMemory += 2;
}
}
6. Create a file named object.d to provide the minimal runtime library functions
needed for the basic language to work without the compiler issuing errors about a
corrupted runtime library. It will include our program entry point, which calls main
and then loops forever, as well as a number of necessary support classes, which
we will not use initially but are required by the compiler. This file must be named
object.d and should contain the following contents for dmd. (Note that this may
be different for other compiler versions, including ldc.)
module object;
static assert((void*).sizeof == 4); // must be 32 bit
281
www.it-ebooks.info
D for Kernel Coding
alias string = immutable(char)[];
alias size_t = uint;
alias ptrdiff_t = int;
extern(C)
void _d_run_main() {
asm {
naked;
call _Dmain;
loop_forever:
cli;
hlt;
jmp loop_forever;
}
}
extern(C) void _d_dso_registry() {}
extern(C) __gshared void* _Dmodule_ref;
extern(C) void _Dmain();
// required support classes by the compiler
class Object { }
class Throwable {}
class Exception : Throwable {}
class Error : Throwable {}
class TypeInfo { }
class TypeInfo_Struct : TypeInfo {
void*[13] compilerProvidedData;
}
class TypeInfo_Interface : TypeInfo {
TypeInfo_Class info;
}
class TypeInfo_Class : TypeInfo {
void*[17] compilerProvidedData;
}
struct ModuleInfo {}
282
www.it-ebooks.info
Chapter 11
7.
Run make.
8. Test the program by running qemu –kernel my_kernel. You may add
other commands to QEMU as well, such as curses if you do not have a
graphics display available.
When you run make, the compiler will run very quickly. This is normal
because it doesn't have to parse any of the runtime or standard library;
the compiler's workload is greatly reduced compared to most programs!
You should see the emulator pop up with the hello message:
The text cursor may be anywhere. Moving the cursor must be done separately from writing to
the screen on bare metal! If you run strip my_kernel; ls –lh my_kernel, you will see
that the file is only about 7 KB in size.
How it works…
Before running the "hello world" program on bare metal, we have four important aspects to
set up: booting support, a custom entry point, a minimal library to use instead of druntime,
and finally, the meat of our program itself.
Booting up an x86 PC can be a fairly involving task. If you were doing it yourself, you'd have
to write a small bootloader program that loads your main file, switches the processor to the
32-bit mode (it initially boots to the 16-bit mode for backward compatibility), and transfers
the execution to the D code.
However, thanks to the multiboot standard supported by QEMU in the test environment and the
GRUB loader on a physical computer, we don't have to worry about all those details. Instead, we
put a multiboot header in our file consisting of flags, a magic number, and a checksum. Then,
we command the linker to put that section at the beginning so that the loader can find it.
283
www.it-ebooks.info
D for Kernel Coding
Since multiboot requires low-level control over linker sections, we could not write it in D.
Instead, we wrote a small file in the GNU assembly language, multiboot.S, to define
the section and header data. It contains no executable code, which brings us to the
custom entry point.
All the code executed by our program is found in the D files. There is no need for a separate
assembly language bootstrapper—when we need assembly in D, we can use the inline
assembler. By default, the linker looks for a symbol called _start to serve as the program
entry point.
In normal code, _start is located in the C runtime library. It performs
preparation tasks and then calls the extern(C) main function, which
in D programs is automatically generated by the compiler to call the _d_
run_main function, which is located in the D runtime library. You can see
the original source code for _d_run_main in dmd2/src/druntime/
src/rt/dmain2.d, found in the dmd zip download. You can also find
the definition of the C main function in the compiler's source code in the
dmd2/src/dmd/mars.c file.
Since the D compiler forces us to define _d_run_main, and we defined a linker script for the
multiboot header anyway, we can easily change the program entry point to go directly into our
code. In linker.ld, the line ENTRY(_d_run_main) instructs the linker to set the entry
point to our _d_run_main function. When the program is loaded, it will begin execution at
the beginning of that function.
Now that we have the linker set up, it is time to start writing code. First, we focused on what
we wanted to accomplish and wrote our test.d file to that effect—we wanted to print a
message to the screen. This code is pretty normal looking—it is just plain D with a regular
main function and helper functions to loop over an array and write it to the video memory.
Interacting with hardware often follows the same principle of writing to a specific memory
location. The video hardware is memory mapped, meaning a portion of the memory space
is reserved for communication with it. One such address is 0xb8000, mapped to the text
screen buffer.
Since from the program's perspective it is just a block of memory, we can access it through a
simple pointer. The text buffer is 80 x 25 cells in size, with each cell represented by two bytes:
first, the extended ASCII character to display, and second, the attributes of that cell, including
foreground color (the lower 4 bits, each representing red, green, blue, and one as a brightness
flag), background color (the next 3 bits), and a blink flag (the highest bit).
When we clear the screen, we look through the entire buffer, setting the character to a space
and the attributes to 0b111, a gray foreground on a black background. Try changing that
number to see a more colorful message!
284
www.it-ebooks.info
Chapter 11
When writing our message, we write our characters at the beginning of the buffer, leaving the
attributes alone. A future exercise may be to define a __gshared variable to keep track of
your current position so that two consecutive prints do not overwrite each other. Be careful
not to write out of bounds of the video memory! Since D's bound checking requires runtime
library support, we disabled them. Since we're running the processor in the kernel mode,
there's no hardware memory protection either. We're on our own to use the pointers correctly.
This print function will not work correctly if the string contains
non-ASCII characters, but for the sake of simplicity, we will ignore
this—writing most non-ASCII characters to the hardware text buffer
is a nontrivial task, and supporting the whole Unicode character
set in this environment is impossible.
Now that our program is written, we must provide a minimal runtime library so that the compiler
will actually accept it. Enter object.d.
object.d is the required module that provides the foundational bridge between the
compiler's world and that of the runtime library. It is also automatically imported to every
D module and provides global aliases and symbols, which the rest of the D code takes for
granted. The string type, for example, is not a keyword in D. Instead, it is defined as
alias for immutable(char)[] in object.d; something we do here too.
The first thing our object.d does, after declaring itself to be the special object module, is
issue static assert to ensure it is actually being compiled for a 32-bit target (the size of
a pointer is 4 bytes). Since the processor is in the 32-bit mode when control is passed to our
program, we need to ensure that our program has generated code it can actually run. The
static assert will cause the compile to fail if we forget to pass the –m32 flag.
Next, we define aliases for the three most common pseudo-built-in types in D: string,
size_t, and ptrdiff_t. We can also define wstring and dstring here if we wanted to
use them. None of these aliases are strictly necessary to compile the D code; however, since
these types are typically used in the D code as though they are built-in, defining them lets us
carry over our habit of writing string to the bare metal world. The size_t and ptrdiff_t
types normally change their type based on the target platform; however, since we are
specifically targeting 32-bit x86, we will ignore this detail.
Next is our program entry point, which is the definition of _d_run_main. It is defined as
extern(C) because the compiler communicates with the runtime through functions without
name mangling. We wrote this function with the naked inline assembly to ensure that we
have precise control over what is run. Though we don't use it here, the flag we set in the
multiboot header to request a map of available memory will make that data available to us
by a pointer stored in the EBX register. If we wanted to expand on this program to use the
memory allocation, this pointer will be valuable information that we don't want to lose.
285
www.it-ebooks.info
D for Kernel Coding
In the naked function, the compiler does not add additional instructions to set up a stack
frame, preserve registers, or even automatically return from the function. It gives us complete
control over everything that happens.
With that control reserved for later use, we proceed to the rest of the function. First, we call
_Dmain, which is a symbol created by the compiler to represent the main function written
in D. The main function is not used directly because the D symbol is not in the scope; this
function is found in a separate file that the runtime is not aware of. Under the function, we
declared the prototype extern(C) void _Dmain(); to bring it into the local scope.
After main returns, since we have no operating system to return to, we disable interrupts with
the cli instruction, then halt the CPU with the hlt instruction. Just in case it ever resumes
execution, we can also use the jmp instruction to go to a previous label, forming an infinite
loop. The user will have to restart the computer to use it again.
If we enabled exception handling—this is possible even on bare metal,
although it takes several lines of code in object.d—we would want
to call a helper function that calls _Dmain inside a try/catch block
instead of calling it directly. In this case, exceptions thrown but not
caught by the program will be gracefully handled. You can see how the
real druntime does this by checking dmd2/src/druntime/src/
rt/dmain2.d.
The next thing our object.d does is define an empty function called _d_dso_registry.
This function is currently specific to D on Linux, but since we used the Linux compiler, it
expects it to be there. The compiler passes information related to registering D-shared
objects. We don't care about this information, so we simply defined an empty function
to ignore it without causing a compile error. You can see the druntime definition of this
function in dmd2/src/druntime/src/rt/sections_linux.d. Similarly, the compiler
may reference _Dmodule_ref to provide a hook for runtime module information, and if
it is missing, it can cause the link to fail; so, we define it but never use it. It is __gshared
because trying to make a thread-local variable would result in either a link error due to the
changing definitions of TLS and non-TLS data, or worse yet, a runtime crash because of the
compiler-generated code that our system doesn't actually support.
Finally, we define the minimal support classes required by the compiler. It expects class
Object and TypeInfo to be available, even if we don't actually use them; this list of
classes will grow somewhat as we use more D data types (although much of that code
can be automatically generated).
The compiler doesn't particularly care about the methods these classes provide, but it does
provide the TypeInfo data in a specific format and expects there to be enough room for that
data. Since we aren't actually using that data currently, instead of reproducing the actual types
of the data to form usable variables, we simply defined an array of void* to pad out the space.
286
www.it-ebooks.info
Chapter 11
The size expected can be found in the compiler's source code in dmd2/src/dmd/typinf.c
and the expected layouts can look at the definitions in dmd2/src/druntime/src/
object_.d. Finally, we compile the program and run it in the emulator to test it. If all goes
well, your program will say Hello, world, from bare metal!
There's more…
Much of the D language will not work with this minimal runtime. To re-add language features,
you'll need to bring in more of the D runtime. If you try to use a feature and get an undefined
symbol error from the linker, search the druntime source code for that symbol. You may be able
to copy and paste it into your own object.d to enable that portion of the language. However,
there are some features you will not want because they complicate memory management. Array
concatenation, for example, is prone to memory leaks without the garbage collector's help, so it
may be best to leave them disabled and use manually written alternatives instead.
You can write the D programs for regular operating systems using a minimal runtime library
too. To try this, start with your custom object.d. Change _d_run_main to import core.
stdc.stdlib and call exit(0) from the C standard library instead of looping forever
(the cli and hlt instructions will cause a segmentation fault on Linux anyway, as they are
protected CPU instructions). When compiling, use the –defaultlib= option for dmd, but do
not use the –c option or the link manually; let dmd automatically link the program normally.
The result will be a small file, about 12 KB in size, with no dependencies except the
system C library. You can write programs in the C-like subset of D, paying only for the small
requirements in object.d and what you decide to use beyond that.
I don't recommend that you do this as a matter of course because you'll lose compatibility
with most other D code as well as many of the value-added features of the D language;
the smaller file size isn't worth those costs! But the option is available to test your minimal
runtime without going to the emulator or other specialized tasks.
See also
ff
ff
ff
ff
ff
My DConf 2014 talk is available at http://dconf.org/2014/talks/ruppe.
html. I discuss this topic as well as how to bring in more of the D runtime to enable
more language features.
The documentation for the multiboot standard is available at http://www.gnu.
org/software/grub/manual/multiboot/multiboot.html.
Visit the home page of the GRUB bootloader at http://www.gnu.org/software/
grub/, which can be used to boot our kernel on a physical PC.
A wiki link with a lot of bare-metal-related articles is http://wiki.osdev.org/
Main_Page. Many of the C examples can also be used in D.
Running on bare metal ARM in Appendix, Addendum will show you how to apply
these principles in programming ARM boards with D.
287
www.it-ebooks.info
D for Kernel Coding
Adding interrupt handling to the bare metal
x86 code
In the previous recipe, we displayed the "hello world" program on bare metal. Next, we'll add
interrupt handling and enable keyboard support.
Getting ready
Get the code from the last recipe and ensure that it still compiles and runs. We will be adding
to it here.
How to do it…
Execute the following steps to add interrupt handling to bare metal x86 code:
1. Declare the constants and data structures needed to communicate with the hardware.
The definitions can be translated from the hardware manuals.
2. Write an empty interrupt handler with a naked inline assembly that does nothing
except return with the iretd instruction.
3. Write a keyboard interrupt handler with a naked inline assembly. We'll need to read
the byte using the keyboard from I/O port 0x60 using the in assembly instruction.
Then, store it in a global variable, acknowledge the interrupt, then clean up. (The
stack and all registers must be left in the same state they were in when we entered
this function.) Then, resume normal execution with the iretd instruction. It is very
important that you do not use the return keyword in D because interrupt handlers
must return with the special instruction.
4. Declare the __gshared variables to hold the data tables for interrupt handlers and
memory protection data.
5. Write helper functions to set the hardware data structures. Load the empty interrupt
handler in the whole table and set the keyboard handler for IRQ 1, which is located
at the interrupt number 1 + IRQOffset.
6. Prepare a global descriptor table with separate descriptors for code, data, and a task
state selector. We don't care about the specifics, so we'll just load the entire memory
space; however, we do need to know the descriptor numbers for the interrupt handler.
7.
Load the global descriptor table with the lgdt assembly instruction.
8. Load the interrupt descriptor table with the lidt assembly instruction.
9. Enable IRQ1—the keyboard's interrupt request line—by writing the appropriate mask
to the programmable interrupt controller's data I/O port with the inline assembly.
10. Enable interrupts with the sti assembly function.
288
www.it-ebooks.info
Chapter 11
11. In your main function, write an endless event loop. It should ensure interrupts are
enabled with the sti instruction, then use the hlt instruction to stop the CPU, and
then wait for the next interrupt. After one arrives, temporarily disable interrupts with
cli so that we can handle the data without it being overwritten as we work, write a
message if a key was pressed, then start the loop over again.
This is quite a bit of code, but once you get the keyboard working, adding other interrupt
handlers is relatively easy. The following is the code:
// The following values are defined by the hardware specs.
enum
enum
enum
enum
enum
enum
PIC1 = 0x20; /* IO port for master PIC */
PIC2 = 0xA0; /* IO port for slave PIC */
PIC1_COMMAND = PIC1; /* Commands to PIC1 */
PIC1_DATA = (PIC1+1); /* IO port for data to PIC1 */
PIC2_COMMAND = PIC2; // ditto for PIC2
PIC2_DATA = (PIC2+1);
// This is the interrupt number where the IRQs are mapped.
// 8 is the default set by the system at boot up. We can
// also change this by reprogramming the interrupt controller,
// which is recommended to avoid conflicts in real world code,
// but here, for simplicity, we'll just use the default.
enum IRQOffset = 8;
// This is a data structure defined by the hardware to hold
// an interrupt handler.
align(1)
struct IdtEntry {
align(1):
ushort offsetLowWord;
ushort selector;
ubyte reserved;
ubyte attributes;
ushort offsetHighWord;
}
// This is a hardware-defined structure to store the location of
// a descriptor table.
align(1)
struct DtLocation {
align(1):
ushort size;
void* address;
}
289
www.it-ebooks.info
D for Kernel Coding
// Ensure the hardware structure is sized correctly.
static assert(DtLocation.sizeof == 6);
// Hardware defined data structure for holding
// the Global Descriptor Table which holds
// memory protection information.
align(1)
struct GdtEntry {
align(1):
ushort limit;
ushort baseLow;
ubyte baseMiddle;
ubyte access;
ubyte limitAndFlags;
ubyte baseHigh;
}
/* End of hardware data definitions */
// This is an interrupt handler that simply returns.
void nullIh() {
asm {
naked;
iretd;
}
}
// stores the last key we got
__gshared uint gotKey = 0;
// This is a keyboard interrupt handler
void keyboardHandler() {
asm {
naked; // we need complete control
push EAX; // store our scratch register
xor EAX, EAX; // clear the scratch register
in AL, 0x60; // read the keyboard byte
mov [gotKey], EAX; // store what we got for use later
// acknowledge that we handled the interrupt
mov AL, 0x20;
out 0x20, AL;
290
www.it-ebooks.info
Chapter 11
pop EAX; // restore our scratch register
iretd; // required special return instruction
}
}
// Now, we define some data buffers to hold our tables
// that the hardware will use.
// This global array holds our entire interrupt handler table.
__gshared IdtEntry[256] idt;
__gshared GdtEntry[4] gdt; // memory protection tables
__gshared ubyte[0x64] tss; // task state data
// Now, we'll declare helper functions to load this data.
/// Enables interrupt requests.
/// lowest bit set = irq 0 enabled
void enableIrqs(ushort enabled) {
// the hardware actually expects a disable bitmask
// rather than an enabled list/ so we'll flip the bits.
enabled = ~enabled;
asm {
// tell the interrupt controller to unmask the interrupt requests,
enabling them.
mov AX, enabled;
out PIC1_DATA, AL;
mov AL, AH;
out PIC2_DATA, AL;
}
}
// The interrupt handler structure has a strange layout
// due to backward compatibility requirements on the
// processor. This helper function helps us set it from
// a regular pointer.
void setInterruptHandler(ubyte number, void* handler) {
IdtEntry entry;
entry.offsetLowWord = cast(size_t)handler & 0xffff;
entry.offsetHighWord = cast(size_t)handler >> 16;
entry.attributes = 0x80 /* present */ | 0b1110 /* 32 bit interrupt
gate */;
entry.selector = 8;
idt[number] = entry;
}
291
www.it-ebooks.info
D for Kernel Coding
// Tell the processor to load our new table.
void loadIdt() {
DtLocation loc;
static assert(idt.sizeof == 8 * 256);
loc.size = cast(ushort) (idt.sizeof - 1);
loc.address = &idt;
asm {
lidt [loc];
}
}
// Load a global descriptor table
//
// We don't actually care about memory protection or
// virtual memory, so we load a simple table here that
// covers the entire address space for both code and data.
void loadGdt() {
GdtEntry entry;
entry.limit = 0xffff;
// page granularity and 32 bit
entry.limitAndFlags = 0xc0 | 0x0f;
entry.access = 0x9a; // present kernel code
gdt[1] = entry;
entry.access = 0x92; // data
gdt[2] = entry;
auto tssPtr = cast(size_t) &tss;
entry.baseLow = tssPtr & 0xffff;
entry.baseMiddle = (tssPtr >> 16) & 0xff;
entry.baseHigh = tssPtr >> 24;
entry.limit = tss.sizeof;
entry.limitAndFlags = 0x40; // present
entry.access = 0x89; // a task buffer (we don't use it but do
prepare it)
gdt[3] = entry;
DtLocation loc;
loc.size = cast(ushort) (gdt.sizeof - 1);
loc.address = &gdt;
asm {
lgdt [loc]; // tell the processor to load it
}
}
292
www.it-ebooks.info
Chapter 11
// This function initializes the system and enables interrupts,
// setting all handlers, except the keyboard IRQ, to our null
// handler. We'll call it from main.
void initializeSystem() {
loadGdt();
foreach(i; 0 .. 256)
setInterruptHandler(cast(ubyte) i, &nullIh);
setInterruptHandler(IRQOffset + 1, &keyboardHandler);
loadIdt();
enableIrqs(1 << 1 /* IRQ1 enabled: keyboard */);
asm {
sti; // enable interrupts
}
}
And here is our new main function that watches for the keyboard input:
void main() {
clearScreen();
//print("Hello, world, from bare metal!");
initializeSystem();
while(true)
asm {
sti; //
hlt; //
cli; //
}
{
enable interrupts
halt the CPU until an interrupt arrives
disable interrupts while we handle the data
if(gotKey) {
print("We got a key!");
// Change the color of the W so we can see a
// difference on each key press
ubyte* videoMemory = cast(ubyte*) 0xb8000;
videoMemory[1] += 1;
// clear out the buffer
gotKey = 0;
}
}
}
293
www.it-ebooks.info
D for Kernel Coding
You may factor out the helper functions and hardware structure definitions to a separate file if
you want. Build the program with the same make file as before, then load it with qemu –kernel
my_kernel in the same way. When it loads, the screen will clear. Press any key and you'll see
a message.
How it works…
Interrupt handlers have specific requirements by the hardware. They must leave the stack
and all registers in the same state they were found when the method was entered, and unlike
normal methods, they must return with the iret family of instructions (specifically, iretd on
32-bit) instead of the regular ret instruction.
D has two important features that help with these requirements without requiring us to write a
helper file with a separate assembler: inline assembly and naked functions.
A naked function is a block of code with no instructions generated by the compiler. It neither
prepares a stack frame nor automatically returns at the end of its execution.
If you want to create a stack frame manually, for example, to use local
variables, you may use the __LOCAL_SIZE constant provided by the
compiler to allocate enough space for your locals.
The other part of complete control is writing the entire interrupt handler in the assembly
language, which is made easy thanks to the easy accessibility of D's variables. While we
could have used D itself, even in a naked function, that would require us to store more
registers on the stack to ensure they are preserved correctly. This is doable, but it is
unnecessary here because the interrupt handler needs to stay short anyway.
The keyboard handler performs three tasks. First, it reads the byte from the keyboard's I/O
port with in AL, 0x60;. Then, it stores that value in a global variable for later reference
and acknowledges the interrupt by writing 0x20, the magic number defined by the hardware
for acknowledgements, to the programmable interrupt controller's control port. If you forget
to acknowledge an interrupt, you won't get any more—the first key press would work, but then
all others wouldn't.
Finally, it returns with the special iretd instruction after carefully restoring the register we
used and cleaning up the stack.
Be careful not to use iret instead of iretd. dmd will output the
16-bit opcode instead of the 32-bit opcode we need, causing the
processor to fault and reset the computer.
294
www.it-ebooks.info
Chapter 11
The event loop in main is currently written for simplicity and can be improved if written
more concurrently and to perform other tasks while waiting. The basic idea is to wait for
an interrupt by first ensuring they are enabled with sti and then stopping the CPU until
one arrives with hlt.
Once it arrives, we basically assert a global lock by disabling interrupts with cli, ensuring
our data won't be changed mid-read (an interrupt can occur after any CPU instruction), and
check for new data. If we have a key, we display our message, update the color of the first
character cell to see the change on each event, and reset the buffer for the next event.
We write to videoMemory, a pointer, with the indexing operator
such as an array. D allows this in the same way as C, with no bounds
checking at all.
A better implementation may provide a longer keyboard buffer and shorter lock if it locks
at all. After installing an interrupt handler for the system clock and running a task while not
doing anything else (although still using hlt if there are no tasks to be run), we'd have the
beginning of a real operating system kernel.
The rest of the code prepares the hardware to enable our interrupt handler. Although it's
necessarily bulky, it doesn't utilize many D features. One notable aspect, however, is the struct
alignment and the static assert to confirm that the size is correct—this is the real-world
application of some code we wrote in Chapter 7, Correctness Checking. In this case, the outer
align isn't strictly necessary for the code to work, but generally, when going for a specific
size, both aligns are necessary for the size check to pass: the one outside to remove struct
padding and the one inside to remove field padding. If we forgot one or the other, there may
be unused space in the struct that would confuse the hardware. Better to have strict tests that
pass reliably than depend on implementation details of struct padding.
Also note that all the global variables are marked with __gshared. D's module-level and
static variables are put in thread-local storage by default. Since our operating system has
no threads, it also does not support thread-local storage! If we forgot __gshared, the code
would still compile, but it would corrupt the memory and likely crash our system when we
tried to run it. In the bare metal environment, the guideline against __gshared doesn't
apply—here, you should use it or the shared keyword, unless you know you have correctly
implemented TLS.
The shared keyword has another potential use on bare metal: it can
make up for the lack of a volatile statement in D. Since the compiler
knows shared data may be updated by somebody else (another thread
in most cases, but it could also be updated by other hardware), it treats
shared reads and writes as volatile. Another alternative is to always
perform volatile input and output with inline assembly or functions
written in assembly.
295
www.it-ebooks.info
www.it-ebooks.info
12
Web and GUI
Programming
In this chapter, we will use third-party libraries to write web and GUI programs with D. We will
investigate the following recipes:
ff
Creating a dynamic website with cgi.d
ff
Creating a web API with web.d
ff
Parsing and modifying an HTML page with dom.d
ff
Accessing a SQL database
ff
Sending an e-mail
ff
Writing colored output to the console
ff
Getting real-time input from the terminal
ff
Working with image files
ff
Creating a graphics window to show a TV static demo
ff
Creating an OpenGL window
Introduction
D has a growing community of third-party library authors. In this chapter, we'll look primarily at
libraries written by me and others. With these libraries, performing web and GUI programming
with D can be easy, though they don't do everything. To prepare you to move beyond these
limitations, we'll also look at techniques used in library implementation. We will also see
practical applications of many of the recipes in this book as well as some new techniques
that you may find useful when writing your own code.
www.it-ebooks.info
Web and GUI Programming
I'll make reference to my Github repository throughout this chapter. This repository can be
located at https://github.com/adamdruppe/arsd.
Creating a dynamic website with cgi.d
My cgi.d file is a self-contained module to create dynamic websites that can be accessed
over the classic CGI protocol, the SCGI and FastCGI protocols, or by an embedded HTTP server
that can be placed behind a reverse proxy—all with the same API for your code to use. The
cgi.d module provides a Cgi class whose API exposes basic interaction with the requesting
web browser such as query parameters, file uploads, cookies, HTTP headers, and writing
response data.
Getting ready
Download cgi.d from https://github.com/adamdruppe/arsd and put it in your
project's directory. You do not need any other files from the repository nor any other external
libraries unless you want to use the FastCGI interface, which requires the C library libfcgi
to be installed on the system.
For testing, you can use the embedded HTTP server and access it directly from your browser.
However, to deploy the application, you'll also want to configure your web server software to
use the application. This differs with each server and each protocol.
How to do it…
Let's execute the following steps to create a dynamic website:
1. Import arsd.cgi.
2. Write a function that handles each request. It should return void and take one
parameter; an instance of the Cgi class.
3. Inspect request parameters with the properties of Cgi such as get, post, cookies,
pathInfo, and domain.
4. Set any cookies and headers needed for your response with the methods of Cgi
such as setCookie, setResponseContentType, and others.
5. Send a response with the write method of Cgi.
6. Mix in the library's generic main function with mixin GenericMain!your_
function_here;.
7. Compile with dmd.d yourfile.d cgi.d –version=embedded_httpd.
8. Run the program. It will remain open in the console, ready to serve requests.
9. Open your web browser to http://localhost:8085/ to see your page.
10. Terminate the server by pressing Ctrl + C in the console when you are finished.
298
www.it-ebooks.info
Chapter 12
The code is as follows:
import arsd.cgi;
import std.array, std.conv;
// This function does a quick and dirty HTML entity encoding
// to prevent XSS. Typically, I use htmlEntitiesEncode in dom.d
string simpleHtmlEncode(string s) {
return s.replace("&", "&").
replace("<", "<").replace(">", ">");
}
void handler(Cgi cgi) {
// this is the default, so the following line is not
// necessary. It is here for demonstration purposes.
cgi.setResponseContentType("text/html; charset=UTF-8");
string data = "Hello, " ~
cgi.request("name", "user").simpleHtmlEncode();
data ~= "<br />\n";
data ~= "Called from: " ~ cgi.pathInfo.simpleHtmlEncode();
data ~= "<br />\n";
data ~= to!string(cgi.get).simpleHtmlEncode() ~ "\n";
cgi.write(data, true); // all written at once
}
mixin GenericMain!handler;
If you go to http://localhost:8085/foo?name=your+name in your browser, you'll see
the following output:
Hello, your name
Called from: /foo
["name":"your name"]
The cgi.d module also supports a command-line interface in all compiled
versions for easier debugging. Call the function with at least two arguments:
an HTTP verb and a path. Then, optionally, add other request parameters as
name=value pairs. For example, ./app HEAD /foo name=test will
print the response, including headers, to stdout.
299
www.it-ebooks.info
Web and GUI Programming
How it works…
The cgi.d module abstracts away the details of interacting with the web server protocols by
hiding them behind the Cgi class and GenericMain function.
The constructors of Cgi come in two flavours: one understands CGI-like input data with a list
of environment variables and a byte stream and the other understands HTTP, with just a byte
stream from which the header information must be extracted. Both of these constructors
support delegation, allowing the details of each protocol implementation to exist elsewhere
(passed to it from GenericMain) while reusing the core code.
The data from HTTP headers is organized into immutable properties of the Cgi class for
easy access while prohibiting modification. These properties are immutable to discourage
using them as global variables due to a bad experience I had with PHP code using the $_POST
array to perform an action at a distance, making functions very difficult to understand. The
Cgi properties are meant to represent the HTTP request, not to be a place to stash function
arguments and other global data.
Responses are crafted through the methods of the Cgi class. The Cgi class offers dedicated
methods to set various headers including cookies, cache, content type, compression, and
others. These methods try to intelligently handle multiple calls, for example, by updating the
buffer instead of writing out two contradictory headers.
Response data is written with cgi.write. If you send all the data at once, set the second
argument to true, allowing Cgi to optimize the response. For example, a complete response
need not be double-buffered or chunked.
Implementation-wise, Cgi is a fairly simple class, using few of D's features. The GenericMain
function is a mixin template that simply provides a prepackaged main function. The most
interesting method, implementation-wise, is cgi.request, which uses an implicit compile-time
type argument and std.conv.to to extract a value from the request parameters. It is a simple
template that does little more than call a library function with an error handler, but it is an easyto-use way to filter input that doesn't match a particular type.
If you use cgi.request with an enum variable, it will filter input and
create a whitelist. The code is as follows:
enum Option { value, option, another }
// this will always be one of the valid options,
// regardless of user input
Option option = cgi.request!Option("option");
300
www.it-ebooks.info
Chapter 12
The embedded_httpd version of Cgi has two network server functions. One is used on Linux
by default: forks, which creates new processes to handle concurrent requests. The other one
is used on all other systems, and it uses Phobos' threads and message passing to achieve the
same task. Processes are more reliable because the server can recover from segmentation
faults, such as null pointer uses, but aside from on Linux, they come with a performance penalty
and do not work correctly at all on Windows. Thanks to D's thread-local storage, both modes
are indistinguishable to most user code. To achieve maximum compatibility across all server
models, you may want to use lazy initialization of thread-local resources.
See also
ff
http://vibed.org/ is another web application framework for D. The vibe.d
module (the name of the entire framework) differs significantly from cgi.d. While
cgi.d was inspired by a desire to replace PHP and is very conservative in its
approach, vibe.d was inspired by Node.js and innovates with fibers (see Chapter
10, Multitasking) for asynchronous I/O based scalability with code written in an
intuitive, serial manner.
Creating a web API with web.d
My web.d file is an add-on module for cgi.d that utilizes D's reflection and code generation
capabilities to automate tasks such as URL routing and JSON and HTML generation from
your code.
Getting ready
The web.d file has several dependencies that can be found in my Github repository. You'll
need to download each of the files and compile them all together. Download cgi.d, web.d,
sha.d, dom.d, and characterencodings.d to your project's directory.
How to do it…
Let's execute the following steps to create a web API:
1. Import arsd.web.
2. Create a class that inherits from ApiProvider.
3. Write the export methods, which implement various functions that you want
to expose.
4. Mix in a main function from the library with mixin FancyMain!Your_Class_name;.
301
www.it-ebooks.info
Web and GUI Programming
5. Compile the program and all dependencies together using any version modifiers you
want from cgi.d or web.d. We can compile with the following command to use the
embedded HTTP server and disable the automatic creation of session files:
dmd yourfile.d cgi.d web.d sha.d dom.d characterencodings.d
-version=no_automatic_session -version=embedded_httpd
6. Access the functions from a web browser, JavaScript, or any other programming
language through HTTP.
The code is as follows:
import arsd.web;
class Test : ApiProvider {
export int add(int a, int b) { return a+b; }
export string sayHello(string name) {
return "Hello, " ~ name;
}
}
mixin FancyMain!Test;
If you go to http://localhost:8085/add or http://localhost:8085/say-hello,
you will see the automatic form and can fill it out to see the result of the corresponding function.
You can see the machine-consumable result by going to http://localhost:8085/add?a=1
&b=2&envelopeFormat=json&format=json.
How it works…
The implementation of web.d was one of my earliest explorations of compile-time
reflection and code generation, and as such, its code is not very pretty to look at, but the
results are remarkable.
Using __traits(derivedMembers), web.d inspects each method in your ApiProvider
subclass, looking for other compatible types and functions marked with the export protection
level (checking with __traits(getProtection)).
It recursively scans compatible types, for example, other ApiProvider instances, to prepare
a tree of URL-mapped functions and objects. The export methods anywhere in the tree are
made available through the Web by automatically generating a wrapper function for them.
The wrapper function translates an associative array of parameters from the web request
into the typed arguments expected by the method. Then, the method is run and the return
value is automatically formatted based on an optional pair of URL parameters: format and
envelopeFormat.
302
www.it-ebooks.info
Chapter 12
The format parameter controls the format of the data (for example, html, json, or table)
and envelopeFormat controls the format of the surrounding metadata (possible options
include html, which wraps the content in an HTML document for presentation in the browser,
and json, which is meant for machine consumption). The wrapper function also catches any
exceptions thrown by the method and also forwards them to the API client or web browser.
The formatting implementation uses compile-time reflection paired with conditional compilation
to automatically handle most types. If the necessary code to support a format does not compile,
attempting to use that format will throw an exception at runtime.
The web.d module also uses the information it gathers from compile-time reflection to
automatically generate HTML forms that can be used as a prototype UI for the functions.
There's more…
The web.d module also includes an HTML template engine that extends dom.d (which we'll
use in the next recipe), an ApiObject type to create RESTful resources, and web session
support that can be file- or cookie-backed. Moreover, web.d works well with html.d. Also,
my Github repository provides methods for HTML sanitization (done via the DOM parser and
a whitelist of allowed tags), CSS denesting and macro expansion similar to the SCSS project,
and more. However, these modules aren't very well documented at this time, however, so if
you want to experiment with them, look at the source code.
Parsing and modifying an HTML page with
dom.d
My dom.d module is an HTML and XML parser that can understand much of the tag soup
found on the Web. Once it parses a document, it provides a JavaScript-style DOM API for
easy inspection and manipulation of the document tree.
Here, we'll use the library to extract some meta-information and text from an HTML page,
and then modify it and save a local copy to explore its features and implementation,
which uses several of the techniques we've learned in this book.
Getting ready
Download dom.d and characterencodings.d from my Github repository. It has no other
dependencies, so you do not need to download any additional files or libraries.
303
www.it-ebooks.info
Web and GUI Programming
How to do it…
Let's execute the following steps to parse and modify an HTML page:
1. Import arsd.dom.
2. Create an instance of the Document class.
3. Pass an unvalidated HTML string to the parseGarbage method, or if you want strict
checks on case and well-formedness, use parseStrict. It will throw exceptions
when it encounters bad syntax.
4. Get the document title and author meta-information with the title property and the
getMeta("author") method.
5. Extract the first paragraph's text with the querySelector or requireSelector
methods and the innerText property. For example, document.
requireSelector("p").innerText; makes use of the requireSelector
method and the innerText property.
6. Modify all links to add a source parameter with document["a[href]"].
setValue("source", "your-site");.
7.
Replace the inner HTML text of a specific element with requireElementByID
and innerHTML.
8. Get the new HTML as a string with the toString method.
9. Compile the program with dmd yourfile.d dom.d characterencodings.d.
The code is as follows:
import arsd.dom;
void main() {
auto document = new Document();
// The example document will be defined inline here
// We could also load the string from a file with
// std.file.readText or the web with std.net.curl.get
document.parseGarbage(`<html><head>
<meta name="author" content="Adam D. Ruppe">
<title>Test Document</title>
</head>
<body>
<p>This is the first paragraph of our
<a href="test.html">test document</a>.
<p>This second paragraph also has a <a href="test2.html">link</a>.
<p id="custom-paragraph">Old text</p>
304
www.it-ebooks.info
Chapter 12
</body>
</html>`);
import std.stdio;
// retrieve and print some meta information
writeln(document.title);
writeln(document.getMeta("author"));
// show a paragraph's text
writeln(document.requireSelector("p").innerText);
// modify all links
document["a[href]"].setValue("source", "your-site");
// change some HTML
document.requireElementById("custom-paragraph").innerHTML
= "New <b>HTML</b>!";
// show the new document
writeln(document.toString());
}
Running the program will print the following output:
Test Document
Adam D. Ruppe
This is the first paragraph of our test document.
<!DOCTYPE html>
<html><head>
<meta content="Adam D. Ruppe" name="author" />
<title>Test Document</title>
</head>
<body>
<p>This is the first paragraph of our
<a href="test.html?source=your-site">test document</a>.
</p><p>This second paragraph also has a
<a href="test2.html?source=your-site">link</a>.
</p><p id="custom-paragraph">New <b>HTML</b>!</p></body>
</html>
The document's parse functions take an HTML string, and not
a filename or URL. If you get exceptions about missing input,
make sure that you are sending it the correct input.
305
www.it-ebooks.info
Web and GUI Programming
How it works…
The dom.d module is centered around two primary classes: Element and Document. The
Document class includes the HTML parser and methods to set and get meta-information
in the formats typically used on websites. The Element class represents one node in the
document including its child nodes and attributes.
The parser's implementation doesn't use any of D's special features except array slicing, but
did need some optimization work. The entity decoder's first draft naively built a new array on
every call, which ended up being a performance problem. For the second draft, I rewrote it to
scan the string ahead of time—before performing any copying or decoding for the & character.
If the & character wasn't found, it simply returned the original slice. This slice is propagated
everywhere it is used, never copied and never reallocated. If one was found, it performed a
single copy and modification for that node.
Replacing the original conservative copying implementation with the new slicing and copy-onwrite for both the entity encoder and decoder resulted in a major speed improvement in the
parser and serialization methods.
In the example, we used the parseGarbage method. The Document class' parser includes
two branches in every error condition: one that simply throws an exception and one that
attempts recovery. The parseGarbage method opts for recovery in all conditions and has
been tested against hundreds of real-world websites. It can recover from unclosed tags,
mismatched tags, improper paragraph nesting, malformed attributes, and mislabeled
character sets.
To handle character sets, the characterencodings.d implementation uses the Phobos
function std.utf.validate to check UTF-8 correctness. If this fails, dom.d attempts to find
a charset meta tag or XML prologue and uses that string to ask characterencodings.d
to translate the data from that character set to UTF-8 for further processing in D. It performs
the translation with hardcoded translation tables. If it cannot determine the character set,
parseGarbage will assume it is Windows-1252 because that is the most common encoding
used on unlabeled websites in my experience.
The Element class has a number of searching and mutation methods, primarily based on
the JavaScript DOM. Search methods include getElementById, getElementsByTagName,
and querySelector, all inspired by and substantially similar to—but not exactly identical
to—JavaScript. The biggest difference between the getElementsByTagName function of
dom.d and JavaScript's function with the same name is that dom.d returns a simple array of
elements, whereas JavaScript returns a live node list that is updated as the tree is mutated.
In D, a live node list would be best represented by a range. However, JavaScript's node list
violates one of the D range rules: it offers random access that runs in linear time instead of
constant time, as required by D's random access ranges. Nevertheless, a live list could be
represented by a forward range in D. The dom.d module doesn't do this simply because I
didn't consider that at the time, and now I am stuck with it for backward compatibility.
306
www.it-ebooks.info
Chapter 12
However, the dom.d module uses a lazy range called ElementStream internally for
all searching. This range can be retrieved with the tree property on Element. The
ElementStream class uses an internal stack to implement an input range over the
recursive DOM tree structure, just like we wrote in Chapter 3, Ranges.
As ElementStream implements the input range protocol, it can be passed to any std.
algorithm functions just like any other range, including filter, map, and others.
The querySelector method and its partner method, requireSelector, parse a CSS
selector and retrieve all nodes that match the pattern. The selector syntax is based on that
used in JavaScript's querySelector function, CSS stylesheets, and the popular jQuery
JavaScript library.
The querySelector method returns null if no matching elements are found. The
requireSelector method will instead throw an exception, ensuring that it never
returns null.
The dom.d module also provides querySelectorAll, which returns an array of elements that
match the selector, whereas querySelector only returns the first match. The Document class'
opIndex, which we used in step 6 of the example, calls querySelectorAll to populate an
ElementCollection object.
The ElementCollection object's implementation uses opDispatch and string mixins
to forward subsequent method calls to each element in the collection at once with minimal
boilerplate. This allows quick and easy manipulation of a group of elements through their
methods. Each wrapped method returns the whole collection, allowing chained calls, as is
often seen in jQuery code.
Lastly, the innerHTML property and the toString method are used to manipulate and
retrieve the content HTML strings. The innerHTML property always uses the nonstrict
parsing options, similar to parseGarbage. Both implementations use an Appender
argument to minimize intermediate allocations as a performance optimization.
There's more…
The dom.d module also makes heavy usage of opDispatch to access attributes, similar
to JavaScript. The element.attrs.attribute_name, element.style.cssRule and
element.dataset.someValue all utilize helper objects with opDispatch to generate
properties that give easy access to attributes. All three collections use the technique we
learned in Chapter 9, Code Generation, with different string translation rules. The attrs
collection provides direct access to the underlying associative array. The style collection
translates from CamelCase to dash-separated names and parses the existing attribute to
provide access to all existing rules and recombines them to provide usable HTML.
307
www.it-ebooks.info
Web and GUI Programming
The style collection also uses alias this and opAssign to enable implicit conversion
to and from an attribute string—something JavaScript cannot do! The dataset method
performs CamelCase to dash-separated conversion and prefixes the attribute with data—for
compatibility with HTML5.
See also
ff
https://github.com/opticron/kxml is another XML library that is better
suited to handle large sets of XML data than dom.d
Accessing a SQL database
My Github repository at http://github.com/adamdruppe/arsd contains a database.d
interface file and implementation files for MySQL, PostgreSQL, SQLite, and Microsoft SQL Server
via ODBC. Here, we'll use them to perform some SQL queries.
Getting ready
Download database.d and a driver file (postgres.d for PostgreSQL, mysql.d for MySQL,
sqlite.d for SQLite, or mssql.d for SQL Server) from my Github.
The drivers also require C libraries. The mysql.d file needs libmysqlclient, which comes
with the MySQL server. The postgres.d file needs libpq, which comes with the PostgreSQL
server. The sqlite.d file needs SQLite installed on the system.
Let's also create a test database to use from the program. In our example, we'll use MySQL,
so create a MySQL database, user, and data table. The following are the commands you can
run in the MySQL console:
create database demonstration;
use demonstration
grant all privileges on demonstration.* to 'demo_user'@'localhost'
identified by 'test';
create table info (id integer auto_increment, name varchar(80), age
integer null, primary key(id)) CHARSET=utf8;
How to do it…
Let's access a SQL database by executing the following steps:
1. Import the driver module, in our case, arsd.mysql.
308
www.it-ebooks.info
Chapter 12
2. Instantiate the object with target-specific parameters. MySQL takes strings for
the hostname, user name, password, and database name. SQLite takes a filename.
PostgreSQL and MS SQL both take connection strings with the parameters in them.
3. Issue queries through the Database interface by using question marks as
placeholders for any data parameters.
4. Process result rows with foreach or the range interface. Each column can be
accessed by integer positions or by name strings.
The code is as follows:
import arsd.mysql;
void main() {
auto db = new MySql("localhost", "demo_user",
"test", "demonstration");
// Add some data to the table
db.query("INSERT INTO info (name) VALUES (?)", "My Name");
db.query("INSERT INTO info (name, age) VALUES (?, ?)",
"Other", 5);
// get the data back out
foreach(line; db.query("SELECT id, name, age FROM info")) {
import std.stdio;
// notice indexing by string or number together
writefln("ID %s %s (Age %s)", line["id"],
line[1], line["age"]);
}
}
Running the program will add data to the table and print the following text. Note how the first
ID's age is an empty string; this is how null is represented in the result line. The following is
the output:
ID 1 My Name (Age )
ID 2 Other (Age 5)
If the program throws an exception, it may be because the database was not properly created.
Avoid building SQL strings by concatenating user data strings. This is
bug prone and may lead to SQL injection vulnerabilities. Instead, always
use parameterized queries from the library or prepared statements from
the database engine's native API.
309
www.it-ebooks.info
Web and GUI Programming
How it works…
These files wrap the C APIs from the database vendors to provide minimal, but functional,
access to the database servers through an abstracted interface. The database.d file will
not attempt to transform SQL syntax differences across database vendors, but it will present
a uniform interface to issue those queries.
The implementation of Database.query is broken up into two parts: first, the public
query method, which is a variadic template that can take any number and mix of types of
arguments; and second, the queryImpl method, which is a virtual function implemented by
each driver. The split was necessary because templates cannot be virtual and fully generic
and convenience functions to accept a variety of data types must be templates.
Older versions of database.d tried to use a runtime variadic function to
enable the virtual method to take varying argument types. It worked, but
only sometimes—because a runtime variadic function needs to inspect
each typeid given for a type it supports. Given this limitation, it couldn't
succinctly support all types, and passing it an unsupported type will
result in a runtime exception instead of a compile-time error! The variadic
template and virtual method split solution resulted in shorter, simpler code
that will properly support all types at compile time.
The public query method loops over its arguments and converts them to an array of std.
variant.Variant, which is then passed to queryImpl for the database engine to use in
parameterized queries. Then, each placeholder in your query string—represented by ? or ?n,
the former pulling the next argument and the latter pulling a specific numbered argument—are
replaced by the value of the next argument.
The query method returns a ResultSet interface, which is an input range of Rows.
ResultSet is also an interface, with different implementations for each database engine. As
an input range, it can be checked for data with the empty property, the current row retrieved
with the front property, and the next row retrieved with the popFront method. It also works
with the foreach statement for easily iterating over all the results. It could, in theory, also be
transformed with std.algorithm like any other input range. However, in practice, you should
do filtering and sorting in the database itself with your SQL query.
The Row object is a struct consisting of an array of strings and a column name mapping.
Thanks to operator overloading, the column values are available through both column
name strings and column index integers, similar to how PHP's old mysql_fetch_array
function works.
Each column is represented by strings primarily for ease of database engine implementation
and to keep the interface simple. As strings, all regular string operations can be performed,
including checking for null or emptiness with the length property or converting them to other
types with std.conv.to.
310
www.it-ebooks.info
Chapter 12
When you are finished with the data and database connection, you may let the garbage
collector clean them up or you may explicitly destroy them with the global destroy method,
which will immediately close the connection.
There's more…
The database.d file also includes two helper objects for building queries: DataObject,
which provides a simple implementation of the active record pattern, and SelectBuilder,
which helps you build a SELECT query by putting together individual components.
The implementation of SelectBuilder is very simple: it is simply a collection of string arrays
and member variables for LIMIT clauses. Its toString method concatenates the arrays
into the proper order to build a working query. The purpose of SelectBuilder is to make
modifying, reusing, and creating queries easier than trying to reparse and splice a SQL string.
The code is as follows:
import arsd.database;
void main() {
auto query = new SelectBuilder();
query.table = "users";
query.fields ~= "id";
query.fields ~= "name";
query.limit = 5;
query.wheres ~= "id > 5";
query.orderBys ~= "name ASC";
import std.stdio;
writeln(query.toString());
}
That program will print out the following constructed query that could be passed to
Database.query:
SELECT id, name FROM users WHERE (id > 5) ORDER BY name ASC
LIMIT 5
DataObject uses opDispatch properties to get and set data for a query. The getter
property returns a string which can be converted to other types with std.conv.to. The setter
property is a template to take any kind of argument and convert it to strings for use in queries
automatically. DataObject, like many ORM solutions, may be subject to race conditions on
the database and is not appropriate for all situations.
311
www.it-ebooks.info
Web and GUI Programming
The database.d file also includes experimental code generation to create a strongly-typed
subclass of DataObject based on a SQL CREATE TABLE statement. It takes a SQL string and
parses it (using several parsing shortcuts) to extract column names and types. Then, it converts
them into D properties and mixins as a generated string of D code, like we did in the Duck typing
to a statically-typed interface recipe, in Chapter 9, Code Generation, to implement the subclass.
However, since the parser is tailored to the particular way I wrote those statements at the time,
it may not work for you.
Lastly, it also has code that uses compile-time reflection on structs to fill them in with a query.
As I find the strings to be generally sufficient for me though, I rarely use this code and, as a
result, it is not maintained.
See also
ff
http://code.dlang.org/packages/ddb is a native PostgreSQL driver that
does not use libpq and offers ORM and other advanced functionality
ff
https://github.com/rejectedsoftware/mysql-native is a native MySQL
driver that does not use libmysql and integrates with the vibe.d framework
ff
The module etc.c.sqlite3, distributed with Phobos, provides bindings to the
SQLite C library
Sending an e-mail
Sending an e-mail is possible with the Phobos wrapper of cURL. cURL is a network client
library which lets us work with a variety of tasks involving URL, including downloading files
through HTTP, uploading files with FTP, and sending e-mail.
Getting ready
cURL is most likely already installed on Posix systems and is installed automatically by
the dmd Windows installer. However, you may need to ensure you have the 32-bit library
installed if you are building 32-bit binaries or the 64-bit library if you are building 64-bit
binaries. To change the type of binary you are building, pass –m32 or –m64 to dmd.
As std.net.curl is a part of Phobos, you do not need to download any additional D
libraries to send a basic e-mail with it.
How to do it…
Let's send a basic e-mail by executing the following steps:
1. Import std.net.curl.
312
www.it-ebooks.info
Chapter 12
2. Create an SMTP object, passing it a server URI and including a protocol, for example,
smtp://localhost or smtps://smtp.gmail.com:465. SMTP is a reference
counted struct, so do not use the new keyword.
3. Call smtp.setAuthentication with your username and password if you need to
log in to your mail server.
4. Call smtp.mailTo(array_of_recipients);. This array should include all e-mail
addresses that will receive the message, including people in the To list, the Cc list,
and the Bcc list of recipients.
5. Set smtp.mailFrom = "your_email_address". The mailFrom value should
not include your name.
6. Set smtp.message to the message string, including e-mail headers separated from
the body by a blank line.
7.
Call smtp.perform() to send the e-mail.
8. Link the curl library with pragma(lib) or the –L option to dmd.
The code is as follows:
import std.net.curl;
pragma(lib, "curl");
void main() {
auto smtp = SMTP("smtp://localhost");
smtp.mailTo(["recipient@example.com"]);
smtp.mailFrom = "sender@example.com";
smtp.message = "Subject: Hello!\nFrom: Your Name
<sender@example.com>\nContent-Type: text/plain;
charset=UTF-8\n\nHey there.";
smtp.perform();
}
If you change the e-mail addresses and mail server to the ones you can actually use, that will
send an e-mail with a subject line of Hello! and body text of Hey there.
If you cannot send e-mail through your mail server, try setting
smtp.verbose = true; before sending the e-mail. This will
cause the library to print debugging information when it runs.
How it works…
There are two common ways for applications to initiate an e-mail: to ask a Simple Mail Transfer
Protocol (SMTP) server to relay it for them or to call a local application (often sendmail) to
send it for them. Phobos has support for both: it can call a local application with std.process
or it can talk to a mail relay server with std.net.curl, which is what we did here.
313
www.it-ebooks.info
Web and GUI Programming
The std.net.curl.SMTP module is a fairly low-level wrapper around the cURL library's
functionality. To use it well, you need to manage the e-mail headers yourself and manage
some protocol details such as building the array of all the mailTo recipients and putting
a plain e-mail address in the mailFrom property. These properties are separate from the
e-mail headers the end user sees. std.net.curl will not parse headers in the message
body, nor will it add recipient headers from the properties.
As a result, the mailTo property must contain all recipients, including the To, Cc, and
Bcc lists. Additionally, the corresponding e-mail headers should be present in the message.
Similarly, mailFrom should contain your e-mail address while the From: header in the
message should also be present and include your name for display to the user.
A Content-Type header should also be present. E-mails will typically work without these
components, but may not appear correctly on the recipient's computer.
The std.net.curl module also supports username and password-based SMTP
authentication and the STARTTLS features often used by e-mail providers. To add your
username and password, use setAuthentication. To use SSL or TLS, use the smtps://
protocol in the SMTP constructor as well as the appropriate port for your mail server (typically
465 or 587; check with your provider to be sure). It is written after a colon that follows the
server name, for example, smtps://yourserver.com:465.
After constructing the message, a call to smtp.perform() will connect to the server and
send the message. It may throw an exception saying it lost the connection to peer. This is most
often caused by bad authentication information or an invalid recipient e-mail address. Be sure
that your username is correct and you are sending to valid recipients; check that all addresses
in the mailTo array are well formed. The std.net.email module has a helper function to
validate that e-mail addresses are well-formed. You can also check that they have non-zero
length and no extra white space.
Finally, to compile the program, we must add libcurl to the linker command. The easiest
way to do this is to write pragma(lib, "curl") in your main file. You may also pass
curl.lib to dmd on Windows or –L-lcurl to dmd on Posix systems.
There's more…
Creating and parsing e-mails can be a complex task due to the need to handle various
character encoding rules, message headers, and the Multipurpose Internet Mail Extensions
(MIME) standard for attachments, alternative bodies, and more.
From my Github repository, you can download my email.d file. The email.d file includes a
EmailMessage class that permits you to build an e-mail message out of a property list and
helper methods without worrying about the specific message format. Once the message is
ready, you can call message.send() to send it via std.net.curl.SMTP. My email.d file
depends on htmltotext.d, dom.d, and characterencodings.d to automatically convert
HTML e-mails to a plain text alternative and parse incoming e-mails with different character sets.
314
www.it-ebooks.info
Chapter 12
Writing colored output to the console
The writefln function has a lot of formatting options for strings, but they always come out
with the same default color. How can we create colored text output in D?
Getting ready
Download terminal.d from my Github repository to your project's directory.
How to do it…
Let's write colored output to the console by executing the following steps:
1. Import terminal.
2. Create an instance of Terminal with a linear output type.
3. Set the foreground and background color with the terminal.color method.
4. Write text with the terminal.write, terminal.writeln, terminal.writef,
or terminal.writefln functions. They work the same way as the homonym
functions in std.stdio.
5. You can flush output with terminal.flush() if it isn't done soon
enough automatically.
6. Compile the program and terminal.d together with dmd yourfile.d
terminal.d.
The following is the code:
import terminal;
void main() {
auto terminal = Terminal(ConsoleOutputType.linear);
terminal.color(Color.green, Color.red);
terminal.writeln("Hello, world!");
}
Running the program will print Hello, world! in green text on a red background.
315
www.it-ebooks.info
Web and GUI Programming
How it works…
Writing colored output is carried out differently on a Unix terminal than on the Windows console.
On a Unix terminal, colors are set by printing an ANSI escape sequence to stdout, and it is the
program's responsibility to set it back to normal before termination. On the Windows console,
colors are changed with an API function, and the operating system will ensure the next program
run sees a consistent state, so you do not have to clean it up manually.
The terminal.d module hides these implementation details behind a consistent interface,
with the Terminal struct performing necessary cleanup work in its destructor.
In an earlier draft of terminal.d, I used an array of delegates
created in the constructor to roll back changes in the destructor.
That was a mistake that led to random crashes because delegates
have a hidden internal pointer to the object. Using internal pointers
in D's structs invokes undefined behavior because the struct may
move at any time without notice, leaving a dangling pointer to the
old, now reused memory. While a list of cleanup delegates may
look elegant like scope(exit), alas it is bug prone and should
not be used with structs.
Terminal operates on a unique resource that is modified in its destructor, and it has a
disabled postblit to statically prohibit copying the object. Similarly, the default construction
is disabled to force the user to call the explicit constructor, giving Terminal a chance to run
necessary initialization functions and gather information about the terminal's existing state
at startup.
Otherwise, the implementation of Terminal is pretty unremarkable—it is just a wrapper for
operating system and library functionality with its own buffering solution.
See also
ff
http://code.dlang.org/packages/ncurses is a binding to the C library
ncurses, which provides similar functionality to terminal.d. For advanced uses,
ncurses may provide better compatibility with your system.
ff
https://github.com/robik/consoled is an alternate D library to provide
colored output and other cross-platform console and terminal operations.
Getting real-time input from the terminal
Getting real-time input from the console or terminal can take a fair amount of platform-specific
code, quite a bit more than writing out colored output.
316
www.it-ebooks.info
Chapter 12
Getting ready
Download terminal.d from my Github and put it in your project directory.
How to do it…
Let's execute the following steps to get real-time input from the terminal:
1. Import terminal.
2. Create a Terminal object.
3. Create a RealTimeConsoleInput object, passing it a pointer to your Terminal
object and passing flags for the types of input you need.
4. Use the input object's methods.
The code is as follows:
import terminal;
void main() {
auto terminal = Terminal(ConsoleOutputType.linear);
auto input = RealTimeConsoleInput(&terminal,
ConsoleInputFlags.raw);
terminal.writeln("Press any key to exit");
auto ch = input.getch();
terminal.writeln("Bye!");
}
Now, run the program. It will immediately exit as soon as you press any key without waiting for
a full line.
How it works…
By default, text input from the user is line buffered by the operating system. This means your
program won't be able to process any of the data the user types until she or he either presses
the Enter key or signals the end of the file (Ctrl + D on most Posix setups and Ctrl + Z on
Windows). To get real-time input, this line buffering must be disabled.
RealTimeConsoleInput is a struct that disables this buffering in its constructor and resets
the settings to normal in its destructor. Like Terminal, the default constructor and postblit
functions of RealTimeConsoleInput are annotated with @disable to force correct use
of the shared resource.
317
www.it-ebooks.info
Web and GUI Programming
There's more…
The terminal.d module also has optional integration with another file in my Github
repository, eventloop.d. To try it, compile both files together and add –version=with_
eventloop to the compile command. The terminal.d module includes a commentedout demo function to show the usage. The eventloop.d module implements a generic
event loop through which any kind of message can be passed from any number of sources,
identified by type. The goal of the event loop is to allow arbitrary combinations of event-driven
libraries, such as a terminal and a GUI window, in a single application.
The implementation of eventloop.d passes messages in two parts: a type identifier and a
pointer to the data. The type identifier is created by hashing the type's mangled name, which
is acquired with typeof(data).mangleof. A type's mangled name is guaranteed to be
unique across an application because a non-unique name will cause a compile-time name
clash error. Alternatively, a handle to typeid could have been used. This pair of numbers is
sent through an operating system pipe back to the application itself, and it can be handled in
a generic event loop as another file descriptor, watched by functions such as select or poll.
An interesting consequence of this implementation is that pointers to the garbage-collected
data cannot be reliably sent as a message. The reason is that the garbage collector cannot
see the kernel's pipe buffer. Consider the following: you send a message, then allocate some
memory before receiving the message. The allocation triggers a garbage collection run.
As the garbage collector cannot see the pipe buffer, it may not find any reference to the
message data and thus believe it is safe to free the data. Then, when the message is read,
the pointer is invalid.
To fix this bug, I opted for manual memory management in the event loop's send and
receive functions. When you send a message, it uses malloc to allocate a copy of the
message. When the message is received, it frees the memory.
The eventloop.d module only contains a Linux epoll and self-pipe-based implementation
at this time.
See also
ff
The ncurses C library also provides real-time input functionality
Working with image files
Reading and writing image files is a way to present visualized results to the user and is also a
starting point to write out images to a web browser or GUI window. Here, we'll use my color.d
and png.d or bmp.d modules to load an image file, convert it to grayscale, and then write it out
to a new file.
318
www.it-ebooks.info
Chapter 12
Getting ready
Download color.d and either png.d or bmp.d from my Github repository and put them
in your project's directory. In the example, we'll use png.d. Neither module requires any
additional D or C libraries.
How to do it…
Let's work with image files by executing the following steps:
1. Import arsd.png.
2. Load the file with readPng, passing it a filename. Be sure that the file is already in
the PNG format.
3. Use the getAsTrueColorImage function to convert the input from whatever PNG
format it was saved as into an RGBA array.
4. Manipulate the pixels. Here, we'll convert to greyscale with a simple average-ofcomponents algorithm.
5. Write the new image out to a file with writePng.
The code is as follows:
import arsd.png;
void main() {
auto image = readPng("test.png").getAsTrueColorImage();
foreach(ref pixel; image.imageData.colors) {
int average = (pixel.r + pixel.g + pixel.b) / 3;
pixel.r = pixel.g = pixel.b = cast(ubyte) average;
}
writePng("test-bw.png", image);
}
The following image shows test.png after the conversion:
319
www.it-ebooks.info
Web and GUI Programming
The bmp.d module works the same way as png.d; however, the
functions are named readBmp and writeBmp instead of Png.
How it works…
The modules we dealt with in this recipe implement the file formats independently and provide
a simple pixel buffer interface to the image.
The implementation of png.d builds on top of the lazy file input ranges Phobos provides
to give a lazy input range of PNG data. This implementation was tricky because the Phobos
byChunk range provides a fixed number of bytes, whereas the PNG file format is made out
of a stream of variable sized bytes. To bridge the gap, I wrote a BufferedInputRange
object with additional consume methods which manage variable sized chunks.
Underneath the readPng and writePng convenience functions, png.d offers both lowand mid-level access to the PNG data structures. The low-level functions provide access to
the individual chunks that make up the file, the precise pixel format stored in the file, the
palette, and so on. The mid-level functions provide input ranges of PNG file chunks and
RgbaScanlines. The range of RgbaScanlines offers a potential hook to use the image
data with std.algorithm and other lazy generic transformation functions.
See also
ff
http://code.dlang.org/packages/cairod is a binding to the Cairo drawing
library, written in C and used by major projects such as GTK. Cairo has significantly
more functionality and quality than my library, though it isn't as lightweight.
ff
http://blog.thecybershadow.net/2014/03/21/functional-imageprocessing-in-d/ is a blog post by Vladimir Panteleev where he discusses his
library, which takes the idea of using ranges of images and runs with it.
Creating a graphics window to show a TV
static demo
My simpledisplay.d file is a module to create and interact with a simple window, enabling
easy graphics display. On Windows, it wraps the Win32 GDI API, and on other systems it uses
Xlib for broad compatibility with minimal dependencies.
Getting ready
Download simpledisplay.d and its dependency color.d from my Github.
320
www.it-ebooks.info
Chapter 12
How to do it…
Let's execute the following steps to create a graphics window:
1. Import simpledisplay.
2. Create an image to use as your pixel drawing buffer.
3. Create a SimpleWindow object with the image's size.
4. Create an image to use as your buffer.
5. Create and run an event loop with window.eventLoop.
6. Pass 25 as the first argument to eventLoop to request a 25 millisecond timer.
7.
Pass a delegate that takes no arguments to serve as the timer handler. In this
function, fill the image with random white and black pixels, get a painter with
window.draw, and draw the image to it with painter.drawImage.
8. Pass a delegate that takes a KeyEvent argument to serve as a key handler.
Call window.close to close the window and exit the loop when you receive
the key to exit.
9. Implement the pausing functionality by making the timer delegate a return call
if paused and changing the pause flag in the key handler.
10. Compile the program with dmd yourfile.d simpledisplay.d color.d.
The code is as follows:
import simpledisplay;
void main() {
bool paused;
auto image = new Image(256, 256);
auto window = new SimpleWindow(image.width, image.height);
window.eventLoop(25,
() {
if(paused) return;
import std.random;
foreach(y; 0 .. image.height)
foreach(x; 0 .. image.width)
image.putPixel(x, y, uniform(0, 2) ?
Color.black : Color.white);
auto painter = window.draw();
painter.drawImage(Point(0, 0), image);
},
(KeyEvent ke) {
if(ke.key == Key.Space)
321
www.it-ebooks.info
Web and GUI Programming
paused = !paused;
if(ke.key == Key.Escape)
window.close();
}
);
}
Running the program will pop up a window with random white noise, similar to static on an old
TV set, as shown in the following screenshot:
As you hold the Space bar, the animation will temporarily stop, and releasing the Space bar
will cause it to resume.
How it works…
The simpledisplay.d module includes the necessary operating system function bindings
and some cross-platform wrapping to enable the easy creation of a graphics window with no
outside dependencies except color.d. It doesn't even use Phobos. You may notice improved
compile times because neither file imports the standard library.
The implementation uses mixin templates to provide the different code for each platform. If
I write this again, I will not use this approach—it resulted in code duplication and difficulty in
maintenance. However, this approach does have one potential saving grace: it can be used
to separate the operating system implementations into entirely different modules, which
may become more maintainable. I didn't do this because I wanted the file to just work when
downloaded individually. The color.d module eventually became a requirement—without
it, the image modules and windowing module will both need to declare separate structures
to hold a color, leading to silly incompatibilities between them. Even if two structures in
different modules have exactly the same layout, they are considered separate, incompatible
types (unless you use an adapter or a cast). However, while the ideal of one standalone
file did not work, I still wanted to stay as close to it as possible and opted for one large
simpledisplay.d file that covers all platforms.
322
www.it-ebooks.info
Chapter 12
Another challenge of the implementation was mapping window procedures of the operating
system level back to the SimpleWindow object of D's class. The window procedures must
match a specific signature and calling convention to be callable by the operating system
(or, in the case of X11, the event loop must work with window IDs from the X server, which
similarly leaves no room for the injection of a D class).
To solve this, I used an associative array of window handle/ID to window class mappings. The
constructor of SimpleWindow creates the window and stores the native window handle in a
static associative array that leads back to itself. Similarly, the destructor of SimpleWindow
removes itself from this map. When a window handle comes through the event loop, the
associative array is used to get the class instance and forward the message to it to be
processed.
The event loop of SimpleWindow uses an array of delegates that are matched on
argument types, inspired by std.concurrency. This is implemented with a foreach
loop and __traits(compiles); it loops over its arguments and attempts to assign them
to the event handling delegates. If it succeeds, it accepts the handler. If not, a static assert
is used to issue a compile-time error.
Finally, simpledisplay.d also supports the following two forms of drawing:
ff
Drawing directly to a window or image using the operating system functions
ff
Writing straight to a local image's pixels
To draw to the window, a draw method that returns a Painter struct is used. The painter
retains a reference to the window for use with native API functions and has a destructor to
automatically swap buffers and clean up resources when it goes out of scope.
Do not use draw before entering your event loop unless you surround the code in braces to
ensure the painter goes out of scope before entering the loop. Otherwise, its destructor will
not fire until program termination!
To draw directly to an image, the implementation tries to achieve efficiency by using a final
class and shared memory on X11, when available. The final class provides a ~10 percent
speed boost over a regular class because it contains no virtual functions, which can be a
performance bottleneck on modern CPUs. The shared memory obviates image copying to
and from the display server on the network-transparent X protocol, saving a significant
amount of time. All this is done transparently to the user.
An interesting consequence of the shared memory approach, however, is the requirement
to ensure cleanup tasks are always performed. As the resource is shared across processes,
the operating system will not automatically release the shared memory handles when your
program terminates. Thus, a signal handler must be installed to handle SIGINT when the
user presses Ctrl + C. This is the same situation that was discussed in the Getting real-time
input from the terminal recipe. If you fail to do this, it may make your X server difficult to
use because the number of possible shared memory handles is limited.
323
www.it-ebooks.info
Web and GUI Programming
See also
ff
http://code.dlang.org/packages/derelict-sdl2 provides dynamic bindings
to SDL, the C Simple Directmedia Layer library used by several graphics applications
ff
http://code.dlang.org/packages/gtk-d provides an object-oriented wrapper
for GTK, a cross-platform GUI toolkit
Creating an OpenGL window
My simpledisplay.d module also supports the creation of OpenGL contexts. It uses an
older version of OpenGL but covers the basic functionality, and the same principle can be
used to add other OpenGL functions. Here, we'll create a colorful spinning pyramid.
Getting ready
Download simpledisplay.d and color.d from my Github repository and put them in your
project folder. On Windows, you must also acquire opengl32.lib and glu32.lib from my
Github repository.
How to do it…
Let's create an OpenGL window by executing the following steps:
1. Import simpledisplay.
2. Create a new SimpleWindow object, passing OpenGlOptions.yes to
the constructor.
3. Set window.redrawOpenGlScene to a delegate that will be called to draw your
scene. This function should use the gl* family of functions to do the drawing and
should not have to swap the OpenGL buffers. For our spinning pyramid, this function
will set up our matrix, set up our viewport, and enable depth testing. Then, draw
the pyramid.
4. Call window.eventLoop with a timeout and a timeout handler function (a delegate
with no arguments) that calls redrawOpenGlSceneNow to draw your new frame.
5. Compile with dmd yourfile.d simpledisplay.d color.d on Posix. On
Windows, also add –version=with_opengl to the compile command.
The code is as follows:
import simpledisplay;
void main() {
324
www.it-ebooks.info
Chapter 12
auto window = new SimpleWindow(512, 512, "OpenGL Demo",
OpenGlOptions.yes);
float f = 0.0;
window.redrawOpenGlScene = {
glMatrixMode(GL_PROJECTION);
glClearDepth(1.0f);
glEnable (GL_DEPTH_TEST);
glDepthFunc(GL_LEQUAL);
glViewport(0,0,window.width,window.height);
// clear the screen
glClearColor(0,0,0,0);
glClear(GL_COLOR_BUFFER_BIT | GL_DEPTH_BUFFER_BIT | GL_ACCUM_
BUFFER_BIT);
glLoadIdentity();
glRotatef(f, 1, 0, 0);
f += 4.5;
glBegin(GL_TRIANGLES);
// base of the pyramid
glColor3f(1, 0, 0); glVertex3f(0.5, -0.5, 0);
glColor3f(0, 1, 0); glVertex3f(0, 0.5, 0);
glColor3f(0, 0, 1); glVertex3f(-0.5, -0.5, 0);
// the other
glColor3f(1,
glColor3f(0,
glColor3f(0,
three sides connect to the top
1, 1); glVertex3f(0, 0, 0.5);
1, 0); glVertex3f(0, 0.5, 0);
0, 1); glVertex3f(-0.5, -0.5, 0);
glColor3f(1, 0, 0); glVertex3f(0.5, -0.5, 0);
glColor3f(1, 1, 1); glVertex3f(0, 0, 0.5);
glColor3f(0, 0, 1); glVertex3f(-0.5, -0.5, 0);
glColor3f(1, 1, 1); glVertex3f(0, 0, 0.5);
glColor3f(1, 0, 0); glVertex3f(0.5, -0.5, 0);
glColor3f(0, 1, 0); glVertex3f(0, 0.5, 0);
glEnd();
};
window.eventLoop(50,
delegate () {
window.redrawOpenGlSceneNow();
});
}
325
www.it-ebooks.info
Web and GUI Programming
Running the program will open a window with an animated spinning pyramid. The following is
one frame from it:
How it works…
The simpledisplay.d module also includes bindings to OpenGL 1.1. It uses a delegate to
redraw the scene so that it can automatically handle cases where your window was covered
partially and exposed without needing you to work the whole message loop. The delegate is
bracketed by code that prepares the OpenGL context, binding it to the correct window and
then swapping the buffers when it is finished—automatically displaying your frame.
OpenGL is disabled by default on Windows because the necessary library files are not bundled
with DMD. I created these libraries by running implib, the tool from Digital Mars, on the
opengl32.dll and glu32.dll files—as we learned about in Chapter 1, Core Tasks. On 32-bit
Windows, the creation or conversion of import libraries is often necessary because DMD uses
an old format that is no longer common. This limitation has been solved for 64-bit Windows.
See also
ff
http://code.dlang.org/packages/derelict has the Derelict library,
which is used by many games programmers in D. It contains more up-to-date
bindings than simpledisplay.d.
326
www.it-ebooks.info
Addendum
This appendix will list short tips and tricks that didn't fit into any particular theme for the
other chapters:
ff
Compiling D for ARM/Linux Raspberry Pi
ff
Running D on bare metal ARM
ff
Using the exponentiation operator
ff
Getting a stack trace without throwing an exception
ff
Finding more information about D
Compiling D for ARM/Linux Raspberry Pi
Raspberry Pi is a small, low-cost computer that uses an ARM processor and the Linux
operating system.
Getting ready
If you don't own a Raspberry Pi, you can emulate the hardware with QEMU. The process
is described at http://xecdesign.com/qemu-emulating-raspberry-pi-theeasy-way/.
www.it-ebooks.info
Addendum
How to do it…
To compile D for an ARM/Linux Raspberry Pi, we need to execute the following steps:
1. Download the GNU D compiler (GDC) cross-compiler from http://gdcproject.
org/downloads/. The header gives the platform you are on. The table lists the
targets. The target for Raspberry Pi is arm-linux-gnueabi.
2. Compile the program. The command-line arguments of GDC that are based on the
gcc compiler differ significantly from dmd in the following manner:
The output file will always be called a.out unless you specify a new name
with the –o option.
You must always include the .d file extension when passing source files to
the compiler.
Many of D's additional compile options need to be passed with –f and
may have different names. For example, -fno-bounds-check works
in the same way as –boundscheck=off on dmd. Refer to the GDC
documentation for more info, or download the gdmd helper script that
converts the flag syntax for you.
3. Copy the executable to your Raspberry Pi.
4. Run the program.
You can also download a native compiler for the Pi which
runs directly on it and produces programs for it. The bottom
of the GDC download page has a native compiler for ARM.
The code is as follows:
import std.stdio;
void main() { writeln("Hello, ARM!"); }
gdc hello.d –ohello
./gdc
The output is as follows:
Hello, ARM!
How it works…
GDC combines the D language portions of dmd (the dmd frontend) with the code generation
portions of gcc (the gcc backend) to create a portable compiler with mature code generation.
With GDC, D code can be generated for every target gcc supports.
328
www.it-ebooks.info
Appendix
Code generation is only half the story to using D. Using it on a new platform also requires
that the runtime library be ported. The GDC team successfully ported the runtime to Linux
on ARM with all tests passing in 2013 and 2014, enabling the full language and standard
library on that platform. Most D code and libraries will now work on ARM/Linux targets such
as Raspberry Pi.
There's more…
Android and iOS systems often have ARM processors too, but they do not run a standard Linux
operating system. In the case of Android, it also does not have linker support for thread-local
variables which D will have to emulate. Work is in progress towards porting the library to these
operating systems and adding support to the language to enable direct access to Objective-C
APIs to facilitate better integration on Apple systems.
See also
ff
http://wiki.dlang.org/LDC is the LDC compiler, a D compiler based on the
LLVM compiler backend. It also has growing support for ARM targets.
Running D on bare metal ARM
By combining the GDC ARM compiler with the stripped runtime concept we used in Chapter 11,
D for Kernel Coding, we can also run D on a bare metal ARM board. Going from this concept to
a working program will take a lot of work, but we will get started with a "hello world" program.
Getting ready
Get an emulator such as QEMU and the GDC cross-compiler targeting ARM. The same crosscompiler for Raspberry Pi that we used previously will work here too. Also, copy the minimal
object.d from Chapter 11, D for Kernel Coding, to a new folder for the ARM project.
How to do it…
To run D on bare metal ARM, we need to execute the following steps:
1. Create a startup.s file that sets up the stack, calls the D function, and then
endlessly loops. The code is as follows:
.global _start
_start:
LDR sp, =stack_top
BL _d_run_main
B .
@ prepare a stack
@ call our D entry point
@ endlessly loop
329
www.it-ebooks.info
Addendum
2. Create a linker script, linker.ld, which puts the startup code at the beginning of
the file and reserves stack space. The code is as follows:
ENTRY(_start)
SECTIONS
{
. = 0x10000;
.startup . : { startup.o(.text) }
.text : { *(.text) }
.data : { *(.data) }
.bss : { *(.bss COMMON) }
. = ALIGN(8);
. = . + 0x1000; /* 4kB of stack memory */
stack_top = .;
}
3. Modify object.d to add an ARM version which calls _Dmain and loops with regular
D code instead of inline assembly. The code is as follows:
void _d_run_main() {
version(ARM) {
_Dmain();
while(true) {}
}
}
4. Write a hello.d file that says hello by writing to the serial port's memory address.
The code is as follows:
enum serialPort = cast(shared(uint)*) 0x101f1000;
void printToSerialPort(string s) {
foreach(c; s)
*serialPort = c;
}
void main() {
printToSerialPort("Hello world from D!\n");
}
5. Create a Makefile that assembles startup.s, compiles object.d and hello.d
with exceptions disabled and the release mode flag turned on, links it together with the
linker script, and then converts the output to a binary image. The code is as follows:
all:
arm-gdcproject-linux-gnueabi-as -mcpu=arm926ej-s -g
startup.s -o startup.o
330
www.it-ebooks.info
Appendix
arm-gdcproject-linux-gnueabi-gdc -frelease -fno-exceptions
-c -mcpu=arm926ej-s -g object.d -o object.o
arm-gdcproject-linux-gnueabi-gdc -frelease -fno-exceptions
-c -mcpu=arm926ej-s -g hello.d -o hello.o
arm-gdcproject-linux-gnueabi-ld -T linker.ld hello.o
startup.o object.o -o hello.elf
arm-gdcproject-linux-gnueabi-objcopy -O binary hello.elf
hello.bin
6. Run the program using qemu-system-arm -M versatilepb -m 128M
-kernel hello.bin –sdl.
In the serial console view of QEMU (press Ctrl + Alt + 3 to switch to it), you'll see the "hello
world" message.
How it works…
Bare metal code for ARM computers follows the same basic principles as for x86 PCs, and the
D code to get you started is substantially similar. The biggest difference is the use of the GDC
compiler instead of dmd, because GDC can generate code for ARM targets and dmd cannot.
GDC also does not support inline assembly syntax of dmd or naked functions (though the gcc
backend does support naked functions for ARM targets, so support for that may be added
later). Instead, GDC supports inline assembly based on the gcc syntax, which uses strings
of assembly code with input, output, and destroyed register specifiers.
Other significant differences between dmd and GDC will only become apparent if exceptions
are enabled, and since we disabled them for the minimal runtime, we didn't have to worry
about that here.
Of course, x86 and ARM hardware is significantly different in regards to details such as
memory mapped addresses, but the principle is the same: use a pointer to the correct
address to communicate. Here, we used a pointer to the UART0 serial port and wrote our
string to it, saying hello.
See also
ff
http://gcc.gnu.org/onlinedocs/gcc/Extended-Asm.html explains the
inline assembler syntax of gcc, which is also used by GDC.
331
www.it-ebooks.info
Addendum
Using the exponentiation operator
D has a built-in exponentiation operator: the ^^ operator.
How to do it…
In order to use the exponentiation operator, we need to execute the following steps:
1. Write an expression with the ^^ operator.
2. Make one or both arguments floating point if you want a floating point result.
The code is as follows:
int a = 2^^3; // a == 8
float b = 2.0 ^^ 3.0; // b == 8.0
auto c = 2 * 2 ^^ 3; // c == 16
How it works…
The exponentiation operator is first subject to constant folding and is then rewritten into a call
to the std.math.pow library function to perform the operation. The result follows the regular
arithmetic type rules of the D language, so the int arguments yield an int result and the
float arguments yield a float result.
The operator also follows the usual arithmetic order of operations, so it has higher precedence
than multiplication, as seen in the third example line.
The choice of ^^ for the operator was driven by the desire: to look like ASCII math without being
confusing in the context of the D programming language. The two other major competitors,
^ and **, were rejected because they conflict with existing operations inherited by C: ^ is
the bitwise XOR operator in both C and D, while ** is currently parsed as multiplication of a
dereferenced pointer. While the lexer could be changed to make it into a new operator, this could
potentially lead to silent breakages when porting C code to D, which D tries to avoid. (D doesn't
mind breaking C code, but it prefers it to be a compile error whenever possible instead of code
that compiles the same then acts differently.)
Thus, ^^ was chosen, and it is visually similar to how exponentiation is often written in ASCII
text (2^3 for example), without being in conflict with any existing C or D code.
Why isn't ^^ used for Boolean XOR in the same way that || is Boolean
OR and && is Boolean AND? It is because Boolean XOR already has an
operator: !=. If you write out the truth tables for is-not-equal, you'll find
they are an exact match for a hypothetical Boolean XOR!
332
www.it-ebooks.info
Appendix
Getting a stack trace without throwing an
exception
When debugging, it may be helpful to get a stack trace without changing the flow of execution.
Throwing an exception will get you a stack trace, but it will also terminate the program. How
can we extract the stack trace without actually unwinding the call stack?
How to do it…
To get a stack trace without throwing an exception, we need to execute the following steps:
1. Import core.runtime;.
2. Call defaultTraceHandler() to get an instance of Throwable.TraceInfo.
3. On Posix systems, wrap the call to defaultTraceHandler in four functions to
ensure relevant data is not cut out by druntime.
4. Return or print trace.toString().
The code is as follows:
string getStackTrace() {
import core.runtime;
version(Posix) {
// druntime cuts out the first few functions on the trace because
they are internal
// so we'll make some dummy functions here so our actual info
doesn't get cut
Throwable.TraceInfo f4() { return defaultTraceHandler(); }
Throwable.TraceInfo f3() { return f4(); }
Throwable.TraceInfo f2() { return f3(); }
Throwable.TraceInfo f1() { return f2(); }
auto strace = f1();
} else {
auto trace = defaultTraceHandler();
}
return trace.toString();
}
We can test the function by calling it inside another program. The value this function returns
matches the stack trace seen when an exception is printed.
You may have to compile with debug information turned on (dmd –g
–debug) to get file and line information about your call stack.
333
www.it-ebooks.info
Addendum
How it works…
When an exception is thrown in D, the trace handler is called to gather information about the
call stack. When the exception is printed with toString, it also calls trace.toString to
add the stack trace to the message.
The trace handler is also available outside of exceptions by importing core.runtime. It works
the same way and provides the same string without modifying the program's execution state. The
only tricky part is on Posix. The trace handler ignores the first several lines of the result because
they are typically functions internal to druntime. Since we're using the handler outside of the
druntime context, this behavior would cut off relevant information!
As a work around, we wrap the call to defaultTraceHandler in several dummy functions
so they are removed by the handler's truncation instead of information we actually care about.
Generating the stack trace string is an expensive operation, so only use it as
a debugging tool. A full stack trace used to be immediately generated any
time an exception was thrown. This proved to be an enormous performance
problem, so the code was changed. Now, a snapshot of the stack trace is
taken immediately, but resolving it into a string with function names is done
lazily upon a call to toString. The result is about a 1000 times speedup
of exceptions thrown and caught inside the application.
Finding more information about D
Searching for D information on the Web can be difficult. If you have a question, how can you
get help?
How to do it…
To find more information about D, we need to execute the following steps:
1. Check the documentation at http://dlang.org/. Navigation is easier if you
have an idea where to look: the Phobos functions are organized by module and the
language features are organized by the type of item: expressions, statements, and so
on. Generally, if you are looking for something which returns a value, it can be found
under Expressions or Functions. Other language constructs can be found under
Statements if a specific page for it cannot be found on the sidebar. The web page
contents are also included in the dmd zip download in dmd2/html for offline viewing
or searching (for example, with grep).
2. Try searching the web with the terms D programming language (optionally in
quotes) or dlang in your query.
334
www.it-ebooks.info
Appendix
3. Search the wiki at http://wiki.dlang.org/ for your topic.
4. Search or ask on Stack Overflow using the D tag
(http://stackoverflow.com/questions/tagged/d).
5. Ask in the D.learn forum at http://forum.dlang.org/. No question is too trivial
or too complex to ask the group.
6. Join the #d chat room on the server irc.freenode.net. Use an IRC client to log
in, or use the web client https://webchat.freenode.net/. In the chat, you can
ask a bot for definitions or links by typing ?some_term or ask the other people in the
room normally. Just jump in and ask; there is usually at least one person active who
will be willing and able to help.
7.
If all else fails, read the source. The complete source is available on Github at
https://github.com/d-programming-language or in the dmd zip file
under dmd2/src.
If you write an article on D, use the complete D programming
language term in the header so search engines will help other
people find it.
How it works…
The preceding tips may help you find answers to questions on your own, and if that fails, the
D community is active and generally friendly. Don't hesitate to stop by the forums or chat room
to ask us anything. We know a lot of projects and links in our brains that aren't easy to find on
the open Web and are often willing to work with you to find solutions to novel problems too.
335
www.it-ebooks.info
www.it-ebooks.info
Index
Symbols
B
@disable annotation 129
@safe
memory corruption bugs, preventing
with 173-175
.stringof property 258
__traits function
about 122, 199
URL 200
bare metal ARM
D, running on 329-331
bare metal x86
D running, with stripped runtime 279-287
bare metal x86 code
interrupt handling, adding to 288-295
Base64
used, to create data URI 42, 43
Basic Utilities Package
URL 12, 90
benchmark
used, for sorting objects 83, 84
Bidirectional ranges 58
Bindings
URL 47
BrokenAddExpression function 29
A
algorithm
implementing, ranges used 58-61
alias parameter 251
appending 14
ARM
D, compiling for 327-329
array operations
appending 14
indexing 14
slicing 14
array replacement
creating 125-129
arrays
building 13-15
processing 13-15
assertions
using 162, 163
associative arrays
used, for translating input 15-17
asynchronous I/O
using 276-278
atomic operations
URL 265
C
C++
interfacing with 99-103
callSpeak function 255
cgi.d
dynamic website, creating with 298-301
URL 298
C interface
Linux system calls, making with 93
class destructors, limitations
handling 136
classes
creating 28-31
URL 31
ClassInfo object 198
www.it-ebooks.info
class memory
managing 121-123
client
creating 38
client-specific code
writing 190, 191
code
documenting, with Ddoc 185-189
coffimplib command 12
collection
range interface, putting on 72-75
colored output
writing, to console 315, 316
COM
using 112-115
COM client
writing 114, 115
ComGuid attribute 113
comhelpers.d file
URL 112
command-line function caller
creating 223-229
compiler
installing 6-8
compiles trait
URL 200
compile-time function evaluation (CTFE) 65
compile-time parameter 128
complex types components
obtaining 210-213
Component Object Model. See COM
COM server
writing 112-114
console
colored output, writing to 315, 316
const-correctness
leveraging 176-179
core thread module
URL 264
C program
writing, in D 96-98
crash-resistant plugin
creating 272
custom exception type
using 21-23
custom lint-style check
implementing, for virtual functions 216-218
D
D
compiling, for ARM 327-329
compiling, for Linux Raspberry Pi 327-329
C program, writing 96-99
learning 334, 335
running, on bare metal ARM 329-331
running on bare metal x86, with stripped
runtime 279-287
data member
range, storing as 80, 81
data structures
generating, from text diagrams 239-241
data URI
creating, Base64 used 42, 43
Ddoc
code, documenting with 185-189
default values, function parameters
determining 207-209
Deimos
URL 12
Derelict library
URL 326
destroy function 123
digest utility
writing 51-53
directory
largest files, finding 35-38
dirEntries function 36, 37
DMD compiler
URL 6
domain-specific language
parsing 235-238
dom.d
HTML page, modifying with 303-308
HTML page, parsing with 303-308
dstep program
URL 99
dtoh program
URL 99
dub
URL 12
dynamic calls
automating, with multiple dispatch 242-245
dynamic runtime type information
obtaining 194, 195
338
www.it-ebooks.info
dynamic scripting language
communicating with 108-112
dynamic website
creating, with cgi.d 298-301
Github repository
URL 298
GNU D compiler (GDC)
URL 328
graphics window
creating 320-323
GRUB bootloader
URL 287
E
e-mail
sending 312-314
emplace function 122
enum keyword 65, 234
evaluate function 29
exceptions
using 162-164
exponentiation operator
using 332
external libraries
using 10-12
external processes
communicating with 107
H
hasLength function 59
Hello World program
writing 6-8
higher-order range
creating 69-72
HTML page
modifying, with dom.d 303-308
parsing, with dom.d 303-308
I
F
Fiber class
URL 271
fibers
using 269-271
find function 85
finish method 51
format parameter 303
Forward ranges 58
free function 103
front property 63
functional tools
used, to query data 86, 87
function overloads
inspecting 206, 207
functions
changing, string parameters used 247, 248
writing 23, 24
G
garbage collector
avoiding 117, 118
GenericMain function 300
getAsTrueColorImage function 319
i18n
subtyped string, creating for 148-150
image files
working with 318-320
immutability
functions, writing 23, 24
object methods, writing 24-26
using 23-26
implib command 11
implicit function template instantiation
(IFTI) 35
indexing 14
inheritance
simulating, with struct 139, 140
inline assembly
Linux system calls, making with 94
innerHTML property 307
inout method 25
input
translating, associative arrays used 15-17
input range
creating 62-66
creating, over tree structure 75-79
instance methods
wrapping 248-251
339
www.it-ebooks.info
integer overflow 144
interrupt handling
adding, to bare metal x86 code 288-295
isDaemon property 264
is expression
URL 206, 214
L
largest files
finding, in directory 35-38
LDC compiler
URL 329
lent resources
managing 130
Linux Raspberry Pi
D, compiling for 327-329
Linux system calls
making 93
making, with C interface 93
making, with inline assembly 94
working 94, 95
listen() method 39
list of child classes
obtaining 196-198
list of members
obtaining 200-205
lookup table
building 246, 247
module documentation
URL 10, 267
modules
adding, to program 8, 10
Multiboot standard
URL 287
multiple dispatch
dynamic calls, automating with 242-245
multiple inheritance
simulating, with mixin templates 157-159
Multipurpose Internet Mail Extensions
(MIME) 314
My DConf 2014 talk
URL 287
N
naked function 294
names, function parameters
determining 207-209
NotNull struct
creating 130-133
O
M
mailFrom property 314
mailTo property 314
main() function 7
makeDataUri function 43
MatchAlias parameter 212
memory corruption bugs
preventing, with @safe 173-175
messages
passing, with std.concurrency 265-267
methods
forwarding, with opDispatch 150-152
mixin templates
multiple inheritance, simulating with 157-159
module availability
determining 198, 199
Object.factory function 197
object invariants
verifying 181-183
object methods
writing 24-26
objects
sorting, benchmark used 83, 84
opApply function 79
opaque handle type
creating 145-148
opAssign function 154
opAssign operator 143
opBinary operator 142
opCast function 34
opCast method 133
opDispatch
methods, forwarding with 150-152
used, to generate properties 252-254
OpenGL window
creating 324-326
opOpAssign operator 143
opUnary operator 142
340
www.it-ebooks.info
output range
about 58
creating 66-68
package
URL 53
pair function 123
parallel data
processing, with std.parallelism 267-269
parallelism module
URL 269
parseGarbage method 306
platform-specific code
writing 189-191
playRound function 46
popFront property 64
post-conditions
verifying 181-183
pre-conditions
verifying 181-183
processes
creating 271-273
process module
URL 274
program
modules, adding to 8-10
properties
generating, opDispatch used 252-254
pure functions side effects
avoiding 180, 181
put method 51
ranged integer
creating 140-145
range interface
putting, on collection 72-75
ranges
Bidirectional ranges 58
Forward ranges 58
Output ranges 58
Random access ranges 58
searching 85
sorting 82, 83
storing, as data member 80, 81
used, for implementing algorithm 58-61
readln method 47
readOctalString function 235
readSet function 39
real-time input
obtaining, from terminal 316-318
reference counted object
making 119, 120
reference semantics
struct, creating with 138, 139
ref function 25
registerType function 219
regular expressions
searching with 49-51
release method 134
requireSelector method 307
Resource Acquisition Is Initialization. See RAII
runtime polymorphic ranges
using 79, 80
runtime type information
extending 219-222
Q
S
QEMU
URL 280
querySelector method 307
scope guards
used, to manage transactions 123, 124
SearchPattern parameter 212
server
creating 39
sigaction function 273
single-locking singleton
exploring 274, 275
slicing 14
spawn function 266
P
R
RAII
using 136
Random access ranges 58
random numbers
generating 44-47
341
www.it-ebooks.info
SQL database
accessing 308-311
stack trace
obtaining, without throwing
exception 333, 334
standard library wrapper
URL 121
statically defined interface
duck typing to 254-260
static assert
using 164-167
static if
using 167-172
static immutable variable 234
std.algorithm module
URL 85
std.algorithm.sort function 37, 49
std.concurrency
messages, passing with 265-267
std.conv.emplace function 103
std.conv.to function 34
std.file.dirEntries function 35
std.json module
URL 56
using 54-56
std.net.curl.SMTP module 314
std.parallelism
parallel data, processing with 267-269
std.range.put method 52
std.regex function 50
std.traits module
URL 205
std.typecons.wrap function 260
std.zlib compression
using 53, 54
string
normalizing 47-49
substring, obtaining from 26, 27
string.matchAll(pattern) function 50
string parameters
used, to change functions 247, 248
stripped runtime
D, running on bare metal x86 with 279-287
struct
creating, with reference semantics 138, 139
inheritance, simulating with 139, 140
used, to mimic C++ object structure 104-106
struct object 120
structure
creating, with two views into same
data 155-157
struct variable 18
style property 252
substring
obtaining, from string 26, 27
subtyped string
creating, for i18n 148-150
subtyping 129
T
tagged dynamic type
creating 152-154
template constraints
using 167-172
terminal
real-time input, obtaining from 316-318
text diagrams
data structures, generating from 239-241
this object 242
threads
using 262-265
thread-safe singleton
exploring 274, 275
toString function 111
toString method 20, 304
transactions
managing, scope guards used 123, 124
tree structure
input range, creating over 75-79
tupleof property 205
type conversions
performing 34, 35
TypeInfo 194
TypeInfo members
URL 196
typeof parameter 215
types, function parameters
determining 207-209
U
Unicode comparisons
performing 47-49
342
www.it-ebooks.info
Uniform Function Call Syntax (UFCS) 38
union 154
unique pointers
using 134-136
unit testing
performing 183, 184
user-defined attributes
using 214, 215
user-defined literals
creating 232-235
user-defined vector type
creating 18-20
Windows API functions
calling 90-92
Windows console
removing 92, 93
Windows SDK
URL 90
WinMain function 93
wrap function 256
writefln function 46, 315
writeln function 7, 110
V
XML library
URL 308
var struct
URL 56
virtual functions
custom lint-style check,
implementing 216-218
X
W
web API
creating, with web.d 301-303
web.d
web API, creating with 301-303
Win32 bindings
URL 112
343
www.it-ebooks.info
www.it-ebooks.info
Thank you for buying
D Cookbook
About Packt Publishing
Packt, pronounced 'packed', published its first book "Mastering phpMyAdmin for Effective MySQL
Management" in April 2004 and subsequently continued to specialize in publishing highly focused
books on specific technologies and solutions.
Our books and publications share the experiences of your fellow IT professionals in adapting and
customizing today's systems, applications, and frameworks. Our solution based books give you the
knowledge and power to customize the software and technologies you're using to get the job done.
Packt books are more specific and less general than the IT books you have seen in the past. Our
unique business model allows us to bring you more focused information, giving you more of what
you need to know, and less of what you don't.
Packt is a modern, yet unique publishing company, which focuses on producing quality,
cutting-edge books for communities of developers, administrators, and newbies alike. For
more information, please visit our website: www.packtpub.com.
About Packt Open Source
In 2010, Packt launched two new brands, Packt Open Source and Packt Enterprise, in order to
continue its focus on specialization. This book is part of the Packt Open Source brand, home
to books published on software built around Open Source licences, and offering information to
anybody from advanced developers to budding web designers. The Open Source brand also runs
Packt's Open Source Royalty Scheme, by which Packt gives a royalty to each Open Source project
about whose software a book is sold.
Writing for Packt
We welcome all inquiries from people who are interested in authoring. Book proposals should be
sent to author@packtpub.com. If your book idea is still at an early stage and you would like to
discuss it first before writing a formal book proposal, contact us; one of our commissioning editors
will get in touch with you.
We're not just looking for published authors; if you have strong technical skills but no writing
experience, our experienced editors can help you develop a writing career, or simply get some
additional reward for your expertise.
www.it-ebooks.info
C++ Application Development
with Code::Blocks
ISBN: 978-1-78328-341-5
Paperback: 128 pages
Develop advanced applications with Code::Blocks quickly
and efficiently with this concise, hands-on guide
1.
Successfully install and configure Code::Blocks
for C++ development.
2.
Perform rapid application development with
Code::Blocks.
3.
Work with advanced C++ features including
code debugging and GUI toolkits.
CryENGINE Game
Programming with C++, C#,
and Lua
ISBN: 978-1-84969-590-9
Paperback: 276 pages
Get to grips with the essential tools for developing games
with the awesome and powerful CryENGINE
1.
Dive into the various CryENGINE subsystems
to quickly learn how to master the engine.
2.
Create your very own game using C++, C#,
or Lua in CryENGINE.
3.
Understand the structure and design of
the engine.
Please check www.PacktPub.com for information on our titles
www.it-ebooks.info
Boost.Asio C++ Network
Programming
ISBN: 978-1-78216-326-8
Paperback: 156 pages
Enhance your skills with practical examples for
C++ network programming
1.
Augment your C++ network programming
using Boost.Asio.
2.
Discover how Boost.Asio handles synchronous
and asynchronous programming models.
3.
Practical examples of client/server applications.
Microsoft Visual C++
Windows Applications by Example
ISBN: 978-1-84719-556-2
Paperback: 440 pages
Code and explanation for real-world MFC
C++ Applications
1.
Learn C++ Windows programming by studying
realistic, interesting examples.
2.
A quick primer in Visual C++ for programmers
of other languages, followed by deep, thorough
examples.
3.
Example applications include a Tetris-style game,
a spreadsheet application, a drawing application,
and a word processor.
Please check www.PacktPub.com for information on our titles
www.it-ebooks.info