/


Автор: Murti K.
Теги: programming languages programming computer science microprocessors packt publisher reverse engineering
ISBN: 978-1-80056-130-4
Год: 2022
Похожие


Текст
Rust Web
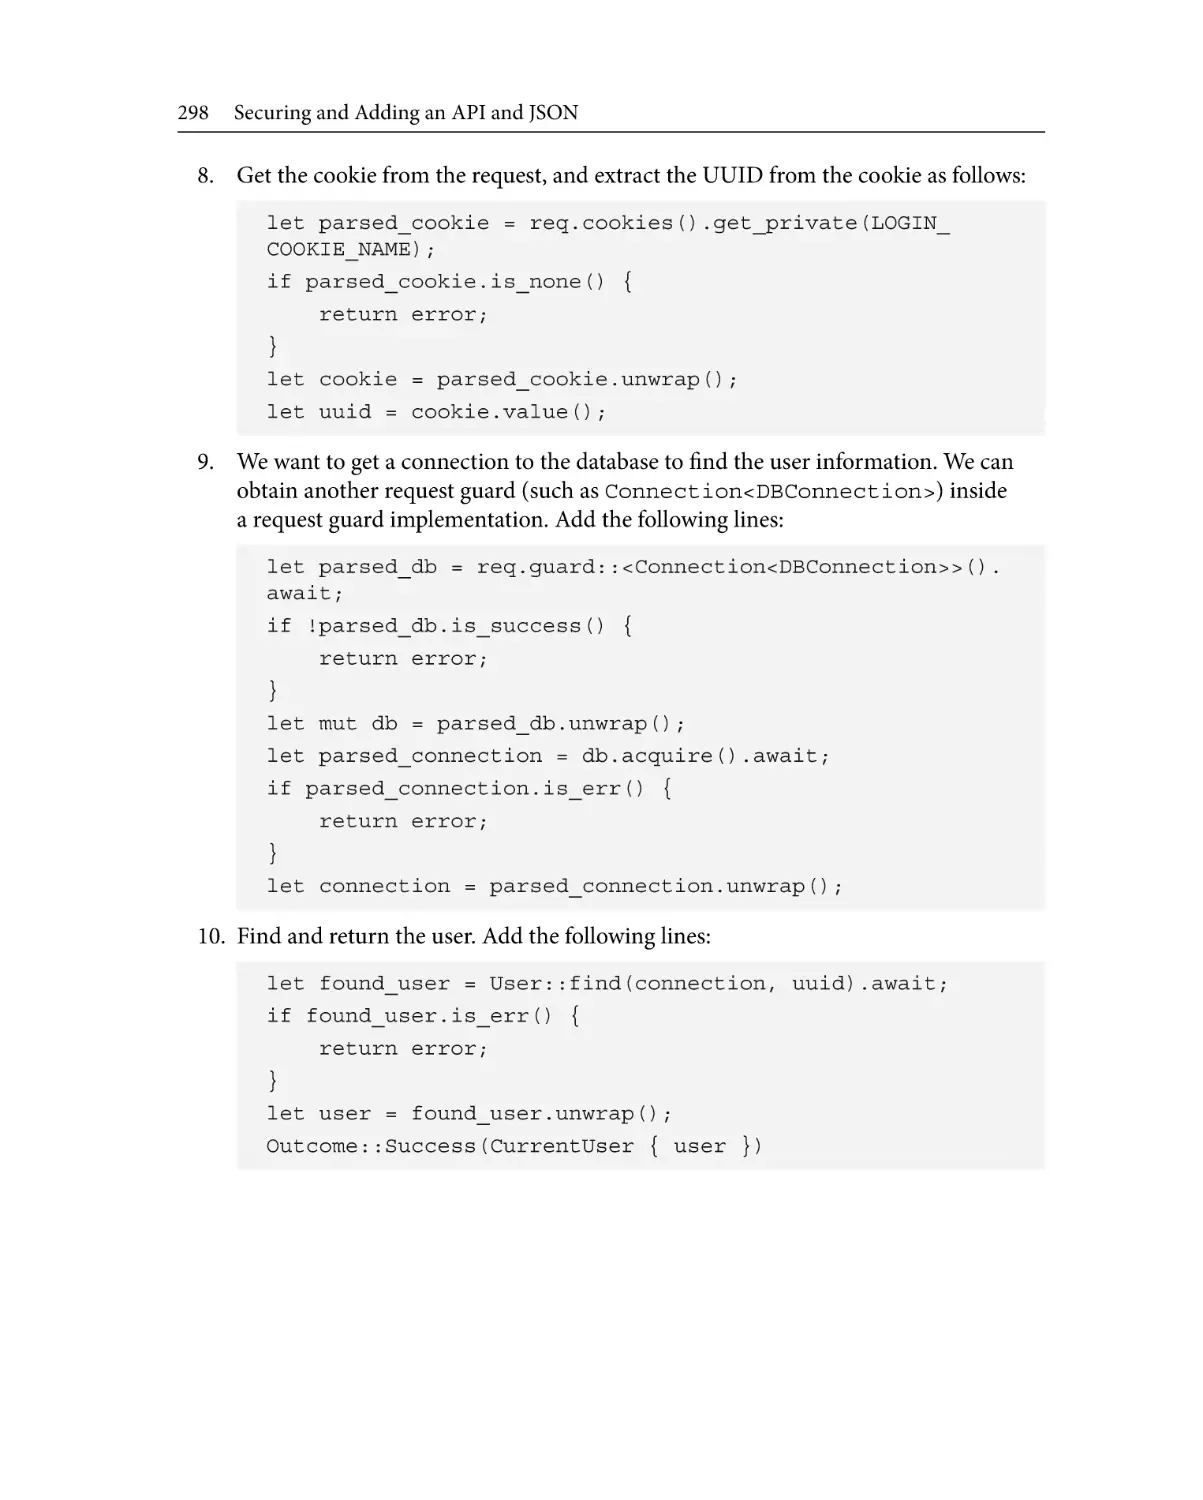
Development
with Rocket
A practical guide to starting your journey in Rust web
development using the Rocket framework
Karuna Murti
BIRMINGHAM—MUMBAI
Rust Web Development with Rocket
Copyright © 2022 Packt Publishing
All rights reserved. No part of this book may be reproduced, stored in a retrieval system,
or transmitted in any form or by any means, without the prior written permission of the
publisher, except in the case of brief quotations embedded in critical articles or reviews.
Every effort has been made in the preparation of this book to ensure the accuracy of the
information presented. However, the information contained in this book is sold without
warranty, either express or implied. Neither the author, nor Packt Publishing or its dealers and
distributors, will be held liable for any damages caused or alleged to have been caused directly
or indirectly by this book.
Packt Publishing has endeavored to provide trademark information about all of the
companies and products mentioned in this book by the appropriate use of capitals. However,
Packt Publishing cannot guarantee the accuracy of this information.
Associate Group Product Manager: Pavan Ramchandani
Publishing Product Manager: Aaron Tanna
Senior Editor: Mark Dsouza
Content Development Editor: Divya Vijayan
Technical Editor: Shubham Sharma
Copy Editor: Safis Editing
Project Coordinator: Rashika Ba
Proofreader: Safis Editing
Indexer: Pratik Shirodkar
Production Designer: Nilesh Mohite
Marketing Coordinators: Anamika Singh and Marylou De Mello
First published: June 2022
Production reference: 1240622
Published by Packt Publishing Ltd.
Livery Place
35 Livery Street
Birmingham
B3 2PB, UK.
ISBN 978-1-80056-130-4
www.packt.com
To my family, Ing, Ping, and Ling, for their 7 years of patience. To my
mom, Tjong Njoek Fa, who always supported me. To my dad, Lestoro, who
introduced me to the wonderful world of books, reading, and writing.
– Karuna Murti
Contributors
About the author
Karuna Murti started out as a network engineer in Indonesia back in 2005. After that,
he continued his career as a web developer, engineering manager, and chief engineer at
a consulting company, using various languages such as PHP, Ruby, JavaScript, Fortran,
and Python. He also worked with web applications and frameworks such as Magento,
WordPress, and Ruby on Rails. In 2015, after establishing his own consulting company, he
moved to Japan and now works as a technical lead at Merpay, one of the leading mobile
payment apps in Japan. He is helping the company to build a cashless society by leading
a team that connects millions of users with thousands of financial institutions in Japan.
Even though he uses Go as the main language in his day job, Rust and Rocket have been a
passion of his ever since their release.
I want to thank Tomohiro Kato for checking the outline of this book. Many
thanks to Robert Jerovšek for reviewing this book.
About the reviewer
Robert Jerovšek is an experienced software engineer who enjoys challenges and has built
various types of applications, ranging from mobile to web, but with a particular focus on
developing robust backend systems for fast-growing services. He also has experience in
management and is currently working as an engineering manager in Japan. Previously, he
worked as a unit lead in South Korea and was the CTO of an EdTech start-up in Spain.
Table of Contents
Preface
Part 1: An Introduction to the Rust
Programming Language and the Rocket
Web Framework
1
Introducing the Rust Language
Technical requirements
4
An overview of the Rust language 4
Writing Hello World!
11
Writing a more complex program
12
Why use the Rust language?
Packages and Cargo
20
Cargo package layout
Using third-party crates
20
24
Tools and getting help
32
Tools
Text editor
Getting help and documentation
32
33
33
Summary
34
Installing the Rust compiler
toolchain
Installing rustup on the Linux OS
or macOS
Installing a different toolchain
and components
Updating the toolchain, rustup,
and components
5
9
9
10
11
2
Building Our First Rocket Web Application
Technical requirements
Introducing Rocket – a web
framework written in the
Rust language
36
36
The HTTP request life cycle in Rocket
Rocket launch sequence
37
37
viii Table of Contents
Creating our first Rocket
web application
38
An asynchronous application
43
Configuring our Rocket web
application
44
Starting the Rocket application in
different profiles
44
Configuring the Rocket web application 46
Configuring the Rocket application
using Rocket.toml
48
Overriding the configuration with
environment variables
51
Getting help
Summary
52
52
3
Rocket Requests and Responses
Technical requirements
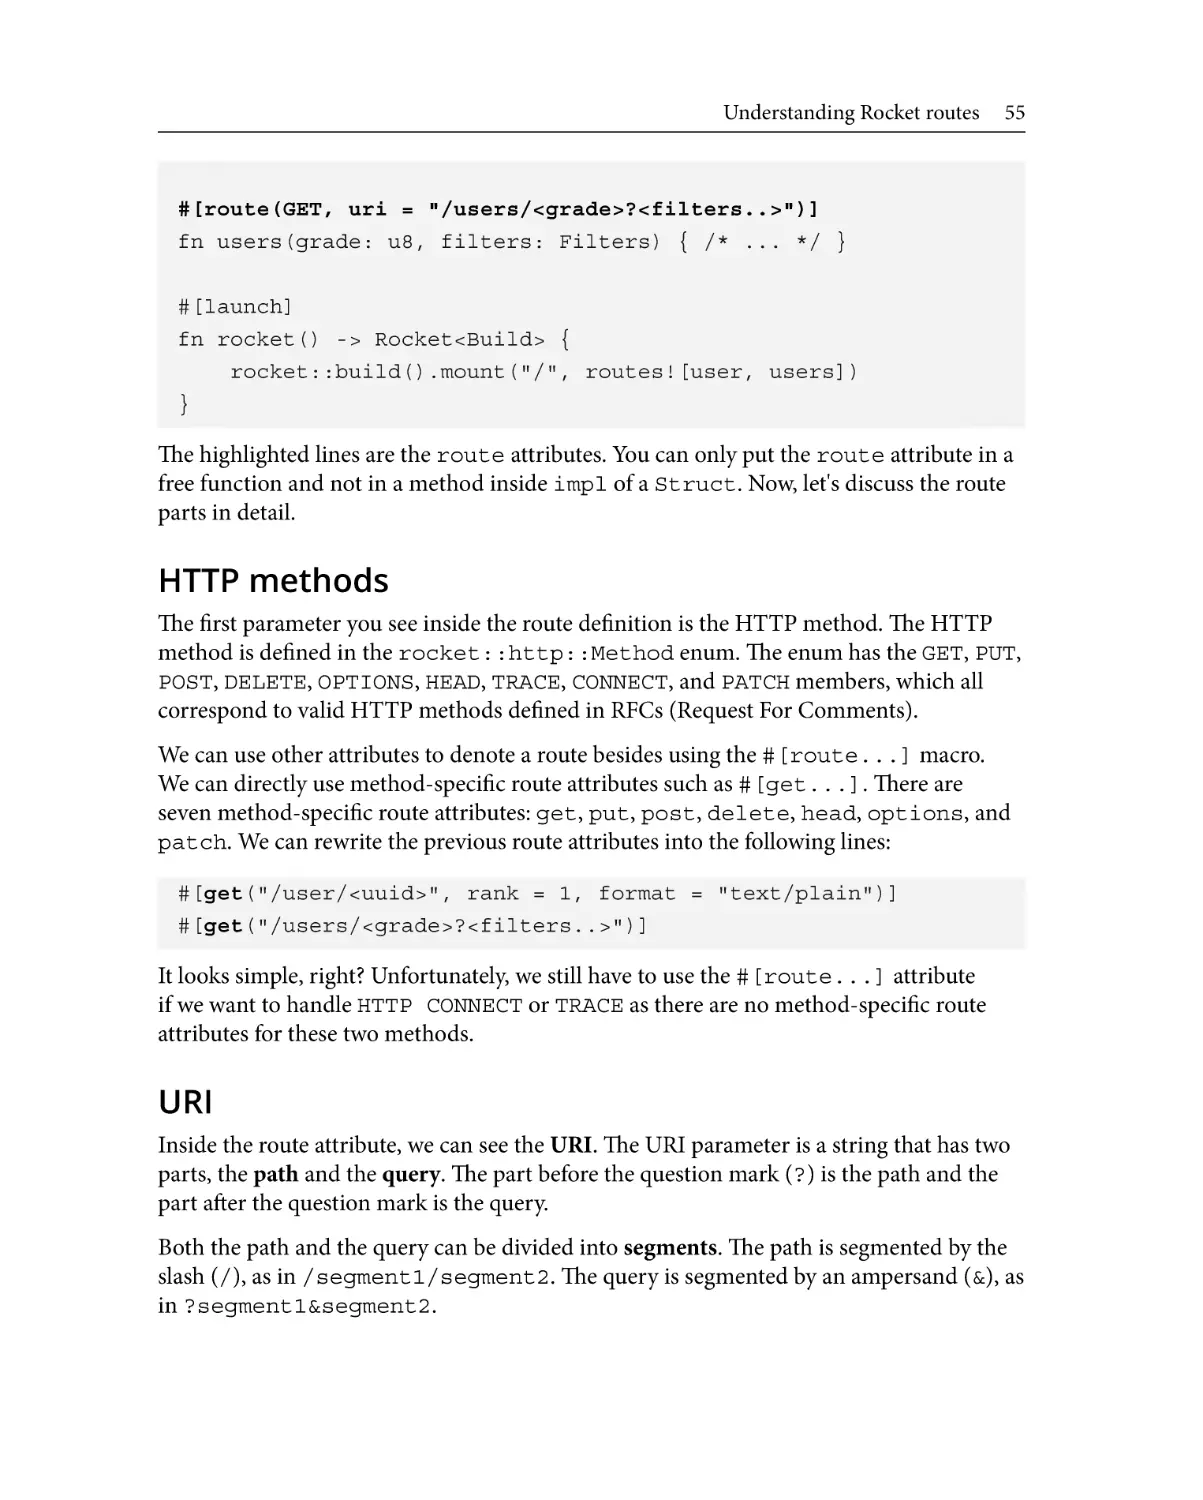
Understanding Rocket routes
54
54
Implementing route handlers
Creating responses
64
71
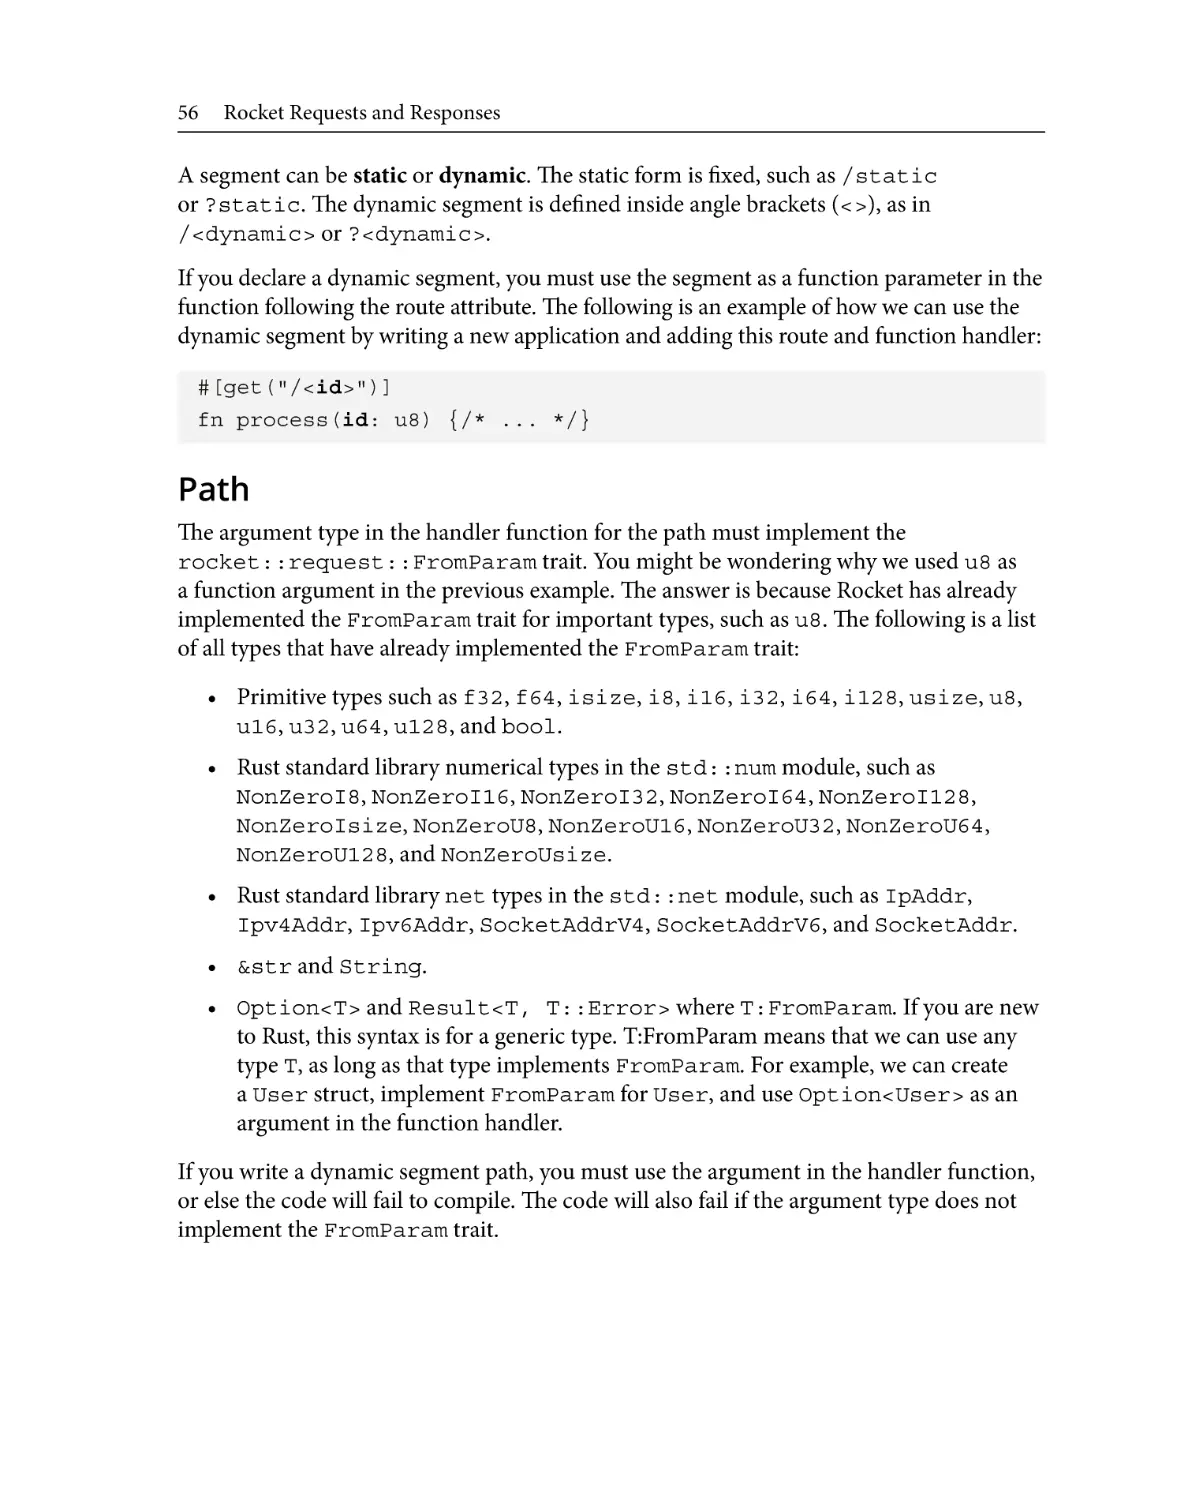
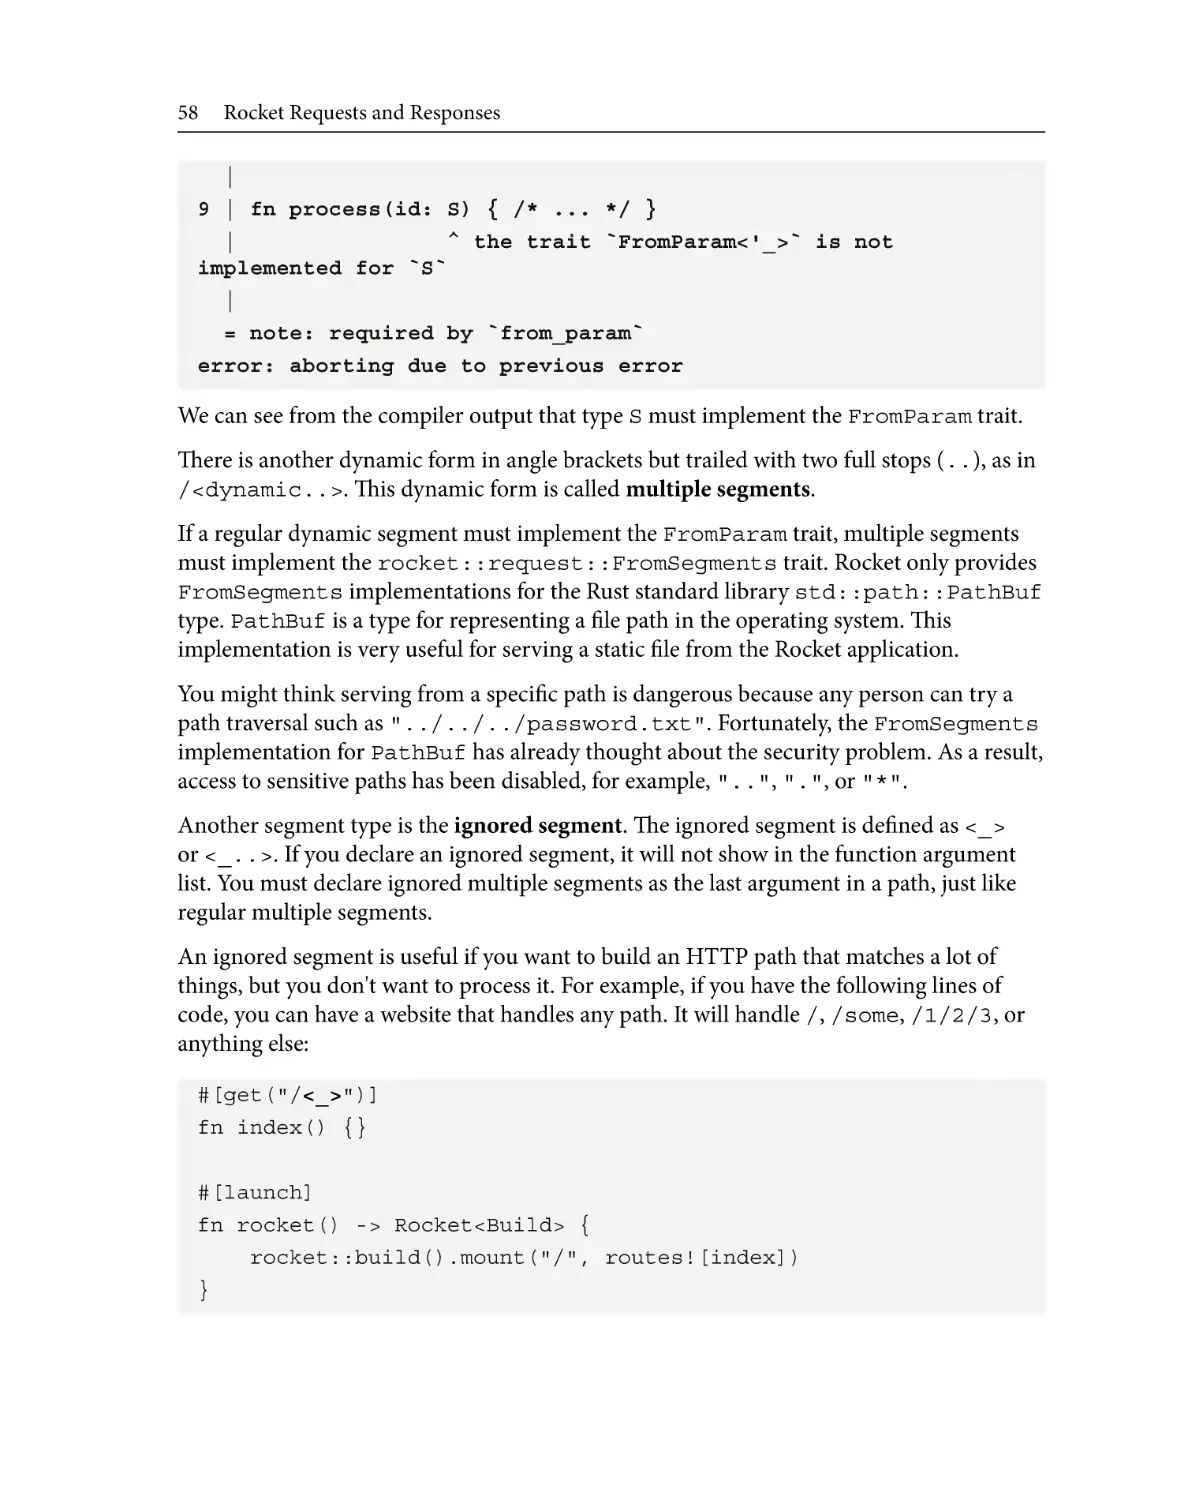
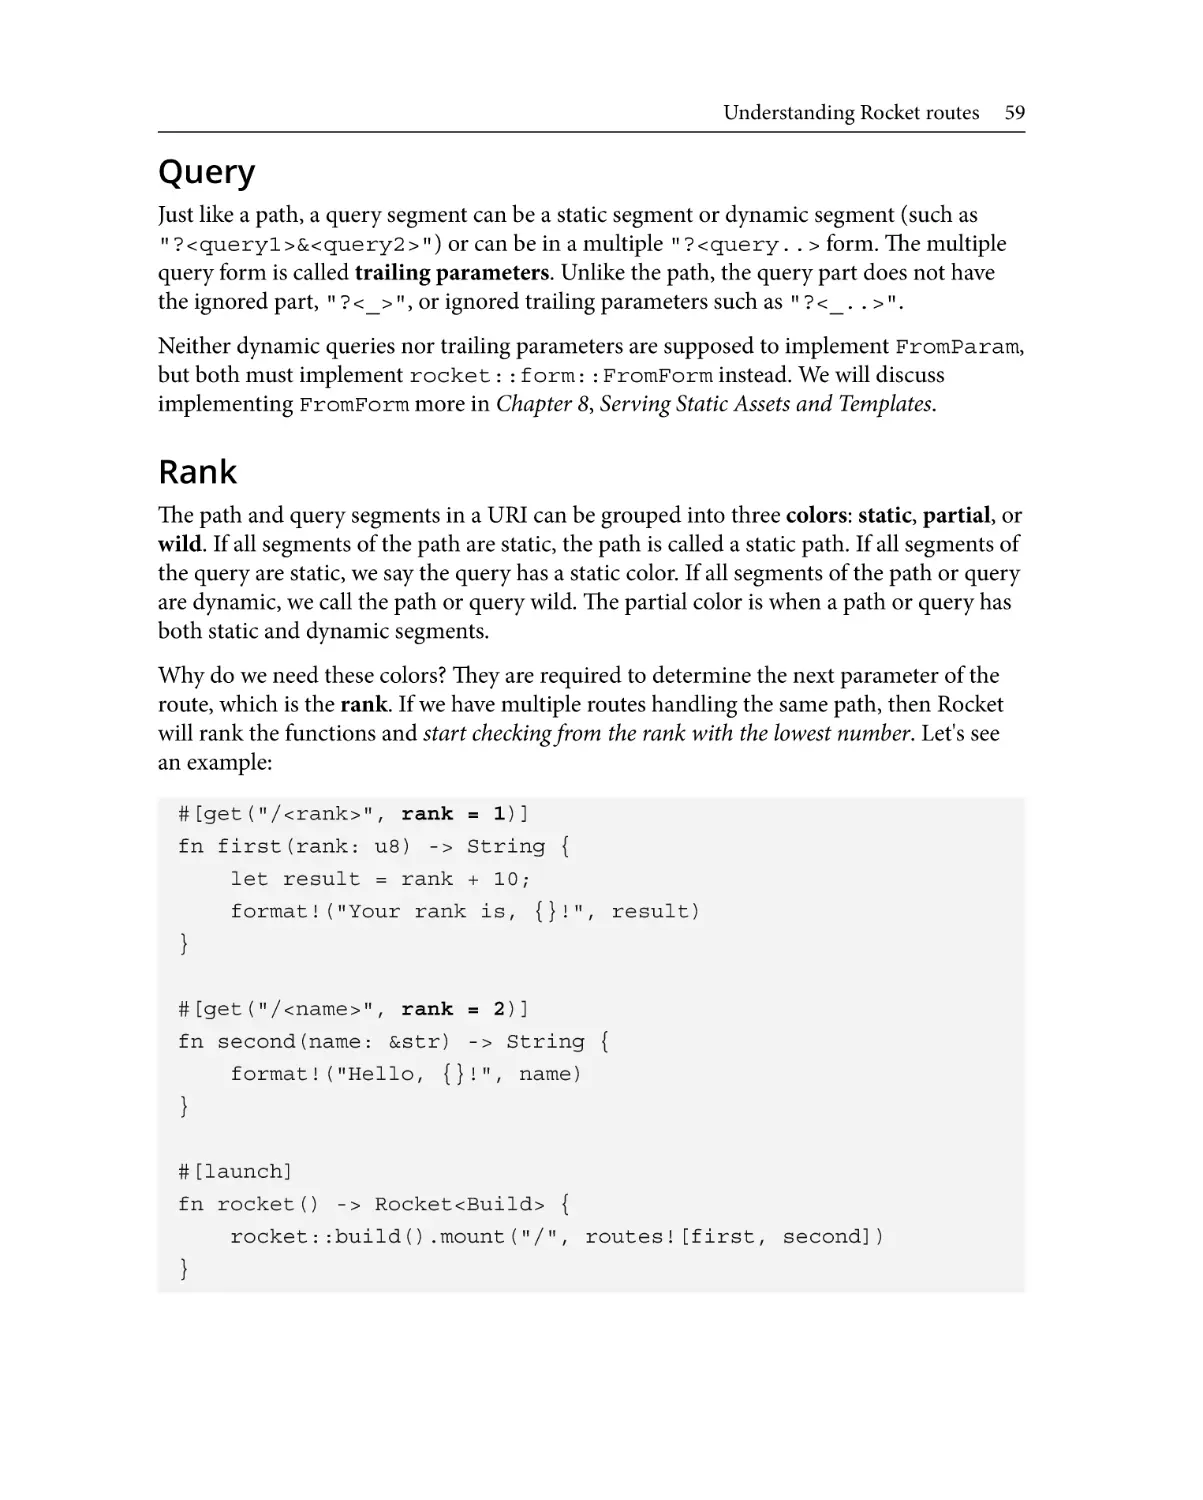
HTTP methods
URI
Path
Query
Rank
Format
Data
55
55
56
59
59
61
63
Wrapping Responder
Built-in implementations
74
78
Making default error catchers
Summary
79
82
4
Building, Igniting, and Launching Rocket
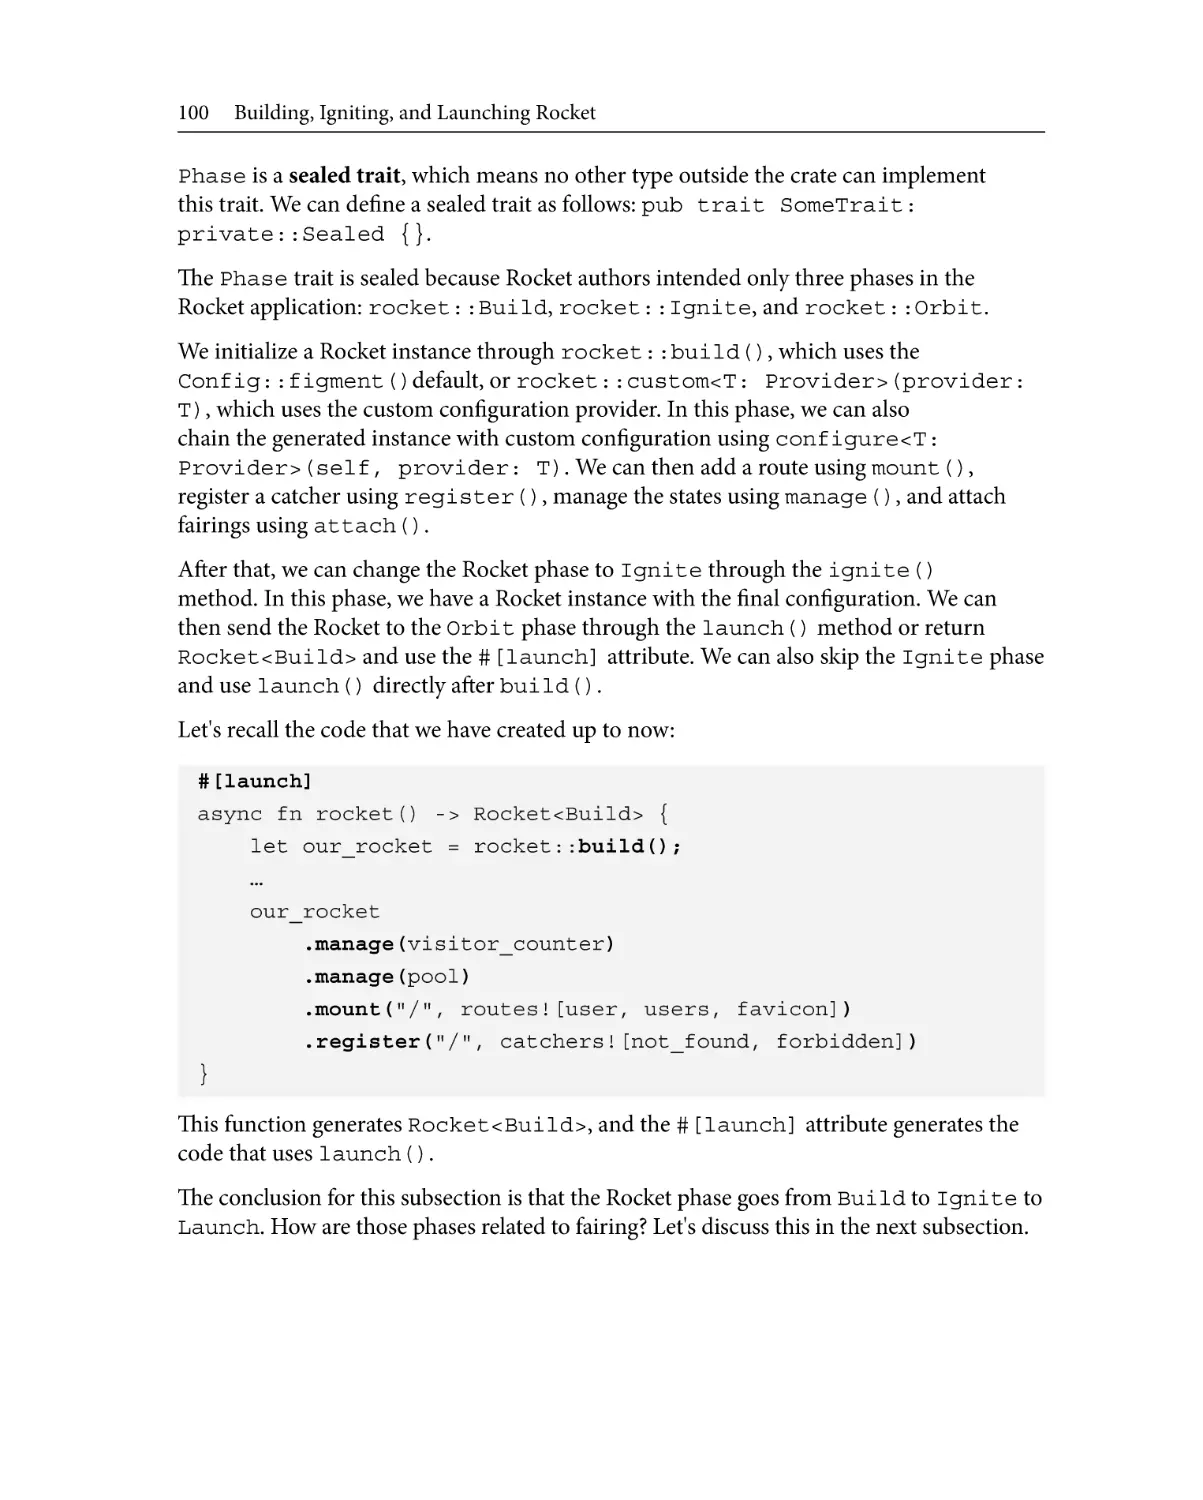
Technical requirements
Managing state
Working with a database
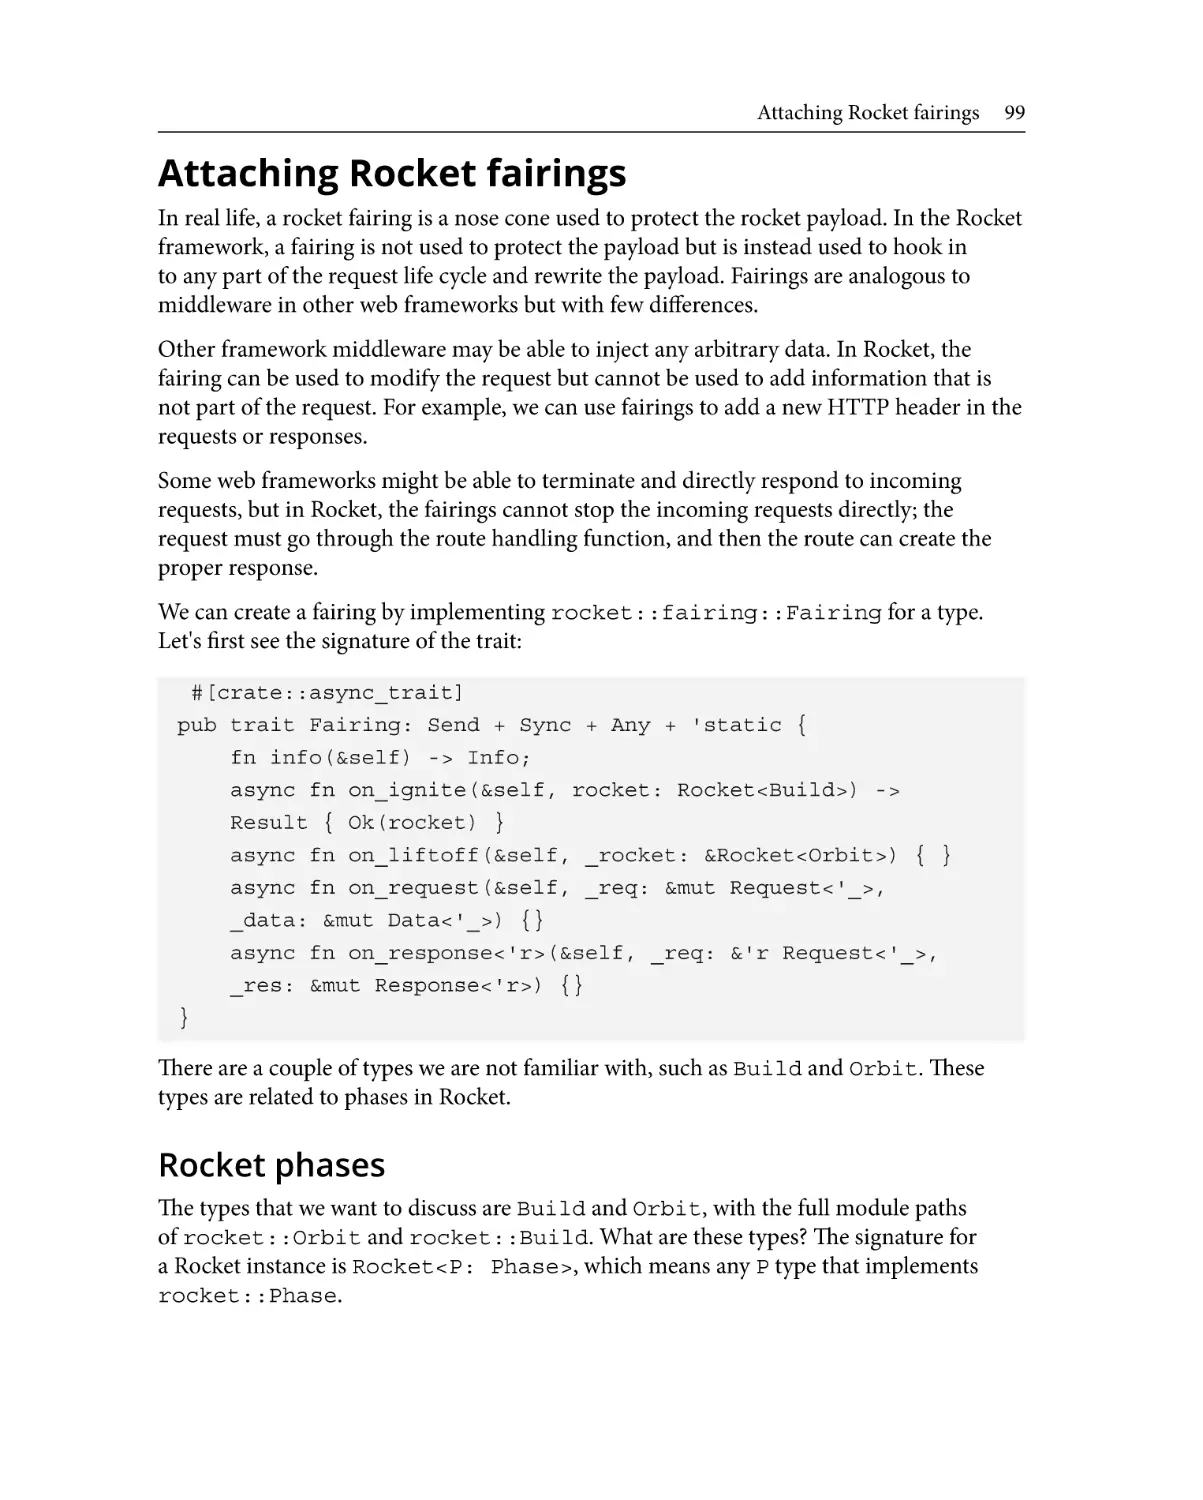
Attaching Rocket fairings
84
84
88
99
Rocket phases
99
Fairing callbacks
Implementing and attaching fairings
Connecting to a database using
rocket_db_pools
Summary
101
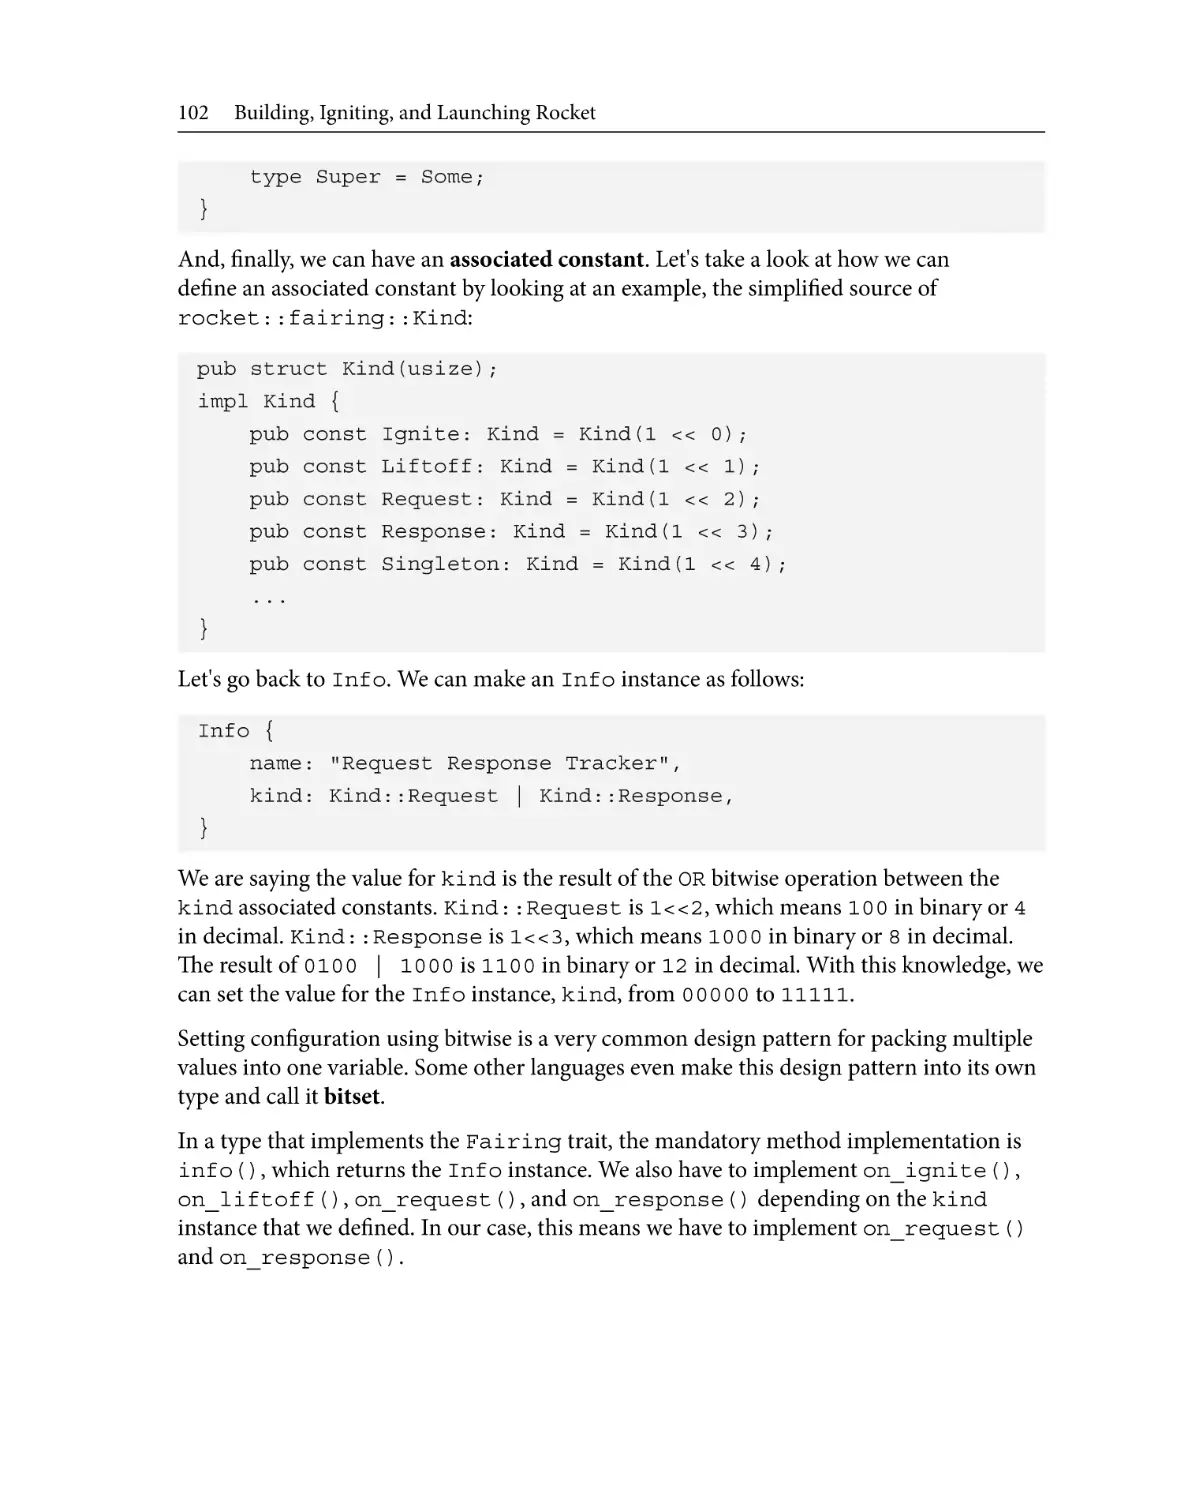
103
108
111
5
Designing a User-Generated Application
Technical requirements
Designing a user-generated
web application
114
114
Planning the user struct
Creating user routes
Making user-generated contents
115
118
123
Table of Contents ix
Finalizing the application
126
Modularizing the Rocket
application
Summary
128
141
Part 2: An In-Depth Look at Rocket Web
Application Development
6
Implementing User CRUD
Technical requirements
Implementing GET user
Implementing GET users
Implementing POST user
146
146
151
158
Implementing PUT and
PATCH user
Implementing DELETE user
Summary
170
178
181
7
Handling Errors in Rust and Rocket
Technical requirements
Using panic!
Catching panic!
Using shutdown
184
184
185
186
Using Option
Returning Result
Creating a custom error type
Logging errors
Summary
187
191
194
200
203
8
Serving Static Assets and Templates
Technical requirements
Serving static assets
Introducing the Tera template
Showcasing users
206
206
208
211
Working with forms
Securing HTML forms from
CSRF
Summary
218
223
231
x Table of Contents
9
Displaying Users' Post
Technical requirements
Displaying posts – text, photo,
and video
Using generic data types and
trait bounds
234
234
248
Learning about ownership
and moving
Borrowing and lifetime
251
256
Implementing borrowing and lifetime 257
Summary
264
10
Uploading and Processing Posts
Technical requirements
Uploading a text post
Uploading a photo post
266
266
273
Processing files asynchronously279
Uploading a video post and
process using a worker
284
Summary
294
11
Securing and Adding an API and JSON
Technical requirements
Authenticating users
Authorizing users
296
296
307
Handling JSON
Protecting the API with a JWT
Summary
312
316
324
Part 3: Finishing the Rust Web Application
Development
12
Testing Your Application
Technical requirements
327
Testing the Rust program
328
Testing the Rocket application 333
Debugging the Rust application 340
Summary
344
Table of Contents xi
13
Launching a Rocket Application
Technical requirements
346
Optimizing production binaries 346
Setting up the Apache
HTTP Server with a
Rocket application
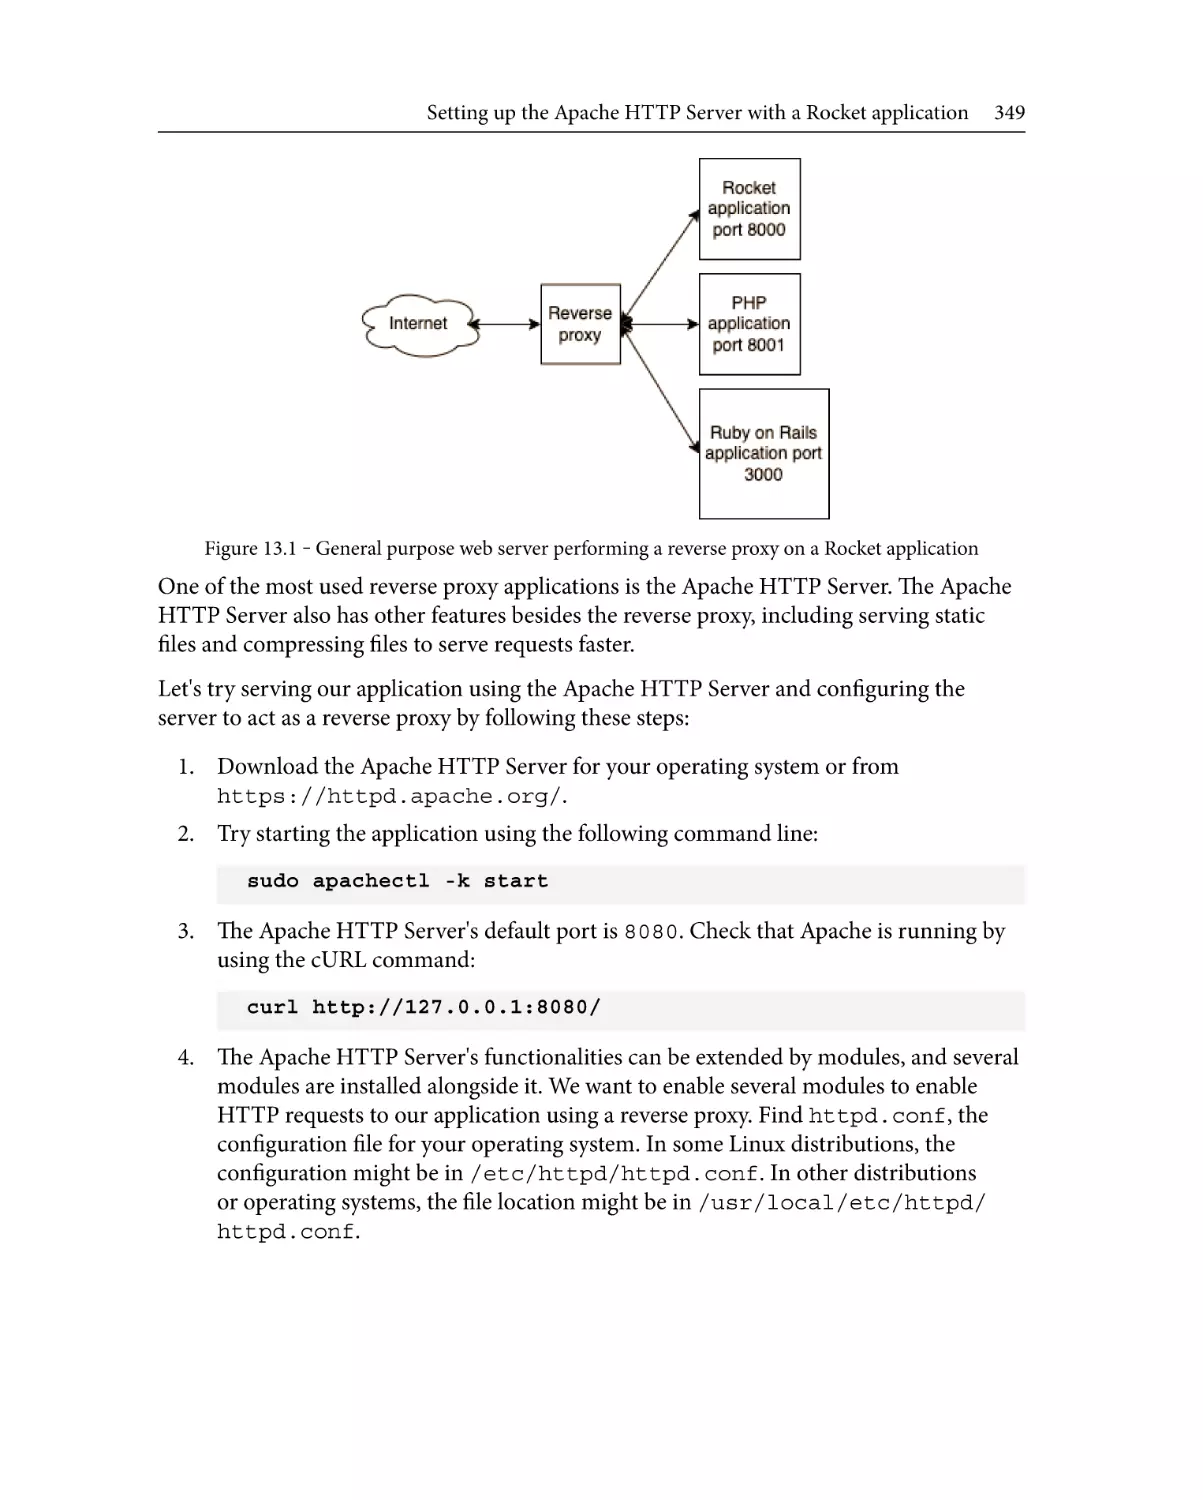
348
Generating Docker images
for a Rocket application
Summary
353
356
14
Building a Full Stack Application
Technical requirements
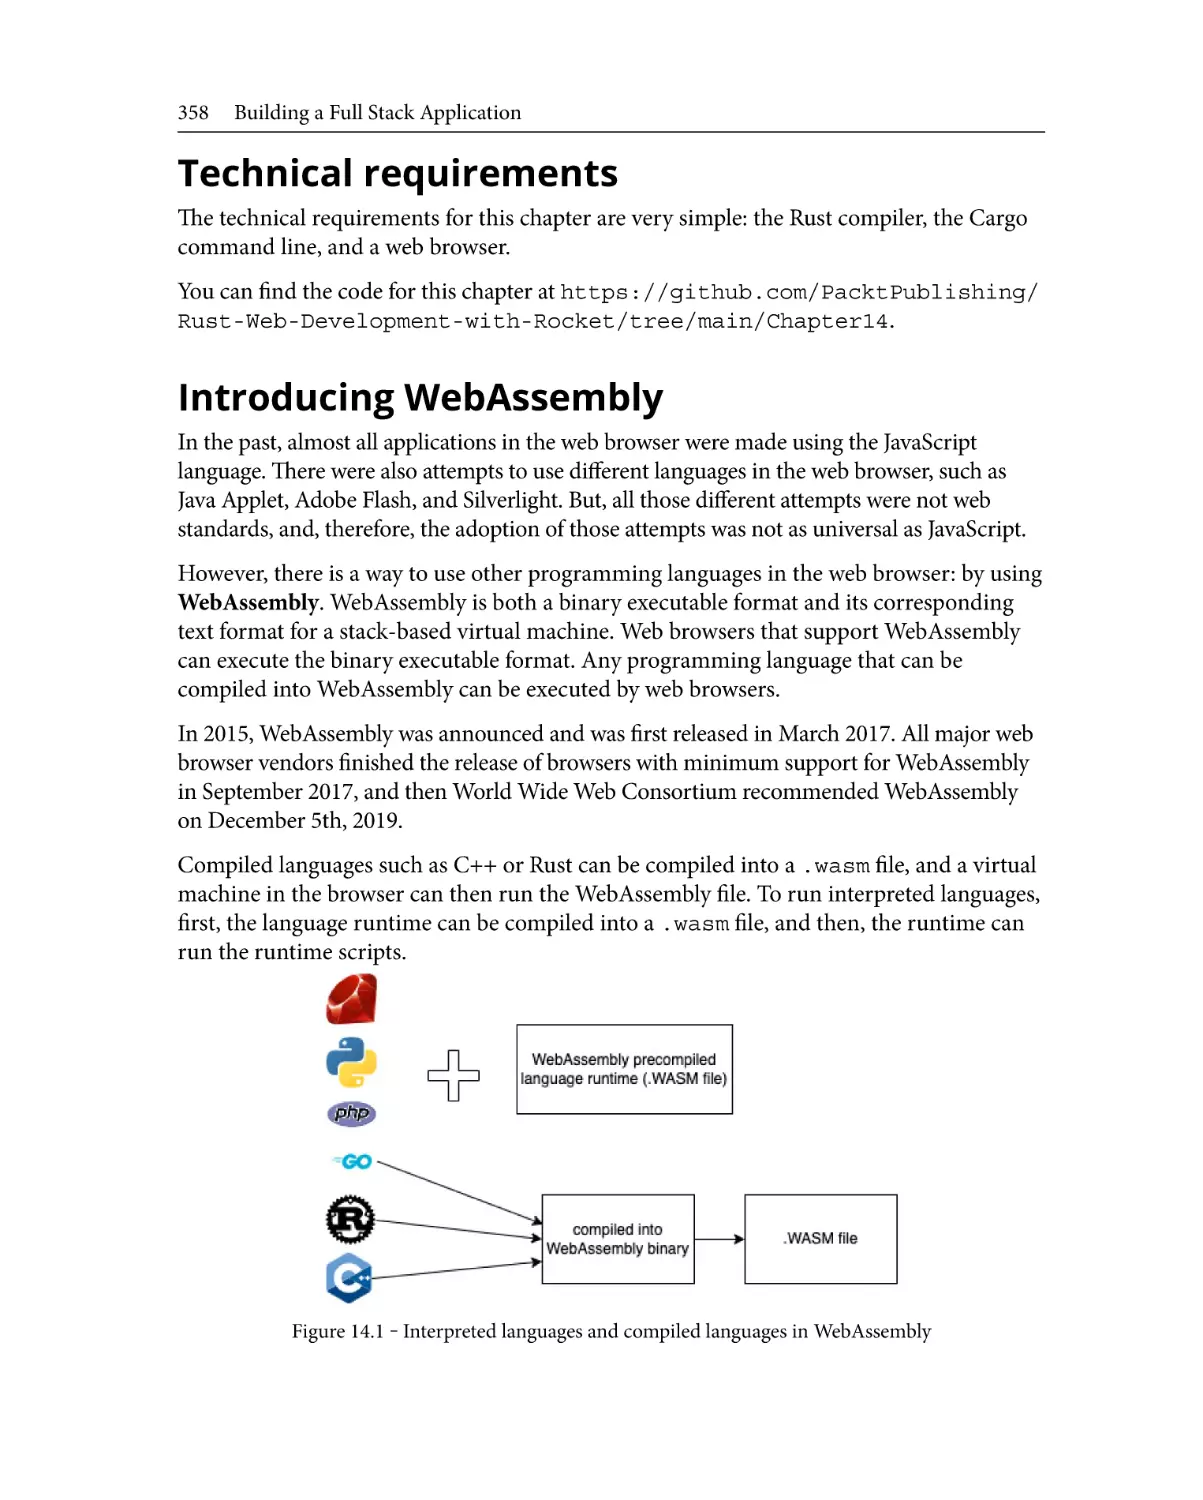
Introducing WebAssembly
Setting up a Cargo workspace
Setting a WebAssembly
build target
358
358
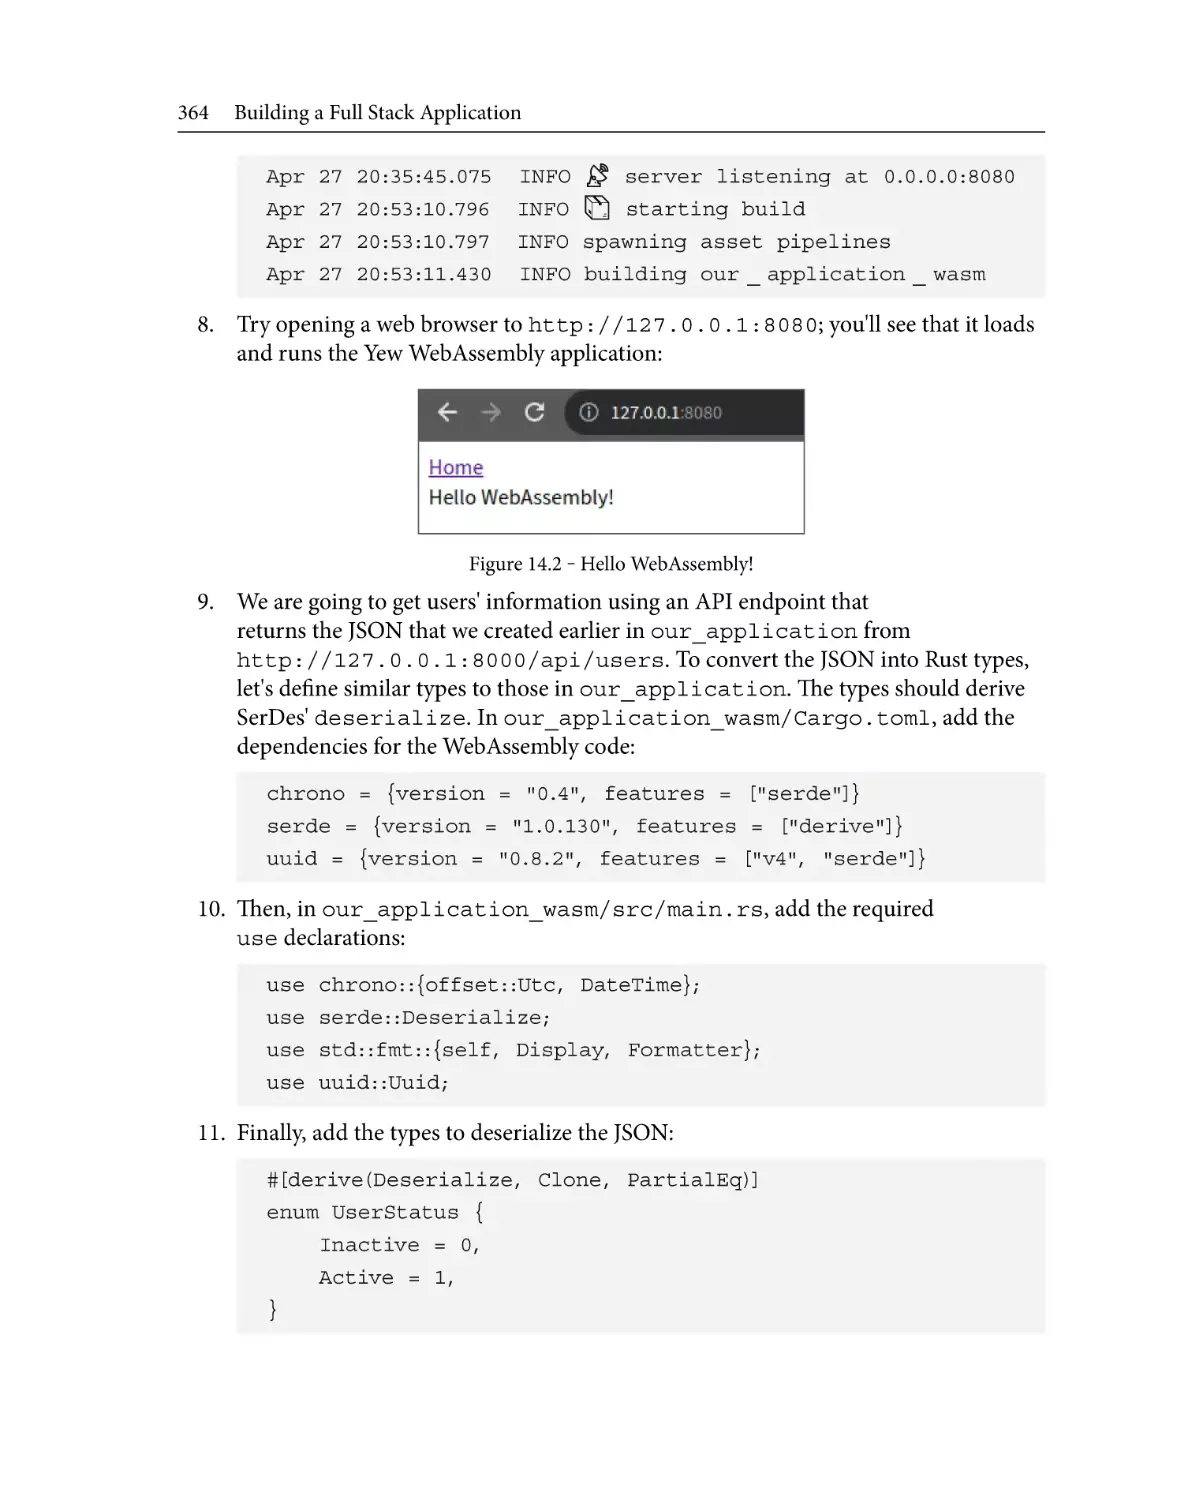
359
360
Writing a WebAssembly
application using Yew
Serving a WebAssembly
application using Rocket
Summary
361
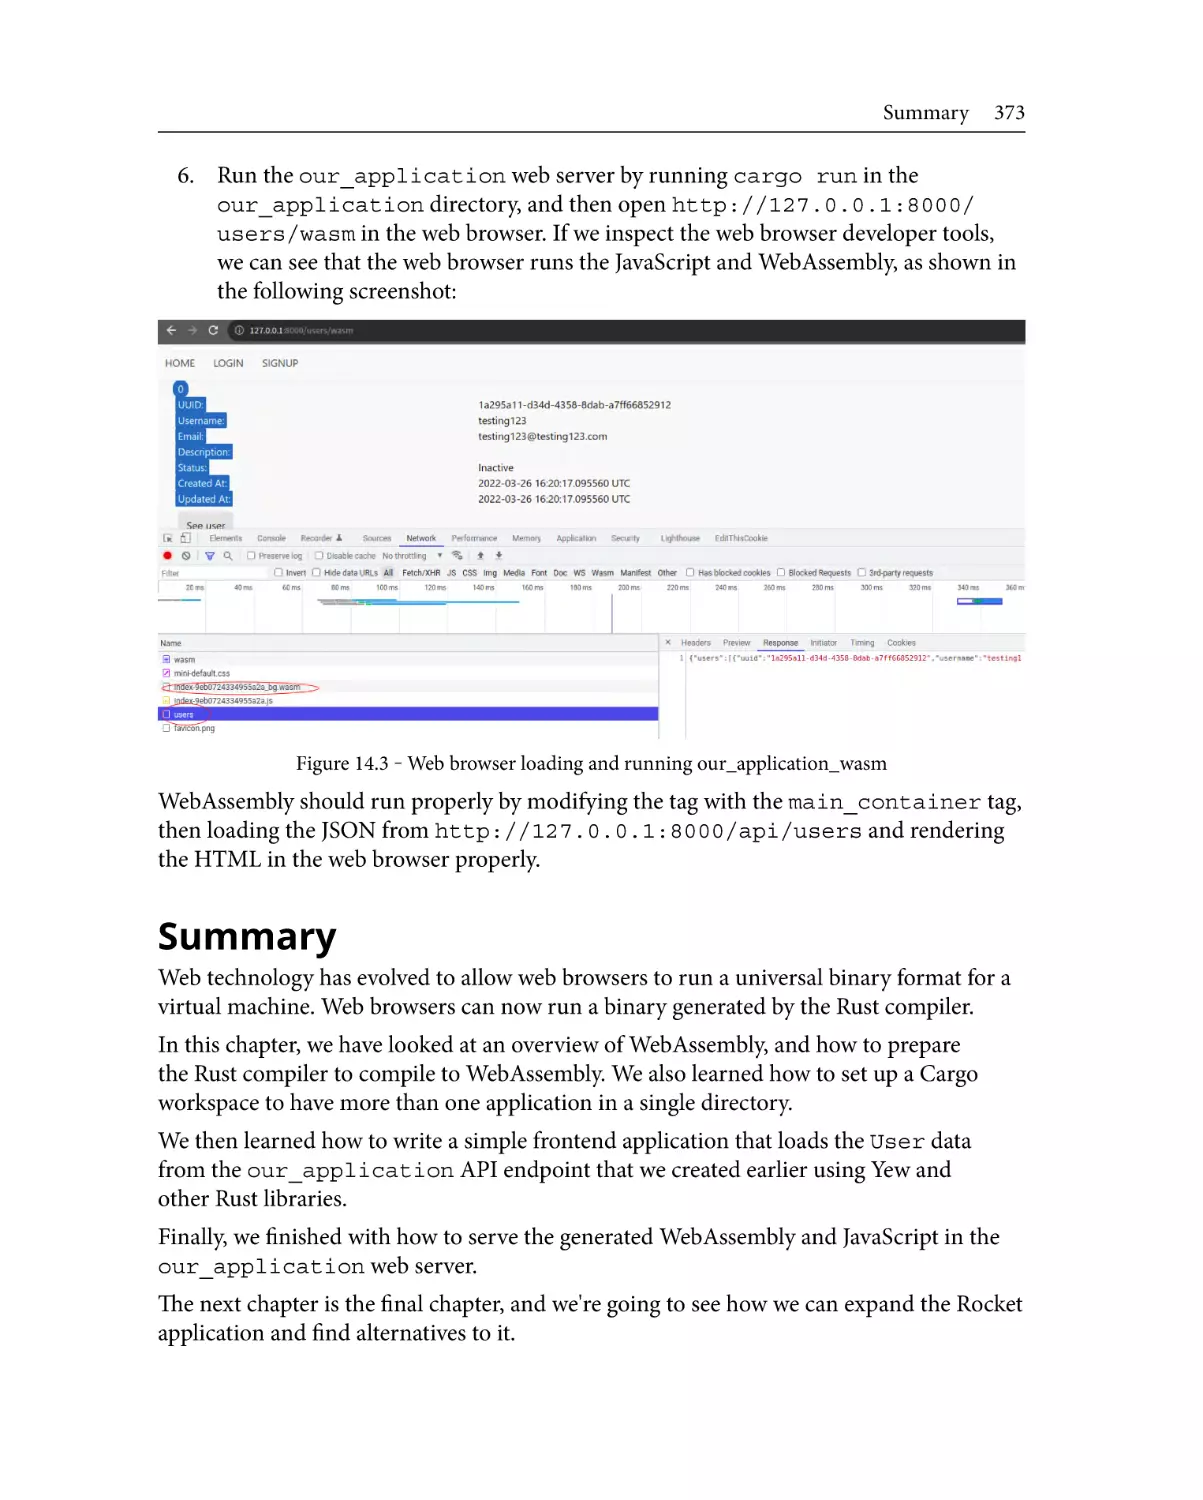
371
373
15
Improving the Rocket Application
Technical requirements
Extending the Rocket
application
Adding logging
Expanding logging to tracing
Setting monitoring
Setting up a mailing and alerting
system
376
376
376
376
378
379
Index
Other Books You May Enjoy
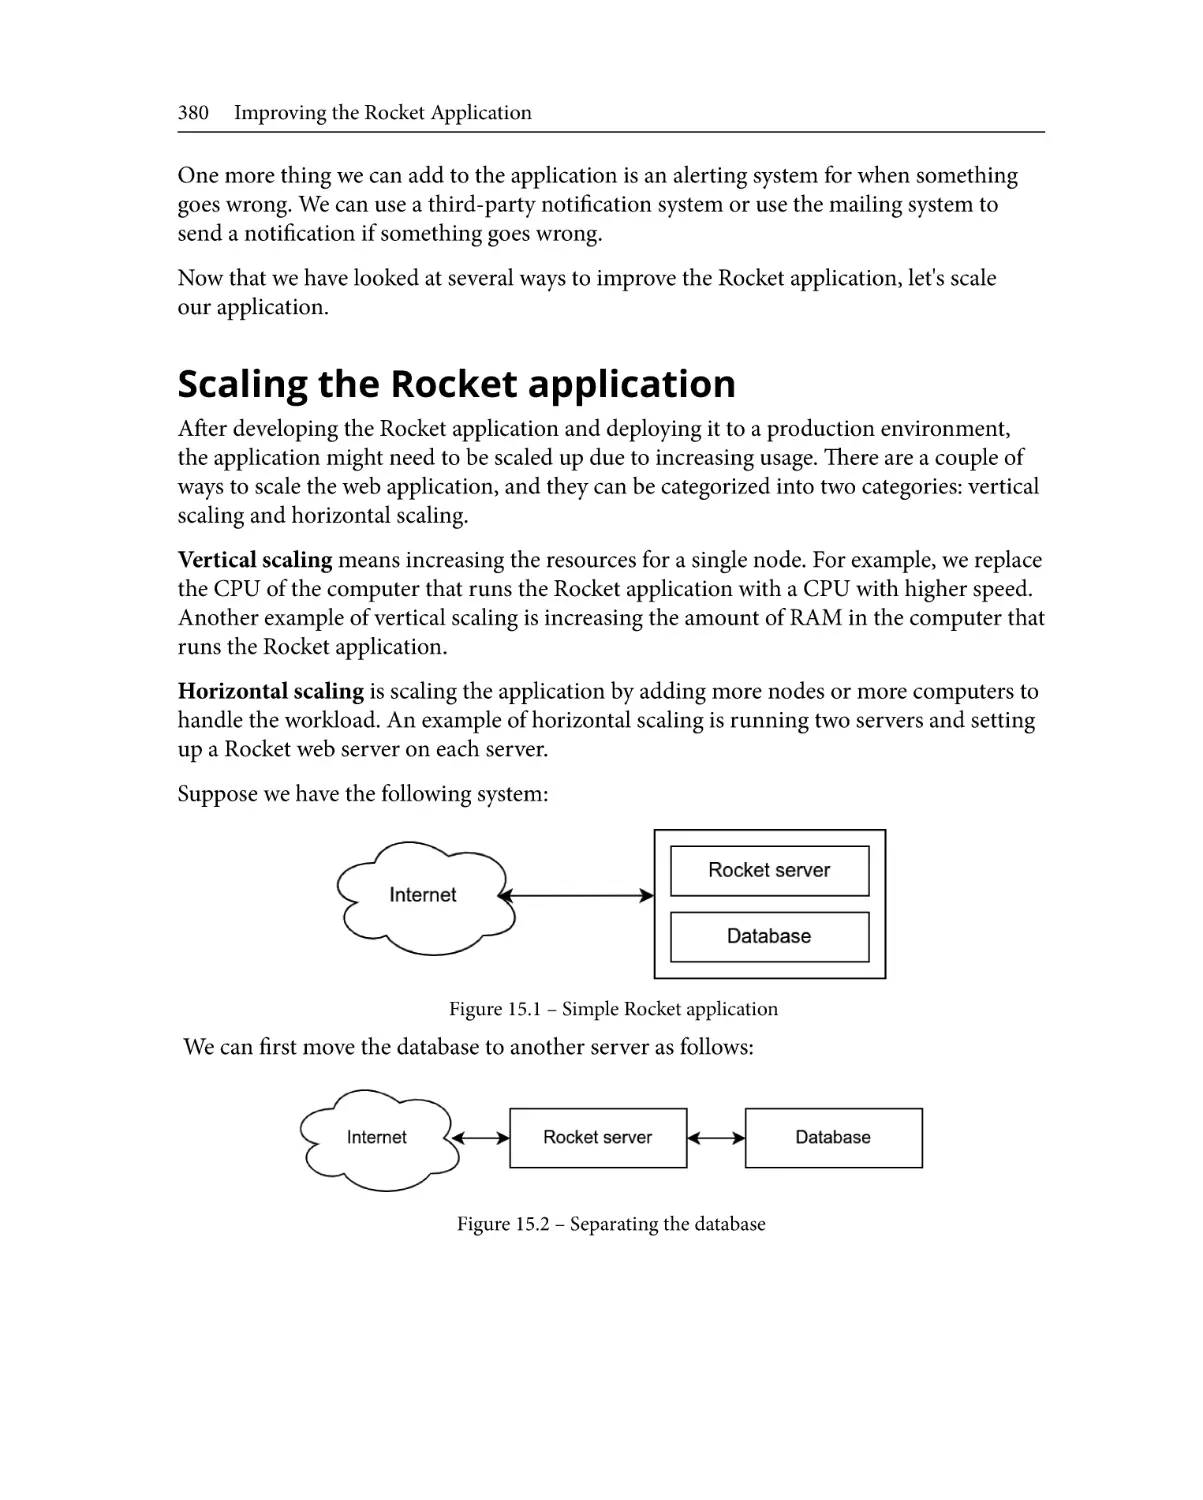
Scaling the Rocket application 380
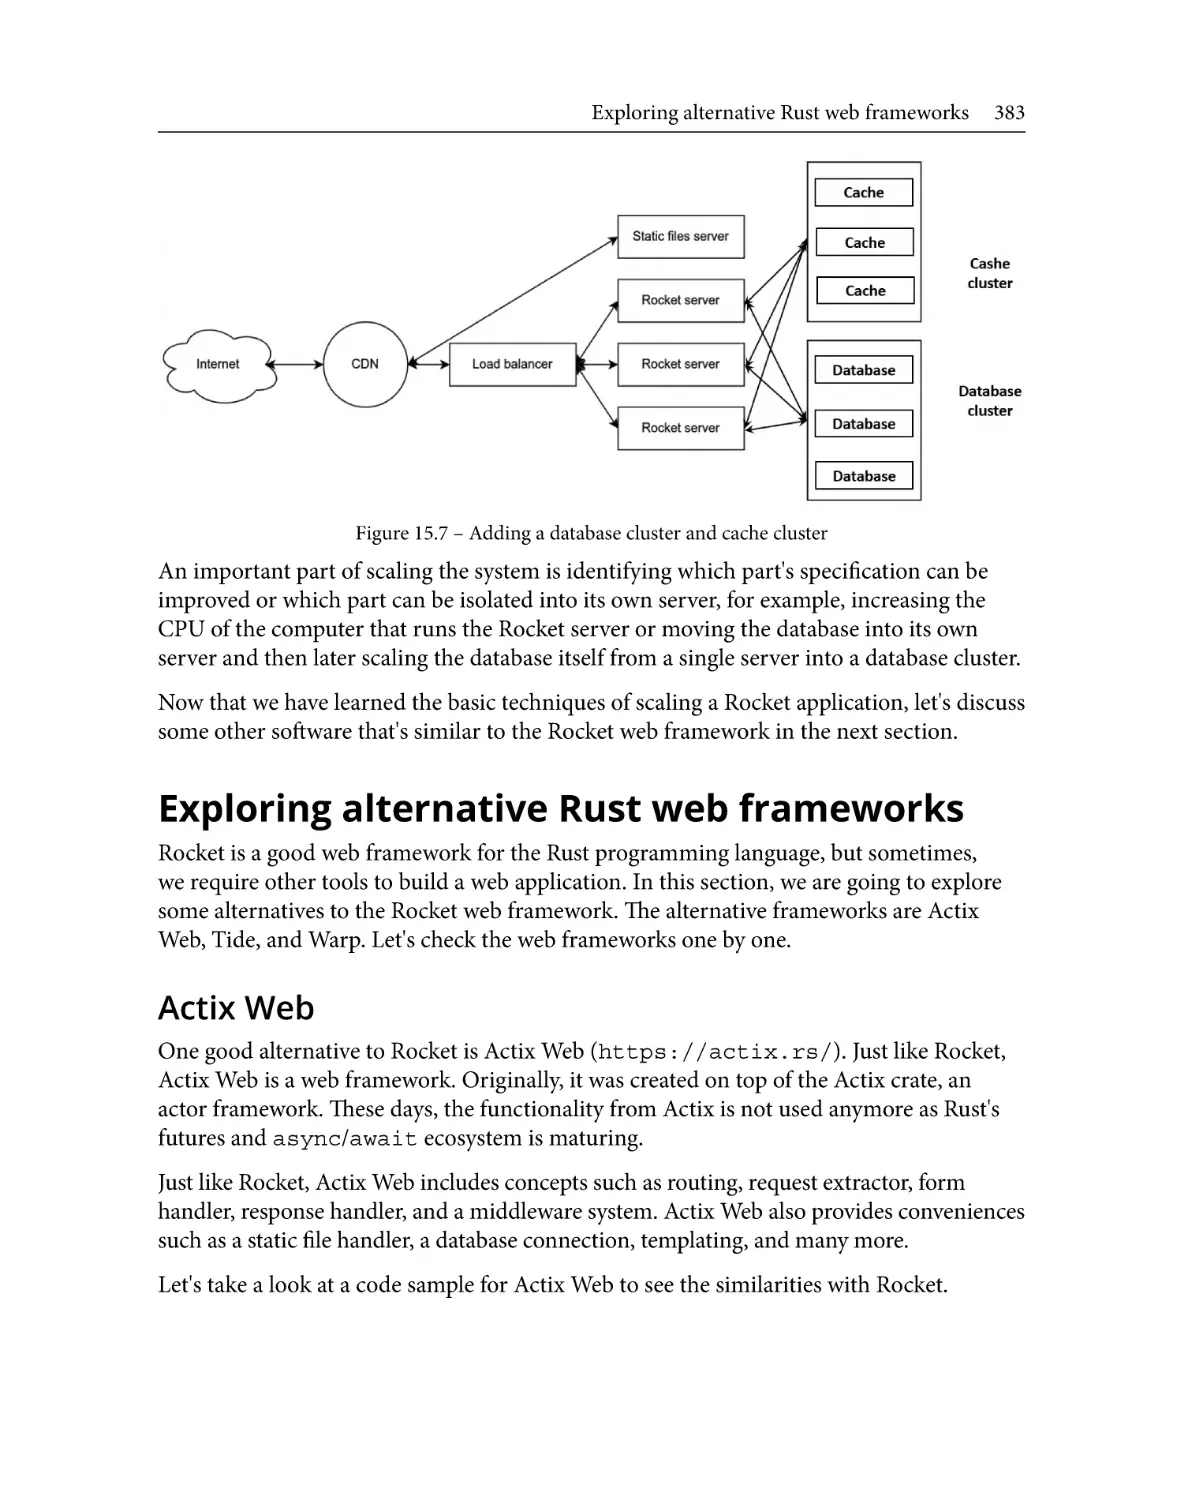
Exploring alternative Rust web
frameworks
383
Actix Web
Tide
Warp
Summary
383
384
385
386
Preface
Rocket is one of the first web frameworks in the Rust programming language. Rocket
provides complete tooling to build web applications, such as tools for routing the requests
and the strong typing of the incoming requests, and middleware to manipulate incoming
requests and outgoing responses. Rocket also provides support for templating and
connections to various databases.
Rocket is a web framework written in the Rust programming language. As one of the
newer programming languages, Rust is designed to be performant and safe. It is easy
to create a safe, multithreaded, and asynchronous application. Rust also has a strong
foundation in its tooling, documentation, and community packages. All those strengths
contribute to Rust's rapid growth in popularity.
This book explores building a complete web application using the Rocket web framework
and the Rust programming language. You will be introduced to various techniques to
build a web application that can handle incoming requests, store the data in an RDBMS,
and generate proper responses back to any HTTP clients.
Who this book is for
We wrote this book to help software engineers who want to learn how to use the Rocket
web framework to build web applications. Although not mandatory, basic knowledge of
the Rust programming language will help you understand the topics covered easily.
What this book covers
Chapter 1, Introducing the Rust Language, introduces the Rust language and the tools to
build Rust applications.
Chapter 2, Building Our First Rocket Web Application, guides you through creating and
configuring a Rocket application.
Chapter 3, Rocket Requests and Responses, introduces the Rocket routes, requests,
and responses.
xiv
Preface
Chapter 4, Building, Igniting, and Launching Rocket, explains two important components
of Rocket: state and fairings. State provides reusable objects, and fairings act as the
middleware part of the Rocket application. This chapter also explains how to connect a
database to the Rocket application.
Chapter 5, Designing a User-Generated Application, explores the process of designing
an application and shows how to use Rust modules to create a more manageable
web application.
Chapter 6, Implementing User CRUD, guides you on how to create, read, update,
and delete (CRUD) objects in the Rocket web application and the database behind the
Rocket application.
Chapter 7, Handling Errors in Rust and Rocket, explains how to handle errors in Rust and
how we can apply error handling in the Rocket application.
Chapter 8, Serving Static Assets and Templates, shows how to serve files (such as CSS files
and JS files) using the Rocket web application. You will also learn how to use a template to
create a response for the Rocket web application.
Chapter 9, Displaying Users' Post, guides you through Rust generics and how to use
generics to display different types of user posts.
Chapter 10, Uploading and Processing Posts, explains asynchronous programming and
multithreading in Rust applications and how to apply these to process user uploads in the
Rocket web application.
Chapter 11, Securing and Adding an API and JSON, guides you through creating
authentication and authorization in a Rocket web application. This chapter also explains
how to create JSON API endpoints and how to secure API endpoints with JWT.
Chapter 12, Testing Your Application, introduces you to testing the Rust application and
creating an end-to-end test for the Rocket web application.
Chapter 13, Launching a Rocket Application, explains how to configure the production
server to serve requests using the Rocket web application. This chapter also explains how
to containerize the Rust application using Docker.
Chapter 14, Building a Full Stack Application, explains how to use the Rust programming
language to build a frontend WebAssembly application to complement the Rocket
web application.
Chapter 15, Improving the Rocket Application, explains how to improve and scale the
Rocket web application. This chapter also introduces you to possible alternatives to the
Rocket web framework.
Preface
xv
To get the most out of this book
You will need a Rust compiler by installing Rustup and the stable toolchain on your
computer. You can use Linux, macOS, or Windows. For macOS users, it is recommended
to use Homebrew. For Windows users, it is recommended to install Rustup using the
Windows Subsystem for Linux (WSL or WSL 2).
All the code in this book has been tested on Arch Linux and macOS, but they should work
on other Linux distributions or the Windows operating system as well.
Since Rust is a compiled language, various development headers might have to be installed
on your computer, for example, libssl-dev or libpq-dev. Pay attention to error
messages when compiling the code sample in this book, and install the required libraries
for your operating system and development environment if needed.
Further along in the book, in Chapter 10, we are going to process videos using the
FFmpeg command line.
If you are using the digital version of this book, we advise you to type the code yourself
or access the code from the book's GitHub repository (a link is available in the next
section). Doing so will help you avoid any potential errors related to the copying and
pasting of code.
Download the example code files
You can download the example code files for this book from GitHub at https://
github.com/PacktPublishing/Rust-Web-Development-with-Rocket. If
there's an update to the code, it will be updated in the GitHub repository.
We also have other code bundles from our rich catalog of books and videos available at
https://github.com/PacktPublishing/. Check them out!
xvi
Preface
Download the color images
We also provide a PDF file that has color images of the screenshots and diagrams used in
this book. You can download it here: https://packt.link/PUFPv.
Conventions used
There are a number of text conventions used throughout this book.
Code in text: Indicates code words in text, database table names, folder names,
filenames, file extensions, pathnames, dummy URLs, user input, and Twitter handles.
Here is an example: "Built-in data types, such as Option or Result, handle null-like
behavior in a safe manner."
A block of code is set as follows:
fn main() {
println!("Hello World!");
}
When we wish to draw your attention to a particular part of a code block, the relevant
lines or items are set in bold:
impl super::Encryptable for Rot13 {
fn encrypt(&self) -> String {
}
}
Any command-line input or output is written as follows:
rustup default stable
rustup component add clippy
Bold: Indicates a new term, an important word, or words that you see onscreen. For
instance, words in menus or dialog boxes appear in bold. Here is an example: "Select
System info from the Administration panel."
Tips or Important Notes
Appear like this.
Preface
xvii
Get in touch
Feedback from our readers is always welcome.
General feedback: If you have questions about any aspect of this book, email us
at customercare@packtpub.com and mention the book title in the subject of
your message.
Errata: Although we have taken every care to ensure the accuracy of our content,
mistakes do happen. If you have found a mistake in this book, we would be grateful if you
would report this to us. Please visit www.packtpub.com/support/errata and fill in
the form.
Piracy: If you come across any illegal copies of our works in any form on the internet,
we would be grateful if you would provide us with the location address or website name.
Please contact us at copyright@packt.com with a link to the material.
If you are interested in becoming an author: If there is a topic that you have expertise
in and you are interested in either writing or contributing to a book, please visit
authors.packtpub.com.
Share Your Thoughts
Once you've read Rust Web Development with Rocket, we'd love to hear your thoughts!
Please click here to go straight to the Amazon review page for this book and share your
feedback.
Your review is important to us and the tech community and will help us make sure we're
delivering excellent quality content.
Part 1:
An Introduction to the
Rust Programming
Language and the
Rocket Web Framework
In this part, you will learn about the Rust programming language, including the basics of
it, how to install it on your operating system, and how to use the Rust tools and package
registry. You will also create a Rocket web application and configure, compile, and run it.
We will look at installing and including other packages for web applications. We will use
sqlx for web application connection to relational databases.
This part comprises the following chapters:
• Chapter 1, Introducing the Rust Language
• Chapter 2, Building Our First Rocket Web Application
• Chapter 3, Rocket Requests and Responses
• Chapter 4, Building, Igniting, and Launching Rocket
• Chapter 5, Designing a User-Generated Application
1
Introducing the Rust
Language
Almost every programmer has heard about the Rust programming language or even tried
or used it. Saying "the Rust programming language" every time is a little bit cumbersome,
so let's just call it Rust, or the Rust language from this point forward.
In this chapter, we will talk a little bit about Rust to help you if you are new to this
language or as a refresher if you have tried it already. This chapter might also help
seasoned Rust language programmers a bit. Later in the chapter, we will learn how to
install the Rust toolchain and create a simple program to introduce the features of the
Rust language. We will then use third-party libraries to enhance one of our programs, and
finally, we will see how we can get help for the Rust language and its libraries.
In this chapter, we're going to cover the following main topics:
• An overview of the Rust language
• Installing the Rust compiler and toolchain
• Writing Hello World
• Exploring Rust crates and Cargo
• Exploring other tools and where to get help
4
Introducing the Rust Language
Technical requirements
To follow the content of this book, you will need a computer running a Unix-like
operating system such as Linux, macOS, or Windows with Windows Subsystem for Linux
(WSLv1 or WSLv2) installed. Don't worry about the Rust compiler and toolchain; we will
install it in this chapter if you don't have it installed already.
The code for this chapter can be found at https://github.com/PacktPublishing/
Rust-Web-Development-with-Rocket/tree/main/Chapter01.
An overview of the Rust language
To build web applications using the Rocket framework, we must first learn a bit about the
Rust language since Rocket is built using that language. According to https://www.
rust-lang.org, the Rust language is "a language empowering everyone to build reliable
and efficient software." It began as a personal project for a programmer named Graydon
Hoare, an employee at Mozilla, around 2006. The Mozilla Foundation saw the potential
of the language for their product; they started sponsoring the project in 2009 before
announcing it to the public in 2010.
Since its inception, the focus of Rust has always been on performance and safety. Building
a web browser is not an easy job; an unsafe language can have very fast performance, but
programmers working with system languages without adequate safety measures in place
can make a lot of mistakes, such as missing pointer references. Rust was designed as a
system language and learned many mistakes from older languages. In older languages,
you can easily shoot yourself in the foot with a null pointer, and nothing in the language
prevents you from compiling such mistakes. In contrast, in the Rust language, you cannot
write a code that resulted in null pointer because it will be detected during compile time,
and you must fix the implementation to make it compile.
A lot of the Rust language design is borrowed from the functional programming
paradigm, as well as from the object-oriented programming paradigm. For example, it
has elements of a functional language such as closures and iterators. You can easily make a
pure function and use the function as a parameter in another function; there are syntaxes
to easily make closures and data types such as Option or Result.
On the other hand, there are no class definitions, but you can easily define a data type,
for example, a struct. After defining that data type, you can create a block to implement
its methods.
An overview of the Rust language
5
Even though there is no inheritance, you can easily group objects by using traits. For
example, you can create a behavior and name it the MakeSound trait. Then, you can
determine what methods should be in that trait by writing the method signatures. If
you define a data type, for example, a struct named Cow, you can tell the compiler that
it implements a MakeSound trait. Because you say the Cow struct implements the
MakeSound trait, you have to implement the methods defined in the trait for the Cow
struct. Sounds like an object-oriented language, right?
The Rust language went through several iterations before a stable version was released
(Rust 1.0) on May 15, 2015. Some of the early language design was scrapped before releasing
the stable release. At one point, Rust had a class feature but this was scrapped before the
stable release because Rust design was changed to have data and behavior separation. You
write data (for example, in the form of a struct or enum type), and then you write a
behavior (for example, impl) separately. To categorize those impl in the same group, we
can make a trait. So, all the functionality you would want from an object-oriented language
can be had thanks to that design. Also, Rust used to have garbage collection, but it was then
scrapped because another design pattern was used. When objects get out of scope, such
as exiting a function, they are deallocated automatically. This type of automatic memory
management made garbage collection unnecessary.
After the first stable release, people added more functionalities to make Rust more
ergonomic and usable. One of the biggest changes was async/await, which was released
in version 1.39. This feature is very useful for developing applications that handle I/O,
and web application programming handles a lot of I/O. Web applications have to handle
database and network connections, reading from files, and so on. People agree that
async/await was one of the most needed features to make the language suitable for web
programming, because in async/await, the program doesn't need to make a new thread,
but it's also not blocking like a conventional function.
Another important feature is const fn, a function that will be evaluated at compiletime instead of runtime.
In recent years, many large companies have started to build a talent pool of Rust
developers, which highlights its significance in business.
Why use the Rust language?
So, why should we use the Rust language for web application development? Aren't existing
established languages good enough for web development? Here are a few reasons why
people would want to use the Rust language for creating web applications:
• Safety
• No garbage collection
6
Introducing the Rust Language
• Speed
• Multithreading and asynchronous programming
• Statically typed
Safety
Although writing applications using a system programming language is advantageous
because it's powerful (a programmer can access the fundamental building block of
a program such as allocating computer memory to store important data and then
deallocating that memory as soon as it is not in use), it's very easy to make mistakes.
There's nothing in a traditional system language to prevent a program from storing data
in memory, creating a pointer to that data, deallocating the data stored in memory, and
trying to access the data again through that pointer. The data is already gone but the
pointer is still pointing to that part of the memory.
Seasoned programmers might easily spot such mistakes in a simple program. Some
companies force their programmers to use a static analysis tool to check the code for such
mistakes. But, as programming techniques become more sophisticated, the complexity
of the application grows, and these kinds of bugs can still be found in many applications.
High-profile bugs and hacks found in recent years, such as Heartbleed, can be prevented if
we use a memory-safe language.
Rust is a memory-safe language because it has certain rules regarding how a programmer
can write their code. For example, when the code is compiled, it checks the lifetime of a
variable, and the compiler will show an error if another variable still tries to access the
already out-of-scope data. Ralf Jung, a postdoctoral researcher, already made the first
formal verification in 2020 that the Rust language is indeed a safe language. Built-in data
types, such as Option or Result, handle null-like behavior in a safe manner.
No garbage collection
Many programmers create and use different techniques for memory management due to
safety problems. One of these techniques is garbage collection. The idea is simple: memory
management is done automatically during runtime so that a programmer doesn't have to
think about memory management. A programmer just needs to create a variable, and when
the variable is not used anymore, the runtime will automatically remove it from memory.
Garbage collection is an interesting and important part of computing. There are many
techniques such as reference counting and tracing. Java, for example, even has several
third-party garbage collectors besides the official garbage collector.
An overview of the Rust language
7
The problem with this language design choice is that garbage collection usually takes
significant computing resources. For example, a part of the memory is still not usable for a
while because the garbage collector has not recycled that memory yet. Or, even worse, the
garbage collector is not able to remove used memory from the heap, so it will accumulate,
and most of the computer memory will become unusable, or what we usually call a
memory leak. In the stop-the-world garbage collection mechanism, the whole program
execution is paused to allow the garbage collector to recycle the memory, after which the
program execution is resumed. As such, some people find it hard to develop real-time
applications with this kind of language.
Rust takes a different approach called resource acquisition is initialization (RAII), which
means an object is deallocated automatically as soon as it's out of scope. For example, if you
write a function, an object created in the function will be deallocated as soon as the function
exits. But obviously, this makes Rust very different compared to programming languages
that deallocate memory manually or programming languages with garbage collection.
Speed
If you are used to doing web development with an interpreted language or a language
with garbage collection, you might say that we don't need to worry about computing
performance as web development is I/O bound; in other words, the bottleneck is when the
application accesses the database, disk, or another network, as they are slower than a CPU
or memory.
The adage might be primarily true but it all depends on application usage. If your
application processes a lot of JSON, the processing is CPU-bound, which means it is
limited by the speed of your CPU and not the speed of disk access or the speed of network
connection. If you care about the security of your application, you might need to work
with hashing and encryption, which are CPU-bound. If you are writing a backend
application for an online streaming service, you want the application to work as optimally
as possible. If you are writing an application serving millions of users, you want the
application to be very optimized and return the response as fast as possible.
The Rust language is a compiled language, so the compiler will convert the program into
machine code, which a computer processor can execute. A compiled language usually
runs faster than an interpreted language because, in an interpreted language, there is an
overhead when the runtime binary interprets the program into native machine code.
In modern interpreters, the speed gap is reduced by using modern techniques such as a
just-in-time (JIT) compiler to speed up the program execution, but in dynamic languages
such as Ruby, it's still slower than using a compiled language.
8
Introducing the Rust Language
Multithreading and asynchronous programming
In traditional programming, synchronous programming means the application has to
wait until CPU has processed a task. In a web application, the server waits until an HTTP
request is processed and responded to; only then does it go on to handle another HTTP
request. This is not a problem if the application just directly creates responses such as
simple text. It becomes a problem when the web application has to take some time to do
the processing; it has to wait for the database server to respond, it has to wait until the file
is fully written on the server, and it has to wait until the API call to the third-party API
service is done successfully.
One way to overcome the problem of waiting is multithreading. A single process can
create multiple threads that share some resources. The Rust language has been designed
to make it easy to create safe multithreaded applications. It's designed with multiple
containers such as Arc to make it easy to pass data between threads.
The problem with multithreading is that spawning a thread means allocating significant
CPU, memory, and OS resources, or what is colloquially known as being expensive. The
solution is to use a different technique called asynchronous programming, where a single
thread is reused by different tasks without waiting for the first task to finish. People can
easily write an async program in Rust because it's been incorporated into the language
since November 7, 2019.
Statically-typed
In programming languages, a dynamically-typed language is one where a variable type is
checked at runtime, while a statically-typed language checks the data type at compile time.
Dynamic typing means it's easier to write code, but it's also easier to make mistakes. Usually,
a programmer has to write more unit tests in dynamically-typed languages to compensate
for not checking the type at compile time. A dynamically-typed language is also considered
more expensive because every time a function is called, the routine has to check the passed
parameters. As a result, it's difficult to optimize a dynamically-typed language.
Rust, on the other hand, is statically-typed, so it's very hard to make mistakes such as
passing a string as a number. The compiler can optimize the resulting machine code and
reduce programming bugs significantly before the application is released.
Now that we have provided an overview of the Rust language and its strengths compared
to other languages, let's learn how to install the Rust compiler toolchain, which will be
used to compile Rust programs. We'll be using this toolchain throughout this book.
Installing the Rust compiler toolchain
9
Installing the Rust compiler toolchain
Let's start by installing the Rust compiler toolchain. Rust has three official channels: stable,
beta, and nightly. The Rust language uses Git as its version control system. People add new
features and bug fixes to the master branch. Every night, the source code from the master
branch is compiled and released to the nightly channel. After six weeks, the code will be
branched off to the beta branch, compiled, and released to the beta channel. People will
then run various tests in the beta release, most often in their CI (Continuous Integration)
installation. If a bug is found, the fix will be committed to the master branch and then
backported to the beta branch. Six weeks after the first beta branch-off, the stable release
will be created from the beta branch.
We will use the compiler from the stable channel throughout the book, but if you feel
adventurous, you can use the other channels as well. There's no guarantee the program
we're going to create will compile if you use another channel though because people add
new features and there might be regression introduced in the new version.
There are several ways to install the Rust toolchain in your system, such as bootstrapping
and compiling it from scratch or using your OS package manager. But, the recommended
way to install the Rust toolchain in your system is by using rustup.
The definition on its website (https://rustup.rs) is very simple: "rustup is an
installer for the systems programming language Rust." Now, let's try following these
instructions to install rustup.
Installing rustup on the Linux OS or macOS
These instructions apply if you are using a Debian 10 Linux distribution, but if you are
already using another Linux distribution, we're going to assume you are already proficient
with the Linux OS and can adapt these instructions suitable to your Linux distribution:
1. Open your terminal of choice.
2. Make sure you have cURL installed by typing this command:
curl
3. If cURL is not installed, let's install it:
apt install curl
If you are using macOS, you will most likely already have cURL installed.
10
Introducing the Rust Language
4. After that, follow the instructions on https://rustup.rs:
curl --proto '=https' --tlsv1.2 -sSf https://sh.rustup.rs
| sh
5. It will then show a greeting and information, which you can customize; for now,
we're just going to use the default setup:
...
1) Proceed with installation (default)
2) Customize installation
3) Cancel installation
>
6. Type 1 to use the default installation.
7. After that, reload your terminal or type this in the current terminal:
source $HOME/.cargo/env
8. You can confirm whether the installation was successful or not by typing rustup
in the Terminal and you should see the usage instruction for rustup.
9. Now, let's install the stable Rust toolchain. Type the following in the terminal:
rustup toolchain install stable
10. After the toolchain has been installed into your OS, let's confirm whether we
can run the Rust compiler. Type rustc in the terminal and you should see the
instructions on how to use it.
Installing a different toolchain and components
Right now, we have the stable toolchain installed, but there are two other default channels
that we can install: nightly and beta.
Sometimes, you might want to use a different toolchain for various reasons. Maybe you
want to try a new feature, or maybe you want to test regression in your application against
an upcoming version of Rust. You can simply install it by using rustup:
rustup toolchain install nightly
Writing Hello World!
11
Each toolchain has components, some of which are required by the toolchain, such as
rustc, which is the Rust compiler. Other components are not installed by default, for
example, clippy, which provides more checks not provided by the rustc compiler and
gives code style suggestions as well. To install it is also very easy; you can use rustup
component add <component> as shown in this example:
rustup default stable
rustup component add clippy
Updating the toolchain, rustup, and components
The Rust toolchain has a regular release schedule of around every three months (six weeks
plus six weeks), but sometimes there's an emergency release for a major bug fix or a fix for
a security problem. As a result, you sometimes need to update your toolchain. Updating is
very easy. This command will also update the components installed in the toolchain:
rustup update
Besides the toolchain, rustup itself might also be updated. You can update it by typing
the following:
rustup self update
Now that we have the Rust compiler toolchain installed in our system, let's write our first
Rust program!
Writing Hello World!
In this section, we are going to write a very basic program, Hello World!. After we
successfully compile that, we are going to write a more complex program to see the basic
capabilities of the Rust language. Let's do it by following these instructions:
1. Let's create a new folder, for example, 01HelloWorld.
2. Create a new file inside the folder and give it the name main.rs.
12
Introducing the Rust Language
3. Let's write our first code in Rust:
fn main() {
println!("Hello World!");
}
4. After that, save your file, and in the same folder, open your terminal, and compile
the code using the rustc command:
rustc main.rs
5. You can see there's a file inside the folder called main; run that file from
your terminal:
./main
6. Congratulations! You just wrote your first Hello World program in the
Rust language.
Next, we're going to step up our Rust language game; we will showcase basic Rust
applications with control flow, modules, and other functionalities.
Writing a more complex program
Of course, after making the Hello World program, we should try to write a more
complex program to see what we can do with the language. We want to make a program
that captures what the user inputted, encrypts it with the selected algorithm, and returns
the output to the terminal:
1. Let's make a new folder, for example, 02ComplexProgram. After that, create the
main.rs file again and add the main function again:
fn main() {}
2. Then, use the std::io module and write the part of the program to tell the user to
input the string they want to encrypt:
use std::io;
fn main() {
println!("Input the string you want to encrypt:");
let mut user_input = String::new();
Writing Hello World!
13
io::stdin()
.read_line(&mut user_input)
.expect("Cannot read input");
println!("Your encrypted string: {}", user_input);
}
Let's explore what we have written line by line:
I. The first line, use std::io;, is telling our program that we are going to use
the std::io module in our program. std should be included by default on a
program unless we specifically say not to use it.
II. The let... line is a variable declaration. When we define a variable in Rust,
the variable is immutable by default, so we must add the mut keyword to make
it mutable. user_input is the variable name, and the right hand of this
statement is initializing a new empty String instance. Notice how we initialize
the variable directly. Rust allows the separation of declaration and initialization,
but that form is not idiomatic, as a programmer might try to use an uninitialized
variable and Rust disallows the use of uninitialized variables. As a result, the code
will not compile.
III. The next piece of code, that is, the stdin() function, initializes the
std::io::Stdin struct. It reads the input from the terminal and puts it
in the user_input variable. Notice that the signature for read_line()
accepts &mut String. We have to explicitly tell the compiler we are passing
a mutable reference because of the Rust borrow checker, which we will discuss
later in Chapter 9, Displaying User's Post. The read_line() output is
std::result::Result, an enum with two variants, Ok(T) and Err(E).
One of the Result methods is expect(), which returns a generic type T, or if
it's an Err variant, then it will cause panic with a generic error E combined with
the passed message.
IV. Two Rust enums (std::result::Result and std::option::Option)
are very ubiquitous and important in the Rust language, so by default, we can use
them in the program without specifying use.
14
Introducing the Rust Language
Next, we want to be able to encrypt the input, but right now, we don't know what
encryption we want to use. The first thing we want to do is make a trait, a particular code
in the Rust language that tells the compiler what functionality a type can have:
1. There are two ways to create a module: create module_name.rs or create a folder
with module_name and add a mod.rs file inside that folder. Let's create a folder
named encryptor and create a new file named mod.rs. Since we want to add a
type and implementation later, let's use the second way. Let's write this in mod.rs:
pub trait Encryptable {
fn encrypt(&self) -> String;
}
2. By default, a type or trait is private, but we want to use it in main.rs and
implement the encryptor on a different file, so we should denote the trait as public
by adding the pub keyword.
3. That trait has one function, encrypt(), which has self-reference as a parameter
and returns String.
4. Now, we should define this new module in main.rs. Put this line before the fn
main block:
pub mod encryptor;
5. Then, let's make a simple type that implements the Encryptable trait. Remember
the Caesar cipher, where the cipher substitutes a letter with another letter? Let's
implement the simplest one called ROT13, where it converts 'a' to 'n' and 'n' to
'a', 'b' to 'o' and 'o' to 'b', and so on. Write the following in the mod.rs file:
pub mod rot13;
6. Let's make another file named rot13.rs inside the encryptor folder.
7. We want to define a simple struct that only has one piece of data, a string, and tell
the compiler that the struct is implementing the Encryptable trait. Put this code
inside the rot13.rs file:
pub struct Rot13(pub String);
impl super::Encryptable for Rot13 {}
You might notice we put pub in everything from the module declaration, to the
trait declaration, struct declaration, and field declaration.
Writing Hello World!
15
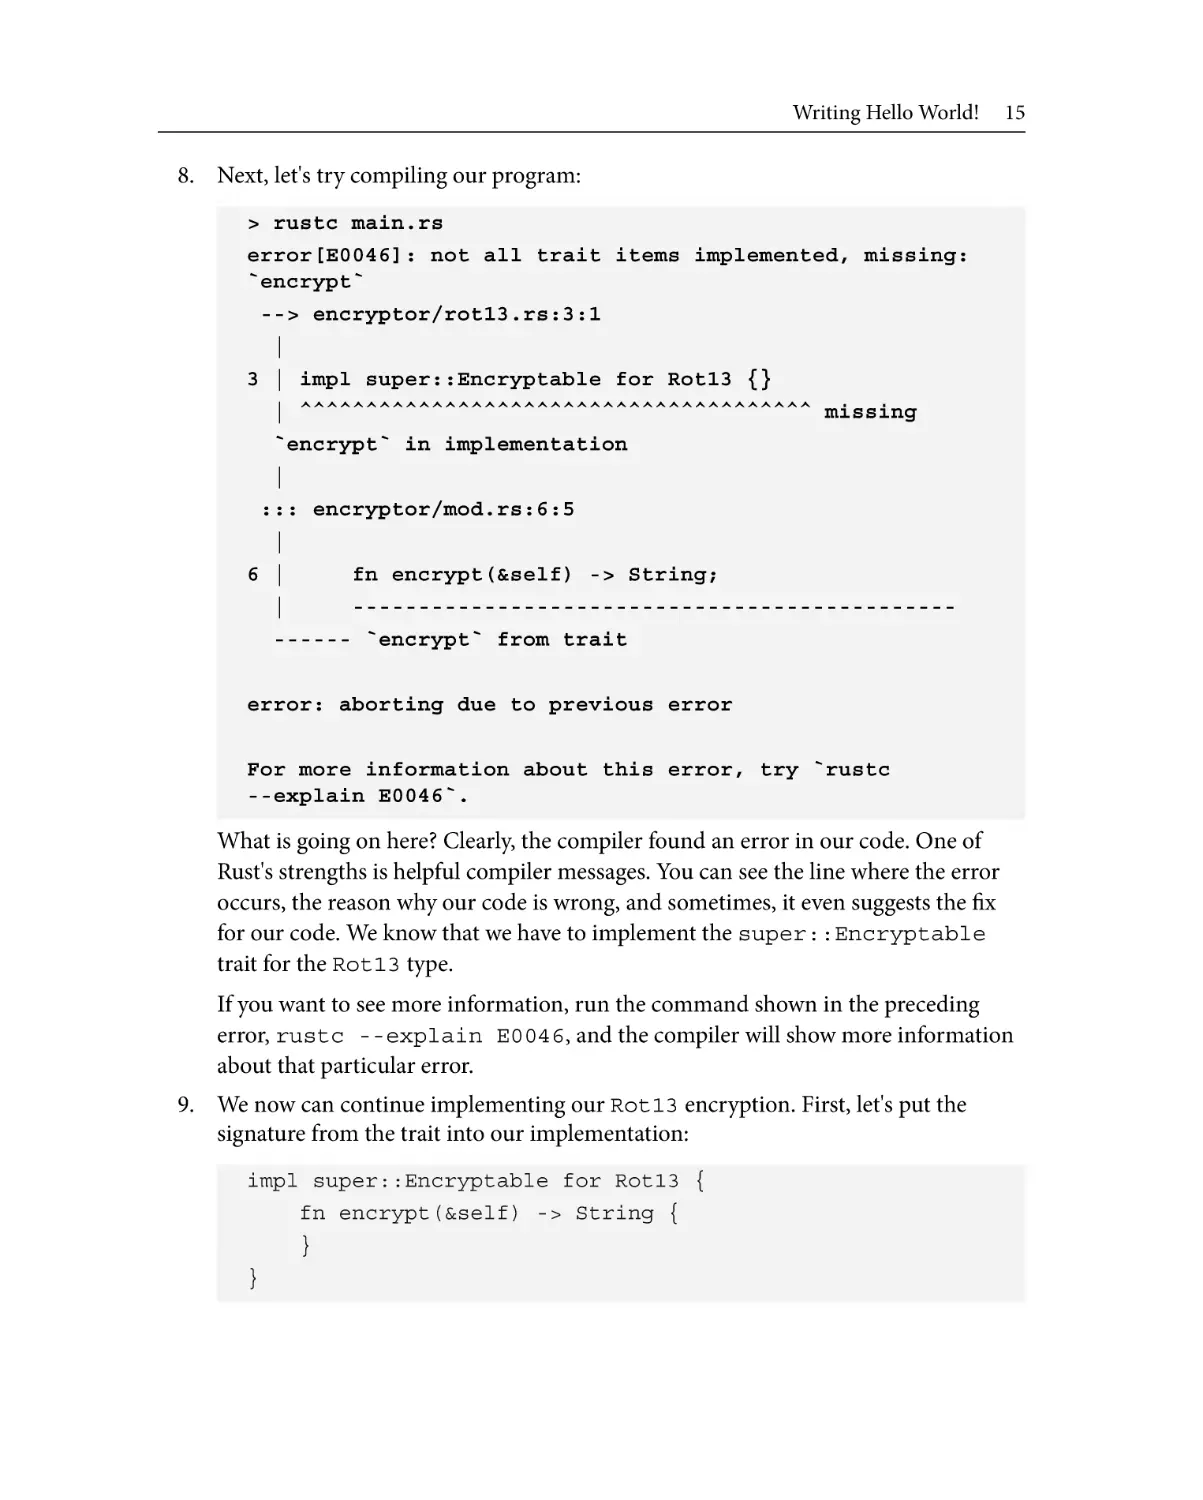
8. Next, let's try compiling our program:
> rustc main.rs
error[E0046]: not all trait items implemented, missing:
`encrypt`
--> encryptor/rot13.rs:3:1
|
3 | impl super::Encryptable for Rot13 {}
| ^^^^^^^^^^^^^^^^^^^^^^^^^^^^^^^^^^^^^^^ missing
`encrypt` in implementation
|
::: encryptor/mod.rs:6:5
|
6 |
fn encrypt(&self) -> String;
|
--------------------------------------------------- `encrypt` from trait
error: aborting due to previous error
For more information about this error, try `rustc
--explain E0046`.
What is going on here? Clearly, the compiler found an error in our code. One of
Rust's strengths is helpful compiler messages. You can see the line where the error
occurs, the reason why our code is wrong, and sometimes, it even suggests the fix
for our code. We know that we have to implement the super::Encryptable
trait for the Rot13 type.
If you want to see more information, run the command shown in the preceding
error, rustc --explain E0046, and the compiler will show more information
about that particular error.
9. We now can continue implementing our Rot13 encryption. First, let's put the
signature from the trait into our implementation:
impl super::Encryptable for Rot13 {
fn encrypt(&self) -> String {
}
}
16
Introducing the Rust Language
The strategy for this encryption is to iterate each character in the string and add 13
to the char value if it has a character before 'n' or 'N', and remove 13 if it has 'n'
or 'N' or characters after it. The Rust language handles Unicode strings by default,
so the program should have a restriction to operate only on the Latin alphabet.
10. On our first iteration, we want to allocate a new string, get the original String
length, start from the zeroeth index, apply a transformation, push to a new string,
and repeat until the end:
fn encrypt(&self) -> String {
let mut new_string = String::new();
let len = self.0.len();
for i in 0..len {
if (self.0[i] >= 'a' && self.0[i] < 'n') ||
(self.0[i] >= 'A' && self.0[i] < 'N') {
new_string.push((self.0[i] as u8 + 13) as
char);
} else if (self.0[i] >= 'n' && self.0[i] <
'z') || (self.0[i] >= 'N' && self.0[i] < 'Z')
{
new_string.push((self.0[i] as u8 - 13) as
char);
} else {
new_string.push(self.0[i]);
}
}
new_string
}
11. Let's try compiling that program. You will quickly find it is not working, with all
errors being `String` cannot be indexed by `usize`. Remember
that Rust handles Unicode by default? Indexing a string will create all sorts of
complications, as Unicode characters have different sizes: some are 1 byte but others
can be 2, 3, or 4 bytes. With regard to index, what exactly are we saying? Is index
means the byte position in a String, grapheme, or Unicode scalar values?
Writing Hello World!
17
In the Rust language, we have primitive types such as u8, char, fn, str,
and many more. In addition to those primitive types, Rust also defines a lot of
modules in the standard library, such as string, io, os, fmt, and thread.
These modules contain many building blocks for programming. For example, the
std::string::String struct deals with String. Important programming
concepts such as comparison and iteration are also defined in these modules, for
example, std::cmp::Eq to compare an instance of a type with another instance.
The Rust language also has std::iter::Iterator to make a type iterable.
Fortunately, for String, we already have a method to do iteration.
12. Let's modify our code a little bit:
fn encrypt(&self) -> String {
let mut new_string = String::new();
for ch in self.0.chars() {
if (ch >= 'a' && ch < 'n') || (ch >= 'A' &&
ch < 'N') {
new_string.push((ch as u8 + 13) as char);
} else if (ch >= 'n' && ch < 'z') || (ch >=
'N' && ch < 'Z') {
new_string.push((ch as u8 - 13) as char);
} else {
new_string.push(ch);
}
}
new_string
}
13. There are two ways of returning; the first one is using the return keyword such as
return new_string;, or we can write just the variable without a semicolon in the
last line of a function. You will see that it's more common to use the second form.
14. The preceding code works just fine, but we can make it more idiomatic. First,
let's process the iterator without the for loop. Let's remove the new string
initialization and use the map() method instead. Any type implementing
std::iter::Iterator will have a map() method that accepts a closure as
the parameter and returns std::iter::Map. We can then use the collect()
method to collect the result of the closure into its own String:
fn encrypt(&self) -> Result<String, Box<dyn Error>> {
self.0
18
Introducing the Rust Language
.chars()
.map(|ch| {
if (ch >= 'a' && ch < 'n') || (ch >= 'A'
&& ch < 'N') {
(ch as u8 + 13) as char
} else if (ch >= 'n' && ch < 'z') || (
ch >= 'N' && ch < 'Z') {
(ch as u8 - 13) as char
} else {
ch
}
})
.collect()
}
The map() method accepts a closure in the form of |x|.... We then use the
captured individual items that we get from chars() and process them.
If you look at the closure, you'll see we don't use the return keyword either. If we
don't put the semicolon in a branch and it's the last item, it will be considered as a
return value.
Using the if block is good, but we can also make it more idiomatic. One of the Rust
language's strengths is the powerful match control flow.
15. Let's change the code again:
fn encrypt(&self) -> String {
self.0
.chars()
.map(|ch| match ch {
'a'..='m' | 'A'..='M' => (ch as u8 + 13)
as char,
'n'..='z' | 'N'..='Z' => (ch as u8 - 13)
as char,
_ => ch,
})
.collect()
}
Writing Hello World!
19
That looks a lot cleaner. The pipe (|) operator is a separator to match items in an
arm. The Rust matcher is exhaustive, which means that the compiler will check
whether all possible values of the matcher are included in the matcher or not. In this
case, it means all characters in Unicode. Try removing the last arm and compiling it
to see what happens if you don't include an item in a collection.
You can define a range by using .. or ..=. The former means we are excluding the
last element, and the latter means we are including the last element.
16. Now that we have implemented our simple encryptor, let's use it in our
main application:
fn main() {
...
io::stdin()
.read_line(&mut user_input)
.expect("Cannot read input");
println!(
"Your encrypted string: {}",
encryptor::rot13::Rot13(user_input).encrypt()
);
}
Right now, when we try to compile it, the compiler will show an error. Basically, the
compiler is saying you cannot use a trait function if the trait is not in the scope, and
the help from the compiler is showing what we need to do.
17. Put the following line above the main() function and the compiler should produce
a binary without any error:
use encryptor::Encryptable;
18. Let's try running the executable:
> ./main
Input the string you want to encrypt:
asdf123
Your encrypted string: nfqs123
> ./main
Input the string you want to encrypt:
20
Introducing the Rust Language
nfqs123
Your encrypted string: asdf123
We have finished our program and we improved it with real-world encryption. In the
next section, we're going to learn how to search for and use third-party libraries and
incorporate them into our application.
Packages and Cargo
Now that we know how to create a simple program in Rust, let's explore Cargo, the Rust
package manager. Cargo is a command-line application that manages your application
dependencies and compiles your code.
Rust has a community package registry at https://crates.io. You can use that
website to search for a library that you can use in your application. Don't forget to check
the license of the library or application that you want to use. If you register on that
website, you can use Cargo to publicly distribute your library or binary.
How do we install Cargo into our system? The good news is Cargo is already installed if
you install the Rust toolchain in the stable channel using rustup.
Cargo package layout
Let's try using Cargo in our application. First, let's copy the application that we
wrote earlier:
cp -r 02ComplexProgram 03Packages
cd 03Packages
cargo init . --name our_package
Since we already have an existing application, we can initialize our existing application
with cargo init. Notice we add the --name option because we are prefixing our
folder name with a number, and a Rust package name cannot start with a number.
If we are creating a new application, we can use the cargo new package_name
command. To create a library-only package instead of a binary package, you can pass the
--lib option to cargo new.
Packages and Cargo
21
You will see two new files, Cargo.toml and Cargo.lock, inside the folder. The .toml
file is a file format commonly used as a configuration file. The lock file is generated
automatically by Cargo, and we don't usually change the content manually. It's also
common to add Cargo.lock to your source code versioning application ignore list, such
as .gitignore, for example.
Let's check the content of the Cargo.toml file:
[package]
name = "our_package"
version = "0.1.0"
edition = "2021"
# See more keys and their definitions at
https://doc.rust-lang.org/cargo/reference/manifest.html
[dependencies]
[[bin]]
name = "our_package"
path = "main.rs"
As you can see, we can define basic things for our application such as name and
version. We can also add important information such as authors, homepage, repository,
and much more. We can also add dependencies that we want to use in the Cargo
application.
One thing that stands out is the edition configuration. The Rust edition is an optional
marker to group various Rust language releases that have the same compatibility. When
Rust 1.0 was released, the compiler did not have the capability to know the async and
await keywords. After async and await were added, it created all sorts of problems
with older compilers. The solution to that problem was to introduce Rust editions. Three
editions have been defined: 2015, 2018, and 2021.
22
Introducing the Rust Language
Right now, the Rust compiler can compile our package perfectly fine, but it is not
very idiomatic because a Cargo project has conventions on file and folder names and
structures. Let's change the files and directory structure a little bit:
1. A package is expected to reside in the src directory. Let's change the Cargo.toml
file [[bin]] path from "main.rs" to "src/main.rs".
2. Create the src directory inside our application folder. Then, move the main.rs
file and the encryptor folder to the src folder.
3. Add these lines to Cargo.toml after [[bin]]:
[lib]
name = "our_package"
path = "src/lib.rs"
4. Let's create the src/lib.rs file and move this line from src/main.rs to src/
lib.rs:
pub mod encryptor;
5. We can then simplify using both the rot13 and Encryptable modules in our
main.rs file:
use our_package::encryptor::{rot13, Encryptable};
use std::io;
fn main() {
...
println!(
"Your encrypted string: {}",
rot13::Rot13(user_input).encrypt()
);
}
Packages and Cargo
23
6. We can check whether there's an error that prevents the code from being compiled by
typing cargo check in the command line. It should produce something like this:
> cargo check
Checking our_package v0.1.0
(/Users/karuna/Chapter01/03Packages)
Finished dev [unoptimized + debuginfo] target(s)
in 1.01s
7. After that, we can build the binary using the cargo build command. Since
we didn't specify any option in our command, the default binary should be
unoptimized and contain debugging symbols. The default location for the generated
binary is in the target folder at the root of the workspace:
$ cargo build
Compiling our_package v0.1.0
(/Users/karuna/Chapter01/03Packages)
Finished dev [unoptimized + debuginfo] target(s)
in 5.09s
You can then run the binary in the target folder as follows:
./target/debug/our_package
debug is enabled by the default dev profile, and our_package is the name that
we specify in Cargo.toml.
If you want to create a release binary, you can specify the --release option,
cargo build --release. You can find the release binary in ./target/
release/our_package.
You can also type cargo run, which will compile and run the application for you.
Now that we have arranged our application structure, let's add real-world encryption to
our application by using a third-party crate.
24
Introducing the Rust Language
Using third-party crates
Before we implement another encryptor using a third-party module, let's modify
our application a little bit. Copy the previous 03Packages folder to the new folder,
04Crates, and use the folder for the following steps:
1. We will rename our Encryptor trait as a Cipher trait and modify the functions. The
reason is that we only need to think about the output of the type, not the encrypt
process itself:
Let's change the content of src/lib.rs to pub mod cipher;.
After that, rename the encryptor folder as cipher.
Then, modify the Encryptable trait into the following:
pub trait Cipher {
fn original_string(&self) -> String;
fn encrypted_string(&self) -> String;
}
The reality is we only need functions to show the original string and the encrypted
string. We don't need to expose the encryption in the type itself.
2. After that, let's also change src/cipher/rot13.rs to use the renamed trait:
impl super::Cipher for Rot13 {
fn original_string(&self) -> String {
String::from(&self.0)
}
fn encrypted_string(&self) -> String {
self.0
.chars()
.map(|ch| match ch {
'a'..='m' | 'A'..='M' => (ch as u8 +
13) as char,
'n'..='z' | 'N'..='Z' => (ch as u8 –
13) as char,
_ => ch,
})
.collect()
Packages and Cargo
25
}
}
3. Let's also modify main.rs to use the new trait and function:
use our_package::cipher::{rot13, Cipher};
…
fn main() {
…
println!(
"Your encrypted string: {}",
rot13::Rot13(user_input).encrypted_string()
);
}
The next step is to determine what encryption and library we want to use for our
new type. We can go to https://crates.io and search for an available crate.
After searching for a real-world encryption algorithm on the website, we found
https://crates.io/crates/rsa. We found that the RSA algorithm is
a secure algorithm, the crate has good documentation and has been audited by
security researchers, the license is compatible with what we need, and there's a
huge number of downloads. Aside from checking the source code of this library, all
indications show that this is a good crate to use. Luckily, there's an install section on
the right side of that page. Besides the rsa crate, we are also going to use the rand
crate, since the RSA algorithm requires a random number generator. Since the
generated encryption is in bytes, we must encode it somehow to string. One of
the common ways is to use base64.
4. Add these lines in our Cargo.toml file, under the [dependencies] section:
rsa = "0.5.0"
rand = "0.8.4"
base64 = "0.13.0"
26
Introducing the Rust Language
5. The next step should be adding a new module and typing using the rsa crate. But,
for this type, we want to modify it a little bit. First, we want to create an associated
function, which might be called a constructor in other languages. We want to then
encrypt the input string in this function and store the encrypted string in a field.
There's a saying that all data not in processing should be encrypted by default, but
the fact is that we as programmers rarely do this.
Since RSA encryption is dealing with byte manipulation, there's a possibility of
errors, so the return value of the associated function should be wrapped in the
Result type. There's no compiler rule, but if a function cannot fail, the return
should be straightforward. Regardless of whether or not a function can produce a
result, the return value should be Option, but if a function can produce an error,
it's better to use Result.
The encrypted_string() method should return the stored encrypted string,
and the original_string() method should decrypt the stored string and
return the plain text.
In src/cipher/mod.rs, change the code to the following:
pub trait Cipher {
fn original_string(&self) -> Result<String,
Box<dyn Error>>;
fn encrypted_string(&self) -> Result<String,
Box<dyn Error>>;
}
6. Since we changed the definition of the trait, we have to change the code in src/
cipher/rot13.rs as well. Change the code to the following:
use std::error::Error;
pub struct Rot13(pub String);
impl super::Cipher for Rot13 {
fn original_string(&self) -> Result<String,
Box<dyn Error>> {
Ok(String::from(&self.0))
}
fn encrypted_string(&self) -> Result<String,
Packages and Cargo
27
Box<dyn Error>> {
Ok(self
.0
...
.collect())
}
}
7. Let's add the following line in the src/cipher/mod.rs file:
pub mod rsa;
8. After that, create rsa.rs inside the cipher folder and create the Rsa struct
inside it. Notice that we use Rsa instead of RSA as the type name. The convention is
to use CamelCase for type:
use std::error::Error;
pub struct Rsa {
data: String,
}
impl Rsa {
pub fn new(input: String) -> Result<Self, Box<
dyn Error>> {
unimplemented!();
}
}
impl super::Cipher for Rsa {
fn original_string(&self) -> Result<String, ()> {
unimplemented!();
}
fn encrypted_string(&self) -> Result<String, ()> {
Ok(String::from(&self.data))
}
}
28
Introducing the Rust Language
There are a couple of things we can observe. The first one is the data field does not
have the pub keyword since we want to make it private. You can see that we have
two impl blocks: one is for defining the methods of the Rsa type itself, and the
other is for implementing the Cipher trait.
Also, the new() function does not have self, mut self, &self, or &mut
self as the first parameter. Consider it as a static method in other languages. This
method is returning Result, which is either Ok(Self) or Box<dyn Error>.
The Self instance is the instance of the Rsa struct, but we'll discuss Box<dyn
Error> later when we talk about error handling in Chapter 7, Handling Errors in
Rust and Rocket. Right now, we haven't implemented this method, hence the usage
of the unimplemented!() macro. Macros in Rust look like a function but with
an extra bang (!).
9. Now, let's implement the associated function. Modify src/cipher/rsa.rs:
use rand::rngs::OsRng;
use rsa::{PaddingScheme, PublicKey, RsaPrivateKey};
use std::error::Error;
const KEY_SIZE: usize = 2048;
pub struct Rsa {
data: String,
private_key: RsaPrivateKey,
}
impl Rsa {
pub fn new(input: String) -> Result<Self, Box<
dyn Error>> {
let mut rng = OsRng;
let private_key = RsaPrivateKey::new(&mut rng,
KEY_SIZE)?;
let public_key = private_key.to_public_key();
let input_bytes = input.as_bytes();
let encrypted_data =
public_key.encrypt(&mut rng, PaddingScheme
::new_pkcs1v15_encrypt(), input_bytes)?;
let encoded_data =
Packages and Cargo
29
base64::encode(encrypted_data);
Ok(Self {
data: encoded_data,
private_key,
})
}
}
The first thing we do is declare the various types we are going to use. After that, we
define a constant to denote what size key we are going to use.
If you understand the RSA algorithm, you already know that it's an asymmetric
algorithm, meaning we have two keys: a public key and a private key. We use the
public key to encrypt data and use the private key to decrypt the data. We can
generate and give the public key to the other party, but we don't want to give the
private key to the other party. That means we must store the private key inside the
struct as well.
The new() implementation is pretty straightforward. The first thing we do is
declare a random number generator, rng. We then generate the RSA private key.
But, pay attention to the question mark operator (?) on the initialization of the
private key. If a function returns Result, we can quickly return the error generated
by calling any method or function inside it by using (?) after that function.
Then, we generate the RSA public key from a private key, encode the input string
as bytes, and encrypt the data. Since encrypting the data might have resulted in an
error, we use the question mark operator again. We then encode the encrypted bytes
as a base64 string and initialize Self, which means the Rsa struct itself.
10. Now, let's implement the original_string() method. We should do the
opposite of what we do when we create the struct:
fn original_string(&self) -> Result<String, Box<dyn
Error>> {
let decoded_data = base64::decode(&self.data)?;
let decrypted_data = self
.private_key
.decrypt(PaddingScheme::
new_pkcs1v15_encrypt(), &decoded_data)?;
Ok(String::from_utf8(decrypted_data)?)
}
30
Introducing the Rust Language
First, we decode the base64 encoded string in the data field. Then, we decrypt
the decoded bytes and convert them back to a string.
11. Now that we have finished our Rsa type, let's use it in our main.rs file:
fn main() {
...
println!(
"Your encrypted string: {}",
rot13::Rot13(user_input).encrypted_
string().unwrap()
);
println!("Input the string you want to encrypt:");
let mut user_input = String::new();
io::stdin()
.read_line(&mut user_input)
.expect("Cannot read input");
let encrypted_input = rsa::Rsa::new(
user_input).expect("");
let encrypted_string = encrypted_input.encrypted_
string().expect("");
println!("Your encrypted string: {}",
encrypted_string);
let decrypted_string = encrypted_input
.original_string().expect("");
println!("Your original string: {}",
decrypted_string);
}
Packages and Cargo
31
Some of you might wonder why we redeclared the user_input variable. The
simple explanation is that Rust already moved the resource to the new Rot13 type,
and Rust does not allow the reuse of the moved value. You can try commenting on
the second variable declaration and compile the application to see the explanation.
We will discuss the Rust borrow checker and moving in more detail in Chapter 9,
Displaying Users' Post.
Now, try running the program by typing cargo run:
$ cargo run
Compiling cfg-if v1.0.0
Compiling subtle v2.4.1
Compiling const-oid v0.6.0
Compiling ppv-lite86 v0.2.10
...
Compiling our_package v0.1.0
(/Users/karuna//Chapter01/04Crates)
Finished dev [unoptimized + debuginfo] target(s)
in 3.17s
Running `target/debug/our_package`
Input the string you want to encrypt:
first
Your encrypted string: svefg
Input the string you want to encrypt:
second
Your encrypted string: lhhb9RvG9zI75U2VC3FxvfUujw0cVqqZFgPXhNixQTF7RoVBEJh2inn7sEefDB7eNlQcf09lD2nULfgc2mK55ZE+UUcYzbMDu45oTaPiDPog4L6FRVpbQR27bkOj9Bq1KS+QAvRtxtTbTa1L5/
OigZbqBc2QOm2yHLCimMPeZKhLBtK2whhtzIDM8l5AYTBg+rA688ZfB7ZI4FSRm4/h22kNzSPo1DECI04ZBprAq4hWHxEKRwtn5TkRLhClGFLSYKkY7Ajjr3EOf4QfkUvFFhZ0qRDndPI5c9RecavofVLxECrYfv5ygYRmW3B1cJn4vcBhVKfQF0JQ+vs+FuTUpw==
Your original string: second
32
Introducing the Rust Language
You will see that Cargo automatically downloaded the dependencies and builds them
one by one. Also, you might notice that encrypting using the Rsa type took a while.
Isn't Rust supposed to be a fast system language? The RSA algorithm itself is a slow
algorithm, but that's not the real cause of the slowness. Because we are running the
program in a development profile, the Rust compiler generates an application binary
with all the debugging information and does not optimize the resulting binary. On
the other hand, if you build the application using the --release flag, the compiler
generates an optimized application binary and strips the debugging symbols. The
resulting binary compiled with the release flag should execute faster than the debug
binary. Try doing it yourself so you'll remember how to build a release binary.
In this section, we have learned about Cargo and third-party packages, so next, let's find
out where to find help and documentation for the tools that we have used.
Tools and getting help
Now that we have created a pretty simple application, you might be wondering what tools
we can use for development, and how to find out more about Rust and get help.
Tools
Besides Cargo, there are a couple more tools we can use for Rust application development:
• rustfmt
This program is for formatting your source code so it follows the Rust style guide.
You can install it by using rustup (rustup component add rustfmt). Then,
you can integrate it with your favorite text editor or use it from the command line.
You can read more about rustfmt at https://github.com/rust-lang/
rustfmt.
• clippy
Does the name remind you of something? clippy is useful for linting your Cargo
application using various lint rules. Right now, there are more than 450 lint rules
you can use. You can install it using this command: rustup component add
clippy. Afterward, you can use it in the Cargo application by running cargo
clippy. Can you try it in the Cargo application that we wrote earlier? You can read
more about clippy at https://github.com/rust-lang/rust-clippy.
Tools and getting help
33
Text editor
Most likely, the text editor of your choice already supports the Rust language, or at least
syntax highlighting Rust. You can install the Rust language server if you want to add
important functionalities such as go to definition, go to implementation, symbol search,
and code completion. Most popular text editors already support the language server, so
you can just install an extension or other integration method to your text editor:
• The Rust language server
You can install it using the rustup command: rustup component add rls
rust-analysis rust-src. Then, you can integrate it into your text editor. For
example, if you are using Visual Studio Code, you can install the Rust extension
and enable rls.
You can read more about it at https://github.com/rust-lang/rls.
• Rust analyzer
This application is poised to be the Rust language server 2.0. It's still considered
to be in alpha as of the writing of this book, but in my experience, this application
works well with regular updates. You can find the executable for this one at
https://github.com/rust-analyzer/rust-analyzer/releases,
and then configure your editor language server to use this application. You can read
more about it at https://rust-analyzer.github.io.
Getting help and documentation
There are a few important documents that you might want to read to find help or
references:
• The Rust programming language book: This is the book that you want to read if
you want to understand more about the Rust programming language. You can find
it online at https://doc.rust-lang.org/book/.
• Rust by Example: This documentation is a collection of small examples that show
the concepts of the Rust language and its standard library's capabilities. You can
read it online at https://doc.rust-lang.org/rust-by-example/
index.html.
• Standard library documentation: As a programmer, you will refer to this standard
library documentation. You can read more about standard libraries, their modules,
the function signatures, what standard libraries' functions do, read the examples,
and more. Find it at https://doc.rust-lang.org/std/index.html.
34
Introducing the Rust Language
• The Cargo book: If you are interested in Cargo and related information such as
the Cargo.toml manifest format, you can read more about it at https://doc.
rust-lang.org/cargo/index.html.
• Rust style guidelines: The Rust language, like other programming languages, has
style guidelines. These guidelines tell a programmer what the convention for naming
is, about whitespaces, how to use constants, and other idiomatic conventions for a
Rust program. Read more about it at https://doc.rust-lang.org/1.0.0/
style/.
• Docs.rs: Suppose you are using a third-party crate, such as the rsa crate that we
used earlier. To find documentation for that library, you can go to https://
crates.io and search for the crate's page, then go to the right pane and go to the
documentation section. Or, you can go to https://docs.rs and search for the
crate name and find the documentation for it.
• Rustup doc: This documentation is not online, but you can install it using rustup
(rustup component add rust-docs). Then, you can open documentation
in your browser while offline using the rustup doc command. If you want to
open standard library documentation offline, you can type rustup doc --std.
There are other documents you can open; try and see what they are by using
rustup doc --help.
• The Rust user forum: If you want to get help or help other Rust programmers, you
can find it all over the internet. There's a dedicated forum to discuss Rust-related
topics at https://users.rust-lang.org/.
Summary
In this chapter, we had a brief overview of the Rust language. We learned about the Rust
toolchain and how to install it as well as the tools required for Rust development. After
that, we created two simple programs, used Cargo, and imported third-party modules
to improve our program. Now that you can write a small program in the Rust language,
explore! Try creating more programs or experimenting with the language. You can try
Rust by Example to see what features we can use in our programs. In subsequent chapters,
we will learn more about Rocket, a web framework written in the Rust language.
2
Building Our
First Rocket Web
Application
In this chapter, we're going to explore Rocket, a framework to create web applications
using the Rust programming language. We will learn a little bit about Rocket before we
create our first web application using the Rocket framework. After that, we will learn how
to configure our Rocket web application. Finally, we will explore how to get help for this
web framework at the end of this chapter.
In this chapter, we're going to cover the following main topics:
• Introducing Rocket – a web framework written in the Rust language
• Creating our first Rocket web application
• Configuring our Rocket web application
• Getting help
36
Building Our First Rocket Web Application
Technical requirements
For this and subsequent chapters, you will need to have the requirements mentioned in
Chapter 1, Introducing the Rust Language, and the Rust toolchain installed. If you still
don't have the Rust compiler toolchain installed, please follow the installation guide in
Chapter 1, Introducing the Rust Language. Also, it would be helpful to have a text editor
with a Rust extension installed and Rust tools such as rustfmt or clippy. If you don't
have a text editor installed already, you can use open source software such as Visual Studio
Code with the rust-analyzer extension. As we're going to make HTTP requests to
the application that we're going to create, you should have a web browser or other HTTP
client installed.
Finally, the Rocket framework has a few releases, all of which are slightly different. We
will only be discussing Rocket 0.5.0. Don't worry if you are planning to use a different
version of Rocket, as the terminology and concepts are almost the same. Use the API
documentation mentioned in the Getting help section of this chapter to see the correct
documentation for your Rocket framework version.
The code for this chapter can be found at https://github.com/
PacktPublishing/Rust-Web-Development-with-Rocket/tree/main/
Chapter02.
Introducing Rocket – a web framework written
in the Rust language
The development of the Rocket web framework began as a project of Sergio Benitez in
2016. For a long time, it was being created with a lot of Rust macrosystems to simplify
the development process; because of this, a stable Rust compiler could not be used until
recently, in 2021. During the development process, async/await capabilities were added to
Rust. Rocket began to incorporate async/await until the issue tracker for it closed in 2021.
Rocket is a fairly simple web framework without many bells and whistles, such as database
Object-relational mapping (ORM) or mailing systems. Programmers can extend
Rocket's capabilities using other Rust crates, for example, by adding third-party logging or
connecting to memory store applications.
Introducing Rocket – a web framework written in the Rust language
37
The HTTP request life cycle in Rocket
Handling HTTP requests is an integral part of web applications. The Rocket web
framework treats incoming HTTP requests as a life cycle. The first thing the web
application does is checks and determines which function or functions will be able to
handle the incoming request. This part is called routing. For example, if there's a GET/
something incoming request, Rocket will check all the registered routes for matches.
After routing, Rocket will perform the validation of the incoming request against types
and guards declared in the first function. If the result does not match and the next route
handling function is available, Rocket will continue validation against the next function
until there are no more functions available to handle that incoming request.
After validation, Rocket will then process with what the programmer wrote in the body
of the function. For example, a programmer creates a SQL query with the data from the
request, sends the query to the database, retrieves the result from the database, and creates
an HTML using the result.
Rocket will finally return a response, which contains the HTTP status, headers, and body.
The request life cycle is then complete.
To recap, the life cycle of a Rocket request is Routing → Validation → Processing →
Response. Next, let's discuss how the Rocket application starts.
Rocket launch sequence
Like a real-life rocket, we start by building the Rocket application. In the building process,
we mount the routes (functions that handle incoming requests) to the Rocket application.
In the building process, the Rocket application also manages various states. A state is
a Rust object that can be accessed in a route handler. For example, let's say we want a
logger that sends events to a logging server. We initialize the logger object when we build
the Rocket application, and when there's an incoming request, we can use the already
managed logger object in the request handler.
Still in the building process, we can also attach fairings. In many web frameworks, there
is usually a middleware component that filters, inspects, authorizes, or modifies incoming
HTTP requests or responses. In the Rocket framework, the function that provides
middleware functionality is called a fairing. For example, if we want to have a universally
unique identifier (UUID) for every HTTP request for audit purposes, we first create a
fairing that generates a random UUID and appends it to the request HTTP header. We also
make the fairing append the same UUID to the generated HTTP response. Next, we attach it
to Rocket. This fairing will then intercept the incoming request and response and modify it.
38
Building Our First Rocket Web Application
After the Rocket application is built and ready, the next step is, of course, launching it. Yay,
the launch is successful! Now, our Rocket application is operational and ready to serve
incoming requests.
Now that we have an overview of the Rocket application, let's try creating a simple
Rocket application.
Creating our first Rocket web application
In this section, we are going to create a very simple web application that handles only one
HTTP path. Follow these steps to create our first Rocket web application:
1. Create a new Rust application using Cargo:
cargo new 01hello_rocket --name hello_rocket
We are creating an application named hello_rocket in a folder named
01hello_rocket.
2. After that, let's modify the Cargo.toml file. Add the following line after
[dependencies]:
rocket = "0.5.0-rc.1"
3. Append the following lines at the top of the src/main.rs file:
#[macro_use]
extern crate rocket;
Here, we are telling the Rust compiler to use macros from the Rocket crate by using
the #[macro_use] attribute. We can skip using that attribute, but that would
mean we must specify use for every single macro that we are going to use.
4. Add the following line to tell the compiler that we are using the definition from the
Rocket crate:
use rocket::{Build, Rocket};
5. After that, let's create our first HTTP handler. Add the following lines after the
preceding ones:
#[get("/")]
fn index() -> &'static str {
"Hello, Rocket!"
}
Creating our first Rocket web application
39
Here, we define a function that returns a reference to a str. The 'a in the Rust
language means that a variable has a 'a lifetime. The life span of a reference depends
on many things. We will discuss these in Chapter 9, Displaying User's Post, when we
discuss object scope and lifetime in more depth. But, a 'static notation is special
because it means that it will last as long as the application is still alive. We can also see
that the return value is "Hello, Rocket" since it is the last line and we did not put
a semicolon at the end.
But, what is the #[get("/")] attribute? Remember before when we used the
#[macro_use] attribute? The rocket::get attribute is a macro attribute that
specifies the HTTP method a function handles, and the route, HTTP paths, and
parameters it handles. There are seven method-specific route attributes that we
can use: get, put, post, delete, head, options, and patch. All of them
correspond to their respective HTTP method name.
We can also use alternate macros to specify route handlers by replacing the attribute
macro with the following:
#[route(GET, path = "/")]
6. Next, delete the fn main() function and add the following lines:
#[launch]
fn rocket() -> Rocket<Build> {
rocket::build().mount("/", routes![index])
}
We have created a function that will generate the main function because we used
the #[launch] attribute. Inside the function, we built the Rocket and mounted the
routes that have an index function to the "/" path.
7. Let's try running the hello_rocket application:
> cargo run
Updating crates.io index
Compiling proc-macro2 v1.0.28
...
Compiling hello_rocket v0.1.0 (/Users/karuna/
Chapter02/01hello_rocket)
40
Building Our First Rocket Web Application
Finished dev [unoptimized + debuginfo] target(s)
in 1m 39s
Running `target/debug/hello_rocket`
Configured for debug.
>> address: 127.0.0.1
>> port: 8000
>> workers: 8
>> ident: Rocket
>> keep-alive: 5s
>> limits: bytes = 8KiB, data-form = 2MiB, file =
1MiB, form = 32KiB, json = 1MiB, msgpack = 1MiB,
string = 8KiB
>> tls: disabled
>> temp dir: /var/folders/gh/
kgsn28fn3hvflpcfq70x6f1w0000gp/T/
>> log level: normal
>> cli colors: true
>> shutdown: ctrlc = true, force = true, signals =
[SIGTERM], grace = 2s, mercy = 3s
Routes:
>> (index) GET /
Fairings:
>> Shield (liftoff, response, singleton)
Shield:
>> X-Content-Type-Options: nosniff
>> X-Frame-Options: SAMEORIGIN
>> Permissions-Policy: interest-cohort=()
Rocket has launched from http://127.0.0.1:8000
You can see the application printed the application configuration, such as keep-alive
timeout duration, request size limits, log level, routes, and many more that you
typically see in an HTTP server to the terminal. After that, the application printed
the various parts of the Rocket. We created a single-route index function, which
handles GET /.
Then, there is the default built-in fairing, Shield. Shield works by injecting HTTP
security and privacy headers to all responses by default.
Creating our first Rocket web application
41
We also see that the application was successfully launched and is now accepting
requests on the address 127.0.0.1 and port 8000.
8. Now, let's test whether the application is really accepting requests. You can use a
web browser or any HTTP client since it's a very simple request, but if you use the
command line, don't stop the running application; open another terminal:
> curl http://127.0.0.1:8000
Hello, Rocket!
You can see that the application responded perfectly. You can also see the log of the
application:
GET /:
>> Matched: (index) GET /
>> Outcome: Success
>> Response succeeded.
9. Now, let's try requesting something that does not exist in our application:
> curl http://127.0.0.1:8000/somepath
<!DOCTYPE html>
<html lang="en">
<head>
<meta charset="utf-8">
<title>404 Not Found</title>
</head>
<body align="center">
…
</body>
</html>
Now, let's see what's going on in the application terminal output:
GET /somepath:
>> No matching routes for GET /somepath.
>> No 404 catcher registered. Using Rocket default.
>> Response succeeded.
We now know that Rocket already has default handlers for 404 status situations.
42
Building Our First Rocket Web Application
Let's recall the Rocket life cycle, Routing → Validation → Processing → Response. The first
request to http://127.0.0.1:8000/ was successful because the application found
the handler for the GET / route. Since we didn't create any validation in the application,
the function then performed some very simple processing, returning a string. The
Rocket framework already implemented the Responder trait for &str, so it created
and returned an appropriate HTTP response. The other request to /somepath did not
pass the routing part, and we did not create any error handler, so the Rocket application
returned a default error handler for this request.
Try opening it in the browser and inspecting the response using developer tools,
or try running the curl command again in verbose mode to see the complete
HTTP response, curl -v http://127.0.0.1:8000/ and curl -v
http://127.0.0.1:8000/somepath:
$ curl -v http://127.0.0.1:8000/somepath
*
Trying 127.0.0.1...
* TCP_NODELAY set
* Connected to 127.0.0.1 (127.0.0.1) port 8000 (#0)
> GET /somepath HTTP/1.1
> Host: 127.0.0.1:8000
> User-Agent: curl/7.64.1
> Accept: */*
>
< HTTP/1.1 404 Not Found
< content-type: text/html; charset=utf-8
< server: Rocket
< x-frame-options: SAMEORIGIN
< x-content-type-options: nosniff
< permissions-policy: interest-cohort=()
< content-length: 383
< date: Fri, 17 Aug 1945 03:00:00 GMT
<
<!DOCTYPE html>
...
* Connection #0 to host 127.0.0.1 left intact
</html>* Closing connection 0
Creating our first Rocket web application
43
You can see that access to / worked perfectly and access to /somepath returned an
HTTP response with a 404 status and with some HTML content. There are some default
privacy and security HTTP headers too, which were injected by the Shield fairing.
Congratulations! You just created your first Rocket-powered web application. What you
just built is a regular Rocket web application. Next, let's modify it to be an asynchronous
web application.
An asynchronous application
What is an asynchronous application? Let's say our web application is sending a query
to a database. While waiting for the response for a few milliseconds, our application
thread is just doing nothing. For a single user and a single request, this is not a problem.
An asynchronous application is an application that allows a processor to do other tasks
while there are blocking tasks, such as waiting for the response from the database. We
will discuss this in detail later; right now, we just want to convert our application into an
asynchronous application.
Let's modify the application that we created earlier and make it asynchronous. You can
find the example folder in 02hello_rocket_async:
1. Remove the use rocket::{Build, Rocket}; line, since we are not going to
use it.
2. After that, let's add the async keyword before fn index().
3. Replace the #[launch] attribute with #[rocket::main]. This is to signify that
this function is going to be the main function in our application.
4. Add the async keyword and rename fn launch() to fn main().
5. We also don't want the main function to return anything, so use remove ->
Rocket<build>.
6. Add .launch().await; after calling mount.
The final code should look like this:
#[macro_use]
extern crate rocket;
#[get("/")]
async fn index() -> &'static str {
"Hello, Rocket!"
}
44
Building Our First Rocket Web Application
#[rocket::main]
async fn main() {
rocket::build().mount("/", routes![
index]).launch().await;
}
Stop the old version from running on the server by using the Ctrl + C command. You
should see something like this:
Warning: Received SIGINT. Requesting shutdown.
Received shutdown request. Waiting for pending I/O...
We don't have any blocking task in our "/" handler right now, so we will not see any
noticeable benefit. Now that we have created our application, let's configure it in the
next section.
Configuring our Rocket web application
Let's learn how to configure our Rocket web application, starting with different profiles for
different situations. Then, we will use the Rocket.toml file to configure it. And finally,
we will learn how to use environment variables to configure our application.
Starting the Rocket application in different profiles
Let's run our synchronous application server without a release flag, and in another
terminal, let's see whether we can benchmark it:
1. First, let's install the application using cargo install benchrs. That's right,
you can install the application using Cargo too! There are very good Rust programs
that you can use in your terminal, for example, ripgrep, which is one of the fastest
applications for grepping string in your code.
If you want to call the Cargo-installed application, you can use the full path or add
it to your terminal path if you are using a Unix-based terminal. Append the
following line to your ~/.profile or any other profile file that will be loaded
by your terminal:
export PATH="$HOME/.cargo/bin:$PATH"
Rustup should already have added Cargo's bin folder to your path if you are
using Windows.
Configuring our Rocket web application
45
2. Run the benchmark against your running application:
benchrs -c 30 -n 3000 -k http://127.0.0.1:8000/
07:59:04.934 [INFO] benchrs:0.1.8
07:59:04.934 [INFO] Spawning 8 threads
07:59:05.699 [INFO] Ran in 0.7199552s 30 connections,
3000 requests with avg request time: 6.5126667ms, median:
6ms, 95th percentile: 11ms and 99th percentile: 14ms
You can see that our application handles around 3,000 requests in 0.7199552
seconds. Not a bad value for a simple application if we compare it to other heavy
frameworks. After that, stop the application for now.
3. Now, let's run the application again but this time in release mode. Do you still
remember how to do it from the previous chapter?
> cargo run –release
It should then compile our application for release and run it.
4. After the application is ready to accept the request again, in another terminal, run
the benchmark again:
$ benchrs -c 30 -n 3000 -k http://127.0.0.1:8000/
08:12:51.388 [INFO] benchrs:0.1.8
08:12:51.388 [INFO] Spawning 8 threads
08:12:51.513 [INFO] Ran in 0.07942524s 30 connections,
3000 requests with avg request time: 0.021333333ms,
median: 0ms,
5th percentile: 0ms and 99th percentile: 1ms
Again, the result is very impressive, but what's going on here? The total benchmark
time now becomes roughly 0.08 seconds, almost 10 times faster than the previous total
benchmark time.
To understand the reason for the speed increase, we need to know about Rocket profiles.
A profile is a name we give for a set of configurations.
Rocket application has two meta-profiles: default and global. The default profile has
all the default configuration values. If we create a profile and do not set the values of its
configuration, the values from the default configuration will be used. As for the global
profile, if we set the configuration values, then it will override the values set in a profile.
46
Building Our First Rocket Web Application
Besides those two meta-profiles, the Rocket framework also provides two configurations.
When running or compiling the application in release mode, Rocket will use the release
profile, and while running or compiling in debug mode, Rocket will select the debug
profile. Running the application in release mode will obviously generate an optimized
executable binary, but there are other optimizations in the application itself. For example,
you will see the difference in the application output. The debug profile by default shows
the output on the terminal, but the release profile by default will not show any request in
the terminal output.
We can create any name for a profile, for example, development, test, staging,
sandbox, or production. Use any name that makes sense to your development
process. For example, in a machine used for QA testing, you might want to give the profile
the name testing.
To choose which profile we want to use, we can specify it in the environment variable. Use
ROCKET_PROFILE=profile_name cargo run in the command line. For example,
you can write ROCKET_PROFILE=profile_name cargo run –release.
Now that we know how to start the application with a certain profile, let's learn how to
create a profile and configure the Rocket application.
Configuring the Rocket web application
Rocket has a way to configure web applications. The web framework uses the figment crate
(https://crates.io/crates/figment) for configuration. There are many providers
(that is, types that implement a Provider trait). Someone can make a type that reads JSON
from a file and implements a Provider trait for that type. That type can then be consumed
by an application that uses the figment crate as the source of the configuration.
In Rust, there's a convention to initialize a struct with a default value if it implements a
standard library trait, std::default::Default. That trait is written as follows:
pub trait Default {
fn default() -> Self;
}
For example, a struct named StructName, which implements the Default trait, will
then be called StructName::default(). Rocket has a rocket::Config struct that
implements the Default trait. The default value is then used to configure the application.
Configuring our Rocket web application
47
If you look at the source for the rocket::Config struct, it is written as follows:
pub struct Config {
pub profile: Profile,
pub address: IpAddr,
pub port: u16,
pub workers: usize,
pub keep_alive: u32,
pub limits: Limits,
pub tls: Option<TlsConfig>,
pub ident: Ident,
pub secret_key: SecretKey,
pub temp_dir: PathBuf,
pub log_level: LogLevel,
pub shutdown: Shutdown,
pub cli_colors: bool,
// some fields omitted
}
As you can see, there are fields such as address and port, which will obviously dictate
how the application behaves. If you check further in the source code, you can see the
Default trait implementation for the Config struct.
Rocket also has a couple of figment providers that override the default rocket::Config
value when we use the rocket::build() method in our application.
The first figment provider reads from the Rocket.toml file, or the file that we specify
if we run the application with the ROCKET_CONFIG environment variable. If we specify
ROCKET_CONFIG (for example, ROCKET_CONFIG=our_config.toml), it will search
our_config.toml at the root directory of the application. If the application cannot find
that configuration file, then the application will look in the parent folder until it reaches
the root of the filesystem. If we specify an absolute path, for example, ROCKET_CONFIG=/
some/directory/our_config.toml, then the application will only search for the file
in that location.
The second figment provider reads the value from Environment variables. We will
see how to do it later, but first, let's try configuring the Rocket application using the
Rocket.toml file.
48
Building Our First Rocket Web Application
Configuring the Rocket application using Rocket.toml
The first thing we need to know is the list of keys we can use in the configuration file.
These are the keys that we can use in the configuration file:
• address: The application will serve at this address.
• port: The application will serve on this port.
• workers: The application will use this number of threads.
• ident: If we specify false, the application will not put an identity in the server
HTTP header; if we specify string, the application will use it as an identity in the
server HTTP header.
• keep_alive: Keep-alive timeout in seconds. Use 0 to disable keep_alive.
• log_level: The maximum level to log (off/normal/debug/critical).
• temp_dir: The path to a directory to store temporary files.
• cli_colors: Use colors and emojis on the log, or not. This is useful to disable
bells and whistles in the release environment.
• secret_key: The Rocket application has a type to store private cookies in the
application. The private cookies are encrypted by this key. The key length is 256 bits,
and you can generate it using tools such as openssl rand -base64 32. Since
this is an important key, you might want to keep it in a safe place.
• tls: Use tls.key and tls.certs to enter the path to your TLS (Transport
Layer Security) key and certificate file.
• limits: This configuration is nested and is used to limit the server read size.
You can write the value in multibyte units such as 1 MB (megabyte) or 1 MiB
(mebibyte). There are several default options:
limits.form – 32 KiB
limits.data-form – 2 MiB
limits.file – 1 MiB
limits.string – 8 KiB
limits.bytes – 8 KiB
limits.json – 1 MiB
limits.msgpack – 1 MiB
Configuring our Rocket web application
49
• shutdown: If a web application is terminated abruptly when it's still processing
something, the data being processed might accidentally get corrupted. For example,
let's say a Rocket application is in the middle of sending updated data to the
database server, but the process is then terminated suddenly. As a result, there is
data inconsistency. This option configures Rocket's smooth shutdown behavior. Like
limits, it has several subconfigurations:
shutdown.ctrlc – Does the application ignore the Ctrl + C keystrokes or not?
shutdown.signals – An array of Unix signals that trigger a shutdown. Only
works on Unix or Unix-like operating systems.
shutdown.grace – The number of seconds in which to finish outstanding
server I/O before stopping it.
shutdown.mercy – The number of seconds in which to finish outstanding
connection I/O before stopping it.
shutdown.force – Specifies whether or not to kill a process that refuses
to cooperate.
Now that we know what keys we can use, let's try configuring our application. Remember
what port our application is running on? Suppose now we want to run the application on
port 3000. Let's create a Rocket.toml file in the root folder of our application:
[default]
port = 3000
Now, try running the application again:
$ cargo run
...
Rocket has launched from http://127.0.0.1:3000
You can see that it's working; we're running the application in port 3000. But, what if we
want to run the application in a different configuration for a different profile? Let's try
adding these lines in the Rocket.toml file and running the application in release mode:
[release]
port = 9999
$ cargo run --release
...
Rocket has launched from http://127.0.0.1:9999
50
Building Our First Rocket Web Application
That's right, we can specify the configuration for a different profile. What do we do if our
option is nested? Because this file is a .toml file, we can write it as follows:
[default.tls]
certs = "/some/directory/cert-chain.pem"
key = "/some/directory/key.pem"
Or, we can write it in the following way:
[default]
tls = { certs = "/some/directory/cert-chain.pem", key = "/some/
directory/key.pem" }
Now, let's see the whole file with the default configuration:
[default]
address = "127.0.0.1"
port = 8000
workers = 16
keep_alive = 5
ident = "Rocket"
log_level = "normal"
temp_dir = "/tmp"
cli_colors = true
## Please do not use this key, but generate your own with
`openssl rand -base64 32`
secret_key = " BCbkLMhRRtYMerGKCcboyD4Mhf6/XefvhW0Wr8Q0s1Q="
[default.limits]
form = "32KiB"
data-form = "2MiB"
file = "1MiB"
string = "8KiB"
bytes = "8KiB"
json = "1MiB"
msgpack = "1MiB"
[default.tls]
Configuring our Rocket web application
51
certs = "/some/directory/cert-chain.pem
key = "/some/directory/key.pem
[default.shutdown]
ctrlc = true
signals = ["term"]
grace = 5
mercy = 5
force = true
Even though we can create the file with the whole configuration, the best practice for using
Rocket.toml is to rely on the default value and only write what we really need to override.
Overriding the configuration with environment
variables
After checking Rocket.toml, the application then overrides the rocket::Config
value again with environment variables. The application will check the availability
of the ROCKET_* environment variables. For example, we might define ROCKET_
IDENT="Merpay" or ROCKET_TLS={certs="abc.pem",key="def.pem"}. This
is very useful if we are doing development and have multiple team members, or if we don't
want something to exist in the configuration files and rely on environment variables, for
example, when we store secret_key in Kubernetes Secrets. In this case, getting the
secret value from environment variables is more secure compared to writing the value
in Rocket.toml and committing it to your source code versioning system.
Let's try overriding the configuration by running the application with ROCKET_
PORT=4000:
$ ROCKET_PORT=4000 cargo run
...
Rocket has launched from http://127.0.0.1:4000
The environment variable override works; we are running the application in port 4000
even though we specified port 3000 in the Rocket.toml file. We will learn how to
extend the default rocket::Config with custom configuration when we configure the
application to connect to a database in Chapter 4, Building, Igniting, and Launching Rocket.
Now that we have learned how to configure the Rocket application, let's find out where we
can get documentation and help for the Rocket web framework.
52
Building Our First Rocket Web Application
Getting help
Getting help with a web framework is essential. In this part, we will see where we can get
help and documentation for the Rocket framework.
You can get help from the website of the Rocket framework itself: https://rocket.
rs/. On that website, there is a guide as follows: https://rocket.rs/v0.5-rc/
guide/. In the top-left corner of that page, there is a dropdown where you can choose
documentation for previous versions of the Rocket web framework.
At https://api.rocket.rs, you can see the documentation for the API, but,
unfortunately, this documentation is for the master branch of the Rocket web framework.
If you want to see the API documentation for your framework version, you have to
manually search for it, such as https://api.rocket.rs/v0.3/rocket/ or
https://api.rocket.rs/v0.4/rocket/.
There is an alternative way to generate offline documentation for the Rocket framework.
Go and download the source code of Rocket from the official repository at https://
github.com/SergioBenitez/Rocket. Then, inside the folder, type ./scripts/
mk-docs.sh to run the shell script. The generated documentation is useful because,
sometimes, there are items that are different from those at https://api.rocket.rs.
For example, the definition for rocket::Config and its default value in the code is a
little bit different from the one in the API documentation.
Summary
In this chapter, we learned a little bit about the Rocket start sequence and request life
cycle. We also created a very simple application and converted it to an asynchronous
application. After that, we learned about the Rocket configuration, wrote the configuration
using Rocket.toml, and overrode it using environment variables. Finally, we learned
where to find the documentation for the Rocket framework.
Now that we have created a simple application with the Rocket web framework, let's
discuss requests and responses further in the next chapter.
3
Rocket Requests
and Responses
We will discuss Rocket requests and responses more in this chapter. The first section will
discuss how Rocket handles incoming requests in the form of routes. We will learn about
various parts of a route including HTTP methods, URIs, and paths. Then, we will create
an application that uses various parts in routes. We will also talk about Rust traits and
implement a Rust trait to create a request handler.
We are also going to discuss responses in a Rocket route handler and implement returning
responses. After that, we will talk more about various built-in responder implementations
and learn how to create an error handler to create a custom error when a route handler
fails. Finally, we will implement a generic error handler to handle common HTTP status
codes such as 404 and 500.
By the end of the chapter, you will be able to create the most important part of the Rocket
framework: functions to handle incoming requests and return responses.
In this chapter, we're going to cover the following main topics:
• Understanding Rocket routes
• Implementing route handlers
54
Rocket Requests and Responses
• Creating responses
• Making default error handlers
Technical requirements
We still have the same technical requirements from Chapter 2, Building Our First Rocket
Web Application for this chapter. We require a Rust compiler to be installed, along with a
text editor, and an HTTP client.
You can find the source code for this chapter at https://github.com/
PacktPublishing/Rust-Web-Development-with-Rocket/tree/main/
Chapter03.
Understanding Rocket routes
We begin our chapter by discussing how Rocket handles incoming requests in the form
of routes. We write functions that can be used to handle incoming requests, put route
attribute above those functions, and attach the route handling functions to the Rocket.
A route has an HTTP method and a URI, which corresponds to the URL path and URL
query. The URI can be static, dynamic, or a combination of both. As well as a URI, there
are other parameters in a route: rank, format, and data. We'll talk about them in detail
later, but first, let's see how we can write a route in our code. Just like previously, let's
create a new Rust application and add Rocket as a dependency. After that, let's add the
following lines in the src/main.rs file:
#[macro_use]
extern crate rocket;
use rocket::{Build, Rocket};
#[derive(FromForm)]
struct Filters {
age: u8,
active: bool,
}
#[route(GET, uri = "/user/<uuid>", rank = 1, format = "text/
plain")]
fn user(uuid: &str) { /* ... */ }
Understanding Rocket routes
55
#[route(GET, uri = "/users/<grade>?<filters..>")]
fn users(grade: u8, filters: Filters) { /* ... */ }
#[launch]
fn rocket() -> Rocket<Build> {
rocket::build().mount("/", routes![user, users])
}
The highlighted lines are the route attributes. You can only put the route attribute in a
free function and not in a method inside impl of a Struct. Now, let's discuss the route
parts in detail.
HTTP methods
The first parameter you see inside the route definition is the HTTP method. The HTTP
method is defined in the rocket::http::Method enum. The enum has the GET, PUT,
POST, DELETE, OPTIONS, HEAD, TRACE, CONNECT, and PATCH members, which all
correspond to valid HTTP methods defined in RFCs (Request For Comments).
We can use other attributes to denote a route besides using the #[route...] macro.
We can directly use method-specific route attributes such as #[get...]. There are
seven method-specific route attributes: get, put, post, delete, head, options, and
patch. We can rewrite the previous route attributes into the following lines:
#[get("/user/<uuid>", rank = 1, format = "text/plain")]
#[get("/users/<grade>?<filters..>")]
It looks simple, right? Unfortunately, we still have to use the #[route...] attribute
if we want to handle HTTP CONNECT or TRACE as there are no method-specific route
attributes for these two methods.
URI
Inside the route attribute, we can see the URI. The URI parameter is a string that has two
parts, the path and the query. The part before the question mark (?) is the path and the
part after the question mark is the query.
Both the path and the query can be divided into segments. The path is segmented by the
slash (/), as in /segment1/segment2. The query is segmented by an ampersand (&), as
in ?segment1&segment2.
56
Rocket Requests and Responses
A segment can be static or dynamic. The static form is fixed, such as /static
or ?static. The dynamic segment is defined inside angle brackets (<>), as in
/<dynamic> or ?<dynamic>.
If you declare a dynamic segment, you must use the segment as a function parameter in the
function following the route attribute. The following is an example of how we can use the
dynamic segment by writing a new application and adding this route and function handler:
#[get("/<id>")]
fn process(id: u8) {/* ... */}
Path
The argument type in the handler function for the path must implement the
rocket::request::FromParam trait. You might be wondering why we used u8 as
a function argument in the previous example. The answer is because Rocket has already
implemented the FromParam trait for important types, such as u8. The following is a list
of all types that have already implemented the FromParam trait:
• Primitive types such as f32, f64, isize, i8, i16, i32, i64, i128, usize, u8,
u16, u32, u64, u128, and bool.
• Rust standard library numerical types in the std::num module, such as
NonZeroI8, NonZeroI16, NonZeroI32, NonZeroI64, NonZeroI128,
NonZeroIsize, NonZeroU8, NonZeroU16, NonZeroU32, NonZeroU64,
NonZeroU128, and NonZeroUsize.
• Rust standard library net types in the std::net module, such as IpAddr,
Ipv4Addr, Ipv6Addr, SocketAddrV4, SocketAddrV6, and SocketAddr.
• &str and String.
• Option<T> and Result<T, T::Error> where T:FromParam. If you are new
to Rust, this syntax is for a generic type. T:FromParam means that we can use any
type T, as long as that type implements FromParam. For example, we can create
a User struct, implement FromParam for User, and use Option<User> as an
argument in the function handler.
If you write a dynamic segment path, you must use the argument in the handler function,
or else the code will fail to compile. The code will also fail if the argument type does not
implement the FromParam trait.
Understanding Rocket routes
57
Let's see the error if we don't use the argument in the handler function by removing id:
u8 from the code:
> cargo build
...
Compiling route v0.1.0 (/Users/karuna/Chapter03/
04UnusedParameter)
error: unused parameter
--> src/main.rs:6:7
|
6 | #[get("/<id>")]
|
^^^^^^^
error: [note] expected argument named `id` here
--> src/main.rs:7:15
|
7 | fn process_abc() { /* ... */ }
|
^^
Then, let's write the dynamic segment, which does not implement FromParam. Define an
empty struct and use that as an argument in the handler function:
struct S;
#[get("/<id>")]
fn process(id: S) { /* ... */ }
Again, the code will not compile:
> cargo build
...
Compiling route v0.1.0 (/home/karuna/workspace/
rocketbook/Chapter03/05NotFromParam)
error[E0277]: the trait bound `S: FromParam<'_>` is not
satisfied
--> src/main.rs:9:16
58
Rocket Requests and Responses
|
9 | fn process(id: S) { /* ... */ }
|
^ the trait `FromParam<'_>` is not
implemented for `S`
|
= note: required by `from_param`
error: aborting due to previous error
We can see from the compiler output that type S must implement the FromParam trait.
There is another dynamic form in angle brackets but trailed with two full stops (..), as in
/<dynamic..>. This dynamic form is called multiple segments.
If a regular dynamic segment must implement the FromParam trait, multiple segments
must implement the rocket::request::FromSegments trait. Rocket only provides
FromSegments implementations for the Rust standard library std::path::PathBuf
type. PathBuf is a type for representing a file path in the operating system. This
implementation is very useful for serving a static file from the Rocket application.
You might think serving from a specific path is dangerous because any person can try a
path traversal such as "../../../password.txt". Fortunately, the FromSegments
implementation for PathBuf has already thought about the security problem. As a result,
access to sensitive paths has been disabled, for example, "..", ".", or "*".
Another segment type is the ignored segment. The ignored segment is defined as <_>
or <_..>. If you declare an ignored segment, it will not show in the function argument
list. You must declare ignored multiple segments as the last argument in a path, just like
regular multiple segments.
An ignored segment is useful if you want to build an HTTP path that matches a lot of
things, but you don't want to process it. For example, if you have the following lines of
code, you can have a website that handles any path. It will handle /, /some, /1/2/3, or
anything else:
#[get("/<_>")]
fn index() {}
#[launch]
fn rocket() -> Rocket<Build> {
rocket::build().mount("/", routes![index])
}
Understanding Rocket routes
59
Query
Just like a path, a query segment can be a static segment or dynamic segment (such as
"?<query1>&<query2>") or can be in a multiple "?<query..> form. The multiple
query form is called trailing parameters. Unlike the path, the query part does not have
the ignored part, "?<_>", or ignored trailing parameters such as "?<_..>".
Neither dynamic queries nor trailing parameters are supposed to implement FromParam,
but both must implement rocket::form::FromForm instead. We will discuss
implementing FromForm more in Chapter 8, Serving Static Assets and Templates.
Rank
The path and query segments in a URI can be grouped into three colors: static, partial, or
wild. If all segments of the path are static, the path is called a static path. If all segments of
the query are static, we say the query has a static color. If all segments of the path or query
are dynamic, we call the path or query wild. The partial color is when a path or query has
both static and dynamic segments.
Why do we need these colors? They are required to determine the next parameter of the
route, which is the rank. If we have multiple routes handling the same path, then Rocket
will rank the functions and start checking from the rank with the lowest number. Let's see
an example:
#[get("/<rank>", rank = 1)]
fn first(rank: u8) -> String {
let result = rank + 10;
format!("Your rank is, {}!", result)
}
#[get("/<name>", rank = 2)]
fn second(name: &str) -> String {
format!("Hello, {}!", name)
}
#[launch]
fn rocket() -> Rocket<Build> {
rocket::build().mount("/", routes![first, second])
}
60
Rocket Requests and Responses
Here, we see we have two functions handling the same path, but with two different
function signatures. Since Rust does not support function overloading, we created the
functions with two different names. Let's try calling each of the routes:
> curl http://127.0.0.1:8000/1
Your rank is, 11!
> curl http://127.0.0.1:8000/jane
Hello, jane!
When we look at the application log in the other terminal, we can see how Rocket chose
the route:
GET /1:
>> Matched: (first) GET /<rank>
>> Outcome: Success
>> Response succeeded.
GET /jane:
>> Matched: (first) GET /<rank>
>> `rank: u8` param guard parsed forwarding with error
"jane"
>> Outcome: Forward
>> Matched: (second) GET /<name> [2]
>> Outcome: Success
>> Response succeeded.
Try reversing the rank in the source code and think about what would happen if you
called it with u8 as the parameter. After that, try requesting the endpoint to see whether
your guess is correct.
Let's recall Rocket's URI colors. Rocket ranks the colors of both path and query as follows:
• static path, static query = -12
• static path, partial query = -11
• static path, wild query = -10
• static path, none query = -9
• partial path, static query = -8
• partial path, partial query = -7
Understanding Rocket routes
61
• partial path, wild query = -6
• partial path, none query = -5
• wild path, static query = -4
• wild path, partial query = -3
• wild path, wild query = -2
• wild path, none query = -1
You can see the path has a lower rank, static is lower than partial, and finally, partial is lower
than the wild color. Keep this in mind when you create multiple routes, as the output might
not be what you expect because your route may have a lower or higher ranking.
Format
Another parameter we can use in a route is format. In requests with the HTTP
method with a payload, such as POST, PUT, PATCH and DELETE, the HTTP request
Content-Type is checked against the value of this parameter. When handling HTTP
requests without payloads, such as GET, HEAD, and OPTIONS, Rocket checks and matches
the route's format with the HTTP requests' Accept header.
Let's create an example for the format parameter. Create a new application and add the
following lines:
#[get("/get", format = "text/plain")]
fn get() -> &'static str {
"GET Request"
}
#[post("/post", format = "form")]
fn post() -> &'static str {
"POST Request"
}
#[launch]
fn rocket() -> Rocket<Build> {
rocket::build().mount("/", routes![get, post])
}
62
Rocket Requests and Responses
If you pay attention closely, the format for the /get endpoint uses the "text/plain"
IANA (Internet Assigned Numbers Authority) media type, but the format for the /post
endpoint is not the correct IANA media type. This is because Rocket accepts the following
shorthand and converts them to the correct IANA media type:
• "any" → "*/*"
• "binary" → "application/octet-stream"
• "bytes" → "application/octet-stream"
• "html" → "text/html; charset=utf-8"
• "plain" → "text/html; charset=utf-8"
• "text" → "text/html; charset=utf-8"
• "json" → "application/json"
• "msgpack" → "application/msgpack"
• "form" → "application/x-www-form-urlencoded"
• "js" → "application/javascript"
• "css" → "text/css; charset=utf-8"
• "multipart" → "multipart/form-data"
• "xml" → "text/xml; charset=utf-8"
• "pdf" → "application/pdf"
Now, run the application and call each of the two endpoints to see how they behave. First,
call the /get endpoint with both the correct and incorrect Accept header:
> curl -H "Accept: text/plain" http://127.0.0.1:8000/get
GET Request
> curl -H "Accept: application/json" http://127.0.0.1:8000/get
{
"error": {
"code": 404,
"reason": "Not Found",
"description": "The requested resource could not be
found."
Understanding Rocket routes
63
}
}
The request with the correct Accept header returns the correct response, while the
request with the incorrect Accept header returns 404 but with a "Content-Type:
application/json" response header. Now, send the POST requests to the /post
endpoint to see the responses:
> curl -X POST -H "Content-Type: application/x-www-formurlencoded" http://127.0.0.1:8000/post
POST Request
> curl -X POST -H "Content-Type: text/plain"
http://127.0.0.1:8000/post
<!DOCTYPE html>
<html lang="en">
<head>
<meta charset="utf-8">
<title>404 Not Found</title>
</head>
...
</html>
Our application outputs the expected response, but the Content-Type of the response
is not what we expected. We will learn how to create a default error handler later in
this chapter.
Data
The data parameter in the route is for processing the request body. The data must be in
a dynamic form such as a dynamic <something> URI segment. After that, the declared
attribute must be included as a parameter in the function following the route attribute. For
example, look at the following lines:
#[derive(FromForm)]
struct Filters {
age: u8,
64
Rocket Requests and Responses
active: bool,
}
#[post("/post", data = "<data>")]
fn post(data: Form<Filters>) -> &'static str {
"POST Request"
}
#[launch]
fn rocket() -> Rocket<Build> {
rocket::build().mount("/", routes![post])
}
If you do not include data as a parameter in the function following the route, Rust will
complain about it at compile time. Try removing the data parameters in the function
signature and try compiling it to see the compiler error output in action.
We will learn more about data later when we implement forms and upload files to the
server. Now that we have learned about Rocket routes, let's make an application to
implement a route that handles a request.
Implementing route handlers
Here, we will make an application that handles a route. We are reusing the first code
that we wrote in this chapter. The idea is that we have several user data, and we want to
send requests that will select and return the selected user data according to the ID sent
in the request. In this part, we will implement the request and selecting part of the route
handlers. In the next section, we will learn how to create a custom response type. In the
subsequent section, we will create a handler for when the request does not match any
user data we have. And finally, in the last section, we will create a default error handler to
handle invalid requests.
Let's start by copying the first code into a new folder. After that, in src/main.rs, add a
User struct after the Filter definition:
struct Filters {
...
}
#[derive(Debug)]
Implementing route handlers
65
struct User {
uuid: String,
name: String,
age: u8,
grade: u8,
active: bool,
}
For the User struct, we are using uuid for object identification. The reason is that if
we use usize or another numeric type as an ID without any authentication, we might
fall into the Insecure Direct Object References (IDOR) security vulnerability where an
unauthorized user can easily guess any number as an ID. The UUID as an identifier is
harder to guess.
Also, in real-world applications, we should probably create transparent encryption for the
name and age as such information can be considered personally identifiable information,
but let's skip it in this book for the sake of learning.
We also add the #[derive(Debug)] attribute on top of the struct. The attribute
automatically creates an implementation for the struct to be printed using fmt::Debug.
We can then use it in code, such as format!("{:?}", User). One of the
requirements for the Debug attribute is that all type members must implement Debug as
well; however, this is not a problem in our case, as all Rust standard library types already
implement the Debug trait.
As for the next step, we want to store several User data in a collection data structure. We
can store them in a [User; 5] array or a growable std::vec::Vec array type. To
find user data inside the array, we can iterate the array or Vec one by one until the end or
until a match is found, but this is not ideal as it is time-consuming for a large array.
In computer science, there are better data structures in which we can store data and easily
find objects by their index, such as a hash map. Rust has many libraries that implement
various data structures, and a hash map is one of them. In the standard library, we can
find it in std::collections::HashMap.
Besides using a standard library, we can use other alternatives, since the Rust community
has already created a lot of data structure-related libraries. Try searching in https://
crates.io or https://lib.rs. For example, if we are not using the standard library,
we can use an alternative crate such as hashbrown.
66
Rocket Requests and Responses
Let's implement it in our src/main.rs file after the User struct declaration.
Unfortunately, the HashMap creation requires heap allocation, so we cannot assign
HashMap to a static variable. Adding the following code will not work:
use std::collections::HashMap;
...
static USERS: HashMap<&str, User> = {
let map = HashMap::new();
map.insert(
"3e3dd4ae-3c37-40c6-aa64-7061f284ce28",
User {
uuid: String::from("3e3dd4ae-3c37-40c6-aa647061f284ce28"),
name: String::from("John Doe"),
age: 18,
grade: 1,
active: true,
},
);
map
};
There are several ways to assign HashMap to a static variable, but the best suggestion is
to use the lazy_static! macro from the lazy_static crate, which runs the code at
runtime and performs heap allocation. Let's add it to our code. First, add lazy_static
in the Cargo.toml dependencies:
[dependencies]
lazy_static = "1.4.0"
rocket = "0.5.0-rc.1"
After that, use and implement it in the code as follows. Feel free to add extra users if you
want to test it later:
use lazy_static::lazy_static;
use std::collections::HashMap;
...
lazy_static! {
static ref USERS: HashMap<&'static str, User> = {
Implementing route handlers
67
let mut map = HashMap::new();
map.insert(
"3e3dd4ae-3c37-40c6-aa64-7061f284ce28",
User {
...
},
);
map
};
}
Let's modify fn user(...) as follows:
#[get("/user/<uuid>", rank = 1, format = "text/plain")]
fn user(uuid: &str) -> String {
let user = USERS.get(uuid);
match user {
Some(u) => format!("Found user: {:?}", u),
None => String::from("User not found"),
}
}
We want the function to return something when we call it, therefore, we add -> String
in the function signature.
HashMap has many methods, such as insert() for inserting a new key and value, or
keys(), which returns an iterator for the keys in HashMap. We are just using get(),
which returns std::option::Option. Remember, Option is just an enum, which
can be None, or Some(T) if it contains a value. Finally, the match control flow operator
returns a string appropriately depending on whether the value is None or Some(u).
Now, if we try to send a GET request to http://127.0.0.1:8000/
user/3e3dd4ae-3c37-40c6-aa64-7061f284ce28, we can see that it will return
the correct response, and if we send a GET request to http://127.0.0.1:8000/
user/other, it will return "User not found".
Now, let's implement the users() function. Let's recall the original signature:
#[route(GET, uri = "/users/<grade>?<filters..>")]
fn users(grade: u8, filters: Filters) {}
68
Rocket Requests and Responses
Because u8 already implements FromParam, we can just use it as it is. But, we want to see
how we can implement FromParam for a custom type. Let's change our use case to have a
path such as "/users/<name_grade>?<filters...>".
First, create a custom NameGrade struct. The 'r annotation means that this struct
should only live as long as the referenced string in its name field:
struct NameGrade<'r> {
name: &'r str,
grade: u8,
}
If we want to implement a trait, we have to look at the signature of that trait. The Rust
compiler requires a type to implement all methods and a type placeholder in a trait. We
can find the trait definition for FromParam from the Rocket API documentation:
pub trait FromParam<'a>: Sized {
type Error: Debug;
fn from_param(param: &'a str) -> Result<Self, Self::Error>;
}
The type Error: Debug; is called a type placeholder. Some traits require the
implementation to have a certain type. Any type that implements this trait should use
a concrete type, which also has a debug trait. Because we just want to show an error
message, we can use &'static str as the Error type for this implementation. Then,
write the trait implementation signature for NameGrade as follows:
use rocket::{request::FromParam, Build, Rocket};
...
impl<'r> FromParam<'r> for NameGrade<'r> {
type Error = &'static str;
fn from_param(param: &'r str) -> Result<Self, Self::
Error> {}
}
Inside the function, add the message that we want to show to the app user:
const ERROR_MESSAGE: Result<NameGrade, &'static str> =
Err("Error parsing user parameter");
Implementing route handlers
69
Then, let's split the input parameter at the '_' character:
let name_grade_vec: Vec<&'r str> = param.split('_').collect();
The name_grade_vec length will be either 2 or other, so we can use match on it. As
name_grade_vec[0] is a string, we can use it as it is, but for the second member, we
have to parse it. And, since the result can be anything, we have to use a special syntax that
is formed as in ::<Type>. This syntax is fondly called turbofish by the Rust community.
Just like Option, Result is just an enum which can either be Ok(T) or Err(E). If the
program successfully parses u8, the method can return Ok(NameGrade{...}), or else
the function can return Err("..."):
match name_grade_vec.len() {
2 => match name_grade_vec[1].parse::<u8>() {
Ok(n) => Ok(Self {
name: name_grade_vec[0],
grade: n,
}),
Err(_) => ERROR_MESSAGE,
},
_ => ERROR_MESSAGE,
}
Now that we have implemented FromParam for NameGrade, we can use NameGrade
as the parameter in the users() function. We also want String as the return type of
the function:
#[get("/users/<name_grade>?<filters..>")]
fn users(name_grade: NameGrade, filters: Filters) -> String {}
Inside the function, write the routine that filters the USERS hash map with name_grade
and filters:
let users: Vec<&User> = USERS
.values()
.filter(|user| user.name.contains(&name_grade.name) &&
user.grade == name_grade.grade)
.filter(|user| user.age == filters.age && user.active
== filters.active)
.collect();
70
Rocket Requests and Responses
HashMap has the values() method, which returns std::collections::hash_
map::Values. Values implements std::iter::Iterator, so we can filter it using
the filter() method. The filter() method accepts a closure, which returns Rust bool
type. The filter() method itself returns std::iter::Filter, which implements the
Iterator trait. The Iterator trait has the collect() method, which can be used to
collect items into the collection. Sometimes, you have to use the ::<Type> turbofish in
collect::<Type>() if the result type cannot be inferred by the compiler.
After that, we can convert the collected users into String:
if users.len() > 0 {
users
.iter()
.map(|u| u.name.to_string())
.collect::<Vec<String>>()
.join(",")
} else {
String::from("No user found")
}
After this is done, run the application and try calling the users() function:
curl -G -d age=18 -d active=true http://127.0.0.1:8000/users/
John_1
It works, but the problem with this is that the query parameters are cumbersome; we want
Filters to be optional. Let's modify the code a little bit. Change the signature of fn
users to the following:
fn users(name_grade: NameGrade, filters: Option<Filters>) ->
String {
...
.filter(|user| {
if let Some(fts) = &filters {
user.age == fts.age && user.active ==
fts.active
} else {
true
}
Creating responses
71
})
...
You might be confused by this piece of code: if let Some(fts) = &filters. It's
one of the destructuring syntaxes in Rust, just like this piece of code:
match something {
Ok(i) => /* use i here */ "",
Err(err) => /* use err here */ "",
}
We have implemented the requests part for these two endpoints, user() and users(),
but the return type for those two endpoints is the Rust standard library type, String.
We want to use our own custom type. So, let's see how we can create a response from the
User struct directly in the next section.
Creating responses
Let's implement a custom response for the User type. In Rocket, all types that implement
rocket::response::Responder can be used as a return type in a function that
handles routes.
Let's take a look at the signature of the Responder trait. This trait requires two lifetimes,
'r and 'o. The result 'o lifetime must at least be equal to the 'r lifetime:
pub trait Responder<'r, 'o: 'r> {
fn respond_to(self, request: &'r Request<'_>) ->
Result<'o>;
}
First, we can include the required module to be used for implementing the Responder
trait for the User struct:
use rocket::http::ContentType;
use rocket::response::{self, Responder, Response};
use std::io::Cursor;
After that, add the implementation signature for the User struct:
impl<'r> Responder<'r, 'r> for &'r User {
fn respond_to(self, _: &'r Request<'_>) ->
72
Rocket Requests and Responses
response::Result<'r> {
}
}
Why do we use rocket::response::{self...} instead of
rocket::response::{Result...}? If we return -> Result, we cannot use
std::result::Result, which is a pretty ubiquitous type in Rust. Write the following
lines in the respond_to() method body:
let user = format!("Found user: {:?}", self);
Response::build()
.sized_body(user.len(), Cursor::new(user))
.raw_header("X-USER-ID", self.uuid.to_string())
.header(ContentType::Plain)
.ok()
The application generates a user String from the User object, then generates
rocket::response::Builder by calling Response::build(). We can set
various payloads for the Builder instance; for example, the sized_body() method
adds the body of the response, raw_header() and header() add the HTTP header,
and finally, we generate response::Result() using the finalize() method.
The first parameter of the sized_body() method is Option, and the parameter
can be None. As a result, the sized_body() method requires the second parameter
to implement the tokio::io::AsyncRead + tokio::io::AsyncSeek
trait to automatically determine the size. Fortunately, we can wrap the body in
std::io::Cursor as Tokio already implements those traits for Cursor.
There's a common pattern that we can observe when we implement the
std::iter::Iterator trait and rocket::response::Builder, called the
builder pattern. It's a pattern used to generate an instance by chaining methods. Take a
look at the following example. We can then generate a Something instance by chaining
the command, such as Something.new().func1().func2():
struct Something {}
impl Something {
fn new() -> Something { ... }
fn func1(&mut self) -> &mut Something { ... }
fn func2(&mut self) -> &mut Something { ... }
}
Creating responses
73
Let's also modify the users() function to return a new Responder. We are defining a
new type, which is commonly known as a newtype idiom. This idiom is useful if we want
to wrap a collection or work around orphan rules.
Orphan rules mean neither type nor impl are in our application or crate. For example,
we cannot implement impl Responder for Iterator in our application. The
reason is that Iterator is defined in the standard library, and Responder is defined in
the Rocket crate.
We can use the newtype idiom as in the following line:
struct NewUser<'a>(Vec<&'a User>);
Notice that the struct has a nameless field. The form for a struct with a nameless field is as
follows: struct NewType(type1, type2, ...).
We can also call a struct with a nameless field a tuple struct because the field is like a
tuple (type1, type2, type3). We then can access the struct's field by its index,
such as self.0, self.1, and so on.
After the newtype definition, add the implementation as follows:
impl<'r> Responder<'r, 'r> for NewUser<'r> {
fn respond_to(self, _: &'r Request<'_>) ->
response::Result<'r> {
let user = self
.0
.iter()
.map(|u| format!("{:?}", u))
.collect::<Vec<String>>()
.join(",");
Response::build()
.sized_body(user.len(), Cursor::new(user))
.header(ContentType::Plain)
.ok()
}
}
74
Rocket Requests and Responses
Like the Responder implementation for the User type, in the Responder
implementation for NewUser, we basically iterate a collection of users again, collect them
as a String, and build the response::Result again.
Finally, let's use both the User and NewUser structs as a response type in the user()
and users() functions:
#[get("/user/<uuid>", rank = 1, format = "text/plain")]
fn user(uuid: &str) -> Option<&User> {
let user = USERS.get(uuid);
match user {
Some(u) => Some(u),
None => None,
}
}
#[get("/users/<name_grade>?<filters..>")]
fn users(name_grade: NameGrade, filters: Option<Filters>) ->
Option<NewUser> {
...
if users.len() > 0 {
Some(NewUser(users))
} else {
None
}
}
Now that we've learned how to implement the Responder trait for a type, let's learn
more about the wrappers that Rocket offers in the next section.
Wrapping Responder
Rocket has two modules that can be used to wrap the returned Responder.
Creating responses
75
The first module is rocket::response::status, which has the following structs:
Accepted, BadRequest, Conflict, Created, Custom, Forbidden, NoContent,
NotFound, and Unauthorized. All the responders except Custom set the status just
like their corresponding HTTP response code. For example, we can modify the previous
user() function as follows:
use rocket::response::status;
...
fn user(uuid: &str) -> status::Accepted<&User>
...
status::Accepted(user)
}
{
The Custom type can be used to wrap a response with other HTTP code not available in
the other structs. For example, take a look at the following lines:
use rocket::http::Status;
use rocket::response::status;
...
fn user(uuid: &str) -> status::Custom<&User> {
...
status::Custom(Status::PreconditionFailed, user)
}
The other module, rocket::response::content, has the following structs: Css,
Custom, Html, JavaScript, Json, MsgPack, Plain, and Xml. Like the status
module, the content module is used to set Content-Type of the response. For
example, we can modify our code to the following lines:
use rocket::response::content;
use rocket::http::ContentType;
...
fn user(uuid: &str) -> content::Plain<&User> {
...
content::Plain(user)
}
76
Rocket Requests and Responses
...
fn users(name_grade: NameGrade, filters: Option<Filters>) ->
content::Custom<NewUser> {
...
status::Custom(ContentType::Plain, NewUser(users));
}
We can also combine both modules as in the following example:
fn user(uuid: &str) -> status::Accepted<content::Plain<&User>>
{
...
status::Accepted(content::Plain(user))
}
We can rewrite this using rocket::http::Status and
rocket::http::ContentType:
fn user(uuid: &str) -> (Status, (ContentType, &User)) {
...
(Status::Accepted, (ContentType::Plain, user))
}
Now, you might be wondering how those structs can create HTTP Status and
Content-Type and use another Responder implementor body. The answer is because
the Response struct has two methods: join() and merge().
Let's assume there are two Response instances: original and override. The
original.join(override) method merges the override body and status if it's
not already present in original. The join() method also adjoins the same headers
from override.
Meanwhile, the merge() method replaces the original body and status with that of
override, and replaces the original header if it exists in override.
Let's rewrite our application to use a default response. This time we want to add a new
HTTP header, "X-CUSTOM-ID". To do so, implement the following function:
fn default_response<'r>() -> response::Response<'r> {
Response::build()
.header(ContentType::Plain)
.raw_header("X-CUSTOM-ID", "CUSTOM")
Creating responses
77
.finalize()
}
Then, modify the Responder implementation for the User struct:
fn respond_to(self, _: &'r Request<'_>) -> response::Result<'r>
{
let base_response = default_response();
let user = format!("Found user: {:?}", self);
Response::build()
.sized_body(user.len(), Cursor::new(user))
.raw_header("X-USER-ID", self.uuid.to_string())
.merge(base_response)
.ok()
}
Finally, modify the Responder implementation for NewUser. But this time, we
want to add extra values: the "X-CUSTOM-ID" header. We can do that using the
join() method:
fn respond_to(self, _: &'r Request<'_>) -> response::Result<'r>
{
let base_response = default_response();
...
Response::build()
.sized_body(user.len(), Cursor::new(user))
.raw_header("X-CUSTOM-ID", "USERS")
.join(base_response)
.ok()
}
Try opening the URL for user and users again; you should see the correct ContentType and X-CUSTOM-ID:
<
<
<
<
<
x-custom-id: CUSTOM
content-type: text/plain; charset=utf-8
x-custom-id: USERS
x-custom-id: CUSTOM
content-type: text/plain; charset=utf-8
78
Rocket Requests and Responses
Built-in implementations
Besides content and status wrappers, Rocket already implemented the Responder
trait for several types to make it easier for developers. The following is a list of types
already implementing the Responder trait:
• std::option::Option – We can return Option<T> for any type of T that
already implements Responder. If the returned variant is Some(T), then T is
returned to the client. We already see the example of this return type in the user()
and users() functions.
• std::result::Result – Both variants T and E in Result<T, E> should
implement Responder. For example, we can change our user() implementation
to return status::NotFound as in the following lines:
use rocket::response::status::NotFound;
...
fn user(uuid: &str) -> Result<&User, NotFound<&str>> {
let user = USERS.get(uuid);
user.ok_or(NotFound("User not found"))
}
• &str and String – These types are returned with the text content as the response
body and Content-Type "text/plain".
• rocket::fs::NamedFile – This Responder trait automatically returns a file
specified with Content-Type based on the file content. For example, we have the
"static/favicon.png" file and we want to serve it in our application. Take a
look at the following example:
use rocket::fs::{NamedFile, relative};
use std::path::Path;
#[get("/favicon.png")]
async fn favicon() -> NamedFile {
NamedFile::open(Path::new(relative!(
"static")).join("favicon.png")).await.unwrap()
}
• rocket::response::Redirect – Redirect is used to return a redirect
response to the client. We will discuss Redirect more in Chapter 8, Serving Static
Assets and Templates.
Making default error catchers
79
• rocket_dyn_templates::Template – This responder returns a dynamic
template. We will discuss templating more in Chapter 8, Serving Static Assets
and Templates.
• rocket::serde::json::Json – This type makes it easy to return the JSON
type. To use this responder implementation, you must enable the "json" feature
in Cargo.toml as follows: rocket = {version = "0.5.0-rc.1",
features = ["json"]}. We will discuss more about JSON in Chapter 11,
Securing and Adding an API and JSON.
• rocket::response::Flash – Flash is a type of cookie that will be erased
after a client accesses it. We will learn how to use this type in Chapter 11, Securing
and Adding an API and JSON.
• rocket::serde::msgpack::MsgPack – MessagePack is a binary
serialization format just like JSON. To use this, you must enable the "msgpack"
feature in Cargo.toml.
• Various stream responders in the rocket::response::stream module – We
will learn more about these responders in Chapter 9, Displaying Users' Post, and
Chapter 10, Uploading and Processing Posts.
We have already implemented a couple of routes, derived FromParam, and created types
that implemented the Responder trait. In the next section, we will learn how to make a
default error catcher for the same kind of HTTP status code.
Making default error catchers
An application should be able to handle an error that may occur anytime during
processing. In a web application, the standardized way to return an error to a client is by
using an HTTP status code. Rocket provides a way to handle returning errors to clients in
the form of rocket::Catcher.
The catcher handler works just like a route handler, with a few exceptions. Let's
modify our last application to see how it works. Let's recall how we implemented the
user() function:
fn user(uuid: &str) -> Result<&User, NotFound<&str>> {
let user = USERS.get(uuid);
user.ok_or(NotFound("User not found"))
}
80
Rocket Requests and Responses
If we request GET /user/wrongid, the application will return an HTTP response
with code 404, a "text/plain" content type, and a "User not found" body. Let's
change the function back to the return Option:
fn user(uuid: &str) -> Option<&User> {
USERS.get(uuid)
}
A function returning Option where the variant is None will use the default 404 error
handler. After that, we can implement the default 404 handler as follows:
#[catch(404)]
fn not_found(req: &Request) -> String {
format!("We cannot find this page {}.", req.uri())
}
Notice the #[catch(404)] attribute above the function. It looks like a route directive.
We can use any valid HTTP status code between 200 to 599 or default. If we put
default, it will be used for any HTTP status code not declared in the code.
Like route, the catch attribute must be put above a free function. We cannot put the
catch attribute above a method inside the impl block. Also like the route handling
function, the catcher function must return a type that implements Responder.
The function handling an error can have zero, one, or two parameters. If the function has
one parameter, the parameter type must be &rocket::Request. If the function has two
parameters, the first parameter type must be rocket::http::Status and the second
parameter must be &Request.
The way the catcher function connects to Rocket is a little bit different. Where we
use mount() and the routes! macro for the route handling functions, we use
register() and the catchers! macro for catcher functions:
#[launch]
fn rocket() -> Rocket<Build> {
rocket::build().mount("/", routes![user, users,
favicon]).register("/", catchers![not_found])
}
How can we tell a route handling function to use a catcher? Let's say a catcher has been
defined and registered as in the following lines:
#[catch(403)]
Making default error catchers
81
fn forbidden(req: &Request) -> String {
format!("Access forbidden {}.", req.uri())
}
fn rocket() -> Rocket<Build> {
rocket::build().mount("/", routes![user, users,
favicon]).register("/", catchers![not_found,
forbidden])
}
We can then return rocket::http::Status directly on the route handling function.
The status will then be forwarded to any registered catcher or Rocket built-in catcher:
use rocket::http::{Status, ContentType};
...
fn users(name_grade: NameGrade, filters: Option<Filters>) ->
Result<NewUser, Status> {
...
if users.is_empty() {
Err(Status::Forbidden)
} else {
Ok(NewUser(users))
}
}
Try calling the GET request to this endpoint and see what happens:
curl -v http://127.0.0.1:8000/users/John_2
...
< HTTP/1.1 403 Forbidden
< content-type: text/plain; charset=utf-8
...
<
* Connection #0 to host 127.0.0.1 left intact
Access Forbidden /users/John_2.* Closing connection 0
The application returns the string from the 403 default handler and the correct HTTP
status is also returned.
82
Rocket Requests and Responses
Summary
This chapter explored one of the most important parts of the Rocket framework. We
learned about a route and its parts such as HTTP methods, URIs, path, query, rank, and
data. We also implemented a couple of routes and various types related to routes in an
application. After that, we explored ways to create responder types and learned about
various wrappers and types already implemented in the Responder trait. Finally, we
learned how to create a catcher and connect it to a Rocket application.
In the next chapter, we will learn about other Rocket components such as states and
fairings. We will learn the initialization process of a Rocket application, and how we can
use those states and fairings to create more modern and complex applications.
4
Building,
Igniting, and
Launching Rocket
Many web applications require some kind of object management that can be reused again
and again, be it a connection pool for a database server, a connection to a memory store,
an HTTP client to third-party servers, or any other object. Another common feature in a
web application is middleware.
In this chapter, we will discuss two Rocket features (state and fairings), which act as the
reusable object management and middleware parts of Rocket. We will also learn how to
create and use connections to database servers, which is very important in almost all
web applications.
After completing this chapter, we expect you to be able to use and implement the reusable
object management and middleware parts of the Rocket web framework. We also expect
you to be able to connect to a database of your own choice.
84
Building, Igniting, and Launching Rocket
In this chapter, we're going to cover the following main topics:
• Managing state
• Working with a database
• Attaching Rocket fairings
Technical requirements
Besides the usual requirements of a Rust compiler, a text editor, and an HTTP client,
starting from this chapter, we're going to work with a database. The database we're going
to use throughout this book is PostgreSQL, and you can download it from https://
www.postgresql.org/, install it from your operating system package manager, or use
a third-party server such as Amazon Web Services (AWS), Microsoft Azure, or Google
Cloud Platform (GCP).
We're going to see how to connect to other Relational Database Management Systems
(RDBMSs) such as SQLite, MySQL, or Microsoft SQL Server, and you can adjust the lesson
code to make the type suitable to those RDBMSs, but it's easier to follow using PostgreSQL.
You can find the source code for this chapter at https://github.com/
PacktPublishing/Rust-Web-Development-with-Rocket/tree/main/
Chapter04.
Managing state
In a web application, usually, programmers need to create an object that can be reused
during the request/response life cycle. In the Rocket web framework, that object is called
a state. A state can be anything such as a database connection pool, an object to store
various customer statistics, an object to store a connection to a memory store, a client to
send Simple Mail Transfer Protocol (SMTP) emails, and many more.
We can tell Rocket to maintain the state, and this is called a managed state. The process
of creating a managed state is quite simple. We need to initialize an object, tell Rocket to
manage it, and finally use it in a route. One caveat is that we can manage many states from
different types, but Rocket can only manage one instance of a Rust type.
Let's try it directly. We are going to have a visitor counter state and tell Rocket
to manage it and increment the counter for every incoming request. We can
reuse the previous application from the previous chapter, copy the program from
Chapter03/15ErrorCatcher into Chapter04/01State, and rename the
application in Cargo.toml as chapter4.
Managing state
85
In src/main.rs, define a struct to hold the value of the visitor counter. For the state to
work, the requirement is T: Send + Sync + 'static:
use std::sync::atomic::AtomicU64;
...
struct VisitorCounter {
visitor: AtomicU64,
}
We already know that 'static is a lifetime marker, but what is Send + Sync?
In modern computing, due to its complexity, there are many ways a program can be
executed in a way not intended. For example, multithreading makes it hard to know
whether a variable value has been changed on another thread or not. Modern CPUs
also perform branch prediction and execute multiple instructions at the same time.
Sophisticated compilers also rearrange the resulting binary code execution flow to
optimize the result. To overcome those problems, some kind of syncing is needed in the
Rust language.
The Rust language has traits and memory containers to solve syncing problems depending
on how programmers intended the application to work. We might want to create an object
in the heap and share the reference to that object in multiple other objects. For example,
we create object x, and we use the reference of x, &x in other objects field, y and z.
This creates another problem, as the program can delete x in other routines making the
program unstable. The solution is to create different containers for different use cases.
These include std::cell::Rc and std::box::Box, among others.
std::marker::Send is one of those traits. The Send trait is making sure any T type
is safe to be transferred to another thread. Almost all types in the std library are Send,
with a few exceptions such as std::rc::Rc and std::cell::UnsafeCell. Rc is a
single-threaded reference counted pointer.
Meanwhile, std::marker::Sync is saying the T type is safe to be shared across
multiple threads. That only holds true if the &T reference is safe to be sent to
another thread. Not all Send types are Sync. For example, std::cell::Cell and
std::cell::RefCell are Send but not Sync.
Both Send + Sync are marker traits; they don't have a function to be implemented by
a type. They are also unsafe traits, so all types implementing these manually are also unsafe
and can lead to undefined behavior. So, how do we implement Send + Sync in our type?
These types are also automatically-derived traits, which means that a type in which all
members are implementing Send automatically becomes a Send type. Almost all types in
the std library are Send + Sync apart from the raw pointers, Rc, Cell, and RefCell.
86
Building, Igniting, and Launching Rocket
What is AtomicU64? With the regular u64 type, even though it's Send + Sync, there's
no synchronization between threads so a data race condition might happen. For example,
two threads access the same variable, x (which has a value of 64) at the same time, and
they increment the value by one. We expect the result to be 66 (as there are two threads),
but because there's no synchronization between threads, the final result is unpredictable.
It can be 65 or 66.
The types in the std::sync module provide a couple of ways to share updates between
multiple threads, including the std::sync::Mutex, std::sync::RwLock, and
std::sync::atomic types. We can also use other libraries that might provide better
speed than a standard library, such as the parking_lot crate.
Now we have defined VisitorCounter, let's initialize it and tell Rocket to manage it as
a state. Write the code inside the rocket() function as in the following lines:
fn rocket() -> Rocket<Build> {
let visitor_counter = VisitorCounter {
visitor: AtomicU64::new(0),
};
rocket::build()
.manage(visitor_counter)
.mount("/", routes![user, users, favicon])
.register("/", catchers![not_found, forbidden])
}
After we tell Rocket to manage the state, we can use it inside the route handling functions.
In the previous chapter, we learned about dynamic segments that we have to use in
function arguments. There are other arguments we can use in a route handling
function, which we call request guards. They are called guards because if a request does
not pass the validation inside the guard, the request will be rejected, and an error response
will be returned.
Any type that implements rocket::request::FromRequest can be considered a
request guard. Incoming requests are then validated against each request guard from left
to right and will short circuit and return an error if the request is not valid.
Suppose we have a route handling function as in the following lines:
#[get("/<param1>")]
fn handler1(param1: u8, type1: Guard1, type2: Guard2) {}
Managing state
87
The Guard1 and Guard2 types are the request guards. The incoming request is then
validated against the Guard1 methods, and if an error occurs, the proper error response
will be returned immediately.
We will learn about and implement request guards throughout the book, but we will just
use a request guard without implementing it in this chapter. FromRequest is already
implemented for rocket::State<T>, so we can use it in the route handling function.
Now that we have learned why we use State in a route handling function, let's use it
in our functions. We want to set the visitor counter so each hit to the request should
increment the counter:
use rocket::{Build, Rocket, State};
#[get("/user/<uuid>", rank = 1, format = "text/plain")]
fn user<'a>(counter: &State<VisitorCounter>, uuid: &'a str) ->
Option<&'a User> {
counter.visitor.fetch_add(1, Ordering::Relaxed);
println!("The number of visitor is: {}", counter.
visitor.load(Ordering::Relaxed));
USERS.get(uuid)
}
Why do we add the 'a lifetime? We are adding a new reference argument, and Rust
cannot infer which lifetime the returned &User should follow. In this case, we are saying
the lifetime of the User reference should be as long as uuid.
Inside the function, we use the AtomicU64 fetch_add() method to increment the
value of the visitor, and we print the value using the AtomicU64 load() method.
Let's add the same for the users() function, but since we have the exact same routine
with the user() function, let's make another function instead:
impl VisitorCounter {
fn increment_counter(&self) {
self.visitor.fetch_add(1, Ordering::Relaxed);
println!(
"The number of visitor is: {}",
self.visitor.load(Ordering::Relaxed)
);
88
Building, Igniting, and Launching Rocket
}
}
...
fn user<'a>(counter: &State<VisitorCounter>, uuid: &'a str) ->
Option<&'a User> {
counter.increment_counter();
...
}
...
fn users<'a>(
counter: &State<VisitorCounter>,
name_grade: NameGrade,
filters: Option<Filters>,
) -> Result<NewUser<'a>, Status> {
counter.increment_counter();
...
}
This example works fine with the Atomic type, but if you ever needed a more complex
type to work with, such as String, Vec, or Struct, try using Mutex or RwLock from
either the standard library or a third-party crate such as parking_lot.
Now that we know what State is in Rocket, let's expand our application by combining it
with a database server. We will use State for storing the connection to the database.
Working with a database
Currently, in our application, we are storing user data in a static variable. This is very
cumbersome, as it is inflexible and we cannot update the data easily. Most modern
applications handling data will use some kind of persistent storage, be it filesystem-backed
storage, a document-oriented database, or a traditional RDBMS.
Rust has many libraries to connect to various databases or database-like storage. There's
the postgres crate, which works as a PostgreSQL client for Rust. There are also other
clients such as mongodb and redis. For object-relational mapping (ORM) and Query
Builder, there's diesel, which can be used to connect to various database systems. For
connection pool management, there are the deadpool and r2d2 crates. All crates have
their strengths and limitations, such as not having an asynchronous application.
Working with a database
89
In this book, we're going to use sqlx to connect to an RDBMS. sqlx claims to be an
SQL toolkit for Rust. It has abstractions for clients to connect to various RDBMSs, it has
a connection pool trait, and it can also be used to convert types to queries and query
responses to Rust types.
As mentioned in the Technical requirements section of this chapter, we're going to use
PostgreSQL as our RDBMS, so please prepare the connection information to PostgreSQL.
After that, follow these steps to convert our application into using a database:
1. We will reuse our application again. The first thing we want to do is to install
sqlx-cli by typing this command in the terminal:
cargo install sqlx-cli
sqlx-cli is a useful command-line application to create a database, create
migrations, and run the migrations. It's not as sophisticated as migration tools in
other established frameworks, but it does its job very well.
2. Prepare the connection information and set the DATABASE_URL environment
variable in your terminal. The DATABASE_URL format should look as follows,
depending on which RDBMS you are using:
postgres://username:password@localhost:port/db_
name?connect_options
For connect_options, it's in query form, and the reference can be found at
https://www.postgresql.org/docs/current/libpq-connect.
html#LIBPQ-CONNSTRING. Other DATABASE_URL format for other RDBMS
might look like:
mysql://username:password@localhost:port/db_name
Or sqlite::memory: or sqlite://path/to/file.db?connect_options
or sqlite:///path/to/file.db?connect_options. The connect options
for SQLite can be found at https://www.sqlite.org/uri.html.
3. Create a new database using this command:
sqlx database create
4. We can create a migration named create_users using this command:
sqlx migrate add create_users
90
Building, Igniting, and Launching Rocket
5. The sqlx CLI will create a new folder named migrations inside the root
directory of our application, and inside the folder, there will be a file with the
timestamp_migration_name.sql pattern. In our example, the filename will
look like migrations/20210923055406_create_users.sql. Inside the
file, we can write SQL queries to create or modify the data definition layer (DDL).
In this case, we want to make the content the same as the User struct, so let's write
the following code into the SQL file:
CREATE TABLE IF NOT EXISTS users
(
uuid
UUID PRIMARY KEY,
name
VARCHAR NOT NULL,
age
SMALLINT NOT NULL DEFAULT 0,
grade SMALLINT NOT NULL DEFAULT 0,
active BOOL NOT NULL DEFAULT TRUE
);
CREATE INDEX name_active_idx ON users(name, active);
How do we know what the mapping between the database column type and
Rust type is? sqlx provides its own mapping; we can find the documentation
at https://docs.rs/sqlx. The crate has great modules for a supported
database. We can search for it in the top search bar; for example, we can find the
documentation for PostgreSQL in https://docs.rs/sqlx/0.5.7/sqlx/
postgres/index.html. On that page, we can see there are types modules that
we can look at.
6. After we write the content of the migration file, we can run the migration using the
following command:
sqlx migrate run
7. After the migration, check the generated database table and see whether the table
schema is correct or not. Let's insert the data from the previous chapter. Also, feel
free to fill the table with sample data of your choice.
8. After migration, include the sqlx crate in our Cargo.toml file. We should also
include the uuid crate as we're going to use PostgreSQL's uuid type. Take a look at
the API documentation of the crate if you want to enable another RDBMS:
sqlx = {version = "0.5.7", features = ["postgres",
"uuid", "runtime-tokio-rustls"]}
uuid = "0.8.2"
Working with a database
91
9. We can delete lazy_static from Cargo.toml and remove references of lazy_
static!, USERS, and HashMap from the src/main.rs file. We don't need those,
and we are only going to retrieve the User data from the database that we inserted
earlier. Use the following SQL INSERT syntax to insert the previous user data:
INSERT INTO public.users
(uuid, name, age, grade, active)
VALUES('3e3dd4ae-3c37-40c6-aa64-7061f284ce28'::uuid,
'John Doe', 18, 1, true);
10. Modify the User struct to follow the database that we've created:
use sqlx::FromRow;
use uuid::Uuid;
...
#[derive(Debug, FromRow)]
struct User {
uuid: Uuid,
name: String,
age: i16,
grade: i16,
active: bool,
}
When sqlx retrieves the result from the database, it will be stored in
sqlx::Database::Row. This type can then be converted to any type that
implements sqlx::FromRow. Luckily, we can derive FromRow as long as all the
members implement sqlx::Decode. There are a few exceptions that we can use
to override FromRow. Here is an example:
#[derive(Debug, FromRow)]
#[sqlx(rename_all = "camelCase")]
struct User {
uuid: Uuid,
name: String,
age: i16,
grade: i16,
#[sqlx(rename = "active")]
present: bool,
#[sqlx(default)]
92
Building, Igniting, and Launching Rocket
not_in_database: String,
}
For rename_all, we can use these options: snake_case, lowercase,
UPPERCASE, camelCase, PascalCase, SCREAMING_SNAKE_CASE, and
kebab-case.
rename is used when we have different column names and type member names. If
a member has no column in the database, and that type has the implementation of
the std::default::Default trait, we can use the default directive.
Why do we use i16? The answer is the PostgreSQL type has no mapping to the Rust
u8 type. We can either use i8, use a bigger i16 type, or try implementing Decode
for u8. In this case, we choose to use the i16 type.
We want the program to read the connection information (DATABASE_URL) from
the environment variable. In Chapter 2, Building Our First Rocket Web Application,
we learned how to configure Rocket using standard configuration, but this time,
we want to add extra configuration. We can start by adding serde to application
dependencies in Cargo.toml.
serde is one of the most used and important libraries in Rust. The name
comes from serialization and deserialization. It is used for anything that involves
serialization and deserialization. It can be used to convert Rust type instances to
bytes representations and vice versa, to JSON and vice versa, to YAML, and any
other type, as long as they implement the serde traits. It can also be used to
transcode one type that implements serde traits to another type that implements
serde traits.
If you want to look at the serde documentation, you can find it on their website at
https://serde.rs.
The serde documentation mentions many native or third-party supports for
many data formats such as JSON, Bincode, CBOR, YAML, MessagePack, TOML,
Pickle, RON, BSON, Avro, JSON5, Postcard, URL query strings, Envy, Envy Store,
S-expressions, D-Bus's binary wire format, and FlexBuffers.
Let's add the following lines into Cargo.toml to include serde in our application:
[dependencies]
...
serde = "1.0.130"
Working with a database
93
11. After that, create a struct that will be used to contain our custom configuration:
use serde::Deserialize;
...
#[derive(Deserialize)]
struct Config {
database_url: String,
}
serde already provides the Deserialize macro that can be used in the derive
attribute. So far, we have used a lot of macros providing libraries that can be used
in the derive attribute, such as Debug, FromRow, Deserialize. The macro
system is one of the important Rust features.
12. Implement the routine to read the configuration and map it into the
rocket() function:
fn rocket() -> Rocket<Build> {
let our_rocket = rocket::build();
let config: Config = our_rocket
.figment()
.extract()
.expect("Incorrect Rocket.toml
configuration");
...
our_rocket
.manage(visitor_counter)
...
}
13. Now that the application can get the DATABASE_URL information from
environment variables, it's time to initialize the database connection pool and tell
Rocket to manage it. Write the following lines:
use sqlx::postgres::PgPoolOptions;
...
async fn rocket() -> Rocket<Build> {
94
Building, Igniting, and Launching Rocket
...
let config: Config = rocket_frame
.figment()
.extract()
.expect("Incorrect Rocket.toml
configuration");
let pool = PgPoolOptions::new()
.max_connections(5)
.connect(&config.database_url)
.await
.expect("Failed to connect to database");
...
rocket_frame
.manage(visitor_counter)
.manage(pool)
...
}
We initialize the connection pool using PgPoolOptions. Other databases can
use their corresponding type, such as sqlx::mysql::MySqlPoolOptions or
sqlx::sqlite::SqlitePoolOptions. The connect() method is an async
method, so we must make rocket() async as well to be able to use the result.
After that, inside the rocket() function, we tell Rocket to manage the
connection pool.
14. Before using the database connection, we used lazy_static and created user
objects as references to the USERS hash map. Now, we will use the data from the
database, so we need to use concrete objects instead of references. Remove the
ampersand (&) from the Responder implementation for the User and
NewUser structs:
impl<'r> Responder<'r, 'r> for User { ... }
struct NewUser(Vec<User>);
impl<'r> Responder<'r, 'r> for NewUser { ... }
Working with a database
95
15. Now, it's time to implement the user() function to use the database connection
pool to query from the database. Modify the user() function as follows:
async fn user(
counter: &State<VisitorCounter>,
pool: &rocket::State<PgPool>,
uuid: &str,
) -> Result<User, Status> {
...
let parsed_uuid = Uuid::parse_str(uuid)
.map_err(|_| Status::BadRequest)?;
let user = sqlx::query_as!(
User,
"SELECT * FROM users WHERE uuid = $1",
parsed_uuid
)
.fetch_one(pool.inner())
.await;
user.map_err(|_| Status::NotFound)
}
We included the connection pool managed state in the function arguments. After
that, we parsed the UUID &str parameter into the Uuid instance. If there's an
error parsing the uuid parameter, we change the error to Status::BadRequest
and return the error.
We then use the query_as! macro to send a query to the database server and
convert the result to a User instance. There are many sqlx macros we can use, such
as query!, query_file!, query_as_unchecked!, and query_file_as!.
You can find the documentation for those macros in the sqlx API documentation
that we mentioned earlier.
The format to use this macro is as follows: query_as!(RustType, "prepared
statement", bind parameter1, ...). If you don't need to get the result as
a Rust type, you can use the query! macro instead.
96
Building, Igniting, and Launching Rocket
We then use the fetch_one() method. If you want to execute instead of query,
for example, to update or delete rows, you can use the execute() method. If you
want to get all the results, you can use the fetch_all() method. You can find
other methods to use and their documentation in the sqlx::query::Query
struct documentation.
We can either keep the user() function return as Option<User> and use
user.ok(), or we change the return to Status::SomeStatus. Since we change
the return type to either Ok(user) or Err(some_error), we can just return the
Ok(user) variant, but we want to use map_err(|_| Status::NotFound) to
change the error to a Status type.
You might be thinking, if we send raw SQL queries to the server, is it possible to do
a SQL injection attack? Is it possible to mistakenly get any user input and execute
sqlx::query_as::<_, User>("SELECT * FROM users WHERE name =
?").bind("Name'; DROP TABLE users").fetch_one(pool.inner())?
The answer is no. sqlx prepared and cached each statement. As the result of using
a prepared statement, it's more secure than a regular SQL query, and the type
returned is also what we expect from the RDBMS server.
16. Let's also change the users() function. Like the user() function, we want the
function to be async and get the connection pool from the Rocket managed state.
We also want to remove the lifetime from NewUser as we are not referencing
USERS anymore:
async fn users(
counter: &State<VisitorCounter>,
pool: &rocket::State<PgPool>,
name_grade: NameGrade<'_>,
filters: Option<Filters>,
) -> Result<NewUser, Status> {…}
17. After that, we can prepare the prepared statement. We append more conditions
to WHERE if the client sends the filters request. For PostgreSQL, the prepared
statement uses $1, $2, and so on, but for other RDBMSs, you can use ? for the
prepared statement:
...
let mut query_str = String::from("SELECT * FROM users
WHERE name LIKE $1 AND grade = $2");
if filters.is_some() {
Working with a database
97
query_str.push_str(" AND age = $3 AND active =
$4");
}
18. Next, write the code to execute the query, but the number of bound parameters may
change depending on whether filters exist or not; we use the query_as function
instead so we can use the if branching. We also add %name% for the name-bound
parameter because we use the LIKE operator in the SQL statement. We also have
to cast the u8 type to the i16 type. And, finally, we use the fetch_all method
to retrieve all the results. The nice thing with the query_as! macro and query as
function is they both returned Vec<T> or not depending on the fetch_one or
fetch_all:
...
let mut query = sqlx::query_as::<_, User>(&query_str)
.bind(format!("%{}%", &name_grade.name))
.bind(name_grade.grade as i16);
if let Some(fts) = &filters {
query = query.bind(fts.age as i16).bind(fts.
active);
}
let unwrapped_users = query.fetch_all(pool.inner()).
await;
let users: Vec<User> = unwrapped_users.map_err(|_|
Status::InternalServerError)?;
19. We can return the result as usual:
...
if users.is_empty() {
Err(Status::NotFound)
} else {
Ok(NewUser(users))
}
98
Building, Igniting, and Launching Rocket
Now, let's try calling the user() and users() endpoints again. It should work as it did
when we used HashMap. Since we didn't modify the connection options after we wrote
connect() on the connection pool, the SQL output is written on the terminal:
/* SQLx ping */; rows: 0, elapsed: 944.711µs
SELECT * FROM users …; rows: 1, elapsed: 11.187ms
SELECT
*
FROM
users
WHERE
uuid = $1
Here is some more of the output:
/* SQLx ping */; rows: 0, elapsed: 524.114µs
SELECT * FROM users …; rows: 1, elapsed: 2.435ms
SELECT
*
FROM
users
WHERE
name LIKE $1
AND grade = $2
In this book, we are not going to use ORM; instead, we are going to use sqlx only, as
it is enough for the scope of this book. If you want to use ORM in your application, you
can use ORM and query builders from https://github.com/NyxCode/ormx or
https://www.sea-ql.org/SeaORM/.
Now that we have learned about State and how to use databases using State, it is time
to learn about another Rocket middleware capability, attaching fairings.
Attaching Rocket fairings
99
Attaching Rocket fairings
In real life, a rocket fairing is a nose cone used to protect the rocket payload. In the Rocket
framework, a fairing is not used to protect the payload but is instead used to hook in
to any part of the request life cycle and rewrite the payload. Fairings are analogous to
middleware in other web frameworks but with few differences.
Other framework middleware may be able to inject any arbitrary data. In Rocket, the
fairing can be used to modify the request but cannot be used to add information that is
not part of the request. For example, we can use fairings to add a new HTTP header in the
requests or responses.
Some web frameworks might be able to terminate and directly respond to incoming
requests, but in Rocket, the fairings cannot stop the incoming requests directly; the
request must go through the route handling function, and then the route can create the
proper response.
We can create a fairing by implementing rocket::fairing::Fairing for a type.
Let's first see the signature of the trait:
#[crate::async_trait]
pub trait Fairing: Send + Sync + Any + 'static {
fn info(&self) -> Info;
async fn on_ignite(&self, rocket: Rocket<Build>) ->
Result { Ok(rocket) }
async fn on_liftoff(&self, _rocket: &Rocket<Orbit>) { }
async fn on_request(&self, _req: &mut Request<'_>,
_data: &mut Data<'_>) {}
async fn on_response<'r>(&self, _req: &'r Request<'_>,
_res: &mut Response<'r>) {}
}
There are a couple of types we are not familiar with, such as Build and Orbit. These
types are related to phases in Rocket.
Rocket phases
The types that we want to discuss are Build and Orbit, with the full module paths
of rocket::Orbit and rocket::Build. What are these types? The signature for
a Rocket instance is Rocket<P: Phase>, which means any P type that implements
rocket::Phase.
100
Building, Igniting, and Launching Rocket
Phase is a sealed trait, which means no other type outside the crate can implement
this trait. We can define a sealed trait as follows: pub trait SomeTrait:
private::Sealed {}.
The Phase trait is sealed because Rocket authors intended only three phases in the
Rocket application: rocket::Build, rocket::Ignite, and rocket::Orbit.
We initialize a Rocket instance through rocket::build(), which uses the
Config::figment()default, or rocket::custom<T: Provider>(provider:
T), which uses the custom configuration provider. In this phase, we can also
chain the generated instance with custom configuration using configure<T:
Provider>(self, provider: T). We can then add a route using mount(),
register a catcher using register(), manage the states using manage(), and attach
fairings using attach().
After that, we can change the Rocket phase to Ignite through the ignite()
method. In this phase, we have a Rocket instance with the final configuration. We can
then send the Rocket to the Orbit phase through the launch() method or return
Rocket<Build> and use the #[launch] attribute. We can also skip the Ignite phase
and use launch() directly after build().
Let's recall the code that we have created up to now:
#[launch]
async fn rocket() -> Rocket<Build> {
let our_rocket = rocket::build();
…
our_rocket
.manage(visitor_counter)
.manage(pool)
.mount("/", routes![user, users, favicon])
.register("/", catchers![not_found, forbidden])
}
This function generates Rocket<Build>, and the #[launch] attribute generates the
code that uses launch().
The conclusion for this subsection is that the Rocket phase goes from Build to Ignite to
Launch. How are those phases related to fairing? Let's discuss this in the next subsection.
Attaching Rocket fairings
101
Fairing callbacks
Any type implementing fairings must implement one mandatory function, info(),
which returns rocket::fairing::Info. The Info struct is defined as follows:
pub struct Info {
pub name: &'static str,
pub kind: Kind,
}
And, rocket::fairing::Kind is defined as just an empty struct, pub
struct Kind(_);, but Kind has the associated constants of Kind::Ignite,
Kind::Liftoff, Kind::Request, Kind::Response, and Kind::Singleton.
What are associated constants? In Rust, we can declare associated items, which are items
declared in traits or defined in implementations. For example, we have this piece of code:
struct Something {
item: u8
}
impl Something {
fn new() -> Something {
Something {
item: 8,
}
}
}
We can use the Something::new() associated function to create a new instance of the
type. There are also associated methods, just like associated functions but with self as
the first parameter. We have already implemented an associated method a couple of times.
We can also define an associated type as follows:
trait SuperTrait {
type Super;
}
struct Something;
struct Some;
impl SuperTrait for Something {
102
Building, Igniting, and Launching Rocket
type Super = Some;
}
And, finally, we can have an associated constant. Let's take a look at how we can
define an associated constant by looking at an example, the simplified source of
rocket::fairing::Kind:
pub struct Kind(usize);
impl Kind {
pub const Ignite: Kind = Kind(1 << 0);
pub const Liftoff: Kind = Kind(1 << 1);
pub const Request: Kind = Kind(1 << 2);
pub const Response: Kind = Kind(1 << 3);
pub const Singleton: Kind = Kind(1 << 4);
...
}
Let's go back to Info. We can make an Info instance as follows:
Info {
name: "Request Response Tracker",
kind: Kind::Request | Kind::Response,
}
We are saying the value for kind is the result of the OR bitwise operation between the
kind associated constants. Kind::Request is 1<<2, which means 100 in binary or 4
in decimal. Kind::Response is 1<<3, which means 1000 in binary or 8 in decimal.
The result of 0100 | 1000 is 1100 in binary or 12 in decimal. With this knowledge, we
can set the value for the Info instance, kind, from 00000 to 11111.
Setting configuration using bitwise is a very common design pattern for packing multiple
values into one variable. Some other languages even make this design pattern into its own
type and call it bitset.
In a type that implements the Fairing trait, the mandatory method implementation is
info(), which returns the Info instance. We also have to implement on_ignite(),
on_liftoff(), on_request(), and on_response() depending on the kind
instance that we defined. In our case, this means we have to implement on_request()
and on_response().
Attaching Rocket fairings
103
Rocket executes our fairing method on different occasions. If we have on_ignite(), it
will be executed before launch. This type of fairing is special as on_ignite() returns
Result, and if the returned variant is Err, it can abort the launch.
For on_liftoff(), this method will be executed after launch, which means when
Rocket is in the Orbit phase.
If we have on_request(), it will be executed after Rocket gets the request but before the
request is routed. This method will have access to Request and Data, which means we
can modify these two items.
And, on_response() will be executed when the route handler has created the response
but before the response is sent to the HTTP client. This callback has access to the
Request and Response instances.
Kind::Singleton is special. We can create multiple instances of fairings of the same
type and attach them to Rocket. But, maybe we only want to allow one instance of the
Fairing implementing type to be added. We can use Kind::Singleton and it will
make sure only the last attached instance of this type will be added.
Now that we know more about Rocket phases and Fairing callbacks, let's implement the
Fairing trait in the next subsection.
Implementing and attaching fairings
Right now, our Rocket application manages VisitorCounter, but we did not add
State<VisitorCounter> to the favicon() function. We might also want to add
new route handling functions, but adding State<VisitorCounter> as an argument
parameter for every route handling function is cumbersome.
We can change VisitorCounter from a managed state into a fairing. At the same time,
let's imagine that we have another requirement in our application. We want to have a
custom header for the request and response for internal logging purposes. We can do it by
adding another fairing to change the incoming requests and responses.
First, let's organize our module usage a little bit. We need to add the fairing-related
modules, rocket::http::Header, rocket::Build, and rocket::Orbit, so
we can use those for our VisitorCounter fairing and another fairing to modify the
requests and responses:
use rocket::fairing::{self, Fairing, Info, Kind};
use rocket::fs::{relative, NamedFile};
use rocket::http::{ContentType, Header, Status};
104
Building, Igniting, and Launching Rocket
use rocket::request::{FromParam, Request};
use rocket::response::{self, Responder, Response};
use rocket::{Build, Data, Orbit, Rocket, State};
Add the Fairing trait implementation for VisitorCounter. We need to decorate the
impl with #[rocket::async_trait], since this trait is an async trait:
#[rocket::async_trait]
impl Fairing for VisitorCounter {
fn info(&self) -> Info {
Info {
name: "Visitor Counter",
kind: Kind::Ignite | Kind::Liftoff | Kind::
Request,
}
}
}
We added the info() mandatory method, which returned the Info instance. Inside the
Info instance, we only really need Kind::Request as we only need to increment the
visitor counter for every incoming request. But this time, we also added Kind::Ignite
and Kind::Liftoff because we want to see when the callback is executed.
Then, we can add the callbacks inside the impl Fairing block:
async fn on_ignite(&self, rocket: Rocket<Build>) ->
fairing::Result {
println!("Setting up visitor counter");
Ok(rocket)
}
async fn on_liftoff(&self, _: &Rocket<Orbit>) {
println!("Finish setting up visitor counter");
}
async fn on_request(&self, _: &mut Request<'_>, _: &mut
Data<'_>) {
self.increment_counter();
}
Attaching Rocket fairings
105
What is the return type on the on_ignite() method? rocket::fairing::Result
is defined as Result<T = Rocket<Build>, E = Rocket<Build>> =
Result<T, E>. This method is used to control whether the program continues or not.
For example, we can check the connection to a third-party server to ensure its readiness.
If the third-party server is ready to accept connections, we can return Ok(rocket). But,
if the third-party server is not available, we can return Err(rocket) to halt the launch
of Rocket. Notice that on_liftoff(), on_request(), and on_response() do not
have a return type, as Fairing is designed to only fail when we build Rocket.
For on_liftoff(), we just want to print something to the application output. For
on_request(), we undertake the real purpose of this fairing: increase the counter for
every request.
After implementing the Fairing trait, we can remove counter:
&State<VisitorCounter> from the user() and users() function arguments.
We also need to remove counter.increment_counter(); from the body of
those functions.
After we have modified the user() and users() functions, we can attach the fairing to
the Rocket application. Change manage(visitor_counter) to attach(visitor_
counter) in the Rocket initialization code.
Time to see the fairing in action! First, take a look at the initialization sequence. You can
see on_ignite() is executed in the beginning, and on_liftoff() is executed after
everything is ready:
> cargo run
...
Setting up visitor counter
Configured for debug.
...
Fairings:
>> Visitor Counter (ignite, liftoff, request)
...
Finish setting up visitor counter
Rocket has launched from http://127.0.0.1:8000
After that, try calling our route handling function again to see the counter increase again:
> curl http://127.0.0.1:8000/user/3e3dd4ae-3c37-40c6-aa647061f284ce28
106
Building, Igniting, and Launching Rocket
And, in the Rocket output, we can see it increase when we use it as a state:
The number of visitor is: 2
Now, let's implement our second use case, injecting a tracing ID to our requests
and responses.
First, modify Cargo.toml to ensure the uuid crate can generate a random UUID:
uuid = {version = "0.8.2", features = ["v4"]}
After that, inside src/main.rs, we can define the header name we want to inject and a
type that works as the fairing:
const X_TRACE_ID: &str = "X-TRACE-ID";
struct XTraceId {}
Afterward, we can implement the Fairing trait for XtraceId. This time, we want to
have on_request() and on_response() callbacks:
#[rocket::async_trait]
impl Fairing for XTraceId {
fn info(&self) -> Info {
Info {
name: "X-TRACE-ID Injector",
kind: Kind::Request | Kind::Response,
}
}
}
Now, write the on_request() and on_response() implementations inside the impl
Fairing block:
async fn on_request(&self, req: &mut Request<'_>, _: &mut
Data<'_>) {
let header = Header::new(X_TRACE_ID,
Uuid::new_v4().to_hyphenated().to_string());
req.add_header(header);
}
async fn on_response<'r>(&self, req: &'r Request<'_>, res: &mut
Response<'r>) {
Attaching Rocket fairings
107
let header = req.headers().get_one(X_TRACE_ID).
unwrap();
res.set_header(Header::new(X_TRACE_ID, header));
}
In on_request(), we generate a random UUID and inject the resulting string as one of
the request headers. In on_response(), we inject the response with the same header
from the request.
Don't forget to initialize and attach this new fairing to the Rocket build and
launch process:
let x_trace_id = XTraceId {};
our_rocket
...
.attach(visitor_counter)
.attach(x_trace_id)
...
Rerun the application. We should have a new fairing in the application output and
"x-trace-id" in the HTTP response:
...
Fairings:
>> X-TRACE-ID Injector (request, response)
>> Visitor Counter (ignite, liftoff, request)
...
Here is another example:
curl -v http://127.0.0.1:8000/user/3e3dd4ae-3c37-40c6-aa647061f284ce28
...
< x-trace-id: 28c0d523-13cc-4132-ab0a-3bb9ae6153a9
...
Please note that we can use both State and Fairing in our application. Only use
Fairing if we need to call this for every request.
108
Building, Igniting, and Launching Rocket
Previously, we created a connection pool and told Rocket to manage it using managed
state but Rocket already has a way to connect to the database via its built-in database
connection, rocket_db_pools, which is a type of fairings. Let's see how we can do it in
the next part.
Connecting to a database using rocket_db_pools
Rocket provided a sanctioned way to connect to some RDBMSs by using rocket_db_
pools. That crate provides the database driver integration for Rocket. We are going to
learn how to use this crate for connecting to the database. Let's change the connection
pool that we made previously from using state into using fairings:
1. We don't need serde, as rocket_db_pools already has its own configuration.
Remove serde from Cargo.toml and add rocket_db_pools as a dependency:
[dependencies]
rocket = "0.5.0-rc.1"
rocket_db_pools = {version = "0.5.0-rc.1", features =
["sqlx_postgres"]}
...
You can also use different features such as sqlx_mysql, sqlx_sqlite, sqlx_
mssql, deadpool_postgres, deadpool_redis, or mongodb.
2. In Rocket.toml, remove the line containing the database_url configuration
and replace it with these lines:
[debug.databases.main_connection]
url = "postgres://username:password@localhost/rocket"
You can use default.databases.main_connection if you like, and you can
also change main_connection to whatever name you see fit.
3. In the Cargo library project, we can re-export something in our_library
using the pub use something; syntax, and another library can then use that
through our_library::something. Remove these use sqlx... and use
serde... lines, as rocket_db_pools already re-exported sqlx and we don't
need serde anymore:
use serde::Deserialize;
...
use sqlx::postgres::{PgPool, PgPoolOptions};
use sqlx::FromRow;
Attaching Rocket fairings
109
4. Add the following lines to use rocket_db_pools. Notice that we can multiline
the use declaration in the code:
use rocket_db_pools::{
sqlx,
sqlx::{FromRow, PgPool},
Connection, Database,
};
5. Delete the struct Config declaration and add the following lines to declare the
database connection type:
#[derive(Database)]
#[database("main_connection")]
struct DBConnection(PgPool);
The database derives an automatically generated rocket_db_
pools::Database implementation for the DBConnection type. Notice that we
wrote the connection name "main_connection", just like what we have set in
Rocket.toml.
6. Remove the config and connection pool initializations in the rocket() function:
let config: Config = our_rocket
.figment()
.extract()
.expect("Incorrect Rocket.toml configuration");
let pool = PgPoolOptions::new()
.max_connections(5)
.connect(&config.database_url)
.await
.expect("Failed to connect to database");
7. Add DBConnection::init() inside the rocket() function and attach it
to Rocket:
async fn rocket() -> Rocket<Build> {
...
rocket::build()
.attach(DBConnection::init())
110
Building, Igniting, and Launching Rocket
.attach(visitor_counter)
...
}
8. Change the user() and users() functions to use the rocket_db_
pools::Connection request guard:
async fn user(mut db: Connection<DBConnection>, uuid:
&str) -> Result<User, Status> {
...
let user = sqlx::query_as!(User, "SELECT * FROM
users WHERE uuid = $1", parsed_uuid)
.fetch_one(&mut *db)
.await;
...
}
...
#[get("/users/<name_grade>?<filters..>")]
async fn users(
mut db: Connection<DBConnection>,
...
) -> Result<NewUser, Status> {
...
let unwrapped_users = query.fetch_all(&mut
*db).await;
...
}
The application should work just like when we managed the connection pool using state,
but with minor differences. Here's the output we see:
Fairings:
...
>> 'main_connection' Database Pool (ignite)
We can see there's a new fairing in the application output but there is no prepared SQL
statement in the application output.
Summary
111
Summary
In this chapter, we learned about two Rocket components, State and Fairing. We can
manage state objects and attach fairings upon building rockets, use the state objects
in route handling functions, and use the fairing functions to execute callbacks on the
build, after launch, on request, and on response.
We also created counter states and used them in the route handling functions. We also
learned how to use sqlx, made a database migration, made a database connection pool
state, and used state to query the database.
Afterward, we learned more about the Rocket initialization process and the building,
igniting, and launching phases.
Finally, we changed the counter state into a fairing and created a new fairing to inject a
custom HTTP header into the incoming requests and outgoing responses.
Armed with that knowledge, you can create reusable objects between route handling
functions, and create a method that can be executed globally between requests
and responses.
Our src/main.rs file is getting bigger and more complicated; we will learn how to
manage our Rust code in modules and plan a more complex application in the next chapter.
5
Designing a
User-Generated
Application
We are going to write a Rocket application in order to learn more about the Rocket
web framework. In this chapter, we are going to design the application and create an
application skeleton. Then, we are going to split the application skeleton into smaller
manageable modules.
After reading this chapter, you will be able to design and create an application skeleton
and modularize your own application to your liking.
In this chapter, we're going to cover the following main topics:
• Designing a user-generated web application
• Planning the user struct
• Creating application routes
• Modularizing a Rocket application
114
Designing a User-Generated Application
Technical requirements
For this chapter, we have the same technical requirements as the previous chapter. We
need a Rust compiler, a text editor, an HTTP client, and a PostgreSQL database server.
You can find the source code for this chapter at https://github.com/
PacktPublishing/Rust-Web-Development-with-Rocket/tree/main/
Chapter05.
Designing a user-generated web application
Up to now, we have gained some fundamental knowledge about the Rocket framework,
such as routes, requests, responses, states, and fairings. Let's expand on that knowledge
and learn more about the Rocket framework's other capabilities, such as request guards,
cookies systems, forms, uploading, and templating, by creating a full-fledged application.
The idea for our application is one that handles various operations for the user, and each
user can create and delete user-generated content such as text, photos, or videos.
We can start by creating requirements for what we want to do. In various development
methodologies, there are many forms and names for defining requirements, such as user
stories, use cases, software requirements, or software requirement specifications.
After specifying the requirements, we can usually create an application skeleton. We can
then implement the application and test the implementation.
In our case, because we want to be practical and understand what is going on at the code
level, we will specify the requirements and create the application skeleton in the same step.
Let's start by creating a new application. Then, name the application "our_application"
and include the rocket and rocket_db_pools crates in Cargo.toml:
[package]
edition = "2018"
name = "our_application"
version = "0.1.0"
[dependencies]
rocket = {path = "../../../rocket/core/lib/", features =
["uuid"]}
rocket_db_pools = {path = "../../../rocket/contrib/db_pools/
lib/", features =[ "sqlx_postgres"]}
Designing a user-generated web application
115
Modify the src/main.rs file to remove the main() function and make sure we have
the most basic Rocket application:
#[macro_use]
extern crate rocket;
use rocket::{Build, Rocket};
#[launch]
async fn rocket() -> Rocket<Build> {
rocket::build()
}
Let's go to the next step by planning what user data we want to have in our application.
Planning the user struct
Let's write the struct for the user in the application. At the most basic level, we want to
have uuid with the Uuid type as a unique identifier, and username with the String
type as a human-rememberable identifier. Then, we can add extra columns such as email
and description with a String type to store a little bit more information about
our user.
We also want to have password for the user data but having a cleartxt password field
is not an option. There are a couple of hashing options, but obviously, we cannot use
insecure old hashing functions such as md5 or sha1. We can, however, use newer secure
hashing encryptions such as bcrypt, scrypt, or argon2. In this book, we will use the
argon2id function, as it is more resistant to graphics processing unit (GPU) attacks
and side-channel attacks. The password hash can be stored in a text format defined by
the Password Hashing Competition (PHC) string format. As we know the format of the
password hash is text, we can use String as the password_hash type.
We also want a status column for our users. The status can be either active or
inactive, so we can use the bool type. But, in the future, we might want it to be
expandable and have other statuses, such as confirmed if we require the user to include
email information and confirm their email before they can use our application. We have to
use another type.
In Rust, we have enum, a type with many variants. We can either have an enum with an
implicit discriminator or an explicit discriminator.
116
Designing a User-Generated Application
An implicit discriminator enum is an enum in which the member is not given a
discriminator; it automatically starts from 0, for example, enum Status {Active,
Inactive}. Using an implicit discriminator enum means we have to add a new data
type in PostgreSQL using the CREATE TYPE SQL statement, for example, CREATE
TYPE status AS ENUM ('active', 'inactive');.
If we use an explicit discriminator enum, that is, an enum in which the member is given
a discriminator, we can use the PostgreSQL INTEGER type and map it to rust i32. An
explicit discriminator enum looks like the following:
enum Status {
Inactive = 0,
Active = 1,
}
Because it's simpler to use an explicit discriminator enum, we will choose this type for the
user status column.
We also want to keep track of when user data is created and when it is updated. The Rust
standard library provides std::time for temporal quantification types, but this module
is very primitive and not usable for day-to-day operations. There are several attempts to
create a good date and time library for Rust, such as the time or chrono crates, and
fortunately, sqlx already supports both crates. We chose to use chrono for this book.
Based on those requirements, let's write the struct definition and the sqlx migration for
the User type:
1. In Cargo.toml, add the sqlx, chrono, and uuid crates:
sqlx = {version = "0.5.9", features = ["postgres",
"uuid", "runtime-tokio-rustls", "chrono"]}
chrono = "0.4"
uuid = {version = "0.8.2", features = ["v4"]}
2. In src/main.rs, add the UserStatus enum and the User struct:
use chrono::{offset::Utc, DateTime};
use rocket_db_pools::sqlx::FromRow;
use uuid::Uuid;
#[derive(sqlx::Type, Debug)]
#[repr(i32)]
enum UserStatus {
Designing a user-generated web application
Inactive = 0,
Active = 1,
}
#[derive(Debug, FromRow)]
struct User {
uuid: Uuid,
username: String,
email: String,
password_hash: String,
description: String,
status: UserStatus,
created_at: DateTime<Utc>,
updated_at: DateTime<Utc>,
}
Notice that we set the UserStatus enum with an explicit discriminator and, in
the User struct, we used UserStatus as the status type.
3. After that, let's set the database URL configuration in the Rocket.toml file:
[default]
[default.databases.main_connection]
url = "postgres://username:password@localhost/rocket"
4. Afterward, create the database migration using the sqlx migrate add
command again, and modify the generated migration file as follows:
CREATE TABLE IF NOT EXISTS users
(
uuid
UUID PRIMARY KEY,
username
VARCHAR NOT NULL UNIQUE,
email
VARCHAR NOT NULL UNIQUE,
password_hash VARCHAR NOT NULL,
description
TEXT,
status
INTEGER NOT NULL DEFAULT 0,
created_at
TIMESTAMPTZ NOT NULL DEFAULT
CURRENT_TIMESTAMP,
updated_at
TIMESTAMPTZ NOT NULL DEFAULT
117
118
Designing a User-Generated Application
CURRENT_TIMESTAMP
);
Notice that we set INTEGER, which corresponds to i32 in Rust as a status
column type. One more thing to notice is because the UNIQUE constraints in
PostgreSQL already automatically create an index for username and email, we
don't need to add custom indices for those two columns.
Don't forget to run the sqlx migrate run command line again to run this
migration.
5. Let's initialize the database connection pool fairing by adding these lines in src/
main.rs:
use rocket_db_pools::{sqlx::{FromRow, PgPool}, Database};
...
#[derive(Database)]
#[database("main_connection")]
struct DBConnection(PgPool);
async fn rocket() -> Rocket<Build> {
rocket::build().attach(DBConnection::init())
}
After our User struct is ready, the next thing we can do is write the code skeleton for
user-related routes, such as creating or deleting users.
Creating user routes
In the previous application, we dealt primarily with getting user data, but in a real-world
application, we also want other operations such as inserting, updating, and deleting data.
We can expand the two functions to get user data (user and users) into create, read,
update, and delete (CRUD) functions. These four basic functions can be considered
fundamental operations of persistent data storage.
In a web application, an architecture style exists to perform operations based on the
HTTP method. If we want to get an entity or a collection of entities, we use the HTTP
GET method. If we want to create an entity, we use the HTTP POST method. If we want
to update an entity, we use the HTTP PUT or PATCH method. And finally, if we want
to delete an entity, we use the HTTP DELETE method. Using those HTTP methods
to deliver data uniformly is called representational state transfer (REST), and an
application following that constraint is called RESTful.
Designing a user-generated web application
119
Before we create RESTful user routes for our application, let's think about what incoming
parameters we want to handle and what responses we want to return. In the previous
chapters, we have created routes that returned String, but most of the web is composed
of HTML.
For user route responses, we want HTML, so we can use
rocket::response::content::RawHtml. We can wrap it in Result,
with Status as the error type. Let's make a type alias to avoid writing
Result<RawHtml<String>, Status> every time we use it as a route function
return type. Add this in src/main.rs:
type HtmlResponse = Result<RawHtml<String>, Status>;
For user route requests, the request payload will be different depending on what the
request is. For a function that uses GET to obtain a particular user information, we would
need to know the identifier of the user, in our case, it would be uuid in the &str type.
We just need the reference (&str) because we are not going to process uuid, so we don't
need the String type:
#[get("/users/<_uuid>", format = "text/html")]
async fn get_user(mut _db: Connection<DBConnection>, _uuid:
&str) -> HtmlResponse {
todo!("will implement later")
}
The compiler will emit a warning if we define a variable or pass a parameter but do not
use it, so we use an underscore (_) before the variable name in the function argument to
suppress the compiler warning for now. We will change the variable to one without an
underscore in front of it when we are implementing the function later.
Just like the unimplemented! macro, the todo! macro is useful for prototyping.
The semantic difference is that if we use todo!, we are saying that the code will be
implemented, but if we use unimplemented!, we are not making any promises.
Mount the route and try running the application now and make the HTTP request to
this endpoint. You can see how the application will panic, but fortunately, Rocket handles
catching the panic in the server using the std::panic::catch_unwind function.
For the list of users, we have to think about the scalability of our application. If we have
a lot of users, it would not be very efficient if we tried to query all the users. We need to
introduce some kind of pagination in our application.
120
Designing a User-Generated Application
One of the weaknesses of using Uuid as an entity ID is that we cannot sort and order the
entity by its ID. We have to use another ordered field. Fortunately, we have defined the
created_at field with TIMESTAMPZ, which has a 1-microsecond resolution and can
be ordered.
But, be aware that if your application is handling high traffic or will be in distributed
systems, the microsecond resolution might not be enough. You can calculate the chance of
collision of TIMESTAMPZ using a formula to calculate the birthday paradox. You can solve
this problem with a monotonic ID or hardware and a database supporting a nanosecond
resolution, but a highly-scalable application is beyond the scope of this book for the
Rocket web framework.
Let's define the Pagination struct for now and then we will implement this struct
later. As we want to use Pagination in the list of users and we will use it as a
request parameter, we can automatically use #[derive(FromForm)] to make
auto-generation for the rocket::form::FromForm implementation. But, we have
to create a new type, OurDateTime, because orphan rules mean we cannot implement
rocket::form::FromForField for DateTime<Utc>;:
use rocket::form::{self, DataField, FromFormField, ValueField};
...
#[derive(Debug, FromRow)]
struct OurDateTime(DateTime<Utc>);
#[rocket::async_trait]
impl<'r> FromFormField<'r> for OurDateTime {
fn from_value(_: ValueField<'r>) -> form::Result<'r,
Self> {
todo!("will implement later")
}
async fn from_data(_: DataField<'r, '_>) -> form::
Result<'r, Self> {
todo!("will implement later")
}
}
#[derive(FromForm)]
struct Pagination {
Designing a user-generated web application
cursor: OurDateTime,
limit: usize,
}
#[derive(sqlx::Type, Debug, FromFormField)]
#[repr(i32)]
enum UserStatus {
...
}
#[derive(Debug, FromRow, FromForm)]
struct User {
...
created_at: OurDateTime,
updated_at: OurDateTime,
}
Now, we can make an unimplemented function for the list of users:
#[get("/users?<_pagination>", format = "text/html")]
async fn get_users(mut _db: Connection<DBConnection>, _
pagination: Option<Pagination>) -> HtmlResponse {
todo!("will implement later")
}
We need a page to fill in the form for inputting new user data:
#[get("/users/new", format = "text/html")]
async fn new_user(mut _db: Connection<DBConnection>) ->
HtmlResponse {
todo!("will implement later")
}
After that, we can create a function to handle the creation of user data:
use rocket::form::{self, DataField, Form, FromFormField,
ValueField};
...
#[post("/users", format = "text/html", data = "<_user>")]
121
122
Designing a User-Generated Application
async fn create_user(mut _db: Connection<DBConnection>, _user:
Form<User>) -> HtmlResponse {
todo!("will implement later")
}
We need a page to modify existing user data:
#[get("/users/edit/<_uuid>", format = "text/html")]
async fn edit_user(mut _db: Connection<DBConnection>, _uuid:
&str) -> HtmlResponse {
todo!("will implement later")
}
We need functions to handle updating user data:
#[put("/users/<_uuid>", format = "text/html", data = "<_
user>")]
async fn put_user(mut _db: Connection<DBConnection>, _uuid:
&str, _user: Form<User>) -> HtmlResponse {
todo!("will implement later")
}
#[patch("/users/<_uuid>", format = "text/html", data = "<_
user>")]
async fn patch_user(
mut _db: Connection<DBConnection>,
_uuid: &str,
_user: Form<User>,
) -> HtmlResponse {
todo!("will implement later")
}
What's the difference between PUT and PATCH? Simply put, in REST, a PUT request
is used if we want to replace the resource completely, and PATCH is used to update
data partially.
The last user-related function is a function to execute HTTP DELETE:
#[delete("/users/<_uuid>", format = "text/html")]
async fn delete_user(mut _db: Connection<DBConnection>, _uuid:
&str) -> HtmlResponse {
Designing a user-generated web application
123
todo!("will implement later")
}
After creating user-related route handling functions, we can expand our requirements.
Making user-generated contents
An application that only handles user data is not fun, so we will add the capability for our
users to upload and delete posts. Each post can be either a text post, a photo post, or a
video post. Let's look at the steps:
1. Create the definition for Post:
#[derive(sqlx::Type, Debug, FromFormField)]
#[repr(i32)]
enum PostType {
Text = 0,
Photo = 1,
Video = 2,
}
#[derive(FromForm)]
struct Post {
uuid: Uuid,
user_uuid: Uuid,
post_type: PostType,
content: String,
created_at: OurDateTime,
}
We want to differentiate the type, so we added the post_type column. We also want
to make a relationship between the user and posts. As we want the user to be able to
create many posts, we can create a user_uuid field in the struct. The content will be
used to store either text content or the file path where we store the uploaded file. We
will deal with the data migration on application implementation later.
124
Designing a User-Generated Application
2. The way each post is presented might be different on our HTML, but it will occupy
the same part on the web page, so let's make a DisplayPostContent trait and
three newtypes for each post type, and implement DisplayPostContent for
each newtype:
trait DisplayPostContent {
fn raw_html() -> String;
}
struct TextPost(Post);
impl DisplayPostContent for TextPost {
fn raw_html() -> String {
todo!("will implement later")
}
}
struct PhotoPost(Post);
impl DisplayPostContent for PhotoPost {
fn raw_html() -> String {
todo!("will implement later")
}
}
struct VideoPost(Post);
impl DisplayPostContent for VideoPost {
fn raw_html() -> String {
todo!("will implement later")
}
}
3. Finally, we can add the routes for handling Post. We can create get_post,
get_posts, create_post, and delete_post. We also want these routes to be
under a user:
#[get("/users/<_user_uuid>/posts/<_uuid>", format =
"text/html")]
async fn get_post(mut _db: Connection<DBConnection>, _
user_uuid: &str, _uuid: &str) -> HtmlResponse {
todo!("will implement later")
Designing a user-generated web application
125
}
#[get("/users/<_user_uuid>/posts?<_pagination>", format =
"text/html")]
async fn get_posts(
mut _db: Connection<DBConnection>,
_user_uuid: &str,
_pagination: Option<Pagination>,
) -> HtmlResponse {
todo!("will implement later")
}
#[post("/users/<_user_uuid>/posts", format = "text/html",
data = "<_upload>")]
async fn create_post(
mut _db: Connection<DBConnection>,
_user_uuid: &str,
_upload: Form<Post>,
) -> HtmlResponse {
todo!("will implement later")
}
#[delete("/users/<_user_uuid>/posts/<_uuid>", format =
"text/html")]
async fn delete_post(
mut _db: Connection<DBConnection>,
_user_uuid: &str,
_uuid: &str,
) -> HtmlResponse {
todo!("will implement later")
}
After adding post-related types and functions, we can finalize creating the application
skeleton in the next subsection.
126
Designing a User-Generated Application
Finalizing the application
Don't forget to add these routes to the Rocket initialization process:
async fn rocket() -> Rocket<Build> {
rocket::build().attach(DBConnection::init()).mount(
"/",
routes![
get_user,
get_users,
new_user,
create_user,
edit_user,
put_user,
patch_user,
delete_user,
get_post,
get_posts,
create_post,
delete_post,
],
)
}
We also want to serve the uploaded file through a route:
use rocket::fs::{NamedFile, TempFile};
...
#[get("/<_filename>")]
async fn assets(_filename: &str) -> NamedFile {
todo!("will implement later")
}
async fn rocket() -> Rocket<Build> {
rocket::build()
...
.mount("/assets", routes![assets])
}
Designing a user-generated web application
127
Time to add our default error handling! Other frameworks usually have a default error
handler for HTTP status codes 404, 422, and 500. Let's make a handler for these codes:
use rocket::request::Request;
...
#[catch(404)]
fn not_found(_: &Request) -> RawHtml<String> {
todo!("will implement later")
}
#[catch(422)]
fn unprocessable_entity(_: &Request) -> RawHtml<String> {
todo!("will implement later")
}
#[catch(500)]
fn internal_server_error(_: &Request) -> RawHtml<String> {
todo!("will implement later")
}
async fn rocket() -> Rocket<Build> {
rocket::build()
...
.register(
"/",
catchers![not_found, unprocessable_entity,
internal_server_error],
)
}
When we run the application using Cargo's run command, the application should launch
correctly. But, when we look at src/main.rs, the file has a lot of functions and type
definitions. We will modularize our application in the next section.
128
Designing a User-Generated Application
Modularizing the Rocket application
Remember in Chapter 1, Introducing the Rust Language, when we made an application
with modules? One of the functions of the application source code is to use it as
documentation for the people working on the application. A good readable code can be
easily further developed and shared with other people on the team.
The compiler does not care whether the program is in one file or multiple files; the
resulting application binary is the same. However, people working on a single, long file
can get confused very easily.
We are going to split our application source code into smaller files and categorize the files
into different modules. Programmers come from various backgrounds and may have their
own paradigm on how to split the source code of the application. For example, programmers
who are used to writing Java programs may prefer organizing their code based on the logical
entities or classes. People who are used to Model-Viev-Controller (MVC) frameworks may
prefer putting files in models, views, and controllers folders. People who are used to clean
architecture may try to organize their code into layers. But, at the end of the day, what really
matters is that the way you organize your code is accepted by the people you work with, and
they can all comfortably and easily use the same source code.
Rocket does not have specific guidelines on how to organize the code, but there are two
things that we can observe to modularize our application. The first one is the Cargo
project package layout convention, and the second one is the Rocket parts themselves.
According to Cargo documentation (https://doc.rust-lang.org/cargo/
guide/project-layout.html), the package layout should be as follows:
┌──
├──
├──
│
│
│
│
│
│
│
│
├──
│
│
Cargo.lock
Cargo.toml
src/
├── lib.rs
├── main.rs
└── bin/
├── named-executable.rs
├── another-executable.rs
└── multi-file-executable/
├── main.rs
└── some_module.rs
benches/
├── large-input.rs
└── multi-file-bench/
Modularizing the Rocket application
│
│
├──
│
│
│
│
└──
129
├── main.rs
└── bench_module.rs
examples/
├── simple.rs
└── multi-file-example/
├── main.rs
└── ex_module.rs
tests/
├── some-integration-tests.rs
└── multi-file-test/
├── main.rs
└── test_module.rs
Since we don't have benchmarks, examples, or tests yet, let's focus on the src folder. We
can split the application into an executable in src/main.rs and a library in src/lib.
rs. It's very common in an executable project to make a small executable code that only
calls the library.
We already know Rocket has different parts, so it's a good idea to split the Rocket
components into their own module. Let's organize our source code into these files
and folders:
┌── Cargo.lock
├── Cargo.toml
└── src/
├── lib.rs
├── main.rs
├── catchers
│
└── put catchers modules here
├── fairings
│
└── put fairings modules here
├── models
│
└── put requests, responses, and database related
modules here
├── routes
│
└── put route handling functions and modules here
├── states
│
└── put states modules here
130
Designing a User-Generated Application
├── traits
│
└── put our traits here
└── views
└── put our templates here
1. First, edit the Cargo.toml file:
[package]
...
[[bin]]
name = "our_application"
path = "src/main.rs"
[lib]
name = "our_application"
path = "src/lib.rs"
[dependencies]
...
2. Create the src/lib.rs file and the following folders: src/catchers, src/
fairings, src/models, src/routes, src/states, src/traits, and
src/views.
3. After that, create a mod.rs file inside each folder: src/catchers/mod.rs,
src/fairings/mod.rs, src/models/mod.rs, src/routes/mod.rs,
src/states/mod.rs, src/traits/mod.rs, and src/views/mod.rs.
4. Then, edit src/lib.rs:
#[macro_use]
extern crate rocket;
pub
pub
pub
pub
pub
pub
mod
mod
mod
mod
mod
mod
catchers;
fairings;
models;
routes;
states;
traits;
Modularizing the Rocket application
131
5. Write the connection for our database first. Edit src/fairings/mod.rs:
pub mod db;
6. Make a new file, src/fairings/db.rs, and write the file just like the
connection we defined earlier in src/main.rs:
use rocket_db_pools::{sqlx::PgPool, Database};
#[derive(Database)]
#[database("main_connection")]
pub struct DBConnection(PgPool);
Notice that we use only use a smaller number of modules compared to src/main.
rs. We also added the pub keyword in order to make the struct accessible from
other modules or from src/main.rs.
7. Because the trait is going to be used by the structs, we need to define the trait first.
In src/traits/mod.rs, copy the trait from src/main.rs:
pub trait DisplayPostContent {
fn raw_html() -> String;
}
8. After that, let's move all of our structs for requests and responses to the src/
models folder. Edit src/models/mod.rs as follows:
pub
pub
pub
pub
pub
pub
pub
pub
pub
mod
mod
mod
mod
mod
mod
mod
mod
mod
our_date_time;
pagination;
photo_post;
post;
post_type;
text_post;
user;
user_status;
video_post;
9. Then, create the files and copy the definition from src/main.rs to those files. The
first one is src/models/our_date_time.rs:
use chrono::{offset::Utc, DateTime};
use rocket::form::{self, DataField, FromFormField,
132
Designing a User-Generated Application
ValueField};
#[derive(Debug)]
pub struct OurDateTime(DateTime<Utc>);
#[rocket::async_trait]
impl<'r> FromFormField<'r> for OurDateTime {
fn from_value(_: ValueField<'r>) -> form::
Result<'r, Self> {
todo!("will implement later")
}
async fn from_data(_: DataField<'r, '_>) ->
form::Result<'r, Self> {
todo!("will implement later")
}
}
10. Next is src/models/pagination.rs:
use super::our_date_time::OurDateTime;
#[derive(FromForm)]
pub struct Pagination {
pub next: OurDateTime,
pub limit: usize,
}
Notice the use declaration uses the super keyword. The Rust module is organized
by hierarchy, with a module containing other modules. The super keyword is used
to access the module containing the current module. The super keyword can be
chained, for example, use super::super::SomeModule;.
11. After that, write src/models/post_type.rs:
use rocket::form::FromFormField;
use rocket_db_pools::sqlx;
#[derive(sqlx::Type, Debug, FromFormField)]
Modularizing the Rocket application
#[repr(i32)]
pub enum PostType {
Text = 0,
Photo = 1,
Video = 2,
}
12. Also, write src/models/post.rs:
use
use
use
use
super::our_date_time::OurDateTime;
super::post_type::PostType;
rocket::form::FromForm;
uuid::Uuid;
#[derive(FromForm)]
pub struct Post {
pub uuid: Uuid,
pub user_uuid: Uuid,
pub post_type: PostType,
pub content: String,
pub created_at: OurDateTime,
}
And then, write src/models/user_status.rs:
use rocket::form::FromFormField;
use rocket_db_pools::sqlx;
#[derive(sqlx::Type, Debug, FromFormField)]
#[repr(i32)]
pub enum UserStatus {
Inactive = 0,
Active = 1,
}
13. Write src/models/user.rs:
use super::our_date_time::OurDateTime;
use super::user_status::UserStatus;
use rocket::form::FromForm;
133
134
Designing a User-Generated Application
use rocket_db_pools::sqlx::FromRow;
use uuid::Uuid;
#[derive(Debug, FromRow, FromForm)]
pub struct User {
pub uuid: Uuid,
pub username: String,
pub email: String,
pub password_hash: String,
pub description: Option<String>,
pub status: UserStatus,
pub created_at: OurDateTime,
pub updated_at: OurDateTime,
}
And then, write the three post newtypes, src/models/photo_post.rs, src/
models/text_post.rs, and src/models/video_post.rs:
use super::post::Post;
use crate::traits::DisplayPostContent;
pub struct PhotoPost(Post);
impl DisplayPostContent for PhotoPost {
fn raw_html() -> String {
todo!("will implement later")
}
}
use super::post::Post;
use crate::traits::DisplayPostContent;
pub struct TextPost(Post);
impl DisplayPostContent for TextPost {
fn raw_html() -> String {
todo!("will implement later")
}
}
Modularizing the Rocket application
135
use super::post::Post;
use crate::traits::DisplayPostContent;
pub struct VideoPost(Post);
impl DisplayPostContent for VideoPost {
fn raw_html() -> String {
todo!("will implement later")
}
}
In all three files, we use the crate keyword in the use declaration. We have
discussed the super keyword before; the crate keyword is referring to the current
library we are working on, which is the our_application library. In Rust 2015
edition, it's written as a double semicolon (::), but since Rust 2018 edition, ::
changed to crate. Now, :: means the root path of the external crate, for example,
::rocket::fs::NamedFile;.
Besides super, ::, and crate, there are a couple more path qualifiers we can use
in a use declaration: self and Self. We can use self to avoid ambiguity when
referring to items in code, as shown in this example:
use super::haha;
mod a {
fn haha() {}
fn other_func() {
self::haha();
}
}
Self is used to refer to an associated type in a trait, as shown in this example:
trait A {
type Any;
fn any(&self) -> Self::Any;
}
struct B;
impl A for B {
type Any = usize;
fn any(&self) -> self::Any {
136
Designing a User-Generated Application
100
}
}
14. Now, let's get back to the application skeleton. After all the structs, it's time to write
routes for the application. Modify src/routes/mod.rs:
use rocket::fs::NamedFile;
use rocket::http::Status;
use rocket::response::content::RawHtml;
pub mod post;
pub mod user;
type HtmlResponse = Result<RawHtml<String>, Status>;
#[get("/<_filename>")]
pub async fn assets(_filename: &str) -> NamedFile {
todo!("will implement later")
}
We could put the function handling assets in their own Rust file, but since
there's only one function and it's very simple, we can just put the function in the
mod.rs file.
15. Next, create and write src/routes/post.rs:
use
use
use
use
use
super::HtmlResponse;
crate::fairings::db::DBConnection;
crate::models::{pagination::Pagination, post::Post};
rocket::form::Form;
rocket_db_pools::Connection;
#[get("/users/<_user_uuid>/posts/<_uuid>", format =
"text/html")]
pub async fn get_post(
mut _db: Connection<DBConnection>,
_user_uuid: &str,
_uuid: &str,
) -> HtmlResponse {
Modularizing the Rocket application
137
todo!("will implement later")
}
#[get("/users/<_user_uuid>/posts?<_pagination>", format =
"text/html")]
pub async fn get_posts(
mut _db: Connection<DBConnection>,
_user_uuid: &str,
_pagination: Option<Pagination>,
) -> HtmlResponse {
todo!("will implement later")
}
#[post("/users/<_user_uuid>/posts", format = "text/html",
data = "<_upload>")]
pub async fn create_post(
mut _db: Connection<DBConnection>,
_user_uuid: &str,
_upload: Form<Post>,
) -> HtmlResponse {
todo!("will implement later")
}
#[delete("/users/<_user_uuid>/posts/<_uuid>", format =
"text/html")]
pub async fn delete_post(
mut _db: Connection<DBConnection>,
_user_uuid: &str,
_uuid: &str,
) -> HtmlResponse {
todo!("will implement later")
}
16. Create and write src/routes/user.rs:
use super::HtmlResponse;
use crate::fairings::db::DBConnection;
use crate::models::{pagination::Pagination, user::User};
138
Designing a User-Generated Application
use rocket::form::Form;
use rocket_db_pools::Connection;
#[get("/users/<_uuid>", format = "text/html")]
pub async fn get_user(mut _db: Connection<DBConnection>,
_uuid: &str) -> HtmlResponse {
todo!("will implement later")
}
#[get("/users?<_pagination>", format = "text/html")]
pub async fn get_users(
mut _db: Connection<DBConnection>,
_pagination: Option<Pagination>,
) -> HtmlResponse {
todo!("will implement later")
}
#[get("/users/new", format = "text/html")]
pub async fn new_user(mut _db: Connection<DBConnection>)
-> HtmlResponse {
todo!("will implement later")
}
#[post("/users", format = "text/html", data = "<_user>")]
pub async fn create_user(mut _db:
Connection<DBConnection>, _user: Form<User>) ->
HtmlResponse {
todo!("will implement later")
}
#[get("/users/edit/<_uuid>", format = "text/html")]
pub async fn edit_user(mut _db: Connection<DBConnection>,
_uuid: &str) -> HtmlResponse {
todo!("will implement later")
}
#[put("/users/<_uuid>", format = "text/html", data = "<_
Modularizing the Rocket application
user>")]
pub async fn put_user(
mut _db: Connection<DBConnection>,
_uuid: &str,
_user: Form<User>,
) -> HtmlResponse {
todo!("will implement later")
}
#[patch("/users/<_uuid>", format = "text/html", data =
"<_user>")]
pub async fn patch_user(
mut _db: Connection<DBConnection>,
_uuid: &str,
_user: Form<User>,
) -> HtmlResponse {
todo!("will implement later")
}
#[delete("/users/<_uuid>", format = "text/html")]
pub async fn delete_user(mut _db:
Connection<DBConnection>, _uuid: &str) -> HtmlResponse {
todo!("will implement later")
}
17. And, to finalize the library, add the catchers in src/catchers/mod.rs:
use rocket::request::Request;
use rocket::response::content::RawHtml;
#[catch(404)]
pub fn not_found(_: &Request) -> RawHtml<String> {
todo!("will implement later")
}
#[catch(422)]
pub fn unprocessable_entity(_: &Request) ->
RawHtml<String> {
139
140
Designing a User-Generated Application
todo!("will implement later")
}
#[catch(500)]
pub fn internal_server_error(_: &Request) ->
RawHtml<String> {
todo!("will implement later")
}
18. When the library is ready, we can modify src/main.rs itself:
#[macro_use]
extern crate rocket;
use
use
use
use
use
our_application::catchers;
our_application::fairings::db::DBConnection;
our_application::routes::{self, post, user};
rocket::{Build, Rocket};
rocket_db_pools::Database;
#[launch]
async fn rocket() -> Rocket<Build> {
rocket::build()
.attach(DBConnection::init())
.mount(
"/",
routes![
user::get_user,
user::get_users,
user::new_user,
user::create_user,
user::edit_user,
user::put_user,
user::patch_user,
user::delete_user,
post::get_post,
post::get_posts,
Summary
141
post::create_post,
post::delete_post,
],
)
.mount("/assets", routes![routes::assets])
.register(
"/",
catchers![
catchers::not_found,
catchers::unprocessable_entity,
catchers::internal_server_error
],
)
}
Our src/main.rs file has become cleaner.
Now, if we want to add more structs or routes, we can easily add new modules in the
corresponding folders. We can also add more states or fairings and easily find the file
location for those items.
Summary
In this chapter, we learned how to design an application, create a Rocket application
skeleton, and organize the Rust application into smaller manageable modules.
We also learned about concepts such as CRUD and RESTful applications, Rust enum
discriminators, and Rust path qualifiers.
Hopefully, after reading this chapter, you can apply those concepts to help you organize
your code better.
We will start implementing this application and learn more about Rust and Rocket
concepts such as templating, request guards, cookies, and JSON, in the following chapters.
Part 2:
An In-Depth Look at
Rocket Web Application
Development
In this part, you will learn about the intermediate concepts of the Rust language, such as
Rust vectors, error handling, Rust Option and Result, enums, looping, matching, closures,
and async. You will learn more about Rocket's built-in guards, creating custom request
guards, forms, cookies, uploading files, templates, and JSON by using the serde crate.
This part comprises the following chapters:
• Chapter 6, Implementing User CRUD
• Chapter 7, Handling Errors in Rust and Rocket
• Chapter 8, Serving Static Assets and Templates
• Chapter 9, Displaying Users' Post
• Chapter 10, Uploading and Processing Posts
• Chapter 11, Securing and Adding an API and JSON
6
Implementing
User CRUD
In the previous chapter, we created a rough outline for the application. In this chapter, we
are going to implement the endpoints for managing users. By implementing the endpoints
in this chapter, you are going to learn about HTTP basic operations for an entity, that is,
creating, reading, updating, and deleting an entity.
In addition, you are going to learn how to construct HTML and an HTML form, send
the form payload to the server, validate and sanitize the form payload, hash the password
payload, and handle failure by redirecting to another endpoint with a message.
Along with implementing the endpoints, you will also learn how to query single and
multiple rows from the database, and how to insert, update, and delete a row from
the database.
In this chapter, we're going to cover the following main topics:
• Implementing GET user
• Implementing GET users
• Implementing POST user
• Implementing PUT and PATCH user
• Implementing DELETE user
146
Implementing User CRUD
Technical requirements
For this chapter, we have the same technical requirements as the previous chapter. We
need a Rust compiler, a text editor, an HTTP client, and a PostgreSQL database server.
You can find the source code for this chapter at https://github.com/
PacktPublishing/Rust-Web-Development-with-Rocket/tree/main/
Chapter06.
Implementing GET user
Let's look at the steps to implement this:
1. We'll start with the basics by implementing the get_user() function in src/
routes/user.rs:
#[get("/users/<_uuid>", format = "text/html")]
pub async fn get_user(mut _db: Connection<DBConnection>,
_uuid: &str) -> HtmlResponse {
todo!("will implement later")
}
Before we implement get_user(), we want to prepare the other routines that we
will use. For example, we want to return HTML, so we need to create a const of
&'static str in the same src/routes/user.rs file as our HTML template.
2. We will create two separate instances of const so we can insert different contents
between the HTML prefix and suffix:
const USER_HTML_PREFIX: &str = r#"<!DOCTYPE html>
<html lang="en">
<head>
<meta charset="utf-8" />
<title>Our Application User</title>
</head>
<body>"#;
const USER_HTML_SUFFIX: &str = r#"</body>
</html>"#;
Implementing GET user
147
After that, we will create two methods for a User struct. The first one is the find
method to find the entry in the database server, and the second one is to create an
HTML string for a User instance.
3. In the src/models/user.rs file, add the following lines to the use directives:
use rocket_db_pools::sqlx::{FromRow, PgConnection};
use std::error::Error;
4. Then, create an impl block for User:
impl User{}
5. Inside the block, add the find() method:
pub async fn find(connection: &mut PgConnection, uuid:
&str) -> Result<Self, Box<dyn Error>> {
let parsed_uuid = Uuid::parse_str(uuid)?;
let query_str = "SELECT * FROM users WHERE uuid =
$1";
Ok(sqlx::query_as::<_, Self>(query_str)
.bind(parsed_uuid)
.fetch_one(connection)
.await?)
}
We created a similar method before. The first thing we do is parse the UUID
(Universal Unique Identifier) &str into a Uuid instance and use the question mark
operator (?) to quickly return Box<dyn Error>. After that, we define the SQL
query string, query_str, and finally, we return the User instance.
One thing a little different here is that we are passing the mutable
reference to PgConnection itself, instead of a mutable reference to
Connection<DBConnection>.
148
Implementing User CRUD
Remember previously, we used Connection<DBConnection> as in
the following:
pub async fn find(db: &mut Connection<DBConnection>,
uuid: &str) -> ... {
...
.fetch_one(&mut *db)
.await?)
}
We first dereference db using an asterisk (*) operator. The connection
implements std::ops::Deref, and its implementation exposes the new
type, DBConnection, which is a wrapper for sqlx::PgPool, an alias to
sqlx::Pool<sqlx::Postgres>.
The sqlx::Executor trait is implemented for sqlx::PgConnection, a
struct that implements the sqlx::Connection trait, representing a single
connection to the database. The sqlx::Executor trait is also implemented for
&sqlx::Pool, an asynchronous pool of SQLx database connections.
Since various sqlx methods (such as fetch_all, fetch_one, fetch_many,
fetch, execute, and execute_many) accept the generic type E, which is bound
by the sqlx::Executor trait, we can use either the reference to the pool itself or
the connection obtained from the pool in those methods.
There's a problem with the find() method since OurDateTime is a type
unknown by sqlx.
6. Add the following directive in src/models/our_date_time.rs:
#[derive(Debug, sqlx::Type)]
#[sqlx(transparent)]
pub struct OurDateTime(DateTime<Utc>);
The transparent directive automatically generates implementations referring to
the implementation of the inner type, which in our case is DateTime<Utc>.
7. Beside the find() method, let's implement another method to convert User to an
HTML String:
pub fn to_html_string(&self) -> String {
format!(
r#"<div><span class="label">UUID:
</span>{uuid}</div>
Implementing GET user
149
<div><span class="label">Username: </span>{username}</
div>
<div><span class="label">Email: </span>{email}</div>
<div><span class="label">Description: </
span>{description}</div>
<div><span class="label">Status: </span>{status}</div>
<div><span class="label">Created At: </span>{created_
at}</div>
<div><span class="label">Updated At: </span>{updated_
at}</div>"#,
uuid = self.uuid,
username = self.username,
email = self.email,
description = self.description.as_ref().
unwrap_or(&String::from("")),
status = self.status.to_string(),
created_at = self.created_at.0.to_rfc3339(),
updated_at = self.updated_at.0.to_rfc3339(),
)
}
8. Since the OurDateTime member is private but we access it like self.created_
at.0.to_rfc3339(), it's going to create an error when we compile it. To resolve
it, convert the member of OurDateTime in src/models/our_date_time.rs
to public:
pub struct OurDateTime(pub DateTime<Utc>);
We need to implement the to_string() method for UserStatus as
well. We can choose to implement to_string(), or we can implement
std::fmt::Display, which automatically provides to_string(). As a
bonus, with the Display trait, we can also use it in the format!("{}",
something) macro.
9. Modify src/models/user_status.rs as follows:
use std::fmt;
...
impl fmt::Display for UserStatus {
fn fmt(&self, f: &mut fmt::Formatter<'_>) ->
150
Implementing User CRUD
fmt::Result {
match *self {
UserStatus::Inactive => write!(f,
"Inactive"),
UserStatus::Active => write!(f, "Active"),
}
}
}
10. It's time to implement the get_user() function in src/routes/user.rs:
use rocket::http::Status;
use rocket::response::content::RawHtml;
use rocket_db_pools::{sqlx::Acquire, Connection};
#[get("/users/<uuid>", format = "text/html")]
pub async fn get_user(mut db: Connection<DBConnection>,
uuid: &str) -> HtmlResponse {
let connection = db
.acquire()
.await
.map_err(|_| Status::InternalServerError)?;
}
First, we add the required use directives, and then we remove the underscore
from _db and _uuid to mark it as a used variable. Then, we acquire a single
connection from the database pool or return InternalServerError if there's
something wrong.
11. After we set the connection variable, we can execute the find() method we
defined previously:
...
let user = User::find(connection, uuid)
.await
.map_err(|_| Status::NotFound)?;
We only expose a simple error, NotFound, for this case, but a more complex
application should handle the error properly, such as logging the error and
returning the proper error status and error messages.
Implementing GET users
151
12. Finally, we can construct the HTML string and return it:
...
let mut html_string = String::from(USER_HTML_PREFIX);
html_string.push_str(&user.to_html_string());
html_string.push_str(format!(r#"<a href="
/users/edit/{}">Edit User</a>"#,
user.uuid).as_ref());
html_string.push_str(r#"<a href="/users">User
List</a>"#);
html_string.push_str(USER_HTML_SUFFIX);
Ok(RawHtml(html_string))
Notice we added two links for editing this user and to go to /users.
In the next section, we are going to implement the get_users() function so the
application can handle a /users endpoint.
Implementing GET users
Now, let's implement get_users(). Here is a quick reminder of what the function
looked like in the previous chapter:
#[get("/users?<_pagination>", format = "text/html")]
pub async fn get_users(
mut _db: Connection<DBConnection>,
_pagination: Option<Pagination>,
) -> HtmlResponse {
todo!("will implement later")
}
As before, we should prepare the routines we're going to use:
1. In src/models/user.rs, create a method called find_all, as in
the following:
use super::pagination::{Pagination};
use crate::fairings::db::DBConnection;
use rocket_db_pools::Connection;
use rocket_db_pools::sqlx::{Acquire, FromRow,
PgConnection};
152
Implementing User CRUD
...
impl User {
...
pub async fn find_all(
db: &mut Connection<DBConnection>,
pagination: Option<Pagination>,
) -> Result<(Vec<Self>, Option<Pagination>),
Box<dyn Error>> {
if pagination.is_some() {
return Self::find_all_with_pagination(db,
&(pagination.unwrap())).await;
} else {
return Self::find_all_without_
pagination(db).await;
}
}
}
The parameter for find_all is Connection, which has the connection pool and
the optional Pagination.
If the function is successful, we want to return a vector of User and Pagination.
We can wrap it as a tuple in parentheses (), but there's a possibility that there's no
further row in the database, so we wrap the returned Pagination in Option.
We then split it into two methods to make it easier to read: find_all_without_
pagination and find_all_with_pagination.
2. Let's modify src/models/pagination.rs a little bit, and add DEFAULT_
LIMIT to limit the number of users we want to fetch at a single time:
pub const DEFAULT_LIMIT: usize = 10;
3. We can then create and implement the function for the base case in src/models/
user.rs, find_all_without_pagination:
use super::pagination::{Pagination, DEFAULT_LIMIT};
...
async fn find_all_without_pagination(db: &mut
Connection<DBConnection>) -> Result<(Vec<Self>,
Option<Pagination>), Box<dyn Error>> {
let query_str = "SELECT * FROM users ORDER BY
Implementing GET users
153
created_at DESC LIMIT $1";
let connection = db.acquire().await?;
let users = sqlx::query_as::<_, Self>(query_str)
.bind(DEFAULT_LIMIT as i32)
.fetch_all(connection)
.await?;
}
Like the find() method, we define query_str and execute the query, and
bind the Vec<User> result to the users variable. But, why do we pass the &mut
Connection<DBConnection> database connection pool this time? Let's
continue the function first:
{
...
let mut new_pagination: Option<Pagination> = None;
if users.len() == DEFAULT_LIMIT {
let query_str = "SELECT EXISTS(SELECT 1 FROM
users WHERE created_at < $1 ORDER BY
created_at DESC LIMIT 1)";
let connection = db.acquire().await?;
let exists = sqlx::query_as::<_,
BoolWrapper>(query_str)
.bind(&users.last().unwrap().created_at)
.fetch_one(connection)
.await?;
if exists.0 {
new_pagination = Some(Pagination {
next: users.last().unwrap().
created_at.to_owned(),
limit: DEFAULT_LIMIT,
});
}
}
Ok((users, new_pagination))
}
154
Implementing User CRUD
We then prepare the returned pagination, setting it to None first. If the fetched
users are equal to DEFAULT_LIMIT, there's a possibility of a next row, so we do the
second query to the database. Since we cannot reuse a single connection, we have
to obtain a new connection again from the database pool. That's why we pass &mut
Connection<DBConnection> to find_all and find_all_without_
pagination instead of &mut PgConnection. If there's the next row, we can
return the pagination wrapped in Some(). But, what is BoolWrapper? We need
to set a type to put the result of the "SELECT EXISTS..." query.
4. Add pub mod bool_wrapper; to src/models/mod.rs and create a new file,
src/models/bool_wrapper.rs, with the following content:
use rocket_db_pools::sqlx::FromRow;
#[derive(FromRow)]
pub struct BoolWrapper(pub bool);
Don't forget to add use super::bool_wrapper::BoolWrapper; to src/
models/user.rs.
5. Now, it's time to implement find_all_with_pagination:
async fn find_all_with_pagination(db: &mut
Connection<DBConnection>, pagination: &Pagination) ->
Result<(Vec<Self>, Option<Pagination>), Box<dyn Error>> {
let query_str =
"SELECT * FROM users WHERE created_at < $1
ORDER BY created_at DESC LIMIT
2";
let connection = db.acquire().await?;
let users = sqlx::query_as::<_, Self>(query_str)
.bind(&pagination.next)
.bind(DEFAULT_LIMIT as i32)
.fetch_all(connection)
.await?;
let mut new_pagination: Option<Pagination> = None;
if users.len() == DEFAULT_LIMIT {
let query_str = "SELECT EXISTS(SELECT 1 FROM
users WHERE created_at < $1 ORDER BY
created_at DESC LIMIT 1)";
Implementing GET users
155
let connection = db.acquire().await?;
let exists = sqlx::query_as::<_,
BoolWrapper>(query_str)
.bind(&users.last().unwrap().created_at)
.fetch_one(connection)
.await?;
if exists.0 {
new_pagination = Some(Pagination {
next: users.last().unwrap().
created_at.to_owned(),
limit: DEFAULT_LIMIT,
});
}
}
Ok((users, new_pagination))
}
The private method works like find_all_without_pagination, but we add a
WHERE condition to start querying from a certain point.
6. Now, it's time to implement the get_users() function:
#[get("/users?<pagination>", format = "text/html")]
pub async fn get_users(mut db: Connection<DBConnection>,
pagination: Option<Pagination>) -> HtmlResponse {
let (users, new_pagination) = User::find_all(&mut
db, pagination)
.await
.map_err(|_| Status::NotFound)?;
}
7. After we have obtained users and new_pagination, we can construct the
HTML for the return value:
...
let mut html_string = String::from(USER_HTML_PREFIX);
for user in users.iter() {
html_string.push_str(&user.to_html_string());
html_string
156
Implementing User CRUD
.push_str(format!(r#"<a href="/users/{}">See
User</a><br/>"#, user.uuid).as_ref());
html_string.push_str(
format!(r#"<a href="/users/edit/{}">Edit
User</a><br/>"#, user.uuid).as_ref(),
);
}
8. Append the link to the next page if we have new_pagination:
if let Some(pg) = new_pagination {
html_string.push_str(
format!(
r#"<a href="/users?pagination.next={}&
pagination.limit={}">Next</a><br/>"#,
&(pg.next.0).timestamp_nanos(),
&pg.limit,
)
.as_ref(),
);
}
Notice we use timestamp_nanos() to convert time to i64 to make it easier to
transport in the HTML.
9. To finalize the function, append the following lines:
html_string.push_str(r#"<a href="/users/new">New user</
a>"#);
html_string.push_str(USER_HTML_SUFFIX);
Ok(RawHtml(html_string))
10. Now, we have to implement FromFormField for OurDateTime since we are
using OurDateTime in the pagination. In src/models/our_date_time.rs,
add the required use directives:
use chrono::{offset::Utc, DateTime, TimeZone};
use rocket::data::ToByteUnit;
Implementing GET users
157
11. Because we are cloning OurDateTime inside the User implementation (users.
last().unwrap().created_at.to_owned()), we also need to derive
Clone for OurDateTime:
#[derive(Debug, sqlx::Type, Clone)]
12. For the from_value implementation, we are just parsing i64 from the request
parameter and converting it to the OurDateTime object:
impl<'r> FromFormField<'r> for OurDateTime {
fn from_value(field: ValueField<'r>) -> form::
Result<'r, Self> {
let timestamp = field.value.parse::<i64>()?;
Ok(OurDateTime(
Utc.timestamp_nanos(timestamp)))
}
...
}
13. But, for from_data, we have to be more involved because we have to convert the
request to bytes, convert it again into &str, and finally, into i64. First, we get the
Rocket limit for the form:
async fn from_data(field: DataField<'r, '_>) ->
form::Result<'r, Self> {
let limit = field
.request
.limits()
.get("form")
.unwrap_or_else(|| 8.kibibytes());
...
}
14. Then, get the bytes from the request:
let bytes = field.data.open(limit).into_bytes().await?;
if !bytes.is_complete() {
return Err((None, Some(limit)).into());
}
let bytes = bytes.into_inner();
158
Implementing User CRUD
15. And finally, we convert bytes to &str, parse it as i64, and convert it
to OurDateTime:
let time_string = std::str::from_utf8(&bytes)?;
let timestamp = time_string.parse::<i64>()?;
Ok(OurDateTime(Utc.timestamp_nanos(timestamp)))
Now, get_user and get_users are ready, but we do not have any data yet. In the next
section, we are going to implement the new_user and create_user functions so we
can insert user data through an HTML form.
Implementing POST user
To create a user, we are going to use the new_user and create_user functions. The
new_user() function is relatively easy to implement; we just need to serve an HTML
page with a form for a user to fill in.
Let's look at the steps:
1. Implement the new_user() function in src/routes/user.rs:
#[get("/users/new", format = "text/html")]
pub async fn new_user() -> HtmlResponse {
let mut html_string = String::from(USER_HTML_
PREFIX);
html_string.push_str(
r#"<form accept-charset="UTF-8" action="/
users" autocomplete="off" method="POST">
<div>
<label for="username">Username:</label>
<input name="username" type="text"/>
</div>
<div>
<label for="email">Email:</label>
<input name="email" type="email"/>
</div>
<div>
<label for="password">Password:</label>
<input name="password" type="password"/>
</div>
Implementing POST user
159
<div>
<label for="password_confirmation">Password
Confirmation:</label>
<input name="password_confirmation"
type="password"/>
</div>
<div>
<label for="description">Tell us a little bit
more about yourself:</label>
<textarea name="description"></textarea>
</div>
<button type="submit" value="Submit">Submit</
button>
</form>"#,
);
html_string.push_str(USER_HTML_SUFFIX);
Ok(RawHtml(html_string))
}
In the HTML, we set the form tag action attribute to "/users" and the
method attribute to "POST". This corresponds to the create_user route in our
application. On the HTML page, we have fields for username, email, password,
password_confirmation, and description. We then insert the button to
submit and serve the html_string to the client application.
2. Try running the application now and open http://127.0.0.1:8000/users/
new in the web browser. Finally, we have something we can render in the browser:
Figure 6.1 ‒ New user page
160
Implementing User CRUD
3. As previously, before implementing the create_user() function, we want to
create other routines first. Since the HTML form has no one-to-one mapping to a
User struct, we create another struct. Put this struct in src/models/user.rs:
#[derive(Debug, FromForm)]
pub struct NewUser<'r> {
#[field(validate = len(5..20).or_else(msg!("name
cannot be empty")))]
pub username: &'r str,
pub email: &'r str,
pub password: &'r str,
#[field(validate = eq(self.password).or_
else(msg!("password confirmation mismatch")))]
pub password_confirmation: &'r str,
#[field(default = "")]
pub description: Option<&'r str>,
}
We set the derive FromForm trait for NewUser, so on top of the struct fields, we
use the field directive. This directive can be used to match the request payload
field name to the struct field name, set the default value, and validate the content of
the field.
If we have HTML form field that is different from the struct field name, we can
rename the field using field directive like the following:
#[field(name = uncased("html-field-name"))]
It can also be done as follows:
#[field(name = "some-other-name")]
If you use uncased macro, then the payload HTML field name containing any case,
such as HTML-FIELD-NAME, will be matched to the struct field name.
For setting the default value, the syntax is as follows:
#[field(default = "default value")]
And, for validation, the syntax is as follows:
#[field(validate = validation_function())]
Implementing POST user
161
There are a couple of built-in validation functions in the rocket::form::validate
module:
contains: This function succeeds when the field as a string has this substring,
or the field as a Vec contains this item, or Option has Some(value),
or rocket::form::Result has Ok(value) – for example,
contains("foo").
eq: This function succeeds when the field value is equal to the function
parameters. A type in Rust can be compared if the type implements
std::cmp::PartialEq. You can see the example in the NewUser struct,
eq(self.password).
ext: This function succeeds if the field type is rocket::fs::TempFile
and the content type matches the function parameter – for example,
ext(rocket::http::ContentType::JavaScript).
len: This function succeeds if the length of the field value is within the parameter
range. You can see the example in our NewUser struct, len(5..20). In Rust, we
define the range as from..to, but we can omit the to part.
ne: This function succeeds if the field value is not equal (!=) to the provided
parameter. A type implementing the std::cmp::PartialEq trait can also use
the inequality operator.
omits: This function is the opposite of contains.
one_of: This function succeeds if the value contains one of the items in the
supplied parameter. The parameter must be an iterator.
range: This function is like len, but it matches the value of the field instead of
the value of the length of the field.
with: We can pass a function or closure with the Boolean return type, and the
function succeeds when the passed function or closure returns true.
Besides those functions, there are three more functions we can use. The functions
work almost the same, but with different messages:
dbg_contains: This function also returns the field value in the error message.
dbg_eq: This function also returns the item value in the error message.
dbg_omits: This function also returns the item value in the error message.
162
Implementing User CRUD
In the NewUser struct, we can see that we can also set a custom error message
by combining the validation function with .or_else("other message", as
shown in the following example:
#[field(validate = len(5..20).or_else(msg!("name cannot
be empty")))]
Besides the provided functions, we can create a custom validation function. The
function should return form::Result<'_, ()>. We want to implement custom
validation for checking the strength of the password and the correctness of the email.
The first validation is password validation. We are going to use a crate called
zxcvbn. This crate is a Rust port of the npm module of the same name created by
Dropbox. The inspiration for the zxcvbn library is based on an xkcd comic strip
(https://xkcd.com/936/), which said that random joined words we can
remember, such as "CorrectHorseBatteryStaple", are easier to remember
and harder to crack compared to some rule such as must contain a minimum of eight
characters, of which one is upper case, one lower case, and one is a number.
4. Add zxcvbn = "2" to the Cargo.toml dependencies, then create the following
function in src/models/user.rs:
use rocket::form::{self, Error as FormError, FromForm};
use zxcvbn::zxcvbn;
...
fn validate_password(password: &str) -> form::Result<'_,
()> {
let entropy = zxcvbn(password, &[]);
if entropy.is_err() || entropy.unwrap().score()
< 3 {
return Err(FormError::validation("weak
password").into());
}
Ok(())
}
You can set the scoring strength up to four, but it means we cannot send a weak
password to the server. Right now, we just set the threshold of the password score
to two.
Implementing POST user
163
5. After that, we can implement the validation for email correctness. First, add regex
= "1.5.4" to Cargo.toml and add this function in src/models/user.rs:
use regex::Regex;
...
fn validate_email(email: &str) -> form::Result<'_, ()> {
const EMAIL_REGEX: &str = r#"(?:[a-z0-9!#$%&
'*+/=?^_`{|}~-]+(?:\.[a-z0-9!#$%&'*+/=?^_`{|}~-]
+)*|"(?:[\x01-\x08\x0b\x0c\x0e-\x1f\x21\
x23-\x5b\x5d-\x7f]|\\[\x01-\x09\x0b\x0c\
x0e-\x7f])*")@(?:(?:[a-z0-9](?:[a-z0-9-]*[
a-z0-9])?\.)+[a-z0-9](?:[a-z0-9-]*[az0-9])?|\[(?:(?:25[0-5]|2[0-4][0-9]|[01]?[0-9][
0-9]?)\.){3}(?:25[0-5]|2[0-4][0-9]|[01]?[0-9][
0-9]?|[a-z0-9-]*[a-z0-9]:(?:[\x01-\x08
\x0b\x0c\x0e-\x1f\x21-\x5a\x53-\x7f]|\\[\x01
-\x09\x0b\x0c\x0e-\x7f])+)\])"#;
let email_regex = Regex::new(EMAIL_REGEX).
unwrap();
if !email_regex.is_match(email) {
return Err(FormError::validation("invalid
email").into());
}
Ok(())
}
6. If the email regular expression (regex) is hard to type, you can also copy and
paste it from the source code on GitHub. We can now use the validations in the
NewUser struct:
pub struct NewUser<'r> {
...
#[field(validate = validate_email().
or_else(msg!("invalid email")))]
pub email: &'r str,
#[field(validate = validate_password()
.or_else(msg!("weak password")))]
pub password: &'r str,
164
Implementing User CRUD
...
}
7. Next, we can implement the create() method for the User struct. For security
purposes, we will hash the password using the secure password-hashing function.
In 2021, people considered md5 as a very insecure hashing function, and sha1
and sha3 as insecure hashing functions, so we will not use those functions. People
usually consider using bcrypt, scrypt, or argon2 instead. Now, argon2 has a
version, argon2id, which is resistant to side-channel attacks and GPU cracking
attacks, so we will use argon2 as a password-hashing implementation.
There is another possible attack on the create() method: cross-site scripting
(XSS). For example, a user can input "<script>console.log("hack")</
script>" as a description. We can rectify this problem by using an HTML
sanitization library called ammonia.
To add argon2 and ammonia for the create() method, add these lines
in Cargo.toml:
ammonia = "3.1.2"
argon2 = "0.3"
rand_core = {version = "0.6", features = ["std"]}
8. We can create a function to sanitize HTML in src/models/mod.rs:
use ammonia::Builder;
use std::collections::hash_set::HashSet;
pub fn clean_html(src: &str) -> String {
Builder::default()
.tags(HashSet::new())
.clean(src)
.to_string()
}
The default cleaner from ammonia::Builder::default allows many HTML
tags, and people can still deface the site. To rectify this problem, we are passing an
empty HashSet to disallow any HTML tag.
Implementing POST user
165
9. After the password hashing and HTML sanitization are ready, it is time to
implement the create() method for the User struct. Add the required use
directives in src/models/user.rs:
use super::clean_html;
use argon2::{password_hash::{rand_core::OsRng,
PasswordHasher, SaltString},Argon2};
10. Put these lines in the impl User block:
pub async fn create<'r>(
connection: &mut PgConnection,
new_user: &'r NewUser<'r>,
) -> Result<Self, Box<dyn Error>> {
let uuid = Uuid::new_v4();
let username = &(clean_html(new_user.username));
let description = &(new_user.description.map(
|desc| clean_html(desc)));
}
We generate a new UUID for the new User instance. After that, we clean the
username value and description value. We don't clean the email and password
because we already validate the content of the email using a regex and we will not
show any password in the HTML.
11. Next, append the following lines to hash the password:
let salt = SaltString::generate(&mut OsRng);
let argon2 = Argon2::default();
let password_hash = argon2.hash_password(new_user.
password.as_bytes(), &salt);
if password_hash.is_err() {
return Err("cannot create password hash".into());
}
12. Next, we send the INSERT statement to our database server and return the inserted
row. Append the following lines:
let query_str = r#"INSERT INTO users
(uuid, username, email, password_hash, description,
status)
VALUES
166
Implementing User CRUD
($1, $2, $3, $4, $5, $6)
RETURNING *"#;
Ok(sqlx::query_as::<_, Self>(query_str)
.bind(uuid)
.bind(username)
.bind(new_user.email)
.bind(password_hash.unwrap().to_string())
.bind(description)
.bind(UserStatus::Inactive)
.fetch_one(connection)
.await?)
13. When the User::create() method is ready, we can implement the create_
user() function. When the application successfully creates a user, it's better to
show the result by redirecting to get_user. For this purpose, we can use the
rocket::response::Redirect type instead of RawHtml.
Also, if there's an error, it's better to redirect to new_user() and show the error so
the user can fix the input error. We can do this by getting the error of the NewUser
validations or any other error, and redirecting to the new_user() function with
embedded error information.
We can get the errors for the request form value using
rocket::form::Contextual, a proxy for the form type that contains
error information. We also going to use rocket::response::Flash to
send a one-time cookie to the web browser and retrieve the message on a route
using rocket::request::FlashMessage. Append these lines to src/
routes/user.rs:
use crate::models::{pagination::Pagination,
user::{NewUser, User}};
use rocket::form::{Contextual, Form};
use rocket::request::FlashMessage;
use rocket::response::{content::RawHtml, Flash,
Redirect};
14. Change the signature of the create_user() function to the following:
#[post("/users", format = "application/x-www-formurlencoded", data = "<user_context>")]
pub async fn create_user<'r>(
Implementing POST user
mut db: Connection<DBConnection>,
user_context: Form<Contextual<'r, NewUser<'r>>>,
) -> Result<Flash<Redirect>, Flash<Redirect>> {}
Because we are sending POST data, the browser will send Content-Type as
"application/x-www-form-urlencoded", so we have to change the
format accordingly.
Also, take a look at the request parameter; instead of Form<NewUser<'r>>,
we are inserting the Contextual type in the middle of the parameter.
We are also changing the return value to Result<Flash<Redirect>,
Flash<Redirect>>.
15. Now, let's implement the function body. Append the following lines to the
function body:
if user_context.value.is_none() {
let error_message = format!(
"<div>{}</div>",
user_context
.context
.errors()
.map(|e| e.to_string())
.collect::<Vec<_>>()
.join("<br/>")
);
return Err(Flash::error(Redirect::to("/
users/new"), error_message));
}
If user_context has value, it means that Rocket successfully converted
the request payload and put it inside the value attribute. We are branching
and returning Error with a Flash message and Redirect directive to "/
users/new".
16. The next implementation is if Rocket successfully parses NewUser. Append the
following lines in the true branch:
let new_user = user_context.value.as_ref().unwrap();
let connection = db.acquire().await.map_err(|_| {
Flash::error(
167
168
Implementing User CRUD
Redirect::to("/users/new"),
"<div>Something went wrong when creating
user</div>",
)
})?;
let user = User::create(connection, new_user).await.map_
err(|_| {
Flash::error(
Redirect::to("/users/new"),
"<div>Something went wrong when creating
user</div>",
)
})?;
Ok(Flash::success(
Redirect::to(format!("/users/{}", user.uuid)),
"<div>Successfully created user</div>",
))
Just like the get_user() function, we create a routine to get the database
connection, perform an INSERT operation to the database server, and generate the
successful Redirect response. But, when an error occurs, instead of returning
HTML, we generate the Redirect directive with the appropriate path and message.
17. We now need to change the new_user() and get_user() functions to be able
to handle incoming FlashMessage request guards. First, for the new_user()
function, change the signature to the following:
get_user(
mut db: Connection<DBConnection>,
uuid: &str,
flash: Option<FlashMessage<'_>>,
)
Implementing POST user
169
18. Because the flash message may not always exist, we wrap it in Option. After let
mut html_string = String::from(USER_HTML_PREFIX);, append the
following lines in the function body:
if flash.is_some() {
html_string.push_str(flash.unwrap().message());
}
19. We change the new_user() function almost the same. Change the function
signature to this:
new_user(flash: Option<FlashMessage<'_>>)
Then, append the following lines after USER_HTML_PREFIX:
if flash.is_some() {
html_string.push_str(flash.unwrap().message());
}
20. Now, it's time to try creating the user data. If everything is correct, you should see
screens like the following. The error message looks as follows:
Figure 6.2 ‒ Error message when failed
170
Implementing User CRUD
The success message looks like the following:
Figure 6.3 ‒ Success message
In the next sections, we are going to continue with updating the user and deleting a user.
Implementing PUT and PATCH user
To update the user, we need a page such as new_user(), but we want the form
pre-populated with existing data. We also want to add another field for the user to confirm
the old password. Let's look at the steps:
1. Change the edit_user() function signature to the following:
#[get("/users/edit/<uuid>", format = "text/html")]
pub async fn edit_user(mut db: Connection<DBConnection>,
uuid: &str, flash: Option<FlashMessage<'_>>) ->
HtmlResponse {}
2. To get the existing user, append the following lines inside the function body block:
let connection = db
.acquire()
.await
.map_err(|_| Status::InternalServerError)?;
let user = User::find(connection, uuid)
.await
.map_err(|_| Status::NotFound)?;
Implementing PUT and PATCH user
171
3. After that, we can append the HTML, such as new_user(), but this time, we
also include the existing data from the user. Append the following lines inside the
edit_user() function body:
let mut html_string = String::from(USER_HTML_PREFIX);
if flash.is_some() {
html_string.push_str(flash.unwrap().message());
}
html_string.push_str(
format!(
r#"<form accept-charset="UTF-8" action="/
users/{}" autocomplete="off" method="POST">
<input type="hidden" name="_METHOD" value="PUT"/>
<div>
<label for="username">Username:</label>
<input name="username" type="text" value="{}"/>
</div>
<div>
<label for="email">Email:</label>
<input name="email" type="email" value="{}"/>
</div>
<div>
<label for="old_password">Old password:</label>
<input name="old_password" type="password"/>
</div>
<div>
<label for="password">New password:</label>
<input name="password" type="password"/>
</div>
<div>
<label for="password_confirmation">Password
Confirmation:</label>
<input name="password_confirmation" type=
"password"/>
</div>
<div>
<label for="description">Tell us a little bit more
172
Implementing User CRUD
about yourself:</label>
<textarea name="description">{}</textarea>
</div>
<button type="submit" value="Submit">Submit</button>
</form>"#,
&user.uuid,
&user.username,
&user.email,
&user.description.unwrap_or_else(||
"".to_string()),
)
.as_ref(),
);
html_string.push_str(USER_HTML_SUFFIX);
Ok(RawHtml(html_string))
After this, all previous links to "/users/edit/{}" that we implemented in the
previous pages should work.
If you look at the code, we see the form's method attribute has a "POST" value. The
reason is that the HTML standard says that a form method can only be GET or POST.
Most web browsers will just change the invalid method, such as PUT and PATCH, to POST.
Some web frameworks work around this limitation by sending an XMLHttpRequest
using JavaScript, or a newer API such as the JavaScript Fetch API. Other web applications
send a POST request but include a hidden value in the request payload. We are going
to use the second way to implement updating the user by adding a new field, name="_
METHOD", with the "PUT" value.
Just like create_user(), we want to execute update_function() to redirect to
edit_user() again if there's something wrong. We also want to execute update_
function() to redirect to the user page again after successfully updating the user.
Since we are adding new payloads, _METHOD and old_password, we need a new type
that is different from NewUser:
1. Create a new struct called EditedUser in src/models/user.rs:
#[derive(Debug, FromForm)]
pub struct EditedUser<'r> {
#[field(name = "_METHOD")]
Implementing PUT and PATCH user
pub method: &'r str,
#[field(validate = len(5..20).or_else(msg!("name
cannot be empty")))]
pub username: &'r str,
#[field(validate = validate_email()
.or_else(msg!("invalid email")))]
pub email: &'r str,
pub old_password: &'r str,
pub password: &'r str,
pub password_confirmation: &'r str,
#[field(default = "")]
pub description: Option<&'r str>,
}
2. We want to skip updating the password if there's no value in old_password,
but if there is a value in old_password, we want to make sure the password
strength is adequate and password_confirmation has the same content as
password. Create a function in src/models/user.rs:
fn skip_validate_password<'v>(password: &'v str, old_
password: &'v str, password_confirmation: &'v str) ->
form::Result<'v, ()> {
if old_password.is_empty() {
return Ok(());
}
validate_password(password)?;
if password.ne(password_confirmation) {
return Err(FormError::validation("password
confirmation mismatch").into());
}
Ok(())
}
173
174
Implementing User CRUD
3. Then, use the validation function in the directive above the password field:
#[field(validate = skip_validate_password(self.old_
password, self.password_confirmation))]
pub password: &'r str,
We need a method for User to update the database row based on the EditedUser
content. This method will also verify the hash of old_password to make sure
EditedUser is valid.
4. Add the use directive in src/models/user.rs:
use argon2::{password_hash::{rand_core::OsRng,
PasswordHash, PasswordHasher, PasswordVerifier,
SaltString}, Argon2};
use chrono::offset::Utc;
5. Create a new method inside the impl User block in src/models/user.rs:
pub async fn update<'r>(db: &mut Connection<DBConnection>,
uuid: &'r str, user: &'r EditedUser<'r>) -> Result<Self,
Box<dyn Error>> {}
6. Inside the method, fetch the old user data from the database:
let connection = db.acquire().await?;
let old_user = Self::find(connection, uuid).await?;
7. Prepare the data for updating:
let now = OurDateTime(Utc::now());
let username = &(clean_html(user.username));
let description = &(user.description.map(|desc| clean_
html(desc)));
8. Because we can change the password or skip changing the password depending on
whether or not we have old_password or not, prepare the query items:
let mut set_strings = vec![
"username = $1",
"email = $2",
"description = $3",
"updated_at = $4",
];
Implementing PUT and PATCH user
175
let mut where_string = "$5";
let mut password_string = String::new();
let is_with_password = !user.old_password.is_empty();
9. If we are updating password, we need to verify old_password with the existing
password. We also want to hash a new password and add the password to set_
strings. Append the following lines:
if is_with_password {
let old_password_hash = PasswordHash::
new(&old_user.password_hash)
.map_err(|_| "cannot read password hash")?;
let argon2 = Argon2::default();
argon2
.verify_password(user.password.as_bytes(),
&old_password_hash)
.map_err(|_| "cannot confirm old password")?;
let salt = SaltString::generate(&mut OsRng);
let new_hash = argon2
.hash_password(user.password.as_bytes(),
&salt)
.map_err(|_| "cannot create password hash")?;
password_string.push_str(
new_hash.to_string().as_ref());
set_strings.push("password_hash = $5");
where_string = "$6";
}
10. We can then construct the UPDATE statement to update the user, execute the
statement, and return the User instance:
let query_str = format!(
r#"UPDATE users SET {} WHERE uuid = {} RETURNING
*"#,
set_strings.join(", "),
where_string,
);
let connection = db.acquire().await?;
176
Implementing User CRUD
let mut binded = sqlx::query_as::<_, Self>(&query_str)
.bind(username)
.bind(user.email)
.bind(description)
.bind(&now);
if is_with_password {
binded = binded.bind(&password_string);
}
let parsed_uuid = Uuid::parse_str(uuid)?;
Ok(binded.bind(parsed_uuid).fetch_one(connection).await?)
11. Now, it's time to use EditedUser and implement update_user(). Append
EditedUser in the use directive:
use crate::models::{pagination::Pagination,
user::{EditedUser, NewUser, User}};
12. Create the update_user() function in src/routes/user.rs:
#[post("/users/<uuid>", format = "application/x-www-formurlencoded", data = "<user_context>")]
pub async fn update_user<'r>(db:
Connection<DBConnection>, uuid: &str, user_
context: Form<Contextual<'r, EditedUser<'r>>>) ->
Result<Flash<Redirect>, Flash<Redirect>> {}
13. In the function, we need to check whether the form is correct or not. Append the
following lines:
if user_context.value.is_none() {
let error_message = format!(
"<div>{}</div>",
user_context
.context
.errors()
.map(|e| e.to_string())
.collect::<Vec<_>>()
.join("<br/>")
);
return Err(Flash::error(
Implementing PUT and PATCH user
177
Redirect::to(format!("/users/edit/{}", uuid)),
error_message,
));
}
14. We can tell the application to process depending on "_METHOD". Append the
following lines:
let user_value = user_context.value.as_ref().unwrap();
match user_value.method {
"PUT" => put_user(db, uuid, user_context).await,
"PATCH" => patch_user(db, uuid, user_
context).await,
_ => Err(Flash::error(
Redirect::to(format!("/users/edit/{}", uuid)),
"<div>Something went wrong when updating
user</div>",
)),
}
We don't waste the functions we defined before. We are using the put_user() and
patch_user() functions.
15. Now, it's time to implement the put_user() function. Change the signature of the
put_user() function:
#[put("/users/<uuid>", format = "application/x-www-formurlencoded", data = "<user_context>")]
pub async fn put_user<'r>(mut db:
Connection<DBConnection>, uuid: &str, user_
context: Form<Contextual<'r, EditedUser<'r>>>) ->
Result<Flash<Redirect>, Flash<Redirect>> {}
Then, implement the function as follows:
let user_value = user_context.value.as_ref().unwrap();
let user = User::update(&mut db, uuid, user_value).await.
map_err(|_| {
Flash::error(
Redirect::to(format!("/users/edit/{}", uuid)),
"<div>Something went wrong when updating
user</div>",
178
Implementing User CRUD
)
})?;
Ok(Flash::success(
Redirect::to(format!("/users/{}", user.uuid)),
"<div>Successfully updated user</div>",
))
16. For the patch_user() function, we can just reuse the put_user() function.
Write the code for patch_user():
#[patch("/users/<uuid>", format = "application/x-wwwform-urlencoded", data = "<user_context>")]
pub async fn patch_user<'r>(db: Connection<DBConnection>,
uuid: &str, user_context: Form<Contextual<'r,
EditedUser<'r>>>) -> Result<Flash<Redirect>,
Flash<Redirect>> {
put_user(db, uuid, user_context).await
}
17. Finally, append the new route in src/main.rs:
user::edit_user,
user::update_user,
user::put_user,
The only endpoint left is for deleting the user. Let's continue with that in the next section.
Implementing DELETE user
The first thing we want to do to delete a user is to create a method for the User struct.
Let's look at the steps:
1. Write the method to delete a user in the impl User block in src/models/
user.rs:
pub async fn destroy(connection: &mut PgConnection, uuid:
&str) -> Result<(), Box<dyn Error>> {
let parsed_uuid = Uuid::parse_str(uuid)?;
let query_str = "DELETE FROM users WHERE uuid =
$1";
sqlx::query(query_str)
Implementing DELETE user
179
.bind(parsed_uuid)
.execute(connection)
.await?;
Ok(())
}
Then, we can implement the delete_user() function in src/routes/user.
rs:
#[delete("/users/<uuid>", format = "application/x-wwwform-urlencoded")]
pub async fn delete_user(
mut db: Connection<DBConnection>,
uuid: &str,
) -> Result<Flash<Redirect>, Flash<Redirect>> {
let connection = db.acquire().await.map_err(|_| {
Flash::error(
Redirect::to("/users"),
"<div>Something went wrong when deleting
user</div>",
)
})?;
User::destroy(connection, uuid).await.map_err(|_| {
Flash::error(
Redirect::to("/users"),
"<div>Something went wrong when deleting
user</div>",
)
})?;
Ok(Flash::success(
Redirect::to("/users"),
"<div>Successfully deleted user</div>",
))
}
180
Implementing User CRUD
2. The problem is that neither the link nor the form in HTML are allowed to use the
DELETE method. We cannot use the link, as any bot seeing it will crawl on it and
could perform resource deletion accidentally. As with updating the user, we can use
the form and send a POST request to a new endpoint. Add a new function in src/
routes/user.rs:
#[post("/users/delete/<uuid>", format = "application/xwww-form-urlencoded")]
pub async fn delete_user_entry_point(
db: Connection<DBConnection>,
uuid: &str,
) -> Result<Flash<Redirect>, Flash<Redirect>> {
delete_user(db, uuid).await
}
3. Don't forget to add the route in src/main.rs:
user::delete_user,
user::delete_user_entry_point,
4. Now, where can we create a form to delete the user? Let's do that on the get_
user() page. Append the HTML for the form as follows:
html_string
.push_str(format!(r#"<a href="/users/edit/{}">Edit
User</a><br/>"#, user.uuid).as_ref());
html_string.push_str(
format!(
r#"<form accept-charset="UTF-8" action="/
users/delete/{}" autocomplete="off"
method="POST"><button type="submit"
value="Submit">Delete</button></form>"#,
user.uuid
)
.as_ref(),
);
We have now completed all of the endpoints used to manage users. Try adding users and
see how pagination works or try improving the HTML. You can also try activating users
for a challenge!
Summary
181
Summary
In this chapter, we have learned about the basic operations for user entities by
implementing the creation, reading, updating, and deleting of user routes.
We also learned more about various modules of the Rocket framework such as RawHtml,
Redirect, Contextual, Flash, Form, and FlashMessage.
Along with implementing the endpoints, we also learned more about database operations
such as querying, inserting, updating, and deleting objects on a database server.
In the next chapter, we are going to learn more about error handling and creating our own
error types.
7
Handling Errors in
Rust and Rocket
In the previous chapter, we learned about creating endpoints and SQL queries to handle
the management of the User entity. In this chapter, we are going to learn more about
error handling in Rust and Rocket. After learning the concepts in this chapter, you will be
able to implement error handling in a Rocket application.
We are also going to discuss more common ways to handle errors in Rust and Rocket,
including signaling unrecoverable errors using the panic! macro and catching the
panic! macro, using Option, using Result, creating a custom Error type, and
logging the generated error.
In this chapter, we're going to cover the following main topics:
• Using panic!
• Using Option
• Returning Result
• Creating a custom error type
• Logging errors
184
Handling Errors in Rust and Rocket
Technical requirements
For this chapter, we have the same technical requirements as the previous chapter. We
need a Rust compiler, a text editor, an HTTP client, and a PostgreSQL database server.
You can find the source code for this chapter at https://github.com/
PacktPublishing/Rust-Web-Development-with-Rocket/tree/main/
Chapter07.
Using panic!
To understand error handling in Rust, we need to begin with the panic! macro. We
can use the panic! macro when the application encounters an unrecoverable error and
there's no purpose in continuing the application. If the application encounters panic!,
the application will emit the backtrace and terminate.
Let's try using panic! on the program that we created in the previous chapter. Suppose
we want the application to read a secret file before we initialize Rocket. If the application
cannot find this secret file, it will not continue.
Let's get started:
1. Add the following line in src/main.rs:
use std::env;
2. In the same file in the rocket() function, prepend the following lines:
let secret_file_path = env::current_dir().unwrap().
join("secret_file");
if !secret_file_path.exists() {
panic!("secret does not exists");
}
3. Afterward, try executing cargo run without creating an empty file named
secret_file inside the working directory. You should see the output as follows:
thread 'main' panicked at 'secret does not exists', src/
main.rs:15:9
note: run with `RUST_BACKTRACE=1` environment variable to
display a backtrace
Using panic!
185
4. Now, try running the application again with RUST_BACKTRACE=1 cargo run.
You should see the backtrace output in the terminal similar to the following:
RUST_BACKTRACE=1 cargo run
Finished dev [unoptimized + debuginfo] target(s)
in 0.18s
Running `target/debug/our_application`
thread 'main' panicked at 'secret does not exists', src/
main.rs:15:9
stack backtrace:
...
14: our_application::main
at ./src/main.rs:12:36
15: core::ops::function::FnOnce::call_once
at /rustc/59eed8a2aac0230a8b5
3e89d4e99d55912ba6b35/library/core/
src/ops/function.rs:227:5
note: Some details are omitted, run with `RUST_
BACKTRACE=full` for a verbose backtrace.
5. Sometimes, we don't want to deallocate after panicking using the panic! macro
because we want the application to exit as soon as possible. We can skip deallocating
by setting panic = "abort" in Cargo.toml under the profile we are using.
Setting that configuration will make our binary smaller and exit faster, and the
operating system will need to clean it later. Let's try doing that. Set the following
lines in Cargo.toml and run the application again:
[profile.dev]
panic = "abort"
Now that we know how to use panic!, let's see how we can catch it in the next section.
Catching panic!
As well as using panic!, we can also use the todo! and unimplemented! macros in
Rust code. Those macros are very useful for prototyping because they will call panic!
while also allowing the code to type-check at compile time.
186
Handling Errors in Rust and Rocket
But, why does Rocket not shut down when we are calling a route with todo!? If we check
the Rocket source code, there's a catch_unwind function in src::panic that can
be used to capture a panicking function. Let's see that code in the Rocket source code,
core/lib/src/server.rs:
let fut = std::panic::catch_unwind(move || run())
.map_err(|e| panic_info!(name, e))
.ok()?;
Here, run() is a route handling function. Each time we call a route that is panicking, the
preceding routine will convert the panic into the result's Err variant. Try removing the
secret_file_path routine we added before and running the application. Now, create
a user and try going into user posts. For example, create a user with the 95a54c16e830-45c9-ba1d-5242c0e4c18f UUID. Try opening http://127.0.0.1/
users/95a54c16-e830-45c9-ba1d-5242c0e4c18f/posts. Since we only put
todo!("will implement later") in the function body, the application will panic,
but the preceding catch_unwind function will catch the panic and convert it into an
error. Please note that catch_unwind will not work if we set panic = "abort" in
Cargo.toml.
In a regular workflow, we don't usually want to use panic!, because panicking interrupts
everything, and the program will not be able to continue. If the Rocket framework does
not catch panic! and one of the route handling functions is panicking, then that single
error will close the application and there will be nothing to handle the other requests. But,
what if we want to terminate the Rocket application when we encounter an unrecoverable
error? Let's see how we can do it in the next section.
Using shutdown
To shut down smoothly if the application encounters an unrecoverable error in the route
handling function, we can use the rocket::Shutdown request guard. Remember, the
request guard is a parameter we are supplying to the route handling functions.
To see the Shutdown request guard in action, let's try implementing it in our
application. Using the previous application, add a new route in src/routes/mod.rs
called /shutdown:
use rocket::Shutdown;
...
#[get("/shutdown")]
pub async fn shutdown(shutdown: Shutdown) -> &'static str {
// suppose this variable is from function which
Using Option
187
// produces irrecoverable error
let result: Result<&str, &str> = Err("err");
if result.is_err() {
shutdown.notify();
return "Shutting down the application.";
}
return "Not doing anything.";
}
Try adding the shutdown() function in src/main.rs. After that, rerun the
application and send an HTTP request to /shutdown while monitoring the output of the
application on the terminal. The application should shut down smoothly.
In the next two sections, let's see how we can use Option and Result as an alternative
way to handle errors.
Using Option
In programming, a routine might produce a correct result or encounter a problem. One
classical example is division by zero. Dividing something by zero is mathematically
undefined. If the application has a routine to divide something, and the routine
encounters zero as input, the application cannot return any number. We want the
application to return another type instead of a number. We need a type that can hold
multiple variants of data.
In Rust, we can define an enum type, a type that can be different variants of data. An
enum type might be as follows:
enum Shapes {
None,
Point(i8),
Line(i8, i8),
Rectangle {
top: (i8, i8),
length: u8,
height: u8,
},
}
188
Handling Errors in Rust and Rocket
Point and Line are said to have unnamed fields, while Rectangle is said to have
named fields. Rectangle can also be called a struct-like enum variant.
If all members of enum have no data, we can add a discriminant on the member. Here is
an example:
enum Color {
Red,
// 0
Green = 127, // 127
Blue,
// 128
}
We can assign enum to a variable, and use the variable in a function as in the following:
fn do_something(color: Color) -> Shapes {
let rectangle = Shapes::Rectangle {
top: (0, 2),
length: 10,
height: 8,
};
match color {
Color::Red => Shapes::None,
Color::Green => Shapes::Point(10),
_ => rectangle,
}
}
Going back to error handling, we can use enum to communicate that there's something
wrong in our code. Going back to division by zero, here is an example:
enum Maybe {
WeCannotDoIt,
WeCanDoIt(i8),
}
fn check_divisible(input: i8) -> Maybe {
if input == 0 {
return Maybe::WeCannotDoIt;
}
Using Option
189
Maybe::WeCanDoIt(input)
}
The preceding pattern returning something or not returning something is very common,
so Rust has its own enum to show whether we have something or not in the standard
library, called std::option::Option:
pub enum Option<T> {
None,
Some(T),
}
Some(T) is used to communicate that we have T, and None is obviously used to
communicate that we don't have T. We used Option in some of the previous code. For
example, we used it in the User struct:
struct User {
...
description: Option<String>,
...
}
We also used Option as a function parameter or return type:
find_all(..., pagination: Option<Pagination>) -> (...,
Option<Pagination>), ... {}
There are many useful things we can use with Option. Suppose we have two variables,
we_have_it and we_do_not_have_it:
let we_have_it: Option<usize> = Some(1);
let we_do_not_have_it: Option<usize> = None;
• One thing we can do is pattern matching and use the content:
match we_have_it {
Some(t) => println!("The value = {}", t),
None => println!("We don't have it"),
};
190
Handling Errors in Rust and Rocket
• We can process it in a more convenient way if we care about the content of we_
have_it:
if let Some(t) = we_have_it {
println!("The value = {}", t);
}
• Option can be compared if the inner type implements std::cmp::Eq and
std::cmp::Ord, that is, the inner type can be compared using ==, !=, >, and
other comparison operators. Notice that we use assert!, a macro used for testing:
assert!(we_have_it != we_do_not_have_it);
• We can check whether a variable is Some or None:
assert!(we_have_it.is_some());
assert!(we_do_not_have_it.is_none());
• We can also get the content by unwrapping Option. But, there's a caveat;
unwrapping None will cause panic, so be careful when unwrapping Option.
Notice we use assert_eq!, which is a macro used for testing to ensure equality:
assert_eq!(we_have_it.unwrap(), 1);
// assert_eq!(we_do_not_have_it.unwrap(), 1);
// will panic
• We can also use the expect() method. This method will work the same with
unwrap() but we can use a custom message:
assert_eq!(we_have_it.expect("Oh no!"), 1);
// assert_eq!(we_do_not_have_it.expect("Oh no!"), 1); //
will panic
• We can unwrap and set the default value so it will not panic if we unwrap None:
assert_eq!(we_have_it.unwrap_or(42), 1);
assert_eq!(we_do_not_have_it.unwrap_or(42), 42);
• We can unwrap and set the default value with a closure:
let x = 42;
assert_eq!(we_have_it.unwrap_or_else(|| x), 1);
assert_eq!(we_do_not_have_it.unwrap_or_else(|| x), 42);
Returning Result
191
• We can convert the value contained to something else using map(), map_or(), or
map_or_else():
assert_eq!(we_have_it.map(|v| format!("The value = {}",
v)), Some("The value = 1".to_string()));
assert_eq!(we_do_not_have_it.map(|v| format!("The value =
{}", v)), None);
assert_eq!(we_have_it.map_or("Oh no!".to_string(),
|v| format!("The value = {}", v)), "The value = 1".to_
string());
assert_eq!(we_do_not_have_it.map_or("Oh no!".to_string(),
|v| format!("The value = {}", v)), "Oh no!".to_string());
assert_eq!(we_have_it.map_or_else(|| "Oh no!".to_
string(), |v| format!("The value = {}", v)), "The value =
1".to_string());
assert_eq!(we_do_not_have_it.map_or_else(|| "Oh no!".
to_string(), |v| format!("The value = {}", v)), "Oh no!".
to_string());
There are other important methods, which you can check in the documentation for
std::option::Option. Even though we can use Option to handle a situation where
there's something or nothing, it does not convey a message of something went wrong. We
can use another type similar to Option in the next part to achieve this.
Returning Result
In Rust, we have the std::result::Result enum that works like Option, but
instead of saying we have it or we don't have it, the Result type is more about saying we
have it or we have this error. Just like Option, Result is an enum type of the possible T
type or possible E error:
enum Result<T, E> {
Ok(T),
Err(E),
}
192
Handling Errors in Rust and Rocket
Going back to the division by zero problem, take a look at the following simple example:
fn division(a: usize, b: usize) -> Result<f64, String> {
if b == 0 {
return Err(String::from("division by zero"));
}
return Ok(a as f64 / b as f64);
}
We don't want division by 0, so we return an error for the preceding function.
Similar to Option, Result has many convenient features we can use. Suppose we have
the we_have_it and we_have_error variables:
let we_have_it: Result<usize, &'static str> = Ok(1);
let we_have_error: Result<usize, &'static str> = Err("Oh no!");
• We can get the value or the error using pattern matching:
match we_have_it {
Ok(v) => println!("The value = {}", v),
Err(e) => println!("The error = {}", e),
};
• Or, we can use if let to destructure and get the value or the error:
if let Ok(v) = we_have_it {
println!("The value = {}", v);
}
if let Err(e) = we_have_error {
println!("The error = {}", e);
}
• We can compare the Ok variant and the Err variant:
assert!(we_have_it != we_have_error);
• We can check whether a variable is an Ok variant or an Err variant:
assert!(we_have_it.is_ok());
assert!(we_have_error.is_err());
Returning Result
193
• We can convert Result to Option:
assert_eq!(we_have_it.ok(), Some(1));
assert_eq!(we_have_error.ok(), None);
assert_eq!(we_have_it.err(), None);
assert_eq!(we_have_error.err(), Some("Oh no!"));
• Just like Option, we can use unwrap(), unwrap_or(), or unwrap_or_
else():
assert_eq!(we_have_it.unwrap(), 1);
// assert_eq!(we_have_error.unwrap(), 1);
// panic
assert_eq!(we_have_it.expect("Oh no!"), 1);
// assert_eq!(we_have_error.expect("Oh no!"), 1);
// panic
assert_eq!(we_have_it.unwrap_or(0), 1);
assert_eq!(we_have_error.unwrap_or(0), 0);
assert_eq!(we_have_it.unwrap_or_else(|_| 0), 1);
assert_eq!(we_have_error.unwrap_or_else(|_| 0), 0);
• And, we can use map(), map_err(), map_or(), or map_or_else():
assert_eq!(we_have_it.map(|v| format!("The value = {}",
v)), Ok("The value = 1".to_string()));
assert_eq!(
we_have_error.map(|v| format!("The error = {}",
v)),
Err("Oh no!")
);
assert_eq!(we_have_it.map_err(|s| s.len()), Ok(1));
assert_eq!(we_have_error.map_err(|s| s.len()), Err(6));
assert_eq!(we_have_it.map_or("Default value".to_string(),
|v| format!("The value = {}", v)), "The value = 1".to_
string());
assert_eq!(we_have_error.map_or("Default value".to_
string(), |v| format!("The value = {}", v)), "Default
value".to_string());
assert_eq!(we_have_it.map_or_else(|_| "Default value".to_
string(), |v| format!("The value = {}", v)), "The value =
194
Handling Errors in Rust and Rocket
1".to_string());
assert_eq!(we_have_error.map_or_else(|_| "Default value".
to_string(), |v| format!("The value = {}", v)), "Default
value".to_string());
There are other important methods besides those methods in the
std::result::Result documentation. Do check them because Option and
Result are very important in Rust and Rocket.
Returning a string or numbers as an error might be acceptable in some cases, but most
likely, we want a real error type with a message and possible backtrace that we can process
further. In the next section, we are going to learn about (and use) the Error trait and
return the dynamic error type in our application.
Creating a custom error type
Rust has a trait to unify propagating errors by providing the std::error::Error trait.
Since the Error trait is defined as pub trait Error: Debug + Display, any
type that implements Error should also implement the Debug and Display traits.
Let's see how we can create a custom error type by creating a new module:
1. In src/lib.rs, add the new errors module:
pub mod errors;
2. After that, create a new folder, src/errors, and add the src/errors/mod.
rs and src/errors/our_error.rs files. In src/errors/mod.rs, add this
line:
pub mod our_error;
3. In src/errors/our_error.rs, add the custom type for error:
use rocket::http::Status;
use std::error::Error;
use std::fmt;
#[derive(Debug)]
pub struct OurError {
pub status: Status,
pub message: String,
debug: Option<Box<dyn Error>>,
Creating a custom error type
195
}
impl fmt::Display for OurError {
fn fmt(&self, f: &mut fmt::Formatter<'_>) ->
fmt::Result {
write!(f, "{}", &self.message)
}
}
4. Then, we can implement the Error trait for OurError. In src/errors/our_
error.rs, add the following lines:
impl Error for OurError {
fn source(&self) -> Option<&(dyn Error + 'static)> {
if self.debug.is_some() {
self.debug.as_ref().unwrap().source();
}
None
}
}
Currently, for the User module, we return a Result<..., Box<dyn Error>>
dynamic error for each method. This is a common pattern of returning an error by
using any type that implements Error and then putting the instance in the heap
using Box.
The problem with this approach is we can only use methods provided by the Error
trait, that is, source(). We want to be able to use the OurError status, message,
and debug information.
5. So, let's add a couple of builder methods to OurError. In src/errors/our_
error.rs, add the following lines:
impl OurError {
fn new_error_with_status(status: Status, message:
String, debug: Option<Box<dyn Error>>) -> Self {
OurError {
status,
message,
debug,
196
Handling Errors in Rust and Rocket
}
}
pub fn new_bad_request_error(message: String,
debug: Option<Box<dyn Error>>) -> Self {
Self::new_error_with_status(Status::
BadRequest, message, debug)
}
pub fn new_not_found_error(message: String,
debug: Option<Box<dyn Error>>) -> Self {
Self::new_error_with_status(Status::NotFound,
message, debug)
}
pub fn new_internal_server_error(
message: String,
debug: Option<Box<dyn Error>>,
) -> Self {
Self::new_error_with_status(Status::
InternalServerError, message, debug)
}
}
6. If we take a look at src/models/user.rs, there are three sources of errors:
sqlx::Error, uuid::Error, and argon2. Let's create a conversion for
sqlx::Error and uuid::Error to OurError. Add the following use
directive in src/errors/our_error.rs:
use sqlx::Error as sqlxError;
use uuid::Error as uuidError;
7. Inside the same file, src/errors/our_error.rs, add the following lines:
impl OurError {
...
pub fn from_uuid_error(e: uuidError) -> Self {
OurError::new_bad_request_error(
Creating a custom error type
String::from("Something went wrong"),
Some(Box::new(e)))
}
}
8. For sqlx::Error, we want to convert not_found error to HTTP status 404
and duplicate index error to an HTTP status 400bad request. Add the following
lines to src/errors/our_error.rs:
use std::borrow::Cow;
....
impl OurError {
....
pub fn from_sqlx_error(e: sqlxError) -> Self {
match e {
sqlxError::RowNotFound => {
OurError::new_not_found_error(
String::from("Not found"),
Some(Box::new(e)))
}
sqlxError::Database(db) => {
if db.code().unwrap_or(Cow::
Borrowed("2300")).starts_with("23") {
return OurError::new_bad_
request_error(
String::from("Cannot create or
update resource"),
Some(Box::new(db)),
);
}
OurError::new_internal_server_error(
String::from("Something went
wrong"),
Some(Box::new(db)),
)
}
_ => OurError::new_internal_server_error(
197
198
Handling Errors in Rust and Rocket
String::from("Something went wrong"),
Some(Box::new(e)),
),
}
}
}
9. We need to do one more thing before we modify our User entity. Some crates in
Rust do not compile the std library by default to make the resulting binary smaller
and embeddable in IoT (Internet of Things) devices or WebAssembly. For example,
the argon2 crate does not include the Error trait implementation by default,
so we need to enable the std feature. In Cargo.toml, modify the argon2
dependencies to enable the std library features:
argon2 = {version = "0.3", features = ["std"]}
10. In src/models/user.rs, delete use std::error::Error; and replace it
with use crate::errors::our_error::OurError;. Then, we can replace
the methods for User to use OurError instead. Here is an example:
pub async fn find(connection: &mut PgConnection, uuid:
&str) -> Result<Self, OurError> {
let parsed_uuid = Uuid::parse_str(
uuid).map_err(OurError::from_uuid_error)?;
let query_str = "SELECT * FROM users WHERE uuid =
$1";
Ok(sqlx::query_as::<_, Self>(query_str)
.bind(parsed_uuid)
.fetch_one(connection)
.await
.map_err(OurError::from_sqlx_error)?)
}
11. For the argon2 error, we can create a function or method, or convert it manually.
For example, in src/models/user.rs, we can do this:
let password_hash = argon2
.hash_password(new_user.password.as_bytes(),
&salt)
.map_err(|e| {
Creating a custom error type
199
OurError::new_internal_server_error(
String::from("Something went wrong"),
Some(Box::new(e)),
)
})?;
Change all the methods to use OurError. Just a reminder: you can find the
complete source code for src/models/user.rs in the GitHub repository at
https://github.com/PacktPublishing/Rust-Web-Developmentwith-Rocket/tree/main/Chapter07.
12. We will then use the OurError status and message in src/routes/user.
rs. Because the Error type already implements the Display trait, we can use e
directly inside format!(). Here is an example:
pub async fn get_user(...) -> HtmlResponse {
...
let user = User::find(connection,
uuid).await.map_err(|e| e.status)?;
...
}
...
pub async fn delete_user(...) -> Result<Flash<Redirect>,
Flash<Redirect>> {
...
User::destroy(connection, uuid)
.await
.map_err(|e| Flash::error(Redirect::to("/
users"), format!("<div>{}</div>", e)))?;
...
}
You can find the complete source code for src/routes/user.rs in the GitHub
repository. Now that we have implemented errors, it might be a good time to try to
implement the catchers that we defined before in src/catchers/mod.rs to show
default errors for the user. You can also see the example of the default catchers in the
source code.
200
Handling Errors in Rust and Rocket
In an application, tracking and logging errors are an important part of maintaining the
application. Since we implemented the Error trait, we can log the source() of an error
in our application. Let's take a look at how to do that in the next section.
Logging errors
In Rust, there's a log crate that provides a facade for application logging. The log provides
five macros: error!, warn!, info!, debug!, and trace!. An application can then
create a log based on the severity and filter what needs to be logged, also based on the
severity. For example, if we filter based on warn, then we only log error! and warn!
and ignore the rest. Since the log crate does not implement the logging itself, people often
use another crate to do the actual implementation. In the documentation for the log crate,
we can find examples of other logging crates that can be used: env_logger, simple_
logger, simplelog, pretty_env_logger, stderrlog, flexi_logger,
log4rs, fern, syslog, and slog-stdlog.
Let's implement custom logging in our application. We will use the fern crate for logging
and wrap that in async_log to make logging asynchronous:
1. First, add these crates in Cargo.toml:
async-log = "2.0.0"
fern = "0.6"
log = "0.4"
2. In Rocket.toml, add the config for log_level:
log_level = "normal"
3. We can then create the function to initialize a global logger in our application. In
src/main.rs, create a new function called setup_logger:
fn setup_logger() {}
Logging errors
201
4. Inside the function, let's initialize the logger:
use log::LevelFilter;
...
let (level, logger) = fern::Dispatch::new()
.format(move |out, message, record| {
out.finish(format_args!(
"[{date}] [{level}][{target}] [{
message}]",
date = chrono::Local::now().format("[
%Y-%m-%d][%H:%M:%S%.3f]"),
target = record.target(),
level = record.level(),
message = message
))
})
.level(LevelFilter::Info)
.chain(std::io::stdout())
.chain(
fern::log_file("logs/application.log")
.unwrap_or_else(|_| panic!("Cannot open
logs/application.log")),
)
.into_log();
First, we create a new instance of fern::Dispatch. After that, we configure the
output format using the format() method. After setting the output format, we set
the log level using the level() method.
For the logger, we want to not only output the log to the operating system stdout,
but we also want to write to a log file. We can do it using the chain() method. To
avoid panicking, don't forget to create a logs folder in the application directory.
5. After we set up the level and logger, we wrap it inside async_log:
async_log::Logger::wrap(logger, || 0).start(level).
unwrap();
202
Handling Errors in Rust and Rocket
6. We will log OurError when it's created. Inside src/errors/our_error.rs,
add the following lines:
impl OurError {
fn new_error_with_status(...) ... {
if debug.is_some() {
log::error!("Error: {:?}", &debug);
}
...
}
}
7. Add the setup_logger() function to src/main.rs:
async fn rocket() -> Rocket<Build> {
setup_logger();
...
}
8. Now, let's try to see OurError inside the application log. Try creating users with
the same username; the application should emit a duplicate username error in the
terminal and logs/application.log similar to the following:
[[2021-11-21][17:50:49.366]] [ERROR][our_
application::errors::our_error]
[Error: Some(PgDatabaseError { severity: Error, code:
"23505", message:
"duplicate key value violates unique constraint \"users_
username_key\""
, detail: Some("Key (username)=(karuna) already
exists."), hint: None, p
osition: None, where: None, schema: Some("public"),
table: Some("users")
, column: None, data_type: None, constraint: Some("users_
username_key"),
file: Some("nbtinsert.c"), line: Some(649), routine:
Some("_bt_check_un
ique") })]
Summary
203
Now that we have learned how to log errors, we can implement logging functionalities to
improve the application. For example, we might want to create server-side analytics, or we
can combine the logs with third-party monitoring as a service to improve the operations
and create business intelligence.
Summary
In this chapter, we have learned some ways to handle errors in Rust and Rocket
applications. We can use panic!, Option, and Result as a way to propagate errors and
create handling for the errors.
We have also learned about creating a custom type that implements the Error trait. The
type can store another error, creating an error chain.
Finally, we learned ways to log errors in our application. We can also use log capability to
improve the application itself.
Our user pages are looking good, but using String all over the place is cumbersome, so
in the next chapter, we are going to learn more about templating using CSS, JavaScript,
and other assets in our application.
8
Serving Static Assets
and Templates
One of the common functions of a web application is serving static files such as
Cascading Style Sheets (CSS) or JavaScript (JS) files. In this chapter, we are going to
learn about serving static assets from the Rocket application.
One common task for a web framework is rendering a template into HTML files. We are
going to learn about using the Tera template to render HTML from the Rocket application.
In this chapter, we're going to cover the following main topics:
• Serving static assets
• Introducing the Tera template
• Showcasing users
• Working with forms
• Securing HTML forms from CSRF
206
Serving Static Assets and Templates
Technical requirements
For this chapter, we have the same technical requirements as the previous chapter. We
need a Rust compiler, a text editor, an HTTP client, and a PostgreSQL database server.
For the text editor, you can try adding an extension supporting the Tera template. If there
is no extension for Tera, try adding an extension for a Jinja2 or Django template and set
the file association to include the *.tera file.
We are going to add CSS to our application, and we are going to use stylesheets from
https://minicss.org/ since it's small and open source. Feel free to use and modify
the example HTML with other stylesheets.
You can find the source code for this chapter at https://github.com/
PacktPublishing/Rust-Web-Development-with-Rocket/tree/main/
Chapter08.
Serving static assets
Serving static assets (such as HTML files, JS files, or CSS files) is a very common task for
a web application. We can make Rocket serve files as well. Let's create the first function
to serve a favicon. Previously you might have noticed that some web browsers requested
a favicon file from our server, even though we did not explicitly mention it on our served
HTML page. Let's look at the steps:
1. In the application root folder, create a folder named static. Inside the static
folder, add a file named favicon.png. You can find sample favicon.png files
on the internet or use the file from the sample source code for this chapter.
2. In src/main.rs, add a new route:
routes![
...
routes::favicon,
],
3. In src/routes/mod.rs, add a new route handling function to serve
favicon.png:
use rocket::fs::{relative, NamedFile};
use std::path::Path;
...
#[get("/favicon.png")]
pub async fn favicon() -> NamedFile {
Serving static assets
207
NamedFile::open(Path::new(relative!("static/
favicon.png")))
.await
.ok()
.unwrap()
}
Here, relative! is a macro that generates a crate-relative version of a path. This
means that the macro refers to the folder of the source file or the generated binary.
For example, we have the source file for this application in /some/source, and by
saying relative!("static/favicon.png"), it means the path is /some/
source/static/favicon.png.
Every time we want to serve a particular file, we can create a route handling
function, return NamedFile, and mount the route to Rocket. But obviously, this
approach is not good; we can create a function to return static files dynamically.
4. Let's reuse the assets function that we created when we made the application
skeleton. Previously, in Chapter 3, Rocket Requests and Responses, we learned that we
can use multiple segments in a route. We can leverage this and serve a file that has
the same filename with the request's multiple segments.
Delete the favicon function that we created earlier and remove the reference
to the function from src/main.rs. In src/routes/mod.rs, modify the
use declarations:
use rocket::fs::{relative, NamedFile};
use std::path::{Path, PathBuf};
5. The application should return an HTTP 404 status code if the application cannot find
the requested file. We can easily return 404 status code by wrapping NamedFile
inside Option. If NamedFile is None, then the response will have 404 status
automatically. Modify the assets function signature in src/routes/mod.rs:
#[get("/<filename..>")]
pub async fn assets(filename: PathBuf) ->
Option<NamedFile> {}
6. We can then implement the assets function:
let mut filename = Path::new(relative!("static")).
join(filename);
NamedFile::open(filename).await.ok()
208
Serving Static Assets and Templates
7. Unfortunately, Rocket returns an HTTP 200 status code if filename is a directory,
so an attacker can try attacking and mapping the folder structure inside the
static folder. Let's handle this case by adding these lines:
let mut filename = Path::new(relative!("static")).
join(filename);
if filename.is_dir() {
filename.push("index.html");
}
NamedFile::open(filename).await.ok()
If an attacker tries to systematically check the path inside the static file, the attacker
will be served with an HTTP 404 status code and will not be able to infer the folder
structures inside the static folder.
8. There's another way to serve the static file: by using the built-in
rocket::fs::FileServer struct. Remove the function to handle static assets
in src/routes/mod.rs, and append the following lines in src/main.rs:
use rocket::fs::relative;
use rocket::fs::FileServer;
...
.mount("/assets", FileServer::from(
relative!("static")))
Even though web frameworks such as Rocket can serve static files, it's more common
to serve static files behind web servers such as Apache Web Server or NGINX. In more
advanced setups, people also utilize cloud storage, such as Amazon Web Services S3 or
Google Cloud Storage, in conjunction with a Content Delivery Network (CDN).
In the next section, we are going to refine the HTML that we created in Chapter 6,
Implementing User CRUD.
Introducing the Tera template
In web applications, there's usually a part that works as a web template system. Web
designers and web developers can create web templates, and the web application generates
HTML pages from the templates.
There are different kinds of web templates: server-side web templates (in which the
template is rendered on the server-side), client-side web templates (where client-side
applications render the template), or hybrid web templates.
Introducing the Tera template
209
There are a couple of templating engines in Rust. We can find templating engines for web
development (such as Handlebars, Tera, Askama, or Liquid) at https://crates.io
or https:/lib.rs.
The Rocket web framework has built-in support for templating in the form of the
rocket_dyn_templates crate. Currently, the crate only supports two engines:
Handlebars and Tera. In this book, we are going to use Tera as the template engine to
simplify the development, but feel free to try the Handlebars engine as well.
Tera is a template engine that is inspired by Jinja2 and Django templates. You can find the
documentation for Tera at https://tera.netlify.app/docs/. A Tera template is
a text file with expressions, statements, and comments. The expressions, statements, and
comments are replaced with variables and expressions when the template is rendered.
For example, let's say we have a file named hello.txt.tera, with the following content:
Hello {{ name }}!
If our program has a name variable with the value "Robert", we can create a hello.
txt file with the following content:
Hello Robert!
As you can see, we can easily create HTML pages with Tera templates. In Tera, there are
three delimiters we can use:
• {{ }} for expressions
• {% %} for statements
• {# #} for comments
Suppose we have a template named hello.html.tera with the following content:
<div>
{# we are setting a variable 'name' with the value
"Robert" #}
{% set name = "Robert" %}
Hello {{ name }}!
</div>
210
Serving Static Assets and Templates
We can render that template into a hello.html file with the following content:
<div>
Hello Robert!
</div>
Tera also has other capabilities such as embedding other templates in a template, basic
data operation, control structures, and functions. Basic data operations include basic
mathematic operations, basic comparison functions, and string concatenations. Control
structures include if branching, for loops, and other templates. Functions are defined
procedures that return some text to be used in the template.
We are going to learn more about some of those capabilities by changing the
OurApplication responses to use the Tera template engine. Let's set up
OurApplication to use the Tera template engine:
1. In the Cargo.toml file, add the dependencies. We need the rocket_dyn_
templates crate and the serde crate to serialize instances:
chrono = {version = "0.4", features = ["serde"]}
rocket_dyn_templates = {path = "../../../rocket/contrib/
dyn_templates/", features = ["tera"]}
serde = "1.0.130"
2. Next, add a new configuration in Rocket.toml to designate a folder in which to
place the template files:
[default]
...
template_dir = "src/views"
3. In src/main.rs, add the following lines to attach the rocket_dyn_
templates::Template fairing to the application:
use rocket_dyn_templates::Template;
...
#[launch]
async fn rocket() -> Rocket<Build> {
...
rocket::build()
...
.attach(Template::fairing())
Showcasing users
211
...
}
Adding the Template fairing is straightforward. We are going to learn about Template
in the next section by replacing RawHtml with Template.
Showcasing users
We are going to modify routes for /users/<uuid> and /users/ by taking the
following steps:
1. The first thing we need to do is to create a template. We already configured the
folder for templates in /src/views, so create a views folder in the src folder
and then, inside the views folder, create a template file named template.html.
tera.
2. We are going to use the file as the base HTML template for all HTML files. Inside
src/views/template.html.tera, add HTML tags as follows:
<!DOCTYPE html>
<html lang="en">
<head>
<meta charset="utf-8" />
<title>Our Application User</title>
<link href="/assets/mini-default.css"
rel="stylesheet">
<link rel="icon" type="image/png" href="/assets/
favicon.png">
<meta name="viewport" content="width=device-width,
initial-scale=1">
</head>
<body>
<div class="container"></div>
</body>
</html>
Notice that we included a CSS file in the HTML file. You can download the
open source CSS file from https://minicss.org/ and put it inside the
static folder. Since we already created a route to serve the static file in /
assets/<filename..>, we can just use the route directly inside the HTML file.
212
Serving Static Assets and Templates
3. For the next step, we need to include a part where we can put the HTML text we
want to render and a part where we can insert flash messages. Modify src/
views/template.html.tera as follows:
<div class="container">
{% if flash %}
<div class="toast" onclick="this.remove()">
{{ flash | safe }}
</div>
{% endif %}
{% block body %}{% endblock body %}
</div>
By default, all variables are rendered escaped to avoid an XSS (Cross-Site Scripting)
attack. We added the condition if there's a flash variable, we put the variable
inside the {{ flash }} expression. To let the HTML tag render as it is and not
escaped, we can use the | safe filter.
Tera has other built-in filters such as lower, upper, capitalize, and many
more. For the content, we are using block statements. The block statements
mean we are going to include another template inside the statement. You can also
see block ends with an endblock statement.
4. Tera can render any type that implements Serde's Serializable trait. Let's
modify User and related types to implement the Serializable trait. In src/
models/user.rs, modify the file as follows:
use rocket::serde::Serialize;
...
#[derive(Debug, FromRow, FromForm, Serialize)]
pub struct User {
...
5. Modify src/models/user_status.rs as follows:
use rocket::serde::Serialize;
...
#[derive(sqlx::Type, Debug, FromFormField, Serialize)]
#[repr(i32)]
pub enum UserStatus {
...
Showcasing users
213
6. Also, modify src/models/our_date_time.rs as follows:
use rocket::serde::Serialize;
#[derive(Debug, sqlx::Type, Clone, Serialize)]
#[sqlx(transparent)]
pub struct OurDateTime(pub DateTime<Utc>);
...
7. For Pagination, we can derive Serialize as it is, but using a timestamp in an
URL does not look good, for example, /users?pagination.next=2021-1201T13:09:13.060915Z&pagination.limit=2. We can make the pagination
URL look better by converting OurDateTime into i64 and vice versa. In src/
models/pagination.rs, append the following lines:
use rocket::serde::Serialize;
...
#[derive(Serialize)]
pub struct PaginationContext {
pub next: i64,
pub limit: usize,
}
impl Pagination {
pub fn to_context(&self) -> PaginationContext {
PaginationContext {
next: self.next.0.timestamp_nanos(),
limit: self.limit,
}
}
}
8. Since we are not going to use RawHtml anymore, remove the use
rocket::response::content::RawHtml; directive from the src/
routes/mod.rs file and modify the file as follows:
use rocket_dyn_templates::Template;
...
type HtmlResponse = Result<Template, Status>;
214
Serving Static Assets and Templates
9. In src/routes/user.rs, remove the use
rocket::response::content::RawHtml directive. We are going to add the
Template directive to make the response return Template, but we also need help
from Serde's Serialize and context! macros to help convert objects into a
Tera variable. Append the following lines:
use rocket::serde::Serialize;
...
use rocket_dyn_templates::{context, Template};
10. Then, we can modify the get_user function. Inside the get_user function in
src/routes/user.rs, delete everything related to RawHtml. Delete all the
lines starting from let mut html_string = String::from(USER_HTML_
PREFIX); to Ok(RawHtml(html_string)).
11. Then, replace the content of the deleted lines with the following lines:
#[derive(Serialize)]
struct GetUser {
user: User,
flash: Option<String>,
}
let flash_message = flash.map(|fm| String::from(fm.
message()));
let context = GetUser {
user,
flash: flash_message,
};
Ok(Template::render("users/show", &context))
Remember that the Tera template can use any Rust type that implements
the Serializable trait. We define the GetUser struct that derives the
Serializable trait. Since the User struct already implements Serializable,
we can use it as a field inside the GetUser struct. After creating a new instance of
GetUser, we then tell the application to render the "users/show" template file.
Showcasing users
215
12. Since we have told the application that the template name is "users/show",
create a new folder named users inside src/views. Inside the src/views/
users folder, create a new file, src/views/users/show.html.tera. After
that, add these lines inside the file:
{% extends "template" %}
{% block body %}
{% include "users/_user" %}
<a href="/users/edit/{{user.uuid}}" class="
button">Edit User</a>
<form accept-charset="UTF-8" action="/users/
delete/{{user.uuid}}" autocomplete="off"
method="POST" id="deleteUser"
class="hidden"></form>
<button type="submit" value="Submit"
form="deleteUser">Delete</button>
<a href="/users" class="button">User List</a>
{% endblock body %}
The first statement, {% extends "template" %}, means we are extending
src/views/template.html.tera, which we created earlier. The parent
src/views/template.html.tera has a statement, {% block body %}
{% endblock body %}, and we tell the Tera engine to override that block with
content from the same block in src/views/users/show.html.tera.
13. Inside that code, we also see {% include "users/_user" %}, so let's create a
src/views/users/_user.html.tera file and add the following lines:
<div class="row">
<div class="col-sm-3"><mark>UUID:</mark></div>
<div class="col-sm-9"> {{ user.uuid }}</div>
</div>
<div class="row">
<div class="col-sm-3"><mark>Username:</mark></div>
<div class="col-sm-9"> {{ user.username }}</div>
</div>
<div class="row">
<div class="col-sm-3"><mark>Email:</mark></div>
<div class="col-sm-9"> {{ user.email }}</div>
216
Serving Static Assets and Templates
</div>
<div class="row">
<div class="col-sm-3"><mark>
Description:</mark></div>
<div class="col-sm-9"> {{ user.description }}</div>
</div>
<div class="row">
<div class="col-sm-3"><mark>Status:</mark></div>
<div class="col-sm-9"> {{ user.status }}</div>
</div>
<div class="row">
<div class="col-sm-3"><mark>Created At:</mark></div>
<div class="col-sm-9"> {{ user.created_at }}</div>
</div>
<div class="row">
<div class="col-sm-3"><mark>Updated At:</mark></div>
<div class="col-sm-9"> {{ user.updated_at }}</div>
</div>
Inside both files, you will see there are many expressions, such as {{ user.
username }}. These expressions are using the variable that we defined
before: let context = GetUser { user, flash: flash_
message,};. Then, we tell the application to render the template:
Ok(Template::render("users/show", &context)).
You might be wondering why we split show.html.tera and _user.html.
tera. One benefit of using a template system is that we can reuse a template. We
want to reuse the same user HTML in the get_users function.
14. Let's modify the get_users function inside the src/routes/user.rs files.
Delete the lines from let mut html_string = String::from(USER_
HTML_PREFIX); to Ok(RawHtml(html_string)). Replace those lines with
the following lines:
let context = context! {users: users, pagination: new_
pagination.map(|pg|pg.to_context())};
Ok(Template::render("users/index", context))
Showcasing users
217
15. Instead of defining a new struct, such as GetUser, we are using the context!
macro. By using the context! macro, we do not need to create a new type to
be passed to the template. Now, create a new file named src/views/users/
index.html.tera, and add the following lines to the file:
{% extends "template" %}
{% block body %}
{% for user in users %}
<div class="container">
<div><mark class="tag">{{loop.
index}}</mark></div>
{% include "users/_user" %}
<a href="/users/{{ user.uuid }}" class="
button">See User</a>
<a href="/users/edit/{{ user.uuid }}"
class="button">Edit User</a>
</div>
{% endfor %}
{% if pagination %}
<a href="/users?pagination.next={{
pagination.next}}&pagination.limit={{
pagination.limit}}" class="button">
Next
</a>
{% endif %}
<a href="/users/new" class="button">New user</a>
{% endblock %}
We see two new things here: a {% for user in users %}...{% endfor %}
statement, which can be used to iterate arrays, and {{loop.index}}, to get the
current iteration inside the for loop.
218
Serving Static Assets and Templates
16. We want to change the new_user and edit_user functions too, but before that,
we want to see get_user and get_users in action. Since we already changed the
HtmlResponse alias into Result<Template, Status>, we need to convert
Ok(RawHtml(html_string)) in new_user and edit_user to use a template
too. Change Ok(RawHtml(html_string)) in the new_user and edit_user
functions to Ok(Template::render("users/tmp", context!())), and
create an empty src/views/users/tmp.html.tera file.
17. Now, we can run the application and check the page that we have improved with CSS:
Figure 8.1 – get_user() rendered
We can see that the template is working along with the correct CSS file that the application
served. In the next section, we will also modify the form to use the template.
Working with forms
If we look at the structure of the form for new_user and edit_user, we can see that
both forms are almost the same, with just a few differences. For example, the forms'
action endpoints are different, as there are two extra fields for edit_user: _METHOD
and old_password. To simplify, we can make one template to be used by both
functions. Let's look at the steps:
1. Create a template called src/views/users/form.html.tera, and insert the
following lines:
{% extends "template" %}
{% block body %}
<form accept-charset="UTF-8" action="{{ form_url }}"
autocomplete="off" method="POST">
Working with forms
<fieldset>
</fieldset>
</form>
{% endblock %}
2. Next, let's add the title to the form by adding a legend tag. Put this inside the
fieldset tag:
<legend>{{ legend }}</legend>
3. Under the legend tag, we can add an extra field if we are editing the user:
{% if edit %}
<input type="hidden" name="_METHOD" value="PUT" />
{% endif %}
4. Continuing with the field, add the fields for username and email as follows:
<div class="row">
<div class="col-sm-12 col-md-3">
<label for="username">Username:</label>
</div>
<div class="col-sm-12 col-md">
<input name="username" type="text" value="{{
user.username }}"/>
</div>
</div>
<div class="row">
<div class="col-sm-12 col-md-3">
<label for="email">Email:</label>
</div>
<div class="col-sm-12 col-md">
<input name="email" type="email" value="{{
user.email }}"/>
</div>
</div>
219
220
Serving Static Assets and Templates
5. Add a conditional old_password field after the email field:
{% if edit %}
<div class="row">
<div class="col-sm-12 col-md-3">
<label for="old_password">Old password:</label>
</div>
<div class="col-sm-12 col-md">
<input name="old_password" type="password" />
</div>
</div>
{% endif %}
6. Add the rest of the fields:
<div class="row">
<div class="col-sm-12 col-md-3">
<label for="password">Password:</label>
</div>
<div class="col-sm-12 col-md">
<input name="password" type="password" />
</div>
</div>
<div class="row">
<div class="col-sm-12 col-md-3">
<label for="password_confirmation">Password
Confirmation:</label>
</div>
<div class="col-sm-12 col-md">
<input name="password_confirmation" type=
"password" />
</div>
</div>
<div class="row">
<div class="col-sm-12 col-md-3">
<label for="description">Tell us a little bit more
about yourself:</label>
</div>
Working with forms
221
<div class="col-sm-12 col-md">
<textarea name="description">{{ user.description
}}</textarea>
</div>
</div>
<button type="submit" value="Submit">Submit</button>
7. Then, change the labels and fields to show the value (if there is a value):
<input name="username" type="text" {% if user %}value="{{
user.username }}"{% endif %} />
...
<input name="email" type="email" {% if user %}value="{{
user.email }}"{% endif %} />
...
<label for="password">{% if edit %}New Password:{% else
%}Password:{% endif %}</label>
...
<textarea name="description">{% if user %}{{ user.
description }}{% endif %}</textarea>
8. After we have created the form template, we can modify the new_user
and edit_user functions. In new_user, remove the lines from let
mut html_string = String::from(USER_HTML_PREFIX); to
Ok(Template::render("users/tmp", context!())) to create
RawHtml.
In form.html.tera, we added these variables: form_url, edit, and legend.
We also need to convert Option<FlashMessage<'_>> into a String since
the default implementation of the Serializable trait by FlashMessage is not
human-readable. Add those variables and render the template in the new_user
function as follows:
let flash_string = flash
.map(|fl| format!("{}", fl.message()))
.unwrap_or_else(|| "".to_string());
let context = context! {
edit: false,
form_url: "/users",
legend: "New User",
flash: flash_string,
222
Serving Static Assets and Templates
};
Ok(Template::render("users/form", context))
9. For edit_user, we can create the same variables, but this time, we
know the data for user so we can include user in the context. Delete the
lines in the edit_user function in src/routes/user.rs from let
mut html_string = String::from(USER_HTML_PREFIX); to
Ok(Template::render("users/tmp", context!())).
Replace those lines with the following code:
let flash_string = flash
.map(|fl| format!("{}", fl.message()))
.unwrap_or_else(|| "".to_string());
let context = context! {
form_url: format!("/users/{}",&user.uuid ),
edit: true,
legend: "Edit User",
flash: flash_string,
user,
};
Ok(Template::render("users/form", context))
10. As the final touch, we can remove the USER_HTML_PREFIX and USER_HTML_
SUFFIX constants from src/routes/user.rs. We should also remove the
src/views/users/tmp.html.tera file since there's no function using that
file anymore. And, since we already enclose the flash message inside the <div></
div> tag in the template, we can remove the div usage from flash messages. For
example, in src/routes/user.rs, we can modify these lines:
Ok(Flash::success(
Redirect::to(format!("/users/{}", user.uuid)),
"<div>Successfully created user</div>",
))
We can modify them into the following lines:
Ok(Flash::success(
Redirect::to(format!("/users/{}", user.uuid)),
"Successfully created user",
))
Securing HTML forms from CSRF
223
One more thing that we can improve for the form is adding a token to secure the
application from cross-site request forgery (CSRF) attacks. We will learn how to secure
our form in the next section.
Securing HTML forms from CSRF
One of the most common security attacks is CSRF, where a malicious third party tricks a
user into sending a web form with different values than intended. One way to mitigate this
attack is by sending a one-time token along with the form content. The web server then
checks the token validity to ensure the request comes from the correct web browser.
We can create such a token in a Rocket application by creating a fairing that will generate
a token and check the form value sent back. Let's look at the steps:
1. First, we need to add the dependencies for this. We are going to need a base64
crate to encode and decode binary values into a string. We also need the secrets
feature from Rocket to store and retrieve private cookies. Private cookies are
just like regular cookies, but they are encrypted by the key we configured in the
Rocket.toml file with secret_key.
For dependencies, we also need to add time as a dependency. Add the following
lines in Cargo.toml:
base64 = {version = "0.13.0"}
...
rocket = {path = "../../../rocket/core/lib/", features =
["uuid", "json", "secrets"]}
...
time = {version = "0.3", features = ["std"]}
The steps for preventing CSRF are generating a random byte, storing the random
byte in a private cookie, hashing the random byte as a string, and rendering the
form template along with the token string. When the user sends the token back, we
can retrieve the token from the cookie and compare both.
2. To make a CSRF fairing, add a new module. In src/fairings/mod.rs, add the
new module:
pub mod csrf;
224
Serving Static Assets and Templates
3. After that, create a file named src/fairings/csrf.rs and add the dependencies
and constants for the default value for the cookie to store the random bytes:
use argon2::{
password_hash::{
rand_core::{OsRng, RngCore},
PasswordHash, PasswordHasher,
PasswordVerifier, SaltString,
},
Argon2,
};
use rocket::fairing::{self, Fairing, Info, Kind};
use rocket::http::{Cookie, Status};
use rocket::request::{FromRequest, Outcome, Request};
use rocket::serde::Serialize;
use rocket::{Build, Data, Rocket};
use time::{Duration, OffsetDateTime};
const CSRF_NAME: &str = "csrf_cookie";
const CSRF_LENGTH: usize = 32;
const CSRF_DURATION: Duration = Duration::hours(1);
Then, we can extend Rocket's Request with a new method to retrieve the CSRF
token. Because Request is an external crate, we cannot add another method, but
we can overcome this by adding a trait and making the external crate type extend
this trait. We cannot extend an external crate with an external trait, but extending
an external crate with an internal trait is permissible.
4. We want to create a method to retrieve CSRF tokens from private cookies. Continue
with src/fairings/csrf.rs by appending the following lines:
trait RequestCsrf {
fn get_csrf_token(&self) -> Option<Vec<u8>>;
}
impl RequestCsrf for Request<'_> {
fn get_csrf_token(&self) -> Option<Vec<u8>> {
self.cookies()
Securing HTML forms from CSRF
225
.get_private(CSRF_NAME)
.and_then(|cookie| base64::
decode(cookie.value()).ok())
.and_then(|raw| {
if raw.len() >= CSRF_LENGTH {
Some(raw)
} else {
None
}
})
}
}
5. After that, we want to add a fairing that retrieves or generates, and stores random
bytes if the cookie does not exist. Add a new struct to be managed as a fairing:
#[derive(Debug, Clone)]
pub struct Csrf {}
impl Csrf {
pub fn new() -> Self {
Self {}
}
}
#[rocket::async_trait]
impl Fairing for Csrf {
fn info(&self) -> Info {
Info {
name: "CSRF Fairing",
kind: Kind::Ignite | Kind::Request,
}
}
async fn on_ignite(&self, rocket: Rocket<Build>) –
> fairing::Result {
Ok(rocket.manage(self.clone()))
226
Serving Static Assets and Templates
}
}
6. We want to retrieve the token first, and if the token does not exist, generate random
bytes and add the bytes to the private token. Inside the impl Fairing block, add
the on_request function:
async fn on_request(&self, request: &mut Request<'_>, _:
&mut Data<'_>) {
if let Some(_) = request.get_csrf_token() {
return;
}
let mut key = vec![0; CSRF_LENGTH];
OsRng.fill_bytes(&mut key);
let encoded = base64::encode(&key[..]);
let expires = OffsetDateTime::now_utc() + CSRF_
DURATION;
let mut csrf_cookie = Cookie::new(
String::from(CSRF_NAME), encoded);
csrf_cookie.set_expires(expires);
request.cookies().add_private(csrf_cookie);
}
7. We need a request guard to retrieve the token string from the request. Append the
following lines:
#[derive(Debug, Serialize)]
pub struct Token(String);
#[rocket::async_trait]
impl<'r> FromRequest<'r> for Token {
type Error = ();
async fn from_request(request: &'r Request<'_>) ->
Outcome<Self, Self::Error> {
match request.get_csrf_token() {
None => Outcome::Failure((Status::
Securing HTML forms from CSRF
227
Forbidden, ())),
Some(token) => Outcome::
Success(Self(base64::encode(token))),
}
}
}
8. We return an HTTP 403 status code if the token is not found. We also need two
more functions: generating a hash and comparing the token hash with other strings.
Since we already use argon2 for password hashing, we can reuse the argon2 crate
for those functions. Append the following lines:
impl Token {
pub fn generate_hash(&self) -> Result<String,
String> {
let salt = SaltString::generate(&mut OsRng);
Argon2::default()
.hash_password(self.0.as_bytes(), &salt)
.map(|hp| hp.to_string())
.map_err(|_| String::from("cannot hash
authenticity token"))
}
pub fn verify(&self, form_authenticity_token:
&str) -> Result<(), String> {
let old_password_hash = self.generate_hash()?;
let parsed_hash = PasswordHash::new(&old_
password_hash)
.map_err(|_| String::from("cannot verify
authenticity token"))?;
Ok(Argon2::default()
.verify_password(form_authenticity_
token.as_bytes(), &parsed_hash)
.map_err(|_| String::from("cannot verify
authenticity token"))?)
}
}
228
Serving Static Assets and Templates
9. After we set up the Csrf fairing, we can use it in the application. In src/main.
rs, attach the fairing to the Rocket application:
use our_application::fairings::{csrf::Csrf,
db::DBConnection};
...
async fn rocket() -> Rocket<Build> {
...
.attach(Csrf::new())
...
}
10. In src/models/user.rs, add a new field to contain the token sent from
the form:
pub struct NewUser<'r> {
...
pub authenticity_token: &'r str,
}
...
pub struct EditedUser<'r> {
...
pub authenticity_token: &'r str,
}
11. In src/views/users/form.html.tera, add the field to store the token string:
<form accept-charset="UTF-8" action="{{ form_url }}"
autocomplete="off" method="POST">
<input type="hidden" name="authenticity_token"
value="{{ csrf_token }}"/>
...
12. Finally, we can modify src/routes/user.rs. Add the Token dependency:
use crate::fairings::csrf::Token as CsrfToken;
Securing HTML forms from CSRF
229
13. We can use CsrfToken as a request guard, pass the token to the template, and
render the template as HTML:
pub async fn new_user(flash: Option<FlashMessage<'_>>,
csrf_token: CsrfToken) -> HtmlResponse {
...
let context = context! {
...
csrf_token: csrf_token,
};
...
}
...
pub async fn edit_user(
mut db: Connection<DBConnection>, uuid: &str,
flash: Option<FlashMessage<'_>>, csrf_token:
CsrfToken) -> HtmlResponse {
...
let context = context! {
...
csrf_token: csrf_token,
};
...
}
14. Modify the create_user function to verify the token and return if the hash does
not match:
pub async fn create_user<'r>(
...
csrf_token: CsrfToken,
) -> Result<Flash<Redirect>, Flash<Redirect>> {
…
let new_user = user_context.value.as_ref().
unwrap();
csrf_token
.verify(&new_user.authenticity_token)
.map_err(|_| {
230
Serving Static Assets and Templates
Flash::error(
Redirect::to("/users/new"),
"Something went wrong when creating
user",
)
})?;
...
}
15. Do the same with the update_user, put_user, and patch_user functions
as well:
pub async fn update_user<'r>(
...
csrf_token: CsrfToken,
) -> Result<Flash<Redirect>, Flash<Redirect>> {
...
match user_value.method {
"PUT" => put_user(db, uuid, user_context,
csrf_token).await,
"PATCH" => patch_user(db, uuid, user_context,
csrf_token).await,
...
}
}
...
pub async fn put_user<'r>(
...
csrf_token: CsrfToken,
) -> Result<Flash<Redirect>, Flash<Redirect>> {
let user_value = user_context.value.as_ref().
unwrap();
csrf_token
.verify(&user_value.authenticity_token)
.map_err(|_| {
Flash::error(
Redirect::to(format!("/users/edit/{}",
Summary
231
uuid)),
"Something went wrong when updating
user",
)
})?;
…
}
…
pub async fn patch_user<'r>(
...
csrf_token: CsrfToken,
) -> Result<Flash<Redirect>, Flash<Redirect>> {
put_user(db, uuid, user_context, csrf_token).await
}
After that, try relaunching the application and sending the form without the token.
We should see the application return an HTTP 403 status code. CSRF is one of the
most common web attacks, but we have learned how to mitigate the attack by using
Rocket features.
Summary
In this chapter, we have learned about three things that are common for a web application.
The first one is learning how to make the Rocket application serve static files by using
either PathBuf or the FileServer struct.
Another thing we have learned is how to use rocket_dyn_templates to convert a
template into a response to the client. We also learned about a template engine, Tera, and
the various capabilities of the Tera template engine.
By utilizing static assets and templates, we can easily create modern web applications.
In the next chapter, we are going to learn about user posts: text, picture, and video.
9
Displaying
Users' Post
In this chapter, we are going to implement displaying user posts. Along with displaying
user posts, we are going to learn about generic data types and trait bounds to group
types that behave similarly and so reduce the creation of similar code. We are also going
to learn about the most important part of the Rust programming language: the memory
model and its terminologies. We are going to learn more about ownership, moving,
copying, cloning, borrowing, and lifetime, and how we can implement those in our code.
After completing this chapter, you will understand and implement those concepts in Rust
programming. Generic data types and trait bounds are useful to reduce repetitions, while
the Rust memory model and concepts are arguably the most distinctive features of the
Rust language and make it not only fast but one of the safest programming languages.
Those concepts also make people say that Rust has a steep learning curve.
234
Displaying Users' Post
In this chapter, we are going to cover these main topics:
• Displaying posts – text, photo, and video
• Using generic data types and trait bounds
• Learning about ownership and moving
• Borrowing and lifetime
Technical requirements
For this chapter, we have the same technical requirements as the previous chapter. We
need a Rust compiler, a text editor, an HTTP client, and a PostgreSQL database server.
You can find the source code for this chapter at https://github.com/
PacktPublishing/Rust-Web-Development-with-Rocket/tree/main/
Chapter09.
Displaying posts – text, photo, and video
In the previous chapters, we implemented user management, including listing, showing,
creating, updating, and deleting user entities. Now, we want to do the same with posts.
To refresh your memory, we are planning to have User posts. The posts can be either text,
photos, or videos.
When we implemented the application skeleton, we created a Post struct in src/
models/post.rs with the following content:
pub struct Post {
pub uuid: Uuid,
pub user_uuid: Uuid,
pub post_type: PostType,
pub content: String,
pub created_at: OurDateTime,
}
The plan is to use post_type to differentiate a post based on its type and use the
content field to store the content of the post.
Displaying posts – text, photo, and video
235
Now that we have rehashed what we wanted to do, let's implement showing the posts:
1. The first thing we want to do is to create a migration file to change the database
schema. We want to create a table to store the posts. In the application root folder,
run this command:
sqlx migrate add create_posts
2. We should then see a new file in the migrations folder named
YYYYMMDDHHMMSS_create_posts.sql (depending on the current date-time).
Edit the file with the following lines:
CREATE TABLE IF NOT EXISTS posts
(
uuid
UUID PRIMARY KEY,
user_uuid UUID NOT NULL,
post_type INTEGER NOT NULL DEFAULT 0,
content
VARCHAR NOT NULL UNIQUE,
created_at TIMESTAMPTZ NOT NULL DEFAULT CURRENT_TIMESTAMP,
FOREIGN KEY (user_uuid) REFERENCES "users" (uuid)
);
3. After editing the file, run the migration in the command line to create the
database table:
sqlx migrate run
4. We have also created a DisplayPostContent trait in src/traits/mod.
rs, which has the raw_html() method. We want to show content in Post by
converting content to HTML snippets and rendering the snippets in the Tera
template. Change the signature of raw_html() so we can use Post as the source
of HTML snippets:
fn raw_html(&self) -> String;
236
Displaying Users' Post
5. Now, we can implement each of the types in src/models/text_post.rs,
src/models/photo_post.rs, and src/models/video_post.rs. Start
with changing src/models/text_post.rs:
pub struct TextPost(pub Post);
impl DisplayPostContent for TextPost {
fn raw_html(&self) -> String {
format!("<p>{}</p>", self.0.content)
}
}
The implementation is very simple, we are just wrapping the Post content inside
a p HTML tag.
6. Next, modify src/models/photo_post.rs:
pub struct PhotoPost(pub Post);
impl DisplayPostContent for PhotoPost {
fn raw_html(&self) -> String {
format!(
r#"<figure><img src="{}" class="section
media"/></figure>"#,
self.0.content
)
}
}
For PhotoPost, we used the Post content as the source of the img HTML tag.
7. The last type we modify is src/models/video_post.rs:
pub struct VideoPost(pub Post);
impl DisplayPostContent for VideoPost {
fn raw_html(&self) -> String {
format!(
r#"<video width="320" height="240" controls>
<source src="{}" type="video/mp4">
Displaying posts – text, photo, and video
237
Your browser does not support the video tag.
</video>"#,
self.0.content
)
}
}
For VideoPost, we are using the Post content as the source of the video
HTML tag.
We need to create templates for the posts. Let's start with a template that will be
used in a single post or multiple posts.
8. Create a posts folder in the src/views folder. Then, create a _post.html.
tera file inside the src/views/posts folder. Add the following lines to the file:
<div class="card fluid">
{{ post.post_html | safe }}
</div>
We are wrapping some content inside a div and filtering the content as safe HTML.
9. In the src/views/posts folder, create a show.html.tera file as a template to
show a single post. Add the following lines to the file:
{% extends "template" %}
{% block body %}
{% include "posts/_post" %}
<button type="submit" value="Submit" form="deletePost">Delete</button>
<a href="/users/{{user.uuid}}/posts" class="button">Post List</a>
{% endblock %}
10. Create an index.html.tera file inside the src/views/posts folder to show
user posts. Add the following lines:
{% extends "template" %}
{% block body %}
{% for post in posts %}
<div class="container">
<div><mark class="tag">{{ loop.index
238
Displaying Users' Post
}}</mark></div>
{% include "posts/_post" %}
<a href="/users/{{ user.uuid }}/posts/{{
post.uuid }}" class="button">See Post</a>
</div>
{% endfor %}
{% if pagination %}
<a href="/users/{{ user.uuid }}/posts?pagina
tion.next={{ pagination.next }}&pagination.limit={{ pagination.limit }}" class="button">
Next
</a>
{% endif %}
<a href="/users/{{ user.uuid }}/posts/new"
class="button">Upload Post</a>
{% endblock %}
11. After creating the views, we can implement methods for the Post struct to get
the data from the database. Modify the src/models/post.rs file to include
use declarations:
use
use
use
use
use
use
use
use
use
use
use
use
super::bool_wrapper::BoolWrapper;
super::pagination::{Pagination, DEFAULT_LIMIT};
super::photo_post::PhotoPost;
super::post_type::PostType;
super::text_post::TextPost;
super::video_post::VideoPost;
crate::errors::our_error::OurError;
crate::fairings::db::DBConnection;
crate::traits::DisplayPostContent;
rocket::form::FromForm;
rocket_db_pools::sqlx::{FromRow, PgConnection};
rocket_db_pools::{sqlx::Acquire, Connection};
Displaying posts – text, photo, and video
239
12. We need to derive FromRow for the Post struct to convert database rows into
Post instances:
#[derive(FromRow, FromForm)]
pub struct Post {
...
}
13. Create an impl block for Post:
impl Post {}
14. Inside the impl Post block, we can add functions to query the database and
return the Post data. As the functions are similar to the User functions, you can
copy the code for steps 14 to 17 in the Chapter09/01DisplayingPost source
code folder. First, we add the find() method to get a single post:
pub async fn find(connection: &mut PgConnection, uuid:
&str) -> Result<Post, OurError> {
let parsed_uuid =
Uuid::parse_str(uuid).map_err(Our
Error::from_uuid_error)?;
let query_str = "SELECT * FROM posts WHERE uuid =
$1";
Ok(sqlx::query_as::<_, Self>(query_str)
.bind(parsed_uuid)
.fetch_one(connection)
.await
.map_err(OurError::from_sqlx_error)?)
}
15. Add the find_all() method:
pub async fn find_all(
db: &mut Connection<DBConnection>,
user_uuid: &str,
pagination: Option<Pagination>,
) -> Result<(Vec<Self>, Option<Pagination>), OurError> {
if pagination.is_some() {
return Self::find_all_with_pagination(db,
240
Displaying Users' Post
user_uuid, &pagination.unwrap()).await;
} else {
return Self::find_all_without_pagination(db,
user_uuid).await;
}
}
16. Add the find_all_without_pagination() method:
async fn find_all_without_pagination(
db: &mut Connection<DBConnection>,
user_uuid: &str,
) -> Result<(Vec<Self>, Option<Pagination>), OurError> {
let parsed_uuid =
Uuid::parse_str(user_uuid).map_err(OurError::from_uuid_error)?;
let query_str = r#"SELECT *
FROM posts
WHERE user_uuid = $1
ORDER BY created_at DESC
LIMIT $2"#;
let connection = db.acquire().await.map_err(OurError::from_sqlx_error)?;
let posts = sqlx::query_as::<_, Self>(query_str)
.bind(parsed_uuid)
.bind(DEFAULT_LIMIT as i32)
.fetch_all(connection)
.await
.map_err(OurError::from_sqlx_error)?;
let mut new_pagination: Option<Pagination> = None;
if posts.len() == DEFAULT_LIMIT {
let query_str = "SELECT EXISTS(SELECT 1 FROM
posts WHERE created_at < $1 ORDER BY
created_at DESC LIMIT 1)";
let connection = db.acquire().
await.map_err(OurError::from_sqlx_error)?;
let exists = sqlx::query_as::<_,
Displaying posts – text, photo, and video
BoolWrapper>(query_str)
.bind(&posts.last().unwrap().created_at)
.fetch_one(connection)
.await
.map_err(OurError::from_sqlx_error)?;
if exists.0 {
new_pagination = Some(Pagination {
next: posts.last().unwrap()
.created_at.to_owned(),
limit: DEFAULT_LIMIT,
});
}
}
Ok((posts, new_pagination))
}
17. Add the find_all_with_pagination() method:
async fn find_all_with_pagination(
db: &mut Connection<DBConnection>,
user_uuid: &str,
pagination: &Pagination,
) -> Result<(Vec<Self>, Option<Pagination>), OurError> {
let parsed_uuid =
Uuid::parse_str(user_uuid).map_err(
OurError::from_uuid_error)?;
let query_str = r#"SELECT *
FROM posts
WHERE user_uuid = $1 AND☐created_at < $2
ORDER BY created_at☐DESC
LIMIT $3"#;
let connection = db.acquire().await.map_err(
OurError::from_sqlx_error)?;
let posts = sqlx::query_as::<_, Self>(query_str)
.bind(&parsed_uuid)
.bind(&pagination.next)
.bind(DEFAULT_LIMIT as i32)
241
242
Displaying Users' Post
.fetch_all(connection)
.await
.map_err(OurError::from_sqlx_error)?;
let mut new_pagination: Option<Pagination> = None;
if posts.len() == DEFAULT_LIMIT {
let query_str = "SELECT EXISTS(SELECT 1 FROM
posts WHERE created_at < $1 ORDER BY
created_at DESC LIMIT 1)";
let connection = db.
acquire().await.map_err(
OurError::from_sqlx_error)?;
let exists = sqlx::query_as::<_,
BoolWrapper>(query_str)
.bind(&posts.last().unwrap().created_at)
.fetch_one(connection)
.await
.map_err(OurError::from_sqlx_error)?;
if exists.0 {
new_pagination = Some(Pagination {
next: posts.last().unwrap().
created_at.to_owned(),
limit: DEFAULT_LIMIT,
});
}
}
Ok((posts, new_pagination))
}
Displaying posts – text, photo, and video
243
18. We need to add methods to convert a Post instance into TextPost, PhotoPost,
or VideoPost. Add the following lines inside the impl Post block:
pub fn to_text(self) -> TextPost {
TextPost(self)
}
pub fn to_photo(self) -> PhotoPost {
PhotoPost(self)
}
pub fn to_video(self) -> VideoPost {
VideoPost(self)
}
19. When the view and model implementations are ready, we can implement the
function for showing user posts. In src/routes/post.rs, add the required
use declarations:
use crate::models::{pagination::Pagination, post::Post,
post_type::PostType, user::User};
use crate::traits::DisplayPostContent;
use rocket::http::Status;
use rocket::serde::Serialize;
use rocket_db_pools::{sqlx::Acquire, Connection};
use rocket_dyn_templates::{context, Template};
20. Modify the get_post() function inside src/routes/post.rs:
#[get("/users/<user_uuid>/posts/<uuid>", format = "text/
html")]
pub async fn get_post(
mut db: Connection<DBConnection>,
user_uuid: &str,
uuid: &str,
) -> HtmlResponse {}
244
Displaying Users' Post
21. Inside the get_post() function, query the user information and the post
information from the database. Write the following lines:
let connection = db
.acquire()
.await
.map_err(|_| Status::InternalServerError)?;
let user = User::find(connection, user_uuid)
.await
.map_err(|e| e.status)?;
let connection = db
.acquire()
.await
.map_err(|_| Status::InternalServerError)?;
let post = Post::find(connection, uuid).await.map_err(|e|
e.status)?;
if post.user_uuid != user.uuid {
return Err(Status::InternalServerError);
}
22. In src/views/posts/show.html.tera and src/views/posts/_post.
html.tera, we have set two variables: user and post. We have to add those two
variables into the context passed to the template. Append two structs that will be
passed to templates:
#[derive(Serialize)]
struct ShowPost {
post_html: String,
}
#[derive(Serialize)]
struct Context {
user: User,
post: ShowPost,
}
Displaying posts – text, photo, and video
245
23. And finally, we can pass the user and post variables into context, render the
template along with context, and return from the function. Append the
following lines:
let mut post_html = String::new();
match post.post_type {
PostType::Text => post_html =
post.to_text().raw_html(),
PostType::Photo => post_html =
post.to_photo().raw_html(),
PostType::Video => post_html =
post.to_video().raw_html(),
}
let context = Context {
user,
post: ShowPost { post_html },
};
Ok(Template::render("posts/show", context))
24. For the get_posts() function in src/routes/post.rs, we want to get the
posts data from the database. Modify the function into the following lines:
#[get("/users/<user_uuid>/posts?<pagination>", format =
"text/html")]
pub async fn get_posts(
mut db: Connection<DBConnection>,
user_uuid: &str,
pagination: Option<Pagination>,
) -> HtmlResponse {
let user = User::find(&mut db,
user_uuid).await.map_err(|e| e.status)?;
let (posts, new_pagination) = Post::find_all(&mut
db, user_uuid, pagination)
.await
.map_err(|e| e.status)?;
}
246
Displaying Users' Post
25. Now that we have implemented getting the posts data, it's time to render those
posts as well. Inside the get_posts() function, append the following lines:
#[derive(Serialize)]
struct ShowPost {
uuid: String,
post_html: String,
}
let show_posts: Vec<ShowPost> = posts
.into_iter()
.map(|post| {
let uuid = post.uuid.to_string();
let mut post_html = String::new();
match post.post_type {
PostType::Text => post_html =
post.to_text().raw_html(),
PostType::Photo => post_html =
post.to_photo().raw_html(),
PostType::Video => post_html =
post.to_video().raw_html(),
};
ShowPost { uuid, post_html }
})
.collect();
let context =
context! {user, posts: show_posts, pagination:
new_pagination.map(|pg|pg.to_context())};
Ok(Template::render("posts/index", context))
Now we have finished the code for get_post() and get_posts(), it's time to test
those two endpoints. Try adding images and videos to a static folder and add an entry in
the database. You can find a sample image and video in the static folder in the source code
in the GitHub repository for this chapter. Here is an example:
Figure 9.1 – Testing the endpoints
Displaying posts – text, photo, and video
247
When we open a web browser and navigate to the user posts page, we should be able to
see something similar to this screenshot:
Figure 9.2 – Example user posts page
We have implemented the functions to show posts, but if we look back at the code, we
can see that all three types (Text, Photo, and Video) have the same method because they
are all implementing the same interface.
Let's convert those into generic data types and trait bounds in the next section.
248
Displaying Users' Post
Using generic data types and trait bounds
A generic data type, generic type, or simply, generic, is a way for programming languages
to be able to apply the same routine to different data types.
For example, we want to create a multiplication(a, b) -> c {} function for
different data types, u8 or f64. If a language does not have a generic, a programmer
might have to implement two different functions, for example, multiplication_
u8(a: u8, b: u8) -> u8 and multiplication_f64(a: f64, b: f64) ->
f64. Creating two different functions might look simple, but as the application grows in
complexity, the branching and figuring out which function to use will be more complex. If
a language has a generic, then the problem of multiple functions can be solved by using
a single function that can accept u8 and f64.
In the Rust language, we can make a function to use generics by declaring the generics
inside angle brackets after the function name as follows:
fn multiplication<T>(a: T, b: T) -> T {}
We can also use generics in a struct or enum definition. Here is an example:
struct Something<T>{
a: T,
b: T,
}
enum Shapes<T, U> {
Rectangle(T, U),
Circle(T),
}
We can also use generics inside method definitions. Following Something<T>, we can
implement the method as follows:
impl<T, U> Something<T, U> {
fn add(&self, T, U) -> T {}
}
At compile time, the compiler identifies and changes the generic code into specific code by
using the concrete type (u8 or f64 in our multiplication example), depending on which
type is used. This process is called monomorphization. Because of monomorphization,
code written using a generic will produce a binary that has the same execution speed as
binary generated using specific code.
Using generic data types and trait bounds
249
Now that we have looked at an introduction to generics, let's use generics in our
existing application:
1. In the src/models/post.rs file, add another method to convert Post
instances into media:
pub fn to_media(self) -> Box<dyn DisplayPostContent> {
match self.post_type {
PostType::Text => Box::new(self.to_text()),
PostType::Photo => Box::new(self.to_photo()),
PostType::Video => Box::new(self.to_video()),
}
}
We are telling the to_media() method to return the type that implemented
DisplayPostContent and put TextPost, PhotoPost, or VideoPost into
the heap.
2. In the src/routes/post.rs file, inside the get_post() function, and after
the Context struct declaration, add the following lines:
struct Context {
…
}
fn create_context<T>(user: User, media: T) -> Context {
Context {
user,
post: ShowPost {
post_html: media.raw_html(),
},
}
}
Yes, we can create a function inside another function. The inner function will have
local scope and cannot be used outside the get_post() function.
3. We need to change the context variable from initiating the struct directly,
as follows:
let context = Context {...};
250
Displaying Users' Post
We need to change it into using the create_context() function:
let media = post.to_media();
let context = create_context(user, media);
At this point, we can see that create_context() can use any type, such as String
or u8, but String and u8 types don't have the raw_html() function. The Rust
compiler will show an error when compiling the code. Let's fix this problem by using
trait bounds.
We have defined and implemented traits several times, and we already know
that a trait provides consistent behavior for different data types. We defined the
DisplayPostContent trait in src/traits/mod.rs, and every type that implements
DisplayPostContent has the same method, raw_html(&self) -> String.
We can limit the generic type by adding a trait after the generic declaration. Change the
create_context() function to use trait bounds:
fn create_context<T: DisplayPostContent>(user: User, media: T)
-> Context {...}
Unfortunately, using DisplayPostContent alone is not enough, because the T size
is not fixed. We can change the function parameters from media: T into a media:
&T reference, as a reference has a fixed size. We also have another problem, as the
DisplayPostContent size is not known at compile time, so we need to add another
bound. Every T type is implicitly expected to have a constant size at compile time,
implicitly trait bound to std::marker::Sized. We can remove the implicit bound by
using a special ?Size syntax.
We can have more than one trait bound and combine them using the + sign. The resulting
signature for the create_context() function will be as follows:
fn create_context<T: DisplayPostContent + ?Sized>(user: User,
media: &T) -> Context {...}
Writing multiple trait bounds inside angle brackets (<>) can make the function signature
hard to read, so there's an alternative syntax for defining trait bounds:
fn create_context<T>(user: User, media: &T) -> Context
where T: DisplayPostContent + ?Sized {...}
Learning about ownership and moving
251
Because we changed the function signature to use a reference, we have to change the
function usage as well:
let context = create_context(user, &*media);
We get media object by dereferencing using the * sign and referencing media again
using the & sign.
Now, the Rust compiler should be able to compile the code again. We will learn more
about reference in the next two sections, but before that, we have to learn about Rust's
memory model called ownership and moving.
Learning about ownership and moving
When we instantiate a struct, we create an instance. Imagine a struct as being like
a template; an instance is created in the memory based on the template and filled with
appropriate data.
An instance in Rust has a scope; it is created in a function and gets returned. Here is
an example:
fn something() -> User {
let user = User::find(...).unwrap();
user
}
let user = something()
If an instance is not returned, then it's removed from memory because it's not used
anymore. In this example, the user instance will be removed by the end of the function:
fn something() {
let user = User::find(...).unwrap();
...
}
We can say that an instance has a scope, as mentioned previously. Any resources created
inside a scope will be destroyed by the end of the scope in the reverse order of their creation.
252
Displaying Users' Post
We can also create a local scope in a routine by using curly brackets, {}. Any instance
created inside the scope will be destroyed by the end of the scope. For example, the user
scope is within the curly brackets:
...
{
let user = User::find(...).unwrap();
}
...
An instance owns resources, not only in stack memory but also in heap memory. When
an instance goes out of scope, either because of function exits or curly brackets scope
exits, the resource attached to the instance is automatically cleaned in reverse order of the
creation. This process is called resource acquisition is initialization (RAII).
Imagine that computer memory consists of a stack and a heap:
Stack: ☐☐☐☐☐☐☐☐☐☐☐☐
Heap: ☐☐☐☐☐☐☐☐☐☐☐☐
An instance owns memory from stack memory:
Stack: ☐☒☒☒☐☐☐☐☐☐☐☐
Heap: ☐☐☐☐☐☐☐☐☐☐☐☐
Another instance may own memory from the stack and the heap. For example, a string
can be a single word or a couple of paragraphs. We cannot say how large a String
instance is going to be, so we cannot store all of the information in stack memory; instead,
we can store some in stack memory and some in heap memory. This is a simplification of
what it looks like:
Stack: ☐☒☐☐☐☐☐☐☐☐☐☐
↓
Heap: ☐☒☒☒☒☐☐☐☐☐☐☐
In other programming languages, there's a function called a destructor, which is a
routine executed when an object is removed from the memory. In Rust, there's a similar
trait called Drop. In order to execute a function when an object destroyed, a type can
implement the std::ops::Drop trait. But, most types don't need to implement the
Drop trait and are automatically removed from memory when they're out of scope.
Learning about ownership and moving
253
In Rust, if we create an instance and set the instance to another instance, it is called move.
To see why it's called move, let's modify our application code. In the src/routes/
post.rs file, inside the get_posts() function, modify it into the following:
let show_posts: Vec<ShowPost> = posts
.into_iter()
.map(|post| ShowPost {
post_html: post.to_media().raw_html(),
uuid: post.uuid.to_string(),
})
.collect();
let context = ...
If we compile the program, we should see an error similar to the following:
error[E0382]: borrow of moved value: `post`
--> src/routes/post.rs:78:19
|
76 |
.map(|post| ShowPost {
|
---- move occurs because `post` has type
`models::post::Post`, which does not implement the `Copy` trait
77 |
post_html: post.to_media().raw_html(),
|
---------- `post` moved due to
this method call
78 |
uuid: post.uuid.to_string(),
|
^^^^^^^^^^^^^^^^^^^^^ value borrowed
here after move
What is moving? Let's go back to the simplification of memory. When an instance is
assigned to another instance, some of the second instance is allocated in stack memory:
Stack: ☐☒☐☐☒☐☐☐☐☐☐☐
↓
Heap: ☐☒☒☒☒☐☐☐☐☐☐☐
Then, some of the new instance points to old data in the heap:
Stack: ☐☒☐☐☒☐☐☐☐☐☐☐
↓
Heap: ☐☒☒☒☒☐☐☐☐☐☐☐
254
Displaying Users' Post
If both instances point to the same heap memory, what happens if the first instance gets
dropped? Because of the possibility of invalid data, in Rust, only one instance may have
its own resources. The Rust compiler will refuse to compile code that uses an instance that
has been moved.
If we look at our code, the to_media() method in Post moved the post instance and
put it inside either TextPost, PhotoPost, or VideoPost. As a result, we cannot use
the post instance again in post.uuid.to_string() because it has been moved.
Right now, we can fix the code by changing the order of the lines:
let show_posts: Vec<ShowPost> = posts
.into_iter()
.map(|post| ShowPost {
uuid: post.uuid.to_string(),
post_html: post.to_media().raw_html(),
})
.collect();
There's no moving when we use post.uuid.to_string(), so the code
should compile.
But, how we can create a copy of an instance instead of moving it? If a type implements
the std::marker::Copy trait, then when we assign an instance from another instance,
it will create a duplicate in the stack. This is the reason why simple types such as u8, which
don't require a lot of memory or have a known size, implement the Copy trait. Let's see
the illustration of how this code works:
let x: u8 = 8;
let y = x;
Stack: ☐☒☐☐☒☐☐☐☐☐☐☐
Heap: ☐☐☐☐☐☐☐☐☐☐☐☐
A type may automatically derive the Copy trait if all members of that type implement the
Copy trait. We also have to derive Clone, because the Copy trait is trait bound by the
Clone trait in its definition: pub trait Copy: Clone { }). Here is an example of
deriving the Copy trait:
#[derive(Copy, Clone)]
struct Circle {
r: u8,
}
Learning about ownership and moving
255
However, this example will not work because String does not implement Copy:
#[derive(Copy, Clone)]
pub struct Sheep {
...
pub name: String,
...
}
This example will work:
#[derive(Clone)]
pub struct Sheep {
...
pub name: String,
...
}
Cloning works by copying the content of the heap memory. For example, let's say we have
the preceding code and the following code:
let dolly = Sheep::new(...);
We can visualize dolly as follows:
Stack: ☐☒☐☐☐☐☐☐☐☐☐☐
↓
Heap: ☐☒☒☒☒☐☐☐☐☐☐☐
Let's say we assign another instance from dolly, as follows:
let debbie = dolly;
This is what the memory usage looks like:
Stack: ☐☒☐☐☐☐☒☐☐☐☐☐
↓
Heap: ☐☒☒☒☒☐☒☒☒☒☐☐
↓
As allocating heap memory is expensive, we can use another way to see the value of an
instance: borrowing.
256
Displaying Users' Post
Borrowing and lifetime
We have used references in our code. A reference is an instance in the stack that points to
another instance. Let's recall what an instance memory usage looks like:
Stack: ☐☒☐☐☐☐☐☐☐☐☐☐
↓
Heap: ☐☒☒☒☒☐☐☐☐☐☐☐
A reference is allocated in stack memory, pointing to another instance:
Stack: ☐☒←☒☐☐☐☐☐☐☐☐
↓
Heap: ☐☒☒☒☒☐☐☐☐☐☐☐
Allocating in the stack is cheaper than allocating in the heap. Because of this, using
references most of the time is more efficient than cloning. The process of creating
a reference is called borrowing, as the reference borrows the content of another instance.
Suppose we have an instance named airwolf:
#[derive(Debug)]
struct Helicopter {
height: u8,
cargo: Vec<u8>,
}
let mut airwolf = Helicopter {
height: 0,
cargo: Vec::new(),
};
airwolf.height = 10;
We can create a reference to airwolf by using an ampersand (&) operator:
let camera_monitor_a = &airwolf;
Borrowing an instance is like a camera monitor; a reference can see the value of the
referenced instance, but the reference cannot modify the value. We can have more than
one reference, as seen in this example:
let camera_monitor_a = &airwolf;
let camera_monitor_b = &airwolf;
Borrowing and lifetime
257
...
let camera_monitor_z = &airwolf;
What if we want a reference that can modify the value of the instance it referenced? We
can create a mutable reference by using the &mut operator:
let remote_control = &mut airwolf;
remote_control.height = 15;
Now, what will happen if we have two remote controls? Well, the helicopter cannot ascend
and descend at the same time. In the same way, Rust restricts mutable references and only
allows one mutable reference at a time.
Rust also disallows using mutable references along with immutable references because
data inconsistency may occur. For example, adding the following lines will not work:
let last_load = camera_monitor_a.cargo.last(); // None
remote_control.cargo.push(100);
What is the value of last_load? We expected last_load to be None, but the remote
control already pushed something to cargo. Because of the data inconsistency problem,
the Rust compiler will emit an error if we try to compile the code.
Implementing borrowing and lifetime
Now that we have learned about ownership, moving, and borrowing, let's modify our code
to use references.
1. If we look at the current definition for TextPost, PhotoPost, and VideoPost,
we can see we are taking ownership of post and moving the post instance into
a new instance of TextPost, PhotoPost, or VideoPost. In src/models/
text_post.rs add the following struct:
pub struct TextPost(pub Post);
2. And in src/models/post.rs , add the following function:
pub fn to_text(self) -> TextPost { // self is post
instance
TextPost(self) // post is moved into TextPost
instance
}
258
Displaying Users' Post
3. We can convert the TextPost field to be a reference to a Post instance. Modify
src/models/text_post.rs into the following:
pub struct TextPost(&Post);
4. Since we are converting the unnamed field into a private unnamed field, we also
need an initializer. Append the following lines:
impl TextPost {
pub fn new(post: &Post) -> Self {
TextPost(post)
}
}
Since we changed the initialization of TextPost, we also need to change the
implementation of to_text() and to_media(). In src/models/post.rs,
change the to_text() method to the following:
pub fn to_text(&self) -> TextPost {
TextPost::new(self)
}
Change the to_media() method to the following:
pub fn to_media(self) -> Box<dyn DisplayPostContent> {
match self.post_type {
PostType::Text => Box::new((&self).to_text()),
...
}
}
5. Let's try compiling the code. We should see an error as follows:
error[E0106]: missing lifetime specifier
--> src/models/text_post.rs:4:21
|
4 | pub struct TextPost(&Post);
|
^ expected named lifetime
parameter
Borrowing and lifetime
259
The reason for this error is that the code needs a lifetime specifier. What is
a lifetime specifier? Let's see an example of a very simple program:
fn main() {
let x;
{
let y = 5;
x = &y;
} // y is out of scope
println!("{}", *x);
}
6. Remember, in Rust, any instance is removed automatically after we reach the end
of the scope. In the preceding code, y is created inside a scope denoted by curly
brackets, {}. When the code reaches the end of the scope, }, the y instance is
cleared from the memory. So, what will happen with x? The preceding code will fail
to compile because x is not valid anymore. We can fix the code as follows:
fn main() {
let x;
{
let y = 5;
x = &y;
println!("{}", *x);
}
}
7. Now, let's take a look at our code in src/models/text_post.rs:
pub struct TextPost(&Post);
Because Rust is multithreaded and has a lot of branching, we cannot guarantee that
the reference to the Post instance, &Post, can exist for as long as the TextPost
instance. What will happen if &Post is already destroyed while the TextPost
instance is not destroyed? The solution is that we place a marker called a lifetime
specifier or lifetime annotation. Let's modify the code definition for TextPost
as follows:
pub struct TextPost<'a>(&'a Post);
260
Displaying Users' Post
We are telling the compiler that any instance of TextPost should live as long as
the referenced &Post, which indicated by lifetime indicator, 'a. If the compiler
finds out that &Post is not living as long as the TextPost instance, it does not
compile the program.
The convention for a lifetime specifier is using a small, single letter such as 'a, but
there's also a special lifetime specifier, 'static. A 'static lifetime specifier
means the data referenced is living as long as the application. For example, we are
saying the data referenced by pi will live as long as the application:
let pi: &'static f64 = &3.14;
8. Let's modify the rest of the application. We have seen how we use a lifetime specifier
in the type definition; let's use it in an impl block and method as well. Modify the
rest of src/models/text_post.rs into the following:
impl<'a> TextPost<'a> {
pub fn new(post: &'a Post) -> Self {...}
}
impl<'a> DisplayPostContent for TextPost<'a> {...}
9. Let's change PhotoPost in src/models/photo_post.rs to use lifetime as well:
pub struct PhotoPost<'a>(&'a Post);
impl<'a> PhotoPost<'a> {
pub fn new(post: &'a Post) -> Self {
PhotoPost(post)
}
}
impl<'a> DisplayPostContent for PhotoPost<'a> {...}
10. Let's also change VideoPost in src/models/video_post.rs:
pub struct VideoPost<'a>(&'a Post);
impl<'a> VideoPost<'a> {
pub fn new(post: &'a Post) -> Self {
VideoPost(post)
}
Borrowing and lifetime
261
}
impl<'a> DisplayPostContent for VideoPost<'a> {...}
11. And in src/models/post.rs, modify the code as follows:
impl Post {
pub fn to_text(&self) -> TextPost {
TextPost::new(self)
}
pub fn to_photo(&self) -> PhotoPost {
PhotoPost::new(self)
}
pub fn to_video(&self) -> VideoPost {
VideoPost::new(self)
}
pub fn to_media<'a>(&'a self) -> Box<dyn
DisplayPostContent + 'a> {
match self.post_type {
PostType::Photo => Box::new(self.to_photo()),
PostType::Text => Box::new(self.to_text()),
PostType::Video => Box::new(self.to_video()),
}
}
...
}
Now, we are using a borrowed Post instance for TextPost, PhotoPost,
or VideoPost instances. But, before we end this chapter, let's refactor the code a little
bit by following these instructions:
1. We can see the ShowPost struct is duplicated inside get_post() and
get_posts(). Add a new struct into src/models/post.rs:
use rocket::serde::Serialize;
...
#[derive(Serialize)]
pub struct ShowPost {
pub uuid: String,
262
Displaying Users' Post
pub post_html: String,
}
2. Add a method to convert Post into ShowPost:
impl Post {
...
pub fn to_show_post<'a>(&'a self) -> ShowPost {
ShowPost {
uuid: self.uuid.to_string(),
post_html: self.to_media().raw_html(),
}
}
...
}
3. In src/routes/post.rs, add ShowPost to a use declaration:
use crate::models::{
pagination::Pagination,
post::{Post, ShowPost},
user::User,
};
4. Modify the get_post() function by removing these lines to remove unnecessary
struct declarations and functions:
#[derive(Serialize)]
struct ShowPost {
post_html: String,
}
#[derive(Serialize)]
struct Context {
user: User,
post: ShowPost,
}
fn create_context<T: DisplayPostContent + ?Sized>(user:
User, media: &T) -> Context {
Context {
user,
Borrowing and lifetime
post: ShowPost {
post_html: media.raw_html(),
},
}
}
let media = post.to_media();
let context = create_context(user, &*media);
5. Replace those lines with the context! macro:
let context = context! { user, post: &(post.to_show_
post())};
6. In the get_posts() function, remove these lines:
#[derive(Serialize)]
struct ShowPost {
uuid: String,
post_html: String,
}
let show_posts: Vec<ShowPost> = posts
.into_iter()
.map(|post| ShowPost {
uuid: post.uuid.to_string(),
post_html: post.to_media().raw_html(),
})
.collect();
Replace those lines with this line:
let show_posts: Vec<ShowPost> = posts.into_iter().
map(|post| post.to_show_post()).collect();
7. Also, change the context instantiation:
let context = context! {user, posts: &show_posts,
pagination: new_pagination.map(|pg|pg.to_context())};
8. And finally, remove the unnecessary use declaration. Remove these lines:
use crate::traits::DisplayPostContent;
use rocket::serde::Serialize;
263
264
Displaying Users' Post
The implementation of showing posts should be cleaner now we are using the borrowed
Post instance. There should be no difference in the speed of the application because
we are just using the reference of a single instance.
In fact, sometimes it's better to use an owned attribute instead of a reference because
there's no significant performance improvement. Using references can be useful in
complex applications, high-memory usage applications, or high-performance applications
such as gaming or high-speed trading with a lot of data, at the cost of development time.
Summary
In this chapter, we have implemented get_post() and get_posts() to show Post
information in a web browser. Along with those implementations, we have learned about
reducing code duplication through generics and trait bounds.
We have also learned about the most distinct and important feature of Rust: its memory
model. We now know an instance owns a memory block, either in the stack or in both the
stack and heap. We have also learned that assigning another instance to an instance means
moving ownership unless it's a simple type that implements the Copy and/or Clone trait.
We have also learned about borrowing, the rules of borrowing, and the use of the lifetime
specifier to complement moving, copying, and borrowing.
Those rules are some of the most confusing parts of Rust, but those rules are also what
make Rust a very safe language while still having the same performance as other system
languages such as C or C++. Now that we have implemented showing posts, let's learn
how to upload data in the next chapter.
10
Uploading and
Processing Posts
In this chapter, we are going to learn how to upload user posts. We will start with the
basics of multipart uploads and continue with TempFile to store the uploaded files.
After uploading the files, we will implement image processing.
The next thing we are going to learn about is improving processing using concurrent
programming techniques, asynchronous programming, and multithreading.
In this chapter, we are going to cover these main topics:
• Uploading a text post
• Uploading a photo post
• Processing files asynchronously
• Uploading a video post and process using worker
266
Uploading and Processing Posts
Technical requirements
For this chapter, we have the usual requirements: a Rust compiler, a text editor, a web
browser, and a PostgreSQL database server. Aside from those requirements, we are going
to process uploaded video files. Download the FFmpeg command line from https://
www.ffmpeg.org/download.html. FFmpeg is a multimedia framework to process
media files. Make sure you can run FFmpeg on the terminal of your operating system.
You can find the source code for this chapter at https://github.com/
PacktPublishing/Rust-Web-Development-with-Rocket/tree/main/
Chapter10.
Uploading a text post
The first thing we want to upload is a text post because it's the simplest type. When we
submit the form in HTML, we can specify the form tag enctype attribute as text/
plain, application/x-www-form-urlencoded, or multipart/form-data.
We already learned how to process application/x-www-form-urlencoded in the
Rocket application when we learned how to create a user. We create a struct and derive
FromForm for that struct. Later, in the route handling function, we set a route attribute,
such as get or post, and assign the struct in the data annotation.
The request body for Content-Type="application/x-www-form-urlencoded"
is simple: the form keys and values are encoded in key-value tuples separated by &, with an
equals sign (=) between the key and the value. If the characters sent are not alphanumeric,
they're percent-encoded (%). An example of a form request body is shown here:
name=John%20Doe&age=18
For uploading a file, Content-Type is multipart/form-data, and the body is
different. Suppose we have the following HTTP header:
Content-Type: multipart/form-data; boundary=--------------------------charactersforboundary123
The HTTP body can be as follows:
Content-Type: multipart/form-data; boundary=--------------------------charactersforboundary123
Content-Disposition: form-data; name="name"
John Doe
Uploading a text post
267
-----------------------------charactersforboundary123
Content-Disposition: form-data; name="upload"; filename="file1.
txt"
Content-Type: text/plain
Lorem ipsum dolor sit amet
-----------------------------charactersforboundary123
Content-Disposition: form-data; name="other_field"
Other field
In Rocket, we can process multipart/form-data by using the multer crate. Let's try
to implement uploading using that crate by following these instructions:
1. Modify our application by adding these crates into the Cargo.toml dependencies:
multer = "2.0.2"
tokio-util = "0.6.9"
2. Add these configurations in Rocket.toml to handle the file upload limit and add
a temporary directory to store the uploaded files:
limits = {"file/avif" = "1Mib", "file/gif" = "1Mib",
"file/jpg" = "1Mib", "file/jpeg" = "1Mib", "file/png" =
"1Mib", "file/svg" = "1Mib", "file/webp" = "1Mib", "file/
webm" = "64Mib", "file/mp4" = "64Mib", "file/mpeg4" =
"64Mib", "file/mpg" = "64Mib", "file/mpeg" = "64Mib",
"file/mov" = "64Mib"}
temp_dir = "/tmp"
3. Modify src/views/posts/index.html.tera to add a form where the user
can upload a file. Add the following lines after the pagination block:
<form action="/users/{{ user.uuid }}/posts"
enctype="multipart/form-data" method="POST">
<fieldset>
<legend>New Post</legend>
<div class="row">
<div class="col-sm-12 col-md-3">
<label for="upload">Upload file:</label>
</div>
268
Uploading and Processing Posts
<div class="col-sm-12 col-md">
<input type="file" name="file" accept="
text/plain">
</div>
</div>
<button type="submit" value="Submit">Submit</
button>
</fieldset>
</form>
4. Add the create() method for Post in the src/models/post.rs file. We
want a method to save the Post data into the database. Add the following lines
inside the impl Post {} block:
pub async fn create(
connection: &mut PgConnection,
user_uuid: &str,
post_type: PostType,
content: &str,
) -> Result<Self, OurError> {
let parsed_uuid = Uuid::parse_str(
user_uuid).map_err(OurError::from_uuid_error)?;
let uuid = Uuid::new_v4();
let query_str = r#"INSERT INTO posts
(uuid, user_uuid, post_type, content)
VALUES
($1, $2, $3, $4)
RETURNING *"#;
Ok(sqlx::query_as::<_, Self>(query_str)
.bind(uuid)
.bind(parsed_uuid)
.bind(post_type)
.bind(content)
.fetch_one(connection)
.await
.map_err(OurError::from_sqlx_error)?)
}
Uploading a text post
269
5. We can remove FromForm as we will not use the placeholder anymore. Remove
these lines from src/models/post.rs:
use rocket::form::FromForm;
...
#[derive(FromRow, FromForm)]
pub struct Post {...}
6. We need the value from the request's Content-Type to get a multipart boundary,
but Rocket doesn't have a request guard that can do that. Let's create a type that
can handle a raw HTTP Content-Type header. In src/lib.rs, add the
following line:
pub mod guards;
In the src folder, create another folder, named guards, and then create a src/
guards/mod.rs file. Inside the file, add the struct to handle the raw HTTP
request body:
use rocket::request::{FromRequest, Outcome};
pub struct RawContentType<'r>(pub &'r str);
7. Implement FromRequest for RawContent to create a request guard:
#[rocket::async_trait]
impl<'r> FromRequest<'r> for RawContentType<'r> {
type Error = ();
async fn from_request(req: &'r rocket::
Request<'_>) -> Outcome<Self, Self::Error> {
let header = req.headers().get_one("
Content-Type").or(Some("")).unwrap();
Outcome::Success(RawContentType(header))
}
}
270
Uploading and Processing Posts
8. Rocket will consider the "/users/delete/<uuid>" route as conflicting with
the "/users/<user_uuid>/posts" route. To avoid that problem, we can add
rank to the route macro. In src/routes/user.rs, edit the route macro above
the delete_user_entry_point() function:
#[post("/users/delete/<uuid>", format = "application/xwww-form-urlencoded", rank = 2)]
pub async fn delete_user_entry_point(...) -> ... {...}
9. In src/routes/post.rs, add the required use declaration to implement the
handling of the HTTP multipart request:
use
use
use
use
use
use
crate::guards::RawContentType;
crate::models::post_type::PostType;
multer::Multipart;
rocket::request::FlashMessage;
rocket::response::{Flash, Redirect};
rocket::data::{ByteUnit, Data};
10. Add a constant to limit the size of the uploaded file:
const TEXT_LIMIT: ByteUnit = ByteUnit::Kibibyte(64);
11. Let's modify the get_posts() function as well to add a flash message if the
upload fails or is successful:
pub async fn get_posts(
...
flash: Option<FlashMessage<'_>>,
) -> HtmlResponse {
let flash_message = flash.map(|fm|
String::from(fm.message()));
...
let context = context! {flash: flash_message,...};
Ok(Template::render("posts/index", context))
}
Uploading a text post
271
12. Now it's time to implement the create_post() function. The first thing we need
to do is modify the post route macro and function signature:
#[post("/users/<user_uuid>/posts", format = "multipart/
form-data", data = "<upload>", rank = 1)]
pub async fn create_post(
mut db: Connection<DBConnection>,
user_uuid: &str,
content_type: RawContentType<'_>,
upload: Data<'_>,
) -> Result<Flash<Redirect>, Flash<Redirect>> {...}
13. Inside the create_post() function, add a closure that returns an error. We add a
closure to avoid repetition. Add the following lines:
let create_err = || {
Flash::error(
Redirect::to(format!("/users/{}/posts",
user_uuid)),
"Something went wrong when uploading file",
)
};
14. Under the create_err definition, continue by getting the boundary from the
content_type request guard:
let boundary = multer::parse_boundary(content_type.0).
map_err(|_| create_err())?;
15. For TextPost, we just store the content of the text file in the post's content field.
Let's open the request body, process it as a multipart, and define a new variable to
store the content of the body. Append the following lines:
let upload_stream = upload.open(TEXT_LIMIT);
let mut multipart = Multipart::new(tokio_
util::io::ReaderStream::new(upload_stream), boundary);
let mut text_post = String::new();
272
Uploading and Processing Posts
16. The next thing we need to do is to iterate the multipart fields. We can iterate
multipart fields as follows:
while let Some(mut field) = multipart.next_field().await.
map_err(|_| create_err())? {
let field_name = field.name();
let file_name = field.file_name();
let content_type = field.content_type();
println!(
"Field name: {:?}, File name: {:?},
Content-Type: {:?}",
field_name, file_name, content_type
);
}
As we only have one field in the form, we can just get the content of the first field
and put the value in the text_post variable. Append the following lines:
while let Some(mut field) = multipart.next_field().await.
map_err(|_| create_err())? {
while let Some(field_chunk) =
field.chunk().await.map_err(|_| create_err())? {
text_post.push_str(std::str::from_utf8(
field_chunk.as_ref()).unwrap());
}
}
17. Finally, after we get the request body content and assign it to text_post, it's time to
store it in the database and return to the posts list page. Append the following lines:
let connection = db.acquire().await.map_err(|_| create_
err())?;
Post::create(connection, user_uuid, PostType::Text,
&text_post)
.await
.map_err(|_| create_err())?;
Ok(Flash::success(
Redirect::to(format!("/users/{}/posts",
user_uuid)),
"Successfully created post",
))
Uploading a photo post
273
Now, try restarting the application and uploading the text file. You should see the content
of the text file on the posts list page:
Figure 10.1 – Uploaded text posts
Now that we have implemented uploading and processing text files, it is time to move on
to uploading and processing photo files.
Uploading a photo post
Before Rocket 0.5, uploading multipart files had to be implemented manually, as in the
previous section. Starting from Rocket 0.5, there's a rocket::fs::TempFile type that
can be used directly to handle uploaded files.
To handle processing image files, we can use an image crate. The crate can handle
opening and saving various image file formats. The image crate also provides ways to
manipulate the image.
274
Uploading and Processing Posts
Websites process uploaded media files such as images for various reasons, including
reducing disk usage. Some websites reduce the image quality and encode the uploaded
images into file format with a default smaller size. In this example, we are going to convert
all uploaded images into JPEG files with 75% quality.
Let's implement uploading image files using the image crate and the TempFile struct by
following these steps:
1. Remove multer and tokio-util from Cargo.toml. Then, add the image
crate to Cargo.toml:
image = "0.24.0"
2. Remove pub mod guards; from src/lib.rs and then remove the src/
guards folder.
3. Add a struct to handle uploaded files in src/models/post.rs:
use rocket::fs::TempFile;
...
#[derive(Debug, FromForm)]
pub struct NewPost<'r> {
pub file: TempFile<'r>,
}
4. Modify src/views/posts/index.html.tera to include images as
accepted files:
...
<input type="file" name="file" accept="text/
plain,image/*">
...
5. Remove unused use declarations, TEXT_LIMIT constant, and part of the
create_post() function from the boundary variable declaration to the multipart
iteration block:
use crate::guards::RawContentType;
use multer::Multipart;
use rocket::data::{ByteUnit, Data};
...
const TEXT_LIMIT: ByteUnit = ByteUnit::Kibibyte(64);
...
Uploading a photo post
275
let boundary = multer::parse_boundary(content_type.0).
map_err(|_| create_err())?;
...until
while let Some(mut field) = multipart.next_field().await.
map_err(|_| create_err())? {
...
}
6. Add the required use declarations:
use
use
use
use
use
use
use
use
use
crate::models::post::{NewPost, Post, ShowPost};
image::codecs::jpeg::JpegEncoder;
image::io::Reader as ImageReader;
image::{DynamicImage, ImageEncoder};
rocket::form::Form;
std::fs::File;
std::io::{BufReader, Read};
std::ops::Deref;
std::path::Path;
7. We can use the NewPost struct that we created earlier as a regular FromForm
deriving struct. Modify the create_post() function signature:
pub async fn create_post<'r>(
mut db: Connection<DBConnection>,
user_uuid: &str,
mut upload: Form<NewPost<'r>>,
) -> Result<Flash<Redirect>, Flash<Redirect>> {...}
8. Under the create_err closure declaration, generate a random uuid name for the
new name of the uploaded file:
let file_uuid = uuid::Uuid::new_v4().to_string();
9. Check Content-Type of the uploaded file, and if the Temp File cannot determine
it, return an error:
if upload.file.content_type().is_none() {
return Err(create_err());
}
276
Uploading and Processing Posts
10. Find the extension of the uploaded file and create a new filename:
let ext = upload.file.content_type().unwrap().
extension().unwrap();
let tmp_filename = format!("/tmp/{}.{}", &file_uuid,
&ext);
11. Persist the uploaded file in the temporary location:
upload
.file
.persist_to(tmp_filename)
.await
.map_err(|_| create_err())?;
12. Define content and post_type to be saved later:
let mut content = String::new();
let mut post_type = PostType::Text;
13. Check the media type of the file. We can separate media types into bitmaps and svg
files. For now, we are going to process text and images only. We will process videos
in the next section. Append the following lines:
let mt = upload.file.content_type().unwrap().deref();
if mt.is_text() {
} else if mt.is_bmp() || mt.is_jpeg() || mt.is_png() ||
mt.is_gif() {
} else if mt.is_svg() {
} else {
return Err(create_err());
}
14. We want to process the text first. Create a vector of byte (u8), open and read the file
into the vector, and push the vector into the content String we defined previously.
Add these lines inside the mt.is_text() block:
let orig_path = upload.file.path().unwrap().to_string_
lossy().to_string();
let mut text_content = vec![];
let _ = File::open(orig_path)
.map_err(|_| create_err())?
Uploading a photo post
277
.read(&mut text_content)
.map_err(|_| create_err())?;
content.push_str(std::str::from_utf8(&text_content).
unwrap());
15. Next, we want to process the svg file. For this one, we cannot convert it into a JPEG
file; we just want to copy the file into a static folder and create an image path of /
assets/random_uuid_filename.svg. Append the following lines inside the
mt.is_svg() block:
post_type = PostType::Photo;
let dest_filename = format!("{}.svg", file_uuid);
content.push_str("/assets/");
content.push_str(&dest_filename);
let dest_path =
Path::new(rocket::fs::relative!("static")).join(&dest_
filename);
upload
.file
.move_copy_to(&dest_path)
.await
.map_err(|_| create_err())?;
16. For bitmap files, we want to convert them into JPEG files. First, we want to define
the destination filename. Append the following lines inside the mt.is_bmp() ||
mt.is_jpeg() || mt.is_png() || mt.is_gif() block:
post_type = PostType::Photo;
let orig_path = upload.file.path().unwrap().to_string_
lossy().to_string();
let dest_filename = format!("{}.jpg", file_uuid);
content.push_str("/assets/");
content.push_str(&dest_filename);
17. Continuing the bitmap processing, open the file into a buffer and decode the buffer
into a binary format that the image crate understands:
let orig_file = File::open(orig_path).map_err(|_| create_
err())?;
let file_reader = BufReader::new(orig_file);
let image: DynamicImage = ImageReader::new(file_reader)
278
Uploading and Processing Posts
.with_guessed_format()
.map_err(|_| create_err())?
.decode()
.map_err(|_| create_err())?;
18. Create a path for the destination file where we want the JPEG result to be, and create
a file at that path. Append the following lines:
let dest_path =
Path::new(rocket::fs::relative!("static")).join(&dest_
filename);
let mut file_writer = File::create(dest_path).map_err(|_|
create_err())?;
19. We then create a JPEG decoder, specify the JPEG quality and the image attributes,
and write the binary format into the destination file. Append the following lines:
let encoder = JpegEncoder::new_with_quality(&mut file_
writer, 75);
encoder
.write_image(
image.as_bytes(),
image.width(),
image.height(),
image.color(),
)
.map_err(|_| create_err())?;
20. Finally, we can save the post as in the previous section. Change the
Post::create() method as follows:
Post::create(connection, user_uuid, post_type, &content)
...
We have now finished creating the routine to upload and process text and image files
using TempFile and the image crate. Unfortunately, this process uses a more traditional
programming paradigm that can be improved. Let's learn how to process the files
asynchronously in the next section.
Processing files asynchronously
279
Processing files asynchronously
At the beginning of computer development, the available resources were usually limited
in some way. For example, an older generation CPU can only execute one thing at a time.
This makes computing difficult because computer resources must wait for the execution
of tasks sequentially. For example, while the CPU is calculating a number, the user cannot
input anything using the keyboard.
Then, people invented operating systems with a scheduler, which assigns resources to run
tasks. The invention of the scheduler led to the idea of a thread. A thread, or operating
system thread, is the smallest sequence of program instructions that can be executed
independently by the scheduler.
Some modern programming languages can generate applications that spawn multiple
threads at the same time, and so are called multithreaded applications.
Creating multithreaded applications can be a drawback, as creating a thread allocates
various resources, such as a memory stack. In certain applications, such as desktop
applications, it's suitable to create multiple threads. But, creating multiple threads can be
a problem in other applications, such as web applications, where requests and responses
come and go quickly.
There are techniques to overcome this problem in multiple ways. Some languages opt to
have green threads, or virtual threads, where the language runtime manages a single
operating system thread and makes the program behave as if it's multithreaded. Some
other languages, such as Javascript and Rust, opt to have async/await, a syntactic feature
that allows execution parts to be suspended and resumed.
In the previous section, we used the Rust standard library to open and write files for
image processing. The library itself is called blocking because, it waits until all the files
have been loaded or written. That is not efficient because I/O operations are slower than
CPU operations, and the thread can be used to do other operations. We can improve the
program by using asynchronous programming.
In Rust, we can declare an async function as follows:
async fn async_task1() {...}
async fn async_task2() {...}
280
Uploading and Processing Posts
Any async function returns the std::future::Future trait. By default, running the
function does not do anything. We can use async_task1 and an executor, such as the
futures crate, to run the async function. The following code will behave like regular
programming:
use futures::executor::block_on;
async fn async_task1() {...}
fn main() {
let wait = async_task1();
block_on(wait); // wait until async_task1 finish
}
We can use .await after the function usage to not block the thread, as follows:
async fn combine() {
async_task1().await;
async_task2().await;
}
fn main() {
block_on(combine());
}
Or, we can wait for both functions to finish, as in the following:
async fn combine2() {
let t1 = async_task1();
let t2 = async_task2();
futures::join!(t1, t2);
}
fn main() {
block_on(combine2());
}
Processing files asynchronously
281
The futures crate is very basic; we can use other runtimes that provide an executor and
a scheduler and many other functionalities. There are a couple of competing runtimes in
the Rust ecosystem, such as tokio, smol, and async-std. We can use those different
runtimes together but it's not very efficient, so it's advised to stick with a single runtime.
Rocket itself uses tokio as the runtime for async/await.
We have used async functions in code before, so let's now use async functions in
more depth. Let's convert the previous image processing to use the async programming
technique by following these steps:
1. Add the crate dependency in Cargo.toml:
tokio = {version = "1.16", features = ["fs", "rt"]}
2. If we look at the code that handles uploading, we can see that file-related operations
use a standard library, so they are blocking. We want to replace those libraries
with Tokio-equivalent async libraries. Remove the use declaration from src/
routes/post.rs:
use std::fs::File;
use std::io::{BufReader, Read};
Then, add these use declarations:
use image::error::ImageError;
use std::io::Cursor;
use tokio::fs::File;
use tokio::io::AsyncReadExt;
3. Replace the content of the mt.is_text() block from the standard library into a
Tokio-equivalent library. Find the following lines:
let _ = File::open(orig_path)
.map_err(|_| create_err())?
.read(&mut text_content)
.map_err(|_| create_err())?;
Replace those lines with the following:
let _ = File::open(orig_path)
.await
.map_err(|_| create_err())?
.read_to_end(&mut text_content)
.await
.map_err(|_| create_err())?;
282
Uploading and Processing Posts
4. Next, replace reading the file in the mt.is_bmp() || mt.is_jpeg() ||
mt.is_png() || mt.is_gif() block. Replace synchronous reading of
the file and use a Tokio-equivalent file reading functionality. We want to wrap
the result in std::io::Cursor because ImageReader methods require
the std::io::Read + std::io:Seek trait, and Cursor is a type that
implemented those traits.
Find the following lines:
let orig_file = File::open(orig_path).map_err(|_| create_
err())?;
let file_reader = BufReader::new(orig_file);
Replace those lines with the following:
let orig_file = tokio::fs::read(orig_path).await.map_
err(|_| create_err())?;
let read_buffer = Cursor::new(orig_file);
5. Wrap the image decoding code in tokio::task::spawn_blocking. This
function allows synchronous code to run inside the Tokio executor. Find the
following lines:
let image: DynamicImage = ImageReader::new(file_reader)
.with_guessed_format()
.map_err(|_| create_err())?
.decode()
.map_err(|_| create_err())?
Replace them with the following lines:
let encoded_result: Result<DynamicImage, ()> =
tokio::task::spawn_blocking(|| {
Ok(ImageReader::new(read_buffer)
.with_guessed_format()
.map_err(|_| ())?
.decode()
.map_err(|_| ())?)
})
.await
.map_err(|_| create_err())?;
let image = encoded_result.map_err(|_| create_err())?;
Processing files asynchronously
283
6. Next, we want to wrap the JPEG encoding in spawn_blocking as well. We also
want to change file writing into a Tokio async function. Find the following lines:
let dest_path =
Path::new(rocket::fs::relative!("static")).join(&dest_
filename);
let mut file_writer = File::create(dest_path).map_err(|_|
create_err())?;
JpegEncoder::new_with_quality(&mut file_writer, 75)
.write_image(
image.as_bytes(),
image.width(),
image.height(),
image.color(),
)
.map_err(|_| create_err())?;
Replace them with the following lines:
let write_result: Result<Vec<u8>, ImageError> =
tokio::task::spawn_blocking(move || {
let mut write_buffer: Vec<u8> = vec![];
let mut write_cursor = Cursor::new(&mut
write_buffer);
let _ = JpegEncoder::new_with_quality(&mut
write_cursor, 75).write_image(
image.as_bytes(),
image.width(),
image.height(),
image.color(),
)?;
Ok(write_buffer)
})
.await
.map_err(|_| create_err())?;
let write_bytes = write_result.map_err(|_| create_
err())?;
let dest_path =
Path::new(rocket::fs::relative!("static")).join(&dest_
filename);
284
Uploading and Processing Posts
tokio::fs::write(dest_path, &write_bytes)
.await
.map_err(|_| create_err())?;
Now, we can run the application and try the uploading functionality again. There should
be no differences, except it now uses the async function. If there are a lot of requests, an
asynchronous application should fare better because the application can use the thread to
do other tasks while the application deals with long I/O, such as reading from and writing
to a database, dealing with network connections, and handling files, for example.
There is one more example where the application uses tokio::sync::channel
to create another asynchronous channel, and rayon (a crate for data
parallelism). You can find this example in the source code for this chapter in the
Chapter10/04UploadingPhotoRayon folder.
In the next section, let's create the handle for uploading videos and processing videos
using a worker.
Uploading a video post and process using a
worker
In this section, we are going to process an uploaded video. Processing an uploaded video
is not a trivial task as it can take a lot of time, so even with the async programming
technique, the generated response will take a lot of time.
Another technique in programming to solve a long processing time is using message
passing. We are going to create another thread to process the video. When a user uploads
a video, we will do the following:
1. Generate a path to the temporary file.
2. Mark the path as unprocessed.
3. Store the path to the file in the database.
4. Send a message from the main Rocket thread into the thread for processing
the video.
5. Return the response for uploading the video.
If the thread to process the video receives a message, it will find the data from the
database, process the file, and mark the post as finished.
Uploading a video post and process using a worker
285
If the user requests the posts list or posts while it's still being processed, the user will
see the loading image. If the user requests the posts list or posts after the processing is
finished, the user will see the correct video in the web browser.
Rust libraries for video processing are not very mature yet. There are a couple of
libraries that can be used to wrap the ffmpeg library, but using the ffmpeg library is
complicated, even if it's used in its own language, the C language. One solution is to use
the ffmpeg-cli crate, a wrapper for the ffmpeg binary.
Follow these instructions to process uploaded video files:
1. We want to add the ffmpeg-cli crate and the flume crate as dependencies. The
flume crate works by generating a channel, a producer, and a consumer. There
are similar libraries, such as std::sync::mpsc or crossbeam-channel,
which can be used with varying performance and quality. Add the dependencies to
Cargo.toml:
flume = "0.10.10"
ffmpeg-cli = "0.1"
2. Change the form to allow uploading video files. Edit src/views/posts/
index.html.tera:
<input type="file" name="file" accept="text/
plain,image/*,video/*">
3. Find a placeholder image to show the video is still being processed.
There's a loading.gif example file in the source code for this section in
Chapter10/05ProcessingVideo/static/loading.gif.
4. Modify the raw_html() method for VideoPost in src/models/video_
post.rs to show the loading.gif image if the video is still not processed yet:
fn raw_html(&self) -> String {
if self.0.content.starts_with("loading") {
return String::from(
"<figure><img src=\"/assets/loading.gif\"
class=\"section media\"/></figure>",
);
}
...
}
286
Uploading and Processing Posts
5. We want a method for Post to update the content and mark it as permanent. Inside
the impl Post{} block in src/models/post.rs, add the following method:
pub async fn make_permanent(
connection: &mut PgConnection,
uuid: &str,
content: &str,
) -> Result<Post, OurError> {
let parsed_uuid = Uuid::parse_str(uuid).map_err(
OurError::from_uuid_error)?;
let query_str = String::from("UPDATE posts SET
content = $1 WHERE uuid = $2 RETURNING *");
Ok(sqlx::query_as::<_, Self>(&query_str)
.bind(content)
.bind(&parsed_uuid)
.fetch_one(connection)
.await
.map_err(OurError::from_sqlx_error))?
}
6. We want to create a message that we want to send to the channel. In src/models/
mod.rs, add a new module:
pub mod worker;
7. Then, create a new file, src/models/worker.rs. Create a new Message struct
in the file as follows:
pub struct Message {
pub uuid: String,
pub orig_filename: String,
pub dest_filename: String,
}
impl Message {
pub fn new() -> Self {
Message {
uuid: String::new(),
orig_filename: String::new(),
dest_filename: String::new(),
Uploading a video post and process using a worker
287
}
}
}
8. Create a worker that will be executed when a channel receives a message. Add a new
module in src/lib.rs called worker:
pub mod workers;
9. Create a folder named workers. Then, create a new file, src/workers/mod.rs,
and add a new video module:
pub mod video;
10. Create a new file, src/workers/video.rs, and add the required use
declarations:
use
use
use
use
use
use
use
crate::models::post::Post;
crate::models::worker::Message;
ffmpeg_cli::{FfmpegBuilder, File, Parameter};
sqlx::pool::PoolConnection;
sqlx::Postgres;
std::process::Stdio;
tokio::runtime::Handle;
11. Add the function signature to process the video as follows:
pub fn process_video(connection: &mut
PoolConnection<Postgres>, wm: Message) -> Result<(), ()>
{...}
12. Inside the process_video() function, append these lines to prepare the
destination file:
let mut dest = String::from("static/");
dest.push_str(&wm.dest_filename);
288
Uploading and Processing Posts
13. We want to re-encode all the files into MP4 files and use the x265 codec for the video
file destination. Append these lines to build the parameters for the ffmpeg binary:
let builder = FfmpegBuilder::new()
.stderr(Stdio::piped())
.option(Parameter::Single("nostdin"))
.option(Parameter::Single("y"))
.input(File::new(&wm.orig_filename))
.output(
File::new(&dest)
.option(Parameter::KeyValue("vcodec",
"libx265"))
.option(Parameter::KeyValue("crf", "28")),
);
14. The next and final step for the worker is to execute the builder. We can make it
async too. Append the following lines:
let make_permanent = async {
let ffmpeg = builder.run().await.unwrap();
let _ = ffmpeg.process.wait_with_output().
unwrap();
let mut display_path = String::from("/assets/");
display_path.push_str(&wm.dest_filename);
Post::make_permanent(connection, &wm.uuid,
&display_path).await
};
let handle = Handle::current();
Ok(handle
.block_on(make_permanent)
.map(|_| ())
.map_err(|_| ())?)
Uploading a video post and process using a worker
289
15. The next thing we want to do is to create a thread to receive and process the
message. We can add a new thread after we initialize Rocket in src/main.rs. We
want to do several things:
Initialize a worker thread.
Initialize a producer (message sender) and a consumer (message receiver).
Initialize a database pool.
In the worker thread, the consumer will obtain a connection from the database
pool and process the message.
Let's start by adding use declarations in src/main.rs:
use
use
use
use
use
our_application::models::worker::Message;
our_application::workers::video::process_video;
rocket::serde::Deserialize;
sqlx::postgres::PgPoolOptions;
tokio::runtime::Handle;
16. Add the structs to get the database configuration from Rocket.toml in src/
main.rs after the use declaration:
#[derive(Deserialize)]
struct Config {
databases: Databases,
}
#[derive(Deserialize)]
struct Databases {
main_connection: MainConnection,
}
#[derive(Deserialize)]
struct MainConnection {
url: String,
}
17. In the rocket() function after setup_logger(), initialize the flume producer
and consumer as follows:
let (tx, rx) = flume::bounded::<Message>(5);
290
Uploading and Processing Posts
18. Let Rocket manage the tx variable. We also want to assign the generated Rocket
object into a variable, because we want to get the database configuration. Find
these lines:
rocket::build()
.attach(DBConnection::init())
.attach(Template::fairing())
.attach(Csrf::new())
.mount(...)
Replace them with the following lines:
let our_rocket = rocket::build()
.attach(DBConnection::init())
.attach(Template::fairing())
.attach(Csrf::new())
.manage(tx)
.mount(...);
19. After we get our_rocket, we want to get the database configuration and initialize
a new database connection pool for the worker. Append the following lines:
let config: Config = our_rocket
.figment()
.extract()
.expect("Incorrect Rocket.toml configuration");
let pool = PgPoolOptions::new()
.max_connections(5)
.connect(&config.databases.main_connection.url)
.await
.expect("Failed to connect to database");
20. Make a thread that will receive and process the message. Also, don't forget that to
return our_rocket as a rocket() signature, we require the Rocket<Build>
return value. Append the following lines:
tokio::task::spawn_blocking(move || loop {
let wm = rx.recv().unwrap();
let handle = Handle::current();
let get_connection = async { (&pool).
acquire().await.unwrap() };
Uploading a video post and process using a worker
291
let mut connection = handle.block_on(get_
connection);
let _ = process_video(&mut connection, wm);
});
our_rocket
21. Now, it's time to use the managed tx variable to send a message in the create_
post() route handling function after we create the video. In src/routes/
post.rs, add the required use declarations:
use
use
use
use
crate::errors::our_error::OurError;
crate::models::worker::Message;
flume::Sender;
rocket::State;
22. In the create_post() function, retrieve the Sender<Message> instance
managed by Rocket. Add the Sender<Message> instance to the function
parameters:
pub async fn create_post<'r>(
...
tx: &State<Sender<Message>>,
)
23. Before the if mt.is_text() block, append the following variables:
let mut wm = Message::new();
let mut is_video = false;
24. After the if mt.is_svg() {} block, add a new block to initialize a temporary
video value and assign the value to the wm variable we have initialized:
else if mt.is_mp4() || mt.is_mpeg() || mt.is_ogg() ||
mt.is_mov() || mt.is_webm() {
post_type = PostType::Video;
let dest_filename = format!("{}.mp4", file_uuid);
content.push_str("loading/assets/");
content.push_str(&dest_filename);
is_video = true;
wm.orig_filename = upload
.file
292
Uploading and Processing Posts
.path()
.unwrap()
.to_string_lossy()
.to_string()
.clone();
wm.dest_filename = dest_filename.clone();
}
25. Find the post creation and return value in the following lines:
Post::create(connection, user_uuid, post_type, &content)
.await
.map_err(|_| create_err())?;
Ok(Flash::success(
Redirect::to(format!("/users/{}/posts",
user_uuid)),
"Successfully created post",
))
Modify this into the following lines:
Ok(Post::create(connection, user_uuid, post_type,
&content)
.await
.and_then(move |post| {
if is_video {
wm.uuid = post.uuid.to_string();
let _ = tx.send(wm).map_err(|_| {
OurError::new_internal_server_error(
String::from("Cannot process
message"),
None,
)
})?;
}
Ok(Flash::success(
Redirect::to(format!("/users/{}/posts",
user_uuid)),
"Successfully created post",
Uploading a video post and process using a worker
293
))
})
.map_err(|_| create_err())?)
Now try restarting the application and uploading the video file; notice the loading page. If
the video has been processed, the video should be displayed:
Figure 10.2 – Uploaded video post
Message passing is a very useful technique to process long-running jobs. Try using
this technique if your application requires heavy processing but you need to return
responses quickly.
Some applications use a more advanced application called a message broker, which
can retry sending messages, schedule sending messages, send messages to multiple
applications, and much more. Some well-known message broker applications are
RabbitMQ, ZeroMQ, and Redis. There are many cloud services providing message broker
services as well, such as Google Cloud Pub/Sub.
Before we complete this chapter, there's one more thing we can do: delete the user
post. Try writing the delete_post() function. You can find the sample code in the
Chapter10/06DeletingPost folder on GitHub.
294
Uploading and Processing Posts
Summary
In this chapter, we have learned several things.
The first thing we learned is how to process multipart forms in Rocket. After that, we
learned how to use TempFile to upload files. Along with uploading photos and videos,
we learned how to process the image files and video files.
We learned more about concurrent programming with async/await and multithreading.
We also covered how to create a thread and pass a message to a different thread.
In the next chapter, we will focus on how to do authentication, authorization, and serving
the API from the Rocket application.
11
Securing and Adding
an API and JSON
Two of the most important aspects of a web application are authentication and
authorization. In this chapter, we are going to learn how to implement simple
authentication and authorization systems. After we have created these systems, we are
going to learn how to create a simple Application Programming Interface (API) and
how to protect the API endpoint using a JSON Web Token (JWT).
At the end of this chapter, you will be able to create an authentication system, with
functionality such as logging in and logging out and setting access rights for logged-in
users. You will also be able to create an API server and know how to secure the API
endpoints.
In this chapter, we are going to cover these main topics:
• Authenticating users
• Authorizing users
• Handling JSON
• Protecting the API with a JWT
296
Securing and Adding an API and JSON
Technical requirements
For this chapter, we have the usual requirements: a Rust compiler, a text editor, a web
browser, and a PostgreSQL database server, along with the FFmpeg command line.
We are going to learn about JSON and APIs in this chapter. Install cURL or any other
HTTP testing client.
You can find the source code for this chapter at https://github.com/
PacktPublishing/Rust-Web-Development-with-Rocket/tree/main/
Chapter11.
Authenticating users
One of the most common tasks of a web application is handling registration and logging
in. By logging in, users can tell the web server that they really are who they say they are.
We already created a sign-up system when we implemented CRUD for the user model.
Now, let's implement a login system using the existing user model.
The idea for login is simple: the user can fill in their username and password. The application
then verifies that the username and password are valid. After that, the application can
generate a cookie with the user's information and return the cookie to the web browser.
Every time there's a request from the browser, the cookie is sent back from the browser to
the server, and we validate the content of the cookie.
To make sure we don't have to implement the cookie for every request, we can create
a request guard that validates the cookie automatically if we use the request guard in
a route handling function.
Let's start implementing a user login system by following these steps:
1. Create a request guard to handle user authentication cookies. We can organize
request guards in the same place to make it easier if we want to add new request
guards. In src/lib.rs, add a new module:
pub mod guards;
2. Then, create a folder called src/guards. Inside src/guards, add a file called
src/guards/mod.rs. Add a new module in this new file:
pub mod auth;
3. After that, create a new file called src/guards/auth.rs.
Authenticating users
297
4. Create a struct to handle user authentication cookies. Let's name the struct
CurrentUser. In src/guards/auth.rs, add a struct to store the User
information:
use
use
use
use
use
use
crate::fairings::db::DBConnection;
crate::models::user::User;
rocket::http::Status;
rocket::request::{FromRequest, Outcome, Request};
rocket::serde::Serialize;
rocket_db_pools::{sqlx::Acquire, Connection};
#[derive(Serialize)]
pub struct CurrentUser {
pub user: User,
}
5. Define a constant that will be used as a key for the cookie to store the user's
universally unique identifier (UUID):
pub const LOGIN_COOKIE_NAME: &str = "user_uuid";
6. Implement the FromRequest trait for CurrentUser to make the struct a request
guard. Add the implementation skeleton as follows:
#[rocket::async_trait]
impl<'r> FromRequest<'r> for CurrentUser {
type Error = ();
async fn from_request(req: &'r Request<'_>) ->
Outcome<Self, Self::Error> {
}
}
7. Inside the from_request function, define an error that will be returned if
something goes wrong:
let error = Outcome::Failure((Status::Unauthorized, ()));
298
Securing and Adding an API and JSON
8. Get the cookie from the request, and extract the UUID from the cookie as follows:
let parsed_cookie = req.cookies().get_private(LOGIN_
COOKIE_NAME);
if parsed_cookie.is_none() {
return error;
}
let cookie = parsed_cookie.unwrap();
let uuid = cookie.value();
9. We want to get a connection to the database to find the user information. We can
obtain another request guard (such as Connection<DBConnection>) inside
a request guard implementation. Add the following lines:
let parsed_db = req.guard::<Connection<DBConnection>>().
await;
if !parsed_db.is_success() {
return error;
}
let mut db = parsed_db.unwrap();
let parsed_connection = db.acquire().await;
if parsed_connection.is_err() {
return error;
}
let connection = parsed_connection.unwrap();
10. Find and return the user. Add the following lines:
let found_user = User::find(connection, uuid).await;
if found_user.is_err() {
return error;
}
let user = found_user.unwrap();
Outcome::Success(CurrentUser { user })
Authenticating users
299
11. Next, we want to implement the login itself. We will create a like sessions/
new route to get the page for the login, a sessions/create route to send the
username and password for login, and a sessions/delete route for logging
out. Before implementing those routes, let's create a template for the login. In src/
views, add a new folder called sessions. Then, create a file called src/views/
sessions/new.html.tera. Append the following lines into the file:
{% extends "template" %}
{% block body %}
<form accept-charset="UTF-8" action="login"
autocomplete="off" method="POST">
<input type="hidden" name="authenticity_token"
value="{{ csrf_token }}"/>
<fieldset>
<legend>Login</legend>
<div class="row">
<div class="col-sm-12 col-md-3">
<label for="username">Username:</label>
</div>
<div class="col-sm-12 col-md">
<input name="username" type="text" value=""
/>
</div>
</div>
<div class="row">
<div class="col-sm-12 col-md-3">
<label for="password">Password:</label>
</div>
<div class="col-sm-12 col-md">
<input name="password" type="password" />
</div>
</div>
<button type="submit" value="Submit">
Submit</button>
</fieldset>
</form>
{% endblock %}
300
Securing and Adding an API and JSON
12. In src/models/user.rs, add a struct for the login information:
#[derive(FromForm)]
pub struct Login<'r> {
pub username: &'r str,
pub password: &'r str,
pub authenticity_token: &'r str,
}
13. Staying in the same file, we want to create a method for the User struct to be able to
find the user from the database based on the login username information, and verify
whether the login password is correct or not. After verifying that the password is
correct by using the update method, it is time to refactor this. Create a new function
to verify passwords:
fn verify_password(ag: &Argon2, reference: &str,
password: &str) -> Result<(), OurError> {
let reference_hash = PasswordHash::new(
reference).map_err(|e| {
OurError::new_internal_server_error(
String::from("Input error"), Some(
Box::new(e)))
})?;
Ok(ag
.verify_password(password.as_bytes(),
&reference_hash)
.map_err(|e| {
OurError::new_internal_server_error(
String::from("Cannot verify
password"),
Some(Box::new(e)),
)
})?)
}
14. Change the update method from these lines:
let old_password_hash = PasswordHash::new(&old_user.
password_hash).map_err(|e| {
OurError::new_internal_server_error(
Authenticating users
301
String::from("Input error"), Some(Box::new(e)))
})?;
let argon2 = Argon2::default();
argon2
.verify_password(user.old_password.as_bytes(),
&old_password_hash)
.map_err(|e| {
OurError::new_internal_server_error(
String::from("Cannot confirm old
password"),
Some(Box::new(e)),
)
})?;
And, change it to the following lines:
let argon2 = Argon2::default();
verify_password(&argon2, &old_user.password_hash, user.
old_password)?;
15. Create a method to find a user based on the login username. Inside the impl User
block, add the following method:
pub async fn find_by_login<'r>(
connection: &mut PgConnection,
login: &'r Login<'r>,
) -> Result<Self, OurError> {
let query_str = "SELECT * FROM users WHERE
username = $1";
let user = sqlx::query_as::<_, Self>(query_str)
.bind(&login.username)
.fetch_one(connection)
.await
.map_err(OurError::from_sqlx_error)?;
let argon2 = Argon2::default();
verify_password(&argon2, &user.password_hash,
&login.password)?;
Ok(user)
}
302
Securing and Adding an API and JSON
16. Now, implement routes for handling login. Create a new mod in src/routes/
mod.rs:
pub mod session;
Then, create a new file called src/routes/session.rs.
17. In src/routes/session.rs, create a route handling function called new.
We want the function to serve the rendered template for the login that we created
earlier. Add the following lines:
use
use
use
use
super::HtmlResponse;
crate::fairings::csrf::Token as CsrfToken;
rocket::request::FlashMessage;
rocket_dyn_templates::{context, Template};
#[get("/login", format = "text/html")]
pub async fn new<'r>(flash: Option<FlashMessage<'_>>,
csrf_token: CsrfToken) -> HtmlResponse {
let flash_string = flash
.map(|fl| format!("{}", fl.message()))
.unwrap_or_else(|| "".to_string());
let context = context! {
flash: flash_string,
csrf_token: csrf_token,
};
Ok(Template::render("sessions/new", context))
}
18. Then, create a new function called create. In this function, we want to find the
user and verify the password with the password hash in the database. If everything
goes well, set the cookie with the user information. Append the following lines:
use
use
use
use
use
use
crate::fairings::db::DBConnection;
crate::guards::auth::LOGIN_COOKIE_NAME;
crate::models::user::{Login, User};
rocket::form::{Contextual, Form};
rocket::http::{Cookie, CookieJar};
rocket::response::{Flash, Redirect};
Authenticating users
use rocket_db_pools::{sqlx::Acquire, Connection};
...
#[post("/login", format = "application/x-www-formurlencoded", data = "<login_context>")]
pub async fn create<'r>(
mut db: Connection<DBConnection>,
login_context: Form<Contextual<'r, Login<'r>>>,
csrf_token: CsrfToken,
cookies: &CookieJar<'_>,
) -> Result<Flash<Redirect>, Flash<Redirect>> {
let login_error = || Flash::error(
Redirect::to("/login"), "Cannot login");
if login_context.value.is_none() {
return Err(login_error());
}
let login = login_context.value.as_ref().unwrap();
csrf_token
.verify(&login.authenticity_token)
.map_err(|_| login_error())?;
let connection = db.acquire().await.map_err(|_|
login_error())?;
let user = User::find_by_login(connection, login)
.await
.map_err(|_| login_error())?;
cookies.add_private(Cookie::new(LOGIN_COOKIE_NAME,
user.uuid.to_string()));
Ok(Flash::success(Redirect::to("/users"), "Login
successfully"))
}
19. Finally, create a function called delete. We will use this function as a route for
logging out. Append the following lines:
#[post("/logout", format = "application/x-www-formurlencoded")]
pub async fn delete(cookies: &CookieJar<'_>) ->
Flash<Redirect> {
cookies.remove_private(
303
304
Securing and Adding an API and JSON
Cookie::named(LOGIN_COOKIE_NAME));
Flash::success(Redirect::to("/users"), "Logout
successfully")
}
20. Add session::new, session::create, and session::delete into
src/main.rs:
use our_application::routes::{self, post, session, user};
...
async fn rocket() -> Rocket<Build> {
...
routes![
...
session::new,
session::create,
session::delete,
]
...
}
21. Now, we can use CurrentUser to ensure that only logged-in users can have access
to some endpoints in our application. In src/routes/user.rs, remove the
routine to find the user in the edit endpoint. Delete the following lines:
pub async fn edit_user(
mut db: Connection<DBConnection>,
...
) -> HtmlResponse {
let connection = db
.acquire()
.await
.map_err(|_| Status::InternalServerError)?;
let user = User::find(connection,
uuid).await.map_err(|e| e.status)?;
...
}
Authenticating users
22. Then, add CurrentUser to the route that requires a logged-in user as follows:
use crate::guards::auth::CurrentUser;
...
pub async fn edit_user(...
current_user: CurrentUser,
) -> HtmlResponse {
...
let context = context! {
form_url: format!("/users/{}", uuid),
...
user: ¤t_user.user,
current_user: ¤t_user,
...
};
...
}
...
pub async fn update_user<'r>(...
current_user: CurrentUser,
) -> Result<Flash<Redirect>, Flash<Redirect>> {
...
match user_value.method {
"PUT" => put_user(db, uuid, user_context,
csrf_token, current_user).await,
"PATCH" => patch_user(db, uuid, user_context,
csrf_token, current_user).await,
...
}
}
...
pub async fn put_user<'r>(...
_current_user: CurrentUser,
) -> Result<Flash<Redirect>, Flash<Redirect>> {...}
...
pub async fn patch_user<'r>(...
current_user: CurrentUser,
305
306
Securing and Adding an API and JSON
) -> Result<Flash<Redirect>, Flash<Redirect>> {
put_user(db, uuid, user_context, csrf_token,
current_user).await
}
...
pub async fn delete_user_entry_point(...
current_user: CurrentUser,
) -> Result<Flash<Redirect>, Flash<Redirect>> {
delete_user(db, uuid, current_user).await
}
...
pub async fn delete_user(...
_current_user: CurrentUser,
) -> Result<Flash<Redirect>, Flash<Redirect>> {...}
23. Finally, protect the endpoint in src/routes/post.rs as well. Only logged-in
users can upload and delete the post, so modify the code into the following:
crate::guards::auth::CurrentUser;
...
pub async fn create_post<'r>(...
_current_user: CurrentUser,
) -> Result<Flash<Redirect>, Flash<Redirect>> {...}
...
pub async fn delete_post(...
_current_user: CurrentUser,
) -> Result<Flash<Redirect>, Flash<Redirect>> {...}
Before we implemented authentication, we could edit and delete any user or post. Now
try editing or deleting something without logging in. Then, try logging in and deleting
and editing.
One problem still exists: after logging in, users can edit and delete other users'
information. We will learn how to prevent this problem by implementing authorization
in the next section.
Authorizing users
307
Authorizing users
Authentication and authorization are two of the main concepts of information security. If
authentication is a way to prove that an entity is who they say they are, then authorization
is a way to give rights to the entity. One entity might be able to modify some resources,
one entity might be able to modify all resources, one entity might only be able to see
limited resources, and so on.
In the previous section, we implemented authentication concepts such as login and
CurrentUser; now it's time to implement authorization. The idea is that we make sure
logged-in users can only modify their own information and posts.
Please keep in mind that this example is very simple. In more advanced information
security, there are more advanced concepts, such as role-based access control. For example,
we can create a role called admin, we can set a certain user as admin, and admin can do
everything without restrictions.
Let's try implementing simple authorization by following these steps:
1. Add a simple method for CurrentUser to compare its instance with a UUID.
Append the following lines in src/guards/auth.rs:
impl CurrentUser {
pub fn is(&self, uuid: &str) -> bool {
self.user.uuid.to_string() == uuid
}
pub fn is_not(&self, uuid: &str) -> bool {
!self.is(uuid)
}
}
2. Add a new type of error as well. Add a new method in src/errors/our_
error.rs in the impl OurError {} block:
pub fn new_unauthorized_error(debug: Option<Box<dyn
Error>>) -> Self {
Self::new_error_with_status(Status::Unauthorized,
String::from("unauthorized"), debug)
}
308
Securing and Adding an API and JSON
3. We can check the CurrentUser instance on the templates to control the flow of
the application. For example, if there's no CurrentUser instance, we show the link
to sign up and log in. If there is a CurrentUser instance, we show the link to log
out. Let's modify the Tera template. Edit src/views/template.html.tera
and append the following lines:
<body>
<header>
<a href="/users" class="button">Home</a>
{% if current_user %}
<form accept-charset="UTF-8" action="/logout"
autocomplete="off" method="POST" id="logout"
class="hidden"></form>
<button type="submit" value="Submit" form="
logout">Logout</button>
{% else %}
<a href="/login" class="button">Login</a>
<a href="/users/new" class="button">Signup</a>
{% endif %}
</header>
<div class="container">
4. Edit src/views/users/index.html.tera and remove the following line:
<a href="/users/new" class="button">New user</a>
Find this line:
<a href="/users/edit/{{ user.uuid }}" class="button">Edit
User</a>
Modify it into the following lines:
{% if current_user and current_user.user.uuid == user.
uuid %}
<a href="/users/edit/{{user.uuid}}" class="
button">Edit User</a>
{% endif %}
5. Edit src/views/users/show.html.tera and find these lines:
<a href="/users/edit/{{user.uuid}}" class="button">Edit
User</a>
Authorizing users
309
<form accept-charset="UTF-8" action="/users/delete/
{{user.uuid}}" autocomplete="off" method="POST"
id="deleteUser" class="hidden"></form>
<button type="submit" value="Submit"
form="deleteUser">Delete</button>
And, surround those lines with conditional checking as follows:
{% if current_user and current_user.user.uuid == user.
uuid %}
<a href...
...
</button>
{% endif %}
6. Next, we want to allow upload only for logged-in users. Find the form lines in
src/views/posts/index.html.tera:
<form action="/users/{{ user.uuid }}/posts"
enctype="multipart/form-data" method="POST">
...
</form>
Surround the form lines with the following conditional:
{% if current_user %}
<form action="/users/{{ user.uuid }}/posts"
enctype="multipart/form-data" method="POST">
...
</form>
{% endif %}
7. Now for the final modification for the template. We want only the owner of the
post to be able to delete the post. Find these lines in src/views/posts/show.
html.tera:
<form accept-charset="UTF-8" action="/users/{{user.
uuid}}/posts/delete/{{post.uuid}}" autocomplete="off"
method="POST" id="deletePost" class="hidden"></form>
<button type="submit" value="Submit"
form="deletePost">Delete</button>
310
Securing and Adding an API and JSON
Surround them with the following lines:
{% if current_user and current_user.user.uuid == user.
uuid %}
<form...
...
</button>
{% endif %}
8. Modify the route handling functions to get the value of current_user. Remember,
we can wrap a request guard in Option, such as Option<CurrentUser>. When
a route handling function fails to get a CurrentUser instance (for example, there is
no logged-in user), it will generate a None variant of Option. We can then pass the
instance to a template.
Let's convert route handling functions, starting from src/routes/post.rs.
Modify the get_post() function as follows:
pub async fn get_post(...
current_user: Option<CurrentUser>,
) -> HtmlResponse {
...
let context = context! {user, current_user, post:
&(post.to_show_post())};
Ok(Template::render("posts/show", context))
}
9. Let's do the same thing with the get_posts() function. Modify the function
as follows:
pub async fn get_posts(...
current_user: Option<CurrentUser>,
) -> HtmlResponse {
let context = context! {
...
current_user,
};
Ok(Template::render("posts/index", context))
}
Authorizing users
311
10. One thing we can do to secure the create_post() function is to check whether
the user uploading the file has the same UUID as user_uuid on the URL. This
check is to prevent logged-in attackers from doctoring the request and sending
false requests. Put the check in the create_post() function before we do file
manipulation, as follows:
pub async fn create_post<'r>(...
current_user: CurrentUser,
) -> Result<Flash<Redirect>, Flash<Redirect>> {
...
if current_user.is_not(user_uuid) {
return Err(create_err());
}
...
}
11. We can do the same check for the delete_post() function in src/routes/
post.rs. We want to prevent unauthorized users from being able to send doctored
requests and delete other people's posts. Modify delete_post() as follows:
pub async fn delete_post(...
current_user: CurrentUser,
) -> Result<Flash<Redirect>, Flash<Redirect>> {
...
if current_user.is_not(user_uuid) {
return Err(delete_err());
}
...
}
12. Try restarting the application, logging in, and seeing whether you can delete other
people's posts. Try also modifying src/routes/user.rs by applying the
same principle: getting the CurrentUser instance and applying the necessary
check, or passing the CurrentUser instance to the template. You can find the
full code, including protecting user-related routes, at https://github.com/
PacktPublishing/Rust-Web-Development-with-Rocket/tree/
main/Chapter11/02Authorization.
13. One of the most common tasks of a web server is providing APIs, and some APIs
must be secured from unwanted usage. We will learn how to serve an API and
protect the API endpoint in the next sections.
312
Securing and Adding an API and JSON
Handling JSON
One of the common tasks of web applications is handling APIs. APIs can return a lot
of different formats, but modern APIs have converged into two common formats: JSON
and XML.
Building an endpoint that returns JSON is pretty simple in the Rocket web
framework. For handling the request body in JSON format, we can use
rocket::serde::json::Json<T> as a data guard. The generic T type must implement
the serde::Deserialize trait or else the Rust compiler will refuse to compile.
For responding, we can do the same thing by responding with
rocket::serde::json::Json<T>. The generic T type must only implement the
serde::Serialize trait when used as a response.
Let's see an example of how to handle JSON requests and responses. We want to create
a single API endpoint, /api/users. This endpoint can receive a JSON body similar
to the structure of our_application::models::pagination::Pagination,
as follows:
{"next":"2022-02-22T22:22:22.222222Z","limit":10}
Follow these steps to implement the API endpoint:
1. Implement serde::Serialize for OurError. Append these lines into
src/errors/our_error.rs:
use rocket::serde::{Serialize, Serializer};
use serde::ser::SerializeStruct;
...
impl Serialize for OurError {
fn serialize<S>(&self, serializer: S) ->
Result<S::Ok, S::Error>
where
S: Serializer,
{
let mut state = serializer.
serialize_struct("OurError", 2)?;
state.serialize_field("status", &self
.status.code)?;
state.serialize_field("message", &self
.message)?;
Handling JSON
313
state.end()
}
}
2. We want Pagination to derive Deserialize and to automatically implement
the Deserialize trait, as Pagination will be used in the JSON data guard,
Json<Pagination>. Because Pagination contains the OurDateTime
member, OurDateTime has to implement the Deserialize trait as well. Modify
src/models/our_date_time.rs and add the Deserialize derive macro:
use rocket::serde::{Deserialize, Serialize};
...
#[derive(Debug, sqlx::Type, Clone, Serialize,
Deserialize)]
#[sqlx(transparent)]
pub struct OurDateTime(pub DateTime<Utc>);
3. Derive Serialize and Deserialize for Pagination. We also want to derive
Serialize because we want to use Pagination as part of the response from the
/api/users endpoint. Modify src/models/pagination.rs as follows:
use rocket::serde::{Deserialize, Serialize};
...
#[derive(FromForm, Serialize, Deserialize)]
pub struct Pagination {...}
4. For the User struct, it already derives Serialize automatically, so we can use
it in a vector of User. One thing to be fixed is we don't want the password to be
included in the resulting JSON. Serde has many macros to control how to generate
serialized data from a struct. Append a single macro that will skip the password_
hash field. Modify src/models/user.rs:
pub struct User {
...
#[serde(skip_serializing)]
pub password_hash: String,
...
}
314
Securing and Adding an API and JSON
5. We want to return the vector of User and Pagination as the resulting JSON.
We can create a new struct to wrap those in a field. Append the following lines in
src/models/user.rs:
#[derive(Serialize)]
pub struct UsersWrapper {
pub users: Vec<User>,
#[serde(skip_serializing_if = "Option::is_none")]
#[serde(default)]
pub pagination: Option<Pagination>,
}
Note that we are skipping the pagination field if it's None.
6. Add a new module in src/routes/mod.rs:
pub mod api;
Then, create a new file in src/routes/api.rs.
7. In src/routes/api.rs, add the usual use declarations, models, errors, and
database connection:
use crate::errors::our_error::OurError;
use crate::fairings::db::DBConnection;
use crate::models::{
pagination::Pagination,
user::{User, UsersWrapper},
};
use rocket_db_pools::Connection;
8. Add a use declaration for rocket::serde::json::Json as well:
use rocket::serde::json::Json;
9. Add a route handling function definition to get users:
#[get("/users", format = "json", data = "<pagination>")]
pub async fn users(
mut db: Connection<DBConnection>,
pagination: Option<Json<Pagination>>,
) -> Result<Json<UsersWrapper>, Json<OurError>> {}
Handling JSON
315
10. Implement the function. In the function, we can get the content of the JSON using
the into_inner() method as follows:
let parsed_pagination = pagination.map(|p| p.into_
inner());
11. Find the users. Append the following lines:
let (users, new_pagination) = User::find_all(&mut db,
parsed_pagination)
.await
.map_err(|_| OurError::new_internal_server_
error(String::from("Internal Error"), None))?;
Because we have implemented the Serialize trait for OurError, we can return
the type automatically.
12. Now, it's time to return UsersWrapper. Append the following lines:
Ok(Json(UsersWrapper {
users,
pagination: new_pagination,
}))
13. The last thing to do is to add the route to src/main.rs:
use our_application::routes::{self, api, post, session,
user};
...
.mount("/", ...)
.mount("/assets", FileServer::from(relative!("static")))
.mount("/api", routes![api::users])
14. Try running the application and sending a request to
http://127.0.0.1:8000/api/users. We can use any HTTP client, but if
we're using cURL, it will be as follows:
curl -X GET -H "Content-Type: application/json" -d
"{\"next\":\"2022-02-22T22:22:22.222222Z\",\"limit\":1}"
http://127.0.0.1:8000/api/users
316
Securing and Adding an API and JSON
The application should return something similar to the following output:
{"users":[{"uuid":"8faa59d6-1079-424a-8eb9-09ceef196
9c8","username":"example","email":"example@example.
com","description":"example","status":"Inactive","created_
at":"2021-11-06T06:09:09.534864Z","updated_at":"2021-11-06T06:0
9:09.534864Z"}],"pagination":{"next":"2021-11-06T06:09:09.53486
4Z","limit":1}}
Now that we have finished creating an API endpoint, let's try securing the endpoint in the
next section.
Protecting the API with a JWT
One common task we want to do is protect the API endpoints from unauthorized access.
There are a lot of reasons why API endpoints have to be protected, such as wanting to
protect sensitive data, conducting financial services, or offering subscription services.
In the web browser, we can protect server endpoints by making a session, assigning a
cookie to the session, and returning the session to the web browser, but an API client is
not always a web browser. API clients can be mobile applications, other web applications,
hardware monitors, and many more. This raises the question, how can we protect the
API endpoint?
There are a lot of ways to protect the API endpoint, but one industry standard is by using
a JWT. According to IETF RFC7519, a JWT is a compact, URL-safe means of representing
claims to be transferred between two parties. The claims in a JWT can be either JSON
objects or special plaintext representations of said JSON objects.
One flow to use a JWT is as follows:
1. The client sends an authentication request to the server.
2. The server responds with a JWT.
3. The client stores the JWT.
4. The client uses the stored JWT to send an API request.
5. The server verifies the JWT and responds accordingly.
Protecting the API with a JWT
317
Let's try implementing API endpoint protection by following these steps:
1. Append the required libraries in the Cargo.toml dependencies section:
hmac = "0.12.1"
jwt = "0.16.0"
sha2 = "0.10.2"
2. We want to use a secret token to sign the JWT token. Add a new entry in
Rocket.toml as follows:
jwt_secret = "fill with your own secret"
3. Add a new state to store a secret for the token. We want to retrieve the secret when
the application creates or verifies JWT. Add the following lines in src/states/
mod.rs:
pub struct JWToken {
pub secret: String,
}
4. Modify src/main.rs to make the application retrieve the secret from the
configuration and manage the state:
use our_application::states::JWToken;
...
struct Config {...
jwt_secret: String,
}
...
async fn rocket() -> Rocket<Build> {
...
let config: Config = our_rocket...
let jwt_secret = JWToken {
secret: String::from(config.jwt_
secret.clone()),
};
let final_rocket = our_rocket.manage(jwt_secret);
...
final_rocket
}
318
Securing and Adding an API and JSON
5. Make one struct to hold JSON data that is sent for authentication, and another
struct to hold JSON data containing the token to be returned to the client. In
src/models/user.rs, add the following use declaration:
use rocket::serde::{Deserialize, Serialize};
Add the following structs:
#[derive(Deserialize)]
pub struct JWTLogin<'r> {
pub username: &'r str,
pub password: &'r str,
}
#[derive(Serialize)]
pub struct Auth {
pub token: String,
}
6. Implement a method to verify the username and password for JWTLogin. Add the
impl block and method:
impl<'r> JWTLogin<'r> {
pub async fn authenticate(
&self,
connection: &mut PgConnection,
secret: &'r str,
) -> Result<Auth, OurError> {}
}
7. Inside the authenticate() method, add the error closure:
let auth_error =
|| OurError::new_bad_request_error(
String::from("Cannot verify password"), None);
8. Then, find the user according to the username and verify the password:
let user = User::find_by_login(
connection,
&Login {
username: self.username,
password: self.password,
Protecting the API with a JWT
319
authenticity_token: "",
},
)
.await
.map_err(|_| auth_error())?;
verify_password(&Argon2::default(), &user.password_hash,
self.password)?;
9. Add the following use declaration:
use
use
use
use
hmac::{Hmac, Mac};
jwt::{SignWithKey};
sha2::Sha256;
std::collections::BTreeMap;
Continue the following inside authenticate to generate a token from the user's
UUID and return the token:
let user_uuid = &user.uuid.to_string();
let key: Hmac<Sha256> =
Hmac::new_from_slice(secret.as_bytes()
).map_err(|_| auth_error())?;
let mut claims = BTreeMap::new();
claims.insert("user_uuid", user_uuid);
let token = claims.sign_with_key(&key).map_err(|_| auth_
error())?;
Ok(Auth {
token: token.as_str().to_string(),
})
10. Create a function to authenticate. Let's call this function login(). In src/
routes/api.rs, add the required use declaration:
use crate::models::user::{Auth, JWTLogin, User,
UsersWrapper};
use crate::states::JWToken;
use rocket::State;
use rocket_db_pools::{sqlx::Acquire, Connection};
320
Securing and Adding an API and JSON
11. Then, add the login() function as follows:
#[post("/login", format = "json", data = "<jwt_login>")]
pub async fn login<'r>(
mut db: Connection<DBConnection>,
jwt_login: Option<Json<JWTLogin<'r>>>,
jwt_secret: &State<JWToken>,
) -> Result<Json<Auth>, Json<OurError>> {
let connection = db
.acquire()
.await
.map_err(|_| OurError::new_internal_server_
error(String::from("Cannot login"), None))?;
let parsed_jwt_login = jwt_login
.map(|p| p.into_inner())
.ok_or_else(|| OurError::new_bad_request_
error(String::from("Cannot login"), None))?;
Ok(Json(
parsed_jwt_login
.authenticate(connection, &jwt_secret
.secret)
.await
.map_err(|_| OurError::new_internal_
server_error(String::from("Cannot login"),
None))?,
))
}
12. Now that we have created login functionality, the next action is to create a request
guard that handles the authorization token in the request header. In src/guards/
auth.rs, add the following use declarations:
use
use
use
use
use
crate::states::JWToken;
hmac::{Hmac, Mac};
jwt::{Header, Token, VerifyWithKey};
sha2::Sha256;
std::collections::BTreeMap;
Protecting the API with a JWT
321
13. Add a new struct for a request guard called APIUser:
pub struct APIUser {
pub user: User,
}
14. Implement FromRequest for APIUser. Add the following block:
#[rocket::async_trait]
impl<'r> FromRequest<'r> for APIUser {
type Error = ();
async fn from_request(req: &'r Request<'_>) ->
Outcome<Self, Self::Error> {}
}
15. Inside from_request(), add the closure to return an error:
let error = || Outcome::Failure ((Status::Unauthorized,
()));
16. Get the token from the request header:
let parsed_header = req.headers().get_
one("Authorization");
if parsed_header.is_none() {
return error();
}
let token_str = parsed_header.unwrap();
17. Get the secret from state:
let parsed_secret = req.rocket().state::<JWToken>();
if parsed_secret.is_none() {
return error();
}
let secret = &parsed_secret.unwrap().secret;
18. Verify the token and get the user's UUID:
let parsed_key: Result<Hmac<Sha256>, _> = Hmac::new_from_
slice(secret.as_bytes());
if parsed_key.is_err() {
322
Securing and Adding an API and JSON
return error();
}
let key = parsed_key.unwrap();
let parsed_token: Result<Token<Header, BTreeMap<String,
String>, _>, _> = token_str.verify_with_key(&key);
if parsed_token.is_err() {
return error();
}
let token = parsed_token.unwrap();
let claims = token.claims();
let parsed_user_uuid = claims.get("user_uuid");
if parsed_user_uuid.is_none() {
return error();
}
let user_uuid = parsed_user_uuid.unwrap();
19. Find the user and return the user data:
let parsed_db = req.guard::<Connection<DBConnection>>().
await;
if !parsed_db.is_success() {
return error();
}
let mut db = parsed_db.unwrap();
let parsed_connection = db.acquire().await;
if parsed_connection.is_err() {
return error();
}
let connection = parsed_connection.unwrap();
let found_user = User::find(connection, &user_uuid).
await;
if found_user.is_err() {
return error();
}
let user = found_user.unwrap();
Outcome::Success(APIUser { user })
Protecting the API with a JWT
323
20. Finally, add a new protected API endpoint in src/routes/api.rs:
use crate::guards::auth::APIUser;
...
#[get("/protected_users", format = "json", data =
"<pagination>")]
pub async fn authenticated_users(
db: Connection<DBConnection>,
pagination: Option<Json<Pagination>>,
_authorized_user: APIUser,
) -> Result<Json<UsersWrapper>, Json<OurError>> {
users(db, pagination).await
}
21. In src/main.rs, add the routes to Rocket:
...
.mount("/api", routes![api::users, api::login,
api::authenticated_users])
...
Now, try accessing the new endpoint. Here is an example when using the cURL
command line:
curl -X GET -H "Content-Type: application/json" \
http://127.0.0.1:8000/api/protected_users
The response will be an error. Now try sending a request to get the access token. Here is
an example:
curl -X POST -H "Content-Type: application/json" \
-d "{\"username\":\"example\", \"password\": \"password\"}" \
http://127.0.0.1:8000/api/login
There's a token returned, as shown in this example:
{"token":"eyJhbGciOiJIUzI1NiJ9.
eyJ1c2VyX3V1aWQiOiJmMGMyZDM4Yy0zNjQ5LTRkOWQtYWQ4My0wZGE4ZmZlY2
E2MDgifQ.XJIaKlIfrBEUw_Ho2HTxd7hQkowTzHkx2q_xKy8HMKA"}
324
Securing and Adding an API and JSON
Use the token to send the request, as in this example:
curl -X GET -H "Content-Type: application/json" \T -H "ContentType: application/json" \
-H "Authorization: eyJhbGciOiJIUzI1NiJ9.
eyJ1c2VyX3V1aWQiOiJmMGMyZDM4Yy0zNjQ5LTRkOWQtYWQ4My0wZGE4ZmZlY2
E2MDgifQ.XJIaKlIfrBEUw_Ho2HTxd7hQkowTzHkx2q_xKy8HMKA" \
http://127.0.0.1:8000/api/protected_users
Then, the correct response will be returned. JWT is a good way to protect API endpoints,
so use the technique that we have learned when necessary.
Summary
In this chapter, we learned about authenticating users and then creating a cookie to store
logged-in user information. We also introduced CurrentUser as a request guard that
works as authorization for certain parts of the application.
After creating authentication and authorization systems, we also learned about API
endpoints. We parsed the incoming request body as a request guard in an API and then
created an API response.
Finally, we learned a little bit about the JWT and how to use it to protect API endpoints.
In the next chapter, we are going to learn how to test the code that we have created.
Part 3:
Finishing the Rust
Web Application
Development
In this part, you will learn which parts are not the main part of the Rocket web
application, but it's nice to have for Rust and Rocket-related web development.
This part comprises the following chapters:
• Chapter 12, Testing Your Application
• Chapter 13, Launching the Rocket Application
• Chapter 14, Building a Full Stack Application
• Chapter 15, Improving the Rocket Application
12
Testing Your
Application
Ensuring that a program runs correctly is an important part of programming. In this
chapter, we are going to learn about testing the Rust application. We are going to implement
a simple unit test for a function, and a functional test for creating a user in our application.
We are going to learn a simple technique to debug and find where a problem occurs in
our code.
After learning the information in this chapter, you will be able to create a unit test and
functional test for Rust and Rocket applications to ensure the applications work as expected.
You will also learn how to use a debugger such as gdb or lldb to debug Rust programs.
In this chapter, we are going to cover these main topics:
• Testing the Rust program
• Testing the Rocket application
• Debugging the Rust application
Technical requirements
In this chapter, we are going to do a test and debug, so we need a debugger. Please install
gdb, the GNU Debugger (https://www.sourceware.org/gdb/download/), for
your operating system.
328
Testing Your Application
You can find the source code for this chapter at https://github.com/
PacktPublishing/Rust-Web-Development-with-Rocket/tree/main/
Chapter12.
Testing the Rust program
One important part of programming is testing the application. There are many kinds of
tests, such as unit tests (to test a single function or method), functional tests (to test the
function of an application), and integration testing (to test various units and functions
as a single combined entity). Various tests should be conducted in order to make the
application as correct as intended.
In the Rust standard library, there are three macros to use in testing: assert!,
assert_eq!, and assert_ne!. The assert! macro accepts one or more
parameters. The first parameter is any statement that evaluates to Boolean, and the
rest is for debugging if the result is not what is expected.
The assert_eq! macro compares equality between the first parameter and second
parameter, and the rest is for debugging if the result is not what is expected. The
assert_ne! macro is the opposite of assert_eq!; this macro tests the inequality
between the first and the second parameters.
Let's see those macros in action. We want to test the raw_html() method of the
TextPost model in src/models/text_post.rs. We want to ensure that the result
of the method is the string we want to have. Follow these steps to test the method:
1. In src/models/text_post.rs, add the following use declarations:
use
use
use
use
crate::models::our_date_time::OurDateTime;
crate::models::post_type::PostType;
chrono::{offset::Utc, TimeZone};
uuid::Uuid;
2. In the same src/models/text_post.rs file, we want to have a function
for testing. To make a function a test function, annotate the function with the
#[test] attribute. Add the function declaration:
#[test]
fn test_raw_html() {
}
Testing the Rust program
329
3. Inside the function, initialize a TextPost instance as follows:
let created_at = OurDateTime(Utc.timestamp_
nanos(1431648000000000));
let post = Post {
uuid: Uuid::new_v4(),
user_uuid: Uuid::new_v4(),
post_type: PostType::Text,
content: String::from("hello"),
created_at: created_at,
};
let text_post = TextPost::new(&post);
4. Add the assert! macro to ensure the resulting string is what we want:
assert!(
text_post.raw_html() ==
String::from("<p>hel1lo</p>"),
"String is not equal, {}, {}",
text_post.raw_html(),
String::from("<p>hello</p>")
);
5. Save the file and run the test by running cargo test on the Terminal. As we
made a mistake in our test code, "<p>hel1lo</p>", the test should fail, as in the
following example:
$ cargo test
Compiling our_application v0.1.0 (/workspace/
rocketbook/Chapter12/01RustTesting)
…
running 1 test
test models::text_post::test_raw_html ... FAILED
failures:
---- models::text_post::test_raw_html stdout ---thread 'models::text_post::test_raw_html' panicked at
'String is not equal, <p>hello</p>, <p>hello</p>', src/
models/text_post.rs:33:5
330
Testing Your Application
note: run with `RUST_BACKTRACE=1` environment variable to
display a backtrace
failures:
models::text_post::test_raw_html
test result: FAILED. 0 passed; 1 failed; 0 ignored; 0
measured; 0 filtered out; finished in 0.00s
error: test failed, to rerun pass '--lib'
6. Fix "<p>hel1lo</p>" by replacing it with "<p>hello</p>". Save the file and
run the test again. The test should work fine now:
$ cargo test
Compiling our_application v0.1.0 (/workspace/
rocketbook/Chapter12/01RustTesting)
…
running 1 test
test models::text_post::test_raw_html ... ok
test result: ok. 1 passed; 0 failed; 0 ignored; 0
measured; 0 filtered out; finished in 0.00s
Running unittests (target/debug/deps/our_
application-43a2db5b02032f30)
running 0 tests
test result: ok. 0 passed; 0 failed; 0 ignored; 0
measured; 0 filtered out; finished in 0.00s
Doc-tests our_application
running 0 tests
test result: ok. 0 passed; 0 failed; 0 ignored; 0
measured; 0 filtered out; finished in 0.00s
Testing the Rust program
331
7. We want to use the assert_eq! and assert_ne! macros. The assert_eq!
macro is used to check that the first parameter is equal to the second parameter. The
assert_ne! macro is used to make sure that the first parameter is not equal to
the second parameter. Add the macros in the test_raw_html() function to see
them in action:
assert_eq!(text_post.raw_html(), String::from("<p>hello</
p>"));
assert_ne!(text_post.raw_html(),
String::from("<img>hello</img>"));
8. Run the test again; it should pass. But, if we look at the test output, there are
warnings, as follows:
warning: unused import: `crate::models::our_date_
time::OurDateTime`
--> src/models/text_post.rs:1:5
|
1 | use crate::models::our_date_time::OurDateTime;
|
^^^^^^^^^^^^^^^^^^^^^^^^^^^^^^^^^^^^^^^^^
|
= note: `#[warn(unused_imports)]` on by default
9. One of the conventions for unit testing is to create a test module and mark the
module as a test so it will not be compiled. In src/models/text_post.rs, add
a new module:
#[cfg(test)]
mod tests {
}
10. In src/models/text_post.rs, remove these unused use declarations:
use
use
use
use
crate::models::our_date_time::OurDateTime;
crate::models::post_type::PostType;
chrono::{offset::Utc, TimeZone};
uuid::Uuid;
332
Testing Your Application
11. Vice versa, add the required use declarations in src/models/text_post.rs
in the tests module:
use
use
use
use
use
use
use
super::TextPost;
crate::models::our_date_time::OurDateTime;
crate::models::post::Post;
crate::models::post_type::PostType;
crate::traits::DisplayPostContent;
chrono::{offset::Utc, TimeZone};
uuid::Uuid;
12. Move the test_raw_html() function into the tests module. Run cargo
test again in the Terminal. The tests should pass with no warnings, as in the
following example:
$ cargo test
Finished test [unoptimized + debuginfo] target(s)
in 0.34s
Running unittests (target/debug/deps/our_
application-40cf18b02419edd7)
running 1 test
test models::text_post::tests::test_raw_html ... ok
test result: ok. 1 passed; 0 failed; 0 ignored; 0
measured; 0 filtered out; finished in 0.00s
Running unittests (target/debug/deps/our_
application-77e614e023a036bf)
running 0 tests
test result: ok. 0 passed; 0 failed; 0 ignored; 0
measured; 0 filtered out; finished in 0.00s
Doc-tests our_application
Testing the Rocket application
333
running 0 tests
test result: ok. 0 passed; 0 failed; 0 ignored; 0
measured; 0 filtered out; finished in 0.00s
Now that we have learned how to perform unit tests in Rust, we can continue by testing
the application with functional testing in the next section.
Testing the Rocket application
Besides putting the test in the src directory, we can create a test in Rust files in the
tests directory inside the root directory of the application. When we run cargo test,
the command line will look into the tests directory and run any test found there. People
usually use tests in the src directory for unit testing and write functional tests in the
tests directory.
The Rocket framework provides a rocket::local module, which contains modules,
structs, and methods to send requests to the local Rocket application. The main purpose
of sending a non-networked request to the local Rocket application is to inspect the
response and ensure that the response is what we expected, mainly for testing.
Let's try implementing integration testing for our application by following these steps:
1. In the root directory of the application, add a new directory named tests. Inside
the tests directory, create a file named functional_tests.rs.
2. Inside tests/functional_tests.rs, add a new test function as follows:
#[test]
fn some_test() {
assert_eq!(2, 1 + 1);
}
3. After that, save and run cargo test from the command line. The tests should
pass, and the cargo test output should show that it was running the test inside
the tests directory, as follows:
...
Running tests/functional_tests.rs
...
334
Testing Your Application
4. Let's continue with testing the Rocket application. Create a test function named
test_rocket, but since the application is async, we need a different test
annotation, as follows:
#[rocket::async_test]
async fn test_rocket() {
}
5. We are going to put the Rocket instance in the
rocket::local::asynchronous::Client instance. Later, we can use the
Client instance to send a request and verify the response. But, one problem is
that the Rocket initialization is in src/main.rs, not in the our_application
library. We can work around this problem by moving the Rocket initialization
from src/main.rs to src/lib.rs. Move the code from src/main.rs
to src/lib.rs under the pub mod declaration, then change any use
our_application:: to use crate::.
After that, rename the rocket() function to setup_rocket(). Also, add
pub in front of the function and remove #[launch] from the top of the
setup_rocket() function.
We want a method to get the database URL, so implement the get_database_url
method for Config in src/lib.rs:
impl Config {
pub fn get_database_url(&self) -> String {
self.databases.main_connection.url.clone()
}
}
6. In src/main.rs, change the application to use setup_rocket(), as follows:
use our_application::setup_rocket;
use rocket::{Build, Rocket};
#[launch]
async fn rocket() -> Rocket<Build> {
setup_rocket().await
}
Testing the Rocket application
335
7. Going back to tests/functional_test.rs, add the our_application
library:
use our_application;
Then, initialize a Rocket instance in test_rocket() as follows:
let rocket = our_application::setup_rocket().await;
8. We want to get a database connection to truncate the database table to ensure a
clean state for the testing. Add the required use declarations:
use our_application::Config;
use rocket_db_pools::sqlx::PgConnection;
use sqlx::postgres::PgPoolOptions;
Then, add the following lines inside the test_rocket() function:
let config_wrapper = rocket.figment().extract();
assert!(config_wrapper.is_ok());
let config: Config = config_wrapper.unwrap();
let db_url = config.get_database_url();
let db_wrapper = PgPoolOptions::new()
.max_connections(5)
.connect(&db_url)
.await;
assert!(db_wrapper.is_ok());
let db = db_wrapper.unwrap();
9. We want to truncate the content of the users table. We want a method for User to
remove all data, but the method should only be available for tests. Let's add a trait to
extend the User model. Add the use declaration:
use our_application::models::user::User;
Add the ModelCleaner trait and implement ModelCleaner for User as follows:
#[rocket::async_trait]
trait ModelCleaner {
async fn clear_all(connection: &mut PgConnection)
-> Result<(), String>;
}
#[rocket::async_trait]
336
Testing Your Application
impl ModelCleaner for User {
async fn clear_all(connection: &mut PgConnection)
-> Result<(), String> {
let _ = sqlx::query("TRUNCATE users RESTART
IDENTITY CASCADE")
.execute(connection)
.await
.map_err(|_| String::from("error
truncating databasse"))?;
Ok(())
}
}
10. Continuing in the test_rocket() function, append the following lines:
let pg_connection_wrapper = db.acquire().await;
assert!(pg_connection_wrapper.is_ok());
let mut pg_connection = pg_connection_wrapper.unwrap();
let clear_result_wrapper = User::clear_all(&mut pg_
connection).await;
assert!(clear_result_wrapper.is_ok());
11. In the tests/functional_tests.rs file, add the use declaration:
use rocket::local::asynchronous::Client;
Then, create a Client instance inside the test_rocket() function:
let client_wrapper = Client::tracked(rocket).await;
assert!(client_wrapper.is_ok());
let client = client_wrapper.unwrap();
12. Right now, the number of users in the database is 0. We want to make a test by
getting "/users" and parsing the HTML. One crate to parse HTML is scraper.
Because we only want to use the scraper crate for testing, add a new part in
Cargo.toml called [dev-dependencies], as follows:
[dev-dependencies]
scraper = "0.12.0"
Testing the Rocket application
337
13. Going back to tests/functional_test.rs, we want to get the "/users"
response. Add the use declaration:
use rocket::http::Status;
Then, append the following lines inside the test_rocket() function:
let req = client.get("/users");
let resp = req.dispatch().await;
assert_eq!(resp.status(), Status::Ok);
14. We want to verify that the response body does not contain any users. If we look at
the src/views/users/index.html.tera template, we see there's a mark
HTML tag for each user. Let's use scraper to verify the response by adding the
use declaration:
use scraper::{Html, Selector};
Then, append the following lines inside the test_rocket() function:
let body_wrapper = resp.into_string().await;
assert!(body_wrapper.is_some());
let body = Html::parse_document(&body_wrapper.unwrap());
let selector = Selector::parse(r#"mark.tag"#).unwrap();
let containers = body.select(&selector);
let num_of_elements = containers.count();
assert_eq!(num_of_elements, 0);
15. We want to create a post request to create a new user, but one problem is that the
application will do an token authenticity check, so we need to get the value from the
"/users/new" page first. Append the following lines to get the token from the
response body:
let req = client.get("/users/new");
let resp = req.dispatch().await;
assert_eq!(resp.status(), Status::Ok);
let body_wrapper = resp.into_string().await;
assert!(body_wrapper.is_some());
let body = Html::parse_document(&body_wrapper.unwrap());
let authenticity_token_selector =
Selector::parse(r#"input[name="authenticity_token"]"#).
unwrap();
338
Testing Your Application
let element_wrapper = body.select(&authenticity_token_
selector).next();
assert!(element_wrapper.is_some());
let element = element_wrapper.unwrap();
let value_wrapper = element.value().attr("value");
assert!(value_wrapper.is_some());
let authenticity_token = value_wrapper.unwrap();
16. Use authenticity_token to send the post request. Add the use declaration:
use rocket::http::ContentType;
17. Then, append the following lines to the test_rocket() function:
let username = "testing123";
let password = "lkjKLAJ09231478mlasdfkjsdkj";
let req = client.post("/users")
.header(ContentType::Form)
.body(
format!("authenticity_token={
}&username={}&email={}@{}
.com&password={}&password_confirmation={}
&description=",
authenticity_token, username, username, username,
password, password,
));
let resp = req.dispatch().await;
assert_eq!(resp.status(), Status::SeeOther);
18. Finally check the "/users" page again; you should see one user. Append the
following lines:
let req = client.get("/users");
let resp = req.dispatch().await;
assert_eq!(resp.status(), Status::Ok);
let body_wrapper = resp.into_string().await;
assert!(body_wrapper.is_some());
let body = Html::parse_document(&body_wrapper.unwrap());
let selector = Selector::parse(r#"mark.tag"#).unwrap();
Testing the Rocket application
let containers = body.select(&selector);
let num_of_elements = containers.count();
assert_eq!(num_of_elements, 1);
Try running the test again. Sometimes the test works:
$ cargo test
...
Running tests/functional_tests.rs (target/debug/deps/
functional_tests-625b16e4b25b72de)
running 2 tests
test some_test ... ok
...
test test_rocket ... ok
test result: ok. 2 passed; 0 failed; 0 ignored; 0 measured; 0
filtered out; finished in 2.43s
But, sometimes, the test doesn't work:
$ cargo test
...
Running tests/functional_tests.rs (target/
debug/deps/functional_tests-625b16e4b25b72de)
running 2 tests
test some_test ... ok
...
test test_rocket ... FAILED
failures:
---- test_rocket stdout ---thread 'test_rocket' panicked at 'assertion failed: `(left ==
right)`
left: `0`,
right: `1`', tests/functional_tests.rs:115:5
339
340
Testing Your Application
note: run with `RUST_BACKTRACE=1` environment variable to
display a backtrace
thread 'rocket-worker-test-thread' panicked at 'called
`Result::unwrap()` on an `Err` value: Disconnected',
/workspace/rocketbook/Chapter12/03RocketTesting/src/lib.
rs:137:28
failures:
test_rocket
test result: FAILED. 1 passed; 1 failed; 0 ignored; 0 measured;
0 filtered out; finished in 2.09s
Why did the test fail? We will learn how to debug the Rust program in the next section.
Debugging the Rust application
In the previous section, we learned about writing functional tests, but sometimes, the test
fails. We want to know why the test failed. There are two possible places where the error
might occur. One is in the user creation process, and the other is in finding users after
creating the user.
One way to debug is by logging where the error might occur. If we log all the possible
errors in the user creation process (for example, in src/routes/user.rs in the
create_user() function), we will find out that the authenticity token verification
sometimes produces an error. An example of logging the error is as follows:
csrf_token
.verify(&new_user.authenticity_token)
.map_err(|err| {
log::error!("Verify authenticity_token error: {}",
err);
Flash::error(
Redirect::to("/users/new"),
"Something went wrong when creating user",
)
})?;
Debugging the Rust application
341
If we continue logging the verify() method and continue tracing the source of the
problem, we will eventually find out that the from_request() method of the token
is not producing the correct result. We can fix the problem by changing the from_
request() method in src/fairings/csrf.rs with the following lines:
async fn from_request(request: &'r Request<'_>) ->
Outcome<Self, Self::Error> {
match request.get_csrf_token() {
None => Outcome::Failure((Status::Forbidden, ())),
Some(token) => Outcome::Success(Self(base64::
encode_config(token, base64::URL_SAFE))),
}
}
Obviously, logging the code and finding the problem is not efficient. We can also use a
debugger such as gdb (GNU Debugger) or lldb to debug Rust programs. gdb can be used
on the Linux operating system, and lldb (Debugger of LLVM Project) can be used on
macOS and Linux operating systems. Please install one of those debuggers if you want to use
a debugger for the Rust programming language.
Rust provides rust-gdb (a wrapper to gdb) and rust-lldb (a wrapper to lldb).
Those programs should be installed with the Rust compiler. Let's see an example of how to
use rust-gdb by following these steps:
1. First, build the application by using the cargo build command on the Terminal.
Since we are not building the release version, debugging symbols should be in the
resulting binary.
2. Check the location of the generated binary in the source directory target
directory; for example, if the source code for the application is in /workspace/
rocketbook/Chapter12/03RocketTesting/, we can find the generated
binary in /workspace/rocketbook/Chapter12/03RocketTesting/
target/debug/our_application.
3. Run rust-gdb on the Terminal just like you would run gdb. Here is an example:
rust-gdb -q target/debug/our_application
342
Testing Your Application
4. You'll see a gdb prompt as follows:
Reading symbols from target/debug/our_application...
Reading symbols from /workspace/rocketbook/
Chapter12/03RocketTesting/target/debug/our_application/
Contents/Resources/DWARF/our_application...
(gdb)
5. Set the breakpoint of the application, as in this example:
b /workspace/rocketbook/Chapter12/03RocketTesting/src/
lib.rs:143
6. You'll see a prompt to set a breakpoint on the our_application library
as follows:
No source file named /workspace/rocketbook/
Chapter12/03RocketTesting/src/lib.rs.
Make breakpoint pending on future shared library load? (y
or [n])
7. Reply with y and notice Breakpoint 1 set as follows:
(y or [n]) y
Breakpoint 1 (/workspace/rocketbook/
Chapter12/03RocketTesting/src/lib.rs:143) pending.
8. Run the application by writing the r command and pressing the Enter key on the
gdb prompt:
(gdb) r
9. The application should run and because it hit the breakpoint, the execution stopped.
We can use the gdb prompt again to inspect final_rocket, as in the following example:
Starting program: /workspace/rocketbook/
Chapter12/03RocketTesting/target/debug/our_application
[Thread debugging using libthread_db enabled]
Using host libthread_db library
Debugging the Rust application
343
"/usr/lib/libthread_db.so.1".
[New Thread 0x7ffff7c71640 (LWP 50269)]
...
[New Thread 0x7ffff746d640 (LWP 50273)]
Thread 1 "our_application" hit Breakpoint 1, our_
application::main::{generator#0} () at
src/lib.rs:143
143
final_rocket
10. Try printing some variables in the debugger prompt:
(gdb) p config
We can see the result printed as follows:
$1 = our_application::Config {databases: our_
application::Databases {main_connection: our_
application::MainConnection {url: "postgres://
username:password@localhost/rocket"}}, jwt_secret: "+/
xbAZJs+e1BA4
gbv2zPrtkkkOhrYmHUGnJIoaL9Qsk="}
11. To quit from gdb, just type quit on prompt and confirm quitting the debugger
as follows:
(gdb) quit
A debugging session is active.
Inferior 1 [process 50265] will be killed.
Quit anyway? (y or n) y
There are many more functionalities in these debuggers, such as setting multiple
breakpoints and stepping through the breakpoints. You can find more information about
gdb at https://www.sourceware.org/gdb/, and about lldb at https://
lldb.llvm.org/.
344
Testing Your Application
There are also debuggers for IDEs or code editors, for example, users of Visual Studio
Code can use CodeLLDB (https://marketplace.visualstudio.com/
items?itemName=vadimcn.vscode-lldb) to conveniently click on the line and
mark the breakpoints from the editor and inspect the variables through a dedicated panel:
Figure 12.1 – CodeLLDB inspecting our application
In any case, using a debugger is an indispensable tool for programming. Learning to use
debuggers properly can help in working with the Rust programming language.
Summary
In this chapter, we learned about testing the Rust program and Rocket application. We
learned about using macros such as assert! to do the testing. We also learned the
difference between unit testing and functional testing.
We created a functional test and learned about modules to do functional testing on a
Rocket application. Finally, we learned a little bit about the technique to debug a Rust
application to help fix it.
Testing and debugging are important parts of programming, as these techniques can
improve the correctness of the application.
After all the development is done, in the next chapter, we are going to learn several ways
to set the Rocket application available to serve real-world users.
13
Launching a
Rocket Application
After development and testing, an important part of development is preparing the
application to serve its intended users. In this chapter, we are going to learn some
techniques to generate a production-ready binary. After we generate the binary, we are
going to learn about configuring the application behind a general-purpose web server.
And finally, we will learn how to generate Docker images for a Rocket application.
After learning the information in this chapter, you will be able to optimize binaries using
Rust compiler flags and Cargo configurations. You will also learn techniques to prepare
your applications to serve their intended users.
In this chapter, we are going to cover these main topics:
• Optimizing production binaries
• Setting up the Apache HTTP Server with a Rocket application
• Generating Docker images for a Rocket application
346
Launching a Rocket Application
Technical requirements
In this chapter, we are going to serve HTTP requests using the Apache HTTP Server
(https://httpd.apache.org/). If you have a Unix-based operating system, you can
usually find the Apache HTTP Server in your operating system package manager. If you
have a Windows operating system, there are recommended downloads at the following
link: https://httpd.apache.org/docs/2.4/platform/windows.html.
You also need to generate a TLS (Transport Layer Security) certificate using OpenSSL. If
you have a Unix-based operating system, you can usually find the OpenSSL binary using
the distribution's package manager. If you have a Windows operating system, you can
find the recommended binary at the following link: https://wiki.openssl.org/
index.php/Binaries.
For generating Docker images, you can use Docker Desktop from the following link:
https://www.docker.com/products/docker-desktop/.
You can find the source code of this chapter at https://github.com/
PacktPublishing/Rust-Web-Development-with-Rocket/tree/main/
Chapter13
Optimizing production binaries
After we create the application, we want to prepare the application to accept a real
connection. In software development, there's a production environment, also called a
release environment or deployment environment. The production environment contains
the configuration of the system and software to make it available to the intended customer.
In Chapter 2, Building Our First Rocket Web Application, we learned that we can tell the
Rust compiler to build release binary when compiling the Rust application. We can use
cargo build or cargo run with the extra --release flag.
To refresh, Cargo will read the configuration in Cargo.toml in the [profile.release]
section. There are some compilation optimizations we can do to improve the resulting image:
1. The first one is the number of codegen-units of compilation. Rust compilation
can take significant time, and to solve this, the compiler may try to split it into parts
and compile them in parallel. But, compiling binaries or libraries in parallel might
omit some optimization. By default, the number of codegen-units is 3. We can
sacrifice the compilation speed and make codegen-units into 1 to optimize the
resulting binary further. For example, in Cargo.toml, we can have the following:
[profile.release]
codegen-units = 1
Optimizing production binaries
347
Link Time Optimization (LTO): The Rust codegen backend, LLVM, can perform
various LTOs to produce output with optimized code. To enable LTO, we can set lto
= yes or lto = "fat". The following is an example of lto in Cargo.toml:
[profile.release]
lto = "fat"
Set the optimization level. We can set optimization levels from 0, 1, 2, and 3,
with the default value being 0 (no optimization) up to 3 (all optimization) as in
the following:
[profile.release]
opt-level = 3
Besides optimization level 0 to 3, we can also also set "s" and "z", with "s"
for binary size optimization and "z" for binary size optimization and turn of
loop vectorization.
Disable panic unwinding. We can set panic to not show the stack trace. The
result is a more optimized binary. Set the following in Cargo.toml to disable
stack unwinding:
[profile.release]
panic = "abort"
2. The second optimization is compiling the correct architecture. CPU producers
will always create a new CPU with better optimization or instruction sets that
can improve the performance of an application. For example, the SSE (Streaming
SIMD Extensions) instruction set was introduced by Intel with the release of Intel
Pentium III.
By default, the Rust compiler will produce binary with a reasonable amount of CPU
support. But, this means newer instruction sets or optimizations are not used when
compiling a library or a binary. We can tell the Rust compiler to produce a binary
that supports newer optimizations or instruction sets of the target machine.
To see the list of the target architecture supported by the Rust compiler, we can use
this command:
rustc --print target-cpus
348
Launching a Rocket Application
For example, if we know the target machine is AMD Ryzen, which supports znver3
architecture, we can compile the Rust program as follows:
RUSTFLAGS='-C target-cpu=znver -C codegen-units=1' cargo
build –release
The reason we use the RUSTFLAGS environment variable is that target-cpu is
not a recognized option in Cargo.toml. Cargo will also use any other rustc
option set in the RUSTFLAGS environment variable.
Now we know how to compile a Rust application for a production environment, let's learn
about deploying a Rocket application behind a web server.
Setting up the Apache HTTP Server with a
Rocket application
We know that Rocket has TLS support in its configuration, so we can set the TCP port to
443, the default HTTPS connection port. In some cases, it might be acceptable to run web
applications directly, for example, when we want to serve content for microservices.
One of the reasons why we don't want to run the Rocket application directly is because of
this warning in the Rocket guide:
Rocket's built-in TLS implements only TLS 1.2 and 1.3. It may not be
suitable for production use.
The TLS library used by the Rocket framework might not be suitable for production use
for various reasons, such as security reasons or it is not yet audited.
There are other reasons why we do not want to serve content directly from Rocket
aside from the TLS library problem. One example is when we want to serve multiple
applications from a single computer. We might want to serve PHP applications from the
same machine too.
One of the techniques people use when serving a Rust application is putting it behind a
general-purpose web server that can do a reverse proxy:
Setting up the Apache HTTP Server with a Rocket application
349
Figure 13.1 ‒ General purpose web server performing a reverse proxy on a Rocket application
One of the most used reverse proxy applications is the Apache HTTP Server. The Apache
HTTP Server also has other features besides the reverse proxy, including serving static
files and compressing files to serve requests faster.
Let's try serving our application using the Apache HTTP Server and configuring the
server to act as a reverse proxy by following these steps:
1. Download the Apache HTTP Server for your operating system or from
https://httpd.apache.org/.
2. Try starting the application using the following command line:
sudo apachectl -k start
3. The Apache HTTP Server's default port is 8080. Check that Apache is running by
using the cURL command:
curl http://127.0.0.1:8080/
4. The Apache HTTP Server's functionalities can be extended by modules, and several
modules are installed alongside it. We want to enable several modules to enable
HTTP requests to our application using a reverse proxy. Find httpd.conf, the
configuration file for your operating system. In some Linux distributions, the
configuration might be in /etc/httpd/httpd.conf. In other distributions
or operating systems, the file location might be in /usr/local/etc/httpd/
httpd.conf.
350
Launching a Rocket Application
Edit the httpd.conf file and remove the comment to enable the required modules:
LoadModule log_config_module libexec/apache2/mod_log_
config.so
LoadModule vhost_alias_module libexec/apache2/mod_vhost_
alias.so
LoadModule socache_shmcb_module libexec/apache2/mod_
socache_shmcb.so
LoadModule ssl_module libexec/apache2/mod_ssl.so
LoadModule xml2enc_module libexec/apache2/mod_xml2enc.so
LoadModule proxy_html_module libexec/apache2/mod_proxy_
html.so
LoadModule proxy_module libexec/apache2/mod_proxy.so
LoadModule proxy_connect_module libexec/apache2/mod_
proxy_connect.so
LoadModule proxy_http_module libexec/apache2/mod_proxy_
http.so
5. In the same httpd.conf file, find these lines and uncomment these lines as well:
Include /usr/local/etc/httpd/extra/httpd-vhosts.conf
Include /usr/local/etc/httpd/extra/httpd-ssl.conf
Include /usr/local/etc/httpd/extra/proxy-html.conf
6. We need a server name. In a real server, we can acquire a domain by buying the
rights to it from a domain registrar and pointing the domain A record to the server
IP address using domain registrar management tools. But, as we're developing in a
development environment, we need a fake domain such as ourapplication.
example.net. Edit /etc/hosts and some test domains as follows:
127.0.0.1 ourapplication.example.net
7. Install openssl for your operating system. After that, generate a certificate for
ourapplication.example.net using the openssl command line, as in
the following:
openssl req -x509 -out ourapplication.example.com.crt
-keyout ourapplication.example.com.key \
-newkey rsa:2048 -nodes -sha256 \
-subj '/CN=ourapplication.example.com' -extensions
Setting up the Apache HTTP Server with a Rocket application
351
EXT -config <( \
printf "[dn]\nCN=ourapplication.example
.com\n[req]\ndistinguished_name = dn\n[EXT]\
nsubjectAltName=DNS:ourapplication.
example.com\nkeyUsage=digitalSignature\
nextendedKeyUsage=serverAuth")
The command line will generate two files, ourapplication.example.com.
crt and ourapplication.example.com.key.
8. Generate a PEM file, a file format that contains certificate as follows:
openssl rsa -in ourapplication.example.com.key -text >
ourapplication.example.com.private.pem
openssl x509 -inform PEM -in ourapplication.example.com.
crt > ourapplication.example.com.public.pem
9. Edit httpd-vhosts.conf. The file might be in /usr/local/etc/
httpd/extra/, depending on your operating system configuration. Add a
new virtual host. We want the virtual host to point to our Rocket application at
http://127.0.0.1:8000. Add the following lines:
<VirtualHost *:443>
ServerName ourapplication.example.com
SSLEngine On
SSLCertificateFile /usr/local/etc/httpd/
ourapplication.example.com.public.pem
SSLCertificateKeyFile /usr/local/etc/httpd/
ourapplication.example.com.private.pem
SSLProxyEngine On
ProxyRequests Off
ProxyVia Off
<Proxy *>
Require all granted
</Proxy>
ProxyPass "/" "http://127.0.0.1:8000/"
ProxyPassReverse "/" "http://127.0.0.1:8000/"
</VirtualHost>
352
Launching a Rocket Application
10. Check whether the configuration is correct by running the following command:
sudo apachectl configtest
11. Restart and open https://ourapplication.example.com in your web
browser. The web browser might complain because the root certificate is unknown.
We can add our generated certificate so it's accepted in our browser. For example,
in Firefox, we can go to Preferences | Privacy & Security | View Certificates. After
that, choose Servers Tab and click Add Exception. Then, ensure that Permanently
store this exception is checked. Finally, click on Confirm Security Exception to
store the security exception. If everything goes well, we can use the example domain
in the browser, as in the following figure:
Figure 13.2 ‒ Using a domain and TLS certificate
Now that we have deployed the Rocket application behind a reverse proxy, we can use the
same principle with a real server. Set up the Apache HTTP Server or NGINX as a reverse
proxy and run the Rocket application behind the reverse proxy.
To run the Rocket application automatically when the operating system starts, we can set
up some kind of service for the operating system. If we are running a Linux distribution
with systemd as a service manager, for example, we can create a systemd service file and
run the application automatically.
In the next section, we are going to learn a different way to deploy an application. We are
going to use Docker to package and create a Docker container for our Rocket application.
Generating Docker images for a Rocket application
353
Generating Docker images for a Rocket
application
Containerization has been a popular choice to ship production applications for a while.
One of the most popular applications for containerization is Docker. In this section, we
are going to learn how to set up Docker to run our Rocket application. To use the docker
command line, please install Docker Desktop from https://www.docker.com/
products/docker-desktop/.
Follow these steps to create and run a Docker image of the Rocket application:
1. In the root folder of the application, create a Dockerfile.
2. There are some base images we can use to build and run the application. We are
going to use Rust's official Docker image from https://hub.docker.com/_/
rust. For the Linux distribution, we are going to use Alpine base because it's one of
the smallest base images for Docker.
In the Dockerfile, add the first line:
FROM rust:alpine as prepare-stage
3. Set the working directory. Append this line to the Dockerfile:
WORKDIR /app
4. We can use Cargo to install the dependencies, but there is another way to quickly
compile the application. We can vendorize the dependencies and use the vendor
dependencies to build the application. Run this command on the root folder of the
application source code:
cargo vendor
5. We want to override the source of the dependencies from the internet to the vendor
folder. Create a .cargo folder in the root application folder, and create config.
toml inside the .cargo folder.
Append these lines to the .cargo/config.toml file:
[source.crates-io]
replace-with = "vendored-sources"
[source.vendored-sources]
directory = "vendor"
354
Launching a Rocket Application
6. We want to add the required files to build the application as a Docker image.
We don't need Rocket.toml, templates, or static files to build the application.
Append these lines to the Dockerfile:
COPY
COPY
COPY
COPY
src src
Cargo.toml Cargo.toml
.cargo .cargo
vendor vendor
7. Add the instructions to build the image. We want to use another stage and install
the dependencies to build the image. Add the following lines:
FROM prepare-stage as build-stage
RUN apk add --no-cache musl-dev
RUN cargo build --release
8. Try building the application by running the following command:
docker build .
9. After testing, add a new part to run the application in the Dockerfile. We want to
open port 8000. We also want to add a default time zone and configure the user to
run the application. Append the following lines:
FROM rust:alpine
EXPOSE 8000
ENV TZ=Asia/Tokyo \
USER=staff
RUN addgroup -S $USER \
&& adduser -S -g $USER $USER
10. We want the image to have the latest libraries. Append the following lines to
the Dockerfile:
RUN apk update \
&& apk add --no-cache ca-certificates tzdata \
&& rm -rf /var/cache/apk/*
11. Set the working directory. Append the following line to the Dockerfile:
WORKDIR /app
Generating Docker images for a Rocket application
355
12. Set Rocket.toml to run from 0.0.0.0. We want to tell the application to use
the host's running database. In Docker, we can reference the host machine using a
special domain, host.docker.internal. Edit Rocket.toml as follows:
[default.databases.main_connection]
url = "postgres://username:passwordR@host.docker.
internal:5432/rocket"
[release]
address = "0.0.0.0"
13. Copy the resulting binary, Rocket.toml, assets, and templates to the final image.
Append the following lines to the Dockerfile:
COPY --from=build-stage /app/target/release/our_
application our_application
COPY Rocket.toml Rocket.toml
COPY static static
COPY src/views src/views
14. Add the folder to store the log file:
RUN mkdir logs
15. Add changing permission to $USER as follows:
RUN chown -R $USER:$USER /app
16. Finally, run the entry point to the application to the Dockerfile:
USER $USER
CMD ["./our_application"]
17. Build the image and create a tag for it using this command:
docker build -t our_application .
18. After building the Docker image, it's time to run it. Use the following command line:
docker run --add-host host.docker.internal:host-gateway
-dp 8000:8000 our_application
356
Launching a Rocket Application
After everything is done, we should see the Docker container is running and showing the
our_application output:
Figure 13.3 ‒ Docker Desktop showing the running container and our_application
Deploying a Rocket application using Docker is just like deploying other applications.
We need to copy the source, build, and run the resulting image. There are some actions
that we can perform to ensure proper deployment, such as vendoring the libraries and
opening the correct ports to ensure requests can be made to the running container and
applications running inside the container.
Summary
In this chapter, we have learned about production-ready compilation options. We can use
them to ensure the resulting binary is as optimized as possible. We also learned about setting
up a general-purpose HTTP server to work in conjunction with a Rocket application. And
finally, we learned to create and run Docker images for the Rocket application.
After learning these techniques, we expanded them to set up the Rocket application to
serve its intended users.
In the next chapter, we are going to learn about using Rust to create a frontend
WebAssembly application in conjunction with a Rocket application.
14
Building a Full Stack
Application
In this chapter, we are going to learn how to build a simple WebAssembly application and
use Rocket to serve the WebAssembly application. We are going to make WebAssembly load
the user information from one of the endpoints that we created earlier. After learning the
information in this chapter, you will be able to write and build a WebAssembly application
using Rust. You will learn how to serve WebAssembly using the Rocket web framework.
In this chapter, we are going to cover these main topics:
• Introducing WebAssembly
• Setting up a Cargo workspace
• Setting a WebAssembly build target
• Writing a WebAssembly application using Yew
• Serving a WebAssembly application using Rocket
358
Building a Full Stack Application
Technical requirements
The technical requirements for this chapter are very simple: the Rust compiler, the Cargo
command line, and a web browser.
You can find the code for this chapter at https://github.com/PacktPublishing/
Rust-Web-Development-with-Rocket/tree/main/Chapter14.
Introducing WebAssembly
In the past, almost all applications in the web browser were made using the JavaScript
language. There were also attempts to use different languages in the web browser, such as
Java Applet, Adobe Flash, and Silverlight. But, all those different attempts were not web
standards, and, therefore, the adoption of those attempts was not as universal as JavaScript.
However, there is a way to use other programming languages in the web browser: by using
WebAssembly. WebAssembly is both a binary executable format and its corresponding
text format for a stack-based virtual machine. Web browsers that support WebAssembly
can execute the binary executable format. Any programming language that can be
compiled into WebAssembly can be executed by web browsers.
In 2015, WebAssembly was announced and was first released in March 2017. All major web
browser vendors finished the release of browsers with minimum support for WebAssembly
in September 2017, and then World Wide Web Consortium recommended WebAssembly
on December 5th, 2019.
Compiled languages such as C++ or Rust can be compiled into a .wasm file, and a virtual
machine in the browser can then run the WebAssembly file. To run interpreted languages,
first, the language runtime can be compiled into a .wasm file, and then, the runtime can
run the runtime scripts.
Figure 14.1 ‒ Interpreted languages and compiled languages in WebAssembly
Setting up a Cargo workspace
359
The Rust programming language supports WebAssembly, and as we have already learned
about Rust and created a backend application using Rust and Rocket, we can take this
opportunity to learn a little about frontend application development using Rust. The old
web standards and web technologies, such as HTML, CSS, and JavaScript, are technologies
that changed the course of human history. Learning about new web standards, such as
WebAssembly, is a good opportunity to be a part of future development.
Let's implement a page in our application where we will render an empty template. The
template will load WebAssembly binary from the server. WebAssembly will call the user
API endpoint that we created earlier. It will then render users using a custom component.
For the implementation, we are going to use Yew (https://yew.rs), which is a
frontend Rust framework.
Setting up a Cargo workspace
Since we are going to create a new application, it would be nice if we could make the code
for the our_application Rocket application work alongside this new application.
Cargo has a feature called Cargo workspaces. A Cargo workspace is a set of different
Cargo packages in a single directory.
Let's set up a Cargo workspace to have multiple applications in a single directory using the
following steps:
1. Create a directory, for example, 01Wasm.
2. Move the our_application directory inside the 01Wasm directory and create a
new Cargo.toml file inside the 01Wasm directory.
3. Edit the Cargo.toml file as follows:
[workspace]
members = [
"our _ application",
]
4. Create a new Rust application inside 01Wasm using this command:
cargo new our _ application _ wasm
360
Building a Full Stack Application
5. After that, add the new application as a member of the workspace in 01Wasm/
Cargo.toml, as follows:
members = [
"our _ application",
"our _ application _ wasm",
]
6. Try building both applications using this command:
cargo build
7. To build or run one of the applications, append --bin with the binary package
name, or --lib with the library package name. To run the application, consider
the location of the directories required for running the Rocket application. For
example, if there's no logs directory, the application might fail to run. Also, if there's
no static directory, the application might not be able to find the assets file.
8. Try building one of the applications by running this command in the terminal:
cargo build --bin our _ application
Now that we have set up the Cargo workspace, we can learn how to build the application
for a different target specifically for WebAssembly.
Setting a WebAssembly build target
The Rust compiler can be set to compile to a different architecture. The architectures are
also called targets. Targets can be identified by using target triple, a string that consists of
three identifiers to be sent to the compiler. Examples of targets are x86_64-unknownlinux_gnu and x86_64-apple-darwin.
Targets can be categorized into three tiers, tier 1, tier 2, and tier 3:
• Tier 1 means that the target is guaranteed to work properly.
• Tier 2 means that the target is guaranteed to build but, sometimes, the automated
test to build the binary for the targets may not pass. The host tools and full standard
library for this tier are also supported.
• Tier 3 means that the Rust code base supports some features of the targets. The
build for those targets may or may not exist, and the tooling might not be complete.
Writing a WebAssembly application using Yew
361
Remember that WebAssembly is a binary format for a virtual machine. The Rust
compiler has targets for the virtual machine specifications, such as asmjs-unknownemscripten, wasm32-unknown-emscripten, or wasm32-unknown-unknown.
The community mostly supports the tooling around wasm32-unknown-unknown.
To see the available target list for the Rust compiler, run the following command in
the terminal:
rustup target list
To add WebAssembly target support for the Rust compiler, run the following command
in the terminal:
rustup target add wasm32-unknown-unknown
After adding the target, try building our_application_wasm by running this
command:
cargo build --target wasm32-unknown-unknown --bin our _
application _ wasm
We will use wasm32-unknown-unknown to build the WebAssembly application in the
next section.
Writing a WebAssembly application using Yew
In the application, we are going to use Yew (https://yew.rs). On the website, it says
that Yew is a modern Rust framework for creating multithreaded frontend web apps.
Cargo can compile the WebAssembly binary, but the WebAssembly binary itself is
not usable without other steps. We have to load the WebAssembly binary in the web
browser's virtual machine engine. There are proposals such as using a <script
type="module"></script> tag, but unfortunately, those proposals are not standard
yet. We have to tell JavaScript to load the module using the WebAssembly Web API.
To make the development easier, we can use wasm-pack from the Rust WebAssembly
working group at https://rustwasm.github.io/. Yew uses an application
named trunk (https://trunkrs.dev) that wraps wasm-pack and provides other
conveniences. Install trunk by using this command:
cargo install --locked trunk
362
Building a Full Stack Application
Now that the preparation for compiling WebAssembly has been completed, we can write
the code for the WebAssembly application. Follow these steps to create the application:
1. Create an HTML file named index.html inside the our_application_wasm
directory. We will use this HTML file to mimic the template on our_application,
with small differences. We want to add an ID for an HTML tag to be the main tag for
the WebAssembly application. Let's name this ID main_container. Append the
following lines to our_application_wasm/index.html:
<!DOCTYPE html>
<html lang="en">
<head>
</head>
<body>
<header>
<a href="/" class="button">Home</a>
</header>
<div class="container" id="main _ container"></div>
</body>
</html>
2. Add yew as a dependency to our_application_wasm. We also want to access
the browser DOM, so we need another dependency. Gloo (https://gloo-rs.
web.app/) provides bindings to the Web API, and we want to use gloo_utils
as a dependency for our WebAssembly application to access the DOM. Add the
following dependencies to our_application_wasm/Cargo.toml:
gloo-utils = "0.1.3"
yew = "0.19"
getrandom = { version = "0.2", features = ["js"] }
3. Add the required use declarations in our_application_wasm/src/main.rs:
use gloo _ utils::document;
use yew::prelude::*;
Writing a WebAssembly application using Yew
363
4. Create a minimal component that creates an empty HTML inside our_
application_wasm/src/main.rs:
#[function _ component(App)]
fn app() -> Html {
html! {
<>{"Hello WebAssembly!"}</>
}
}
5. Use gloo_utils in the main() function in our_application_wasm/
src/main.rs to select the div tag with the main_container ID. Append the
following lines in the main() function:
let document = document();
let main _ container = document.query _ selector("#main _
container").unwrap().unwrap();
6. Initialize a Yew application by appending this line to the main() function:
yew::start _ app _ in _ element::<App>(main _ container);
7. We can use trunk to create a small web server and build everything needed to
build the WebAssembly and related JavaScript to load the WebAssembly and serve
the HTML. Run this command in the terminal inside the our_application_
wasm directory:
trunk serve
There should be an output like the following in the terminal:
Apr 27 20:35:44.122 INFO fetching cargo artifacts
Apr 27 20:35:44.747 INFO processing WASM
Apr 27 20:35:44.782 INFO using system installed binary
app="wasm-bindgen" version="0.2.80"
Apr 27 20:35:44.782 INFO calling wasm-bindgen
Apr 27 20:35:45.065 INFO copying generated wasm-bindgen
artifacts
Apr 27 20:35:45.072 INFO applying new distribution
Apr 27 20:35:45.074 INFO ✅ success
Apr 27 20:35:45.074 INFO 📡 serving static assets at -> /
364
Building a Full Stack Application
Apr
Apr
Apr
Apr
27
27
27
27
20:35:45.075
20:53:10.796
20:53:10.797
20:53:11.430
INFO
INFO
INFO
INFO
📡 server listening at 0.0.0.0:8080
📦 starting build
spawning asset pipelines
building our _ application _ wasm
8. Try opening a web browser to http://127.0.0.1:8080; you'll see that it loads
and runs the Yew WebAssembly application:
Figure 14.2 ‒ Hello WebAssembly!
9. We are going to get users' information using an API endpoint that
returns the JSON that we created earlier in our_application from
http://127.0.0.1:8000/api/users. To convert the JSON into Rust types,
let's define similar types to those in our_application. The types should derive
SerDes' deserialize. In our_application_wasm/Cargo.toml, add the
dependencies for the WebAssembly code:
chrono = {version = "0.4", features = ["serde"]}
serde = {version = "1.0.130", features = ["derive"]}
uuid = {version = "0.8.2", features = ["v4", "serde"]}
10. Then, in our_application_wasm/src/main.rs, add the required
use declarations:
use
use
use
use
chrono::{offset::Utc, DateTime};
serde::Deserialize;
std::fmt::{self, Display, Formatter};
uuid::Uuid;
11. Finally, add the types to deserialize the JSON:
#[derive(Deserialize, Clone, PartialEq)]
enum UserStatus {
Inactive = 0,
Active = 1,
}
Writing a WebAssembly application using Yew
impl fmt::Display for UserStatus {
fn fmt(&self, f: &mut fmt::Formatter<' _ >) ->
fmt::Result {
match *self {
UserStatus::Inactive => write!(f,
"Inactive"),
UserStatus::Active => write!(f, "Active"),
}
}
}
#[derive(Copy, Clone, Deserialize, PartialEq)]
struct OurDateTime(DateTime<Utc>);
impl fmt::Display for OurDateTime {
fn fmt(&self, f: &mut fmt::Formatter<' _ >) ->
fmt::Result {
write!(f, "{}", self.0)
}
}
#[derive(Deserialize, Clone, PartialEq)]
struct User {
uuid: Uuid,
username: String,
email: String,
description: Option<String>,
status: UserStatus,
created _ at: OurDateTime,
updated _ at: OurDateTime,
}
#[derive(Clone, Copy, Deserialize, PartialEq)]
struct Pagination {
next: OurDateTime,
365
366
Building a Full Stack Application
limit: usize,
}
#[derive(Deserialize, Default, Properties, PartialEq)]
struct UsersWrapper {
users: Vec<User>,
#[serde(skip _ serializing _ if = "Option::is _ none")]
#[serde(default)]
pagination: Option<Pagination>,
}
Note
One thing that we can do to improve redefining the types is to create a library
that defines types that can be used by both applications.
12. If we look at the User struct, we can see that the description field is an Option.
Create a convenience function to return an empty String if the value is None,
and return the String content of Some if the value is Some. Add the following
function to our_application_wasm/src/main.rs:
struct DisplayOption<T>(pub Option<T>);
impl<T: Display> Display for DisplayOption<T> {
fn fmt(&self, f: &mut Formatter) -> fmt::Result {
match self.0 {
Some(ref v) => write!(f, "{}", v),
None => write!(f, ""),
}
}
}
13. It's now time to implement a component that will render User. We will name the
component UsersList. Add the following function to our_application_
wasm/src/main.rs:
#[function _ component(UsersList)]
fn users _ list(UsersWrapper { users, .. }: &UsersWrapper)
-> Html {
users.iter()
Writing a WebAssembly application using Yew
.enumerate().map(|user| html! {
<div class="container">
<div><mark class="tag">{ format!("{}",
user.0) }</mark></div>
<div class="row">
<div class="col-sm-3"><mark>{ "UUID:"
}</mark></div>
<div class="col-sm-9"> { format!("{}",
user.1.uuid) }</div>
</div>
<div class="row">
<div class="col-sm-3"><mark>{
"Username:" }</mark></div>
<div class="col-sm-9">{ format!("{}",
user.1.username) }</div>
</div>
<div class="row">
<div class="col-sm-3"><mark>{ "Email:"
}</mark></div>
<div class="col-sm-9"> { format!("{}",
user.1.email) }</div>
</div>
<div class="row">
<div class="col-sm-3"><mark>{
"Description:" }</mark></div>
<div class="col-sm-9"> { format!("{}",
DisplayOption(user.1.description.
as _ ref())) }</div>
</div>
<div class="row">
<div class="col-sm-3"><mark>{
"Status:" }</mark></div>
<div class="col-sm-9"> { format!("{}",
user.1.status) }</div>
</div>
<div class="row">
367
368
Building a Full Stack Application
<div class="col-sm-3"><mark>{ "Created
At:" }</mark></div>
<div class="col-sm-9"> { format!("{}",
user.1.created _ at) }</div>
</div>
<div class="row">
<div class="col-sm-3"><mark>{ "Updated
At:" }</mark></div>
<div class="col-sm-9"> { format!("{}",
user.1.updated _ at) }</div>
</div>
<a href={format!("/users/{}",
user.1.uuid)} class="button">{ "See user"
}</a>
</div>
}).collect()
}
Notice that the html! macro content looks like the content of our_
application/src/views/users/_user.html.tera.
14. We want to load the User data from the API endpoint. We can do this by using
two libraries, reqwasm (which provides HTTP request functionality), and wasmbindgen-futures (which converts Rust futures into JavaScript promise
and vice versa). Add the following dependencies to our_application_wasm/
Cargo.toml:
reqwasm = "0.2"
wasm-bindgen-futures = "0.4"
15. In our_application_wasm/src/main.rs, add a const for our API
endpoint. Add the following line:
const USERS _ URL: &str = "http://127.0.0.1:8000/api/users";
16. Implement the routine to fetch the User data. Add the required use declaration:
use reqwasm::http::Request;
Writing a WebAssembly application using Yew
Then, append the following lines inside the app() function in our_
application_wasm/src/main.rs:
fn app() -> Html {
let users _ wrapper = use _ state(|| UsersWrapper::
default());
{
let users _ wrapper = users _ wrapper.clone();
use _ effect _ with _ deps(
move | _ | {
let users _ wrapper =
users _ wrapper.clone();
wasm _ bindgen _ futures::spawn _
local(async move {
let fetched _ users _ wrapper:
UsersWrapper = Request::get(
USERS _ URL)
.send()
.await
.unwrap()
.json()
.await
.unwrap();
users _ wrapper.set(fetched _
users _ wrapper);
});
|| ()
},
(),
);
}
}
369
370
Building a Full Stack Application
17. Below the {} block under the users_wrapper fetching, set the value for next
and limit. Append the following lines:
let users _ wrapper = use _ state(|| UsersWrapper::default());
{
...
}
let (next, limit): (Option<OurDateTime>, Option<usize>) =
if users _ wrapper.pagination.is _ some()
{
let pagination = users _ wrapper.
pagination.as _ ref().unwrap();
(Some(pagination.next), Some(pagination.limit))
} else {
(None, None)
};
18. Change the HTML from Hello WebAssembly! to show the proper User
information. We want to use the UsersList component that we created earlier.
Change the html! macro content into the following:
html! {
<>
<UsersList users = {users _ wrapper.
users.clone()}/>
if next.is _ some() {
<a href={ format!("/users?
pagination.next={}&pagination.limit={}",
DisplayOption(next), DisplayOption(limit))
} class="button">
{ "Next" }
</a>
}
</>
}
Serving a WebAssembly application using Rocket
371
19. Build the our_application_wasm WebAssembly and JavaScript by running this
command in the terminal:
trunk build
The command should generate three files in the dist directory: index.html,
a WebAssembly file with random name, and a JavaScript file with random
name. The example of random WebAssembly and JavaScript file are
index-9eb0724334955a2a_bg.wasm and index-9eb0724334955a2a.js
in the dist directory.
At this point, we have successfully written and built a WebAssembly application.
In the next section, we are going to learn how to serve a WebAssembly application
using Rocket.
Serving a WebAssembly application using
Rocket
In this section, we are going to serve the WebAssembly web application using the
following steps:
1. To run the WebAssembly file in our_application, we have to modify
our_application a little bit. First, copy the WebAssembly and the
JavaScript from our_application_wasm/dist to the our_application/
static directory.
2. Edit the template to be able to selectively use WebAssembly in our_
application/src/views/template.html.tera as follows:
<head>
...
{% block wasm %}{% endblock wasm %}
<meta...>
</head>
<body>
...
{% block wasmscript %}{% endblock wasmscript %}
</body>
372
Building a Full Stack Application
3. Add a new template file named our_application/src/views/users/
wasm.html.tera. Edit the file in order to make sure the HTML file loads the
necessary WebAssembly and JavaScript file, and run the WebAssembly on the right
DOM. Add the following lines:
{% extends "template" %}
{% block wasm %}
<link rel="preload" href="/assets/index-9eb0724334955a2a _
bg.wasm" as="fetch" type="application/wasm" crossorigin="">
<link rel="modulepreload" href="/assets/index9eb0724334955a2a.js">
{% endblock wasm %}
{% block body %}
<div id="main _ container"></div>
{% endblock body %}
{% block wasmscript %}
<script type="module">import init from '/assets/index9eb0724334955a2a.js';init('/assets/index-9eb0724334955a2a _
bg.wasm');</script>
{% endblock wasmscript %}
4. Add a new route handling function to load just the generated HTML. Add the
following function in our_application/src/routes/user.rs:
#[get("/users/wasm", format = "text/html")]
pub async fn wasm() -> HtmlResponse {
let context = context! {};
Ok(Template::render("users/wasm", context))
}
5. Finally, don't forget to load the route. Add the new route in our_application/
src/lib.rs:
user::delete _ user _ entry _ point,
user::wasm,
post::get _ post,
Summary
373
6. Run the our_application web server by running cargo run in the
our_application directory, and then open http://127.0.0.1:8000/
users/wasm in the web browser. If we inspect the web browser developer tools,
we can see that the web browser runs the JavaScript and WebAssembly, as shown in
the following screenshot:
Figure 14.3 ‒ Web browser loading and running our_application_wasm
WebAssembly should run properly by modifying the tag with the main_container tag,
then loading the JSON from http://127.0.0.1:8000/api/users and rendering
the HTML in the web browser properly.
Summary
Web technology has evolved to allow web browsers to run a universal binary format for a
virtual machine. Web browsers can now run a binary generated by the Rust compiler.
In this chapter, we have looked at an overview of WebAssembly, and how to prepare
the Rust compiler to compile to WebAssembly. We also learned how to set up a Cargo
workspace to have more than one application in a single directory.
We then learned how to write a simple frontend application that loads the User data
from the our_application API endpoint that we created earlier using Yew and
other Rust libraries.
Finally, we finished with how to serve the generated WebAssembly and JavaScript in the
our_application web server.
The next chapter is the final chapter, and we're going to see how we can expand the Rocket
application and find alternatives to it.
15
Improving the
Rocket Application
Now that we have finished the simple application, in this final chapter, we will explore the
improvements we can make to the Rocket application.
In this chapter, we will learn about adding various technologies such as logging, tracing,
and monitoring to bring the Rocket application up to the standard of modern web
development. We will explore techniques to scale the Rocket application.
We will also explore other web frameworks for the Rust language. One web framework
might not be the best tool for everything, so by knowing about other web frameworks, we
can broaden our knowledge of the Rust web ecosystem.
In this chapter, we are going to cover these main topics:
• Extending the Rocket application
• Scaling the Rocket application
• Exploring alternative Rust web frameworks
376
Improving the Rocket Application
Technical requirements
The technical requirements for this chapter are very simple: the Rust compiler, the Cargo
command line, and a web browser.
You can find the code for this chapter at https://github.com/
PacktPublishing/Rust-Web-Development-with-Rocket/tree/main/
Chapter15.
Extending the Rocket application
We have successfully created a simple Rocket application from scratch, starting with a
basic Rocket concept such as routing. There are a lot of things that can be done to improve
the application. In this section, we are going to discuss some of the libraries we can use to
add functionality and improvements to the system.
Adding logging
A good web application in a modern setup usually requires logging and monitoring systems
to obtain information about the system itself. Previously, we learned how to add logging to
the Rocket application. The logging system writes to stdout and to a file. We can improve
the logging system by using a distributed logging system in which the application sends the
log to another server to create an ongoing record of application events.
We can create a Rocket fairing that sends log events to a third-party logging server such as
Logstash, Fluentd, or Datadog. The logs can then be extracted, transformed, aggregated,
filtered, and searched for further analysis.
An example of a crate that can be used to send a log to Fluentd is at https://github.
com/tkrs/poston. Using a poston crate, we can create a worker pool to send data
periodically to a Fluentd server.
Expanding logging to tracing
After setting logging for the Rocket application, we can improve the logging functionality
further with the tracing concept. Where logging is usually concerned with recording
an individual event, tracing is concerned with the workflow of an application. There are
several terminologies that are commonly used, including log, event, span, and trace.
Extending the Rocket application
377
A log is a single piece of information used by programmers to capture data, while an
event is the structured form of a log. For example, let's say we have a log using the
Common Log Format (https://en.wikipedia.org/wiki/Common_Log_
Format) as shown here:
127.0.0.1 user-identifier frank [10/Oct/2000:13:55:36 -0700]
"GET /apache_pb.gif HTTP/1.0" 200 2326
We can convert the log into an event as follows:
{
"request.host": "127.0.0.1",
"request.ident": "user-identifier",
"request.authuser": "frank",
"request.date": "2000-10-10 13:55:36-07",
"request.request": "GET /apache_pb.gif HTTP/1.0",
"request.status": 200,
"request.bytes": 2326,
}
A span is a type of log, but instead of information from a single point in time, a span
covers a duration. And, finally, a trace is a collection of spans that can be used to create a
workflow of application parts.
Suppose we have a Rocket application with a fairing named Trace, we can implement
tracing by using the Trace fairing and following these steps:
1. Create a struct that implements a Rocket request guard, for example, RequestID.
2. When a request arrives, the Trace fairing assigns request_id (an instance of
RequestID) to the Request instance.
3. The Trace fairing then creates a log with the request_id and start_time
information.
4. A route handling function then retrieves request_id as a parameter because the
struct implements the Rocket request guard.
5. Inside the route handling function, the first thing we want the application to do is to
create a log with request_id and the function_start_time information.
6. We can add various logs inside the function to record the timing; for example,
before we send a query to the database, we create a log with request_id and
time information. Later, we can create a log again when we receive the response
from the database.
378
Improving the Rocket Application
7. We can then add a log again before the function returns with the request_id
and time to mark the end of the function.
8. Finally, in the Trace fairing, we create a log again with request_id and
end_time.
By transforming and analyzing the logs, we can construct the logs with the same
request_id into spans. Finally, we can construct the trees of the spans into a trace that
records the timing of each event of a request in the Rocket request-response life cycle.
By using tracing information, we can determine which parts of the application can be
improved further.
There are a couple of crates that we can use to do the tracing, for example,
https://docs.rs/tracing/latest/tracing/ and https://docs.rs/
tracing-log/latest/tracing_log/, which bridge the Rust logging functionality
to the tracing functionality.
Setting monitoring
Where logging and tracing are used to obtain information for the Rocket application, then
monitoring is the process to obtain information for the system to evaluate the system's
capabilities itself. For example, we collect our server CPU usage for the Rocket application.
For monitoring, we can use tools such as Prometheus with Grafana as the visualizer,
Datadog, or other third-party applications. We usually install an agent, an application that
collects and sends various system information to a distributed monitoring server.
Even though there's no direct connection to the Rocket application, usually, a monitoring
system also collects information about the application itself. For example, in a
containerized environment, there are liveness and readiness concepts that make sure a
container is ready to receive its intended function.
We can set a route in the Rocket application that returns a 200 HTTP status code, or a
route that pings the database and returns a 200 HTTP status code. We can then tell the
monitoring system to periodically check the response from the Rocket application. If
there's a response, it means the application still works correctly, but if there's no response,
it means there's something wrong with the Rocket application.
Extending the Rocket application
379
Setting up a mailing and alerting system
Sometimes, we need mailing functionality in a web application. For example, when a user
registers on a website, the system then sends an email for verification. There are a couple
of libraries to send an email for Rust. An example is the Lettre crate (https://crates.
io/crates/lettre). Let's take a look at the sample code for sending an email.
In Cargo.toml, add the following dependencies:
[dependencies]
lettre = "0.9"
lettre_email = "0.9"
In the application, for example in src/lib.rs, we can add the following function to
send an email:
use lettre::{SmtpClient, Transport};
use lettre_email::EmailBuilder;
fn send_email(email: &str, name: &str) -> Result<String,
String> {
let email = EmailBuilder::new()
.to((email, name))
.from("admin@our_application.com")
.subject("Hi, welcome to our_application")
.text("Hello, thank you for joining our_
application.")
.build()
.unwrap();
let mut mailer = SmtpClient::new_unencrypted_
localhost().unwrap().transport();
mailer
.send(email.into())
.map(|_| String::from("Successfuly sent email"))
.map_err(|_| String::from("Couldn't send email"))
}
380
Improving the Rocket Application
One more thing we can add to the application is an alerting system for when something
goes wrong. We can use a third-party notification system or use the mailing system to
send a notification if something goes wrong.
Now that we have looked at several ways to improve the Rocket application, let's scale
our application.
Scaling the Rocket application
After developing the Rocket application and deploying it to a production environment,
the application might need to be scaled up due to increasing usage. There are a couple of
ways to scale the web application, and they can be categorized into two categories: vertical
scaling and horizontal scaling.
Vertical scaling means increasing the resources for a single node. For example, we replace
the CPU of the computer that runs the Rocket application with a CPU with higher speed.
Another example of vertical scaling is increasing the amount of RAM in the computer that
runs the Rocket application.
Horizontal scaling is scaling the application by adding more nodes or more computers to
handle the workload. An example of horizontal scaling is running two servers and setting
up a Rocket web server on each server.
Suppose we have the following system:
Figure 15.1 – Simple Rocket application
We can first move the database to another server as follows:
Figure 15.2 – Separating the database
Scaling the Rocket application
381
Then, we can add a load balancer as in the following:
Figure 15.3 – Adding a load balancer
The load balancer can be a hardware load balancer, an IaaS (Infrastructure as a service)
load balancer such as AWS Load Balancer, a Kubernetes load balancer, or a software load
balancer such as HAProxy or NGINX.
After we add the load balancer, we can then add other machines, each with their own
Rocket server instance, as follows:
Figure 15.4 – Scaling the Rocket application horizontally
There are a couple of things we need to take care of if we want to load balance the Rocket
server, for example, make sure "secret_key" in Rocket.toml is the same for all the
Rocket server instances. Another thing we can do is make sure our session libraries and
cookies are not storing the content on the memory of each instance, but on shared storage,
such as a database.
Yet another idea to improve Rocket application scaling is hosting static files or assets on
their own server. The static files server can be a general-purpose web server such as an
Apache HTTP Server or NGINX or a service such as AWS S3 or Azure Storage. One
thing we need to take care of is that when generating a Rocket response, we need to set
the static assets into the correct server. For example, instead of setting the HTML CSS to
"./mini-default.css", we have to set "https://static.example.com/
mini-default.css".
382
Improving the Rocket Application
A diagram of the static server along with the load balancer can be seen in the
following figure:
Figure 15.5 – Adding a static files server
We can also add a content delivery network (CDN) to distribute the load on the system,
as follows:
Figure 15.6 – Adding a CDN
The CDN can be from the IaaS, such as AWS CloudFront or GCP Cloud CDN, or a
third-party CDN provider such as Fastly, Akamai, or Cloudflare. These CDNs provide
servers in various geographical locations and can provide caching and a faster network
connection to make our application faster.
After basic scaling, the system can be scaled further, such as by adding database
replications or clusters, or adding caching systems such as Redis or Redis cache clusters.
An example of such a system is shown here:
Exploring alternative Rust web frameworks
383
Figure 15.7 – Adding a database cluster and cache cluster
An important part of scaling the system is identifying which part's specification can be
improved or which part can be isolated into its own server, for example, increasing the
CPU of the computer that runs the Rocket server or moving the database into its own
server and then later scaling the database itself from a single server into a database cluster.
Now that we have learned the basic techniques of scaling a Rocket application, let's discuss
some other software that's similar to the Rocket web framework in the next section.
Exploring alternative Rust web frameworks
Rocket is a good web framework for the Rust programming language, but sometimes,
we require other tools to build a web application. In this section, we are going to explore
some alternatives to the Rocket web framework. The alternative frameworks are Actix
Web, Tide, and Warp. Let's check the web frameworks one by one.
Actix Web
One good alternative to Rocket is Actix Web (https://actix.rs/). Just like Rocket,
Actix Web is a web framework. Originally, it was created on top of the Actix crate, an
actor framework. These days, the functionality from Actix is not used anymore as Rust's
futures and async/await ecosystem is maturing.
Just like Rocket, Actix Web includes concepts such as routing, request extractor, form
handler, response handler, and a middleware system. Actix Web also provides conveniences
such as a static file handler, a database connection, templating, and many more.
Let's take a look at a code sample for Actix Web to see the similarities with Rocket.
384
Improving the Rocket Application
In Cargo.toml, add the following:
[dependencies]
actix-web = "4.0.1"
And, in src/main.rs, add the following:
use actix_web::{get, web, App, HttpServer, Responder};
#[get("/users/{name}")]
async fn user(name: web::Path<String>) -> impl Responder {
format!("Hello {name}!")
}
#[actix_web::main]
async fn main() -> std::io::Result<()> {
HttpServer::new(|| {
App::new()
.route("/hello_world", web::get().to(|| async {
"Hello World!" }))
.service(user)
})
.bind(("127.0.0.1", 8080))?
.run()
.await
}
Try running the application and opening http://127.0.0.1:8080/hello_world
or http://127.0.0.1:8080/users/world to see the result.
Tide
Another Rust web framework alternative is Tide (https://github.com/http-rs/
tide). Unlike Rocket or Actix Web, this framework provides only basic functions, such as
request type, result type, sessions, and middleware.
Let's take a look at a code sample for Tide to see the similarities with Rocket.
Warp
385
In Cargo.toml, add the following:
[dependencies]
tide = "0.16.0"
async-std = { version = "1.8.0", features = ["attributes"] }
And, in src/main.rs, add the following:
use tide::Request;
async fn hello_world(_: Request<()>) -> tide::Result {
Ok(String::from("Hello World!").into())
}
#[async_std::main]
async fn main() -> tide::Result<()> {
let mut app = tide::new();
app.at("/hello_world").get(hello_world);
app.listen("127.0.0.1:8080").await?;
Ok(())
}
Try running the application by running cargo run on the command line and opening
http://127.0.0.1:8080/hello_world in the browser.
Warp
Another Rust web framework alternative is Warp (https://github.com/
seanmonstar/warp). This framework provides various functionalities on top of
its filter function. By using the filter, it can perform path routing, extract parameters
and headers, deserialize query strings, and parse various request bodies such as forms,
multipart form data, and JSON. Warp also supports serving static files, directories,
WebSocket, logging, middleware, and a basic compression system.
Let's take a look at an example application using Warp. In the Cargo.toml file, add
the following:
[dependencies]
tokio = {version = "1", features = ["full"]}
warp = "0.3"
386
Improving the Rocket Application
And, in the src/main.rs file, add the following:
use warp::Filter;
#[tokio::main]
async fn main() {
let hello = warp::path!("hello_world")
.and(warp::path::end())
.map(|| format!("Hello world!"));
warp::serve(hello).run(([127, 0, 0, 1], 8080)).await;
}
Again, like the Tide and Warp examples, try opening http://127.0.0.1:8080/
hello_world in the browser.
Summary
In this final chapter, we have learned how to improve and scale a Rocket application.
We can use various tools to improve Rocket applications, such as adding logging,
tracing, monitoring, and mailers. We also learned a little bit about principles for scaling
Rocket applications.
Finally, we learned about alternative Rust web frameworks such as Actix Web, Tide,
13 and Warp.
We started this book by learning how to create and build Rust application, and tools for
working with Rust such as Cargo. We then learned the basics of Rocket applications such
as the life cycle of requests and how to configure a Rocket application.
We then continued by learning about more concepts such as Rocket routes, and route
parts such as HTTP method, path, format, and data. To handle a route, we have to create a
function that receives the request object and returns the response object.
Continuing the basics of Rocket, we learned more about Rocket components such as state,
connecting a database with Rocket, and fairings.
After that, we learned how to organize Rust modules to create more complex applications.
We then designed an application and implemented the routes to manage entities such as
user and post. To manage entities, we learned how to write queries to the database to add,
get, modify, or delete items.
Summary
387
We then discussed more advanced topics such as Rust error handling and its
implementation in a Rocket application. Continuing the more advanced topics, we also
learned about Rocket functionalities such as serving static assets and using templates to
generate a response. We also discussed how to use forms and how to protect forms from
malicious attackers using CSRF.
After learning how to handle form data, we learned about the Rust generic and how
to apply the Rust generic in a Rocket application to render Post with the same trait.
To handle the variants of Post, we learned more about advanced Rust programming,
including lifetime and memory safety. We also learned more about async programming
and multithreading when we implemented processing of the variants of Post.
In order to use Rocket as a modern web framework, we also learned how to allow a
Rocket application to handle APIs and JSON, protect the application using authentication
and authorization, and learned how to use JWT to secure an API.
To make sure our Rocket application worked as intended, we then learned how to test
Rust and Rocket applications. After making sure the application worked as intended,
we learned how to deploy the application in different ways, such as putting the Rocket
application behind a general-purpose web server and using Docker to build and serve the
Rocket application.
To complement the backend application, we learned how to use Rust to create a
WebAssembly application in the frontend. And finally, we learned more about how to
scale Rocket applications, as well as how to find alternatives to the Rocket web framework.
Now that we have learned all the foundations for building Rust and Rocket applications,
we can implement Rust and Rocket web framework skills in production-grade web
applications. To expand upon your knowledge from this book, you can learn more from
the Rust or Rocket websites and forums. Don't hesitate to experiment and make great
applications using the Rust language and Rocket web framework.
Index
A
C
Actix Web
about 383, 384
reference link 383
Apache HTTP Server
setting, with Rocket application 348-352
Application Programming Interface (API)
protecting, with JWT 316-324
Askama templating engine 209
associated constant 101, 102
associated function 26, 101
associated items 101
associated methods 101
associated type 101
async/await feature 279
asynchronous application 43, 44
asynchronous programming 8
authentication 307
authorization 307
automatically-derived trait 85
Cargo
about 20
third-party crates, using 24-32
Cargo book
reference link 34
Cargo package layout 20-23
Cargo workspace
about 359
setting up 359, 360
clippy
about 32
reference link 32
CodeLLDB
reference link 344
command-line application 20
Common Log Format
reference link 377
content delivery network (CDN) 208, 382
crate rocket
reference link 52
crate tracing
reference link 378
crate tracing_log
reference link 378
B
bitset 102
borrowing instance 256-264
builder pattern 72
390
Index
create, read, update, and
delete (CRUD) 118
cross-site request forgery (CSRF) attacks
about 223
HTML forms, securing from 223-231
cross-site scripting (XSS) 164
custom error type
creating 194-199
D
data parameter 54
database
working with 88-98
data definition layer (DDL) 90
dbg_contains function 161
dbg_eq function 161
dbg_omits function 161
debug profile 46
default error catchers
making 79-81
default meta-profiles 45
DELETE user
implementing 178, 180
destructor 252
Django template 209
Docker images
generating, for Rocket
application 353-356
Docs.rs
reference link 34
Drop 252
dynamically-typed language 8
E
environment variables
used, for overriding Rocket
configuration 51
event 377
explicit discriminator 115
F
fairing 37
figment crate
about 46
reference link 46
files
asynchronous processing 279-284
form
working with 218-222
format parameter 54
G
generic data type
about 248
using 248, 249
generic type 248
GET user
implementing 146-151
GET users
implementing 151-158
global meta-profiles 45
Gloo
URL 362
GNU Debugger (gdb)
reference link 343
graphics processing unit (GPU) 115
green threads 279
Index 391
H
Handlebars templating engine 209
Hello World!
complex program, writing 11-20
horizontal scaling 380
HTML forms
securing, from CSRF 223-231
HTTP request life cycle in Rocket
processing 37
response 37
routing 37
validation 37
I
ignored segment 58
implicit discriminator 115
Insecure Direct Object
References (IDOR) 65
J
Jinja2 template 209
JSON
handling 312-316
JSON Web Token (JWT)
API, protecting 316-324
just-in-time (JIT) compiler 7
L
lifetime annotation 259
lifetime specifier 259
Link Time Optimization (LTO) 347
Linux OS
rustup, installing 9, 10
Liquid templating engine 209
lldb
URL 343
log 377
logging errors 200-203
M
macOS
rustup, installing 9, 10
managed state 84
marker trait 85
memory leak 7
message broker 293
MessagePack 79
monomorphization 248
multiple segments 58
multithreaded applications 279
N
nameless field 73
newtype idiom 73
O
object-relational mapping (ORM) 88
open source CSS file
reference link 211
Option
using 187-191
orphan rules 73
ownership and moving
learning 251-255
392
Index
P
panic!
implementing 186
shutdown request guard, using 186
using 184, 185
Password Hashing Competition
(PHC) 115
PATCH user
implementing 170-178
photo post
uploading 273-278
posts
displaying 234-247
POST user
implementing 158-170
production binary
optimizing 346-348
PUT user
implementing 170-178
R
rank parameter 54, 59
reference 256
regular expression (regex) 163
release profile 46
representational state transfer (REST) 118
request guards 86
resource acquisition is initialization
(RAII) 7, 252
responder
built-in implementations 78, 79
wrapping 74-77
responses
creating 71-74
RESTful 119
Result
returning 191-194
Rocket
phases 99, 100
used, for serving WebAssembly
application 371-373
Rocket application
alerting system, setting up 379, 380
Apache HTTP Server, setting
with 348-352
Docker images, generating 353-356
extending 376
logging, adding 376
logging, expanding to trace 376-378
mailing, setting up 379, 380
modularizing 128-141
monitoring, setting 378
scaling 380-382
testing 333-340
rocket_db_pools
used, for connecting to
database 108-110
Rocket fairings
attaching 99, 103-108
callbacks 101-103
database, connecting with
rocket_db_pools 108-110
implementing 103-108
Rocket framework 114
Rocket launch sequence
fairing 37
routes 37
state 37
Rocket profiles 45
Rocket route parameters
data 63, 64
format 61-63
HTTP methods 55
Index 393
path 56, 58
query 59
rank 59-61
URI 55, 56
Rocket routes 54, 55
Rocket.toml
used, for configuring Rocket
application 48-51
Rocket web application
about 36
configuration, overriding with
environment variables 51
configuring 44-47
configuring, with Rocket.toml 48-51
converting, into asynchronous
application 43, 44
creating 38-43
help and documentation,
obtaining from website 52
HTTP request life cycle 37
reference link 52
Rocket launch sequence 37, 38
working, in different profiles 44-46
Rocket web framework
alternatives, exploring 383
route 54
route handlers
implementing 64-71
routing 37
RSA algorithm
reference link 25
Rust analyzer
about 33
reference link 33
Rust application
debugging 340-344
development tools 32
Rust by Example
reference link 33
Rust compiler
target list, viewing 361
WebAssembly target support,
adding 361
Rust compiler toolchain
components, installing 10
components, updating 11
installing 9
rustup, installing on Linux OS 9, 10
rustup, installing on macOS 9, 10
rustup, updating 11
updating 11
rustfmt
about 32
reference link 32
Rust language
need for 5
overview 4, 5
URL 4
Rust language server
about 33
reference link 33
Rust language, need for
asynchronous programming 8
multithreading 8
no garbage collection 6, 7
safety 6
speed 7
statically-typed language 8
Rust package registry
reference link 20
Rust program
testing 328-333
Rust programming language
reference link 33
394
Index
Rust style guidelines
reference link 34
rustup
reference link 9
Rust user forum
reference link 34
Rust WebAssembly working group
reference link 361
S
scheduler 279
sealed trait 100
segments
about 55
dynamic segment 56
static form 56
serde documentation
reference link 92
Shield 40
Simple Mail Transfer Protocol (SMTP) 84
span 377
standard library documentation
reference link 33
state
managing 84-88
static assets
serving 206-208
static path 59
struct 4
struct-like enum variant 188
T
targets
about 360
examples 360
Tier 1 360
Tier 2 360
Tier 3 360
target triple 360
templating engines
reference link 209
Tera template
about 208
reference link 209
using 209, 210
text editor 33
text post
uploading 266-273
thread 279
Tide 384, 385
trace 377
trailing parameters 59
trait bounds
about 250
using 250
traits 5
trunk
URL 361
tuple 73
tuple struct 73
turbofish 69
type placeholder 68
U
universally unique identifier
(UUID) 37, 297
unsafe traits 85
URI 54
URI parameter
path 55
query 55
Index 395
user-generated web application
creating 126, 127
designing 114, 115
user-generated contents,
making 123-125
user routes, creating 118-122
user struct, planning 115-118
user login system
implementing 296-306
users
authenticating 296
authorizing 307-311
displaying 211-218
V
vertical scaling 380
video post
processing, with worker 284-293
uploading 284-293
virtual threads 279
W
Warp 385, 386
WebAssembly
about 358, 359
build target, setting 360, 361
WebAssembly application
serving, with Rocket 371-373
writing, with Yew 361-371
web templates
client-side web templates 208
server-side web templates 208
worker
used, for processing video post 284-293
Y
Yew
URL 359
used, for writing WebAssembly
application 361-371
Packt.com
Subscribe to our online digital library for full access to over 7,000 books and videos, as
well as industry leading tools to help you plan your personal development and advance
your career. For more information, please visit our website.
Why subscribe?
• Spend less time learning and more time coding with practical eBooks and Videos
from over 4,000 industry professionals
• Improve your learning with Skill Plans built especially for you
• Get a free eBook or video every month
• Fully searchable for easy access to vital information
• Copy and paste, print, and bookmark content
Did you know that Packt offers eBook versions of every book published, with PDF and
ePub files available? You can upgrade to the eBook version at packt.com and as a print
book customer, you are entitled to a discount on the eBook copy. Get in touch with us at
customercare@packtpub.com for more details.
At www.packt.com, you can also read a collection of free technical articles, sign up
for a range of free newsletters, and receive exclusive discounts and offers on Packt books
and eBooks.
398
Other Books You May Enjoy
Other Books You
May Enjoy
If you enjoyed this book, you may be interested in these other books by Packt:
Rust Web Programming
Maxwell Flitton
ISBN: 978-1-80056-081-9
• Structure scalable web apps in Rust in Rocket, Actix Web, and Warp
• Apply data persistence for your web apps using PostgreSQL
• Build login, JWT, and config modules for your web apps
• Serve HTML, CSS, and JavaScript from the Actix Web server
• Build unit tests and functional API tests in Postman and Newman
Other Books You May Enjoy
Game Development with Rust and WebAssembly
Eric Smith
ISBN: 978-1-80107-097-3
• Build and deploy a Rust application to the web using WebAssembly
• Use wasm-bindgen and the Canvas API to draw real-time graphics
• Write a game loop and take keyboard input for dynamic action
• Explore collision detection and create a dynamic character that can jump on
and off platforms and fall down holes
• Manage animations using state machines
399
400
Packt is searching for authors like you
If you're interested in becoming an author for Packt, please visit authors.
packtpub.com and apply today. We have worked with thousands of developers and
tech professionals, just like you, to help them share their insight with the global tech
community. You can make a general application, apply for a specific hot topic that we are
recruiting an author for, or submit your own idea.
Share Your Thoughts
Now you've finished Rust Web Development with Rocket, we'd love to hear your thoughts!
If you purchased the book from Amazon, please click here to go straight to the Amazon
review page for this book and share your feedback or leave a review on the site that you
purchased it from.
Your review is important to us and the tech community and will help us make sure we're
delivering excellent quality content.