/


Текст
Drawing
THE HEAD AND FIGURE
By JACK HAMM
A PERIGEE BOOK
Drawing
THE HEAD AND FIGURE
Dedicated to
My Wife, Dorisnel
Who Has Given Invaluable Assistance
All Along the Way
A Perigee Book
Published by The Berkley Publishing Group
A division of Penguin Putnam Inc.
375 Hudson Street
New York, New York 10014
Copyright © 1963 by Jack Hamm
All rights reserved. This book, or parts thereof,
may not be reproduced in any form without permission.
Published simultaneously in Canada by
General Publishing Co. Limited, Toronto
First Perigee edition: January 1983
ISBN 0-399-50791-4
The Penguin Putnam Inc. World Wide Web site address is
http://www.penguinputnam.com
Printed in the United States of America
35 34 33 32
PREFACE
What in life is more important than peo-
ple? Take people away and there’s not
much left. Take people out of art, and art
becomes lonesome. Yet in art circles we
hear, “He is good at almost everything —
except his figure drawing.” Indeed, if you
can draw people well, you become a wanted
individual in both commercial and fine
art.
It is true that at some time or other every-
one has tried to draw people. Long before
a child learns to write, he makes marks
which in his uninhibited imagination repre-
sent a person. No one has convinced him
that he has no artistic ability, nor has he
convinced himself, so he continues his un-
affected effort to draw. Because he persists,
oftentimes to the undoing of household
furniture, walls — and parents — his draw-
ings begin to show a decided measure of
improvement. Then one day interest wanes,
due to acquired restraints, and only a few
after that regularly take up the drawing
pencil. The others borrow the oft-repeated
phrase, “Oh, I can’t draw a straight line!”
The plain truth is that, since we are not ma-
chines, no one can. An interesting crooked
line is much more to be desired than one
ruled along by a straight-edge, for it tran-
scribes something of the person behind it,
the pulse of life. Whereas an instrument like
the compass or ruler may be used briefly
as a device, it should always be subservient
to the freehand line.
Now comes the great paradox. People
are always watching people. How does it
happen, then, that even among artists the
way a person is put together remains an
enigma? Of course, one reason is that the
human body is not static like a rock or
simple like an apple. Yet, because it is in
such demand in art and is the dramatic
focal point of our universal concern for
life, we need to face up to it, learn it, record
it, and profit from it.
When taken step by step and part by
part, anatomy for the artist is not as in-
scrutable as one might suppose. In fact, like
everything else, “it’s simple when you know
how.” ’ Then knowing how becomes the
problem.
The purpose of this book is to approach
the problem of figure drawing in such a
way as to give the student something he
can understand and remember. It goes
without saying that nothing will ever take
the place of practice, provided the practice
is in the right direction and in earnest. The
art student should strive to have endless
patience and be doggedly persistent. If
things don’t go well in a given practice ses-
sion, he should know that the best of art-
ists have had many such sessions. But, the
remarkable thing about going through a
disheartening session is that the student is
very often on the threshold of marvelous
discovery.
Carlyle said, “Every noble work is at
first impossible.” Many students, however,
unwittingly prolong the travel time between
the impossible and the possible. It is hoped
that by the simplified approaches in this
book the sincere student will see that good
figure drawing is not impossible. The pen-
cil, pen, or brush are not magic wands to
be waved over the paper but are richly sat-
isfying and rewarding instruments when
perseveringly applied to a challenging piece
of white paper.
Jack Hamm
CONTENTS
Introduction to the Head
Youth and Age
The Head — In Six Freehand Steps ... 1
Head Construction — The Double Circle 2
Beginning the Head — Front View ... 4
Experimenting with a Flattened Pencil . 6
The Facial Features
The Eye — Step by Step................. 7
Pointers in Drawing the Eye............ 8
The Eye Wheel......................... 10
Portraying the Female Mouth.......... 11
The Laugh and the Triangle............ 12
Nose Construction..................... 13
Using the Fewest Lines in Drawing the
Nose............................... 14
The Nose from Various Angles......... 15
Drawing the Ear....................... 16
The Hair
The Natural Fall of Hair.............. 17
Suggested Simplification of Hair..... 19
Ways of Drawing Dark Hair............. 20
Ways of Drawing Light Hair............ 21
Drawing Men’s Hair Step by Step .... 22
Head Patterns and Comparisons
Hidden Angles — Hidden Circles —
The Kite........................... 23
Foreshortening the Head from the Side . 24
The Female Profile in Easy Sequence . . 27
Differences in Male and Female Profiles 29
The Head in Fashion and Design .... 30
The Male Profile in Easy Sequence ... 31
Helpful Pointers in the Male Profile ... 32
Recording the Planes in the Male Head 33
Differences in the Male Head —Front . . 34
Drawing Children’s Heads............... 36
The Semi-Cartoon Head.................. 37
Adding Age to a Face................... 38
Fundamentals of the Figure
Proportions of the Human Figure .... 39
The Skeleton Beneath................... 40
The Simplified Figurette............... 41
Starting from Scratch to Draw the
Human Figure........................ 42
The Changes of Direction in the Figure 43
The Basic Lines of the Figure Extended 44
Building on the Double Triangle .... 45
Approaching Figure Drawing in
Different Ways...................... 46
Arm Movement and Body Proportions . 47
The Principle of the “T”............... 48
Step-at-a-Time Sketching............... 49
The Torso and the Figure
Joining Arms and Legs to the Torso . . 50
Bone and Muscle Prominence in the
Chest .,............................... 51
A Simplified Guide — 12 Standard
Positions.............................. 52
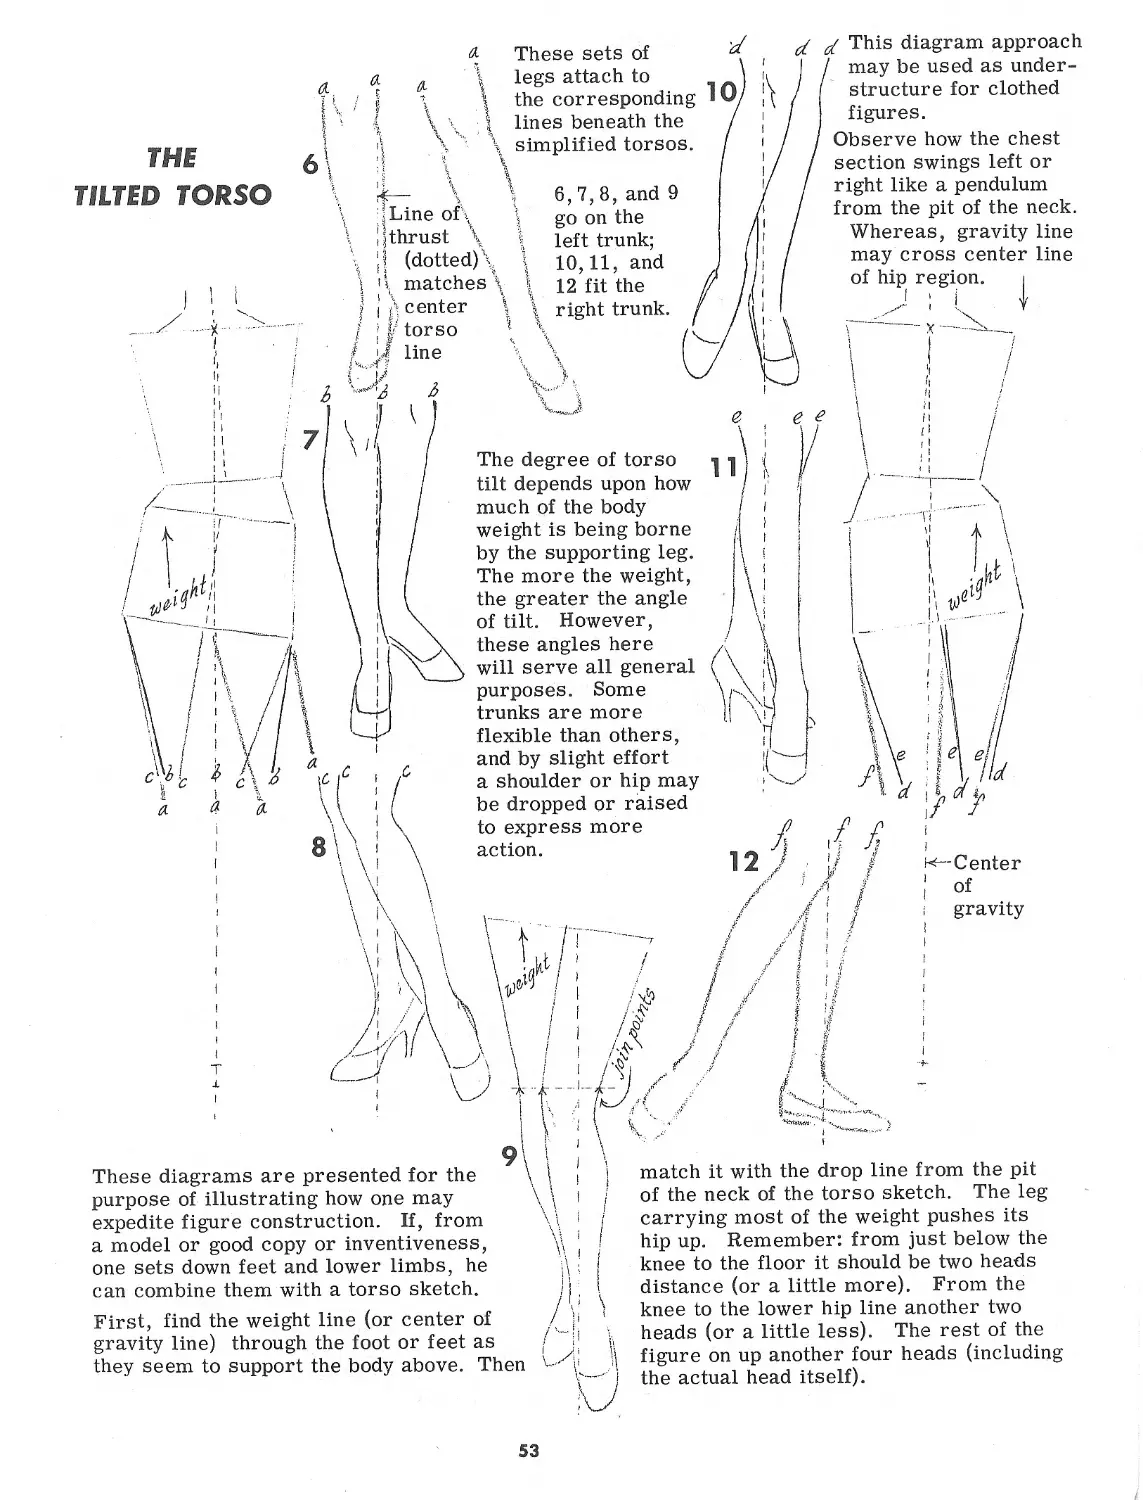
The Tilted Torso....................... 53
Simplifying the Pelvic Region ...... 54
Further Differences between Male
and Female Hip Sections................ 55
Using the Abbreviated Bone Forms ... 56
Checking the Surface Anatomy Over
the Bone Forms......................... 57
Principles of Figure Drawing
Planes and Solidity.................... 58
CONTENTS
Lines of Direction, Sweep, and Action . 59
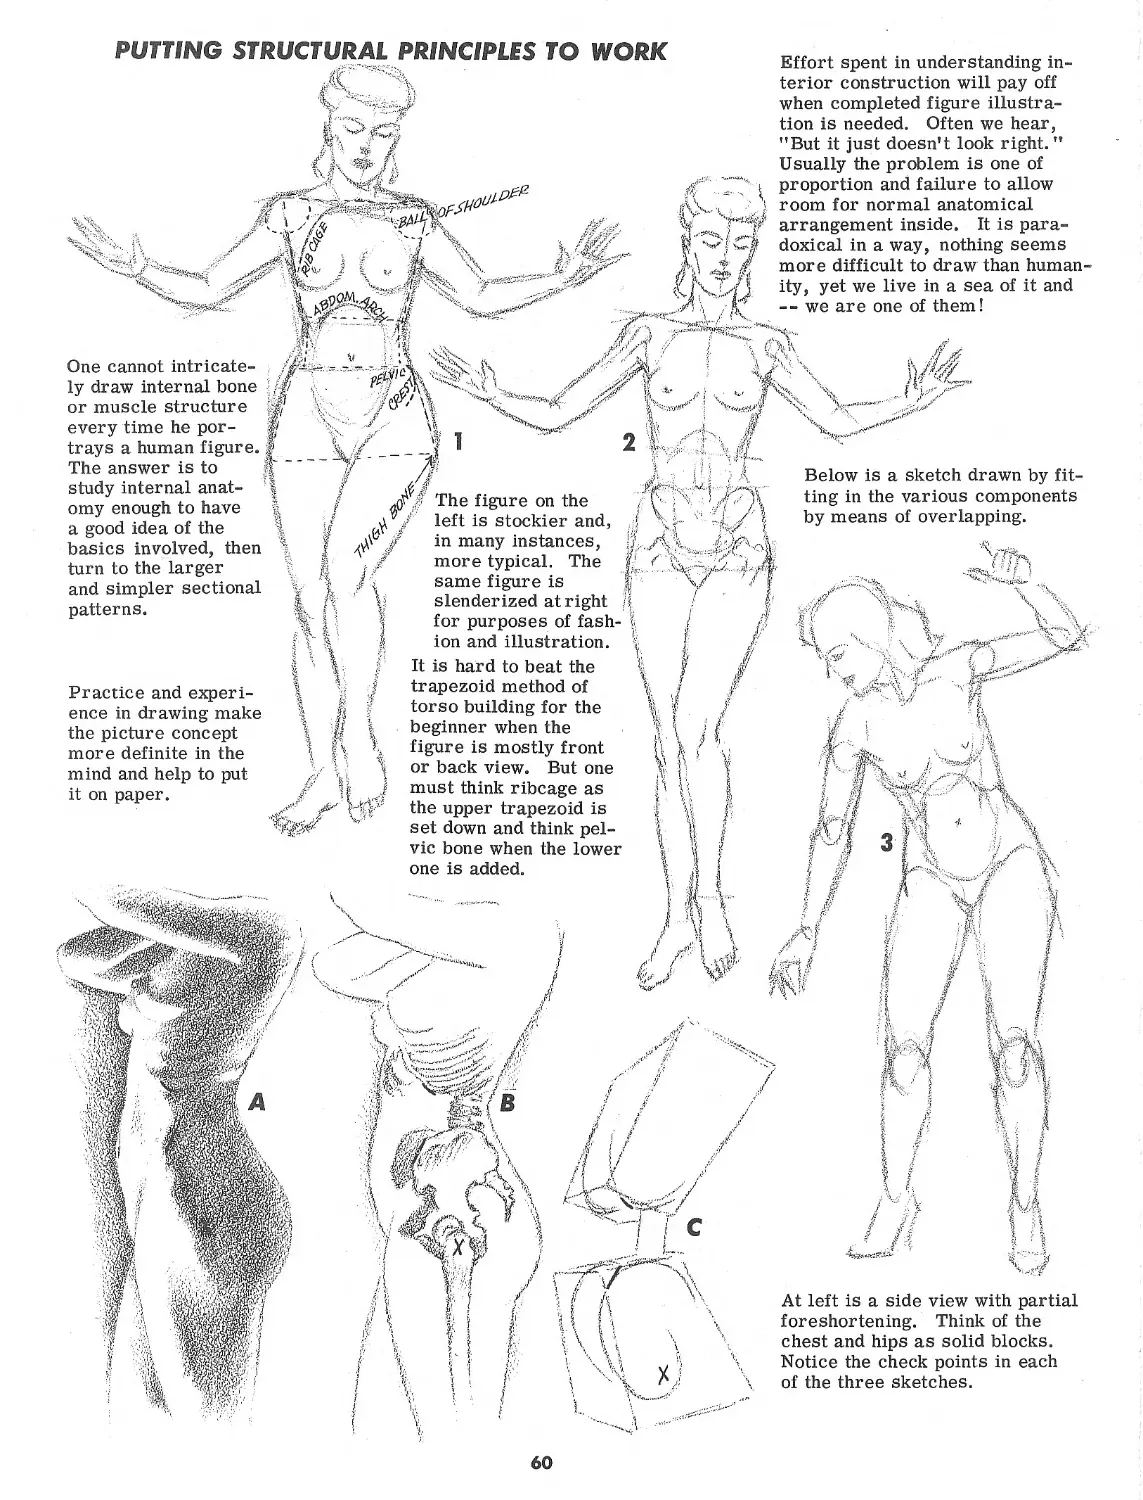
Putting Structural Principles to Work . . 60
How Hips and Shoulders Cooperate ... 61
The Back of the Human Figure.......... 62
The Back and the Front Related .... 63
Pencil Approaches to Figure Sketching . 64
The Neck and Shoulders
Notes on the Neck and Major Neck
Muscles.............................. 65
Neck Tips............................... 66
Explaining and Drawing Necks........ 67
Types of Neck and Shoulder Lines ... 68
What to Remember in Drawing
Shoulders............................ 69
The Shoulder Shape...................... 70
Learning More About the Shoulder-blade
Area................................. 71
Explaining the Shoulder’s Appearance. . 72
Making the Shoulders Look Right ... 73
The Arm
The Bones and Muscles of the Arm ... 74
Helpful Pointers in Drawing the Arm . . 75
The Way the Arm Tapers and the Hump
That Turns to a Dimple............... 76
Facts That Make Arm Drawing Easier . 77
The Outstretched Arm.................... 78
More Tips on Drawing the Arm .... 79
Looking in on the Elbow’s Structure . . 80
Making the Elbow Look Right........... 81
The Hand
A Simplified Approach in Drawing the
Hand................................. 82
The Hand — Side View Simplified .... 84
Bones of the Hand................. 85
The Palm-side..................... 86
Skin Folds on the Fingers Simplified . . 87
The Writing Hand.................. 88
The Fist............................. 89
Practice the “Rough” and the Open Hand 90
The Leg
Methods in Drawing the Leg........... 91
A Few Lines in Starting.............. 92
Leg Bones That Show on the Surface . . 93
Leg Muscles from the Front and Back . 94
Leg Muscles from the Side............ 95
Understanding Knee Construction .... 96
Types of Knees....................... 97
Helpful Pointers in Drawing the Leg . . 98
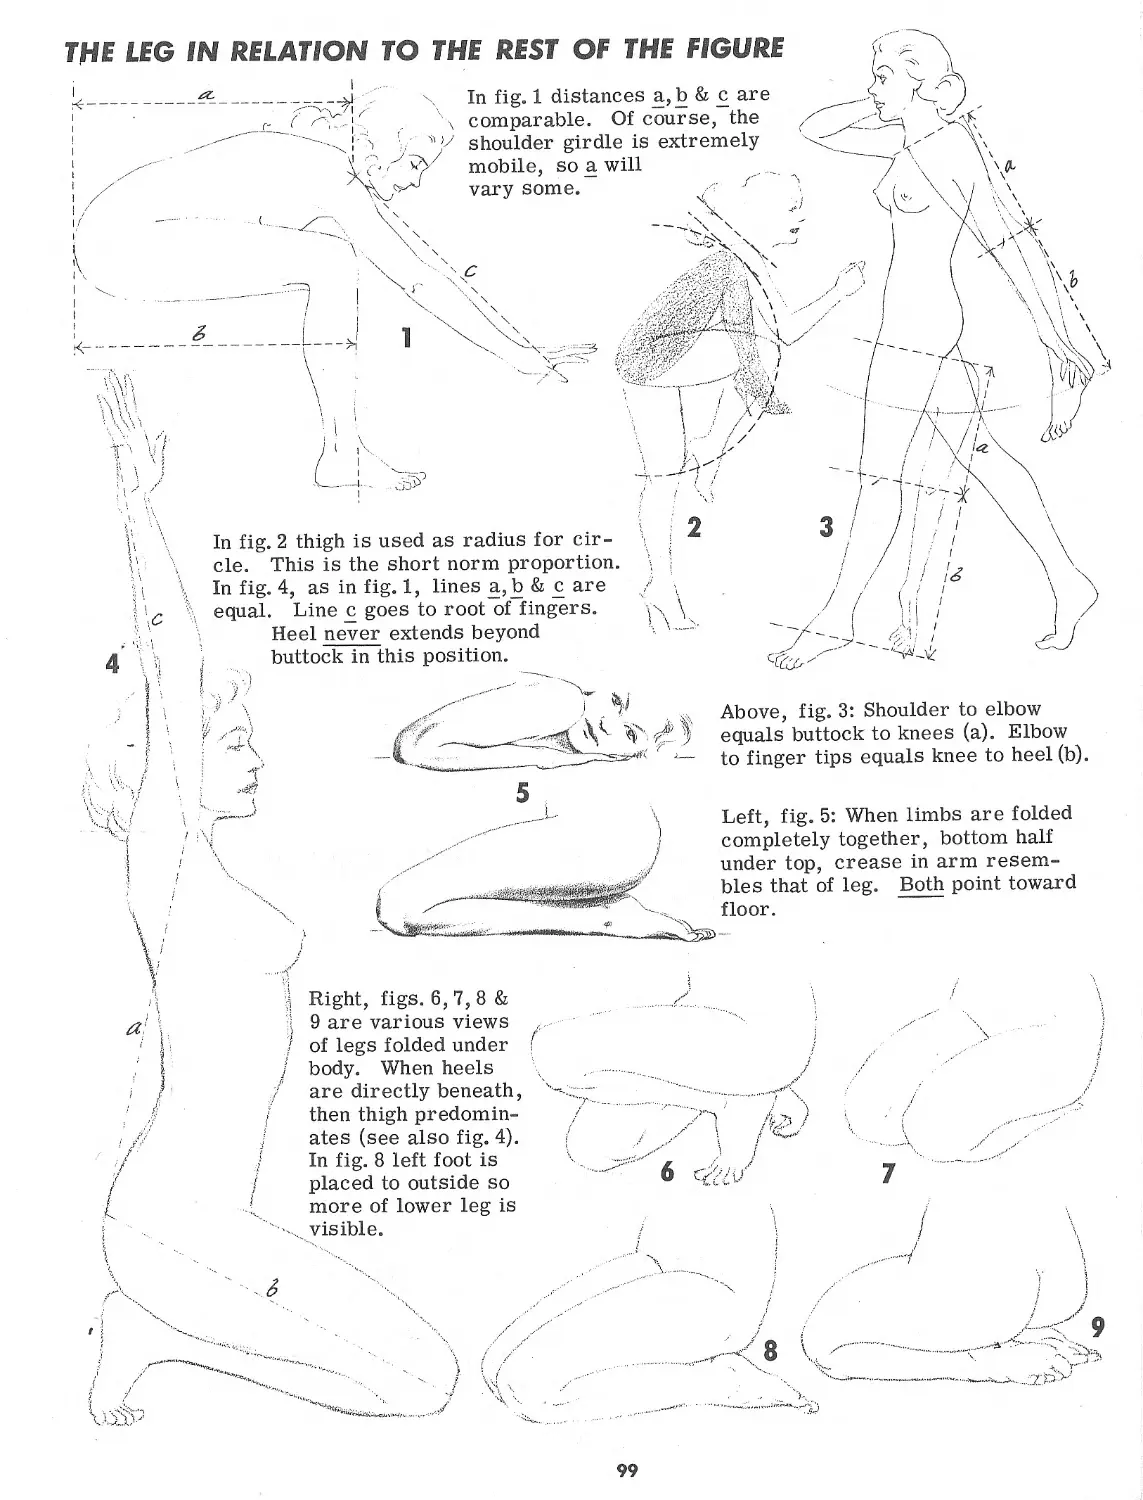
The Leg in Relation to the Rest of the
Figure............................ 99
The Feet
Fundamentals of Feet.................100
Bones and Tendons of the Feet........101
Footnotes............................102
Drawing Women’s Shoes................103
Above and Below Shoes................104
Feet and Fashion.....................105
Drawing Men’s Shoes..................106
Making Shoe Drawing Easier...........107
Feet First...........................108
Clothing
Simple Folds from Body Protrusions
and Indentions........................109
Various Types of Folds...............110
Folds in Light and Shadow............Ill
The Female Figure and Clothing .... 112
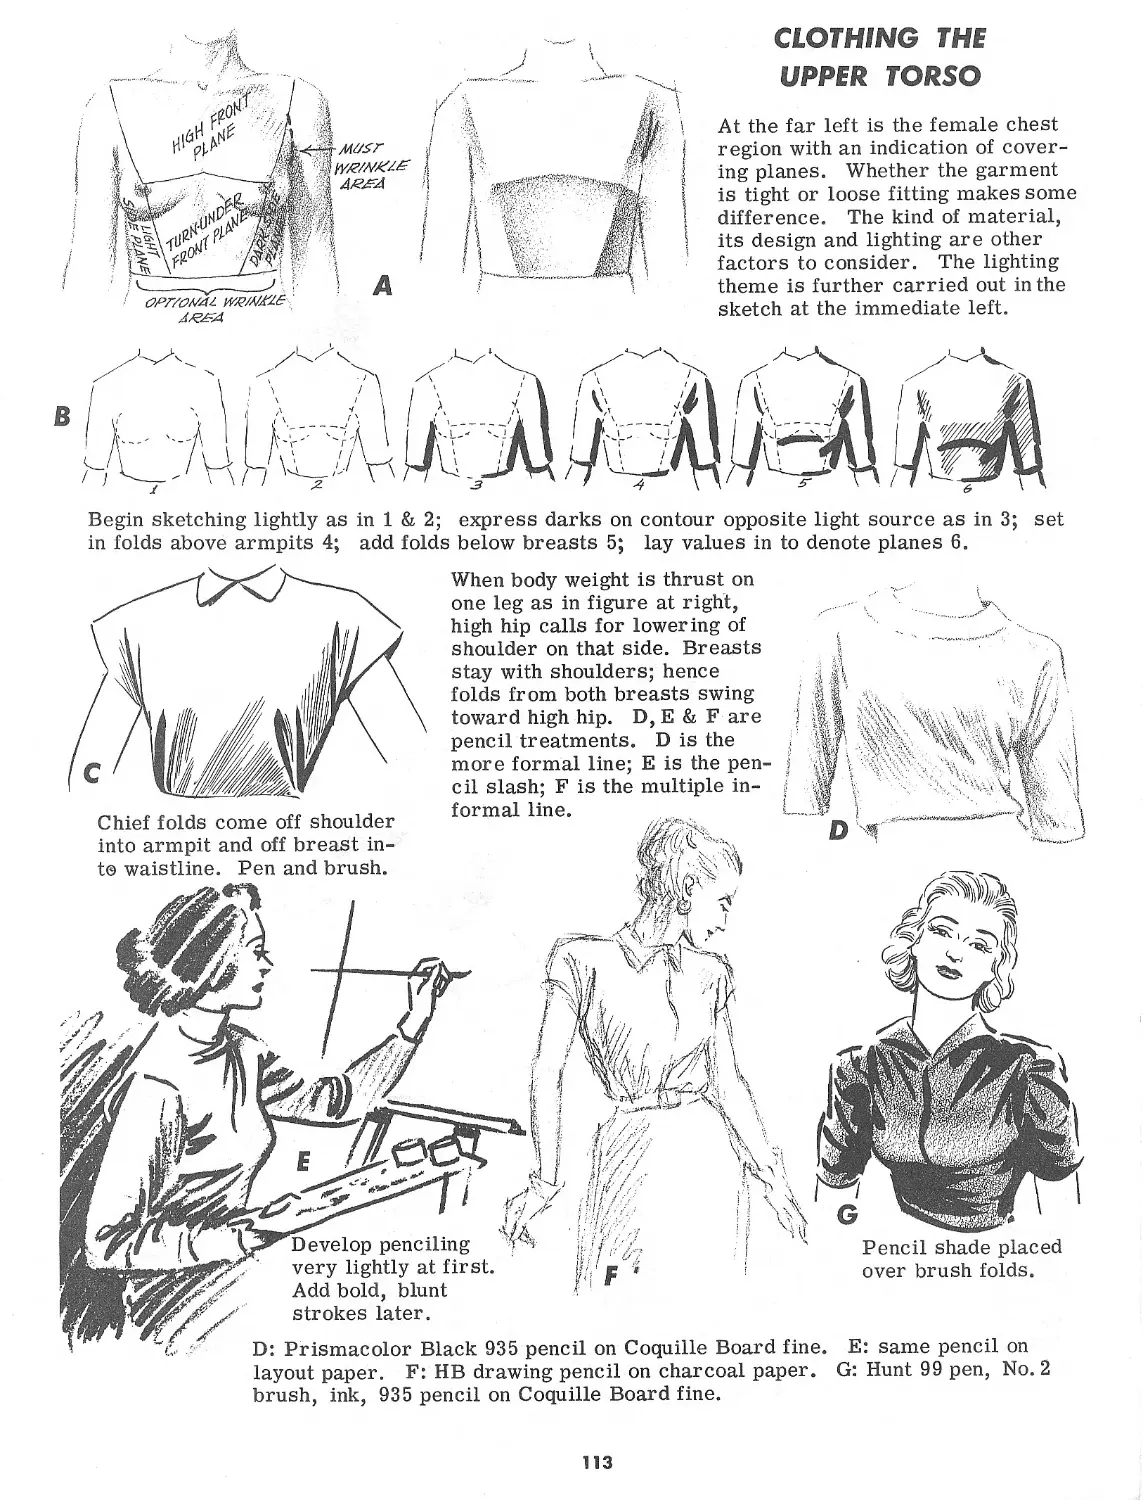
Clothing the Upper Torso.............113
Folds — Complex and Simple...........114
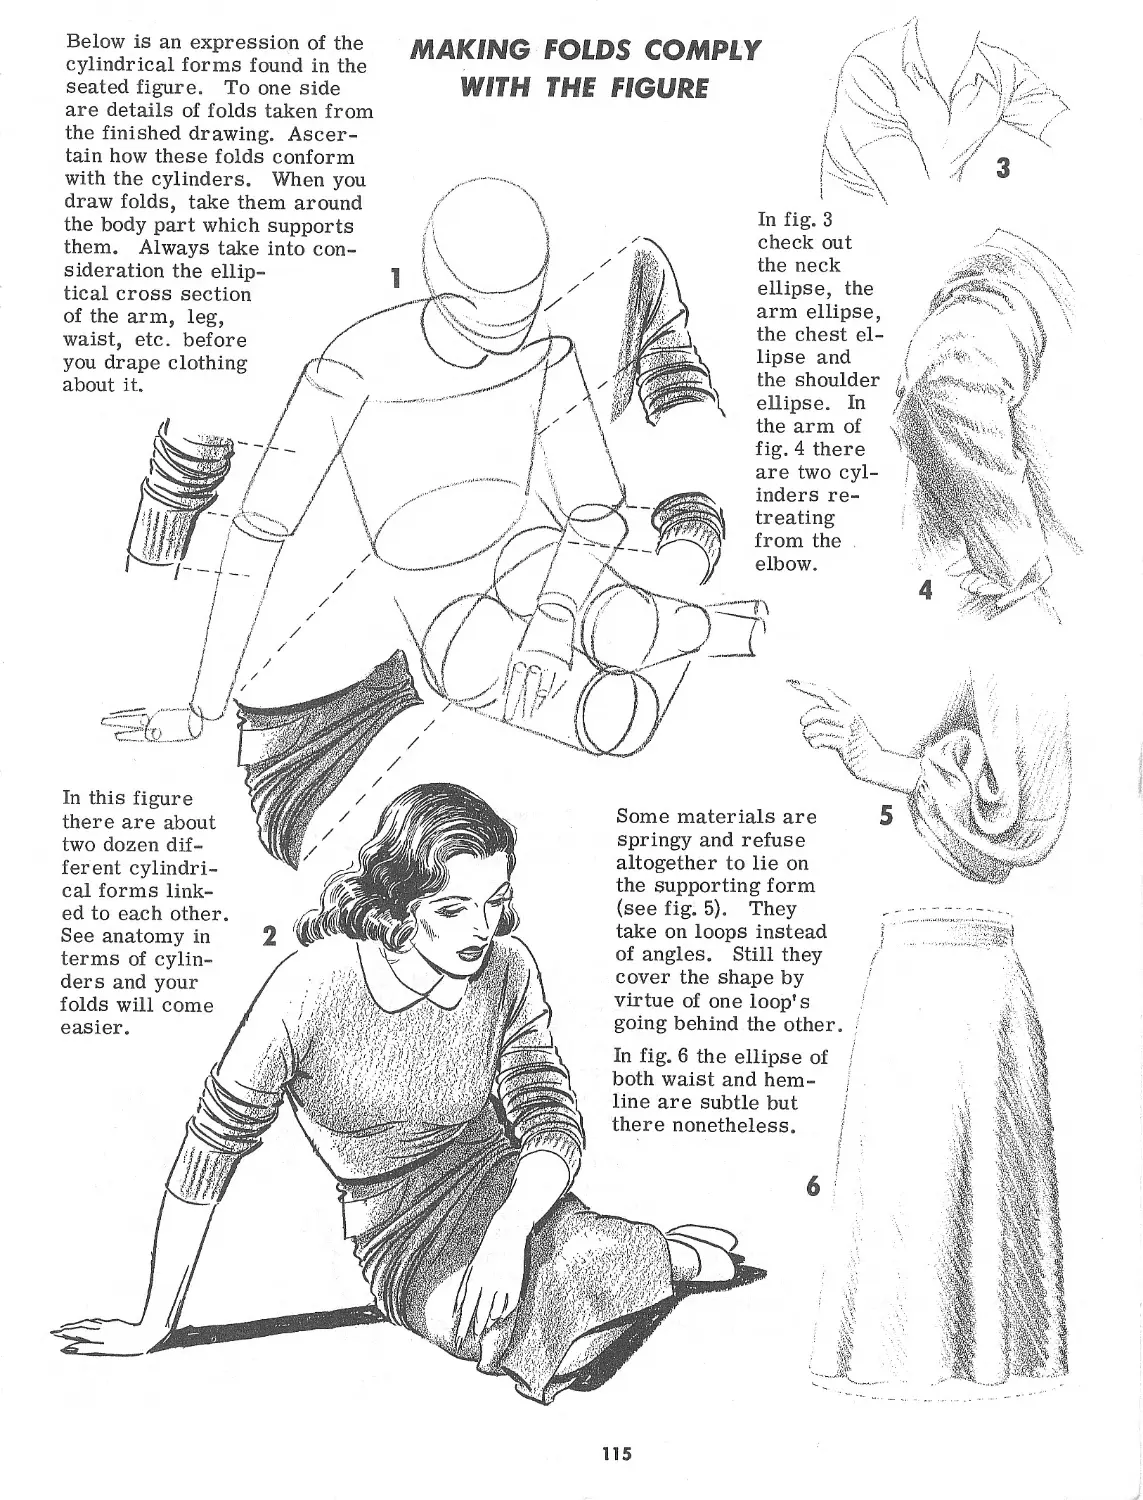
Making Folds Comply with the Figure . 115
The Male Figure and Clothing.........116
Notes on Simplified Body Frames .... 117
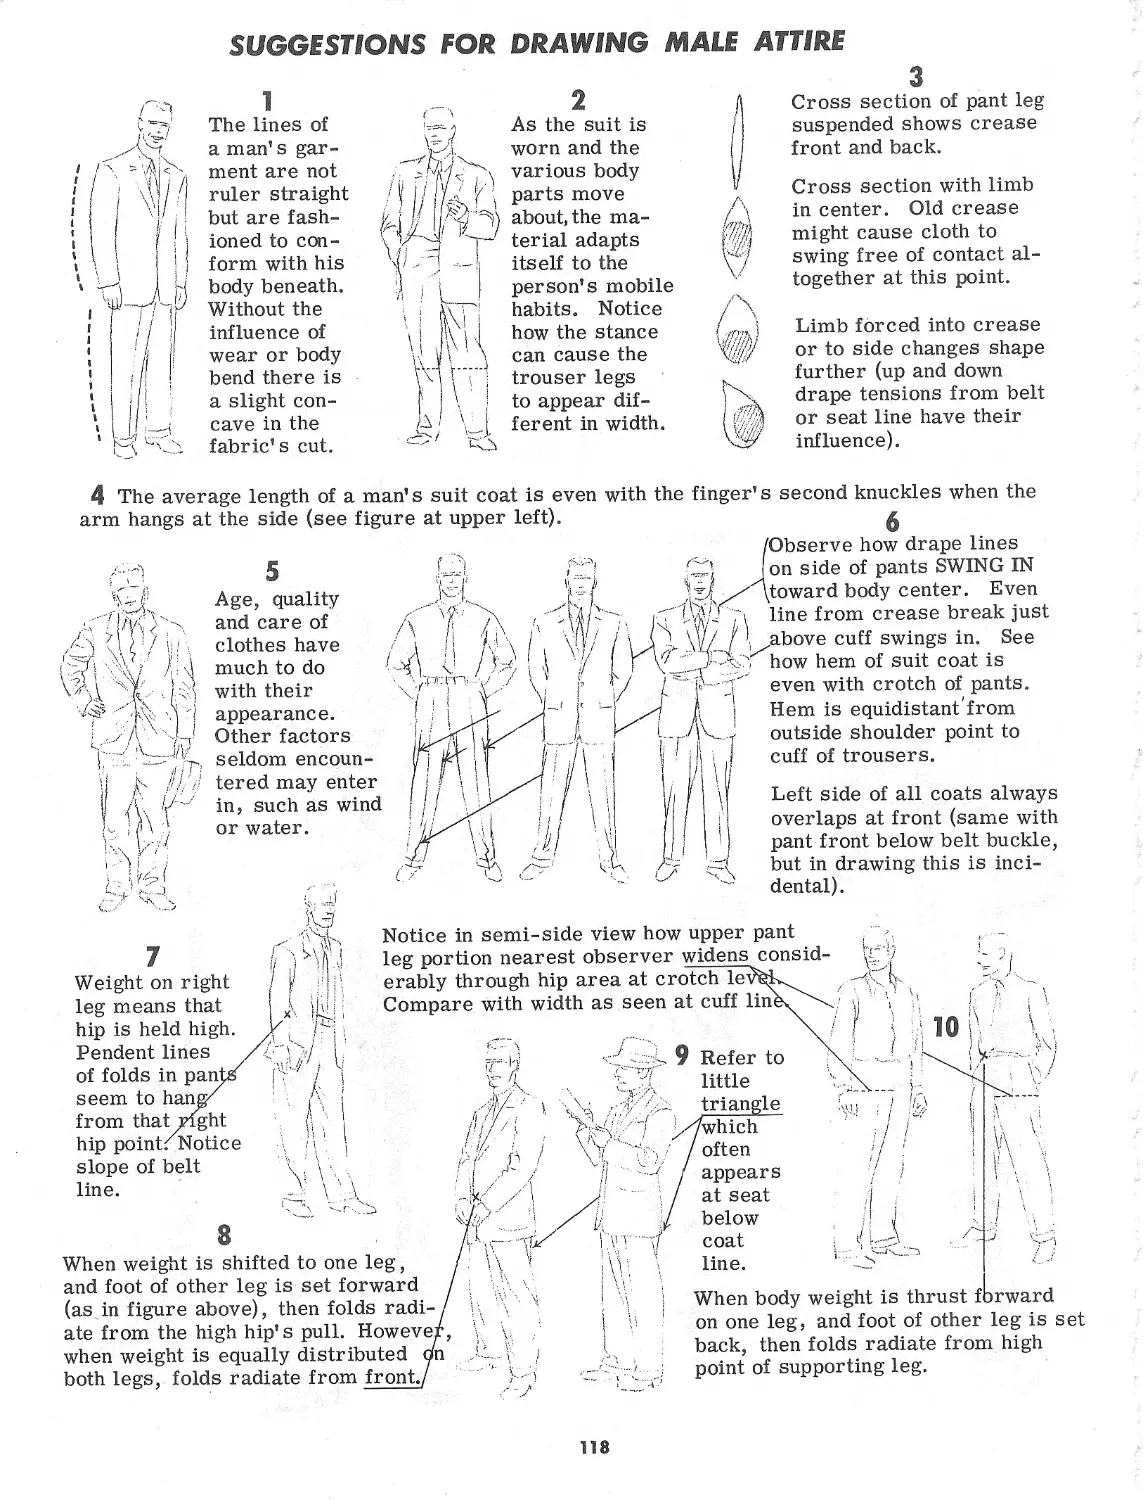
Suggestions for Drawing Male Attire . . 118
How to Draw Sleeve Folds.............119
Making Folds Easier to Draw..........120
THE HEAD-IN SIX FREEHAND STEPS
1 Sketch the egg shape.
2 Divide it equally both
ways. Mark off the
horizontal line in
fourths. Mark off
the bottom half of
the vertical line in
fifths.
3 Place the eyeballs
above the two top dots.
Sketch the nose line
on the 2nd dot down
and the mouth line
on the 2nd dot up.
4 Sketch upper lid line
and outer lip lines.
Bottoms of ears come
even with nose. Draw
outline for hair.
5 Sketch crevice for top
lid over eye and sug-
gestion for lower lid.
Add couple of lashes
to top lid. Draw brow
and bridge line of nose.
Sketch in values for
lips and hair.
6 Every face you do will
look slightly- different.
Don’t stop with one.
Carefully draw a dozen
or more until they be-
gin to look right.
HEAD CONSTRUCTION— THE DOUBLE CIRCLE
A mechanical method of setting down the proportions of the ideal female head. This method
is a learning device to acquaint the .._
student with proportions. Use it
sparingly — then sketch freehand!
1 Mark off line in fifths.
This represents width
of head which is approx-
imately five eyes wide.
Later,eyes will come
below 2 and 4.
2 Place compass point in
center of 3 at dot A.
Draw circle crossing
point B,enclosing line
which is five eyes in
length.
3 Draw vertical line
through center A.
Add distances 6 and
7 same as eye units
1 through 5. C will
be tip of nose later.
4 Divide distance 6 in
half, finding point F.
Use this point for
center of smaller
circle reaching to
E which becomes
bottom of chin. F
will be top of mouth
and D bottom of
mouth.
5 Carefully join each
circle with lines G
and H. Be sure that
lines do not go in-
side or outside of
circles.
6 Draw line J to К at
exact point where
lines G and H touch
large circle. Top
of eyes will later
touch line J-K.
2
7 Use point J to subscribe
arc K-M. Likewise use
Point К to subscribe arc
J-L. These arcs will
become cheek lines.
Shaded area is inden-
tion below cheek bone
which may or may not
show on finished face.
8 Draw two vertical lines
from points J and K.
These lines N-J and O-K
will be sides of head.
Notice how they trim off
sides of large circle
slightly.
9 Draw eyes below line J-K
directly below numbers 2
and 4 of the original start-
ing line. Draw nose on
line C directly below num-
ber 3 of original starting
line. Draw mouth between
lines F and D. Make mouth
overall a little wider than
nose.
Eyelids may be full
or shallow and will
come just above line
J-K. Upper lid may
not show at all. Eyes
may be dark, light or
in between. Various
shapes and slants of
eyes may be tried.
Cheeks may be flatter and
chin may vary in shape. )
Draw brows halfway between
eyes and original starting
line. Achieve variety here.
The straight mouth F
has many variations. Zj
3
BEGINNING THE HEAD—FRONT VIEW
3 After lightly sketching
the egg shape, divide
it in half both ways.
The average head is
approximately 5 eyes
wide. The eyes them-
selves will go over
numbers 2 and 4. Sel-
dom do 2, 3 and 4 vary.
1 and 5 may be narrow-
ed. Sideburns of hair
and an overlapping of
lashes from the eyes
may make distances
4 The inside corners of
the eyes will be on
this line. The outside
corners may be on it
or above it. The nose
tip is 11/2 eyes’ dis-
tance away from the
horizontal center line.
2 The general shape of
the head is far from
being a circle. It is
more ”egg” shaped,
with the smaller end
on the bottom.
5 When looking directly
at the head, the ears
are as long as the dis-
tance from the top of
the eyes to the bottom
of the nose.
6a The width of the eye
(opened normally) is
x half its own length.
/ The average eyebrow
/ comes up another half
/ an eye — this varies
I somewhat with type.
/ I
6 b The width of the aver-
age female mouth is
half an eye. The dis-
tance from the top of
the mouth to the nose
is another half an eye.
The width of the top
lip is usually about
1/3 the depth of the
mouth.
4
7 Many students are not able to construct
a well-proportioned face because they
violate the equilateral law of facial fea-
ture arrangement. Individual features
may be well drawn, but if they are not
in the right place the whole countenance
will look wrong.
8
Looking directly at the
face, distances A, В and
C should be the same.
Be sure to exclude the
eyelashes . (There are
some attractive faces
that are the exceptions,
but this is the rule.)
Common failings are: Eyes that are too
close together, noses that are too long or
short, mouths that are too far removed
from the eyes, chins that are too big, etc.
Simply the knowledge of this triangle safe-
guard will assist in placing features cor-
rectly.
As stated in the first paragraph, the
average head is 5 eyes wide. There
may be some variance where the dot-
ted lines appear. From the top out-
This eye’s distance may be rotated
around the outside of the bottom lip,
thus finding the chin and lower cheek
line.
9 Here is a sinister diagram with the eye unit 10
actually placed in the locations talked about.
Above is the face ’’wearing” the features
as we are accustomed to seeing them.
5
EXPERIMENTING WITH .4 FLATTENED PENCIL
. In all the arts requiring the drawing
£'л’- of people, preliminary sketches are
of great value. In developing these ч
’’roughs” make very light foundation-
-ТЧ . al lines first. VJU
'''•Narrow stroke
л Wide stroke
Draw eyes,
then brows
<ч
Make practice strokes every
half minute or so to see what
condition your pencil point is
in •— also to see if you are
holding it to make anticipated
stroke. .
Firm stroke
Stroke with
pressure on
one end----
Airy stroke
Mould hair
simply
Strive for correct
proportions
6
THE EYE— STEP BY STEP
Here is a suggested way of ’’building” the female eye.
Note: Always sketch lightly at the beginning. This will leave
your work pliable and manageable. The diagrams at
the left are more heavily drawn for emphasis.
The basic shape of the human eye is the football ellipse.
Choosing the point on the left side as the inside corner, this
basic shape may be slightly flattened at top left and bottom right.
3
The outer or right corner may be lifted a little above the
original center line (optional).
The inner area at top left often is bowed in (again optional).
Now, upon this foundation add several sweeping lashes at
top right.
5
6
Sketch in shorter lashes in abbreviated clusters at bottom right.
Add a light second line parallel to this lash line. This defines
the thickness of the lower lid. Begin to minimize lower left
outline. This is the fade-away portion which will keep eye from
looking too hard and unnatural.
7
Decide on direction of gaze and put in outer iris edge with inner
pupil outline. Make slight wedge-like emphasis by inside corner.
Sketch dark and light values in the circles. Gradation of values
varies with selected color of eye.
8
Add shadow area over iris on either side of pupil. A lighter
shadow area (beneath top lid) may be laid over ’’white” portion
of eye — on smaller drawings this may be omitted.
Add top fold of eyelid. This may be a narrow or wide strip or
it may hardly show at all. Heavy up the line out of which grow
the top eyelashes — this may be done all the way across. Put
in highlight either with opaque white or eraser.
7
POINTERS IN DRAWING THE EYE
At the peak of arch the top
hairs start growing down
to meet under hairs still
slanted up.
In the eyebrow, hairs grow
obliquely away from nose.
Fleck of white at lowest point
of lower lid curve indicates
excess moisture in eye. This
will appear more pronounced
in sad, crying eye.
The cornea is like a
mound on the eyeball.
The slight depression
where one merges in-
to the other may pick
up a little more shadow.
This helps to give eye
feeling of dimension.
Margin of upper lid rounds
off here. Margin of lower
lid squares off here and
usually shows, especially
from midway to outside
corner.
Notice how lower lid pocket
is moulded around eyeball.
Bright light
stimulates cir-
cular fibers in
iris and con-
stricts pupil.
In darkness
pupil gets
larger.
Top lashes curl up and lower lashes
curl down so they do not interlace
when eye is closed.
However, lashes with
pronounced curl come
down before they swoop
up. Hence the scallop
here.
In looking at a near object
the pupil is small; in looking
at a distant object it is large.
(If in bright sunlight, the lids
will squint to accommodate.)
Highlight is caught by
clear, wet surface of
cornea’s transparent
tissue. In a room with
multiple lights two or
three highlights may
As lid lowers, sharp fold
may become depression
in shadow
The lower the lid the
deeper the shadow
over the iris.
applies
in reverse
(though not
as much) to
lower lashes.
appear.
Lashes are actually
arranged in double
or triple rows at the
margin of lid. This
gives them tendency
to cluster as they
come out.
8
Sparkle or liveliness is
obtained by drawing pupil
More sparkle can be ob-
tained by placing high-
Sometimes it is quite
effective to show a
dash of highlight across
in its entirety. Avoid
light spot high on the eye.
showing shadow from lid
or lashes on iris or pupil
(for maximum sparkle).
portion of iris and pupil.
There actually is a
jreak in the corner
where lashes do not
appear. It is a mis-
take to draw them
all around the eye.
However, shadow
from the extended
lashes may fall on
the skin beside the
eye. Even in a
small drawing this
may be subtly
shown, though it
is not necessary.
Whenever mouth is in laughing
position, the lower lid pushes
up, covering part of iris.
(meaning ’’rainbow”) is the colored portion of the eye. The markings of
coloration converge toward the pupil. The various shades of blue eyes are caused
by pigmentation of the lens capsule showing through the texture of the iris. Gray,
brown and black eyes get their coloration from pigment granules in the iris itself.
Other colors of eyes are mixtures of these with the blue (which is always there in
all eyes) and the influence of the tiny channels of arteries, veins and nerves.
This coloration is more in evidence at the outer edges of the iris.
Some eyelids have several
delicate skin folds which
may become more
pronounced with
age.
The natural color of the
lids may be somewhat
zdarker than surrounding
flesh.
As the eye is opened, most
of the upper lid is with-
drawn in a deep fold here.
The margin of the lower lid is really thinner than that of the
upper lid. It shows more because it is moist and slick and
catches light readily.
An eye focused downward
will appear elliptical. The
eyeball starts to turn under
as it points its lens at its
intended subject.
9
THE EYE WHEEL
Making an eye wheel can be
an interesting experiment.
Simply cut a circle of draw-
ing paper and lay it over an-
other sheet. Mark off the
cheek lines so that they reg-
ister when the wheel is re-
volved. Be sure the features
come within the triangle dis-
cussed on pages 5 and 12.
You may draw one or more
face halves on the outside
of your circle.
One reason why there
are millions of dif-
ferent-looking people
in the world is be-
cause of the endless
combinations of fea-
tures — yet they all
take place within a
few square inches of
’’face space.” With
everyone being lim-
ited to just two eyes,
one nose and a mouth,
you would think most
humans would look
like everybody else.
For the most part the
contrary is true. We
are a world of individ-
uals with as many sep-
arate countenances.
Even so, the artist
finds himself getting
into a rut when it comes
to types of faces. To
offset this he should
file mentally scores of
feature differences. The
rewards are great!
The eye is the number one feature transmitting thoughts
behind expressions. There are eight areas of exterior
response which may work singularly or in combination:
the three general areas of skin alteration (where lines
may appear) А, В & C; and five sets of horizontals which
may move up and down, twist and tilt — these are rep-
resented by the five columns of numbers in the above
diagram. Though the normal setting of the eye and brow
differs with people, number 3 above in each col-
umn is considered the normal awake setting. Try flex-
ing the muscles around your eyes before a mirror.
Learn what can be done in these tell-tale response areas.
10
PORTRAYING THE FEMALE MOUTH
The mouth is singularly the most important feature of the face for
conveying the mood or feeling of the individual. It is the number
one sign of expression. It is forthright and seldom subtle as
the eyes may be. The corners of the mouth alone speak worlds.
There are around 24
skin creases across
the length of each lip.
In pronouncing sounds
like ”o” and ”u” they
show up more. In a
laugh they nearly dis-
appear. They run off
the mouth into the face
as old age comes on.
Even on painted lips
a highlight may be
divided because of
these creases.
Hollow above mouth
Part known as”Cupid’s bow”
Depression
may occur
here.
Under lip may catch
shadow from projected
If dotted
curve of bottom lip
were extended it would
cut back into face.
Dotted line of top lip
would shoot off into
space. This is the
general rule along
the full part of the
female mouth.
which may register
interesting shadow.
lip rim may
project farther
than lower lip.
part of the
mouth is the line of
the aperture itself.
upper lip.
11
THE LAUGH AND THE TRIANGLE
1 The distance between the top of the upper lip and the nose
is lessened (by the stretch from side to side). Ordinarily
this distance is half an eye (the unit of facial measurement).
Here Is an interesting and helpful phenomenon to observe
concerning the equilateral triangle guide that may be super-
imposed over the features of the face. This triangle with
the two top points at the outside edges of the eyes (not eye-
lashes) will have the bottom point falling at the base of the
lower lip IN BOTH THE STRAIGHT MOUTH AND THE
LAUGHING MOUTH. The reasons for this are:
2 Even though the lips are parted and the distance В is
increased, the distance A is shortened. Hence, A and В
together stiH add up to the one eye unit length.
3 The distance from the bottom of the lower lip to the nose
is approximately the same in the LAUGHING MOUTH and
the STRAIGHT MOUTH. In a normal laugh the set of the
teeth and the position of the chin are nearly the same as
when the lips are in a straight placement.
4 The foregoing is true in the NORMAL laugh. It is not so
with the yelling laugh or the hilarious laugh when the jaw is
forced open. Nor is it true when the mouth flies open in awe
or wonderment.
The above mouth is open abnormally.
Despite this fact, the investigator will
often be amazed at the results of the
triangle check. Just because you wish
to draw a wide-open mouth, don't ex-
tend the bottom triangle point too far.
The lips on the face at the right are
full — especially for a hearty laugh —
yet the three points of the equilateral
triangle fall into place remarkably well.
Try the measurements and see for your-
self.
GLASHA A
In the above diagram the various
external parts of the nose are iden-
NOSE CONSTRUCTION
In the column at the right
are the lower areas of
noses which might be ei-
ther male or female. The
greater difference between
the two is told by the front
view where the male char-
acteristics are less deli-
cate. Find and name the
nose parts in the semi-
front view sketched below.
1 Pointed tip,
flat septum.
2 Septum tapered
into tip.
tified. Notice that the nasal bone
comes down almost halfway be-
fore the cartilage takes over. This
is sometimes marked by a slight
widening. The glabella is the smooth
area between the brows. The pro-
file nose is half on the face and half
off (see middle-point arrow).
MALE NOSES
1 Aquiline tip,
hooked around
end.
2 Relatively flat
plane across
nostrils.
angled wing.
4 Pert nose,
small nostril.
5 Nostril angled
down.
5 Wide ball,
tapered
septum.
3 Large round
ball, nostrils
hidden.
Large straight-
across nostrils. 4
4 Small round
ball, nostrils
barely dis-
cernible.
3 Rounded nose
parts, small
nostrils.
6 Long nostril,
rolled septum.
4 Low-hanging
septum, large
nostrils.
... •
7 Angled septum.
6 Small ball
squared.
5 Flat septum,
squared wings.
8 Under part flat.
6
Shape some con-
sider standard.
9 Back of wing
flattened.
13
USING THE FEWEST LINES IN DRAWING THE NOSE
Above are eight simple suggestions for front
view female noses. It is usually well to indi-
cate the two depressions on either side of the
nose between the eyes — at least put in one
of them. The nostril cavities may be lost in
the thin shadow of fig. 2 (line may be thickened
denoting a little more shadow) — this is the
simplest way of treating the nose. Never put
in two round holes by themselves. The two
slash marks of fig. 1 may be used without the
outside nostril lines but should be carefully
placed. A line along the side of the female
nose is always risky for the beginner and
might best be left out. In 3,4, 7, and 8 a feel-
Here are eight ways of drawing the male nose
in a semi-front position. The patterns for both
male and female may be interchanged. The
male is usually more coarse; the female more
delicate. The farthest nostril ’’wing” may
or may not be in evidence, depending on the
relative width and length of the lower part of
the nose. The wider the nose between the out-
er nostrils, the more likely the farthest one
will show. As the face is turned toward you
both wings will show in any event.
Below are a dozen nose variations, the
completed profile with the first.
ing of light is coming from top right. The
nose will take a little shadow without any be-
ing placed elsewhere on the face proper. A
corresponding bit may be added beneath the
chin, however.
...
Notice the difference m
bridge, nostril and tip.
Above, a reminder
of the simple arcs
(black lines) that
may be used. Don’t
draw the circles.
each brow,
Try them out!
If lines are drawn
from eye corners to
lip corners, the cross-
ing point will be close
to the nose tip. (For a
straight head-on view
only.)
How much attention to give the vertical alongside the front-
view nose? If entire face is in partial shadow, it can’t be
ignored. If face is in full light, be safe, treat it lightly.
Study similarity of nose and cheek
shadows at left. These two treat-
ments worth their weight in gold!
14
THE NOSE FROM VARIOUS ANGLES
1 A semi-front nose.
2 -The far nostril re-
moved and brought
down (look at its
shape).
3 The same nose in
flat profile (dotted).
Notice how the bridge
line changes going
back to the tilted
semi-front view.
1 A nose turned so that
the far nostril cavity
is just out of sight.
2 Only the wing’s rim
is showing.
3 Observe how the far
cavity hugs the septum
line, being just beyond it.
Here the far nostril cav-
ity is but a trace. Same
drawing in line below.
Above examine the various
cross-sections of the fore-
shortened nose. See how
the base attaches to the face.
In the diagram at the right the skull’s
opening is pictured behind the nose.
Acquaint yourself with the mound of
bone on either side of the cavity. Feel
of your own. This will sometimes
catch a highlight; it is a gentle rise be-
tween the sink of the inside eye corner
and the sink beside the nostril wing.
The far eye
sets like the
sun beyond
nose’s ridge.
Top view, wings
extra wide apart,
rounded ball.
High, rounded
wings, thick
undefined ball.
Wide furrowed
septum squared
onto area above
lip.
Under view show-
ing angle of wing
attachment, very
narrow septum.
Squared ball,
flattened under
surface, low
flat wing.
Wing groove
brought for-
ward and down,
tip flattened.
15
DRAWING
THE EAR
SIMPLIFYING THE EAR IN SIX STEPS
Above are the major parts of the ear set down in a
suggested sequence. The basic construction of all
ears is the same even though they may differ some-
what in appearance. Notice how the lines in fig. 2
bypass each other. The ”Y” in fig. 3 is raised; the
area immediately surrounding is lbwered. In fig. a
at the far right observe how the helix or rim at the
top may go behind itself. Too, see how in fig. b
the rear rim may bow toward the head,or in G (next
to the bottom line-up) it may bow away from the
head. In figs, a & c the anti-helix or tail of the "Y"
sack /=;га¥г
Though it is not neces- (marked x ) may protrude
sary to learn the names in some instances,
of the parts, for your in-
formation they are given above left. The tragus and anti-tragus
are designed to protect the notch or orifice between, into which
the sound enters the head. The concha is the deepest part of the
outer ear structure and nearly always catches some shadow. The
lobule is softer and less rigid than the rest of the ear. It may
grow out from the head or hang pendant-like from the ear.
Above are different ears from various angles. Looking down from the top and back (A) the forward
part of the helix appears to loop in sharply above the orifice (hole). The front of the lobe is attach-
ed just above the articulating part of the lower jaw (feel yours with your finger), and the back of the
concha attaches just in front of the mastoid bone (see drawing E).
Examples of ears done with pen or brush using ink. Different lighting playing on the many ridges
produces numerous possibilities. Learn the essentials of the ear’s form, and observe ears!
16
THE NATURAL FALL OF HAIR
As VARIETY is the keynote in much of art, so variety plays a great part in every well-drawn
coiffure. In the magnified section of hair in the circle at the bottom of the page notice the
variety of widths in the swirling locks of hair. The next time you are sitting behind a woman
observe the layers of locks. In the diagram the under-locks 1,2 and 3 are of varying widths.
The same is true with the over-locks 4, 5 and 6. Yet each set of locks combines to form a tuft-
unit owing to common value (darkness or lightness which may be due to shadow) or common
swirl (the direction of the separate tresses).
1 Even though hair has been run through a comb and is hanging
naturally, it has a tendency to spring into individual clusters.
One reason for this is that the scalp is not level. The follicles
holding the hair roots are slanted differently on this changing
scalp line. Consequently the hair soon forms a lock after it
leaves the surface of the scalp.
2
A second reason for these
clusters is that the hair
picks up electricity and
each hair is attracted to
the next hair. So they
arrange themselves in
groups as they hang.
3
The head moves more (under most
circumstances) than any other ex-
ternal part of the body. This, along
with subsequent shifting of air cur-
rents about the head, causes light-
textured hair to break up into mobile
strands and tufts.
The degree
of dryness
or oiliness
as well as
the weight
of the hair
itself has
much to do
with the way
hair falls.
5 Artificial devices and setting solutions
may divert the natural fall of the hair.
Even so, it must be made to resemble
the pliable, airy material it really is.
A CLOSE-UP OF HAIR
In the inner circle on the right
you have the minor breakdowns
of locks of hair as they might ,
appear. Of course, with a
toss of the head this forma-
tion would change.
The arrows at the bottom
indicate the general direc-
tion all the hair is going.
A and В locks finally fall
into line perhaps to sep-
arate a little farther down.
Study the various widths of all
hair strands 1 through 10. Natural
variety is one of the keynotes in
successfully drawing hair.
Examine the locks. Notice
how strands 4 and 5 in lock
В are separated by a de-
pression no wider than
a line; whereas, strands
5 and 6 have a deeper
and wider depression 7.
See how strand 6 turns
completely over into the
sub-strands marked 9's.
Eight is a deeper depres-
sion than 7 and darker.
Eight and 10 are going in
the same direction, but 10
is on top of 8. The general
hair-set of all the locks A
through E is influenced toward
the right at the bottom.
17
A highlight area
Make the hairline
on the forehead
soft and natural
Areas of parallel lines ‘
may be drawn easier
when hand is ’’inside”
the arc
Sheen put in with
opaque white
Looking head-on
Observe ’’ribbon” twist in hair
18
Some-
times
a tress
will have
a spiral
twist
A few
loose,
broken
lines at
outer
edges
Looking into
a ringlet
at a ringlet
Contrasting under-strips
of dark shadow will make
blonde hair appear lighter
One of the objectives in drawing hair
is to make it appear fluffy and weightless.
Learn to ’’think texture” with your pen or
brush. The blonde hair on this page was
done with pen. Facial features were
done with brush. Spare areas of pen-
cil tone were added to the coiffure above;
values below were obtained
entirely with line.
Notice: no mechanical
Watch for sheens
oF highlight and
lowlight in hair
SUGGESTED SIMPLIFICATION OF HAIR
This drawing is presented for the purpose of studying further what
hair actually does. Before one can interpret, simplify or abstract-
ly portray hair, he should become
familiar with the real
thing.
Using the above sketch
style, partially outline the
changes of plane (where
the whites become grays
and the grays become
blacks) in the hair
on the big head.
Try treating
the sections
as a mass.
км
At left are two excerpts of hair done in a still freer style than
that on the large head. The blonde is pen. The black is brush.
In the freer blonde technique, leave out more lines than exam-
ple B. In the more casual black rendering, add to, in fact,
close up the bulk of the numerous lines in example C so that
you are working with wider blacks. Strive to become inven-
tive in your own style.
19
WAYS OF DRAWING DARK HAIR
*
There may be times when you will por-
tray black hair by making it completely
solid, but it is likely to look flat. Bits
of sheen and sparkling whites will give
it life and lustre. In the midst of a sea
of black make the small line groups go
with the flow of hair.
When there is a crisp demarcation between black
and a strip or spot of highlight, it is best to put in
the blacks first (A). If there is a merging of black
into the highlight, start with your line group and
close it into black by pen or brush pressure (B).
Above is an example of a
pencil screen thrown over
the lighter areas after the
darks have been applied.
Use a grained 2-ply board.
In every coil or round mound of hair there
least a few lines that run clear through the
light. Try limited flecks of opaque white also.
20
WAYS OF DRAWING LIGHT HAIR
Blond hair is depicted by keeping
the overall rendering in a light key
including most of the lowlights or
shadow areas. Line groups are
held open and may be limited in
number. Usually they appear in
a surface valley in the hair; when
not confined there they are subtly
employed to record either
shape or direction of hair.
In setting in a line group
the lines themselves are
seldom if ever straight.
Within the arc they sub-
scribe there is a parallel
feeling (A), but the groups
may swing first one way,
then another to comply with
hair placement (B). The
rounds of hair may contain
lines that fan (C).
In most styles
hair will lift and
fall off the fore-
head (D). If there
are ringed clus-
ters, don’t for-
get to stagger
them (E). Learn
to draw hair to
swirl behind
itself (F).
21
DRAWING MEN'S HAIR STEP BY STEP
1 Pencil skull
and ear line.
2 Decide on hair
line and amount
of hair rise.
3 Brush line just
below part, be-
hind ear, top
and front.
4 Fill in rest of
darks suggest-
ing highlights.
5 With pen put in
middle tones in
fleecy groups.
Of course, there is no end to the many possible hair arrangements, textures and shades. Num-
ber 6 is an example of straight, dark hair. In 7 the hair is extra fine and wavy. Curly, middle-
toned hair is drawn in 8. In 9 blond, relatively straight hair is shown. Notice that the hair in
10 goes forward from the part line and then back; whereas in 9 the hair goes back from the part.
Regardless of the technique used in drawing hair, it must be
made to look soft and pliable. The hairline on forehead and
at temples should have a light, Informal edging. Male hair
lies in pliant strips, conforming to the skull shape beneath.
If there is a part, watch for highlights on
either side. Usually it is well to have broken
lines about the outside
contour. Look for the S-
curved sweepback from
temple to behind the ear.
22
23
The foreshortened female face from the side is not hard to draw once one understands what
is happening. Often the ear is the key as to what parts of the facial features are exposed
to view.
FORESHORTENING THE HEAD FROM THE SIDE
First consider two
The extreme rear
view which has
these two bone
regions barely
3
showing.
As the head turns, the
4
From contour alone
this position discloses
a laughing expression,
though the mouth is
entirely hidden.
eyelashes of the upper
lid usually come into
view first, and possi-
bly the tip of the pen-
ciled or extended eye-
brow.
A little more turning
of the head reveals a
bit of the eyelid.
Brow may or may not
show.
6
Then tip of nose shows,
and a small portion of
the lips may or may not
show, depending upon in-
dividual features of the
person. Notice ear high
(above eye-level) and ear
low (below eye-level).
24
An example of a small
mouth still not showing,
and yet both upper and
lower lashes are in evi-
dence beneath a low brow.
8
Heavy lid with white eyeball
not drawn owing to its ’’water-
like” contour. This ear is
flat to head, but most ears
are set out.
9
Heavy lid looking down.
Notice S line made by
eyebrow and malar bone.
10
Protruding eye promin-
ently displayed. Observe
’’cut-off” line of cheek
area in front of nose base
and mouth.
Example of emphasized
lashes and arched brow
coming down to meet
line of frontal bone.
There’s just a suggestion
of the pupil. Note broken
’’cut-off” line of cheek.
Prominent cheek line
even though face is ap-
proaching straight pro-
file position. Socket line
drawn pointing toward
high brow. See ’’cut-off”
line hiding mouth corner.
25
of nose
13
Watch how bridge
may run into eye if face is
in semi-profile; whereas
bridge line runs below eye
if face turns away, and
above eye. if face nears
complete profile.
14
In this position laughing
eye is drawn close to
’’root” of nose at forehead.
Continuous cheek line
intercepts nose and mouth.
Faces foreshortened from
side and top. See how nose
tip ’’boxes" in eye.
Left, eye would be big orb
and wide from front. Right,
eye would be relatively
small from front. Both
these faces are almost in
exact side profile.
17
Face foreshortened from
side and bottom. Notice
peculiar "cut-off" of cheek
line.
26
THE FEMALE PROFILE IN EASY SEQUENCE
1 Sketch a square and
divide it in fourths.
2 Divide lines a & b in fourths
and line c in half for skull.
3 Divide line d in fourths
and draw jaw line.
4 Start nose just inside square
and above center line.
5 Draw eye line just above
center line also.
6 Make eye "arrowhead" and
similar shape for mouth.
9 Complete feature
and hair details.
3 Divide lines e & f in half for
neck and draw hair outline.
7 Join upper lip with nose, put
in brow and ear as shown.
Above are some very simple profile types. Create some of your own. Always sketch lightly!
27
is
When a straight line, above left,
J dropped from the brow’s apex to the
, chin, the upper lip nearly always
comes well in front of it. In fact,
the profile is built on a curve (A)
When drawing someone’s pro-
file be extremely observant of
the directions taken by the
line parts, also their compar-
ative lengths. In your mind’s
eye extend the contour lines to
better find their angles and
shape. Particularly notice the
relative slants of foreheads,
brows, tops and bottoms of
noses. Good portrait draw-
ing comes from a constant л, ,
comparison of distances.
and not with all the features on a
straight line (B). Another common
error is to push the forehead and
chin in front of the straight line (C).
A little-known fact about the eye which
applies in profile is that one cannot
move the upper lid without the lower
lid moving too, though to a lesser de-
gree. Still this is enough to affect the
eye’s position (see dotted line at right).
When face is only slightly foreshorten-
ed (far right), closing eye appears to
drop considerably.
28
From above, eye
curve is reversed.
Depression above
inside of eye often
catches shadow.
Line may connect
brow and eye.
From under, lids
are convex.
Seeing "through”
lashes, notice how
upper lid may car-
ry around and down.
Lashes may show on
other side of nose.
DIFFERENCES IN MALE AND FEMALE PROFILES
More males have slight indentions in foreheads
than females.
2
As a rule male brows extend out farther than
do those of females.
3
Bridge root of female nose is more likely to
be rounded, at least to some degree, than males.
4
Male noses tend to be somewhat longer, but
only because entire head is a little larger.—
5
6
There is more likely to be a curve between
mouth and nose of the female than the male.
7 Overall thickness of male lips is less than female^
8 Male chins tend to be bolder, more pronounced
than female chins.
29
IN FASHION AND DESIGN
THE HEAD
Try incorporating these optional character-
istics in your female fashion heads:
Heavier upper eyelid
Longer lashes or pronounced eye rims
Extra dark around eyes
Eyes sometimes closer together
Slight slant to eyes
Thin nose with nostrils closer
Sometimes smaller mouth
Usually passive expression
Sunken or flat cheek line
More pointed chin
Slender neck
Freer lines — even wispy
Informal strokes as if
by accident
Optional male characteristics:
Often no upper lid
Sometimes squinty eyes
Lower brow
Tapered nose
Bony cheeks
Thinner face
Sophisticated or
carefree look
Usually more ragged
line treatment
30
THE MALE PROFILE IN EASY SEQUENCE
Draw a rectangle (1/8 deeper than wide) and divide it in half both ways. Start at left side of rec-
tangle (1). 2. Draw nose line (about 1/5 rectangle’s height) with root just above halfway mark.
3. Nose height same as distance from lip to chin; upper lip half of that. 4. Draw lip line. 5. Set
in small brow triangle outside of perpendicular and similar lower lip triangle inside of perpen-
dicular. 6. Hair line is nose’s height from brow point. 7.Draw another small modified triangle
inside perpendicular at hair line. 8. Draw jaw to center head line. Also bottom of chin and top
of hair. 9. Draw eye directly above center line. 10. Sketch brow over eye. 11. Add short line be-
neath eye, two nostril lines, and three lip lines as shown. 12. Complete hair lines, neck, and
back of head. Add ear behind center line even with nose. Following are suggested techniques.
line sketch
with Hunt 99 pen
on 2-ply bristol.
Zigzag line sketch
with Hunt 99 pen
on 2-ply bristol.
Done with
cloth tied over
wooden matdh,
ink partly dry. Few
Lack and white flecks
added. Reverse side
coarse coquille board.
31
HELPFUL POINTERS IN THE MALE PROFILE
What would be an ideal face
to one would not be to another.
At left are proposed indention
marks for various parts of the
profile. Surely they are not
the same with all faces. More
often than not, marks 1,2 & 3
are in line with each other.
"0 The small retreat under the
' lip will most likely be the far-
thest point back.
Omit-
ting
0fi high
1 lines;
0' accent-
ing
low
lines.
Strive for freedom of line in
your sketching as you progress.
Try to break away from long,
hard, continuous lines.
Z 3 4 & & 7 <9 9/6 JZ Z3 /4
Here are a few simple, linear types. 1 & 2 have the profile’s bare essentials. Usually it is
well to start with the nose, then work up and down from it. There are millions of possibilities!
+ S' ё, 7 S
Notice the different brow placements above. Eye shapes and expressions have endless variations.
Catalog some of your own making. Observe eye depths, widths, lid formations, wrinkles, etc.
<5
The mouth has every bit as much to do with expression as do the eyes. Just the corner turned up
or down slightly makes worlds of difference. A short shadow line may suffice beneath lower lip.
32
RECORDING THE PLANES IN THE MALE HEAD
Studies of Lincoln afford ex-
This drawing is done chiefly
Notice exceptionally heavy
Grease pencil on
charcoal paper.
Above are the major planes of the face with the under- / "J '
lying frame of bone which causes them. One way of \____________-
portraying pronounced masculinity is to stress the ap-
pearance of the zygomatic arch (cheek bone) £ and the
hollow beneath it which slants to-
ward the mouth. There is a strip
of flesh in the black area of dia-
/ vW gram 3 which protrudes as a re-
-— W|i suit of repeated pullings of two
v'/facial muscles (indicated above
f'' hollow) which lift the mouth cor-
•/ Wi? ners. Evidence of this usually is
. Si 'Wu jMBr&i recorded in the drawing of a good
. S W male head. Check these points in
t 4 Г' the attending sketches.
with straight lines and angles
both in contour & plane. Pris-
macolor 935 pencil on coquille.
brush lines in head above.
Compare this concept with
skull structure at top of page.
cellent opportunity to express
marked bone work. Grease pen-
cil on coarse water-color paper,
33
DJFFERENCES Ш THE MALE HEAD - FRONT
After one has studied and practiced the opening sequences
on the female head, he can employ the same essential ap-
Below, left, the principal key to foreshortening is illustrated. You are look-
ing down into or up into a series of circles upon which the features lie. There
is a "show line” and a ’’disappearing line” in each case. Study the diagram.
proaches in drawing the male head. The head of the male
reveals more of the underlying bone, is more angular,
more rugged. The brows are heavier and usually lower
placed. The lip line is thinner, spreads wider. The jaw
is heavier and more strongly defined. The neck is thick-
er. Never start on an individual feature and carry it to
completion, but think first of the head as a whole. Indi-
cate feature placement. Go back and forth several times
from one feature to another — this will prevent your los-
ing concept of the whole.
34
35
DRAWING CHILDREN'S HEADS
Points to remember in drawing heads
of children:
The face is smaller in proportion to the
rest of the head
Back of the head sticks out farther and
neck is smaller
Usually the ear is larger proportionate-
ly than rest of features
The iris or colored part of the eye ap-
proaches adult size and in its small?
setting is nearly fully exposed ч
The eyes appear a little wider apart
in very small children
Whereas lashes appear longer, brows
are much thinner
Early nose is usually upturned; center
septum is flatter in babies
Upper lip protrudes at first; mouth has
more indention at corners
Chin is less prominent and recedes
Early cheeks are rounder
ft 3-5 b'6
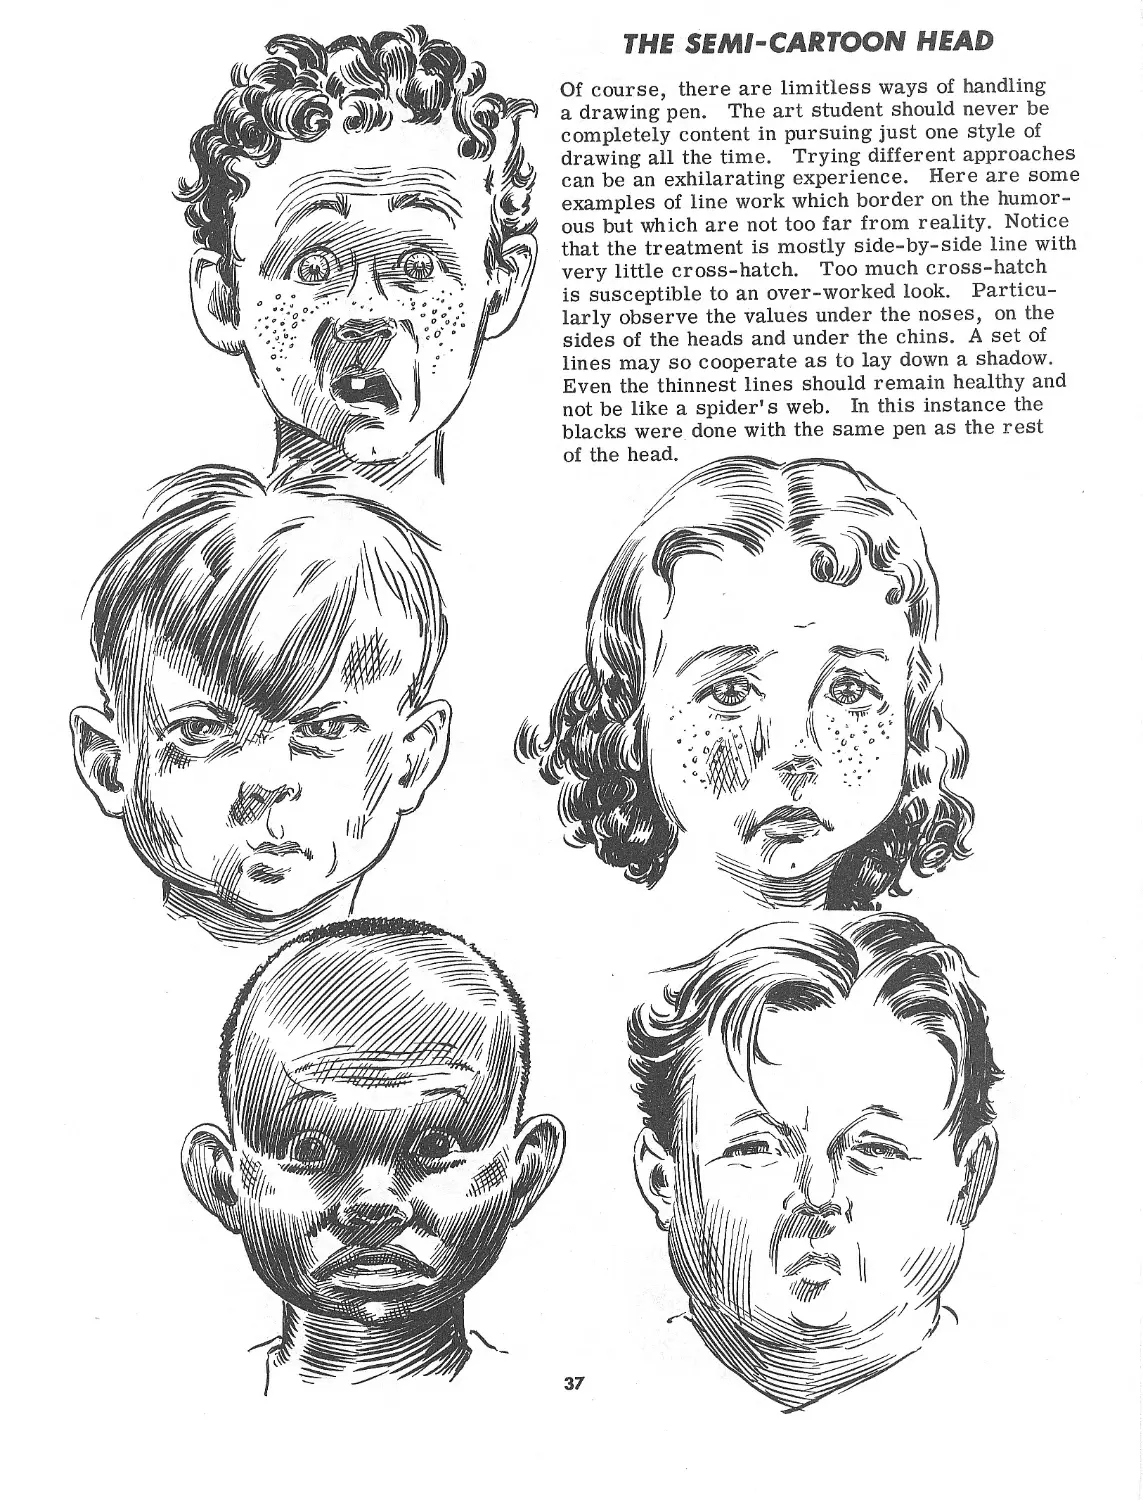
THE SEMI-CARTOON HEAD
Of course, there are limitless ways of handling
a drawing pen. The art student should never be
completely content in pursuing just one style of
drawing all the time. Trying different approaches
can be an exhilarating experience. Here are some
examples of line work which border on the humor-
ous but which are not too far from reality. Notice
that the treatment is mostly side-by-side line with
very little cross-hatch. Too much cross-hatch
is susceptible to an over-worked look. Particu-
larly observe the values under the noses, on the
sides of the heads and under the chins. A set of
lines may so cooperate as to lay down a shadow.
Even the thinnest lines should remain healthy and
not be like a spider’s web. In this instance the
blacks were done with the same pen as the rest
of the head.
37
ADDING AGE TO A FACE
'A
Points to remember in drawing elderly folk:
Hair thins or turns noticeably white
Definite lines remain in forehead
Eyebrows may become sparse or scraggly
Eyelids have tendency to droop
Socket bone protrudes as eyes sink back
Wrinkles form around lower lid pocket
Slight depression may occur at temples
Cheek bones become prominent with
hollow below
Ears lengthen; lobe hangs pendant-like
Ball of nose may appear to swell
Mouth sinks back and wrinkles run off lips
Flesh drops at jowls
Chin bone protrudes
Neck becomes gaunt; skin hangs in drapes
38
PROPORTIONS OF THE HUMAN FIGURE
The unit of measurement in drawing the human figure is usually a "head’s length." The
average height is thought of as being 7 1Д heads. However, race, sex, age and individual
physical differences prevent setting down any fixed rules as to anatomical proportions.
Most artists prefer a male
figure 8 heads high. Some-
times a petite female draw-
ing as small as 6 heads
desired. For purposes
fashion or grace the
female may be 8 or
even 9 heads tall.
is
of
nipples
navel
crotch
floor
fingertips
Readings on
the right go
bottom of knee
left.
Above is a figure 7 1Д heads overall. To
the left is the same head and torso propor-
tion as in the shorter figure, but the arm
and leg have been altered to comply with
the 8-head height. Many artists prefer the
extra length in the legs. The half-head
longer ”C” leg is sometimes used with the
"B" arm length.
Of course, it is not necessary to draw the re-
peated row of heads. In this case they are pic-
tured to help retain comparative relationships.
First, mark the edge of a paper scrap with your
chosen head unit and follow down through your
sketch as it is developed. After considerable
practice you will be able to sense the proportions.
39
THE SKELETON BENEATH
/ШМЕЙ4/Е
Едстгг/м
eoeerx
С/.ЛГ/Л'Е
SMTWEA
<S4e44S'-
MEMCdEPUZf
7/4А7Д
$7WVW<
JZ7EE/jB
/Д/Д/А4
EAtS/S
7^с‘///г//и
FRONT
eswe-
едсед/ад
7VEV7^-
Ш4---
ялрше—
СЕР7/СД7
Д4Ш&4Е!
-ла^ЛТЯ/
—ллг^рта/
'ГЕМРОРДД
— ХП$£М1Д77е
—М4У/77Д
___мдее/ТЗДе
, ТГЕ’ГЕЕИ'ЛДЕ It&ttF.B&l
. -7S7 тд/ЕЕЛС/е кяегджел
!---ЕЛР/ЕТДД
- ясе/р/тад
г тт/арде/е
a>aw
BACK
«TiKzwsf
77S/4-
г/вшЛ-
The human skeleton has about 200 separate bones. Sixty-four of these are in
the hands and arms alone. The chief concern of the art student is to acquaint
himself with the ’’show” bones that have bearing on the surface forms. They
are important and not as difficult to learn as one might first imagine. The
long bones, found mostly in the four limbs, play the biggest role in body move-
ment. Besides being strong support bones, muscles convert them into marvel-
ous mechanical levers. Their smooth extremities are designed for articulation.
The plate-like bones such as the skull and ilium of the pelvis serve in a protec-
tive capacity for delicate tissues and organs beneath. In addition, a few power-
ful muscles find their origin on these bones like the temporal muscle on the
side of the skull which raises the lower jaw, and the thigh and hip-joint mus-
cles which have their origin on the crest of the ilium. The cage of ribs
forms a basket protection for life-propelling organs, besides being elastic
for breathing expansion and contraction. Then we have long bones, plate bones,
and thirdly, irregular bones found in the face, spine and in the hands and feet.
There are four kinds of bone joints. Ball and socket joints have a rounded head
fitting into a cup-like cavity (shoulder and hip). Hinge joints have a forward and
backward movement (elbow and knee). Pivot joints (as occur between the head
of the radius and the radial notch of the ulna — outside of elbow) allow for a
twisting action. Lastly, gliding joints have a limited movement (in spine and
between carpal and tarsal bones in hand and foot). Other sections will deal
further with bone functions.
40
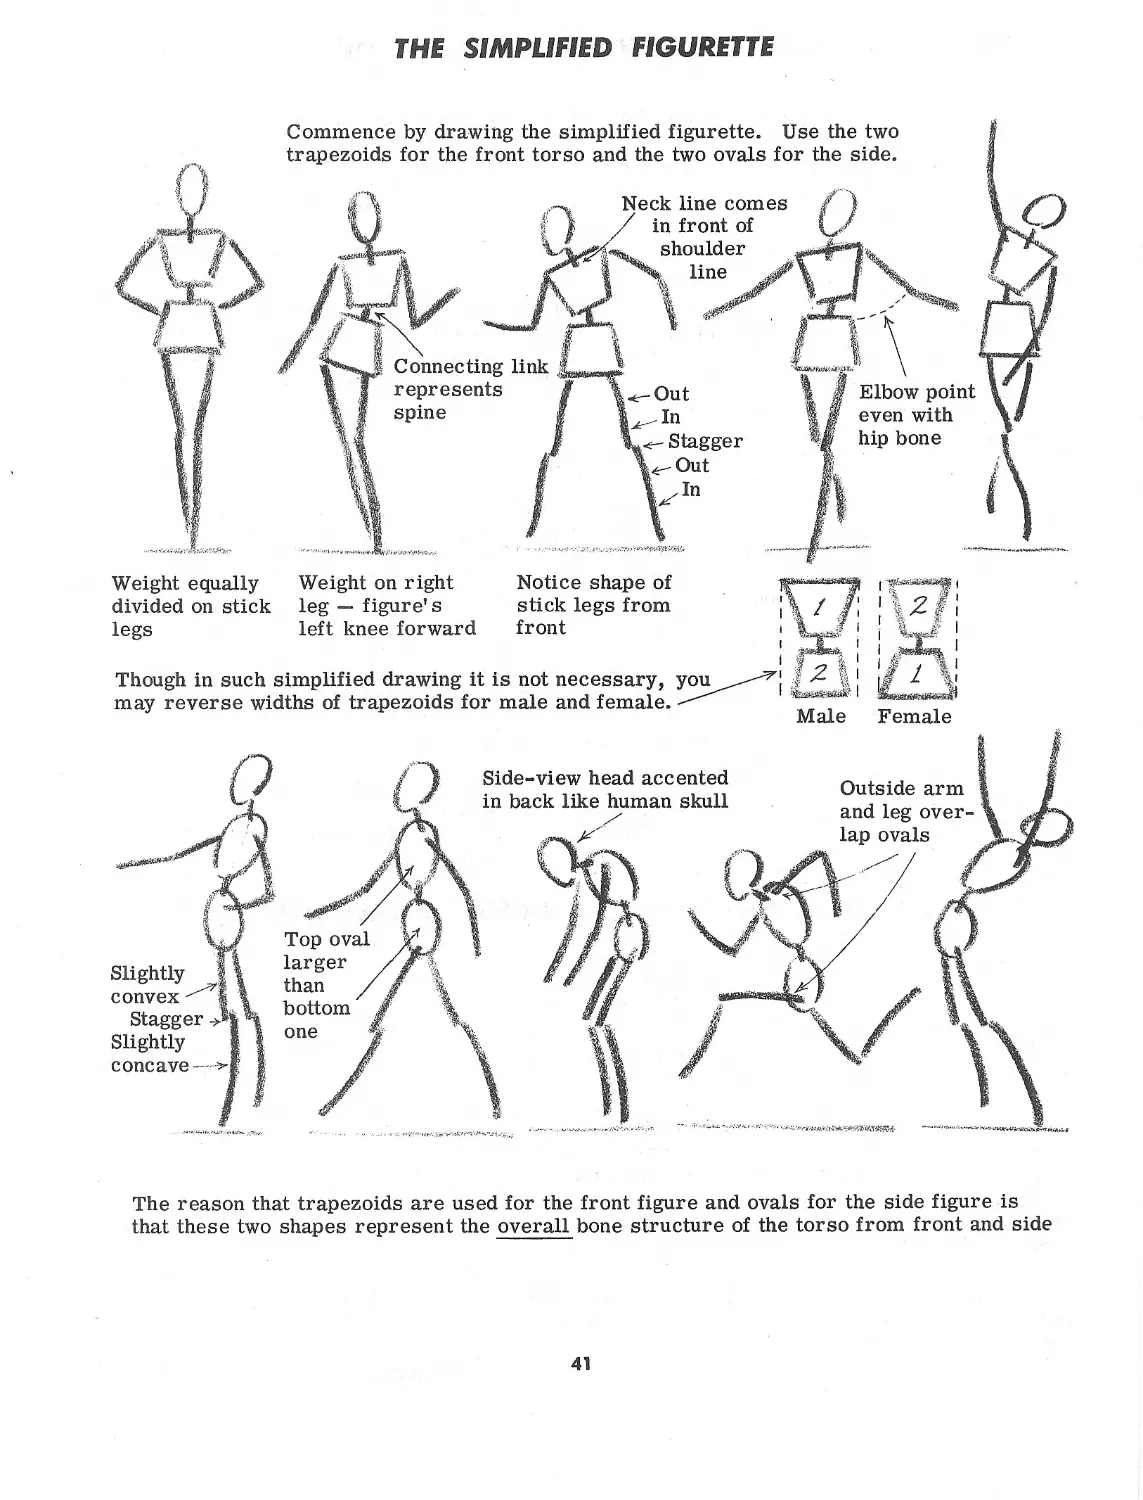
THE SIMPLIFIED FIGURETTE
Weight equally
divided on stick
legs
Weight on right
leg — figure’s
left knee forward
Notice shape of
stick legs from
front
Though in such simplified drawing it is not necessary, you
may reverse widths of trapezoids for male and female.
The reason that trapezoids are used for the front figure and ovals for the side figure is
that these two shapes represent the overall bone structure of the torso from front and side
41
STARTING FROM SCRATCH TO DRAW THE HOMAN FIGURE
Oftentimes a truth is established best by showing several approaches to it. On these
forthcoming pages different simplified devices will be presented which will be helpful in
understanding how the human body is put together. Only non-technical terms are used.
Before one can ever learn to draw the surface anatomy, he should find out
something of the understructure. By remembering ”TUM" with the ”U”
upside down,one can associate a number of important facts with it.
The ”T” is simply the collarbones and spine. In the straight front view they
cross (though not attached; the spine is a few inches behind) at the pit of the
neck marked ”x. ’’ This ”x” is a significant point in the human framework
for the artist. He moves out from here in determining many figure factors.
The inverted ”U" represents the rib-cage area. The horizontal crossbar of
the ”T” intersects a small part of the curve at the top.
The ”M” becomes the hip region and serves a triple purpose. The center
portion (the ”V" of the ”M”) depicts the general structure beneath known as
the pelvic bone. Notice the ”V" is flattened considerably on the bottom. The
middle of the "V” suggests the stomach’s surface area. The outside of the
"M” defines the sides of the hips.
Four notations may be made at the check points (1 through 4):
1 There is a slight hollow here just inside the ball of the shoulder.
This exists on everyone. It occurs just above and on the inside of the
armpit.
2 If ribs show at all, and they often do, it’s along here. The flesh is
thin at this place.
3 The hip bone nearly always is in evidence here. This is another
vitally important point in figure structure.
4 The outside knob of the upper thigh bone. This is still another
landmark in drawing the human form.
COMPARATIVE DIFFERENCES BETWEEN FEMALE AND MALE
The first figure at the right, the female, is noticeably
more narrow at the shoulders than the hips. The re-
verse is true of the male. The female ”T” and the in-
verted ”U” are smaller, but the female "V" inside the
”M” does not likewise diminish. It flares wider and
may not be quite as tall as the male.
The crossbar (the shoulder line of the collarbones)
may rock as a seesaw on point "x. ” There is mobil-
ity here. The ”U" and the ”M” sections are unable
to change their basic shape, but movement does occur
between each of them in the stem of the ”T”, the lower
center of the spine.
Observe how the outsides of the "M” (here dotted lines)
in the male are parallel, whereas in the female they
spread outward as they go down.
MALE
42
THE CHANGES OF DIRECTION IN THE FIGURE
| Every segment 1 through {
j 8 is of different length | >
(see comparison below).
Taken from the
figure at left the
dark center bars
indicating direction
appear at right.
Notice how
the body
weight is
thrust on
the left leg.
This causes
body center
to bow out
this much
from orig-
inal position.
1
Look for changes of direction
in the human figure. If the body
weight is shifted on one foot or
the other, there will always be
some change of direction running
through the body.
A line running through the pit of
the neck and drawn perpendicular
to the floor lets you know where
the feet must be placed. If both
feet are on one side or the other
of this line then figure will be off
balance.
2
There are eight static
areas or sections of the
body that in themselves
do not move. However,
where these join on to
the other, a change of
direction may occur.
The two of the eight that
possess some degree of
pliability are the neck
”2” and the mid-section
designated as ”4”. The
others are rigid.
3
There are certain lines
in the contour of the
body that tend to be
straight. If the entire
body were curved it
would lack in the appear-
ance of strength. The
outside contour itself
then has interesting
changes of direction.
Observe the variety
of the line lengths in
this contour.
43
THE BASIC LINES OF THE FIGURE EXTENDED
The purpose of these diagrams is for observation only. They are not intended as a method of drawing. By
the simple extension of lines found in the ideal figure, one becomes aware of the marvelous symmetry, bal-
ance and power incorporated in the masterful design. The very structural lines themselves bespeak maxi-
mum strength.
Line found
on side
of head,
Line found
on inside
of lower
leg
_ Chin line-' Г ; ; Shoulder / \ line / ’
/ Line of
i trapezius
muscle
' Inside line
of sterno-
mastoid
muscle
-/Line found
' enclosing
I chest area
i Line found
on outside
of upper leg
Bottom
of knee
line
Bottom of
sternum bone
у Top crest
Д of pelvis _
"Outside line
- of spine
Line
bordering
bottom of
rib cage
— all in
line with
nipple.
44
Line
। j ./^bordering
1 ’ (iliac rim
'of pelvis
Wrist at center line\
or
slightly below
Space be- r-
tween thighs \,
starts at point '
of inner tri-
angle (enclos-
ing chest area)
five heads
down
Figure at right shows
surface anatomy sketched
over demarcation lines
of diagrams to left.
BUILDING ON THE DOUBLE TRIANGLE
1 Decide on
head size. Draw
line from pit of
neck (x) to floor.
Mark off line to
be eight head’s
lengths (includ-
ing head). Place
shoulder line
slightly above
neck pit. Place
lower hip line
at half-way mark
four heads down.
Lines should be
little over 1 1/2
heads long.
Weight is to be
on right leg so
tilt these two
lines toward each
other on right
side. SKETCH
LIGHTLY!
2 Make triangles overlapping each other with center points on shoulder and hip lines as shown.
3 Sketch leg outlines. Knee of straight leg comes just above 6th marker. Bent knee comes below.
4 Block in arms. Nipples come at 2nd marker. Indicate neck, hair and facial features.
5 Finish sketch over lightly-drawn framework of first four steps. Transfer finish if necessary.
The chief value of the double
triangle exercise is to help
one become conscious of the
four extremities of the torso
and their relation to one an-
other. We think of the lower
hip bone (really the top out-
side of the thigh bone) as a
part of the torso. Actually
the outside triangle points
may be rounded somewhat,
allowing the points themselves
to go outside the body on oc-
casion. There may be some
modification necessary through
the waist. The high hip bones
on either side of the navel will
jut out a little from the trian-
gle lines.
The idea of the triangles
assists in calling attention
to the diagonals which run
through the figure’s trunk.
Study the sections on arms
and legs in order to draw
them properly.
From both back and front
the apex of each triangle
falls on the same spot:
the pit of the neck and the
crotch of the figure. Notice
above how the top spot is
switched from the spine.
45
APPROACHING FIGURE DRAWING IN DIFFERENT WAYS
Setting points in
relation to one
another.
Looking for con-
tour planes in terms
of straight lines.
Building on torso
trapezoids with
bold strokes.
Seeing the figure
in terms of cylin-
der thicknesses.
Thinking of solidity
by means of block-
ing in sections.
Visualizing the
skeleton beneath
the surface.
Seeing what remains
on either side of im-
aginary plumb lines.
Feeling sweep of
line that runs
through figure.
Expressing free-
dom in contour
exaggeration.
Thinking in terms
of light and shadow
throughout figure.
46
ARM MOVEMENT AND BODY PROPORTIONS
Normal figure height from top of skull
to floor is usually about the same as
distance between finger tips when
arms are extended outward
parallel to floor.
This way figure
fits into square,
Ellipse
de-
. scribed
: by fin-
ger tips
Circle-
with pit
of neck
as
cen-
ter
amowm ршяя \ Note on shoulder
ciAV/сле positions:
маяла \Any arm movement
from A through E
changes shoulder
top bufxlittle because
of spac e\allowanc e
between humer-
us and acromion
process of
scapula.
Movements
above E
necessi-
tate
radical
lifting of
scapula &
clavicle.
Location of armpit
goes up and in as
arms are raised.
No. 1 is armpit with
hands at side. No. 4
with hands extended
overhead.
Navel becomes center
of circle made from
floor to finger tips
when arms are
directly overhead.
Nipple begins rise
from arm J’s po-
sition as dotted
arrow indi-
cates.
Crotch is
equidistant
from top of
head to
floor.
Notice how arc
of finger tips "a"
cuts half way
between figure’s
center point
and bottom of
knee.
Refer to reach over-
head of arm I as being
same distance from
pit of neck x as fin-
gertips of arm A.
Radii from navel run-
ning through arms I
and H are equal to
radii running through
legs M and N, but
from arm G down, the
fingertips leave the
great circle.
47
THE PRINCIPLE OF THE "T"
an arrow.
4'77 :< /
In the sketch above each line
which will disappear behind
the next has
With two strokes as simple
as the letter ”T” at the left
one of the most fundamen-
tal truths of figure drawing
can be illustrated. The stem
of the T seems to be going behind the
crossbar at the top. You may tilt this
crossbar so that it nearly parallels
the stem, and still the stem will ap-
pear to be going behind it. Look at the
series of seven lines in the arc below
and notice how each disappears be-
hind the next. Watch for these on the
surface contour of your model. Thus,
lines help to define form.
Ut-
The various external sec-
tions of the body are usual-
ly in front of or behind the
ones next to them. In the
diagram at left the lighter,
numbered portions are in
front of the darker portions.
Hence, the lines defining the
darker will go behind the
lighter. When drawing the
human figure ask yourself
which parts are closer and
which are behind and far-
ther away.
Everything that one sees
in real life which has edges
takes on dimension because
of this simple principle.
Muscles crisscross each
other over bones which do
the same thing (see exam-
ple sketch of arm at right).
Even before one ever learns
to identify anatomical parts
of the body, he should seek
to record the T*s of the edges
by sheer observation.
In the circle insets at the
right are details of the mo-
del’s contour. The dotted
arrows take you in to where
the ’’action” of one line go-
ing behind the other is hap-
pening. All the parts which
are forward, head, shoul-
ders, breasts, thighs and
knees have lines which are
going behind them.
48
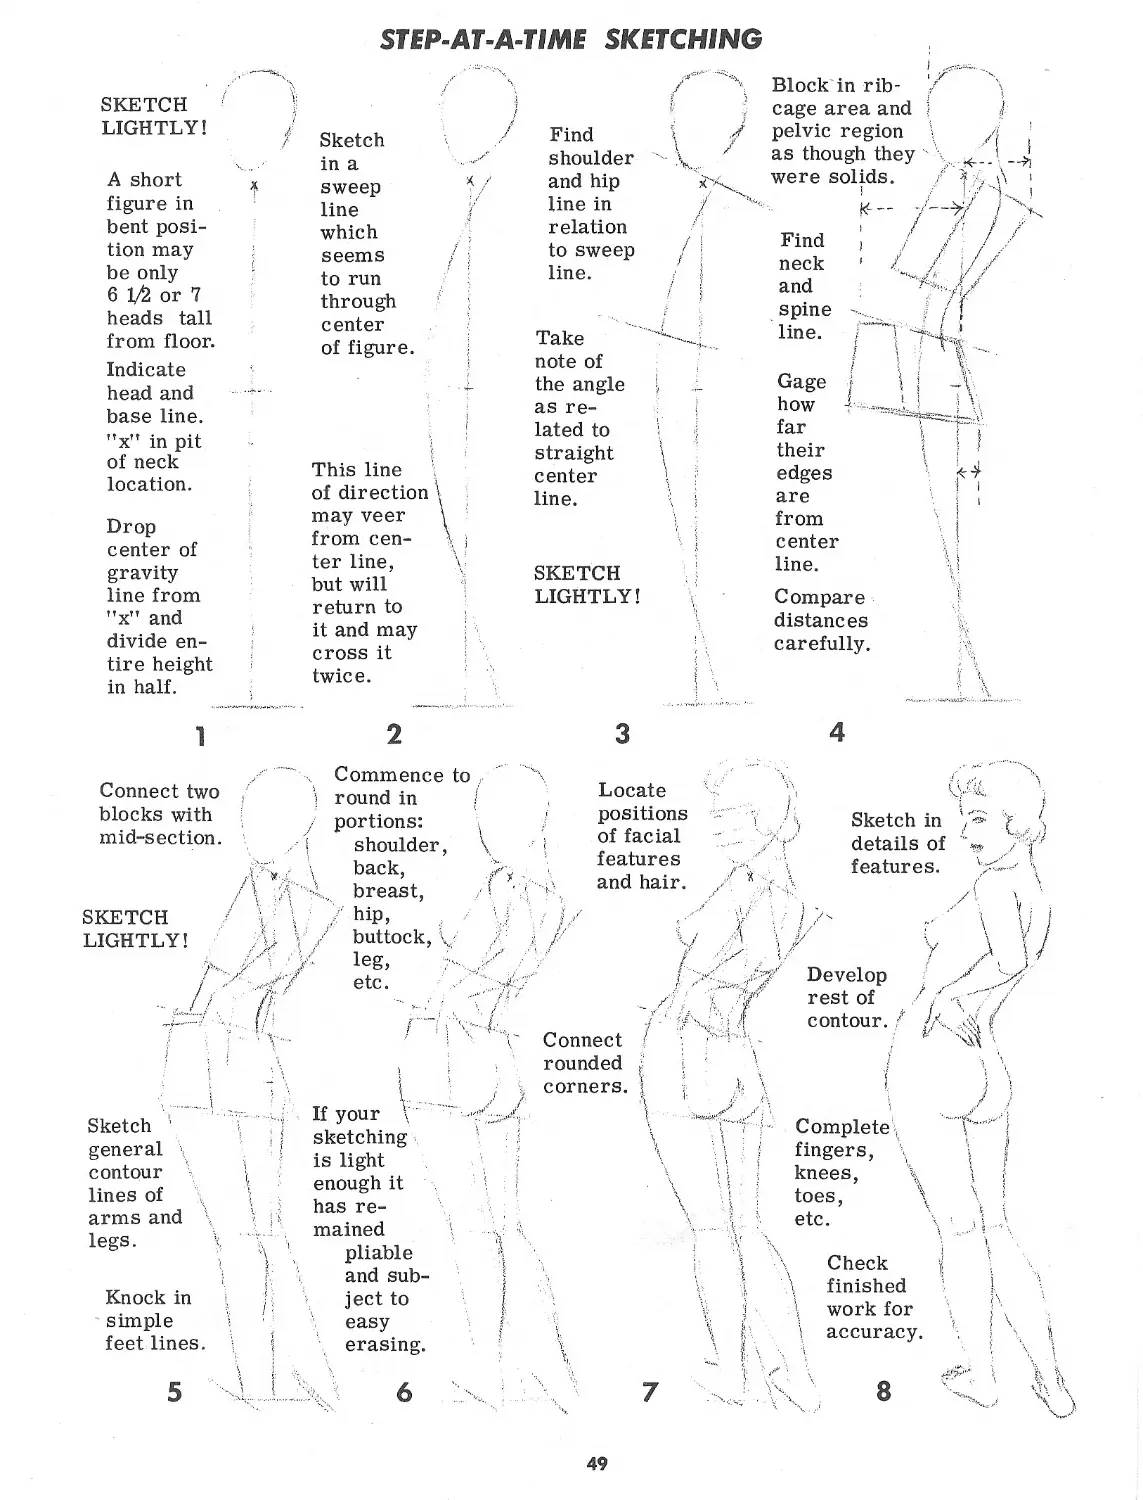
STEP-AT-A-TIME SKETCHING
SKETCH ’ ' j
LIGHTLY! / Sketch \ 1 in a
A short x sweep '* /
figure in ! line Z
bent posi- which
tion may seems / j
be only to run
6 or 7 through
heads tall center
from floor. of figure.
Indicate head and base line. , 4
”x’f in pit of neck This line
location. of direction \
Drop center of may veer \ from cen- \ i ter line, \
gravity line from but will
”x" and divide en- return to it and may
tire height in half. cross it twice.
1 2
\ Commence to
Connect two . i round in /
blocks with J portions: \
mid-section. shoulder, \
! . back,
breast,
SKETCH hip,
LIGHTLY! buttock, .
leg,
etc.
/"- , i
Sketch ’ \ , general contour ; lines of \ arms and | ..y If your V i sketching \ j is light enough it i I has re- mained ; t
legs. 1 T pliable and sub- ;
Knock in h jectto (
simple easy /
feet lines. 5 erasing.
5 ' -1 ' 6 -X.
/ 4 1 ' Block in rib- / \ cage area and -• j/
Find \ / pelvic region
shoulder \ as though they ' \
and hip 44 line in / relation were solids. ... X. ^4 A 1 'z /
Find
to sweep j i line. i | neck and i ••• spine / / f
Take note of line. '' '“‘•4.^
the angle j i Gage
as re- how : i V
lated to ' far "ГУ
straight \ their \
center 1 edges ;
line. \ j are ’ from j center 1
SKETCH :j line.
LIGHTLY! Compare distances carefully. у i \
3 4
Locate £
positions у \ Sketch in
. 1 of facial Z't‘/ details of
features , and hair. /. \ \ features. V
/! v'.
i ’ F \ V 1
* / U ,Л
У / , у Develop 44'
( rest of z и contour. / >4-., wZ
Connect ' ,'сух rounded j ’ \ corners. | | J?
/)
1 Complete fingers, у--'! \ i
' \ | i knees, \ toes, \ etc. t i X ’
4 £ 1 \ Check ?: \ finished \ work for I \ \
\ ' 1 ' \ accuracy.
ХЛ 7 J... ЛЧ 8
49
JOINING ARMS AND LEGS
TO THE TORSO
The upper arm appears to tuck
under from any position. See
additional diagrams in the sec-
tions specifically dealing with
the arms and legs.
The appendages don't just stick on
to the trunk but are "grafted” by
bone and muscle combinations.
First, notice the two standby trap-
ezoid shapes for the chest and hips
which will receive the arms and
legs. Secondly, see how the rib-
cage and pelvis (dotted) fit inside.
Next, follow the grooves (arrows)
rolling off the lifted arms, under
the shoulders and into the chest.
Thus, the top shoulder muscle
(deltoid), the chest muscle (pec-
tor alis major) and the stomach
muscle (rectus abdominis) are de-
fined like a large wedge. All of
this is discernible on the surface
of the completed figure. In pass-
ing observe the neck width as be-
ing similar to that of the stomach
muscles. (For further study of
the shoulder's place in "grafting”
the arm see p. 70 ff.).
Even though the bottom trapezoid
can be envisioned helpfully, actual-
ly the big front leg muscles attach
to the pelvic bone inside, leaving a
groove rolling in toward the crotch.
Compare this with the arrowed lines
described on the front of the chest.
When the arms are lower-
ed, the deltoids round over
like extended ledges. The
arms seem to come out from
underneath. The armpit is somewhat of
a center point for the deltoid’s arc. The
origins of all the upper arm muscles are
shielded by the massive deltoid's covering
50
BONE AND MUSCLE PROMINENCE IN THE CHEST
Bone lines that have a way of
getting attention are the clavi-
cles (f) and the bottom of the
Muscles from the chest into
the arm are in a sense ’’woven
basket-like when viewed from
beneath. Note the ’’over and
under, over and under” start-
ing with the top arrow.
Check out these ’’show points” which are discussed
on this page in the above sketch. Remember them!
ribcage (g).
As we consider further those
muscles that concern the artist
most in the upper torso, we find
the above (black lines) showing
themselves on the surface. The
neck’s sterno-mastoid (a), the
deltoid’s inner outline (b) and
the bottom of the chest’s pec-
torlis major (c) — all are visi-
ble.
In the lower chest area, evidence
of the serratus magnus coming
off the eight upper ribs (d) and
the rectus abdominis (e) manifest
themselves in a well-developed
chest.
51
A SIMPLIFIED GUIDE — 12 STANDARD POSITIONS
--A
Right \
Torso and
thighs repre-
sented by {
straight \
sketch lines'-
Typical figure stances assumed by most models are
outlined on these pages. There are, of course, end-
less variations; but it helps to know a few character-
istic positions. These may be adapted for fashion,
ad use or illustration.
The body weight is distributed
equally on both legs in examples
1,2, 3, and 4.
Back foot
The back leg usually (though not
always) carries the bulk of the
body weight when weight is shifted.
Often the most attractive
standing poses have one
knee placed somewhat in
front of the other.
Notice that a line dropped per-
pendicularly from the pit of the
neck always crosses or comes
closer to the foot supporting the
bulk of the body weight.
Chest:
inverted
trapezoid
fihouldeA
/and hip \
/ come to- \
• gether on \
side where's
/ body weight
\ is shifted /
Heel
behind
heel
C to D 3/4
distance
A to В
Hip down \
on "balances
leg” side
Bottom of
knee: half
way from
”D” to
heel in
shoe
ftt/ Leg
carrying \
weight
forces
hip up
At first
glance this
figure may
look right,
but it is not
standing
'’naturally”
Foot
behind
heel
Observe that center lines of
feet may be almost at right
angles from each other
52
VJ
These sets of
legs attach to
the corresponding
lines beneath the
simplified torsos.
THE
TILTED TORSO
presented for the
не- Center
of
gravity
e\ e
I I /w
I и i?
Line of\
thrust \
(dotted) \
matches \
\center ;
The degree of torso
tilt depends upon how
much of the body
weight is being borne
by the supporting leg.
The more the weight,
the greater the angle
of tilt. However,
these angles here
will serve all general
purposes. Some
trunks are more
flexible than others,
and by slight effort
a shoulder or hip may
be dropped or raised
to express more
action.
These diagrams are
purpose of illustrating how one may
expedite figure construction. If, from
a model or good copy or inventiveness,
one sets down feet and lower limbs, he
can combine them with a torso sketch.
First, find the weight line (or center of
gravity line) through the foot or feet as
they seem to support the body above. Then
6, 7, 8, and 9
go on the
left trunk;
10,11, and
12 fit the
right trunk.
' This diagram approach
may be used as under-
structure for clothed
figures.
Observe how the chest
section swings left or
right like a pendulum
from the pit of the neck.
Whereas, gravity line
may cross center line
of hip region. ।
match it with the drop line from the pit
of the neck of the torso sketch. The leg
carrying most of the weight pushes its
hip up. Remember: from just below the
knee to the floor it should be two heads
distance (or a little more). From the
knee to the lower hip line another two
heads (or a little less). The rest of the
figure on up another four heads (including
the actual head itself).
53
SIMPLIFYING THE PELVIC REGION
The pelvis is the important mechanical axis in the human frame. It is a
basin-like ring of five stout bones fused into one. On each side is a
haunch bone made up of the ilium, pubis and ischium. Behind are the
other two, the sacrum and coccyx, which really are a part of the spine
being wedged into and firmly united with the haunch bones. Above are
the male and female pelves compared. The male is more narrow and
compact; the female wider and more spacious. The abbreviated sketch
forms at upper right prove helpful in figure construction.
Design at
right facil-
itates move- \ 'A
ment of leg
bone. See ;
allowance • J ;
(arrows be-
low) for
ball and
socket.
Try simple figure sketching , utilizing the abbreviated
sketch forms of the pelvic bone. Iliac ring nearest you
gets flatter as figure turns. These abbreviated forms
are not to be used in a straight side-view figure.
54
FURTHER DIFFERENCES BETWEEN MALE AND FEMALE HIP SECTIONS
, A/lALZr
At left see how
upper body weight
on spinal column
is transferred in-
to pelvis and on to
shaft of femur in
leg. The dotted
ring is the thick-
est part of the
entire pelvic bone.
The bowl-like iliac
discs that rise on
the sides protect
the lower internal
organs. The ischi-
um rings at the
bottom support the
body when seated.
/&/ИА/£:
At the right are two side view
comparisons of the male and
female pelvic bones. Not on-
ly does the female pelvis tilt
forward, but the anterior su-
perior iliac spine extends
outward (black area); where-
as the spine of the pubis un-
derneath retreats. Also the
sacrum at the rear angles
out considerably more than
the male. Besides being tall-
er (black extension), the male
structure is more perpendic-
ular. These differences man-
ifest themselves in the exter-
nal hip carriage (see A and В
in diagrams above).
///AC
Refer to the sketch at the left which //'
emphasizes independent action be-
tween the chest area and the pelvic
region. Not only may the two sec-
tions twist in different directions,
but one may incline upward, while
the other may tip downward. Thus,
figure action must first be register-
ed in the trunk before it can be re-
layed through the appendages.
In the simplified outline at the right
observe the two shaded areas. The
front line of the thigh slopes toward !
the iliac crest. The other prominence /
which many times shows on the sur-
face, the tenth rib: if continued, its J /
line would coincide with the top of 3 / (
the buttock. Remember these torso
zones. They help in figure drawing.
55
USING
ABBREVIATED BONE FORMS
THE
s;*«M4Sfc
Assembling the
the pelvis form
is simple. Check
with the detailed
bone formation.
Here is a skeletal breakdown and simplification show
ing the use of abbreviated bone forms. The black strips
on the far right are the bone parts which are likely to
have direct bearing on the surface anatomy. They may
be located on the completed torso at upper left.
At right is
this minimun
framework
upon which
the figure is
constructed.
Observe rel-
ative ribcage
and pelvic
bone sizes.
At left notice
the dotted cen-
ter ring, also
the loops of
the ilium above
and the ischium
below.
56
S7abaz//aa
7Z/CBA7
fa
S7A&/V0 MZ/SCZB
---r/?AP^A/i/£ AIZ/SCZB
CZA//CZA BC/ZB
%^OAL70/£>
,i& /AIZ/BCZA
CHECKING THE SURFACE ANATOMY
OVER THE BONE FORMS
'%7 (bcZA/C ВО//в)
wrz/w#
ZZ/AC S/W/B
оаг/^/гт-У
Z/&W&//
^АвРСШ/Л/А£ ABC//
i‘ Qz//VB (ZBBAZ SB b/bs)
------A/A/BA AZBA
—-7//BC7Z/5 ABZZCJA1///B
As illustrated in the above
skeletal interior, the chest
region is to be thought of
as a solid mass. As such
it may turn or twist on the
flexible stem of the spinal
column but in itself is fix-
ed. The same is true with
the pelvic region; it may
be tilted or turned, but it
must move as a unit. On
the other hand, the back-
bone is composed of flex-
ible joints, which discs
with cartilage cushion in-
serts are more moveable
between the chest and head,
and between the chest and
pelvis.
The rib-cage has more bones
in it that are near the skin sur-
face than does the formation of
the pelvis. Because the mus-
cle fibers in the hips are most-
ly in bundles, and the muscle
fibers around the chest are in
sheets, one cannot draw a pel-
vic bone and get the hip shape
as easily as one can draw the
rib-cage and get the chest shape.
However, in one sense, the ball
and socket joints of the upper
arm bones widen the shoulder
area just as the ball and socket
joints of the upper leg bones
widen the hips.
*— /Zvvsise pasc/aв
AH/SCZZr
| <$&FA7
; /BOCZ/AA/BA^
BcWZP
7AS7Z/$
ВСГ.ВВ’А/ZAC
MZ/SCZB
Above are listed
the bones and
muscles which
have to do with
the torso’s im-
mediate exter-
ior. Discern
how each part
exerts itself on
the surface.
At right notice
how the chest
seats itself in-
to the midsec-
tion, and the
thighs receive
the pelvic re-
gion.
57
SOLIDITY
PLANES
AND
there is a change in shape caught by the
The third dimen-
sion of depth in
the human figure
is best acquired
by depicting the
existing planes.
These planes are
not flat with
sharp edges, but
they are figured
to be that part of
the anatomy which
is mostly front, or
side, or back, or
top or bottom.
Light and shadow
are essential, but these
are in no short supply.
At left the source of
light is mainly from
above; hence, the sec-
tional forms are seen
to ’’turn under” in sha-
dow. At right notice
the ’’edge” running mid-
way up and down through
the figure. This is a re-
sult of strong backlight
with noticeable reflected
light in front. Even
though no actual edge occurs,
shadow. Therefore, we know we are dealing with subdivisions in the
figure which are third dimensional. Changes of plane indicate solidity.
At left values are proportioned to tell of that part of
the head, neck, arms, torso and lower limbs which
are facing front. Since a cylinder or ball is rounded
but since there is a demarcation for light and shadow,
then planes are contrived to demonstrate solidity. Es-
tablishment of the chest and hip blocks (above) helps.
58
SWEEP AND ACTION
LINES OF DIRECTION,,
2 V.
All the dark arrows in
the sketch at the right
are a part of the figure's
contour. Each points to
another arrow separated
by a dotted line. Not all
poses will so align them-
selves, but very often
there are follow-through
lines of direction which
may be pleasingly pick-
ed up and emphasized
elsewhere in the compo-
sition. The point being
this: what are the lines
in your subject doing in
relation to the other
lines? This system of
thinking when drawing
will take one through
the entirety of the sub-
ject rather than permit-
ting him to become im-
prisoned in detail.
Whereas at left the con- /
cern is with the outline
of the figure, at right the
sweep that runs through
is stressed. This sweep
may be detected wholly
within the framework as
in figure "2" or it may
go across the frame
from one side to the
other " 3." The artist
may lightly throw on his
paper the lines of sweep
and then build around
them by locating the head
position, neck line, shoul-
der line, hip line, elbow
and knee positions, etc.
A figure which is
in the act of mov-
ing may still be in-
terpreted in terms
of line direction
and sweep as well
as the set of the
body sections.
It also helps (at
left) to recognize
the "set" of the
body sections in
relation to one
another. The neck
is not set perpen-
dicularly nor are
the hips.
Effort spent in understanding in-
terior construction will pay off
when completed figure illustra-
tion is needed. Often we hear,
"But it just doesn’t look right. ”
Usually the problem is one of
proportion and failure to allow
room for normal anatomical
arrangement inside. It is para-
doxical in a way, nothing seems
more difficult to draw than human-
ity, yet we live in a sea of it and
-- wo are one of them!
PUTTING STRUCTURAL PRINCIPLES TO WORK
грек
u
At left is a side view with partial
foreshortening. Think of the
chest and hips as solid blocks.
Notice the check points in each
of the three sketches.
One cannot intricate-
ly draw internal bone
or muscle structure
every time he por-
trays a human figure.
The answer is to
study internal anat-
omy enough to have
a good idea of the
basics involved, then
turn to the larger
and simpler sectional
patterns.
Practice and experi-
ence in drawing make
the picture concept
more definite in the
mind and help to put
it on paper.
It
The figure on the
left is stockier and,
in many instances,
more typical. The
same figure is
slenderized at right
for purposes of fash
ion and illustration,
is hard to beat the
trapezoid method of
torso building for the
beginner when the
figure is mostly front
or back view. But one
must think ribcage as
the upper trapezoid is
set down and think pel-
vic bone when the lower
one is added.
Below is a sketch drawn by fit-
ting in the various components
by means of overlapping.
60
oisr^/^ат/алт
CUTS?
BIM
SHIFT
SUUS
SHIFT
HOW H/PS AND SHOULDERS COOPERATE
It goes without saying that the two legs of a
human being are his only means of standing
support. Relieve one leg of its share of
body weight and what happens ? The other
one takes on more of the load.
Even a weighted-down table with four legs
will have a tendency to sag at one corner if
that corner’s leg is shortened or removed.
Likewise, the hip-side of a human sags if
he quits leaning on that side’s leg and shifts
his weight to the other leg. This shift forces
the weight-bearing hip up as the other hip
sags down.
Rather than the top part of the torso contin-
uing to lean by going in the direction of the
sloping hips, it swings back in order to com-
pensate and maintain body balance. Hence,
if a hip is forced up, the shoulder on that
side comes down, for the chest bulk switches
over on the opposite side of the center of
gravity from the hip bulk. The flexible link
of the mid-section accounts for their tilts
being opposite.
There may be a few (rare) instances when both
the feet appear to be firmly planted on the ground
(figure at left), and yet, owing to the chest and
shoulders being forcibly shifted to one side, the
center of balance (line from neck pit) is
likewise shifted farther to one side. Now
comes the exception to the rule (termed
’’unnatural stance”): the leg carrying
most of the weight has a low hip above it.
Here are
three differ-
ent poses
illustrating , (
the top of page \ ।
principle. See \ '
the weight-bear- \
ing leg (arrow) *
and the shoulder I
above it. f
61
THE BACK OF THE HUMAN FIGURE
STA/AAA? -AJAS/
<2^ /’'Я МРМШ
r^yv^/л/ое/^ Ae^A oa z/^a-w
^XFA^AA/tt O&Z/<2//7
is divided in
----/А/0-//&/ЛА ДНААР
thirds across
a/dc
юшяе Аг/АЗРА’/ее я/ас ca/a/a-
(lAZ/AA-A/S MVM/C--------------------
Above left -- with arms
at side the inside bor-
ders of scapulas (a) often
line up with sides of hips
(b). In some cases these
borders are parallel in
this body position. Notice in
this drawing
how the back
by these shoulder blade edges. The borders or edges
separate as the shoulders go forward, get closer as
shoulders are pulled back. Directly to the left observe
scapula prominence when hands are behind back. Spine
here is subcutaneous;
whereas, above right
it is more imbedded.
Practice sim-
plified back
sketches such
as those on
right. See how-
center groove line
of spine changes
direction at mid-
section. Traces of
scapula may be em-
phasized. See how
trapezius flows into
neck. (For related
study: pp. 66, 71 ff. on
neck and shoulders)
62
THE
BACK AND THE FRONT RELATED
At left the pattern of back
muscles is expressed in
shaded differences, "a" is
the tendinous area attach-
ed to the spine for the tra-
pezius, and ”b” is the ten-
dinous area for the latis-
simus dorsi. These sin-
ewy sheets have a tenden-
cy to depress when their
muscles contract in relief.
----желхлмлае
G/t/7-.АЖ
л^гл'г/з'
5G/AAW/G
/ИАААК?
ttE3A/O-A1457Z>/£>
___ZeAGAZZ/i'AS
Below is a diagram with the arm
cut away showing the back muscles
as they merge with the side and
front muscles of the torso.
S'
These dotted lines
are likely to show
on surface
3/.A/G
/ИА&М/4-
3*7&?a/4a
оза/яа/а?-
swaeM
АМ/лье/ае
Inner indentation
of thigh’s edge is
higher
7ZA/SO3
/tte/AU:
А4&&-''
Inner indentation
of knee’s edge is
lower
Inner portion of
calf muscle is
lower
At left are helpful
facts about surface
forms which every
figure artist should
know.
Remember
inner ankle bone
is higher
At right is a
sketch of a well
developed back
with the mus-
cles in a state
of contraction.
63
PENCIL HANDLING IN
FIGURE SKETCHING
Figure 1 is done in def-
inite strokes of varied
width after a very light
concept of the entire fig-
ure has been set down.
In a composition
with the append-
ages pulled in al-
ways be aware of
\ the overall shape
\ into which the fig-
\ ure fits — in this
, case a triangle.
Sketch No. 2 is an example of the light touch
with the pencil roving over the
paper. Held
the pencil
loosely. Give free rein
to your wrist and fore-
In figure 3 the multiple
line is used. Be sure
to keep the strokes light
and pliable. Think of
the various sections in
relation to the whole.
In No. 4 the first stage is
done in more-or-less sin-
gular lines. After the
proportions are correct,
lightly block in where the
shadow areas are to go.
Seek to model the sur-
face by laying down the
strokes to conform
with the particular
shape beneath. '
64
NOTES ON THE NECK
For the beginner it will be well to keep these facts in mind concerning the shape of the neck:
WRONG
The neck side view is
very seldom straight up
and down.
RIGHT
The natural position is
for the neck to tilt for-
ward as it leaves the
shoulders. This angle is
usually more pronounced
in a woman than a man.
The sides of the front view
neck do not grow abruptly
out of a flat shoulder line.
The lines of the neck
side view do not end
parallel to the ground.
Nor are these side view
lines the same length.
There are always varying
degrees of a trapezoid at
the base of the neck (front).
FEMALE
The extremities of these
lines end higher in the
back and lower in the
front. Also the back of
the neck is shorter than
the front line.
The sides of the neck /
are rarely parallel /
for any distance at all. /
8
The lines taper accord-
ing to the individual
shape and set of the
neck muscles.
MAJOR NECK MUSCLES
10
Trapezius
Mastoid
bone
Sterno-
mastoid
_________muscles
are usually more
graceful
Clavicle
Sternum
collar bone
The two muscles that have to do with the
appearance of the neck more than the others
are the sterno-mastoid and the trapezius.
The secondary group
in the Adam’s apple
area is mostly con-
cealed. This portion
of the female neck
projects slightly in
a rounded form.
The "inh er roof of
rno-mastoid
Scle shows less
often — it may
appear when neck
is turned sharply
or under conditions
of strain.
Clavicle or
MALE muscles may
have more bulk
The slashing angle
of the sterno-mastoid
gives the male neck
a feel of power.
In the male
box ridge/^tick^but
above the pit/df the
neck which goes in.
65
Attachment to spine
of scapula
Sterno-
mastoid- I-
Base of
skull
NECK
TIPS
Trapezius
Sterno-
mastoid—
Trapezius-.-Jc;
1 In the average neck
the shortest distance
across is where the
sterno-mastoid seems
to disappear on the
other side of the tra-
pezius.
2 The top seven cervical
vertebrae constitute the
neck. Here the trape-
zius and sterno-mastoid
have been set to one side.
Simply fit the letters one
over
the other.
little be-
he sterno-
3 In a highly developed male
neck the shortest/distance
across may be
low the ears. —*_
mastoid swells at its cen-
ter.
.J 4 When the body is
erect there is a:
'"slight hollow here
! ^""protrusion here
// (around seventh
// cervical vertebra)
/ hollow ridge here
5 When the body is
bent forward (chin
down and back
curved) the reverse
is true, except for
the seventh verte-
bra.
Muscle pro-
trusion
7th vertebra
(high point
along spine)
Spine showing
6
From the
rear, top of
trapezius
may look
like part
of the back.
From the
front, same
muscle looks
like part of
the neck.
well encased inside neck. The seventh
(bottom of neck area) sticks out.
8 Slight
concave curve
''above seventh vertebra
when head is turned
toward shoulder and
forward.
line before
V;/rounding into spine
When head is turned toward
shoulder, sterno-mastoid of
neck twists into trapezius.
The inevitable result-wrinkles
in the skin.
9
66
On this page are female necks from actual models. A long neck will
look longer from front if chin is lifted slightly (drawing at left). A
short neck will look shorter when shoulders are brought up as they
sometimes are (drawing below). Compare the same points "a” in each
where the sterno-mastoid and trapezius appear to overlap, also the
trapezius diagonals ”b”.
EXPLAINING AND DRAWING NECKS
and over middle and
bottom neck lines
(see arrows below).
2
A slight recessed flat,
(arrow) may be ob-
served on occasion (11).
When head is turned with shoulders
front, line beneath chin enters neck
and follows on to pit between clavi-
cles (see arrows in figure 10).
Trapezius closest viewer (espe-
cially in fashion models) may be
accented and corresponding mus-
cle on other side may be obscure-
ly hidden (see 3). However...
Rarely will female
Adam’s apple (A)
show. Clavicle bone
(B) shows more
often than not.
A gentle rise on far side as shoul- b
der approaches neck may occur (4)/j
or line may merge into neck if po-
sition warrants (see 5).
If interior lines are suggest-
ed at all, the sterno-mastoid
muscle closest (A) will appear
_ ( widest
' К (figure 7).
In every case from front and semi-
front (when one wishes stronger
definition) top of neck lines appear
to come down
Curve line from a bowed back
may seem to run into neck as
in drawing to right (8).
(Л 11
In strong light and
shadow lower end of
sterno-mastoid muscle
may appear "knife-edge" -
sharp. As muscle
swells going up, shadow-
edge is softened.
Only slight allowance for Adam’s
apple, as in women this area not
as prominent as in men.
67
1 Clavicles straight \
I across from each i \
| other; slender песку
,l rnlnmn with flare '
! column with flare
at bottom
Clavicle 4
prominent
on shoulder’s
contour
11
Neck
line
v’s \
over\
back
trape-
zius
!1 , Inside' clavicle
/ knobs prominent;}
neck pit hardly *
noticeable
Wide-flare
effect of 2
trapezius
muscle at
shoulder
line (a to b)
| TYPES OF NECK
AND SHOULDER
ONES
Smooth
embedded
neck
muscles
Smaller con-&
cave effect \ - b
of trapezius y^
muscle at
shoulder
line (a to b)
Clavicles \
dipping \
toward
center
Clavicles scarcely \
discernible (this
\/ rarely happens) x
Body
action
will
amplify
under-
structure
of neck &
shoulders
From side,neck
pit may resem-
ble sharp ”v”
3 Shoulders forward
& below eye-level
/4 cause clavicles to *\
dip radically
, " toward
center
fry
/ 6 Majority of clav-
l s icles slant toward у
U center, but not all n
Some few
clavicles
rise toward
center; being
slightly above
eye-level «
makes them 7 I
appear more so /
Chin lift
and head
turn will
bring
sterno-
mastoids
and clav-
icles into
relief
WHAT TO REMEMBER
IN DRAWING SHOULDERS
One of the biggest helps in drawing
shoulders front view is the know-
ledge of the trapezoid shape (see
dotted lines in diagram at right).
Shoulders are not straight across
from end to end. The trapezoid
shape is always there, though it
may vary greatly in length and
height in different people. The
sides of the trapezoid which slant
up and toward each other may be
concave or straight, and in some
instances may be convex.
The slanting sides of the trapezoid
are simply the tops of the trapezius
muscles coming over the shoulder
and inserting into the clavicle as in-
dicated in drawing at right. The ”X"
markings show where the indentions
and hollows are as they appear in
the surface anatomy in the next draw-
ing.
When one examines the exterior of
the shoulders he can see evidence
of the bone and muscle structure
beneath. Take note of the heavy
deltoid as this arm-raising muscle
rounds over the head of the humer-
us or upper arm bone. The sterno- /
mastoids are two of the most showy s
muscles in the body. Find the ever-
present trapezoid shape! //
Clavicle
Sterno-
mastoid
muscl
Deltoid
muscle
Trapezius
muscle
bone
Sternum
bone
Shoulders are usu-
ally about four times
as wide as the neck.
On a sketch line (a)
place a square (b)
with the chin drop-
ping over onto it.
Locate and sketch
the trapezoid shape
at the base of the
neck. The top (dot-
ted line) need not
be drawn.
Cut off shoulder cor-
ners for tops of del-
toid muscles. Locate
armpits beneath the
between point of the
short oblique lines on
either side of neck.
Neck pit will be slight-
ly below original start-
ing line. Clavicle lines
on either side will slope
down to it. Brief oblique
lines above armpits sug-
gest shoulder hollows.
69
THE SHOULDER SHAPE
Too often the shoulder is thought of as merging into the
chest area without any distinct shape of its own. From
the front there is always a thrusting out regardless of
the arm’s position. Think of the very top of the arm
overlapping the upper torso — a on top of b.
Keep in mind that c is the only point
of the shoulder girdle that is fixed;
that is, the clavicles at the sternum
are held by ligaments. Points a & b
may move several inches with £ sta-
tionary. As the shoulder is raised
and brought in, point a appears to over
lap the outer extremity of clavicle b.
Acromion process
of
"X-raying” the surface anatomy one sees the bone
framework which, enshrouded by muscle, holds
out the shape under study. Take note of opposite
shoulder also.
Coracoid
process
of scapula
Biceps.
^Triceps
Pectoralis
ajor
Sterno-
mastoid
Trapezius
Deltoid
4
Looking through the exterior we see how
the muscles cover the shoulder joint. The
deltoid attaches to the outer third of the
clavicle and comes down over the pectoral
(see black line). It is along here that the
valley indention is the deepest between
shoulder and chest. This shows on people.
5 Above observe the low in the surface anatomy
between the highs of the shoulder joint and the
rib-cage region. Often a shadow is cast in
this low.
Here is a contrivance which may help
in depicting dimension through the
shoulders. It is the ’’fan” or arc of
hollows: the two outside ones are more
prominent; the three inside ones may
be less prominent. On some people
particular ones show more than others.
70
LEARNING MORE ABOUT THE SHOULDER-BLADE AREA
When hand is laid on shoulder in
above position, an arc skirting
bottom of shoulder-blade (or scap-
ula) will likewise touch bottom of
deltoid (big shoulder muscle) and
cross wrist. Notice how dotted
line off finger tips encircles shoul-
der. Also, wrist is approximately
half way between elbow and back of
shoulder.
Refer to shoulder-blade protrud-
ing from back in figure 2. Follow
same arc as in figure 1. In 3 ex-
amine simplified scapula that
causes this protrusion (for more
detailed information on this bone see fig. 6 below). In
4 observe deltoid muscle rounded over bones which
makes evident indention on arm at arc’s crossing.
5 Front view 6 Back
LEFT
SCAPULA
(SHOULDER
BLADE)
Right: Simpli-
fied rough
of shoulder
blades...
view 7 External view
f shows
promin-
ently
a & к
next in
promi-
nence
a. Acromion process
b. Infra-spinous fossa
c. Anterior or ventral
surface
d. Glenoid cavity (for
head of humerus)
e. Coracoid process
f. Interior or verte-
h shows
on occa-
sion
bral border
g. External or axillary
border
h. Inferior angle
i. Medial angle
j. Supra-spinous fossa
k. Spine
1. Superior border
i sel-
dom
shows
Sketch No. 9 gives position of
scapula in relation to rib cage,
back bone and humerus (upper
arm bone). Direct rear view.
In figure 10
observe how
scapular
under-struc-
ture forms
base for
join of arm
(view slightly
foreshorten-
ed). Notice
how bottom
of area seems
to curve under
arm into
lower line
of breast.
71
EXPLAINING THE SHOULDER'S APPEARANCE
Acromion
1. See how the outer surfaces
betray the framework beneath.
These projections are impor-
tant for they find expression
through clothing even when it
is loosely fitted.
2. Compare the exterior in the
first illustration with the bone
arrangement shown here. Note
the spine of the shoulder-blade
(scapula) as well as the internal
border of that very evident bone.
The hard place on the top outside
of your shoulder (feel it) is the
acromion process of that narrow
spine. Just inside this point the
clavicle is attached and assumes
showy prominence as it travels
inward.
3. From this outer juncture
(marked X) the spine of the
scapula and the clavicle re-
cede on either side. At the
point of each arrow above,
the two bones become rather
conspicuous. Movement of
the arm causes them to be-
come more distinctly outlined.
Observe people’s shoulders!
Spine of
Scapula
^Vertebral border
4. The top arrows at the left
all point to the spine that juts
out on the scapula. This marks
the turning place which divides
the ’’back” from the shoulders.
The bottom arrows point to bor-
der of this blade-bone which is
i nearest the central vertebra.
\ They separtate more as the
shoulders are brought forward.
5. On the right look at the two knobs of the'
clavicles protruding at the neck’s base.
6 & 7. When one is looking directly into the shoul-
ders from the side, here is an item which is helpful
to remember: the lines of the upper arm where they
- join the shoulder spread outward slightly. The front
' line points into the slope of the neck. The arm must
be hanging naturally by the side and the neck and head
in their relaxed position. In like manner the outside
line of the arm points to the scapula spines origin on
the scapula. This, as mentioned in the foregoing notes,
is often a marked bulge in the back contour. Also ob- ,
serve that distances ”a” and ”b” are usually the same ;
(between the black dots: neck’s length and space from
neck’s base to where arm line begins).
Models in 6 & 7 are different to illustrate
consistency of these features.
72
MAKING THE SHOULDERS
LOOK RIGHT
The three diagrams at the right
show why the artist should allow
more width for the distant shoul-
der and less width for the nearest
shoulder in drawing the semi-
front view.
By simple laws of
perspective one
would expect dis-
tance В to be wid-
er than A. Such is
not usually the case
except when shoul-
ders are reared
back in an unnatur-
al position.
Nor is it right to
make A and В
same distance as
in above diagram.
If subject is
standing at atten-
tion or forcibly
setting the shoul-
ders, then such
an alignment
might occur.
Because shoulder
girdle when re-
laxed has a tend-
ency to bow in
slightly, shoulder
A curls around,
whereas viewer is
looking head on in-
to shoulder B.
Hence distance A
is greater than B.
Either side of the shoulder girdle
is quite flexible. The extent to
which the shoulder tops may be
turned in is demonstrated in the
When elbows are raised and shoul-
ders are thrust forward, chin may
be pulled back, making center root
of neck (middle X) well behind
shoulder points.
8
First dorsal First rib
vertebra
Collar-bone
(Clavicle)
Breast-bone
(Sternum)
Shoulder-
blade
(Scapula)
Even in side view
shoulders are often
set forward to re-
veal part of back
(see flat of shoulder
blade at bracket).
At lower left is top
view of shoulder gir-
dle’s bone structure.
Only attachment is at
sternum bone which ,
gives girdle much free- /
dom. Shoulders may
be brought forward ; :
from breast center as ?
dotted lines indicate.
Above and below the arrows
point to the ridge of the ’’roof”
of the shoulders (top of trape-
zius muscle).
Deltoid muscle
covers outer
shoulder (dotted
line). X’s show
points of attach-
ment to collar-
bone and shoul-
der blade.
73
THE BONES AND MUSCLES OF THE ARM
1 Р£/.ГЛ£1
Z 7P/CPPP Z.Q//G//£AD
3 33/1C///AZ/3/WWi'i
<м&°/ Z/Z7Z4/2/3
/зхгз/узо/гз оз гт/г/Рз
z/zpx's //рхр
2
Y- V-
Above left is an outside view of the right arm. See how the mus-
cles underneath show on the surface. At right is a female left
arm with corresponding numbers to muscles. Notice dotted lines
representing muscle trend as they pass beneath each other.
зХГРА/зор САяз/ рто/сх/з
O/POPAPOPPPOCPAS 03/7/70
S А//ОО//3//^________
рХгрх/зае сомли/л/хз
f ^y^tYzg сх/?р/ //хмле/з
J Р/СРР РОА/ТРА/ТРО
/м&/гг/ол/\
/ХЗ/ТО/Х/
реолтягае хррзз
S&4&//&&4£>/4Z./3
гз/сзрзхот/бРзРхо
TP/COPO 0/7X33 7X3/0
73/0333 /ул/зо/оз/о
SPXcWXU/S /Х/Т/О/ХЗ
^3/GZO3Gd3P/Pd£>/Z//3
i\\ Р/ХМА-е/ЗХОЛ'ЗХ/З
6
OP/&/P'
РРРХ/Р У/.РИХ
Z2ACP Р/РИ/
/73ZXO/C
7,0/3303 O//73P///PQ
tp/oppp XOP3-//3AD
73/C33S 737/ООХ/
\l\3PXC/7/OPAC>/AZ/3
^зххзА/хохг слез/~
///0/7/73
^хт/с/>л/з//з
ixxzxwoae oo/xtp/////3
l'lPX73VCOP C/PP7 ///Л/7.Р/3
P/SXO3 Cd/PO/ ///7/73/3
Appendage muscles have two
attachments: an origin, gen-
erally closest to spinal axis,
and an insertion, where it
grabs onto the bone to be pull-
ed. When the muscle tissue шмюАр
at center is contracted, the
insertion moves toward the
origin. Tendons tie muscle
to bone and take up less space.
Muscles work in opposing
pairs. Flexors pull in; exten-
sors extend or pull the other
way. When one muscle be-
comes active, like a seesaw
its opposite becomes passive
in a cooperative manner.
//РХГРРХОРЗ 03 77/Ш7<д
74
3
At left and below
notice the mark-
offs on the arm.
Above are two natural
ways to carry the arm.
On each one is a fact
which may be very use-
ful to the figure artist.
HELPFUL POINTERS IN DRAWING THE ARM
‘fl
The arm does not hang straight
down. Its relaxed position from
the side is to angle forward
slightly from the elbow. Should
you draw a line from the base of
the skull downward, it runs close
to the center of the deltoid (big
shoulder muscle). The hand
hangs in front of that line; often-
times the knuckle will approach
or go just beyond the front thigh
line. The sketches at left also
point out that the small of the
back disappears under the re-
laxed elbow.
The arm does not
have parallel sides
The distance from
the shoulder (a) to
the elbow (b) is the
same or very simi
lar to the distance
from the elbow (b)
to the first knuckles
of the hand (c).
Ponder this posi-
tion’s contour for
a moment.
2 Above witness the arm-hang
front view. The outer con-
tour does not square off with
the shoulders. There is a
gentle curve out, then in.
The upper forearm edge is
farthest from the body.
It may be surprising to know that
the expanse between the wrist and
the inside bend of the elbow is in
many cases but a hand’s length.
75
THE WAY THE ARM TAPERS
] There are
two tapers
to the
straight-
ened arm.
From the
top to the
elbow is
one; the
other from
the elbow
to the
wrist.
Especially
is this
true when
the arm is
turned so
that you
see across
the promi-
nences
(condyles)
of the
lower
humerus
at the
2 The widest
part of the
arm below
the deltoid
is just be-
low the
elbow crease
(between
check marks
at left).
Across the
widest part
of the
wrist is
still narrow-
er than
narrowest
part of
upper arm
(see dotted
lines in
arm at
right).
5
is straight-
”x” point
THE HUMP THAT TURNS
TO A
4 Notice that the outer
condyle (marked x on \
both arm and bone \
structure below) \
is fairly prom- 1
inent when
the elbow
is bent.
As the arm
ened this
becomes an in-
dention in the
surface (see
three arms
at right).
DIMPLE
Both arms
on the left
are slen-
der types.
Observe
the vary-
ing widths
across
the elbows
of the
shorter &
stockier
person on
the right.
The left
arm is
a view
through
the con-
dyles;
the right
elbow is
across the
condyles.
/ЛШМГ/ОЛА.
76
FACTS THAT MAKE ARM DRAWING EASIER
Above is a characteristic mark
It is helpful to know that the major forearm muscles merge into
tendons about midway between the elbow and wrist. Should you
extend the nearly parallel lines from the front half, the shaded
area (fig. 2) would represent the extra width of the muscles in
the back half. Tightening of muscles makes this particularly so.
that nearly always shows at the
bottom of the outside forearm.
It is sometimes called the’’ulnar
furrow” because the edge of the
ulna bone may be traced close
under the skin. Additionally, two
muscles skirt this ulna edge,
making the furrow more promi-
nent.
The dotted line of fig. 6
locates the ulna’s edge
and the furrow between
the extending and flexing
muscle. See the external
influence on the male arm
(fig. 5) and female (fig. 7).
Below is a female arm dis-
playing the ulnar furrow.
Directly below that is the
same arm’s bone structure.
When the back of the hand is up and
palm down, the radius crosses over
the ulna. Trace the ulnar furrow;
also, observe the gentle swell off
the ’’tendon half” to the ’’muscle
half” of the forearm.
77
THE OUTSTRETCHED ARM
When the hand is pulled back (as above), the extensor muscles of the
forearm which do it swell and rise (a) while the flexors (b) relax.
Too many students imagine the edges
of the outstretched arm to be straighter
than they are. The four top protrusions
to look for and record are (above): 1. Wrist,
2. Noticeable forearm muscle widening,
3. Bicep and 4. Deltoid.
Notice how the bicep
runs into the forearm
(a) and the under line
(b) from the elbow
runs in the opposite
direction into the upper
arm.
In the two drawings above observe the
marked influence of the inner condyle
of the humerus. In most arm positions
this is the most ’’showy” bone point
of them all.
If entire arm is extended with
palm up, then hand is turned
completely over, leaving upper
arm as is; straightened arm 5
will appear to bow down. This
is even more true with female
arm (see sketch at right).
Under great stress the long head (a) and the inner head (b) of the triceps
will show beneath the inside arm; also, the tendon of the biceps (c) and
the tendons of the flexor muscles (d).
Coming off the
external condyle and its
ridge above (dotted) are the supin-
ators and extensor muscles (on back of
forearm) which turn the palm up and extend
the fingers. Coming off the internal condyle
are the pronator and flexor muscles which turn
the palm down and flex (close) the fingers.
78
MORE TIPS ON DRAWING THE ARM
&р/дд/з дешбг/з
7 At right notice
the muscle evi-
dence discussed
at left.
It always helps to re-
member shape in con-
nection with function.
The outer end of the
clavicle (a) and the
acromion process of
the scapula (b) are
slightly concave with
operating space be-
neath for the ball and
socket joint (also see
arrows of movement
at right).
2
The acromion (a)
and top of clavi-
cle (b) may show.
The tuberosities
\ (prominences for
muscle attach- j
ment) of the hum- /
erus (c) are hid- I
i den beneath the /
I deltoid muscle. J
When hands
are folded
in, a line
passes
from the
thumb-
side into
the fore-
arm. This
marks the
lower ex-
tremity of
the radius.
Above, watch for the shallow dips: in front of
radius at wrist (a), under ulna behind wrist (b),
inner elbow hollow (c) and the dip behind the
olecranon of ulna when elbow is bent beyond
90° (d).
5 At right, notice how the
forearm is bounded by
four demarcations
зир/л/дгае /cwa/s
• 7 / z2£zza-z>
£X7FA/5Oe-
There is an important set of "show” muscles that causes a rising swirl on top of the elbow
in a straightened arm. Here and at the deltoid one finds the highest points of this arm posi-
tion. Their sides leave a marked contrasting low which shows. (Straighten your own arm
ind feel these muscles with the other hand.) They come from behind, starting at the external
condyloid ridge of the humerus and swirl up and over into forearm tendons. The extensor
carpi radialis longus extends the wrist and the brachioradialis (supinator longus) supinates
(or turns the palm up) and flexes the elbow.
79
LOOKING IN ON THE ELBOW'S STRUCTURE
Above is the inside bone structure of the right elbow joint. There are
three bony parts which show on the surface: the inner and outer promi-
nences or condyles of the humerus and the bottom projection or olecra-
non of the ulna. The outer condyle (marked ”x”) is visible when the
elbow is bent, but ’’turns” to a dimple on the surface when the arm is
straight. At the elbow-end the ulna is heavy and locks into the humerus
to form a hinge. The radius head is scarcely discernible outwardly, but
In fig. A the three black
lines are the bony parts
it is well to know that this small, thick disc rotates every time the wrist
turns, whereas the ulna keeps its place. In this wrist action the entire
radius crosses over the ulna. The radius here is small; at the thumb-
side of the wrist it is large. The reverse is true of the ulna. Here it is
of fig. В which may be
seen on the surface. The
dotted line runs through
80
MAKING THE ELBOW LOOK RIGHT
1Л
2
The ulna’s tip (olecranon)
expresses itself outward-
ly more than most other
bones of the body.
OZFCGA/YCW
6 From the inside a short flat
angling off the upper arm (A);
from the outside a shallow
concave sliding off the lower
arm into a rounded point (B).
1
When you’re looking into the
inside of the bent arm, learn
why from most visual angles
there is a short flat place at
the end of the elbow. Two
bone prominences make it:
the olecranon of the ulna &
the inner condyle of the
humerus.
Above are the bones of
the arm silhouetted to
better define the flat
that occurs at the hinge
joint. Notice the very
wide angle of the dotted
lines. This angle is not
that of the arm’s bend,
but that of the slope of
the flat (usually 135
or more).
The inner condyle of the
humerus is quite sharp
and not much more than
skin deep from the sur-
face.
The powerful flexor muscles
that close the hand have a
greater mechanical advantage
originating at the inner con-
dyle than they would have from
the outer and shorter condyle
on the other side. The weaker
extensor muscles that open
the hand originate at the outer
condyle.
7
You will be called
upon to draw the out-
side arm in this posi-
tion many times.
Remember:
the concave at the
elbow is off the
forearm;
the convex at the
elbow is off the
upper arm.
81
A SIMPLIFIED APPROACH IN DRAWING THE HAND
A confinement line
drawn completely
around the palmar
surface of the hand
gives the appearance
of a ’’flat-iron. ” It
is the ideal shape
for thrust or push-
ing. The mere out-
line of the human
hand possesses
much in the way of
beauty of form.
By extending a line
from the wrist we
enclose the finger
area. The hand’s
prized auxiliary,
the thumb, curves
cooperatively
toward the fingers
which would be
lost without its
assistance.
By means of a half-
way line between
the base of the hand
and the uppermost
tip, we will be able
to gage the position
of the fingers in
relation to the thumb,
and the rest of the
hand.
By drawing a curved
.line above this half-
' way mark, we will
find the base-line of
the fingers. The
little finger base is
the only one which
falls below this
straight line. Yet
all the finger cor-
ners (black dots)
come above this cen-
ter line. Distances
1 through 5 may be
called equal. Center
finger goes to top of
oval. Each finger
tapers with oval.
The length of the
center finger is
already determin-
ed. Fingers 1 and
3 may be the same,
but often 3 is a bit
longer. Four steps
down, and the thumb
5 comes a little
above the curved
base-line of the
four fingers.
Round the finger tips.
The thumb pulled in
like this is in semi-
side view. Finger
joints likewise fol-
low the curve as in-
dicated. The top
arc starts on the
thumb line and ends
on the thumb line.
The middle-arc starts
on the original center
line and ends on the
same thumb line.
(See black triangles)
82
An interesting note
concerning the base
of the fingers: A
short prominent
skin-fold angles
away from the in-
side fingers fol-
lowing the curved
base-line upon
which the fingers
stand.
When the hand is
flattened, as it is
in these sketches,
and the thumb is
curved in, the
palmar skin-fold
at the big base of
the thumb points
to the thumb’s top
joint. Also there
is a marked crease
on the thumb which
points to the bunch-
ed loose skin that
may look like an
inverted ”T. ”
9 0 Add the two other
more distinct fold
lines in the palm\
as indicated. The\
pits between the_______
fingers toward ~~
their base may be
darkened as there
is often a deeper
’’hole” there. An
extra fold line at
the wrist is always
there and a sug-~^
gestion of the ten-
dons.——
11 Turning the flattened
hand over you will ob-
serve that part of the
inside thumb will be
„cut off from view.
Too, you will see
loose skin-folds on
all the knuckles. The
folds on the fingers
will be enclosed in
small circular forma-
tions. The top row
will be less promi-
nent. The protrusions
of the bottom knuckles
will be elliptical and
shadows or skin-folds
will take this shape.
The narrow hand
bones and tendons
are in evidence here.
Having predetermined
the skin-folds over
the finger joints in
diagram number 6,
it is well to know
that on a hand this
large or larger you
may record a double
line on the first row
of joints. Usually a
single line will suf-
fice on the top set.
In drawing a small
hand a fragment of
a single line will be
sufficient on the first
row also. Or in a
very small hand you
may leave them out
entirely.
10
12
From the back side
of the hand the fin-
gers will appear to
be longer. The
division lines will
reach the lower dots.
The finger-nails come
< down about halfway to
| , the top joints. There
p-7-----f are short drag lines
J falling away from the
< * center finger position
^at the base of the fin-
gers. There may be
tendon suggestions as
these thin muscles fan
from the center of the
wrist to each of the
fingers. You may re-
cord the wrist bone
and a hollow beneath
the thumb. The wrist
is closer to you than
the hand, and in a sense
is on top.
83
THE HAND —SIDE VIEW SIMPLIFIED
1 The straightened hand from the side
represents, in its simplest form, a
tapering trapezoid. From the out-
side or little finger side the base of
the trapezoid will be thicker than
from the thumb side (compare with
\ diagram at right).
Notice the very evident step-down from
the wrist to the hand. There is always
a change of direction at this point.
2 A smaller trapezoid shape is in evi-
dence running from the wrist to the
base of the little finger. Its length
is half the distance of the entire hand.
5 From the inside or thumb side the i
trapezoid shape has a more notice- ‘
able step-down where the heel of the |
hand meets the under-side of the wrist.
6 The two knuckle-bones of the thumb
are in tandem with the thumb-nail, and
the knuckle part that shows is about
the same width as the nail itself. The
shaded area demonstrates the decided
step-down and change of direction from
the wrist to the thumb. The ball-base
of the thumb is the most powerful part
of the hand.
3 By establishing a rectangle over the
hand, some facts of proportion may
be learned. The center point (black
dot) falls on the back of the hand and
gives us the hand thickness there.
Where the heel of the hand joins the
wrist, and also the width of the finger,
may be determined by striking the
quarter mark from the bottom.
7 Owing to the greater drop of the
thumb-base, a superimposed rec-
tangle covering the inside of the
hand will be wider than the rectan-
gle at the left. The half-way line
crosses the top knuckle of the thumb.
4 The finished side-view has all the
modern lines of a high-speed rocket.
8 The thumb laid alongside the hand
will cause a contraction of the thumb j
base, hence the elliptical shape there.
84
BONES OF THE HAND
No side-to-side move-
ment over these
, squared-off bones.
c
8 Carpal bones
As fingers separate,
the web between
stretches the corner
into a square shape.
In this position undersides
of first two sections of the
four fingers tend to square
off slightly.
14 Phalanges
(finger-bones)
5 Metacarpal bones
Some mobility here. у
Practically no mobility here.
Great mobility here.
When you
double up
your fist
^~these_s quar e
bones show
(from the
f other side)
and these
rounded
Side-to-side
movement
possible
over
these
к rounded
\ (bones.
Г bones
show.
Notice the outer
surfaces of the
fingers are in-
fluenced by the
bone joints in-
side.
These four bones
cannot be separated
from each other;
they are almost
immovable... not
so with the fifth
metacarpal.
Thumb is
capable of
separating
itself twice
the extended
distance be-
tween the fin-
gers themselves.
85
THE PALM-SIDE
One reason middle
finger is tall is its
starting position.
The two hands on this page
have been drawn with fingers
set apart to better show the
actual shape of the palm sur-
face.
THE
LONG HAND
Notice tendency of fingers
to bow in. If dotted lines
were continued they would
meet.
THE
SHORT HAND
There are four major flesh pads
Inside the hand. The most prom-
inent contains the versatile mus-
cles of the thumb (A). The pad
directly under the knuckles of the
hand (D — across the dotted line)
is next in prominence. The two
inside pads (B and C) are the flat-
test and are somewhat lost as A
and D come together. Flex your
own hand and see.
Little ”a” is the only loose-skin
area on the inside of the hand.
This is the crumpled web between
the thumb and index finger. It
plays prominently in appearance
on either side of the hand.
3
THE SQUARE
)
This is a square
superimposed
over the long
palm. Notice
where contour
lines cross over.
Protrusions \
of finger-bones \
fit into inden-
tions. (Back of
hand — bones
brought together)
Straighten your own
fingers and bring
them together so they
are side-by-side.
They fit because all
the knuckles of the
finger-bones are
staggered in position.
Their "arched" posi-
tion helps to stagger
them.
/
The conspicious creases inside the
hand are lines numbered 1,2 and 4.
The line marked 3 may or may not
appear (like other minor creases),
but it is included here to make the
big ”M”— a device to remember.
Notice how the center of the wrist
points to crease 1 and how the top
of the M frames the root of the in-
dex finger.
4
THE ARCH
The short palm
compared with a
square. The chief
difference between
the two is in the
top areas marked
l "x".
86
SKIN FOLDS ON THE FINGERS SIMPLIFIED
Notice lines separating
pads on inside of fingers
run about half way arounds
fingers. This is true of X
fingers in any position.
These fold lines are accent-
ed more as fingers are
bent. Examine your own
fingers.
See these fingers
in hand ”A” / /
in secondary
Small part of skin
"telescopes” into
fold
es
You may not draw them in
a straightened finger but
a trace of the line is still
there.
In the straight finger (side
view) skin fold lines from
the joints come a little way
around finger. They do
not meet with the under-
neath line. There is a
narrow area between devoid7^
of lines.
These skin fold lines are
of important help in depicting
the foreshortened fingers.
Think of each section of fin-
ger as a cylinder fitted onto
another cylinder or ’’tin can. ”
The skin fold becomes a par-
tial rim of the can.
Compare diagrams with
hands A through D.
:- u Я
87
THE
WRITING HAND
8
From front notice how bottom
two fingers tuck under in shadow.
1 Heel of hand and
bottom two
fingers
supporting.
Finger-tips alone
touching paper. 5 Hand in
/ mid-air,
weight on
point.
Three-finger support—
to steady instrument
held by artisan.
6 Above and below \.
thumb and index
finger meet.
3 Second finger is
usually under pen
or pencil, though
not always.
--Last three fingers
staggered in position.
Center of
pencil
rests in
fleshy
skin
folds
between
thumb
and index
finger.
88
2 Knuckles on back of hand
are more rounded; whereas,
knuckles of fingers have a
tendency to square off.
Extremity of thumb
is laid alongside first
two fingers.
THE FIST
1 Drawing the clenched
fist calls for expressing
extreme tension on the
part of the hidden ten-
dons inside the hand as
well as tightly stretched
skin outside the hand.^-
Back of the hand is smooth-
est in clinch. These tendons
and veins are compressed.
6 Object in
hand tends
to line up
fingers
more
evenly.
7 In the fist there is always
foreshortening somewhere.
3 Thumb does its best to
double up too. The tight-
\ er the clinch the more
nearly thumb takes on
squared position. Notice
multiple folds inside.
The index finger always
sticks out farther than
the others, followed by
the middle finger. Reason:
Fleshy base of thumb is
pulled in and gets in the
way.
Web between
taut... lines always
point up toward thumb-
side of hand.
89
PRACTICE THE "ROUGH"
Don’t become discouraged in the matter of drawing hands. No artist has ever lived who could draw
the human hand in all given positions without some struggle. You are very close to a model — at the
end of your arm. Use a mirror occasionally. Examine pictures of hands. Think in terms of the inte-
rior, the wrist and the fingers. At times it helps to imagine the overall hand within confinement lines.
THE OPEN HAND
A. In drawing the open hand take into consideration
that it requires conscious effort to straighten one’s
hand. Even so, the fingers usually do not appear
mathematically parallel. See how the finger tips
flatten slightly just before getting to the rounded end.
B. Here the little finger is the ’’lonesome” finger (by
itself). C. In this case it is the index finger. Often
the fingers align themselves in this manner — such
adds interest to the hands.
90
METHODS IN DRAWING THE LEG
Here are several exercises suggested as
helps in understanding leg construction.
Of course these introductory
devices are not presented as
an open sesame to leg draw-
ing in general. However, if
one converges upon the pro-
blem from many angles he
will add to his drawing skills.
When considering the basic
outside lines of the leg there
is a feeling of stagger at the
knee (fig. 1). A preliminary
oval at the knee line, then sub-
sequent setting in of contour
curves as in figures 2, 3 and
4 will bring the final drawing,
figure 5.
As you make these sketches
check out the sub-surface
anatomy depicted in the dia-
grams on the after pages of
this section. Become cur-
ious as to why a contour line
is there. Something under-
neath causes it to so appear.
The natural stance of a man is not
with his heels together but with his
feet some inches apart. If a line is
drawn from the outside top of the
thigh (b) perpendicular to the floor,
the contact point (c) may be the ball
of the foot just behind the big toe
which takes much of the body weight.
Next draw an oblique line from point
”c” to the crotch (a). This beginning
will afford guides from which to work.
Half way between ”b’’ and ”c” place a
line to cut through the knee as in fig-
ure 2. About 1/4 of the lower leg from
the floor, angle a line for the ankles.
This same fourth (dotted, fig. 2) above
the knee line will give the starting
point for the bulge of the outer thigh
muscle (fig. 3). At the knee line start
the calf muscles, stopping the inside
one another 1/4 way up from the in-
side ankle (this point is a variable,
but is never below the half-way mark
of the lower limb). The outside mus-
cle goes on down to meet the slope of
the outside ankle bone. Notice how
much (shaded area) is outside the
triangle in fig. 4. Add remainder of
leg and foot for complete fig. 5.
№
91
A FEW LINES
will give you a start in draw-
ing the female leg. At left two
merging lines to the ankles
need have only swells a,b, c &
d as shown to formulate pro-
per shape. Both a and d are
same length with equal space
between. Swell b is inside of
knee, and c is opposite d but
shorter.
At right notice the long rectan-
gle divided in half both ways.
Knee is just above half mark.
Front of lower leg follows cen-
ter line (dotted) to 1/4 mark.
Back of leg leaves rectangle in
only two places. If shoe has
a lower heel, then toe may stick
out in front of overall rectangle.
Below, leg is commenced with
several simple geometrical
shapes. Where the arch of the
foot leaves the straight line of
the lower leg is approximately
1/4 of the lower leg (pointed
toes included). Check out mus-
cles to find the ’’why” of the
surface.
92
М*У.
<4*
&
i /у
LEG BONES THAT SHOW
ON THE SURFACE
At the top the great tro-
chanter of the femur
should be mentioned, al-
though it manifests it-
self chiefly when the leg
is straight and carries
the body weight. The fe-
mur shaft is always bur-
ied in muscle, but the ex-
ternal condyle of the femur
shows (as well as the in-
ternal condyle on the far
leg). The patella and its
ligament beneath express
themselves in every posi-
tion. The external and in-
ternal condyles of the
tibia are very close to the
skin, but a thin layer of
muscle rounds over them.
The head of the fibula is
very likely to show. Where
the four x’s are in tandem
marks the front center of
the tibia which is ’’practi-
cally out in the open. " It
looks as if the fibula shows,
and this streak is most of-
ten there, but it is the per-
oneus longus muscle run-
ning alongside the fibula.
The lower extremity of the
fibula (external malleolus)
pops out all the time. The
direction of the light has
much to do with the reveal-
ment of all these bones.
When the legs are bent, especially when the
feet are drawn under the thighs, the bones
of the knee joints are made visible. Basically
they assume the shape of modified squares (see
fig. 5) — part of this, particularly the top inside,
is muscle, ’’a”, the external condyle of the fe-
mur, is higher than ,Tb”, the internal condyle,
but muscle thickness over ”b" evens off the top
of the knee in appearance. The patella ”e”
slides down into the under groove or patellar
surface of the femur, making the knee more or
less flat on the front. The ligament of the pa-
tella is pulled over the tibia and shows slightly.
The condyles of the tibia ”c” and ”d’’ square
off the bottom part of the knee in this position.
93
1/43733 ////ззлх/з
(ЭХ^хз^/хз/И/зз
тзт/зае зх$с/43
ззиае/х
LEG MUSCLES FROM THE
FRONT AND BACK
-4457Z/S 3X7347/4/3
ЗЗЛ4/М34433ХА/034/3
3473444
ззегаз/т/з
r/S/44/347/3/4’4/3
з/гззд/х/. хм/дза/г/з
FEMALE LEGS
TYPES OF
6/2ЛС/4/3
-зд/г/яз/г/х
XV733X744 /И444 3344/3
— 037/3/4
з/тз/гх зз/аоз/Х-
44/07/3/44 34V4>
<$/740/4/3
4434/0703 /44<3/3/3
3341/- 73MO/4/33//3—
^Хз/зо/ззи/т/з
/7МЗЗ /7340
7/3/4. 34/34У//4//34/3
5//344e?3
V437Z/3 зх/зз/з/з
здегоз/оз
З/зез //34£>
Below are several different types of female legs. Check out the interior structure on No. 1 and No. 2 by
reference to the muscles listed above. No. 3 is an example of subcutaneous fat concealing all but general
bone and muscle shape beneath; nevertheless, it is still there. Compare the heavier type No. 4 with the
slender No. 5 legs and note how the basic under-pattern is the same.
94
WAr'W
PASCM£
-махмшз
6At/Z££&
auzd/aas.
Where
patella’s
ligament
fastens
to tibia
(a) is di-
rectly in
front of
bottom
line of
seated
thigh (c).
Above, the line d
which often appears
over outside ankle
bone is simply an
extension of the
fibula e of fig. 2.
At right observe
the large vastus
externus and in-
ternus muscles'
surface showing
(both outside and
inside view of leg).
These muscles in-
sert at the patella
and extend leg.
Also the biceps
tendon running in-
to the fibula's
head may be in
evidence on sur-
face of straight-
ened leg.
Perhaps the most
showy muscle of
the male leg is
the gastrocnemius
(or calf muscle)
— especially the
inner head.
LEG MUSCLES FROM THE SIDE
7£Oe/4fA/72»e 0е T&tU/K
The tendon of the biceps femoris long head
always stands out on surface when leg is
bent for sitting. (See fig. lb and fig. 3g)
M/ZG&ae
swzme
Surface marks _f & _g both attach to
head of fibula x. The peroneus lon-
gus muscle alongside of fibula
causes mark £ going into ankle bone.
. vat :
/А/07/ff/Al.
VAS7Z/S
ZAS7Z/S—
///Г&?М/£
uaus bs^
ЗДЛ/О
FAZ£UA.
£/&AM£ArOF£AZ£Z(A.
GASZ&CAZZW/ZZZ-
7/3/AA/.S МШ/7
SCA^7/S-
7/^/A
____ZEV£O ACW/ZA/SZ
—МиМЛР//6ЛМ0/га/:М&г
гЛ&МгЯ&ЗЦу
Szm/- &•
шишМ' vfei
95
UNDERSTANDING KNEE CONSTRUCTION
££WT /£/=/-ЕШГ MEW У //гП' lEWMZWEW ZWE/PEWEW 4 g/KW MEW
Consider the above 8 check
points which show on the sur-
face; four (numbered) are
big bone condyles inside and
out. Here ligament of patel-
la is stretched to limit by
flexion action.
Notice the patella’s position between the femur’s condyles (fig.2). The fibula's
head sets to the rear of the tibia's external condyle, yet it is on the outside
(fig. 1). The big bone ends are like two clenched fists, the upper (femur) sliding
over the lower (tibia) when the leg is flexed or extended. This gliding action
is aided by the double convex rounds on the back of the femur which articulate
in the very shallow cups at the top of the tibia (see fig. 4).
At right lower
limb is pulled
back under thigh.
Locate the check
points (x’s) of fig. 2
in the knee’s surface
&
3
'(Z
At right fol-
low lines a
;$ and b as leg
turns from
side to back.
in me кпее- s sun ace
anatomy fig. 1. These Ж
check points correspond |
to the interior bone draw-
ing of fig. 3. Observe the
squared effect of fig. 2 as it
appears in fig. 1. Trace the
patella’s ligament down middle ;
of knee in fig.1.
\
fc
From the outside notice how the con-
tour lines run. Lines a and b point
toward each other and pass in front
of knee rumples 1 and 2. Calf line
£ runs in and up.
At left remember the "CU"
, (black lines). The C is the
inside Sartorius rounding
over the condyles. The
sides of the U are the vis-
ible skin markings from
the semi-tendinosus and
the biceps femoris beneath.
The bottom of the U is sim-
ply a fold crease.
96
TYPES OF KNEES
FEMALE Above, surface anatomy of female knees, right leg, as contrasted with male
knees below. In each cas« the patella or kneecap is just above center. 1. Squared with two
horizontal rumples, one underneath other. 2. Rounded with center depression. 3. Overlapping
rounds; bottom round of fatty tissue concealing ligament of patella appears larger than top round
encasing patella. 4. Large ”V”, fleshy thickness covering underparts. 5. Marked revealing of
under structure (see interior diagrams) can and does appear on some female knees. 6. Type
most often drawn, double round with top overlapping and bottom smaller (being ligament partial-
ly outlined).
; /i/O-T/BMA
——7 r— AtVZ?
1 2
У4Я&4 1
• 04^/Z/y
I V— 4/&44MW7
/44-/5^77^3^
i H-z=zzzz?j^/’
Л Az2/ZZZZz/
']&&/£> SAC
Above is cross section of
knee from side showing
why there is rumpling of
contour when leg is straight-
ened. Besides protection of
joint, patella acts as pulley
sliding over middle notch of
femur when front thigh mus-
cles pull ligament attached
to tibia. Thin fluid sacs call-
ed bursa lubricate sliding.
Compare 12 surface illustra-
tions above with right diagram,
MALE
exhibit more muscle make-up than female
(see six examples above). No. 5 most high-
ly developed; No. 4 least developed. Observe
prominence of vastus muscles protruding
just above knee. Notice ligament of patella
pushing out at bottom of knee’s center. See
how entire knee sets in ”V” of lower attach-
ment
For the most part male knees
on
tibia of ilio-tibial band & sartorius.
н__jJj-
---
ттмае/з
~77/0-77<ff/4£ J4/V0
-/3/ZZZZ4
Z/^4^7/7 04^44/44
<У=4Г47ае47>
//£ 7~£/7 C7334
£ S&e$4
(Г////744& И0 W
мю/а/г/м
97
HELPFUL POINTERS IN DRAWING THE LEG |
In fig. 1 notice the (highly developed) muscle ’’bulge"
setting of the vastus externus (up) and the vastus
internus (down). Also, follow the lower leg’s inside
front shaping. In fig. 2 see the surface grouping of
protrusions above and below knee. Fig. 3 shows the
femur concealment and tibia "exposure. ” In fig. 4
a lean, heavy-boned leg is pictured — remember
how fibula sets lower, top and bottom, than tibia.
7
A point that can-
not be overem-
phasized is the
staggering of
the upper and
lower leg
sections.
Look for and
record this
fact in your
drawing. The
leg is not just
straight up
and down
throughout.
Look carefully at the above
leg modeling, then verify
the reasons for it by sound-
ing out the muscles beneath.
The legs in illustrations 1,
6 and 7 are all highly devel-
oped for muscle definition
98
THE LEG IN RELATION TO THE REST OF THE FIGURE
In fig. 1 distances a,b & c are
Л comparable. Of course, the
V shoulder girdle is extremely
mobile, so a will
vary some.
M.S15
In fig. 2 thigh is used as radius for cir-
cle. This is the short norm proportion
In fig. 4, as in fig. 1, lines a,b & c are
equal. Line c goes to root of fingers.
Heel never extends beyond
buttock in this position.
Right, figs. 6, 7, 8 &
. 9 are various views
/ of legs folded under
/ body. When heels
are directly beneath,
then thigh predomin-
ates (see also fig. 4).
In fig. 8 left foot is
placed to outside so
more of lower leg is
visible.
"I
w-
3 /
/ и
Above, fig. 3: Shoulder to elbow
equals buttock to knees (a). Elbow
to finger tips equals knee to heel(b).
Left, fig. 5: When limbs are folded
completely together, bottom half
under top, crease in arm resem-
bles that of leg. Both point toward
floor.
99
FUNDAMENTALS OF FEET
Some part of the foot always angles off
from the leg line, whether it is supporting the
body weight or not. Learn of the ankle posi-
tion early, remembering the inside ankle is
higher and farther toward the front than the
outside ankle. The big toe tends to keep flat
with the ground; the other toes bend over and
reach down to the ground.
3
The foot is slightly longer than the height of the
head. The hand is about 2/Z the length of the
foot. When it is pressed to the floor, the over-
all width of the foot is as wide as the hand. The
female proportions are somewhat less. (The
figure that is 8-plus heads high may have feet
1 1/3 heads in length and 1/2 head
Together the feet form \
a crossways spring. I
The tops of each instep I
and insole curve toward x
each other.
width.)
in
From the inside the foot
is built into a modified
spring. The heel acts
as a foundation for bear- । ;
ing bulk of weight. Fore / Д i
part of foot acts as spring
to absorb shock. ' <
^/52lM<S- HEEL
___£ J- ~~-\base|
Transverse
arch of instep.
Toes relaxed
become a part
of the trans-
verse arch.
The big toe and ball pad behind it jut
out like the thumb of the hand —
especially under pressure.
THE ARCHES IN ACTION
a. The inside longi-
tudinal arch just be-
hind the big toe
plays the major
part in cushioning
the
step.
The inside
surface of
the foot is
often in
tandem with
inside line
of leg.
1'
ns
b. The outside
longitudinal
arch flattens
to the ground
and gives the
body sideways
stability.
c. The transverse arches along the cross sec-
tions of the middle and front of foot give
added shock absorption.
d. The half-moon shaped curve running around
bottom of foot aids in overall equipoise. (Foot
lifted to illustrate; actually heel hits floor first)
100
The transverse (means Tibia
across) arch in center Navicular Internal Malleolus
of foot:
•---------Cuboid
—External Cuneiform
Middle Cuneiform
СУ "Internal Cuneiform
Phalanges
Oscalcis
External Malleolus
2 OUTER VIEW t
k-Transverse
Arch
Phalanges
Metatarsus Oscalcis
Longitudinal Arch
INNER VIEW t
Tibia
Total: 26 Bones in Foot
14 PHALANGES or Toe Bones
\(3 in each toe, 2 in big toe)
7 TARSALS or Ankle Bones
5 METATARSALS or Instep Bones
X(darkened for sake of separation)
t
3 BONE SUMMARY
iX i
5 The thinnest part of the leg (be-
tween the arrows) is a few inches
above the ankle bones (black
dots). The same is true
with the front view.
This view shows the feet off the
floor in a relaxed position. Notice
how much of the foot remains
above the dotted leg line. When
the fore part of the foot is pointed
down at its maximum, point ”a”
will contact point ”b” of the leg
line. It seldom goes beyond the
line. The instep is then left slight
ly rounded above the leg line.
Tibia
Astragalus / Flbula
Navicular(
Middle Cuneiform
External Cuneiform \
r-Astragalus
Transverse
Ligament
FIVE TENDONS THAT MAY
SHOW UNDER STRESS
Long Extensor
Tendons of Toes
Extensor of
Big Toe
7
Right: The dark-
ened area reveals
the thickly skinned
pads of the feet
which contact the
ground.
Left: The outside
borders beneath
the feet combine
to make a cylin-
drical base to
support the body.
Notice the long
Achilles’ tendon (x)
rising from heel.
101
'FOOTNOTES1
2 Right: The three bottom
areas in the order of
their coverage. They
serve as elastic pads
protecting three layers
of unseen muscles be-
neath the foot’s bone Q
structure.
1 The little toe may come back as much
as 1/3 the length of the entire foot. In
most cases, however, it is located
back around 1/4 the length.
4 The several
/ changes of
/ planes down
the top of
the foot are
suggested
by the dot-
ted line at
the left.
The outer ridge of the sole pad
(between dotted lines) tends to
bulge a little — especially is
this true as age comes on
plus excessive weight.
It’s more notice-
able among - -
peoples who 1
go barefoot. -
Unlike the finger-bone phalanges
/ the toe-bone phalanges cannot
move about as dexterously. On
"tip-toe” they’ll spread when
forced against the floor.
Toes turned under mean the bottom '
flexor muscles of the toes gather and
rumple the fleshy sole pads and thin-
ner skin of the arch. However, pad
of heel always remains smooth under
any circumstance.
7 In walking, the outside back of the heel marked
I foot settles into contact with the ground.
i other,
strikes first, then the rest of the
The feet do not track parallel with each
You draw the feet of a walking man pointing out slightly.
В Some toes when relaxed will bend down at
nearly a 90 degree angle. This does not
apply to the big toe; it usually has an
inward set rather than downward
when forced out of line. This
extreme angle is often due
to the torturous design '
of certain shoes. ; X
When foot is pointed
down, the outside
ankle region rounds
out (as per dotted
line). This is be-
cause point ”x"
which has been a
hollow is filled in
by knob extremity
of the big leg bone
(tibia). Black dot
is ankle bone.
102
DRAWING WOMEN'S SHOES
1. Start with elongated trapezoid
shape. (Remember, in all block-
ing such as this, sketch lightly!)
This is front foot thrust forward
in typical stance where back foot
carries bulk of body weight. If
leg lines slant into foot as is the
case here, and arch side of foot
is exposed, then ankle line will
be more severely tilted.
2. Sketch in ankles. Added toe
lines will form a triangular shape
beneath trapezoid.
3. Indicate shoe’s instep line which
is partly dependent on style. This
usually occurs just behind root of
toes. Draw sides of shoes across
ball of foot. These will appear just
beyond trapezoid’s sides. Back of
heel may barely show. If heel is
centered, rear part of shoe, will be
out of sight.
4. You may or may not have some
evidence of break where top plane
of toe section starts up on instep.
Here it is suggested. Too, there is
a small vertical line at point where
planes retreat on either side of shoe.
/ THE BASIC FORM
S. t 5 x'W
The artist is called upon to draw more high-heeled shoes
than any other kind. The above diagrams, both left and
right, are of the same type of shoe. The soles of these feet
are not flat with the eye-level of the observer. They rep-
resent the position most needed by the artist in portraying
the model as she appears in most settings, i. e., with her
eye-level on yours. The front view at the far left is a left
foot set out to balance the body being supported by the above
right foot — inside view. With the exception of the ankle
placement being different (lower outside), the outside view
is the same. In the high heel the arch itself appears essen-
tially the same from both sides.
1. Sketch the leg lines cutting through the trapezoid and the
modified triangle beneath. The back leg line (when limb is
in vertical position) always points directly to cap of shoe’s
heel. Front leg line points to spot where sole leaves the
floor. Because foot is tilted down, heel protrudes farther
out in a high-heeled shoe than in a lower heeled shoe.
Notice plane of toe section is in line with extreme rear base
of heel.
2. Draw shoe arch as wide as leg is thick. Toe front de-
pends entirely on style, but allow room for toes inside shoe.
Round heel into back triangle of trapezoid, and add back arc
for heel column.
3. Sketch in sides of shoe and inside of heel column. See
how root of heel column merges into high point of arch.
Round sole slightly, as it is somewhat below eye-level.
4. Observe how top plane of toe section disappears around
where instep enters shoe. This again is because eye-level
is above and you are looking down, as it were, into shoe’s
opening. If foot looks wrong, check it out with the forego-
ing sequences. Draw several until they look right.
For foot protection and warmth most of humanity
wear some kind of soles on their feet. One of
V\ the problems in shoe design is to hold this
sole to the foot itself. Consequently, the
,—shoe uppers must conform in some way
/ to the cross-sectional shape of the
\ foot. Study and keep in mind the
Cbasic form of the bare foot.
103
ABOVE AND BELOW SHOES
In the above drawing a portion of the sole is showing.
Extract the heel of each foot and you can picture the
anatomy beneath in a more or less shoeless state.
The dotted line is ’’drawn through” to reveal how the
heel is attached.
Looking into the shoe on the left shows
how the foot flares outward from the
bottom of the leg. Refer to the shoe’s
opening in relation to the sole beneath.
The second sketch depicts the shoe from
underneath. Two heels are suggested: a
half block and a more pointed heel. In
both cases you are seeing the front of the
heel column which means the toe is some-
what closer to you. In the next sketch
you see more of the back of the heel col-
umn which means the toe is farther away.
Also, since the heel tip is to the right of
center, the whole foot is seen more from
the inside than the outside.
5
When legs are tilt-
ed at an angle such
as at left, bottoms
of feet may show.
Foot nearest has
toe pointed more
toward viewer,
hence it is drawn
shorter than other
foot which is more
side view.
Here is the left foot from
above. Learn to ’’draw
through” (dotted lines) in
order to check construc-
tion. Not much of shoe
heel is in sight. Observe
shoe’s opening into which
foot is placed.
7
Here is the right foot from
the underside. More of the
heel is seen than at left.
Foot’s side barely shows.
Front leg line disappears
behind instep. Heel cap is
on level with the sole of the
ball. ’’Imagine” foot inside.
Some of shoe’s
arch as well as
sole may be ex-
posed when foot
is lifted. Several
heel widths are
indicated here.
In the semi-
front from be-
low notice th£/
deep niche"ef-
fect along inside of heel.
10 In drawing women’s ’’flats” (extreme right) the basic rules
are quite similar to those used in blocking in men’s footwear.
The styles are more variable, particularly across the uppers.
104
FEET AND FASHION
By now you may have remembered that the thinnest part of the human leg is
from two to three inches above the ankles. From the side the thickest part of
the foot is directly across from the back edge of the heel. It may come any-
where through the tarsal bones (area of the bracket). In the female this sec-
tion may be smoothly rounded by a fill of subcutaneous fat, or in both male and
female any one of these bones may show slightly beneath the surface.
I
*------------->('
Women’s shoe fashions change with the wind. However,
since madame's foot remains essentially the same her
shoes will always have some kind of toes, sides and heels.
On occasion the
sides disappear,
leaving the sole
to be held on by
a toe or heel at-
tachment. There are hundreds of
variations, but at left and below are
more basic pat-
shortened easily.
Superimposed over the foot at the right are a number of suggested innovations
in shoe designs. All of the lines and changes comply with the basic foot shape.
Through women’s magazines and ads one can learn of the current fashions to
use in answer to the immediate need.
In order to understand the breakdown of the foot-in-shoe
from the rear,the above floor line has been placed on the
eye-level. Notice the sole’s (2) concave allowance for
the arch on the inside left. See now the top of the heel (3)
coincides with the top-back of the sole (2). Observe how
the shoe’s upper encases the heel (4), and how the heel
column of the shoe lines up with the sole in the completed
diagram (5).
Most of your demands will be to
draw the shoe with the eye-level
well above the floor, in which case
the heel tip will appear below the
front ball of the foot (see above).
105
DRAWING MEN'S SHOES
1 Block in foot, using simple straight
lines of trapezoid shape. Base of
trapezoid swings to outside. In aver-
age front view, outside leg line, if ex-
tended, will cross on or near root of
center toe. Sketch oblique ankle line.
Notice big toe
allowance.
Arrows: where
toe area be-
comes instep.
begins to show.
Observe pant cuffs
in these diagrams.
2 Connect bottom toe lines with base
of trapezoid. Set in curve of shoe
upper over top line of trapezoid. Sketch
-curve of instep and repeat
-curve for seam over shoe toe. Notice
'suggestion for side of heel section at
A.. - - —rear of shoe.
Heel sole is
not as wide
as front ball
sole; may not
show at all.
/ 3 Though it is not necessary, one
\ <f/~-L^^should be able to show foot encased
< 'j/ .^^ithiiijshoe outline. There will be a
/.• i little play^between front of shoe toe
/f - M /and foot toe. Observe line of break
//, , /where foot becomes leg. Top of shoe
! tongue appears a little below this.
Where ball sole
leaves ground is
about 1/2 overall
shoe length. Heel
about 1/4. Styles
vary somewhat.
4 In nearly all male footwear there
is the laced V coming down the instep.
The point of the V is about half way to
toe. There are multiple patterns on
the shoe uppers. Extreme front of
shoe sole may be pointed, rounded or
squared.
With eye-level almost on floor,
witness evidences of the trans-
verse arch repeated along the
visible part of the shoe. From A
this angle the heel barely shows.
Discern how arch effect carries
across inside of shoes./With eye-
level low, underpart of/toe tip may
start to show (especially in long-
worn shoes).
No part of the human attire
so reveals the day-by-day
struggle of life than a pair
of shoes. The more the wrin-
kles, the more the oval
sketch lines may be drawn.
106
The topmost rim of a
man’s shoe is concave
under the ankles. This
line merges into a con-
vex line over the instep.
Point 2 (the concave)
must clear the outside
ankle bone when toe is
bent downward. Point
1 is predetermined by
foot’s being in this posi-
tion also — it must clear
the back leg line. Point
3 must not interfere
with leg when brought
forward as per dotted
line. The function of
the rim4 s design will
help one remember its
shape.
Since most men’s shoes are dark colored
and are supposed to shine, it is well to con-
sider where the highlights are most likely
to appear. Usually there is a vertical strip
of reflected light on the back of the heel sec-
tion. The comparative flat of the center
sides carries a monotone except where it
bends under to meet the sole. Probably the
changing planes of the exposed toe will have
several flecks of light. A shoe when it has
been worn has a slight rocker effect on the
bottom and is not flat with the floor.
MAKING SHOE DRAWING EASIER
The spring-like arch of the foot is more apparent in the shoe from
the inside view. Figure III is a typical angle often drawn by the
artist. Reverting to figure I, study the spring-like core of the arch
marked A. See how lines В and C tend to run parallel with it. In
fact, the whole center section seems to reach down to the floor.
In figure II notice the curved sweep of these same two lines В and C.
Line C is the inside of the sole which has been made visable here.
Line В is the instep which is roughly 1/3 of the shoe’s upper. Feel
out the center arch section while sketching figure III.
3
Left: There are two arcs
in the cut of the shoe sole.
The inside arc A is always
more pronounced to accom-
modate the natural arch of
the foot. Arc В in some
soles is barely discernible.
Black dots are where the
arcs break and the sole edge
curves in toward toe. Shaded
area contacts ground. Con-
tact along dotted line may
vary with heel height. Style
changes alter contour some-
what.
4 /
Above: Sole contacts
ground at point (black
dot) farther forward on
inside of shoe than out-
side (see arrows). Lines
A and В show relation
between contact points
and break of instep.
6
The ankle may bend left
or right to nearly a 45°
angle. The shoe’s upper
may give a little to com-
ply. Hump A is bone and
В is shoe. There are 3
changes of direction so
numbered. Imagine the
trapezoid shape (discus-
sed earlier) blocked over
foot beneath ankle line.
107
FEET FIRST
From the rear men’s pant cuffs often
cover part of the shoe.
The heel in this position
is somewhat like a squat
barrel with varying de-
grees of the barrel’s waist
and the front toe areas
showing (or none at all).
1
It is interesting to note that in the
cut of most men’s soles the inside
line at the arch (black), if extended
(dotted), crosses the opposite ex-
tremity of the toe (x). The big toe
region (A) is on the inside of this
extended line.
3
When a walking foot
is pointed toward you
the sole of the ball
may scoop up like the
runner on a rocking
chair. The bottom of
the heel may hardly
4
Keep in mind that the inside
ankle bone is not only higher
off the ground but farther for-
ward than the outside ankle
bone. The widest part of a
shoe is at the bottom of the
shoe laces.
5
As the sole is
exposed ob-
serve how the
side of the
uppers
narrows.
108
As clothes conform to the body they of necessity must fold in places. The kind of fold the cloth
takes depends upon its location and texture. It is important to know what body shape is beneath
the material, hence the foregoing study on anatomy. Always there is a certain amount of bone
and muscle structure revealed through the cloth.
SIMPLE FOLDS FROM
BODY PROTRUSIONS
3 Since any covering must
go around or fall over the
big shoulder muscle (del-
toid), there usually are
folds here, particularly
with arm movement.
1 The hump of the knee
(condyles of the femur)
causes the trouser fab-
ric to yield in a manner
similar to this sketch.
2 When the elbow is bent
folds must occur in the
sleeve. In the outer
view the apex (olecra-
non of the ulna) of the
joint pushes into view.
4 Folds of some kind may
occur off the high inside
of the shoulder blade
(vertebral border of scap-
ula). Any body protrusion
can be the originating point
for folds, depending upon
apparel’s design.
I
5 At the point of the nipple of
the female breast a few light
folds may occur, or in the
vicinity beneath the breast
the fabric may change its
contour into slight combina-
tions of folds and shadow.
6 In the hang of a skirt from
the side very often long
drape folds find their begin-
ning at the hip bone (front
crest of iliac — check pelvic
bone).
SIMPLE FOLDS FROM BODY INDENTIONS
1
Whereas, all of the foregoing are examples of folds
which have their origin at points of protrusion, there /', \
are other folds which come from points of indention / \
sometimes referred to as ’’tuck points. ”
2 Natural tuck points: where the fabric is folded
Forced tuck points: made by bends at the joints
over in the making (armpits and crotch).
(knee, elbow, wrist, etc.) or flexing of the torso.
3 Tuck points brought on by stitching.
4 Tuck points caused by outside pressure such as
chair bottoms, table tops, and outside influences.
109
VARIOUS TYPES OF FOLDS
Folds may be of many sizes and take varied shapes. Often they will resemble letters of the alpha-
bet such as the above Y,X,S, U, V, and P (the latter being one fold passing beneath another). Folds
may be loose and open or tight and compressed as figures 3, example S, illustrates. Clothing
folds are to be seen wherever there are people. Form the habit of watching them at times to see
what they do. Learn from your own person and a mirror. Flex your legs, arms, and torso.
WfOU> (C//?CAXAX)
CO/srx/де
XASSXS
УПЮ
10
mow хагл
Nearly all folds in clothing are either
crush folds or tension folds. In figure
10 the crush is without tension. In 11
there is tension to the left. In 12 the
tension is spread. In
СА/ХГА/Л7 XX/X X/&X \
cxx/a/// xa>//> /ди/
Folds always have some
point of support, whether
internal, 7 & 8, or ex-
ternal, 9. They tend to
radiate from these points
either by gravity or other
forces. Fabric lying in
a clump on the floor or floating in
wind or water is an exception but is
seldom related to the human figure.
XXX/X A AX
/МОХЛ/Г/ХА/
//4M5/MS
13 there is twist.
V
I
In the illustration at the left is
an example of a simple tension
fold (from x to x) and a simple
crush fold (*). The material
here is between medium and
heavy weight. A lighter mate-
rial would have thinner folds
and several more of them.
The seated figure is wearing a garment which has been improvised to dis-
play nearly every known type of fold. It is highly unlikely that all of these
would appear in any dress of fashion at the same time. The purpose is sim-
ply to help one identify the various kinds of folds.
110
FOLDS IN LIGHT AND SHADOW
1 The above line could conceivably be the cross section of folds in cloth lying on a table. It illus-
trates a vital factor about folds that happen anywhere. Most likely there are a limited number of
light sources involved. Because of this there usually are shadows and partial shadows on or be-
low the folds themselves. In this diagram the arrows represent the source of light. The parts
of the line done in pencil are the areas more directly exposed to the light. The parts which are
dotted are in partial shadow, and the parts of the line in black are in total shadow.
This explains why some folds or parts of folds are drawn heavily while others are drawn lightly.
Too, it helps the artist to understand that one side of a fold may be treated with a coarse line;
whereas the other side of the same fold will call for a less prominent shade strip of some kind.
Ill
THE FEMALE FIGURE AND CLOTHING
Above are sequences showing how one may (A) block in the
figure, (B) refine it enough to be sure of its correctness and
(C) add attire which will fit naturally. The extent of the under-
drawing in the development of a clothed figure is up to the in-
dividual artist. One thing sure, when he is through, the figure
must be able to reside within the garment. When a sketch
nearing completion looks wrong, many artists throw a tissue
over it and ’’draw through," returning all or parts of the sketch
to the basic anatomy. This way the parts which emerge from
the clothing will "belong" to the figure beneath. From the
start all underdrawing must be put down lightly and forever
subject to change.
112
CLOTHING THE
UPPER TORSO
At the far left is the female chest
region with an indication of cover-
ing planes. Whether the garment
is tight or loose fitting makes some
difference. The kind of material,
its design and lighting are other
factors to consider. The lighting
theme is further carried out in the
sketch at the immediate left.
Begin sketching lightly as in 1 & 2; express darks on contour opposite light source as in 3; set
in folds above armpits 4; add folds below breasts 5; lay values in to denote planes 6.
Chief folds come off shoulder
into armpit and off breast in-
to waistline. Pen and brush.
When body weight is thrust on
one leg as in figure at right,
high hip calls for lowering of
shoulder on that side. Breasts
stay with shoulders; hence
folds from both breasts swing
toward high hip. D, E & F are
pencil treatments. D is the
more formal line; E is the pen-
cil slash; F is the multiple in-
formal line.
E: same pencil on
G: Hunt 99 pen, No. 2
Pencil shade placed
over brush folds.
Develop penciling 'T*
very lightly at first.
Add bold, blunt
strokes later.
D: Prismacolor Black 935 pencil on Coquille Board fine,
layout paper. F: HB drawing pencil on charcoal paper,
brush, ink, 935 pencil on Coquille Board fine.
113
FOLDS — COMPLEX AND SIMPLE
Though there are many dif-
ferent techniques of render-
ing, here are some pencil
(1), pen (2) and brush (3)
suggestions for handling
folds. Remember the mate-
rial is soft and flexible,
so keep your treatment
light and airy. Notice
the various ’’weights”
of lines in each medium.
In the pencil see
how small mas-
ses of value are
obtained with
sketchy parallel
lines. Look care-
fully at the line
groups in the pen
drawing. There
are some single
lines and double
lines. For em-
phasis or shadow
a triple-plus
may be used
In a brush drawing the average
individual line tends to be heavier
than when done in pen; however,
relief from monotony can be had
by using some thin, even broken
lines (particularly on the contours
of the sides from whence the light
comes). Slight folds call for the
thinner, more insignificant lines.
Above is a brush drawing with folds reduced to a mini-
mum. The quantity of folds shown is always up to the
artist. One does not have to put them all in. In the cir
cles are follow-up folds or secondary folds (in this case
done with pen). They depict more of a low or indention
in the fabric rather than an actual tuck-under. Practic
combining brush and pen folds. At first use them spar
ingly. Plain areas make the folds that do occur more
meaningful and pleasing.
114
Below is an expression of the
cylindrical forms found in the
seated figure. To one side
are details of folds taken from
the finished drawing. Ascer-
tain how these folds conform
with the cylinders. When you
draw folds, take them around
the body part which supports
them. Always take into con-
sideration the ellip-
tical cross section
of the arm, leg,
waist, etc. before
you drape clothing
about it.
In this figure
there are about
two dozen dif-
ferent cylindri-
cal forms link-
ed to each other.
See anatomy in
terms of cylin-
ders and your
folds will
easier.
come
MAKING FOLDS COMPLY
WITH THE FIGURE
In fig. 3
check out
the neck
ellipse, the
arm ellipse,
the chest el-
lipse and
the shoulder
ellipse. In
the arm of
fig. 4 there
are two cyl-
inders re-
treating
from the
elbow.
Some materials are
springy and refuse
altogether to lie on
the supporting form
(see fig. 5). They
take on loops instead
of angles. Still they
cover the shape by
virtue of one loop’s
going behind the other.
In fig. 6 the ellipse of
both waist and hem-
line are subtle but
there nonetheless.
115
FIGURE AND
CLOTHING
THE MALE
By this time the student should have
experimented with various basic body
frames. Fig. A is but a suggestion.
Some of the polishing of fig. В could
be left out before the clothing of fig.
C is added.
Any fully attired figure drawing should '
be evolved with the artist understand-
ing what is going on in the process.
There may be a few happy accidents
in guess work, but the one who can
produce consistently is the artist who
has a comfortable knowledge of figure
fundamentals. As anatomy is studied,
the total concept will be without the
gaps which previously proved bother-
some. If this concept is soundly in-
grained from tireless practice then
one can more successfully slenderize
the figure for fashion or broaden it
for mural work or adapt it in other
ways to meet specific requirements.
116
NOTES ON SIMPLIFIED BODY FRAMES
2
Earlier in this book successive stages were
given on figure understructure, starting with
the head oval, the plumb line from the neck
pit, the shoulder and hip lines, etc. As one
learns proportions and the proper setting of
the parts, he will find it easier to mark off
the areas, top to bottom , of the figure. A cer-
tain sized body part will automatically call
for related parts properly proportioned. In
a very real sense one learns to visualize
the whole almost simultaneously with the
setting down of the parts. At first these
parts are not detailed but are simply out-
lined. There should be a back and forth
play from the whole to the parts and from
the parts back to the whole. Great atten-
tion to detail should come in the latter
stages.
Fig. 1 utilizes the double triangle.
Fig. 2 is a simple sectional outline.
In fig. 3 semi-parallel lines are
used (shaded area points out that
parallel leg strips move toward
outside of hips). Fig. 4 shows body
in suit.
117
SUGGESTIONS FOR
DRAWING MALE ATTIRE
1
The lines of
a man’s gar-
ment are not
ruler straight
but are fash-
ioned to con-
form with his
body beneath.
Without the
influence of
wear or body
bend there is
a slight con-
cave in the
fabric’s cut.
2
As the suit is
worn and the
various body
parts move
about, the ma-
terial adapts
itself to the
person’s mobile
habits. Notice
how the stance
can cause the
trouser legs
to appear dif-
ferent in width.
I
/\
V
b
3
Cross section of pant leg
suspended shows crease
front and back.
Cross section with limb
in center. Old crease
might cause cloth to
swing free of contact al-
together at this point.
Limb forced into crease
or to side changes shape
further (up and down
drape tensions from belt
or seat line have their
influence).
4 The average length of a man’s suit coat is even with the finger’s second knuckles when the
arm hangs at the side (see figure at upper left). &
5
Age, quality
and care of
clothes have
much to do
with their
appearance.
Other factors
seldom encoun-
tered may enter
in, such as wind
or water.
Weight on right
leg means that
hip is held high.
Pendent lines
of folds in pan
seem to han
from that jzight
hip pointf Notice
slope of belt
line.
i lit
8
When weight is shifted to one leg,
and foot of other leg is set forward
(as in figure above), then folds radi-
ate from the high hip’s pull. Howeve
when weight is equally distributed
both legs, folds radiate from front.
(Observe how drape lines
on side of pants SWING IN
^toward body center. Even
line from crease break just
„above cuff swings in. See
how hem of suit coat is
even with crotch of pants.
Hem is equidistant'from
outside shoulder point to
cuff of trousers.
Left side of all coats always
overlaps at front (same with
pant front below belt buckle,
but in drawing this is inci-
dental) .
Notice in semi-side view how upper pant
leg portion nearest observer widens consid- v.
er ably through hip area at crotch le^L
Compare with width as seen at cuff lim
9 Refer to
little
triangle
/which
often
appears
at seat
below
coat
line.
When body weight is thrust forward
on one leg, and foot of other leg is set
back, then folds radiate from high
point of supporting leg.
118
HOW TO DRAW SLEEVE FOLDS
Figs. A through D show the arm
bent at the elbow. Fig. A is sim-
ple pen treatment. В has both
the thick and thin. C shows a
rather solid brush stroke.
D employs a
variety of pen
and brush
with some
stutter lines
and small
line groups.
Whenever the arm is moved from fig. l’s posi-
tion, tension is set up somewhere on the circular
seam where the sleeve attaches to the coat. Op-
posite this tension, crush will set in. Notice the
slant of the fold angle as recorded in fig. 3 and
(in the back) fig. 2. As the arm is raised the
tension and crush become more severe. The
shorter stretch from cuff to armpit seam pulls
the cuff edge back as the arm ascends (follow
figs. 1 through 8).
arm
the
the
119
Three blouse treatments: Fig. 1, light
zigzag lines with sawtooth edging on
heavy fold hollows; grays expressed
by small line groups. Fig. 2, softly
treated edges with multiple sketch lines.
Fig. 3, heavy, informal underlines with
light, broken toplines.
MAKING FOLDS EASIER TO DRAW
RIGHT
Fig. 4 diagrams four major fold
spots. Here the drawing is too
mechanical, but it illustrates a
principle. Notice the flattened
elliptical pattern which may be
followed with a more subtle, in-
formal technique. In each case
the top curve tucks into the bot-
tom coming up to meet it.
In fig. 5 the dotted ellipse repre-
sents the "curve and tuck" fold of fig. 4. The secondary folds
(black slash lines on either side) very
often occur. Notice the same general
directional sweep each takes (arrows).
Fig. 6 suggests three
other ways of handling
the slashes.
1 WRONG
At left fig. 7 is overloaded with
monotonous, belabored folds.
Try a fresher approach with
more breaks in the outline, more
variety in the interior line thick-
nesses such as fig. 8. Fig. 9 offers
another practice suggestion in
line variation. Examine other
artist’s styles in developing your
own. Draw experimentally!
120