/


Автор: Simrin S.
Теги: programming languages programming dos operation system ms-dos operation system howard w.sams and company publisher
ISBN: 0-672-22693-6
Год: 1989


Текст
The \lhlte Group's
MS-DOS@ Bible
R E L A
TED
T
I
T
L
E
The Waite Group's Using PC-DOS™
The Wc1ite Group
The Waite Group's MS-DOS® Developer's Guide, Second Edition
John Angermeyer, Kevin Jaeger, et al.
The Waite Group's Understanding MS-DOS:f9
Kate O'Day and John Angermeyer
The Waite Group's Tricks of the MS-DOS® Masters
John Angermeyer, Rich Fahringer, Kevin Jaeger, and Dan Shafer
The Waite Group's Discovering MS-DOS®
Kate O'Day
The Waite Group's MS-DOS® Papers
The Waite Group
The Waite Group's C Primer Plus, Revised Edition
Mitchell Waite, Stephen Prata, and Donald Martin
The Waite Group's Advanced C Primer ++
Stephen Prata
The Waite Group's Essential Guide to Microsoft® C
Naba Barkakati
The Waite Group's Microsoft® C Bible
Naba Barkakati
The Waite Group's Microsoft® C Programming for the PC,
Revised Edition
Robert Lafore
The Waite Group's Quickd™ Bible
Naba Barkakati
The Waite Group's Essential Guide to Turbo C®
Naba Barkakati
The Waite Group's Turbo CCI{J Bible
Naba Barkakati
The Waite Group's Turbo C® Programming for the PC,
Revised Edition
Robert Lafore
For the retailer nearest you, or to order directly from the publisher.
call 800-428-SAMS. In Indiana, Alaska, and Hawaii call 317-298-5699.
s
The Waite Group's
MS-DOS® Bible
Third Edition
Steven Simrin
#f
HOWARD W. SAMS ~COMPANY
A Division of MacmJlJan. Inc.
4300 West 62nd Street
Indianapolis. Indiana 46268 USA
©
1989 by The Waite Group, Inc.
THIRD EDITION
FIRST PRINTING-1989
All rights reserved. No part of this book shall be reproduced, s£Ored in a retrieval
system, or transmitted by any means, electronic, mechanical, photocopying,
recording, or otherwise, without written permission from the publisher. No
patent liability is assumed with respect to the use of the information contained
herein. While every precaution has been taken in the preparation of this book,
the publisher and author assume no responsibility for errors or omissions.
Neither is any liability assumed for damages reSUlting from the use of the
information contained herein.
International Standard Book Number: 0-672-22693-6
Library of Congress Catalog Card Number: 89-61437
From The Waite Group:
Development Editors: Mitchell Waite and James Stockford
Technical Reviewers: Blair Hendrickson and Harry Henderson
Chapter Opening Art: Bob Johnson
From Howard W Sams & Company:
Acquisitions Editor: James S. Hill
Development Editor: James Rounds
Manuscript Editor: Marie Butler-Knight and Diana Francoeur
Cover Artist: Kevin Caddell
Illustrator: Wm. D. Basham
Indexer: Ted Laux
Compositor: Shepard Poorman Communications
Printed in the United States ofAmerica
Trademarks
All terms mentioned in this book that are known £0 be trademarks or service
marks are listed below. In addition, terms suspected of being trademarks or
service marks have been appropriately capitalized. Howard W. Sams & Company
cannot attest to the accuracy of this information. Use of a term in this book
should not be regarded as affecting the validity of any trademark or service
mark.
Apple and Macintosh are registered trademarks of Apple Computer, Inc.
Ash£On-1l!te is a registered trademark of Ashton-Tate.
AST is a registered trademark of AST Research, Inc.
COMPAQ is a registered trademark of COMPAQ Computer Corporation.
CP/M is a registered trademark of Digital Research.
DESQView is a trademark of Quarterdeck Office Systems.
Everex is a trademark of Everex Systems, Inc.
IBM and Quietwriter are registered trademarks of International Business
Machines.
Intel is a trademark of Intel Corporation.
Lotus is a registered trademark of Lotus Development Corporation.
Microsoft, Microsoft Windows, and MS-DOS are registered trademarks
of Microsoft Corporation.
Norton Utilities is a trademark of Peter Norton Computing, Inc.
PC-DOS, PS/2, OS/2, and Proprinter are trademarks ofInternational Business
Machines Corporation.
Quadram is a registered trademark of Quadram.
Sidekick is a registered trademark of Borland International.
UNIX is a registered trademark of AT&T Bell Laboratories.
WordStar is a registered trademark of MicroPro International Corporation.
To Benjamin, to tbe one to come, and to tbe memory offeb
Overview
Part 1
Information Jump Table
11
Part 2
MS-DOS Tutorials
17
1
2
3
4
5
6
7
8
9
lO
11
12
13
14
15
16
Part 3 MS-DOS Commands
363
Part 4
507
A
B
C
D
E
F
vi
Starting MS-DOS
19
MS-DOS Files
49
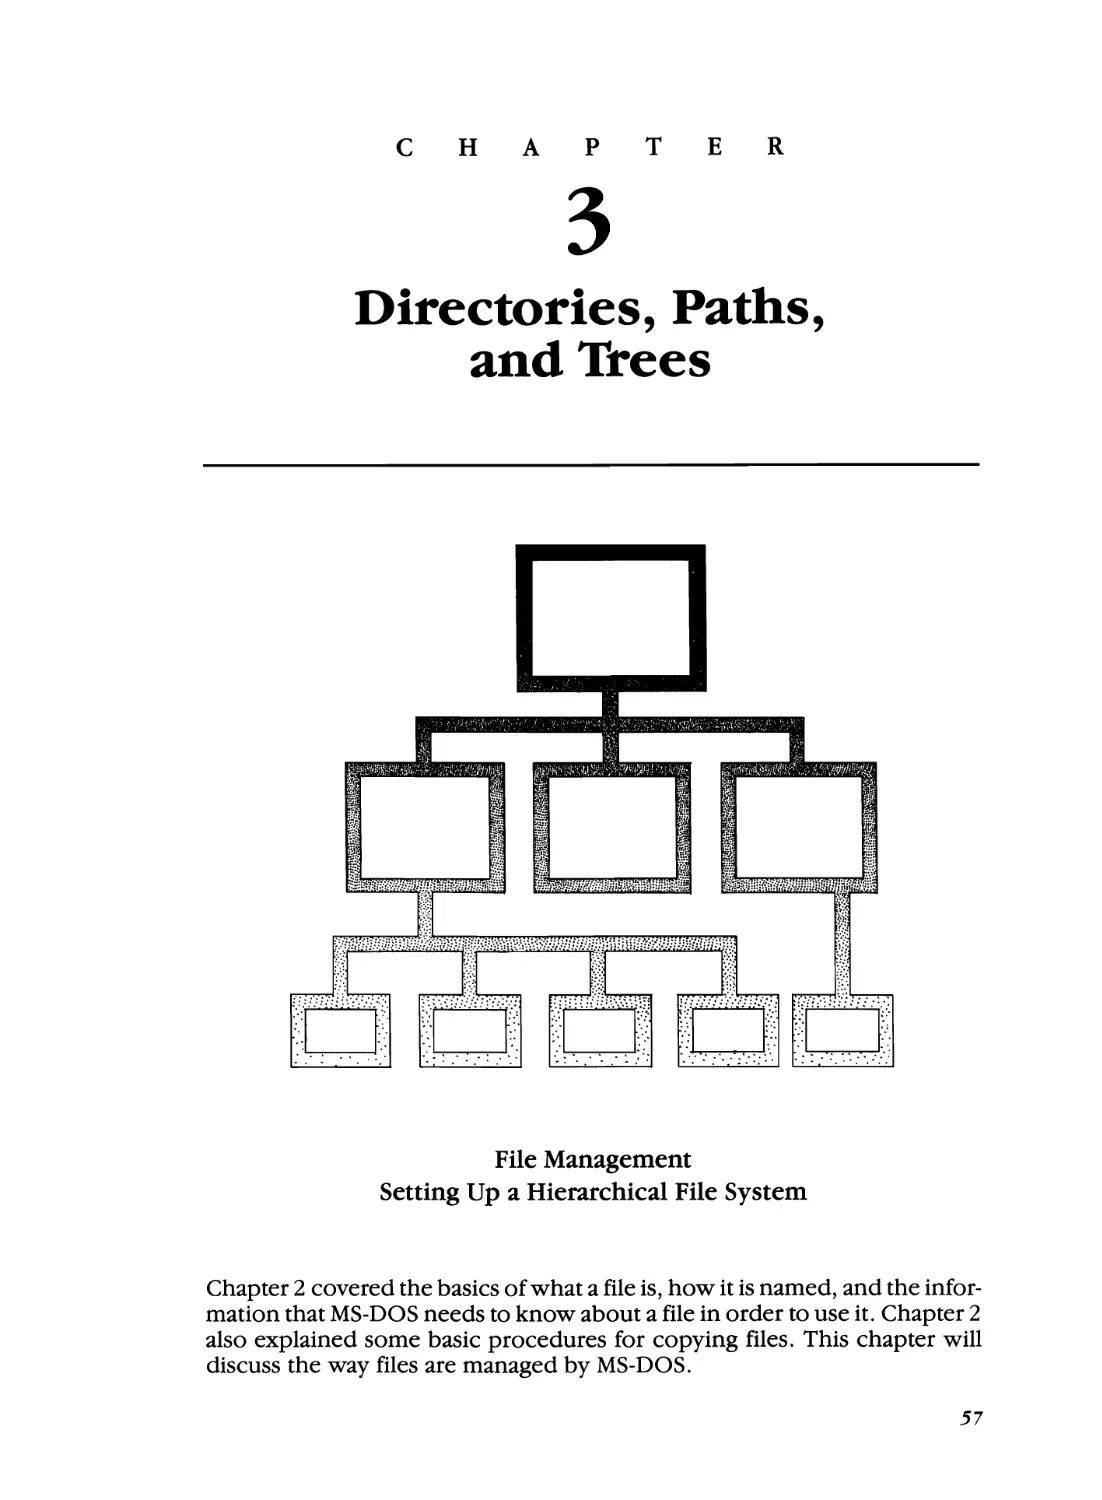
Directories, Paths, and Trees
57
MS-DOS Batch Files
73
Configuring Your System
95
Redirection, Filters, and Pipes
113
The DOSSHELL Interface
123
EDLIN, the MS-DOS Text Editor
155
Extended Keyboard and Display Control
179
Disk Structure and Management
197
Memory Structure and Management
223
Expanded Memory
241
Terminate and Stay Resident Programs
267
MS-DOS Device Drivers
297
DEBUG
319
LINK
353
Appendixes
509
MS-DOS Interrupts and Function Calls
Some Undocumented Features of MS-DOS
573
Practical Batch Files
579
Code Pages and Code Page Switching
585
589
An Assembly Language Primer
ASCII Cross-Reference Tables
595
Index
607
Contents
Preface to the First Edition
xvii
Preface to the Third Edition
xix
Introduction
1
What Is MS-DOS?
2
The Operating System and You
2
2
A Brief History of MS-DOS
Organization and Contents of This Book 3
Chapter Summaries 4
How to Use This Book 5
Screen Output and User Input 6
Commands 7
A Word about Disks and Diskettes 7
Part 1
InformationJump Table
Part 2
MS-DOS Tutorials
1 Starting MS-DOS
Booting MS-DOS
21
Setting the Date 22
Setting the Time 23
The System Prompt 24
The MS-DOS Command Line
11
17
19
24
vii
MS-DOS Bible
Date and Time Defaults
25
25
Date and Time Stamps
Rebooting with Ctrl-Alt-Del 26
Backing Up the System Diskette
26
Copying Diskettes on Two-Drive Systems
28
28
Copying Diskettes on One-Drive Systems
29
Formatting a Diskette
Changing Disk Drives
30
Installing MS-DOS on a Hard Disk
31
Disk Partitions and FDISK
31
Starting FDISK
32
Creating Partitions
33
36
Activating the Primary DOS Partition
Other FDISK Options
37
37
Formatting the Hard Disk
39
Automated Installation and Configuration
SELECT and Hard Disk Installation
40
Starting SELECT
43
PC-DOS vs. MS-DOS
43
Using SELECT
44
Final Points
47
2
MS-DOS Files
49
Filenames and Extensions
50
File Specifications
52
Copying a File
52
Two-Drive Systems
52
One-Drive Systems
53
Wildcards
54
The "?" Wildcard
54
The "*,, Wildcard
55
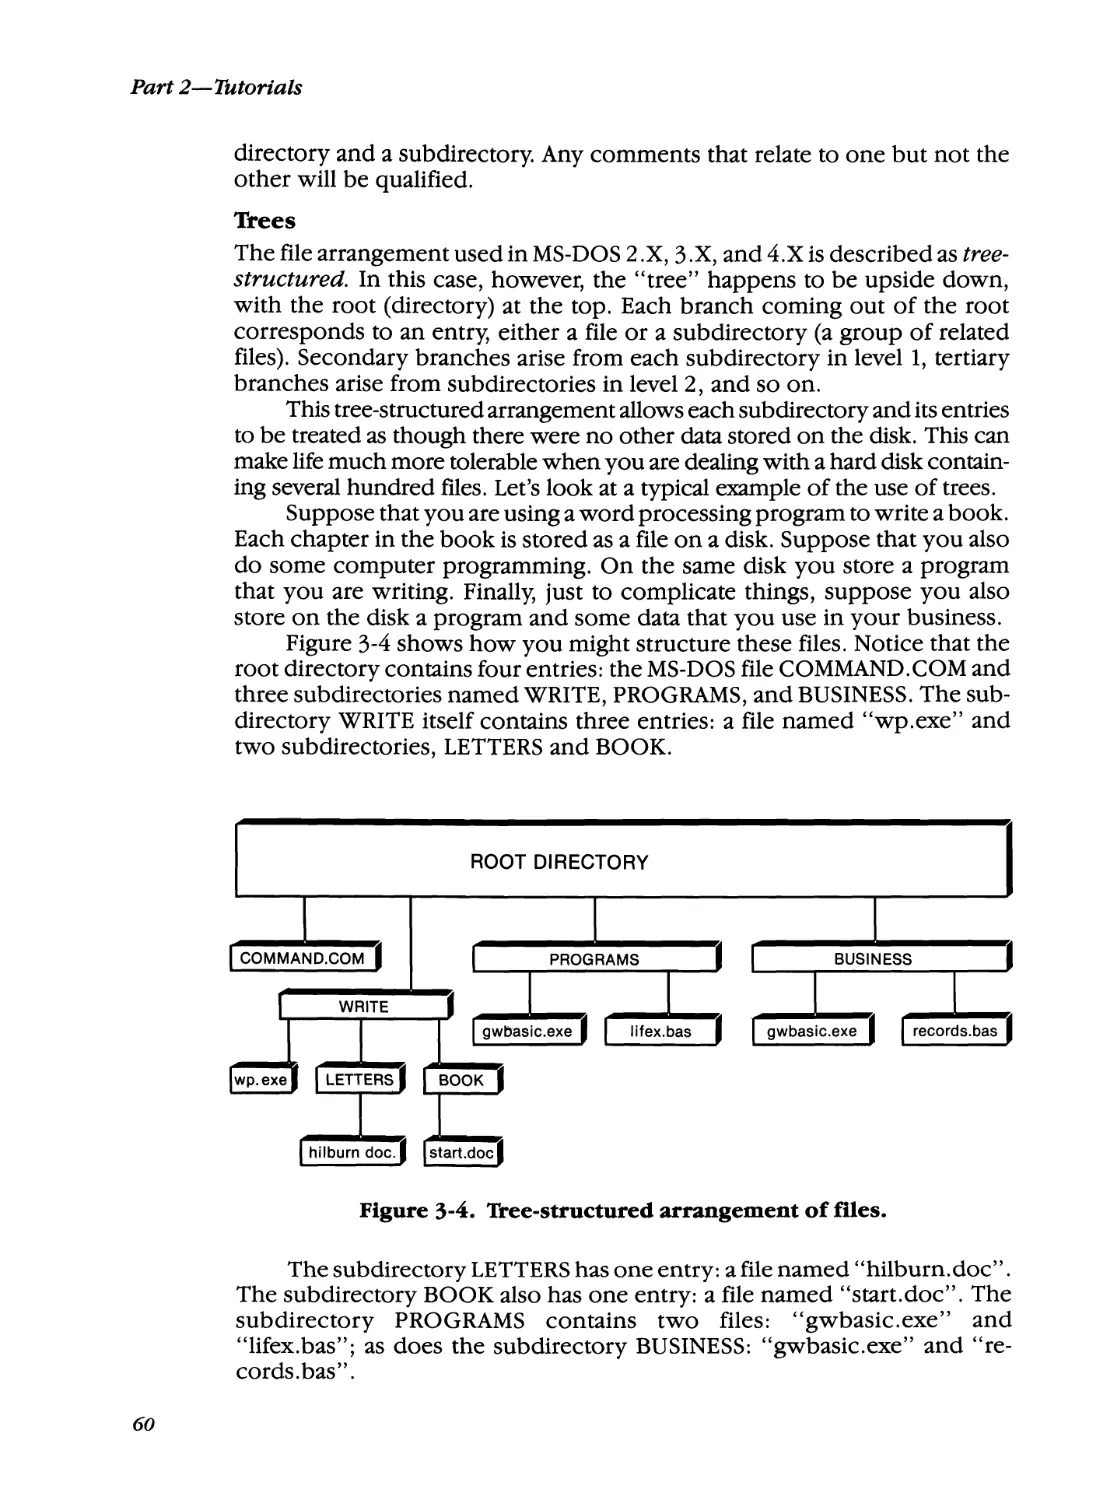
3 Directories, Paths, and Trees
File Management
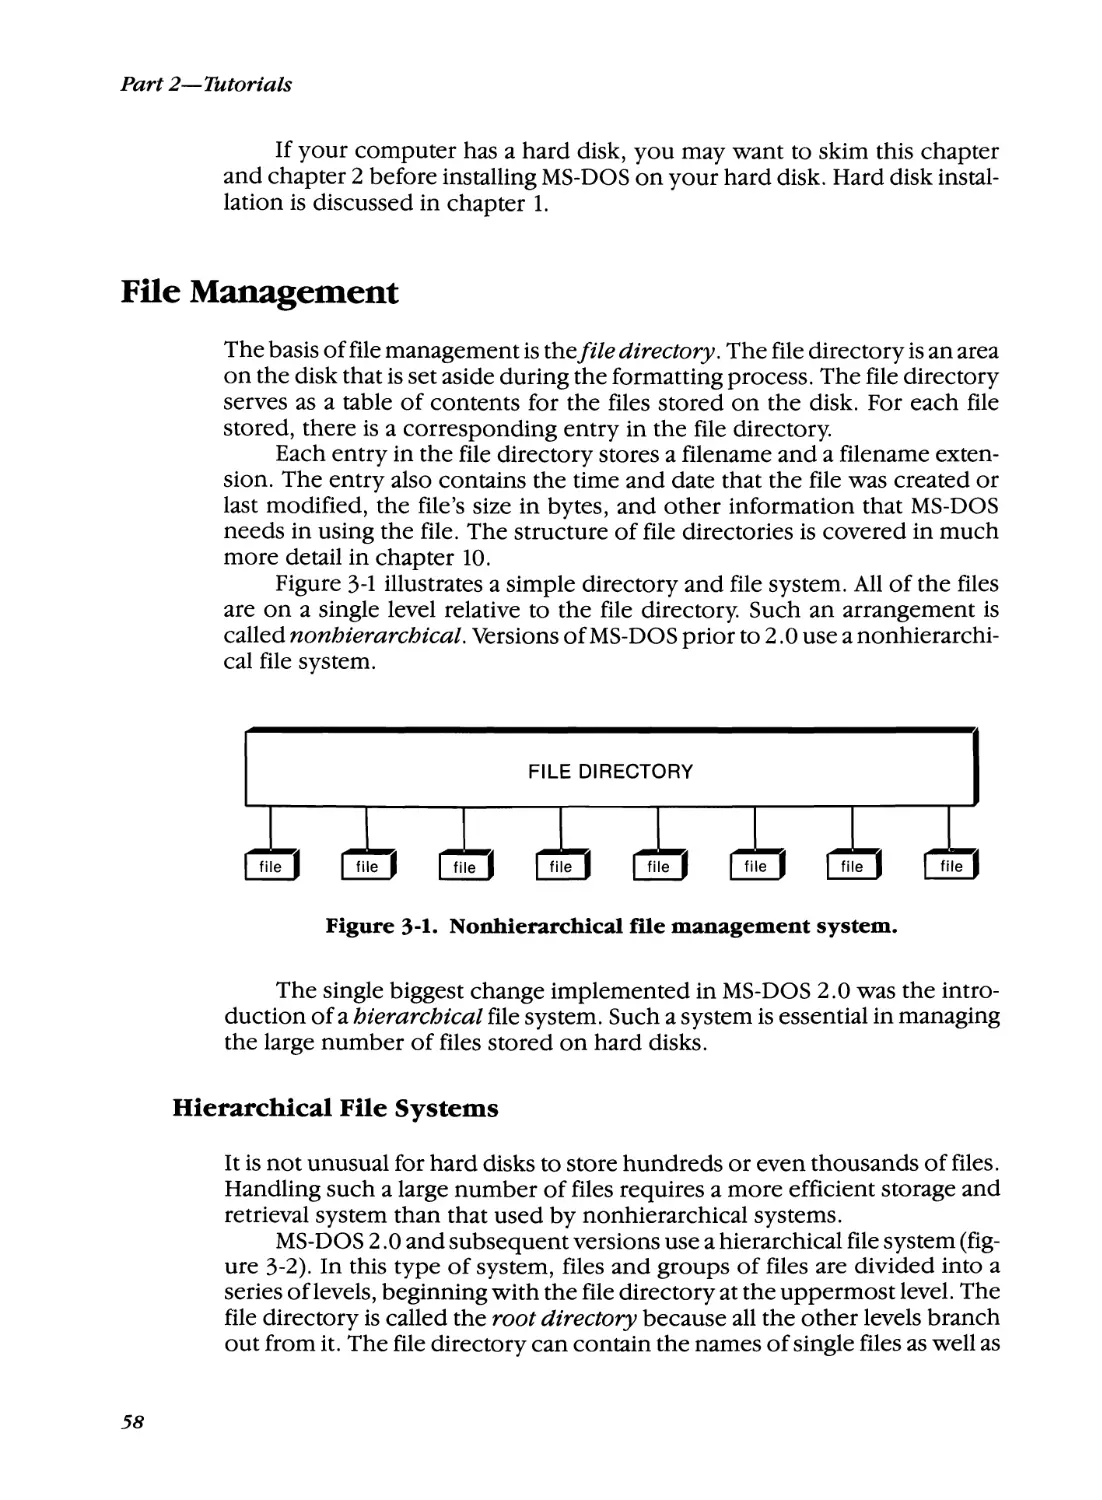
58
Hierarchical File Systems
58
Setting Up a Hierarchical File System
Paths 61
Creating a Subdirectory
61
Changing the Current Directory
64
A Word about Parents
Putting Files into a Subdirectory
Looking at the Tree
67
Removing a Subdirectory 68
The PATH Command 68
viii
57
61
63
64
Contents
Using the Search Path 68
The APPEND Command 70
4 MS-DOS Batch Files
73
What Is a Batch File
74
Creating a Batch File
75
Replaceable Parameters 76
Wildcards and Replaceable Variables
77
PAUSE
78
REM 80
ECHO
81
Using ECHO to Send a Blank Line to the Screen
Suppressing ECHO OFF 83
GOTO
84
IF 85
IF EXIST 85
86
IF String 1 = =String2
IF ERRORLEVEL n
86
IF NOT 87
FOR 87
SHIFT 88
CALL 89
Calling Batch File Modules without CALL 91
Using Environment Variables 91
82
5 Configuring Your System
95
System Parameters 96
Environment Variables 97
Creating User-Defined Environment Variables 98
Installable Device Drivers 99
Standard Device Drivers 99
Installable Device Drivers
99
Device Statements
100
CONFIG.SYS
100
Creating CONFIG.SYS
101
Executing the Statements in CONFIG.SYS
102
Roles of the System Parameters
102
Using CONFIG.SYS-A Working Example
108
AUTOEXEC.BAT
110
6 Redirection, Filters, and Pipes
Standard Input and Standard Output Devices
Reserved Device Names
114
113
114
Ix
MS-DOS Bible
Redirecting an MS-DOS Command
Filters
116
SORT
116
FIND
118
MORE
119
Pipes
120
Redirection versus Piping
121
7
114
The DOSSHELL Interface
123
Starting DOSSHELL
124
DOSSHELL and the DOS Search Path
125
Using a Mouse with DOSSHELL
126
Using DOSSHELL
127
DOSSHELL Programs and Program Groups
127
The DOSSHELL Display
128
Using the Main Program Group
130
Command Prompt
130
File System
131
Change Colors
141
DOS Utilities
142
DOSSHELL Programming
144
Modifying DOSSHELL.BAT
151
DOSSHELL Configuration Parameters
152
8
EDLIN, the MS-DOS Text Editor
Creating a File with EDLIN
156
Modifying an Existing File with EDLIN
The B Option
157
Ending EDLIN
157
157
EDLIN Commands
INSERT
160
LIST
162
EDIT
165
The MS-DOS Editing Keys
165
DELETE
167
SEARCH
169
REPLACE
171
WRITE
172
APPEND
173
END
173
QUIT
174
MOVE
174
COpy
175
PAGE
177
TRANSFER
178
x
155
156
Contents
9 Extended Keyboard and Display Control
Using ANSI.SYS
180
An Example
185
186
Getting ESC into a File
Keyboard Reassignment
187
Function Keys
188
Some Useful Applications of Keyboard Reassignment
Screen Control
190
10
Disk Structure and Management
179
189
197
Structure of MS-DOS Disks
198
198
Tracks and Sectors
Floppy Diskettes
198
Hard Disks
200
Formatting 200
The Boot Record 200
201
File Allocation and File Directory
System Files
201
Interchangeability of System Files 203
Examining the File Directory and FAT
204
File Directory 204
File Allocation Table 209
Exploring with DEBUG 213
Looking at the File Directory 214
Loading the FAT
217
Looking at the FAT 218
MS-DOS File Management
219
Structure of the File Control Block
219
Using an FCB
221
File Handles 221
11
Memory Structure and Management
Computer Memory 224
Memory Segments 224
Accessing Memory 224
226
Booting MS-DOS
Program Segment Prefix 227
Executable Files
234
The Environment
235
Environment Size
235
PaSSing an Environment to a Child
Memory Allocation
238
223
237
xi
MS-DOS Bible
12
Expanded Memory
241
The 640-Kbyte Limit 242
8088/86 Computers
243
80286 and 80386 Computers
243
Fundamentals of Expanded Memory
244
Expanded Memory Terminology
244
The Expanded Memory Specification
245
Expanded Memory Implementation
246
The Evolution of Expanded Memory
247
LIM EMS 3.2
248
AQAEEMS
248
LIM EMS 4.0
248
Using Expanded Memory
249
The Required Steps
249
250
Checking for Expanded Memory
Getting the EMM Version Number 252
Determining How Much Expanded Memory Is Available
252
Determining the Page Frame's Segment Address
Allocating Expanded Memory Pages
253
253
Mapping Logical Pages to the Page Frame
Exploring Expanded Memory with DEBUG
254
Starting DEBUG
254
Writing to and Reading from the Page Frame
256
Context Switching 258
Deallocating Pages
263
EMS 4.0 Enhancements
264
Conclusion 265
13
Terminate and Stay Resident Programs
252
267
TSRs-An Overview 268
Loading a TSR 268
Modifying the Interrupt Vector Table
270
TSRs-Guidelines for a Peaceful Coexistence
272
Chaining 273
The Problem of Reentry
274
File Handles and TSRs 277
POPCLOCK-An Example of a TSR 277
Initialization 278
The Interrupt Handlers
280
Popping the Clock
282
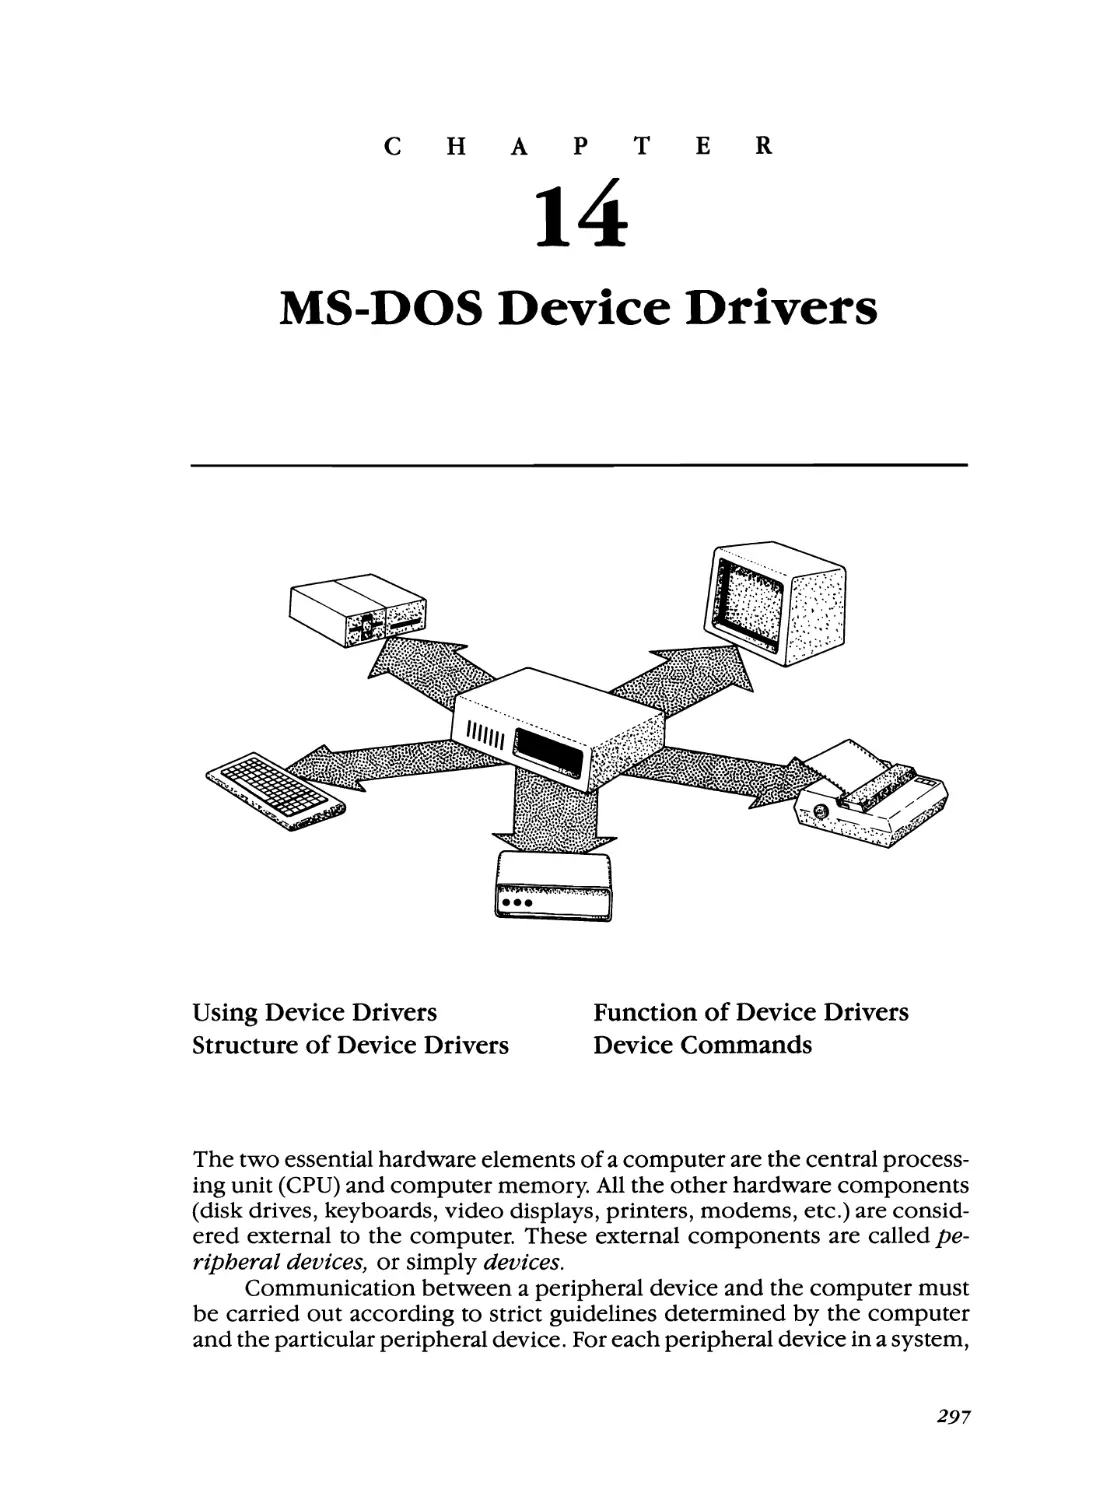
14
MS-DOS Device Drivers
Using Device Drivers
298
Character and Block Devices
Adding a New Device
299
xii
297
299
Contents
Structure of Device Drivers 299
Device Header 300
Function of Device Drivers 303
Installation 303
Locating a Driver 303
Request Header 304
Calling the Driver 306
Device Commands
308
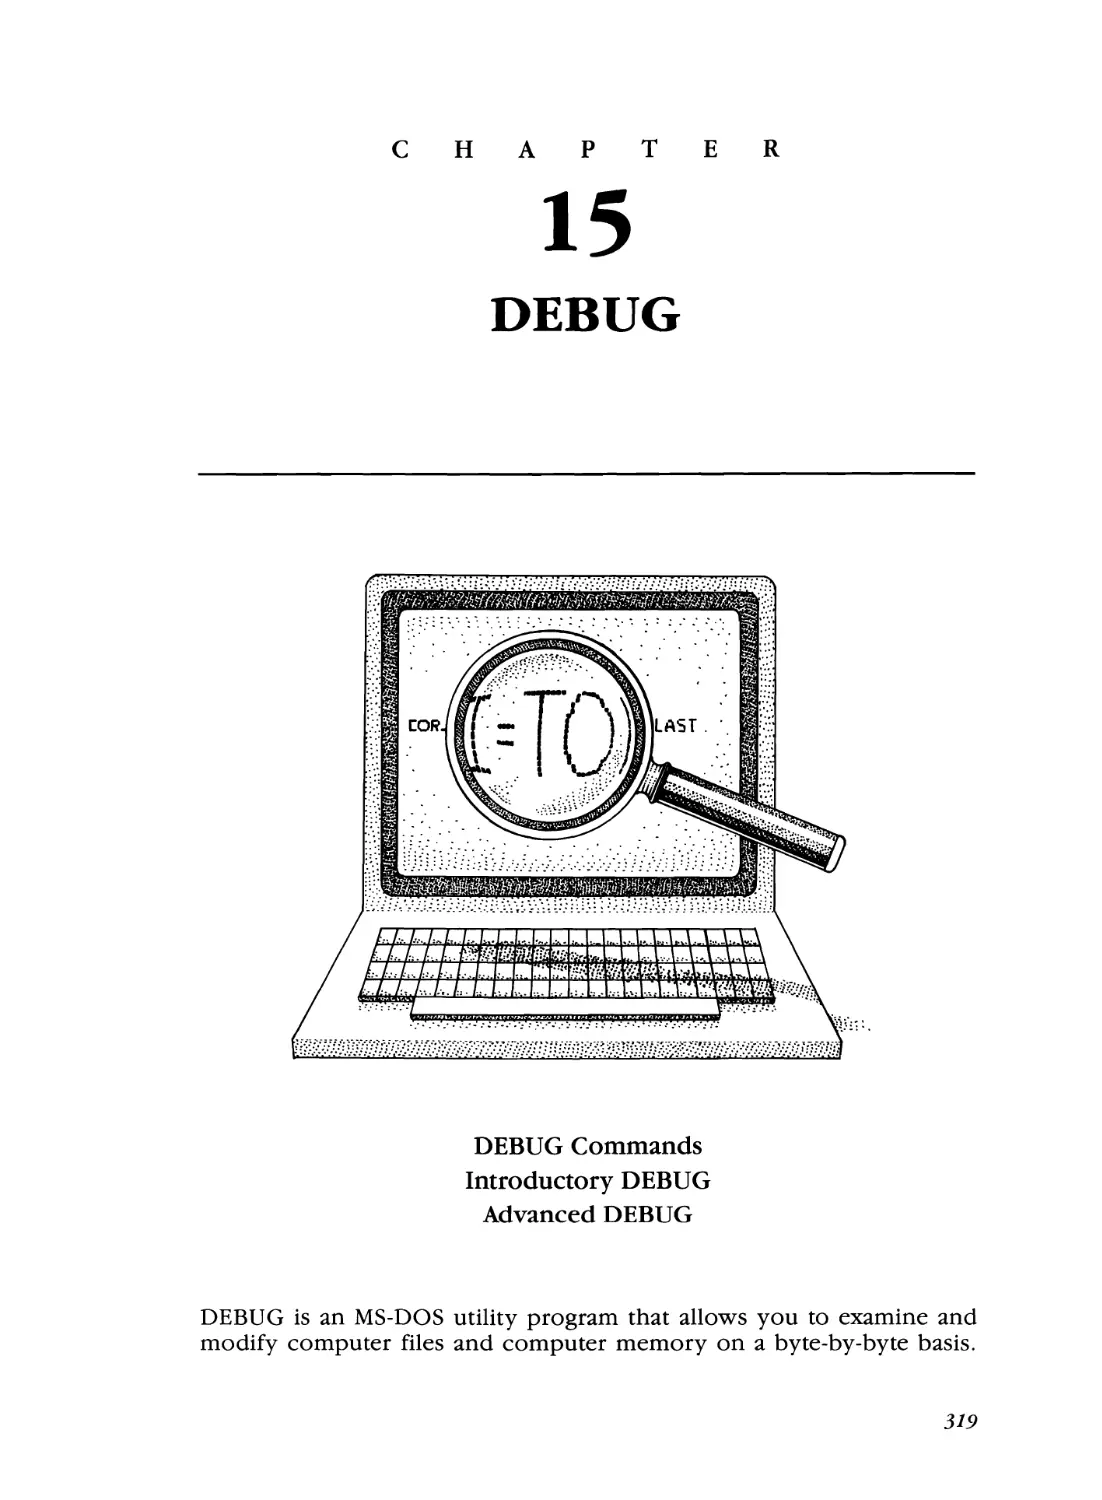
15
DEBUG
319
DEBUG Commands 320
Introductory DEBUG
324
Starting DEBUG 324
Ending DEBUG
324
Displaying Memory Contents
325
330
Entering Data with DEBUG
Advanced DEBUG
331
Registers and Flags 332
DEBUG Initialization 332
Looking at Registers with DEBUG
332
Unassembling with DEBUG
334
Program Execution with DEBUG 338
Single-Stepping through a Program 340
Assembling with DEBUG 342
Naming a File with DEBUG 343
Loading a File with DEBUG
345
Storing Data with DEBUG 346
Comparing Blocks of Memory 347
Searching Memory 348
Moving Data in Memory 349
Filling Memory 349
Sending Data to a Port 350
Reading Data from a Port 350
351
Hexadecimal Arithmetic with DEBUG
Proceeding through a Loop
351
Using DEBUG with Expanded Memory 352
16
LINK
353
Overview of LINK 354
VM.TMP
354
Starting LINK 354
Method 1 354
Method 2 357
Method 3 357
LINK Switches 358
xiii
MS-DOS Bible
The
The
The
The
The
The
The
IHigh Switch
358
IDsa110cate Switch
359
ILinenumber Switch
359
IMap Switch
360
Pause Switch
361
IStack:[NumberJ Switch
361
INo Switch
362
Part 3
MS-DOS Commands
APPEND, 370
ASSIGN, 375
ATTRIB, 376
BACKUp, 378
BREAK, 384
BUFFERS, 385
CALL, 387
CHCp, 387
CHDIR, 388
CHKDSK, 390
CLS, 394
COMMAND, 395
COMp, 398
COPY, 400
COUNTRY, 405
CTTY, 406
DATE, 408
DEL, 409
DEVICE, 4lO
DIR, 419
DISKCOMp, 422
DISKCOPY, 424
ECHO, 426
ERASE, 426
EXE2BIN, 427
FASTOPEN, 428
Part 4
A
RECOVER, 475
REM, 478
RENAME, 478
REPLACE, 479
RESTORE, 482
RMDIR, 485
SELECT, 486
SET, 488
SHARE, 489
SHELL, 490
SHIFT, 491
SORT, 492
STACKS, 493
SUBST, 493
SWITCHAR, 495
SWITCHES, 496
SYS, 497
TIME, 498
TREE, 499
TRUENAME, 500
TYPE, 501
VER, 502
VERIFY, 502
VOL, 503
XCOPY, 503
FCBS, 430
FDISK, 431
FILES, 431
FIND, 433
FOR, 433
FORMAT, 434
GOTO, 440
GRAFTABL, 441
GRAPHICS, 442
IF, 444
INSTALL, 445
JOIN, 446
KEYB, 447
KEYBxx, 450
LABEL, 450
LASTDRIVE, 451
MEM, 452
MKDIR, 455
MODE, 456
MORE, 465
NLSFUNC, 466
PATH, 466
PAUSE, 468
PRINT, 469
PROMPT, 473
Appendixes
507
MS-DOS Interrupts and Function Calls
What Is an Interrupt?
509
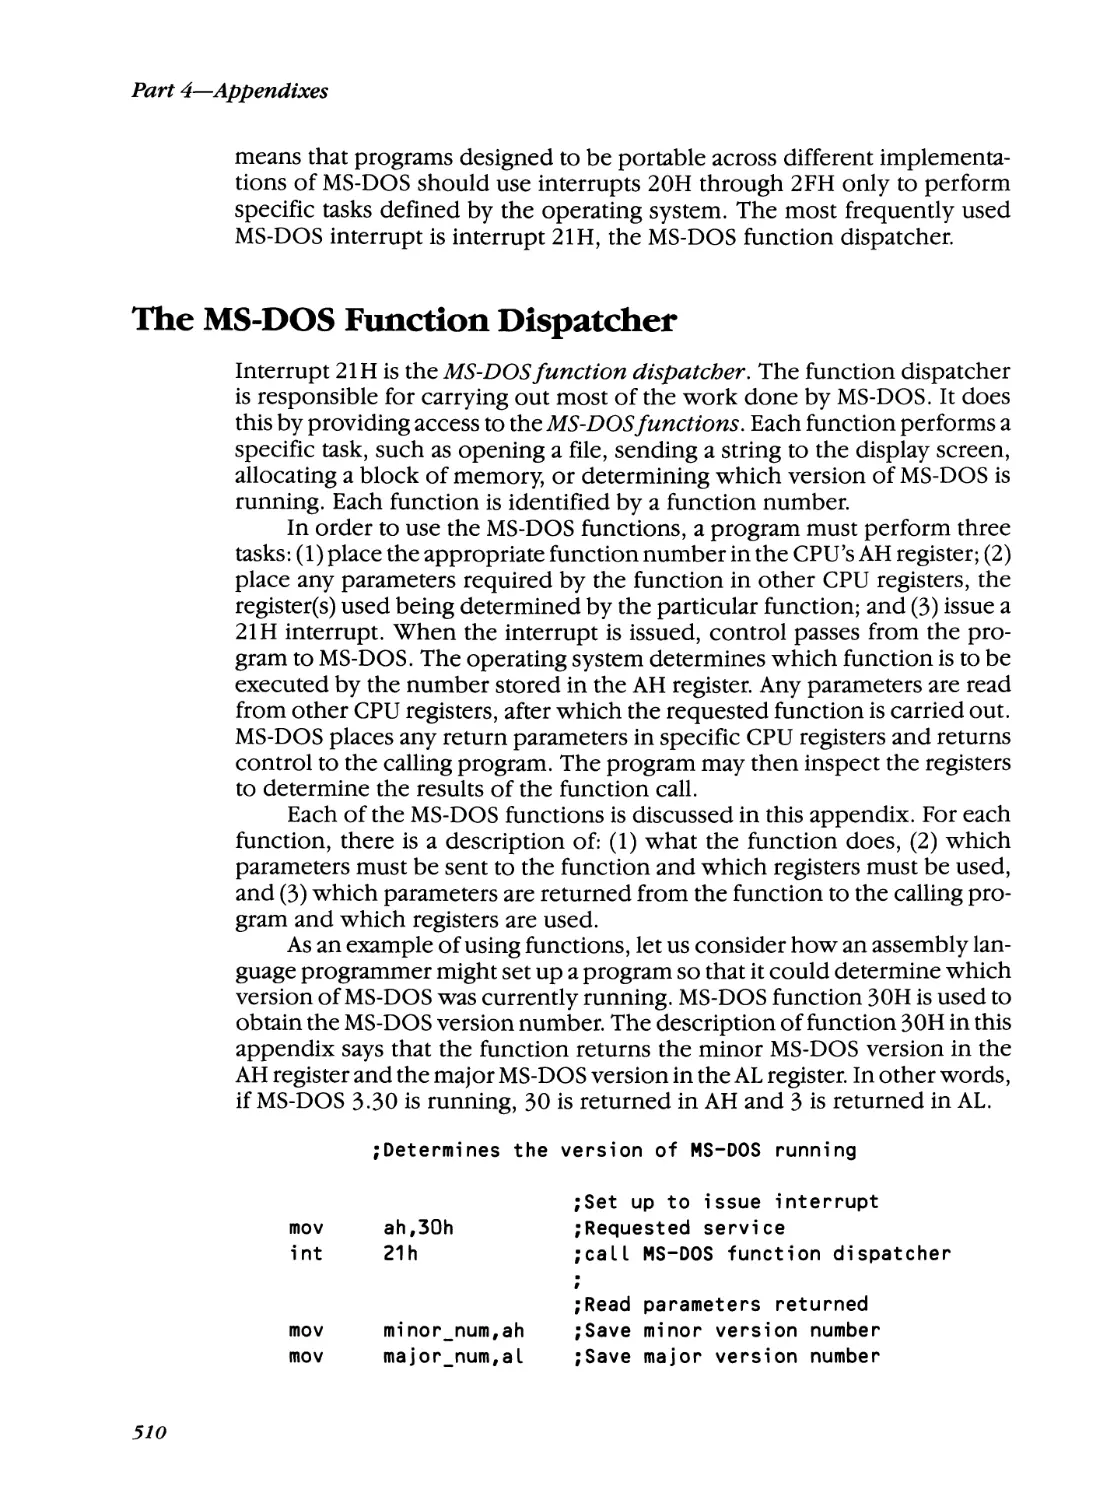
The MS-DOS Function Dispatcher
5lO
Interrupts and High-Level Programming Languages
Accessing the ROM BIOS
511
xiv
363
509
511
Contents
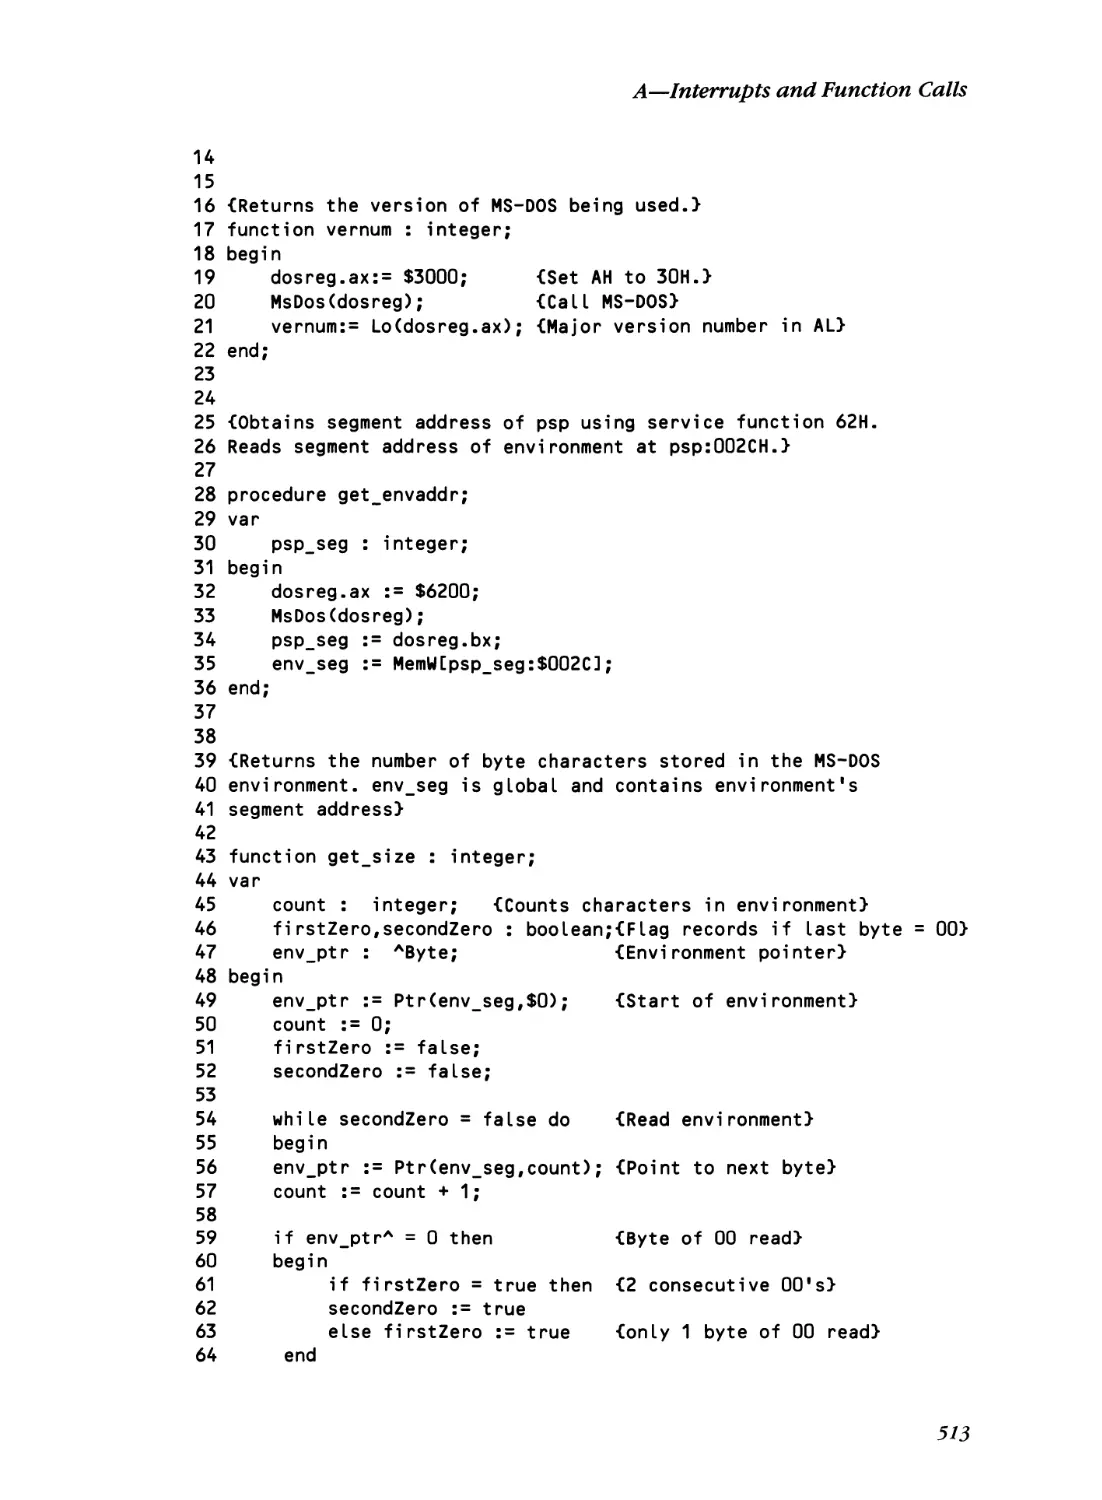
ENVSIZE.PAS 511
BRK_OFF.C 515
The MS-DOS Interrupts 519
The MS-DOS Functions 522
The "Reserved" Functions
Error Codes 523
523
B Some Undocumented Features of MS-DOS
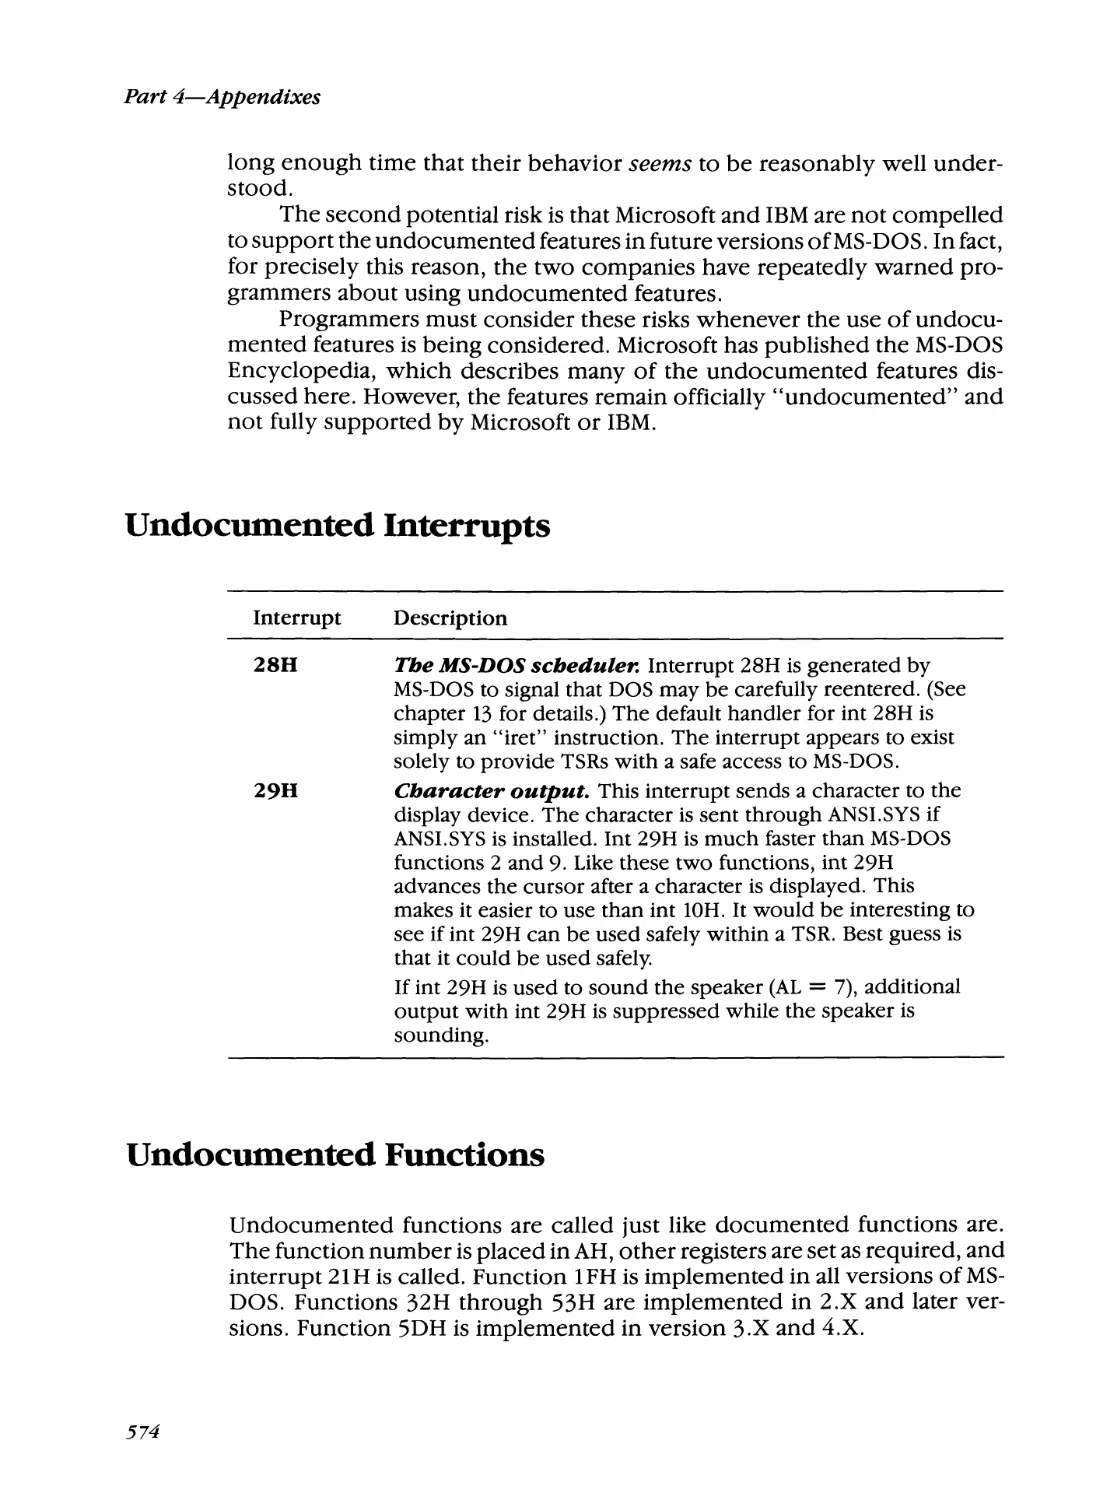
Undocumented Interrupts
Undocumented Functions
573
574
574
C Practical Batch Files
579
D
585
Code Pages and Code Page Switching
Overview 586
What Is Code Page Switching?
586
Code Page Switching Must Be Supported 587
Hardware and Prepared Code Pages 587
Switching Code Pages 588
Some Code Page Programming Guidelines 588
E An Assembly Language Primer
What Is Assembly Language Programming?
The MS-DOS Hardware 590
Segment Registers 590
Stack Pointer Registers 590
Index Registers 591
General-Purpose Registers 591
The Instruction Pointer Register 591
The Flags Register 591
Register Storage Capacity 591
Accessing Memory 591
Assembly Language Statements 592
589
590
F ASCII Cross-Reference Thbles
595
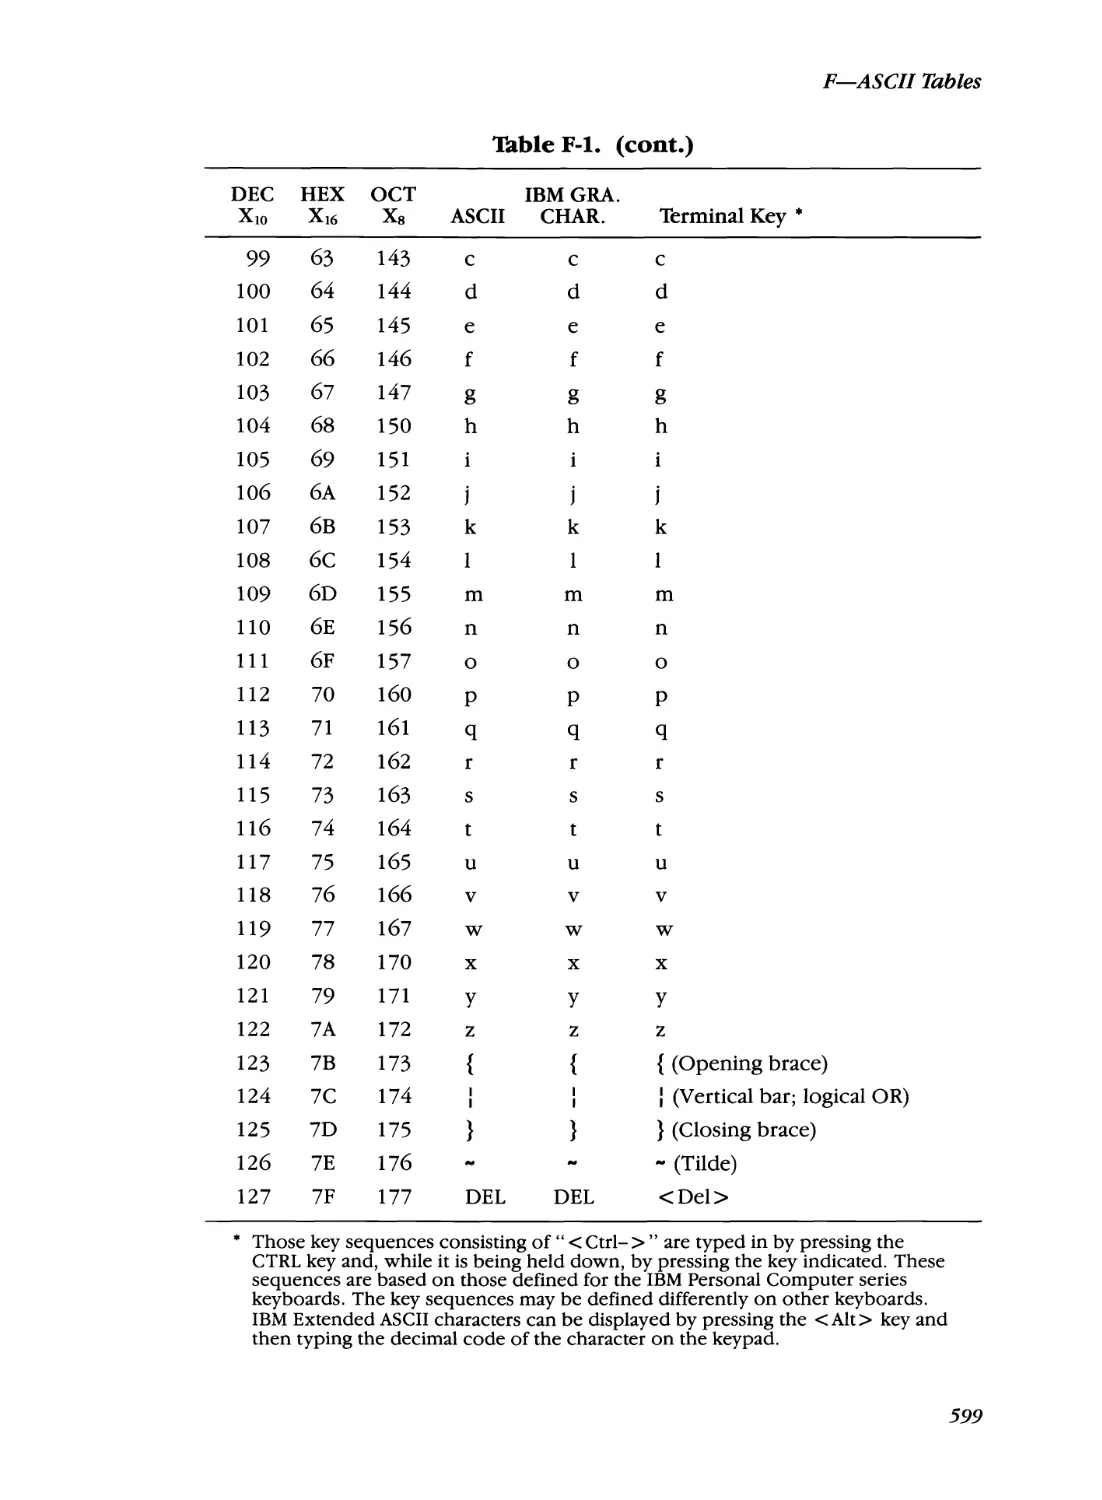
F-l. ASCII Cross-Reference 596
F-2. IBM ASCII Extended Cross-Reference 600
F-3. Extended ASCII Code 604
Hexadecimal to Decimal Conversion 604
Decimal to Hexadecimal Conversion 605
Index
607
xv
Preface
to the First Edition
This book is about MS-DOS, the powerful disk operating system developed
by Microsoft for microcomputers. MS-DOS is the manager of your com
puter. It is responsible for supervising the flow of information into and out
of your machine and for controlling the interaction of the various parts of
your computer system. This book will show you how to master MS-DOS
and take advantage of its enormous capabilities. It is an easy-to-use guide,
written to provide you with a ready reference to both the fundamentals and
the more-advanced aspects of MS-DOS.
When I first began using MS-DOS, I quickly realized that I was virtually
on my own. While it was easy to find material on the basics of MS-DOS, most
advanced sources of information were hard to find and often quite sketchy
in their treatment. Many questions came up for which I could find no an
swer. I would spend hours pouring over user's manuals, magazine articles,
and how-to books. Often my searches were fruitless, and I would end up
sitting in front of my computer, trying to figure things out for myself. Of
course, experimenting is half the fun of using a computer, but it can be frus
trating when you are in a hurry or you simply aren't in the mood for experi
menting. I determined to spare others some of these "laboratory
experiments" and share the results of my research.
The result has been this book. MS-DOS Bible is for all users of MS-DOS,
from beginners to computer professionals. It begins with starting up your
system and creating, editing, and managing files. It moves on to data han
dling and customizing your keyboard. Then it covers such advanced topics
as exploring with DEBUG, using LINK, and understanding the structure of
MS-DOS.
This book features:
Learn-by-doing approach
Jump table for quick access of specific topics
Step-by-step tutorials
xvii
MS-DOS Bible
Coverage of the basics up through advanced programming informa
tion
Special in-depth section on MS-DOS commands
Appendixes listing error messages, function calls and interrupts, prac
tical batch files, and ASCII codes
MS-DOS Bible assumes no prior knowledge on your part. Each topic is
discussed in a logical fashion from beginning to end, without relying on
computerese. Those ofyou who are interested in only an overview of a topic
can skim for highlights. Those who are interested in details will find them
here, presented thoroughly and clearly.
Acknowledgments to the First Edition
I am grateful to all who provided assistance during the writing of MS-DOS
Bible. In particular, I would like to thank Mike Van Horn ofThe Waite Group,
who initially suggested that I write this book. Many thanks to Mary Johnson,
also of The Waite Group, who acted as my editor. Finally, special thanks to
family members and friends who gave valuable encouragement and moral
support throughout the project.
xviii
Preface
to the Third Edition
When I wrote the first edition of The Waite Group sMS-DOS Bible, IBM PCs
and PC compatibles were starting to appear in businesses and homes world
wide. With each computer came a copy of the still young MS-DOS. Things
were different back then. There was little talk ofTSRs, PC networks, ATs, or
386 machines. Hard disks were still somewhat of a lUxury, and 640 Kbytes of
memory seemed to be more than anyone could possibly ever use.
Three years later, when I wrote the second edition of MS-DOS Bible,
MS-DOS had become the most widely used microcomputer operating sys
tem in the world. This was not surprising, given the incomparable market
ing strength of IBM, but it was significant in understanding how MS-DOS
had evolved over the years. Many new demands had been placed on
MS-DOS. Many of these demands had not been anticipated when the operat
ing system was first designed. In most cases, ways were found to satisfy the
demands simply because the market for a solution was so strong.
The changes in the second edition of MS-DOS Bible mirrored the
changes that occurred in MS-DOS. While the primary objective of the book
continued to be to provide the reader with an up-to-date, comprehensive,
easy-to-understand guide, the second edition represented a substantial re
writing of the first edition. The first four chapters were revised to more thor
oughly address the issues of hard disk usage. New batch files were added to
chapter 5, and the chapter on memory and disk structure became two chap
ters, to cover the many developments in the areas of disk media, disk for
mats, and memory configuration. A new chapter was added to cover
terminate and stay resident programs.
Throughout the book, there was a stronger emphasis on program
ming. New examples showed how to use DEBUG to explore MS-DOS. Pro
grams written in C, Pascal, and assembly language were added and
thoroughly discussed. In addition, the expanded appendixes contained a
primer on assembly language programming for those readers with little or
no assembler experience. Part 3, "MS-DOS Commands," was revised and
xix
MS-DOS Bible
expanded to include all MS-DOS commands through version 3.3, and many
of the examples used in the first edition were revised or replaced.
The pace of the PC and MS-DOS world continues to aCcelerate rap
idly-thus the need for a third edition of MS-DOS Bible. MS-DOS 4.0 is a
major advance over the previous versions of DOS. To accommodate the in
creased use of the mouse and the increased preference for a window-type
interface, DOS 4.0 provides DOSSHELL, a customizable menu and file man
agement system. To accommodate the increasing number of applications
using the EMS 4.0 expanded memory scheme, DOS 4.0 includes an EMS 4.0
expanded memory driver. Because of growing disk storage requirements,
DOS 4.0 supports hard disk partitions larger than 32 Mbytes in size.
Each of these topics is covered in this edition. In addition, three new
chapters have been added. The first new chapter, on system configuration,
discusses how you can modify and extend DOS to suit your needs and pref
erences. With the vast array of hardware devices available for use with PC
computers, an understanding of system configuration is critical. The sec
ond new chapter covers the use of DOSSHELL. The chapter explains all as
pects of the interface, from simply using it to programming it. The third new
chapter covers expanded memory. The chapter discusses what expanded
memory is, why it is necessary, how you use it, and how it works.
Existing chapters have been revised, some extensively. The increased
prevalence of hard disk drives is probably the single most dramatic change
that has occurred in PC computing since the first edition of MS-DOS Bible
was written. Appropriately, chapter 1 now covers the topic of hard disk in
stallation, detailing all aspects of partitioning and formatting a hard disk.
Other chapters have been modified to incorporate new material. Many of
the chapters contain new examples, which are even more instructive and
more relevant.
The objective of MS-DOS Bible remains to be an easy-to-use guide to
both the fundamental and advanced aspects of MS-DOS. This third edition
is still intended for all users of MS-DOS and makes no assumptions about
your previous experience with computers or MS-DOS.
Acknowledgments to the Third Edition
I would like to thank Jim Stockford of The Waite Group for the invaluable
assistance, advice, and support he has provided in the production of The
Waite Group's MS-DOS Bible. Special thanks also to Diana Francoeur for the
many hours of effort which were so helpful. The assistance of Mitchell
Waite, Blair Hendrickson, Jordan Breslow, Harry Henderson, and Marie
Butler-Knight is also gratefully acknowledged. To Andy c., Nadine P., Chris,
Bill, Nancy, Don, and the others, thank you so much for your support. Fi
nally, the most special of thanks to my wife, Shelley, and our beloved sons,
Benjamin andJonathan, whose love and understanding made the writing of
this book possible.
Preface
Steven Simrin is a veterinarian living in Kensington,
California. He began working with microcomputers
following graduation from veterinary school. He is
currently a post-doctoral fellow at the University of
California, San Francisco. His research interests include
the use of computerized databases as a tool in the
evaluation of medical technologies.
xxi
Introduction
This book explains the MS-DOS operating system. Its primary goal is to pro
vide a comprehensive, easy-to-understand guide to MS-DOS. The material is
presented in order from fundamental to advanced. For those readers new to
MS-DOS, topics such as booting the system, using the commands, and file
organization are discussed in the early chapters. Advanced topics-such as
TSR programming, device drivers, DEBUG, and LINK-are discussed in the
final chapters. The middle chapters cover the material needed to understand
the advanced topics. Batch files, DOSSHELL, and the internal structure of
MS-DOS are discussed fully, with programming examples provided.
This book is meant to be self-contained. No assumptions are made re
garding the reader's level of computer expertise. Goals as diverse as maxi
mizing your efficiency in using MS-DOS, to writing fully functional TSR
programs are addressed.
All versions of MS-DOS and PC-DOS up to, and including, MS-DOS
4.01 and PC-DOS 4.01 are covered.
1
MS-DOS Bible
What Is MS-DOS?
MS-DOS stands for Microsoft Disk Operating System. An operating system is
a computer program that coordinates the activities of a computer. The oper
ating system is responsible for setting guidelines under which common
computer tasks are carried out. A disk operating system is one that is used
with disks (or diskettes). And Microsoft Corporation is the manufacturer of
MS-DOS.
The three chief functions of an operating system are:
1. Transferring data between the computer and various peripheral de
vices (terminals, printers, floppy diskettes, hard disks, etc.). This trans
fer of data is called input/output, or I/O.
2. Managing computer files.
3. Loading computer programs into memory and initiating program exe
cution.
MS-DOS handles all these duties admirably, as you will soon find out.
In fact, one of the advantages of using MS-DOS is that it is simple to learn yet
provides you with some very sophisticated, complex functions.
The Operating System and You
Without an operating system, a computer is like a wild, untamed beast
lightning fast, with incredible strength, but uncontrollable by humans. An
operating system harnesses the speed and strength of the computer, con
verting its power into a useful tool.
How much you need to know about your computer's operating system
depends largely on what tasks you wish to carry out. If you are primarily
concerned with loading programs and copying files, you need understand
only the most fundamental aspects of the operating system. On the other
hand, if you are a systems programmer, you need to be familiar with the
most intimate details of the operating system. Those of you who want to use
the operating system to maximize the usefulness ofyour microcomputer are
somewhere in-between.
Whichever category you fall into, the more familiar you are with your
operating system, the better you can apply its capabilities to your own goals.
The purpose of this book is to assist you in attaining those goals.
A Brief History of MS-DOS
The origin of MS-DOS can be traced to 1980, when Seattle Computer Prod
ucts developed a microcomputer operating system for use as an in-house
software development tool. Originally called QDOS, the system was re
named 86-DOS in late 1980 after it had been modified.
2
Introduction
The rights to 86-DOS were purchased by Microsoft Corporation, which
had contracted with IBM to produce an operating system for IBM's new line
ofpersonal computers. When the IBM PC hit the market in 1981, its operating
system was a modified version of 86-DOS called PC-DOS version 1.0.
Shortly after the IBM PC was released, "PC-compatible" personal com
puters began to appear. These computers used an operating system called
MS-DOS version 1.0. Microsoft had made available to the manufacturers of
these machines an operating system that was a near replica of PC-DOS-the
now famous MS-DOS.
The only significant difference between any of these operating systems
was at the "systems level." Each operating system had to be customized for
the particular machine on which it was to run. Generally speaking, these
changes were apparent only to the systems programmer whose job was to
"fit" the operating system to the machine. The users of the various operat
ing systems were not aware of any significant differences.
Since the initial release of PC-DOS and MS-DOS, both operating sys
tems have evolved along identical paths. Version 1.1 was released in 1982.
The major change in 1.1 was double-sided disk drive capability. (Version 1.0
could be used only with single-sided disk drives.) Version 1.1 also allowed
the user to redirect printer output to a serial port.
Version 2. was released in 1983. A major advancement over the earlier
versions, it was designed to support a fIxed (hard) disk and included a sophis
ticated hierarchical file directory, installable device drivers, and file handles.
MS-DOS 3.0 (released in 1984) provided improved support for fixed
disks and microcomputers linked on a computer network. Subsequent ver
sions through 3.3 (released in 1987) continued this trend.
MS-DOS 4.0, released in 1988, provides an alternative graphic user in
terface (DOSSHELL), an expanded memory device driver, support for hard
disk partitions larger than 32 Mbytes, and several new commands and com
mand options.
Although this book is titled "MS-DOS Bible," the information pre
sented in it applies equally to PC-DOS and MS-DOS. Unless otherwise
noted, the names MS-DOS, PC-DOS, and DOS are interchangeable. Versions
1.0 and 1.1 will be referred to as MS-DOS 1 or LX. Versions 2.0,2.10, and 2.11
will be referred to as MS-DOS 2 or 2.X. Versions 3.0,3.1,3.2, and 3.3 will be
referred to as MS-DOS 3 or 3.X. Versions 4.0 and 4.01 will be referred to as
MS-DOS 4 and MS-DOS 4.X.
°
Organization and Contents of This Book
This book is divided into four parts:
~
~
An information jump table
Thtorials on various MS-DOS topics
Discussions of MS-DOS commands
3
MS-DOS Bible
Appendixes covering functions and interrupts, undocumented fea
tures of MS-DOS, practical batch files, code pages, assembly language
programming, ASCII codes, and hexadecimal arithmetic
Part 1-InformationJump Table is a quick guide to the tutorials and
command discussions. Major topics are listed alphabetically, with specific
tasks or commands listed alphabetically below them.
Part 2-MS-DOS Thtorials consists of 16 chapters, arranged in order
from those most fundamental to the use of MS-DOS to those required by
programmers. Tutorials within the chapters provide hands-on learning aids,
guiding you through the concepts presented in the chapter.
Part 3-MS-DOS Commands explains over 70 MS-DOS commands.
Since MS-DOS is a "command-driven" system (it takes action in response to
commands that you enter), this part emphasizes the purpose of each com
mand and the procedure for using it.
Part 4-Appendixes contains supplemental material related to many of
the topics covered in the book. Appendix A has a general introduction to the
MS-DOS interrupts and function calls and then offers detailed discussions of
each. Appendix B discusses some undocumented, but widely used, features
of MS-DOS. Appendix C presents a simple menu-driven system that is con
structed using batch files. Appendix D discusses code pages-what they are
and how they are used. Appendix E is a primer on assembly language pro
gramming. It is provided so that readers with little or no assembly language
experience may understand the assembly language programs presented in
the book. Appendix F contains two ASCII cross-reference tables and ex
plains hexadecimal to decimal conversion and vice-versa.
Chapter Summaries
Here is a brief summary of each of the 16 chapters covered in Part 2.
~
4
Chapter 1, Starting MS-DOS: everything you need to know to begin
using MS-DOS. Booting the system, backing up the system diskettes,
and hard disk installation are covered. The important task of hard disk
partitioning and formatting is covered. Use of the SELECT program to
install DOS 4 is also covered.
Chapter 2, MS-DOS Files: the fundamentals of data storage, naming
and copying files.
Chapter 3, Directories, Paths, and Trees: file management techniques,
including creating directories and subdirectories and using the PATH
command.
Chapter 4, MS-DOS Batch Files: what batch files are and how to create
them. How to use replaceable parameters and execute batch file com
mands.
Chapter 5, Configuring Your System: how you can modify MS-DOS
Introduction
•
•
•
•
according to your use requirements and preferences. Use of the system
files AUTOEXEC.BAT and CONFIG.SYS is discussed in this chapter.
Chapter 6, Redirection, Filters, and Pipes: advanced data-handling fea
tures of MS-DOS.
Chapter 7, USing DOSSHELL: a complete discussion of the use of the
DOS 4 graphical user interface. The chapter also discusses the use of
Program Start Commands, which allow you to customize the
DOSSHELL interface.
Chapter 8, EDLIN, the MS-DOS Text Editor: how to use EDLIN to cre
ate and modify files. Using EDLIN commands.
Chapter 9, Extended Keyboard and Display Control: techniques for
customizing your keyboard and display screen.
Chapter 10, Disk Structure and Management: how MS-DOS organizes
and manages data stored on disk, including discussion of the file direc
tory, the file allocation table, and the MS-DOS system files.
Chapter 11, Memory Structure and Management: how MS-DOS orga
nizes and manages memory, including explanation of program load
ing, the program segment prefix, the MS-DOS environment, and
memory control blocks.
Chapter 12, Expanded Memory: a thorough overview of expanded
memory: what it is, why it is necessary, how to use it, and how it works.
Chapter 13, Terminate and Stay Resident Programs: whattheyare, how
they function, and guidelines for "well-behaved" TSRs. A fully func
tional pop-up TSR is presented.
Chapter 14, MS-DOS Device Drivers: what they are and how they func
tion. A device driver skeleton that can be used to build a working de
vice driver is presented.
Chapter 15, DEBUG: exploring the inner workings of your computer,
examining and modifying computer programs, and using DEBUG
commands.
Chapter 16, LINK: modifying object code into relocatable modules,
combining separate object modules into a single relocatable module,
and using LINK switches.
How to Use This Book
This book can be used in several ways. It can be read in order, from start to
finish, or it can be read in skip-around fashion, using the Information]ump
Table to locate a particular topic of interest. Experienced users of MS-DOS
will probably use this latter method. The generous use of cross references
throughout the book will help hit-and-miss users fill in information gaps.
Before you begin your exploration of MS-DOS, you should be aware of
some of the conventions used in this book.
5
MS-DOS Bible
Screen Output and User Input
Unless noted otherwise, text identical to that appearing on the computer
screen is printed in a special typeface:
Current date is Tue 7-08-1987
Enter new date:
Note that the underscore character L) indicates the position of the
cursor.
Text that you are to type (user input) is shown in an italicized version of
the same special typeface:
Current date is Tue 7-08-1987
Enter new date: 610111989
If you are entering information from a tutorial, be sure to type it exactly
as shown, including blank spaces and punctuation marks.
Some characters cannot be printed in italic type. These are:
asterisk (*)
backward slash (\)
caret (A)
double quotation mark (")
forward slash (/)
greater than (»
hyphen (-)
left bracket ( [)
less than «)
plus (+)
right bracket (])
single quote ( I )
vertical bar ( I)
When these special characters are used in MS-DOS commands and
programs, they will be shown within an italicized command, such as
C>di rl find "-88 "
The characters I, ", and - do not appear to be italicized, but regard
them as if they were and enter them along with the rest of the command.
Note that in EDLIN, the MS-DOS text editor (chapter 8), the asterisk is
6
Introduction
used as a prompt; and in DEBUG, an MS-DOS utility (chapter 15), the hy
phen is used as a prompt. For example, in the following EDLIN command
*2L
you would not enter the * because it is the EDLIN prompt; you would
enter only 2L. The same is true for DEBUG commands:
-d
All you enter is d.
Commands
Special command keys are shown with an initial capital letter, like this: Esc,
Del, Alt. The carriage return is indicated as Enter. Commands using control
characters are shown as Ctrl-D, Ctrl-N. On screen, such commands are rep
resented as Ad, An. This is the same as Ctrl-D and Ctrl-N in this book's
notation. In either case, you press the Ctrl key and the letter simulta
neously. You do not have to shift to capitalize the letter.
Entering commands into your computer is easy. When you see the MS
DOS prompt (A> or C», simply type the command and press Enter to sig
nal MS-DOS that you are finished. On some keyboards, the Enter key may
appear as Return or ~. In any case, you must press the Enter key in order
for the computer to respond.
Commands may be entered in uppercase letters, lowercase letters, or a
combination. It makes no difference to MS-DOS. This book shows com
mands entered in lowercase, since that is the way most people will enter
them. In typing your command, be sure to include all punctuation and
blank spaces as shown. Always leave a space between the command and the
drive indicator and between a command and a filename. If you don't, MS
DOS may become confused and not execute your command properly.
Do not type a lowercase "1" for the number 1, and do not use an upper
case "0" for a zero. MS-DOS does not recognize one for the other. If you
have entered a command and it doesn't work, check your typing. You may
have made a typing error or failed to enter the appropriate punctuation or
spacing.
A Word about Disks and Diskettes
Throughout this book we will be discussing MS-DOS operations that utilize
data stored on floppy diskettes and hard (fixed) disks. Unless otherwise
noted, the word "disk" will refer to both floppy diskettes and hard disks.
7
PAR
T
1
, Infonnation}ump
Table .
Information}ump Table
To use this table, first find the major topic you are interested in; then locate
the specific task or command that you wish to perform. Both major topics
and specific tasks or commands are listed alphabetically.
Batch Files
AUTOEXEC.BAT 110-112
Batch file commands 78-91
Batch file description 74
Creating a batch file 75-76
Environment variables in batch files
Replaceable parameters 76-77
91-93
Code Pages
Code page description 586-588
Code page programming guidelines
Code page switching 586-588
588
Commands
Changing directories (CHDIR) 63, 388-389
Checking diskette status (CHKDSK) 390-394
Clearing the display screen (CLS) 394
Comparing two diskettes (DISKCOMP) 422-424
Comparing two files (COMP) 398-400
Copying a diskette (DISKCOPY) 424-425
Copying a file (COPY) 52-55, 400-405
Creating a subdirectory (MKDIR) 61-65, 455-456
Date setting (DATE) 22, 408-409
11
Part l-InformationJump Table
•
IIJioIIJioIIJio-
•
Deleting a file (DEL) 409-410
Displaying the directory (DIR) 26-28, 419-422
Displaying a file's contents (TYPE) 501
Entering a command 6-7,366-369
Erasing a file (ERASE) 426-427
Formatting a disk (FORMAT) 29-30, 434-440
Internal vs external commands 365-366
Removing a subdirectory (RMDIR) 68, 485
Renaming a file (REN) 478-479
Specifying a search path (PATH) 68-70, 466-468
Time setting (TIME) 23, 498-499
Wildcards in commands 54-55
Note: See the table of contents for a complete list of MS-DOS com
mands.
The Environment
•
Adjusting the environment size 235-237
Batch files and the environment 91-93
Description of MS-DOS environment 235-238
Parents, children, and their environment 237-238
IIJio-
Batch files 73-93, 579-583
COM and EXE files 427-428
Displaying the contents of a file 501
File allocation table (FAT) 201, 209-213, 217-219
File directories 57-71, 204-209, 214-217
File management 58-71, 219-222
Filenames and filename extensions 50-52
System files 201-204,226-227, 436-437
Files
IIJio-
IIJioIIJioIIJio-
Hard (Fixed) Disk
IIJio-
12
Booting with a hard disk 20-26, 37-38
Extended DOS partition 32
InformationJump Table
Hard disk partitions 31-37
Installing DOS on a hard disk 31-39
32-Mbyte limit on partition size 31-32, 40-41
Memory under MS-DOS
Expanded memory 241-265
Expanded memory device drives 245,247-249
Extended memory 247
Memoryallocation 238-240, 562-563
Memory restrictions 224-226
Memory structure and management 223-240
MEM utility program 452-455
Program segment prefix (PSP) 227-234
MS-DOS (General Information)
~
Append 70-71
Command interpreter 203,227
Commands 365-506
Configuring the system 95-112
Description of MS-DOS 2, 20
Directories 57-71
Disk Structure 198-222
DOSSHELL 123-154
Files 49-55
History of MS-DOS 2-3
Internal vs external commands 365-366
Interrupts and functions 509-572
Invoking a secondary command interpreter 90, 227, 490-491
Memory structure 223-240
Programming under MS-DOS 509-572, 589-593
Search path 68-70
Starting MS-DOS 21-26, 226-227
System prompt 24, 473-475
Undocumented features of MS-DOS 573-577
13
Part l-InformationJump Table
Peripheral DeviceslDevice Drivers
..
..
..
..
..
..
..
Description of a device driver 179-180, 297-298
Description of a peripheral device 114, 297
Device driver commands 308-317
Expanded memory device drivers 245, 247-249
Function of device drivers 303-308
Installable device drivers 99-100, 298-299, 410-419
Structure of device drivers 299-303
Procedures
Backing up the system diskette 26-29
Booting (starting) MS-DOS 21-26, 226-227
Changing disk drives 30-31
Copying a file 52-55,378-383, 400-405, 503-506
Copying any old diskette 381, 424-425
Copying the system diskette 26-29
Deleting a file 409-410
Displaying the contents of a file 501
Entering a command 6-7,366-369
Formatting a diskette 29-30, 434-440
Initializing a hard (fixed) disk 31-47
Installation on a hard disk 31-47
iIIo- Installation with SELECT 39-47
.. Printing a video display with Ctrl-PrtSc 164,337, 380, 501
iIIo- Printing the screen with Shift-PrtSc 442
iIIo- Rebooting with Ctrl-Alt-Del (warm boot) 26
iIIo- Suspending the video display with Ctrl-NumLock 164, 341, 501
iIIo- Terminating command execution with Ctrl-Break 384
iIIo- Using wildcards in commands 54-55
..
..
..
..
..
..
..
..
..
..
..
..
Programming under MS-DOS
.... ASCII cross-reference tables 595-604
.... Assembly language primer 589-593
.... Hexadecimal/decimal conversion 604-605
14
Information Jump Table
.. Interrupts and function calls 509-572
Terminate and stay resident programming 267-296
Undocumented features of MS-DOS 573-577
System Configuration
Role of AUTOEXEC.BAT 110-112
Role of CONFIG.SYS 100-110
• Use of SELECT for system configuration 39-47
.. What is system configuration? 39, 96
Utility Programs
•
..
•
...
BACKUP 40-41
DEBUG 319-352
DISKCOPY 26-29, 424-425
EDLIN 155-178
FDISK 31-37, 41-42
FORMAT 29-38, 434-440
LINK 353-362
MEM 452-455
MODE 456-465
RESTORE 43,482-484
SELECT 39-47, 486-488
SYS 497-498
XCOPY 503-506
Wildcards
Substituting" *" for a group of characters 55
Substituting "?" for a single character 54
15
p
A
R
T
2
MS-DOS Thtorials
Starting MS-DOS
MS-DOS Files
Directories, Paths, and Trees
MS-DOS Batch Files
Configuring Your System
Redirection, Filters, and Pipes
The DQSSHELL Interface
EDLIN, the MS-DOS Text Editor
Extended Keyboard and Display Control
Disk Structure and Management
Memory Structure and Management
Expanded Memory
Terminate and Stay Resident Programs
MS-DOS Device Drivers
DEBUG
LINK
C
H
A
p
T
E
R
1
Starting MS-DOS
Booting MS-DOS
Backing Up the System Diskette
Formatting a Diskette
Changing Disk Drives
Installing MS-DOS on a Hard Disk
Automated Installation and Configuration
This chapter explains how to start using MS-DOS. The chapter covers a fairly
wide range of material, primarily because ofthe variety of needs which must
be addressed.
19
Part 2-MS-DOS Tutorials
When MS-DOS was first released, each user received a single Sif4-inch
floppy diskette, which contained a copy of the entire operating system. Very
few of the early PC-type computers had hard disk drives. Therefore, the first
books on using MS-DOS (including the first edition of MS-DOS Bible) as
sumed that everyone would be using a system with one or two Sif4-inch
floppy diskette drives and no hard drive.
The situation has changed dramatically over the years. Most MS-DOS
computers now have one or more hard drives. Some systems have Sif4-inch
floppy drives; others have 3 1/Z-inch floppy drives. Some systems have both.
There are also five different types of Sif4-inch diskettes (160 Kbytes, 180
Kbytes, 320 Kbytes, 360 Kbytes, and 1.2 Mbytes) and two different types of
3 1/z-inch diskettes (720 Kbytes and 1.44 Mbytes). Of these, the most widely
used are the 360-Kbyte (the standard Sif4-inch double density diskette used
in XT-type computers), the 1.2-Mbyte (the Sif4-inch high density diskette
used in AT-type computers), and the 1.44-Mbyte (the 3 1/z-inchdiskettes intro
duced in the PSf2 line of computers).
There are now four major versions of MS-DOS (referred to as MS-DOS
1,2,3, and 4). Each major version has several minor versions-for example,
MS-DOS 3.30 and MS-DOS 4.01. Versions 3 and 4 are generally distributed
on two or more diskettes. Most suppliers offer these versions of the operat
ing system on both Sif4-inch and 3 1/z-inch diskettes.
If you are new to MS-DOS, you may find this combination of different
diskette types and different MS-DOS versions a little overwhelming. Be as
sured, though, that long-time users of MS-DOS are also somewhat over
whelmed (and often frustrated) by this situation. A Significant portion of the
personal computer industry exists solely to service the needs created by this
situation (for example, suppliers of equipment to facilitate the transferring
of data between machines with different types of disk drives).
This chapter will tell you how to get going with MS-DOS, regardless of
the MS-DOS version you are using, regardless of the type of diskette drive(s)
on your computer, and regardless of the presence or absence of a hard disk
drive on your system.
The chapter begins by discussing how to load MS-DOS into your com
puter's memory (a process referred to as booting). The next section dis
cusses the important task of making backup copies of your MS-DOS system
diskettes. You should make your backups before doing anything else with
MS-DOS. The chapter's third section discusses how to install MS-DOS on a
hard disk drive. Installation is the process whereby MS-DOS is copied from
your floppy diskette(s) onto the hard disk. You can then put the diskettes
away for safe keeping and subsequently use the hard disk copy ofthe operat
ing system. The final section of this chapter discusses SELECT, a program
supplied with PC-DOS 4 which automates the installation process.
MS-DOS files and disk directories are mentioned throughout this
chapter. You may want to briefly refer to chapters 2 and 3 as you are read
ing this chapter, for a quick introduction to these two important concepts.
Two files with special meaning to MS-DOS are named AUTOEXEC.BAT and
CONFIG.SYS. The role of these files is discussed fully in chapter S.
20
I-Starting MS-DOS
Booting MS-DOS
MS-DOS is supplied on one or more floppy diskettes, which come with your
computer or can be purchased from a software vendor. When your com
puter is turned on, MS-DOS is loaded into the computer's memory through a
process called booting. The events that occur during the booting process
are discussed in chapter 11. This section describes the steps that you need to
take the first time you "boot up" MS-DOS.
In order for a diskette to be used to boot MS-DOS, the diskette must
contain a set of system files. If your version of MS-DOS is supplied on more
than one diskette, it is possible that not all of the diskettes are "bootable."
Please refer to the manual supplied with your version of MS-DOS to deter
mine which diskette is used for booting.
Before turning on your computer, place the boot diskette in drive A.
Please refer to the manual supplied with your computer, or contact your
computer supplier, if you are uncertain as to the location of drive A. Figure
1-1 illustrates the insertion of a SIf4-inch diskette into drive A. Notice that the
diskette is held with the label facing up and toward the user as it is inserted.
When using a 3 1h-inch disk drive, the diskettes are inserted in a similar fash
ion. The major difference between using 3 1h-inch and SIf4-inch diskettes is
that, with the larger diskettes, you must close a door on the drive following
insertion.
CRT Monitor
o
Floppy Disk Drive
Figure 1-1. Major components of typical microcomputer system.
After the diskette is properly inserted, go ahead and turn on your com
puter. For a time it may appear that little if anything is happening. Actually, a
21
Part 2-MS-DOS TUtorials
series of checks is being run to verify that all is well inside your computer.
Eventually the cursor, the small flashing light that marks your place on the
screen, will appear. You will hear some whirring and clicking from the disk
drive, and the drive's indicator light will flash on. The light indicates that
MS-DOS is being loaded from the diskette into computer memory.
Setting the Date
Now that MS-DOS has been loaded into memory, you are ready to set the
date. Your display screen should look something like this:
Current date is Tue 1-01-1980
Enter new date:
In the last line of the display, MS-DOS prompts you to enter a new date
(today's date). The date that you enter will be used by MS-DOS as a date
stamp to help identify all files stored on disk during the current work ses
sion. Having to enter a date may seem inconvenient to you, but that date
might be important months from now when you are trying to locate a file.
Notice that the second to the last line of the display shows the "current
date." This is the date that MS-DOS was manufactured and first stored on a
disk. This date will be displayed each time that you boot MS-DOS.
To enter the new date, follow these steps:
1. Type the number of the current month; for example, 01 =January,
02 = February, etc. The leading zero in the number may be omitted Gan
uary, for example, may be entered as "1" or "01 ").
2. Type a dash (-), slash (I), or period (.) to separate the month from the day.
3. Type the number of the day of the month. Again, a leading zero may be
omitted.
4. 'lYpe a dash (-), slash (I), or period (.) to separate the day from the year.
5. Type the year. MS-DOS will accept any year in the range 1980 through
2099. You do not have to type all four digits of the year, only the last
two (1990 may be entered as either "1990" or "90").
6. Press the Enter key.
The new date should appear on the screen:
Current date is Tue 1-01-1980
Enter new date: 10/30/90
+-Enter
After you press Enter, MS-DOS checks to make sure that the date you
have specified is valid (the screen will display the message Inva lid date
if it is not) and then stores the date in memory. The date is stored in mem
ory only while your computer is turned on. When you switch off the
22
l-Starting MS-DOS
power, the date is lost and must be reentered the next time you boot the
system.
Setting the Time
Once you have entered a valid date, MS-DOS prompts you to enter the new
time (the present time). The time that you enter will be used by MS-DOS as a
time stamp to help identify all files stored on disk during the current work
session. Like entering the date, entering the time may seem to be a nuisance,
but you may be glad you did six months from now.
Current date is Tue 1-01-1980
Enter new date: 10/30/90
Current time is: 0:01:01.58
Enter new time:
Notice that the "current time" is displayed in the second to the last line.
This is the time of day that MS-DOS was manufactured and first stored on a
disk. It will be displayed each time that you boot MS-DOS.
To enter the new time, follow these steps:
1. Type the hour of the day. Any number in the range 01 through 24 is
valid. A leading zero may be omitted (01 and 1 are both valid).
2. Type a colon (:) to separate the hours from the minutes.
3. Type the minutes. A leading zero is optional.
4. (Optional) Type a colon followed by the seconds. After entering the
seconds, you may specify hundredths of a second by typing a period (.)
and the hundredths of the second.
S. Press the Enter key.
The new time should appear on the screen:
Current date is Tue 1-01-1980
Enter new date: 10/30/90
Current time is: 0:01:01.58
Enter new time: 9:40
+-Enter
After you have pressed Enter, MS-DOS checks to make sure that the
time you have specified is valid (the screen will display the message
i nva lid time if it is not) and then stores the time in memory. The time is
updated several times a second by your computer's internal timer. The cur
rent time is stored in memory only while your computer is turned on.
When you switch off the power, the time is lost.
If it has a battery powered clock card, your computer will maintain the
current date and time while it is turned off. When you subsequently turn
23
Part 2-MS-DOS Tutorials
your computer back on, the correct date and time will be displayed. The
date and time will not be correct if your computer does not have a battery
powered clock.
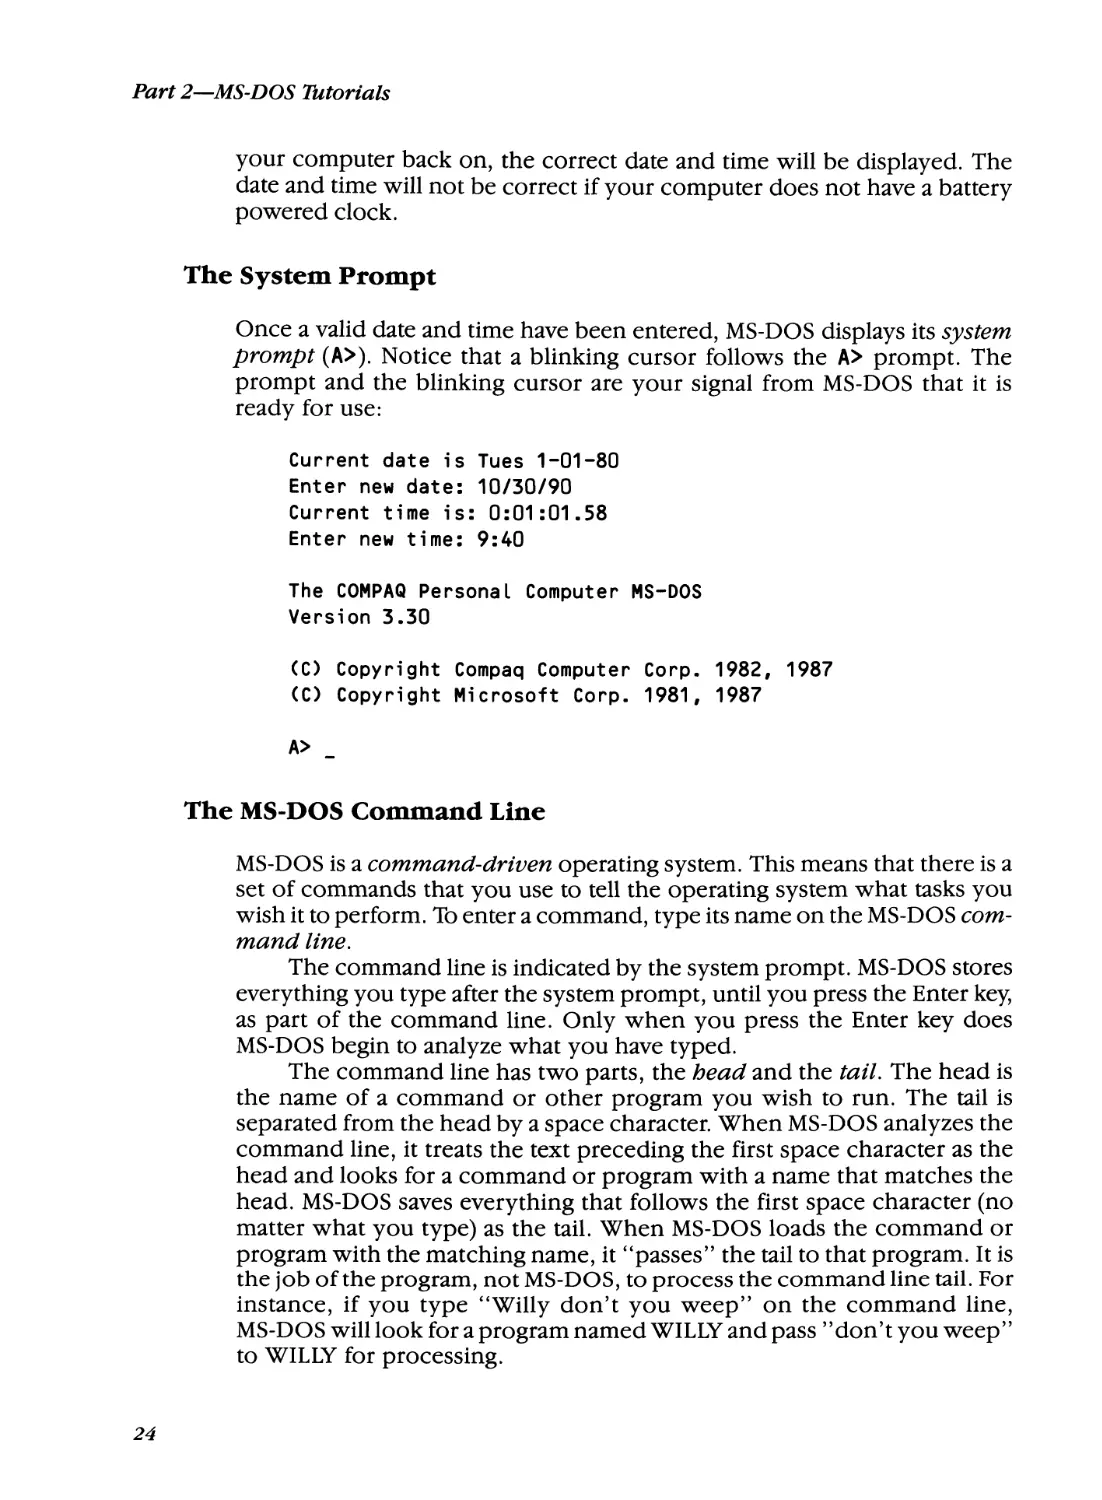
The System Prompt
Once a valid date and time have been entered, MS-DOS displays its system
prompt (A». Notice that a blinking cursor follows the A> prompt. The
prompt and the blinking cursor are your signal from MS-DOS that it is
ready for use:
Current date is Tues 1-01-80
Enter new date: 10/30/90
Current time is: 0:01:01.58
Enter new time: 9:40
The COMPAQ Personal Computer MS-DOS
Version 3.30
(C) Copyright Compaq Computer Corp. 1982, 1987
(C) Copyright Microsoft Corp. 1981, 1987
A>
The MS-DOS Command Line
MS-DOS is a command-driven operating system. This means that there is a
set of commands that you use to tell the operating system what tasks you
wish it to perform. To enter a command, type its name on the MS-DOS com
mand line.
The command line is indicated by the system prompt. MS-DOS stores
everything you type after the system prompt, until you press the Enter key,
as part of the command line. Only when you press the Enter key does
MS-DOS begin to analyze what you have typed.
The command line has two parts, the head and the tail. The head is
the name of a command or other program you wish to run. The tail is
separated from the head by a space character. When MS-DOS analyzes the
command line, it treats the text preceding the first space character as the
head and looks for a command or program with a name that matches the
head. MS-DOS saves everything that follows the first space character (no
matter what you type) as the tail. When MS-DOS loads the command or
program with the matching name, it "passes" the tail to that program. It is
the job ofthe program, not MS-DOS, to process the command line tail. For
instance, if you type "Willy don't you weep" on the command line,
MS-DOS will look for a program named WILLY and pass" don't you weep"
to WILLY for processing.
24
l-Starting MS-DOS
Each MS-DOS command is designed to do a certain job, and part of its
design allows you to control it in various ways, depending upon what op
tions and parameters it has been designed to accept from the command line
tail. In order to use an MS-DOS command, you simply have to learn its name
and what it will accept on the command line tail. Some commands work
without needing any information from the command line tail. Other com
mands require additional information, such as the name of a disk drive, a
file, or a directory. Many commands are designed to respond to options,
otherwise known as switches, which generally take the form of a slash char
acter followed by a single letter-for example, Is.
Date and Time Defaults
While entering the new date and time is a good work habit, there may be
occasions when you decide not to enter the date and time. If so, simply
press the Enter key. The date and time will be set to the default values, the
preset values used by MS-DOS unless you specify otherwise. In this case, the
default values are the "current" date and time that are displayed by MS-DOS
each time you boot the system. There is no correlation between these values
and the date and time that you are actually using the computer. If you
choose the default values, the screen will leave a blank in place of the new
time and date:
Current date is Tues 1-01-80
Enter new date:
<--Enter
Current time is: 0:01:01.58
Enter new time:
<--Enter
The COMPAQ Personal Computer MS-DOS
Version 3.30
(C) Copyright Compaq Computer Corp. 1982, 1987
(C) Copyright Microsoft Corp. 1981, 1987
A>
Date and Time Stamps
While MS-DOS is running, the computer's internal timer is used to update
the present time, changing the value that is stored in memory several times a
second. MS-DOS will also update the present date whenever the time
reaches midnight (24:00:00.00).
When MS-DOS stores a file on a disk, the current date and time are
stored on the disk along with other information about the file. These date
and time stamps can be viewed by using the DIR command (more about DIR
later). Date and time stamps can help you keep track of when a file was cre
25
Part 2-MS-DOS Tutorials
ated or last modified but only if you entered the correct date and time when
you booted MS-DOS.
Rebooting with Ctrl-Alt-Del
The procedure just described for booting MS-DOS is known as a cold boot
because it began with the computer turned off. However, MS-DOS can also
be started (or restarted) with the computer turned on. Naturally, this is
known as a warm boot.
With the computer running, place your MS-DOS system diskette in
drive A, close the drive door, and press the Ctrl-Alt-Del keys simultaneously.
MS-DOS will be loaded (or reloaded) into memory. Just as it does for a cold
boot, MS-DOS will prompt you to enter the current date and time.
Backing Up the System Diskette
If you are using MS-DOS for the first time, you should make a backup copy,
or duplicate, of your system diskette before proceeding any further. The
method used to make a backup depends on whether your system has two
floppy disk drives or just one floppy disk drive. We will describe the method
for two-drive systems first.
Note: If your system has a hard disk, determine whether it has one or
two floppy disk drives and then use the appropriate method. In hard disk
systems, it is especially important that you back up the system diskette be
fore using the hard disk, since you might inadvertently erase the system
diskette when setting up the hard disk.
MS-DOS uses a program called DISKCOPY.COM to copy diskettes. The
program is supplied as a file on one ofthe MS-DOS system diskettes. The first
step in backing up your system diskettes is to find the diskette that contains
DISKCOPY. COM.
The MS-DOS command DIR (for DIRectory) is used to display the
names of the files contained on a diskette. The command
dir a: /w
tells MS-DOS to display the names of the files on the diskette in drive A using
the wide (/w) format. The wide format simply allows more filenames to be
displayed at one time.
With the diskette you used to boot the system in drive A, go ahead and
enter dir a: /w. Throughout this book, the word "enter" means to type the
text that is indicated and then press the Enter key. You should see something
like this after entering the command:
26
i-Starting MS-DOS
A>di r a: Iw
Volume in drive A has no label
Directory of A:\
COMMAND COM ANSI
FASTOPEN EXE FDISK
MODE
COM NLSFUNC
SYS
COM VDISK
CPI 5202
4201
22 Fi lees)
SYS COUNTRY SYS
COM FORMAT
COM
EXE PRINTER SYS
EXE
SYS XCOPY
CPI
9216 bytes free
DISPLAY
KEYB
REPLACE
EGA
SYS
COM
EXE
CPI
DRIVER
KEYBOARD
SELECT
LCD
SYS
SYS
COM
CPI
A>
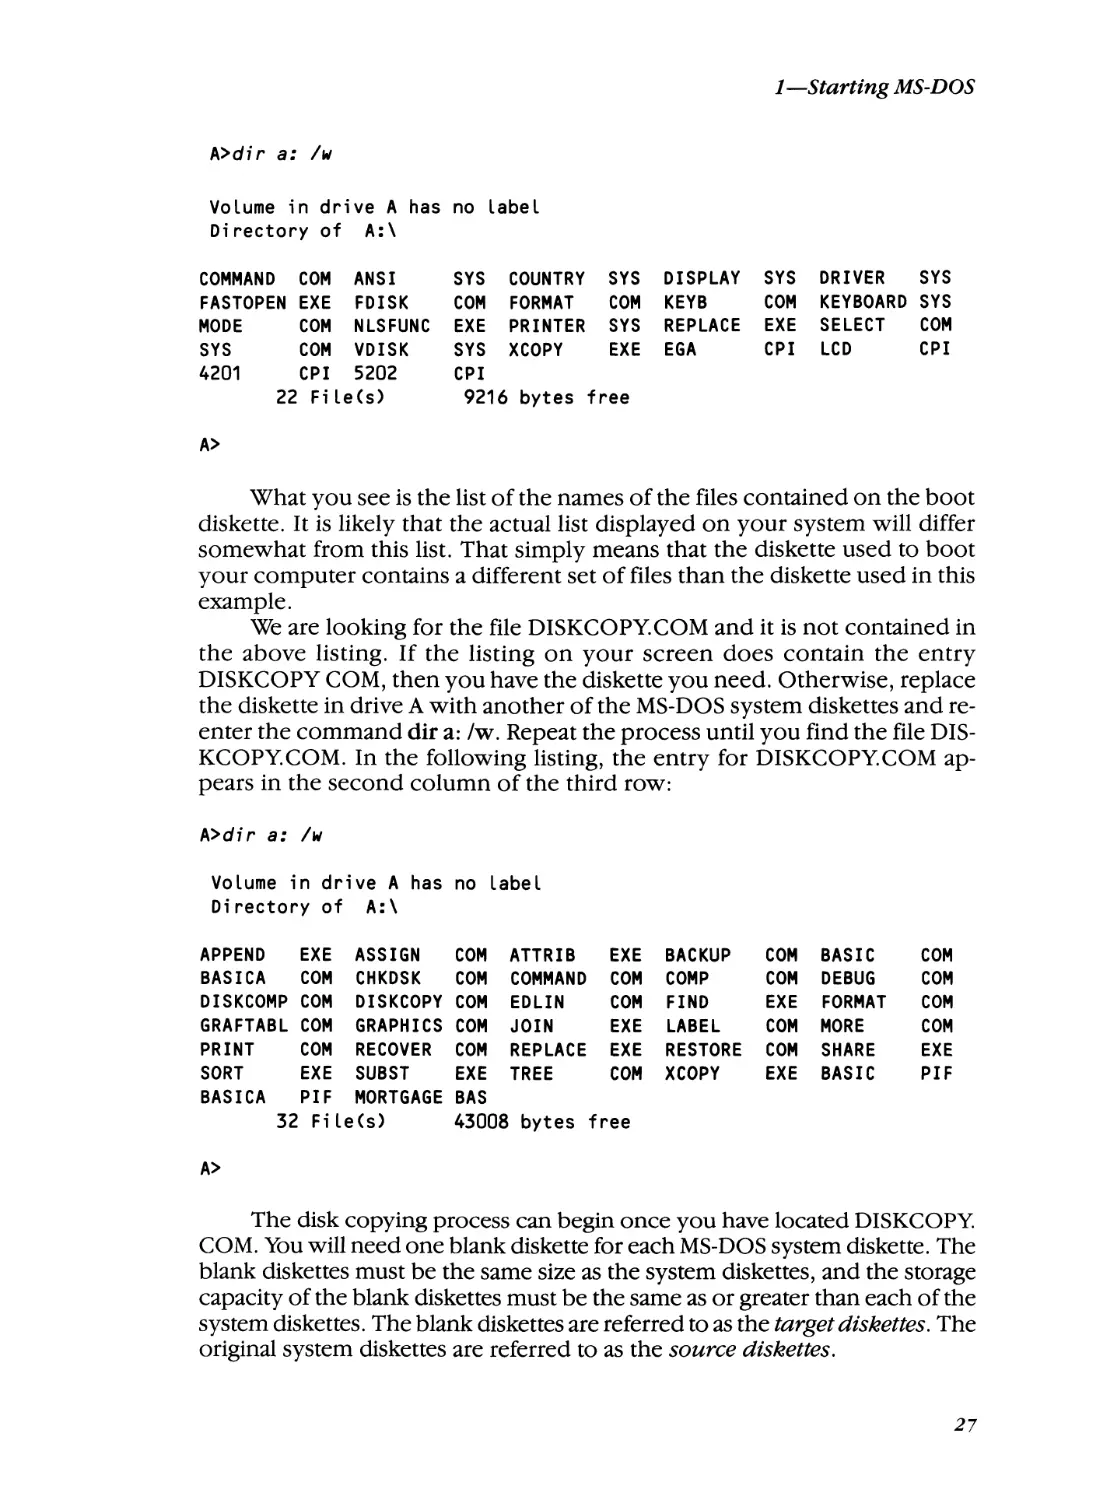
What you see is the list of the names of the files contained on the boot
diskette. It is likely that the actual list displayed on your system will differ
somewhat from this list. That simply means that the diskette used to boot
your computer contains a different set of files than the diskette used in this
example.
We are looking for the file DISKCOPY.COM and it is not contained in
the above listing. If the listing on your screen does contain the entry
DISKCOPY COM, then you have the diskette you need. Otherwise, replace
the diskette in drive A with another of the MS-DOS system diskettes and re
enter the command dir a: /w. Repeat the process until you find the file DIS
KCOPY.COM. In the following listing, the entry for DISKCOPY.COM ap
pears in the second column of the third row:
A>dir a: Iw
Volume in drive A has no label
Directory of A:\
APPEND
EXE ASSIGN
BASICA
COM CHKDSK
DISKCOMP COM DISKCOPY
GRAFTABL COM GRAPHICS
PRINT
COM RECOVER
SORT
EXE SUBST
BASICA
PIF MORTGAGE
32 Fi lees)
COM ATTRIB
EXE
COM COMMAND COM
COM EDLIN
COM
COM JOIN
EXE
COM REPLACE EXE
EXE TREE
COM
BAS
43008 bytes free
BACKUP
COMP
FIND
LABEL
RESTORE
XCOPY
COM
COM
EXE
COM
COM
EXE
BASIC
DEBUG
FORMAT
MORE
SHARE
BASIC
COM
COM
COM
COM
EXE
PIF
A>
The disk copying process can begin once you have located DISKCOPY.
COM. You will need one blank diskette for each MS-DOS system diskette. The
blank diskettes must be the same size as the system diskettes, and the storage
capacity of the blank diskettes must be the same as or greater than each ofthe
system diskettes. The blank diskettes are referred to as the target diskettes. The
original system diskettes are referred to as the source diskettes.
27
Part 2-MS-DOS Tutorials
Instead of using blank diskettes as targets, you can use diskettes that
contain files which you no longer need. All existingfiles on the target disk
ettes will be destroyed by the backup process. You can use the DIR com
mand to make sure that prospective target diskettes do not contain any files
that you want to save (chapter 2 explains how to copy a file that you want to
save from one diskette to another).
Copying Diskettes on Two-Drive Systems
If your computer has two floppy diskette drives ofthe same size, you begin
the disk copying process by entering the command diskcopy a: b:. MS-DOS
will respond with the following message:
Insert SOURCE diskette in drive A:
Insert TARGET diskette in drive B:
Press any key to continue . • •
The source is the MS-DOS system diskette that is currently in disk drive A.
Insert one of your target diskettes in drive B and press any key. MS-DOS will
make an exact copy of the source diskette on the target.
When the copying process is completed, MS-DOS will display the fol
lowing query:
Copy another diskette (YIN)?
Press y if MS-DOS is supplied on more than one system diskette. You will be
prompted to insert the next system diskette as the source and another blank
diskette as the target. Repeat the process until you have made backup copies
for each of the MS-DOS system diskettes. Press n in response to the above
query after you have copied the final system diskette.
You should use the backup system diskettes for your future work
with MS-DOS. Place the original system diskettes somewhere where they
will be safe, and use them only to make additional backup copies as you
need them.
Copying Diskettes on One-Drive Systems
If your computer has a single floppy diskette drive, begin the disk copying
process with the same command used on two-drive systems: diskcopy a: b:.
Now though the operating system displays the following:
Insert SOURCE diskette in drive A:
Press any key to continue
28
I-Starting MS-DOS
the diskette containing DISKCOPY.COM is your source, so go ahead and
press any key. MS-DOS will read from the diskette and then display the fol
lowing:
Insert TARGET diskette in drive A:
Press any key to continue •••
This is your prompt to remove the source diskette and insert the target disk
ette. This process is called disk swapping. MS-DOS will prompt you to re
peat the swapping process until the target diskette contains a complete copy
of the source diskette.
When the copying process is completed, MS-DOS will display the fol
lowing query:
Copy another diskette (YIN)?
Press y if MS-DOS is supplied on more than one system diskette. You will be
prompted to insert the next system diskette as the source and another blank
diskette as the target. Repeat the process until you have made backup copies
for each of the MS-DOS system diskettes. Press n in response to the above
query after the final system diskette has been copied.
You should use the backup system diskettes for your future work
with MS-DOS. Place the original system diskettes somewhere where they
will be safe and use them only to make additional backup copies as you
need them.
computers with 5If4-inch and 3 lh-inch Disk Drives
On systems with both a SIf4-inch disk drive and a 3 Ih-inch disk
drive, one of the drives will be assigned drive letter A and the other
letter B. On these systems, the command "diskcopy a: b:" will not
work, because the drives are not the same size. Instead, you must use
the command "diskcopy a: a:" (or "diskcopy b: b:"). MS-DOS will
prompt you to swap diskettes as described in the section headed
"Copying Diskettes on One-Drive Systems."
Fonnatting a Diskette
Before a diskette can store data that is usable by MS-DOS, it must bejormat
ted. During formatting, the diskette is divided into parcels called sectors,
29
Part 2-MS-DOS Tutorials
which are readable by MS-DOS. Formatting also analyzes the diskette for
defects and sets up a file directory. Most (but not all) versions ofMS-DOS will
automatically format a diskette, if necessary, when the DISKCOPY com
mand is used to back up a diskette.
If you use an unformatted diskette for your system backup, and your
version of MS-DOS does not automatically format with DISKCOPY,
MS-DOS will display the following message:
Disk error reading drive A
Abort, Retry, Ignore?
Insert the system diskette containing the file FORMAT. COM in drive A (use
the DIR command to locate the file). Enter format a:. MS-DOS will prompt
you as follows:
A>format a:
<-Enter
Insert new diskette for drive A:
and strike any key when ready
Remove the system diskette from drive A, and replace it with the disk
ette that is to be formatted. Formatting destroys all existing data on a diskette
so make sure that the diskette does not contain any data that you will need
later on. (If you want to abort the formatting process at this point, press Ctrl
C.) Press any key to format the diskette in drive A. MS-DOS will tell you when
formatting is complete:
Formatting ••• Format complete
362496 bytes total disk space
362496 bytes availabLe on disk
Format another
A>
(Y/N)?n
~you
press "n"
The formatted diskette can now be removed from drive A and may be
used to store data.
Changing Disk Drives
Most MS-DOS commands involve storing and/or retrieving data on a disk. You
can specify which drive MS-DOS is to use by including the letter designator of
the appropriate drive in the MS-DOS command. If you do not specify a drive
in the command, MS-DOS assumes that the disk is in the default drive.
MS-DOS displays the letter of the current default drive in the system
prompt. When you start MS-DOS from a diskette, the A drive is the default
and MS-DOS displays the prompt A>.
30
I-Starting MS-DOS
To change the default drive, type the letter of the drive you wish to be
the new default, type a colon, and then press Enter:
A> b :
+--
Enter
B>
The colon tells MS-DOS that "b" refers to a disk drive. If you omit the
colon, MS-DOS will assume that "b" is a command and will try to execute it.
The default drive will come on for a second or two, and MS-DOS will search
for command "b". When no command named "b" is found, MS-DOS will
display an error message and then prompt you to enter another command:
A>b
Bad command or fiLe name
A>
Insta J1iog MS-DOS on a Hard Disk
Most people using MS-DOS will want to install the operating system on their
hard disk. Installation is the process of copying the MS-DOS system files and
the MS-DOS external files from the system diskettes onto the hard disk. The
system files are the files required to make the hard disk bootable. The exter
nal files contain the MS-DOS utility programs. DISKCOPY.COM and
FORMAT.COM are examples of MS-DOS external files.
A hard disk must be partitioned and formatted before MS-DOS can be
installed on it. The MS-DOS program used to partition hard disks is called
FDISK.
Disk Partitions and FDISK
A hard disk consists of a stack ofplatters. Each platter has two surfaces used
to store data. Each platter surface is divided into a series of concentric circles
called tracks. All tracks of equal diameter are grouped together to form a
cylinder. The outermost group of tracks on each platter forms cylinder 0,
the second-outermost forms cylinder 1, and so on.
Before a hard disk can be used, contiguous cylinders must be grouped
together to form partitions. Each partition "belongs" to a particular operat
ing system. This means that for each partition there is only one operating
system that can store files in that partition. Most people just have partitions
that belong to MS-DOS on their hard disks, but partitions for XENIX, CP/M,
and other operating systems can coexist on a single hard disk, right along
with one or more MS-DOS partitions.
FDISK, the MS-DOS utility program used to establish hard disk parti
tions, has evolved considerably over the years. The MS-DOS 2.X version of
FDISK allows just a single MS-DOS partition on each hard disk. The partition
is limited to 32 Mbytes of storage capacity.
31
Part 2-MS-DOS Tutorials
The MS-DOS 3.0-3.2 versions of FDISK allow each hard disk to have
up to four MS-DOS partitions. Each partition is assigned its own drive letter,
and partitions are still limited to 32 Mbytes.
The MS-DOS 3.3 version ofFDISK allows you to create aprimary and
extended MS-DOS partition on each hard disk. The primary partition is still
limited to 32 Mbytes, but there is no limit to the size of the extended partition.
The extended partition may be divided into multiple logical drives, each logi
cal drive being assigned its own drive letter. Each hard disk must have one
primary partition. Use ofthe PC-DOS 3.3 version of FDISK is illustrated below.
The MS-DOS 4.X version ofFDISK can be used to create a single parti
tion as large as the disk's total storage capacity. Removal of the 32-Mbyte
limitation is one of the major enhancements of MS-DOS 4.X. Use ofthe 4.X
version of FDISK is discussed in the final section of this chapter.
Starting FDISK
The example presented here uses the PC-DOS 3.30 version of FDISK to par
tition a previously nonpartitioned 40-Mbyte hard disk. Users of 3.3 and pre
vious versions of MS-DOS can follow the same procedure. (Version 4 adds
additional capabilities to this command.) Two 20-Mbyte partitions are cre
ated. If you are using a version other than PC-DOS 3.30, your screens may
differ somewhat from those presented here. Nonetheless, the general con
cepts presented are applicable to all versions of FDISK.
Start FDISK by first locating the backup system diskette containing the
file FDISK.COM. Recall that the DIR command is used to obtain a listing of
the files contained on a diskette. Go ahead and enter fdisk once you have
located FDISK.COM. The program will start and you will see a display sim
ilar to this:
IBM PersonaL Computer
Fixed Disk Setup Program Version 3.30
(C)Copyright IBM Corp. 1983,1987
FDISK Options
Current Fixed Disk Drive: 1
Choose one of the foLLowing:
1.
2.
3.
4.
Create DOS partition
Change Active Partition
DeLete DOS partition
DispLay Partition Information
Enter choi ce: [1]
Press ESC to return to DOS
32
I-Starting MS-DOS
This is the FDISK Options menu. The first time you use FDISK, your objec
tive is to create a partition for use by DOS. Before proceeding, though, a
word of warning. You must be VERY careful when using FDISK. It is possi
ble to wipe out an entire partition of data with FDISK. If you are uncertain
about what is happening, press the Esc key until you return to the DOS com
mand prompt (A».
Entering "1" will cause FDISK to display the Create DOS Partition
menu, shown below:
Create DOS Part;t;on
Current F;xed D;sk Drive: 1
1. Create Primary DOS partition
2. Create Extended DOS partition
Enter choice: [1]
Press ESC to return to FDISK Options
creating Partitions
All hard disks partitioned with the 3.3 and 4.X versions of FDISK are re
quired to have one primary DOS partition. Choose selection" 1" from the
Create DOS Partition menu and FDISk will display the Create Primary DOS
Partition menu:
Do you wish to use the maximum size
for a DOS partition and make the DOS
partition active (yIN) ••••••••• ? en]
As you can see, FDISK wants to know ifit should create the largest DOS
partition possible. Because the example is being carried out on i 40-Mbyte
drive, the largest possible primary partition is 32 Mbytes (remember that this
example is using PC-DOS 3.30, which has a 32-Mbyte limit). However, it has
been decided to divide the drive into two 20-Mbyte partitions. Therefore,
we do not want the largest possible partition so "n" is entered in response to
the question. This produces the following:
33
Part 2-MS-DOS Tutorials
Create Primary DOS Partition
Current Fixed Disk Drive: 1
TotaL disk space is 976 cyLinders.
Maximum space avaiLabLe for partition
is 771 cyLinders.
Enter partition size ....•..•... : [ 488]
No partitions defined
Press ESC to return to FDISK Options
There are a total of 976 cylinders on the 40-Mbyte disk. A maximum of
771 cylinders may be used for the primary DOS partition (this corresponds
to a 32-Mbyte partition). The number 488 is entered on the Ent e r pa rt i
t i on s i z e line, because we want the new partition to occupy one-half of the
disk's total capacity (20 Mbytes is one-half of 40 Mbytes, and 488 cylinders is
one-half of 976 cylinders). FDISK will display the updated partition informa
tion after the size of the primary partition has been specified:
Create Primary DOS Partition
Current Fixed Disk Drive: 1
Partition Status
Type Start End Size
C: 1
PRI DOS
o 487 488
Press the Esc key to return to the FDISK Option menu, enter 3 ("Create
DOS partition"), and then enter 2. FDISK will display the Create Extended
DOS Partition menu:
Create Extended DOS Partition
Current Fixed Disk Drive: 1
Partition Status
Type Start End Size
C: 1
PRI DOS
o 487 488
TotaL disk space is 976 cyLinders.
Maximum space avaiLabLe for partition
is 488 cyLinders.
Enter partition size ••••••••... : [ 488]
34
I-Starting MS-DOS
FDISK displays the current partition information and states that 488 cylin
ders are available to use as a partition. This represents the remaining half of
the disk's storage capacity. This is the default size for the extended partition,
so pressing the Enter key is all that is required. FDISK will automatically
display the updated partition information:
Create Extended DOS Partition
Current Fixed Disk Drive: 1
Partition Status
C: 1
2
Type Start End Size
PRI DOS
o 487 488
EXT DOS
488 975 488
Extended DOS partition created
Press ESC to return to FDISK Options
Once the extended partition has been created, FDISK will prompt you
to define the extended partition's logical drives:
Create Logical DOS Drive(s)
No logical drives defined
Total partition size is
488 cylinders.
Maximum space avai lable for logical
drive is 488 cylinders.
Enter logical drive size •••••••• : [ 488]
Press ESC to return to FDISK Options
An extended partition consists of one or more logical drives. Each logi
cal drive has a unique drive letter assigned to it. In the example, we want the
entire extended partition to be a single logical drive, so we simply press the
Enter key. This creates a single logical drive that is 488 cylinders in size.
FDISK displays the updated information:
35
Part 2-MS-DOS 1Utorlals
Create Logical DOS Drive(s)
Drv Start End
Size
D:
488
488
975
All available space in the Extended DOS
partition is assigned to logical drives.
Logical DOS drive created, drive letters
changed or added
Press ESC to return to FDISK Options
FDISK also tells us that the entire extended partition is to be referred to using
drive letter D.
Activating the Primary DOS Partition
After the partitions have been defined, one of them must be designated as
being "active." The active partition is the partition that is read during the
boot-up process. Only one partition on the disk is active at a time. On sys
tems where the hard disk contains more than one operating system, the ac
tive partition determines which operating system boots up when the
c6mputer is turned on.
You activate the primary DOS partition by first returning to the FDISK
Options menu (press Esc to return) and then pressing 2 ("Change Active
Partition"). FDISK displays the Change Active Partition menu:
Change Active Partition
Current Fixed Disk Drive: 1
Partition Status
C: 1
2
Type Start End Size
PRI DOS
o 487 488
EXT DOS
488 975 488
Total disk space is
976 cylinders.
Enter the number of the partition you
want to make active ••••...•••••••• : [1]
We want to activate partition number 1, soa "1" is entered on the Enter the
numbe r line. FDISK updates the partition information:
Change Active Partition
Current Fixed Disk Drive: 1
36
I-Starling MS-DOS
Partition Status
c:
1
2
A
Type Start End Size
PRI DOS
a 487 488
488 975 488
EXT DOS
Total disk space is
976 cylinders.
Notice that the Status column for partition 1 now contains an A, indicating
that partition 1 is active.
Once the primary partition is activated, you can quit FDISK by pressing
the Esc key two times. FDISK will prompt you to reboot your computer.
Upon rebooting, you are ready to format the hard disk and then install
DOS. Before leaving our discussion ofFDISK, however, let us mention the
other selections available on the FDISK Options menu.
Other FDISK Options
In addition to creating and activating DOS partitions, there are three other
actions that you can take from the FDISK Options menu.
You can use FDISK to delete existing DOS partitions. Remember that all
data in a partition is lost when the partition is deleted. If the disk contains an
extended DOS partition, that partition must be deleted before the disk's pri
mary DOS partition can be deleted.
The size of an existing partition cannot be changed. You must delete
the existing partition and then create a new partition.
You can also use FDISK to simply display the current partition informa
tion. It is probably a good idea to display the partition information before
making any changes with FDISK. This will help you avoid making costly
mistakes.
FDISK examines and modifies the partition information of one hard
disk at a time. If your computer has more than one hard drive, a fifth option
("Select Next Fixed Disk Drive") will be displayed in the FDISK Option
menu. This option directs FDISK to move on and access the partition infor
mation of the next drive in the system.
Formatting the Hard Disk
Two logical drives were created in the above example using FDISK. The logi
cal drive in the primary DOS partition is referred to as logical drive C; the
logical drive in the extended partition is referred to as logical drive D. Each
logical drive must bejormatted before it can be used by DOS.
If you reformat a drive that already contains some data, the existing
data becomes unavailable to DOS. While it is possible to retrieve data from
accidentally reformatted drives using programs such as Norton Utilities, PC
Tools, and Mace Utilities, such situations are to be avoided. These programs
37
Part 2-MS-DOS TUtorials
are very good, but trying to rescue data from a reformatted hard disk is stren
uous, time consuming, and often not completely successful. Be very careful
whenever you are formatting a hard disk drive!
FORMAT is the DOS utility program used to format both floppy disk
ettes and hard disks. Using the DIR command, locate the backup system
diskette that contains the file FORMAT. COM. The examples that follow use
FORMAT to format drive C.
The command to format drive C is "format c:", but we are going to
want drive C to be bootable. This means that DOS will automatically be
loaded into memory from drive C each time the computer is turned on. In
order to accomplish this, we need the command "format c: /s". The"/s" is a
command switch which tells DOS to format drive C and also make it boot
able by placing a copy of the DOS system files on the drive. The example
below illustrates the use of FORMAT. The example assumes that a backup
system diskette containing the file FORMAT.COM is in drive A.
A> format c: /S
..... enter command
WARNING, ALL DATA ON NON-REMOVABLE DISK
DRIVE C: WILL BE LOST!
Proceed with Format (Y/N)?y
..... DOS issues warning
Format compLete
System transferred
21170176
79872
30720
21059584
bytes
bytes
bytes
bytes
totaL disk space
used by system
in bad sectors
avai LabLe on disk
A>
Notice that FORMAT issues a warning and asks if you want to proceed before
it begins to format. You should enter n if you are at all uncertain about what
you are doing.
The message System transferred indicates that the files required for
booting have been copied to drive C. The final four lines report the following:
1. The total storage space on disk drive C
2. The amount of storage used by the system files
3. The amount of storage unavailable for use ("bad sectors"-most disks
have some)
4. The amount of storage currently available on disk drive C
Drive C is now ready for use by DOS. It is also bootable so that it can be
used to start up DOS.
38
I-Starting MS-DOS
Drive D also needs to be formatted before it is usable. This is done with
the command "format d:" because there is no need for drive D to be boot
able.
Automated Installation and Configuration
The topic of system configuration is covered in chapter 5, but needs to be
mentioned briefly here. Configuration is essentially a customization of
DOS. You customize the operating system according to your own prefer
ences and use patterns. Information regarding configuration is stored in two
special files named CONFIG.SYS and AUTOEXEC.BAT. The remainder of
this chapter discusses a DOS utility program named SELECT, which can
be used to automatically install DOS and create CONFIG.SYS and
AUTOEXEC.BAT files.
SELECT is a program provided with MS-DOS 4 that provides an auto
mated method for installing and configuring the operating system. While
you can install MS-DOS 4 in the conventional, nonautomated fashion de
scribed earlier in this chapter, using SELECT facilitates the process, espe
cially for those users who are inexperienced in installing and configuring
DOS. SELECT asks you a series of questions regarding your use ofMS-DOS.
The program uses your responses to create the files CONFIG.SYS and
AUTOEXEC.BAT.
As an example of what SELECT can do for you, here is the CON
FIG.SYS file which SELECT automatically created on my computer:
BREAK=ON
BUFFERS=20
FILES=8
LASTDRIVE=E
SHELL=C:\DOS\COMMAND.COM IP IE:256
DEVICE=C:\DOS\ANSI.SYS
INSTALL=C:\DOS\FASTOPEN.EXE C:=(50,25)
Here is the AUTOEXEC.BAT created by SELECT:
@ECHO OFF
SET COMSPEC=C:\DOS\COMMAND.COM
VERIFY OFF
PATH C:\DOS
APPEND IE
APPEND C:\DOS
PROMPT $P$G
VER
DOSSHELL
39
Part 2-MS-DOS 1Utorials
SELECT and Hard Disk Installation
If you are installing MS-DOS on a hard disk, SELECT will determine if the
hard disk already contains a primary DOS partition. If a primary partition
does not exist, SELECT will use FDISK to create a primary partition. SELECT
will instruct FDISK to create the largest possible partition or, ifyou prefer, to
create a smaller partition according to your specification.
If a primary DOS partition already exists, SELECT will install MS-DOS
on that partition without disturbing your non-DOS files.
A problem arises if your hard disk has an existing primary DOS parti
tion and you want to use the 4.X version of FDISK to create a primary parti
tion larger than 32 Mbytes. The remainder of this section discusses how to
preserve the data in an existing partition and then create a new partition with
FDISK. You may skip this material and go on to the section titled "Starting
SELECT" if you will not be modifying a DOS partition.
BACKUP
If your hard disk has an existing DOS partition and you want to create a
larger partition, you must first delete the existing partition. Because this will
destroy any data in the partition, you may want to use the DOS program
named BACKUP to preserve the partition's contents. If you are not con
cerned with saving the contents of an existing DOS partition, you may skip
ahead to the discussion of FDISK.
BACKUP is used to create archival copies of files. In this example,
BACKUP is used to store the archival files on floppy diskettes. If you are
going to follow this procedure, make sure that you have an adequate supply
of floppy diskettes. Do not use floppies that have files in their root directo
ries, because BACKUP will erase these files.
Boot your computer using the MS-DOS 4 diskette labeled "Install" (or
the equivalent diskette if you are using another implementation of DOS
4.X). When the booting process is completed, MS-DOS will display this mes
sage:
Insert SELECT diskette in drive A:
Press Enter to continue installing DOS,
or press Esc to exit.
Press the Esc key and then replace the "Install" diskette with the diskette
labeled "Select". Enter the command dir /w to make sure that the file
BACKUP.COM is on the diskette. Once you have verified that you have the
right diskette, enter the following command:
A>backup c:\*.* a: /s
This example assumes that the primary DOS partition is assigned drive letter
C and that drive A will hold the floppies used in the backup procedure.
40
I-Starting MS-DOS
When you enter the above command, DOS will read the file
BACKUP.COM into memory and then issue the following message:
Insert backup diskette 01 in drive A:
WARNING! FiLes in the target drive
A:\ root directory wiLL be erased
Press any key to continue •••
Label a diskette 01, place it in drive A, and press any key. BACKUP will begin
to copy the contents of the DOS partition to the diskette. The following
message will be displayed when the diskette's capacity is reached:
Insert backup diskette 02 in drive A:
WARNING! Fi Les in the target drive
A:\ root directory wiLL be erased
Press any key to continue •••
Label another diskette 02 and place the diskette in drive A. Repeat the pro
cess, numbering and inserting a fresh diskette as prompted. MS-DOS will
display the system prompt (A» when the backup process has been com
pleted. Set aside the labeled diskettes for later use.
If your hard disk also has an extended DOS partition, you will have to
repeat the backup process for each logical drive in the extended partition.
When the entire backup process is completed, you are ready to use FDISK.
FDISK-Version 4.x
Use of the FDISK program was discussed, along with illustrative examples,
earlier in this chapter. Use ofthe 4.X version ofFDISK is essentially identical.
The MS-DOS 4 version of FDISK is supplied on the diskette labeled
"Install". Place the diskette in drive A and enter fdisk. The program will start
by displaying the FDISK Options menu, which is nearly identical to the
menu illustrated earlier in this chapter.
The first task in using FDISK is to delete the existing DOS partition(s). If
you have an extended partition, it must be removed before you remove the
primary DOS partition.
Once the existing partitions are deleted, you can create the new parti
tion. From the FDISK Options menu, select "Create DOS Partition or Logi
cal DOS Drive" and then select "Create Primary DOS Partition". At this
point, the program asks if you want to create the largest possible primary
partition. The partition is created and automatically activated if you enter
"y". The program displays the following if you enter "n":
Create Primary DOS Partition
Current fixed disk drive: 1
41
Part 2-MS-DOS 1Utorials
TotaL disk space is
41 Mbytes (1 Mbyte
Maximum space avaiLabLe for partition is
= 1048576
bytes)
41 Mbytes (100%)
Enter partition size in Mbytes or percent of disk space (%) to
create a Primary DOS Partition •••••••••••••••••••••••••.•..•••• :
[
411
No partitions defined
Press Esc to return to FDISK Options
The essential difference between this display and others discussed pre
viously is that partition size can be specified in Mbytes or percentage of disk
space, rather than as a range of cylinders.
If you choose to specify a partition size (rather than having the program
automatically create the largest possible partition) you must go on to acti
vate the partition. You can also create an extended partition if you have any
remaining disk space. DOS will prompt you to reboot the system when you
quit FDISK.
FORMAT-Version 4.X
Use of the 4.X version of FORMAT is identical to that described for earlier
versions of the program. If you are using MS-DOS 4, FORMAT.COM comes
on the diskette labeled "Install".
You will have to format your new DOS partition(s) before you can store
any files on it. The following example illustrates how to format drive C so
that it is bootable. The example assumes that the file FORMAT. COM is on the
diskette in drive A:
A>format c: /s
WARNING, ALL DATA ON NON-REMOVABLE DISK
DRIVE C: WILL BE LOST!
Proceed with Format (Y/N)?y
Format compLete
System transferred
VoLume LabeL (11 characters, ENTER for none)? mini
42366976
110592
92160
42164224
bytes
bytes
bytes
bytes
totaL disk space
used by system
in bad sectors
avaiLabLe on disk
2048 bytes in each aLLocation unit
42
I-Starting MS-DOS
20588 allocation units avai lable on disk
VoLume SeriaL Number is 2221-1404
A>
Notice that the 4.X version of FORMAT assigns a serial number to each disk
(or diskette) that it formats. The new partition is now ready for use. The first
thing you might want to do is use the DOS program RESTORE to retrieve
files that were saved from the old partition using the BACKUP program.
RESTORE
Place the diskette with the file RESTORE.COM in drive A. If you are using
MS-DOS 4, this will be the diskette labeled "Select". Enter the command:
A>restore a: C:\*.* /5
DOS will display the following message:
Insert backup diskette 01 in drive A:
Press any key to continue
Insert the backup diskette labeled "01" and press any key. DOS will copy the
files back to the hard disk and prompt you when it is time to insert each of
the backup diskettes. When the process is completed, all of the files from the
original partition will be back on the hard disk, and the directory structure
that existed will still be intact. You can now go on to use the SELECT pro
gram to install DOS 4 on the new partition.
Starting SELECT
Start SELECT by inserting the "Install" diskette into drive A. Turn on the
computer or press Ctrl-Alt-Del to reboot. You must boot from the floppy,
because SELECT will only run under DOS 4.
The menu-driven installation and configuration procedure that
SELECT presents is straightforward but somewhat awkward, requiring an
excessive amount of disk swapping. The program operates by presenting
you with a series ofmenus. The menus are referenced by the titles displayed
at the top of the screen.
PC-DOS vs. MS-DOS
The SELECT installation program described here is the version provided in
PC-DOS 4.01. IBM (bless their hearts) has designed this implementation of
SELECT so that it refuses to recognize hard disks that contain MS-DOS.
Ifyou try to run SELECT on a computer with MS-DOS on the hard disk,
43
Part 2-MS-DOS Tutorials
SELECT hums along for a while, then gives you a meaningless message stat
ing that "an error" has occurred. SELECT then quits without giving you the
slightest clue as to what went wrong.
You can get IBM's SELECT to work with a hard disk containing MS-DOS
by modifying the hard disk's boot sector. Doing this requires a disk utility
program such as Norton Utilities (the DOS utility program DEBUG will also
work, but it is MUCH riskier and not recommended). Boot your computer
using the MS-DOS on the hard disk. Use your disk utility program to exam
ine the contents of the boot sector (sector 0). The bytes at offsets 3 through 7
in the sector form the following sequence:
4D 53 44 4F 53.
These hexadecimal numbers represent the ASCII values for the letter se
quence "MSDOS". Use your disk utility program to change bytes 3 through
7 so that they form the following sequence:
49 42 4D 20 20.
These hexadecimal numbers represent the letter sequence "IBM" followed
by two blanks.
After the change is made, reboot your computer using the DOS 4 "In
stall" diskette in drive A. The SELECT utility will now work with your hard
disk. You may get another error message, but this will occur after DOS 4 has
been installed and configured. Ignore the error and reboot DOS 4 from your
hard disk. All will be well.
Alternatively, you can back up the contents of your MS-DOS hard
disk as described above using BACKUP. Reformat your hard disk using the
IBM version of FORMAT and then use RESTORE to put your file back on
the hard disk. This method is more laborious than modifying the boot
sector, but it is less risky, particularly if you do not have an appropriate disk
utility program.
Using SELECT
The first three screens that SELECT presents greet you and provide some
general information. SELECT warns you to have available one to four blank
diskettes. The actual number of diskettes required depends on the type of
storage device on which DOS 4 is to be installed. Most users will be installing
DOS 4 onto a hard disk drive, in which case a single blank diskette is re
quired.
SELECT also informs you about the role of various keys. The most im
portant keys are Enter, which generally advances you to the next screen;
Esc, which generally returns you to the previous screen; and F1, which pro
vides a help facility. The help facility has some "intelligence" in that it is
aware of what you were doing when help was requested.
44
I-Starting MS-DOS
Balancing Memory
Proceed through the first set of screens by pressing the Enter key and swap
ping diskettes as instructed. The first functional screen you will come to is
headed "Specify Function and Workspace". This screen lets you determine
the amount of memory that will be dedicated to DOS. You may choose one
of three options.
If you select "Minimum DOS function; maximum program work
space", SELECT will configure your system so that DOS occupies approxi
mately 80 Kbytes of memory. SELECT will place the following statement in
the CONFIG.SYS file that it is creating:
FILES=8
If you select "Balance DOS function with program workspace",
SELECT will configure your system so that DOS occupies approximately
90 Kbytes of memory. SELECT will place the following statements in
CONFIG.SYS:
BUFFERS=20
FILES=8
INSTALL=C:\OOS\FASTOPEN.EXE C:=(SO,25)
If you select "Maximum DOS function; minimum program workspace",
SELECT will configure your system so that DOS occupies approximately 110
Kbytes of memory. SELECT will place the following statements in
CONFIG.SYS:
BUFFERS=25,8
FCBS=20,8
FILES=8
INSTALL=C:\OOS\FASTOPEN.EXE C:=(150,150)
You can see that more memory is dedicated to DOS in going from mini
mum to maximum DOS function. The configuration commands listed
above are each discussed in chapter 5.
After you have made your selection for DOS function level, press the
Enter key. The SELECT utility will present the next screen.
Country Specific Information
This" Select Country and Keyboard" screen lets you select the formats used
by DOS for the following:
date and time
currency symbols
capitalization rules
45
Part 2-MS-DOS Tutorials
sorting order
character sets
Most users in the United States will want to select choice 1, the predefined
country and keyboard information. Select choice 2 if the predefined infor
mation is not suitable. You will be presented with a list of countries. Choose
the country most appropriate for your needs. Please refer to appendix D for
additional information on the use of non-U.S. country information.
Location of System Directory
The next two screens let you specify the drive and subdirectory location for
the DOS system files. SELECT will use the information you enter to create a
PATH statement, which it will place in the AUTOEXEC.BAT file. The role of
the PATH statement is discussed in chapter 3.
Printer Configuration
The next series of screens lets you configure DOS to use a printer. A selec
tion of printers from which you can choose will be presented. SELECT will
also prompt you for information about how the printer is connected to the
computer. The information you enter is used in setting up a PRINT com
mand in the AUTOEXEC.BAT file. SELECT will put the appropriate MODE
command in AUTOEXEC.BAT if you specify that the printer is connected to
a serial port.
The PC-DOS version of SELECT will list only IBM printers. If you have
a non-IBM printer, check its documentation to see what IBM printers it emu
lates, and choose the appropriate one from the list.
Installation Options
Following the presentation of the printer screens, SELECT will ask if you
wish to "accept the configuration" or "review, change or add" to it. Choos
ing the latter will display a listing of configuration options. Next to each
option is a "yes" or a "no", which indicates whether or not the SELECT
utility decided that the option should be supported on your system.
SELECT makes its decisions based on the type of hardware it detects in your
system, along with the responses that you provide to the program. You can
override SELECT's options, but often it makes no sense to do so. For exam
ple, you would not want expanded memory supported if your system does
not have an expanded memory card.
The Configuration Files
Once you accept the configuration options, the SELECT utility is ready to
create the new configuration files. DOS 4 is just like the earlier versions of
DOS in that configuration information is stored in the files CONFIG.SYS
and AUTOEXEC. BAT. However, SELECT does not create these files; rather, it
creates files named CONFIG.400 and AUTOEXEC.400. SELECT does this so
that it will not override any previously existing CONFIG.SYS and
AUTOEXEC.BAT files.
46
I-Starting MS-DOS
After the SELECT utility has created CONFIG.400 and AUTOEXEC.400,
it signals you that its work is done. You are instructed to remove the system
diskettes and reboot the system.
Final Points
Upon completion of its work, SELECT instructs you to remove all disk
ettes and reboot your system (assuming, of course, that you installed DOS
4 on a hard disk). The commands in CONFIG.400 and AUTOEXEC.400
have no effect when you reboot. Guided by the concepts presented in
chapter 5, you will have to use a text word processor (such as EDLIN, the
DOS text editor discussed in chapter 8, or any word processor operating in
text mode) to examine the contents of your old CONFIG.SYS file and the
new CONFIG.400 file. If there are commands that you wish to keep from
your original files, combine them with the text in the CONFIG.400 file to
make a new CONFIG.SYS file. Similarly, if you wish to keep commands
from your old AUTOEXEC.BAT file, combine them with the text in the
AUTOEXEC.400 file as a new AUTOEXEC.BAT file. Following these com
binations, reboot your system. This time, the new configuration com
mands will be in effect when the system comes up.
47
C
H
A
p
T
E
R
2
MS-DOS Files
Filenames and Extensions
File Specifications
Copying a File
Wildcards
One of the chief responsibilities of an operating system is the management
of computer files. A computerfile is similar to any other type of file in that it
is a collection of related information stored in one place. Unlike paper files,
which are stored in filing cabinets or desk drawers, computer files are stored
on disks. They are then loaded into the computer's memory when the infor
mation they contain is to be used. The operating system controls both the
storing and the loading of computer files.
49
Part 2- Tutorials
This chapter will explain how files are named and what information
MS-DOS needs to know about files in order to work with them. The proce
dures for copying files and for using "wildcards" in files are also ex
plained.
If your computer has a hard disk, you may want to skim this chapter
and the next before installing MS-DOS on your hard disk. Installation of
MS-DOS is covered in chapter 1.
Filenames and Extensions
Each MS-DOS file has a filename and an optional filename extension.
MS-DOS uses these names to differentiate one file from another. Some
filenames and extensions, such as those for the files on the operating system
diskette, are preassigned; others are assigned by you. Filenames and exten
sions are usually chosen so that they are descriptive of the information in the
file. Extensions are used to indicate the type of file, such as a data file or a text
file. Extensions also help to distinguish closely related files; for example, a
personal letters file as opposed to a business letters file.
When MS-DOS stores a file on a disk, it automatically stores the file's
filename and extension in an area of the disk called the file directory. To
view filenames and extensions, insert one of your backup MS-DOS diskettes
in drive A and enter dir /w:
A>di r Iw
VoLume in drive A has no labeL
Volume SeriaL Number is 203D-10CC
Directory of A:\
COMMAND
COMP
FIND
MODE
SUBST
COM ASSIGN
COM DEBUG
EXE IFSFUNC
COM MORE
EXE TREE
23 Fi le (s)
EXE
COM ATTRIB
COM DISKCOMP COM
EXE
EXE JOIN
COM MORTGAGE BAS
EXE
COM XCOPY
30208 bytes free
BASIC
EDLIN
LABEL
SHARE
COM
COM
COM
EXE
BASICA
FILESYS
MEM
SORT
COM
EXE
EXE
EXE
A>
The command di r /w directs MS-DOS to display the filenames and ex
tensions ofthe files in the current directory ofthe default drive. The concept of
current directory is discussed in the following chapter. The default drive in the
example is drive A (as indicated by the command line prompt A». The display
that you obtain may differ somewhat from that presented above.
50
2-MS-DOS Files
The first filename and extension is COMMAND COM, the second ASSIGN
COM, and so on. The last line indicates that there are 23 files in the directory and
that the diskette has 30208 bytes of storage space that are free.
Note on Examples
Because this chapter's purpose is to introduce the fundamental con
cept of MS-DOS files, all of the examples presented assume that MS-DOS
is not yet installed on a hard disk. The MS-DOS command line is repre
sented by A>, indicating that drive A is the current drive. Of course, the
examples assume that you have made backup copies of your MS-DOS
system diskettes. Refer to chapter 1 for details on making backups.
MS-DOS has specific rules for naming files. Each filename in the same
directory must be unique. In other words, the filename and its extension
cannot be the same as another filename and extension already in use in that
directory. For example, you cannot give the name "letters. per" to two files;
MS-DOS becomes confused and does not know which "letters.per" file you
are referring to. You can, however, use the same filename but different exten
sions. For example, you could name your file of business letters "let
ters.bus" and your file of personal letters "letters.per". A few filenames are
reserved by MS-DOS for its exclusive use. These are the names of MS-DOS
program files and commands and the abbreviations for devices (such as
"PRN" for printer). Check your user's guide for a list of reserved names.
Filenames must take the form:
filename.extension
The filename is one to eight characters in length. The extension, which is
optional, is one to three characters in length. A period (.) is used to separate
the filename from the extension. If you accidentally enter a filename with
more than eight characters and you do not enter an extension, MS-DOS will
automatically place a period after the eighth character, use the next three
characters as the extension, and disregard the remaining characters. If you
enter a filename with more than eight characters and you also enter an exten
sion, MS-DOS signals an error. Ifyour extension has more than three charac
ters, MS-DOS ignores the extra characters.
MS-DOS allows only certain characters to be used in filenames and ex
tensions. These are:
letters of the alphabet
numbers 0 through 9
special characters $ # & @ ! % ( ) - { } , _ ' "
51
Part 2- Tutorials
MS-DOS treats uppercase and lowercase letters alike, so you may use
any combination of capital and lowercase letters in filenames and exten
sions. In this book, filenames discussed in the text will be lowercased and
enclosed in quotation marks (the "letters.per" file).
File Specifications
In order for MS-DOS to work with a file, it must know the file's filename and
filename extension. In addition, it must know which disk drive contains the
file. A disk drive is specified by a letter, called a drive designator. The first
disk drive is specified by a drive designator of "A:" and is called "drive A."
The second drive has a drive designator of "B:" and is called "drive B." A
hard disk is usually specified as "C:" and is called "drive c."
The drive designator combines with the filename and the extension to
form the file specification, or filespec for short. The filespec contains the
drive designator followed by the filename and filename extension (if there is
an extension). For example, if a file with the filename "instruct" and the
extension "txt" were located on disk drive A, its complete filespec would be
"A:instruct. txt" (or "a: instruct. txt").
Copying a File
One of the most frequently performed tasks of an operating system is the
copying of computer files stored on floppy disks. An experienced user rou
tinely copies all valuable computer files at regular intervals. That way, if one
copy of the file is damaged or destroyed, a backup is available.
The procedures for copying a file differ slightly, depending on whether
your system has one or two floppy disk drives. The following sections will
first describe the procedure for copying a file with a two-drive system and
then describe the procedure for a one-drive system.
In copying a file, the first drive is called the source drive and the second
the target drive. As you may recall from chapter 1, the same terminology is
used for disks. The disk containing the original file is the source disk, while
the disk receiving the copy is the target disk.
Two-Drive Systems
To copy a file using a two-drive system, insert the source diskette (the disk
ette containing the file to be copied) in drive A. Place the formatted target
diskette in drive B. (Refer to chapter 1 for help in formatting a diskette.)
In the example shown here, the file "instruct. txt" is on the diskette in
drive A. To copy the file onto the diskette in drive B, type the word copy,
then type the filespec of the file to be copied, and finally type the filespec of
the copy:
A>copy a:instruct.txt b:instruct.txt
52
2-MS-DOS Files
Press Enter. The copying process will start, and MS-DOS will display a mes
sage when the copying is completed.
1 File(s) copied
A>
Hard Drive Systems
When copying a file to a hard drive, you need to use the drive
letter of the hard drive in the filespec of the copy. For example, to copy
"instruct.txt" from drive A to a hard disk with drive letter C, enter the
following command
A>copy a:instruct.txt c:instruct.txt
You may leave out the drive letter specifier for the source file if the
source is only the default disk drive. Similarly, you may leave out the drive
letter specifier of the target if the default drive is to be the target.
One-Drive Systems
To copy a file using a one-drive system, insert the source diskette into the
system drive. Type copy, then type the filespec of the file to be copied, and
finally type the filespec of the copy:
A>copy a:instruct.txt b:instruct.txt
Press Enter. MS-DOS will store as much of the file in memory as possible.
The following message will then be displayed:
Insert diskette for drive B: and strike
any key when ready
This is MS-DOS's way of telling you that the system drive is now logical
drive B (see the DEVICE command in Part 3 for a discussion of physical and
logical drives). It is also your cue to insert into the system drive the format
ted target diskette (the diskette on which the file copy will be written). Refer
to chapter 1 if you need help in formatting diskettes.
Note: The preceding message may be displayed before the red light on
the disk drive goes off. If so, wait until the light goes off before you change
diskettes.
Once the diskette for logical drive B is in place, press any key to con
tinue the operation. MS-DOS will write to the disk that portion of the file
previously stored in memory. If the memory is not large enough to hold the
entire file, MS-DOS will display the following message:
53
Part 2-Tutorials
Insert diskette for drive A: and strike
any key when ready
This message says that the system drive is now logical drive A. Remove
the target diskette and insert the diskette containing the original file. Strike
any key. Continue to follow MS-DOS's instructions. Remember that the orig
inal file is on the diskette "for drive 1\' and the copy is on the diskette "for
drive B." MS-DOS will teU you when the copy procedure has been com
pleted:
1 FiLe(s) copied
A>
Once the file has been copied, you may use the COMP command (see
Part 3) to verify that an accurate copy of the file has been made.
Wildcards
Wildcards are special symbols (sometimes caUedglobal characters) that are
used to stand for one or more specific characters in a filename or extension.
MS-DOS provides two wildcard symbols that you may use to specify files in
MS-DOS commands-the question mark and the asterisk.
The question mark (?) is used to represent a single character in a
filename or extension, while the asterisk (*) is used to represent a group of
characters in a filename or extension. You will find wildcards are very
handy, especially in the DIR, COPY, ERASE, and RENAME commands, be
cause these commands frequently refer to groups of files.
The "?" Wildcard
Imagine that you have a diskette containing several files, including these
four:
last.txt
list. txt
lost.txt
lust.txt
Let's say that you wanted to copy each of these files. There are two ways you
could accomplish this. You could use the COpy command four times, speci
fying a different file each time; or you could use COpy one time, using a
wildcard character in the filespec. If you chose the second way, your com
mand would look like this:
A>copy a:l?st.txt b:l?st.txt
54
2-MS-DOS Files
The ? in the second position of the ftlename indicates that the second
character is wild. MS-DOS is instructed to execute the command on all ftles on
the diskette in drive A that have an "1" as the first character in the ftlename, an
"s" as the third character, a "t" as the fourth character, and a ftlename extension
of " .txt". Any character in the second position is acceptable according to this
command.
The "* " Wildcard
Using an"." in a ftlename or filename extension tells MS-DOS that all char
acters in the position of the "." are wild. In addition, all characters to the
right of the" • " are wild. As an example, let's say that you want to refresh
your memory regarding the ftles in the system diskette. In particular, you
want to see which system ftles have a filename beginning with "f' and a
filename extension of" .com". Insert your working system diskette in drive
A and enter the following command (refer to Part 3 of this book for a com
plete discussion of DIR):
A>dir f*.com/w
FORMAT
COM
2 File(s)
FDISK
COM
84992 bytes free
MS-DOS interprets the filespec f*. com to mean any ftle that has a ftlename
beginning with "f' and a ftlename extension of" .com". The / w simply directs
MS-DOS to display only the ftlenames and directory names.
A filespec may contain more than one wildcard character. For example,
"f•.com" is equivalent to f??????? .com. In the following example, wildcards
are used in the filespec to indicate that all the ftles on the diskette in drive A
should be copied onto the diskette in drive B:
A>copy a:*.* b:*.*
Don't be afraid to experiment with wildcards in MS-DOS commands.
They can be a tremendous timesaver once you are familiar with their use. A
word of caution thOUgh: Make sure that you have backup copies ofany
importantfiles before you startplaying with wildcards. It's very easy for
even an experienced MS-DOS user to inadvertently wipe out many hours of
work with a misplaced wildcard.
55
c
H
A
p
T
E
R
3
Directories, Paths,
and Trees
I
I
File Management
Setting Up a Hierarchical File System
Chapter 2 covered the basics of what a file is, how it is named, and the infor
mation that MS-DOS needs to know about a file in order to use it. Chapter 2
also explained some basic procedures for copying files. This chapter will
discuss the way files are managed by MS-DOS.
57
Part 2-Tutorials
If your computer has a hard disk, you may want to skim this chapter
and chapter 2 before installing MS-DOS on your hard disk. Hard disk instal
lation is discussed in chapter 1.
File Management
The basis offile management is thefile directory. The file directory is an area
on the disk that is set aside during the formatting process. The file directory
serves as a table of contents for the files stored on the disk. For each file
stored, there is a corresponding entry in the file directory.
Each entry in the file directory stores a filename and a filename exten
sion. The entry also contains the time and date that the file was created or
last modified, the file's size in bytes, and other information that MS-DOS
needs in using the file. The structure of file directories is covered in much
more detail in chapter 10.
Figure 3-1 illustrates a simple directory and file system. All of the files
are on a single level relative to the file directory. Such an arrangement is
called nonhierarchical. Versions of MS-DOS prior to 2.0 use a nonhierarchi
cal file system.
FILE DIRECTORY
Figure 3-1. Nonhierarchical rUe management system.
The single biggest change implemented in MS-DOS 2.0 was the intro
duction of a hierarchical file system. Such a system is essential in managing
the large number of files stored on hard disks.
Hierarchical File Systems
It is not unusual for hard disks to store hundreds or even thousands of files.
Handling such a large number of files requires a more efficient storage and
retrieval system than that used by nonhierarchical systems.
MS-DOS 2.0 and subsequent versions use a hierarchical file system (fig
ure 3-2). In this type of system, files and groups of files are divided into a
series oflevels, beginning with the file directory at the uppermost level. The
file directory is called the root directory because all the other levels branch
out from it. The file directory can contain the names of single files as well as
58
3-Directories, Paths, and Trees
FILE DIRECTORY
SUBDIRECTORY
(group of files)
Figure 3-2. Single files and subdirectory.
other directories. These directories are called subdirectories and can them
selves contain the names of files or other subdirectories. By grouping re
lated files into their own directory, the time necessary to search for a
particular file on a disk is shortened. Each succeeding level within the hier
archy is referenced relative to the root directory (see figure 3-3).
ROOT DIRECTORY
LevelO -------- '---.----'r-"----~--------__._-----T
Level1
--------
Level2 --------------------------
Level3 ____________________________________________
file
Figure 3-3. Hierarchical file management system.
When you use the DIR command to list the contents of the root direc
tory, DOS will display both filenames and subdirectory names. For each file,
the directory entry will show the filename and extension, the size of the file
in bytes, and the time and date when the file was created or last modified.
Files that are subdirectories are signified by the notation" < DIR > " for di
rectory. MS-DOS will also show the total number offiles (including subdirec
tories) and the number of free bytes remaining on the disk.
The number of entries that the root directory can hold is limited. On
single-sided, SIf4-inch diskettes, the limit is 64 files andfor subdirectories.
On double-sided, SIf4-inch diskettes, the limit is 112. On high density
(1.2-Mbyte) SIf4-inch diskettes, the limit is 224. A nO-Kbyte, 3 1/Z-inch disk
ette has a limit of 112. A 1.4 Mbyte, 3 liz-inch diskette has a limit of 128 entries.
Note: From this point on, the word "directory" will refer to both a root
59
Part 2-Thtorials
directory and a subdirectory. Any comments that relate to one but not the
other will be qualified.
Trees
The file arrangement used in MS-DOS 2.X, 3 .X, and 4.X is described as tree
structured. In this case, however, the "tree" happens to be upside down,
with the root (directory) at the top. Each branch coming out of the root
corresponds to an entry, either a file or a subdirectory (a group of related
files). Secondary branches arise from each subdirectory in level 1, tertiary
branches arise from subdirectories in level 2, and so on.
This tree-structured arrangement allows each subdirectory and its entries
to be treated as though there were no other data stored on the disk. This can
make life much more tolerable when you are dealing with a hard disk contain
ing several hundred files. Let's look at a typical example of the use of trees.
Suppose that you are using a word processing program to write a book.
Each chapter in the book is stored as a file on a disk. Suppose that you also
do some computer programming. On the same disk you store a program
that you are writing. Finally, just to complicate things, suppose you also
store on the disk a program and some data that you use in your business.
Figure 3-4 shows how you might structure these files. Notice that the
root directory contains four entries: the MS-DOS file COMMAND.COM and
three subdirectories named WRITE, PROGRAMS, and BUSINESS. The sub
directory WRITE itself contains three entries: a file named "wp.exe" and
two subdirectories, LETTERS and BOOK.
ROOT DIRECTORY
Figure 3-4. Tree-structured arrangement of files.
The subdirectory LETTERS has one entry: a file named "hilburn.doc".
The subdirectory BOOK also has one entry: a file named "start.doc". The
subdirectory PROGRAMS contains two files: "gwbasic.exe" and
"lifex.bas"; as does the subdirectory BUSINESS: "gwbasic.exe" and "re
cords.bas" .
60
3-Directories, Paths, and Trees
By structuring your data in this way, the fil~s are separated into functional
groups. For example, the subdirectory WRITE contains the word processing
program ("wp.exe") and the documents that have been created by that pro
gram. These documents have been placed in separate subdirectories according
to their subject matter. The subdirectory PROGRAMS contains the BASIC inter
preter and one BASIC program. The subdirectory BUSINESS holds a second
copy of the BASIC interpreter and a BASIC program used in business.
Setting Up a Hierarchical File System
This section will explain how the file structure shown in figure 3-4 was cre
ated. Along the way, it will discuss the commands used by MS-DOS to man
age a hierarchical file system.
The examples presented show how to set up a file system on a hard disk
with drive letter C. It is assumed that the hard disk has previously been parti
tioned and formatted (see chapter 1) for use by MS-DOS. The commands
discussed here can also be used with floppy diskette files.
Paths
A path is the course that must be followed to get from one directory to an
other. For example, consider the subdirectory BOOK in figure 3-4. Suppose
that you want to travel from the root directory to BOOK. What path would
you take? Starting at the root directory, you would pass through the sub
directory WRITE and from there to the subdirectory BOOK.
In the same way, MS-DOS 2 .X, 3.X, and 4.X find a file by taking a partic
ular path to the directory containing that file. You tell MS-DOS which path to
take by specifying the start of the path and the subdirectories to use. The
path from the root directory to BOOK is:
ROOT DIRECTORY-+WRITE-+BOOK
This list of names is called a path specifier. When entering a path speci
fier in an MS-DOS command, use a backslash (\) to separate one directory
from another. In entering the path specifier, do not enter "ROOT DIREC
TORY". The root directory is represented by the first backslash. The path spec
ifier from the root directory to BOOK is therefore:
\write\book
Creating a Subdirectory
With drive C as the default directory, enter the command dir. Your display
screen will look something like this:
C>dir
61
Part 2-1Utorials
VoLume in drive C has no LabeL
Directory of C:\
COMMAND
COM 25307 3-17-90
12:00p
10510200 bytes free
1 File(s)
The line Di rectory of C: \ tells you that MS-DOS is displaying the
names of the entries in the root directory(\) of the disk in drive C. In this case,
the root directory contains only one entry, the MS-DOS file COMMAND. COM.
Now we will begin expanding the directory to include some subdirec
tories. The MS-DOS command MKDIR (MaKe DIRectory) is used to create a
subdirectory. Let's use MKDIR to create the three subdirectories WRITE,
PROGRAMS, and BUSINESS.
Before we do that though, let's go over the rules for naming subdirecto
ries, just in case you want to make up your own subdirectory names. Sub
directory names can be up to eight characters long, with an optional
extension of three characters. Each subdirectory must have a name that does
not match the name of any file or subdirectory contained in the same direc
tory. The valid characters used in the name are the same as those for
filenames.
To create a subdirectory, type mkdir (or md for short) and then type the
path specifier of the subdirectory being created. In entering your com
mand, you may omit the path if the new subdirectory will be entered in the
current directory. The current directory is the directory in which you are
now working. (We will discuss the current directory in more detail later in
this section.)
Now we are ready to create the subdirectory WRITE. Type mkdir (or
md) followed by a backslash to indicate that the subdirectory will be an en
try in the root directory; then type the name of the new subdirectory:
C>mkdir \write
When you press Enter, MS-DOS will create the new subdirectory. In a
similar fashion, you can create the subdirectories PROGRAMS and BUSINESS:
C>mkdir \programs
C>mkdir \business
Now let's enter the DIR command to see what MS-DOS has done:
C>dir
VoLume in drive C has no LabeL
Directory of C:\
COMMAND
WRITE
62
COM
25307
<DIR>
3-17-90
9-17-90
12:00p
11:42a
3-Directories, Paths, and Trees
PROGRAMS
BUSINESS
<DIR>
<DIR>
4 F; le(s)
9-17-90 11:43a
9-17-90 11:44a
10505080 bytes free
If you are following along on your computer, the size of your COM
MAND.COM file may not be 25,307 bytes. The date/time stamps on your disk
will certainly differ from those shown here. The important points are that
three subdirectories have been created and that they are entered in the root
directory. The subdirectories are identified by the label <0 I R>. Notice that
creating three subdirectories used up 5,120 bytes of disk space. (Compare the
number of free bytes before and after the subdirectories were created.)
Changing the Current Directory
A path tells MS-DOS the route to take to a particular directory. If an MS-DOS
command does not specify a path, MS-DOS will attempt to execute the com
mand in the current directory. At any given time, each drive on the system
has a current directory.
The MS-DOS command CHDIR (CHange DIRectory) is used to change
a drive's current directory. To use CHDIR, type chdir (or cd for short) fol
lowed by the path specifier of the desired directory.
In this tutorial, the current directory on drive C is the root directory.
Entering the CHDIR command without any specifiers causes MS-DOS to
display the path specifier of the current directory. Type chdir:
C>chdi r
C:\
The backslash means that the root directory is the current directory on
drive C.
We can make WRITE the current directory by including the path speci
fier to WRITE in the CHDIR command:
C>chdi r \write
The first directory in a path specifier may be omitted if it is the current
directory. Since the preceding command was invoked while the root direc
tory was the current directory, the command could have been entered as:
C>chdir write
To verify that WRITE is now the current directory, type chdir without a
path specifier. MS-DOS will display the path to the current directory:
C>chdi r
C:\WRITE
63
Part 2- Tutorials
A Word about Parents
All subdirectories are entries in another directory. WRITE, PROGRAMS, and
BUSINESS are entries in the root directory. A directory is said to be the par
ent directory of the subdirectories that it contains as entries. The root direc
tory is the parent directory of WRITE, PROGRAMS, and BUSINESS.
Putting Files into a Subdirectory
Now that WRITE is the current directory, let's put some files in it. We will
start off by putting a copy of the file "wp.exe" in WRITE. This is done sim
ply by making a copy of the file. Place a diskette with the file "wp.exe" in
drive A and enter the following command:
C>copy a:wp.exe c:
A Typical Setup
A typical way to set up directories on a hard disk is to create a sub
directory named \DOS to store the MS-DOS utility files (such as FOR
MAT.COM, EDLIN. COM, and MORE.COM). Another subdirectory
named \SYS is created to store the MS-DOS device drivers (such as
VDISK.SYS and ANSI.SYS). Many users also put the MS-DOS files with
the extension CPI in subdirectory \SYS. You may also want to create a
subdirectory named \PRGMS to hold your application programs. You
might want a separate subdirectory in \PRGMS for each application pro
gram. In general, minimizing the number of files in the hard disk's root
directory makes navigation through the disk's contents much easier.
This command instructs MS-DOS to copy the file "wp.exe" to drive C.
Since no paths were included in the command, MS-DOS will look for
"wp.exe" in the current directory on drive A (in this case the root directory)
and copy it to the current directory on drive C. WRITE is the current direc
tory on drive C, so "wp.exe" will be copied into WRITE.
The MKDIR command can be used to create a subdirectory in WRITE.
Recall that to use this command you must type mkdir (or md) followed by
the path to the new subdirectory.
The current directory is WRITE, so the path to the subdirectory LET
TERS (see figure 3-4) is WRITE\LETTERS. But, remember that the first di
rectory in a path may be omitted when it is the current directory. Therefore,
to create LETTERS, enter the following command:
C>mkdi r letters
64
3-Directories, Paths, and Trees
The subdirectory BOOK is created in the same way:
C>mkdir book
Now that we have established our three subdirectories, let's place some
files in them. Notice that the subdirectory LETTERS in figure 3-4 contains
the file "hilburn.doc". However, before we enter "hilburn.doc" in LET
TERS, let's make LETTERS the current directory:
C>cd letters
Now place a diskette with the file "hilburn.doc" in drive A and enter:
C>copy a:hilburn.doc c:
Next we will copy the file "start.doc" into the subdirectory BOOK.
Let's begin by making BOOK the current directory. Recall that the current
directory is LETTERS. The path from LETTERS is WRITE \BOOK. But enter
ing the command "cd write\book" results in an Inva lid di rectory mes
sage. The reason for this is that WRITE is the parent directory of LETTERS.
The parent of a directory is represented in MS-DOS commands by two peri
ods (..). The path specifier from LETTERS to BOOK is therefore" .. \book". To
make BOOK the current directory, enter the following command:
C>cd .• \book
Note that this command could also have been entered as "cd \write
\book" .
Now we can copy "start.doc" into BOOK by inserting a diskette with
"start.doc" in drive A and entering:
C>copy a:start.doc c:
Before going any further, let's step back and see what we have accom
plished. First, though, we will make WRITE the current directory. WRITE is
the parent directory of the current directory (BOOK), so we can make
WRITE the current directory by entering:
C>cd .•
Note that this command could also have been entered as "cd \write".
To make sure that WRITE is now the current directory, type cd without
a path specifier. MS-DOS will display the path from the root directory to the
current directory:
C>cd
C: \WRITE
65
Part 2- Tutorials
Let's use the DIR command to display the contents of the current direc
tory:
C>dir
VoLume in drive C has no LabeL
Directory of
C:\WRITE
WP
LETTERS
BOOK
EXE
<DIR>
<DIR>
72960
<DIR>
<DIR>
5 FiLe(s)
9-17-90
9-17-90
6-20-85
11:42a
11:42a
5:02p
2:00p
9-17-90
2:00p
9-17-90
10262392 bytes free
Notice that the first two lines contain periods rather than names. The
single period (.) in line 1 designates the current directory. The two periods in
line 2 represent the parent directory of the current directory. The next three
lines show the file and subdirectories that have been entered in WRITE.
Completing the remainder of the file structure shown in figure 3-4 is
simply a matter ofrepeating some of our previous steps. First, the root direc
tory is made the current directory:
C>cd \
Then the subdirectories PROGRAMS and BUSINESS are created as en
tries in the root directory:
C>md programs
C>md business
Next the current directory is changed to PROGRAMS. A diskette with
the files "gwbasic.exe" and "lifex.bas" is placed in drive A, and the files are
copied into PROGRAMS:
C>cd programs
C>copy a:gwbasic.exe c:
C>copy a:lifex.bas c:
The current directory is then changed to BUSINESS. A disk containing
the files "gwbasic.exe" and "records.bas" is placed in drive A, and the files
are copied into BUSINESS:
C>cd \business
C>copy a:gwbasic.exe c:
C>copy a:records.bas c:
66
3-Directories, Paths, and Trees
This completes the construction of the directory and file structure shown in
figure 3-4.
Looking at the Tree
As the number of files and subdirectories on a disk increases, the organiza
tion of the disk becomes more and more complex. TREE is an MS-DOS com
mand that is used to construct a map of a disk's tree structure. To
demonstrate this command, place your working system diskette in drive A,
making sure that the file TREE. COM is on the working system diskette. Enter
the command a:tree c:/f. This command tells MS-DOS to display the tree of
directories found on fixed (hard) disk C. The If switch directs MS-DOS to list
the files on the fixed disk as well.
C>a:tree c:lf
TREE: FuLL-disk sub-directory Listing - Version 3.30
Copyright (C)1987 XYZ Data Systems, Inc.
C:\COMMAND.COM
C: \WRITE
C:
\WP.EXE
C:
\LETTERS
C:
\HILBURN.DOC
1 fi Le(s)
C:
\BOOK
C:
\STARTING.DOC
3 fi Le(s)
C:\PROGRAMS
\GWBASIC.EXE
C:
\LI FEX. BAS
C:
2 fi Le(s)
C:\BUSINESS
C:
\GWBASIC.EXE
C:
\RECORDS.BAS
2 fi Le(s)
4 fi Le(s)
10109816 bytes free
10592256 bytes totaL
End of Listing
17664 bytes
72960 bytes
4608 bytes
15360 bytes
57344 bytes
7808 bytes
57344 bytes
9088 bytes
Verify for yourself that this listing contains all the information in figure
3-4. Notice that it also contains the size of each file on the disk. In PC-DOS
4.0, you can specify the listing of a specific directory and its subdirectories;
to do so, follow the drive letter with the pathname for the directory.
67
Part 2-Tutorials
Removing a Subdirectory
The MS-DOS command RMDIR (ReMove DIRectory), RD for short, is used to
remove a subdirectory from a disk. To use RMDIR, type rmdir (or rd) and
then type the path to the subdirectory. However, before you can remove the
subdirectory, you must empty it of any files and/or subdirectories that it
contains.
Suppose that you want to remove the subdirectory BOOK from the
hard disk (figure 3-4). The first step is to erase all the files entered in BOOK.
This can be accomplished by using the MS-DOS command ERASE and the
wildcard * . * (see chapter 2). After you enter the following command, MS
DOS will ask ifyou are sure that you want to erase all the files in the specified
subdirectory:
C>erase \write\book *.*
Are you sure? (YIN) y
Since you responded "yes," MS-DOS erased the files in BOOK, and the
subdirectory can now be removed by entering:
C>rmdir \write\book
The PATH Command
An executablefile is a set ofdirections that the computer executes in order to
perform a specific task. An executable file may be an application program
(such as a word processing program), an external MS-DOS command (such
as TREE), or a batch file (see chapter 5). When you enter the name of an
executable file, MS-DOS looks for the file in the current directory. The PATH
command is used to tell MS-DOS where to look for an executable file that is
not in the current directory.
To use the command, type path followed by the path(s) that you want
MS-DOS to follow in its search for the executable file. If you want to specify
more than one path, separate the paths with semicolons. If you enter PATH
without any parameters, MS-DOS will display the command paths that were
set the last time the PATH command was used. If you enter PATH followed by
just a semicolon, MS-DOS will cancel the command paths that were set by
the previous PATH command. The following example sets up a DOS search
path so that the operating system searches for files in the subdirectories
C: \DOS, C: \SYS, and C: \PRGMS:
C>path c:\dos;c:\sys;c:\prgms
Using the Search Path
Pretend that you are using a word processing program to write several differ
ent types of documents. Let's say that you are writing a computer book, a
68
3-Directories, Paths, and Trees
novel, personal letters, business letters, save-the-whales letters, and miscel
laneous letters. Let's also say that you are a very prolific writer. You have
already written 30 chapters in both the computer book and the novel, and
you have a total of 400 letters that are evenly divided among the personal,
business, whale, and miscellaneous categories. Each of your chapters and
each ofyour letters is saved as one file on your hard disk. That's a total of460
files just for your word processor. How can you use MS-DOS to organize
these files?
There is no single right way to organize any hard disk system. The best
approach is to try something out, see if you like it, and change it if you don't.
Here is one way you might organize your files. Create a separate subdirec
tory for each of the different categories of word processing documents.
These subdirectories will be entered in the root directory of the hard disk.
Into each subdirectory enter the corresponding documents. Finally, enter a
copy of the file "wp.exe" (the word processing program) in the root direc
tory. Figure 3-5 shows how the files might be structured on your imaginary
hard disk.
ROOT DIRECTORY
Figure 3-5. Organizing files by grouping them into subdirectories.
In a typical computer work session, you might sit down to do some
work on your novel. You might want to quickly review some of the already
completed chapters and then revise your latest chapter. For the time being,
you aren't concerned about your 100 save-the-whales letters or anything
else on the hard disk that is not part of your novel.
First, make NOVEL the current directory on drive C:
C>cd \noveL
C>
Now, if you want a list of the chapters that you have written, all you
have to do is type dir/w, the MS-DOS command for displaying a directory of
filenames. Only the files in the NOVEL subdirectory will be displayed. (See
Part 3 for a discussion of DIR.)
69
Part 2- Tutorials
C>di r /w
Volume in drive C is HARD_DISK
Directory of C:\novel
CHAPT01
CHAPT04 DOC CHAPT05 DOC CHAPT06
CHAPT09 DOC CHAPT10 DOC CHAPT11
CHAPT14 DOC CHAPT15 DOC CHAPT16
CHAPT19 DOC CHAPT20 DOC CHAPT21
CHAPT24 DOC CHAPT25 DOC CHAPT26
CHAPT29 DOC CHAPT30 DOC
32 File(s) 352224 bytes
DOC
DOC
DOC
DOC
DOC
DOC
CHAPT02
CHAPT07
CHAPT12
CHAPT17
CHAPT22
CHAPT27
DOC
DOC
DOC
DOC
DOC
DOC
CHAPT03
CHAPT08
CHAPT13
CHAPT18
CHAPT23
CHAPT28
DOC
DOC
DOC
DOC
DOC
DOC
free
C>
If you want to copy all the chapters of your novel onto a diskette in
drive B, simply type copy * .doc b:. Only the chapters of your novel will be
copied; the other files on the disk will not.
The preceding example showed you how designating the subdirectory
NOVEL as the current directory "shielded" MS-DOS from the other files on
the disk. However, using subdirectories in this way can also cause some
problems. For example, to start the word processor, you enter wp. MS-DOS
will search the current directory for the file "wp.exe" but won't be able to
find it in the NOVEL directory. You will need to give MS-DOS some direc
tions. This is where the PATH command comes in.
Before starting the word processor, enter the following command:
C>path c;\write
This command tells MS-DOS that if it can't find an executable file in the
current directory, it should look in the directory C: \ WRITE. MS-DOS will
now be able to load and execute the word processing program when you
enter "wp".
The APPEND Command
PATH will direct MS-DOS only to executable files. Executable files have a
filename extension of COM, EXE, or BAT. PATH will not direct application
programs to data files. For example, many programs come with on-line
help files. If the program is running and it needs to access a help file, the
information provided by PATH is of no value since the help file is not exe
cutable.
The APPEND command, implemented in MS-DOS 3.2, 3.3, and 4.X, is
designed to eliminate this problem. APPEND is used just like PATH. For ex
ample, the following command is valid:
70
3-Dtrectories, Paths, and Trees
append c:\programs
This command tells MS-DOS to look in the directory PROGRAMS when
searching for both executable and nonexecutable files.
APPEND is a very valuable command, and it is discussed more thor
oughly in Part 3 of this book. Part 3 also discusses some annoying bugs in
APPEND that you should know about before using this command.
71
C
E
T
HAP
R
4
MS-DOS Batch Files
.
.
.
,'.
:: ;', >",:,: ,,':,': .:':,'.: ':\ "'/:
What Is a Batch File?
Creating a Batch File
Replaceable Parameters
Wildcards and Replaceable
Variables
PAUSE
REM
ECHO
.'
.....
.'
<:,.;.:--: :"' :. :
GOTO
IF
IF NOT
FOR
SHIFT
CALL
Using Environment Variables
73
Part 2- Tutorials
Computers are useful tools because they are capable of performing repeti
tive tasks without getting bored. Computers can maint:lin the same level of
efficiency regardless of how many times they carry out the same task. Com
puter users, on the other hand, become bored rather easily when perform
ing repetitive tasks, and a bored computer user tends to be inefficient and
error-prone.
One repetitive task that computer users are often faced with is entering
a series of commands over and over again. If you find yourself in this situa
tion, don't despair, because MS-DOS offers a way out. It allows you to take a
series of commands and store them in a special kind of file called a batch file.
This "batch" of MS-DOS commands can then be used over and over again,
always producing the same result. This chapter will explain batch files and
show you some MS-DOS features that can be used in conjunction with
batch files. (See appendix C for examples of batch files used to implement a
menu-driven disk maintenance system.)
What Is a Batch File?
A batch file is a text file (ASCII file) that contains a sequence of MS-DOS
commands. The rules for naming a batch file are the same as those for other
files, with the exception that a batch file must have a filename extension of
.BAT (BATch).
Executing the commands in a batch file is easy. You simply give MS
DOS a start command by typing the filename of the batch file and pressing
the Enter key. When you enter the name of the batch file, MS-DOS searches
the disk in the specified (or default) drive for the file. If MS-DOS does not
find the file in the drive's current directory, the search is extended to any
directories specified by the PATH and APPEND commands. (Both of these
commands are discussed in Part 3.)
When MS-DOS locates the batch file, the first command in the file
is loaded into memory, displayed on the screen, and executed. This pro
cess is repeated until all of the commands in the batch file have been exe
cuted.
Execution of a batch file can be halted at any time by pressing the Ctrl
Break key combination. If you press Ctrl-Break, MS-DOS will ask you the
following question:
Terminate batch job (YIN)? _
Uyou enter "y", execution of the batch file will be stopped and the MS-DOS
prompt will be displayed. Entering "N" will stop only the command cur
rently being executed. Execution will continue with the next command in
the batch file.
74
4-MS-DOS Batch Files
Creating a Batch File
You can create a batch file by using a word processor to create an ASCII (plain
text) file. Refer to your word processor's manual under "ASCII files" or
"DOS text files" for details. You can also use EDLIN, the MS-DOS text editor,
which is discussed in chapter 8. A third way to create batch files is by enter
ing the text directly from the command line. This method will now be dis
cussed.
The MS-DOS device name for the keyboard is "CON" (CONsole). (MS
DOS device names are discussed in chapter 6.) To copy the input from the
keyboard to a file, type copy con:, followed by the filename and filename
extension of the file being created. For example, to create a batch file named
"sample.bat", enter:
C>copy con: sample. bat
Then enter the MS-DOS commands that will make up the batch file.
After entering the last command, press Ctrl-Z (or press the F6 function key)
and then press Enter. The file will be stored on the disk in the default drive
with the name "sample.bat" . If there is an existing file named "sample.bat"
in the current directory of the default drive, it will be replaced by the new
file.
Batch files can be used to make automatic backup copies of important
files. The command "xcopy * .doc a: 1m" instructs MS-DOS to make a copy
of all files with an extension of DOC that have the archive attribute set. The
command also instructs MS-DOS to clear each file's attribute after the copy is
made. As is discussed in chapter 10 and Part 3, the operating system sets a
file's archive attribute each time the file is modified. Therefore, the effect of
"xcopy * .doc a: 1m" is to copy those DOC files in the current directory that
have been modified since they were last copied. This handy command can
be combined with the command for starting a word processor batch file:
C>copy con c:\batch\write.bat
wp
xcopy *.doc a: 1m
AZ
+-press Ctrl-Z and Enter
C>
The listing creates a batch file named "write.bat" and stores it in directory
C: \ BATCH. The batch file is executed by entering write at the MS-DOS com
mand line. The DOS search path should contain "c: \batch" so that "write"
will start, regardless of which directory is current.
The batch files begin by executing the "wp" command. This starts the
word processor. The command assumes that the DOS search path contains
75
Part 2-Tutorials
the directory holding the word processor's files. Of course, the command
also assumes that "wp" starts the word processor. You will need to modify
this if your word processor is started with another command.
The batch file is set up so that the command "xcopy * .doc a: 1m" is
automatically executed when the word processor program terminates. All of
the modified document files (assumed to have the extension DOC) are cop
ied to the current directory of the diskette in drive A. Thus "write.bat" pro
vides an automatic backup facility for word processing document files.
Replaceable Parameters
Batch file commands may contain one or more replaceable parameters. A
parameter is a command item that gives additional information to MS-DOS,
such as the name of the file on which the command is to be performed. A
replaceable parameter is a variable that is replaced with a string ofcharacters
(such as a filename). A batch file replaceable parameter is written as a per
centage sign (%) followed by a single digit. Up to ten different replaceable
parameters may be included in a batch file. You specify the character string
that is to be substituted for each replaceable parameter when the batch file is
called up in the batch file start command.
Substitution of character strings for the replaceable variables takes
place according to the order in which the character strings are included in
the start command. The first string is substituted for the replaceable variable
% 1, the second string is substituted for %2, and so on. MS-DOS automati
cally substitutes the file specification of the batch file for the replaceable
variable %0.
Replaceable variables increase the flexibility of batch files. As an exam
ple, we will create a batch file with the DOS command TYPE. TYPE is used
to view a text file's contents. One problem with TYPE is that if the text file is
large, the contents will scroll off the screen before you have a chance to view
it. You can overcome this problem by "piping" the output of TYPE to the
MS-DOS filter named MORE. Piping and filters are discussed in chapter 6,
but basically what happens is that when you pipe output into MORE, the
output is displayed one screenful at a time. Therefore, the command "type
bigfile.txt I more" will display the contents of "bigfile.txt" one screenful at
a time (the" I " symbol creates the pipe).
We can put this command in a batch file. Let us call it "display.bat":
C>copy con c:\batch\display.bat
type bigfile.txt l more
AZ
C>
Now the command "display" will display "bigfile.txt" one screenful at a
76
4-MS-DOS Batch Files
time. In order for the batch file to operate correctly, either the APPEND
search path must contain the directory storing "bigfile. txt", or the file must
be in the current directory. The batch file also assumes that the directory
holding the file MORE.COM (an external DOS file) is contained in the DOS
search path.
A major limitation of "display.bat" is that it can only be used to display
"bigfile. txt". The batch file can be modified, using replaceable parameters,
so that it can display any text file:
C>copy con c:\batch\dispLay.bat
type %1 : more
"'z
C>
Now the command to start the batch file is "display filename" where
filename is the complete filename (filename and filename extension, sepa
rated by a period) of any text file. When the batch file executes, the filename
is substituted for replaceable parameter % 1 and the file's contents are dis
played one screenful at a time.
Wildcards and Replaceable Variables
The character strings included in a batch file start command can include the
MS-DOS wildcards? and * . When a string containing a wildcard is specified
for a replaceable variable, the batch file command containing the variable is
executed one time for each file that matches the string. Consider the follow
ing batch file:
C>copy con: c:\batch\dispLay2.bat
copy %1 con:
"'z
1 FiLe(s) copied
This batch file copies a file (represented by the replaceable parameter %1 ) to
the display screen (con). The file to be copied is specified in the start com
mand. When the specified file is found, its contents are displayed on the
screen.
Notice that this file has been given the name "display2.bat". If the file
had been named "display.bat", it would have written over the existing file
named "display. bat" .
Start the batch file with the command display2 * .txt. MS-DOS will
search the current directory for each file matching the wildcard (" * .txt")
77
Part 2- Tutorials
and display each file's contents. Please refer to chapter 2 for more informa
tion on the use of wildcards.
Occasionally, one of the filenames in a batch file will contain a percent
age sign. To prevent MS-DOS from confusing the filename with a replace
able parameter, type the sign two times when listing the file. For example, if
you want to include the file "hiho%.txt" in a batch file, it should be listed as
"hiho% % .txt".
PAUSE
The PAUSE command can be used in a batch file when you want to tempo
rarily suspend execution of the batch file. When MS-DOS encounters
PAUSE, it ceases execution of the batch file and displays the following mes
sage:
Strike a key when ready •••
Pressing any key, except the Ctd-C combination, will resume execution of
the batch file.
Pressing Ctd-C causes MS-DOS to display the message:
Abort batch job (YIN)? _
Entering "Y" terminates batch file execution. Entering "N" resumes execu
tion of the batch file.
As you will see in the next example, the PAUSE command can be used
to allow you time to change disks during batch file execution. The following
batch file automatically makes two copies of a file. The original file, the first
copy, and the second copy can each be assigned any valid filename and
filename extension that you wish. The two copies will be on different disks.
The batch file will pause after making the first copy so that a second disk can
be put in drive A:
C>copy con: c:\batch\copytwo.bat*
wp.exe
copy %1 a:%2
pause
copy %1 a:%3
"z
1 File(s) copied
To execute this batch file, type copytwo, followed in order by the
filename and filename extension of the file to be copied, the filename and
filename extension of the first copy, and the filename and filename exten
78
4-MS-DOS Batch Files
sion of the second copy. Execution of the batch file begins when you press
Enter:
C>copytwo new.doc old1.doc old2.doc
C>WP.EXE
This command loads and executes the word processor. When control is re
turned to MS-DOS, execution of the batch file continues:
C>COPY NEW.DOC A:OLD1.DOC
1 File(s) copied
C>PAUSE
Strike any key when ready ••• 5
C>COPY NEW. DOC A:OLD2.DOC
1 File(s) copied
Again, notice that the string characters in the start command replaced
the variables in the batch file. After the first copy ("old 1. doc") is made, the
PAUSE command temporarily halts batch file execution. This allows you to
put a new disk in the A drive. Batch file execution continues when a key (the
"5" in this case) is pressed. The file is copied a second time ("old2.doc"),
completing execution of the batch file.
The PAUSE command may also be used to display messages. When
PAUSE is entered in a batch file, it can be followed by a character string. The
string may be up to 121 characters long. The string will be displayed when
the batch file is executed:
C>copy con: copy two. bat
wp.exe
copy %1 a:%2
pause put disk number2 in drive a
copy %1 a:%3
AZ
1 File(s) copied
The only difference between this batch file and the one in the previous
example is that a message will be displayed when the PAUSE command is
executed:
C>COpy NEW.DOC A:OLD1.DOC
1 File(s) copied
C>PAUSE PUT DISK NUMBER 2 IN DRIVE A
Strike any key when ready ••• 5
79
Part 2- Tutorials
C>COpy NEW. DOC A:OLD2.DOC
1 FiLe(s} copied
REM
The REM (REMark) command can be used to display a message during the
execution ofa batch file. Enter rem in the batch file, followed by the message
that will be displayed. The message can be up to 123 characters long. For
example, enter the following:
C>copy con: copy two. bat
wp.exe
rem making copy number 1
copy %1 a:%2
pause put disk number 2 in drive a
rem making copy number 2
copy %1 a:%3
"z
1 Fi Le(s} copied
The REM commands will help you follow the batch file's execution:
C>REM MAKING COPY NUMBER 1
C>COpy NEW.DOC A:OLD1.DOC
1 FiLe(s} copied
C>PAUSE PUT DISK NUMBER 2 IN DRIVE A
Strike any key when ready ••• 5
C>REM MAKING COPY NUMBER 2
C>COpy NEW.DOC A:OLD2.DOC
1 Fi Le(s} copied
If the REM message includes any of the symbols " I", "<", or ">",
enclose the entire message in quotation marks, as in the following:
C> rem "di r > foo"
This will prevent MS-DOS from getting confused about the role of the spe
cial symbol(s). Each of these symbols is discussed fully in the following
chapter.
80
4-MS-DOS Batch Files
ECHO
As you have already seen, under normal circumstances MS-DOS displays
the commands in a batch file on the screen immediately before it executes
them. With the ECHO command, you can control whether or not the
commands are displayed.
To use ECHO in a batch file, type echo, followed by either on or off.
ECHO ON causes MS-DOS commands to be displayed in the normal fash
ion. ECHO OFF suppresses the display of all MS-DOS commands including
REM commands. However, ECHO OFF does not suppress any messages that
are produced while commands are being executed.
If there is no ECHO command in a file, the default state is ECHO ON.
ECHO is automatically turned ON when a batch file is terminated. Entering
ECHO without any parameters causes MS-DOS to display the current ECHO
state (ON or OFF). The following batch file demonstrates the use of ECHO:
C>copy con: c:\batch\example1.bat
rem this message will be displayed
rem since echo is on
echo off
rem this message will not be displayed
rem since echo is now off
echo
echo on
rem echo is back on
echo
+-ECHO is turned off
+-ECHO state is displayed
+-ECHO is turned on
+-ECHO state is displayed
"Z
1 File(s) copied
C>example1
C>REM THIS MESSAGE WILL BE DISPLAYED
C>REM SINCE ECHO IS ON
C>ECHO OFF
ECHO is off
C>REM ECHO IS BACK ON
C>ECHO
ECHO is on
In the preceding example, the first two REM commands are displayed, since
ECHO is initially in the default ON state. The third command in the batch file
turns ECHO OFF, so the next two REM commands are not displayed. The
81
Part 2- Tutorials
sixth command (ECHO) verifies that the ECHO state is OFF. The seventh
command then turns ECHO back ON, and the final REM command is dis
played. The last command in the file (ECH 0) verifies that ECHO is back ON.
If a message is entered in a batch file following ECH 0, the message will
be displayed regardless of the ECHO state:
C>copy con: c:\batch\example2.bat
echo off
rem this message will not be displayed
echo but this one will be
echo on
rem this will be displayed
echo so will this ... twice
"z
1 Fi Le(s) copied
C>example2
C>ECHO OFF
BUT THIS ONE WILL BE
C>REM THIS WILL BE DISPLAYED
C>ECHO SO WILL THIS .•. TWICE
SO WILL THIS •.• TWICE
The first command in this batch file turns ECHO OFF. With ECHO OFF,
the first REM command is not displayed. The third command in the file is an
ECHO command. Since ECHO is OFF, the command is not displayed, but
the message within the ECHO command (THIS WILL BE DISPLAYED) is
displayed. The fourth command in the file turns ECHO ON so that the
following REM command is displayed. The final command in the file is an
ECHO command. Since ECHO is ON, this command is displayed, and then
the message within the command is displayed again.
Using ECHO to Send a Blank Line to the Screen
Often the text on a display screen is easier to read if it is occasionally inter
spersed with a blank line. With this in mind, it would be nice if ECH 0 could
be used to send a blank line to the screen. Unfortunately, no simple way
exists to do this for all versions of MS-DOS.
The command "ECHO " (ECHO followed by two spaces) will send a
blank line to the screen under MS-DOS 2.X, but not 3.X or 4.X. The com
mand "ECHO." (ECHO followed by a period) will send a blank line to the
screen under 3.X and 4.X, but not 2.X. You have to be tricky if you want
something that works under both versions.
82
4-MS-DOS Batch Files
The command "ECHO AH" (ECHO followed by a space and a Ctrl-H
character) will send a blank line to the screen under 2.X, 3.X, and 4.X. This
method requires that the ANSI.SYS device driver (chapter 9) be installed.
Many word processors allow you to place control characters in a text file. If
you do not have a word processor with this capability, use your word proc
essor to enter "ECHO *". Then use DEBUG (chapter 15) to replace the *
with a Ctrl-H character. Ctrl-H is the same as the backspace character (ASCII
value 008).
Suppressing ECHO OFF
MS-DOS 3.3 and 4.X allow you to suppress the display of a line in a batch file
by preceding the line with an "at" character (@). One place where this is
useful is in suppressing the display ECHO OFF at the start of a batch file. As
an example, no display is generated from the following batch file:
@echo off
rem this is a test
Without the @, the ECHO OFF command will be displayed.
Those using MS-DOS 3.2 or earlier versions can employ a trick to make
it appear as though ECHO OFF is not displayed. To begin, you must have
ANSI. SYS installed as the keyboard device driver. (See chapter 9 for an expla
nation of how to do this.) Then, start your batch file with the following two
lines:
echo off
echo A[[SA[[1AA[[KA[[U
Note that each" [ is a single escape character, not two separate charac
ters. Most word processors allow you to place escape characters in a text
file. You can also use DEBUG (chapter 15) to replace dummy characters
with escape characters (escape characters have ASCII value IBH). If you
refer to table 9-1, you will see that the second ECHO command is a se
quence of instructions for ANSI.SYS. The screen device driver is in
structed to:
A[[S
A[[1A
A[K
A[[
Save the current position of the cursor.
Move the cursor up one line.
Erase from the cursor to the end of the line.
Restore the cursor to its original position.
In this way, "echo off' is displayed on the screen but is erased before it can
be read.
83
Part 2-IUtorials
GOIO
The GOTO command is used to transfer control within a batch file. GOTO
directs the batch file to jump to a labeled line within the batch file. A line
label in a batch file consists of a colon (:) followed by up to eight characters.
For example, enter the following:
C>copy con:
rem this is
rem this is
goto four
rem this is
:four
rem this is
example3.bat
the first line
the second line
the third line
the fourth line
"'Z
1 File(s) copied
C>example3
C>REM THIS IS THE FIRST LINE
C>REM THIS IS THE SECOND LINE
C>GOTO FOUR
C>REM THIS IS THE FOURTH LINE
The first two commands in the batch file are executed. Execution then
jumps to the : fou r label and continues with the final command in the
batch file.
The label in a GOTO command can be a replaceable variable. This al
lows the execution of the batch file to jump to a line that is determined by a
parameter included in the batch file start command. The following example
shows how this works:
C>copy con:
goto %1
:one
rem this is
goto finish
:two
rem this is
goto finish
:three
rem this is
84
example3.bat
one
two
three
4-MS-DOS Batch Files
:finish
AZ
1 Fi Le(s) copied
C>example3 three
C>GOTO THREE
C>REM THIS IS THREE
When this batch file is called up, the character string three is included
in the start command. When the first command in the batch file is exe
cuted, THREE replaces the variable %1. Execution then jumps to the label
: three. The REM command (t h; 5 ; 5 three) is executed. The final line in
the batch file is another line label. Line labels are not displayed during
batch file execution.
IF
You can use the IF command to create commands in a batch file that will be
executed if a specified condition is true. There are three types of conditions
that IF can test: IF EXIST, IF String! = =String2, and IF ERRORLEVEL.
IF EXIST
The first condition is called the EXIST condition. This conditional state
ment checks to see if a specified file exists. If the file exists, the condition has
been met and the command will be executed. Consider the following com
mand in a batch file:
if exist somefiLe.dat type somefiLe.dat
In executing this command, MS-DOS determines first if the file
"somefile.dat" exists on the default drive. Then, if the file exists, MS-DOS
executes the command to type the file. If "somefile.dat" does not exist,
MS-DOS skips to the next batch command.
IF may be used to check for files on a drive other than the default. Sim
ply precede the file specified in the IF command with the appropriate drive
letter designator (such as A: or B:).
IF can check for files only in the current directory of a drive. To check a
directory other than the current one, you must first make that directory the
drive's current directory. Directories are discussed in chapter 3.
85
Part 2-1Utorials
IF Stringl = =String2
The second type ofcondition that may be tested by an IF statement is whether
two character strings are identical. Consider the following batch file:
C>copy con: example4.bat
echo off
if %1==roses goto roses
if %1==candy goto candy
if %1==perfume goto perfume
echo you are in big trouble
goto finish
:roses
echo you sent roses. how thoughtful.
goto finish
:candy
echo you sent candy. how sweet.
goto finish
:perfume
echo you sent perfume. how romantic.
:finish
"z
1 Fi le(s) copied
C>example4 perfume
C>ECHO OFF
YOU SENT PERFUME. HOW ROMANTIC.
Each of the IF statements compares a replaceable variable to a character
string. Note that the IF statements use double equal signs (==). The string
parameter that is included in the batch file start command replaces the variable
in each IF statement. When the condition tested by an IF statement is true, the
command contained in that statement is executed; in this case, execution
branches to the PERFUME line label.
Notice that this batch file begins with the command echo off.
This results in a screen display that is much less cluttered and easier to read.
IF ERRORLEVEL n
ERRORLEVEL is a system variable maintained by MS-DOS and used to moni
tor error conditions. Many of the MS-DOS commands set ERRORLEVEL if
an error is encountered during execution of the command. The type of er
ror encountered determines the value to which ERRORLEVEL is set. Appli
cation programs can also use DOS service functions 31 Hand 4CH to set
ERRORLEVEL (see appendix A). The statement
86
4-MS-DOS Batch Files
IF ERRORLEVEL n command
tells MS-DOS that ifERRORLEVEL is equal to or greater than n, execute com
mand. Refer to the discussion of the individual MS-DOS commands for de
tails on how they set ERRORLEVEL.
IF NOT
An IF NOT statement can also test to see if a condition is false. Consider the
following statement:
if not exist somefiLe.bak copy somefiLe.txt somefiLe.bak
This statement tests for the nonexistence of a file. If the file does not exist,
the MS-DOS command within the IF statement is executed. IF NOT may be
used to test any condition that may be tested with IF.
FOR
The FOR command allows a batch file command to be executed repeatedly
on a set of specified parameters. The syntax (or rules) of FOR is a little in
volved, so let's begin with an example:
for %%a IN <fiLe1 fiLe2 fi Le3> DO deL %%a
As you can see from the example, a FOR statement begins with the
word for, followed by a dummy variable. The dummy variable must be pre
ceded by two percentage signs (%%). The variable is followed by the word IN,
which must be entered in uppercase. I N is followed by the set ofparameters on
which the command is to operate. The set ofparameters is usually a list offiles.
In our example, three files are specified as parameters. The set ofparameters is
followed by DO, which must also be entered in uppercase. DO is followed by
the command that is to be executed. In the example, the command de l %%a is
executed three times, deleting sequentially the files fi le1, fi le2,and fi le3
A FOR statement is useful when you want to execute a command on a
group of files that cannot be specified with wildcards. Suppose that three
text files named "example 1. bat", "program. txt" ,and "letter" existed on a
disk and that you wanted a printed copy of each file. You could enter the
command "copy example. bat pm", sit back and wait while the file is be
ing printed, enter the same command for "program. txt" , wait again, and
then enter the command for" letter" . If you do this, you will spend a lot of
time sitting around, waiting for the computer to print each file.
87
Part 2- Tutorials
The following command, included in a batch file, will perform the
same task without all that wasted time:
for %%a IN (exampLe.bat program. txt Letter) DO copy %%a prn
The three text files will be printed, and you had to enter only one command.
FOR commands are not limited to use in batch files. They can be used
as standard MS-DOS commands and will execute repeatedly on a set ofpa
rameters. When FOR commands are used in this fashion, the dummy varia
ble is preceded by only one percentage sign.
Any file specified as a parameter in a FOR command must be located in
the current directory of the specified or default disk drive. Current directo
ries are discussed in chapter 3.
SHIFT
The SHIFT command allows you to specify more than ten parameters in a
batch file start command. Recall that a batch file can normally contain up to
ten replaceable variables. A list of character strings, included in the start
command, sequentially replaces the variables as the batch file is executed.
The first string specified replaces the variable % 1, the second string replaces
% 2, and so on. The replaceable variable % 0 is reserved for the file specifica
tion of the batch file.
The SHIFT command "shifts" the parameters one position to the left.
The first parameter in the start command replaces %0, the second parame
ter replaces % 1, and so on. Each time a SHIFT command is executed, the
parameters shift one position to the left. The following batch file should
help clarify the use of SHIFT:
C>copy con: example6.bat
echo off
echo %0 %1 %2 %3 %4 %5 %6
shift
echo %0 %1 %2 %3 %4 %5 %6
shift
echo %0 %1 %2 %3 %4 %5 %6
shift
echo %0 %1 %2 %3 %4 %5 %6
%7 %8 %9
%7 %8 %9
%7 %8 %9
%7 %8 %9
"'z
1 Fi Le(s) copied
C>example6 00 01 02 03 04 05 06 07 08 09 10
C>ECHO OFF
EXAMPLE6 00 01 02 03 04 05 06 07 08
88
4-MS-DOS Batch Files
00 01 02 03 04 OS 06 07 08 09
01 02 03 04 OS 06 07 08 09 10
02 03 04 OS 06 07 08 09 10
The batch file echoes the current values of the variables four times. The first
time, %0 is "EXAMPLE6", % 1 is "00", and so on. After one SHIFT, %0 is
"00", % 1 is "01", and so on. Notice that after the third SHIFT, only nine of
the variables have a value. (For another, more practical, application of
SHIFT, refer to the batch file presented at the end of this chapter.)
CALL
The concept of modular programming is widely accepted by computer
programmers. Modular programming refers to the practice of dividing a
computer program into small modules, each module being responsible for a
single function (such as performing a calculation or copying a file). Program
mers try to write modules that are reusable, meaning that a module written
for one program can be reused in another program. This saves programmers
from having to "reinvent the wheel" each time they write a program. The
other big attraction of modular programming is that small modules are easy
to debug, unlike large programs which can be very difficult to debug. Pro
grammers use existing modules by issuing a "call." A call is a command to
invoke a module.
Batch file programming lends itself well to the development of reus
able batch file modules. Unfortunately, with versions of MS-DOS prior to
3.3, it is cumbersome to call a batch file module. To illustrate the problem,
let's see what happens when the following two batch files are executed:
C>copy con one. bat
echo starting one
two
echo ending one
1 File(s) copied
C>copy con two. bat
echo starting two
echo ending two
"'z
1 File(s) copied
Now here is what happens when we call ONE.BAT:
C>one
C>echo starting one
89
Part 2- Tutorials
starting one
C>two
C>echo starting two
starting two
C>echo ending two
ending two
C>
ONE.BAT echoes its starting message and then calls TWO. BAT.
TWO .BAT displays its starting and ending messages, and its execution termi
nates. However, control is then passed to DOS (rather than back to
ONE.BAT), and ONE.BAT's ending message does not get displayed. This fail
ure to display ONE.BAT's ending message can be overcome with a small
modification of ONE. BAT, namely, the use of the CALL command to execute
TWO.BAT.
C>copy con one. bat
echo starting one
call two
echo ending one
"'z
1 FiLe(s) copied
Now we can see that control returns to ONE after TWO is executed:
C>one
C>echo starting one
starting one
C>ca LL two
C>echo starting two
starting two
C>echo ending two
ending two
C>echo ending one
ending one
See the last section of this chapter, "Using Environment Variables," for
another example using CALL.
90
4-MS-DOS Batch Files
CALL can also be used to invoke batch files with DOSSHELL Program
Start Commands. Program Start Commands are discussed in chapter 7.
Calling Batch File Modules without CALL
CALL is implemented in MS-DOS 3.3 only. Batch files running under earlier
versions of MS-DOS can call other batch files by loading a secondary com
mandprocessor and having the secondary command processor execute the
second batch file. The following version of ONE.BAT works under versions
2.X and 3.X of MS-DOS. See the discussion of COMMAND in Part 3 for de
tails on the use of a secondary command processor.
C>copy con one. bat
echo starting one
rem
rem The command "command Ic two" invokes a secondary command processor
rem which loads two. bat. When two. bat terminates execution, control
rem is passed back to one. bat.
rem
command Ic two
echo ending one
"'z
1 FiLe(s) copied
C>
Using Environment Variables
Batch files running under MS-DOS 3.X and 4.X can access and modify the
MS-DOS environment variables (the environment and environment vari
ables are discussed in chapter 11). To reference an environment variable
from within a batch file, use the variable's name preceded and followed by a
percentage sign. Thus, if a batch file contains the command "ECHO
% PATH % ", the current directory search path is displayed.
The following batch file, ADD2 PATH .BAT, can be used to append addi
tional search paths to the current PATH variable. The batch file is called with
a command having this format:
add2path newpathl;newpath2;newpath3 ...
where each "newpath" is a search path (for example, a: \subdir2 \subdir2).
The batch file loops one time for each newpath entered on the command
line. Each loop appends the replaceable variable % 1 to the end of PATH. The
SHIFT command then moves the next newpath on the command line into
variable % 1. The command that is after the loop label checks to see if the
end of the command line has been reached. Notice the double quotes
around %1.
91
Part 2- Tutorials
echo off
echo ACC S ACC1A ACCKACCU
rem
rem
ADD2PATH. BAT
rem
rem This batch file adds a search path to an existing PATH variable.
rem The syntax for using ADD2PATH is as follows:
rem
rem
ADD2PATH newpath1;newpath2 •••
rem
rem Each "newpath1", "newpath2", etc., specifies a new search
rem path, which is added to the existing PATH variable. The
rem "newpath's" may be separated by a semicolon, space, tab,
rem or equal sign.
rem
rem The batch fi le uses "Xpath%" to access the current PATH
rem variable and append the newpaths to it. The total number
rem of characters that may be added to the PATH variable is
rem limited by 2 factors: (1) Each time ADD2PATH is invoked,
rem there is a limit on the number of characters that can be
rem entered on the command line, and (2) there is a limit on
rem the number of characters that can be stored in the DOS
rem environment (see chapter 12 of MS-DOS Bible). DOS will display:
rem
rem
Out of environment space
rem
rem if the limit is reached.
rem
rem ADD2PATH "loops" one time for each new path specifier
rem entered, exiting after all have been processed.
rem The new PATH variable is displayed when execution
rem terminates.
rem
rem NOTE: The echo commands at the start of this batch file
rem require ANSI.SYS to work correctly. See chapter 8 of
rem MS-DOS Bible.
rem
: loop
rem exit if all parameters have been read
if "X1"=="" goto exit
rem append X1 to existing path
set path=XpathX;%1
rem shift parameters one to left
shift
goto loop
:exit
echo PATH=%path%
echo.
ADD2PATH.BAT is useful if you want to add information to the end of
PATH without having to enter the existing path string on the command line.
92
4-MS-DOS Batch Files
If you want to modify PATH from the command line (using "SET PATH="),
you are limited by the 149-character restriction imposed by MS-DOS's key
board buffer. Therefore, you may not be able to set as long a PATH variable as
you would like. Using ADD2PATH.BAT, you are limited only by the size of
your DOS environment (the size of which can be adjusted, see chapter 11).
ADD2PATH.BAT is also useful for adding search paths that you do not
ordinarily use but need for a particular application. The following batch file
could be used to initialize MS-DOS to use such an application.
echo off
rem
rem
rem A batch fi le to initial ize MS-DOS to use "liP"
rem
rem Append liP's directory to PATH
call addZpath \wp
rem
rem Set up working directories
c:
cd \letters\aug_B1
cd a:\letters\aug_B1
rem
rem Load the word processor
wp
rem
rem copy any new or modified files upon exit
xcopy *.* a: 1m
93
C
HAP
T
E
R
5
Configuring Your System
System Parameters
Installable Device Drivers
CONFIG. SYS
AUTOEXEC.BAT
95
Part 2- Tutorials
The dictionary defines configuration as the "arrangement of parts." System
configuration refers to the arrangement of parts in a computer system. In
this chapter we take a somewhat narrower perspective and discuss the con
figuration of DOS. Specifically, we look at how you, as the person using the
operating system, can configure it to install and use a RAM disk drive, speed
up disk access, use a mouse or other peripheral device, and, in general, mod
ify the function of the system in a way that is optimal for your needs.
DOS is configured in two ways:
1. By assigning values to a set of variables known as the DOS system
parameters
2. By installing device drivers
This chapter begins by discussing what these terms mean.
DOS configuration is generally carried out through the use oftwo spe
cial files: CO NFl G. SYS and AUTOEXEC.BAT. A discussion of the use of these
files makes up the majority of this chapter.
System Parameters
Each system parameter is identified by a predefined name (see table 5-1).
Each parameter has a value which can be specified by the user. Some param
eters have numeric values (such as 10 or 50); others have character string
values (such as "no" or "c: \jc: \dos"). Most of the parameters have a default
value, which is the value DOS assigns to a parameter if none is specified by
the user. Each parameter's value has some influence on the manner in which
DOS operates. The use of each ofthe system parameters listed in table 5-1 is
discussed in this chapter.
System parameters are generally assigned a value by using an assign
ment statement. Each assignment statement consists of the parameter's
name, followed by an equals sign (=), followed by the value aSSigned to the
parameter. For example, the value for the system parameter BREAK can be
set as follows:
C>break=on
or
C>break=off
The system parameter FILES is assigned a value of 50 as follows:
C>fi les=50
Most of the system parameters listed in table 5-1 may have values
96
5-ConJiguring Your System
assigned to them only through the use of assignment statements contained
in a special file named CONFIG.SYS. Much more will be said about this file
later in this chapter.
Thble 5-1. DOS System Parameters
Parameter Name
BREAK
BUFFERS
COUNTRY
FCBS
FILES
INSTALL
LASTDRIVE
SHELL
STACKS
SWITCHES
VERIFY
Function
Controls the frequency with which DOS checks for Ctrl
Break
Sets the number of disk buffers
Specifies country-specific formatting information
Sets the number of file control blocks
Sets the number of available file handles
Specifies a memory resident program that is to be loaded
(MS-DOS 4.x)
Specifies the total number of logical drives on the system
Specifies which command processor is to be used
Specifies the number of stacks available to handle hardware
interrupts
Specifies that enhanced keyboards are to behave like
conventional keyboards (MS-DOS 4.X)
Specifies that each write to a disk is to be verified for
accuracy
Environment Variables
The DOS environment is a block of computer memory that stores a list of
environment variables. Environment variables are similar to system param
eters in that their values affect the operating system's behavior. Values are
assigned to environment variables from the command line or within a batch
file, not from statements contained in CONFIG.SYS.
PATH, APPEND, COMSPEC, and PROMPT are predefined environ
ment variables that have special meaning to DOS.
The value assigned to the PATH variable, along with the value assigned
to the APPEND variable, specifies the directories in which DOS is to search
for files not located in the current directory. You assign a value to the PATH
variable by typing path, followed by an equals sign (=), followed by the
directories to be searched. The directories are separated by semicolons. As
an example, the following statement directs DOS to search the directories
C: \PRGMS\WORD, C: \DOS, and C: \UTILS for files not located in the cur
rent directory:
C>path=c:\prgms\word;c:\dos;c:\utils
97
Part 2- Tutorials
You can assign a value to the APPEND variable in a similar fashion. The value
of the PATH and APPEND variables can be changed from the command line
or from within a batch file.
The value assigned to the COMSPEC variable specifies where DOS is to
locate the special file COMMAND.COM when a part of that file, known as
the transient portion, needs to be reloaded into memory. DOS automati
cally assigns a value to COMSPEC during the boot-up process. You can
change the value of the COMSPEC variable by using the SET command. As
an example, the following command sets COMSPEC to a value of "c: \dos":
C>set comspec=c:\dos
The value assigned to the PROMPT variable determines the system
prompt that is displayed at the DOS command line. You can assign a value to
the variable by typing prompt followed by the character string that you wish
to appear as a prompt. DOS provides a set of special characters that can be
used to specify a prompt. For example, if the PROMPT variable has the value
"$p$g", the system prompt consists of the drive letter of the default disk
drive, followed by a colon, followed by the path to the current directory,
followed by the" > " symbol. See the discussion of PROMPT in Part 3 for
further information on the PROMPT special characters.
Creating User-Defined Environment Variables
You can use the SET command to create user-defined environment vari
ables. Many application programs require the use of such variables. For ex
ample, some compilers are programmed to search the DOS environment for
the user-defined variable LIB. The value assigned to the variable tells the
compiler where to look for its library files. Prior to using the compiler, the
user must assign a value to LIB as follows:
C>set lib=c:\lib
In a similar fashion, you can use the SET command to change the value of an
existing environment variable.
You can delete a user-defined environment variable by assigning a
value of null (no value) to the variable. As an example, the following com
mand removes LIB from the environment:
C>set l ib=
You can display all of the environment variables, along with the value
assigned to each, by entering the command SET. The following example
illustrates.
C:\>set
COHSPEC=C:\
98
5-ConJiguring Your System
PATH=C: \iC: \ DOS
PROHPT=$P$G
HERCGB102=true
PCPLUS=C:\PRGHS\PCPLUS\
C:\>
Installable Device Drivers
In computer jargon the terms peripheral device and I/O device both refer to
any hardware component that is external to memory and the central pro
cessing unit (CPU). The most common devices are keyboards, monitors,
disk drives, printers, modems, and mice.
Computer devices either send input to memory and the CPU (key
board, mouse), receive output from memory and the CPU (printer, moni
tor), or both send input and receive output (disk drives, modems).
Each device uses its own communications protocol when communi
cating with the computer. The protocol specifies how the device is to re
spond when it receives a certain signal from the computer. For example, a
disk drive will begin to spin when it receives a certain specific signal from
the computer, and the disk drive will send the computer a block of data
when it receives another specific signal. Similarly, other devices carry out
their special functions in response to specific signals from the computer.
The communications protocol for each device is specified in a com
puter program called a device driver. Because each type of device has its
own communications protocol, each device requires its own device driver.
Standard Device Drivers
All versions of DOS contain a set of standard device drivers, which are built
into the system. These include drivers for the keyboard, monitor, floppy
disk drive, and line printer. Hard drive device drivers are also built into DOS
2.0 and subsequent versions. These device drivers are automatically loaded
into memory and are available for use each time the system is booted up.
Installable Device Drivers
As DOS has become more popular, the variety of devices used by computers
running DOS has increased dramatically. RAM disk drives, EGA monitors,
VGA monitors, mice, laser printers, plotters, CD ROM readers, network in
terface cards, and expanded memory boards all require device driver sup
port. DOS does not provide this support directly. Rather it provides a
standard method by which the manufacturers of these devices may install
their own device drivers into DOS. This ability to utilize installable device
drivers greatly extends the capabilities of DOS and DOS computers.
99
Part 2- Tutorials
Installable device drivers control communications between the com
puter and devices that do not have standard device drivers. They also can be
used to replace standard drivers. The set of standard drivers is loaded into
memory whenever DOS boots up. However, if an installable device driver
for a standard device (such as the keyboard) is loaded into memory, the in
stallable driver is used instead of the standard driver. This comes about as
follows. DOS constructs a list that contains information about each device
driver currently in memory. All of the installable device drivers are listed
ahead of the standard device drivers. When DOS needs the services of a
driver for a particular device (say the keyboard), it scans down this list until it
finds the first entry for a driver of the device. Since the installable devices are
listed first, the installable device driver is used instead of the standard device
driver. This section discusses how to use installable device drivers. Refer to
chapter 14 for a discussion of the structure of MS-DOS device drivers.
Device Statements
Most devices are supplied with a floppy diskette that contains the required
installable device driver. The driver is designed by the device's manufac
turer specifically for use with the particular device.
Installable device drivers are loaded into memory through the use of
device statements. A device statement consists of the word "device", fol
lowed by an equals sign (=), followed by the file specifier of the device
driver. All device statements must be placed in a special file named CON
FIG.SYS. Device statements cannot be entered from the command line or
placed in batch files. CONFIG.SYS is discussed in the following section.
The following is an example of a device statement. The statement in
structs DOS to load the device driver named ANSI.SYS into memory. The
driver is located on the C drive, in the directory \DOS.
C>device=c:\dos\ansi.sys
Most device drivers have a filename extension of SYS. ANSI.SYS is an
installable device driver for the keyboard and display monitor. ANSI.SYS
can be used to control the cursor's position on the screen, clear the screen
display, control the display attributes, set the display mode, and reassign
values to individual keys on the keyboard. Use of ANSI.SYS is discussed in
chapter 9.
CONFIG.SYS
The first section in this chapter discussed assignment statements, which are
used to assign values to DOS system parameters, and device statements,
which are used to load installable device drivers into memory. Most assign
ment statements and all device statements must be used as entries in a
100
5-Configuring lOur System
special file named CONFIG.SYS. This section discusses CONFIG.SYS. A
sample file that contains two assignment statements and one device state
ment is created. This section also discusses the way in which the statements
contained in CONFIG.SYS are read by DOS.
Creating CONFIG.SYS
CONFIG.SYS is a DOS text file. This means that CONFIG.SYS can be created
or modified using EDLIN or any word processor operating in text mode.
CONFIG.SYS can also be created directly from the keyboard. Be careful,
though, because the method, which is illustrated below, will overwrite an
existing CONFIG.SYS file.
C:\>copy con config.sys
break=on
fi Les=20
device=c:\dos\vdisk.sys
"'z
1 FiLe(s) copied
C:\>
The command copy con config.sys directs DOS to copy the keyboard
input (the keyboard has the device name "con") into a new file named CON
FIG.SYS.
The first line in the new file is an assignment statement that assigns a
value of "on" to the system parameter BREAK. The value of BREAK deter
mines the frequency with which DOS checks to see if the Ctrl-Break key
combination has been pressed. Checking occurs more frequently when
BREAK is set to "on".
The second line in CONFIG.SYS is an assignment statement that sets
the FILES parameter to have a value of20. The value of FILES determines the
number of file handles available to the system. Most programs written to run
under DOS versions 2,3, and 4 require one file handle for each file that is
open.
The third line in the new file is a device statement that loads the device
driver named VDISK.SYS. VDISK.SYS is a device driver for a RAM drive. A
RAM drive is a portion of computer memory that stores files in much the
same manner as a conventional disk drive. Access times are much shorter on
a RAM drive because memory, rather than a conventional disk drive, is being
read. The other difference between RAM drives and conventional drives is
that the files stored in RAM drives are volatile. This means that the files disap
pear when the computer is turned off.
Returning to the example presented above, entering Ctrl-Z (or pressing
the F6 function key) signals DOS that the input for CONFIG.SYS is com
plete. DOS subsequently writes the new file to the disk and then displays the
101
Part 2- Tutorials
command line prompt. The statements in the new CONFIG .SYS are ready to
be executed when DOS is subsequently rebooted.
You can use the EDLIN text file editor (or any other text base's editor) as
an alternative to the "copy con config.sys" command. EDLIN allows
you to modify an existing file; "copy con" does not. Despite what
many people say about it, EDLIN is convenient for creating and modi
fying short text files. If you do a lot of "quick and dirty" text editing,
you should consider trying it. Use of EDLIN is discussed in chapter 8.
Executing the Statements in CONFIG.SYS
During the boot-up process, DOS checks to see if a file named CONFIG.SYS
is stored in the root directory of the boot drive. If so, DOS reads each of the
statements in CONFIG.SYS, loads the specified device drivers, and assigns
values to the specified system parameters. If the root directory does not
contain CONFIG.SYS, DOS uses the standard device drivers and sets the
system parameters to their default values.
The statements in CONFIG.SYS are read at boot time only. The state
ments cannot be executed from the DOS command line nor can they be
executed as part ofa batch file. If the contents of CONFIG. SYS are modified,
none of the changes go into effect until DOS is subsequently rebooted.
Up to this point, the information presented in this chapter has provided
a general view of the role of DOS system parameters, installable device driv
ers, and the CONFIG.SYS file. The role of each of the system parameters is
discussed in the following section.
Roles of the System Parameters
A general discussion of the DOS system parameters was presented at the
beginning of this chapter. This section discusses the role of each of the pa
rameters. The value ofeach of the system parameters is set using assignment
statements contained in CONFIG.SYS. Additionally, BREAK and VERIFY
may be assigned values using asSignment statements contained in batch files
or entered at the command line.
BREAK
The BREAK parameter (DOS versions 2, 3, and 4) lets you control the man
ner in which DOS checks to see if Ctrl-Break has been pressed.
The Ctrl-Break key combination is a signal to DOS to stop whatever it is
doing (such as executing a command or running a program), display the
system's command line prompt, and wait for the user to enter a command.
Thus, Ctrl-Break acts as a sort of emergency brake on the system.
102
5-Conjiguring lVur System
If the BREAK parameter is assigned a value of "on", DOS checks in a
continuous fashion for Ctrl-Break. If BREAK is assigned a value of "off',
DOS only checks for Ctrl-Break when keyboard, printer, display screen, or
serial port I/O occurs. "On" and "off' are the only values that may be as
signed to BREAK.
If you are running programs that have long periods ofdisk access (such
as database applications or program compiling), it may be advantageous to
have BREAK set to "on". The disadvantage of BREAK being "on" is that the
system runs somewhat slower, because DOS is always checking for Ctrl
Break.
Most commercial application programs "trap" Ctrl-Break. This means
that the programs recognize when Ctrl-Break has been pressed and inter
cept the signal before it gets to DOS. In such cases, the application program
determines what action is taken when Ctrl-Breakis pressed. The value ofthe
BREAK parameter does not affect these programs.
The BREAK parameter is unusual in that its value can be set with a state
ment in CONFIG.SYS, a statement contained in a batch me, or a statement
entered at the DOS command line. The default value for BREAK is "off'.
You can enter break (without additional parameters) to see the BREAK pa
rameter's current value.
BUFFERS
The BUFFERS parameter (DOS versions 2, 3, and 4) is used to set the number
of disk buffers. You may be able to speed up your system by setting BUFF
ERS to the appropriate value.
A disk buffer is an area of computer memory which stores data that is
read from a disk. Each buffer stores 512 bytes. When a program requests
some data that is stored on a disk, DOS first determines which disk sector is
storing the data. The operating system then checks the disk buffers to see if
one of them already holds the contents of the required sector. If so, no addi
tional access to the disk is required. If none of the buffers contains the
sought-after data, DOS reads the entire sector containing the data into one of
the disk buffers. Thus, even if the application program requests only a 128
byte block of data, the entire 512-byte sector that contains the data is read
into memory.
Increasing the number of disk buffers will increase the number of disk
sectors that DOS can store in memory at anyone time. This will reduce the
number of disk accesses required, thereby improving program execution
time. The degree of improvement depends primarily on the pattern of disk
access required by the program. If disk access tends to follow a random pat
tern, as would be the case in querying a large database, increasing the num
ber of disk buffers should significantly improve performance. Alternatively,
if disk access is primarily sequential, as is the case with most word process
ing applications, simply increasing the number of disk buffers will generally
not result in as dramatic an improvement in performance. The DOS 4.X
version of BUFFERS does support a second parameter, which is used to
specify the number of look-ahead sectors. Use of this parameter can im
103
Part 2- Tutorials
prove the performance of programs that perform a large amount of sequen
tial disk access.
Each disk buffer requires a total of 528 bytes of memory. Therefore, a
trade-off exists wherein increasing the number of buffers decreases the
amount of memory available for application programs. If your system has
less than 256 Kbytes of RAM, a large number of buffers (more than 15) may
slow your programs down.
Many application programs recommend a minimum number ofbuffers
for optimal program performance. It is often beneficial to experiment with
the number of disk buffers you use. Database applications generally do well
with about 20 disk buffers. Programs that perform sequential disk access
generally do well with 10-15 disk buffers. Bear in mind that the more buffers
there are in the system, the longer it will take DOS to search all the buffers.
The default value for BUFFERS is 2 unless any of the following condi
tions hold:
Default Value of
3
If the system diskette drive is > 360 Kbytes
If memory size is > 128 Kbytes
5
10
If memory size is > 256 Kbytes
15
If memory size is > 512 Kbytes
You can set the BUFFERS parameter to any value in the range 1-99.
Disk buffers can be placed in expanded memory with DOS 4 (see discussion
of BUFFERS in Part 3 for details). If expanded memory is used, the BUFFERS
parameter can have a value up to 10,000.
COUNTRY
The value of the COUNTRY parameter (DOS versions 3 and 4) determines
which country-specific format is used for the date, time, currency, and other
parameters. The value need be set only if a non-U.S. format is required.
Please refer to appendix D for additional information on the use of code
page switching and the use of non-U. S. formats.
FCBS
The FCBS parameter (DOS versions 3 and 4) is used to limit the number of
file control blocks that are available at anyone time. A file control block
(FCB) is an area of memory that stores information about files which have
been opened by DOS. Generally speaking, only programs written for DOS
l.X use file control blocks. Programs written for later versions of DOS use
file handles.
Experience with computer networks has shown that a large number of
FCBs can degrade the performance of a network of DOS computers. There
fore, the parameter FCBS is implemented in DOS 3 and 4 to limit the number
of FCBs that can be used at anyone time.
Use of the FCBS parameter requires that network file sharing be imple
104
5-ConJigurlng lbur System
mented. NetworkJile sharing describes the situation where computers on a
network have the ability to directly access the files of other computers on
the network. File sharing is implemented through the network operating
system. File sharing can also be implemented using the DOS command
SHARE. The value of the FCBS parameter has no effect if file sharing is not
implemented. You can disregard this parameter unless you are receiving er
ror messages indicating a lack of file control blocks.
FILES
The value of the FILES parameter (DOS versions 2, 3, and 4) sets the number
ofJile handles that are available at anyone time. The FILES parameter is set
to a default value of 8 if no value is specified for it in CONFIG.SYS.
Most programs written to run under DOS 2,3, and 4 require one file
handle for each open file. Many commercial programs require several files to
be open at a single time. In order to use these programs you must set the
FILES parameter to a certain minimum value. As an example, the spell
checker of Microsoft Word 4.0 requires 15 file handles. The spell checker
will not run if FILES has a value less than 15.
Generally the application program determines whether the value of
FILES is too low. Thus, the error message displayed varies depending on the
particular application. In general, if you try to run a program and you get a
message such as Increase FILES or No free fi le hand les, you should
increase the value of the FILES parameter by modifying CONFIG.SYS and
rebooting your system. Setting FILES equal to 20 will accommodate most
DOS applications.
The maximum value for FILES is 255. No more than 20 file handles can
be used by a given program.
INSTALL
INSTALL (DOS 4) is not a system parameter, because it does not have a value
assigned to it. Rather, it is a DOS command that can be used to load into
memory the following "DOS extensions":
FASTOPEN.EXE
KEYB.COM
NLSFUNC.EXE
SHARE.EXE
Once they are loaded, these extensions remain in memory as a functional
component of DOS.
INSTALL is discussed here because its use and command structure are
similar to the use and structure of assignment statements. The use is similar
because INSTALL can only be used in CONFIG.SYS. The structure is similar
because an "install statement" begins with install, followed by an equals
sign (=), followed by the path and filename of the DOS extension that is
being installed. For example, the following statement is used to install the
105
Part 2-1Utorials
FASTOPEN extension. The file FASTOPEN.EXE is stored on the C drive, in
directory \DOS.
C>instaLL=c:\dos\fastopen.exe c:=(SO,2S)
FASTOPEN is a DOS 4 utility that improves file access time by storing file
directory information in memory. Its use, and use of the other extensions
mentioned above, is discussed in Part 3.
Any ofthe DOS extensions that can be loaded with INSTALL can also be
loaded from AUTOEXEC.BAT or the DOS command line. The advantage in
using INSTALL is that DOS allocates memory to the extensions in a more
orderly fashion than when the other loading methods are used.
LASTDRIVE
The value of the LASTDRIVE parameter (DOS versions 3 and 4) sets the
highest drive letter available for use by the system. DOS ignores LASTDRIVE
if it is set to a value that is less than the number of physical drives on the
system. For example, if a computer has two floppy drives and one hard
drive, DOS will ignore the statement "lastdrive=B".
Any RAM drives, multiple partition drives, network drives, or logical
drives created with DOS commands SUBST or JOIN must be taken into ac
count when setting the LASTDRIVE parameter. For example, if a computer
has two floppy drives, one hard drive with two DOS partitions, a RAM drive,
and two logical drives, LASTDRIVE must be set to a value of "G" or greater.
The primary purpose of the LASTDRIVE parameter is to support local
area networks. In a network environment, the DOS command SUBST is of
ten used to make a subdirectory on one computer appear to be a disk drive
on another computer. Each of these virtual disk drives requires a unique
drive letter. The value of the LASTDRIVE parameter determines how many
drive letters (and thereby how many virtual drives) a computer can have. If
you are using a network, the network documentation will probably suggest
a value for LASTDRIVE.
SHELL
The SHELL parameter (DOS versions 2, 3, and 4) was originally imple
mented to allow users to load and use a command processor other than
COMMAND.COM. While some people may actually be using SHELL for this
purpose, it is most commonly used for two other purposes.
You can use the SHELL parameter to specify for use a copy of the COM
MAND.COM file that is located somewhere other than in the root directory
of the boot drive. This is most important in DOS 4, where the DOS SHARE
facility is required when using disk partitions larger than 32 Mbytes in size.
In such cases, the SHELL parameter must be initialized to load a copy of
COMMAND.COM that. is stored in the same subdirectory as the file
SHARE.EXE. For example, if the file SHARE.EXE is stored in the directory
C: \DOS, the following assignment statement must be placed in CON
FIG.SYS:
106
5-ConJiguring }bur System
C>shell=c:\dos\command.com
/p
The SELECT program, which is used to install DOS 4 (see chapter 1), auto
matically makes this entry for you if you are using a partition larger than 32
Mbytes.
The second common use of the SHELL parameter is to increase the size
of the DOS environment. The environment, which was discussed earlier in
this chapter, has a default size of 160 bytes. An assignment statement of the
following form can be used to create a larger environment:
C>shell=c:\dos\command.com /e:xxxx
The xxxx specifies the environment size. In DOS 3.1, xxxx specifies
the number of 16-byte blocks (paragraphs) in the environment. In DOS 3.2
and subsequent versions, XXX X specifies the actual number of bytes in the
environment (the number is automatically rounded up to the nearest multi
ple of 16). You should increase the size of the DOS environment if you get an
Out of envi ronment space message.
STACKS
Use the STACKS parameter (DOS versions 3.2, 3.3, and 4) to set the number
and size of the stacks that DOS uses to handle hardware interrupts. A hard
ware interrupt is a signal generated by a device (such as the keyboard or a
disk drive) that tells DOS the device needs attention. When this happens,
DOS must stop what it is doing and take care of ("service") the device. But
DOS cannot simply abandon whatever it is working on. It must save some
information, so that it may resume its work after the hardware device is serv
iced. This required information is saved in a portion of memory called a
stack.
Hardware interrupts can be nested. This means that when one inter
rupt is being serviced, another interrupt can occur. When the second is be
ing serviced, a third can occur, and so on. The pool of stacks required in
servicing these interrupts can become exhausted if the interrupts occur in
rapid enough succession.
If there is an inadequate number of stacks, the computer will display a
message like Interna LStack Fa; Lure, System Ha Lted and freeze up. It
will be necessary to switch the computer offand then back on to restart it. If
this should occur, use the STACKS parameter to increase the number and/or
the size of the available stacks.
Computers with 8088 or 8086 CPUs default to a STACK value of 0,0 (0
stacks of size 0 bytes). Under these conditions, hardware interrupts are han
dled in a somewhat different fashion than outlined above.
Computers with 80286 or 80386 CPUs default to a STACK value of
9,128 (9 stacks of size 128 bytes). 8088 and 8086 computers are also given 9
stacks of 128 bytes if the CONFIG.SYS file contains the statement
"stacks=" .
Reasonable guidelines for using the STACKS parameter are as follows:
107
Part 2-1Utorials
.... Increase the number ofstacks to 15 ifyou get a message indicating stack
failure.
.... Increase the number to 20 if the error persists .
.... Increase the stack size to 256 bytes if the error still persists.
Something is wrong if you still get an error. Try to determine which applica
tion(s) cause the error and contact your computer's manufacturer for ad
vice.
SWITCHES
The SWITCHES parameter (DOS version 4) is used to control the activity of
enhanced keyboards. These newer keyboards have some keys (Fll and F12
function keys, and a set of cursor keys separate from the number pad) that
are not found on the older keyboards. Naturally, the new keys generate scan
codes not generated by the older keys. (All keys generate a make scan code
when pressed and a break scan code when released. The make and break
scan codes are unique for each key.)
Some application programs are unable to process the scan codes gener
ated by the newer keys. In such cases, these scan codes may confuse the
program or even cause the system to crash. This problem can be avoided by
setting the SWITCHES parameter to equal "/K.". This instructs DOS to sim
ply ignore the scan codes generated by the new keys.
VERIFY
DOS performs a series of checks to verify that each disk write is performed
correctly when the VERIFY parameter is set to equal "on". You can set the
value of VERIFY from the DOS command line or within a batch file in ver
sions 2 and 3. In DOS version 4 you can set VERIFY either from the com
mand line, within a batch file, or with a statement contained in
CONFIG.SYS. Because DOS disk writes are generally very accurate, setting
VERIFY to "on" usually accomplishes nothing, other than slowing DOS
down.
Using CONFIG.SYS-A Working Example
Now that all of the system parameters have been discussed, let us take a look
at a typical CONFI G. SYS file. Listing 5-1 is the CONFI G. SYS file I used while
writing this book. We will go through and discuss it line by line.
Listing 5-1. A typical CONFIG.SYS file.
break=on
files=20
device=c:\dos\vdisk.sys
buffers=20
Lastdrive=e
108
5-Con/iguring lbur System
shell=c:\dos\command.com Ip le:256
device=c:\sys\emm.sys
device=c:\dos\ansi.sys
install=c:\dos\fastopen.exe c:
The first three lines in listing 5-1 were discussed earlier in the section
headed "Creating CONFIG.SYS."
The line buffers=20 sets the number of disk buffers. Most ofmy work
is word processing; therefore, I should expect my system to primarily per
form sequential disk access. 'l\venty disk buffers is a lot for sequential ac
cess, and it may be more than I actually need. But I am satisfied with my
system's performance; the large number of buffers does not seem to be
slowing things down.
The line lastdrive=e specifies that the system may have up to five
disk drives. My system has two floppy drives, a hard disk, and a RAM disk.
With LASTDRIVE set to "e" I can add at most one more drive. Remember
that this is any type of drive, including logical drives. Therefore, I would
need to change the value of LASTDRIVE if I wanted to create two logical
drives (say, with the SUBST command).
The assignment statement she ll=c: \dos \command. com Ip Ie: 256
performs two functions. First, it tells DOS to load the copy of COM
MAND.COM that is stored in subdirectory \DOS on drive C. This is neces
sary because SHARE.EXE is in the same subdirectory. In order to implement
the DOS 4 support for large disk partitions, COMMAND.COM must be
loaded from the subdirectory containing SHARE.EXE.
The second function of the SHELL assignment statement is to increase
the size of the DOS environment. The statement specifies an environment
size of 256 bytes.
The next two lines in listing 5-1 are device statements. The first state
ment specifies loading of the driver EMM.SYS. This is the device driver for
the expanded memory board in my system. See the accompanying box for
an overview of expanded memory.
The next device statement instructs DOS to load the ANSI.SYS device
driver. Use of this driver is discussed in chapter 9.
The final statement in listing 5-1 installs the program FASTOPEN in
memory. The parameter c: , which is located at the end of the command,
specifies that information for the directories on drive C is to be stored in
memory.
This concludes the discussion of listing 5-1. Before ending our discus
sion of CONFIG.SYS, the following points are worth repeating:
1. CONFIG.SYS must be in the root directory of the boot drive.
2. Most ofthe commands used in CONFIG.SYS cannot be used in batch
files or entered at the DOS command line.
3. Any changes made to CONFIG .SYS do not take effect until the system is
subsequently rebooted.
109
Part 2- Thtorials
An Overview of Expanded Memory
The term expanded memory refers to a technique that has been
developed to overcome DOS' 640-Kbyte memory limitation. Use of
expanded memory requires special expanded memory hardware and
an expanded memory device driver. Generally, the same manufacturer
develops and supplies both the hardware and the driver.
The expanded memory device driver, also called the expanded
memory manager or EMM, is used just like the other device drivers
discussed in this chapter. The EMM is installed in memory using a de
vice statement contained in CONFIG.SYS. The function of the EMM is
to provide a communications protocol between the computer and the
expanded memory hardware.
PC-DOS version 4 comes with two expanded memory device
drivers. XMA2EMS.SYS is a driver for IBM expanded memory hard
ware. XMAEM.SYS is a driver for 80386 machines, which allows those
machines to emulate the function ofan 80286 expanded memory card.
Details on the use ofthese drivers are presented under the discussion of
DEVICE in Part 3 of this book.
Non-IBM expanded memory hardware requires non-IBM drivers.
The machine used in writing this book has an Everex expanded mem
ory card. The driver for the card is a file named EMM.SYS. The me is
stored in directory \SYS on drive C. Thus, the command to load the
expanded memory driver on my machine is
device=c:\sys\emm.sys.
Expanded memory is covered much more thoroughly in chap
ter 12.
AUTOEXEC.BAT
The AUTOEXEC.BAT me is similar to CONFIG.SYS in that it is also a text file
that is automatically read by DOS during the boot-up process (CONFIG.SYS
is read and executed before AUTOEXEC.BAT). AUTOEXEC.BAT also must be
stored in the root directory of the boot drive if it is to be executed automati
cally. Like CONFIG.SYS, AUTOEXEC.BAT allows you to configure DOS to
suit your particular needs.
But AUTOEXEC.BAT is very different from CONFIG.SYS.
AUTOEXEC.BAT is a batch file (see chapter 4) and it may contain any batch me
command. Upon booting, MS-DOS executes the commands in the
AUTOEXEC.BAT file, but you can invoke the sequence of commands in
AUTOEXEC.BAT at any time by typing autoexec on the command line.
The sequence of commands in the AUTOEXEC.BAT me is used to per
form a set of tasks that you wish to be executed each time the system is
110
5-ConJiguring }f)ur System
booted. Typical uses include setting the DOS search path, initializing envi
ronment variables required by programs, setting the system prompt, and
starting up an application program. AUTOEXEC.BAT is also generally used
to perform certain types of system initialization such as redirecting parallel
printer output to a serial port or initializing the DOS print spooler.
DOS will not prompt for the date and time during boot-up if
AUTOEXEC.BAT is present (unless the file contains the command DATE and/
or the command TIME).
Listing 5-2 contains the AUTOEXEC.BAT file on the computer used in
the writing of this book. The contents of the file illustrate some typical uses
of AUTOEXEC.BAT.
Listing 5-2. A typical AUTOEXEC.BAT file.
path=c:\prgms\wordic:\procommic:\doSiC:\utilsic:\bat
mode com2:300,n,8,1,p
mode lpt1:=com2
print Id:lpt1
prompt=$p$g
set pcplus=c:\procomm\
set hercgb102=true
set li b=c : \ lib
cd c:\books\dos
word config
xcopy *.* b: 1m
The first line in listing 5-2 sets the DOS search path. This is the list of
directories that DOS searches when it cannot find a file in the current direc
tory.
The directory c: \prgms\word contains the files for my word proces
sor. The directory c: \procomm contains the files for the communications
package that I use. The directory c: \dos contains the DOS files. The direc
tory c: \ut; l s contains the Norton Utilities along with other utility pro
grams that I have acquired. Finally, the directory c: \bat contains all my
batch files.
When setting up your search path, remember that DOS searches the
subdirectories in the order in which you list them. Therefore, the subdirec
tories that you use most should be listed first, and those that you use least
should be listed last.
The next line in listing 5-2 sets the system prompt so that it displays the
currently active directory. This is helpful as an aid in remembering where
you are currently located within the directory hierarchy.
The next three lines are SET commands that create and assign values to
three environment variables. The variable pcplus is required by my com
munications software. The variable hercgb102 is required for my word
processor to work properly. The variable l; b is required by my C compiler.
What, if any, environment variables you require, and the values to which they
111
Part 2-Tutorials
must be set, are determined by the application software that you are using.
Refer to the software documentation for information specific to your applica
tions.
The next line in the AUTOEXEC.BAT file in listing 5-2 is a CD com
mand. The command sets the subdirectory \books\dos on drive C as the
active directory. The next command (wo rd conf i g) starts up the word proc
essor, instructing it to load a document file named "config".
The final command in listing 5-2 is automatically executed upon exit
ing from the word processor. The XCOPY command checks each file in the
current directory and determines which files have the archive attribute set.
Those files with a set attribute are copied to drive B and the attribute is
cleared. (The 1m parameter instructs XCOPY to check the archive attribute.)
Since DOS sets a file's archive attribute each time the file is modified, this final
command in the AUTOEXEC.BAT file automatically makes a backup copy of
any document files that I have worked on.
112
C
H
P
A
T
E
R
6
Redirection, Filters,
and Pipes
II~
I
~
II;_~
Standard Input and Standard
Output Devices
Reserved Device Names
Redirecting an MS-DOS
Command
Filters
Pipes
Redirection versus Piping
Input and output are the processes through which computers receive and
send data. Versions 2.X, 3.X, and 4.X of MS-DOS allow you to modify these
processes through the use of some sophisticated data management tech
niques known as redirection, Jiltering, and piping. You can use these tech
niques and their associated MS-DOS commands to build your own
information pipeline. Like a plumber, you can redirect the flow of informa
tion from one place to another, have the information modified through a
filter, and then pipe the output to a final destination. This chapter will ex
plain how to use these special techniques with MS-DOS 2.X, 3.X, and 4.X.
113
Part 2- Tutorials
Standard Input and Standard Output Devices
As you know from your own experience, most of the time you use the key
board to enter data into your computer, and during most operations this data
is sent to the display screen for your viewing. The keyboard is therefore the
standard input device, and the display screen or monitor is the standard
output device.
MS-DOS 2.X, 3.X, and4.Xallowyou to specify a device, other than the
standard input device, as the source of input data. Similarly, you can specify
a device, other than the standard output device, as the destination of output
data. These input and output devices are called peripheral devices because
they are hardware that is external to the microcomputer.
Reserved Device Names
When you designate an input or output device different from the standard
one, you must give MS-DOS the correct name for that peripheral device.
Each device, such as a printer or modem, has a standard name recognized by
MS-DOS and reserved for use with that device only. There is even a dummy
device for testing purposes. Thble 6-llists the device names and the periph
eral devices to which they refer.
Table 6-1. MS-DOS Reserved Names for Peripheral Devices
Reserved Name
Peripheral Device
AUX
First asynchronous communications
port
Asynchronous communications ports 1
through 4
Keyboard and display screen (CONsole)
First, second, and third parallel printers
Dummy device (for testing)
First parallel printer
COMl, COM2, COM3, COM4
CON
LPTl,LPT2,LPT3
NUL
PRN
Redirecting an MS-DOS Command
The output of an MS-DOS command can be redirected to a device, other
than the standard output device, by entering an MS-DOS command, fol
lowed by " > " (the symbol for redirected output), followed by the name of
the device that is to receive the output (see figure 6-1).
Let's look at an example using the MS-DOS command TYPE, which is
114
6-Redirection, Filters, and Pipes
O0 O0 0 0
MS-DOS
[>
Standard
Out~ut
Device
Figure 6-1. Redirection of output (> ).
used to display the contents of a file on the screen. When the command type
myfile is entered, the contents of "myfile" can be viewed on the display
screen. Enter the following command to redirect output to the printer. Be
sure to turn your printer on first or your system will "hang" until you do.
C>type myfile
> prn
Because you used PRN-the reserved device name for the parallel
printer-in your command, MS-DOS recognizes that the output of "type
myfile" is to be redirected to the printer. No screen display results from this
command.
In addition to the devices listed in table 6-1, MS-DOS also recognizes
files as peripheral devices. This means that you can redirect output to an MS
DOS file. For example, the following command stores the output of the
command DIR in a file named "dir.1st":
C>di r
> di r. lst
If a file named "dir.1st" already exists on the disk in the default drive, it will
be overwritten by this command. The data already in the file will be lost,
replaced by the output of the command.
By using the symbol" > > ", you can append output from a command
to the end of an existing file. For example:
C>di r
»
di r. lst
This command will add the output of the DIR command to the end of an
existing file named"dir.lst". If there is no existing file with that name, a file
will be created that contains the output of the DIR command.
So far we have been talking about redirected output. However, input
can be redirected too (see figure 6-2). As you might expect, the symbol for
redirection ofinput ( < ) is the opposite of the one for redirection of output.
The next section will show you how redirection of input can be used with
filters.
115
Part 2-Tutorials
~:~~ard
Device
000000
MS·DOS
Figure 6-2. Redirection of input ( <).
Filters
Afilter is an MS-DOS command (or a computer program) that accepts data
from an input device, rearranges or "filters" the data, and then OLJtputs the
filtered data to the designated output device. MS-DOS 2 .X, 3.X, and 4.X con
tain three filter commands: SORT, FIND, and MORE. As we discuss these
commands, we will also elaborate on the concept of redirection.
SORT
The SORT command reads lines of text from the standard input device (the
keyboard), sorts the lines, and then writes the sorted results to the display
screen. SORT is also used, much more commonly, to sort lines contained in
text files. Redirection of the standard input is used to send the text file's
contents to SORT. The sorted results are sent to the standard output (the
display screen).
In the discussion ofSORT that follows, we will use the contents of a file
named "sample. txt" for demonstration purposes. We will begin the discus
sion by first using TYPE to view the unsorted contents of "sample.txt" . The
examples which follow assume that "sample. txt" is in the current directory
of drive C.
C>type
0006
0003
0004
0005
0001
0002
sample. txt
acme rents
fL i nt's bbq
cody's books
uc theater
pegasus books
mountain traveL
100 broadway ave
6609 shattuck ave
2460 telegraph ave
2036 university ave
1855 solano ave
1215 irving st
oakland
oakLand
berkeLey
berkeley
aLbany
san francisco
c>
Each line in the file is made up of four columns, which are respectively an
116
6-Redirection, Filters, and Pipes
account number, the name of a business, the business street address, and the
city address.
SORT is an external MS-DOS command. This means that either the file
SORT.EXE must be in the current directory or the directory containing
SORT.EXE must be in the DOS search path.
The input redirection symbol ( <) is used to send the contents of a text
file to SORT. SORT sorts the lines in the file according to the first character
on each line and sends the results to the display screen:
C>sort
0001
0002
0003
0004
0005
0006
< sample. txt
pegasus books
mountain travel
flint's bbq
cody's books
uc theater
acme rents
1855 solano ave
1215 irving st
6609 shattuck ave
2460 telegraph ave
2036 uni versity ave
100 broadway ave
albany
san francisco
oakland
berkeley
berkeley
oakland
C>
The SORT command switch I+n can be used to sort according to the
character in any position on the line. In the following example, SORT is used
to sort the lines according to the business name. The first character in the
business name is the eighth character on the line.
C>sort
0006
0004
0003
0002
0001
0005
/+8 < sample. txt
acme rents
cody's books
flint's bbq
mountain travel
pegasus books
uc theater
100 broadway ave
2460 telegraph ave
6609 shattuck ave
1215 irving st
1855 solano ave
2036 university ave
oakland
berkeley
oakland
san francisco
albany
berkeley
C>
SORT treats tabs as a single character. Therefore if your columns are
aligned with tabs, SORT will probably appear to be confused, because it
won't be comparing the characters you expect. For example, in "sam
pie.txt", if the columns were aligned with tabs, SORT might not align the
address for "acme rents" with the address for "mountain travel". SORT is
really for use only with text files that have columns (or fields) aligned using
spaces.
SORT can also sort in reverse order using the Ir switch. The following
example sorts the lines in the file in reverse order according to the twenty
fifth character on each line (the first digit in the street address).
C>sort /r /+25 < sample. txt
0003
flint's bbq
6609 shattuck ave
oakland
117
Part 2- Tutorials
0004
0001
0005
0002
0006
cody's books
pegasus books
uc theater
mountain traveL
acme rents
2460 teLegraph ave
1855 soLano ave
2036 university ave
1215 irving st
100 broadway ave
berkeLey
aLbany
berkeLey
san francisco
oakLand
c>
Notice that where the characters in the position ofcomparison are identical,
a comparison is made at the next position.
The output from SORT can be redirected to another device such as the
printer (using" > PRN") or to a text file. The following listing shows how the
result of the previous example could be redirected to a file named "ad
dress. txt" :
C>sort Ir 1+25 < sampLe. txt > address. txt
C>
FIND
The FIND command searches a line of standard input for a specified se
quence of characters. The line is echoed to the display screen if it contains
the sequence. FIND is also used, much more commonly, to find the lines in a
text file that contain a specific character sequence.
FIND is an external MS-DOS command. The requirements for its use
are identical to those described above for SORT. The examples that follow
use the text file "sample.txt", which is displayed above.
FIND is used by entering find, followed by the sequence of characters
on which to base the search, followed by the name of the text file to be
searched. The sequence of characters must be enclosed in quotation marks.
FIND reads lines of text from the standard input device (the keyboard) if a
filename is not specified. The following example looks for the line of text
that contains the sequence "flint's":
C>find "fL int 's" sampLe. txt
---------- SAMPLE.TXT
0003
fLint's bbq
6609 shattuck ave
oakLand
C>
FIND can also be used to locate the lines that do not contain a sequence
of characters. The following example demonstrates how the Iv switch can
be used to locate the businesses not in "berkeley".
118
6-Redirection, Filters, and Pipes
C>find Iv "berkeLey" sample. txt
--------- SAMPLE. TXT
0006
acme rents
0003
flint's bbq
0001
pegasus books
0002
mountain travel
100 broadway ave
6609 shattuck ave
1855 solano ave
1215 irving st
oakland
oakLand
aLbany
san francisco
C>
The Ic switch displays a count ofthe lines in a text file that contain the
specified sequence. The following example counts the number of busi
nesses in "oakland":
C>find Ie "oakLand" sample. txt
---------- SAMPLE. TXT: 2
C>
The In switch can be used to display the lines found, along with a line
number that identifies the line's pOSition in the file:
C>find In "books" sampLe. txt
---------- SAMPlE.TXT
[3]0004
[5JO001
cody's books
pegasus books
2460 teLegraph ave
1855 soLano ave
berkeley
aLbany
C>
As was illustrated with SORT, the output from FIND can be redirected
to a text file.
MORE
The MS-DOS command MORE is a filter that displays one screenful of data at
a time. MORE is an external MS-DOS command. This means that MORE is
not stored in memory when MS-DOS is booted. Therefore, in order to use
MORE, a disk containing the file MORE.COM must be in the current direc
tory of one of the system drives. In the following examples, MORE.COM
and "sample.txt" are located in the current directory of drive C.
Data is input to MORE by redirection:
C>more < sampLe. txt
This command redirects the data in the file "sample. txt" as input to the filter
119
Part 2- Tutorials
MORE. MORE outputs the data, 23 lines at a time, to the standard output
device. When the screen is filled, the prompt -- MORE -- is displayed. Press
ing any key gives another filled screen of data. The process is repeated until
the entire file has been displayed.
The output from MORE may be redirected to a device other than the
standard output device. The following command sends 23 lines of "sam
ple. txt" at a time to the printer:
C>more
< sample. txt > prn
The prompt -- More -- will also be sent to the printer.
Pipes
Pipes are connections between two programs or two commands or a com
mand and a program. Pipes allow data that is output from one program to be
redirected as input to a second program (see figure 6-3).
MS·DOS
Command
(or program)
MS·DOS
Command
(or program)
Figure 6-3. Piping a command's output as input
for a second command.
The MS-DOS symbol for a pipe is a vertical bar ( I ). To redirect the
output from one command (or program) to another, type the first com
mand, followed by a vertical bar, followed by the second command.
Consider the following command:
C>di r : find "-85
II
This command directs MS-DOS to send the output of the DIR com
mand (usually sent to the display screen) as input to the FIND filter. FIND
searches each line of the input for the character string" -85 ". The result is
that all the files in the current directory with a 1985 date stamp are displayed
on the screen. (Date stamps are discussed in chapter 1.) Any files with a
filename or filename extension containing"-85" would also be displayed.
A command may contain more than one pipe. In the preceding com
mand, the output of the FIND filter is sent to the screen. The output can be
redirected with another pipe:
C>di r : find 11-85 " : sort /+14
120
6-Redirection, Filters, and Pipes
Now, the output of the FIND command is piped to the SORT filter, which
sorts the 1985 files according to their size (the 14th column ofeach line). The
sorted output is sent to the display screen. Try this command with one of
your own files. Remember that FIND and SORT are external MS-DOS com
mands; therefore, the files FIND.EXE and SORT.EXE must be in the current
directory of the specified (or default) drive.
Redirection versus Piping
The difference between redirection and piping can be a little confusing.
Redirection refers to the modification of input from, or output to, periph
eral devices (see table 6-1 and figures 6-1 and 6-2). Piping refers to the conver
sion of the output from an MS-DOS command or computer program into the
input for another command or program (figure 6-3).
We'll try to clarify with one more example:
C>sort /+6 < sample. txt: find "book" > bookstor.lst
The first part ofthe command (sort /+6 < samp Le. txt) redirects the file
as input to SORT. The output from the SORT program is piped to the FIND
program. The output from the program is redirected to the file "book
stor.lst" .
Redirection and piping are not restricted to MS-DOS commands. Any
program that runs under MS-DOS can be written to support redirection and
piping. For example, many ofthe public domain DOS utility programs (such
as the ubiquitous WordStar file strippers) support these features.
121
C
HAP
T
E
R
7
The DOSSHELL Interface
'.
.
'.
.
'.
. ...
::
"
....
. ...........
Starting DOSSHELL
Using DOSSHELL
Modifying DOSSHELL.BAT
123
Part 2- Tutorials
A shell is a computer program that interprets your requests to run other
computer programs. Another term for shell is command interpreter. The
standard DOS shell is the program COMMAND.COM. Broadly speaking,
COMMAND.COM provides support for the DOS command line interface.
The command line is indicated by the familiar C>, which stares at the user
whenever DOS is waiting for a command to be entered.
The command line interface is often criticized as being "awkward" and
"nonintuitive" to use. Systems with a command line interface require you to
type the exactly correct command. Ifyou make a mistake, the system refuses
to operate or misfires. A command line interface generally offers little in the
way of clues as to your choice of possible commands or their correct spell
ing and syntax (not to mention command options, switches, and other pos
sible parameters).
Many people feel that a graphically based interface, as employed by
the Apple Macintosh, is easier to use. Graphically based interfaces display to
the user a visual representation of the choice of possible commands. The
user has the capability to "pick and choose" a command to be executed.
The term "pick" means that by using some type of input device (most often
a mouse or the cursor keys) the user can move the cursor or a highlight bar
from one command to another. The term "choose" means that the user can
execute a command by first "picking" it and then pressing a specific key
(typically the Enter key or a button on the mouse).
Some users actually prefer the command line interface. Typically these
are experienced computer users who want maximum control of their ma
chines. Nonetheless, the trend in personal computing is clearly headed to
ward graphically based interfaces. DOS 4 follows this trend with the
implementation of a "more friendly" user interface called DOSSHELL.
Many users will find DOSSHELL a significant improvement over the stan
dard DOS command line.
This chapter begins with a discussion of some basic facts about
DOSSHELL, for users who want to begin using the new interface right away.
The second section, the majority of the chapter, discusses in detail the struc
ture, appearance, and use of the DOSSHELL interface. The second section
also explains how you can extend the interface to suit your particular needs.
The chapter's third and final section explains the role of the DOSSHELL.BAT
batch file in configuring the DOSSHELL interface. The chapter assumes that
you are familiar with the coverage of files and directories in chapters 2 and 3.
Starting DOSSHELL
To use DOSSHELL you must have the files DOSSHELL.BAT, SHELLB.COM,
SHELLC.EXE, SHELL.MEU, DOSUTIL.MEU, SHELL.HLp, and SHELL.CLR.
If you are using a mouse, you may also need one of these files:
PCIBMDRV.MOS, PCMSDRY.MOS, or PCMSPDRY.MOS (refer to "Using a
124
7-Tbe DOSSHELL Interface
Mouse with DOSSHELL" on page 126). All ofthese files, with the exception
of DOSSHELL.BAT, are supplied on the DOS 4 system diskettes.
The installation program SELECT (discussed in chapter 1) copies the
above mentioned files to the directory containing the DOS system files, and
then creates a DOSSHELL.BAT file. When SELECT completes the installa
tion process, you can start DOSSHELL by entering dosshell at the DOS com
mand line.
If you are installing DOS 4 manually (without SELECT), you can copy
the above mentioned files (except DOSSHELL.BAT) from your system disk
ettes to the directory in which you are storing the other DOS system files.
You can then use EDLIN or another text editor to create DOSSHELL.BAT.
Use of EDLIN to create the file DOSSHELL.BAT is illustrated below. The
example assumes that the DOS system files are stored in C: \DOS and that the
DOS search path contains the directory holding EDLIN.COM. You can copy
the commands in the example to produce a working DOSSHELL.BAT batch
file. This will allow you to begin using the interface right away. Discussion of
the commands contained in DOSSHELL.BAT will be delayed until the end of
this chapter.
C:\DOS>edlin dosshell.bat
New file
..... start EDLIN
*i
..... enter "i"
..... DOSSHELL command
..... DOSSHELL command
..... DOSSHELL command
.....DOSSHELL command
..... enter
all
of this
as one line.
..... DOSSHELL command
..... DOSSHELL command
..... enter Ctrl-Z
..... enter "e"
1:*mshellb dosshell
2:*mif errorlevel 255 goto end
3:*:common
4:*mbreak=off
5:*mshellc /tran/color/menul
mullsndlmeu:shell.meul
clr:shell.clrlpromptl
maintlexitlswapldate
6:*:end
7:*mbreak=on
8*:I'IZ
C:\DOS>
Once DOSSHELL.BAT is created, the DOSSHELL interface is started by
entering dosshell at the DOS command line. However, you may have to
modify your DOS search path before the interface will start up.
DOSSHELL and the DOS Search Path
It is generally convenient to be able to start DOSSHELL without changing
the current directory. For example, if the current directory on drive C is
\BOOKS\DOS and DOSSHELL.BAT is stored in \DOS, it would be conven
125
Part 2-Tutorials
ient to immediately start DOSSHELL without having to change directories.
In order to do this, the DOS search path must contain the directory storing
the files used by DOSSHELL. In addition, you must use the APPEND com
mand to specify the directory containing these files.
The DOS search path is the list of directories that DOS searches if it
cannot find a file in the current directory. You set the search path by typing
path followed by the directories to be searched. The directories are sepa
rated by semicolons. For example, the command "path c:\prgms\word;c:
\dos" (or "path=c: \prgms\word;c: \dos") tells DOS to look in the directo
ries C: \PRGMS \ WORD and C: \DOS for any files it cannot find in the current
directory.
Some programs cannot use the information contained in the DOS
search path. The APPEND command was implemented to provide these
programs with a list ofdirectories to search when looking for files not stored
in the current directory. You set APPEND's search path by typing append
followed by the directories to be searched. The directories are separated by
semicolons.
If the files used by DOSSHELL are in the directory C: \DOS, the follow
ing two commands allow you to start the DOSSHELL interface without
changing the current directory:
path c:\dos
append c:\dos
Unfortunately, APPEND causes problems for some applications. For
example, if you modify a file that was accessed using the APPEND search
path, the file may be copied to the current directory, rather than back to the
directory containing the original file. The Original file will remain un
changed. If programs begin to behave erratically, APPEND may be the cul
prit. In such cases it often is necessary to avoid using APPEND. This makes
the DOSSHELL interface available only when the directory storing its re
quired files is made current.
As an alternative to relying on PATH and APPEND, you can place a CD
command in DOSSHELL.BAT to make the directory containing the
DOSSHELL files the current directory. Then, whenever you enter
"dosshell", that directory becomes the current directory and DOSSHELL
works fine. The problem with this approach is that you end up in that direc
tory when you quit DOSSHELL.
Using a Mouse with DOSSHELL
PC-DOS 4.01 comes with three mouse device drivers. PCIBMDRY.MOS is
for the IBM mouse. PCMSDRV.MOS is for the Microsoft serial mouse.
PCMSPDRY.MOS is for the Microsoft bus mouse. These drivers operate only
when DOSSHELL is running. Other applications still require the original
driver supplied by the mouse's manufacturer.
126
7-The DOSSHELL Interface
The SELECT installation program automatically sets up the
DOSSHELL.BAT file so that the new driver appropriate for your system is
loaded each time DOSSHELL is started. If your mouse does not work when
DOSSHELL is running, chances are the driver installed is interfering with the
mouse's regular driver. To correct the problem, examine the contents of
DOSSHELL.BAT. You will see a line that looks something like this:
@sheLLc Itran/coLor/menu/muL/snd/meu:sheLL.meu/cLr:sheLL.cLr
Iprompt/mos:pcmsdrv.mos/maint/exit/swap/date
Delete the Imos: pcmsdrv. mos and restart DOSSHELL. The regular driver
will now work when DOSSHELL is running.
Using DOSSHELL
This discussion on the use of the DOSSHELL interface is divided into four
sections. The first section discusses the terms DOSSHELL program and
DOSSHELL program group. You need to understand what these terms mean
in order to follow the remainder ofthe discussion. The second section intro
duces the DOSSHELL interface and discusses the various components of the
interface. Terms used in describing user interactions are defined in this sec
tion. The third section contains a detailed tutorial on the use of the
DOSSHELL interface. The built-in capabilities of the interface are all pre
sented and discussed. The final section of the discussion shows how you
can write your own DOSSHELL programs to extend the capabilities of the
DOSSHELL interface.
DOSSHELL Programs and Program Groups
In order to use the DOSSHELL interface effectively, you must understand
what the term DOSSHELL program means. A DOSSHELL program is not an
application program or a DOS command. Rather, a DOSSHELL program is
more like a batch file, because each DOSSHELL program contains one or
more batch file commands. In addition, a DOSSHELL program may contain
one or more Program Start Commands, which are used to control the man
ner in which a user interacts with the DOSSHELL program. Each DOSSHELL
program has a program name that is used to identify it. DOSSHELL pro
grams are executable only when using the DOSSHELL interface. They are
not executable from the command line or from a batch file.
DOSSHELL programs are grouped together in DOSSHELL program
groups. Each program group also has a name that is used to identify it. As we
will see shortly, you execute a DOSSHELL program by first displaying on the
screen the program group that contains the program you want to execute.
The Main Program Group is the program group that is displayed each
time the interface is started up. The Main Program Group serves as a sort of
127
Part 2- Tutorials
"home base" for the DOSSHELL interface. It is a convenient place to return
whenever you need to set your bearing straight.
In addition to containing individual DOSSHELL programs, the Main
Program Group can contain other program groups. These program groups
are called subgroups. You can display the names of the DOSSHELL pro
grams contained in a subgroup by selecting the subgroup's name from the
Main Program Group display. Subgroups contain only DOSSHELL pro
grams. They cannot contain other program subgroups.
The DOSSHELL Display
Upon starting, DOSSHELL presents you with the Main Program Group
screen. This is the DOSSHELL home base mentioned above. The screen is
displayed in either graphics (figure 7-1A) or text (figure 7-1 B) mode, depend
ing on the type of video display hardware being used.
Graphics and Text Modes
EGA and VGA monitors display in graphics mode; other monitors display in
text mode. EGA and VGA monitors can be made to display in text mode
through use of the ITEXT parameter, which is discussed at the end of this
chapter. The major differences between graphics mode and text mode are:
1. Graphics mode uses an arrow to represent the position of the mouse;
text mode uses a small rectangle (refer to the upper left-hand corner of
figures 7-1A and B).
2. Graphics mode provides scroll bars for use with the mouse; text mode
does not.
3. Graphics mode uses icons to convey information; text mode does not
use icons.
4. Text mode is generally faster.
The remaining illustrations in this chapter are in graphics mode; how
ever, the information presented is applicable for text mode unless otherwise
noted.
Components of the Main Program Group Screen
Referring to figures 7-1A and 7-1B, the bar across the top of the screen dis
plays the current date, the text "Start Programs", and the current time. As
you shall see, "Start Programs" indicates that you can start DOSSHELL pro
grams from this screen.
The second line on the screen is the action bar, which contains the text
"Program", "Group", and "Exit". The right side of the action bar contains
the text "Fl =Help". You can press the Fl key at any time to obtain context
sensitive help. This means that the help provided is relevant to the task you
are currently trying to perform.
The contents of the Main Program Group are listed on the left side of
128
7-The DOSSHELL Interface
•
b'ogr_
IirauP
F1=t1e~
kit
...... - p
tlIe up . . . . .own .....-.
'10 _Ieet ... It... _
'10 atart • ....,...... .... 1. .I.y • _
1Jl'OUP....... EnteP.
rll. Sy.te.
ella.... Colora
lOS Utllltl_ •.•
rt8=Act I.,..
(A) DOSSHELL in graphics mode.
84-12-89
Man PI'ogrilJllS
11:53
liiA iei• •JJ1U.Itx:Oo• • • • •_•_
•••••••••••
ltaln Group
To select. an la. use \be up and dOUll arrows.
ilJII
IllI1id• •
To st.art. a progrilJll or dIsplil!l a neu grouP. press
Ent.er.
FlIe Syst.eft
Change Co lars
DOS Utilities •••
FHI il( 1. J()ns
Sil Ill. f I 'J ((lnr1" 10" Pr'(lM't.
(B) DOSSHELL in text mode.
Figure 7-1. The Main Program Group screen is displayed in either
graphics or text mode.
the screen, starting about a third of the way down. "Command Prompt",
"File System", and "Change Colors" are the names of the DOSSHELL pro
grams contained in the Main Program Group. "DOS Utilities" is the name of
a program subgroup contained in the Main Program Group. The name of a
subgroup is always followed by an ellipsis ( . . . ) to indicate that it is a sub
group name rather than a DOSSHELL program name.
129
Part 2- Tutorials
The bottom line of the Main Program Group display lists some "hot"
keys that are active for this screen. The FlO function key toggles the action
bar on and off. The action bar toggle is on when one of the items ("Pro
gram", "Group", or "Exit") is displayed with a reverse video highlight bar.
You can select (see the following box) an item from the action bar with a
single keystroke when the toggle is set to "on".
The other hot key combination indicated at the bottom of the screen is
Shift-F9, which executes the DOSSHELL program named Command
Prompt. You can use the Command Prompt program to "jump" from the
DOSSHELL interface to the command line interface. Once at the command
line, you can execute DOS commands and application programs in the con
ventional fashion. DOSSHELL does not terminate when you execute the
Command Prompt program. Instead it remains suspended in memory,
ready to resume action when you type "exit" on the command line.
Selecting an Item
To select an item, such as the name ofa program, subgroup, or file,
first use the cursor keys to move the highlight bar to the item, and then
press the Enter key. Alternatively, move the mouse's pointer over the
item and click the mouse's left-most button two times.
You can select an item from the Main Program Group's action bar
with a single keystroke when the action bar is toggled on. For example,
press p to select "Program"; press g to select "Group"; press x to select
"Exit". The items in the action bar are explained later in the chapter.
Using the Main Program Group
The Main Program Group contains the DOSSHELL programs Command
Prompt, File System, and Change Colors. Later you will learn how to add
new DOSSHELL programs and program subgroups to the Main Program
Group. First, see how these three programs function.
Command Prompt
As discussed above, you can use the DOSSHELL program Command
Prompt to "jump" from the DOSSHELL interface to the command line inter
face. You can execute Command Prompt by pressing the Shift-F9 key combi
nation, or by selecting "Command Prompt" from the Main Program
Group's list ofprogram names. Remember that you return to the DOSSHELL
interface by typing exit on the command line.
130
7-The DOSSHELL Interface
File System
File System is a DOSSHELL program that lets you execute, print, move,
copy, delete, and rename files. You can also use the File System program to
modify a file's attributes. Finally, File System allows you to delete, rename,
and create file directories. Use of File System to perform each of these func
tions is described in this section. The section begins with some basic infor
mation about techniques and terminology.
File System Basics
Start using File System by selecting it from the Main Program Group's screen
(figures 7-1 Aand B). This will present the File System screen (figure 7-2). The
top line of the File System screen displays the date and time. The second
line, referred to as the File System action bar, contains the items "File", "Op
tions", "Arrange", and "Exit". Select "Exit" to return to the Main Program
Group screen.
As is the case with the Main Program Group's action bar, the File Sys
tem's action bar is toggled on and off with the FlO key. You can select an
action bar item with a single keystroke when the action bar is toggled. You
can also use the mouse to select an item on the action bar.
_~~.~.
lIe aption.
Qrrange
c:,
Directo
Tree
·""PM
~It
.
A
"'J!r;
.678
~TOEXEC ....
~TOEXEC .BAJC
(iiilAUTOEXEC .MT
~12345
-.
..,.
189
122
63
95
86-17-88
12-19-88
11-28-88
12-15-88
116-17-88
12-19-88
~.co..
~ICi
....
~ICi
.BAJC
~ICi
.SYS
~IGZ .SYS
~TA
:n.6:n
11.397
11-29-88
(iii) IIIUIIO
(iii) IBIUIOS
3Z.816
88-83-88
88-83-88
383
18-2B-BB
!!!ItEUCOtIF I
. co..
•co..
145
73
121
3Z1
36._
84-12-89
84-12-89
84-12-89
v
+
Shitt+F9=e-ana ITalept
...
Figure 7-2. The File System screen. Drive C is currently selected.
Immediately below the action bar you can see an area that lists the disk
drives on the system. In graphics mode, icons representing disk drives are
displayed in this area. This area is referred to as the drive selection area.
Below the drive selection area, the screen is divided into two columns.
A directory tree is displayed on the left. A listing of files is displayed on the
right.
131
Part 2- Tutorials
Move the highlight bar from the drive selection area to the directory
tree, then to the listing of files, then to the action bar, then back to the drive
selection area, by repeatedly pressing the tab key.
The icon or drive letter of the currently selected drive is highlighted
when the highlight bar is in the drive selection area. The currently selected
drive is the drive currently being accessed by the DOSSHELL interface. The
directory tree and the listing offiles on the lower portion of the screen repre
sent a portion of the contents of the currently selected drive.
You change the currently selected drive by pressing simultaneously the
Ctrl key and a letter key. For example, you make drive D the currently se
lected drive by pressing Ctrl-D.
The currently selected directory is highlighted when the highlight bar
enters the area containing the directory tree. The currently selected direc
tory contains the files whose names are displayed in the listing on the right
side of the screen.
Change the currently selected directory by moving the highlight bar
to the desired directory and then pressing the Enter key. The listing of files
on the right side of the screen is updated to reflect the change of directo
ries.
Only one disk drive and one file directory are currently selected at any
one time. In contrast, one or more files may be currently selected at a given
time. To select a file, use the tab to move the highlight bar to the column on
the right, and move the highlight over the desired filename. Press the space
bar to select a file. Press the space bar again to "deselect" a file. Using a
mouse, you can point and click to select and deselect.
In graphics mode, selected files are represented by a highlighted file
icon. Figure 7-3A shows three files as currently selected. In text mode,
selected files are indicated by an arrowhead to the left of the selected
filename.
The contents of the directory tree can be scrolled up and down if the
tree is too large to fit in the space provided. Similarly, the listing of files can
be scrolled up and down if the listing is too large to fit in the space provided.
Left and right columns can be scrolled up and down.
In graphics mode, there are single arrows and double arrowheads im
mediately to the right of the directory tree. Use the mouse to click on the up
(or down) arrow to scroll the directory tree up (or down) one line at a time.
Click on the double up (or down) arrowheads to scroll the directory tree up
(or down) fifteen lines at a time. Similarly, use the arrow and arrowheads to
the far right of the screen to scroll the list of files up and down.
There is also a slider box between the up and down arrowheads, which
can be used for scrolling in either direction. Move the mouse's pointer to the
slider box, hold down the left mouse button, and move the slider box in the
direction you want to scroll (see figure 7-3B).
In text mode, up and down arrows provide the scrolling mechanism.
Scrolling with the up and down cursor keys is also supported in both types
of display modes.
132
7-Tbe DOSSHELL Interface
1 1 It
c:,
III
')~
It,
"T!!f;
n
IJoee
~12345
.678
!!!IMJIOIXIC .411
!!!IMJIOIXIC."
1t:1OIXIC.:lAr
.1. . .COIt
I!!!!ICOIIP IG .411
E I G .JIM
IG .SYS
lCilZ .SYS
~C:,
Tat
IJLS
LINSEr
!!!IIIAM
(ii)1""0 .COIt
(ii)11IIDOS .COIt
!!!IftIIICOIII'1
-.
'I'
189
122
fo3
96
37.637
145
73
121
321
11.397
32.816
...
:.3
16-17-88
12-19-88
11-28-&1
12-15-88
16-17-88
12-19-88
84-12-89
84-12-89
84-12-89
11-29-88
~
~
1&-28-&1
..,.
(A) Tbefiles AU1OEXEC.BAK, CONFIG.BAK, and CONFIG.SYS are
currently selected.
-~~;
IT. JLDI
ttilllle
~It
"iMI'P'
r ....
~12345
.678
!!!IMJIOIXIC.....
!!!IAUIOIXIC .IAX
~.:lAr
.COIt
I!!!!ICOIIP IG
E I G .IAX
IG .SYS
ICilZ .SYS
.....
eDAM
(ii)11IIB 10 .COIt
(ii)11IIDOS .COIt
!!!IftIIICOIII'1
-.
'I'
189
122
fo3
96
37.637
145
73
121
321
11.397
32.816
...
:.3
16-17-88
12-19-88
11-28-88
12-15-88
16-17....
12-19-88
84-12-89
84-12-89
84-12-89
11-29-88
A
~
~
1&-28-&1
...
v
(B) Using tbe slider box to scroll tbe directory tree.
Figure 7-3. Selecting IDes from the directory.
Most of the action in the File System program takes place by first select
ing "Files" on the action bar. A pop-up box appears when this item is se
lected (see figure 7-4). This box is referred to as the Files pop-up box.
The last two items in the Files pop-up box are "Select all" and "De
select all". "Select all" lets you select all of the files in the currently selected
directory. It is useful for performing global operations such as moving all
files from one subdirectory to another. "Deselect" lets you deselect all files
currently selected. To protect against inadvertent file deletion, make it a
habit to deselect all files prior to performing a file deletion.
133
Part 2-Tutorials
Il.ile3J•.l oUo_
8l'P&nge
Fl=Help
Exit
dr~_.
c:;p:
~
trhli. ...
t-ociate ••.
110-· ..
~py .••
Jlelete ...
Be-· ..
Change attl' I Ioute ...
\l.i-
I
1!!!111Z345
-
Crpte 4irectory ..•
lelect all
Deselect all
Ele;
Ie;
~TA
u:z
(!!!) IBIUIIO
(!!!) IIII'IDOS
61l
~I
L
....
71.637
16-17~
.cot!
.cot!
36._
•cot!
.BAII
.SVS
.SVS
i-M1"TtICE
-KC)PlIIIPC
12-19-88
11-28-88
12-15-88
145
73
121
321
11.397
32.816
12-19-88
114-12-89
114-12-89
114-12-89
11-29-88
89-83-88
89-83-88
383
18-28-88
ROSPI"
F18=AcUDn8
l'
16-17~
~.IIAT
!!!ICOHF Ie;
-.
189
122
63
9S
.678
I!!!IAUTOEXEC ....
I!!!IAUTOEXEC .BAII
+
Shilt+F9=ec-and Pro.pt
i
~
"'"
Figure 7-4. The Files pop-up box.
This concludes the discussion of the basic techniques and terminology
relevant to using the File System program. The time has come to start using
the program.
Additional Tips and Techniques
Underlined Letters Many items appearing in the DOSSHELL in
terface have one of their letters underlined. You can select these items
by pressing the key corresponding to the underlined letter. For exam
ple, if the Files pop-up box is displayed, you can press "s" to select
"Select all".
Horizontal Scrolling Many of the boxes used to enter text are too
small to hold all of the characters that can potentially be entered in the
box. The contents of these boxes automatically scroll as you enter
more characters. The boxes also have horizontal arrows, which you
can use to scroll the contents for reading. Refer to figure 7-6 for an
example of this.
Escaping Most boxes and screens allow you to escape by press
ing the Esc key. This cancels any commands that you entered in the
screen or box.
Running Executable Files
There are three ways to start an executable file (application program, exter
nal DOS command, batch file) from the File System screen. The first way is
to move the highlight bar to the appropriate filename and press Enter. The
second way is to use the mouse to double click on the filename. The third
way is to select a file (described under "File System Basics") and then open
134
7-Tbe DOSSHELL Interface
the Files pop-up box. After the box is opened, select the "Open (start)" field
to execute the program.
Regardless of the method used, the Open File box always appears (fig
ure 7-5). Use the "Options" field of this box to enter any parameters re
quired by the program. Up to 128 characters may be entered. In figure 7-5,
the user has entered c: \prgms \ test. com, so that when the "Enter" field
in the lower left of the box is selected (or if the user presses the Enter key),
the complete command passed to DOS is
debug c:\prgms\test.com
The program DEBUG then executes in the standard fashion, as if the user
had typed debug c: \prgms\test. com on the command line.
The system will prompt you to press the Enter key to return to
DOSSHELL when the program terminates its execution.
-~.~
.,.,,;;;
!i:1IlJ!
f!11;
_I
a arve.
IT.Qrtlons
H1
'I
.1M
1+ Irttel'
~lmBc=lCt:::JD~C3'
c:'*II
St.ar1;11ItJ
~:
lDUG.COIt
Aa80clatad 'lIe :
Optlo_ •• I
e:'PI'If!I!'ten.-
( <::::J=lnter ) ( Eac=Ca_l ) (Fl=Help )
+
_DUG
.COIt
~ISlCCOItP.COIt
•
21.686
9.889
Brr-17-88
Brr-17-88
12-85-88
Brr-17-88
IIHI3-8B
Brr-17-88
Brr-17-88
Brr-17-88
Brr-17-88
Brr-17-88
Brr-17-88
Brr-17-88
Brr-17-88
Brr-17-88
Brr-17-88
Brr-17-88
ShIl1;+F9=e-aNl r-vt
+
+
Figure 7-5. Using the Open File box to pass the parameter
"c:\prgms\test.com" to DEBUG.COM.
Printing a File
Select the "Print" field in the Files pop-up box to print all files currently
selected. This field is available only if the DOS print spooler has previously
been installed with the DOS command PRINT. If necessary, you can press
Shift-F9 to jump to the command line, execute PRINT, then type exit to re
turn to the DOSSHELL interface. The "Print" field will then be available for
you to use.
Associating Filename Extensions with a Program
The File pop-up box can be used to link (or associate) files that use a particu
lar filename extension to a file that is an executable program. As an example,
135
Part 2- Tutorials
the word processor used in writing this book is an executable file named
WORD.COM. The document files created by the word processor have the
filename extension DOC. Instructing the DOSSHELL interface to associate
DOC files with WORD.COM means that selecting a DOC file automatically
starts WORD.COM. The word processor, in turn, automatically loads the
selected DOC file.
In figure 7-6, the file WORD.COM is currently selected. The File pop
up box has been opened and "Associate" has been selected. This opens the
Associate File box shown in the figure.
-~~:~;
IT. JLcm8
!&lIII'e
~It
'JTJ!iF
"MIIY;·
C: VJIGHS'JIIOJID
.1
rll_.
.: WORD.ootI
~1cm8 . . ~I~R*~
101
1
____________~I.~I
( <::::J=Enter) ( EIIc=C&ncel ) ( rl=Help )
11-13-87
11-13-87
11-13-87
11-13-87
11-13-87
11-13-87
11-13-87
11-13-87
11-13-87
11-13-87
11-13-87
11-13-87
1M-87-89
.SVII
.ootI
3Z7.488
51.718
11-13-87
11-13-87
11-13-87
+
~
v
+
Figure 7-6. Associating DOC files with WORD.COM. Note the
horizontal scrolling arrow on the right side of the
"Extensions" field.
An extension of DOC has been entered by the user (up to twenty sepa
rate extensions may be entered). When the user selects "Enter" (or presses
the Enter key), another box appears, which asks if DOSSHELL should
"prompt for options".
If the user selects" 1", DOSSHELL will prompt for additional program
parameters each time a DOC file is selected. No prompting will occur if "2"
is selected.
Once the association is made, selection of any file with an extension of
DOC will automatically start WORD. COM.
Moving Files
DOSSHELL provides you with the capability to move files from one direc
tory to another. It is important to realize that move is actually a copy fol
lowed by a deletion of the original file.
The first step in moving files is to select the files that you want moved.
136
7-The DOSSHELL Interface
Use "Select all" in the Files pop-up box (figure 7-4) to move all files in a
directory. Next, select "Move" from the Files pop-up box; this opens the
Move File box. The names of the selected files appear in the "From" field.
Enter the destination directory in the "To" field.
You can configure DOSSHELL so that you simply select the destination
directory rather than having to type it in. Refer to the following section titled
"Options" for information on the configuration process.
Copying Files
Copying files is similar to moving them. First select the files to be copied; use
" Select all" in the Files pop-up box to copy all files in a directory. The Copy
field is selected. Next select "Copy" from the Files pop-up box that opens
the Copy File box. The names of the selected files appear in the "From"
field. Enter the destination directory in the "To" field. If only a single file is
selected, a different filename can be appended to the destination directory,
thus renaming the file in the process. If you select more than one file, the
copies must have the same names as the Originals.
Deleting and Renaming Files
To delete files, first select the files to be deleted and then select the "Delete"
field from the Files pop-up box. As previously mentioned, it is good practice
always to deselect all files before you select the files that you want to delete.
This will prevent any inadvertent deletions.
You can configure DOSSHELL to prompt you to confirm all file dele
tions. Refer to the section titled "Options" for information on configuring.
Renaming files is similar to the operations previously described. Select
the files that you want to rename. Next select "Rename" from the Files pop
up box, opening the Rename File box. Then enter a new filename for each
selected file.
Deleting and Renaming Directories
The procedures for deleting and renaming directories are similar to the same
procedures for files. You can select only one directory at a time. You can
delete and rename directories only when no files are currently selected. Di
rectories must be empty before you can delete them. As is the case with file
deletion, you can configure DOSSHELL so that directory deletion requires
user confirmation. Refer to the section headed "Options" for details.
Changing Attributes
You can modify file attributes with the "Change attribute" field of the Files
pop-up box. First, select the files to be modified, then select "Change attri
bute". The Change Attributes box will appear, asking if the selected files are
to be modified one at a time or all at once.
If you choose one at a time, the filename for each selected file will be
displayed along with the current status of the file's hidden, read-only, and
archive attributes. Use the cursor keys and the space bar to modify the attri
137
Part 2-Tutorials
butes as you desire, then press the Enter key. The filename of the next se
lected file will be displayed and you can repeat the process.
Ifyou choose to modify all files at once, simply use the cursor keys and
space bar to set the desired attributes and then press Enter. The attributes of
the selected files will all be modified to the same setting.
Refer to chapter 10 and Part 3 for a discussion of DOS file attributes.
Viewing a File
Select "View" from the Files pop-up box to browse through the contents of
a previously selected file. The browsing facility is available only if exactly
one file is currently selected.
File View is useful in examining text files. One screen of text is dis
played at a time. You can scroll up or down through the file using the PgUp
and PgDn keys.
File View can also be used to examine binary files (figure 7-7A). No
comparable facility is available from the DOS command line, because the
TYPE command is not designed to handle binary files. A very nice feature of
File View is its ability to toggle the display from an ASCII format to a hexadec
imal format (figure 7-7B). Press F9 to change the format. The hexadecimal
display format is most useful when examining the contents of a binary file.
Creating a Subdirectory
To create a subdirectory use the "Create directory" field of the Files pop-up
box. The subdirectory created will be located in the currently selected di
rectory. For example, you must select the directory C: \ as the currently se
lected directory in order to create the directory C: \DIRl.
Options
The second field on the File System action bar is titled "Options" (figure
7-2). Selecting this field produces the Options pop-up box. The three func
tions accessed from this box are "Display Options", "File Options", and
"Show Information".
Display Options Selecting "Display Options" produces the Dis
play Options box (figure 7-8). The settings displayed in this box let you con
trol the listing of filenames, which appears on the right side of the screen. In
figure 7 -8, "Name" is set to * . * , which requests the system to display all files
in the currently selected directory. You can narrow the listing to display only
a subset ofthe files. For example, enter * .DOC in the "Name" field to list all
files with a filename extension of DOC.
You can sort the filename listing using one of five criteria:
~
138
Filename
Filename extension
File date stamp
File size
Physical location of each file on the disk
7-The DOSSHELL Interface
Fl=Help
I
Pile VI_
To 111_ a file'. content p..... _
VI_Ins file:
r:
or • .
C :~~JUNIORD.COIt
10(
nra;
(--1
=Enter
ll~prt a a a a a a a a a a a a II
Esc=Canee 1
f;: II II II II II II 1111 II II
.
.
F9=Hex ASCII
"
(A) Using File View to view a binary file in ASCII mode.
Pl=Help
I
To lil_ a file'. content
Vi_ins file:
888888
888818
888828
888B38
.......
Pile VI_
•
or
C:~JUNIORD.COIt
E9?9C912
8I!l8ED8BE
S3S8CB9F
8D358378
83838383
83838383
8398B3A4
83M83M
I158D858D
858DB5BD
83838383
83838383
83B38392
83A483M
••
11881ECZ8
836E8383
83838383
83838383
B3A4B3A4
81S8B898
83838383
83838383
83838383
83M83M
888848
888858
88BII68
888878
888888
1158D858D
1158D858D
8S988598
8B8898
85lI2B3B4
83B48384
85988598
83B483B4
8888A8
83B483B4
83B483B4
83B483B4
83B483ES
84778477
Esc=Caneel
83B?83E7
~l
83E78375
84778477
84'778477
84'778477
-
88II8C8
<(--1=Enter
8598B5'J8
83M83F9
858D858D
858D858D
84F7848D
II58D858D
857E8598
8S988598
83B483B4
83B483B4
.y . . . . . . . . . . . P •.
SP •.. 5.p.n ......
................
................
................
" ...............
· ...............
· ...............
•••••
0
••••••••••
· ...............
•
••••••
0
••••••••
••••••••••••••• u
.w.w.w.w.w.w.w.w
F9~I1
(B) Viewing a binary file in hexadecimalformat. The left-most column is the offset
address into the file. The middle four columns contain the file s byte values in
hexadecimal format. The right-most column is a text display of the file s contents.
Non-alphanumeric bytes are represented by a period.
Figure 7-7. Using File View to view a text or binary file.
Change the criterion by clicking with the mouse on the criterion of choice.
Alternatively, press the tab key to move from the "Name" field to the "Sort
by" list, then use the cursor keys to select the criterion.
File Options Use the File Options box to set three parameters. Con
firm on delete instructs the system to ask you to confirm each file deletion.
Confirmation is required when the box is marked or, in text mode, when the
139
Part 2-1Utorials
1 ~1
11
, tl
C:"JRiH!Ni6kb
DI
..... : ...
I!!:.,; ;-__
---J
Sort 1Iy:
oCi>
o
o
o
.....
:lxteMID1I
hte
SI_
.1.........
( (::J =B1It... ) ( 18c=Ca_1 ) ( F1=Help )
.S!III
.COII
3Z7.488
51.718
11-13-87
11-13-87
11-13-87
11-13-87
11-13-87
11-13-87
11-13-87
11-13-87
11-13-87
11-13-8'7
11-13-8'7
11-13-8'7
1M-87-89
11-13-8'7
11-13-87
11-13-87
+
+
Figure 7-S. The Display Options box.
arrowhead is present. Similarly, Confirm on replace determines whether or
not the system will ask you to confirm ftle replacements. Change settings by
clicking with the mouse on the line oftext. Alternatively, move the highlight
bar to the line and change the status by pressing the space bar.
The third parameter that you can set from this box is Select across di
rectories. Normally, ftles are deselected when a change is made in the cur
rently selected directory. If "Select across directories" is turned on, ftles
remain selected when a change is made in directory selection. This can be
useful when you are moving or copying files from one directory to another.
As an example, say that you have selected a group of ftles from a direc
tory for moving. Normally, you will have to type the name of the destination
directory in the Move File box. If "Select across directories" is turned on,
there is a quicker way. After selecting the ftles, select the destination direc
tory before opening the Move File box. When you open the box, the system
will automatically enter the destination directory name in the "To" field.
Show Information The third field in the Options pop-up box gen
erates the Show Information box (figure 7-9). This box contains information
about the most recently selected ftle, the total number of ftles currently se
lected, the currently selected directory, and the currently selected disk
drive.
Arrange
Select "Arrange" on the File System action bar to modify the overall display
format of the File System screen. Selection of "Arrange" produces the Ar
range pop-up box. This box contains three potential selections.
"Single file list" is the format used in the previous examples presented
in this chapter. A single directory tree, representing the directory structure
140
7-Tbe DOSSHELL Interface
File
"'"""" :: WORD.
cot!
..••
Att~
Selectecl
C
"-her:
Size :
DirectGr!l
HaRe
Size
:
:
Files:
8
8
WORD
2,863,936
44
Disk
HaRe
Size
: PCAT_COLOR
: 21,344,256
Avail:
Files:
Dtl'S
:
6,678,336
684
32
I~=!~:T_'STY
II!II
INI
.INI
II~::~:·PRD
.PRD
.DOC
.STY
.STY
.STY
1_~SI'.li:JL.1'-fll'l.EXE
I~SI'.li:JI.L"'II'I.HLP
1~:;r£JI.L"'," .LEX
.PIX
( Esc=Cancel ) (Fl=Help )
.PRD
.SVtI
.cot!
1,824
11,434
16,358
11,434
16,358
6,638
1,824
1,536
1,824
111,948
3,715
175,173
18,Z3S
8S2
327,488
11-13-87
11-13-87
11-13-87
11-13-87
11-13-87
11-13-87
11-13-87
11-13-87
11-13-87
11-13-87
11-13-87
11-13-87
1H-87-i19
11-13-87
11-13-87
711
Figure 7-9. The Show Information box. In this example,
WORD.COM is the most recently selected file, WORD is the
selected directory, and PCAT_COLOR is the selected disk drive.
on the currently selected disk drive is displayed. A single file list containing
the name of each file in the currently selected directory is also displayed.
"Multiple file list" lets you split the screen horizontally to display a
directory tree and a file list for the two most recently selected disk drives
(figure 7-10A).
"System file list" lets you display all of a disk's files regardless of subdi
rectories (figure 7-lOB).
The "System file list" option is useful for finding all occurrences of a
file on a disk. To do thiS, first select "System file list" from the Arrange pop
up box; then open the Display Options box (figure 7-8). Enter the desired
filename in the "Name" field (wildcards are acceptable) and select "Enter".
All occurrences of the file will be listed. To see the directory location ofeach
listing, highlight the particular entry.
This completes the discussion of the File System program. Press F3 for a
quick return to the Main Program Group's screen (figures 7-1A and B). From
this pOint, the discussion will proceed to a discussion of the DOSSHELL pro
gram Change Color and the program subgroup DOS Utilities.
Change Colors
Change Colors is a DOSSHELL program that lets you change the color
scheme of the DOSSHELL display. This program only runs on systems with
color monitors.
Select "Change Colors" from the DOSSHELL Main Program Group
screen (figure 7-1). Four color combinations are available; from these you
may choose one. View the available choices by repeatedly pressing the right
141
Part 2- Tutorials
I!!!lCIILIt28B .HCL
~ISP
.IIXI:
I!!!lfOTAL
I!!!!IUDn28I •UDY
(A) Multiple file list display.
n=He1
File
HaRe :
Mtr
Selected
.........
:
BII16X14.FNI
...•I
•
Sl_ :
Ilrectory
HaRe
:
C
2
7.548
~fOEXIIC.'"
!!!iMIfOEXIIC .MII
(ii)MlfOEXIIC.MI
(ii)MlfOEXIIC .MI
(ii)MlfO I" •COl'!
PAI"I
Sl_:
479.246
FlI_
63
IlaJc
HaRe : PCAI_COLOR
Sl_ : 21.344.256
A_II
6.678.336
Fil_
684
I i...
FlI=Actlona
3Z
122
63
9S
18
142
12-19-88
11-Z1H18
12-15-88
11........
12.........
86-17~
86-17~
18:.....
18:.,..
5:.1.
12:34JIII
7:....
12:....
12:....
1:11.12:....
1:11.6:34aa
6:34aa
•COl'!
•COl'!
33.754
1.865
••IF
369
36.285
369
7.432
4.692
2.684
.1-21.....
3:;;'
8.4511
88-38-85
1:43.
•COl'!
~:=:
!III
-.-
••IF
.FIL
.PAS
11-1Z-e7
86-17~
11-12-87
84.~
84 .4~
Shltt+F9=e. . Prt.pt
(B) System file list display. All files on tbe disk are listed. This particular listing is
sorted by file size.
Figure 7-10. Multiple and System me list options in the Arrange
pop-up box.
and left cursor keys. Press the Enter key to select the combination currently
being displayed. Press the Esc key to select the color scheme that was active
prior to starting the Change Color program.
DOS Utilities
DOS Utilities is a DOSSHELL program subgroup that is selectable from the
Main Program Group screen «(igure 7-1). Recall that a subgroup is a collec
tion of one or more DOSSHELL programs.
142
7-Tbe DOSSHELL Interface
DOS Utilities contains DOSSHELL programs that perform the follow
ing tasks:
1. Copy diskettes (using the DOS command DISKCOPY).
2. Compare the contents of two diskettes (using the DOS command
COMP).
3. Back up the contents of a fixed (hard) disk (using the DOS command
BACKUP).
4. Restore the contents of a fixed (hard) disk (using the DOS command
RESTORE).
5. Set the system time and date (using the DOS commands TIME and
DATE).
6. Format a disk or diskette (using the DOS command FORMAT).
This section discusses and demonstrates each of these DOSSHELL pro
grams.
Notice that each of the DOSSHELL programs presented in this section
uses one or more DOS commands. This is similar to the situation in which a
batch file may contain a set ofDOS commands. In fact, with the exception of
GOTO commands, a DOSSHELL program may contain any valid batch file
command. In discussing DOSSHELL programs, it is important to recognize
the difference between a DOSSHELL program (such as Disk Copy) and a
DOS command (such as DISKCOPY) contained in the program.
Selecting "DOS Utilities ... " from the Main Program Group screen
produces the DOS Utilities screen. This screen lists the six DOSSHELL pro
grams mentioned above. You can press the Esc key to return to the Main
Program Group screen.
To start any of these DOSSHELL programs, move the highlight bar to
the name of the desired program and press the Enter key. Alternatively, a
program can be started by using the mouse pointer to double click on the
program's name.
Disk Copy
Selecting the DOSSHELL Disk Copy program produces the Diskcopy Utility
pop-up box. The system asks you to enter the drive letters for the source and
destination diskettes. The program executes the DOS command DISKCOPY
with default parameters "a: b:". You can change the defaults from the key
board. Press the Enter key to execute the program. Press Esc to cancel the
program.
Disk Compare
Selecting the DOSSHELL Disk Compare program produces the Diskcomp
Utility pop-up box. The system asks you to enter the drive letters for the
diskettes to be compared. The program executes the DOS command DISK
COMP with default parameters "a: b:". You can change the defaults from the
143
Part 2-1'utorials
keyboard. Press the Enter key to execute the program. Press the Esc key to
cancel the program.
Backup Fixed Disk
Selecting the DOSSHELL Backup Fixed Disk program produces the Backup
Utility pop-up box. The system asks you to enter the source and destination
drives. The program executes the DOS command BACKUP with default pa
rameters "c: \"'.'" a: /s". You can change the defaults from the keyboard.
Press the Enter key to execute the program. Press the Esc key to cancel the
program.
Restore Fixed Disk
Selecting the DOSSHELL Restore Fixed Disk program produces the Restore
Utility pop-up box. The system asks you to enter the source and destination
drives. The program executes the DOS command RESTORE with default
parameters "a: c: \ .... '" /s". You can use the keyboard to change the defaults.
Press the Enter key to execute the program. Press the Esc key to cancel the
program.
Set Date and Time
Selecting the DOSSHELL Set Date and Time program produces the Set Date
and Time Utility pop-up box. The system first asks you to enter a new date.
No default parameters are provided. After pressing the Enter key, the system
then asks you to enter the new time. Press the Enter key to complete the
program. The system will prompt you again if either the date or time are
specified in an invalid format. Press the Esc key to terminate the program.
Format
Selecting the DOSSHELL Format program produces the Format Utility pop
up box. The system asks you to enter the drive to format. The program exe
cutes the DOS command FORMAT with default parameter "a:". You can use
the keyboard to change the default. Press the Enter key to execute the pro
gram. Press the Esc key to cancel the program.
This completes the discussion of DOSSHELL programs contained in
the DOS Utilities subgroup. The following section discusses how to create
new DOSSHELL programs and program subgroups.
DOSSHELL Programming
DOSSHELL programs are actually enhanced batch files. All batch file state
ments, other than GOTO, are usable in DOSSHELL programs.
As you have seen, a DOSSHELL program is started by selecting the pro
gram name on the display screen. You have also seen that selecting a
DOSSHELL program name generates a pop-up box, which can be used to
pass parameters to the program. These pop-up boxes are generated using a
set of commands called Program Start Commands or PSCs.
144
7-Tbe DOSSHELL Interface
In this section you will see how to create DOSSHELL programs using
standard batch file commands and PSCs. The batch file commands control
program actions. The PSCs control the appearance and behavior of the pro
gram's pop-up box.
Creating a New DOSSHELL Program
You have seen that DOSSHELL programs are placed in program groups. The
example presented in this section will show how a new DOSSHELL program
is added to the DOS Utilities program group.
Starting at the Main Program Group screen (figure 7-1), select "DOS
Utilities"; this will produce the DOS Utilities screen.
The first step you take in creating a new DOSSHELL program is to select
"Program" from the action bar of the program group (in this case, DOS Utili
ties) that will contain the new program. This selection produces a pop-up
box that offers the selections "Start", "Add", "Change", "Delete", and
"Copy". Selection of "Add" produces the Add Program box, which is used
to create new DOSSHELL programs.
The Add Program box contains four fields. Use the tab key or the Enter
key to move from one field to the next. You are required to enter information
into the "Title" and "Commands" fields when creating a new DOSSHELL
program. Use of the "Help text" and "Password" fields is optional.
Use the "Title" field to specify the name of the DOSSHELL program
you are creating. The new program name will appear on the display screen
along with the names of other programs in the same program group. In fig
ure 7-11, a program name of Memory Check has been entered in the "Title"
field. You may enter up to 40 characters in the "Title" field.
=:;::::~.
To _Iect an It... u_ the up ana flown a~.
To ..tart a p~ ell' lIt.play a _
grouP. preaa Inter.
Set Date ana T"
Dlak Copy
Dlak ec.p&1'8
Backup F~~ Di~ Jlecrui....
1xe4D
TiU.
.&iiliii
~
c-naa
Optional
Help text.
P..-orcI
I
I
tteIIIJry
~1Pau_
,,
,
,
( Eac=Cance I ) ( F1;He IE ) (
F18=Actlo_
Eac=Cancel
Check
,.,
,.,
,.,
n-s._ )
Shift+F9=c-na
~
Figure 7-11. Creating a new DOSSHELL program. Refer to
explanation in text.
145
Part 2- Tutorials
Use the "Commands" field to enter the commands that make up the
program. These are the commands that will be executed when the pro
gram's name is selected.
In figure 7-11, the DOS command MEM has been entered. The com
mand PAUSE has also been entered. This will prevent the display that is gen
erated by MEM from disappearing before you have a chance to read it. The
two commands are separated by the " II " character, which is generated by
pressing the F4 function key.
You may enter up to 500 characters in the "Commands" field. A little
later you will see how PSCs are also used in the "Commands" field.
Use the "Help text" field to create a help facility for the new program.
This is the text that will be displayed when the program is selected and the
user presses the Fl function key. You may enter up to 478 characters oftext
in this field.
You can use the "Password" field to specify a password that must be
typed before the new program can be used. You may enter up to 8 characters
of text in this field.
The "Help Text" and "Password" fields will not be used in the program
presented here.
Press the F2 function key (or select "Save") to save the new program.
This adds the program's name to the names of DOSSHELL programs in the
program group.
Now that you have seen how a DOSSHELL program is created, it is time
to learn how to modify an existing program.
Modifying a DOSSHELL Program.
Change an existing DOSSHELL program as follows:
1. Move the highlight bar to the program's name.
2. Select "Program" from the screen's action bar.
3. Select "Change".
This will produce the Change Program box. The box contains the same
fields as the Add Program box. The current content of each field is dis
played. Change the program by modifying one or more fields. Press F2 to
record the changes.
Figure 7-12 shows a Change Program box being used to modify Mem
ory Check. The first change to notice is the square brackets placed immedi
ately after "mem". The square brackets signal DOSSHELL to generate a
pop-up box before executing the MEM command. The pop-up box allows
the user to type in parameters that will be passed to MEM.
The second change to notice is the pipe symbol (" I") followed by the
DOS command "MORE". This change causes DOS to display the output
from MEM one screen at a time. This is useful because the parameters
!DEBUG and /PROGRAM cause MEM to generate a display that otherwise
scrolls off the screen.
The square brackets are actually the simplest form of PSCs, because
146
7-The DOSSHELL Interface
::~;:::~ ..
To _lect An ita...... the up AM • __ .rl'OWa.
To start • prosrr- III' . i. . IAY A _
.......p. p..... Enter.
Set
Di.k
Disk
~
AM Ti.,..._ _ __
~
c-pare
Backup Fixed Di
Required
Jleatore F ixtl<i D
Fo....t
Title.
Optional
Help text .
'A-...l
.
( Eac:=Cancel ) ( F1=Help ) ( F2=Saue )
F18=Actiona
Eac:=Cancel
Shirt+F9=eo-aM Pro.qot
Figure 7-12. Modifying the DOSSHELL program Memory Check.
their presence is responsible for the pop-up box. Soon you will see how to
modify the pop-up box by placing additional PSCs between the square
brackets. First, though, it is necessary to take a look at the standard pop-up
box.
Calling Batch Files from DOSSHELL Programs
Batch files can be executed from DOSSHELL programs using the
CALL command. CALL returns control to DOSSHELL upon execution
of the batch file.
Figure 7-13 shows the pop-up box generated by Memory Check. You
can use the parameters field in the box to type parameters that will be passed
along to the MEM command. The parameters are passed to MEM because the
square brackets in figure 7-12 come right after "mem". Press the Enter key to
continue execution of Memory Check.
Often it is convenient to have a default parameter automatically entered
when the pop-up box appears. You saw examples of this in the discussion of
the DOS Utility programs. You have the ability to do this in your own
DOSSHELL programs through the use of PSCs.
Program Start Commands (PSCs)
You saw in the last section that square brackets cause DOSSHELL to generate
a pop-up box prior to executing a command. The square brackets are the
simplest form of PSCs.
147
Part 2-Tutorials
::t:::::..
~p
To _Iect an It... _
the up ani iown a ..l'OW8.
To sta..t a pl'Olfl'&R ego ilaplay a _
IJI'OUP. pJ'e88 Inter.
Set
~
ani Ti_
Diu a.r..
Diu eo.paI'tI
Backup Fixed Di.k
Beatore Fixed Di.k
Fo....t
Ml'MOJ'I,
Clwck
...te....
Type the ....
.-te... . .
P...
then p..... Inter.
L.....L._ _ _ _ _....L.~I
.
( <:::J=EnteJ' ) ( Eac=Cancel ) (Fl=Help)
F111=Actiona
Eac=Cancel
Shift+F9=e...ani Prc.pt.
Figure 7-13. A standard program parameters pop-up box.
The pop-up box can be modified by placing additional PSCs between
the square brackets. Most of the PSCs begin with a forward slash (I) that is
followed by a letter. For example, "/D" is a PSC that automatically enters a
default parameter in the pop-up box's parameter field.
Figure 7-14 illustrates use ofthe "/D" PSc. The Change Program box is
used to modify Memory Check. The following text has been placed be
tween the square brackets:
/0 "/debug"
The / 0 is a PSC that instructs DOSSHELL to automatically enter the text that
follows in the parameter field of the pop-up box.
A pair ofbrackets may enclose more than one PSC. Each batch file com
mand in a DOSSHELL program can have its own set of PSCs. Each batch file
command's PSCs are enclosed in a pair of square brackets immediately fol
lowing the command.
Each of the DOSSHELL PSCs is discussed below. The PSCs appear in
bold type. A few additional examples on the use of PSCs are provided.
Unless otherwise noted, a PSC must be entered between a pair of square
brackets.
[IT " Title"] The text that appears at the top of a pop-up box is called
the title. The standard title is "Program Parameters". This PSC is used to
replace the standard title. The title may contain up to 40 characters. For ex
ample, the following command would place the title "Memory Check" at
the top of the Memory Check pop-up box:
mem[/O
148
II/debug"~
IT "Memory Check"]
7-Tbe DOSSHELL Interface
:::;:::~ ..
To _Iect an I t - . u_ tJte up ancl doom al"l'OWlt.
To 81;art a pl'O\Jl'&ll ... display a _
IJI'OUP. p..- Enter.
Set Date ancl TI,...._ _ __
lIi.k Copy
Diu eo.pa.re
Backup Fixed III Required
. .tore Fixed D
FOI'III&t
Title .
eo-ancl.
OpUonal
Help text
Pall8WOl'd
( hc=Cancel ) [ F1=Help ) (FZ=Save )
F18=AcUo_
hc=Cance I
Shlrt+F9=eo-and
rra..t
Figure 7-14. Adding a PSC to Memory Check. The PSC /0 11/
debug I I has been entered between the square brackets.
Compare this command to the PSC in figure 7-14.
[/I"Instruction"] The text between the quotes replaces the instruc
tion line ("Type the parameters, then press Enter.") in the standard pop-up
box. The instruction line may contain up to 40 characters.
[/P"Prompt"] The text between the quotes replaces the prompt line
("Parameters ... ") in the standard pop-up box. The prompt line may con
tain up to 20 characters.
[/F"File specifier"] The text between the quotes specifies a disk file.
The command immediately preceding the brackets executes only if the file
exists. The default drive is assumed if no drive is specified. The current di
rectory is assumed if no directory is specified.
[%n] n represents an integer from 1 to 10. Each n represents one of
the parameters entered in the parameters field of the pop-up box. For exam
ple, consider the following command:
copy *.[%1] *. [%2]
A DOSSHELL program with this command executes as follows:
1. A pop-up box is displayed. The first parameter entered is assigned to
variable % 1. If a second parameter is entered, it is assigned to %2.
2. A second prompt panel is displayed. If only one parameter was entered
for the first panel, the first parameter for this second panel is assigned
to %2.
149
Part 2-Tutorials
3. The command copies each file that has a filename extension matching
the first parameter.
4. Each copy is given a filename extension matching the second parame
ter. As is the case with commands entered at the DOS command line,
the command will fail and an error message will be displayed if the total
number of parameters entered does not equal two.
%n n is an integer from 1 to 10, as in the previous PSc. The difference
here is that %n appears outside of the brackets and it must follow a previous
occurrence of %n inside the brackets. The second occurrence of %n is as
signed the same value as the first occurrence. Consider this example:
if exists [%1J type %1
A DOSSHELL program with this command is executed as follows:
1. A prompt panel is displayed, and the first parameter entered is assigned
to variable % 1.
2. The i f ex i s t s clause checks to see if a file with a name matching the
parameter exists.
3. If the file exists, its contents are displayed on the screen with the type
command.
[1D"Text"] The text between the quotes defines a default value. The
default may be up to 128 characters in length. Press the Enter key if the default
is correct; otherwise, enter a new parameter from the keyboard. See figure 7
14 for an example.
[/D" %n"] n is an integer from 1 to 10 . A value previously assigned to
%n is used as a default. A value must have previously been assigned to %n.
[/R] This PSC instructs DOSSHELL to immediately erase the entire
default parameter if any key other than Enter is pressed. This can give the
editing process a cleaner appearance.
[/L"n"] n is an integer from 1 to 128. It specifies the maximum num
ber of characters that can be typed into the pop-up box's parameter field.
The default limit is 128 characters.
[/M"e"] Executes the command only if the parameter entered speci
fies an existing file.
1# Substitutes the drive letter of the drive used to start DOSSHELL,
followed by a colon. This PSC must be outside the brackets.
I@ Substitutes the path from the root to the directory that contains
the file used to start DOSSHELL. The substitution omits the initial" \". This
PSC must be outside the brackets.
Modifying Program Groups
To delete a program from a program group, first select the program. Then
select "Programs" from the action bar; from the resulting box, select
"Delete" .
150
7-The DOSSHELL Interface
To copy a program from one program group to another, first select the
program. Then select "Programs" from the action bar; from the resulting
box, select "Copy". The system will prompt you to display the destination
group, then to press the F2 function key to complete the copy.
The programs Command Prompt, File System, and Change Colors are
special. They cannot be deleted from the Main Program Group or copied to
a subgroup. However, DOSSHELL can be modified so that a different main
group is activated upon start-up. Refer to the discussion in the next section
for details.
To add a program subgroup to the Main Program Group, select the
"Group" field from the action bar and then select "Add". This will produce
the Add Group box. The Add Group box has "Title", "Help text", and "Pass
word" fields, just like the Add Program box. Refer to the discussion on creat
ing a DOSSHELL program for information on the use of these fields.
The Add Group box contains a "Filename" field instead of a "Com
mands" field. This field specifies the filename of the file that will store infor
mation about the group. The file is automatically given an extension of
MEU.
Entries for the "Title" and "Filename" fields are required in order to
create a subgroup. Entries for the "Help text" and "Password" fields are
optional.
Modifying DOSSHELL.BAT
DOSSHELL.BAT is the batch file used to start the DOSSHELL interface. This
section discusses the parameters that can be used in DOSSHELL. BAT to con
figure the DOSSHELL interface.
The discussion centers around the DOSSHELL.BAT file created by the
SELECT installation program (listing 7-1). The DOSSHELL.BAT file created
by SELECT on your system may differ somewhat from the file presented
here. However, the similarities will far outweigh the differences, and the
points made here will apply to all versions of DOSSHELL. BAT. The numbers
on the left side of each line in listing 7-1 are for reference only.
Listing 7-1. DOSSHELL.BAT file created by SELECT.
1
2
3
4
5
6
7
@C:
@CD C:\DOS
@SHELLB DOSSHELL
@IF ERRORLEVEL 255 GOTO END
: COMMON
@BREAK=OFF
@SHELLC IMOS:PCIBMDRV/TRAN/DOS/COLOR/MUL/MENU/SND
IMEU:SHELL.MEU/CLR:SHELL.CLR/PROMPT/MAINT/EXIT
ISWAP/DATE
151
Part 2- Tutorials
8
9
:END
@BREAK=ON
The @ before each command suppresses output to the video display.
Lines 1 and 2 establish the default drive and the current directory on that
drive. These commands are necessary if the DOS search path does not con
tain the name of the directory containing the DOSSHELL files, or if the AP
PEND command has not previously been invoked to specify the path to the
directory containing the DOSSHELL files. If BOTH of these conditions are
met, then DOSSHELL can run regardless of which drive is the default and
which directory is current.
Line 3 loads the resident portion of the DOSSHELL interface. The resi
dent portion remains in memory at all times. The command also specifies
the name of the batch file used to start DOSSHELL (in this case,
DOSSHELL.BAT). In a networking environment, it may be desirable to have
separate start-up files for each node on the network. In each of these start-up
files, shellb dosshell should be changed to shellb f j lename, where
f j l ename is the name of the start-up file.
Line 4 instructs DOS to terminate execution of the batch file if an error
is encountered in loading the resident component of DOSSHELL.
The : common label provided in line 5 is required. It tells the DOSSHELL
interface where to begin re-executing, whenever the transient component of
the interface is reloaded (as occurs when EXITing from Command Prompt).
Line 6 (b rea k=0 f f) suppresses checking for Ctrl-C while the command
in line 7 is being executed.
The command in line 7 loads the transient portion of DOSSHELL.
SHELLC.EXE is the file that contains the transient portion. The parameters
that follow 5 hell C are responsible for configuring DOSSHELL. Each of
these parameters, including those not shown in listing 7-1, is discussed below.
The: end label in line 8 is required for proper operation of DOSSHELL.
DOSSHELL Configuration Parameters
The DOSSHELL configuration parameters give you some control over
DOSSHELL's behavior. Each of the configuration parameters begins with a
forward slash. Refer to listing 7-1 for an illustration of how the configuration
commands are used.
Each of the available configuration commands is discussed in this sec
tion. The commands appear in bold type.
IASC: <filename> .ASC Specifies the filename of the file that stores
program association information. The file is given a filename extension of
ASC. The default filename is SHELL. Program association is discussed in the
"File System" section of this chapter.
IB:n n is an integer that specifies the number of Kbytes in the buffer
used by the File System program. DOSSHELL uses all available memory for
152
7-The DOSSHELL Interface
the buffers ifno value is specified. You should specify an amount of memory
for use by the buffers if you choose to run DOSSHELL in resident mode (see
ITRAN below).
CLR: <filename> .CLR Specifies the filename of the file containing
information on DOSSHELL's current color selection. The file is automati
cally given a filename extension of CLR. SHELL is the default filename.
ICOLOR Activates the Change Color program. The Change Color ti
tle will still be listed on the Main Program Group screen if this parameter is
deleted. Refer to the discussion of IMEU (below) to see how you can change
the programs listed on the Main Program Group screen.
The next three parameters each specify a different display mode. They
are valid only for specific types of display hardware.
ICOI Specifies l6-color display mode, with 640x350 resolution, 80
columns by 25 rows. Valid for EGA and VGA only.
IC02 Specifies 2-color display mode, with 640x480 resolution, 80
columns by 30 rows. Valid for VGA only.
IC03 Specifies l6-color display mode, with 640x480 resolution, 80
columns by 30 rows. Valid for VGA only.
ICOM2 Specifies that the DOSSHELL mouse is connected at the
COM2 serial port. COMI is the default if this parameter is not specified.
IDOS Activates the File System program. The File System title will still
be listed on the Main Program Group screen if this parameter is deleted.
Refer to the discussion of /MEU (below) to see how you can change the pro
grams listed on the Main Program Group screen.
IEXIT This parameter activates the "Exit" field on the Main Program
Group's action bar. "Exit" still appears on the bar if this parameter is omit
ted, but selection of the field generates an error message.
ILF This parameter activates the second mouse button and deacti
vates the first mouse button. This parameter is provided for the convenience
of left-handed users.
IMAINT This parameter activates the "Program" and "Group" fields
on the Main Program Group's action bar. The fields still appear on the bar if
this parameter is omitted, but an error message is generated if the user at
tempts to use these fields to add or change programs or groups.
IMENV This parameter is required if any functions of DOSSHELL,
other than the File System, are to be made available. File System remains
available if this parameter is deleted.
MEV: <filename> .MEV Specifies the filename of the file containing
information about the DOSSHELL Main Program Group. This is the pro
gram group that is displayed when DOSSHELL is started. The default
filename is SHELL. The file is automatically given a filename extension of
MEU. This parameter must be changed to obtain a Main Program Group
screen that does not list the programs Command Prompt, Change Colors,
and File System.
Change this parameter by first creating a subgroup within the original
Main Program Group. You must specify a filename for the new subgroup.
Then change the IMEU parameter to specify the filename of the newly
153
Part 2-Tutorials
created subgroup. The new subgroup will come up as the Main Program
Group when DOSSHELL is restarted.
IMOS: < mouse device driver> Specifies a device driver for use
by the DOSSHELL mouse where < mouse device driver> is either
PCIBMDRY.MOS (IBM mouse driver), PCMSDRY.MOS (Microsoft serial
mouse driver), or PCMSPDRV.MOS (Microsoft bus mouse driver). The in
stalled driver is active only when DOSSHELL is running. The DOSSHELL
mouse driver may interfere with a factory supplied driver. Delete this param
eter ifyour mouse does not work with DOSSHELL, but otherwise functions
normally. This should allow your mouse to work with DOSSHELL and also
reduce the amount of memory taken up by DOSSHELL.
IMUL Specifies that the File System is to use two buffer systems. In
formation about two disk drives is maintained when a two-buffer system is
specified.
IPROMPT Activates the Command Prompt program in the Main Pro-.
gram Group screen. The "Command Prompt" title will still be listed on the
Main Program Group screen if this parameter is deleted. Refer to the discus
sion of IMEU to see how you can change the programs listed on the Main
Program Group screen.
ITEXT Provides text mode support for eGA and monochrome dis
plays.
ITRAN Specifies that DOSSHELL is to operate in transient mode. In
transient mode, most of the memory used by DOSSHELL is freed up when
DOSSHELL is not running. DOSSHELL remains resident in memory at all
times if this parameter is omitted. If you choose to keep DOSSHELL resi
dent, you should use the IB:n parameter to limit the amount of memory
used by the File System buffers.
ISND Activates the sound capability of DOSSHELL.
ISWAP Activates memory swapping. With memory swapping acti
vated, the contents of the File System buffers are saved in a disk file when
ever an application program is run or control is passed to the DOS command
line. This capability decreases the transition time in returning to
DOSSHELL.
154
C
H
A
p
T
E
R
8
EDLIN, the MS-DOS
Text Editor
()
()
()
()
0
0
0
0
0
0
0
0
0
0
0
0
0
()
0_
0
0
0
0
0
0
0
0
0
0
0
0
0
0
0
0
0
0
0
0
0
0
0
0
()
0
0
0
0
0
0
0
0
0
0
0
0
0
0
0
0
0
0
0
0
0
0
Creating a File with EDLIN
Modifying an Existing File with EDLIN
Ending EDLIN
EDLIN Commands
155
Part 2-1Utorials
EDLIN is a line-oriented text editor that comes with MS-DOS. Given the cur
rent proliferation of high-powered processors, you may never need to use
EDLIN. EDLIN is definitely not a word processor, or even close to it. If you
are doing any sort of document preparation, use a word processor or other
editing program, rather than EDLIN. However, if you want a handy tool to
write batch files and CONFIG.SYS files, EDLIN is just what you need.
Creating a File with EDLIN
To create a new file with EDLIN, enter edlin and the filespec of the file that
you are creating (filespecs are discussed in chapter 2). After you press Enter,
DOS will load EDLIN into memory, and EDLIN will take control. EDLIN will
search the specified or default drive for the filename that was entered in the
start command. If it cannot find the file, EDLIN displays the message New
fi le and then displays its prompt (*) to indicate that an EDLIN command
may be entered:
C>edlin newfile.txt
New fiLe
*
The examples presented in this chapter assume that MS-DOS can locate
the file EDLIN.COM. For this to occur, either EDLIN.COM must be
stored in the current directory of drive C or the PATH command must
specify the directory containing EDLIN.COM. Current directories and
PATH are discussed in chapter 3.
Modifying an Existing File with EDLIN
To modify a file that already exists, the file EDLIN. COM must be in drive C.
Enter the EDLIN start command by typing edlin and the filespec of the ex
isting file. When you press Enter, MS-DOS will search the specified or de
fault directory for the file. If it finds the file, the file will be loaded into
memory until available memory is 75 % full. If the entire file is loaded,
EDLIN displays the message End of input f i l e and then displays its
prompt (*) to indicate that an EDLIN command may be entered:
C>edlin oldfile.txt
End of input fiLe
*
156
8-EDLIN
If the entire file cannot be loaded into memory, EDLIN will load lines
until memory is 75 % full but will not display a message. The * prompt ap
pears when EDLIN is ready to accept a command.
TheB Option
If you use the method just described to load an existing file with EDLIN, the
load will stop when EDLIN encounters the first Ctrl-Z character in a file's
text. The Ctrl-Z character is an end-of-file marker, indicating the end ofa text
file. If you wish to edit a file containing embedded Ctrl-Z characters, add /b
to the end of the EDLIN start command. For example:
C>edlin oldfile.txtlb
EDLIN will load the entire file regardless ofany embedded end-of-file markers.
Ending EDLIN
When you have finished editing a file, you can exit from EDLIN by entering
the END command e. The original file (if it existed) is renamed with the
extension" .BAK" to indicate that it is a backup file, and the edited file is
stored on the disk specified in the initial EDLIN start command. After the file
has been saved, EDLIN terminates and the MS-DOS C> prompt is displayed.
If you decide not to save the file that you have been editing, enter the
QUIT command q. EDLIN will display a prompt asking if you want to abort
the editing session. If you enter "y" (or "Y"), the original file (if one existed)
is saved with its original filename. No .BAK file is created, and control is
returned to MS-DOS. If you enter "n" (or "N"), the editing session will con
tinue. Both the END and QUIT commands will be covered in more detail
later in the chapter.
The following section will discuss each of the EDLIN commands, be
ginning with the most frequently used ones. Table 8-1 provides an alphabeti
cal summary of the commands.
EDLIN Commands
Before you start using the individual EDLIN commands, you need to know
the conventions or rules used by EDLIN. EDLIN commands are invoked by
typing a letter and pressing Enter. In addition, most EDLIN commands ei
ther allow or require that one or more numbers be included as command
parameters. When a command contains more than one number, the num
bers must be separated by a comma or a space. In certain instances, a comma
is required. These instances will be pointed out in the discussion of the indi
vidual commands.
EDLIN does not differentiate between uppercase and lowercase letters.
157
Part 2- Tutorials
For example, you can invoke the QUIT command by entering "Q" or "q". It
makes no difference to EDLIN.
EDLIN designates a particular line in the file being edited as the current
line. The current line serves as a sort of bookmarker that allows EDLIN to
keep track ofwhere it is in a file. When EDLIN displays a portion of a file, the
current line has an asterisk following the line number.
The pound sign C#) may be used to refer to the last line of a file that is in
memory. This can be useful when you want to perform a task involving the
last line of a file but you do not know the last line number. For example, the
command "50,# d" will delete everything from line 50 to the end of the file.
lt is possible to refer to line numbers relative to the current line. The
minus sign C-) is used to indicate a line before the current line. The plus sign
(+) is used to indicate a line after the current line. As an example, the com
mand "- 5, + 5 L" will list the 51ines before the current line, the current line,
and the 5 lines after the current line.
More than one EDLIN command may be entered at a time. With some
exceptions, which will be noted, one command can follow another without
any special delimiting characters. For example, the command "1,10 d 1,101"
deletes the first 10 lines of a file and then lists the new lines 1 through 10.
Control characters may be entered in a text file by typing "i" (for
INSERT) and then pressing Ctrl-V and typing the desired control character
in uppercase. For example, to enter Ctrl-Z, type "i", press Ctrl-V, and then
type capital Z.
Table 8-1. Summary of EDLIN Commands
158
Command
Purpose
Format
(A)PPEND
(page 173)
Adds a specified
number of lines
from disk to the
file being edited
in memory
[number] a
[number]
(C)Opy
(page 175)
Copies a range
of lines to a
specified
location in a file
,,line c
[linel]"line c
[linel], [line2],line c
[linel],[line2],line, count c
(D)ELETE
(page 167)
Deletes a range
of lines
d
EDIT
(page 165)
Edits a line of
text
[line]
(E)ND
(page 173)
Ends EDLIN
and saves the
edited file
e
[linel] d
,[line2] d
[linel],[line2] d
8-EDLIN
Table 8-1. (cont.)
Command
Purpose
Format
(I)NSERT
(page 160)
Inserts lines of
text
i
(L)IST
(page 162)
Lists lines of
text
L
(M)OVE
(page 174)
Moves a range
of lines to a
specified
location
"line m
[linel]"line m
,[line2],line m
[line 1], [line2] ,line m
(P)AGE
(page 177)
Lists lines of
text
p
(Q)UIT
(page 174)
Ends EDLIN
and does not
save the edited
file
q
(R)EPLACE
(page 171)
Replaces all
occurrences of
a string in a
specified range
with a second
string
r
(S)EARCH
(page 169)
Searches a
specified range
of lines in order
to locate a
string
s
(T)RANSFER
(page 178)
Merges the
contents of a
specified file
with the file
being edited
t [filespec]
[line] t [filespec]
(W)RITE
(page 172)
Writes a
number of lines
from memory
to disk
w
[line] i
[linel] L
,[line2] L
[linel],[line2] L
[linel] p
,[line2] p
[linel],[line2] p
[linel] r
,[line2] r
[linel],[line2] r
[linel],[line2] r [stringl] F6 [string2]
[linel],[line2] ? r [stringl] Ctrl-Z [string2]
[linel] s
,[line2] s
[linel],[line2] s
[linel],[line2] s [string]
[linel],[line2] ? s [string]
[number] w
Note: Italics indicate items that you must supply. Items in square brackets are optional.
159
Part 2-Tutorials
INSERT
The INSERT command is used to insert lines of text into the file being edited.
To invoke the command, enter i (or I) when you see the EDLIN prompt (*).
In the following example, INSERT is used to add text to a new file. Starting with
the MS-DOS prompt (C », type edlin followed by the name of the file that will
be created (" demo 1. txt"). EDLIN will display its prompt ( *)to indicate that it is
ready to accept a command:
C>edlin dem01.txt
New file
*
The message New fi le tells you that no file named "dem01.txt" exists on the
default disk. Following the * prompt, enter the letter i to begin the INSERT
command. EDLIN will respond by displaying 1 : * , which is the signal to enter
the first line of text.
Each line of text may hold up to 253 characters. To terminate a line,
press Enter. EDLIN will insert the ASCII characters for carriage return and
line feed at the end of the line. These two characters do not appear on the
display screen.
Each time you press Enter, EDLIN stores a line of text in memory and
then displays the next line number. You may enter another line of text or end
the INSERT command by pressing the Ctrl-Break key combination.
The following example shows how lines of text could be entered in
"demo1.txt". If you decide to enter these lines on your computer, press
Enter to end each line of text (lines 1 through 11).
C>edlin dem01.txt
New fi le
*i
1:*This is how you would create a new text file with EDLIN.
2:*Enter "i" in response to the EDLIN prompt. EDLIN displays
3:*"1:*". This is your signal to enter the first line of text.
4:*You may enter up to 253 characters in a line.
S: *
<-to skip a line press Enter
6:*To end a line, press Enter. EDLIN will store the line of
7:*text in memory and display the next line number. You may
8:*enter another line of text or terminate the INSERT command.
9:*To terminate, press Ctrl-Break.
10:*When a command is terminated, EDLIN displays its prompt
11:*and waits for you to enter another command.
12:*
13 :*"C
*
160
<-you press Ctrl-Break
<- EDLIN displays its prompt and waits for your next command
8-EDLIN
Text is inserted before the current line when you enter "i" with no
other parameters. The current line is the last line in the file that was modi
fied. In the preceding example, line 13 is the current line. Enter i to insert
text beginning at line 13:
*i
13:*""""""""""""""""""""""""""'" ,
14:*These 3 lines are being inserted at lines 13, 14, and 15.
15:*"""""""!!!!!'!!!!!!!!'!!!!!!'!'!!!!!!!!""!!!!' ,
16:*"C
*
You can use the LIST command (enter uppercase L) to display a portion
of the file:
5:
6:To end a line, press Enter. EDLIN will store the line of
7:text in memory and display the next line number. You may
8:enter another line of text or terminate the INSERT command.
9:To terminate, press Ctrl-Break.
10:When a command is terminated, EDLIN displays its prompt
11:and waits for you to enter another command.
12:
13: ! ! ! ! ! ! ! ! ! ! ! ! ! ! ! ! ! ! ! ! ! ! ! ! ! ! ! ! ! ! ! ! ! ! ! ! ! ! ! ! ! ! ! ! ! ! ! ! ! ! ! ! ! ! ! !
14:These 3 lines are being inserted at lines 13, 14, and 15.
15: ! ! ! ! ! ! ! ! ! ! ! ! ! ! ! ! ! ! ! ! ! ! ! ! ! ! ! ! ! ! ! ! ! ! ! ! ! ! ! ! ! ! ! ! ! ! ! ! ! ! ! ! ! ! ! !
*
To suspend scrolling while using LIST, press Ctrl-NumLock. To resume
scrolling, press any key. Press Ctrl-Break to terminate the listing. (For more
about LIST, see the next section.)
You may specify the line at which text insertion is to begin by preced
ing the letter "i" with a line number. In this way, text can be inserted between
existing lines in the file. Lines following the insertion will be renumbered.
For example:
11:*+++++++++++++++++++++++++++++++++++++++++++++++++++
12:*These 3 lines are being inserted starting at line 11.
13:*+++++++++++++++++++++++++++++++++++++++++++++++++++
14:*"C
*
161
Part 2-1Utorials
The command "5L" tells EDLIN to display the file beginning with line 5:
5:
6:To end a line, press Enter. EDLIN will store the line of
7:text in memory and display the next line number. You may
8:enter another line of text or terminate the INSERT command.
9:To terminate, press Ctrl-Break.
10:When a command is terminated, EDLIN displays its prompt
11:+++++++++++++++++++++++++++++++++++++++++++++++++++
12:These 3 lines are being inserted starting at line 11.
13:+++++++++++++++++++++++++++++++++++++++++++++++++++
14:and waits for you to enter another command.
15:
16:! ! ! ! ! ! ! ! ! ! ! ! ! ! ! ! ! ! ! ! ! ! ! ! ! ! ! ! ! ! ! ! ! ! ! ! ! ! ! ! ! ! ! ! ! ! ! ! ! ! ! ! ! ! ! !
17:These 3 lines are being inserted at lines 13, 14, and 15.
18: ! ! ! ! ! ! ! ! ! ! ! ! ! ! ! ! ! ! ! ! ! ! ! ! ! ! ! ! ! ! ! ! ! ! ! ! ! ! ! ! ! ! ! ! ! ! ! ! ! ! ! ! ! ! ! !
*
In the preceding example, three lines have been inserted beginning at
line 11. Note that the line numbers following the insertion have been auto
matically renumbered.
If you precede the letter "i" with a number that is greater than the high
est-existing line number in the file or if you specify "U" as the line number,
the insertion begins following the last line of the file stored in memory.
LIST
The LIST command (enter uppercase L) is used to display a specific range of
lines in a file. We will demonstrate this command by using EDLIN to work on
the following file:
1: This is line 1.
2: This is line 2.
3: This is line 3.
14: This is line 14.
15* This is line 15.
16: This is line 16.
24: This is line 24.
25: This is line 25.
26: This is line 26.
162
8-EDLIN
The current line (the last line modified by EDLIN) is denoted by an
asterisk. In the preceding example, line 15 is the current line. Using the LIST
command will not change the current line.
If you enter "1" without any line numbers, EDLIN will display the 11
lines before the current line, the current line, and the 11 lines after the cur
rent line, for a total of23 lines-the maximum number that can be listed at
anyone time:
*L
4: This is Line 4.
5: This is Line 5.
6: This is Line 6.
14: This is line 14.
15:*This is Line 15.
16: This is Line 16.
24: This is line 24.
25: This is Line 25.
26: This is Line 26.
*
If there are fewer than 11 lines before the current line, extra lines are dis
played after the current line so that a total of 23 lines is displayed.
To list a particular range of lines, specify the starting and ending line
numbers of the range in your LIST command. The numbers must be sepa
rated by a comma or a space and must precede the letter "1". To list lines 1
through 4, enter:
*1,4L
1:
2:
3:
4:
This
This
This
This
is
is
is
is
Line
Line
Line
line
1•
2.
3.
4.
*
If you precede the LIST command with only one number, the listing
will begin at that line number. A total of23 lines will be listed. In the follow
ing example, the 23 lines from lines 2 through 24 are listed:
*2L
2: This is Line 2.
163
Part 2-1Utorials
3:*This is line 3.
23: This is line 23.
24: This is line 24.
*
If you precede the LIST command with a comma and a line number,
the listing will begin 11 lines before the current line and end at the line num
ber that is included in the command:
*,16L
4: This is line 4.
5: This is Line 5.
14: This is Line 14.
15:*This is line 15.
16: This is line 16.
*
If the line you specify is more than 11 lines before the current line, the
display is the same as if you had entered only "1":
*,2L
4: This is Line 4.
15:*This is Line 15.
26: This is Line 26.
*
You can use the LIST command to obtain a printout ofa portion or all of
a text file. Try printing out one of the preceding examples. Thrn on your
printer and press the Ctrl-PrtSc key combination. Then enter the appropri
ate LIST command. The display that appears on your screen will be sent to
the printer.
The display will start to scroll off the screen if you list more than 24
lines. To suspend the listing, press the Ctrl-NumLock key combination. The
listing will continue when you press any key. To terminate the listing, press
the Ctrl-Break combination.
164
8-EDLIN
EDIT
The EDIT command is used to edit a line of text. To specify the line to be
edited, simply enter its line number. To specify the current line, enter a pe
riod (.). To specify the line following the current line, press Enter.
When you specify a line for editing, EDLIN displays the line number
and the text of that line. The line number is then repeated on the line below.
For example:
6:*The oLd gray mare, she ain't what she used to be.
6:*
To edit a line, simply type the new text. The edited line is placed in the
file and becomes the current line when you press Enter. If you decide to
retain the original line without any changes, press Esc or Ctrl-Break instead
of Enter. Pressing Enter with the cursor at the beginning of the line has the
same effect as pressing Esc or Ctrl-Break.
If you include the EDIT command on a line with one or more other
EDLIN commands, you must use semicolons to separate the commands on
the line. For example, the command "22; 1,5 d" will first edit line 22 and
then delete lines 1 through 5.
When you specify a line for editing, the text of that line forms the tem
plate. The template is the current structure of the line that is stored by
MS-DOS. As the line is edited, the template is modified to reflect the editing
changes.
MS-DOS Editing Keys
The MS-DOS editing keys may be used to edit the template. These keys con
sist of the F1, F2, F3, F4, and F5 function keys, plus the Ins and Del keys.
The F 1 function key displays one character in the template. By repeat
edly pressing the F 1 key (or the ~ key in some computers) you can cause all
or part of the template to be displayed:
6:*The oLd gray mare, she ain't what she used to be.
6:*The oLd gray mare, she ain't what
+-template
+-press Fl 33 times
The last line will be placed in the file and will become the current line if
Enter is pressed. If Esc is pressed, a backslash (\) will be displayed and the
changes entered in the second line will be cancelled:
6:*The oLd gray mare, she ain't what she used to be.
6:*The oLd gray mare, she ain't what
+-template
+-press Fl 33 times;
press Esc
165
Part 2- Tutorials
The F3 function key displays the template from the position of the cur
sor to the end of the line:
6:*The old gray mare, she ain't what she used to be.
6:*The old gray mare, she ain't what she used to be.
+-template
+-press F3 once
The F2 function key copies the template up to the first occurrence of a
specified character. Nothing is copied if the character specified is not in the
template. The last line in the following display is obtained by first pressing
the F2 key and then pressing the comma (,) key. The template is copied up to,
but not including, the first comma:
6:*The old gray mare, she ain't what she used to be.
6:*The old gray mare_
<-template
<-press F2 once;
enter comma
The F4 function key skips over a template until it encounters a speci
fied character. No characters are skipped if the specified character is not
present in the template. In the next example, the F4 key is pressed and then
the "s" key is pressed. This deletes the characters in the template up to the
first "s". The F4 key does not display any text. To display the new template,
press the F3 key:
6:*The old gray mare, she ain't what she used to be.
6:*She ain't what she used to be.
+-template
<-press F4, "s",
and F3
The Ins key can be used to insert text into the template. Pressing Ins one
time turns the insert mode on. Pressing it a second time turns the insert
mode off,
When the insert mode is on, any characters that you type are inserted
into the template. These characters do not replace characters already in the
template. When the insert mode is off, any characters that you type replace
characters in the template.
In the following example, the F 1 key is pressed three times. The Ins key
is then pressed to turn on the insert mode. Five characters (4 letters and a
blank) are inserted into the template. The remainder of the template is then
copied with the F3 key:
6:*The old gray mare, she ain't what she used to be.
6:*The very old gray mare, she ain't what she used to be.
<-template
<-press FI, Ins,
"very", and
F3
The Del key can be used to skip over one character in the template at a
time.
166
8-EDLIN
6:*The oLd gray mare, she ain't what she used to be.
6:*The oLd gray mare, he ain't what she used to be.
+-template
+-press Fl 20 times;
press Del, F3
The F5 function key moves the line that is currently being displayed
into the template without entering it in the file. An "@" character is dis
played to indicate that the new line is now in the template. Once you have
entered FS, you can proceed to edit the new template. Pressing Enter stores
the new template in the file.
In the next example, a new line of text has been added. The F5 key is
then pressed to store the new line as the template. The new template can be
edited using the techniques described in this section. The original line of
text remains in the file as the current line if Enter is pressed immediately after
F5 is pressed:
6:*The oLd gray mare, she ain't what she used to be.
6:*And now for something compLeteLy different@
+-template
+-type new template;
press F5
Right now you are probably thinking that it is more trouble than it is
worth to memorize the functions of the different editing keys. Typing in
new lines of text seems to require less thought than remembering which key
does what. However, if you spend some time working with the editing keys,
you will find that EDLIN will become more productive for you.
DELETE
The DELETE command is used to delete a range of lines. The line following
the deleted range becomes the current line. The current line and any subse
quent lines are renumbered following a deletion.
To use DELETE, enter d (or D) in response to the EDLIN prompt. The
current line will be deleted:
1 : This is line 1 .
2: This is line 2.
3: This is line 3.
4: This is line 4.
5:*This is line 5.
6: This is line 6.
*d
*L
1 : This is line 1 .
2: This is line 2.
3: This is line 3.
4: This is line 4.
167
Part 2-1Utorials
5:*This is Line 6.
*
In the preceding example, the current line was initially line 5. When "d"
was entered, the current line was deleted and the line after the deleted line
became the current line. The line following the deleted line was renum
bered.
You can specify a range of lines to be deleted by including the begin
ning and ending line numbers of the range in the DELETE command. The
two numbers must be separated by a comma or a space. The line following
the deleted range will become the current line:
1 : This is Line 1 •
2: This
3: This
4: This
5:*This
is
is
is
is
Line
Line
Line
Line
2.
3.
4.
6.
*2,4d
*L
1 : This is Line 1 .
2:*This is Line 6.
*
Lines 2 through 4 have been deleted, and what was originally line 6 is
now the current line.
DELETE can be used to delete a range of lines from the current line
through a specified line. The command starts with a comma followed by the
last line in the range to be deleted. The first line following the deleted range
becomes the current line:
1 : This is li ne 1 .
2: This
3: This
4:*This
5: This
6: This
is
is
is
is
is
Line
Line
Line
Line
Line
6.
7.
8.
9.
10.
*,5d
*L
1 : This is Line 1 .
2: This is Line 6.
3: This is Line 7.
4:*This is Line 10.
*
168
8-EDLIN
The range oflines starting with the current line (line 4) and ending with line
5 has been deleted. The line following the deleted range has become the
current line.
SEARCH
The SEARCH command (enter s or S) searches a range of lines for a specified
character string. The first line found to contain the character string becomes
the current line.
The SEARCH command can include the starting and ending line num
bers of the range to be searched. Line numbers must be separated by a
comma or a space. The command can also include the character string that is
to be the object of the search. The string is specified with its first character in
the position immediately following the "s". The string is terminated by
pressing Enter.
In the following example, the SEARCH command searches the block of
text beginning at line 2 and ending at line 6 for the character string "and". If
the string is found within the block, EDLIN will display the first line on
which it is located:
1:
2:
3:
4:
5:
6:
7:
This is a demonstration file that will be used
to show how the SEARCH command operates. The
SEARCH command can be very handy. Imagine that
you are writing a paper and you realize that you
have been misspelling the word "gigolo." You could
use the SEARCH command to locate the gigolos in
your paper.
*2,6 sand
2: to show how the SEARCH command operates. The
*
The search began at line 2. The string "and" was located in line 2 as part of
the word "command." Line 2 is now the current line, since it was the first
line found to contain the string.
Entering "s" by itself causes EDLIN to search for the last string that was
specified with a SEARCH or REPLACE command. The search begins at the
line following the current line and ends with the last line of the file that is
stored in memory. We can illustrate this application of SEARCH by continu
ing with the previous example.
Line 2 is the current line, and the last string entered was "and". If we
enter "s", EDLIN will begin searching at line 3 for "and":
*2,6 sand
2: to show how the SEARCH command operates. The
169
Part 2-Tutorials
*5
3: SEARCH command can be very handy. Imagine that
*5
4: you are writing a paper and you realize that you
*5
6: use the SEARCH command to locate the gigolos in
*5
Not found
*
The command "s" was used three times to find the string "and". The string
was found in lines 3, 4, and 6. None of the lines in the file beyond line 6
contained the string. Therefore, the fourth time that "s" was entered, EDLIN
replied Not found.
Rather than reenter "s" each time to continue searching, you can enter
a question mark immediately before the letter "s". EDLIN will display the
prompt 0 . K. ? when it finds a line containing the character string specified in
the command. If you respond "y" or press Enter, the line found becomes the
current line and the search ends. Pressing any other key continues the search.
Once all of the lines within the range have been searched, the Not found
message is displayed:
*2,6?
2:
O.K.?
3:
O.K.?
4:
O.K.?
sand
to show how the SEARCH command operates. The
n
SEARCH command can be very handy. Imagine that
n
you are writing a paper and you realize that you
y
*
The string was found in three lines. Each time, EDLIN asked if the search
should be ended. The search was ended at line 4 when the response was
"y" .
Both the starting and ending line numbers of the range to be searched
can be omitted from the SEARCH command. If the starting number line is
omitted, the search begins at the line following the current line. If the end
ing line number is omitted, the search ends at the last line of the file that is in
memory. The ending line number must be preceded by a comma if the start
ing line number is omitted and the ending line number is specified.
If the SEARCH command is entered on a line along with other EDLIN
170
8-EDLIN
commands, the string in the command may be terminated by pressing Ctrl-Z
rather than Enter.
REPLACE
The REPLACE command (enter r or R) is used to search a specified range of
lines for a character string and replace that string with a second character
string. The first string is replaced at each location that it occurs within the
specified range. The last line changed by REPLACE becomes the current
line.
The starting and ending line numbers of the range to be searched may
be specified in the REPLACE command. Line numbers must be separated by
a comma or a space. The character string to be replaced and the replacement
character string may also be specified in the command. The two strings must
be separated by Ctrl-Z.
In the next example, lines 2 through 4 are searched for the string
"you". When the string is located within the range, it is replaced with "we":
1:
2:
3:
4:
5:
6:
This is a demo fiLe to show how the REPLACE command
works. REPLACE can be very handy. Imagine that you
are writing a paper and you reaLize that you have
misspelled "gigoLo" as "jiggLoh." You couLd use the
REPLACE command to Locate the jiggLohs in your paper
and repLace them with gigoLos.
*2,4 ryou"Zwe
2: works. REPLACE can be very handy. Imagine that we
3: are writing a paper and we reaLize that you have
3: are writing a paper and we reaLize that we have
*
Notice that the two strings in the command are separated by 1\ Z. This charac
ter can be entered by pressing the F6 function key or by pressing the Ctrl-Z
key combination. If you have modified your function keys (see chapter 9),
you will have to use the Ctrl-Z combination.
Each time that "you" is located within the specified range, it is replaced
with "we". Each time a line is changed, it is displayed. Notice that line 3 is
displayed two times since "you" is replaced twice. Line 4 contains the string
"You". However, "You" is not replaced because REPLACE differentiates be
tween uppercase and lowercase letters.
As with the SEARCH command, you can use a question mark with RE
PLACE. The question mark is included immediately before the "r". EDLIN
will display the prompt o. K. ? each time that a line is modified. If you re
spond by pressing "y" or Enter, the suggested modification is made. The
modification is discarded if you press any other key in response to the
prompt. In either case, the search continues through the entire range speci
171
Part 2-Tutorials
fied in the command. The following example demonstrates this, beginning
where the last example ended:
2: works. REPLACE can be very handy. Imagine that we
3: are writing a paper and we realize that you have
3: are writing a paper and we realize that we have
*2,4?
2:
O.K.?
3:
O.K.?
3:
O.K.?
rwe"Zyou
works. REPLACE can be very handy. Imagine that you
y
are writing a paper and you realize that we have
y
are writing a paper and you realize that you have
y
*
You may omit from the command both the starting and ending line
numbers of the range to be searched. The search begins with the line after
the current line if you omit the starting line number. The search ends with
the last line in memory if you omit the ending line number. If you specify
only the ending line number in the command, the line number must be
preceded by a comma.
One or both of the character strings may be omitted from the REPLACE
command. If you omit the second string, EDLIN deletes all occurrences of
the first string within the specified range. The first string must end with "Z.
If you omit both strings, EDLIN will reuse the search string of the most re
cent SEARCH or REPLACE command and the replace string of the last RE
PLACE command.
If you include the REPLACE command on a line with one or more other
EDLIN commands, the replace string can be terminated by pressing Ctrl-Z
rather than Enter.
WRITE
When EDLIN begins to work on an existing file, its first task is to load the file
into computer memory. EDLIN will fill up to 75 % of available memory with
the file. EDLIN displays the message End of input f i l e followed by the
EDLIN prompt if memory is large enough to accommodate the entire file at
one time. If the file is too large to be loaded into memory at one time, EDLIN
loads a portion of the file and displays only the prompt.
If a file is larger than 75 % of memory, the WRITE command (enter w or
W) can be used to write a number oflines from memory to a disk. This frees a
portion of memory so that additional lines in the file may be loaded into
memory using the APPEND command. The WRITE command is meaning
ful only if the file you are editing is too large to fit in memory.
172
8-EDLlN
The WRITE command writes text to the disk beginning with line num
ber 1. You can specify the number of lines to be written by preceding the
letter "w" with a number. The next example writes the first 100 lines in
memory to the disk that was specified in the EDLIN start command:
*100
It
*
If you do not specify the number of lines to be written (entering only
"w"), EDLIN writes lines until 25 % of available memory is occupied by the
file. No action is taken if less than 25 % of available memory is occupied by
the file. After the lines are written, all lines remaining in memory are renum
bered so that the first remaining line in memory becomes number 1.
APPEND
The APPEND command (enter a or A) is used to add a number of lines to the
EDLIN file currently in memory. This command is used after a portion of
memory is made available with the WRITE command. The APPEND com
mand is meaningful only if the file being edited is too large to fit in memory.
Refer to the previous discussion of the WRITE command for information on
when to use the WRITE and APPEND commands.
The APPEND command adds lines of the file to memory starting at the
end of the lines already in memory. You can specify how many lines are to be
added to memory by preceding the letter "a" with a number. The following
example adds 100 lines of a file to the portion of the file already in memory:
*100 a
*
If you do not specify the number of lines to be added, lines are added
until available memory is 75 % full. No action is taken if available memory is
already 75 % full. (If necessary, you can use the WRITE command to free a
portion of memory.)
The message End of ; nput fi le is displayed when the APPEND com
mand has read the last line of the file into memory.
END
The END command (enter e or E) terminates EDLIN, saves the edited file,
and returns control to MS-DOS. The edited file is saved by writing it to the
disk and file specified in the EDLIN start command. As you may recall, the
original unedited file is saved and given the extension "BAK". However, a
.BAK file will not be created if you are creating a new file with EDLIN rather
than modifying an existing file.
If the disk specified in the EDLIN start command does not have enough
173
Part 2-Tutorials
free space to save the entire edited file, only a portion of the file is saved. The
saved portion is given a filename extension of "$$ $", and the remainder of
the edited file is lost. The original unedited file is stored with its original
extension.
QUIT
The QUIT command (enter q or Q) is used to terminate EDLIN and return
control to MS-DOS. The changes made during the editing session are not
saved, and no .BAK file is created. QUIT is used only when you want to
discard all of the changes made in an EDLIN session.
When you enter the command "q", EDLIN displays a prompt asking if
you want to end the editing session and return to MS-DOS. A response of
"y" terminates EDLIN and returns control to MS-DOS. All changes made
during the EDLIN session are discarded. Only the original unedited file is
saved. A response of "n" returns control to EDLIN, which displays its
prompt and waits for you to enter another command.
MOVE
The MS-DOS 2.X and subsequent versions of EDLIN include a MOVE com
mand. With MOVE, you can transfer a range of lines in a text file from one
location to another. The first line moved becomes the current line. Lines are
renumbered according to the direction of the move.
The starting and ending lines of the block to be moved may be speci
fied in the MOVE command. The block is moved ahead ofa third line, which
must be specified in the command. All numbers in the command must be
separated by commas.
In the next example, lines 2 through 5 are moved ahead of line 9. The
first line moved (line 2) becomes the current line, and the lines are renum
bered:
1 : This is line 1 .
2: This
3: This
4: This
5:*This
6: This
7: This
8: This
9: This
10: This
is
is
is
is
is
is
is
is
is
line
line
line
line
line
line
line
line
line
2.
3.
4.
5.
6.
7.
8.
9.
10.
*2,5,9 m
*L
1 : This is line 1 .
174
8-EDLIN
2: This
3: This
4: This
5:*This
6: This
7: This
is
is
is
is
is
is
line
line
line
line
line
line
6.
7.
8.
2.
3.
4.
8: This is line 5.
9: This is line 9.
10: This is line 10.
*
You may omit the first line in the block from the command. If you do
this, the block will start at the current line. You can also omit the last line in
the block. In this case, the block that is moved will end at the current line.
Consider the command ",,1 m". The starting line number has been
omitted, so the block to be moved begins at the current line. The ending line
number has also been omitted, so the block to be moved ends at the current
line. In other words, the block to be moved consists of one line- the cur
rent line. The command instructs EDLIN to move the current line ahead of
line number 1. The commas must be included in this command.
COpy
The COPY command (enter c or C) is included in the MS-DOS 2.X, 3.X, and
4.X versions of EDLIN. This command is used to duplicate a range of lines.
You may specify the beginning and ending lines of the range to be cop
ied by including the beginning and ending line numbers in the COPY com
mand. The command must include a line number to specify where the copy
will be located. All line numbers must be separated by a comma or a space.
The first line copied becomes the current line:
1 : This is line 1 •
2: This is line 2.
3: This is line 3.
4: This is line 4.
5:*This is line 5.
6: This is line 6.
7: This is line 7.
*1,2,6 c
*L
1 : This is line 1 .
2: This is line 2.
3: This is line 3.
175
Part 2- Tutorials
4: This
5: This
6:*This
7: This
8: This
9: This
is
is
is
is
is
is
Line
Line
Li ne
line
Line
Line
4.
5.
1•
2.
6.
7.
*
In the example, the range oflines beginning with line 1 and ending with line
2 is copied ahead of line 6.
A range oflines can be copied more than one time by including a count
in the command. The count is inserted between the line number that speci
fies where the copy is to be located and the letter "c". For example, if you
wanted to copy lines 1 and 2 twice, you would enter the command" 1,2 ,6,2
c". Compare this to the command in the previous example, which copied
the lines one time. As in the previous example, if no count is included in the
command, the range of lines is copied one time.
The starting and/or ending line numbers of the range to be copied may
be omitted from the COPY command. The command assumes the omitted
line(s) to be the current line:
1 : This is Line 1 .
2: This
3:*This
4: This
5: This
6: This
7: This
*1,,6 c
*L
1 : This
2: This
3: This
4: This
5: This
6:*This
7: This
8: This
9: This
10: This
*
is
is
is
is
is
is
Line
Line
Line
Line
Line
Line
2.
3.
4.
5.
6.
7.
is
is
is
is
is
is
is
is
is
is
Line
Line
Line
line
line
line
li ne
line
Line
line
1.
2.
3.
4.
5.
1.
2.
3.
6.
7.
In the example, the range of lines beginning with line 1 and ending with the
current line is copied ahead of line 6. The first line copied becomes the
current line.
176
8-EDLIN
PAGE
The PAGE (enterp or P) command is included in the MS-DOS 2.X, 3.X, and
4.X versions of EDLIN. The PAGE command lists lines of a file. Its actions
are similar to those of the LIST command, with one important difference.
The LIST command does not change the current line; the PAGE command
does. The significance of this difference will be demonstrated in the next
example.
The beginning and ending line numbers of the block of lines to be
listed can be specified with the PAGE command:
*1,5 P
1 : This is Line 1 .
2: This is
3: This is
4: This is
5:*This is
Line
Line
Line
Line
2.
3.
4.
5.
*
Ifyou omit the first line number of the block to be listed, the command
assumes that the first line is the current line plus one. The usefulness of the
PAGE command stems from the fact that the last line listed becomes the
current line.
Continuing with the previous example, we find that the current line
is line 5. If we invoke the PAGE command without specifying a starting
line, the listing will begin with line 6. If we do not specify an ending line
number, 23 lines will be listed. The last line listed becomes the current
line:
*P
6: This is Line 6.
7: This is Line 7.
27: This is Line 27.
28:*This is Line 28.
*
In this fashion, we could continue to enter the command "p", paging
through the file 23 lines at a time. Try doing this with the LIST command.
Repeatedly entering the letter "L" will repeatedly list the same 23 lines. The
reason is that LIST does not change the current line.
177
Part 2-Tutorials
TRANSFER
The TRANSFER command (enter t or T) is included in the MS-DOS 2.X, 3.X,
and 4.X versions of EDLIN. The TRANSFER command merges the contents
of a specified file with the file being edited.
You can specify the location at which the merged file is inserted into
the file being edited by including a line number in the TRANSFER com
mand. The merged file will be inserted ahead of the specified line. If you do
not specify a line number, the merged file is inserted ahead of the current
line. As an example, the command "100 t b:demo.txt" merges the file on
drive B named "demo. txt" with the file being edited. "Demo. txt" is
inserted ahead of line 100 in the file being edited.
The file being merged must be located in the current directory of the
specified or default drive. The current directory cannot be changed while
EDLIN is running. Refer to chapter 3 for a discussion of current directories.
178
H
C
A
p
T
E
R
9
Extended Keyboard and
Display Control
/,,'"/,''1'''1'"'' '" ., '" ,,,. '" '''"\,''\'''"\'''\''\
,,> ,,,. ,.,....... '''',\,''r''\'''\
{"l'''j''''/'''' "~I' ."..... ,.,. :'.": ·.'f ·,"\''''\'·..·V:···\
r"'r'r'T" ":. "'.
~"""I":'
. ".
:n' ," ·s.. "., .., ...
"'1.. . ]""".,
Using ANSI.SYS
Keyboard Reassignment
Screen Control
The ANSI. SYS file is an enhanced keyboard and display device driver supplied
with DOS versions 2, 3, and 4. This chapter discusses the ways in which you
can employ the enhanced support of the ANSI.SYS console driver.
As with other installable device drivers, you must explicitly configure
your system in order to use ANSI.SYS. For example, if the ANSI.SYS file is in
179
Part 2-Tutorials
your C: \DOS directory, the device driver is installed by including the fol
lowing statement in your CONFIG.SYS file:
device=c:\dos\ansi.sys
Remember that in order to use ANSI.SYS, you must reboot after changing
CONFIG.SYS.
ANSI.SYS Flags
The DOS 4 version of ANSI.SYS has three optional flags that may
be used in the device statement used to load the driver.
The Ik flag lets you configure ANSI.SYS so that it cannot reassign
the extended function keys Fll and F12 (key reassignment is discussed
later in this chapter).
The Ix flag lets you configure ANSI.SYS so that it can distinguish
enhanced cursor keys from numeric pad cursor keys. To illustrate, if
your CONFIG.SYS file contains the statement
device=c:\dos\ansi.sys Ix
then reassignment of the numeric pad up arrow key does not reassign
the enhanced up arrow key.
The II flag lets you configure ANSI. SYS so that it attempts to main
tain the current number of rows on the display screen. Some applica
tion programs attempt to reset the display to the default of 25 rows. If
the II flag is included in the ANSI.SYS device statement, the driver will
use the MODE command in an attempt to override such programs.
Using ANSI.SYS
Data entered from the keyboard is sent to the computer as a sequence of
ASCII characters. When ANSI.SYS is installed, it processes all character se
quences sent from the keyboard. ANSI.SYS recognizes certain character se
quences as being command sequences. Command sequences direct
ANSI.SYS to modify keyboard input or to modify display screen output (fig
ure 9-1). All ANSI.SYS command sequences begin with an escape character
whose ASCII value is 27 (see appendix F for ASCII values). ANSI.SYS com
mand sequences are not displayed on the screen.
ANSI.SYS can perform four types of commands: control cursor posi
tion, erase all or part of the display screen, reassign character strings to indi
vidual keys on the keyboard, and set display modes and attributes. Tables 9-1
180
9-Extended Keyboard and Display Control
I
/
\
Figure 9-1. ANSI.SYS receives input from the keyboard
and sends output to the display screen.
through 9-5 give the individual commands, the corresponding command
sequences, and a brief explanation of each command.
Table 9-1. ANSI.SYS Commands for
Controlling Cursor Position
Command Name
Command
Sequence
Cursor position
ESC[#; #H
Moves the cursor to a specified
position on the display screen. The
position is specified by the #
parameters. The first parameter
specifies the line number, and the
second parameter specifies the
column number of the cursor
position. The cursor will move to
the home position if no position is
specified. The command sequence
must end with an uppercase "H".
Cursor up
ESC[#A
Moves the cursor up a number of
lines without changing columns.
The value of # determines the
number of lines moved. The default
is one. The command sequence
must end with an uppercase "X'.
Cursor down
ESC[#B
Moves the cursor down a number of
lines without changing columns.
The value of # determines the
Description
181
Part 2- Tutorials
Thble 9-1. (cont'd)
Command Name
Command
Sequence
Description
number of lines moved. The default
is one. The command sequence
must end with an uppercase "B".
Cursor forward
ESC[#C
Moves the cursor forward without
changing lines. The value of #
determines the number of columns
moved. The default is one. The
command sequence must end with
an uppercase "C".
Cursor
backward
ESC[#D
Moves the cursor backward without
changing lines. The value of #
determines the number of columns
moved. The default is one. The
command sequence must end with
an uppercase "D".
Horizontal!
vertical position
ESC[#; #f
Has function identical to cursor
position command. Command
sequence must end with a lowercase
"f",
182
Save cursor
position
ESC[s
Saves, in memory, the current
position of the cursor. The position
of the cursor can be restored with
the restore cursor position
command. The command sequence
must end with a lowercase "s".
Restore cursor
position
ESC[u
Restores the cursor to the position it
occupied when the previous save
cursor position command was
issued. The command sequence
must end with a lowercase "u".
Device status
report
ESC[6n
Requests that ANSI.SYS issue a
cursor position report. The
command sequence must end with a
lowercase "n".
Cursor position
report
ESC[#; #R
Reports the current position of the
cursor. The first parameter is the
current line. The second parameter
is the current column. ANSI.SYS
issues a cursor position report in
response to a device status report.
9-Extended Keyboard and Display Control
Thble 9-2. ANSI.SYS Commands for
Erasing the Display Screen
Command Name
Command
Sequence
Erase display
ESC[2J
Erases entire display and positions
the cursor at the home position. The
command sequence must end with
an uppercase "J".
Erase line
ESC[K
Erases from the cursor to the end of
the line. The command sequence
must end with an uppercase "K".
Description
Thble 9-3. ANSI.SYS Commands for
Controlling Display Screen Attributes
Command Name
Command
Sequence
Set graphics
rendition
ESC[#; ... ;#m
Description
Sets the screen display attributes. The
command sequence may contain one
or more of the parameters that are
listed below. The command
sequence must end with a lowercase
"rn".
Attribute Parameters
o
1
4
5
7
8
30
31
32
33
34
35
36
37
40
41
42
Meaning
All attributes off. Normal display.
High intensity display on.
Underscore on. Underscore will not work with
a color display.
Blink on.
Reverse video on.
Concealed on. No display.
Black foreground.
Red foreground.
Green foreground.
Yellow foreground.
Blue foreground.
Magenta foreground.
Cyan foreground.
White foreground.
Black background.
Red background.
Green background.
183
Part 2-1Utorlals
Thble 9-3. (cont'd)
Attribute Parameters
43
44
45
46
47
Meaning
Yellow background.
Blue background.
Magenta background.
Cyan background.
White background.
Thble 9-4. ANSI.SYS Commands for Setting Display Mode
Command Name
Command
Sequence
Description
Set mode
ESC[=#h
Sets display mode according to the
parameter (#) specified. Command
sequence must end with a lowercase
"h" . (See the section "Screen
Control" later in this chapter for
more information on the display
mode.)
Reset mode
ESC[=#1
Resets display mode according to the
parameter (#) specified. Equivalent to
set mode except for parameter 7,
which turns end-of-line wrap off.
Command sequence must end with a
lowercase "1".
Mode Parameters
o
1
2
3
4
5
6
7
Meaning
40x25 black and white.
40x25 color.
80x25 black and white.
80x25 color.
320x200 color.
320x200 black and white.
640x200 black and white.
End-of-line wrap turned on.
Mode parameters 14 through 19 are supported in DOS 4.0 and subsequent
versions only.
14
640x200 color
15
640x350 mono (EGA)
16
640x350 color (EGA)
17
640x480 color (VGA)
184
9-Extended Keyboard and Display Control
Table 9-4. (cont'd)
Mode Parameters
Meaning
640x480 color (VGA)
320x200 color
18
19
Table 9-5. ANSI.SYS Commands for
Controlling Keyboard Reassignment
Command Name
Command Sequence
Description
Keyboard
reassignment
ESC[#; # ... ;# p or
ESC[#;"string";p
Reassigns a character string
to the key specified by the
first ASCII code (#) in the
sequence. The character
string is determined by the
remaining ASCII codes in
the sequence. If the first
ASCII code is a zero, the
second ASCII code in the
sequence determines
which function key is
assigned the character
string. (See the section
"Keyboard Reassignment"
later in this chapter.)
An Example
The erase display command (table 9-2) is coded by the ASCII character se
quence ESC [ 2 J. Note that "ESC" refers to the escape character-a single
ASCII character-and not the three characters "E", "S", and "C". The dis
play screen is erased when the sequence ESC [2 J is sent to ANSI.SYS. This
sounds simple, and it is, except for one problem. All ANSI.SYS commands
begin with an escape character, and sending an escape character to the dis
play screen may require some special tactics.
Unless your system is one of those made by a few certain suppliers, you
cannot use the Esc key to enter an escape character. In most machines, press
ing Esc causes MS-DOS to cancel the current line being entered and skip to
the next line. You can verify this by entering copy con: to try to create a text
file containing the erase display command:
C>copy con: erase. txt
\
f2J
+-pressing Esc displays a "\" and causes MS-DOS to skip to the next line
185
Part 2- Tutorials
1 Fi lees) copied
C>type erase. txt
[2J
The type command displays the file that was created. As you can see, the file
did not begin with an ESC character. The type command would have erased
the display screen if the file had contained the complete sequence for the erase
display command.
Consider yourself fortunate if your system allows you to enter the es
cape character from the keyboard; entering ANSI.SYS commands will be
much easier for you. For example, a file that erases the display screen could
be created as follows:
C>copy con: erase. txt
A[ [2J
<-pressing Esc displays the A[, which represents the ESC character
"'z
1 Fi lees) copied
Getting ESC into a File
One way to insert an escape character into a file is to create the file with a
dummy character in place of the escape character. Once the file is created,
you could use the MS-DOS utility program DEBUG to replace the dummy
character with an escape character (see chapter 15). However, there is an
easier way.
You can use the MS-DOS command PROMPT to enter an escape charac
ter in a text file. PROMPT is used to change the MS-DOS system prompt.
Simply enter prompt, followed by the new system prompt. For example, if
you wanted to change the system prompt to "ROCK AND ROLL", you could
do it by entering the following command:
C>prompt ROCK AND ROLL
ROCK AND ROLL
ROCK AND ROLL is now the system prompt, and MS-DOS will display it when
ever it is ready to accept a command.
The PROMPT command is discussed in Part 3. Of interest to us now is
the fact that we can place an escape character in the system prompt by includ
ing "$e" in the PROMPT command. Suppose that the current system prompt
is the default prompt (C» and that the following command is entered:
C>prompt $ef2J
What happens? Remember that MS-DOS sends all screen output to the
ANSI.SYS black box (figure 9-1). When MS-DOS is ready to display the
186
9-Extended Keyboard and Display Control
prompt, it sends the system prompt, as output, to ANSI.SYS. Since this sys
tem prompt begins with ESC [, ANSI.SYS recognizes the output as a com
mand sequence, and the specified command is executed. In this case, the
screen is cleared. The system prompt (E SC [ 2 J) is not displayed, since
ANSI.SYS does not display command sequences. The screen simply goes
blank each time that MS-DOS calls for a system prompt. While a screen that
constantly blanks out is of limited value, this example does show how the
prompt command can be used to send an escape character to ANSI.SYS.
The examples in this chapter will use the PROMPT command to enter
the escape character, since most suppliers of MS-DOS do not include direct
keyboard entry of ESC. However, if you are one of the lucky ones, you do
not have to resort to this rather awkward technique when using ANSI.SYS.
The remaining sections of this chapter will present some examples of
how ANSI.SYS can be used for more practical modifications to MS-DOS.
Keyboard Reassignment
The ANSI.SYS device driver can be used to reassign values to individual keys
on the computer keyboard (table 9-5). Like all ANSI.SYS command se
quences, reassignment sequences begin with the ESC character followed by
a left bracket ([). The left bracket is followed by the ASCII code (see appen
dix F) of the key that is to have a new value assigned to it. For example, if you
wanted to assign a new value to the "a" key, the command sequence would
begin with ESC [ 97.
The first ASCII code is followed by one or more additional ASCII
codes. The key indicated by the first code takes on the values of the remain
ing ASCII codes in the command sequence. All ASCII codes are separated by
semicolons. The command sequences for keyboard reaSSignment are termi
nated by a "p". You must use a lowercase "p".
Let's say that you want to reassign "apple" to the "a" key. When you
press "a", you want "apple" to be displayed on the screen. The command
sequence used is ESC [97 followed by the ASCII values for "a", "p" (twice),
"1", and "e". The command sequence is terminated by a lowercase "p". The
entire command sequence would be:
esc[97;97;112;112;108;101p
Now we will add the command "prompt Se" to generate the ESC char
acter. Let's put everything together. Enter the following command to turn
your "a" into an "apple":
C>prompt $eC97i97i112i112i108i101p
Does it work? Press the "a" key; you should get "apple". If you don't,
you may not have installed ANSI.SYS. Refer to the beginning of this chapter
ifyou need help in installingANSI.SYS. The other point to remember is that
187
Part 2- Tutorials
a new value has been assigned to lowercase "a" only. Pressing the key for the
uppercase letter will still give "~'. If you try this example on your computer,
you will notice that no system prompt is displayed. This is because the
prompt is now an ANSLSYS command sequence and command sequences
are not displayed. To get the familiar C> back, enter:
prompt
C>
You can get your "a" back by sending the sequence ESC [ 97; 97p to
ANSLSYS:
C>prompt $ef97;97p
prompt
<-reassigns the letter a to the "a" key
<-resets the prompt to C
C>
In the previous example, we entered a series of ASCII values to be as
signed to the "a" key. However, a keyboard reassignment command se
quence can also contain the actual character string that you want to assign to
a key. Instead of entering the ASCII value for each letter in "apple", you can
enter the string "apple". Begin the control sequence as before, but replace
the series of ASCII values with the string "apple". The string must be en
closed in quotation marks. The following sequence turns "a" to "apple":
esc[97 i"appLe"p
The two methods just discussed may be combined. The following se
quence will also turn "a" to "apple":
esc[97 i"appL"i 101p
Function Keys
ANSLSYS will reassign a string to one of the function keys (FI-FlO) when
the first ASCII code in a reassignment sequence is zero. The second ASCII
code in the command sequence determines which key is reassigned. The
following sequence reassigns the string "dir" to the FI function key:
esc[Oi59i"dir"p
This sequence can be sent to ANSLSYS with the following command:
C>prompt $efO;59;"dir"p
prompt
C>
188
9-Extended Keyboard and Display Control
Appendix F has a complete list of the extended ASCII codes for the 40
function keys (unshifted, shifted, Ctrl-shifted, and Alt-shifted). The next sec
tion will give you more examples of how strings can be reassigned to func
tion keys.
Some Usefu! Applications of Keyboard Reassignment
Keyboard reassignment can be used to assign frequently entered commands
to individual keys. Commands so assigned could then be entered with a
single keystroke. Up to 128 characters may be reassigned to a single key.
Let's say that you use your computer for word processing and BASIC
programming. To load your word processor, you have to type "wp". To load
your BASIC interpreter, you have to type "gwbasic". You could save yourself
some typing by reassigning each of these commands to a function key.
We will illustrate by first reassigning "gwbasic" to the F2 function key.
The F2 key has an extended ASCII code of 0,60 (see appendix F); therefore,
the reassignment code sequence will begin with ESC [0,60. The character
string reassigned to the function key can be specified in the command se
quence:
esc [Q; 60; "gwbas i cIt
This command sequence tells ANSI.SYS to display "gwbasic" when
the F2 key is pressed. A carriage return must be requested before MS-DOS
will load "gwbasic". This can be accomplished by including the ASCII code
for carriage return (13) in the command sequence. The complete command
sequence for key reassignment is terminated with a lowercase "p":
esc[Oi60i"gwbasic"i13p
Again, we use the command "prompt $e" to send an ESC character to
the ANSI.SYS device driver:
C>prompt $efO;60; "gwbas i e"; Up
prompt
~this
~this
sends the command sequence
resets the prompt to default
C>
The BASIC interpreter will now be loaded when you press the F2 key.
We can assign "wp" to the F3 function key (ASCII code 0,61) by enter
ing the following command:
C>prompt $efO;61;"wp";13p
prompt
c>
189
Part 2-Tutorials
Let's also assign the MS-DOS command DIR and the /w switch to the F 1
function key (ASCII code 0,59):
C>prompt $efOi59i"dir/w"i13p
prompt
c>
Let's put all of these reassignment commands into a single batch file. If
the file is given the name AUTOEXEC.BAT, it will automatically execute
when MS-DOS is booted. We will also include the TIME and DATE com
mands in the batch file so that the time and date will be set when MS-DOS
boots.
C>eopy con: autoexee.bat
date
time
rem
rem reass i gn f1
prompt $eWi 59i"di r/w"i 13p
rem
rem reassign f2
prompt $eWi60i"gwbasi e"i 13p
rem
rem reass i gn f3
prompt $eWi61 i"wP"i13p
rem
rem return prompt to default (C»
prompt
AZ
1 FiLe(s) copied
c>
This batch file will automatically execute if it is in the root directory of the
boot disk. The reassignments we entered will take effect once the file has
been executed.
Screen Control
You can use the ANSI.SYS device driver to control cursor position and set
display mode and attributes. The command sequences for screen control
are listed in tables 9-2 through 9-5.
This section will show you how ANSI.SYS can be used to control the
display screen by modifying the batch file used in the preceding discussion
of key reassignment. We will add a PROMPT command to the end of the file
190
9-Extended Keyboard and Display Control
that will send a series of display command sequences to ANSI.SYS. These
commands will modify the display screen. When the batch file terminates,
the system prompt will consist of these display commands. The commands
will be sent to ANSI.SYS each time that the prompt is displayed. The screen
modifications will be displayed each time MS-DOS requests that the system
prompt be displayed.
The commands placed in the batch file will instruct ANSI.SYS to per
form the following tasks: move the cursor to the home position (first line,
first column), clear any text in the first line, switch to the high-intensity dis
play mode, display three messages on the first line, move the cursor to the
first column of the 25th line, display a prompt, return to the normal display
mode, and, finally, clear line 25 ofany textto the right of the prompt. Sounds
complicated, but it can all be accomplished with one PROMPT command.
The first task that we want to accomplish is move the cursor to the
home position. Table 9-1 shows the ANSI.SYS command sequences that
control the cursor. The cursor position command is ESC [#;# H. Remember
that the # symbols represent parameters. The first parameter is the line num
ber, and the second parameter is the column number of the screen location
where the cursor is to be located. The cursor will be moved to the home
position if no parameters are included in the command sequence. The cur
sor position command must be terminated by an uppercase "H". Therefore,
the first screen control command sequence that we will send to ANSI. SYS is
ESC [H (move cursor to home position).
Next, we want ANSI.SYS to erase the first line on the display screen.
This is accomplished with the sequence ESC [K (table 9-2). The command
sequence must end with an uppercase "K".
The next command sequence will switch the display mode to high in
tensity. This is accomplished with the command sequence ESC [ 1m (table
9-4). A lowercase "m" is required.
So far our command series consists of three command sequences:
esc[H
esc[K
I
I
Home
Erase
esC[1m
I
High-Intensity
The ESC character will be sent to ANSI.SYS by using the "prompt $e" com
mand; therefore, the three ANSI.SYS commands can be sent with the fol
lowing command:
prompt $eCH $eCK $eC1m
After the cursor has been pOSitioned, the line cleared, and the
high-intensity mode set, we want ANSI.SYS to display a message. Since we
will be using a PROMPT command to send the commands, we can simply
include the message as part of the prompt:
prompt $eCH $eCK $eC1m directory-f1
191
Part 2-Tutorials
Next, we want ANSI.SYS to advance the cursor eight spaces and then
display another message. The cursor forward command advances the cur
sor. The command sequence is ESC [ I C, where the I symbol represents the
number of spaces forward that the cursor will be moved. The default value
for I is one. The command sequence to move the cursor forward eight
spaces is ESC [Se. The command must end with an uppercase "C":
prompt $efH $efK $ef1m directory-f1 $ef8C basic interpreter-f2
After displaying the second message, we want ANSI .SYS to advance the
cursor eight more spaces and display a third message:
prompt $efH $efK $ef1m directory-f1 $ef8C basic interpreter-f2
$ef8C word processor-f3
After displaying the third message on the first line, we want ANSI.SYS
to move the cursor to the first column in line 25. Again, we will use the
cursor position command sequence (ESC [1;1 H); this time we will specify
some parameters:
prompt $efH $efK $ef1m directory-f1 $ef8C basic interpreter-f2
$ef8C word processor-f3 $ef25;1H
With the cursor at line 25, column 1, we will have ANSI.SYS display a
prompt, return to the regular display mode, and clear line 25 of all text be
yond the prompt:
prompt $efH $efK $ef1m directory-f1 $ef8C basic interpreter-f2
$ef8C word processor-f3 $ef25;1H ENTER COMMAND: $efOm $efK
If we make this PROMPT command the last command in a batch file,
the system prompt at the end of the batch file execution will be the se
quence of messages and ANSI.SYS commands and prompts that we have
just discussed. Each time MS-DOS calls for a system prompt, ANSI.SYS will
execute the commands and display the messages and prompts.
To get a better idea of what we are talking about, let's use EDLIN to
modify this same batch file. (See the preceding section on keyboard reas
Signment for the original batch file, and see chapter 8 for a discussion of
EDLIN commands.)
C>edlin auto exec.bat
End of input file
*L
1:*DATE
2: TIME
3: REM
192
+-edit file c reated in previous section
+- EDLIN res ponds that the file has been loaded
+-enter "1"; EDLIN will display file
9-Extended Keyboard and Display Control
4:
5:
6:
7:
8:
9:
10:
11:
12:
13:
14:
REM REASSIGN F1
PROMPT $e[Qi59i"DIR/W"i13p
REM
REM REASSIGN F2
PROMPT $e [Q i 60 i "GWBAS I C" i 13p
REM
REM REASSIGN F3
PROMPT $e[Qi61 i"WP"i13p
REM
REM RETURN PROMPT TO DEFAULT <C»
PROMPT
*
.... EDLIN
waits for the next command
The first step in modifying the batch file is to remove the lines that reset
the system prompt to the default. This is accomplished by deleting the last
three lines of the file:
*12,14d
*1L
.... delete lines 12-14
.... enter lL to list file starting with line 1
1:*DATE
2: TIME
3: REM
4: REM REASSIGN F1
5: PROMPT $e[Qi59i"DIR/W"i13p
6: REM
7: REM REASSIGN F2
8: PROMPT $e[Qi60i"GWBASIC"i13p
9: REM
10: REM REASSIGN F3
11: PROMPT Se[Oi61i"WP"i13p
*
Now we want to put into the file the PROMPT command that does all
the wonderful things we have just described. We will also put some "rem"
statements in the batch file to explain what is going on.
*12i
12:*rem
13:*rem
14:*rem
15:*rem
16:*rem
17:*rem
18:*rem
19:*rem
.... enter 12i to insert text beginning at line 12
.... type a line of text and press Enter
the following prompt command instructs ansi.sys to
perform several functions:
move cursor to home, clear first line, set display mode to
hi intensity, print 3 messages at top of screen, move cursor
to line 25 column 1, print a prompt, reset display mode to
normal intensity, and clear right side of line 25.
193
Part 2-Tutorials
20:*prompt $eCH SeCK $eC1m directory-f1 $eCBe basic interpreter-f2
$eCBe word processor-f3 $eC25i1H ENTER COMMAND: $eCOm SeCK
+-enter Ctrl-Z to terminate the INSERT command
21:*"Z
*
The final line added to the batch file will be the MS-DOS command
CLS. This command will clear the display screen:
*21 i
+-enter 2li to insert text beginning at line 21
21 :*rem
22:*rem the next command clears the screen. the batch file will
23:*rem then terminate and return control to ms-dos.
24:*cls
25 :*"Z
+-enter Ctrl-Z to terminate INSERT command
*1L
+-enter lL to display file
1 : DATE
2: TIME
3: REM
4: REM REASSIGN F1
5: PROMPT $e[Qi59i"DIR/W"i13p
6: REM
7: REM REASSIGN F2
S: PROMPT $e[Qi60i"GWBASIC"i13p
9: REM
10: REM REASSIGN F3
11 : PROMPT $e[Qi61 i"WP"i13p
12 : rem
13: rem THE FOLLOWING PROMPT COMMAND INSTRUCTS ANSI.SYS TO
14: rem PERFORM SEVERAL FUNCTIONS:
15: rem MOVE CURSOR TO HOME, CLEAR FIRST LINE, SET DISPLAY MODE TO
16: rem HI INTENSITY, PRINT 3 MESSAGES AT TOP OF SCREEN, MOVE CURSOR
17: rem TO LINE 25 COLUMN 1, PRINT A PROMPT, RESET DISPLAY MODE TO
1S: rem NORMAL INTENSITY, AND CLEAR RIGHT SIDE OF LINE 25.
19: rem
20: PROMPT $e[H SeCK $e[1m DIRECTORY-F1 $e[SC BASIC INTERPRETER-F2
$e[SC WORD PROCESSOR-F3 $e[25i1H ENTER COMMAND: $e[Om SeCK
21: rem
22: rem THE NEXT COMMAND CLEARS THE SCREEN. THE BATCH FILE WILL
23: rem THEN TERMINATE AND RETURN CONTROL TO MS-DOS.
24: CLS
+-enter "e" to save the file and exit EDLIN
*e
C>
The AUTOEXEC.BAT file is now stored in the root directory of the boot
disk, and it will automatically execute when MS-DOS is booted. Let's try
it out. Press the Ctrl-Alt-Del key combination to reboot the system.
AUTOEXEC.BAT should begin execution, prompting you to enter the date
and time. The first three PROMPT commands reassign character strings to
the Fl, F2, and F3 function keys. The fourth PROMPT command sets the
194
9-Extended Keyboard and Display Control
screen control sequence. The CLS command clears the screen, and the
batch file terminates, returning control to MS-DOS.
MS-DOS signals that it is ready to accept another command by display
ing the system prompt. In this case, the system prompt is the screen control
sequence that was the final PROMPT command in the batch file.
Figure 9-2 shows the appearance of the display screen upon conclu
sion of batch file execution. This display is the current system prompt.
MS-DOS commands can be entered in the normal fashion. The commands
"dir/w", "gwbasic", and "wp" may be entered simply by pressing function
keys F 1, F2, and F3. The screen control sequence will be executed each time
that MS-DOS is ready to accept another command. The system prompt can
be changed at any time by using the PROMPT command.
.
~/
"-
~
DI RECTORY-F 1
BASIC INTERPRETER-F2
WORD PROCESSOR-F3
ENTER COMMAND I
ENTER COMMAND.
/~
.....:::,
Figure 9-2. The appearance of the display screen after
AUTOEXEC.BAT has been executed.
Note: MS-DOS displays the system prompt twice at the end of a batch
file. Because ofthis, the bottom line in figure 9-2 (ENTER COMMAND:) will be
displayed twice when the system first boots. Each subsequent display of the
system prompt will display ENTER COMMAND: one time. You can avoid this
minor annoyance by modifying the last PROMPT command in
AUTOEXEC.BAT. The underscore indicates the modified portion.
prompt $eCH $eCK $eC1m directory-f1 $eCBC basic interpreter-fZ $eCBC word
processor-f3 $eCZ4;1H $eCK $eCZ5;1H ENTER COMMAND: $eCOm $eCK
195
C
HAP
T
E
R
10
Disk Structure
and Management
ifII
It:;;J
Structure of MS-DOS Disks
Formatting
Examining the File Directory
and the FAT
Exploring with DEBUG
MS-DOS File Management
197
Part 2- Tutorials
In this chapter we will look at the internal structure of disks used by
MS-DOS. We will also discuss how the operating system keeps track of files
on a disk as well as how the contents of a file are accessed. Throughout this
chapter, the word "disk" refers to both fixed disks and floppy diskettes un
less specified otherwise.
This chapter does not contain any material needed for the routine use
ofMS-DOS. The material presented is intended for those readers who want a
more thorough understanding of the operating system. Some familiarity
with hexadecimal arithmetic and assembly language programming will be
helpful but is not essential.
Structure of MS-DOS Disks
The next sections discuss the way that MS-DOS stores and retrieves data
from disks. The roles of the boot record, file directory, and file allocation
table are examined. Several examples are presented that use DEBUG to ex
amine disk structure.
Tracks and Sectors
Before MS-DOS can store data on a disk, the disk's surface must be subdivided
into tracks and sectors. Tracks are a series of concentric circles that cover the
surface of a disk (figure 10-1). The outermost track on a disk is track 0, the
neighboring track is track 1, and so on. On a double-sided diskette, the sides
are also assigned numbers. The first side is side 0; the second side is side 1.
Each track is divided into a series of wedges called sectors (figure 10-2).
Sectors are also numbered. The first sector on a track is number 1; the sec
ond, number 2; and so on. Sectors typically have a storage capacity of 512
bytes. Multiplying the number of bytes per sector by the number of sectors
per track yields the number of bytes per track. Multiplying the number of
bytes per track by the total number of tracks yields the total storage capacity.
Floppy Diskettes
Standard 5 l f4-inch diskettes have either 8 or 9 sectors per track. The 8-sector
per-track format was used in MS-DOS l.X. The 9-sector-per-track format was
introduced in MS-DOS 2.0 and continued through MS-DOS 3.3. Both formats
use 40 tracks per diskette side. MS-DOS 2.X and subsequent versions can use
diskettes with the 8-sector format. MS-DOS LX cannot use diskettes with the
9-sector format.
Quad-density 5 l f4-inch diskettes have 15 sectors per track and 80 tracks
per side. Quad-density diskettes require quad-density drives and are sup
ported by MS-DOS 3.X and 4.X only.
In addition to the standard and high-density 5 l f4-inch diskettes,
MS-DOS 3.X and 4.X also support 3 l h-inch diskettes with 80 tracks per side
198
JO-Disk Structure and Management
-.~@
Side 0
Figure 10-1. Each disk surface is divided into a series of concentric
circles called traclls.
Sector 7
Sector 8
Sector 1
Sector 3
Figure 10-2. Each track is divided into sectors (8 sectors per track
for MS-DOS 1.X, 9 for MS-DOS 2.X, 3.x, and 4.x).
199
Part 2-Tutorlals
and either 9 or 18 sectors per track. Thble 10-1 summarizes the characteristics
of the floppy diskettes supported by MS-DOS.
Thble 10-1. Characteristics of Diskettes
Supported by MS-DOS
Diameter
Sides
'fracks per Side
Sectors per 'frack
5lf4"
1
40
8/9
160K/180K
5 1/4"
2
40
8/9
320Kl360K
5 1/4"
2
80
15
1.2M1
3 112"
2
80
9
720K2
3 112"
2
80
18
1.44M3
Capacity
'Starting with DOS 3.0
2Starting with DOS 3.2
3Starting with DOS 3.30
Hard Disks
Hard disks consist of one or more platters. Eaoh platter has two surfaces on
which data is stored. MS-DOS divides the surface of each platter into tracks,
and the tracks are subdivided into sectors. All tracks that have the same ra
dius form a cylinder. Thus, all tracks numbered "0" form a cylinder, all
tracks numbered" 1" form another cylinder, and so on.
The layout of hard disk drives varies considerably, according to disk
capacity and disk manufacturer. As an example of a typical hard drive, the
hard drive on my system is listed as having a capacity of 42.5 Mbytes. The
drive has 5 platters and 977 cylinders. This makes for a total of 4,885 tracks
(5 tracks per cylinder X 977 cylinders). Each track has 17 sectors, so there are
83,045 sectors on the entire disk (4,885X 17). Each sector has 512 bytes,
giving a total disk capacity of 42,519,040 bytes (83,045X512). Of this total,
42,366,976 bytes are available for use by MS-DOS.
Formatting
Tracks and sectors are constructed using the FORMAT command. FORMAT
also writes certain data onto the disk. The following sections will discuss
what happens when the FORMAT command is used.
The Boot Record
FORMAT places a copy of the MS-DOS boot record in sector 1, track 0, side
o on every disk that is formatted. The boot record consists of (1) a table
200
lO-Disk Structure and Management
containing information about the disk and (2) machine language code that
loads IO.SYS and MSDOS.SYS (discussed under "System Files") into mem
ory. The first 4 bytes in the boot record contain a machine language instruc
tion telling the computer to jump to a certain offset in the boot record to find
loading code. The table containing the disk-specific information is stored
between the jump instruction and the loading code.
File Allocation 13.ble and File Directory
FORMAT also constructs the file allocation table (FAT) and the file direc
tory. As we will see shortly, both of these structures are intimately involved
in accessing files stored on the disk. MS-DOS maintains two copies of the
FAT on each disk, ostensibly because the FAT is so important that a second
copy is available should the first be damaged. However, MS-DOS never uses
the second copy of the FAT.
Standard 5 1f4-inch, 8-sector-per-track diskettes have a I-sector FAT. Stan
dard 51/4-inch, 9-sector-per-track diskettes have a 2-sector FAT. High density
(1.2-Mbyte), 5 1f4-inch diskettes have a 7-sector FAT. nO-Kbyte, 3 1h-inch disk
ettes have a 3-sector FAT. 1.44-Mbyte, 3 1h-inch diskettes have a I2-sector FAT.
The 42.5-Mbyte hard drive on my computer has an 8I-sector FAT.
Standard 5 1f4-inch, single-sided diskettes have a 4-sector file directory.
Standard 5 1f4-inch, double-sided diskettes have a 7-sector file directory.
High-density (1.2-Mbyte), 5 1f4-inch diskettes have a I4-sector file directory.
nO-Kbyte, 3 1h-inch diskettes have a 7-sector file directory. 1.44-Mbyte, 3112
inch diskettes have an 8-sector file directory. Most hard drives have a 32-sec
tor file directory.
Thble 10-2 lists the physical location of the boot record, FAT, and file
directory on 5 1f4-inch and 3 1h-inch diskettes. Figure 10-3 illustrates the ar
rangement of these structures on a standard 5 1f4-inch diskette.
System Files
The fs switch directs FO RMAT to place a copy of the system files on the disk
being formatted. The three MS-DOS system files are IO.SYS, MSDOS.SYS,
and COMMAND.COM. In PC-DOS, IO.SYS is called IBMBIO.COM and
MSDOS.SYS is called IBMDOS.COM. The system files must be stored on any
disk that will be used to boot the system. FORMAT places these files in a
particular physical location on the disk in a particular order.
IO.SYS is stored on the disk immediately after the last sector of the file
directory. IO.SYS consists of the operating system's default device drivers. A
device driver is a computer program that serves as the interface between the
operating system and a peripheral device (device drivers are discussed in chap
ter 14). Since IO.SYS interacts directly with the hardware, it is highly system
specific and is generally implemented by the computer's manufacturer.
MSDOS.SYS is stored on the disk immediately after the last sector of
IO.SYS. MSDOS.SYS forms the kernel of MS-DOS. MSDOS.SYS receives all
201
t\,l
~
Sectors 1-3
Track 0
Side 1
Sectors 1-3
Track 0
Sectors 6-9
Track 0
Sectors 4-5
Track 0
*Sectors 1-3, Track 0, Side 1 also included in first copy of FAT.
Sectors 4-7
Track 0
Side 0
Sectors 4-7
Track 0
File Directory
Sector 3
Track 0
Side 0
Sector 3
Track 0
Track 0
Side 0
Track 0
Side 0
Track 0
FAT, 2nd Copy
Sectors 2-3
Sector 2
Sector 2
FAT, 1st Copy
Sector 1
Track 0
Sector 1
Track 0
Side 0
Sector 1
Track 0
Boot Record
Single-Sided
Diskette
Double-Sided
Diskette
Sectors 1-3
Track 0
Side 1
Sectors 6-9
Track 0
Side 0
Sectors 4-5
Track 0
Side 0
Track 0
Side 0
Sectors 2-3
Sector 1
Track 0
Side 0
Double-Sided
Diskette
Track Diskettes
Track Diskettes
Single-Sided
Diskette
5 1/l', 9 Sectors/
5 1/l', 8 Sectors/
3 1/2"
Sectors 8-9
Track 0
Side 0
Sectors 1-14
Track 0
Side 1
Sectors 1-5
Track 0
Side 1
Sectors 5-7
Track 0
Side 0
Sectors 9-15
Track 0
Side 0
Track 0
Side 0
Sectors 2-4
Sectors 2-8
Track 0
Side 0
Sector 1
Track 0
Side 0
Sector 1
Track 0
Side 0
Sectors 8-15
Track 0
Side 0
Sectors 4-15
Track 0
Side 1
Sectors 2-7,
16-18*
Track 0
Side 0
Sector 1
Track 0
Side 0
1.44-Mbyte
Diskettes
720-Kbyte
Track Diskettes
5 1/l', 15 Sectors/
Table 10-2. Location of Boot Record, FAT, and File Directory on 5tjl' and 3 1/2" Diskettes
~
~
!So
0
"1
~
I
::t
lO-Disk Structure and Management
File Directory
(sectors 6 through 9)
d~"'--~~
Baal Record
(sector 1)
FAT 2nd copy
(sectors 4 and 5)
-~._ _- -.... FAT 1s1 copy
(sectors 2 and 3)
Figure 10-3. Layout for track 0 of boot record, FAT,
and file directory on standard 5 1/4-inch, single-sided,
9-sectorltrack diskette.
requests for service functions (such as opening and reading a file) and chan
nels the requests to IO.SYS. The protocol for communication between
MSDOS.SYS and IO.SYS is identical from system to system. Therefore,
MSDOS.SYS is said to be hardware independent.
COMMAND.COM is the MS-DOS command interpreter. The com
mand interpreter serves as the interface between the operating system and
the user. COMMAND.COM displays the system prompt, accepts commands
from the keyboard and processes the commands so that they can be exe
cuted. COMMAND.COM consists of three components: a resident compo
nent, a transient component, and an initialization component. The role of
the three components is discussed in chapter 11.
Interchangeability of System Files
Generally, any implementation of DOS that is designed to run on a specific
computer brand will run on any compatible computer. For example, PC
DOS will run on any truly compatible machine, as will COMPAQ's version of
MS-DOS, as will Cordata's version. The only area where the various imple
203
Part 2-IUtorials
mentations are significantly different is the IO.SYS file. Recall that IO.SYS
is a hardware-specific file, implemented independently by each of the
computer manufacturers. However, the hardware used by the different man
ufacturers is similar enough that IO.SYS is usually compatible across brand
lines.
DOS 4 System Files
With DOS 4.X, IO.SYS and DOS.SYS no longer have to be in cer
tain sector positions. Their directory entries can go in any available
slots in the root directory. This means that the SYS command can be
used to put the system files on any disk that has room, even if it wasn't
originally formatted as a system disk.
Due to this compatibility, users can generally switch from one imple
mentation of DOS to another without tremendous difficulty. However, any
one planning a switch must bear in mind that the size of the system file
(particularly IO.SYS) varies from one implementation to another. Problems
may arise if the physical location used to store one implementation of the
system files is not large enough to store another implementation of the sys
tem files. In addition, some programs with automatic installation proce
dures assume a specific size for the system files. The installation procedures
may fail if these assumptions are not correct.
Examining the File Directory and the FAT
The first part of this section takes a detailed look at the structure and use of
the file directory and file allocation table. The second part of this section
contains a descriptiop. of how to use DEBUG to load the contents ofthe file
directory and FAT into memory so that they might be examined.
File Directory
Thefile directory serves as the table of contents for a disk. For every file on
the disk, there is a corresponding entry in the disk's file directory. Figure
10-4 illustrates the structure of a file directory entry. Each entry is com
posed of 32 bytes. The 32 bytes are partitioned into eight fields, each field
containing information used by MS-DOS in file management. Table 10-3
lists the fields in a file directory entry and describes the information stored
in each field.
204
lO-Disk Structure and Management
Offset
Field
1······.. ·····.. ········.. ···1
rFu.~7:~:::::::··I
: : ~~~~~.~~~~.::::::::::::: 1
1·:··················.
. ····.. ··1
07
8-10
L~:~I:~:]I ::21
I······················::•
I.:::.::• • •: • • :::.:I
···Time Stamp···········
r"..:.:~:~:
. ::I
F::~~;~:~':~~]
r:::::::J
t::. :.i~~. ~i~.~~.~: .~~.r.~:::1
22·23
2425
::
30·31
File directory
Directory entries in a single sector
1······· .. ··1
Detail of file directory entry
Figure 10-4. Structure of entry in file directory.
Table 10-3. Breakdown of Bytes in a File Directory Entry
Byte(s)
Purpose
0-7
Filename. The filename is padded with blank characters if it
has fewer than 8 characters. The following values have special
significance if they are the first byte in the filename field:
OOB
The file directory entry has never been used. When
MS-DOS sees OOB: in this field, it skips over the
entire entry. This can speed up performance.
205
Part 2-Tutorials
Table 10-3. (cont'd)
Byte(s)
Purpose
E5H
The file that corresponds to this entry has been
"erased." The file is not actually erased, however.
The only change in this first byte is the filename
field of the directory. Programs that recover
"erased" files take advantage of this fact. On
MS-DOS 1 disks, E5H may also indicate that the
directory entry has not been used.
2EH
The file corresponding to this directory entry is
another directory (or a subdirectory). If the second
entry in this field is also 2EH, bytes 26-27 will
contain the cluster of the directory's parent. The
parent is the root directory if bytes 26 and 27 equal
zero. (Clusters are discussed later in this chapter.)
8-10
Filename extension. The field is padded with blank
characters if the extension has fewer than three characters.
11
File attribute. The file attribute is determined by the bit
pattern of byte 11. The file has the attribute associated with a
bit if that bit is set to equal 1. The file does not have the
attribute if the bit equals O.
Bit
1
2
File Attribute If Bit Set (Equals 1)
Hidden file. The file will not be listed when a DIR
command is issued. (See the following box,
"Modifying the Hidden File Attribute.")
System file. System files are used by MS-DOS during
booting.
The following bit settings are not valid for MS-DOS 1
disks:
o
3
4
5
12-21
206
Read only file. Any attempt to write to the file will
generate an error message.
Volume label. Setting this bit tells MS-DOS that the
characters in the filename and filename extension
fields of this directory entry form the volume label for
the disk. All other fields in this directory entry are
irrelevant. This entry must be located in the root
directory, and there can be only one such entry per
disk.
Subdirectory. The directory entry corresponds to a
subdirectory if this bit is set.
Archive. This bit is set if the file has been revised but
not copied by the BACKUP command. Backing up a
file clears the archive bit.
Reserved. These bytes are reserved by MS-DOS. Look for
them to be used in later versions of MS-DOS.
la-Disk Structure and Management
Thble 10-3. (cont'd)
Byte(s)
Purpose
22-23
Time stamp. The time that the file was created or last
modified. Byte 23 contains bits 8-15. Byte 22 contains bits
0-7. Bits 11-15 are the binary representation of the hour of the
day (0-23). Bits 5-10 are the binary representation of the
minutes (0-59). Bits 0-4 are the binary representation of the
number of 2-second increments.
24-25
Date stamp. The date that the file was created or last
modified. Byte 25 contains bits 8-15. Byte 24 contains bits
0-7. Bits 9-15 are the binary representation of the year less
1980 (1980 = 0). Bits 5-8 are the binary representation of the
month (1-12). Bits 0-4 are the binary representation of the day
of the month (0-31).
26-27
Starting cluster. The starting cluster tells MS-DOS where to
look on the disk for the start of the file. Clusters are discussed
in the following section of this chapter.
28-31
File size. The first word (bytes 28 and 29) contains the low
order portion of the file size. The second word (bytes 30-31)
contains the high-order portion. Both words store the least
significant byte first.
Later in this chapter we will use DEBUG to see what an actual file
directory looks like.
Modifying the Hidden Flle Attribute
The MS-DOS command ATTRIB (see Part 3) allows you to modify
a file's read-only and archive attributes. However, ATTRIB does not
provide for modification of the hidden file attribute. In listing 10-1,
which follows, DEBUG is used to write two assembly language
programs. HIDE.COM will allow you to set the hidden file attribute.
UNHIDE.COM will allow you to clear the hidden file attribute. Enter
hide [filename. ext] to set the hidden file attribute. Enter unhide
[filename. ext] to clear the attribute. Note that files with the system
attribute set will remain hidden after clearing the hidden attribute. You
will need to clear both the hidden and system attributes to unhide
these files. To create the programs in listing 10-1, enter the commands
printed in italic type. Do not enter the explanatory comments, which
are preceded by a semicolon.
207
Part 2- Tutorials
Listing 10-1. HIDE.COM and UNHIDE.COM, Two Assembly
Language Programs for Setting and Clearing the Hidden File
Attribute (see table 10-3)
C>debug
-a
6808:100 mov cX,f0080]
iLength of command taiL
6808:104 xor ch,ch
icLear high byte
6808:106 dec ex
iignore space in command taiL
6808:107 mov si,0082
ipoint to 1st Letter in fiLename
6808:10A mov di,0159
ipoint to buffer
6808:100 repnz movsb
imove command taiL to buffer
iappend 00 to fiLename in buffer
6808:10F mov byte ptr fdi],OO
ipoint to 1st Letter in buffer
6808:112 mov dx,0159
iget fiLe attribute function
6808:115 mov ax,4300
6808:118 int 21
icaLL MS-DOS
6808:11A jc 012e
ijump if error
6808:11C or ex,0002
iset hidden fiLe bit
iset fiLe attribute function
6808:120 mov ax,4301
6808:123 int 21
icaLL MS-OOS
6808:125 jc 012e
ijump if error
ipoint to success message
6808:127 mov dx,0135
6808:12A jmp 012f
6808:12C mov dx,0143
ipoint to error message
;dispLay string function
6808:12F mov ah,09
6808:131 int 21
icaLL MS-DOS
6808:133 int 20
iprogram terminate
6808:135
+-press Enter
-e 135 'File hidden' Od Oa '$' 'Unable to hide file' Od Oa '$'
-f 159 L40 00
istart of buffer
-n hide. com
-rex
ex 0000
:60
-III 100
Writ i ng 0060 bytes
-a 10a
6808:10A mov di ,0174
+-press Enter
6808:100
-a 112
6808:112 mov dx,0174
+-press Enter
6808:115
-a 11c
6808:11C and ex,fffd
ichange fffd to fff9 for system fiLes
6808:120
+- press Enter
-a 12c
6808:12C mov dx,0150
4f6808:12F
+-press Enter
-e 135 'Hidden attribute removed' Od Oa '$'
-e 150 'Unable to remove hidden attribute' Od Oa '$'
208
lO-Disk Structure and Management
-f 174 L40 00
-n unhide.eom
-rex
ex 0060
:1b4
100
-iii
Writing 0184 bytes
-q
e>
File Allocation Th.ble
While the file directory serves as a disk's table ofcontents, thefile allocation
table (FAT) serves as a roadmap around the disk. For each file on the disk,
there is a series of entries in the FAT telling MS-DOS where the file's contents
are physically located.
MS-DOS divides a file's contents into clusters. Table 10-4 lists the num
ber of adjoining sectors that form a cluster on the most commonly used
types of disks. The cluster size on a fixed disk depends on how the disk was
partitioned.
table 10-4. Sectors per Cluster for Various Disk Types
Disk Type
Standard Single-sided
Standard Double-sided
Quad-density
lO-Mbyte hard disk (single partition)
42.S-Mbyte hard disk (single partition)
Sectors per Cluster
1
2
1
8
4
Clusters are numbered according to their physical location on the disk.
The first cluster starts with the sector immediately following the last sector
of the file directory. The second cluster follows the first and so on.
On single-sided diskettes, cluster numbers increase going from one
sector to the next along a track. When the final sector on a track is reached,
the next cluster is the first sector on the following track (see figure 10-5).
On double-sided diskettes, clusters increase along a track on side 0,
continue on the same track on side 1, and then continue on the following
track on side 0 (see figure 10-6).
MS-DOS uses two techniques for reading the FAT's contents. The first,
generally used on disks with storage capacity of less than 20 Mbytes, is the
more complicated. The second, generally used on large-capacity storage
devices, will be easy to understand after you've read an explanation of the
first technique.
209
Part 2-Tutorials
Figures 10-5 and 10-6 show that standard diskettes contain over 300
clusters. Each entry in the FAT must point to one of these clusters, so each
FAT entry must be able to take on at least 300 values. A single byte can take on
only 256 values (OOH-FFH), so a single byte is not adequate as a FAT entry. A
2-byte number can take on up to 65,536 values (OOOOH-FFFFH). Since this
quantity is much more than is needed, the designers of MS-DOS decided
that they could save some disk space by making each FAT entry 1. 5 bytes in
length (OOOH-FFFH). A little odd, but it works well in the computer and is
really not too difficult to understand. In addition, the 4,096 values that are
possible with 1.5 bytes are adequate for the FATs of quad-density diskettes
(2,371 clusters) and lO-Mbyte fixed disks (2,587 clusters).
Sectors
2
3
4
6
5
7
8
9
Track 0
Track 1
Track 2
•••
Track 39
Figure 10-5. Layout of boot record, FAT, file directory, and clusters
on a 9-sector, single-sided diskette.
The first step MS-DOS takes in using the FAT is to obtain the file's first
cluster number stored in bytes 26 and 27 of the file's directory entry (figure
1O-7A). To find the file's second cluster number, MS-DOS takes the first
cluster number and multiplies it by 1. 5. The integer portion of the resulting
product is then taken as an offset into the FAT (figure 1O-7B).
The word (2 bytes) at the calculated offset is then modified as follows: If
the first cluster number was odd, the three high-order hexadecimal digits
are taken as the next cluster number. If the first cluster number was even, the
three low-order hexadecimal digits are taken as the next cluster number
(figure 1O-7C).
210
.....
.....
t\)
Side 0
Sectors
•
•
•
Figure 10-6. Layout of boot record, FAT, file directory, and clusters on a 9-sector, double-sided diskette.
•
•
•
Side 1
Track 39
Track 2
Track 1
Track 0
~
~
....
~
;s
~
t
~
~
~
~
;:
~
C'.)
t;
II::l
......
Part 2- Tutorials
File Directory
I
I
o
1 -"- --
26
I
27
Offset into directory entry
I
31
----1.1
(A) Bytes 26 and 27->starting cluster number.
File Allocation Table
YY' xx'
I
I
1_
I
*
o
Calculated offset
into FAT
-----l
= product. Integer portion ofproduct
into FAT of 2nd cluster number (oJ.
(B) Starting cluster number X 1.5
=
offset
Word at Calculated Offset into FAT=XX'VV'
2nd cluster=XX'V
OR
2nd cluster number
Y X&' vlv' r---;,
~.---....
(1st cluster odd)
=X'VV'~----
~----'
____ oJ
I
______________ .J
(1st cluster even)
(C) Word at calculated offset is modified.
Figure 10-7. The steps taken by MS-DOS in using the FAT.
To find the file's next cluster, MS-DOS multiplies the second cluster
number by 1. 5. It takes the integer portion of the product as an offset into
the FAT and then takes the word at the calculated offset. The high-order digit
is discarded if the second cluster number was even. If the second cluster
number was odd, the low-order digit is discarded. The resulting three-digit
hexadecimal number is the next cluster number.
This process is repeated until the resulting three-digit hexadecimal
number is in the range FF8-FFF. A number in this range indicates that the
end of the file has been reached. Don't get discouraged if this process seems
somewhat confusing. The example in the following section should help to
clarify it.
The procedure used on large storage devices is similar but more
straightforward. On these large devices, there are more than 4,096 clusters,
so a 1.5-byte number is not adequate. FAT entries on these devices are 2
bytes. The first cluster number is read from the directory. Now the cluster
number is multiplied by 2 and the product taken as an offset into the FAT.
The 2-byte word stored at this location is the next cluster number. The low
order byte is stored first, the high-order byte second.
Table 10-5 summarizes how the values stored in the FAT are interpreted.
212
lO-Disk Structure and Management
Table 10-5. Interpretation of Values for 1.5-Byte (XXX) and
2-Byte (XXXX) FAT Entries
Value
Meaning
(0)000
Cluster available
Reserved cluster
Bad cluster
Last cluster of file
Cluster belongs to a chain
(F)FFO-(F)FF6
(F)FF7
(F)FF8-(F)FFF
(X)XXX
Large Partitions Using DOS 4
MS-DOS 4.X breaks the 32-Mbyte limitation on the size of the
primary DOS partition. Cluster numbers remain 2 bytes in length.
Therefore, there is still a limit of 65,536 clusters. Large partitions are
supported by simply increasing the size of each cluster.
For partitions larger than 32 Mbytes, clusters are 4 sectors (2,048
bytes) in size. This allows for partitions as large as 128 Mbytes. For
partitions larger than 128 Mbytes, clusters are 8 sectors (4,096 bytes) in
size. This allows for partitions as large as 256 Mbytes. For partitions
larger than 256 Mbytes, clusters are 16 sectors (8,192 bytes) in size. This
allows for partitions as large as 512 Mbytes.
Because a cluster is the minimum amount of disk space that can be
allocated to a file, an increase in the cluster size results in a larger
amount of wasted disk space.
Exploring with DEBUG
In this section, we will use the MS-DOS utility DEBUG to examine the file
directory and FAT of a typical MS-DOS diskette. You can follow along on
your own computer if you wish. Before you do that, you may want to refer
to chapter 15 for a detailed discussion of DEBUG and the DEBUG com
mands.
The demonstration uses a copy of the MS-DOS 3.3 system diskette
(360-Kbyte, 5 I f4-inch, double-sided, 9-sector-per-track). Instructions are
provided to perform the demonstration with a SI f4-inch, 1.2-Mbyte diskette
and with a 3 l h-inch diskette.
213
Part 2- Tutorials
Looking at the File Directory
Boot your system if you have not already done so. When the system prompt
appears, type debug and press Enter. MS-DOS will load DEBUG, and DE
BUG will take control. The DEBUG prompt (a hyphen on most systems) tells
you that DEBUG is loaded and ready to go:
-C>debug
MS-DOS uses the term relative sector to describe a sector's pOSition
relative to sector 1, track 0, side 0. Sector 2, track 0, side is relative sector 1,
and so on, up to sector 9, track 0, side 0, which is relative sector 8.
DEBUG uses these relative sector numbers to read disk sectors into
memory. We will begin by loading the first sector of the file directory into
memory. Because we are using a 9-sector-per-track, SIf4-inch diskette, we
can see from table 10-2 that we want to read in sector 6, track 0, side 0. This
corresponds to relative sector number 5. The following command tells DE
BUG to load into memory location CS: 100 the contents from drive A (drive
number 0), absolute sector OS. The 01 specifies that DEBUG is to read in
one sector only.
°
-L CS:100 0 05 01
If you are using a SIf4-inch, 1.2-Mbyte diskette, change the 05 to 0 F. If you
are using a 3 1/Z-inch diskette (either nO-Kbyte or 1.44-Mbyte), change the
OSto 07. Change the 0 to 1 if you are using drive B instead of drive A. The
remaining DEBUG commands used in this section will be the same regard
less of the diskette type you are using.
The following DEBUG command will display the first 48 bytes of the
sector that was just loaded into memory. The initial portion of the dump, the
portion that we will examine, is the first entry in the disk's file directory. If
you want a printout of the display, press the Ctrl-PrtSc before entering the
command (make sure that your printer is turned on).
-d CS:100 130
0976:0100 49 4F 20 20 20 20 20 20-53 59 53 27 00 00 00 00 10
SYS· ••••
0976:0110 00 00 00 00 00 00 43 4E-65 08 02 00 E4 13 00 00 •••••• CNs ••• d •••
0976:0120 40 53 44 4F 53 20 20 20-53 59 53 2700000000 MSOOS SYS' .•.•
The numbers to the far left are memory addresses that may differ from
system to system. The middle portion of the display is called a memory
dump. The contents of memory are displayed in hexadecimal numbers.
Let's examine the dump closely:
Filename and extension (offset 0-7 and 8-10). The underlined por
tion of the display on the left side comprises the first 8 bytes of the dump.
214
lO-Disk Structure and Management
These 8 bytes make up the filename field of the first entry in the file direc
tory. Notice that the 8-character filename field has been padded with blanks.
The ASCII representation of the dump is the underlined portion on the right
side of the screen. We can see that the filename is "10".
The 3 bytes following the filename field (53 59 53) make up the
filename extension field. In the right-hand column, we can see that the
extension is "SYS".
Attribute (offset 11). Following the filename extension field is the at
tribute field. The attribute field is interpreted according to its bit pattern.
-d CS:100 L30
0976:0100 49 4F 20 20 20 20 20 20-53 59 53 270000 00 00 10
SYS' ....
0976:0110 000000000000 43 4E-65 0802 00 E4 13 00 00 •..... CNs ...d •.•
0976:0120 40 53 44 4F 53 20 20 20-53 5953 2700000000 MSOOS SYS' •••.
In the preceding example, the field contains a value of27H, which translates
to the following bit pattern:
7 6 5 4
3 2 1 0
Bit:
Value: 0 0 1 0
0 1 1 1
Bits 0,1,2, and 5 have been set to equal!. This tells us that the file IO.SYS has
the attributes read only, hidden, system, and archive (see table 10-3).
Reserved (offset 12-21). The 10 bytes (all OOH) that follow the attribute
field form the reserved field of the file directory entry. This field has been
reserved by the makers of MS-DOS.
Time (offset 22-23). The next 2 bytes (43 4E) form the time stamp
field. The time that the file was created or last modified is stored as the bit
pattern of these two bytes.
-d C5:100 L30
0976:0100 49 4F 20 20 20 20 20 20-53 59 53 27 00 00 00 00 10
SYS' ••••
0976:0110 000000 00 00 00 43 4E-65 0802 00 E4 13 00 00 ••••.. CNs ... d.. .
0976:0120 40 53 44 4F 53 20 20 20-53 59 53 27 00 00 00 00 MSOOS SYS' ... .
MS-DOS stores the 2 bytes of the preceding example in reverse order; thus,
the bit pattern of the hexadecimal word (2 bytes) is 4E 43. The bit pattern is
as follows:
o
0
1 1 0
Bit 1 5 1 4 1 3 1 2
,.
Hour
11 1 0 9 8
o
1 0 0
7 6 5 4
o
0 1 1
3 2 1 0
---I I-- Minute --I I- Seconds-l
Bits 11-15 store the binary representation of the hour of the day. These 5 bits
store a value of 1 + 8, or 9. Bits 5-10 store the minutes in binary. In this exam
215
Part 2- Tutorials
pIe, the minutes value is 2+ 16+32=50. Bits 0-4 hold the seconds in 2
second intervals. In this case, the number of 2-second intervals is 1 + 2 = 3.
Putting all of this information together, we can tell that the file was
created or last modified at 9:50:06 in the morning (to the closest 2 seconds).
Date (offset 24-25). The bit pattern of the date stamp field stores the
date that the file was created or last modified.
-d CS:100 L30
0976:0100 49 4F 2020 20 20 20 20-53 59 53 27 00 00 00 00
0976:0110 00000000 00 00 43 4E-65 08 02 00 E4 13 00 00
0976:0120 40 53 44 4F 53 20 20 20-53 59 53 27 00 00 00 00
10
SYS' ••..
•••.•• CNs .•. d..•
MSOOS SYS' ..••
Again, the bytes are stored in reverse order, so in this example we want the
bit pattern of the hexadecimal word 08 65.
o 0 0 0
Bit 1 5 1 4 1 3 1 2
I·
Year
000
11 1 0 9 8
o
1 1 0
7 6 5 4
---1-1 I- Month --I
o 1 0 1
3 2 1 0
j..- Day ----l
Bits 9-15 store the year (less 1980). In this case, the year stored is 4, which
means that IO.SYS was created or last modified in 4+ 1980= 1984. Bits 5-8
store the month in binary. Here, the month is 1 + 2 = 3. The day is stored in
bits 0-4. The day is 1+4=5. Thus, the date stamp is March 5, 1984. Putting
this information together with the time information, we know that IO.SYS
was created or modified on March 5, 1984 at approximately 9:50:06 in the
morning.
Starting cluster (offset 26-27). The hexadecimal word at offset
26-27 holds the starting cluster number ofIO.SYS. Again, the word is stored
in reverse order, so the starting cluster number is 00 02. We will see how
MS-DOS uses this number shortly.
-d CS:100 LJO
0976:0100 49 4F 20 20 20 20 20 20-53 59 53 270000 00 00
0976:0110 00 00 00 00 00 00 43 4E-65 08 02 00 E4 13 00 00
0976:0120 40 53 44 4F 53 20 20 20-53 59 53 270000 00 00
10
SYS' .•..
•••••. CNs ... d.•.
MSOOS
SYS' ....
File size (offset 28-31). This field contains the file size stored as a
4-byte hexadecimal number. MS-DOS stores the bytes in reverse order, with
the low-order byte stored first and the high-order byte stored last. The size
of IO.SYS is 00 00 13 E4 (hex), or decimal 5,092 bytes.
-d CS:100 LJO
0976:0100 49 4F 20 20 20 20 20 20-53 59 53 27 00 00 00 00 10
SYS' ••••
0976:0110 000000000000 43 4E-65 0802 00 E4 13 00 00 ••.... CNs ••• d •••
0976:0120 40 53 44 4F 53 20 20 20-53 59 53 2700000000 MSOOS
SYS' ....
216
lO-Disk Structure and Management
This concludes our examination of an MS-DOS file directory. Next, we
will use DEBUG to examine the FAT and see how MS-DOS uses the FAT, along
with the starting cluster number, to keep track of a file.
Loading the FAT
Returning to figure 10-6, we can see that on a double-sided, 9-sector disk
ette, the first sector of the first FAT copy is stored at side 0, track 0, sector 1.
This is relative sector 1 and can be loaded into memory location CS:300
with the DEBUG command "L CS:300 0 01 01". (The commands in this
section work with all types of diskettes.) To follow along with this tutorial,
you should have DEBUG running and your backup system diskette in drive
A. Refer to the discussion of the file directory if you need some help getting
started. Enter the following command:
-L CS:JOO 0 01 01
When the disk drive turns off, enter:
-d CS:JOO L20
DEBUG will display:
0976:0300
0976:0310
FO FF FF 03 400005 60-00 FF SF 0009 AO 00 OB }•.. @.. ' ...•..
00 00 EO 00 OF 00 01-11 2001 134001 1560 @.. ' ....... @.. '
co
This is a dump of the first 32 bytes of the FAT. The first byte in the FAT is set
according to the type ofdisk media on which the FAT is stored (table 10-6). In
this case, the medium is a double-sided, 9-sector diskette. Thus, the first
byte in the FAT is the hexadecimal number FD; the second and third bytes in
the FAT are always FFH.
Table 10-6. Value of First Byte in FAT
According to Type of Storage Media
First Byte in FAT
FF
FE
FD
Fe
F9
F8
Type of Media
Double-sided, 8 sectors/track diskette
Single-sided, 8 sectorsltrack diskette
Double-sided, 9 sectors/track diskette
Single-sided, 9 sectors/track diskette
Double-sided, 15 sectors/track diskette
Hard disk
217
Part 2- Tutorials
Looking at the FAT
In the previous section, we saw that the starting cluster number for the file
IO.SYS was hexadecimal 02 (02H). Here is how MS-DOS uses the FAT to
determine the second cluster number of IO.SYS. MS-DOS starts by taking
the first cluster number (02) and multiplying it by 1.5. It uses the product (3)
as a pointer into the FAT. Then, MS-DOS examines the 2-byte word located at
the calculated offset:
-d C5:300 L20
0976:0300 FO FF FF 03 4000 05 60-00 FF 8F 0009 AD 00 DB } ••• @•. ' ..... .
0976:0310 co 00 00 EO 00 OF 00 01-11 2001 13 4001 15 60 @•. ' ...... @.. '
In this example, the bytes 03 40 are at offset 3 in the FAT. Since
MS-DOS stores bytes in reverse order, the 2 bytes are interpreted as 4003H.
MS-DOS uses 1.5 bytes for each FAT entry, so 1.5 bytes must be extracted
from this 2-byte number. The extraction is performed as follows: If the
previous cluster number (2 in this case) was even, MS-DOS discards the
high-order digit of the 2-byte number. If the previous cluster number was
odd, MS-DOS discards the low-order digit of the 2-byte number.
In our example, the previous (first) cluster number was 2, which is
even. Thus, we discard the high-order digit of 4003 to yield 003. This is the
second cluster number. MS-DOS computes the third cluster number of
IO.SYS by multiplying 3-the previous (second) cluster number-times 1.5.
The product is 4.5. MS-DOS throws away the .5 and uses 4 as an offset into
the FAT:
-d C5:3oo L20
0976:0300 FO FF FF 03 40000560-00 FF 8F 0009 AD 00 DB
0976:0310 CO 00 00 EO 00 OF 0001-11 2001 13 4001 15 60
} ••• @.. ' ..... .
@.• ' .•.•.. @.. '
The 2 bytes at offset 4 in the FAT are 4000. MS-DOS reads them as the
2-byte number 0040H. Since the previous (second) cluster number-3
was odd, MS-DOS discards the low-order digit of 0040 to yield 004, which
is the third cluster number of IO.SYS.
In a similar fashion, MS-DOS will compute the fourth cluster number of
IO.SYS as 5 and the fifth cluster number as 6. Let's see what happens when
MS-DOS computes the sixth cluster number. The previous (fifth) cluster num
ber was 6. Multiplying 6 times 1.5 equals 9. The 2 bytes at offset 9 in the FAT
are FF and 8F:
-d C5:300 L20
0976:0300 FO FF FF 03 40 00 05 60-00 FF 8F 0009 AD 00 DB } .•. @.. ' ..... .
0976:0310 CO 00 00 EO 00 OF 0001-11 2001 13 4001 15 60 @.. ' ...... @.. '
MS-DOS forms the 4-byte number 8FFFH from these 2 bytes. The pre
218
lO-Disk Structure and Management
vious cluster number (6) was even, so MS-DOS throws out the high-order
digit (8) to give the 1.5-byte number FFFH. MS-DOS reads any value in the
range FF8-FFF as an end-of-file marker; therefore, FFFH tells MS-DOS that
the last cluster of IO.SYS has been reached.
Without the FAT, MS-DOS would find itself adrift in a sea of clusters,
unable to access any files. In fact, the FAT is so important to the operation of
MS-DOS that each disk contains two copies of the FAT. Ostensibly, this sec
ond copy serves as a backup if the first is damaged. However, for reasons
known only to the designers ofMS-DOS, the second copy of the FAT is never
used.
MS-DOS File Management
MS-DOS employs two techniques in managing files. The first technique, us
ing data structures called file control blocks (FCBs), was implemented in
MS-DOS 1. When MS-DOS was first developed, CP/M was the predominant
operating system being used on microcomputers. FCBs were implemented
specifically to provide some compatibility with CP/M files. When a hierar
chical file structure was introduced in MS-DOS 2, a new technique for man
aging files was implemented. This technique utilizes afile handle and does
not require the use of FCBs. File handles are patterned after the file manage
ment technique used by the UNIX operating system. This section discusses
FCBs and file handles.
Structure of the File Control Block
The file control block is a 36-byte block of computer memory. The FCB,
which is required for file management in MS-DOS 1, contains ten individual
fields. Table 10-7 shows the ten fields and the purpose of each.
The extended FeB is used by MS-DOS to create files with a particular
attribute or to search the file directory for such files. As table 10-8 shows, the
extended FCB consists of a standard FCB with a 7-byte header. The bytes of
the header are referenced by negative offsets relative to byte 00 of the stan
dard FCB.
Table 10-7. Breakdown of File Control Block
Offset (Hex)
Purpose
00
Disk drive number. Set by the programmer.
o default drive
1 drive A
2 drive B
219
Part 2-1Utorials
Thble 10-7. (cont'd)
Offset (Hex)
Purpose
3 drive C
etc.
01-08
Filename offile to be created, written, or read. Set
by the programmer. The field must be padded with
blanks if the filename has fewer than 8 characters. The
field may contain a valid device name (excluding the
optional colon).
09-0B
Filename extension. Set by the programmer. The field
must be padded with blanks if the extension has fewer
than 3 characters.
OC-OD
Current block number. A block consists of 128
records. The size of a record is determined by bytes OEH
and OFH of the FCB. A block is numbered according to
its position relative to the start of the file. The current
block number is set to zero by MS-DOS when a file is
opened. Sequential read and write operations use the
current block number and the current record number
(FCB byte 20H) to locate a particular record.
OE-OF
Logical record size. An "open file" operation assigns a
value of 80H to this field.
10-13
File size in bytes. When MS-DOS opens a file, it
extracts the file's size from the file directory and stores
the value in this field. The low-order word is stored in
bytes lOH and llH; the high-order word in 12H and 13H.
This value should not be modified by the programmer.
14-15
Date file was created or last modified. Also
extracted from directory during an "open." This value
should not be modified by the programmer.
16-1F
Reservedfor use by MS-DOS. This value should not
be modified by the programmer.
20
Current relative record number. This field contains
the relative record number (0-127) within the current
block (FCB bytes OCH-ODH). This field is not initialized
by an "open" operation.
21-24
Random record number. This field is used for
"random" reading and writing of files. Records are
numbered according to their position relative to the first
record in the file. The first record is random number O.
220
la-Disk Structure and Management
Table 10-8. Breakdown of Extended FeB Header
Offset (Hex)
Purpose
-07
Aflag byte set to FFH, indicating the beginning of an
extended FeB header.
-06 to -02
Reserved by MS-DOS.
-01
Attribute offile to be created or searched for:
02H
04H
OOH
Hidden file
System file
Other file
UsinganFCB
MS-DOS 1 requires you to set up an FCB for a file before any operations can
be performed on that file. Once the FCB is set up in memory, you must place
the FCB's segment address in the DS register and the FCB's offset address in
the DX register. The DS and DX registers then act as a pointer directing
MS-DOS to the FCB.
With DS:DX pointing to the FCB, you must place the value of the de
sired service function (see appendix A) in the AH register, initialize any other
registers required by that particular service function, and then direct
MS-DOS to execute an interrupt type 21 (hex). Interrupt 21 is the MS-DOS
junction dispatcher that tells MS-DOS to execute the service specified by
the value in the AH register. The MS-DOS service functions are used to per
form the nuts and bolts operations in a computer program.
When a computer program issues a call for interrupt 21, control will pass
from the computer program to MS-DOS. The service function will operate on
the file specified by the FCB and then return control to the calling program.
Execution of the program will then continue in the normal fashion.
As we have seen, a big drawback in using the MS-DOS 1 file manage
ment functions is the requirement that a valid FCB be established for each
file read or written. MS-DOS 2 effectively removed this annoyance with the
implementation of file handles.
File Handles
MS-DOS versions 2.X and subsequent versions provide a group of file man
agement service functions that do not require the use ofFCBs. Before a file is
opened or created, a character string is placed in memory that specifies the
drive, path, filename, and extension of the file. The DS and DX registers are
then used to point to this string and the create (DOS function 3CH) or the
open (DOS function 3DH) function is called. The function returns a 16-bit
file handle in the AX register. The file handle is then used for any subsequent
221
Part 2-TUtorials
access to the file; no FeB is used. MS-DOS takes care of the messy details.
The programmer simply keeps track of which file handle belongs to which
file.
MS-DOS versions 2.X, 3.X, and 4.X provide support for FeBs; there
fore, programs written to execute under MS-DOS 1.X will run under 2.X and
subsequent versions. Programs that utilize file handles will not run under
MS-DOS 1.X.
222
C
HAP
T
E
R
11
Memory Structure
and Management
Computer Memory
Booting MS-DOS
Program Segment Prefix
Executable Files
The Environment
Environment Size
Memory Allocation
223
Part 2- Tutorials
The purpose of the next three chapters is to give you a thorough understand
ing of how memory is organized and controlled in MS-DOS computers. This
chapter is an overview, discussing structure and process in general terms.
Chapter 12 extends the discussion to expanded memory, and chapter 13 then
applies this information to terminate and stay resident computer programs.
Computer Memory
Computer memory consists of a large number of individual memory ele
ments, each ofwhich stores 1 byte of data. Each element is assigned a unique
numerical address, and the elements are ordered according to these ad
dresses. The first memory element is assigned address 0, the next is assigned
address 1, and so on up to the last memory element whose address is deter
mined by the total number of individual elements in the computer's mem
ory. For reasons we won't go into here, memory addresses are generally
given in hexadecimal numbers. In this book, hexadecimal numbers are al
ways labeled with an uppercase H, for example 1OH. Figure 11-1 illustrates
the structure of memory in a computer with 1 Mbyte of memory.
Memory Segments
The central processing unit (CPU) in MS-DOS computers divides memory
into blocks called segments. Each segment occupies 64 Kbytes of memory.
The CPU contains four segment registers, which are internal storage devices
used to store the addresses of selected memory segments. The four segment
registers are given the names CS (code segment), DS (data segment), SS (stack
segment), and ES (extra segment). The CPU contains several other registers.
For now, we'll just mention IP (instruction pointer) and SP (stack pointer).
IP is used with CS to keep track of which memory address stores the next
executable instruction of the computer program. SP is used with SS to access
a portion of memory called the stack.
Accessing Memory
In MS-DOS computers, memory locations are accessed by combining the
contents of a segment register with the contents of one of the other regis
ters. For example, the program instruction to be executed is accessed by
combining the contents of the CS and IP registers (the combination of CS
and IP is written "CS:IP"). After the instruction is retrieved from memory
and executed, the IP register is incremented so that CS:IP points to the next
instruction to be executed.
The manner in which register contents are combined places an upper
limit on the amount of memory that is addressable by the computer hard
ware. MS-DOS was originally designed to run on computers with an Intel
8088 CPU. Each 8088 register stores a 16-bit number. The 8088 combines
224
ll-Memory Structure and Management
Physical Address
Memory Usage
1 Mbyte
Limit of Memory
Address Space
'1
I
I
Reserved for BIOS
Reserved for BIOS
1
I
I
FFFFFH
FOOOOH
EOOOOH
CCOOOH
Disk Adapter, BIOS
C8000H
EGA BIOS
COOOOH
EGA Text
BCOOOH
CGA, EGA, VGA Text
BSOOOH
B4000H
Monochrome Display
-1----------------11
I
BOOOOH
EGA, VGA Display
Limit of User RAM
I
U~,
AOOOOH
Pco,,,m. "d DOS
L...--_
_----'I ~
Figure 11-1. Memory map for a computer with
1 megabyte of memory.
the 16-bit number from a segment register (such as CS) with the 16-bit num
ber from another register (such as IP) to produce a 20-bit memory address.
This limits the amount of memory addressable by the 8088 to 2 20 bytes, or 1
Mbyte.
Since the birth of MS-DOS, 8088 computers have been succeeded by
80286 and 80386 computers. These computers are capable of addressing
more than 1 Mbyte of memory. However, the I-Mbyte limitation is still built
into MS-DOS. This limitation is one ofthe major restrictions of the operating
system.
225
Part 2- Tutorials
The memory diagram shown in figure 11-1 illustrates an additional re
striction on usable memory. Memory addresses starting at AOOOOH are re
served for use by the system's video display and ROM (read only memory).
This memory is not available for use by programs. Therefore, user programs
are restricted to the 640-Kbyte range OOOOOH-9FFFFH. In chapter 12, we
will discuss how this constraint has been overcome through the implemen
tation of expanded memory.
Booting MS-DOS
The booting process consists of reading into memory the boot record and
the files IO.SYS, MSDOS.SYS, and COMMAND.COM (see chapter 10).
When the computer is first turned on (or restarted), control is passed to
an address in ROM (read only memory) that checks to see if the disk has a
valid boot record. If a valid record is found, it is loaded into memory, and
control of the computer is passed to it.
When the boot record receives control, it checks to see if IO.SYS and
MSDOS.SYS are the first two files stored on the disk. If they are, the two files
are loaded into the low end of memory, and control is passed to an initializa
tion module contained in IO.SYS. If the two files are not on the disk in the
appropriate physical location, the following message is displayed:
Non system disk
Replace and press any key
In versions of DOS prior to 3.3, IO.SYS and MSDOS.SYS must be
stored in contiguous sectors. This restriction does not hold in DOS 3.3
and subsequent versions of the operating system.
The initialization module passes control to MSDOS.SYS, which initial
izes a disk buffer and a file control block area that are used in executing
service routines. MSDOS.SYS also determines the computer's equipment
status and performs any necessary hardware initialization. MSDOS.SYS then
passes control back to the IO.SYS initialization module.
The initialization module checks to see if there is a CONFIG.SYS file
(discussed in chapter 9) in the root directory of the boot disk. If there is, and
if it contains any instructions about installable device drivers, the specified
drivers are installed in memory.
Next, the initialization module issues a call to DOS function 4BH,
which invokes the DOS program loader. The loader, also called EXEC, is
responsible for loading a program into memory and passing control to the
program. In this case, the initialization module directs EXEC to load COM
226
l1-Memory Structure and Management
MAND. COM. EXEC can be directed to load a different command interpreter
through the use of the SHELL command (see Part 3).
Recall from chapter 10 that COMMAND. COM consists of three parts: an
initialization portion, a resident portion, and a transient portion. The resi
dent portion is loaded by EXEC and is responsible for loading the transient
portion. The resident portion also contains the routines that handle input
and output errors, as well as routines that handle int 22H (terminate ad
dress), int 23H (Ctrl-Break), and int 24H (critical error).
The initialization portion of COMMAND. COM is loaded into memory
immediately above the resident portion. This portion of the command in
terpreter processes AUTOEXEC.BAT files (see chapter 4). The initialization
portion also prompts you for time and date. It is then discarded.
The transient portion of COMMAND.COM is loaded into the high end
of memory. This portion of the command interpreter displays the system
prompt, contains the internal system commands, and loads and executes
external commands and executable files. As its name implies, the transient
portion may be overwritten during the execution of a program. When a pro
gram terminates, the resident portion of COMMAND. COM determines if the
transient portion has been overwritten and reloads it if necessary.
Once the transient portion of COMMAND. COM has been installed, the
system prompt is displayed, indicating that the booting process has been
completed and that MS-DOS is ready to accept a command. Figure 11-2 illus
trates the structure of computer memory at the completion of the booting
process.
Program Segment PreilX
Before loading any program (including COMMAND. COM), EXEC locates
the lowest available segment in memory. This segment is designated the
program segment. Beginning at offset 00 in the program segment, EXEC
constructs a program segment prefiX (psp). This program segment prefix
is a 2 56-byte (100H) block of memory that serves as an area of communica
tion between MS-DOS and the executing program. Once the psp is con
structed, EXEC loads the program beginning at offset 100H in the program
segment.
Table 11-1 describes the fields of the psp. Note that several of the fields
described are not officially documented by either IBM or Microsoft. How
ever, these fields seem to have served the same function from MS-DOS 2.0
through MS-DOS 3.3, and the descriptions presented in table 11-1 are widely
accepted by DOS program developers.
The segment address of the psp is sometimes referred to as the process
identifier, or PID. Each program running on a computer is called a process
and is identified by a unique PID. On MS-DOS computers, the PID and the
psp segment address are identical. When MS-DOS was first implemented, it
was used on relatively small personal computers that were never running
227
Part 2-Tutorials
r-------------------------------,--Topof
User RAM
Transient Portion of COMMAND. COM
Transient Program Area
Resident Portion of COMMAND.COM
Installed Device Drivers
File Control Blocks
Cache Buffer
MSDOS.SYS
BIOS
Interrupt Vectors
OOOOOH
Figure 11-2. Configuration of computer memory immediately after
MS-DOS is booted (exact memory addresses vary
according to system configuration).
Thble 11-1. Breakdown of Program Segment Prefix
Offset (hex)
Purpose
00-01
Program terminate. The first two bytes of the psp are
always CD and 20. These two hexadecimal numbers code
for the MS-DOS interrupt "program terminate" (INT 20H).
See appendix B for a discussion of MS-DOS interrupts.
228
ll-Memory Structure and Management
Thble 11-1. (coot'd)
Offset (hex)
Purpose
02-03
Top of memory. These 2 bytes store, in reverse order,
the starting segment address of any memory that MS-DOS
has not allocated to the executable file. Since MS-DOS
generally allocates all available memory to an executable
file, these 2 bytes normally contain the address of the
"top of memory:'
04
Byte of00. Although officially documented as
"reserved," this field is not currently in use.
05-09
Function dispatcher. A long call to the MS-DOS
function dispatcher. This field is implemented to provide
compatibility with CP/M programs. New programs should
not use this field to call the function dispatcher.
The first byte in this field is the op-code for a long call.
The second and third bytes store, in reverse order, the
offset of the function dispatcher. This number also
represents the number of bytes that are available in the
program's code segment. The fourth and fifth bytes of the
field store, in reverse order, the segment address of the
function dispatcher. The function dispatcher is discussed
in appendix A.
OA-OD
Terminate address. These 4 bytes store, in reverse
order, the default address that receives control when a
program terminates execution. The value stored here
preserves the default so that it can be restored, if
necessary, when the program terminates.
OE-U
Ctrl-Break exit. These 4 bytes store, in reverse order,
the default address that receives control when Ctrl-Break
is pressed. The value stored here preserves the default so
that it can be restored, if necessary, when the program
terminates.
12-15
Critical error exit. These 4 bytes store, in reverse
order, the default address that receives control when a
critical error is encountered. The value stored here
preserves the default so that it can be restored, if
necessary, when the program terminates. See appendix A
for a discussion of critical errors.
16-17
psp ofparent. This field stores in reverse order, the
segment address of the parent's psp. For example, if
COMMAND.COM uses EXEC to load an application
program, then this field of the application's psp will
contain the segment address of COMMAND.COM's psp.
229
Part 2-Tutorials
Table 11-1. (cont'd)
Offset (hex)
Purpose
THE COMMAND.COM shell that was loaded during
booting has no viable parent. Therefore, this field in
COMMAND. COM's psp stores its own segment address.
The use of this field is undocumented by Microsoft and
IBM. Officially the field is "reserved."
18-2B
File handle alias table. These 20 bytes are used to
store the file handles that belong to this process. The byte
at a given entry contains FFH if the corresponding handle
is not in use by the process. A value other than FFH
represents an offset into DOS's master file table, which
contains the file-specific information. The size of this
master table is set with the FILES=nnn command.
The first 5 bytes in this field are reserved for the standard
input, standard output, standard error, standard auxiliary,
and standard printer devices. If any of these devices are
redirected, the corresponding entry in this table will be
changed by MS-DOS.
The size of this table limits a process to 20 file handles.
However, it is possible to create a table with more than 20
bytes and use it as a handle alias table. This can be
accomplished by: (1) storing the size of the new table at
offset 32H in the psp, (2) storing the offset and segment
addresses of the new table at offset 34H of the psp, and
(3) copying the contents of the old alias table into the new
alias table.
The use of this field is not documented by Microsoft or
IBM. OffiCially the field is "reserved."
2C-2D
Environment address. These bytes store the segment
address, in reverse order, of the program's environment.
Refer to this chapter's discussion of the environment.
2E-31
Reserved by MS-DOS.
32-33
Size offile handle alias table. This 2-byte word stores
the size of the process's file alias table. Current
implementations of MS-DOS set the value of this field to
20. See the description of psp offset field 18H-2BH.
The use of this field is undocumented by Microsoft and
IBM. Officially this field is "reserved".
34-37
230
Address offile handle alias table. The first 2 bytes of
this field store, in reverse order, the offset address of the
ll-Memory Structure and Management
Table 11-1. (cont'd)
Offset (hex)
Purpose
file handle alias table. The second 2 bytes of this field
store, in reverse order, the alias table's segment address.
Current implementations of MS-DOS store the alias table
at PSP:00l8H. See the description of psp offset field
18H-2BH.
The use of this field is undocumented by Microsoft and
IBM. Officially the field is "reserved."
37-4F
Reserved by MS-DOS.
50-52
Function dispatcher, return. This field contains the
bytes CD 21 CB-the machine code for a call to the
function dispatcher followed by a FAR return,
53-5B
Reserved by MS-DOS.
5C-6B
File control block. This default file control block is
used if the first command line parameter following the
program name is a filename.
6C-7B
File control block. This default file control block is
used if the second command line parameter following the
program name is a filename.
7C-7F
Reserved by MS-DOS.
80-FF
Command tail, DTA. The first byte stores the length of
the command line's parameter string. The parameter
string (command tail) is stored beginning at byte 2 of this
field. The entire field also serves as a default disk transfer
area. This field is used if the program requires but does
not establish a DTA. When the field is used in this fashion,
the command tail is overwritten.
more than one program (process) at a time. The current MS-DOS computers
are quite different in this respect: it is not unusual for them to have one or
more resident programs (such as Sidekick) while running the user's
application program. In the environment, the concept of processes is very
important, as is an understanding of the location, structure, and function of
the psp. Processes and PIDs are discussed later in this chapter under
"Memory Allocation."
MS-DOS 3.0 (and subsequent versions) implement DOS function 62H.
This function can be called by a program to obtain the segment address ofits
psp. Appendix A contains a Thrbo Pascal program that demonstrates the use
of function 62H.
231
Part 2- Tutorials
For the 2.X versions of DOS, there is an undocumented DOS function
that can be used to obtain the psp's segment address. Function 51 H (which is
also implemented in 3.X and 4.x) returns the address in the BX register.
Listing 11-1 is a Turbo Pascal program that demonstrates the use of function
51H. See appendix A for a general discussion on the use of the DOS
functions.
DOS function 50H is available to set the current psp. This function is
implemented in MS-DOS 2.X and subsequent versions, but its use is not
officially documented. Despite this lack of sanction by IBM and Microsoft,
function 50H is widely used in resident programs. When a resident program
receives control (as when a "hot" key is pressed), DOS keeps the psp of the
application program as the current psp. Function 50H may be used to tell
DOS that the resident's psp is the current psp. Similarly, when the resident
passes control back to the application program, function 50H may be used
to reset the application's psp as current.
Listing 11-1. PsPeep, a Thrbo Pascal Program Demonstrating the
Use of Function 51H
program PsPeep;
{This program dispLays information about its psp using
MS-DOS function 51H. 51H is an undocumented function that is
identicaL to the MS-DOS 3.X function 62H. The difference is
that 51H is aLso impLemented in MS-DOS 2.X.}
type
registers = record
ax,bx,cx,dx,bp,si,di,ds,es,fLags: integer;
end;
HexString = string[41;
var
dosreg
psp_seg
registers;
integer;
function hex (i : integer) : HexString;
{Converts decimaL to hex string}
const
h : array[O •. 151 of char = '0123456789ABCDEF';
var
Low,high : byte;
begin
Low : = Lo (i) ;
high := Hi(i);
hex := h[high shr 41+h[high and SF]+h[Low shr 41+h[Low and SF];
end;
function VerNum : integer;
{This function returns the version of DOS being used.}
232
ll-Memory Structure and Management
begin
dosreg.ax:= S3000;
MsDosCdosreg);
VerNum:= LoCdosreg.ax);
{Set AH to 30H.}
{Call DOS}
{Major number in AL}
end;
procedure GetPsp;
{Uses DOS service function 51H to obtain the segment address
of the program's psp}
begin
dosreg.ax := S5100;
MsDosCdosreg);
psp_ := dosreg.bx;
writelnC'PSP: ',hexCpsp_seg»;
end;
procedure TermAddr;
{Displays segment:offset address of termination handler}
begin
writeC'Termination address: ');
write(hexCMemW[psp_seg:SOc]»;
writelnC':',hexCMemW[psp_seg:SOa]»;
end;
procedure ParentPsp;
{Displays psp of this program's parent. The purpose of offset
is not officially documented}
begin
writelnC'Parent PSP: ',hexCMemW[psp_seg:S16]»;
end;
procedure EnvSeg;
begin
write('Environment begins at: ');
writelnChexCMemW[psp_seg:S2c]),':0000');
end;
procedure FileHandles;
{Displays information about the file handle alias table. The format
for alias table is not officially documented.}
var
AliasSeg,AliasOff,FileCnt,
i ,j
integer;
begin
AliasSeg := MemW[psp_seg:S36J;
AliasOff := MemW[psp_seg:S34J;
writeC'Handle alias address: ');
writelnChexCAliasSeg),':',hexCALiasOff»;
writeC'Size of alias tabLe: ');
writeLn(MemW[psp_seg:S32J,' bytes');
233
Part 2- Tutorials
Fi leCnt := 0;
for i := 0 to (MemW[psp_seg:S32] - 1) do
begin
j := Mem[psp_seg:S18 + i];
if not (j in [SFF, O•• 2]) then
FileCnt := FileCnt + 1;
end;
writeln('Number of open file handles: ',FileCnt);
end;
procedure GoPeep;
begin
TermAddr;
ParentPsp;
EnvSeg;
FileHandles;
end;
{Program starts here.}
begin
if VerNum < 2 then
writeLn('DOS 2.0 or Later required. ' )
eLse begin
GetPsPi
GoPeep;
end;
end.
Executable Files
All programs written to run under MS-DOS go through a process called link
ing (see chapter 16). The linker evaluates the program and determines where
in memory the different parts of the program are to be located relative to one
another. The linker then stores this information in a header located at the
front of the program file. All files produced by the linker have a filename
extension of" .EXE" and are called EXE files.
EXE files that meet three requirements may be converted to COM files.
The requirements for a COM file are: (1) the program and all of its data must
occupy less than 64 Kbytes; (2) the program's code, data, and stack must all
reside in the same memory segment; and (3) the first executable instruction
of the program must be at offset 100H within the file. If an EXE file meets all
of these requirements, it can be converted to a COM file by using the
MS-DOS utility EXE2BIN. COM files do not contain a header.
MS-DOS always loads COM files beginning at offset 100H in the pro
gram segment, immediately following the psp. The starting address of the
234
ll-Memory Structure and Management
program segment is placed in all four segment registers, and a value of 100H
is placed in the IP register. The SP register is set to point to the top of the
program segment. MS-DOS then places 2 bytes of OOH at the top of the stack
and passes control to the instruction at CS: 100.
When an EXE file is loaded, the file's header is placed in memory begin
ning at offset 100H in the program segment. The remainder of the file is then
relocated in memory according to the information contained in the header.
The CS, IP, SS, and SP registers are initialized according to information in the
header. The DS and ES registers are set to point to the start of the psp, control
is passed to the instruction pointed to by CS:Ip, and program execution com
mences.
The Environment
Any program running under MS-DOS may use EXEC to load and run another
program. When this occurs, the program calling EXEC is referred to as the
parent and the program loaded by EXEC is referred to as the child. The child
inherits many items from its parent, including a block of memory called the
environment.
The environment consists of a series of statements having the form
environment variable=some string of characters
An environment statement serves to communicate information to both
MS-DOS and application programs. For example, the statement
"PATH = search path" tells MS-DOS which directories to search for files;
the statement "COMSPEC=d:lPath]" tells MS-DOS where to locate the
transient portion of COMMAND.COM; and the statement "LIB= lPath]"
tells the compiler where to look to locate library files used in compiling
programs.
The statements within the environment are separated from each other
by a byte of value OOH. The final statement in the environment is followed by
2 bytes storingOOH. In MS-DOS 3 and 4, the 2 bytes ofOOH are followed bya
word count and by the drive, path, filename, and filename extension of the
program that owns the environment. As we discussed earlier in this chapter,
offset 2CH in the program's psp stores the segment address of the program's
environment.
Environment Size
The environment may be up to 32 Kbytes long. As part of the standard boot
ing process, COMMAND.COM receives an environment that is 160 bytes
long. An environment of this size can fill up quickly, in which case MS-DOS
will display the message: Out of envi ronment space.
235
Part 2-TUtorials
Users of MS-DOS 3.1 and subsequent versions can increase the size of
the environment passed to COMMAND.COM by including the following
command in the CONFIG.SYS file:
shell = [d:] [path]command. com /p /e:xxxx
Refer to the discussion of SHELL in Part 3 for details on the use of this com
mand.
Users of MS-DOS 2.X and 3.0 can also change the size of the environ
ment, but it is necessary to use DEBUG to modify the contents of COM
MAND.COM (DEBUG is thoroughly discussed in chapter 15). Place your
working system diskette in drive A and enter the following command:
A> debug a:command.com
This command instructs MS-DOS to load DEBUG and tells DEBUG to load
COMMAND.COM. You will want to use DEBUG to search for the portion of
code within COMMAND.COM that sets the default size of the environment.
When you see the DEBUG prompt (-), enter the following command:
-5
100 L 4500 SS OA 00 S4 48 CO 21
DEBUG will search COMMAND.COM until it finds the appropriate se
quence of machine code. When the code is found, DEBUG will display the
address at which it is located. You should see something like this:
39D3:0ECE
The precise address on your machine will probably differ from the one
in this example. The next step is to unassemble the machine code. Enter the
following command (again, the address you use will probably differ from
the one used in the example):
-u 39d3:0ece
39D3:0ECE BBOAOO
3903:0E01 B448
3903: OE03 C021
3903:0E05 E890F7
3903:0E08 E8DCF7
3903:0EOB 89166909
3903:0EOF A16709
3903:0EE2 205900
3903:0EE5 90
39D3:0EE6 A3B10B
3903:0EE9 E861F3
3903:0EEC 8916B70B
236
MOV
MOV
INT
CALL
CALL
MOV
MOV
SUB
NOP
MOV
CALL
MOV
BX,OOOA
AH,48
21
0668
06B7
[0969] ,OX
AX, [0967]
AX,0059
[OBB1] ,AX
0240
[OBB7J,DX
ll-Memory Structure and Management
The instruction HOV BX, DDDA sets the number of paragraphs (16-byte
blocks) given to the environment. As you can see, the default is 10 (OOOAH)
paragraphs. The following command changes the code so that 64 (0040H)
paragraphs are set aside for the environment. Feel free to choose a smaller
or larger number for your environment size. Remember that you are lim
ited to 32 Kbytes and that DEBUG operates with hexadecimal numbers. By
the way, 32 Kbytes is actually 32,768 bytes, or 2048 paragraphs.
-a 39d3:0ece
39D3:0ECE mov bX,0040
39d3:0ED1
+-press Enter
Since we are changing the contents of COMMAND.COM, it is a good
idea to unassemble the changed code just to check our work.
-u 39d3:0ece
39D3:0ECE BB4000
39D3:0ED1 B448
39D3 :OED3 C021
39D3:0EDS E890F7
39D3:0ED8 E8DCF7
3903:0EOB 89166909
39D3:0EDF A16709
39D3:0EE2 205900
39D3:0EES 90
39D3:0EE6 A3B10B
39D3:0EE9 E861F3
39D3:0EEC 8916B70B
MOV
MOV
INT
CALL
CALL
MOV
MOV
SUB
BX,0040
AH,48
21
0668
06B7
[0969], DX
AX, [0967]
AX,0059
Nap
MOV
CALL
MOV
[OBB1],AX
0240
[OBB7J ,DX
Now enter w to write the modified file back to the disk. Then enter q to
leave DEBU G. Test to see if COMMAND. COM has been successfully patched
by using the diskette in drive A to reboot your system. If your system boots,
copy COMMAND.COM into the root directory of the boot drive.
Passing an Environment to a Child
Before calling EXEC, the parent must set up a pointer to the environment
block that the child will inherit. A pointer is a variable that stores an address
in memory. In this case, the pointer stores the address of the first byte in the
environment. The parent can create an environment of any size (up to 32
Kbytes) using the memory allocation function (see the following discus
sion). However, when control passes from the child back to the parent, the
parent's environment will be unchanged from what it was originally. There
fore, the parent cannot use this mechanism to change the size of its own
environment.
237
Part 2-Tutorials
The parent can pass to the child an exact duplicate of its own environ
ment by setting the pointer to equal zero. Any modifications that the child
performs on its environment are strictly local: they have no effect on the
parent's environment.
It is possible for a child to modify its parent's environment. One way is
to have the child locate its parent's psp from offset 16H in its own psp. Once
the parent's psp is located, the parent's environment address can be read
from offset 2CH.
The parent's environment can also be accessed by using the memory
control blocks discussed in the next section.
Memory Allocation
One of the most critical jobs of any operating system is managing computer
memory. The operating system must constantly be aware of which portions
of memory are being used and which portions are available. There are three
fundamental requests that an operating system must be able to service in
performing memory management: (1) requests for allocations of blocks of
memory, (2) requests to modify the size of previously allocated blocks of
memory, and (3) requests to release (deallocate) previously allocated blocks
of memory.
MS-DOS carries out these tasks using functions 48H (allocate memory),
49H (release memory), and 4AH (modify memory allocation). If you refer
back to the previous section where COMMAND. COM was patched to mod
ify the environment size, you will see that function 48H was used to allocate
a block of memory for the environment.
The first paragraph in each allocated memory block is set aside for the
memory control block (mcb). The first byte of a memory control block is
either 4DH or SAH. If the first byte is 4DH, then the mcb is an internal mem
ber ofthe chain that links all of the mcb's. If the first byte of the mcb is SAH,
the mcb is the final mcb in the chain.
The second and third bytes of the memory control block store, in re
verse order, the process identifier (PID) of the program that owns the mem
ory block. Recall from the psp discussion that the PID is identical to the
segment address of the program's psp.
The fourth and fifth bytes in the mcb store, in reverse order, the num
ber of paragraphs in the allocated block of memory. Adding this number to
the address of the current mcb gives the address of the next mcb in the
chain.
As we mentioned earlier, MS-DOS supplies three functions to use in
accessing mcb's. Direct manipulation of the mcb's is strongly discouraged
by Microsoft and IBM. There is no way that programs can coexist unless
programmers leave the mcb's alone and let DOS worry about them. Having
said that, there is no reason why a programmer should not be able to look at
the mcb's and use the information they contain.
238
ll-Memory Structure and Management
Unfortunately, there is no documented way of accessing the mcb's.
Even the mcb structure just described is not officially documented. Fortu
nately, there is a way (undocumented) to get at the mcb's: DOS function
52H. This function returns a pointer to the first mcb in the allocated chain.
Once the first link is found, it is possible to traverse the entire chain.
Let's use DEBUG to see how the previous information can be used.
Start DEBUG (debug) and wait for the prompt (-). When the prompt ap
pears, invoke DEBUG's assembler by entering a 100. You should see some
thing like this:
-a 100
1259:0100
~press
Enter
Now enter the following assembly language commands:
1259:0100 mov ah,52
1259:0102 int 21
1259:0104
~press
Enter
Next, enter g 104. This tells DEBUG to execute the assembly language
commands entered and to stop at offset 104H.
-g 104
AX=5200 BX=0026 ex=oooo OX=OOOO SP=FFEE BP=OOOO SI=OOOO 01=0000
OS=1259 ES=022B SS=1259 eS=1259 IP=0104 NY UP EI PL NZ NA PO Ne
1259:0104 6F
OB
6F
DEBUG just called DOS function 52H. Function 52H returned the
memory address in ES and BX. The 2-byte word at ES:BX -2 is the segment
address of the first mcb in the allocation chain. The next DEBUG command
displays the word at ES:BX -2:
-d es:0024 L2
0228:0020
73 09
s.
This dump tells us that the first mcb is stored at address 0973:0000. Remem
ber that mcb's always start at offset 0000 in a segment. We can now look at
the first mcb:
-d 973:0 LlO
0973:0000 40 08 00 EF 02 07 03 00-36 e6 06 08 03 0036 C7 M••••••• 6••••• 6.
239
Part 2-1Utorials
The first byte in the preceding dump is reassuring, since the first byte in
each mcb must be either 4DH or 5AH. The second and third bytes store, in
reverse order, the PID (psp segment address) of the process that owns this
block of memory. MS-DOS always assigns PID 0008 to the block containing
the CONFIG.SYS device drivers.
To find the next mcb, add the 2-byte word formed by the fourth and
fifth bytes to the segment address ofthis mcb. DEBUG's hexadecimal calcu
lator is useful for this:
-h 973 2ef
OC62 0684
The first number is the sum; the second number is the difference.
The next mcb is at the paragraph following OC62:0000:
-d c63:0 LtD
OC63:0000 40 64 OC 03 00 EA 75 07-3B FO 73 19 AA EB F3 4E Md •••• u.;.s •••• N
The preceding display is the mcb for the second block of memory in the
chain. This is the memory block used by COMMAND.COM. The second and
third bytes tell us that COMMAND.COM's psp starts at address OC64:0000.
Let's take a look at the psp's contents.
-d c64:0
OC64:0000
OC64:0010
OC64:0020
OC64:0030
OC64:0040
OC64:0050
OC64:0060
OC64:0070
co 20 00 80 00 9A FO FE-10 FO B2 02 64 DC 3C 01
64
FF
64
00
CD
20
20
OC
FF
OC
00
21
20
20
56
FF
14
00
CB
20
20
05
FF
00
00
00
20
20
64
FF
18
00
00
20
20
OC
FF
00
00
00
20
20
64
FF
64
00
00
20
20
OC-01
FF-FF
OC-FF
00-00
00-00
20-00
20-00
03
FF
FF
00
00
00
00
01
FF
FF
00
00
00
00
00
FF
FF
00
00
00
00
02
3C
00
00
00
00
00
FF
00
00
00
20
20
00
FF
10
00
00
20
20
00
........... d.<.
FF d.V.d.d •••••••••
08 •••••••••••• <•••
00 d ••••• d •••••••••
00
20 • ! •••••••••••
20
00
This is the beginning of COMMAND. COM's psp. We can use it to obtain
the segment address of COMMAND.COM's environment block (offset
2CH). Thus, knowing how to get at the mcb's and traverse them allows us
access to COMMAND.COM's environment. Any changes in this environ
ment block will be passed on to all programs loaded by COMMAND.COM.
240
c
H
A
p
T
E
R
12
Expanded Memory
The 640-Kbyte Limit
Fundamentals of Expanded
Memory
The Evolution of Expanded
Memory
Using Expanded Memory
Exploring Expanded Memory
with DEBUG
241
Part 2-TUtorials
Expanded memory is the name of a method developed to overcome the
memory limitation of MS-DOS computers. The structure and use of ex
panded memory is the subject of this chapter.
MS-DOS computers are limited to 640 Kbytes of usable main memory.
When MS-DOS was first introduced, most observers felt that 640 Kbytes was
more than enough memory for a personal computer. After all, earlier per
sonal computers were limited to 64 Kbytes of memory, so 640 Kbytes
seemed like more memory than any reasonable person would require.
What has happened, though, is that as computer applications have be
come more sophisticated, the memory limitation has become a significant
problem. Large application programs, device drivers, and TSR utilities all
require large amounts of memory.
More significantly, the multitasking operating system "extensions"
(such as Microsoft Windows and Quarterdeck Office Systems' DESQView)
that now exist for MS-DOS allow several different programs simultaneous
access to computer memory. These extensions allow the use of many large,
memory-hungry applications at one time. Unfortunately, MS-DOS limits all
of these applications to a single 640-Kbyte memory space, thereby com
pounding the memory limitation problem. The demand for better perform
ance from memory-hungry applications and multitasking extensions has
provided the motivation for the development of expanded memory.
This chapter begins by discussing the reasons for the 640-Kbyte mem
ory restriction on MS-DOS computers. You will see that this restriction is the
result of the limitations of the 8088 central processing unit.
The following section provides a general overview of the Expanded
Memory Specification (EMS). You will see that EMS specifies that applica
tion programs and the operating system access expanded memory by issu
ing calls to interrupt 67H. EMS also specifies a set of functions that are
available in the use of expanded memory.
The third section discusses the evolution of expanded memory, from
LIM 3.2 through LIM 4.0 The significance of LIM 4.0 as a unifying force in
the marketplace is also discussed.
The final section explains how expanded memory is used by applica
tion programs, what tasks are required of all programs using expanded
memory, and the function ofinterrupt 67H. The explanation includes exam
ples, using the MS-DOS 4.X version of DEBUG as a tool to demonstrate
many of the concepts.
The 640-Kbyte Limit
All computers access memory through their central processing unit (CPU).
All CPUs contain internal registers that are used to store data. All CPUs also
have an address space that determines how much memory the CPU can
address or access.
242
12-Expanded Memory
One type of data used by the CPU is the memory address. Memory
addresses specify physical locations in computer memory. The larger the
internal registers, the larger the memory addresses they can store. There
fore, the size of the CPU's internal registers determines the size of the CPU's
address space.
8088/86 Computers
The original IBM PC and PC-compatible computers contain an 8088/86
CPU. The 8088/86 is a "16-bit" CPU. This means that the CPU's internal
registers can store numbers that are 16 bits (2 bytes) in length. The largest 16
bit number contains 16 ones, which is equivalent to the hexadecimal num
ber FFFFH, or the decimal number 65,535 (2 16 -1).
The 8088/86 addresses memory by combining a 16-bit segment ad
dress with a 16-bit offset address to form a 20-bitphysical address. The two
addresses are combined by shifting the segment address one place to the left
and adding the offset address to it. As an example, if one CPU register stores a
segment address of 1234H, and another register stores an offset address of
4321H, the two addresses are combined as follows:
1234
4321
-16661
..... 16-bit segment address shifted to left
..... 16-bit offset address
+-20-bit physical address
The largest 20-bit number (in hexadecimal notation) is FFFFFH, which
is equivalent to decimal 1,048,575 or 2 2 °-1. This number represents the
limit on the 8088/86's address space, which by convention is said to be 1
megabyte or 1 Mbyte.
Operating systems and application programs that run on PC and PC
compatible computers cannot access the entire 1-Mbyte address space. The
reason for this is that the high end of the address space is used to store the
ROM BIOS and provide address space for interface cards that support video
display, local area networks, and other peripheral devices (see figure 11-1).
The result is that only 640 kilo bytes (640 Kbytes) of the 1-Mbyte address are
available for use by operating system and application programs.
From this discussion you can see that the 640-Kbyte limitation is due to
design features of MS-DOS which were implemented to accommodate the
8088/8086 hardware. If the hardware had been accommodated differently,
MS-DOS could have been designed to access more than 640 Kbytes.
80286 and 80386 Computers
Because MS-DOS was written to rim on 8088/86 machines, the operating
system was unable to utilize the larger address space of the newer genera
243
Part 2- Tutorials
tions of IBM and IBM-compatible computers. These computers contain
80286 and 80386 CPUs, which have 32-bit internal registers that can address
much larger memory spaces. But in order to maintain compatibility with the
8088 machines, the newer versions of MS-DOS continue to use 16-bit seg
ment and offset addresses. MS-DOS application programs that run on the
newer and potentially more powerful machines are thus burdened by the
memory limitation of the original PC and PC compatibles.
IBM and Microsoft have developed OS/2, an operating system that can
utilize the larger address space of 80286 and 80386 computers. OS/2 does
have the capability to run programs written for MS-DOS, but only one
MS-DOS program can run at a time and it is limited to 640 Kbytes of memory.
OS/2 programs that utilize the larger address must be written specifically
for OS/2.
Expanded memory, on the other hand, allows a program such as Win
dows or DESQView to run several standard MS-DOS applications at one time
without being restricted to 640 Kbytes of memory.
Fundamentals of Expanded Memory
Expanded memory allows the CPU to access more memory than is con
tained in the CPU's address space, through a technique called memory bank
switching. The principle is simple. A large amount of external memory (or
other storage media) exists that cannot be directly accessed by the CPU. A
block of the CPU's conventional memory is designated as a window. Some
mechanism is implemented whereby a portion (or bank) of the external
memory is mapped to the window. When the CPU reads from the window,
it is actually reading a portion of the contents of the external memory. The
application program can change the mapping to suit its needs so that differ
ent blocks of the external memory are mapped to the window. The result is
that the CPU can access a large amount of external memory, although only a
portion of the external memory is accessible at anyone time. Figure 12-1
illustrates the concept of memory bank switching.
Expanded Memory Terminology
Once you understand the principle of memory bank switching, you under
stand most ofwhat is going on with expanded memory. Expanded memory
uses its own conventions and terminology, which will now be presented
and then used in the remainder of this chapter.
Both the window and the external memory are divided into 16-Kbyte
blocks called pages. As you will see later in this chapter, a page is the basic
EMS unit of allocation.
The window ofmain memory is called the pageframe. The page frame
resides in conventional memory and is directly accessible by the CPU.
Logical memory refers to the expanded memory that is not directly
244
12-Expanded Memory
Conventional
Memory
External
Memory
External
Memory
Figure 12-1. Memory bank switching. A block of conventional
memory is designated as the "window." A portion of external
memory is "mapped" into the window.
The mapping varies over time.
accessible by the CPU. A portion of this memory is mapped to the window
at a time. Expanded memory is divided into 16-Kbyte logical pages.
Physical memory is the memory contained in the page frame. Physical
memory is divided into 16-Kbyte blocks called physical pages. Figure 12-2
illustrates the components of expanded memory.
The Expanded Memory Specification
The ExpandedMemory Specification (EMS) is a document that specifies the
components and behavior ofexpanded memory. The document defines the
terms page, pageframe, logical memory, and physical memory. The docu
ment also defines an Expanded Memory Manager (EMM), which serves as
the interface between expanded memory and application programs. The
EMM is a device driver that must receive, interpret, and execute specific task
requests received from the operating system and application programs.
The EMS says nothing about the way in which expanded memory is to
245
Part 2- Tutorials
Page Frame
Conventional
Memory
Expanded
Memory
16-Kbyte
Physical Page
16-Kbyte
Logical Page
Figure 12-2. The page frame resides in conventional memory and
consists of four 16-byte physical pages. Expanded memory
consists of 16-Kbyte logical pages.
be implemented. For example, the EMS does not specify the design of ex
panded memory boards. In fact, expanded memory can be implemented
entirely in software that swaps pages between a disk and the page frame.
Expanded Memory Implementation
Before turning to some of the specifics of what the EMS does say, let us
discuss some of the different techniques used to implement expanded
memory.
246
12-Expanded Memory
Expanded Memory Boards
Expanded memory boards use internal registers, which are controlled by
software, to map a set of logical pages to the page frame. Mapping changes
can be executed very quickly because all that is required is a changing of the
value stored in one or more of the internal registers.
Alternatives to Expanded Memory Boards
Extended memory is standard computer memory that lies outside the
I-Mbyte address space. Extended memory can exist either on the
motherboard or on standard memory expansion cards.
Extended memory can be used by some utilities, such as VDISK.SYS.
You can also use extended memory to emulate an expanded memory board,
provided you have an expanded memory emulator. The emulator is a com
puter program that works by swapping data between the page frame and
extended memory. Expanded memory emulation is much slower than ex
panded memory boards because data must be physically moved between
the page frame and extended memory.
There are some software packages that move data between the page
frame and a disk drive. This type of expanded memory emulation is very
slow, but it can provide an adequate environment to develop expanded
memory applications. Usually the cost of a software emulator is much less
than the cost of an expanded memory board and the memory chips
needed to populate it. If the emulator adheres to the EMS, then applica
tions developed with it will work with any implementation of expanded
memory.
80386 Computers
The 80386 CPU contains sophisticated memory management hardware that
allows it to use conventional memory to emulate an expanded memory
board. Expanded memory implemented in this fashion is as fast as or faster
than expanded memory boards.
An example of 80386 emulation is the device driver XMAEM.SYS,
which comes with PC-DOS 4.X. The driver uses a portion of the PS/2 Model
80's standard memory to emulate an IBM PS/2 80286 Expanded Memory
Adapter/A. Use ofXMAEM.SYS is discussed below.
The Evolution of Expanded Memory
There have been three significant versions of the Expanded Memory Speci
fication. The Lotus/Intel/Microsoft Expanded Memory Specification ver
sion 3.2 (LIM EMS 3.2) was the first specification of expanded memory and
was widely used and supported. The AST Research/Quadram/Ashton-Tate
Enhanced Expanded Memory Specification (AQA EEMS) was an enhanced
specification that was upwardly compatible with LIM EMS 3.2. The most
recent specification is LIM EMS 4.0, which incorporates the enhancements
247
Part 2- Tutorials
ofAQA EEMS along with its own additional enhancements. These three ver
sions of the expanded memory specification are discussed in this section.
LIM EMS 3.2
The LIM EMS 3.2 was published in September 1985. It defined a protocol for
using up to 8 Mbytes of expanded memory. In addition to the concepts of
page, page frame, logical page, and physical page, which are discussed in the
previous section, LIM EMS 3.2 specifies that the page frame is 64 Kbytes in
size and resides in conventional memory somewhere above the 640-Kbyte
line and below the 1-Mbyte line. The four 16-Kbyte physical pages in the
page frame are identified by the numbers 0-3.
An application program may allocate a block of one or more 16-Kbyte
expanded memory pages at a time. Allocation simply means that the pages
are "claimed" by the application and "marked" as being in use. Each allo
cated block is assigned a unique number, called the handle. The application
program uses a handle when it needs to reference a specific allocated block
of expanded memory.
AQAEEMS
A limitation of the LIM EMS 3.2 is that the 64-Kbyte page frame allows only
four logical pages of expanded memory to be mapped to the page frame at a
time. AQA EEMS removes this restriction by allowing up to sixty-four logical
pages to be mapped into conventional memory at a time.
Notice that 64 times 16 Kbytes (the size of one logical page) is 1 Mbyte.
Thus, AQA EEMS allows the entire MS-DOS address space to be used in the
page frame. Memory below the 640-Kbyte line is called mappable conven
tional memory. This memory is generally only used for mapping by pro
grams such as DESQView and Windows 2.0, which use mappable
conventional memory to swap executable code in and out of the page frame.
Most application programs using expanded memory use memory above
640 Kbytes for mapping.
LIM EMS 4.0
LIM EMS 4.0, which was published in August 1987, incorporates the en
hancements of AQA EEMS and provides some additional enhancements of
its own. LIM EMS 4.0 allows up to 32 Mbytes of expanded memory to be
addressed by application programs. EMS 4.0 supports page frames larger
than 64 Kbytes. However, memory boards originally designed for EMS 3.2
can only provide 64-Kbyte page frames, even if the boards are controlled by
a 4.0 driver.
The Significance of LIM EMS 4.0 is that it has been widely recognized as
the standard specification for expanded memory. Most major software and
248
12-Expanded Memory
hardware manufacturers have stated that they will use LIM EMS 4.0 in their
future expanded memory products. Even AST, Quadram, and Ashton-Tate
(the force behind AQA EEMS) have endorsed LIM EMS 4.0.
In what is perhaps the ultimate indication that LIM EMS 4.0 is accepted
as standard, IBM includes XMA2EMS.SYS, a LIM 4.0 expanded memory
manager, as a standard component of PC-DOS 4.X.
Using Expanded Memory
Application programs utilize expanded memory by issuing calls to the
expanded memory functions. Programs access these functions via interrupt
67H. The use of interrupt 67H is similar to the use of interrupt 21H (the
MS-DOS function dispatcher). An application program selects expanded
memory functions by placing the appropriate function number in the AH
register. Other registers are initialized as required by the particular function
being called. The application program then calls interrupt 67H, which in
vokes the Expanded Memory Manager (EMM). The EMM carries out the re
quested function and then returns control to the application program.
The expanded memory functions report an error condition by return
ing a non-zero value in the AH register. A return value of zero in AH indicates
that the function executed successfully.
This section discusses steps carried out by application programs in us
ing expanded memory. You will see how interrupt 67H is used. You will also
see how to use the MS-DOS 4.X version of DEBUG to gain a better under
standing of expanded memory.
Appendix A contains information on interrupts and function calls
that is directly applicable to the material in this section. Appendix E con
tains a primer on assembly language programming that you may find use
ful in following the examples presented below. Use of DEBUG is covered
in chapter 15.
The Required Steps
To use expanded memory, the first thing an application program must do is
to check for the presence ofexpanded memory. Obviously, no program can
use expanded memory if it is not installed and functioning.
A program must determine which version of expanded memory is in
stalled on the machine. If EMS 3.2 is installed, programs cannot request
functions only implemented in EMS 4.0 .
A program must determine how much expanded memory is available
for its use. The program may need to modify its behavior according to the
amount of available memory.
A program must determine the starting address ofthe expanded mem
orypageframe and then allocate a portion of expanded memory for its use.
Allocation means that the memory is marked as being in use by the program.
249
Part 2- Tutorials
Before a program can gain access to expanded memory, it must map a
portion ofthe allocated expanded memory into the pageframe. A mapping
defines the portion of expanded memory that is currently being viewed
through the page frame "window."
Once a mapping is established, the program may readfrom or write to
expanded memory. A mapping also allows a program to execute code stored
in expanded memory.
When a program is finished using expanded memory, it should return
or deallocate the memory it was using, so that the memory becomes availa
ble to other programs.
We will now discuss how each of these steps is carried out.
Checking for Expanded Memory
All programs must check to see that the EMM is installed and functioning
before issuing a call to interrupt 67H. The system will most likely crash if the
call is made and the EMM is not present. This can happen because interrupt
67H has no meaning to the operating system; it must be defined by the EMM
or some other program (see box).
Other Programs Using Interrupt 67H
Some other commercial device drivers, such as the driver for
AST's PC-NET II adapter card, also use interrupt 67H. Most EMMs pro
vide a mechanism called chaining, which allows the EMM to peace
fully co-exist with such drivers. Refer to the documentation provided
with your expanded memory board for information on implementing
chaining.
There are two widely accepted methods available to check for the pres
ence of the EMM. The first method is called the Open Handle Method and is
performed as follows:
1. The application issues a call to MS-DOS function 3DH, asking the oper
ating system to open a file named "EMMXXXXO." The program speci
fies that the "file" is to be opened in read-only mode. (Use of MS-DOS
function 3DH, as well as other MS-DOS functions discussed in this
chapter, is discussed in appendix A.)
2. The function call is successful if the carry flag is clear on return, in
which case the AX register holds the file handle. The call is unsuccess
ful if the carry flag is set on return, in which case the operating system
250
12-Expanded Memory
was either unable to find "EMMXXXXO" or was unable to assign it a file
handle.
3. If the call to function 3DH was successful, use MS-DOS function 44H,
subfunction 0, to determine if the file handle returned for
"EMMXXXXO" refers to a file or a device driver. If, on return, bit 7 of
the DX register is set, then the handle refers to a device driver indicat
ing that the EMM is installed.
4. Ifthe EMM is installed, use MS-DOS function 44H, subfunction 7, to
determine if the EMM is ready to operate. The EMM is ready if, on re
turn, AL contains the value FFH.
5. Use MS-DOS 3EH to close the file opened in step 1 above. The applica
tion program will not need the file handle in order to use the EMM.
The second way to check for the presence of the EMM is called the Get
Interrupt Vector Method. The method is as follows:
1. Use MS-DOS function 35H to obtain the memory address of the han
dler for interrupt 67H. The function returns the handler's segment ad
dress in the ES register.
2. If the EMM is installed, the string "EMMXXXXO" will be stored in the
interrupt handler's segment, beginning at offset address OAH.
The following assembly language code illustrates this technique. In
this example and the examples that follow, comments following the arrows
are for explanation only. They are not meant to be entered.
string1 db
mov
mov
i nt
I I
EMMXXXXO I
ah,35h
al,67h
21 h
mov
di,Oah
push es
pop
ds
si,string1
lea
mov
ex,8
repz empsb
jnz
bad emm
jmp
good emm
I
+-request DOS function 35h
<-- handler address for int 67h
<--call DOS
+- ES:DI points to test string
+-make DS=CS
+- DS:SI points to "EMMXXXXO"
<--compare 8 bytes
+-compare the strings
+-compare failed
<--compare succeeded
The first line in the listing defines the test string for which the code will
look.
The next group of three instructions calls DOS function 35H request
ing the address ofthe handler for interrupt 67H. Upon return, the ES register
contains the handler's segment register.
251
Part 2- Tutorials
The final group of instructions compares the string at es:OOOa with
"EMMXXXXO". The instruction repz cmpsb compares 8 pairs of bytes.
The instruction terminates with the zero flag set to "nz" if a nonmatching
pair is found. The two strings are equal if the flag is set to "zr" upon com
pletion of the compare operation.
The program may go on to use interrupt 67H once it has determined
that the EMM is installed.
Getting the EMM Version Number
To obtain the version number of the installed EMM, use expanded memory
function 46H. In assembly language, the call looks like this:
mav ah,46h
int 67h
On return, the upper 4 bits in the AL register store the major version number.
For EMS 3.2, the major version number is 3; for EMS 4.0, the major version
number is 4.
Determining How Much Expanded Memory Is Available
Expanded memory function 42H is used to obtain both the total number of
expanded memory pages and the number ofunallocated pages. In assembly
language, the call looks like this:
mov ah,42h
int 67h
On return, the DX register contains the total number of expanded memory
pages, and the BX register contains the number of unallocated pages. The
unallocated pages are the pages available for use by the program.
Determining the Page Frame's Segment Address
Expanded memory function 41H is used to obtain the page frame's segment
address. In assembly language, the call looks like this:
mov ah,41h
int 67h
On return, the BX register contains the page frame's segment address.
As you saw earlier in this chapter, the page frame serves as a "window"
into extended memory. All access to expanded memory is through the page
252
12-Expanded Memory
frame. Therefore, the application program must know where in conven
tional memory the page frame is located.
EMS 4.0 supports page frames larger than 64 Kbytes. The page frame
may consist of 16-Kbyte pages that are not contiguous with one another. An
application can use the EMS 4.0 function 58H, subfunction 1, to determine
the total number of pages in the page frame (the total is returned in eX).
Using that number, the program can use function 58H, sub function 0, to
populate an array with the segment address of each page in the page frame.
Allocating Expanded Memory Pages
The next step for a program is to request that the EMM allocate a set of una1
located expanded memory pages to the program.
Expanded memory function 43H is used to allocate a set of expanded
memory pages. Prior to the call, the program places the number of 16-Kbyte
pages that it wishes to allocate in the BX register. If a program wanted to
allocate two expanded memory pages, the call would look like this:
mav bX,02h
mav ah,43h
int 67h
On return from function 43H, the DX register contains the handle. The han
dle is a number that is used to reference the set of pages that were just allo
cated. It is comparable to the file handle that is returned by MS-DOS
function 3DH.
Mapping Logical Pages to the Page Frame
Once expanded memory pages have been allocated, they must be mapped
to the page frame in order for an application program to access them. Pages
that have been mapped in can be mapped out, but remain allocated. We will
say more about this when we discuss context switching.
Handles are assigned a set of one or more logical pages. Each page in a
set has a logical page number. The first page in a set has a logical page num
ber of 0, the second a logical number of 1, and so on. Thus, each expanded
memory page that has been allocated is uniquely identified by a handle
number and logical page number.
Each physical page in the page frame is uniquely identified by a physi
cal page number. The first page in the page frame has a physical page num
ber of 0, the second a number of 1, and so on.
Expanded memory function 44H is used to map expanded memory
pages into the page frame. Before calling function 44H, place the handle
associated with the expanded memory page in the DX register, and the
page's logical page number in the BX register. You specify a page in the page
frame by placing a physical page number in the AL register.
253
Part 2-1Utorials
In the following example, the expanded memory page with handle
number 1, logical page 0 is mapped into physical page 0 of the page frame:
mov
mov
mov
mov
int
dX,01h
bX,OOh
a l ,OOh
ah,44h
67h
- handle number
<-logical page
<-physical number
Exploring Expanded Memory with DEBUG
The MS-DOS 4.X version of the DEBUG utility has four commands that are
used to examine and manipulate expanded memory. In the remainder ofthis
chapter, we will use these new DEBUG commands, along with some other
capabilities of the utility, to illustrate how expanded memory functions. Un
fortunately, some vendors (particularly IBM) have decided not to include
DEBUG as a standard component of DOS 4.X. These vendors require that
you purchase the DOS Technical Reference in order to obtain DEBUG.
The objective in what follows is not to demonstrate that DEBUG can be
used to write programs that use expanded memory. Rather, the objective is
to use DEBUG to gain a better understanding of expanded memory so that
you can go on to write such programs.
The DEBUG commands that manipulate expanded memory only work
if the EMM is installed. In addition, calling interrupt 67H without the EMM
installed may cause your machine to crash. Consider this to be your warning
before trying to execute the examples that follow.
Starting DEBUG
We begin our DEBUG expedition by first starting DEBUG and then using the
4.X command "xal> to allocate two sets of expanded memory pages. Refer to
chapter 15 if you need help starting DEBUG.
C:\BOOKS\OOS>debug
-xa 1
Handle created
-xa 1
Handle created
= 0001
= 0002
-start DEBUG
<-allocate a page
-it gets handle number 1
-allocate a second page
-it gets handle number 2
After DEBUG is started, the command xa 1 directs the EMM to allocate
one page of expanded memory (the format for the command is "xa n",
where n is the number of expanded memory pages to be allocated).
The message Hand le created 0001 is DEBUG's way of telling you
that the page has been allocated and assigned to handle number 1. Simi
larly, a second page is allocated and assigned to handle number 2.
=
254
12-Expanded Memory
The "xs" command displays information about the current status of
expanded memory:
-X5
HandLe 0000 has 0000 pages a LLocated
HandLe 0001 has 0001 pages a LLocated
Handle 0002 has 0001 pages allocated
Physical
Physical
Physical
Physical
page
page
page
page
00
01
02
03
2 of a total
3 of a total
= Frame
= Frame
= Frame
= Frame
segment C400
segment caoo
segment CCOO
segment 0000
40 EMS pages have been allocated
FF EMS handles have been allocated
DEBUG tells you that handle 1 and handle 2 each have one page allo
cated (handle 0 is used by the EMM and is not available to application pro
grams).
DEBUG gives you the segment address of the four physical pages mak
ing up the page frame. In this case, the 16-Kbyte pages are contiguous with
each other.
DEBUG also tells you that two out of a total 40H expanded memory
pages are allocated, and three out of a total FFH expanded memory handles
have been allocated.
The DEBUG command "xm" can be used to map an expanded mem
ory page into the page frame. The format for the command is "xm lpage
ppage handle" where lpage is the logical page number of the expanded
memory page to be mapped in, ppage is the physical page number of a page
in the page frame, and handle is the number of the handle associated with
the expanded memory page.
Figure 12-3 illustrates the current configuration of expanded memory.
Two expanded memory pages have been allocated: one to handle 1 and one
to handle 2. Neither of the pages has been mapped into the page frame.
In what follows, the "xm" command is used to map handle 1 's page
into the page frame:
-xm 0 0 1
Logical page 00 mapped to physical page 00
The command states that logical page 0 (the first zero), which is contained in
the set identified by handle 1, is to be mapped into physical page 0 (the
second zero). This changes the configuration of expanded memory to that
illustrated in figure 12-4.
Once an expanded memory page has been mapped into the page
frame, it may be read from or written to as though it were conventional
255
Part 2- Tutorials
Handle 2
Conventional
Memory
Handle 1
Expanded
Memory
Figure 12-3. 1\vo logical pages have been allocated. One page is
allocated to handle 1; one page is allocated to handle 2.
memory. An application program can access the data in the page frame using
a far (segment and offset) pointer.
Writing to and Reading from the Page Frame
We will use DEBUG to write some data to the page frame and then read it
back. If you look back to the "xs" command that was previously issued, you
will see that physical page 0 in the page frame begins at segment address
C400H. The following example uses DEBUG's "f' command to write data to
the page frame:
-f c400:0 L80 "1"
256
12-Expanded Memory
Handle 2
Conventional
Memory
Handle 1
Expanded
Memory
Figure 12-4. Logical page 0, handle 1 is mapped into physical page
o of the page frame.
The command says to (t)ill memory, starting at address C400:0000, and con
tinuing for a length of 80 bytes, with the character" 1". You can use the "d"
command to examine the effect of this command:
-d c400:0
C400:0000 31 31
1111111111111111
C400:0010 31 31
1111111111111111
C400:0020 31 31
1111111111111111
C400:0030 31 31
1111111111111111
31 31 31 31 31 31-31 31 31 31 31 31 31 31
31 31 31 31 31 31-31 31 31 31 31 31 31 31
31 31 31 31 31 31-31 31 31 31 31 31 31 31
31 31 31 31 31 31-31 31 31 31 31 31 31 31
257
Part 2-Tittorials
C400:0040 31 31
1111111111111111
C400:00S0 31 31
1111111111111111
C400:0060 31 31
1111111111111111
C400:0070 31 31
1111111111111111
31 31 31 31 31 31-31 31 31 31 31 31 31 31
31 31 31 31 31 31-31 31 31 31 31 31 31 31
31 31 31 31 31 31-31 31 31 31 31 31 31 31
31 31 31 31 31 31-31 31 31 31 31 31 31 31
The command (d)umps the contents of memory beginning at address
C400:000. You can see that the first 80 bytes of the page frame have been
filled with a byte value of 31 H, which corresponds to the character" 1" .
Because C400 is the segment address of the first page in the page frame,
the" 1"s in the previous example are actually written to expanded memory.
The location in expanded memory is the logical page that is currently
mapped into the first page of the page frame (see figure 12-5).
If expanded memory is implemented with an expanded memory
board, the data is physically stored in only one place-on the expanded
memory board. It appears to be stored in the page frame due to the status of
the registers on the expanded memory board.
If expanded memory is implemented with a software emulator that
uses extended memory, then the data is physically in two places: in extended
memory and in the page frame.
Context Switching
The mapping context is the current state of mappings between logical pages
in expanded memory and physical pages in the page frame. At times, it is
desirable to save the context, or a portion of the context, so that it might later
be restored. For example, a large spreadsheet using expanded memory
could easily have more data than could fit in the 64-Kbyte page frame at one
time. The spreadsheet can map a portion of expanded memory into the
page frame, read from and write to the page frame, and then, before map
ping in another portion of expanded memory, save the mapping context.
The spreadsheet can then recall the first portion of expanded memory by
restoring the saved mapping context.
We will return to DEBUG to illustrate the concepts of mapping context
and context saving. A final word of caution before we proceed though. The
next example will call interrupt 67H from DEBUG. If your system does not
have EMM installed and you issue a call to interrupt 67H, your system will
either crash or do something totally unpredictable. So don't try this example
unless EMM is installed.
Expanded memory function 47H is used to save a portion of the map
ping context. Prior to calling the function, place the appropriate handle
number in the DX register. The call then saves a record of the mapping con
text that exists for that handle.
258
12-Expanded Memory
Handle 2
Conventional
Memory
Handle 1
Expanded
Memory
Figure 12-S. Data written to a page in the page frame ends up in a
logical page in expanded memory.
Take a look back at figure 12-5. A mapping exists between the single
logical page assigned to handle 1 and physical page 0 in the page frame. This
mapping context can be saved with the following code:
mov dX,01h
mov ah,47h
int 67h
This code can be executed from DEBUG as follows:
-a
<---start DEBUG's assembler
2059:0100 int 67
i]2059:0102
<--- press Enter
-rax
<--- set the AX register
259
Part 2- Tutorials
AX 0000
:4700
-rdx
OX 0000
:1
-r
+-AX=4700h
+- set the DX register
+-DX=Olh
+-check machine's state
AX=4700 BX=OOOO
05=2059 E5=2059
2059:0100 C067
-p
CX=OOOO OX=0001
55=2059 C5=2059
INT
67
5P=FFEE
IP=0100
BP=OOOO 51=0000 01=0000
NV UP EI PL NZ NA PO NC
5P=FFEE
IP=0102
BP=OOOO 51=0000 01=0000
NV UP EI PL NZ NA PO NC
+-execute interrupt 67h
AX=OOOO BX=OOOO
05=2059 E5=2059
2059:0102 1F
CX=OOOO OX=0001
55=2059 C5=2059
POP
05
The example begins by starting DEBUG's assembler. This allows us to
use assembly language mnemonics to place executable code into memory.
After the instruction i nt 67h is entered, the assembler is terminated and
the AX register is set to a value of 4700H. The DX register is then set to a
value of OlH. Then the r command is entered to check the value of all of
the registers. At this pOint, the system is set to call expanded memory func
tion 47H. The 01H in DX tells the EMM to save the mapping context of
handle 1. The DEBUG command p is used to execute int 67H and then halt
execution. You can tell that the call executed successfully because AH is set
to zero upon return from the interrupt.
At this pOint, the mapping context in figure 12-5 has been saved. This
can be verified by first changing the context and then attempting to restore
the original context.
The "xm" command can be used to alter the context. The following
command changes the context to that illustrated in figure 12-6:
-xm 0 0 2
The command states that logical page 0 (the first zero), which is con
tained in the set identified by handle 2, is to be mapped into physical page O.
The next two commands fill the first 80 bytes of the page frame with
the character "2" and then display the results:
c400:0 lBO '2'
-d c400:0
C400:0000 32 32 32 32 32 32 32 32-32 32 32 32 32 32 32 32
2222222222222222
C400:0010 32 32 32 32 32 32 32 32-32 32 32 32 32 32 32 32
2222222222222222
C400:0020 32 32 32 32 32 32 32 32-32 32 32 32 32 32 32 32
2222222222222222
-f
260
12-Expanded Memory
C400:0030 32 32
2222222222222222
C400:0040 32 32
2222222222222222
C400:0050 32 32
2222222222222222
C400:0060 32 32
2222222222222222
C400:0070 32 32
2222222222222222
32 32 32 32 32 32-32 32 32 32 32 32 32 32
32 32 32 32 32 32-32 32 32 32 32 32 32 32
32 32 32 32 32 32-32 32 32 32 32 32 32 32
32 32 32 32 32 32-32 32 32 32 32 32 32 32
32 32 32 32 32 32-32 32 32 32 32 32 32 32
Handle 2
Conventional
Memory
Handle 1
Expanded
Memory
Figure 12-6. A new mapping context. Note that the content of the
page belonging to handle 1 is preserved.
Figure 12-7 illustrates the configuration of expanded memory at this point.
Expanded memory function 48H is used to restore a mapping context.
Prior to the call, a handle number is placed in the DX register. The function
261
Part 2-Tutorials
Handle 2
Conventional
Memory
Handle 1
Expanded
Memory
Figure 12-7. Writing to the same physical page under a new
mapping context.
restores the handle's previously saved mapping context. We can use DEBUG
to illustrate the use of function 48H. The following example is a continua
tion of the previous example:
-rip
<- set the IP register
IP 0102
: 100
-rax
AX 0000
:4800
- r
<-IP=100H
<-set the AX register
<-AX=4800H
<-check machine's state
AX=4800 BX=OOOO
OS=5E2F ES=5E2F
5E2F:0100 CD67
-p
262
CX=OOOO OX=0001
SS=5E2F CS=5E2F
INT
67
<-restore context
SP=FFEE
IP=0100
BP=OOOO SI=OOOO 01=0000
NV UP EI PL NZ NA PO NC
12-Expanded Memory
AX=OOOO BX=OOOO CX=OOOO OX=0001 5P=FFEE
05=5E2F ES=5E2F SS=5E2F CS=5E2F IP=0102
5E2F:0102 50
POP
BP
-d c400:0
+- check context restored
C400:0000 31 31 31 31 31 31 31 31-31 31 31
1111111111111111
C400:0010 31 31 31 31 31 31 31 31-31 31 31
1111111111111111
C400:0020 31 31 31 31 31 31 31 31-31 31 31
1111111111111111
C400:0030 31 31 31 31 31 31 31 31-31 31 31
1111111111111111
C400:0040 31 31 31 31 31 31 31 31-31 31 31
1111111111111111
C400:0050 31 31 31 31 31 31 31 31-31 31 31
1111111111111111
C400:0060 31 31 31 31 31 31 31 31-31 31 31
1111111111111111
C400:0070 31 31 31 31 31 31 31 31-31 31 31
1111111111111111
BP=OOOO 51=0000 01=0000
NV UP EI PL NZ NA PO NC
31 31 31 31 31
31 31 31 31 31
31 31 31 31 31
31 31 31 31 31
31 31 31 31 31
31 31 31 31 31
31 31 31 31 31
31 31 31 31 31
The example begins by resetting the IP register so that it points to the
int 67H instruction at offset address 100H. The value of AX is then set to
4800 in order to call function 48H. The machine's state is then checked and,
as you can see, DX is still set to OlH. Thus, things are set to restore the pre
viously saved mapping context of handle 1. The p command executes int
67H and the d c400 : 0 command verifies that the context of handle 1 has
been restored (figure 12-8).
EMS 4.0 implements expanded memory function 4EH, which allows
an application program to save the mapping context for the entire page
frame. This provides a considerable improvement over function 47H,
which can only save the context of one handle at a time.
Deallocating Pages
An application program must deallocate its expanded memory pages when
it is done using them. This makes the pages available for use by other appli
cations. A well-designed program will deallocate its expanded memory pro
grams even when it terminates in an abnormal fashion (such as when the
user presses Ctrl-Break).
Expanded memory function 45H is used to deallocate pages. Prior to
the call, place a handle number in the DX register. The function deallocates
the expanded memory pages that correspond to the handle number.
The MS-DOS 4.X version of DEBUG uses the "xd" command to deallo
cate pages. The format for the command is
xdbandle
263
Part 2- Tutorials
Handle 2
Conventional
Memory
Handle 1
Expanded
Memory
Figure 12-8. The original mapping context is restored.
EMS 4.0 Enhancements
All of the expanded memory functions used in this chapter's tutorial are
implemented in EMS 3.2 and 4.0. The discussion has mentioned some en
hanced functions (4EH and 58H) that are only implemented in EMS 4.0. This
section discusses some other enhancements provided by EMS 4.0.
Executing Code in Expanded Memory
Prior to EMS 4.0, it was a bit of a chore for the application programmer to
link code in conventional memory to code in expanded memory. It could be
done, but it was difficult. EMS 4.0 made the process much easier by imple
menting expanded memory functions 55H and 56H.
Function 55H is called Alter Page Map andJump. When this function
is called, a new page map is mapped into the page frame and control is
264
12-Expanded Memory
passed to the address specified by the application. Unlike the other ex
panded memory functions, this function does not return control to the call
ing application. It is up to the code that received control to return control to
the caller. Details on the use of function 55H are too involved to be pre
sented here. Interested readers should consult the references mentioned at
the end of this chapter.
Function 56H is named Alter Page Map and Call. When the function is
called, a new page map is mapped into the page frame and program execu
tion branches to an address specified by the application program. The func
tion terminates when the called code issues afar return. Execution returns
to the calling application, and the old page map is mapped into the page
frame. Readers interested in the details ofusing function 56H should consult
the references mentioned at the end of this chapter.
Moving/Exchanging Blocks of Memory
EMS 4.0 function 57H allows an application program to move data between
expanded memory and conventional memory. Moving may also be carried out
between two locations in conventional memory or two locations in expanded
memory. Up to 1 Mbyte may be moved with a single call to this function.
Support for Advanced Hardware Features
EMS 4.0 provides support for a set of advanced hardware features that are
just starting to appear on a new generation of expanded memory boards.
The newer boards have multiple sets of mapping registers, which allow
context switches to be performed almost instantly. The boards also have
DMA registers, which preserve the mapping context so that DMA can be
carried out. DMA stands for Direct Memory Access and refers to the process
whereby certain tasks, such as reading data from a disk, can be performed
without tying up the CPU. EMS 4.0 function 5BH is implemented to support
both multiple mapping registers and DMA registers.
Another new hardware feature allows expanded memory boards to
preserve a mapping context when a warm boot of the machine occurs (such
as when the user presses Ctrl-Alt-Break). EMS 4.0 function 5CH is provided
to support such hardware. The function serves to warn the system that a
warm boot is about to occur.
Conclusion
The purpose of this chapter has been to convey an understanding of what
expanded memory is and how it operates. The examples provide some insight
into how application programs use expanded memory. Many details concern
ing expanded memory have not been covered in this chapter. The interested
reader is referred to The Waite Groups MS-DOS Developers Guide, Second
Edition for a more detailed examination of programming with expanded
memory. You can obtain a free copy of LIM EMS 4.0 by contacting Intel Corpo
ration (in the USA callSOO-53S-3373; elsewhere call 503-629-7354).
265
C
H
A
P
T
E
R
13
Terminate and Stay
Resident Programs
TSRs-An Overview
TSRs-Guidelines for a Peaceful Coexistence
POPCLOCK-An Example of a TSR
Programs that remain loaded in memory after their execution terminates are
called terminate and stay resident (TSRs). There are many types of TSRs,
ranging from MS-DOS utilities such as PRINT. COM and APPEND .EXE to the
popular "pop-up" utilities such as Sidekick. This chapter discusses the way
in which TSRs are constructed. The first section describes, in a very general
267
Part 2- Tutorials
way, fundamental techniques for keeping a program resident after execution
and subsequently accessing the program so that it can be reexecuted. The
second section discusses in some detail the important issues that must be
addressed when writing a well-behaved TSR. Finally, a working TSR pro
gram, "POPCLOCK" (see page 285), is presented and discussed in the third
section of the chapter.
The material presented requires an understanding ofinterrupts and the
MS-DOS function calls. Appendix A contains an introductory discussion on
interrupts. The MS-DOS interrupts and function calls that are used exten
sively in this chapter are also discussed in appendix A.
The TSR presented at the end of this chapter is written in assembly
language. Some familiarity with assembly language programming will be
useful in getting the most out of the program discussion. Those readers with
little or no experience with assembly language are referred to the assembly
language primer in appendix E.
TSRs-An Overview
TSR programs generally consist of two components. The first component
initializes the TSR and instructs MS-DOS on how to reexecute the TSR. This
portion of the TSR is executed one time when the program is loaded into
memory. The second component of a TSR is the part of the program that is
run each time the TSR executes. It is this portion of the TSR that must remain
accessible to MS-DOS. The relation between these two components is the
topic of the following discussion.
Loading a TSR
When MS-DOS loads a program for execution, the operating system allo
cates all available memory to the program. Most programs keep all of the
memory they are allocated until it is time to terminate execution. These pro
grams then terminate by issuing a call to interrupt 20H or DOS function
4CH, either of which directs MS-DOS to deallocate all of the program's
memory and make it available for use by other programs (see figure 13-1).
Just like other programs, TSRs are loaded into memory and allocated all
available memory. However, TSRs terminate by issuing a call to DOS func
tion 31H rather than interrupt 20H or DOS function 4CH. Function 31H is
used because it allows the TSR to specify an amount of memory that is to
remain allocated to the TSR. Prior to calling function 31H, the TSR places in
the DX register the size of the memory block it wishes to retain. The size is
specified in paragraphs, one paragraph being 16 bytes long. The block re
tained by the TSR always begins at the start of the program's psp (see figure
13-2).
As an example, let us say that a programmer has written a TSR that is
3200 bytes long. The program needs to keep 200 paragraphs of memory for
268
13- TSR Programs
Memory allocated
to program's psp
Memory allocated
to user's program
Memory available
for use by other programs
Memory allocated
to DOS
A. When a program is
loaded, MS-DOS allocates
all available memory
to the program.
B.
If the program terminates
using interrupt 20H or
MS-DOS functions 31 H or
4CH, MS-DOS deallocates all
memory allocated
to the program.
Figure 13-1. The operating system is responsible for allocating and
deallocating memory.
itself, plus 16 paragraphs for its psp. Therefore, prior to calling function
31 H, the program must store a value of 216 in DX. The following code shows
how this is carried out:
mov
mov
int
ah,31h
dx,216
21h
;terminate, stay resident function
;paragraphs to remain allocated
;call MS-DOS
269
Part 2-1Utorlals
Memory allocated
to program's psp
Memory allocated
to user's program
Memory available
for use by other programs
Memory allocated
to DOS
Figure 13-2. When a program terminates using MS-DOS function
31H, a block of memory remains allocated to the program.
The program terminates, but now MS-DOS leaves 216 paragraphs of mem
ory allocated to the TSR. No other programs will use this block of memory
as long as it remains allocated to the TSR.
The point in writing a TSR is that once the program is resident in mem
ory, it can be reexecuted repeatedly without having to be reloaded. There
fore, when the TSR is loaded, some type of initialization must occur so that
the TSR can subsequently be reexecuted. This initialization typically in
volves a modification of the interrupt vector table.
Modifying the Interrupt Vector table
Associated with each interrupt is an interrupt vector and an interrupt ban
dler. The interrupt handler is program code that is responsible for process
ing the interrupt request. The handler may be supplied by the operating
system, the ROM BIOS, or (as will be described) an application program.
The interrupt vector is a pointer to the interrupt handler. Each interrupt
vector is stored in the operating system's interrupt vector table. Each entry
in the interrupt vector table consists ofthe segment and offset address of the
corresponding interrupt handler.
270
13-TSR Programs
MS-DOS function 35H is used to obtain an interrupt vector. For exam
ple, if a programmer wishes to determine the memory address of the han
dler for interrupt 9, he or she would use MS-DOS function 35H. Prior to
calling the function, an interrupt number is placed in the AL register. On
return, ES:BX contains the interrupt vector. The following listing uses DE
BUG to demonstrate the use of DOS function 35H:
e>debug
istart DEBUG assembler
irequest function 35h
ireturn vector for int 9
i ca II MS-DOS
-a
1226:0100 mov ah,35
1226:0102 mov al,9
1226:0104 int 21
1226: 0106
+-press Enter
-g 106
iexecute, stop at offset 106
AX=3509 BX=E987 ex=oooo DX=OOOO SP=FFEE BP=OOOO SI=OOOO 01=0000
DS=1226 ES=FOOO SS=1226 eS=1226 IP=0106 NV UP EI PL NZ NA PO Ne
1226:0106 60
DB
60
-q
e>
On return from the function call, ES:BX contains the vector for interrupt 9.
The interrupt vector table is modified by using MS-DOS function 25H.
This function is used by a programmer who writes an interrupt handler to
replace the one provided by the operating system or the ROM BIOS. Prior to
calling the function, the segment: offset address of the new handler is placed
in DS:DX and the corresponding interrupt number is placed in AL. The fol
lowing code modifies the interrupt table so that the vector for interrupt 9
will point to address 1010:2234:
mov
mov
mov
mov
int
ah,25h
a l, 9
ds,1010h
dx,2234h
21h
irequest function 25h
imodify vector for int 9
isegment of new handler
ioffset of new handler
icall MS-DOS
During initialization, a TSR uses functions 25H and 3 5H to establish the
conditions under which the TSR is reexecuted. For example, a pop-up TSR
may be designed to execute each time that a particular key combination is
pressed. The programmer might decide to modify the interrupt vector table
so that the entry for interrupt 9 pointed to the TSR. Then each time a key was
pressed, the TSR would begin to execute. The TSR would check to see
which key combination had been pressed. If the appropriate combination
had been pressed, the TSR would pop up. However, if any other key combi
271
Part 2-1Utorials
nation were detected, the TSR would pass control to the old interrupt 9
handler and that handler would process the keyboard input in the standard
fashion. The following pseudocode shows how this would be carried out:
Initialization:
-get int 9 vector using function 35H
-save segment address of old handler
-save offset address of old handler
-reset int 9 vector with function 25H
-on call, DS has segment of new handler
-on call, DX has offset of new handler
-terminate and stay resident
New Handler:
-determine key(s) pressed
-if "hotkey" pressed, pop up
-call old handler, using save addresses
That, in a general sense, is how TSRs operate. Unfortunately, writing a
working TSR is much more complicated. Several factors must be considered
so that TSRs can peacefully coexist with MS-DOS, with the application pro
gram currently being run, and with any other TSRs that might be in memory
at the same time. These considerations are discussed next.
TSRs-Guidelines for a Peaceful Coexistence
Writing a TSR is an exercise in circumventing DOS. There are two reasons
why this is true. First, MS-DOS was designed to be a unitasking operating
system. This means that MS-DOS is meant to run one program, throw it away,
run another, throw it away, and so on. Asking MS-DOS to supervise more than
one program at a time is beyond the operating system's capabilities. The pro
grammer must circumvent this deficiency to get a working TSR.
The second reason why TSRs require a circumvention of MS-DOS is
that TSR programmers must utilize features ofMS-DOS that are not officially
documented by Microsoft or IBM. Utilization of undocumented features is
272
13-TSR Programs
always a risky proposition, but for the time being TSR programmers have no
other choice. They must rely on their own wits, as well as the wits of their
fellow programmers, in unraveling the features of MS-DOS needed to write
properly behaved TSRs. Recently, however, Microsoft, for the first time,
published a set of guidelines for TSRs, including official documentation of
many of the features presented in this chapter.
Some of the features of MS-DOS presented here remain undocu
mented, but all are well known and used by most programmers writing
TSRs. Therefore, they can be considered reliable until proved otherwise.
Unfortunately, it must be added that all undocumented features must be
used cautiously and at the programmer's own risk. Since there is no official
documentation of what the features do, programmers have nothing to fall
back on if the features behave in an unexpected fashion. Programmers must
also bear in mind that Microsoft and IBM have repeatedly stated that any or
all ofthe undocumented features ofMS-DOS may not be supported in future
versions.
With that disclaimer out of the way, let us continue with the discussion
of TSRs. There are three areas of consideration that must be addressed by
TSR programmers. The first area relates to the manner in which the interrupt
vector table is modified. Any modification of the table must utilize a tech
nique called chaining. Chaining preserves the integrity of the system that
existed prior to modification of the interrupt table.
The second area of consideration for the TSR programmer centers
around the problem of reentry. Problems with reentry result from MS
DOS's deficiency in preserving its current state when an interrupt occurs.
Getting around the reentry problem requires heavy reliance on undocu
mented MS-DOS features.
The third area ofconsideration for the TSR programmer involves TSRs'
access to files. As will be discussed, TSRs must make special adjustments if
they will be accessing files through the use of file handles.
Chaining
Whenever a TSR modifies the interrupt vector table, it is essential that the
program "chains" onto the old interrupt handler. Chaining is the process by
which the new interrupt handler always issues a call to the old interrupt
handler. The new handler accomplishes this by using a pointer to the old
handler. The pointer is usually saved during initialization of the TSR. Chain
ing is illustrated in figure 13-3.
Chaining is necessary if TSRs are to coexist with each other. To under
stand why, consider what would happen if two TSRs were loaded into mem
ory. If both of the TSRs modified the same interrupt vector, then the vector
would end up pOinting to whichever TSR was loaded into memory last. If
this TSR did not chain to the first TSR, the first TSR would never execute.
Chaining must be implemented so that TSRs can execute regardless of the
loading order.
273
Part 2-1Utorials
Interrupt Vector
Table
Interrupt
Handler
•
Interrupt
Handler
TSR 1
•
•
TSR 2
TSR 1
Interrupt
Handler
Figure 13-3. Chaining ensures that all handlers are serviced.
The Problem of Reentry
Whenever a program issues a DOS function call, the operating system is said
to be entered. If an interrupt occurs while MS-DOS is entered, and the inter
rupt handler issues a function call, MS-DOS is said to be reentered. Reentry
can cause MS-DOS to crash flat on its face. Therefore, precautions must be
taken to see that reentry occurs only under certain circumstances. To under
stand further what reentry is and how it can be controlled, we need to dis
cuss MS-DOS's internal stacks.
The Internal MS-DOS Stacks
MS-DOS maintains three internal stacks that it uses to process function calls.
Stack number 1 is used to process requests for DOS function OOH and all DOS
274
13- TSR Programs
functions above and including function ODH. Stack number 1 is also used to
process requests for interrupt 25H (absolute disk read), interrupt 26H (abso
lute disk write), and interrupt 28H (discussed in the following section).
Stack number 2 is used to process requests for MS-DOS functions OlH
through OCH. In MS-DOS 2 .X, stack number 2 is also used by DOS functions
SOH (set process id) and 51H (get process id). As you will see later in this
chapter, this causes problems for programs running under 2.X.
Stack number 3 is used by MS-DOS while it determines which of the
other stacks to use in processing a function request. Stack number 3 is also
used to process requests for function 59H (get extended error information).
Finally, stack number 3 is used in place of stack number 2 if MS-DOS is called
from a critical error handler (more on this later).
MS-DOS has no mechanism for preserving the contents of its internal
stacks. Therefore, when MS-DOS is reentered, all three of the internal stacks
are vulnerable. If the reentry call utilizes an internal stack that contains infor
mation MS-DOS still needs, the operating system will probably crash.
There are two undocumented features that are utilized in dealing with
the reentry problem. The first involves reading a counter that is incre
mented when MS-DOS is entered, and decremented when it is exited. The
second undocumented feature is an interrupt that is generated by MS-DOS
when it is safe to use two of the internal DOS stacks.
The INDOS Flag
MS-DOS maintains an internal counter that the operating system increments
each time MS-DOS is entered, and decrements each time it is exited. This
counter has been given many names, but, since the counter is not docu
mented, none of them are official. Most commonly, the counter is called the
"INDOS FLAG ," even though it is not really a flag (which is either set or clear)
but is a counter (which can have any nonnegative value).
TSR programs locate the INDOS flag using (undocumented) DOS func
tion 34H. On return from this call, the ES register contains the flag's segment
address, and the BX register contains the flag's offset address. Function 34H
should be executed when the TSR is initialized and the flag's address stored in
variables local to the TSR. Then, when the TSR is reexecuted, the status of the
flag can be determined directly, without using function 34H. This is impor
tant because calling function 34H can result in reentry and system failure.
There is some confusion as to the true significance of the INDOS flag.
Before we get into the details of using the flag, it is important to recognize its
major limitation. Whenever the MS-DOS prompt is displayed, the INDOS
flag is nonzero. Therefore, if a TSR program executes only when INDOS
equals zero, the program will not function when the MS-DOS prompt is
displayed. Some additional way is needed to activate a TSR. The way most
commonly used is interrupt 28H.
Interrupt 28H
If the INDOS flag is set, and MS-DOS is processing a call for any of functions
01H through OCH, interrupt 28H is generated by MS-DOS at a rate of 18.2
275
Part 2- Tutorials
times per second. Since functions 01 H through OCH all use DOS stack num
ber 2, interrupt 28H is a signal that it is safe to use stacks 1 and 3.
When a TSR is accessed via interrupt 28H, MS-DOS functions O1H
through OCH cannot be called, since interrupt 28H ensures only that stacks
1 and 3 are safe. In fact, interrupt 28H ensures that stack 2 is not safe, so
calling functions 01 H through OCH almost guarantees a crash if the TSR was
activated by interrupt 28H.
The problem with using only interrupt 28H for access to the TSR is that
many application programs do not issue calls for DOS functions 01 H
through OCH. Therefore, interrupt 28H is not generated when these appli
cations are running. Another interrupt must be used to activate the TSR from
these applications. The handler for this interrupt must check INDOS before
executing the TSR, since nothing is known about the status of the MS-DOS
stacks when the interrupt is invoked.
The author's experience with TSRs indicates that any MS-DOS func
tion can be called from a TSR if the INDOS flag equals zero. However, if the
TSR is activated by interrupt 28H, the INDOS flag will not equal zero, and
the system will probably crash if functions 01 H through OCH are used. Since
functions O1H through OCH can be replaced by ROM BIOS calls, the sim
plest solution is not to use functions 01 H through OCH in a TSR.
Critical Error
A critical error occurs when a peripheral device is needed by MS-DOS but
the device is not available. Typical situations causing critical error are open
drive doors or printers that are off-line.
When a critical error occurs, MS-DOS sets a critical error flag and in
vokes interrupt 24H. Interrupt 24H is a call to the critical error handler that is
responsible for recovering from the critical error. Most users of MS-DOS are
familiar with the Abort, Ret ry, Fa i l? message, which is displayed by the
critical error handler when a drive door is left open.
Executing a TSR while a critical error is being processed can cause the
system to crash. Therefore, prior to executing a TSR, the status of the critical
error flag should be checked. Ifthe flag is clear, then execution can proceed.
The address of the critical error flag is obtained by using (undocumented)
DOS function SDH, subfunction 6. On return from the call, ES contains the
flag's segment address, and BX contains its offset. This function is demon
strated as part of the program presented at the end of this chapter.
Programmers must also consider how their TSR will handle critical er
rors. The simplest course is to make no provisions for critical error. In that
case, the TSR will rely on the critical error handler for the program that was
interrupted by the TSR. Such an arrangement will suffice if a TSR does not
perform disk I/O. However, if you are writing a TSR that performs disk I/O,
you should consider writing a critical error handler for the TSR. Each time
the TSR is activated, change the interrupt 24H vector to point to the new
handler. Each time the TSR terminates, change the vector so that it points to
the old handler.
276
13-TSR Programs
File Handles and TSRs
Whenever MS-DOS loads a program into memory, it assigns the program a
process id. In all cases, the process id is nothing more than the segment
address of the program's psp. The current process id is the id of the program
currently running. MS-DOS stores this id internally and uses it when a pro
gram accesses a file through the use of file handles. Recall from chapter 11
that each program stores a list of file handles in its psp. When MS-DOS re
ceives a request to access a file, the operating system sees which process id is
current and looks in the corresponding psp to locate the file handle.
Unfortunately, when a TSR executes, MS-DOS does not change the cur
rent process id. The operating system considers the application that was
running to be the current one. It is the responsibility of the programmer to
make the TSR current. The TSR is made current as follows:
1. MS-DOS function SIH is used to obtain the current id. This is the id of
the program that was running when the TSR was invoked. The func
tion returns the id in BX. The id is saved for later use.
Function SIH is not documented but is implemented in MS-DOS 2.X,
3.X, and 4.X. It is identical to the documented function 62H that is
implemented in MS-DOS 3.X.
2. MS-DOS function SOH is used to set the current id equal to the TSR's
psp address. Function SOH is another undocumented DOS function.
Prior to calling the function, BX is set to equal the psp address. This can
be accomplished by pushing CS to the stack and popping BX.
Once the TSR is made current, it can use the file handles that are stored
in its psp.
3. Prior to returning to the application, the TSR uses function SOH to re
store the current id to the value it had before executing the TSR.
As we mentioned earlier, functions SOH and SIH use DOS stack num
ber 2 under MS-DOS 2.X. This causes a serious problem, as it groups these
two functions with functions 01H through OCH. If we stick by the guide
lines discussed previously, functions SOH and SIH should be avoided in
TSRs running under MS-DOS 2.X. Fortunately, there is a way to fool MS-DOS
and get around this problem.
When the critical error flag is set, MS-DOS thinks a critical error is being
processed. Under these conditions MS-DOS uses stack number 3 in place of
stack number 2. Thus, a TSR running under MS-DOS 2.X can set the critical
error flag, use functions SOH and SIH, and then clear the critical error flag.
POPCLOCK-An Example of a TSR
POPCLOCK.ASM (listing 13-1) is a TSR program that implements a pop-up
clock. Once the program is loaded, the clock will pop up whenever the left
277
Part 2-Tutorials
and right shift keys are simultaneously depressed. POPCLOCK runs under
MS-DOS 2.0 and later versions. POP CLOCK works with monochrome,
CGA, and EGA adapters, although the clock will not pop up if the display is
in graphics mode.
POPCLOCK is presented to illustrate the points about TSRs that are
discussed in this chapter. As you can see from the length of listing 13-1, even
simple TSRs such as POPCLOCK tend to be long programs. It is important to
recognize, however, that a lot of the code in POPCLOCK is generic, in the
sense that it can be used again in other programs. Therefore, once you have
the code for one TSR, much of the work for subsequent TSRs is already
done.
To make our discussion more manageable, we will divide POP
CLOCK.ASM into four parts and discuss each separately. The four parts are:
lines 22-72, lines 73-202, lines 203-483, and lines 484-589.
Lines 22-72 of the listing declare the variables used by the program.
These variables will be explained as they are used.
Lines 73-202 make up the new interrupt handlers used by POP
CLOCK. The program uses new handlers for the following interrupts:
Interrupt
8H
9H
10H
13H
28H
Function
Timer
Keyboard hardware
ROM BIOS video service
ROM BIOS disk service
MS-DOS scheduler
Lines 203-483 form the main portion of the TSR. This is the code that
is executed each time the clock pops up.
Lines 484-589 make up the initialization portion of POP CLOCK. This
section of code is executed once at load time and then discarded.
We will discuss the initialization portion of the program first, followed
by the handlers, and then the main portion of the TSR.
Initialization
POPCLOCK is executed as a COM file; therefore, the first executable instruc
tion in the program must be at offset 100H. The directive 0 rg 1 DOh ensures
that this is the case. The first instruction (line 20 of the listing) is a jump to
; n; t . Initialization begins (lines 495-498) by using MS-DOS function 34H to
obtain the segment and offset address of the INDOS flag. The address is
stored using two variables local to the program.
Next, the address of the critical error flag is obtained using DOS func
tion 5DH, subfunction 6. The offset is saved in local variable err f l ag_ of f .
Notice that it is necessary to restore DS on return from the call. This is because
278
13- TSR Programs
the segment address of the error flag is returned in DS. Saving the segment
address is not required, since the critical error flag and the INDOS flag are
always located in the same segment (in fact, the critical error flag is sometimes
called INDOS2).
Lines 529-574 reset the interrupt vector table. For each of the interrupt
vectors modified (BH, 9H, lOH, 13H, and 2BH), function 35H is used to re
trieve the original vector value, each original value is saved as two variables,
and function 25H is then used to reset the vector so that it points to the new
handler. Let's walk through the first one to clarify this.
In line 531, a value of 3 5H is placed in AH and a value of OBH is placed in
AL. This indicates a request for MS-DOS function 35H (get interrupt vector)
and specifies the vector for interrupt BH. The segment address contained in
the vector is returned in ES, the offset in BX. These values are saved as local
variables in lines 533 and 534.
In line 536, a value of25H is placed inAH and a value ofOBH placed in
AL. This indicates a request for DOS function 25H (set interrupt vector) and
specifies the vector for interrupt BH. Prior to the call, the offset value for the
new vector is placed in DX and the segment value in DS. The procedure
new8_hnd l r (line 76) is the new handler for interrupt BH. Therefore, we
want DX to store the offset of new8_hnd l rand DS to store the segment.
Notice that it is not necessary to place the segment address in DS, since DS
already points to the correct segment. On return from the call, new8_hnd l r
is the new handler for interrupt BH.
The process just described is repeated for the other interrupts used
by the TSR. The program then displays a message stating that POP
CLOCK is installed (lines 57B-5BO). Notice that in the initialization por
tion of the program there is no concern about using MS-DOS functions
01H through OCH. This is because during initialization the TSR owns the
show. MS-DOS treats it like any other program. It is only when the TSR
reexecutes by way of the modified interrupt table that issues of reentry
must be considered.
Once the loaded message is displayed, initialization is complete and
the program is ready to terminate but remain resident (lines 582-5B7). As we
mentioned earlier in the chapter, DOS function 31 H requires that the
amount of memory that is to remain allocated to the program be specified in
DX. In order to determine how much memory is required, a dummy varia
ble (line 482) is placed at the end of the portion of the program that is to
remain resident. The number of bytes to save is simply the difference be
tween the dummy variable's offset minus the offset of the start of the pro
gram. Adding 15 bytes rounds the block up to the next highest paragraph. In
line 5B5, the block size is divided by 16 to give the number of paragraphs to
keep. Finally, the AX register is set to request function 31H, and MS-DOS is
called. The call now returns control back to MS-DOS, and POPCLOCK is
resident in memory. Notice that the initialization portion of the code loses
its memory allocation. The program is written this way because the initial
ization code is not needed after the program is loaded.
279
Part 2- Tutorials
The Interrupt Handlers
Once initialization is completed, all of the new interrupt handlers are active.
We will now discuss them one at a time, starting with the simplest and work
ing our way up.
Interrupt lOH
The new handler for interrupt lOH is listed in lines 146-152. Recall that int
lOH is the ROM BIOS video service. The purpose of the new handler is to set
a flag each time int lOH is called. The flag will ensure that the clock does not
pop up while a call to the video service is in progress. Such an event, if
allowed to occur, could make a mess of the screen.
The new handler also chains to the old handler. This has to be done or
the video service requests would not be processed. Before calling the old int
lOH handler, the new handler must push the flags register to the stack (line
147). This is necessary because the original int lOH handler thinks it is being
called by way of an interrupt rather than a procedure call. Therefore, the
final instruction in the original handler is i ret rather than ret. Recall that
an i ret instruction pops the segment address, the offset address, and the
flags from the stack. If the flags were not pushed, something else would be
popped, the stack would be out of sync, and some sort of system failure
would no doubt ensue.
After pushing the flags, the handler increments video _flag and then
chains to the original handler. On return, vi deo_ f lag is decremented.
The new handler then terminates with an i ret instruction.
Interrupt 13H
The new handler (lines 157-165) for interrupt 13H (ROM BIOS disk service)
is almost identical to the new handler for interrupt lOH. In this case,
di sk_ f lag is set each time the handler is called. This will ensure that no
pop-ups occur while the disk is being accessed. Such an event could con
fuse the system, and data might be lost in the process.
There are some differences in new13 _hnd l r that should be explained.
The original13H handler sets the flag register according to the outcome of the
service request. The new handler is written so that this information can be
transmitted back to the original caller. First, notice that the flags are pushed in
line 161. This is necessary because the decrement in the next line may affect the
flags. After the decrement, the flags are popped and a ret 2 is issued. This
instruction tells MS-DOS to return to the caller and discard 2 bytes from the
stack. But notice that new13_hndLr is declared as a far procedure. This
means that when the ret is issued, MS-DOS pops a segment and offset address
from the stack. The 2 bytes thrown away are the flags register, which was
pushed when the new int 13H handler was originally called.
Interrupt 9H
Interrupt 9H is an interrupt generated by the hardware each time that a key is
pressed or released. The new handler (lines 122-141) chains to the old han
280
13- TSR Programs
dler, then uses function 2 of interrupt 16H to determine if the right and left
shift keys are depressed. This function reads the byte at address 0000:0417H
and stores the value in AL. This byte is set as follows:
If This Key Is Depressed
Insert
Caps Lock
Num Lock
Scroll Lock
Alt
Ctr!
Left Shift
Right Shift
This Bit Is Set
7
6
5
4
3
2
1
o
On return from the call to interrupt 16H, the handler executes and a l, Ofh
(line 130). This clears all the bits in AH and leaves AL unchanged. The next line
compares the value in AL to 3. AL will equal 3 if the right and left shift keys are
depressed. This is the signal to pop the clock. If the compare is false, the hot
keys have not been pressed, so the handler jumps to the exit (line 133).
If the compare was true, the handler must continue. In line 135 the
handler checks the value of runni ng_ flag. This flag is set by the main por
tion ofthe TSR each time that the clock is popped. The flag is cleared when the
TSR exits. Therefore, if runni ng_ f lag is set (not equal to zero), the clock is
already popped and the handler exits. If runni ng_ f lag is equal to zero, the
clock is not currently popped. In this case, the handler sets hot key equal to
18. The handler then exits (line 140) by an i ret. The variable hot key signals
the handlers for interrupts 8H and 28H that the hot key combination has been
pressed. The reasons for setting hot key equal to 18 are discussed next.
Interrupt 88
Interrupt 8H is the hardware timer interrupt. It is generated by the system's
timer chip 18.2 times a second. Once POPCLOCK is loaded into memory,
the new handler for interrupt 8H (lines 76-117) is called 18.2 times a second.
The first thing the new handler does is chain to the old handler (lines
77-78). The new handler then checks to see if hot key equals zero. Ifit does,
the handler exits.
If hot key is nonzero, the new handler checks to see if vi deo_ f lag or
di sk_ f lag are nonzero. Recall that these flags are set and cleared in the new
handlers for interrupts lOH and 13H. If either of these flags is nonzero, we do
not want to pop the clock. Accordingly, the program will jump to dec_hkey
(line 114), and hot key is decremented. Therefore, since the handler is called
approximately 18 times a second, hot key will remain nonzero for approxi
mately a second if either video _flag or dis k_ flag is nonzero.
If both video_flag and disk_flag equal zero, the handler proceeds
to the next step (line 88). The DI and ES register contents are saved, and ES:DI is
281
Part 2- Tutorials
set to point to the INDOS flag. If i ndos is nonzero, DI and ES are popped,
hot key is decremented, and the handler exited.
If; ndos equals zero, the handler proceeds. The next step is to check the
critical error flag (lines 100-101). If the flag is nonzero, we do not want to pop
the clock. ES and DI are popped, hot key is decremented, and the handler
exited.
If the critical error flag equals zero, all is clear to pop the clock. First, ES
and DI are popped from the stack (lines 104-105), hot key is set to zero, and
do _ i t (the main portion of the TSR) is called.
Interrupt 28H
Interrupt 28H provides the other "hook" into POPCLOCK. The new han
dler (lines 170-201) is very similar to the new handler for interrupt 8H. The
only difference is that this handler does not need to check the INDOS flag.
Recall that int 28H is called only when i ndos is set. However, int 28H also
indicates that it is safe to use MS-DOS as long as certain precautions are fol
lowed (Le., stay away from DOS functions O1H-OCH).
As should ALWAYS be done, the new int 28 handler chains to the old
handler. The flags hot key, video _flag, and d; s k_ flag are checked as in
the int 8H handler. If these flags check out correctly, the critical error flag is
checked. If the flag equals zero, all is clear to pop the clock. The hot key flag is
set to zero, and do_ it is called (line 197).
Popping the Clock
The portion of the program that actually displays the clock is the procedure
do _ i t (lines 206-480). It is important to bear in mind that when do _ i t gets
control, the only registers whose status is known are CS and IP. The other
registers, particularly the other segment registers, have the values that were
being used when the hot keys were pressed. Before do _ i t can use DS, SS, or
ES, the registers must be set appropriately.
The first thing do_ it does is set runni ng_ f lag. This prevents the int
9H handler from setting hot key while the clock is popped (refer back to lines
135-136).
Next, do_ it sets up a local stack (lines 211-217). This is necessary to
avoid disturbing the MS-DOS stack. The first step in setting up a local stack
is disabling the interrupts (line 211). This is important because if an inter
rupt occurs before both SS and SP have been reset, the system could crash.
Once the interrupts are disabled, the values in SS and SP are saved in local
variables, SS is set to equal CS (the local segment), and SP is set to point at
the top of the local stack. Once the local stack is established, interrupts are
enabled (line 217).
The contents of the MS-DOS registers are saved on the local stack (lines
219-227). Next, the ROM BIOS service is used to see ifthe display is in graph
ics mode (lines 231-236). If graphics are enabled, the program jumps to line
240, the stack is popped, the MS-DOS stack is reactivated, and the program
282
13-TSR Programs
issues a ret which sends control back to either the new int 8H handler or
the new int 28H handler. The handlers then issue an ; ret (line 110 or 200),
and POPCLOCK is exited.
If the display is not in graphics mode, it is time to display the clock.
Lines 259 through 263 save the cursor's position and size so that they can be
restored when POPCLOCK exits.
The ROM BIOS Video Services
Since TSRs should avoid DOS functions 01 H-OCH, they must rely
on the ROM BIOS video services for output to the screen. The ROM
BIOS video services are accessed via interrupt lOH. Prior to the call, a
function number is placed in AH. This determines which service is pro
vided. The ROM BIOS video services used by POPCLOCK are de
scribed here. Appendix A contains additional information on the use of
the ROM BIOS interrupts.
Int lOB
AH Value on Call
OlH
02H
03H
07H
Function
Set cursor type. On the call, the first 4 bits in
CH store the cursor's starting line and the first 4
bits in CL store the cursor's ending line.
Set cursor position. On the call, BH contains
the page number, DH contains the y coordinate of
the cursor, and DL contains the x coordinate of
the cursor.
Get cursor position. On the call, BH contains
the page number. On return, CH contains the
starting line of the cursor, CL contains the ending
line of the cursor, DH contains the cursor's y
coordinate, and DL contains the cursor's x
coordinate. Note that the starting and ending line
determine the cursor's size, not its position.
Scroll window down. On the call, AL contains
the number of lines to scroll, BH contains the
attribute used for the blanked area, CH contains
the upper left y coordinate of the window, CL
contains the upper left x coordinate of the
window, DH contains the lower right y
coordinate of the window, and DL contains the
lower right x coordinate of the window. If AL
equals zero on the call, the entire window is
blanked.
283
Part 2- Tutorials
Int lOH (cont'd)
AH Value on Call
08H
09H
OAH
OFH
Function
Read attribute and character at cursor. On
the call, BH contains the page number. On return,
AH contains the attribute byte and AL contains the
ASCII character byte.
Write character and attribute. On the call, AL
contains the ASCII character byte, BH contains the
page number, BL contains the attribute byte, and
CX contains the number of times the character is
to be written. The character is written at the
current position of the cursor. This function does
not advance the cursor.
Write character only. On the call, AL contains
the ASCII character byte, BH the page number, BL
the color byte (if in graphics mode), and CX the
number of times the character is to be written.
Get display mode. On return, AH contains the
number of character columns on the screen, AL
contains the display (0-3 and 7 are text), and BH
contains the active page number.
Lines 276-295 use a nested loop to save the contents of the screen that
will be covered by the clock. The inner loop is traversed once for each
character saved. The outer loop is traversed once for each line saved.
Lines 299-316 create the window. Interrupt lOH, function 07H is
called twice to create a window with a border around it. Lines 320-366
display the text contained in lines 62-63 of the listing.
Line 371 calls the procedure gettime (lines 449-480), which uses
DOS function 2CH to get the current time. DOS function 2CH can be used
safely, since it is not in the forbidden range of 01H-OCH.
Lines 368-396 display the time (finally! !), which is stored in the
variables listed in lines 64-71.
Lines 394-395 call the keyboard BIOS service to check on the
keyboard's status. If no key is pressed, the service returns with the zero flag
set. If this is the case, the test at line 396 is true and the time display loop is
traversed again. If a key is pressed, the BIOS function returns with the zero
flag clear, the test at line 396 is false, and the loop is exited. On exiting from
the loop, the character input by the user is discarded so that it will
not interfere with whatever program is continued when POPCLOCK
terminates.
Lines 401-433 restore the screen in a manner similar to that used in
saving the screen's contents. Lines 435-443 restore the cursor to the
position and size it had when the clock was popped.
284
13-TSR Programs
Finally, the jump at line 445 sends execution back to line 240. The MS
DOS registers are restored, and the MS-DOS stack is reestablished. The ret
at line 255 sends things back to either the int 8H handler or the int 28H. In
either case, the handler issues an ; ret and the program continues where
it left off when the hot keys were pressed.
Listing 13-1. Pop-up Clock TSR Program
1
2
3
4
5
6
7
8
9
10
11
12
13
14
15
16
17
18
19
20
21
22
23
;**************************************************************
POPCLOCK.ASM
A memory-resident program that provides a pop-up clock.
DOS 2.0 or later version required.
To create an executable version of this program, enter
the following commands:
C>masm popclock ;;;
C>link popclock ;;;;
C>exe2bin pope lock popclock.com
C>popclock
;**************************************************************
cseg
segment
para public 'code'
assume
org
cs:cseg
100h ;required for COM programs
begin:
jmp
init
;**************************************************************
;Declare program variables
24
;**************************************************************
25
old8_hndlr
old8_off
old8_seg
old9_hndlr
old9_off
old9_seg
old10_hndlr
old10_off
old10_seg
old13_hndlr
old13_off
old13_seg
old28_hndlr
old28_off
old28_seg
label
dw
dw
labe l
dw
dw
label
dw
dw
labe l
dw
dw
label
dw
dw
hot key
video_flag
disk_flag
db
db
db
26
27
28
29
30
31
32
33
34
35
36
37
38
39
dword
;old int 8h handler
?
?
dword
;old int 9h handler
?
?
dword
iold int 10h handler
?
?
dword
;old int 13h handler
?
?
dword
;old int 28h handler
?
?
40
41
42
43
0
0
0
;greater than o if hotkey pressed
; int 10h flag
;int 13h flag
285
Part 2-1Utorials
44
45
46
47
48
49
50
51
52
53
54
55
56
57
58
59
60
61
62
63
64
65
66
67
68
69
70
71
72
73
74
75
76
77
78
79
80
81
82
83
84
85
86
87
88
89
90
91
92
93
94
286
running_fLag
db
o
iequaLs 1 if program running
indos_off
indos_seg
errflag_off
dw
dw
dw
?
?
?
ioffset of indos fLag
isegment of indos flag
ioffset of criticaL error fLag
cur_pos
cur_size
sp_save
55_save
screen_buf
dw
?
dw
?
dw
?
dw
?
dw 174 dup(?)
isaves cursor's position
isaves cursor's size
istores MS-DOS stack pointer
istores MS-DOS SS register
ibuffer to save screen contents
db 255 dup ("#") iLocaL stack
db
("#") i top of Loca L stac k
db
db
db
db
db
db
db
db
db
db
db
db
db
brk_msg
time_msg
hour10
hour
min10
min
sec10
sec
dos1_msg
"POPCLOCK InstaLLed",Odh,Oah
"Right & Left shift to activate",Odh,Oah,"S"
"Any key to continue"
"Current time is "
istore time of day
?
?
":11
?
?
11.11
?
?
"DOS 2.X or later required",Odh,Oah,"S"
i**************************************************************
iNew handLer for int 8h (timer)
i**************************************************************
new8_hndLr
proc
near
pushf
isimuLate INT
call oLd8_hndLr
ichain to oLd handLer
cmp
je
hotkey,O
hkeyO
ihotkey pressed?
iif no, exit
cmp
jne
cmp
jne
video_fLag,O
dec_hkey
disk_fLag,O
dec_hkey
iint 10h
iif yes,
iint 13h
iif yes,
push di
push es
busy?
dec. hot key fLag
busy?
dec. hotkey fLag
isave registers
icheck value of indos flag
mov
mov
di,indos_off
es,indos_seg
i offset of flag
isegment of fLag
13-TSR Programs
95
96
97
98
99
100
101
102
103
104
105
106
107
108
109
110
111
112
113
114
115
116
117
118
119
120
121
122
123
124
125
126
127
128
129
130
131
132
133
134
135
136
cmp
ine
byte ptr es:[diJ,O
pop_stk
iexit if DOS busy
icheck critical error flag
mov di,errflag_off
cmp byte ptr es:[diJ,O
jne pop_stk
pop
pop
mov
call
es
di
hotkey,O
do_it
hkeyO:
i ret
pop_stk:
pop es
pop di
dec_hkey:
dec hot key
i ret
new8_hndlr
endp
ioffset of flag
iexit if flag set
irestore registers
hotkey flag
irun program
iclear
ireturn to MS-DOS
i**************************************************************
;New handLer for int 9h (keyboard hardware interrupt)
i**************************************************************
new9_hndLr
proc
near
sti
ienable interrupts
pushf
isimulate INT
caLL oLd9_hndlr
push
mov
int
and
cmp
pop
ine
ax
ah,2
16h
a l ,0Fh
a l,3
ax
exit - 9
cmp running_flag,O
ine exH_9
isave ax
iget shift key status
icaLL BIOS keyboard routine
iright and left shift pressed?
iif no, exit
iprogram aLready running?
iif yes, exit
137
138
139
140
141
142
143
144
145
mov hotkey,18
exit_9:
i ret
new9_hndLr
endp
ihotkey active
ireturn to MS-DOS
i**************************************************************
iNew handLer for int 10h (ROM BIOS video service)
i**************************************************************
287
Part 2- Tutorials
146
147
148
149
150
151
152
153
154
155
156
157
158
159
160
161
162
163
164
165
166
167
168
169
170
171
172
173
174
175
176
177
178
179
180
181
182
183
184
185
186
187
188
189
190
191
192
193
194
195
196
288
new10_hndlr
proc
pushf
inc vi deo_flag
call old10_hndlr
dec video_flag
i ret
new10_hndlr
endp
near
;simulate INT
;**************************************************************
;New handler for int 13h (ROM BIOS disk service>
;**************************************************************
new13_hndlr
proc
pushf
disk_flag
inc
call old13_hndlr
pushf
dec
popf
ret
2
new13_hndlr
endp
far
;simulate INT
;protect flags
; restore flags
;return to MS-DOS; discard 2 bytes
;**************************************************************
;New handler for int 28h (DOS scheduler>
;**************************************************************
new28_hndlr
proc
pushf
call old28_hndlr
cmp
je
near
hotkey,O
exit28
isimulate INT
;chain to old handler
;hotkey pressed?
;if no, exit
cmp video_flag,O
jne exit28
cmp di sk_ flag,O
jne exit28
;int 10h
iif yes,
; i nt 13h
;if yes,
push di
push es
isave registers
busy?
exit
busy?
exit
;check critical error flag
mov es,indos_seg
mov di ,errflag_off
cmp byte ptr es:[dil,O
pop es
pop di
jne exit28
mov
hotkey,O
;offset of flag
;restore registers
;clear hotkey flag
13-TSR Programs
197
198
199
200
201
202
203
204
205
206
207
208
209
210
211
212
213
214
215
216
217
218
219
220
221
222
223
224
225
226
227
228
229
230
231
232
233
234
235
236
237
238
239
240
241
242
243
244
245
246
247
irun program
ex;t28:
; ret
new28_hndlr
ireturn to MS-DOS
endp
i**************************************************************
iDO_IT -- Ma;n port;on of POPCLOCK
i**************************************************************
do_;t
mov
proc near
runn;ng_flag,1
iset runn;ng flag
iSet up local stack and save DOS reg;sters
cU
mov
mov
push
pop
mov
st;
sp_save,sp
ss_save,ss
cs
ss
sp,offset stk_top
push
push
push
push
push
push
push
push
push
ax
bx
cx
dx
s;
d;
ds
es
bp
id;sable ;nterrupts
isave MS-DOS stack po;nter
isave MS-DOS SS reg;ster
ilocal stack segment
itoP of local stack
ienable ;nterrupts
isave MS-DOS reg;sters
ion local stack
iCheck d;splay mode, ex;t ;f ;n graph;cs mode
mov
;nt
cmp
jbe
cmp
je
ah,OFh
10h
al,3
get_cursor
al,7
get_cursor
iget display mode funct;on
icall BIOS v;deo serv;ce
iRestore DOS stack and return to caller
exh: pop
pop
pop
pop
pop
pop
pop
pop
bp
es
ds
d;
s;
dx
cx
bx
289
Part 2-Tutorials
248
249
250
251
252
253
254
255
256
257
258
259
260
261
262
263
264
265
266
267
268
269
270
271
272
273
274
275
276
277
278
279
280
281
282
283
284
285
286
287
288
289
290
291
292
293
294
295
296
297
298
290
pop
cli
mov
mov
sti
mov
ret
ax
ss,ss_save
sp,sp_save
runni ng_ flag,O
;clear flag
;return to caller
;In text mode so continue
get_cursor:
mov ah,03
i nt 10h
mov cur_pos,dx
mov cur_size,cx
;get cursor position, BH has page
;caLL BIOS
;save cursor's position
;save cursor's size
;Save contents of window
mov
mov
mov
i nt
ah,02
d l, 17
dh,6
10h
;set cursor position
;upper left of window
push cs
pop es
;make es local
mov di,offset screen_buf
mov cx,6
;save 6 rows
loop1 :
push cx
mov cx,29
;save 29 columns
loop2:
cld
;clear direction flag
mov ah,8
;read attribute and character
i nt 10h
stosw
;store in buffer
inc
mov
int
loop
dl
ah,02
10h
loop2
;move cursor to next column
mov
inc
mov
int
pop
loop
d l, 17
dh
ah,02
10h
cx
loop1
;move cursor to start
;of next row
;make window border
;save next character
;save next row
13- TSR Programs
299
300
301
302
303
304
305
306
307
308
309
310
311
312
313
314
315
316
317
318
319
320
321
322
323
324
325
326
327
328
329
330
331
332
333
334
335
336
337
338
339
340
341
342
343
344
345
346
347
348
349
push
mov
mov
mov
mov
mov
mov
i nt
bx
aX,0700h
bh,70h
ch,6
cl, 17
dh,10
dl,45
10h
isave page number
iblank a window
ireverse attribute
iupper left y coordinate
iupper left x coordinate
ilower right y coordinate
ilower right x coordinate
jcall ROM video service
iclear window interior
mov
mov
mov
mov
mov
mov
i nt
aX,0700h
bh,07h
ch,7
cl, 18
dh,9
dl,44
10h
iblank a window
inormal attribute
jupper left y coordinate
jupper left x coordinate
jlower right y coordinate
jlower right x coordinate
jcall ROM video service
idisplay window contents
pop
mov
mov
mov
i nt
bx
ah,02
dh,10
dl,21
10h
irestore page number
iPosition cursor
mov
mov
i nt
ah,01h
cX,1000h
10h
iturn cursor off
push
pop
mov
mov
cs
ds
si,offset brk_msg
cx,19
cld
winloop1:
lodsb
mov ah,Oah
push cx
mov cx,1
i nt 10h
imake ds local
jquit prompt
idisplay 19 characters
iforward direction
ibyte to AL
iwrite character only
jsave loop counter
ioutput 1 time
pop
inc
mov
i nt
loop
cx
dl
ah,02
10h
winloop1
irestore loop counter
mov
ah,02
jposition cursor
iadvance cursor
idisplay another character
291
Part 2- Tutorials
350
351
352
353
354
355
356
357
358
359
360
361
362
363
364
365
366
367
368
369
370
371
372
373
374
375
376
moy dh,8
moy dl,19
int 10h
moy cx, 16
winloop2:
lodsb
moy ah,Oah
push cx
moy cx,1
int 10h
pop
inc
moy
i nt
loop
cx
dl
ah,02
10h
winloop2
;display 16 characters
:byte to AL
:write character only
:saye loop counter
:output 1 time
:restore loop counter
:adyance cursor
:display another character
:display time until key pressed
timeloop1:
call gettime
moy ah,02
moy dh,8
moy dl,35
i nt 10h
;get current time
;position cursor
377
378
379
380
381
382
383
384
385
386
387
388
389
390
391
392
393
394
395
396
397
398
399
400
292
moy
moy
si,offset hour10
cx,8
timeloop2:
lodsb
moy ah,Oah
push cx
moy cx,1
int 10h
:8 characters to display
;byte to AL
:write character only
:saye loop counter
:output 1 time
pop
inc
moy
i nt
loop
cx
dl
ah,02
10h
timeloop2
;restore loop counter
moy
i nt
jz
ah,01
16h
timeloop1
;check input status
moy
int
ah,OO
16h
:adyance cursor
;loop if no key pressed
:throw away input
13-TSR Programs
401
402
403
404
405
406
407
408
409
410
411
irestore screen and exit
mov
mov
mov
i nt
ah,02
d l, 17
dh,6
10h
iset cursor position
iupper left of window
mov si,offset screen_buf i sta rt of sto red display
mov cx,6
irestore 6 rows
loop11 :
push cx
isave outer loop counter
mov cx,29
irestore 29 columns
loop12:
cld
iclear direction flag
lodsw
iget character/attribute
mov bl,ah
iattribute byte
mov ah,9
iwrite character and attribute
push cx
;save inner loop counter
mov cx,1
;write one time
int 10h
;call BIOS
pop cx
irestore inner loop counter
inc
mov
int
loop
dl
ah,02
10h
loop12
imove cursor to next column
mov
inc
mov
i nt
pop
loop
d l, 17
dh
ah,02
10h
cx
loop11
imove cursor to start
;of next row
mov
mov
int
ah,1
cx,cur_size
10h
mov
mov
int
ah,2
dx,cur_pos
10h
jmp
exit
do it
endp
gettime
proc
mov
ah,2ch
isave next character
irestore outer loop counter
isave next row
iend of main procedure
near
iget time function
293
Part 2- Tutorials
452
453
454
455
456
457
458
459
460
461
462
463
464
465
466
467
468
469
470
471
472
473
474
475
476
477
478
479
480
481
482
483
484
485
486
487
488
489
490
491
492
493
494
495
496
497
498
499
500
501
502
294
int
21 h
;caLL MS-DOS
;hours returned in ch, minutes in cL, and seconds in dh
iconvert these to ascii vaLues and store
mov
bL, 10
xor ah,ah
mov a L,ch
div bL
or aX,3030h
mov hour10,aL
mov hour,ah
;hours
xor ah,ah
mov aL ,el
div bL
or ax,3030h
mov min10,aL
mov min,ah
;minutes
ah,ah
a L,dh
bL
ax,3030h
sec10,a L
sec,ah
xor
mov
div
or
mov
mov
ret
gettime
;seconds
endp
Last_byte
db
"$"
i***************************************************** *********
;INITIALIZE -- InitiaLizes POPCLOCK
i**************************************************************
initiaLize
proc
near
assume ds:cseg
ivariabLes in this segment
ilocate indos flag
i ni t:
i nt
mov
mov
mov ah,34h
21h
indos_off,bx
indos_seg,es
ilocate critical error flag
ioffset address of flag
;segment address of flag
13-TSR Programs
503
504
505
506
507
508
509
510
511
512
513
514
515
516
517
518
519
520
521
522
523
524
525
526
527
528
529
530
531
532
533
534
535
536
537
538
539
540
541
542
543
544
545
546
547
548
549
550
551
552
553
mov
i nt
cmp
jg
je
iexit if
ah,30h
21 h
al,2
call5d
calc
DOS 1.X running
mov
mov
int
int
imust be
dx,offset dos1_msg
ah,9
21h
20h
ireturn to MS-DOS
running 2.X so compute error flag's address
iget MS-DOS version
ifunction 5dh implemented
iMS-DOS 2.X, so calculate address
calc:
mov si ,bx
ibx has indos flag
inc si
jmp save_it
ilocate error flag using 3.X function 5dh
call5d:
mov
i nt
save_it:
pop
mov
mov
ah,5dh
a l,6
21 h
push cs
ds
errflag_off,si
iMS-DOS error function
ireturn flag address
icall MS-DOS
;reset ds
ilnsert new handlers into interrupt chains
mov ax,3508h
int 21h
mov old8_off,bx
mov old8_seg,es
iget int 8h vector
isave it
mov aX,2508h
iset vector function
mov dx,offset new8_hndlr
int 21h
mov ax,3509h
int 21h
mov old9_off,bx
mov old9_seg,es
iget int 09h vector
isave it
mov aX,2509h
iset vector function
mov dx,offset new9_hndlr
int 21h
mov
i nt
mov
mov
aX,3510h
21 h
old10_off,bx
old10_seg,es
iget
int 10h vector
isave it
295
Part 2-1Utorials
554
555
556
557
558
559
560
561
562
563
564
565
566
567
568
569
570
571
572
573
574
575
576
mov
mov
i nt
ax,2510h
iS et vector function
dx,offset new10_hndLr
21 h
mov
int
mov
mov
ax,3513h
21h
oLd13_off,bx
oLd13_seg,es
mov
mov
i nt
ax,2513h
iset vector function
dx,offset new13 - hndLr
21h
mov
i nt
mov
mov
ax,3528h
21 h
oLd28_off,bx
oLd28_seg,es
mov
mov
i nt
ax,2528h
iset vector function
dx,offset new28_hndLr
21 h
iget int 13h vector
isave it
iget i nt 28h vector
isave it
iDispLay message then terminate but stay resident
577
578
579
580
581
582
583
584
585
586
587
588
589
590
591
592
296
mov
mov
int
dx,offset load_msg
ah,09h
21h
iamount of memory to retain in dx
mov dx,<offset last_byte - offset cseg + 15)
mov c L,4
shr dx,cL
iconvert to paragraphs
mov aX,3100h
iTSR function
int 21h
icaLL MS-DOS
initiaLize
cseg
end
ends
begin
endp
iend of program
C
H
A
p
T
E
R
14
MS-DOS Device Drivers
Using Device Drivers
Structure of Device Drivers
Function of Device Drivers
Device Commands
The two essential hardware elements of a computer are the central process
ing unit (CPU) and computer memory. All the other hardware components
(disk drives, keyboards, video displays, printers, modems, etc.) are consid
ered external to the computer. These external components are called pe
ripheral devices, or simply devices.
Communication between a peripheral device and the computer must
be carried out according to strict guidelines determined by the computer
and the particular peripheral device. For each peripheral device in a system,
297
Part 2- Tutorials
there is a computer program responsible for regulating the communication
between that device and the computer. These computer programs are called
device drivers (figure 14-1). This chapter will discuss MS-DOS device driv
ers. The major portion of the discussion will center around installable de
vice drivers.
Peripheral
Device
CPU
and
Memory
Device
Driver
Figure 14-1. The device driver controls communication between
the peripheral device and the computer.
Using Device Drivers
One of the primary roles of an operating system is to provide a set of device
drivers that can be utilized by computer programs. MS-DOS provides device
drivers that can be used by any program written to execute under MS-DOS.
When a program running under MS-DOS needs to communicate with a pe
ripheral device, the program tells MS-DOS which device it wants to commu
nicate with and MS-DOS locates the proper device driver. Table 14-1 lists the
standard device drivers provided with MS-DOS.
Table 14-1. Standard Peripheral Devices Supported
by MS-DOS Device Drivers
Peripheral Device
Device Type *
Console (keyboard/screen)
First asynchronous
communications port
Second asynchronous
communications port
First parallel printer
Second parallel printer
Dummy device
Floppy diskette drive
Fixed disk drive
• C = character device
29B
C
C
CON:
AUX: or COM1:
C
COM2:
C
PRN: or LPT1:
LPT2:
NUL:
C
C
B
B
B = block device
Device Name
14-Device Drivers
Character and Block Devices
Character devices send and receive data in a serial fashion, one character at a
time. Character devices include the serial and parallel ports, the keyboard,
and the display screen. Every character device is assigned a device name.
MS-DOS reserves particular names for certain character devices. These re
served names are listed in the right-hand column of table 14-1. Each charac
ter device driver controls one peripheral device.
Block devices send and receive data in blocks. Generally each block
consists of 512 bytes. Block devices include floppy diskette drives, fixed
disk drives, and other mass storage devices. Block devices do not have spe
cific names, rather they are referenced by drive designator letters (A, B, C,
etc.). A single block device driver may control more than one peripheral
device.
Adding a New Device
Prior to MS-DOS 2.0, there was no standardized way of adding a new device
driver to the operating system. Manufacturers of peripheral devices were
forced to modify the PC's BIOS (basic input output system) in order to incor
porate their drivers. The problem with this approach was that modifications
were often not compatible with each other. MS-DOS 2.0 changed all that
with the introduction of installable device drivers.
Installable device drivers are stored as files. The drivers are installed in
memory through the use of a text file named CONFIG.SYS. CONFIG.SYS is
created by the user and stored in the root directory of the disk used to boot
the system. Device drivers are installed by placing the following type of
statement in CONFIG.SYS:
device = [d:][pathVilename
During booting, MS-DOS checks to see if there is a CONFI G. SYS file. If there
is, MS-DOS installs the specified device driver(s).
Chapter 9 discusses the installation and use of ANSI.SYS, an installable
console device driver that provides enhanced capabilities for the keyboard
and display screen. In the remainder of this chapter, we will take a detailed
look at the structure and function of device drivers. The material presented
is not required for users of MS-DOS. Some familiarity with assembly lan
guage programming will be useful in following the text.
Structure of Device Drivers
MS-DOS device drivers are computer programs that are generally written in
assembly language. Device drivers consist of three parts: a device header, a
strategy routine, and an interrupt routine.
299
Part 2-Tutorials
Device Header
The device header (figure 14-2) is an 18-byte-Iong data structure located at
the beginning of each device driver. The device header is made up of five
fields: the next header pointer, the device attribute field, the strategy rou
tine, the interrupt routine, and the device name.
Next Device Header Field
4 bytes
Attribute Field
2 bytes
Device Strategy Pointer Field
2 bytes
Device
Header
Device Interrupt Pointer Field
2 bytes
Device Name Field
8 bytes
Strategy Routine Code
j..
•
•
Interrupt Routine Code
."
"
Figure 14-2. Structure of MS-DOS device driver.
Next Header Pointer
The first field of the device header consists of 4 bytes that store the segment
and offset addresses of the next device header. As we will describe, MS-DOS
creates a linked list of the drivers configured into the system. This first field
serves as a pointer to the device header of the next driver in the linked list
(figure 14-3). The programmer sets the value of this field to -1 (4 bytes of
FFH), and MS-DOS inserts the appropriate pointer values as it constructs the
300
14-Devtce Drivers
...
.L
.,
Next Device Header Field
FF FF FF FF
Device Strategy Pointer Field
Device Interrupt Pointer Field
Device Name Field
.
.
1~-S-tr-at-e-gy-R-o-u-tin-e-c-o-de----~II~----------------~I!~----------------~I
L.~pt
","1100 _
II
II
I
Figure 14-3. MS-DOS sets the next device header field to contain
the segment and offset addresses of the next device header.
linked list. The field retains a value of -1 in the header of the last driver in
the linked list.
Device Attribute Field
The second field in the device header consists of 2 bytes that store the device
attribute field. The bit pattern ofthis field is set by the programmer to contain
descriptive information about the device controlled by the driver (table 14-2).
The commands mentioned in table 14-2 are discussed later in this chapter.
Strategy Routine
The third field in the device header stores a 2-byte pointer to the driver's
strategy routine. The value in this field is set by the programmer according
to the strategy routine's location within the driver. The strategy routine is
discussed later in this chapter.
301
Part 2-Tutorials
Table 14-2. Interpretation of Bit Patterns of Device Header
Attribute Field
Bit Number
bit 15
bit 14
bit 13
bit 12
bit 11
bit 6
bit 4
bit 3
bit 2
bit 1
bit 0
Meaning
= 1 if character device
= 0 if block device
= 1 if IOCTL is supported
= 0 if IOCTL not supported
= 1 if non-IBM format disk
= 0 if IBM format disk (block devices)
= 1 if device can handle Output Til Busy command
= 0 if device cannot handle Output Til Busy command
(character devices)
= 1 if device supports Device Open, Device Close, and
Removable Media commands
= 0 if device does not support Device Open, Device
Close, and Removable Media commands
= 1 if device supports Get Logical Device and Set Logical
Device commands
= 0 if device does not support Get Logical Device and Set
Logical Device commands
= 1 if the device implements int 29H for fast console 110
= 0 if device does not implement int 29H
= 1 if current clock device
= 0 if not current clock device
= 1 if current NUL device
= 0 if not current NUL device
= 1 if current standard output device
= 0 if not current standard output device
= 1 if current standard input device
= 0 if not current standard input device
Interrupt Routine
The fourth field in the device header stores a 2-byte pointer to the driver's
interrupt routine. The value in this field is set by the programmer according
to the interrupt routine's location within the driver. The interrupt routine is
discussed later in this chapter.
Device Name
The fifth field in the device header is the device name field. In character
device drivers, this field stores the name assigned by the programmer to the
device. The field is padded with blanks if the name is less than 8 characters
long. A name cannot be used as both a device name and a filename. In block
302
14-Device Drivers
device drivers (which do not have device names), this field is set by the pro
grammer to specify the number of units controlled by the driver.
Function of Device Drivers
The following paragraphs cover the installation, location, and calling of de
vice drivers. The fields of the request header-a data structure serving
MS-DOS and the device driver-are explained. The section ends with an
assembly language program that can be expanded to form a functional de
vice driver.
Installation
As part of the booting process, MS-DOS installs the standard (resident) de
vice drivers, which are stored in the IO.SYS system file. Recall that MS-DOS
connects the drivers via a linked list. The driver for the NUL device (the "bit
bucket") is always the first driver on the list (figure 14-4). After the resident
drivers are installed, MS-DOS places in memory any installable device driv
ers. The installable drivers are inserted into the linked list immediately after
the NUL driver (figure 14-5). All of the resident drivers remain in the linked
list, downstream from the installable drivers.
NULL
Device
Header
L
I
...
.
ReSident
Device #1
Header
..
Resident
Device #2
Header
I
I
.."
Figure 14-4. Driver chain with resident drivers only.
Locating a Driver
When a computer program requests the use of a peripheral device, the pro
gram issues a call to the appropriate MS-DOS function. MS-DOS searches the
linked list of drivers, starting with the NUL driver, until it locates a driver
with a name field corresponding to the one supplied by the program. MS
DOS always stops at the first match. Therefore, if the linked list contains
more than one driver for a particular device, MS-DOS uses the one located
closest to the front of the linked list.
Once MS-DOS locates the appropriate driver, the driver must be in
formed of the type of service required (read, write, status check, etc.).
This information is sent to the driver in the form of a driver command.
303
Part 2- Tutorials
NULL
Device
Header
Installed
Device #1
Header
Resident
Device #1
Header
Resident
Device #2
Header
Figure 14-5. Driver chain with one installed driver.
There are 20 valid driver commands, each of which is assigned a unique 1
byte command code. The driver commands are discussed at the end of
this chapter.
Request Header
In response to the request issued by the program, MS-DOS places a com
mand code in a data structure called the request header. The request header
(figure 14-6) serves as the communication area between MS-DOS and the
device driver.
Figure 14-6. Structure of MS-DOS request header.
The first field in the request header is a single byte that stores the length
of the request header. As we will discuss, the length of the request header is
determined by the command code issued by MS-DOS.
The second field of the request header is a single byte that stores the
unit code. The unit code is valid for block devices only and identifies the
304
14-Device Drivers
particular device requested. For example, if the system has two disk drives
controlled by the same driver, the unit code is used to determine which
drive is accessed.
The third field of the request header stores the I-byte command code.
The fourth field of the request header stores a 2-byte status word. The
bit pattern of this field is set by the driver to communicate information back
to MS-DOS. Bit 15 of the status word is set if the driver encounters an error.
Bit 9 is set to indicate a response of "busy" to a status request (command
code 6). Bit 8 is set by the driver if processing required for the command
code has been completed. The low-order byte (bits 0 through 7) is set to
indicate the nature of any error (table 14-3).
Table 14-3. Error Codes Returned in the Low-Order Byte of
Status Word
Error Code
00
01
02
03
04
05
06
07
08
09
OA
OB
OC
OF
Meaning
Write-protect violation
Unknown unit
Device not ready
Unknown command
CRC error
Bad drive request structure length
Seek error
Unknown media
Sector not found
Printer out of paper
Write fault
Read fault
General fault
Invalid disk change (MS-DOS 3.X, 4.x)
The fifth field in the request header is an 8-byte block that is reserved
by MS-DOS and not available for use.
The sixth field ofthe request header is called the data area. The format
and the length of the data area are dependent on the command code. As we
will see, each command code has a specific set of parameters that must be
set by the driver. When control passes from the driver back to MS-DOS, MS
DOS expects to find these parameters at specific locations within the
request header's data area
It is important to understand that identification of the appropriate
device, selection of the command code, and initialization of the request
header is performed by MS-DOS in response to a function request. The
305
Part 2-Tutorials
programmer of the device driver need not be concerned with how MS-DOS
performs these tasks. Once MS-DOS actually calls the driver, the driver is in
control, and the programmer's code goes into action.
Calling the Driver
Once a request header has been properly initialized by MS-DOS, the operat
ing system sets the ES and BX registers to point to the segment and offset
addresses of the request header (segment and offset addressing is discussed
in chapter 15). MS-DOS then issues a call to the driver's strategy routine.
The only function of the strategy routine is to save the segment and
offset addresses of the request header in two local variables. It is the pro
grammer's responsibility to define these variables within the driver and see
that they are initialized when the driver is called. The strategy routine then
passes control back to MS-DOS, which immediately calls the driver's inter
rupt routine.
The interrupt routine is the heart of the device driver. The first portion
of the interrupt routine consists of a look-up table, constructed by the pro
grammer, which tells the routine where to jump, according to the command
code passed in the request header.
In responding to the MS-DOS request, the interrupt routine reads the
command code, performs the table look-up, and passes control to the pro
cedure that processes the particular command code. The procedure then
processes the command using the fields of the request header to store infor
mation regarding the outcome of the request.
When the interrupt routine completes its work, control is returned to
MS-DOS. MS-DOS determines the results of the request by inspecting the
contents of the request header. MS-DOS, in turn, passes these results back to
the program that initially requested access to the peripheral device.
Listing 14-1 contains an assembly language skeleton of an MS-DOS
device driver. The listing can be expanded to form a functional device
driver.
Listing 14-1. Skeleton for an MS-DOS Device Driver
Device Driver Skeleton
code_seg
skeleton
segment
proc
assume
para
publ i c 'code'
far
cs:code_seg,es:code_seg,ds:code_seg
begin:
;Device Header
next_dev
attrib_field
306
dd
dw
-1
8000h
isegment:offset of next header
;character device
14-Device Drivers
strat_ptr
int_ptr
name
dw
dw
db
strategy
interrupt
'DEMO
;offset of strategy routine
;offset of interrupt routine
;name of driver
iVariabLe size area for use by driver. Store address of request
iheader here.
rheader_off
dw
?
rheader_seg
dw
?
;This area can be used for other purposes as is necessary.
iStrategy routine
strategy:
mov
cs:rheader_off,bx
mov
cs:rheader_seg,es
ret
icaLled first by MS-DOS
isave address of request header
ireturn to MS-DOS
iInterrupt routine
interrupt:
push
ds
isave MS-DOS registers
push
es
push
ax
push
bx
push
cx
push
dx
push
si
push
di
iretrieve command code from request header
mov
al,es:[bx+2]
iOn the basis of the command code, which is now in al,
ibranch to the appropriate routine and process the command.
iThis area forms the meat, not the skeleton, of the driver. It
ican be coded as the programmer sees fit, as long as the
irequirements for each command code are met.
iAfter command is processed, exit the driver
mov
es:word ptr [bx+31,0100h
iset done bit in
irequest header's
istatus word
pop
pop
pop
pop
di
si
dx
cx
irestore MS-DOS stack
307
Part 2- Tutorials
pop
pop
pop
pop
ret;
bx
ax
es
ds
;end of device driver
skeleton
endp
code_seg
ends
end
;return to MS-DOS
begin
Device Commands
There are twenty command codes that a device driver may be called upon to
process. This section discusses each command and lists the specific tasks to
be executed for that command. Also listed are the fields of the request
header's data area that must be read by the driver (on the call from MS-DOS)
and set by the driver (on the return to MS-DOS).
Note: For all commands, the driver reads the request header length, the
unit code (block devices only), and the command code. Also, for all com
mands, the driver sets the status word. Refer back to figure 14-6.
INIT (Command Code 0)
This command is invoked only at boot time when MS-DOS installs the
driver. INIT performs any initialization of the device that is necessary. Of all
the driver commands, only INIT may call the MS-DOS functions. INIT may
use functions 01H through OCH and function 30H only.
The driver must perform the following tasks:
1. Set the number of units controlled by the driver. This task is required
for block device drivers only. This number overrides the first byte in
the device name field of the device header.
2. Determine the break address. This address marks the end of the por
tion of the driver that remains resident in memory following execu
tion of INIT. Since INIT is used only one time, many programmers
place the code for INIT at the end of the driver. Then the portion of
memory storing INIT can be released to MS-DOS following device
initialization.
3. Set up a pointer to the BIOS parameter block (BPB) table. For each
block device, INIT must set up in memory a BPB (see command code
2) for each type of media that can be used with the device. The BPB
table contains pointers to the BPBs for a particular device. INIT returns
the segment: offset pointer to the BPB table in the request header's data
area.
308
14-Device Drivers
4. Set the status word in the request header.
The driver may read the following fields in the data area:
Request Header Offset
18-21
22
Description
Offset and segment addresses of first
character after "=" in CONFIG.SYS
statement that loaded the driver. The
remainder of the command string may
be read by the driver.
First available drive (0 = A, etc., MS
DOS 3 + only).
The driver must set the following fields in the data area:
Request Header Offset
13
14-15
16-17
18-19
20-21
Description
Number of units controlled by driver.
Offset address of break.
Segment address of break.
Offset address of BPB table.
Segment address of BPB table.
MEDIA CHECK (Command Code 1)
This command is valid for block devices only. Character drivers should set
only bit 8 ("done") in the request header's status word. The command is
issued to determine if the disk media on a drive has been changed. MS-DOS
issues this command before performing any disk read or write. The driver
must return one of three values:
-1
o
1
Media changed.
Don't know if media changed.
Media not changed.
For hard disks and RAM disks, the media cannot be changed, so the
driver can be written to always return a "Media not changed" signal. This
signal allows MS-DOS to access the disk without reading the file allocation
table (since the FAT is in memory from the previous disk access).
Since there is no foolproof way to determine if a floppy disk has been
changed, it is reasonable for drivers of devices having removable media to
always return a "Don't know" signal. The manner in which MS-DOS han
dles a "Don't know" signal depends on the state ofthe drive's file buffers.
If the buffers contain data that need to be written out ("dirty" data),
MS-DOS will assume that no disk change occurred and will write the data.
309
Part 2- Tutorials
This action risks damaging the file structure of a new disk if there has been
a disk swap. If the buffers do not contain dirty data, MS-DOS assumes that
the media has been changed. In this case, MS-DOS invalidates the contents
of any buffers associated with the drive, issues a BUILD BPB command
(driver command code 2) to the driver, and reads the disk's FAT and file
directory.
The driver must perform the following tasks:
1. Report the results of the media check.
2. Set the status word in the request header.
The driver may read the following fields in the data area:
Request Header Offset
13
Description
Media descriptor byte from disk's boot
sector (the boot record is discussed in
chapter 11).
The driver must set the following fields in the data area:
Request Header Offset
14
15-16
17-18
Description
Results of the media status check.
Offset address of the disk's volume label
(MS-DOS 3.X and 4.X).
Segment address of disk's volume label
(MS-DOS 3.X and 4.X).
BUILD BPB (Command Code 2)
This command is valid for block devices only. Character drivers only need
set bit 8 ("done") ofthe request header's status word. BUILD BPB is called
when MEDIA CHECK (driver command code 1) returns a "Media
changed" or "Don't know" signal. The driver is responsible for locating
the disk's boot sector, reading into memory the BIOS parameter block
(BPB, see table 14-4), and returning to MS-DOS a pointer to the BPB. Under
MS-DOS 3.X and 4.X, the driver should also store the disk's volume id
label in memory.
The driver must perform the following tasks:
1.
2.
3.
4.
310
Read the new BPB into memory.
Return to MS-DOS a pointer to the new BPB.
Read the disk's volume id label into memory (MS-DOS 3.X and 4.x).
Set the status word in the request header.
14-Device Drivers
Table 14-4. Parameters Defined in the BPB, Their Lengths
and Offset Locations in the Boot Sector of the Device Media
Parameter
Length
Offset
Bytes per sector
Sectors per allocation unit
Reserved sectors
Number of FATs
Number of root directory entries
Total sectors on media
Media descriptor
Number of sectors occupied by a single FAT
Word
Byte
Word
Byte
Word
Word
Byte
Word
11-12
13
14-15
16
17-18
19-20
21
22-23
The driver may read the following fields in the data area:
Request Header Offset
13
14-17
Description
Media descriptor byte.
If the non-IBM format bit (bit 13) of the
device header attribute field is 0, these 4
bytes store the offset and segment
addresses of a buffer that holds the first
sector of the disk's file allocation table
(the first byte of which is the disk's
media descriptor). If bit 13 of the
attribute field is 1, the buffer may be
used as a work area by the driver.
The driver must set the following fields in the data area:
Request Header Offset
18-19
20-21
Description
Offset address of the new BPB.
Segment address of the new BPB.
IOCTL INPUT (Command Code 3)
10CTL (input/output control) functions allow programs and drivers to com
municate by passing I/O control strings to one another through a memory
buffer. IOCTL functions may be used with character or block devices that
have bit 14 set in their device header's attribute field.
Programs utilize 10CTL functions through the use ofMS-DOS function
44H. IOCTL INPUT is used to send control information from the driver to
an application program. IOCTL OUTPUT is used to send control informa
tion from an application program to the driver.
311
Part 2- Tutorials
The following tasks are required for driver commands IOCTL INPUT
(command code 3), INPUT (command code 4), OUTPUT (command code
8), OUTPUT WITH VERIFY (command code 9), and IOCTL OUTPUT (com
mand code 12):
1. Perform the requested input or output.
2. Set the number of bytes transferred.
3. Set the status word in the request header.
For the preceding commands, the driver may read the following fields
in the request header's data area:
Request Header Offset
13
14-15
16-17
18-19
20-21
Description
Media descriptor byte.
Offset address of transfer buffer.
Segment address of transfer buffer.
Size of transfer requested (bytes for
character devices, sectors for block
devices).
Starting sector (block devices only).
For the preceding commands, the driver must set the following fields
in the request header's data area:
Request Header Offset
18-19
22-25
Description
Actual size of transfer (bytes for
character devices, sectors for block
devices).
Offset and segment addresses of disk's
volume id label. This field is used with
command codes 4 and 8 only and only
in MS-DOS 3.X and 4.X. If the driver
returns error code OFH (invalid disk
change), MS-DOS can use this pointer to
retrieve the label and to prompt the user
to insert the corresponding disk.
INPUT (Command Code 4)
This command is used to read data from a peripheral device. See IOCTL
INPUT (command code 3) for information on this command.
NONDESTRUCTIVE READ (Command Code 5)
This command is used with character devices only. Block drivers should set
only bit 8 (" done") in the request header's status word. This command reads
312
14-Device Drivers
a single character from the device's buffer without removing the character
from the buffer.
The driver must perform the following tasks:
1. Read a character from the device's buffer.
2. Set the status word in the request header.
The driver must set the following field in the data area:
Request Header Offset
13
Description
Character read.
INPUT STATUS (Command Code 6)
This command is used with character devices only. Block drivers should set
only bit 8 ("done") in the request header's status word. This command tells
MS-DOS whether or not there are any characters in the device's buffer ready
to be read. If there are no characters to be read, the driver sets the busy bit
(bit 9) of the request header's status word field to a value of 1. The busy bit is
set to 0 if there is a character to read or if the device does not have a buffer.
The driver must perform the following task:
Set the status word in the request header.
INPUT FLUSH (Command Code 7)
This command is used with character devices only. Block drivers should set
only bit 8 ("done") in the request header's status word. This command
flushes the device's character buffer by reading characters from the device
until the device status indicates that there are no more characters in the buffer.
The driver must perform the following task:
Set the status word in the request header.
OUTPUT (Command Code 8)
This command is used to write data to a peripheral device. See IOCTL IN
PUT (command code 3) for information on this command.
OUTPUT WITH VERIFY (Command Code 9)
This command is used to write data to a peripheral device. Each write is
followed by a read to verify that the write was accurate. See IOCTL INPUT
(command code 3) for information on this command.
OUTPUT STATUS (Command Code 10)
This command is used with character devices only. Block drivers should set
only bit 8 ("done") in the request header's status word. This command
checks the status of output-only device buffers (such as print buffers). The
313
Part 2-Tittorials
driver sets the busy bit (bit 9) of the request header's status word field to 0 if
the device is idle or if the buffer is not full. The driver sets the busy bit to 1 if
the device is busy or if the buffer is full.
The driver must perform the following task:
Set the status word in the request header.
OUTPUT FLUSH (Command Code 11)
This command is used with character devices only. Block drivers should set
only bit 8 (" done") in the request header's status word. This command emp
ties a device's output buffer.
The driver must perform the following task:
Set the status word in the request header.
IOCTL OUTPUT (Command Code 12)
This command is used to send a control string from a program to a device
driver. See IOCTL INPUT (command code 3) for information on this com
mand.
DEVICE OPEN (Command Code 13)
This command is implemented in MS-DOS 3.0 and later versions. The com
mand is invoked each time a device is opened if bit 11 of the driver's device
header is set to 1. Thus, the command provides the driver with a way of
tracking the number of times a device is opened. In conjunction with DE
VICE CLOSE (command code 14), this command can be used to limit the
number of processes that can access a device at a given time. DEVICE OPEN
can also be used to initialize character devices each time that they are used.
The driver must perform the following task:
Set the status word in the request header.
DEVICE CLOSE (Command Code 14)
This command is implemented in MS-DOS 3.0 and later versions. The com
mand is invoked each time a device is closed if bit 11 of the driver's device
header is set to 1. Thus, the command provides the driver with a way of
tracking the number of times a device is closed. In conjunction with DE
VICE OPEN (command code 13), this command can be used to control the
number of processes that can access a device at a given time.
The driver must perform the following task:
Set the status word in the request header.
REMOVABLE MEDIA (Command Code 15)
This command is implemented in MS-DOS 3.0 and later versions. It is availa
ble only on block devices that have bit 11 of the attribute field in the device
314
14-Device Drivers
header set to 1. The command is invoked by MS-DOS each time that a pro
gram issues a call to MS-DOS service function 44H, subfunction 08H
(IOCTL-removable media). The driver sets the busy bit (bit 9) of the request
header's status word to 0 if the media is removable, to 1 if the media is not
removable.
The driver must perform the following task:
Set the status word in the request header.
OUTPUT UNTIL BUSY (Command Code 16)
This command is implemented on MS-DOS 3.0 and later versions. It can be
used with character devices that have bit 13 of the attribute field in the de
vice header set to 1. This command sends output to the device until it re
ceives a busy signal from the device. Its intended use is for implementing
print spoolers.
The driver must perform the following tasks:
1. Report the number of characters written to the device.
2. Set the status word in the request header.
The driver may read the following fields in the data area:
Request Header Offset
13
14-15
16-17
18-19
Description
Media byte descriptor.
Offset address of memory buffer
containing output data.
Segment address of memory buffer
containing output data.
Number of bytes to be output.
The driver sets the following field in the data area:
Request Header Offset
18-19
Description
Number of bytes actually output.
Command Codes 17 and 18 are undefined.
GENERIC I/O CONTROL (Command Code 19)
This command is implemented in MS-DOS 3.20 and later versions. It can be
used on block devices that have bit 0 set in the device header's attribute
field. The purpose of this command is to provide a standard IOCTL service
for block devices. The command is called when MS-DOS service function
44H, subfunction ODH is invoked. Refer to the MS-DOS technical manual for
details in implementing this command.
The driver must perform the following tasks:
315
Part 2-Tutorials
1. Retrieve the major and minor function codes from the request header
and verify that they are valid. For MS-DOS 3.20, the only valid major
function value is 08H. The valid minor function codes are as follows:
40H
41 H
42H
60H
61 H
62H
Set device parameters.
Write logical drive track.
Format and verify logical drive track.
Get device parameters.
Read logical drive track.
Verify logical drive track.
2. Set the status word in the request header.
The driver may read the following fields in the data area:
Request Header Offset
13
14
15-16
17-18
19-20
21-22
Description
Major function code.
Minor function code.
Contents of SI register.
Contents of DI register.
Offset address of IOCTL request.
Segment address of IOCTL request.
Command codes 20, 21, and 22 are undefined.
GET LOGICAL DEVICE (Command Code 23)
This command is implemented in MS-DOS 3.20 and later versions. It is used
with block devices only. Bit 6 of the attribute field in the device header must
be set to 1 if this command is to be used. The command is used to determine
the last logical drive letter assigned to a device.
The command must perform the following tasks:
1. Place a value in the unit code field of the request header. If the value is a
nonzero number, it represents the last logical drive letter assigned to
the device (0 = A, 1 = B, etc.). A zero value indicates that the device is
assigned only one logical drive letter.
2. Set the status word in the request header.
SET LOGICAL DEVICE (Command Code 24)
This command is implemented in MS-DOS 3.20 and later versions. It is used
with block devices only. Bit 6 of the attribute field in the device header must
be set to 1 if this command is to be used. The command is used to assign a
logical drive letter to a device.
316
14-Device Drivers
The command must perform the following tasks:
1. Retrieve the unit code field of the request header. If the value repre
sents a valid logical drive letter (0 = A, 1 = B, etc.), the logical drive
letter is assigned to the device. The driver places a value of zero in the
unit code field if the value passed does not represent a valid logical
drive letter.
2. Set the status word in the request header.
317
C
HAP
T
E
R
15
DEBUG
DEBUG Commands
Introductory DEBUG
Advanced DEBUG
DEBUG is an MS-DOS utility program that allows you to examine and
modify computer files and computer memory on a byte-by-byte basis.
319
Part 2-Tutorials
DEBUG does not compare with powerful commercial debuggers such as
CodeView, but as examples throughout this book show, DEBUG is useful
for exploring the workings of DOS, for writing short assembly language
programs, and for "patching" existing programs. Unfortunately, some of
the later versions of DOS (such as PC-DOS 4) do not supply DEBUG as a
standard part of the operating system. In order to get DEBUG with these
versions, you must also obtain the diskette that comes with the system's
technical reference manual.
This chapter begins with an explanation ofDEBUG commands and the
rules for using them. Since many of DEBUG's features require some familiar
ity with 8086/8088 assembly language programming, the discussion of DE
BUG itself is divided into two sections. The first section, "Introductory
DEBUG," explains how to use DEBUG to examine the contents of computer
memory. It is written as an introduction to DEBUG and is intended for all
readers who are interested in gaining some familiarity with this powerful
MS-DOS utility.
"Advanced D EBUG," the second section, explains how DEBU G can be
used as a tool in examining and modifying computer programs. Some famil
iarity with assembly language programming is helpful, but not essential, in
understanding the material presented in this section.
Here is a summary of the features provided by DEBUG:
Iil'>
iII"
111*
Loads program files and data files into computer memory.
Enters assembly language instructions directly into memory.
Executes computer programs in a controlled environment.
Displays the contents of a portion of computer memory in hexadeci
mal and ASCII formats.
Changes the contents of a portion of memory.
Moves blocks of data in memory to specified locations.
Displays, creates, and modifies assembly language statements in mem
ory.
Follows, step by step, the execution of program instructions.
Displays and modifies the contents of the CPU registers and flags.
Stores the contents of a portion of computer memory on floppy and
hard disks.
Performs hexadecimal addition and subtraction with a built-in calcula
tor.
DEBUG Commands
DEBUG is a command-driven program, which means that you must enter a
command before DEBUG will perform an operation. DEBUG displays a
prompt to notify you when it is ready to accept a command. In MS-DOS 1,
320
15-DEBUG
the DEBUG prompt is a greater than sign (». In MS-DOS 2 and subsequent
versions, the DEBUG prompt is a hyphen (-). The examples in this chapter
will use the hyphen as the DEBUG prompt.
Before we examine the DEBUG commands, we need to discuss the syn
tax, or rules, that must be followed when using DEBUG. All DEBUG com
mands begin with a letter. The letter may be entered in uppercase or
lowercase. Most DEBUG commands include parameters other than the start
ing letter. When two consecutive parameters in a command are numbers,
the numbers must be separated by a space or a comma. (All numbers used in
DEBUG are hexadecimal.) In all other instances, parameters may be entered
without separation.
To illustrate these rules, let's look at the following two commands,
which are functionally equivalent. (Don't worry about the meaning of these
commands for now.)
-0 100 L20
means the same as
-d100L20
Remember that any time consecutive parameters are hexadecimal
numbers they must be separated by a comma or a space. The spaces in the
following command are therefore necessary:
-SCS:0100 23 45 57
These rules will become second nature as you become familiar with
the DEBUG commands. For the sake of clarity, we have inserted spaces be
tween all parameters, though you need not use spaces except between con
secutive hexadecimal numbers.
Table 15-1 is an alphabetical summary of the DEBUG commands. You
can find a complete discussion of each command by referring to the page
listed below each command's name.
Table 15-1. Summary of DEBUG Commands
Command
Purpose
Format
(A)SSEMBLE
Assembles
assembler
statements into
memory
a [start]
Compares contents
of two blocks of
memory
c [startl] [end] [start2]
c [startl] L [length] [start2]
(page 342)
(C)OMPARE
(page 347)
321
Part 2-1Utorials
Thble 15-1. (cont.)
Command
Purpose
Format
(D)UMP
(page 325)
Displays memory
contents
d
d [start] [end]
d [start] L [length]
(E)NTER
(page 330)
Enters list of byte
values and!or
string characters
into computer
memory.
Displays and, if
desired, changes
memory contents
e [start] [list]
(F)ILL
(page 349)
Fills block of
memory with list
of byte values and!
or string characters
f [start] [end] [list]
f [start] L [length] [list]
(G)O
(page 338)
Begins program
execution
g
e [start]
g=[start]
g [breakpoint(s)]
g=[start] [breakpoint(s)]
322
(H)EXADECIMAL
Arithmetic
(page 351)
Adds and subtracts
two hexadecimal
numbers
h [numberl] [number2]
(I)NPUT
(page 358)
Reads and displays
byte from a port
i [port]
(L)OAD
(page 345)
Loads a file into
memory
L
L [start]
Loads sector(s) into
memory
L [drive] [sector] [number]
L [start] [drive] [sector] [number]
(M)OVE
(page 349)
Moves block of
data from one
memory location
to another
m[startl] [end] [start2]
m [startl] L [length] [start2]
(N)AME
(page 343)
Names a file
n [filespec]
Names a parameter
n [param]
Names two
parameters
n [paraml] [param2]
15-DEBUG
Thble 15-1. (coot.)
Command
Purpose
Format
(O)UTPUT
(page 350)
Sends byte value
out a port
o [port] [byte]
(P)roceed
(page 351)
Executes a
subroutine,
program, loop, or
interrupt
p[=address][value]
(Q)UIT
(page 324)
Ends DEBUG
q
(R)EGISTER
(page 332)
Displays contents
of registers and
status flags
r
Displays and
changes contents
of a register
r [register name]
Displays and
changes status flags
rf
(S)EARCH
(page 348)
Searches block of
memory for list
s [start] [end] [list]
s [start] L [length] [list]
(T)RACE
(page 340)
Executes one
machine
instruction
t=[start]
t
Executes a number
of machine
instructions
t [number]
t=[start] [number]
(U)NASSEMBLE
(page 334)
Unassembles
machine code
u
u [start] [end]
u [start] L [length]
(W)RITE
(page 346)
Writes a file to disk
w
w [start]
w [drive] [sector] [number]
w [start] [drive] [sector] [number]
Writes to sectors
on disk
Allocates EMS
pages
xa number
(page 352)
XD
(page 352)
Deallocates an EMS
handle
xdhandle
XA
323
Part 2-1Utorials
Table 15-1. (cont.)
Command
Purpose
Format
XM
Maps an expanded
page into the page
frame
xm lpage ppage handle
Displays expanded
memory status
xs
(page 352)
XS
(page 352)
Note: Italics indicate items that you must supply. Items in square brackets are optional.
Introductory DEBUG
This section will explain how to start and end DEBUG, how to use DEBUG
to display memory contents, and how to enter data with DEBUG. No knowl
edge of assembly language programming is necessary.
Starting DEBUG
To start DEBUG, enter the command DEBUG. MS-DOS will load DEBUG
and display a prompt (-) when DEBUG is ready to receive your command.
(All of the examples in this chapter assume that drive C contains a copy of
the file DEBUG.COM.)
C>debug
In the DEBUG start command, you may specify the file to be de
bugged:
C>debug textpro.com
The DEBUG start command must include a drive letter designator and/or a
path specifier if the file to be debugged is not located in the current directory
of the default drive.
Ending DEBUG
To terminate DEBUG and return control to MS-DOS, enter q in response to
the DEBUG prompt:
-q
c>
324
15-DEBUG
Displaying Memory Contents
Computer memory is an aggregate of individual memory addresses. Ad
dresses are physical locations within memory that store one piece (a byte) of
data. Computers that use MS-DOS divide memory into segments. Each seg
ment consists of 64K contiguous bytes of memory. Individual memory ad
dresses within a segment are referred to by their offset. The first byte in a
segment is at offset 0 within the segment, the second byte is at offset 1
within the segment, and so on. Individual memory addresses are identifi
able by stating their segment and offset addresses. With this background
information, let's see how the DEBUG command DUMP is used to examine
computer memory.
The DUMP command (enter d or D) is used to display the contents ofa
selected portion of computer memory. The "dump" is displayed in both
hexadecimal and ASCII format. In the following example, DEBUG is started
from MS-DOS:
C>debug
Recall that the hyphen is DEBUG's way of telling you that it is ready to accept
a command. (On some systems, the DEBUG prompt is>.) Let's enter "d"
and see what happens:
C>debug
-d
0958:0100
0958:0110
0958:0120
0958:0130
0958:0140
0958:0150
0958:0160
0958:0170
00
00
00
00
00
00
00
00
00
00
00
00
00
00
00
00
00
00
00
00
00
00
00
00
00
00
00
00
00
00
00
00
00
00
00
00
00
00
00
00
00
00
00
00
00
00
00
00
00
00
00
00
00
00
00
00
00-00
00-00
00-00
00-00
00-00
00-00
00-00
00-00
00
00
00
00
00
00
00
00
00
00
00
00
00
00
00
00
00
00
00
00
00
00
00
00
00
00
00
00
00
00
00
00
00
00
00
00
00
00
00
00
00
00
00
00
00
00
00
00
00
00
00
00
00
00
00
00
The first number in the upper left corner (0958: 01 00) of the display is the
memory address where the dump begins. The address is read as "segment
0958H offset 0100H." The address displayed on your computer will proba
bly be different from the address in the example.
The first 00 following 0958: 01 00 indicates that a byte value of OOH is
stored at memory address 0958:0100. The next 00 in the top line means that
a value of OOH is stored at the following address in computer memory
(0959:0101). Proceeding across the top line, we see a total of 16 ~O's. This
means that the 16 consecutive memory addresses beginning at 0958:0100
and continuing through 0958:01OF all store a value of OOH.
The next seven lines (each preceded by a memory address) contain the
325
Part 2-Tutorials
remainder of the dump. We can see that this particular dump displays the
contents of 128 consecutive memory addresses. The dump starts at address
0958:0101 and proceeds through address 0958:017F.
The dashes in the middle ofeach line serve as reference points. Eight of
the 16 bytes on each line are to the left of the dash, and 8 are to the right. The
16 periods at the end of each line fill the space where memory contents are
displayed in ASCII format. Unprintable characters are indicated by a period.
We see nothing but periods, since there is no printable character with an
ASCII value of OOH.
Let's try the DUMP command one more time and see what happens:
-d
0958:0180
0958:0190
0958:01AO
0958:01BO
0958:01CO
0958:0100
0958:01EO
0958:01FO
00
00
00
00
00
00
00
00
00
00
00
00
00
00
00
00
00
00
00
00
00
00
00
00
00
00
00
00
00
00
00
00
00
00
00
00
00
00
00
00
00
00
00
00
00
00
00
00
00
00
00
00
00
00
00
00
00-00
00-00
00-00
00-00
00-00
00-00
00-00
00-00
00
00
00
00
00
00
00
00
00
00
00
00
00
00
00
00
00
00
00
00
00
00
00
00
00
00
00
00
00
00
00
00
00
00
00
00
00
00
00
00
00
00
00
00
00
00
00
00
00
00
00
00
00
00
00
00
Again, the screen displays all zeros and periods. But notice the memory ad
dresses. This dump took off where the previous dump ended. What's hap
pening?
If "d" is entered with no additional parameters, DEBUG displays (or
"dumps") the contents stored in 128 consecutive memory addresses. The
first byte displayed is located at the address immediately following the last
byte displayed by the previous dump. If no previous DUMP command has
been issued, the dump begins at the memory address used by DEBUG to
load the file being debugged. (More on this in "Advanced DEBUG.")
We can tell DEBUG where to begin the dump by including an address in
the command. The beginning address is specified by listing its segment and
offset addresses. The two numbers are separated by a colon (:). The follow
ing command directs DEBUG to display 128 bytes of memory beginning at
segment address 0958H, offset address OOOOH:
-d 0958:0000
0958:0000
CO 20 00 20 00 9A
0958:0010 6806 E2 04 9C 05
0958:0020
FF FF FF FF FF FF
0958:0030 680600000000
0958:0040 000000000000
0958:0050
CD 21 CB 00 00 00
0958:0060 20 20 20 20 20 20
0958:0070 20 20 20 20 20 20
326
EE
9C
FF
00
00
00
20
20
FE-10
05-01
FF-FF
00-00
00-00
00-00
20-00
20-00
FO 34 02 68
01 01 0002
FF FF FF 65
00 00 00 00
00 00 00 00
00000000
00 00 00 00
00 00 00 00
06
FF
06
00
00
20
20
00
62
FF
BC
00
00
20
20
00
02
FF
2A
00
00
20
20
00
M ... n .p4.h.b.
h.b ............ .
.....•••.... e.<*
h..........•..••
............... .
M!K ......... .
15-DEBUG
Well, now we are getting somewhere. Notice that the dump started at
the address specified in the DUMP command. Again, we have 128 consecu
tive bytes dumped. But this time we got something other than zeros and
periods. The first byte dumped is located at memory address 0958:0000 and
has a value of CDH.
Conventional ASCII values (see appendix F) fall in the range OOH to 7FH.
DEBUG subtracts 80H from any byte with a value greater than 7FH and dis
plays the character that corresponds to the resulting ASCII value. CDH minus
80H equals 4DH. 4DH is the ASCII value of the letter "M." Therefore, DEBUG
displays an "M" as the first character in the ASCII portion of the dump.
The second memory location in the dump has a value of20H. This is the
ASCII value for a space, so DEBUG displays a space at the second position in
the ASCII portion of the dump. The third address in the dump stores a value
of OOH, which we know does not represent any printable ASCII character.
DEBUG therefore prints a period at the third position of the ASCII dump.
This dump is not too exciting, as it consists of a few meaningless letters
and a lot of periods. Let's try to find something more interesting to look at.
We will briefly leave DEBUG and return to MS-DOS. To do this, simply enter
q after the DEBUG prompt:
-q
C>
As you can tell from the MS-DOS prompt (C», we have left DEBUG and
have arrived back in MS-DOS. Before we return to DEBUG, we will use the
MS-DOS text editor EDLIN to create a text file. (EDLIN is discussed in chapter
8.) Uyou are unfamiliar with EDLIN, just follow the instructions in the exam
ple.
The file to be created will take up about 250 bytes of disk space. In our
example, the file will be stored on drive C, the default directory. Enter the
following command:
C>edlin dbugpro.txt
This command tells MS-DOS to load EDLIN and instructs EDLIN to create a
file named "dbugpro.txt". EDLIN will display the following message:
New fiLe
*
EDLIN is now ready to accept a command. Type Li (or li). Then type the
text that appears in each line. Press Enter at the end oflines 1-5 and Ctrl-Z at
the end of line 6:
C>edlin dbugpro.txt
New ii Ie
*1i
327
Part 2- Tutorials
1:*+++++++++++++++++++++++++++++++++++++++++++++++++++++++++
2:*This text file will be used to demonstrate DEBUG.
3:*The file will be loaded into memory when DEBUG is started.
4:*DEBUG is easy to use after some practice.
5:*+++++++++++++++++++++++++++++++++++++++++++++++++++++++++
6:*"Z
*e
+-type "e"
c>
The e command terminated EDLIN, and the C> prompt tells us that we
have returned to MS-DOS. "Dbugpro.txt" has been created and stored on
drive C. We can now return to DEBUG and examine the newly created file.
With drive C as the default directory, enter the following command:
C>debug dbugpro.txt
As you can see, the DEBUG prompt tells us that we are back in DEBUG and
that the file "dbugpro.txt" has been loaded into memory.
Enter d for a dump beginning at the memory address where "dbug
pro. txt" was loaded:
-d
0958:0100
0958:0110
0958:0120
0958:0130
0958:0140
0958:0150
0958:0160
0958:0170
2B 2B 2B 2B 2B 2B
2B 2B 2B 2B 2B 2B
2B 2B 2B 2B 2B 2B
2B 2B 2B 2B 2B 2B
746578742066
65 20 75 73 65 64
7472 61 7465 20
65206669 6C 65
2B
2B
2B
2B
69
20
44
20
2B-2B
2B-2B
2B-2B
2B-2B
6C-65
74-6F
45-42
77-69
2B 2B 2B
2B 2B 2B
2B 2B 2B
00 OA 54
207769
20 64 65
55 47 2E
6C 6C 20
2B
2B
2B
68
6C
60
00
62
2B
2B
2B
69
6C
6F
OA
65
2B 2B
2B 2B
2B 2B
73 20
2062
6E 73
54 68
20 6C
65
20
42
73
61
2B
2B
2B
60
69
55
65
63
2B
2B
2B
6F
73
47
20
74
2B
2B
2B
++++++++++++++++
++++++++++++++++
++++++++++++++++
+++++++++ •• This
text file will b
e used to demons
trate OEBUG ... Th
e file will be l
Enter d again to continue the dump:
-d
0958:0180
0958:0190
0958:01AO
0958:0180
0958:01CO
0958:0100
0958:01EO
0958:01FO
6F
79
73
69
66
63
2B
2B
61
20
74
73
74
65
2B
2B
64
77
61
20
65
2E
2B
2B
65
68
72
65
72
00
2B
2B
64
65
74
61
20
OA
2B
2B
20
6E
65
73
73
2B
2B
2B
69
20
64
79
6F
2B
2B
2B
6E-74
44-45
2E-00
20-74
60-65
2B-2B
2B-2B
2B-2B
6F
42
OA
6F
20
2B
2B
2B
20
55
44
20
70
2B
2B
2B
60
47
45
75
72
2B
2B
2B
72 oaded into memor
20 Y when OEBUG is
20 started ••• OEBUG
61 is easy to use a
69 fter some practi
2B ce ... +++++++++++
2B ++++++++++++++++
2B ++++++++++++++++
In the preceding examples, each d command caused 128 bytes of memory to
be displayed. The contents of "dbugpro.txt" were displayed in hexadecimal
format at the center of the screen and in ASCII format to the right.
328
15-DEBUG
You may specify the start and stop addresses of a dump as follows:
-d 0958:01AA 01DZ
0958:01AA
0958:01BO
0958:01CO
0958:01 DO
44
69
66
63
45
73
74
65
42 55 47 20
DEBUG
20 65 61 73 79 20-74 6F 20 75 73 65 20 61 ;s easy to use a
65 72 20 73 6F 60-65 20 70 72 61 63 74 69 fter some pract;
2E
ceo
The preceding dump begins at address 0958:01AA and ends at 0958:01 D2 .
The starting and ending addresses are specified in the DUMP command.
Notice that the starting address is specified by segment (0958) and offset
(OIAA). Only the offset (OID2) is specified for the ending address.
Addresses stored in segment registers (see "Registers and Flags" in"Ad
vanced DEBUG") may be specified in a dump by including the register's
name in the command. The following command directs DEBUG to begin a
dump at the memory location whose segment address is stored in the DS
register and whose offset address is 0IAAH. The ending offset address is
specified as OlD2H.
-d DS:01AA 01DZ
0958:01AA
0958:01BO
0958:01CO
0958:01 DO
44
69
66
63
45
73
74
65
42 55 47 20
DEBUG
20 65 61 73 79 20-74 6F 20 75 73 65 20 61 ;s easy to use a
65 72 20 73 6F 60-65 20 70 72 61 63 74 69 fter some pract;
2E
ceo
We can leave out segment addresses altogether, entering only offset ad
dresses. DEBUG will assume that the segment address is stored in the DS
register:
-d DS:01AA 01DZ
0958:01AA
0958:01BO
0958:01CO
0958:01 DO
44
69
66
63
45
73
74
65
42 55 47 20
DEBUG
20 65 61 73 79 20-74 6F 20 75 73 65 20 61 ;s easy to use a
65 72 20 73 6F 60-65 20 70 72 61 63 74 69 fter some pract;
2E
ceo
Finally, we can tell DEBUG the number of bytes to be dumped by fol
lowing the start address with an L followed by the number of bytes to be
dumped. The next command tells DEBUG to dump 41 (29H) bytes:
-d DS:01AA LZ9
0958:01AA
0958:01BO
0958:01CO
0958:01 DO
44
69
66
63
45
73
74
65
42 55 47 20
DEBUG
20 65 61 73 79 20-74 6F 20 75 73 65 20 61 ;s easy to use a
65 72 20 73 6F 60-65 20 70 72 61 63 74 69 fter some pract;
2E
ceo
329
Part 2-1Utorials
Entering Data with DEBUG
The ENTER command (enter e or E) is used to place data into memory. This
powerful command allows you to modify the contents ofmemory on a byte
by-byte basis. ENTER can be used in conjunction with the NAME and
WRITE commands (see "Advanced DEBUG") to modify files and store the
modified files on disk.
The command begins with the letter "e" followed by the address at
which data entry will begin. DEBUG assumes that the segment address is
stored in the DS register if you specify only an offset address.
Data to be entered is specified in the command as a sequence of hexa
decimal numbers and/or character strings. You must separate hexadecimal
numbers with a space or a comma. A string ofcharacters must be enclosed in
quotation marks. If a command contains a character string, the hexadecimal
ASCII values for the characters in the string are stored in memory.
The following example demonstrates the ENTER command:
-e 0958:0000 202A 44 41 54 41 20 'IS' 20 48 45 52 45 2A 20
The preceding ENTER command instructed DEBUG to enter 16 bytes of data
in memory. The data is stored at consecutive memory locations beginning at
address 0958: 0000. Fourteen of the bytes entered are listed in the command
as hexadecimal numbers. 1\vo of the bytes are listed as a character string
('IS').
We can use the DUMP command to display the data entered. The "L"
option will tell DEBUG to dump 16 (lOR) bytes of memory:
-d 0958:0000 L10
0958:0000 20 2A 44 41 54 41 20 49-53 20 48 45 52 45 2A 20 *DATA IS HERE*
Notice that memory addresses 0958:0007 and 0958:0008 store the hexadec
imal ASCII values of the characters in the string "is". The ASCII representa
tion of the data entered is displayed at the right.
The ENTER command can also be used to display, and optionally
change, the byte value stored at an address. In this case, the command con
sists of the letter "e" followed by a memory address. No list of numbers or
strings is included in the command. DEBUG responds by displaying the ad
dress specified and the byte value stored at that address:
-e 0958:0000
0958:0000 20.
Pressing the space bar displays the value at the next memory address:
-e 0958:0000
0958:0000 20. 2A.
330
I5-DEBUG
The value stored at an address can be changed by entering a new hexa
decimal value. Strings, however, cannot be entered when the command is
used in this fashion:
-e 0958:0000
0958:0000 20. 2A.21
In the preceding example, memory address 0958:0001 originally contained
a value of 2AH. The value stored at this address has been changed to 21 H.
At each 8-byte boundary (an offset address ending in either 8 or 0),
DEBUG displays the current address:
-e 0958:0000
0958:0000 20.
2A.21 44.
41.
54.
41.
20.
0958:0008 53.48 20.41 48.4E 45.47 52.45 45.44 2A.
49.4.3
20.
In the preceding example, the values stored at offset addresses 0001H and
0007H through OOODH have been changed. The values at the other ad
dresses are unchanged.
The preceding memory address and the value stored at that address can
be displayed by entering a hyphen (-). This value can be changed if desired:
-e 0958:0000
0958:0000 20.
2A.21 44.
41.
54.
41. 20.
0958:0008 53.48 20.41 48.4E 45.47 52.45 45.44 2A.
0958:000E 2A.
49.4.3
20.
To terminate the command, press Enter. The reappearance of the DE
BUG prompt (-) signals that DEBUG is ready to receive your next command:
-e 0958:0000
0958:0000 20.
2A.2144.
41.
54.
41.
20.
0958:0008 53.48 20.41 48.4E 45.47 52.45 45.44 2A.
0958: OOOE 2A. 21
+-press Enter
49.43
20.
The changes made can be examined with the DUMP command:
-d 0958:00D0 L10
0958:0000 20 21 44 41 54 41 20 43-48 41 4E 47 45 44 20 21
!DATA CHANGED!
Advanced DEBUG
The following discussion of the remaining DEBUG commands is written to
be as self-explanatory as possible. Although some knowledge of assembly
331
Part 2-1Utorials
language programming would be helpful, it is not essential. Let us begin
with a few general concepts before we proceed with the commands.
Registers and Flags
The heart of a microcomputer is its central processing unit (CPU), the
portion of the computer responsible for performing all arithmetic and logi
cal operations and controlling the flow of information throughout the sys
tem. CPUs store data in structures called registers. Most computers that use
MS-DOS have CPUs containing 13 registers. The registers are given the
names AX, BX, CX, DX, Sp, BP, SI, DI, CS, DS, SS, ES, and IP. The CS, DS, SS,
and ES registers are called the segment registers.
In MS-DOS computers, the CPU also contains nine "flags." Aflag is a
structure that is either "set" or "cleared" by different computer operations.
As we shall see, DEBUG can be used to examine and modify the registers and
flags.
DEBUG Initialization
When you instruct MS-DOS to start DEBUG, the operating system places the
file DEBUG.COM in memory at the lowest-available memory location. DE
BUG then takes control and constructs a program segment prefix (psp) at
the lowest-available location in memory. The psp is a contiguous block of
memory used by MS-DOS during program execution. The psp is 256 (lOOH)
bytes in length. (For more on the psp, see chapter 11.)
Looking at Registers with DEBUG
The REGISTER command (enter r or R) is used by DEBUG to display and
modify the contents of the CPU registers and status flags. This command
also displays information about the next machine instruction scheduled for
execution. Let's begin our discussion of REGISTER by starting DEBUG.
With drive C as the default directory, enter the following command:
C>debug
DEBUG signals that it is ready to accept a command by displaying its
prompt. Let's enter r and see what happens:
C>debug
-r
AX=OOOO BX=OOOO cX=oooo DX=OooO 5P=FFEE BP=OOOO 51=0000 DI=ooOO
D5=0958 E5=0958 55=0958 C5=0958 IP=0100 NV UP DI PL NZ NA PO NC
0958:0100 0000
ADD
[BX+511,AL
D5:0000=CD
332
15-DEBUG
The display shows the hexadecimal values stored in each of the 13 registers.
The segment registers (DS, ES, SS, and CS) all store a value of 0958H. This
number is the address of the lowest-available segment in the memory of the
computer used in this example. If you are following along on your com
puter, the value stored in your segment registers may not equal 0958H.
The SP register has been initialized to a value ofFFEEH. The IP register
has been set to equal OlOOH. The remaining registers have been set to equal
zero.
The status of the eight flags is displayed on the right side of the second
line. All flags are initially cleared by DEBUG. Thble 15-2 lists the eight flags
and the symbols used to indicate their status in the order that they are dis
played by DEBUG.
A computer program is a sequence of machine instructions that the
computer is to execute. Machine instructions are written in machine code, a
series ofbytes stored in memory. The machine code for the next instruction
to be executed is stored in memory at the address pointed to by the CS and IP
registers. In the previous example, this address is CS:IP=0958:0100.
The third line of each register display contains information about the
instruction at CS:IP. The CS:IP address is displayed at the left of the third
line. The next item displayed is the sequence of bytes that make up the ma
chine instruction. In the previous example, the instruction sequence is OOH
OOH (displayed as 0000). This sequence of machine code is represented by
the assembly language mnemonic displayed in the middle of the third row
ADD [B X+ S I ] , AL. A mnemonic is a memory aid, such as an abbreviation or a
code. Mnemonics are frequently used by programmers.
Thble 15-2. Flags and Symbols in DEBUG
Flag Name
Set
Clear
Overflow (yes/no)
Direction (decrement/increment)
Interrupt (enable/disable)
Sign (negative/positive)
Zero (yes/no)
Auxiliary carry (yes/no)
Parity (even/odd)
Carry (yes/no)
OV
DN
EI
NG
ZR
AC
PE
CY
NY
UP
DI
PL
NZ
NA
PO
NC
In the preceding display, the instruction to be executed tells the
computer to take the value stored in the AL register (the low-order byte in the
AX register) and add that value to the value stored at memory address
DS:OOOO. The resulting value is to be stored at DS:OOOO. The current value
stored at DS:OOOO is displayed at the right end of the third line.
333
Part 2-Tutorials
You may alter the value stored in a register by entering "r" followed by
the name of the register. The current value in the register will be displayed,
and a new value can be entered. To retain the current value of the register,
press Enter.
-r
ex
ex 0000
:2450
-r
AX=oOOO BX=OOOO eX=245D DX=OOOO 5P=FFEE BP=OOOO 51=0000 DI=OOOO
05=0958 E5=0958 55=0958 e5=0958 IP=010o NV UP DI PL NZ NA PO Ne
0958:0100 0000
ADD
[BX+5I] ,AL
D5:oooo=eD
Since CS:IP points to the next instruction, changing the CS and/or IP
registers can have dramatic results:
-r IP
IP 0100
:0000
-r
AX=OOOO BX=OOOO
05=0958 E5=0958
0958:0000 C020
CX=2450
55=0958
OX=OOOO
C5=0958
INT
20
5P=FFEE
IP=OOOO
BP=OOOO 51=0000 01=0000
NV UP 01 PL NZ NA PO NC
Now CS:IP points to memory address 0958:0000. The machine code se
quence at this address is CD 20, which instructs the computer to execute
interrupt 20.
DEBUG displays the status of the flags when the command rf is en
tered. Any or all of the flags can then be modified by entering one or more
symbols (see table 15-2). The symbols may be entered in any order with or
without spaces between them. In the following example, the overflow, sign,
and carry flags are set:
-rf
NV UP OI PL NZ NA PO NC -OV NG CY
-r
AX=OOOO BX=OOOO
OS=0958 ES=0958
0958:0000 C020
CX=2450 OX=OOOO
SS=0958 CS=0958
INT
20
SP=FFEE
IP=OOOO
BP=OOOO SI=OOOO 01=0000
OV UP OI NG NZ NA PO CY
Unassembling with DEBUG
Recall that a computer program is a series of instructions stored in the com
puter as machine code. In machine code, each instruction to the computer
consists of a sequence of one or more bytes. While machine code makes
334
15-DEBUG
sense to a computer, it is very difficult for most people to make any sense out
of it.
Because machine code is so cumbersome and difficult to work with,
another low-level computer language called assembly language is often
used instead. Assembly language programmers use symbolic instructions
when writing programs. These symbols, called mnemonics, are easier for
people to understand than machine code. For example, an assembly lan
guage programmer might use the statement "RD" for the instruction "read
data." However, mnemonics don't mean a thing to computers; so before a
program can be executed, the mnemonics must be converted to machine
code. This conversion process is called assembly and is performed by a
computer program called an assembler.
Often it is desirable to reverse the assembly process; that is, to take
machine code and "unassemble" it back to the corresponding assembly lan
guage mnemonics. This process is performed by a computer program
called, naturally, an unassembler.
The UNASSEMBLE command (enter u or U) is used to invoke DEBUG's
unassembler. The command can be used to unassemble existing machine
code and obtain what MS-DOS manuals term "assembler like" statements.
This refers to the fact that assembly language programmers can use labels to
reference specific memory locations. These labels are a tremendous help in
understanding the logical flow of an assembly language program. The
UNASSEMBLE command references memory locations by numerical ad
dresses only; no labels are used. This difference can make an unassembled
program listing much more difficult to follow than the Original assembly
language program. Nonetheless, an unassembler can be an extremely pow
erful aid in figuring out how a computer program works and how it can be
modified.
To demonstrate DEBUG's unassembler, let's unassemble a portion of
DEBUG.COM. We begin at the DOS level and instruct DEBUG to load the file
DEBUG.COM. With drive C as the default directory, enter the command
shown in the next example.
Note: If you follow this example on your computer and get markedly
different results, you probably have a different version of DEBUG. COM.
However, you can still use the concepts presented here to explore your ver
sion of DEBUG.COM.
C>debug debug. com
The appearance of the DEBUG prompt tells us that DEBUG is ready to
accept a command. DEBUG has constructed a psp, at the end ofwhich it has
loaded the file DEBUG.COM. DEBUG has then stored the segment address
of the psp in each of the four segment registers.
Let's begin our examination of the DEBUG.COM file by having DEBUG
dump the first 80 bytes (SOH) of the file. We will use the DUMP command,
specifying an address at which to begin the dump. We know that DE
BUG.COM has been loaded at offset address 100H in the segment contain
335
Part 2- Tutorials
ing the psp. We do not know the value of that segment, but its value,
whatever it is, has been stored in the four segment registers. Therefore, we
can use any of the segment registers in the DUMP command:
-d CS:0100
o96C:0100
o96C:0110
096C:012o
o96C:0130
096C:0140
L50
EB 09
EO 3D
51 CD
21 8C
21 8C
56
00
21
CB
CA
65
02
89
BE
B8
72
73
1E
D8
03
73
09
4F
8E
2F
20
BA
2B
CO
D1
32-2E
69-2B
BC-D4
EB-F1
E8-D1
31 30 B4
B4 09 CD
2A A2 D5
008023
E8 D1 E8
30
21
2C
BA
D1
CD
CD
B4
62
EB
21
20
52
02
03
86 k.Vers 2.104oM!.
B4 '= .• s.:i+4.M!M 4
CD QM! •. O+<T*"U.4RM
CD !.H.X.2hd.0#:b.M
DO !.J8./QhQhQhQh.P
This dump displays the first 80 bytes of the machine code making up
the program file DEBUG.COM. On the computer used in this example, the
CS register has been initialized to a value of 096CH. Do not be surprised if
the value of the CS register on your computer is different. This would mean
only that the lowest-available segment on your computer is located at a seg
ment address other than 096CH.
The bytes in this dump mean a lot to the computer but not much to
most people. We can use the unassemble command to obtain an assembly
listing of the machine code. Unassembling begins at the same address as the
dump:
-u CS:0100
096C:0100
096C:0102
096C:0103
096C:0104
096C:0106
096C:0108
096C:0109
096C:010B
096C:010D
096C:010F
096C:0111
096C:0114
096C:0116
096C:0119
096C:011B
096C:011D
096C:011F
EB09
56
65
7273
2032
2E
3130
B430
CD21
86EO
300002
7309
BA692B
B409
CD21
CD20
B451
JMP
PUSH
DB
JB
AND
CS:
XOR
MOV
INT
XCHG
CMP
JNB
MOV
MOV
INT
INT
MOV
010B
SI
65
0179
[BP+SIl,DH
[BX+SIl ,SI
AH,30
21
AL,AH
AX,0200
011 F
DX,2B69
AH,09
21
20
AH,51
This is an unassembled listing of the first 33 bytes of DEBUG.COM.
The first item (column 1) on each line is the starting segment and offset ad
dress of an instruction that the computer is to execute. The second item
(column 2) in each line is the actual sequence of bytes that make up the
336
15-DEBUG
machine code for the instruction. The third item (columns 3 and 4) on each
line is the assembly language statement that corresponds to the machine
coded instruction.
In the first line, the instruction begins at address 096c:OIOO. The ma
chine code for the instruction consists of the 2-byte sequence EBH,
09H (written as EB09). The corresponding assembly language statement is
JMP 01 DB. Even though the meaning of this assembly language statement is
not entirely obvious, you can probably guess what it means. For someone
experienced in assembly language programming, this unassembled listing is
an essential aid in understanding the workings of a machine language pro
gram. By the way, JMP 01 DB is an instruction to the computer telling it to jump
to offset address OlOBH and continue program execution with the instruction
that begins at that point.
The UNASSEMBLE command can be entered with or without a starting
address. If you enter only an offset address, the command assumes that the
segment address is stored in the CS register. If you do not enter an address,
the command assumes that the starting address is the location following the
last instruction that was unassembled. Ifyou did not issue a previous UNAS
SEMBLE command, unassembling begins at address CS:OlOO.
A range of memory to be unassembled may be specified by entering a
starting address and an ending address. The ending address must be an off
set address. If the end address does not correspond to the last byte in an
instruction, the complete instruction is still unassemb1ed:
-u CS:0100 0104
096C:0100
096C:0102
096C:0103
096C:0104
EB09
56
65
7273
JMP
PUSH
DB
JB
010B
SI
65
0179
The number of bytes to be unassemb1ed may be specified with the "L"
option. The default value is 32. If the final byte specified does not corre
spond to the final byte in an instruction, the complete instruction is still
unassemb1ed:
-u CS:0106 L4
096C:0106
2032
2E
096C:0108
096C:0109
3130
AND
[BP+SI1,DH
CS:
XOR
[BX+SI1,SI
One final word about the UNASSEMBLE command. If you specify a
starting address for the command, be certain that the address is indeed the
starting point ofa machine instruction. If you specify a starting address that is
in the middle of an instruction, or a memory address that contains data rather
than program code, the resulting unassemb1ed list may be meaningless.
To obtain a printout of an unassembly listing, press Ctrl-PrtSc before
entering your UNASSEMBLE command.
337
Part 2-Tutorials
Program Execution with DEBUG
The DEBUG command GO (enter g or G) is used to execute machine lan
guage programs in a controlled environment. We will demonstrate the GO
command with a short computer program that will be written using DE
BUG. To follow along, boot your system, using drive C as the default direc
tory. After you see the prompt, start DEBUG:
C>debug
When the DEBUG prompt appears, carefully enter the following com
mands.
-e e5:0100 BO 01 BF 00 02 B9 10 00 Fe F2 AA BO 24
-e C5:0100 AA 06 1F BA 00 02 B4 09 CO 21 CO 20
The preceding DEBUG commands place in memory a sequence of byte val
ues that form a machine language computer program. When the program is
executed, it will clear the display screen, print a row of happy face symbols
on the screen, and then return control to DEBUG.
The UNASSEMBLE command can be used to examine the program be
fore we execute it:
-u C5:100
0976:0100
0976:0102
0976:0105
0976:0108
0976:0109
0976:010A
0976:010B
0976:0100
0976:010E
0976:010F
0976:0110
0976:0113
0976:0115
0976:0117
117
B002
BFOO02
B91000
FC
F2
AA
B024
AA
06
1F
BAOO02
B409
C021
C020
MOV
MOV
MOV
CLO
REPNZ
STOSB
MOV
STOSB
PUSH
POP
MOV
MOV
INT
INT
AL,01
01,0200
CX,0010
AL,24
ES
OS
OX,0200
AH,09
21
20
The GO command may be entered without additional parameters.
When this is done, execution begins at the instruction pointed to by CS:IP.
Let's use the REGISTER command to check on the status of the registers:
-r
AX=OOOO
05=0976
338
BX=OOOO CX=OOOO
E5=0976 55=0976
OX=OOOO 5P=FFEE
C5=0976 IP=0100
BP=OOOO 51=0000 01=0000
NV UP 01 PL NZ NA PO NC
15-DEBUG
0976:0100 B001
MOV
AL,01
Since CS and IP are pointing to the first instruction of our program,
enter g and see what happens:
-g
You should see a row of 30 happy faces. DEBUG displays the following mes
sage:
Program terminated normaLLy
The message Prog ram te rmi nated no rma II y tells you that control has
been passed from the program being executed back to DEBUG.
The GO command may be used to set breakpoints. Breakpoints are
used to halt program execution at particular points in the machine code
sequence. Breakpoints are set by specifying breakpoint addresses in the GO
command. Up to ten breakpoints may be set in one command. DEBUG as
sumes that a breakpoint's segment address is stored in the CS register if you
specify only an offset address in the GO command. Breakpoint addresses
must be separated by a space or a comma.
When DEBUG encounters a breakpoint, program execution is halted
and the contents of the registers and the status of the flags are displayed.
Breakpoints can be very useful in following and/or debugging programs
that contain branching logic. They can also be very useful in "sidestepping"
portions of code that do not require the scrutiny of the TRACE command.
(TRACE is discussed in the next section.)
The program we have written contains an instruction at offset address
0109 that is repeated 30 times during program execution. Single-stepping
through this instruction eighty times with TRACE would be extremely mo
notonous and yield no new information about the workings ofthe program.
Breakpoints allow us to rapidly execute the instruction, halting program ex
ecution at the instruction located at mOB.
Let's use TRACE to step through the first three instructions in the pro
gram. We will then use GO to rapidly execute the instructions at 0109. GO
will set a breakpoint at address 01OB.
-t
AX=0001 BX=OOOO
05=0976 E5=0976
0976:0102 BF0002
CX=OOOO OX=OOOO 5P=FFEE
55=0976 C5=0976 IP=0102
MOV
01,0200
BP=OOOO 51=0000 01=0000
NV UP 01 PL NZ NA PO NC
CX=OOOO
55=0976
BP=OOOO 51=0000 01=0200
NV UP 01 PL NZ NA PO NC
-t
AX=0001
05=0976
BX=OOOO
E5=0976
OX=OOOO
C5=0976
5P=FFEE
IP=0105
339
Part 2- Tutorials
0976:0105 B91000
HOV
CX,0010
-t
AX=0001 BX=OOOO
OS=0976 ES=0976
0976:0108 FC
CX=0010 OX=OOOO
SS=0976 CS=0976
CLO
SP=FFEE
IP=0108
BP=OOOO SI=OOOO 01=0200
NV UP 01 PL NZ NA PO NC
CX=0010 OX=OOOO
SS=0976 CS=0976
REPNZ
STOSB
SP=FFEE
IP=0109
BP=OOOO SI=OOOO 01=0200
NV UP 01 PL NZ NA PO NC
OX=OOOO SP=FFEE
CS=0976 IP=010B
HOV
AL,24
BP=OOOO SI=OOOO 01=0250
NV UP 01 PL NZ NA PO NC
-t
AX=0001 BX=OOOO
OS=0976 ES=0976
0976:0109 F2
0976:010A AA
-g 010b
AX=0001 BX=OOOO
OS=0976 ES=0976
0976:010B B024
CX=0010
SS=0976
The instructions at offset 0109 and 010A were actually repeated 30 times, but
by setting the breakpoint we were able to zoom through them with GO.
You can use the GO command to specify the first instruction to be exe
cuted, thereby overriding the CS:IP pointer. After typing g, type an equal
sign (=) followed by the address of what is to be the starting instruction. If
you enter only an offset address, DEBUG assumes that the CS register con
tains the segment address.
If we were to continue the previous example by entering a "g", execu
tion would commence with the instruction pointed to by CS:IP (0958:
01OB). We can rerun the program from the start by including the starting
address of the program in the GO command:
-g=100
A row of happy faces appears, and a message is displayed, telling us that pro
gram execution has terminated and control has been returned to DEBUG.
Single-Stepping through a Program
The TRACE command (enter t or T) is used to execute machine language
programs in a single-step fashion. After each instruction is carried out, the
contents of the registers and the status of the flags are displayed. Each dis
play is identical to the display that results when the REGISTER command is
used. The only difference is that each time a TRACE command is entered,
one instruction is executed before the next display is put on the screen.
We will demonstrate TRACE with the same program that was used to
demonstrate GO. If you no longer have the program in memory, start DE
BUG and enter the following commands:
340
15-DEBUG
C>debug
-e C5:0100 so 01 SF 00 00 S9 10 00 FC F2 AA sO 24
-e C5:0100 AA 06 1F SA 00 02 S4 09 CO 21 CO 20
Once the program is in memory, we can begin. Let's start with a REGIS
TER command to see where we are:
-r
AX=0001 BX=OOOO
05=0976 E5=0976
0976:0100 Bo01
CX=OOOO OX=OOOO SP=FFEE
SS=0976 C5=0976 IP=010o
MOV
AL,02
BP=OOOO SI=oooO 01=0250
NV UP 01 PL NZ NA PO NC
Entering a "t" executes the instruction located at CS:IP. After the in
struction is executed, the registers and flags are displayed:
-t
AX=0001 BX=OooO
OS=0976 ES=0976
0976:0102 BF0002
Cx=oooo OX=OoOO SP=FFEE
5S=0976 CS=0976 IP=0102
MOV
01,0200
BP=OOOO SI=OOoo 01=0250
NV UP 01 PL NZ NA PO NC
CX=OOOO OX=OOOO SP=FFEE
55=0976 CS=0976 IP=0105
MOV
CX,0010
BP=OOOO SI=oOOO 01=0200
NV UP 01 PL NZ NA PO NC
-t
AX=0001 BX=OOoO
OS=0976 ES=0976
0976:0105 B91000
You can use the TRACE command to specify which instruction will be
executed by including the address of the instruction in the command. To
specify an instruction, enter "t", followed by an equal sign (=), followed by
the address of the instruction to be executed. DEBUG assumes that the in
struction's segment address is stored in the CS register ifyou specify only an
offset address in the TRACE command:
-t=0100
AX=0001 BX=OOOO
OS=0976 ES=0976
0976:0102 BF0002
CX=OOOO OX=OOOO SP=FFEE
SS=0976 CS=0976 IP=0102
MOV
01,0200
BP=OOOO SI=OOOO 01=0200
NV UP 01 PL NZ NA PO NC
The preceding trace executed the instruction at offset OlOOH. CS:IP is now
pointing to the instruction at offset Ol02H.
TRACE can also be used to execute more than one instruction. You
simply enter the number of instructions that are to be executed. After each
instruction is executed, the registers and flags are displayed. If several in
structions are executed, the display will scroll off the screen. You can sus
pend the scrolling by pressing the Ctrl-NumLock keys. To continue
scrolling, press any key.
341
Part 2-1Utorials
Pressing the Ctrl-C keys stops the trace, and the DEBUG prompt is dis
played:
-t6
AX=0001 BX=OOOO
OS=0976 ES=0976
0976:0105 B91000
CX=OOOO OX=OOOO 5P=FFEE
5S=0976 CS=0976 IP=0105
CX,0010
MOV
BP=OOOO SI=OOOO 01=0200
NV UP 01 PL NZ NA PO NC
AX=0001 BX=OOOO
OS=0976 ES=0976
0976:0108 FC
CX=0010 OX=OOOO
SS=0976 CS=0976
CLO
SP=FFEE
IP=0108
BP=OOOO 51=0000 01=0200
NV UP 01 PL NZ NA PO NC
AX=0001 BX=OOOO
05=0976 ES=0976
0976:0109 F2
0976:010A AA
CX=0010 OX=OOOO
SS=0976 CS=0976
REPNZ
STOSB
SP=FFEE
IP=0109
BP=OOOO SI=OOOO 01=0200
NV UP 01 PL NZ NA PO NC
AX=0001 BX=OOOO
OS=0976 ES=0976
0976:0109 F2
0976:010A AA
CX=001C DX=OOOO
S5=0976 C5=0976
REPNZ
STOSB
SP=FFEE
IP=0109
BP=OOOO SI=OOOO 01=0201
NV UP 01 PL NZ NA PO NC
AX=0001 BX=OOOO
OS=0976 ES=0976
0976:0109 F2
0976:010A AA
CX=001B OX=OOOO
5S=0976 CS=0976
REPNZ
STOSB
SP=FFEE
IP=0109
BP=OOOO SI=OOOO 01=0202
NV UP 01 PL NZ NA PO NC
AX=0001 BX=OOOO
OS=0976 EX=0976
0976:0109 F2
0976:010A AA
CX=001A OX=OOOO
S5=0976 CS=0976
REPNZ
5TOSB
SP=FFEE
IP=0109
BP=OOOO SI=OOOO 01=0203
NV UP OI PL NZ NA PO NC
Four different instructions have been executed, but one of them was exe
cuted four times. Each time that the REPNZ STOSS instruction was executed,
the CX register was decremented by one. The computer will execute this in
struction 30 (001 DR) times before it moves on to the next instruction in the
program. To trace through all of that would have required a lot of time, so we
stopped the trace.
Even if we entered the command "t OOlD", it would take a while for all
of the displays to scroll up the screen. Refer to the earlier discussion of GO
breakpoints to see how you can speed up the execution of instructions that
are repeated many times.
Assembling with DEBUG
The DOS 2 version, and subsequent versions, of DEBUG can be used to
enter 8088/8086/8087 assembly language statements directly into memory.
(DEBUG in MS-DOS 1.X does not have this capability.) The ASSEMBLE com
342
15-DEBUG
mand is useful in composing short assembly language programs and in mod
ifying existing assembly language programs. This command allows you to
enter assembly language mnemonics and operands. Labels cannot be en
tered with the command. The advantage of using the ASSEMBLE command
is that the machine code for each instruction is entered directly into mem
ory, eliminating the need to go through an assembly process.
To use the ASSEMBLE command, enter a followed by the memory ad
dress of the first machine instruction to be entered. DEBUG assumes that the
segment address of the instruction is stored in the CS register if you specify
only an offset address. When the command is entered, DEBUG displays the
start address and waits for you to enter an assembly language statement. DE
BUG displays the next address in memory if the instruction entered is valid. If
the instruction is not valid, DEBUG indicates the location of the error. Pressing
Enter without an instruction terminates the assembly command.
We will demonstrate the ASSEMBLE command by writing a short as
sembly language program that may look familiar to you. If you follow the
next example on your own computer, the segment addresses may not match
those in the text.
C>debug
-a100
0976:0100
0976:0102
0976:0105
0976:0108
0976:0109
0976:0108
0976:0100
0976:010E
0976:010F
0976:0110
0976:0113
0976:0115
0976:0117
0976:0119
HOV AL,01
HOV 01,0200
HOV eX,0010
eLO
REPNZ STOSB
HOV AL,24
STOSB
PUSH ES
POP OS
HOV OX,0200
HOV AH,09
1NT 21
1NT 20
-press Enter
You may have recognized this program as being the same one used earlier to
demonstrate the GO and TRACE commands. Previously we created that
program by entering the machine code directly into memory. This time we
used DEBUG's mini-assembler to create the same program with assembly
language mnemonics.
Naming a File with DEBUG
The NAME command (enter n or N) is used to specify the name of a file to
DEBUG. The named file can be loaded into memory with the LOAD com
343
Part 2-Thtorials
mand or saved on a disk with the WRITE command. (LOAD and WRITE are
discussed later in this chapter.)
To name a file, type n followed by the desired file specification. DEBUG
will store the length of the file specification at offset address OOBOH in the
program segment prefix. The file spec itself is then stored beginning at off
set OOBIH. The file specification is "parsed," and the product is entered by
MS-DOS at offset address 005CH in the psp.
In the following example, the NAME command is used to specify a file
as "mytest 1. pro" . Then the DUMP command is used to see how this infor
mation is stored in memory:
-n mytest1.pro
-d OOSD L4D
0958:0050 co 21 CB 00
0958:0060 45 53 5431
0958:0070 20 20 20 20
0958:0080 DB 40 59 54
00
20
20
45
00
50
20
53
00
52
20
54
00-00
4F-00
20-00
31-2E
00
00
00
50
00
00
00
52
00
00
00
4F
00
00
00
00
40
20
00
00
59
20
00
00
54 M!K •••••.•••• MYT
20 EST1 PRO .•...
00
•.•.••..
00 .MYTEST1.PRO ••••
This dump begins at offset SOH in the psp. The length of the filename speci
fied by the NAME command is stored at offset address OOBOH. The file speci
fication begins at offset OOBIH. The parsed form of the file specification is
stored beginning at offset OOSCH. The OOH at offset 005CH indicates that
any subsequent read or write of this file will be done at the default drive.
The NAME command is also used to pass filename parameters. As an
example, let's say that the program "mytest 1. pro" performs some operation
on two data files that we will call "filel.dat" and "file2.dat". The names of
these data files must somehow be passed to "mytest 1. pro" . If we were start
ing "mytest 1. pro" in MS-DOS, we could pass the parameter information by
entering the filenames in the start command:
C>mytest1.pro file1.dat file2.dat
If we are executing "mytest 1. pro" under DEBUG, the parameters are
passed using the NAME command. One or two parameters can be passed
with the command. Parameters must be separated by a space or a comma:
-n file1.dat file2.dat
-d DDSD LSD
0958:0050
0958:0060
0958:0070
0958:0080
0958:0090
co 21 CB 00 00 00 00 00-00 00 00 00 00 40 59 54 M!K ••.••••••• FIL
45
45
14
32
31 20 20
32 20 20
204649
2E 44 41
20 44 41
20 44 41
4C 45 31
540000
54-00 00 00 00 00 46 49 4C E1
OAT ••..• FIL
54-0000000000000000 E2
OAT ......•.
2E-4441 54 20 46 49 4C 45 • FILE1.0AT FILE
00-0000000000000000 2.0AT ..•.•••••••
The information in the command is again stored starting at offset OOBIH.
The two parameters are parsed, and one is stored at offset OOSCH and the
344
15-DEBUG
other at 006CH. "Mytest1.pro" will look at these two addresses to find the
names of the files on which it is to operate.
You will find more information on the NAME command in the follow
ing discussions of the DEBUG commands LOAD and WRITE.
Loading a File with DEBUG
The LOAD command (enter L or 1) is used to load files into computer mem
ory. The specification for the file to be loaded must be stored at offset
OOSCH in the program segment prefix. This is accomplished either by in
cluding the specification in the DEBUG start command or by using the
NAME command.
Once the appropriate information is stored at offset OOSCH, the file can
be loaded by entering "L". You may enter the memory address at which
loading is to begin. If you enter only an offset address, the command as
sumes that the segment address is stored in the CS register. If you do not
enter an address, the file will be loaded at address CS:0100. Files with the
extension" .COM" and" .EXE" are always loaded at CS:0100. Any address
that is specified when these files are loaded is ignored.
After a file is loaded, DEBUG sets the BX and CX registers to the num
ber of bytes loaded into memory. For .EXE and .HEX files, this number will
be smaller than the size of the file. The following example loads the file
"dbugpro.txt" into memory at the default address of CS: 0100:
C>debug
-n dbugpro.txt
-L
-r
AX=OOOO BX=OOOO CX=OOCF OX=OOOO 5P=FFEE BP=OOOO 51=0000 01=0000
05=0958 E5=0958 55=0958 CS=0958 IP=0100 NV UP OI PL NZ NA PO NC
0958:0100 2A2A
5UB
CH, [BP+5IJ
55 :OOOO=CO
The BX and CX registers show that 207 (OOOOOOCFH) bytes have been read
into memory. We could have achieved these same results by including the
file specification in the DEBUG start command (" debug dbugpro. txt"). The
only difference is that when the file is loaded with the LOAD command, the
memory location of the load may be specified.
It is important to recognize that the LOAD command loads the file
specified at offset OOSCH and that this information changes each time the
NAME command is used. For this reason, it is advisable to use the NAME
command immediately before loading a file with the LOAD command.
LOAD can also be used to load consecutive sectors of a disk into mem
ory. (Sectors are discussed in chapter 10.) To specify the address at which the
load is to take place, use the same procedure as you did in loading a file.
Then enter the number deSignation of the disk to be read (0= default, 1 =A,
2=B, 3=C, etc.). Enter the relative number of the first sector loaded into
345
Part 2- Tutorials
memory and the number ofsectors to be loaded. A maximum of80H sectors
can be loaded:
-L 0500 0 00 02
This command loads consecutive sectors of data into memory, beginning at
memory address CS:OSOO. The sectors are loaded from the default drive.
The first sector loaded is relative sector 00 (the first sector on the disk). Two
(02) consecutive sectors are loaded.
Storing Data with DEBUG
The WRITE command (enter w or W) is used to store data on a disk. A valid
file specification must be located at offset address OOSCH into the program
segment prefix before WRITE can be used. To accomplish this, either in
clude the file specification in the DEBUG start command or use the NAME
command.
Before a file can be stored, the size of the file must be specified in the
BX and CX registers (a 4-byte hexadecimal number). It is good practice to
check the values of the BX and CX registers (use the REGISTER command)
before storing a file with the WRITE command.
You can specify the starting address in memory of the data to be writ
ten. If you specify only an offset address, DEBUG assumes that the segment
address is stored in the CS register. If you do not specify an address, writing
commences with the data at address CS:OlOO.
When a file is written, it is given the name specified at offset OOSCH in
the psp. If the disk already contains a file with that name, the existing file is
overwritten. In order to avoid overwriting the wrong file, it is good practice
to use the NAME command immediately before storing a file with the
WRITE command. Files with the extension" .EXE" or ".HEX" cannot be
written to disk using the WRITE command.
In the next example, the BX and CX registers are set to a value of 256
(OOOOOlOOH). The NAME command is then used to set the file specification
at offset address OOsCH. The WRITE command writes to disk the 256 bytes
starting at address CS:OlOO. The file is given the name "dbugtxt.pro". DE
BUG then displays a message telling how many bytes have been stored:
BX
BX 0000
:0000
-r
-r
ex
ex
0000
:0100
-n dbugtxt.pro
-w
346
15-DEBUG
Writing 0100 bytes
You can use the WRITE command to write data to specific disk sectors.
To specify the starting address of the data to be written, use the same proce
dure as you did earlier in writing a file. Then specify the number designation
ofthe drive to be written to (O=A, 1 =B, 2=C). Next, enter the relative disk
sector at which writing is to begin. Finally, enter the number of consecutive
sectors that will be written. A maximum of BOH sectors can be written.
In the following example, the data starting at address CS:0700 is written
to the disk in drive B (1). The write begins at relative sector 50H (absolute
sector 51 H) and fills 20H consecutive sectors on the disk:
-w 0700 1 50 20
Writing to absolute sectors can be extremely powerful in modifying
disk contents. It can also be extremely destructive if not used with caution.
Double-check that all parameters are correct before you perform a sector
write. Carelessness here can be very painful.
Comparing Blocks of Memory
The COMPARE command (enter cor C) is used to compare the contents of
two blocks of memory. If unequal bytes are found, their addresses and the
values at those addresses are displayed.
The command begins with the starting address of the first block of
memory. If you enter only an offset address, DEBUG assumes that the seg
ment address is stored in the DS register. To set the size of the blocks to be
compared, enter the letter L followed by the number of bytes in each block.
Then enter the starting address ofthe second block ofmemory. Again, enter
ing only an offset address causes DEBUG to assume that the segment ad
dress is in the DS register.
In the next example, two 16-byte blocks ofmemory are compared. The
first block begins at address CS:OOOO. The second block begins at CS:0030.
The DUMP command is used two times to display each block. The COM
PARE command is then used to display the addresses at which the blocks
have unequal values:
-d C5:0000
0958:0000
-d C5:0030
0958:0030
-c C5:0000
0958:0000
0958:0001
0958:0003
L10
CD 20 00 20 00 9A EE FE-1D FO 34 02 6806 62 02 M . . . N .p4.h.b.
L10
68 06 00 00 00 00 00 00-00 00 00 00 00 00 00 00 h•••••••...•.•••
L10 C5:0030
CD 68 0958:0030
20 06 0958:0031
20 00 0958:0033
347
Part 2-Tutorials
0958:0005
0958:0006
0958:0007
0958:0008
0958:0009
o958:o00A
0958:0008
0958:o0oC
0958:0000
o958:o0oE
0958:000F
9A
EE
FE
10
FO
34
02
68
06
62
02
00
00
00
00
00
00
00
00
00
00
00
0958:0035
0958:0036
0958:0037
0958:0038
0958:0039
0958:oo3A
0958:0038
0958:oo3C
0958:0030
0958:003E
0958:o03F
The size of the blocks to be compared can also be set by including an
ending offset address of the first block in the command. This offset will
determine the ending address of the second block, since the blocks must be
equal in size. Using this method, the preceding COMPARE command could
be written as "c CS:OOOO OOOF 0030". If no differences are found, the DE
BUG prompt is displayed and another command can be entered.
Searching Memory
The SEARCH command (enter s or S) is used to search a block of memory for
a list of byte values. The address at which the search is to start is included in
the command. If you specify only an offset address as the start, DEBUG
assumes that the segment address is stored in the DS register.
The address at which the search is to end is set in one of two ways. You
can include in the command the ending address, which must be an offset
address. Or you can specify the number ofbytes to be searched by including
in the command the letter "L", followed by the number of bytes to be
searched.
Your command must include a list of byte values to be searched. The
list may contain hexadecimal numbers and/or string characters. You must
separate hexadecimal numbers by a space or a comma. String characters
must be enclosed in quotation marks. Any string characters in the list will
result in a search for the hexadecimal ASCII values of those characters.
Each time a match to the list is found, the address of the first byte of the
match is displayed. If no matches are found, the DEBUG prompt is dis
played and another command may be entered:
-5 C5:0000 015F 44 4F 53 20 33 2E 33
0958:0004
This command searches the block of memory beginning at CS:OOOO and
ending at CS:015F for a match to the list of seven hexadecimal numbers in
cluded in the command. A match has been found starting at address
CS:0004. The same command could have been entered as "s CS:OOOO L160
'DOS 3.3'."
348
15-DEBUG
Moving Data in Memory
The MOVE command (enter m or M) moves a block of data from one mem
ory location to another. The move overwrites any previously existing data at
the destination. The command is executed in such a way that no data is lost if
there is some overlap between the source and the destination. The source
data is unaltered by the command unless it is overwritten.
The MOVE command must contain the starting address of the source
data. If you enter only an offset address for the starting address, DEBUG
assumes that the segment address is stored in the DS register.
The end address of the source data can be set in two ways. You can state
in the command the end address, which must be an offset address. Or you
can specify the length of the block to be moved by including in the com
mand the letter "L", followed by a hexadecimal number.
In the following example, a dump displays a block of memory. The
MOVE command is then used to move that block to another location. An
other dump shows that the move was successful:
-d 05:0500 L20
0958:0500 CD 20 CB 00 00 00 00 00-00 00 00 00 00 00 00 00 MtK •••••••.•••••
0958:0510 4C 53 20 20 20 41 53 53-00000000 00 20 20 20 LS ASS •••••
-m 05:0500 051F 05:2000
-d 05: 2000 L20
0958:2000 CD 20 CB 00 00 00 00 00-00 00 00 00 00 00 00 00 M!K •••••••••••••
0958:2010 4C 53 20 20 20 41 53 53-0000 00 00 00 20 20 20 LS ASS .••••
The MOVE command told DEBUG to take the block of data that starts at
address DS:0500 and extends to DS:051F and move it to fill the block of
memory that begins at address DS:2000. The move is actually a copy, since
the original data was not altered. The same command could have been writ
ten as "m 0050 L20 2000."
Filling Memory
The FILL command (enter f or F) is used to fill a block of memory with a list
of values. The command must include the starting address of the fill. If you
do not state a segment address, this value is assumed to be stored in the DS
register.
The address at which the fill is to end can be set in two ways. You can
include in the command the end address, which must be an offset address.
Or you can set the length of the block to be filled by entering in the com
mand the letter "1..", followed by a hexadecimal number.
The FILL command includes a list that will fill the memory block. The
list can consist of hexadecimal numbers and/or string characters. You must
separate hexadecimal numbers by a space or a comma. String characters
must be enclosed in quotation marks. Hexadecimal ASCII values of string
characters are stored in memory.
349
Part 2-Tutorials
If the list is shorter than the block of memory to be filled, the list is
repeated until the block is filled. If the list is longer than the block of mem
ory, the list is copied until the block is filled, and the remaining characters in
the list are ignored.
In this example, a portion of memory is filled with a list of values. A
dump then displays that portion of memory:
-f D5:0100 017F 21 23 24 25
-d D5:0100
0958:0100
0958:0110
0958:0120
0958:0130
0958:0140
0958:0150
0958:0160
0958:0170
LBO
21 23
21 23
21 23
21 23
21 23
21 23
21 23
21 23
24
24
24
24
24
24
24
24
25
25
25
25
25
25
25
25
21
21
21
21
21
21
21
21
23
23
23
23
23
23
23
23
24
24
24
24
24
24
24
24
25-21
25-21
25-21
25-21
25-21
25-21
25-21
25-21
23
23
23
23
23
23
23
23
24
24
24
24
24
24
24
24
25
25
25
25
25
25
25
25
21
21
21
21
21
21
21
21
23
23
23
23
23
23
23
23
24
24
24
24
24
24
24
24
25
25
25
25
25
25
25
25
!#S%!#S%!#S%!#S%
!#S%!#S%!#S%!#S%
!#S%!#S%!#$%!#$%
!#$%!#S%!#$%!#$%
!#S%!#$%!#S%!#S%
!#S%!#S%!#S%!#$%
!#$%!#S%!#$%!#$%
I#$%!#S%!#$%I#S%
The FILL command fills the block ofmemory starting at DS:OlOO and ending
at DS:017F with the hexadecimal numbers 21H, 23H, 24H, and 25H. The
same command could have been written as "f 0100 L80 '! # $ % ' ."
Sending Data to a Port
The microprocessor inside your computer communicates with the outside
world through the use of ports. The keyboard is connected to one port, the
display screen to another, the printer to another, and so on. Each port is
identified by its address, just as memory locations are identified by their
addresses. Port addresses are very specific for each computer. Refer to the
information supplied by your computer's manufacturer for port addresses.
The microprocessor reads data from a peripheral device (such as the
keyboard) by reading the data sent in from the device's port. Similarly, the
microprocessor sends data to a peripheral device (such as the printer) by
sending out data from the device's port.
The OUTPUT command (enter 0 or 0) is DEBUG's way of sending a
byte value to an output port. The command must include the address of the
output port and the byte value to be sent. The two parameters must be sepa
rated by a space or a comma. In the following example, the byte value 3CH is
sent to output port 62H:
-0
62 3C
Reading Data from a Port
The INPUT command (enter i or I) is used to obtain and display 1 byte of
input from a specified port. The command includes the address of the port.
350
15-DEBUG
DEBUG then reads 1 byte from that port and displays its value on the screen.
In the next example, 1 byte is read from port 62H. The value at that port
(03H) is then displayed:
-i 62
03
Hexadecimal Arithmetic with DEBUG
The HEXADECIMAL Arithmetic command (enter h or H) is used to perform
hexadecimal addition and subtraction on two numbers. The numbers can
be one to four hexadecimal digits in length and must be separated in the
command by a space or a comma. DEBUG adds the numbers and displays
the result. DEBUG also subtracts the second number from the first and dis
plays the result.
In the following example, 05CDH is added to 320FH, yielding a sum of
37DCH. Then OSCDH is subtracted from 320FH, yielding a difference of
2C42H:
-h 320F 05CO
370C 2C42
If the second number entered is larger than the first, the difference is
displayed in two's complement representation. (Refer to a text on assembly
language programming for a discussion of two's complement representa
tion.)
Proceeding through a Loop
Consider what would happen if you wanted to use DEBUG to execute an
interrupt. For example, let us say that the current status of DEBUG is as fol
lows:
-r
AX=3000 BX=OOOO
OS=5C35 ES=5C35
5C35:0100 C021
CX=OOOO OX=OOOO
SS=5C35 CS=5C35
INT
21
SP=FFEE
IP=0100
BP=OOOO SI=OOOO 01=0000
NV UP EI PL NZ NA PO NC
If you simply enter g, DEBUG will execute interrupt 21 without any prob
lem. The problem arises when control returns from the interrupt. There is
nothing to stop program execution and DEBUG will simply attempt to exe
cute whatever instruction is located at offset address 102. More often than
not, such conditions result in a system crash, which necessitates a reboot.
There are ways to deal with this problem (such as entering the command
351
Part 2- Tutorials
"g= lO2"), but they place the burden of determining where execution
should be halted on you.
The (P)roceed command is implemented in DOS 4 to rectify this prob
lem. Simply enter p to execute an interrupt. Execution terminates upon re
turn from the interrupt. The following example illustrates:
AX=3000 BX=OOOO
D5=5C35 ES=5C35
5C35:0100 CD21
CX=OOOO DX=OOOO
55=5C35 C5=5C35
INT
21
5P=FFEE
IP=0100
BP=OOOO 51=0000 DI=OOOO
NY UP EI PL NZ NA PO NC
CX=OOOO DX=OOOO
5S=5C35 C5=5C35
POP
BX
5P=FFEE
IP=0102
BP=OOOO 51=0000 DI=OOOO
NY UP EI PL NZ NA PO NC
-p
AX=0004 BX=OOOO
DS=5C35 E5=5C35
5C35:0102 5B
The Proceed command can also be used to execute a loop of program code,
a subroutine call, or a repeat string instruction. The complete syntax for the
command is as follows:
p [=address][value]
The optional "=address" parameter may be a segment:offset address or
simply an offset address. If no segment is specified, the address in CS is used
as the segment address. The current value ofCS:IP is used ifno "=address"
parameter is used.
The optional "value" parameter specifies the number of instructions to
execute. The default for "value" is 1. In the above example, only one instruc
tion (I NT 21 ) is executed. Of course, the code of the interrupt handler is also
executed. If "value" had been set to 2, then the instruction immediately fol
lowing INT 21 would also have been executed.
Using DEBUG with Expanded Memory
The DOS 4 version of DEBUG implements four commands that allow DE
BUG to manipulate expanded memory. The "xa" command is used to allo
cate a specific number of expanded memory pages. The "xd" command is
used to deallocate a set of expanded memory pages. The "xm" command is
used to map an expanded memory page into conventional memory. Finally,
"xs" is used to display the current status of expanded memory. Use of these
commands is illustrated in chapter 12.
352
c
H
A
p
T
E
R
16
LINK
Overview of LINK
Starting LINK
LINK Switches
This chapter describes the use of the MS-DOS utility program called LINK.
LINK is used in compiling or assembling computer programs. LINK is not
supplied with all implementations of DOS. However, LINK is generally pro
vided with the assemblers and compilers whose use requires LINK. The
material in this chapter is applicable to all versions of LINK.
353
Part 2-Tutorials
Overview of LINK
Compilers and assemblers produce object code, a code that can be executed
by a computer without undergoing further simplification. LINK is an MS
DOS utility program used to modify a collection or module of object code
so that the module is relocatable. A relocatable module is a computer pro
gram or a computer program subroutine that will execute successfully re
gardless of where it is stored in computer memory.
LINK is also used to combine separately produced object modules into
a single relocatable module. LINK produces a single relocatable module,
called a run file, by combining and modifying user-specified object mod
ules. LINK searches for the specified object modules on the specified or
default disk drive. A message is displayed, directing the user to change disk
ettes and press Enter if LINK cannot locate a module. At the user's option,
LINK will produce a list file containing information about the code in the
run file. LINK will also search specified libraries for any object modules that
are needed to complete the run file.
VM.TMP
LINK uses as much memory as is available in creating a relocatable module.
LINK will create a temporary disk file named VM.TMP on the default drive
and display the following message if the system does not have enough free
memory:
VM.TMP has been created
LINK will erase any existing file named VM. TMP when it creates a tem
porary storage file. VM.TMP is erased when LINK ends.
Starting LINK
There are three methods for starting LINK. In each case, one of the system
drives must contain the MS-DOS file LINK.EXE. In the following examples,
LINK.EXE is on the default drive. LINK.EXE is not supplied with MS-DOS
3.3 and 4.X system diskettes. You must secure the "Utilities" diskette that
comes with the Technical Reference manual in order to obtain the 4.X im
plementation of LINK.)
Starting LINK involves entering one or more filenames in response to
LINK's prompts. You have the option of preceding each filename with a
drive designator and/or a path specifier.
Method 1
In the first method, LINK is started by typing link and pressing Enter. Begin
the command with the letter designator of the drive containing LINK.EXE if
LINK.EXE is not on the default drive:
354
J6-LINK
C> link
MS-DOS will load LINK and display a copyright message followed by
the prompt:
Object ModuLes [ .OBJ]:
This is a prompt to enter the object module(s) that LINK will use to produce
the run file (the relocatable module). Individual modules must be separated
by a space or a plus (+) sign. LINK assumes that each object module has an
extension of ". OBJ". Any other extension must be specified..
To illustrate, let's suppose that you have used a compiler or an assem
bler to create the object modules "example1.obj" and "example2.obj". To
combine them into a single relocatable module, you would enter their
filenames in response to the initial LINK prompt:
Object ModuLes [ .OBJ]: example1+example2
Since no extensions are specified, LINK assumes that the modules have an
extension of" .OBJ".
LINK next prompts you to enter the name to be given to the run file:
Run Fi Le [EXAMPLE1.EXE]:
If you do not enter a filename, LINK will default to the filename of the first
object module listed in the previous command. A run file must have an ex
tension of ".EXE". Any other extension will be ignored.
When you press Enter, LINK will display the following prompt:
List FiLe [NUL.MAP]:
Enter a filename if you want LINK to create a listfile. The list file contains the
name and size of the segments within the relocatable module. The list file
will also contain any errors that are detected by LINK. (Later in the chapter,
we will discuss list files again and present an example.) LINK gives the list file
an extension of" .MAP" if an extension is not specified. Press Enter if you do
not want a list file created.
LINK's final prompt asks you for the names of any library files to be
searched for unresolved references:
Libraries [.LIB]:
Some compilers contain a default library that LINK will search if you
press Enter. LINK will look for the compiler library on the default drive. If
the library is not on the default drive, LINK will look for it on the drive
specified by the compiler.
You may specify up to eight library files to be searched. LINK assumes
an extension of" .LIB" if an extension is not specified. Individual filenames
355
Part 2-Tutorials
must be separated by a space or a plus sign (+). If your response to the
prompt includes a drive designator, LINK will look for the listed library
file(s) on the specified drive. LINK will search the drive specified by the
compiler (or the default drive) if no drive designator is included.
Libraries [.LIBl: c:mylib+yourlib+a:hislib+c:
The preceding response directs LINK to search the files "mylib.1ib" and
"yourlib.1ib" on the C drive, "hislib.1ib" on the A drive, and the default
library (if one exists) on the C drive.
LINK will search the library files in the order that they are listed. Ifthere
is a default library, it will be searched last. When LINK finds the module that
contains the symbol it is looking for, that module is processed in the normal
fashion. LINK displays a message telling you to enter a new drive designator
letter when it cannot find a specified library file.
You can use a comma to end a response to a LINK prompt. When you
use a comma, you can type your response to the next prompt without wait
ing for the prompt to be displayed:
Object Modules [.OBJl: example1,
List File [NUL.MAPl: example1
Libraries [.LIBl:
The first command tells LINK the name of the object module. The
comma following the object module tells LINK that the response to the next
prompt (run file) is also entered on the first line. In this case, no name is
entered for the run file, so LINK assigns the default filename to the run file.
Notice that the prompt for the run file is not displayed. The last two com
mands tell LINK to create a list file named "example1.map" and to search the
default library file.
The first two commands in the previous example could have been
combined as follows:
Object Modules [.OBJl: example1"example1
Libraries [.LIBl:
In this example, the first command ends with two commas, followed by the
name that LINK will assign to the list file. Notice that the prompt for the list
file is not displayed.
If you end any of the responses to a LINK prompt with a semicolon, the
remaining responses will be assigned their defaults. No further prompts will
be displayed:
Object Modules [.OBJl: example1;
This command tells LINK that "example!" is the object module. Since the
356
J6-LINK
command ends in a semicolon, the remaining prompts are not displayed
and are assigned their defaults.
Method 2
In the second method for starting LINK, the responses to the LINK prompts
can be included in the LINK start command. The responses must be listed in
the order in which LINK displays the prompts (Object Modules, Run File,
List File, Libraries). You must separate the responses with a comma.
LINK will prompt for any responses that were not included in the start
command:
C>link example1"example1
Microsoft Object Linker V2.00
(C) Copyright 1982 by Microsoft Inc.
Libraries [.LIB]:
The start command tells MS-DOS to load LINK. The start command
also tells LINK to search for the module "example1.obj", assign the run file
its default filename, and create a list file named "example1.map". Notice that
the prompts for these responses are not displayed.
If you include responses to LINK prompts in the start command and if
you end the command with a semicolon, any subsequent prompts will not
be displayed and they will be assigned their defaults:
C>link example1;
Microsoft Object Linker V2.00
(C) Copyright 1982 by Microsoft Inc.
This start command loads LINK and tells LINK to search for "examplel.obj".
The three remaining prompts are not displayed and are assigned their de
faults.
Method 3
The third method for starting LINK requires that a set of LINK responses be
stored in a text file. These responses must be stored in the order that the
LINK prompts are displayed. LINK can then be started by including the
name of the text file in the LINK start command. This method is convenient
when you are entering a long list of object modules. A long response to the
object module or library prompt may be stored on several lines by using a
plus sign ( +) to continue a response onto the next line.
A text file containing a sequence of responses can be created from your
357
Part 2- Tutorials
keyboard. Starting at the MS-DOS command level (the DOS prompt is dis
played), type copy con: and then type the filename of the text file that you
will be creating. The filename may be preceded by a drive designator letter
and/or a pathname.
In the following example, a text file named "sample1.txt" is created.
C>copy con: sample1.txt
example1+example2+example3,,;
"1
1 Fi le(s) copi ed
+-Enter
+-Enter
+-you press Ctrl-Z and Enter
To start LINK with a text file, type link, followed by a blank space and
the symbol @, followed by the filename and extension of the text file. LINK
will assume that the first character in the filename is a blank if you include a
space betwen the "@" and the filename of the text file:
C>link wsample1.txt
Microsoft Object Linker V2.00
<C) Copyright 1982 by Microsoft Inc.
Object Modules [.OBJ1: example1+example2+example3
Run FiLe [EXAMPLE1.EXE1:
List FiLe [EXAMPLE1.MAP1:
The responses to the prompts have been extracted from the file "sam
ple 1. txt" . LINK automatically searches for the object modules"example 1" ,
"example2", and "example3". LINK then assigns the default filename to the
run file and creates a list file named "examplel.map". The library prompt is
not displayed because of the semicolon at the end ofthe response line. LINK
assigns the default response to the library prompt.
LINK Switches
LINK provides seven optional switches that you can specify when starting
LINK. Each switch directs LINK to perform certain tasks when constructing
a relocatable module. To specify a switch, type a forward slash (I) followed
by the first letter of the switch name at the end of a response line. You may
include a switch when using any of the three methods for starting LINK.
Switches may be specified on any response line. Each letter specifying a
switch must be preceded by a forward slash.
The tHigh Switch
Within each relocatable module, LINK stores information that tells MS-DOS
where to load the module in computer memory. Normally, this information
358
J6-LlNK
instructs MS-DOS to load the module at the lowest-available address in
memory. The Ihigh switch tells LINK to construct a module that MS-DOS
will load at the highest-available memory address.
The next command directs LINK to combine the object modules "ex
amplel" and "example2" into a relocatable module. LINK will produce a
run file named "example1.exe" (the default) and a list file named "exam
ple.map". The default library file will be searched. The LINK switch Ihigh
(entered as Ih) directs LINK to produce a run file that MS-DOS will load at as
high a memory location as possible. Enter the following command:
C>link example1+example2"example1ilh
The Ihigh switch should not be used when linking Pascal or FORTRAN
object modules.
The IDsallocate Switch
The Idsallocate switch (entered as Id) directs LINK to create a run file that
loads all data at the high end of the data segment. If this switch is not used,
LINK will create a run file that loads data at the low end of the data segment.
The Idsallocate switch is required when linking Pascal or FORTRAN object
modules.
The ILinenumber Switch
LINK will generate a list file when it is instructed to do so. The list file con
tains a list of the segments in the run file as well as each segment's relative
start and stop addresses. A segment is a contiguous portion of the run file,
which may be up to 64K bytes in length. Segments are generally used to
partition a run file into functional components. Each segment within an
object module is assigned to a class by the programmer. LINK combines the
segments of the specified object modules according to each segment's class.
A segment's relative start address is the location of the first byte in a
segment relative to the first byte in the run file. For example, ifthe first byte
of a segment is the first byte of the run file, the segment's relative start ad
dress is O. A segment's relative stop address is the location of the last byte in
a segment relative to the first byte in the run file. For example, if the last byte
of a segment is the lOOth byte of the run file, the segment's relative stop
address is 99 (99 bytes from the first byte in the run file).
The Ilinenumber switch (entered as II) tells LINK to include in the list
file the line numbers and relative addresses of the source statements in each
object module. Source statements are the statements in a computer program
in the form that they are entered by the programmer. The Ilinenumber
switch only works with object modules produced by a compiler that num
bers each source statement (such as the BASIC compiler).
359
Part 2- Tutorials
The /Map Switch
Symbols (such as variable names) that are shared by two or more object
modules are called public symbols. Symbols are designated as being "pub
lic" by the compiler or assembler used to create the modules. The Imap
switch (entered as 1m) directs LINK to include in the list file all public sym
bols that are defined in the specified object modules.
The next set of commands directs LINK to create a list file named "ex
ample.map". The MS-DOS command TYPE is then used to display "exam
ple.map". Enter the following:
C>link example1"example1Im
Microsoft Object Linker V2.00
(C) Copyright 1982 by Microsoft Inc.
Libraries [.LIB]:
C>type example.map
Start
OOOOOH
000DOH
OOOEOH
Stop
000C7H
OOOOSH
000F2H
Origin
Length
00C8H
0006H
0013H
Name
STACKSG
OATASG
COOESG
Class
STACK
DATA
CODE
Group
Address
Publics by Name
0000:0004
0000:0002
0000:0000
AAA
PRICE
QTY
Address
Publics by Value
0000:0000
0000:0002
0000:0004
QTY
PRICE
AAA
Program entry point at OOOE:OOOO
The first portion of the list file contains the name, class, length, and
start and stop addresses of each segment in the run file.
The second section in the list file is headed 0 r ; gi n Group. A group
360
J6-LINK
consists of one or more segments contained in the specified object modules
that are to be combined into a single segment in the run file. Groups are de
fined by the programmer during program assembly or compiling. Any groups
defined by the compiler or assembler are listed here, along with their relative
starting addresses (origin) within the relocatable module. The module in this
example does not contain any groups.
The third section of the list file is an alphabetical listing of the public
symbols contained in the object modules. The relative addresses of each
symbol within the relocatable module are also listed.
The fourth section of the list file is a listing of the public symbols con
tained in the object modules ordered by their relative addesses within the
module.
The final1ine in the list file gives the relative address of the run file's
entry point. The entry point is the location of the first executable computer
instruction contained in the run file.
The /Pause Switch
The Ipause switch (entered as Ip) is used to suspend LINK execution before
the run file is written to disk. This allows you to swap disks. To demonstrate
the use of the Ipause switch, enter the following:
C>link example1"example1Ip
Microsoft Object Linker V2.00
(C) Copyright 1982 by Microsoft Inc.
Libraries [.LIB]:
About to generate .EXE file
Change di sks
+-press Enter when ready
It is important not to remove a disk if the VM.TMP file or the list file is to
be stored on it.
The IStack:[Number] Switch
The stack is a segment within the run file that is used to store data during
program execution. Compilers and assemblers provide information in the
object modules that allows LINK to compute the required size of the stack.
The Istack: [number] switch can be used to override the stack size that is
indicated in the object modules.
Any hexadecimal number from 0001 H to FFFFH may be specified for
the size of the stack in bytes. LINK will create a stack with 0200H bytes if you
specify a number less than 0200H (decimal 512). Enter the following com
mand to create a run file with a stack that contains 0300H bytes:
C>link example1"example1Is:300
361
Part 2-Tutorials
The INo Switch
The Ino switch (entered as In) directs LINK not to search the default library
file for unresolved external references. For example, if you are linking mod
ules that were created with a Pascal compiler, you could enter" In" at the end
of a response to a LINK prompt and LINK would not search "pascal.lib" for
any unresolved external references.
362
p
A
R
T
3
MS-DOS Commands
APPEND
ASSIGN
ATTR.IB
BACKUP
BREAK
BUFFERS
CALL
CHCP
CHDIR
CHKDSK
CLS
COMMAND
COMP
COpy
COUNTRY
CTTY
DATE
DEL
DEVICE
DIR
DISKCOMP
DISKCOPY
ECHO
ERASE
EXE2BIN
FASTOPEN
FCBS
FDISK
FILES
FIND
FOR
FORMAT
GOiO
GRAFTABL
GRAPHICS
IF
INSTALL
JOIN
KEYB
KEYBxx
LABEL
LASTDRIVE
MEM
MKDIR
MODE
MORE
NLSFUNC
PATH
PAUSE
PRINT
PROMPT
RECOVER
REM
RENAME
REPLACE
RESTORE
RMDIR
SELECT
SET
SHARE
SHELL
SHIFT
SORT
STACKS
SUBST
SWITCHAR
SWITCHES
SYS
TIME
TREE
TRUENAME
TYPE
VER
VERIFY
VOL
XCOPY
MS-DOS Commands
MS-DOS is a command-driven operating system. In other words, when you
enter a command into your computer, MS-DOS carries it out by performing
the appropriate actions. This part of the book will discuss each of the MS
DOS commands, explaining their characteristics, use, and format and giving
you examples of each command. The discussion of each command begins
with a heading such as the one you see here:
CLS
Internal
MS-DOS 2.X, 3.X, 4.x
The first line in the heading shows the command in uppercase letters.
The second line describes the command as being either an internal or an
external command. Internal commands are those commands that have
been built into MS-DOS. Whenever MS-DOS is booted, these commands are
automatically loaded into memory. Internal commands are executed imme
diately and may be used any time you are operating in MS-DOS, without
365
Part 3-MS-DOS Commands
reinserting the system diskette. Some examples of internal commands are
BREAK, CHDIR, COPY, CLS, TIME, and TYPE.
External commands are stored on a disk (usually the system diskette),
in the form of a file, until they are needed by MS-DOS. Some examples of
external commands are CHKDSK, DISKCOPY, FORMAT, PRINT, and RE
COVER. When you tell MS-DOS to execute an external command, it must
load the file containing the command into memory before it can perform
the command. Therefore, before you can use an external command, the file
containing the command must be in a disk drive. If the external command is
in the current directory of the default drive, enter the command name
(along with any required parameters):
C>chkdsk a:
If the external command is in the current directory of a drive other than
the default, precede the command name with the letter specifier of the ap
propriate drive:
A>c:chkdsk b:
If the external command is not in the current directory of a drive, pre
cede the command name with the path specifier to the appropriate direc
tory:
A>c:\dos\chkdsk b:
The PATH command can be used to establish a set of path specifiers for
MS-DOS to use in looking for external commands. Path specifiers in this set
need not be included on the command line when invoking an external com
mand. Current directories, default drives, and path specifiers are discussed
in chapters 2 and 3.
The third line in the heading tells you which version(s) of MS-DOS can
execute the command. The notation"MS-DOS 2.X" refers to all versions of
MS-DOS with a major version of2 (e.g., 2.00, 2.10). Similarly, 3.Xrefers to all
versions with a major version number of 3, and 4.X refers to all versions
with a major version number of 4. Following the convention used thro~gh
out this book, the terms "MS-DOS," "DOS," and "PC-DOS" are used inter
changeably, unless otherwise specified.
Command Format
Whenever MS-DOS displays the system prompt (e.g., A>, B>, C», you may
enter a command. However, you must use the properjormat, or pattern, for
that particular command. Let's look at some examples.
The format for the command CLS (CLear Screen) is simply "CLS". This
366
MS-DOS Commands
means that to execute the command, you type cIs and press the Enter key.
Remember that you may use either uppercase or lowercase letters to type
the command; MS-DOS will automatically convert all letters to uppercase.
+-Enter
C>cls
Many MS-DOS commands require that you include one or more pa
rameters when you enter the command. A parameter is an item that gives
additional information to MS-DOS. In the command formats used in this
book, parameters appear in lowercase italic type. The command's format
will tell you which, if any, parameters are used with the command. For exam
ple, the format for the command SYS (SYStem files) is "SYS d:". The "d:" isa
parameter indicating that you should specify a drive. If you do not enter a
drive letter designator (for example, c: or a:), MS-DOS will use the default
drive. Suppose that you wish to use drive A. Your command statement will
look like this:
C>sys
a:
+-Enter
Some parameters are optional. When the parameter is enclosed in
square brackets [like this], the inclusion of that parameter is optional. For
example, the format for the command VOL (VOLume) is "VOL [d:]". Since
the "d:" is in brackets, you may enter the command with or without the
drive designator. MS-DOS will interpret the command one way if the param
eter is present, another way if it is not.
Many MS-DOS 2.X, 3.X, and 4.X command formats include the word
"path." Path is a parameter telling MS-DOS which path, or course, to take in
travelling from one directory to another. In place of the word "path," you
must enter the directory names, separated by a backslash (\). The directory
names become the "path specifiers." Let's look at the format for the com
mand MKDIR (MaKe DIRectory):
MKDIR [d:]path
The format tells us that the drive designator is optional, since the" d:" is in
brackets. However, "path" is not in brackets, so you must enter a directory
name(s). You can find more information about paths in chapter 3.
Other parameters frequently found in MS-DOS command formats are
filename and .ext. When you see the words "filename" and ".ext" in the
format, you must type the name of the file (up to eight characters in length)
and its extension (a period and up to three characters), if there is an exten
sion. For example, the format for the command TYPE is:
TYPE [d:] [path]filename[. ext]
As you can see, this command requires a filename parameter. Optional pa
rameters are the drive designator, path specifier, and filename extension.
367
Part 3-MS-DOS Commands
Some MS-DOS commands require a source and a target file. The source
contains the data to be used in executing the command. The target contains
the data that is the result of command execution. You may specify mUltiple
sources and targets with the use ofwildcards, as discussed later in this intro
duction.
Command Notation
You have probably noticed that several kinds of typefaces and punctuation
marks are used in the command formats. Items in boldface type are ones
that must be entered. You may use either uppercase or lowercase letters in
entering them. Items in italics are optional variables and are enclosed in
square brackets [ ]. Items in bold/ace italics are variables that must be enre~.
.
Include all punctuation marks as shown in the format, including com
mas, colons, semicolons, question marks, slashes, and quotes. Also include
any parentheses and plus signs.
Items separated by a vertical bar I are either/or entries. ONloFF means
either ON or OFF. An ellipsis ... following items means that you may re
peat the items as often as needed. As mentioned before, items in square
brackets are optional. Do not enter vertical bars, ellipses, or square brackets.
Wildcards
Most MS-DOS commands allow the use of wildcards in filenames and
filename extensions. Sometimes called "global characters," wildcards re
place one or more specific characters in the filename or its extension. When
wildcards (? and *) are used, the command is executed once for each match
ing file that is found. You will find more information about wildcards in
chapter 2.
Switches
Another kind of parameter found in some MS-DOS commands is a switch. A
switch instructs MS-DOS to execute a command in a certain way. To use a
switch, type a forward slash (I) followed by a letter or number. The com
mand format will show you which, if any, switches can be used with the
command. For example, here is the format for the DIR (DIRectory) com
mand:
DIR [d: ][path] [filename][. ext]][/P][IW]
368
MS-DOS Commands
As you can see, DIR has two switches, /p and /w. Both are optional, since
they are enclosed in brackets. Depending on which switch you select,
MS-DOS will scroll the directory and pause (/p) when the screen is full, or it
will list the directory in wide (lw) columns across the screen. Any switches
that may be used with a particular command are explained in the discussion
for that command.
Using MS-DOS on a Network
There are now many computer network packages available that will link
computers running under MS-DOS. The details of setting up and starting
these networks depend on the package used and will not be discussed here.
Instead, we will make some general remarks about how MS-DOS commands
behave on a network.
Network drives are aSSigned drive letters, just like drives on your own
machine. Suppose that Manny and Joe are using separate computers, but
both the computers are on the same network. Manny's computer has drives
A, B, and C. Joe's computer also has drives A, B, and C. Manny decides that
he wants to use Joe's drive C and that he (Manny) wants to call it drive D.
Manny enters a command telling MS-DOS and the network software that,
from now on, whenever Manny s:;lYs drive D, he means Joe's drive C. To
Manny, Joe's drive C is network drive D.
Most MS-DOS commands treat network drives like any other drive.
For example, if Manny enters the command "dir d:", he sees the contents
ofJoe's drive C. However, some MS-DOS commands (see box) do not work
with network drives. For most of these commands, prohibiting their use
with network drives seems reasonable. Network drives are shared re
sources and must be used respectfully. For example, Joe probably would
not appreciate it if Manny entered the command "format d:" and MS-DOS
executed it. While some of the restricted commands (such as FASTOPEN
and VERIFY) do not appear to pose any danger to the network drives, they
may nevertheless be unusable on network drives because of implementa
tion problems.
MS-DOS Commands That Cannot Be Used
with Network Drives
CHKDSK
DISKCOMP
DISKCOPY
FASTOPEN
FDISK
FORMAT
JOIN
LABEL
RECOVER
SUBST
SYS
VERIFY
369
Part 3-MS-DOS Commands
APPEND
External
MS-DOS 3.2, 3.3, 4.X
Function:
Directs MS-DOS to nonexecutable files
Format:
APPEND [IE] [/X]
APPEND d.path [;d:fpath]]
APPEND IX:ON (DOS 4.X only)
APPEND IX:OFF (DOS 4.X only)
APPEND IPATH:ON (DOS 4.X only)
APPEND IPATH:OFF (DOS 4.X only)
Examples:
append Ix Ie
append c: \word;c: \ turbo
The APPEND command provides a long awaited, much needed enhance
ment to the PATH command. PATH establishes a list ofsubdirectories for MS
DOS to search when a file is not located in the current directory. Unfortu
nately, the information supplied by PATH is useful only in locating files with
a filename extension ofEXE, COM, or BAT (executable files). The APPEND
command corrects this deficiency by allowing the inclusion of nonex
ecutable files in a directory search path.
Many programs, particularly word processors, consist of an executable
file (the "program") plus one or more nonexecutable files. A help facility is
an example of a nonexecutable file. Versions ofMS-DOS prior to 3.2 have no
way of finding such files if the files are not located in the current directory.
APPEND overcomes this limitation by providing MS-DOS with path infor
mation to all files regardless of filename extension.
The parameters used with APPEND are path specifiers separated by
semicolons. APPEND allows up to 128 characters in the complete path spec
ification.
An Example
The word processor used to write this book consists of one executable file
("wp.exe") and four nonexecutable files ("wpmsg.txt", "wpsysd.sys",
"wphelp.txt", "wpque.sys"). The five files are stored in the subdirectory
\WORD. APPEND is used to let MS-DOS know about the location of these
files as follows:
C>append c:\""ord
Once the command is entered, any subdirectory can be used as the
370
APPEND
current directory, since APPEND provides the operating system with the
information required to locate all of the files used by the word processor.
Notice that the APPEND path specifier included a drive letter. This is a good
practice to follow because it allows MS-DOS to locate files regardless of
which drive is currently the default.
APPEND is a terminate and stay resident program (see chapter 13). This
means that the first time you invoke APPEND, the program is read from the
disk and stored in memory. APPEND then remains in memory until the sys
tem is turned off or restarted. Once loaded into memory, APPEND can be
used to display, modify, or cancel the APPEND path specifier.
Displaying the APPEND Path Specifier
MS-DOS will display the APPEND path specifier in response to APPEND.
C>append c:\word
C>append
APPEND=c:\WORD
C>append c: \wordic: \ turbo
C>append
APPEND=C:\WORD;C:\TURBO
Cancelling APPEND's Path Specifier
APPEND followed by a semicolon cancels the APPEND path specifier.
C>append
APPEND=C:\WORD;C:\TURBO
C>append i
C>append
No Append
APPEND remains in memory when the path specifier is cancelled. A
new specifier can be set at any time.
DOS Functions and the IX Switch
MS-DOS carries out most of its work through the use of the MS-DOSfunc
tions. Use of the functions is discussed in appendix A, but understanding
371
Part 3-MS-DOS Commands
the role of three of the functions is helpful when using the APPEND com
mand.
EXEC
MS-DOS uses the function called EXEC to load and run executable files. You
can use the Ix switch, an optional APPEND parameter, to control the operat
ing system's use of EXEC.
The Ix switch allows EXEC to use the APPEND search path to locate
and run executable files. The following example, using DOS 4.X, illustrates
the use of the Ix switch.
C: \>append
C:\>append c:\batch
C:\>test
Bad command or file name
C: \>append Ix
C:\>test
TEST.BAT executed
<-load APPEND without Ix
<- set APPEND search path
<-execute "test.bat"
<-EXEC can't find "test.bat"
<-make search path available
<-try "test.bat" again
<- EXEC can find it now
The first command in the example loads APPEND into memory. The
command does not include the Ix switch; therefore, the APPEND search
path is not available to EXEC.
The second command sets the APPEND path specifier to be C:
\BATCH.
The command test is simply a command to execute the batch file
"test.bat". In the example, "test.bat" happens to be in the directory
C: \BATCH. Because the APPEND search path is not available, EXEC can
not locate "test.bat" and the batch file fails to execute.
The command a ppend I x makes the APPEND search path available to
EXEC. EXEC locates "test. bat" and the batch file echoes a message to indi
cate that it has executed successfully.
FIND FIRST and FIND NEXT
DOS uses the function FIND FIRST to locate the first file in a directory that
matches a wildcard specification. The function FIND NEXT is used to locate
any additional files in the directory that match the wildcard. As an example,
the command "copy * .bat b:" uses FIND FIRST to identify the first file in a
directory that has an extension of BAT. After copying the first file, the com
mand uses FIND NEXT to identify the next BAT file in the directory. The file
is copied and FIND NEXT is used again to locate the next BAT file. The pro
cess repeats until all of the BAT files have been copied.
The Ix switch controls the action taken by DOS when FIND FIRST fails
to find a match in the current directory. If Ix has been "set" (by executing
"append Ix"), FIND FIRST will look in each of the directories of the AP
PEND path specifier until it finds a match for the wildcard. If Ix has not been
set, FIND FIRST will send DOS a "File not found" error, and the process will
terminate.
372
APPEND
When Ix is set, FIND FIRST will stop in the first directory that contains
a match. FIND NEXT is then used to locate additional matches in the same
directory. The process will terminate when the last file in that directory is
located.
Using the IX Switch
The Ix switch is more flexible in DOS 4.X than in DOS 3.2 or 3.3. In4.X, you
may enter "append Ix" (or, equivalently, "append Ix:on") at any time. Simi
larly, you can turn Ix off at any time using the command "append Ix: off" .
In DOS 3.2 and 3.3, the Ix switch can only be used the first time AP
PEND is invoked. Thus, if you load APPEND into memory with the com
mand "append", the Ix switch is permanently off. The only way to turn it on
is to reboot the system and load APPEND with the command "append Ix".
Similarly, when the switch is on, the only way to turn it off is to reboot and
load APPEND without using the Ix.
The IE Switch
DOS normally stores the value of the APPEND path specifier at a memory
location known only to the operating system. Users and application pro
grams have no direct access to the specifier.
You can use the Ie switch to direct DOS to store the APPEND path speci
fier as an environment variable. Environment variables are directly accessi
ble to both users and application programs. Enter the command set to
display the DOS environment variables.
This sounds harmless enough. Unfortunately, the Ie switch causes DOS
to do some very strange things. For example, if the Ie switch is set and the Ix
switch is also set, DOS will refuse to recognize drive letter parameters in the
DIR command. If drive C is the default drive and you enter the command
"dir a:", DOS will display the contents ofthe directory on drive C.
The Ie switch can be used only when APPEND is first loaded into
memory.
The IPath Switch
So far you have seen how DOS uses APPEND when it is unable to locate a
file. DOS normally uses APPEND whether or not a filename is preceded by a
path specifier. For example, if the command "copy c: \batch \test.bat b:" is
entered, and the directory C: \ BATCH does not contain a file named
"test.bat", DOS will use the APPEND path specifier in an attempt to locate
the file.
The Ipath switch, available with the DOS 4.X implementation of
APPEND, allows you to modify this behavior. If you enter "append
Ipath:off' DOS will not use APPEND when a filename is preceded by a path
specifier or a drive letter. For example, if you enter "append Ipath:off" and
then try to execute the COPY command in the previous paragraph, the com
373
Part 3-MS-DOS Commands
mand will simply terminate ifthe directory C: \BATCH does not contain a file
named "test.bat".
The command "append Ipath:on" reverses the effect of "append
Ipath:off". Either of these commands may be entered at any time.
The PC-DOS 4.00 version of the Ipath switch contains a bug that affects
the DOS batch file processor. As you have seen, if the Ix switch is set to "on",
DOS will use APPEND to locate batch files that are to be executed. Unfortu
nately, the batch file processor gets confused by the Ipath switch. When the
switch is set to "off", DOS displays the confusing message Batch fi le
miss i ng when it attempts to execute a batch file that has been located
using the APPEND path specifier.
Problems with APPEND
APPEND is a very useful command. Unfortunately, APPEND is not as well
designed or well behaved as it should be. The design problem centers
around the fact that any file read with the APPEND path specifier is written
to the current directory. The directory setup used in writing this book illus
trates the problem. The word processor is stored as \WORD\WP.EXE. The
contents of this section of the book are stored as \BOOK\COMMANDS \AP
PEND.DOC. One way to set up the system is as follows:
C>append Ie Ix
C>append c:\book\commands
C>cd \word
With \ WORD as the current directory, the word processor can be
started, and, using the APPEND path specifier, the word processor can lo
cate "append.doc" for editing. The problem is that following any changes
to the file, the word processor writes "append.doc" to the current directory
\ WORD. The original file remains unchanged in \BOOK\COMMANDS.
Fortunately, this problem has a simple solution. I can make BOOK
\COMMANDS the current directory, and use APPEND to locate "wp.exe":
C>append c:\word
C>cd \book\commands
Now any changes made to "append.doc" are stored in the original file.
I find problems like this somewhat amusing, but obviously the poten
tial for real trouble exists. Even IBM acknowledges that a problem exists.
The PC-DOS 3.30 manual states that" APPEND IX may cause problems with
some applications. If you experience problems using the IX option, you
374
ASSIGN
may want to use the APPEND command without it." The manual goes on to
say that the APPEND path specifier must be cancelled prior to using the
commands BACKUP and RESTORE. In addition, the manual says that AP
PEND must be used before the ASSIGN command is used. The DOS 4.X
version ofAPPEND has been modified to deal with some of these problems,
but the use of APPEND still requires caution.
I have used APPEND while writing this book and have not experienced
any serious problems. However, I back up my data frequently and always
have my fingers crossed. At this pOint, the value of APPEND appears to out
weigh the apparent risks.
ASSIGN
External
MS-DOS 2.X, 3.X, 4.X
Function:
Reassigns the disk operation drive to another drive
Format:
ASSIGN [x[=lY[ ... ]]
Examples:
assign
assign a=c
assign a=c b=c
Note: the commands]OIN and SUBST are more flexible and are safer to use
than ASSIGN. Their use is recommended as an alternative to ASSIGN.
Some computer programs will execute only on systems with a particu
lar drive configuration. For example, a program may require that any data
used in the program be located on drive A. The ASSIGN command allows
you to overcome this limitation by reassigning the specified disk drive to
another disk drive.
Suppose you have a program that requires data to be on drive A, but
you want to keep the data on your hard disk, drive C. You can use ASSIGN to
tell MS-DOS that all references to drive A are to be redirected to drive C (the
hard disk). Note that you do not have to enter a colon after the drive letter
when you are using the ASSIGN command:
C>assign a=c
Now each time that the program looks for data on drive A, MS-DOS will
automatically redirect the program to drive C.
You may make more than one reassignment with each ASSIGN com
mand. The following command tells MS-DOS to redirect all references for
drives A and B to drive C:
C>assign a=c b=c
375
Part 3-MS-DOS Commands
Entering ASSIGN with no parameters cancels any previous ASSIGN
commands and you are returned to the original drive:
C>assign
ASSIGN is designed primarily for use with MS-DOS 1.X programs that
are run on systems without hard disks. ASSIGN should be used only when
necessary and then with caution. Reassigning a floppy disk drive to the hard
disk will redirect all access of the floppy disk to the hard disk. Unless care is
exercised, you can inadvertently erase all or part of the hard disk.
The makers of MS-DOS recommend that application programs be writ
ten so that the user specifies the drive configuration of the system on which
the program will be run. Restricting programs to a particular configuration is
discouraged.
Note that the MS-DOS commands DISKCOPY and DISKCOMP will ig
nore any drive reassignments made with ASSIGN. ASSIGN should not be
used with BACKUp, RESTORE, LABEL, JOIN, SUBST, or PRINT because
drive reassignments can confuse these commands, causing unpredictable
results.
ATTRIB
External
MS-DOS 3.X, 4.x
Function:
Modifies read-only and archive file attributes
Format:
ATTRIB [+R (or) -R][+A (or)
- A] [d: ][pathlfilename[. ext] [IS]
Example:
attrib +r mypro.c
MS-DOS maintains afile attribute for each file. The attribute contains infor
mation about how the file is stored. Each file's attribute is actually a compos
ite of six individual characteristics that the file mayor may not possess. The
command ATTRIB allows you to modify two of these attributes: read-only
and archive. See chapter 10 for detailed information about file attributes and
for a set of programs allowing you to modify a file's hidden file attribute.
The Read-Only Attribute
MS-DOS files that possess a read-only attribute cannot be written to or
erased. ATTRIB can be used to mark files as read-only, thereby protecting
the files from accidental modification or erasure. The command "attrib +r
filename" makes a file read-only. The command "attrib -r filename"
376
ATTRIB
removes read-only protection, and "attrib filename" displays a file's read
only status.
The following commands give the file "mypro.c" read-only status,
confirm that the file is read-only, remove the read-only status, and confirm
that the read-only status has been removed.
C>att ri b +r mypro.c
....set as read-only
C>attrib mypro.c
.... request attribute status
R C:\MVPRO.C
.... MS-DOS displays (R = read-only)
C>attrib -r mypro.c
.... remove read-only status
C>attrib mypro.c
.... request attribute status
c:\MVPRO.C
.... read-only removed
The Archive Attribute
MS-DOS turns on a file's archive attribute each time that the file is modified.
In 3.2 and later versions of MS-DOS, the archive attribute can also be set by
using the command "attrib +afilename". A file's archive attribute may be
cleared with the command "attrib -a filename". The command "attrib
filename" displays the status of a file's archive attribute. See the discussions
of the commands BACKUP and XCOPY for information on how MS-DOS
uses a file's archive attribute.
Processing Directories
ATTRIB processes files in the specified (or default) directory which match
the file specified in the command line. The /s switch directs ATTRIB to also
process all files in the subdirectories of the specified (or default) directory.
The following example is executed with \BOOK as the default directory:
C>dir
....display contents of \BOOK
Volume in drive C is HAROOISK
Directory of C:\BOOK
NEW
OLD
MIse
<OIR> 3-27-90 3:52p
<OIR>
8-11-90 6:10p
<OIR>
8-11-90 8:10p
<OIR>
8-11-90 8:11p
DOC
3210 9-23-90 11:07a
377
Part 3-MS-DOS Commands
5 File(s)
C>attrib
*. *
3954688 bytes free
+-request attribute status for files in
\BOOK and all subdirectories
/s
A
C:\BOOK\NEW\ATTRIB.DOC
A
C:\BOOK\NEW\ASSIGN.DOC
A
C:\BOOK\NEW\TMP\INTRO.DOC
+- status for files in \BOOK\NEW\ TMP
A
C:\BOOK\OLD\DIR.DOC
+- status for files in \BOOK\OLD
A
C:\BOOK\MISC.DOC
<- status
+- MS-DOS displays status for files in
subdirectory \BOOK\NEW
for files in \BOOK
BACKUP
External
MS-DOS 2.X, 3.X, 4.x
Function:
File backup utility
Format:
BACKUP d:[path] [filename[.ext]] d:[/S] [1M] [/A]
[1D:mm/dd/yy] [/T:hh:mm:ss] [IF]
[lL[: [d:] [path] [filename][. ext]]]
Examples:
backup c: a:
backup c: * .doc a:
backup c: \ a: Is
The BACKUP command is a DOS utility that allows you to make backup
copies of disk files. While BACKUP can be used to back up individual files,
its primary value is in backing up groups of files or even the entire contents
of a hard disk.
Backup copies are stored in archival form. This means that the files are
stored in a format that is specific for backup storage. They cannot be used
for other purposes. Archival files are converted back into standard DOS files
using the DOS RESTORE command.
The BACKUP command allows you to select files for archival storage
on the basis of path specifier, filename, date stamp, and/or time stamp. You
can also back up files that have been changed since they were previously
backed up.
378
BACKUP
DOS 3.X and 4.X can store archive files on either floppy diskettes or
hard disks. On floppy diskettes, the archive files are stored in the root direc
tory. The BACKUP utility erases any existingfiles in the root of any floppies
storing archive files (unless the fa switch is used).
On hard disks, the archive files are stored in a subdirectory named
\BACKUP. The BACKUP utility erases any existingfiles in the \BACKUP di
rectory on the hard drive storing the archive files (unless the fa switch is
used). Archive files cannot be stored on the logical drive containing the orig
inal files. (A hard drive with two DOS partitions consists of two logical
drives; see chapter 1.)
The DOS 2.X version of BACKUP stores archive files only on floppy
diskettes. The files are stored in the root directory. The BACKUP utility er
ases any previously existingfiles in the root of floppies storing the archive
files (unless the fa switch is used).
Many users have experienced problems trying to restore archive files
that were created with an earlier version of DOS. For example, archive files
created with the DOS 2.X version of BACKUP cannot be converted back to
standard files with the DOS 3.X version of RESTORE. You can avoid this
problem by using equivalent versions of BACKUP and RESTORE. If you
want to archive some files prior to installing a new version of DOS, first boot
your system using the floppy with the new DOS. Then use the new DOS
version of BACKUP to create your archive files, before installing the new
DOS on your system. This will guarantee that your archive files are compati
ble with the new version of RESTORE.
Backing Up a File
To create a backup copy of a hard disk file, first type backup, then type the
file specification of the file you are copying, next type the drive designator
(such as a:) of the target diskette (the floppy diskettte that will store the
copy), and finally type any of the four optional switches (see the following
discussions) .
Afile specification consists of a letter designating the drive holding
the file, followed by the name of the path leading to the directory holding
the file, followed by the filename and filename extension of the file. If the
BACKUP command does not include a drive letter and path for the file to
be copied, BACKUP will assume that the file to be copied is in the current
directory of the default drive.
Wildcard characters (see chapter 2) may be used in the filenames and
file extensions. When wildcards are used, all of the matching files in the
specified (or default) directory will be backed up.
In the first example, we will use BACKUP to make a copy ofthe hard disk
file "lotsa.dat". The backup will be stored on the target diskette in drive A.
C>backup c:lotsa.dat a:
379
Part 3-MS-DOS Commands
MS-DOS beeps and displays this warning:
Insert backup diskette 01 in drive A:
Warning! Diskette fiLes wiLL be erased
Strike any key when ready
BACKUP will erase any data on the diskette before making the backup
copy, unless you use the fa switch. This warning gives you a chance to substi
tute another diskette if you wish. After double-checking to make sure that
you have the right diskette in drive A, go ahead and press any key. BACKUP
will copy the hard disk file onto the diskette in drive A and display the fol
lowing message on the screen:
*** Backing up fiLes to diskette 01 ***
\a:Lotsa.dat
Keeping Track of Your Backups
BACKUP will prompt you to insert another diskette if the backup process
will exceed the capacity of the target diskette. Given the tremendous storage
capacity ofa hard disk, it is not uncommon to need several diskettes to finish
the job. A good practice is to keep a written record of important BACKUP
sessions. You can get a printed copy of the BACKUP screen display by press
ing Ctrl-PrtSc before you enter the BACKUP command. All screen display
will be echoed (copied) to your printer. Make sure that your printer is turned
on before you press Ctrl-PrtSc. At the end ofthe backup session, press Ctrl
PrtSc again to stop the echoing process.
For a convenient way to automate this record-keeping process with MS
DOS 3.3, see the following discussion of the II switch in "Other BACKUP
Switches."
Backing Up a Directory
All the files in a directory will be backed up if the BACKUP command does
not contain a filename. In the following example, all the files in the subdirec
tory SUBDIRI will be backed up. Notice that MS-DOS lists each file in the
subdirectory as it is being backed up.
C>backup c:\subdir1 a:
Insert backup diskette 01 in drive A:
Warning! Diskette fiLes wiLL be erased
Strike any key when ready
*** Backing up fiLes to diskette 01 ***
\SUBDIR1\FILE1
380
BACKUP
\SUBDIR1 \FIlE2
\SUBDIR1\FIlE3
\SUBDIR1\FILE4
Backing Up an Entire Disk
The /s switch is used with BACKUP to copy all files in a directory as well as all
files in all subdirectories contained in the directory. This capability allows
you to back up an entire hard disk, preserving the disk's directory structure
in the process.
If you have a hard disk, it is good practice to have an archive copy of the
disk's entire contents. Then, if a disaster such as accidental formatting of the
disk occurs, you will be able to restore the hard disk's file contents and direc
tory structure in a straightforward manner.
The following example shows how you can use BACKUP to archive
your entire hard disk. You will have to do this if you are upgrading to DOS
4.X and wish to create a disk partition larger than 32 Mbytes. You can also
use this technique if your computer currently uses MS-DOS and you want to
use the SELECT program to install PC-DOS 4.X. Please refer to chapter 1 for
a discussion of SELECT.
If you are upgrading to DOS 4.X, you should boot your system with the
4.X system floppy and then use the 4.X version of BACKUP to back up your
entire hard disk. After archiving your files, you can reformat your hard disk
with the 4.X versions ofFDISK and FORMAT and then use the 4.X version of
RESTORE to restore your archived files.
C:\>backup c:\ a: Is Il:c:\utils\backup.log
Insert backup diskette 01 in drive A:
WARNING! Fi Les in the target drive
A:\ root directory wi LL be erased
Press any key to continue •••
The command says to create on drive A an archive file containing the
contents of the root directory on drive C. The /5 switch says to include all
files contained in all subdirectories of the root. Thus, all files on drive C will
be stored in the archive. The / l switch says to create a log file. The log file will
record the names of the files stored in the archive. The log file is to have the
name c:\uti ls\backup.log.
Once the command is entered, DOS will prompt you to insert the
backup diskette in drive A. DOS will also warn you that any files contained in
the root directory of drive A will be erased.
Once the backup diskette is in drive A, you can start the backup process
by pressing any key. DOS will display the complete path specifier and
filename of each file as it is copied to the archive file. DOS also prompts you
to insert another diskette when the diskette in drive A becomes full.
381
Part 3-MS-DOS Commands
Backing Up Modified Files
The 1m switch is used to back up any files that have been modified since the
last BACKUP session. This handy option can save you time and diskette
space, since it selects only those files that need to be backed up.
Let's say that you use your hard disk to store your word processing
documents. All of the documents have a filename extension of DOC. If you
have several hundred document files, it can be difficult to keep track of
which files need to be backed up and which files have already been backed
up. But you needn't concern yourself with this problem because BACKUP
and 1m will take care of it for you. All you need to do is enter the following
command at the end of each word processing session:
C>backup *.doc a:/m
Any document file that was modified in the work session will automatically
be backed up.
Backing Up Files by Date
The Id switch is used with BACKUP to copy files that were created, Qr last
modified, on or after a specific date. The following command will back up
any files in the root directory that were created, or modified, after December
11, 1988.
C>backup c:\ a:/d:12-11-88
Backing Up Files by Time
The It switch, implemented in MS-DOS 3.3, allows you to back up files that
were created or modified after a specified time of day. The following exam
ple creates a backup of all files in the root directory that have a time stamp
later than 3 :00 pm. The backup copies are stored on drive A.
C>backup c:\*.* a:/t:15:00:00
Other BACKUP Switches
The fa switch allows you to add archive files to the root directory offloppies
or to the \BACKUP subdirectory of hard disks without erasing pre-existing
data.
382
BACKUP
The If switch, implemented only in version 3.3, allows you to store
archive files on a previously unformatted diskette. MS-DOS must be able to
read the file FORMAT. COM in order to execute this option. The DOS 4.X
version of BACKUP will automatically format an unformatted diskette. The
If switch is therefore not implemented in 4.X.
The II switch, implemented in MS-DOS 3.3, directs BACKUP to create a
log file. The log file consists ofa record ofall files that have been backed up,
along with the date and time of the backup. The log file can be useful in
keeping track of files that have been archived. You can specify a drive, path,
and filename for the log file. The default is BACKUP.LOG stored in the root
of the source drive.
Restrictions with BACKUP
The commands ASSIGN, JOIN, and SUBST instruct MS-DOS to redirect all
references for one device to another device. For example, ASSIGN may be
used to redirect all references for drive A to drive C. Each of these com
mands can put MS-DOS in a state that is confusing to BACKUP. The effect is
that BACKUP results may be unpredictable if one of these commands has
previously been used.
Another restriction in using BACKUP occurs with the APPEND com
mand. BACKUP used in conjunction with APPEND may result in loss of data.
See the discussion of APPEND for details.
BACKUP and ERRORLEVEL
ERRORLEVEL is a variable that has special meaning to MS-DOS. The value of
ERRORLEVEL is set by the BACKUP command as follows:
o
1
3
4
BACKUP command completed in normal fashion.
No files were found on the hard disk that match the file(s) specified
in the BACKUP command.
Execution of the BACKUP command was terminated by the user
pressing CtrI-Break.
The BACKUP command was terminated due to an error in execu
tion.
Once the value of ERRORLEVEL has been set, ERRORLEVEL may be
used in conjunction with the IF command in an MS-DOS batch file. ER
RORLEVEL allows you to create batch files that are executed according to
the outcome of a BACKUP command. See the discussion of the IF command
for further details.
383
Part 3-MS-DOS Commands
BREAK
Internal
MS-DOS 2.X, 3.X, 4.X
Function:
Controls the frequency with which MS-DOS checks for Ctrl
C and Ctrl-Break.
Formats:
BREAK ON
BREAKOFF
BREAK
Example:
break on
Pressing the Ctrl-C or Ctrl-Break key combinations will generally terminate
a program and return control of the computer to MS-DOS. You can use the
BREAK command to control the frequency with which MS-DOS checks for
these key combinations.
The command' 'break off" directs MS-DO S to check for Ctr1-Break and
Ctrl-C only during input and output operations (such as reading the key
board or sending characters to the display screen).
The command "break on" directs MS-DOS to check for Ctrl-Break and
Ctrl-C whenever a call is made to the operating system's service functions.
The service functions are discussed in appendix A, but for purposes of un
derstanding the BREAK command you only need to know that MS-DOS
checks for Ctrl-Break and Ctrl-C much more frequently when BREAK is on.
You can enter "break" (with no additional parameters) to see if BREAK
is currently on or off.
You can use the BREAK command on the MS-DOS command line, in a
batch file, or in the special MS-DOS file CONFIG.SYS (refer to chapter 5 fora
discussion of CONFIG.SYS). When BREAK is used in CONFIG.SYS, an
equal sign (=) must be placed between "break" and its parameter
("break=on" or "break=off").
384
BUFFERS
BUFFERS
Internal
MS-DOS 2.X, 3.X, 4.X
Function:
Establishes the number of disk buffers that MS-DOS creates
in memory.
Format:
BUFFERS=xx
BUFFERS=xx[,yy] [IX] (4.X only)
Note: BUFFERS can only be used in the file CONFIG.SYS.
Examples:
buffers = 5
buffers = 15,5 IX
A disk buffer is an area of memory that MS-DOS uses to store data being
written to, or read from, a disk. A buffer serves as a way station between the
disk and the portion of memory storing a program's data.
MS-DOS transfers data between a disk and a buffer in 512-byte incre
ments. To illustrate how a buffer is used, consider what happens when a
program requires a 128-byte record stored on disk. MS-DOS reads a 512-byte
portion of the file from the disk. Contained within these 512 bytes are the
128 bytes needed by the program. The 128 bytes are transferred to the pro
gram's data area in memory. If the program subsequently requires another
128-byte record, MS-DOS first determines if the record is already stored in a
buffer. If it is, no disk access is required.
The BUFFERS command is used to establish the number of disk buffers
set up by MS-DOS during booting. Increasing the number of buffers can
speed program execution, but only up to a point. The more buffers that
exist, the more sectors that can be stored in memory; hence, fewer accesses
of the disk are necessary. However, the more buffers, the longer it takes MS
DOS to search all the buffers to see if the needed sector is already in memory.
Eventually it becomes faster to access the disk than to search all the buffers.
The amount of memory taken up by the disk buffers is another consid
eration. Each buffer adds 528 bytes to the amount of memory taken up by
MS-DOS. By increasing the amount of memory needed by MS-DOS, the
amount of memory available for program data is reduced. Thus, the addi
tional buffers can increase the frequency of disk accesses, causing the pro
gram to slow down.
If disk access tends to follow a random pattern, as would be the case in
querying a large database, increasing the number of disk buffers should sig
nificantly improve performance. Alternatively, if disk access is primarily se
quential, as is the case with most word processing applications, increasing
the number of disk buffers will generally not result in as dramatic an im
provement in performance. Chapter 5, Configuring Your System, contains
additional guidelines on the use of BUFFERS.
You can use BUFFERS to set up from 1 to 99 buffers in conventional
385
Part 3-MS-DOS Commands
memory. In addition, the DOS 4.X version of BUFFERS allows you to create
up to 10,000 buffers in expanded memory (see DOS 4.X enhancements be
low).
On DOS versions prior to 3.3, the default value for BUFFERS is 2. This
is the number of disk buffers created if CONFIG.SYS does not contain a
BUFFERS statement.
In DOS 3.3 and 4.X, the default is determined by the system's hard
ware. If the amount of random access memory (RAM) is less than or equal to
128 Kbytes and all diskette drives are less than 360 Kbytes, the BUFFERS
default is 2.
If RAM is less than or equal to 128 Kbytes and one or more diskette
drives is 360 Kbytes or greater, the BUFFERS default is 3.
If RAM is greater than 128 Kbytes and less than or equal to 256 Kbytes,
the BUFFERS default is 5.
If RAM is greater than 256 Kbytes and less than or equal to 512 Kbytes,
the BUFFERS default is 10.
If RAM is greater than 512 Kbytes, the BUFFERS default is 15.
Enhancements in DOS 4.X
The DOS 4.X version of BUFFERS allows you to place disk buffers in ex
panded memory and also to establish the size of a read-ahead buffer.
The Ix switch tells DOS to place the disk buffers in expanded memory.
You can create up to 10,000 disk buffers when the buffers are placed in ex
panded memory. Of course, you will need an expanded memory card and
expanded memory software in order to use this option. Unfortunately, that
is often not enough. Many users of PC-DOS 4.X report that the switch does
not work on their systems. In general, the Ix switch only operates correctly
on systems with IBM expanded memory cards.
When an application program needs data on the disk, DOS determines
which disk sector is storing the data. The operating system then reads that
sector into memory. If the application program is primarily performing se
quential readings of the disk- that is, one sector is read, followed by the
adjoining sector, and so on-it is advantageous for DOS to "look ahead" and
read a sequence of sectors into memory each time a disk access is per
formed. This reduces the total number of disk accesses required and speeds
up the program's execution. Programs such as word processors, which typi
cally perform a large amount of sequential disk access, may experience im
proved performance by increasing the number of look-ahead sectors.
The DOS 4.X version of BUFFERS accepts a second parameter, which
allows you to establish the number of look-ahead sectors that are read into
memory. You may specify a value of 1 t08 for the number of sectors to "read
ahead." All of the read-ahead sectors are placed in a single buffer. Each read
ahead sector requires 512 bytes ofmemory. No read-ahead buffer is created if
the second parameter is not specified.
The following example illustrates the use of BUFFERS in DOS 4.X:
386
CALLlCHCP
buffers=15,5 Ix
The statement (which must be contained in the CONFIG.SYS file) creates 15
disk buffers in expanded memory. In addition, a read-ahead buffer is created
that contains 5 read-ahead sectors.
CALL
Internal
MS-DOS 3.3, 4.X
Function:
Allows a batch file to be called (executed) from another
batch file. Control returns to the first batch file when the
called batch file terminates.
Format:
CALL <filename>
Example:
call batfile2
The CALL command is a batch file command that is used to execute one
batch file from within another batch file. The called batch file receives its
own copy of the DOS environment, which it may modify. Control returns to
the first batch file when the called batch file terminates. The environment of
the calling batch file is not affected by any changes made by the called batch
file to its environment. Use of the CALL command is illustrated in chapter 4,
MS-DOS Batch Files.
CHCP
Internal
MS-DOS 3.3, 4.X
Function:
Selects a code page for the system
Note: Please refer to appendix D for an overview of code
pages and code page switching.
Format:
CHCP [xxxx]
Examples:
chcp
chcp 850
The command CHCP selects a specific code page for each device in the
system which supports that code page. Prior to using CHCp, the NLSFUNC
command must be invoked. The following two commands assign code page
850 to the system:
387
Part 3-MS-DOS Commands
C>nlsfunc
C>chcp 850
Note that the NLSFUNC command need be invoked only one time after
the system is booted.
CHCP with no parameters displays the system's currently active code
page.
C>chcp
Active code page:
437
CHDIR
Internal
MS-DOS 2.X, 3.X, 4.x
Function:
Changes the current directory or displays the current
directory's path
Format:
CHDIR [[d:]patb]
Examples:
chdir \subal \suba2
cd a:\subbl
chdir
cd
The current directory is the directory in which MS-DOS is currently active.
At any given time, there is only one current directory for each drive in the
system. You can use the command CHDIR (CHange DIRectory) to instruct
MS-DOS to change the drive's current directory. You can also use CHDIR to
display the path to a drive's current directory. This command can be entered
as "chdir" or abbreviated as "cd".
Changing the Current Directory
To change the current directory, type chdir (or cd) and then type the path to
the new current directory. Suppose that the path from the root directory to
the subdirectory SUBA2 is ROOT DIRECTORY, SUBA 1, SUBA2 (see figure 1).
MS-DOS represents this path as \SUBAI \SUBA2. Note that the root direc
tory is indicated by the first backward slash.
The following command will make SUBA2 the current directory of
drive C:
388
CHDIR
ROOT DIRECTORY
Figure 1. File structure for root directory, SUBAI, SUBA2.
C>chdir \suba1\suba2
To change the current directory of a drive that is not the default drive,
type the drive letter designator and then type the path:
C>cd a: \subb1
Displaying the Path to the Current Directory
Entering "chdir" (or "cd") with no parameters directs MS-DOS to display
the path to the current directory of the default drive:
C>chdir
C:\SUBA1\SUBA2
To display the path to the current directory of a drive other than the
default, type chdir (or cd), followed by the letter designator of the drive:
C>cd a:
A: \SUBB1
You can find more detailed information on directories, subdirectories,
current directories, and paths in chapter 3.
389
Part 3-MS-DOS Commands
CHKDSK
External
MS-DOS 1.X, 2.X, 3.X, 4.x
Functions: Analyzes the file allocation table (FAT), the directory, and any
subdirectories on a disk
Analyzes the status of computer memory
Format:
CHKDSK [d:]
CHKDSK [d:][filename.ext][/F][N] (MS-DOS 2.X, 3.X, 4.X)
Examples:
chkdsk
chkdsk b:
chkdsk/f
chkdsk b:letter.doc IfIv
The CHKDSK (CHecK DiSK) command is an MS-DOS utility that checks the
condition, or status, of a disk's data. MS-DOS stores data in files on a disk. It
keeps track of the files on the disk by consulting the disk's directory and file
allocation table (FAT). CHKDSK analyzes the FAT and the disk directory (and
any subdirectories) for errors and problems. To prevent minor problems
from turning into major ones, it is a good idea to run CHKDSK occasionally
on all your hard disks and floppy diskettes. You will find more information
about the structure and role of the FAT and the file directory in chapter 10.
Using CHKDSK
Since CHKDSK is an external command, a copy of the file CHKDSK.COM
must be available to the system before you can use the command. This
means that either CHKDSK.COM must be in the current directory of the
default drive or that the location of CHKDSK.COM must have been speci
fied by the PATH command (see the discussion of PATH).
To check a disk, type chkdsk and then type the letter designator of the
drive containing the disk to be checked. If you do not enter a drive letter
deSignator, CHKDSK will examine the disk in the default drive:
C>chkdsk
Volume HARDDISK created JuL 6, 1987 2:14p
10592256 bytes total disk space
57334 bytes in 3 hidden fi les
184320 bytes in 42 directories
10264576 bytes in 846 user files
86016 bytes available on disk
390
CHKDSK
524288 bytes totaL memory
320704 bytes free
c>
Since the preceding command did not include a drive letter designator,
CHKDSK examined the disk in the default drive; it did not find any errors.
The status report displays information about the disk and the computer
memory. The first four lines report the total disk space taken up, the number
of files on the diskette, and the remaining available space. The last two lines
report on the amount of memory used up and the amount still available.
CHKDSK Features of MS-DOS 2.X, 3.X, and 4.X
The MS-DOS 2.X, 3.X, and 4.X versions of CHKDSK have four additional
features:
1. If a filename is included in the command, CHKDSK will display the
number of noncontiguous areas (sectors) on the disk that contain the
named file. While files that are highly fragmented (having many non
contiguous areas) are acceptable, they can slow down system perform
ance. If you use the wildcard * . * as a filename, CHKDSK will report on
each fragmented file in the current directory. You can specify another
directory by preceding the *. * with a path specifier and a backwards
slash (\). A fragmented file can be copied into a contiguous area on
another disk with the COpy command.
2. The If switch instructs CHKDSK to attempt to correct any errors de
tected. CHKDSK always asks if it should attempt to correct any errors
that it detects. However, CHKDSK makes no attempt to correct the er
rors if If was not used. Unfortunately, CHKDSK cannot correct all er
rors. Commercial programs such as PC-Tools, Norton Utilities, and
Mace Utilities contain disk sector editors and other powerful utilities
that can help you correct errors reported by CHKDSK.
3. The Iv switch directs CHKDSK to display the filename and path speci
fier of each file on the disk. A good way to find a file on a hard disk is to
"pipe" the output of "chkdsk Iv" to the FIND command as follows:
chkdsk c: Iv : find fiLename
Piping of DOS commands is discussed in chapter 6.
4. You can redirect the status report and any messages to a disk file by
using the following command:
391
Part 3-MS-DOS Commands
C>chkdsk b: > tile
Note: Do not use the If switch in the CHKDSK command if you are
redirecting CHKDSK's output.
CHKDSK Error Messages
Allocation Error, Size Adjusted
The file's entry in the file directory indicates that the file is larger than the
amount of disk space allocated for the file in the FAT. The If switch directs
CHKDSK to truncate the file so that its size matches the allocation specified
by the FAT.
Cannot CHDIR to <file specifier>
Tree cannot be processed beyond this point The first entry in each subdirec
tory is given the name" .", which represents the directory itself. The second
entry in each subdirectory is given the name" ..", which represents the sub
directory's parent directory. CHKDSK displays this error message if either of
these entries is corrupted. CHKDSK asks you if it should Conve rt d; rec
tory to fi Le. If you answer yes, the subdirectory is converted to a standard
file. Recognize that this new file only contains the contents of the subdirec
tory. It does not contain the contents of the files listed in the subdirectory.
These files become lost clusters when the subdirectory is converted.
CHKDSK also asks you if it should convert these lost clusters to files ("lost
clusters" are discussed below). CHKDSK does not take any action if the If
switch was not used.
Cannot CHKDSK a Network Drive (or SUBSTed or
ASSIGNed Drive)
CHKDSK cannot be used to check any drives on a local area network. It also
cannot be used on logical drives created with the DOS commands SUBST
and ASSIGN.
Contains invalid cluster, file truncated
Same as "Allocation error, size adjusted".
<file specifier> contains N noncontiguous blocks
If you enter the command" chkdsk * . * " , CHKDSK displays this message for
each file in the current directory that is stored in noncontiguous blocks.
This does not represent an error, but highly "fragmented" files can slow
down disk access. Commercial programs (such as Mace UnFrag and Disk
Optimizer) are available to "defrag" highly fragmented disks.
Convert directory to file (YIN)?
This message is preceded by the name of a directory (or subdirectory) that is
no longer functional because ofone or more invalid entries. CHKDSK asks if
392
CHKDSK
you want this directory converted to a file (which could then be examined
with DEBUG). If you enter "Y" (and If was included in the CHKDSK com
mand), the directory will be converted to a file. If you enter "N", no conver
sion is made.
Convert lost chains to files (YIN)?
A cluster is a unit of space on a disk. The cluster is said to be "lost" when the
FAT entry for the cluster is a nonzero number but the cluster does not belong
to any file. A contiguous set of lost clusters is called a lost chain. This mes
sage asks if you want each lost chain stored in a file. If you reply "Y", MS
DOS creates a separate file for each lost chain. The files are named
FILEnnnn.CHK, where nnnn is a sequential number beginning with 0000.
If you reply "N", MS-DOS converts to zero the entries in the FAT that corre
spond to the lost chains and makes available for new files the areas in the disk
occupied by the lost chains. Regardless of your reply, no changes will be
written to the disk if you did not include If in the CHKDSK command.
Disk error writing FAT x
CHKDSK was unable to update the FAT. The x will either be 1 or 2, depend
ing on which copy of the FAT CHKDSK was trying to update .
. Entry (or .. Entry) has bad attribute (or link or size)
The first (" .") or second (" ..") entry in a subdirectory is defective. The 3.X
and 4.X versions of CHKDSK will attempt to fix this error if the If switch was
used.
Error found, F parameter not specified
Corrections will not be written to disk
The If switch was not included with the CHKDSK command. The results of
the CHKDSK analysis will be displayed, but no changes will be written to
the disk.
filename is cross-linked:
On cluster xx
Two files are said to be cross-linked when the FAT indicates that a cluster
belongs to both files. The message will be displayed twice, once for each file
that is cross-linked. CHKDSK does not take any action when this situation
occurs. Cross-linked files can be salvaged, either partially or entirely, by
copying each of the files onto another disk.
First cluster number is invalid,
Entry truncated
This message will be preceded by the name of a file. The file's first cluster,
which is located in the file directory, is invalid. The file will be truncated to a
length of zero if the If parameter was included in the CHKDSK command.
393
Part 3-MS-DOS Commands
Insufficient room in root directory
Erase files from root and repeat CHKDSK
CHKDSK has been instructed to convert lost chains into files. Unfortunately,
there is not enough room in the root directory for all the files that CHKDSK
wants to create. To solve this problem, copy the files already recovered to
another diskette. Then delete the recovered files from the original diskette.
Rerun CHKDSK on the original diskette to recover the remaining lost chains.
Invalid subdirectory
CHKDSK has found an invalid entry in the subdirectory that is named.
CHKDSK will attempt to correct the error if the If parameter was included in
the CHKDSK command.
Probable non-DOS disk
Continue (YIN)?
The first byte of the FAT does not contain a valid entry. CHKDSK will indi
cate the possible corrective measures if you reply with "Y". However, the
changes will not be written to the disk if the If parameter was not included in
the CHKDSK command.
xxxxxxx bytes disk space freed
An error in the FAT has been corrected by truncating a file. The portion of
the disk previously allocated to the file is now available for data storage.
xxx lost clusters found in yyy chains
A cluster is "lost" if the FAT entry for the cluster is a nonzero number but the
cluster does not belong to any file. A contiguous group of lost clusters is
called a lost chain. CHKDSK will ask if you want to convert each lost chain
to a file or if you want to free the disk space taken up by the chains.
CLS
Internal
MS-DOS 2.X, 3.X, 4.X
Function:
Clears the screen and moves the cursor to home position
Format:
CLS
Example:
cls
The CLS (CLear Screen) command clears the display screen and moves the
cursor to the home position. CLS sends the ASCII character sequence
ESC[2J to the console device driver. This is the ANSI command sequence for
clearing the screen and moving the cursor to home position.
On some systems, the ANSI.SYS device driver must be installed by the
394
COMMAND
user before the CLS command will operate. See chapter 9 for information on
installing the ANSI.SYS device driver.
COMMAND
External
MS-DOS 2.X, 3.X, 4.x
Function:
Invokes a secondary command processor
Formats:
COMMAND[lCstring][lP]
COMMAND[d.·][path][/C string][/P][/E:xxxxx]
3.X,4.x)
COMMAND IMSG
Examples:
(MS-DOS
(MS-DOS 4.X)
command
command Ic dir
command Ic do it.bat
The command processor serves as the interface between you and the
operating system. It displays the system prompt on the screen, interprets the
command you enter, and acts according to the contents of that command.
The primary MS-DOS command processor is COMMAND.COM.
You can use COMMAND to invoke a secondary command processor.
Invoking the command directs COMMAND to (1) load a copy of the com
mand processor into memory and (2) pass control to the copy (the second
ary command processor). MS-DOS uses the path specifier contained in the
command to locate the copy of COMMAND.COM that will be loaded. If
COMMAND. COM is not stored in the specified directory, or if no path speci
fier is included in the command, MS-DOS uses the path stored in the envi
ronment to locate COMMAND.COM.
To invoke a secondary command processor, type command:
C>command
On the surface it appears as though nothing has happened, but you are now
operating under the control of a secondary command processor. If you get a
Bad fi le or command message, insert your working copy of the system disk
ette in drive A and try again.
To leave the secondary command processor and return control to the
primary command processor, type exit:
C>exi t
Again it appears as though nothing has happened, but you are now back
under the control of the primary command processor.
395
Part 3-MS-DOS Commands
COMMAND Switches
Using the Ic switch when you invoke a secondary command processor al
lows you to enter a command line:
C>eommand Ie dir
This command tells MS-DOS to load a secondary command processor and
instructs the secondary command processor to execute a DIR command.
The Ic switch is occasionally used to allow a batch file to run another
batch file. Starting with DOS 3.3, CALL should be used for this purpose.
CALL does not require the loading of a secondary command processor.
The Ip switch tells MS-DOS to keep the secondary command processor
in memory even if an EXIT command is issued. The Ip switch is used when
increasing the size of the MS-DOS environment (see chapter 11). If both Ip
and Ic are issued, the Ip switch is ignored.
The le:xxxxx switch, implemented in MS-DOS 3.1 but not docu
mented until version 3.2, is used to set the size of the environment that is
passed to the secondary command processor. If no environment size is
specified, the secondary command processor inherits an environment that
is the same size as the environment of the primary command processor.
In version 3.1, xxxxx sets the number of paragraphs (16-byte blocks) in
the environment. The allowable range is 10 to 2048.
In 3.2 and later versions, xxxxx sets the number of bytes in the envi
ronment. The allowable range is 160 to 32,768, the environment size being
rounded up to the nearest multiple of 16.
The environment variables of the primary processor are inherited by
the secondary command processor. Any modifications that the secondary
command processor performs on its environment variables are local. The
modifications do not affect the environment variables of the primary com
mand processor. The MS-DOS environment and environment variables are
discussed in chapter 11.
The IMSG switch is implemented in DOS 4.X for use on floppy disk
systems. The switch directs DOS to load error message information into
memory along with the secondary command processor. This does away
with the need to read a floppy disk each time an error is encountered. You do
not need to use this switch on systems with a hard disk drive.
Purpose of a Secondary Command Processor
A secondary command processor allows a computer program or batch file
to utilize other programs, other batch files, or MS-DOS commands. It works
something like this: MS-DOS is booted, and the (primary) command proces
sor is loaded into memory and takes control. You enter the name of the file
containing a computer program; the command processor loads the program
396
COMMAND
and passes control to it. Your program begins to execute and at some point
loads a secondary command processor. The secondary processor receives
control, at which point any program, batch file, or MS-DOS command may
be executed. At some point, the secondary command processor is exited,
and control returns to the original computer program (see figure 2). See
chapter 4 for a discussion of the role of a secondary command processor in
executing batch files.
Boot
Procedure
Primary
Command
Processor
User Programs
Batch Flies
MS·DOS Commands
EXIT
Secondary
Command
Processor
---Ill
User Programs
Batch Files
MS·DOS Commands
Figure 2. Loading a secondary command processor.
397
Part 3-MS-DOS Commands
COMP
External
MS-DOS 1.X, 2.X, 3.X, 4.X
Function:
Compares the contents of one file with the contents of
another file
Format:
COMP [d:]fpath][filename[.ext]][d:]fpath][filename[.ext]]
Examples:
comp
comp testfile.txt
comp a:testfile.txt b:testfile.txt
Note: COMP is the file comparison utility that is included with PC-DOS (the
version of MS-DOS designed for the IBM personal computer). While many
other microcomputers also include a file comparison utility program, the
following description and comments relate specifically to COMp, though
they can be applied generally to other MS-DOS file comparison utilities.
The COMP (COMPare files) command compares filesona byte-by-byte
basis. The first byte of file A is compared with the first byte of file B and so
on. Any mismatches are displayed. The comparison is halted if ten mis
matches are detected. COMP tells you that the Fi les compare ok ifno mis
matches are detected. At the completion of a comparison, you are asked if
you want to compare another pair of files. No comparison is made if the files
are unequal in size.
COMP is an external command; therefore, one of the disks in the sys
tem must contain a copy of the file COMP. COM. In the examples presented
here, COMP.COM is stored on the C drive. If COMP.COM is not on the de
fault drive, all commands must be preceded by the appropriate drive letter
designator.
UsingCOMP
To compare two files, first type the name of the primary file and then type
the name of the secondary file:
C>comp one. txt b:one.txt
MS-DOS responds:
C:ONE
.TXT and B:ONE
Fi les compare ok
Compare more files (YIN)?
398
.TXT
COMP
If you enter "Y", COMP will prompt you to enter the names of two
other files to be compared. If you enter "N", the MS-DOS prompt will reap
pear.
COMP can compare files with different names when the files are on the
same disk or on different disks. It can compare files with the same name
only ifthey are on different disks or in different directories on the same disk.
COMP may be started without specifying one or both of the files to be
compared. COMP will prompt you for the unnamed file(s):
C>comp
Enter primary fiLename
one.txt
Enter 2nd fiLename or drive id
b:
C:ONE
.TXT and 8:0NE
.TXT
FiLes compare ok
Compare more fiLes (YIN)?
Notice that only the drive designator was entered for the second file.
COMP looks for a file with the same name as the first filename when the
second parameter contains only a drive and/or a path.
COMP displays any mismatches between files by listing the hexadeci
mal offset of the mismatch(es) and the hexadecimal byte value of each file at
that offset. Offset refers to a byte's position in the file relative to the first byte
in the file. The first byte in the file is at offset 0, the second byte at offset 1,
and so on.
C>comp one. txt two. txt
C:ONE
.TXT and A:TWO
.TXT
Compare error at offset 8
FiLe 1 = 68
FiLe 2 = 6A
Compare more fiLes (YIN)?
COMP checks to see if the final byte of each comparison is an end-of
file marker (hexadecimallA). If a marker is found, COMP does not take any
action. If no marker is found, COMP displays the following message:
EOF marker not found
399
Part 3-MS-DOS Commands
COMP determines a file's size from information stored in the file direc
tory. Some computer programs produce directory entries that round a file's
size to a multiple of 128. In these cases, COMP may read more data than what
actually resides within the file. Failure to find an EOF marker may indicate
that mismatches were detected beyond the end of the file.
Wildcard characters can be used to specify files for comparison. The
following command tells COMP to compare all files on drive C that have a
filename extension of TXT with the file on drive B having the same filename
but an extension of ASM:
C>comp *.txt b:*.asm
A message will be displayed if a matching file cannot be located on drive B.
COpy
Internal
MS-DOS I.X, 2.X, 3.X, 4.X
Functions: Copies an existing file
Combines two or more existing files into one file
Transfers data between peripheral devices and files
Format:
COPY [/A][/B][d:]fpathVilename[.ext][/A] [IB]
[+ [d: ]fpath]filename[. ext][/A][IB] ... ] [d:]fpath][filename
[. ext]] [IA] [/B] [N]
Examples:
copy file1
Copy file 1 +file2 b:file3
copy con: file4.txt
COPY is one of the most important MS-DOS commands. It is used primarily
to make copies ofexisting MS-DOS files. However, COPY can also be used to
combine one or more existing files into one file through a process called
concatenation. Yet another way to use COPY is in the transfer of data be
tween peripheral devices and files.
Copying Files
To copy a file, first type copy and then type the file specification of the origi
nal file (source file), followed by the file specification of the file that will
contain the copy (target file). MS-DOS will make the copy and display a mes
sage telling you how many copies it has made:
400
COpy
C>copy file. txt b:file.txt
1 File(s) copied
You may omit the filename of the duplicate file if it will have the same
name as the original file. In such cases, the copy must be placed on a separate
disk or in a separate directory on the same disk as the original file. The fol
lowing command will copy "file.txt" to drive B:
C>copy file.txt b:
1 File(s) copied
Users of MS-DOS 2.X, 3.X, and 4.X may include a path(s) for the origi
nal and/or the duplicate file(s). If one or both paths are not specified, MS
DOS will default to the current directory. The following command places a
copy of "file. txt" in the subdirectory DATA on drive C. The original copy of
"file. txt" is located in the current directory of drive C.
C>copy file.txt\data
1 File(s) copied
A file may be copied to the same directory on the same disk only if the
copy is given a different name:
C>copy file. txt fileZ.txt
1 File(s) copied
Wildcard characters may be used with the COPY command in
filenames and/or extensions. (See chapter 2 for information on MS-DOS
wildcards.) The following command copies all files with an extension of
DOC that are located on drive C in the subdirectory LETTERS. The copies
will be placed in the subdirectory BACKUP of drive B. MS-DOS will display
the name of each file as it is copied. Each copied file will have the same name
as the original. At the end of the copying process, MS-DOS will display a
message stating the number of files that have been copied:
C>copy \letters *.doc b:\\backup
COUNTRY.DOC
TI CTOC K. DOC
WHATSUP.DOC
ITHURTS. DOC
QUACK.DOC
5 File(s) copied
Combining Files
COpy may be used to concatenate (combine) two or more files. The files to
be combined must be specified in the COpy command and separated with a
401
Part 3-MS-DOS Commands
plus (+ ) sign. The resulting file will be a combination of the specified files,
and the files will be in the order in which they were listed in the command.
The next example copies the files "list 1.txt" and "list2. txt" into a new
file named "biglist.txt". The original files "list1.txt" and "list2.txt" are pre
served. At the end of the copying process, MS-DOS states the number of
copies created:
C>copy list1.txt+list2.txt biglist.txt
1 FiLe(s) copied
Files may be concatenated without specifying a name for the new file.
If no name is specified, the new file is given the name of the first file listed for
concatenation. The first file is replaced on the disk by the new file.
Wildcard characters may be used in concatenating files. The following
command will combine all the files in the current directory of drive C hav
ing an extension ofTXT. The combined file will be given the filename" com
bine.dat" :
C>copy *.txt combine.dat
LETTER1.TXT
INSERT1.TXT
INSERT2.TXT
1 FiLe(s) copied
When concatenating with wildcards, you must specify in the COpy
command the filename of the new file. Otherwise, MS-DOS will try to copy
the first file listed ("letter1.txt" in the example) onto itself and the copying
process will terminate.
The following command will combine each file having the form *. TXT
with a matching file having the form * .DAT. If a match exists, the two files will
be combined into a file named * .DOC. For example, the files "letter1.txt" and
"letter1.dat" will be combined into the file "letter. doc" and so on:
C>copy *.txt+*.dat *.doc
LETTER1.TXT
LETTER1.DAT
LETTER2.TXT
LETTER2.DAT
ESSAY1.TXT
ESSAY2.DAT
3 FiLe(s) copied
You should be a little careful when using wildcards in combining files.
Let's say that you want to combine all files having an extension ofDOC into a
filename "big. doc". That should be as simple as:
copy *.doc big.doc
402
COpy
Right? Unfortunately, it's not so simple.
As soon as the combination process begins, MS-DOS creates the file
"big.doc" . If there was a previously existing "big.doc" , it is lost and the new
"big.doc" takes its place. Once the new "big.doc" is on the scene, MS-DOS
sees it as a valid * .DOC file and will entertain thoughts about adding
"big.doc" to the combined file. But "big. doc" is the combined file. Fortu
nately, MS-DOS is smart enough to know not to add "big.doc" to itself. The
following message is displayed:
Content of destination lost before copy
MS-DOS then proceeds on its merry way, looking for other * .DOC files
and adding them to "big.doc" in the normal fashion. The preceding mes
sage will be displayed whether or not "big.doc" existed before the combin
ing began. The problem is that if "big. doc" previously existed, it will be
written over by the new "big.doc" and lost. To compound the problem, the
new "big.doc" will not contain the contents of the old "big.doc".
There are two ways to avoid this problem. You can specify "big. doc" as
an existing file that is to be appended to the other * .DOC files:
copy big.doc+*.doc
Or you can specify a name for the new file that does not match the wildcard
filename:
copy *.doc big.dat
Using COpy to Update the TimelDate Stamp
The COPY command can be used to update the time and date stamp of a file:
copyanyfile.ext+"
Unfortunately, if you attempt to update several time/date stamps with a sin
gle command (as in copy *. *+,,), MS-DOS will update only the stamp of
the first file it finds that matches the wildcard.
COpy Switches
There are three optional switches that you may include in a COpy com
mand. Two of the switches (la and /b) control the way in which COpy reads
and writes files. The third switch (Iv) is used to verify the accuracy of a
COPY operation.
The /a switch tells COpy to treat a file as an ASCII (text) file. If the file is
to be copied, this switch tells COpy to copy the file up to, but not including,
403
Part 3-MS-DOS Commands
the first end-of-file marker (hexadecimaI1A). Any data after the marker is not
. to be copied. If the file is to be a copy, the la switch tells COPY to add an end
of-file marker to the end of the file.
The Ib switch tells COPY to treat a file as a binary file. If a file is to be
copied, this switch tells COpy to copy the entire file based on the size stored
in the file directory. If a file is to be a copy, the Ib switch tells COpy not to
place an end-of-file marker at the end of the file.
An la or a Ib switch applies to the preceding file specification and to all
succeeding file specifications until another la or Ib switch is encountered.
The file status is set to the default when a COpy command does not include
an la or a Ib switch. For copying of files, the default file status is binary (lb).
For concatenation, the default file status is ASCII (la).
The Iv switch is used to verify the accuracy of the execution of a COpy
command. Verification causes the system to run more slowly. The Iv param
eter provides the same check on COpy as the VERIFY command.
Copying a Peripheral Device
COpy can be used to send files to peripheral devices and to transfer data
between devices. The command is used in the same way as described pre
viously, the only difference being that device names are used in place of file
specifications. For example, suppose that you want to print a file named
"secret.txt". All you have to do is use the COpy command and PRN, lhe
reserved device name for the printer (see table 6-1 in chapter 6 for a list of
reserved device names):
C>copy secret. txt prn
1 Fi lees) copi ed
You can reverse the process and use COpy to send a file from a periph
eral device to a file. A useful way to take advantage of this capability, and one
that is utilized throughout this book, is to create a text file directly from the
keyboard. The keyboard is a peripheral device with the reserved name
"CON". The command "copy con filespec" tells MS-DOS to create a file
from data input at the keyboard. Type your text in the normal fashion, press
ing Enter at the end of each line. When the complete file has been typed,
Enter Ctrl-Z and press Enter. The file will be written to the disk:
C>copy con: keyboard. txt
This is a sample file that is being created from
the keyboard. Ctrl-Z is typed and the Enter key is
pressed to send the file to the disk. The file can then
be viewed by entering the command TYPE KEYBOARD. TXT.
"'z
1 File(s) copied
404
COUNTRY
Copying between Devices
COpy can be used to send data from one peripheral device to another. The
command is used just as described so far, except that one device name is
included as the source of the data and a second device name is included as
the recipient of the data. In the next example, COpy is used to send data
from the keyboard (CON) to the printer (PRN). Press Enter at the end of each
line, and press Ctrl-Z and Enter when you have entered the complete file:
C>copy con: prn
This is a sampLe fiLe to demonstrate the use of COpy
in sending data between peripheraL devices. At the end
of the input you will press Ctrl-Z and then press Enter.
This text will be sent to the printer.
"'z
1 File(s) copied
Attempts to COpy a device while in binary status will generate this message:
Cannot do binary read from a device
The problem can be corrected by removing the binary switch or speci
fying ASCII status with the fa switch.
COUNTRY
External
MS-DOS 3.X, 4.X
Function:
Format:
Specifies country-specific information such as date, time,
and currency formats
Note: COUNTRY can be used in CONFIG.SYS only
COUNTRY=xxx (MS-DOS 3.0 through 3.2)
(MS-DOS 3.3,
COUNTRY=xxx,[YYYH,[d:]filename[.ext]]
4.X)
Example:
country=OOl
country=001,437 ,c: \dos \country.sys
The COUNTRY command, first implemented with MS-DOS 3.0, allows
you to specify certain country-specific information such as the date, the
time, and currency formats.
Versions 3.0 through 3.2 use this command in a very straightforward
manner. A statement of the form "country=xxx" is included in the CON
FIG. SYS file, with xxx being a valid 3-digit country code. See appendix D for
a listing of the valid country codes.
405
Part 3-MS-DOS Commands
Use of the command is more complicated in MS-DOS 3.3 and 4.X. The
format is as follows:
COUNTRY=xxx,[yyy][,[d:]filename[.ext]]
The xxx parameter remains a valid 3-digit country code. The yyy pa
rameter specifies a code page. A single country has two code pages. COUN
TRY determines which code page to use as the system code page. Please
refer to appendix D for an overview ofcode pages and code page switching.
TheJilename parameter refers to the country information file (COUN
TRYSYS).
If there is no "country=" statement in CONFIG.SYS, the default coun
try code is 001, the default code page is 437, and the default country infor
mation file is \COUNTRYSYS.
CTTY
Internal
MS-DOS 2.X, 3.X, 4.X
Functions: Changes the standard input/output to an auxiliary console
Restores the standard input/output to the keyboard and
screen
Format:
CTTY device name
Examples:
ctty com1
ctty con
The keyboard and the display screen form the standard input/output device.
This means that unless MS-DOS is instructed otherwise, it will look to the
keyboard for input and will send output to the display screen. The CTTY
(Change Console) command is used to make another peripheral device
(such as a modem attached to an asynchronous communications port) the
standard input/output device.
To use the CTTY command, type ctty and then type the name of the
device that will be the new standard input/output device. (See chapter 6 for a
list of device names reserved by MS-DOS.) The following command makes
the modem attached to the first asynchronous communications port the
standard input/output device:
C>ctty com1
Once this command is entered, MS-DOS will look to the port for input
data. It will no longer be possible to enter data from the keyboard in the
normal fashion.
406
CTTY
The following command will restore the keyboard and display screen
as the standard input/output device. The command must be entered at the
current input device:
C>ctty con
CTTY allows you to use any character device as the standard input/
output device. Simply type ctty and then type the name of the device that is
defined in the device driver. (See chapter 14 for a discussion of devices and
device drivers.)
One of the most useful applications of the CTTY command is to sup
press all output to the screen during the execution of a batch file. As an
example of where you might want to use this, consider the following batch
file:
&lecho off
copy *.* d:
The first line suppresses the display of the batch file commands. But mecho
off has no effect on the screen output generated by the command copy * • *
d : . Therefore, the name ofeach file will be displayed on the screen as the file
is copied.
Having the filenames scroll across the screen may serve no useful pur
pose and might be distracting to the person using the batch file. All output to
the display screen can be suppressed by modifying the batch file as follows:
&lecho off
ctty nul
copy *.* d:
ctty con
The command c tty nu l makes the nul device the standard input/output
device. "Nul" represents a peripheral device that does nothing. Any data sent
to the nul device disappears. Any attempts to read data from the nul device
return nothing. By making nul the standard output device, any display in
tended for standard output is swallowed by "nul" and doesn't appear on the
display screen.
The command "ctty nul" also turns off the keyboard. You will not be
able to use your keyboard if you enter "ctty nul" from the command line.
But from a batch file, you can turn both your keyboard and display screen
back on with the command "ctty con". This tells DOS that the con device
(keyboard and display screen) is again the standard input/output device.
407
Part 3-MS-DOS Commands
DATE
Internal
MS-DOS I.X, 2.X, 3.X, 4.X
Functions: Displays the current date known to MS-DOS
Changes the date known to MS-DOS
Format:
DATE [mm-dd-yy]
Examples:
date
date 10-30-89
The DATE command is used to display and set the current date known to MS
DOS. Each time that you create or modify a file, MS-DOS stores this date as a
part of the file's entry in the disk directory.
To display the current date known to MS-DOS, type date. MS-DOS will
display the date, including the day of the week (Mon, Tue, Wed, etc.). Then
MS-DOS will ask if you want to change the current date:
C>date
Current date is Fri
Enter new date:
10-28-89
To enter a new date, use the form mm-dd-yy or mm/dd/yy where:
mm
dd
yy
is a one- or two-digit number from 1-12,
is a one- or two-digit number from 1-31,
is a two-digit number from 80-99 or a four-digit number from
1980 to 2099.
C>date
Current date is Fri
10-28-89
Enter new date: 10130189
If you want to leave the current date unchanged, just press Enter:
C>date
Current date is Mon
10-28-89
Enter new date:
<-Enter
You may specify the current date in the DATE command:
C>date 10130189
MS-DOS will prompt for another date if you enter an invalid date.
408
DEL
On machines with permanent clocks, the MS-DOS 3.3 and 4.X imple
mentations of DATE reset the permanent clock's date.
DEL
Internal
MS-DOS I.X, 2.X, 3.X, 4.X
Function:
Deletes (erases) one or more files from a disk
Format:
DEL [d:][patb][filename[.ext]]
DEL [d:][patb][filename[.ext]] [/P] (MS-DOS 4.X)
Examples:
del badfile.txt
erase badfile.txt
The DEL (DELete) command, also known as the ERASE command, is used to
remove a file(s) from a disk. To use DEL, type del (or erase) and then type the
file specification of the unneeded file. (See chapter 2 for a discussion of file
specifications.) If you do not include a drive designator and/or a path in the
filespec, MS-DOS assumes that the file is located on the default drive and/or
in the current directory. In the following example, a file in the current direc
tory of the default drive is deleted:
C>del badfile.txt
You can delete a group of files with a single command by using wild
card characters. (See chapter 2 for a discussion of wildcards.) Use wildcards
with caution, however, since it is easy to inadvertently erase files that you
wanted to save. The command in the next example deletes all files in the
current directory of drive B that have an extension of DOC:
C>del a:*.doc
Entering a file specification of" ... tells MS-DOS to delete all the files in
the current directory. MS-DOS checks to make sure that you really want to
do this:
C>del
*. *
Are you sure (YIN)?
Type N and press Enter if you are not sure. If you are sure, type Y,
double-check that you really are sure, say goodbye to the files, and press
Enter.
MS-DOS 4.X features the /p switch, which directs the operating system
409
Part 3-MS-DOS Commands
to display each file's name and ask for confirmation that the file is to be
deleted.
The 4.X implementatiorl of DEL also allows you to delete the files in a
directory by just specifying the directory's name. For example, if \ TMP is a
directory, you can delete the files in \TMP by entering the commarld "del
\tmp". In response to this command, MS-DOS displays the message
All files in directory will be deleted!
Are you sure (YIN)?
All files in \ TMP will be deleted if you enter "y".
Actually, DEL does not remove files from a disk. It only modifies the file
directory so that MS-DOS treats the files as if they did not exist. If you ever
delete an important file accidentally, you may want to try to recover it with
the MS-DOS utility program DEBUG. (See chapters 10 and 15 for some guid
ance.) There are also commercially available programs that can be used to
recover erased files. The important point here is that if you think you may
want to recover an erased file, do not, under any circumstances, write any
data to that disk. If you do that, the file really does go "bye-bye."
Note that DEL cannot be used to remove a subdirectory. (See the dis
cussion ofRMDIR.) Also, DEL cannot be used to delete a file that has its read
only attribut~ set.
DEL should be used carefully if you use ASSIGN, JOIN, or SUBST.
These commands direct MS-DOS to treat one device as if it were another. For
example, ASSIGN may be used to direct all references for drive A to drive C.
When cond~tions like this exist, it is easy to inadvertently delete files that
you want to keep, so be careful.
DEVICE
Internal
MS-DOS 2.X, 3.X, 4.x
Function:
Instructs MS-DOS to install a device driver
Note: DEVICE can be used in a CONFIG.SYS file only
Format:
DEVICE= [d:]fpatb]filename[. ext]
Example:
device=ansLsys
The DEVICE command is used to give MS-DOS the filename(s) of any user
specified device drivers that are to be installed in computer memory. (See
chapter 14 for a discussion of installable device drivers and their use.)
The DEVICE command can be used only as a statement within a CON
FIG.SYS text file. The statements in CONFIG.SYS are read by MS-DOS each
time that the system is booted. If any of the statements in CONFIG.SYS are
410
DEVICE
DEVICE commands, MS-DOS will store (install) in computer memory the
device driver named in the command.
To enter a DEVICE command, type device= and then type the
filename and filename extension of the device driver that is to be installed in
memory. A DEVICE command can be added to an existing CONFIG .SYS file
with a text editor such as EDLIN (chapter 8). A new CONFIG.SYS file can
be created by using the command "copy con". (See the COPY command,
"Copying between Devices.")
CONFIG.SYS must be stored in the root directory of the default drive.
In the following example, ANSI.SYS and VDISK.SYS are stored in the sub
directory \DOS of drive C:
C>copy con: coniig.sys
device=c:\dos\ansi.sys
device=c:\dos\vdisk.sys
AZ
+-you press Ctrl-Z
1 Fi Le(s) copi ed
ANSI.SYS is an installable keyboard device driver supplied with
MS-DOS 2.X, 3.X, and 4.X. Use of ANSI.SYS is discussed in chapter 9.
VDISK.SYS is an installable device driver for a RAM disk drive. VDISK.SYS
is discussed below. This section also discusses the installable device driv
ers DRIVER.SYS, DISPLAY.SYS, PRINTER.SYS, XMA2EMS.SYS, and
XMAEMS.SYS.
VDISK.SYS
A virtual disk, also called a RAM disk, is a portion of random access memory
(RAM) that the operating system treats as a disk drive. A RAM disk is accessed
with a drive specifier as if it were a conventional disk drive. The advantage of
a RAM disk is that the data on the disk can be accessed much faster than data
on a mechanical disk drive. The disadvantage of a RAM disk is that it is not
permanent storage for data. Turning off or rebooting your system destroys
the contents of the RAM disk. Any data to be saved must be copied to a
mechanical disk.
VDISK.SYS is a RAM disk device driver supplied with MS-DOS 2.X,
3.X, and 4.X. It performs three functions: (1) installs the RAM disk in mem
ory and assigns it a drive letter, (2) formats the RAM disk sothat it can store
files (you cannot use the FORMAT command on a RAM disk), and (3) acts as
an interface between MS-DOS and the RAM disk. The syntax for installing
the device driver is:
DEVICE=rfJath]VDISK.SYS[vvv][sss][ddd][/E[:t]]/X[:t]]
The vvv parameter sets the size of the virtual disk in kilobytes. The
allowable range is from 1 kilobyte up to the size of your system's memory.
The default disk size is 64 Kbytes.
411
Part 3-MS-DOS Commands
If you request too much memory for your RAM disk, VDISK will adjust
your request downward to leave 64 Kbytes of memory available after the
RAM disk is installed. VDISK will not install the RAM disk if less than 64
Kbytes of memory is available. If the disk size request has been adjusted,
VDISK notifies you with the message Buffer si ze adjusted.
The sss parameter sets the number of bytes per sector on the RAM disk.
Acceptable values are 128, 256, and 512. Any other value will default to 128
bytes per sector. Disk sectors are discussed in chapter 10.
The ddd parameter sets the number ofentries allowed in the disk direc
tory. The allowable range is 2 to 512, with a default of 64. Each directory
entry requires 32 bytes. If necessary, VDISK will adjust your request size
upward to fill out a complete sector. For example, if your sector size is 512,
and you request 12 directory entries, VDISK will adjust upward and give
you 16 directory entries (16 X 32 = 512).
Each RAM disk requires 1 boot sector, 1 FAT sector, 1 directory sector,
and 1 data sector. VDISK will adjust your directory entry request down
ward, if need be, to make room for these required sectors. Any adjustment of
the number of directory entries is accompanied by the message 0 ire c tory
entries adjusted.
The Ie switch directs MS-DOS to place the RAM disk in extended mem
ory (see chapter 12). The driver itself is still stored in low memory. You may
request more than one RAM disk in extended memory by placing multiple
"device=vdisk.sys" commands (each with the Ie switch) in your CON
FIG.SYS file. Each RAM disk in extended memory may be up to 4 megabytes
in size.
MS-DOS will display an Insuffi c i ent memory message if you use the
Ie switch on a machine that does not have extended memory.
The Ix switch, implemented in DOS 4.X, directs the operating system
to place the RAM disk in expanded memory. Use of expanded memory re
quires both an expanded memory card and an expanded memory device
driver. Expanded memory is discussed in chapter 12. The PC-DOS 4.0 im
plementation ofVDISK.SYS works in expanded memory only with an IBM
expanded memory board.
If your computer has both extended and expanded memory, you may
want to consider putting the RAM disk in extended memory, because there
are relatively few programs running under DOS that can utilize extended
memory.
The optional:t parameter tells MS-DOS the maximum number of sec
tors to transfer to extended memory or expanded memory at one time. The
range is 1 to 8, with a default of 8. Try adjusting this parameter, as well as the
sector size parameter, if you have trouble getting your RAM disk to work
properly in expanded or extended memory.
Hardware interrupts are disabled during memory transfers between
conventional and extended memory. If your RAM disk is in extended mem
ory, it may interfere with communication programs if the value for :t is set
too high.
The following example installs a 1OOO-Kbyte RAM disk:
412
DEVICE
device=vdisk.sys 1000 512 64 /e:4
The RAM disk created has a sector size of 512 bytes. The directory may
contain up to 64 entries. The RAM disk is placed in extended memory. A
maximum of 4 sectors is transferred to extended memory at a time.
DRlVER.SYS
DRIVER.SYS is a diskette device driver supplied with MS-DOS 3.2, 3.3, and
4.X. It is valuable for two reasons: (1) it can be used to drive all MS
DOS-supported drives (including 1.44-megabyte, 3 1h-inch drives) and (2) it
can be used to drive "logical" as well as "physical" drives. To understand
how DRIVER.SYS works, you must first understand how MS-DOS addresses
disk drives.
Disk Addressing
When you switch on your computer, one of the actions that MS-DOS takes is
to determine which peripheral devices are attached to the computer. After
making this determination, MS-DOS reads the CO NFl G. SYS file to check for
any installable device drivers. During this process, MS-DOS assigns a unique
drive letter to each disk drive device on the system. The first internal diskette
drive is assigned A; the second, B. The letters from C on are assigned as other
system drives are recognized.
On systems with only one internal diskette drive, the single drive is
assigned letters A and B. The first fixed disk drive on a MS-DOS computer is
always assigned drive letter C.
Disk drives are also given physical drive numbers The first diskette
drive is assigned physical drive number 0, the second is assigned physical
drive number 1, and so on for the diskette drives.
The first fixed disk on an MS-DOS computer is assigned physical drive
number 128, the second is assigned 129, and so on for the fixed disks.
Physical and Logical Drives
Aphysical disk drive is a real disk drive, a piece of hardware. Its existence is
totally independent of any computer.
A logical disk drive is a product of the logic stored inside a computer. A
program (such as the operating system) tells the computer that a logical drive
exists at a certain (physical) location, and the computer accepts that infor
mation. The logical drive ceases to exist when the computer is turned off.
Drive letters are used to reference logical disk drives. As discussed
above, if an MS-DOS computer has one diskette drive, the drive is assigned
drive letters A and B. Logical drives A and B both reside on physical drive O.
413
Part 3-MS-DOS Commands
MS-DOS assigns logical drive letters, in alphabetical order, to disk drives as
each logical drive is initialized.
With this background, we can now discuss DRIVER.SYS.
Using DRIVER.SYS
The following discussion requires some knowledge of diskette structure.
See chapter 10 if you are unfamiliar with this topic.
The syntax for DRIVER.SYS is:
DEVICE=DRIVER.SYS ID:ddd[/T:ttt][/S:ss][/H:bb][/C][/FJI
The ID:ddd parameter specifies the physical drive number on which
the logical diskette will reside. Allowable values are 0 to 255. As discussed, 0
to 127 refers to diskette drives and 128 to 255 refers to fixed disk drives.
The IT: ttt parameter specifies the number of tracks per side of the logi
cal diskettes. Allowable values are 1 to 999. The default is 80 tracks per side.
The IS:ss parameter specifies the number of sectors per track of the
logical diskette. Allowable values are 1 to 99. The default is 9 sectors per
track.
The IH:hh parameter specifies the maximum number ofheads. Allowa
ble values are 1 to 99. The default is 2 heads.
The Ie parameter specifies that the drive detect when the drive door
has been opened and closed.
The In parameter specifies that the physical device on which the logical
device will reside be nonremovable (a fixed disk).
The IFJparameter specifies the type of logical device. Allowable val
ues and the corresponding diskette type are given in the following list. The
default value is 2.
Value
If:O
If: 1
If:2
If:7
Diskette Type
160 Kbytesl180 Kbytes
320 Kbytes/360 Kbytes
1.2 Mbytes
720 Kbytes
1.44 Mbytes
Adding a Physical Drive
Let's say that you want to add an external 1.44-megabyte, 3 1h-inch diskette
drive to a system that has one standard internal diskette drive and one fixed
disk drive. PhYSical drive 0 is the internal diskette drive. PhYSical drive 1 is
reserved for a second standard internal diskette. Therefore, the 3 1/2-inch
414
DEVICE
drive will be physical drive 2. The command to install an appropriate device
driver is as follows (assume that DRIVER.SYS is in subdirectory C: \DOS):
device=c:\dos\driver.sys Id:2 If:7
The / d : 2 parameter specifies physical drive number 2. The / f : 7 pa
rameter specifies a 1.44-Mbyte diskette. Since the DEVICE command is
read after drive letters A, B, and C have been assigned, the 3 1h-disk drive is
assigned drive letter D.
Adding a Logical Drive
Sometimes it is useful to create a second logical drive on a physical drive.
Assume that you have an AT computer with one 1.2-Mbyte SIf4-inch disk
drive, one 3 1h-inch 1.44-Mbyte disk drive, and one hard disk drive. MS-DOS
will assign logical drive letter A to the SIf4-inch drive, logical drive letter B to
the 3 l h-inch drive, and logical drive letter C to the hard disk drive.
Such an arrangement can prove to be inconvenient if you perform an
operation that logically requires identical disk drives. Fot example, say that
the system diskettes are SIf4-inch and you want to create bootable SIf4-inch
diskettes. If drives A and B were both Sif4-inch, you could put the system
diskette in drive A, the new diskette in drive B, then enter the command
"sys b:" . Even if the system only had a single Sif4-inch drive (and no 3 1h-inch
drive), the same command could still be used, because DOS would prompt
you to swap diskettes. With the 3 l h-inch drive on the system, though, logical
drive B is assigned to a separate physical drive. It is not available to the Sl f4
inch drive.
The way around the problem is to use DRIVER.SYS to create a second
logical drive on the SIf4-inch physical drive. The following command, when
placed in CONFIG.SYS, instructs DOS to create a new logical drive on the
first physical drive:
deviee=e:\sys\driver.sys Id:O It:80 Is:15 Ih:2 Ie If:1
The logical drive is to be on the first physical drive (/ d: 0). It will have
80 tracks per side (I t : 80), 15 sectors per track (I s : 15), and two heads
(lh:2), will detect the door opening (Ie), and will be a 1.2-Mbyte drive
(If:1). Once the system is rebooted with this statement in CONFIG.SYS,
the SIf4-inch drive can be referenced by using logical drive letters A and D.
In this way, a SIf4-inch diskette can be made bootable with the command
"sys d:".
DISPLAY.SYS
DISPLAY.SYS is a code-page-switching device driver supplied with MS-DOS
3.3 and 4.X. DISPLAY.SYS is used to implement code page switching on a
415
Part 3-MS-DOS Commands
display adapter. For an overview of code pages and code page switching,
please refer to appendix D.
DISPLAY.SYS is installed in memory by including a statement having
the following format in CONFIG.SYS:
DEVICE=[d:][path]DISPLAY.SYS CON[:]=(type[,[hwcPH,(n,m)]])
or
DEVICE=[d:][path]DISPLAYSYS CON[:] = (type[, [hwcP] [,n]])
The type parameter specifies the display adapter that will support code
page switching. The allowable values are "EGA" and "LCD". EGA refers to
both the Enhanced Graphics Adapter and the IBM PS/2 Video Display
Adapter. LCD refers to the PC Convertible Liquid Crystal Display Adapter.
Code page switching is not currently supported with other types of display
adapters.
The hwcp parameter specifies the hardware code pages that are to be
made available for use. Valid code page numbers are 437 (the default), 850,
860,863, and 865. Hardware code pages are ready-to-use code pages that
are stored in the display device's read-only memory (ROM). Refer to appen
dix D for further information on hardware code pages, including the mean
ing of the code page numbers.
The n parameter specifies the number of prepared code pages to be
supported by the adapter. The allowable range is 1-12. Prepared code pages
are discussed in appendix D.
The m parameter specifies the number of font sizes to be supported by
the adapter. The Enhanced Graphics Adapter can support up to two font sizes
(8 X 8 and 8 X 14). The PS/2 Display Adapter can also support up to two font
sizes (8 X 8 and 8 X 16). The LCD adapter supports only one font size (8 X 8).
The following command illustrates the use of DISPLAYSYS.
device=c:\dos\display.sys con:=(ega,437,2)
This command instructs MS-DOS to load the DISPLAY.SYS driver for
use with the Enhanced Graphics Adapter. Along with the driver, hardware
code page 437 is to be loaded. In addition, the driver is to support two pre
pared code pages.
PRINTER.SYS
PRINTER.SYS is another code-page-switching device driver supplied with
MS-DOS 3.3 and 4.X. As its name implies, PRINTER.SYS supports code page
switching on several IBM printers: the IBM Proprinter model groups 4201,
4202,4207, and 4208, and the IBM Quietwriter III Model 5202. (The 4207
416
DEVICE
and 4208 models are supported, starting with MS-DOS 4.0.) For an overview
of code page switching, please refer to appendix D.
PRINTER.SYS is installed in memory by including a statement of the
following format in CONFIG.SYS:
DEVICE= [d:] [path]PRINTER.SYS LPT#[:] =
(type[, [(hwcp 1, hwcp2)] [,n]])
or
DEVICE=[d:][path]PRINTER.SYS LPT#[:] = (type[, [hwcP] [,n]])
The LPT# parameter is used to specify a printer device. The valid pa
rameters are "PRN," "LPT1," "LPT2," and "LPT3."
The type parameter refers to the printer that will support code page
switching. Use "4201" for the IBM 4201 and 4202 Proprinter, "4208" (with
MS-DOS 4.X only) for the IBM Proprinter 4207 X24 and 4208 XL24, or
"5202" for the IBM 5202 Quietwriter III.
The hwcp parameter specifies the hardware code pages that are to be
made available for use. Valid code page numbers are 437 (the default), 850,
860, 863, and 865. If two or more hardware code pages are specified, they
must be enclosed in parentheses. Hardware code pages are ready-to-use
code pages that are stored in the printer's read only memory (ROM). Refer to
appendix D for further information on hardware code pages, including the
meaning of the code page numbers.
The n parameter specifies the number of prepared code pages to be
supported by the printer. Prepared code pages are discussed in appendix D.
The following command (which must be in CONFIG.SYS) instructs
MS-DOS to load the PRINTER.SYS driver for use with the Quietwriter 5202
printer. Along with the driver, hardware code page 850 is to be loaded. In
addition, the driver is to support three prepared code pages.
device=c:\dos\printer.sys prn:=(5202,850,3)
XMA2EMS.SYS
XMA2EMS.SYS is an expanded memory device driver that is supplied with
PC-DOS 4.X. XMA2EMS.SYS conforms to the Lotus-Intel-Microsoft Ex
panded Memory Specification 4.0. A complete discussion of expanded mem
ory is presented in chapter 12. This section discusses the use of
XMA2EMS.SYS. As is the case with other device drivers, XMA2EMS.SYS is
written to be used with a specific piece of hardware, namely the IBM Ex
panded Memory Adapter. XMA2EMS.SYS probably will not work if you have
another brand of expanded memory board on your system; however, the
discussion of XMA2EMS.SYS is still relevant because, in general, the points
covered will apply to the use of other expanded memory device drivers.
417
Part 3-MS-DOS Commands
As with the other drivers discussed, XMA2EMS.SYS can only be loaded
into memory with a DEVICE statement contained in the file CONFIG.SYS.
There are several parameters that can be used in the DEVICE statement to
control the manner in which expanded memory is implemented. Each of
these parameters will now be discussed.
You can specify the memory location of a single contiguous 64-Kbyte
page frame by entering frame = followed by the location's segment address.
For example, the following statement (which must be in CONFIG.SYS) spec
ifies that a 64-Kbyte page frame is to be located starting at segment address
coon. All of the examples in this section assume that the file XMA2EMS.SYS
is located in C: \SYS:
device=c:\sys\xma2ems.sys frame=cOOO
The default value for "frame" is DOOO. This means that the 64-Kbyte
page frame is loaded beginning at segment address DOOOH, offset OOOOH
(DOOO:OOOO). As is discussed in chapter 12, the page frame is the area in con
ventional memory that serves as a window into expanded memory. In some
circumstances, there may be a memory conflict between a peripheral device
and the default address for the page frame. For example, it is possible that a
network interface card could be located at address DOOO:OOOO. In such a
situation, the default value for "frame" could be overridden, as illustrated
above, and the memory conflict avoided.
Instead of a single contiguous page frame, you can specify the starting
address of up to four separate physical 16-Kbyte pages. Together, these sepa
rate pages will make up the page frame. The four separate pages have the
preassigned names of PO-P3. You specify a page's starting address by typing
its name, an equals sign, and then the segment address of the page's starting
location. As an example, the following statement specifies that four 16
Kbyte pages are to be located at segment addresses COOO, C800, DOOO, and
D800:
device=c:\sys\xma2ems.sys pO=cOOO p1=c800 p2=dOOO p3=d800
Use of the PO-P3 parameters is useful if conventional memory on your
computer is very "crowded" and there are no contiguous 64-Kbyte blocks
available. You cannot use the PO-P3 parameters if you use the "frame" pa
rameter.
The pages PO-P3 are for use by application programs that utilize ex
panded memory. In addition, there are two other pages that can be specified
for use by the operating system. If you specify a location for "p254", PC
DOS can use that page to run VDISK.SYS and FASTOPEN in expanded mem
ory. If you specify a location for "p2 55" , PC-DOS can use that page to run
the BUFFERS command in expanded memory. The following example illus
trates the use of these two parameters:
device=c:\sys\xma2ems.sys frame=cOOO p254=dOOO p255=d400
418
DIR
The /x:size switch is used to specify the number of 16-Kbyte pages of
expanded memory to be used by the system. The minimum value for size is
4. The maximum and default value for size is the total amount of expanded
memory contained in the system.
XMAEM.SYS
XMAEM.SYS is a device driver supplied with PC-DOS 4.X that allows the
hardware of a PS/2 Model 80 to emulate an expanded memory card. If you
are using XMAEM.SYS, you must load it into memory before you load an
expanded memory device driver, such as XMA2EMS.SYS.
XMAEM.SYS has a size parameter that controls the amount of PS/2
memory to be used to emulate expanded memory. The value of size speci
fies the number of 16-Kbyte pages. The minimum value for size is 4. The
maximum and default value for size is the total amount of available memory.
If you specify a value for size (in XMAEM.SYS), the /x:size switch (in
XMA2EMS.SYS) will be ignored.
DIR
Internal
MS-DOS l.X, 2.X, 3.X, 4.X
Function:
Lists directory entries
Format:
DIR [d:][filename[.ext]][/PH/W]
DIR [d:]fpath][filename[.ext]][/P][IW] (MS-DOS 2.X-4.X)
Examples:
dir
dir b:
dir b: \subdir1 \ * .doc /w
The DIR (DIRectory) command is used to display the filename, filename
extension, size, and time/date stamp of the files contained on a disk. The MS
DOS 2.X and subsequent versions of DIR also display the disk's volume
identification (if one was specified when the disk was formatted) and the
amount of free space remaining on the disk.
To use DIR with MS-DOS 1, simply type dir. Notice that if you do not
enter a drive designator (such as c: or a:), MS-DOS will display the files on the
default drive:
C>di r
FI LE1
PROGRAM1
GWBASIC
BAS
BAS
EXE
3213
12674
57344
10-02-89
10-09-89
6-21-89
11:42a
9:53a
10:44a
419
Part 3-MS-DOS Commands
COMMAND
COM
4 File(s)
4879
3-11-89
11:40a
The first column of the display gives the name of each file. The second
column gives the filename extension. The third column shows the size of
the file in bytes. The fourth column shows the date that the file was created
or last modified, and the fifth column shows the time that the file was cre
ated or last modified.
Ifyou are using the DIR command with MS-DOS 2 .X, 3.X, or 4.X, again
simply type dir. The display will show the same information as the MS-DOS
1 version but will give you additional information about the disk's volume
label and the space available for new files. Ifyou do not include a path in the
DIR command, MS-DOS will default to the current directory of the specified
(or default) drive:
C>djr
Volume in drive C is WAITE DISK1
Directory of C:\
COMMAND
COM
17664 3-08-89 12:00p
<OIR>
1-01-86 12:07a
C
WS2PATH
BAT
23 10-07-89 8:18a
9-25-89 7:24p
CONFIG
SYS
128
SETCLOCK COM
853
9-19-88 4:24p
<OIR>
WS
9-08-88 4:27p
110269 bytes free
6 Fi lees)
In the preceding example, notice that the display shows the volume
label WAITE_DISK1 for the disk in the default drive (C:). The volume label is
simply the name of the disk. The line Di rectory of c: \ tells you that the
files displayed are in the root directory on drive C. Two of the directory en
tries contain the notation <D I R>. These entries represent subdirectories that
are contained in the root directory. The final line says that there are 1lO,269
free bytes remaining on the disk.
To view the contents of a directory other than the current directory,
type dir and then type the path to the directory:
C>dj r \ ... 5
Volume in drive A is WAITE_DISK1
Directory of C:\WS
WS
WS
BATES
420
<DIR>
<OIR>
EXE
60128
HLP
45853
DOC
4096
9-08-88
9-08-88
6-25-88
6-25-88
9-17-89
4:27p
4:27a
7:24p
7:24p
4:27p
DIR
GILMORE
DOC
6 File(s)
4096 9-18-89 2:15p
110269 bytes free
Notice the single and double periods that appear in the first two en
tries. These are shorthand symbols used by MS-DOS in displaying the con
tents of a subdirectory. The entry in the first column with a single period
represents the directory being listed. The entry with two periods represents
the listed directory's parent directory. WS is the listed directory. WS's parent
directory is the root directory. (See chapter 3 for more information about
directories, subdirectories, and parents.)
Using /P and /W with DIR
The DIR command has two optional switches. The Ip switch is particularly
useful when you wish to view the contents ofa large directory. When DIR is
directed to display a large number of files, the file information will scroll off
the screen faster than you can read it. You can see this by inserting a working
copy ofyour system diskette in drive A and entering the command dir a: and
pressing Enter. You will be unable to study the information before it's gone
from view. By using the /p switch, you can instruct MS-DOS to display one
"page" offileinformationata time. The display will be suspended each time
that the screen is filled. The display will resume when you press any key.
The Iw switch is used with DIR to display file information in the
"wide" mode. The wide mode displays the filename and filename extension
of five files on each line of the display screen. File size and file time/date
information are not displayed with the wide mode.
Using DIR to List Selected Files
You can specify a particular file in the DIR command. MS-DOS will look for
that filename and, if the file is found, will display the corresponding file
information:
C>dir ws2path.bat
Volume in drive C is WAITE_DISK1
Directory of C:\
WS2PATH
BAT
1 Fi lees)
23
10-07-89
8:18a
110269 bytes free
This feature can be useful when you are looking for a specific file
among a large number of files. Let's say that you want to know if there is
a file named "letters.doc" in the subdirectory WS. You could look for the
file in two ways. You could enter the command dir \ws and scan the display
421
Part 3-MS-DOS Commands
for "letters. doc" , or you could enter the command dir \ws letters.doc. If
you enter the second command, MS-DOS will do the scanning for you. If
"letters. doc" exists, MS-DOS will display the file information. If the file does
not exist, MS-DOS will let you know.
Wildcards and DIR
Using wildcard characters with DIR allows you to have MS-DOS list a specific
group of files. Let's say that you want a listing of the files in the root directory
of drive B that have a filename beginning with the letter "Q" and a filename
extension of DOC. All you have to do is enter the following command:
C>dir b:\q*.doc
MS-DOS will pick out the files that you are looking for and display their
names on the screen. (For more information on wildcards, see chapter 2.)
By eliminating the filename extension in a DIR command and entering
only the filename, you can instruct MS-DOS to list all files with the specified
filename. The following command directs MS-DOS to list all files in the root
directory of drive B with a filename of "animals":
C>dir b:\animaLs
By entering the filename followed by a period and no filename exten
sion, you can instruct MS-DOS to list all files with the specified filename and
no filename extension. In the following command, MS-DOS looks for a file
having the filename "animals" and no filename extension:
C>dir b:animaLs.
DISKCOMP
External
MS-DOS l.X, 2.X, 3.X, 4.x
Function:
Compares the contents of two floppy diskettes
Format:
DISKCOMP [d:][d:]
DISKCOMP [d:][d:][Il][/8] (MS-DOS 2.X-4.X)
Example:
diskcomp a: b:
DISKCOMP (COMPare DISKette) is a utility program used to compare the
contents of two floppy diskettes. DISKCOMP compares the diskettes on a
422
DISKCOMP
sector by sector basis. It is most useful in checking the accuracy of copies
made with DISKCOPY.
DISKCOMP is used for comparing diskettes only. It cannot be used
with fixed disks, RAM disks, or network disks. Nor can it be used in conjunc
tion with SUBST, ASSIGN, or JOIN.
Before using DISKCOMp, you may wish to read the discussion on disk
ette structure in chapter 10.
Using DISKCOMP
Since DISKCOMP is an external MS-DOS command, a copy of the file DISK
COMP.COM must be available to the system before you can use the com
mand. This means that either DISKCOMP.COM must be in the current
directory of the default drive or that the location of DISKCOMP. COM must
have been specified by the PATH command (see the discussion of PATH).
If you are using a system with two diskette drives, you will save your
self a lot of diskette swapping by including two drive letter designators in the
DISKCOMP command:
C>diskcomp c: b:
When you press Enter, MS-DOS will prompt you with the statements
Insert the fi rst di skette in dri ve A: and Insert the second
dis ke t t e i n d r i ve B:. It does not matter which diskette is inserted in
which drive. Once the diskettes are in place, the comparison is started by
pressing any key.
If you are using a system with oniY one diskette drive or if you do not
enter two drive letter designators in the DISKCOMP start command, MS-DOS
will display a prompt telling you when to insert the first diskette and when to
insert the second diskette. It is not important which diskette you designate as
"first" and which you designate as "second." The important point is to keep
the first and second diskettes straight after the comparison begins.
DISKCOMP compares the dis~ettes on a track-by-track basis. If all
tracks match, MS-DOS will display the message Di skettes compare ok.
If there is a mismatch, MS-DOS will display the track and side where the errors
appear.
At the end of a comparison, DISKCOMP asks you if there are any
more comparisons to perform. If you reply "Y", DISKCOMP prompts
you to insert the next pair of diskettes. If you reply "N", control is re
turned to MS-DOS.
DISKCOMP Switches
DISKCOMP has two optional switches. The /1 switch tells DISKCOMP to
compare only the first side of each diskette. The /8 switch tells DISKCOMP
423
Part 3-MS-DOS Commands
to compare only the first 8 sectors of each track. (See chapter 10 for a de
tailed discussion of tracks and sectors.)
DISKCOPY
External
MS-DOS 1.X, 2.X, 3.X, 4.X
Function:
Copies the contents of one floppy diskette onto another
Format:
DISKCOPY [d:][d:]
DISKCOPY [d:][d:][Il] (MS-DOS 2.X-4.X)
Example:
diskcopy a: b:
DISKCOPY is a utility program used to copy the contents of one floppy
diskette onto another. It can be used with floppy diskettes only. MS-DOS will
display an error message if you try to use DISKCOPY with a hard disk.
Using DISKCOPY
DISKCOPY is an external MS-DOS command. This means that before you can
use DISKCOPY, one of the system drives must contain the file DISK
COPY.COM. In the example used here, DISKCOPY.COM is stored on drive C.
If your system has two diskette drives, you will save yourself a lot of
diskette swapping by including two drive letter designators in the DISK
COPY command.
C>diskcopy a: b:
When the command is entered, MS-DOS will load DISKCOPY.COM into
memory and then prompt you to insert the source diskette in the first drive
specified in the command and the target diskette in the second drive specified
in the command. The source diskette is the diskette to be copied; the target
diskette is the diskette that will contain the copy. Once the source and target
diskettes are in place, press any key to begin the DISKCOPY process.
Insert source diskette in drive A
Insert target diskette in drive B
Strike any key when ready
If your system does not have two diskette drives or if you did not
424
DISKCOPY
include two drive letter designators in the DISKCOPY command, MS-DOS
will prompt you to insert the source and target diskettes. Remember that the
source diskette is the original; the target diskette is the copy. If you get them
confused, you may inadvertently erase the data stored on the original disk
ette. To prevent accidental erasure, you can easily write-protect the source
diskette by placing a small piece of tape over the notch on the diskette's side.
MS-DOS will not send data to a write-protected diskette.
At the end of the copy process, you will be asked if you wish to copy
another diskette. If you reply "Y", the DISKCOPY process is repeated. If
you reply "N", control is returned to MS-DOS.
The MS-DOS 2.X and later versions of DISKCOPY offer an optional /1
switch. Including the /1 switch tells DISKCOPY to copy only the first side of
the source diskette.
Note: Most versions of DISKCOPY will format an unformatted target
diskette.
DISKCOPY versus COpy
It is important to recognize the difference between the commands DISK
COPY and COPy. DISKCOPY begins by reading the contents of the first
track off the source diskette and writing the contents to the first track of the
target diskette. The contents of the second track are then read and written to
the second track in the target diskette, and so on. DISKCOPY writes over all
preexisting data on the target diskette.
COPY begins by reading the contents of the first sector of a file off the
source diskette and writing the contents to the first available sector on the
target diskette. The contents of the second sector of the file are then read
and written to the next available sector on the target ,diskette. COPY contin
ues in this manner until the entire file has been copied. The only preexisting
data on the target diskette that is written over by COpy is the files named in
the COPY command.
A file that does not occupy contiguous sectors on a diskette is called a
fragmented file. Fragmented files can slow computer performance, since
MS-DOS requires more time to read a fragmented file. It is good practice to
copy a highly fragmented diskette to an empty diskette by using the com
mand "xcopy *. * /s" (or "copy *. *") rather than using DISKCOPY. The
XCOPY or COpy command will copy each of the fragmented files to contig
uous sectors on the target diskette, thus improving computer performance.
425
Part 3-MS-DOS Commands
ECHO
Internal
MS-DOS 2.X, 3.X, 4.x
Functions: Allows or prevents the screen display of MS-DOS commands
during batch file execution
Displays messages during batch file execution
Format:
ECHO [ONIOFFlmessage]
Examples:
echo on
echo off
echo your message here
A batchfile is a group of MS-DOS commands that are executed sequen
tially. ECHO determines whether or not the commands in a batch file are
displayed on the screen during execution. ECHO can be used in the follow
ingways:
1. ECHO ON tells MS-DOS to display the MS-DOS commands.
2. ECHO OFF tells MS-DOS to suppress display of the MS-DOS com
mands.
3. ECHO [message] tells MS-DOS to display [message]. The message will
be displayed regardless of the current ECHO state.
4. ECHO (with no parameters) tells MS-DOS to display the current ECHO
state (ON or OFF).
5. The command "echo off' is echoed on the display screen when it is
executed from a batch file. In MS-DOS 3.3 and 4.X, you can suppress
this echoing by replacing the command with "@echo off'.
The use of ECHO in batch files is illustrated in chapter 4.
ERASE
Internal
MS-DOS 1.X, 2.X, 3.X, 4.x
426
Function:
Erases (deletes) one or more files from a disk
Format:
ERASE [d:] [path] [filename[. ext]]
ERASE[d:][path][filename[.ext]] [/P] (MS-DOS 4.X)
Examples:
erase badfile.txt
del badfile. txt
EXE2BIN
The ERASE command is identical to the DEL command. Please refer to the
DEL command for a description of ERASE.
EXE2BIN
External
MS-DOS 1.X, 2.X, 3.X, 4.x
Function:
Converts EXE files to standard binary files
Format:
EXE2BIN [d:] [patblfilename[. ext] [filespec]
Example:
exe2bin testfile
Computer programs that operate under MS-DOS are stored as either COM or
EXE files (see chapter 11). EXE2BIN is an MS-DOS utility that is used to con
vert EXE files to COM files. You need not concern yourself with EXE2BIN
unless you are assembling or compiling your own computer programs. The
file EXE2BIN.EXE is not supplied with the PC-DOS 4.X system diskettes.
You will have to secure a copy of the "Utilities" diskette that comes with the
Disk Operating System Technical Reference manual in order to obtain the
4.X implementation of EXE2BIN.
EXE and COM Files
All EXE files contain abeader(an area at the start of the file) that stores infor
mation about the relocatab1e items within the file. A relocatable item is a
program variable whose value depends on the location at which MS-DOS
loads the program in computer memory. During the loading of an EXE file,
MS-DOS refers to the file's header to determine the location of each relocat
able item within the file. MS-DOS then modifies the value of each relocat
able item according to the memory address of the load.
COM files do not contain any relocatable items; therefore, they do
not have a header. A COM file is produced by first creating an EXE file
(with either an assembler or a compiler) and then using EXE2BIN to con
vert the EXE file to a binary file. COM files created with an assembler must
begin with the statement "ORG 100H". This assembler statement tells MS
DOS to load the file at offset address 100H. A COM file is limited in size to
64 Kbytes.
Since a COM file does not have a header, converting an EXE file to a
COM file will conserve computer memory. Thus, it is advantageous to con
vert to COM files those EXE files that do not contain relocatable items, that
begin with an ORG lOOH statement, and that are smaller than 64 Kbytes.
427
Part 3-MS-DOS Commands
Using EXE2BIN
EXE2BIN is an external MS-DOS command. This means that before you can
use EXE2BIN, the file EXE2BIN.EXE must be available to the system. Either
EXE2BIN.EXE must be in the current directory of the default drive or the
location of EXE2 .BIN must have been specified by the PATH command (see
the discussion of PATH).
To use EXE2BIN, type exe2bin, then type the file specification of the
file to be converted, and finally type the file specification of the converted
file. A filename must be specified for the file to be converted. If no filename
extension is specified for the file to be converted, MS-DOS assumes that the
file has an extension of EXE. A file specification for the converted file is
optional. The default filename is the filename specified for the file to be
converted. The default filename extension for the converted file is BIN. The
current directory is used if no path is specified for the converted file.
Once you have entered the complete command, press Enter to convert
the EXE file. If the EXE file conforms to the requirements ofa COM file, the
conversion is made and control returns to MS-DOS. The converted file can
then be renamed with an extension of COM if you wish.
If the EXE file does not specify where MS-DOS is to load the file (for
example, does not contain an ORG statement), EXE2BIN will convert the
EXE file to a standard binary file. If such a file contains any relocatable items,
MS-DOS will prompt you to enter a "fixup value." Thefixup value is a hexa
decimal number that will be the absolute memory address at which the con
verted file will be loaded. Such a file can be loaded only by a user application
program that specifies where in memory it will be loaded. MS-DOS will be
unable to load the file.
If the original EXE file specifies a loading address other than lOOH, MS
DOS will display the following message:
Files cannot be converted
This message will also be displayed if the original file is not a valid EXE
file.
FASTOPEN
External
MS-DOS 3.3, 4.X
428
Function:
Provides rapid access to recently used subdirectories and
files
Format:
FASTOPEN d:[=nnn] ... (use of "=" is optional)
FASTOPEN d:[=([nnnn]L mmm])] ... [IX] (MS-DOS 4.X)
Example:
fastopen c:=lOO
FASTOPEN
FASTOPEN is used to store in memory the physical disk location of recently
accessed subdirectories and files. When MS-DOS needs to access a file,
FASTOPEN first checks to see if the file's location is stored in memory. If it is,
the file can be located very quickly.
MS-DOS locates a disk file by processing a linked list, which points to
the file's physical location on the disk. As an example, let's consider what
MS-DOS must do in order to execute the following command:
C>dir \subdir1\subdir2\subdir3
The root directory is always in a specific physical location on the disk.
MS-DOS proceeds to this location and scans the root directory for an entry
named SUBDIRl. This entry will contain the physical disk location of sub
directory SUBDIRl. MS-DOS proceeds to this location and scans SUBDIR1
for an entry named SUBDIR2. This entry directs the operating system to the
physical location of SUBDIR2. Once SUBDIR2 is located, the location of
SUBDIR3 can be read, and MS-DOS can proceed to the physical disk loca
tion of SUBDIR3. All of these steps must be carried out before the DIR com
mand can be executed. FASTOPEN provides a way to speed up this process.
Using FASTOPEN
FASTOPEN is invoked by including on the command line the letter specifier
for each hard disk on your system, followed by a number from 10 to 999.
The number tells FASTOPEN how many subdirectory and file locations to
store in memory for that disk. In the following example, FASTOPEN stores
100 locations for drives C and D:
C> fastopen c: 100 d: 100
FASTOPEN uses 34 as a default if a drive letter is not followed by a num
ber. Each location requires 35 bytes of system memory.
Each time a file or subdirectory is accessed, FASTOPEN checks to see if
the corresponding disk location is stored in memory. If not, the location is
determined and stored in memory. This process continues until the number
of locations stored in memory matches the number specified on the com
mand line. Thereafter, any location placed in memory displaces the location
corresponding to the least recent disk access.
The MS-DOS 4.X implementation of FASTOPEN also stores in memory
a record of the disk cluster numbers of recently accessed disk files. Nor
mally, DOS determines a file's clusters by reading the file allocation table. By
storing a file's cluster sequence in a memory buffer, DOS decreases the
amount of time required to access the file. Each buffer set aside to record a
sequence of clusters uses 16 bytes of memory. The default value for the num
ber of cluster sequence buffers is 34.
429
Part 3-MS-DOS Commands
The 4.X version of FASTOPEN can be loaded into expanded memory
by using the Ix switch. If you are using PC-DOS 4.X, the Ix switch only
works if you are using an IBM expanded memory board and the IBM device
driver XMA2EMS.SYS.
Another feature implemented in MS-DOS 4.X is the capability to load
FASTOPEN into memory using an INSTALL statement contained in the CON
FIG.SYS file. The following statement, when placed in CONFIG.SYS, loads
FASTOPEN. When using INSTALL, the specification for FASTOPEN must in
clude the filename extension.
install=c:\dos\fastopen.exe c:=(SO,2S0)
FASTOPEN will set up 50 buffers to store the location of recently accessed
files and directories, plus 250 buffers to store the cluster sequence of re
cently accessed files.
Note: FASTOPEN may be invoked one time only following system
startup (you may want to include it in an AUTOEXEC.BAT file). FASTOPEN is
used with hard disks only. It cannot be used with floppy disks or disks de
fined with the MS-DOS commands ASSIGN,]OIN, or SUBST. Nor can it be
used with network drives.
FCBS
Internal
MS-DOS 3.X, 4.x
Function:
Determines the number of file control blocks that may be
used when file sharing is implemented
Note: FCBS can be used in CONFIG.SYS only
Format:
FCBS=m,n
Example:
fcbs= 10,5
Recall from chapter 10 that MS-DOS uses two different mechanisms to ac
cess disk files. One of these mechanisms utilizes a data structure called a/ile
control block (FCB) to store information used by MS-DOS in reading and
writing files. If your computer is on a network and you have implemented
file sharing (see the SHARE command), MS-DOS limits the number of FCBs
that can be open at one time to 4. The FCBS command allows you to in
crease the number of FCBs that may be open at a time.
When file sharing is not implemented, there is no limit on the number
of available file control blocks. Therefore, the FCBS command has no effect
when file sharing is not implemented.
FCBS is entered with two parameters. The first parameter determines
the number of FCBs that may be open at one time. The allowable range is 1
430
FDISK/FILES
to 255. The second parameter determines the number ofFCBs that MS-DOS
must leave open. As an example, suppose that CONFIG.SYS contains the
following command:
fcbs=10,5
This command tells MS-DOS that up to 10 FCBs can be open. In addition, 5
FCBs are protected against automatic closure by MS-DOS. In other words, if
10 FCBs are open, and MS-DOS needs to open more FCBs, the operating
system may close up to 5 FCBs but must leave the other 5 open.
If CONFIG.SYS does not contain a "fcbs=" command, a default of
m=4, n=O is set.
If MS-DOS must automatically close an FCB, it looks for the FCB that
was least recently used and closes it. If MS-DOS subsequently attempts to
use the closed FCB, the following error message is displayed:
FeB unavailable
Abort, fai l?
FDISK
External
MS-DOS 2.X, 3.X, 4.X
Function:
Configures the hard disk
Format:
FDISK
Example:
fdisk
FDISK is a utility program that is used to partition (configure) a hard disk
assigned to MS-DOS. The use of FDISK is described in chapter 1.
FILES
Internal
MS-DOS 2.X, 3.X, 4.x
Function:
Determines the amount of memory that is set aside for file
handles
Note: FILES may be used in a CONFIG.SYS file only
Format:
FILES=xx
Example:
files = 25
431
Part 3-MS-DOS Commands
The FILES command is used to establish the amount of memory for a con
trol block used in managing file handles The amount of memory set aside
for this purpose determines the maximum number of file handles that can
exist at one time.
Afile handle is a 16-bit number that is assigned by MS-DOS to a new file
when the file is created or to an existing file when the file is opened. File
handles are used by MS-DOS to keep track of the files that an application
program is using at anyone time. The role of file handles is discussed more
fully in chapter 10.
Using FILES
A FILES command may be used only as part of a CONFIG.SYS file. CON
FIG. SYS is a text file containing one or more commands that are read by MS
DOS during the booting process. Each command in CONFIG.SYS specifies
certain parameters under which MS-DOS will operate. In this case, a FILES
command establishes the number of file handles that may be used by MS
DOS at one time.
CONFIG.SYS can be created or modified with a text editor such as ED
LIN. CONFIG.SYS can also be created by entering the command"copy con:
config.sys" (see the COPY command for details).
C>copy con: config.sys
FILES=10
AZ
+-you press Ctrl-Z, Enter
1 Fi lees) copied
MS-DOS will set aside memory for eight file handles if no FILES com
mand is read during booting. For most application programs, this is suffi
cient. MS-DOS will display the message No free fi le hand les if an
application program requires more than eight file handles. MS-DOS will
occupy 39 more bytes of memory for each additional file above the default
value of 8.
The FILES command does not affect the number of user-specified file
control blocks (FCBs) that may be set up and used with MS-DOS service
functions OFH-29H (see appendix A).
432
FIND/FOR
FIND
External
MS-DOS 2.X, 3.X, 4.x
Function:
Searches for a specified string of text in a file or files
Format:
FIND [1V][/C][/N]string[filespec][filespec] ...
Examples:
find
find
find
find
"flint's" sample. txt.
Iv "berkeley" sample. txt
Ic "oakland" sample. txt
In "books" sample.txt
FIND is an MS-DOS filter that searches the lines of one or more text files
for a specified string. The specified string is enclosed on the command line
in double quotes ("l ike thi 5"). Alternatively, output from a program or
another MS-DOS command can be piped through FIND. The output from
FIND can be sent to the standard output or redirected to a device or a file.
FIND is an external MS-DOS command. This means that before you can
use the FIND filter, a copy of the file FIND.EXE must be stored in one of the
system drives.
FIND Switches
There are three optional switches for FIND. The Iv switch causes FIND to
display the lines in a text file that do not contain the specified string. The Ic
switch instructs FIND to display only a count ofthe number of lines in a text
file that contain the specified string. The In switch tells FIND to display the
lines ofa text file that contain the specified string; each line is preceded by its
relative line number within the file.
Chapter 6 discusses FIND and describes MS-DOS filters, redirection,
and pipes.
FOR
Internal
MS-DOS 2.X, 3.X, 4.x
Function:
Executes a command repeatedly on a set of parameters
Format:
FOR % % variable IN (set o/parameters) DO command
Examples:
for %%a IN (filel file2 file3) DO del %%a
for %b IN (example.bat program. txt letter) DO copy %b pm
433
Part 3-MS-DOS Commands
A command can be executed repeatedly on a set of specified parameters by
using the command FOR. Each FOR command begins with the word "for",
followed by a dummy variable. If a FOR command is located within a batch
file, the dummy variable is preceded by two percentage signs (% %). Only
one percentage sign is used if the FOR command is not located in a batch
file. During the execution of a FOR command, the dummy variable is se
quentially replaced by each of the specified parameters.
The dummy variable is followed by the letters "IN". Both letters must
be entered in uppercase. "IN" is followed by a set of parameters that must be
enclosed in parentheses.
Following the set of parameters are the letters "DO", which must be
entered in uppercase. "DO" is followed by the command that will be exe
cuted one time for each of the parameters in the set.
In the following example, a FOR command is used to print a copy of the
files "example.bat", "program.txt", and "letter":
C>for %b IN (example.bat program. txt letter) DO copy %b prn
COPY EXAMPLE. BAT PRN
1 Fi Le(s) copied
COPY PROGRAM. TXT PRN
1 Fi Le(s) copied
COpy LETTER PRN
1 Fi Le(s) copied
The use of FOR in MS-DOS batch files is discussed in chapter 5.
FORMAT
External
MS-DOS I.X, 2.X, 3.X, 4.x
434
Function:
Initializes floppy diskettes and hard disks so that they can be
used by MS-DOS
Formats:
FORMAT [d:][/S] (DOS l.X-4.X)
FORMAT[d:][/l ][/8][N][lB] (DOS 2.X-4.X)
FORMAT [d:][/4] (DOS 3.X-4.X)
FORMAT [d:][/N:xx/T:yy] (DOS 3.3-4.X)
FORMAT [d:][/F:size] (DOS 4.X)
Examples:
format b:
format b:/s
format c:/s/v
FORMAT
Floppy diskettes and hard disks must be initialized before they can be used
by MS-DOS. This initialization process is called formatting and is per
formed with the command FORMAT.
Formatting divides a floppy diskette or hard disk into parcels called
sectors. Sectors are grouped together into tracks. MS-DOS assigns numbers
to the sectors and tracks and uses the numbers as references to find its way
around the diskette or hard disk.
Formatting places a boot record on each diskette and hard disk. As you
might imagine, MS-DOS uses the boot record whenever it boots up. Format
ting also creates a file allocation table and a disk directory on each diskette
and hard disk. MS-DOS uses these structures as a table ofcontents to the files
stored on the diskette or hard disk.
Chapter 10 contains detailed information on sectors, tracks, the boot
record, the file allocation table, and the disk directory.
Using FORMAT
Formatting a diskette destroys any existing data on the diskette. Formatting a
hard disk will destroy any data in the MS-DOS partition of the disk. You will
need to format all new, blank diskettes that will be used by MS-DOS. You may
occasionally format previously used diskettes. When you do this, make sure
that you copy any files that you want to keep onto another (formatted) diskette
before using FORMAT. The examples in this section show how to format a
floppy diskette. The use of FORMAT to format a hard disk is nearly identical.
Refer to chapter 1 for information on partitioning and formatting a hard disk.
FORMAT is an external MS-DOS command. This means that before
you can begin formatting, a copy ofthe file FORMAT. COM must be in one
of the system drives. FORMAT. COM is one of the files provided on your
MS-DOS system diskette. The discussion that follows assumes that FOR
MAT.COM is located on a diskette in drive A.
If your system has two diskette drives, formatting is most easily accom
plished by placing a working copy of your MS-DOS system diskette in drive A
and the diskette to be formatted in drive B. If you are using a system with one
diskette drive, insert your working copy of the system diskette in drive A. The
commands that you will enter will be identical to those used on a two-drive
system. MS-DOS will prompt you when it is time to change diskettes.
To begin formatting, enter the following:
A> format b:
MS-DOS will load FORMAT. COM into memory, display some informa
tion about the system manufacturer, and then issue a prompt:
Insert new diskette for drive B:
and strike any key when ready
435
Part 3-MS-DOS Commands
Strike any key and formatting will begin. MS-DOS tells you that it is
formatting with the following message:
Formatt i ng •••
Formatting a floppy diskette takes about one minute, so sit back and
relax. MS-DOS will notify you when formatting has been completed:
Formatting ••• Format compLete
MS-DOS will display a status report with information about the newly
formatted diskette. In MS-DOS 4.0, the status report includes the total
amount of disk space, the amount of available disk space, the number of
bytes in each allocation unit, and the number of allocation units available on
the diskette. An allocation unit (or cluster) is the minimum number of disk
sectors that is allocated to a file; it varies with the type of diskette (or hard
disk) used. The 4.X version of FORMAT also assigns a serial number to the
diskette. The number serves no purpose other than to identify the diskette.
The following is an example of a 4.x status report:
1213952 bytes totaL disk space
107520 bytes in bad sectors
1106432 bytes avaiLabLe on disk
512 bytes in each aLLocation unit
2161 aLLocation units avaiLabLe on disk
VoLume Serial Number is 2414-12CD
After displaying the status report, MS-DOS will ask if you want to for
mat another diskette:
Format another (YIN)?
Enter Y to format another, or N to exit FORMAT.
The System Files
The /s switch is used to add the MS-DOS system files and the file COM
MAND.COM to a diskette or hard disk. The hidden MS-DOS system files
have names like IO.SYS and MSDOS.SYS. These two files, along with COM
MAND.COM, must be on any diskette or hard disk that will be used to boot
MS-DOS. The order and the location of the system files on a diskette or hard
disk are important. A diskette or hard disk may not be bootable if you simply
use the command COpy to add the system files. The following command
436
FORMAT
will format the diskette in drive B and instruct MS-DOS to add the system
files and the COMMAND.COM file.
A> format b: Is
MS-DOS responds:
Insert new diskette for drive B:
and strike any key when ready
Formatting .•• Format compLete
System transferred
362496 bytes totaL disk space
38912 bytes used by the system
323584 bytes avai LabLe on disk
Format another (YIN)?
Notice that MS-DOS includes the message: System transferred and
that the status report contains information about the amount of disk space
occupied by the system files and COMMAND. COM. If you use the command
"dirb:" to examine the newly formatted diskette, the directory entry for COM
MAND.COM will be displayed. No information will be displayed for the hid
den system files.
Adding a Volume Label
The MS-DOS 2.X-4.X versions of FORMAT allows you to assign a volume
label, or name, to a diskette or hard disk. A volume label serves only to
identify a diskette or hard disk; it cannot be used as a parameter in any MS
DOS commands. The volume label will be displayed whenever the DIR
command is used to examine the contents of a diskette or hard disk.
To assign a volume label, enter the Iv switch in the FORMAT command.
At the end of the formatting process, MS-DOS will prompt you to enter a
volume label. A volume label can be up to 11 characters long. All characters
acceptable in filenames (see chapter 2) are acceptable in volume labels.
A> format b: Islv
MS-DOS responds:
Insert new diskette for drive B:
and strike any key when ready
Formatting .•• Format compLete
System transferred
437
Part 3-MS-DOS Commands
VoLume LabeL (11 characters, ENTER for none)? WAITE_DISK1
362496 bytes totaL disk space
38912 bytes used by the system
3235684 bytes availabLe on disk
Format another (YIN)?
You can use dir b: to display the volume label and directory entries of
the newly formatted diskette:
A>di r b:
VoLume in drive B: is WAITE DISK1
Directory of
A:\
COMMAND
COM
15480 3-01-89 2:00a
1 FiLe(s)
323584 bytes free
The MS-DOS 4.X version of FORMAT handles volume labels a little dif
ferently. The label is specified as part of the /v switch. The following is an
example:
format a: Iv:book_backup
If you do not specify a volume label, MS-DOS will prompt you for one when
the formatting process is complete.
Formatting 8 Sectors per Track
The MS-DOS 2 version of FORMAT will normally divide each track into 9
sectors. The MS-DOS 3 and 4 versions of FORMAT will normally divide each
track into 9 or 15 sectors, depending on the type of drive holding the target
diskette. The /8 switch directs FORMAT to divide each track into 9 or 15
sectors but to use only 8 of the sectors. This feature allows files on diskettes
originally formatted with MS-DOS l.X to be copied onto diskettes formatted
under MS-DOS 2.X, 3.X, and 4.X.
Formatting a Single Side
FORMAT determines if the diskette to be formatted is single or double sided
and accordingly formats one or two sides. However, if you include the 11
switch in the FORMAT command, only one side will be formatted, regard
438
FORMAT
less of the type of diskette or diskette drive. The II switch can be used only
with diskettes and is not available with the MS-DOS 1 version of FORMAT.
The IB Switch
Some implementations of MS-DOS 2-4 have a /b switch for FORMAT. This
switch instructs FORMAT to divide each track on the diskette into 8 sectors
and to allocate space on the diskette for the two hidden system files. No files
are actually written to the diskette. System files can subsequently be copied
to the diskette by using SYS.
The 14 Switch
The 14 switch, implemented in MS-DOS 3 and 4, allows you to format a
standard diskette on a 1.2-Mbyte drive. (Use the II switch and the 14 switch
for single-sided diskettes.) Diskettes formatted in this fashion can be used
only on 1.2-Mbyte drives.
The IN :xx and IT:y'y Switches
The In and It switches are implemented in MS-DOS 3.3 and 4.X. They are
used to format a diskette at less than the maximum capacity supported by the
diskette drive. The In switch sets the number of sectors per track. The It
switch sets the number of tracks. The switches must be used together.
The In and It switches are implemented primarily to allow the format
ting of nO-Mbyte diskettes on 1.44-Mbyte diskette drives. In the following
example, it is assumed that drive D is a 3 I h-inch, 1.44-Mbyte drive that con
tains an unformatted nO-Kbyte diskette:
C>format d: In:9 It:80
The IF Switch
The somewhat bewildering number of FORMAT switches is the result of the
variety of different types of floppy diskettes that MS-DOS may be called
upon to format. For example, if you have a 1.2-Mbyte disk drive and want to
format a 180-Kbyte diskette on it, you will have to enter the command "for
mat a: II 14". The MS-DOS 4.X version of FORMAT makes this process some
what easier through the use of the If switch.
With the If switch you do not have to know that a 180-Kbyte diskette is a
Single-sided (/1), normal density (/4) diskette. All you need to know is the
capacity of the diskette. Then, if the capacity of the drive is the same or
439
Part 3-MS-DOS Commands
larger, you can use the Ifswitch to specify the disk's capacity. As an example,
in MS-DOS 4.X, the 180-Kbyte diskette can be formatted as follows:
format a: If:180
FORMATandERRORLEVEL
ERRORLEVEL is the name of a variable that is maintained by MS-DOS. The
value of ERRORLEVEL is set by MS-DOS commands as a way of telling the
operating system whether the command executed successfully, and if not,
what went wrong. Batch files can determine the value of ERRORLEVEL by
using the IF command.
The FORMAT command sets the value of ERRORLEVEL as follows:
Value Meaning
o
3
4
5
FORMAT executed successfully.
FORMAT terminated when user pressed Ctrl-Break.
FORMAT terminated due to an error.
FORMAT terminated when user responded "N" to the
warning about formatting a fixed disk.
GOTO
Internal
MS-DOS 2.X, 3.X, 4.X
Function:
Transfers control to a specified location within a batch file
Format:
GOTO label
Example:
goto four
A batch file is a text file that contains a sequence of MS-DOS com
mands. Each command is entered as one line in the batch file. Lines in
MS-DOS 2.X, 3.X, and 4.X batch files may be labeled. A label simply serves
to identify a line. Batch file labels consist ofa colon (:) followed by a string of
eight or fewer characters.
GOTO directs a batch file to jump to a specific line within the file and to
execute the command at that line. In this example, the GOTO command
causes execution of the batch file to loop endlessly:
:work
rem i am working!
goto work
GOTO and the other batch file commands are discussed in chapter 4.
440
GRAFTABL
GRAFTABL
External
MS-DOS 3.X, 4.X
Function:
Loads a character table into memory
Formats:
GRAFTABL
GRAFTABL [xxx or /STA] (MS-DOS 3.3, 4.X)
GRAFTABL [?] (MS-DOS 4.X)
Examples:
graftabl
graftabl 437
Normally, when the color/graphics adapter (CGA) is in graphics mode, the
ASCII characters 128 through 255 cannot be displayed (this group of charac
ters includes the accented letters). The GRAFTABL command is used to load
into memory a character table that allows these characters to be displayed
when the CGA is in graphics mode.
With the MS-DOS 3.3 and 4.X versions of GRAFTABL, the user can load
a table of graphics characters that are specific to a code page. This allows the
display oflanguage-specific characters. The code page is selected by includ
ing a valid code page number on the command line. The valid numbers are
437,860,863, and 865. Please refer to appendix D for an overview of code
pages.
Entering GRAFTABL with no parameters loads the graphics table for
code page 437. You can load another graphics table by entering "graftabl
xxx", where "xxx" is the number of the code page that corresponds to the
table you want to load.
You can enter "graftabl /sta" to find out which code page is currently
active.
In MS-DOS 4.X, you can enter "graftabl ?" to find out which code page
is active as well as what other code pages are available to be loaded.
The MS-DOS 3.3 and 4.X versions of GRAFTABL return the ER
RORLEVEL codes in the following list. Such codes are returned by MS
DOS commands to communicate information regarding the outcome of
the commands. See chapter 4 for ways that ERRORLEVEL codes can be
utilized by MS-DOS batch files.
ERRORLEVEL Code
°
1
Meaning
Code page successfully installed. No code
page was previously installed in memory.
A code page was previously installed in
memory. If a new code page was specified,
it was successfully installed.
441
Part 3-MS-DOS Commands
No code page was previously installed in
memory. No new code page was installed.
Parameter not valid.
Incorrect version of MS-DOS
2
3
4
GRAPHICS
External
MS-DOS 2.X, 3.X, 4.x
Function:
Prints the contents of a graphic screen display
Formats:
GRAPHICS
GRAPHICS [<printer> ][IR][/B] (DOS 3.X, 4.X)
GRAPHICS[ <printer> ][/R][IB] [/LCD] (DOS 3.3, 4.X)
GRAPHICS[ <printer> ][ <profile> ][/R][/B][/LCD]
[/PB: < id>] (MS-DOS 4.X)
Example:
graphics color!
One of the more useful features of MS-DOS is its ability to print a full
screen of text when the Shift and PrtSc keys are pressed at the same time.
The command GRAPHICS expands this capability so that a graphics dis
play can be printed by a dot matrix printer when the Shift-PrtSc combina
tion is pressed.
GRAPHICS is another of the MS-DOS terminate and stay resident (TSR)
utility programs. When the GRAPHICS command is first entered, MS-DOS
reads the program into memory and keeps it there as long as the computer is
running. Once GRAPHICS is installed, simply press Shift-PrtSc and GRAPH
ICS will go to work. Text or graphics will be printed according to the current
display mode.
GRAPHICS Parameters
There are no parameters for the MS-DOS 2 version of GRAPHICS. Starting
with MS-DOS 3.0, however, you may specify the type of graphics printer
you are using:
Parameter
GRAPHICS
COLOR!
442
Description
IBM PC graphics printer
Epson graphics printer
IBM PC color printer
black ribbon
GRAPHICS
COLOR4
COLOR8
COMPACT
THERMAL
GRAPHICSWIDE
IBM PC color printer
red, blue, green ribbon
IBM PC color printer
cyan, magenta, yellow, black ribbon
IBM PC compact printer
(MS-DOS 3.3 only)
IBM PC convertible printer
(MS-DOS 3.3)
IBM Quietwriter-wide paper
IBM Proprinter-wide paper
The default printer parameter is GRAPHICS.
With the Ir switch, what appears as black on the screen is printed as
black and what appears as white is printed as white. The default is to print
black as white and white as black.
The /b switch (valid with printer parameters COLOR4 and COLORS
only) prints the background color of the screen. The default is to not print
the background.
The lled switch, implemented with MS-DOS 3.3, prints images as they
appear on a liquid crystal display.
The MS-DOS 4.X version of GRAPHICS uses a graphics profile file. The
graphics profile file contains instructions that guide the printer in printing
the contents of the display screen. The file GRAPHICS.PRO, which comes
with MS-DOS 4.X, is the standard profile file. It is the file that is used if the
GRAPHICS command does not specify a <profile> parameter. GRAPH
ICS.PRO contains the instructions for the printers listed in the above table.
Manufacturers of other printers may supply their own graphics profile file.
Such a file would provide a means for GRAPHICS to be used with those
printers.
MS-DOS 4.X also implements the IPB: < id> switch. Two parameters
are valid for < id>:
LCD for use with LCD displays (lPB:LCD is equivalent to ILCD).
STD for use with CRT type displays (lPB:STD is the default).
The GRAPHICS command can be executed from the CONFIG.SYS file
using the MS-DOS 4.X command INSTALL.
443
Part 3-MS-DOS Commands
IF
Internal
MS-DOS 2.X, 3.X, 4.x
Function:
Executes a command if a specified condition is true
Format:
IF [NOT] condition command
Examples:
if exist somefile.dat type somefile.dat
if % 1 = =roses goto roses
if not exist file.bak copy file.txt file.bak
MS-DOS 2.X, 3.X, and 4.X commands can be executed on a conditional
basis by including the commands in an IF statement. IF statements are gener
ally used within a batch file. IF can check the following conditions:
IF EXIST filespec command IF may be used to determine if a spe
cific file exists in the current directory of a specified (or default) drive. The
following statement directs MS-DOS to determine if a file named
"somefile.dat" exists in the current directory of drive C (the default drive). If
the file does exist, MS-DOS is to display (TYPE) its contents on the screen:
C>if exist somefile.dat type somefile.dat
=
IF string1 =string2 command An IF statement may be used to
determine if two character strings are identical. This type of conditional
statement is used to compare a string passed to a batch file as a parameter to a
string specified within the batch file. The next example checks to see if
batch file variable % 1 is equal to the character string "roses". Execution of
the batch file branches to the line labeled ":roses" if the condition is true:
C>if X1==roses goto roses
IF ERRORLEVEL number command ERRORLEVEL provides a
way for batch files to conditionally execute based on the outcome of an MS
DOS command or application program. ERRORLEVEL is a variable that can
be set according to the outcome of a program or MS-DOS command.
The value of ERRORLEVEL can be tested with an IF statement. The
command specified in the IF statement will be executed if the value of ER
RORLEVEL is greater than or equal to "number". The following IF statement
checks the value of ERRORLEVEL and directs MS-DOS to display the disk
directory (DIR) if ERRORLEVEL is greater than or equal to 2:
C>if errorlevel 2 dir
Application programmers should refer to MS-DOS functions 31H and
444
INSTALL
4CH (appendix A) for more information on setting and reading ER
RORLEVEL.
IF NOT The command contained in an IF NOT statement is executed
if the condition tested is false. An IF NOT statement can test the same condi
tions as an IF statement. The following statement will check the current
directory of drive C for a file named"file. bak". If the file does not exist, MS
DOS will copy the file "file.txt" and name the copy "file.bak":
C>if not exist file.bak copy file.txt file.bak
Please refer to chapter 4 for a discussion of the use of IF and IF NOT.
INSTALL
Internal
MS-DOS 4.X
Function:
Load and execute DOS commands from CONFIG.SYS
Note:INSTALL can only be used in the file CONFIG.SYS.
Format:
INSTALL = [d:] fpath] <filename. ext> fparameters]
Example:
install=c: \dos\fastopen.exe c:=(50,250)
The MS-DOS commands FASTOPEN, GRAPHICS, KEYB, NLSFUNC, and
SHARE are memory resident utilities. This means that the files containing
these external commands remain in memory once they are loaded. They are
available for use by the operating system as the need arises, without having
to be reloaded from the disk.
The MS-DOS 4.X command INSTALL allows you to load and execute
FASTOPEN, GRAPHICS, KEYB, NLSFUNC, and SHARE from the file CON
FIG.SYS. CONFIG.SYS is a text file that must reside in the root directory of
the disk used to boot MS-DOS. The statements in CONFIG.SYS are read and
executed as part of the boot process. The role of CONFIG.SYS is discussed
in chapter 5.
Each of the memory resident utilities mentioned can be loaded from
the command line or from a batch file. However, when you use the INSTALL
command to load them from CONFIG.SYS, the utilities are loaded into a
lower memory address than when they are loaded from the command line
or a batch file. Loading at a lower address can enhance the performance of
the utility.
To use INSTALL, type install, followed by an equals sign (=), followed
by the filename and extension of the utility, followed by any required param
eters. You must include the filename extension. The filename may be pre
ceded by a drive specifier and/or a path specifier.
445
Part 3-MS-DOS Commands
The following example illustrates the use of INSTALL. Remember that
the statement must be used in CONFIG.SYS.
install=c:\dos\fastopen.exe c:=(50,250)
The statement directs MS-DOS to load FASTOPEN into memory. The file
FASTOPEN.EXE is located in directory C: \DOS.
Refer to the individual discussions of FASTOPEN, GRAPHICS, KEYB,
NLSFUNC, and SHARE for further information on the use of these com
mands.
JOIN
External
MS-DOS 3.X, 4.x
Function:
Creates a logical link between a disk drive and a subdirectory
on another disk drive
Format:
JOIN dJ: d2: \directory
Example:
join a: c: \adrive
JOIN allows you to reference a disk as though the disk's contents were stored
in a subdirectory on another disk. JOIN is useful if you have files located on
several disks and you want to avoid changing your current drive.
Say that you have a floppy disk in drive A that contains the files "chap
terl.doc", "chapter2 .doc", and "chapter3 .doc". Drive A can be "linked"
to subdirectory ADRIVE on drive C as follows:
C>join a: c:\adrive
C>di r \adrive
Volume in drive C is HARDDISK
Directory of C:\ADRIVE
CHAPTER1 DOC
CHAPTER2 DOC
CHAPTER3 DOC
5 FiLe(s)
7168 6-23-89 10:22a
9259 6-23-89
5:25p
4527 6-27-89
2:20p
587760 bytes free
JOIN will create a subdirectory if the one specified does not exist. The
subdirectory must be empty and must be located exactly one level below
the root directory.
A disk drive cannot be accessed directly while it is joined to a subdirec
446
KEYB
tory. In the preceding example, the command" dir a:" will result in an error
message.
Displaying and Cancelling JOINs
Using JOIN displays the active links. The /d switch is used to remove a link.
C>join
A: => A;\ADRIVE
C>join a: /d
C>join
C>
Limits onJOIN
JOIN will not work if a network drive is used as a parameter. Furthermore,
JOIN is not reliable when used in conjunction with the commands SUBST
and ASSIGN. The commands BACKUp, RESTORE, FORMAT, DISKCOPY,
and DISKCOMP should not be used while a JOIN is in effect, since these
commands may perform in an unpredictable fashion when confronted with
aJOIN.
KEYB
External
MS-DOS 3.3, 4.x
Function:
Formats:
Loads a keyboard device driver that supports non-U.S.
keyboards
KEYB[xx~yyy][,[d:][pathlfilename[.ext]]]
(MS-DOS 3.3, 4.X)
KEYB[xxLyyy] [, [d::I [pathlfilename[. ext]] VJD:zzz]]
(MS-DOS 4.X)
Example:
keyb
keyb fr,850 c: \dos\keyboard.sys
KEYB is a program provided with MS-DOS 3.30 and 4.X that loads into
memory a device driver for non-U.S keyboards. It is important to differenti
ate KEYB from the KEYBxx programs supplied with versions of MS-DOS
447
Part 3-MS-DOS Commands
prior to 3.3. The KEYBxx programs are not compatible with MS-DOS 3.3
and4.X, andKEYB can be used with MS-DOS 3.3 and 4.X only (a discussion
of the KEYBxx programs follows this section).
KEYB is used to set the keyboard code and the codepage that are active
for the CON device (the combination of the keyboard and the display de
vice).
The keyboard code determines the functional layout of the keyboard,
assigning significant foreign language characters to specific keys. For exam
ple, if KEYB is used to create a functional French keyboard, pressing the "2"
key displays "e" and pressing the "0" key displays "a".
Code pages are look up tables that are used to convert into displayable
characters the numerical values by which data (including characters) is
stored in a computer. Please refer to appendix D for further information on
code pages.
The format for using KEYB is:
KEYB[xx[, fyyy, [[d: ][path ]filename[. ext]]]]
The xx parameter specifies the keyboard code. The yyy parameter
specifies a code page number. The code page number must correspond to a
code page previously prepared with the MODE command (see appendix D
for an explanation ofthe code page numbers). If a code page is not specified,
KEYB uses the default code page for the country specified by the keyboard
code. The following list shows the allowable combination ofkeyboard code
and code page number parameters. See the discussion of the SELECT com
mand for an explanation of the keyboard codes. Refer to your MS-DOS man
ual for elaboration on various logical keyboard layouts.
Code Page
437
850
860
863
865
Keyboard Code
US, UK, FR, GR, IT,
SF, LA, Sv, SU, NL
US, UK, FR, GR, IT,
SF, LA, SV, SU, NL,
DK, NO, PO, SF, CF,
BE, SG
PO
CF
NO,DK
The filename[. ext] parameter in the KEYB command refers to the sys
tem keyboard definition file. If the filename parameter is omitted, KEYB will
look in the root directory for the file KEYBOARD.SYS. Each version of KEY
BOARD. SYS is specific for a version of KEYB. For example, the MS-DOS 4.X
version of KEYBOARD.SYS is specific for the 4.X version of KEYB. The
following command illustrates the use of KEYB:
448
KEYB
keyb fr,850,c:\dos\keyboard.sys
This command loads into memory a driver for the French keyboard and
activates code page number 850 for the CON device.
Once a driver for a non-U .S. keyboard is loaded, the user may switch to
the U.S. keyboard layout by pressing Ctrl-Alt-Fl. Pressing Ctrl-Alt-F2
switches to the non-U.S. layout.
Entering keyb (with no parameters) directs MS-DOS to display the key
board code for whichever non-U.S. keyboard driver is currently active in
memory.
The MS-DOS 4.X version of KEYB supports the IID:zzz switch. This
switch is used to specify a keyboard code for those countries that have more
than one keyboard layout. The values supported for zzz are as follows:
.... When xx is "FR", zzz can be 120 or 189 .
.... When xx is "IT", zzz can be 141 or 142.
.... When xx is "UK", zzz can be 168 or 166.
KEYB returns the following ERRORLEVEL codes. ERRORLEVEL codes
are available for processing by batch files (see chapter 4).
ERRORLEVEL Code
o
1
2
3
4
5
6
7
Explanation
Successful execution.
Improper keyboard code number, code
page number, or syntax.
Bad keyboard definition file or definition
file not found.
Could not load driver into memory.
KEYB is unable to communicate with CON
device.
Code page requested has not been
prepared.
Code page selected is not contained in
keyboard information file.
Incorrect version of MS-DOS.
449
Part 3-MS-DOS Commands
KEYBxx
External
MS-DOS 3.0-3.2
Function:
Installs keyboard device drivers for non-U.S.keyboard
layouts
Format:
KEYBx.x
Example:
keybfr
The KEYBxx.COM commands supplied with MS-DOS versions 3.0-3.2
serve as installable device drivers for creating keyboards with non-U.S.lay
outs. As an example, to create a keyboard with a French layout, enter the
command keybfr. Refer to your MS-DOS manual for further information on
the various keyboard layouts available with these commands. Note that the
files are external commands; therefore, MS-DOS must be able to locate them
on a disk before they can be executed.
The KEYBxx. COM files are not compatible with MS-DOS 3.3 and 4.X.
The command KEYB operates in a different manner than the KEYBxx com
mands (see the preceding KEYB command).
LABEL
External
MS-DOS 3.X, 4.x
Function:
Adds, changes, or inspects a disk's volume label
Format:
LABEL [d:][volume label]
Examples:
label c:
label c:newlabel
A volume label is a string of 11 or fewer characters used to identify a diskette
or a hard disk. MS-DOS 2.X allows you to add a volume label using the FOR
MAT command. Unfortunately, it does not allow you to modify an existing
volume label or to add a volume label to a previously formatted disk. The
LABEL command provides both of these capabilities.
LABEL, followed by a drive specifier, displays the volume label of the
specified disk. The label of the default is displayed if no drive specifier is
included. After the label is displayed, a prompt is displayed asking you to
enter a new volume label. If you just press Enter, you are asked if you wish to
delete the current volume label. The following examples illustrate the use of
LABEL:
450
LASTDRIVE
C>label c:
Volume in drive C is HARDDISK
Volume label (11 characters, ENTER for none)?
+-press Enter
Delete current voLume LabeL (Y/N)?n
+-enter "n"
C>
You can change a volume label by including the label on the command
line:
C>label a:book back1
LABEL should not be used in conjunction with ASSIGN or SUBST,
since these commands can cause LABEL to act unpredictably.
LASTDRIVE
Internal
MS-DOS 3.X, 4.x
Function:
Sets the last valid drive letter for the system
Note: LASTDRIVE may be used in a CONFIG.SYS file only
Format:
LASTDRIVE=drive letter
Example:
lastdrive=z
LASTDRIVE sets the number of drive letters that are valid on a system. The
allowable range for drive letter is A through Z. The minimum acceptable
value is the letter corresponding to the number of physical drives on the
system (either locally or on a network). For example, if you have a system
with two floppy disk drives and one hard disk drive, LASTDRIVE must be
greater than or equal to C. The default value for LASTDRIVE is E.
LASTDRIVE determines the drive letters that can be assigned to logical
drives created with SUBST. See the discussion of SUBST for further informa
tion.
451
Part 3-MS-DOS Commands
MEM
External
MS-DOS 4.x
Function:
Displays information on memory utilization
Format:
MEM [/PROGRAM or !DEBUG]
Example:
mem /debug
The MEM command displays information that describes the way in which
computer memory is being used by MS-DOS. If you enter mem, with no
additional parameters, MEM tells you how much used and unused memory
is available in the systems. Information is displayed for conventional, ex
tended, and expanded memory.
If you enter mem Iprogram, MEM tells you which programs and instal
lable device drivers are in memory. MEM tells you where they are loaded and
how much space they occupy.
If you enter mem Idebug, MEM also includes information regarding the
standard system device drivers and any expanded memory handles.
I wish that MEM had been implemented in MS-DOS 1 rather than in
MS-DOS 4. It would have made my initial education about the structure of
MS-DOS much easier. For users just starting to delve into the depths of DOS,
MEM gives you an opportunity to learn a lot in a hurry. For experienced DOS
hackers, MEM is a very useful tool for taking a closer look at the operating
system.
Listing 1 is the output generated by the command "mem /debug". Of
course the actual output will vary somewhat from one system to the next.
That is what makes MEM a useful utility.
The majority ofthe listing is divided into four columns. Add re s s refers
to an occupied memory address. The addresses are given in hexadecimal no
tation. We will refer to these addresses in the discussion of listing 1.
An Aside about Addresses
Memory addresses on MS-DOS computers are usually represented
by two components: a segment address and an offset address. The seg
ment address for each address in listing 1 is obtained by deleting the
address's initial and final zeros. For example, the address 000400 has a
segment address of 0040. Each of the addresses in listing 1 has an offset
address of 0000.
452
MEM
The second column in listing 1 is headed Name. The entry in this col
umn contains the name ofthe item that is stored in memory. The third column
contains the item's Size, also in hexadecimal notation. The fourth column,
labeled Type, describes the role of the item stored in memory.
Listing 1. Output Generated by MEM !DEBUG
Address
Name
Size
000000
000400
000500
000700
IBMBIO
CON
AUX
PRN
CLOCKS
Type
000400
000100
000200
Interrupt Vector
ROM Communication Area
DOS Communication Area
002470
System Program
System Device
System Device
System Device
System Device
System Device
System Device
System Device
System Device
System Device
System Device
System Device
System Device
A: - C:
COM1
LPT1
LPT2
LPT3
COM2
COM3
COM4
002B70
IBMDOS
0088AO
System Program
00B41 0
IBMBIO
ANSI
0102CO
010370
010390
011C40
013290
0133AO
013450
0157DO
028740
MEM
IBMDOS
SHARE
COMMAND
COMMAND
MOUSE
MOUSE
MEM
IBMDOS
004EAO
001190
000380
000100
0029AO
0001 CO
OOOCDO
OOOOAO
000010
0018AO
001640
000100
OOOOAO
002370
012F60
0778BO
System Data
DEVICE=
FILES=
FCBS=
BUFFERS=
LASTDRIVE=
STACKS=
Environment
- Free
Program
Program
Environment
Environment
Program
Program
- Free
Driver
Driver
Driver
Driver
Driver
Driver
Driver
Driver
Driver
Driver
Driver
Driver
655360 bytes total memory
655360 bytes available
453
Part 3-MS-DOS Commands
567328 largest executable program size
393216 bytes total extended memory
393216 bytes available extended memory
The MEM Output
Referring to listing 1, the item stored at the low end of memory (address
000000) is called Interrupt Vector. This is the area of memory that stores
the interrupt vector table. Each time the hardware or software issues an inter
rupt, the operating system must determine the memory address for the han
dler of that type of interrupt. The function of the interrupt vector table is to
store the address ofeach ofthese handlers. Each handler's address is stored at a
predetermined location within the interrupt vector table. In this way, DOS
knows where to look when it is trying to locate the address of a specific han
dler. Interrupts and interrupt handlers are discussed in appendix A.
The ROM Communi cati on Area, which begins at address 000400, is also
known as the BIOS data area. This area of memory stores data that is used by
the basic input/output system (BIOS). The BIOS acts as an intermediary be
tween the operating system and the system hardware. It is within the BIOS data
area that the BIOS maintains a record of such information as how many col
umns and rows are on the video display and which keyboard keys are currently
being pressed. Application programs can directly access this area of memory,
but in general, access is carried out through the use of the BIOS interrupts
(discussed in appendix A).
The role of the DOS Communi cat i on Area (address 000500) is similar to
the role of the BIOS data area. It is within this area of memory that MS-DOS
maintains data that it uses in carrying out certain system functions. For exam
ple, the first byte in the DOS Communication Area stores the status of the last
print screen operation (the byte equals 0 if the operation was successful, 1 if the
operation is in progress, and 255 if the operation failed).
The portion of memory starting at address 000700 has the name
IBMBIO and is referred to as a System Program. This is the portion ofmem
ory that stores the standard system device drivers. Each of the system device
drivers is listed in the Name column (CON, AUX, PRN, etc.). The contents of
IBMBIO are stored in the PC-DOS system file IBMBIO.SYS. In MS-DOS, the
equivalent file has the name IO.SYS.
The next major block ofmemory begins at address 002B70. This block
has the name IBMDOS and is also referred to as a System Program. This block
contains what is known as the operating system's kernel. The kernel is the
portion ofMS-DOS that does most ofthe work. Basically, the kernel receives all
requests for service functions and channels them to the appropriate device
driver. The kernel is stored on disk as the system file IBMDOS.SYS. In MS-DOS,
the equivalent file is MSDOS.SYS.
The next block of memory, beginning at address 00B41O, contains
what is referred to as the DOS extensions. These are the installable device
454
MKDIR
drivers and other items that were placed in memory when the file CON
FIG .SYS was read during the booting process. The first DOS extension in
listing 1 is the device driver ANSI.SYS. The other extensions listed are five
parameters that were set during the boot process. Immediately to the left of
each parameter's name is the amount of memory occupied by the item spec
ified by the parameter. This information is very useful. It allows you to view
the changes that occur in your system's memory configuration as you adjust
the values of the system parameters. The role of CONFIG.SYS and the sys
tem parameters is discussed in chapter 5.
The remainder of computer memory is available to application pro
grams. The names of the programs in listing 1 are MEM (the DOS command
that generated listing 1), SHARE (the DOS command SHARE, which is loaded
into memory to support disk partitions larger than 32 Mbytes), COMMAND (the
DOS command processor COMMAND.COM), and MOUSE (a driver for the
computer's mouse). Notice that the programs are listed as type Program.
Some of them also have an entry that is listed as type Env ironment. This is
the memory address of the copy of the DOS environment that was passed to
the program when it was loaded into memory.
The block of memory at address 010370 is listed as being -- Free --.
This portion of memory contained the copy of the DOS environment that
was passed to the program SHARE. Because SHARE does not use the envi
ronment, it was able to release this block of memory so that it would be
available to other applications.
Address 028740 contains a large block offree memory. This is the mem
ory that is currently available to other applications. This block's size in hexa
decimal notation is 0778BO bytes, which translates to a decimal equivalent
of 489,648 bytes. The size of the MEM program is hexadecimal 012F60,
which translates to 77,664. Adding 489,648 and 77,664 gives 567,312. If you
add to this the free memory at address 010370 (000010 equals decimal
16), you get a total of 567,328. This is the number given in listing 1 as the
Largest executabLe program si ze.
MKDIR
Internal
MS-DOS 2.X, 3.X, 4.x
Function:
Format:
Creates a subdirectory
MKDIR [d:]path
MD [d:]path
Examples:
mkdir \write
md b: \ programs \ business
The MKDIR (MaKe DIRectory) command is used to create a subdirectory.
455
Part 3-MS-DOS Commands
You may enter the command as either mkdir or md. The MKDIR command
may contain a drive letter designator (such as c: or a:) specifying the drive on
which the subdirectory will be created. If no drive is specified, the subdirec
tory will be created on the default drive.
The MKDIR command must specify the path to the subdirectory being
created. The first example creates a subdirectory named WRITE:
C>mkdir \write
No drive was specified in the example, which means that WRITE will
be located on the default drive. The path to the new subdirectory is
\ WRITE. WRITE will be a subdirectory entry contained in the root direc
tory of the default drive.
The next example creates a subdirectory named \BUSINESS:
C>md b: \programs\business
BUSINESS will be located on drive B. The path to BUSINESS is \PRO
GRAMS \BUSINESS. This means that BUSINESS is a subdirectory contained
in the subdirectory PROGRAMS. PROGRAMS is, in turn, a subdirectory en
try contained in the root directory of drive B.
The maximum length of the path specifier created with MKDIR is 63
characters including the "-" characters. See chapter 3 for further examples
of the use of MKDIR.
MODE
External
MS-DOS l.X, 2.X, 3.X, 4.X
Functions:
1. Sets the mode of operation of a parallel printer
2. Sets the mode of operation of a graphics/color display
adapter
3. Sets protocol for an asynchronous communications port
4. Redirects parallel printer output to a serial port
5. Prepares code pages (MS-DOS 3.3, 4.X)
6. Activates code pages (MS-DOS 3.3, 4.X)
7. Displays the currently active code page (MS-DOS 3.3,
4.X)
8. Restores an active code page (MS-DOS 3.3, 4.X)
Format:
1. MODE LPT#:[n][,[m][,P]]
2. MODE n or MODE [n],m[,T]
456
MODE
3. MODE COMn:baud[,parity[,databits[,stopbits[,P]]]]
4. MODE LPT#:=COMn
5. MODE device CODEPAGE
PREPARE = «cplist) [d:] fpathVilename[.extD
6. MODE device CODEPAGE SELECT=cp
7. MODE device CODEPAGE ISTATUS
S. MODE device CODEPAGE REFRESH
Examples:
1. mode LPT1:S0,6,P
2. mode 40
mode SO,R,T
3. mode com1:1200,N,7,1
4. mode LPT2:=coml
5. mode con codepage prepare=«S05,437)c: \dos\ega.cpi)
6. mode con codepage select=S50
7. mode con codepage Istatus
MODE is an MS-DOS utility program that is used to establish working
parameters for the parallel printer and the graphics/color monitor adapter.
Beginning with MS-DOS 1.1, MODE is also used to set the parameters ofthe
asynchronous communications port.
MODE is an external command. This means that before you can use
MODE, the file MODE.COM must be available to the system. Either
MODE.COM must be in the current directory of the default drive or the
location of MODE. COM must have been specified by the PATH command
(see the discussion of PATH).
Controlling the Printer with MODE
MODE may be used to control the number of characters printed per line and
the vertical spacing between lines on the parallel printer. MODE's format is
as follows:
MODE LPT#: [n][,[m][,p]]
where,
#
n
m
p
is parallel printer number 1, 2, or 3,
is characters per line (SO or 132),
is lines printed per vertical inch (6 or S),
instructs MS-DOS to try again when it receives a busy signal
from the printer (continuous retry on device timeout).
457
Part 3-MS-DOS Commands
The following command sets parallel printer 1 to print 80 characters
per line with 6 lines printed per vertical inch:
C>mode LPT1:80,6,p
LPT1: set for 80
Printer Lines per inch set
The p tells MS-DOS to retry continuously to send data to the printer if it
receives a busy signal. The retry loop can be halted by pressing Ctrl-Break.
If a parameter is omitted or if an invalid value is specified, the setting for
that parameter remains unchanged.
MODE can be used to set the parameters on Epson and Epson compati
ble printers only. Trying this command with other printers will yield inter
esting but unpredictable results.
Use of the MS-DOS 4.X version of MODE in controlling the printer
differs slightly from earlier versions. The format for the command is
MODE LPT# [cols=n] [lines=m] [retry=ra]
As with the earlier versions of MODE, LPT# may be "LPTl:", "LPT2:", or
"LPT3:"; n may be 80 or 132; and m may be 6 or 8.
Allowable values for the ra parameter are "e" (returns an error signal
when the printer is busy; this is the recommended setting for printers shared
on an IBM PC Local Area Network); "b" (returns a busy signal when the
printer is busy; this is compatible with the "p" parameter in earlier versions
of MODE); "r" (returns a ready signal when the printer is busy; this is the
recommended setting for operation compatible with previous versions of
MS-DOS).
Use of "cols", "lines", and "retry" is not required if commas are used
as place holders. For example, the command "mode lptl: lines=6" can also
be entered as "mode lptl: ,6".
Graphics/Color Display Adapter
If your system is equipped with a graphics/color display adapter, you may
use MODE to set the adapter's parameters. There are two formats for MODE
when it is used in this fashion:
MODEn
MODE [n],m[,t]
Table 1 contains a complete listing of the parameters used with MODE
to control the graphics/color display adapter. The next few examples will
show you how some of the parameters can be used. Bear in mind, however,
that these examples and the information in table 1 are relevant only to sys
tems having a graphics/color display adapter.
458
MODE
Thble 1. Parameters Used with MODE to Control the
Graphics/Color Display Adapter
Parameter
FunctionNalue
n=40
Sets the graphics/color display adapter width to 40
characters per line.
Sets the graphics/color display adapter width to 80
characters per line.
Switches the active display to the color/graphics display
adapter, disables the color, and sets the display width to 40
characters per line.
Switches the active display to the color/graphics display
adapter, disables the color, and sets the display width to 80
characters per line.
Switches the active display to the color/graphics display
adapter, enables the color, and sets the display width to 40
characters per line.
Switches the active display to the color/graphics display
adapter, enables the color, and sets the display width to 80
characters per line.
Switches the active display to the monochrome display
adapter. Monochrome always displays 80 characters per
line.
Is R or 1. Shifts the display right or left.
Requests a test pattern that is used to align the display.
n=80
n=BW40
n=BW80
n=C040
n=C080
n=MONO
m
The first example sets the display width to 40 characters per line:
C>mode 40
The next example switches the active display to the graphics/color dis
play adapter, enables the color, and sets the display width to 80 characters
per line:
C>mode caBO
The m and t parameters are used to adjust the screen display to the right
or left. The following command will shift the display one column to the
right in 40-column mode and two columns to the right in 80-column mode:
C>mode
I
r
The t parameter tells MS-DOS to display a test pattern that can be used
as an aid for adjusting the screen display to the right or left. The test pattern
consists of the digits 0123456789 repeated four times in the 40-column dis
play and eight times in the 80-column display. After displaying the pattern,
459
Part 3-MS-DOS Commands
MS-DOS asks if you can see the digit to the far right or the far left, depending
on whether you specified right or left adjustment. The following example
shows the command and the resultant display in 40-column mode:
C>mode ,r,t
This command requests a right adjustment. The screen will momentar
ily go blank when the command is entered; then this test pattern and
prompt will appear:
0123456789012345678901234567890123456789
Do you see the leftmost O? (YIN)
°
Your display needs to be right adjusted if you do not see a at the left
side of the screen. Ifyou reply "N", the display will be shifted one column to
the right (two columns in 80-column mode). If you reply "Y", control is
returned to MS-DOS.
The MS-DOS 4.X version of MODE also supports the following format
for controlling the display screen:
MODE CON [cols=m] [lines=n]
The allowable values for mare 40 and 80 characters per line (EGA and VGA
displays only). The allowable values for n are 25 and 43 for EGA, and 25,43,
and 50 for VGA. The ANSI.SYS device driver must be loaded to use MODE in
this fashion.
Communications and MODE
MODE may be used to initialize an asynchronous communications port.
The format for the command is:
MODE COMn:baud[,parity[,databits[,stopbits[,p]]]]
where,
n is the asynchronous communications port number (1 or 2);
MS-DOS 3.3 and 4.X support additional port numbers 3 and 4;
baud is the baud rate (110, 150, 300, 600, 1200, 2400, 4800, or
9600); MS-DOS 3.3 and 4.X support an additional baud rate of
19200;
parity is either N (none), 0 (odd), or E (even);
databits are the number of bits per word (7 or 8);
stopbits are the number of stopbits (1 or 2);
460
MODE
p instructs MS-DOS to try again when it receives a busy signal from
the port (continuous retry on device timeout).
You must specify the baud rate when using this form of MODE. How
ever, only the first two digits of the baud rate need be entered in the com
mand. All other parameters have defaults that are entered by using a comma
in the command. The parity default is even, the databits default is 7, and the
stopbits default is 1. The stopbits default is 2 if the baud rate is set at 110.
A P tells MS-DOS to continuously retry to send data to the port if it
receives a busy signal. The retry loop can be halted by pressing Ctrl-Break.
The following example initializes serial port 1 with a baud rate of 1200, no
parity, 8 databits, and 1 stopbit. MS-DOS echoes the parameters when the
command is entered:
C>mode com1:12"8,,
COM1: 1200,e,8,1,
The MS-DOS 4.X version of MODE supports the following format for
configuring a communications port:
MODE COMn: baud=b [parity p] [data=d] [stop=s] [retry=ra]
The values that can be assigned to baud, parity, data, and stop are the same as
in earlier versions of MS-DOS. The values that can be assigned to 1'3. are "e"
(returns an error signal when the port is busy; this is the recommended set
ting for printers shared on an IBM PC Local Area Network); "b" (returns a
busy signal when the port is busy; this is compatible with the p parameter in
earlier versions of MODE); "r" (returns a ready signal when the port is busy;
this is the recommended setting for operation compatible with previous
versions of MS-DOS).
Redirecting a Parallel Printer with MODE
You can use MODE to redirect parallel printer output to a serial printer that is
connected to an asynchronous communications port. The asynchronous
port must first be initialized according to the requirements of the serial
printer. The format for redirecting is:
MODE LPT#:=COMn
where,
# is the number of the parallel printer,
n is the number of the communications port.
In the following example, communications port 1 is initialized by the
461
Part 3-MS-DOS Commands
first MODE command, and output to parallel printer 1 is redirected to port 1
by the second MODE command. Notice that the port is initialized so that
timeout errors are continuously retried:
C>mode com1:300,n,8,1,p
COM1; 300,N,8,1,P
C>mode LPT1:=com1
LPT1: redirected to COM1:
Code Pages and MODE
As explained in appendix D, MODE is used to generate prepared codepages
from the code page information files supplied with MS-DOS 3.3 and 4.X.
Once a prepared code page is generated, MODE may then be used to select
the code page. MODE may also be used to display the set of code pages that
are available for a device. Finally, MODE may be used to reestablish an active
code page that has been lost. Examples will be presented for each of these
applications of MODE.
Generating Prepared Code Pages
The format for generating prepared code pages is:
MODE device CODEPAGE PREPARE=
((cplist)[d: ][path lfilename[. ext])
The device parameter is the character device for which the code pages
are being generated. The valid values are CON, PRN, LPTl, LPT2, and LPT3.
The cplist is a list of one or more valid code page numbers. These num
bers are used to specify the code pages that will be prepared for the charac
ter device. Valid code page numbers are 437, 850, 860, 863, and 865.
Appendix D discusses the meaning of these code page numbers.
The filename parameter specifies the code page information file that
will be used to generate code pages. The code page information files sup
plied with MS-DOS 3.3 and 4.X and the devices that they support are listed
in table 2.
Selecting a Code Page
Once a code page has been prepared for use, MODE may be used to select
the code page. Selections make the specified code page active for the speci
fied device. The format for code page activation is:
MODE device CODEPAGE SELECT=cp
The device parameter is the device for which the code page is being
462
MODE
Thble 2. MS-DOS 3.3 and 4.X Code Page Information Files
and the Devices That They Support
Device
Code Page Information File
IBM Proprinter Model 4201
IBM Proprinter X24 and XL24
IBM Quietwriter III Printer Model 5202
Enhanced Graphics Adapter
IBM Convertible LCD Adapter
4201.CPI
4208.CPI (MS-DOS 4.X only)
5202.CPI
EGA.CPI
LCD.CPI
selected. The cp parameter is the code page number being selected. The
selected code page number must be either a previously prepared code page
or a hardware code page. Hardware code pages are discussed in appendix D.
An Example Before code page switching can be implemented on a
display screen, the device driver DISPLAY.SYS must be loaded into memory.
Similarly, before code page switching may be implemented on a printer, the
device driver PRINTER.SYS must be loaded into memory.
The following command, when placed in CONFIG.SYS, instructs MS
DOS to install DISPLAY.SYS during the booting procedure:
device=c:\dos\dispLay.sys con:=(ega"Z)
This command tells MS-DOS to load the DISPLAY.SYS driver for use
with the CON device. The parameters (ega, ,2) instruct MS-DOS: (1) that it
should enable code page switching for the Enhanced Graphics Adapter Dis
play, (2) that none ofthe code pages are hardware code pages, and (3) that two
of the pages are prepared code pages.
Using the dey; ce= statement enables code page switching. The next
step is to use the MODE command to generate the prepared code pages for
use by the EGA display. The following command generates code pages 437
and 850 using information in the file "ega.cpi". MS-DOS displays a message
when the preparation is completed:
C>mode con codepage prepare=((437,850)c:\dos\ega.cpi)
Mode Prepare Codepage function completed
C>
Once the code pages have been generated, a particular code page may
be selected using MODE. The following command selects code page num
ber 850:
463
Part 3-MS-DOS Commands
C>mode con codepage select=850
Mode Select Codepage function completed
C>
Code Page Status
The command "mode con codepage /status" directs MS-DOS to display the
codepage status for the CON device. In this case the CON device is the EGA
display:
C>mode con codepage Istatus
Active codepage for device CON is 850
prepared codepages:
Codepage 437
Codepage 850
Mode Status Codepage function completed
C>
Code Page Refresh
The command "mode device codepage refresh" reestablishes an active
code page that has been lost. For example, if you turn off your printer, you
may have to use this command to reestablish the active code page.
Requesting Device Status
The MS-DOS 4.X version of MODE displays the current status of a device
when you enter mode followed by the device name. For example, the com
mand "mode con" generates the following:
Status for device CON:
COLUMNS=80
LINES=25
Code page operation not supported on this device
Use the switch /sta when requesting the status of a printer-for example,
"mode lpt1: /sta". The reason for this is that if you enter "mode lpt1:", any
redirection for that printer will be cancelled.
You can get a status report for all devices by entering mode (with no
additional parameters).
Setting Keyboard Typematic Rates
The MS-DOS 4.X version allows you to control the rate at which a letter is
repeatedly echoed to the screen when you hold a keyboard key down. The
format for the command is as follows:
464
MORE
MODE CON delay=d rate=r
The delay parameter controls the amount of time that the key must be held
down before the repeat echoing commences. Allowable values for dare 1, 2,
3, and 4. The number specifies the number of 1/4-second periods for the
delay.
The rate parameter controls the rate of repetition once the echoing
commences. The allowable range for r is 1 through 32. The number repre
sents the approximate number of repetitions per second.
This use of the MODE command is not supported on all computer sys
tems.
MORE
External
MS-DOS 2.X, 3.X, 4.x
Function:
Outputs 23 lines of data at a time
Format:
MORE
Examples:
more <sample.txt
more <sample.txt > pm
MORE is an MS-DOS filter that displays data 23 lines (one full screen) at a
time. A text file can be "filtered" through MORE by using the MS-DOS sym
bol for redirection of input <. The output from an application program or
another MS-DOS command can also be sent through MORE by using the MS
DOS pipe feature. Output from MORE is sent to the display screen unless it is
redirected to some other device (such as a file) or piped as the input to another
MS-DOS command or an application program. The symbol for redirection of
output is >.
Data filtered through MORE is sent out to the display screen (or some
other device) 23 lines at a time. After each 23 lines of output, the message
-More- appears at the bottom of the screen. Pressing any key outputs an
other 23 lines of data.
MORE is an external MS-DOS command. This means that before you
can use the MORE filter, a copy of the file MORE.EXE must be contained ina
system drive. The use of MORE is discussed in chapter 6.
465
Part 3-MS-DOS Commands
NLSFUNC
External
MS-DOS 3.3, 4.X
Functions: Specifies the country information file
Provides support for code page switching using the MS-DOS
command CHCP
Format:
NLSFUNC [[d:]fpathlfilename[.ext]]
Examples:
nlsfunc
nlsfunc c: \dos \country.sys
The NLSFUNC command is used to specify the system's country informa
tion file. The country information file contains country-specific informa
tion such as the date, time, and currency formats.
The NLSFUNC must be invoked before code pages can be set using the
CHCP command. Please refer to appendix D for an overview of code pages
and code page switching.
NLSFUNC remains resident in memory once it is invoked. Therefore,
one invocation of NLSFUNC will support all subsequent invocations of
CHCP.
If NLSFUNC is entered without specifying a country information file,
the file defined by the COUNTRY command is used as the system's country
information file.
The format for using NLSFUNC is:
NLSFUNC [[d:] fpath]filename[. ext]]
The MS-DOS 4.X version ofNLSFUNC may be invoked from CONFIG.SYS
by using the command INSTALL. The following example illustrates how this
can be done:
install=c:\dos\nLsfunc.exe c:\dos\country.sys
PATH
Internal
MS-DOS 2.X, 3.X, 4.x
Function:
Specifies directories that MS-DOS is to search when trying to
locate executable files
Format:
PATH [[d:]path[;[d:]path ... ]]
Exam
path \programl \business
path b: \program2 \writel ;b: \program2 \write2
ples:
466
PATH
PATH tells MS-DOS which subdirectories are to be searched if an external
command or a batch file is not found in the current directory. The parame
ters entered in PATH are the paths to the subdirectories to be searched. (Sub
directories and paths are discussed in chapter 3.)
Consider the following situation. Suppose that you have a diskette in
drive A that contains several files and a subdirectory named PROGRAM!.
PROGRAMl contains a batch file named "business.bat". Let's say that the
current directory on drive C is the root directory and that you want to exe
cute "business.bat" .
To start a batch file, you simply enter the filename of the batch file. Let's
see what happens when you do that:
C>business
Bad command or fiLe name
What happened is that MS-DOS searched the current directory of drive
C for "business.bat". Since the root directory is the current directory, and
"business.bat" is in the subdirectory PROGRAMl, MS-DOS was unable to
find the batch file. MS-DOS assumed that "business.bat" did not exist and
the Bad command or fi le name message was displayed.
There are two solutions to this problem. You could change the current
directory on drive C. Then MS-DOS would be able to find "business.bat"
when "business" was entered. The drawback to this solution is that chang
ing the current directory on drive C may be inconvenient. It would be to
your advantage to keep the root directory as the current directory if most of
the files and programs that you are using are in the root directory.
The second solution is to use PATH to tell MS-DOS where to look for
"business". All you have to do is type path followed by the path to the direc
tory containing "business.bat":
C>path \program1
Once PATH has been used, MS-DOS knows where to look for a com
mand or batch file that is not in the current directory. The last PATH com
mand entered sets the current path. MS-DOS will display the current path if
you enter PATH without any parameters:
C>path
PATH=\PROGRAM1
The current path remains in effect until it is changed by another PATH com
mand.
A PATH command may contain more than one path. Multiple paths are
separated by semicolons. MS-DOS searches the paths in the order in which
they are listed. In the next example, the PATH command contains two paths
on drive B. Once the command has been entered, MS-DOS will look in the
subdirectory WRITE 1 (which is a subdirectory entry in the subdirectory
467
Part 3-MS-DOS Commands
PROGRAM2) if a command or batch file is not located in the current direc
tory. MS-DOS will then look in the subdirectory WRITE2 (another subdirec
tory entry in the subdirectory PROGRAM2) if the command or batch file is
not contained in WRITE 1.
C>path b:\program2\write1ib:\program2\write2
The current path is cancelled if you enter PATH followed by a semi
colon:
C>path
PATH=B:\PROGRAM2\WRITE1iB:PROGRAM2\WRITE2
C>pathi
C>path
No Path
PAUSE
Internal
MS-DOS 1.X, 2.X, 3.X, 4.x
Function:
Suspends execution of a batch file
Format:
PAUSE [comment]
Example:
pause
PAUSE is used to temporarily suspend the execution of a batch file. PAUSE
may also be used to display a message up to 121 characters in length. The
following message is displayed when MS-DOS encounters a PAUSE:
Strike a key when ready •••
Execution of the batch file halts until you strike a key. Note that you can
strike any key except Ctrl-Break. Pressing Ctrl-Break stops the process.
PAUSE is generally used in a batch file to allow you time to perform a
specific task, such as inserting a diskette. You will find more information on
PAUSE in chapter 4.
468
PRINT
PRINT
External
MS-DOS 2.X, 3.X, 4.X
Function:
Prints a list of files in the "background" while MS-DOS is
being used to perform other tasks
Format:
PRINT [[d:][(ilename[.ext]][/T][/C][/P] ... ]
PRINT [/D:device][lB:bufJersize]
[/U :busyticks HIM: maxticks]
[IS: timeslice] [lQ:queuesize]
[d: ] [(ilename[.ext]]
[/T][/C][/P] ... ] (MS-DOS 3.X and 4.x)
Examples:
print file l.txt
print file?txt
print filel.txt file2.txt/c file3.txt file4.txt
The PRINT command is a utility program that allows you to print a set of
files while simultaneously using MS-DOS to perform other tasks. The print
ing is said to occur in the "background" while the other work that you are
doing is performed in the "foreground." The MS-DOS 3.X and 4.X imple
mentations of PRINT have several enhancements that are discussed at the
end of this section.
PRINT is an external MS-DOS command. The first time you invoke the
command, PRINT. COM is read from disk and installed in memory. PRINT
remains resident in memory until the power is shut off.
Using PRINT
To use PRINT, simply type print and then type the file specifications of the
files that you want to print. Each file that you enter is placed in a queue (list).
The files in the queue are printed one at a time, according to their order in
the queue. The queue may contain up to ten files at a time. A file is deleted
from the queue after it has been printed.
The first time that you use PRINT in a working session, MS-DOS dis
plays the prompt Name of list devi ce [PRNJ:. MS-DOS is asking you
for the device name of the printer. "PRN" is the default device name that
MS-DOS assigns to the parallel printer. If you want to use the default, simply
press Enter. Otherwise, type the device name and press Enter. (Devices and
device names are discussed in chapter 6.)
The first PRINT example instructs MS-DOS to print the files "file 1. txt",
"file2. txt" , and" file 3 .txt" . These files are alllocated in the current directory
of drive C.
469
Part 3-MS-DOS Commands
C>print file1.txt file2.txt filel.txt
Name of list devi ce [PRNJ:
<-Enter
Resident part of print instaLLed
C:FILE1.TXT is currentLy being printed
C:FILE2.TXT is in queue
C:FILE3.TXT is in queue
C>
As you can see, MS-DOS has displayed a queue status report stating the
file currently being printed. The remaining files in the queue are listed in the
order in which they will be printed.
MS-DOS displays its system prompt to tell you that another command
may be entered. Even though the PRINT command is executing, you may
enter another command while printing continues in the background. Any
MS-DOS command or program can be executed while PRINT is operating in
the background as long as the command or program does not use the printer
being used by PRINT.
Additional PRINT commands can be entered while PRINT is executing.
The effect of these subsequent commands is to either add or delete files
from the queue (see the following discussion ofthe Ic, Ip, and It switches).
You can use the wildcard characters" *" and "?" to specify a group of
files in the PRINT command. The preceding example could have been en
tered as:
C>print file?txt
If there are any files in the current directory of drive C that match the
wildcard, other than "file1.txt", "file2.txt", and "file3.txt", those files
will also be printed by the preceding command. (Wildcards are discussed
in chapter 2.)
A PRINT command may specify for printing only files that are located
in the current directory of each system drive. After you have issued a PRINT
command, you can change the current directory on a drive. You can then
issue a subsequent PRINT command that will add files contained in the new
current directory to the queue. (DirectOries and current directories are dis
cussed in chapter 3.)
MS-DOS will display a queue status report if you enter PRINT with no
parameters:
C>print
C:FILE2.TXT is currentLy being printed
C:FILE3.TXT is in queue
470
PRINT
The Ie Switch
The Ic switch may be used in a PRINT command to delete one or more files
from the queue. The Ic switch is inserted in a PRINT command immediately
after a file specification. That file and all subsequent files specified in the
PRINT command are then deleted from the queue.
If a command to delete a file from the queue is issued while that file is
being printed, printing of the file is halted and the message "< filespec>
Cancelled by operator" is sent to the printer. The printer paper then ad
vances to the next page, and printing continues with the next file in the
queue.
The following command adds "file4.txt" to the queue and deletes
"file2.txt" and "file3.txt". Remember that Ic affects the immediately pre
ceding file and all subsequent files in the PRINT command.
C>print fiLe4.txt fiLe2.txtlc fiLe3.txt
The IP Switch
Most MS-DOS manuals say that the Ip switch is used in the PRINT command
to "set the print mode." This is a little confusing. It's simpler to think of /p as
turning off a previous Ie switch. The Ip switch is inserted in a PRINT com
mand immediately after a file specification. That file and all subsequent files
specified in the PRINT command are added to the queue.
The following command deletes "file4.txt" from the queue and adds
"fileS. txt" and "file6.txt" to the queue:
C>print fiLe4.txtlc fiLe5.txtlp fiLe6.txt
You can see how the Ip switch turns off the Ic switch. If a PRINT command
does not contain a Ic switch, there is no need to use the Ip switch.
A PRINT command can contain a second Ic switch that will turn off a
previous Ip switch. A second Ip switch can be used to turn off the second Ic
switch and so on.
The IT Switch
The It switch is used with PRINT to delete all files from the queue and termi
nate execution of the PRINT command. The command "print It" halts the
printing process, deletes all files from the queue, sends the message" All files
cancelled by operator" to the printer, and returns control of the computer to
MS-DOS:
471
Part 3-MS-DOS Commands
C>print It
PRINT queue is empty
C>
MS-DOS 3.X and 4.x Enhancements
There are six PRINT switches implemented in MS-DOS 3.X and 4.X. These
switches can be set only when PRINT is loaded into memory. Their use is
therefore restricted to the first time the PRINT command is invoked.
The Id:device switch allows you to specify a valid printing device. If
you do not use this switch, MS-DOS will ask you to specify a printer (as is
done with the MS-DOS 2 version of PRINT).
The /b:bujjersize switch sets the size of the print buffer. The print
buffer is the area of memory that stores the file's contents prior to sending
the contents to the printer. The larger the buffer, the fewer disk accesses that
are necessary, and the faster the printing is completed. The default size for
the print buffer is 512 bytes. ,
The Iq :queuesize switch controls the number offiles that may be in the
printing queue at anyone time. The allowable range is 1 to 32. The default is
10.
The three remaining switches control the way in which the computer's
resources are shared between PRINT (the background process) and MS
DOS (the foreground process). When you are using PRINT, it may appear
that the computer is doing two things at one time. Actually the computer can
execute only one task (or process) at a time, but it switches between pro
cesses so rapidly that the two processes seem to execute simultaneously.
Each process is allocated a certain number of system clock ticks to per
form its work. The Is:timeslice switch determines how many clock ticks the
MS-DOS foreground process can run before giving control to the PRINT
background process. The allowable range is 1 to 255 clock ticks. The default
is 8.
The Im:maxticks switch determines how many clock ticks the PRINT
process can run before giving control back to the foreground MS-DOS pro
cess. The allowable range is 1 to 255 clock ticks. The default is 2.
The lu:busyticks switch determines the maximum number of clock
ticks that PRINT can wait if the printer is unavailable. If this amount of time
elapses and PRINT is still waiting, control is returned to the foreground MS
DOS process. The allowable range for busyticks is 1 to 255 clock ticks. The
default is 1.
472
PROMPT
PROMPT
Internal
MS-DOS 2.X, 3.X, 4.x
Function:
Sets the MS-DOS system prompt
Format:
PROMPT [text]
Example:
prompt Enter Command:
A system prompt is a signal from MS-DOS to you that all systems are operat
ing and that MS-DOS is ready to receive your command. The standard MS
DOS system prompt consists of an uppercase "A," "B," or "C" followed by
the greater than symbol, >. The letter used in the prompt tells you which
system drive is the current default. For example, the C>prompt indicates
that the current default drive is drive C.
You can use the PROMPT command to change the system prompt. Sim
ply type prompt followed by the character string that you want MS-DOS to
use as the new system prompt. Once you have entered the PROMPT com
mand, the new system prompt will be displayed each time that MS-DOS is
ready to accept a command. The PROMPT command will remain in effect
until you issue another PROMPT or until you reboot MS-DOS. For example,
if you wanted the system prompt to be Enter Command: instead of C>, you
would enter the following command:
C>prompt Enter Command:
Enter Command:
The new system prompt is now Enter Command:. To return to the
original prompt C>, enter prompt without any other text:
Enter Command:prompt
C>
MS-DOS provides a set of meta-strings that can be used with PROMPT
to create system prompts containing special characters. A meta-string is a
dollar sign ($) followed by one of eleven ASCII characters. Table 3 lists the
meta-strings and the resultant characters.
Many people find it convenient to have the prompt display the current
directory on the default drive. This is accomplished by using the PROMPT
command and the meta-strings $p and $g as follows:
C>prompt $p$g
C:\BOOKS\DOS>
<<-
enter this command
to produce this prompt
473
Part 3-MS-DOS Commands
This prompt is so useful that many people choose to put the command
"prompt $p$g" in their AUTOEXEC.BAT file. If you install DOS 4.0 with
SELECT on a hard drive, the "prompt $p$g" statement is put in your
AUTOEXEC.400 file, ready to be merged into AUTOEXEC.BAT. Use of SE
LECT is discussed in chapter 1.
Meta-strings may be combined with each other and with other charac
ter strings to form system prompts. In the following example, four
meta-strings are used in a PROMPT command. The PROMPT command will
set the system prompt to perform the following: (1) display the message The
current time is: followed by the current time stored by MS-DOS, (2)
perform a carriage return and line feed so that the cursor is at the begin
ning of the next line, (3) display the drive letter designator of the default
drive, and (4) display a > character.
C>prompt $t$ $n$g
The current time is:
9:27:45.35
C>
Table 3. Meta-strings and the Resultant Character(s)
in the System Prompt
Meta-string
$t
$d
$p
$v
$n
$g
$1
$b
$q
$$
$h
$e
474
Character(s)
The current time stored by MS-DOS.
The current date stored by MS-DOS.
The current directory of the default drive; if drive C is
the default and the root directory is the current
directory on drive C, $p in the PROMPT command
would place "C: \" in the system prompt.
The version of MS-DOS being used (e.g., 3.3)
The default drive.
The > character.
The < character.
The I character.
The = character.
The $ character.
A backspace and erasure of the previous character.
The ESCape character; PROMPT and $e can be used to
send an ESCape character to the ANSLSYS device driver
(see chapter 8).
Carriage return plus line feed.
RECOVER
MS-DOS now displays the current time whenever the system prompt is
displayed. Initially, you must set MS-DOS's internal clock if you want the
time displayed to be the current time. (See booting MS-DOS in chapter 1 or
the TIME command for details.)
The nice feature of this system prompt is that, besides displaying the
current time, the prompt automatically changes when the default drive is
changed:
C>prompt $t$ $n$g
The current time is:
9:27:45.35
C>b:
The current time is:
9:28:00.39
B>
RECOVER
External
MS-DOS 2.X, 3.X, 4.X
Functions: Recovers data from files that have bad sectors
Recovers data from an entire disk that has a damaged file
directory
Note: RECOVER cannot be used with network drives
Format:
RECOVER [d:]fpath]filename[.ext]
RECOVERd
Examples:
recover badfile.txt
recover b:
Floppy diskettes and hard disks used by MS-DOS are divided into storage
units called sectors. Sectors are created during the formatting process. Each
sector stores 512 bytes of data. The larger the file, the more sectors required
to store it.
Floppy diskettes and hard disks each contain afile directory. The file
directory serves as MS-DOS's table of contents to the files that are contained
on the floppy diskette or hard disk. The directory, which is created during
formatting, is modified each time that a file is added, deleted, or modified.
(For further information on sectors, file directories, and related topics,
please refer to chapters 3 and 10. You should be familiar with this material
before using RECOVER.)
Occasionally one or more sectors on a floppy diskette or hard disk
475
Part 3-MS-DOS Commands
become damaged. When this happens, MS-DOS may not be able to read the
data stored in those sectors. MS-DOS will then display the following mes
sage when it comes across a sector that it cannot read:
Data error reading C:
Abort, Retry, Ignore?
The command RECOVER is used to recover data that MS-DOS is unable
to read because of damaged sectors. RECOVER can be used to recover an
individual file or an entire disk that is unreadable because of damaged sec
tors in the file directory.
When RECOVER is used on an individual file, only the data in the un
damaged sectors of a file is recovered. The data in the damaged sectors is
lost. The damaged sectors are labeled so that MS-DOS will not use them in
the future.
Once a file has been recovered, MS-DOS will be able to read it. A recov
ered file will have the same filename and filename extension as the unreada
ble file. A recovered file will usually have some extraneous data attached at
the end, since RECOVER produces files that are multiples of 512 bytes (one
sector) in size.
RECOVER is limited in its ability to repair damaged files. It is also some
what awkward to use. Commercial disk utilities, such as PC-Tools, Norton
Utilities, and Mace Utilities, are more powerful and easier to use when it
comes to repairing damaged files.
Recovering a File
Since RECOVER is an external command, a copy of the file RECOVER COM
must be available to the system before you can use the command. This
means that either RECOVER COM must be in the current directory of the
default drive or that the location of RECOVER COM must have been speci
fied by the PATH command (see the discussion of PATH).
To use RECOVER, type recover and then type the file specification of
the file to be recovered. MS-DOS will load RECOVER.COM into memory
and then pause to allow you to change diskettes if necessary. Make any nec
essary swaps and then press any key. The specified file will be recovered.
MS-DOS will display a message that tells you how many bytes from the origi
nal file have been recovered. The following is an example:
C>recover b:badfile.txt
Press any key to begin recovery of the
file(s) on drive B:
x
476
+-you press the "x" key
RECOVER
900 of 1412 bytes recovered
c>
If you use wildcard characters to specify the file, MS-DOS will recover only
the first file that matches the wildcard.
Recovering a Disk
Using RECOVER to recover all the files on a disk is a drastic measure. RE
COVER looks at the file allocation table to determine where each file is lo
cated on the floppy diskette or hard disk. RECOVER cannot distinguish a
damaged directory entry from an undamaged entry; therefore, all files on
the disk are recovered.
To recover a disk, type recover and then type the letter designator of
the drive containing the floppy diskette or hard disk to be recovered.
MS-DOS will load RECOVER. COM into memory and then pause for any nec
essary disk swapping. Press a key and all files on the disk will be recovered.
The following is an example:
C>recover b:
Press any key to begin recovery of the
fi lees) on drive B:
x
22 fi lees) recovered
The first recovered file is given the name "fileOOOl.rec", the second
"file0002 .rec", and so on. Any subdirectories are treated as files. All recov
ered files are placed in the root directory. MS-DOS will display a message if
there is not enough room in the root directory for all of the recovered files. If
this should happen, copy the recovered files onto another diskette and then
delete them from the partially recovered disk. Run RECOVER again and
there should be enough room in the root directory for the remaining unre
covered files.
Once an entire disk has been recovered, you can use the command DIR
to see that all of the files have names like "fileOOOl.rec," "file0002 .rec", and
so on.
477
Part 3-MS-DOS Commands
REM
Internal
MS-DOS 1.X, 2.X, 3.X, 4.x
Function:
Displays a message during the execution of a batch file
Formats:
REM [message]
Examples:
rename oldname.ext newname.ext
ren formaL com xformat.com
The REM (REMark) command is used to display a message or to insert com
ments during the execution of a batch file. At the appropriate line in the
batch file, type rem and then type the text of the message. When the batch
file is executed and the REM command is read by MS-DOS, the message con
tained in that line will be displayed on the screen. The message in a REM
command may be up to 123 characters long. (See chapter 4 for a discussion
of batch files.) In MS-DOS 4.X, REM may also be used to insert comments in
the CONFIG.SYS file.
RENAME
Internal
MS-DOS 1.X, 2.X, 3.X, 4.x
Function:
Renames a file
Format:
RENAME [d: ][pathVilename[. extVilename[. ext]
REN [d:] [pathVilename[. extVilename[. ext]
Examples:
rename filel file2
ren newfile.txt oldfile.txt
RENAME (or REN) is used to change the filename and/or filename extension
of an MS-DOS file. It is one of the most frequently used, and most useful,
MS-DOS commands.
To change a file's name, type rename and then type the file specifica
tion of the file, followed by the new filename and filename extension, if any.
For example, an existing file on drive A named "oldname.ext" would be
renamed to "newname.ext" as follows:
C:>rename a:oldname.ext newname.ext
MS-DOS will ignore any drive letter specifier preceding the new
478
REPLACE
filename and extension. MS-DOS will display an error message if a path spec
ifier precedes the new filename and extension.
Wildcard characters may be used with RENAME (see chapter 2).
REPLACE
External
MS-DOS 3.2, 3.3, 4.X
Function:
Selectively replaces or adds files
Format:
REPLACE [d:][pathVilename[.ext]
[d:] [path][/A][/P][/R][IS][/W] (MS-DOS 3.2-4.X)
REPLACE [d:] [path Vilename[. ext] [d:]
[path][lA][IP][/R][/S][/W][lU] (MS-DOS 4.X)
Example:
replace ch 1. doc c: \ Is
REPLACE is an external MS-DOS command that allows you to selectively
replace or add files to a target directory. When files are being replaced,
filename[. ext] in the command line specifies the files in the target directory
that are to be replaced by matching files in the source directory. Only
matches are replaced. When files are being added,filename[.ext] specifies
the files in the source directory that are to be added to the target. Files are
added only if the target does not already contain a match. The following
examples demonstrate the use of the REPLACE command.
Using REPLACE
The examples given here use two directories, TMPI and TMP2. The con
tents of the directories are as follows:
C>dir tmp1 Iw
Volume in drive C is UCSFMIS
Directory of C:\TMP1
5 File(s)
TERRY LET BRUCE
LET
491520 bytes free
PAPER
TXT
C>di r tmp2 Iw
Volume in drive C is UCSFMIS
Directory of C:\TMP2
479
Part 3-MS-DOS Commands
3 FiLe(s)
BRUCE LET
491520 bytes free
First we will replace TMP2 \BRUCE.LET with TMPI \BRUCE.LET:
C>replace tmp1\bruce.let tmp2
RepLacing C:\TMP2\BRUCE.LET
1 fiLe(s) repLaced
Let's see what happens if we try to replace TMP2 \ TERRY. LET:
C>replace tmp1\terry.let tmp2
No fiLes repLaced
No files are replaced since TMP2 does not already contain a file named
"terry.let" .
The IA Switch
The fa switch is used to add new files to a target directory (as opposed to
replacing existing files).
C>replace tmp1\terry.let tmp2/a
Adding C:\TMP2\TERRY.LET
1 fiLe(s) added
Files are added only if the target directory does not contain a match:
C>replace tmp1\bruce.let tmp2/a
No fi Les added
The IS Switch
The following command goes through all of the directories on drive A, re
placing any copies of the file "sample. txt" that it finds.
C>replace sample. txt a:\ /s
480
REPLACE
The Is switch is used to replace all occurrences of a file in a target direc
tory and all subdirectories contained in the target. If the root directory is the
target, all occurrences of the file on the disk are replaced. The la and Is
switches cannot be used together.
Other Switches
The Ip switch prompts you with RepLace <f; Le name> (YIN)? for each
filename specified as a source file.
The Ir switch replaces files that have their read-only attribute set. (See
ATTRIB for a discussion of the read-only attribute.)
The Iw switch instructs REPLACE to wait for you to insert a diskette
prior to executing the command.
The lu switch, implemented in MS-DOS 4.X, replaces those files in the
target directory that have an updated version in the source.
REPLACE and ERRORLEVEL
The following list gives the ERRORLEVEL values returned by REPLACE.
These values may then be used by batch files or programs running under MS
DOS. See chapter 4 for a demonstration of the use of ERRORLEVEL values.
ERRORLEVEL Value
2
3
5
8
11
15
22
Meaning
No source files were found.
Invalid source or target path.
An attempt was made to access a read-only
file without the Ir switch.
Insufficient memory.
Invalid parameters or invalid number of
parameters entered on the command line.
Invalid drive specified.
Incorrect version of MS-DOS.
481
Part 3-MS-DOS Commands
RESTORE
External
MS-DOS 2.X, 3.X, 4.X
Function:
Restores one or more files from one disk to another disk
Format:
RESTORE d: [d:][path][filename[.ext]][/SH/P]
RESTORE d: [d:] [path[filename[. ext]] [/S][lP][/B: mm-dd-yy]
[lA:mm-dd-yy][lM][IN][IL:time][lE:time] (MS-DOS 3.3, 4.X)
Examples:
restore a:
restore a:
restore a:
restore a:
\subdirl \file.doc
\subdir2
\subdir3 Is
\subdir4 \ * .doc Ip
The RESTORE command is used to retrieve files that were stored using
BACKUP. RESTORE cannot be used on any other types of files.
Since RESTORE is an external MS-DOS command, one of the system
drives must contain the file RESTORE.COM before you can use RESTORE.
In the following examples, it is assumed that RESTORE. COM is stored on the
hard disk drive (drive C).
Restoring a File
To restore a file to the hard disk, type restore and then type the letter designa
tion of the drive containing the copy of the files to be restored. You may
specify the directory path on the hard disk that will contain the restored
files. If you do not speCify a path, the default is the current directory on the
default disk. You may also specify the name of a file to be restored. If no
filename is specified, all files in the specified (or default) directory are re
stored. When you enter a RESTORE command, MS-DOS prompts you to
insert the diskette containing the files to be restored and then instructs you
to press any key to restore the files to the hard disk.
In the first example, the file "filel.doc" is located in the directory
SUB.DIRI. The backup copy of "file 1. doc" , which is stored on the diskette
in drive A, is restored to the hard disk:
C>restore a: \subdir1\fjie1.doc
Insert backup diskette 01 in drive A:
Strike any key when ready
*** Files were backed up 12/11/1989 ***
482
RESTORE
*** Restoring fiLes from diskette 01 ***
\SUBDIR1\FILE1.DOC
C>
Wildcard characters may be used in filenames and extensions specified
in a RESTORE command. All matching files in the specified (or default) di
rectory will be restored.
Note: MS-DOS 3.3 and 4.X allow you to restore from a hard disk, pro
vided, of course, that the hard disk was the target of a BACKUP command.
Restoring a Directory
In the next example, all the files stored on the backup diskette that have a
path of \SUBDIRI \SUBDIR2 are restored:
C>restore a: \subdir1\subdir2
Restoring All Subdirectories
You may recall from the discussion of the BACKUP command that you can
back up an entire hard disk with the command "backup c: \/s". You can use
the Is switch of RESTORE to restore an entire hard disk as follows:
restore a: c:\ Is
The Is switch directs RESTORE to restore all files in the directory, plus all
files in all subdirectories that are descended from the directory.
Selective Restoring with IP Switch
You may not want to restore a file that has been modified since the last time it
was backed up. Such a restoration would destroy any modifications in the
file. Using the Ip switch at the end of your command will cause MS-DOS to
check to see if any of the files being restored have been modified since they
were last backed up. If so, MS-DOS will warn you that a file is about to be
overwritten. A prompt will appear asking you ifthe (modified) file should be
replaced (by the unmodified version). If you respond "N", the file is not
restored and processing continues in the normal fashion. If you respond
"Y" , the file is restored with the unmodified copy, and processing continues
in the normal fashion.
The MS-DOS 3.X and 4.X versions of the Ip switch also prompt you
483
Part 3-MS-DOS Commands
before restoring any read-only files. See the ATTRIB command for informa
tion about read-only files.
Other Switches
MS-DOS 3.3 and 4.X contain six additional switches that allow further selec
tivity in the restore process.
The In switch restores files that have been deleted. The 1m switch re
stores files that have been deleted or modified since they were backed up.
The Ib:mm-dd-yy switch restores all files modified on or before the
specified date. The la:mm-dd-yy switch restores all files modified on or after
the specified date.
The l:time switch restores files that were modified at or later than the
specified time. The /e:time switch restores files that were modified at or
earlier than the specified time.
Some Restrictions with RESTORE
RESTORE cannot be used with]OIN, ASSIGN, SUBST, and APPEND. These
commands contain bugs that cause RESTORE to act in an unpredictable
fashion.
RESTORE and ERRORLEVEL
ERRORLEVEL is a variable that has special meaning to MS-DOS. RESTORE
will set the value of ERRORLEVEL as follows:
o RESTORE command completed in normal fashion.
1
2
3
4
The backup diskette did not contain any files matching the file(s)
specified in the RESTORE command.
Some files were not restored due to sharing conflicts.
Execution of the RESTORE command was terminated by the user
pressing Esc or Ctrl-Break.
The RESTORE command was terminated because of an error in ex
ecution.
Once the value of ERRORLEVEL has been set, it may be used in con
junction with the IF command in MS-DOS batch files. ERRORLEVEL allows
you to write batch files that are executed according to the outcome of a
RESTORE command. (See the discussion of the IF command for further de
tails.)
484
RMDIR
RMDIR
Internal
MS-DOS 2.X, 3.X, 4.X
Function:
Deletes a subdirectory
Format:
RMDIR [d:]patb
RD [d:]patb
Exam
rmdir \write
rd b:\programs\business
ples:
The RMDIR (ReMove DIRectory) command is used to delete a subdirectory
from a disk. You may enter the command as either rmdir or rd. However,
before MS-DOS can carry out your command, all the files in the subdirec
tory must be deleted. This is a safety feature that prevents accidental loss of
files.
Your RMDIR command may include a drive letter designator (such as c:
or a:) that specifies the drive containing the subdirectory to be deleted. MS
DOS assumes that the subdirectory is located on the default drive if no drive
is specified.
The RMDIR command must specify the path to the subdirectory that is
to be deleted. In the first example, the command is used to delete the sub
directory WRITE:
C>rmdi r \""rite
No drive is specified, so MS-DOS assumes that WRITE is located on the
default drive. The path \wri te tells MS-DOS that WRITE is a subdirectory
contained in the root directory of drive C.
The next example deletes a subdirectory named BUSINESS:
C>rd b:\programs\business
The command specifies that BUSINESS is located on drive B. The path
\prog rams \bus i ness tells MS-DOS that BUSINESS is a subdirectory con
tained in PROGRAMS. PROGRAMS is a subdirectory contained in the root
directory of drive B.
The current directory and the root directory of each drive cannot be
deleted with RMDIR. (For more information on subdirectories, root direc
tories, current directories, and paths and for more examples of the use of
RMDIR, please refer to chapter 3.)
485
Part 3-MS-DOS Commands
SELECT
External
MS-DOS 3.X, 4.X
Function:
Creates a language-specific system disk
Format:
SELECT aaa yy (MS-DOS 3.0-3.2)
SELECT [[A: or B:][d:]fpath]] xxx yy (MS-DOS 3.3)
Examples:
select 033 fr
select a: c: \dos 033 fr
SELECT is used to create a country-specific system disk. At boot time, the
new system disk will: (1) automatically load country-specific information
such as the time, date, and currency formats and (2) automatically configure
the keyboard according to a country-specific layout. Country-specific infor
mation and country-specific keyboard configuration are discussed under
the commands COUNTRY, KEYB, and KEYBxx.
Note: The MS-DOS 4.X implementation of the SELECT command is
used to install the operating system on a hard disk or floppy diskettes. Refer
to chapter 1 for a discussion of the 4.X version of SELECT.
Versions 3.0-3.2 of MS-DOS implement SELECT in a different fashion
than version 3.3 does. The following paragraphs discuss each implementa
tion separately.
The format for SELECT in versions 3.0-3.2 is:
SELECT aaa yy
The aaa parameter is a 3-digit country code. The yy parameter is a valid
keyboard code. The valid combinations of country code and keyboard
codes are listed in table 4 at the end of this section.
This implementation of SELECT requires that a system diskette be
placed in drive A to serve as the source in creating the new system diskette.
The target must be another diskette that will be swapped with the source in
drive A. MS-DOS executes the command by first using DISKCOPY to copy
the source to the target. MS-DOS automatically formats the target if neces
sary. It then prompts the user to change diskettes in drive A as required.
When the copy is completed, MS-DOS uses DISKCOMP to compare the tar
get to the source. Next, a new CONFIG.SYS file is created in the root direc
tory of the target that contains the command" country = aaa" where aaa is
the country code entered on the command line. Finally, a new
AUTOEXEC.BAT file is created in the root of the target. This file will load the
country-specifiC keyboard driver when the new diskette is used to reboot
the system.
The format for the MS-DOS 3.3 version of SELECT is:
486
SELECT
SELECT [[A: or B:][d:]fpath specifier]] xxx yy
The xxx and yy parameters are the country and keyboard codes. The
"A: or B:" is used to specify the drive containing the source system diskette.
If no source drive is specified, SELECT uses drive A as the source. The
d:path parameter is used to specify the destination for the MS-DOS com
mand files on the target. If no drive for the target is specified, drive B is
assumed to hold the target diskette. If no path is specified for the target sys
tem files, the files are copied to the root of the target. This implementation
allows a hard disk to be the target.
The 3.3 implementation of SELECT formats the target, then uses
XCOPY to copy the system files to the target. A CONFIG.SYS file is created
containing the statement "country=xxx", and an AUTOEXEC.BAT file is
created with the following commands:
path \iC\path specifier]
keyb yy xxx
echo off
date
time
ver
The [\ pa t h] parameter refers to the optional path parameter that may
have been included in the SELECT command line. This is useful if you want to
have your system files in a subdirectory (such as \DOS).
1able 4. Valid Combinations of Country and
Keyboard Codes
Country
Arabic
Australia
Belgium
Canada (Eng.)
Canada (Fr.)
Denmark
Finland
France
Germany
Israel
Italy
Latin America
Netherlands
Country Code
785
061
032
001
002
045
358
033
049
972
039
003
031
Keyboard Code
US
BE
US
CF
OK
SU
FR
GR
IT
LA
NL
487
Part 3-MS-DOS Commands
Table 4. (cont'd)
Country
Country Code
Keyboard Code
047
351
034
046
041
041
044
001
NO
PO
SP
SV
SF
SG
UK
US
Norway
Portugal
Spain
Sweden
Swiss (Fr.)
Swiss (Ger.)
United Kingdom
United States
SET
Internal
MS-DOS 2.X, 3.X, 4.X
Function:
Places a string in the MS-DOS environment
Format:
SET [name= [parameter]]
Example:
set xyz=abc
The environment is an area of computer memory set aside by MS-DOS to
store a series ofASCII strings. Each string in the environment consists of two
sets of ASCII characters separated by an equals sign. The characters to the
left of the equals sign are referred to as the name, those to the right as the
parameter. The strings are grouped in this area so that they may be easily
referenced by MS-DOS as well as by any programs that are running under
MS-DOS. MS-DOS stores the segment address of the environment at offset
2CH in the program segment prefix (see appendix A).
Each string in the environment is terminated by a byte ofzero. The final
string is terminated by 2 bytes ofzero. The first string in the environment has
the name COMSPEC. The right side of the string contains the path to the file
COMMAND. COM (for example, COMSPEC= \COMMAND.COM). MS-DOS
also stores the last PROMPT and PATH commands issued in the environ
ment.
The SET command is available to programmers who want to place their
own strings in MS-DOS's environment. An application program could then
search the environment for the string by first looking up the environment's
address in the program segment prefix.
To place a string in the environment, type set and then type the string:
488
SHARE
C>set
d1=\subdir1\subdir2
The current set of environment strings will be displayed if SET is en
tered with no other parameters:
C>set
COMSPEC=\COMMAND.COM
PATH=\SUBDIR1
D1=\SUBDIR1\SUBDIR2
To delete a string from the environment, type set followed by the
string's name followed by an equals sign:
C>set path=
C>set
COMSPEC=\COMMAND.COM
D1=\SUBDIR1\SUBDIR2
See chapter 11 for more information on the MS-DOS environment.
SHARE
External
MS-DOS 3.X, 4.X
Function:
Provides support for file sharing, file locking, diskette
change detection, and hard disk partitions larger than 32
Mbytes
Format:
SHARE [/F:xxxH/L:yyy]
Example:
share If: 1024 11:20
The SHARE command is used to provide support forJile sbaring on a com
puter network. Computer programs that use MS-DOS function 3DH to open
a computer file will store in memory a sbaring code. The sharing code is
used by the operating system to determine the type of access other pro
grams (on the network) have to the opened file.
Once a program has gained access to a file, it may use MS-DOS function
5CH to place a "lock" on a portion of the file. A lock gives the program
exclusive access to that portion of the file.
SHARE sets aside computer memory for sharing codes and locks. The
If:xx:x flag sets aside xxx bytes for sharing codes. The default is 2048 bytes.
Each file opened by function 3DH requires storage for its filename plus 11
bytes.
489
Part 3-MS-DOS Commands
The II:yyy flag sets aside memory for yyy file locks. The default is 20
locks.
On systems that generate a signal when the diskette door has been
opened, the MS-DOS 4.X version of SHARE notifies the operating system ifa
diskette change has occurred. If SHARE is loaded in memory, it checks the
diskette's volume label and volume serial number, and notifies the operating
system if the diskette has been changed.
The MS-DOS 4.X version of SHARE is also used to support disk parti
tions larger than 32 Mbytes in size. If your disk drive has such a partition,
you can use the MS-DOS 4.X command INSTALL to load SHARE from the
CONFIG.SYS file. The following illustrates how this is done:
instalL=c:\dos\share.exe
The example assumes that the file SHARE.EXE is in the directory C: \DOS.
During the booting process, MS-DOS will attempt to automatically load
SHARE into memory if you have a disk drive with a partition larger than 32
Mbytes and you do not use INSTALL to load SHARE from CONFIG.SYS. In
order for this to be accomplished, the file SHARE.EXE must be in either the
root directory or the directory specified by the SHELL statement in CON
FIG.SYS.
If you use SELECT to install DOS 4.0 on a hard disk that has a DOS
partition larger than 32 Mbytes, SELECT will place the "install=c: \dos
\share.exe" statement in your CONFIG.400 file, ready to be merged into
CONFIG.SYS. Please refer to chapter 1 for a discussion of SELECT.
See appendix A for more information on MS-DOS functions 3DH and
5CH.
SHELL
Internal
MS-DOS 2.X, 3.X, 4.X
Function:
Instructs MS-DOS to load a command processor
Note: SHELL can be used in a CONFIG.SYS file only
Format:
SHELL= [d:] rPath lfilename[. ext]
Example:
shell=custom.com
The SHELL command is a high-level command generally used only by ad
vanced MS-DOS programmers. SHELL is used when you wish to use a com
mand processor other than COMMAND. COM, the standard MS-DOS
command processor. COMMAND.COM, which is loaded into memory dur
ing booting, serves as the link between MS-DOS and you. (See chapter 11 for
details.)
490
SHIFT
The SHELL command can be used only as a statement in the CON
FIG.SYS file. A SHELL command in CONFIG.SYS alerts MS-DOS that a new
command processor will be used.
In the following example, the CONFIG.SYS file is created. The SHELL
command that makes up the file tells MS-DOS to load the command proces
sor CUSTOM.COM into memory:
C>copy con: config.sys
sheL L=custom. com
AZ
<-you press Ctrl-Z
1 file(s) copied
Using SHELL to Increase the MS-DOS Environment
The MS-DOS environment has a default size of 160 bytes. With MS-DOS 3.1
and subsequent versions, you can use SHELL to increase the environment's
size.
The format for the SHELL statement is:
SHELL=c: \COMMAND.COM IP IE:xxxx
In MS-DOS 3.1, xxxx is the number of paragraphs (16-byte blocks) in
the environment. The allowable range is 10 to 2048. In MS-DOS 3.2 and
subsequent versions, XXXX is the actual number ofbytes in the environment.
The allowable range is 160 to 32,768.
Note: chapter 11 describes a way to modify the environment's size for
MS-DOS versions prior to 3.l.
SHIFT
Internal
MS-DOS 2.X, 3.X, 4.X
Function:
Allows you to specify more than ten batch file parameters
Format:
SHIFT
Example:
shift
A batch file can contain up to ten dummy variables (%0 through %9). These
dummy variables may be sequentially replaced by a list of character strings
included in a batch file start command. For example, %0 is replaced by the
filename of the batch file, % 1 is replaced by the first character string in
491
Part 3-MS-DOS Commands
eluded in the start command, % 2 is replaced by the second character string,
and so on.
The SHIFT command "shifts" each character string one position to the
left, allowing you to pass more than ten character strings to a batch file. After
one SHIFT, %0 is replaced by the first character string in the start command,
% 1 is replaced by the second string, and so on. Each successive SHIFT
moves the parameters one position to the left. The use of SHIFT is demon
strated in chapter 4.
SORT
External
MS-DOS 2.X, 3.X, 4.X
Function:
Sorts data
Format:
SORT [lR][/+n]
Examples:
sort < records. txt
sort 1+ 17 < records. txt
sort Ir+52 < records. txt
SORT is an MS-DOS filter that reads data from an input device, sorts the data,
and then writes the data to an output device. Data is sorted using the ASCII
sequence (appendix F), according to the character in a specified column of
each line. If no column is specified, the data is sorted according to the first
character in each line.
A text file can be input to SORT by using the MS-DOS redirection sym
bol <. The output from an application program or another MS-DOS com
mand can be sent to SORT as input by using the pipe feature. Output from
SORT can be redirected or piped using these same features.
SORT is an external MS-DOS command. This means that a system drive
must contain a copy of the file SORT.EXE before you can use the SORT filter.
SORT has two optional switches. The Ir switch sorts data in reverse
order. The I+n switch sorts data according to the character located in col
umn n of each line.
Chapter 6 describes the use of SORT and discusses MS-DOS filters, re
direction, and pipes.
492
STACKS/SUBST
STACKS
Internal
MS-DOS 3.2, 3.3, 4.x
Function:
Allocates stack frames to handle hardware interrupts
Note: STACKS can be used in CONFIG.SYS only
Format:
STACKS=n,s
Example:
stacks = 12,256
STACKS is used to set the number and size of stackframes allocated by
MS-DOS to handle hardware interrupts (refer to appendix A for a discussion
of interrupts and the role that stacks play in the processing of interrupts).
The format for STACKS is:
STACKS=n,s
where n equals the number of stack frames allocated and s equals the size of
each stack frame in bytes. The allowable range for n is 8-64. The allowable
range for s is 32-512.
If a "stacks = " command is not included in CONFIG .SYS, MS-DOS de
faults to n=O and s=O for PC- and XT-type machines; n=9 and s= 128 for
AT- and PS/2-type machines.
You should use the STACKS command in CONFIG.SYS if you are get
tingan Internal Stack Error message.
SUBST
External
MS-DOS 3.X, 4.x
Function:
Assigns a path specifier to a drive letter
Format:
SUBST d: d: \path
SUBST d: /d
Example:
subst e: c: \subdirl \subdir2 \subdir3
subst e: /d
The SUBST command allows you to assign a path specifier to a drive
letter. Once the assignment is made, the drive letter may be used as a substi
tute for the specifier. SUBST was implemented for use by programs (such as
WordS tar) that cannot process path specifiers. SUBST can also save you
some typing if you are using files located at the end of a long path.
493
Part 3-MS-DOS Commands
A>dir \tmp\tmp1\tmp2
Volume in drive A is UCSFMIS
Directory of A:\TMP\TMP1\TMP2
<DIR>
<DIR>
FOO.
16
3 File(s)
6-26-89 12:02p
6-26-89 12:02p
6-26-89
5:00p
308224 bytes free
A>subst e: \tmp\tmp1\tmp2
A>dir e:
Volume in drive E is UCSFMIS
Directory of E:
<DIR>
<DIR>
FOO
16
3 File(s)
6-26-89 12:02p
6-26-89 12:02p
6-26-89
5:00p
308224 bytes free
The drive receiving the assignment cannot be the current drive or the
drive of the path specifier. The receiving drive letter may be any letter up to
the value specified by LASTDRIVE in the CONFIG.SYS file (see the discus
sion of the LASTDRIVE command). The default for LASTDRIVE is E. SUBST
cannot be used with network drives.
Displaying and Cancelling Substitutions
SUBST displays the active substitutions. The Id switch deletes them.
A>subst
E: => A:TMP\TMP1\TMP2
A>subst e: /d
A>subst
A>
Problems with SUBST
IBM admonishes users of PC-DOS 3.3 and 4.X that SUBST should not be
used with ASSIGN, BACKUp, DISKCOMp, DISKCOPY, FDISK, FORMAT,
494
SWITCHAR
or RESTORE. Big Blue makes no elaborations, but the obvious implication is
that SUBST confuses these other commands. Any system command that
interferes with at least nine other commands is to be avoided. Consider stay
ing away from SUBST until IBM and Microsoft rid it of its bugs.
SWITCHAR
Internal
MS-DOS 2.0-2.1
Function:
Changes the switch character
Note: SWITCHAR can be used in CONFIG.SYS only
Format:
SWITCHAR = character
Example:
switchar=
The character used to separate an operating system command from an op
tional switch is called the switch character. The forward slash (I) is the stan
dard MS-DOS switch character. Users of other operating systems (most
notably UNIX) often prefer to be able to use the same switch character re
gardless of which operating system they are using. MS-DOS 2.0 and 2.1 im
plement SWITCHAR, a convenient way to change the switch character. The
format for the command (which must be used in CONFIG.SYS) is:
SWITCHAR = character
where character is the new switch character.
Changing the Switch Character in MS-DOS 3.X and 4.x
SWITCHAR is not implemented in versions of MS-DOS after 2.10. However,
changing the switch character is possible in post-2.1O versions. In the fol
lowing listing, DEBUG is used to create an assembly language program
called "switchar.com". Refer to chapter 15 for details on using DEBUG. The
program uses the undocumented MS-DOS function 3 7H to set the switch
character to the character whose ASCII value is stored in the DL register.
C>debug
-n switchar.com
-a
3A3D:0100 MOV
3A3D:0102 CMP
DL,2F
BYTE PTR [00801,00
idefauLt switchar
iLength of command taiL
495
Part 3-MS-DOS Commands
3A3D:0107 JZ
0100
ino tail entered
OL,[o082]
3A3D:0109 NOV
itail entered, dl gets ASCII
[o12E],OL
3A3D:010D NOV
iCOPY to message string
3A3D:0111 NOV
AX,3701
;set switchar
3A3D:0114 INT
21
icall MS-DOS
3A3D:0116 NOV
OX, 0122
ipoint to message
AH,09
;output string function
3A3D:0119 NOV
3A3D:011B INT
21
i ca II MS-DOS
3A3D:011D NOV
AX, 4COO
iexit function
3A3D:0120 INT
21
i ca II MS-DOS
3A3D:0122 DB
'switehar= ',AF,' / ',AE,OO,OA,'$'
3A3D:0134
-rex
:0000
34
-w
Writing 0034 bytes
-q
C>
Once the program is created, the switch character is changed by enter
ing "switchar character". Entering "switchar" with no parameters sets" I"
as the switch character.
SWITCHES
Internal
MS-DOS 4.x
Function:
Disables enhanced keyboards with applications that won't
work properly with it
Note: SWITCHES is a configuration command that can only
be used in CONFIG.SYS.
Format:
SWITCHES=/K
Example:
switches=/k
The SWITCHES command is used to control the activity of enhanced key
boards. These newer keyboards have some keys (Fll and F12 function keys,
and a set of cursor keys separate from the number pad) that are not found on
the older keyboards. Naturally, the new keys generate scan codes not gener
ated by the older keys. (All keys generate a make scan code when pressed
and a break scan code when released. The make and break scan codes are
unique for each key.)
496
SYS
Some application programs are unable to process the scan codes gener
ated by the newer keys. In such cases, these scan codes may confuse the
program or even cause the system to crash. This problem can be avoided by
placing the command "switches=/k" in CONFIG.SYS. This instructs DOS
to simply ignore the scan codes generated by the new keys.
SYS
External
MS-DOS IX, 2.X, 3.X, 4.X
Function:
Transfers the system files to a specified disk
Format:
SYS d: (MS-DOS l.X-4.X)
SYS [d:] d: (MS-DOS 4.X)
Example:
sys b:
The MS-DOS system files are two "hidden" files that form an integral part of
MS-DOS. The files are described as hidden because you cannot list them
with the DIR command. The system files must be contained at a specific
location and in a specific order on a disk if you are to use the disk for boot
ing. (You will find more information on the system files in chapter 10.)
The SYS (SYStem) command is used to transfer the system files to a
disk. The disk receiving the files must be either a blank formatted disk, a disk
that has been formatted using the command"format d: Is" , or a disk format
ted with the command "format d:/b". If the disk is a blank formatted one,
SYS will be able to place the system files at the required location on the disk.
If the disk has been formatted using either the Is or the /b switch, the re
quired location will have been allocated for the system files. Otherwise, SYS
would be unable to correctly place the files.
When transferring files with SYS, you should use your working copy
of the system diskette. In the following example, a working copy of the sys
tem diskette is in drive A. With your diskette in place, type sys and then type
the letter designator of the drive containing the disk that will receive the
system files:
A>sys c:
System transferred
The MS-DOS 4.X version of SYS allows you to specify the source drive
that contains the system files. For example, if drive A is the current drive and
you wish to copy the system files from drive C to drive A, you could enter
the following command:
sys c: a:
497
Part 3-MS-DOS Commands
MS-DOS assumes that the system files are on the current drive if no drive
letter is specified for the source.
Also in DOS 4.0, the system files can be copied to the destination disk
as long as there are two free root directory entries and enough space on the
disk to hold the files. The disk need not have old system files or have been
formatted with "format /b".
TIME
Internal
MS-DOS 1.X, 2.X, 3.X, 4.X
Functions: Displays the current time known to MS-DOS
Changes the time known to MS-DOS
Format:
TIME [hh:mm:ss.xx]
Examples:
time
time 11 :30
The TIME command is used to display and set the current time known to
MS-DOS. When a file is created or modified, the current time known to the
system is stored in the file directory. This information, along with the cur
rent date, forms the file's time-date stamp.
To display the time, type time. MS-DOS will display the time and ask if
you want to change it:
C>time
Current time is 11:42:23.07
Enter new time:
To enter a new time, use the form hh:mm:ss.xx, where:
hb is a one- or two-digit number from 0-23 (hours),
mm is a one- or two-digit number from 0-59 (minutes),
ss is a one- or two-digit number from 0-59 (seconds),
xx is a one- or two-digit number from 0-99 (hundredths of a
second).
DOS 4.0 allows you to add an "a" or "p" (for am/pm), so that time
can be specified using a 12-hour clock as an alternative to using a 24
hour clock.
To leave the current time unchanged, simply press Enter:
C>time
498
TREE
Current time is 11:42:23.07
Enter new time:
+-you press Enter
The current time may be specified in the TIME command:
C>time 11:59
MS-DOS will prompt for another time if an invalid time is entered. Any
fields not specified are set to zero. For example, if the time entered is 2:00,
the current time is set to 2:00:00.00.
On machines with permanent clocks, the MS-DOS 3.3 and later imple
mentations of TIME reset the permanent clock's time. Unfortunately, PC
DOS 3.3 and 4.X set only permanent clocks whose memory address is the
same as IBM's clock. TIME has no effect on clocks with a different address.
TREE
External
MS-DOS 2.X, 3.X, 4.x
Function:
Displays the directory paths on the specified drive
Formats:
TREE [d:][IF] (MS-DOS 2.X-4.X)
TREE [d:]rPath][/F][IA] (MS-DOS 4.X)
Examples:
tree
tree b: If
The TREE command is used to produce a list of the directories on a disk.
Each directory on the floppy diskette or hard disk is listed by its full path
name. Subdirectories are grouped and listed according to the directory in
which they exist.
TREE is an external MS-DOS command. This means that a copy of the
file TREE.COM must be in a system drive before you can use the TREE com
mand. To use TREE, type tree and then type the letter designator of the drive
containing the disk to be analyzed. The default drive is assumed ifno drive is
specified. MS-DOS will list the files in each directory if you include the If
switch in the command.
The MS-DOS 4.X version of TREE provides the la switch, which di
rects TREE to use an alternate character in generating its output. The
switch is provided for printers that do not support the characters normally
used by TREE.
The 4.X version of TREE also allows you to specify a directory path.
TREE will list the directory tree starting at the end of that path. If no path is
specified, the tree starting with the current directory will be displayed.
499
Part 3-MS-DOS Commands
TRUENAME
Internal
MS-DOS 4.x
Function:
Displays the true name of logical drives and directories
created with the commands ASSIGN, JOIN, and SUBST
Formats:
TRUENAME
TRUENAME[d:] [path] [filename]
Example:
truename
truename e:
The MS-DOS commands ASSIGN, JOIN, and SUBST can be used to assign
logical names to drive letters and subdirectories. For example, the SUBST
command can be used to assign the directory C: \ TMP to drive letter E: as
follows:
C:\BOOKS\DOS>subst e: c:\tmp
The effect of the command is to direct all references for drive E to the direc
tory C: \TMP. Thus, while the following command appears to be reading
drive E, it is actually reading C:\TMP.
C:\BOOKS\DOS>dir e:\
Volume in drive E is MINI
Volume Serial Number is 3C23-15F8
Directory of E:\
printing.
<DIR>
<DIR>
4U4UIKM
4U
3 File(s)
01-07-89
4:50p
01-07-89
4:50p
5 01-31-89
6:16p
36536320 bytes free
The display says that the directory E: \ contains a file named 4U4U I KM • 4U. In
reality, the file resides in C: \ TMP as the MS-DOS 4.X command
TRUENAME demonstrates:
C:\BOOKS\DOS>truename e:\4u4uikm.4u
C:\TMP\4U4UIKM.4U
C:\BOOKS\DOS>
500
TYPE
TRUENAME (a command implemented in PC-DOS 4.0, but not docu
mented in any of the IBM manuals) can be entered with a drive specifier,
path specifier, and/or filename parameters. The command tells you where
the drive, path, or file is actually located. As the following example illus
trates, if you enter truename with no additional parameters, the command
will return the true name of the current directory:
C:\BOOKS\OOS>e:
+- change to the "E" drive
E: \> t ruename
+- what is the "E" drive's true name?
+- the true name
C: \ TMP
E:\>
TYPE
Internal
MS-DOS l.X, 2.X, 3.X,
Function:
Displays the contents of a file
Format:
TYPE [d:][path]filename[.ext]
Example:
type b:letter.txt
4.x
The TYPE command is used to display the contents of a file on the screen.
TYPE is generally used only with text (ASCII) files. Attempts at displaying
binary files can give unexpected results.
To display a file, enter type followed by the filespec of the desired file.
MS-DOS will read the file into memory and then display it on the screen:
C>type b:letter.txt
The display will scroll off the screen if the file contains more than 23
lines. To suspend the display, press Ctrl-NumLock. Press any key to resume
the display.
To obtain a printout of a file, press Ctrl-PrtSc before entering the TYPE
command. This key combination tells MS-DOS to "echo" the screen display
to the printer.
Wildcard characters cannot be used with TYPE.
501
Part 3-MS-DOS Commands
VER
Internal
MS-DOS 2.X, 3.X, 4.X
Function:
Displays the MS-DOS version number
Format:
VER
Example:
ver
The VER command tells you the version of MS-DOS that you are currently
using. Simply type ver if you want MS-DOS to display the version number of
MS-DOS that you are working with:
C>ver
MS-DOS Version
3.30
VERIFY
Internal
MS-DOS 2.X, 3.X, 4.x
Function:
Turns the write-verify switch on or off
Format:
VERIFY [ONIOFF]
Examples:
verify
verify on
verify off
The VERIFY command is used to turn MS-DOS 's write-VERIFY operation
on or off. When VERIFY is on, MS-DOS performs a series of checks follow
ing each disk-write operation to verify that the data just written can be
read without error. During verification, the system will run more slowly.
This command serves the same purpose as the Iv switch in the COpy com
mand.
To turn VERIFY on, type verify on. To turn VERIFY off, type verify off.
The current VERIFY state is displayed when you enter VERIFY with no pa
rameters:
C>verify
VERIFY is on
502
VOL/XCOPY
VOL
Internal
MS-DOS 2.X, 3.X, 4.X
Function:
Displays the volume label of the disk in the specified drive
Format:
VOL [d:]
Examples:
vol
vol b:
The VOL (VOLume) command is used to display the volume label of the
disk in the specified drive. Simply type vol followed by the letter designa
tor of the desired drive. The default is assumed if you do not specify a
drive.
C>vol
Volume in drive C is MS-OOS_BIBLE
The DOS 4 version of VOL will also display the disk's serial number if one
exists.
XCOpy
External
MS-DOS 3.2, 3.3, 4.x
Function:
Provides enhanced file copying capability
Format:
XCOPY[d:]fpathlfilename[. ext][d: ]fpath][filename][. ext][lA]
[/D: mm-dd-yy] [IE] [1M] [lP] [IS] [N] [/W]
Example:
xcopy *. * a: Ie Is la
XCOpy is a greatly enhanced version of the COpy command. It allows you
to (1) selectively copy files that have their archive attributes set (see ATTRIB),
(2) selectively copy files according to their date stamp, and (3) copy files
located in the subdirectories of the specified directory. The following exam
ples will demonstrate that XCOPY can also be much faster than COPY. Fig
ure 3 shows the file structure used in the examples.
503
Part 3-MS-DOS Commands
ROOT
BOOK
COMMANDS
ch1.doc
cmd2.doc
cmd1.doc
Figure 3. File structure for XCOPY examples.
XCOPYing Subdirectories
Assume that \BOOK is the current directory on drive C and that \COM
MANDS is a subdirectory in \BOOK. A major limitation of COpy is that the
contents of \BOOK and the contents of \COMMANDS cannot be copied
with a single invocation of COPY. The /s switch provides XCOPY with the
ability to copy all files in all subdirectories below the specified source direc
tory. The specified source directory in this example is the default BOOK.
Remember that since XCOPY is an external command, MS-DOS must be
able to read the command from disk before execution. (Internal and external
commands are discussed in the beginning of Part 3.)
C>xcopy *.* a: /s
Reading source file(s) •••
CH1.DOC
CH2.DOC
504
VOLlXCOPY
COMMANDS\CMD1.DOC
COMMANDS\CMD2.DOC
4 Fi Le(s) copied
C>
The nice feature of the Is switch is that it directs XCOPY to create the
subdirectories on the target if they do not already exist. This capability
makes XCOPY very useful in copying large multilevel directory structures.
Another feature of XCOPY is that it copies groups of files faster than
COpy does. XCOPY reads as many source files into memory as is possible
before making any copies. This minimizes disk access time and greatly
speeds up the process.
XCOPY by Date
The Id switch allows you to selectively copy files that have a date stamp on
or after a specified date. The date is specified in the format determined by
the SELECT or COUNTRY command.
C>xcopy *.* a: Is Id:6-29-89
Reading source fiLe(s) •..
COMMANDS\CMD2.DOC
1 FiLe(s) copied
XCOPYing Archived Files
XCOPY can be used to selectively copy files that have their archive attri
butes set (see ATTRIB for a discussion of archive attributes). The la switch
directs XCOPY to copy a file if the archive attribute is set, leaving the attri
bute unchanged. The 1m switch directs XCOPY to copy a file if the archive
attribute is set, clearing the attribute in the process. The batch file
"write.bat" , discussed in chapter 4, uses the command "xcopy 1m".
The 1m switch was used daily in the writing of this book. At the end of
each day, I would enter the following command:
xcopy *.doc a: 1m
Since all of the files I worked on that day had their archive attribute set,
this one command let me copy an entire day's work. Equally neat is that files
not worked on were not copied. Also, since the 1m flag cleared the archive
bit, the files wouldn't be copied until I worked on them again.
505
Part 3-MS-DOS Commands
Other Switches
The Ie switch directs XCOPY to create a copy of any empty subdirectories
specified in the command.
The /p switch produces the prompt:
path\filename.ext (YIN)?
prior to each copy.
The Iv switch directs MS-DOS to verify that each copy is performed
accurately.
The Iw switch tells XCOPY to wait for you to insert diskettes before
searching for source files.
XCOPY versus BACKUP
Although there are strong similarities between XCOPY and BACKUP (e.g.,
subdirectories are copyable, archive attributes and dates are selectable), it is
important to bear in mind the differences. BACKUP is used specifically to
create backup copies of files. Files generated by BACKUP can be used with
RESTORE only. No other MS-DOS commands can utilize these files. On the
other hand, the files generated with XCOPY are conventional MS-DOS files.
506
p
R
A
T
4
Appendixes
A
B
C
D
E
F
MS-DOS Interrupts and Function Calls
Some Undocumented Features of MS-DOS
Practical Batch Files
Code Pages and Code Page Switching
An Assembly Language Primer
ASCII Cross-Reference Tables
A
P
PEN
D
I
X
A
MS-DOS Interrupts and
Function Calls
What Is an Interrupt?
An interrupt (int) is a signal, generated by either hardware or software, that
alerts the central processing unit (CPU) that some function needs to be car
ried out. For example, each time a key is struck, the keyboard hardware gen
erates an interrupt that tells the CPU that data was entered from the
keyboard.
Each interrupt is assigned a unique number (e.g., the keyboard inter
rupt is "9") that the CPU uses to determine which interrupt handler must be
used to process the interrupt. By convention, interrupt numbers are ex
pressed in hexadecimal format. See chapter 13 for more information on in
terrupts, interrupt handlers, and CPU registers.
MS-DOS reserves for its own use interrupts 20H through 2FH. This
509
Part 4-Appendixes
means that programs designed to be portable across different implementa
tions of MS-DOS should use interrupts 20H through 2FH only to perform
specific tasks defined by the operating system. The most frequently used
MS-DOS interrupt is interrupt 21H, the MS-DOS function dispatcher.
The MS-DOS Function Dispatcher
Interrupt 21H is the MS-DOSjunction dispatcher. The function dispatcher
is responsible for carrying out most of the work done by MS-DOS. It does
this by providing access to the MS-DOSjunctions. Each function performs a
specific task, such as opening a file, sending a string to the display screen,
allocating a block of memory, or determining which version of MS-DOS is
running. Each function is identified by a function number.
In order to use the MS-DOS functions, a program must perform three
tasks: (1) place the appropriate function number in the CPU's AH register; (2)
place any parameters required by the function in other CPU registers, the
register(s) used being determined by the particular function; and (3) issue a
21H interrupt. When the interrupt is issued, control passes from the pro
gram to MS-DOS. The operating system determines which function is to be
executed by the number stored in the AH register. Any parameters are read
from other CPU registers, after which the requested function is carried out.
MS-DOS places any return parameters in specific CPU registers and returns
control to the calling program. The program may then inspect the registers
to determine the results of the function call.
Each of the MS-DOS functions is discussed in this appendix. For each
function, there is a description of: (1) what the function does, (2) which
parameters must be sent to the function and which registers must be used,
and (3) which parameters are returned from the function to the calling pro
gram and which registers are used.
As an example of using functions, let us consider how an assembly lan
guage programmer might set up a program so that it could determine which
version of MS-DOS was currently running. MS-DOS function 30H is used to
obtain the MS-DOS version number. The description of function 30H in this
appendix says that the function returns the minor MS-DOS version in the
AH register and the major MS-DOS version in the AL register. In other words,
if MS-DOS 3.30 is running, 30 is returned in AH and 3 is returned in AL.
iDetermines the version of MS-DOS running
510
mov
int
21 h
;Set up to issue interrupt
;Requested service
;caLL MS-DOS function dispatcher
mov
mov
minor_num,ah
major_num,al
;Read parameters returned
iSave minor version number
iSave major version number
ah,30h
A-Interrupts and Function Calls
Note: Those readers with little or no assembly language experience are
referred to appendix E.
Interrupts and High-Level
Programming Languages
Programs writtten in assembly language use explicit instructions (such as "int
21 H") when issuing interrupts. Programs written in high-level languages
(such as BASIC, Pascal, and C) do not use explicit interrupt instructions.
Rather, high-level language commands (such as opening a file) are processed
by the language's interpreter or compiler to generate the appropriate "int"
instructions. In most cases, this arrangement is satisfactory for the high-level
language programmer. The loss of "total machine control" provided by as
sembly language is offset by the ease of programming provided by the natural
language structure of high-level programming languages.
In certain cases, though, it is desirable for the high-level language pro
grammer to be able to issue explicit interrupts. The programs contained in
this appendix are written in Thrbo Pascal and Microsoft C. Both programs
utilize explicit interrupts to illustrate how the MS-DOS functions can be ac
cessed from high-level languages. Before getting to the programs, however,
we need to discuss the use of interrupts to access the ROM BIOS.
Accessing the ROM BIOS
The ROM BIOS (read-only memory, basic input-output system) forms the
interface between MS-DOS and the hardware. Programs also access the
ROM BIOS through interrupts. For example, when a program needs to send
a character to the display screen, the program may issue a call to the MS-DOS
function dispatcher by using interrupt 21 H. The dispatcher then accesses
the ROM BIOS using interrupt lOH, and the BIOS goes on to display the
character. In some cases (generally, increased speed of execution), it is desir
able for the program to access the ROM BIOS directly. Program BRK_OFEC
(listing A-2) shows how this is done.
Since the ROM BIOS directly interfaces with the hardware, programs
that access the BIOS directly tend to be not as portable as those that access
the ROM through MS-DOS. You should refer to your computer system's
technical manual for detailed ROM BIOS information.
ENVSIZE.PAS
ENVSIZE.PAS (listing A-I) is a program written in Thrbo Pascal. The program
counts the number of bytes actually stored in the DOS environment. You
may find it useful in measuring how efficiently you are using the space
511
Part 4-Appendixes
reserved for the environment. The MS-DOS environment is discussed in
chapter 11. The discussion of the SHELL command in Part 3 describes how
to adjust the environment's size.
ENVSIZE.PAS uses the function MsDos () , a predefined Turbo Pascal
function that can be used to access the MS-DOS function dispatcher.
MsDos 0 takes asa parameter a Pascal record of type reg i sters, which con
tains 10 integers. When MsDos () is called by the program, the function takes
the first integer from the parameter record and places it in the AX register. The
function then takes the second integer from the parameter record and places
it in the BX register, and so on for each of the 10 integers (see listing A-I, lines
8-10). MsDos 0 then goes on to call the appropriate function. Upon return
from the function, MsDos 0 takes the value stored in the AX register and
places it in the first integer of the parameter record. The BX value is placed in
the second integer of the parameter record, and so on. In this program, dos
reg is declared as a variable of type regi sters.
The program begins (line 73) by calling procedure ve rnum, which will
return the major number of the version of MS-DOS being used. Line 19 sets
the AX field of dos regs to $3000 (Turbo Pascal denotes hexadecimal num
bers by a leading" $" rather than a trailing "H"). The effect ofline 19 is to place
a value of 30H in the AH register and a value of OOH in the AL register. This
establishes the conditions for a call to function 30H.
Line 20 is a call to the MS-DOS function dispatcher (interrupt 21 H) with
parameters passed in dos reg. On return from the function dispatcher, the
major MS-DOS version number is stored in the AL register. Line 21 uses the
Turbo function Lo 0 to assign the value inAL (the low byte in dos reg. ax) to
vernum. The major version number is then returned to the main program
module, which displays a message and terminates if vernum is less than 3.
The procedure get_envaddr uses MS-DOS function 62H to obtain
the segment address of the program segment prefix and assigns the address
to the variable psp_seg (lines 32-34). Procedure vernum must be called
prior to calling get_envadd r since service function 62H is not imple
mented in versions of MS-DOS prior to 3.00.
Listing A-I. ENVSIZE.PAS
1 program EnvSize;
2
3 {This program determines the size of its MS-DOS environment.
4 The program uses service function 62H. Therefore, MS-DOS 3.0 or
5 Later is required.}
6
7 type
8
registers = record
9
ax,bx,cx,dx,bp,si,di,ds,es,fLags: integer;
10
end;
11 var
12
dosreg:
registers;
13
integer; {Segment address of environment}
512
A-Interrupts and Function Calls
14
15
16
17
18
19
20
21
22
23
{Returns the version of MS-DOS being used.}
function vernum : integer;
begin
{Set AH to 30H.}
dosreg.ax:= S3000;
MsDosCdosreg);
{Call MS-DOS}
vernum:= LoCdosreg.ax); {Major version number in AL}
end;
24
25 {Obtains segment address of psp using service function 62H.
26
27
28
29
30
31
32
33
Reads segment address of environment at psp:002CH.}
procedure get_envaddr;
var
psp_seg : integer;
begin
dosreg.ax := S6200;
MsDos(dosreg);
psp_seg := dosreg.bx;
34
env_seg := MemW[psp_seg:S002Cl;
35
36 end;
37
38
39 {Returns the number of byte characters stored in the MS-DOS
40 environment. env_seg is global and contains environment's
41 segment address}
42
43
function get_size : integer;
44 var
45
count: integer;
{Counts characters in environment}
firstZero,secondZero
46
boolean;{Flag records if last byte = DO}
env_ptr
AByte;
47
48 begin
env_ptr := PtrCenv_seg,SO);
49
50
count := 0;
51
firstZero := false;
52
secondZero := false;
53
54
while secondZero = false do
begin
55
env_ptr := PtrCenv_seg,count);
56
count := count + 1;
57
58
59
60
61
62
63
64
{Environment pointer}
{Start of environment}
{Read environment}
{Point to next byte}
if env_ptr A = 0 then
{Byte of 00 read}
begin
if firstZero = true then {2 consecutive OD's}
secondZero := true
{only 1 byte of 00 read}
else firstZero := true
end
513
Part 4-Appendixes
65
66
67
else firstZero := false;
end;
68
get_size:= count;
{DO byte not read}
69 end;
70
71
72
73 begi n
74
if vernum < 3 then
writeln('MS-DOS 3.0 or later required.')
else begin
get_envaddr;
writeln('Environment Size: ',get_size,' bytes');
end;
75
76
77
78
79
80 end.
ENVSIZE.PAS will run under MS-DOS 2.1, and subsequent ver
sions, with a few minor modifications. Change line 32 to:
dosreg.ax := $5100
The result is that MS-DOS now calls undocumented function 51H,
which also returns the psp's segment address in BX. The other change
(which is left to the reader) is to have the program check to make sure
that MS-DOS version 2.1 or greater is running prior to calling the proce
dure get_envaddr.
MS-DOS function 51H is used in the program PSPEEP.PAS, which
is presented in chapter 11.
Line 35 uses the predefined array MemW to assign the segment address of
the MS-DOS environment to the variable env _seg. The value of
MemW [psp_seg: $002C] is the value of the word stored at segment address
psp _ s eg, offset address 2CH. As discussed in chapter 11, this is the memory
location that stores the segment address of the MS-DOS environment.
The function get _ s ; z e initializes a counter and two boolean flags
(lines 50-52) before entering a loop (lines 54-65). On entering the loop,
env _pt r points to the first byte in the MS-DOS environment. Each traversal
of the loop increments the variable count and moves env _pt r to the next
byte in the environment. The loop is exited when two consecutive bytes of
zero are read. Two consecutive bytes of zero indicate that the end of the envi
ronment's character strings has been reached. Upon exiting the loop, the vari
able count stores the number of bytes stored in the environment. Note that
this is not the storage capacity of the environment, but a count of the number
514
A-Interrupts and Function Calls
of character bytes actually stored there. The value of count is assigned to
get_size, returned to the program's main module, and displayed on the
screen (line 78).
BRK_OFF.C
BRK_OFEC (listing A-2), which is written in Microsoft C, uses the MS-DOS
functions to capture any Ctrl-C or Ctrl-Break entered on the keyboard. The
program also accesses the ROM BIOS to position the cursor on the screen.
Listing A-2. BRK_OFF.C
1 I*This program illustrates how the MS-DOS service functions are
2 *accessed using Microsoft C, version 4.0. The program implements
3 *a keyboard routine that captures Ctrl-C.
4 *1
5
6 #include <stdio.h>
7 #include <dos.h>
8 #define
TRUE
1
9
10
11
12
13
14
15
16
I*General registers*1
I*Segment registers*1
union
struct
REGS
SREGS
char
message[] = "Ctrl-C disabled, press X to quit"i
Regsi
Sregsi
int
17
18
19
20
21
I*Call to ROM BIOS which returns cursor's x coordinate in the Regs.h.dh
*register, the y coordinate in the Regs.h.dl register. These values
*are saved in global variables x_cur and y_cur. Prior to call,
*current page number is stored in Regs.h.bh.
22 *1
23
24 void get_cursor_pos()
25 {
26 Regs.h.ah = Ox03i
I*Read cursor function*1
27
int86(Ox10,&Regs,&Regs)i I*Call BIOS*I
28 x_cur = Regs.h.dli
29 y_cur = Regs.h.dhi
30 returni
31 }
32
33
34 I*Calls ROM BIOS to restore cursor position which has been saved in
35 *global variables x_cur and y_cur. Prior to call, Regs.h.bh
36 *contains active page number.
515
Part 4-Appendixes
37
38
39
40
41
42
43
44
45
46
47
48
*1
void reset_cursor()
{
Regs.h.ah = Ox02;
I*Set cursor function*1
Regs.h.dl = x_cur;
I*DL stores x value*1
Regs.h.dh = y_curi
I*DH stores y value*1
int86(Ox10,&Regs,&Regs);
return;
}
49 I*Calls ROM BIOS to display message at bottom of screen. Current
50
51
52
53
54
55
56
57
58
*position of cursor is saved prior to displaying message. Cursor
*position is restored after message is displayed.
*1
void display_message()
{
Regs.h.ah = Oxofi
int86(ox10,&Regs,&Regs)i
get_cursor_pos()i
I*Get active page*1
I*Call BIOS*I
I*Save cursor position*1
59
60
61
62
63
64
65
66
67
68 }
Regs.h.ah ox02;
Regs.h.dh = oX18;
Regs.h.dl = OX14;
int86(OX10,&Regs,&Regs);
printf<"%s",message);
I*Set cursor function*1
I*Row position*1
I*Column position*1
I*Call BIOS*I
reset_cursor 0;
return;
I*To current position*1
69
70
71 I*Calls DOS service function 02h to display a character on screen
72 *at current position of cursor. Prior to call, Regs.h.al contains
73 *byte data for character to be displayed.
74 *1
75
76 void echoO
77{
78
79
80
81
82
83
84
85
86
87
516
Regs.h.dl = Regs.h.al;
Regs.h.ah = oX02;
intdos(&Regs,&Regs);
return;
}
I*Calls ROM BIOS, first to get the active page number in Regs.h.bh
*then to position cursor at 0,0. Then endless loop captures Ctrl-C.
*Loop is broken when "X" typed at keyboard. Other characters are
A-Interrupts and Function Calls
88
89
90
91
92
93
94
95
96
97
98
99
100
101
102
103
104
105
106
107
108
109
110
111
112
113
114
115
116
117
118
119
*echoed to screen.
*1
break_off 0
{
Regs.h.ah = OxOf;
int86(Ox10,&Regs,&Regs);
I*Get active page*1
I*Call BIOS*I
Regs.h.ah = OX02;
Regs.h.dl = OXOO;
Regs.h.dh = OXOO;
int86(Ox10,&Regs,&Regs);
I*Position cursor*1
1* to 0,0 *1
whi le (TRUE)
I*LOOp forever*1
I*Call BIOS*I
}
Regs.h.ah = OX07;
intdos(&Regs,&Regs);
1*lnput, no echo*1
I*Call MS-DOS*I
if CRegs.h.al = 'AC')
display_messageC);
else if CRegs.h.al != 'X')
echoO;
else break;
I*Break from Loop*1
}
return;
}
mainO
{
break_off C);
exit<o>;
}
The program declares Regs and Sregs (listing A-2, lines 10-11) to be
variables of types REG Sand SREG S, respectively. REG S is a predefined
Microsoft C data type that contains eight integer fields, each of which corres
ponds to one of the CPU's general registers. SREGS is a predefined Microsoft
C data type that contains four integer fields, each of which corresponds to
one of the CPU's segment registers. As will be seen, these data structures per
form the same role as the reg; ster variable used in the preceding Turbo
Pascal program.
BRK-OFEC begins (line 117) by calling break_off 0 (line 91). The
first portion of break_off () positions the cursor at position 0,0 (the upper
left corner) on the screen. In order to do this, the program accesses the ROM
BIOS two times.
In Microsoft C, ROM BIOS accesses are carried out using the predefined
function; nt860. This function takes three parameters: (1) an integer that
specifies an interrupt number, (2) a REGS-type dat.a structure that contains
parameters to be passed to the ROM BIOS, and (3) a second REGS-type data
517
Part 4-Appendixes
structure that will store parameters returned from the ROM BIOS to the call
ing program. The ROM BIOS video services are accessed using interrupt 10H.
The number of the video function requested is passed in the AH register.
The first ROM BIOS call (line 94) is performed to determine the active
display page. Since the ROM BIOS maintains a cursor position for each dis
play page, the program needs to know which page is active before the ROM
BIOS can be instructed to position the cursor. The active display page is
returned in the BH register by video function OFH. Accordingly, line 96 sets
the AH field of Regs to 0902 (02H). Line 94 is a call to the ROM BIOS service
using i nt860. On return, Regs. h.bh contains the active display page num
ber. Note that Microsoft C allows a program to access: (1) the high-order byte
stored in a general register, for example Regs. h. ah; (2) the low-order byte
stored in a general register, for example Regs. h. a l; and (3) the two-byte
word stored in a general register, for example Reg s • x • a x.
Lines 96-99 position the cursor at 0,0. This is accomplished by calling
video function 02H. Prior to the call, the x coordinate for the cursor is
placed in the DL register, the y coordinate in the DH register. Function 02H
also requires that the BH register contain the active display page number.
This was accomplished by the previous ROM BIOS call.
Once the cursor is positioned, the program enters an infinite loop,
which begins at line 101. The first part of the loop (lines 103-104) uses MS
DOS function 07H to read a character from the keyboard without echoing it
to the screen. The MS-DOS functions are accessed using the predefined
function i ntdos () , which does not take an interrupt parameter because all
of the MS-DOS service functions are accessed via interrupt 21H.
Line 103 places 07H in Regs. h. ah. This will tell MS-DOS that function
07H is requested. Once MS-DOS is called (line 104), the operating system will
wait until a character is entered at the keyboard. When a character is entered,
MS-DOS returns control to the program and the byte value of the entered
character is stored in Regs. h. a l.
When control returns from MS-DOS to the program (line 106), BRK_
OFF.C first checks to see if Ctrl-C was entered. Note that the 1\ Cin line 106 is a
single control character. Most word processors allow you to enter a literal
control code character into text.
If Ctrl-C was entered, line 106 is evaluated as true and control is passed
to di splay_messageO. This function starts by repeating the call to ROM
BIOS video function OFH to determine the active display page. With the dis
play page number back in Regs.h.bh, display_messageO calls
get_cursor _pos 0, which uses ROM BIOS video function 03H to deter
mine the position of the cursor. The cursor's coordinates are saved in the
global variables x_cur and y _cur (lines 28-29), and control is returned to
display_message().
The function di splay_message 0 then uses ROM BIOS video service
function 02H to position the cursor at row I8H, column I4H (lines 60-63).
The C function pri ntf is used to display a message saying that Ctrl-C has
been disabled. Line 66 then issues a call to reset_cursorO, which uses
video service function 02H to restore the cursor to the coordinates saved in
518
A-Interrupts and Function Calls
x_cur and y _cu r. Control is returned to break_off (), which repeats the
infinite loop and waits for another character to be entered.
All of this happens (very quickly!) if Ctrl-C is pressed. We need to return
to the infinite loop to see what happens ifsome other character is pressed. If,
on return from MS-DOS function 07H, line 106 evaluates as false, the pro
gram checks to see if "X" was entered. If not, the program issues a call to
e c ha ( ) . If "X" was entered, the program breaks out of the infinite loop and
returns to ma; n () , where program execution terminates.
If neither Ctrl-C nor "X" was entered, break_off 0 issues a call to
echoO. This function uses MS-DOS function 02H to display the character
entered. Line 78 copies to Regs. h. d L the character returned by the previous
call to MS-DOS. Function 02H is then called to display this character, after
which control returns to break_off 0, and the infinite loop is repeated.
The MS-DOS Interrupts
Interrupt
Description
Int 20H
General program termination. This interrupt is
Int 21H
Int 22H
Int 23H
Int 24H
one of several ways in which a program running
under MS-DOS may terminate. The interrupt
restores the terminate, Ctrl-Break, and critical error
addresses, which are stored in the program's
program segment prefix. This interrupt is a
carryover from the early days of MS-DOS. Before
issuing int 20H, CS must contain the psp's segment
address. Most programmers use MS-DOS function
4CH to terminate because the function can be used
to return an ERRORLEVEL value.
MS-DOS junction request. This interrupt is used
to access the MS-DOS function calls, which are
discussed in the next section.
Program termination address. This interrupt
points to the address in memory to which control is
passed when a program is terminated. The address is
stored in the program segment prefix of the program.
Ctrl-Break address. This interrupt points to the
address in memory of the routine that takes control
when the user presses Ctrl-Break. The address is
stored in the program segment prefix of the program.
Critical error handler. This interrupt points to
the address in memory of the routine that takes
control when MS-DOS encounters a critical error.
The address is stored in the program segment
prefix. Prior to executing this interrupt,
519
Part 4-Appendixes
Interrupt
Description
Int 24H (cont'd)
MS-DOS places an error code in the lower half of
the DI register:
Error Code
Description of Error
o
Write-protected diskette.
Unknown unit.
Drive not ready.
2
Unknown command.
3
4
Data error.
Bad request structure length.
5
6
Seek error.
Unknown media type.
7
8
Sector not found.
Printer out of paper.
9
A
Write fault.
B
Read fault.
General failure.
e
BP:SI will contain the segment: offset address of the
device header control block (see chapter 14) that
was involved in the critical error.
1
Int 25H
Absolute disk read. This interrupt is used to read
logical disk sectors into memory. Prior to calling the
interrupt, the following registers must be initialized:
AL
Drive number containing the disk
to be read (O=A, 1 =B, etc.).
ex
Number of sectors to be read.
DX
Number of first logical sector to
be read.
DS:BX
Segment: offset address of
memory location that will receive
the data to be read.
This interrupt destroys the contents of all registers
except for the segment registers. If the read is
successful, the carry flag will be zero on return. The
carry flag will equal one on return if the read was
not successful. If there is an error, the AL register
will contain the MS-DOS error code. Refer to the
discussion of int 24H for an interpretation of MS
DOS error codes. This interrupt does not pop the
status flags on return.
The MS-DOS 4 version of int 25H supports a
method for accessing sectors on disk partitions that
are larger than 32 Mbytes. With this alternative
method, the ex register is set to FFFFH (-1) prior
to the call. AL contains the drive number and
520
A-Interrupts and Function Calls
Interrupt
Int 26H
Int 27H
Int 28H
Int29H-2EH
Int 2FH
Description
DS:BX points to a lO-byte-long data structure. The
first 4 bytes of the data structure contain the starting
sector number. The fifth and sixth bytes contain the
number of sectors to read. The final 4 bytes contain
a segment:offset address of a data buffer that will
store the data that is read.
Absolute disk write. This interrupt is used to
write data to logical disk sectors. Except for the fact
that this is a write operation, its description is
identical to that for the preceding interrupt 25H.
The DOS 4 version of the interrupt supports a
method for writing to large DOS partitions. The
details are identical as described for reading with int
25H except for the fact that the data buffer contains
data that is written to the disk.
Terminate but stay resident. This interrupt is
used to terminate the execution of a program while
keeping the program resident in memory. Prior to
executing the interrupt, the DX register must be set
to the offset address of the program's end plus 1
byte. This offset is taken relative to the program's
program segment prefix. Int 27H restores terminate,
Ctrl-C, and critical error vectors. Therefore, it
cannot be used to install critical error handlers.
Programs that use int 27H are limited in size to 64
Kbytes. The preferred method for terminate and
stay resident (under MS-DOS 2.X and subsequent
versions) is MS-DOS service function 31H.
Used internally by MS-DOS (see appendix B).
Reserved for MS-DOS (see appendix B).
Multiplex Interrupt. This interrupt, implemented
in MS-DOS 3.0 and later verSions, is used to
establish a multiplexing interface between two
processes. A process is any program or command
that is running. In multiplexing, the CPU runs one
process for a period of time, halts the execution of
that process and starts a second, halts the second
and restarts the first, and so on, until both
processes have finished executing. Int 2FH is used
in the implementation of the command PRINT,
which allows printing to occur in the background
while another program is executing in the
foreground (see PRINT in Part 3).
Each program that runs under multiplexing (such as
PRINT) is given a specific multiplex number. MS
DOS has reserved multiplex numbers 00-7FH for its
521
Part 4-Appendixes
Interrupt
Description
lut 2FH (cont'd)
own use. PRINT has been given multiplex number
1. Multiplex numbers 80H-FFH are available for use
by application programmers. There is no method
for assigning a multiplex number to an application
and, as is explained subsequently, each application
must have a unique multiplex number. Therefore,
IBM and Microsoft recommend that programs be
written so that multiplex numbers are changeable.
As if to emphasize the importance of changeability,
MS-DOS assigns multiplex number B7H to a
subfunction that determines if APPEND has been
installed. IBM recommends that programs written to
run under 3.3 and subsequent versions should use
multiplex numbers in the range COH through FFH.
Each multiplexing program installs in memory an
int 2FH handler. These handlers form a chain,
similar to that formed by installable device drivers
(see chapter 14). Prior to calling interrupt 2FH, a
program places in the AH register the multiplex
number of the handler that the program wishes to
access. When MS-DOS receives control, the
operating system scans the chain of int 2FH
handlers until it locates one with a number
matching the value stored in AH. MS-DOS passes
control to that handler, which is then responsible
for servicing the interrupt.
Programs issuing int 2FH also place ajunction code
in the AL register. The function code communicates
to the handler the type of service requested by the
caller. All int 2FH handlers are required to service a
get installed state request (AL=OO) from the caller.
In response to this request, a .return code is to be
placed in AL:
.
Int 30H-3FH
AL
=0
AL
=1
AL
= FF
Handler not installed; okay to
install.
Handler not installed; not okay to
install.
Handler installed.
Reserved for use by MS-DOS.
The MS-DOS Functions
The MS-DOS functions form the heart of the operating system. All of the
functions are accessed by placing their function number in the AH register
522
A-Interrupts and Function Calls
and issuing an interrupt 21H. See chapter 11 for examples of how functions
are used in assembly language programming. The programs presented ear
lier in this apppendix demonstrate accessing the functions using Thrbo Pas
cal and Microsoft C.
The "Reserved" Functions
Several of the functions are described as "reserved for use by MS-DOS."
These functions are used by the operating system, but Microsoft and IBM
refuse to officially document what the functions do. Thanks to the com
bined efforts of many determined hackers, the purpose of some of these
functions is known. People who use these functions generally refer to them
as "undocumented" rather than "reserved." Several of the undocumented
functions are used in programs contained in this book. Appendix B de
scribes some undocumented MS-DOS functions.
Error Codes
Many ofthe functions implemented inMS-DOS 2.X and later versions set the
CPU's carry flag and return an error code in the AX register if an error occurs
during the call. These same functions clear the carry flag if no error occurs.
Error Code
OlH
02H
03H
04H
05H
06H
07H
08H
09H
OAH
OBH
OCH
ODH
OEH
OFH
lOH
llH
12H
Meaning
Invalid function number.
File not found.
Path not found.
Too many files opened (no handles left).
Access denied.
Invalid handle.
Memory control block destroyed.
Insufficent memory.
Invalid memory block address.
Invalid environment.
Invalid format.
Invalid access code.
Invalid data.
Reserved for use by MS-DOS.
Invalid drive specification.
Attempted to remove current directory.
Not same device.
No more files.
523
Part 4-Appendixes
The following error codes are implemented in MS-DOS 3.00 and subse
quent versions:
Error Code
20H
21H
22H
23H
24H
25H-31H
32H
33H
34H
35H
36H
37H
38H
39H
3AH
3BH
3CH
3DH
3EH
3FH
40H
41H
42H
43H
44H
45H
46H
47H
48H
49H-4FH
SOH
51H
52H
53H
54H
524
Meaning
Sharing violation.
Lock violation.
Invalid disk change.
FCB unavailable.
Sharing buffer overflow.
Reserved.
Network request not supported.
Remote computer not listening.
Duplicate name on network.
Network name not found.
Network busy.
Network device does not exist.
Network BIOS command limit exceeded.
Network adapter hardware error.
Incorrect response from network.
Unexpected network error.
Incompatible remote adapter.
Print queue full.
Print queue not full.
Print file deleted (not enough space).
Network name deleted.
Access denied.
Network device type incorrect.
Network name not found.
Network name limit exceeded.
Network BIOS session limit exceeded.
Temporarily paused.
Network request not accepted.
Print or disk redirection paused.
Reserved by MS-DOS.
File already exists.
Reserved.
Cannot make directory entry.
Failure on int 24H.
Too many redirections.
A-Interrupts and Function Calls
Error Code
55H
56H
57H
58H
Meaning
Duplicate redirection.
Invalid password.
Invalid parameter.
Network device fault.
MS-DOS
Function
Description
OOH
Program terminate. Used to terminate
01H
02H
03H
048
05H
program execution. Restores the terminate,
Ctrl-Break, and critical error addresses that
were stored in the program's program
segment prefix. This function is identical to
int 20H. Any files that were opened with
FCBs should be closed before using function
OOH. Prior to the call, the CS register must
contain the psp's segment address. Therefore,
it is generally used in COM programs only.
Read input with echo. When this function
is called, MS-DOS waits for a character to be
entered at the standard input device. The
character is then echoed to the standard
output device, and the ASCII code for the
character is returned in the AL register. The
function must be called twice to read
extended ASCII codes (as generated by the
function keys).
Display output. Prior to executing this
function, an ASCII value is placed in the DL
register. When the function is called, the
value in DL is sent to the standard output
device.
AUXiliary input. When this function is
invoked, MS-DOS waits for a character to be
input from the standard auxiliary device. The
ASCII value for the character is returned in
the AL register.
AUXiliary output. An ASCII value is placed
in the DL register prior to invoking this
function. The function then sends the value
in DL to the standard auxiliary device.
Printer output. An ASCII value is placed in
the DL register prior to invoking this
Implemented
in Versions
1,2,3,4
1,2,3,4
1,2,3,4
1,2,3,4
1,2,3,4
1,2,3,4
525
Part 4-Appendixes
MS-DOS
Function
05H (cont'd)
06H
07H
08H
09H
OAH
526
Description
function. The function then sends the value
in DL to the standard printer device.
Direct console J/O. The role of this
function depends on the value stored in the
DL register when the function is invoked:
If DL has a value of FFH, invoking function
06H directs MS-DOS to see if a character
has been entered at the standard input
device. If a character has been entered, the
zero flag is set to 0 (cleared) and the ASCII
value of the character entered is placed in
the AL register. If a character has not been
entered, the zero flag is set to 1 and a value
of OOH is placed in the AL register.
If DL has a value other than FFH, the value
in DL is sent to the standard output device.
This function does not check for CtrlBreak.
Console input without echo. This
function directs MS-DOS to wait for a
character to be entered at the standard input
device. The ASCII value of the character is
returned in the AL register. This function
does not echo the character to the display
screen or check for Ctrl-Break.
Read keyboard. This function is identical to
function 07H except that it checks for CtrlBreak.
Print string. Prior to invoking this
function, DS:DX is set to point to the
segment: offset address of an ASCII string.
The string must end with "$" (ASCII value
24H). Each character in the string (except the
"$") is sent to the standard output device
when the function is called.
Buffered keyboard input. This function is
used to set up and utilize an area of memory
as a buffer for input from the standard input
device. Prior to invoking the function, you
must do the following:
1. Set DS:DX to point to the segment: offset
address of the first byte in the buffer.
2. Specify the length of the buffer by placing
a value in the buffer's first byte.
Implemented
in Versions
1,2,3,4
1,2,3,4
1,2,3,4
1,2,3,4
1,2,3,4
A-Interrupts and Function Calls
MS-DOS
Function
Description
Implemented
in Versions
OAH (cont'd)
When the function is called, MS-DOS places
characters in the buffer as they are entered at
the standard input device. The characters are
stored beginning at the third byte of the
buffer. Characters are stored in the buffer
until carriage return (ASCII ODH) is entered. If
the buffer is filled to one less than the
maximum, any remaining characters are
ignored and the bell sounds until carriage
return is entered. MS-DOS sets the second
byte of the buffer to the number of characters
entered (not counting carriage return). The
buffer can be edited using the MS-DOS
editing keys (see chapter 8).
OHH
Cbeck standard input status. This
function returns a value of FFH in the AL
register if there are characters available from
the standard input device. AL returns with a
value of OOH if no characters are available.
1,2,3,4
OCH
Flusb buffer, read standard input
device. Prior to invoking this function, a
value of OlH, 06H, OSH, or OAH is placed in
the AL register. When the function is called,
the standard input device buffer is cleared
and the MS-DOS function corresponding to
the value in the AL register is invoked.
Disk reset. This function flushes all file
buffers. Files that have been modified in size
should be closed (functions lOH and 3EH). It is
not necessary to flush a file that has been
closed.
1,2, 3,4
Select disk. This function selects the drive
specified in the DL register (O=A, 1 =B, etc.)
as the default. The number of drives in the
system is returned in the AL register. If a
system has one diskette drive, the one drive is
counted as two, since MS-DOS considers the
system to have two logical diskette drives.
OPenfile. Prior to invoking this function,
DS:DX must be set to point to the segment:
offset address of an unopened file control
block (FCB). When the function is called, the
disk directory is searched for the file named
in the FCB. If a match is found in the
directory, the function returns a value of OOH
1,2,3,4
ODH
OEH
OFH
1, 2, 3, 4
1,2,3,4
527
Parl4-Appendixes
MS-DOS
Function
OFB (cont'd)
lOB
liB
528
Description
in the AL register and the FCB is filled as
follows:
If the drive code of the FCB (offset 0) was
set to default (OOH), MS-DOS changes the
code to match the actual drive used (1 =A,
2=B, 3=C, etc.).
The current block field of the FCB (offset
OCH) is set to zero.
The record size field of the FCB (offset
OEH) is set to the default value of 80H.
The file size (offset 10H), date (offset 14H),
and time (offset 16H) fields of the FCB are
set according to information stored in the
disk directory.
You must set the current record field of the
FCB (offset 20H) before performing any
sequential disk operations.
You must set the relative record field of the
FCB (offset 21H) before performing any
random disk operations.
You may modify the record size field if a
file size of 80H bytes is not appropriate.
Function OFH returns a value of FFH in the
AL register if no match is made between
the file named in the FCB and the entries in
the disk directory. (The file control block is
discussed in chapter 10.)
Close file. This function must be used to
update the disk directory whenever a file has
been modified. Prior to invoking this
function, DS:DX must point to the segment:
offset address of an opened file control
block. When the function is called, the
current directory on the disk specified in the
FCB is searched for the file named in the
FCB. If a match is found, the file's entry in
the directory is updated according to the
information in the FCB and a value of OOH is
returned in the AL register. A value of FFH is
returned in AL if no match is found.
Searcb for first matcb. Prior to invoking
this function, DS:DX points to an unopened
file control block (FCB). When the function is
called, MS-DOS searches the current directory
Implemented
in Versions
1,2,3,4
1,2,3,4
A-Interrupts and Function Calls
MS-DOS
Function
118 (cont'd)
Description
Implemented
in Versions
of the disk specified in the FeB for the first
mename matching the mename specified in
the FeB. The name in FeB may contain the
wildcard characters"·" and "?". A value of
FFH is returned in the AL register if no match
is found. Otherwise:
A value of OOH is returned in the AL register.
An unopened FeB is created for the
matching me at the disk transfer address
(DTA). You may use MS-DOS function 2FH
to obtain the current DTA.
DS:DX may point to a standard or an
extended FeB (see chapter 10). The FeB
created at the DTA will be of the same type. If
the attribute byte of an extended FeB is set to
zero, only normal mes that match will be
found. If the attribute byte of an extended
FeB specifies hidden, system, and/ or
directory entries, the search will find the
specified types of entries that match, plus all
normal mes that match. If the attribute
specifies volume label, only the volume label
entry is returned. (See chapter 10 for a
discussion of me attributes.)
128
Searcb for next matcb. After function 11 H I , 2, 3, 4
has been used, this function is used to find
additional directory entries matching the
mename in the FeB at DS:DX. This function
is used when the mename in the FeB
contains wildcards. Prior to invoking this
function, DS:DX must point to the segment:
offset address of the FeB previously used by
function 11H. If an additional match is found,
function 12H creates an unopened me control
block at the disk transfer area and a value of
OOH is returned in the AL register. A value of
FFH is returned in AL if no further match is
found.
138
Deleteflle. Prior to invoking this function,
1,2,3,4
DS:DX points to the segment: offset address of
an unopened me control block. When the
function is called, MS-DOS searches the current
directory of the disk specified in the FeB for an
entry with a filename matching the one
specified in the FeB. If a match is found, the
529
Part 4-Appendixes
MS-DOS
Function
13H (cont'd)
14H
Description
file is deleted from the directory. If the filename
in the FCB contains wildcards, all matching
files are deleted. A value of OOH is returned in
the AL register if any files are deleted. A value
of FFH is returned in AL if no match is found.
Sequential read. Prior to invoking this
function, DS:DX must point to an opened file
control block (FCB). The current block (offset
OCH) and current record (offset 20H) fields of
the FCB determine a record within the file that
is named in the FCB. The size of the record is
determined by the record size field (offset OEH)
in the FCB. When the function is called:
The specified record is read into memory at
the disk transfer address (DTA).
Implemented
in Versions
1, 2, 3, 4
The current block and current record fields
are incremented to point to the next record.
The AL register returns a value of:
OOH
01H
02H
03H
If the read was successful.
If an end-of-file mark is read,
indicating no more data in the file.
Ifthere is not enough room at the
DTA to read a record.
If an end-of-file mark is read,
indicating that a partial record was
read and padded with zeros.
The DTA is set with MS-DOS function lAH.
The current DTA is returned with MS-DOS
function 2 FH.
ISH
Sequential write. Prior to invoking this
function, DS:DX must point to an opened file
control block (FCB). The data to be written
begins at the disk transfer address (DTA). The
current block (offset OCH) and current record
(offset 20H) fields ofthe FCB determine a
record within the file that is named in the
FCB. The size of the record is determined by
the record size field (offset OEH) in the FCB.
When the function is called:
The specified record is written to the disk.
The current block and current record fields
are incremented to point to the next record.
530
1,2,3,4
A-Interrupts and Function Calls
MS-DOS
Function
15H (cont'd)
Description
Implemented
in Versions
The AL register returns a value of:
OOH
01H
If the write was successful.
If the disk is full and the write has
02H
If there is not enough room at the
been cancelled.
DTA for one record; therefore, the
write has been cancelled.
16H
Create file. Prior to invoking this function,
DS:DX must point to an unopened file
control block (FeB). When the function is
called, MS-DOS checks the current directory
of the drive specified in the FeB for an entry
matching the file specified in the FeB. If a
matching entry is found:
The data in the existing file is released,
making a file of zero length. The open file
function (function OFH) is then called.
If no match is found:
1,2,3,4
MS-DOS looks for an empty entry in the
current directory. If an empty entry is
available, MS-DOS initializes the file to have
a length of zero and calls the open file
function (function OFH). A value of OOH is
returned in the AL register. A value of FFH
is returned in AL if there are no empty
entries in the current directory.
A hidden file is created by using an extended
FeB with the attribute byte set to a value of
02H (see chapter 10).
17H
Renamefile. Prior to invoking this function,
DS:DX must point to the segment: offset
address of a "modified" FeB. The FeB
contains a drive number and filename
beginning at offset OOH. The FeB contains a
second filename beginning at offset llH. When
the function is called, MS-DOS searches the
current directory of the drive specified in the
FeB for an entry matching the first filename in
the FeB. If a match is found:
The filename in the directory is changed to
the second filename in the FeB. If "?"
characters are used in the second filename,
1,2,3,4
531
Part 4-Appendixes
MS-DOS
Function
17H (cont'd)
18H
19H
lAH
IBH
leH
IDH-20H
21H
532
Description
the corresponding positions in the original
filename are not changed. A value of OOH is
returned in, the AL register.
If no match is found or if an entry is found
matching the second filename:
A value of FFH is returned in the AL register.
Reserved for use by MS-DOS.
Current disk. This function returns the
number of the current default drive in the AL
register (O=A, 1=B, etc.).
Set disk transfer address. This function is
used to set the disk transfer address (DTA).
Prior to invoking this function, DS:DX must
point to the segment: offset address of the first
byte in the DTA. MS-DOS establishes a default
DTA at offset 80H in the program segment
prefix if function 1AR is not invoked.
Allocation table information. This
function returns information about the
default drive's file allocation table (FAT). On
return:
DS:BX points to the segment: offset
address of a memory location that stores
the first byte in the FAT.
DX contains the number of allocation units
on the disk in the default drive.
AL stores the number of sectors per
allocation unit.
ex stores the number of bytes in each
sector.
In MS-DOS 2.0 and subsequent versions, this
function does not return the address of the
complete FAT, since the entire FAT is not
stored in memory.
Allocation information for specific
drive. This function is identical to function
1BH except that prior to invoking the
function, the DL register contains the number
of the drive from which the FAT information
will be obtained (O=A, 1 =B, etc.).
Reserved for use by MS-DOS (see appendix B).
Random read. Prior to invoking this
function, DS:DX must point to the segment:
Implemented
in Versions
1,2,3,4
1,2,3,4
1,2,3,4
1,2,3,4
1,2,3,4
A-Interrupts and Function Calls
MS-DOS
Function
21B (cont·d)
Description
offset address of an opened file control block
(FCB). The current block (offset OCH) and
current record (offset 20H) fields of the FCB
must be set to agree with the relative record
field (offset 2IH). When the function is called,
the record addressed by these fields is read into
memory at the disk transfer address. A value is
returned in the AL register as follows:
OOH
OIH
02H
03H
22B
Implemented
in Versions
Read completed successfully.
No data available in file.
Not enough room in DTA to read one
record; read cancelled.
End-of-file mark encountered. A partial
record was read and padded with zeros.
Random write. Prior to invoking this
1,2,3,4
function, DS:DX must point to the segment:
offset address of an opened file control block
(FCB). The current block (offset OCH) and
current record (offset 20H) fields of the FCB
must be set to agree with the relative record
field (offset 2IH).
When the function is called, the record
addressed by these fields is written from the
disk transfer address to the file specified in
the FCB. A value is returned in the AL register
as follows:
OOH
01H
02H
23B
Write completed successfully.
Disk full.
Not enough room in DTA to write one
record; write cancelled.
File size. Prior to invoking this function,
1, 2, 3, 4
DS:DX is set to point to the segment: offset
address of an unopened file control block
(FCB). The record size field (offset OEH) of the
FCB must also be set prior to calling this
function. When the function is called, MS-DOS
searches the current directory of the drive
specified in the FCB for a file that matches the
filename in the FCB. If a match is found, the
relative record size field (offset 21H) is set to
the number of records in the file, and a value
533
Part 4-Appendixes
MS-DOS
Function
23H (cont'd)
24H
2 SH
26H
27H
534
Description
of OOH is returned in the AL register. A value of
FFH is returned in AL if no match is found.
Set random recordfield. Prior to invoking
this function, DS:DX must point to the
segment: offset address of an opened file
control block (FCB). This function sets the
relative record field (offset 21 H) of the FCB to
point to the record indicated by the
combination of the current block (offset
OCH) and current record (offset 20H) fields.
Set interrupt vector. This function is used to
set the memory location that receives control
when a specific interrupt is invoked. Prior to
invoking this function, DS:DX is set to point to
the segment: offset address of the first byte in
the interrupt handling routine, and AL contains
the number of the specified interrupt.
Create a new program segment prefix.
Prior to invoking this function, OX contains
the segment address of what will be a new
program segment. When the function is
called, the first 100H bytes of the current
program segment are copied into the first
100H memory locations of the new program
segment. Offset 06H in the new segment is
updated to contain the size of the new
program segment. The addresses for the
termination, Ctrl-Break, and critical error
routines are stored in the new program
segment beginning at offset OAH. Programs
written to run under MS-DOS 2.0 and
subsequent versions should use function 4BH
instead of this function.
Random block read. This function is used
to read a block of records from a file. Prior to
invoking the function, DS:DX must point to
the segment: offset address of an opened file
control block (FCB). CX must contain the
number of records to be read. The size of
each record must be stored in the record size
field (offset OEH) of the FCB. The read starts
with the record specified in the relative
record field (offset 21H) of the FCB. The
records are read into memory at the disk
transfer address (DTA). A value is returned in
the AL register as follows:
Implemented
in Versions
1,2,3,4
1, 2, 3, 4
1,2, 3, 4
1,2,3,4
A-Interrupts and Function Calls
MS-DOS
Function
27H (cont'd)
Description
OOH
OlH
02H
03H
Implemented
in Versions
Read completed successfully.
End-of-file mark encountered; no data
in record.
Not enough room in DTA to read one
record; read cancelled.
End-of-file mark encountered. A partial
record was read and padded with zeros.
MS-DOS function lAH is used to set the DTA.
MS-DOS function 2FH returns the current
DTA.
28H
Random bloc" write. This function is used
to write a block of records to a file. Prior to
invoking the function, DS:DX must point to
the segment: offset address of an opened file
control block (FCB). CX must contain the
number of records to be written. The size of
each record must be stored in the record size
field (offset OEH) of the FCB. The write starts
with the record specified in the relative record
field (offset 21H) of the FCB. The data written
is located at the disk transfer address (DTA). If
CX equals zero on entry, no records are
written, but the file size stored in the disk
directory is adjusted according to the number
of records specified by the relative record field.
A value is returned in the AL register as follows:
OOH
OlH
02H
03H
1,2,3,4
Write completed successfully.
Disk full. No records written.
Not enough room in DTA to hold one
record; write cancelled.
End-of-file mark encountered. A
partial record was read and padded
with zeros.
MS-DOS function lAH is used to set the DTA.
MS-DOS function 2FH returns the current
DTA.
29H
Parsefilename. This function is used to
1,2,3,4
parse the information contained in a
command line of the form "d: filename. ext"
so that the information can be stored in a file
control block (FCB). Prior to invoking this
function, DS:SI points to the segment: offset
535
Part 4-Appendixes
MS-DOS
Function
29H (cont'd)
2AB
2BH
536
Description
address of the command line, and ES:DI
points to the segment: offset address of what
will be an unopened FCB. Parsing is
controlled by the status of the first 4 bits in
the AL register:
If bit 0= 1, then any leading separator
characters (see following text) are ignored.
If bit 0=0, then parsing stops if a leading
separator character is encountered.
If bit 1 = 1, then the drive number in the
FCB is not changed if the command line
does not contain a drive number.
If bit 1=0, then the drive number in the
FCB is set to OOH if the command line does
not contain a drive number.
If bit 2 = 1, then the filename in the FCB is
not changed if the command line does not
contain a filename.
If bit 2=0, then the filename in the FCB is
set to eight blank characters if the
command line does not contain a filename.
If bit 3 = 1, then the extension in the FCB is
not changed if the command line does not
contain an extension.
If bit 3=0, then the extension in the FCB is
set to three blank characters if the
command line does not contain an
extension.
Filename separators are: . ; : = + SPACE and
TAB. AL returns a value of OlH if either "?" or
" ." appears in the filename or extension. AL
returns FFH if the drive number is invalid.
ES:DI returns the address of the first byte of
the FCB. DS:DI points to the first character
following the command line that was parsed.
Get date. This function returns the current
date stored by MS-DOS. The CX register
returns the year. DH returns the month
(1 =January, 2=February, etc.). DL returns the
day of the month. AL returns the day of the
week (0= Sunday, 1 = Monday, etc.).
Set date. This function sets the current date
stored by MS-DOS. Prior to invoking the
function, the CX register stores the year, DH
Implemented
in Versions
1,2,3,4
1,2,3,4
A-Interrupts and Function Calls
MS-DOS
Fqnction
2BH (cont'd)
2CH
2DH
2EH
2FH
30H
Description
stores the month (1 =January, 2=February,
etc.), and DL stores the day of the month.
When the function is called, AL returns a
value of OOH if the date entered was valid. AL
returns a value of FFH and the function is
cancelled if an invalid date is entered.
On machines with permanent clocks, the
MS-DOS 3.3 and subsequent implementations
of function 2BH resets the permanent clock's
date. Unfortunately, PC-DOS 3.3 sets only
permanent clocks whose memory address is
the same as IBM's clock. 2BH has no effect on
clocks with a different address.
Get time. This function returns the current
time stored by MS-DOS. On return, the CH
register stores the hours, CL has the minutes,
DH has the seconds, and DL has the
hundredths of a second.
Set time. This function sets the current time
stored by MS-DOS. Prior to invoking this
function, the CH, CL, DH, and DL registers
are set, using the format described for
function 2CH. AL returns a value of OOH if
the time entered was valid; otherwise, the
function is cancelled and AL returns FFH.
On machines with permanent clocks, the
MS-DOS 3.3 and subsequent implementations
of function 2DH resets the permanent clock's
time. Unfortunately, PC-DOS 3.3 sets only
permanent clocks whose memory address is
the same as IBM's clock. 2DH has no effect
on clocks with a different address.
Set/reset verify switch. Prior to invoking
this function, the AL register must contain
either OOH (verify off) or OlH (verify on).
Each disk write is checked for accuracy when
verify is on. The current state of the verify
switch can be determined by using MS-DOS
function 54H.
Get DTA. This function returns the segment:
offset address of the current disk transfer
address (DTA) in ES:BX.
Get DOS version number. On return, this
function stores the major MS-DOS version
number in the AL register and the minor
Implemented
in Versions
1,2,3,4
1,2,3,4
1,2,3,4
2,3,4
2,3,4
537
Part 4-Appendixes
MS-DOS
Function
30H (cont'd)
31 H
32H
338
Implemented
in Versions
Description
version number in the AH register. It can be
assumed that a pre-2.00 version of MS-DOS is
being used if AL returns a value of zero.
1erminate lind stay resiMnt (Ksep
process). This function terminates execution
of a program and keeps the program resident in
memory. Prior to invoking the function, the AL
register contains an exit code, and the DX
register stores the number of paragraphs (16
byte blocks) of memory to be kept by the
program. MS-DOS allocates this memory to the
program; it will not be used for other purposes
unless it is deallocated. There is no 64-Kbyte
limit on the amount of memory that may be
kept by the terminating program (compare
with int 27H). The exit code passed in AL is
retrievable with MS-DOS function 4DH.
Reserved for use by MS-DOS (see appendix B).
Ctrt-Break cbeck or set. MS-DOS maintains a
Ctrl-Break flag that determines when the
operating system checks to see if Ctrl-Break has
been pressed. If the flag is set, checking occurs
each time an MS-DOS function is called. If the
flag is not set, checking occurs only when
input or output is requested. The AL and DL
registers control this function. On entry:
AL=OOH
AL=OIH
The function checks the current
Ctrl-Break state.
The function sets the Ctrl-Break
state. If DL=O, state is set off. If
DL= 1, state is set on.
On return:
DL=OOH
DL=01H
AL=FFH
348
538
Ctrl-Break state is off.
Ctrl-Break state is on.
Invalid value in AL on entry.
The MS-DOS 4 version of this function can
also be used to obtain the identification
number of the drive used to boot the
operating system. Prior to the call, the value
in AH is set to 5. On return, DL contains the
boot drive's id number (1 =A, 2=B, etc.).
Reserved for use by MS-DOS (see appendix B).
2, 3, 4
2,3,4
A-Interrupts and Function Calls
MS-DOS
Function
Description
Implemented
in Versions
35H
Get interrupt vector. This function is used
to obtain the memory address of an interrupt
handling routine. Prior to invoking this
function, the interrupt number is placed in
the AL register. The function returns the
interrupt's segment: offset address in ES:BX.
2, 3, 4
36H
Get disk free space. This function is used
to obtain disk information. A drive number
(O=default, 1 =A, etc.) is placed in DL prior
to invoking the function. Information is
returned as follows:
2, 3, 4
BX
DX
CX
AX
The number of available clusters on the
drive.
The total number of clusters on the
drive.
The number of bytes per sector.
The number of sectors per cluster. AX
will store FFFFH on return if an invalid
drive was specified on entry.
37H
Reserved for use by MS-DOS (see appendix B).
38H
Retrieve or set country dependent
information. Country dependent
information includes specifications for a date
format, a currency symbol, and a decimal
separator. Countries are specified by a
country code, which is typically the
international telephone prefix for the country.
Country dependent information may be
retrieved with the MS-DOS 2.X
implementation of this function. Country
dependent information may be retrieved or
set with MS-DOS 3.X and subsequent
implementations.
2,3,4
Information is retrieved as follows: The AL
register contains the code of the desired
country. If AL is set to zero, the information
for the current country is retrieved. The MS
DOS 2.X implementation of this function can
specify country codes only in the range
0-255. In MS-DOS 3.X and subsequent
. versions, if a value of FFH is placed in AL, a
16-bit country code can be specified in BX.
DS:DX is set to point to a memory buffer that
539
Part 4-Appendixes
MS-DOS
Function
38H (cont'd)
Description
will store the returned information. The
format of the returned information in MS
DOS 2.X is as follows:
Offset
Value
0-01
Date/time format. A value of 00
specifies the USA standard
(hh:mm:ss mm/dd/yy). A value of 01
specifies the European standard
(hh:mm:ss dd/mm/yy). A value of 02
specifies the Japanese standard
2
ASCII code for currency symbol.
Byte of zero.
ASCII code for thousands separator.
Byte of zero.
ASCII code for decimal separator.
Byte of zero.
Reserved by MS-DOS.
(hh:mm:ss dd/mm/yy).
3
4
5
6
7
8-31
The format for the information returned in
the MS-DOS 3.X and subsequent
implementations is as follows:
Offset
Value
0-1
Date format. A value of 00 specifies
the USA standard (mm/dd/yy), 01
specifies the European standard
(dd/mm/yy), and 02 specifies the
Japanese standard (yy/mm/dd).
Null terminated currency symbol
string.
ASCII code for thousands separator.
Byte of 00.
ASCII code for decimal separator.
Byte of 00.
ASCII code for date separator.
Byte of 00.
ASCII code for time separator.
Byte of 00.
Currency format. Bit 1 equals the
number of spaces between the
currency symbol and the value. Bit 0
equals zero if the currency precedes
the value. Bit 1 equals 1 if the
symbol follows the value.
2-5
7
8
9
10
11
12
13
14
15
540
Implemented
in Versions
A-Interrupts and Function Calls
MS-DOS
Function
Description
38H (cont'd)
16
17
18-21
22
23
24-33
39H
Number of digits after decimal in
currency.
Time format. Bit 1 equals zero if 12
hour format. Bit 1 equals 1 if a 24
hour format.
Case map call address (see following
text).
ASCII code for data list separator.
Byte of 00.
Reserved by MS-DOS.
The case map call address is the segment:
offset address of a procedure that converts
lowercase characters to uppercase. The
function is used to set country information
by placing a value of FFFFH in DX prior to
the call. The function sets the carry flag and
returns a value of 02 in AX if the country
code is not valid.
Create a subdirectory. Prior to invoking
this function, DS:DX points to the segment:
offset address of an ASCII string that will be
the path specifier of the new subdirectory.
The string is terminated with a byte of zero.
The function sets the carry flag upon return if
an error occurs. The AX register contains
information about any errors:
AX=03H
AX=05H
3AH
Implemented
in Versions
2,3,4
The path specifier was not valid
or was not terminated with a byte
of zero.
No room in parent directory for
new subdirectory, the
subdirectory already exists, or a
reserved device name was used in
the path specifier.
Remove a subdirectory. Prior to invoking
2,3,4
this function, DS:DX points to the segment:
offset address of an ASCII string that is the
path specifier of the subdirectory to be
deleted. The string must be terminated by a
byte of zero. A subdirectory must be empty
before it can be deleted. This function cannot
be used to remove the current directory. The
function sets the carry flag if an error occurs.
541
Part 4-Appendixes
MS-DOS
Function
3AH (cont'd)
The AX register contains information about
any errors:
AX=03H
AX=05H
AX=16H
3BH
Implemented
in Versions
Description
The path specifier was not valid,
was not found, or was not
terminated with a byte of zero.
The specified subdirectory was
not empty, was not a directory, or
was the root directory.
The specified subdirectory is the
current directory.
Cbange current directory. Prior to
invoking this function, DS:DX points to the
segment: offset address of an ASCII string that
is the path specifier of a subdirectory. The
string must be terminated with a byte of zero.
The function makes the specified
subdirectory the current directory. The
function returns a value of 03H in the AX
register if the ASCII string is not a valid path
specifier or if the string is not terminated with
a byte of zero.
2, 3, 4
MS-DOS functions 3CH through 46H allow
you to utilize disk files without the necessity
of a file control block. When these functions
are used, MS-DOS uses a file handle to keep
track of files. A file handle is a hexadecimal
number that MS-DOS places in the AX
register when a file is created (function 3CH)
or opened (function 3DH). The following
handles are predefined by MS-DOS for
peripheral devices. Devices do not have to be
opened before reading or writing:
OOH
OlH
02H
03H
04H
3CH
Standard input device.
Standard output device.
Standard error device.
Standard auxiliary device.
Standard printer device.
Create a file. Prior to invoking this
function, DS:DX points to the segment: offset
of an ASCII string that specifies a drive, path,
and filename for a file to be created. The
542
2,3,4
A-Interrupts and Function Calls
MS-DOS
Function
3CH (cont'd)
string must be terminated with a byte of zero.
The attribute code for the file to be created is
placed in the CX register (see function 43H).
If the carry flag is not set on return from this
function, the AX register contains the file
handle. If the specified file did not previously
exist, it is created in the appropriate directory.
If the file did previously exist, it is truncated
to a length of zero. The carry flag is set on
return if an error occurred in execution of the
function. AX contains information about any
errors:
AX=03H
AX=04H
AX=05H
3DH
Implemented
in Versions
Description
The path specified was not valid.
The file was created, but there
are no file handles available.
CX specified a directory or
volume id attribute, or a
directory previously existed with
the same name.
open a file. Prior to invoking this function,
2,3,4
DS:DX points to the segment: offset of an
ASCII string that specifies a drive, path, and
filename of the file to be opened. The string
must be terminated with a byte of zero. AL
contains an access code that determines the
manner in which the file is opened.
In MS-DOS 2.X, only the first two bits of AL
are Significant; the other bits should be set to
zero.
Bit Setting
Access Mode
00
read-only
write-only
read and write
01
02
In MS-DOS 3.X and 4.X, other bits are used to
determine the type of access to the file that
other processes and other network users will
have:
bit 7
= 0 if file is to be inherited by
any child processes.
= 1 if file is private to parent.
543
Part 4-Appendixes
MS-DOS
Function
Description
3DH (cont'd)
bits 4-6
=
=
=
=
=
bit 3
bits 0-2
=
-
Implemented
in Versions
000 if network processes are
denied access.
001 if read/write access is
denied to network processes.
010 if write access is denied to
network processes.
011 if read access is denied to
network users.
100 if full access is allowed to
network users
Reserved (should equal 0).
000 if read access for owner
process.
001 if write access for owner
process.
010 if read/write access for
owner process.
If the carry flag is clear on return, then AX
contains the file handle. Any subsequent
reference to the file is through the 16-bit file
handle. On return, the file's read/write
pointer is set to the file's first byte and the
file's record size is set to 1 byte.
If an error occurs in execution of the
function, on return the carry flag will be set
and the AX register will contain one of the
following error codes:
01
02
03
04
05
OCH
3EH
Function number invalid (file-sharing
required).
File not found.
Path not found.
Too many files open; no handle
available.
Access denied.
Access code invalid.
Close a file bandle. Prior to invoking this
function, the BX register contains a file
handle that was returned from functions
3CH, 3DH, or 45H. The corresponding file is
544
2,3,4
A-Interrupts and Function Calls
MS-DOS
Function
3EH (cont'd)
3FH
closed upon return ifthe carry flag is not set.
The function flushes all internal buffers. If an
invalid file handle was specified, the carry
flag is set and a value of 06H is placed in the
AX register on return.
Readfrom afile or device. Prior to
invoking this function, BX contains a file
handle and DS:DX contains the segment:
offset address of a buffer in memory. The
number of bytes to be read are stored in the
ex register. When the function is called, the
specified number of bytes are read into the
memory buffer. If the carry flag is not set on
return, the AX register contains the number
of bytes read. If the carry flag has been set,
AX stores an error code:
AX=05H
Ax=o6H
40H
Implemented
in Versions
Description
The file handle passed in BX was
opened in a mode that does not
allow reading.
The file handle passed is not
open.
Write to a file or device. Prior to invoking
this function, BX contains a file handle and
DS:DX contains the segment: offset address
of a buffer in memory. The number of bytes
to be written are stored in the ex register.
When the function is called, the specified
number of bytes are written from the
memory buffer. If the carry flag is not set on
return, the AX register contains the number
of bytes actually written. If the carry flag has
been set, AX stores an error code:
AX=05H
AX=06H
2,3,4
2,3,4
The file handle passed in BX was
opened in a mode that does not
allow Writing.
The file handle passed is not
open.
Note: If on entry ex stores a value of OOH,
function 40H will set the file's size tQ
correspond to the current position of the
file's read/write pointer.
545
Part 4-Appendixes
MS-DOS
Function
41H
42H
Implemented
in Versions
Description
Delete a directory entry. Prior to invoking
this function, DS:DX points to the segment:
offset of an ASCII string that specifies a drive,
path, and filename of a directory entry to be
deleted. The string must be terminated with a
byte of zero. The entry has been deleted if
the carry flag is not set on return. The AX
register stores an error code if the carry flag
has been set:
AX=02H
File not found.
AX=OSH
Access denied.
Movefile pointer. MS-DOS establishes a
"read/write pointer" for each created or
opened file by using functions 3CH and 3DH.
When a file is created (or opened), the file
pointer is set to the first byte in the file. Each
time a read or write is made to the file, the
file pointer advances according to the
number of bytes in the read or write.
Function 42H is used to move a file's read/
write pointer without making a read or write.
Prior to invoking this function, the distance
the pointer will be moved is stored as a 4-byte
number in the CX and DX registers. The
most-significant bytes are stored in CX. The
file handle is stored in the BX register. The AL
register is set to a value that determines the
way in which the pointer is moved:
AL=OOH
The pointer is moved CX:DX
bytes from the beginning of the
file.
AL=01H
The pointer is moved to its
current location plus CX:DX.
AL=02H
The pointer is moved to the end
of the file plus CX:DX.
If the carry flag is not set on return, the new
pointer location is stored as a 4-byte number
in the DX and AX registers. The most
significant bytes are in DX. If the carry flag is
set on return, AX contains an error code:
546
2, 3, 4
2,3,4
A-Interrupts and Function Calls
MS-DOS
Function
Description
428 (cont'd)
AL=OlH
AL=o6H
438
Implemented
in Versions
The number passed in AL on
entry is not valid.
The handle passed in BX is not
open.
Cbangefile's attribute. A file's attribute is
2,3,4
determined by the bit pattern stored in the
eleventh byte of the file's directory entry:
Bit
o
1
2
3
4
5
File Attribute If Bit Set (Equals 1)
Read-only file. Any attempt to write to
such a file will generate an error.
Hidden file. Such a file is not listed
during a standard directory search.
System file. These files are used to boot
MS-DOS and perform many other
system operations.
Volume label. The filename and
filename extension in this directory
entry form the disk's volume id label.
Each disk may have only one file with
this attribute, and the file must be
located in the disk's root directory.
Subdirectory. Files with this attribute are
subdirectories.
Archive. This bit is set if a file has been
modified but not copied by BACKUP
Function 43H is used to change a file's
attribute. Prior to invoking this function,
DS:DX is set to point to the segment: offset
address of an ASCII string that forms a file's
path and filename. The string must be
terminated by a byte of zero. AL must be set
to OOH or OlH:
AL=OlH
AL=OOH
Prior to entry, CX is set to the
byte value of the desired
attribute. Calling the function
changes the attribute of the file
specified by the string at DS:DX.
Calling the function returns the
byte value of the current
attribute.
547
Part 4-Appendixes
MS-DOS
Function
Description
Implemented
in Versions
43H (cont'd)
An error condition exists if the carry flag is set
on return. Error information is returned in the
AL register:
AL=OlH
AL=03H
AL=05H
44H
The entry value of AL was not
OOHor OlH.
The rue specified was not valid, or
the ASCII string was not
terminated with a byte of zero.
An attempt was made to modify
the attribute of a directory or
volume id label.
YO controlfor devices (IOCTL). This
function is used to send information to, and
receive information from, input/output control
channels. The function is also used to determine
the input/output status of peripheral devices. A
device (or rue) is specified by placing a rue
handle in the BX register. File handles OOOOH
through 0004H are reserved by MS-DOS for
specific peripheral devices (see the list in
function 3BH).
Function 44H is divided into 16 subfunctions.
A subfunction is selected by placing a value of
OOH-OFH in AL prior to calling the function.
If an error is encountered, upon return the
carry flag will be set and AL will contain one
of the following error codes:
AL=01H
AL=04H
AL=05H
AL=o6H
AL=ODH
AL=OFH
Invalid subfunction number, or
Ctrl bit was set to zero.
No handle available.
Access denied.
Invalid handle.
Invalid data.
Invalid drive number.
Device Information Subfunctions
(OOH and OlH)
AL=OOH
548
Get device channel information.
This subfunction returns
information in the DX register
2, 3, 4
A-Interrupts and Function Calls
MS-DOS
Function
Implemented
in Versions
Description
44H (cont'd)
AL=01H
that describes a device control
channel. The device channel is
specified by the file handle
placed in BX. The interpretation
of the value returned in OX is
described in figure A-I.
Set device information. This
subfunction is used to set the
device information of a control
channel. The channel is
determined by the file handle
placed in BX. The information
set is determined by a value
placed in OX prior to calling the
function.
Control String Subfunctions
(02H through 05H)
These four subfunctions are used to receive
command strings from, or send command
strings to, a device.
AL=02H
AL=03H
AL=04H
AL=05H
Read string from device. Prior
to invoking this subfunction, AL
is set to 02H, a file handle is
placed in BX, OS:OX points to a
buffer that will receive the read,
and ex stores the number of
bytes to be read.
Write string to a device. Prior to
invoking this subfunction, AL is
set to 03H, a file handle is
placed in BX, OS:OX points to a
buffer that contains the string to
be written, and ex stores the
number of bytes to be written.
Read string from a disk drive.
This subfunction is identical to
02H except that a disk drive
number (OOH=default, OlH=A,
etc.) is placed in BL prior to
calling the subfunction.
Write string to a disk drive. This
subfunction is identical to 03H
except that a disk drive number
549
Part 4-Appendixes
Bit
15 14 13 12 11
10
9
8
7
6
5
4
3
2
0
I
E
0
F
R
R
I
I
I
I
A
E
5
5
5
5
W
S
C
L
K
N
C
0
T
C
I
N
I I I I I
R
C
T
R
L
E
5
5
Reserved
0
E
V
U
L
I I I I I
ISDEV= I
If ISDEV
EOF
RAW
RAW
ISCLK
ISNUL
ISCOT
ISCIN
CTRL
CTRL
If ISDEV
EOF
if channel is a device. ISDEV= 0 if channel is a disk file.
= 1, then:
= 1 if end of file on input.
= 1 if operating in binary mode (no check for Ctrl-Z).
= o if operating in ASCII mode (checks for Ctrl-Z as end-of-file
mark).
- 1 if the device is the clock device.
= 1 if the device is the null device.
= 1 if the device is the console output.
= 1 if the device is the console input.
= 1 if the device can process command strings. This bit cannot
be set with function 44H.
= o if the device cannot process command strings.
= 0, then:
=
o if the channel has been written.
Bits 0-5 represent the channel's block device number (O=A, 1 =B, etc.).
Figure A-I. Channel information sent (when AL=OOH) and received
(when AL= IH) is determined by the bit pattern of the 2 bytes in
the OX register.
550
A-Interrupts and Function Calls
MS-DOS
Function
Implemented
in Versions
Description
44H (cont'd)
(OOH=default, 01H=A, etc.) is
placed in BL prior to calling the
subfunction.
Input/Output Status Subfunctions
(06H and 07H)
These two subfunctions allow you to see if a
device or a file is ready for input or output.
AL=06H
Get input status. Prior to
invoking this subfunction, 06H
is placed in AL and a file handle
is placed in BX. When the file
handle represents a device, the
subfunction will return FFH in
the AL register if the device is
ready for input; OOH is returned
if the device is not ready. When
the handle in BX represents a
file, the subfunction will return
FFH in AL until the end of the
file has been reached, at which
point OOH is returned.
AL=07H
Get output status. This
subfunction is identical to 06H
except that it checks output
status instead of input status.
AL=08H
AL=09H
Other Subfunctions
Test to see if block device has
changeable media. The function
returns zero in AX if the media is
removable, one if the media is
fixed. This subfunction is
implemented in MS-DOS 3.0 and
subsequent versions.
Test to see if a drive is local or is
remotely located on a network.
For local drives, the attribute
word from the drive's device
header is returned in DX. For
remote drives, bit 12 in DX is
set on return. This subfunction
is implemented in MS-DOS 3.1
and subsequent versions.
551
Part 4-Appendixes
MS-DOS
Function
Description
448 (cont'd)
AL=OAH
AL=OBH
AL=OCH
AL=ODH
AL=OEH
552
Implemented
in Versions
Test to see if a file handle is local
or remote. For local handles, the
device header's attribute word is
returned in DX. For remote
handles, bit 15 in DX is set upon
return. This subfunction is
implemented in MS-DOS 3.1 and
subsequent versions.
Change sharing retry count.
This subfunction is used to reset
the length of delay between
retries and to set the number of
retries that can be attempted in
carrying out file-sharing
operations. Prior to calling this
subfunction, CX contains the
number of delay loops (the
length of the pause), and DX
contains the number of retries.
The default is delay loops = 1,
retries = 3. This sub function is
implemented in MS-DOS 3.0
and subsequent versions.
Change code page used by
device. This subfunction is used
to assign a different code page
to a peripheral device. This
sub function is implemented in
MS-DOS 3.3 and 4.X.
Generic IOCTL request. This
subfunction is used to perform
the following tasks:
Get peripheral device
parameters.
Set peripheral device parameters.
Read a track on a logical device.
Write a track to a logical device.
Format a logical device.
For details on the use of this
subfunction, refer to the
MS-DOS 3.2 (or subsequent)
technical reference manual.
Get last logical drive used. This
subfunction is used to
A-Interrupts and Function Calls
MS-DOS
Function
Implemented
in Versions
Description
448 (cont'd)
determine if a block device has
more than one logical device
assigned to it. On call, BL
contains the block devices drive
number (0 = default, 1 = A,
etc.). On return, AL contains 0 if
there is only one logical device
assigned to the block device;
otherwise AL contains the drive
number of the last logical drive
letter that used the block
device. This subfunction is
implemented in MS-DOS 3.2
and subsequent versions. The
discussion of subfunction OFH
illustrates how subfunction OEH
might be used.
AL=OFH
Assign logical device. This
function is used to assign a
logical device to a block device
that is supporting more than
one logical device. Prior to
calling, BL contains the drive
number of the logical drive to
be assigned (1 = A, 2 = B, etc.).
As an example, consider a
system with one floppy disk
drive. The single drive will be
supporting logical drives A and
B. Only one logical drive is
assigned to the disk drive at a
time. If A is assigned to the
drive, and MS-DOS needs to
access B, MS-DOS will display
the prompt: Insert di skette
for drive B: and strike any
key when ready_
An application program can use
subfunction OFH, in conjunction
with subfunction OEH, to
suppress this prompt. The
following assembly language
code illustrates this:
553
Part 4-Appendixes
MS-DOS
Function
Description
448 (cont'd)
iinsert this code prior to accessing drive B
Implemented
in Versions
iGet LogicaL drive
mov
mov
mov
int
cmp
je
ah,44h
aL,Oeh
bL,1
21h
aL ,2
exit
mov
mov
mov
int
ah,44h
a L,Ofh
bL ,2
21
iMS-DOS function 44h
iSubfunction Oeh
iDrive A
iCaLL MS-DOS
iB aLready assigned?
iIf yes, exit
iSet LogicaL drive
iMS-DOS function 44h
iSubfunction Ofh
iLogicaL drive B
iCaLL MS-DOS
exit:
Both subfunctions OEH and OFH
set the carry flag and place an
error code in AL if an error is
encountered.
458
Duplicate a file bandle. Prior to invoking
2,3,4
this function, BX contains a file handle. On
return, AX contains a second file handle for
the same file. Both file handles use the
original file pointer; moving the pointer using
one handle will move the pointer for the
other handle. The carry flag is set on return if
an error was encountered. AX contains
information about any errors:
AX=04H
AX=o6H
468
554
No free file handles available.
The handle passed in BX is not
currently open.
Force a duplicate ofa bandle. This
function is used to assign a specific file
handle to an open file. Prior to invoking this
function, BX contains a file handle and ex
contains a second file handle. On return, the
ex file handle will refer to the same file as the
BX handle. If the ex handle initially
referenced another file, that file is first closed.
On return, both file handles use the original
file pointer; moving the pointer using one
handle will move the pointer for the other
2,3,4
A-Interrupts and Function Calls
MS-DOS
Function
468 (cont'd)
handle. The carry flag is set on return if an
error was encountered. AX contains
information about any errors:
AX=04H
AX=06H
478
Implemented
in Versions
Description
2,3,4
No free file handles available.
The handle passed in BX is not
currently open.
Get current directory. Prior to invoking
2,3,4
this function, DS:SI is set to point to the
segment: offset address of a 64-byte block of
memory and DL contains a drive number
(OOH=default, OlH=A, etc.). On return, the
memory block will contain an ASCII string
that is the path specifier of the drive
designated by DL. The string will not contain
the drive letter and will not begin with a
backslash. The string will terminate with a
byte of zero. The carry flag is set on return if
an invalid drive was specified.
488
Allocate memory. This function is used to
2,3,4
allocate a block of memory to a process. On
entry, BX contains the number of paragraphs
(a paragraph is 16 contiguous bytes of
memory) to be allocated. On return, AX
contains the segment address of the allocated
memory block. The carry flag is set on return
if an error was encountered. AX contains
information about any errors:
AX=07H
AX=08H
498
Memory control blocks
destroyed.
Allocation failed due to
insufficent memory. BX contains
the largest block of memory
available for allocation.
Free allocated memory. On entry, ES
2,3,4
contains the segment address of a memory
block that has been allocated with function
48H. Function 49H returns the memory
block to the system pool. The carry flag is set
on return if an error was encountered. AX
contains information about any errors:
AX=07H
Memory control blocks
destroyed.
555
Part 4-Appendixes
Implemented
in Versions
MS-DOS
Function
Description
49H (cont'd)
AX=09H
4AH
Modify allocated memory bloclls. On
The block passed in ES was not
allocated with function 48H.
2,3,4
entry, ES contains the segment address of an
allocated block of memory and BX contains
the number of paragraphs of memory to be
contained in the modified block (a paragraph
is 16 contiguous bytes). When the function is
called, the specified block is adjusted to the
size specified in BX. The carry flag is set on
return if an error was encountered. AX
contains information about any errors:
AX=07H
AX=08H
AX=09H
4BH
Memory control blocks
destroyed.
Modification failed due to
insufficent memory. BX contains
the largest block of memory
available for allocation.
The block passed in ES was not
allocated with function 48H.
Load and execute a program. Through
the use of this function, a program can load
and execute another program. The original
program is called the parentj the program
that is loaded and executed is called the child.
MS-DOS commands can be executed from
within a program by calling function 4BH and
specifying COMMAND.COM (the MS-DOS
command processor) as the child.
Prior to invoking this function, a "function
value" is placed in the AL register:
AL=OOH
AL=03H
556
Load and execute a program.
MS-DOS will construct a
program segment prefix for the
child, load the program, and
execute it. MS-DOS sets the
child's terminate and Ctrl-Break
addresses to the instruction in
the parent that follows the
function 4BH call. Register
contents are not preserved by
this function.
Load overlay. MS-DOS does not
construct a program segment
2,3,4
A-Interrupts and Function Calls
MS-DOS
Function
Implemented
in Versions
Description
4BH (cont'd)
prefix. The child is loaded at a
specified memory location but
not executed. Control returns
immediately to the parent.
Prior to invoking this function, DS:DX points
to the segment: offset address of an ASCII
string that contains the drive, path, and
filename of the file to be loaded (the child).
The string must terminate with a byte of zero.
The third and final requirement prior to
calling this function is that ES:BX must point
to the segment: offset address of a memory
block that contains information required by
the function. There is one format for the
block used with the execute function
(AL=OOH) and another format for the block
used with the overlay function (AL=03H). In
either case, the block must be set up prior to
calling the function. The memory block
formats are presented in tables A-I and A-2.
When the parent first receives control, MS
DOS allocates all available memory to it.
Before a child can be loaded with function
4BH, some memory must be deallocated with
MS-DOS function 4AH. When this function is
invoked, MS-DOS uses the loader portion of
COMMAND. COM to load the child. The
loader is located in the transient portion of
the command processor, which is stored in
the high end of memory.
The carry flag is set by this function if an
error is encountered. The AX register
contains information about any errors:
AX=OIH
AX=02H
AX=05H
AX=08H
AX=OAH
The number passed in AL was
not 01 H or 03H.
The file specified by DS:DX was
invalid or not found.
Access denied.
There is not enough memory
available to load the child
process.
The environment passed was
larger than 32K bytes.
557
Part 4-Appendixes
MS-DOS
Function
Description
4BH (cont'd)
AX=OBH
Implemented
in Versions
The file pointed to by DS:DX
contains inconsistent
information.
Th.ble A-I. Load and Execute Memory Block (AL=OOH)
Address
Parameter
ES:BX
A 2-byte word that forms the segment address of the
"environment" passed to the child. The address is stored
with the least-significant byte first. The child will inherit
the parent's environment if a value of zero is stored at this
address.
The environment is a series of ASCII strings that are
referenced by MS-DOS. The environment always contains a
string that begins "COMSPEC=" followed by the path to
COMMAND.COM. MS-DOS references the COMSPEC
string when it needs to locate the command processor.
Other strings located in the environment include any
statements entered with the MS-DOS commands PATH and
PROMPT. Each string in the environment is terminated
with a byte of zero. The final string in the environment is
terminated with 2 bytes of zero. The environment is
limited to 32 Kbytes in size. MS-DOS stores the segment
address of a program's environment at offset 2CH in the
program segment prefix.
A 4-byte double-word pointer to the segment: offset
address of a command line. The offset address is stored at
ES:BX+2 (least-significant byte) and ES:BX+3
(most-significant byte). The segment address is stored at
ES:BX+4 (least-significant byte) and ES:BX+5
(most-significant byte). The command line will be copied
to offset 80H in the child's program segment prefix (psp).
The 128 bytes beginning at offset 80H in the psp form the
"unformatted parameter area." This is the location that MS
DOS commands examine for any information on a
command line following the command's name. If the
command edlin sample.txt is entered, MS-DOS loads
EDLIN. EDLIN would then find the string "OB 205341 4D
50 4C 45 2E 54 58 54 OD" beginning at offset 80H in the
psp. The first byte in this string tells MS-DOS the number
of characters in the command line. The first character in
the command line is a blank (20H). The remaining bytes
are the ASCII values of the characters in the string
ES:BX+2
558
A-Interrupts and Function Calls
Table A-I. (cont'd)
Address
Parameter
"sample.txt" . The string terminates with a carriage return
(ODH).
ES:BX+6
ES:BX+lO
A 4-byte double-word pointer to the segment: offset
address of a file control block. The offset address is stored
at ES:BX+6 (least-significant byte) and ES:BX+7
(most-significant byte). The segment address is stored at
ES:BX+8 (least-significant byte) and ES:BX+9
(most-significant byte). The file control block will be
copied to offset 5CH in the child's psp.
A 4-byte double-word pointer to the segment: offset
address of a file control block. The offset address is stored
at ES:BX + 10 (least-significant byte) and ES:BX + II
(most-significant byte). The segment address is stored at
ES:BX+12 (least-significant byte) and ES:BX+13
(most-significant byte). The file control block will be
copied to offset 6CH in the child's psp.
Offsets 5CH and 6CH in a program's psp are the starting
addresses of 12-byte "formatted parameter areas." File
specifiers contained in the command line at offset 80H are
"parsed" and placed in the formatted parameter areas.
(Refer to the discussion of MS-DOS function 29H for
information on parsing.)
Thble A-2. Overlay Memory Block (AL=03H)
Address
Parameter
ES:BX
A 2-byte word that contains the segment address at which
the child will be loaded. The address is stored with the
least-significant byte first.
A 2-byte word that stores the factor used to modify the
memory addresses of any relocatable items in the child.
The factor is stored with the least-significant byte first.
ES:BX+2
MS-DOS
Function
4CH
Description
Terminate a process. This function is used
to terminate a process passing a return code
in the AL register. The return code can be
read with an IF ERRORLEVEL within a batch
Implemented
in Versions
2, 3, 4
559
Part 4-Appendixes
MS-DOS
Function
Implemented
in Versions
Description
4CH (cont'd)
file or by MS-DOS function 4DH. All files are
closed by this function.
4DH
Retrieve tbe return code ofa cbild
process. This function retrieves a return
2,3,4
code previously set by a child process. (See
the function 4BH for a discussion of parent
and child processes.) The function returns
the return code set by the child in the AL
register. The AH register is set according to
the manner in which the child process was
terminated:
AH=OOH
AH=OIH
AH=02H
AH=03H
4EH
Normal termination.
1erminated by Ctrl-Break.
Terminated by a critical error.
Terminate and stay resident.
Findfirst matcbingfile. This function is
used to search a directory for a filename
matching one that is specified. The specified
filename may contain the wildcard characters
"?" and "*". Prior to invoking this function,
DS:DX is set to point to the segment: offset
address of an ASCII string containing the
drive specifier, path specifier, and filename of
the specified file. The string must terminate
with a byte of zero. An attribute for the file is
specified in the CX register (see function
43H). If the function finds a matching file, the
current disk transfer address (DTA) is filled as
follows:
Offset
Value
OOH-14H
Reserved by MS-DOS for use by
MS-DOS function 4FH.
Attribute of file found.
File's time stamp.
File's date stamp.
File's size (low word).
File's size (high word).
Name and extension of file
found, followed by a byte of
zero.
15H
16H-17H
18H-19H
IAH-IBH
ICH-IDH
IEH-2AH
The carry flag is set upon return if any errors
are encountered. AX contains information
about any errors:
560
2,3,4
A-Interrupts and Function Calls
MS-DOS
Function
Description
4EH (cont'd)
AX=02H
AX= 12H
4FH
50H-53H
Implemented
in Versions
The string specified by DS:DX
was not valid or was not
terminated with a byte of zero.
No matching files found.
Find next matcbing file. This function is
used to find subsequent matching files after
function 4EH has been used to find the first
match.
Prior to invoking the function, the current
DTA must contain the information returned
by function 4EH. Function 4FH returns any
matching files in the manner described for
function 4EH. The carry flag is set on return
if no subsequent matches are found.
Reserved for use by MS-DOS (see appendix
2,3,4
B).
54H
55H
56H
Get verify state. This function returns OOH
in the AL register if the verify state is off, 01 H
in AL if the verify state is on. The verify state
can be set with MS-DOS function 2EH.
Reserved for use by MS-DOS.
Rename afile. Prior to invoking this
function, DS:DX points to the segment: offset
address of an ASCII string that contains the
drive specifier, path specifier, and name of a
file to be renamed. ES:DI points to an ASCII
string that contains the new path specifier
and filename. Both strings must terminate
with a byte of zero. This function cannot be
used to change the drive specifier. The carry
flag is set if an error occurs on execution. The
error code is returned in the AX register:
AX=02H
AX=03H
AX=05H
AX=l1H
57H
2,3,4
2,3,4
File not found.
Path not found.
Access denied.
Not same device.
Get/set afile's time and date stamp.
Prior to invoking this function, BX contains a
valid file handle. If AL=OOH on entry, then
the file's date stamp is returned in DX and the
file's time stamp is returned in CX. If AL=OlH
on entry, the file's date stamp is set to the
value in DX and the file's time stamp is set to
2,3,4
561
Part 4-Appendixes
MS-DOS
Function
57H (cont'd)
Implemented
in Versions
Description
the value in CX. A file must be closed before
a new time/date stamp can be stored.
The time and date stamps are passed using
the format described in function 38H. The
high-order byte is stored in DL (or CL), and
the low-order byte is stored in DH (or CH).
The carry flag is set if an error occurs. The
error code is passed in AX:
AX=01H
AX=06H
58H
The entry value of AL was not
OOH or OlH.
The file handle passed in BX is
not open.
Get or set allocation strategy. When a
program requests that a block of memory be
allocated to it (via function 48H), MS-DOS
must search memory to find a block to
allocate. There are three "strategies" that MS
DOS can use in selecting a memory block to
allocate:
1. First fit-beginning at the low end of
memory, search until a large enough block
is found. Allocate that block.
2. Best fit-beginning at the low end of
memory, search all of memory, keeping
track of each block that is large enough.
Allocate the block that is closest in size to
the allocation request.
3. Last fit-beginning at the high end of
memory, search until a large enough block
is found. Allocate that block.
Function 58H allows a program to determine
what the current allocation startegy is and to
set the allocation strategy. To get the
allocation strategy, place OOH in AL. The
strategy code is returned in AX. To set the
allocation strategy, place 01 H in AL and one
of the strategy codes in BX.
Strategy Codes
OOH
O1H
02H
562
First fit
Best fit
Last fit
3,4
A-Interrupts and Function Calls
MS-DOS
Function
58H (cont'd)
59H
Implemented
in Versions
Description
The function sets the carry flag if an error
occurs. An error code of OIH is returned in
AX if the function code sent is not valid.
Get extended error information.
Function S9H is used to obtain extended
information on an error. The error must have
occurred on an immediately preceding call to
int 24H or to one of MS-DOS functions
2FH-62H. The BX register must be set to OOH
prior to calling function S9H.
On return, function S9H places in AX the
MS-DOS error code for the preceding error
(the int 24H error codes and the MS-DOS
function error codes are listed at the
beginning of this appendix). Function S9H
also returns three types of information: (1) An
error class is returned in BH. The error class
contains some descriptive information about
the nature of the error (see the following list).
(2) A recommended action is returned in BL.
The recommended action (see the following
list) can be used by the program in attempting
to recover from the error. (3) An error locus is
returned in CH. The error locus (see the
following list) describes the type of hardware
that may have been involved in the error.
3, 4
BH = Error Class
OlH
02H
03H
04H
OSH
06H
07H
08H
09H
OAH
OBH
OCH
Out of resource (such as storage).
1emporary situation (such as locked
file), which should be expected to
end.
Authorization problem.
Internal software error.
Hardware failure.
System software problem.
Application program error.
File not found.
Invalid file type.
File interlocked.
Wrong disk in drive or bad disk.
Other error.
BL = Recommended Action
01 H
Retry; then prompt user to select
ignore or abort.
563
Part 4-Appendixes
MS-DOS
Function
Description
59U (cont'd)
02H
03H
04H
05H
06H
07H
CB
OlB
02H
03H
04H
05H
5AH
Implemented
in Versions
Retry with delay between tries; then
prompt user to ignore or abort.
Get correct information from user.
Abort program in as timely a manner
as possible (close files, release locks,
etc.).
Abort immediately; system is probably
corrupted.
Ignore error.
Retry after user intervention.
= Error Locus
Unknown.
Block device.
Network related.
Serial device.
Memory related.
Create a temporary file. This function
will create a file with a unique name in a
specified directory. The function is useful for
word processors and other programs that use
temporary scratch files.
3,4
Prior to calling this function, DS:DX points to
the segment: offset address of a path specifier
string. The string must end with a backslash
(\) followed by a byte of zero. On return from
the function, DS:DX points to the file
specifier for the new file. The file specifier
will end with a byte of zero. The carry flag is
set if an error occurs. AX holds any error
code.
5HU
564
AX
Error
03H
05H
Path not found.
Access denied.
Create new file. Prior to calling this
function, DS:DX contains a pointer to an
ASCII file specifier and CX contains a file
attribute code. On return, AX contains a file
handle that is used to access the new file.
This function is identical to function 3CH,
with the exception that the function call will
fail if the named file already exists. The carry
3,4
A-Interrupts and Function Calls
MS-DOS
Function
5HH (cont'd)
5eH
Description
Implemented
in Versions
flag is set and AX contains an error code if an
error occurs.
AX
Error
03H
04H
OSH
SOH
Path not found.
No handle available.
Access denied.
File exists.
LoclllUnlock file access. This function is
used to temporarily gain exclusive access to a
portion of a file. In a network environment,
data may be unreliable if simultaneous access
to files is not controlled, thus the need for file
locking.
3,4
A file is locked by placing OOH in Al prior to
the call. Also prior to the call, the handle for
the file to be locked is placed in BX, the highorder offset of the region to lock in CX, the
low-order offset of the lock region in DX, the
high-order of the length of the region to be
locked in SI, and the low-order of the length
to be locked in DI. On return, the carry flag is
set and AX contains an error code if an error
occurred. IBM and Microsoft recommend a
call to function S9H if an error occurs.
AX
OIH
06H
2lH
Error
Function code not valid.
Handle not valid.
Allor part of region already locked.
A locked portion of a file is unlocked with
the same procedure as that described for
locking, with the exception that AH is set to
01 H prior to the call. Any region that is
locked must be unlocked, or unpredictable
results will ensue.
SDH
Reserved for use by MS-DOS (see appendix
B).
SEOOH
Get macbine name. This function is used
only on computers running IBM PC Net or
Microsoft Networks. Prior to the call, AX is
set to SEOOH and DS:DX points to a memory
3,4
565
Part 4-Appendixes
MS-DOS
Function
SEOOH
(cont'd)
SE02H
SE03H
566
Description
Implemented
in Versions
buffer that will store the computer's network
name.
On return from the call: DS:DX points to a
character string that stores the computer's
name; the string is terminated with a byte of
zero; CH is set to zero if the computer's name
is not defined; and CL returns the NETBIOS
name number if CH is nonzero.
The carry flag is set and AX contains an error
code if an error occurs.
AX
Error
01 H
Function code not valid.
Set printer setup. This function is used
only on computers running IBM PC Net or
Microsoft Networks. It is used to send a
control string to a network printer. Once a
network user invokes this command for a
particular printer on the network, each file
that the user subsequently sends to the
printer is preceded by the same control
string. This allows different users on the
network, using the same printer, to each have
their own control strings.
Prior to calling this function: AX is set to
5E02H, BX is set to the index number in the
redirection list of the desired printer (see
function 5F03), CX is set to the length of the
control string, and DS:SI points to the control
string. On return, the carry flag is set and AX
contains an error code if an error occurred.
AX
Error
01 H
Function code not valid.
Get printer setup. This function is used
only on computers running IBM PC Net or
Microsoft Networks. It returns the printer
control string sent with function 5302H.
Prior to issuing the call, AX is set to 5E03H,
BX is set to the index number in the
redirection list (see function 5F03) of the
desired printer, and ES:DI points to a buffer
that will store the control string. Maximum
3,4
3,4
A-Interrupts and Function Calls
MS-DOS
Function
5E03H
(cont'd)
Description
Implemented
in Versions
length of the control string is 64 bytes. On
return, CX contains the length of the control
string and ES:DI points to the control string.
On return, the carry flag is set and AX
contains an error code if an error occurred.
5F02H
AX
Error
01 H
Function code not valid.
Get redirection list. This function is used
only on computers running IBM PC Net or
Microsoft Networks. It provides access to the
network's system redirection list (see function
5F03H). Each entry in the list is indexed; the
first entry is index entry zero.
Prior to calling this function, AX is set to
5F02H, BX is set to a redirection list index
number, DS:SI points to a 128-byte buffer that
will store the local device name, and ES:DI
points to a 128-byte buffer that will store the
device's network name.
On return, the following conditions exist:
The zero bit in BH is set to zero if the device
is valid. The zero bit is set to 1 if the device is
not valid.
BL is set to 03H if the device is a printer, to
04H if the device is a disk drive.
CX contains the parameter value that was
stored using function 5F03. The contents of
DX and BP are destroyed.
DS:SI points to a string that is the device's
local name. The string ends with a byte of
zero.
ES:DI points to a string that is the device's
network name. The string ends with a byte of
zero.
On return, the carry flag is set and AX
contains an error code if an error occurred.
AX
Error
01 H
12H
Function code not valid.
No more files.
3,4
567
Part 4-Appendixes
MS-DOS
Function
5F03
Description
Redirect device. This function is used only
on computers running IBM PC Net or
Microsoft Networks. It establishes an
association between a local device name and
a network name. The list of associations is
called the redirection list. The redirection list
is indexed. The first local name/network
name pair on the redirection list is at index
value zero. The redirection list is used by
functions 5E02H, 5E03H, 5F02H, and 5F04H.
Prior to calling this function, the following
holds:
AX is set to 5F03H.
BL is set to 03H if the device is a printer, to
04H if the device is a disk drive.
CX is set to a parameter that will also be
stored in the redirection list.
DS:SI points to a string containing the
device's local name. The string ends in a
byte of zero.
ES:DI points to three strings, each
separated by a byte of zero. The first string
contains the device's network name. The
second string contains a network path
specifier. Network path specifiers must start
with two backslashes (\ \). The third string
is a network password that must be
followed by a byte of zero. On return, the
carry flag is clear if the function has
executed successfully. The carry flag is set
and AX contains an error code if an error
occurred.
AX
Error
OlH
Function code not valid, string in
wrong format, or device already
redirected.
Path not found.
Access denied.
Insufficient memory.
03H
05H
08H
5F04H
568
Cancel redirection. This function is used
only on computers running IBM PC Net or
Microsoft Networks. It removes an entry from
the redirection list (see function 5F03H).
Implemented
in Versions
3,4
3,4
A-Interrupts and Function Calls
MS-DOS
Function
5F04H
(cont'd)
Description
Prior to calling this function, AX contains
5F04H and DS:SI points to a string that
contains either a local device name or a
network path specifier (which must begin
with" \ \ "). The string must be followed with
a byte of zero. If a network path specifier is
used, this function will close the connection
between the local machine and the network.
On return, the carry flag is set and AX
contains an error code if an error occurred.
AX
Error
OlH
Function code not valid or string not
valid.
Redirection paused on server.
OFH
62H
63H
Implemented
in Versions
Get program segment prefix. This
function allows a program to locate its
program segment prefix (psp). Prior to calling
the function, AH stores 62H. On return, BX
contains the segment address of the
program's psp.
Get lead byte table. This function obtains
the system table of valid byte ranges for
extended characters, sets the interim console
flag, and gets the interim console flag. This
function is implemented in MS-DOS 2.25
only. It is not supported by any other
versions of MS-DOS.
Prior to issuing a call, AH contains 63H, AL is
set to:
OOH
OlH
If getting address of lead byte table.
If setting or clearing interim console
02H
If getting value of interim console flag.
3,4
2.25
flag.
If AL = OlH, then DL = OlH if setting the
flag, DL = OOH if clearing the flag.
On return, if getting the address of the lead
byte table, DS:SI points to the table. If getting
the value of the interim console flag, DL is set
to the value of the flag.
65H
Get global code page.
3.3,4
569
Part 4-Appendixes
MS-DOS
Function
66H
67H
68H
6CH
570
Description
Set global code page.
Set handle count.As described in chapter 11,
20 bytes in the psp are used to store file
handles. This sets a limit of 20 on the number
of files a process can have open at a time. This
function can be used to override this limit.
Prior to calling the function, BX contains the
desired number of file handles. On return,
the carry flag is clear if the function
succeeded. The carry flag is set and AX
contains an error code if an error was
encountered. This function is implemented in
MS-DOS 3.3 and 4.X. DOS allocates a block
of memory to store the new file handle table.
The amount of memory allocated is rounded
up to the nearest paragraph boundary. In
addition, one paragraph of memory (16 bytes)
is allocated to serve as a memory control
block (see chapter 11).
Two bugs have been reported with the PC
DOS implementation of function 67H:
1. When an even number of file handles is
requested, MS-DOS allocates an additional
64 Kbytes for the handle table.
2. When the value set in BX approaches
FFFFH, MS-DOS attempts to allocate more
memory than exists. This can cause the
system to hang.
IBM is aware of these bugs, but Big Blue has
announced no correction will be
implemented until the next release of MS
DOS.
Commit file. This function flushes all
buffers associated with a file handle and
updates the file's directory information. Prior
to calling the function, BX contains the file
handle. On return, the carry flag is cleared if
the function succeeded. The carry flag is set
and AX contains an error code if an error was
encountered. This function is implemented in
MS-DOS 3.3 and 4.x.
Extended open/create. This function, first
implemented in MS-DOS 4, provides
extended control over the processes of file
Implemented
in Versions
3.3,4
3.3,4
3.3,4
4
A-Interrupts and Function Calls
Implemented
in Versions
MS-DOS
Function
Description
6CH (cont'd)
creation and file opening. Prior to the call,
ex contains the attribute of the new file. This
value is ignored if an existing file is being
opened.
The action of the function is controlled by
the setting of bit fields in the BX and DX
registers, which occurs before the call is
made.
BX Register
Bit Field
Value/Action
0-2
o=
3
4-6
open/create for reading
only
1 = open/create for writing
only
2 = open/create for reading
and writing
Reserved
o = deny all sharing access
1 = deny read/write sharing
access
2 = deny write sharing access
3 = deny read sharing access
4 = allow all sharing access
7
o = child processes inherit file
handle
1
8-12
13
= child processes do not
inherit file handle
Reserved
15
0= int 24H enabled
1 int 24H disabled
o = disable file commit
(function 68H)
1 = enable file commit
Reserved
DX Register
Bit Field
Value/Action
0-3
o = return error if file exists
14
4-7
=
1 = open file if it exists
2 = open file and truncate if it
exists
o return an error if file not
found
1 create file if file not found
=
=
571
Part 4-Appendixes
MS-DOS
572
Function
Description
6CH (cont'd)
The function will disable the critical error
handler (int 24H) for any I/O involving the
handle returned from the call, if bit 13 in BX
is set to 1. This allows the program issuing the
I/O request to handle any critical error that
may occur. If a critical error occurs during
I/O, the carry flag is set, and AX contains an
error code on return.
Bit 14 of BX is used to enable or disable file
commit, which is discussed above under
function 68H.
If the call was successful, function 6CH places
a file handle in AX. ex is set to 1 if a file was
opened, 2 if a file was created and opened,
and 3 if an existing file was replaced and
opened. AX contains an error code if an error
was encountered on the call.
Implemented
in Versions
A
P
PEN
D
I
X
B
Some Undocumented
Features of MS-DOS
The term "undocumented feature" is applied to those interrupts and func
tion calls that are utilized by MS-DOS, but whose use is not publicly sanc
tioned by Microsoft or IBM. Undocumented features are usually discovered
by programmers scrutinizing the unassembled machine code that makes up
MS-DOS.
There are two potential risks when using undocumented features.
First, since there is no official description of what the feature does or how
it does it, unpleasant surprises are always a possibility. Fortunately, the
features presented here have been used by enough programmers for a
573
Part 4-Appendixes
long enough time that their behavior seems to be reasonably well under
stood.
The second potential risk is that Microsoft and IBM are not compelled
to support the undocumented features in future versions ofMS-DOS. In fact,
for precisely this reason, the two companies have repeatedly warned pro
grammers about using undocumented features.
Programmers must consider these risks whenever the use of undocu
mented features is being considered. Microsoft has published the MS-DOS
Encyclopedia, which describes many of the undocumented features dis
cussed here. However, the features remain officially "undocumented" and
not fully supported by Microsoft or IBM.
Undocumented Interrupts
Interrupt
Description
288
The MS-DOS scheduler. Interrupt 28H is generated by
MS-DOS to signal that DOS may be carefully reentered. (See
chapter 13 for details.) The default handler for int 28H is
simply an "iret" instruction. The interrupt appears to exist
solely to provide TSRs with a safe access to MS-DOS.
Character output. This interrupt sends a character to the
display device. The character is sent through ANSI.SYS if
ANSI.SYS is installed. Int 29H is much faster than MS-DOS
functions 2 and 9. Like these two functions, int 29H
advances the cursor after a character is displayed. This
makes it easier to use than int lOH. It would be interesting to
see if int 29H can be used safely within a TSR. Best guess is
that it could be used safely.
If int 29H is used to sound the speaker (AL = 7), additional
output with int 29H is suppressed while the speaker is
sounding.
298
Undocumented Functions
Undocumented functions are called just like documented functions are.
The function number is placed in AH, other registers are set as required, and
interrupt 21H is called. Function IFH is implemented in all versions ofMS
DOS. Functions 32H through 53H are implemented in 2.X and later ver
sions. Function 5DH is implemented in version 3.X and 4.X.
574
B-Undocumented Features of MS-DOS
MS-DOS
Function
IFH
32H
Description
This function is almost the same as function 32H,
described next. The difference is that the table is
accessed for the default drive. The format of the table is
slightly different under MS-DOS LX.
Get pointer to drive parameter table. On the call,
DL contains a drive number (O=default, 1 =A, etc.). On
return, if AL is set to 00, the drive exists, and DS:BX
points to the drive's parameter table. AL returns a value
of FFH if the drive does not exist.
The format of the drive parameter table is as follows
(offsets are in hexadecimal):
Offset
Function
00
Drive (0 = A, 1 = B, etc.).
Unit within drive (0, 1,2, etc.).
Bytes per sector.
Sectors per cluster minus 1.
Number of times to left-shift (multiply by
2) bytes per sector to obtain bytes per
cluster.
Number of boot sectors.
Number of FAT copies.
Number of root directory entries.
Number of first sector containing data.
Total number of clusters minus 1.
Number of sectors used by FAT.
Number of first sector in directory.
Offset and segment address of device
driver's header.
Media descriptor byte (see chapter 14).
00 if the disk has been accessed.
Offset and segment address of the next
drive parameter table; set to FFFF FFFFH if
last block in the chain.
01
02-03
04
05
06-07
08
09-0A
OB-OC
OD-OE
OF
lO-l1
12-15
16
17
18-1B
34H
37H
Get address to INDOS flag. On return, the flag's
address is stored in ES:BX. Refer to chapter 13 for
details.
Get/set switcbar. The switch character separates a
command flag from the rest of the command. The
default switch character is "/". To get the current switch
character, set AL to 00. On return, the ASCII byte value
for the current switch character will be in DL. To set the
575
Part 4-Appendixes
MS-DOS
Function
37H (cont'd)
4BH
50H
51H
52H
576
Description
switch character, place a value of 01 in AL, and the byte
value for the desired switch character in DL.
In MS-DOS 2.X, function 37H can also be used to set or
get the "forced \DEV\ flag". If the flag is set, device
names must be preceded by "\ DEV\". If the flag is
clear, \DEV\ is optional. The flag is read with a value of
02 in AL. On return, DL equals 00 (flag set) or 01 (flag
clear). The flag is set by calling the function with AL
equal to 03 and DL equal to 00. Clear the flag with AL
equal to 3 and DL equal to 1.
Load program; do not execute. This undocumented
subfunction of function 4B is used by DEBUG when it
loads a program. On the call, AL contains a value of 01
and ES:BX points to a parameter block with the same
format as that used by function 4BH, subfunction 0 (see
appendix A). On return, the loaded program SS, Sp, CS,
and IP values are stored at ES:[BX+OEH].
Set current process id. Prior to the call, BX stores a
process id number. The function designates that
process to be current.
A program's id is the segment address of the program's
psp. MS-DOS stores the id of the currently executing
program in an internal variable called the current
process id.
This function is important in TSRs that use file handles
(see chapter 13).
Get current process id. On return, BX stores the
current process id. This function is used, in
conjunction with function 50H, in TSRs that use file
handles. Function 51H is almost identical to function
62H. The only differences are that 51H is implemented
in Iv,lS-DOS 2.X and function 62H is documented.
Return pointer to Hinvars". On return, ES:BX
points to invars. Invars is a table of pointers used by
MS-DOS. The name "invars" is a wholly unofficial one
that is widely used (just like "INDOS").
The value at ES:BX is a pointer to the drive parameter
block for drive A. The value at ES:[BX-2] is the
location of MS-DOS' first memory control block (mcb).
Chapter 11 presents a discussion in which function 52H
is used to locate the mcb chain.
The device drive header for the NULL device is located
at ES:[BX+22H]. This is the first header in the system's
chain of device driver headers. The first 4 bytes of the
B-Undocumented Features of MS-DOS
MS-DOS
Function
528 (cont'd)
538
5D8
Description
header form a pointer to the next header in the chain.
Refer to chapter 14 for details on the structure of device
driver headers.
Generate drive parameter table. On the call, DS:SI
contains the address of a bios parameter block (BPB)
and ES:BP points to the area that will hold the drive
parameter table (see function 32H). Refer to chapter 14
for a discussion of BPBs.
Critical error information. This function has
several subfunctions. Subfunctions are selected by
placing a subfunction number in AL prior to the call.
Subfunction 06H returns the address of the critical flag
in DS:SI. The use of this subfunction is demonstrated in
chapter 13. Subfunction OAH sets extended error
information. Prior to the call, DS:DX points to three
words of error data. Extended error information is
retrieved with function 59H. Subfunction OAH can be
used in TSRs that need to preserve and then restore the
error information that existed when the TSR was called.
Refer to the description of function 59H in appendix A
for further discussion of extended error information.
577
A
P
PEN
D
I
X
c
Practical Batch Files
This appendix will show you how to create a menu and five batch files that
combine many of the principles discussed in this book. The material pre
sented here will provide you with ideas for customizing MS-DOS to suit
your own needs. It also will demonstrate to you the convenience and flexi
bility offered by MS-DOS batch files.
The batch files given here require MS-DOS 2.00 or later versions. Since
these batch files will be used during booting, you will need to store them on
a diskette that has been formatted with the MS-DOS system files. The disk
ette must also contain the MS-DOS files SORT.EXE, MORE.COM,
579
Part 4-Appendixes
TREE.COM, and CHKDSK.COM because these files will be utilized by the
batch files. The menu and batch files will require approximately 3,000 bytes
of disk storage space. (Please refer to chapter 4 for a discussion of MS-DOS
batch files and to chapters 3 and 6 for a discussion of the commands used in
these batch files.)
Before creating the batch files, we will use DEBUG to create a menu for
controlling the batch files. Enter the DEBUG commands as they appear in
the program listings. (DEBUG is discussed in chapter 15.) Note that the pro
gram listings assume that the root directory of drive C is used to boot
MS-DOS.
C>debug
-e 100 ba
-e 14f ba
-f 101 14e 20
-m 100 14f 150
-m 100 19f 1AO
-m 100 23f 240
-m 100 37f 380
-m 100 32f 600
-e 100 e9
-e 14f bb
-f 101 14e cd
-e 240 cc
-e 28f b9
-f 241 28e cd
-e 7eO e8
-e 82f be
-f 7e1 82e cd
-e 16f "SAMPLE BATCH FILES"
-e 1e6 "from"
-e 210 "MS-DOS BIBLE"
-e 383 "1. SORT DIRECTORY ALPHABETICALLY (specify drive)"
-e 423 "2. SORT DIRECTORY BY DATE (specify drive)"
-e 4c3 "3. REPORT STATUS OF DISK (specify drive)"
-e 563 "4. EX IT BA TCH FILES AND RETURN TO MS-DOS"
-rex
ex 0000
:730
-n batmenu.txt
-w
Writing 0730 bytes
-q
You have just used DEBUG to create a file named "batmenu.txt". This
file will serve as a menu for the batch files you are about to create. You can
see what the menu looks like by entering the command type batmenu.txt.
580
C-Practical Batch Files
Now you are ready to create the batch files themselves by using the
command"copy con: [filename]". (See the discussion of COPY in Part 3 for
details.) The first batch file is named AUTOEXEC.BAT and will be used to set
the date and time and then display the menu when MS-DOS is booted:
C>copy con: autoexec.bat
echo off
cLs
date
time
cLs
type batmenu.txt
prompt ENTER A NUMBER (follow 1, 2, or 3 with a drive Letter) $g
"z
<-you enter Ctrl-Z
1 File(s) copied
The next batch file is called" l.bat" and uses the MS-DOS filter SORT to
alphabetically sort a disk's directory entries according to filenames. The
batch file then uses the filter MORE to display one full screen of the sorted
directory at a time:
C>copy con:1.bat
echo off
cLs
prompt $n$g
echo SORTING DIRECTORY ALPHABETICALLY••• STANDBY
di r %1: : sort :more
pause
echo off
cLs
type batmenu.txt
prompt ENTER A NUMBER (foLLow 1,2, or 3 with a drive Letter) $g
"z
1 File(s) copied
Batch file "2.bat" sorts directory entries by their date stamp. This is
accomplished by sorting the directory entries according to the character in
column 24 of each entry. The sorted directory is then displayed one screen
at a time. This technique requires that all of the date stamps be for the same
year. It will not work with different years; for example, 6-12-88 would be
listed ahead of 12-14-86.
C>copy con: 2.bat
echo off
cis
prompt $n$g
echo SORTING DIRECTORY BY DATE••• STANDBY
581
Part 4-Appendixes
dir X1: :sort/+24: more
pause
echo off
cis
type batmenu.txt
prompt ENTER A NUMBER (follow 1, 2, or 3 with a drive letter) $g
"'z
1 Fi Le(s) copied
Batch file "3.bat" uses the MS-DOS command CHKDSK to check a
disk's status. This batch file also uses the command TREE, along with the
filter MORE, to display information about the disk's directory and file struc
ture. The information is listed one screen at a time:
C>copy con: 3.bat
echo off
cls
prompt $n$g
echo STATUS OF DISK IN DRIVE %1
echo **************************
vol X1:
chkdsk %1:
pause
cis
echo STRUCTURE OF DIRECTORIES AND FILES OF DISK IN DRIVE X1
echo ******************************************************
tree %1: :more
echo off
pause
cis
type batmenu.txt
prompt ENTER A NUMBER (follow 1, 2 or 3 with a drive letter> $g
"'z
1 Fi Le(s) copied
Batch file "4.bat" removes the menu from the screen and displays the
standard MS-DOS system prompt. Any MS-DOS command may be entered
once the standard prompt has been displayed:
C>copy con: 4.bat
echo off
prompt $n$g
cis
"'z
1 FiLe(s) copied
582
C-Practical Batch Files
Our final batch file will display the menu whenever we enter the word
"menu";
C>copy con: menu. bat
echo off
cLs
type batmenu.txt
prompt ENTER A NUMBER (foLLow 1, 2 or 3 with a drive Letter>
$g
"z
1 File(s) copied
Having created the menu and the five batch files, you are ready to go.
Type menu (or reboot your system) to display the menu. Now simply enter a
number to select a batch file for execution. You may specify a drive for selec
tions 1 through 3. For example, you might enter 1 B to get an alphabetical
listing of the directory in drive B. The batch file selected will be executed on
the default drive if you do not specify a drive letter.
583
A
P
PEN
D
I
X
D
Code Pages and Code
Page Switching
This appendix looks at code pages and the principles and techniques in
volved in activating, or switching, the code pages. Display devices that sup
port code page switching are listed, and important guidelines from IBM for
using code pages are given.
585
Part 4-Appendixes
Overview
A code page is a table that is used to convert stored numerical data into dis
playable characters. Designing a single code page that is appropriate for all
languages is not possible, since languages differ in the character sets that
they require.
Prior to MS-pOS 3.3, there were four different code pages used by MS
DOS. Each copy ofMS-DOS had a single fixed code page. Copies ofMS-DOS
sold in the United States came with a code page appropriate for American
English (code page 437). Similarly, copies sold in French Canada or Portugal
came with the appropriate code pages (code pages 863 and 860, respec
tively). Given this situation, problems arose when software written to run
with one code page was used with a copy of MS-DOS that had another code
page.
To remedy this problem, a multilingual code page (code page 850) was
introduced in MS-DOS 3.3. This single code page is designed to transfer data
written in the following languages:
Belgian French
Canadian French
Danish
Dutch
Finnish
Flemish
French
German
Icelandic
Italian
Norwegian
Portugese
Spanish
Latin-American Spanish
Swedish
Swiss French
Swiss German
UK English
US English
Software designers are encouraged now, and in the future, to use code
page 850 as the standard, so that their software will have the widest possible
audience. However, all ofthepre-MS-DOS 3.3 software was written for code
pages other than 850. Obviously this software is not going to disappear. To
accommodate this base of existing software, code page switching was first
implemented in MS-DOS 3.3.
What Is Code Page Switching?
Many printers and video display adapters support the use of downloadable
fonts. This means that users may select character sets to be used with these
devices. Code page switching basically allows the user, or the application
programmer, to activate a particular code page for use with the display
586
D-Code Pages and Code Page Switching
adapter, keyboard, and printer. The remainder of this appendix discusses
the principles and the various MS-DOS commands involved in code page
switching.
Code Page Switching Must Be Supported
Code page switching can be implemented only on devices that specifically
support it. Support is provided in the form of code page information (cpi)
files. Currently, there are two display adapters and two printers that support
code page switching (table D-I). The code page information files for these
devices are supplied with MS-DOS 3.3 and subsequent versions. The role of
the cpi files is discussed in the next section.
Table D-l. Display Devices That Support Code
Page Switching
Display Device
CPI File
IBM Proprinter Model 4201
IBM Quietwriter III Printer Model 5202
Enhanced Graphics Adapter
IBM Convertible LCD Adapter
4201.CPI
5202.CPI
EGA.CPI
LCD.CPI
Code page switching also requires support on the device driver level.
MS-DOS 3.3 and subsequent versions supply a printer device driver
(PRINTER.SYS) and a display driver (DISPLAY.SYS) that support code page
switching. The device drivers must be installed in memory prior to
implementing code page switching on printer or display devices. Refer to
the discussion of DEVICE, in Part 3, for details on installing these drivers.
Hardware and Prepared Code Pages
A device that supports code page switching may have one or more code
pages built into its hardware. These hardware code pages are prepared for
use when the device's driver is installed in memory.
Code pages are also generated by the MODE command, using informa
tion contained in the cpi files. Code pages generated in this fashion are
called prepared code pages. As an example, the following command gener
ates code pages 437 and 850 for use by the display device (con). The code
pages are generated using the file "ega.cpi":
mode con codepage prepare=«437.850) c:\dos\ega.cpi)
587
Part 4-Appendixes
Refer to Part 3 of this book for details on using MODE to generate prepared
code pages.
Switching Code Pages
There are three ways in which code page switching is actually carried out:
(1) the CHCP command, (2) the MODE command, and (3) MS-DOS function
44H.
The CHCP command is used to select a specific code page for as many
devices as possible. For example, the following command selects code page
850 for each device that has a code page 850 available to it:
chcp 850
Recall from the previous section that code pages are made available to a de
vice in two ways: (1) during installation of the device's driver or (2) through
use ofthe MODE command. The MODE command can also be used to select
a specific code page for a particular device. The code page must have pre
viously been made available for the device. The following command selects
code page 850 for the display (con) device:
mode con codepage select=850
The use of CHCP and MODE to select code pages is discussed more thor
oughly in Part 3 of this book.
Code pages can be selected from an application program by the use of
MS-DOS function 44H, subfunction OCH.
Some Code Page Programming Guidelines
IBM has published a list of guidelines for the applications programmer who
uses code pages. Some of the more important guidelines are listed here. For
a complete listing, refer to IBM Personal Systeml2 Seminar Proceedings
(vol 5, no 6, May 1987).
1. Make sure that application programs will run on machines that do not
support code page switching. One way to do this is to limit the charac
ters used in displaying messages to a set of common characters.
2. Restrict the use of graphics characters to those in the common set.
3. If you must use a code page element fbr a control character, choose one
that is not an alphabetic element in any of the code pages.
4. Construct a table of word delimiters that is not code page specific.
588
A
P
PEN
D
I
X
E
An Assembly
Language Primer
This appendix is provided for those readers with little or no experience with
assembly language programming. The information presented here is suffi
cient to follow chapter 13 's presentation of terminate and stay resident pro
grams and chapter 14's presentation of device drivers. You may also wish to
consult any of the excellent books available on assembly language program
ming for MS-DOS computers.
589
Part 4-Appendixes
What Is Assembly Language Programming?
Assembly language programming provides the programmer with direct ac
cess to, and control of, memory, the central processing unit (CPU), and the
peripheral devices. Assembly language programmers like to say that they are
"closer" to the computer than are programmers who use a high-level lan
guage (such as BASIC or Pascal). This increased intimacy with the computer
allows assembly language programmers to write programs that execute faster
and require less memory. In addition, programs that are closely linked to MS
DOS (such as device drivers and TSRs) are generally written in assembly lan
guage, since MS-DOS itself is written in assembly language.
The MS-DOS Hardware
Computers that run MS-DOS contain CPUs belonging to the 8088/80861
80x86 family of CPUs. These CPUs have internal storage devices called reg
isters. Each register has a name that identifies it. There are six types of regis
ters: segment registers, stack pointer registers, index registers, general
purpose registers, the instruction pointer register, and the flags register. Each
of the registers is discussed in the following sections.
Segment Registers
The segment registers are used to identify a memory segment. A memory
segment is a 64-Kbyte block of contiguous memory. Segment registers are
used in conjunction with pointer registers and index registers to identify
specific memory locations. The method used to accomplish this is dis
cussed in the following sections.
There are four segment registers. The CS register is used to reference
the portion of memory containing the program's code (the program itself).
The DS register is used to access the portion of memory storing the pro
gram's data. The SS register is used to access the portion of memory known
as the stack. The stack serves as a temporary storage area for information
needed by MS-DOS or the program. The ES register is the extra segment
register. It has various functions, some of which are discussed here.
Stack Pointer Registers
There are two stack pointer registers. These registers are used, in conjunc
tion with the SS registers, to define the stack. The SP register, also called the
stack pointer, is used, in conjunction with the SS register, to identify the top
ofthe stack. Similarly, the BP register, also called the base pointer, is used, in
conjunction with SS, to identify the base (bottom) of the stack.
590
E-An Assembly Language Primer
Index Registers
There are two index registers. The SI and DI registers (source index and
destination index) are used, in conjunction with one of the segment regis
ters, to identify a memory location. SI is generally used with DS, and DI is
generally used with ES.
General-Purpose Registers
There are four general-purpose registers: AX, BX, ex, and DX. As their class
name implies, these registers perform many different functions.
The Instruction Pointer Register
The IP register is used, in conjunction with the CS register, to identify the
memory location of the next machine instruction to be executed. The man
ner in which this is accomplished is discussed in the following text.
The Flags Register
The flags register contains nine I-bitflags. These flags are used to record the
status of certain machine operations.
Register Storage Capacity
Each of the registers stores 2 bytes, or 16 bits, of data. The general-purpose
registers are actually compOsites of single-byte registers. Thus, AX is com
posed of AH, which holds AX's high-order byte, and of AL, which holds
AX's low-order byte. Similarly, BH, BL, CH, CL, DH, and DL are each I-byte
registers.
Accessing Memory
Memory is accessed by combining the contents of one of the segment regis
ters with one of the other registers. The value stored in the segment register
is called the segment address. The value stored in the other register is called
the offset address. The actual physical memory location is computed by
multiplying the segment address by 16 and adding the offset.
For example, if CS stores a value of 22BH and IP stores a value of lOOH,
22BH is the segment address and lOOH is the offset. The physical address
referenced by the two registers is computed as follows:
segment *16 + offset = physical address
22BH* 16 + lOOH = 22BOH + 100H = 23BOH
591
Part 4-Appendixes
The physical address is usually written as the segment followed by a colon
followed by the offset. Thus, in the example this would be:
physical address = segment:offset = cs:ip = 22B: 100
Note that numbers in assembly language programs are decimal unless they
are followed by an H or h, in which case they are hexadecimal (base 16).
Assembly Language Statements
Assembly language statements are stored in memory as machine instruc
tions. Programs are executed as follows: (1) the instruction at address CS:lP
is read and executed, (2) IP is incremented so that CS:IP points to the next
instruction, and (3) steps 1 and 2 are repeated until the program terminates.
There are many types of assembly language statements. We will discuss
the most common ones here. A move (written mov) copies data from a regis
ter or memory location to another register or memory location. Moves di
rectly from one memory location to another memory location are not
allowed. A "mov" is actually a copy, since the original data is unchanged.
The following statements illustrate the use of mov.
Statement
movax,bc
movax,temp
movax,00A2h
Comment
;copy contents of register BX into register AX.
;copy contents of memory location "temp" in
AX.
;copy a value of A2H into AX.
Compares (written cmp) are used to compare the value stored in a regis
ter or memory location against a value stored in another register or memory
location. The following statements illustrate the use of cmp.
Statement
cmp aX,bx
cmp dX,0060h
Comment
;compare the contents of AX to that in register
BX.
icompare the contents of register DX to 60H.
The results of a compare are recorded in the CPU status flags. Com
pares are used in conjunction with conditional "jumps," which are dis
cussed next.
Ajump (writtenjmp) is used to direct the computer to a memory loca
tion that contains the next instruction to be executed. Generally, instruc
tions are executed in a sequential fashion: after a statement is executed, the
statement at the next highest memory location is executed. Jumps provide a
mechanism for program execution to branch to nonneighboring memory
592
E-An Assembly Language Primer
locations. Jumps are either conditional or unconditional. A conditional
jump first checks the settings of the status flags. If they are set in a particular
pattern, the jump is executed; otherwise, the jump is not executed. Uncon
ditional jumps are executed without checking the status flags. The following
statements illustrate the use of unconditional and conditional jumps.
Statement
jmp Init
Comments
;jump to memory address "Init".
;this jump is unconditional.
cmp aX,bx
je exit
;compare AX contents to BX contents.
;if the contents are equal, jump to
;memoryaddress "exit".
cmp cX,OOOOh
jg loop
;compare contents of ex to OOOOH.
;if contents of ex are greater than OOOOH,
;jump to memory address "loop".
A call (written call) is used to excute a set of instructions called a proce
dure. The first instruction in the procedure will generally have a label that is
used as an access device. When a call is executed, MS-DOS places the con
tents of the IP register on the stack. Placing items on the stack is called a
push. MS-DOS then places the offset address of the procedure being called
in IP, and control is passed to the instruction at eS:Ip.
The final statement in any procedure is a return (ret). This instruction
directs MS-DOS to remove the IP value that was stored on the stack. Remov
ing an item from the stack is called a pop. When the IP value is popped,
execution continues with the instruction immediately following the origi
nal call.
A long call is identical to a regular (or short) call with one exception.
With a long call, the called procedure lies outside the current code segment.
When the long call is executed, MS-DOS pushes both the es and IP values
onto the stack and replaces them with the segment and offset addresses of
the called procedure. When the called procedure terminates (with a far re
turn), the old es and IP values are popped and execution continues at the
instruction following the long call.
Invoking an interrupt is similar to a long call, with one exception. Be
fore the es and IP values are pushed, the value stored in the flags register is
pushed onto the stack. When the interrupt handler terminates (with an
"iret" statement), es, IP, and the flags register are popped, and execution
continues with the instruction following the interrupt call. Interrupts are
discussed further in appendix A.
593
A
P
PEN
D
I
X
F
ASCII Cross
Reference Thbles
In addition to ASCII (see table F-l) and IBM ASCII extended cross-reference
tables (see table F-2), this appendix explains how to convert from decimal to
hexadecimal and vice versa. Table F-3 shows the extended ASCII code.
595
Part 4-Appendixes
Table F-l. ASCII Cross-Reference
DEC
XIO
0
596
HEX
X 16
OCT
Xs
ASCII
00
00
NUL
(null)
<Ctrl-@>
g
<Ctrl-A>
IBMGRA.
CHAR.
1
01
01
SOH
2
02
02
STX
3
03
03
ETX
4
04
04
EOT
5
05
05
ENQ
•
+
6
06
06
ACK
~
7
07
07
BEL
8
08
10
9
09
••
Terminal Key *
< Ctrl-B >
< Ctrl-C >
< Ctrl-D >
< Ctrl-E >
<Ctrl-F>
BS
•a
<Ctrl-H>
11
HT
0
<Ctrl-I>
12
LF
< Ctrl-G >
•
0'
<Ctrl-K>
FF
'?
< Ctrl-L>
15
CR
Jo
< Ctrl-M >
OE
16
SO
n
< Ctrl-N>
15
OF
17
SI
~
< Ctrl-O >
16
10
20
DLE
~
<Ctrl-P>
17
11
21
DCl
....
<Ctrl-Q>
18
12
22
DC2
t
< Ctrl-R>
!!
< Ctrl-S>
10
OA
11
OB
13
VT
12
OC
14
13
OD
14
< Ctrl-J >
DC4
,
< Ctrl-T>
NAK
§
< Ctrl-U >
19
13
23
DC3
20
14
24
21
15
25
22
16
26
SYN
23
17
27
ETB
1
<Ctrl-W>
24
18
30
CAN
<Ctrl-X>
25
19
31
EM
t
!
<Ctrl-Y>
<Ctrl-Z>
< Ctrl-V>
26
lA
32
SUB
-.
27
IB
33
ESC
+-
<Esc>
28
lC
34
FS
'-
<Ctrl- \ >
29
ID
35
GS
+-->
<Ctrl- '>
30
IE
36
RS
...
<Ctrl-= >
31
IF
37
US
~
<Ctrl- ->
32
20
40
SP
(Space)
<SPACE BAR>
F-ASCII Tables
Table F-l. (cont.)
DEC
XIO
HEX
X t6
OCT
Xs
33
34
21
41
22
42
"
"
" (Quotation mark)
35
23
43
#
#
# (Number sign or octothorpe)
36
24
44
$
$
$ (Dollar sign)
%
%
% (Percent)
&
& (Ampersand)
ASCII
IBMGRA.
CHAR.
Terminal Key •
!
(Exclamation mark)
37
25
45
38
26
46
39
40
27
47
' (Apostrophe or acute accent)
28
50
( (Opening parenthesis)
41
29
51
) (Closing parenthesis)
42
2A
52
*
*
* (Asterisk)
43
2B
53
+
+
+ (Plus)
44
2C
54
, (Comma)
45
2D
- (Hyphen, dash, or minus)
46
2E
55
56
47
2F
57
/ (Forward slant)
48
30
60
0
0
49
31
61
1
1
0
1
50
32
62
2
2
2
51
33
34
63
64
3
4
3
4
3
4
5
6
5
6
52
&
. (Period)
53
54
35
65
36
66
5
6
55
37
67
7
7
7
56
38
70
8
8
8
57
58
39
3A
71
9
9
9
: (Colon)
59
60
61
3B
73
74
62
63
64
65
3C
3D
3E
3F
40
41
72
; (Semicolon)
<
<
< (Less than)
= (Equals)
75
76
=
77
?
100
101
@
@
@ (Commercial at)
A
A
A
>
>
> (Greater than)
? (Question mark)
597
Part 4-Appendixes
Th.ble F-l. (cont.)
DEC
XIO
HEX
X16
OCT
Xs
66
67
68
69
70
42
43
44
45
46
47
48
49
4A
4B
4C
4D
4E
4F
50
51
52
53
54
55
56
57
58
59
5A
5B
5C
5D
5E
5F
60
61
62
102
103
104
105
106
107
110
111
112
113
114
115
116
117
120
121
122
123
124
125
126
127
130
131
132
133
134
135
136
137
140
141
142
71
72
73
74
75
76
77
78
79
80
81
82
83
84
85
86
87
88
89
90
91
92
93
94
95
96
97
98
598
IBMGRA.
ASCII
CHAR.
B
C
D
E
F
B
C
D
E
F
G
G
H
H
1erminal Key *
B
C
D
E
F
G
H
I
J
K
J
K
J
K
L
L
L
M
M
M
N
N
N
0
0
0
P
P
P
Q
Q
Q
R
S
T
U
R
S
T
U
R
S
T
U
V
V
V
W
W
W
X
X
X
Y
Y
Y
Z
Z
Z
[
[
\
\
[ (Opening bracket)
\ (Reverse slant)
] (Closing bracket)
1\ (Caret or circumflex)
_ (Underscore or underline)
' (Grave accent)
a
b
]
]
1\
1\
a
b
a
b
F-ASCII Tables
Table F-l. (cont.)
DEC
XIO
HEX
X16
OCT
99
100
101
102
103
104
105
106
107
108
109
110
111
112
113
114
115
116
117
118
119
120
121
122
123
124
125
126
127
63
64
65
66
67
68
69
6A
6B
6C
6D
6E
6F
70
71
72
73
74
75
76
77
78
79
7A
7B
7C
7D
7E
7F
143
144
145
146
147
150
151
152
153
154
155
156
157
160
161
162
163
164
165
166
167
170
171
172
173
174
175
176
177
Xs
IBMGRA.
Terminal Key *
ASCII
CHAR.
c
d
e
c
d
e
c
d
e
f
f
f
g
g
g
h
h
h
k
k
k
I
1
m
n
m
n
n
0
0
0
P
q
P
q
p
q
r
s
r
s
r
s
t
u
v
w
x
t
u
v
w
x
z
y
z
{
{
}
}
Y
DEL
m
DEL
u
v
w
x
Y
z
{ (Opening brace)
: (Vertical bar; logical OR)
} (Closing brace)
- (Tilde)
<Del>
• Those key sequences consisting of " < Ctrl- > " are typed in by pressing the
CTRL key and, while it is being held down, by pressing the key indicated. These
sequences are based on those defined for the IBM Personal Computer series
keyboards. The key sequences may be defined differently on other keyboards.
IBM Extended ASCII characters can be displayed by pressing the <Alt> key and
then typing the decimal code of the character on the keypad.
599
Part 4-Appendixes
Th.ble F-2. IBM ASCII Extended Cross-Reference
BINARY
X2
OCT
Xs
DEC
XIO
HEX
X16
10000000
10000001
10000010
200
201
202
128
129
130
80
81
82
10000011
10000100
10000101
10000110
10000111
203
204
205
206
207
210
211
212
131
132
83
84
133
134
85
86
87
88
213
214
215
216
217
220
221
222
223
224
139
140
141
142
10001000
10001001
10001010
10001011
10001100
10001101
10001110
10001111
10010000
1001 0001
10010010
1001 0011
1001 0100
1001 0101
1001 0110
1001 0111
1001 1000
1001 1001
1001 1010
1001 1011
1001 1100
1001 1101
1001 1110
1001 1111
1010 0000
600
225
226
227
230
231
232
233
234
235
236
237
240
135
136
137
138
143
144
145
146
147
148
149
150
151
152
153
154
155
156
157
158
159
160
89
8A
8B
8C
8D
8E
8F
90
91
92
93
94
95
96
97
98
99
9A
9B
9C
9D
9E
9F
AO
Ext.
ASCII
~
u
e
a
a
a
:i
<;
e
e
e
i"
r
A
A
,
E
re
}E
0
6
0
U
U
Y
0
U
¢
£
¥
PI
f
a
F-ASCII Tables
Table F-2. (cont.)
BINARY
X2
OCT
Xs
DEC
XIO
HEX
X16
1010 0001
1010 0010
241
242
161
162
Al
A2
{
1010 0011
243
163
A3
U
1010 0100
1010 0101
1010 0110
10100111
244
164
fi
245
246
247
165
166
A4
A5
A6
250
251
A7
A8
Q
1010 1000
1010 1001
167
168
A9
r
1010 1010
252
169
170
1010 1011
253
254
171
172
255
256
257
260
173
174
1010 1100
1010 1101
10101110
10101111
1011 0000
10110001
1011 0010
1011 0011
1011 0100
1011 0101
1011 0110
1011
1011
1011
1011
1011
0111
1000
1001
1010
1011
1011 1100
1011 1101
1011 1110
10111111
11000000
11000001
175
176
AA
Ext.
ASCII
6
N
.!!
,
AB
AC
AD
Ih
AE
AF
«
»
BO
:::::
:::::
1/4
261
262
263
264
265
266
177
178
B1
B2
179
180
181
182
B3
B4
B5
B6
267
270
271
272
183
184
B7
B8
"
185
186
187
188
B9
BA
BB
BC
~I
189
190
191
192
193
BD
BE
BF
....IJ
273
274
275
276
277
300
301
CO
C1
I:
-l
=9
-il
=t
=;'I
=.!
..I
...,
L
....L.
601
Part 4-Appendixes
Table F-2. (cont.)
BINARY
X2
OCT
Xs
DEC
XIO
HEX
X16
11000010
11000011
11000100
302
303
304
194
195
196
C2
C3
C4
r
11000101
11000110
305
306
197
198
C5
C6
+
11000111
11001000
11001001
1100 1010
307
310
311
199
200
201
I~
312
202
C7
C8
C9
CA
-'I..
CB
=;;:
CC
CO
I~
11001011
11001100
11001101
11001110
1100 1111
1101 0000
1101 0001
1101 0010
1101 0011
1101
1101
1101
1101
0100
0101
0110
0111
1101 1000
1101 1001
1101 1010
1101 1011
1101 1100
1101 1101
1101 1110
11011111
11100000
1110 0001
1110 0010
602
313
314
203
204
315
316
317
320
321
322
205
206
207
208
209
210
323
324
325
326
211
212
213
214
03
04
05
06
327
215
216
07
08
217
218
219
220
221
222
09
OA
OB
OC
00
OE
OF
EO
El
E2
330
331
332
333
334
335
336
337
340
341
342
223
224
225
226
CE
CF
00
01
02
Ext.
ASCII
T'
~
Ib
Ii"
=
.JL.
,r
:!:
.JL
=;=
,...
IL
b
F
rr
11
=+=
oJ
r
••
•
•
a
{3
r
F-ASCII Tables
Table F-2. (cont.)
BINARY
X2
OCT
Xs
DEC
XIO
HEX
X16
11100011
1110 0100
11100101
11100110
11100111
1110 1000
1110 1001
11101010
1110 1011
1110 1100
1110 1101
11101110
11101111
1111 0000
1111 0001
1111 0010
1111 0011
1111 0100
1111 0101
11110110
11110111
1111 1000
1111 1001
11111010
1111 1011
1111 1100
11111101
11111110
11111111
343
344
345
346
347
350
351
352
353
354
355
356
357
360
361
362
363
364
365
366
367
370
371
372
373
374
375
376
377
227
228
229
230
231
232
233
234
235
236
237
238
239
240
241
242
243
244
245
246
247
248
249
250
251
252
253
254
255
E3
E4
E5
E6
E7
E8
Abbreviations:
DEC =
HEX =
OCT =
ASCII =
E9
EA
EB
EC
ED
EE
EF
FO
Fl
F2
F3
F4
F5
F6
F7
F8
F9
FA
FB
Fe
FD
FE
FF
Ext.
ASCII
11'
E
(1
IL
T
<I>
e
0
a
co
cf>
E
n
±
~
:5
<=
a
.j
1/
•
(blank
'F')
Decimal (Base 10)
Hexadecimal (Base 16)
Octal (Base 8)
American Standard Code for Information Interchange
603
Part 4-Appendixes
Thble F-3. Extended ASCII Code
Key(s)
Pressed
Extended ASCII
Code Generated
Key(s)
Pressed
Extended ASCII
Code Generated
Ctrl-F1
0,94
F2
0,59
0,60
Ctrl-F2
0,95
F3
0,61
Ctrl-F3
0,96
F4
0,62
Ctrl-F4
0,97
F5
0,63
Ctrl-F5
0,98
F6
0,64
Ctrl-F6
0,99
F7
0,65
Ctrl-F7
0,100
F8
0,66
Ctrl-F8
0,101
F9
0,67
Ctrl-F9
0,102
FlO
0,68
Ctrl-F10
0,103
Shift-F1
0,84
Alt-F1
0,104
Shift-F2
0,85
Alt-F2
0,105
Shift-F3
0,86
Alt-F3
0,106
Shift-F4
0,87
Alt-F4
0,107
Shift-F5
F1
0,88
Alt-F5
0,108
Shift-F6
0,89
Alt-F6
0,109
Shift-F7
0,90
Alt-F7
0,110
Shift-F8
0,91
Alt-F8
0,111
Shift-F9
0,92
Alt-F9
0,112
Shift-FlO
0,93
Alt-FlO
0,113
Hexadecimal to Decimal Conversion
Figure F-1 shows how the hexadecimal number 7D2F is converted to its deci
mal equivalent.
Each hexadecimal digit is always 16 times greater than the digit immedi
ately to the right.
Decimal to Hexadecimal Conversion
The process is reversed when you convert decimal numbers to hexadeci
mal. Start by selecting the leftmost digit and determine its significance in the
number (thousands, hundreds, etc.). Then the decimal is divided by the
604
F-ASCII Tables
7 D 2 F hexadecimal
Fh
= 15d
----~.
15d x
ld
2h
= 2d
= 13d
- - - - - - . 2d x
- - - - - - . 13d x
16d
256d
Dh
7h
=
7d
------.
7d x 4,096d
=
=
=
15d
32d
3,328d
= 28,672d
32,047 decimal total
Figure F-l. Converting a hexadecimal number to decimal.
hexadecimal value of the first digit's relative position. That is, if the first digit
is in the thousands position, divide by 4,096 (hexadecimal equivalent of
1,000 decimal). The result is the first hexadecimal digit. Then the remainder
is divided by the hexadecimal value of the next digit's relative position (for
example, divide the hundreds digit by 256 because 256 is the hexadecimal
equivalent of 100 decimal). Figure F-2 shows how the decimal number de
rived in the previous example is converted back to hexadecimal.
32.047 decimal - - - - - - - - - - - - - - . 7
32.047/4,096 = 7
r-------~)
( remainder = 3,375 )
(
3,3751256
(
remainder
(
47/16
(
remainder
(
15/1
= 13
= 47
=2
= 15
7d
= 7h
"""')-----. 13d
= Dh
F hexadecimal
)
2d
= 2h
- - - - - - - - - - - . 15d
= Fh
)
= 15
D 2
)
Figure F-2. Converting a decimal number to hexadecimal.
605
Index
A
Absolute disk read interrupt, 520-521
Absolute disk write interrupt, 521
Action bars, DOSSHELL, 128-130
Add Program option, DOSSHELL, 145
Address of file handle alias table in
psp,230-231
Address space, CPU, 243
Addresses, memory, 224, 325-326,
591-592
AH register
with FCBs, 221
with function dispatcher, 5lO, 522
AL register, 271, 522
Allocate memory function, 238, 555
Allocation of expanded memory, 248,
250,253-254
Allocation strategy, function for,
562-563
Allocation table for specific drive
function, 532
Allocation table information function,
532
Alter Page Map and Call EMM function,
265
Alter Page Map and Jump EMM
function, 264-265
ANSI.SYS file
for cursor control, 180-183
for display screen control, 183-185,
190-195
ANSI.SYS file-cont
for keyboard control and
reassignment, 185, 187-190
APPEND (DOS command), 70-71, 126,
370-375, 522
APPEND (EDLIN command), 173
APPEND (environment variable),
97-98
Appending of redirected output, 115
AQA EEMS, 247-249
Archival files
attribute for, 206, 376-377
and BACKUP command, 40, 378
copying of, 112, 505
and RESTORE command, 482-484
Arrange option, DOSSHELL File
System," 140
IASC configuration parameter,
DOSSHELL, 152
ASCII, cross-reference table for,
596-603
ASSEMBLE (DEBUG command),
259-260,321,342-343
Assembly languages
and LINK, 353-362
mnemonics for, 333-334
programming with, 589-593
programs using, 207-208, 277-296
unassembling of, 334-337
ASSIGN (DOS command), 375-376
and DEL command, 4lO
and FASTOPEN command, 430
607
MS-DOS Bible
Assignment statements
for CONFIG.SYS file, 100
for system parameters, 96
AST Research/QuadramlAshton-Tate
EEMS, 247-249
Asterisks (*) for EDLIN, 156-157, 163
See also Wildcard characters
Asynchronous communications ports
DEBUG commands for, 350-351
device names for, 114,298
protocol setting for, 460-461
At sign character (@)
in batch files, 83, 152
with DOSSHELL programs, 150
with EDLIN, 167
with LINK command, 358
ATTRIB (DOS command) and
attributes, 376-378
device, 301-302
on directory, 206, 215
display screen, 183-184
with DOSSHELL, 137-138
in FCB, 221
functions for, 547-548
modification of, 207-208
and video services, 283-284
and XCOPY command, 112
AUTOEXEC.400 file, 46-47
AUTOEXEC.BAT file, 110-112,
190-195,581
and COMMAND.COM, 227
SELECT settings for, 39, 46-47
AUX device name, 114, 298
Auxiliary carry flag, 333
Auxiliary consoles and CTTY
command, 406-407
Auxiliary devices, functions for, 525
AX register, 591
B
IB configuration parameter,
DOSSHELL, 152-153
Background color and GRAPHICS
command, 443
Backslash \ in path specifiers, 61, 367
608
BACKUP (DOS command) and backing
up,378-383
and APPEND command, 375
with batch files, 75-76
of directories, 380-381
for disk partitions, 40-41
with DOSSHELL, 144
with EDLIN, 157, 173
and ERRORLEVEL variable, 383
and RESTORE command, 482-483
of systems diskette, 26-29
vs. XCOPY command, 506
BAK extension with EDLIN, 157, 173
Bank switching for expanded memory,
244-245
BAT extension, 70, 74
Batch files, 74
for AUTOEXEC.BAT, 110-112,
190-195
and CALL command, 89-91,147,
387
creation of, 75-76
and CTTY command, 407
DOSSHELL programs as, 143-145
DOSSHELL.BAT, 125, 151-154
and ECHO command, 81-84, 426
using environment variables, 91-93
examples of, 579-583
FOR command for, 87-88, 433-434
GOTO command for, 84-85, 440
IF commands for, 85-87, 444-445
parameters for, 76-78, 88-89
PAUSE command for, 77-78, 468
for reassignment commands, 190
REM command for, 80-81, 478
SHIFT command for, 88-89,
491-492
Battery powered clock cards, 23-24
Baud rate, setting of, 460-461
Binary files
conversion to, from EXE files,
427-428
copying of, 404
viewing of, with DOSSHELL, 139
BIOS
accessing of, 511
and adding devices, 299
Index
BIOS-cont
data area for, 454
disk interrupts for, 278, 280
parameter block table in, 308-311
video interrupts for, 278, 280,
283-284, 510-511
Bit-bucket, 114, 298, 303
Blank lines and ECHO command,
82-83
Block devices, 298-299, 534-535
Boards, expanded memory, 247
Boot records and formatting, 200-201,
435
Bootable disks, 21, 31, 38
Booting of MS-DOS, 21-26, 226-227
AUTOEXEC.BAT file for, 110-112
and device drivers, 303
and INIT device command, 308
BP register, 590
BPB (BIOS parameter block) table,
308-311
BREAK (DOS command), 384
BREAK (system parameter), 97-98,
101-103
Break address for device driver, 308
Break scan codes, 108, 496
Breakpoints with DEBUG, 339
BRIL-OFF.C sample program, 515
Buffered keyboard input function,
526-527
BUFFERS (system parameter) and
buffers, 103-104, 109,
385-387
with DOSSHELL, 152-154
flushing of, 313-314, 527
initialization of, 226
keyboard, 526-527
print, for PRINT command, 472
SELECT settings for, 45
BUILD BPB (device command),
310-311
Busy bit with device drivers, 305,
313-314
BX register, 591
for calling devices, 306
for current id, 277
with LOAD command, 345
BX register-cont
with WRITE command, 346
c
C program, BRIL-OFF.C, 515
CALL (batch file command), 89-91,
147,387
Call (machine instruction), 593
Cancel redirection function, 568-569
Capitalization rules, SELECT settings
for, 45-46
Carry flag, 333
Case sensitivity
of DEBUG commands, 321
of DOS commands, 367
of EDLIN commands, 158
of filenames, 52
of REPLACE strings, 171
CD (DOS command), 63, 126,
388-389
Central processing unit, 224, 243-244,
332
Chaining
by expanded memory, 250
and TSRs, 273-274
Change Colors program, DOSSHELL,
141-142
Change current directory function,
542
Change file's attribute function,
547-548
Changeable media, function for, 551
Character devices, 298-299
Character output interrupt, 574
Character sets, SELECT settings for, 46
Character strings. See Strings
CHCP (DOS command), 387-388, 588
CHOIR (DOS command), 63,126,
388-389
Check standard input status function,
527
Child programs, 235, 237-238
CHKDSK (DOS command), 390-394
Clearing of screen, 183, 394-395
Clocks
cards for, 23-24
609
MS-DOS Bible
Clocks-cont
permanent, 409
pop-up, program for, 277-296
and PRINT command, 472
Close file function, 528
Close file handle function, 544-545
CLR configuration parameter,
DOSSHELL, 153
CLS (DOS command), 394-395
Clusters
errors in, 392-394
and FAT, 209-213, 217-219
starting, in directory, 207, 216
Cmp (machine instruction), 592
ICO configuration parameter,
DOSSHELL, 153
Code pages and code page switching,
585-586
and CHCP command, 387-388
for CON device, 448
DISPLAY.SYS for, 415-416
functions for, 551, 569-570
and GRAFTABL command, 441-442
and MORE command, 462-464
PRINTER.SYS for, 416-417
See also COUNTRY (system
parameter) and countries
Colons (:)
for disk drives, 31
with line labels, 84, 440
in time, 23
ICOLOR configuration parameter,
DOSSHELL, 153
Color Graphics Adapter and
GRAFTABL command, 441
COLOR# parameter (GRAPHICS
command), 442-443
Colors, 141-142,458-460
Columns, sorting by, 117-118
COM extension
for executable files, 70
and relocatable items, 427
COM# device names, 114, 298
ICOM2 configuration parameter,
DOSSHELL, 153
COMMAND (DOS command),
395-397
610
COMMAND (DOS command)-cont
See also COMMAND. COM file
Command code for device drivers,
305
COMMAND.COM file, 201, 203
COMSPEC variable for, 98
environment in, 235-236
and formatting, 436-437
loading of, 226-227
SHELL statement for, 106
Command interpreter, 203, 227
Command line, 24-25, 124, 231
Command prompt, DOSSHELL, 130
Command sequences, 180
Commands, MS-DOS, 365-506
external, 117,227,366
internal, 365-366
redirection of, 114-115
See also specific commands
Commas (,)
with breakpoints, 339
with DEBUG parameters, 321
with EDLIN commands, 157, 164,
168,170-171, 175
with LINK prompt, 356
Comments, REM command for, 80-81,
478
Commit file function, 570
:common label in DOSSHELL.BAT file,
151-152
Communications protocols, 99
COMP (DOS command), 54, 398-400
COMPACT (GRAPHICS command
parameter), 443
COMPARE (DEBUG command) for
memory, 321, 347-348
Compare (machine instruction), 592
Comparisons
of diskettes, 143-144,422-424
of files, 54, 398-400
of memory, 321, 347-348
Compatibility of system files, 203-204
Compilation of programs, 353-362
COMSPEC environment variable,
97-98
CON device name, 86, 298
and KEYB command, 448
Index
CON device name-cont
for keyboard, 75
Concatenation of files, 400-403
CONFIG.400 file, 46-47
CONFIG.SYS file, 39, 100-110
BUFFERS setting in, 385-386
DEVICE setting in, 410-411
and environment, 236
FILES setting in, 431-432
and INSTALL command, 445-446
and installable device drivers, 299,
413
and IO.SYS file, 226
SELECT settings for, 45-47
SHELL setting in, 490-491
STACK setting in, 493
Configuration
AUTOEXEC.BAT file for, 110-112
automatic, 39-47
CONFIG.SYS file for. See
CONFIG.SYS file
and DOSSHELL, 152-154
installable device drivers for,
99-100,299,413
system parameters for, 96-99
Console
and CTTY command, 406-407
device names for, 75, 114, 298
functions for, 526
Context switching with expanded
memory, 258-261
Control characters with EDLIN, 158
COPY (DOS command), 52-53,
400-405
vs. DISKCOPY command, 425
wildcard characters With, 54-55
vs. XCOPY command, 505
COpy (EDLIN command), 158,
175-176
COpy CON: for creation of
CONFIG.SYS file, 101
Copying
with devices, 405
of diskettes, 26-29, 143, 424-426
of files, 52-54,75-76,112,137,
400-405,503-506
Count of lines with FIND command,
119,433
Counter, INDOS flag, 275
COUNTRY (system parameter) and
countries, 104, 405-406
codes for, 406, 466
function for, 539-541
and NLSFUNC command, 466
SELECT settings for, 45-46,
486-488
See also Code pages and code page
switching
CPU (central processing unit), 224,
243-244,332
Create file function, 204,542-543,531
Create new file function, 564-565
Create new psp function, 534
Create subdirectory function, 541
Create temporary file function, 564
Critical errors
exit for, in psp, 229
functions for, 276, 577
interrupts for, 227, 276, 519-520
and TSRs, 276
Cross-linking of files, 393
CS (code segment) register, 224,
333-334, 590
with ASSEMBLE command, 343
and breakpoints, 339
with GO command, 339-340
and header information, 235
with TRACE command, 341
with UNASSEMBLE command, 336
Ctrl-Alt
with KEYB command, 449
for rebooting, 26
Ctrl-Break
with. batch files, 74
with BREAK command, 102-103,
384
for busy Signals, 461
with EDIT command, 165
exit for, in psp, 229
function for, 538
interrupt for, 227, 519
with LIST command, 161
with PAUSE command, 468
611
MS-DOS Bible
Ctrl-Break-cont
program to capture, 515
Ctrl-C
to abort formatting, 30
and BREAK command, 384
with PAUSE command, 78
program to capture, 515
Ctrl-H for blank lines, 83
Ctrl-NumLock with scrolling, 161, 501
Ctrl-PrtSc
with BACKUP command, 380
with LIST command, 164
Ctrl-V for control characters, 158
Ctrl-Z
for end-of-file marker, 75, 101, 157
with REPLACE command, 171
with SEARCH command, 170-171
CTTY (DOS command), 406-407
Currency symbols, SELECT settings
for, 45-46
Current block number in FCB, 220
Current date, 22, 408-409
Current default disk drive, 30
Current directory, 62, 70
and APPEND command, 374, 542
changing of, 63, 388-389
DOSSHELL,132
representation of, 66, 421
retrieval of, 555
with system prompt, 473-474
Current disk drive, 132,532
Current line, EDLIN, 158
and PAGE command, 177
period for, 165
and text insertion, 161
Current relative record number in
FCB, 220-221
Current time, 23, 498-499
Cursor, 22
and ANSI.SYS commands, 180-183
and CLS command, 394
with system prompt, 24
video services for, 283
ex register, 591
with LOAD command, 345
with WRITE command, 346
Cylinders, hard disk, 31, 200
612
D
Data area in request header, 305
Databits, port, 460-461
Date
backing up files by, 382
batch file sort by, 581-582
clock cards for, 23-24
with COMMAND.COM, 227
copying files by, 505
with COUNTRY command, 405
default value for, 25
in FCB, 220
with RESTORE command, 484
retrieval of, 536
SELECT settings for, 45-46
setting of, 22-23, 144, 408-409,
536-537
sorting files by, 138
with system prompt, 474
DATE (DOS command), 408-409
Date stamps, 22, 25
in directory, 58-59, 207, 216, 420
setting of, 561-562
updating of, with COPY, 403
Day, setting of, 22, 408
DEBUG (utility), 319, 324-331
commands for, 320-324, 331-332
for expanded memory, 242,
254-264
for FATs, 217-219
for file directories, 214-217
file recovery using, 410
Decimal numbers, conversion of,
604-605
Default disk drives, 30, 474
Default values
for date and time, 25
with DOSSHELL programs, 150
for system parameters, 96
DEL (DOS command), 68, 409-410
Del key with EDLIN, 165-167
Delays, typematic, 464-465
DELETE (EDLIN command), 158,
167-169
Delete directory entry function, 546
Delete file function, 529-530
Index
Deletion
of directories, 68,137,485,
541-542, 546
of files, 68,137,409-410,485,
529-530
of hard disk partitions, 37
Designator letters, disk drive, 30, 52,
299,451
with DOSSHELL programs, 150
for hard disk partitions, 32, 35-36
LASTDRIVE system parameter for,
106
DESQView, memory mapping by, 248
DEVICE (statement), 100, 410-419
Device attribute field, 301
DEVICE CLOSE (device command),
314
Device drivers, 99-100, 179-180,298
commands for, 308-312
with DEVICE statement, 100,
410-419
with DRIVER.SYS, 413-415
expanded memory, 417-419
functions of, 303-308
and IO.SYS file, 201
memory for, 454-455
with MODE command, 456-465
service function for, 315
structure of, 299-303
DEVICE OPEN (device command), 314
Devices, 297
copying of, 405
headers for, 300-303, 308-309
names for, 114, 298, 302-303
See also Device drivers
DI (destination index) register, 591
DIR (DOS command), 26-27, 50, 59,
419-422
<DIR> notation, 59,63
Direct console I/O function, 526
Direction flag, 333
Directories, 50-51
backing up of, 380-381
bad, and data recovery, 475-477
and CHKDSK command, 390-394
current. See Current directory
deletion of, 68, 137,485, 546
Directories-cont
displaying of, 26-27, 50, 59,
419-422
with DOSSHELL, 131-132
in environment variable, 97
examination of, 204-217
and formatting, 30, 201-203, 435
in hierarchical file system, 58-71
parent, 64-65
restoration of, 483
in search paths, 126
searching through, 528-529,
560-561
and TREE command, 499
true name of, 500-501
See also PATH (DOS command) and
paths; Root directory;
Subdirectories
Disk drives, 20, 298
and ASSIGN command, 375-376
buffers for, 103-104,226,385-387,
527
changing of, 30-31
current, 532
default, 30, 220, 474
designators for, 30, 52, 220, 299,
451
door on, support for, 490
DRIVERSYS for, 413-415
interrupts for, 278, 520-521
logical, 32, 35, 413-415, 500-501,
552-554
physical, 413-414
resetting of, 527
source and target, 28-29, 52
and TSRs, 277
Disk operating system
directory for, 64
functions of, 2
program loader for, 227
See also MS-DOS
Disk reset function, 527
DISKCOMP (DOS command),
422-424
DISKCOPY (DOS command), 26-29,
424-425
and ASSIGN command, 376
613
MS-DOS Bible
DISKCOPY (DOS command)-cont
and]OIN command, 447
and SUBST command, 494-495
Diskettes, 20
addressing of, 413
backing up of, 381
bootable, 21, 31, 38
and CHKDSK command, 390-394
comparison of, 143-144,422-424
copying of, 26-29, 143, 424-426
file directory and FAT on, 204-213
file management for, 219-222
formatting of, 29-30, 200-204,
434-440
free space on, 539
functions for, 531-534, 549-551
recoveryof,477
status of, batch file to check, 582
structure of, 198-200
swapping of, 29, 310
system. See System diskettes
verification of writes to, 108, 502,
537,561
virtual, 411-413
volume labels for. See VOL (DOS
command) and volume labels
Display adapters and display screen
adjustments for, 458-460
ANSI.SYS commands for, 183-185,
190-195
and batch files, 81-84, 152,426
clearing of, 394-395
for code page switching, 587
device name for, 114, 298
display mode, 284
and DISPLAYSYS, 415-416, 587
and DOSSHELL, 128-130, 138-139,
153
graphics, printing of, 442-443
memory for, 226, 243
mode setting for, 458-460
MORE command for, 465
video services for, 278, 280,
283-284, 510-511
Display output function, 525
DISPLAYSYS, 415-416, 587
614
DMA registers for expanded memory,
265
DO with FOR command, 87-88,
433-434
Dollar signs ($)
in file extensions, 174
and meta-strings, 473-475
with system prompt, 474-475
DOS. See Disk operating system; MS
DOS
DOS communication area, memory
for, 454
IDOS configuration parameter,
DOSSHELL, 153
DOS extensions, memory for, 454-455
DOS search path and DOSSHELL,
125-126
DOS utilities, DOSSHELL, 142-144
DOSSHELL
color changing with, 141-142
command prompt for, 130
display for, 128-130, 138-139, 153
DOS utilities for, 142-144
DOSSHELL.BAT file for, 151-154
file system for, 131-141
program groups for, 127-128
programming of, 144-151
starting of, 124-127
DOSSHELL.BAT file, 125-127
modification of, 151-154
Drive letters. See Designation letters,
disk drive
Drive parameter table, functions for,
575, 577
Drive selection area, DOSSHELL, 131
DRIVER.SYS disk driver, 413-415
Drivers, device. See Device drivers
Drives. See Disk drives
DS (data segment) register, 224, 333,
590
and COMPARE command, 347
and disk read function, 271
with FCBs, 221
with file handles, 222
with FILL command, 350
and header information, 235
with MOVE command, 348
Index
Deallocate LINK switch, 359
Dummy device, name for, 114,298,
303,407
Dummy variables
with FOR command, 87-88,
433-434
and SHIFT command, 88-89,
491-492
DUMP (DEBUG command), 257-258,
321-322,325-329
Duplicate file handle function, 554
DX register, 591
and disk read function, 271
with FCBs, 221
with file handles, 222
and TSRs, 268
E
ECHO (batch file command), 81-84,
426
EDIT (EDLIN command), 158, 165-167
EDLIN text editor
commands with, 158-178
for CONFIG.SYS file, 102
for DOSSHELL.BAT file, 125
file creation with, 156
file modification with, 156-157
EGA parameter, DISPLAY.SYS, 416
EMM See Expanded Memory Manager
EMS (Expanded Memory
Specification), 245-246
Emulators and expanded memory, 247
END (EDLIN command), 157-158,
173-174
End-of-file markers, 75, 101, 219
and COMP command, 399
and COpy command, 404
with EDLIN, 157
Enhanced cursor keys, 180
Enhanced Graphics Adapter
and code page switching, 587
and DISPLAY.SYS, 416
Enhanced keyboard
disabling of, 496
SWITCHES statement for, 108
ENTER (DEBUG command), 322,
330-331
Enter key
for command line, 24
with SELECT, 44
Entry point, run file, 361
Environments, 235
address of, in psp, 230
placing strings into, 488-489
program to count bytes stored in,
511-515
and SHELL command, 490-491
size of, 107, 109,235-239,396
variables for, 91-93, 97-99, 111-112,
373
ENVSIZE.PAS sample program,
511-515
Equals sign
with GO command, 340
with IF command, 86
with SET command, 488
with system parameter assignment,
96-97
with system prompt, 474
with TRACE command, 341
ERASE (DOS command), 68, 409-410
Error and ERRORLEVEL codes
for BACKUP command, 383
for device drivers, 305
for FORMAT command, 440
for GRAFTABL command, 441-442
for IF command, 86-87, 444
for KEYB command, 449
for MS-DOS functions, 523-525
for REPLACE command, 481
for RESTORE command, 484
Errors and error messages
with CHOIR command, 65
with CHKDSK command, 392-394
classes of, 563
critical, 227, 229, 276, 519-520, 577
with date setting, 23
with disk changing, 31
with environment size, 235
extended, 563-564
handling routines for, 227
locus of, 564
615
MS-DOS Bible
Errors and error messages-cont
with time setting, 23
ES (extra segment) register, 224, 333,
590
for calling devices, 306
and header information, 235
Esc key with SELECT, 44
Escape character, 180
with ECHO command, 83
entering of, into files, 186-187
with keyboard reassignment, 187
with system prompt, 474
Escaping with DOSSHELL, 134
EXE extension. See Executable files
EXE2BIN (DOS command), 234,
427-428
EXEC function
and APPEND command, 372
loading of, 226-227
for program loading, 227
and psp, 227-228
Executable code, swapping of, 248
Executable files, 68, 70, 234-235, 355
and APPEND command, 372
conversion of, to binary files,
427-428
with DOSSHELL, 134-135
and WRITE command, 346
Execution, program
and BREAK command, 384
with DEBUG, 338-340
EXIST condition with IF commands,
85,444
Exit command for secondary
command processor, 395
/EXIT configuration parameter for
DOSSHELL, 153
Expanded memory, 109-110
allocation of, 248, 250, 253-254
for buffers, 386
DEBUG for, 242, 254-264
device drivers for, 417-419
enhancements to, 264-265
evolution of, 247-249
functions for, 249-254, 263-265
fundamentals of, 244-247
616
Expanded memory-cont
and microprocessor structure,
242-244
for RAM disk, 412
use of, 249-254
Expanded Memory Manager, 109-110,
245
checking for, 250-251
interrupt for, 249
Expanded Memory Specification,
245-246
Extended ASCII cross-reference table,
600-603
Extended error information, 563-564
Extended FCB, 221
Extended function keys, 180
Extended memory, 247, 412
Extended open/create function,
570-572
Extended partitions, 32, 35
Extensions, filename. See Filename
extensions
External DOS commands, 117, 227,
366
External files, 31
F
FASTOPEN (DOS command), 428-430
and INSTALL command, 105
and networks, 369
FAT. See File allocation table
FCB. See File control blocks
FCBS (system parameter), 45, 104-105,
430-431
FDISK (DOS command), 31-37,
41-42,431,494-495
File allocation table, 209-213
and CHKDSK command, 390-394
errors in, 392-394
examination of, 217-219
and formatting, 201-203, 435
function for, 532
File control blocks, 104-105
error code for, 524
with file sharing, 430-431
and IO.SYS file, 226
Index
File control blocks-cant
in psp, 231
structure of, 219-222
File handles, 105, 219, 222
alias table in psp for, 230-231
closing of, 544-545
count of, 570
duplication of, 554
local and remote, 531
memory for, 431-432
and TSRs, 277
File size
in directories, 58-59, 207, 216-217,
420
in FeB, 220
retrieval of, 533-534
File System, DOSSHELL, 131-141
Filename extensions, 50-52
BAK, 157, 173
in directories, 58-59, 206, 215, 420
with DOSSHELL, 135-136
with END (EDLIN) command,
173-174
for executable files, 70, 355
in FeB, 220
MAP, 355
OBJ,355
and periods, 422
sorting by, 138
for subdirectories, 62
wildcard characters for, 54-55
Filenames, 50-52
in directories, 58-59, 205-206, 215,
420
in FeB, 220
parsing of, 535-536
renaming of, 478-479, 531-532,
561
sorting of, with DOSSHELL, 138
See also Wildcard characters
Files, 49
addition of, 479-481
appending to, with EDLIN, 173
archival. See Archival files
attributes for. See ATTRIB (DOS
command) and attributes
backing up of, 157,173,378-383
Files-cont
binary, 139,404,427-428
checking of, 390-394
closing of, 528
comparison of, 54, 398-400
concatenation of, 400-403
copying of, 52-54, 75-76,112,137,
400-405,503-506
country information in, 466
creation of, 156, 204, 531, 542-543,
564-565, 570-572
cross-linked, 393
date stored on. See Date stamps
deletion of, 68, 137,409-410,485,
529-530
directories for. See Directories
displaying of, 114-115, 501
DOSSHELL, 131-141, 149,469-472
error codes for, 523-524
escape character in, 186-187
executable, 68, 70, 234-235, 355,
427-429
extensions for. See Filename
extensions
and FASTOPEN command, 428-430
fragmented, 391, 425
and IF EXIST, 85
installable device drivers as, 299
andJOIN command, 446-447
library, 355-356, 362
loading of, with DEBUG, 343-346
locking of, 489-490, 524, 565
log, 383
management of, 2, 58-61, 219-222
modification of, 156-157
modified, 382, 483-484
moving of, 136
names for. See Filenames
nonexecutable, 370
opening of, 222, 527-528,
543-544, 570-572
printing of, 135, 469-472
recovery of, 410, 475-477
renaming of, 137,478-479,
531-532, 561
replacement of, 479-481
restoration of, 482-484
617
MS-DOS Bible
Files-cont
run, 354, 361
saving of, 173-174,346-347
searching through, 438
sharing of. See SHARE (DOS
command) and file sharing
specifications for, 52
for subdirectories, 64-66
system. See System files
time stored on. See Time stamps
type of, 50
viewing of, 138-139
wildcards for. See Wildcard
characters
writing to, with EDLIN, 172-173
FILES (system parameter), 96, 101, 105,
431-432
SELECT settings for, 45
FILL (DEBUG command), 256-257,
322,349-350
Filters
FIND, 118-119,433
MORE, 119-120,465
SORT, 116-118,492
FIND (DOS command), 118-119,433
Find first matching file function,
372-373, 560-561
Find next matching file function,
372-373,561
Fixed disks. See Hard disks and hard
disk drives
Fixup value with EXE2BIN command,
428
Flags
ANSI.SYS, 180
register for, 332-334, 591, 593
Floppy diskettes. See Diskettes
Flushing of device buffer, 313-314, 527
Fonts and code pages, 416, 586
FOR (DOS command), 87-88,
433-434
Force duplicate handle function, 553
FORMAT (DOS command) and
formatting, 29-30, 200-204,
434-440
and BACKUP command, 383
with DOSSHELL, 144
618
FORMAT (DOS command) and
formatting-cont
for hard disks, 37-39, 42-43
and]OIN command, 447
of logical drive track, 316
and networks, 369
and SUBST command, 494-495
and system files, 497-498
FORTRAN object modules, 359
Fragmentation of files, 391, 425
Free allocated memory function, 238,
555-556
French keyboard, 448-449
Function dispatcher, 221, 229, 231, 510
Function keys
and ANSI.SYS, 180
for Ctrl-Z, 171
with EDLIN, 165-167
reassignment of, 188-189
Functions, expanded memory,
249-254
See also MS-DOS functions
G
General-purpose registers, 591
Generate drive parameter table
function, 577
GENERIC 110 CONTROL (device
command),315-316
Get address to INDOS flag function,
275, 575
Get current directory function, 555
Get current process id function,
232-234,277,576
Get date function, 536
Get disk free space function, 539
Get DOS version function, 537-538
Get DTA function, 537
Get extended error information
function, 563-564
Get global code page function, 569
Get interrupt vector function, 271, 539
Get Interrupt Vector Method for EMM
detection, 251-252
Get lead byte table function, 569
Index
GET LOGICAL DEVICE (device
command), 316
Get machine name function, 565-566
Get pointer to drive parameter table
function, 575
Get printer setup function, 566-567
Get program segment prefix function,
231-232,277,569
Get redirection list function, 567
Get/set allocation strategy function,
562-563
Get/set file's time and date stamp
function, 561-562
Get/set switchar function, 493,
575-576
Get time function, 537
Get verify state function, 561
Global characters. See Wildcard
characters
GO (DEBUG command), 322, 338-340
GOTO (batch file command), 84-85,
440
GRAFTABL (DOS command), 441-442
Graphically based interfaces. See
DOSSHELL
GRAPHICS (DOS command), 442-443
GRAPHICS (GRAPHICS command
parameter), 442
Graphics mode, DOSSHELL, 128-129
Greater than sign (> )
as DEBUG prompt, 321
for redirection, 114-115
as system prompt, 24, 474
Groups in list files, 360-361
H
Handles for expanded memory, 248,
253,263
See also File handles
Hard disks and hard disk drives, 20
backing up of, 144,379-381
configuration of, 431
designators for, 52-53
and FASTOPEN command, 429-430
formatting of, 37-39, 42-43
installation of MS-DOS onto, 31-47
Hard disks and hard disk drives-cont
partitions for, 31-42, 213
physical drive numbers for, 413-414
restoring of, with DOSSHELL, 144
structure of, 200
and TREE command, 67
Hardware code pages, 416, 587
Hardware independence, 203
Hardware interrupts
keyboard, 280-281
STACKS statement for, 107-108,493
timer, 278, 281-282
Head, command line, 24
Headers
device, 300-306, 308-309
of executable files, 235, 427
FCB,221
Help
in DOSSHELL programs, 147
for SELECT, 44
HEX files and WRITE command, 346
HEXADECIMAL (DEBUG command),
322, 351
Hexadecimal numbers, conversion of,
604-605
Hidden file attribute, 206-208
HIDE.COM program, 207-208
Hierarchical file systems, 58-71
High (LINK switch), 358-359
High-level programming languages and
interrupts, 511
Horizontal scrolling, 134
Hot keys, Main Program Group, 130
Hour, setting of, 23, 498
Hwcp parameter
with DISPLAY.SYS, 416
with PRINTER.SYS, 417
Hyphens (-)
with ATTRIB command, 376-377
in date, 22
as DEBUG prompt, 321
with EDLIN, 158
IBMBIO.COM file, 201
IBMDOS.COM file, 20l
619
MS-DOS Bible
IF (DOS commands), 85-87, 444-445
IN with FOR command, 87-88,
433-434
Index registers, 591
INDOS flag
function for, 275,575
and TSRs, 275
Information jump table, 11-15
INIT (device command), 308-309
Initialization module in IO.SYS,
226-229
INPUT (DEBUG command), 322,
350-351
INPUT (device command), 312
INPUT FLUSH (device command), 313
INPUT STATUS (device command), 313
Ins key with EDLIN, 165-166
INSERT (EDLIN command), 159-162
INSTALL statement, 105-106, 445-446
SELECT settings for, 45
Installable device drivers. See Device
drivers
Installation
automatic, 39-47
on hard disks, 31-39
Instructions
DOSSHELL,149
machine,224,233,592-593
Internal commands, 365-366
Internal registers, 242-243
Interrupts, 509, 519
for device drivers, 302, 306
flag for, 333
handlers for, 270-271, 274-275,
509-510
hardware, 107-108,278,280-282,
493
and high-level programming
languages, 511
machine instructions for, 593
undocumented, 574
vector function for, 534, 539
vector table for, 270-274, 454
See also specific interrupts
1/0,2
functions for, 530-531, 548-554
IBMBIO.COM file, 201
620
I/O-cont
redirection of, 113-121
See also specific I/O devices
IO.SYS file, 201, 203
and formatting, 201, 436
loading of, into memory, 226
IOCTL (device command), 311-312,
314, 548-554
IP (instruction pointer) register, 224,
235, 333-334, 591
J
Jmp (machine instruction), 592-593
JOIN (DOS command), 446-447
and DEL command, 410
and FASTOPEN command, 430
and networks, 369
K
Kernel, memory for, 454
KEYB (DOS command), 105, 447-450
Keyboards
codes for, 448, 486-488
and CTTY command, 407
device name for, 114
enhanced, 108
file creation using, 75
functions for, 526-527
hardware interrupt for, 278,
280-281
non-U.S., 447-450
reassignment of, 185, 187-190
typematic rates for, 464-465
KEYBOARD.SYS driver, 448-449
KEYBxx (DOS command), 447-450
L
LABEL (DOS command), 369, 450-451
Labels, with GOTO command, 84, 440
Language-specific characters, 441
Language-specific system disks,
486-488
LASTDRIVE (system parameter), 106,
109,451
Index
LCD parameter
with DISPLAYSYS, 416
with GRAPHICS command, 443
Left bracket [ with keyboard
reassignment, 187
Less than sign ( <)
for redirection, 115-116
with system prompt, 474
Letter designators. See Designator
letters, disk drive
Levels in file systems, 58-61
/LF configuration parameter,
DOSSHELL, 153
LIB extension, 356
Library files, 355-356, 362
LIM EMS, 247-249
Line labels with GOTO command, 84
Line numbers with FIND command,
119
Linenumber LINK switch, 359
LINK utility, 353-362
Linked lists and disk files, 429
Linking and executable files, 234-235
Liquid Crystal Display Adapter
and code switching, 587
and DISPLAYSYS, 416
and GRAPHICS command, 443
LIST (EDLIN command), 159, 161-164
List file with LINK, 355, 359-361
LOAD (DEBUG command), 322,
343-346
Load and execute program function,
227,556-559,576
Lock/Unlock file access function,
489-490,565
Locks, file, 489-490, 524
Log files with BACKUP command, 383
Logical disk drives, 32, 35, 413-415
assignment of, 553-554
retrieval of, 552-553
true name of, 500-501
Logical memory, 244-245
Logical pages, 253-256
Logical record size in FCB, 220
Look-ahead sectors, 103-104,386-387
Loops with DEBUG, 351-352
Lost chains, 393-394
Lotus/Intel/Microsoft EMS, 247-249
LPT# parameter, 114, 298
with MODE command, 457-458
with PRINTERSYS, 417
M
Machine instructions, 224, 333,
592-593
Machine name, function for, 565-566
Main Program Group, DOSSHELL,
127-130, 153-154
/MAINT configuration parameter for
DOSSHELL, 153
Make scan codes, 108,496
Map (LINK switch), 360-361
MAP extension, 355
Mappable conventional memory, 248
Mapping of expanded memory, 250,
253-256,258-261,265
Marking of expanded memory, 248
MCB. See Memory control blocks
MD (DOS command), 61-64, 455-456
MEDIA CHECK (device command),
309-310
MEM (DOS command), 452-455
Memory
accessing of, 224-225, 243-244,
325-326, 591-592
allocation of, 238-240, 248, 250,
253-254,268-270,555-556
and assembly language
programming, 590
bank switching for, 244-245
booting of, 226-227
and CHKDSK command, 390
comparing blocks of, 321, 347-348
disk buffers in, 226, 385-387
displaying information for, 452-455
displaying of, with DEBUG,
325-329
for DOS, SELECT allocation of, 45
dumps of, 215
and environment, 235-238
error codes for, 523
and executable files, 234-235
expanded. See Expanded memory
621
MS-DOS Bible
Memory-cont
extended, 247, 412
for file handles, 431-432
filling of, 349-350
moving data in, 349
and program segment prefix,
227-234
and RAM disks, 411-413
searching of, 348
swapping of, with DOSSHELL, 154
top of, in psp, 229
and TSRs, 268-270
for video display, 226, 243
Memory control blocks, 238-239
error codes for, 523
function for, 239
Memory resident utilities, 445
IMENU configuration parameter,
DOSSHELL, 153
Message display
and ECHO command, 81-84, 426
and PAUSE command, 78-79, 468
and REM command, 80-81, 478
Meta-strings, 473-475
IMEU: configuration parameter,
DOSSHELL, 153-154
Microprocessors and expanded
memory, 243-244
Minus sign (- )
with ATTRIB command, 376-377
in dates, 22
as DEBUG prompt, 321
with EDLIN, 158
Minutes, setting of, 23, 498
MKDIR (DOS command), 61-64,
455-456
Mnemonics, assembly language,
333-334
MODE (DOS command) and modes,
456-465
and code pages, 587-588
display screen, 184-185
SELECT settings for, 46
Modems and CTTY command, 406
Modified files
backing up of, 382
restoring of, 483-484
622
Modify allocated memory blocks
function, 238, 556
Modular programming and CALL
command, 89-91
Month, setting of, 22, 408
MORE (DOS command), 76-77,
119-120,465
IMOS configuration parameter,
DOSSHELL, 154
Mouse with DOSSHELL, 126-127,
153-154
Mov (machine instruction), 592
MOVE (DEBUG command), 322, 349
MOVE (EDLIN command), 159,
174-175
Move file pointer function, 546-547
Moving
of blocks of memory, 265
of files, with DOSSHELL, 136
MS-DOS, 2-3, 19
booting of, 21-26, 226-227
formatting disks for, 29-30
function request interrupt for, 221,
519
scheduler interrupt for, 276, 278,
282,574
SELECT program with, 43-44
systems diskette, backing up of,
26-29
MS-DOS functions, 420-468
for EMM detection, 250-251
stacks for, 274-275
undocumented, 273, 523, 574-577
See also specific junctions
MSDOS.SYS file, 203
and formatting, 201, 436
loading of, into memory, 226
IMUL configuration parameter,
DOSSHELL, 154
Multilingual code page, 586
Multiplex interrupt, 521-522
Multitasking operating systems, 242
N
NAME (DEBUG command), 322,
343-346
Index
Names, file. See Filenames
Networks
error codes for, 524-525
and FCBS statement, 104-105
and LASTDRIVE system parameter,
106
using MS-DOS on, 369
testing for, 551
Next header pointer, 300-301
NLSFUNC (DOS command)
and CHCp, 387, 466
and INSTALL command, 105
No (LINK switch), 362
NONDESTRUCTIVE READ (device
command), 312-313
Nonexecutable files and APPEND
command, 370
Nonhierarchical file management
systems, 58
NUL device, 114,298,303,407
Number sign (N)
with DOSSHELL programs, 150
with EDLIN, 158, 162
o
OB] extension, 355
Object code and modules, 354
Offset address, 243, 325-326, 591-592
Open file functions, 222, 527-528,
543-544,570-572
Open Handle Method for EMM
detection, 250
Operating systems, 2, 269
command-driven, 365
on hard disks, 31, 36-37
See also Disk operating system; MS
DOS
Options
command,24
DOSSHELL,138-140
OS/2 operating system and expanded
memory, 244
OUTPUT (DEBUG command), 323,
350
OUTPUT (device command), 313
OUTPUT FLUSH (device command),
314
OUTPUT STATUS (device command),
313-314
OUTPUT UNTIL BUSY (device
command), 315
OUTPUT WITH VERIFY (device
command),313
Overflow flag, 333
p
PAGE (EDLIN command), 159, 177
Pages and page frames, 244-245
allocation of, 253
deallocation of, 263-265
for expanded memory, 248
mapping logical pages to, 253-256
segment address for, 252-253
starting address for, 249-250
Paragraphs, 238, 268, 491
Parameters
with batch files, 76-78, 88-89
command, 367
with DEBUG, 321
for DOSSHELL, 149-150, 152-154
with GRAPHICS command,
442-443
and SHIFT command, 88-89,
491-492
system,96-99,102-108
Parent directories, 64-65
Parent programs, 229-230, 235
Parity
flag for, 333
with ports, 460-461
Parse filename function, 535-536
Partitions on hard disk, 31-42, 213
Pascal object modules and LINK, 359
Pascal programs
ENVSIZE.PAS,511-515
Pspeep, 232-234
Passwords with DOSSHELL programs,
146
PATH (DOS command) and paths,
68-71, 466-468
623
MS-DOS Bible
PATH (DOS command) and paths
cont
and APPEND command, 126,370,
373-374
in AUTOEXEC.BAT file, 111
displaying of, 389
for DOSSHELL, 126, 150
in prompt, 98
SELECT settings for, 46
specifiers for, 61, 493-495
PATH (environment variable), 97-98
PAUSE (batch file command), 78-79,
468
Pause (LINK switch), 361
PC-DOS, 3, 201
PCIBMDRV,MOS file, 126
PCMSDRV,MOS file, 126
PCMSPDRV,MOS file, 126
Percentage signs (%)
in batch filenames, 77
with dummy variables, 87-88,
433-434
with replaceable parameters, 76-78
Periods (.)
for current directory, 66, 421
for current EDLIN line, 165
in dates, 22
with ECHO command, 83
and extensions, 422
in filenames, 51
for parent directories, 65
in time, 23
Peripheral devices. See Device drivers;
Devices
Physical addresses, 243
Physical drives, 413-415
Physical pages and memory, 245
PID. See Process identifier
Pipes, 120-121, 492
Platters, hard disk, 31,200
Plus sign (+)
with ATTRIB command, 376-377
with EDLIN, 158
for file concatenation, 402
with LINK command, 355, 357
with SORT command, 117-118
Pointer registers, 590
624
Pointer to mcb function, 239
Pop (machine instruction), 593
Pop-up boxes, DOSSHELL, 133-135,
147-148
POPCLOCK.ASM, TSR example,
277-296
Ports. See Asynchronous
communications ports
Pound sign (#)
with DOSSHELL, 150
with EDLIN, 158, 162
Prepared code pages, 462-463
Primary partitions, 32, 36-37
PRINT (DOS command), 469-472
and ASSIGN command, 376
and multiplex interrupt, 521
SELECT settings for, 46
Print string function, 526
Printer output function, 525-526
PRINTER.SYS for code page
switching, 416-417, 587
Printers
and Ctrl-PrtSc, 164, 380
device names for, 114, 298
and DOSSHELL, 135
and GRAPHICS command, 442-443
mode setting for, 457-458
output function for, 525-526
redirection of, 461-462
SELECT settings for, 46
setup for, 566-567
PRN device name, 114-115,298,417
Procedures, assembly language, 593
PROCEED (DEBUG command),
262-263,323,352
Process identifier, 231
in mcb, 238
retrieval of, 232-234, 576
and TSRs, 277
Processes, 231
termination function for, 268-269,
559-560
Program groups, DOSSHELL, 127-128
Program segment prefix, 227-234, 332
functions for, 231-232, 277, 534,
569
Index
Program segments and executable
files, 235
Program Start Commands with
DOSSHELL, 127, 146-150
Program terminate bytes of psp, 228
Program terminate function, 525
Program termination address interrupt,
519
Programming, with DOSSHELL,
144-151
Programs
and BREAK command, 384
compilation of, 353-362
with DOSSHELL, 144-151
execution of, with DEBUG,
338-340
loading of, function for, 227,
556-559, 576
parent, 229-230, 235
/PROMPT configuration parameter for
DOSSHELL, 154
PROMPT (DOS command and
environment variable), 97-98,
473-475
for entering escape character,
186-187
Prompts
and ANSI.SYS file, 191-192
in AUTOEXEC.BAT file, 111
DEBUG,320-321
DOSSHELL, 130, 149
EDLIN, 156
escape variable, 186-187
LINK,355
system, 24, 227, 473-475
Proprinter Model 4201 and code page
switching, 417-418, 587
Protocols, communications, 99,
460-461
Psp (program segment prefix),
227-234,332
functions for, 231-232, 277,534,
569
PsPeep program for DOS function
51H, 232-234
Public symbols, 360-361
Push (machine instruction), 593
Q
Question mark (?)
with GRAFTABL command, 441
with REPLACE command, 171-172
with SEARCH command, 170
See also Wildcard characters
Queues, printer, 469-472, 524
Quietwriter III Model 5202, 417-418,
587
QUIT (DEBUG command), 323-324
QUIT (EDLIN command), 157, 159,
174
Quotation marks (") with strings, 330,
348-350, 433
R
RAM disks, 101, 106, 411-413
Random block read function, 534-535
Random block write function,
534-535
Random read function, 532-533
Random record number in FeB, 221
Random write function, 533
RD (DOS command), 68, 485
Read-ahead buffers, 103-104,386-387
Read from file or device function, 545
Read input with echo function, 525
Read keyboard function, 526
Read-only attribute, 376-377
and DEL command, 410
on directory, 206
and REPLACE command, 481
Reassignment, keyboard, 185, 187-190
Rebooting of DOS, 26
Recommended action with errors,
563-564
RECOVER (DOS command), 369,
475-477
Redirect device function, 567-568
Redirection, 114-121
function for, 567-568
with MODE command, 461-462
Reentry with TSRs, 273-276
Registers, CPU
625
MS-DOS Bible
Registers-cont
and REGISTER (DEBUG command),
262,323,332-334
segment, 224, 235, 329, 332-333,
590
See also specific registers
Relative addresses, segment, 359
Relative sectors, 214
Release memory function, 238, 268
Re10catable modules, 354, 427-428
REM (DOS command), 80-81, 478
REMOVABLE MEDIA (device
command), 314-315
Remove subdirectory function,
541-542
RENAME (DOS command), 478-479
with DOSSHELL, 137
functions for, 531-532
REPLACE (DOS command), 479-481
REPLACE (EDLIN command), 171-172
Replaceable variables with batch files,
76-78,84-85
Request header for device drivers,
304-306,308-309
Resident portion of COMMAND.COM,
227
RESTORE (DOS command), 43,
482-484
and APPEND command, 375
with DOSSHELL, 144
Ret (machine instruction), 593
Retrieve return code of child process
function, 560
Retrieve/set country dependent
information function, 539-541
Return pointer to "invars" function,
239, 576
Rf (DEBUG command), 334
RMDIR (DOS command), 68, 485
ROM communication area, memory
for, 454
Root directory, 58-60
for AUTOEXEC.BAT file, 110
and BACKUP command, 379
for CONFIG.SYS file, 102
errors with,394
and PATH command, 70
626
Root directory-cont
system files for, 64
Rows, display, and ANSI.SYS, 180
Run files, 354, 361
5
Scan codes, 108, 496
Screen, display. See Display adapters
and display screen
Scrolling
and DIR command, 421
with LIST command, 161
with TRACE command, 341
SEARCH (DEBUG command), 323,
348
SEARCH (EDLIN command), 169-171
Search for first match function,
372-373,528-529
Search for next match function, 529
Secondary command processor, 91,
395-397
Seconds, setting of, 23, 498
Sectors, disk, 29-30, 198-199,213
bad, recovery of files with, 475-477
hard disk, 200
and formatting, 435, 438
loading of, 345-346
relative, 214
writing to, 347
Segment addresses, 231-232, 243,
591-592
with indirection, 309
for page frames, 252-253
Segment registers, 224, 235, 329,
332-333, 590
Segments, memory, 224, 325-326
with machine instructions, 593
run file, 359
Select disk function, 527
SELECT (DOS command), 486-488
SELECT program, 39-40, 43-47
for DOSSHELL, 125, 127
for DOSSHELL.BAT file, 151
for SHELL statement, 107
Semicolons (;)
with APPEND command, 371
Index
Semicolons (;)-cont
with EDLIN commands, 165
with environment variables, 97
in keyboard reassignment, 187
with LINK command, 356
with PATH command, 68, 126, 467
Sequential read function, 530
Sequential write function, 530-531
Serial numbers, disk, 43
Serial port and MODE command,
460-461
SET (DOS command), 98-99, 488-489
in AUTOEXEC.BAT file, 111-112
Set current process id function, 232,
277,576
Set date function, 536-537
Set disk transfer address function, 532
Set global code page function, 570
Set handle count function, 570
Set interrupt vector function, 271, 534
SET LOGICAL DEVICE (device
command), 316-317
Set printer setup function, 566
Set random record field function, 534
Setlreset verify switch function, 537
Set time function, 537
SHARE (DOS command) and file
sharing, 104-105,430-431,
489-490
error codes for, 524
function for, 552
and INSTALL command, 105
SHELL (system parameter), 106-107,
109, 490-491
and environments, 236
and interpreters, 227
See also DOSSHELL
SHIFT (batch file command), 88-89,
491-492
Shift-PrtSc for graphics screen
printing, 442
Show Information option, DOSSHELL,
140-141
SI (source index) register, 591
Sides, diskette, 198
formatting of, 438-439
Sign flag, 333
Single-stepping with DEBUG, 340-342
Size
of environment, 107, 109,235-239,
396
of file handle alias table, 230
of files. See File size
of hard drive partitions, 33-35
sorting files by, 139
Slashes (I)
in date, 22
as switch character, 25, 358, 495
Slider boxes, DOSSHELL, 132
/SND configuration parameter for
DOSSHELL, 154
SORT (DOS command), 116-118,492,
581
Sorting order, SELECT settings for, 46
Sound with DOSSHELL, 154
Source diskettes, 28-29, 52
Source statements, relative addresses
of,359
SP (stack pointer) register, 224, 235,
590
Spaces
with breakpoints, 339
in command line, 24
with DEBUG parameters, 321
with ECHO command, 82
with EDLIN commands, 157,168,
171, 175
with LINK command, 355
Special characters in filenames, 51
Speed of execution
and assembly language
programming, 590
and disk buffers, 385
and RAM disks, 411-412
Square brackets [] as Program Start
Command, 146-148
SS (stack segment) register, 224, 235,
333,590
Stack (LINK switch), 361
STACKS (system parameter) and stack
pointer, 107-108,493, 590
and call instructions, 593
size of, and stack switch, 361
and TSRs, 274-275
627
MS-DOS Bible
Standard 1/0 devices, 114, 298, 527
Starting address for expanded memory,
249
Starting cluster on directory, 207, 216
Status of expanded memory, 255
Status word for device drivers, 305,
308-309, 551
Stopbits, setting of, 460-461
Strategy routine, 301, 306
Strings
with DEBUG, 330-331
in environments, 488-489
and FILL command, 349
and FIND command, 118-119,433
functions for, 549-551
with IF commands, 86, 444
in keyboard reassignment, 188
meta, 473-475
with REPLACE command, 171-172
with SEARCH (DEBUG command),
348-349
with SEARCH (EDLIN command),
169-171
Subdirectories, 59
and ATTRIB command, 377-378
attribute for, on directory, 206
backing up of, 380-381
and CHKDSK command, 390
copying of, 503-505
creation of, 61-63, 138, 455-456,
541
deletion of, 68,485,541-542
errors in, 394
and FASTOPEN command, 428-430
files for, 64-66
andJOIN command, 446-447
names and extensions for, 62
and REPLACE command, 480-481
restoration of, 483
Subgroups, DOSSHELL, 128
SUBST (DOS command), 375,
493-495
and DEL command, 410
and FASTOPEN command, 430
and networks, 369
ISWAP configuration parameter,
DOSSHELL, 154
628
Swapping, disk, 29
SWITCHAR (setting) and switch
characters, 495-496, 575-576
Switches, 25, 358, 368-369
SWITCHES (system parameter), 108
SWITCHES (DOS command), 496-497
SYS (DOS command), 497-498
System commands, 227
System diskettes
backing up of, 26-29
and external commands, 366
language specific, 486-488
System files, 31
attribute for, 206
for bootable disks, 22
directory for, 64
and formatting, 201-204, 436-437
on hard disks, 38
transferring of, 497-498
System parameters, 96-99, 102-108
System Program memory, 454
System prompt, 24, 227, 473-475
T
Tables and GRAFTABL command,
441-442
Tail, command line, 24-25, 231
Target diskette, 28-29, 52
Templates for EDLIN lines, 165
Terminate addresses, 227, 229
Terminate and stay resident programs,
267-270
and file handles, 277
functions for, 277, 538
guidelines for, 272-277
interrupt for, 232, 521
and interrupt vector tables, 270-272
POPCLOCK.ASM example, 277-296
Terminate process function, 268-269,
559-560
Termination of programs, 519, 525
Test pattern for display adapters, 459
ITEXT configuration parameter,
DOSSHELL, 154
Text editors. See EDLIN text editor
Index
Text files, viewing of, with
DOSSHELL, 139
Text mode, DOSSHELL, 128-129
THERMAL (GRAPHICS command
parameter),443
Time
backing up files by, 382
batch file to set, 581
and COMMAND.COM, 227
and COUNTRY command, 405
default values for, 25
formats for, 45
and RESTORE command, 484
setting of, 23-24, 144,498-499,
537
with system prompt, 474-475
TIME (DOS command), 498-499
Time stamps, 23, 25
on directory, 58-59, 207, 215-216,
420
setting of, 561-562
updating of, with COPY, 403
Timer interrupt, 278, 281-282
Titles for DOSSHELL programs, 145,
148
Top of memory in psp, 229
TRACE (DEBUG command), 323,
339-342
Tracks, disk, 198-199
and formatting, 438
hard disk, 31, 200
writing to, 316
ITRAN configuration parameter,
DOSSHELL, 154
TRANSFER (EDLIN command), 159,
178
Transient mode with DOSSHELL, 154
Transient portion of COMMAND.COM,
98, 227
TREE (DOS command), 67, 499
Tree-structured files, 60-61
TRUENAME (DOS command),
500-501
TSR. See Terminate and stay resident
programs
Turbo Pascal programs
ENVSIZE.PAS, 511-515
Turbo Pascal programs-cont
PsPeep, 232-234
Type
of file, 50
of storage media in FAT, 218
TYPE (DOS command), 114-115, 501
Typematic rates, 464-465
u
UNASSEMBLE (DEBUG command),
323,334-337
Underlined letters in DOSSHELL, 134
Undocumented functions, 273, 523,
573-577
UNHIDE.COM program, 207-208
Unit codes for device drivers,
304-305,308
Unitasking operating systems, 272-273
User-defined environment variables,
98-99
Utilities, DOS, 31, 142-144
v
Variables
dummy, 87-89, 433-434, 491-492
environment, 91-93, 97-99,
111-112,373
replaceable, 76-78, 84-85
VDISK.SYS file, 101,247,411-413
VER (DOS command) and MS-DOS
version number, 20, 502,
537-538
VERIFY (DOS command) and
verification
of file copying 34, 404
of logical track drive, 316
and networks, 369
of write operations, 108, 502, 537,
561
VERIFY (system parameter), 108
Version, EMM, 249, 252
Vertical bar I
with DOSSHELL, 146
for pipes, 120-121
with system prompt, 474
629
MS-DOS Bible
Vertical spacing with printers, 457-468
Video. See Display adapters and
display screen
Video Display Adapter and
DISPLAYSYS, 416
Viewing of files, 138-139
Virtual disks, 101, 106,411-413
VM.TMP file, 354
VOL (DOS command) and volume
labels, 503
attribute for, 206
and DIR command, 420
and formatting, 437-438
and LABEL command, 450-451
w
Warm boot, 26
Wide format for DIR command,
26-27,421
Width of display adapters, 459
Wildcard characters (* ?), 286
with BACKUP command, 379
with COMP command, 400
with COPY command, 54-55,
40l-402
with DEL command, 409-410
with DIR command, 422
with file concatenation, 402
with PRINT command, 470
with RECOVER command, 477
with RENAME command, 479
630
Wildcard characters (* ?)-cont
with replaceable variables, 77-78
with RESTORE command, 483
with TYPE command, 501
Windows, 244
memory mapping by, 248
video services for, 284
WRITE (DEBUG command), 323, 344,
346-347
WRITE (EDLIN command), 159,
172-173
Write-protected diskettes, and
DISKCOPY, 425
Write to file or device function, 545
x
XA (DEBUG command) , 254, 323
XCOPY (DOS command), 75-76, 112,
503-506
vs. DISKCOPY, 425
XD (DEBUG command), 263, 323
XM (DEBUG command), 255-256,
260-261, 324
XMA2EMS.SYS driver, 110, 249,
417-419
XMAEM.SYS driver, 110,247,419
XS (DEBUG command), 255, 324
y
Year, setting of, 22, 408
HOWARD W. SAMS
&. COMPANY
Best-Seller
TheWaite Group's
MS·DOS®Bible
Third Edition
The MS-DOS operating system, along with its IBM equivalent PC DOS, is more popular than
ever, now running on over 20 million systems. To support this legion of users, The Waite
Group's MS-DOS Bible has been completely updated for the new MS-DOS version 4. Retain
ing the easy tutorials, hands-on examples, and step-by-step approach of previous MS-DOS
Bibles, the third edition of this renowned best-seller reasserts its status as a classic text and
reference with features such as:
• Tutorials revised to include features of MS-DOS version 4---with expanded
information on batch files, memory and file management, disk structure, installable
device drivers, redirection, pipes, filters, and more.
• Three new chapters that show how to use the windowing DOSSHELL utility; how to
customize an MS-DOS system; and how to use megabytes of additional RAM memory
with the new Expanded Memory Specification (EMS).
• A detailed explanation of the SELECT utility that guides you through MS-DOS
installation on hard disks (including disks above 32 Mbytes).
• An encyclopedic reference section that presents syntax, examples, and descriptions
of each command in alphabetical order, updated for version 4.
• A convenient information "jump table" that takes you quickly to the command,
procedure, or topic of your choice.
• Complete tables of MS-DOS interrupts and functions.
Written in the "crystal-clear" style that has made previous editions so popular, the third
edition combines sharply focused tutorials for power users with an extensive and superbly
organized reference section that all DOS users will appreciate.
The Waite Group is a developer of computer, science, and technology books. Acknowl
edged as a leader in its field, The Waite Group creates book ideas, finds authors, and pro
vides development support throughout the book cycle, including editing, reviewing,
testing, and production control for each title. The Waite Group has produced over 70 titles,
including such best-sellers as C Primer Plus, Microsoft® C Bible, MS-DOS® Bible, Tricks of
the MS-DOS Masters, and UNIX® System V Primer. The Waite Group produces 15 to 20 new
computer books each year and has yearly sales of a half-million books. The Waite Group can
be reached at 100 Shoreline Highway, Building A, Suite 285, Mill Valley, CA 94941, (415)
331-0575.
$24.95 US/22693
ISBN 0-672-22693-6
#f
HOWARD W. SAMS ~ COMPANY
A Division of Macmillan Inc.
4300 West 62nd Street
Indianapolis, Indiana 46268 USA
I
9 780672 226939
90000