/


Текст
\
Ml vL
VL"L
\
Vv 11I
"1
1
— *<#>-
,j
•M.
Mlkr UL
s l/'k \ P Mt'lSl
EVERYMAN CHESS
Contents
Mikhail Tal - A Personal Tribute
Introduction
The Main Indicator - King in the Centre
Breakthrough in the Centre
The Assault Ratio
Invasion Trajectories
Lines of Communication
Outposts
Eliminating Defenders
At the Royal Court
Destroying the Fortress Walls
Answers to: What Would You Have Played?
Postscript
Index of Players
List of Illustrative Games
vi
vii
1
32
42
51
74
89
105
116
128
167
179
180
183
Mikhail Tal: A Personal Tribute
YOUNG PLAYERS of today may find
it difficult to appreciate what the name
of Mikhail Tal means to chess
devotees of my generation, to the late 1950s
I became passionately interested in the
game and began subscribing to Chess
Magazine, where I first read about Tal.
In particular I remember his exploits in
the 1958 USSR Championship, where
he was striving to retain the title he
had sensationally won the year before.
Going into the last round level with
Tigran Petrosian, Tal had Black
against Boris Spassky, who himself
needed to win at all costs, in order to
progress to the next stage of the World
Championship cycle. Petrosian
prudently agreed an early draw, but after
five hours' play Spassky and Tal were
still locked in battle, and their game
was adjourned in a position that looked
grim for Tal. I can still recall the
words of Salo Flohr, as they appeared
in Chess: "Tal and all Riga slept badly
that night". As it happens, the reader
can follow this game in Chapter 8, and
see how Tal defended heroically,
before finally breaking out with a
decisive counterattack to win his second
USSR Championship gold medal.
The next year, 1959, saw the
thrilling Candidates Tournament in
Yugoslavia, in which Tal and Keres fought
out a ding-dong battle, Tal in
particular taking huge risks in striving to
win in virtually every game. Even the
legendary Botvinnik was unable to
resist his fiery play, but, not long after
wresting the World Championship in
1960, Tal suffered the first bout of ill-
health that was to dog Mm for the rest
of his life. And after losing the Return
Match the following year, he was
never again to contest the title,
although he reached the Candidates stage
on several occasions.
With the passing years his playing
style inevitably mellowed and became
more solid, although in almost every
event he could be relied on to provide
at least one combinational flash
recalling the Tal of old.
I vividly recall one occasion in 1970
at the Moscow University Chess Club,
when Tal came to give a talk about the
recent "Match of the Century" in
Belgrade. He spoke modestly and
wittily to the packed audience, and a
wonderful evening was rounded off by
a 12-player lightning tournament, into
which the grandmaster threw himself
wholeheartedly. As one of the leading
foreign players at the University Club,
I was invited to take part, but in my
game with Tal was too over-awed, and
after losing dismally in under 20
moves I felt too ashamed to engage the
great man in conversation...
The pleasure I have gained from
translating this book, and which I hope
will be shared by its readers, is tinged
by the regret, felt throughout the chess
world, that the incomparable Mikhail
Tal is no longer with us.
Ken Neat July 1994
Introduction
ON THE ONE HAND, this is not a
textbook. Because in chess, in the
opinion of the authors, this name can
be given only to an explanation of the
rules — the bishop moves diagonally,
the rook vertically or horizontally in
any direction — and also, perhaps, to
the principles of checkmating the lone
king with pieces of different values.
These are indisputable — they are
axioms.
Everything else in chess consists of
theorems, and they need to be
demonstrated. Sometimes they drag on for
many years, and sometimes stretch far
into the distant future. Indeed: does the
truth lie in a strong pawn centre, or the
attack on it? Who will give a definitive
answer? And when?
On the other hand, this is
nevertheless a textbook. Similar to those that
set out the basics of versification, the
metres and peculiarities, say, of
Alexandrine verse. It is true that, after
studying all this, you will not
necessarily become an Alexander Pushkin, a
William Shakespeare, or a Johann
Goethe — geniuses themselves make
paths in the endless world in the name
of creativity, but... Neither Pushkin,
nor Shakespeare, nor Goethe would
have become who they were, had their
knowledge of poetry (feelings and
thoughts we introduce into this
conversation in brackets; they are primary
and lay at the very foundation)
remained at the level of prehistoric,
primitive people, who made single-line
drawings on their cave walls of the
desired objects of their hunting, but
nothing more...
And so, dear readers, what you have
before you is a guide. Since it is fully
admitted that this is a field in which
there are many more exceptions than
rules, this book has the aim merely of
suggesting: where and on which paths
in the dense forest of variations are
concealed those very indicators —
imperceptible or altogether invisible —
that will allow you to replace quiet
forward movement with a much more
rapid tempo, or to switch from a
positional struggle to an attack. It is not
always explosive, sacrificial — on the
queenside things very often do not
come to this. But if the target of the
pursuit becomes the king, the sacrifice
becomes both a basic weapon, and the
main "performer" of that army which is
mounting the offensive. This is why
reference points and prompts are so
important, in deciding whether or not it
is the right time for a sacrifice.
The theory of sacrifices has already
been studied — true, not especially
often, and not very recently — by
chess researchers, including
grandmasters Rudolf Spielman in the mid-
thirties, and Leonid Shamkovich in the
late sixties. The classification of
sacrifices compiled by them was correct,
although also not altogether complete:
life in chess does not stand still. But
the aim of this book is different: it is to
demonstrate the practical application
viii Attack with Mikhail Tal
of these sacrifices, to give typical
attacking procedures, and — most
important — to point out those very
"symptoms" of a position, which
indicate the existence, at its heart, of a
combinational, sacrificial solution to
the problem. However — and the
reader can see this for himself — the
correctness of an attack on the kingside
may sometimes depend on whether the
white a-pawn is at a2, a3 or a4...
So then, let's be off. The authors
have endeavoured to differentiate the
sections as far as possible, although, of
course, in practice attacks only on h6
or exclusively on the light squares do
not occur. But the main idea may be
suggested by one particular feature of
the position — and it is this that gives
the name to this or that chapter. Each
chapter is accompanied by illustrative
games: at the demand of one author
(I.D.) they are taken from the
"personal collection" of the other
(M.T.). The basis for this selection
was the record number of special
prizes, the vast majority for "brilliance
in attack", which overcame the feeble
resistance of one author against the
other, and Attack was victorious.
May the readers of this book also be
victorious.
1 The Main Indicator -
King in the Centre
"IT IS A PROFOUND MISTAKE
to imagine that the art of combination
depends only on natural talent, and that
it cannot be learned. Every
experienced player knows that all (or almost
all) combinations arise from a
recollection of familiar elements."
I.D. This thought of Richard R&i
(with certain doubts regarding the
numerical grounds of "all or almost all
combinations") can be considered
indisputable. And the king in the centre
is a stable "familiar element" of
possible combinational attacks.
M.T. At any event I can admit: as
long as my opponent has not yet
castled, on each move I seek a pretext for
an offensive. Even when I realise that
the king is not in danger.
I.D. Is such an expenditure of time
and effort justified?
M.T. Well... It is more likely that
doubts are unjustified, as shown by the
following instructive episode. It
occurred in the 4th game of my
Candidates Semi-Final Match with Bent
Larsen in 1965. After 1 e4 £if6 2 e5
£id5 3 d4 d6 4 £if3 dxe5 (to some
extent a Larsen patent) 5 £}xe5 there
suddenly followed 5...£id7.
Had this been a simultaneous
display, I would have decided that my
opponent had simply overlooked 6
£}xf7 <g>xf7 7 >grh5+, when, against his
will, the black king is forced to "go for
a walk".
But Larsen could not have
overlooked this, and I began examining
possible variations. My intuition
insistently kept telling me that the sacrifice
had to be correct, but I decided to
calculate everything "as far as mate",
spent some 50 minutes, but then in one
of the innumerable variations I found
something resembling a defence, and...
rejected the sacrifice. This was a
betrayal of myself, I saved the game only
by a miracle after the adjournment, and
in general I barely, in a "war of
nerves", won the match.
Of course, I should have begun the
attack without thinking, and only after
the forced 7...<g>e6 8 c4 £i5f6 9 d5+
■S>d6 10 #f7 £ie5 11 0.(4 studied the
position. This is no place to give
variations: in certain of them the black
king is mated not even on the central
files, but at b2 or al! And so that this
should not sound totally unreal, here,
cleared of a whole network of
branches, is a continuation which, though
not of course obligatory, is very pretty
— I1...C5 12£>c3a6 13 gdl!! g6 14
Axe5+ <S>xe5 15 d6 g5 (defending
against 16 f4) 16 gd2 £.{5 17 ge2+
<£>d4 18 ge4+H .&xe4 19 &e6H, with
the threat of 20 £>e2+ <g>d3 21 &h3+
<£>c2 22 ©b3+ <g>bl 23 £ic3+ <g>al 24
Ad3 Axd3 25 <g>d2+ &bl 26 gxbl
mate.
And so, the attack on the king. It
includes many components. If there is
2
Attack with Mikhail Tal
a lead in development, if the king's
pawn shelter is weakened or files and
diagonals have been opened, if a
secure piece outpost or a striking force
has been created — all these are
sufficient grounds for an offensive, and a
discussion of them will follow. But for
the moment — the assault on the king
that is still in the centre.
These are the most natural kingside
pawn formations, arising almost
invariably in many semi-open and closed
openings. They can be broken up only
by a direct blow — by a sacrifice at e6
or f7. The offensive then proceeds
either along the opened central files, or
else along either the h5-e8 diagonal (if
it has been weakened beforehand, this
often serves as a "prompt" for the
attack) or the a2-g8 diagonal.
However, usually the attack is
mounted down both central files.
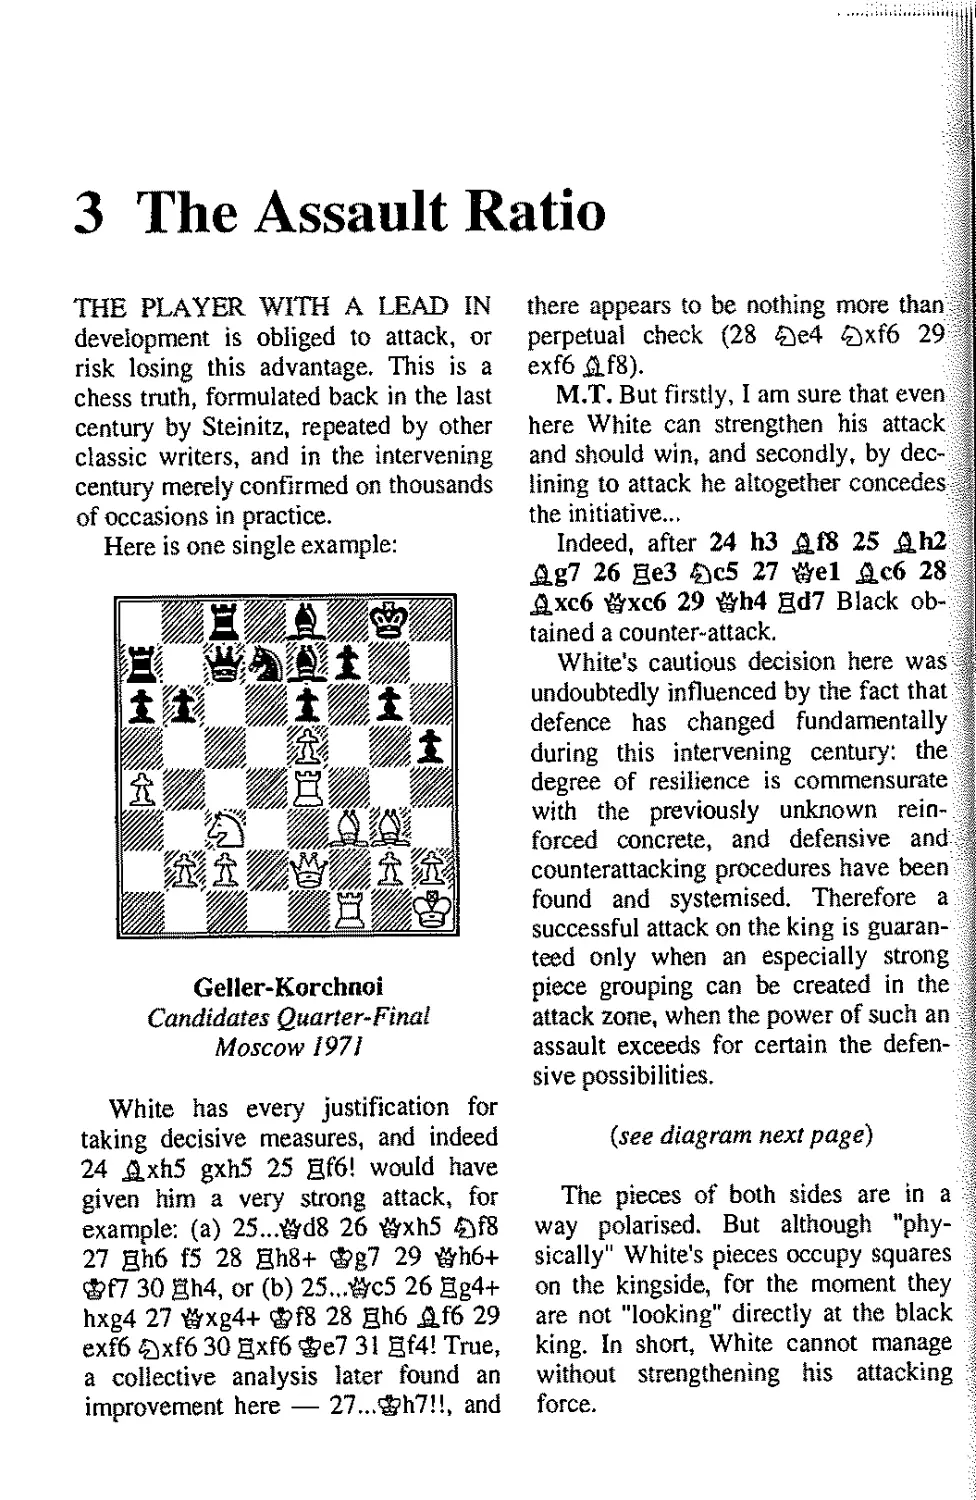
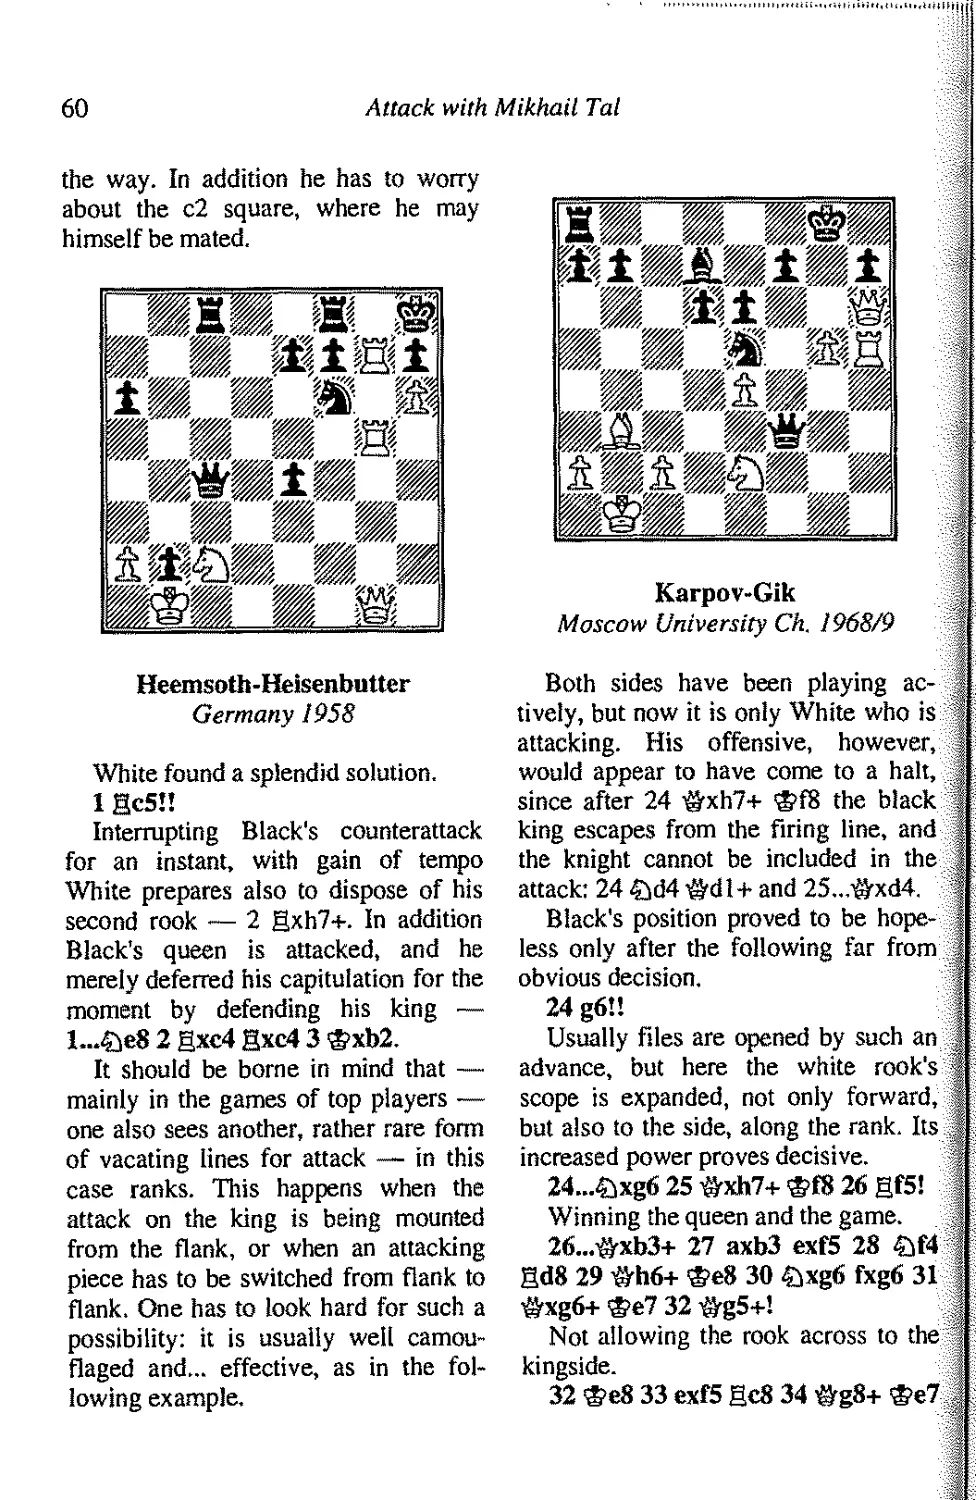
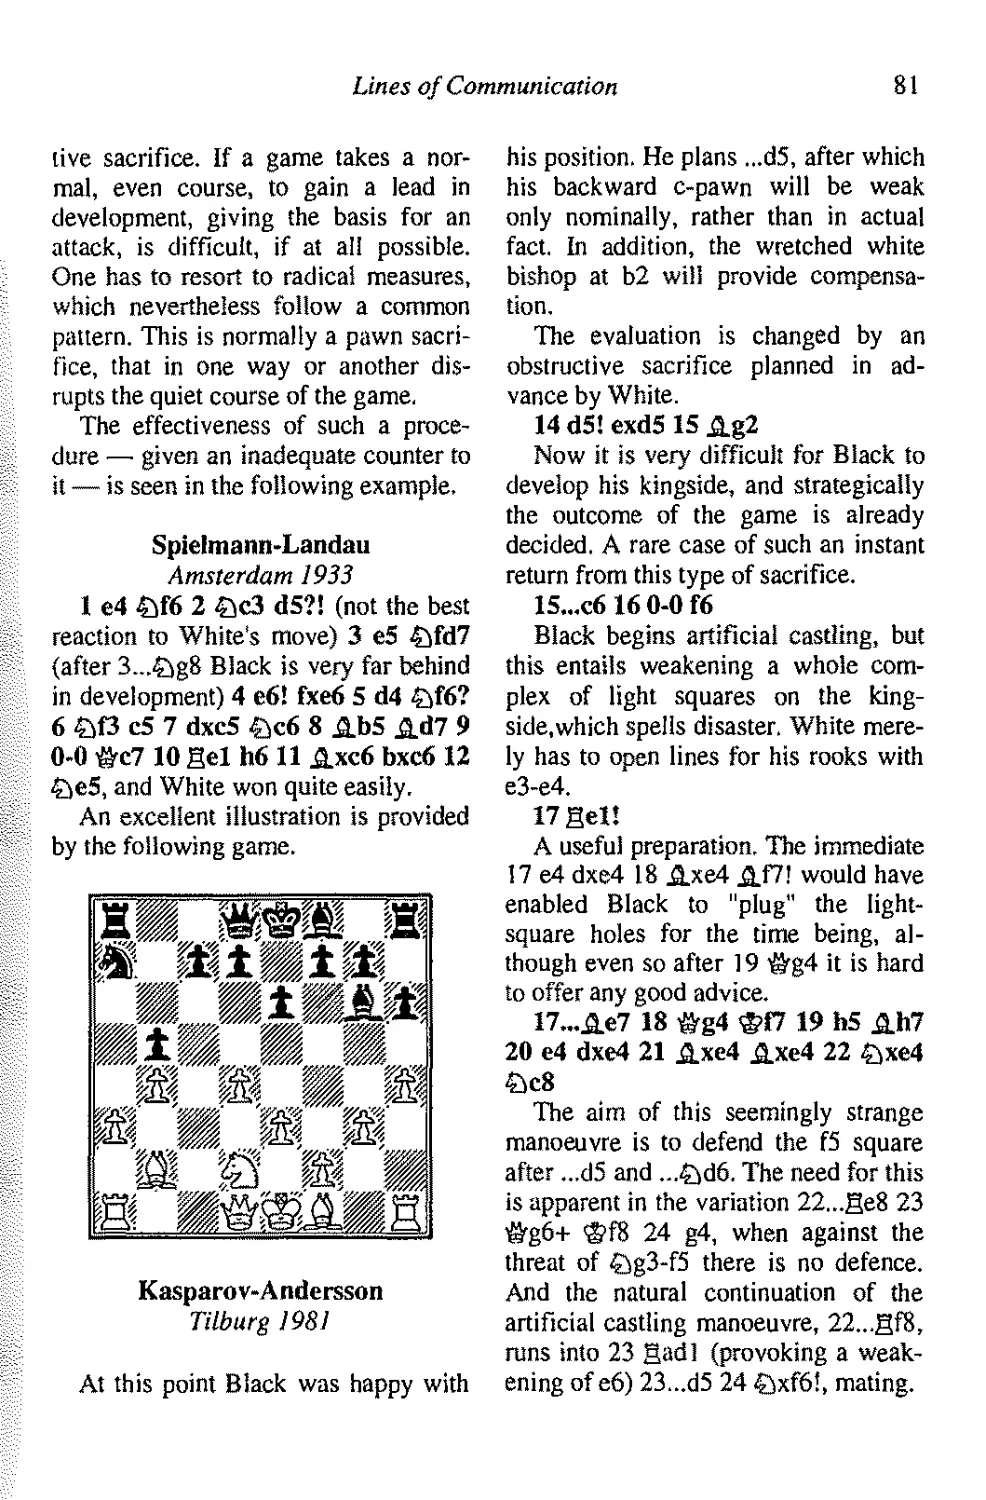
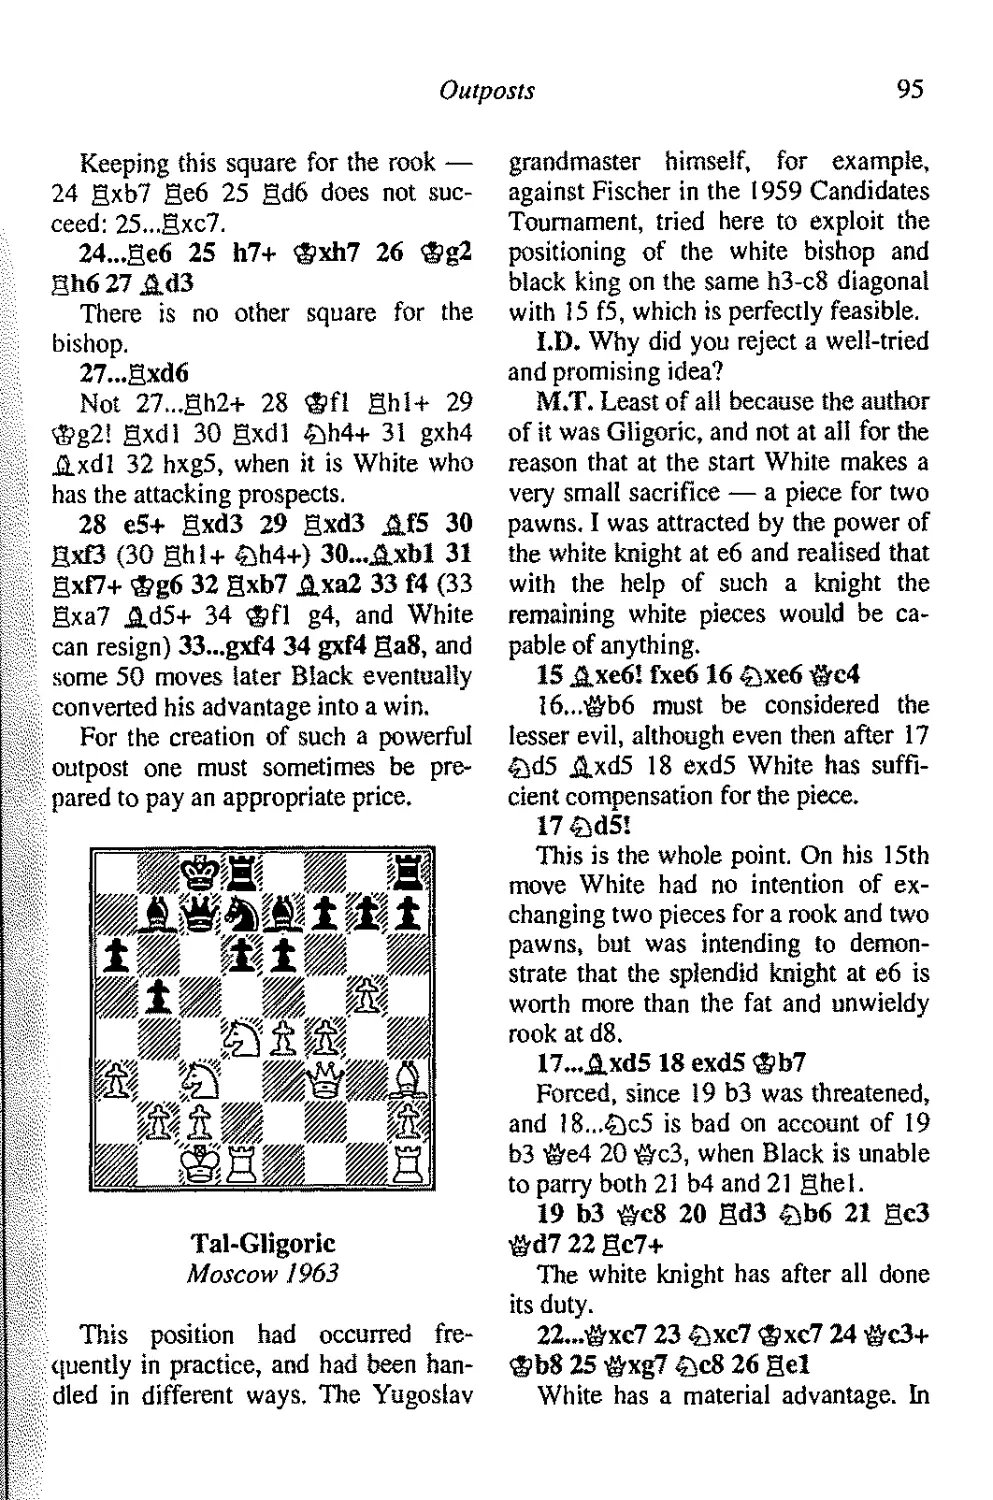
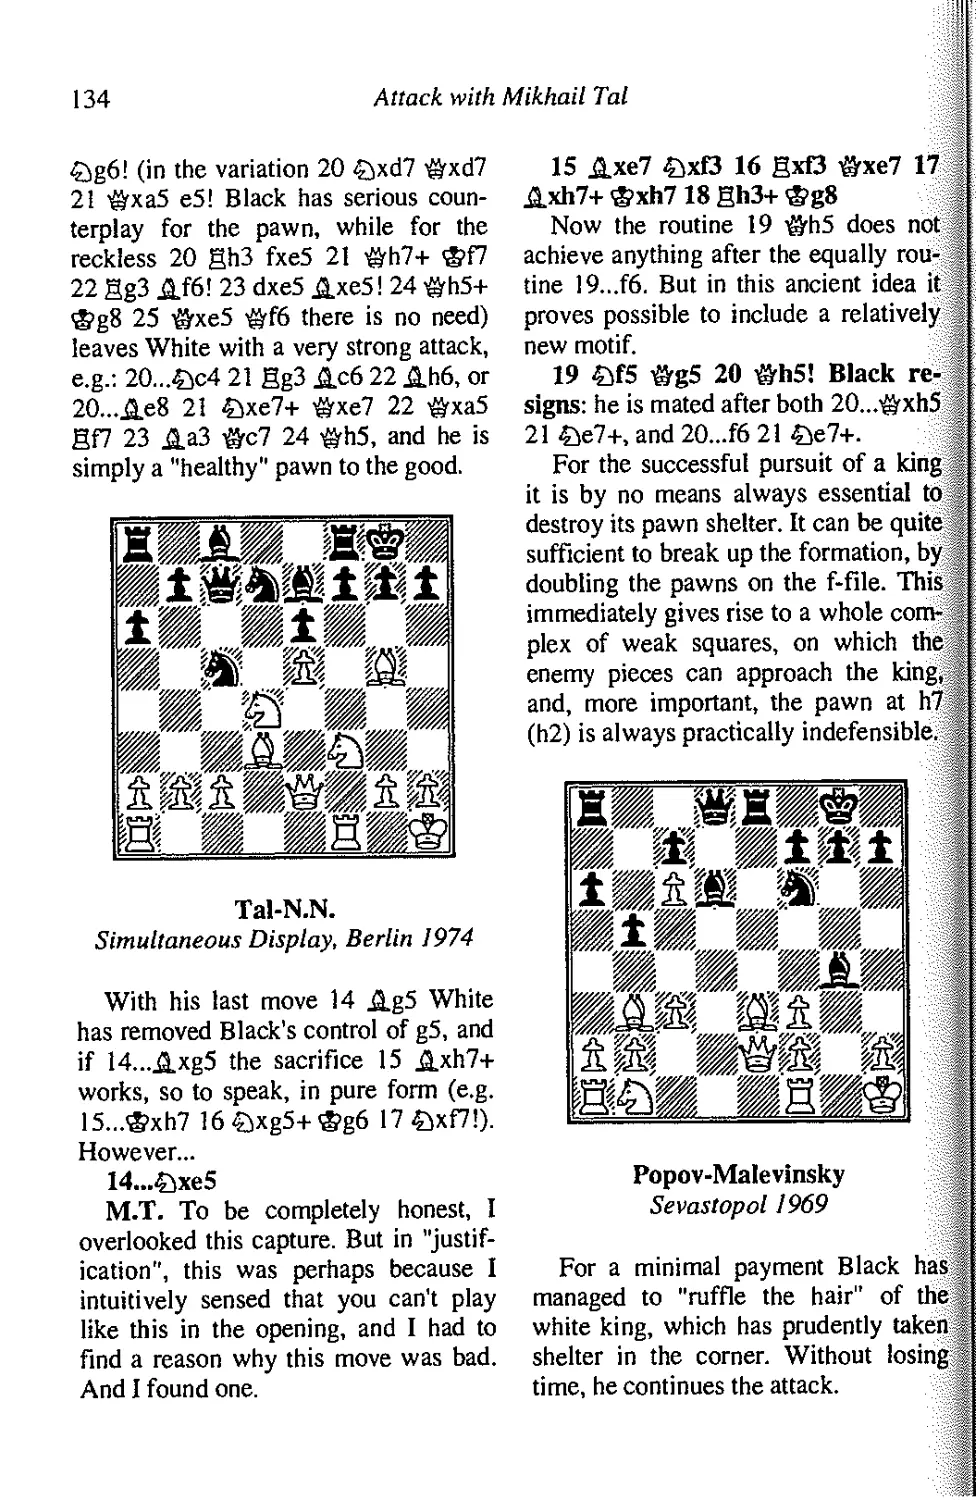
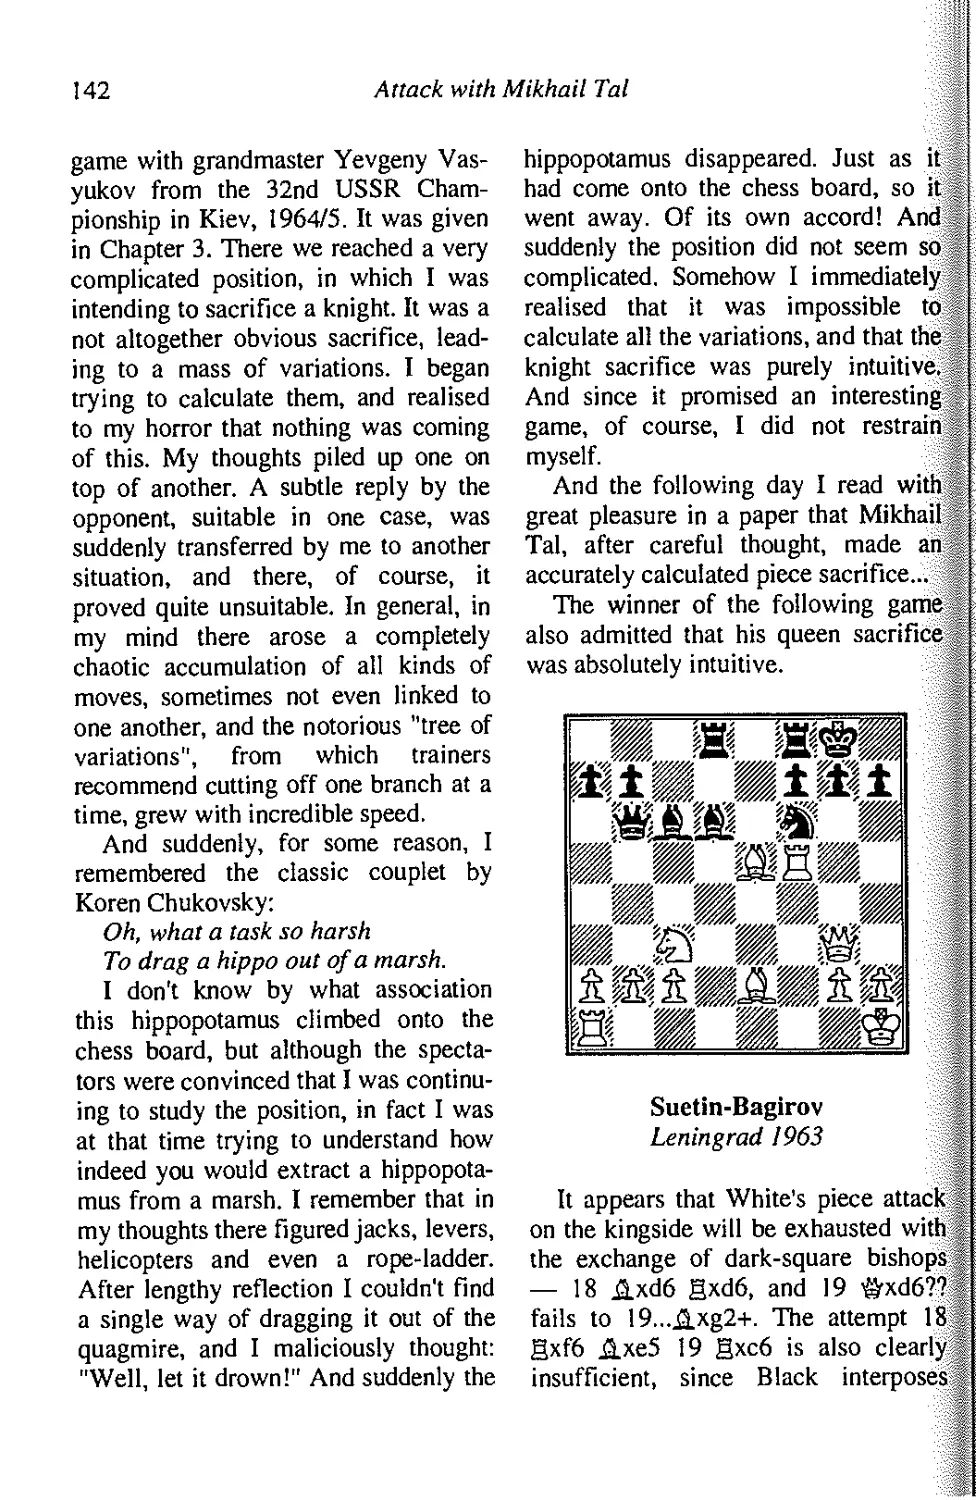
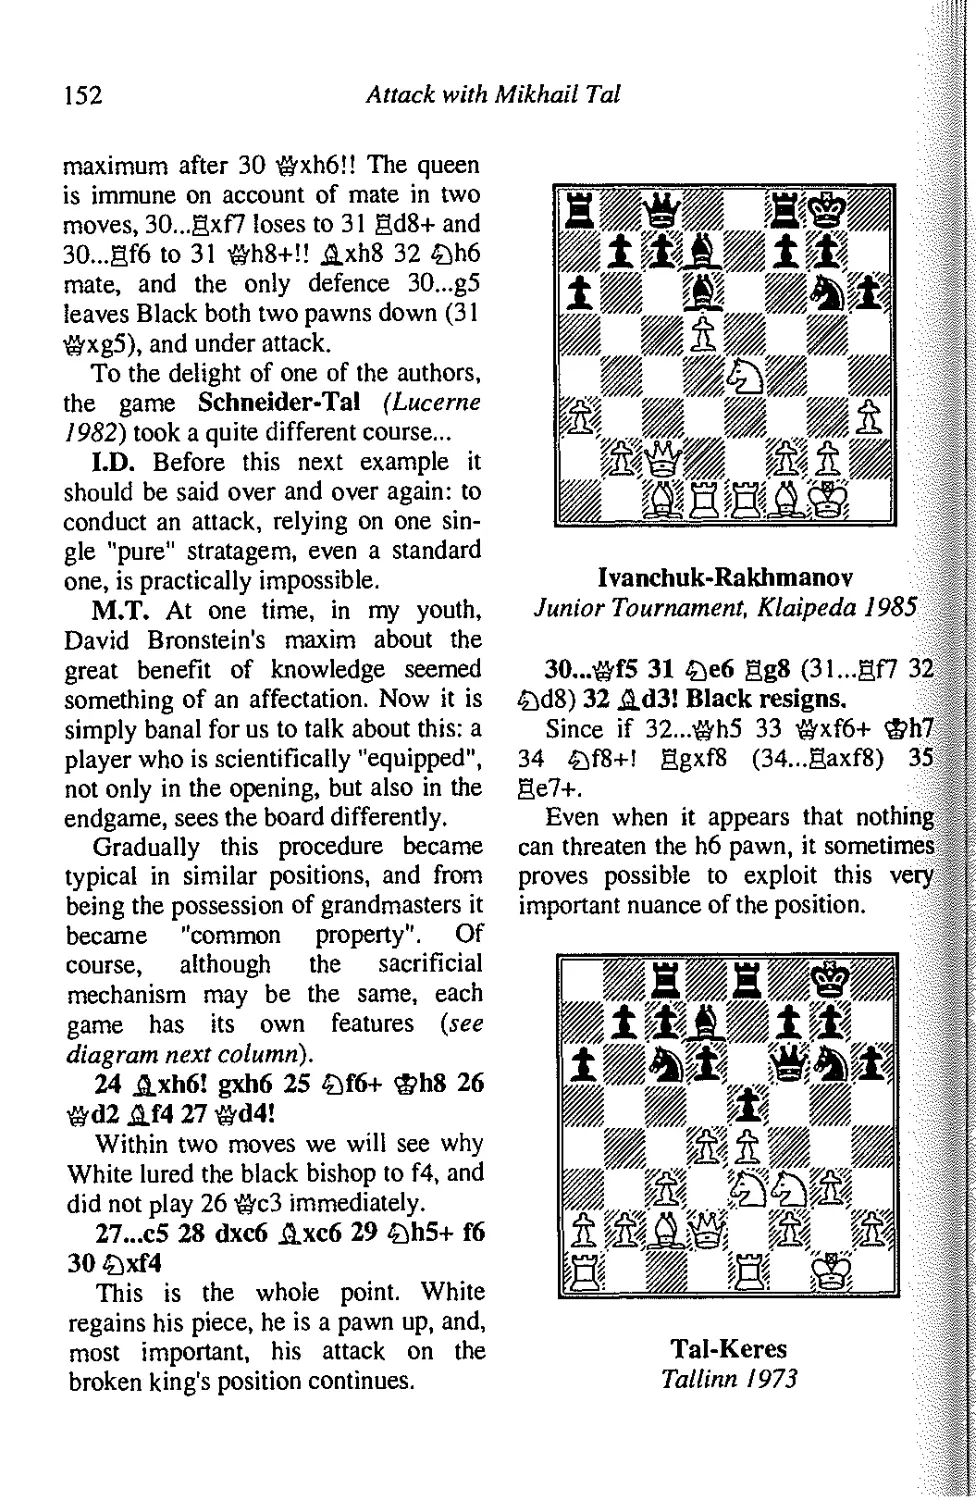
Nezhmetdinov-Kamyshov
Russian Federation Championship
Yaroslavl 1951
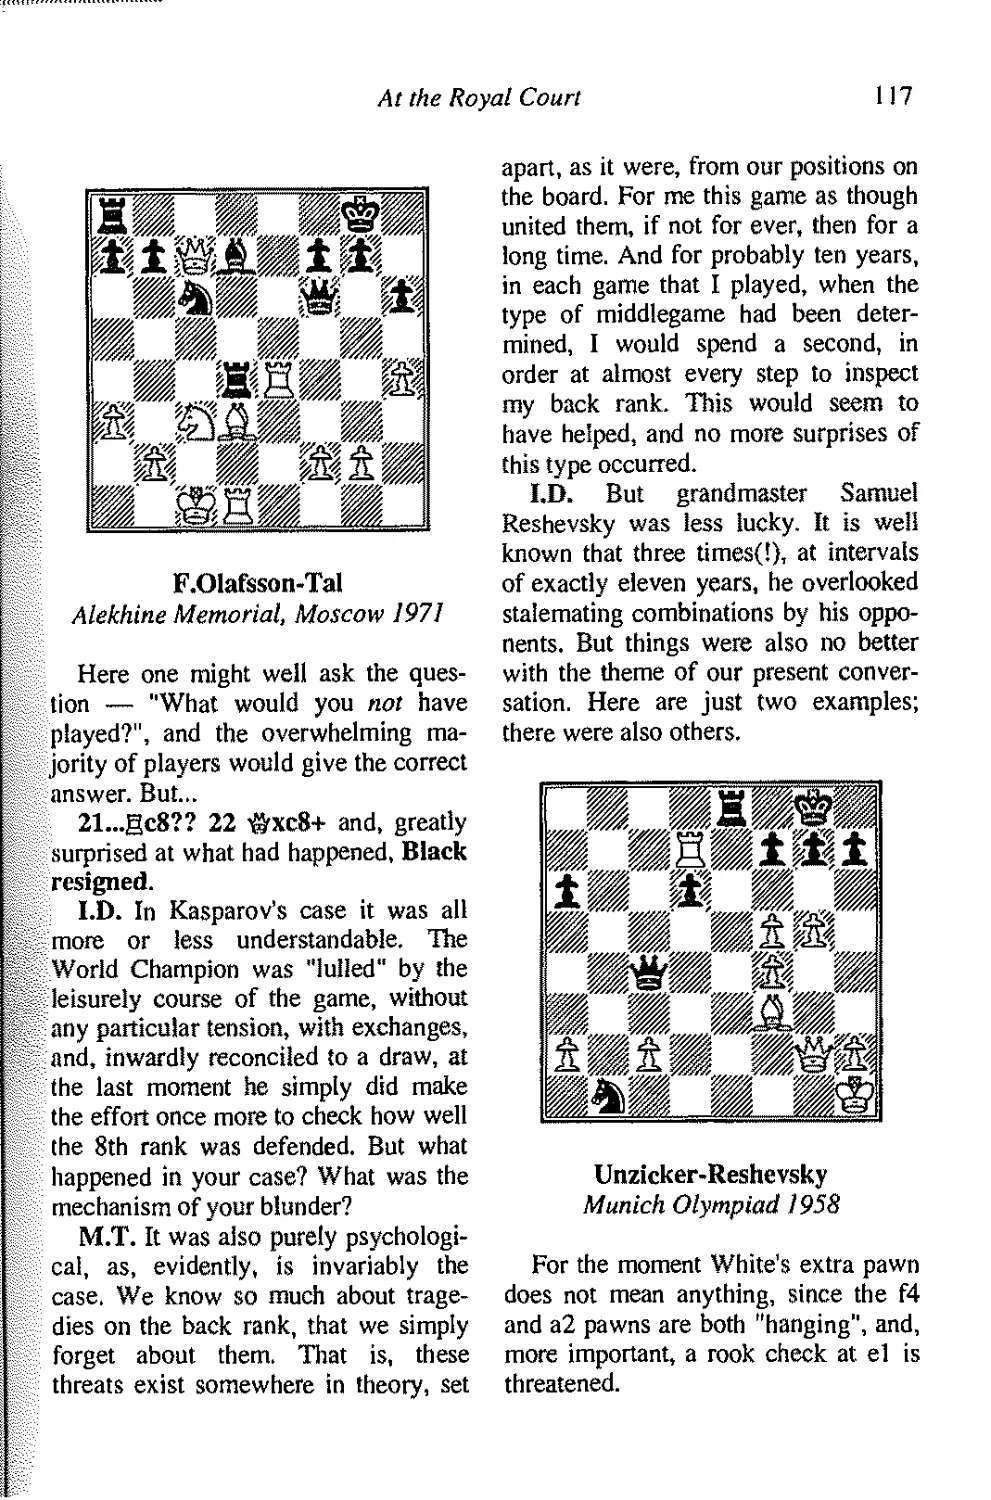
This can be considered a classic
example: a preceding pawn sacrifice for
the initiative, an energetic exploitation
of a lead in development, and — an
attack with limited forces!
17Sxf7!!©xf7
17...Sg8 18 &h5 Sg6 19 £h8! is
also bad.
18 ©hS+ ©e7 19 cxdS eS 20 f4
©xdS 21 fxeS fS 22 e6 ©f6 23 h4!
Preparing mate at f7 or g5.
23...ACS+ 24 ©hi ©xe6 25 #h6+
Black resigns.
Rudolf Spielmann called such a
sacrifice "preventive" — after it the king
does indeed lose the opportunity of
ending up in its customary and
therefore safest place, and is "invited"
to face the full force of the attack.
Most often this draught threatens not
just a cold, but terminal pneumonia...
King in the Centre
3
1 ^ffilffii
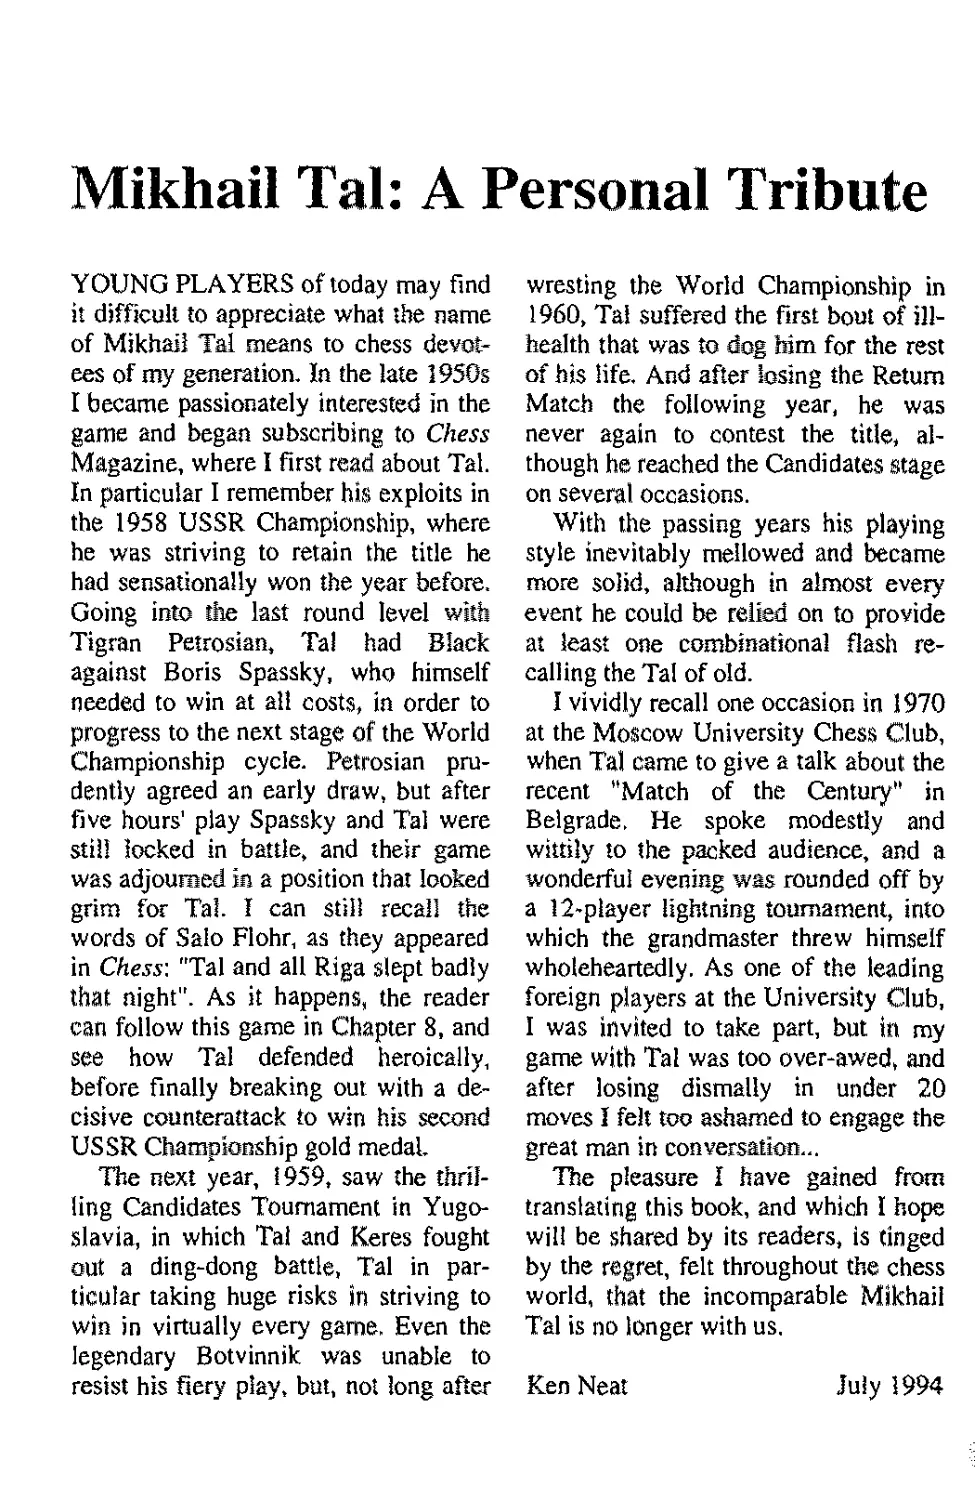
Kupreichik-Grigorian
Leningrad 1974
By a temporary pawn sacrifice
Black appears to have gained good
counterplay on the g-file, and is
intending, at the least, after 17 £if3 Qxh4 18
©xh4 b5 (there is no point in hurrying
to restore material equality; the threat
of ...b4 forces White to waste a tempo)
19 a3 Ab7 to complete his
development, and, more important, to create
the preconditions for a counterattack,
in particular on e4.
All this would be right, were it not
for the fact that the black king is still
in the centre, and that White has the
possibility of "inviting" it to face the
storm.
17 Qxf7! &xf7
The interposition of 17...Qxh4 18
<grxh4 <3>xf7 changes little: after 19
&h7+ gg7 20 Ah5+ ®f8 21 &h8+
gg8 22 gxf6+ Black loses
immediately, while 19...®f8 is insufficient, if
only because of 20 Qd5!, renewing the
threat of Ah5.
18 Axf6 ^xf6 19 gd5!
Preventing the black queen from
switching to the centre or the kingside,
where it could have taken on the role
of central defender.
19...b5
Not through choice: if 19...©d8
White has both 20 gg5 with the
irresistible threat of Ah5, and 20 gxd6
&e7 21 £>d5 exd5 22 gdxf6+ &xf6
23 gxf6+ ®xf6 24 ■&d6+, which is
also good enough to win. And 19...
exd5 20 £ixd5 &d8 21 gxf6+ is
similar to this second variation.
20 e5
20 gg5, as given above, would have
been more quickly decisive, but on the
other hand White now attacks "with
checks".
20...dxe5 21 gxf6+ <3>xf6 22 Qe4+
<3>f7 23 ©f2+ <3>g7 24 ©f6+ <3>h7 25
Qg5+ <3>h6 26 gd3 ©el+ 27 Adl
&h4 28 gh3 &xh3 29 Qf7+ <3>h7 30
gxh3 Ad7 31 h4 gg7 32 h5 Qf4 33
Af3 Qd5 34 &h6+ <3>g8 35 ©h8+
<3>xf7 36 ©xa8, and White soon
realised his material advantage.
|g|Oji gpij
IB 1
IP' P0
§&§§
m
m±m
lift
£1 I
mm
w
it
■
■ M
H Bins?* i
m
m
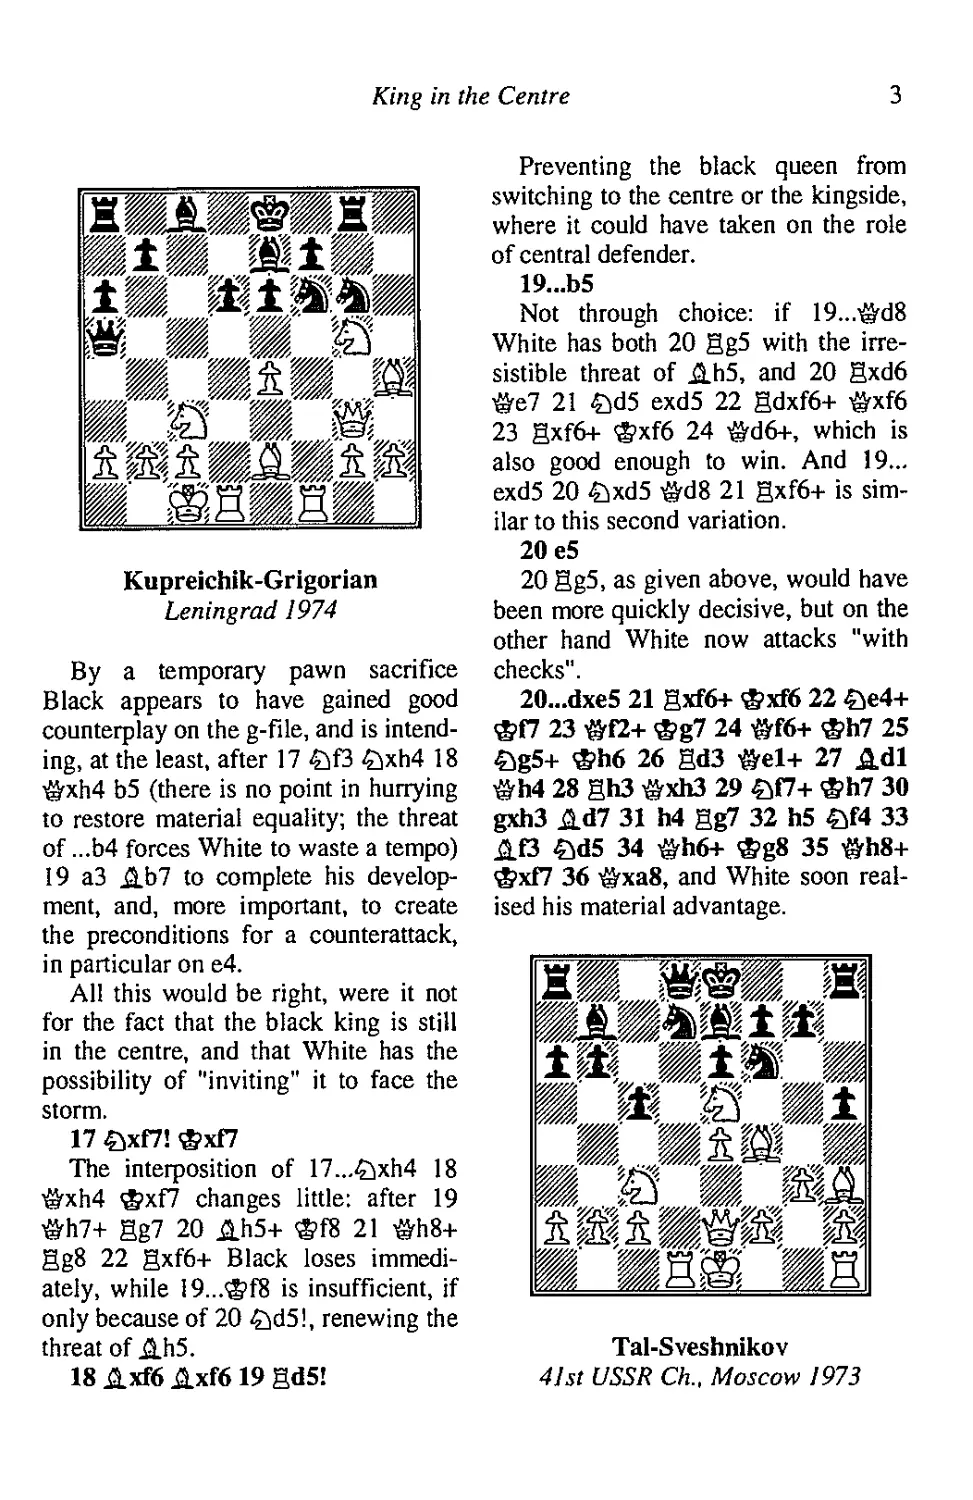
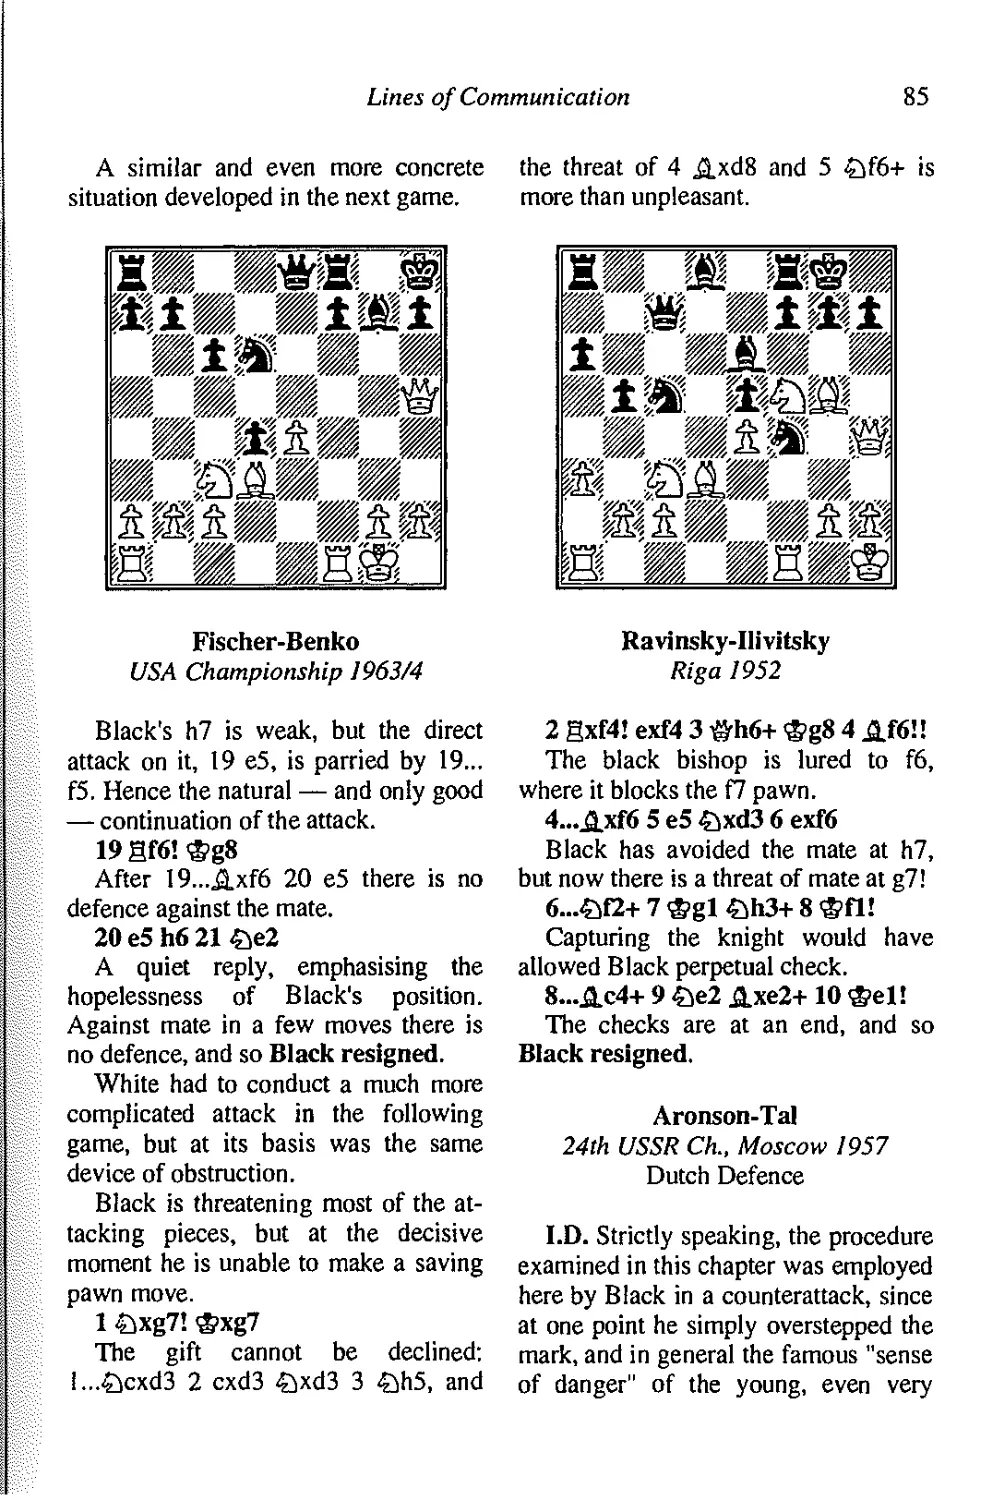
Tal-Sveshnikov
41st USSR Ch., Moscow 1973
4
Attack with Mikhail Tal
Objectively speaking, White does
not need to hurry, since he has
achieved all that he could dream of: he has
brought his central attacker, the knight
at e5, into a striking position, he has
his sights set on e6, and his queen's
rook and queen are both active. In
addition, the advanced h-pawn hinders
Black's castling, and therefore 12 0-0
was perfectly possible, in order to
begin the assault a move later. But
what chess player will defer his
enjoyment without extreme necessity?
12 £ixf7! ®xf7 13 <a.xe6+ ®f8
The bishop is taboo - 13...®xe6 14
#c4+ (a "left hook"), winning
immediately.
14 0-0
14 e5 ^.xhl 15 exf6 is also
sufficient, when both 15...gxf6 16 gxd7
and 15...£ixf6 16 gxd8+ gxd8 17 f3
give White a great advantage.
14...&C8 15 gxd7 £>xd7 16 gdl
&c6 17 £>d5 ©b7 18 e5 &e8, and
now White had a straightforward win
by 19 &xd7+ &xd7 20 e6 &xd5
(otherwise 21 £jc7+) 21 gxd5 ,2.xd5
22 &e5 &c6 23 &c7 (but not 23
&xg7? gfg 24 &c7 &f6) 23...Ab5 24
c4 ,2.xc4 25 ,2.d6, or the more prosaic
25 ©c6+, with mate in three moves.
Today the episode, known in its time
as the "Argentine tragedy", has been
largely forgotten. It occurred in the
14th round of the Goteborg Interzonal
Tournament, 1955, when by the will of
the draw an unusual USSR v.
Argentina match took place: Geller had
White against Panno, Keres against
Najdorf, and Spassky against Pilnik.
Specially for that day, the Argentine
grandmasters prepared an innovation
in a well known variation of the
Sicilian Defence.
Here Black struck the flank blow
9...gS, and after 10 fxg5 he continued
10...£sfd7, planning to regain the pawn
and obtain the "eternal" e5 square for
his knight. After this his (7 pawn
would be securely defended, and time
would be gained for the development
of his queenside forces.
Black's plan could have been fully
justified, had not for an instant the h5-
e8 diagonal been weakened and his e6
insufficiently defended.
The first to notice this was Yefim
Geller.
11 £xe6(!) fxe6 12 ©h5+ &f8 13
Ab5!
Aimed indirectly against the black
outpost at e5; to support it with the
other knight from c6 will not now be
possible.
13...£ie5
This continuation, prepared in
advance, loses, as does 13...<2?g7, played
by the other Argentine grandmasters.
The strongest defence was found much
later, after a debate in virtually all the
King in the Centre
5
world's chess magazines. It consists in
13...Hh7!, covering f7 in a different
way, when after 14 0-0+ @g8 15 g6
gg7 16 Sf7 Axh4 17 &xh6 Sxf7 18
gxf7+ @xf7 19 &h7+ @e8 White
either gives perpetual check, or
continues the attack with 20 $h5+ @f8 21
Sfl+ Af6 22 e5, although here too
Black nevertheless has a draw.
14 Ag3!
Essential accuracy. After the move
order 14 0-0+ @g8! 15 Ag3 the
offensive could have been parried by 15...
hxg5! But now it is all over!
14...AxgS
Alas, here 14...@g8 is met by 15
5.xe5 dxe5 16 i&g6+, while 14...@g7
loses to 15 Jixe5+ dxe5 16 0-0 $g8
17Ae8!
15 0-0+ @e7 16 AxeS ©b6+
Nothing is changed by 16...Ae3+
17 @hl dxe5 18 ©xe5 Ad4 19 ©d5+
&xd5 20 &c7+.
17 @hl dxeS 18 ©f7+ @d6 19
Sadl+ &d4
If 19...@c5 White wins most
quickly by 20 $f2+, mating.
20 gxd4+ exd4 21 eS+ @cS
A rare, pure mate in the centre of
the board results after 21...@xe5 22
^c7.
22©c7+£c6 23.a.xc6
Black resigns: 23...bxc6 24 $a5+
@c4 25 b3 mate.
The other two games concluded in
similar fashion.
Of course, in the next diagram
White has the possibility of further
activating his forces - his king's rook,
but in this time Black will endeavour
to simplify the position, in particular
by ...Sd8. Bringing up the knight by 17
£je4 is parried by the natural and
strong centralisation of the queen —
I7...&e5!, and so White resorts to a
typical solution:
Nezhmetdinov-Suetin
Russian Federation Ch.,1947
17 Axe6! fxe6 18 ©xe6+ Ae7
After the alternative defence 18...
i&e7 White has a choice between 19
©b3 Ag7 20 ggl (but not 20 gel
Ae5 21 gxe5 &xe5 22 &xb7 0-0,
when the advantage passes to Black)
20...Sf8 21 Hg4, and the more
convincing 19 #f5! Ac8 20 &f3! Black
still cannot castle, 20...Ha7 is met by
21 £>e4, and after 20...$c7 all the
white forces unite with 21 Hel+ Ae7
22 Hgl Hf8 23 &h5+ @d8 24 Sg7
Se8 25 £d5! &a5 26 £>xe7! (or 26
$xe8+) 26...#xh5 27 £>xc6 mate!
19 £e4 Ac8 20 £f6+ @f8 21
Sd7!
Another typical decision: Black's
central defender — his light-square
bishop, is removed from the game. We
shall be studying this procedure in
detail in a later chapter.
6
Attack with Mikhail Tal
21...Axd7 22 £>xd7+ &e8 23
£>f6+ ®d8
Or 23...®f8 24 ggl!, and by the
threat of mate at g8 White wins both
black rooks. But what is he to do now,
since Black has prepared 24...ig'b6 ?
24&e2!!
This decides the game.
24...&d6 25 gdl &xdl+ 26 &xdl
Axf6 27 #xf6+ &c7 28 &e7+ <£>b6
29 c4, and a few moves later Black
resigned.
Sometimes it is not so easy to
approach e6, but any "customs duties"
will be recovered on the way. There
are many examples, of which one of
the most striking is a game from more
than half a century ago.
Ravinsky-Panov
Moscow 1943
The player with a lead in
development is obliged to attack. But there is
simply no other target, other than e6,
and it appears to be quite securely
covered by the black knights. Securely?
20 gxd7!! £>xd7 21 £>xe6 fxe6 22
The result is the same, the only
difference being that White has had to ,
pay a higher price.
22...Ae7
The king cannot escape from the .
centre: 22...&d8 23 Ag5+ &c7 24 ;
&c6+ &b8 25 £f4+ gc7 26 £xc7+
&xc7 27 <&a8 mate.
23 gel &c5
In this way Black coordinates his
forces and takes control of the
important g5 square, since it is clear that
White cannot manage without
including his reserves in the attack.
The other defence against the
immediate mate, 23...4Sb6, is weaker on
account of the overloading of the black
queen. White quickly wins by 24 _&g5
(24 £e3 allows Black to defend by
giving up his knight — 24... >&d7; this
is where the price, paid by White for ;
the sacrifice on e6, tells) 24...gc7 25
Ac6+ &f8 26 ge3, and Black has no
adequate defence against 27 gf3+.
24 b4!
Destroying Black's coordination.
With 24...ig'xb4 he loses control over
g5, and after 25 Ag5 he does not have
the defence 25...42if6. Nevertheless,
according to analysis by grandmaster
Reuben Fine, it was in this line that
Black should have sought salvation:
25,..i&xel+! (once again reminding
White that in his attack he has not
sacrificed, as usual, a minor piece, but
a whole rook!) 26 &xel <Sf6 27 &e6
gxc2 28 £c6+ &f8 29 &c8+ ®f7 30
&xh8 gxc6 31 Axf6 £xf6 32 &xh7,
and there is still a lot of play to come.
After the move in the game Black's
king remains for ever under fire.
24...£>f8 25 &g4 &c3 26 gxe7+!
King in the Centre
1
Leaving the king totally exposed.
26...<£>xe7 27 Ag5+ <S>d6
The alternative was 27..,<£>e8 28
Me2+! <S>f7 (28...<S>d7 29 <&e7 mate)
29 &d5+ <S>g6 30 &e4+ <S>xg5 31
>&f4+ <S>h5 32 .0.17+ g6 33 <&h4 mate.
28 &dl+! <£>c7 29 Af4+ <S>b6 30
©d6+ <£>a7 31 ©e7+ gc7 32 Axc7
©al+ 33 Atl Qg6 34 &c5+ <£>b7 35
Aa5, and Black did not in fact succeed
in avoiding mate.
I.D. Misha, the whole world knows
of that unusual ease with which you
"squander" material in an attack. I
realise that this ease is purely superficial,
yet is there a limit to your generosity,
is there an inner censor, which
sometimes places a veto on tempting
attacking ideas?
M.T. I hope that we are talking not
about those attacks, that are calculated
to the end, but about those, in the
correctness of which one is persuaded by
experience, knowledge and intuition? I
once discussed this with grandmaster
Yefim Geller, and we generally agreed
that in intuitive attacks there is a limit
to the amount of material that can be
sacrificed.
I.D. That is what the Tal of the
early 1990s thinks. But what did, say,
the Tal of 1960, the World Champion,
think?
M.T. Mmmm... If you were to give
me that Tal now, I would show him
what's what. No, Geller is right: if for
an attack on the king you have to give
up a piece for one or two pawns, and
there is the prospect, even in the
absence of a mate, of winning two pieces
for a rook, then there is nothing to
think about. If you sacrifice a rook for
a pawn, it would be good at least to be
sure of perpetual check. Of course, this
is the most abstract viewpoint, and in
concrete terms you could have, for
example, two minor pieces and positional
compensation for a queen.
I.D. In short, if the beauty of a
combination does not depend, as one of the
old writers said, on the "thickness" of
the sacrificed piece...
M.T. ... then in an attack one still
has to make one's demands
commensurate with one's possibilities. And don't
look at me like that: I have been an ex-
World Champion for 30 years!
The e6 square may also provide the
altar for a "free" offering: a piece
intrudes in here with the same idea - of
enticing the black pawn away from f7,
thereby opening the h5-e8 diagonal.
Tal-Bilek
Amsterdam Interzonal 1964
The rejoinder 15 £je6 is logical and
quite correct: after 15...fxe6 16 igrh5+
<S>d7 17 ©g4 the black king's path to
a7 is blocked, and White has numerous
threats, including 18 ©xg7 and 19 d6,
8
Attack with Mikhail Tal
or 18 d6 immediately.
15...#d6 16 £>xg7+ <S>f8 17 £>e6+
©e8
Here in the event of 17...fxe6 the
black king is completely defenceless.
18 ghfl &g5+ 19 ©bl b5 20 #h5
A.f4 21 Jib3 a5 22 £>c7+!
The quickest, although 22 a4 or
even 22 g3 is quite sufficient.
22...#xc7 23 d6, and Black
resigned, since on 23...#d7 there would
have followed the obvious 24 Bxf4
exf4 25 #e5+.
An alternative to the direct blow
against a king in the centre is the
attack on it from the flank. In practice
this most often reduces to the attacking
pieces breaking through to g7 (usually
the queen) or on the a4-e8 diagonal
(again, usually the queen).
M.T. Of course, we are formulating
things somewhat abstractly, rather in
the style of Mikhail Moiseyevich (Bot-
vinnik - I.D.), but, strangely enough, a
great variety of attacks reduce to this...
I.D. In your games tool
Tal-Vooremaa
Tallinn 1971
14#g3
The only possibility of maintaining
the initiative, even if at the cost of a
piece: after 14 fxe5 Jixe5 15 c3 d6
Black has nothing to fear.
14...exd4 IS #xg7 gf8 16 e5 &e7
17fSf6
Otherwise White himself would
advance his pawn to this square.
18£,f4gf719exf6!£>e5
The queen is clearly immune —
after 19...gxg7 20 fxg7 <S>f7 21 f6 the
threats of 22 Ac4+ and 22 .&h7 are
irresistible, and also after 21....2,xf6
22£>xh5.
20 Q.C4U
Diverting the knight both from the
e-file, and away from g6 square beside
the king, from where in certain
variations the queen will continue the
attack.
20...£>xc4 21 #g8+ £f8
Or 21...gf8 22 #g6+ gf7 23 £>d5
#d6 24 fxe7 ©xd5 25 f6.
22£>xh5
Again threatening a blow from the
flank.
22...£>d6 23 Bael+ ©d8 24 Be7!
This essentially concludes the game.
24...#b5 25 gfel #d5 26 £f4
#xa2 27 £ie6+ #xe6
After 27...dxe6 28 Bxf7 &xf7 29
&xf8+ ©c7 30 &xf7+ <S>b6 31 fxe6
in the near future White will obtain as
many queens as he wants.
28 fxe6 gxf6 29 gf7 Black
resigns.
In the next diagram Black is
intending to complete his queenside
development with gain of tempi, after
which he will have at least equal
chances. The hopes for White, who up
King in the Centre
till now has been conducting an attack
through the centre, involve a flank
continuation of it.
Wi ffliffi W% +
m, „ m MX .
ftlifilltl
xmpmm&Wk
Tal-Gufeld
Gori 1968
20 £>xb5! cxb5 21 Axb5+ £>d7 22
gdl &e7
The best defence was 22...Ae7,
after which White appears to have
nothing better than to go into an equal
endgame: 23 &h8+ Af8 24 <&e5 &xg5 25
Axd7+ Axd7 26 Qxd7 &g4+ 27
®xf2 &xdl 28 &xf8+ ®xd7 29
©xa8. But now the black king is
drawn out into the firing line.
23 gxd7! Axd7 24 Axd7+ &xd7
25 &d5+ &c7 26 &xa8 &c5 27 c3,
and White's pawn preponderance
decided the outcome.
The same idea is embodied in the
illustrative game Tal-Larsen (p.24),
but for the moment here is another
typical flank operation by White.
There is a second theme - the intrusion
of the heavy pieces onto the 7th rank,
but it is only extremely rarely that any
procedures occur in pure form.
IGF*
%%M '•%%
M S ■ W-.
Botvinnik-Euwe
The Hague/Moscow 1948
The position is very sharp. The
white rook has occupied the open file,
and for the moment — but not for ever
— the black king is stuck in the centre.
On the other hand, Black has an
excellent bishop and a phalanx of central
pawns. In short, after the retreat of the
knight each side will have his chances.
But, as it turns out, the retreat is not
obligatory, since White has a different
way of proceeding.
22 &g3! fxe5 23 &g7 gf8 24 gc7
The invasion has taken place, mates
at d7 and e7 are threatened, and the
bishop is "hanging" — things are bad
for Black. He fails to save the game by
24...&d6 25 gxb7 d3 26 ga7 &d8 27
*&xh7, with unavoidable mating
threats. Therefore he gave up his queen
— 24...#xc7, but was soon forced to
resign.
In all these cases the path for the
attacking queen to land a "right hook"
was already open. The same goal may
be achieved, if first the way has to be
10
Attack with Mikhail Tat
cleared by an advance of the pawns.
The subsequent invasion of the pieces
can then usually be supported by the
far-advanced infantry.
mtmimtm
m miwim
£ pi a. |§ mK I
Nezhmetdinov-Paoli
Bucharest 1953
This position also illustrates to an
equal degree the next theme of our
discussion: how incautious it is to
voluntarily leave the king in the centre.
True, kingside castling is not possible
here — White is well prepared for an
attack on this area of the board, but the
"normal" 12...£je5 (essential now or
on the following move to neutralise the
queen's X-ray pressure on f7) 13 #e2
0-0-0 would have given the game a
"normal" course. But Black, hoping for
a counterattack, leaves his king in the
centre, and White lands an energetic
knock-out blow from the flank.
12...gc8? 13 g5 hxg5 14 hxg5 Se5
15 ©g2! £>g8 (15...t>fg4 16 Af4) 16
f4 £>c4 17 Axc4 ©xc4 18 f5 b5 19
®bl b4 20 g6! e5
After 20...bxc3 21 gxf7+ &xf7
White wins most simply by the direct
22 #xg7+ <§e8 23 #xh8, although he
also has the more elegant 22 b3! #c7
23 #g6+ <§f8 24 fxe6, mating. But
now f7 is defended by the queen, and
the white knights are attacked...
21 b3!
Now, in contrast to 21 £sd5, Black
does not have time to block the
position by 21...f6.
21...©xc3 22 gxf7+ <Sd8 23 ©xg7
exd4 24 &xd4!
The quickest, most accurate
(weaving a mating net) and prettiest solution.
24...©xc2+ 25 ®al Sh2 26 Ab6+
Sc7 27 ©xg8+
Black resigns, since he is mated in
two moves. White's play was rewarded
by the first brilliancy prize.
®±mr m±m±
mmmPwfmm
gsgi m m
m m tufa
Larsen-Spassky
"Match of the Century"
Belgrade 1970
Black has the initiative, but at first
sight it appears difficult to approach
the white king. Of course, it can be
forced to remain for ever in the centre,
but the price for this (ll...gxd2 12
£ixd2 £>xe3 13 #c3 Sd8) is perhaps
King in the Centre
11
loo great. And so Black begins an
attack from the flank.
Il...h5 12 h3
Practically forced. Firstly, because
the knight, which has been "launched
into the penalty area" (we will be
talking about this attacking procedure
later, in Chapter 3) cannot be tolerated
for long, and secondly, because the
concrete 12 £>c3 is refuted by the
equally concrete I2...gxd2M, when
after 13 &xd2 Axe3 14 &c2 Af2+
White has to part with his queen.
12...h4! 13 hxg4
The interposition of 13 Axg4 Axg4
and now 14 hxg4 would have led to
variations, similar to those that
occurred in the game: 14...hxg3 15 ggl
ghl!! 16 gxhl g2 17 ggl &h4+ 18
<ge2 &xg4+ 19 <g>e1 &g3+ 20 <S>e2
(or 20 <S>dl $rf2 21 &xe4 &xgl + 22
<gc2 $rf2, winning) 20...&f3+ 21 <®el
:Q.e7, when the outcome is decided.
13...hxg3 14 ggl ghl!! 15 gxhl
g2 16 gfl
There is no choice: if 16 ggl Black
has the decisive 16...i&h4+ 17 <S>dl
$rhl 18&c3&xgl+19<S>c2©f2.
16...&h4+ 17 <®dl gxfl=&+
White resigns. After 18 Axfl
;Q.xg4+ mate is inevitable.
I.D. This confirms what you said in
an interview, given after the "Match of
the Century" in Belgrade: "Spassky...
won a game, that will undoubtedly find
its way into the books"...
M.T. In my opinion, only
Nostradamus has made faultless forecasts,
decades and centuries beforehand.
Besides, the attack from the flank was
carried out brilliantly by Boris, but
there was no sacrifice on f2, the theme
of this section...
I.D. Well, what of it? All the same,
examples cannot be clinically pure,
procedures and themes are interwoven
and, incidentally, we should now make
a slight digression and jump ahead.
The sacrifice on f7, drawing out the
king, can also be made after it has
moved away from the centre into its
shelter. The double defence of this
point makes it less vulnerable, of
course, but even so the pawn linkage
"e6 + f7" continues to draw the
attention of the attacking side, and nearly
always requires additional defence by
other pieces. Otherwise disaster can
strike here.
This eternal truth is sometimes
forgotten by even the most experienced
grandmasters.
Smirin-Smyslov
55th USSR Ch., Moscow 1988
Of course, Black stands worse, and
the powerful piece outpost at e5 simply
obliges him to keep an eye not only on
his queenside pawn weaknesses, but
also on the "e6 + f7" link of his pawn
12
Attack with Mikhail Tal
chain. Therefore 21...id7 was
essential, and if 22 £)g5 £)fd5, at least
blocking the dangerous diagonal.
21....&a6?
This activity leads to disaster.
22 &xfT. gxf7 23 Axe6 Sed5 24
Se5 gaa7 25 gxc6
25 £>xc6 ©b6 26 £)xa7 ©xa7 27
g5 would also have won.
25...£tf4 26 gxa6! gxa6 27 Axf7+
®h8 28 igrf3 Black resigns (28...
&xd4 29 £)c6).
Kaplan-Radulescu
Hungary 1980
Black is cramped over the entire
front. Especially unpleasant is the rook
at c7, preventing him from completing
his queenside development. It would be
good to send it home by 18...£}d5, but
then for an instant the black king
remains completely undefended, and 19
igrh5 leads to a quick mate. Hence his
natural desire to first drive away
White's "central striker", also
removing his h7 pawn from attack.
18...h6 19 £xf7!
It turns out that now this is possible.
After 19...®xf7 20 &xf6 &xc7 (20...
gxf6 or 20...'g>xf6 allows a quick
mate) 21 -&h5+ &(8 22 Jlxg7+!
®xg7 23 igrg6+ ®f8 24 -&xh6+ <&fl
25 ig6+ ,®f6 from the several
possible mates White chose 26 jlh5+ ^(5
27 &g6+ &f4 28 &g4 mate.
Adorjan-Tarjan
Riga Interzonal 1979
Not one of White's pieces is
"looking" at the kingside. But for the
moment Black's main forces too are
blocked in on the left corner of the
board, and so White can calmly
prepare an attack on the classic point f7.
17 Se5!
An essential prelude, planned long
beforehand, otherwise the black knight
leaps viad7 toc5.
17...ga7 18 Ah3 &a8 19 &rf7!
®xf7
Alas, forced: 19...gxf7 20 &xe6
&f8 21 &xb8.
20 jj.xb8 &xb8 21 &xe6+ ®e8 22
gd7 gxd7 23 &xd7+ ®n 24 &e6+
White contents himself with
perpetual check. The alternative was 24
King in the Centre
13
Q.&6+ <S>f6 25 jj.d5 (threatening mate
in one move) 25...#c8 26 e5+ <S>g6 27
#xe7 Axd5 28 #d6+ JJ.e6 29 #xb6
h6 30 gxa5 <S>h7 when, although in the
endgame (31 #c6) Black has nothing
to fear, and with the queens on the
white king might come under a
counterattack, even so White's chances look
preferable.
24...<S>e8 25 #d7+ Draw agreed.
And, finally, another motif may
suggest the preparation of this typical
combination: the deployment on the
a2-g8 diagonal of the black rook and
king, or in the following instance, of
even the queen and king.
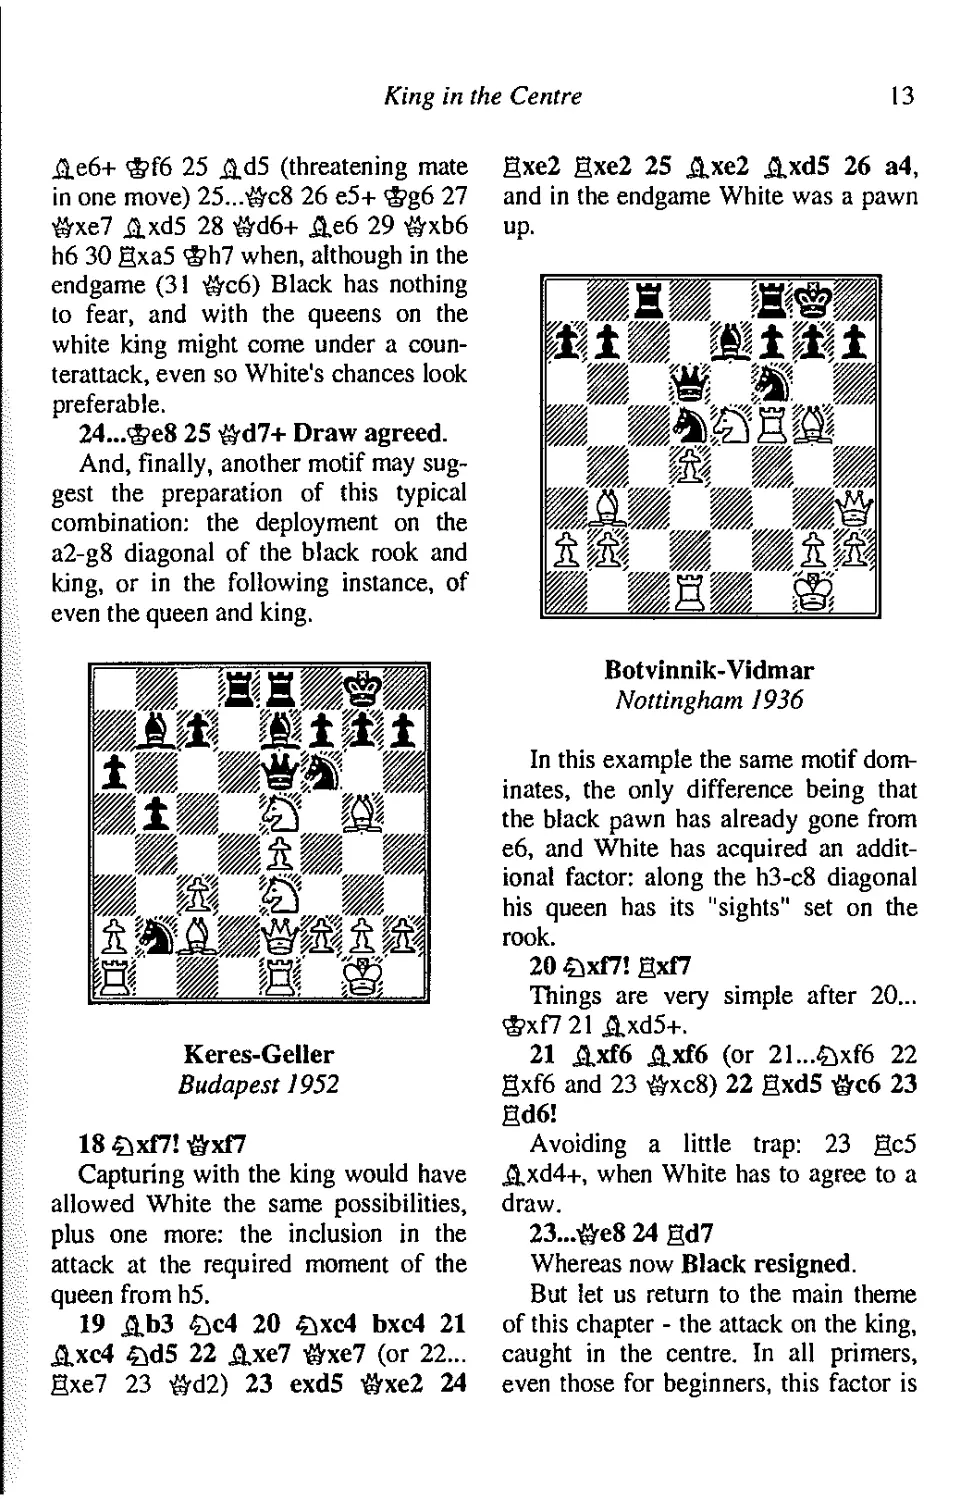
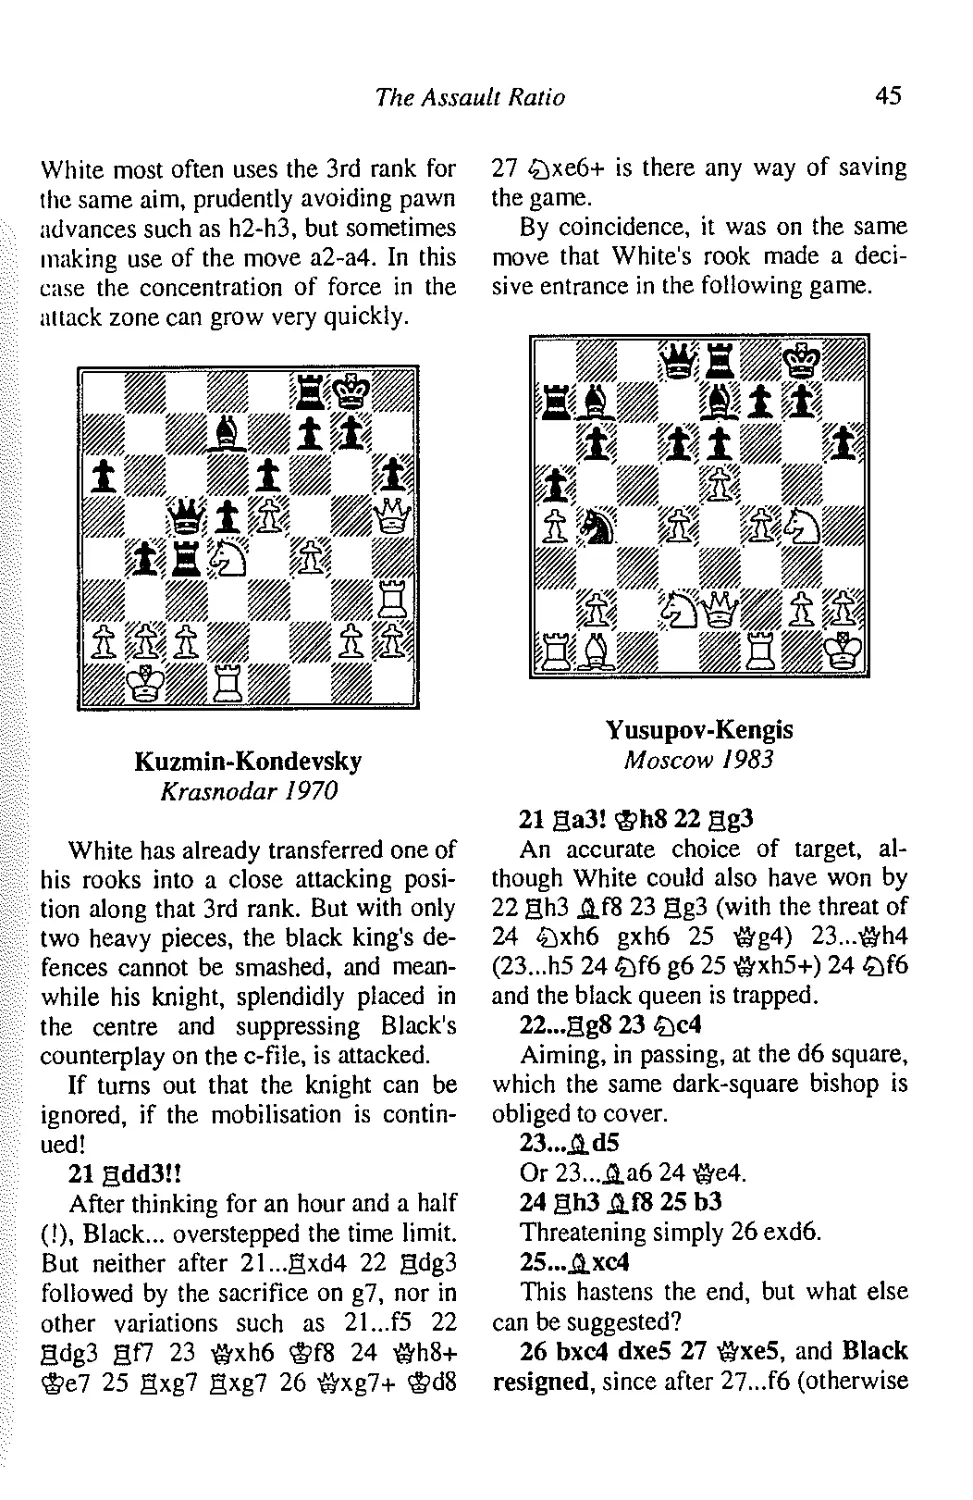
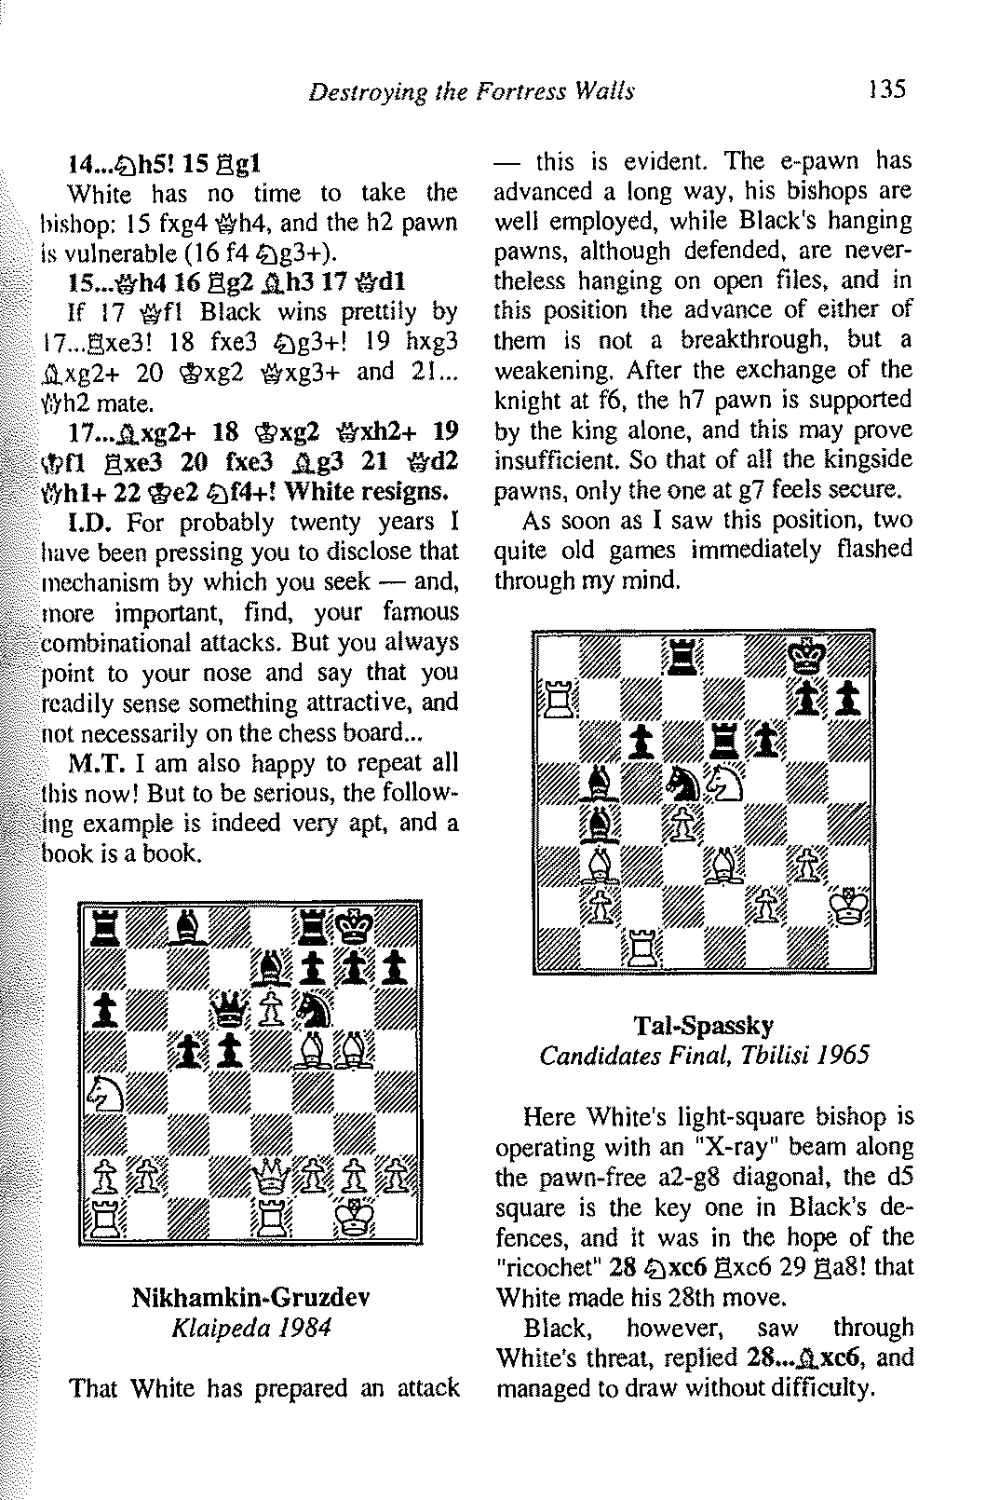
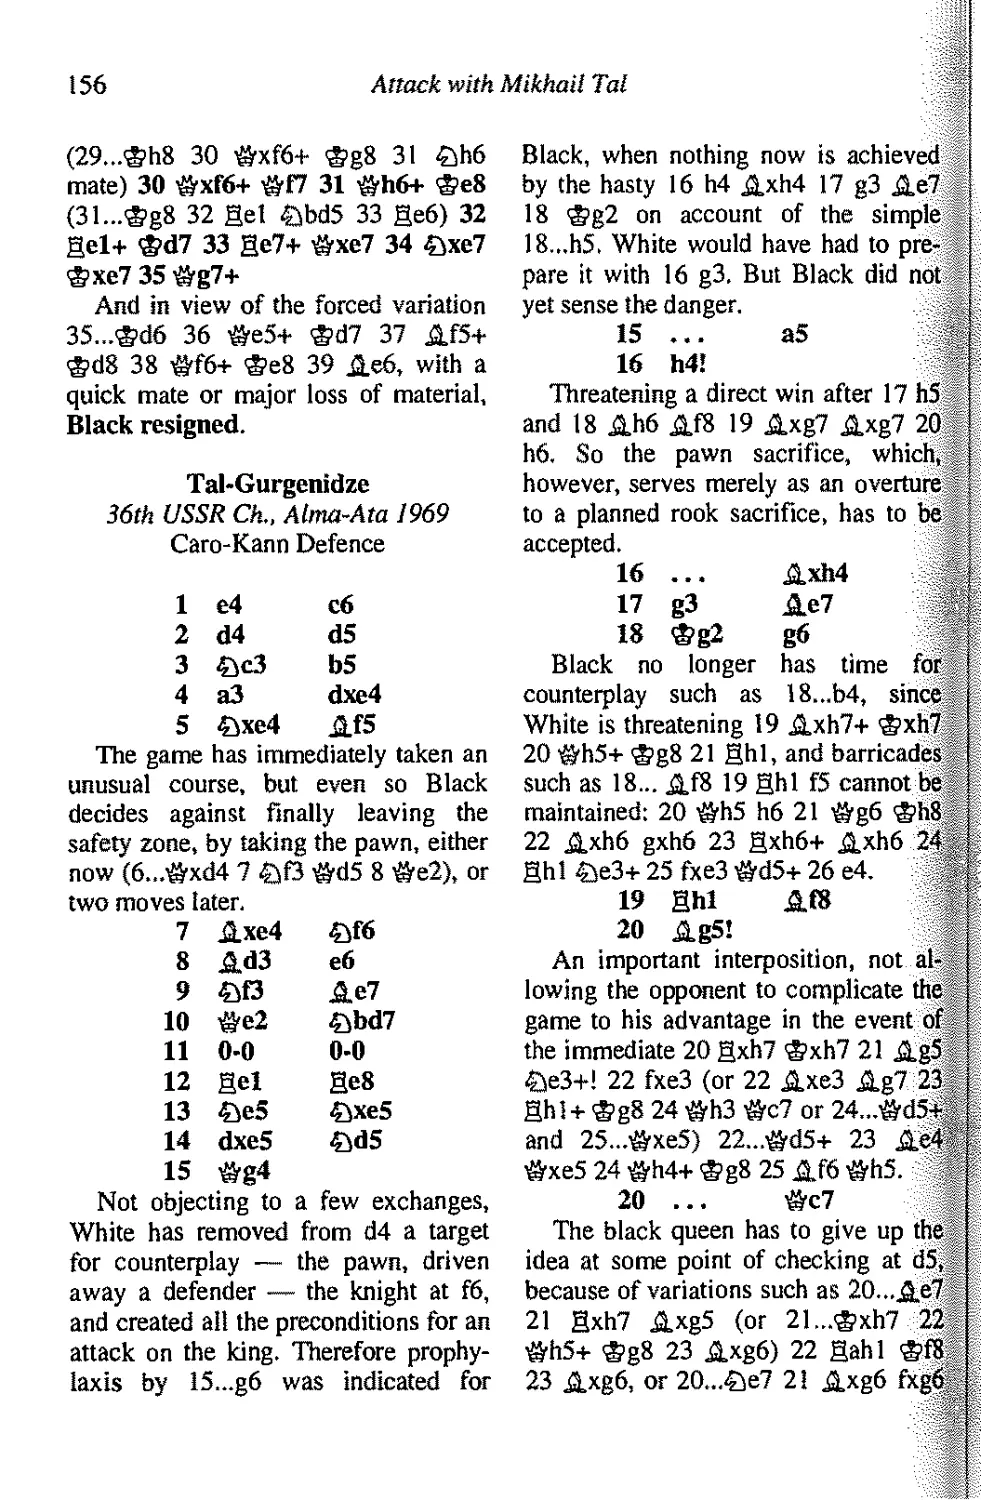
Keres-Geller
Budapest 1952
18 £ixf7! &xf7
Capturing with the king would have
allowed White the same possibilities,
plus one more: the inclusion in the
attack at the required moment of the
queen from h5.
19 JJ.b3 £>c4 20 £ixc4 bxc4 21
JJ.XC4 £ld5 22 JJ.xe7 &xe7 (or 22...
gxe7 23 #d2) 23 exd5 &xe2 24
gxe2 gxe2 25 JJ.xe2 JJ.xd5 26 a4,
and in the endgame White was a pawn
up.
Botvinnik-Vidmar
Nottingham 1936
In this example the same motif
dominates, the only difference being that
the black pawn has already gone from
e6, and White has acquired an
additional factor: along the h3-c8 diagonal
his queen has its "sights" set on the
rook.
20 £ixf7! gxf7
Things are very simple after 20...
<£>xf7 21 J3,xd5+.
21 JJ.xf6 JJ.xf6 (or 21...£>xf6 22
gxf6 and 23 #xc8) 22 gxd5 ©c6 23
gd6!
Avoiding a little trap: 23 gc5
,3,xd4+, when White has to agree to a
draw.
23...&e8 24 gd7
Whereas now Black resigned.
But let us return to the main theme
of this chapter - the attack on the king,
caught in the centre. In all primers,
even those for beginners, this factor is
14
Attack with Mikhail Tal
mentioned as a sure indicator of a
possible attack. There is probably no
sense in once again listing all those
difficulties that a king, remaining on its
initial square, causes its troops. They
are well known. But also known is this
paradoxical fact: for centuries, in one
tournament after another, their
participants forget to concern themselves
about their king, and in such instances
the response of the opponent can and
should be appropriate. In short, it must
be said again and again: the king in the
centre is the signal for an attack.
Because a delay in evacuating the king
can cost a player very dearly.
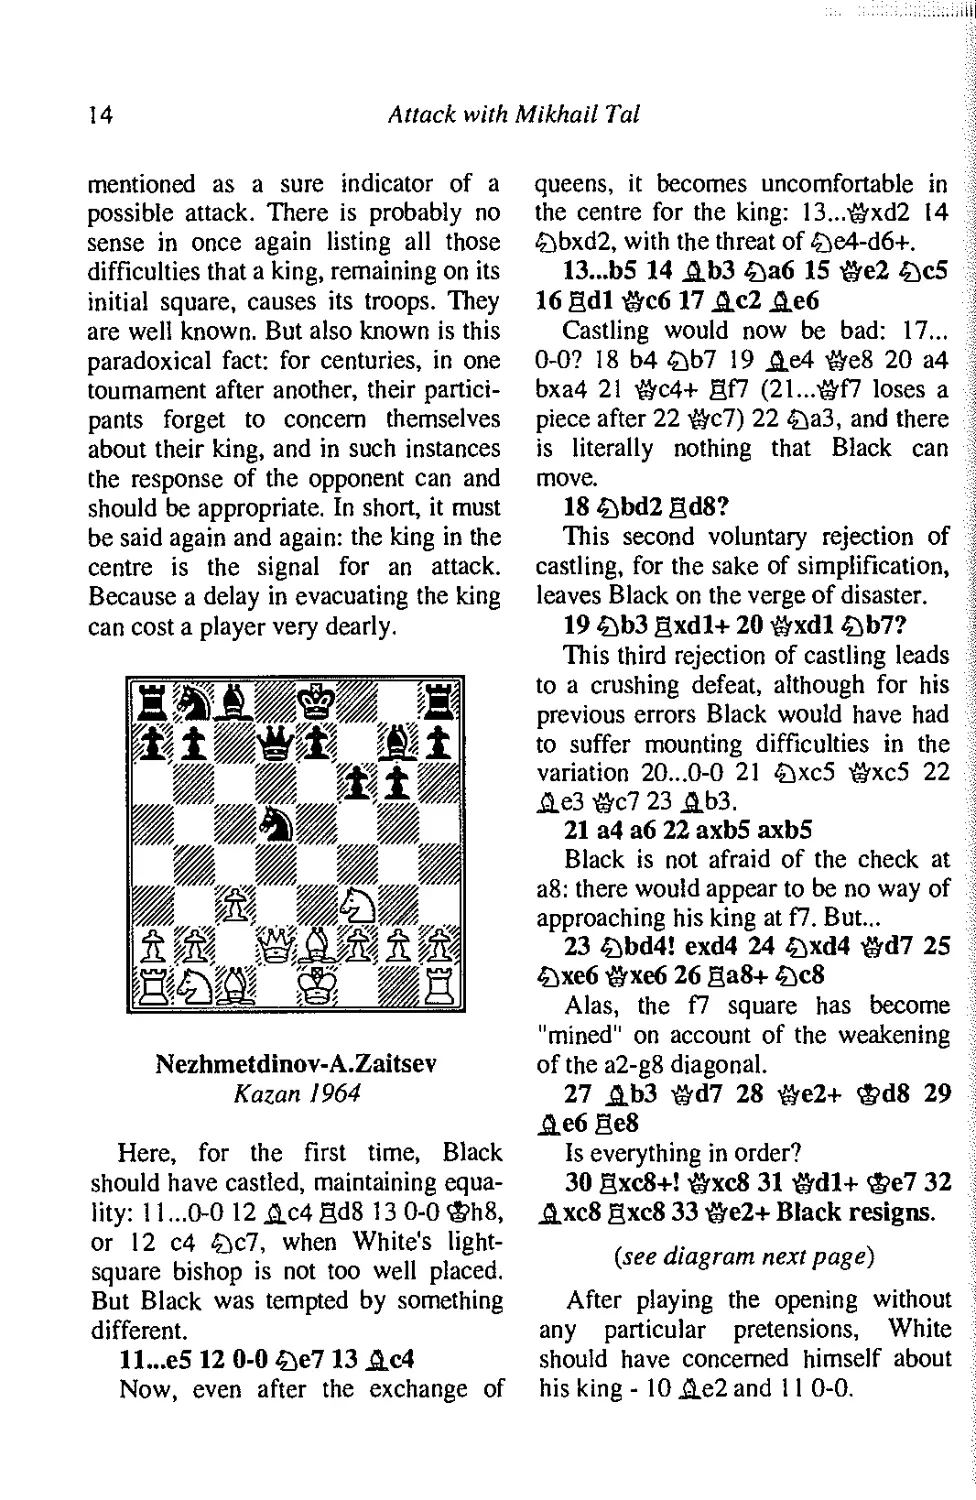
Nezhmetdinov-A.Zaitsev
Kazan 1964
Here, for the first time, Black
should have castled, maintaining
equality: 11 ...0-0 12 Ac4 gd8 13 0-0 &h8,
or 12 c4 £tc7, when White's light-
square bishop is not too well placed.
But Black was tempted by something
different.
Il...e5 12 0-0 £e7 13 Ac4
Now, even after the exchange of
queens, it becomes uncomfortable in
the centre for the king: 13...'&xd2 14
£lbxd2, with the threat of £>e4-d6+.
13...b5 14 Ab3 £a6 15 &e2 £c5
16 gdl &c6 17 Ac2 Ae6
Castling would now be bad: 17...
0-0? 18 b4 £ib7 19 Ae4 «e8 20 a4
bxa4 21 -&C4+ gf7 (21...#f7 loses a
piece after 22 -&cl) 22 £ia3, and there
is literally nothing that Black can
move.
18 £bd2 gd8?
This second voluntary rejection of
castling, for the sake of simplification,
leaves Black on the verge of disaster.
19 £b3 gxdl+ 20 «xdl £b7?
This third rejection of castling leads
to a crushing defeat, although for his
previous errors Black would have had
to suffer mounting difficulties in the
variation 20...0-0 21 £ixc5 &xc5 22
Ae3 &c7 23 Ab3.
21 a4 a6 22 axb5 axb5
Black is not afraid of the check at
a8: there would appear to be no way of
approaching his king at f7. But...
23 £bd4! exd4 24 £xd4 &d7 25
£xe6 &xe6 26 ga8+ £c8
Alas, the f7 square has become
"mined" on account of the weakening
of the a2-g8 diagonal.
27 Ab3 &d7 28 «e2+ &d8 29
Ae6 ge8
Is everything in order?
30 gxc8+! &xc8 31 &dl+ &e7 32
Axc8 gxc8 33 igre2+ Black resigns.
(see diagram next page)
After playing the opening without
any particular pretensions, White
should have concerned himself about
his king-10 Ae2and 11 0-0.
King in the Centre
15
ssip
MiB/.,pii!
positional concessions, which may be
very diverse.
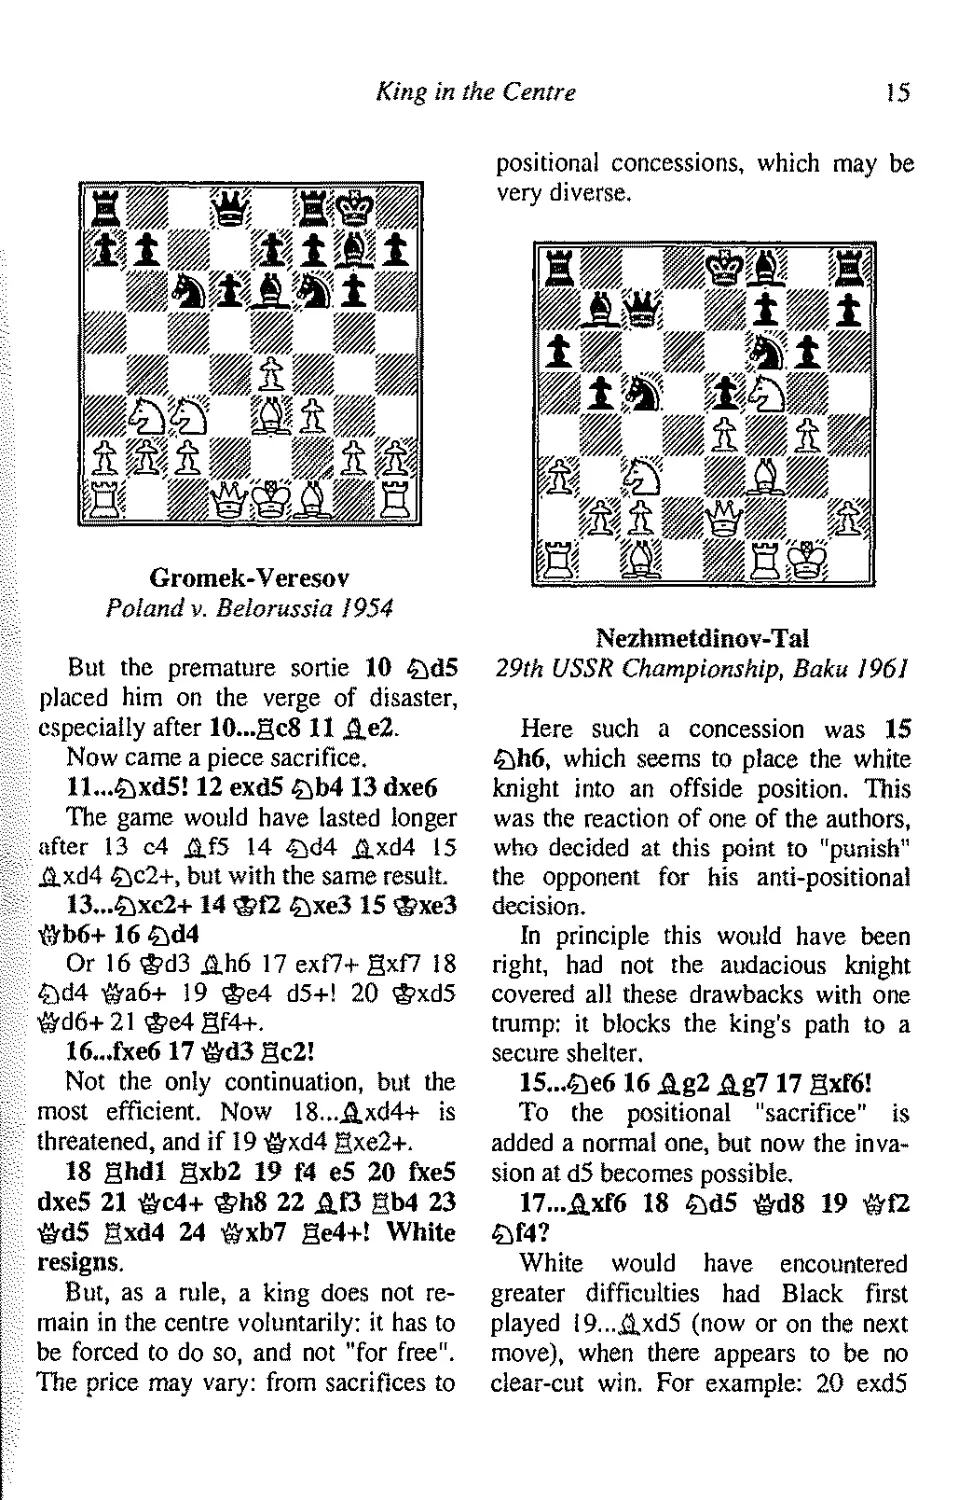
Gromek-Veresov
Poland v. Belorussia 1954
But the premature sortie 10 £>d5
placed him on the verge of disaster,
especially after 10...gc8 11 A«2.
Now came a piece sacrifice.
Il...&xd5! 12 exdS &b4 B dxe6
The game would have lasted longer
after 13 c4 Af5 14 £>d4 Axd4 15
Axd4 £>c2+, but with the same result.
13...&XC2+ 14 ©f2 &xe3 IS ©xe3
#b6+ 16 &d4
Or 16 <g>d3 Ah6 17 exf7+ gxf7 18
£>d4 &a6+ 19 ®e4 d5+! 20 ®xd5
&d6+21<g>e4gf4+.
16...fxe6 17 «d3 gc2!
Not the only continuation, but the
most efficient. Now 18...Axd4+ is
threatened, and if 19 i&xd4 Bxe2+.
18 ghdl gxb2 19 f4 eS 20 fxeS
dxeS 21 «c4+ &h8 22 Af3 Bb4 23
«dS Bxd4 24 &xb7 ge4+! White
resigns.
But, as a rule, a king does not
remain in the centre voluntarily: it has to
be forced to do so, and not "for free".
The price may vary: from sacrifices to
, ,f rMwm„ m
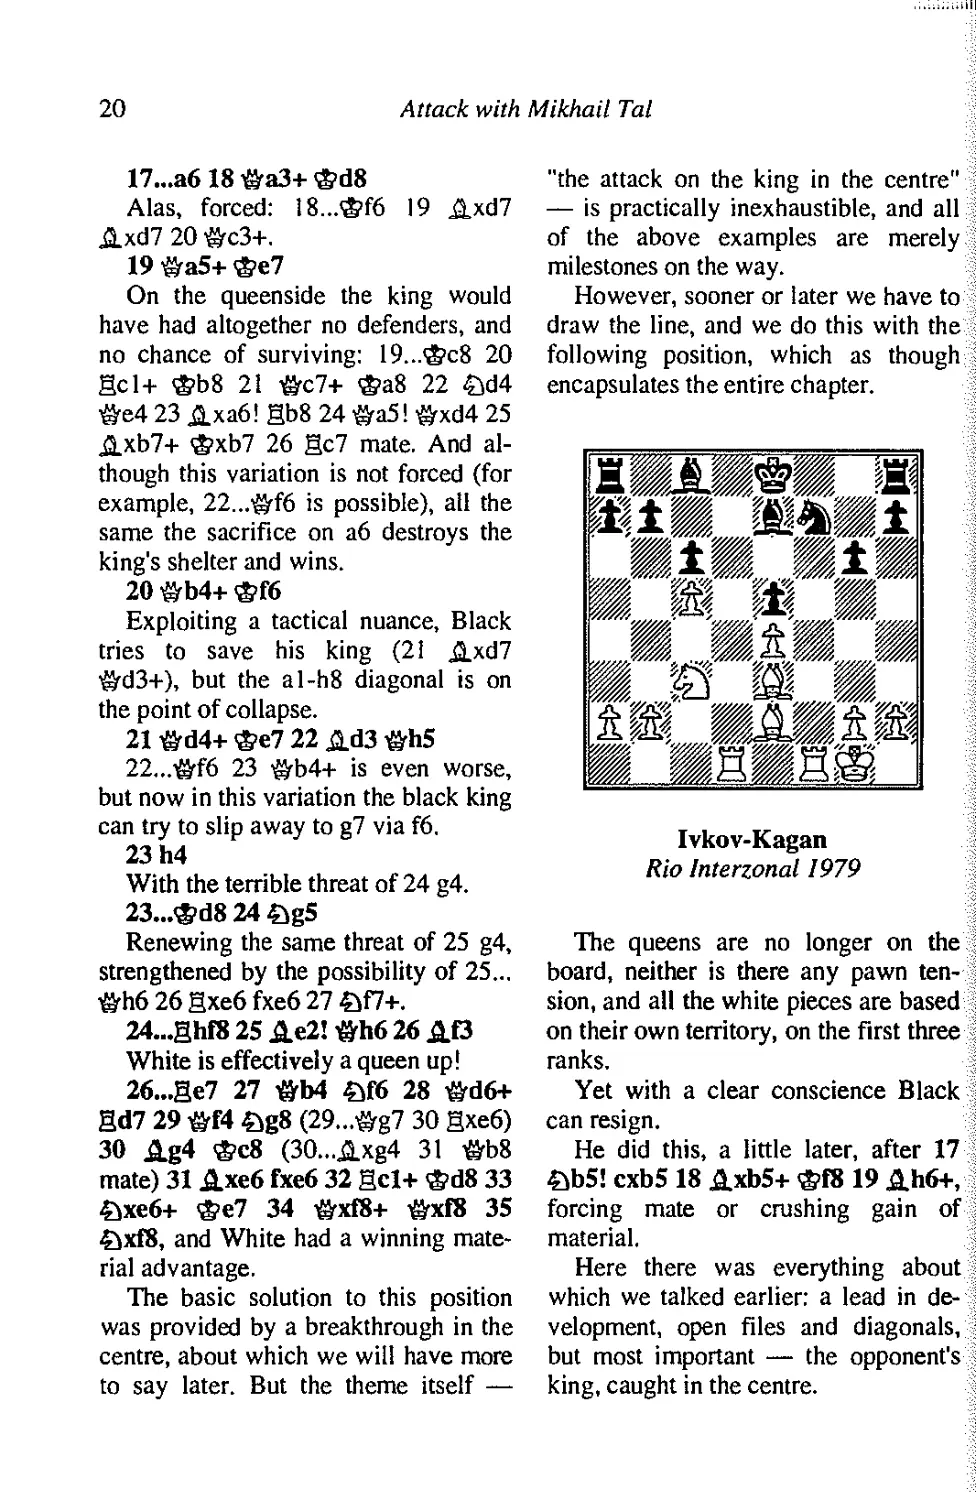
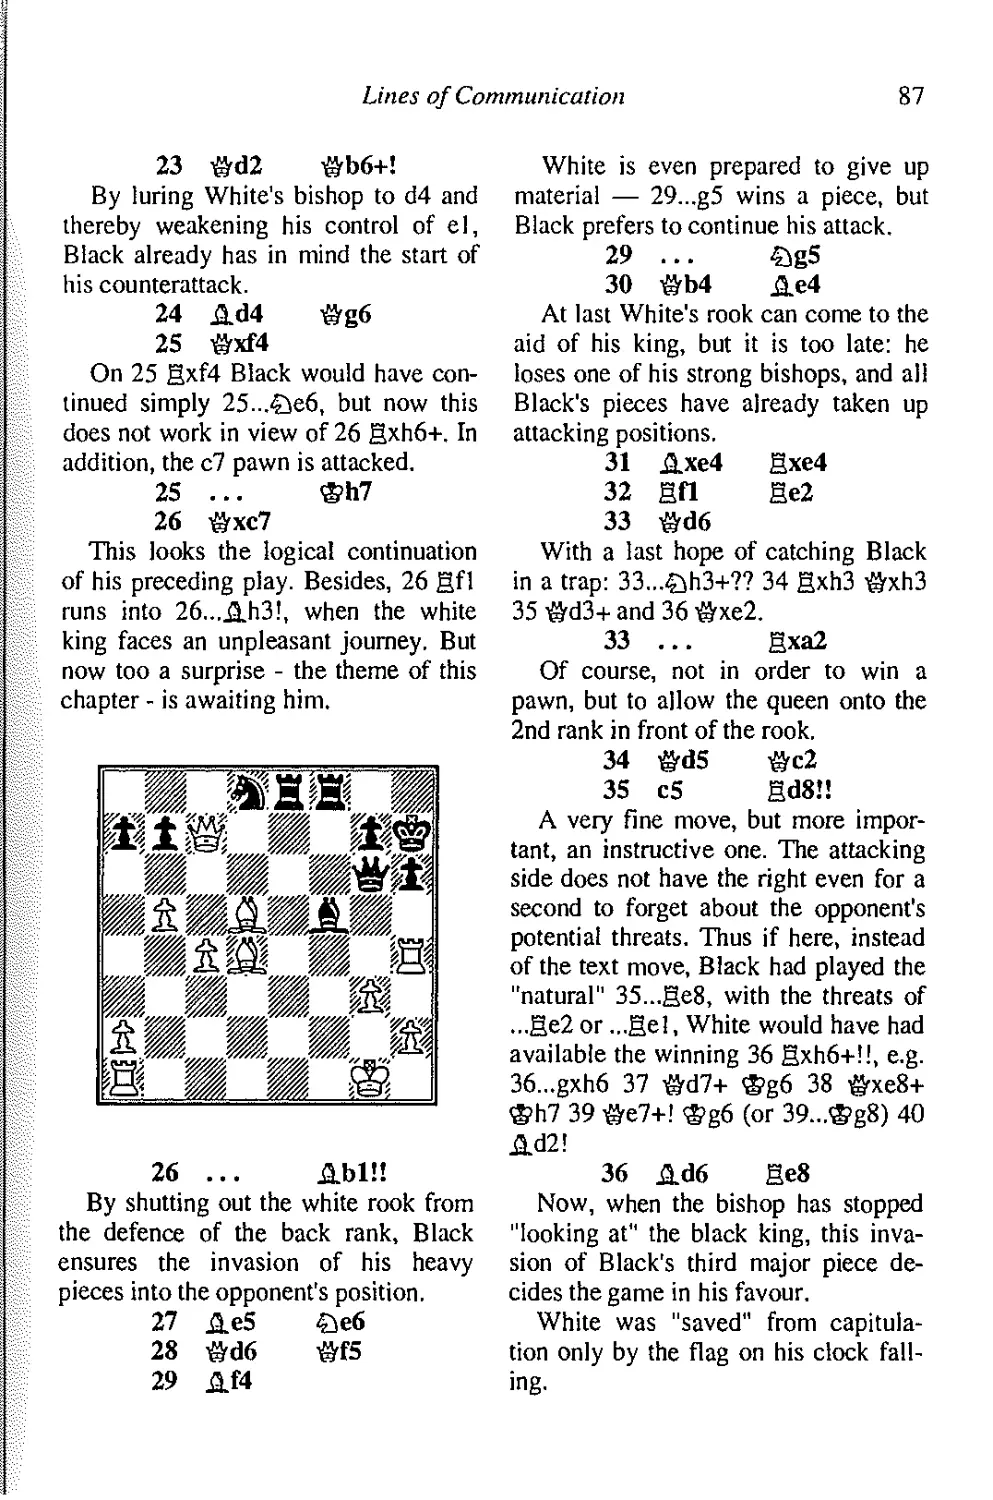
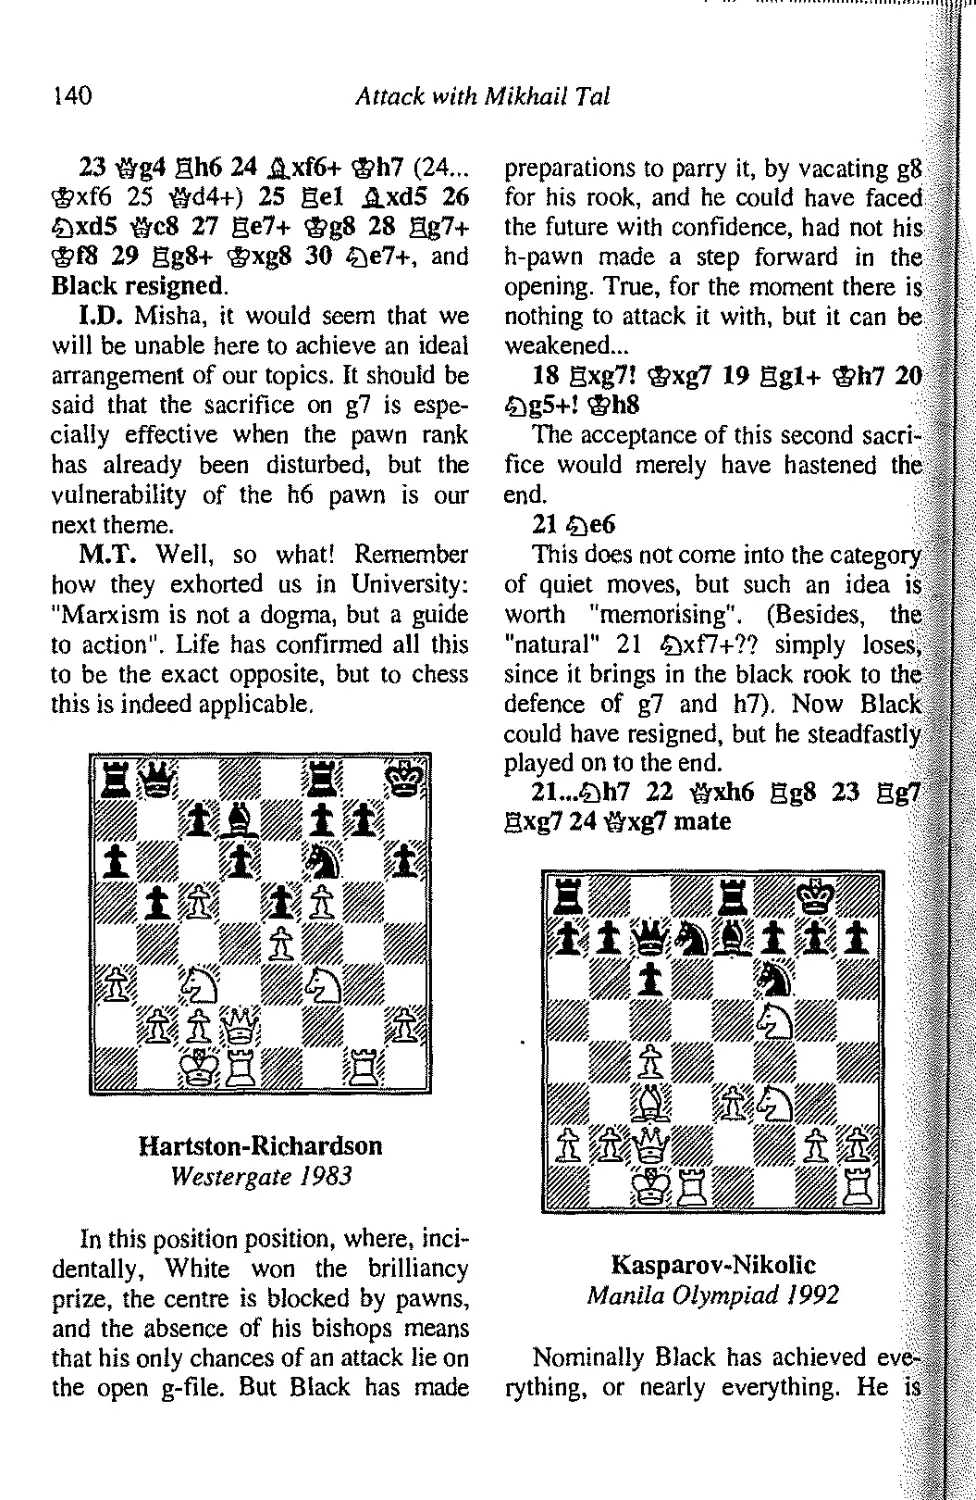
Nezhmetdinov-Tal
29th USSR Championship, Baku 1961
Here such a concession was 15
£>h6, which seems to place the white
knight into an offside position. This
was the reaction of one of the authors,
who decided at this point to "punish"
the opponent for his anti-positional
decision.
In principle this would have been
right, had not the audacious knight
covered all these drawbacks with one
trump: it blocks the king's path to a
secure shelter.
15...£ie6 16 Ag2 Ag7 17 gxftt!
To the positional "sacrifice" is
added a normal one, but now the
invasion at d5 becomes possible.
17...Axf6 18 &d5 &d8 19 &f2
&f4?
White would have encountered
greater difficulties had Black first
played I9...,2,xd5 (now or on the next
move), when there appears to be no
clear-cut win. For example: 20 exd5
16
Attack with Mikhail Tal
£if4 21 &xf4 exf4 22 ©xf4 ©b6+ 23
©hi 0-0-0 24 c3!! (the direct
exchange of blows 24 <Sxf7 Axb2 25
Bfl Bhf8 26 ©b4 &g7 27 &xd8
Bxfl + 28 Axfl ©f2 29 Ah3 leaves
Black with the advantage after 29...
©f3+ 30 ®gl ©xd5, but not 29...
Ad4? 30 g5+ ®xd8 31 ©d6+ etc.,
when White wins) 24...Bhf8 25 g5
Ae7 26 &h3+ ®b7 27 £)xf7 ®a7! 28
Ae6, and although White has a serious
advantage, there is still a struggle in
prospect.
20 Axf4 exf4 21 e5! £.xe5
Alas, Black is obliged to open the
central files, along which he comes
under attack.
21....&h4 is very strongly met by 22
©d4!, with the threat of e5-e6, and
after 22...Bf8 23 gdl £.xd5 24 &xd5
Bc8 25 ©a7 ©c7 26 ©xa6 White
must win, since 26...i&xc2 is bad on
account of 27 Axf7+ Bxf7 28 &e6+
Be7 29 ©g8+.
If 21...Ag5 White has time for 22
£if6+ ®f8 23 &xb7 Bb8 24 Ml
&xh6 25 gdl ©e7 26 ©h4 Ag7 27
£)d7+ ®e8 28 ©f2 Bc8 29 ©d4,
when Black cannot parry the numerous
threats, the chief of which is 30 Ab7
Bc7 3I &xa6.
And after 21....2,xd5 all the same
the e-file is opened, and White wins
the queen: 22 exf6! Axg2 23 gel+.
22 gel f6 23 £>xf6+! &xf6 24
&d4! ®f8 25 Bxe5 ©d8
Or 25...gd8 26 Be8+! ®g7 27
Se7+.
26 Bf5+ gxf5 27 &xh8+ ®e7 28
igrg7+ <g>e6 29 gxf5+ Black resigns.
This ability — to prevent the
opponent from removing his king to safety
— was also possessed by the top
players in the earlier era of romantic chess.
P.Morphy-E.Morphy
USA IS50
12 e5! dxe5 13 gfel £.d7 14 gabl
The black king has not been allowed.
across to the kingside, but on the
queenside too it will evidently be
uncomfortable. But there is no
alternative.
14...0-0-0 15 £.a6! £>a5 16 gecl
Q.c6 17 &xa5 bxa6 18 &xa6+ ©d7
19 gxc6 and White won (19...©xc6
20Bdl+).
I.D. However, let us leave in peace
the shadows of our great predecessors.
Their opponents played rather naive
chess, and on the whole they defended
weakly (here, for example, more
tenacious was 15...bxa6 16 &b3 Ag4 17
©b7+ ®d7 18 gbdl+ ®e8 19 Bxd8+
®xd8! 20 ©a8+ Ac8 21 Bdl+ £>d4,
although White still retains an attack -
22 ^d5+). More instructive, in my
opinion, are modern games even at the
level of masters, to say nothing of
grandmasters, candidates and champions.
King in the Centre
17
M.T. Alas, I am forced to agree. In
my youth I gained enormous pleasure
from examining the games of the old
masters, but when the so-called "Tal
School" opened in Riga, at the very
first meeting I said to my young
friends: "For pleasure you can read the
games collections of Anderssen and
Chigorin, but for benefit you should
study Tarrasch, Keres and Bronstein."
In modem chess the art of defence
has grown greatly, and it is becoming
increasingly difficult to win a won
position. But the basic principles of attack
are eternal. Moreover, the assault need
not necessarily resemble a meteorite,
be instantaneous and be calculated
from beginning to end: the king in the
centre can be the target of a lengthy,
multi-stage offensive, with one phase
logically developing into another.
An example — and a brilliant one!
— is provided by the following game.
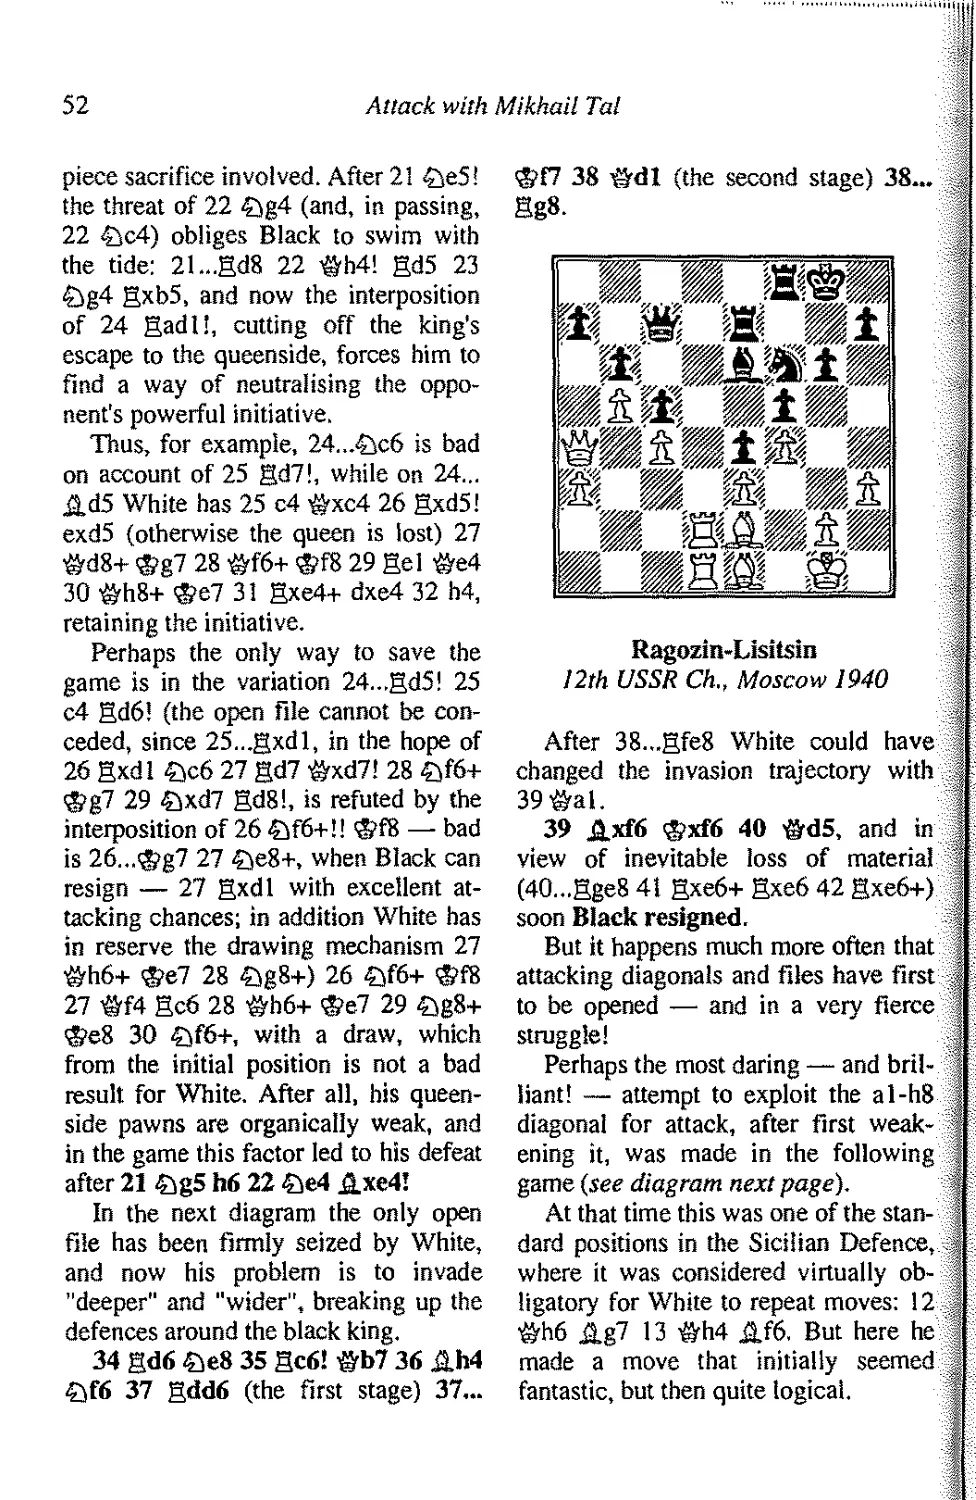
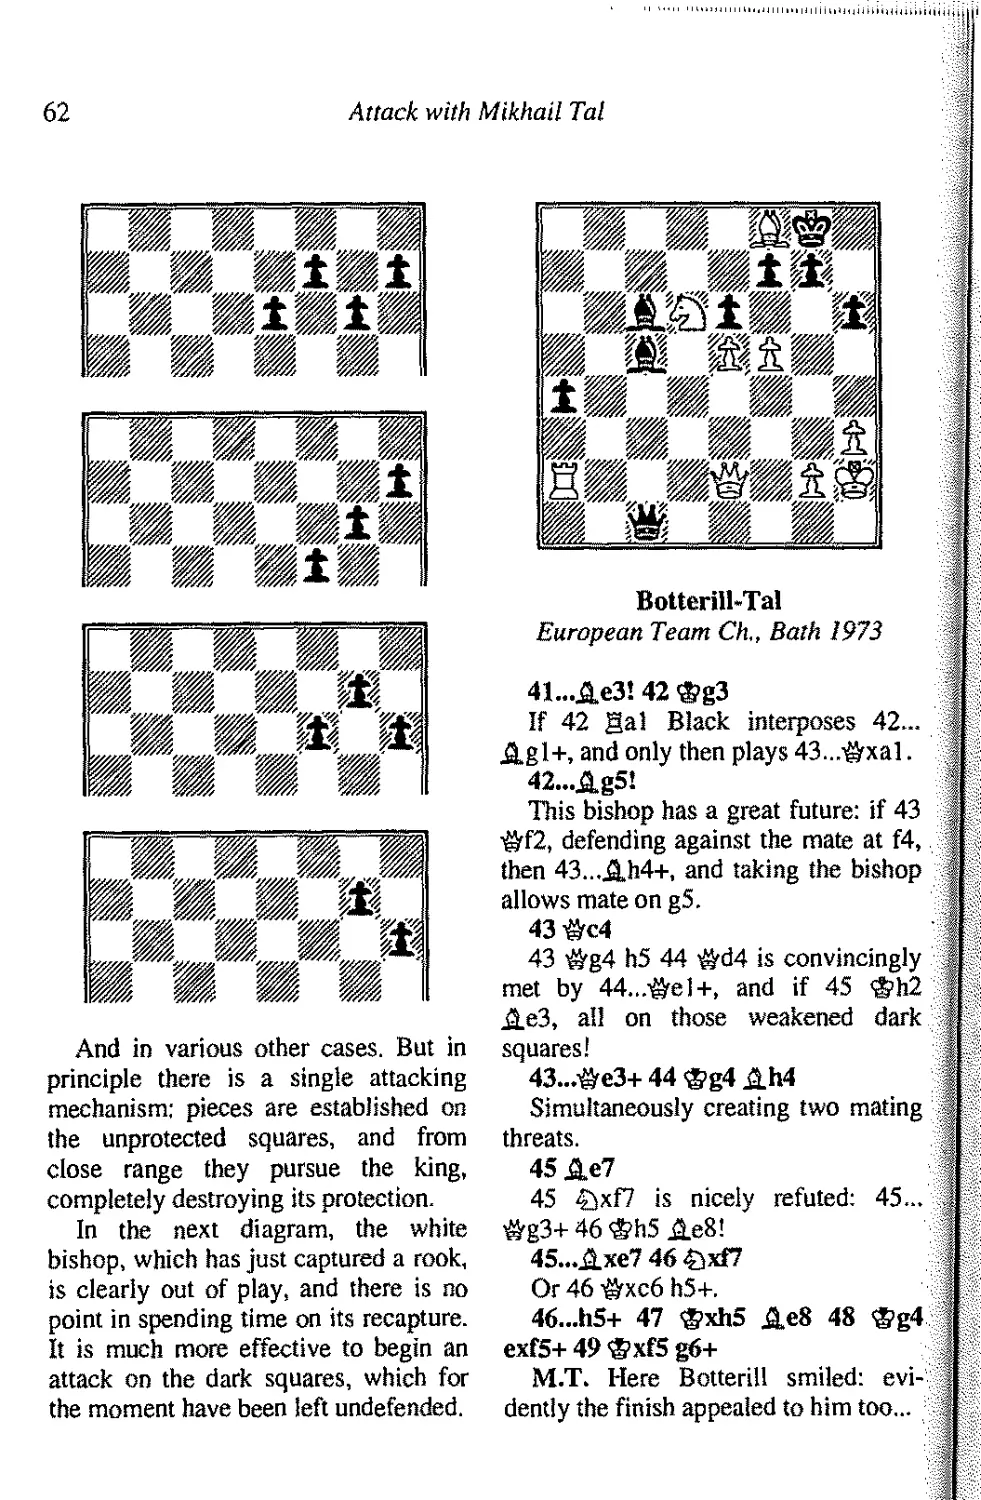
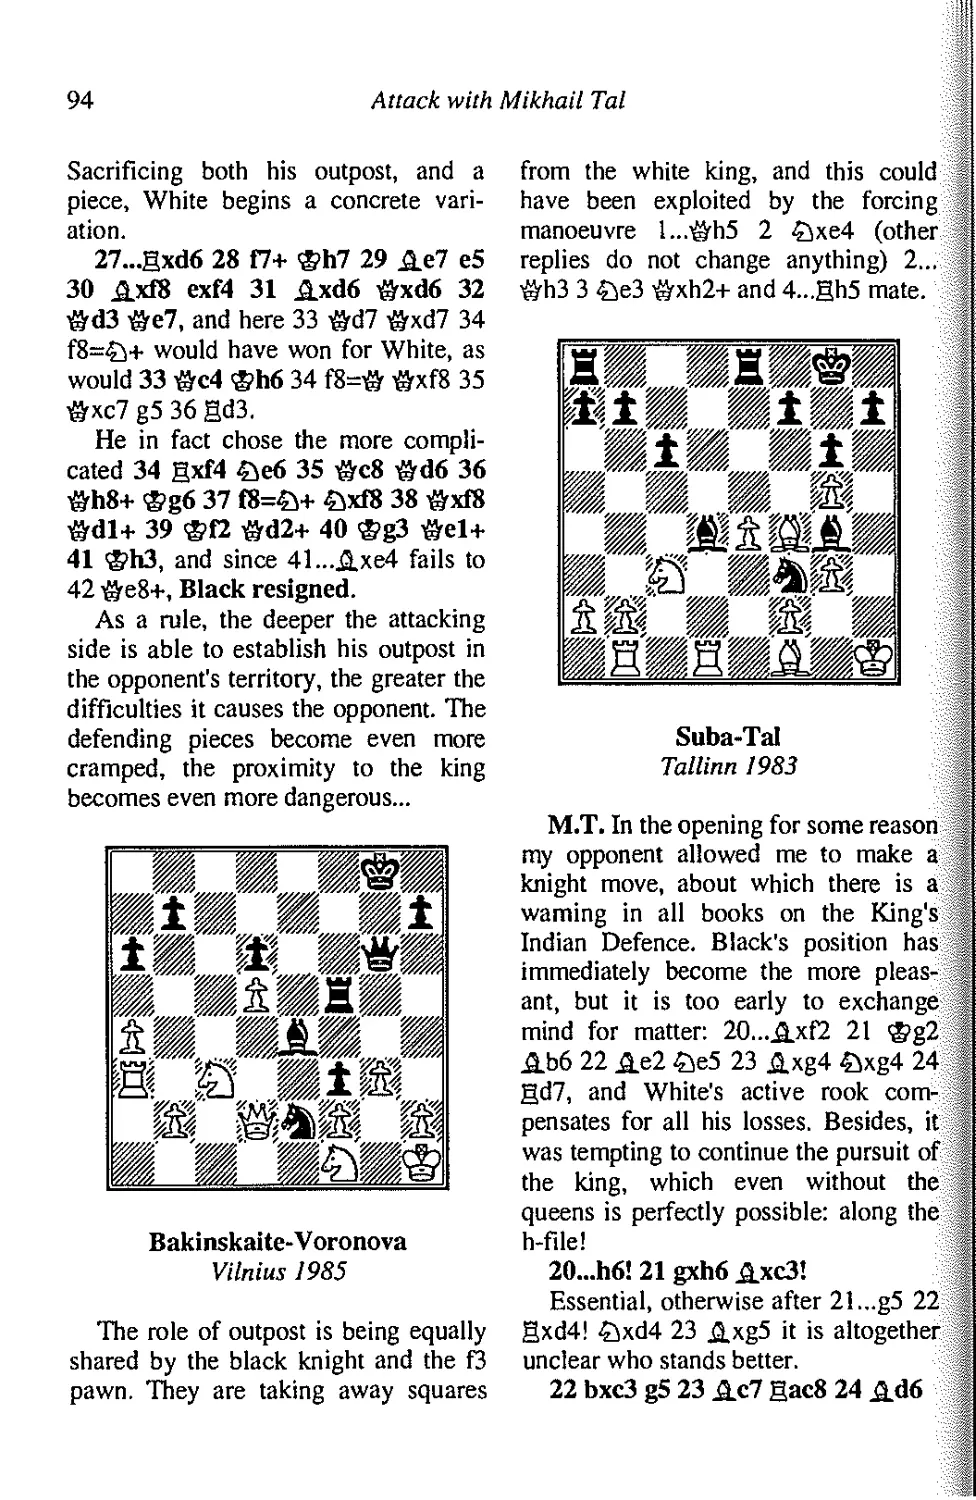
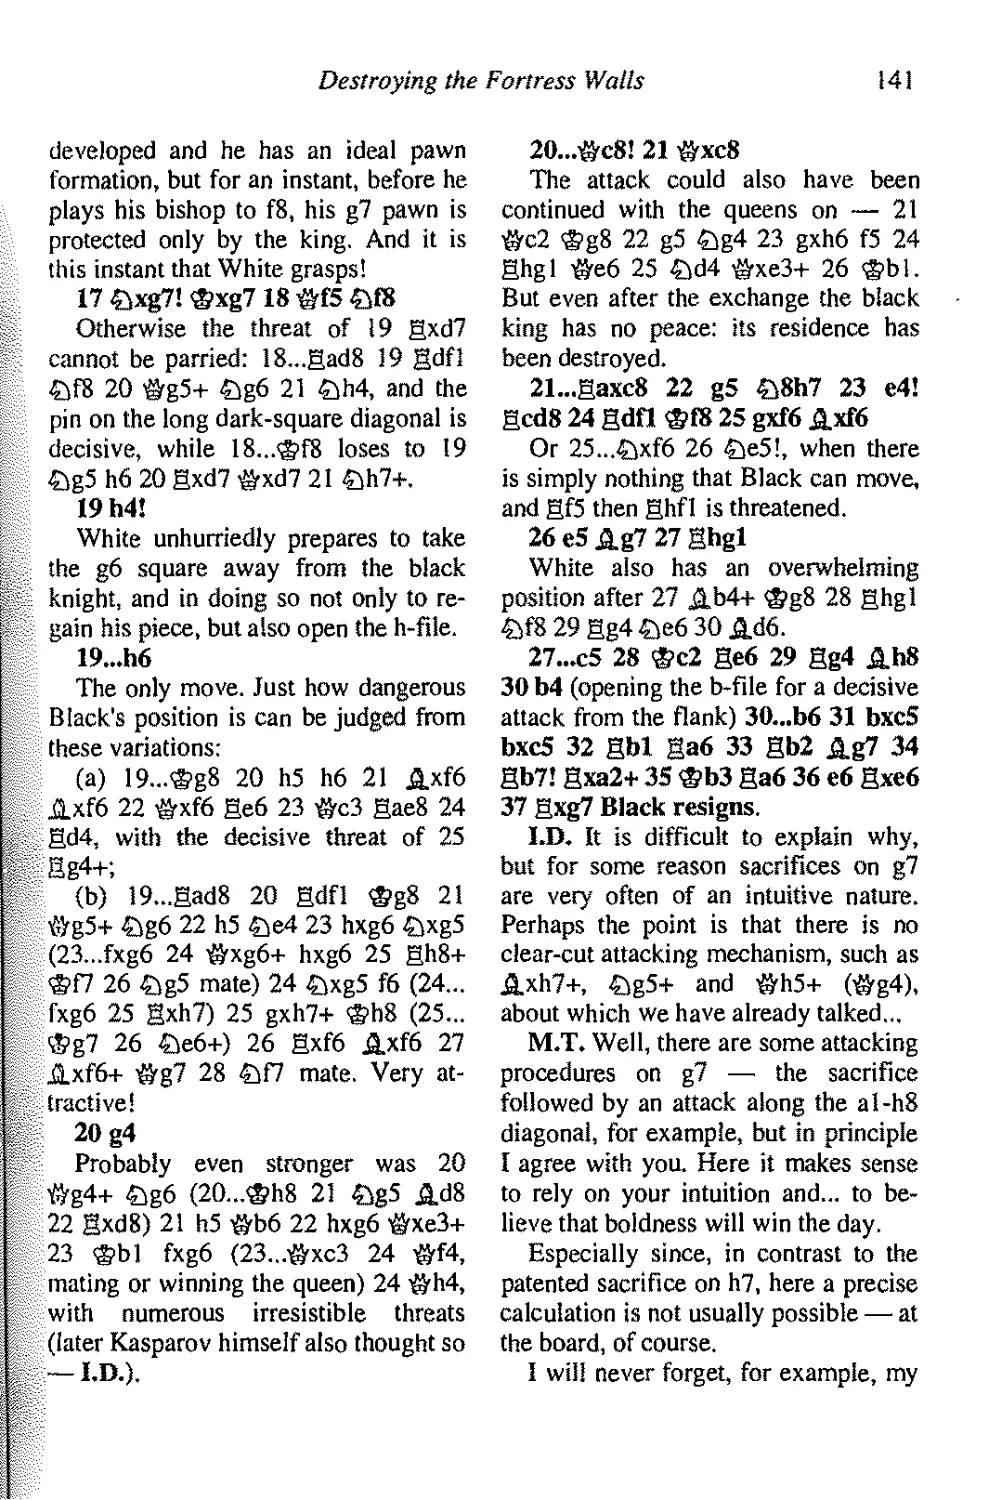
Chiburdanidze-Dvoiris
Tallinn 1980
White is fully mobilised, and
essentially cannot even strengthen the
placing of her pieces: they are
extremely actively placed. Black, by
contrast, has made several "superfluous"
pawn moves, his queen has gone to b6
in two moves, and as a result not all
his forces are in play. And yet he needs
only one tempo for queenside
castling... The player with the advantage is
obliged to attack!
12 adS!! exdS
The other knight is taboo: 12...
©xd4? 13 Anf6 gxf6 14 £xb5 and 15
&xf6+.
13 £c6!!
Before opening the c-file, White
cuts off the black king's escape to the
saving shelter at c7.
13...jlxc6
The attacking file cannot be kept
closed: 13,..d4 14 e5!
14 exdS+ JJ.e7 (14...®d8 15 dxc6
&c5 16 c7+) IS dxc6 £c5 16 £xf6
gxf617.fl.f5!
And once again the black king has
nowhere to go.
17...-&C7
Forced, since Black has to defend
both his bishop, and his d6 pawn, and
also the advanced white pawn has to
be blocked.
18 b4 £e6 19 ©hS &g7 20 £d7+
Erecting a barrier in front of Black's
queen, which is obliged to look after
his bishop.
20...&f8 21 ©h6 dS
The main point is to bring the queen
out to d6, but in passing Black sets a
little trap.
22gxe7!<g>xe7 23gel+!
The trap — 23 ©xg7? ©xf4+ 24
®bl Sag8, when Black wins — fails
to operate.
18
Attack with Mikhail Tal
i
23...<g>f8 24 &xf6 <g>g8 25 Se7 Sf8
26 &.e6!
It's all over!
26...&xe7 27 &xe7 fxe6
Or 27...&xe6 28 f5 &g7 29 c7.
28 c7 h5 29 &xf8+ Black resigns.
This theme received a quite amazing
interpretation in the following world-
famous game.
M.T. I am happy to admit that I
watched this game with envy, and
would have readily exchanged my
silver medal of that championship for
the right to sign the scoresheet — the
white half, of course.
I.D. And when White's next move
was announced in the press centre, we
decided that the impregnable Ratmir
Kholmov, the "central defender" as he
was then called, had for a moment
taken leave of his senses.
Kholmov-Keres
26th USSR Championship
Tbilisi 1959
12&c6(!!)
The following variation is not too
complicated: 12...&xdl? 13 Sxdl
Ab7 (or 13...,&d7) 14 £,d5, when
14....S.XC6 is bad in view of 15 ©c7+
®f8 16 £ixa8 &xa8 17 Sd8 mate, and -
otherwise after 14...0-0 White simply
picks up the e7 pawn with check. But ;
Black has another possibility. -
12...&d7(!)
This is what was played, and how
can White now save his piece?
13 &xe7!! ,
Once again two exclamation marks, j
although this is merely a continuation j
of White's brilliant conception. White 1
forces the black king to remain in the
centre, since in the event of 13...i8rxe7 ',
14 &d5 &d8 15 &f6+ ,&xf6 (or j
15...®e7 16 &f3 Ae6 17 Ag5, and j
Black loses material) 16 exf6+ jie6
17 Axh6 &xf6 18 ©g4! without sac- \
rificing anything White has a powerful '
initiative, which is merely strengthened \
by the opposite-colour bishops. And ;
totally bad is 13...&xdl 14 Sxdl '
®xe7 15 Ag5+ ®e6 16 Sd6+ ®f5 1
(16...®xe5 17 Sd5+, mating) 17 f4, '
with various mating threats. j
13...<g>xe7 14 &.xh6! i
Again a paradoxical decision. The j
bishop, which was predestined for an j
attack along the weakened dark j
squares, is exchanged for the "off- j
side" knight. j
M.T. But on the other hand, a major ]
attacking principle is maintained — "a j
tempo". The time that we don't have is s
more precious than the piece that we i
do have. I
14...£.xh6 15 &f3 Ag7!
The best defence. Now after 16
&xa8 Ab7 17 &xa7 &c6 18 f3 Sa8
19 £)d5+ &xd5 20 &xb6 the outcome ;
is unclear. i
King in the Centre
19
16£,d5+®d8
Forced, since Black loses quickly
after both 16...®e8 17 £)f6+ Axf6 18
cxf6+ and 19 #xa8, and 16...®f8 17
c6©b7 18e7+©e8 19 ©f6!
17 gadl Ab7
To find the strongest continuation
17...©b7 at the board would be
practically impossible, in view of its
paradoxical nature. True, even in this case
after 18 e6! White has a very strong
attack, e.g. 18...fxe6 19 £ib4+ ®c7 20
©g3+ e5 21 gxe5! cxb4 22 gc5+,
mating.
18 ©b3 5,c6 19 £)xb6 axb6 20
mn Axe5 21 gxd7+ .&xd7 22
gxeS, and White won.
More complicated are instances
when both sides appear to have the
right to play actively, and when it is
more difficult to decide: should one
continue attacking or now switch to
defence? Here the deciding role is
played by an accurate appraisal of all
the factors "for" and "against".
Karpov-Yusupov
55th USSR Championship
Moscow 1988
Both kings have lost the right to
castle, and, in addition, the positions of
each side have their pluses and
minuses. White, for example, is for the
moment playing without his king's
rook, and at least three tempi are
required to bring it into the game. Black,
for his part, is clearly weak on the dark
squares, but he only needs to bring his
king to f6, when he could think of
seizing the initiative. This could have
happened, for example, after 16 #a3+
®f6 17 Ad3 #d5 18 ©xa7 Ag4!, or
16 5,xe6 fxe6 17 ©a3+ ©f6 18
©xa7?? ©b5+ 19 ®gl ga8 winning,
or 16 £)g5 ®d8! (here 16..,<£>f6 is
weaker in view of the concrete 17
,2,xe6 fxe6 18 <Se4+, when White
wins the exchange) 17 £ixe6+ fxe6 18
5,xe6 ©b5+ 19 ®gl ge7! with coun-
terplay; in this last variation 17 5,xe6
fxe6 18 £ixe6+ <S>c8 19 ©b3 ge7!
also favours Black.
The correct evaluation of the
position is only established by the typical
attacking device carried out by the ex-
World Champion.
16d5»
At the cost of the isolated pawn the
black queen's path to b5 is cut, and
more important — the weak dark
squares become glaringly weak! After
all, now White can also attack along
the long dark-square diagonal from c3.
And another achievement for White
becomes apparent on his next move.
16...cxd5 17 Ab5!
Revealing another target — the
knight at d7, which is insufficiently
protected, as best illustrated in the
variation 17... ®f8 18 ©c3 gg8 19
£>d4, 20 £ixe6+ and 21 5,xd7.
20
Attack with Mikhail Tal
17...a6 18 &a3+ <g>d8
Alas, forced: 18...<g>f6 19 Axd7
Axd7 20 &c3+.
19 &a5+ <g>e7
On the queenside the king would
have had altogether no defenders, and
no chance of surviving: 19...(S'c8 20
Scl+ <g>b8 21 &c7+ <g>a8 22 £>d4
#e4 23 Axa6! Sb8 24 ©a5! ©xd4 25
A"b7+ <g>xb7 26 gc7 mate. And
although this variation is not forced (for
example, 22...igrf6 is possible), all the
same the sacrifice on a6 destroys the
king's shelter and wins.
20 &b4+ <g>f6
Exploiting a tactical nuance, Black
tries to save his king (21 ,2.xd7
$rd3+), but the al-h8 diagonal is on
the point of collapse.
21 &d4+ <g>e7 22 £d3 &h5
22...igrf6 23 igrb4+ is even worse,
but now in this variation the black king
can try to slip away to g7 via f6.
23 h4
With the terrible threat of 24 g4.
23...<£>d8 24 £>g5
Renewing the same threat of 25 g4,
strengthened by the possibility of 25...
&h6 26 Sxe6 fxe6 27 £>f7+.
24...ghf8 25 Ae2! &h6 26 Af3
White is effectively a queen up!
26...ge7 27 &b4 £>f6 28 &d6+
gd7 29 &f4 £>g8 (29...&g7 30 Sxe6)
30 Ag4 <S>c8 (30...Axg4 31 &b8
mate) 31 Axe6 fxe6 32 Scl+ <g>d8 33
£>xe6+ <g>e7 34 &xf8+ &xf8 35
4}xf8, and White had a winning
material advantage.
The basic solution to this position
was provided by a breakthrough in the
centre, about which we will have more
to say later. But the theme itself —
"the attack on the king in the centre"
— is practically inexhaustible, and all
of the above examples are merely
milestones on the way.
However, sooner or later we have to
draw the line, and we do this with the
following position, which as though
encapsulates the entire chapter.
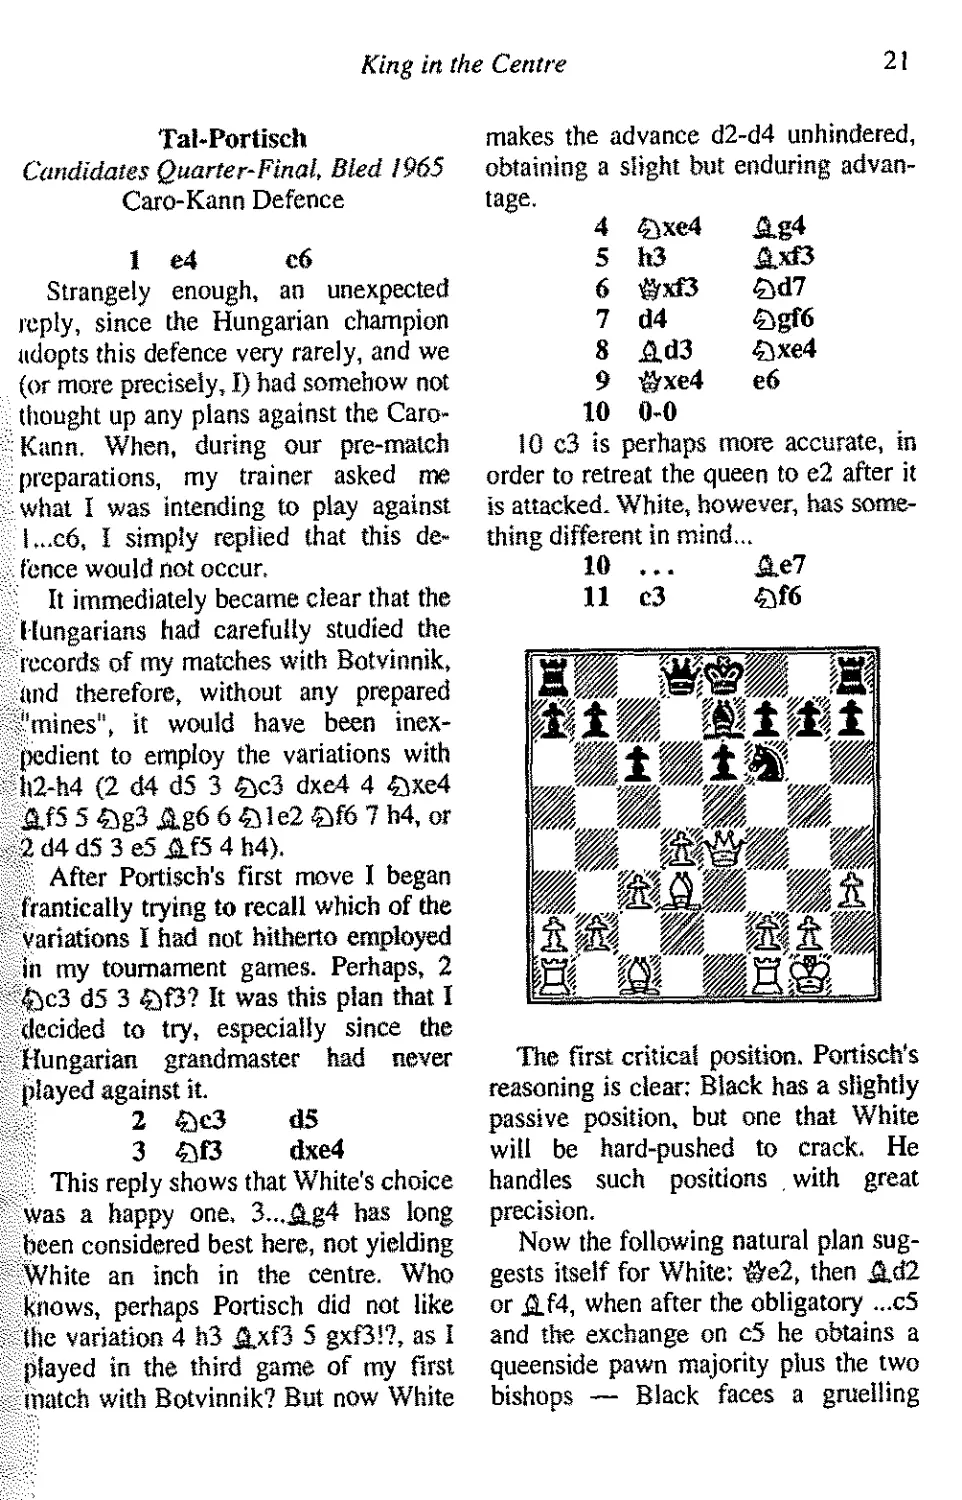
Ivkov-Kagan
Rio Interzonal 1979
The queens are no longer on the
board, neither is there any pawn
tension, and all the white pieces are based
on their own territory, on the first three
ranks.
Yet with a clear conscience Black
can resign.
He did this, a little later, after 17
£>b5! cxb5 18 Axb5+ <g>f8 19 Ah6+,
forcing mate or crushing gain of
material.
Here there was everything about
which we talked earlier: a lead in
development, open files and diagonals,
but most important — the opponent's
king, caught in the centre.
King in the Centre
21
Tal-Portisch
Candidates Quarter-Final, Bled 1965
Caro-Kann Defence
1 (4 c6
Strangely enough, an unexpected
reply, since the Hungarian champion
adopts this defence very rarely, and we
(or more precisely, I) had somehow not
thought up any plans against the Caro-
Kann. When, during our pre-malch
preparations, my trainer asked rne
what I was intending to play against
I...c6, I simply replied that this
defence would not occur.
It immediately became clear that the
Hungarians had carefully studied the
records of my matches with Botvinnik,
and therefore, without any prepared
"mines", it would have been
inexpedient to employ the variations with
Il2-h4 (2 d4 dS 3 £>c3 dxe4 4 4We4
AfS 5 45g3 Ag6 6 £>le2 fcK 7 h4, or
2d4d5 3e5Af5 4h4).
After Portisch's first move I began
frantically trying to recall which of the
variations I had not hitherto employed
in my tournament games. Perhaps, 2
fec3 d5 3 fif3? It was this plan that I
decided to try, especially since the
Hungarian grandmaster had never
played against it.
2 €)c3 dS
3 41f3 dxe4
This reply shows that White's choice
was a happy one, 3...,&g4 has long
been considered best here, not yielding
White an inch in the centre. Who
knows, perhaps Portisch did not like
the variation 4 1>3 &xf3 5 gxf3!?, as I
played in the third game of my first
match with Botvinnik? But now White
makes the advance d2-d4 unhindered,
obtaining a slight but enduring
advantage.
4 Qxe4 Ag4
5 h3 &rf3
6 &rf3 £>d7
7 d4 £>gf6
8 Ad3 45xe4
9 ©xe4 e6
10 0-0
10 c3 is perhaps more accurate, in
order to retreat the queen to e2 after it
is attacked. White, however, has
something different in mind...
10 ... &e7
11 c3 45f6
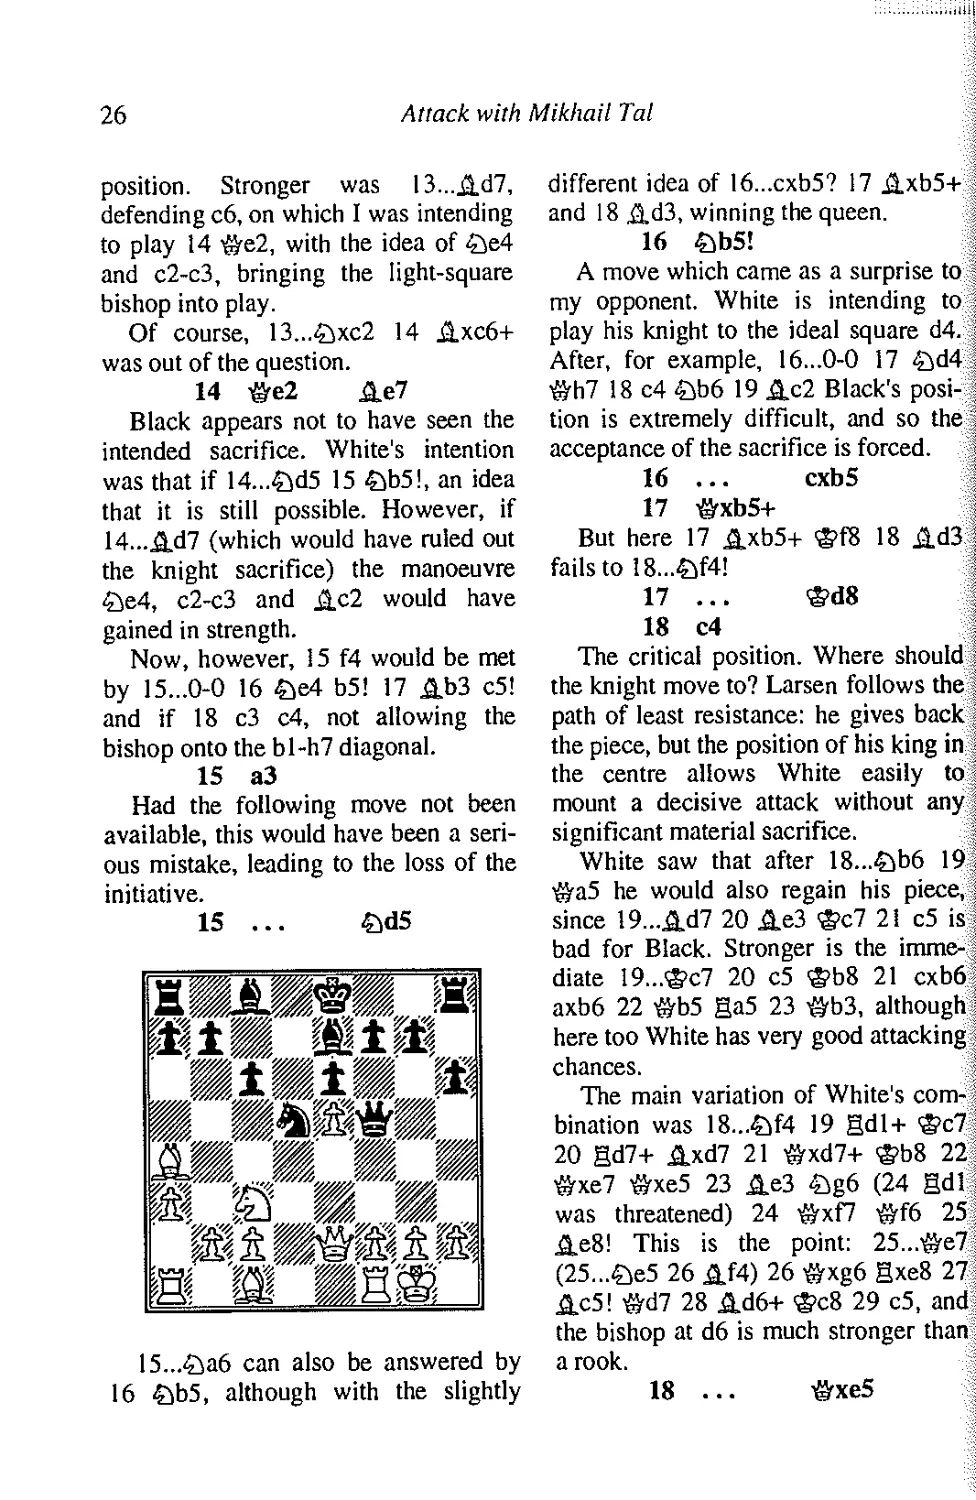
The first critical position. Portisch's
reasoning is clear: Black has a slightly
passive position, but one that White
will be hard-pushed to crack. He
handles such positions , with great
precision.
Now the following natural plan
suggests itself for White: ©e2, then SJ2
or jj.f4, when after the obligatory ...c5
and the exchange on c5 he obtains a
queenside pawn majority plus the two
bishops — Black faces a gruelling
22
Attack with Mikhail Tal
defence. And I, of course, realised that
12 i&e2 was a natural and strong
move.
But nevertheless I was attracted by
another idea.
12 ©h4
This provokes Black's reply:
12 ... £id5
In a number of variations Black
strengthens his defences by the
manoeuvre ...&f6-d7-f8, but now from d5
it is difficult for the knight to reach f8.
However, this is achieved at the cost of
several tempi, and Black has time to
stabilise the position.
13 ©g4 Af6
Not, of course, 13...0-0 14 Ah6
Af6 15 ©e4, winning the exchange.
14 gel
Initially I had been intending to
complete the queen manoeuvre by 14
©e4, keeping the black king in the
centre, but then I noticed that after
14...Qe7 followed by ...Qf5 White's
initiative would quickly peter out.
Allowing Black to castle is by no
means evidence of White's good nature
— after 14...0-0 he succeeds in
advantageously regrouping his pieces: 15
Ah6Be8 16gadl ©b6 17 Ac 1, when
the bishop returns to what is perhaps
its best position, and the rook is
actively placed in the centre. So
Portisch prevents the development of
White's queenside:
14 ... ©b6
The second critical position. Up till
now Portisch had played quickly and
confidently. White has clearly not
achieved what he could have expected
from the opening: the queen is pressing
on the b2 pawn, pinning down the
bishop at c 1. Therefore "correct" (one
can also write it without the inverted
commas) was the reserved 15 a3, with
the hope, in a protracted struggle, of
exploiting the illustrious bishop pair.
All this is true. But for 14 moves the
black king has remained with impunity
in the centre of the board. Is there no
way of exploiting this and at the same
time abruptly changing the course of
the game?
This was how the idea arose of the
rook sacrifice at e6. An amusing
variation flashed though my mind —
one that was by no means forced, but
highly camouflaged, which afforded a
certain aesthetic pleasure. And I
concluded that, even if the sacrifice might
lead only to a draw, it was correct, and
in addition the change in the character
of the play was bound to be unpleasant
for Portisch.
15 c4?! &b4
On I5...£ie7 I was intending to play
16 d5! cxd5 17 cxd5 Qxd5 18 ©a4+,
at least preventing Black from castling.
16 Bxe6+ fxe6
17 ©xe6+
King in the Centre
23
Here Black was faced with the
problem of how to punish his opponent
lor his "recklessness". It is clear that
this aim is least of all answered by
I7...®d8: White has 18 ©d6+©e8 19
$Vc6+ etc. I did not see anything better
during the game, nor do I now.
My hopes were mainly associated
with the "refutation" 17...iie7, when
White does indeed lose after 18 Ag5
*Vc7 19 gel £ixd3! 20 &xe7 &d7!
I le can, however, obtain a very
attractive position by interposing 18 ilg6+!,
when Black cannot play 18...hxg6 19
Ag5 &c7 20 gel with the threat of 21
Mxg6+! Therefore he must reply 18...
*d8 19 Jlf5 &xd4 (not 19...&C7 20
Af4 ©c8 21 &e4) 20 &f4. This
position greatly appealed to me, and a
continuation of the variation (not
exactly forced, it is true) revealed a most
attractive idea: 20„.ge8 21 gel g6?
22 &e3 &d6 23 &xa7! &xe6 24
,Q.b6+ <g>c8 (not 24...@d7 25 &xe6+
<&d6 26 c5 mate) 25 jixe6+ and 26
ild7. However, in this variation too
Hlack could have defended.
After the game Portisch admitted
that he had seen the rook sacrifice, but
lllld not considered it dangerous; and
when it in fact took place, he became
ill at ease. Only this nervousness can
explain why he instantly, without
thinking, replied
17 ... &f8
I was even upset: so much time and
effort had been spent on the analysis of
the most complex and attractive
variations, and not one of them was to
occur on the board...
18 Af4 gd8
The only good move. Insufficient is
18...ge8 19 .A,d6+ £e7 20 gel ©d8
21 ge3!, or I8...i&d8 19 gel g5! 20
Jid6+ ©g7 21 Axb4, when White has
a very strong attack with level
material. By parting with his queen, Black
can face the future with confidence.
19 c5 £>xd3!
20 cxb6
Still out for blood... My first
intention here had been at last to force a
draw by 20 .fl,h6, to which Black's
only good reply is 20...'&xb2! (less
good is 20..,©c7 21 &xf6+ ®g8 22
ilxg7!). But not every c-pawn can
reach a7! Therefore White decided on
the again rather risky, but not losing
capture of the queen.
20 ... ©xf4
21 &g4 &d5
22 bxa7
The third critical position. Initially it
appeared to me to favour White, but
when, awaiting my opponent's reply, I
began examining the plan with ...g6
and ...Sl?g7, I had to change my
evaluation: chances were roughly
equal. Of course, were Black to
succeed in coordinating his forces, his
24
Attack with Mikhail Tal
position would become clearly
preferable. But there are two factors that
hinder this: the audacious pawn at a7,
which at the very least frightens Black,
and, although only temporary, the
difficulties in developing his king's rook.
With his next move Portisch tries
simultaneously to solve both of these
problems, but the further course of the
game shows that the plan chosen is
incorrect.
22 ... ®e7
"Suicide?", was my first thought.
But then I realised that Black's
manoeuvre was not without its logic: the
king heads for the a7 pawn, and any
checks will only act as a "favourable
wind", for example 23 gel+ ®d6 24
®g3+ ®d7 25 i»g4+ ®c7.
But Portisch did not see my next
move, which, incidentally, would have
occurred to a player with an attacking
style. Therefore it would have been
stronger, without further ado, to play
22...g6. How the game would have
developed in this case, I honestly do
not know. But at the board it seemed to
me that to a considerable extent the a7
pawn "insures" White against defeat.
In a number of variations he is able, by
giving it up with a8=igf, to pick up both
of Black's queenside pawns in
compensation.
23 b4!
Preparing a "warm reception" for
the enemy king. It is bad to take the
pawn because of 24 gbl, but after b4-
b5 White either exchanges on c6,
opening lines, or advances it further,
when the lone a7 pawn is transformed
into a pawn tandem a7A6.
Here Black could have held the
position by 23...Qc7, suggested by •
Aronin. But the picture had been so
unexpectedly transformed, that Por-;
tisch succeeded in losing a defensible -
position in a matter of moves.
23 ... ga8
If not 23...&C7, then Black should ;
at least have chosen 23...®d6 24 b5
®c7, not abandoning, for the moment,
the pursuit of the pawn. In any event,
Black will not have time to take it. '
24 gcl+ ®d6 i
25 bS gxa7 i
This loses instantly, but by now .
Black's defence was very difficult.;
White has at his disposal two threats: >
the attacking 26 bxc6 bxc6 27 ®e6+ ;
®c7 28 gel, and the constricting 26 J
b6!, after which Black must either *
agree to the a7 pawn being a constant I
threat, or nevertheless go in for the j
extremely dangerous opening of the b- J
file (after 26...&xb6 27 gbl).
26 Se6+ ®c7 i
27 gxf6 Black resigns :
Tal-Larsen '
Candidates Semi-Final, Bled 1965
Alekhine's Defence
1 e4 £>f6
2 eS SdS '
3 d4 d6
4 ftO dxeS
5 £ixe5 e6
So, once again this dubious (there is
no other word for it) variation.
Directly after the Larsen-Ivkov match
the Yugoslav grandmaster showed me
the final game of that encounter, and
"scolded" himself for making the
pseudo-active move 6 #h5. At the
King in the Centre
25
same time, he offered the following
opinion: that 6 £>d2 is the quietest
reply, and 6 ©f3, although committing,
is the strongest, with which, after a
cursory analysis, I agreed. Of course,
in the existing match situation, the
committing nature of White's move
was by no means a hindrance.
6 ©f3 ©f6
6...£}f6 is perhaps stronger,
agreeing to a slightly passive position.
White would have replied 7 ite3,
preparing queenside castling. After
l.arsen's move the black queen proves
to be badly placed, and he has to waste
precious time defending it.
7 ©g3 h6
8 itg5 was threatened.
8 Sc3
White must play energetically, in
order to exploit the better placing of
his pieces. Since exchanging on c3
would only strengthen White's centre,
and his queen's knight is threatening to
move with great effect to e4, Black
continues manoeuvring with his knight,
hoping to divert White from his
intentions.
8 ... .&b4
9 Jlb5+ c6
10 Jla4 Sd7
The transference of the bishop to the
rather inactive post at a4 does not
signify that White has given up ideas
of an attack. After £}e4 and c2-c3 the
bishop can be advantageously switched
to the important bl-h7 diagonal.
Here White thought for quite a long
time. The advantages of his position
lire perfectly clear: a lead in
development, Black's difficulty in
evacuating his king, but all this must be
effectively exploited. In such a position
victory is doubly necessary: if I could
not win from such a position, the
psychological shock would be too
great — it would mean that I had
altogether forgotten how to win.
Here White has several very
tempting ways to develop his initiative. The
first that suggests itself is the tactical
possibility of 11 a3 £>d5 12 <Sxc6.
Then 12...bxc6 loses quickly to 13
Axc6 £>5b6 14 <&b5! But the idea
proves insufficient after 12...£>xc3 13
bxc3 (13 ©xc3 &b6 14 &b8+ <£>d8)
13...e»b6 14 £b5 Ad7 15 &xa7 ©d8.
The positional 11 ^,f4 does not give
anything decisive after 1 l...£>d5.
White gains good attacking chances
by 11 £>e4 ©f5 12 f3, and objectively
this was perhaps the strongest
continuation, although after 12...£>xe5 13
dxe5 Ad7 14 a3 £id5 15 c4 £ib6 16
Jlc2 ^h5 it is not so easy to continue
the attack. I was intending to continue
my analysis of this variation, when
suddenly my attention was drawn to
the possibility of the piece sacrifice
that occurred in the game within a few
moves. This idea seemed very
tempting.
11 0-0 Sxe5
This knight cannot be tolerated for
long.
12 dxe5 ©g6
13 ©f3
White could have obtained the
better ending by exchanging queens, but
this would have been a small
achievement.
13 ... ©f5
Not altogether successful. Black
drives the queen to a more comfortable
26
Attack with Mikhail Tal
position. Stronger was 13...Ad7,
defending c6, on which I was intending
to play 14 $re2, with the idea of 5>e4
and c2-c3, bringing the light-square
bishop into play.
Of course, 13...tjxc2 14 Axc6+
was out of the question.
14 ©e2 &e7
Black appears not to have seen the
intended sacrifice. White's intention
was that if 14...£)d5 15 £>b5!, an idea
that it is still possible. However, if
14....&d7 (which would have ruled out
the knight sacrifice) the manoeuvre
£je4, c2-c3 and Ac2 would have
gained in strength.
Now, however, 15 f4 would be met
by 15...0-0 16 £>e4 b5! 17 &b3 c5!
and if 18 c3 c4, not allowing the
bishop onto the bl-h7 diagonal.
15 a3
Had the following move not been
available, this would have been a
serious mistake, leading to the loss of the
initiative.
15 ... £>d5
.,., .„„„ ^t .0>.„ ,,„
15...£>a6 can also be answered by
16 £>b5, although with the slightly
different idea of 16...cxb5? 17 Axb5+
and 18 &d3, winning the queen.
16 ©b5!
A move which came as a surprise to
my opponent. White is intending to
play his knight to the ideal square d4.
After, for example, 16...0-0 17 £>d4
©h7 18 c4 £>b6 19 &c2 Black's
position is extremely difficult, and so the
acceptance of the sacrifice is forced.
16 ... cxb5
17 &xb5+
But here 17 &xb5+ ®f8 18 &d3
failstol8...af4!
17 ... ®d8
18 c4
The critical position. Where should
the knight move to? Larsen follows the
path of least resistance: he gives back
the piece, but the position of his king in
the centre allows White easily to
mount a decisive attack without any
significant material sacrifice.
White saw that after 18...£>b6 19
$ra5 he would also regain his piece,
since 19...^,d7 20 &e3 ®c7 21 c5 is
bad for Black. Stronger is the
immediate 19...®c7 20 c5 ®b8 21 cxb6
axb6 22 ©b5 ga5 23 ©b3, although
here too White has very good attacking
chances.
The main variation of White's
combination was 18...£>f4 19 gdl + ®c7
20 gd7+ &xd7 21 ©xd7+ ®b8 22
©xe7 ©xe5 23 &e3 £>g6 (24 gdl
was threatened) 24 ©xf7 $f6 25
&e8! This is the point: 25...©e7
(25...&e5 26 &f4) 26 ©xg6 gxe8 27
&c5! ©d7 28 &d6+ ®c8 29 c5, and
the bishop at d6 is much stronger than
a rook.
18 ... ©xe5
King in the Centre
27
19 cxdS Ad6
20 g3 &xd5
21 &e2
It becomes clear that for the pawn
White has much more than sufficient
compensation. The black king is a long
way from any sort of peaceful refuge,
and White only needs to develop his
queen's bishop, for all his pieces to
join in a decisive attack.
21 ... 3>e7
22 gdl «aS
23 &g4 &f5
This clever possibility does nothing
nt all to help Black. White considered
here 23...e5, after which neither 24
*Vh4+ f6 nor 24 Ag5+ hxg5 25
#xg5+ ®f8 26 Sxd6 Ae6 27 gadl
161 is altogether convincing. But by
continuing 24 &xg7 Ae6 (or 24...
#xa4) 25 Axh6 White gains an
irresistible attack.
24 &c4
24 #xg7?? £Le5l would have been
it terrible blunder.
The queen manoeuvre emphasises
just how hopeless Black's position is,
dince after 24,..gd8 25 .Q.e3 he has no
good move.
24 ... &c5
25 &d3 #d5
26 ®c3
It is for this square that the white
queen has been aiming. Now 26...'&e5
is not possible on account of 27 Af4.
Illack is forced to worsen still further
Hie placing of his pieces.
26 ... AeS
27 &el
27 &e3 &a5 28 Ad2 was also
perfectly adequate, but there were already
many ways to win.
27 ... &c5
28 Ad2 3>f6
29 gacl
Now everything is clear. The
onslaught of the white pieces is quite
impossible to withstand.
29 ... &b6
30 Ae3 &a6
31 &M
Threatening, incidentally, 32 Ab5.
31 ... bS
32 Axb5 &b7
33 f4 AbS
34 Ac6
Black resigns. Out of his 33 moves,
13 were made by his queen.
Tal-Hecht
Varna Olympiad 1962
Queen's Indian Defence
Although the cascade of sacrifices
in this game was linked by the single
general aim of attacking the king
caught in the centre, at the same time it
was, as it were, divided into stages.
Thus, when he gave up a pawn, White
was not counting on further sacrifices,
but was prepared to content himself
with the initiative. And since a
"primary" sacrifice does not exist —
there is only the first, the second, and
so on, so as the attack developed the
aim also changed.
1
2
3
4
S
6
7
8
d4
c4
£>ra
&c3
AgS
e3
Ah4
bxc3
£>f6
e6
b6
AM
Ab7
h6
Axc3+
d6
28 Attack with Mikhail Tat
9 £>d2 e5
10 13 &e7
11 e4 Sbd7
12 Ad3 £>f8
Black stubbornly avoids breaking
the pin at the cost of any weakening.
Earlier he could have chosen 7...g5 8
Ag3 £se4, and now he could have
followed Keres in his game with
Botvinnik, 12th USSR Championship,
Moscow 1940: 12...g5 13 Af2 £>h5
14 g3 £sg7 15 #e2 h5, gaining coun-
terplay sufficient for equality.
Now, however, by getting his blow
in first, White initiates unfathomable
complications. However, the move
played is not necessarily the strongest
continuation in this position. He could
have obtained a favourable position by
the "Spanish" manoeuvre 13 £ifl
followed by £>e3 and <&d5 (or £sf5).
13 ©a4+ was also good, and if
13...#d7 14 &c2. And yet the move
played is the one most in the spirit of
the position: White is able to open up
the game, for which he happily
sacrifices a pawn.
13 c5 dxc5
On 13...bxc5 there could have
followed 14 d5, when White gains control
of c4 and b5, as well as the open
b-file.
14 dxe5 <&xe5
Now White has a pawn majority in
the centre, i.e. on the part of the board
where he is intending to begin active
play. But Black's defensive resources
are, of course, quite adequate.
15 &a4+ c6?
A mistake, after which White also
gains the use of the d6 square for his
attack.
15...Q6d7 was much stronger,
although here too after 16 #c2 White's
initiative would have been quite
appreciable.
16 0-0 &g6
After I6...#xc3 both 17 Aa6 and
17 £>c4 b5 18 ©d6+ g>d7 19 &xb5
cxb5 20 Axb5+ are unpleasant for
Black. But now White has to hurry,
since a position has been reached
where every tempo may be decisive.
Black only needs to "hide" his king,
and for the pawn White will have no
compensation. If 17 Ag3 the strongest
is 17...#e7, when 18 £sc4 fails to
18,..b5.
17 &c4 ^e6
Not 17...b5 18 £>xe5 bxa4 19 £>xg6
fxg6 20 e5, when Black can resign.
18 e5!
As already mentioned, White's chief
aim is to keep the king at e8. With his
18th move he begins a combination, in
anticipation of... a favourable
endgame. The position does not promise
anything better.
18 ... b5
18...£sxh4 was interesting. After 19
£id6+ 3?f8 it is unfavourable for
White to take any of the three pieces
that are en prise: on 20 #xh4 or 20
<Sxb7 there follows 20...#xe5. The e5
pawn is more valuable than any of the
black minor pieces, and therefore
White had decided to play the
positional 20 gael, since with one move
the threats to the three pieces cannot be
eliminated.
(see diagram next page)
19 exf6!!
King in the Centre
29
This move brings to mind the well
known game Lilienthal-Capablanca,
Hastings 1934/35, in which White,
then a young master, quickly forced
the ex-World Champion's capitulation.
Hecht made his reply without
thinking... Of course, anyone with the black
pieces would be very happy to play
19...0-0. Then three of White's pieces
lire en prise, and if he moves his queen,
2()...£lxh4 leads to a position where
Illack is under no threat.
But against 19...0-0 White has the
very strong rejoinder 20 gael! If
2()...©d5 there can follow 21 ©c2
4lxh4 22 £>e5 with a powerful attack,
while after 20...grxel 21 gxel bxa4
'22 Axg6 fxg6 23 Se7 Black cannot
play 23,..gf7 on account of 24 £>d6.
At this point the effusive Miguel
Najdorf, who was watching the game,
came up and... kissed me (M.T.).
19 ... bxa4
20 fxg7 gg8
21 AfS!!
The culmination of the combination!
After 21 ...'&xc4 Black will be a whole
queen up(!), but he loses: 22 §fel +
&e6 23 gxe6+ fxe6 24 &xg6+ ®d7
25 gdl+ ®c7 26 &g3+ <S>b6 27
gb1+ ®a6 28 &d3+ ®a5 29 &c7+
mate. Meanwhile, 21...#xf5 leads to a
hopeless ending: 22 £>d6+ ®d7 23
£>xf5 &xh4 24 gadl + <S>c7 25 £xh4
gxg7 26 gfel, and the variation
21...&xh4 22 &xe6 fxe6 23 £>d6+
demonstrates the "agility" of the white
knight.
Black chooses the best defence,
having in mind a counterblow on the
next move.
21 ... ©xh4
22 ,3,xe6 ,3,a6
How is White to save his piece?
23 £d6+ ®e7
24 Ac4!
This concludes the combination,
which has brought White a marked
advantage in the endgame.
24 ... gxg7
25 g3 ®xd6
A mistake, since in positions of this
type a bishop is stronger than a knight.
Black would have retained some
drawing chances after 25...Axc4 26
£xc4 Sd8.
30 Attack with Mikhail Tal
26 JLxa6 £}f5
27 Sabl f6
28 Sfdl+ ©e7
29 Sel+ ©d6
30 ©f2 c4
Creating a shelter for the king at c5.
Nevertheless 30...h5 was more
tenacious, for the moment maintaining the
knight at its important post.
31 g4 £>e7
32 gb7 gag8
33 &XC4 £,d5
34 ,&xd5 cxd5
35 Sb4 Sc8
Black should at least have
exchanged a pair of kingside pawns by
35...H5 36 h3 hxg4 37 hxg4 f5,
although even this would hardly have
saved him.
After the move played, which leads
to a "mutual elimination" of pawns,
everything is clear.
36 Sxa4 Sxc3
37 ga6+ ©c5
38 S*f6 h5
39 h3 hxg4
40 hxg4 Sh7
41 g5 Sh5
42 Sf5 Sc2+
43 ©g3 ©c4
44 gee5 d4
45 g6 Shi
46 Sc5+ ©d3
47 Sxc2 ©xc2
48 ©f4 ggl
49 Sg5
Black resigns: 49...Sxg5 50 '©xgS
d3 51 g7 d2 52 g8=© dl=& 53
&b3+.
WHAT WOULD YOU HAVE
PLAYED?
No.l
Wb Wmvs'Si 'Si.
m x iii'afii x m
*S§sIfXfIfll til
1 W, flrB V^
<i fH «e! «J
« k| ««p pp
m "m "rn^rn
Black is attacking the knight that
has crossed the demarcation line. To
where should it retreat?
No.2
HP MWWVm
piyp Wifflt
, jBi^ pi fM &H
Here too the white knight has the
right to choose...
King in the Centre
No.3
No.5
n±it w.±m±
Wi Wf WH- + WZ,
IV-l' 'fflffii r^ 'fflffl V^
But here there would not appear to White plans to get rid of the enemy
be any choice: the knight must be outpost at d4, and then, according to
taken and the black king will finally circumstances, either queenside cas-
castle... tling with chances of an attack C&h6,
h2-h4 etc.), or else the quieter kingside
castling. But it is Black to move...
No.4 No.6
Black has just played 12...c5?, evi-
After 15 ■g'xB ■&xd4 Black gains a
dently expecting the theoretical 13 tempo by attacking the white knight,
£sxf6+... castles, and then sets about realising
his advantage. Correct?
2 Breakthrough in the Centre
A CERTAIN FRENCH GENERAL
went down in history for the following
dispatch to his commander: "My centre
is broken, my flanks are retreating, I
attack". ..(I.D.)
M.T. Mmm... This might do — in a
tournament for beginners.
But at our and your level of chess -
hardly. True, a "retreating" or even
absent queenside does not prevent a
desperate assault on the kingside, but
the domination of one player in the
centre completely rules out activity by
the other. Deviations from this rule are
more likely to be found in studies, than
in practical play.
On the other hand, an advantage in
the centre almost always allows an
attack to be obtained. Whether in the
centre itself, or on one of the flanks —
this depends on the concrete features of
the position. With a mobile pawn
centre the strength of the attack grows
greatly after a breakthrough in the
centre, which usually achieves several
aims:
— the opening of lines, along which
rooks and bishops situated on the
queenside can instantly join the attack;
often their scope is restricted by their
own pawns in the centre;
— the vacating of a central square,
via which, for example, a slow-moving
queen's knight can join the attack, or
which, like a spring-board, can be used
by a rook for a subsequent switching
along the rank;
— finally, the disruption, if only for
a certain time, of the coordination of
the enemy pieces.
In short, a breakthrough in the
centre is always the start of an attack,
which, however, is by no means bound
to be swift and explosive, but can grow
by degrees, like the seventh wave in
the sea.
This is why voluntarily conceding
the opponent a mobile pawn centre, or
perhaps only a single pawn in the
centre that is capable of advancing, is
equivalent to voluntarily entering the
lion's cage. This comparison is perhaps
evoked by the following game, in
which the player with White was a
grandmaster by the name of Lev.
(A play on words: lev is the Russian
word for lion - Translator's note)
Polugayevsky-C.Hansen
European Team Ch., Plovdiv 1983
In the opening Black has clearly
underestimated the possible pawn
Breakthrough in the Centre
33
offensive by his opponent on the king-
side, and stands worse. But
nevertheless, even with the two bishops, he
should not have opened the centre and
given White a dynamic pawn at d4.
The correct 15....&b7 (15...Qf6 16 g5,
and the king's pawn shelter collapses)
16 exd5 exd5 would yet have given
him hope of gradually neutralising the
attack. But...
15...dxe4? 16 £.xe4 (gaining a
tempo) 16...Sb8 17 g5 h5 18 d5
The central files and the long dark-
square diagonal are opened (18...e5
fails to 19 d6) and White's lead in
development quickly decides.
18...exd5 19 £>xd5 £>c5 20 &c3+
®h7 21 &c2 &e6
21...£.g4 is no better, being well
met by the quiet 22 £je3.
22 £>f4 &c8 23 £>xh5, and without
waiting for the completion of the attack
after 23...gg8 24 Qf6+ £.xf6 25 gxf6
followed by 26 Qg5 and h4-h5, Black
resigned.
Of course, such gifts of fate do not
occur in every round. For a
breakthrough in the centre one usually has to
battle — and pay.
In the next diagram, the game has
hardly passed out of the opening stage,
but the pawn formation is already
largely determined, and the two sides
are considering their strategic plans. If
the game were to take a quiet course.
Black, after completing his
development, could hope to use the strength of
his dark-square bishop, which has no
opponent.
But... White makes excellent use of
the trumps of his position, including
the advanced position of the black
queen, to develop a powerful initiative
by means of a central breakthrough.
Chernin-Miles
Tunis Interzonal 1985
12 e5! dxe5 13 £>e4 &f4 14 £>fd2!
The white offensive is not "in a
hurry", but now two of Black's pieces
become targets for attack, and he is
forced to lose time.
14...Af5 15 &d3 &xe4 16 £>xe4
£>d7 17 g3 ©g4 18 h3 ©h5 19 d6
The development of Black's kingside
is hindered, his queen has been driven
to the edge of the board, and his king is
still in the centre (as is White's, but
Black's is under attack).
The pawn sacrificed is a miserly
price for all this.
19...&g6 20Sdl!
The outpost at d6 is supported, and
now 21 Qxc5 is a real threat. Black's
tactical attempts to confuse matters are
ignored by White.
20...D3 21 &e2
Not allowing the black rook to move
off a light square with gain of tempo
(21&xb3Sb8).
34 Attack with Mikhail Tal
21...f5 22 g4! c4 23 &bl fxg4 24
©xc4 ©f7 25 ©c6 gd8 26 hxg4
The immediate 26 £}c5 was also
possible, since 26...i&f3 fails to the
bishop check at g6.
26...g6 27 <ac5 gg8 28 &e4 &g7
29 £>xa6 ©f4 30 £>c7+ &f7 31 ©c4+
■2>f6 32 £>d5+ Black resigns.
In this case the breakthrough in the
centre was merely strengthened by the
fact that the stranded black king was
pursued.
After a breakthrough, a piece
offensive against the castled position is
more common, as one of the authors
experienced in the following game.
Polugayevsky-Tal
37th USSR Championship
Moscow 1969
This position had already occurred
in previous games, and who could have
known that, in the quiet of his study,
White had worked out a variation
giving him a decisive advantage, or... a
forced win.
16 dS! exd5 17 eS!
By breaking through in the centre,
White has imparted a great deal of
energy to his e-pawn, but more
important — he has opened a way for
his pieces to the kingside.
17...£>c4 18 ©f4 <ab2
After 18...h6 White would have won
by 19 m$ g6 20 ©h3 <S>g7 21 e6 fxe6
22 £>d4, while if 18...gc6 he has 19
£>g5 h6 20 Ah7+ <g>h8 21 £>xf7+
gxf7 (or 2I...&xh7 22 £>xd8 gxf4 23
e6!) 22 ©xf7 &xh7 23 ©xb7.
19 Axh7+ <S>xh7 20 £>g5+ ®g6 21
h4!!
With the unequivocal intention of
giving mate in the variation 22 h5+!
<S>xh5 23 g4+ &g6 24 ©f5+ &h6 25
£ixf7+, and 21...f5 fails to save Black
on account of 22 gd4! (with the same
idea of h4-h5) 22...#e7 23 h5+ <S>h6
24 £>f7+ <g>h7 25 ©xf5+ ®g8 26 e6
gxf7 27 exf7+ ©xf7 28 ©xf7+ <S>xf7
29 gf4+ <g>g8 30 ge7.
21...gc4 22 h5+ <g>h6 23 £ixf7+
&h7 24 &f5+ <S>g8 25 e6 ©f6 (there
is no other defence against 26 h6) 26
$rxf6 gxf6
And now, after inaccuracies by both
sides, White won easily: 27 gd2 (27
£}d6 was more energetic) 27...gc6 28
gxb2 ge8 (and here 28....&C8 was
more tenacious) 29 £>h6+ 'S'h? 30
<af5 gcxe6 31 gxe6 gxe6 32 gc2
gc6 33 ge2 ,&c8 34 ge7+ &h8 35
<ah4 f5 36 £>g6+ &g8 37 gxa7
Black resigns.
In the next diagram White has
achieved a strategically won position.
There is nothing to support Black's
counterplay on the queenside, whereas
around his king there are many
weaknesses, and his pieces (queen and
knight) are far from ideally placed.
Breakthrough in the Centre
35
Nevertheless, it is only by a
breakthrough that White can capitalise on
all the advantages of his position.
m, m m wx
mm, Wim
after 39...c3 40 bxc3 &c4 41 .Q.f3 h4
42 &xh4 &xc3 43 Ad5 &e3 44
Sxa6.
PEP P®P
± J.#E J.1 ± ±
mm±m ■
B fH H S
11 f§ 11 11
§§ *43^lPl^lP£
mmm mm
• HI B IES &fe
Ribli-Gheorghiu
fl/ga Interzonal 1979
27 eS! f5
Otherwise absolutely all the lines
are opened.
28.&C6
Also good enough to win was 28 e6
Ae8 29 Axf5 gxf5 30 £>xf5 &f8,
when 31 £sxe7+ and 31 £sxd6 are
equally strong. But White prefers,
firstly, to clear the e-file, and secondly,
to include in the attack the only piece
that is not participating — the knight
atc3.
28....Q.XC6 29 dxc6 &f8 30 £)d5
Sxc6
The exchange is lost in any case,
and that is not all.
31 exd6 Sxel 32 Sxel &xd6 33
£>e7+ <3>f7 34 £,xc6 &xc6 35 ^e3
£>f8 36 &e7+ ©g8 37 gdl £)ce6 38
Sd6 &c8 39 Adl
The bishop heads for d5, and Black
can resign, which he did in fact do
Szabo-van Seters
Hilversum 1947
Although nominally Black has
completed his development, his position
gives serious cause for alarm. Ideally
aimed against the black king is the
bishop at a2, which together with the
queen can also operate on the bl-h7
diagonal, and the e-file is open for the
white rook. Nevertheless, a rapid
success can be gained only by increasing
the number of targets to attack, and
this is ideally achieved by a
breakthrough in the centre.
17 d5!! £xd5
The alternative capture 17...exd5 is
refuted by the simple 18 Abl g6 19
Sxe7 (this demonstrates the superiority
of the 17 d5 breakthrough over the
immediate 17 Abl). After 17...£»5
18 £se5 Sdd8 19 &bl g6 20 £>b5
*&b8 21 d6 Black loses material, while
the attempt to exploit the pin on the
audacious white pawn, 17...gcd8, is
36
Attack with Mikhail Tal
refuted by 18 j2.xf6! Axf6 19 ©e2!,
exploiting the weakness of the back
rank to create an irresistible threat
against e6.
18 j2.xd5! ©d8
The same idea, but with 18...gcd8,
is refuted by the thematic 19 gxe6!
But now the second white bishop is
also attacked.
19 ©e4!
Renewing the attack on e6 (19...
j2.xg5 20 j2.xe61).
19...exdS 20 QxdS Axg5 21
SxgS!
Here we can sum up the outcome of
the central breakthrough. The white
pieces have closed in, and a weakening
of the black king's position is
inevitable. In addition its main defenders
have been exchanged, and the final
assault now commences.
21...g6 22 ©h4 h5 23 £>f6+ ©xf6
24 gxd7 Qd8 25 ge8+ &g7 26
gxf7+, and Black, who is losing his
queen, resigned (26...£>xf7 27 £>e6+).
I.D. Every player has a "game of his
life", a victory in which he seemingly
moves onto a higher chess plane. You
first became champion of your country,
and at the same time a grandmaster, by
defeating the highly experienced
Alexander Tolush in the final round of
the 1957 USSR Championship.
M.T. Surprisingly, it was also the
first time in my serious chess career
that I made such an effective
breakthrough in the centre (see diagram
next column).
White has of course made more
progress in the preceding complications,
and for the pawn he has a strong
attack. But for 30 j2.d2 followed by
g4-g5 he has neither the time, nor the
right: firstly, Black will establish a
piece at e5, and secondly, counterplay
on the b-file is already imminent.
Besides, White must include his reserves
— his knight and light-square bishop.
All this is achieved with a single
thematic move.
Tal-Tolush
24th USSR Championship
Moscow 1957
30 eS! gxeS
30...fxg5 also opens the f-file for
White, and after 31 j2.xg6 hxg6 32
■&h8+ &fl 33 gh7+! he gives mate in
a few moves.
31 j2.xg6 gb7
For the moment both bishops are
immune: the light-square one on
account of the same variation, and the
dark-square one in view of 31...gxg5
32 j2.xh7+ &f7 33 £}e4.
32£>e4!
Another gain from the breakthrough.
32...fxgS 33 gfl gxe4
There is no other defence against 34
£>f6+.
Breakthrough in the Centre
37
34 £xe4 gg7 35 gf6 ,&xg4 36
Shfl £>d7 37 Sxd6 #e7 38 Sxa6
®h8 39 Axh7! £>b8 40 Af5+ ®g8
41 ,&e6+ Axe6 42 Sxe6 Black
resigns.
Geller-Spassky
25th USSR Championship
Riga 1958
Here too White has gained a clear
positional advantage, with the two
bishops, the better pawn formation, and -
the possibility at the necessary moment
of a breakthrough in the centre.
23 Sce3! <&e6 (23...<&fxe4 can be
met by 24 Axe7 Sxe7 25 &g5!) 24
eS!
It is in this way, by ridding Black of
his pawn weakness, that White imparts
additional dynamic strength to his
rooks, which dominate on the e-file,
overloaded with black pieces.
24...£>g4
24...dxe5 25 Sxe5 would also have
led to the loss of a pawn.
25 hxg4 ©xg5 26 exd6 £}xf3+ 27
gxf3 AgS 28 a4
The ending with two extra pawns is
easily won after 28 J3,c4 &d7 29 gxe8
gxe8 30 Sxe8+ &xe8 31 d7 and 32
jj,xa6. But for the moment White
decides to stay in the middlegame.
28...#d7 29 Sxe8 Sxe8 30 gxe8+
#xe8 31 d7 #f8
If 3l...igre7 White has the decisive
32 f4.
32#e2
White is in no hurry to go into the
pawn ending after 32 J3,xf7 &xf7 33
d8=i&+, but creates the simple threat
of 33 i»e8.
32...#e7 33 #d3 h6 34 Ac4!
Enticing the black a-pawn into an
attack and effectively deciding the
game.
34...a5 35 Axf7 Ah4
Or 35...#xf7 36 d8=#+ J3,xd8 37
#xd8+ ®h7 38 @xa5, and the f3
pawn is immune in view of the
exchange of queens.
36 ®g2 Af6 37 Ac4 @d8 38 #d5
Ag5 39 #f7 Black resigns.
Against the threat of 40 #e8+ ®h7
41 Ad3+ there is no defence.
Spassky-O'Kelly
San Juan 1969
38
Attack with Mikhail Tal
This game can be considered a
model example of this type of operation.
27 Axf5! gxf5
The h5 pawn has been weakened,
and a path towards the king from g5
has been opened, but... Black's centre
has been strengthened, he has gained
control of e4, and there is the prospect
of his knight reaching there.
28d5!!
This breakthrough is the key to
White's plan. At the cost of a pawn he
occupies the centre with his pieces, and
the next stage of the game commences.
28...Axc3 29 &xc3 cxd5 30 £id4
&d7
The threat of 31 Qxf5 forces Black
first to concede the queenside.
31 c5! ah7 32 b4 a6 33 a4! gc8
Alas, 33...©xa4 fails to 34 c6! bxc6
35 gal, trapping the queen.
34 b5 axb5 35 axbS gf8
The black knight has hopes of
occupying e4, but at the point when this is
achieved disaster is all ready to strike.
36 c6 bxc6 37 bxc6 ©d8 38 gel
Qf6 39c7&d7 40&e3!
White has tied down the black
forces with his c7 pawn, and now, with
his control of the centre, he switches
his sights to the kingside, where his
attacking queen is unopposed.
40...£ie4
The dream is realised, but a longer
resistance could have been offered by
40...Qh7 41 gec2 ®g7 42 &e5+
®g8, although after 43 gc6 White has
the irresistible threat of Sd4-b5-
a7(d6); he can also play for a mating
attack with 44 f3 followed by g3-g4.
41 f3 e5 42 fxe4 f4 43 gxf4 exd4 44
gg2+
Black resigns: 44...®h7 45 ©f3
©d6 46 ©xh5+ ©h6, and now the
simplest is 47 ©xh6+ ®xh6 48 exd5.
Spassky-Tal
Tallinn 1973
Nimzo-Indian Defence
1 d4 af6
2 c4 e6
3 ac3
I took this to be the first sign of
Spassky's aggressive intentions. When
in a more peaceable mood he plays 3
Qf3, which usually leads to the
relatively quiet Queen's Indian Defence.
3 ... Ab4
4 Ag5
Throwing down the gauntlet. This,
the Leningrad Variation, which is quite
often employed by Spassky, usually
leads to a sharp and complicated
battle.
4 ... h6
5 AM c5
6 d5 b5
The challenge is accepted. This
sharp continuation seems to me quite
logical, although Black also has other,
quieter moves, such as 6...d6, 6...e5 or
6....2,xc3+. The move 6...b5 is akin to
the Volga (Benko) Gambit, which has
recently been played quite frequently.
7 dxe6
Very complicated play results from
7 e4 g5 8 j£g3 £>xe4 9 Ae5, which
occurred in the game Levenfish-Estrin
(USSR Championship Semi-Final,
1951). White also suffered a reverse in
the game Korchnoi-Durasevic from the
USSR-Yugoslavia Match (Belgrade
1956). It was then that grandmaster
Breakthrough in the Centre 39
Tolush suggested for White a different
plan, involving the win of a pawn, and
subsequently he successfully employed
it. This is the course that Spassky
chooses. True, to me it seems more
correct to say not that White wins a
pawn, but that Black sacrifices it.
7 ... fxe6
8 cxb5 d5
Now Black has an active pawn
centre.
9 e3 0-0
10 £sO
Better, perhaps, was 10 ild3 d4 11
exd4 cxd4 12 a3, or the immediate 10
a3. It is on this possibility that the
evaluation of the entire variation depends.
10 ... &a5
11 fi.xf6
This exchange is forced in view of
the threatened ll...£ie4.
11 ... gxf6
12 ©d2
12 $rcl is more accurate, so that
after a subsequent a2-a3 the black
bishop should be immediately
attacked, since the rook at al is defended.
True, Black can reply 12...c4.
12 ... a6!
13 bxa6
A risky move. 13 b6 or 13 ile2
axb5 14 0-0 was more circumspect.
13 ... £sc6
Black, of course, does not take on
a6, but intensifies the threat of ...d4.
14 &e2
Here too 14 ^cl came into
consideration, in order to answer
14...d4 with 15 a3 ,&xc3+ 16 bxc3. In
this case White would have been in no
immediate danger.
14 ... d4!
15 exd4
15 ... Bxl3
This combination leads by force to
an advantage for Black.
16 AxB cxd4
17 0-0
Interesting variations arise after 17
gel. In this case I was intending to
play 16....&xa6 (17...dxc3 18 bxc3 is
unpromising) 18 ilxc6 Bd8, when
Black must win, e.g. 19 ©c2 dxc3 20
bxc3 ©e5+ 21 SLeA. Here 21....fl.d3
wins easily, but at the board I worked
out another variation that appealed to
me: 21...JJ.XC3+ 22 ©xc3 ©xe4+ 23
>&e3 i&xg2 24 >grxe6+ (the only move)
24...<S>h8 25 -&c6 &xc6 26 Bxc6
ii,b7!, and Black wins a rook.
Moreover, it is amusing that, if White tries
to give up his rook as dearly as
possible, after 27 Bxh6+ gxh6 he is
mated: 28 0-0 Sg8 mate, or 28 ggl
JJ.f3 and then ...gdl mate.
17 ... dxc3
18 bxc3 &XC3
19 &d6 gxa6
Of course, not 19....&xal 20'&xc6.
20 fi.xc6
40
Attack with Mikhail Tal
If the rook had moved from al,
Black would have played 20...£jd4.
20 ... Ab4!
The concluding move of the
combination. White loses his bishop at
c6. 20...j3.e5 was insufficient on
account of 21 '&e7.
21 &b8 gxc6
22 gacl AcS
23 gc2
Spassky aims for pressure on the
c-file, but in White's position an
Achilles' heel comes to light — at f2.
Possibly he should have looked for
counter-chances by moving his rook
off the c-file, for example to d 1.
23 ... $a4
24 $b3
24 gfcl was not possible on account
of24...Axf2+.
24 ... $f4
Here I considered two moves -—
24...©e4and24...©f4.
I rejected 24...■QeA in view of 25
gfcl Ab7 26 &xb7 Axf2+ 27 ®fl!
(not 27 ®hl? gxc2) 27...$d3+ 28
®xf2 gxc2+ 29 gxc2 $xc2+, when it
is clear that the resulting queen ending
with an extra pawn for Black is an
extremely minor achievement.
Therefore I switched my choice to
24...$f4. Against 25 $b5 I was
intending 25...$d6, and if 26 gfcl
Jl,a6, when 27 $85 is not possible:
27...j3.xf2+.
25 $g3
25 $f3 was better, and if 25...$xf3
26 gxf3 e5 27 ®hl! Ab7 28 gbl gb6
29 gxb6 AxO+ 30®gl Axb6 31 a4,
when the ending is still unclear.
Black, however, would not have
exchanged queens, but could have
played 25...igrd6 or 25...'S'c7, retaining
the advantage.
25 ... $f5
26 gfcl Ab7
27 &f3
27 &b8+ ®h7! (but not 27...gc8 28
©xc8+ Axc8 29 gxc5, when it is
White who wins) 28 igrxb7 was not
possible on account of 28...jS.xf2+, but
27 h3 was more tenacious.
27 ... «rg5
28 $b3
If 28 &g3 the check at f2 is again
decisive: 28...j3.xf2+ 29 ®xf2 (or 29
$xf2 $xcl+) 29...gxc2+ 30 gxc2
&f5+.
28 ... gc7
29 g3
On 29 igrxe6+ Black would have
won by 29...gf7, while if 29 $g3 he
again has the decisive 29...jS.xf2+.
The only move not to lose
immediately was 29 $fh3.
29 ... Axf2+
30 ®xf2 $f6+
I played this in accordance with my
preliminary calculations. 30...$rf5+ 31
®gl $re4 wins more quickly.
Breakthrough in the Centre
41
31 <g>el &e5+
32 <g>fl
32 ®dl ©d4+ 33 ®el ©gl + and
32 ®f2 g(7+ 33 ®gl ©d4+ were
equally bad.
32 ... Aa6+
33 ®gl ©d4+
34 ®g2 ©e4+
35 <g>gl
If 35 ®h3 gxc2 and then 36...
jj,fl+.
35 ... &.W
36 h4 &hl+
. 37 <g>f2 gf7+
38 <g>e2 &e4+
White resigns: after 39 ©e3 J3,a6+
40 ®d2 gd7+ he loses his queen.
WHAT WOULD YOU HAVE
PLAYED?
No.8
H§1 1
if
Hf
i
B
111.
'^ks 1
SI
©Hi
m±%A
■±B ■
■±■1
|^g| f§§ ^
IS
£■ 1
S
■
mmy,
W&m&Wi
llBSfi
Although there are signs that the
position is double-edged (in particular
on account of the g-file), it is
nevertheless clearly in White's favour. Black's
king prevents his rooks from uniting,
but what particular plan should White
aim for? And how should it be carried
out?
No.9
No.7
mm m. m.±
HUP aEfl
m. m mn
m 'mm &
,„„0, ...0X0MM
* fS$ * W% W%i ?&i
Fill'B. Bill
HI gl fefe §» A
* $8$ ^^ ?S * W
zm m mzm
■ g M
White stands more actively, but how
can he build up his initiative?
The h5 and g6 pawns are weak, as
well as the whole complex of dark
squares around the black king. Where
should the first blow be struck?
3 The Assault Ratio
THE PLAYER WITH A LEAD IN
development is obliged to attack, or
risk losing this advantage. This is a
chess truth, formulated back in the last
century by Steinitz, repeated by other
classic writers, and in the intervening
century merely confirmed on thousands
of occasions in practice.
Here is one single example:
Geller-Korchnoi
Candidates Quarter-Final
Moscow 1971
White has every justification for
taking decisive measures, and indeed
24 AxfrS gxh5 25 gf6! would have
given him a very strong attack, for
example: (a) 25...&d8 26 &xh5 £>f8
27 gh6 f5 28 gh8+ <£>g7 29 &h6+
<£>f7 30 gh4, or (b) 25...*c5 26 gg4+
hxg4 27 &xg4+ <£>f8 28 gh6 Af6 29
exf6 Qxf6 30 gxf6 <S>e7 31 gf4! True,
a collective analysis later found an
improvement here — 27...'Sh7!!, and
there appears to be nothing more than '
perpetual check (28 £>e4 £xf6 29
exf6 &f8).
M.T. But firstly, I am sure that even
here White can strengthen his attack
and should win, and secondly, by
declining to attack he altogether concedes :
the initiative...
Indeed, after 24 h3 Af8 25 Ah2
£g7 26 ge3 £>c5 27 &el £c6 28 :
Axc6 &xc6 29 &h4 gd7 Black
obtained a counter-attack.
White's cautious decision here was \
undoubtedly influenced by the fact that ',
defence has changed fundamentally .'
during this intervening century: the "
degree of resilience is commensurate
with the previously unknown
reinforced concrete, and defensive and "
counterattacking procedures have been
found and systemised. Therefore a
successful attack on the king is guaran- -
teed only when an especially strong j
piece grouping can be created in the
attack zone, when the power of such an i
assault exceeds for certain the
defensive possibilities.
(see diagram next page)
The pieces of both sides are in a
way polarised. But although
"physically" White's pieces occupy squares
on the kingside, for the moment they
are not "looking" directly at the black
king. In short, White cannot manage
without strengthening his attacking
force.
The Assault Ratio
43
Kasparov-Marjanovic
Malta Olympiad 1980
17 £e4! Axb2 18 £g5!
White is already two pawns down,
but now the concentration of his pieces
clearly exceeds the defensive forces.
18...&C6
Black cannot eliminate the most
dangerous attacker: 18...£}e6 19 £}d6,
with numerous threats such as 20
£idxf7+, 20 &c2 and 20 &h5.
19 £e7 &f6 20 £}xh7! &d4 21
&h5 g6 22 &h4
There is no way of saving the game,
and the players each make an
"unnecessary" move: Black, in the
sense that he might well have not
bothered to make one, and White, in that he
can win "as he pleases".
22.„Axal 23 £f6+
Black resigns: 23...<gg7 24 &h6+
®xf6 25 &g5 mate.
In the next diagram, Black's
consistent pressure on c4 has proved
successful. In order to defend his pawn, White
would have to give up his outpost
pawn at e5, by capturing 14 exd6 en
passant, but he can also sacrifice it,
continuing his plan of concentrating his
forces against the black king.
Kotov-Keres
Candidates Tournament
Budapest 1950
14 Abl!
White chooses the second
alternative, the more crucial and only correct
one. Besides, in the given instance his
strategic idea is supported by concrete
calculation.
14...g5
Of course, this is not a counterattack
in the attack zone, but merely a
defence, especially since 14....&xc4 i5
&c2 g6 16 Af6! followed by &d2 or
^f2-h4 cannot be tolerated.
15 &c2 £g6
Black has eliminated the pin, and
the attacking diagonal is blocked...
16 £f4!!
Now all White's forces (not
including his rooks) are in the attack, aimed
at one point.
16...gxh4
The alternative was to try and hold
44
Attack with Mikhail Tai
the g6 square: 16...<&e8 17 Sh5! #c6
(or 17...f5 18 exf6 gxh4 19 cxd5!
exd5+ 20 ®f2, and after regaining his
piece — 20...&h7 2] gel, with the
threat of 22 ge7 — White obtains a
material advantage with an
overwhelming position) 18 cxd5 exd5 19
SXgi, with a decisive strengthening of
the attack after the undermining move
h2-h4.
17 £ixg6 ge8 18 £ih8!
While opening the way for the
queen, the knight itself also remains in
the attack.
18...ge7 19 &h7+ ®f8 20 f4 £ixc4
It is not possible to evacuate the
king: 20...&e8 21 £ixf7! gxn 22
Ag6 &e7 23 f5.
21 f5 exf5 22 0-0
The f-file is opened for the rooks,
and the outcome is settled.
22...ic8 23 ixf5 fi.xf5 24 gxf5
®e8 25 gxH ®d7 26 &f5+ <S>c6 27
&f6+ <S>d7 28 e6+ ®c6
Or 28...®d6 29 gxe7, and 29...
#xe7 is bad on account of 30 £jf7+.
29 gxe7 &xh8 30 gxc7+! <g>b5
(30...&xc7 31 &e7+ ®b8 32 gfl) 31
&e7 a5 32 &d7+ ®a6 33 gbl Black
resigns.
The concentration of force before
the final phase of the attack is often
made by outwardly imperceptible piece
movements far from the epicentre of
the coming events (see diagram next
column).
The material balance has been
disturbed in favour of White. In the
endgame this would be of decisive
importance, but for the moment, exploiting in
the full sense of the word his piece
advantage, Black launches an assault
on the kingside. In a certain sense he
even has two "extra" pieces: after all,
the bishops are of opposite colour.
VlB^f|
Stein-Geller
Kislovodsk 1966
22...j3,h4 23 gc2 gc7!
Black's last fighting unit, not ready
for the assault, takes up an attacking
position. Maximum concentration!
24 g3 ixg3! 25 fxg3 &g5 26 g4
The weakness of the king's pawn
screen, the remoteness of the rook at
a6, and, as a consequence, Black's
decisive superiority in force leave
White without any chances of saving
the game. In the main variation 26 gg2
ge7 27 &d4 gel+ 28 ®h2 &cl he
also comes under a mating attack.
26...ge7 27 &d4 &h4 28 gal
gel+ 29 gxel &xel+ 30 ®h2 ©g3+
31 ©hi <grxh3+ 32 ©gl (or mate in
three moves: 32 gh2 £ig3+ 33 <S>gl
gf 1 +) 32...&g3 White resigns.
Here the rook was switched to the
decisive part of the battlefield along
the 7th rank (or, using the old
descriptive notation, along the 2nd rank).
The Assault Ratio
45
White most often uses the 3rd rank for
the same aim, prudently avoiding pawn
advances such as h2-h3, but sometimes
making use of the move a2-a4. In this
case the concentration of force in the
altack zone can grow very quickly.
Kuzmin-Kondevsky
Krasnodar 1970
White has already transferred one of
his rooks into a close attacking
position along that 3rd rank. But with only
two heavy pieces, the black king's
defences cannot be smashed, and
meanwhile his knight, splendidly placed in
the centre and suppressing Black's
counterplay on the c-file, is attacked.
If turns out that the knight can be
ignored, if the mobilisation is
continued!
21 gdd3!!
After thinking for an hour and a half
(!), Black... overstepped the time limit.
But neither after 21...gxd4 22 gdg3
followed by the sacrifice on g7, nor in
other variations such as 21...f5 22
gdg3 gf7 23 &xh6 ®f8 24 &h8+
&e7 25 gxg7 gxg7 26 &xg7+ ®d8
27 £ixe6+ is there any way of saving
the game.
By coincidence, it was on the same
move that White's rook made a
decisive entrance in the following game.
Yusupov-Kengis
Moscow 1983
21 ga3! ©h8 22 gg3
An accurate choice of target,
although White could also have won by
22 gh3 £f8 23 gg3 (with the threat of
24 £ixh6 gxh6 25 &g4) 23...&h4
(23...h5 24 £|f6 g6 25 &xh5+) 24 &f6
and the black queen is trapped.
22...gg8 23 £ic4
Aiming, in passing, at the d6 square,
which the same dark-square bishop is
obliged to cover.
23...Jld5
Or 23...Jla6 24 &e4.
24 gh3 Af8 25 b3
Threatening simply 26 exd6.
25...J3.XC4
This hastens the end, but what else
can be suggested?
26 bxc4 dxe5 27 &xe5, and Black
resigned, since after 27...f6 (otherwise
46
Attack with Mikhail Tal
28 gxh6 mate) his position makes a
pitiful impression.
I.D. There is also another procedure
for preparing a decisive assault, which
has never previously been considered
in chess literature. My co-author has
suggested calling it "launching"...
M.T. ... and in doing so I have no
claims to authorship. This is pure
plagiarism, since in ice-hockey this
concept has existed since the game was
born.* The point of it is that the puck
ends up close to the goal, but no one
knows what will happen with it next.
Who will gain possession of the puck,
who they will pass it to, in which
direction it will fly. At any event, when I
"launch" a piece close to the enemy
king, I never aim it only at one point.
I.D. In your opinion, is such a
stratagem objectively strong, or is it more
a means of psychological pressure?
M.T. One cannot, of course, deny
the effect of surprise, and often after
such an escapade a mistake follows.
* It is a popular practice, particularly in
Canadian ice-hockey, for a player to
pass the puck not to a team member,
but simply close to the opponents' goal,
in the hope that one of his team will get
to it first and will be able to shoot at
goal. Similarly in chess, a piece may be
moved close to the enemy king, but
without any concrete aim, much
depending on future developments,
including the defence chosen. In the
absence of any generally accepted
English name for this practice, the term
"launching" has been adopted, to
convey its speculative nature
(Translator's note).
But that also happens in any situation
when there is a sharp turn in the play.
But the main thing is that it is "normal"
move, and the "launching" is in no way
disproved. After all, this is one version
of concentrating force, only without a
clear and single aim planned
beforehand.
Tal-Vasyukov
32nd USSR Championship
Kiev 1964/5
One senses a certain remoteness of
the black pieces from the kingside, and
White aims to exploit this factor.
IS £)h5!
Typical "launching". Approaching
the black king at the length of a drawn .
sword, the knight is looking both at f6, ,
and at g7 — according to circum- ;
stances. For example, 15...gae8 can be ;
met by 16 c4 fib4 (16...S5f6 17 j
©xf6+ £>xf6 allows White to set up a ,
strong piece outpost in the centre with ;
18 fie5, when 19 Axf6 and 20 £>d7 is •
already threatened) 17 J5,xh7+ <g>xh7
18 Hxd7 &xd7 19 £>e5 &d4 20 £>f6+
gxf6 21 #h5+ with a quick mate. In
The Assault Ratio
47
the game itself the knight goes the
other way.
M.T. Only one should not harbour
any illusions: at the moment of
"launching" the knight had already
been allotted the role of a condemned
man.
15,..®h8!
A useful move from all points of
view. The threat of a possible sacrifice
at h7 is not so terrible (without
check!), and in the variation 16 c4
<&5f6 17 <£xf6 <Sxf6 Black is ready
after a further exchange to play his
rook to g8.
16 &e4 f6!
Again the best, and possibly the
only move. If White has time to play
17 c4, his advantage over the entire
board will become evident. 16...f5 was
weaker in view of 17 jlxd5 ixd5 18
Qf4, when 18...Jlc4 fails to 19 gxd7!
17jlli4
White might have been tempted to
win a pawn by 17 jlf4, but after
17...«sxf4 18 £xf4 ©xf4! 19 Axb7
gad8 20 ©xe6 £)e5! any real
advantage would have evaporated instantly
— 21 &xd8 gxd8 22 <Sxe5? is not
possible on account of 22...©xf2+!
n...&i6
Very interestingly played. Black
only needs to follow up with 18...©c5,
and he will seize the initiative.
Therefore White's move is forced, but
in fact it had already been planned in
outline at the moment of "launching".
18 c4 £a6
How should White continue?
Defending the pawn with the rook is
inconsistent: after all, the pin is
maintained. On 19 _&d3 Black replies 18...
Sf4 20 £sxf4 Jixf4 21 #xe6 £sc5.
Drastic measures are required, but 19
ilxh7 is insufficient in view of
19...®xh7 20 &e4+ ®h8! 21 ©xe6
ilxc4. Only one move remains:
19 ©xg7! ®xg7 (bad is 19...<Sf4
20 ©d2, or 19....&XC4 20 <Sxe6) 20
£d4 £c5 21 &g4+ ®h8 22 £xe6
£xe6 23 ©xe6 gae8 24 &xd5
Axh2+ 25 <2?hl, and now the lesser
evil for Black was 25...©xc4! 26
©xc4 jlxc4 27 gfel, although the
ending favours White.
But after 25...&f4 26 ©h5! White
retains a winning advantage in the
event of 26...gxe4 27 Sd7, and on
26...i$xe4 (the only move) he could
have won immediately by 27 gdel.
M.T. We once talked about
"launching" at one of the sessions of
the school run by grandmaster Gipslis
and myself for young Latvian players,
and fairly soon I was gladdened by 17-
year-old Alexei Shirov, who by that
time was already World Junior Under-
16 Champion.
Shirov-Stangl
World Junior Ch., Tunja 1989
48
Attack with Mikhail Tal
White needs to get rid of the one
black piece that is preventing him from
beginning an offensive on the kingside
— the bishop at g4. With this aim, 11
h3 followed by g2-g4 and f4-f5 would
have done, but a "launching" is even
better.
H ©gS .&xe2 12 #xe2
Now the white knight supports the
possible breakthrough 13 e6, and it is
hard for Black to endure it close to his
king.
12...h613©xr7!
The goal has arisen of its own
accord!
13...®xt7 14 f5 gxf5 15 ©h5+
®g8 16 gdfl e6 17 g4 #d8 18 gxf5
exf519 ghgl #e7
Only White's knight is not
participating in the attack, and his advantage
in force suggests a solution.
20 gxg7+! ®xg7
Had Black given up his queen (20...
^>xg7 21 ggl) he would then have lost
much more.
21 ggl+ ®f8 22 Axh6+ gxh6 23
#xh6+ &e8 24 gg7 #b4
Forced: 24...#f8 25 #e6+ ®d8 26
gg8.
25 a3!
Elegantly removing the defence
from f8 and forcing mate after
25...©xd4 26 Bg8+ ®f7 27 #h7+
®e6 28 ge8. Black resigns.
In the next diagram too, White
makes concrete gains by a "launching".
17 ©g5!
The obvious aim is 18 £}ge4, but
there is also a reserve one that is not
yet evident.
17...£>h5
Practically forced, since after
17...Sad8 18 g4! Black altogether has
a problem: what to move?
Balashov-Stein
39th USSR Championship
Leningrad 1971
18 Ah2 f5 19 gfel Ae5!?
The best chance — to remove his
concerns over the d6 pawn. But...
20 g4! fxg4 21 ©xh7!
Goal! Of course, talking in ice- -'
hockey terms, the match is not yet .
won, but even after the most logical <
2l....fl.f5 (bad is 21...®xh7 22 #g5, '
and wins) 22 £}g5 White has a clear
advantage in view of the weakness of
e6, to where his agile knight will soon •■
find its way.
21...g3?!22fxg3.a.f5
Here too the capture 22...®xh7 23
#g5 Ad4+ 24 &hl £>f6 25 ©xg6+
®h8 26 gfl Axh3 27 gxf6 Axf6 28 ',
©xf6+ ®g8 29 #h4 ©d7 (or -
29....&C8) 30 £>e4 would have given ;
White an irresistible attack.
But in the game too, after the correct
23 £}g5! he should have won ;
"lawfully" — 23...Axg3 24 Bxe8+
The Assault Ratio
49
gxe8 25 Axf5 gxf5 26 Axg3 £xg3
27<gh2£th5 28Sgl,or23...Axbl 24
gxbl Axg3 25 Axg3 £xg3 26 £e6
with a decisive advantage.
In fact, he went wrong with 23
Axf5? (giving Black counterplay by
opening the g-file), and won only after
inaccuracies by both sides, during
which he was close to defeat.
M.T. Which in no way affects the
evaluation of the entire idea, begun on
the 17th move with the "launching".
17 £g5
ral-Averbakh
USSR Team Ch. Semi-Final
1
2
3
4
5
6
7
8
9
10
11
12
13
14
15
16
Riga 1961
Ruy Lopez
e4
£f3
Ab5
Aa4
0-0
gel
Ab3
c3
h3
Ac2
d4
£bd2
dxc5
£ifl
&e2
£ie3
Black's 14...gd8
provocative,
deprived of
since
e5
£ic6
a6
£f6
Ae7
b5
d6
0-0
£ia5
c5
&c7
£ic6
dxc5
gd8
g6
gb8
is clearly rather
his f7 square is
ts central defender. But if
White develops unhurriedly with Ad2,
gadl etc.,
as in many well known
games, Black's position will prove
quite satisfactory.
%AmAmMwS
mmMmm
a sag a' m
The knight does not threaten
anything for the moment, but it clearly
intends to sacrifice itself at f7, or — in
some cases — at h7.
17 ... Are
18 &f3
As though confirming his
"sacrificial mood" — now there is no
way back for the knight.
18 ... Ae7
19 £d5! &d6
After the capture on d5 the
weakness of f7 would already have been felt
— 20...£je7 is not possible.
20 Ae3 h6
It was difficult to tolerate the knight
any longer since 21 gadl was
threatened, but now White begins a
combination that he has calculated right to
the end.
21 &xf6+ Axf6
It would have been better to part
with a pawn after 2]...©xf6 22 &xf6
Axf6 23 £f3.
22 gadl &e7
50
Attack with Mikhail Tal
mm^
%0JsLw§, m%w
WHAT WOULD YOU HAVE
PLAYED?
No.10
23 SlxcSX Sxdl
24 Sxdl #xc5
25 &xf6 hxg5
26 Ab3!
This quiet move is the point of the
combination. The black king loses its
pawn protection and comes under the
fire of all three remaining white pieces.
26 ... gb7
27 &xg6+ ®f8
28 #h6+
And in view of the variation
28...®e7 29 Sd5! &b6 30 &xg5+
®f8 31 &h6+ ®e7 (31...®g8 32
Sd3) 32 &h4+, Black resigned.
Compared with familiar positions, in
the opening Black has lost two tempi
— this is too great a handicap. To
what does it give White the right?
No.ll
- ■ it"-
%p$B,r mpu
All five white pieces are aimed at
the black king. Is some further
strengthening required, or is it time to
seek a combinational blow?
4 Invasion Trajectories
INVASION TRAJECTORIES ARE
the diagonals, ranks and files that in
fact make up the entire black and white
arena of the chess battle. But initially
they are blocked by pawn barriers, of
both sides, and increasing the mobility
of his pieces is essentially one of the
main problems for each player. For
this the pieces need clear trajectories.
For such privileges a player has to
battle, sacrifice pawns and pieces, or
make positional concessions.
But let us nevertheless begin with
some particular instances: the
conclusions of attacks along trajectories that
have already been cleared.
The idea of an attack along a
weakened long dark-square diagonal is
illustrated in pure form by the following
example, from a ladies' competition.
Archakova-Andreyeva
Kaliningrad 1970
The position of the black king is
quite badly compromised. White can
choose between a piece attack on h6
and the advance of her h-pawn, which,
however, does not completely rule out
Black's defensive chances, associated
in particular with 28...^rb4. But the
latter preferred the mercenary 28...
.Q,xc5??, after which the main line of
attack became the al-h8 diagonal.
29 &f6 Bg8 30 Bd8 ©e7
So, has the diversion of the defender
not succeeded? Has the attack been
parried?
31 &h8+! Black resigns.
Kasparov-Korchnoi
Candidates Semi-Final, London 1983
In this, the first game of the match,
the dark squares in the vicinity of the
black king have been weakened, and
although White no longer has his dark-
square bishop, this weakening could
and should have been exploited with
the help of his knight, in spite of the
52
Attack with Mikhail Tal
piece sacrifice involved. After 21 £}e5!
the threat of 22 45g4 (and, in passing,
22 <Qc4) obliges Black to swim with
the tide: 21...gd8 22 ®h4! gd5 23
£}g4 gxb5, and now the interposition
of 24 gadl!, cutting off the Icing's
escape to the queenside, forces him to
find a way of neutralising the
opponent's powerful initiative.
Thus, for example, 24.,.£}c6 is bad
on account of 25 gd7!, while on 24...
J2,d5 White has 25 c4 #xc4 26 gxd5!
exd5 (otherwise the queen is lost) 27
&d8+ ®g7 28 &f6+ ®f8 29 gel &e4
30 &h8+ ®e7 31 gxe4+ dxe4 32 h4,
retaining the initiative.
Perhaps the only way to save the
game is in the variation 24...gd5! 25
c4 gd6! (the open file cannot be
conceded, since 25,..gxdl, in the hope of
26 gxdl £>c6 27 gd7 &xd7! 28 £>f6+
®g7 29 ©xd7 gd8!, is refuted by the
interposition of 26 £if6+!! ®f8 — bad
is 26,..®g7 27 £>e8+, when Black can
resign — 27 gxdl with excellent
attacking chances; in addition White has
in reserve the drawing mechanism 27
&h6+ ®e7 28 £>g8+) 26 £>f6+ ®fg
27 i&f4 gc6 28 &h6+ ®e7 29 £>g8+
®e8 30 £)f6+, with a draw, which
from the initial position is not a bad
result for White. After all, his queen-
side pawns are organically weak, and
in the game this factor led to his defeat
after 21 £ig5 h6 22 £ie4 ,&xe4!
In the next diagram the only open
file has been firmly seized by White,
and now his problem is to invade
"deeper" and "wider", breaking up the
defences around the black king.
34 gd6 ©e8 35 gc6! ©b7 36 AM
£>f6 37 gdd6 (the first stage) 37...
®f7 38 #dl (the second stage) 38...
Sg8.
Ragozin-Lisitsin
12th USSR Ch., Moscow 1940
After 38...gfe8 White could have
changed the invasion trajectory with ,
39<&al.
39 Axf6 ®xf6 40 ©d5, and in
view of inevitable loss of material
(40...gge8 41 gxe6+ gxe6 42 gxe6+)
soon Black resigned.
But it happens much more often that
attacking diagonals and files have first
to be opened — and in a very fierce
struggle!
Perhaps the most daring — and bril- '
liant! — attempt to exploit the al-h8
diagonal for attack, after first
weakening it, was made in the following
game (see diagram next page).
At that time this was one of the
standard positions in the Sicilian Defence,
where it was considered virtually
obligatory for White to repeat moves: 12
&h6 Ag7 13 &h4 Af6. But here he
made a move that initially seemed
fantastic, but then quite logical.
Invasion Trajectories
53
Nezhmetdinov-Chernikov
Rostov-on-Don 1962
12 #xf6!?!
The idea of the combination
immediately becomes clear: with Jld4, £sd5
and Bal-dl-d3-f3 to set up powerful
pressure on the f6 pawn, and after its
fall — an attack along the diagonal.
12...£)e2+! (by diverting the knight.
Black gains a tempo) 13 £sxe2 exf6 14
£>c3ge8
14...d5 seems better, in order after
15 £)xd5 to continue 15...ad8 or 15...
Jle6, intending to get rid of the
aggressive knight. But White too can try and
save a tempo by continuing 15 Jl.d4!?
IS £>d5 Be6 16 £d4 &g7 17
Badl d6
On 17...gxe4 White can interpose
18 JS.c3 and then 19 £>xf6, while if
17...b5 18.a.c3&d8 19Qxf6Bxf620
Bd6.
18 Bd3 £d7 19 g£3 £b5 20 £c3
&d8 21 £,xf6! Ae2
Black loses after 21....a.xfl 22
£>g4+ <S>g8 23 £>h6+ <g>f8 24 £>xf7
&e7 25 <&g5+ <Se8 26 Qxe6, when
the only way to prolong his king's life
is by giving up his queen.
22£>xh7+&g8
Or 22...<£>xh7 23 Bxf7+ <g>h6 24
£d2+ g5 25 £xe6 £xf 1 26 £f5 &h8
27 h4 £e2 28 £xg5+ S>h5 29 f3
£xf3 30 gxf3 &d4+ 31 <g>g2 gh8 32
gf6, and the threat of 33 Jlg4 mate
forces Black to part with his queen.
23 Bh3 BeS
Alas, blocking the fatal diagonal (24
Qg5 was threatened) does not prove
possible.
24 f4! £xfl 25 <®xfl Bc8 26 £d4
The hasty 26 fxe5 dxe5 27 £xe5
would have allowed Black a draw by
perpetual check: 27...igrdl+. But now
the knight again moves into a striking
position.
26...bS 27 £)g5 gc7
Black cannot also plug the
neighbouring diagonal with 27...ac4. White
first captures both black rooks with his
bishops('), and then carries out the
same "little combination" as in the
game.
And if 27...&f6 he wins by 28
£xf7+ <g>g7 29 ah7+ <g>f8 30 £>e6+
®e7 31 £xg6+! ®xe6 32 f5+.
28 £xf7+! gxf7 29 gh8+ &xh8 30
£>xf7+ <g>h7 31 £>xd8 gxe4 32 £>c6
gxf4+ 33 &e2 Black resigns.
This is another example from the
games of a player, who is not too well
known in Europe, international master
Rashid Nezhmetdinov...
M.T.... Against whom, incidentally,
I lost three of our official games,
although I should have lost all four. And
how I lost them!
I.D. Don't worry, we have already
given one of them...
54
Attack with Mikhail Tal
Nezhmetdinov-Kotkov
Russian Ch„ Krasnodar 1957
The position of Black's king has
certainly been weakened by the advance
of his pawn to f5, but how can this
factor be exploited? 17 <af4 is met by
the simple 17...£}e5, and under the
cover of this knight Black gradually
completes his development.
17 £yxc7!! &xc7 18 &d5+ ®h8 19
Be8!
Of course, not 19 Axd6? ©J6!,
when the picture changes sharply.
19...ar6 20 Sx«B+ &x« 21 Ab2!
White plans — and carries out! —
an invasion of the opponent's position
along the a2-g8 diagonal, but in this he
is helped by pressure and latent threats
along the adjacent diagonal.
21...Ag7
After 21...®g7 White realises his
plan in pure form — 22 Ac4, with the
invasion at g8.
Black has a seemingly more
tenacious, and certainly more cunning
defence in 21 ,,.^7, when if White is
tempted by the plausible and showy 22
ge8£>xe8 23&f7!!,herunsinto22... !
Ae6! 23 Sxf8+ Sxf8 24 &xe6 d5 25 -'
g4 fxg4 26 hxg4 h6 27 f4 g5, when '
Black gradually frees himself.
But instead of this, White had
prepared in advance the essentially forced j
variation 22 &d4 £>e4 (22...Qg8 is
met by 23 Se8 «xd4 24 Axd4+ Ag7
25 Ac4, while if 22...Ae7 23 &e3
AfS 24 &g5) 23 f3 d5 24 fxe4 fxe4
25 &f2!, which Black can avoid only „
at the cost of a hopeless ending. i
22 Ac4! Ad7 23 Axf6 Axffi 24 '
&l7&d8
24...£.g5 is also insufficient: 25 g3
gc8 26 h4 Ac6 27 Se8+ gxe8 28
^xc7, and White must merely avoid ;
blundering into the mate after 28... '
Sel+ 29 ®h2?? (29 Afl). The move
in the game allows a pretty finish.
25Se8+!!
Black resigns. He cannot simulta- "
neously defend f6 and f8. <
So that the timely opening of a di- -
agonal brought the attacking side rich
— and pretty, if they can be such —
dividends.
It would be naive to think that a "
good friend of both authors, five-times -,',
Women's World Champion Nona :j
Gaprindashvili, did not know about
this attacking procedure...
I.D. The point is probably that
knowledge comes in different forms. -.
Some, that was once assimilated, is ;
stored somewhere in the depths of the ,
brain, and is soundly asleep...
M.T. Of course, no grandmaster, on
sitting down at the board, repeats in his '
mind the entire range of chess
knowledge, but for me a sign of good form is
when it is all "spontaneously", as it ;
Invasion Trajectories
55
were, available, and what is needed
surfaces of its own accord at the
required moment...
I.D. But how can this be attained?
M.T. Nothing, apart from constant
training, has yet been thought up by
mankind. Neither in science, nor in art,
nor in chess...
t"3«
Gaprindashvili-Vereczi
Belgrade 1974
Here White is attacking, Black is
counterattacking, and it is not clear
which is the more dangerous. It is
White's move, and she has a draw in
the rook ending (36 i&f7+), but she has
also discovered a mating motif.
36 h3!! gxfl+ 37 wh2
Here there is no point in giving any
exclamation marks: White is merely
continuing what has been begun. The
threat is 38 hxg4+, with mate to
follow, and 37...gxh3 allows 38 g4+ wh4
39 i&xf6+, mating.
37...g3+ 38 fxg3 &e3
Black has taken control of the
invasion square h6 and is herself
threatening mate in one move. Therefore White
gave perpetual check — 39 i&g4+
Wh6 40 i&g7+, although she could
have opened one more diagonal for a
decisive attack. After 39 gxe5+ fxe5
40 g4+ wh4 the game would have
been concluded by 41 i&e7+, and if
41...<&g5 42 g3 mate. A finish, worthy
of any textbook, in any era!
The opening of files is virtually the
main motif in the majority of games
where the target of one side is the
enemy king. Lines can be cleared by
exchanges, but more often — by
sacrifices.
Geller-Vasyukov
USSR Spartakiad, Riga 1975
White has an advantage in
mobilisation, and in the placing of his king.
In addition Black's position has many
weaknesses (the d6 pawn, the d5 and
f5 squares, and the kingside pawns),
but it is very difficult to approach
them. Apart from one way...
16 f4! exf4 17 Axf4! gxf4 18 gxf4
£)h7
At the cost of a piece White has
opened lines on the kingside, exposed a
56 Attack with Mikhail Tal
glaring weakness at f7, acquired an
outpost at d5, and his attack on the
king becomes threatening.
19 &d5 ©d8 20 b4 Aa7 21 e5
i5,e6 (21...dxe5 is decisively met by 22
gxf7!) 22 exd6 gc6 23 Ag4 (again
aiming at f7) 23...gxd6 24 JJ,xe6
gxe6 25 ©f6+ ®e7 26 ©d5+ ®f8 27
gdfl ©g5 28 h4 JLb8 29 gc4 ge5 30
gd4 ©e6 (30...ae4!? came into
consideration, creating counterplay) 31
©g6 ©e8 32 gd3 gxdS 33 gxd5 fcf4
34 ©f6 gg8 35 gd8, and Black
played on for a further ten moves, only
because it was a team event.
Kupreichik-Belyavsky
Chelyabinsk 1974
White has an enormous spatial
advantage, and in addition virtually all
the black pieces are practically
stalemated. True, had it been Black to
move, with a pawn sacrifice he could
have gained a "gulp of air" — 23.„e4
24 .&xe4 SJ6 25 £,d4 Axd4+ 26
©xd4 f6 27 MS Hfe8, and after
White's "normal" move — 23 Ae4, he
could have tried to set up some
defensive lines with 23...f6, which,
however, would hardly be sufficient.
But White (and it is in fact him to
move) is not inclined to defer his
assault, and he resorts to a typical
attacking device, opening the f-file and the
bl-h7 diagonal.
23 f6! Axf6 24 £,e4 ®h8
Roughly the same variations would
have occurred after the alternative
24,..gce8.
25 gxf6! gxf6 26 £_xh7 gg8 27
gfl gg7 28 Ae4 f5 29 jj.xf5 jj.xf5 30
gxfS ®g8
Here Black evidently breathed a
sigh of relief...
31Ah6gg6 32gg5!
Exchanging one of the three
attacking pieces for the only defender! After
this the black king is completely
exposed.
32...®h7
Or 32...gxg5 33 £,xg5 gc5 34 jj.f6
®fg 35 ©h7 ©eg 36 ©g8+.
33 gxg6 fxg6 34 ©h3 ®g8 35
©d7 Black resigns.
HUP W * lai? <%K
m m±w at
m m ■ ■
Kostina-Sammul
Tbilisi 1974
Invasion Trajectories
57
Every single white piece is ready,
either immediately or within a couple
of moves, to take part in the attack on
the enemy king. But the latter has
enough — or nearly enough —
defenders, there are no serious
weaknesses, and, most important, for the
moment the position is a closed one.
Hence White's immediate task — to
open lines!
24 £g6! hxg6
It would have been preferable to
decline this Greek gift and to prevent
the immediate opening of lines by
24...iixg6 25 hxg6 h6, although even
here after 26 £sf7 gxf7 (evidently
forced) 27 gxf7+ ©xf7 28 Axf6 Axf6
29 f3 exf3+ 30 &xf3 followed by e3-
e4 White stands clearly better.
25 hxg6 Axg6 26 gahl £|h5 27
gxh5 Axh5 28 &xh5 Axg5 29
Axg7!
Not the only solution, but the most
consistent: the pawn screen is
completely destroyed, Black's king is
"undressed" and, strictly speaking, she
could already have resigned.
29...e5 30 >grh7+ (other moves were
also possible) 30...@f7 31 Axf8+
@e8 32 Ac5, and White won.
It is usually another gift that is
offered at g6, when the g-pawn,
supported by its neighbour on the h-file or
sometimes even unsupported, moves
into a double attack.
However, this procedure is
examined in detail in one of the illustrative
games in this chapter (Tal-Mohrlok).
For the moment here is another
example of the opening of lines, and of how
the pieces can exploit this.
There is nothing to herald a storm,
except perhaps that one senses a rather
abstract weakness of the a7-gl
diagonal. And yet...
Mititelu-Tal
World Student Team Ch, Varna 1958
17...£ig4!!
This is not a queen sacrifice, since
18 Axd8 £>f2+ 19 ©gl £xdl + 20
©hi £if2+ 21 <S>gl gexd8 gives
Black both material compensation, and
an attack. His idea was a different one,
based, incidentally, on White's
accurate reply.
18 fxg4 &xg5 19 exd5 Ag4 20 d6
Axe2 21 £xe2 &xd6 22 gxd6 £ib5
23 «d2 &g4 24 £c3 £xd6 25 «xd6
gcd8
Forcing play has led to Black's
desired result. The disturbing of the
material balance is nominally not in his
favour, but on the other hand all the
central files are open, and the black
rooks are established on them. Strictly
speaking, there is no attack as yet, but
with every justification Black can
count on one, as soon as his rooks
advance, ideally onto the 2nd rank.
58
Attack with Mikhail Tal
26 #c7 h5 27 Sfl Sd7 28 #xa5
h4 29 gxh4 Sd2
Black's idea is realised in pure form,
although in passing he has to parry
some counterthreats by the opponent.
30 Ad5 ®h8 31 &b4 #h3 32 #f4
Sxh2+ 33 &gl Sc2!
Pawn-grabbing (33...Sxb2?) would
have given White an important tempo
for defence,
34 Qdl Se6 35 h5 Sf6 36 &b8+
Sc8 37Ag2Sxn+
After this Black can "sadistically"
remain the exchange up, or (after
interposing a check) with an extra queen.
White resigns.
Minasian-Miles
Moscow 1990
One senses that the black king has
already endured some anxious
moments, but... Now the tripled g-pawns
hinder the approach to it, for example,
20 f3 gxf3 21 #xf3+ £>f5, and the
king is clearly destined for a long life.
But White nevertheless finds a way
of opening both files and diagonals for
the attack.
20 h3! gxh3 21 Axg6+!! ®xg6 22
£if4+ ®f7 23 #hS+ ®g8 24 £>xe6
#e8 25 Sdgl!
Gaining a tempo for the decisive,
mobilisation of reserves.
25....2,f8 26 &xh3
There is no need to resort to drastic
measures such as 26 Sg6: Black has
practically no useful moves.
26...Qf7 27 #fS Sc8 28 Sxh8+
£sxh8 29 Qxg7! Axg7 30 Ah6
There are many black pieces around
the king, but none to defend it.
30...Scl+ 31 &xcl! Black resigns.
Diagonals often have to be cleared
not only of enemy pieces, but also of
one's own. Here, as in play along the
files, it can be useful to vacate a
square for the piece that can occupy it
to greatest effect. Time in attack is
precious, and lines are normally
cleared with gain of tempo, i.e. with a
sacrifice.
Schmid-Kinzel
Siegen Olympiad 1970
A rook on the 7th rank is always an
achievement, but in the given instance
Invasion Trajectories
59
it has no particular prospects, and
White also has to concern himself
about his knight. He could, of course,
try to set up a queen and rook battery
along the h2-b8 diagonal, but is it not
simpler (of course, knowing this
procedure) to clear this diagonal.
24 gxb7+! #xb7 25 &e5+ ®a8
Black has little choice: 2S.,.®c8 26
Scl+ ®d7 27 #d6+ ®e8 28 £ic7+,
and he loses his queen.
26 £)C7+ &b8 27 £)xe6+ ®a8 28
£ixd8, and White easily realised his
material advantage.
White was also able to extend his
attacking trajectories in the following
game.
Uhlmnnn-Uitumen
Palma Interzonal 1970
White has the initiative for the
pawn, but no direct strengthening of
the attack is apparent. In addition the
white queen is tied to the back rank. Of
course, the black king could be
approached by giving check on the al-h8
diagonal, but the c3 square is under
control.
27 M!
Whether or not Black accepts the
sacrifice, all the same one square, al
or b2, is opened for the white queen.
27...#xb4?
The only defence was 27...#d8, in
order to oppose the white queen from
f6. But now Black loses.
28.fl.xe6
And it transpires that after
28....&xe6 29 #al+ the black king is
unable simultaneously to defend the
rook, the bishop and itself. Hence —
28...&M 29 ®xbl Axbl 30 £sd2,
and a gradual loss for Black.
Vacating a file before one's
strongest piece (usually the queen) moves
onto it — this theme is well known
from the following textbook pattern,
which, however, occurs from time to
time in practice with various
modifications.
Both rooks are sacrificed at h8, and
then comes #hl+ and #h7 mate.
Therefore we will restrict ourselves
to one elegant example.
White's queen very much needs to
reach g7, but both his own rooks are in
60 Attack with Mikhail Tal
the way. In addition he has to worry
about the c2 square, where he may
himself be mated.
gPSl
Heemsoth-Heisenbutter
Germany 1958
White found a splendid solution.
1 Bc5!!
Interrupting Black's counterattack
for an instant, with gain of tempo
White prepares also to dispose of his
second rook — 2 Bxh7+. In addition
Black's queen is attacked, and he
merely deferred his capitulation for the
moment by defending his king —
l...£>e8 2 gxc4 Bxc4 3 ®xb2.
It should be borne in mind that —
mainly in the games of top players —
one also sees another, rather rare form
of vacating lines for attack — in this
case ranks. This happens when the
attack on the king is being mounted
from the flank, or when an attacking
piece has to be switched from flank to
flank. One has to look hard for such a
possibility: it is usually well
camouflaged and... effective, as in the
following example.
Karpov-Gik
Moscow University Ch. 1968/9
Both sides have been playing
actively, but now it is only White who is
attacking. His offensive, however,
would appear to have come to a halt,
since after 24 ®xh7+ ®f8 the black
king escapes from the firing line, and
the knight cannot be included in the
attack: 24 £>d4&dl+ and 25...#xd4.
Black's position proved to be
hopeless only after the following far from
obvious decision.
24 g6!!
Usually files are opened by such an
advance, but here the white rook's
scope is expanded, not only forward,
but also to the side, along the rank. Its
increased power proves decisive.
24...£>xg6 25 #xh7+ ®f8 26 gf5!
Winning the queen and the game.
26...#xb3+ 27 axb3 exf5 28 &f4
gd8 29 #h6+ ®e8 30 &xg6 fxg6 31
&xg6+ ®e7 32 #g5+!
Not allowing the rook across to the
kingside.
32 ®e8 33 exf5 Bc8 34 ®g8+ ®e7
Invasion Trajectories
61
35 ©g7+. Black resigns: the f-pawn
will now advance.
Stein-Tukmakov
USSR 1972
This illustrates a similar idea, but
much simpler. White gives up the pride
of his position — his passed d-pawn,
in order to open up the 7th rank.
38 d8=#+! Hbxd8 39 ©e7+
The white queen has joined the
attack, and Black resigned.
j|viyijiii
life ;^1I
lPillPi43 W
Larsen-Kavalek
Lugano 1970
The position is sharp and full of life.
White is pressing on the half-open d-
file, and the h-file has also been
opened "in his favour". But Black too
has his play: he is threatening to drive
away the knight by ...g5 and establish
a piece outpost at d3, attacking the
important dark-square bishop.
The scales tip in favour of White
only after his far from obvious clearing
of the 2nd rank.
20 g4! £ixg4 21B exf3 22 JJ.xB
At the cost of a pawn the way for
the queen to h2 has been opened.
22...£ie5
Switching to defence — 22...£|f6 23
©h2 Hfe8 — is insufficient: 24 &>5
£>c8 25 Axf6 Axf6 26 ®h7+ «>f8 27
Ad5 and White wins (he threatens, in
particular, 28 JJ.xf7 &xf7 29 £ixg6+).
23 ©h2 Axc4!?
An interesting counterattack, for
which, however, Black does not have
enough resources. But pure defence
would have led to variations similar to
those given earlier.
24 bxc4 fixB 25 ©H.7+ <S>f7 26
£icd5 Hg8 27 £>xe7 gb8 28 <S>al
■®xe7 29 ©Xg6+ <S>f8 30 £>e6+ #xe6
31 Axg7+! <S>e7 32 j$.f8+!! gbxfS 33
HH.7+
And in view of the variation
33...gf7 34 gxf7+ ©xf7 35 ©xd6+
<S>e8 36 ©d8 mate, Black resigned.
Holes in the Fortress Walls
Thematically linked to the attack along
a weak diagonal is the attack along a
whole complex of weak squares in the
vicinity of the enemy king. This can
arise with numerous pawn formations:
62
Attack with Mikhail Tal
i t
i 1
9 • • ■ +
And in various other cases. But in
principle there is a single attacking
mechanism: pieces are established on
the unprotected squares, and from
close range they pursue the king,
completely destroying its protection.
In the next diagram, the white
bishop, which has just captured a rook,
is clearly out of play, and there is no
point in spending time on its recapture.
It is much more effective to begin an
attack on the dark squares, which for
the moment have been left undefended.
Botterill-Tal
European Team Ch„ Bath 1973
41...Ae3! 42 ®g3
If 42 gal Black interposes 42...
Agl+, and only then plays 43...$rxal.
42...Ag5!
This bishop has a great future: if 43
$rf2, defending against the mate at f4,
then 43...Ah4+, and taking the bishop
allows mate on g5.
43«c4
43 #g4 h5 44 #d4 is convincingly
met by 44...&el+, and if 45 <®h2
Ae3, all on those weakened dark
squares!
43...«e3+ 44 ©g4 &h4
Simultaneously creating two mating
threats.
4SAe7
45 4}xf7 is nicely refuted: 45...
#g3+ 46 <Sh5 Ae8!
45...Axe7 46 £)xf7
Or46«xc6h5+.
46...hS+ 47 ©xh5 Ae8 48 ©g4
exf5+49©xfSg6+
M.T. Here BotteriU smiled:
evidently the finish appealed to him too...
Invasion Trajectories
63
50®g4Ad7+
White resigns; this attack along the
weak squares won Black the brilliancy
prize at the European Team
Championship.
Liebert-Tal
Skopje Olympiad 1972
In principle the theme is the same
here, with the not especially important
difference that the role of the gi pawn
is played by a bishop.
22...£>de5! 23 txeS Axe5+ 24 ®gl
©g3 25 SD Sh4 26 £>xh4 &h2+ 27
3>f2 &g3+ 28 ®D .&xh4
The first phase of the attack is
complete. The white king has been drawn
out into the open, and is "ready" to
perish after the rook invasion at g3.
Covering this square by 29 .&f4 does
not help, since all the same there
follows 29...Sg3+.
29 &d4+ &(6 30 &f2
30 Axf6+ gxf6 31 &f2 would have
given a respite, but only for an instant
— 31...f4.
30....&e5! 31 ghl
All the same the weak dark squares
cannot be defended.
31...©tf4+ 32 3>e2 &xd4 33 &xd4
Axd4 34 AH gg3
Alas for White, the theme of Black's
entire play in this game remains
unchanged to the end.
35 b3 Ac5 36 gefl ge7+ 37 ®d2
ge3 38 £dl Sg2+ 39 ®cl Sc3+ 40
®bl 5.a3 White resigns: dark-square
strategy!
Damsky-Stefanov
Kazan 1962
White's superiority is determined by
his spatial advantage and his
invulnerable pawn outpost at e5, but most
importantly — by the weakness of a
whole complex of dark squares on the
kingside, of which the white knight has
already made "convenient" use. On the
kingside, castling is practically
impossible, on the queenside it cannot be
done without losing the f7 pawn, and it
only remains for Black to castle
artificially under the cover of the blocked
pawn centre.
64
Attack with Mikhail Tal
16...©d7 17 g4!
When lines are opened, the
weakness of the dark squares will become a
decisive factor,
17...hxg4 18 Axg4 ©c6 19 gahl
Ad7 20 h5 gxh5 21 gxhS gxhS 22
gxh5 gc8 23 gh7 Ae8
Are attack and defence balanced? If
24 J5,h5 Black has the sufficient
defence 24...gc7, then ...b6 and ...<S>b7.
True, in reserve White has the advance
of his pawn to f5, but the position is
already ripe for a "little combination".
24 &xe6\ £>xe6 25 £>xe6 i&xe6 26
gh6 Ad7 27 gxe6+ fxe6 28 ©K, and
in view of the weakness of the e6
pawn, Black was unable to set up a
"fortress".
Kalinkin-Nezhmetdinov
Vologda 1962
All the indications suggest that it is
White who is attacking. His minor
pieces are actively placed, the dark
squares around the black king are
weakened, and, for example, in the
event of 17,..iJ,xh6 18 £>xh6+ ®f8 19
f4 £ic6 20 g4 £if6 21 g5 this will soon
tell. But, it turns out, Black too has the •
preconditions for a counterattack — or ;
attack? — and they too are based on -
exploiting the weak squares, which in .
the vicinity of the white king... do not •
yet exist! ;
17...C6! 18 £>c7 £>f4!
Of course, 18...®xc7 19 Axg5
would have surrendered the complex of
dark squares to White. But the ex- ."
change sacrifice enables Black to seize .
the initiative, which, however, would <
not have led to anything without the ;
idea mentioned above.
By threatening the knight at f5, -,
Black begins forcing play. '•
19 &xg5 «xgS 20 ag3 h5 21 ;
£>xa8 gxa8 22 ©xd6 h4 23 a4
White does not even suspect any .
danger, especially since after 23..,hxg3 ,
24 hxg3 £ih5 he, of course, was not
intending 25 f4?? &xg3 26 fxe5 £>f4 .
27 ©d2 £}h3+, when he has to agree
to perpetual check, since 28 ®fl loses
to 28....&e6 29 b3 &h2 with the threat
of 30...®gl+ or immediately 30... '■
Sl%A. Instead, the simple 25 axb5 cxb5
26 Ab3, with the threat of 27 gxa6, "
would have given him a material
advantage and good prospects.
23...h3»
It transpires that it is not the white
knight that is attacked, but the securely
defended g2 square, and •— all the
suddenly weakened light squares on
the kingside. Surprisingly, White no
longer has any satisfactory defence.
24axb5cxb5 25gxa6
Desperation, but 25 £lAI hxg2 26 -
f3, not allowing the black bishop to go
to g4, is refuted by the simple 26...
©fd3 27 ge2 Ah3!
,,, , i i., I, > t i 1 hi hill r IH 1111 Ill I I
Invasion Trajectories
65
25...gxa6 26 &xa6 hxg2 27 &dl
Ag4 28 &al &B 29 ©a8+ ®h7 30
■&c8 jlxdl White resigns.
The weakness of squares around the
king is especially acute if their natural
defender — the bishop — is no longer
on the board. The attacking side may
exchange it, but even more effective is
an attack with the participation of an
"opposite-colour" bishop, since in this
case it does not have any worthy
opponent.
I.D. In short, in the endgame
opposite-colour bishops are a saving
factor...
M.T. ... but it is no accident that
between the opening and the endgame
the Gods have created the middlegame.
"%. Mil Bff
Sax-Hebert
Rio Interzonal 1979
The plans for the two sides are
determined: after castling on opposite
sides, mutual pawn storms are in
prospect. To the usual principle in such
cases of "who is quicker" is added here
— and this is decisive — the factor of
opposite-colour bishops.
Incidentally, White took this into
account beforehand, when he aimed for
this position.
14 Ag5! b4 15 &xf6 &xf6 16
£>d5 Axd5 17 &xd5 gac8
Contrary to the usual state of affairs,
on this occasion simplification has
favoured the attacking side: he has an
"extra" piece. For the moment the
counterattacking side does not have an
"extra" piece — the bishop at f6 is
rather passive. And the interposition of
17....2.g5+ does not help: 18 ®bl
gac8 19 h4 &h6 20 f6 g6 21 h5, and
in principle Black can resign.
18 h4 ®n8 19 ®bl &c7 20 &b3
aS 21 g4 Ae7 22 gS f6
And immediately the idea takes
shape of a mate at g8...
23 &h5 &d8 24 ghgl &e7 25 gg3
Ab6 26 gd2 Ad4 27 gdg2
Now the black bishop too can
participate in the attack, but White has
achieved more in the concentration of
force.
27...a4 28 Ae6
No deviation!
28...gb8 29 gxf6 &xf6
The light-square bishop would also
have triumphed after 29...gxf6 30
©g4.
30 gxg7 &xg7 31 gxg7 ®xg7 32
&g5+ ®n8 33 hS gb7 34 h6 Ac5 35
f6gff7
Against 36 •&£!+ there is no other
defence.
36 &d5 gbc7 37 &g4 Black
resigns.
In this last example we have seen
the role that pawns can play in the
offensive against a king. Apart from
the fact that pawn advances open
66
Attack with Mikhail Tat
attacking lines and break up the walls
of the king's fortress (about which
more in detail in a later chapter), they
also secure space for their pieces, and
cramp the opponent's forces and the
enemy king itself. Normally all this is
at the cost of their own lives.
Geller-GIIgoric
"Match of the Century"
Belgrade 1970
At first sight White appears to have
no grounds for a pawn storm, and in
addition Black is just one move away
from being perfectly safe. Yet with the
help of a sacrifice this becomes
possible.
23 ©xeS! Sxe5 24 AxeS &xe5 25
f4
White's idea, in launching this
operation, is that the rapid advance of his
central pawn pair will drive back the
black forces to unfavourable positions.
25...®e6
Here Black's queen comes under a
further attack by the white f-pawn, but
what can he do? After the "active"
25...#c3 26 igrf2 the queen would
simply be lost: 26...£sc6 27 e5 £se8 28
ge3 ■&b2 29 £sxh6+ gxh6 30 ,&h7+.
26 e5 £>e8
Trying to hold the position by tacti- .
cal means, 26...£je4, does not succeed:
27 gxe4! ©xf5 28 geel ©e6 (or 28...
#h5 29 #d3) 29 f5, and the pawns
continue their formidable advance. "•
27 £>h4!
The most energetic. Now the
weakness of Black's h7 becomes fatal.
27...£ic6 28 &d3 g6 29 f5
The culmination of White's entire
plan. Now the black king is opened up,
and the attack continues as though of
its own accord.
29...gxf5 30 £>xf5
Threatening mate: 31 £se7+ etc. -,
Black's reply is forced, since after 30...
Ag7 31 &xg7 <S>xg7 (31...£sxg7 32
&h7+ ®f8 33 &h8+) 32 #h7+ S?f8 -
33 &f5! the queen has no retreat - ;
33...#e7 34 #h8 mate.
30...#g6 31 &e2!
31 #d7 would also have won, but .
White wishes to deny his opponent any '
chances at all.
31...«rgS
This leads to the loss of the queen, *
but Black's position was already
indefensible.
Thus after 31...#e6 32 #e4 &g6
White has a pleasant choice between '
33 ge3 £>d8 34 gd5 Axd5 35 cxd5,
and the sharper 33 gd7! ,&c8 34 e6
Axd7 (34„.#xe6 35 £>e7+) 35 exd7 ,
<&g7 (or 35...£>c7) 36 £sh4!
32 h4 ®f4 33 g3
The queen is trapped: after ,
33...#xe5 34 #g4+ #g7 35 &xg7 i
and a few further unnecessary moves, -
Black resigned.
Invasion Trajectories
67
Far-advanced pawns can also play a
part in the endgame, if the pursuit of
the king continues. They may take
away squares from the enemy king and
create a mating net.
Tseshkovsky-Polugayevsky
Riga Interzonal 1979
Here the struggle has largely lost its
sharpness. White has the advantage,
but it becomes decisive only after
Black underestimates the strength of
the f5/g5 pawn pair and... the always
potential weakness of his back rank.
25...ge2+? 26 gJ2 gxf2+ 27 <g>xI2
£ixb2 28 &xb2 gxc2+ 29 <g>e3 gxb2
And so, Black is two pawns up, but
the very next move is essentially the
last one in the game.
30 gel!
M.T. Strictly speaking, the
exclamation mark should have been
attached much earlier, to White's entire
plan. At the least, to his move 25 £}d5.
I.D. What was the mechanism of
Black's mistake?
M.T. I think, the absence of the
queens from the board. With the
queens on, even a player of a much
more modest standard than
grandmaster Polugayevsky would have kept his
eyes on the white pawn pair, the
strength of which is evident. But after
the exchange of queens, even a top-
class grandmaster can exclude this
factor from his attention.
30...gb3+ 31 <g>e2 gb2+ 32 <g>el
f6 33 g6
On 32...g6 there would of course
have followed 33 f6.
33...ga2 34 gc8 gal+ 35 <g>d2
ga2+ 36 <g>d3 ga3+ 37 <g>c2 ga2+ 38
<S>c3
Now the rook can even be allowed
onto the e-file: 38...ge2 39 £f4 (with
gain of tempo) and then Se6.
38...hxg6 39 £ie7+ <g>h7
It would be good to play 39...<§>f7
40 Qxg6 Ae7, and if 41 gc7 ge2, but
alas — 41 £}h8mate!
40 fxg6+ <g>h6 41 Bxf8 ge2
Black would have lost even more
quickly after 41...gxa4 42 h4 <&b5 43
gh8+ <g>g4 44 h5 and then h5-h6.
However, in the game itself White
required only 10 more moves to realise
his advantage.
In the next diagram there appears to
be no sign of an impending tragedy.
But when Black went in for this
position, he overlooked the fact that the
f5 pawn was too close to his king.
True, for the moment it is alone...
28 Axc6! £ixc6 29 gxb6 &xb6 30
&c4+<g>h831&f7
The pawn has received
"reinforcement" in the form of the queen, and in
addition 32 $3% is threatened.
Blocking the bishop's diagonal (by
31...Qb4) does not succeed: 32 f6 gg8
68
Attack with Mikhail Tal
33 fxg7+ Sxg7 34 #f8+ and 35
#xb4.
Yusupov-A.Sokolov
55th USSR Ch„ Moscow 1988
31...Sg8 32 f6 ®d8 33 Ae7 Sxe7
34fxe7
The white pawn has moved away
from the king, but only in order to
become a queen. This cannot be
prevented,
34...#d7 35 Sd3 h6 36 Sf3! Sc8
37 ©f8+ ®h7 38 gf7 Scl+ 39 ®g2
&c6+ 40 ®h3 #e6+ 41 ®h4 Black
resigns.
Tal-Mohrlok
Varna Olympiad 1962
Sicilian Defence
1 t-4
2 so
3 d4
4 £sxd4
5 Sc3
6 AgS
7 ®d2
8 0-0-0
c5
Se6
cxd4
Sf6
d6
e6
&&
0-0
9
10
11
12
13
14
15
Sb3
a
g4
Ae3
g5
h4
g.6
#b6
a6
Sd8
®c7
Sd7
b5
This pawn sacrifice is a fairly
routine one, since it is obvious that White
needs open lines for an attack on the
black king, which for the moment has
been deserted by its "subjects", in
particular the knight from f6 and the
rook from f8.
M.T. Incidentally, I made this
sacrifice on two earlier occasions, but the
game with Mohrlok is taken as the
main one, for the reason that after it no
one else granted me the same
pleasure...
,«HJB! »e«
! m$m±m±
..life Au£*L
tmtm m, i
15 ... fxg6
This was how the problem of the
"impudent" pawn was solved by Boles-
lavsky in a game with Spassky (25th
USSR Championship, Riga 1958). In a
training game Tal-Koblenz (also in
Riga, but a year earlier) Black
eliminated the presumptuous infantryman in a
Invasion Trajectories 69
different way: I5...hxg6.
M.T. I cannot deny myself the
pleasure of giving the attack and
combination that followed: 16 h5 gxh5 17
gxh5 £>f6 18 ghl d5 19 e5! £>xe5
(19...&xe5? 20 Af4 &f5 21 Ad3 &e4
22 fxe4 and 23 &h2) 20 Af4 jj.d6 21
&h2 ®f8 22 &h8+ £>g8 23 gh7 f5 24
J3.h6 Bd7 25 Axb5! gf7 (if 25...axb5
26 &xb5, 27 £>xd6 and 28 Axg7+) 26
ggl Ba7 27 £>d4 £,g4 28 fxg4 &eS
29 <Sc6! Axc3 30 jj.e3! (with the
threat of 31 jj.c5+) 30...d4 31 gghl!
(threatening 32 &xg8+) 31...gd7 32
Jlg5 axb5 33 aih6!, and against the
concluding stroke 34 Hf6+ there is no
defence.
Finally, in a telegraph game Tal-
Stoltz, 1959, in the diagram position
Black declined the gift, and attempted
in search of counterplay to strengthen
his piece pressure on the queenside:
15...£>c5. But he too came under an
attack — 16 gxf7+ <g>xf7 17 Ah3!
(aiming at the weak e6 pawn) 17...
Qa4 18 f4 <Sb4 19 f5 e5 (it turns out
that 19...£ixc3 20 bxc3 <Sxa2+ 21
<S>b2 is not possible) 20 £ixa4! (White
is not tempted by the win of the
exchange — 20 £|d5 £,xd5 21 &xd5+
®f8 22 &xa8 jj.b7 23 &a7 ga8 24
£id4 exd4 25 #xd4, since then Black
gains counterplay: 25...jif6 26 #xd6+
&xd6 27 gxd6 Axb2+ 28 ®bl
jlxe4) 20.„axa2+ 21 ®bl bxa4 22
£ta5 Sb8 (the sharpening of the play
seems to be not unfavourable for
Black, since if 23 ®xa2 he has 23...
gb5, but...) 23 &d5+! ®f8 24 ®xa2
©xc2 (or 24...gb5 25 &c6 &xa5 26
f6) 25 gd2! gxb2+ 26 ®al &c3 27
igrd3!, and Black resigned.
16 hS gxhS
17 gxhS £>f6
18 ggS £>e5
19 &g2 Af8
20 Ae2 £>c4
21 Axc4 bxc4
22 £>d4 Bb8
23 Bhl Bb7
24 Bh6!
A difficult move. On 24...g6 White
had prepared 25 ghxg6+ hxg6 26
gxg6+ ®f7 27 &g5 &h7 28 &h5 £>f6
29 gxf6+ ®xf6 30 fif5!!, and against
the threat of Ag5+ there is no defence.
24 ... ®f7
25 gh4 &b6
26 £>dl ©c7
27 f4 h6
28 gg6 ge8
29 fS eS
30 £>c3!
Threatening 31 gxf6+.
30 ... &d8
31 £}c6 Black resigns
Torbergsson-Tal
Reykjavik 1964
King's Indian Defence
1 d4 £>f6
2 c4 g6
3 &c3 ig7
4 e4 0-0
5 f4 d6
6 &f3 cS
7 dS e6
8 J3.e2 exd5
9 exdS bS!?
10 &xb5
If 10 cxb5, Black would have
continued 10...a6, in analogy with the
Benko Gambit.
70
Attack with Mikhail Tal
10 ... £e4
11 0-0 a6
12 £a3
This then is the idea of Black's
sacrifice! The knight at a3 occupies a
most unfavourable position, and Black
has time to concentrate his forces in
the centre. Perhaps White should have
returned the pawn with 12 4}c3.
12 ... Sa7!
Black finds a "clear road" to
transfer his rook to the centre.
13 Ad3 ge7
14 &c2 gfeS
15 gel
It is now clear that White has
difficulties in developing his queenside.
15 ... &d7
16 £e3 £df6
17 #c2 £h5
White has not found the best plan,
and is already obliged to parry
concrete threats.
18 g3
This move is a success... for Black.
But 18 Sfl would have been very
strongly answered by 18...£ig5!
18 ... Ad4
19 &xd4 cxd4
20 &g2 &gS!
21 Sxe7 £h3+
22 <£>fl
If 22 <£>hl Black has 22...®xe7 23
Ad2 &f6 24 gel £,g4.
22 ... Sxe7
The natural 22...©xe7 after 23 Ad2
would have given White a tempo for
the defence-24 gel.
23 Ad2 &S6
24 £h4
24 gel is decisively met by 24...
£g4 25 gxe7 &xe7! 26 &h4 Se3+.
24 ... £,g4
25 £0
On 25 ®g2 Black had prepared the
following variation: 25,..#e8 26 f5
ge2+ 27 Axe2 #xe2+ 28 ®xh3 h5
29 Shi £f2+ 30 ®g2 &xhl+.
25 ... ge3
26 <£>g2 #e7
27 gel
M.T. Here Black could have carried
out two interesting combinations. I
spent a long time considering 27...
gxel 28 ©xel Af5 29 £f3 #e3 30
Axe3 £xe3+ 31 ®hl Axd3! 32 #d2
Ae4 33 #e2 g5 34 g4 h5, and wins.
Unfortunately, the combination is not
forced. After 29 #dl I could not see
any way to win, and so I chose the
second possibility.
27 ... £>xf4+!
28 gxf4 gxel
29 fixel @h4
30 Acl
Obviously the only move.
30 ... #xel
31 h3
This loses very quickly, but even
after the superior 31 f5 4}e5 Black has
Invasion Trajectories 71
an irresistible attack.
31 ... Qh6!
32 f5 £>xf5
33 Q.t1
Now comes the concluding
combination.
33 ... Qh4+
34 ©h2 Qf3+
35 ©g2 ^xh3+!
36 ©xf3
36 ©xh3 loses to 36...#h4+ and
37...Qel+.
36 ... &gl!
With the threat of 37....fl.g4+ 38
<S>e4 f5 mate. If 37 &M6, then 37...
.9,g4+ 38 ©f4 ^,h5 is decisive.
37 .&xg6 igrg4+
38 ©f2 &xf4+
39 ©gl hxg6
White resigns
Tal-Donner
Beverwijk 1968
French Defence
1 e4 e6
2 d4 d5
3 Qc3 Ab4
4 e5 c5
5 a3 ^.xc3+
6 bxc3 &c7
7 Qf3 b6
8 a4 Aa6
9 .9.xa6 £>xa6
10 &e2 Qb8
In solving the problem of his
"French" bishop, Black is forced to
pay for it in terms of tempi. Thus the
knight is obliged to return home, since
on 10,..cxd4 there would have
followed 11 &b5+©d8 (or ll...©f8 12
Aa3+ £>e7 13 &xa6 &xc3+ 14 ©e2
#xc2+ 15 Qd2 and 16 ghcl) 12
#xa6#xc3+ 13 <S>e2, and I3...&xa!
is not possible in view of the bishop
check at g5. But since the black pieces
have retreated to their initial positions,
White needs to open as many files and
diagonals as possible for the attack.
11 a5! bxa5
If U...cxd4 12 0-0!, and White
achieves his aim. Nevertheless 11...
£>d7 was more circumspect, but Black
had not anticipated his opponent's 14th
move.
12 .9.33 Qd7
Perhaps Black should have given up
a pawn to gain a tempo — 12...Qe7 13
Axc5 Qd7.
13 dxc5 £>e7
14 c6!
A consistent continuation of the
same tactics.
14 ... igrxc6
15 0-0 &xc3
16 gfdl £>c6
First 16...^c4 was rather more
accurate. But Black wants with gain of
tempo (the e5 pawn!) to reposition his
knights, such that they block the open
files on the queenside.
17 A<16 &c4
18 &e3 &e4
19 &b3 Qb6
20 c4!
M.T. The white rooks need the
c-file! Hence this new intuitive
sacrifice of what is now a third pawn.
Moreover, in my calculations I
established that neither 20...Qxc4 21 &b7,
nor 20...dxc4 21 &b5 gc8 22 gxa5 is
possible. The counterattacking attempt
20...a4 is parried by 21 gxa4! (21
&b5? #xc4) 22...dxc4 22 &xb6!
72
Attack with Mikhail Tal
axb6 23 gxa8+ £d8 24 gc8, when
there is no defence against 25 .&,c7 or
25 gc7.
20 ... ©xc4
21 ©a3 ©a6
22 gacl gc8
23 £>d2!
Aiming for c5.
23 ... f«
After the game 23...4}d4 was
suggested, and if 24 gxc8+ ©xc8 25
©xa5 ©d7, but White ;an play more
elegantly and strongly: 24 4>hl! £}f5
25 gxc8+ ©xc8 26 gel &d8 27 &c5
f5 28 ©xa5 fxe5 29 ©xa7 £}d7 30
Aa3 €>e7 31 gc7, when the threats of
32 £f3 and 32 £o3 are irresistible.
24 exf« gxf6
25 ©D ®d7
25...®f7 is insufficient on account
of 26 ©h5+ ®g7 27 gc3, while if
25...£)d7 the following variation, while
somewhat "cooperative", is not without
its logic: 26 ©g4 (with the threat of 27
©g7) 26...®d8 27 ©xe6 ge8 28
©xd5 ©e2 29 Qc4 ©e6 30 £xa5
©xd5 31 £>b7mate,
26 ©xf6 She8
Or 26...®xd6 27 Oe4+ ®c7 28
£c5 &e2 29 ©g7+ ®d6 30 £b7
mate.
27 fie4 £e7
27...dxe4 28 ©g7+ Qe7 29 Axe7+
Qd5 30 Af6+ leads to mate.
28 £c5+ gxcS
29 Axc5 £ic4
30 Axe7
Black resigns: 30...gxe7 31
gxd5+.
WHAT WOULD YOU HAVE
PLAYED?
No.12
In this position from our classical ]
heritage, reckoning that after 18 h6 -
Black would block the position by
!8...g6, and after 18 g6 by 18...fxg6
19 hxg6 h6, White began the
concluding attack with 18 Axh7+ ®xh7 19
g6+ ®g8 20 £}xe4 dxe4 21 h6! f6 (or
21...exf3 22 gxf7+©xf7 23 hxg7) 22 .
hxg7 exf3 23 gh8+ ®xg7 24 gh7+,
and soon won. We will say straight
away — a possible solution. But is it
obligatory?
Invasion Trajectories
73
No.13
White carried out a similar plan in
this position: 13 hS! 4Sc4 14 .2.xc4
Sxc4 IS g5 mi 16 Sdgl &c7 17 g6
gc8. How can Black's defences be
further broken up? (After all, he
himself has prepared counterplay with
18...gxc3.)
No.14
The impression is that on the
kingside Black has been playing not
chess, but draughts (checkers). At any
event, the pawn formation here
resembles the jaw of an old man, who
not once in his life has been to the
dentist. Naturally, the light squares
have already been occupied by the
white pieces. But what next?
No.15
For the moment Black has managed
to forestall the opponent's activity on
the queenside and to gain the initiative
on the kingside, as, however, often
happens in the fianchetto variation of
the King's Indian Defence. But now
White is threatening by 21 h4 to block
all the lines here, and then to begin
play on the opposite side of the board,
where he is stronger. And after 20...h5
21 gxh5 gxh5 22 <&>hl there is no
possibility of Black creating an attack
on the g-file...
5 Lines of Communication
IT IS ON HOW THE PIECES
behave on the communication lines —
files and diagonals — that the success
or failure of an attack depends. There
is nothing surprising about this: for
200 years no one has cast doubts on
Napoleon's aphorism: "War is
communications". How to clear and use
them was the subject of the previous
chapter. But for victory this is
sometimes not enough. Not only to give
your own pieces scope, but to close
lines to the opponent's men: this is the
task of any player who sits down at the
chess board. Intuitively everyone
senses this, but strangely enough, in
practice such attacking procedures and
plans are not regularly encountered.
Evidently our subconsciousness needs
to be reinforced by consciousness,
based on knowledge — and then your
opponent's pieces will often be too late
in reaching the decisive part of the
battlefield. Too late, because of you!
The Barrier
In the theory of chess this is a new
concept. The authors define it in the
first instance as a non-material barrier,
through which either one piece, or a
whole group of pieces, is unable to
pass. In short, it is a communication
line under close-range fire, and the
creation of one is usually a basis for
future success.
It was this motif that prompted
White's decision in the following
game, the final one of the match.
Tal-Larsen
Candidates Semi-Final, Bled 1965
16 £)d5! exd5 17 exd5
The piece sacrifice is a positional
one, since it has been used to erect an >
invisible barrier on the e-file. A
number of squares on it (e5, e6) are
controlled by white pawns, and a white
rook will soon be moved to el. By
contrast, Black's pieces (queen, rook,
bishop and to some extent his knight) :
are bunched together on the queenside !
and cannot easily come to the aid of
their king. Now White is threatening
the routine combination with bishop
sacrifices at h7 and g7, against which
Black cannot defend without making
positional concessions. If 17...g6 \
White can continue his attack either by
18 h4, or the more active 18 18*3! So
Larsen aims to cover his h7 with the
other pawn.
Lines of Communication
75
17...f5
But now White's dark-square bishop
is too strong.
18 gdel
Here Black has an unpleasant
choice: he can either defend the bishop
with his rook from f7, but this will then
allow the white pawns to open up the
kingside with gain of tempo (g5-g6!),
or else move yet another piece away
from the kingside. On 18....&d8 the
following very curious variation was
possible: 19 &h5 £sc5 20 Axg7!
Qxd3+ 21 ®bl (not 21 cxd3? &c7+)
21...Qxel (21...&xf4 22 &h6) 22 g6
&xg7 23 &xh7+ gf6 24 g7 gf7 25
g8=£s mate!
18...gf7 19 h4 Ab7 20 Axf5
M.T. But this can be attributed to
competitive considerations. Had this
position not been reached in the last
game of the match, I would
undoubtedly have played more sharply: 20 g6
hxg6 21 h5 g5 22 Jlxf5 (weaker is 22
h6 g4 23 hxg7 £.f6, or 23...<&f6 24
gxe7 gxf3 25 Jlxf6 gxe7) with very
dangerous threats. E.g., 22...gxf5 23
gxe7 <&e5 fails to 24 h6! <Sxf3 25 h7+
&f8 26 gxg7 with inevitable mate.
But at this point I wanted to make
absolutely sure, and at the board I was
unable to find a forced win after
22...Jlf6 23 Ae6 &f8! (not 23,..Jlxd4
24 fxg5 and g5-g6). That there was a
win, I was sure (just as I am sure now),
but the experience of the preceding
game warned me against spending time
on the calculation of long, complicated
variations — I might end up in time
trouble, particularly since after the
move made my position remains very
favourable.
20...gxf5
If 20...£if8 White can simply
intensify the pressure, by defending the
bishop with his queen and renewing
the still-present threat of .&xh7+.
21 gxe7 £se5
After the passive 21...gf7 Black is
crashed by 22 gxf7 &xf7 23 g6+
hxg6 24 h5, when his king is
completely exposed. The Danish
grandmaster tries to seize the initiative by
tactical means, but White is prepared
for this.
22 &e4 &f8! 23 fxe5! gf4 24 &e3
gf3
After this move White wins without
any great difficulty. The main variation
of the combination begun with 20
Axf5 was 24...j3.xd5 25 exd6 gxd4
(after 25...j3.xhl 26 gxg7+ Black's
scattered pieces are helpless) 26
&xd4! (weaker is 26 gel &f4!)
26....&xh1 27 b3. Here Black probably
does best to return the piece
immediately by 27...Jlf3 28 ©c4+ gh8 29
gf7 ^xd6 30 gxf3, with some chances
of saving the game. The attempt to
maintain his material advantage is
hopeless — the white h-pawn, on
reaching the 6th rank, lands the
decisive blow. The exchange of rooks after
27...ge8 also loses to 28 ©e5 gxe7 29
dxe7 &e8 30 &e6+ gh8 31 h5 Af3
32 h6, or 31...Ac6 32 g6 with the
irresistible threat of 33 <&n.
25 $>e2 ^xe7
No better is 25...&f4+ 26 &d2
gfl+27gxfl &xfI+28&dl,or25...
Axd5 26 exd6.
26 &xf3 dxe5 27 gel gd8
The ending after 27...gf8 28 gxe5
#xe5 29 &xf8+ ©xf8 30 Jlxe5 gives
76 Attack with Mikhail Tal
White an easy win — Black has no
time to take on d5 in view of 31 Ad6+.
28 gxe5 Sd6 29 «f4!
With this simple bit of tactics (29...
Axd5 30 ge8+) White keeps his two
extra pawns. The finish is
straightforward.
29...gf8 30 «e4 b3
There is nothing better.
31 axb3 gil+ 32 ®d2 «b4+ 33 c3
#d6 34 AcS!
Not altogether necessary (there were
many ways to win), but an amusing
concluding combination.
34...'©xcS 35 ge8+ gf8 36 «e6+
®h8 37 «f7 Black resigns.
A similar idea was carried out by
White in the following game, with the
"slight" difference that a real sacrifice
proved unnecessary, and the barrier,
cleaving Black's position, was erected
not even for free, but with the win of a
pawn...
Shishkin-Karasev
Leningrad 1989
13 adS! #d8 14 £)f5! exfS IS ex-
fS®h8
The threat of ge4-h4 does not even
leave Black time for 15...ge8.
16 £>xe7 &xg2 17 «h6!
The quickest way to win.
17„.<ad7 18 <ag6+ ®g8
Alas, after 18...fxg6 19 fxg6 not one
of Black's pieces is able to come to the
aid of his king - partly on account of
the barrier erected by White.
19 <axf8 ©rf8 20 «xf8+ ®xf8 21
®xg2, and Black resigned.
Geller-Velimirovic
Havana 1971
In this position the role of the
barrier is partly played by the pawn chain
a2/b3/c4/d5. It is practically keeping
one black knight out of the game, but '
that is only part of the matter. White's
plans include active play on the king- •
side, from which will be excluded the .
remaining black pieces, in particular
the queen's rook. This is possible only
if he can establish control over the
"transit" square e7, from which the
black queen could carry out the great- «
est number of functions — of defence .*
and counterattack.
Lines of Communication
77
Hence the fantastic and unusually
audacious plan — to sacrifice a rook!
Instead of 14 Ab2 e3 15 fxe3 £,g4, for
which Black was hoping, there came a
clap of thunder.
14 £>dxe4!! £>xe4 15 £>xe4 Axal
16 Ag5 Af6
Black cannot avoid the coming pin,
since, if he moves his queen, the
bishop at al is lost, and with material
almost equal (a pawn for the
exchange) White gains a powerful attack.
17 £ixf6+ Hxf6 18 &al £>f7 19
gel
Despite being a rook down, in the
main thrust of the attack White has a
superiority in force. It is difficult for
Black to bring his queenside pieces
into play, since simple developing
moves do not work. For example, on
19...Af5 or 19...Ad7 there follows 20
©c3! (with the threat of 21 Axf6
©xf6 22 &xa5) 20...b6 (the only
defence) 21 ge6! and White wins, since
the forced 21...Axe6 leads to the
opening of the long light-square
diagonal — 22 dxe6+, and loss of material
for Black.
19...gb8
The alternative defence was 19...h6,
but it would not have saved the game
after the simple reply 20 Axh6. For
example: 20...Af5 21 Ag5 gc8 22 g4
Axg4 23 ge4 Af5 24 gh4, or 20...
©h8 21 Ag5 Ad7 (if 21...Af5 22
<&c3 b6 23 ge6, whereas now in this
variation Black has 23...gf5) 22 ge4!
gf5 (otherwise 23 Axf6 ©xf6 24 gf4,
while on 22...gf8 there would have
followed 23 gh4 &g7 24 Ah6 &g8 25
Axf8 &xf8 26 gh7+ ®e8 27 &el +
<3>d8 28 &xa5+) 23 ge7+ ®g8 24
<&xh8+ ®xh8 25 Ad2, with a decisive
advantage.
20 ge3 b6
Defending the knight, which, as we
have seen, was "hanging" in several
variations. No better was 20...Af5 21
h3! h5 22 g4 hxg4 23 hxg4 Axg4 24
ge4 Af5 (24...Ah5 25 ge6) 25 gh4.
21 gf3 Af5 22 g4 &h8 23 ,&xf6
The simplest solution: White
transposes into a won ending. 23 Ah3 is not
altogether clear in view of 23...gg8.
23...&xf6 24 ©xf6+ £>xf6 25 gxf5
gxf5 26 ge3
An important link in the plan for
realising White's advantage. The
frontal attack on the f5 pawn, 26 Ah3,
would have allowed Black to maintain
equality: 26...gg8+ 27 £>fl gg5. But
now the white rook penetrates into the
heart of Black's position.
26...£>b7 27 ge6+ &f7 28 &B
The threat of a bishop check at h5
finally disrupts the coordination of the
black pieces.
28...gg8+ 29 &fl &f8
Black cannot hold the h5 square:
29...gg5 30 h4.
30 Ah5 gg5 31 ge8+ &g7 32
ge7+ &h6 33 gxb7 gxh5 34 gxa7
gxh2 35 gd7, and White won easily
in the rook ending.
Interference
Closely approaching the "barrier"
theme, first formulated here, as an
effective attacking procedure, is so-
called "interference" — a purely
tactical blow, which also has the aim of
cutting off the opponent's forces from
the defence of some key or simply
78
Attack with Mikhail Tal
important point. But whereas the
barrier is lowered for a long time and acts
rather as part of a strategic plan,
interference is instantaneous and operates
immediately.
Klovans-Tolush
Leningrad 1962
Only the black queen is guarding the
mating point g7, and the interference
move 37 gc7! is immediately decisive:
if 37...&XC7 38 #d4+, forcing mate.
Simagin-Bronstein
Moscow 1947
Must White force perpetual check?
The answer would have been yes, had
he not noticed the thunderous 51
jlgS!, when Black must either go into
a lost queen ending after 51...©xg5 (if
51...fxg5 52 f6, forcing mate) 52
#d8+ &g7 53 #c7+ and 54 #xh2, or
else accept the fact that both(!) his
queens are cut off from the king's
residence. He preferred the latter: 51...
hl=&, and after 52 &e8+ <g>g7 53
&g6+ &f8 54 #xf6+ &g8 55 &d8+
&g7 56 #e7+ &g8 57 &e8+ Black
resigned in view of mate in three,
A.Petrosian-Panchenko
Odessa 1973
After incorrectly accepting a pawn
sacrifice in the opening, White is
markedly behind in development. True, he
has no weaknesses, and at first sight it
is not clear how Black can approach
the white king still in the centre.
The solution to the problem lies in a
far from obvious interference move.
14...Ab4!!
The threat of 15...£.xc3 leaves
White no time for 15 ftg3, and after
Lines of Communication
79
his forced reply his queen loses control
of the 4th rank, from which the assault
on his king intensifies.
IS cxb4 Ac4 16 &g3
After 16 £ie3 Axe2 17 ©xe2
£id4+ white loses the right to castle,
and he is left with simply nothing to
move (18 ©el She8, with the threats
of 19...&h5 20 &dl &xdl+ or 19...
i&e4). But now he hopes, by returning
the material, to take his king to safety.
16...Ab5! 17 &a3
Otherwise the black knight comes
into play with gain of tempo.
17.„Sd3! 18 Af4 &e6 19 b3
And once again the queen's path to
the centre of the battle is blocked.
19...Sxg3 20 0-0 Sxg2+ 21 ©xg2
Axe2 22 f3
In parrying the deadly check at g4,
White is prepared to part with his
gains, but for Black this is not enough.
22...Sf8 23 Ag3 &e3 24 &cl (24
gf2 £>d4) 24...Axf3+ 25 Sxf3 &xf3+
26 ®gl ge8, and with a continuing
attack Black now has a material
advantage. He soon won.
It was this attacking procedure that
was at the basis of a deeply-calculated
variation in the following game.
M.T. To be honest, I recalled it with
pleasure during the illustrative game
that we selected for this chapter.
Botvinnik himself admitted that he
went in for this position, assuming that
after 22 axb3 Sb7 Black would not
have any serious difficulties.
22 Sdl!
In this somewhat paradoxical way
White ensures the invasion of his rook
onto the 8th rank. But it would not
have brought any dividends, had he not
had "in reserve" his murderous 25th
move...
Ragozin-Botvinrtik
Moscow 1945
22...Sa8
Bad is 22...Sb7 23 Sd8+ ©h7 24
Ad3+ f5 25 Sxc8 £)d4 26 Aa6, when
Black can resign; 22...£icl loses to 23
Sd8+ ©h7 24 Ad3+ £>xd3 25 Axb8.
23 Sd8+ .3.18
This leads to a mortal pin on the 8th
rank, but there is no choice. If 23...
©h7 24 Ad3+ g6 25 cxb3! (after 25
Ae5 Ab7 26 Sd7 £)C5 27 Sxf7+ ©g8
28 Ac4 Aa6! or 28 Axg6 Sd8! 29 h4
Sdl-t- 30 ©h2 £)d7 Black holds on)
25...Ab7 26 Ab8 a5 27 a4, with the
threat of 28 Ac4. If Black tries to free
himself by tactics: 27....2.C3
(threatening 28...Ae5, and if 28 Se8 Ad4,
threatening 29...Aa7), then 28 Ac7,
and after 28...Sxd8 29 Axd8 ©g7 30
f3 White would appear to have a
decisive advantage in the endgame, in view
of Black's weak queenside pawns.
24 axb3(?)
Here this "automatic" capture
80 Attack with Mikhail Tal
"towards the centre" is a serious
inaccuracy, spoiling a splendid idea.
24...Ab7
So, is the activity of the white rook
curtailed? After all, it cannot be kept
on the 7th rank after 25 gd7 Ac8.
25 Ab8!
The crux of White's plan. On the
main part of the battlefield he retains
an advantage in force.
25...aS 26 f3
Alas, after the correct 24 cxb3
White could now have stalemated the
black pieces by 26 a4!, when equally
bad for Black are 26....fl.a6 27 Axa6
gxa6 28 Ad6, and 26...c5 27 Ac7,
winning the a5 pawn, and 26...g6 27
Ac4 <£>g7 28 Ae5+ and 29 Sd7. True,
he still retains an advantage.
26...a4 27 bxa4 gxa4 28 ®B (28
Ad6 ga8) 28...CS 29 ®e3 £.c6 30
Ad3 Ba8, and now, by continuing 31
Ae4!, White could well have hoped to
win, e.g. 31,..aa3+ 32 ®f4 g5+ 33
®e5 Axe4 34 ®xe4 ga6 35 ®d5,
threatening the thematic 36 Ad6.
Kasparov-Pribyl
Skara 1980
After the quiet 20 Af4 White would
have retained sufficient compensation
for the pawn. But with a piece sacrifice
he excludes the enemy queen from the
defence of the weakened kingside,
thereby gaining the opportunity to
mount an attack with superior forces.
20 d7! fxgS 21 ®c4+ ®h8 22
£>xg5Af6
A weighty argument in favour of
White's entire plan would have been
22...Ad4 23 gxd4! cxd4 24 ®xd4+
<S>g8 25 £>e6.
23 <£e6 £>c7
There is nothing else: if 23...<£b4 24
#f4 £>c6 25 £>xf8 gxfg 26 d8=®
£>xd8 27 gxd8.
24 £>xf8 gxf8 25 gd6 Ae7 26
d8=®!
Seemingly paradoxical, but
consistent and strong. Now d7 is needed for
the attack along the 7th rank, and the
black queen is still out of play.
26.„Axd8
Or 26...Sxd8 27 gxd8+ Axd8 28
#f7 ®d5 (defending against the mate
at f8) 29 #xd5 £>xd5 30 gdl, and
White wins.
27 ®c3+ ®g8 28 gd7 Af6 29
&c4+®h8 30W4
The piece is regained, and the
ending after 30...Ag7 31 #xc7 #xc7 32
Sxc7 Ad4 33 gfl must be won for
White. But...
30...®a6? 31 ®h6 Black resigns.
Obstruction
There is also another typical "mine", or
more precisely, a typical barricade,
that can be erected in the path of the
enemy forces: the well known obstruc-
Lines of Communication
81
live sacrifice. If a game takes a
normal, even course, to gain a lead in
development, giving the basis for an
attack, is difficult, if at all possible.
One has to resort to radical measures,
which nevertheless follow a common
pattern. This is normally a pawn
sacrifice, that in one way or another
disrupts the quiet course of the game.
The effectiveness of such a
procedure — given an inadequate counter to
it — is seen in the following example.
Spielmann-Landau
Amsterdam 1933
1 e4 £>f6 2 Qc3 dS?! (not the best
reaction to White's move) 3 e5 £)fd7
(after 3...£>g8 Black is very far behind
in development) 4 c6! fxe6 S d4 £>f6?
6 £tf3 c5 7 dxc5 ©c6 8 Ab5 &A1 9
0-0 &c7 10 gel h6 II Axc6 bxcfi 12
£>e5, and White won quite easily.
An excellent illustration is provided
by the following game.
Kasparov-Andersson
Tilburg 1981
At this point Black was happy with
his position. He plans ...d5, after which
his backward c-pawn will be weak
only nominally, rather than in actual
fact. In addition, the wretched white
bishop at b2 will provide
compensation.
The evaluation is changed by an
obstructive sacrifice planned in
advance by White.
14 d5! exd5 IS Ag2
Now it is very difficult for Black to
develop his kingside, and strategically
the outcome of the game is already
decided. A rare case of such an instant
return from this type of sacrifice.
15...c6160-0f6
Black begins artificial castling, but
this entails weakening a whole
complex of light squares on the king-
side, which spells disaster. White
merely has to open lines for his rooks with
e3-e4.
17 gel!
A useful preparation. The immediate
17 e4 dxe4 18 Axe4 &fJ! would have
enabled Black to "plug" the light-
square holes for the time being,
although even so after 19 &g4 it is hard
to offer any good advice.
17_.fl.e7 18 &g4 ®f7 19 hS Ah7
20 c4 dxe4 21 .fl.xe4 .fl.xe4 22 £>xe4
£>c8
The aim of this seemingly strange
manoeuvre is to defend the f5 square
after ...d5 and ...£>d6. The need for this
is apparent in the variation 22...ge8 23
&g6+ ®f8 24 g4, when against the
threat of Og3-f5 there is no defence.
And the natural continuation of the
artificial castling manoeuvre, 22...gf8,
runs into 23 Badl (provoking a
weakening of e6) 23...d5 24 ©xf6!, mating.
82
Attack with Mikhail Tal
23 gadl Ha7 24 &xf6!
Another typical sacrifice with this
type of pawn structure: the king is
deprived of its shelter.
24...grf6
It all ends even more quickly after
24...j5.xf6 25 &g6+ ®f8 26 Jj.xf6
gxf6 27 Be6.
25 &g6+ ®f8 26 jj.cl dS 27 gd4!
This is more accurate than the
immediate 27 JJ,xh6+ Hxh6 28 &xh6+
®g8 29 Hd4 Jj.f8 30Hg4+gg7 31
Sxg7+ JJ,xg7 32 &g6 Qe7, when for
the moment Black can hold on.
27...&d6 28 gg4 £>f7 29 jj.xh6+
®e8 30 Jj.g7 Black resigns.
For the h-pawn he has to give up his
rook, and, what's more, immediately.
Here we see a similar idea:
m
§§
ti
•«.
%,A
UN
HI
§<MM W
£1111
§ B fUE
mXm m
w i
H
triui
a
m
wJLwl U
bSb
1M&M
Keres-Schmid
Bamberg 1968
Seemingly, Black's bishop pair and
sound pawn centre should allow him to
face the future with confidence, but
White finds an interesting possibility
of increasing his lead in development.
12 e6!
An excellent sacrifice, obstructing
the development of Black's kingside.
12...&xe6
Totally cheerless is 12...fxe6 13
£)e5, and wherever the queen moves to
(13...&d6 14 Jj.f4), White, relying on
his powerful piece deployment, creates
very strong pressure.
13£g5&g6
After 13...#d7 14 £>xe4 dxe4 15
#xe4 Black's queenside is broken up,
but even so this looks the lesser evil.
14 £>xe4 dxe415 Af4 f516 &e4!
Rather than the tempting 16 #b3,
with the threat of 17 <g*7, White
prefers the consistent obstruction of the
enemy forces: again 16...e6 is not
possible, meanwhile, his plans include
doubling rooks on the open d-file,
adjacent to the black king.
16...C5
Opening a retreat for the queen;
Black has no objection to 17 #xc5
#e6 followed by ...®f7 and ...g6.
17 gadl &c618 f3
An extra file for the attack will do
no harm, although 18 gd2 is also
sufficient, threatening after the doubling
of rooks to invade Black's position.
18...h6
Alas, here too the "norma!" 18...e6
runs into 19 Hd6! Jj.xd6 20 &xe6+
®d8 21 Hdl, and Black can resign.
19fxe4
19 gfel looks even stronger, and if
19...exf3 20 Be5 with decisive threats.
19...&xe4 20 &xc5 e6 21 &c7
Jle7 22 gd7! Jj.d8 23 gxd8+ gxd8
24<grxg7
Black's position has collapsed, and
since 24„.©d4+ 25 &xd4 Sxd4 fails
to 26 .fl.eS, it is essentially all over.
Lines of Communication
83
24...SK 25 Axh6 &d4+
There is nothing else: 25..,Sf7 26
•&g8+ ®e7 27 Ag5+.
26 ©xd4 gxd4 27 c3!
A precise little move: for the
moment the d2 square is under control.
27...Sd6 28 AxiS ®xf8 29 gel,
and White realised his great material
advantage.
Kasparov-Lutikov
Minsk 1978
White has a lead in development,
but under the cover of his central pawn
chain Black hopes gradually to
neutralise it. Therefore White's obstructive
sacrifice is more than justified.
9 e6! fxe6 10 &d3 £,gf6 11 ©e2
g612©xe6Ag713 0-0
"The opponent's defences will not be
cracked by crude pressure down the e-
file; operations on one of the flanks are
also required. I already had in mind the
general idea of a pawn offensive on the
queenside, and so I decided to hide my
king away on the opposite wing"
(Kasparov). But queenside castling
followed by the advance of the g- and
f-pawns was also possible.
13...eihS14AgSeit8
Preparing to take the king to its
"usual" place. After 14...,fl.xd4 15
Sfel £J6 16 Axf6 £)hxf6 17 £,a4
intending c2-c4 White has good play.
IS &g4 Sf6 16 &e2 &d617 gael
Planning to open up the game by f2~
f4-f5.
17...e6 18 £,a4 <£>f719 b4 b6
White has too many threats after
19...&xb4 20£ic5.
20 ©d2 Se8 21 Af4 ©e7 22 b5
&a3 23 £,c3 cS 24 Sbl! ©a4 25
dxc5 bxc5 26 c4!, and since after 26...
d4 the black queen remains out of play,
the opening of the centre is inevitable
and White's unhurried attack
continues. It was begun, as you will recall,
by the obstructive pawn sacrifice.
In order to seal the opponent's forces
in their initial positions, more generous
offers can be made, as in the following
game. True, here the obstructive
sacrifice also plays the role of a powerful
pawn outpost.
BeyUn-Lipnitsky
Yurtnala 1950
84
Attack with Mikhail Tal
15...e4!
And immediately it becomes clear
that White's extra pawn, his passed
pawn in the centre, and his attack on
the black bishop do not compensate for
his lack of development. For the
moment, the sacrifice is not a real one: the
threat of 16...gac8 does not leave
White time for anything, apart from
16 Scl gac8!
Nevertheless!
17 ©xd7 e3!
The apotheosis of Black's idea.
First, the opponent is now playing
without his kingside pieces, and
second, the white king is almost encircled.
18@a4
Further "pawn-grabbing" — 18
igrxb7 — is punished by 18...Bxc3 19
©b2 Sfc8 20 Sxc3 Sxc3 21 g3 Sb3!!
18...Sxc3 19 Sdl Sfc8 20 g3 gel
21 Ah3 Sxdl+ 22 ©xdl ©c3+ 23
®fl •©•d2! 24 ®g2
I.D. I asked Mikhail Beylin, who
was playing White, whether he felt
reassured at this point, and received a
reply in the affirmative...
M.T. Really? Black's concluding
blow is not so complicated, although
this does not make it any less pretty.
Besides, Black clearly must have
anticipated it six or seven moves earlier.
24...Scl!
White resigns, since after 25 igrxcl
igrxe2+ 26 ®gl he is mated by
26...©f2.
Even so, the obstructive sacrifice is
usually of a more local nature, and
usually prevents the king from being
defended by the advance of one of the
pawns sheltering it. The pawn is
blockaded on the square where it
stands, and for this aim a long-range
piece is usually used.
I.D. The first combination of my
coauthor to appear in print was of this
type. Did you keep the cutting from the
magazine?
M.T. No, but I liked it.
I.D. What exactly?
M.T. Both the combination, and its
publication.
Tal-Leonov
Riga 1948
28gf6!
Now Black does not have the
defensive advance 28...f5, and "in
passing" the threat of 29 Bxh6 is created.
At the same time, the rook is taboo:
28...gxf6 29 Axh7+ ®xh7 30 £)g4
©f8 31 £>xf6+ ®h8 32 gfl, and
against the manoeuvre Bf4-g4 there is
no satisfactory defence.
28...©f8 29 Sf4 Ad7 (here 29...f5
no longer works on account of the
immediate 30 g4) 30 Qg4! (the
pressure intensifies) 30...Ae8 31 Qf6+
Qxf6 32 exf6 Sc7 33 fxg7 ®xg7 34
igre5+ Black resigns.
Lines of Communication
85
A similar and even more concrete the threat of 4 Axd8 and 5 £sf6+ is
situation developed in the next game. more than unpleasant.
3 IIP IIP S sS
■ 'W> ■ ±'H±
mtm Ami§& A
■ Pin W,
t llil Hill
far ■ fumur
Fischer-Benko
CSA Championship 1963/4
Black's h7 is weak, but the direct
attack on it, 19 e5, is parried by 19...
f5. Hence the natural — and only good
— continuation of the attack.
19Sf6!&g8
After I9...Jlxf6 20 e5 there is no
defence against the mate.
20e5h6 21<&e2
A quiet reply, emphasising the
hopelessness of Black's position.
Against mate in a few moves there is
no defence, and so Black resigned.
White had to conduct a much more
complicated attack in the following
game, but at its basis was the same
device of obstruction.
Black is threatening most of the
attacking pieces, but at the decisive
moment he is unable to make a saving
pawn move.
1 £>xg7! <g>xg7
The gift cannot be declined:
I...£>cxd3 2 cxd3 £)xd3 3 <&h5, and
Ravinsky-Ilivitsky
Riga 1952
2 gxf4! exf4 3 &h6+ &g8 4 jj.f6!!
The black bishop is lured to f6,
where it blocks the f7 pawn.
4...jJ.xf6 5 e5 £>xd3 6 exf6
Black has avoided the mate at h7,
but now there is a threat of mate at g7!
6...&f2+ 7 ®gl Sh3+ 8 &fl!
Capturing the knight would have
allowed Black perpetual check.
8....3.C4+ 9 £e2 &xe2+ 10 <g>el!
The checks are at an end, and so
Black resigned.
Aronson-Tal
24th USSR Ch., Moscow 1957
Dutch Defence
I.D. Strictly speaking, the procedure
examined in this chapter was employed
here by Black in a counterattack, since
at one point he simply overstepped the
mark, and in general the famous "sense
of danger" of the young, even very
86 Attack with Mikhail Tal
young Tal was still virtually in its
embryo state...
M.T. Well, of what significance is
this? Interference — it is the same,
both in attack, and in counterattack.
1 d4 e6
2 c4 f5
3 £f3 £>f6
4 £ic3 &e7
5 g3 0-0
6 Ag2 d6
7 0-0 &e8
8 gel igrg6
9 e4 fxe4
10 £ixe4 £ixe4
11 gxe4 £ic6
The unprotected state of the white
rook is clearly illusory: after 11...
©xe4?? 12 £>h4 the centralised black
queen is trapped.
12 ©e2 &X6
13 Ad2 e5
At just the right time: had he
allowed the white bishop to go to c3,
Black would have been cramped.
14 dxe5 dxeS?!
Black deliberately weakens his
position for the sake of complicating the
play. The "normal" 14...£}xe5 15 .&c3
£>xf3+ 16 &xf3 Af5 17 ge3 and gb8
would have led to approximate
equality and a more than probable draw.
M.T. But it wasn't for the sake of
such tedium that Black moved onto
"Dutch rails" from those of, say, the
Orthodox Defence.
15 Ac3 SLtS
16 £>h4 Axh4
17 gxh4 gae8
18 b4!
A natural and powerful reaction to
Black's antipositional play. His pieces
have abandoned the queenside, and it
is here that White begins his offensive.
18 ... &f6
19 &e3 h6
In search of tactical chances,
associated with the one current drawback
of White's position — the restricted
position of his king's rook.
20 b5 &d8
21 Ad5+?
The simple 21 c5 would have seized
a mass of space, opened a path for the
rook along the 4th rank, and White's
advantage would have grown
markedly. But now the greater part of his
advantage is lost, since his bishop at
d5 is not only an attacker, but is also
the target for a counterblow.
21 ... ®h8
Of course, not 21...®h7?, when
after the exchange of bishops (22 .S.e4)
Black's chances of counterplay would
have been close to nil.
22 f4?
Now the character of the position
changes sharply, and the main role
begins to be played by the dynamics of
the pieces — and Black's are
developed at least as well, and are better
coordinated.
Of course, trying to win the
exchange by 22 Ab4? would also not
have succeeded: 22...g5 23 Axf8 gxf8
24 ge4 c6 (here it is, the vulnerable
position of the bishop at d5) 25 gxe5
cxd5, and the threat of 26...£}f7 leaves
White no time for 26 cxd5.
But even so, 22 c5 would have
retained for White slightly the more
pleasant game after 22...c6 23 bxc6
axc6 24gel.
22 ... exf4!
Lines of Communication
87
23 ©d2 ©b6+!
By luring White's bishop to d4 and
thereby weakening his control of el,
Black already has in mind the start of
his counterattack.
24 Ad4 ©g6
25 ©xf4
On 25 gxf4 Black would have
continued simply 25...£se6, but now this
does not work in view of 26 gxh6+. In
addition, the c7 pawn is attacked.
25 ... ®h7
26 ©xc7
This looks the logical continuation
of his preceding play. Besides, 26 gfl
runs into 26,..Ah3!, when the white
king faces an unpleasant journey. But
now too a surprise - the theme of this
chapter - is awaiting him.
-tea.
26 ... Abl!!
By shutting out the white rook from
the defence of the back rank, Black
ensures the invasion of his heavy
pieces into the opponent's position.
27 Ae5 £ie6
28 ©d6 ©f5
29 Af4
White is even prepared to give up
material — 29...g5 wins a piece, but
Black prefers to continue his attack.
29 ... ©g5
30 ©b4 Ae4
At last White's rook can come to the
aid of his king, but it is too late: he
loses one of his strong bishops, and all
Black's pieces have already taken up
attacking positions.
31 Axe4 gxe4
32 gfl ge2
33 ©d6
With a last hope of catching Black
in a trap: 33„.£ih3+?? 34 gxh3 ©xh3
35 ©d3+ and 36 ©xe2.
33 ... gxa2
Of course, not in order to win a
pawn, but to allow the queen onto the
2nd rank in front of the rook.
34 &d5 ©c2
35 c5 gd8!!
A very fine move, but more
important, an instructive one. The attacking
side does not have the right even for a
second to forget about the opponent's
potential threats. Thus if here, instead
of the text move, Black had played the
"natural" 35...ge8, with the threats of
...ge2 or ...gel, White would have had
available the winning 36 gxh6+H, e.g.
36...gxh6 37 ©d7+ ®g6 38 &xe8+
®h7 39 ©e7+! ®g6 (or 39...®g8) 40
Ad2!
36 Ad6 ge8
Now, when the bishop has stopped
"looking at" the black king, this
invasion of Black's third major piece
decides the game in his favour.
White was "saved" from
capitulation only by the flag on his clock
falling.
88 Attack with Mikhail Tal
WHAT WOULD YOU HAVE
PLAYED?
No.16
For the moment f7 and h7 are
defended. How can the attack be intensified?
No.17
After 23 &h6 Black resigned. Of
course, his bishop and rook are
attacked, and if 23... Ae7 there follows mate
at g7. But, after all, there is the simple
23...gxg3, and if 24 &xf8+ Sg8. So
was his capitulation was premature?
No.18
An attack on f7 is imminent, and the
white bishop has its "X-ray" sights set
on the black king. But where is that
last straw that, so to speak, is capable
of breaking the camel's back? After all,
if 21 g3 $rc7!, defending everything...
No.19
How can Black continue his attack?
If !...©h3+ 2 <S>gl ge5 3 £ie4, or 1...
£)h3 2 e3, while if 1... Se5 2 £ie4 gh5
3 £if6+. So does he have to be content
with perpetual check?
6 Outposts
MILITARY DICTIONARIES give a
single interpretation of the concept of
an outpost: "a well defended
fortification in an advanced position". In the
Middle Ages they could have been
bulwarks in front of the bridge, not
allowing an enemy to begin an immediate
assault on some nobleman's castle.
Later these were fleches and redoubts
at Borodino, Waterloo, Port Arthur...
Chess has added another meaning to
the word "outpost". On the board too it
is a securely defended fighting unit,
only not with the aim of defence, but
for attack. Being advanced, beyond the
demarcation line, even within the heart
of the opponent's position, the outpost
cramps the enemy forces, hinders
manoeuvres aimed at bringing up pieces to
the main part of the battlefield, and
finally, controls various squares.
Relying on the outpost, the attacking
side assembles his forces and prepares
a decisive assault, in which the outpost
piece also usually plays a part.
This is why not every advanced and
securely defended piece has the right to
"call" itself an outpost.
In the next diagram it is clear that
White's "interests" are by no means
limited to the queenside, and therefore
the role played by the white knight can
be called anything you iike, only not
that of an outpost. Essentially it is
merely covering the black passed
pawn, and this is too modest, too
thankless a role for it. After all, White
is a pawn down, and to achieve any
kind of dynamic balance he must
revive his dying initiative.
The move sealed by him was an
excellent one!
Makarychev-Kholmov
Frunze 1989
41 £sd8!
At the cost of two tempi White
transfers his knight to e6, creating a
genuine outpost, and its role in the
attack on the king very soon becomes
apparent.
41...b4 42 gxa4 ©xa4 43 £se6
©a3
After the seemingly more consistent
43...b3 White has the prosaic defence
44fixc7iBra2 45.fl.cl.
44 ©f2 ©a2 45 jld2 b3 46 ©c5
©xd2 47 ©xc7 £se8 48 ©xc4! b2 49
TBrc6, and instead of allowing perpetual
check after 49...bl=© 50 ©xe8
followed by £)g5-f7, Black preferred to
give it himself: 49...£>f6 SO ©b7
90 Attack with Mikhail Tal
£>g4+ and then ...fif2-g4.
A far from obvious plan for setting
up an outpost was carried out by White
in the following game.
Barcza-Panno
Amsterdam Olympiad 1954
Naturally, White can increase his
activity only by the break d4-d5,
followed by occupying the central file
that is then opened. But he discovers a
potential weakness in Black's position
and begins creating it.
26£>e2gc7 27.a.c3!b6
The c6 point has been weakened,
and the breakthrough now has the aim
not of opening files, but of establishing
an outpost.
28 dS! cxdS 29 exdS Sc5 30 Axg7
<£>xg7 31 £se3 &b7 32 &eS bS 33
<Sc6 ga8
The black rook has been denied the
d8 square. But even more important is
the fact that the knight outpost on the
queenside is aimed in particular at e7,
and this is close to the black king.
34 &e2 $b6 35 ©c2 Sb7 36
&e3+f6
This creates fresh weaknesses in the
king's pawn screen, but there is nothing
to be done: 36...S>g8 37 &e5 ge8 38
W <g>g7 39 ©d8! is no better.
37 £>f4 £>d6 38 &d3 ge8 39 gel
40 Qe6+ <Sxe6 41 gxe6 is
threatened, when the pressure on e7 (with
the active participation of the outpost!)
becomes unbearable. Black's desperate
attempt to free himself runs into a little
combination.
39...e5 40 dxe6! Sxc6 41 e7 £>f5
(otherwise White invades at go) 42
exf8=&+ Sxf8 43 &d7+ Sf7
The outpost has done its work.
White has broken into the opponent's
position and the simplest now would be
to give mate by 44 ®xf7+ ®xf7 45
gd7+. In fact he satisfied himself with
the exchange — 44 £>e6+ gxeS 45
i@rxe6, and won on the 53rd move.
For a model example of a piece
outpost in the centre, the authors have
chosen (though not unanimously, one
being "for", and one abstaining) the
following game.
Tal-Speelman
Subotica Interzonal 1987
Outposts
91
It is sufficient to say that the black
knight reached c7 not in two moves
(,..£b8-a6-c7), but in four (,..£ib8-d7-
b6-d5-c7)! Therefore White is obliged
energetically to exploit his lead in
development.
14 &e5!
The price for this eternal knight in
the centre is very modest.
14...#xd4 15 Ac3 #d816 &gf3
The alternative was 16 gdl &e8 17
■&d3, with the threat of Sg4.
16...&ce8 17 g4! b5 18 g5!
This is not stronger, but it is more
pleasant than 18 £}xc6 #c7 19 cxb5.
18...hxgS 19 £>xg5 ga6 20 #f3 b4
21 #h3 g6
Otherwise mate.
22 Axg6! bxc3
Or 22...fxg6 23 £ixg6 <2>g7 24 #h7
mate.
23 £>exf7 #d2+ 24 <£>fl gxi7 25
AxH+! <£>g7 26 ggl
Aiming not at Black's queen, but at
his king — 27 £|f3+ <S>f8 28 &h8+
<S>xf7 29 £,e5 mate.
26...#xg5 27 gxg5+ <2>xf7 28 bx-
c3!
The last precise move: after 28
&xc3 £ie4 29 &f3+ &8f6 White
would lose the exchange on account of
the threatened check at e2.
28...e5, and after dejectedly making
this move, Black resigned.
Here we saw nearly all the functions
of a piece outpost: the support and
organisation of a flank offensive, and
the landing of a decisive blow. That
these actions are typical is confirmed
by numerous practical examples, such
as the following.
14 g4! Ab715 g5 &d5
it
Keres-Petrov
Estonia v. Latvia 1939
The rook is immune: 15....fl.xhl 15
gxf6 Axf6 17 £id7 #c6 18 &xf6+
gxf6 19 #g4+ <£>h8 20 #h4 f5 21
i&f6+, when White mates as he
pleases.
16 ghgl!
This is stronger than 16 £}d7 #c7
17 £}xf8 Sf4 with counterplay.
16...#c7 17 gg4
With the help of his outpost White
prepares a powerful attack. He is
already threatening 18 Axh7+, with
mate in a few moves.
17...g6 18 gh4!
Renewing the threat against h7, but
now with the rook.
18...Ad6 19 &g4
A weakening around the black king
has been provoked, and the knight
outpost itself joins the attack.
19...gfc8 20 <£>bl
Though not without its uses, this
prophylaxis against a check at f4 is
nevertheless unnecessary. However,
White has no reason to hurry.
92
Attack with Mikhail Tal
20...b5 21 ggl &e7?
White was threatening 22 <£jf6+
£ixf6 23 gxf6 followed by the
unavoidable 24 gxh7 <g>xh7 25 &h5+,
but why lose immediately? 21...#e7
was more tenacious, when White
continues 22 &e4, threatening 23 5,xd5
and 24 £>f6+.
22 £>h6+ <®f8 23 £>xf7 .&c5 24
gxh7 .&d4 25 #xe6, and soon Black
resigned.
Tal-G.Garcia
Yurmala 1983
With his last move (14....&e7-f6)
Black has prevented the advance of the
white pawn centre, which was
possible, for example, in the event of 14...
Ag6 15 c4 #d7 16 d5 (Karpov-Por-
tisch, Lucerne Olympiad 1982). But
now White gains the opportunity to put
into operation another plan: to create a
piece outpost at e5 and with the help of
a flank pawn attack to drive back the
black pieces to unfavourable positions.
15 &f4 Sac8 16 ge3 &a5 17 £>e5
c5 18 g4! &g6 19 Ag2 #d8 20 dxc5!
The threat of moving the white
outpost a further step forward, to d6, and
the fact that 20...gxc5 is not possible
on account of 21 £sd7, force Black to
spend a tempo on capturing the c5
pawn and restoring material equality.
But during this time the attack on his
king comes to a head.
20....&xe5 21 gxe5 #f6 22 .&g3
£>c4 23 g5! #a6 24 ge7
The first achievement!
24...gxc5 25 #d4!
The tempo for mobilising White's
queen's rook is more precious than
pawns — his at b5 and Black's at b7.
25...gxg5 26 h4 ga5 27 gael h6
28&flb529ge8!
Against the mate on the 8th rank
there is no defence (29...#b6 30
gxf8+ <g>xf8 31 #d7 <®g8 — 31...f5
32 #c8+ with mate in three moves —
32 ge8+ <®h7 33 #c8 &C2 34 h5),
and so Black resigned.
When a player has an outpost in the
centre, with its help he can plan and
carry out flank attacks not only with
pawns, but also with pieces.
Keres-Kurajica
European Team Ch, Kapfenberg 1970
Outposts
93
White exploits the strength of his
advanced knight to the full.
23 &xh6+! <§>g8
If Black takes the queen, he remains
two pawns down with a bad position.
White could again have forced this by
continuing 24 #h8+, but he now has a
better alternative.
24.&h4£i8h725£ixg6!
And in view of the mate after 25...
fxg6 26 &xg6+ ®f8 27 gg3, Black
resigned.
Ivkov-Kolarov
Wageningen 1957
From this position the game did not
last long. White played 1 a4, and after
l...bxa4 2 gxa4 $rd7H he resigned,
since whatever he does the rook at f7 is
"freed" and gives mate at fl. The
weakness of the back rank certainly
told here, but firstly, Black's
occupation of the f-file was assisted by his
outpost, and secondly, the white rooks
were so cramped by the black bishop
that the attempt to free them can be
considered obligatory.
White's position in the following
diagram is strategically superior thanks
to his occupation of the c-file and the
two bishops.
Kasparov-Butnoryus
USSR Spartakiad, Moscow 1979
Therefore Black's tactical attempt
15...&g5 16 f4 &g6 17 fxe5 £c5 18
Ag3 £}xa6 would have been quite
justified, had it not allowed White to
create a powerful piece-pawn outpost.
19 &f5! gae8
Naturally, 19...exf5 20#xd5 would
have been practically equivalent to
capitulation, the white bishop being so
much stronger than the black knight.
20 £d6 ge7 21 gf4!
Threatening in passing 22 gg4 #h6
23 Af4 &h5 24 gxg7+, White creates
decisive pressure on f7, begun by the
knight manoeuvre to d6.
21...h5 22 e4 £.a8 23 Ah4 gd7 24
gc3 &h6 25 &fl £c7 26 gcf3! f5
There is nothing else, since on 26...
©g6 there would have followed 27
Af6, with the threat of 28 gg3.
27 exf6!
"The Moor has done his duty..."
94
Attack with Mikhail Tal
Sacrificing both his outpost, and a
piece, White begins a concrete
variation.
27...gxd6 28 f7+ ®h7 29 £e7 eS
30 Axf8 exf4 31 Axd6 #xd6 32
#d3 #e7, and here 33 #d7 #xd7 34
f8=£l+ would have won for White, as
would 33 #c4 ®h6 34 f8=# #xf8 35
#xc7 g5 36 gd3.
He in fact chose the more
complicated 34 gxf4 £se6 35 #c8 #d6 36
#h8+ ®g6 37 f8=£s+ £sxf8 38 #xf8
#dl+ 39 ®f2 #d2+ 40 ®g3 #el+
41 ®h3, and since 41....&xe4 fails to
42 #e8+, Black resigned.
As a rule, the deeper the attacking
side is able to establish his outpost in
the opponent's territory, the greater the
difficulties it causes the opponent. The
defending pieces become even more
cramped, the proximity to the king
becomes even more dangerous...
Bakinskaite-Voronova
Vilnius 1985
The role of outpost is being equally
shared by the black knight and the f3
pawn. They are taking away squares
from the white king, and this could
have been exploited by the forcing
manoeuvre l...^rh5 2 £ixe4 (other
replies do not change anything) 2...
&h3 3 £ie3 &xh2+ and 4...gh5 mate.
4"""- in £%JA
Suba-Tal
Tallinn 1983
M.T. In the opening for some reason
my opponent allowed me to make a
knight move, about which there is a
warning in all books on the King's
Indian Defence. Black's position has
immediately become the more
pleasant, but it is too early to exchange
mind for matter: 20...Axf2 21 ®g2
Ab6 22 .fl.e-2 £se5 23 Jixg4 £>xg4 24
gd7, and White's active rook
compensates for all his losses. Besides, it
was tempting to continue the pursuit of
the king, which even without the
queens is perfectly possible: along the
h-file!
20...h6! 21 gxh6 Axc3!
Essential, otherwise after 21.,.g5 22
gxd4! £wd4 23 .&xg5 it is altogether
unclear who stands better.
22 bxc3 g5 23 Ac7 gac8 24 ^.d6
Outposts
95
Keeping this square for the rook —
24 Bxb7 Se6 25 Sd6 does not
succeed: 25...Sxc7.
24...Se6 25 h7+ ®xh7 26 ®g2
Bh627iS.d3
There is no other square for the
bishop.
27...Sxd6
Not 27...Sh2+ 28 ®fl Shl+ 29
<S>g2! gxdl 30 gxdl £>h4+ 31 gxh4
Jlxdl 32 hxg5, when it is White who
has the attacking prospects.
28 e5+ Sxd3 29 Sxd3 JUS 30
Bxf3 (30 ghl+ <&h4+) 30...iS.xbl 31
Sxf7+ ©g6 32 Sxb7 Axa2 33 f4 (33
Sxa7 Ad5+ 34 ®fl g4, and White
can resign) 33...gxf4 34 gxf4 Ba8, and
some 50 moves later Black eventually
converted his advantage into a win.
For the creation of such a powerful
outpost one must sometimes be
prepared to pay an appropriate price.
Tal-Gligoric
Moscow 1963
This position had occurred
frequently in practice, and had been
handled in different ways. The Yugoslav
grandmaster himself, for example,
against Fischer in the 1959 Candidates
Tournament, tried here to exploit the
positioning of the white bishop and
black king on the same h3-c8 diagonal
with 15 f5, which is perfectly feasible.
I.D. Why did you reject a well-tried
and promising idea?
M.T. Least of all because the author
of it was Gligoric, and not at all for the
reason that at the start White makes a
very small sacrifice — a piece for two
pawns. I was attracted by the power of
the white knight at e6 and realised that
with the help of such a knight the
remaining white pieces would be
capable of anything.
15 j3.xe6! fxefi 16 £xe6 #c4
16...^b6 must be considered the
lesser evil, although even then after 17
£d5 Axd5 18 exd5 White has
sufficient compensation for the piece.
17 <&d5!
This is the whole point. On his 15th
move White had no intention of
exchanging two pieces for a rook and two
pawns, but was intending to
demonstrate that the splendid knight at e6 is
worth more than the fat and unwieldy
rook at d8.
17~.fl.xd518 exdS ®b7
Forced, since 19 b3 was threatened,
and 18...£)c5 is bad on account of 19
b3 &e4 20 #c3, when Black is unable
to parry both 21 b4 and 21 Shel.
19 b3 #c8 20 gd3 £b6 21 Se3
&d7 22 gc7+
The white knight has after all done
its duty.
22...&xe7 23 ftxc7 ®xc7 24 &c3+
®b8 25 &xg7 <&c8 26 gel
White has a material advantage. In
96
Attack with Mikhail Tai
addition it is very difficult for Black to
coordinate his pieces and bring them
out into play. The outcome of the game
is decided, and an illustration of this is
the possible variation 26...ghg8 27
«xh7 gh8 28 gxe7!
26.„adg8 27 #d4 JS,d8 28 ge6
gfS 29 h4 h6 30 g6 ghg8 31 h5 gf5
In the event of 31...gxf4 32 «xf4
Ag5 33 <&xg5 hxg5 34 h6, in place of
one queen White quickly acquires
another.
32 ©e4 gxhS 33 ge8 gxe8 34
«xe8 <Xf6 35 c4! bxc4 36 bxc4 gh3
37 ®d2 Ac3+ 38 ®e2 ,fl.d4 39 fS
gxa3 40 c5! dxc5 41 d6, and after
giving a few checks, Black resigned.
Until now the diagram positions
have mainly shown piece outposts. The
other type — pawn outposts, are even
more common. Their existence is
determined even by opening theory: for
example, in the French Defence a white
pawn is established at e5, and the
evaluation of many variations depends on
whether Black can destroy this outpost
or will be forced to endure its pressure.
Moreover, it should be borne in
mind that a classic piece outpost,
supported by a pawn, has the property that
it can be transformed into a pawn
outpost, with all the attendant
consequences.
In the following diagram Black has
no weaknesses, but he also has little
breathing-space, mainly on account of
the powerful piece outpost in the
centre. With his next move White
further strengthens it.
15 f4 «e7
After the exchange 15...£>xe5 16
dxe5 the piece outpost is transformed
into a pawn outpost, which in turn
secures White control of d6, and after
16...#e7 17 gxd8 «xd8 (alas, forced,
otherwise the a7 pawn is lost) 18 gdl
White, after seizing the only open file,
creates a new outpost at d6.
Spassky-Donner
Leiden 1970
With the move in the game Black
begins a battle against the e5 outpost,
planning ...f6. But this creates a
weakness at e6, which means that White's
outpost has done its job.
16 h4! f6 17 £>f3 £h5 18 JS,h3
£xf3 19 <&xf3 £>f8 20 ghel <&f7 21
JS.fl gd6 22 £c4 gad8 23 fS! gxd4
24 fxe6 gxdl+
The blockade of the white pawn
does not succeed: 24...i&e7 25 ©a3!
c5 26 &xa7 gxdl+ 27 gxdl gxdl +
28®xdl£>g6 29<&xb7!
25 gxdl gxdl+ 26 «xdl Black
resigns (if 26...'&e7 27 «d8).
The next diagram is another typical
transformation of an outpost — and its
fruits.
Outposts
97
Larsen-Tal
Leningrad Interzonal 1973
After further strengthening his
outpost by 19...e5, and at the same time
removing the pin on the knight, Black
invites his opponent to give a reply to
the eternal question - "what to do?"
20 £,xd4
After 20 £>d2 White would have
had to reckon with the flank attack
20...g5, again under cover of the
outpost in the centre.
20...exd4 21 &c4 &h5 22 &a4
The lesser evil was 22 e3 dxe3 23
Sxe3, and although Black would have
immediately restored his outpost with
23...gd4, nevertheless the unpleasant
pressure of the black d4 pawn would
have disappeared. But now this outpost
also plays the role of a barrier, cutting
off the white queen from the kingside.
22...Sfe8 23 &xa7 Sd6
Not so much to defend the b6 pawn,
as to attack f2.
24 b4 Sf6
24...cxb4 was also good, but the
position is ripe for a forcing variation.
25 bxc5 &f5!
Inducing a serious weakening, since
26 gfl loses immediately to 26...gxe2.
26 £3 &h3 27 &c7 Sf5!
A quiet move with an irresistible
threat. As soon as Black places one of
his rooks at e5, the white king will be
absolutely defenceless.
28 cxb6 Sfe5
Or 28...See5 29 g4 &g3+ 30 ®hl
(30 ®fl Sxf3+) 30...Sh5!, which
would also have won.
29 e4
The main variation of Black's attack
was 29 ©xe5+ gxe5 30 g4, hoping
with rook against queen to exploit the
strength of the b-pawn.Then he can
continue 30...<&g3+ 31 &hl (after 31
®fl ©h2! White cannot do anything,
since on 32 b7 there follows 32...gb5,
when 33 gbl is not possible, while if
32 a4 the attack can be continued by
32...h5!, e.g. 33 b7 Se7 34 Sabl hxg4
34 b8=© g3) 31 ...h5! 32 b7 Sb5 33
Sebl hxg4! 34 Sxb5 ©h3+ 35 ®gl
g3.
29...&xg3+ 30 ®hl ©xh4+ 31
®g2 Sg5+ 32 ®fl ©h3+ 33 ®e2
Sg2+ 34 ®dl &xf3+ 35 ®cl ©C
White resigns.
Even in the concluding attack the
pawn outpost at d4 played its part,
taking a square away from the white king.
A pawn outpost, even more than a
piece outpost, gains in strength the
more advanced it is. On the 6th rank
the pawn is not only close to its
queening square, but — in the context
of our attacking theme — it usually
becomes virtually the main component
of the mating net around the enemy
king. This is so obvious that it will be
98 Attack with Mikhail Tal
sufficient to give one single example
from "girls'" chess...
Ziedinya-Auzinya
Riga 1980
A part is undoubtedly played by the
inadequately defended back rank, but
the chief credit in the mate: 1 ©g6+!
Axg6 2 hxg6+ <S>g8 3 gb8+
nevertheless goes to the pawn outpost at g6.
Levenfish-Ryumin
Moscow 1936
And now here is one example from
"men's" chess, where such an
opportunity was missed.
White has a clear advantage: better
development, outpost at e5, occupation
of the open file, and a knight that has
been "launched" into the vicinity of the
black king. All this could have been
realised instantly — 27 £>f6+! gxf6 28
exf6, when the f6 pawn "guarantees"
one of the two mates — 29 ^g3+ or
29 ©xf8+. But after the lame 27 £lg3?
Black was able to save the game:
27...©b5 28 gfel Ab7 etc.
And now another slightly exotic
example of how dangerous it is to allow
the opponent to set up a bind with a
pawn outpost in the centre...
Kaila-Kivi
Helsinki 1949
1 e4 c6 2 d4 d5 3 exd5 cxd5 4 c4
dxc4 5 Axc4 e6 6 &c3 £d7? 7 d5 eS
8 £tf3 a6 9 0-0 £)gf6 10 d6 Sb6 11
Axf7+ £.xf7 12 ©b3+ ®g6 13
4}xe5+ ®hS 14 4}e2 (bringing up the
assault cavalry) 14...©e8 15 ©f3+
Ag4 16 ©xg4+ £)xg4 17 Sg3+ ®h4
18 £|f3 mate.
This game should not be taken too
seriously, but as the saying goes, "in
every joke there is a grain of truth".
A pawn outpost contains an
additional, latent strength, when it is not
blockaded and retains its mobility.
In the next example, in full
accordance with opening theory, back on
move 11 Black advanced his pawn to
f4, and with energetic play he has
made more progress on the kingside,
than White on the queenside. But to
"get at" the king is not so simple: if
39...ghl 40 Sg4, and he has to reckon
Outposts
99
with the thematic gc8.
Najdorf-Gligoric
Mar del Plata 1953
Everything is decided by the energy
of the pawn outpost, whose main
function has already been fulfilled.
39..JB! 40 &e3 (all three captures
lead to the loss of the queen!) 40...gf4
41gxf3
But now the king is completely
exposed, and the attack on it proceeds
from both the flank and the rear.
41...&h2+ 42 ©el &hl+ 43 ©e2
AhS 44 ©d2 gxO! 45 &g5+ .&g7 46
©c2 (another check would not have
changed anything - 46 gc8+ ©h7)
46...gf2+ 47 Q.d2 &dl+ 48 ©c3
^al*. and in view of the inevitable
mate (49 ©d3 Ae2+ 50 ©e3 - or 50
®c2 £.dl + 51 ©d3 &bl+ - 50...gf3+
51 ®xe2 &f 1 mate) White resigned.
The above ideas were as though
synthesised in the following example.
Black would appear to have
achieved a great deal, but... While still
on the way to this position, White had
planned to eliminate the enemy
outpost, realising that the basis for
creating his own had already been laid.
Chekhov-Pahtz
Lvov 1983
23 gfxe3! fxe3 24 &xe3 &g6 25
Qe4!
No deviations from the general
course, such as 25 £}xe5...
25...gae8
The knight could have been
prevented from going any further by J5...
h6, but then 26 &h3 with a very strong
attack on the light squares Cfl.h5).
26 Qg5 ©h8 27 Qe6 gf5
Returning the exchange by 27...
gxe6 would have simply meant losing
the e5 pawn.
28 SiSi gg8 29 g3 gf7
Evidently 29...&f7 would have been
slightly more tenacious.
30 &e2! &h6 31 Ah5 gf5 32 Ag4
gf633Qxe5!Ac8
The pawn has been captured at just
the right time, since on 33...£ixe5 34
&xe5 Sxg4 35 gfl ggg6 36 gxf6
gxf6 White wins by 37 &b8+. Here
too the e6 outpost plays a decisive role.
100
Attack with Mikhail Tal
34 Qxd7 Axd7 35 #eS! &xe6
The white bishop is still immune,
but now the piece outpost is
transformed into a pawn outpost — or a far-
advanced passed pawn!
36dxe6gxg437gfl#g5
If 37...<§g7 or 37...ggg6 the simple
38 e7 wins.
38 #xf6+ #xf6 39 gxf6 ge4 40
<§f2 &g7 41 <§>f3 gel, and
simultaneously with this move Black
resigned.
Polugayevsky-Tal
Riga Interzonal 1979
English Opening
M.T. This game was played exactly
ten years after, in September 1969, in
the 2nd round of the 37th USSR
Championship, Polugayevsky had
opened the score in our personal
encounters. That game received wide
recognition, and found its way into the
theory books.
And now it was September 1979,
again the 2nd round (the events, it is
true, were different); naturally, this
sort of association did nothing for my
frame of mind, and besides, in the
intervening decade Polugayevsky had
increased the score to 5-1. But... that is
the way the pairings came out!
1 SO cS!
Of course, an exclamation mark is
attached to this move not because it is
the strongest, the best. Simply, I did
not want to allow my opponent the
possibility of repeating the opening of
the first game won by him, an extract
from which is given in the chapter
Breakthrough in the Centre,
2 c4 £sf6
3 Qc3 dS
4 cxdS QxdS
5 e4
The move 5 e4 has enjoyed its
"ebbs" and "flows". According to the
latest theoretical conclusions, it casts
doubts on the 3...d5 variation.
Incidentally, the game Timman-Tal
(Montreal 1979) developed in the same
way. Black played 5...£sxc3, and after
6 dxc3 he ended up in a difficult
position. Only then did 1 realise that
the offer to exchange queens here is by
no means synonymous with an offer of
a draw.
Possibly 5 e4 is not such a terrible
move for Black, In particular, three
months later this was demonstrated by
Vaganian in a game with me in Ihc
USSR Championship in Minsk. After
5...£sxc3 6 dxc3 #xd!+ 7 <§xdl the
Yerevan grandmaster played the much
stronger 7...£sc6 8 ,2.e3 b6 9 a4 ,2.b7
10 £>d2 0-0-0 11 ®c2 £>a5, and
achieved a perfectly acceptable
position.
But at any event, in September I did
not yet know this game, and neither did
Polugayevsky.
5 ... Qb4
This is considered the most critical
move. As it transpired only after the
tournament, my opponent had specially
prepared this variation for his game
with me. And it so happened that my
trainer and I had also specially
examined this very continuation before the
game with Polugayevsky.
6 &c4
The bishop check at b5, which has
recently been fashionable, achieves
Outposts
101
little after 6...4}8c6 7 d4 (this is much
stronger than 7 a3, as Poutiainen
played against me in Tallinn 1977, or 7
0-0, the continuation employed against
me by Tukmakov, 45th USSR
Championship, Leningrad 1977) 7...cxd4 8
;\3, and here the simple 8...ild7, if
there is nothing better, secures Black a
practically equal game.
6 ... Ae6
The whims of chess fashion! — I
suspect that 50 years ago this
continuation would have shocked its
legislators. But now it is considered the
strongest, and virtually the only move.
Black allows the doubling of his pawns
on the e-file, obtaining in return only
one compensating factor, but an
attractive one: his knight ensconces itself
at d3, but whether its residency will be
temporary or permanent, depends on
the opponent.
7 Axe6 Qd3+
8 ®fl fxe6
9 £)g5
So far this is a standard variation.
Until quite recently it was thought that
Black could achieve an excellent game
here by continuing 9...£>c6 10 £ixe6
#d7 11 <Sd5 Bc8 etc. But in the game
Timman-Stean from the Amsterdam
Zonal Tournament (1978) the Dutch
grandmaster prepared a significant
improvement: instead of 11 £)d5 came
the simple, but nevertheless
unexpected 11 <Qxc5!, and it transpired that
after 1 l...<&xc5 12 #h5+ g6 13 #xc5
Black has an initiative that might
compensate for one pawn, but two pawns
in this position is too high a price for
it. In short, mind gave way to matter.
This game was widely reported, and
searches for an improvement in Black's
play began. Players reverted to the
plausible 9...i&d7, and 9...£sc6 was
tried. And in the game Sekey-Palatnik
(Frunze 1979) Black employed the
experimental 9.,.£sa6. True, from this
game it is not possible to give a real
assessment of the move, since
immediately after 10 #a4+ #d7 the players
agreed a draw. But at any event the
position had become problematic, and
one of the attempts to solve this
problem was the move employed in the
present game.
9 ... ©b6!?
I am not inclined to overrate the
strength of this move, but in the given
instance the experiment fully justified
itself. During a training session three
of us analysed this position: Kapengut,
Koblenz and I. And the following
move, made by Polugayevsky, was
suggested by Koblenz.
10 #e2
Other continuations would seem to
be more dangerous for Black. In
particular, 10 ®c2, 10 #f3, or 10 £>a4.
However, analysis in one's study is one
102 Attack with Mikhail Tal
thing, playing in a tournament is
another. It seems to me that only the
latter can serve as a true criterion.
10 ... c4
11 b3
This move is the idea behind
White's plan. His primary task is to
deprive the advanced knight of support,
since it is perfectly evident that nearly
all Black's remaining pieces are still
occupying their "god-given" positions.
But, strangely enough, Black
nevertheless succeeds in consolidating his
grip on the "enemy beach-head".
Jumping ahead I should mention that
the knight holds its ground at d3 almost
to the end of the game.
11 ... h6!
The point is that White's forces too
are not well placed. The knight at g5 is
his only active piece. With his last
move Black drives it back, and at the
same time prepares to develop his
queenside. He does not fear the check
at h5, since after 12 ©h5+ ®d7 his
king moves to safety, while in certain
cases the position of the enemy queen
at h5 even gives him a tempo for the
developing move ...g6.
12 &D
It is important that the attempt at an
immediate attack does not succeed,
since after 12 £>a4 ©d4 (12...©c6 is
also possible) 13 £>xe6 ®xal 14
®h5+ g6! (14...gd7? 15 Sd5+ gc8
16 ©d8 mate) 15 ©xg6+ gd7 no
decisive continuation is apparent.
It is probable that 12 £)h3, covering
f2, was slightly more accurate, but in
this case, I think, there can be no
question of the variation being refuted.
12 ... Sc6
13 bxc4 0-0-0
White's first sortie has not
succeeded. The black knight has not only held
on to d3, but has even, it could be said,
established itself more comfortably.
The evaluation of the plan chosen by
Black depends largely on the sharp
variation 14 £)d5!? But during the
game both players established that
after 14...exd5 15 <&xd3 Black can
interpose the strong move 15,..£>b4!,
when White's plan is essentially
refuted. For example: 16 <&bl dxc4, 16
©d4 ©xd4 17 &xd4 dxe4, or 16 &c3
dxe4 17 £>e5 g5 18 £>f7 Ag7 19
Sxg7 £>d3, and the other black knight
settles in at the sacred d3 square.
14 Aa3 was also examined. In the
event of 14...©a5 15 £>b5 a6 16 £>d6+
exd6 17 &xd3 £>e5 18 ©b3 £>xf3 19
gxf3 ©xd2 20 gbl White has a good
game, but Black was planning to an- %
swer 14 5.a3 with 14...g5.
Perhaps some consideration should ;
be given to the positional piece sacri- ."
fice 14 £)d5 exd5 15 cxd5 £>ce5,
although White does not appear to gain .*
a great deal in compensation.
Be that as it may, but White's rather
phlegmatic development leads to a
very difficult position. Black only :,
needs to bring into play his bishop and
then to occupy the half-open f-file, and ;
his attack will become very powerful.
14 g3 g5
15 &g2
The exchanging operation 15 £)d5
exd5 16 ©xd3 Ag7! 17 e5 (17 gbl '
dxc4!) 17...Shf8 holds little promise
for White. Now he is ready to "smoke ■■
out" the knight from d3 by ftel, and
therefore, rather than the natural ;
Outposts
103
development of the bishop at g7, Black
prefers the following move, which
proves very effective.
15 ... &c5!
If now 16 <Sel, simply 16...<§rxc4,
and instead of the knight a much
"heavier" piece establishes itself at d3.
16 Bbl Ag7
Perhaps only now can one
confidently state that White's position is
very difficult. Sensing this, Polu-
gayevsky attempts a counterattack, but
it proves insufficiently justified.
17 £)b5 &xc4
Active defence (18...£)f4+ is
threatened). Of course, not 17...a6? 18 Aa3
&xc4 19 £a7+! (19...£Sxa7 20 Bhci).
18 &e3 Hhf8
Black's threats are the more
immediate: 19...Hxf3 and 19,..g4. Therefore
White is forced to cover f2.
19 m g4
Strictly speaking, now 19...a6 was
not at all bad, but simply Black had
worked out a fairly clear-cut variation.
20 £)h4 £ixf2!
21 £)g6
21 gxf2 Hxf2+ 22 ®xf2 Hf8+ or
22 &xf2 <&xe4+ is quite unacceptable
for White. Polugayevsky was probably
pinning some hopes on the
interposition 21 i£)g6, although after it the white
king is too alone.
21 ... Hd3!
In this game the d3 square has
proved to be something of a staging post
for Black. 21.„Hf3 would have been
much weaker, since after 22 £)xa7+
£>xa7 23 &xa7 #xe4 White has 24
£ixe7+ ®c7 25 &b6+ ®d7 26
&xb7+. Here it is important that the e4
pawn is not captured with check. Thus
now this variation does not work, since
after ...$>xe4+ Black gives mate.
22 £ia3
Another interposition. 22 &el Hdf3
would have led positions similar to
those in the game.
For Black there is naturally no point
in considering variations where the
queens are exchanged — his main aim
is to maintain the attack on e4.
Therefore his next move suggests itself.
22 ... &a4
23 &ei ma
Now there is nothing to prevent the
104
Attack with Mikhail Tal
black knight from returning to the fatal
(for White) square, and what's more,
with much greater effect than earlier.
To complete the picture it should be
added that by this time White was
already significantly short of time.
24 &xf8 &d3
25 ©dl
Not without its piquancy is the
variation 25 ©e2 Sd4 26 ©d! &xdl 27
Sxdl gf2+ with mate after 28...£>f3.
Here too 25...gf2+ was very strong,
but for some reason I did not want to
allow White the possibility of
sacrificing his queen, although, of course, this
would not have saved him. I chose the
continuation in the game, only because
I had planned it beforehand.
25 ... i&xe4
26 gxf3 gx£3+
27 &fl ©f5
28 &gl &d4+
White resigns
WHAT WOULD YOU HAVE
PLAYED?
The attempt to set up a piece outpost
at d6 does not succeed: if 19 c3 or 19
Jic3 Black immediately replies 19...
£ic5, exchanging knights. But White
already has a pawn outpost at e5...
No.21
■MM Tut? £fcM*_pugg2??
.11 S I®!
HI * Mi HI * #&
Kmmwm
f£& '<W& 'f£& W% £>
mK pj# pf fi|,3L
V3/. \V5>. Wfff. r&i
O iE& Hi w-
'/=$,<. ftY: WW, if&i
Taking account of what has been
said, there are at least three reasons
that allow Black to play... what?
No.22
No.20
^^ffl1
m.wm wm m HI
m m ■!■
Hr mzmsmf
This position, where it is White to
move, should not cause any problems.
7 Eliminating Defenders
DEFEND TO THE LAST MAN! —
such was the order usually given by
commanders of fortresses under siege,
after they themselves had received
similar dispatches from their superiors.
It is another matter that attitudes have
changed to such exalted and
threatening words, thereby saving precious
human lives. And besides, what could
objectively be done by a dozen or so
remaining defenders against a much
greater enemy force?
In chess — a wonderful model of
our everyday life — things are
different. The dimensions are different, and
the role of the single lone "soldier" is
also different. Even on his own, he is
sometimes capable of holding a
dubious game, or saving a position that, as
they say, is at death's door. Therefore
the most important task in any attack is
to eliminate those defenders that stand
in the way to the king, even if a
considerable price has to be paid.
However, there are several ways of
eliminating a particular piece, that is
the mainstay of the enemy defences.
The most convenient for the attacking
side is to do this, so to speak, for free
— by forcing its exchange.
As usual in positions with the type
of pawn formation in the following
diagram, the main defender of the dark
squares is the bishop of the
corresponding colour, and it is this piece
that White begins pursuing.
21.2.g5!£>d4 22&e3!
White is prepared to tolerate the
knight at d4 for a time, and to give up
the exchange: 22...£>c2 23 #f4 ,&xg5
24 £)Xg5 gf8 25 £sg4!, so long as the
dark squares become a gaping wound
in the opponent's position. Black can
no longer avoid the exchange.
Fischer-Feuerstein
USA Ch., New York 1957/8
22...£.xg5 23 &xg5 £>e8 (the
functions of the bishop are taken on by the
knight) 24 £>g4 £>f5 25 gacl
The position is not the sort where
you have to burn your boats in making
a swift attack. Besides, in passing the
weakness at b3 can also be harassed.
25...&C7 26 £>d2 gd4 27 £>xb3
gxc4 28 gcdl!
Leaving the black bishop
unemployed for the time being.
28...ga4 29 ge4 £b5 30 gel!
&b631£>d2
The white pieces return to the main
part of the battlefield.
106 Attack with Mikhail Tat
31...gxe4 32 Qxe4 jld3 33 Qgf6+
©h8 34 g4
Now both black knights lose control
over g7, and White wins easily:
34...,&xe4 35 j|,xe4 £,d4 36 dxe8
©d8 37 ©xd8 gxdS 38 ad6, and
soon Black resigned.
However, more often the exchange
of a defender is achieved by sacrificial
means, the material losses being more
than compensated by the fact that the
squares being defended are fully or
partly taken over by the attacker. By
giving up a more valuable piece for the
defender, the attacking side greatly
increases the energetic potential of his
offensive. There is no opponent, and
hence there is no counter to the attack
on a particular part of the battlefield.
Ubilava-Tlmoshchenko
Chelyabinsk 1974
Black has just attacked the white
queen, but for this he has incautiously
used the sole defender of his weak dark
squares. Its disappearance from the
board is equivalent to defeat for Black,
especially since a new master of the
dark squares appears.
14 &xe5!! dxe5 15 gxd8+ ©xd8
16Ag5+*e8
16...®d7 is pointless, while after
16...©c7 17if6and 18 ,&xe5+ Black
is a pawn down in a hopeless ending.
n Ate ags is a«» aa? » Qa4
Bb4
It is easy to see that there is no other
defence. For example, 19...C5 20 £>xc5
Ab5 21 a4, and after taking on a6 the
white knight gives check at c7.
20 Qc5 gd4 21 gxd4 exd4 22 h4!
The domination of the dark squares
must be consolidated: if now 22...g5
23 h5, and the black rook is still shut
in.
22...e5 23 f3 Ae6 24 b3 a5 25 g4
h5 26 g5 &h3 27 ©f2 (the white king
heads for the queenside, and it is all
over) 27...gf8 28 ©e2 Bg8 29 a4 gf8
30 b4 axb4 31 a5 Ac8 32 ®d3 Bg8
33 ©c4 Black resigns.
2 lit 2 S, SA@
Tal-Suetin
Tbilisi 1969/70
In the opening Black has taken too
many liberties. He has left his king in
Eliminating Defenders
107
the centre and exchanged his dark-
square bishop, and his knight at g6 is
badly placed. In addition, without
hindrance White has "launched" (cf.
Chapter 3) his queen into Black's "goal
area". He now begins a decisive
attack, by helping the opponent to obtain
an excellent "central" defender, and —
by planning in advance its elimination.
16 f5! exf5 17 exf5 £>e5 18 <ae6!
&xe6 19 fxe6 g6
Clearly, 19...0-0-0 20 exf7 gdf8 21
a4 with a crushing attack is not a
realistic alternative. But now after 20
cxf7+ <&xf7 21 &h4 0-0 22 gdf2 <&c6
Black is somehow able to hold on,
thanks in particular to his knight at e5.
20 <grxe5! (immediately resolving
the problem of the defender and of the
defence in general) 20...dxe5 21
cxf7+, and Black resigned, rather
than face the piquant variation 21...
*d7 22 &f5+ <S>c6 23 Ae4+ Qd5 24
Axd5+ ^7 25 Axa8+ "g>e7 26
Ag5+ <S>f8 27 &h6+ &e7 28 f8=&+
Sxf8 29 &xf8+.
Gereben-Geller
Budapest 1952
After castling on opposite sides,
pawn storms on the principle of "who
is quicker" are a standard procedure,
and therefore instead of the possible
17...JS,d7 Black preferred not to waste
a tempo, since for a start he had a quite
specific aim, after, of course, the
opening of lines.
17...a4! 18 h4
For the moment it is bad to accept
the gift: 18 fxe6 fxe6 19 &g3 &h4 20
&h2 gf2 21 ghel Ag5+, and Black
wins.
18...axb3 19 axb3 ga2! 20 fxe6
fxe6 21 &e3 &a5 22 c4 gxb2!
Removing one defender...
23 &xb2 &a3+ 24 &bl ga8 25
Qcl &al+ 26 &C2 ga2+!
And now a second, which had come
to the aid of the king. After this the
gathering in of the "harvest" begins.
27 <axa2 #xa2+ 28 &C1 £ixb3+
29&xb3#xb3
Black now has a material
advantage, and his attack continues. When
the bishop joined in, White resigned.
Very often the main defensive
functions are entrusted to a knight
(remember the aphorism: "bishops for
attack, knights for defence"), but on
open or half-open files they can
typically become a target for the attacker's
long-range rooks (see diagram next
page).
Contrary to the aphorism just
mentioned, White's attack is supported by
his knight, but in addition the black
knight is the only (for the moment, at
any event, until ...f6 is played)
defender of f6. And it is from this square
that the black king can be invited to go
for a walk.
108
Attack with Mikhail Tal
Nrahmetdmov-Romanov
Arkhangelsk 1950
25 Sxd7! Axd7 26 #f6+ ®h6 27
BE!
27 SB was not dangerous in view
of 27....2.xg4, but now against mate by
Bh5 there is no defence. Unless Black
prefers 27....fl.xf5 28 Sxf5 mate.
27...#a7+ 28 4>g2 Black resigns.
Keres-Szabo
USSR v. Hungary 1955
Here we have a position of so-called
dynamic equilibrium. White's play is
on the kingside, whereas Black's is on
the b-file and against the e5 outpost,
which is insufficiently supported,
Therefore everything depends on the
energy of the two players and — an
accurate choice of goal.
18 Sxd7!>
Realising that the black knight was
ready to act as the sole defender of the
kingside (from f8), White gains time
for his attack and acquires an
advantage in force on the required part of the
board.
18...Axd719A«J3h6
Parrying the main threat of 20 igrg5
g6 21 h5 with a crushing attack and,
perhaps, secretly hoping for 20 #xh6?
#xe5 21 #h7+ ®f8 22 #h8+ ®e7 23
#xg7 #xg7, which would suit Black
perfectly well.
20 #f4 ®f8 (defending against 21
#f6)2iaxg7!
Now the white pawn outpost will
have its say,
21...®xg7 22 #f6+ ®f8 (or
22...®g8 23 #xh6 f5 24 exf6) 23
Sl%6, and in view of 23...Se7 24 ^h8
mate Black resigned.
The next diagram shows a slightly
more complicated implementation of a
similar theme.
White's standard threats on the
h-file are strong. But he does not have
time to double heavy pieces by 1 ifirh4
on account of l..,#e3+ and 2...#h6,
when on 3 Sh5 Black can interpose
3...Sxg6. And the typical defence
elimination 1 gxf8+ is parried by 1...
®xf8! (I...gxf8 2 Sh8+ ®xh8 3
^h5+ and 4 ^h7 mate) 2 Sh8+ ©g8,
when the game is still alive.
Eliminating Defenders
109
Kosten-Sanz
Hastings Challengers 1978/9
But from the defending knight White
can first remove the defending king!
1 Sh8+!! ®xh8 2 axf8+ gxiS 3
\^h5+ Black resigns.
Vasyukov-Durasevic
Belgrade 1961
White already has a material
advantage, which he could increase with the
simple 1 Bxb7, when Black cannot
even escape from the pin by 1 ...\^c6 on
account of 2 Bb6.
But the ideal position of White's
rook (on the 7th rank) and bishop (on
the long dark-square diagonal)
demands that he look closely at the point
where their "glances" intersect — the
g7 square. True, it is defended three
times(!) and very securely. Securely?
1 gxe6! (the first defender is
eliminated) l...^xe6 2 &xf8! (and now the
second) 2...£xf8 3 Bxg7+ (the third is
powerless) S.-.'S'hS 4 gxg6+! (the
most precise), and Black resigned, as
4...gf6 fails to save him on account of
5 Bxf6, when the queen has nowhere
to hide on a completely open board.
The elimination of defenders around
the king can be the theme of the most
unexpected operations.
Saigin-Tal
Match, Riga 1954
M.T. It can be considered
unexpected only as regards its ultimate aim,
since in general the black pieces are
ideally placed, the rook invasion at e2
is threatened, and there are also other
motifs in the air...
110 Attack with Mikhail Tal
25...£>e3! 26 fxe3 ,&xe3+ 27 £,ni
,&xd2 28 ©xd2 ge2 29 ©c3 gxg2!
This is the point of Black's idea. By
leaving the white king without its last
defender, Black intends to combine the
advance of his passed pawn with an
attack on the light squares, that are no
longer controlled. For example, 30
&xg2 d2 31 gdl Ag4 32 £>f3 ©d3!
Therefore White resigned.
Spassky-Petrosian
World Championship, Moscow 1969
Any player with the slightest
experience will immediately judge Black's
position to be very dubious. Indeed:
White has open files for his attack, the
number of pawns sheltering the black
king has been reduced, all the light
squares around it are weak — and all
this for one single pawn. But...
Firstly, the key point g7 is securely
defended. Secondly, the light-square
bishop cannot be switched to the b 1 -h7
diagonal, where together with the
queen it could begin an attack on the
light squares. Thirdly, there is no dark-
square bishop to be sacrificed on the
traditional h6 square, and it is not
evident how one of the knights can be
moved across with this aim. As for the
manoeuvre gfl-f3-h3xh6, it is both
lengthy, and it leaves open the
question: what next? Finally, Black has the
possibility of defending his weakness
at e6 a third time and of including his
queen's rook in the defence along the
5th rank.
Therefore the means by which
White eliminates the main defenders of
the black king must be considered
typical.
21 e5!! dxe5 22 £>e4! £,h5
The essence of White's manoeuvre
lies in the variations 22...£ixe4 23
gxf8+ gxf8 24 ©xg7 mate, and 22...
exd4 23 £>xf6 g5 24 ©h3 ge7 25
gxg5 Ag7 26 gxg7, mating. But now
too the additional defence of the g7
squares proves insufficient.
23 ©g6! exd4
After 23...£lf4 another motif would
have worked: 24 Sxf4! exf4 25 c3!
and — an attack on the light squares
after JJ.c2 ancj £^6.
24£>g5!
The most energetic, and in view of
the forced variation 24...hxg5 25
©xh5+ &g8 26 ©f7+ &h8 27 Sf3
Black resigned.
Sometimes a defender cannot be
eliminated even at a high price — it is
too securely defended. But in such
cases one must consider: can it perhaps
be diverted?!
In the next example Black appears
to have been the more successful: he
has a material advantage, and the
white queen, that has broken into his
position, is restricted by the bishop,
Eliminating Defenders
111
which cannot be advantageously
eliminated.
:«#
% wb&wh was?
\B3mT
Spassky-Geller
Candidates 'A-Final, Sukhumi 1968
36 jlh6! Jlj(h6
An exchange? But what to do after
37 #xh6+ <g>e7 38 &xf6 &xf6 39
gxf6 ©xfe? — the black rooks are
clearly stronger than the white queen!
37©h8+!<g>e7 38&xf6!
After luring away the defender of
the f6 pawn, White continues his
attack, although he is now a rook down.
38...jlf4?
Black keeps his material advantage,
but loses the game. By 38,..iJ.f8>
blocking White's main line of attack, he
could have held the balance: 39 gel +
©e5 40 gxe5+dxe5 41 Qd5+ <g>e6.
39 g5 <S>e6 40 #e8+ ®f5 41 #xf7
ge7 (41...<g>xg5 42 &e4+) 42 ©xe7
■S>xg5
The defence planned by Black on
his 38rd move — 42...gal 43 &c8+
<S>e5 (43..,<g>xg5 44 £e4+ #xe4+ 45
dxe4 gxfl+ 46 ,S'g2 leads to the loss
of the bishop) 44 £g4+ <g>d5 would
have lost to the problem-like 45 c4-f!
43 $re7! (now the black king is
unable to escape from the firing line)
43...&e3
If 43...<&xf6 White wins the queen,
or gives mate: 44 ggl+ <g>f5 45 <@re4.
44 &e4+ g,h5 45 #h7+ Ah6 46
&d7
In order to answer 46...iJ.g5 with 47
#g4+ <g>h6 48 h4 jle7 49 ggl, when
g6 cannot be defended.
46...jlf4 47 £f6+ ®g5 48 &AS
Black resigns.
m M ....
/////' flail W^
Gurieli-Wu Ming Qien
Women's Interzonal
Zhelewovodsk 1985
Both kings are rather unfavourably,
if not badly placed. True, neither can
be approached directly, and therefore
at first sight Black's next move doeu
not appear particularly good.
23...e5!?
Certainly, the h3 pawn is now
attacked, but the important d6 square is
also weakened, and it is immediately
occupied by White.
24 &d6
112
Attack with Mikhail Tal
Threatening the deadly 25 jj,c6+. If
24....&d7 White has the extremely
unpleasant 25 £sc5, while after 24...e4
25 ©xf6 jj,xh3 26 jj,xe4 the bishop
check at c6 is again on the agenda.
But not only White is attacking, and
the bishop at g2 is not only a striker,
but also the central defender.
24„.£.e4!!
Black diverts the bishop from the
defence of the h3 pawn, simultaneously
opening the diagonal for the queen.
White no longer has any attack, nor
indeed any defence.
25 ©gl Ah4 (25....fl.h2+ would
have won more quickly) 26 £sc5
Axg2 (and here 26...gxg2+ forces
mate), and soon White resigned.
Gurgenidze-Sergievsky
USSR 1962
Strictly speaking, here too neither
king feels altogether comfortable. One
has been deprived of its pawn shelter,
while the other is still in the centre.
But whereas Black's king is not
threatened by a single enemy piece, all his
forces without exception are aimed
directly or indirectly at the white king:
there is pressure both along the g- and
h-files, and along the long light-square
diagonal.
Even so, at first sight it appears that
White can hold on. As yet there is no
immediate threat against h2, and e4,
the key point of his position, is quite
securely defended. But suddenly...
27...jJ,d2!! 28 ©xd2
Forced to worry about his knight,
White's queen is diverted from the
defence of e4, and everything promptly
collapses.
28...£>xe4 29 ©e3 &g5+!
Paradoxically, this is stronger than
winning the queen after 29...£sg5+ 30
<2?g3 Sh3+.
30 ©xg5 £>xg5+ 31 <®g3 Sh3+ 32
<®g4 Af3+ 33 <®xg5 Sh5 mate.
Tal-Dvoretsky
42nd USSR Ch., Leningrad 1972
King's Indian Defence
1 d4 £>f6
2 c4 g6
3 £>c3 Ag7
4 e4 d6
5 Ae2 0-0
6 £>f3 e5
7 Ae3 c6
M.T. I cannot claim to have had
much experience of this variation, but
here either 7...£)c6 or 7...£)bd7 has
been played against me. For a time
7...^e7 was also popular. As
Dvoretsky admitted after the game, at
literally the last minute he glanced in
Boleslavsky's book, and discovered
that the author recommends the modest
pawn move 7...c6. For the moment
Eliminating Defenders
113
I! lack refrains from developing his
queen's knight. After some thought, I
could find nothing better than castling,
but perhaps White should play 8 d5!?
8 0-0 exd4
9 £xd4
The position after 9 .Qxd4 ge8 10
O dS 11 cxdS cxdS 12 &bS &d7 or
10 Mi fibd7 does not promise White
any advantage, but the capture with the
bishop is also fairly harmless.
9 ... Be8
10 &c2 <&bd7
Possibly Black should not have been
in hurry to make this move. The direct
I0...#e7 11 Hfel c5 came into
consideration, when White has either to give
up his bishop, or a pawn: 12 &e3
£ixe4 13 <Sxe4 #xe4 14 #d2, for
which he gains some compensation.
11 Badl ©e7
12 gfel Qe5
If 12...fic5, which looks more
purposeful. White had prepared 13 b4,
when it transpires that the threat to the
e4 pawn is illusory: 13...£)cxe4 14
&d3 d5 15 cxdS cxdS 16 &xf6! Black
could have continued 13...£>e6 14 iJ.e3
Sg4 with a complicated game. After
the move played, White at least no
longer has to worry about his e4 pawn.
13 h3 £.h6
An interesting move, essentially
forcing White to go in for complications,
which, however, turn out to be in his
favour. After other moves he would
have had time for the regrouping Jle3
and #d2, with positional pressure.
14 b4!
The threat of 14...c5 was rather
unpleasant.
14 ... b6
15 c5!
As we have already indicated, this is
forced, but... also good.
15 ... bxc5
M.T. After the game the dejected
Dvoretsky said that he had simply
forgotten about the transposition of
moves that occurred in the game. For
my part, I thought for a long time
before making my next move.
16 QxeS
M.T. Since I was quite happy about
the main variation (after 15...fixf3+
16 &xf3) 16...bxc5 17 bxcS dxcS 18
.S.e3 .S.xe3 19 Bxe3: for the pawn
White has more than sufficient
compensation, I hesitated, wondering
whether I shouldn't be content with this.
But then I decided that White could
gain a more appreciable advantage.
16 ... dxe5
Better chances were probably
offered by 16...cxd4 17 £>xc6 ©b7.
17 £xe5 #b7
White has a clear positional
advantage, but this is only the first stage.
18 Qa4
Aiming at the blockading square c5.
114
Attack with Mikhail Tat
18 ... Ae6
18...Af8 was more tenacious.
19 Ad6 &d7
20 £ic5 £ixc5
21 bxc5!
The point is that now a
transformation of advantages has taken place:
instead of pressure on the weak c6
pawn and occupation of c5, White has
acquired another, significantly more
important advantage — undisputed (as
long as the bishop at d6 is "alive")
possession of the b-file.
21 ... AfS
21...^04 was perhaps more active,
in order to answer 22 gbl with 22...
&a3. True, White has 22 Aa6, forcing
the black queen to guard the b7 square.
M.T. The move in the game sets a
clever trap. At first I began examining
interesting variations such as 22 Axe5
Axa2 23 ial &b3 24 &d2 Axc5
(bad is 24...gxe4 25 Af3 gxel+ 26
Bxel Ag7 27 Axg7 ®xg7 28 gal!)
25 >&g5. The variations appeared
convincing enough, but, after some
hesitation, I decided against opening the
floodgates for the black pieces. And I
was right: on 22 Axe5 Black had
prepared 22...Ab3!, not only securing
opposite-colour bishops, but also
regaining his pawn!
22- gbl
White sticks to his overall plan.
22 ... &d7
23 gedl
For the moment all White's pieces
are directed against the queenside.
23 ... &.X&6
24 cxd6!
Another transformation. The point
of White's play is his quiet 27th move.
24 ... gab8
25 a4
A new tramp comes into play. The
advance of this pawn to a6 followed by
the invasion at b7 is bound to decide
the game.
25 ... gxbl
26 &xbl &d8
It only remains for Black to play
27...<&b6, and his position will be
tenable, but...
27 &c2!
If now 27...&b6 White has the
decisive 28 gbl. The black queen is
obliged to revert to its cheerless
occupation of blockading the d6 pawn.
27 ... &d7
28 &c5 f6
Clearly, 28...Ab3 29 gbl Axa4 30
gal is bad for Black.
29 a5 ®g7
30 gbl gd8
31 a6 ®h6
Now White could have played 32
gb7 "&xd6 33 "&xa7, when the a-pawn
must decide the game, but it was time
to think also about the black king!
32 &e3+
More accurate than 32 gb7 &xd6
33 &e3+ g5 34 &f3 Ad7, when all the
same White is "forced" to capture the
a7 pawn.
32 ... g5
33 &f3 #f7
34 gb7 gd7
(see diagram next page)
35 Ac4!
By diverting the defender of the f5
square, White wins by force.
35 ... fS
Clever, but insufficient. The
acceptance of the sacrifice leads to mate:
Eliminating Defenders
115
35...jlxc4 36 Sxd7, and if 36...&xd7
37 •©xf6+. Black also loses after 35...
<Sg7 36 Jlxe6 •©xe6 37 &f5. But now
misfortune strikes from the other side.
■'*i±wjm'''M
36 exf5
The c6 pawn is still weak! On
36...jlxc4 there follows 37 &xc6!
36 ... ©xf5
37 J3,xe6 Black resigns
WHAT WOULD YOU HAVE
PLAYED?
No.23
m m
i 1!
±n ■' w&w
White, to move, is one of the kings
of chess.
No,24
'/m„ . Wm,,,
£
mm
■,±B,,±B^B
pss
w/., mm,..
m las®
Again the player with White is a
former World Champion.
No.25
There is no way to defend the key c2
pawn, whereas Black's bishop and
knight are covering the approaches to
his king. Does this mean that the scales
have tipped in his favour? Even if the
turn to move is with his opponent, also
a former World Champion?
8 At the Royal Court
IF IT IS ACCEPTED AS AN AXIOM
that the white and black troops are led
by their kings, the royal court must be
taken as the two extreme ranks at
either end of the board, the 1st and
2nd, and the 7th and 8th. As in life,
other pieces aim to come here for an
audience, but in contrast to life — with
evil intentions. After all, an invasion of
the opponent's residence is both an
aim, and a highly effective means of
attack, and by the very nature of chess
the pieces most suitable for this are the
"straightforward-moving" rook and
queen. Their "thoughts" are usually
also straightforward: either to give
mate on the back rank (if the king has
no escape square, or if it is
insufficiently open), or to drive the king via
the escape square out of his residence
into the open field, where it will come
under the fire of the other pieces.
For the moment we are talking only
about the very back rank, of which a
detailed discussion invariably takes
place in any lesson for beginners, and
which is present in every chess primer.
Nevertheless, variations on this theme
are encountered from time to time even
by the most famous of grandmasters...
(see diagram next column)
If World Champion Garry Kasparov
were asked to find a win for White in
this position, he would be unlikely to
require more than five seconds of
thought.
il lit •r^tyt
Mi, ,«,,,,,,,,1I
tmr ffii ..pi
Kasparov-Ribli
World Cup, Skelleftea 1989
Yet he himself offered a draw, when
after the obligatory 26 gxb5 &xe3 he
could have played the very pretty and
not especially complicated 27 gd8!!
#xb5 (27...gxd8 28 gd5!) 28 #d6
Axf2+ (28...ge8 29 ©e7 &xf2+ 30
<3?g2! #c6+ 31 ®fl ©hl+ 32 <3?xf2
#xh2+ 33 ®el #xg3+ 34 <3?dl!
#gl+ 36 <3?d2, and the checks come to
an end) 29 >3?xf2 #f5+ (or 29...ge8 30
a4! #xa4 32 #xa6!) 30 <3?g2 #e4+
31 ®h3 #f5+ 32 g4 #fl+ 33 <3?g3
©gl+ 34 <3?f3 #fl+ 35 ®e3 ©h3+ 36
®d4! (36 ®d2?? #h6+ 37 ®dl g6)
36...e5+ 37 <3?d5 ©g2+ 38 <3?c5 #gl+
39 <3?c6 ©cl+ 40 <3?b7 ©bl+ 41 <3?a7
#gl+ 42 <S>xa6, and Black can resign.
M.T. Kasparov overlooked this
opportunity, but in the following game I
did not miss the chance to allow a mate
in two moves.
At the Royal Court 117
F.Olafsson-Tal
Alekhine Memorial, Moscow 1971
Here one might well ask the
question — "What would you not have
played?", and the overwhelming
majority of players would give the correct
answer. But...
21...gc8?? 22 ®xc8+ and, greatly
surprised at what had happened, Black
resigned.
I.D. In Kasparov's case it was all
more or less understandable. The
World Champion was "lulled" by the
leisurely course of the game, without
any particular tension, with exchanges,
and, inwardly reconciled to a draw, at
the last moment he simply did make
the effort once more to check how well
the 8th rank was defended. But what
happened in your case? What was the
mechanism of your blunder?
M.T. It was also purely
psychological, as, evidently, is invariably the
case. We know so much about
tragedies on the back rank, that we simply
forget about them. That is, these
threats exist somewhere in theory, set
apart, as it were, from our positions on
the board. For me this game as though
united them, if not for ever, then for a
long time. And for probably ten years,
in each game that I played, when the
type of middlegame had been
determined, I would spend a second, in
order at almost every step to inspect
my back rank. This would seem to
have helped, and no more surprises of
this type occurred.
I.D. But grandmaster Samuel
Reshevsky was less lucky. It is well
known that three times(!), at intervals
of exactly eleven years, he overlooked
stalemating combinations by his
opponents. But things were also no better
with the theme of our present
conversation. Here are just two examples;
there were also others.
Unzicker-Reshevsky
Munich Olympiad 1958
For the moment White's extra pawn
does not mean anything, since the f4
and a2 pawns are both "hanging", and,
more important, a rook check at el is
threatened.
118
Attack with Mikhail Tat
White is saved by the eternal theme
of the back rank.
27 ■gre2!! -grcS (after the exchange
of queens White would have increased
his material advantage) 28 gc7! <grd8
29-&C4
The black queen has been driven
back, and the game is decided.
29...dS 30 Axd5 £>d2 31 §c6 gf8
32 gxf7 gxf7 33 g6 hxg6 34 fxg6
®fS 35 gxi7 fie4 (mate in three
moves was threatened: 36 "grc5+ #e7
37 ©c8+) 36 -&e8+ Black resigns.
Reshevsky-Fischer
Palma de Matlorca Interzonal 1970
White's attack on f7 has reached its
peak and would seem bound to be
crowned by success, since after
29...-&d4+ 30 ©hi Black's rook is
attacked, and if 30...ge7 he loses an
important pawn — 31 ■&xd6. But is
this obligatory?
30...#B!, and White resigned (31
Hgl Bel), because in the heat of the
battle he completely forgot about the
weakness of his back rank.
But things are not limited to these
typical cases. In attacks on the back
rank the heavy pieces are often helped
by minor pieces, and sometimes the
invasion of the back rank is merely a
subsidiary factor, strengthening other
attacking motifs.
Rossolimo-Livingston
New York 1961
The black king is in a mating net,
woven in particular by the white
bishops, and White's entire subsequent
play pursues just one aim: that of
invading the 8th rank. This is not easy to .
achieve.
18 c4>! »xg5+ 19 Ag3 gxdl 20
gaxdl Sd5
20...igra5 is less tenacious: 21 b4!
&b6 22 c5 &xa6 23 gd8+, mating.
21 cxd5 c5 22 b4 c4 23 gd4
All the same, Black is unable to
keep the files closed.
23...eS 24 dxe6 Axb4 25 gd7 gb8
Defending against 26 Ab7 mate.
26 gfdl
White renews this threat: 27 Ab7+
gxb7 28 gd8+, and mates.
26...Ae7 27 exf7 c3
At the Royal Court
119
On 27...$f6 White would have won
by28.fl.xbS<g>xbS29gbl+.
28f8=©
The diversion of the Mack rook or
bishop leads to mate. Black resigns.
""SMi
^„.„„^i«,„
m
N.N.-Rossolimo
Paris 1944
In this game of the future
grandmaster, the "sights" of Black's bishop and
rook at f8 intersect at f2, which for the
moment is defended. For the moment!
i...gdin
Exploiting an additional nuance of
the position — the overloading of
White's queen's rook, Black creates
irresistible threats both along the first,
and the second (f2) ranks. White could
already resign.
2 Axb7+ <g>b8 3 c4 gxf2!
This is much quicker than 3.„Axf2+
4 ©xf2 gxf2 5 gfxdl &c5 6 Ad5+
<g>cS 7 <g>h2, although here too matters
end in a mating attack — 7...gft>.
4 ©xb5 gfxfl+ 5 ®h2 ghl mate
!n this last example we had a
glimpse of the diversion theme (of the
queen's rook from the defence of the
queen), which in principle is the main
device in the attack on the back rank.
Classic examples of this theme
(Adams-Torre, New Orleans 1920,
and Bernstein-Capablanca, Moscow
1914) are well known, and so we will
restrict ourselves to three others, that
create an unusually strong emotional
impression.
w/,...,..,W">...
«M?J
m a M @
n§ aes h w
'mi 'm^'wJ^
■s. Win £• Win f$*'s ■& f&
Levitsky-Marshall
Breslau 1912
Despite being a piece down, White
is clearly intending to take the
initiative; after placing his rook on the 7th
rank next move, he will create mating
threats, and then, after the black knight
moves, he will capture the rook on h3.
True, Black already has a drawing
mechanism in place: 23...<£e2+ 24
<g>hl 4^3+25^1 Qe2+.
But he found what was perhaps the
most beautiful move in the history of
chess, emphasising the vertical and
diagonal harmony of all the black
pieces, attacking the king.
23...©g3!! White resigns
Mate at h2 is threatened, and the
120
Attack with Mikhail Tat
black queen is immune: 24 hxg3 £>e2
mate; 24 fxg3 £>e2+ 25 ®hl gxfl
mate; 24 &xg3 £>e2+ 25 ®hl £>xg3+
26 ®gl £>xfl or 26...£>e2+, and
Black remains a piece up.
This has something in common with
the next game, where the blow struck
by Black was equally spectacular, and
as a manifestation of diagonal-vertical
interaction was perhaps even more
difficult to find.
Mikenas-Bronstein
33rd USSR Ch., Tallinn 1965
White appears to stand not at all
badly. He has the better pawn
formation on the queenside, a passed pawn
in the centre, and an active rook on b4,
while the possible invasion by Black of
his back rank — 24...i&el+ is parried
by the simple 25 ©fl.
But his shrewd opponent had seen
that the black queen on the long dark-
square diagonal was aiming not only at
the b2 pawn, which is securely
defended, but also — "X-ray" fashion -
at the unprotected rook on a 1.
This means that it would be good to
divert the b2 pawn, and if not it, then
the queen from the defence of f I, and if
not it, then the rook from the back •
rank... And this was how Black
conceived an amazing move, rivalling the '
concluding stroke in the previous
example.
24...gxa3!!
This attack on a three-times(H)
defended pawn, noticed moreover by
"peripheral vision" on the edge of the
board, led to White's capitulation. '
The two preceding examples are
chess classics, well and widely known.
But here is one from more recent
times.
Kengis-Gufeld
Moscow 1983
All White's pieces have invaded the
opponent's position, the price being the
right for Black to have an extra
(second!) queen. But after the
immediate 45...dl=& 46 gxf8+ &xf8 47
■&e6+ ®h7 48 <Sxf8+ ®h8, firstly, the
number of queens becomes equal, and
secondly (and most important) White
promptly makes a new invasion — 49
At the Royal Court
121
©e8!, with the threat of a "discovered
mate".
Black therefore decided to play the
diverting 45...gxc5, hoping after 46
gxc5 d1=& 47 gc8 ©d6 to advance
his a-pawn and thereby divert the
white rook or obtain a queen ending
with an extra pawn. But here the
strength of a rook in the opposing
king's residence is fully revealed.
46 ©66!!
That's it! Black has no choice —
46...,&xe6 allows mate in two, and he
could have spared himself the last few
moves: 47 £se7+ <S>h7 48 ©xH £se6
49 £ixc8 dl=& 50 £ie7 &d8 51
■&xe6.
But even if there is no direct mate,
pieces invading the 8th rank can attack
the opponent's king from the rear, and
land unexpected blows in places that
are inaccessible from "in front".
This only became possible because
the white rook was pinning the h6
pawn.
In the following game the then
World Champion overlooked a similar
possibility.
Karpov-HUbner
Montreal 1979
JOUIUII
«G
loopa
m ztm-a-mm
Geller-Tukmakov
50th USSR Ch., Moscow 1983
The game had a curious finish: 35
gh8+ <S>g6 36 ©g3+ <S>h5 37 ©gS
mate!
After driving the king onto a light
square — 39 gg8+ ©117, White could
have vacated the g8 square with gain
of tempo for a "discovered check" to
the queen and won a pawn — 40 gxg6
(he could also have won by 40 ^e3,
andif40...j3.d8 41 gh8+!).
Instead he switched his rook to the
7th rank by 39 &c4 Bf6 40 Bc7,
which in this case proved insufficient
for a win.
But usually, even a lone rook that
has broken into the royal residence is a
terrible force. The opposing pawns are
initially arranged along the 7th rank,
and in addition the enemy king is in the
immediate vicinity. But when two
pieces penetrate, and there is also
support at hand...
122
Attack with Mikhail Tal
Ditman-Balanel
Erfurt 1955
If he picks up two pawns, White
risks losing the game: 29 ©xh6 i&h8
30 ©xg5 (30 gh7 igrf6, and White has
nothing better than to repeat moves,
e.g. 31 gf2 ©xc3!) 30...ge5. But after
all, he commands the cherished 7th
rank!
29 &d7! Qb6 30 gf8+! and mate
next move. A typical idea: one
attacking piece makes way for another, that
is capable of more.
It is interesting that 29...©h8 30
gh7 ©f6 would have led to a mirror
variation — 31 gh8+!
In the next diagram Black's rook has
not only already penetrated into the
opponent's position, but from the 2nd
rank it is also ready to land a blow on
the 1st rank — with the help of the
other pieces, of course.
41...Qf3+! 42 &fl
A "step to the right" — 42 ®hl
looks more dangerous, and this
impression is confirmed by fantastically
beautiful variations such as 42...
Axe3!! 43 fxe3 gdxg2!l 44 £|Xg2
Sg3, mating, or 43 £}e6 gxf2 44 gxf3
gfl + 45 ®h2 exf3! 46 £|Xg5 £f4
Sunye-Kasparov
World Junior Team Ch., Graz 1981
However, the "step to the left" also
leaves the white king under fire.
42....&xe3!!
Joining the sights of both rooks on •
the g2 pawn.
43 fxe3
Naturally, 43 ©xe3?? would have •
allowed mate on the 1st rank.
43...gdxg2!
A rare instance, when the second
rook does not aim for the 2nd rank. But
here Black needs to create the threat of
44...£>d2+.
44 ©c3 gh2 45 Qe2 <£>h7!
Parrying the threat of perpetual
check from c8 and f5, Black plans the -
"normal" invasion ...ggg2.
46 «c8?!
46 ©b4 was better, but even then
Black would have won after 46...f5 47 -
©b5 f4! 48 ©b4 Qd2+! 49 ©xd2 (or
At the Royal Court
123
49 3>el f3 50 ®xd2 gxe2+ 51 ®c3
Hxe3+ 52 ®d4 f2) 49...ghl + 50 ®f2
(3!
46...ghl+47®f2fid2!
And White resigned in view of the
forced 48 Qg3 Sh2+ 49 3>el &f3+ 50
<<T?f 1 gxb2, when further resistance is
pointless.
Spassky-Tal
25th USSR Ch., Riga 1958
Nimzo-Indian Defence
1 d4 Sf6
2 c4 e6
3 fic3 AM
4 a3 A*c3+
5 bxc3 c5
6 e3 Qc6
7 Ad3 e5
Even at that time Black knew
perfectly well that the usual 7...0-0 8 Qe2
b6 9 e4 Qe8 leads to a complicated
name, pleasant enough for him. But
what if it was in this variation that
White had prepared something? And
so — Black deviates!
I.D. One of the favourite sayings of
my co-author has always been: "When
the tram-driver seeks new paths, the
tram goes off the rails"...
M.T. But not this time!
8 Qe2
On 8 d5 Black had "devised" 8...e4,
when he stands well after either 9 Ae2
Se5, or 9 dxc6 exd3 10 cxd7+ •©xd7.
8 ... e4
9 AM b6
10 fig3 Aa6
11 f3
The only real alternative was 11
/Axe4 £ixe4 12 Axe4 Axc4 13 f3.
The line recommended by Keres after
the game, 11 i&a4 Qa5 12 Qxe4, is
less convincing, since Black quickly
restores material equality by 12...
Qxe4 13 Axe4 gc8, with good play.
11 ... Axc4
"Pawn-grabbing" is punished: 11...
exf3 12 #xf3 Axc4 13 Qf5 0-0 14
e4, and White has a powerful
initiative.
12 Qf5!
In the variation 12 fxe4 d6 13 •©f3
0-0 14 e5 dxe5 15 ©xc6 exd4 it is
Black who has a strong attack on the
enemy king stranded in the centre.
12 ... 0-0
There is nothing else, but nothing
else is required.
13 fid6 Ad3
14 Axd3 exd3
15 #xd3 cxd4
16 cxd4 Qe8!
17 £sf5 d5
White's pawn centre has essentially
been blocked, and Black can be happy
with the result of his opening
experiment.
18 a4 Qd6
19 £sxd6
Of course, not 19 Aa3 Qxf5 20
Axf8? i&g5, with numerous threats.
19 ... «xd6
20 Aa3 fib4
21 «b3 a5
22 0-0 gfc8
23 gacl #e6
Here Black offered a draw, having
worked out the "long" variation 24
Axb4 axb4 25 ®f2 «d6 26 ®gl
i&e6.
24 Axb4 axb4
25 ®f2 #d6
124 Attack with Mikhail Tal
w. a mlkm
26 h3
White, naturally, avoids the
objectively strongest continuation, since the
tournament situation demanded that he
play only for a win, but now after
26...h5, with the idea of ...h4, the
initiative would have passed to Black.
M.T. But he played a routine move!
26 ... ®ra?
27 gc2! gxc2+
28 #xe2 g6
29 gel &d7
30 &c6 ©xc6
31 gxc6 ga6
More accurate, of course, was
31...gxa4 32 gxb6 &e7 with a quick
draw. But now the game reverts... to
the middlegame.
32 a5 b3
Here 32...gxa5 33 gxb6 would
have left White a pawn up.
33 axb6 b2
34 b7 bl=©
35 gc8+ ®g7
36 b8=&
The new queens have appeared on
the same file, and in addition all the
pieces are in the opponent's rearguard.
An unusual state of affairs!
36 ... ga2+
37 ®g3 &el+
38 ®h2 ©xe3
39 gg8+ ®f6
The draw that Black needed would
have been more simply achieved bv
39...<S>h6 40 #f8+ ®h5 41 ftxfj
gxg2+!, forcing perpetual check.
40 &d6+ &e6
41 #f4+ &f5
42 &d6+ &e6
43 &g3
The position has radically changed.
The white king is now in safety,
whereas Black's is completely exposed
to the elements.
43 ... #e3
44 h4 ge2!
The tempting 44...gal 45 ©d6+
©e6 46 #f4+ #f5 47 &h6 is weaker,
since Black's pieces lose their
coordination, and his king is in jeopardy.
45 &d6+ &e6
46 ©f4+S ©0
47 ©h6
With the same idea.
47 ... <S>e7
48 &f8+ ®f6
49 &g7+ <S>e7
50 ga8!
The threat of a check at a7 forces
the black pieces to retreat.
50 ... &d7
51 &f8+ ®f6
52 ga6+ ge6
53 &h8+ <S>e7
54 ga8 gel
55 ®g3 h5
56 ®f2 ge6
(see diagram, next page)
At the Royal Court
125
57 gc8!
Now Black can only move his rook,
since his queen is tied to the defence of
(15 and e8. In the event of 57...#d6
White wins by 58 Be8+ and 59 Bd8+,
;ind pawn moves are impossible.
And since 57...Bc6 fails to 58 ©f8+
Wf6 59 Bd8 ©c7 60 ©h8+ <£>e7 61
He8+ ®d7 62 ge5, when White
carries out a favourable regrouping,
Mack's reply is forced.
57 ... Bd6
58 ©18+?
An imperceptible, but significant
mistake, which in the heat of the
moment went unnoticed by both players.
It is not possible to occupy, or more
precisely, to take control of all the
squares around the black king with the
queen and rook alone, and, as Chekh-
over later showed, White should have
mobilised his pawns with 58 g4! Then
58...Be6 loses to 59 g5 (taking away
the f6 square) 59...BC6 60 -&f8+ &e6
61 Be8+ <£>f5 62 Be7 Bc2+ 63 ®g3
■&d6+ 64 Be5+. The alternative is 58...
hxg4 59 &f8+ <£>f6 60 ficg4. Now on
60...Be6 there follows 61 Bc3 Be4 62
Bf3+ ®e6 63 g5, with an unavoidable
invasion at f6, while if 60...Bc6 61
Be8 Bc2+ 62 <£>f3 Bc3+ 63 <£>f4
<&c7+ 64 Be5!, with the decisive threat
of g4-g5 mate.
After the move played Black
breathed a certain sigh of relief.
58 ... <£>f6
59 Be8
Here 59 g4 is no longer so effective
on account of 59...Be6, and White
prefers to threaten mate in two moves.
59 ... ge6
60 &h8+ <£>f5
61 ©h6
Either capture of the rook again
leads to mate, and White continues the
attack on the dark squares, although it
is no longer dangerous.
61 ... <£>f6
62 ©h8+
Winning a pawn by 62 Bd8 ^06 63
©g5+ ®g7 64 ©xd5 (64 Bxd5 f6)
would have allowed Black to seize the
initiative after 64...1&C2+ 65 ®g3
&c7+66<g>f2©f4.
62 ... <S>f5
63 Bd8
' 13 9 W
/05, Wmr '£3i
111 J& ill a ill
■±■§■1
126
Attack with Mikhail Tat
White should now have admitted
that he had missed the win, and agreed
to a draw, but in the heat of the battle
how difficult it can be to soberly assess
a change in the chess climate!
63 ... &c6!
Threatening for a start to check at
c2 and c7.
64 gc8?
White should have concerned
himself over his own king — 64 ®g3,
when he is still within the safety zone.
64 ... &a6
65 &g3 &d6+
66 &h3
No better is 66 ®f2 ,&b4, when it is
the black pieces that "invite
themselves" to a reception with the white
king — with evil intentions. Had
White left his rook at d8, this would
not have been possible on account of
the capture on d5, forcing mate.
66 ... gel
67 g3
Or 67 g4+ hxg4+ 68 fxg4+ ®f4 69
&h6+ &e4! 70 ge8+ <S>f3, and the
white king is mated.
67 ... ggl
68 f4 gel
Black has excluded the counter g3-
g4+, which was possible in certain
cases, and has taken complete
command. He now threatens 69,..i&e6 with
a discovered check and a quick mate.
The only way to defend against this
was 69 ge8, but then after 69...gxe8
70 i&xe8 i&e6 the d4 pawn is soon lost
— and with it the game.
Rather than suffering without end,
White prefers an end without suffering.
69 gc2 &e6
70 gf2 ghl+
71 &g2 &e4+
72 gf3 &g4
73 &c8+ f5
White resigns: after 74 &c3 Black
has the simple, but elegant 74...gfl,
and in the pawn ending he can, if he
wishes, have four extra pawns.
WHAT WOULD YOU HAVE
PLAYED?
No.26
White is on the attack, and he would
appear to have achieved a great deal.
He has broken up the black king's
pawn shelter, and after the fall of the
f5 pawn he will begin a direct assault
on h7 and f7.
True, it is Black to move, but his
counterplay with 22....&d4+ 23 ®hl
£>f2+ 24 gxf2 Axf2 does not work on
account of 25 £>xe8.What then should
he do?
At the Royal Court
127
No.27
No.28
ynm±mm
0§k0ikf IS, jmy,,
WW WW
imimJmA
For the pawn White has gained
more than sufficient compensation. He
has seized the open file in the centre,
the black knights have been lured to
the edge of the board, and finally, there
is the possibility of an attack on g7 (24
' Sg5). But from its ideal position the
"central defender" — the black queen
— is capable of withstanding the
assault...
No.29
«f '/Mi ty*& r% ?£?i
For a long time Black's position in It is true that the white rooks have
No.28 was lost. But what is it now? occupied the 7th rank, on which, inci-
The black pieces have, after all, dentally, there is not a single pawn,
entered the white king's residence... But what next?
9 Destroying the Fortress Walls
AN ENGLISHMAN'S HOME is his
castle. This saying is also encountered
in various versions among Russians,
Germans, Spaniards, and, of course...
chess kings. The pawn rank f7/g7/h7
(kingside castling does after all occur
much more frequently than queenside,
at least for the defending side) is that
wall behind which the king seeks
shelter. And for a time he finds it until
•— or if — an attack achieves its goal:
the destruction of the fortress walls.
Moreover, the pawns are most
solidly placed when they are on their
initial squares. Firstly, in this case the
attacker must spend much more time
on the concentration of force (we will
see how a rapid attack is possible from
afar against a pawn that has advanced
to h6), and secondly, the advance at
the required moment of the required
pawn is capable to cutting a trajectory
of the attacking pieces. But as is
known, a pawn is not able to reverse
its move, and a step forward may
irreparably reduce the further
defensive resources, as occurred, for
example, in the following game.
Black already has his sights set on
the enemy king position, his rook is on
course for h5, and the simplifying
attempt 15 Axg4 4}xg4 16 h3 is
fraught with danger: 16...4}xf2! 17
®xf2 ig'h4+ with a powerful attack.
White could still have maintained
approximate equality by the calm 15
Ael, defending f2 and now planning
the exchange of bishops. Instead, an
incautious advance presented Black
with a clear target.
Gilfer-B08k
Stockholm Olympiad 1937
15 h3? Axh3! 16 gxh3 ©d7 17
.an
Now the king's escape is cut off lo
the centre, where it would be covercd
by the e- and f-pawns.
The only way of prolonging the
resistance (although it would not have
changed the outcome) was by 17 t'4
&xh3 18 fxe5 Axe5 19 &f3
(otherwise mate) 19...&xf3 20 Jlel Qg4 21
Hd2, when a possible finish would be
21...£)xe3 22 gf2 &g4+ 23 &hl
#h3+ 24 ®gl Ah2+ 25 ®hl Ag3+
26 ®gl &xf2+ 27 ®xf2 ge8, and
wins.
17...gg5+ 18 ®hl ©C6+ 19 «4
■&xe4 20 .&xe4 ©xe4+ 21 f3 ©e5 22
f4 ©e4+ 23 ®h2 Axf4+ 24 Axf4
©xf4+ 25 ®hl ©f2 White resigns.
Destroying the Fortress Walls
129
mtm, mtmt
I iai if
Castaldi-Euwe
Stockholm Olympiad 1937
In this game from the same
Olympiad, for the exchange White has
a powerful attacking grouping against
a king, whose pawn shelter is not
supported by pieces. Now 32 gd6
followed by .S,h6 is threatened, and
attempts to avert this by the advance of
any of the three black pawns merely
make things worse.
E.g.: 31...h6? 32 &xh6, or 31...f6?
32 £h6 g6 33 &g7+ &g8 34 £h6+,
or, finally, 31...g6 32 £h6 <S>g7 (32...
^xg4?? 33 £f6 mate) 33 ©xe6 fxe6
34 gd7+ <£>f8 35 g3!, with the
irresistible threat of £>g4, mating. Only
in this last variation does Black retain
a draw after 32...gf8 33 ©xe6 fxe6 34
Hd8 &g7 35 Sd7+, although here too
White has other possibilities, such as
33 #f3, with the idea on 33...f5, 33...
f6 or 33,..®g7 of replying 34 &g4.
Black did not disturb his pawns
prematurely, after 31...Sac8 32 .a,h6
g6 (now is the right time!) 33 @g5
£d4 34 £g7+ &g8 35 4f6 S2c7 36
h4 .S,c5 he retained hopes of a
defence, and after mistakes by White he
even won.
Therefore an assault on the royal
fortress often begins with the discovery
and creation in it of weak points,
which then provide targets for a
decisive blow. As, for example, in the
following game.
IpiJmi
.......„.„ 4j^t,,,
I S H ill »
Salov-Sax
World Cup, Skelleftea 1989
White's powerful piece outpost at d5
gives him an appreciable advantage,
but even so it is hard to imagine that
the walls of the royal fortress, which
have no vulnerable points, will
collapse within a few moves. After all,
Black intends ...Ac5 and ...£>e7,
eliminating the main enemy, after which his
queen will reach the kingside via c6.
21 #cn
By the threat of 22 £>xe7+ White
gains time to transfer his knight to f5,
and — most important — to force the
opponent into a fatal weakening of one
of the links in his pawn chain.
21...gfe8
130
Attack with Mikhail Tal
Forced, since 21...gae8 22 Qf5
leaves Black either the exchange down
— 22...®c8 23 Qdxe7+ Qxe7 24
4}d6, or simply in a bad position —
22..,&b8 23 &dxe7+ Qxe7 24 Qd6
gd8 25 gc3.
22 afS £tS
Apparently satisfactory, but the f7
pawn is no longer covered by the rook.
23 £>h6+! gxh6 24 &f6+ ®h8 25
gxd7
Now 25...®c8 26 ©f5 leads to
mate, while the game continuation 25...
&xd7 26 £>xd7 £>d4 27 &d5 Ag7 28
e3 £se6 merely allowed Black to
prolong a hopeless struggle.
Murey-Poldauf
Podolsk 1991
By combining two opening schemes
(...®f8 and ...&a5-a4) Black has not
equalised fully, although he has
created some counterplay. Thus, in
particular, he threatens ll...c4 12 &e2
^xc2, when on the kingside the black
queen becomes the central defender.
So White begins trying to break up
the enemy king's pawn shelter.
11 #h5! h6
Forced, since in the event of 11...
cxd4 12 Qg5 Qxe5 13 Qxh7+ gxh7
14 ®xh7 Q5g6 the advance of White's
h-pawn is decisive. And after ll...g6
he mounts a swift attack on the dark
squares.
12 dxcS ®a5
Simplification by 12. ..£}g6 13
&xg6 fxg6 14 'grxgfj *gre4+ 15 ®xc4
dxe4 16 &h4 ®f7 17 f4! leaves White
too many pawns ahead — even with
opposite-colour bishops.
13 0-0 &xc5 14 gfbl &a5 (15 gb5
was threatened) 15 £>g5 g6 16 igrh4
White has forced another weakening
advance. The g6 and h6 pawns have
now become targets for attack, and
there is an invasion point at f6. Is this
sufficient?
16...&C4 17 £>xf7!
Quite sufficient! The shelter's last
support is destroyed, after which there
is no defence.
17...®xf7
If 17...Qxd2, then 18 £ixh8 &xbl
19 Qxg6+ £>xg6 20 &f6+ is more
than adequate.
18 ©f6+ ®g8 19 Axg6 axeS
No better is 19...gh7 20 &xh7+
®xh7 21 &f7+ ®h8 22 &f8+ ®h7 23
&xh6, when the pinned knight is
unable to defend g7.
20 Ah5 &7c6
Otherwise (for example, after 20...
®d6) the white rook joins the attack
along the 4th rank.
21 Af4 &f8 22 Axe5 ©xf6 23
Axf6, and White won easily and
quickly: 23...gh7 24 gel gc7 25 ge3
®h7 26 f4 Ad7 27 f5! exfS 28 gael
f4 29 ge7+! £>xe7 30 gxe7+ ®g8 31
Destroying the Fortress Walls
131
Jtg7+ @f8 32 gh7. The attack on the
bare king continued even after the
exchange of queens.
Tal-Rantanen
Tallinn 1979
White's advantage comprises
several factors (powerful piece outpost in
the centre, rook on the 7th rank,
occupation of the open f-file, and, finally,
superior pawn formation and great
piece activity), but is this not all
temporary? For example, 24 Bdf 1 ih5 25
Ha7 gb7, and the pressure of the rook
along the 7th rank has already been
neutralised; and besides, after each
exchange of heavy pieces Black's
position becomes increasingly safe.
But White finds another way: he
creates weaknesses around the enemy
king. For the moment g7 is securely
defended, and there is no way of
increasing the pressure on it, while not
one of his pieces is aimed towards h7.
24£>f6!!gxf6
This forced (24...jJ.xdl 25 «h4 h5
26 ©g5 gb7 27 «g6, and mates)
capture of the knight immediately
transforms h7 into a real weakness,
and the attack proceeds against it.
25 &h4 Ag7 26 Ah6 Axdl
The only way to resist was by 26...
gg8 27 gxd6 gb7 28 Axg7+ gxg7 29
gxb7 «xb7 30 gd8+ gg8 31 gxg8+
<S>xg8 32 <&xg4+, although with an
extra pawn and more secure king,
White must win the queen ending.
27 Axg7+ @g8
After the game it transpired that,
strangely enough, both(!) players had
aimed for this position. Alas...
28 Ah8! ®xf7 29 «xf6+ @g8 30
dg7 mate
HI + HI <M
i s w? ,ff%
1 I i W
s® &J ?M HI
F.Olafsson-Donner
Lugano 1970
While Black has been engaged in
exchanging White's fianchettoed dark-
square bishop, White has "launched"
his knight to g5 and now embarks on
an attack against the king's fortress.
His first task is to weaken the pawn
screen, to prepare breaches in the
fortress walls.
13f4exf414gxf4h6
The threat of 15 &.g4 forces Black
132 Attack with Mikhail Tat
to make this advance, but this is only
the start.
15£sR
There was little point in playing 15
41ge4: at the required moment the
defender could have begun simplifying.
15...&e7 16 gfl ge8
Black vacates a square for his
queen's knight. This weakens his
defence of f6, but how else is he to
complete his development? This problem is
not solved by 16...c5 17 ©h4! b6 18
fif5 #e6 19 Af3 Eb8 20 ©d5, when
he can essentially resign: 21 JJ.g4
followed by £}xh6+ is threatened, and
20...£)xd5 allows the crushing 21
JUd5 #e8 22 ©xh6+ gxh6 23 ©g6+.
17 £sd4 £jffi 18 Ad3 Ae619 gxf6
After this the walls of the king's
fortress lie in ruins.
19...gxf6 20 £se4 £47 21 #dl fS
Otherwise 22 #h5 and 23 gf3 with
a quick mate.
22 £sxf5 £xf5 23 gxfS
Now the attack continues with
material practically equal.
23...#e6 24 ©D £se5 25 &g3+
®I8 (25...®h8 26 gf6) 26 £sf6!
£sxd3 27 £sh7+ ®e7 28 #c7+ &d7
29 gxf7+ ®xf7 30 #xd7+ ge7 31
igffS+ and Black resigned, since after
31...®g8 White wins most quickly by
32©g6+.
After playing the opening badly (see
diagram next column). Black is
already obliged to parry the threat of 10
Sg5 g6 11 h4.
9...ge8 10 Ad3 h6
Insufficient is 10...£sf8 11 fig5,
when ll„.h6 is bad in view of 12
Jt.h7+. Black immediately has to grant
the opponent a "chink" in his defences.
Salov-Taulbut
Moscow 1983
11 h4 £>b6 12 gh3 dxc4 13 Ae4
cxd4 14 Bg3 ®h8
No better is 14...d3 15 &d2 ®f8,
when a blow is landed on another
section of the wall— 16Bxg7!
IS Axh6 g6 (15...gxh6 16 #d2) 16
AgS &d7 17 Af6+ ®g8 18 Axg6
Black resigns.
Sacrifices on h7
Yes, Black's h7 pawn (or White's at
h2) is always slightly weak, even with
the ideal pawn formation, if, of course,
it is defended only by the king. The
attacking mechanism has been too well
known for 150, if not 200 years, for us
to give a detailed discussion here. A
bishop sacrifice at h7 draws out the
king, the knight advances to g5 with
check, clearing the way for the queen
(usually to h5) and a rook (usually
along the 3rd rank). It is probable that
thousands of such games throughout
the world have been played - and won!
Destroying the Fortress Walls
133
- so we have included here some that
are complicated by certain additional
motifs. After all, for a chess player, as
for a musician, it is not enough to
know only the rudiments, and to be
able to perform only a single song...
In the table of the Taxco Interzonal
Tournament, 1985, the result of the
game Speelman-Tal was quite
different. But it ended rather too quickly in a
draw, and the players sat down... to
play blitz!
It is easy to see that the framework
of the combination is in place (13...
Ji.xh2+ and 14...Qg4+), but will not
the entire concept collapse? After all, it
appears that White has a defence...
13...Axh2+! 14 ®xh2 £)g4+ 15
®g3
The only way to avoid inevitable
defeat was by 15 Axg4 &xh4+ 16 Ah3
£xh3 17 gxh3 &xf2+ 18 ®hl £>xd4
19cxd4&xd4...
M.T. ...but in this case I simply
would not have shown this game.
Speelman, fortunately, played
differently, reckoning after the queen check
at d6 to block with the f2 pawn.
15...ge3+!
Diversion of the defender,
obstruction — call it what you will: 16 fxe3
&d6+ 17 ®f3 £>ce5+ 18 ®g3 £>d3+
19®f3.&h2mate.
M.T. Quite an attractive concept?
I.D. In-struc-tive!
This same mechanism can work
even when the g5 invasion square is
securely controlled.
Veresov-Dzentelovsky
Minsk 1956
Nominally Black has no
weaknesses, and his position would be ideal,
but - with his knight at f6 (defending
h7) and his rook at f8 (defending f7).
Without them White's thematic attack
is perfectly correct.
16 £xh7+! ®xh7 17 £)e5!
The f7 pawn is attacked, and the
queen's invasion at h7 will be
supported by the rook, whose path
along the 3rd rank has been cleared.
The further course of the game is of
no interest, since Black made a
blunder. But even the comparatively best
17...®g8 18 &h5 Sf8 19 ge3 f6 20
134
Attack with Mikhail Tal
Qg6! (in the variation 20 Qxd7 &xd7
21 >grxa5 e5! Black has serious coun-
terplay for the pawn, while for the
reckless 20 gh3 fxe5 21 ©h7+ ®f7
22 gg3 &f6! 23 dxe5 &xe5! 24 &h5+
®g8 25 ©xe5 >grf6 there is no need)
leaves White with a very strong attack,
e.g.: 20...&C4 21 gg3 &c6 22 &h6, or
20....2.e8 21 &xe7+ $rxe7 22 ©xa5
gf7 23 &a3 #c7 24 ©h5, and he is
simply a "healthy" pawn to the good.
Tal-N.N.
Simultaneous Display, Berlin 1974
With his last move 14 .2,g5 White
has removed Black's control of g5, and
if 14....2,xg5 the sacrifice 15 ^.xh7+
works, so to speak, in pure form (e.g.
15...®xh7 16Qxg5+®g6 17&xf7!).
However...
14...£>xe5
M.T. To be completely honest, I
overlooked this capture. But in
"justification", this was perhaps because I
intuitively sensed that you can't play
like this in the opening, and I had to
find a reason why this move was bad.
And I found one.
15 &xe7 £,xf3 16 gxf3 #xe7 17
&xh7+ ®xh7 18 gh3+ <g>g8
Now the routine 19 #h5 does not
achieve anything after the equally
routine 19...f6. But in this ancient idea it
proves possible to include a relatively
new motif.
19 &B #g5 20 #hS! Black
resigns: he is mated after both 20...>grxh5
21 £,e7+, and 20...f6 21 £,e7+.
For the successful pursuit of a king
it is by no means always essential to
destroy its pawn shelter. It can be quite
sufficient to break up the formation, by
doubling the pawns on the f-file. This
immediately gives rise to a whole
complex of weak squares, on which the
enemy pieces can approach the king,
and, more important, the pawn at h7
(h2) is always practically indefensible.
Popov-Malevinsky
Sevastopol 1969
For a minimal payment Black has
managed to "ruffle the hair" of the
white king, which has prudently taken
shelter in the corner. Without losing
time, he continues the attack.
Destroying the Fortress Walls
135
14...£>h5! 15 Bgl
White has no time to take the
bishop: 15 fxg4 #h4, and the h2 pawn
is vulnerable (16 f4 £}g3+).
15...#h4 16 Bg2 Ah3 17 #dl
If 17 #fl Black wins prettily by
I7...gxe3! 18 fxe3 £>g3+! 19 hxg3
JJ.xg2+ 20 <S>xg2 #xg3+ and 21...
f.yh2 mate.
17...jJ.xg2+ 18 ®xg2 #xh2+ 19
St>n gxe3 20 fxe3 &g3 21 #d2
*Vhl+ 22 ©e2 £if4+! White resigns.
I.D. For probably twenty years I
have been pressing you to disclose that
mechanism by which you seek — and,
more important, find, your famous
combinational attacks. But you always
point to your nose and say that you
readily sense something attractive, and
not necessarily on the chess board...
M.T. I am also happy to repeat all
this now! But to be serious, the
following example is indeed very apt, and a
hook is a book.
Nikhamkin-Gruzdev
Klaipeda 1984
That White has prepared an attack
— this is evident. The e-pawn has
advanced a long way, his bishops are
well employed, while Black's hanging
pawns, although defended, are
nevertheless hanging on open files, and in
this position the advance of either of
them is not a breakthrough, but a
weakening. After the exchange of the
knight at f6, the h7 pawn is supported
by the king alone, and this may prove
insufficient. So that of all the kingside
pawns, only the one at g7 feels secure.
As soon as I saw this position, two
quite old games immediately flashed
through my mind.
Tal-Spassky
Candidates Final, Tbilisi 1965
Here White's light-square bishop is
operating with an "X-ray" beam along
the pawn-free a2-g8 diagonal, the d5
square is the key one in Black's
defences, and it was in the hope of the
"ricochet" 28 £}xc6 gxc6 29 ga8! that
White made his 28th move.
Black, however, saw through
White's threat, replied 28....$.xc6, and
managed to draw without difficulty.
136 Attack with Mikhail Tal
" rfi%i W f&i 'M
Tal v. Brinck-Claussen
Havana Olympiad 1966
A concrete and forcing variation
was found, including the "h7 theme",
18 <&b6!! &xb6
Otherwise simply 19 £}xc8 and 20
exf7+, winning the exchange.
19Axf6Axf6 20Axh7+!
The wall of another royal fortress
collapses.
20...<S>xh7 21 #hS+ ®g8 22 exf7+
gxf7 23 ge8+ g« 24 &xd5+
Black resigns. Even the best move,
24...&,e6 does not save him after 25
gxe6, e.g. 25...gad8 26 gd6+ gf7 27
&xf7+ ®xf7 28 gxb6.
Sacrifices on h7 and g7
Here there is a similar pattern, and
after 33 <&xd5 _&xd5 34 gagi Axa2
35 gxd8+ <g?f7 36 &c6! <&e7 37
&e8+ ®e6 38 gc8 White successfully
concluded his pursuit of the king:
38...&d5 39 gc3 #d7 40 ge3+ ®d6
41 &b8+ ®c6 42 a4 £,d5 43 gel
&d6 44 gcl+ ®d7 45 &c8+ Black
resigns.
I.D. Yet in our example the light-
square bishop is not in the same place,
and also...
M.T. After the capture on f7 the
diagonal will be opened, the d5 pawn's
defence can be removed, and in
general one senses the "ricochet" theme.
I.D. Again intuition, sensing, and all
these hunting associations!
M.T. Precisely! But with one
nuance: the position is not difficult to
calculate, knowing the idea of the
attack, and if there is nothing concrete,
then for the moment White still has
strengthening moves — gadl and,
perhaps, £}c3.
Of the attacks on these squares, after
which the king proves completely
"bare", pride of place goes to the
double-bishop sacrifice, which was
discovered on the chess board by the then
World Champion in the following
game. A rare instance, where the time
that an important tactical device was
conceived is known to the very day!
SSI
Lasker-Bauer
Amsterdam 1889
Destroying the Fortress Walls
137
The white knight has just advanced
from g3 to h5, and White's subsequent
blows are as inevitable as the rising of
the sun.
14...axh5
There is nothing else. 14...£le8 is
decisively met by 15 j2.xg7 £>xg7 16
«Vg4, and 14...h6 by 15 £xf6 £xf6 16
<Sxf6+ gxf6 17 ®g4+ &h8 18 ©h4
*g7 19 gf3 Sfd8 20 gg3+, winning
(he f6 and h6 pawns. If 14.„d4 15
Axf6 j2.xf6 16 >grg4 e5 Black runs
into 17 <a.e41, while 16...®h8 17 gf3
Hg8 allows 18 Axh7 Sgd8 19 ®h3.
15 ja.xh7+!
"The start of a very deep and elegant
combination" (Steinitz).
15...®xh7 16 ©xh5+ &g8 17
ja.xg7!!
Lasker's contemporaries were very
well familiar with the sacrifice on h7,
but the second sacrifice on g7 was a
revelation to them.
17...&xg7
Or 17...f6, as Nimzowitsch
subsequently played against Tarrasch (cf.
the next example), but then 18 gf3
*Ve8 19^h8+®f7 20©h7.
18 #g4+ ®h7 19 WB eS 20 Sh3+
*Vh6 21 Sxhfrf &xh6 22 ©<J7
A finale, without which the
combination would be incorrect: a double
attack on the two bishops. Here the
curtain could already have been lowered...
22...ja.f« 23 &xb7 &g7 24 gfl
Hab8 25 ©<J7 Sfd8 26 ®g4+ &i8 27
fxc5 Ag7 28 e6 gb7 29 ®g6 f6 30
Bxf«+ £xf6 31 >&xf6+ ®e8 32 &h8+
*e7 33 ®g7+ Black resigns.
Since then more than a hundred
years have passed, and although only a
small number of such combinational
routs have appeared in print, they have
long become textbook examples.
Moreover, the difference lies only in
the preparation of the attack and the
nuances in its implementation.
Nimzowitsch-Tarrasch
St Petersburg 1914
A brilliant tactician like Tarrasch
could easily, had he wished, have
found a way of shattering the peace of
the white king — 19...j2.xg2!, and
after 20 ®xg2 (20 dxc5 ®g5, and
wins) 20...&g5+ 21 ®f3 (21 ®hl
«4) 21...Bfe8! 22 Sgl ©f4+ 23 ®g2
Se2 White could have resigned with a
clear conscience. But Tarrasch had no
desire to conduct the attack in this
way: he already knew of Lasker's
combination! Hence:
19...ja.xh2+ 20 ®xh2 ®b4+ 21
®glja.xg222t3
The bishop is immune on account of
a similar double attack to that of 25
years earlier, made at the end of the
combination: 22 ®xg2 <&g4+ 23 ®hl
Sd5 24 &xc5 Sh5+! 25 ®xh5 ©xh5+
26 ®g2 ®g5+ and 27...®xd2.
138
Attack with Mikhail Tat
22...gfe8!
Preparing ...i&g3, which if played
immediately would have been parried
by 23 Qe4.
23 £se4 ©hl+ 24 ®f2 .&xfl 25 dS
Naturally, White cannot take the
bishop on account of the loss of his
queen, but he can try to give mate on
the al-h8 diagonal.,,
25...fS!
Here too Black should not be
criticised! The choice was to win
prosaically by 25...-&g2+ 26 ®e3 (26 <£>el
©xf3) 26...©xc2 27 gxc2 f5 28 ®f2
fxe4, or to go in for a forcing and
pretty variation calculated to the end.
26 &c3 &g2+ 27 ®e3 gxe4+! 28
fxe4 f4+
One imagines that Tarrasch
deliberately avoided the "crude" mate in
three moves: 28../»g3+ 29 ®d2 ©f2+
30$dl$e2mate.
29 <£>xf4 gf8+ 30 ®e5 ©h2+ 31
®e6 ge8+ 32 ®d7 Ab5 mate
Also a pure mate, but here Black
has no "superfluous" inactive pieces.
I Hi m,s.m
22 Axf6 .&xa4 23 .&xh7+ &xh7
24 ©hS+ ®g8 25 .&xg7 Axh2+
So as somehow to include the queen
in the defence. If immediately 25..,
®xg7 26 ©g5+ ®h7 27 Qf5, and
Black has no adequate defence, e.g.
27...Ae5 28 ©h5+ ®g8 29 Qe7+
®g7 30 *xe5+ ©f6 31 ©g3+ *h8
(intending to answer 32 ge3 with 32...
Ac2!) 32 &h3+ ®g7 33 ©g4+ ®h8
(33...*h7 34 ge3) 34 ©h5+ ®g7 35
Qf5+ ®g8 36 *g4+! and 37 ge3,
winning the queen.
26 ®xh2 <£>xg7 27 Qf5+ ®« (or
27...®g8 28 *g5+ &g6 29 Qe7+) 28
&h6+ ®xf5 29 ©xb6 .&b5 30 Se3 f6
31 Agre6+ Black resigns.
9, M WM
m m . m I
M S3 MZffl
Gaudin-Oskam
Bromley 1920
Alekhine-Drewitt
Portsmouth 1923
For the knight Black has three
pawns, but... There was Amsterdam
1889, St Petersburg 1914, and...
20 Axh7+
"A similar sacrifice of two bishops
had already occurred earlier. Here its
interest lies solely in the way in which
this combination was prepared," writes
Destroying the Fortress Walls
139
Alekhine, and he goes on to assert that
White's earlier pressure on the queen-
side was merely a camouflage for the
attack on the king.
20...©xh7 21 Bh3+ «>g8 22 Axg7
If he takes the bishop, Black is
mated in three moves, while on 22...f6
White does not need to win the queen
for rook, bishop and pawn (23 i&h5
&xg7 24 gg3), since he has 23 Ah6!
&h7 24 &h5! Af8 (or 24...Ae8 25
Bg3+ ®h8 26 Ag7+ ©g8 27 Axf6+)
25 &g4+ ®h8(f7) 26 £xf8. ft is not
clear whether Drewitt saw all this, or
if he took his opponent "at his word",
but at any event Black resigned.
■ mtmtmt
±«±«±a m
Kuzmin-Sveshnikov
41st USSR Ch., Moscow 1973
In the next diagram, for the pawn
White has a lead in development and a
huge spatial advantage, but if he
attacks in the approved manner with 16
Axh7+ ®xh7 17 &h5+ ®g8 18
Axg7 ®xg7 19 &g4+ ©h7 20 gf3,
Black's defences hold after 20,..£>xf4
21 Bxf4 f5. Therefore the combination
begins with an overture!
16 £>b6! £>xb6, and now that given
above. In the final position, although
three pieces down, White gives mate
from h3.
Sacrifices on g7
Here everything is more or less clear,
if the attacking side succeeds in
opening a file for his heavy artillery.
iAi .mm
A.Sokolov-Saloy
USSR 1983
At the cost of a piece White has
opened the g-file and the a2-g8 diagonal
for his attack, but the success of it
depends on whether he can further break
up the black king's pawn shelter:
otherwise one of White's strikers, his light-
square bishop, will be exchanged.
18 Bxg7+! <£?xg7 19 Sgl+ £«6
(the only move) 20 exf5 (with the
terrible threat of 21 &h5) 20...Bh8 21
Ad4+ Af6 22 fxgfi fxg6
The defence is not eased by 22...
Axd4 23 gxf7+ ®f6 24 &g4
(threatening 25 &g5 mate) 24...®e7 25
'g'xd4, and although a rook up, Black
cannot save the game.
140 Attack with Mikhail Tal
23 ©g4 Sh6 24 Axf6+ &h7 (24...
®xf6 25 -&A4+) 25 gel Axd5 26
£>xd5 ©c8 27 ge7+ &g8 28 Sg7+
®f8 29 gg8+ ®xg8 30 £>e7+, and
Black resigned.
I.D. Misha, it would seem that we
will be unable here to achieve an ideal
arrangement of our topics. It should be
said that the sacrifice on g7 is
especially effective when the pawn rank
has already been disturbed, but the
vulnerability of the h6 pawn is our
next theme,
M.T. Well, so what! Remember
how they exhorted us in University:
"Marxism is not a dogma, but a guide
to action". Life has confirmed all this
to be the exact opposite, but to chess
this is indeed applicable.
Hartston-Richardson
Westergate 1983
In this position position, where,
incidentally, White won the brilliancy
prize, the centre is blocked by pawns,
and the absence of his bishops means
that his only chances of an attack lie on
the open g-file. But Black has made
preparations to parry it, by vacating gS
for his rook, and he could have faced
the future with confidence, had not his
h-pawn made a step forward in the
opening. True, for the moment there is
nothing to attack it with, but it can be
weakened...
18 gxg7> &xg7 19 ggl+ &h7 20
£>g5+! &h8
The acceptance of this second
sacrifice would merely have hastened the
end.
21£>e6
This does not come into the category
of quiet moves, but such an idea is
worth "memorising". (Besides, the
"natural" 21 £}xf7+?? simply loses,
since it brings in the black rook to the
defence of g7 and h7). Now Black
could have resigned, but he steadfastly
played on to the end.
21...£>h7 22 ©xh6 gg8 23 gg7
Sxg7 24 >&xg7 mate
Kasparov-Nikolic
Manila Olympiad 1992
Nominally Black has achieved
everything, or nearly everything. He is
Destroying the Fortress Walls
141
developed and he has an ideal pawn
formation, but for an instant, before he
plays his bishop to f8, his g7 pawn is
protected only by the king. And it is
this instant that White grasps!
17£>xg7!®xg718Sf5£>ra
Otherwise the threat of 19 gxd7
cannot be parried: 18...gad8 19 gdfl
SfS 20 ©g5+ 4}g6 21 4}h4, and the
pin on the long dark-square diagonal is
decisive, while 18...<g>f8 loses to 19
Sg5 h6 20 Sxd7 &xd7 21 £ih7+.
19 h4!
White unhurriedly prepares to take
the g6 square away from the black
knight, and in doing so not only to
regain his piece, but also open the h-file.
19...h6
The only move. Just how dangerous
Black's position is can be judged from
these variations:
(a) 19...®g8 20 h5 h6 21 Axf6
&xf6 22 &xf6 Se6 23 &c3 Sae8 24
gd4, with the decisive threat of 25
Bg4+;
(b) 19..,Sad8 20 Sdfl ®g8 21
©g5+ £>g6 22 h5 £}e4 23 hxg6 £>xg5
(23...fxg6 24 &xg6+ hxg6 25 Sh8+
®n 26 £>g5 mate) 24 £>xg5 f6 (24...
fxg6 25 gxh7) 25 gxh7+ ®h8 (25...
®g7 26 £>e6+) 26 Sxf6 Axf6 27
J.xf6+ &g7 28 <Sf7 mate. Very
attractive!
20 g4
Probably even stronger was 20
&g4+ &g6 (20...®h8 21 £>g5 Ad8
22 Bxd8) 21 h5 &b6 22 hxg6 &xe3+
23 ®bl fxg6 (23...&xc3 24 &f4,
mating or winning the queen) 24 ©114,
with numerous irresistible threats
(later Kasparov himself also thought so
-I.D.).
20...&C8! 21 &xc8
The attack could also have been
continued with the queens on — 21
&c2 ®g8 22 g5 4}g4 23 gxh6 f5 24
Shgl &e6 25 £>d4 &Xe3+ 26 ®bl.
But even after the exchange the black
king has no peace: its residence has
been destroyed.
21...Saxc8 22 g5 £>8h7 23 e4!
Scd8 24 gdfl ®ffi 25 gxf6 Axf6
Or 25...£>xf6 26 £}e5!, when there
is simply nothing that Black can move,
and gf5 then ghf 1 is threatened.
26e5Ag7 27Bhgl
White also has an overwhelming
position after 27 Ab4+ ®g8 28 ghgl
&f8 29Sg4£>e6 30Ad6.
27...C5 28 ®c2 ge6 29 gg4 Ah8
30 b4 (opening the b-file for a decisive
attack from the flank) 30...b6 31 bxcS
bxc5 32 gbl ga6 33 gb2 Ag7 34
gb7! gxa2+ 35 ®b3 ga6 36 e6 gxe6
37 Sxg7 Black resigns.
I.D. It is difficult to explain why,
but for some reason sacrifices on g7
are very often of an intuitive nature.
Perhaps the point is that there is no
clear-cut attacking mechanism, such as
Axh7+, £>g5+ and &h5+ (&g4),
about which we have already talked...
M.T. Well, there are some attacking
procedures on g7 — the sacrifice
followed by an attack along the al-h8
diagonal, for example, but in principle
I agree with you. Here it makes sense
to rely on your intuition and... to
believe that boldness will win the day.
Especially since, in contrast to the
patented sacrifice on h7, here a precise
calculation is not usually possible — at
the board, of course.
I will never forget, for example, my
142 Attack with Mikhail Tal
game with grandmaster Yevgeny Vas-
yukov from the 32nd USSR
Championship in Kiev, 1964/5. It was given
in Chapter 3. There we reached a very
complicated position, in which I was
intending to sacrifice a knight. It was a
not altogether obvious sacrifice,
leading to a mass of variations. I began
trying to calculate them, and realised
to my horror that nothing was coming
of this. My thoughts piled up one on
top of another. A subtle reply by the
opponent, suitable in one case, was
suddenly transferred by me to another
situation, and there, of course, it
proved quite unsuitable. In general, in
my mind there arose a completely
chaotic accumulation of all kinds of
moves, sometimes not even linked to
one another, and the notorious "tree of
variations", from which trainers
recommend cutting off one branch at a
time, grew with incredible speed.
And suddenly, for some reason, I
remembered the classic couplet by
Koren Chukovsky:
Oh, what a task so harsh
To drag a hippo out of a marsh.
I don't know by what association
this hippopotamus climbed onto the
chess board, but although the
spectators were convinced that I was
continuing to study the position, in fact I was
at that time trying to understand how
indeed you would extract a
hippopotamus from a marsh. I remember that in
my thoughts there figured jacks, levers,
helicopters and even a rope-ladder.
After lengthy reflection I couldn't find
a single way of dragging it out of the
quagmire, and I maliciously thought:
"Well, let it drown!" And suddenly the
hippopotamus disappeared. Just as it
had come onto the chess board, so it
went away. Of its own accord! And
suddenly the position did not seem so
complicated. Somehow I immediately
realised that it was impossible to
calculate all the variations, and that the
knight sacrifice was purely intuitive.
And since it promised an interesting
game, of course, I did not restrain
myself.
And the following day I read with
great pleasure in a paper that Mikhail
Tal, after careful thought, made an
accurately calculated piece sacrifice...
The winner of the following game
also admitted that his queen sacrifice
was absolutely intuitive.
Suetin-Bagirov
Leningrad 1963
It appears that White's piece attack
on the kingside will be exhausted with
the exchange of dark-square bishops
— 18 £xd6 Sxd6, and 19 &xd6??
fails to 19...jlxg2+. The attempt 18
gxf6 Axe5 19 Sxc6 is also clearly
insufficient, since Black interposes
Destroying the Fortress Walls
143
19...i&xb2! After weighing up these
straightforward variations and trying in
vain to work out an alternative, White
took an intuitive risk.
18 ©xg7+!? ®xg7 19 Axf6+ ®h6
Much later, in a "collective" — but
by no means joint! — grandmaster
analysis, doubts were cast on the
correctness of the sacrifice by 19...®g6,
when the tempting 20 Ad3 is parried
by the almost paradoxical 20...Ae7!
21 jlxe7 gxd3 22 gg5+ ®h6 23 cxd3
Se8!24Af6ae6!
M.T. I too analysed this position,
and after 20 gaf 1 ©e3 21 jld3 ®n6! I
suggested 22 £dl ©d2 23 §5f2, but
then 23...©xf2! 24 gxf2 gde8 25 jlc3
f5! favours Black.
I.D. During the game White
considered 22 Axd8 gxd8 23 gxf7 gd7 24
Qd5, and only then established that his
idea would be ruined by the counter
24...Axd5 25 gxd7 Axg2+ 26 ®xg2
*Vg5+ 27 ®f3 igrf4+.
M.T. But as they say, a game and
analysis are very different things.
Indeed, after 20 gafl! (threatening
21 Sh5+ ®g6 22 Sh4, with a deadly
bishop check at d3 or h5) 20... ©e3 21
gh5+ ®g6 22 gh4 Af4! (the only
defence) 23 ghxf4 h5 (there is no
other defence against 24 Hg4+ or 24
gh4) 24 Axd8 gxd8 25 Ad3+ gxd3
(the strongest) 26 cxd3 ©xd3 27 gf6+
®g5 28 gxf7 h4 29 ®gl ©e3+ 30
H7f2 objectively the chances were
already with White, and the time trouble
mistake 30...®h5? (it was still
possible to save the game by 30...h3! 31
gxh3 Af3) 31 &e2! ®h6 32 &f4 a5
33 gdl a4 34 h3 ®h7 35 &d5
allowed him to secure his king completely
and to create a new phase of the attack.
After 35...©c5 36 £>f6+ ®g7 37 a3
®g6 38 &g4 ®h7 39 gel ©d6 40
£}e3 ®g6 41 £tf5 ©d8 42 ge6+ ®f7
43 &d4+ ®g7 44 Se4 Ad7 45 &f3
White won the h4 pawn, and on the
84th move — the game.
Sacrifices on f7
The enticing of a king out of his
fortress by a sacrifice at f7 has already
been examined — and in considerable
detail — in Chapter 1. Therefore here
we will limit ourselves to a single, but
highly instructive game.
Sveshnikov-A.Sokolov
Sochi 1983
In the evaluation of this position,
three factors stand out: Black's minor
pieces are bunched together on the
queenside, his f7 has been weakened
by the departure of the rook from f8,
and his queen has clearly come out
prematurely. All this suggested to
White the idea of an unusual
combinational attack.
144
Attack with Mikhail Tal
15 £h5 &f6 16 £g5!!
Diverting the last defender (of
course, apart from the king) of f7.
16...igrxg5 17 &xf7+ ®xf7
(otherwise 18 <Bxe6, 19 £}xd8 and mate on
the 8th rank) 18 Sxe6 &g6 19 &d5
<Sf6 (if 19...®e8 the simplest is 20
Sd6+ £xd6 21 &xd6) 20 &xd8+
®f8 (20...®e8 21 gxe7+ and wins)
21 igre5 &c5 (Black must keep control
of the dark squares in the centre; after
21....fl.xd8? 22 ©d6+ his king has
nowhere to hide) 22 <Sd4 (22....&xf2+
was threatened) 22...®g8,
Now the energetic 23 ge3! &d7 24
£sxb7 Se8 25 &f4 gxe3 26 fxe3
&xd4 27 exd4 £c6 28 d5 Axb7 29
^rd4 led to a position with an unusual
balance of forces, but nevertheless won
for White.
Until now we have been pointing out
various ways of demolishing the initial,
untouched wall in front of the castled
position. But it only requires one of the
pawns to make a step forward, for it
immediately to become, if not a target
for attack, then at least an object of
attention by the other side.
Pawns at f7-g6-h7
This pawn formation, if it is
"cemented" by the dark-square bishop at g7, is
virtually the most secure wall around
the king. But Black still has to reckon
with the rapid advance of the white
h-pawn, even in those cases when he
has his "own play" (or counterplay).
M.T. Even so, it should once again
be mentioned: there is no need to be
afraid, but simply to reckon with this
possibility.
I.D. Instructive here are both the
following example, and the notes to it
by the winner, taken from Shakh-
matnye Olympiady (Moscow, 1974).
mi + ■{'*■'■ wt * i^N? +
Bronstein-Palmiotti
Munich Olympiad 1958
From this advance (6 e5) there is
much to be gained: (1) the knight at f6
is driven from its post; (2) the scope of;
the bishop at g7 is temporarily
restricted; (3) the defence of the squares
h5 and h7 is weakened.
White promptly exploits this last
factor, by beginning a sharp attack on
the kingside. However, he does not-
succeed in achieving any immediate
gains, and, perhaps for this reason, in
many games where this position was
reached, White played 6 .fl.e2 or 6
Ac4, but hardly ever h2-h4. I say
"hardly ever", since I am not sure that I -
am familiar with all the games. Indeed,
Black's threat of breaking up the white .
centre by ...c5 looks very imposing, but.
I have never feared ghosts, and, after
specificially weighing up the
variations, I came (of course, at the board)
Destroying the Fortress Walls
145
to an unexpected conclusion: is White's
centre really so necessary? Especially
after the weight of the struggle has
switched to the h-file!
Incidentally, in the given position it
is not White's centre that crumbles, but
his central pawns.
I should like to draw the readers'
attention to a certain chance factor in
White's success — the availability to
the white queen of the favourable
manoeuvre i&dl-d4-f2-h4. But chance
factors of this type are present in any
position, and the skill of a player
consists in finding and exploiting such
features.
6...£ifd7 7ri4c58h5cxd4
The plans of the two players are
more than transparent: White is
playing for a direct mate on the h-file,
while Black is trustingly following the
dogma "play in the centre is the best
form of defence against a flank attack".
Precise calculation is now required.
For example, can't White rush straight
into the mass of variations with the
tempting 9 hxg6!? Alas, for the
moment such an attack is unjustified: 9...
dxc3 10 gxf7+ gxf7 11 £>g5 £rf8 etc.
There is ample scope for analysis,
but since a conclusion to the attack is
not apparent (which means that no real
gain is also apparent), without any
great regret White "courageously"
captured the d4 pawn with his queen,
which is fully in accordance with his
strategic plan and is not at all a loss of
time. All the same the white queen has
to make its way to the h-file, and it
makes no difference by which route it
goes!
9 &xd4 dxe5
Black has achieved the maximum —
he has broken up the enemy centre and
won a pawn. Nevertheless, after
White's next move the position is, to
say the least, double-edged.
10&f2exf4
As shown by later analyses, 10...e4!
was correct.
11 hxg6 hxg6 12 Axf4 £>f6 13
&h4 &a5
A clever defence: Black threatens
...i&h5! Here I understood the
optimism of my opponent — 14 Ag5 or 14
Ae5 is pointless, while if 14 £)g5
Ag4, and how is White going to
castle? Meanwhile threats against c3 are
imminent. But even so...
14 £>g5 Ag4
The impression is that White's plans
have been ruined — castling on the
queenside is difficult, and there is no
mate on the h-file. But in fact White
had altogether no intention of giving an
immediate mate. It was important for
him to open the file, in order to have
the opportunity of using this threat, and
as for queenside castling, well, it is not
obligatory: the king will even feel
more secure in the right-hand corner,
among its own pieces. But won't this
weaken White's attack? After all, the
rook will move off the open file. Of
course not. On the h-file there is
already one heavy piece, and, in view of
the threatening position of the knight at
g5, this is more than sufficient.
On the contrary, there was nothing
for the rook to do at hi, whereas after
kingside castling it opens fire on the
f-file.
15 Ad3 ©bd7 16 0-0 Ah5 17
gael e5
146
Attack with Mikhail Tal
This decisively weakens a number
of important squares (d5, f7, f6), but
with passive defence too White's attack
can no longer be stopped.
It has to be admitted that, in
deciding on his main strategic plan of
action, White has been able to delve
more deeply into the resulting
complications.
18 j3.d2 &c5+ 19 j3.e3 #c6 20
j3.b5
The most accurate solution, but by
no means the only one. The manoeuvre
£)e4-g3 would have achieved the same
aim.
20...#c7 21 j3.e2!
White attacks the opponent's most
vulnerable point. If the bastion at h5
falls, Black's entire army will be
demoralised. And the bastion falls!
21... jlxe2 22 gxe2 gfc8 23 £>ce4
Bringing up the last reserves. The
black king starts running.
23...®f8 24 ftxf6 ftxffi 25 gxf6
j3.xf626fth7+
The white forces have broken into
the Promised Land.
26...®e7 27 #xf6+ ®e8 28 gd2
28 jld4 would possibly have led to
Black's resignation, but the rook move,
cutting off the king from the queenside,
leads to mate.
28,..a5
Indecision, or belief in a miracle.
29#g7
Black resigns in view of inevitable
mate.
In the following example Black
certainly has sufficient compensation
for the pawn, but what was it that
made White create in his position
another target for attack? After all, he
could have covered the d3 square, for
which the black queen and knight are
clearly aiming, by 18 ^b5, preparing
Ad2, and at least completing his
queenside development. In view of his
pawn mass in the centre, there would
still have been all to play for. But...
Sliwa-Stahlberg
Goteborg Interzonal 1955
18 g3? h5l 19 ®g2 h4 20 fte2 fS
2I...f4 is threatened, and after 21 f4
with what can White cover all the light
squares around his king, and of what
use is such a white bishop?
21#c2ftf622&c4f4!
With fresh pawn sacrifices Black
opens the attacking files.
23 ftxf4 Axf4 24 exf4 b5!
Ensuring an invasion at c2 or e2.
25 #xb5 #c2+ 26 ®h3 hxg3 27
#b3
If 27 hxg3 Black wins immediately
by 27...®f7!
27...#f5+ 28 ®xg3 ge2 29 jle3
#g6+ 30 ®h4 #h6+ 31 ®g3 fth5+
Two moves before mate, White
resigns.
Destroying the Fortress Walls
147
Pawns at f7-g6-h6
Here it is not only the g6 pawn that is
vulnerable, but also the adjacent pawn
at h6, and there is a whole range of
"keys" to this fortification, as an
examination of the following examples will
reveal.
Yuferov-Nikitin
Moscow 1972
The piece-pawn formation around
the black king is typical of many
games in which Black employs the
kingside fianchetto. Typical too are
both White's attack on what is here the
most real weakness of this set-up —
the h6 pawn, and the defence chosen
by Black, who by threatening an
exchange is trying to drive back the white
queen. But note should be taken of the
typical and spectacular manoeuvre that
allows White to .continue his attack. By
accepting the sacrifice — and there is
nothing else! — Black opens the h-file
for his opponent.
17 Ag5! hxgS 18 £)Xg5 ge8 19
Ad5!
In the given instance it all proceeds
very smoothly. Black has no choice.
19...ge7 20 gadl £sc7 21 Axf7+!
gxf7 22 ©h7+ <g>f8 23 ©xg6 ©xg5
Forced, since if 23...ge7 White's
offensive resembles an avalanche: 24 f4
e4 25 f5, while after 23...gf6 24 £sh7+
<S>g8 25 £ixf6+ @xf6 26 ©xf6 ,3,xf6
27 gxd7 further losses are inevitable.
24 ©xg5 &e6 25 ©h5 £)c4 26
gxd7! gxd7 27 ©g4
A quiet move, attacking both black
knights and — by X-ray — the rook at
d7. White increased his material
advantage still further, and realised it
without any particular problems.
Tal-Petrosian
Moscow 1974
Black is so far behind in
development that in his kingside assault White
can even include quiet moves. It is the
same idea: his pieces engage in a
"hand-to-hand" fight with the
controller of the dark squares.
19 £)eg5+! hxg5
Even if he declines the sacrifice,
Black cannot avoid a decisive attack
148 Attack with Mikhail Tal
on f7 — queen from c4, rook from e7
and, if necessary, knight from e5.
20 £>xg5+ ®g8 21 &f4
The threat against f7 is incidental,
the main one being $rh4-h7 mate.
21...£|d7 (heading for f6) 22 Sxd7!
&xd7 (the other capture would have
allowed mate at h7) 23 &xf7+ (now
this too is possible) Black resigns.
mmmM.
'^'Q'IP'ft'IP ^
'dim Aw> Va
<%, Him ti, rtjf. *3t
Turnhuber-Persig
correspondence 1991
In principle it is just the same in this
position, except that the invasion
square is the adjacent one. As soon as
the white queen invades at h6, the
black king will succumb. But for the
moment the transit square f5 is
covered, and so White begins by
eliminating the defender.
22 Sxd7 &xd7
Capturing with either knight is no
better, e.g. 22...£6xd7 23 £hf5+ gxf5
24 £>xf5+ ®f6 25 &xh6+ £g6 26 h4
Sg8 27 ©g5 mate.
23 £sgf5+!, and as a way of
capitulating Black chose 23...®g8 24 £>xg6
£>xg6 25 &xh6, which differs little
from 23...gxf5 24 £xf5+ ®g8 25
&g3+.
M.T. In general it is rather
optimistic to regard the h6 pawn as a reliable
guard of the g5 square...
I.D. ... with which the immediate
approaches to the king's fortress can be
considered to begin, and an invasion
on which is nearly always either the
overture to an attack, or its beginning.
However, the following practical
examples are already from another act...
M.T.... of the same opera!
Pawns at f7-g7-h6
If variations with the fianchetto of the
king's bishop in the opening are
disregarded, it is the h-pawn, more often
than its colleagues, that makes a step
forward, sometimes even in the
opening, and, as a rule, in order to drive
back or at least determine the
intentions of a white bishop at g5.
«m
"""I SUB Hi
Tal-Byrne
Biel Interzonal 1976
Black has just invited the white
Destroying the Fortress Walls 149
bishop to "declare its intentions", and
in the event of 15 J3,h4 he is
threatening the typical counter 15...
£)xe4, since at h4 the bishop is
unprotected. But here too White is
prepared, at the cost of a piece, to
effect the opening of the rook's file.
15 h4! hxg5 (15...gfd8 was
nevertheless better, freeing in good time a
Ilight path for the king) 16 hxg5 £}xe4
(on this counter Black was pinning all
his hopes; after 17 £}xe4 &xd2 his
position is quite acceptable) 17 #d3!,
and it transpires that Black loses after
cither 17...£xc3+ 18 bxc3 g6 19
$h3+!®g7 20&h6+®g8 21 Bhl, or
17...£>xg5 18 ghl+ ®g8 19 fxg5 f6
20 g6, or 17...C 18 ©h3+ ®g8 19
£>xe4 &xe4 20 g6 &M 21 &xh4
gfe8 22£xf5!
He chose 17....&xg5 18 £}xe4
&xe4 19 Bxe4 ,&h6 20 g4 f5 21 gxe6
J2,xf4 22 £|Xf5, and in view of the
threats of 23 £xg7, 23 <Se7, 23 ghl +
and 23 Be7, after thinking for 40
minutes he resigned.
In the game Shabalov-Smirin
(Manila Olympiad 1992) in the well
known variation 1 e4 c5 2 £|f3 A6 3
d4 cxd4 4 £}xd4 gjfg 5 £)<£ £jC6 6
AgS e6 7 &d2 Ae7 8 0-0-0 0-0 9 f4
h6 10 h4 White showed that he-has his
opinion regarding the position after
10...&xd4 11 &xd4 hxg5 12 hxg5
£>g4 13 Ae2 e5 14 &gl exf4 15
,&xg4 ,&xg5 16 &h2 Ah6 17 Af3
©f6, which theory evaluates in favour
of Black.
M.T. Yes, we analysed it in our
school (the Latvian School for Young
Chess Players under the direction of
Mikhail Tal - I.D.), and Shabalov was
there. But now the theme is different...
10...£xd4 n &xd4 a6 12 Ae2
&a5 13 £LB gd8 14 g4 &ffl
hb m mm
wtm&mtm ,
±h mtm. m
m w v w
, .. .„ „..j§, », .
Thus the h6 pawn has not forced the
white bishop to abandon its aggressive
post, and it now becomes that brick, a
blow at which can break up the entire
defensive wall.
15 ,&xh6! gxh6 16 g5 &e8
Alas, the simplifying attempt 16...
igrc5 leaves Black both a pawn down,
and under pressure by the white pieces
— 17 ©xc5 dxc5 18 gxf6 ,&xf6 19 e5
,&e7 20ia,xb7ga7 21ia,f3.
17 gdgl!
The threat (18 gxh6+ ®h7 19 Sg7+
®xh6 20 Bxf7) is stronger than its
immediate execution (17 gxh6 J3,f6).
17...h5 18 ,&xh5 Af8 19 f5 &e5 20
&d2 exf5 21 g6! fxg6
This opens files for the opponent's
attack, but after 21...f6 22 g7 &xg7 23
Ag6 (or 23 &h6 ,&e8 24 £d5) 23...f4
24 £|d5 it is hard to find any defence
for Black.
22 Bxg6+ ®h7 23 ghgl fxe4 24
Bh6+» ,&xh6 25 ,&g6+ <®g7 26
,&xe8+ ®h7 27 ,&g6+ <gg7 28
150
Attack with Mikhail Tal
£xe4+ ®H 29 &xh6 gh8 30 &AS+
■SeS 31 &d2 ©d8 (32 gel was
threatened) 32 gel &h5 33 £>e4 &h6
(otherwise 34 $ra5+) 34 £>g5 ©C7 35
ge7 gae8 36 ©aS+ b6 (36...©c8 37
Jlxb7+), and although White missed
the quickest win by 37 i&xa6, and if
37...gxe7 38 &b7+ &d8 39 #xb6+
■S>c8 40 jlb7+, mating, he
nevertheless concluded the pursuit of the king:
37 &c3+ ©d8 38 gxd7+! ©xd7 39
&c6+ <&e7 40 &c7+ ©f5 41 &xd6+
®fS 42 #d7+ ©eS 43 JU7 etc., that
began with the sacrifice on h6.
(This game and another extract from
a game played in Manila, were
analysed for this book by the authors in a
Moscow hospital, four days before the
death of Mikhail Tal, the eighth World
Champion in the history of chess —
I.D.).
The illusory defence of g5 was even
more energetically emphasised in the
next game, in which White decisively
weakened the defence of one of two
vulnerable points — h6 or f7.
• A f^i wa Wfr, *
m^Mm,. Is
hi §»i m &3
18 AgS!! &d7
It transpires that there is nothing
else: on 18...>&xg5 White mates by 19
&xf7+, while if 18...hxg5 19Sg6!
19 gadl &A6 20 £xh6
Now, when the over-protection (as
Nimzowitsch expressed it) has been
eliminated, the wall can be attacked.
20...gxh6
No better is 20...£>xb3 21 .&xg7!
■S>xg7 22 £>f5+, when on 22...©g8
there follows 23 <&g5+, while if 22...
®f6 23 &h6+.
21 &g6+ <&f& 22 &f6 (threatening
23 £g6+ and 24 <&h8 mate) 22...©g8
23 ge3 Black resigns.
Sometimes a less mobile piece can
succeed in breaking through onto the
seemingly well-defended "penalty
spot", opposite the king.
yjM y\i'A it; y»n "JL. VJi&
„ m MXm m
■ w ar.jc
Geller-Portisch
Moscow 1967
Bronstein-Zamikhovsky
Leningrad 1970
14 £>g5! gf8
If 14...hxg5 15 fxg5 ©d5 16 Ah7+,
with mate in a few moves.
15 £ig6! ge8
Alas, on this knight too there is a
Destroying the Fortress Walls
151
taboo: 15...fxg6 16 &xe6+ ®h8 17
&xe7 hxg5 18 fxg5 £>h7 19 gxf8+
OhxfS 20 &e4 &b7 21 Af4 &xf4 22
Axb7 gb8 23 gfl, and it is difficult
for Black to coordinate his pieces.
16 £>xe6! #<J6 17 fS! fxg6 (if
I7...fxe6 White would have continued
as in the game, but with even greater
effect) 18 &t4 ©c6 19 AbS ©e4 20
©xe4 £>xe4 21 fxg6, and although he
was a piece up, Black was unable to
free himself.
The game concluded 21...£>df6 22
£>c7 Ad7 23 &xd7 £sxd7 24 gael
£>df6 25 £sxa8 gxa8 26 Sxe4! £sxe4
27 gel Ad6 28 gxe4 &xf4 29 gxf4,
and White easily realised his material
advantage.
Since from time to time the
defender's control over g5 proves simply
to be illusory, the move ...h6 should be
regarded with particular caution and
scepticism. Of course, in chess, as in
life, there are no absolute truths: what
is bad in one situation may prove good
in another, and the advance of the h-
pawn may avoid, for example, a mate
on the back rank. But much more often
it proves ruinous, by presenting a
target for a pawn or piece attack.
In the following position White's
pieces are unusually well coordinated:
they are all aimed at the black king, the
undoing of which is the h-pawn.
Indeed, if it were at h7 with the knight
at f8, Black's defensive resources
would not yet be exhausted. As it is,
the advance of a white pawn
completely breaks up the king's fortress.
22 g4! ©d6
In the hope of 23 g5 #d5, since
22...£idf8 is clearly insufficient.
Alckliine-Wccnink
Prague 1931
23 Ag« gf8 24 gS £xd4 25 gxhfi
£ldf6 26 hxg7+ ®xg7 27 &h6+ ®h8
28 £sxd4 ©xd4 29 Ab2
Black resigned, since if 29...$rd7
30 gd3!
The weakness of White's back rank
apparently does not allow him to
continue his attack in the "natural" way —
30 £>xh6+ &xh6 31 gxf8+ ®xf8 32
$rxh6+ ®e8, and it is Black who wins.
But the assault ratio, reaches its
152 Attack with Mikhail Tal
maximum after 30 ©xh6!! The queen
is immune on account of mate in two
moves, 30...gxf7 loses to 31 Hd8+ and
30...gf6 to 31 ©h8+!! Axh8 32 £)h6
mate, and the only defence 30...g5
leaves Black both two pawns down (31
©xg5), and under attack.
To the delight of one of the authors,
the game Schneider-Tal (Lucerne
1982) took a quite different course...
I.D. Before this next example it
should be said over and over again: to
conduct an attack, relying on one
single "pure" stratagem, even a standard
one, is practically impossible.
M.T. At one time, in my youth,
David Bronstein's maxim about the
great benefit of knowledge seemed
something of an affectation. Now it is
simply banal for us to talk about this: a
player who is scientifically "equipped",
not only in the opening, but also in the
endgame, sees the board differently.
Gradually this procedure became
typical in similar positions, and from
being the possession of grandmasters it
became "common property". Of
course, although the sacrificial
mechanism may be the same, each
game has its own features (see
diagram next column).
24 Axh6! gxh6 25 £)f6+ &h8 26
©d2 M* 27 ©d4!
Within two moves we will see why
White lured the black bishop to f4, and
did not play 26 ©c3 immediately.
27...C5 28 dxc6 Axc6 29 ©hS+ f6
30©xf4
This is the whole point. White
regains his piece, he is a pawn up, and,
most important, his attack on the
broken king's position continues.
Ivanchuk-Raklimanov
Junior Tournament, Klaipeda 1985
30...©f5 31 £>e6 gg8 (31...gf7 32
£>d8) 32 Ad3! Black resigns.
Since if 32...©h5 33 ©xf6+ &h7
34 <&f8+! ggxf8 (34...gaxf8) 35
ge7+.
Even when it appears that nothing
can threaten the h6 pawn, it sometimes
proves possible to exploit this very
important nuance of the position.
Tal-Keres
Tallinn 1973
Destroying the Fortress Walls
153
16 Sd5!
White was ready to content himself
with a positional advantage after 16...
$rd&, but Black decided to accept the
challenge.
16...#xJ3 17 Adl -Sh4 18 gxh4
©h3 19 £tf6+!
This Black did not expect, and he
gave up the exchange by 19...®h8 20
£>xe8 Bxe8 21 h5, after which he
gradually lost.
Of course, essential was 19...gxf6
20 &xh6 exd4 21 ®hl Qe5 22 Sgl+
£>g4 (22...<&g6 is insufficient — 23
Sxg6+ fxg6 24 &xg6+ <S>h8 25 &h6+
^8 26 .2.h5) with a sharp game, but
White's entire manoeuvre became
possible precisely because of the advance
of the h-pawn from its initial post.
It is worth studying the possibility of
an explosive attack on h6, even when
the opponent has obvious counterplay.
Varanin-Moskvin
USSR 1989
For example, here Black is ready by
...£)d4 to set White serious problems,
and at the least to exchange part of the
attacking forces, while maintaining
control of the open file. And yet White
still risked the sacrifice: after all, the
advanced pawn at h6 is as though
created for this.
31 .a.xh6!
After 31 £>xh6+ gxh6 32 Jixh6
.2.f8 White has no good continuation.
31...<&d4 32&f4ac2
Preferable was 32....&xf3 33 £xf3
&xf3+ 34 &xf3 &g5 35 £xg5 £xg5,
with some compensation for the pawn.
33 Axg7! ®xg7 (33...Qxel 34
&h6+ ®xg7 35 &xf7+ ®h8 36 &h4!,
and Black loses too much) 34 £>f6!!
The culmination of the attack.
Exploiting the fact that his knight is
immune, White again creates a threat
against f7.
Again Black has no time for 34...
£}xel on account of 35 £>g5! £>xg2 36
&e8+! <gh8 37 &xf7+ &g8 38 #g4+
®xf7 39 &g6+ ®f8 40 &xc7 &g5 41
h6.
34...Sh8 35 Sedl! (forcing the
opponent's reply) 35...©xal 36 <Sg5!
All White's pieces are now in the
attack, whereas after 36 gd7 ©xd7 37
&xd7 £xf3 38 £xf3 &g5 there
would have remained insufficient
force.
36...Sad8
Black loses amusingly in the forcing
variation 36...Qxg5 37 ©xg5+ <S>f8
38 Sd7 &xd7 (38....2.xf6 39 exf6
©xd7 40 ©g7+ leads to mate) 39
Qxd7+ ®e8 40 Qf6+ £xf6 41 &xf6
Sxh5 42 £xb7 Sb8 43 £f3 Sh7 44
£e4 Sh5 45 g4 Sh3 46 ®g2.
37 &e8+!
And in view of mate in three moves
(37...®h6 38 &xf7+ ®xh5 39 &h6+
154 Attack with
®g4 40 ©h3) Black resigned.
In addition, the appearance of a
pawn at h6 immediately provokes (or
should provoke) in the player with
White the seditious thought: is it not
possible to carry out an "attack from
afar": sacrifice the dark-square bishop
from its initial position, and then with
a quiet move bring the queen onto the
cl-h6 diagonal.
I.D. I came across this manoeuvre in
some games from the 1920s...
M.T.... but even so it received full
recognition only after the following
game.
Bronstein-Keres
Goteborg Interzonal 1955
For the moment White has
sacrificed two pawns, obtaining in return
the f5 square for one of his knights, d6
for the other, and the real possibility of
regaining one of the pawns almost by
force: 14 £)f5 ge8, and apart from the
possible sacrifice on h6 he also has 15
45bd6 (which, however, does not lead
to the win of the exchange: 15... £.xd6
16 £>xd6 ge6! and if 17 £>xb7 &c7).
Mikhail Tat j
But he made use of a different at- j
tacking mechanism. j
14 £xh61? gxhfi IS ©d2 £>h7 j
Later analyses showed that by im- |
mediately bringing up his reserves — '
15...£)c5!, with the aim of blocking the \
bl-h7 diagonal, Black would have had j
better chances of defending his king, j
e.g. 16Bael ad3 17 Axd3cxd3, and !
if 18 &f5 £e4 19 &bd4 ge8 20 i
£>xh6+ ®f8 21 &g5 £g6 22 gxe7 I
gxe7 23 ©xf6 ge4! 24 &h8+ ®e7 25 I
&hf5+ £xf5 26 £sxf5+ ®e6 27 &h3
>grri8, when nothing forcing is
apparent, and he remains the exchange up. i
But the attack can also be continued !
by 18 ©xh6!, when 18... £>h7 19 £>f5 ■
Af6 20 ge3 ge8 21 gg3+ <S>h8 22 '
gg7 is bad for Black, and 18...ge8 can j
be met by 19 £>f5 £f8 20 ©g5+ ®h7 !
21 £>bd6 ge6 22 ge3 £>g8 23 &h5+ I
£sh6 24 £wh6 &xh6 25 ©xf7+ ®h8 :
26 gxe6 dxe6 27 #xb7. '.
In the game Black decided simply to
extinguish the first wave of the attack,
keeping a favourable material balance.
16&xh6f517£>xf5axf5
He has to give up the exchange; if |
17...gf7 18 &g6+ ®f8 19 &bd6 |
£xd6 20 ©xd6+ <$g8 21 &h6+. :
18 £xf5 &f8 19 gadl Ag5 20 '
&h5©f6 21£>d6.fi.e622&g4®li8 ,
Parrying two threats, 23 ©xc4+ and
23 h4. But the king's fortress has teen
completely destroyed, and with his
very next move White succeeds in
creating a further three(!) threats, which
cannot all be parried simultaneously.
23Ae4!
On the agenda is 24 ?g?xg5 followed
by 25 £sf7+, and 24 .3,xc4 followed by -
25 fte4, and — the game continuation.
Destroying the Fortress Walls
155
23...Ah6 24 .&xc6 dxc6 25 ©xc4
ftc5 26 b4 &ce6 27 «rxc6
White now has a material
advantage, and the pursuit of the king is
merely postponed for the moment.
27...gb8 28 <Se4 ©g6 29 gd6 Ag7
30 f4 ©g4 31 h3 ©e2 32 <Sg3 ©e3+
33 <®h2 &d4
Or 33...&xf4 34 gh6+ &h7 (if 34...
<£>g8 35 &c4+ <S4e6 36 gxf8+) 35
©d6! Axh6 36 ©xb8+ &f8 37 ©d6,
and the ending after the exchange of
queens should be won for White.
34 ©d5 ge8 35 &h5 £)e2 36
£>xg7 ©g3+ 37 &hl &xf4 38 ^J3
£se2 39 gh6+ Black resigns.
If the king's position is even more
weakened, it can be very
straightforward to mount an attack of this type, as
in the following example.
Voitsekh-Morozov
USSR Correspondence Ch. 1973-5
The pawn formation around the
black king suggests only one solution.
An experienced player would not even
bother calculating variations in
advance, since this can be done later: the
weakness of the bl-h7 diagonal is just
too gaping, the f- and h-pawns, which
have incautiously stepped forward, are
just too vulnerable.
22 &xh6+! gxh6 23 ©g4+ &h8 24
Axh6!
I.D. Misha, how much time would
you have spent considering this second
sacrifice?
M.T. One second at most. Firstly,
White's rook at el was undefended,
and the exchange at e8 would bring up
the black queen to the defence.
Secondly, it is a pseudo-sacrifice: after
24...Axh6 25 ©g6 White, at the least,
regains the piece. And thirdly, if you
and I are writing a book about
attacking procedures, it means that they are
familiar to us...
I.D. In my opinion, from this
example one can best of all not so much
understand, as sense what is meant by
the weakness of a single square or a
complex of squares. Once David Bron-
stein gave a classic formulation of this:
by moving to a weak square, a piece is
able to attack the neighbouring squares
and the forces standing on them. An
ideal illustration is the variation 24...
jj,xh6 25 ©g6. Such an invasion
would not be possible, for example,
with a black pawn at f7, i.e. without
the "holes" in Black's position.
24...ge7 25 Axf8 ©xf8 26 ©h5+
&g8 27 Sxe7 ©xe7
In principle, simplification favours
the defending side, if he also has a
material advantage. But here
exchanges have eliminated defenders that are
difficult to replace, whereas all White's
reserves can easily join the attack.
28 <Sf5 ©d7 29 ©g6+ <®f8
156 Attack with Mikhail Tal
(29...®h8 30 &xf6+ <g>g8 31 £)h6
mate) 30 &xf6+ &f7 31 &h6+ <g>e8
(31...®g8 32 gel &bd5 33 ge6) 32
gel+ &d7 33 ge7+ &xe7 34 £>xe7
<g>xe7 35 <&g7+
And in view of the forced variation
35.,.<g>d6 36 &e5+ <g>d7 37 Af5+
<g>d8 38 ©f6+ <g>e8 39 Jle6, with a
quick mate or major loss of material.
Black resigned.
Tal-Gurgenidze
36th USSR Ch., Alma-Ata 1969
Caro-Kann Defence
1 e4 c6
2 d4 d5
3 £>c3 b5
4 a3 dxe4
5 £>xe4 SLtS
The game has immediately taken an
unusual course, but even so Black
decides against finally leaving the
safety zone, by taking the pawn, either
now (6.,.&xd4 7 &B &d5 8 &e2), or
two moves later.
7
8
9
10
11
12
13
14
15
Jlxe4
&d3
£tf3
©e2
0-0
gel
£>e5
dxe5
&g4
£>f6
eft
Ae7
£>bd7
0-0
ge8
£}xe5
£>d5
Not objecting to a few exchanges,
White has removed from d4 a target
for counterplay — the pawn, driven
away a defender — the knight at f6,
and created all the preconditions for an
attack on the king. Therefore
prophylaxis by 15...g6 was indicated for
Black, when nothing now is achieved i
by the hasty 16 h4 Jlxh4 17 g3 Jle7
18 ®g2 on account of the simple ,
18...h5. White would have had to pre- I
pare it with 16 g3. But Black did not I
yet sense the danger. ;
15 ... a5
16 h4!
Threatening a direct win after 17 hS I
and 18 Ah6 Af8 19 Axg7 Axg7 20 !
h6. So the pawn sacrifice, which,
however, serves merely as an overture
to a planned rook sacrifice, has to be
accepted.
16 ... Axh4
17 g3 Ae7
18 &g2 g6
Black no longer has time for !
counterplay such as 18...b4, since
White is threatening 19 Axh7+ &xh7
20 ©h5+ <g>g8 21 ghl, and barricades
such as 18... Af8 19 ghl f5 cannot be j
maintained: 20 &h5 h6 21 &g6 <g>h8 j
22 Axh6 gxh6 23 gxh6+ Axh6 24 !
ghl £>e3+ 25 fxe3 &d5+ 26 e4.
19 ghl &U
20 Ag5!
An important interposition, not al- j
lowing the opponent to complicate the j
game to his advantage in the event of '
the immediate 20 gxh7 &xh7 21 Ag5
£>e3+! 22 fxe3 (or 22 Axe3 Ag7 23 I
Sh! + ®g8 24#h3«rc7or24...«rd5+ .
and 25...&xe5) 22..,&d5+ 23 Ae4 ,
&xe5 24 &h4+ <g>g8 25 &f6 &h5.
20 ... &c7
The black queen has to give up the
idea at some point of checking at d5,
because of variations such as 20....S.e7
21 gxh7 Axg5 (or 21...<g>xh7 22
&h5+ <g>g8 23 Axg6) 22 gahl &f8
23 Axg6, or 20...£e7 21 Axg6 fxg6
Destroying the Fortress Walls
157
(21...hxg6 22 JLf6 Ag7 23 &h4 also
concludes matters) 22 'grxe6+, and of
the many mates, this one is rather
elegant: 22...&h8 23 gxh7+ gxh7 24
ghl + jj.h6 25 gxh6+ gg7 26 jj.f6+
<S>xh6 27 &h3 mate.
S' ■ ■ US
21 Sxh7! &xe5
If 21...gxh7 22 Shl+ <2>g8 23 jj.f6
&xf6 24 exf6 &e5 25 jj.xg6 &xf6 26
ih7+ gh8 27 &g8 mate.
22 gxf7!
Persisting with his desire to offer
this rook.
22 ... gxf7
23 ja.xg6+ <S>g8
Or 23...gxg6 24 JLf4+.
24 ja.xe8 jj.g7
After 24...gxe8 the black queen
would have been attacked from the
other side — 25 jj.f6+. As it is, White
continues his offensive, now with a
material advantage.
25 Ad7 &c7
26 Axc6 Sf8
27 Sdl &c5
28 Af3 &xc2
29 sd7 an
30 Sd8+ Sf8
31 jj.f6 &h7
32 Ae4 &h6
33 Ag5 &h8
34 gd7
Black resigns: if 34...gf7 35 gxc7.
Spassky-Tal
Montreal 1979
Queen's Indian Defence
1 d4 &f6
2 c4 e6
3 &f3 b6
4 e3
The Queen's Indian Defence is an
opening that until recently had a very
quiet reputation. Sometimes in
newspaper reports one would even read
comments such as: "The players used
the Queen's Indian Defence for
peaceable aims." However, a certain
reassessment of values is currently taking
place, and in particular, this opening is
often and very successfully employed
by Karpov.
There is no denying that White, if he
wishes, can play with a high degree of
solidity (the move that best meets this
aim is 4 g3). But peaceableness on the
part of my opponent was the last thing
I expected in this game.
4 ... jj.b7
5 jj.d3 d5
6 b3
This is no better and no worse than
6 0-0. Perhaps the only slight nuance is
that White does not allow his opponent
the opportunity for relieving
manoeuvres such as 6...dxc4 and 7...c5.
6 ... jj.d6
7 0-0 0-0
8 jj.b2 &bd7
158
Attack with Mikhail Tal
9 £>bd2 &e7
10 gel gad8
Up to now the moves have been
more or less obligatory. Both sides are
deploying their forces as well as
possible in anticipation of the coming
battle. The alternative here was 10... £>e4,
but the position after 11 $rc2 f5 12
£>e5 did not particularly appeal to me.
With his last, consolidating move,
Black invites his opponent to
determine the position of his queen. In reply
to 11 \gre2 I was now intending 11...
£>e4, while after the continuation
chosen by Spassky, I thought that the
advance of the c-pawn would gain in
strength.
11 &c2 c5
12 cxd5
The other, roughly equivalent
possibility was 12 gfdl, against which I
had prepared 12...cxd4 13 exd4 gc8.
In such situations the loss of a tempo is
not so significant.
12 ... exd5
13 dxc5
But this exchange is, I think, bad.
The weakness of the hanging pawns in
not apparent at all, and Black's pieces
operate together most harmoniously. In
my opinion, 13 &b5 or 13 Af5 was
stronger.
13 ... bxc5
14 ©c3
And this is simply a challenge...
When after the game I asked Spassky
why he made this move, he spread his
hands: "A beggar isn't afraid of being
robbed".
The idea of a pawn breakthrough
now becomes very possible. I spent
some time examining the immediate
14...d4, and came to the conclusion
that for the moment it did not promise
anything real, and so, guided by
general considerations, I brought into play
my last, "sleeping" piece,
14 ... BfeS
15 gfdl
That day it would seem that Boris
was betrayed by his sense of danger. I
expected 15 gfel, in reply to which I
was intending seriously to consider
15...C4 (16 bxc4 &b4 17 &c2 dxc4).
But now White himself provokes the
breakthrough in the centre, and Black's
pieces are so ideally placed that there
is no sense in delaying it.
15 ... d4
16 exd4 cxd4
17 &a5
Good or bad, White should have
accepted the pawn sacrifice. It is true that
17 igrxd4 loses material after 17...£>c5,
but after 17 <&xd41 could see no
forcing way of developing the attack. For
the sake of my conscience, so to speak,
I had prepared a reserve variation:
17...#e5 18 &4f3 &h5, with full
compensation for the pawn, but even so I
Destroying the Fortress Walls
159
would probably have been unable to
resist the temptation — it is not often
that opportunity occurs for sacrificing
a bishop at h2 in games at grandmaster
level. But here things are not
completely clear. After 17... Axh2+ 18
®xh2 Qg4+ 19 <©g3 (bad is 19 ®gl
©h4 20 £>4f3 &xf2+ 21 ®hl ge5! 22
Jlf5 £>e3) 19...-©e5+ 20 f4 (after 20
©xg4 £>f6+ White is mated) 20...
©e3+ 21 Q4f3 Qdf6 Black's attack is
very dangerous, but White is by no
means doomed (there is the possibility
of 22 Axh7+, for instance).
At any event, the continuation
chosen by Spassky is bad. Firstly, because
the "condemned" pawn is still alive,
and in addition the position of the
queen on the 5th rank shortly gives
Black the opportunity, with gain of
tempo, for the decisive inclusion of his
rook in the attack.
17 ... £>e5
18 £>xe5
18 gel was perhaps slightly more
tenacious, although Black has a very
attractive choice between 18...,&xf3
and 18...exd3!?
18 ... iJ.xe5
19 £>c4
Black's attack develops slightly
more slowly, but probably just as
effectively, after 19 £>fl £>d5 20 £>g3
•&f4 21Aflh5.
19 ... gd5
Here it is, the decisive tempo. For
the bishop sacrifice all is ready.
20 &<J2
I was expecting 20 .0.a3 (with the
idea of driving the queen off the d8-h4
diagonal), which is decisively met by
20...-©e6 21 &d2 Axh2+! 22 ®xh2
Sh5+ 23 ®gl ghl+!, with mate in
two moves.
20 ... j|.xh2+
A familiar theme in a slightly new
setting.
21 ®xh2 Sh5+!
White was evidently counting only
on 21...£>g4+ 22 g>g3, but now the
way forward for the king is blocked.
After 22 ®g3 Black has the
immediately decisive 22...£ie4+ (however,
22...gg5+ is also good) 23 Axe4
&h4+.
22 ®gl £>g4
White resigns
Against the two threats, the prosaic
23...&h4 and the elegant 23... ghl +
(in reply, say, to 23 gel) there is no
defence.
Tal-Stean
Alekhine Memorial, Moscow 1975
Tarrasch Defence
1 £f3 £>f6
2 c4 c5
3 £>c3 e6
4 g3 d5
160 Attack with Mikhail Tal
5
6
7
8
9
10
n
12
cxd5
(14
Ag2
0-0
Ag5
£ixd4
Ae3
©b3
exd5
£>c6
Ae7
0-0
cxd4
h6
ge8
From the fact that after this my
opponent thought for a long time, I
concluded that I had succeeded in devising
something new.
12 ... £>a5
13 ©c2
At a5 the knight stands no better
than at c6, but for the moment Black
plays logically.
13 ... Ag4
14 h3 Ad7
But this is inconsistent. 14...£.h5
was clearly stronger, keeping the e2
pawn under attack. The continuation
could have been 15 gadl gc8 16 £)f5
JS.b4, with an unclear game.
15 gadl
It transpires that at d7 the bishop is
only in the way of its own pieces.
15 ... gc8
16 £>f5
Not so much play against the
isolated pawn (White has in reserve the
strategic manoeuvre jj.d4 and £)e3), as
the start of an attack on the king. It
was for this reason that on the previous
move the dl square was occupied by
the queen's rook. The point is that in
reply to 16...£)c4 White has a
combination: 17 £>xd5 Qxd5 (17...Qxe3 18
Qfxe7+ gxe7 19 &xc8!) 18 &xd5
Qxe3 19 Qxh6+! <£>f8 20 fxe3!, and
the rook at f 1 has its say.
Comparatively best was 16...£.e6,
but this would have meant admitting
that all the preceding manoeuvres with
this bishop were pointless.
16 ... MS
17 Axd5 ge5
Possibly Stean was hoping to gain
positional compensation for the pawn
after 17...£xd5 18 gxd5 ©c7, but
then noticed that 19 &f4 leads to
further loss of material. Otherwise Black
would hardly have willingly allowed
the following piece sacrifice.
18 ^xh6+ gxh6
19 ©g6+ &h8
20 Axf7 gc6
The only move. The game would
have concluded instantly after 20...
jlg7 21 jixh6 Axh6 (2l...»f8 22
»xf6) 22 gxd7!
21 gd5
My old illness — trying for too
much. Far simpler was 21 &xh6 jj.xh6
22 ©xh6+ Qh7 23 ®f4, when all
Black's pieces are "hanging".
But now he should have played 21...
gxd5 22 £>xd5 Ag7, when it appears
that White has nothing better than 23
&xh6, which, however, is quite
Destroying the Fortress Walls
161
sufficient for a win.
21 ... ©e7
It was this very move that White
was reckoning on, since the resulting
position very much appealed to him.
22 Ad4 Qc4
23 f4
It transpires that if 23...jif5, as
planned, White wins simply with 24
gxe5 £>xe5 25 ©xf5 £>xf7 26 £>d5.
23 ... JLg7
24 JJ.xe5 £ixe5
White would have been set greater
problems by 24,..Qe3, but of course
this too could not have saved the game.
For example, 25 gf3 £>exd5 26 £>xd5,
or 25,..Af5 26 Axf6 gxf6 27 ge5,
and several pieces disappear from the
board, but they are mainly Black's.
25 gxe5 ©f8
White has such a large material
reserve that it is by no means essential to
hang on to the exchange.
26 Ab3 Qg4
27 ©d3 Qxe5
In reply to 27...Jlxe5 White wins
most simply by 28 ^xd7.
28 fxe5 ©c5+
29 &h2 AeS
30 e6
White's extra material does not
prevent him from continuing his attack.
30 ... gd6
31 ©c4 Black resigns
Tal-Portisch
Candidates Quarter Final, Bled 1965
French Defence
1 c4 e6
2 d4 d5
3 Qc3 Qf6
4 Ag5 dxe4
5 Qxe4 Qbd7
Until 1962 this variation was not
especially popular, and was employed
only rarely — and on those occasions
when Black very much needed a draw.
At the Candidates Tournament in
Curacao, this variation was chosen against
me by Petrosian in round eight, and by
Benko two rounds later. In the game
with Petrosian I played 6 Qxf6+ Qxf6
7 £>f3 c5, and after an hour's thought I
chose the absolutely unique plan of 8
©d3 Ae7 9 Axf6 Axf6 10 ©b5+.
Naturally, White lost very quickly.
The game with Benko developed more
normally, but during the encounter
with Portisch I could not recall the
precise move order (until now I have
endeavoured fairly successfully to forget
all the games that I played in Curacao).
6 £>xf6+
Perhaps the most accurate. After 6
£>f3 Ael Black succeeds in
simplifying the position, since 7 £ixf6+ can be
answered by 7...J3.xf6.
6 ... £>xf6
7 Qf3 c5
162
Attack with Mikhail Tal
8 Ac4
I think that it is in this way, without
trying to refute Black's opening, that
White attains the most promising
position. Attempts to force matters by 8
£>e5 or 8 Ab5+ do not achieve
anything real against accurate defence.
8 ... cxd4
9 0-0 £e7
10 &e2 h6
Black's desire to get rid of the
bishop at g5 is understandable. But in
the future the pawn at h6 will draw the
attention of the white pieces aimed at
the kingside. The h6 square is a very
convenient one on which to sacrifice.
Perhaps more in the spirit of the
position was 10...0-0 11 gadl £>d5 12
.&xe7 £>xe7, when Black's knight can
begin shadowing its white opponent: in
the event of £>e5 Black replies ...£>g6,
while with the white knight at d4 Black
will prepare ...£>c6. In positions of this
type the exchange of knights is to the
advantage of the defender.
11 Af4 0-0
12 Badl &dl
13 §xd4
White thought for about half an hour
over this move. It was difficult to
decide which was stronger — the
openly aggressive move in the game,
or the more reserved 13 <£sxd4, after
which White could have manoeuvred
his rook along the third rank without
loss of time. In nearly all variations
White's attack would have developed
completely unhindered.
But what did not much appeal to me
was that Black could reply 13„.£>d5
14 JIe5 JIf6 15 J!xd5 exd5 16 j!xf6
>grxf6, and although White has an
undisputed positional advantage, it may
prove insufficient for a win. White can
easily obtain three quarters of a point,
but after a defeat one wants more...
13 ... #b6
14 &d2!
It was with this continuation in mind
that on his previous move White
decided to capture the pawn with his :
rook. I did not consider any other :
moves. Therefore I was most surprised i
when after the game Portisch informed i
me that only here had we diverged '
from the Tal-Benko game, where I had :
chosen the, in my (present) opinion, i
ridiculous continuation 14 gd3. It was '.
not surprising that here, having come ;
up against an innovation, Portisch ■
thought for some forty minutes.
14 ... J!c6 |
Black could also have defended his j
bishop, and simultaneously prepared to \
meet the coming bishop sacrifice, by
14...gfc8. After this I was intending
once more to check the sharp variation
15 J!xh6 gxh6 16 &xh6 &xd4! 17 i
£>xd4 gxc4 18 Sdi with dangerous
threats, and if this proved insufficient I
Destroying the Fortress Walls
163
had in reserve the unpretentious retreat
15 Ab3, maintaining an attractive
position. Now White's reply is
practically forced, since otherwise 14 -&d2 is
simply a waste of time.
15 .2.3*6 £se4
The only move. In the event of 15...
gxh6 White would have continued the
attack by 16 #xh6, when if 16...Axf3
he has the decisive 17 -&g5+ ®h8 18
Sh4+ £>h7 (or I8...^,h5 19 Ad3, with
the irresistible threat of 20 gxh5+) 19
&xe7, when 19...gg8 fails to 20
#f6+, while 16...£se4 is very strongly
met by 17 .Q.d3. If Black changes the
move order by playing 15....S.xf3, if he
wishes White can transpose into
variations already considered by 16
&xg7. Besides this, the simple 16 gxf3
gxh6 17®hl is also good.
16 #f4 gxh6
17 gxe4
This gives the game a rather
different direction. In return for the
sacrificed exchange, White counts on
maintaining a persistent initiative. The
attempt to force matters by 17 -&xh6
succeeds after 17...Jlc5 18 £)g5!, 17...
gfd8 18 Axe6!, or 17...#c5 18 Ad3,
but after the only good move 17...
Sad8!, keeping f7 defended, White
probably has nothing better than to
force a draw by perpetual check: 18
Axe6Sxd4I9Af5£sf6.
17 ... Axe4
18 #xe4
Here Portisch again thought for a
considerable length of time. He has a
minimal advantage in force — the
exchange for a pawn. But the exposed
position of his king and the presence of
opposite-colour bishops call on him to
be extra-careful. Thus 18...'grxb2 loses
almost immediately to 19 £ie5!, when
it is impossible to defend against the
various sacrifices on e6 and f7 (19...
Af6 20 Ad3). I thought that the best
defensive resource was 18....&.f6 19
Ad3 gfd8 20 &h7+ ®f8 21 &xh6+
®e7 (21...jlg7 is weaker: 22 &f4 or
22 <&h5) 22 b3, but here White now
has two pawns for the exchange, and
his initiative shows no signs of
diminishing. Portisch aims to include
his rook in the defence.
18 ... gadS!
19 b3
The prospect of reestablishing
material equality after 19 Ad3 gxd3 and
20...'g'xb2 appeared insufficient.
19 ... &c5
Now the idea of Black's defence is
revealed. First of all, for the moment
he is restricting the white rook by the
attack on f2, and he plans for the
bishop to take part in the defence from
d4. The following manoeuvre by White
is aimed at further weakening Black's
kingside. It involves the calculation of
a lengthy variation, a calculation
which, unfortunately, is inaccurate.
Meanwhile, by continuing simply 20
c3, White would have retained all the
advantages of his position, and the
defence would have involved enormous
difficulties. However, White's
oversight is a rather amusing one.
20 &f4 ®g7
21 &e5+
This forces the advance of the pawn,
since it is hopeless to allow the queen
in at f6.
21 ... f6
22 &g3+
164 Attack with Mikhail Tal
Naturally, White did not even
consider capturing on e6.
22 ... ®h7
23 gel
Here Black had a very interesting
defensive possibility: 23....fl.b4. I had
taken this into account, and had
prepared what I imagined to be a winning
variation: 24 JS.xe6 JS,xel 25 JS,f5+
®h8 26 &g6 Jj.xf2+ 27 ®fl gdl+ 28
<S>e2 &e3+ 29 ®xdl. But while
Portisch was considering his move, I
noticed to my horror that, by playing
28...gel+, Black would give mate
first. White would probably have had
to move his rook, or else force a draw
by 24 c3 JS,xc3 25 fih4 jlxel 26
<grg6+. After the mistake committed by
Black, White's attack gains in strength
with every move.
23 ... gg8
24 &h4 gd6
25 &fl
I do not feel inclined to attach a
question mark to this move. It looks
perfectly logical. White frees his queen
from having to defend the f2 pawn,
since nothing is gained by capturing it
without check.
But here he had a very fine
opportunity of instantly gaining a decisive
advantage, by playing 25 c3 a5 26 a3!!
(this possibility was pointed out,
immediately after the game, by my
trainer, Koblenz). Now, in view of the
threat of 27 b4, Black is forced to
move either his queen or his rook, but
then White captures one of the pawns,
e6 or f6, with decisive effect. E.g„
26...gc6 27 #xf6 J5,xf2+ 28 «fl
gxc4 29 gxe6, or 26...f5 27 b4 axb4
28 axb4 gg4 29 &e7+ gg7 30 bxc5
&xc5 31 &f8! gg8 32 &f7+ gg7 33
&g5+! hxg5 34 «rh5+ ®g8 35 gxe6.
Fortunately, White's omission does not
alter the general evaluation of the
position. It is extremely difficult for Black
to defend against the numerous threats,
especially when in severe time trouble.
25 ... f5
26 h3
Preparing for the g-pawn to come
into play as a "battering-ram".
26 ... gg6
26...>gfc6, preventing White's next
move, was perhaps more tenacious.
27 g4!
This destroys, once and for all, the
black king's shelter. Black achieves
nothing by 27...fxg4 28 hxg4 $rc6 on
account of the simple 29 £>e5, when he
does not have a single check. Here too
the best defence was probably 27...
#c6 28 gxf5 &xf3 29 fxg6+ ®xg6,
but then White is material up with an
active position. The move played by
Portisch loses very quickly.
27 ... gd7
28 gxe6!
It was still possible to fall into a trap
Destroying the Fortress Walls
— 28 Axe6? Axf2!, and Black
succeeds in simplifying the position. But
now it is all over.
28 ... gdl+
29 ®g2 gxe6
30 Axe6 fxg4
31 &xg4 gd8
32 £)e5 Black resigns
WHAT WOULD YOU HAVE
PLAYED?
No.30
The white outpost at e5 creates the
preconditions for an attack, but it is
inadequately supported and sooner or
later will inevitably become a target
for Black's counterattack. Nevertheless
White has some initiative, and...
At first sight position No.31 seems
fairly simple, but in fact it is extremely
difficult for Black. 13 Ag5 is
threatened, and the simplifying attempt 12...
Qxd5 loses quickly to 13 Axd5+ <S>h8
14Ag5&e8 15&h5!
No.31
Black could have defended with
12...£>e7 13 &xf6+ gxf6 14 gxf6
gxf6, although here too White has a
great advantage. In fact he chose 12...
h6 (preventing the pin) 13 #d3 Ae6.
Now 14 <Sxf6+ gxf6 15 d5 does not
work in view of 15...£}e5, but...
No.32
Combinations of this type should
occur to a player "spontaneously"...
166
Attack with Mikhail Tal
No.33
No.35
m ....... ....... ....
?48 Ml • W
mm mm
I mss
si
isi
mtmwr^
ml- -..
SW
This applies even more so here...
No34
Although nominally White has a
material advantage, can his king feel
safe? After all, the leading bastion of
his fortress, the g3 pawn, seems
securely defended..
No.36
m-Wi?..
%M*
But in this position a minute or two's
thought is in order...
Here the cement from the fortress
walls has already been washed away...
i
Answers to:
What would you have played?
No.l (p.30)
Tal-Simagin
23rd USSR Ch., Leningrad 1956
We do not know, because the knight
did not even think of retreating. It
offered itself as a sacrifice, depriving
the black king of the right to castle.
12 £>xf7! ®xf7 13 fS
Naturally, lines have to be opened
for the attack on the king.
13...dxeS 14 fxe6+ &xe6 15 gbl!!
Unexpectedly White's attacking
potential is increased, for example, in the
variation 15...©a5 16 gxb7, when his
threats become irresistible. The rook
also comes in useful on the b-file in the
event of 15...<&a6 16 <&g4+ ®d6 17
dxe5+ ©c7 18 Af4, and therefore
Black accepts the challenge.
15...&xbl 16 &c4+ &d6 17 .&a3+
&c7 18 gxbl Axa3 19 #b3!
For the queen Black has sufficient
material compensation, but White's
lead in development makes his attack
irresistible.
19...Ae7 20#xb7+®d6
The king is forced to go back.
21 dxeS+ £>xe5 22 gdl+ &e6 23
&b3+ &f5 24 gfl+ ®e4 25 gel+
&B 26 g4+ ®f6 27 gfl+ ®g6 28
©e6+ &h7 (28... Af6 29 ©f5+ and 30
>&xe5) 29 ©xe5, and apart from the
initiative White now has also a
material advantage.
No.2 (p.30)
Tal-Tukmakov
Sochi 1970
Yet, strangely enough, it practically
has no choice. If, with such strong
"X-ray" pressure along the a2-g8
diagonal you do not begin an attack on
the black king, then when do you ever
attack? Unless perhaps White's extra
pawn could have raised its voice after
the retreat of the knight and the slow
realisation of his extra pawn. But what
player listens to the opinion of a
pawn?!
22 £>xf7! &xf7 23 dxe5 .&xc5
Black decides not to be obstinate,
and promptly returns the piece. After
23...£>h7 24 ©f3+ ®g8 25 gdl he
would nevertheless have had to do this,
but in even more unfavourable
circumstances.
24 exf6 gxel+ 25 #xel #xf6 26
£>e4 ©e7 27 #e2 gd8 28 #xb5
#xe4 29 &xb7+ ®f8 30 Ae3
Returning part of the material won,
White opens the f-file for the
concluding attack on the king. Therefore
Black resigns.
No.3(p,31)
Tal-Zaid
Moscow 1972
Nothing of the sort] Chess is not
168 Attack with Mikhail Tal
draughts (checkers), capturing, as we
know, is not obligatory, and important
intermediate moves are sometimes
available.
19 ,&xf7+!
In this way the black king is kept in
the centre, there being no question of
White's attack being calculated as far
as mate. It is based on the sincere
belief (and knowledge!) that a king in
such a situation is bound sooner or
later to succumb.
19...®xf7 20 ©d5+ ®g6
If 20...®f8 21 gxe4, and 21...fird6
failsto22gfl+.
21 &xe4+ ®17 22 BO+ M6
Now, after interposing 23 <grd5+.
White could have brought to the centre
his last reserve his knight. But:
23£ic5
M.T. I did not anticipate the
brilliant defence of my young opponent;
the game was played in a clock
simultaneous, and Zaid was then only a
candidate master.
23...Be8!! 24 ©d5+
If 24 gxf6+ Black would not have
replied 24...gxf6 25 ©h7+, with mate
in a few moves, but 24...®xf6!, while
on 24 gxe8 ©xc5+ 25 ®hl he had
prepared 25...igrc6 (the showy 25...
jlf5 does not work, since White again
interposes 26 gxfS gxe8 27 ©xe8-i-),
and after the forced exchange of
queens the black bishops are ready to
show their strength.
24...®f8 25 ©d6+ ®f7 26 &xb7
©a4?!
Time scramble; 26....&xb7 27 &xa3
gxe5 was better.
27 &d5+ ®f8 28 £|d6 &e6 29
Bxe6 Bxe6 30 ©xe6 ©d4+ 31 ®hl
©a7 32 £>f5 &f7 33 ©d6+ Ae7 34
©c6 Bd8 35 &xa6 Black resigns.
No.4(p.31)
Tal v. Gomez-Baillo
Termas de Rio Hondo 1987
But the f7 square is already "ripe", |
and White immediately exploits this. I
13 £id6! cxd4 |
Or 13...fire7 14 £f4 £>h5 15 Sfel !
lSrf6 16 Ae5 £>xe5 17 dxe5 with a \
great advantage, since the pressure on :
f7 continues.
14 &xf7 &e5
White also wins the exchange after
14...Hxf7 15 Si<A <Sc5 16 Axf7+ ,
&h8(16...®f8 17.fl.b4) 17©a3. I
15 &xd8+ &xb3 16 &e4+ g,hg 17 ,
.&xb3 gxd8 18 &g5 (the unfortunate
fl square!) 18...gd5 (18...gf8 19 '
&b4)19Hfel j
And Black resigned in view of the
variation 19....fl.b7 20 £}f7+ ®g8 21
£>d6.
No.5(p.3I)
Barcsa-Tal
Tallinn 1971
And Black found a way of keeping :
the white king in the centre!
9....&h3' 10 £>fxd4
After 10 0-0 £ixf3+ White loses the
exchange, while 10 £iexd4 .&xg2 11
Bgl exd4 12 £>xd4, in the hope of '
!2...J2.h3 13 g4 followed by Bg3, is .
countered by 12...C5! 13 £>b3 .fl.f3 14 \
g4f5! !
10....&xg2 11 ggl exd4 12 &xd4 !
c5 13 £|b5 SJ3 14 g4
For the piece White has only 11 '•
Answers to: What would you have played?
169
pawn, but the black bishop may be
trapped at any moment, and after 14...
f5 15 gxf5 gxf5 16 gxg7+! ®xg7 17
Ah6+ ®g8 18 Axf8 #xf8 19 £>xd6
fxe4 20 ©g5+ £>g6 21 ©d5+ the
situation becomes complicated. And so
Black strikes from the other side.
14...d5! 15 .flxc5 gc8 16 Aa3
dxe4 17 dxe4
Now both 17...#xd2+ 18 ®xd2
gfe8 19 ®e3 and 17...Axe4 18 #xd8
gfxd8 19 Axe7 are bad for Black. But
on the other hand, the continuation in
the game is good.
17...#b6! 18 Axe7 #xb5 19 Axf8
#xb2 20 Axg7 ®xg7
In this position, where he has a quite
appreciable material advantage, White
resigned.
He has no defence. 21 gdl is met by
21...gxc2, mating after 22 #f4 ge2+
or winning a rook in the variation 22
©d4+ ©xd4 23 gxd4 gcl+. And after
21 gel gd8 22 <gre3 the game is
concluded in highly spectacular fashion by
22...#xc2!
No.6(p.31)
Kapengut-Kupreichik
Minsk 1969
Not altogether. White found a way
of keeping the black king in the centre,
even at the cost of weakening his pawn
formation.
15 £>d6+! exd6 16 gel+ ®f8 17
gxf3f6
17...gg8 18 Ae3 and 19 cxd6 is
even worse for Black.
18 ge6 dxc5 19 Axc5+
After 19 gxf6+ ®g7 20 gd6+
£>xd4 the attack on the king comes to
an end, and for the queen Black
obtains quite sufficient compensation.
19...®g7 20 gd6 #e8 21 gd7+
®h6 22 #d6 (22 gbl came into con
sideration) 22...#e5 23 Ae3+ ®h5?
23...g5 offers more chances,
although after 24 <grd2 Black has to
reckon with the threat of 25 f4.
24 #dl! #e6 25 gd6 #e7 26 f4+
®h6 27 f5+ g5 28 h4 gad8 29 hxg5+
®g7 30 gxf6+ #xf6 31 #g4+ Black
resigns.
No.7 (p.41)
Veresov-Osnos
Grozny 1969
By breaking through in the centre.
This is the only way for White to bring
his reserves into play, since otherwise
he has no way of intensifying the
pressure on the kingside.
17 e5! dxe5 18 £>e4
^ Not so much attacking the f6 square
(the exchange of queens will reduce
Black's problems), as threatening the
dagger-blow 19 d6!
18...#d7
Now on 19 d6 Black has a retreat
square for his bishop at d8, and he is
not especially afraid of 19 £wf6+.
But...
19 #xf6!
The defensive lines are breached in
a different way. Simplification for
Black is unacceptable: after 19...Axf6
20 &xf6+ ©h8 21 &xd7 £>xd7 the
invasion 22 gf7 leads to the loss of a
piece.
19...Ad8 20 gf2 #e7 21 #f3 £>d7
Other moves too would not have
avoided loss of material. For example,
170
Attack with Mikhail Tal
21...Sc8 22 J2.g5 #c7 (22...#d7 23
&xd8 and 24 £>f6+) 23 d6, and 23...
#c6 is completely bad on account of
mate in three moves,
22 Ag5 &xg5 23 Qxg5 &xg5 24
d6 e4 25 #f7+ ®h8 26 &xd7, and
White won easily.
No.8(p.41)
Capablanca-Alekhfne
New York 1924
He has to open files, otherwise
Black will create counterplay. But 18
cxb6 axb6 immediately makes
apparent White's pawn weaknesses on the
queenside, and so he prepared a
different manoeuvre.
18 gfdl! bxc5
Castling is dangerous (19 a4), and it
is not possible to find anything else.
19d5!&d6
The only move, since Black loses
quickly after 19...exd5 20 Qxd5 #d6
21 Sabl with the threat of 22 Qb6.
20 dxe6 &xe6 21 &xc5 #h6 22
■&f2!, and the five black pawn islands
were a more than sufficient basis for a
win. White easily won a pawn and...
failed to realise his advantage, through
his own fault. But this bears no
relation to our theme.
No.9 (p.41)
Gipslis-Borer
Berlin 1991
First of all White opened a path for
his queen to the kingside.
22 d5! £d7
It is clear that the pawn cannot be
captured (22...exd5?? 23 ge8+), while
22...f6 fails to a sacrifice that is
thematic in such positions: 23 gxh5!!
gxh5 24 #xf6, with numerous threats.
23 gxh5!! gxhS 24 #f6 #xd5
Forced in view of 24...jJ.e8 25 ge5
exd5 (26 gxh5 was threatened) 26
gxe8+, and hoping for 25 ge5 jj.e8 26
gxd5 gxd5, when there is still some
play in the position. Even here White
should win — 27 £k5 followed by
#g5xh5, but he wants more.
25 Qe5 £e8 26 ge3 &dl+ 27
<S?h2 gd4 28 gg3+ gg4 29 Qxg4
hxg4 30 h5!!
Another reserve joins the attack, and
there are hardly any defenders.
30...#d8 31 gxg4+ <J?f8 32 &g7+
®e7 33 Sf4 #a5?
A tougher defence was offered by
33...J2.C6 34 Sxf7+ <S>d6 35 &d4+
J2.d5 36 #b4+ ®c6 37 #xb7+ ®d6,
when although White continues
attacking with material now equal, there
is no forced win. Now, however, the
game concludes quickly,
34 &f6+ ®f8 (34...®d6 35 gd4+)
35 h6 Sd8 36 h7 Black resigns.
No.10 (p.50)
Troinov-Popov
USSR 1962
It gives him not only the right, but
also the obligation — to attack. White
rightly "launches" his queen into the
vicinity of the black king.
13 &h5 ge8
Black intends to parry the attack on
h7 (Sf3-h3) by transferring his knight
to f8. But the move played creates
other weaknesses, and White now
strikes from the other side.
Answers to: What would you have played? 171
14 &xd5!! exd515 &xf7+! &xf7
The Greek gift has to be accepted
(15...&h8 16£)e6).
16.2.xd5+ &g6
Evidently Black considered the
variation 16...®f8 17 £se6+ &g8 18
£ixd8+ &h8 19 £ixc6 bxc6 20 Jlxc6
Sb8 21 e6 <Sf6 22 &xe8 &xe8 23 f5
to be too cheerless (23...gxb2 24
gabl), and he sends his king out into
the storm.
17 f5+ gh5 18 &B+ &h4 19 g3+
&h3 20 &g2+ &g4 21 gf4+
And, two moves before mate, Black
resigned.
No.ll (p.50)
Geller-Polugayevsky
28th USSR Ch., Moscow 1961
Alas, there does not appear to be
any combination breaking up the king's
shelter: after all, Black has drawn up
nearly all his forces for the defence,
and his queen, although temporarily
"lagging behind", is ready to come into
play by taking on d5, although he then
has to reckon with 45xg7.
But White has a possibility of
further increasing his attacking potential.
27 £e3! Sd2 28 £g4
With gain of tempo White has kept
the black queen passive, and, more
important, he has increased the
offensive power of his rook at fl and
found a new target for his knight to
attack: not only the h6 pawn, but also
f6. Now all his pieces are operating at
full power.
28...&d729h4!
There is no point in hurrying with
29 ©xh6+, since now this threat is
intensified: 30 ©xh6+ gxh6 31 £sf6+
&h8 32 &xd7+ &gj 33 &xg7+
®xg7 34 h5, winning a piece.
29...©e7 30 ge3 &d7 31 #xh6+
&g8
Or 31...gxh6 32 Sf6+ &h8 33
Sxd7+ &e5 34 &c3 gc2 35 d4.
32 gxe8
Mate at g7 and the rook at d2 are
both "hanging". Black resigns.
No.12 (p.72)
Rubinstein-Teichmann
Vienna 1908
No, because the opening of lines for
attack could have been carried out
more quickly, and perhaps more
efficiently: 18 g6 (nevertheless!) 18...fxg6
19 hxg6 h6 20 £xe4 dxe4 21 &g5,
and the game is over: both 22 .Q.e6+
and 22 i&xc4+ are threatened, and
21....2.d5 is met by the decisive 22
.2.xe4.
No.13 (p.73)
Adorjan-Ribli
Riga Interzonal 1979
By interposing 18 Ah6! And since
counterplay with 18...gxc3 is now
clearly too late — 19 gxf7+ ®xf7 20
Sxg7+ &e8 21 bxc3 ©xc3 22 &xc3
gxc3 23 gxh7, and since the bishop is
immune — 18...gxh6 19 ©xh6,
mating, Black has to defend his g7.
1S...2.16 19 gxh7+ &xh7 20
&xg7! &xg7 21 h6 &f6 22 ©g2
Black resigns, since against the
invasion 23 &g7+ (23...Jlxg7 24 hxg7+
®g8 25 gh8 mate) there is no
defence.
172 Attack with Mikhail Tal
No.14 (p.73)
Kochiev-F.Wade
Moscow 1983
White used his occupation of the
light squares to invade the opponent's
position.
29 &f3 £>f7 30 £)fe3 Ae7 31
&f5+ ®g7 32 &e6 gxdl 33 gxdl
gd8 34 gxd8 &xd8 3S ©h2
Contrary to the usual state of affairs,
the exchanges have not eased Black's
position. White's queen is tying its
black opponent to the defence of the
bishop, and on the light squares the
reserves will soon be brought up.
35...©f8 36 OfS &c7 37 £)ce3 hS
38 &xe7 &xe7 39 &c8+ £)d8 40 £>B
&e8 41 &c7
Mate can be avoided only at the cost
of the queenside pawns. Black
resigns.
No.lS (p.73)
Levenfish-EIiskases
Moscow 1936
In fact Black nevertheless played
20...h5!, since if 21 gxh5 he has 21...
g5! (there is no need to resort to the
sharp 21...gh8) followed by 22...gh8
and 23...gxh5, with a very strong
attack down the open h-file. The
situation is similar after 21 h3 hxg4 22
hxg4 gh8, and so White's reply is
practically forced.
21 Ah3 gh8 22 &g2 Ah4 23 £>b5
Axel 24 gfxel £)a6 25 g5
Necessary, alas, otherwise after
25... hxg4 26 Axg4 Axg4 27 <grxg4
gh4 White loses slowly, but surely.
25...Axh3 26 &xh3 &xg5+ 27
©hi &e7 28 ggl ©h6 29 c5!?
A desperate attempt to break the
unhappy course of events. Otherwise
...g5, ...gaf8, the advance of the king,
and ...g4.
29...&XC5!
Black is not afraid of ghosts!
Especially since the only alternative
was the passive 29...gae8, since 29...
g5 or 29...gag8 would have handed
White the initiative — 30 cxd6 cxd6
31 &e6!
30 £)xc7 &xc7 31 gxg6+ ©xg6 32
&f5+ ©h6 33 &f6+ ©h7 34 &f5+
©g8!
In giving up his queen, Black
reminds his opponent that one piece on
its own cannot do much.
35 ggl+ &g7 36 &f» gh7 37
&xd6 <Sd3! 38 &e6+ ©h8 39 gxg7
gxg7 40 &h6+ ©g8 41 h4 <&el!
Avoiding the last pitfall: 41...ga6,
intending mate after 42 #xh5 gag6, is
refuted by 42 d6!
42&e6+©h7 43#h3
It turns out that 43 <grxe5 is not
possible on account of 43...ggl+!
43...gag8 White resigns.
No.16 (p.88)
Stolberg-Zak
USSR 1938
By the most ordinary interference!
After 28 gd7! Black could, of course,
have prolonged his resistance in a
hopeless position — 28...g6 29 gxc7
gxh5 30 <&xf7, but he "preferred" to
allow a smothered mate in the main
variation 28...Axd7 29 <grxf7+ ©li8
30 Ac4 <Sg6 31 &g8+ gxg8 32 <5f7
mate.
Answers to: What would you have played?
173
No.17 (p.88)
Tal-Platonov
Dubna 1973
It fact Black's resignation was very
timely! At the last moment he noticed
that in reply to his planned 23...gxg3
there would follow 24,2.g6!!, when the
rook's retreat is cut off, and mate is
inevitable.
No.18 (p.88)
Polugayevsky-Osnos
36th USSR Ch., Alma-Ata 1969
The last straw for Black was 21 e5!
This unusual interference move severs
Black's connections on the b8-h2
diagonal, and his position collapses.
21...&d2 22 a3 gf8 23 &xe6! gS
If 23...fxe6 24 &xe6+ &h8 25 g3,
and White's material advantage is
enough for a win.
24 g3 fxe6
No better is 24...©e2 25 gxf4! gxf4
26 &g5+ &h8 27 &h6! gg8 (27...
®g8 28 &f5) 28 ©f6+ gg7 29 AxH
■&dl+ 30 <g>a2, when the e-pawn
cannot be stopped.
25 igrxe6+ &gj 26 gxf4 igrg2
Equally hopeless is 26...gxf4 27
gxf4 ©xf4 28 ©d7+ &g6 29 &xb5
©xh2 30 &d3+ &g7 31 &e4.
27 gdl gx« 28 &d7+ an 29 e6
Black resigns.
No.19 (p.88)
Fridman-Tornblom
Stockholm 1974
A move away from victory, this
would have been a strange decision!
By l...ge3! Black blocked the e2
pawn. If 2 fxe3, then 2...£>h3 is now
decisive, and at the same time 2...gxf3
is threatened. White resigned.
No.20(p.l04)
Tal-Andersson
Match, Stockholm 1976
Yes, and relying on this outpost (the
f6 square is under control) White
began a direct attack on the king.
19 gg3 ©xc2 20 ©e3 (with the
threat of 21 &h6) 20...&C4 21 b3
&d5 22 Qf6+ &xf6 23 exf6
The white outpost has moved to the
6th rank, and although it is
insufficiently defended, the attack has been
strengthened.
23...g6 24 gg4 &h8 25.2.1)6! gc8
Taking the unprotected bishop —
25...£>xb6 — diverts Black's attention
from the kingside, and he is mated or
loses his queen: 26 igrh6 gg8 27 gh4.
26 &h6 gg8 27 gd4
Here 27 gh4 is parried by 27...£>f8,
when Black himself launches a
counterattack.
27...£>xb6
If 27...igrb7 White achieves his aim
— 28 ©xh7+, mating.
28 gxd5 £>xd5 29 gO gc3 30
gxc3 £)xc3 31 ©e3 b4 32 &a7 &&
33 ©c5 gb8 34 ©d6, and in view of
the unavoidable loss of his queenside
pawns, Black resigned.
No.21(p.l04)
Kask-Kamenetsky
USSR Corr. Team Ch., 1974-5
Firstly, White's main forces are
174
Attack with Mikhail Tal
concentrated on the queenside, and the
black outpost at e4 greatly restricts
their possible rapid regrouping.
Secondly, there is a classic target for
attack — the advanced pawn at h3.
And thirdly, also classic is the
deployment of Black's queen and
bishops, which are aimed at the
kingside. In short, there are more than
sufficient grounds for the decision.
23.„Axh3! 24 gxh3 &xh3 25 £>e5
£Jd6 (renewing the threat of mate in a
few moves) 26 Ag4 |Jg6 27 ©xg6
&xg4+ 28 ®fl fxg6 29 &c4+ ®h7
30ga2
The threat of 30...Bxf2+ 31 ®xf2
Jlg3+ with a quick mate has been
parried, but the pursuit of the king
continues — incidentally, with level
material.
30...H5 31 ®el h4 32 &fl h3 33
®<J2 JJ.g3 34 ®c3 Bf3 35 &gl &e6
36Bd2
Compared with the initial diagram,
the queen has "castled very long", but
has not gained any peace. By
destroying the pawn chain around the king,
Black drives it back. To its doom.
36...Axf2! 37 Sxf2 Bxe3+ 38 ®d2
Even in a non-correspondence game
it would not be difficult to calculate the
forcing variation 38 ®b2 Bb3+ 39
®c2 (or 39 <Sal Bxa3+ 40 ®bl
&b3+ 41 Bb2 &a4, mating) 39...
&c4+ 40 ®dl &xd4+ 41 ®el &e3+
42 ®dl Bd3+ 43 ®c2 Bc3+ 44 ®bl
Bxcl+, leading to a queen ending
where Black is five(!!) pawns up.
38...&b3 39 &fl Bd3+ 40 ®el
&xa3 41 gcc2 &al+ 42 <Se2 &xd4
43 iSSrcl Sg3 44 gd2 &e3+ 45 ®fl
&g5
There are too many threats, and
White resigned.
No.22(p.l04)
Menehik-Thomas
London 1932
At any event, the first Women's
World Champion concluded matters by
force.
20 f6+ ®h8
After 20...®xf6 White gains the
tempi required for the creation of a
mating net: 21 #g5+ <Sg7 22 h6+
®g8 23 ■&!6.
21 «h6 Bg8 22 hxg6 fxg6 23
&xh7+!
And Black resigned, since he is
mated by the opponent's minimal
forces: rook and f6 pawn.
No.23(p.U5)
Botvinnik-Chekhover
Moscow 1935
This position was reached after a
prolonged sacrificial attack. White
concluded by eliminating the main
defender: 32 Bxf6! Axf6 33 &h7+
®f8 34 gel! Ae5 (what else?) 35
#h8+ ®e7 36 &xg7+ ®d6 37
#xe5+ ®d7, and White, still a rook
down, announced mate in six moves:
38 &f5+ ®c6 39 d5+ ®c5 40 JJ.a3+
®xc4 41 -©e4+ ®c3 42 &M+ ®b2
43 &bl mate.
No.24(p.ll5)
Tal-Najdorf
Leipzig Olympiad 1960
White has assembled a striking
Answers to: What would you have played?
175
force of pieces on the kingside. But
everything turns on the position of
Black's knight: it is not attacking, but
is primarily defending the approaches
to his king, in particular f6. Therefore:
21 Sxe4! dxe4 22 Af6! &b6
The "slightest movement" of the g7
pawn would have allowed mate in one
or two moves.
23 Axg7 gfe8 24 AeS &g6 25
£>h6+<S>f8 26f5!
Black resigns: 26...igrg5 is met by
27 fixf?!, while if 26...&c6 White
wins by either 27 &h5 &d7 28
Ad6+!, or 27 &g3 &xh6 28 Ad6+
Be7 29 Axe7+ ®xe7 30 &e5+.
No.25(p.ll5)
Spassky-Geller
Candidates 'A-Final, Sukhumi 1968
Alas, the defenders of the black king
can be eliminated, and Spassky, who
was on his way to the chess throne, did
this on nearly every move!
23 axf«n exf6 24 &h7+ <£f8 25
£>xl7!
The f7 pawn was also playing a
defensive role, and now 25...<S>xf7 26
Ah6 gg8 27 £>f4 is a very convincing
variation. The attackers that have
perished on the decisive part of the
battlefield are replaced by fresh troops,
whereas the defenders (of the g6 pawn,
at least) cannot be replaced. Therefore:
25...gxc2 26 Ah6 gxcl+
It is too late for 26...&xd3 27
&xg7+ ®e8 28 Bxc2 &xc2 29 £>f4,
when White wins.
27 £>xcl <£xf7
Or 27...Axh6 28 £>xh6 <ge8 29
£>g8!, and the pursuit of the black king
continues.
28 igrxg7+ &e8, and now White
could have quickly decided matters by
29 e5 Axg2 30 e6, mating. But the
game continuation 29 g5 f5 30 igrxg6+
<gd7 31 igff7+ <gc6 32 exf5+ also led
to a win.
No.26(p.l26)
Brink-Claussen v. JXittlewood
Varna Olympiad 1962
He should divert the white queen
from the defence of f2 and exploit the
weakness of the back rank.
22...&xd6! 23 &xd6 &d4+ 24
®hl £>f2+
White resigns: he is either mated,
or is left a piece down: 25 <^gl £>e4+.
To be fair, it should be mentioned
that the less spectacular 22...jJ.e5
would also have won.
No.27(p,127)
Makogonov-Smyslov
12th USSR Ch., Moscow 1940
This means that the queen must be
driven away, exploiting the barely
perceptible weakness of the back rank.
24 Se5!! igrc8 (the rook is clearly
immune) 25 Ah3!
One blow after another. If now 25...
&b8, then 26 Sg5 g6 27 Sb5, and
there is no defence against the threat of
Ah6 (27...fic5 28 Ah6 &e5 29
i&xe5, and again the back rank is
Black's downfall). At the same time
the immediate 25 Bg5 would not have
achieved its aim on account of
25...Sc3.
So Black decides on a sacrifice.
176
Attack with Mikhail Tai
25...gd8 26 AxeS gxdl+ 27 ®g2
gxc8
Alas, the attack continues.
28 BgS g6 29 gbS (the way for the
bishop to h6 is opened) 29...gd6 30
gxb3 £>xb3 31 #xb3 Black resigns.
No.28(p.l27)
Bouaziz-Miles
Riga Interzonal 1979
The position is now drawn, and after
4S...Hxh3! White should have
reconciled himself to this, by playing 46
#f 1! Sg3+ 47 ®f2 gxf3+ 48 <S>xf3
#xfl+, with perpetual check after 49
®e4.
But through inertia he chose 46
®xh3??, overlooking the fearful blow
46...#hl+ 47 #h2 #xf3+ 48 ®xh4
Ae7+ 49 gS .Q.xg5+!
Only here did White realise that he
would be prettily mated: 50 ©xg5 f6+
51 ®h4 g5 mate, or 51 ©g6 #g4
mate.
No.29(p.l27)
Stein-Sokolsky
Odessa 1960
Even without his queen White was
able to create decisive threats against
the king.
27 gg7+! Axg7 28 gxg7+ ®h8 29
gc7!
White's material advantage becomes
decisive. He threatens 30 Ag7+ Sg8
31 fif6+, and the black knight is
attacked.
A few moves later Black resigned
(if 29...&e5 30 £.f4 #f5 31 gxc6
etc.).
No.30(p.l65)
Mikhalchishin-Yudasin
Nikolayev 1983
Everything depends on whether
White can break up the pawn screen
around the black king.
20 &h6l Bxdl+ 21 ®xdl
(otherwise the e5 outpost falls) 21...#f8 22
c3£>d7
The attempt to exchange bishops by
22,..J,d5 does not succeed: 23 Ac2,
and 23...Axa2 is not possible on
account of 24 #e4. Therefore Black
aims by pressure on the e5 pawn to tie
down the opponent's forces.
23 ®cl a5 24 .S.c2 a4 25 Be3!
®h8 (26 Bg3 was threatened) 26 JLg5
(maintaining in certain variations the
possibility of Af6) 26...ga5 27 Bh3
h6 28 #f4 £>xe5?
This leaves f6 undefended and loses
by force. White has more problems
after 28...gxe5 29 Axh6 gxh6 30
gxh6+ ©g8, when Black's defensive
resources are by no means exhausted.
29 Axh6! gxh6 30 gxh6+ ®g8 31
j£.h7+ ®h8, and without waiting for
White's reply, Black resigned: 32
#f6+ #g7 33 #d8+ leads to mate.
No Jl (p. 165)
Tal-Plaskett
Sochi 1984
But White can exploit the target
created to begin an attack.
14 Axh6 AxdS 15 cxd5 £>b4 16
#g6 #e7
Has the first wave been repulsed,
and can Black now pick up the d5
pawn?
Answers to: What would you have played?
177
17 a3!
White even urges him to! After 17...
Qbxd5 18 Axg7 ©xg7 19 Axd5+
Qxd5 20 ©e6+ White is a pawn up
and the black king is "bare".
17...&C2 18 &xg7 &xg7 19 &xc2,
and Black could have spared himself
the following five moves.
No.32(p.l65)
Tal-Gedevanishvili
Georgian Championship 1970
Of course, White's concentration of
force against the black king is not the
maximum, but it is evidently quite
sufficient. Queen, rook, bishop and
knight — part of them can be
sacrificed to break up Black's defensive
lines.
18 £)f6+! gxfS 19 Axh7+ <8>h8
No better is 19...®xh7 20 exf6 £ig6
21 ©h5+ <§g8 22 Sbfl(gl) or 22
gff 1, and against the mate at g7 there
is no defence.
20 gh4 <®g7 21 &cl Dg8 22
Axg8 Black resigns.
No.33(p.l66)
Tal-Taimanov
Blitz Tournament, Leningrad 1977
Were the black pawn still at h7,
there would be a long and hard
struggle in prospect, although White has
every chance (pawn majority with an
outpost at e5) of an attack on the
kingside. But the pawn has "stuck out",
and this leads to the rapid collapse of
Black's position.
29 Axh6! gxh6 30 &xh6 &c6 31
«rgS+ £ig6
Or 31...<®h8 32 f4, and the way for
the rooks to h3 is open.
32 f4 &e6 33 fS &e7 34 f6 &f8 35
Axg6 fxg6 36 &xg6+ <§h8 37 gf4
Black resigns.
No.34(p.l66)
Tal-Miles
Porz 1981/2
But hardly any more, since the
insufficiently defended f7 pawn may also
be attacked through a blow at another
link of the pawn chain, a device that is
as typical as it is simple.
15 Axh7+! £ixh7
After 15...'®xh7 the defender of the
h5 square is diverted by 16 Hxd7, and
if 16...£)xd7 17 &h5+ <§g8 18 &xf7+
■Sh? 19 £}h5 with a quick mate.
Therefore Black prefers
immediately to remain a pawn down, which,
however, is equivalent to capitulation.
16 gxd7 g6
If 16...f6 17 £ig6 ©c6 White wins
by 18 gxb7!, while after 16...£lf6 he
does not content himself with an extra
pawn, but continues his decisive
attack: 17 Qh5! Qxd7 18 &g4 g5 (18...
Af8 19 &xd7 and 20 Qxf8, or 18...g6
19&xg6) ]9&xd7©d8 20gdl!
17 b4
White could have simply set about
realising his material advantage, but
instead he makes use of a chance
possibility: 17...'&xb4 diverts the queen
from the defence of e6 and allows 18
Qxg6, while 17...cxb4 clears the way
for the white c-pawn.
17...Ac8 18 bxc5 &xc5 19 &e4
&b6 20 &f3
I.D. 20 Sd3 with the idea of 21 gg3
178 Attack with Mikhail Tal
is more natural, but the move in the
game is prettier: on 20...,2,xd7 White
had prepared 21 Ae3!, while if 20...f5
21 #g3.
20...#b2 21 fixf7
None of White's pieces can be
taken.
21...#g7 22 fih6+ <£>h8 23 gc7
Winning the queen in the variation
23 Ae5 ,&xd7 24 ,2.xg7+ <S>xg7 does
not satisfy White.
23...gf8 24 Sxe7
Black resigned in view of the
dismal choice between 24...#xe7 25
Ae5+, and 24.. ,gxf4 25 Sxg7 Sxf3
26 Sg8+.
No.35(p.l66)
Drike-Krantz
Correspondence 1989-91
Only at first sight. In fact White's
defences collapsed instantly after
17...£ixh2!, and in view of the
unattractive choice between 18 ®xh2
Axg3+ 19 fxg3 #xg3+ 20 <£>hl
gh8+, and 18 #h6 #xh6 19 Axh6
fihg4 20 Ad2 axf2!, White
resigned,
No.36(p.l66)
Tal-Chepukaitis
Blitz Tournament, Leningrad 1977
There are obvious possibilities of
sacrifices on h7 and g6.
23 £xh7! Jlj£f6 24 £xf6+ <£>f8 25
&xg6&f7 26©g5
With the intention of winning the
queen after 27 fih7+ ge8 28 £g6.
26...&g7 27fih7+&f7 28&d8
Threatening "only" 29 <Bg5+.
28...©h6 29 Qg5+ 3>g7 30 ®e7+
<S>g8 31 Ah7+
Black resigns, since White has an
unusually pleasant choice between
winning the queen and mating in a few
moves.
Postscript
THIS BOOK did not turn out quite as
we had planned. Unfortunately, there is
no chapter about the offensive on the
queenside: Mikhail Tal had some
interesting thoughts about this, and
regarded activity on this part of the
board both as an independent
operation, valuable in its own right, and as a
diverting, as it were secondary
operation, undertaken in order at a
convenient moment to nevertheless assail the
place where the enemy king was
sheltered.
Of this planned chapter there
remained only fragments, and two or
three of the other sections could
perhaps have been a little fuller. But we
did not have time. One of the greatest
of chess magicians, the former World
Champion Mikhail Ta], has passed
away. Right to his last day he
maintained his interest in chess, and, of
course, not only chess: from a Moscow
hospital he travelled to a tournament in
Spain, he went out for a day to play in
a blitz-tournament, and he analysed
and made recordings of the material
for this book. To profound regret, all
this was to be his last.
This is why the title planned earlier
Everything about Attack has been
changed. Tal was a wonderful master
of attack, and in his career of more
than a third of a century in top-level
chess, what pleased him most was not
a point in the tournament table, and not
a victory, but a successful attack.
And 1 should like once again to
repeat the words of Mikhail Tal, that
appear in the introduction to this book:
may the readers win their games, by
attacking. Attacking brilliantly.
It was this that always made Tal
happy.
Iakov Damsky
Index of Players
Adorjan 12,171
Alekhine 138,151,170
Andersson 81,173
Andreyeva 51
Archakova 51
Auzinya 98
Bagirov 142
Bakinskaite 94
Balanel 122
Balashov 48
Barcza 90,168
Bauer 136
Belyavsky 56
Benko 85
Beylin 83
Bilek 7
BOOk 128
Borer 170
Botterill 62
Botvinnik 9,13,79,174
Bouaziz 176
Brinck-Claussen 136,175
Branstein 78,120,144,150,
Butnoryus 93
Byrne 148
Capablanca 170
Castaldi 129
Chekhov 99
Chekhover 174
Chepukaitis 178
Chemikov 53
Chemin 33
Chiburdanidze 17
Damsky 63
Dkman 122
Donner 96,131
Drewitt 138
Drike 178
Durasevic 109
Dvoiris 17
Dzentelovsky 133
Eliskases 172
Euwe 9,129
Feuerstein 105
Fischer 85,105, 118
Fridman 173
Gaprindashvili 55
Garcia, G. 92
Gaudin 138
Gedevanishvili 177
Geller 4, 13, 37, 42,44,55, 66, 76,
107,111,121,150,171,175
Gereben 107
Gheorghiu 35
Gik 60
Gilfer 128
Gipslis 170
Gligoric 66,95,99
Gomez-Baillo 168
Grigorian 3
Gromek 15
Gruzdev 135
Gufeld 9,120
Gurgenidze 112
Gurieli 111
Hansen, C. 32
Hartston 140
Hebert 65
Heemsoth 60
Heisenbutter 60
Index of Players
181
Hiibner 121
Ilivitsky 85
Ivanchuk 152
Ivkov 20,93
Kagan 20
Kaila 98
Kalinkin 64
Kamenetsky 173
Kamyshov 2
Kapengut 169
Kaplan 12
Karasev 76
Karpov 19,60,121
Kask 173
Kavalek 61
Kasparov 43,51,80,81,83,93, 116,
122,140
Kengis 45,120
Keres 4,13,18,43,82,91,92,108,
152,154
Kholmov 18,89
Kinzel 58
Kivi 98
Klovans 78
Kochiev 172
Kolarov 93
Kondevsky 45
Korchnoi 42,51
Kosten 109
Kostina 56
Kotkov 54
Kotov 43
Krantz 178
Kupreichik 3,56,169
Kurajica 92
Kuzmin 45,139
Landau 81
Larsen 1,10,61,74,97
Lasker 136
Leonov 84
Levenfish 98, 172
Levitsky 119
Liebert 63
Lipnitsky 83
Lisitsin 52
Littlewood, J.
Livingston 118
Lutikov 83
175
Makogonov 175
Makarychev 89
Malevinsky 134
Marjanovic 43
Marshall 119
Menchik 174
Mikenas 120
Mikhalchishin 176
Miles 33,58,176, 177
Minasian 58
Mititelu 57
Morozov 155
Morphy, E, 16
Morphy, P. 16
Moskvin 153
Murey 130
Najdorf 4,99, 174
Nezhmetdinov 2,5,
54,64,108
Nikhamkin 135
Nikitin 147
Nikotic 140
Nimzowitsch 137
N.N. 119,134
O'Kelly 37
01afsson,F. 117,131
Oskam 138
Osnos 169,173
Pahtz 99
10,14,15,53,
182
Attack with Mikhail Tal
Palmiotti 144
Panchenko 78
Panno 4,90
Panov 6
Paoli 10
Persig 148
Petrosian, A. 78
Petrosian,T. 110, 147
Petrov 91
Pilnik 4
Plaskett 176
Platonov 173
Poldauf 130
Polugayevsky 32,34,67,171,173
Popov 134,170
Portisch 150
Pribyl 80
Radulescu 12
Ragozin 52,79
Rakhmanov 152
Rantanen 131
Ravinsky 6, 85
Reshevsky 117, 118
Ribli 35,116,171
Richardson 140
Romanov 108
Rossolimo 118,119
Rubinstein 171
Ryumin 98
Saigin 109
Salov 129, 132, 139
Sammul 56
Sanz 109
Sax 65,129
Schmid 58,82
Schneider 151
Sergievsky 112
Shabalov 149
Shirov 47
Shishkin 76
Simagin 78,167
Sliwa 146
Smirin 11,149
Smyslov 11,175
Sokolov.A. 68,139,143
Sokolsky 176
Spassky 4,10,37,96, 110,111,135,
175
Speelmart 90,133
Spielmann 81
Stahlberg 146
Stangl 47
Stefanov 63
Stein 44,48,61,176
Stolberg 172
Suba 94
Suetin 5,106,142
Sunye 122
Sveshnikov 3,139,143
Szabo 35, 108
Taimanov 177
Tal 1,3,7,8,9, 15,34,46,57,62,
63, 74, 84, 90, 92, 94, 95, 97, 106,
109,117,131, 133,134,135,136,
147, 148, 151, 152, 167, 168, 173,
174, 176, 177,178
Tarjan 12
Tarrasch 137
Taulbut 132
Teichmann 171
Thomas 174
Timoshchenko 106
Tolush 36,78
Tomblom 173
Troinov 170
Tseshkovsky 67
Tukmakov 61, 121,167
Turnhuber 148
Ubilava 106
Uhlmann 59
Index of Players
183
Uitumen 59
Unzicker 117
van Seters 35
Varanin 153
Vasyukov 46, 55, 109
Velimirovic 76
Vereczi 55
Veresov 15, 133, 169
Vidmar 13
Voitsekh 155
Vooremaa 8
Voronova 94
Wade, F. 172
Weenink 151
Wu Ming Qien 111
Yudasin 176
Yuferov 147
Yusupov 19,45,68
Zaid 167
Zaitsev, A. 14
Zak 172
Zamikhovsky 150
Ziedinya 98
Illustrative Games
Tal-Portisch, 1965
Tal-Larsen, 1965
Tal-Hecht, 1962
Spassky-Tal, 1973
Tal-Averbakh, 1961
Tal-Mohrlok, 1962
Torbergsson-Tal, 1964
Tal-Donner, 1968
21
24
27
38
49
68
69
71
Aronson-Tal, 1957
Polugayevsky-Tal, 1979
Tal-Dvoretsky, 1972
Spassky-Tal, 1958
Tal-Gurgenidze, 1969
Spassky-Tal, 1979
Tal-Stean, 1975
Tal-Portisch, 1965
85
100
112
123
156
157
159
161
S 18.95 £12.99
ATTACK WITH
MIKHAIL TAL
MIKHAIL TAL & IAKOV DAMSKY
The legendary Mikhail Tal was the finest ever
exponent of attacking chess. His all-out sacrificial
style took him all the way to the World Championship
title. Dogged by ill-health, Tal's reign was a short one,
and he was never able to regain his crown, but Tal
remained an outstanding player right up to his death
in 1992. His departure has taken away one of the
chess world's most charismatic figures; a player who
excited chess passions wherever he went.
In this, his last book, written together with Russian
sports journalist lakov Damsky, Tal shows how to
unleash devastating attacks in all kinds of positions.
isbn i-6S7ii-Di3-"i