/


Текст
First English edition 2008 by Quality Chess UK LLP. Translated from the
German edition Tigersprung auf DWZ15001
Copyright © 2007, 2008 Artur Yusupov
All rights reserved. No part of this publication may be reproduced, stored
in a retrieval system or transmitted in any form or by any means, electronic,
electrostatic, magnetic tape, photocopying, recording or otherwise, without prior
permission of the publisher.
ISBN 978-1-906552-01-5
All sales or enquiries should be directed to Quality Chess UK LLP,
20 Balvie Road, Milngavie, Glasgow G62 7TA, United Kingdom
e-mail: info@qualitychessbooks.com
website: www.qualitychessbooks.com
Distributed in US and Canada by SCB Distributors, Gardena, California, US
www. scbdis tribu tors. com
Distributed in Rest of the World by Quality Chess UK LLP through Sunrise
Handicrafts, Smyczkowa 4/98, 20-844 Lublin, Poland
Cover Photo: Nadja Jussupow
Photos on page 63 reprinted with the kind permission of Nadja Jussupow
Photo of Judit Polgar on page 211 reprinted with kind permission of the
organizers of the World Championship tournament in San Luis Argentina 2005.
Photos of Viktor Korchnoi and Parimarjan Negi on page 211 reprinted with kind
permission of the organizers of Corus Chess Tournament in Wijk aan Zee, The
Netherlands
Translated by Ian Adams
Typeset and editing by Colin McNab
Additional editing: Jacob Aagaard and John Shaw
Cover design and generic typeset: Augusto Caruso of Caissa Italia
Printed in Estonia by Tallinna Raamatutriikikoja LLC
Build Up Your Chess
with Artur Yusupov
The Fundamentals
Artur Yusupov
Quality Chess
www. qualitychessbooks. com
CONTENTS
Key to symbols used 4
Preface 5
Introduction 6
1 Mating motifs 8
2 Mating motifs 2 18
3 Basic opening principles 30
4 Simple pawn endings 44
5 Double check 54
6 The value of the pieces 64
7 The discovered attack 74
8 Centralizing the pieces 82
9 Mate in two moves 92
10 The opposition 100
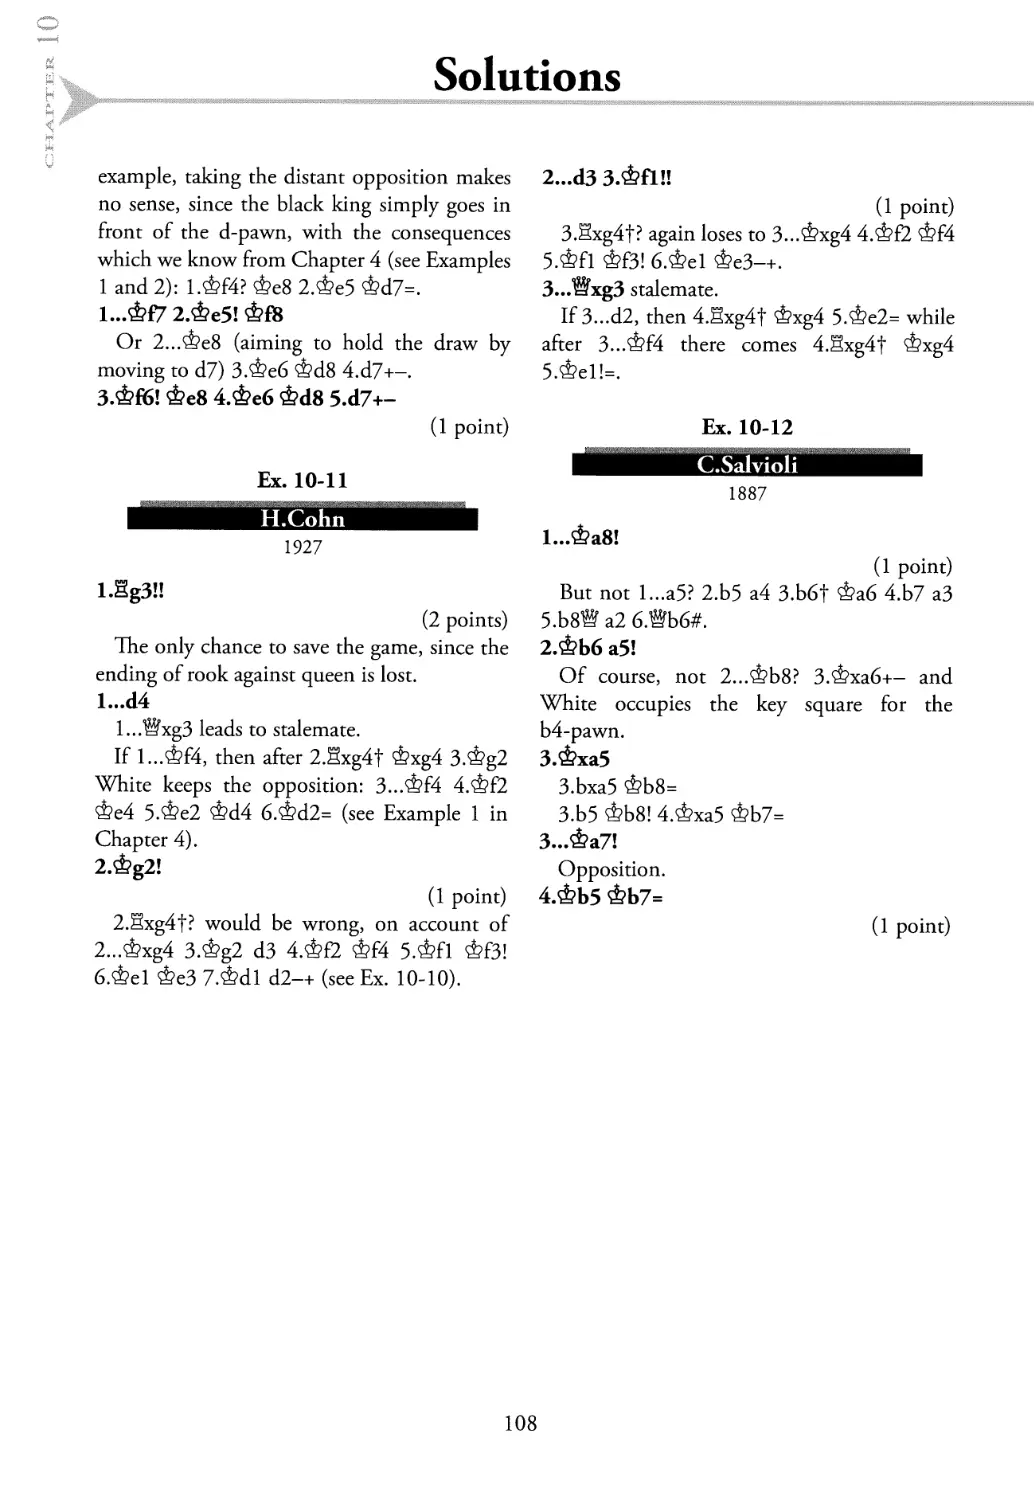
11 The pin 110
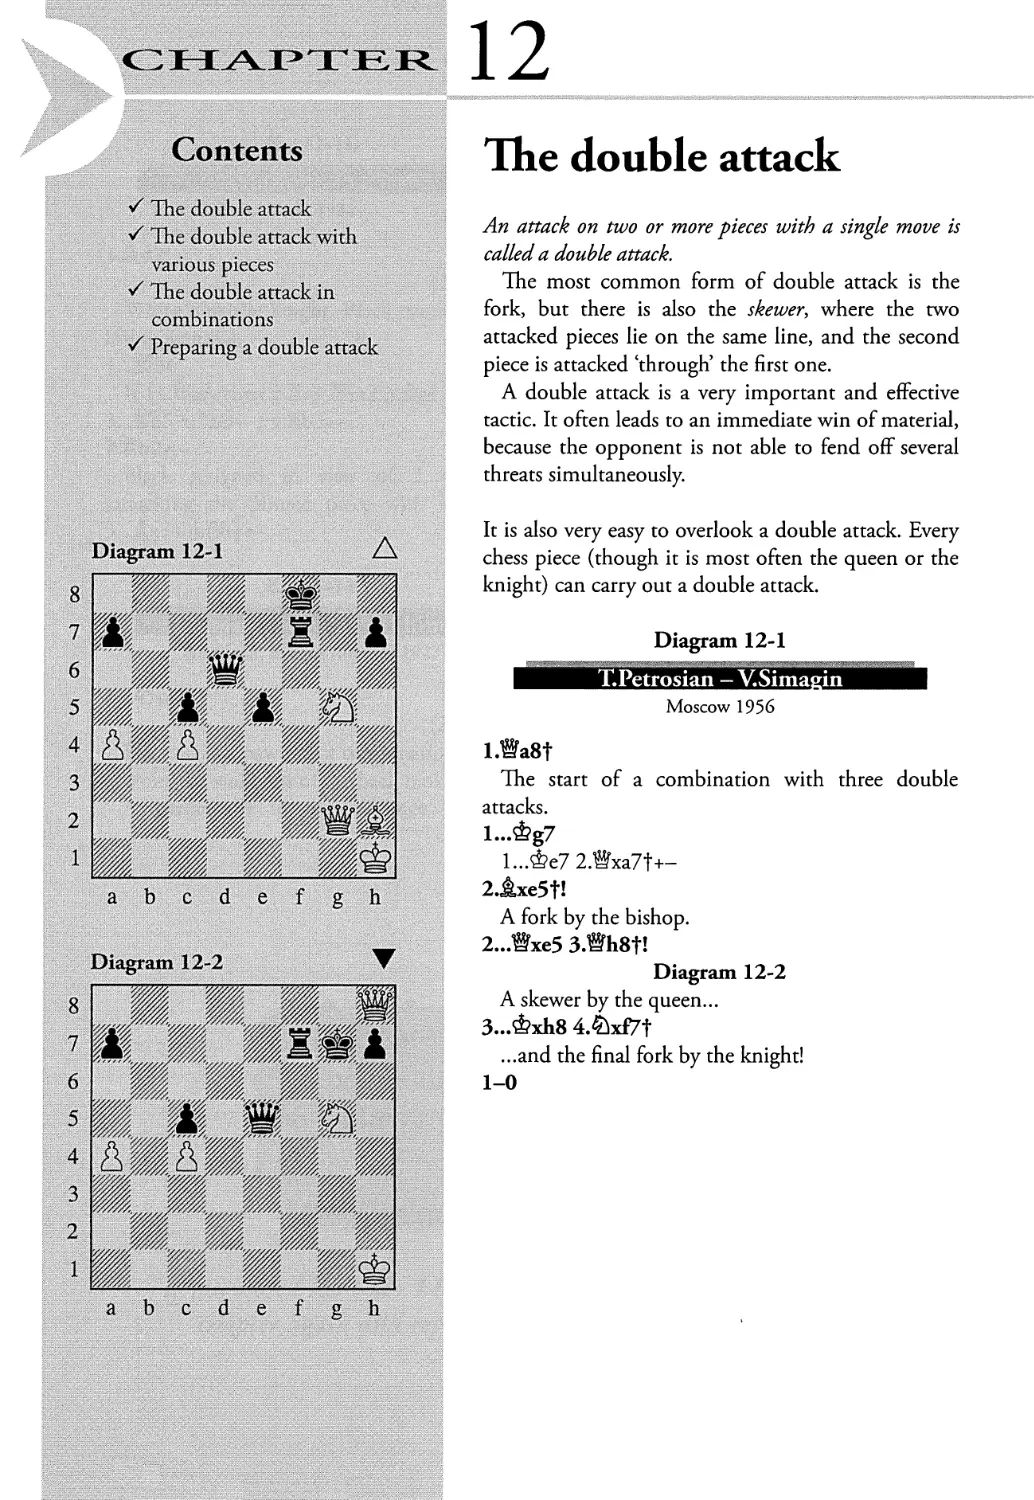
12 The double attack 120
13 Realizing a material advantage 128
14 Open files and Outposts 138
15 Combinations 148
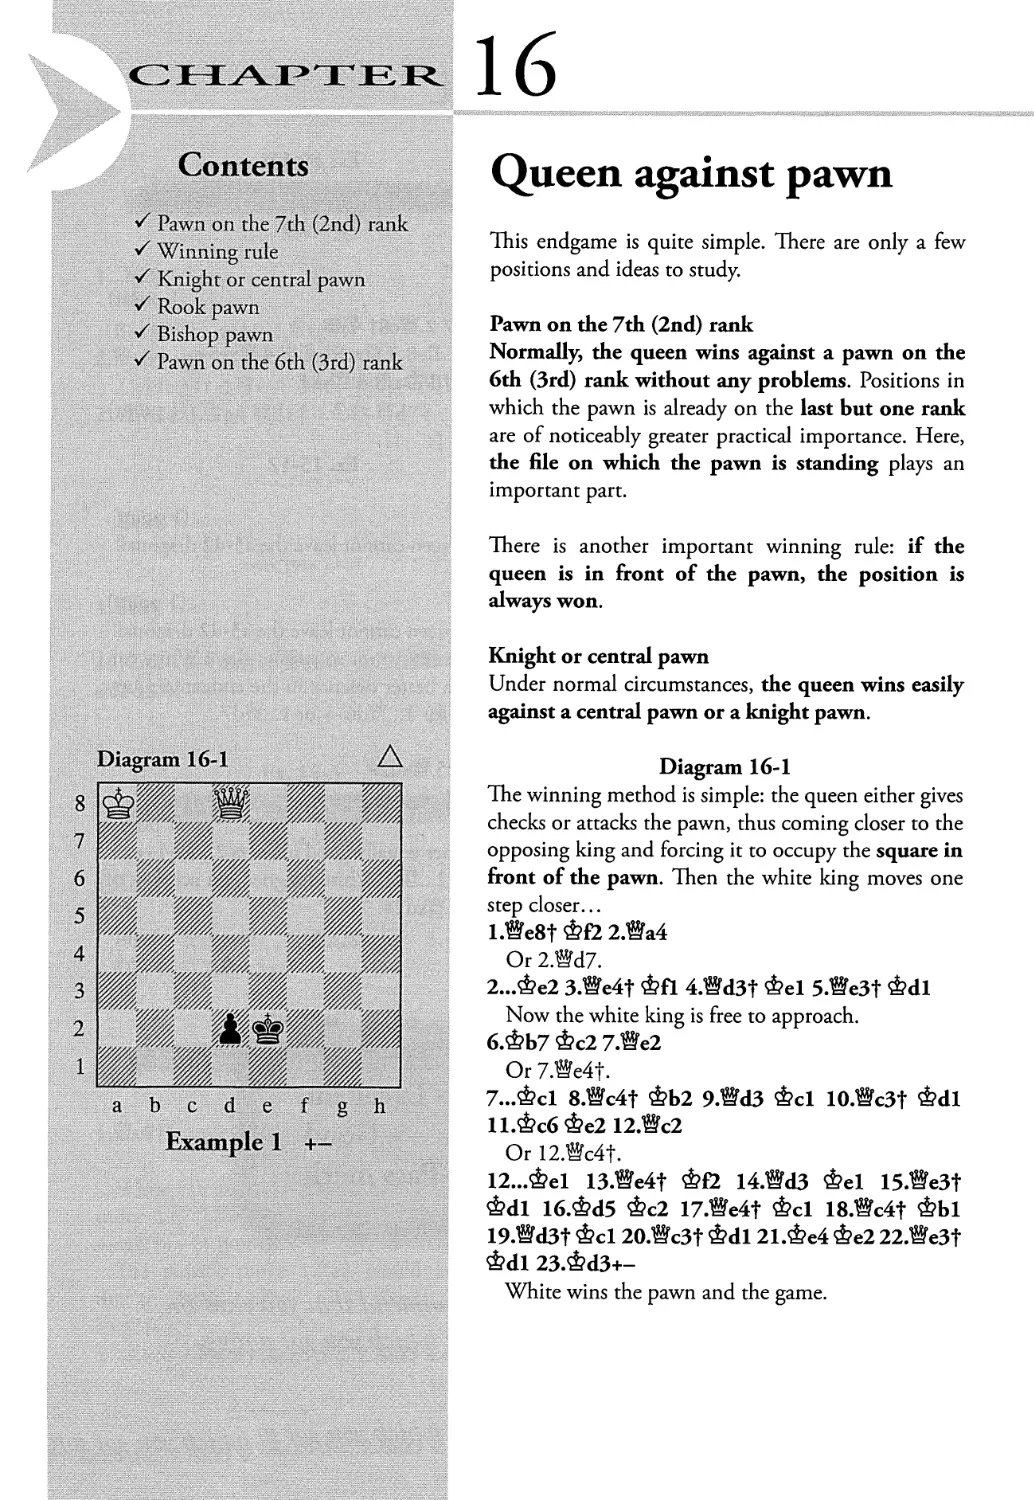
16 Queen against pawn 156
17 Stalemate motifs 164
18 Forced variations 172
19 Combinations involving promotion 182
20 Weak points 192
21 Pawn combinations 202
22 The wrong bishop 212
23 Smothered mate 222
24 Gambits 232
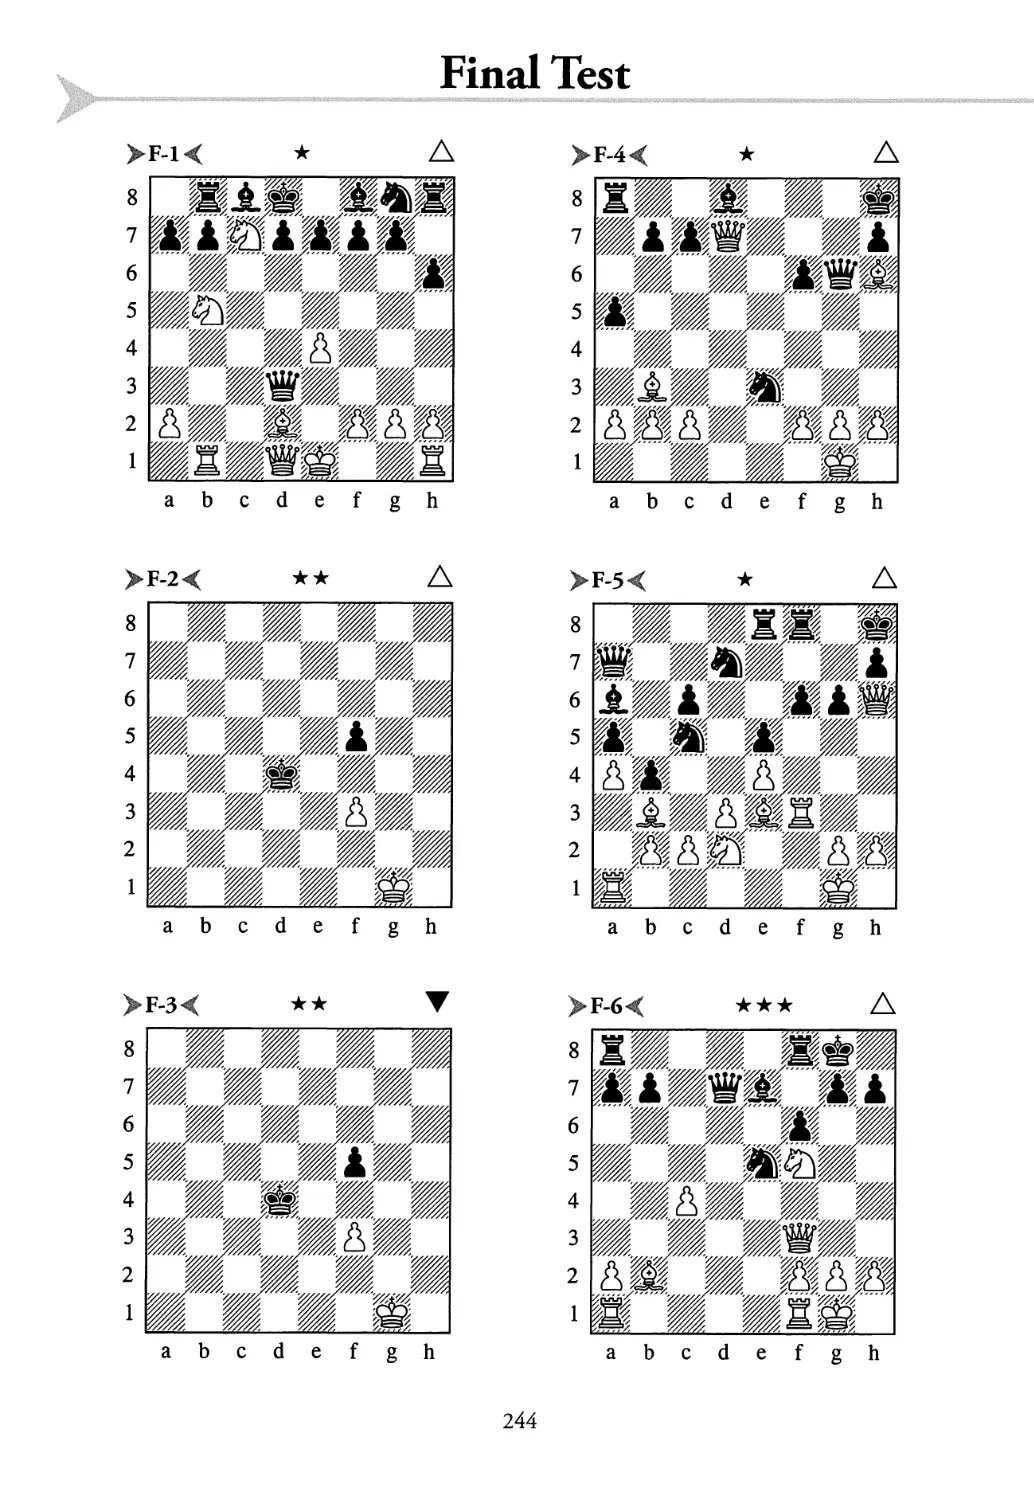
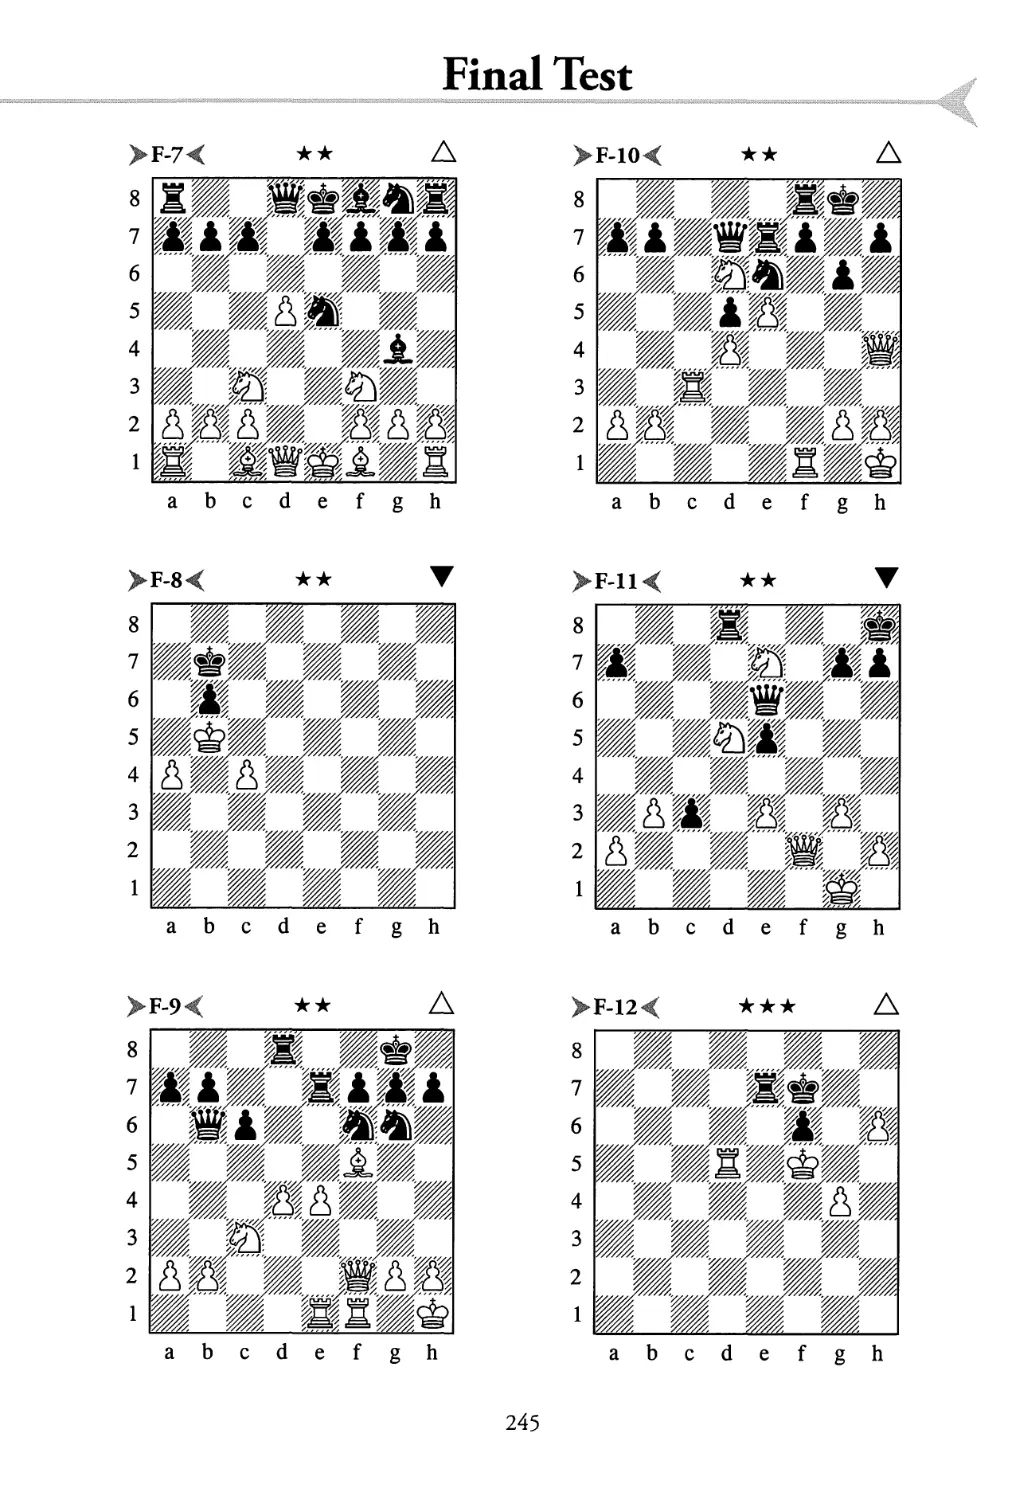
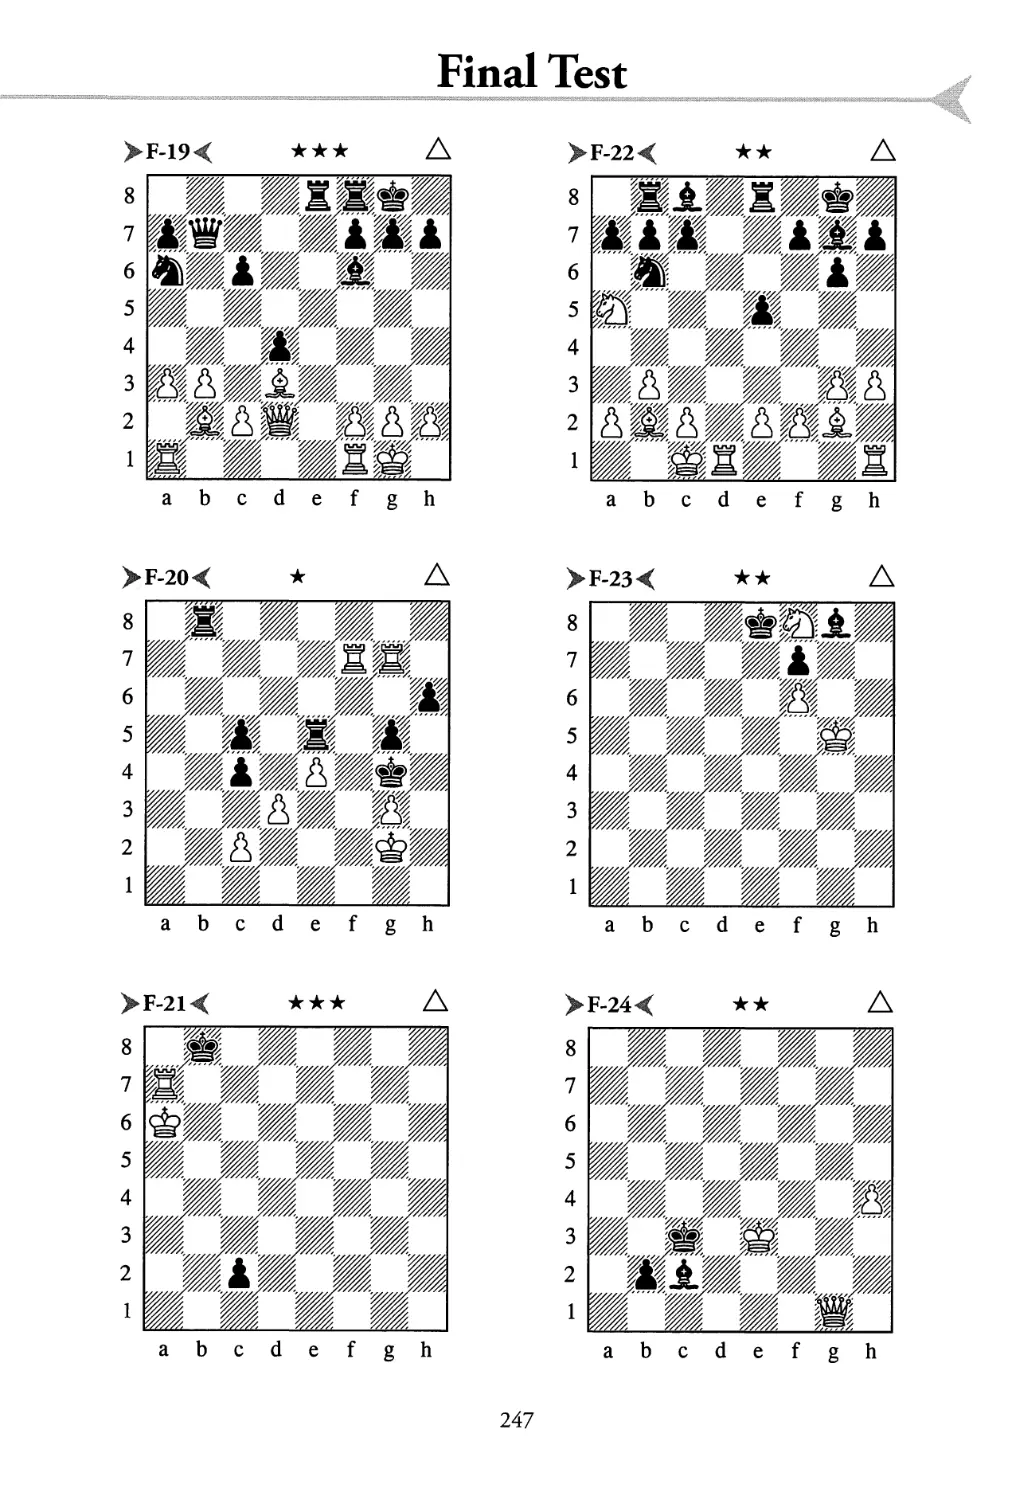
Final test 244
Appendices
Index of composers and analysts 252
Index of games 254
Recommended books 262
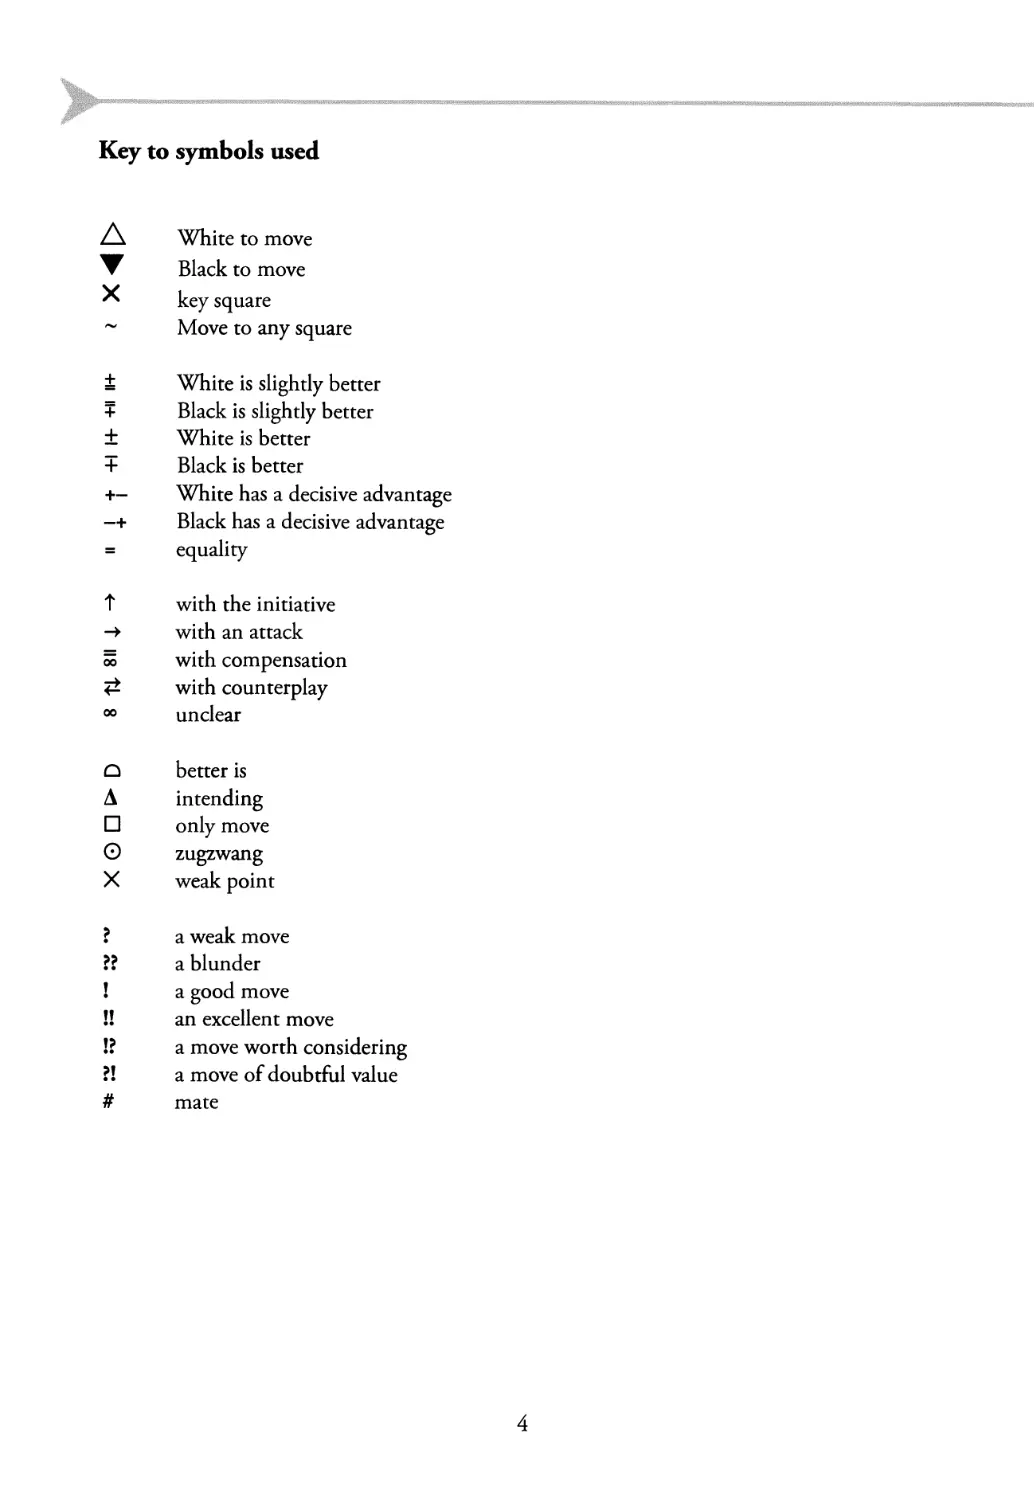
Key to symbols used
A White to move Black to move
X key square
Move to any square
± ¥ ± + White is slightly better Black is slightly better White is better Black is better
+- White has a decisive advantage
-+ Black has a decisive advantage
= equality
t 00 00 with the initiative with an attack with compensation with counterplay unclear
Q A □ 0 X better is intending only move zugzwang weak point
? ?? ! n a weak move a blunder a good move an excellent move
!? ?! # a move worth considering a move of doubtful value mate
4
Preface
It was a pleasure to have Artur Yusupov working as my second, both personally and professionally.
It is therefore an honour for me to write the preface to the new manual Build Up Your Chess
with Artur Yusupov.
This new book was created by expanding and improving the original online lessons from the
Chess Tigers University. As an honorary member of the Chess Tigers, it has given me great
pleasure to see this logical follow-up take concrete form and meet the twin challenges of being
both a valuable textbook and a bedside book.
It was in 1994 that I met Artur Yusupov in the semi-finals of the Candidates’ cycle in Wijk
aan Zee. 1 managed to come out ahead by 4.5-2.5, but I recognized that Artur harboured great
potential, both in his chess knowledge and extensive match experience.
Artur’s systematic and professional approach to analysing games was the decisive factor in
having him as my second in rhe World Championship Finals in New York 1995 and Lausanne
1998. His mastery of the methods of the Russian chess school was very helpful in the preparation
for the matches, as well as during the matches themselves. It was his idea that I should play the
Trompovsky in the last game in Lausanne. I was 3-2 down, but was able to level the match at
3-3 and thus force a play-off.
I am still very grateful for everything that Artur did for me.
Artur’s vast experience as a trainer convinced him that there is a considerable need for better
tuition for amateurs. Matching the level to the needs of the student is perhaps not too difficult,
but the masterstroke is structuring the information in such a way that makes it immediately
useful for amateurs. I am naturally enthusiastic about the rich variety of material in this series,
which can help beginners become top amateurs.
I wish Artur Yusupov all the best with the publication of the first book in the series Build Up
Your Chess with Artur Yusupov. Making this work available in English means that even more
people who are keen to learn can enjoy it to the full.
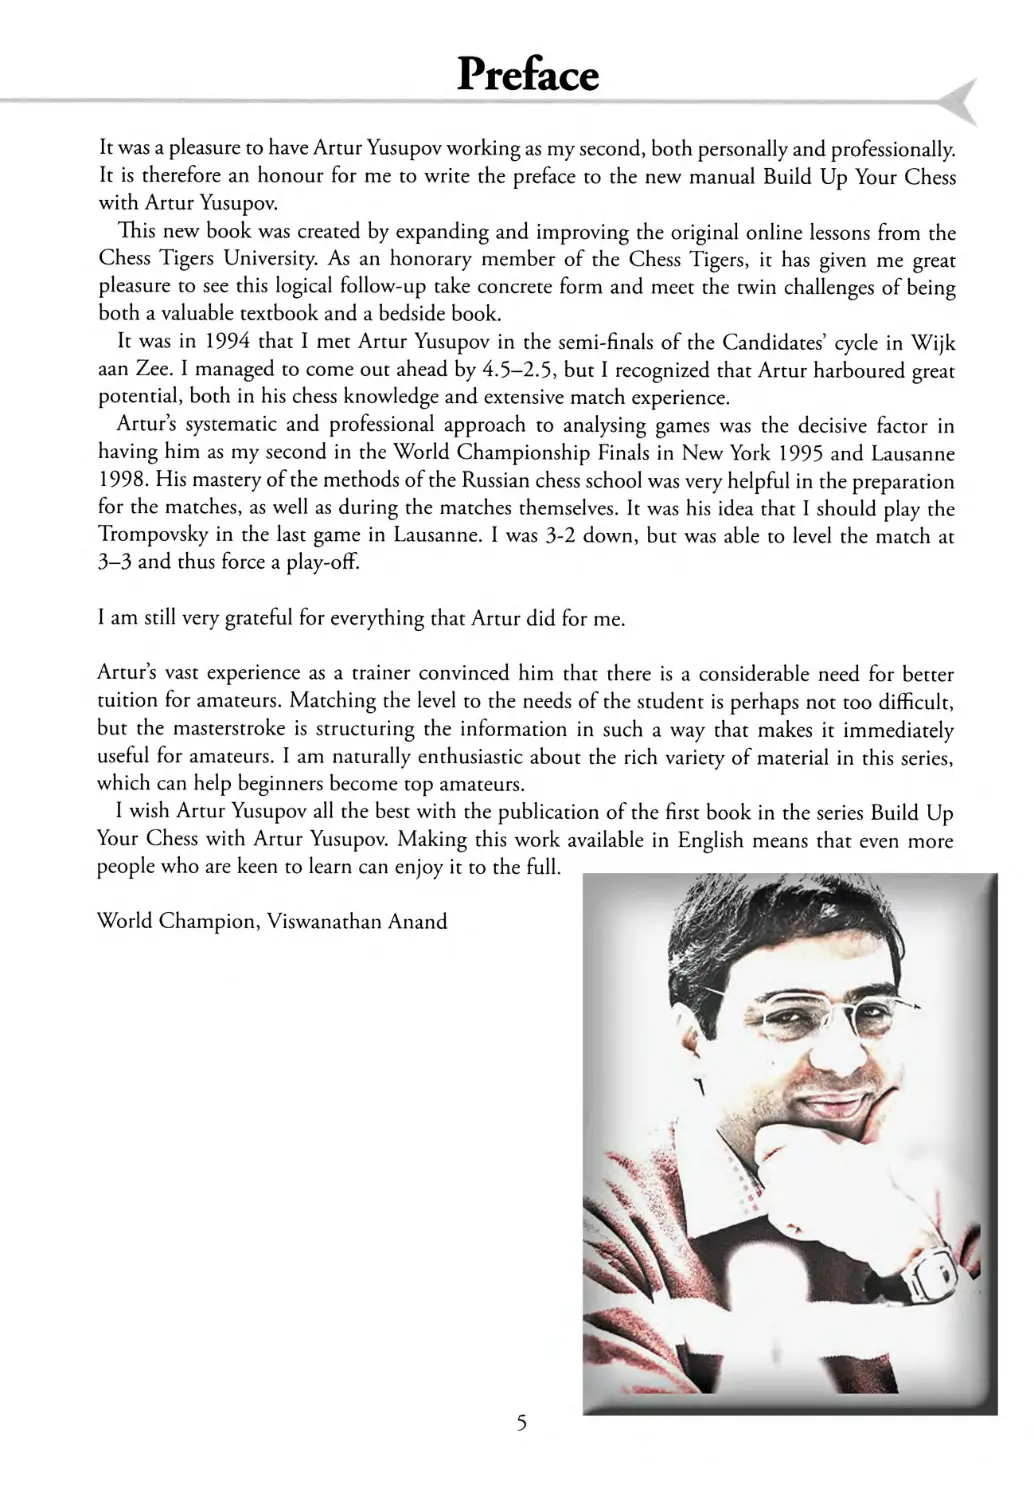
World Champion, Viswanathan Anand
5
Introduction
During my many years of work as a chess trainer, I have noticed that there are only a few books
which are really suitable for most amateur players. Some good books treat individual aspects of
the game (middlegame or endgame, tactics or positional play) without paying any real heed to
the readers playing level. This brought about the idea of working out a teaching programme
aimed specifically at a certain playing strength. Such teaching programmes, in a brief form
and intended as systematic help for trainers, are common only in Russia, where they are very
popular. One very well known and much valued example is a publication by Golenischev, which
inspired some aspects of my methodology.
In 2003 I began a 3-year training programme in my chess academy. Three groups were set
up according to playing strength: under Elo 1500, under Elo 1800 and under Elo 2100. Each
annual stage consisted of 24 teaching modules and 24 tests, plus a final test at the end of the
course.
This programme was later taken over, in a different form, by the Chess Tigers University and
is still being used there.
The overwhelmingly positive comments of my students encouraged me to rework this
programme in the form of a series of books. In doing so, I was able to make use of many
evaluations, corrections and suggestions from my students. While I was redrafting, especially
the explanations in the solutions, that feedback from my students was very valuable.
This book is the first volume in a series of manuals designed for players who are building the
foundations of their chess knowledge. The reader will receive the necessary basic knowledge in
six areas of the game - tactics, positional play, strategy, the calculation of variations, the
opening and the endgame.
The reader will benefit from the methodical build-up in this book, even if some of the
material is familiar, as it will close any possible gaps in his chess knowledge and thus construct
solid foundations for future success. To make the book entertaining and varied, I have mixed
up these different areas, but you can always see from the header to which area any particular
chapter belongs.
At this point I must emphasize that just working with this book does not guarantee a rise in
your rating. It simply gives you a solid basis for a leap forward in chess ability. You should also
play in tournaments, analyse your own games, play through well-annotated games of stronger
players and read books on chess (I have included some suggestions at the end of this book).
I have also been concerned with another problem area since I moved to Germany: the role
of trainers in chess education. In Germany there are unfortunately too few qualified trainers.
There is also a widespread opinion that a talented chess player does not need a trainer. I do not
share that opinion. I believe that many talented chess players could develop much further, if
they had support at the correct time and if they had not left gaps in their learning.
Chess is a complicated sport, which has to be studied for many years. It is hard to imagine
any other sport without coaches. (Is there a single athletics club or football club that does not
have a trainer?) This manual is intended for the many club players who unfortunately receive no
support in attempting to master our complicated sport. In this way it is intended as a substitute
for a trainer for those that have none (and a support for trainers), but not an equal replacement
for a trainer.
I further believe that many chess lovers, who show great commitment to working with young
players in chess clubs, will gain with this series of books (as well as with the programme of the
6
Chess Tigers University) important methodological support and high quality training material
for their chess lessons. The students will certainly profit from the supplementary explanations
given by trainers and from lively discussions about the themes in the books.
How to work with this book
First read through the lessons. You absolutely must play through all the examples and all the
variations on a chessboard.
First think about every diagram position (for at least 5 minutes) and try to find the solutions
on your own. On average, you will need 1 to 2 hours per lesson. However, there is no time
limit; some students may need more time for specific lessons.
It is important to have a good understanding of the subject.
The second part of the lesson is a test with 12 positions. The stars near the number of each
exercise indicate the level of difficulty and, at the same time, the maximum number of points
which you can earn for the correct solution with all necessary variations (★ = 1 point). Try to
solve the positions without moving the pieces! If you cannot solve the position straight away,
you must try for a second time for approximately 10 minutes. This time you may move the
pieces. You must look for new ideas.
On absolutely no account may you get help from a computer!
Normally you will also need 1 to 2 hours for each test. Try to solve all the exercises. Consider
each position as though it were appearing in one of your own games and look for the best
possible continuation. You do not always have to mate or win quickly. It is sometimes enough
to suggest a good move. Especially in the lessons on the opening, it is more important for you
to reflect on the position, take a decision and then carefully play through the solutions. This will
help you better understand the ideas of the opening. Mistakes are part of the learning process!
It is very important to write down all the necessary variations. If you do this you will be
able to compare your solution with the one given in the book and you can also see how well
you have understood the particular subject. If your score is too low, we recommend that you
work through the chapter again. We also recommend that you play through the solutions,
including all the variations, on a chessboard.
You will find an explanation of the standard chess symbols used in this book on page 4.
At this point I should like to express my gratitude to a large number of people who have
supported my work in various ways. There is firstly my wife Nadja for the design of the German
edition book and her help in working through the solutions, my daughter Katja for many
corrections to my German, my chess trainer Mark Dvoretsky, from whose training methods
I have learned so much, the Chess Tigers and Hans-Walter Schmitt for their constructive and
productive cooperation, Mike Rosa for correcting some mistakes, Reinhold from Schwerin for
his proofreading, and finally to Semen Oxman and Oleg Aizman, who gave valuable advice
concerning the design of the book.
I would also like to thank Augusto Caruso for his elaboration of Nadjas design for the English
edition and Ian Adams for translating the book.
GM Artur Yusupov
7
ОХ^ЖЖ 1
Contents
S Marc along open lines
S Anastasias mate
S The Arabian mate
S The queen-bishop battery
S The queen-rook battery
S Boden’s mate
8
7
6
5
4
3
2
1
8
7
6
5
4
3
2
1
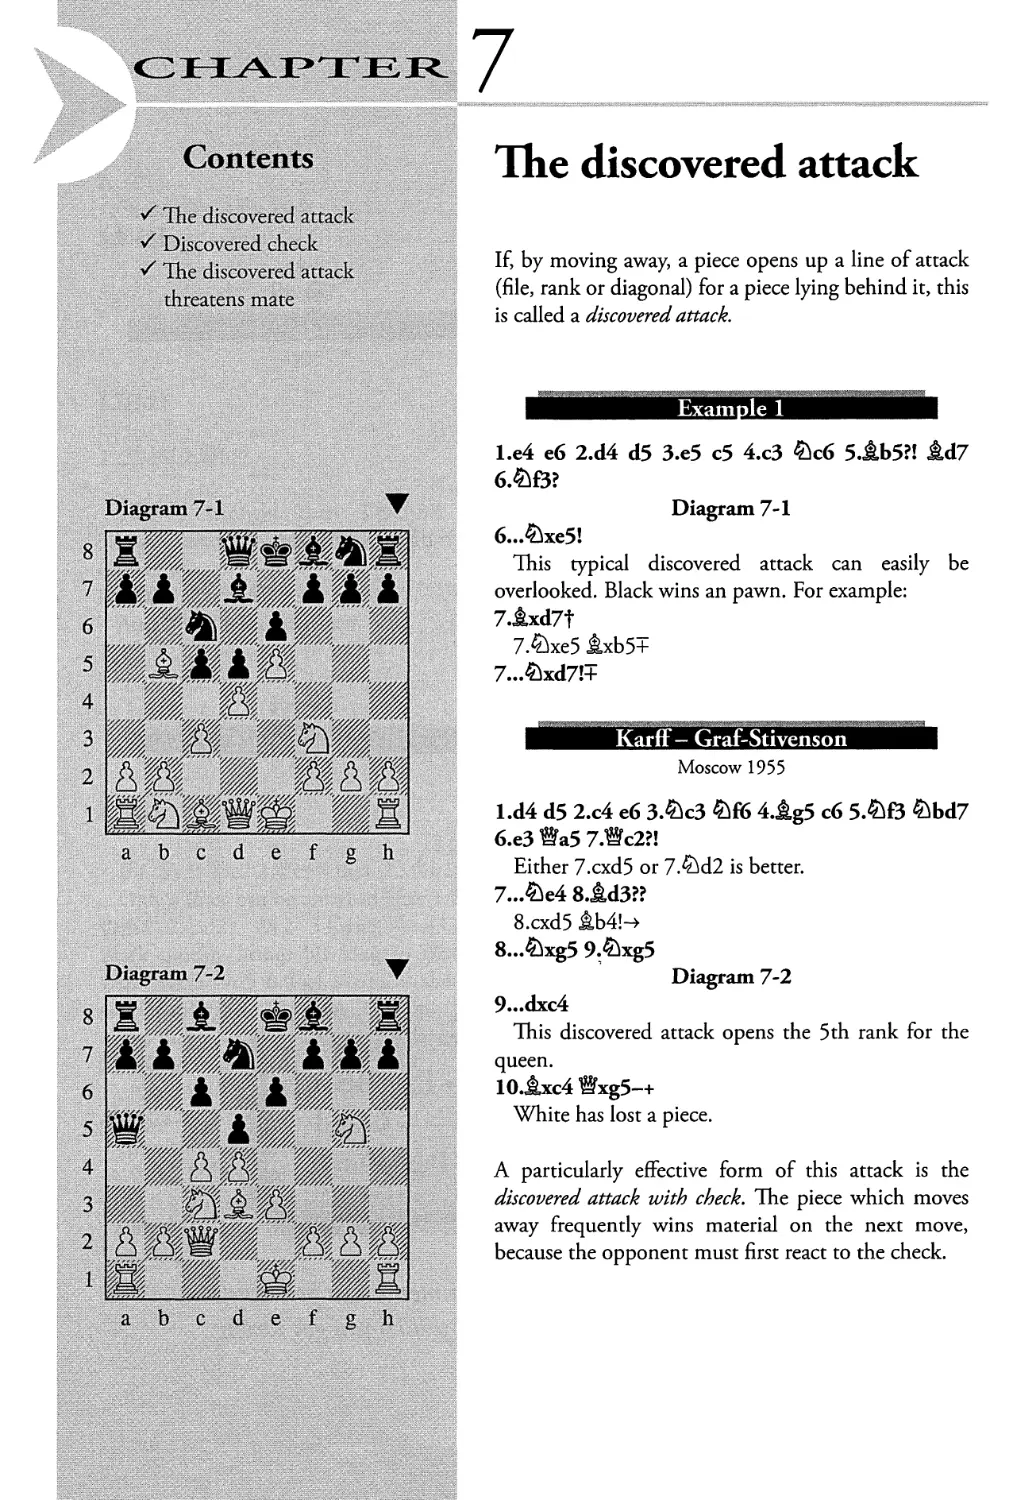
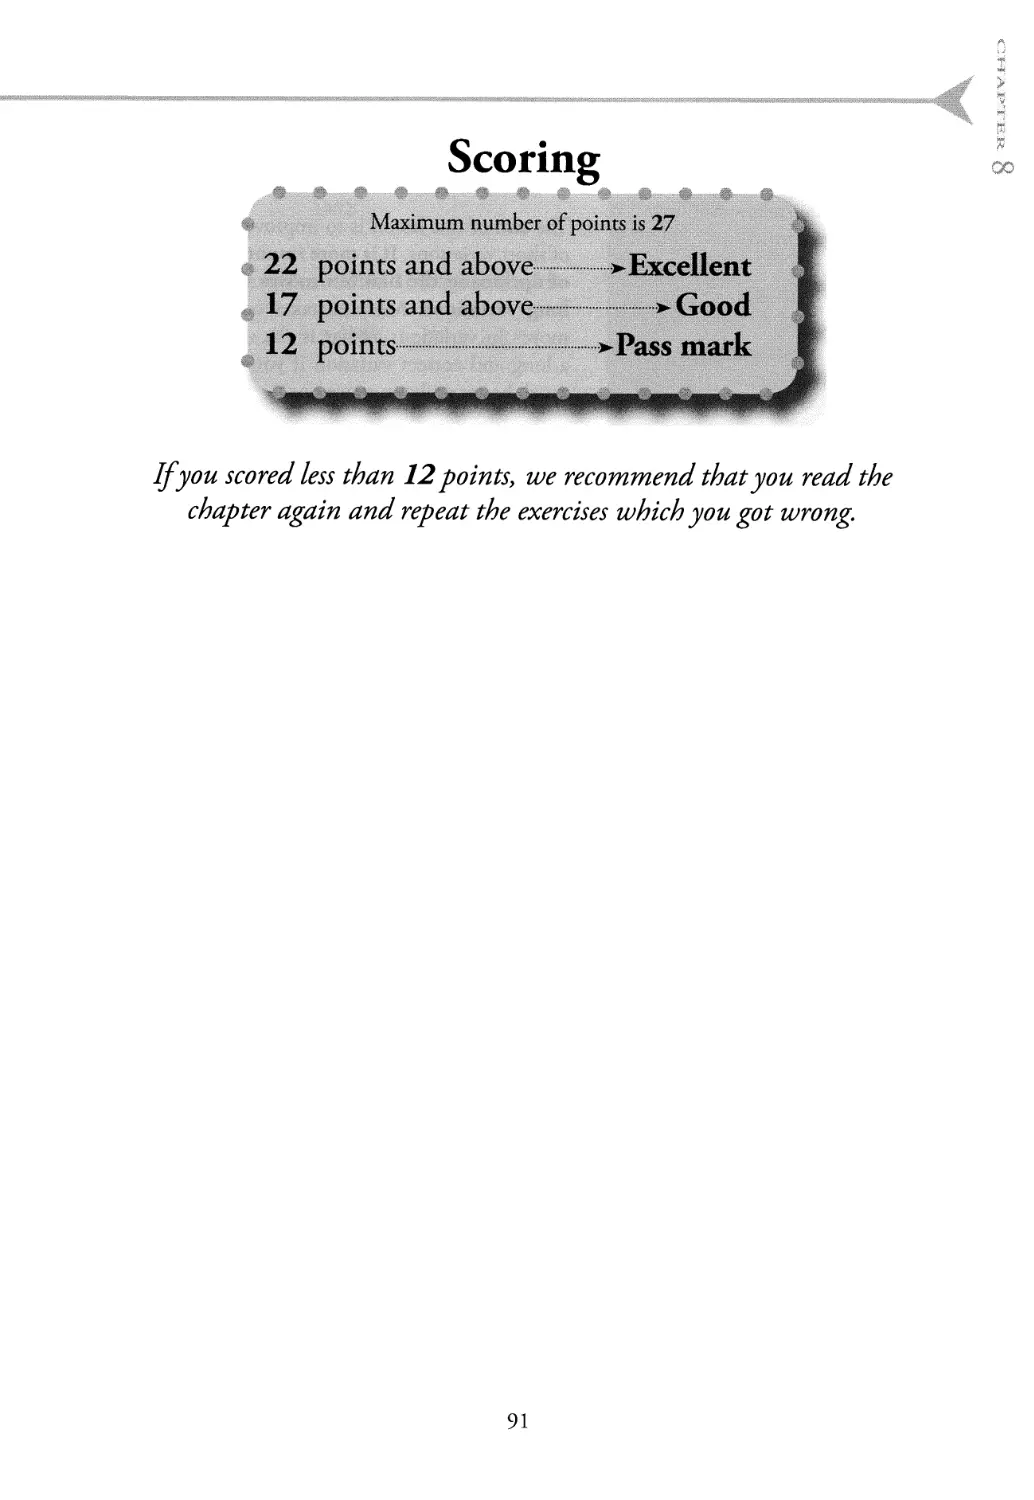
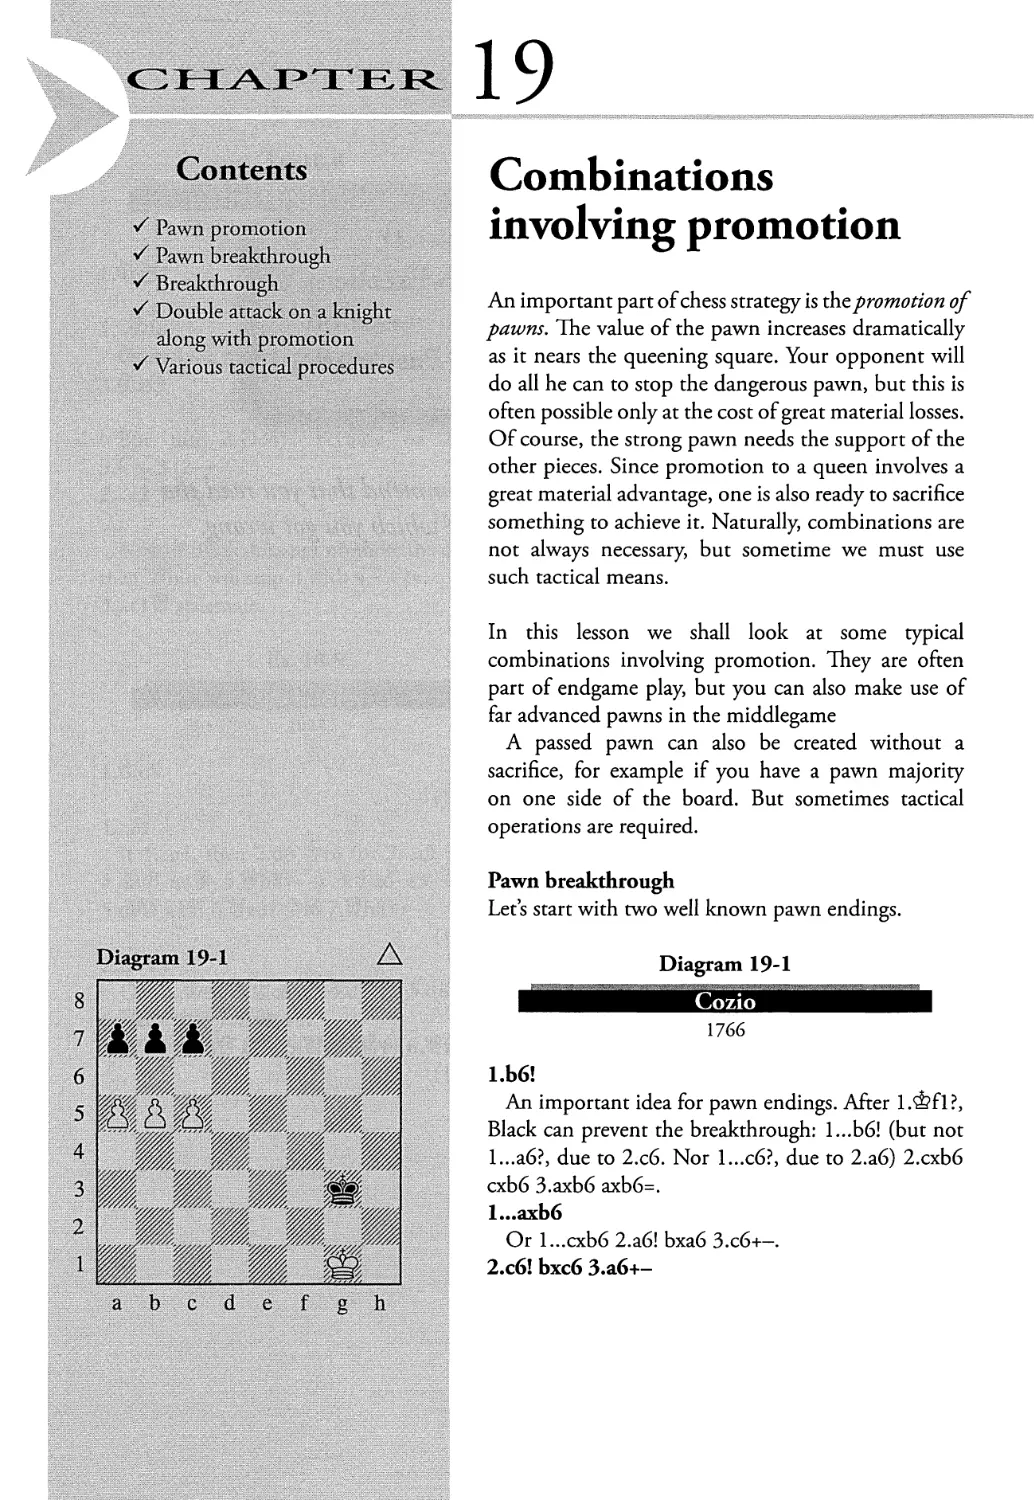
Diagram 1-1 Z\
abcdefgh
Mating motifs
In this lesson we shall study various typical mating
motifs. This should enable you to exploit any such
opportunity in practical play.
Mate along open lines
This is a very well-known and important motif. It
involves two major pieces (rook + queen or two
rooks) operating along open files or ranks and forcing
the opposing king to the edge of the board. Since it
has no way out, the king is mated there.
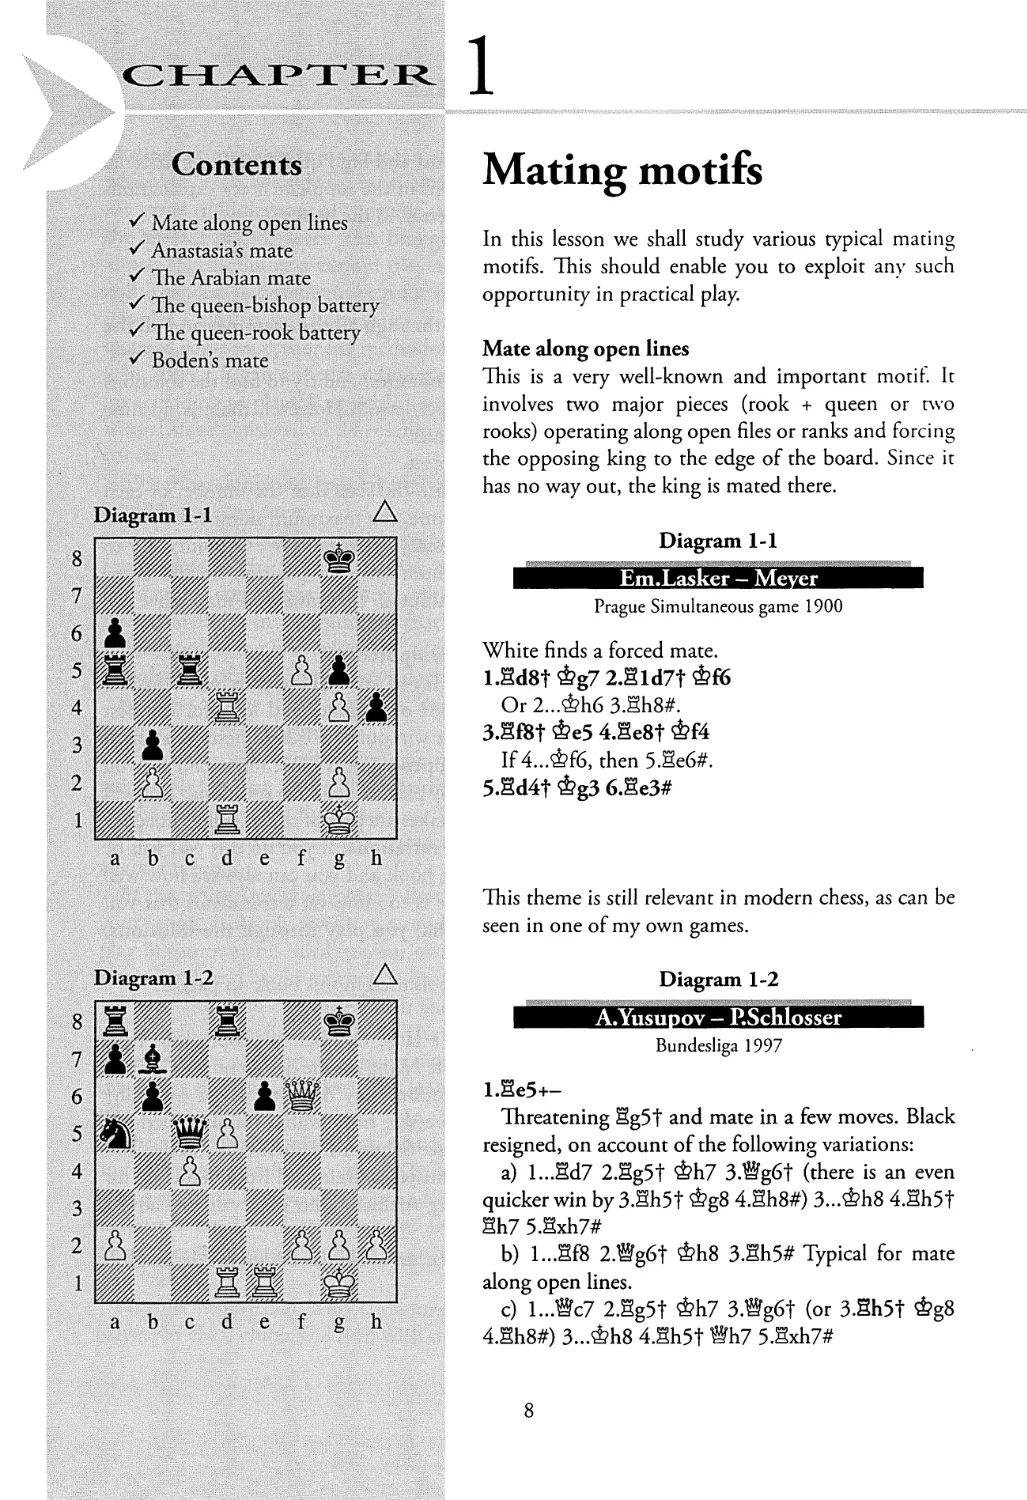
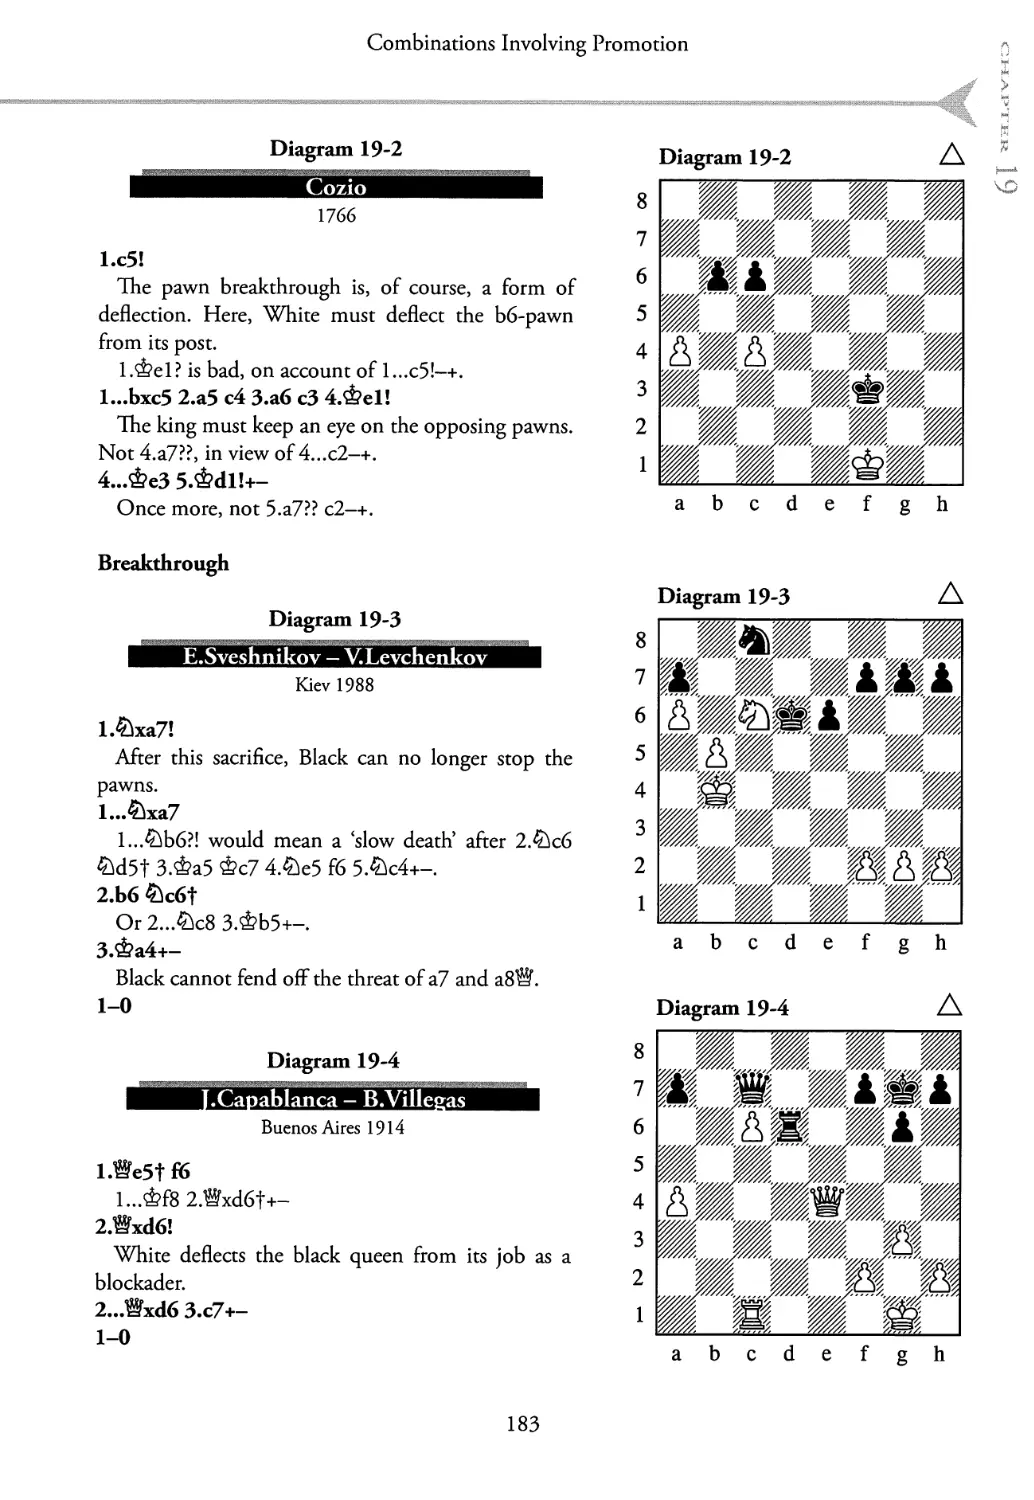
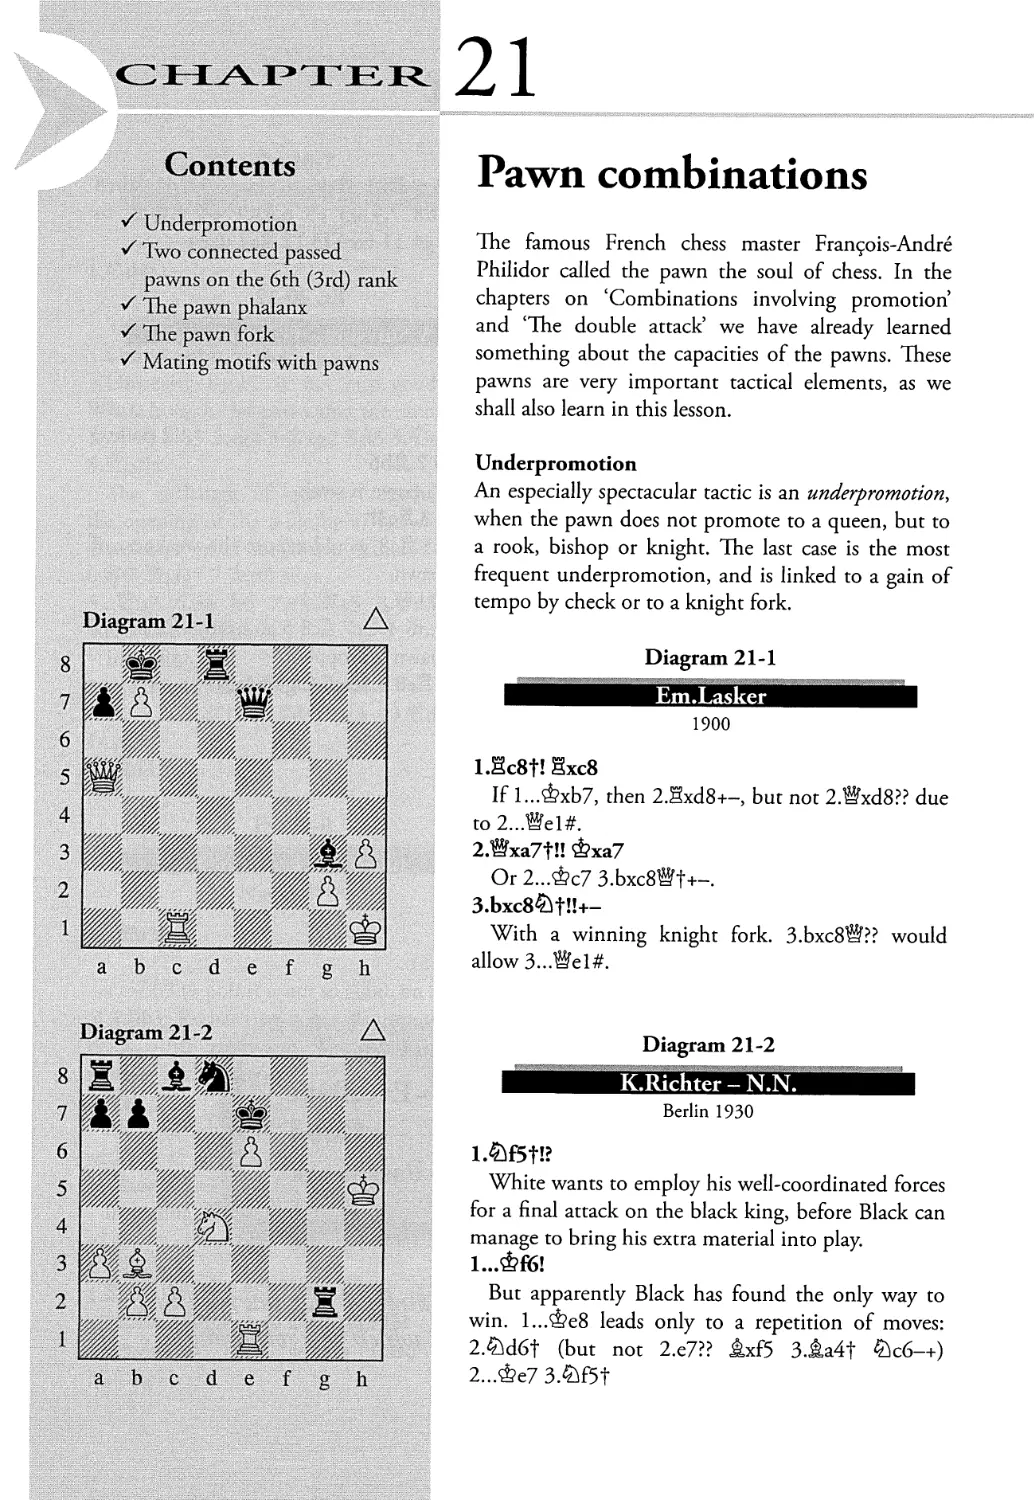
Diagram 1-1
Em.Lasker — Meyer
Prague Simultaneous game 1900
White finds a forced mate.
l.Sd8t &g7 2.Sld7t
Or 2...&h6 3.Sh8#.
3.Sf8t Фе5 4.Se8f &f4
If 4...&f6, then 5.Se6#.
5.Sd4f &g3 6.Se3#
This theme is still relevant in modern chess, as can be
seen in one of my own games.
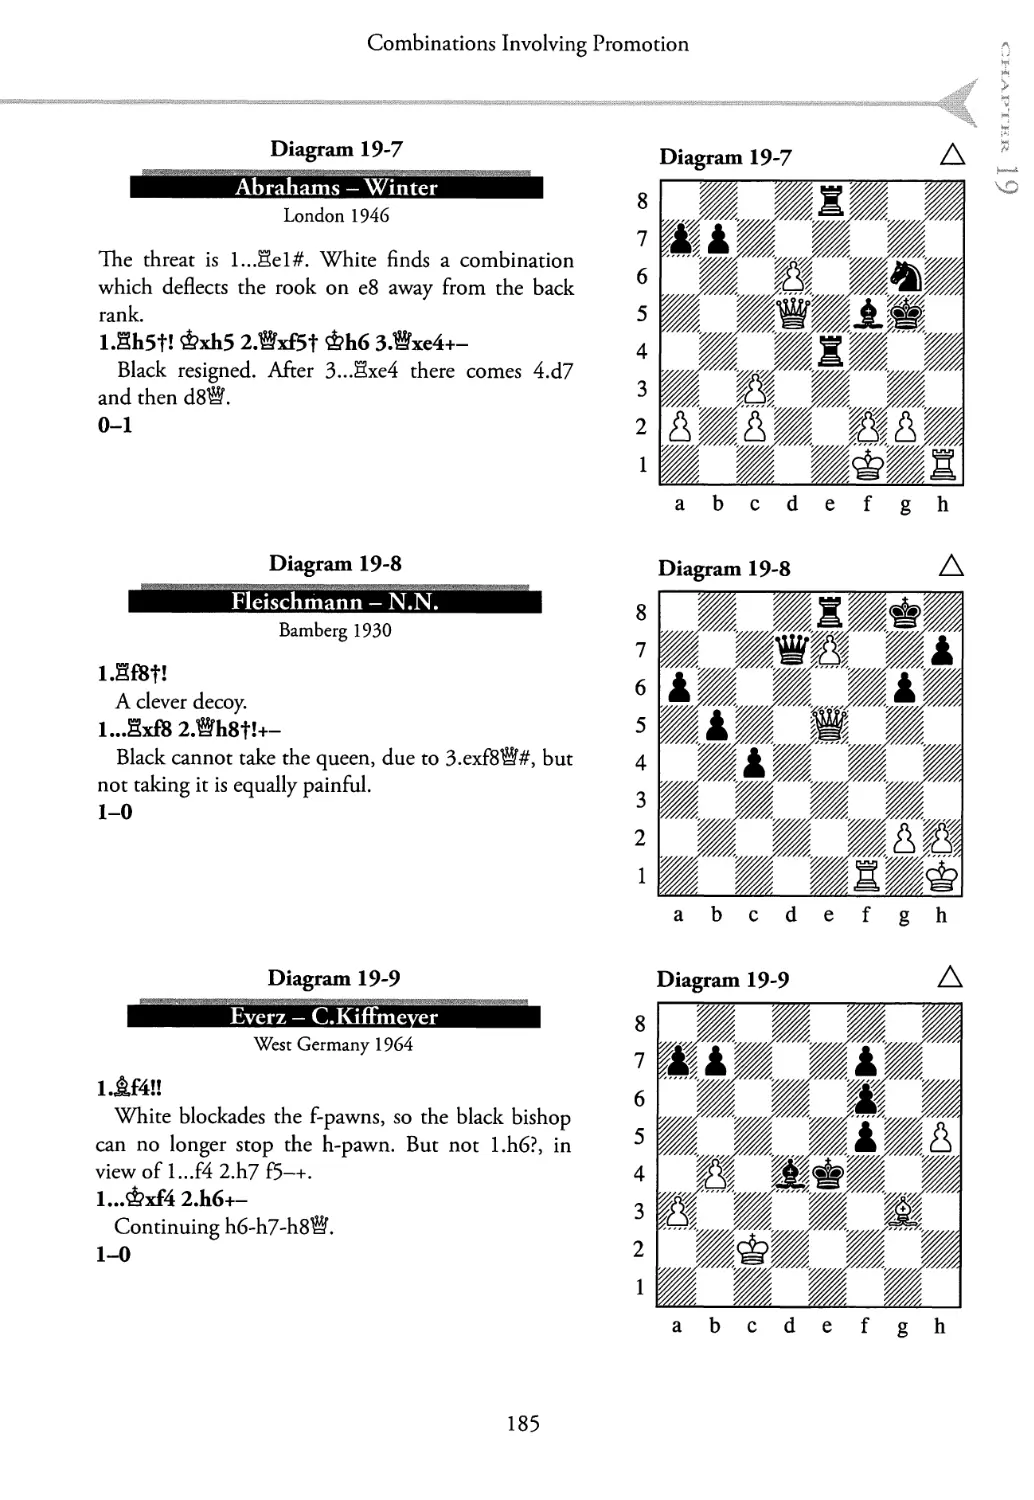
Diagram 1-2
A. Yusupov — P.Schlosser
Bundesliga 1997
l.Se5+-
Threatening Sg5t and mate in a few moves. Black
resigned, on account of the following variations:
a) 1...2d7 2.2g5t ФЬ7 3.®g6f (there is an even
quicker win by 3.Sh5t &g8 4.ЙЬ8#) З...ФЬ8 4.Sh5t
Sh7 5.Sxh7#
b) 1 ...Sf8 2.®g6f ФЬ8 3.Sh5# Typical for mate
along open lines.
c) l...®c7 2,gg5t &h7 3.®g6t (or 3.Sh5t &g8
4.Sh8#) З...ФЬ8 4.gh5t ®h7 5.Sxh7#
8
Mating Motifs
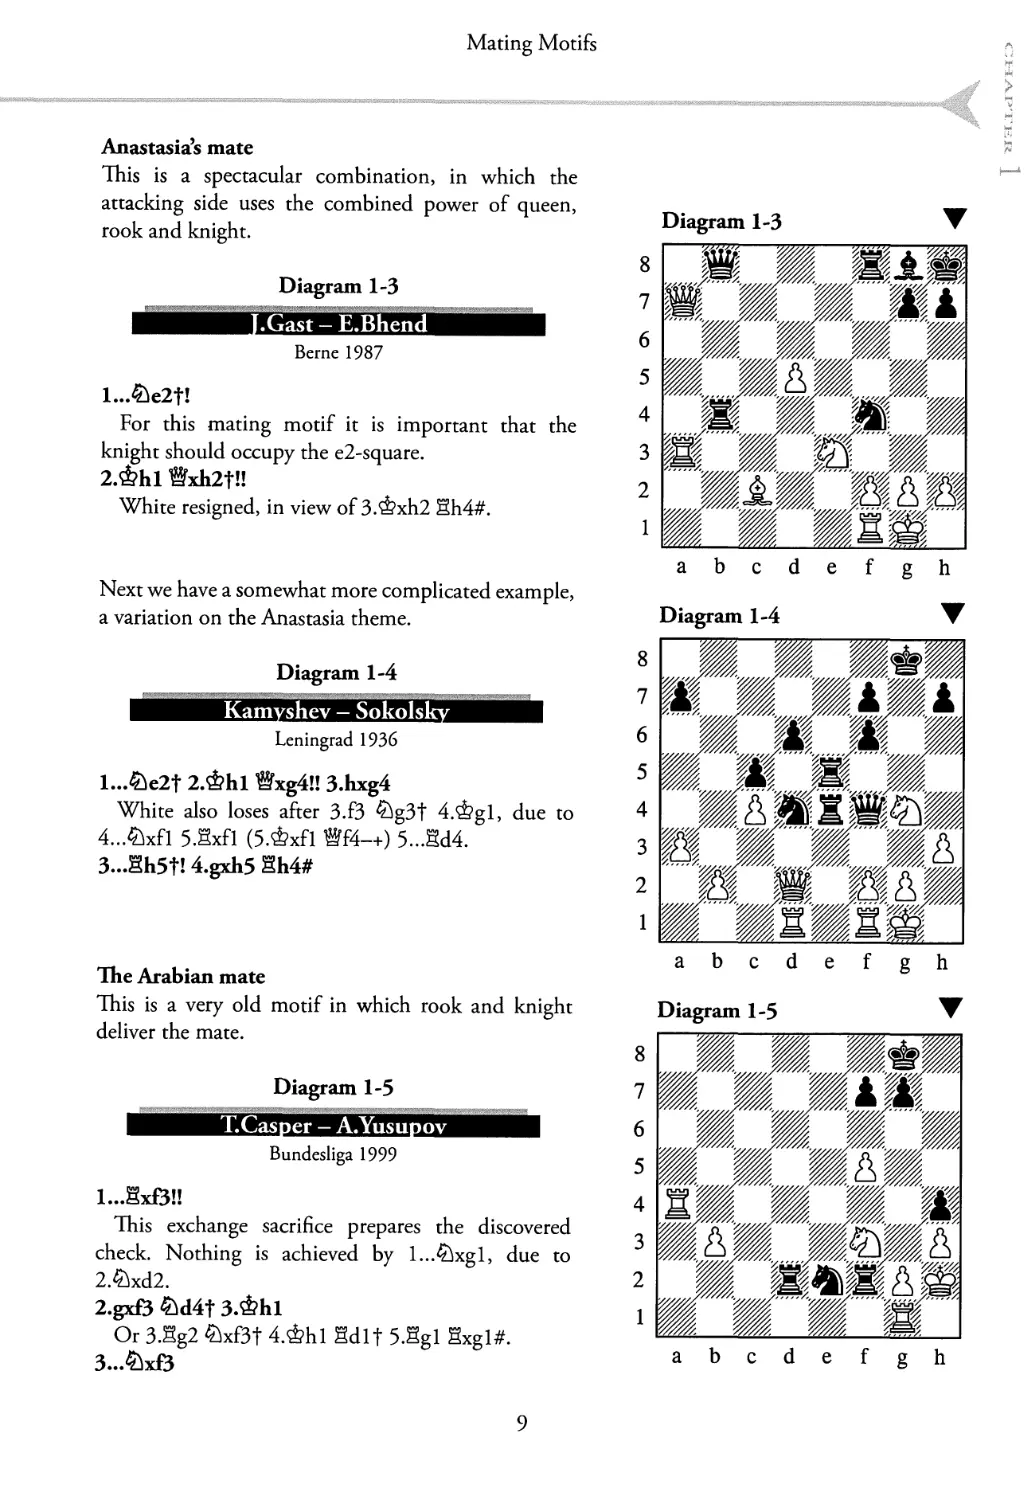
Anastasia’s mate
This is a spectacular combination, in which the
attacking side uses the combined power of queen,
rook and knight.
Diagram 1-3
.Gast - E.Bhend
Berne 1987
l...^e2f!
For this mating motif it is important that the
knight should occupy the e2-square.
2.&hl Wxh2t!I
White resigned, in view of 3.&xh2 Sh4#.
Next we have a somewhat more complicated example,
a variation on the Anastasia theme.
Diagram 1-3
abcdefgh
Diagram 1-4
Kamyshev - Sokols)
Leningrad 1936
l...^e2f 2.&hl ®Kg4!I 3.hxg4
White also loses after 3.f3 ^g3t 4.<&gl, due to
4...W1 5.Sxfl (5.&xfl @f4-+) 5...Sd4.
3...Sh5t! 4.gxh5 Eh4#
The Arabian mate
This is a very old motif in which rook and knight
deliver the mate.
Diagram 1-5
Diagram 1-4
abcdefgh
T.Casper - A.Yusupov
Bundesliga 1999
l...gxB!I
This exchange sacrifice prepares the discovered
check. Nothing is achieved by l...^xgl, due to
2.^xd2.
2.gxf3 &d4f 3.&hl
Or 3.Sg2 W3t 4.ФЫ Sdlt 5.Sgl Sxgl#.
3...^хЙ
Diagram 1-5
abcdefgh
9
Tactics 1
abcdefgh
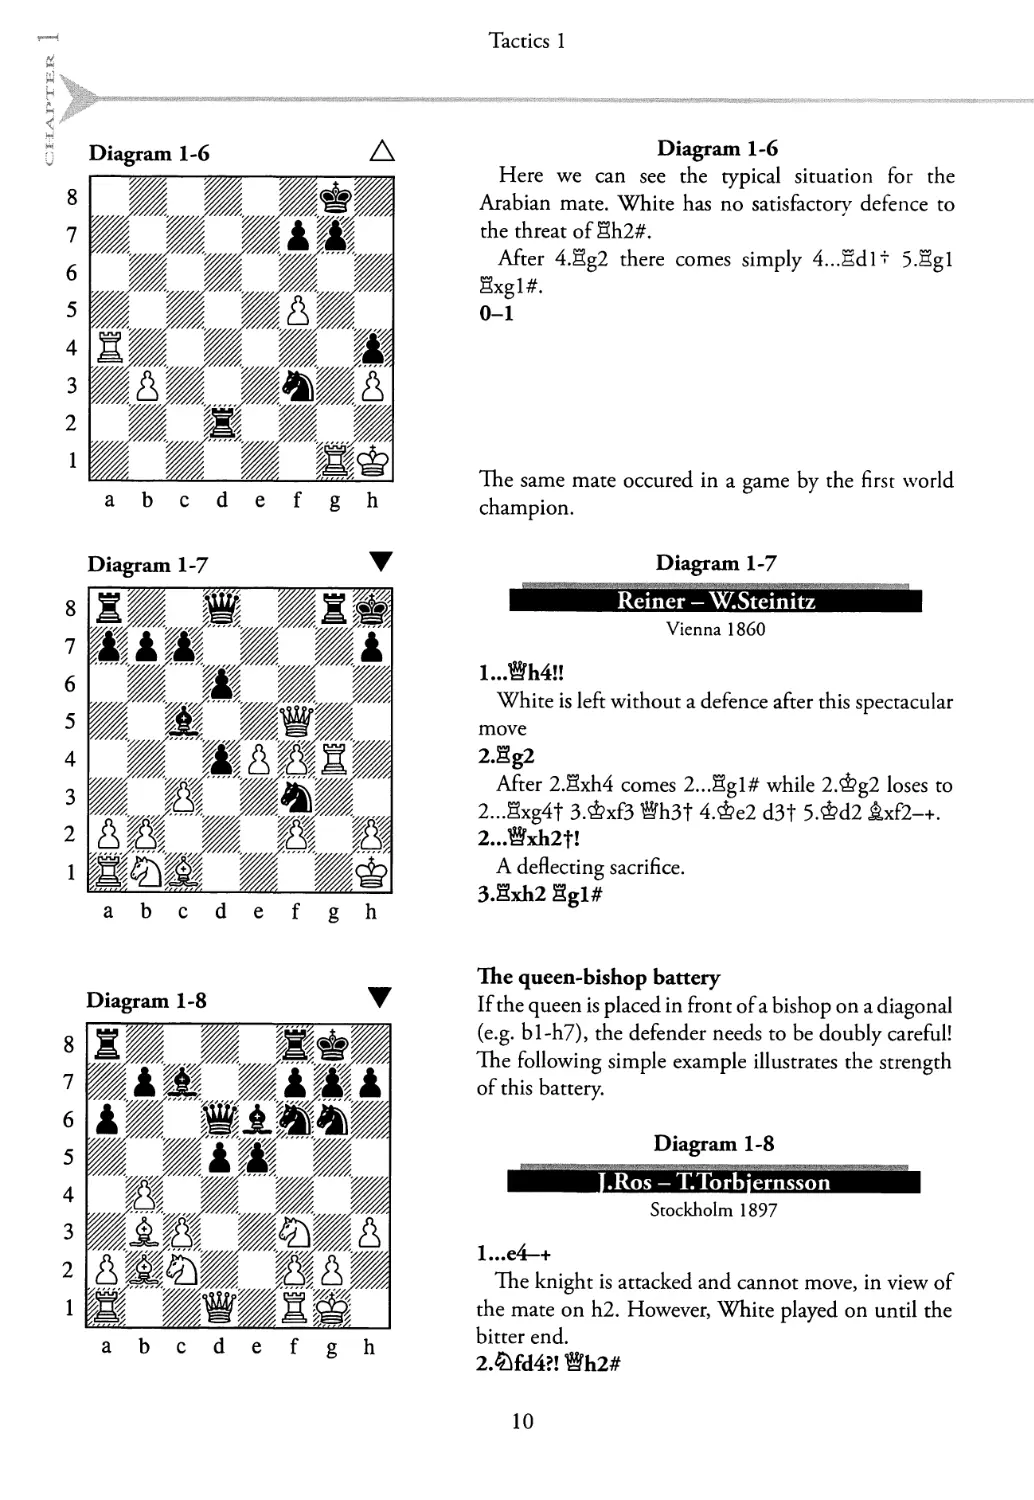
Diagram 1-6
Here we can see the typical situation for the
Arabian mate. White has no satisfactory defence to
the threat of Sh2#.
After 4.Sg2 there comes simply 4...Sdlt 5.Sgl
Sxgl#.
0-1
The same mate occured in a game by the first world
champion.
Diagram 1-7
Reiner - W.Steinitz
Vienna 1860
1..Ж4!!
White is left without a defence after this spectacular
move
2,Sg2
After 2.Sxh4 comes 2...Sgl# while 2.&g2 loses to
2...Sxg4t 3.&xf3 ®h3t 4.Фе2 d3t 5.&d2 lxf2-+.
2...®xh2f!
A deflecting sacrifice.
3.Sdi2 ggl#
The queen-bishop battery
If the queen is placed in front of a bishop on a diagonal
(e.g. bl-h7), the defender needs to be doubly careful!
The following simple example illustrates the strength
of this battery.
Diagram 1-8
Ros — T.Torbjernsson
Stockholm 1897
l...e4-+
The knight is attacked and cannot move, in view of
the mate on h2. However, White played on until the
bitter end.
2.&fd4?l ®h2#
10
Mating Motifs
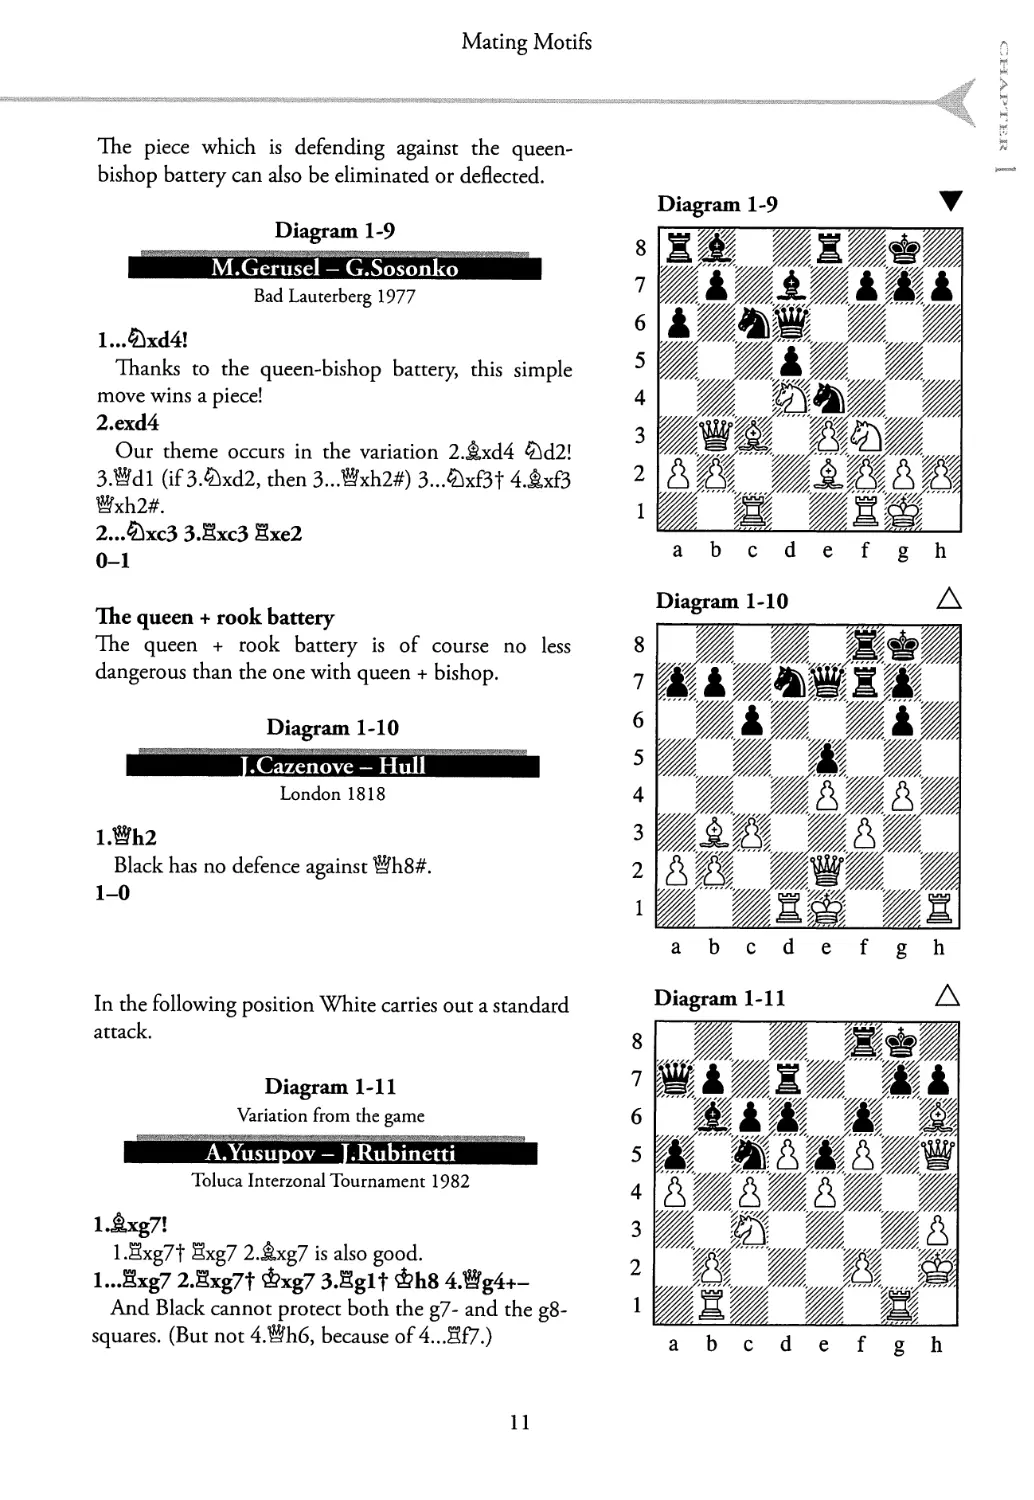
The piece which is defending against the queen-
bishop battery can also be eliminated or deflected.
Diagram 1-9
M.Gerusel - G.Sosonko
Bad Lauterberg 1977
l...&xd4!
Thanks to the queen-bishop battery, this simple
move wins a piece!
2.exd4
Our theme occurs in the variation 2.jkxd4 ^d2!
3.®d 1 (if 3.^xd2, then 3...®xh2#) 3...^xf3t 4.jkxf3
®xh2#.
2...£}xc3 3.Sxc3 Sxe2
0-1
Diagram 1-9
abcdefgh
The queen + rook battery
The queen + rook battery is of course no less
dangerous than the one with queen + bishop.
Diagram 1-10
Г _____ J.Cazenove — Hull
London 1818
l.Wh2
Black has no defence against ®h8#.
1-0
Diagram 1-10 Z\
abcdefgh
In the following position White carries out a standard
attack.
Diagram 1-11
Variation from the game
A.Yusupov - ]
Toluca Interzonal Tournament 1982
l.^xg7!
1.5xg7t Sxg7 2.jkxg7 is also good.
l...Sxg7 2.Sxg7t ^xg7 3.Sglf Ф118 4.Wg4+-
And Black cannot protect both the g7- and the g8-
squares. (But not 4.®h6, because of 4...Hf7.)
Diagram 1-11
abcdefgh
11
Tactics 1
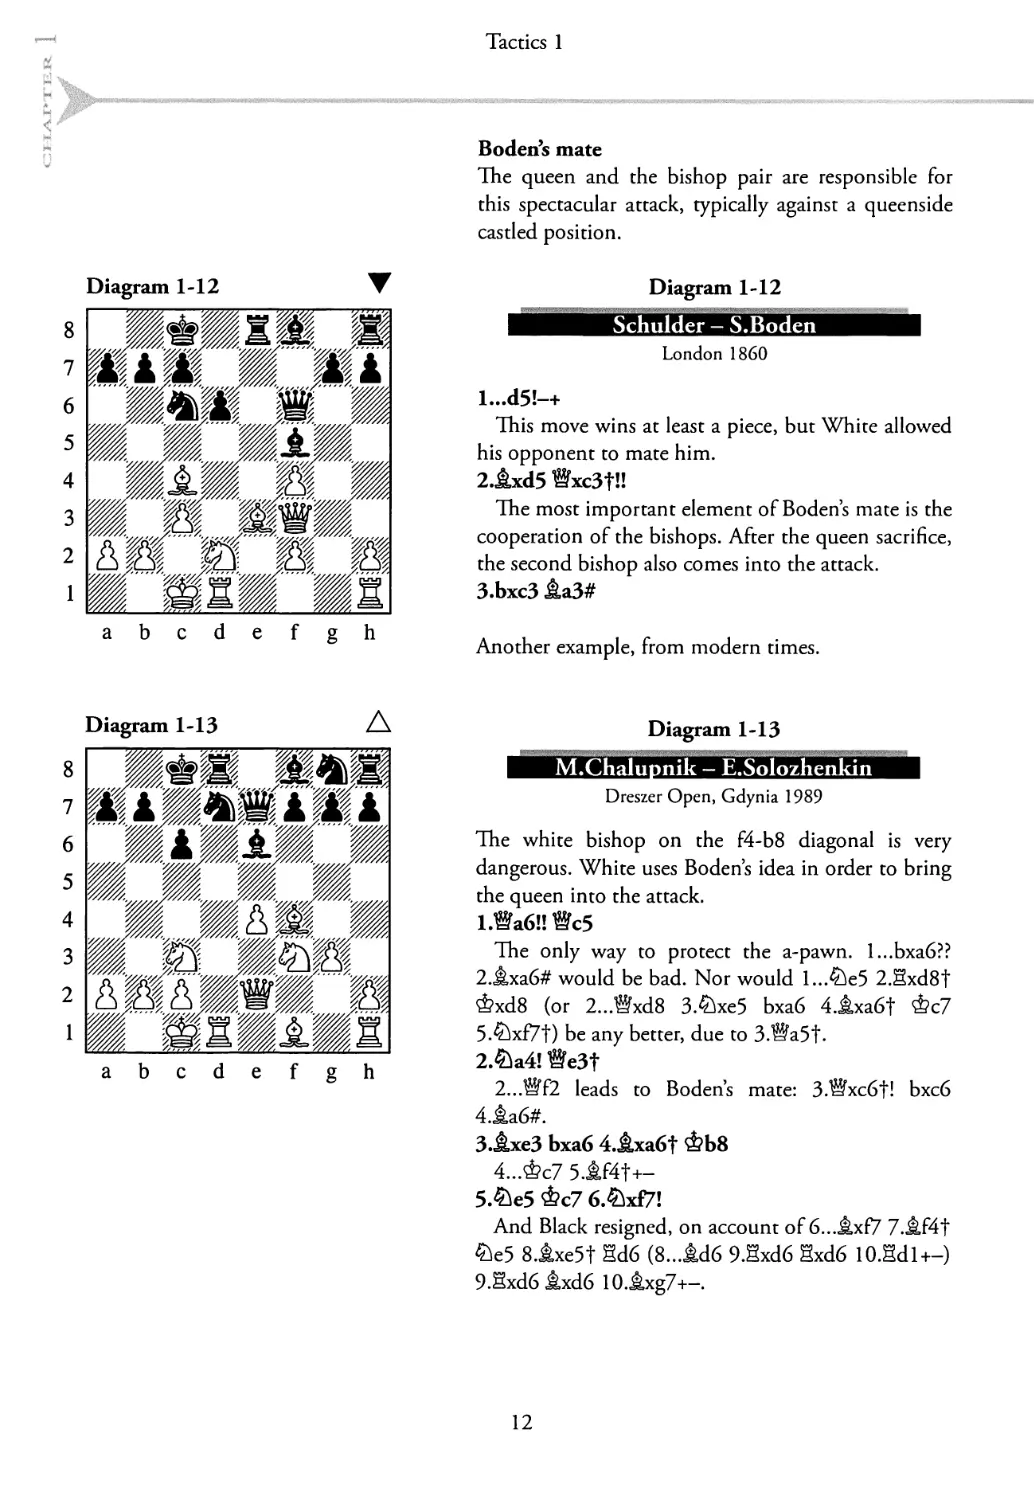
Boden’s mate
The queen and the bishop pair are responsible for
this spectacular attack, typically against a queenside
castled position.
Diagram 1-12
Diagram 1-12
Schulder - S.Boden
abcdefgh
London 1860
l...d5!-+
This move wins at least a piece, but White allowed
his opponent to mate him.
2.JLxd5 Wxc3fH
The most important element of Boden’s mate is the
cooperation of the bishops. After the queen sacrifice,
the second bishop also comes into the attack.
З.ЬхсЗ ia3#
Another example, from modern times.
Diagram 1-13
Diagram 1-13 A
M.Chalupnik - E.Solozhenkin
abcdefgh
Dreszer Open, Gdynia 1989
The white bishop on the f4-b8 diagonal is very
dangerous. White uses Boden’s idea in order to bring
the queen into the attack.
I.®a61! ®c5
The only way to protect the a-pawn. I...bxa6??
2.jkxa6# would be bad. Nor would l...&e5 2,Hxd8t
<&xd8 (or 2...®xd8 З.^хе5 bxa6 4.jkxa6t Фс7
5.^xf7t) be any better, due to 3.®a5t.
2.&a4! We3t
2...®f2 leads to Boden’s mate: 3.®xc6f! bxc6
4.Ла6#.
3.llxe3 Ьхаб 4.jLxa6f &Ь8
4...Фс7 5.1f4t+-
5.&e5 Фс7 6.&xf7!
And Black resigned, on account of 6...Jlxf7 7.JLF4T
&e5 8.1xe5t Sd6 (8...1d6 9.Sxd6 Sxd6 10.Sdl+-)
9.Sxd6 Jkxd6 10.1,xg7+-
12
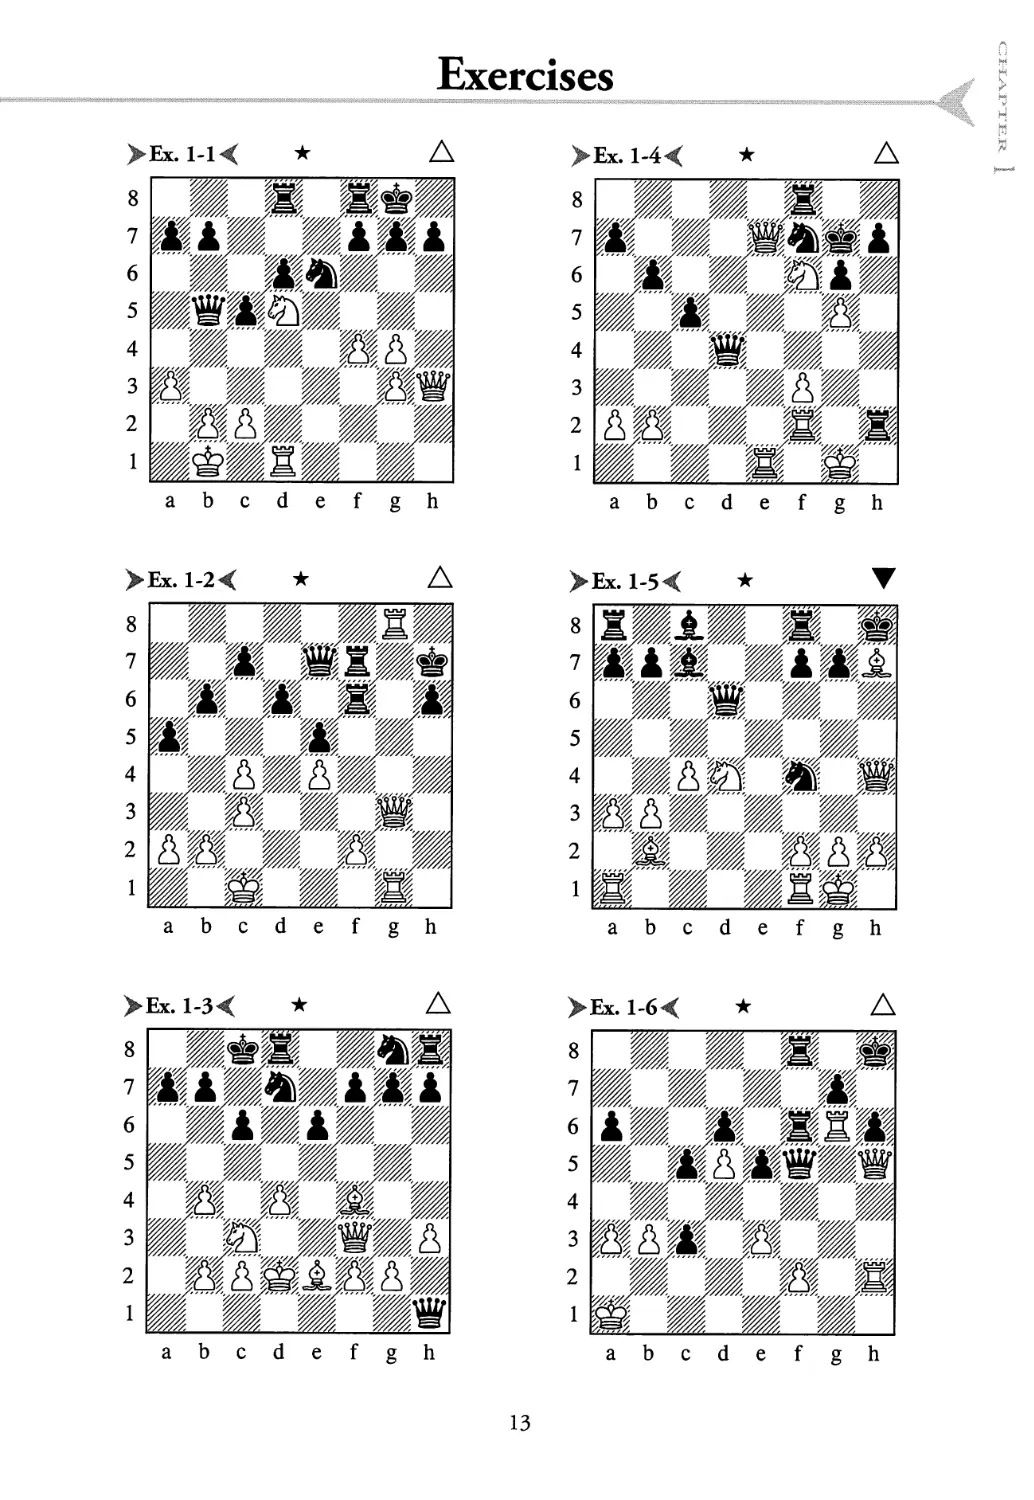
Exercises
>Ex. 1-1 < ★ Д
abcdefgh
>Ex. l-4< ★ Д
abcdefgh
>Ex. 1-2 < ★ Д
abcdefgh
>Ex. l-5< ★
abcdefgh
>Ex. l-3< ★
abcdefgh
>Ex. l-6< ★ Д
8
7
6
5
4
3
2
1
abcdefgh
13
Exercises
abcdefgh
XEx. 1-11< ** Д
abcdefgh
>Ex. 1-12< ★
abcdef gh
14
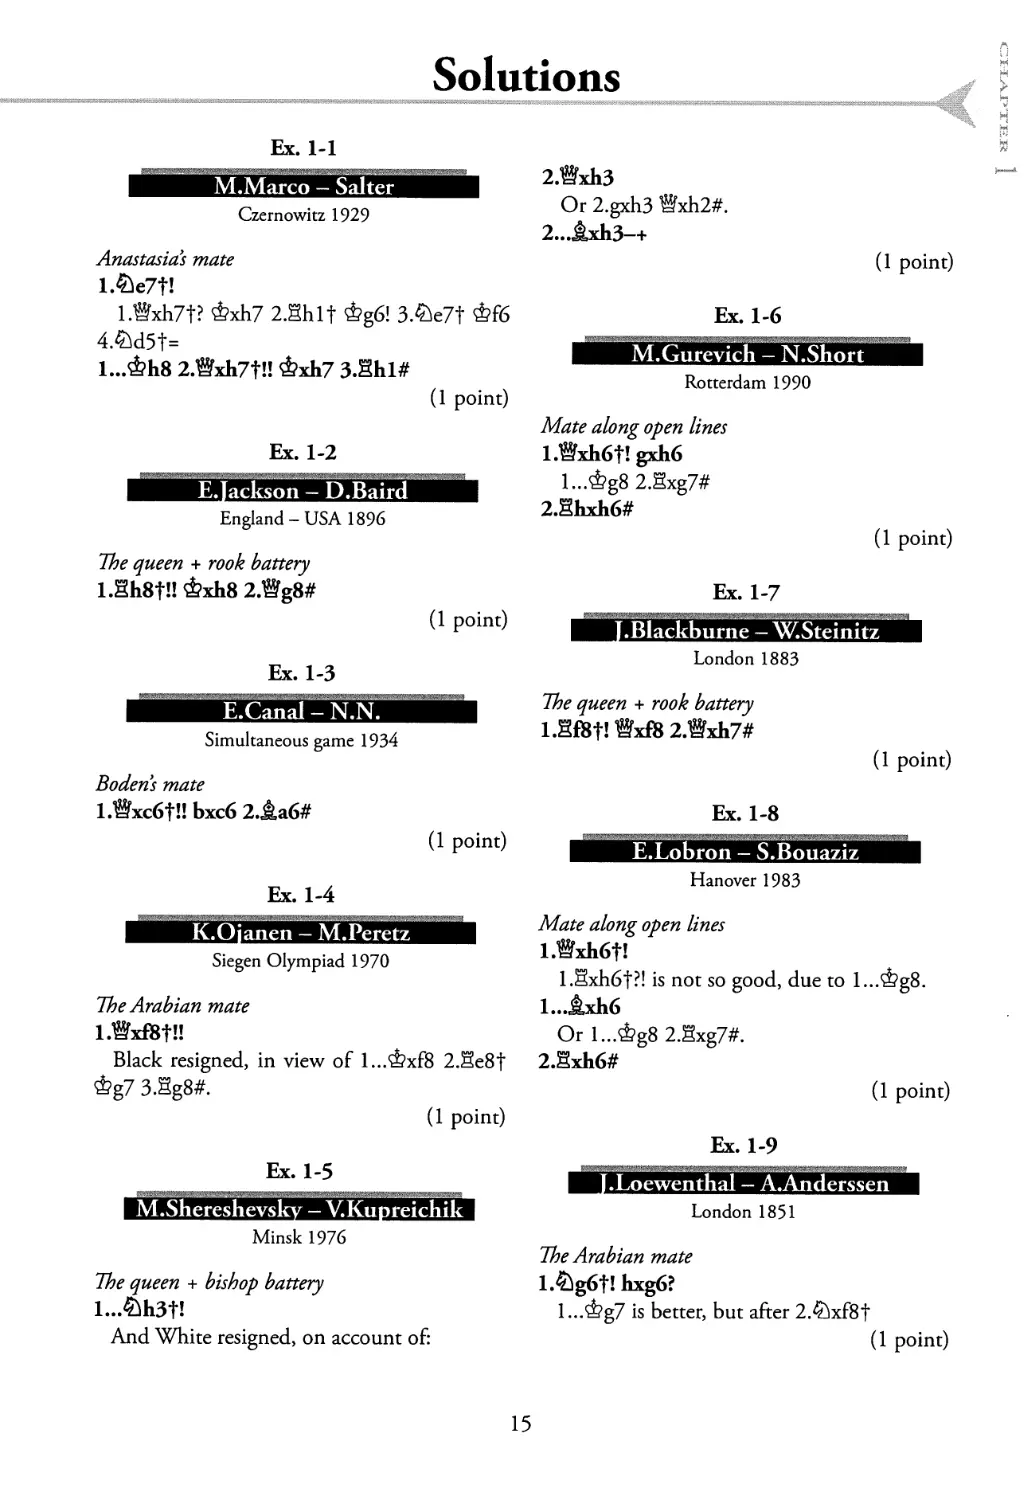
Solutions
Ex. 1-1
M.Marco - Salter
Czernowitz 1929
Anastasias mate
l.^e7t!
I.®xh7t? &xh7 2.Ehlt &g6! 3.&e7t &Й5
4Ad5t=
I...&I18 2.®xh7t!! &xh7 3.SK1#
(1 point)
Ex. 1-2
E Jackson - D.Baird
England - USA 1896
The queen + rook battery
l.Sh8f!! ФхЬ8 2>g8#
(1 point)
Ex. 1-3
E?Canai-”*N.N.'
Simultaneous game 1934
Bodens mate
l .®xc6f!! Ьхсб 2.Даб#
(1 point)
Ex. 1-4
K.Ojanen - M.Peretz
Siegen Olympiad 1970
The Arabian mate
l>xf8t!I
Black resigned, in view of 1...ФхГ8 2.йе8|
<&g7 3.Sg8#.
(1 point)
Ex. 1-5
M.Shereshevsky - V.Kupreichik
Minsk 1976
The queen + bishop battery
l... £h3t!
And White resigned, on account of:
2 .Wxh3
Or 2.gxh3 ®xh2#.
2... jbdi3-+
(1 point)
Ex. 1-6
M.Gurevich - N.Short
Rotterdam 1990
Mate along open lines
l.Wxh6f! gxh6
l... &g8 2.Sxg7#
2.Shxh6#
(1 point)
Ex. 1-7
. В lackburn e - WSteinitz
London 1883
The queen + rook battery
l.SfBf! Wxffi 2.Wxh7#
(1 point)
Ex. 1-8
E.Lobron - S.Bouaziz
Hanover 1983
Mate along open lines
l.Wxh6f!
I.&di6f?! is not so good, due to l.-.^gS.
I...jbch6
Or l...&g8 2.Sxg7#.
2.Sxh6#
(1 point)
Ex. 1-9
J.Loewenthal — A.Anderssen
London 1851
The Arabian mate
l.^g6f! hxg6?
I... ^g7 is better, but after 2.^xf8f
(1 point)
15
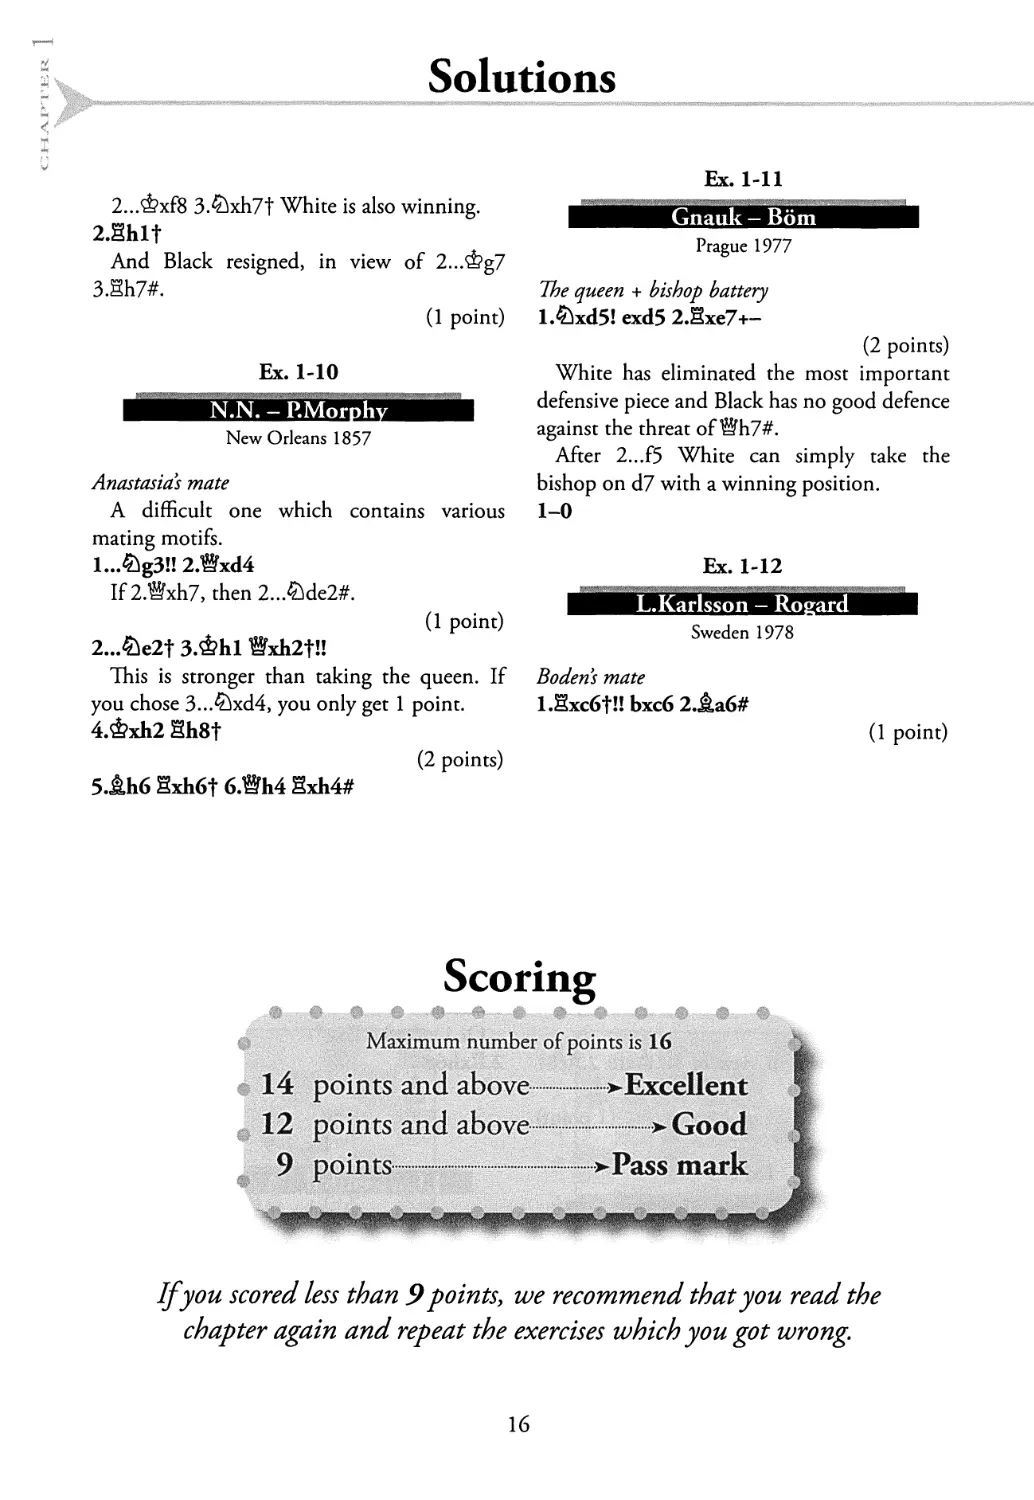
Solutions
2...ФхГ8 3.£)xh7t White is also winning.
2.Shlt
And Black resigned, in view of 2...'^,g7
3.Sh7#.
(1 point)
Ex. 1-10
N.N. - P.Morphy
New Orleans 1857
Anastasias mate
К difficult one which contains various
mating motifs.
L..^g3!! 2.®xd4
If 2.®xh7, then 2...&de2#.
(1 point)
2...&e2f 3.&М Bxh2tl!
This is stronger than taking the queen. If
you chose 3...£sxd4, you only get 1 point.
4.&xh2 Sh8t
(2 points)
5.ДЬ6 Sxh6f 6.®h4 Sxh4#
Ex. 1-11
Gnauk — Bom
Prague 1977
The queen + bishop battery
l.^xd5! exd5 2.Bxe7+-
(2 points)
White has eliminated the most important
defensive piece and Black has no good defence
against the threat of ®h7#.
After 2...f5 White can simply take the
bishop on d7 with a winning position.
1-0
Ex. 1-12
L.Karlsson - Rogard
Sweden 1978
Bodens mate
l.Sxc6t!! Ьхсб 2.Jta6#
(1 point)
Scoring
Maximum number of points is 16
14 points and above >Excellent
12 points and above >Good
9 points................>Pass mark
If you scored less than 9 points, we recommend that you read the
chapter again and repeat the exercises which you got wrong
16
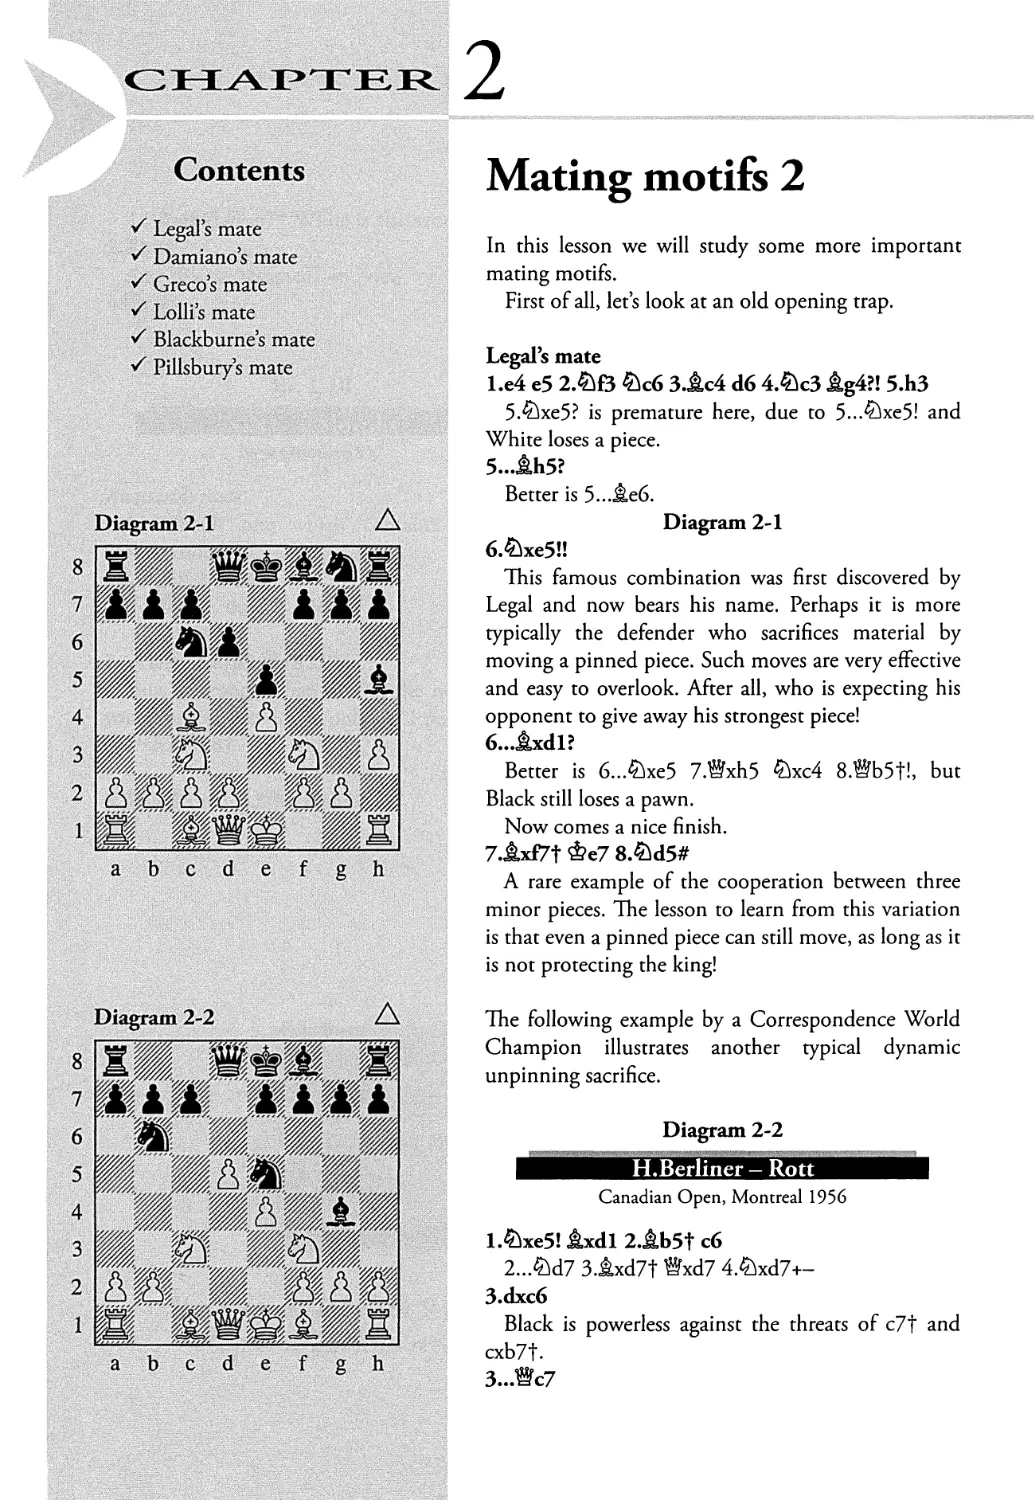
Contents
J Legal’s mate
Damianos mate
S Grecos mate
S Loll is mate
S Blackburncs mate
S Pillsbury’s mate
8
7
6
5
4
3
2
1
8
7
6
5
4
3
2
1
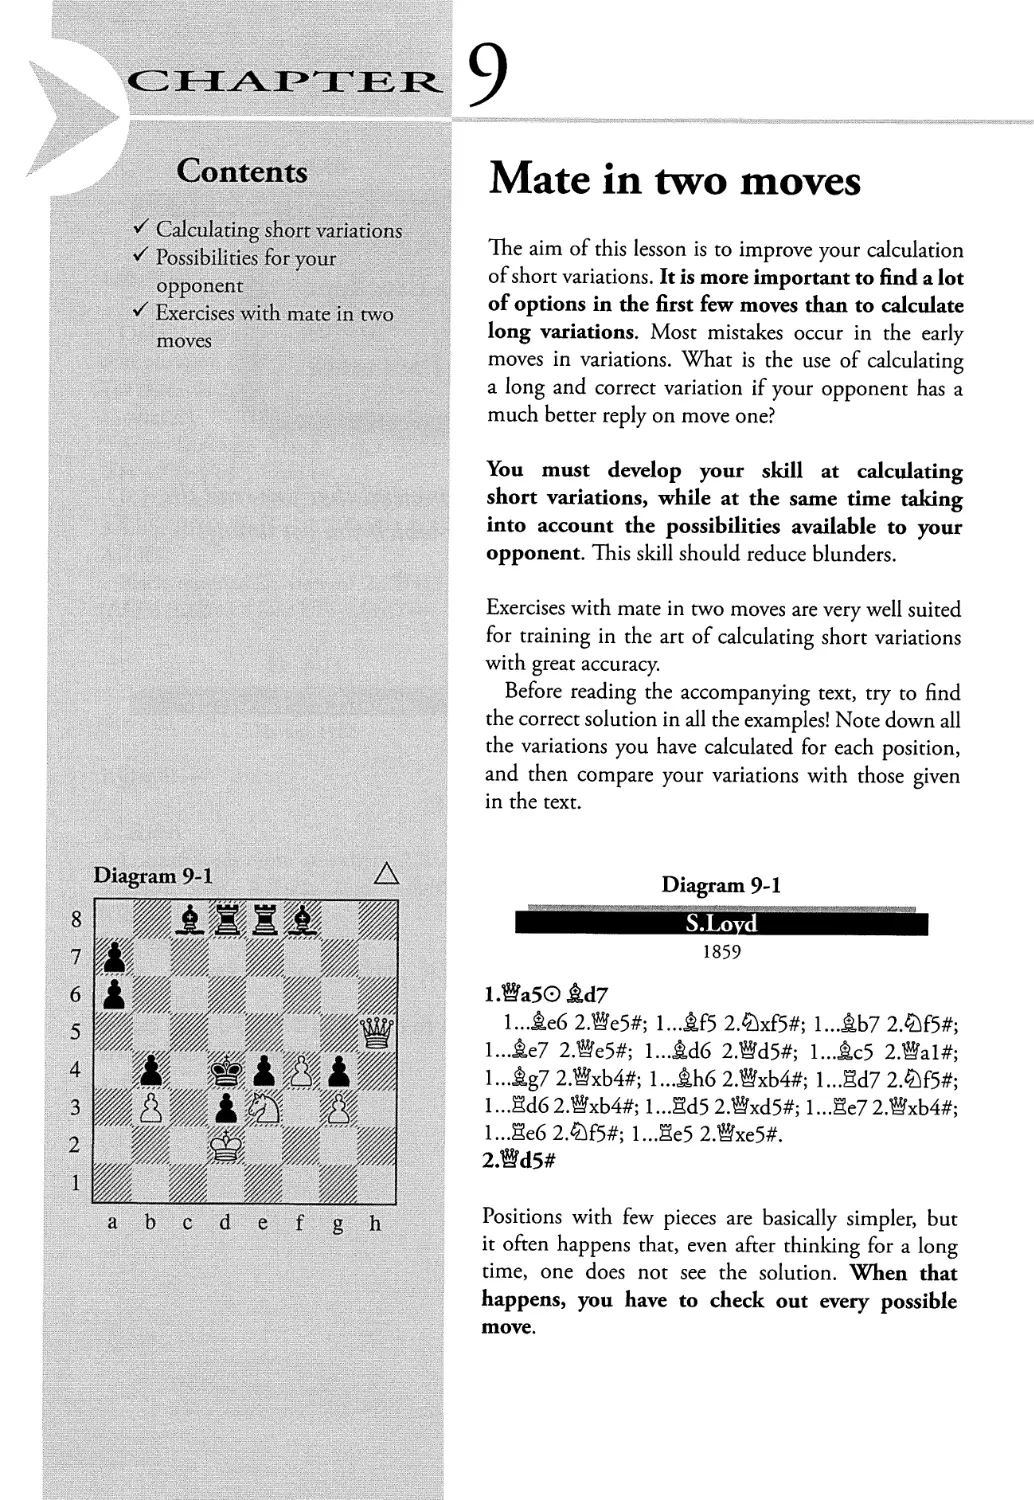
Diagram 2-1
abcdefgh
Diagram 2-2 A
abcdefgh
2
Mating motifs 2
In this lesson we will study some more important
mating motifs.
First of all, let s look at an old opening trap.
Legal’s mate
l.e4 e5 2.£^f3 3.JLc4 d6 4.^c3 JLg4?! 5.h3
5 .^xe5? is premature here, due to 5...^xe5! and
White loses a piece.
5... th5?
Better is 5...JU6.
Diagram 2-1
6 .£ixe5!!
This famous combination was first discovered by
Legal and now bears his name. Perhaps it is more
typically the defender who sacrifices material by
moving a pinned piece. Such moves are very effective
and easy to overlook. After all, who is expecting his
opponent to give away his strongest piece!
6... JLxdl?
Better is 6...^xe5 7.®xh5 &xc4 8.®b5t!, but
Black still loses a pawn.
Now comes a nice finish.
7 .bdf7t &e7 8.^d5#
A rare example of the cooperation between three
minor pieces. The lesson to learn from this variation
is that even a pinned piece can still move, as long as it
is not protecting the king!
The following example by a Correspondence World
Champion illustrates another typical dynamic
unpinning sacrifice.
Diagram 2-2
H.Berliner - Rott
Canadian Open, Montreal 1956
l.^xe5! JLxdl 2.JLb5t c6
2...&d7 3.ixd7t ®xd7 4.^xd7+-
3.dxc6
Black is powerless against the threats of c7t and
cxb7t-
3...Wc7
Mating Motifs 2
3...a6 4.c7t axb5 5.cxd8®t Hxd8 6.^xdl+-
4 .cxb7t &d8
4... ^d7 5.bxa8®t+-
5.&x£7#
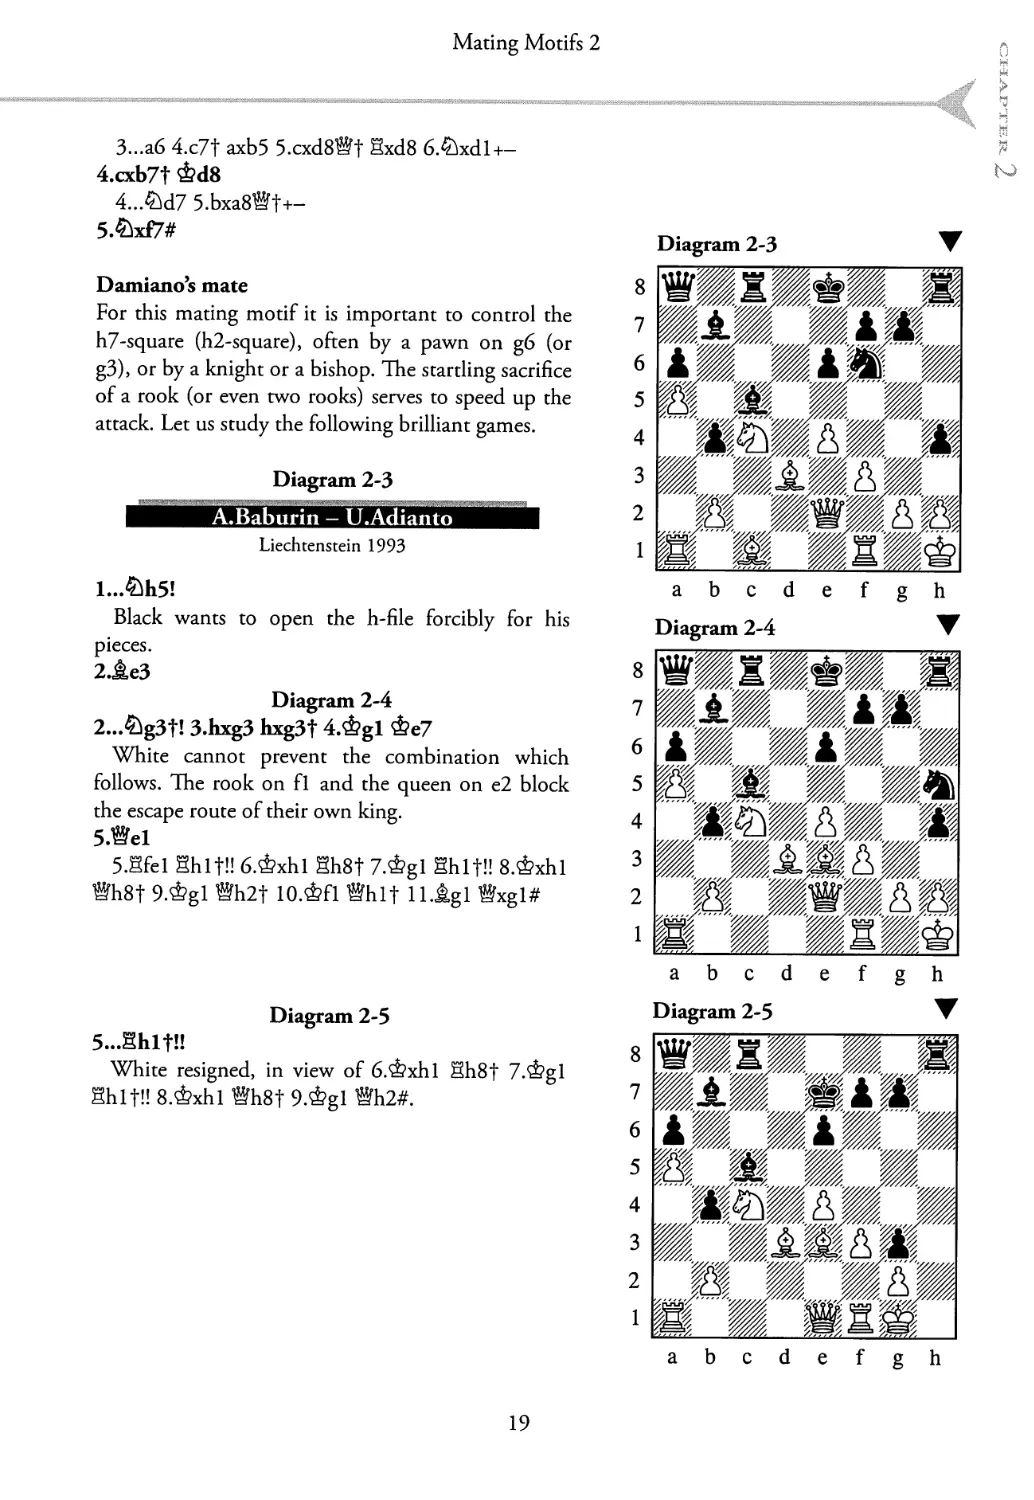
Damiano’s mate
For this mating motif it is important to control the
h7-square (h2-square), often by a pawn on g6 (or
g3), or by a knight or a bishop. The startling sacrifice
of a rook (or even two rooks) serves to speed up the
attack. Let us study the following brilliant games.
Diagram 2-3
A.Baburin - U.Adianto
Liechtenstein 1993
Black wants to open the h-file forcibly for his
pieces.
2^e3
Diagram 2-4
2...&g3t! 3.hxg3 hxg3t 4.&gl ^e7
White cannot prevent the combination which
follows. The rook on fl and the queen on e2 block
the escape route of their own king.
5 .®el
5.Sfel Shitl! б.ФхЫ Sh8t 7.&gl Shif!! 8.&xhl
®i8t 9.&gl ®h2f Ю.ФП ©hit 1 l.i.gl ®xgl#
Diagram 2-3
8
7
6
5
4
3
2
1
8
7
6
5
4
3
2
1
Diagram 2-5
5...Shlf!!
White resigned, in view of б.ФхЫ Sh8f 7.&gl
Shit!! 8.ФхЫ ®h8f 9.&gl ®h2#.
Diagram 2-5
abcdefgh
19
Tactics 2
Diagram 2-6
8
7
6
5
4
3
2
1
8
7
6
5
4
3
2
1
Diagram 2-6
abcdefgh
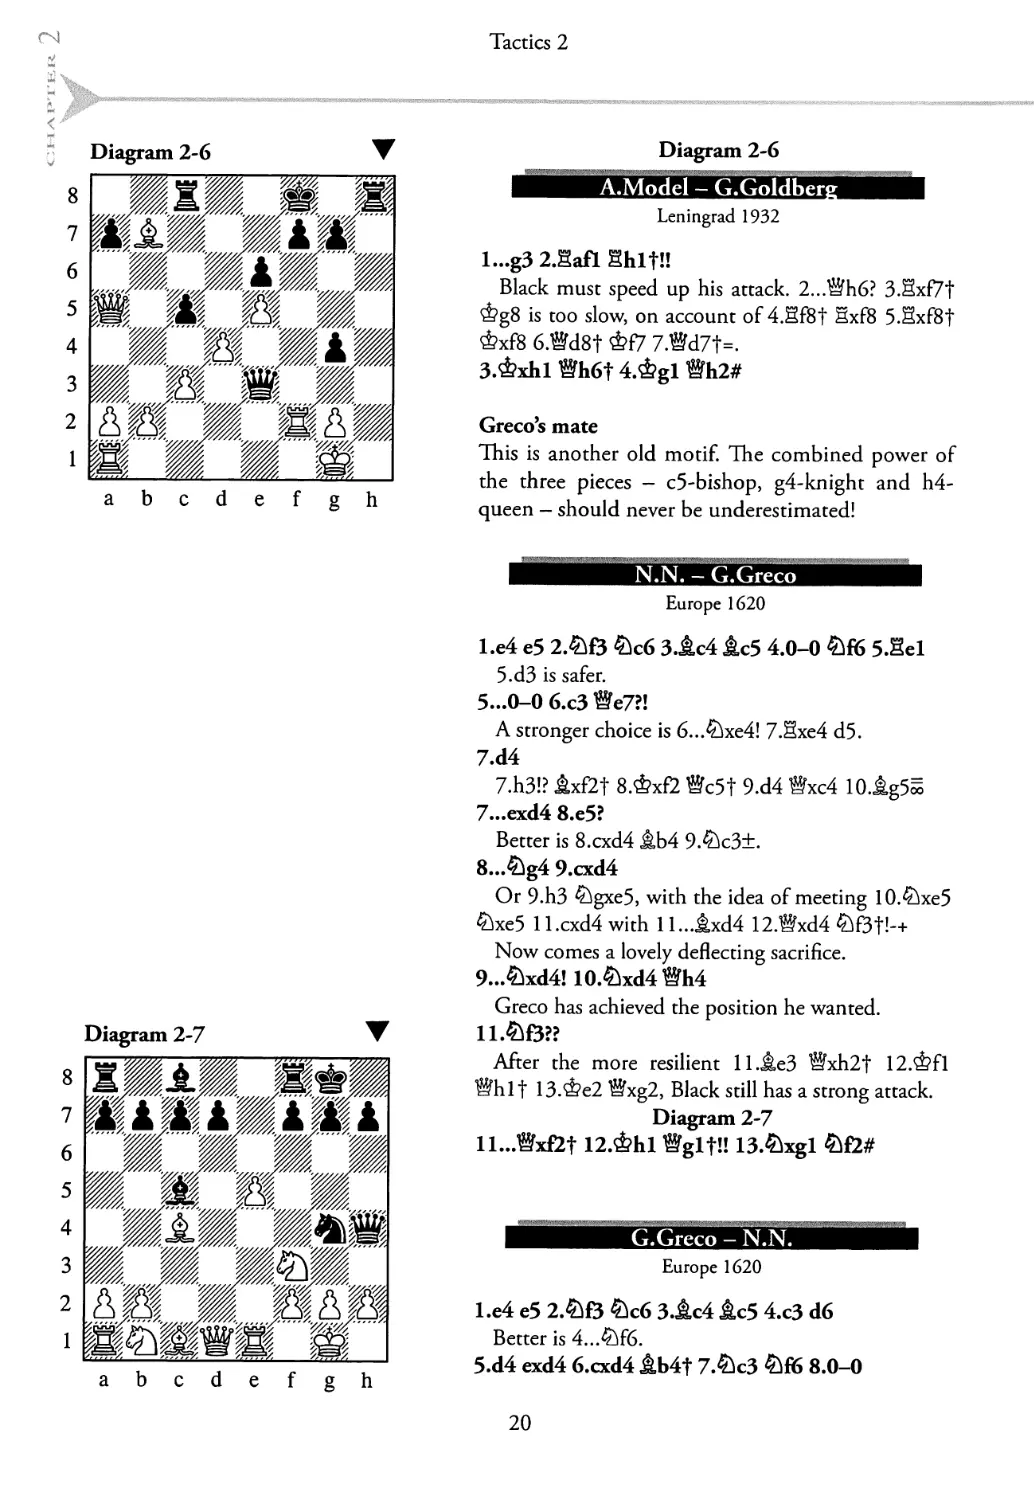
A.ModeL-G.Goldber^
Leningrad 1932
l...g3 2.Safl Shlfl!
Black must speed up his attack. 2...®h6? 3.Sxf7t
<&g8 is too slow, on account of 4.Sf8f Sxf8 5.Sxf8f
&xf8 6.@d8f &f7 7.Wd7t=.
3.&xhl Wh6f 4.&gl ®h2#
Greco’s mate
This is another old motif. The combined power of
the three pieces - c5-bishop, g4-knight and h4-
queen — should never be underestimated!
N.N. - G.Greco
Diagram 2-7
Europe 1620
1.е4 e5 2.&B £c6 З.Дс4 Дс5 4.0-0 5.Sel
5.d3 is safer.
5...0-0 б.сЗ We7?I
A stronger choice is 6...^xe4! 7.Sxe4 d5.
7.d4
7.h3l? Ixf2t 8.Фх£2 Wc5t 9.d4 Йхс4 10.1g5^
7...exd4 8.e5?
Better is 8.cxd4 jkb4 9 Ac3±.
8...£}g4 9.cxd4
Or 9.h3 ^gxe5, with the idea of meeting 10Axe5
^xe5 1 l.cxd4 with 1 l...jLxd4 12.®xd4 £if3t!-+
Now comes a lovely deflecting sacrifice.
9...^xd4! 10.^xd4Wh4
Greco has achieved the position he wanted.
After the more resilient H.jke3 ®xh2f 12.ФА
Shi t 13.Фе2 Sxg2, Black still has a strong attack.
Diagram 2-7
ll...Wxf2t 12.&Ы Wglfl! 13.^xgl &£2#
abcdefgh
G.Greco - N.N.
Europe 1620
l.e4 e5 2.^13 ^c6 3.llc4 Jlc5 4.c3 d6
Better is 4...?T6.
5.d4 exd4 6.cxd4 Jlb4t 7.^c3 8.0-0
20
Mating Motifs 2
8.&g51? is stronger.
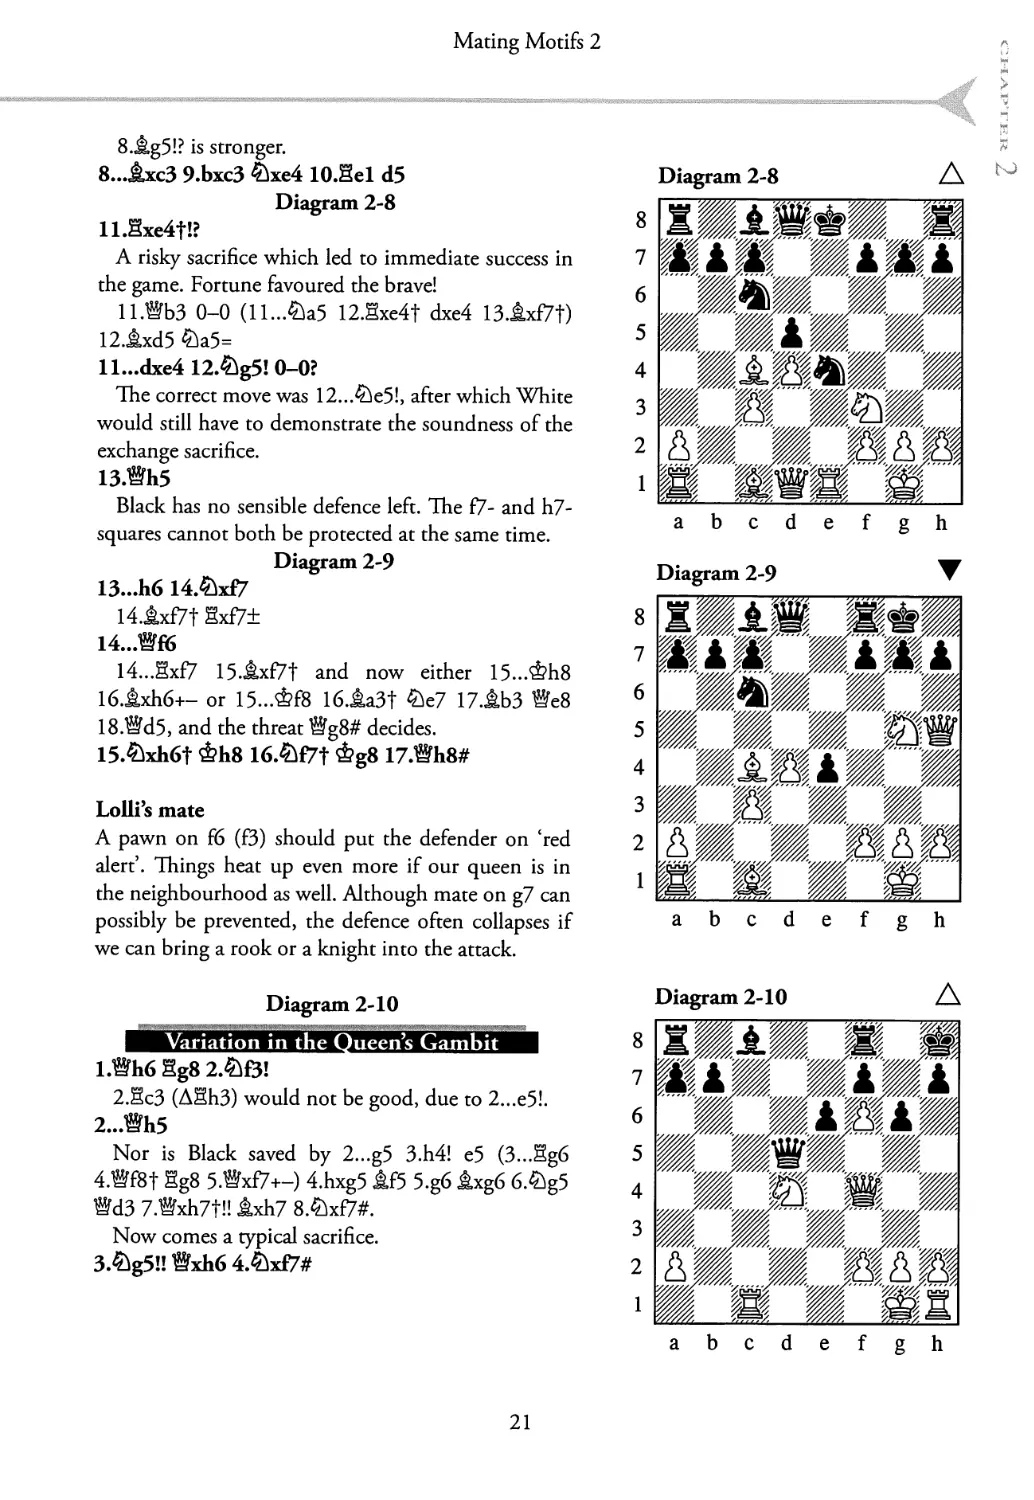
8...ДхсЗ 9.bxc3 ^xe4 lO.Hel d5
Diagram 2-8
ll.Sxe4t!?
A risky sacrifice which led to immediate success in
the game. Fortune favoured the brave!
Il .®b3 0-0 (H...^a5 12.Sxe4f dxe4 13.txf7t)
12 .Jbcd5
H...dxe4 12.&g5! 0-0?
The correct move was 12...^e5!> after which White
would still have to demonstrate the soundness of the
exchange sacrifice.
13 .Wh5
Black has no sensible defence left. The f7- and h7-
squares cannot both be protected at the same time.
Diagram 2-9
13.. .116 14.^xf7
14.1xf7t gxf7±
14...W16
14...Sxf7 15.^xf7f and now either 15...<£h8
16.txh6+- or 15...<£f8 16.ta3t &e7 17.tb3 ®e8
18.@d5, and the threat Sg8# decides.
15.&xh6t £h8 16.^f7t £g8 17.Wh8#
Lolli s mate
A pawn on f6 (f3) should put the defender on Ted
alert’. Things heat up even more if our queen is in
the neighbourhood as well. Although mate on g7 can
possibly be prevented, the defence often collapses if
we can bring a rook or a knight into the attack.
Diagram 2-10
Diagram 2-8
8
7
6
5
4
3
2
1
abcdefgh
Diagram 2-9
abcdefgh
Variation in the Queen’s Gambit
l .®h6 Sg8 2.&&1
2 .§сЗ (ASh3) would not be good, due to 2,..e51.
2... Ш
Nor is Black saved by 2...g5 3.h4! e5 (3...Sg6
4.®f8t Sg8 5.®xf7+~) 4.hxg5 £15 5.g6 txg6 6.2g5
®d3 7.®xh7t!l Axh7 8.2x17#.
Now comes a typical sacrifice.
3.2g5!! ®xh6 4.2x17#
Diagram 2-10
abcdefgh
21
Tactics 2
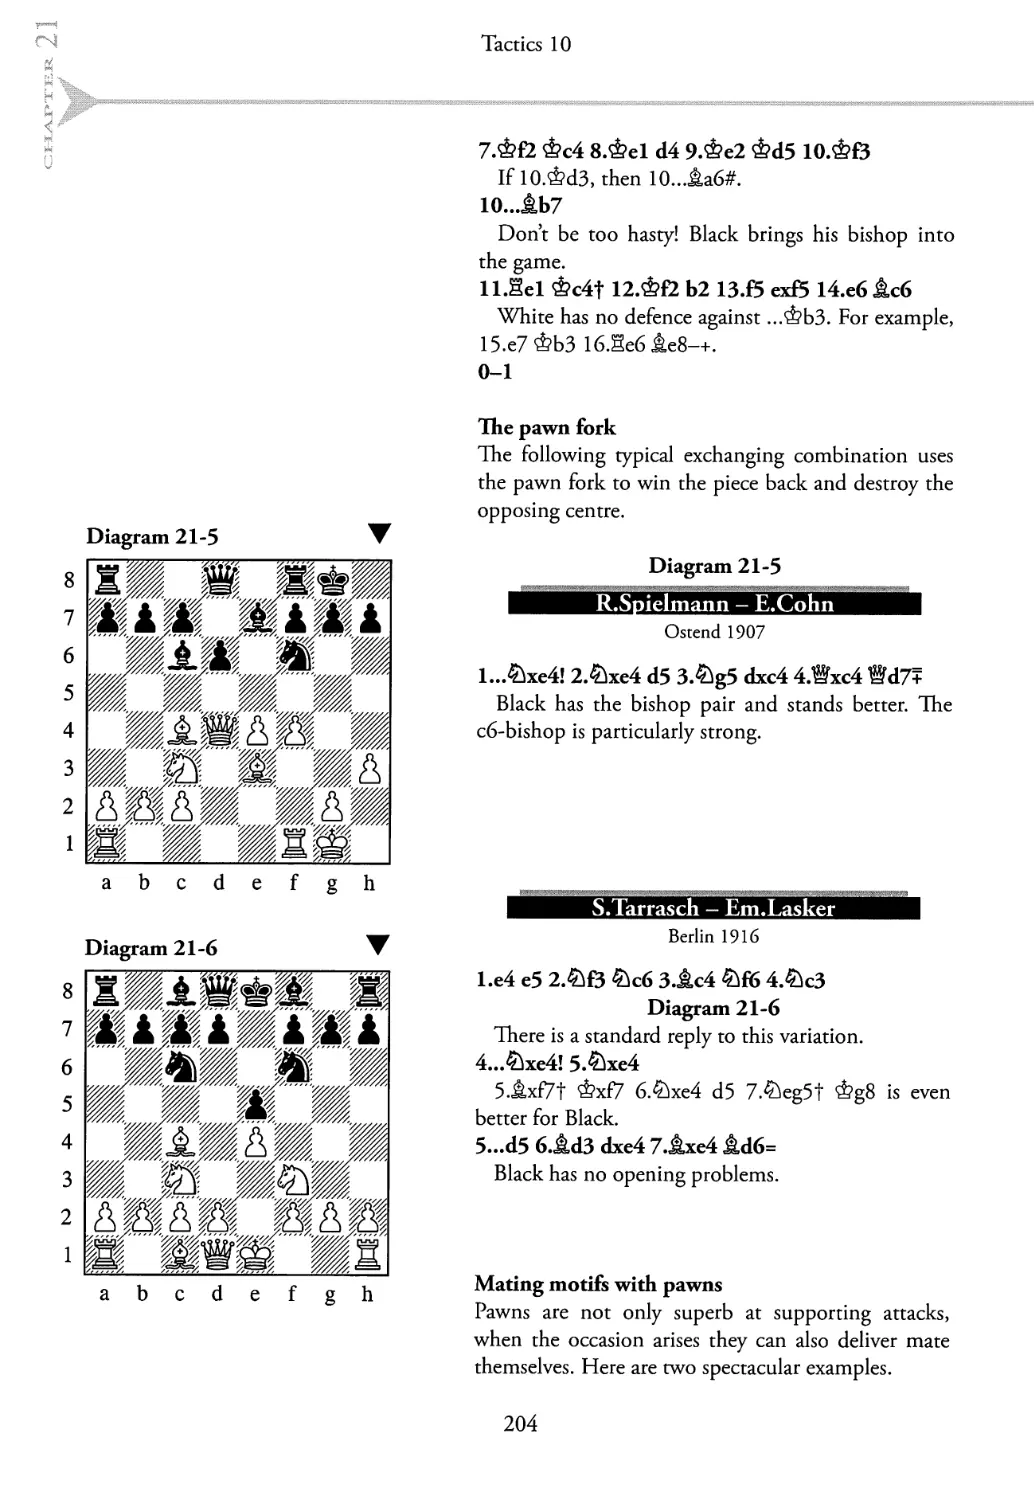
Diagram 2-11
M.Heintze - S.Gratias
East German Womens Ch, Frankfurt/Oder 1977
Uhg7t!
I.dxe4 is also good, but not l.Sh3??, on account of
1 ...Seit! 2.Sxel ®xg2#.
I... gxg7 2.f6l gg8 3>xh7tl!
Followed by Sh3t and Sxh4#.
Blackburne’s mate
In Blackburne’s mate the attacking side uses the
power of the bishop pair and the knight on g5 for a
startling queen sacrifice!
Diagram 2-12
8
7
6
5
4
3
2
1
Diagram 2-12
A.Yusupov - P.Scheeren
abcdefgh
Diagram 2-13 A
European Team Ch, Plovdiv 1983
l.Wxh5I! JLxg5
Black cannot accept the queen sacrifice: l...gxh5
2.Jbch7#. Nor can he play l...^xg5 2.®h8#.
2.jkxg6!
This second offer of a sacrifice, which Black cannot
accept due to a rapid mate, opens up the king position
even more.
2...£6 3.f4+- Wg7 4.£xg5 ^xg5
White has won the piece back and is still attacking.
Blacks position falls apart.
5.h4 £ie4
If 5...W, then 6.Sd4! (ASg4) 6..T5 7.txh7t
®xh7 8.Sg4f! fxg4 9.®g5t+-
6.txe4dxe4 7.Sf4(ASg4)
And Black resigned, in view of the variation 7...®h7
8.®xh7t &xh7 9.Sd7t+-
Let’s see another variation on the Blackburne theme.
Diagram 2-13
M.Olesen - W.Buehl
US Open 1992
abcdefgh
l.^g4!+- ^h5
l..Axg4? 2.®xh7#
2.Wxh5H gxh5
22
Mating Motifs 2
2...1xg5 3.®xg5+-
3.^h6f!
Black resigned, since 3...^xh6 is followed by
4.1x117#.
Pillsbury’s mate
In this motif, which exploits the combined force of
bishop and rook, an open g-file is decisive.
Diagram 2-14
Variation from the game
H.Pillsbury - ELee
London 1899
l.WB!!
I.^d2 ®xf2f 2.ФсЗ, threatening ®g4f or Sglf,
is also good.
l... ®g6 2.1xf8 Sxf8 3.0-0-0+-
2.Sglf &h8 3.1g7t &g8 4.1xf6t Wg4 5.Sxg4#
Sometimes, the combinations do not lead to mate,
but only to a gain of material, since the opponent
may be in a position to avoid the worst.
Diagram 2-14
abcdefgh
Diagram 2-15
Variation from the game
M .Euwe - P. Romanovs)
Leningrad 1934
L..&£3tH 2.gxf3 Wg5t 3.&g2
З.ФЫ lxf3t-+
3...h3 4.®xg7fO Wxg7 5.1xg7 hxg2-+
White loses a piece. If 6.1xf8, then 6...gxfl®t
7.&xfl &xf8-+.
Now you can do the second test. Look for active
moves. Be aware that in the first position the white
king has previously moved, and therefore White may
not castle.
Diagram 2-15
abcdefgh
23
Exercises
>Ex.2-5< ★
>Ex. 2-2 < ★
abcdefgh
abcdefgh
>Ex.2-3< ★
abcdefgh
>Ex.2-6< ★★ A
8
7
6
5
4
3
2
1
abcdefg h
24
Exercises
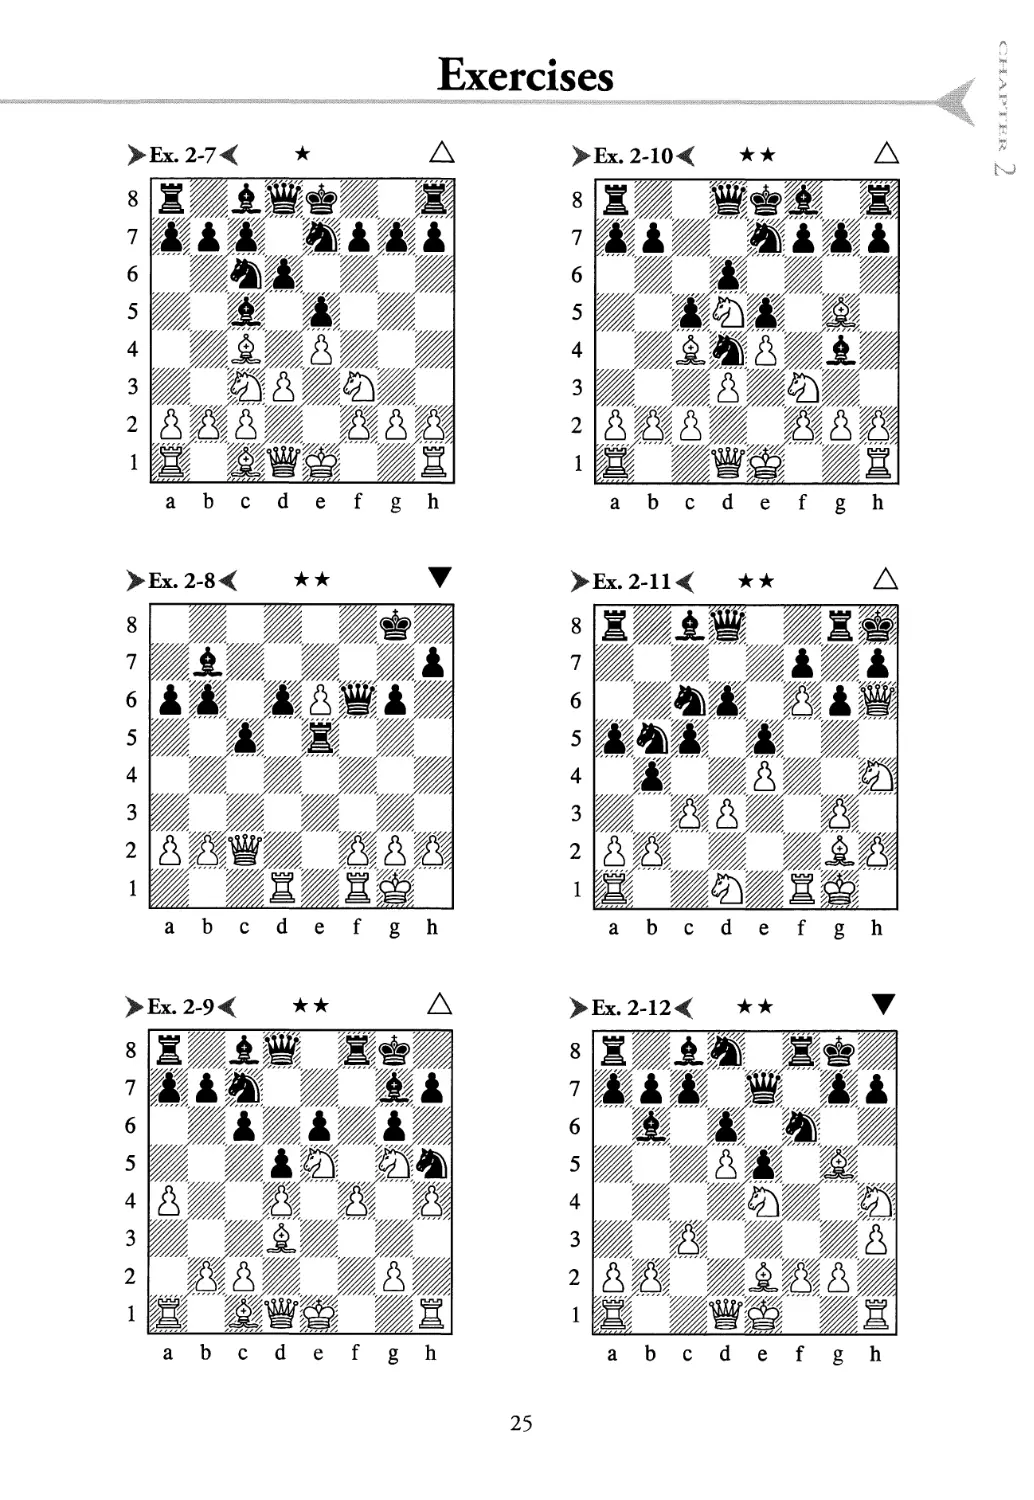
>Ex. 2-7< ★ A
abcdefgh
>Ex.2-10< ★★ A
abcdefgh
> Ex. 2-11 < ★★ A
8
7
6
5
4
3
2
1
abcdefgh
>Ex.2-12< ★★
abcdef gh
25
Solutions
Ex. 2-1
Koschtenko - Lerner
USSR 1962
Pillsbury's mate
l.WB!!
Not l.Sfl? due to 1...Да6+.
l... Wx£3
A more stubborn try is l...®g6 2.<&d2
®h6t З.ФсЗ Se8 4.Shglf &f8 5.tg7t ®xg7
6.Sxg7 &xg7 7.®xc6+—.
2.Sglt
(1 point)
Mate follows
1-0
Ex. 2-2
R.Kvnoch - IJamieson
Scotland 1994
Grecos mate
L&g5! h6 2.Wg6!
(1 point)
Black resigned, he loses in all lines: 2...hxg5
3.®h5# or 2...®xc4f 3.Sxc4 hxg5 4.h4+-.
2Af7t? would not be so convincing.
2...Sxf7 З.Ш7 ^c6+
If you chose l.®h6 you only get 1 point.
After l...Sg8 2.Sf4 g5! Black wards off
Whites threats.
l...Wc2
The best defence. If l...Sg8, then White
has 2.Sh4!, threatening 3.Sxh7t followed by
4.®h4#.
(1 point)
2.Wh6!!
(1 point)
And Keres resigned, in view of 2...®xblf
3.&h2 gg8 4.®xh7t &xh7 5.Sh4#.
Other moves would not be so good, for
example 2.Sgl allows 2...®d2!± and the black
queen can disrupt Whites attack on the cl-h6
diagonal.
Ex. 2-5
Zchakaja 1982
Blackburnes mate
1 .WH5!! (A®xh7#) l...gxh5
I... 5ff6 2.JLxf6+- or l...h6 2.®xh6+-.
2 .ДхЬ7#
(1 point)
Ex. 2-3
Ex. 2-6
A.Kabatianski - R.Atlas
A.Gaensmantel - W.Eff
Roslavl 1989
Damiano's mate
l...Sh8t 2.&gl ShlfH
(1 point)
White resigned, in view of З.ФхЫ Hh8f
4.&gl Shit 5.&xhl ®h8t 6.&gl ®h2#.
Ex. 2-4
D.Bronstein - P.Keres
Budapest 1950
Lolli's mate
l.Sf4!
(1 point)
Eppingen 1988
Damianos mate
l.Sh8f!I
1 .g6 (you only get 1 point if you chose this
move) is less precise, in view of 1 ...2f5 2.®g4
®a5’? 3.®h3 (or 3.Sh8t &xh8 4.®h3t
th4 5.®xh4f &g8 6.®h7t &f8) 3...®xc3t'
4.®xc3 JLb4-+.
Another sub-optimal move is l.®h5 (also
only 1 point). This gives Black time for
counterplay, e.g. I...®a5 2.g6 ®xc3t 3.&fl
Sxf2f 4.&xf2 ®xd4f 5.&e3 ®b2f 6.ФЕЗ
(or 6.&gl Wxalt 7.ФЕ2 ®b2f=) 6...^xe5t
7.^g3 ^xg6#
26
Solutions
Ex. 2-9
After l.Sh8f!! White has a forced mate:
l...&xh8 (or 1...ФГ7 2.®h5t g6 3.®h7t Фе8
4.®xg6#) 2.®h5t &g8 3.g6 Sf5 4.®h7t &f8
5.®h8#.
(2 points)
Ex. 2-7
H.Soatz - A.Lund
Bavaria 1989
Grecos mate
l.S)g5!±
(1 point)
1...0-0?!
Leads to the immediate loss of the game.
Black would do better to sacrifice a pawn:
1 ...d5 2.exd5±.
2.Wh5+- h6 3.&xf7 lxf2f
Or 3...Sxf7 4.®xf7t ФЬ7 5.0-0+-.
4.&dl
This is even stronger than taking the
bishop.
4..J,g4f
If 4...Sxf7, then 5.®xf7t &h8 6.Ш2+-.
After 4...®e8 there comes 5.^xh6f ФЬ7
6.^f7t &g8 7.®h8#.
5.Wxg4 Sxf7 6.jlxf7t ^xf7 7.Sfl+-
White is clearly winning. Next came:
7...&d4 8.Sx£2f &g8 9.1,xli6 g6 10.&d5
Wc8 ll.^xe7t
Black resigned.
Ex. 2-8
ohelsson — Belawenez
Correspondence Olympiad 1979
Pillsbury's mate
(A®g2#)
l...jbcg2 is not so good, due to 2.f4!°°
(but not 2.&xg2 Sg5t З.ФЬЗ Wf3t 4.ФЬ4
®g4#).
After 1 ...Sg5? comes 2.f3±.
2.gxf3 Sg5t 3.&hl ДхВ#
(2 points)
P.Svedenborg - A.Berglund
Norway 1992
Blackburne’s mate
l.®xh5!!+- (A®h7#)
Black resigned. If l...JLxe5 then 2.®xh7#>
or if l...h6 then 2.®xg6+-. And if l...gxh5
then 2.jbch7t ^h8 3.^g6#, but of course not
3.&ef7t Sxf7 4.£xf7t &xh7 5.&xd8±.
(2 points)
If you chose the less incisive l.£}xh7!?>
you only get 1 point. Black can try l...Sxf4,
although after 2.^xg6 White is still winning.
Ex. 2-10
G.Bucklev - N.N.
London 1840
Legal's mate
1.5ixe5!
Equally good is l.^ixd4’ JLxdl 2.JLb5t
(2 points) 2...®d7 (2...^c6 loses to either
3.JLxd8+- or З.^хсб ®xg5 4.^xe5t ^d8
5.^xf7t+-) 3.JLxd7t &xd7 4.JLxe7 JLxe7
5.ФТ5+-.
l..J,xdl?
I...dxe5 2.®xg4 is more stubborn, with the
following variations:
a) 2...®a5t 3.b4 cxb4 4.JLxe7 Дхе7 5.®xg7
gf8 6.®xe5+-
b) 2...^xc2f 3.^dl ^xal 4J»b5t+-
c) 2...f6 3.JLxf6! ^xc2f (if 3...®a5t, then
4.b4!. After 3...gxf6 there follows 4.^xf6#.)
4.ФП £ixal 5.&xg7+-
2.^f6t! gxffi 3.1.xf7#
(2 points)
Ex. 2-11
P.Jirovsky - Z.Adamek
Mlada Boleslav 1992
Lolli's mate
(1 point)
T1
Solutions
i...m
A somewhat tougher response is l...g5
2.^xg5 Sxg5 3.@xg5+-.
If 1...Йх£6, then 2,^g5 ®g7 3.^xf7t+-
2.&g5l!
And Black resigned, due to 2...®xh6
3.&xf7#.
(1 point)
Ex. 2-12
B.Horwitz — L.Bledow
Berlin 1837
Legal's mate
l...^xe4l!
But not l...jbd2t? due to 2.^xf2!+-
2.Дхе7 ix£2f 3.&fl 2>g3#
(2 points)
Scoring
Maximum number of points is 20
17 points and above >Excellent
14 points and above >Good
11 points................>Pass mark
If you scored less than 11 points, we recommend that you read the
chapter again and repeat the exercises which you got wrong.
28
Contents
J Rapid development of all
the pieces
J The struggle for the centre
J 'Ihe struggle against the
opponents ideas
J Goals in the opening
3
Basic opening principles
In this lesson we will examine the most important
principles in playing the opening.
Whenever we study the games of strong players, we
notice how they, above all, aim to mobilize their
forces quickly. This is quite logical: the more pieces
we have in play, the more attacking chances we
obtain. In addition, we must also prepare to castle,
in order to get our own king to safety and bring the
rook into the game.
The first principle of opening play is rapid
development of all the pieces.
We also see how experienced players try to seize the
centre with pawns, or at least exert strong pressure on
it with their pieces. In the chess struggle the centre
is a strategically important commanding height.
Whoever controls the centre determines the course of
the game.
The second principle of opening play is to
struggle for the centre.
A lead in development is the ideal which we set as our
goal in the opening. Sometimes one move can put
the brakes on our opponent’s development - any loss
of time we incur in such an operation is frequently
rewarded in the future course of the game. A move
which develops one of our own pieces and at the same
time slows down our opponent’s development is of
course ideal, when possible.
The third principle of opening play is to struggle
against our opponent’s ideas, in order to make his
development more difficult and to prevent him
from achieving control over the centre.
A.Meel
. P.
Mobile 1855
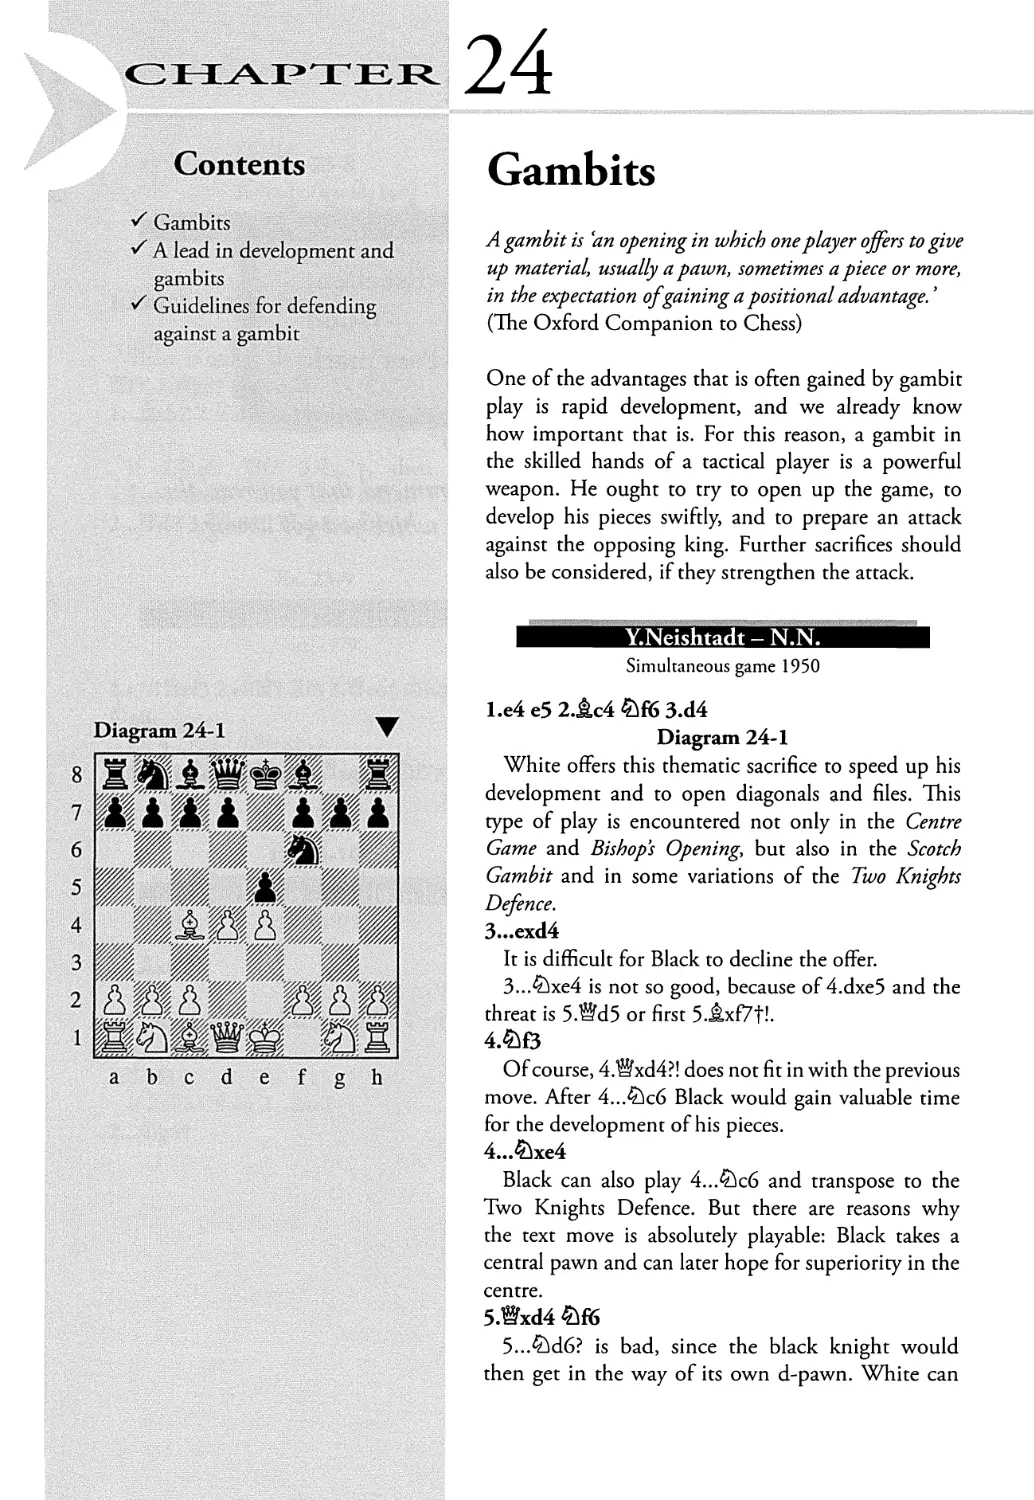
l.e4 e5 2.£if3 ^сб 3.d4 exd4 4.JLc4
White is playing a gambit line. 4.^xd4 leads to the
Scotch Game. 4.c3 is also a gambit in which White
tries to develop his pieces rapidly.
Basic Opening Principles
4...Дс5
4...^f6 is also good. If 5.e5, then comes 5...d5!
with the idea 6.exf6 dxc4=.
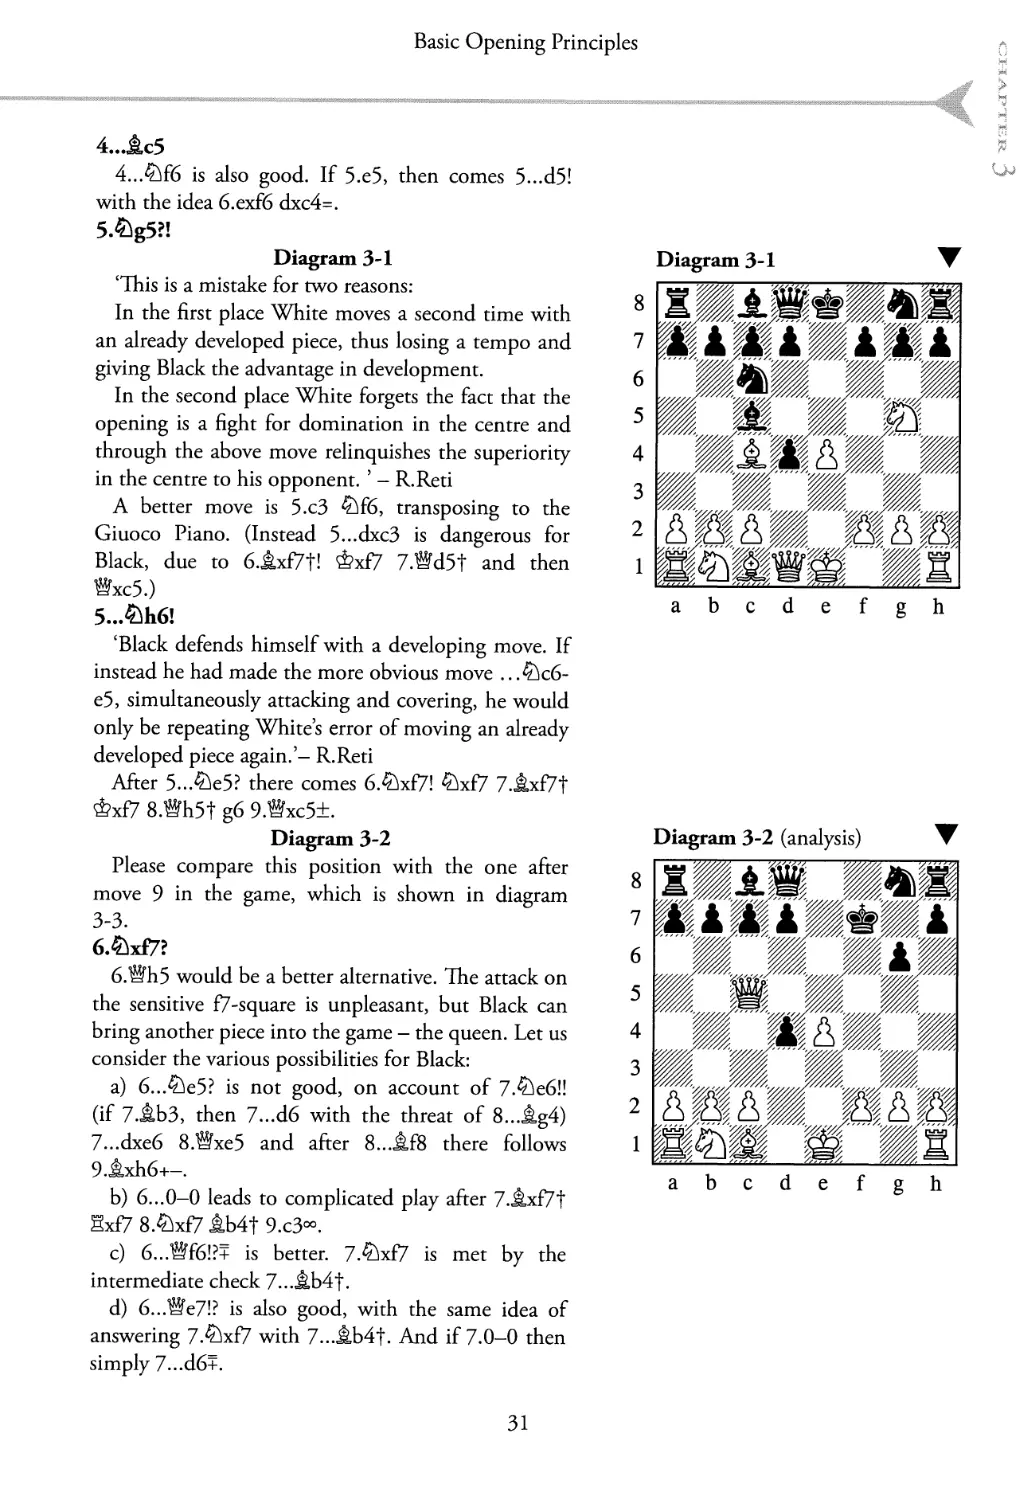
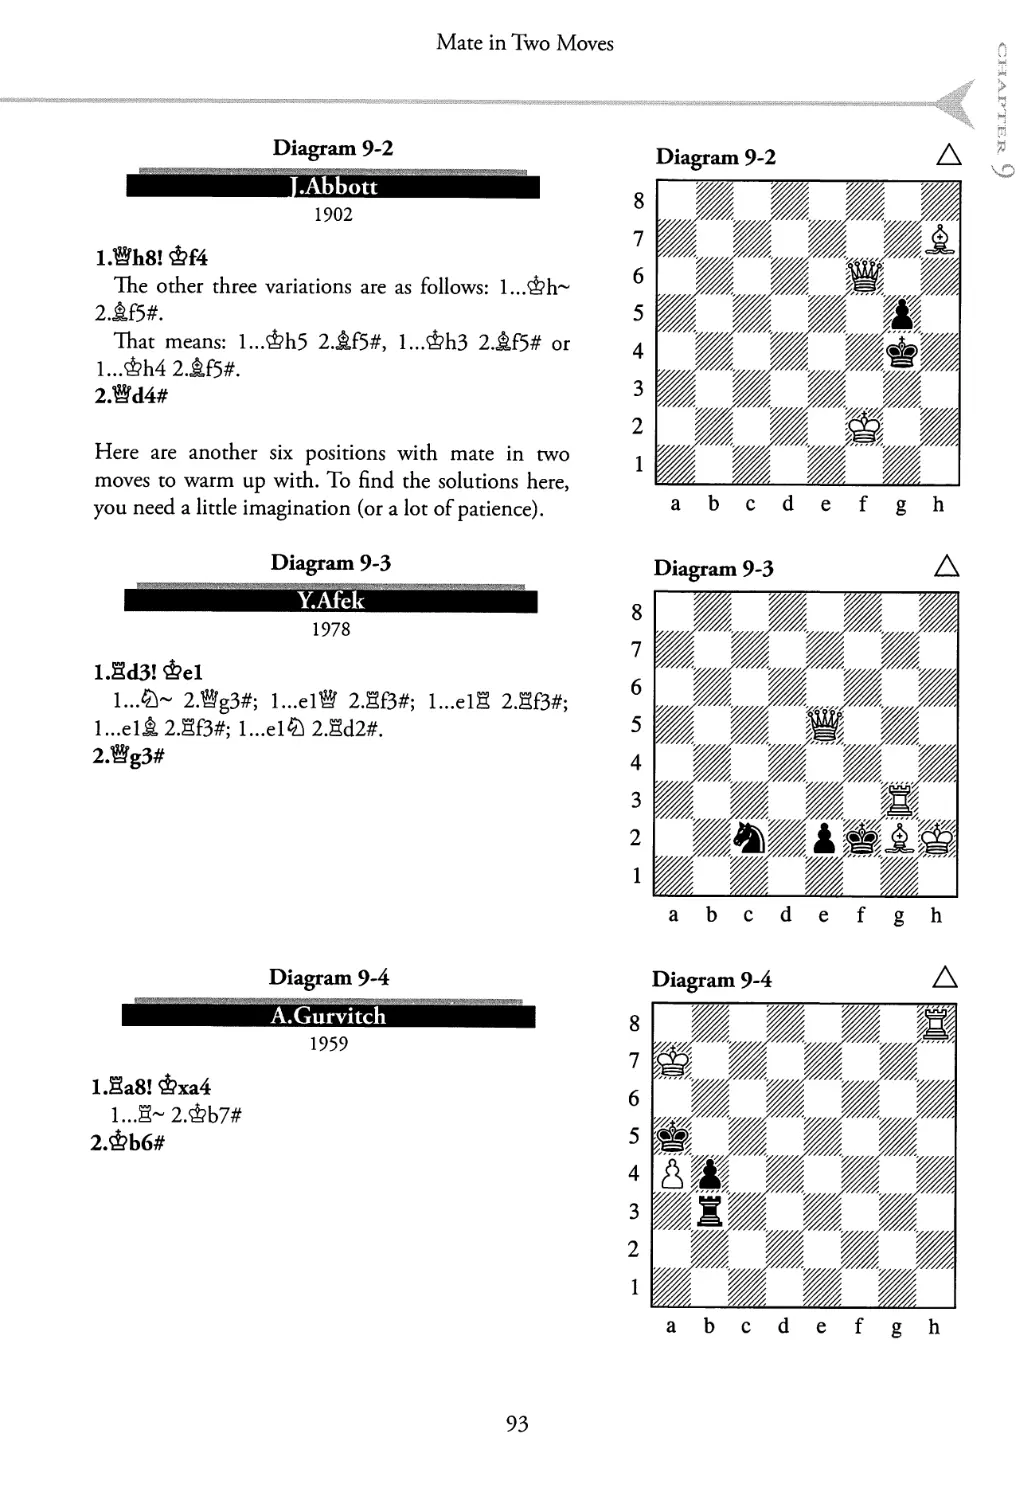
5.fcg5?l
Diagram 3-1
‘This is a mistake for two reasons:
In the first place White moves a second time with
an already developed piece, thus losing a tempo and
giving Black the advantage in development.
In the second place White forgets the fact that the
opening is a fight for domination in the centre and
through the above move relinquishes the superiority
in the centre to his opponent. ’ - R.Reti
A better move is 5.c3 ^f6, transposing to the
Giuoco Piano. (Instead 5...dxc3 is dangerous for
Black, due to 6.jlxf7t! &xf7 7.®d5t and then
Wxc5.)
5...&h6!
‘Black defends himself with a developing move. If
instead he had made the more obvious move .. .^c6-
e5, simultaneously attacking and covering, he would
only be repeating White’s error of moving an already
developed piece again.’- R.Reti
After 5...^e5? there comes 6.&xf7! ?^xf7 7.Hxf7t
Фх£7 8.®h5t g6 9.®xc5±.
Diagram 3-2
Please compare this position with the one after
move 9 in the game, which is shown in diagram
3-3.
6.^xf7?
6.®h5 would be a better alternative. The attack on
the sensitive f7-square is unpleasant, but Black can
bring another piece into the game - the queen. Let us
consider the various possibilities for Black:
a) 6...£ie5? is not good, on account of 7.^e6!!
(if 7.Ab3, then 7...d6 with the threat of 8..Jlg4)
7...dxe6 8.®xe5 and after 8..Jlf8 there follows
9.jbdi6+—.
b) 6...0-0 leads to complicated play after 7.Jbdf7t
Sxf7 8.^xf7 lb4f 9.c3°°.
c) 6...®f6!?T is better. 7.^xf7 is met by the
intermediate check 7..JLb4f.
d) 6...®e7!? is also good, with the same idea of
answering 7.^xf7 with 7..JLb4f. And if 7.0-0 then
simply 7...d6T.
Diagram 3-1
abcdefgh
Diagram 3-2 (analysis)
abcdefgh
31
Opening 1
Diagram 3-3
abcdefgh
Diagram 3-4
abcdefgh
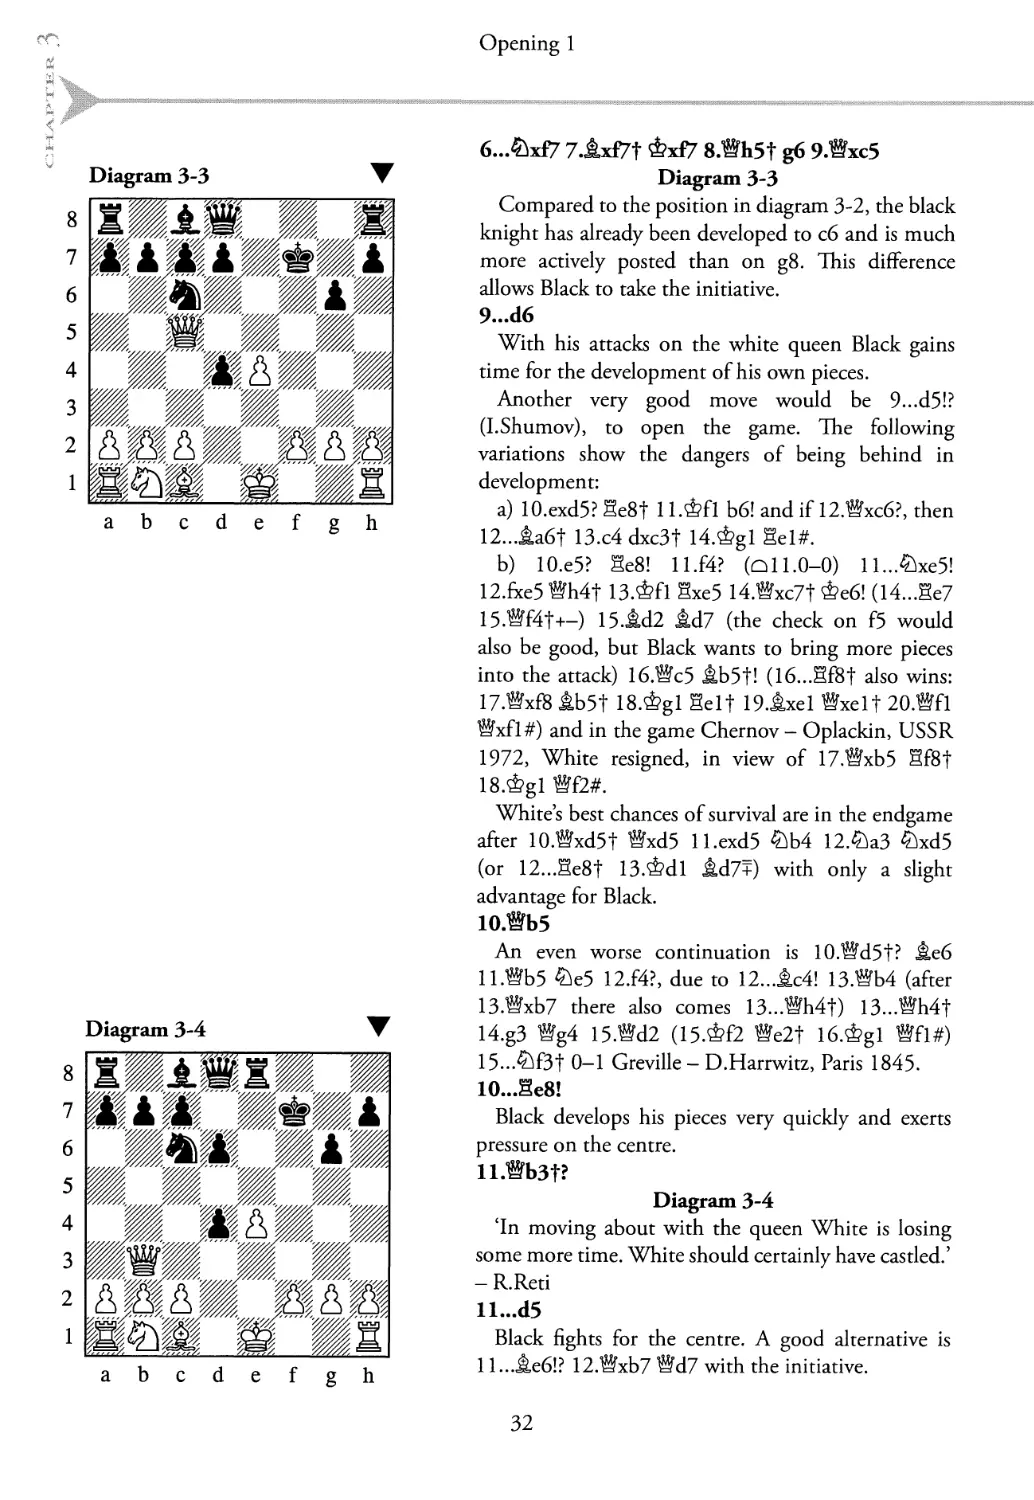
6...^xf7 7.JLx£7t &xf7 8.®h5t g6 9.®xc5
Diagram 3-3
Compared to the position in diagram 3-2, the black
knight has already been developed to c6 and is much
more actively posted than on g8. This difference
allows Black to take the initiative.
9... d6
With his attacks on the white queen Black gains
time for the development of his own pieces.
Another very good move would be 9...d5!?
(I.Shumov), to open the game. The following
variations show the dangers of being behind in
development:
a) 10.exd5? Se8f 1 l.^fl b6! and if 12.®xc6?, then
12...ta6f 13.c4dxc3t 14.&gl Sei#.
b) 10.e5? Se8! H.f4? (Ql 1.0-0) ll...^xe5!
12.fxe5 ®h4f 13.&fl Sxe5 14.®xc7t &e6! (14...Se7
15.®f4t+-) 15.^d2 JLd7 (the check on f5 would
also be good, but Black wants to bring more pieces
into the attack) 16.®c5 Ab5f! (16...Sf8f also wins:
17.®xf8 Ab5t 18.&gl Self 19.1xel ®xelf 20.®fl
®xfl#) and in the game Chernov - Oplackin, USSR
1972, White resigned, in view of 17.®xb5 Sf8f
18.&gl ®f2#.
White s best chances of survival are in the endgame
after 10.®xd5t ®xd5 ll.exd5 £ib4 12.£la3 ^xd5
(or 12...Se8f 13.^dl Ad7?) with only a slight
advantage for Black.
10.Wb5
An even worse continuation is 10.®d5t? Леб
1 l.®b5 ^e5 12.f4?, due to 12...Лс4! 13.®b4 (after
13.®xb7 there also comes 13...®h4f) 13...®h4f
14.g3 ®g4 15.®d2 (15.^f2 ®e2f 16.&gl ®fl#)
15...^f3t 0-1 Greville- D.Harrwitz, Paris 1845.
10...Se8!
Black develops his pieces very quickly and exerts
pressure on the centre.
Il.®b3t?
Diagram 3-4
‘In moving about with the queen White is losing
some more time. White should certainly have castled.’
- R.Reti
ll...d5
Black fights for the centre. A good alternative is
11 ...Леб!? 12.®xb7 ®d7 with the initiative.
32
Basic Opening Principles
12.B
Here White would be better getting his king into
safety with 12.0-0 Sxe4+.
12... ^a5
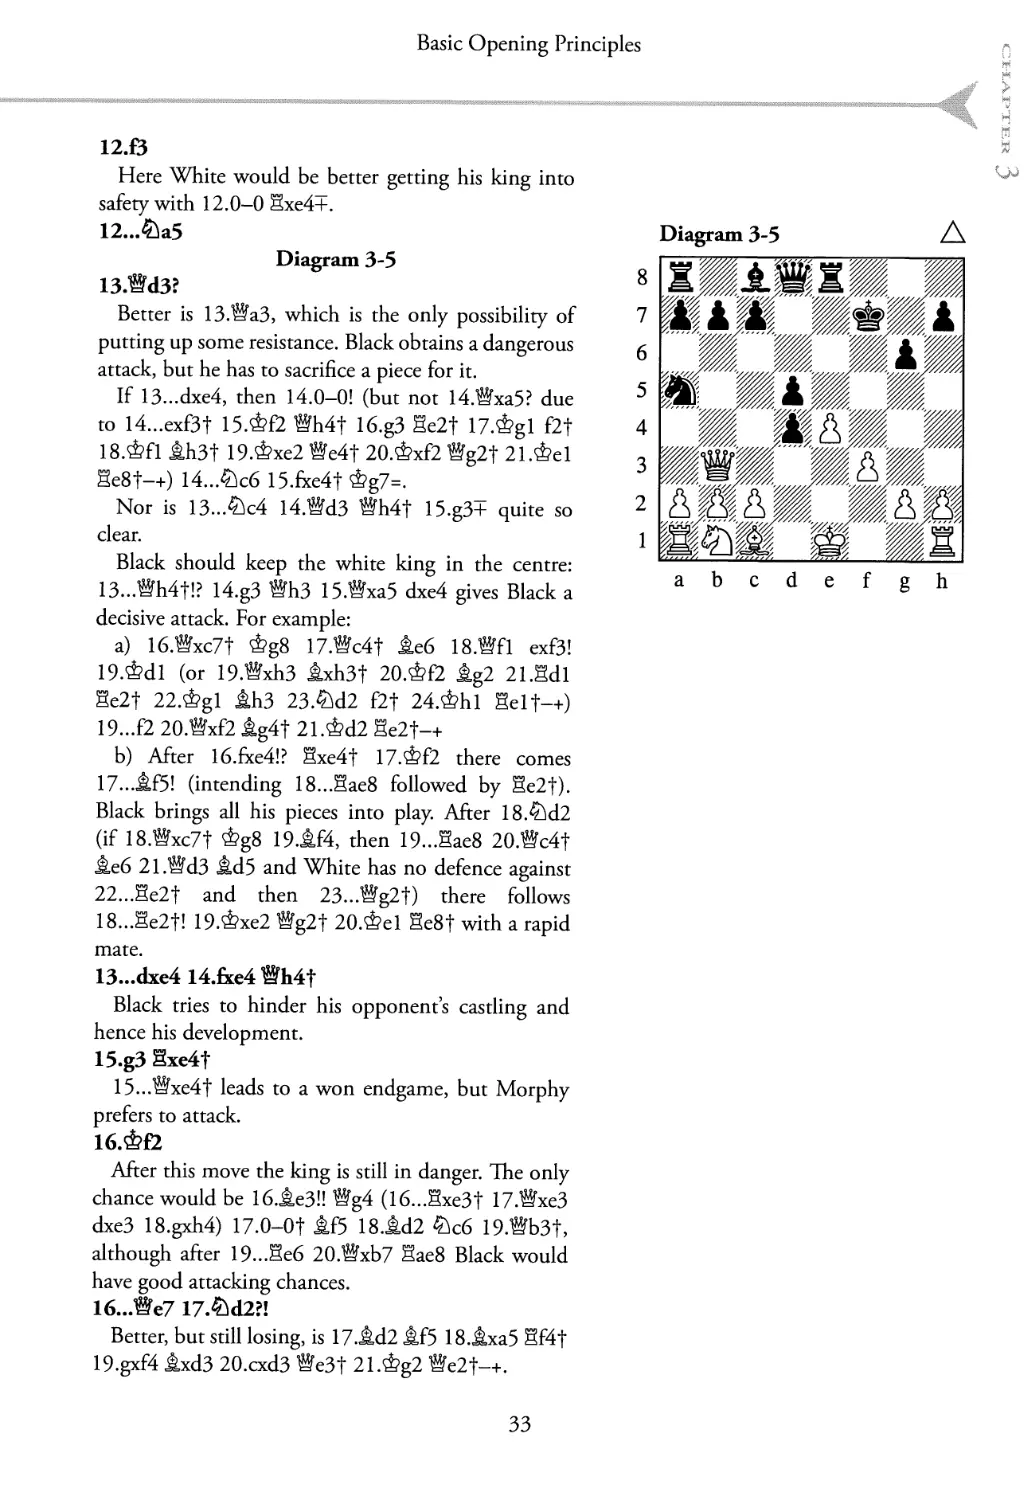
Diagram 3-5
13.®d3?
Better is 13.®a3, which is the only possibility of
putting up some resistance. Black obtains a dangerous
attack, but he has to sacrifice a piece for it.
If 13...dxe4, then 14.0-0! (but not 14.®xa5? due
to 14...exf3t 15.&f2 ®h4f 16.g3 Se2f 17.&gl f2f
18.&fl lh3t 19.Фхе2 ®e4f 20.&xf2 ®g2f 21.&el
Se8f-+) 14...&c6 15.fxe4f &g7=.
Nor is 13...^c4 14.®d3 ®h4f 15.g3+ quite so
clear.
Black should keep the white king in the centre:
13...®h4f!? 14.g3 ®h3 15.®xa5 dxe4 gives Black a
decisive attack. For example:
a) 16.®xc7t &g8 17.®c4f le6 18.®fl exf3!
19.&dl (or 19.®xh3 lxh3t 20.ФЕ2 lg2 21.Sdl
Se2f 22.&gl lh3 23.^d2 f2f 24.ФЫ Selt-+)
19...f2 20.®xf2 lg4f 21.&d2 Se2f-+
b) After 16.fxe4!? Sxe4f 17.^f2 there comes
17...If5! (intending 18...§ae8 followed by Se2t).
Black brings all his pieces into play. After 18.£jd2
(if 18.®xc7t &g8 19.1f4, then 19...Sae8 20.®c4f
le6 21.®d3 ld5 and White has no defence against
22...§e2t and then 23...®g2f) there follows
18...Se2f! 19.&xe2 ®g2f 2О.Фе1 He8f with a rapid
mate.
13...dxe4 14.fxe4 ®h4f
Black tries to hinder his opponent’s castling and
hence his development.
15 .g3 Sxe4f
15... ®xe4f leads to a won endgame, but Morphy
prefers to attack.
16 .ФЕ2
After this move the king is still in danger. The only
chance would be 16.1e3!! ®g4 (16...§xe3t 17.®xe3
dxe3 18.gxh4) 17.0-Of lf5 18.1d2 &c6 19.®b3t,
although after 19...Se6 20.®xb7 Sae8 Black would
have good attacking chances.
16... We7 17.&d2?I
Better, but still losing, is 17.1x12 lf5 18.1xa5 Sf4f
19.gxf4 lxd3 2O.cxd3 ®e3t 21.&g2 ®e2f-+.
Diagram 3-5 A
abcdefgh
33
Opening 1
abcdefgh
17...Se3!
The white queen must protect the e2-square.
18.®b5
If 18.Bxd4, then 18...5e2t 19.&gl M3-+.
18...c6! 19.Bfl
19.®xa5 loses to 19...Se2|: 20.&f3 ®e3, 20.&gl
Be3t 21 ,&fl B£2 and 20.&fl Self 21.&g2 Be2#.
Diagram 3-6
19...M3!
Black ends the game with a combination. Morphy
plays very energetically. Almost all the white
pieces, on the other hand, are still in their starting
positions.
20.Ш1
20.®xh3 loses to 2O...Se2| 21.&fl (21.&gl
Be3t-+; 21.&f3 Be3t 22.&g4 h5t 23.&h4 Be7#)
21...Selt 22.&g2®e2#.
2O...Sf8
‘Beginners who, in the heat of the fight only play
with pieces that are already engaged in battle and
often forget to call on their reserves, can learn a lesson
from this move.’ R.Reti
21.&f3 Фе8
A little joke. White can do nothing about the threat
of 22...Sxf3t, but 21...&g8 would lead to the same
result.
0-1
S.Buecker - A.Yusupov
Diagram 3-7
8
7
6
5
4
3
2
1
abcdefgh
Bundesliga 1993
l.f4 d5 2.ЬЗ?!
Better is 2.^f3.
2...^g4
Black hinders the natural move £T3. Then Black
can take on f3, and his opponent gets doubled
pawns.
3.h3?
This just leads to weaknesses on the kingside. 3.g3
or 3.JLb2 is better.
3...M5 4.g4
Diagram 3-7
4...e5!
Black grabs the chance and seizes the centre. 4...e6
5.£T3 ®f6?! would not be so good, due to 6.d4=.
34
Basic Opening Principles
5.&B
5 .gxh5?? is followed by 5...®h4#.
5... e4!
White loses even more time, because he will have
to move for a second time a piece which is already
developed.
6 .e3 ILg6
The alternative 6...exf3 7.®xf3 jlg6 8.f5 ®f6 9.^c3
is not so clear.
7 .^e5 td6
Instead of this, 7...®h4f 8.Фе2 JLd6 9.®el does
not achieve much.
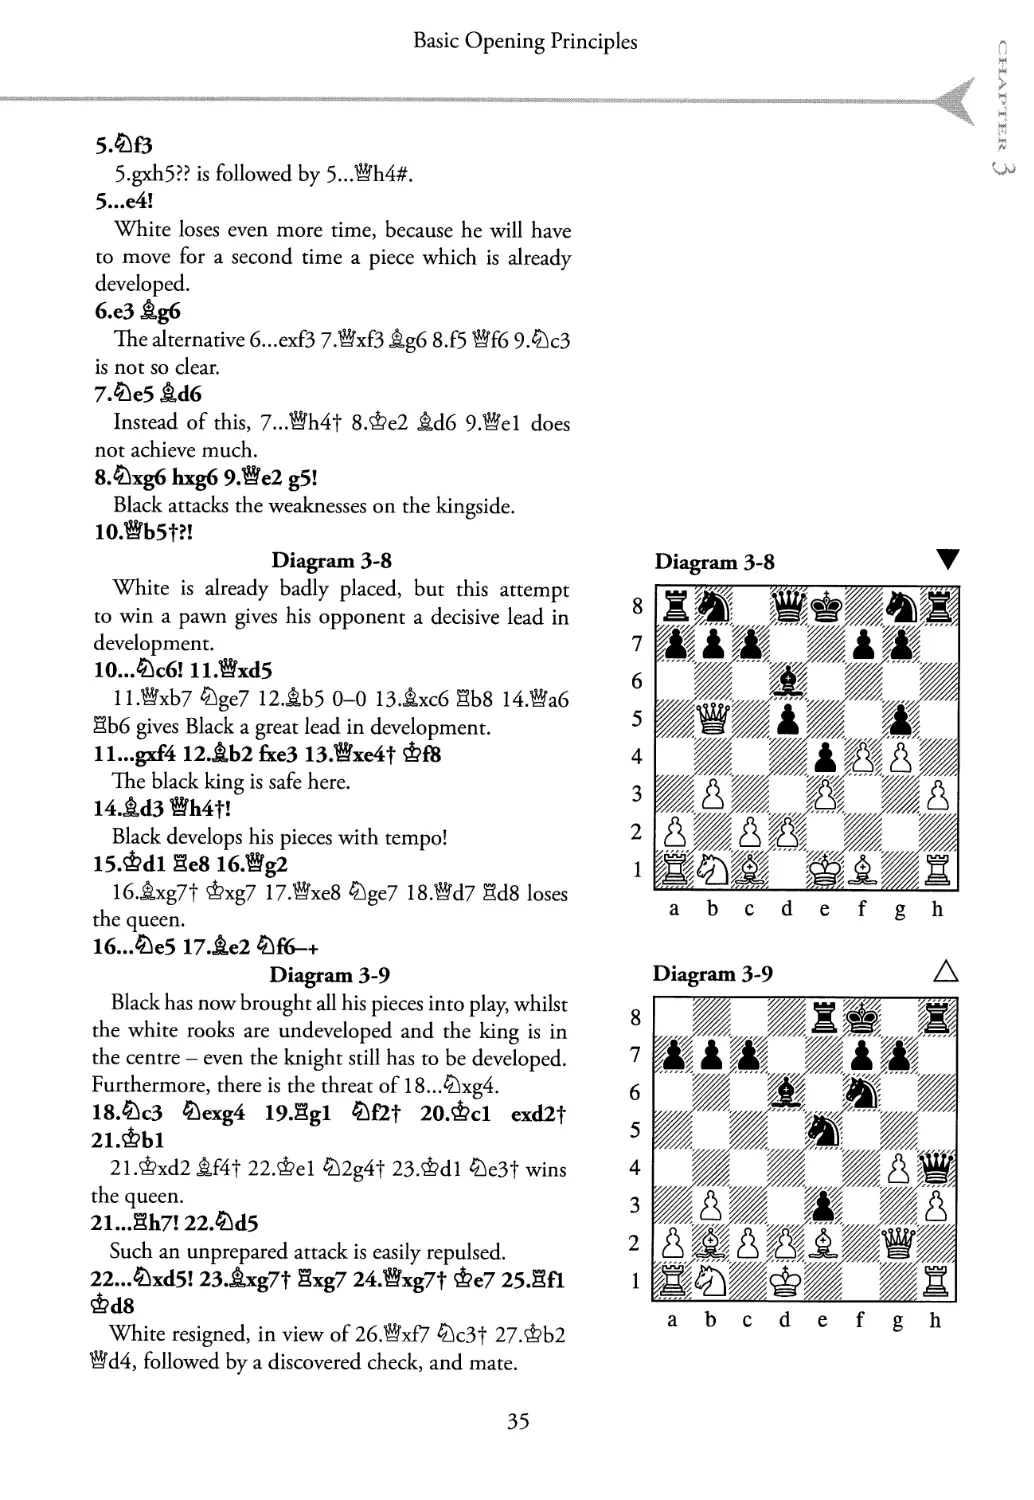
8 .^xg6 hxg6 9.We2 g5!
Black attacks the weaknesses on the kingside.
10>Ь51?!
Diagram 3-8
White is already badly placed, but this attempt
to win a pawn gives his opponent a decisive lead in
development.
10...^c6! Il.®xd5
ll.®xb7 ^ge7 12.tb5 0-0 13.Axc6 §b8 14.®a6
Sb6 gives Black a great lead in development.
Il...gxf4 12.ДЬ2 &e3 13.Wxe4f &IS
The black king is safe here.
14.1ЫЗ Wh4f!
Black develops his pieces with tempo!
15.&dl Se8 16.Wg2
16.jlxg7t ^xg7 17.®xe8 ^ge7 18.®d7 Sd8 loses
the queen.
16...®e5 17.Де2 &fo-+
Diagram 3-9
Black has now brought all his pieces into play, whilst
the white rooks are undeveloped and the king is in
the centre - even the knight still has to be developed.
Furthermore, there is the threat of 18...^xg4.
18.&c3 &exg4 19.Sgl &£2f 2О.Фс1 exd2f
21.&Ы
21.&xd2 &f4t 22.^el ^2g4f 23.&dl 2)e3t wins
the queen.
21...Sh7! 22.Ы5
Such an unprepared attack is easily repulsed.
22...£lxd5! 23.ixg7f Sxg7 24.®xg7t &e7 25-Sfl
&d8
White resigned, in view of 26.®xf7 £)c3t 27.ФЬ2
9d4, followed by a discovered check, and mate.
Diagram 3-8
abcdefgh
Diagram 3-9
abcdefgh
35
Opening 1
The best that can be achieved in the opening is:
In as short a time as possible, we must bring
the maximum number of pieces into play, seize
control of the central squares (e4, d4, e5> d5) and,
at the same time, hinder our opponent’s attempts
to achieve the same goals.
lhe absolute minimum is:
We must develop the pieces rapidly and castle to
get our king to safety, aim our pieces at the central
squares and, at the same time, hinder our opponent
from achieving either a clear lead in development
or complete control of the centre.
Tie players, especially White, should try to dictate
events right from the start of the game, also called
seizing the initiative, lhe initiative is an advantage!
In the following difficult test you do not always have
to win at once (though sometimes you can!). Try to
punish your opponent for his mistakes in the opening,
or at least make the best move for your side.
36
Exercises
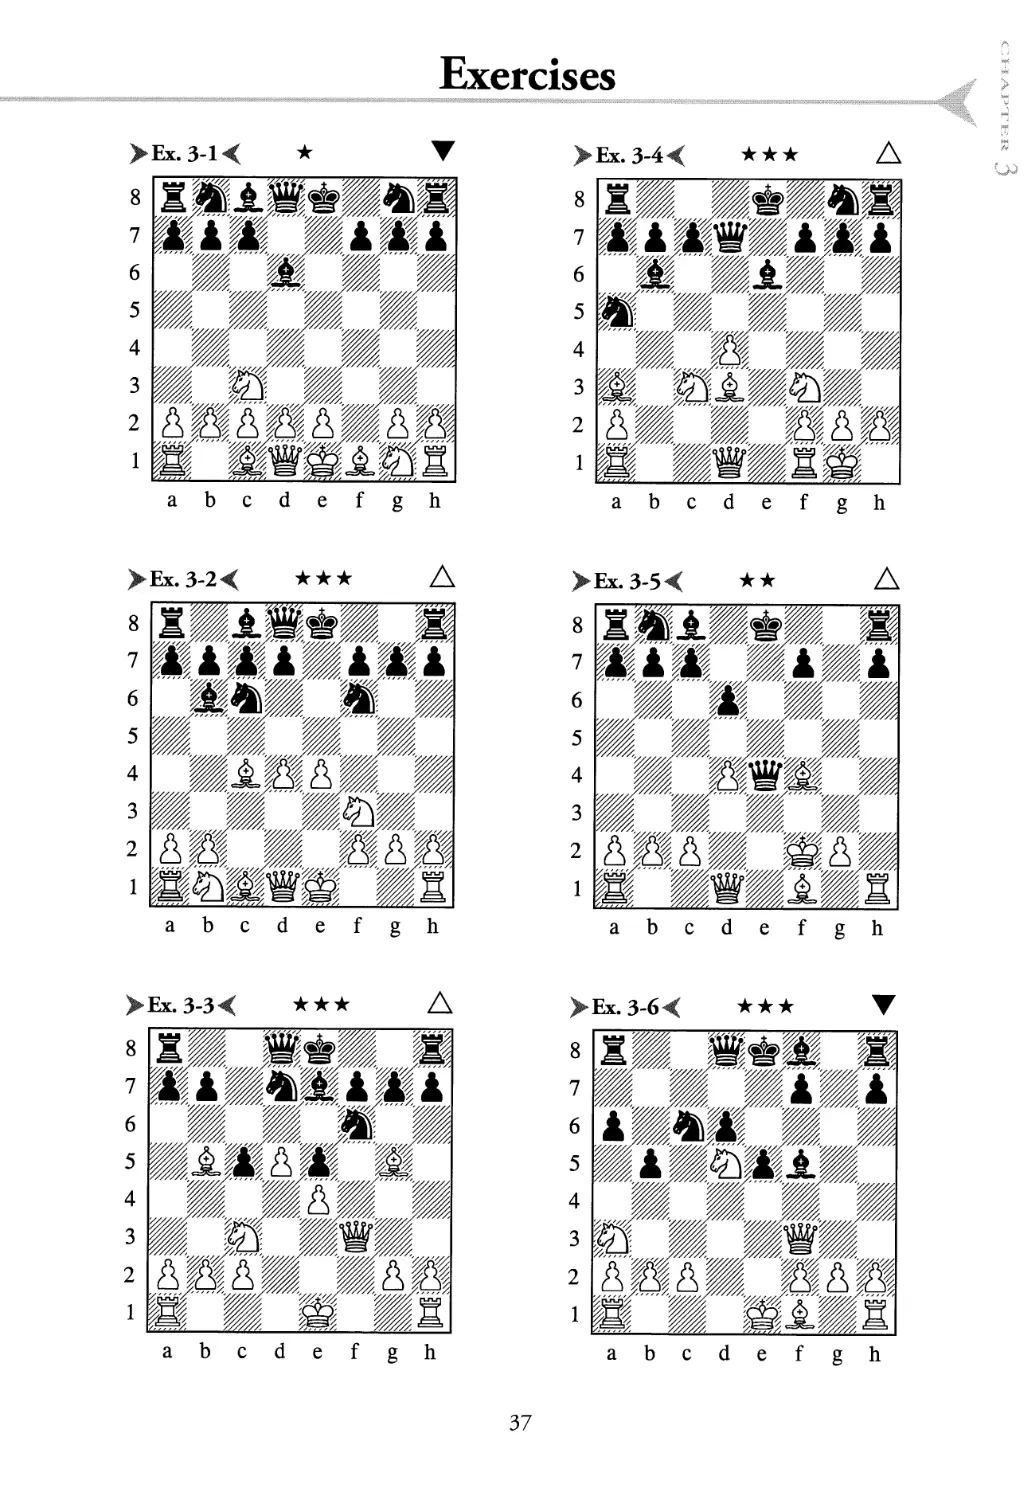
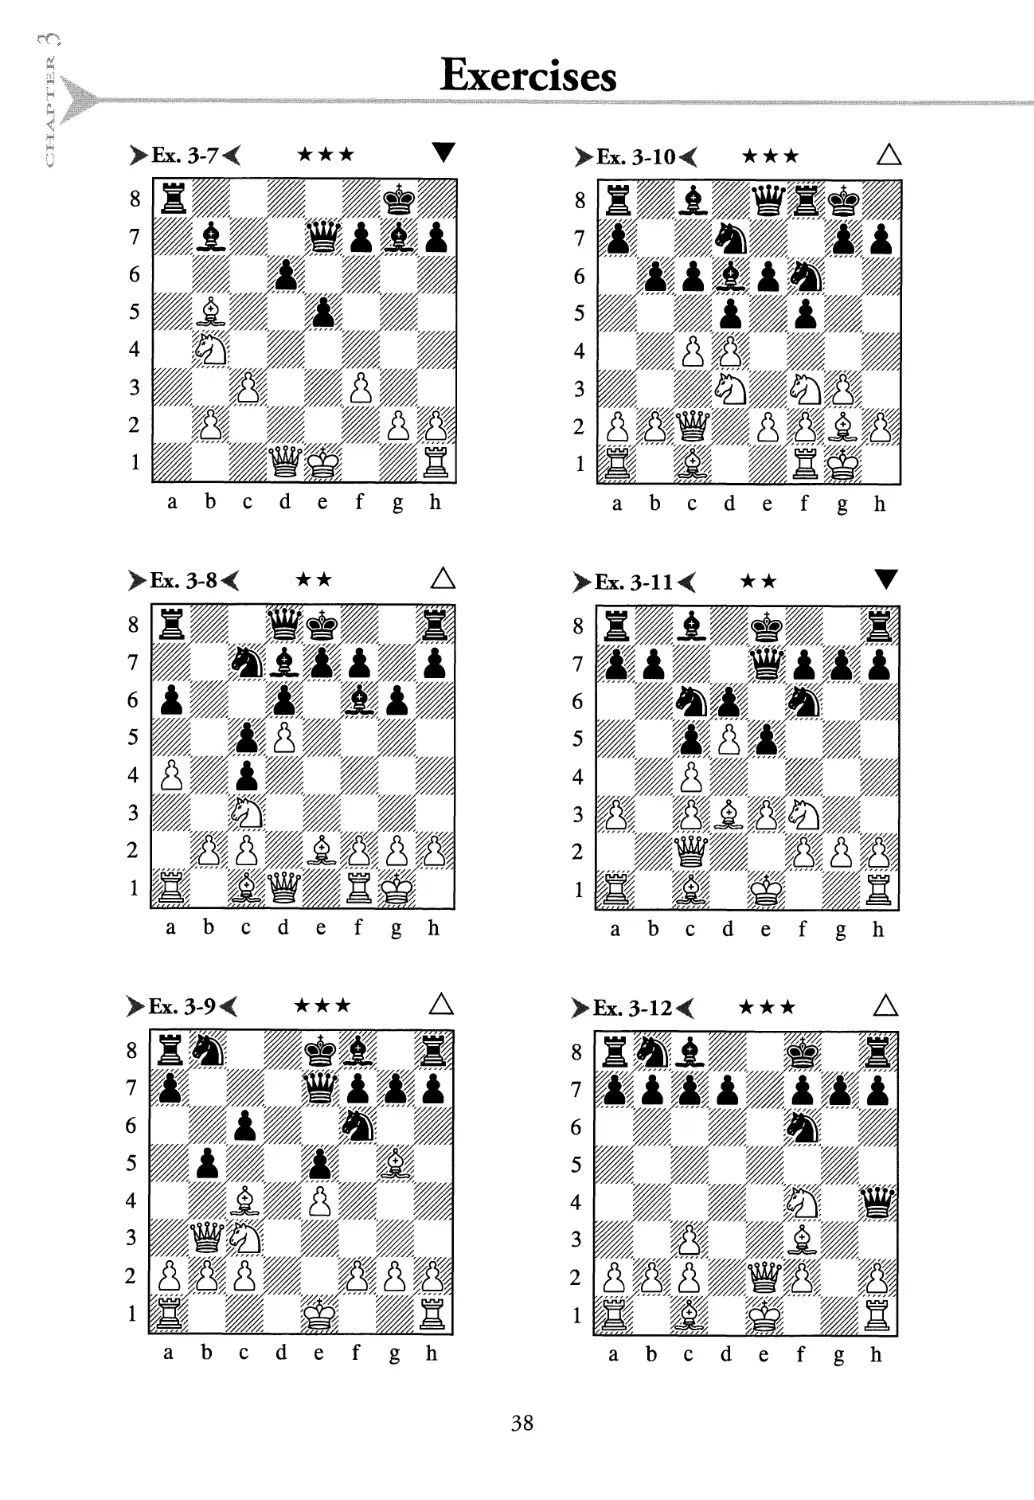
>Ех.З-1<
abcdefgh
>Ех.З-4<
abcdefgh
>Ex. 3-2< ★★★ A
8
7
6
5
4
3
2
1
abcdefgh
>Ex.3-5<
abcdefgh
>Ex.3-34 ★ ★★ A
abcdefgh
>Ex. 3-64
abcdefgh
37
Exercises
abcdefgh
>Ex.3-10< ★★★ A
abcdefgh
>Ex.3-8< ★★ A
abcdefgh
> Ex. 3-11 < ★★
abcdefgh
>Ex. 3-9< ★★★ A
8
7
6
5
4
3
2
1
abcdefgh
>Ex.3-12< ★★★
abcdefgh
38
Solutions
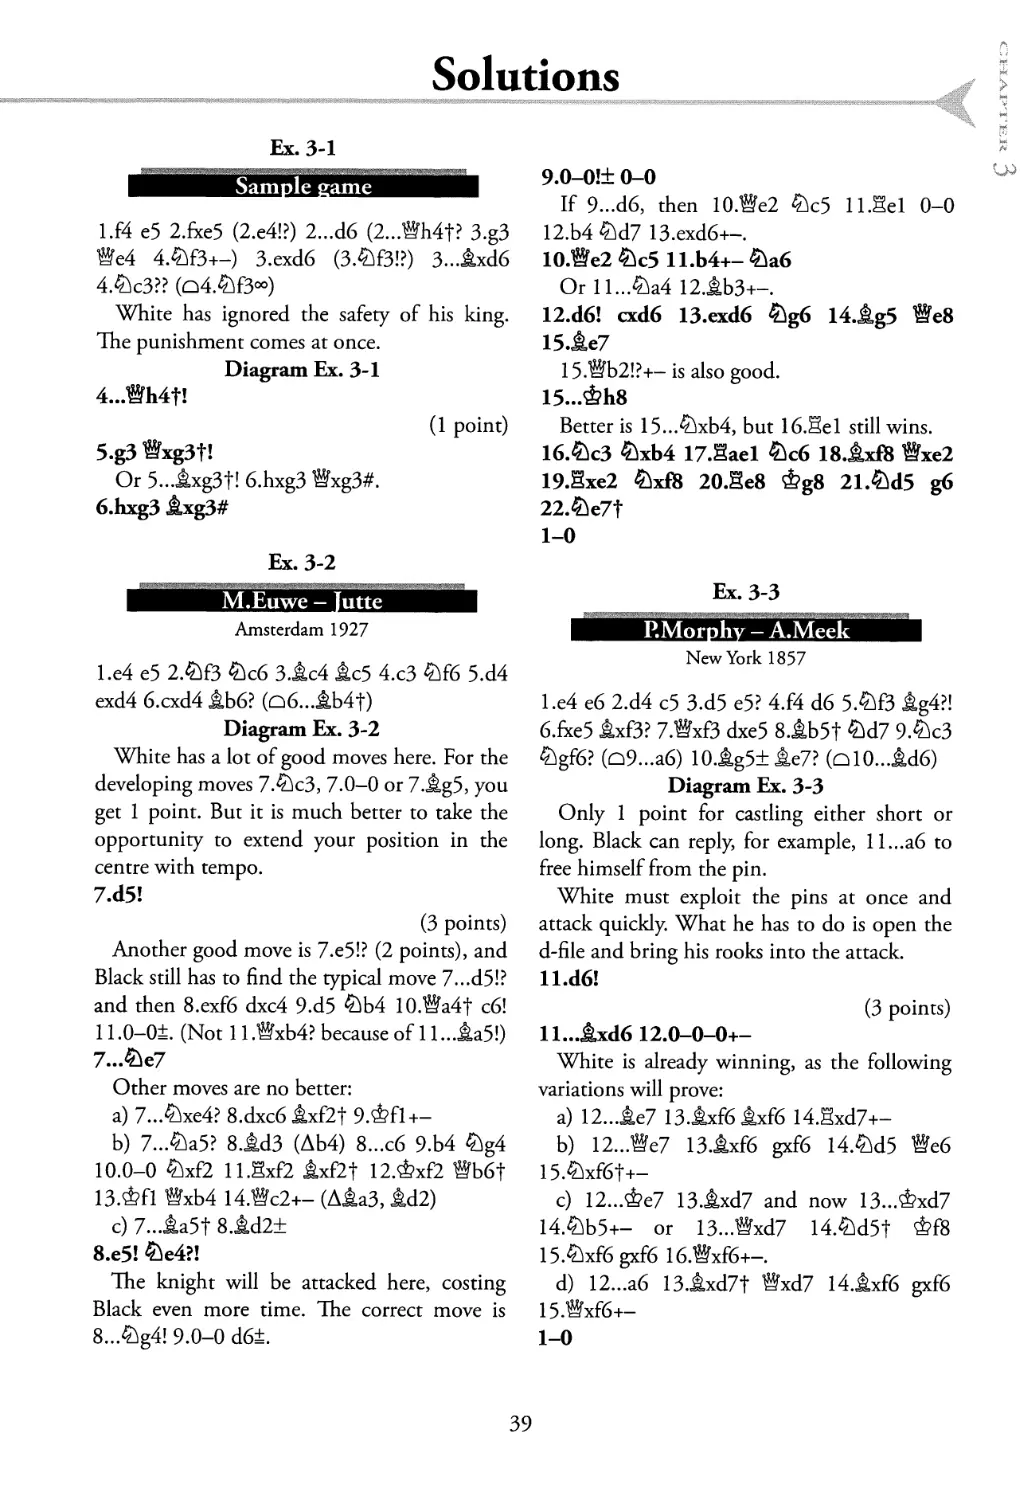
Ex. 3-1
Sample game
l.f4 e5 2.fxe5 (2.e4!?) 2...d6 (2...®h4t? 3.g3
We4 4.^f3+—) 3.exd6 (3Af3!?) 3...&xd6
4.^c3?? (Q4.^f3°°)
White has ignored the safety of his king.
The punishment comes at once.
Diagram Ex. 3-1
4...Wh4f!
(1 point)
5.g3 Wxg3t!
Or 5..JLxg3t! 6.hxg3 ®xg3#.
6.hxg3 JLxg3#
Ex. 3-2
Amsterdam 1927
l.e4 e5 2.£lf3 £k6 3JLc4 $Lc5 4.c3 ?T6 5.d4
exd4 6.cxd4 JLb6? (Q6...^,b4f)
Diagram Ex. 3-2
White has a lot of good moves here. For the
developing moves 7.^c3, 7.0-0 or 7.&g5, you
get 1 point. But it is much better to take the
opportunity to extend your position in the
centre with tempo.
7 .d5!
(3 points)
Another good move is 7.e5!? (2 points), and
Black still has to find the typical move 7...d51?
and then 8.exf6 dxc4 9.d5 ^Ь4 10.®a4f c6!
11.0-0±. (Not 1 l.®xb4? because of 1 l...jta5!)
7...^e7
Other moves are no better:
a) 7...^xe4? 8.dxc6 jLxf2f 9.^fl+-
b) 7...Ш? 8.1d3 (Ab4) 8...c6 9.b4 £g4
10.0-0 &xf2 ll.Bxf2 txf2t 12.Фх£2 ®b6f
13.ФА ®xb4 14.®c2+- (Д^аЗ, ld2)
c) 7...ta5t 8.td2±
8 .e5! &e4?I
The knight will be attacked here, costing
Black even more time. The correct move is
8...^g4! 9.0-0 d6±.
9.0-0!± 0-0
If 9...d6, then 10.®e2 ^c5 ll.Sel 0-0
12.b4 ^d7 13.exd6+-.
10.We2 ll.b4+- ^a6
Or ll...£a4 12.Ш+-.
12.d6! cxd6 13.exd6 ^g6 14.jLg5 We8
15.te7
15 .®b2!?+- is also good.
15... &h8
Better is 15...^xb4, but 16.Sei still wins.
16 .^c3 ^xb4 17.Sael ^c6 18.JLx£8 ®xe2
19 .Sxe2 ^xf8 2O.Se8 &g8 21.Ы5 g6
22.^e7t
1-0
Ex. 3-3
P.Morphy - A.Meek
New York 1857
l.e4 e6 2.d4 c5 3.d5 e5? 4.f4 d6 5.^f3 JLg4?!
6.fxe5 JLxf3? 7.Wxf3 dxe5 8.JLb5t ^d7 9.^c3
^gf6? (Q9...a6) 10.jLg5± Ле7? (Q10...jld6)
Diagram Ex. 3-3
Only 1 point for castling either short or
long. Black can reply, for example, 11...a6 to
free himself from the pin.
White must exploit the pins at once and
attack quickly. What he has to do is open the
d-file and bring his rooks into the attack.
Il.d6!
(3 points)
U...l,xd6 12.0-0-0+-
White is already winning, as the following
variations will prove:
a) 12...jLe7 13.&xf6^xf6 14.Sxd7+-
b) 12...®e7 13JLxf6 gxf6 14.^d5 ®e6
15.^xf6f+-
c) 12...Фе7 13.JLxd7 and now 13...^xd7
14,^b5+- or 13...®xd7 14.^d5t &f8
15.^xf6gxf6 16.®xf6+-.
d) 12...a6 13.jLxd7t ®xd7 14.jLxf6 gxf6
15.®xf6+-
1-0
39
Solutions
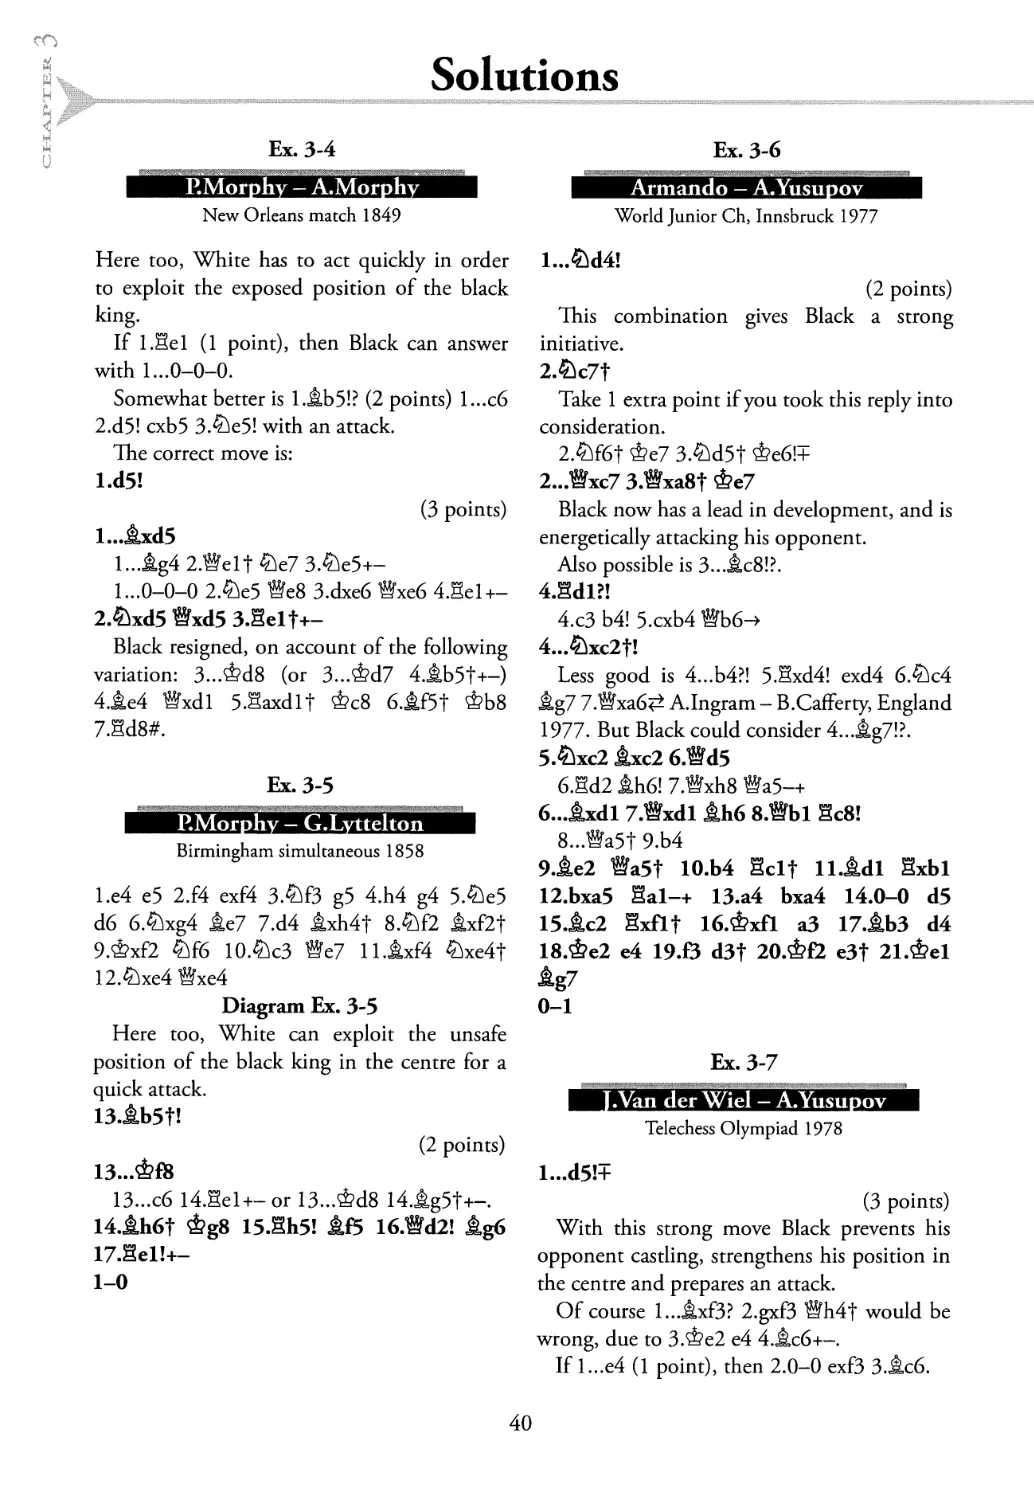
Ex. 3-4
Ex. 3-6
P.Morphy - A.Morphy
Armando - A.Yusupov
New Orleans match 1849
Here too, White has to act quickly in order
to exploit the exposed position of the black
king.
If l.Sel (1 point), then Black can answer
with 1... 0-0-0.
Somewhat better is 1 JLb5!? (2 points) l...c6
2.d5! cxb5 3.^e5! with an attack.
lhe correct move is:
l .d5!
(3 points)
l...jLxd5
l... tg4 2.®elf ^e7 3.^e5+-
1... 0-0-0 2.^e5 ®e8 3.dxe6 ®xe6 4.Sel+-
2 .^xd5 ®xd5 3.Self+-
Black resigned, on account of the following
variation: 3...&d8 (or 3...&d7 4.jlb5t+-)
4.te4 ®xdl 5.Saxdlt &c8 6.tf5t &b8
7.Sd8#.
Ex. 3-5
P.Morphy - G.Lyttelton
Birmingham simultaneous 1858
l.e4 e5 2.f4 exf4 3.^f3 g5 4.h4 g4 5.^e5
d6 6.^xg4 jte7 7.d4 jLxh4f 8.^£2 jLxf2f
9.^xf2 ^f6 10.^c3 ®e7 ll.jLxf4 £}xe4f
12.£}xe4 ®xe4
Diagram Ex. 3-5
Here too, White can exploit the unsafe
position of the black king in the centre for a
quick attack.
13.tb5t!
(2 points)
13...&1S
13...c6 14.Sel+-or 13...&d8 14.1g5t+-.
14.1.h6t &g8 15.Sh5! &Б 16.Ш2! ,tg6
17.Sel!+-
1-0
World Junior Ch, Innsbruck 1977
l...^d4!
(2 points)
This combination gives Black a strong
initiative.
2.&c7t
Take 1 extra point if you took this reply into
consideration.
2.®f6f Фе7 3.^d5t <±>e6!=P
2...Wxc7 3.Wxa8f Фе7
Black now has a lead in development, and is
energetically attacking his opponent.
Also possible is 3..JLc8!?.
4.Sdl?!
4 .сЗ Ь4! 5.cxb4 ®b6-»
4... ^xc2f!
Less good is 4...b4?! 5.Sxd4! exd4 6.^c4
JLg7 7.®xa6# A.Ingram - B.Cafferty, England
1977. But Black could consider 4...ig7!?.
5 .^xc2 Jlxc2 6.Wd5
6 .§d2 ih6! 7.®xh8 ®a5-+
6...JLxdl 7.Wxdl JLh6 8.Wbl Sc8!
8...®a5t 9.b4
9.1e2 Wa5t Ю.Ь4 Self llJ,dl Sxbl
12.bxa5 Sal-+ 13.a4 bxa4 14.0-0 d5
15.Дс2 Sxflf 16.ФхА аЗ 17.ДЬЗ d4
18.Фе2 e4 19.B d3t 20.ФЕ2 e3t 21.Фе1
&g7
0-1
Ex. 3-7
.Van der Wiel - A.Yusupov
Telechess Olympiad 1978
l...d5!+
(3 points)
With this strong move Black prevents his
opponent castling, strengthens his position in
the centre and prepares an attack.
Of course l...jLxf3? 2.gxf3 ®h4f would be
wrong, due to З.Фе2 e4 4.Дс6+-.
If l...e4 (1 point), then 2.0-0 exf3 3.Jic6.
40
Solutions
2.Де2
2.£)xd5? loses to 2...jlxd5 3.®xd5 Half—+.
If 2.0-0?, then 2...®c5t-+.
2...®c5 3.®d2 e4! 4.fxe4
After 4.f4 there follows 4...d4!.
4...dxe4 5.Jldl e3 6.®d3
If 6>e2 Sd8 7.0-0, then 7...Ш2-+.
6...®g5 7.&c2 ixg2 8.Sgl ®h4f 9.Фе2
®f2#
Ex. 3-8
Variation from the game
M.Botvinnik - L.Schmid
Leipzig Olympiad 1960
White should prevent his opponent from
castling. The c4-pawn is not important.
1.M6!
(2 points)
White is better, since the black king is left in
the middle.
Only 1 point is given for 1. jlxc4, since after
1... 0-0± Black brings his king to safety.
Ex. 3-9
6..Axd7
Now comes a pretty finish.
7.Wb8fl! &xb8 8.Sd8#
Ex. 3-10
A.Yusupov - Khatib
Tunis (1) 1979
l.d4 f5 2.£)f3 £if6 3.g3 e6 4.ig2 ie7 5.0-0
d5 6.c4 c6 7.£)bd2 0-0 8.£>e5 &bd7 9.2)d3
&d6 10.£)f3 ®e8 ll.®c2 b6??
Diagram Ex. 3-10
Only 1 point for the positional move
12.jLf4, since instead White can win a pawn!
Always check out the active moves first!
12.cxd5!
(3 points)
12...M7
After 12...cxd5 there comes 13.®c6+-.
13.dxc6 ®c8 14.£ig5 He8 15.®a4+- JLxc6
16.Дхс6 Sb8 17.1.f4 ®c7 18.Had jbtf4
19.W4®d6 20.®b3
1-0
Ex. 3-11
P.Morphy - ‘Allies’
Khatib - A.Yusupov
Paris Opera 1858
l.^xb5!
(3 points)
White takes the chance to mount an attack
against the opposing king with a piece sacrifice.
I.^d5 would be wrong, due to l...bxc4.
Only 1 point for the modest retreat 1Ле2
®b4=.
I... cxb5 2.jLxb5t &bd7
Or 2...&d8 3.0-0-Of Фс8 4.Sd3 ®b4
5.2c3t ФЬ7 6.®xf7t ®e7 7.®c4+-.
3.0-0-0 Sd8 4.Sxd7!
This is how to attack! White gives his
opponent no rest.
4...Sxd7 5.Sdl+- ®e6 6.jLxd7t
Also good were 6.®xe6f fxe6 7.ilxf6+- and
6.&xf6+-.
Tunis (6) 1979
1 .£T3 £T6 2.c4 еб 3.d4 JLb4f 4.^c3 c5 5.e3
^c6 6.a3 JLxc3t 7.bxc3 d6 8.JLd3 e5 9.®c2
®e7 10.d5
Diagram Ex. 3-11
10...e4!
(2 points)
Black fights for the initiative.
10...^a5? is bad, due to ll.®a4f. But
retreating is too passive: 10...^Ь8 1 l.^d2± or
10...^d8 ll.^d2±.
11.1хе4?!
ll.dxcb is necessary, continuing ll...exd3
(ll...exf3!? 12.gxf3 bxc6=) 12.cxb7! &xb7
13.®xd3. Although White has an extra pawn,
Black is well placed, since the c4-pawn is a
hopeless weakness.
41
Solutions
11...®хе4 12.Wxe4f &xe4 13.dxc6 bxc6+
(Xc4) 14.&gl? ia6 15.B &xc3 16.^>£2
2ia4-+ 17.e4 Дхс4 18j,f4 Фе7 19.£>h3
Sab8 2O.Ehdl Shd8 21.Sd2 &b2 22.±gl
f6 23.1g3 Sb3 24.ЙЫ &a4 25.§cl d5
26.exd5 cxd5 27. W4 g5 28.&И5 ld3
29.£elf &f7 30.112 d4 31.^g3 Sxa3
32.^e4 c4 33.JLg3 JLxe4 34.2xe4 Saif
0-1
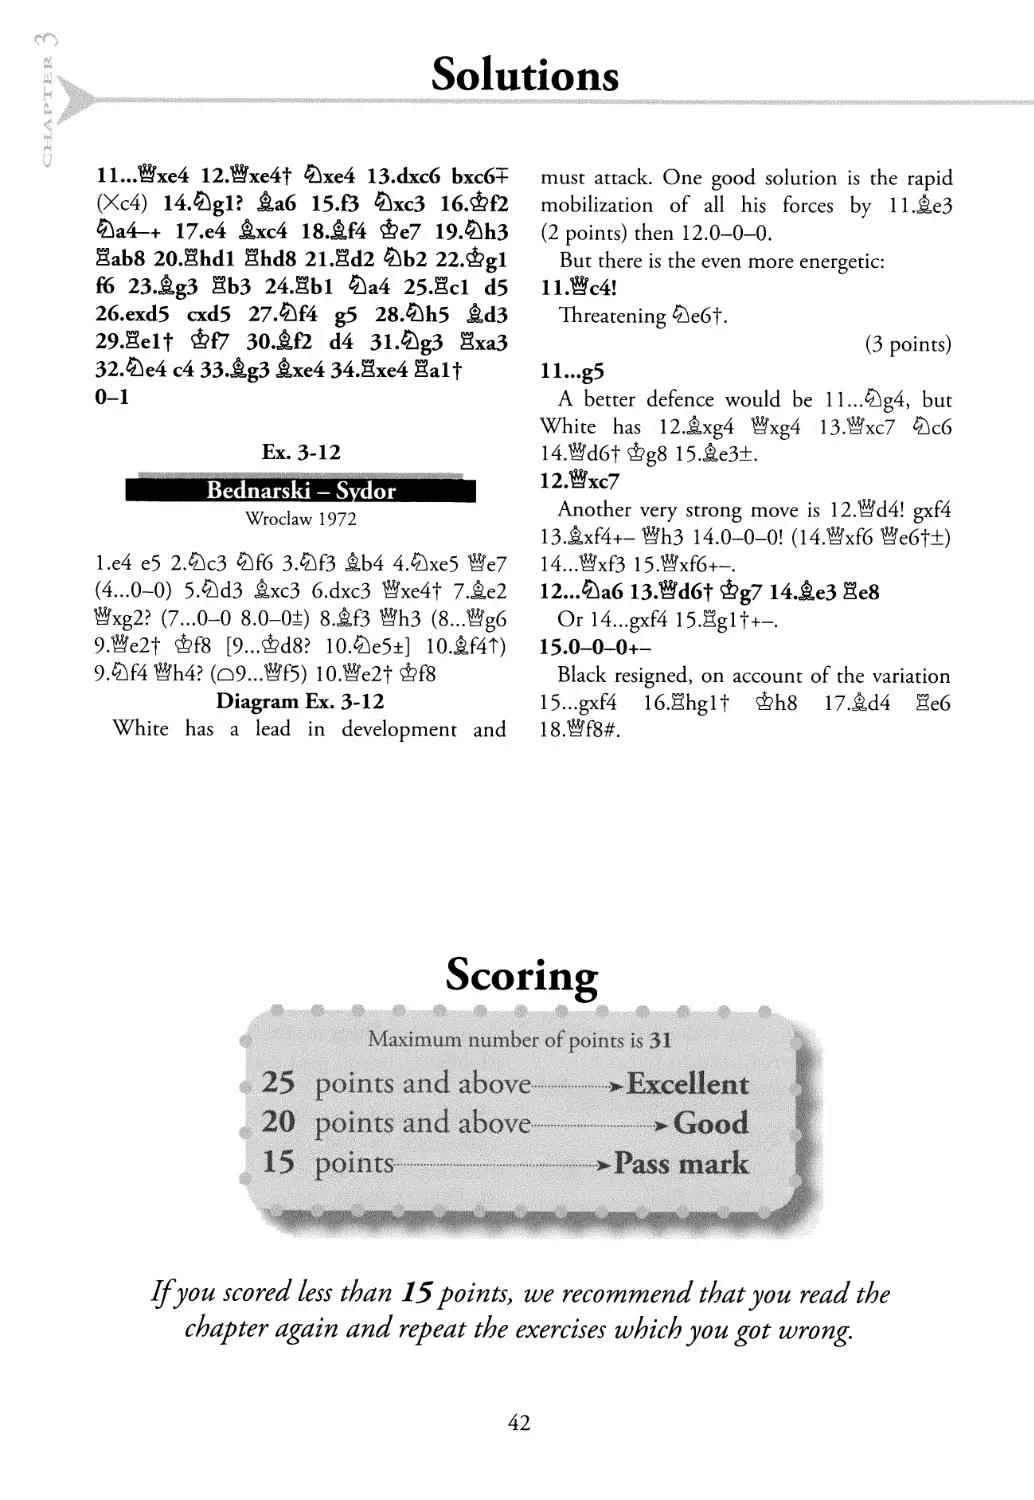
Ex. 3-12
Bednarski - Sydor
Wroclaw 1972
l.e4 e5 2.£k3 QhfG 3.^f3 JLb4 4.&xe5 ®e7
(4...0-0) 5.£W3 ДхсЗ 6.dxc3 ®xe4f 7.Де2
®xg2? (7...0-0 8.0-0±) 8.&f3 ®h3 (8...®g6
9.Be2t &f8 [9...&d8? 10.£)e5+] 10.i,f4T)
9Ж4 Bh4? (Q9...BF5) 10.®e2t &f8
Diagram Ex. 3-12
White has a lead in development and
must attack. One good solution is the rapid
mobilization of all his forces by П.ЛеЗ
(2 points) then 12.0-0-0.
But there is the even more energetic:
ll.®c4!
Threatening ^e6f.
(3 points)
ll...g5
A better defence would be ll...^g4, but
White has 12.^,xg4 ®xg4 13.®xc7 ?k6
14.®d6f &g8 15.&e3±.
12.®xc7
Another very strong move is 12.®d4! gxf4
13.1xf4+- Bh3 14.0-0-0! (14.®xf6 ®e6t±)
14...®xf3 15.®xf6+-.
12...&a6 13.®d6t &g7 14.ДеЗ Se8
Or 14...gxf4 15.Sglt+-.
15.0-0-0+-
Black resigned, on account of the variation
15...gxf4 16.Shglt M8 17.id4 §e6
18.®f8#.
Scoring
If you scored less than 15 points, we recommend that you read the
chapter again and repeat the exercises which you got wrong.
42
Contents
S Promoting the pawn
S Key squares
S The opposition
J Rook pawns
S The rule of the square
4
Simple pawn endings
In this lesson we will look at some important elements
of pawn endings: key squares, the opposition and the
rule of the square.
Promoting the pawn
The best way for the king to fight against a pawn is
by occupying a square in its path. In this case the
stronger side must try to position his own king in
front of his pawn.
Diagram 4-1 AV
8
7
6
5
4
3
2
1
abcdefgh
Example 1
White to play =
Black to play +—
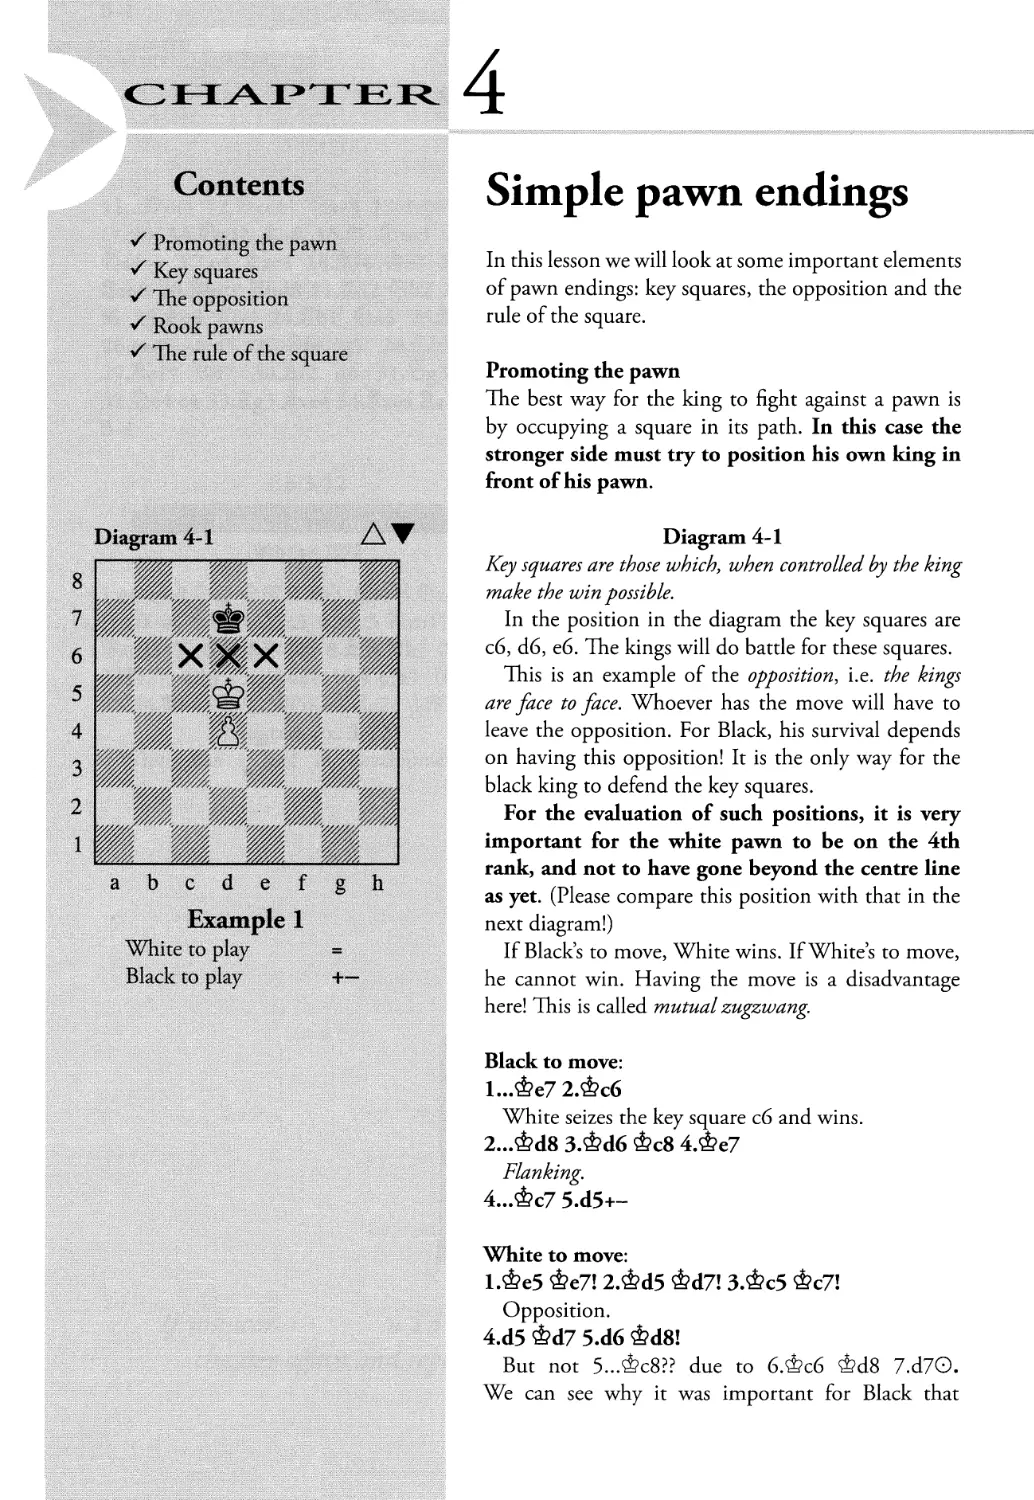
Diagram 4-1
Key squares are those which, when controlled by the king
make the win possible.
In the position in the diagram the key squares are
c6, d6, e6. The kings will do battle for these squares.
This is an example of the opposition, i.e. the kings
are face to face. Whoever has the move will have to
leave the opposition. For Black, his survival depends
on having this opposition! It is the only way for the
black king to defend the key squares.
For the evaluation of such positions, it is very
important for the white pawn to be on the 4th
rank, and not to have gone beyond the centre line
as yet. (Please compare this position with that in the
next diagram!)
If Black’s to move, White wins. If White’s to move,
he cannot win. Having the move is a disadvantage
here! This is called mutual zugzwang.
Black to move:
1...Фе7 2.Фс6
White seizes the key square c6 and wins.
2...&d8 3.&d6 Фс8 4.Фе7
Flanking.
4...Фс7 5.d5+-
White to move:
1.Фе5 Фе7! 2.&d5 &d7! З.Фс5 Фс7!
Opposition.
4.d5 &d7 5.d6 &d8!
But not 5..Ac8?? due to 6.d?c6 d?d8 7.d7O.
We can see why it was important for Black that
Simple Pawn Endings
the white pawn had not yet crossed the centre line:
it means that the black king still has a square on the
8th rank to which it can retreat!
6.&c6 <&c8 7.d7t &d80=
Diagram 4-2
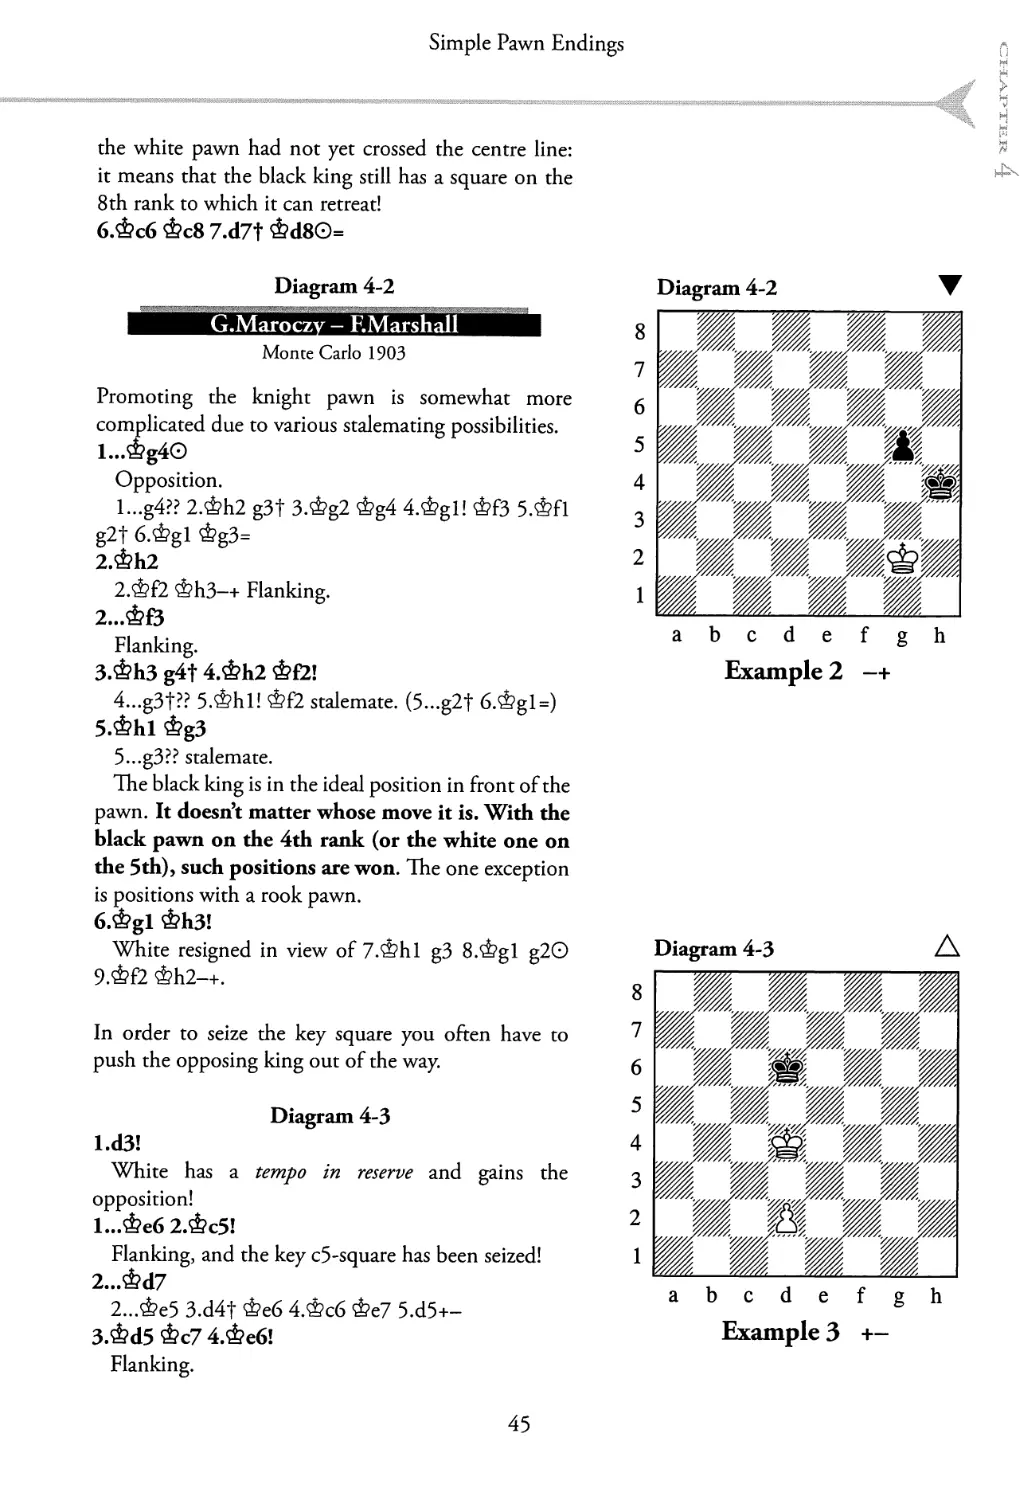
G.Maroczy - EMarshall
Monte Carlo 1903
Promoting the knight pawn is somewhat more
complicated due to various stalemating possibilities.
l...©g4O
Opposition.
I...g4?? 2.&h2 g3t 3.&g2 &g4 4.&gl! &f3 5.&fl
g2f 6.&gl &g3=
2.&h2
2.Ф£2 ФЬЗ-+ Flanking.
2...ФВ
Flanking.
3.&h3 g4t 4.&h2
4...g3t?? 5.ФЬ1! ф£2 stalemate. (5...g2f 6.^gl=)
5.&hl &g3
5...g3?? stalemate.
The black king is in the ideal position in front of the
pawn. It doesn’t matter whose move it is. With the
black pawn on the 4th rank (or the white one on
the 5th), such positions are won. The one exception
is positions with a rook pawn.
6.&gl <±>h3!
White resigned in view of 7.ФЬ1 g3 8.^gl g2O
9.ФЕ2 &h2-+.
In order to seize the key square you often have to
push the opposing king out of the way.
Diagram 4-2
abcdefgh
Example 2 -+
Diagram 4-3
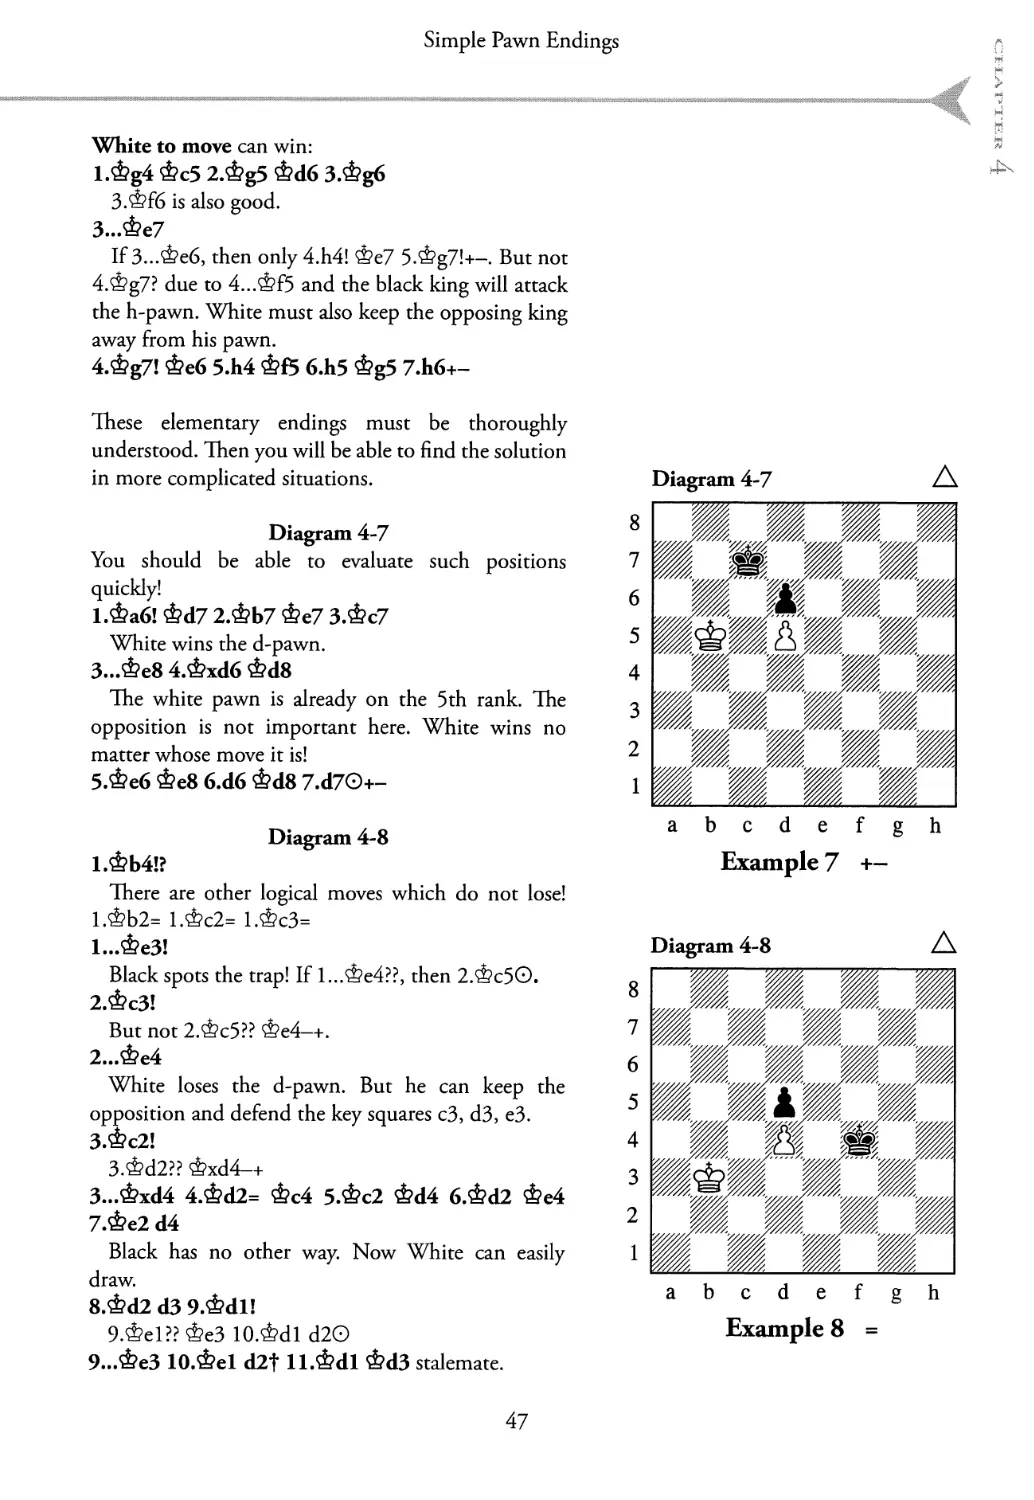
l.d3!
White has a tempo in reserve and gains the
opposition!
1... Фе6 2.Фс5!
Flanking, and the key c5-square has been seized!
2...&d7
2...Фе5 3.d4t Феб 4.Фсб Фе7 5.d5+-
3.&d5 Фс7 4,Фе6!
Flanking.
Diagram 4-3 A
abcdef gh
Example 3 +-
45
Endgame 1
Diagram 4-4
abcdefgh
Example 4 =
Diagram 4-5 A
4.d4?? &d7O Opposition!
4...&d8 5.d4 &e8 6.d5 &d8 7.&d6
7.d6?? Фе8 8,d7t &d8O
7...Фе8 8.&c7 &e7 9.d6f+-
Rook pawn
Diagram 4-4
The key squares for the h-pawn are g2 and gl. White
achieves a draw if he can get his king in front of
the pawn. If Black’s king is in front of the pawn,
White can still draw by blocking in the opponent’s
king with his own king from fl or £2. To win in
such positions, Black must seize full control of the
g2- or gl-squares. No matter whose to move, the
position in the diagram is drawn:
1.Фй=
Or, with Black to play, 1 ...&g3 2.d?gl = h2f З.ФЬ 1
ФЬЗ stalemate.
Diagram 4-5
A useful drawing position.
I.&g8
l.h6 &£7 2.ФЬ8 ФГ8 3.h7 &£7 stalemate.
l... &g5=
abcdef gh
Example 5 =
Diagram 4-6
Y.Averbakh
Diagram 4-6 A ▼
8
7
6
5
4
3
2
1
abcdefgh
Example 6 +—/=
The key squares are g7 and g8.
Black to move can achieve a draw:
1...Фс5 2.&g4 Фаб 3.&g5 Фе7 4.Фё6 Фй=
Intending Фg8=.
5.Ф117
5.h4 Фg8 6.h5 ФЬ8 7.ФБ6 Фg8 8^g6 ФЬ8=
White cannot entice the black king out of the corner.
9.h6 Фg8 10.h7t ФЬ8 11.ФЬ6 stalemate.
5...ФГ 6.h4 Фй 7.h5 Ф£7 8.h6 Фй 9.Ф118
9,^g6 Ф§8=
9...Ф17 10.h7 Фй stalemate.
46
Simple Pawn Endings
White to move can win:
l.&g4 &c5 2,&g5 *&d6 3.&g6
3 .^f6 is also good.
3... &e7
If З...Фе6, then only 4.h4! Фе7 5.^g7!+- But not
4.^g7? due to 4...ф£5 and the black king will attack
the h-pawn. White must also keep the opposing king
away from his pawn.
4 .*&g7! Феб 5.h4 Фб 6.h5 &g5 7.H6+-
These elementary endings must be thoroughly
understood. Then you will be able to find the solution
in more complicated situations.
Diagram 4-7
You should be able to evaluate such positions
quickly!
1.Фа6! &d7 2.ФБ7 Фе7 З.Фс7
White wins the d-pawn.
З...Фе8 4.Фх<16 Фав
The white pawn is already on the 5 th rank. The
opposition is not important here. White wins no
matter whose move it is!
5.Феб Фе8 6.d6 Фав 7.d7O+-
Diagram 4-8
1.ФЬ41?
There are other logical moves which do not lose!
1.ФЬ2= 1.Фс2= 1.ФсЗ=
1...ФеЗ!
Black spots the trap! If 1...Фе4??, then 2.Фс50.
2 .ФсЗ!
But not 2.Фс5?? Фе4—+.
2... Фе4
White loses the d-pawn. But he can keep the
opposition and defend the key squares c3, d3, e3.
З .Фс2!
З.Фа2?? Фха4-+
З...Фха4 4.Фа2= Фс4 5.Фс2 Фа4 б.Фаг Фе4
7.Фе2 d4
Black has no other way. Now White can easily
draw.
8 .Ф<12 d3 9.Фа1!
9 .Фе1?? ФеЗ 1О.Фс11 d2O
9... ФеЗ Ю.Фе! d2f П.Фа! Ф<13 stalemate.
Diagram 4-7 A
abcdefgh
Example 7 +-
Diagram 4-8
abcdef gh
Example 8 =
47
Endgame 1
abcdefgh
Example 9 =
The rule of the square
For situations in which both kings are far away from
the pawn, the rule of the square is a useful concept.
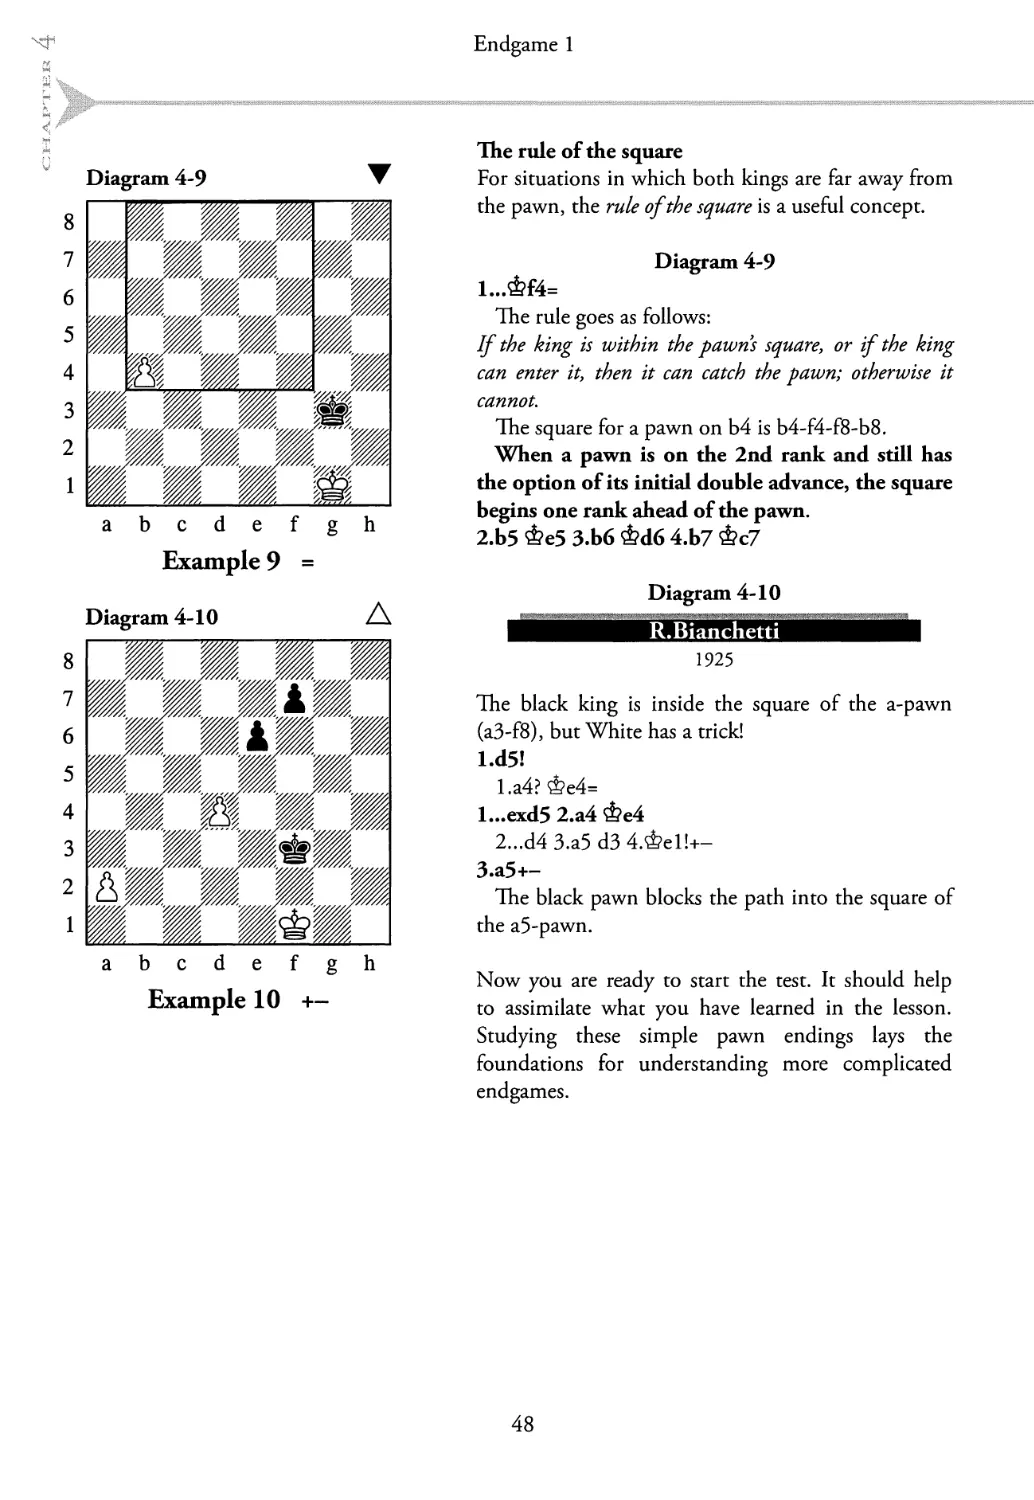
Diagram 4-9
The rule goes as follows:
If the king is within the pawns square, or if the king
can enter it, then it can catch the pawn; otherwise it
cannot.
The square for a pawn on b4 is b4-f4-f8-b8.
When a pawn is on the 2nd rank and still has
the option of its initial double advance, the square
begins one rank ahead of the pawn.
2.b5 Фе5 З.Ьб Ф<16 4,b7 Фс7
Diagram 4-10
Diagram 4-10
R.Bianchetti
abcdefgh
Example 10 +-
1925
The black king is inside the square of the a-pawn
(a3-f8), but White has a trick!
I.d5!
1.а4? Фе4=
l... exd5 2.a4 Фе4
2...d4 3.a5 d3 4.Фе1!+-
3.a5+-
The black pawn blocks the path into the square of
the a5-pawn.
Now you are ready to start the test. It should help
to assimilate what you have learned in the lesson.
Studying these simple pawn endings lays the
foundations for understanding more complicated
endgames.
48
Exercises
>
>Ex. 4-4 4
8
7
6
5
4
3
2
49
Exercises
>Ex. 4-84 ★★★ Д >Ex. 4-114 ★ A
50
Solutions
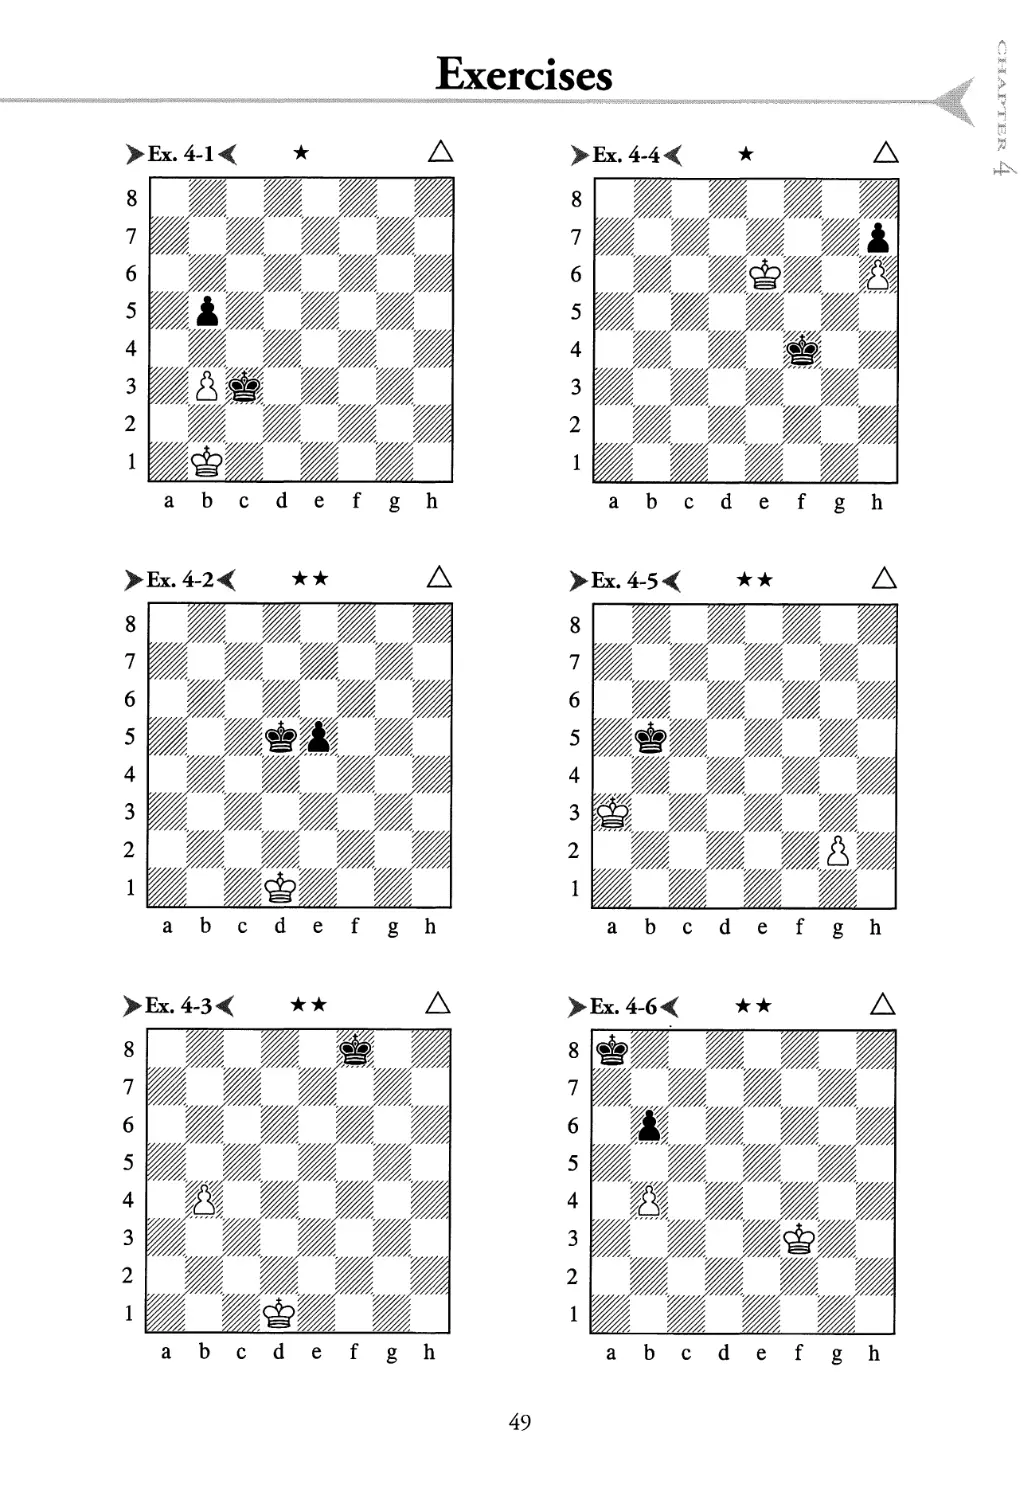
Ex. 4-1
N. Grigoriev
1925
l.b4!
(1 point)
But not 1 .Фа2? Ь4-+ and Black wins, since
the b-pawn has already crossed the centre line
and the black king is in front of the pawn.
1... ФхЬ4 2.&b2!=
Opposition.
Ex. 4-2
l.^el!
(2 points)
White must fight for the key squares d3, e3,
f3 (see Example 1). If the black king gets in
front of the pawn, White must be able to seize
the opposition by occupying the appropriate
square. For example, l.^d2? would be wrong
due to l...^d4, when Black gains the opposi-
tion: 2.Фе2 Фе4 З.Ф£2 &d3! 4.Фе1 ФеЗ-+.
1...Фе4
Or 1 ...<&d4 2.^d2!=, while if 1...Фс4 then
2.Фе2! &d4 3.&d2=.
2.&e2!=
Opposition.
Ex. 4-3
The key squares for the b4-pawn are a6, b6
and c6. White can get his king in front of the
pawn and gain the opposition!
1.Фс2! Фе7 2.ФБЗ! Ф<16 З.Фа4!
(1 point)
The only way! If З.Фс4?, then З...Фс6=.
З...Фс6 4.Фа5 ФЬ7
Or 4,..Фс7 5.Фаб+- and White has seized
the key square.
5.ФБ5+-
(1 point)
White gains the opposition (see Example 2).
Ex. 4-4
1.Фй!
(1 point)
White wants to win the h7-pawn, while at
the same time barring the way of the black
king to the saving square fZ (see Example 4).
I.<tbf7? does not win: 1... Фе5 2.Ф§7 Феб
З.ФхЬ7 Ф£7=.
1...Фе4 2.&g7 Фв З.ФхЬ7 Фй 4^g8+-
Ех. 4-5
N. Grigoriev
1.&ЬЗ!
(1 point)
The kings are already battling for the
opposition. I.g4? is wrong due to 1...Фс4=.
1...Фс5 2.&c3 &d5 3.&d3 Фе5 4.ФеЗ &£5
5.&В &g5 6.&g3+-
(1 point)
It is important to gain the opposition on the
g-file, in order to decide the struggle for the
key squares f4, g4 and h4.
6...Ф6 7.&И4
Flanking. White occupies the key square.
7...Ф16 8.&h5 &g7 9.&g5 &f7 10.<£h6
&g8 ll.&g6+-
Ex. 4-6
N. Grigoriev
1925
1.Ь5!
(1 point)
It is important that the white pawn crosses
the centre line. If 1.Фе4?, then l...b5! and
Black draws as in Ex. 4-1.
1... ФЬ7 2.Фе4 Фс7 3.&e5!
(1 point)
But not 3.&d5? <&d7 4.Фе5 Фе7=.
3...&d7 4.&d5!
Opposition.
4...4?c7 5.^e6
Flanking.
5...ФЬ7 6.&d6 S$?b8 7.&c6 Фа7 8.&c7O
S$?a8 9.&xb6 &b8 10.&a6!+-
And continues as in Example 2.
51
Solutions
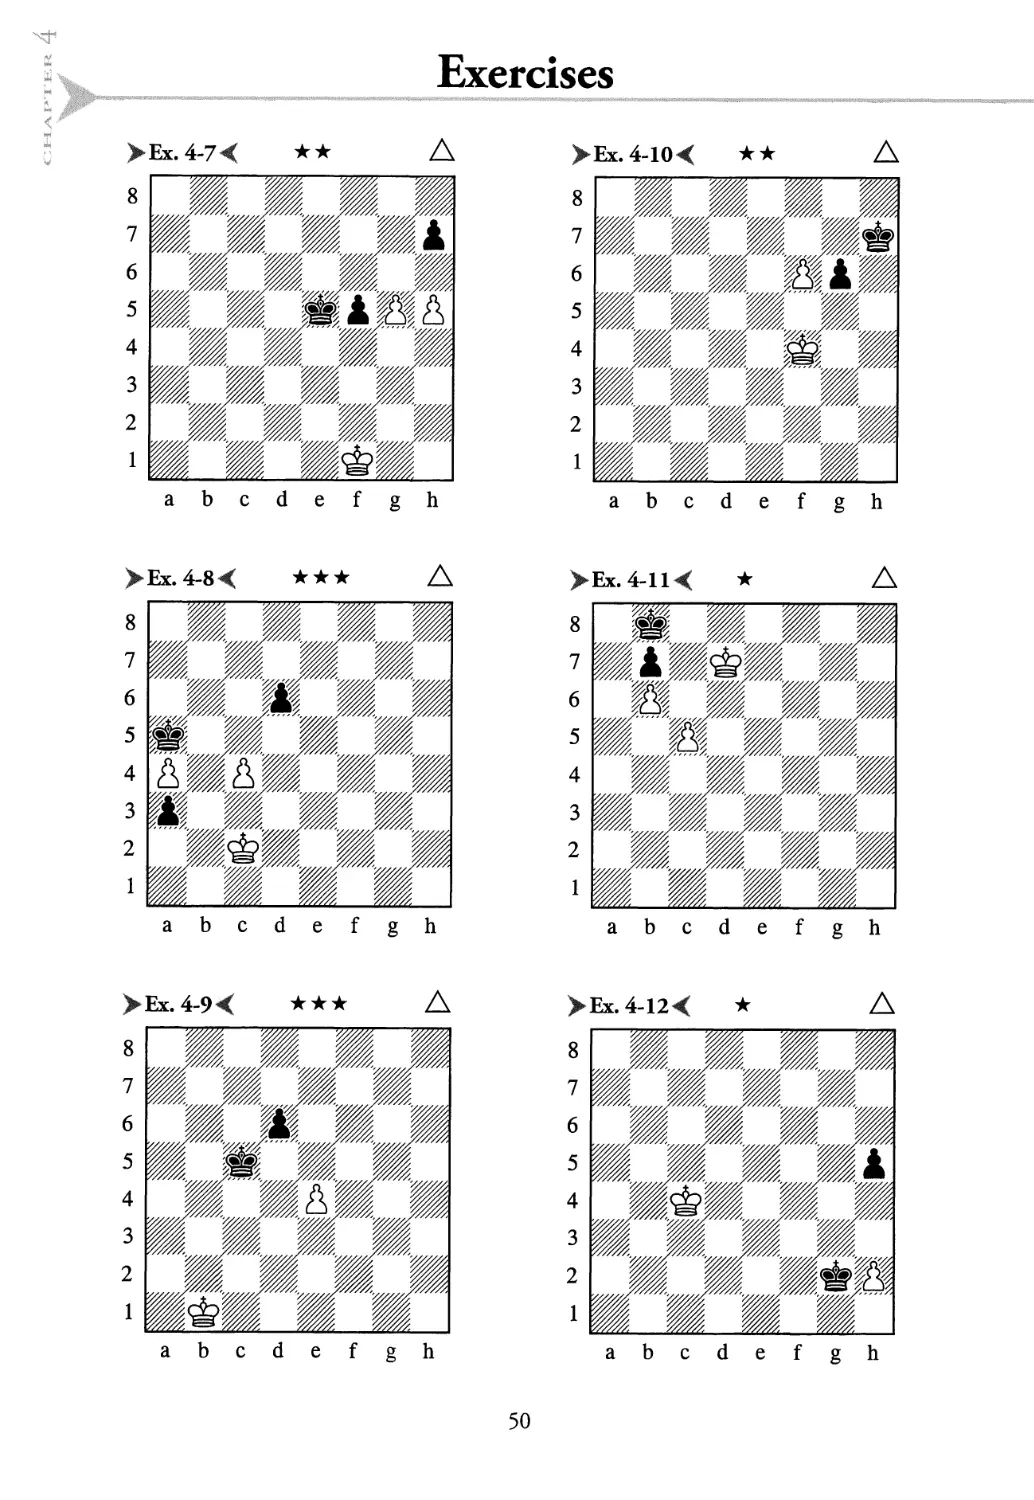
Ex. 4-7
l.h6!
(2 points)
White wins with a breakthrough.
Nothing would be achieved by 1.ФЕ2? f4=.
And l.g6? hxg6 2.h6?? would even lose to
2...ФГ6-+, as the black king is in the square of
the h-pawn.
l... S$?e6 2.g6! hxg6 3.h7+-
Ex. 4-8
N.Grigoriev
1923
1.ФЬЗ!
(1 point)
l.c5? loses to l...dxc5 2.ФЬЗ a2 З.ФЬ2
ФЬ4! 4.Фа1 ФЬЗ 5.а5 с4 б.аб сЗ 7.а7 с2
8.а8® cl®#.
1...а2 2.&Ь2!
(1 point)
If 2.Фха2?, then after 2...Фха4 З.ФЬ2
ФЬ4, Black either wins the c4-pawn and has
a reserve tempo (as in Example 3), or he gains
the opposition after 4.c5 dxc5-+.
2...ФЬ4 З.ФаП Фха4
Black has nothing better.
4.c5!
(1 point)
Now the pawn sacrifice leads to a draw.
4...dxc5 5.&xa2
Opposition.
5...ФЬ4 6.&Ь2 Фс4 7.&c2=
Ex. 4-9
l.e5!
(2 points)
White must sacrifice the pawn at once.
1.Фс2? is followed by l...&d4 2.e5 Фхе5!-+.
I... dxe5 2.Фс1!
But not 2.Фс2? Фс4-+.
2...&d5
Or 2...&d4 3.&d2 and White gains the
opposition.
3.&dl!
(1 point)
З...Фе4 4.Фе2=
Ex. 4-10
L.Prokes
l.&g5!
(1 point)
1...Ф118!?
If l...^g8, then 2.^’xg6+—.
2 .Ф116!
(1 point)
2„.g5
2... ^g8 loses: 3.^xg6 and now З...ФГ8
4.f7+- or З...Ф118 4.Ф171+-.
3 .f7
And mate next move.
3.^xg5 also wins: З...ФЬ7 (or 3...^g8
4.&g6 ФГ8 5.f7+-) 4.ФТ5 (4.ФБ5+-) 4...&g8
5.Феб Ф® 6.F7+-.
Ex. 4-11
l.&d8
There is a slower win with 1.ФА6 Фс8
2.Фе7 (but not 2.c6? due to 2...ФЬ8! 3.c7t
Фс8=) 2...ФБ8 3.&d7 Фа8 4x6+—. This also
earns 1 point.
1x6? leads to a draw: l...bxc6 2.Фхс6
Фс8=.
1...Фа8 2x6!
(1 point)
2...bxc6
2... ФЬ8 3.c7t+-
З.Фс7+-
Ex. 4-12
l.h4!
(1 point)
White deflects the black king.
I.^d3? loses: 1...ФхЬ2 2.Фе2 ^>g2-+.
I... &g3 2.Ф<13 ФхЬ4 З.Фе2 &g3 4.&fl=
See Example 4.
52
Scoring
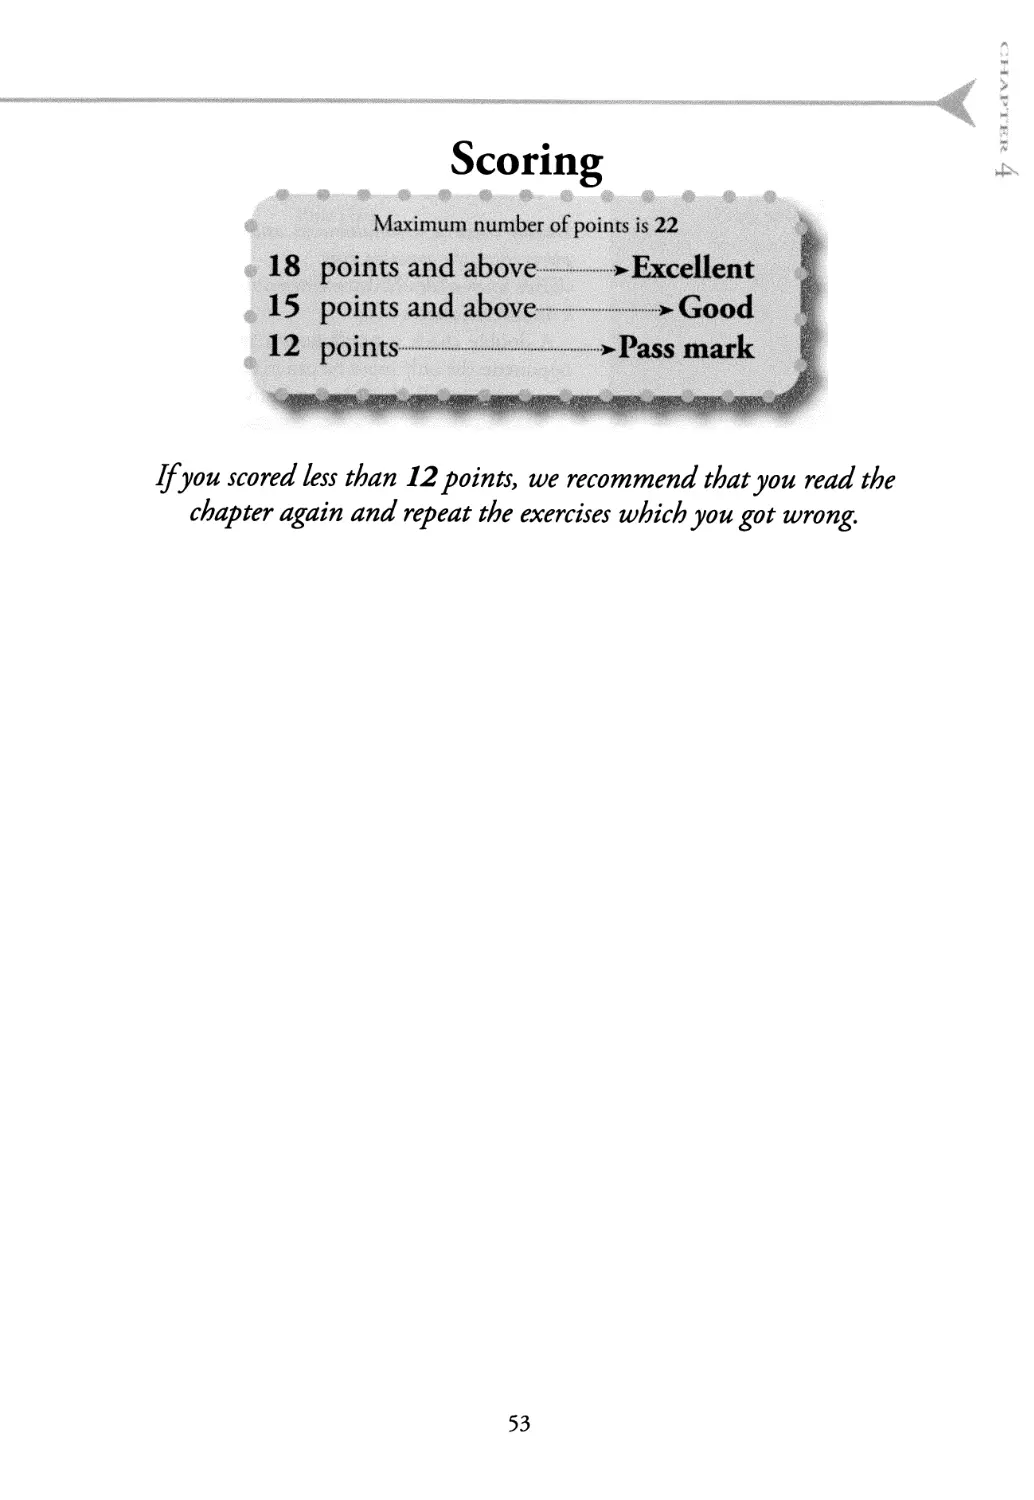
Maximum number of points is 22
18 points and above > Excellent
15 points and above >Good
12 points > Pass mark
If you scored less than 12 points, we recommend that you read the
chapter again and repeat the exercises which you got wrong.
53
5
Contents
S Mare by double check
J Mating combinations
involving double check
S Decoying
Double check
Double check is a simultaneous attack, in which two
pieces check the opposing king
This form of double attack can only be achieved via
a discovered check.
A double check is particularly dangerous for your
opponent: the only move he can make is a king move.
A mate by double check is also easily overlooked.
abcdefgh
A.Meek-N.N.
USA 1855
l.e4 e5 2.f4 exf4 d5 4.<^c3 dxe4 5.^xe4
Jkg4 6.®e2 Дх£3??
Diagram 5-1
Black hasn’t seen the trap.
7.^16#
H.Lohmann - R.Teschner
Diagram 5-2
abcdefgh
West German Ch 1950
l.e4 e6 2.d4 d5 З.^сЗ dxe4 4.^xe4 &d7 5.^13
6.2>fg5 &e7 7.&xf7 &xf7 8.&g5t &g8
9.^xe6 ®e8 10.£lxc7??
Diagram 5-2
A typical mistake: White was obviously only
expecting a queen move.
10...1,b4#
The double check is often an important part of a
mating combination. Since the opponent must move
his king, this speeds up the attack decisively. You can
even put one of the pieces giving check en prise\
Double Check
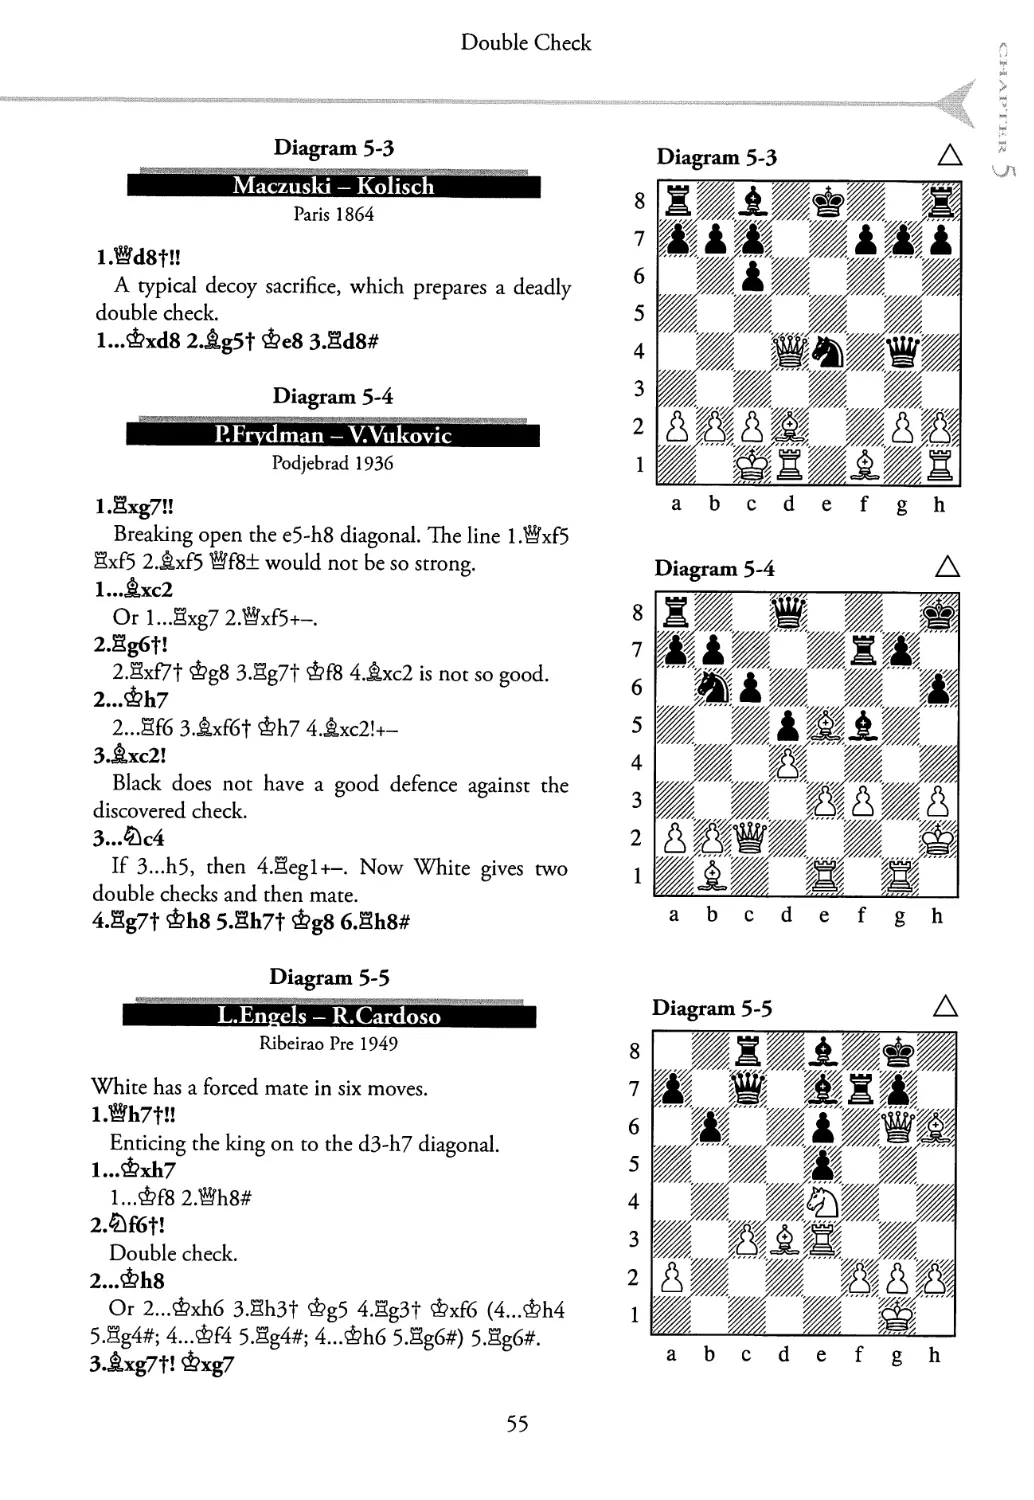
Diagram 5-3
Maczuski - Kolisch
Paris 1864
l.®d8f!!
A typical decoy sacrifice, which prepares a deadly
double check.
I...&xd8 2 J,g5t &e8 3.Sd8#
Diagram 5-4
..j
P.Frydman — V.Vukovic
Podjebrad 1936
l.S xg7!!
Breaking open the e5-h8 diagonal. The line l.®xf5
Hxf5 2.jlxf5 Wf8± would not be so strong.
I.. .jkxc2
Or l...Sxg7 2.Ш5+-.
2.Sg6f!
2.Sxf7t &g8 3.Sg7t &f8 4.Лхс2 is not so good.
2...&h7
2...SF6 3.txf6t &h7 4.txc2’+-
3.lkxc2!
Black does not have a good defence against the
discovered check.
3...^c4
If 3...h5, then 4.Segl+-. Now White gives two
double checks and then mate.
4.Sg7t &h8 5.Sh7t &g8 6.Sh8#
Diagram 5-3
abcdefgh
Diagram 5-4
abcdef gh
Diagram 5-5
L.Eneels — R. Cardoso
Ribeirao Pre 1949
White has a forced mate in six moves.
I.®h7tl!
Enticing the king on to the d3-h7 diagonal.
1... ФхЬ7
I...&f8 2>h8#
Double check.
2...&h8
Or 2...&xh6 3.Sh3t &g5 4.Sg3t &xf6 (4...&h4
5.Sg4#; 4...&f4 5.Sg4#; 4...Ф116 5.Sg6#) 5.Sg6#.
34xg7t! &xg7
Diagram 5-5
abcdef gh
55
Tactics 3
Or 3...Hxg7 4.Sh3t ih5 5.Sxh5t Sh7 6.Sxh7#.
4.Sg3t! Фхй
4...&f8 5.Eg8, 4...&h8 5.Sg8#, 4...ФИ6 5.£g6#.
5.Sg6#
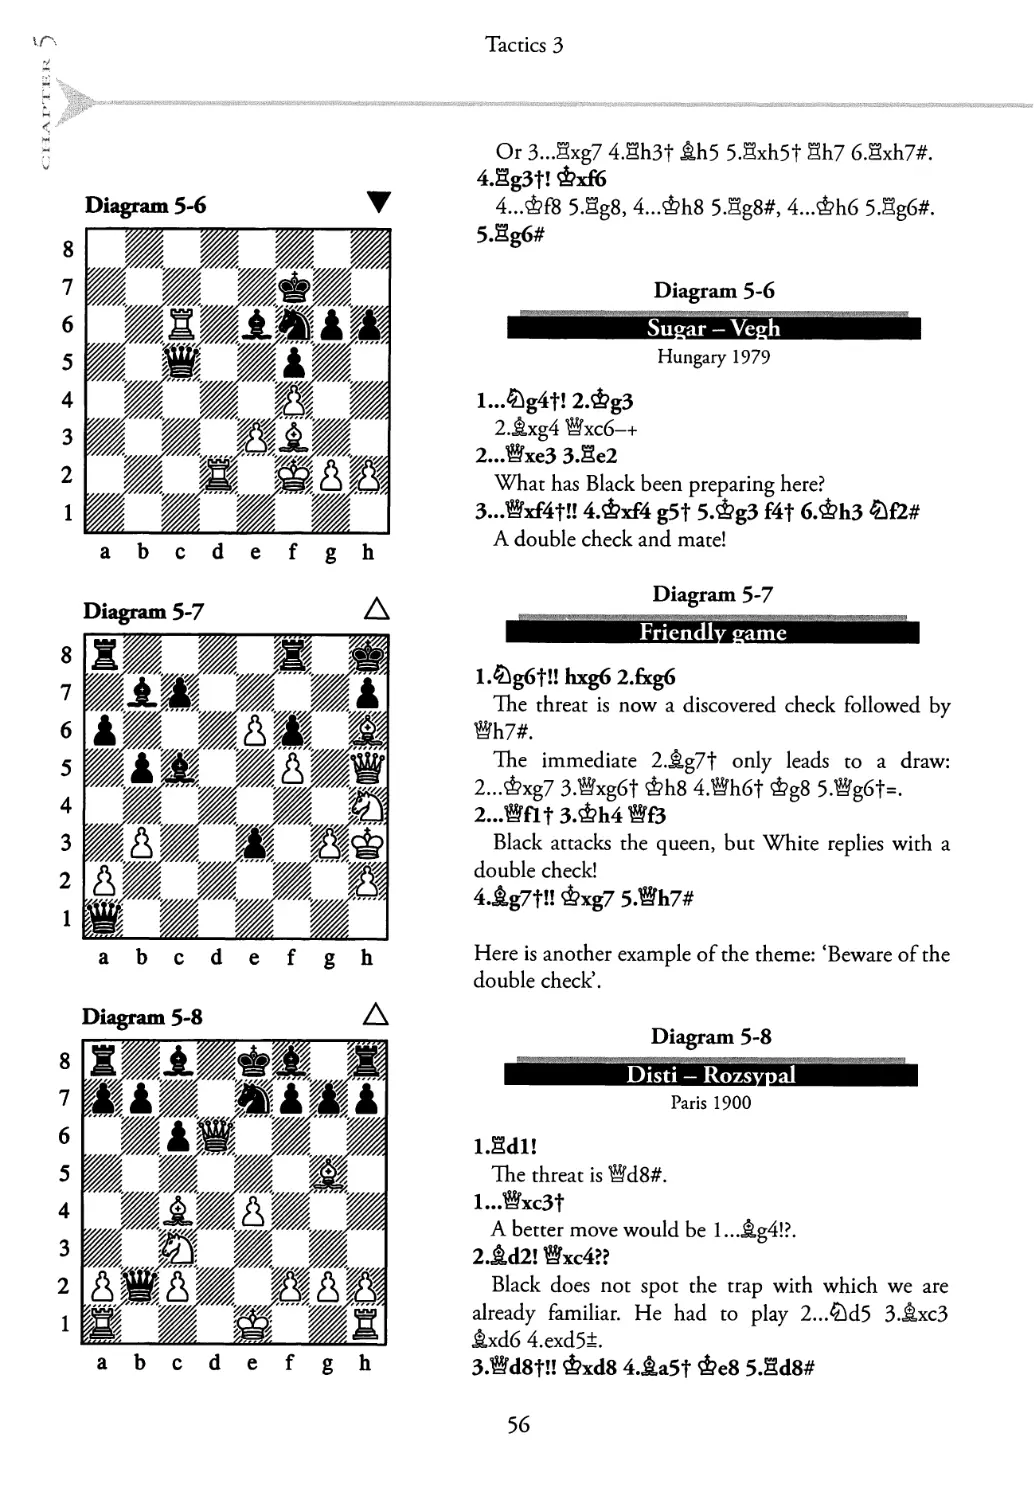
Diagram 5-6
Sugar - Vegh
Hungary 1979
l...^g4f! 2.&g3
2.jlxg4 ®xc6-+
2...®xe3 3.Se2
What has Black been preparing here?
3...®tf4t!! 4.&xf4 g5t 5.&g3 f4f 6.&h3 &£2#
A double check and mate!
Diagram 5-7
Friendly game
1 .&g6f!! hxg6 2.fxg6
The threat is now a discovered check followed by
®h7#.
The immediate 2.jLg7t only leads to a draw:
2...&xg7 3.®xg6t ФЬ8 4,®h6t &g8 5.®g6t=.
2...®Flt 3.&h4
Black attacks the queen, but White replies with a
double check!
4.tg7tU &xg7 5.Wh7#
Here is another example of the theme: ‘Beware of the
double check’.
Diagram 5-8
Disti — Rozsypal
Paris 1900
l.Sdl!
The threat is ®d8#.
l...Wxc3t
A better move would be 1 ...JLg4!?.
2.td2! Wxc4??
Black does not spot the trap with which we are
already familiar. He had to play 2...&d5 З.ЛхсЗ
JLxd6 4.exd5±.
3.®d8fl! &xd8 4.ta5t &e8 5.Sd8#
56
Double Check
Although a double check is a dangerous weapon, it
does not always win!
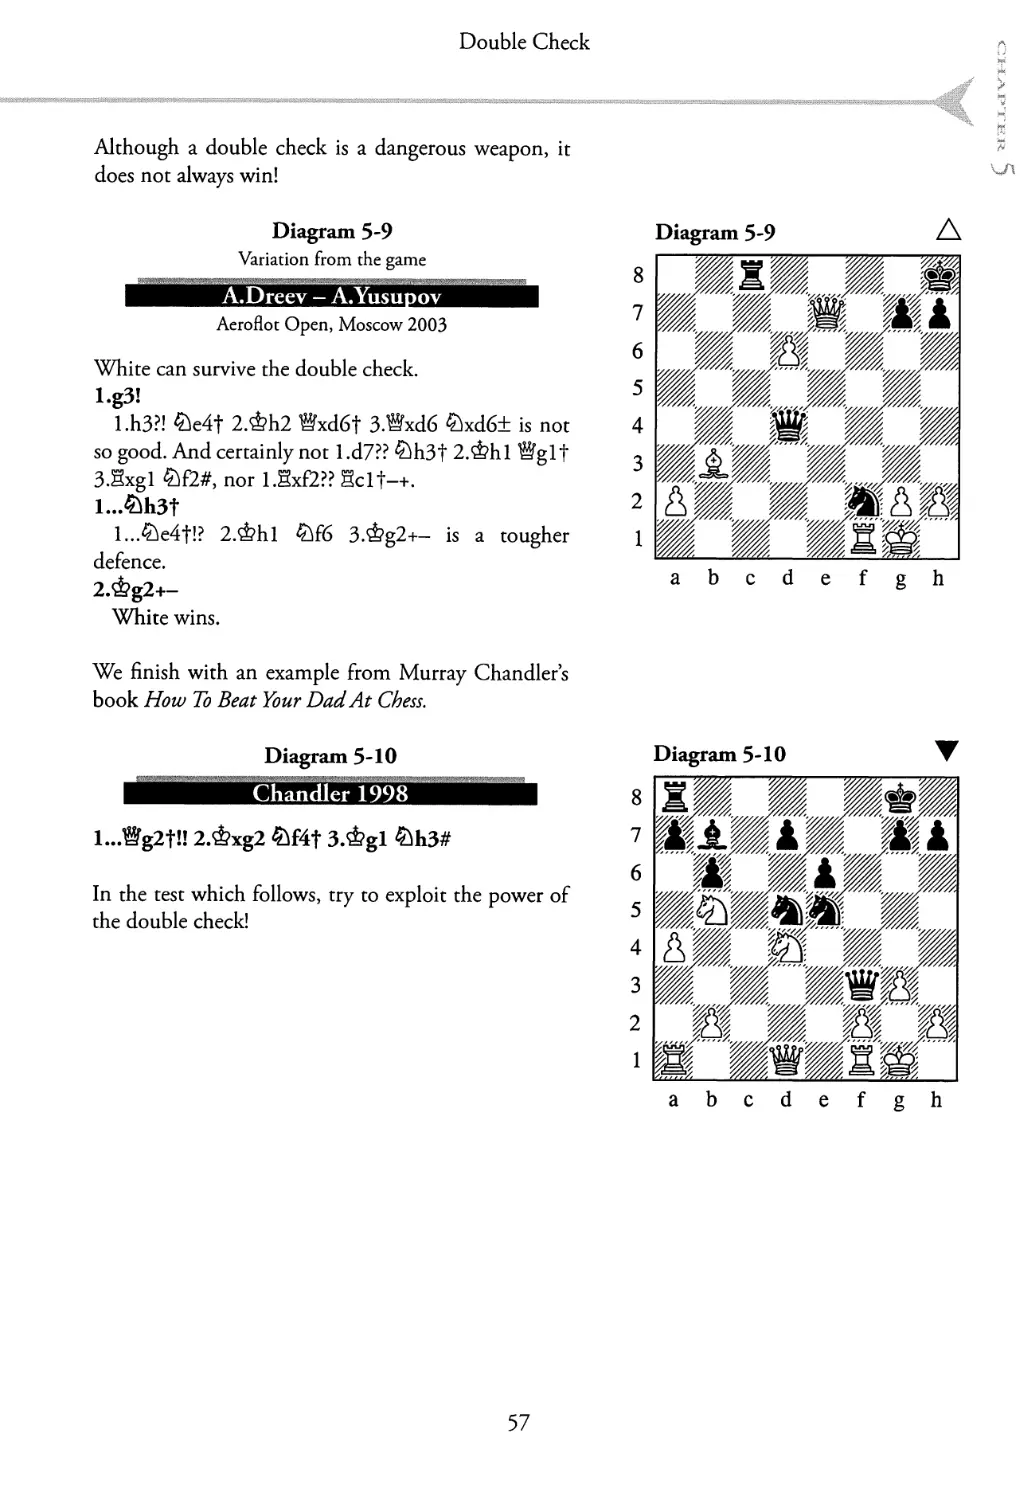
Diagram 5-9
Variation from the game
Aeroflot Open, Moscow 2003
White can survive the double check.
Lg3! 5 f
l.h3?! £ie4t 2.Ф112 ®xd6f 3.®xd6 £}xd6+ is not 4
so good. And certainly not l.d7?? ^h3t 2.ФЫ ®glt - W
3.Sxgl ^f2#, nor 1.5x£2?? gclt-+.
l...£h3t 2 I
l...^e4f!? 2.ФН ®F6 3.&g2+- is a tougher 1
defence.
2.&g2+- 3
White wins.
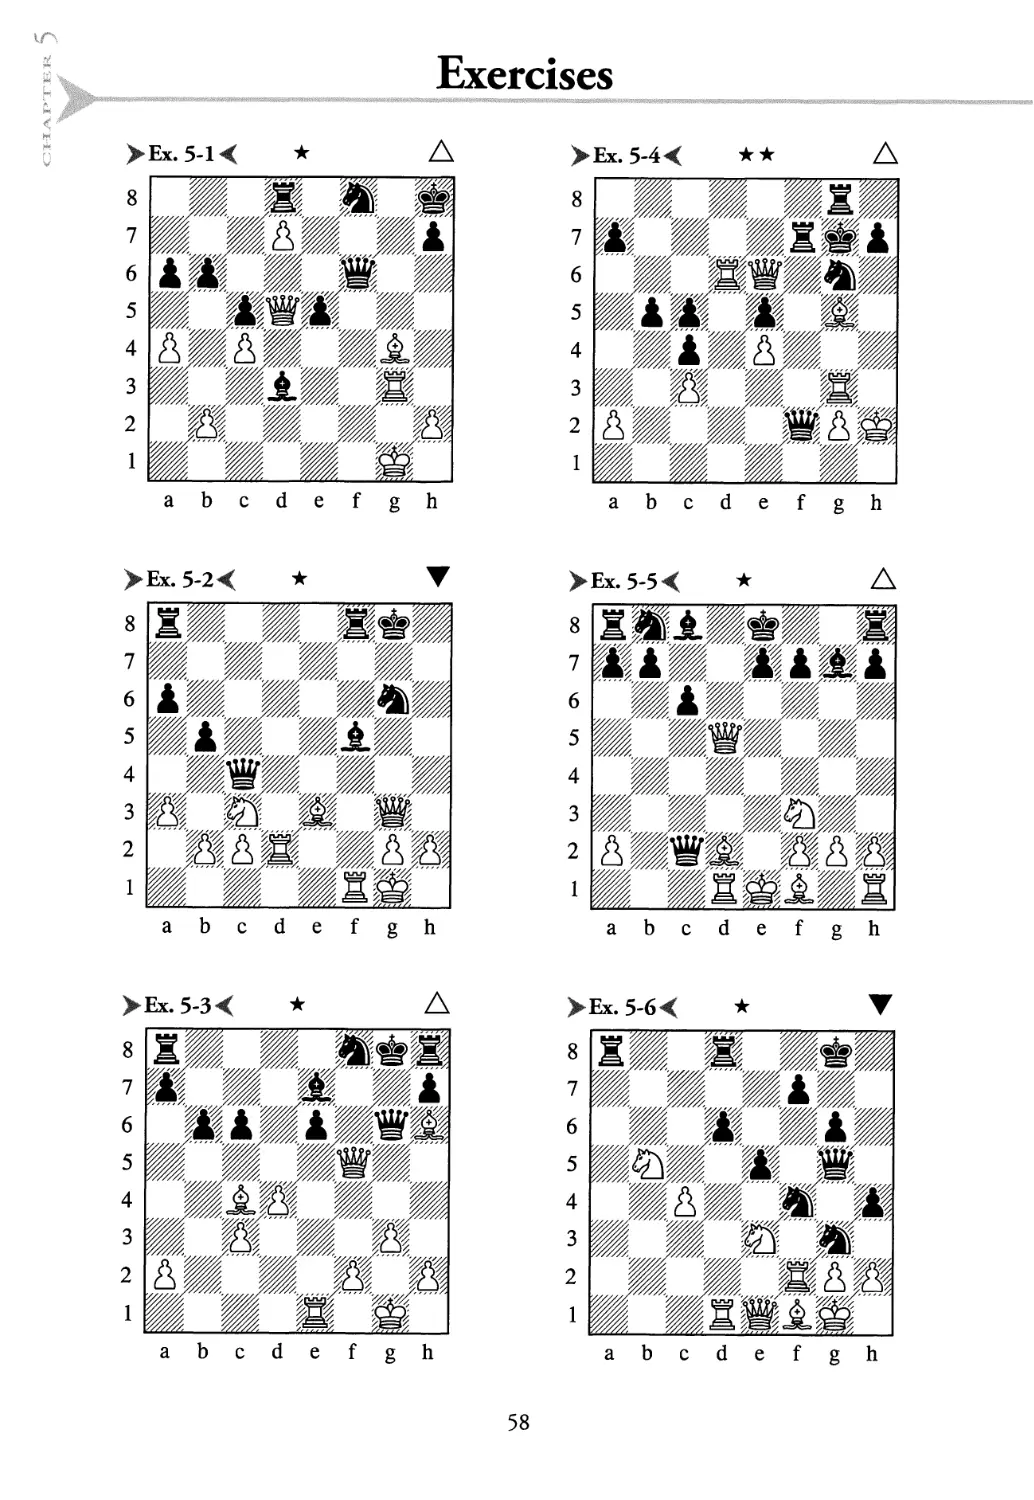
We finish with an example from Murray Chandlers
book How To Beat Your Dad At Chess.
Diagram 5-10
Diagram 5-10
l...Wg2fl! 2.&xg2 2>f4t 3.&gl £>h3#
In the test which follows, try to exploit the power of
the double check!
57
Exercises
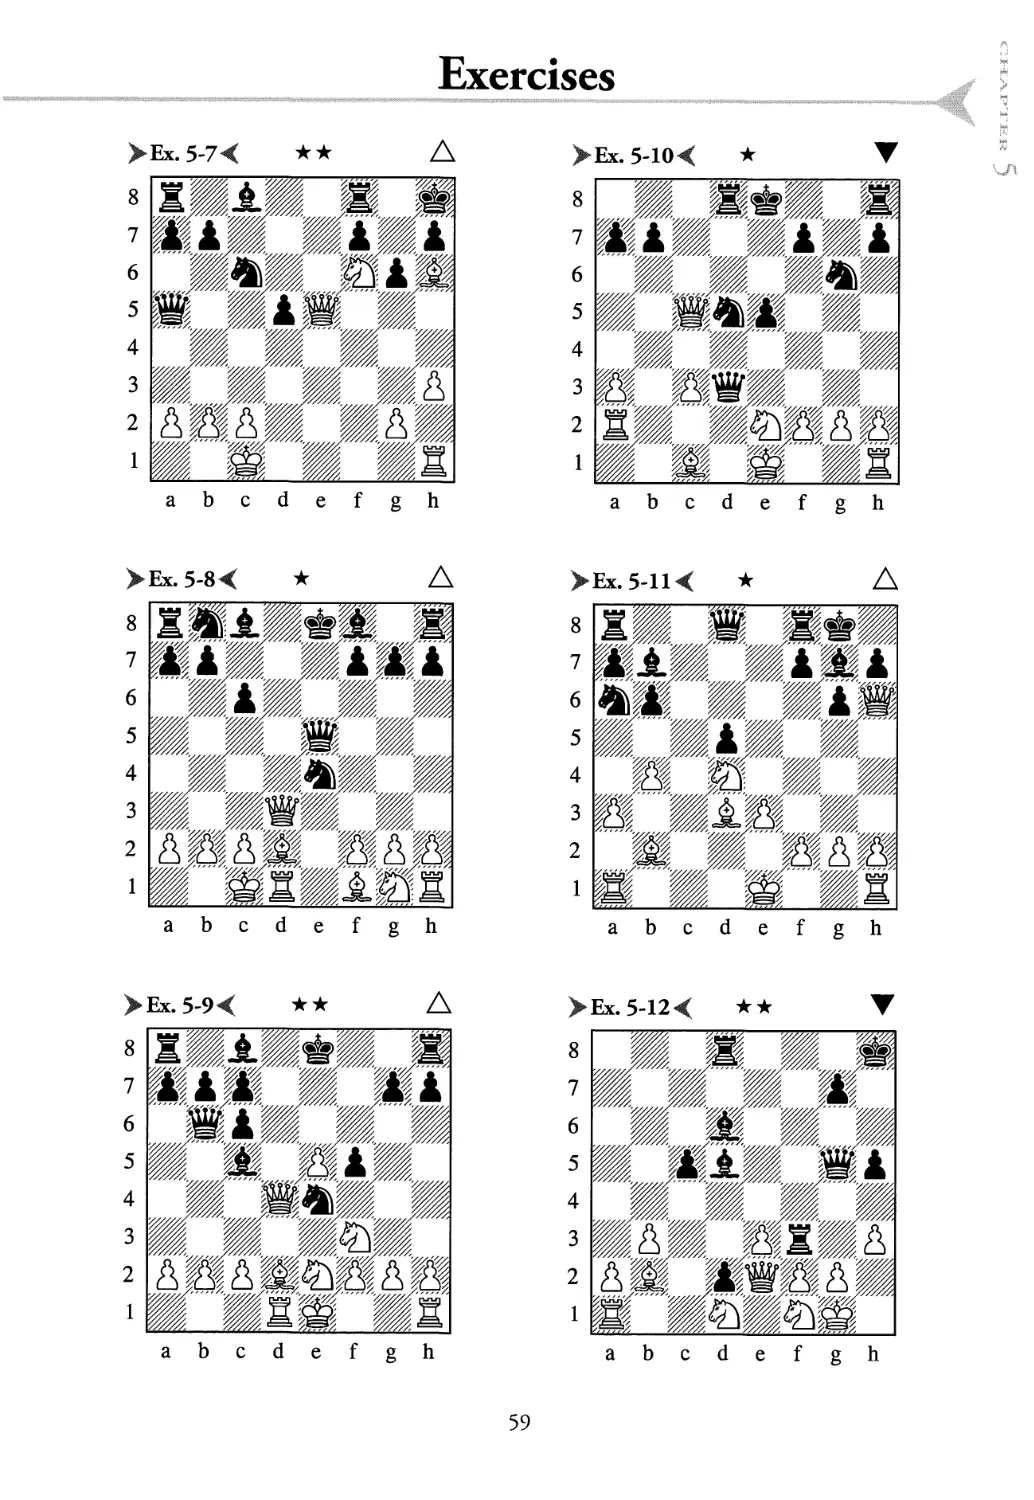
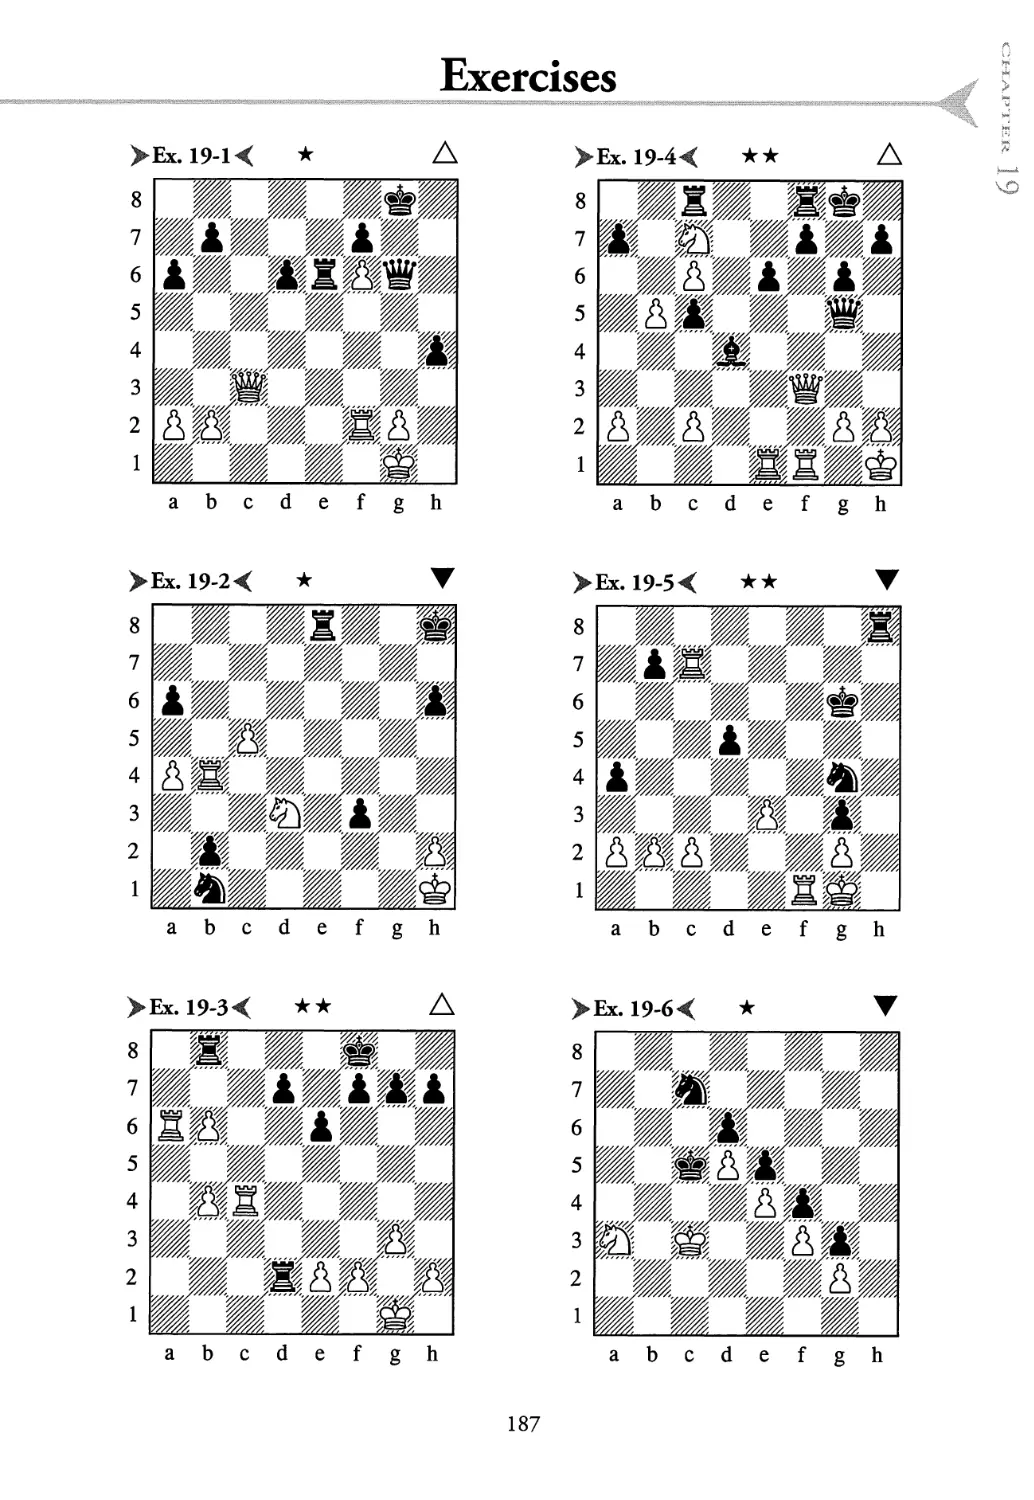
>Ex.5-l< ★
abcdefgh
XEx. 5-4 <
abcdefgh
Ex. 5-2 <
abcdefgh
>Ex. 5-5 < ★ A
abcdefgh
>Ex. 5-3< ★ A
8
7
6
5
4
3
2
1
abcdefgh
>Ex. 5-6< ★
abcdefgh
58
Exercises
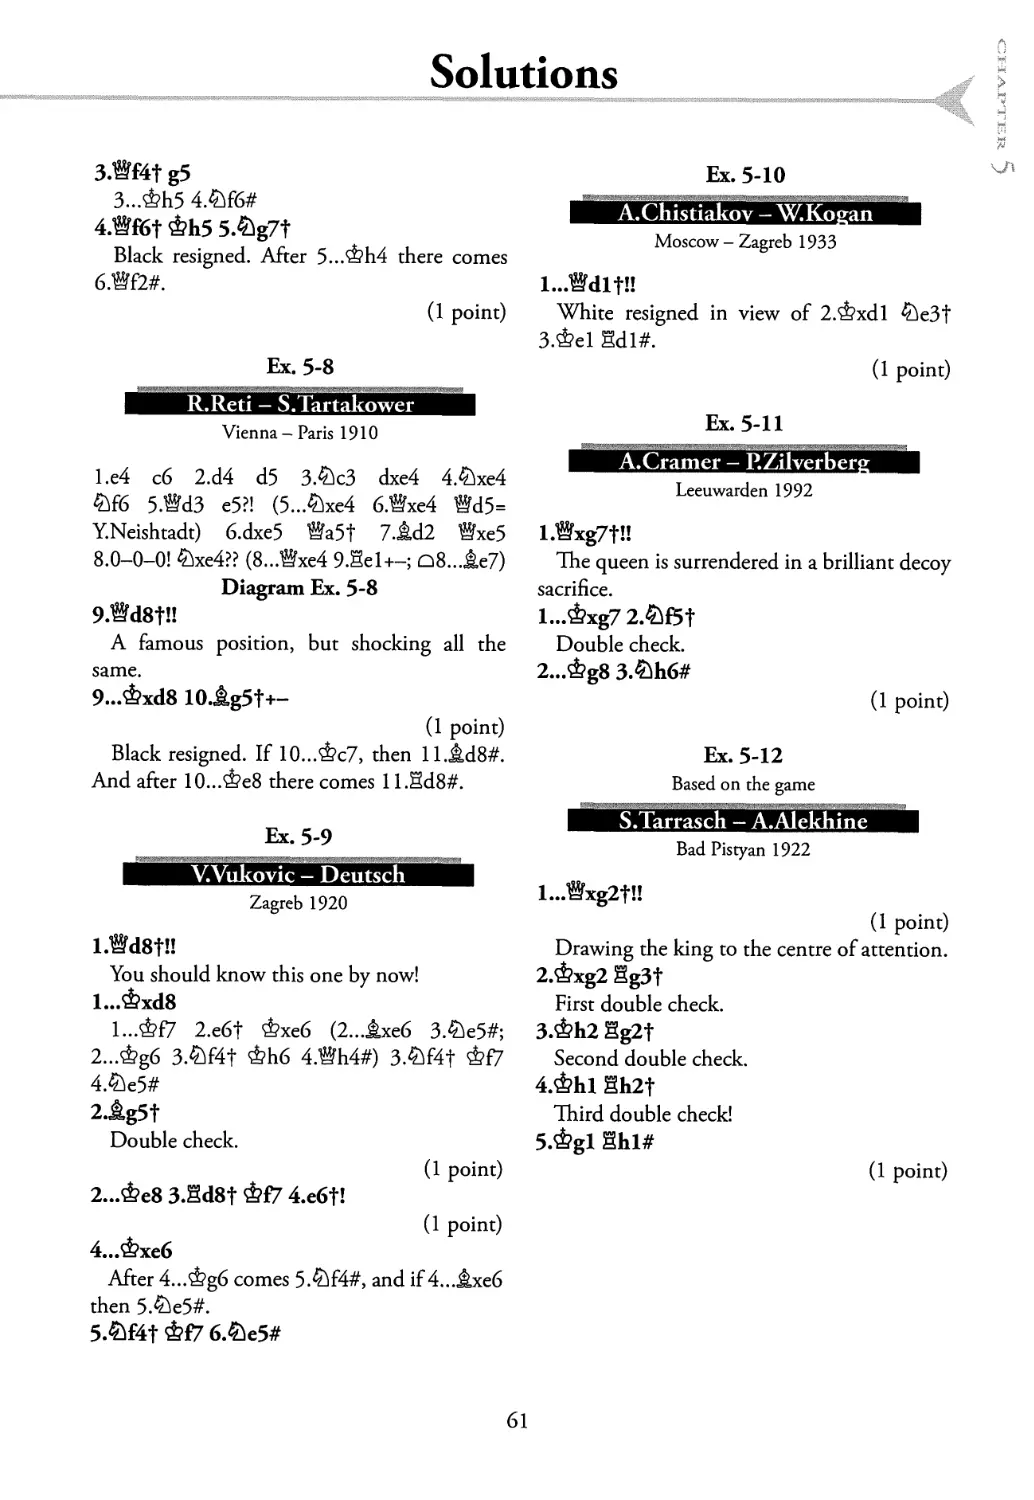
>Ex. 5-7<
abcdefgh
>Ex. 5-10< ★
abcdefgh
>Ex. 5-8< ★ A
abcdefgh
> Ex. 5-11 < ★
abcdefgh
>Ex.5-9< ★★ A
abcdefgh
abcdef gh
59
Solutions
Ex. 5-1
LNei--T.Petrosian
USSR I960
l.KgSfl!
Drawing the king to the g-file.
I...&xg8 2.i.e6t
Double check.
2...&h8 3.Sg8#
(1 point)
Ex. 5-2
Kondrakov - Gluhouski
USSR 1965
l...®xflf!!
Enticing the king to the f-file.
2.&xfl &13t
Double check.
З.Фе1
3.&gl meets the same fate.
3...2fl#
(1 point)
Ex. 5-3
M.Djurkovic - L.Cserna
Wolfsberg 1986
l.Sxe6!!+-
Opening up the c4-g8 diagonal.
l...Wxf5
1...W 2.gg6t hxg6 3.®xf7#
1...^хе6 2.Jlxe6t+-
2.Sg6#
(1 point)
Mate by double check!
Ex. 5-4
S.Witkowski - Blaschack
Poland 1953
l.Wxe5t«
1 .Sd7! (1 point) l...ggf8 (l...Sxd7 2.®xd7t
®f7 3.JLh6f+-) 2.gf3 is also very good.
I...£ixe5
l...&f8? 2.Sd8# or l...gf6 2.&xft>t+-.
(1 point)
Double check. But not 2.JLh6f?, due to
2...&h8.
2...&h6
2...±f8 3.Sd8#
3.^g7t!!
Another double check.
З...Ф115 4.2h6#
(another 1 point)
Ex. 5-5
O.Linder - A.Kruglikov
Moscow 1965
l.e4 2.^c3 d5 3.e5 d4 4.exf6 dxc3 5.fxg7
cxd2t 6.1xd2 ixg7 7.Bh5 Bd4 8.&f3 Bxb2
9.Sdl ®xc2 10.®d5 c6
Diagram Ex. 5-5
ll.Wd8t!I
A brilliant decoy. Black resigned in view of
ll...&xd8 12.jla5t (double check) 12...Фе8
13.Sd8#.
(1 point)
Ex. 5-6
R.Ponomarev — Pugacev
USSR 1989
1...211i3tH 2.gxh3 Ste2t
Double check.
З.ФБ1 Bgl#
(1 point)
Ex. 5-7
Mabs - Alexander
London 1961
l.&g7f!! &xg7 2.&e8t
Double check.
(1 point)
2...&h6
2...&g8 3.®g7#
60
Solutions
3 .Wf4t g5
3... &h5 4.£>f6#
4 .Wf6t &h5 5.&g7t
Black resigned. After 5...ФЬ4 there comes
6>f2#.
(1 point)
Ex. 5-8
R.Reti — S.Tartakower
Vienna-Paris 1910
l.e4 c6 2.d4 d5 3.£lc3 dxe4 4.£lxe4
2>f6 5.®d3 e5?l (5...^xe4 6.®xe4 ®d5=
YNeishtadt) 6.dxe5 ®a5t 7.id2 ®xe5
8.0-0-0! 2)xe4?? (8...®xe4 9.Sel+-; £>8...&e7)
Diagram Ex. 5-8
9.Wd8f!!
A famous position, but shocking all the
same.
9...&xd8 10.^g5t+-
(1 point)
Black resigned. If 1О...Фс7, then 1 l.id8#.
And after 1О...Фе8 there comes 1 l.Sd8#.
Ex. 5-9
..... ______________
VVukovic - Deutsch
Zagreb 1920
l.Wd8t«
You should know this one by now!
I...&xd8
1...Ф17 2.e6f Фхеб (2..Лхе6 З.£)е5#;
2...&g6 3.&f4t &h6 4>h4#) 3.^f4f &f7
4Ae5#
2.tg5t
Double check.
(1 point)
2...&e8 3.§d8t &f7 4.e6f!
(1 point)
4...&xe6
After 4...&g6 comes 5.^f4#, and if 4...JLxe6
then 5.&e5#.
5.^f4t &f7 6.®>e5#
Ex. 5-10
A.Chistiakov - W.Kogan
Moscow - Zagreb 1933
l...®dltl!
White resigned in view of 2.'^>xdl 41e3t
3.&el Bdl#.
(1 point)
Ex. 5-11
A.Cramer - P.Zilverber
Leeuwarden 1992
l>xg7tl!
The queen is surrendered in a brilliant decoy
sacrifice.
I...&xg7 2.&£5t
Double check.
2...&g8 3.£>h6#
(1 point)
Ex. 5-12
Based on the game
S. Tarr as ch - A.Alekhine
Bad Pistyan 1922
l...®xg2f!!
(1 point)
Drawing the king to the centre of attention.
2.&xg2 Sg3t
First double check.
3.&h2 Sg2t
Second double check.
4.ФЫ Sh2t
Third double check!
5.&gl Shi#
(1 point)
61
Scoring
Maximum number of points is 16
14 points and above > Excellent
12 points and above >Good
9 points >Pass mark
If you scored less than 9 points, we recommend that you read the
chapter again and repeat the exercises which you got wrong
Artur Yusupov was born in Moscow, but is now German. Artur first
made his mark in international chess by becoming World Junior
Champion in 1977. He raced to the grandmaster title in 1980
and soon established himself as one of the very best by reaching
the Semi-Finals of the World Championship three times. In
recent years he has built a fine reputation as an author and coach.
62
Artur in his home surrounded by friends
Artur with two students
63
Contents
S The value of rhe pieces
S Relative strength of the pieces
J Uneven material distribution:
1. Queen against two rooks
or three minor pieces
2. Rook + minor piece (and a
pawn) against queen
3. Three pawns against a
minor piece
4. Two minor pieces against
a rook (and one or two
pawns)
6
The value of the pieces
You must understand clearly the value of the pieces.
Usually the relative value of the pieces is expressed as
a number of pawns. The following table is used, but
only as a rough evaluation:
1 knight = 1 bishop = 3 pawns
1 rook = 4.5 pawns
1 queen = 3 minor pieces = 2 rooks = 9 pawns
From the table we can see that:
A rook is stronger than a minor piece + a pawn
A rook + pawn are weaker than two minor pieces
A queen is stronger than rook + minor piece
A queen is weaker than a rook + two minor
pieces
However, the value of the pieces is not an absolute
and constant number.
A pawn on the seventh rank can be very strong and
perhaps promote to a queen. A knight in the centre
or a rook on an open file are far more effective than
their passively positioned counterparts.
G.Lisitsin described five factors which influence
the relative strength of the pieces:
1) The central position of a piece
2) A safe, well protected position
3) The activity of the piece
4) Coordination with other pieces
5) The mobility of the piece
Diagram 6-1
B. Horwitz
1880
White wins, because the opposing pieces are very
badly placed.
1JBI &h6 2.g4 &h7
2...M7 3.g5#
3.g5 ФЬ8 4.Де4О ih7 5.1xh7 ФхЬ7 6.Фх17 ФЬ8
7.&g6 &g8 8.&h6 &h8 9.g6+-
1-0
The Value of the Pieces
Diagram 6-2
M.Taimanov - G.Lisitsin
USSR Ch semifinal, Leningrad 1949
White uses the active positioning of his pieces for a
startling combination.
I.&xb7!! Sxb7 2.®xb7! ®xb7 3.Sxc8 4.Sb8!
After this strong move, Black can no longer defend
his knights.
4...@e7
4...Wxb8 loses to 5.^d7t, while 4...®a7 is refuted
by 5.Sxe8f! Фхе8 6.Sc8| Фе7 7.^c6|.
5.йха8 g6 6.йсс8 &g7 7.йхе8+-
White has a decisive material advantage.
7...®c7 8.Hec8 ®b7 9.Sab8 Wa7 10.Sh8 ®e7
ll.Sbg8t &h6 12.Sxg6f &h5 13.§g3 &h4
14.&BT &h5 15.Shg8
1-0
Diagram 6-3
Diagram 6-2 Z\
abcdefgh
Mantefel - Presnjakov
Penza 1950
After:
l.g3! hxg3 2.hxg3
Black resigned, because he could not at the same
time ward off the threat of mate and protect his
bishop. For example:
a) 2...&h6 3.®h7t &g5 4.®h4#
b) 2...Ш 3.®h7t &g4 (3...Wh6 4.Wf5f ®g5
5.Wh3t+-) 4.£e2t &g5 (4...&xg3 5.®h2#) 5.®h5#
c) 2...Wh6t 3.&g2 c5 4.Wf5#
Diagram 6-4
Diagram 6-3
abcdefgh
RJVezhmetdmov - Y.Estrin
USSR Ch semifinal, Baku 1951
White wins by an elegant combination, which is
only possible because of the mobility of the knight
on f3.
L&xg7! &xg7 2.Ы4! Wc8 3.^Bt &g8 4.Wg3t
£>g4 5.Wxg4f
Black resigned. After 5...JLg5 or 5...2g6 there is the
decisive 6.^(x)e7!f.
Diagram 6-4
abcdefgh
65
Positional Play 1
It is especially difficult to evaluate positions with
an uneven distribution of material. In this case the
nuances of the position are very important.
Here are some useful remarks about what advanced
players do to get their bearings in situations like that.
1) ‘The queen is generally not as strong as two
rooks or three pieces.
Because two rooks can attack the same square
twice, they are superior to the queen. But if the king
of the player with the rooks is not in a safe position
and if it is exposed to a lot of checks, the queen
is stronger. Minor pieces must be well protected
(by each other or by pawns), or else they will be
captured by the queen.’ - S.Tarrasch
Diagram 6-5
Diagram 6-5
Cousigne - A.Yusupov
France 2002
1...5ee6!
Normally such endings should be drawn by
perpetual check or repetition of moves, but here the
white pieces are unfavourably placed and White loses
the queen. The threat is 2...Sh6f, 3...Seg6f and then
4...Sf6.
2,®d5 Sh6t 3.&g4 Seg6t 4.Ф» Bh4f 5.&f5
Sh5t-+ 6.&f4 Sxd5
0-1
2) A rook, minor piece and passed pawn on the 6th
(3rd) rank are superior to the queen. The queen
is stronger if there is play on both wings. But if
play is concentrated on a single wing, a rook and a
minor piece are often no worse than the queen.
Diagram 6-6
.Nunn - A.Yusupov
Linares 1988
l...^g5!
Black wants to redeploy his knight (via f3 and e5 to
g4) and attack the f2-pawn. The two black pieces will
hunt down the f-pawn and win it. After that Black
will advance his pawns. Thus the position is won for
66
The Value of the Pieces
Black, although he still has to play very carefully.
2.&g3 3.We4 4.Wc2 £ig4 5.£3 6.f4
^g4 7.Wd3 £h6
Intending to unpin by ...ФЬ7 and then ...g6.
8.Wd6f &h7 9.®d3
Or 9.®e7 g6 10.®f8 ^g4 ll.&f3 ^e5t! (A^d7-
c5-e6-+).
9...g6 10.Wd7 ^g4 ll.Wa7 &g7
Intending .. Af6-d5.
12.®d4f 2tf6 13.®b2 &h7 14.®b7 Ы5-+
15.®a7 ^xf4 16.®d7 ^еб 17.®b7 Sf4 18.Wb5
h4f 19.&h3 g5 2O.Wb7?l
More resistance could be put up by 20.®d3t *&g7
21.®c3t &d4!?-+.
2O...£iffi!
The knight goes to g6, to shelter the black king
from the queen checks.
21.®d5
Or 21.®e7 g4f 22.&g2 ^g6-+.
21...&h6 22.Wd6f &g6 23.Wd2 g4f 24.&g2 &h5
25.®d5t 6 26.Wd7 h3t 27.&gl g3! 28.Wh7t
&g5 29.Wxh3 £>h4l
White resigned, in view of 30.®xg3f (or 30.Ф111
g2f 31.ФЬ2 Sf3-+) 3O...5g4-+.
3) In the middlegame, three pawns are normally
weaker than a bishop or a knight, because the
opponent has an extra piece for his attack. Only
connected central passed pawns or far advanced
pawns are better than the piece. In the endgame,
the value of pawns generally increases, and so the
three pawns are normally no worse than a minor
piece.
Diagram 6-7
M.Petursson - t.Nunn
t > r: i г 4
Reykjavik 1990
The correct plan here is an attack on the kingside.
l .W£2! Sa7
1 ...b5 The counterattack comes too late due to 2.e5!
fee5 3 Axe5! bxc4 (no better is 3...Sxe5 4.Sxe5 Йхе5
5.&e6f’ £xe6 6.®f8#) 4.ШТ gxh5 5>f7t+-.
2 .e5!
White has an extra piece and attacks!
Diagram 6-7
abcdefgh
67
Positional Play 1
2... fxe5 3.£}xe5 Sae7
3...Sxe5 is bad on account of 4.Sxe5 ®xe5 5 Ae6f!
&h6 (5...&xe6 6.®f8#) 6>f8t Ш 7.^e2f ®xe2
8.<?W+-.
If 3...£g5, then 4.W! Sxf7 5.W &h6 6.®xf7
Sxel 7.Sxel gxh5 (7...&xh5 8.®xh7t ^h6 9.JLe2f
&g5 10.h4t+-) 8.&d3 £e3t 9.Sxe3 dxe3 10.®xh7f
&g5 ll.®g7t &h4 (11...ФГ4 12>g3#) 12.g3t &h3
13.^fl#.
4.2if7!+- Sx£7
4...®c6 5.^xd8+- or 4...®c7 5.^h5t gxh5
6Ж6Г+-.
5.Sxe8
1-0
4) In the middlegame, two minor pieces are
often stronger than a rook and two pawns. In the
endgame, however, a rook and even a single passed
pawn are sometimes better than the two pieces.
If, for example, two minor pieces attack the f2- or
f7-pawn in the opening, this pawn is sufficiently
protected by castling short.
Diagram 6-8
Diagram 6-8
VBabula - M.Kaminski
Lazne Bohdanec 1996
abcdefgh
1 .Д c3
The black castled position is too open. White
organizes a rapid attack.
1... Й
Other moves are no better:
a) l...Sxel 2.jlxg7 ^xg7 (or if first 2...§fe8 then
3.&f2!+~) 3.®c3t+-
b) l...®g6 2.tf5 Wc6 3.M7#
2 .Де6| ФЬ8 3.W6 сб 4.Sdl Se7 5.Sd6! h5
6.Дс4+-
Black cannot defend the f6-pawn.
1-0
68
Exercises
>Ex. 6-4< ★
]>Ex. 6-1X
abcdefgh
8
7
6
5
4
3
2
1
abcdefgh
>Ex. 6-2 <
abcdefgh
>Ex.6-5< ★ Д
8
7
6
5
4
3
2
1
abcdef gh
>Ex.6-3<
abcdefgh
XEx. 6-6 <
★ ★
abcdefgh
69
Exercises
► Ex. 6-7< ★★ A >Ex. 6-10< ★★
abcdefgh abcdefgh
>Ex. 6-8< ★★
> Ex. 6-11 < ★
abcdefgh abcdefgh
> Ex. 6-9 К *
> Ex. 6-12 < ★
abcdefgh
abcdefgh
70
Solutions
Ex. 6-1
Variation from the game
S.Kindermann - A.Yusupov
Bundesliga 1996
Black has a material advantage and White
must fight for a draw.
!.Wxf5tH Sxf5= stalemate.
(2 points)
Ex. 6-2
jLPortisch - O.Panno
Madrid 1973
L^xh6!
An equally good way to play is 1.Ь4 ^c6
2Axh6!+-.
1...ФхЬ6 2.^xg5
(2 points)
2...&g7
2...Hff8 3.^xe6f+- or 2...fxg5 3.&xg5t+-.
3.£ixf7
White has won a rook and two pawns for
two knights.
3...®xf7 4.Ь4 5.llf4+- a5 6.bxa5 Sa8
7.a4 bxa4 8.Sxa4 Sxa5 9.Sb4 Sa8 10.Sb6
&d8 ll.Wbl Sa7 12.&g2 Sb7 13.Sxb7
?ixb7 14.Wb6 ®d7 15.Wc7!+-
The exchange of queens leaves the knight
marooned on b7.
1-0
Ex. 6-3
.Hodgson — A. Yermolins!
Hastings 1996
l...&e5!
(2 points)
l...^e7 2.Sg2 ^d5 3.Sagl# is not
convincing. The text move is more precise
than l...^a5 (1 point), since White has fewer
options.
After l...^e5! White resigned. On 2.dxe5
(2.Sagl loses to 2...^xf3t 3.^dl ^xgl-+,
whereas if 2.Hxf6 then 2...^xf3t 3.&dl
®xc3-+) there follows 2...Hd7t 3.&el ®xc3t
4.&f2 Sd2f 5.&g3 ®xe5t 6.®f4 ®xf4f
7.exf4 hxg6-+.
Ex. 6-4
H.Kmoch - Prinz
Amsterdam 1940
l.SxfZt!
(1 point)
Black resigned. He loses in all variations:
a) l...Sxf7 2Axe6f+—
b) l.-.^gS 2.41xe6+—
с) 1...ФЬ6 2.Bxh7t ^xg5 3.h4f And now:
cl) З...ФГ6 4.Sfl#
c2) 3...&g44.&e2fgf3 (or4...&g3 5.&e4#)
5.&cf3t 6.Sf7t 7.g4#
сЗ) З...Ф6 4.gflt &g4 5.te2t Sf3 6.txf3t
&f5 (6...&g3 7.^e4#) 7.te2#
Ex. 6-5
.Kling
1851
l .@e2!
(1 point)
l... h3
l„.&g3 2.®g2#
2 .^h20+-
Ex. 6-6
E.Pogosiants
1964
lAd7!
(1 point)
The threat is mate!
I...^xd3!
I...l.e8 2,c3#
2.c3f!
(1 point)
White cannot take the bishop due to
stalemate, but he can win the piece in another
way!
71
мэ
Solutions
2...Фс4
Or 2...Фе4 3.$te5t+-.
3.&e5t+-
Ex. 6-7
L.Kubbel
1935
l.Wb2t
(1 point)
1...Фа6! 2.®b8!
(1 point)
This is stronger than 2.®xh8?! Фха7
3.®xh5 ®xd3 4.®a5t &b7 5.®b4f Фаб
6.®xf4 c5=.
2...Sxb8 3.axb8^t!
And White wins the queen.
1-0
Ex. 6-8
EBondarenko
1940
l.^d2!
(2 points)
If l.®c3t ®c2 2.®e3t, then 2...ФЬ2±.
Only a draw can be obtained after l.Wxblf
ФхЫ 2.£)d2t Фс2 З.&хЬЗ ФхЬЗ, since
Black quickly brings his king to f7: 4.Ф12
Фс4 5.&f3 &d5 6.&g4 Феб 7.ФхЬ4 &f7=
(see Chapter 4).
The move 1 ,&d2! wins some valuable tempi
compared to this variation.
l... ®xal 2.£lxb3t &Ы 3.^xal &xal
4.&g2+-
Another good move is 4.ФГ2+—.
4...&b2 5.&B ФсЗ 6.^>g4 &d4 7.&xh4
Фе5 8.&g5 Феб 9.&g6! Фе7 10.&g7! Феб
ll.h4 ф£5 12.h5 &g5 13.Б6
1-0
Ex. 6-9
B.Gulko - Vkupreichii
Kislovodsk 1982
l...e4!-+
(1 point)
Black brings his knight into the attack via
the e5-square. 1 ...®hlf 2.®fl+ would not be
so strong.
2.Фе2
If 2.®c5, then 2...^e5! 3.®xe5 ®hlf—+.
2...®h5t 3.&el &e5 4.Wc7 &d3t
0-1
Ex. 6-10
L.Ljubojevic — A. Yusupov
Tilburg 1987
l...We5t-+
(2 points)
Black intends 2...c5 to exploit the pin on
the d4-knight and win a piece. White resigned
in view of 2.^d3 c5 3.4}2f3 ®d6-+ pinning
the knight.
Ex. 6-11
Variation from the game
P.Svidler - V. Anand
Dos Hermanas 1999
l.h7 &g7
Or 1...21d5t 2.&d6 &g7 3.^xd5 &xh7
4.Феб+—.
2.f6f!+-
(1 point)
Ex. 6-12
A.Yusupov - D.Shapiro
World Open, Philadelphia 2002
The far advanced pawns decide the game.
I .c6!
(1 point)
l... dxc6
l... Sa6 loses after 2Ab4 Sa5 3.cxd7+-.
72
Solutions
2 .d7+- cxd5 3.d8® Sc4f 4.<^d3 Se4
If 4...Sxf4, then 5.®c7t+-.
5.h51?
This is even better than 5.®xd5 h5 6.®b7t
ФЬ6 7.®xa7+—. Black cannot construct a
fortress.
5...gxh5 6.®xd5
Now the f5-pawn is weak.
6,..&g6 7.®g8f &K 8.g3 a5
Or 8...h4 9,gxh4 gxf4 10.®f8t Феб
ll.®xh6t+-.
9.®h7!+-
Both of Black’s h-pawns drop.
1-0
Scoring
Maximum number of points is 19
16 points and above >Excellent
13 points and above >Good
9 points.............>Pass mark
If you scored less than 9 points, we recommend that you read the
chapter again and repeat the exercises which you got wrong.
73
1|
Contents
7
The discovered attack
S The discovered attack
S Discovered check
J Hie discovered attack
threatens mate
If, by moving away, a piece opens up a line of attack
(file, rank or diagonal) for a piece lying behind it, this
is called a discovered attack.
Examole 1
Diagram 7-1
l.e4 e6 2.d4 d5 З.е5 c5 4.сЗ ^сб 5.ДЬ5?! td7
6.&B?
Diagram 7-1
6...^xe5!
This typical discovered attack can easily be
overlooked. Black wins an pawn. For example:
7.&xd7t
7.&xe5 Jbcb5+
7...&xd7!+
।
______KarfF - Graf-Stivenson________
abcdefgh
Diagram 7-2
Moscow 1955
l.d4 d5 2.c4 еб З.^сЗ 4.jlg5 c6 5.^£3 £}bd7
6.e3 ®a5 7.Wc2?!
Either 7.cxd5 or 7 Ad2 is better.
7...&e4 8.1d3??
8.cxd5 JLb4!—>
8...^xg5 9.^xg5
Diagram 7-2
9...dxc4
This discovered attack opens the 5 th rank for the
queen.
10.JLxc4 Wxg5-+
White has lost a piece.
A particularly effective form of this attack is the
discovered attack with check. The piece which moves
away frequently wins material on the next move,
because the opponent must first react to the check.
abcdefgh
The Discovered Attack
Milner-Barry Gambit
l.e4 e6 2.d4 d5 З.е5 c5 4.сЗ ^сб 5.^f3 ®b6
6.JLd3 cxd4 7.cxd4
Diagram 7-3
7...&xd4??
A typical mistake. Black overlooks a discovered
attack with check. 7...Jld7 is correct, after which
...^xd4 is threatened. 8.0—0 leads to the exciting
Milner-Barry Gambit.
8.&xd4 ®xd4? 9.i,b5t+-
And White wins the queen.
Diagram 7-3
8
7
6
5
4
3
2
1
abcdefgh
T.Ghitescu - RJFischer
Leipzig Olympiad 1960
l.d4 2.c4 еб З.&сЗ M4 4.e3 0-0 5.1,d3
d5 6.^6 ^c6 7.0-0 dxc4 8.Jtxc4 Jtd6 9.lkb5
e5 10.jkxc6 exd4! Il.exd4 bxc6 12.jkg5 Se8
13.®d3 c5!
Diagram 7-4
14.dxc5??
Even an experienced player can sometimes commit
a beginner’s mistake!
14...jLxh2f!
Another typical discovered attack with check.
0-1
Diagram 7-4 A
abcdefgh
Diagram 7-5
.Zukertort —
London 1883
l.^g7t!
This discovered attack wins White the queen and
the game.
I... &g8
l...®xg7 2.®e8# is an important point.
2.®xe7+-
1-0
Diagram 7-5 A
abcdefgh
75
Tactics 4
Diagram 7-6
S.Resheyskv-R.Byrne
abcdefgh
USA Ch, Chicago 1973
l...Wxg2t!
Black is preparing a discovered attack!
l..JLxe5t? would be bad, on account of 2.®xe5t
(check!) 2...Hg7 3.Sg3+-
2.&xg2 jkxe5t-+
Black regains the queen with interest!
0-1
A discovered attack is particularly effective if it
is linked to a threat of mate, or if a very valuable
piece is attacked.
F.Ferraro - T.Navarro
Diagram 7-7 A
Pan American Ch, Cascavel 1996
1.е4 c5 2.&B d6 3.ib5t &d7 4.^xd7t ®xd7
5.0-0 6.e5 dxe5 7.^xe5 ®c7 8.d4l? cxd4
9.M4 e6?
Better is the theoretical 9...®b6.
Diagram 7-7
10.^g6!+—
A typical discovered attack. White simultaneously
attacks the queen and the rook on h8.
1-0
abcdefgh
Medor - Zunker
1973
Diagram 7-8 Z\
abcdefgh
l.e4 c5 2.£if3 £k6 3.d4 cxd4 4.^xd4 g6 5.c4
6.%hc3 £ixd4 7.®xd4 d6 8.jkg5 Ikg7 9.Де2 0-0
10.®d2®a5 11.0-0 Sd8?!
Both players missed the strong 12.b4! with the idea
of 12...®xb4 13.e5! and White attacks.
12 J,h6 M8??
Diagram 7-8
13.&d5!+-
With the double threat of mate by <йе7 and
winning the queen by ®xa5- Black cannot meet both
threats at the same time. You should always bear this
typical discovered attack in mind when the queens
are developed as they are in this game.
76
The Discovered Attack
Diagram 7-9
LVon Popiel — G.Marco
Monte Carlo 1902
The bishop on d4 is pinned and under attack. Black
resigned here, but he could have won the game with
a discovered attack!
l...jLgl!!-+
After this brilliant move there are two threats:
...Sxd3 and mate on h2! White cannot defend against
both.
Diagram 7-9
V.Kanzayeli -
California 1993
abcdefgh
l.^B 2.c4 e6 3.g3 Ь6 4.&g2 5.d4 ^e7
6.0-0 0-0 7.^ic3 ^e4 8.Wc2 £ixc3 9.Wxc3 d6
10.Wc2 c5??
10...f5 would be better.
Diagram 7-10
ll.&g5!
Another typical tactical trick.
H...jLxg5
Forced, because of the threat of ®xh7#.
12.jkxb7 ILxcl 13.Haxcl ^d7 14.jLxa8 ®xa8
15.Sfdl+-
White has won the exchange.
1-0
One important form of discovered attack has already
been studied in Chapter 5: The double check.
Another typical combination with a discovered
attack, Legal’s mate, was a subject in Chapter 2:
Mating motifs 2.
Now try to find the combinations with a discovered
attack in the test positions.
Diagram 7-10
abcdefgh
77
Exercises
>Ex.7-4<
>Ex.7-l< ★ A
abcdefgh
8
7
6
5
4
3
2
1
abcdef gh
>Ex. 7-2 X
abcdefgh
>Ex. 7-5 <
abcdefgh
>Ex. 7-3< ★★
abcdef gh
>Ex. 7-6< ★
abcdefgh
78
Exercises
>Ex. 7-7 < ★ A
abcdefgh
8
7
6
5
4
3
2
1
abcdefgh
> Ex. 7-8 К ★ A
abcdefgh
> Ex. 7-11 < ★ A
8
7
6
5
4
3
2
1
abcdefgh
>Ex. 7-9< ★
abcdefgh
> Ex. 7-12 < ★
abcdefgh
79
Solutions
Ex. 7-1
R.Fischer - B.Spassl
World Ch, Reykjavik (8) 1972
1 .Ы5!
(1 point)
l...®xd2 2.£lxe7t &f8 3.Sxd2 Фхе7 4.5xc4
§blt 5.ДП+-
1-0
Ex. 7-2
Urdis - Laiwa
Correspondence 1959
lj.a5!+-
(2 points)
But not l.exd6??, allowing l...®xg2# or
l.jiel?? allowing l...®fl#.
L..&xd5
l... ®xc2 loses to 2.jlxc7#.
2 .®x£2 jkxg2f 3.®xg2 Sxg2 4.&xg2+-
1-0
Ex. 7-5
Manchester 1890
1.2Ж6!
(1 point)
l...®xh3
l...gxh6 loses to 2.®xe6+-.
If l...He7 2.®xe6 Sxe6, then 3.^f7t &g8
4.^xd8+-.
2.^x£7t &g8 3.gxh3 &xf7 4.f4+-
1-0
Ex. 7-6
S.Tarrasch
l...d3!
(1 point)
2.1xf6
2.®xd3 ®xb2-+
2...dxe2—+
Ex. 7-3
Ex. 7-7
Ravinsch - Tamm
Domuls — Kazhoks
Tartu 1979
Daugavpils 1980
l...Sh5t!!
(1 point)
A superb decoy.
2.&xh5 &f4t-+
(1 point)
The correct discovered attack. Of course not
2...£lg3t?? 3.®xg3.
White resigned in view of 3.^g5 ^e6t
(intermediate check) 4.&f5 Hxel-+.
Ex. 7-4
Variation from the game
P.Morphy - J.Loewenthal
London (12) 1858
l.J?,xd6!+-
(1 point)
With the idea l...®xd6 2.jkxh7f ФхЬ7
3.Sxd6+-.
1-0
Ex. 7-8
Bansdorf - Lipola
Helsinki 1957
l.®xc8tl!
1...Фхс8 2.1,h3t+-
1-0
(1 point)
l.£)xe6 fxe6 2.jLg6f!+-
(1 point)
80
Solutions
Ex. 7-9
A.Tolush — V.Antoshin
Leningrad 1956
l...Belf 2.ФГ2 2)e4t
(1 point)
З.Фхе1 ®xg6—+
0-1
Ex. 7-10
l...JLxb2
l...exd5 2.jLxf6 g6 3.exd5+-
2.&e7t &Й 3.&xc6+-
1-0
Ex. 7-12
P.Trifimovic - M.Aaron
P.Votruba - AJosephson
Stockholm 1980
l.^xg6!+-
(1 point)
1-0
Ex. 7-11
Hoogovens Beverwijk 1962
l.llg8!+-
(1 point)
Threatening both ®h7# and 5xd8.
l...Sxd2
l...®xg8 2.Sxd8 lf8 3.Sld7+- or l...&xg8
2.Sxd8+—.
2.Wh7#
Biesbardis - Borisov
Correspondence 1982
l.&d5!
(1 point)
Scoring
Maximum number of points is 15
13 points and above >Excellent
11 points and above > Good
8 points................>Pass mark
If you scored less than 8 points, we recommend that you read the
chapter again and repeat the exercises which you got wrong.
81
Contents
The role of the centre in
chess
J Centralizing a piece
King in the centre (in rhe
endgame)
S Queen in the centre
Knight in rhe centre
Centralizing the pieces
As we already know, in the game of chess the centre
plays an important role. Whoever controls the
centre can also attack successfully on the flanks.
Dominating the centre is an important strategic
goal in the opening and in the middlegame. But even
in the endgame you cannot ignore the centre.
In Chapter 6 we learned that the relative value of a
piece increases if it is positioned in the centre, for
example, a knight in the centre controls at least twice
as many squares as it does on the edge of the board.
Also the activity of the pieces is considerably greater
when they are in the centre. Even if the pieces only
control central squares, they are mostly doing useful
work and can very quickly be activated or centralized.
But a centralized piece can often dominate the whole
position.
Diagram 8-1
S.Tarrasch - A.Rubinstcin
San Sebastian 1912
The dark-squared bishop is occupying a powerful
post in the centre and its influence can be felt on
both wings. Rubinstein very cleverly makes use of
this advantage.
L..Sb2!
Black wants to exchange rooks.
2.Sxb2 txb2 3.Sd2 ld4 4.&113?!
4.Sc2 would be better.
4...Фе6! 5.Sc2 &d6+
His opponent can find no antidote to the extremely
powerful bishop.
Of course, not 5.. JLxd3?? 6.Sd2.
6.6?! Sc8! 7.tdl Sxc2t 8.Дхс2 Фе5
With the exchange of rooks, Blacks advantage
grows, since the black king can now take an active
part in the game.
9.g41e3 10.ФВ &d4-+
Diagram 8-2
The king’s invasion of the centre decides the game.
Black won this endgame easily.
Centralizing the Pieces
Sudden centralization of his queen saved White in
the next game.
Diagram 8-3
P.Keres - R.Fischer
Curacao 1962
l.We5!!
Fischer was only expecting 1 Jlf5t ®xf5 2.®xg2
®f4f! 3.®g4 (З.ФЬЗ ®h6f!-+) 3...®xg4f 4.&xg4
<±>g6!-+.
But l.ig4! gl® (1 ...®hlt) 2.if5t! <&h8 (2...®xf5
3.®g7f!! ^xg7 stalemate) 3.®e5t (Centralization!)
3...®g7 4.®b8f ®g8 5.®e5t would also be good
enough for a draw.
l... ®hlf
The main line is l...®f2f 2.Ф113 gl® (2...gl^f
3.&g4=) 3.£f5t &h6 (3...®xf5t 4.®xf5t ®g6
5.®xg6t <&xg6 6.<&g4= Opposition!) 4.®f6f ФЬ5
5.Jlg6t! ®xg6 6.®g5+!! <&xg5= stalemate.
2.1h3 ®xh3t
2...gl® 3.®h5+ &g7 4.®g6f !=
З.ФхЬЗ gl® 4.®e7t ФЬ8 5.®f8f &h7 6.®f7t
Black cannot win:
6...®g7 7.®xg7+! <&xg7 8.<±>g3! ФТ6 9.ФТ4
(opposition) 9...Феб 1О.Фе4 <&d6 11.d?d4 Фс7
12.&d5 ФЬ7 13.Фс4! Фс7 14.<&d5 &d7 15.Фе5=
The next example also demonstrates the importance
of controlling the central squares.
Diagram 8-4
Diagram 8-3 A
abcdefgh
A.Nimzowitsch - V.Vukovic
Kecskemet 1927
The black queen on c6 is very active. White exploits
tactical motifs to win the struggle in the centre.
I.®h5!
Threatening to win a pawn after 2.Sxc5 ®xc5
3.®xe8f.
I.h3 c4 2.®c2 Sg8# would be worse.
l... Se7
If l...&g7, then 2.Sc3 with an attack.
2.Sdl (ASd8t) 2...®g6 З.Ш 3...&g7
4.Wd5!
Diagram 8-4
abcdefgh
83
Strategy 1
abcdefgh
Diagram 8-5
Now compare this position with the position in the
previous diagram!
4...Ш5 5.Sd3 W 6.Sg3t &h8 7.®xc5 Wflf
8.®gl Sf7 9.h3 e4 10.&h2+-
And White won in the endgame.
For the knight especially, it is particularly valuable
to have a good position in the centre. A knight is a
close-quarters fighter and has to be brought near to
the enemy. It can intervene rapidly in the action if it
has a protected central position. The central squares
d4-d5-e4-e5, and c4-c5-f4-f5, are especially suited
to that. (But if we get the chance to get a protected
post even nearer the enemy position, we should
grab it.)
The following game illustrates how important a
well-placed knight can be.
H.Pillsbury - G.Marco
Paris 1900
l.d4 d5 2.c4 еб З.&сЗ 4.1g5 Де7 5.e3 0-0
6.&B b6 (6...h6!?) 7.1d3 &>7 8.cxd5 exd5 9.&e5
Pillsbury’s favourite strategy, known as posting up’.
The knight is supported first by the d4-pawn and
then by the f4-pawn. 9.0-0 is the alternative.
Diagram 8-6
9...&bd7
9...c5!?
10.f4 c5
The only way to put White’s strategy to the test
would be for Black to make use of a central square
for his own knight: 10...£>e4!? at once (or slightly
later) would be required. For example 11.lxe4 dxe4
12.1xe7 ®xe7 13.0-0 f6 (or 13...^f6 and then c5)
with a normal position.
11.0-0 c4?
A typical mistake. Black removes the pressure on
the centre. His queenside initiative will come too
late.
Better is 1 l...cxd4 12.exd4 ^e4!?.
12.1x2 a6 13.WB!
This controls the e4-square. 13.a4 is also not bad.
13...b5 14.Wh3 g6
84
Centralizing the Pieces
Black must defend against ^xd7.
If 14..Axe5?, then 15.dxe5! (this is even better
than the stereotyped 15.fxe5) 15...^e4 16.^xe4 dxe4
17.Sadl ®e8 18.1xe7 ®xe7 19.Sd7+-.
14...h6? would be bad, in view of 15.Jbdi6! gxh6
16.®xh6, followed by Sf3-g3.
Diagram 8-7
15.6!
White opens lines for an attack.
15...b4 16.ficg6! hxg6
16...bxc3? 17.Sxf6! ^xf6 18.jlxf6 fxg6 19.®e6f+-
17.®h4!?
Even simpler is the immediate 17.^xd7! ^xd7 (or
17...®xd7 18.®xd7 ^xd7 19.Axe7 bxc3 2O.Axf8
cxb2 21.§abl+-) 18.jlxg6! fxg6 19.®e6f <&g7
20.1xe7+-.
17...bxc3 18.^xd7!
The knight has done a good job.
18...®xd7 19.Sxf6!+- a5
Black cannot fend off White’s attack: after
19...cxb2 there follows 20.Safi, threatening Jlxg6,
while if 19...<ixf6?, then 2O.jLxf6+-.
2O.Safl
The immediate 2O.Axg6! would be very good:
2O...fxg6 21.Sxg6t &f7 22.Sflf Фе8 23.Sxf8f
jkxf8 24.®h5 and Black cannot ward off the
double check without suffering losses, e.g. 24...®f7
25.§e6t+-.
2O...Sa6
Diagram 8-8
21.1xg6! &g6 22.Sxffif IxfB 23.Sxffif!
Black resigned: 23...&xf8 24.®h8f Ф<7 25.®h7t
Ф£8 (neither 25...Фе8 26.®g8# nor 25...Феб
26.®xg6# is any better) 26.®xd7+-
In the following test, try to find a way either to
centralize or to make use of the central positions of
the pieces.
Think the way you would in a game and then
simply make up your mind. There does not always
have to be an immediate win!
The test is difficult, but perhaps it will help you
to pay more attention to the centre in the future.
When in doubt, take the decision which favours
the centre!
Diagram 8-7
abcdefgh
85
Exercises
ХЕх. 8-1Ч ★★★ A
8
7
6
5
4
3
2
1
abcdefgh
>Ex. 8-4<
abcdef gh
>Ex. 8-2 < ★★★ A
abcdefgh
У Ex. 8-5 4
abcdefgh
>Ex.8-3< ★★
abcdefgh
>Ex. 8-6<
abcdefgh
86
Exercises
>Ex. 8-7<
>Ex. 8-10< ★★
abcdefgh
abcdefgh
У Ex. 8-8 К ★★★
XEx. 8-1 IK A
abcdefgh
abcdefgh
>Ex. 8-9< ★
>Ex.8-12< ★★★
abcdefgh
abcdefgh
87
Solutions
Ex. 8-1
- R. Fischer
Mar del Plata I960
l.Se5!
(3 points)
l.Sxf8f (only 1 point) would not be good,
as l...jkxf8 2.^e5?? (or 2.Se8??) allows
2...®xg2#.
If l.£e5?, then l...Sx£2 2.®xf2 ic5!
3.®xc5 ®xg2#.
l... Sd8
Black loses in all variations:
a) l...®g6 2.Sxe7+—
b) l...®h4 2.Sxf8t txf8 3.®xh4+-
c) 1 ...if6 2.®d6!+-
2.We4! Wh4 3.§f4+-
Black resigned. After 3...®g3 comes
4.Sxe7+“
Se8 13.Ф112 Фс7 14.Sclt &d7 15.f4±
15Jlf6+- would have been even better
(Nimzowitsch), but despite that White won
the game.
Ex. 8-3
R.Fischer - ROlafsson
Belgrade 1959
l.^g5!
(1 point)
The еб-pawn is weak.
1...M6
If l...c5, then 2.^dxe6! Лхеб 3Jlxf6 exf6
4.£>xe6± and 4...®xe6 loses to 5.Sel+-
2.£idxe6 JLxg5 3.^xg5 0-0 4.Wd2 JLf5
5.Sael±
Ex. 8-2
Ex. 8-4
A.Nimzowitsch - O.Duras
A.Rubinstein - B.Nikolaev
San Sebastian 1912
1.Ы4!
(3 points)
l.®d3? would be bad, due to 1..ЛЬ5-+.
For 1ЛЬ2 you get 1 point, as this move is
not so strong as lAd4, since it allows Black
to swap off the good knight.
White is ready to sacrifice a pawn in order
to blockade the black passed pawn and to
place his own knight on a splendid central
position.
I...§h5
After l..dlxb4 2.®d3, followed by ЛеЗ
and Sbl (Nimzowitsch), White gets a strong
queenside initiative, since he can also use the
now open b-file for an attack.
2.Wd3 Sdh8?! 3.h3 g5?I 4j,e3 g4 5.^6
<t,b5
After 5...®d8 comes 6Axe7 ®xe7 7.®d4±
(Nimzowitsch).
6.®a3 ®a6 7.®хаб Дхаб 8.^xe7 JLxfl
9.Sxfl g5! 10.B! gxh3 ll.g4 S5h7 12.JLxg5
Russian Ch, Kiev 1903
l.f4!±
(2 points)
The knight is well-placed in the centre. It
needs to have its position secured. White is
aiming for a set-up in the centre such as we
saw in the game H.Pillsbury - G.Marco.
Only 1 point for the moves l.®h5 or
l.^xg6.
I...^dxe5?l
A better move would be l...c5 2.®f3±.
2.£xe5 &c8 3.®h5 кеб 4.&e2! Wd7
Black threatens JLg4.
5.h3 ld8?!
Better is 5...c5.
6.^f4± ^e7 7.Sacl
The immediate 7.§f3 is stronger.
7...c5 8.SB c4 9.1Ы Sae8 lO.Scfl l,d8
И.^хеб ®хеб 12.jLf5 ®e7 13.H4 a5
14.e4!+- ®b7 15.® g4 dxe4 16.JLxe4 ®e7
17J,d5! &H8 18.1xc4 Wb4 19.b3 b5
20.1,el Wa3 21.1,xb5 Se7 22.1,с4 ЛЬб
88
Solutions
23.ФЫ ®xa2 24.e6 ft> 25.d5 Ac5 26.1c3
2ig6 27.h5
1-0
Ex. 8-5
A.Anastasian - A.Yusupov
Aeroflot Open, Moscow 2003
l...Se6!
(2 points)
l...£ld6 (1 point) would not be so good:
2.Sd7 ®xd3 (2...Sc8? 3.®xc8!) 3.Sxd6! Sxd6
4.Bxe8=.
2.Wc8 ^d6-+
0-1
Ex. 8-6
A.Rubinstein — S.Tarrasch
Karlsbad 1923
l.le4!±
(2 points)
The centralization of the bishop improves
White’s position. l.Sb7I? would not have been
bad either, or l.Sbl!?, intending to double
rooks on the 7th rank (1 point). On the
other hand, a check on c4 would not improve
Whites position.
L..Sd7 2.ga8 gdd8 3.Sfl! Wd6
If 3...®xflt 4.®xfl Sxflt 5.&xfl Sf8t,
then 6.Фе2 ^d7 7.Sa5±.
4.§x£St SdS 5.&g2 Wb4 6.®d3 &h8 7.Sa7
®b2f 8.Ф113 ®b6 9.Sa8 Sd8 10.®c4 &d7
10.. .®xe3? 1 l.®b4!+-
ll .Wc6!?± Sxa8
ll... ®xc6?? 12.Sxd8t+-
12 .®xa8t ^b8 13.®d5 Wc7
Black intends ®d7t.
14.jLf5! ^c6 15.Wc4! Wd6?
Better is 15...®b7 16.®e6 ^e7 17.®xe5±.
16.W17I+-
Threatening ®e8f.
16...Wd8 17>g6
1-0
Ex. 8-7
A.Rubinstein - ESamisch
Marienbad 1925
l.b5!
(2 points)
White must secure the d5-square.
I.^d5 (1 point) would not be so good,
due to l...c6, nor l.Sd5 (1 point), because
of l...f4=.
I...&e5 2.£d5± h6 3.Sal! Sxal 4.Sxal g4?
5.f4!± 21g6 6.Sa7 Sf7 7.1d4! &h7 8.Sa8
Sd7 9.1b2 h5 10.Wc3 &f7
See Exercise 8-8.
Ex. 8-8
A.Rubinstein - ESamisch
Marienbad 1925
l.£e3!
(3 points)
White wins a pawn by force. For the good
moves Sd3 or ®d4, intending e2-e4, you get
2 points.
1... Ш 2.SW5+-d5
After 2...®xf5 comes 3.3xd8! and if
3...Sxd8, then 4.®g7#.
3.cxd5 WxE5 4.Exd8 Se7 5.Ee8! Sd7 6.e4
®17 7.Sh8f &xh8 8.Bxh8t &g6 9.f5t
&g5 10.1x1#
Ex. 8-9
R. Fischer -
Stockholm 1962
l.JLxb6! Wxb6 2.^d5
(1 point)
The knight is a monster on d5.
2...Wd8 3.f4!
Not 3Axe7t? ®xe7 4.®xd6??, on account
of4...gfd8-+.
3...exf4 4.Wxf4 Wd7 5.Wf5!±
5.^f6f?! gxf6 6.gxf6 ФЬ8± would not be
quite so clear.
89
Solutions
Ex. 8-10
Ex. 8-12
R.Fischer - R.Steinmeyer
RJ^ischer - Ё. Geller
USA Ch, New York 1963
l.^e5!+-
(2 points)
Only 1 point for 1Ла5 or l.^xe4. The
centralization of the knight is much stronger.
The threat is 2.^xf7.
After l..Axg3 2.fxg3 ®xg3 comes 3.Sd3
®f4 4.Sf3 ®e4 5.SW+-.
If l...^xc3t!?> then 2.bxc3! Sg8 (or 2...^g4
3.^h5’. ®f5 4.®xf5 exf5 5.^xf7+-) 3.?ixf7±.
2,Sdfl!
Black resigned in view of 2...®xg3 3.Sxf2
(A§f3) 3...®e3 4.Se2 ®f4 5.^xf7+-.
Ex. 8-11
R.Fischer - S.Gligoric
Havana 1966
l .£ixa6!+-
(2 points)
l...JLxh3
l... bxa6 loses more quickly to 2.Sxc6 ®d7
3.Sxa6t ФЬ7 4,Sa7t ФЬ8 5.Sa8f ФЬ7
6.®a6#.
2 .e5 ^xe5
Or 2...fxe5 3.^c5t &b8 4.§c3!+-
intending Sa3.
3 .dxe5 fxe5 4.£fo5t &Ь8 5.gxh3 e4 6.^xe4
We7 7.Sc3 Ь5 8.Wc2
1-0
Monte Carlo 1967
1...Де4!-+
(3 points)
l...h6 (2 points) would not be so strong, on
account of 2.Лхс4! (if 2.JLg4 then 2...jld6)
2...®xc4 3.®xe5t &d7 4.®xg7t &c8 5.Scl
ixg2f 6.&xg2 ®g4f 7.&fl ®glt 8.Фе2
and it is not clear whether Black can win the
game.
After l...e4?! there comes 2.®al JLd4 (if
2...c3, then 3.1f7f &d7 4.Sdl) 3.®cl#.
For centralizing the queen by l...®e4
you get 1 point. The strong bishop move
strengthens the black position and fends off
Whites attack.
2.1, g4
If 2.1,f5 JLxf5 3.®xe5t> then З...Ф<17 with
the following variations:
a) 4.9xg7t &c6 (another good move is
4...&C8 5.Sel ld7-+) 5>f6t ld6 6,®xf5
Bxf5 7.Sxf5 Sb8-+
b) 4.®xf5t ®xf5 5.Sxf5 Фс6-+
2...Sb8 3.i.dl
Threatening Jia4t.
After 3.JLe2 there follows 3...^xg2f! 4.^xg2
Sb2-+.
3...^d74.gf7t^e6-+
White resigned. After 5.Sxg7 there comes
5...1xg2f 6.^>xg2 Sb2f 7.ФЫ @d5t-+.
And if 5.Sfl, then Black has 5...Sb2 6,jkg4t
Ф45 7.^.f3 JLxf3 8.gxf3 Sxa2-+.
90
Scoring
Maximum number of points is TJ
22 points and above > Excellent
17 points and above >Good
12 points >Pass mark
If you scored less than 12 points, we recommend that you read the
chapter again and repeat the exercises which you got wrong.
91
Contents
S Cal ci 11 a r i n g s h о r t vari a ti о ns
S Possibilities for your
opponent
J Exercises with mate in two
moves
9
Mate in two moves
The aim of this lesson is to improve your calculation
of short variations. It is more important to find a lot
of options in the first few moves than to calculate
long variations. Most mistakes occur in the early
moves in variations. What is the use of calculating
a long and correct variation if your opponent has a
much better reply on move one?
You must develop your skill at calculating
short variations, while at the same time taking
into account the possibilities available to your
opponent. This skill should reduce blunders.
Exercises with mate in two moves are very well suited
for training in the art of calculating short variations
with great accuracy.
Before reading the accompanying text, try to find
the correct solution in all the examples! Note down all
the variations you have calculated for each position,
and then compare your variations with those given
in the text.
Diagram 9-1
S.Loyd
1859
l.®a5O &d7
l... te6 2.®e5#; l...^f5 2.W5#; l...tb7 2.Ш#;
l...ie7 2.®e5#; l...id6 2.®d5#; l...ic5 2.®al#;
l...&g7 2>xb4#; 1...Ш 2.®xb4#; l...Sd7 2.£if5#;
l...Sd62.®xb4#; l.„Sd52.®xd5#; l...Se72.®xb4#;
1...2e6 2.£)f5#; l...Se5 2.@xe5#.
2.®d5#
Positions with few pieces are basically simpler, but
it often happens that, even after thinking for a long
time, one does not see the solution. When that
happens, you have to check out every possible
move.
Mate in Two Moves
Diagram 9-2
[.Abbott
1902
l.Bh8! &f4
The other three variations are as follows: 1...ФЬ~
2.&f5#.
That means: 1...ФЬ5 2.ДГ5#, 1...ФЬЗ 2.jkf5# or
I...&h4 2.if5#.
2.Ш4#
Here are another six positions with mate in two
moves to warm up with. To find the solutions here,
you need a little imagination (or a lot of patience).
Diagram 9-2
8
7
6
5
4
3
2
1
abcdefgh
Diagram 9-3
Y.Afek
1978
l.Sd3! Фе1
2.®g3#; l...el® 2.S6#; l...elS 2,gf3#;
l...el&2.gf3#; l...el£> 2.Sd2#.
2.®g3#
Diagram 9-3
abcdefgh
Diagram 9-4
A.Gurvitch
1959
1.§а8! Фха4
1...S- 2.ФЬ7#
2.&b6#
Diagram 9-4
abcdefgh
93
Calculating Variations 1
Diagram 9-5
Diagram 9-5
V.Chepizhny
1987
l.Wbl! £lf4 (or £e5, c5, b4, £2)
If l...^b2 (or £lcl, el), then 2.®h7#.
2.&£2#
abcdefgh
Diagram 9-6
Diagram 9-6
S.Lovd
1881
l.®a2! Jlg4 (or Д£3, e2, dl)
l...&g6 (or t£7, e8) 2.®g2#; l...&g6 2.9g8#;
l...&g4 2.®g2#.
2.®g8#
abcdefgh
Diagram 9-7
Diagram 9-7
JLSchett
1881
l.Wa6! ФхаЗ
l...bxa3 2.®xb5#; l...bxa4 2.®d3#.
2.^c5#
abcdefgh
94
Mate in Two Moves
Diagram 9-8
M.Lokker
1967
I.&b2 2)b4
1...Ы4 2.®el#; 2.®a4#.
2.®d8#
In all the positions in the test, you have to find mate
in two moves.
There is only one single way to achieve mate in
two moves.
Check out all your opponents replies with great
care! In your solution you must have calculated
and written down all possible replies for your
opponent.
Diagram 9-8 Z\
abcdefgh
95
Exercises
A >Ex.9-5< ★ A
>Ex. 9-2 < ★
abcdefgh
abcdefgh
>Ex.9-3< ★
abcdefgh
>Ex. 9-6< ★ A
abcdefgh
96
Exercises
>Ex.9-8< ★
>Ex.9-10< ★
abcdefgh
A > Ex. 9-11 < ★ A
abcdef gh
abcdef gh
>Ex. 9-9< ★ A
8
7
6
5
4
3
2
1
abcdefgh
>Ex.9-12< ★ A
8
7
6
5
4
3
2
1
abcdefgh
97
Solutions
Ex. 9-1 Ex. 9-6
A. Grin
D.Uljanov
1964
l.Wa8! Ig2
1...1- 2.h8®# or 1...ФИ2 2.h8®#.
2.®xg2#
(1 point)
Ex. 9-2
ЬЛа1аЬег
1932
l.le7! ±f4
l...&d4 2.®e4#
2.We4#
(1 point)
Ex. 9-3
1909
l.Sd6! (Дйеб#) 1...&ха7
l...£lb6 2.®xe7#; l...‘21xd6 2.®xe7#;
l...±xd6 2.®b8#; l...lxd6 2.®g7#; 1...1-
2.ge6#; l...c4 2.Se6#; l...d4 2.®xc5#.
2.Se6#
(1 point)
Ex. 9-7
A.Bottachi
E.Szentgydrgyi
1928
l.la3! e2
2.^e2#
2.1c5#
(1 point)
Ex. 9-4
1921
l.Sg4! b4
l...®d5 2.Sg8#; 1„>с5 2.^xc5#; 1...W6
2.Sg8#; l...®g5 2.£>xg5#; l...®h5 2.£>g5#;
l...®xd6 2.&xd6#; l...@xf6 2Axf6#; 1..Ж4
2.Sg8#; l...®g3 2.&xg3#; l...®h2f 2.^(2#-,
l...®xe4t 2.1xe4#; 1...Ш4 2.Sg8#; l...®c3
2.&xc3#; l...®b2f 2.£id2#; 2.Sg8#.
2.Sg8#
(1 point)
Ex. 9-8
H.Bettman
T.Schonberger
1925
l.la4f! &d3
1,..Фе1 2.®e2#
2.1b5#
(1 point)
Ex. 9-5
1923
l.Sd7! Фхсб
1„.Фс8 2,cxd8®#; 1„.Фха7 2.c8^#;
l...Hc8 2.cxd8^#; l...?\xc6 2.cxb8®#;
l...^e6 2.c8®#. After any move by the knight
on £7 then 2,c8®#.
2.cxb8^#
(1 point)
Ex. 9-9
A.Lebedev
GAXfennik
1929
l.le4! &e7
1...2>d6 2.1d5#; 1...2>b6 2.16#; l...£a7
2.16#.
2.Sft>#
(1 point)
1918
1.Фс7О lg4 (or 16, e2, dl, e8)
l...lg6 2.®f6#; l...lf7 2.®d6#; l...Sg6
2.®e8#; l...Sf6 (orSh7, h8) 2.®(x)f6#.
2.®e8#
(1 point)
98
Solutions
Ex. 9-10 Ex. 9-12
W.Speckmann______________________N.KosoIapov
1963
l .®g8! Ф15 l.®h3 Фхсб
1... ФхЬ5 2.®xg5#; 1...Э- 2.£lf6#; l...g2 1„.Фа4 2.®b3#; 1...Фа6 2.®d3#; 1...Фс4
2 .®xg5#. 2.®b3#.
2.Sxg5# 2.®d7#
(1 point) (1 point)
Ex. 9-11
S.Loyd
1885
l .®a8O Sg7
1... S-6 2.®g8#; l...Sg8 2.®xg8#; l...&g7
2 .®g8#.
2 .®hl#
(1 point)
Scoring
Maximum number of points is 1.2
11 points and above > Excellent
9 points and above > Good
6 points.................>Pass mark
If you scored less than 6points, we recommend that you read the
chapter again and repeat the exercises which you got wrong.
99
Contents
S The opposition and
corresponding squares
S Corresponding squares and
mutual zugzwang
S Reserve tempi
S Flanking manoeuvre
S Distant opposition
S Different forms of the
opposition
Diagram 10-1 A
abcdefgh
Example 1 +-
Diagram 10-2 A
abcdefgh
10
The opposition
In Chapter 4 we saw some simple examples of the
opposition. Let’s now deepen our knowledge.
It must be understood that the opposition is only a
special case of corresponding squares.
Corresponding squares are squares on which both sides
find themselves in zugzwang.
What we call the opposition is when the kings stand
opposite each other with only one square between
them.
When there are three or five squares between them
we speak about the distant opposition.
The opposition can be diagonal, horizontal or
vertical.
Diagram 10-1
To break down his opponent’s defence, White must
pass the right to move to his opponent. White wins
here, because he has exactly two reserve tempi.
What would be wrong here would be the expansive
move:
l .a4?
White would then win the opposition and the
black king would have to move to one side, but after
that White would not have a reserve tempo left.
1... Фс7!
Not 1...Фа7? on account of 2,a5! bxa5 З.Фха5 and
White gains the opposition again.
2 .Фаб
The white king tries a flanking manoeuvre.
It would be useless playing 2.c5 bxc5 3.^xc5 ФЬ7=,
as the a-pawn does not win.
2... Фс6 З.Фа7 Фс7!
Diagram 10-2
Black takes the horizontal opposition.
4.Фа8 Фс8!=
But not 4...Феб? 5.ФБ8 Фс5 6.ФБ7+-.
Let us return to Diagram 10-1.
We need all the reserve tempi here. So the correct
move is:
l.a3!
The Opposition
Once more, the black king must give way, going to
one side.
I... ±c7
After 1...Фа7 2.d?c6 Фаб there comes 3.a4 (White
uses his second reserve tempo to gain the horizontal
opposition. Also good would be З.Фс7 first.) З...Фа7
4.Фс7 (of course not 4.ФБ5? ФЬ7!=) 4...Фаб 5.ФБ8
(after having gained the opposition on the 7th rank,
there now comes the flanking manoeuvre) 5...Фа5
6.ФБ7+-.
2 .Фаб Феб 3.a4!
З .Фа7? is bad, due to 3...b5!=.
Diagram 10-3
З... Фс7 4.&a7
White wins the horizontal opposition.
4...&c6 5.&b8
And then comes the flanking.
5...&d6
Or 5...&c5 б.ФЬ7+-.
6.ФЬ7 ®c5 7.Фс7 Фхс4 8.ФхЬ6+-
Diagram 10-3
abcdefgh
Diagram 10-4
1921
1 .Фе2!
White will win the struggle for the key e5-square,
after first gaining the distant opposition.
1... Фе7
If l..^d7, then 2.<^?d3 Феб З.Фе4+-.
After l...^d81? there comes 2.ФАЗ! (The distant
opposition is crucial only on the e-file. White can
now use a flanking manoeuvre to shorten the distant
opposition. He must not play 2.ФеЗ?, due to 2...Фе7!
with the distant opposition, when З.Фе4 Феб 4.ФА4
ФГ6= leads to a draw. The same happens after 2^d3?
Фd7!= with the distant opposition.) 2...Фе7 З.ФеЗ!
(again White gains the distant opposition, but not
З.ФА4? Фf6=) З...Феб (З..Фч16 4^d4+- opposition)
4,Фе4+- with the opposition. Play continues as in
the main line.
2 .ФеЗ Феб З.Фе4
Opposition. Black now has two possibilities.
Diagram 10-4
abcdefgh
Example 2 +-
101
Endgame 2
abcdefgh
Diagram 10-5 (Variation A)
З... ФК 4.Ф£4!
4 .<^?d5? would be premature, in view of 4...ФГ5
5.Фс5 4>g4 6.ФхЬ5 ФхЬ4 7.Фс5 <^?g4 8.b5 h4 9.Ь6
h3 10.b7 h2 ll.b8® hl®=.
4... sbg6
Or 4...Феб 5.^g5 4>d5 б.ФхЬ5 Фс4 7.^g5 ФхЬ4
8.h5 Фс4 9.h6 Ь4 10.h7 b3 ll.h8®+-.
5 .Фе5
The key square.
5... &g7 6.Ф6+-
Another good move is б.ФН5 Ф£б 7.Фс5+—.
6...Ф116 7.Ф16О &h7 8.&g5+-
Diagram 10-5 (Variation B)
3...&d6 4.&d4! Феб
4...Феб 5.Фс5+-
5.Фе5+-
The key square.
5...ФЬ6 6.&d5 ФЬ7 7.Фс5 Фаб 8.Фс6О Фа7
9.ФхЬ5 ФЬ7 1О.Фс5 Фс7 11.Ф<15! ФЬб 12.Фе5
ФЬ5 13.Ф6 ФхЬ4 14.&g5 Фс5 15.ФхЬ5 Ф<16
16.&g6 Фе7 17.&g7!+-
Diagram 10-6
H.Neustadtl
Example 3 =
Chess magazine 1890
Only the distant, horizontal opposition can save
White!
1.ФЫ1!
1.ФГ1? loses to 1..5bd2 2.ФЕ2 ФdЗ (another good
move is 2...g4-+) 3^gl ФеЗ 4^g2 Фе2О-+ and
Black gains the opposition.
I^g3? fails to 1...Фе1! 2^g2 Фе2 3^g3 ФА
4,Фё4 ФЕ2-+.
1...Фе1
If E..g4, then 2^g2! Фd2 3.fxg4 e4 4.g5 e3 5.g6
e2 6.g7 el® 7.g8®=. After l..^d2 comes 2.&h2!=.
2.&gl!
Horizontal opposition.
2...Фе2 3.&g2! ФеЗ 4.&g3! &d2
Or 4...&d4 5.&g4!=.
5.Ф112! &d3 6.ФЬЗ!=
102
The Opposition
The following theoretically important endgame
illustrates all forms of the opposition.
Diagram 10-7
l.&B
The black king must remain inside the square of
the a-pawn. But it also has another task: it must
defend the key squares c4, d4 and e4.
Black has a simple defensive method: as long as
the white king is on the 1st or 2nd rank, the black
king remains on d6 or e6. Only if the white king
moves to the third rank does Black have to occupy a
corresponding square: l.^h3 4>d5 ! or l.’&gS Фе51.
I...&d5!
The corresponding squares are d3 (f3, h3) - d5
and e3 (g3) - e5.
2.&g3 Фе5!
Diagonal opposition.
3.&h3 &d5! 4.Ф114 &d4!
Horizontal, distant opposition.
5.Ф115 &d5! 6.Ф116 &d6! 7.Ф117 &d7! 8.Ф118
&d8! 9.&g7 Фе7!
Horizontal opposition.
10.&g6 Феб! U.&g5 Фе5! 12.&g4 Фе4! 13.&g3
Фе5! 14.Ф© ®d5! 15.ФеЗ Фе5!
Opposition. Not 15...Фс5?? 1б.Фе4+- and White
occupies the key square.
16.&d3 ®d5!
Opposition.
1,7.ФеЗ Фе5! 18.a5 &d5 19.аб Феб 20.&d4 ФЬб
21.Фс4 Фхаб 22.ФхЬ4 Ф>Ь6=
Opposition.
abcdefgh
Example 4 =
The test which follows will show how well you have
understood the two lessons on pawn endings.
103
Exercises
>Ex. 10-4< ★
abcdefgh
abcdefgh
> Ex. 10-24 ★★★ A
8
7
6
5
4
3
2
1
>Ex. 10-54 ★ A
abcdefgh abcdefgh
> Ex. 10-34 ★★★ A
>Ex. 10-64 ★★
104
Exercises
> Ex. 10-7 X * A > Ex. 10-10 X ★★ A
abcdefgh abcdefgh
>Ex. 10-8 <
abcdefgh
>Ex. 10-94
abcdefgh
105
Solutions
Ex. 10-1
.Moravec
1952
1.Фс2!
(1 point)
l.f6? gxf6 2.Фс2 would be wrong, in view
of 2...Феб З.ФНЗ ФТ5-+ and the black king
will occupy g4, the key square for the f6-pawn
(see Example 1 in Chapter 4).
I... &d6!
1„.Фе7 2.ФАЗ &f6 З.Фе4= is simple.
2.16!
(1 point)
2.ФАЗ? loses after 2...Фе5 З.ФеЗ (if 3.f6,
then 3...&xf6!+-) 3...^xf5 4.sbf3 &g5 5.^g3
g6-+ (see Example 3 in Chapter 4).
2...gxl6 3.&d2!
(1 point)
The distant opposition. З.ФАЗ? ФА5
4.ФеЗ Фе5 5.^f3 ФТ5 б.ФеЗ 4>g4—+ would
be bad.
З...Фе6 4.Фе2!
We also saw this idea in Ex. 4-9.
4...Ф15 5.Фв=
Opposition.
Ex. 10-2
BLMattison
1918
l.g6!
(1 point)
If l.^g2? ^g4 2.ф£2 (or 2.g6 fxg6 3.f5
gxf5~+ and Black holds the opposition),
then 2...^xf4 3.&g2 ^xg5 and Black wins,
because he has a reserve tempo: 4.4>g3 ФТ5
5.&f3 f6-+.
I... fcg6 2.6!
(1 point)
After 2.^gl? comes 2...<ig4 3.f5 Фх£5!
4.ФЕ2 ФА4—+. Also bad is 2.sbg2? ^g4 З.ФТ1
(3.f5 gxf5!-+) 3...&xf4 4.Ф£2 g5-+.
2...gxf5 3.&gl!
(1 point)
3...&g5 4.ФА!
See also Ex. 4-2.
Not 4.^g2? ^g4-+ nor 4.ФЕ2? ФТ4—+.
4...Ф14 5.Ф£2=
Opposition.
Ex. 10-3
I.Dritina
1907
1.Ф13!
(1 point)
White must first gain the distant opposition
on the f-file.
If 1.ф£4?, then 1...ФТ6 and White gets no
further, e.g. 2.Фе4 Фе7! З.ФА4 (or З.ФГ5
ф£7=) З...ФА7! 4.ФсЗ Фс7! 5.ФЬ4 ФЬ6!=.
1... Фе7 2.&g4!
(1 point)
White shortens the distance between the
two kings with this typical flanking manoeuvre
(see also Example 2 of this chapter).
2...ФК
Or 2...ф£8 3.&f4! Фе7 4.&g5!+-. If
2...Ф£7, then З.ФГ5+— wins.
3.&f4! Фе7
Or 3...&g6 4.Фе4 ф£6 5.Ф<14 Фе7 б.ФсЗ
Ф<17 7.ФБ4 Фс7 8.Фа5! ФЬ7 9.ФБ5+-.
(1 point)
4.&g5!
Flanking.
4...Ф17 б.Фб!
Opposition.
5...®е7 6.&g6
Flanking.
6...Фе8 7.Фй &d7 8.ф£7 Ф<18 9.Фе6 Фс7
1О.Фе7+-
Ех. 10-4
1...ФЬ6!
(1 point)
The horizontal, distant opposition, as in
Example 3.
The alternatives are bad:
106
Solutions
а) 1...Ф17? 2.&d7 &g6 З.Феб Ф§7 4.Фе7
&g6 5.^f8 ФЬб 6.&£7+-
b) l...&g6? 2.Феб ^g7 З.Фе7+—
с) 1...Ф117? 2.±d7! ФЬб (2..^g8 З.Феб
Фg7 4.Фе7+~) З.Фе8!+- Фg7 4.Фе7 Фg6
5.ФГ8+-
2.Фе7 &g7! З.Фе8 &g8! 4.Ф<17 ФЬ7!=
Ех. 10-5
1.Ф<15!
(1 point)
White takes the opposition. 1.Фе5? would
be bad, due to 1...Фе7=.
1... Фе7 2.Фе5!
But not 2.Феб?, allowing 2...Феб!= with the
horizontal opposition.
2...Фг з.Фаб
Flanking.
З...ФЙ 4.Фе6 &g7 5.Фе7 Фg8 б.Ф£6 ФЬ7
7.ФГО+-
Ех. 10-6
1 .Фс6!
(1 point)
The black king has no corresponding square,
since his pawn is on g6.
But not l^d6?, on account of 1...ФГ6
2.0d7 Ф17 = with the horizontal opposition.
1... ФК
Or 1...Ф17 2.Фа7+-.
2 .Фаб! &(7 З.Фа7! ф£б
After 3..^f8 there follows the flanking
move 4.Феб+—.
4.Фе8!
Flanking, after gaining the opposition on
the 7th rank.
4...&g7 5.Фе7 Фg8 6.Ф16 ФЬ7 7.Ф£7 ФЬб
8.Фё80
(1 point)
8...g5 9.fxg5t Фg6 10.Ф1В+-
Ex. 10-7
l.d5!
(1 point)
We know this idea from Example 1. Playing
l^f6? would be bad, in view of l../bd6
2.Ф17 Фd7=.
1...еха5 2.&xd5
Opposition.
2...Фе7 З.Фе5 ФГ 4.Фб!+-
Ех. 10-8
1...Ф117!
(1 point)
1...ФЬ5? loses, because of 2^g7 g5 З.ФТ6!
gxf4 4.gxf4 Фg4 5.Фе5О+—.
2.Ф17 ФЬб 3.&g8 g5! 4.Ф>£7 gxf4 5.gxf4
Ф117! б.Ф16 sbg8! 7.ФхВ Ф£7!=
(1 point)
Ex. 10-9
EYates — S.Tartakower
Homburg 1927
1.ФаЗ!
(1 point)
1.&Ы? would be bad, due to 1...ФхЬ4
2,ФЬ2 Фа4 З.ФЫ ФаЗ 4.Фа1 Ь2| 5.ФЬ1
Ь4-+.
1...Ь2
Or 1...ФсЗ stalemate.
2.Фа2!
(1 point)
But not 2.(&xb2? on account of 2...ФхЬ4
and Black gains the opposition.
2...ЫД1 З.ФхЫ ФхЬ4 4.ФЬ2=
Opposition (see Example 2 in Chapter 4).
¥2-1/2
Ex. 10-10
1949
1.ФВ!
(1 point)
You must understand that the opposition is
not a universal weapon, but only a special case
of a pair of corresponding squares. Here, for
107
Solutions
example, taking the distant opposition makes
no sense, since the black king simply goes in
front of the d-pawn, with the consequences
which we know from Chapter 4 (see Examples
1 and 2): 1 .<±>£4? Фе8 2.Фе5 &d7=.
1... Ф17 2.Фе5! Фй
Or 2...Фе8 (aiming to hold the draw by
moving to d7) З.Феб ФЬ8 4.d7+-.
З.Фй! Фе8 4.Фе6 Ф<18 5.d7+-
(1 point)
Ex. 10-11
H.Cohn
1927
l.Sg3!!
(2 points)
The only chance to save the game, since the
ending of rook against queen is lost.
I...d4
l...Bxg3 leads to stalemate.
If 1...ФГ4, then after 2.Sxg4f &xg4 3.^g2
White keeps the opposition: З...ФЬ4 4.Ф£2
Фе4 5.Фе2 <&d4 6.<&d2= (see Example 1 in
Chapter 4).
2.&g2!
(1 point)
2.Sxg4f? would be wrong, on account of
2...<&xg4 3.&g2 d3 4.Ф12 ФЕ4 5.ФП ФЕЗ!
б.Фе! ФеЗ 7.&dl d2-+ (see Ex. 10-10).
2...d3 З-ФП!!
(1 point)
3.Sxg4f? again loses to 3...^xg4 4.Ф£2 Ф£4
5.ФП ^f3! 6.Фе1 ФеЗ-+.
3...®xg3 stalemate.
If 3...d2, then 4.Sxg4f ^xg4 5.Фе2= while
after З..Ф£4 there comes 4.Sxg4f 4>xg4
5.Фе1!=.
Ex. 10-12
C.Salvioli
1887
1...Фа8!
(1 point)
But not l...a5? 2.b5 a4 3.b6f Фаб 4.b7 a3
5.b8® a2 6.®b6#.
2 .ФЬ6 a5!
Of course, not 2...ФЬ8? З.Фхаб+- and
White occupies the key square for the
b4-pawn.
З .Фха5
3.bxa5 ФЬ8=
З.Ь5 ФЬ8! 4.Фха5 ФЬ7=
З... Фа7!
Opposition.
4 .ФЬ5 ФЬ7=
(1 point)
108
Scoring
Maximum number of points is 26
22 points and above > Excellent |
18 points and above >Good ¥
12 points.................>Pass mark f
'9^- ;V'<- •Vr’"'- ;:’^A
If you scored less than 12 points, we recommend that you read the
chapter again and repeat the exercises which you got wrong.
109
11
Contents
J The pin
J The absolute pin
J Winning material by means
of a pin
J Attacking the pinned piece
with a pawn
J Exchanging on the pinning
square
S Exploiting the pin by
zugzwang
J Pinning combinations
J The pin as a positional device
8
7
6
5
4
3
2
1
8
7
6
5
4
3
2
1
Diagram 11-1
abcde fgh
The pin
What is a pin?
‘One of the most frequent and most dangerous forms
of attack is the pin. Any piece which moves along a
straight line (queen, rook or bishop) attacks another
piece, which cannot escape from the attack because
by doing so it would expose another important
piece - rook, queen or even king - which lies behind
it along the line of the attack. So the pinned piece
must remain where it is and is then exposed to
further attacks by pieces and above all by pawns.’ -
S.Tarrasch
The absolute pin
An absolute pin is particularly strong and dangerous,
since the piece behind the pinned piece is the king.
The protection offered by a piece which is
pinned is purely imaginary! It is only pretending
to protect, in reality it is crippled and immobile.’ -
A.Nimzowitsch
Diagram 11-1
Schatz - Giegold
Hof 1928
Black has a combination, which is based on a pin.
l...Shlt! 2.&g3
If 2.ФхЫ, then 2...®xh3t-+ exploits the absolute
pin on the g2-pawn along the diagonal.
2...®h4f!
Also good enough is 2...Hxh3t 3.gxh3 ®h4f
4.M2 ®xf2#.
3.§xh4f gxh4#
Diagram 11-2
EOlafsson - O.Bazan
Mar del Plata I960
White finds a little combination, which exploits the
various tactical nuances in the position.
I.f4! §xe4 2.15! bd5
If 2...M5, then 3.Sxe4 Лхе4 4.Ш! ®xf6
5.®b8t+-.
The Pin
Neither is 2...Sxel 3.Sxel Sxelf 4.®xel JLxf5 any
good, on account of 5.£te7t+-.
3.Sxe4 JLxe4 4.^fi6f
The g7-pawn is now pinned.
4...Ф118 5.^xe8 ®xe8 6.Wc7 bxc4 7.Hdl!
Black resigned. The threat is 8.Sd8, and after
7...JLd3 there follows simply 8.bxc4 with an easy
win.
й
H
й
Winning material by means of a pin
The pin is often an important part of tactical
operations. A pin can frequently lead to gaining an
advantage in material.
Diagram 11-3
Variation from the game
A.Yusupov -
Amsterdam 1994
l.Sbl!
This pins the knight. The threat is 2. JLd4.
l...Sb8
Black wants to unpin with 2...^d71, but White
employs a typical idea to prevent that.
2.te5! Sb7 3.td4+-
White wins a piece.
Diagram 11-3 A
abcdefgh
Diagram 11-4
A.Yusupov - P.Nikolic
Munich 1994
During a tactical exchange of pieces, White uses the
pin to win the game.
l.jLxe4!
Nothing is achieved by 1.2xb3 Sxc6. And if
l.&e5t, then 1 ...Фй5.
l..JLa4
Or l...fxe4 2.^e5t &f6 3.®g4f &f5 4.Sxb3 Self
5.&h2 h5 6.Sb5t+-
2.jLf3 Sxc6
The main variation would go 2...Дхс6 3.Hc2+- and
White wins the pinned piece.
3.Sb7t 4.1xc6+-
Diagram 11-4 A
abcdefgh
111
Tactics 5
Attacking the pinned piece with a pawn
Diagram 11-5 A
8
7
6
5
4
3
2
1
abcdefgh
Diagram 11-5
A.Yusupov - B.Martin
Can Picafort 1981
l.^xf5!
Much more energetic than l.f4 £}g6 2.JLd3±.
1... 5xf5 2.Wc2!
But not 2.1d3 ®d7 3.g4??, in view of 3...^xf3t
4.&g2 ^xd2 5.1x151 Wxf5 6.gxf5 &xfl-+.
2...Wg5 3.g4!
A typical pawn attack on the pinned piece.
3...^g6 4.®xf5 Wxf5 5.gxf5 £T4 6.1c4 lxb2
7.2ael+-
Diagram 11-6
Bastrikov - Iakovlev
USSR 1956
White has various ways to turn his decisive positional
advantage into a material one. The game went:
l.c5!+-
A pretty move, which simultaneously exploits the
pins on both the b- and d-pawns. Black loses a pawn
and the game. White could also exploit the pin on
the b-pawn by l.a5! Sdb7 2.a6 Sa7 3.5xd6+-. The
pin on the d-pawn even gives White a third way to
win a pawn, by l.Sxe5! dxe5 2.Sxd7.
1-0
Exchanging on the pinning square
Diagram 11-7
A.Nimzowitsch
1.5x16!
With this move, White links two typical motifs: he
gets an absolute pin and wins a tempo after general
exchanges. I.lxf6t Sxf6 2.5xf6 Фхйб З.Ь4 Фе5 4.b5
&d6 leads only to a draw.
l...Sx!6 2.b4 &f7
2...a6 3.b5 axb5 4.a6+-
3.1x16 &xf6 4.b5 ^еб 5.Ь6 ахЬб б.аб!
White wins.
112
The Pin
Exploiting the pin by zugzwang
Diagram 11-8
V.Kupreichik - S.Dolmatov
USSR Ch, Vilnius 1980
After the obvious moves
l...jLc6f 2.Ee4 Ee6! 3.Eael
Black plays
3...g6!
White can no longer unpin with f4-f5 and &f4.
4.jLc3 &f7 5.h4 Exe4 6.Exe4 h5 7.a4 a5 8.b3
JLd5-+
White is in zugzwang. After 9.JLe5 there comes
9...d2, while after 9.Hd2 the win is achieved by
9...&f6 then &f5.
0-1
A few more examples with pinning combinations,
which are sometimes rather hard to see.
Diagram 11-8
abcdefgh
Diagram 11-9
S.Tarrasch
The following combination occurs frequently.
I...^xf4! 2.gxf4 Eg6-+
Black wins the queen.
Diagram 11-9
abcdefgh
Diagram 11-10
K.Pytel - P.Ostojic
Bagneux 1978
l.^xe4!
The knight on f6 is pinned, because it has to block
access to the crucial square g7. If l.g4, then Black
defends by l...®f81.
I...^bd7
Black must accept the loss of the e4-pawn. After
l...®xe4 comes 2.JLF3+—, and when the queen
retreats, White wins the rook on a8. If l..Axe4??,
then, of course, 2.®xg7#.
2.Edl Ea6 3.&g3 lb7 4.0-0+-
Diagram 11-10
abcdefgh
113
Tactics 5
If the pinned piece is not covering the king, but a
stronger piece, it can, however, move away. Moves
like that, which uncover a stronger piece, are very
easy to overlook. See Chapter 7 - The discovered
attack.
Diagram 11-11 Z\
The pin is not only a tactical motif, but is also an
important positional device
Diagram 11-11
Example 1
abcdefgh
Here, the pin on the f6-knight brings White a great
advantage. It can lead to the destruction of the castled
position.
1.Ы5 Ы4?
If 1...Ф118 or l...Se8, then 2.f4! while after l...h6
there comes 2.^xf6f gxf6 3.jbdi6+~.
gxffi 3.JU16+-
Because of the threat of ®g4f, Black has to
surrender the exchange.
Diagram 11-12
Diagram 11-12
Example 2
abcdefgh
Although White has one pawn less, the pin on the
knight signifies a clear advantage to White. Black
cannot bring his pieces on the queenside into play.
l.Sc8t &f7 2.g4 Феб 3.Sh8 h6 4.&h4+-
The pin can often bring about a tactical or a
positional advantage. For that reason, you must fight
against any pin with due urgency, or even prevent
one occurring.
Test your understanding with the following twelve
exercises about the pin.
114
Exercises
>Ex. 11-
> Ex. 11-4 X ★★ A
abcdefgh
abcdefgh
>Ex. ll-2< ★ A
>Ex. 11-54 ★★
abcdefgh
abcdefgh
>Ex. 11-34 ★
УЕх. 11-64 ** A
abcdefgh
abcdefgh
115
Exercises
>Ex. 11-74 ★★
> Ex. 11-104 ★★ A
abcdefgh
abcdefgh
> Ex. 11-84 ★★ A
>Ex.ll-ll< ★★
abcdefgh
abcdefgh
>Ex. U-12< ★★
abcdef gh
abcdef gh
116
Solutions
Ex. 11-1
Variation from the game
Leningrad 1941
l... ^e5-+
(1 point)
Black utilizes the pin on the d4-pawn and
wins the exchange.
Ex. 11-2
l.tc3!=
(1 point)
Black cannot unpin the rook on d4. After
l...Sd8 the white bishop will simply remain
on the al-сЗ diagonal. All that Black can do
is surrender the rook, but then the ending of
rook against bishop is objectively drawn.
Ex. 11-3
V.Mikenas - L.Aronin
USSR Ch, Moscow 1957
l... Sd8!-+
(1 point)
Exploiting the pin on the diagonal. White
resigned, in view of 2.Wxf5 Sxdl#.
Ex. 11-4
L.Kubbel
1921
White has a stalemate defence:
l.Sd3!=
(2 points)
l...Wxd3 stalemate.
Ex. 11-5
A.Kotov - M.Botvinnik
USSR Ch, Leningrad 1939
l...®xg2f! 2.Wxg2 Sxe2-+
(2 points)
0-1
Ex. 11-6
A.Troitzky
1930
l.l,e5t« 2.Wg5!+-
(2 points)
A very pretty cross-pinning motif.
Ex. 11-7
H.Mattison
1930
l.&h2!
(2 points)
But not 1JH4?, on account of l...d2 2.jLxd2
stalemate.
White now wins the g6-rook, due to
zugzwang.
I...d2 2.jLxd20 ФЬ4 3.&xg6+-
Ex. 11-8
Variation from the game
т—. - .. ~ . ... ' ...
C.Van den Berg — E.Eliskases
Hoogovens Beverwijk 1959
l.Sxft! ®xfi6 2.d6f!+-
(2 points)
Deflection is used to exploit the pin.
Ex. 11-9
M.Makogonov - V.Chekhover
Tbilisi 1937
l...Sft!
(1 point)
This pins the white queen on the f-file.
2.Sd8O
White defends with a counter-pin on the
rook on the 8th rank.
2...®h4t!-+
(1 point)
This way Black exploits the absolute pin,
next comes 3...®xf6.
0-1
117
Solutions
Ex. 11-10
A.Yusupov - G.Sax
Vrbas 1980
1.Д<12!
(2 points)
White pins the knight. Black cannot avoid
losing material.
1... WM
If 1...ЖЗ, then 2.Sc3 ®xa2 З.Дс4 ®b2 (or
3...®a5 4.Sb3+-) 4.Sb3+-.
2.Sb2+-
Black resigned in view of 2...a5 З.аЗ
(attacking the pinned piece with a pawn)
3..dbcd4 4.2Ы+-.
Ex. 11-11
LCapablanca — A, Alekhine
World Ch, Buenos Aires (1) 1927
l...^xc2!
(2 points)
Black wins a pawn by a combination which
exploits the weakness of the back rank.
A participant in our distance learning
programme - David Uhlmann - found
another solution here: l...a5! (also 2 points)
2.a3 (or 2.c3 a4 3.®dl ^xa2 45al &xf4-+
if 2.£id3, then 2...a4-+) 2...a4 3.®c3 £ta2-+
winning the exchange.
2 .Hxc2
Or 2.®xc2 ®xc2 3.Sxc2 JLxf4-+.
2... Wxf4
The bishop on e3 is pinned, because of the
possibility of a back rank mate!
3 .g3 ®F5-+
Ex. 11-12
A.Kotov - R.Kholmov
Moscow 1971
1.®Ь5!!
(2 points)
But not l.jbcc5 Sxc5 2.®d4, due to 2...Sc7
and Black successfully unpins.
I...^xc2
If l...Sxb5, then 2.Sxc8f Ф17 3.jLxa7+-
2.Дха7 Bxa2 3.Jlc5 h6 4.h4
1-0
Scoring
Maximum number of points is 21
19 points and above >Excellent
16 points and above >Good
11 points >Pass mark
If you scored less than 11 points, we recommend that you read the
chapter again and repeat the exercises which you got wrong.
118
Contents
S The double attack
S 'lhe double attack with
various pieces
lhe double attack in
combinations
S Preparing a double attack
Diagram 12-1 A
12
The double attack
An attack on two or more pieces with a single move is
called a double attack.
The most common form of double attack is the
fork, but there is also the skewer, where the two
attacked pieces lie on the same line, and the second
piece is attacked ‘through’ the first one.
A double attack is a very important and effective
tactic. It often leads to an immediate win of material,
because the opponent is not able to fend off several
threats simultaneously.
It is also very easy to overlook a double attack. Every
chess piece (though it is most often the queen or the
knight) can carry out a double attack.
Diagram 12-1
abcdefgh
Diagram 12-2
T.Petrosian - V.Simagin
Moscow 1956
l.Wa8f
The start of a combination with three double
attacks.
I...$g7
1...Фе7 2.Bxa7t+-
2.ixe5f!
A fork by the bishop.
2...®xe5 3.Bh8f!
Diagram 12-2
A skewer by the queen...
З...ФхЬ8 4.4kf7t
...and the final fork by the knight!
1-0
abcdefgh
The Double Attack
In the following study White wins the opposing
queen by a startling array of double attacks.
Diagram 12-3
H.Rinck
1903
l.S a8’!®a2
All other moves lose even more quickly:
a) l„>e6 2,Sa6f+—
b) l...®xa8 2.if3t+-
c) 1...Ш5 2.tf3+-
d) I..>c4 2.§c8t+-
e) 1..Ж7 2.tg6!! ®xg6 3.Sa6t+-
2.Sxa4!®g8
If 2...®xa4, then З.Де81+—.
3.Sa8 ®h7d 4.^g6!! Wxg6 5.Sa6f+—
1-0
Diagram 12-4
Example 1
Diagram 12-3 A
l.& h3!
White aims for a stalemate.
l...gl^t
l...gl® or l...glS is stalemate. l...gljL also leads
only to a draw.
2.&g2 &e2 3.&fl!=
A double attack by the king on the two minor
pieces saves the game.
A double attack often forms part of a combination.
Diagram 12-5
A.Yusupov - M.Holzhauer
abcdefgh
Diagram 12-4 A
German Ch, Altenkirchen 1999
l.JLxh6!
A standard sacrifice designed to break open the
castled position.
I... gxh6 2.Wxh6 ^g6
2...jLxg3 3.fxg3 would be no better, in view
of 4.jLxe4 dxe4 5.®g5t ФЬ7 6.d5 ^xd5 (6...jLf5
7Ж4+-) 7.Sadl f5 8.^xd5 Ьх15 9.Sf4+-.
3.f4
abcdefgh
Diagram 12-5 A
abcdefgh
121
гм
Tactics 6
abcdefgh
Diagram 12-7
abcdefgh
Diagram 12-6
An important move, which prepares the threat
of f4-f5. On the other hand, 3.JLxg6 fxg6 4.®xg6f
®g7+ would not have been good.
3...®c7
If 3...Sac8, then 4.f5 JLxg3 5.fxe6 ®xe6 6.jLxg6+-.
After 3...Sae8 there comes 4.f5 Jlxg3 5.fxg6 fxg6
6.®xg6t ®g7 7.Sxf6!+-
4.^ge2
Black is no longer able to fend off the threatened
fork. But not the immediate 4.f5?, due to 4...JLf4.
4...gfe8
If 4...jbd7, then 5.f5 ^e7 6.®xf6+—.
5.15
Diagram 12-7
5...ДЙ 6.®g5 &h7 7.®d2 &h4 8.&e6+-
As a result of the combination, White has won a
pawn and clearly has the superior game. White went
on to win the game.
To protect yourself against double attacks by your
opponent, you must try not to leave any of your
pieces unprotected. And opposing pieces which
have no defenders are possible targets for our
double attacks.
A double attack is particularly effective if one of the
pieces under attack is the king
Diagram 12-8
L.Kubbel
1909
1 .Фс1!
After this move, the bishop cannot find a safe
square on the diagonal and becomes the victim of
a double attack. But not l.d7? Фс7 2.Фс1, due to
2...1а2! З.ФЬ2 &xb3=.
a) l.'.J,a2 2,ФЬ2+-
b) l...te4 2.d7 Фс7 3.^e6f &xd74.£te5t+-
c) l...lg6 2.d7 Фс7 3.^e6t &xd7 4.2)f8t+-
d) 1...M7 2.d7 Фс7 3.£le6t &xd7 4.2)f8t+-
2 .d7 Фс7 3.£e6t &xd7 4.$k5t+-
122
The Double Attack
Double attacks are dangerous, but they do not always
win the game!
Diagram 12-9
V. Bagirov - A.Yusupov
Leningrad simultaneous 1975
I>c2?
A double attack on the bishop on c7 and the pawn
on h7, but Black saves himself with a tactical trick.
The simple l.jLd3= was better.
I...g6!
And White cannot take the bishop, on account of
2.®xc7 Sc8! 3.®xa7 gclf-+.
In the test which follows, you should first of all
look for potential victims’ for your attack, such as
unprotected pieces of your opponent. Then you
will also find the double attack!
Diagram 12-9
abcdefgh
123
Exercises
Ex. 12-К ★
abcdefgh
>Ex. 12-2 < ★
abcdef gh
>Ex. 12-3 < ★
abcdefgh
124
Exercises
>Ex. 12-7 < ★ A
>Ex. 12-10< ★★
abcdefgh
abcdefgh
>Ex. 12-8-4 ★★
>Ex. 12-114
abcdefgh
abcdefgh
> Ex. 12-9 < ★★
>Ex. 12-124 ★
abcdefgh
abcdef gh
125
Solutions
™ Ex. 12-1
Ex. 12-6
_____AJChernin-LStohl
B.Tansson — K.Pvtel
Hungarian Team Ch 1997
l...®b8!-+
(1 point)
0-1
Ex. 12-2
E.Hansen - A.Nimzowitsch
Copenhagen 1928
1...6T! 2.exf6f £>xf6t-+
(1 point)
0-1
Ex. 12-3
M. Gurevich — A. Yusupov
USSRCh, Moscow 1988
l...®xh3f!
(1 point)
2.ФВ
If 2.ФхЬЗ, then 2...^xf2f-+.
2...®f5t З.ФеЗ ^хсЗ 4.bxc3 ®e6f-+
Stockholm 1975
1.Ш41+-
(2 points)
A triple attack on g7, g4 and c5. Black
resigned, in view of l...®xd4 2.&e7t ^h8
3.Sxf8# and l...Sxf5 2.®xc5 Sxflf 3.&g2
Sf2f 4.&gl+-.
On the other hand, l.®xd5t?? would be a
blunder, because of l...®xd5t (check to the
king on hl!).
Nor is l.e4? any good, because of 1 ...^f2f.
Ex. 12-7
V. Korchnoi - A.Yusupov
4th Borowski Tournament, Essen 2002
l.£k6!+-
(1 point)
Black resigned, due to l...Sxb7 2.^d8f+-
Another good move would be 1Ас4,
intending a4-a5-a6, since after I...Sxb7 there
comes 2.£id6t (also 1 point).
Ex. 12-4
Variation from the game
Ex. 12-8
M.Chigorin -D. Janowski
M. Wahls - E.Rozentalis
Paris 1900
Bundesliga 1992
l.®cl!+-
(1 point)
Ex. 12-5
.Pinter - H.Hurme
Helsinki 1983
l... d3! 2.jLxd3 e4
(1 point)
З.Де2
З.Дх£6 exd3—+
4...exf3 5.gx£3 ®e5 6.f4 ®a5f-+
l.®c5+-
(2 points)
A double attack, threatening both the bishop
on f5 and mate on f8. For the moves l.®b4
or l.®a3 (attacking a pawn rather than the
bishop) you get 1 point. It is better to attack
the stronger pieces.
1-0
Ex. 12-9
T.Paehtz - Fernandez
Albena 1989
White must do something about the threat of
l...Sccl. Next came:
126
Solutions
Ex. 12-11
1.®а2!!
(2 points)
Black is pinned on the a2-g8 diagonal. For
l.®d2, intending 2.®d8f, you get 1 point.
I...^xa2
Or l...Sacl 2.®xc4t+-.
2.jLxc4f
1-0
Ex. 12-10
Y.Seirawan- B.Kogan
Philadelphia 1986
l.llxe6t!
(2 points)
This is a typical combination. We already
saw the same idea in Ex. 12-3. Black resigned,
in view of l...JLxe6 2.®f8f Фх£8 3.^xe6f
Фе7 4.£ixc7 &d6 5.^e8f Фе7 6.£>xg7+-
1-0
French Defence
Another typical combination.
l.jLxf6! JLxfft 2.®e4+-
(2 points)
With a double attack on h7 and a8. If you
chose 2.jbdi7t, you get 1 point. It is not bad,
but 2.®e4 wins more material.
Ex. 12-12
T. Petrosian — B.Spassky
World Ch, Moscow (10) 1966
l .®h8f!
(1 point)
Black resigned, on account of 1...ФхЬ8
2 .^xf7t &g7 3.^xg5+-
1-0
Scoring
Maximum number of points is 17
15 points and above >Excellent
13 points and above >Good
10 points >Pass mark
If you scored less than 10 points, we recommend that you read the
chapter again and repeat the exercises which you got wrong.
127
13
Contents
S Attacking play
Playing to simplify the
position
S Exchanging correctly
J 'lhe transition to a won
pawn ending
S Returning part of the
material advantage
S 'Ihe correct attitude
S Allow no counterplay’
Realizing a material
advantage
The side which has an advantage in material can
employ one of two basically different strategies to
exploit the advantage.
Whenever we have more pieces than our
opponent, the best strategy is usually to play for
an attack.
Because we have more pieces, our opponent is
forced to defend against superior forces. Thus we can
often simply attack one point with more pieces than
he has available for the defence.
Diagram 13-1
A.Yusupov - T.Georgadze
USSR Ch, Minsk 1979
1.Дс2
White has a very small advantage in material. In
the ending the rook and pawn could compensate for
the two white minor pieces, but in the middlegame
the latter are superior to the rook and pawn. White
prepares a direct attack.
I...^e6 2.®d3 g6
2...Hd8? 3.£f6t+-
3.tb3
The rook is too valuable and must retreat.
3...Se7 4.®d6+-
The threats include and also Wxg6f. Black
can do nothing against the combined attack of the
white pieces.
4...Sb4
Or 4...Welt (4...Hbb7 5.®xg6t+-) 5.&h2 Wxe4
6.®xe7 ®f4f 7.&gl ®e3t 8.ФЫ1+- and White
escapes the checks.
Black resigned, in view of 5...^g7 6.®xe7 Wd4t
7.&hl+-.
The second method consists of aiming for a
simplification of the position. You try to swap off
pieces and aim for the endgame. In the endgame
Realizing a Material Advantage
you can convert your advantage in material without
having to worry too much about counterplay.
In fact, with fewer pieces on the board, the
effectiveness of an extra piece is all the greater.
Diagram 13-2
J.Capablanca - V.Ragozin
Moscow 1936
l.Wb5!
With two extra pawns, White aims for
simplification. Although he has to return one pawn,
he consolidates his advantage.
White cannot unpin his bishop by l.®d4?, on
account of 1 ...®a5!+. While if l.^b5?!, then l..dlc6
2.Ш Sxa7°°.
l... Wxb5 2.&xb5 Sxe4 3.Sxe4 jLxe4 4.^d2 jLd3
5.£}xd6 Sxa7
5...cxd6± would be no better, as White would have
two connected passed pawns.
6.&6e4 7.&c5 ДВ 8.&B &e6 9.Scl &f8
Ю.^хебТ Дхеб
Diagram 13-3
11.Ы4
‘White’s plan consists of preventing the advance
of the c-pawn (because otherwise the white b-pawn
could become weak) and controlling the whole board
as far as the 5 th rank. That is achieved by the advance
of the king to e3, by placing the rook on c3 and
the knight on d4, as well as advancing the pawns to
b4 and f4. Once such a position has been reached,
White can set in motion his pawns on the queenside.’
- J.Capablanca
П...ЙЬ7 12.Ь4Д<17 13.f4&e7 14.&£2Sa715.Sc3
&d6 16.Sd3 &e7 17.ФеЗ±
You will find the end of the game in the test
positions.
Diagram 13-2
abcdefgh
abcdefgh
However, it is important to retain at least some
pawns, because many endgames with an extra piece,
but without pawns, cannot be won.
Thus an important rule is:
The side which has the advantage in material
should try to exchange pieces, but avoid exchanging
pawns.
129
Positional Play 2
One useful method is the transition to a won pawn
ending.
Diagram 13-4
Diagram 13-4
A. Yusupov — U.Bonsch
Bundesliga 2001
l.g5!
White is preparing an exchanging combination
which leads to a simple pawn ending.
1... SB 2.Sxf7t! Sxf7 3.1,xf7 &xf7 4.&d5+-
We already know this pawn ending.
1-0
abcdefgh
Sometimes, in order to simplify our task and
eliminate any counterplay, we can return part of our
material advantage.
Diagram 13-5
Diagram 13-5 A
A.Yusupov - A.Shirov
abcdefgh
Moscow 1992
l.Sxel!?
White could also have won the game with the
strong move 1 .&g3, but he did not want to take any
risks in time trouble and preferred a simpler way.
l... Sxel 2.txf5 Sxe8 3.^f6f &g7
After З...Ф118 4.£ixe8 gxf5 5.^xd6, White would
win the endgame very easily, e.g. 5...JH8 6.c5 (or
6.^xf5 Ф117 7.^g3 &g6 8.^f4+-) and now:
а) 6...&h7 7.W £g7 8.c6 £e5 9.&c5 a5
10.^a6+-
b) 6...&g8 7.W (or 7.&f3+-) 7...tg7 8.c6 te5
9.^c5+-
c) 6...&g7 7.&e8t+-
4.&xe8f 5.&17
Black resigned.
As soon as they have acquired an advantage in material,
some players make a great mistake. They think they
have already won the game, their concentration lapses
and they simply wait for their opponent to resign.
Such behaviour is very often punished: you overlook
your opponents threats and sometimes you even lose
a game which you had already almost won.
130
Realizing a Material Advantage
In such situations we must play with even greater
care and not allow any counterplay.
Diagram 13-6
S.Gligoric - V.Smyslov
Zurich 1953
L..Sfd8!
The exchange of rooks will limit his opponent’s
count er-chances.
2.Sadl Sxd2
‘White has fewer chances with one rook than with
two.’ - E.Mednis
3.Sxd2 &f8
The king heads for the centre to protect the squares
on the d-file.
4.B &e7 5.&Й
Diagram 13-7
5...h5!
‘White is strong on the queenside, Black on the
kingside. So Black attacks on the kingside, where he
has more forces.’ - E.Mednis
б.ФеЗ g5 7.Sh2 Sd8!
Black methodically improves his position,
without haste.
8.Shl g4! 9.frg4 ^xg4f 10.&e2
Targeting White’s weakness on e4.
П.&еЗ Sd4 12.SA ^g4f 13.&e2
Diagram 13-8
13...&f8!
Black has found a logical plan. He now transfers
his king to the kingside by ^g7-g6, to support the
play by his pawns.
In the endgame, you should attempt to
coordinate the pieces, to create a passed pawn,
support it and escort it to the queening square.
14.SS &g7 15.Sd3
Diagram 13-6
abcdefgh
Diagram 13-7
abcdef gh
Diagram 13-8
abcdefgh
131
Positional Play 2
IM.
Diagram 13-9
abcdefgh
Diagram 13-9
White is trying to get some counterplay on the
queenside. So Black changes the route for his king:
the king goes to f6, in order to seize the central
e5-square after the exchange of rooks.
Less good is 15...^g6 16.Sxd4 exd4 17.^b5 e5
18.£W#.
16.Sxd4 exd4 17.^Ь5 &e5 18.£}xa7 &xe4
19.^c8
If 19.Ш, then 19...d3t 20.&d2 £e5-+,
intending ...Ф£3.
19...d3t
Losing the game is always possible, for example:
19...e5?? 20.&d6#
20.&d2 &d4 21.c5
If 21.^xb6 W6 22.<йа4, then either 22...<йе4|
23.&dl £xg3-+ or 23...ФеЗ 24.£b2 £c3t-+.
Nor would 21.^d6 ^e5-+ save White.
21...bxc5 22.£}d6
White resigned. His fate is sealed in lines such as:
23.^b5t &e4 24.&c3t &f3 25.a4 &xg3 26.a5
2k6 27.a6 h4 28.^e4f &g2 29.&xd3 ^b4f-+
23.a4 c4 24.^b5t ^c5 25.bxc4 Фхс4 26Ad6f
ФЬ4-+
132
Exercises
> Ex. 13-14
>Ex. 13-44 ★ A
abcdefgh
abcdef gh
>Ex. 13-24
> Ex. 13-54 ★★ A
abcdef gh
abcdef gh
>Ex. 13-34
> Ex. 13-64 ★★ A
abcdefgh
abcdefgh
133
Exercises
>Ех. 13-7 < ★ Д
8
7
6
5
4
3
2
1
abcdefgh
>Ex. 13-10< ★
abcdefgh
> Ex. 13-8 X **
abcdef gh
> Ex. 13-11X ★★ Д
abcdefgh
>Ex. 13-9 <
abcdefgh
>Ex. 13-12< ★★
abcdefgh
134
Solutions
Ex. 13-1
Ex. 13-3
' J.Capablanca - V.Ragozin
A. Yusupov - N.Short
Moscow 1936
Linares 1992
1ЛкЗ!
(2 points)
‘The pawns on the queenside are ready to
advance. There is also the threat of 2.^e4f.’
- M. Dvoretsky
Only 1 point for l.g4 or l.h4. It is more
logical to act on the queenside, since White
has an extra pawn there.
1...6 2.b5 Sa8
If 2...Sxa3, then 3.^e4f fxe4 4.йхаЗ JLxb5
5.Sg3 c5t 6.Фхе4 tc6f 7.&d3+-.
З.Фс4!
The immediate 3.a4 is not so good, on
account of 3.. JLe6! and the white king cannot
support a further advance of the pawns on the
queenside.
3...te6t 4.ФЬ4 c5t 5.bxc6 Ig8 6.^b5t
Фхс6±
See Ex. 13-6.
l.^h4!+-
(2 points)
Forcing the correct exchange. White now
wins easily:
a) l...Sxe5 2.Фхе5 g5 (2...&h7 3.&F5
&g8 4.<±>g6 &F8 5.&F5+-) 3.&F3 &g7 4.ФГ5
ф£7 5.g4 &g7 6.4M4 (or 6.^xg5+-) 6...&f7
7.^e2 &g7 8.£g3 &f7 9.£ih5+-
b) l...g5t 2.&g4+-
1-0
Ex. 13-4
A.Yusupov - N.Short
Dubai Olympiad 1986
1.WH6I+-
(1 point)
Black cannot fend off Whites threats.
1-0
Ex. 13-2
Variation from the game
Ex. 13-5
Zhuravlev
M.Glienke - A.Yusupov
German Ch, Bremen 1998
l... d3t!
(1 point)
Transition to a won pawn ending. After
l...Sgl or 1...5Ы, White can reply 2.^d3.
2.&xdl dxc2f З.Фхс2 &e4 4.&d2 &F3
5.&el f4!-+
(1 point)
6.gxF4 &xF4 7.&e2 &g4 8.ФеЗ &xh4
9.®f4 &h3 10.&g5 ®g2 ll.f4 &g3
12.&xg6 ^xf4 13.&xh5 &e3 14.&g5 &d3
15.&B ФсЗ 16.&e5 b4 17.&d5 &b2-+
l.Wd4f £bg8 2.Wd5t!
(2 points)
Returning part of the material, in order to
stifle the counterplay and simplify the game,
is the best practical decision. Computers are
reluctant to return material, but for humans
simplicity is king!
2...Wxd5 3.cxd5 txd5 4.b4 Ф(8 5.b5 Фе7
6.Ь6 Феб
6...&d6 7.Sdl! Феб 8,Sxd5’+-
7.Sc7h6
7...&d6 8.Sxh7 Феб 9.b7+-
8.b7 <txb7 9.Sxb7 Фе5 10.Sb6 g5 ll.Sxh6
gxh4 12.Sxh4+-
135
A A f • > - A
Solutions
Ex. 13-6
T.Capablanca - V. Ragozin
Moscow 1936
l.Sd3!
(2 points)
‘This should be noted: White does not
push his passed pawn, but turns to attack his
opponent’s kingside pawns. This corresponds
totally to an important principle of exploiting
an advantage - the principle of two weaknesses!
— M. Dvoretsky
l...g5 2.Sd6t &Ь7 3.frg5
3.Sxh6 is less precise, due to 3...gxf4
followed by ...JLd5. (J.Capablanca)
3...hxg5 4.Sg6 SfB 5.Sxg5+-
White has won a second pawn and went on
to win the game.
Ex. 13-7
A.Yusupov - G.Timoschenko
USSR Ch 1st League, Ashkhabad 1978
1Ш-
(1 point)
The simplification of the position by the
exchange of queens is the simplest way to
victory.
1...ФЬ6 2,®xc7t Фхс7 З.ФЯ. Да5 4.Фе2
Феб 5.S)e4 ld8 6.f4 h6 7.g4 &d5 8.&g3!?
1.16 9.Ф13 Феб 1О.Фе4 1сЗ 11.&15 h5
12.gxh5 Ф16 13.&e3!? 14.£>g4 la5
15.6
1-0
Ex. 13-8
B.Smith - A.Yusupov
US Open, Cherry Hill 2002
After l...<^?g4 there follows 2.^d2 and Black
has not achieved much (only 1 point for this
move).
l...Sb3t 2.§xb3 axb3 3.^xf7 gives White
good drawing chances, since there are very few
pawns left. In fact, Black has a forced win.
I...^xf4t!-+
(2 points)
2.gxf4 Sxf4
White resigned, in view of 3.^h3 Sf3t+-.
Ex. 13-9
D.Pirrot - A.Yusupov
German Ch, Saarbriicken 2002
l...Sh3t
(2 points)
The exchange of rooks gets rid of any
counterplay. Only 1 point for l...Sg3, after
that the exchange of rooks is not so forcing.
2.Фё2 Sg3t З.Ф111 Sxglt 4.Фхё1 ФЬб
5.Ь5 1хе5 б.Ьб
Or 6^g2 £ie4 7.Se7 2>g5 8.b6 ФхЬ5 9.b7
h3t Ю.Фё1 Фё4 ll.Se8 d4 12.b8® lxb8
13.Bxb8 e5-+.
6...1d4f 7^g2 lxb6 8.Sft>t ФхЬ5 9.Sxe6
£)c4—+
White resigned.
Ex. 13-10
A.Yusupov - LNemet
Swiss Team Ch 2001
l.Wg6f
Just as good is l.®f7t ^h8 2.®h5t+-«
(1 point)
1...Ф118 2>h5t
(1 point)
2...®xh5t 3.£)xh5 ld4 4.16I+-
1-0
136
Solutions
Ex. 13-11
Ex. 13-12
A. Yusupov — E.Lobron
S.Djuric - A.Yusupov
Stockholm 2003
1 .Ь5!
(1 point)
l.Be4 is bad, due to l...axb4 2,axb4 £lxb4!.
l...Sc3
Or l...Sc7 2.jLbl! ^xel 3.Sxc7 JLxb5
4.Bc3!+-
2 .ДЫ1+-
Take 1 point if you saw this idea here or
after other black rook moves.
The move 2.Be2 is not so good, because of
2...£d4!.
Black resigned, on account of 2...^xel
З .ВхсЗ Jbcb5 4.Be3+-
1-0
Sarajevo 1984
l...Sh8!
(1 point)
The threat is ^£2f. Black must play for
mate.
l... Bh7 (or h6, h5, h4) is equally good.
2.Sb2 Be8
(1 point)
2...Ba8-+ would be just as strong.
White resigned, in view of 3.2b 1 jLf2f 4.ФН
Sh8-+ and then Shi#. The white pawns are
just getting in the way of the defence.
0-1
Scoring
Maximum number of points is 21
18 points and above >Excellent
15 points and above >Good
11 points................>Pass mark
If you scored less than 11 points, we recommend that you read the
chapter again and repeat the exercises which you got wrong.
137
14
Contents
S lhe struggle for the open file
S Doubling rooks
J Outposts
S Controlling the entry square
on the 7th (2nd) or 8th (1st)
S Exploiting the open file
- invading the 7th (2nd) or
8th (1st) rank
Open files and Outposts
The open file is an important strategic element. The
major pieces need an open file to get into the game.
It is very important to control an open file. Often
the struggle for a single open file decides the strategic
battle.
Why should you occupy an open file?
In order to invade the 7th (2nd) or 8th (1st)
rank! From there, the rook or queen can either attack
the opposing king or attack the unprotected pawns
from the side.
The pawns are especially susceptible to attacks from
the side, because they cannot protect one another. In
addition, there are many different points of attack on
the back rank.
In the struggle for the open file, the following
elements are used:
1) Doubling rooks
2) Outposts
3) Controlling the entry square on the 7th (2nd) or
8th (1st) rank
In the following example, we can see these
elements in praxis in an instructive game between
two amateurs.
A.Hellinger - C.Mischke
Bad Wiessee 1999
l.d4 2.&f3 e6 3 J,g5 d5 4.еЗ Ь6 5.&bd2 l,b7
6.£ie5
6.id3!?
6...Де7 7.1.d3 &fd7l?
If 7...£)bd7, then 8.ДБ5 0-0 (8...a6 9.Jlxf6 axb5
10.ixg7Sg8 11.2ixd7®xd7 12.ie5 Sxg2 13.&g3±)
9.&c6±.
After 7...0—0 comes 8.JLxf6 jbcf6 9.f4±.
8.1f4!?±
Also good would be 8.Дхе7 Йхе7 9.f4±.
8...i,d6?!
In the opening, it is usually not good to move the
same piece twice. 8...£>c6I? was preferable.
Open files and Outposts
Diagram 14-1
9.^dB?!
White should bring his strongest piece into the
game. It is better to play either 9.®h5P g6 10.®h6±
or 9.®g4, intending to meet 9...0-0 with 10.jLh6
®f6 ll.^xd7 ^xd7 12.jLg5+-
9...ft> 10.^xd7 ®xd7
10...^xd7 llJlxd6 cxd6± would not be bad
either.
11.0-0 JLxf4
H...£k6!?
12.exf4 0-0 13.c3 ®d6
Black should play 13...JLa6! 14.jLxa6 ^xa6
15.Sei c6=.
14.g3 ^d7 15.®c2 h6
This weakens the white squares near the king.
Better would be 15...f5!?±.
16.Sfel Sfe8
Diagram 14-2
17.Se3
White prepares to double his rooks on the semi-
open e-file, in order to create pressure against the e6-
pawn.
17...e5
Black looks for counterplay in the centre. This
strategy may be praiseworthy, but here it fails, as a
result of the weaknesses in the castled position. Better
was 17...^f8±.
18j,h7t &h8 19.Sael?!
The correct continuation was 19.JLg6! Se7
2O.^h4±, threatening
19...e4 2O.tg6 Sed8 21ЛЛ4 22.6
If 22.f3!?, then 22...^xg6 23.^xg6f ФЬ7=.
22...Дс6?!
Intending ...JLe8, but Black underestimates the next
move. He should first look for active counterplay.
The correct idea was 22...c5!?#, to prepare to open
the c-file.
Diagram 14-3
23.6!±
White opens the e-file. His pieces are ready to
exploit this file and invade his opponent’s camp.
23...exB 24.WE2! &h7
Diagram 14-1 Z\
abcdef gh
Diagram 14-2 Z\
abcdef gh
Diagram 14-3
abcdef gh
139
Strategy 2
Diagram 14-4
abcdefgh
Diagram 14-5 A
abcdefgh
Diagram 14-6 A
abcdefgh
Diagram 14-4
25.1x117!
A very strong move. White exchanges his strong
bishop, which controlled the entry square e8. But
the black knight could have become very active
on g5. In addition, White can now use the g6-square
for his knight.
25.Se6? would run into the surprising 25...^g5!l,
when 26.Sxd6 loses to 26...^h3t 27.ФГ1 lb5t-
25...&xh7 26.WxB?!
But here White should use his outpost on the
e-file. Better was 26.Se6! ®d7 27.Se7 ®c8, and only
now 28.®xf3. e.g. 28...Sg8 29.®h5 le8 3O.£g6±
26...Se8
Diagram 14-5
The correct idea. Black wants to exchange rooks
and thus reduce the importance of the open file.
27.®h5?!
Here too, the correct strategy was to occupy the
outpost square. After 27.Se6 Sxe6 28.fxe6± White
obtains a strong passed pawn.
27...Sxe3?
Nor does Black make use of his outpost - the
e4-square. After 27...Se4! he could take the sting out
of the white initiative on the e-file.
28.Sxe3 ®d7
Diagram 14-6
Black is preparing to further simplify the position
with Se8.
29.®e2?
Simply doubling does not achieve anything. White
should be using tactical means to prepare his invasion
of the 7th rank.
The correct idea is 29.^g6! He8 3O.Se7! ®d8
(3O...Sxe7 loses the queen to 31.£T8t) 31.£T8t!
Bxf8 32.®g6f and 33.®xg7#.
29...Se8 30.ФС2?!
Scorning the last chance to exploit the e6-outpost
with ЗО.Йеб!?.
3O...Sxe3 31.®xe3 We8
General exchanges on the open file lead to a level
endgame.
32.®xe8=
Уг-Уг
140
Open files and Outposts
Let us study a classic game, featuring two
grandmasters from bygone days, in which we shall see
the exploitation of an open file with an invasion of
the 2nd rank, where the doubled rooks will be very
impressive!
Diagram 14-7
A.Nimzowitsch -
New York 1927
Black is well placed and in control of both open
files. But he still has to prepare the invasion of the
2nd rank.
l...Wa2
A clever move, which also takes aim at the a3-pawn.
If 1...Ш2, then 2.®f3.
2.Bal
After 2.®f3 there follows 2...Hc2 and White has
problems with the a3-pawn.
2...Wb3
There is already the threat of ...Hc2.
3-.td4Sc2 4.Wa6
Diagram 14-8
4...e5!
The second rook will also find its way on to the
second rank.
5.txe5 Sdd2 6.®b7
A thematic variation would be 6.Sfl Wxe3!! 7.tf4
Sxf2!! 8.txe3 Sg2t 9.ФЫ Sxh2f 10.&gl Scg2#.
6...Sx£2 7.g4
Whites castled position is weakened and he
cannot stand up to the coordinated attack of Black’s
major pieces.
7...®e6! 8.tg3
Diagram 14-9
8...Sxh2!
White was hoping for 8...®xg4 9.Sfl, but
Capablanca finds a much better solution.
9.®S
If 9.txh2, then 9...®xg4f 10.Ф111 ®h3-+ and
White has no defence against the threats of mate.
9...Shg2f 10.Wxg2
The only move, but one which concedes Black a
decisive advantage in material.
lO.^fl loses after 10...®c4f-+. 10.ФЫ after
141
Strategy 2
10..>h6f-+.
10...Sxg2t ll.&xg2 Wxg4 12.Sadl h5!
Whites king position is too open. Black can exploit
this.
13.Sd4Wg5 14.Ф112 a5!?
Played to bring the bishop on f8 into the game.
15.Se2 ахЬ4 16.axb4 £e7 17.Se4 JUS 18.S£2 Wd5
19.Se8f &h7
White cannot do much against the threatened
attack by ...h5-h4. Nor can the b4-pawn be defended.
White resigned.
0-1
142
Exercises
> Ex. 14-1 < ★ A
abcdefgh
> Ex. 14-44 ★★ Д
8
7
6
5
4
3
2
1
abcdef gh
> Ex. 14-2 < ★★
abcdefgh
У Ex. 14-54 ★★
abcdefgh
> Ex. 14-34 ★★
abcdefgh
>Ex. 14-64 ★ A
abcdefgh
143
Exercises
> Ex. 14-10< ★ ★ A
abcdefgh
> Ex. 14-11 < ★ A
abcdefgh
>Ex. 14-12 < ★ A
abcdefgh
144
Solutions
Ex. 14-1
M.Taimanov - Y. Averbakh
Zurich 1953
l.Sd6!
(1 point)
Occupying the outpost.
l..JLb7
If 1...2xd6 2.exd6 f6, then 3.Sa7+-
2.Sadl
Also possible are 2.h41? and 2.e4!?.
2...Sxd6
If 2...JLc8, then White plays 3.e4, with
various ideas: Sdl-d3-h3, Jlcl-g5 and f4-f5.
3.exd6
White has a dangerous attack and a strong
passed pawn on d6.
Ex. 14-2
M.Taimanov - E. Geller
Zurich 1953
l.Se3!?±
(2 points)
A thematic move, preparing to double on
theb-file. For the moves 1.5k3, l.^e3, l.£if2,
l.lg2 or 1.Да5 you only get 1 point.
1...ЙЬ7 2.Seb3 &Л7 3.®a5 ®c8 4.^f2 >d8
5>c3 ta4 6.S3b2
If6.Sb7, then 6...Se7.
6..ЛМ7 7.h4 Sa7 8.ih3 Wc7 9.&g5 &xg5
10.jkxg5 Jbcg5 ll.hxg5 &g7 12.®F31+-
White plans ^?g2, Jkxd7, ®F6t and Shi.
12...Ш8
See Ex. 14-8.
Ex. 14-3
I ...
G.Stahlberg - M.Taimanov
Zurich 1953
l...Sc6!
(2 points)
Doubling rooks. l...Sc7! is equally good.
2.jkxa6 Wxa6 3.^0 Sfc8 4.Wb3 &e4
5.^d2 Sc2!+
5...Sxcl would not be so strong: 6.Saxcl
£>xd2 7.2xc8f ®xc8 8.®dl £>e4 9.®cl with
counterplay.
Ex. 14-4
M.Botvinnik - N.Sorokin
USSR Ch, Moscow 1931
l.Sd2!
(2 points)
1.2d4 is not so precise (1 point), because
the rook on d4 can be attacked.
I...^b6 2.Sadi Wc5
2...td7 3.&e5 &f6 4.a5 £xc4 (4...£bd5!?)
5.Sxd7 ^xd7 6.Sxd7 ®b4 7.^xc4±
M.Botvinnik.
2...e5 3.Sd6!?± or 2...®b4 3.Sd4±.
З.Да2±
Ex. 14-5
A.Karpov - S.Gligoric
San Antonio 1972
l.Sh2!
(2 points)
White prepares to double. The active
move l.g6 is not bad (1 point). Nor is the
consolidating move l.®g2 (also 1 point). The
deeper meaning behind A. Karpov’s move does
not become clear until move 5.
l...We7?
Black intends 2.®hl ®f8. However, l...a5
was better.
2.&b3 &c7 3.&B (Xc5) 3...&d7 4.a3!
Suddenly Karpov opens another file on the
queenside.
4...bxa3 5.Sa2!-> Sh4 б.ёхаЗ Sgh8 7-Sbl
(A£a5) 7...Sb8
Better is 7...f6.
8 .®el! Sxg4
8... Shh8 9.®a5t Фс8 lO.fiS! gxffi ll.^xc5+-
9 .<&xg4 Дс8 10>a5t
Black resigned in view of 10...Sb6 H.^xc5
JLxc5 12.Hxb6 JLxb6 13.ДхЬ6| £>xb6 14.c5+—.
145
Solutions
Ex. 14-6 Ex. 14-9
A. Yusupov - E.Rozentalis
A.Karpov - W.Unzicker
Bundesliga 1995
l.Sd7!±
(1 point)
The invasion of the 7th rank also limits the
mobility of the knight on e8.
l...Sc7
1 ...5k7? is bad, due to 2.bxa5 bxa5 3.2xa5.
After 1...2b8I? White does not play 2.bxa5
bxa5 3.2xa5 2xb2 4.2a8, on account of
4...<&f8 5.2dd8 g6=, but rather 2.Фе2!? axb4
3.Ed4!±.
2.Sadl!±
Ex. 14-7
C.Lutz - A.Yusupov
Munich 1992
l...Se8!
(1 point)
The rook should occupy the open file.
2.®d2®e5
Doubling on the open e-file.
3.®f4®c3+
Ex. 14-8
—
M.Taimanov - E.Geller
Zurich 1953
l.Sb7!
(2 points)
Invading the 7th rank. I.jkxd7 (1 point) is
not so strong, in view of 1...2xd7 2.2b8 ®xb8
3.Sxb8 Sxb8 4.®f6t &h7=.
l...Sxb7 2.Sxb7 &g8
The threat was 3.&xd7 JLxd7 4.®f6f+-.
3.JLxd7 ^xd7 4.^g4! Wxg5
If4...Se7, then 5.&f6f &g7 6.®hl+-while
4...jLxg4 loses at once to 5.®xf7t+-.
5.Sxd7 6 6.exf5 Sb8+-
1-0
Nice Olympiad 1974
l.&a7!
(3 points)
Only 1 point for l.®b2, since in this case
White cannot win the struggle for the open
а-file, but has to exchange the rooks
Karpovs play illustrates a very important
procedure: doubling rooks behind a piece
which is placed in front of them, thus taking
control of the a-file.
I...^e8 2.jLc2 &c7 3.Seal±
Ex. 14-10
E.Geller - V.Simagin
USSR Ch, Moscow 1951
1.Даб!
(2 points)
Controlling the entry square c8.
Another move which would not be bad is
1.2xc8!? ®xc8 2.2cl± (1 point).
1... Лха6 2.®xa6 Sxcl 3.Sxcl Wa8 4.jLd6
Sd8 5.e5 tg7 6.Sc7!+-
Invading the 7th rank.
6..>e4 7.^d2Welf
For 7...®xd4, see Ex. 14-11.
8.^fl £118 9-®xa7 Мб 10.Sxf7 Bbl
ll.Be7 Sc8 12.Sxh7 £xh7 13.Bxe6f &g7
14.®d7t &g8 15.Bxc8f &g7 16.®c7t &g8
17.e6
1-0
Ex. 14-11
Variation from the game
E.Geller - V.Simagin
USSR Ch, Moscow 1951
l.Sxd7!+-
(1 point)
146
Solutions
Ex. 14-12
J I r J 1
T. Petrosian - H.Pilnik
Amsterdam 1956
l.Sc6!
(1 point)
Occupying the outpost.
I...®d8
Or l...Sxc6 2.bxc6, intending Ia6-b7 and
then a5±, with an attack on the queenside.
2.Sacl №6
Planning ...^d7-c5.
3.1ft! Scb8
If 3...^d7, then 4.1h3! Hxc6 5.dxc6 £ic5
6.^d5, threatening 7.c7±.
4.1113 a6 5.Sel!
So that the e4-pawn will be defended after
the planned 6.£k4.
If 5.f3, then 5...axb5 6.axb5 h4#
- T. Petrosian.
5...axb5 6.axb5 &h7 7.&c4± (Xb6) 7...Sa2
8.1g2 Ж 9.Sfl &g5 10.®b3 Sba8
ll.Sxb6 Sal 12.Sc6 S8a2 13.®e3+-
Scoring
Maximum number of points is 20
17 points and above....>Excellent J'
14 points and above >Good ?
10 points-.............>Pass mark f
If you scored less than 10 points, we recommend that you read the
chapter again and repeat the exercises which you got wrong.
147
Contents
S The combination
S Aims of combinations
S Active moves
J Checks and forcing play
J When should you stop
calculating?
Diagram 15-1
8
7
6
5
4
3
2
1
abcdefgh
Combinations
By a combination we mean (a sequence of forcing moves
with a specific goal, and grounded in tactics. A sacrifice
is likely to be present and Botvinnik, among others, says
is always present.’
(The Oxford Companion to Chess)
lhe aim of a combination need not simply be mate,
but it can also be winning material, stalemate or
promoting a pawn.
In the earlier lessons, we have already studied some
typical mating combinations.
What is most important of all is that your opponent
is enticed into a forced exchange of material and has
to follow through to the end of the sequence.
Firstly, try looking at the diagrams in the following
examples and finding the correct combination on
your own, before looking at the explanations which
accompany them!
Diagram 15-1
N.Short - C.Lutz
Budapest 2003
White finds a forced mate.
l.Sxf7t! &xf7 2.®f5t &g7
2...Фе8 is no better: 3.Se5t Ле7 4.Sxe7t ^dS
5.®xd7#.
3.®xd7t
Or 3...1e7 4.®xe7t ФЬ8 5.®f6t Sg7 6.®f8t &h7
(6„.Sg8 7.®h6#) 7.g6t! ФЬб (7...&xg6 8.Eg5t+-;
7...Sxg6 8.Sh5t and then mate) 8.®h8t ^xg6
9.®h5t ФЙ5 10.W5#.
4.®e6f
Black resigned, in view of 4...ФЬ5 (or 4..dlf6
5.®f5t Ш 6.®h3t &g6 7.®h6t Ф(7 8.®xfi5t
Фе8 9.®e7#) 5.®h3t &g6 6.®h6f Ф£7 7.Sf5t ^e8
8.®e6f and then mate.
Combinations
Diagram 15-2
.Polgar - EBerkes
Budapest 2003
LSh7tn
White sacrifices a whole rook, just to bring her
queen onto the open file with tempo.
I...&xh7 2.Wh2f &g8
2...&g7 is even worse, on account of 3.®h6f.
3.Shl
The threat is ®h8# or ®h7#. Black must give up
his queen to prevent mate.
3..dbcg5t 4.&xg5 ®xg5t
4...&g7 does not save the queen, because of
5.^xe6f!, and if 5...fxe6 then 6.®h7t &f6 7.g5f!
&xg5 8.®h4#.
5.f4 ®xf4f 6.Wxf4 Дхе4 7.®xe4
But not 7.®h6?? due to 7..Jlxhl.
White has a decisive material and positional
advantage. Black may have resigned too early here,
but White should win in the long run.
Diagram 15-3
8
7
6
5
4
3
2
1
Diagram 15-2 A
abcdefgh
Correspondence 1957
White finds a lovely drawing combination.
I.ga8! Sxa8 2,Wa2f=
And Black must stalemate his opponent:
2...££xa2 stalemate.
Because 2...&f8?? allows 3.®f7#.
In a combination, you normally only use active
moves: checks, captures, various attacking moves or
threats. In this lesson, it is precisely these active
possibilities on which you should be concentrating.
Special attention needs to be paid to the first
moves.
Diagram 15-3 A
abcdefgh
149
Tactics 7
: 1 u 1 и
Diagram 15-4
Diagram 15-4
A.Alekhine-V.Mikenas
Kemeri 1937
In the game, Black played:
l...jkxe4?!
And obtained just a small advantage.
Instead Black could have played the combination
1 ...Sc2! 2.®xc2 ®xf3t 3.&gl th3 4.^f6f £xf6-+
winning immediately.
abcdefgh
Diagram 15-5
Diagram 15-5
N.Krogius - G.Lisitsin
USSR Ch, Leningrad 1951
Of course, the highest priority has to be given to
checks. In this position Black found a forced win.
l...Sxb2f! 2.ФхЬ2 Bb4f З.Фа1
Or З.Фа2 Sc2t 4.Фа1 Wb2#.
3...Wa3t 4.ФЫ Sb7t 5.&c2 Sb2f 6.&dl Wai#
abcdefgh
Diagram 15-6
Kofinan-Kotlerman
Diagram 15-6
abcdefgh
Ukrainian Ch 1947
White has a strong attack.
l.Wg6t 2.Se6!!
An important, active, attacking move which his
opponent cannot ignore.
2...Wc5
2..Лхе6 3.dxe6 leads to a situation in which Black
can do nothing about the threat of mate on f7.
3.Sxf6|!
A typical sacrifice which opens up the king’s
position.
3...ex£6 4.Wx£6f &g8
Or 4...Фе8 5.®xh8f+-.
5.®g6t 6.^e6|
150
Combinations
And White wins:
6...Фе7 &d6
Or 7...Фе8 8 Ag7#.
8.&f4f JLe6 9.@xe6#
In order to achieve the goal of the combination,
you often have to accept temporary material losses.
When this is the case, you should not break off your
calculation of lines too soon. The position can
only be evaluated when there are no more active
moves left.
In the examples which follow, we shall see once more
how important the active moves are. Try to attack
the opposing pieces!
Diagram 15-7
Variation from the game
.Capablanca - A.Alekhine
World Ch, Buenos Aires (1) 1927
L..Wc7! 2.S£8
If 2.®b3 ®xb8 3.®xf7t, then З...Ф116-+ escapes
the checks. 2.Sa8 would not be good, on account of
2...@c6-+, with an attack on the rook and also the
threat of Self.
2...&g7! 3.§a8 Self
Or first 3...®c6.
4.&h2Wc6-+
With a double attack, threatening the a8-rook as
well as mate on hl.
Diagram 15-8
Diagram 15-7
abcdef gh
Em.Lasker - V.Ragozin
Moscow 1936
1...Дс7! 2.Sf6
The rook must protect the b6-square!
2...1d8! 3.Sd6 &e7 4.Sb6 Wxb6! 5>xb6 l,c5t-+
Black wins the exchange.
abcdefgh
151
Exercises
abcdefgh abcdefgh
>Ex. 15-3 К ★
> Ex. 15-5 X ★★
abcdefgh
abcdef gh
>Ex. 15-6<
abcdefgh
152
Exercises
>Ex. 15-10< ★★ A
abcdef gh
>Ex. 15-114 ★ ★
abcdef gh
> Ex. 15-12 X ★★
abcdef gh
153
Solutions
Ex. 15-1
Ex. 15-5
4 % Л* л I * , 4V ’ ч Л. ..f ь ч С-2Х-» «» Чк“„^и
Liutov - M.Botvinnik
E.Boffoliubow - Monticelli
Leningrad 1925
San Remo 1930
1...H5!
(1 point)
But not 1 ...g4f?? 2.@xg4f.
2.®xh5
2.g4 hxg4t 3.®xg4 ®hlt 4.&g3 ®elf-+
2...Whlt 3.&g4 Wdlf 4.&В Wd7#
(1 point)
Ex. 15-2
A.Alekhine - Freyman
New York 1924
l.Se8f
(1 point)
l..AfB 2.&h6t! Wxh6 3.Sxffit! &xf8
4.Wd8#
(1 point)
Ex. 15-3
O.Duras - R.Spieimann
Vienna 1907
l.Sd8t!
(1 point)
Black resigned. l...Sxd8 (or l...$l?xd8
2.^b7t+-) 2.1xc5+-
Ex. 15-4
.Mieses - C.Von Bardeleben
Barmen 1905
L®e8t!
(1 point)
White can also play his moves in a different
order: l.c7t! Sxf3 2.®e8f! Sxe8 3.Sxe8f ФБ7
4.c8®f+- (1 point).
The passive move l.Se2 would be bad,
due to either l...Sxf3 or l...Sxg2f 2.jbcg2
Sxg2f—+.
I...gxe8 2.Sxe8t Дхе8 3.c7f SxB 4.c8®#
(1 point)
But certainly not l...®hlf?? 2.ФхЫ Sflf
3.&h2 £ig4t, since White can capture on h3!
2.&xfl Whit 3.±£2 &g4#
(2 points)
Ex. 15-6
Riemann - S.Tarrasch
Leipzig 1883
1...2>g4t!
(1 point)
But not 1 ..Adi?? 2.Wxd3 Sxhlt 3.&g31.
2.Wxg4
2,hxg4 Sxhlt З.ФхЫ Wxg3—+
2...Wd6t 3.g3
Or 3.®g3 Sxhlt-+.
3...Wd2t 4.^e2
4.®e2 also loses to 4...Sf2t—+.
4...S£2t 5.&gl Wei#
(1 point)
Ex. 15-7
G.Siegel -V. Mikhalevski
Neuchatel 1996
l...lh4t!
(1 point)
If l...axb5, then 2,Wb7=.
In the game White resigned, in view of
2.^xh4 (or 2.&f3 Wf2#) 2...Wf2t 3.&g5 h6t
4.ФхЬ6 Wh4#.
(1 point)
Ex. 15-8
Eckart-S/Iarrasch
Nuremberg 1887
l...WGt»
But not l...Hdlt?? due to 2,£ixdl, and
2...Wf2t? is unfortunately not mate...
154
Solutions
2.Фх£2 Sdlt-+
(1 point)
Followed by mate.
0-1
Ex. 15-9
Kratkovsky — Lapshis
USSR 1982
Certainly not ‘first’ l.Sxc5, in view of
l...®xc5t (with check!).
I...&xg8 2.&h6f &h8 3.4if7t-
(2 points)
Ex. 15-10
Variation from the game
A. Yusupov — M.Carlsen
Politiken Cup, Copenhagen 2003
If 1...Ш7 2.5W7 &xf7, then 3.Sflt+-.
And if 1...Ф118, then 2.Hxd7!
(1 point)
with the idea 2...®xd7 3.Jtf6t+-.
2.g5t &h5 3.Sxh7#
(1 point)
Ex. 15-11
Nikonov - Hardin
Kirov 1981
1.2ie7t!
(1 point)
l...Sxe7 2.®c8t
Or 2...Sc8 3.Bxe8t &f8 4.®xe5+-.
3.®xf8f!! &x£8 4.Sh8#
(1 point)
Ex. 15-12
Celander - A.Yusupov
Rilton Cup, Stockholm 2002
1...Б6!
(1 point)
The queen cannot leave the a5-d2 diagonal!
I...®xd2f is not so strong, since White can
put up a better defence in the endgame. Only
1 point for l...®d6-+ or l...@d7.
2.®c3
2.®xf5 ®xd2#
2...Sc4!-+
(1 point)
Another equally good move is 2...jLb4-+.
After 2...2c4 White resigned, on account of
3.®xc4 ®xd2#.
Scoring
Maximum number of points is 22
19 points and above > Excellent
16 points and above >Good
12 points..............>Pass mark
If you scored less than 12 points, we recommend that you read the
chapter again and repeat the exercises which you got wrong.
155
— 16
Contents
S Pawn on the 7th (2nd) rank
S Winning rule
S Knight or central pawn
J Rook pawn
Bishop pawn
S Pawn on the 6th (3rd) rank
Queen against pawn
This endgame is quite simple. There are only a few
positions and ideas to study.
Pawn on the 7th (2nd) rank
Normally, the queen wins against a pawn on the
6th (3rd) rank without any problems. Positions in
which the pawn is already on the last but one rank
are of noticeably greater practical importance. Here,
the file on which the pawn is standing plays an
important part.
There is another important winning rule: if the
queen is in front of the pawn, the position is
always won.
Knight or central pawn
Under normal circumstances, the queen wins easily
against a central pawn or a knight pawn.
Diagram 16-1
The winning method is simple: the queen either gives
checks or attacks the pawn, thus coming closer to the
opposing king and forcing it to occupy the square in
front of the pawn. Then the white king moves one
step closer...
I.®e8t &£2 2>a4
Or 2.®d7.
2...Фе2 3.®е4| ФП 4.®d3t Фе1 5.®e3t &dl
Now the white king is free to approach.
6.ФЬ7 Фс2 7.®e2
Or 7.®e4f.
7...&C1 8.®c4f &Ь2 9.®d3 Фс1 10.®c3+ &dl
U.&c6 Фе2 12.®c2
Or 12.®c4f.
12...<&el 13.®e4t &£2 14.®d3 Фе1 15.®e3t
&dl 16.&d5 &c2 17.®e4t Фс1 18.®c4f &Ы
19.®d3t &cl 2O.Bc3t &dl 21.Фе4 Фе2 22>e3t
&dl 23.&d3+-
White wins the pawn and the game.
Queen against Pawn
There are seldom any difficulties.
Diagram 16-2
l.We4t &£2 2.Wd3 Фе1 3>e3t
An unexpected resource. White cannot take the
pawn, because of stalemate! Our king is too close!
But this gives White another powerful idea: play for
mate!
4.@©t Фе1 5.&g2! dl® 6>£2#
Rook pawn
With either a rook or a bishop pawn, the winning
method described above does not work, since there is
also a stalemate defence.
Hence many endings of this sort finish in a draw.
The win only becomes possible if the white king is
near enough to help its queen deliver mate or win
the pawn.
Diagram 16-3
Diagram 16-2 Z\
abcdefgh
Example 2 +-
C.Lolli
1763
The white king is outside of the winning zone: a5-
d5-e4-el. But a little trick enables the king to come
closer.
1.ФЬ6!
The only path to a win. If 1.®е4? ФЬ2 2.®b4f
Фс2 3.®a3 ФЫ 4.®b3t, then 4...±al!=.
1... ФЬ2 2.&a5t Фс1 3.®hlf ФЬ2 4>g2f &Ы
5.&a4
The king is heading to b3.
5...al@t 6.&b3+-
Diagram 16-4
Black cannot defend against the mate.
We shall also frequently see similar mating attacks
in endgames with the bishop pawn.
Diagram 16-3 A
abcdefgh
Example 3 +-
Diagram 16-4
abcdefgh
157
Endgame 3
Diagram 16-5 A
abcdefgh
Example 4 =
Diagram 16-6 A
abcdefgh
Example 5 +-
Bishop pawn
Diagram 16-5
Here, the white king is outside of the winning zone:
a4-c4-d3-e3-el. The position is drawn, although
Black still has to play very carefully, since the white
king is not so far away.
l.Wb4f Фа2 2.Wc3
If 2.®d2, then 2...ФЫ! (but not 2...Фа1?
3.®clt+-) 3.®d3 and then either:
а) З...ФБ2 4.®e2 Фа1!= (if 4...ФЫ??, then
5.Фс4 cl®f 6.ФБЗ-+ is another important mating
position)
b) or the immediate 3...&al=.
2...ФЫ 3.®b3t ФаП
An important stalemate defence.
4.Wxc2 stalemate.
Diagram 16-6
The black king is on the wrong side of the pawn. So
the winning zone is bigger here: a5-d5-e4-g4-gl.
I>d4f &e2 2.Wc3 &dl 3.Wd3t Фс1
Black does not yet have a stalemate defence.
4.&c4
The white king is now close enough to the b3-
square.
4...&b2 5.Wd2 ФЫ
5...Фа1 6.Wclf+-
б.ФЬЗ clW 7.Wa2#
Diagram 16-7 A
Diagram 16-7
l .®d4f Фс1
Black wants to bring his king to the correct side.
If 1...Фе2, then 2.®b2 &dl 3.&£2, continuing as in
the main variation.
2 .®alf
But not 2.&f2? ФЬ1=.
2... &d2 3.®b2 ±dl 4.ФЕ2! &d2
After 4...cl® there comes 5.®e2#.
5.®d4f Фс1 6.Фе2 ФЫ 7.®b4f Фа2
7...&С1 8.&d3 &dl 9.®d2#
8.&d2+-
abcdefgh
Example 6 +-
158
Queen against Pawn
You do not have to memorize the winning zones. It
is enough if you understand the methods described
above.
If the king is far away from a rook pawn or a
bishop pawn, the win is impossible. If it is close
by, you must check out the specific variations.
Pawn on the 6th (3rd) rank
Diagram 16-8
I.Horowitz
1965
With a pawn on the 6th rank, Whites task is even
easier, since there is no threat of a stalemate. But
there are some positions known to theory which are
drawn, because the pieces of the stronger side do not
so much help each other as get in each other’s way.
1 .Ш6!
The pin on the diagonal leads to an elementary
win.
1... ФЬЗ
1„.Фс2 2.Ш4+-
2 .©d4
Or 2.$bg6+—.
2... c2
Black has no way to improve his position, and
White will bring his king closer.
3 .®al+—
The queen blocks the pawn.
The positions in the test will help you gain a better
understanding of the subject of the lesson. In each
case, you must also give your evaluation of the
position (+- or = or -+).
Diagram 16-8 A
abcdefgh
Example 7 +-
159
Exercises
> Ex. 16-14 ★★
8
7
6
5
4
3
2
1
> Ex. 16-44 ★★ A
abcdefgh
abcdefgh
>Ex. 16-2 <
> Ex. 16-54 ★ ★
abcdefgh
abcdefgh
>Ex. 16-34
abcdefgh
> Ex. 16-64 **
8
7
6
5
4
3
2
1
abcdefgh
160
Exercises
abcdefgh
> Ex. 16-10-4 ★★★ A
8
7
6
5
4
3
2
1
abcdef gh
> Ex. 16-84 *** A
abcdefgh
>Ex. 16-11
abcdefgh
> Ex. 16-94 ★★★
abcdefgh
> Ex. 16-124 ★**
abcdefgh
161
Solutions
Ex. 16-1
Evaluation +—
(1 point)
White forces the black king to occupy the
square in front of the passed pawn, then the
white king approaches...
I.®c4f ^d2 2.®ЬЗ Фс1 3.Wc3t &bl
4.&d6
(1 point)
And then carry on as in Example 1.
4...Фа2 5.®a5t
Or 5.®c2 Фа1 6.®a4t+-.
5...ФБЗ 6.®b5t &c2 7.@c4t &d2 8>b3
&cl 9.®c3t &bl 1О.Фс5 Фа2 ll.®a5t
ФЬЗ 12.Wb4f &c2 13.®c4f &d2 14.®b3
Фс1 15.®c3t &bl 16.&b4 Фа2 17.®a3t
&Ы 18.ФсЗ+-
Ex. 16-2
Evaluation =
(1 point)
l.&h8!=
(1 point)
See Example 3.
Ex. 16-3
Evaluation =
(1 point)
l.&a8!=
(1 point)
l...Wxc7 stalemate.
See Example 4.
Ex. 16-4
Evaluation +—
(1 point)
It is important that Black still has a second
pawn, so that the stalemate defence does
not work. (Without the h-pawn the position
would be drawn!)
I.®b3t £al 2.®c2!
But not 2.®xh3?? ^b2=.
2...h2 3.®cl#
(1 point)
Ex. 16-5
Evaluation +-
(1 point)
1.Фе4!
I.®d5t? would be wrong, on account of
1...Фе1! drawing. 1...Фс1? would allow white
to play 2.®a2! and return to the main line.
White plays for mate, as in Examples 4
and 5.
1...C1W 2.&d3+-
(1 point)
2...®f4 3.®c2f Фе1 4.®e2#
Ex. 16-6
Evaluation +-
(1 point)
l .®d4f! &ЬЗ 2.®al+-
(I point)
The white queen blocks the pawn! (Winning
rule). See Example 7.
Ex. 16-7
Evaluation =
(1 point)
1...Фа1!
(2 points)
But not 1...ФЫ?, in view of 2.ФсЗ cl®t
З.ФЬЗ+-, with the same mating position as in
Example 4.
2 .®d2 &bl=
Ex. 16-8
Evaluation +-
(1 point)
l.®g2!!+-
(2 points)
Only this tactical trick wins! I.®d4f? Фе2
2.®c3 &dl 3.®d3 Фс1 4.&d4 ФЬ2 leads to
a draw, as in Example 4 and Ex. 16-7.
I...&d3
Or 1 ...cl® 2.®g5t &d3 3.®xcl+-.
2.®g5!+-
And then ®cl and the queen blocks the
pawn (Winning rule).
162
Solutions
Ex. 16-9
Evaluation =
(1 point)
l...&c3!=
(2 points)
If 1...ФЛ?, then 2.ФИ4 cl® З.Ф<13+-. See
Ex. 16-5.
2.®a3t &d2 3.®b2 &dl 4.®d4f
After 4.&d4 comes 4...cl®= and the white
queen is under attack!
4...Фс1 5.Фе4 &bl=
Ex. 16-10
Evaluation +-
(I point)
l.®c2
l.®xa5 bl® is drawn.
I.®c4f achieves nothing after 1...Фа1.
1...Фа1 2.Фе6!
(1 point)
With a transition to a won pawn ending!
2...Ы® 3.®xblf &xbl 4.&d5 Фс2 5.Фс4!
Ф<12 6.ФЬ5 ФсЗ 7.Фха5+-
(1 point)
Ex. 16-11
Evaluation +-
(1 point)
l.®b3t Фа1 2.®dlf ФЬ2 3.®d2t ФЫ
4.ФЬ4!
Or 4.Фа4!.
4...al® 5.ФЬЗ+-
(1 point)
See Example 3.
Ex. 16-12
Evaluation =
(1 point)
1.Фс8!
(2 points)
To achieve a draw, White must get his
bishop pawn to the 7th rank. Fortunately, the
black king gets in the way of checks on the
c8-h3 diagonal.
1.Фс7? loses to l...®d5-+.
1.Фе7? is hopeless: l...®c2 2.&d6 ®d3t
З.Феб ®c4f 4,&d6 ®d4t 5.Феб ®c5 6.&d7
®d5t-+ (see Example 7).
1...Фе4 2.c7 &d5 З.ФЬ7 ®b3t 4.Фа7
®a4f 5.ФЬ7 ®c6t 6.ФЬ8 ®b6f
Or 6...®d6 7.ФЬ7 ®e7 (7...®d7 8.ФЬ8=)
8.Фа8! Феб 9.c8®t ФЬб 10.®b8f= (see Ex.
16-7)
7.Фа8!=
See Ex. 16-3.
Scoring
Maximum number of points is 29
25 points and above >Excellent
21 points and above > Good
15 points................>Pass mark
If you scored less than 15 points, we recommend that you read the
chapter again and repeat the exercises which you got wrong.
163
Contents
S Stalemating combinations
S Stalemate motifs in the
endgame
S The stalemate defence in the
pawn ending
S Stalemate ideas in studies
S Stalemate ideas in the
middlegame
17
Stalemate motifs
If we find ourselves in a very bad, or even an almost
hopeless situation, we should not acknowledge
defeat too early. We should first think about a final
defensive possibility: we can sometimes save the
game with a stalemate combination.
Stalemate motifs are, of course, most frequently
found in the endgame.
Diagram 17-1
The end of a study by
V.Kosyrev
Diagram 17-1 Д
abcdefgh
Diagram 17-2
abcdefgh
1978
White saves himself with a typical stalemate
combination.
l.Wxe6f!
All other moves lose:
а) 1.Фе7? id5t 2.&d8 (2.&f8 ®f6f-+) 2...®c7#
b) 1 .®g6? ®d6t 2.Фе8 id7t 3.&f7 l,e8t-+
c) l.®a4? ®f6t 2.Фе8 ®f7t 3.&d8 ®f8f 4.®e8
®d6t-+
d) 1 .®f8? ®c7t 2.Фе8 ®d7#-+
l...®xe6 stalemate.
Diagram 17-2
l.Sa2f!
White uses the stalemate motif to achieve a draw.
But not 1 .Sb3t?? ®xb3-+.
I...&b4
1...&ЬЗ 2.Sa3t! ФхаЗ=
2.§b2t &c4
2...ФсЗ 3.Sb3t! ФхЬЗ=
3.Sc2f &d4
There is no other way for Black to escape the
checks.
4.Sd2=
In Chapter 10, we already saw some stalemate
motifs in pawn endings. Stalemate is one of the
most important defensive resources in such pawn
endings.
Stalemate Motifs
Diagram 17-3
Variation from the game
M.Chigorin - S.Tarrasch
Ostend 1905
l.g6!
The black king is very active, but White constructs
a fortress. I.h5? is no good, due to l...h6!-+.
I... h6
Or l...hxg6 2.fxg6 f5t 3.&g5 f4 4.h5 f3 5.h6=.
2.&h5!=
Black cannot take the f5-pawn, because of the
stalemate!
Diagram 17-3 A
abcdefgh
Diagram 17-4
The end of a study by
A.Selesniev
1930
l.a6! &d5 2.ФЬ4 Феб З.Фа5
Another stalemate defence.
3...&c5 stalemate.
If we have (or our opponent has) very little material
remaining, special care needs to be taken with regard
to the possibility of a stalemate trap.
Diagram 17-4 A
abcdefgh
Diagram 17-5
R.Hiibner - A.Adorjan
Bad Lauterberg 1980
l...Sc5??
After l...Sxh3-+ Black could win easily. But he
wanted to exchange rooks, in order to make the
transition to a won pawn endgame...
2.^xh4! Sxg5 stalemate.
Diagram 17-5
abcdefgh
165
Tactics 8
8
7
6
5
4
3
2
1
8
7
6
5
4
3
2
1
8
7
6
5
4
3
2
1
Diagram 17-7
Diagram 17-6
C Schlcchtcr - H.Wolf
Nuremberg 1906
In a lost position, Black sets a final trap.
1...ФВ 2.b5 Se3! 3.b6??
White does not see the trap! The correct move
was 3.^fl+-.
3...Self! 4.Bxel stalemate.
Many beautiful examples of wonderful stalemate
ideas can be found in studies.
Diagram 17-7
From a study by
R.Reti
1922
1...Ы® 2.^xblt &a4!
And either White loses the bishop, or he must
stalemate his opponent!
3.^el stalemate.
abcdefgh
Diagram 17-8
The end of a study by
Diagram 17-8 A
G.Nadareishvili
1973
abcdefgh
lJ,b4!I
The only way to draw.
1.ФхЬЗ? loses to I..JLxd2-+. Salvation may seem
in reach with the obvious l.JLxcl?, but there follows
the unpleasant l...^c5# (rather than the obliging
l...£lxcl? stalemate).
I...axb4 2.axb4!
Either the knight is lost, or the white king is
stalemated. 2.ФхЬЗ? loses after 2...jLxa3-+.
2...5id4 stalemate.
166
Stalemate Motifs
We have already seen stalemate combinations in
the middlegame. They are rare, but can be very
effective.
Diagram 17-9
Karaksoni — Borbeli
Oradja 1948
The black king and pawn cannot move. Black finds a
way to sacrifice his superfluous pieces!
I...£lf4t! 2.gxf4
Or 2.ФГЗ We2f З.Фх£4 Wf3t 4.Фх£3 stalemate.
2...®x£2f!
Also good is 2...Whit!.
3.&113 Wxh2f!
Or 3...Wg2t!.
4.^>g4 Wh3t! 5.ФхЬЗ stalemate.
Diagram 17-9
8
7
6
5
4
3
2
1
abcdefgh
Diagram 17-10
H.Reefschlager - R.Sej
Bundesliga 1983
l...Sclt!
Black finds a stalemate idea: if he did not have
his rook and queen, Black would have no possible
moves!
2.&h2
2.Sxcl Sxclf 3.^g2 ®glf! leads even more
quickly to a draw.
2...®c2f 3.&h3 Shlf!
3...Sxbl? loses to 4.@a7t and then mate on g7.
4.Sxhl ®g2f! 5.&xg2 stalemate.
Diagram 17-10
abcdef gh
167
Exercises
>Ex. 17-24 ★
>Ex. 17-54 ★ A
abcdefgh abcdefgh
>Ex. 17-34 ★ A
>Ex. 17-6 4 ★
abcdefgh
abcdefgh
168
Exercises
>Ex. 17-7 < ★
abcdefgh
>Ex. 17-10< ★★ A
abcdefgh
>Ex. 17-8 < ★ A
8
7
6
5
4
3
2
1
abcdefgh
abcdefgh
>Ex. 17-94 ★
abcdefgh
>Ex. 17-12< ★
abcdefgh
169
Solutions
SHAPTE.R
Ex. 17-1
The end of a study by
Ex. 17-5
The end of a study by
R.Reti
H.Rinck
1927
l.ffiWf!
(1 point)
But not l.f6f?, due to 1 ...£>xf6t!.
1..ЛЫВ &e8
Or 2...JLxf6 stalemate.
3.f7t Фе7 stalemate.
(1 point)
Ex. 17-2
The end of a study by
R.Reti
1922
The threat is ...^f3 and then .. Ag5#.
lJ,g4!D
If l.g4? then I...£lf3, followed by mate.
I...^xg4 stalemate.
(1 point)
Ex. 17-3
The end of a study by
JVBron
1979
l.d8W ®h4f 2.^g7! ®xd8 stalemate.
(1 point)
Ex. 17-4
The end of a study by
____ _:
Y.Afek
1983
l.&g8!
(1 point)
l...Sxg7t
Or l...&xg6 2.ФЬ8! Hxg7 stalemate.
2.&h8! Sa7
2...&xg6 stalemate or 2...Sxg6 stalemate.
3.g7! Sxg7 stalemate.
(1 point)
1911
l.e4! &gl 2.e5! dxe5 stalemate.
(1 point)
Ex. 17-6
Tomovic - Vidmar
Ljubljana 1945
l... Sxe5! 2.&xe5
Or 2.Sxf7 Sd5t!=, with a ‘desperado rook’,
which time and again offers itself up as a
sacrifice...
2...f6t=
(1 point)
And then stalemate.
Ex. 17-7
M.Chigorin - C.Schlechter
Ostend 1905
l...&a8!=
(1 point)
With a draw, in view of 2.Фа6 (or 2.@xc7
stalemate) 2...®c8f 3.&a5 ®c7!=.
Ex. 17-8
Stolberg - Pimenov
Rostov on Don 1941
l.Sh8t!
(1 point)
l.®g5?? would lose to l...®f3t 2.&gl
®f2f 3.&hl ®h2#. White must sacrifice all
his major pieces.
I...&xh8
But not l...&g6?? 2.@e6#.
2.Sb8t &h7 3.Sh8f! &xh8 4.Wxg7t!
And then stalemate.
170
Solutions
>
г
я
Ex. 17-9
Ex. 17-11
W.Pietzsch - R.Fuchs
Moscow 1963
Berlin 1963
l...®cl|!=
(1 point)
Since after 2.®xcl we have stalemate.
Note that sacrificing the queen anywhere else
(e.g. 1 ...®h2t??) does not lead to stalemate, as
the black king has access to the d2-square.
Ex. 17-10
G.Lisitsin - I.Bondarevs
USSR Ch semifinal, Leningard 1950
lJbe4f!
(1 point)
But not 15e5t?? &xe5 2.jbce4, because
Black will not take the bishop!
I...lxe4 2.Se5t!
(1 point)
2...&d6
Or 2...Фхе5 stalemate.
3.Sxe4=
With a theoretical draw, since rook and
knight cannot win against rook. (Of course
you still have to defend carefully.)
I...^g7f! 2.&xg7 ®g6t!!=
(1 point)
Stalemate follows.
Ex. 17-12
Rodriguez — Weisman
Bucharest 1974
l...^£2f! 2.&x£2
2.'kl?h2?? would be bad, on account of
2...®xh4t 3.±gl ®g3t-+.
2..>h3t!
(1 point)
3.&gl
Or 3.JLxh3 stalemate.
3...®g4| 4.&h2
4.1g3 ®xg3t 5.&hl ®xh4t 6.&gl ®g3t=
leads to a perpetual check.
4...®h3t!=
*/2-»/2
Scoring
Maximum number of points is 15
13 points and above > Excellent
11 points and above >Good
8 points.............>Pass mark i.
If you scored less than 8 points, we recommend that you read the
chapter again and repeat the exercises which you got wrong.
171
18
Contents
J lhe meaning of active
moves
Forced variations
S Combinations
Forced variations
In Chapter 15 we learned something about the
importance of active moves (checks, captures or
exchanges, various attacking moves or threats).
Normally, our opponent cannot ignore these moves
and must react to them in an appropriate fashion.
Active moves cause the game to take on a forced
character. Forcing variations can frequently, with
appropriate practice, be calcuated quite far into
the future. In this lesson we will be training your
ability to do just this.
Diagram 18-1
N.Grigoriev
Diagram 18-2
abcdefgh
1930
White has more dangerous passed pawns than his
opponent and has a forced win.
I.f4! ФЬ4
lhe black king must get into the square of the
f-pawn. (The concept of a passed pawns square was
explained in Chapter 4.)
If l...d5, then 2.f5 d4 3.f6 d3 4.17 d2 5.f8®t and
White wins, on account of the promotion with
check!
2.h4! d5
If 2...a5, then 3.h5 a4 4.h6 a3 5.h7 a2 6.h8®+-
and the queen controls the queening square al.
3.6!
But not 3.h5? d4=.
З...Фс5 4.h5! d4
Diagram 18-2
5.16
This is the more elegant way, but White has another
solution: 5.&g2 Фс4 6.Ф12 (also good is 6.f6 d3 7.17
d2 8.18® dl® 9.®Ht+-) 6...ФБЗ (or 6...ФсЗ 7.h6
d3 8.h7+-) 7.16 d3 8.17 d2 9.18® dl® 10.®13t
®xl3t П.ФхВ a5 12.h6 a4 13.h7 a3 14.h8® a2
15.®al+-.
5...&d6 6.h6 d3 7.17 &e7 8.h7 d2 9.fS®t
White entices the black king onto the 8th rank,
so that he can promote his h-pawn with check!
9...&xl8 10.h8®f+-
Forced Variations
I do not differentiate, in principle, between forced
variations and combinations. (A combination is defined
as a forced variation with a sacrifice.) More important
than this technical distinction is actually the forcing
nature of the play. You can push your opponent into
certain reactions without having to sacrifice. We saw
one example of this in Chapter 15, in the variation
from the game J.Capablanca - A.Alekhine (Diagram
15-7). In the strictest sense of the term, that was not
a combination, but only a forced variation.
Here are some more examples of how to achieve
your goal with attacking moves.
Diagram 18-3
J.Capablanca - EYates
New York 1924
Capablanca finds a way to win the a5-pawn by force:
l.£c3! Sc5 2.&e4 Sb5 3.&ed6!
This is even better than 3.Hal ^b6 4.^xb6 Hxb6
5.Hxa5 ^c6±.
3...Sc5 4.&b7
With a decisive double attack.
4...йс7 5.^bxa5+-
Diagram 18-3 A
Diagram 18-4
abcdefgh
M.Euwe - A.Alekhine
Zurich 1934
In the game White played a positional move, l.b4.
Instead of that, however, he could have won a pawn
with:
l.e4!
The threat is the double attack by e4-e5. Black
would not have been able to hang on to his h7-
pawn.
I...dxe4
l...@d8 2.e5 wins the h7-pawn in even better
circumstances.
2.^xe4 &xe4 3.Jtxe4
With a double attack on the rook on a8 and the
pawn on h7.
З...Ы5 4.txh7t±
Diagram 18-4 A
abcdefgh
173
Calculating Variations 2
Diagram 18-5
8
7
6
5
4
3
2
1
8
7
6
5
4
3
2
1
Diagram 18-5
abcdefgh
S, Larsen — A. Yusupov
Politiken Cup, Copenhagen 2003
l...&g7!
Black prepares for the exchanges which will
follow.
2.Sd2 d3!
Or else White could mount some counterplay
against the d4-pawn.
3.Sedl
З.еЗ would be positionally good for Black, who
would then obtain a strong passed pawn on d3.
3...dxe2 4.Sxd8 el®t
4...Hxd8 5.<&xe2+ would not be so clear.
5.Sxel Hxelf 6.&h2 §bl-+
Black wins a second pawn. Next came:
7.Sd4 Ь5 8.td5 Sxb4 9.^xc4 Sxc4 10.Sd6 h5
ll.Sb6 b4 12.&g2 g5 13.&h2 Ь4 14.&ИЗ hxg3
15.feg3 16.Sb5 ft 17.Sb7 Фе8 18.Ba7 b3
19.Sb7 Sc3 20.&g4 &d8 21.&Б &c8 22.Sb4
Sxg3 23.&xf6 &d7 24.&e5 &c6 25.Sb8 &c5
0-1
Diagram 18-6
R.Hansen - A.Yusupov
abcdefgh
Politiken Cup, Copenhagen 2003
You should not be surprised to learn that Black wins
by force here.
l...Hxb3t 2.Фс2
2.Фа1 Sa3t then mate. 2.Фа2 2c3t (2...Sb4f is
good enough) З.ФЬ 1 ®b3t and then mate.
2...Sd3
As well as attacking the queen, this also threatens
mate on b3.
3 .®b2
Or 3.®b4 ®a2f 4.®b2 Sd2f-+.
3... Wd5-+
The threat is ...Sd2t.
4 .®b4
Or 4.®xb6 ®a2|-+.
4... Wa2f-+
0-1
174
Forced Variations
But in this lesson we also want to look at some
combinations.
Diagram 18-7
Chaplinsky — Ustinov
Leningrad 1951
l.Sd7!
1.3d5!+- is also sufficient.
l...Wxd7
Black must accept the sacrifice, in view of the
numerous threats.
2.Wh8f Фе7 3.®xe5t We6 4.Wc7f!
An important intermediate check. 4.®xb8? would
be bad, on account of 4...Wxa2t 5.Фс1 Salt
6.&d2 Wxfl.
After 4...®d7 there comes 5.Sxf7t’«+-.
5.Wxb8|
Black resigned.
Diagram 18-8
Diagram 18-7
abcdef gh
E.Bogoljubow — R.Spielmann
Magdeburg 1927
Here too, Black has a forced win.
l...Sx£2! 2.Sex£2
If 2.Sficf2, then 2...®alt-+.
2...gx£2 3.Wx£2
The alternatives are no better: 3.®b8t Sf8|—+ or
3.Sx£2 ®alt-+.
3...®e5-+
Black wins the queen.
0-1
Diagram 18-8
abcdefgh
xraxdvx ir:
00
175
Calculating Variations 2
Diagram 18-9
Diagram 18-9 A
R.Spielmann - E.Grunfeld
abcdefgh
Karlsbad 1929
White sees his opportunity, attacks and wins the
qame.
1.115! &e7
l...e5 2.hxg6 exd4 3.gxf7f ФЬ8 4.Sxd4 loses two
pawns without any compensation.
2.txg7!
2.®g5 would also be good: 2...f6 3.JLxe6f &h8
4.h6!+-. (R.Spielmann)
2...&xg7
Black cannot decline the sacrifice, because there is
not only the threat of JLxf8, but also that of JLf6 with
a decisive attack, for example 2...jLxe4 3.&f6 JLhl
4.1d5! Ixd5 5.®h6 £f5 6.®g5t, and mate.
3.®g5t $}g6 4.h6f
Black has no defence against ®f6 followed by mate
on g7.
1-0
In the test we shall concentrate on active moves. It
is important to spot and calculate forced variations
in advance. You must, as always, pay particular
attention to the first moves. Errors on the first move
of a variation cannot be corrected later!
As usual, try to solve the following positions
without moving the pieces on the board. You should
only move the pieces if, after some time, you cannot
see a solution.
176
Exercises
> Ex. 18-1 < ★ A
abcdefgh
abcdefgh
VEx. 18-2 <
>Ex. 18-5 < ★
abcdefgh
abcdef gh
> Ex. 18-3 X ★★★ A
>Ex. 18-6< ★
abcdefgh
abcdefgh
177
Exercises
>Ex. 18-7 < ★ A
abcdefgh
>Ex. 18-8< ★★★ A
8
7
6
5
4
3
2
1
abcdefgh
> Ex. 18-94 ★★★ A
abcdef gh
178
Solutions
Ex. 18-1
Ex. 18-4
R.Spielmann — S.Tartakower
W.Steinitz - M.Chigorin
Marienbad 1925
1 .®h6! ®xelt 2..tfl+-
(1 point)
2 .^g2 £le3t З.ФЬЗ wins too, but in a much
more complicated manner.
2... Se8
Or 2...®e3t 3 Axe3+-.
3>g7#
Ex. 18-2
R.Spielmann — Gerlinger
Vienna 1929
l.&e7t!+-
(1 point)
Black resigned since he is mated in three
moves:
l...®xe7 2.®xh7f!
But not 2.Sh5?> on account of 2...F5 and
Black wins! It is better to continue attacking
with checks!
2...&xh7 3.Sh5t &g8 4.Sh8#
(another 1 point)
Ex. 18-3
Based on a game by
P.Morphy
l.Sa8t!l
(2 points)
For l.bxc7t Фхс7 2.®xg7+— or l.®xg7
you only get 1 point. White has a much better
solution.
1...Фха8 2,bxc7!!+-
(1 point)
But not 2.®xd8f Hxd8 3.bxc7, because of
3...Sd6.
2...®x£8
Otherwise Black loses the queen.
3.Sal#
World Ch, Havana (4) 1892
i.M6t
(1 point)
1 .Bh6f &f6 is just as good: 2.®h4t+—
l... &f6
If 1...ФБ7, then 2.jLxf8t, followed by mate.
2.®h4t &e5 3>xd4f
(1 point)
Followed by mate.
Ex. 18-5
E.Vasiukov - H.Pfleger
Hastings 1965
l.Sxd5!+-
(1 point)
Black resigned, in view of l...®xd5 2.^f6f
lxf6 3.®xf6 ®dl t 4.Ф112 and then ®g7#.
Ex. 18-6
S.Winawer - M.Chigorin
Warsaw 1882
l...®xf3t 2.Sg2 Ih3 3.Sagl Se8!-+
(1 point)
4.®c3
Other moves also lose:
a) 4Ag3 txg2f 5.Sxg2 Self-+
b) 4.Be3 jbcg2f 5-Sxg2 ®xe4-+
4...JLxg2f 5.Sxg2 Sxe4—+
0-1
Ex. 18-7
Pavelchak - N.N.
Berlin 1951
1 >g6f!! Sxg6 2.hxg6f Ф118 3.SM7#
(1 point)
179
Solutions
Ex. 18-8
Ex. 18-10
H.Rinck
Kruta - Basl
1904
(1 point)
l...&ffc
Other king moves make no difference.
(1 point)
But not 2.^e4f, because of 2,..Фе5
З.^хсЗ f2-+.
2...c2 3.&gl!
(1 point)
Now, if Black does not promote the c-pawn,
then White will stop it with 4.^e2=.
3...cl® stalemate.
Ex. 18-9
AJSelesniev
1927
1 .Фс5
(1 point)
1...Й
If l...a4, then 2.d6 Феб (or 2...a3 3.d7 a2
4.d8® al® 5.®h8f+~) З.Фсб a3 4.d7 a2
5.d8® al® 6.®e8t &f6 7.®h8f+- .
(1 point)
2 .d6f3
Or 2,..Феб З.Фсб f3 4.d7 £2 5.d8® fl®
6.®e8f &£6 7.®f8f+-.
3 .d7 £2 4.d8® fl® 5.®e8f &f4 6.®fBf+-
(1 point)
1-0
Prague 1962
iJket! exS
l...Sxf5 2.Sxh6f! gxh6 (2...ФхЬ6 3.®g6#)
3.®g8#
2.Sxg7t &xg7 3.Sg3f Sg6 4.Sxg6f ФЬ7
5.®g8#
(1 point)
Ex. 18-11
Forintos - Tompyic
Budapest 1957
l.®f8f ФЕ7 2.®xf7t
(1 point)
Not 2.jbcg6t?> on account of 2...fxg6=.
2...&h8 3.®£8t ФЬ7 4,i,xg6t! &xg6
5.®g8#
(another 1 point)
Ex. 18-12
A.Yusupov - A.Suetin
Moscow 1980
l.^xf5 gx£5 2.^xh6
(1 point)
2...®g5
2...&g7 3.&12+-
3.2>xf5!
(1 point)
Black resigned in view of 3...®xf5 4.®xf5
exf5 5.e6f ^gS 6.e7+—.
180
Scoring
Maximum number of points is 23
20 points and above > Excellent
16 points and above >Good
12 points..............>Pass mark
If you scored less than 12 points, we recommend that you read the
chapter again and repeat the exercises which you got wrong.
181
o«^ER 19
Contents
S Pawn promotion
S Pawn breakthrough
S Breakthrough
S Double attack on a knight
along with promotion
J Various tactical procedures
Combinations
involving promotion
An important part of chess strategy is the promotion of
pawns. The value of the pawn increases dramatically
as it nears the queening square. Your opponent will
do all he can to stop the dangerous pawn, but this is
often possible only at the cost of great material losses.
Of course, the strong pawn needs the support of the
other pieces. Since promotion to a queen involves a
great material advantage, one is also ready to sacrifice
something to achieve it. Naturally, combinations are
not always necessary, but sometime we must use
such tactical means.
In this lesson we shall look at some typical
combinations involving promotion. They are often
part of endgame play, but you can also make use of
far advanced pawns in the middlegame
A passed pawn can also be created without a
sacrifice, for example if you have a pawn majority
on one side of the board. But sometimes tactical
operations are required.
Pawn breakthrough
Lets start with two well known pawn endings.
Diagram 19-1
Cozio
1766
l.b6!
An important idea for pawn endings. After l.^fl?,
Black can prevent the breakthrough: I ...b6! (but not
l...a6?, due to 2.c6. Nor l...c6?, due to 2.a6) 2.cxb6
cxb6 З.ахЬб axb6=.
I...axb6
Or 1...схЬ6 2.a6! Ьхаб З.сб+-.
2.c6! bxc6 3.a6+-
Combinations Involving Promotion
Diagram 19-2
Cpzio
1766
l.c5!
The pawn breakthrough is, of course, a form of
deflection. Here, White must deflect the b6-pawn
from its post.
1.Фе1? is bad, on account of l...c5!-+.
I... bxc5 2.a5 c4 З.аб c3 4.^el!
The king must keep an eye on the opposing pawns.
Not 4.a7??, in view of 4...c2-+.
4...&e3 5.&dl!+-
Once more, not 5.a7?? c2-+.
Breakthrough
Diagram 19-3
E.Syeshnikov - V.L^eychenkov
Kiev 1988
1Аха7!
After this sacrifice, Black can no longer stop the
pawns.
I...£}xa7
1...£Ъ6?! would mean a ‘slow death’ after 2.^c6
^d5t З.Фа5 Фс7 4.£>e5 f6 5.^c4+-.
2.b6 £lc6t
Or 2.. Ac8 З.Ш+-.
3.&a4+-
Black cannot fend off the threat of a7 and а8Й.
1-0
Diagram 19-4
Diagram 19-3
abcdefgh
Capablanca - B.Villegas
Buenos Aires 1914
l .@e5tft
l... &f8 2.®xd6f+-
2 .Wxd6!
White deflects the black queen from its job as a
blockader.
2,.. ®xd6 3.c7+—
1-0
Diagram 19-4 A
8
7
6
5
4
3
2
1
abcdefgh
183
Tactics 9
Double attack: threatening a knight along with
promotion
Let us consider two opening catastrophes.
Natopov - Rasdobarin
Diagram 19-5
Krasnoyarsk 1969
l.f4 e5 2.fite5 d6 3.exd6 JLxd6 4.£^f3 g5 5.e4?
Better is 5.d4.
5...g4 6.5igl?
6Ad4 was necessary.
6...®h4f 7.&e2 g3
Threatening ®xe4#.
8.&c3
Diagram 19-5
8...Wxh2! 9.Sxh2 gxh2
A typical situation. The threat is ...hl®, as well as
...hxgl®, and White cannot ward off both threats at
the same time.
lO.^B hl®-+
White has lost a whole rook.
0-1
abcdefgh
P.Horvath - H.Hicker
Diagram 19-6
abcdefgh
Finkenstein 1997
l.d4 d5 &f5 З.с4 сб 4.®b3 ®b6 5.cxd5
Wxb3 б.ахЬЗ JLxbl?
The correct move is 6...cxd5 7.^c3i.
Diagram 19-6
7.dxc6! Де4?
In an old game Black realized his mistake and
played 7...^xc6, but was lost anyway after 8.Hxbl,
C.Schlechter— J.Perlis, Karlsbad 1911.
8.Hxa7! Sxa7 9.c7+-
The pawn cannot be stopped. White won with his
queen after 34 moves.
Here are a few more examples, which additionally
illustrate various tactical procedures: deflection,
decoying, blockade, blocking, knight against rook pawn.
184
Combinations Involving Promotion
Diagram 19-7
Abrahams - Winter
London 1946
The threat is l...Hel#. White finds a combination
which deflects the rook on e8 away from the back
rank.
l.Bh5t! &xh5 2.®xf5t &h6 3.Wxe4+-
Black resigned. After 3...Sxe4 there comes 4.d7
and then d8®.
0-1
Diagram 19-8
Fleischmann — N.N.
Bamberg 1930
l.SfSf!
A clever decoy.
l...Sxf8 2.®h8t!+-
Black cannot take the queen, due to 3.exf8®#, but
not taking it is equally painful.
1-0
Diagram 19-9
Everz — C.Kiffmeyer
West Germany 1964
l.tf4!!
White blockades the f-pawns, so the black bishop
can no longer stop the h-pawn. But not l.h6?, in
view of 1 ...f4 2.h7 f5-+.
l..J &xf4 2.h6+-
Continuing h6-h7-h8®.
1-0
Diagram 19-9
abcdefgh
185
Tactics 9
Diagram 19-10
Skuratow - Schwedtchikow
USSR 1972
l.Sh5!
Not l.fxe7? when Black has l...Sxe6.
l...Hxh5 2.fxe7+—
The pawn on e6 blocks the e-file.
1-0
Diagram 19-11
Diagram 19-11 A
E.Gleizerov - O.Korneev
Malaga 2000
White carries out a typical combination.
I.^xb7! ^xb7 2.bxa6+-
An important position. The black knight cannot
stop the white rook pawn, and even gets in the way of
its own bishop.
1-0
abcdefgh
186
Exercises
>Ex. 19-1 <
> Ex. 19-4 < ★★ A
abcdefgh
abcdefgh
>Ex. 19-2< ★
> Ex. 19-54 ★★
abcdefgh
>Ex. 19-34 ★★ A
8
7
6
5
4
3
2
1
abcdefgh
abcdefgh
>Ex. 19-64 ★ 1
abcdefgh
187
Exercises
>Ex. 19-10< ★★
abcdefgh
> Ex. 19-8 < ★★
>Ex. 19-11 ★
abcdefgh
abcdefgh
>Ex. 19-9 <
> Ex. 19-124 ★★★
abcdefgh
abcdefgh
188
Solutions
Ex. 19-1
Ex. 19-5
В. So assky — В. Larsen__
Madl - Johner
Palma de Mallorca 1969
1910
l.®c8f Ф117 2.Wxe6! fxe6 3.F7+—
(1 point)
1-0
Ex. 19-2
l...&£2 2.Sxf2 Shlf! 3.&xhl gx£2-+
(2 points)
0-1
Ex. 19-6
U.Bonsch — L.Psakhis
Scholz — Lorenz
Trnava 1988
l...Selt!
(1 point)
White resigned, in view of 2.^xel f2-+.
Ex. 19-3
M.Dlugy - P.Popovic
Paris 1987
l.Sa8!!
l.Sc8f!l Sxc8 2.b7 Sdc2 3.Sa8 +- is equally
good (also 2 points).
However, if l.Sc7?, then 1...Фе7 (or l...Sd6
2.b7 Sxa6 3.Sc8t Фе7 4.Sxb8 Sb6) 2.b7
<±>d8 3.§c8t Sxc8 4.Sa8 Sdc2.
l...Sxa8 2.Б71+-
(2 points)
With the idea of Sc8t next.
1-0
Ex. 19-4
A.Kapengut - M.Sherestievsky
USSR 1969
l.£)xe6!! fxe6 2.®xf8f Sxf8 3.Sxf8t
(2 points)
3...&g7
Or З...Фх£В 4.c7 and then 5.c8®.
4.c7+- (Д5.с8®)
1-0
1964
l...&xd5t!
(1 point)
White resigned, on account of 2.exd5 e4!
3.fxe4 (if 3.^c2 exf3 4.&el, then 4...f2-+)
3...f3-+.
Ex. 19-7
Heuacker - N.N.
Miinster 1936
l.Sg7t! &xg7 2.a7±
(1 point)
Ex. 19-8
A.Medina Garcia - M.Tal
Palma de Mallorca 1966
l...®xf3t 2.&xf3
White resigned, facing the prospect of
2...£)e3!-+.
(2 points)
Ex. 19-9
A.Sznapik - R.Bernard
Polish Ch, Poznan 1971
The game continuation was l.c7t? <&a7
2.Sxf6 Af8 3.Sexf7 Ab7 4.£e5 Sc8~.
Instead of that, White should play:
l.Sd8!
(2 points)
l...Sa7
l...Sxd8 2.c7t+- or l...^f8 2.Sb7#.
189
Solutions
2.Sxa7 Sxd8
Or 2...Фха7 3.2xh8+—.
3.c7t+-
Ex. 19-11
Variation from the game
Y. Balashov - A.Yusupov
Minsk 1982
Ex. 19-10
A.Pomar Salamanca -
Olot 1974
l...Wxg4!!
2.hxg4 h3-+
(1 point)
l...f4!
(2 points)
This typical pawn breakthrough leads to the
win of the game.
L..^g6?? would be wrong: 2.Фе6 ^g5
З.Ф17 h4 (3...f4 4.gxf4f ф£5 5.g3+-) 4.gxh4f
&xh4 5.g3t ФЬЗ 6.&f6 &g2 7.&xf5 &xf2
8.Ф£4О+- (analysis by Y.Averbakh).
2.&d5
If 2.exf4, then 2...h4! 3.gxh4 g3-+. After
2.gxf4 there follows simply 2...h4-+.
2...h4! 3.&xe4
3.gxf4 h3-+ or 3.gxh4 g3 4.fxg3 fxe3-+.
3...B!
3...h3?? 4.gxh3 gxh3 5.^f3+-
4.gx£3 h3-+
0-1
Ex. 19-12
Hahn - S.Tarrasch
Halle 1883
l...£c3!
(1 point)
Not the immediate l...Sxflf? 2.Sxfl ДсЗ,
because of 3.&g2 e3 4.&f3 and the pawn
is stopped. Black must first win a tempo by
attacking the rook with his bishop!
2.Sdl Sxflf!
(2 points)
3.Sxfl e3-+
And all White can do is give up his rook for
the e-pawn after 4.&g2 e2.
0-1
Scoring
Maximum number of points is 20
18 points and above >Excellent
15 points and above >Good
11 points.............> Pass mark
If you scored less than 11 points, we recommend that you read the
chapter again and repeat the exercises which you got wrong.
190
Contents
S A weak square
J A weak point
S Weak squares in the castled
position
J Exploiting the weaknesses
20
Weak points
By a weak square we mean one in or near one's own
territory which can, in the long run, be occupied by a
hostile piece.’— M.Euwe
Normally, a square is only weak if your own
pawns cannot protect it. But if your opponent is not
in a position to exploit this potential weakness, then
it is of no practical importance, and we do not call it
a weak square.
The concept of a weak point is somewhat wider
than that of a weak square. The term is used to describe
not only a square, but also a pawn, which can get no
support from its fellow pawns and is under attack by
your opponent.
Diagram 20-1 /X
Diagram 20-1
M.Botvinnik - S.Flohr
abcdefgh
Diagram 20-2 1
abcdefgh
Moscow 1936
l.c5!
An excellent decision. White obtains an outpost
on d6, which he can occupy with his knight after the
instructive manoeuvre &Ы -a3-c4-d6. Another option
is b4-b5, with an attack on the point c6. However, the
fact that advancing the c-pawn somewhat weakens
his d4-pawn (which he cannot advance because it
is blockaded) is unimportant, since Black is in no
position to attack it effectively.
I...a5
Directed against b3-b4.
2.&bl!Wf8 3.£ia31d8
In order to protect the a5-pawn.
4.&c41,c7 5.&d6±
Diagram 20-2
At some point, Black will have to swap off this
strong knight, but then White will obtain an equally
strong passed pawn.
5...Sb8 6.Sbl
White is playing positionally, preparing b2-b4 and
seeking to increase the pressure against the b7-pawn.
The tactical solution, 6.&xb7 Sxb7 7.®xc6
ЛЬ8 8.Wxe6t+-> would also be good, with three
connected pawns against a bishop.
Weak Points
6...®d8 7.Ь4 axb4 8.йхЬ4 JLxd6 9.exd6 ®a5
10.Sdb3
White attacks the weak point b7.
10...Se8 ll.We2
The еб-pawn is also weak. 11 .Sxb7 would be
premature, in view of 11...5§xb7 12.55xb7 ®xa4 with
counterplay.
ll...Wa8 12.Se3 &f7
Diagram 20-3
13.Wc4?I
13.^gl would be more prudent. Black can now
obtain some counterplay.
13...B5! 14.Wc2
Of course not 14.axb5?, due to cxb5t nor 14.cxb6,
due to 14...c5t 15.b7 Sxb7 16.Sxb7t ®xb7f
17.ФЕ2 cxd4.
14...Sxd6?I
If 14...Sa7, then 15.axb5 Sa2 16.Sb2 cxb5t
17.Ф113+-. Black should prefer 14...bxa4±.
15.cxd6 c5t 16.ФИЗ cxb4 17.®c7t &g8 18.d7
The passed pawn is too strong.
18...Sf8 19.Wd6
Also good is 19.Hxe6 g5 20.®d6+-, intending Se7.
19..J16 2O.Wxe6f ФЬ7 21.®e8 b3
After 21...®hl there comes 22.Sel+-.
While if 21...Ш8, then 22.®xf8 ®xf8 23.Ee8 ®f7
24.d8® ®h5t 25.&g2.
22.®xa8 ^xa8 23.axb5
23.Se8? would not be good, due to 23...b2 24.Sxa8
bl® 25.d8® ®flf 2б.ФЬ4 g5t 27.Ш ®h3#.
23...Sd8 24.Sxb3 Sxd7 25.b6+-
Black resigned because of the following line:
25...§b7 26.^g2 &g6 27.&f3 &f6 28.Sb5 Феб
29.ФеЗ &d6 30.&d3 Феб 31.Фс4 &d6 32.Sd5t
Феб 33.Sc5t Ф<16 (ЗЗ...ФхЬ6 34.Sb5t+-)
34.ФЬ5+— Analysis by M.Botvinnik.
Diagram 20-4
A.Lilienthal - P.Keres
Diagram 20-3 Д
8
7
6
5
4
3
2
1
abcdefgh
Leningrad/Moscow 1941
l.h5!
The threat is h5-h6t> so Black has to weaken the
f5-square.
I... gxh5 2.£}e3 d6
Diagram 20-4
abcdef gh
193
Positional Play 3
From f5 the knight attacks not only the king, but
also the pawn on d6.
3...&g6 4.®c3! ^a6 5.Wc6 ^c5 6.(3 ^d3 7.Wc7
b5 8.Wxa7
The black position is lost.
1-0
Sometimes several squares of the same colour are
weak. This often happens after the exchange of the
bishop which was responsible for defending them.
Weak squares in a castled position are especially
alarming.
Diagram 20-5
abcdefgh
S.Tartakower - Em.Lasker
St Petersburg 1909
The white position has one irredeemable defect: the
light squares are too weak. Black finds a way to bring
his knight into the attack.
1 ...g5! 2.®a2
Nor does 2.fxg5 ^e5! offer White any hope, as he
has no good defence against the threat of ...£if3t. For
example 3.Sc3 fails to 3...Sd3.
2...gxf4 3.Se2 Wg6 4.Wc2 &h7
Black prepares an attack down the open g-file.
5.®c3 Sg8 6.&hl Wh5!-+ 7.Sd2 &g3 8.jLxg3
Hxg3 9.Wc6 £e5 10.We4f &g8 ll.SdfZ 5g5
12.Sc2 Sdl
0-1
Diagram 20-6
Diagram 20-6
A.Rubinstein - R.Spielmann
abcdefgh
Bad Pistyan 1912
l...ld4t 2.&Н £>£5
The threat is ...£)g3t.
3.^xf5 txf5 4.Selt
The black king is quite safe on f8 and can later go
tog7.
5.®f3
5.h3 was necessary. Without the knight, it is hard
for Black to exploit the weak square g3.
5...h3!
Since White has had to swap off his light-squared
194
Weak Points
bishop, Black aims to play on the light squares.
6.g3
6.g4 is not good, due to 6...®h4!-+.
6...Ш7 7.1,d2 ig4
This bishop has now become very powerful!
8.® fl?!
A better try would be 8.®d3 ®F5 9.!§e4+.
8...®f5 9.Sacl &g7 1О.ДеЗ JUS
The second black bishop is also more active than its
counterpart!
П.ЬЗ She8
Black is preparing to double pieces on the e-file.
12JU2 iet i3.&gi
Diagram 20-7
13..J,g2! 14.Sxe8 txfl!
Since the white king position has been weakened,
the black queen will be stronger in the attack than
the two rooks.
15.Sxa8Wd3 16.Se8
16.Sxfl fails to 16..ЖЗ-+.
16...ШЙН
A forcing combination brings to an end a perfectly
played strategic game by Spielmann.
17.&xfl Whit 18.tgl Wg2t 19.&el Wxglf
20.&d2 Wxh2f-+
White resigned. One possible variation would be
21.£te2 Wg2 22.Sgl Wxgl!! 23.^xgl h2 and Black
wins.
Diagram 20-7
abcdefgh
You should find the weak points in your
opponent’s position and attack them. Weak
squares, which often lie deep in your opponent’s
half of the board, offer ideal and safe posts for your
pieces. From these excellent positions, your pieces
can mount active operations and attack the opposing
pieces and pawns.
Diagram 20-8
M.Botvinnik — J.Donner
Amsterdam 1963
l.^d4!
White wants to exchange the light-squared bishops,
so that later on he can occupy the weak square c6.
I...l,xg2 2.&xg2 Sc7 3.®b3!
Diagram 20-8
abcdef gh
195
Positional Play 3
Played in order to meet 3...®b7t with 4.®f3.
3...Sfc8 4.Sfcl ®b7t 5>B!
White wants to exchange those pieces which are
able to control the сб-square. By doing so he will
achieve a great advantage.
5...Ы5
Threatening 6...4ie5.
6.e4! 7.b5!
Diagram 20-9
Now White has control over the сб-square. If
7...£te5, then he can play 8.®e2, followed by f2-f4
and £k6.
7...a6 8.^c6± JLf8 9.a4 ахЬ5 10.axb5 Sxal
ll.Sxal Sa8
Diagram 20-10
12.Sdl!
A difficult move. White brings his rook on to a
central file, where it can exert more pressure. The
black rook alone cannot achieve much on the a-file.
12...^e8 13.^c4 2ic5 14.e5!
Now, and only now, does White relinquish control
over the central square d5, since Black can no longer
exploit it.
14...Sc8?!
After 14...^c7, intending ...£}d5, there follows
15.Sd7!! ^xd7 16.^e7t+-« 14...h6 could be tried.
15.Sal!
White exploits his chance. The invasion via the
а-file disorganizes the defence. You can see how
important the knight on c6 is for White s game.
15...Sc7
If 15...§a8?, then 16.Sxa8 ®xa8 17.^e7t+-.
16.Sa7 Wxa7
16...®c8 17.^xb6 is also no use.
17.^xa7 Sxa7 18.^xb6+-
1-0
You should also try not to allow weaknesses to
occur in your own camp, and to protect your weak
points adequately.
Find the weak points in the test positions and try
to exploit them.
196
Exercises
> Ex. 20-1 < ★
abcdefgh
> Ex. 20-4 < ★ A
8
7
6
5
4
3
2
1
abcdefgh
> Ex. 20-2 < ★★
abcdefgh
>Ex. 20-5 <
abcdefgh
Ex. 20-3 < ★★ A
abcdef gh
>Ex.20-6< ★ A
abcdef gh
197
Exercises
> Ex. 20-11
Ex.20-8< ★★
abcdefgh
abcdefgh
>Ex.20-9< ★ ★★
abcdefgh
>Ex.20-12< ★★ A
8
7
6
5
4
3
2
1
abcdef gh
198
Solutions
Ex. 20-1
Ex. 20-4
A.Yusupov - A.Khalifman
E.Geller - I.Boleslavsi
Ubeda 1997
l.&b4!
(1 point)
Double attack on a6 and f7.
I...a5
Of course not 1 ...£}Ь8? 2.jbd7.
2.td5I?
2.£id5± is equally good.
2...jLxd5 3.^xd5±
Black has a weak pawn on b6.
Ex. 20-2
T.Petrosian - A.Chistiakov
USSR Ch, Moscow 1952
l.c5!±
(1 point)
Taking control of the weakness on d6.
1..Л И8 2.®d6 £)e6 3.Jtc4 4.®xc7 &xc7
5.^a5 Sb8 6.£)a4 jke6 7.JLxe6 £)xe6 8.£)c4
&c7 9.&ab6 &e6 10.b4 Stf4 ll.Sd2 Sbd8
12.§hdl Sxd2 13.Sxd2 JLg7 14.fta5! Sb8
15.1xf4 exf4 16.Ы7 Sd8 17.^xf6f lxf6
18.Sxd8t txd8 19.^xb7+-
1-0
Ex. 20-5
EYates - H.Grob
Merano 1926
l.Se5!
(2 points)
Threatening ®xh7f! and Sh5+-.
Only 1 point for l.®h6?!, since Black has a
good defence: l...^f5! 2.®g5 h6 3.Jlxd8 hxg5
4.jlxg5 c4±.
I...tf5 2.Wh6+-
1-0
Ex. 20-6
E.Geller -
Bolbochan
A.Suetin - S.Furman
USSRTeam Ch, Riga 1954
l.g3l?
(1 point)
If l.’&gl (also 1 point), then 1...4ib8!?.
However, l.jLxc6?? would be very bad, due to
l...Se4f-+.
1... S15 2.Дхс6 Дхсб 3.^e5±
(another 1 point)
White has occupied the weak point e5, and
stands clearly better.
Ex. 20-3
Stockholm 1962
l.&la2!
(2 points)
The knight goes via b4 to d5.
I.^d5 (1 point) is not as good, since after
the exchange on d5, White must take with the
pawn. The weakness on d5 is then plugged’.
It is better to have a piece posted on d5 rather
than the pawn!
After l.^d3 comes I...d5!.
I...^c5
l...a5 would weaken the b5-square.
2.^b4 a5 3.^bd5 £}xd5 4.£}xd5 Jlxd5
5.Wxd5 Wxd5 6.§xd5 g6 7.c3 Sa7 8.Jlb5±
USSR Ch, Leningrad 1963
l .®d6!
(1 point)
l... Wa7t
After the exchange of queens, Black would
no longer be able to protect his weakness
on a5: l...®xd6 2.^xd6 ^d7 3Ac4+-.
2 .ФЯ £}d7 3.Wxc6+-
199
Solutions
Ex. 20-7
__ RDautov-
Istanbul Olympiad 2000
l.&d4!
(2 points)
The weak point is c6!
Only 1 point for l.a3.
However, l.^e5 is not any good, since
White loses the b4-pawn after the exchanges.
1...&16 2.b5 JLxg2 3.&xg2 Sd5 4.&c6 ®d7
5.Wc2!±
The exchange of queens, together with
the opening of the а-file by a7-a6, would be
a welcome relief for Black: 5.Sxd5? ®xd5t
6.®f3 ®xf3t 7.&xf3 a6=.
5...®b7 6.a4 h6 7.e4 Sc5 8.®d3 Sxcl
9.Sxcl аб 10.Sc4
Intending Sd4.
10...axb5 ll.axb5 ®c7
Or ll..Ad7?! 12.Sd4 ^c5 13.®dl ®c7
14.e5±.
12.Sd4±
Ex. 20-8
P.Clarke ~ T.Petrosian
Munich 1958
1...WB3!
(2 points)
l...£)b3 (1 point) is not so good, on account
of 2.ЙЫ. Exchanging queens is important for
Black, since afterwards White will have no
more attacking chances.
2.®e2
After 2.®xb3 £lxb3, Black can continue
with b5, a5 and b4.
2..JU4 3.1еЗ ФЬ8
Intending Sc8-c6-b6 to target the weak
b2-pawn, but there was the even simpler
3..>c2!+.
4.Sadl! ®c2! 5.Sd2 6.Sfl g5^ 7.h3
h5 8.£>h2 gdg8 9.g4®g6 10Л13?
Better is 10.f4 gxf4 ll.Ji.xf4 hxg4
12.£ixg4+.
10...hxg4 llj.xg4 2>c6 12.13? &d8 13.1,12
fce7 14.Sel Sh6 15.$)fl? Sgh8 16.1g3
Hxh3!-+ 17.txh3 Sxh3 18.®g2 ®h7
19.£)e3 £lg6 2O.£)g4 4t)f4 21.&xf4 gxf4
22.d?fl Sg3 23.W12? ®h3t 24.Фе2 gg2
25.Sgl Sxf2f 26.&X12 ®h7 27.Shl ®g6
0-1
Ex. 20-9
Budapest Candidates 1950
l.te3!
(3 points)
The d6-square is weak, so White exchanges
the piece which is protecting that square.
Only 1 point for other bishop moves along
the g5-cl diagonal.
l...Shc8
l...jLxe3 2.fxe3 f5 3.^d6±
2.Де2! g6 3.&e4! ДхеЗ
3...&b4 4.g4 ^g7 5.^bd6+-
4.&e3 Sc2
4...jLxb5 5.axb5 ^c5 6.£M6 Sf8 7.b6! a6
8.Sacl+-
5.^bd6! Sf8
5...£xe2 6.Sxf7t &d8 7^f8t+-
6.Дхаб Ьхаб 7.g4 ^g7 8.^ft>! JLc6
9.Sfcl!+-
Black resigned in view of 9...Sg2f 10.ФН
Exh2 ll.Sxc6 Shit 12.&g2 Sxal 13.Sc7t
<&d8 14.Sd7#.
Ex. 20-10
M.Botvinnik - P.Keres
World Ch, The Hague/Moscow 1948
l.^ih5!
(2 points)
The pawns on g7 and f6 are weak. The
knight attacks them both.
After 1 .ФеЗ or l.g4 (1 point for these
moves), there follows simply l...g6.
1...£>е6 2.ФеЗ ^e7 (Ag6) 3.d5 #>c5
200
Solutions
Or 3...g6 4.4W6 &xf6 5.dxe6+-.
4.£lxg7+— ^<16 5.£)e6 £)d7 6.*^>d4 £le5
7.^7 &c4 8.&Bt &c7 9.&c3 &d7 10.g4
^e5 H.g5 ficg5 12.hxg5 £16 IS.&bd ^xg5
14.e5 h5 15.e6t &d8 16.&xb5
1-0
Ex. 20-11
M.Aaron - M.Botvinnik
Leipzig Olympiad 1960
l...$c5!
(3 points)
This tactical trick brings the knight onto the
weak square d3.
1 point for the moves l...&d6, 1...SF8 or
1 ...g5, which do improve the position, but do
not exploit the weakness on d3.
2.<&e2
After 2.bxc5 Йхс5 3.®ixc4 Sxc4+ the c3-
pawn is weak.
2...^d3 З.ЭЫ &d6 4.a4 g5 5.Ed2 Sbc8
6.Ь5 5Ь8 7.&b3 e5 8.&cl e4 9.&dl f4
10.Se2 g4 ll.fice4 6 12.Sa2 dxe4-+
Ex. 20-12
V.Smyslov - G.Borisenko
Moscow 1961
l.a5!
(2 points)
1... &е5 2.ДЬ6
The c5-pawn is weak.
2...Sa8 3.Sc3!
З.Дхс5 Hc8 would expose the weakness of
the c4-pawn.
3...Sc8
Or 3...f6 4.&c7 Sc8 5.a6 Ьхаб 6Axa6 and
the c5-pawn is dropping.
4.£)a7! Se8 5.Дхс5 ^g4 6.h3+-
1-0
Scoring
Maximum number of points is 23
20 points and above >Excellent
17 points and above >Good
12 points >Passmark
If you scored less than 12 points, we recommend that you read the
chapter again and repeat the exercises which you got wrong.
201
21
Contents
S Underpromorion
S 1 wo connected passed
pawns on the 6th (3rd) rank
J The pawn phalanx
S Hie pawn fork
S Mating motifs with pawns
Pawn combinations
The famous French chess master Francois-Andre
Philidor called the pawn the soul of chess. In the
chapters on ‘Combinations involving promotion
and ‘The double attack’ we have already learned
something about the capacities of the pawns. These
pawns are very important tactical elements, as we
shall also learn in this lesson.
Underpromotion
An especially spectacular tactic is an underpromotion,
when the pawn does not promote to a queen, but to
a rook, bishop or knight. The last case is the most
frequent underpromotion, and is linked to a gain of
tempo by check or to a knight fork.
Diagram 21-1
Em.Lasker
1900
Diagram 21-1
8
7
6
5
4
3
2
1
abcdefgh
l.Ec8t! Sxc8
If 1...ФхЬ7, then 2.Sxd8+-, but not 2.®xd8?? due
to 2..>el#.
2,®xa7t!I Фха7
Or 2...Фс7 3.bxc8®t+-.
3.bxc8&f!!+-
With a winning knight fork. 3.bxc8®?? would
allow 3...®el#.
Diagram 21-2
K.Richter - N.N.
Berlin 1930
l.^f5tl?
White wants to employ his well-coordinated forces
for a final attack on the black king, before Black can
manage to bring his extra material into play.
But apparently Black has found the only way to
win. 1...Фе8 leads only to a repetition of moves:
2.^d6f (but not 2.e7?? JLxf5 3.JLa4f £k6-+)
2...Фе7 3.£T5t
Pawn Combinations
2.e7! I,xf5??
A fatal error in a won position. Black was reckoning
simply on 3.e8® Sh2# and had completely forgotten
the motif of underpromotion. The correct move is
2...jLd7, and Black is winning.
3.e8&#!!
Two connected passed pawns
Two connected passed pawns are much stronger
than a single passed pawn, because they can offer
each other mutual support. In the endgame a rook
cannot stop two connected passed pawns on the
6th (or 3rd) rank (or one on the 7th and the other
on the 5th rank).
Diagram 21-3
l...Sxa2! 2.Sxa2 b3 3.Sa8t &g7 4.Фе2
If 4.Sb8, then 4...c2-+ while after 4.Sc8 there
comes 4...b2-+.
4...h2! 5.Sh8 c2-+
The pawn phalanx
In the next example, Aron Nimzowitsch made superb
use of the penetrative power of a pawn phalanx
against the author of Pawn Power in Chess.
Diagram 21-4
Diagram 21-3
abcdefgh
H.Kmoch - A.Nimzowitsch
Bad Niendorf 1927
How can Black break down the blockade on the
queenside and conduct his pawns to their much
desired promotion?
l...Sh4I!
Nimzowitsch sacrifices his strongest piece! The
threat is ...Sa4-a2, followed by ...a5-a4-a3.
2.cxh4 a4 3.h5t ^xh5
The three connected passed pawns simply cannot
be stopped.
4.Jla3 сЗ 5.ЙЫ Фс4 6.f4 st?xd4
This is the simplest. Now Black has obtained a
fourth connected passed pawn!
Diagram 21-4
abcdefgh
203
Tactics 10
7.&£2 Фс4 8.&el d4 9.&e2 &d5 1О.Ф13
If 1О.Ф43, then 10...Даб#.
10...ДБ7
Don’t be too hasty! Black brings his bishop into
the game.
ll.Sel &c4f 12.&Й Ь2 13.f5 exB 14.e61x6
White has no defence against ...ФЬЗ. For example,
15.e7 ФЬЗ 16.5e61e8-+.
0-1
The pawn fork
The following typical exchanging combination uses
the pawn fork to win the piece back and destroy the
opposing centre.
Diagram 21-5
Diagram 21-5
R.Spielmann - E.Cohn
Ostend 1907
l...^ixe4! 2.£}xe4 d5 3.^g5 dxc4 4.®xc4 Wd7+
Black has the bishop pair and stands better. The
сб-bishop is particularly strong.
abcdefgh
S.Tarrasch - Em.Lasker
Berlin 1916
Diagram 21-6
l.e4 e5 2.^8 £lc6 3.1c4 ^f6 4.^c3
Diagram 21-6
There is a standard reply to this variation.
4...^xe4! 5.^xe4
5.1xf7f ^xf7 6.^xe4 d5 7.^eg5t &g8 is even
better for Black.
5...d5 6.1d3 dxe4 7.1xe4 ld6=
Black has no opening problems.
abcdefgh
Mating motifs with pawns
Pawns are not only superb at supporting attacks,
when the occasion arises they can also deliver mate
themselves. Here are two spectacular examples.
204
Pawn Combinations
Diagram 21-7
R.Skuja
1956
1 .ФеЗ!
l.JLg3? is bad, on account of l...f4.
1... ФхЬ4
If l...f4f 2.Фе4 13 (2...ФхЬ4 3.g6! — see the main
variation), then 3.jLf2+-.
2 .g6!
White is aiming for a zugzwang position.
2... f4f
Or 2...fxg6 3.^f4 wins similarly.
З .ФВ! feg6 4.&xf4O g5t 5.ФВ g4 6.&f4 g3
7.hxg3#
Diagram 21-7 A
8
7
6
5
4
3
2
1
abcdef gh
Diagram 21-8
Moldoiarov — Samochanov
Correspondence 1974
l.gg6!
White is playing for mate. l.Sxa5? &g3= would
only lead to a draw.
I... a4 2.ФеЗ аЗ З.Ф& a2 4.Sg3
Threatening Sh3#.
4...1е6 5.Sh3t! Ixh3 6.g3#
Diagram 21-8 Д
abcdefgh
205
Exercises
> Ex. 21-1 < ★ A
> Ex. 21-4 < ★★
abcdefgh
abcdefgh
> Ex. 21-2 < ★
> Ex. 21-5 < ★★ A
abcdefgh
abcdefgh
>Ex. 21-34 ★
XEx. 21-64 **
abcdefgh
abcdefgh
206
Exercises
>Ex. 21-7К
abcdefgh
>Ex.21-10< ★★ A
8
7
6
5
4
3
2
1
abcdefgh
> Ex. 21-8 < ★★ A
abcdefgh
>Ex. 21-11 < ★
abcdefgh
>Ex.21-9< ★
abcdefgh
>Ex.21-12< ★ A
abcdefgh
207
Solutions
Ex. 21-1
l.g4!
But not 1.2a5 Sb8 2.g4 Sb6t 3.&xf7
5b7t=.
I... a2 2.gh5t! gxh5 3.g5t Sxg5 4.hxg5#
(1 point)
Ex. 21-2
l...Sxc2!
I...d3? 2.cxd3t &xd3 3.h5 c2 4.h6 gdl
5.2xc2=
2.gxc2 d3
(1 point)
3.Scl
Or 3.Sxc3t ФхсЗ 4.h5 d2 5.h6 dl® 6.h7
®d4-+.
3...d2 4.gdl c2-+
Ex. 21-3
Woizechowski - Sandler
Riga 1982
1...е2! 2.tx£2
Or 2.Sxf4 Sxf4 3.JLxg3 Фс6-+.
2...te3!
(1 point)
3.Sal gx£2f-+
But not 3..JLxf2f? 4.ФЬ1 el®t 5.Sxel
JLxel and White has set up a drawing fortress.
0-1
Ex. 21-4
G.Stahlberg - V.Menchik
Moscow 1935
In the game Menchik played 1...Дс7?.
Instead the Womens World Champion
could have won the game with a promotion
combination:
l...®xb3!
(1 point)
2.axb3 a2
(1 point)
But not 2...jLxc3, because of 3.®a6.
3.®dl JLxc3-+
Ex. 21-5
V.Panov — M.Taimanov
Moscow 1952
l.^xa6!
White now creates a pawn phalanx and
wins the game. I.®e7 is not so energetic
(only 1 point).
l... Sxa6 2.d6!
(2 points)
2...®xe5
If 2...®xd6, then 3.td5t &f8 4.®h8f Фе7
5.®g7t Фе8 6.®f7#.
3.1xe5 Sa5 4.&d5t &Й 5.Sbl+-
1-0
Ex. 21-6
A.MedinaGarcia- H.Meckin;
Palma de Mallorca 1969
l...e4!
(2 points)
Black seizes his chance and activates his
pawns in the centre. Only 1 point for 1 ...Sf3.
2.®c4
If 2.®xe4, then 2...Se5 3.®g4 h5-+.
(1 point)
2...d5! 3.®b5 e3! 4.f4
4.§xe3 Sxf2f 5.Sxf2 ®xf2f-+
4...d4
Another very strong move would be
4...®e6.
5.Scl?! g5!-+ 6.cxd4 gpdF4 7.Ф111 fxg3
8.®d7cxd4 9.Sgl S£2
0-1
Ex. 21-7
I.Csom - T.Ghitescu
Siegen Olympiad 1970
l .^e7!
(1 point)
I... i.g5
Other moves lose more simply: 1...Дс7
2.&e8f+- or l...^xe7 2.&e8f &f8 3.d8®+-.
208
Solutions
2 .£>e8t &h6 &h5 4.&g7t
(1 point)
4...&h4
Or 4...Ф116 5.^f5t &h5 6.g4#.
5.&112
Threatening g3#.
5...^d8
Or 5...if4+ 6.g3t+-.
6.f4!
Threatening g3# once more, this time
decisively.
1-0
Ex. 21-8
B.Gulko - K.Grigorian
USSR 1971
l.SfBf!
lAg6!?+- (1 point) is also good enough,
but the move in the game wins in a more
forcing manner.
1...M
1...Ф117 2.Bg6#
2 .Wd5t!
(1 point)
2... &h7
2...&h8 3.exf8®t+-
3 .exf8&t!!
(1 point)
3... &h8 4.2>eg6#
Ex. 21-9
Piotrowski - Tannenben
Lemberg 1926
l.®h8f!! ФхЬ8 2.g7t &g8 3.M7t! &xh7
4 .g8W#
(1 point)
Ex. 21-10
E.Melnichenko
1979
l.g6!
1.ФР4 would be wrong, on account of
l...f5!=.
I...feg6f
1..T6 2.&xf6+—
2.Ф£4!О g5t 3.&£3
Or 3.&f5 g4 4.<±>F4 g3 5.hxg3#.
3...g4f 4.&f4 g3 5.hxg3#
(2 points)
Ex. 21-11
R.Spielmann - L.Forgacs
Ostend 1907
l...^xe4!
(1 point)
2.£}xe4 d5 3.ILxd5 Wxd5 4.£ic3 Wd6=
Ex. 21-12
Goljak - Gaiduk
Moscow 1949
1.^16! gxft) 2.exf6
(1 point)
2...gg£8?!
If 2...^ec6, then 3.F7+-. But a more
stubborn defence would be 2...^bc6 3.f7
Sxg2f and then 4...Sf8.
3.1,xe7 4.Se3 (ДДЬ5) 4...Ы7 5.M5
Sexe7 6.fxe7 Sxe7 7.Wel+-
1-0
209
a
Scoring
Maximum number of points is 19
16 points and above > Excellent
13 points and above >Good
9 points >Pass mark
If you scored less than 9 points, we recommend that you read the
chapter again and repeat the exercises which you got wrong.
The World Chess Federation has the Latin motto Gens una sumus
which means, ‘We are one people’. Chess is a truly global sport, played
worldwide by men, women and children of all races, religions and ages.
Viktor Korchnoi has been one of
the best players in the world for over five
decades, and he was still in the Top 100 at the
age of 75. ‘If a player believes in miracles he can
sometimes perform them.’ - V.Korchnoi
Z' Judit Polgar is the strongest ever
' women player. Polgar became a grand-
master at 15, and since then she has established
herself as a top player. In 2005 she became the
к first woman to compete in a World 7
Championship final.
Parimarjan Negi from
India became a grandmaster while still
only 13 years old. In chess it’s the brain that
counts, not the birth certificate.
210
211
Contents
J Fortress I
J Cutting off from the saving
corner’
Fortress II
The wrong bishop
Sometimes in a game of chess, quite a large material
advantage is not sufficient for victory. One example
of this will be found in this lesson: an elementary
defensive fortress based on the concept of the wrong
bishop.
Diagram 22-1
Diagram 22-1
Fortress I
abcdefgh
Fortress 1 =
Although White is ahead by a bishop and a pawn,
he cannot win the game. The defence is very simple:
all the black king has to do is remain in the corner.
The white king and the light-squared bishop are not
in a position to drive the black king out of the dark
corner square h8.
So we say that White has the wrong bishop. In fact,
if White had a dark-squared bishop, the win would
be a very easy one.
It is very important to point out here that White
has a rook pawn. In every other case, White could
win with the help of a simple zugzwang.
&g8 2.h6 &h8
White can only go for stalemate.
3.h7=
Diagram 22-2 A
Even if White had some more pawns on the h-file,
the position would remain a draw!
It is only when the stronger side manages to cut the
opposing king off from the saving corner that one can
hope for a win.
Diagram 22-2
Example 1
abcdefgh
Example 1 +-
1.Да2!+-
The black king cannot get into the corner and
White wins by zugzwang.
l.Jlh7? Ф(7 2.&f2 would not be so good here, on
account of 2...^f6! with the threat of ...&g5. White
would win in this position if his king could reach
the f4-square. But here he cannot avoid a repetition
The Wrong Bishop
of moves: З.Ле4 &f7 (A...^g8) 4.jLh7 &f6= This is
an important king manoeuvre, which we shall see
again.
Diagram 22-3
Example 2
White can cut the black king ofF along the
e8-h5 diagonal.
1.M5I+-
Of course not 1.JLc2, in view of l...&f7 with a
draw, as in the previous example.
Diagram 22-3 Z\
abcdefgh
The motif ‘rook pawn and wrong bishop’ sometimes
offers the defending side surprising opportunities for
a draw.
Example 2 +—
Diagram 22-4
C.De Feij
1940
1.Фс2’О=
This is the only move which saves the game:
1.ФсЗ?? loses after l..dLb3-+ and 1 .&cl?? is bad due
to l...&b3-+.
This is an instructive position of mutual zugzwang.
With Black to move, the position is drawn, since
Black has to let the opposing king into the saving
corner. With White to move, Black wins.
Diagram 22-4
abcdefgh
The transition to an endgame with the wrong bishop
and a rook pawn is an important defensive resource.
When he has the wrong bishop, the stronger side
must play with great care to prevent this drawing
fortress.
The following instructive endgame, which appeared
in my book Schachunterricht with faulty comments,
illustrates the serious technical problems which both
sides face.
213
Endgame 4
Diagram 22-5
K.Smith - M.Campos
Diagram 22-6 (analysis) Zk
abcdefgh
San Antonio 1972
l... Sb2
This move was criticized, but it is not easy to find
another plan. For example, 1 ...g5?! 2.ФВ Ф£5 3.&g2
and Black cannot make any progress.
2.Sxb2 txb2 З.ФВ!
To achieve a draw, White must either swap off the
pawn on g6 or entice it on to the h-file. (Black then
has the wrong bishop!)
White can achieve this second aim if he first
immobilizes Black’s g6-pawn, with the moves h4,
g4 and g5, and then attacks it with h4-h5. However,
putting this plan into action too hastily would grant
Black an opportunity to win.
After 3.h4? Black has to find the only route to
victory:
3...^g7! (Д...ФЬ6-Ь5)
Diagram 22-6
This is the only redeployment which draws the
sting from White’s defensive idea. A draw would be
the result after З...Ф£5? 4.ФТЗ Феб 5.g4 JLc3 6.g5
ФТ5 7.h5!=.
4.g4
The following variation shows how Black can win
against passive defence: 4.ФТЗ ФЬб 5.&g4 JLe5
б.ФЬЗ ФЬ5 7.g4f ФЬб 8.&g2 Яс7 9.ФТЗ ^d8
10.&g3 Де7 И.ФЬЗ &b4 12.&g3 telf 13.ФЬЗ
JLf2-+ White is in zugzwang.
4...ФЬ6! 5.Ф£3 tc3 6.Фе4 iel 7.h5 g5 8.&f5 tc3
9.Феб Фg7.,
Of course not 9...<&d4?, on account of 10.ФТ7
ФЬ7 11.Ф£8 ДсЗ 12.ф£7 ig7 1 З.Феб Фg8
14^f5=. Black must not allow the opposing king
to get to f7.
1О.Ф£5 id2 И.Феб jLcl 12.Фе7
Or 12.Фе5 Ф(7 13.ФГ5 If4-+.
12...tb2 13.Феб tf6 14.ФТ5 Ф£7-+
214
The Wrong Bishop
We now return to the position in the game after
з.Фв.
Diagram 22-7
З... Ф6?!
After this move White can realize his main idea at
once. Another bad move is 3...g5?> due to 4.h4!=.
However, more problems arise after either 3...<&g5
or З...ЛсЗ.
After 3...&g5 (3...&c3 4.h3 &g5 leads to the same
thing) 4.h3 (4.h4f? loses after 4...<&h5) 4...ДсЗ,
Black aims to bring his bishop to el. White has two
ways to reach a draw:
a) The passive 5.<&g2 is possible. After 5...Яе1
6.&f3 &f5 7.&g2 g5 (or 7...Фе4 8.h4! — see line b2
below), there follows 8.^f3.
Diagram 22-8
This is a position of mutual zugzwang. (Find out
for yourself how Black wins if it is White’s move!) If
Black moves his king, White immediately plays h4.
After a bishop move, White first plays g4f and then
h4, forcing the drawing position with the rook pawn
and the wrong bishop.
b) 5.Фе2!? &f5 6.ФЕ2 &e4 7.&g2! (7.&e2? id4!
cuts off the white king) and now:
bl) 7...g5 8.Ф£2=, intending g4 and then h4.
(But not 8.g4?, due to 8...Яе1! and the idea of h4 is
defused.)
b2) 7...&el 8.h4! Фе5 9.^h3!=, and then g4-g5
and h5.
4.h4!
White realizes his plan, as described above, and
brings about by force the position with the wrong
bishop. Not 4.g4f? ^g5-+.
4...tc3 5.g4t Фйб 6.g5t!
6.h5? g5-+
Diagram 22-9
7.E5! gxh5 8.&g2 &xg5=
White has reached the classic drawing position.
У2-У2
The presence of other pawns on the defender’s side
can also have a negative effect, either changing the
evaluation of the position or adding important new
details.
Diagram 22-8 (analysis)
abcdefgh
Diagram 22-9 A
8
7
6
5
4
3
2
1
abcdefgh
215
Endgame 4
Diagram 22-10
W. Von Holzhausen
1910
Fortress 2 =
1 .Фс2!
Without the b-pawn, the white king would find
it easier to reach the saving corner. For example,
1.Фс1?? loses to l..JLd3, as after 2.b4f there comes
2...axb3!-+.
1 .JU2
If the white king reaches the saving corner, the
draw becomes obvious: 1...ФЬ4 2.ФЫ ФЬЗ З.Фа1
Фс2 (or 3...&d3 stalemate) 4.b4=
2 .b4f!
2.b3?? loses, on account of 2...аЗ З.ФсЗ &b5 4.b4
Фа4 and White is in zugzwang.
2...axb3t
Or 2...ФхЬ4 3.&b2=.
З.ФЬ2=
Diagram 22-11
Another important theoretical fortress. Black
cannot win, because of the bad position of the
bishop.
З...ФЬ4 4.Фа1 ФсЗ stalemate.
In the final example of this chapter we shall see how
a World Champion in his prime was able to impose
his will on a very tenacious opponent, despite the
apparently drawish nature of the position caused by
the wrong bishop.
Diagram 22-12
Diagram 22-12
N.Short - G.Kasparov
Belgrade 1989
abcdefgh
г.Лаз!
Forcing White to move the b2-pawn.
2.b3 Фе! З.ФБ2 Ф<12 4.Фа1 Фс2 5.Фа2 Фс1
6.Фа11Ы!
White is in zugzwang and must move the b4-pawn.
This will give Black a b-pawn, but as White still has
the ЬЗ-pawn, he will not be stalemated and will
therefore lose.
0-1
216
Exercises
>Ex. 22-24 ★★★ A >Ex. 22-54 ★ ★ A
abcdefgh abcdefgh
>Ex. 22-34 ★★ A
>Ex. 22-6 <
abcdefgh
abcdefgh
217
Exercises
-Ex. 22-7< ★ ★★
> Ex. 22-10 < ★★
abcdefgh
abcdefgh
> Ex. 22-8 < ★★ A
abcdefgh
>Ex.22-ll<
>Ex.22-9< ★ ★
8
7
6
5
4
3
2
1
>Ex.22-12< ★★
218
Solutions
Ex. 22-1
(1 point)
But not l..JLf4? 2.ф£3=.
2.ФВ M4-+
Or 2...Ле1-+, cutting off the king, as in
Example 2.
Ex. 22-2
Perlis
1901
l.la4t
(1 point)
1...Фс7 2.1xd7!
(1 point)
But not 2.ФИ5 d6, and Black’s two extra
pawns will win without incident.
2...&xd7 З.аб!
(1 point)
3.&d5? loses, due to 3..JLd3-+. Black can
maintain his pawn on the b-file and therefore
he wins, since the concept of the wrong bishop
only exists when there is a rook pawn!
3...bxa6 4.&d5=
The king runs into the saving corner and
White constructs Fortress I.
Ex. 22-3
IGEmmrich
1921
l.a6!
The order of moves is important. I.f7t
would be wrong in view of l...jLxf7 and if
2.a6 (1 consolation point), then 2...b5! 3.a7
id5-+.
I...bxa6 2.f7!t bcf7 З.Ф1б=
(2 points)
Ex. 22-4
M.Lewitt
1928
1.Ф&П
(2 points)
1.ФГЗ? <&g3! 2.Фе2 Феб З.ФА ih2 4.g4
h3-+ would be wrong. The black king reaches
g5 with a win. You get 1 consolation point if
you did not find the draw, but did suggest this
variation.
1.ФП? loses an important tempo compared
to the main variation (1 consolation point).
1...Д112 2.g4! h3
2...hxg3t 3.&g2= with Fortress IL
3.&B Феб 4.g5 Ф15 5.g6 Фxg6 6^g4=
(1 point)
Compare this exercise with the example
from Diagram 22-10.
Ex. 22-5
A.Dall Ava
1929
l.fSWf!
(1 point)
White can also save himself by l.^d7 g5
2.f8®t ixf8 3.^xf8 Фё7 4.^e6t &f6 5.^c5
or 5.5M4 (only 1 point for this variation). But
the main line is much simpler.
l...lxffi 2.&f7t &g8 3.£di6t gxh6 4.Фс2!=
(1 point)
Ex. 22-6
.Uchoa
1936
l.c3!
(1 point)
This is the only way for White to exploit the
bad position of the bishop.
1...БЗ 2.Фс1 Фаз З.ФЬ2 Фс4 4.Фа1!
(1 point)
4...ФБ5 5.ФЬ2 Фа4 6.с4 ФЬ4 7x5 Фхс5=
Fortress II
219
Solutions
Ex. 22-7
Ex. 22-9
L.Prokes
A.Ojanen
1947
1.Ф<12!
(1 point)
But not l.^dl? &f5! 2.Ф<12 аЗ З.ФсЗ &e6
4.Фс2 Да2 5.ФсЗ Фс5-+ (see Example 1).
I... a3
Or 2,ФсЗ! (2.Фс1? аЗ-+) 2...Фс5
З.ФЬ2=.
(1 point)
2.Фс2!
(1 point)
Other moves lose: 2.&cl? JLf5-+ or 2.ФсЗ?
Деб З.Фс2 Да2 4.ФсЗ Фс5-+.
2...ДВ1
Or 2„.&е6 З.ФЫ=.
з.Фьз=
Ех. 22-8
1957
Once again White finds a way to destroy the
dangerous b-pawn and thus reach the drawing
position we know so well.
I .c6!
(1 point)
1... Дхс6
Or 1...Фе7 2.c7 &d7 3.ia4I.
2 .Да4! Ьха4 З.Фс12!
(1 point)
But not 3.^dl?, due to 3...JLe4! 4.Фс1 a3-+.
3...a3
Or З...Яе4 4.ФсЗ!.
4.Фс2!=
As in Ex. 22-7.
У2-У2
Ex. 22-10
B.Avtsarpv
A.Koranyi
1951
1.^а6!
(1 point)
1.аЗ? is not so good (1 consolation point),
on account of l...a5! 2.axb4 axb4 З.Фс2
ЯЬ5! 4.&b2 &d5 5.&b3 Фс5 6.ФЬ2 (or
6.Фс2 Фс4 7.&b2 ЬЗ 8.ФаЗ ФсЗ 9.&d7
Ь2-+) 6...Фс4 7.&c2 b3t 8.&b2 ФЬ4 9.ФЬ 1
ФсЗ-+.
1...Дха6 2.аЗ!
(1 point)
2.ФЬЗ? would be wrong, due to 2...Фс5
З.аЗ JLc4f-+. With 2.a3, White swaps off the
dangerous b-pawn and set up Fortress I.
2...bxa3t
Even if Black leaves the last white pawn
on the board, he cannot crack open White’s
fortress. You can check it out for yourself on a
chess board.
З.ФхаЗ=
1962
l.b3!
(1 point)
1.ФБ5? a4 and Black wins, since the white
king cannot make it into the saving corner:
а) 2,Фс4 Фе4 З.ФсЗ ФеЗ 4.ФЬ4 (4.ЬЗ
ахЬЗ—+) 4..^d3 5.ФаЗ JLb3 6.ФЬ4 Фс2—+
Ь) 2.ФЬ4 Фd4 З.ФаЗ ДЬЗ 4.ФЬ4 ФdЗ-+
1...^хЬЗ 2.ФЬ5 а4 З.ФЬ4 Фа4 4.ФаЗ
ФсЗ stalemate.
(1 point)
Ex. 22-11
Е. Belikov
1966
lAb7t! Феб
Or 1...Фс7 2.£>a5 &d5 3^d2 Фd6 4.Фс2!
Фс5 5.ФсЗ=.
2.^a5t!
2...bxa5 З.Ф<12 Фс5 4.ФсЗ а4 5.ФЬ2=
220
Solutions
Ex. 22-12
'iihxjvb
KJunker
1976
l.h4 &d4 2.h5 &e5 3.h6 Фй 4,ДЬ5!+-
(2 points)
But not 4.Лс2, on account of 4...d?f7= (see
Example 2).
Scoring
Maximum number of points is 25
22 points and above > Excellent
18 points and above >Good
13 points >Pass mark
If you scored less than 13 points, we recommend that you read the
chapter again and repeat the exercises which you got wrong.
221
. ,, х,..,23
Smothered mate
Contents
S Lucena's mate
J Variations on Lucena s mare
S The king is encaged in the
end same
The smothered mate is a typical and effective
combination. A single knight mates the king, whose
own pieces are blocking its escape squares.
A classic version, named after Lucena, contains a
queen sacrifice in order to entice the rook to an
unfavourable square.
8
7
6
5
4
3
2
1
8
7
6
5
4
3
2
1
Diagram 23-1
Lucena
1497
l.We6f ^h8
1...ФГ8 2.®f7#
&g8 3.&h6t
An important double check. Once again, the black
king cannot move away from the corner, in view of
®f7#.
З...Ф118 4.Wg8f!!
A sacrifice involving decoying forces the rook to
block the g8-square.
4...Sxg8 5.&f7#
This is one of the oldest and most famous mating
combinations in chess.
In this lesson we shall look at a few versions of this
important tactical motif.
Diagram 23-2
EGiese - A.Buescher
Bremen Blitz 1990
In this case the decoy sacrifice only works because the
bishop helps by controlling the g8-square.
I.®g8t! Sxg8 2.^f7#
It is not necessary for the king to be in the corner for
you to be able to deliver a smothered mate!
Smothered Mate
Diagram 23-3
N.N. - G.Greco
Europe 1620
2.Фе1 ^d3t 3.&dl
Or 3.&fl ®f2#.
3—WeltI!
Once again - decoying!
4.^xel ^£2#
This variation on the theme by Paul Morphy is
particularly pretty.
abcdefgh
Diagram 23-4
P.Morphy - N.N.
Paris 1859
l.$k5t &Ь8
l... &d8 2.®d7#
2.&d7t &c8 3.^b6f &b8
3...&d8 4.®d7#
4.®c8f!! Sxc8 5.^d7#
The king is blocked in by five of its own pieces!
Diagram 23-4 Д
8
7
6
5
4
3
2
1
abcdefgh
In the next two examples White demonstrates
methods for the preparation of a smothered mate.
Diagram 23-5
M.Tal - L.Portisch
Biel 1976
After the startling:
l.^h6!
Black resigned.
He can only fend off the threat of 2.®g8f and
then 3.&f7# at the cost of great material losses:
l...Exe6 (l...gxh6 2.®xh7#) 2.&xe6+-
Diagram 23-5
abcdefgh
223
Tactics 11
abcdefgh
Diagram 23-8 A
Diagram 23-6
Donetsk 1961
1.Ь4!
I.^h6f! is also very strong:
a) l...gxh6 2.®g4f ФЬ8 (or 2..JLg7 3.Jbch6+-)
3.®f5! Black cannot fend off the threat of ®xh7#.
b) If 1...Ф118, then 2.^xf7t *&g8 3.®d5 JLe7 and
what follows is the combination we already know,
with the double check on h6 and then the smothered
mate. 4.&h6f <±>h8 5.®g8f!l Sxg8 6.W#
Lets return to the position after l.b4. Next came:
l...cxb4 2.Wh5!
The threat is a discovered attack, winning the
queen or mating on h7 (or h8).
2...Ф118
If 2...b6, then 3.^e7t txe7 4.®xh7t &f8
5.®h8#.
3.ftMd8 4.&h6!
The threat is now ®g8#.
4 .jLc4! is also good.
4... td6
Or 4...gxh6 5.®xh7#.
Diagram 23-8
5 .®g8tl! Sxg8 6.&f7#
Sometimes the defending king is only partially
hemmed in by its own pieces, but the opposing
pieces control some escape squares. This version of
smothered mate is not so well known, but often
crops up in praxis.
abcdefgh
224
Smothered Mate
Diagram 23-9
A.Alekhine ~ N.N.
Pressburg 1933
l.£g6t &h7 2.&e5t &h8
Or 2...Ле4 3.jkxe4f ^xe4 4.®g6f ^g8 5-®xe8t+~.
3.^f7t &g8 4.£lxh6t Ф118 5.Wg8t Sxg8 6.&f7#
The bishop on d3 is controlling the h7-square.
Diagram 23-9
Diagram 23-10
Based on the game
abcdefgh
Chennikov - Radchenko
Krasnodar I960
From g3 the knight controls the escape squares fl
and hl.
2.&gl Wg2fl!
A typical decoy!
3.Sxg2 ^h3#
The next two examples again show the strength of
the discovered battery comprising knight + queen.
Diagram 23-11
Diagram 23-10
abcdefgh
KandcdhT^ZЖО{^еп
Helsinki 1962
l...^g4!
Not the only way to win, but the quickest way.
2.1,xe7 Wb6l!
Never just make a recapture automatically! The
threat is ...^f3t and then ...®gl#.
3.&hl
With a hopeless position, White allows the
smothered mate. The variation З.йеЗ ®ie2t! 4.jLxe2
®xe3t 5.&hl 6.&gl £>xe4t 7.&hl ^f2f
8.&gl £id3t 9.^hl ^xcl-+ is thematic.
3...£tf2t 4.&gl &e2t! 5.Дхе2
Other moves lead to the same result.
5...^h3t 6.&hl WgltU 7.Sxgl ^£2#
Diagram 23-11
abcdefgh
225
Tactics 11
Diagram 23-12
Diagram 23-12 A
O.Bernstein —
Ostend 1907
abcdefgh
l.^eg5!
The threat is not only ^xh3, but also ^f7t!.
I...feg5 2.Sxd7
2.?}xe5 is not so good, on account of 2...jLd6±.
2...Wxd7 3.^xe5+-
You should convince yourself of the fact that all
queen moves lose: White either wins the queen by
means of a discovered check or delivers smothered
mate.
Black resigned here.
It is very useful to know the following endgame
situation. A lone knight, with the modest help of the
king, mates the opposing king which is hemmed in.
Diagram 23-13
Diagram 23-13 A
Example 1
l.^g4f! &hl 2.ФЛ
Black is in zugzwang and must block in his own
king.
2...112 3.&£2#
abcdefgh
226
u
Exercises
> Ex. 23-1 < ★ A
8
7
6
5
4
3
2
1
abcdefgh
>Ex.23-4< ★★ A
8
7
6
5
4
3
2
1
abcdefgh
>Ex. 23-2< ★
abcdefgh
> Ex. 23-5 < ★★
abcdefgh
>Ex.23-3< ★★ A
abcdefgh
abcdefgh
227
Exercises
> Ex. 23-11 < ★ A
abcdefgh
abcdefgh
Ex. 23-9< ★
>Ex.23-12< ★★
228
Solutions
Ex. 23-1
M.Taimanov — Jakobsen
Copenhagen 1967
l.®g7t!! &xg7 2.^h6#
(1 point)
Ex. 23-2
Based on the game
Pilar - Kvicala
Prague 1899
l... £hg3t 2.&h2 f 3.&hl
З .ФБЗ Bg3#
3... Wh2f!! 4.^fxh2
4 .£)gxh2 £)fg3#
4... £)fg3#
(1 point)
Ex. 23-3
4.^e7t 5.£)g6f &g8 6.Ш|Н M
7&e7#
(2 points)
Ex. 23-5
Fedder - H.Westerinen
Roskille 1978
l...?)g3t! 2.Ф112 4)flt!
(1 point)
3.&hl
3.Sxfl ®xg2#
3...Bg3!
(1 point)
Threatening ...'Bh2#.
White resigned, in view of 4.£)6g4 (4.^,f4
exf4-+) 4...®h2t!l 5.^xh2 2>g3#.
Ex. 23-6
F.Kohnlein
D Janowski - N.N
1914
l.£b5t! &d8
1... ФЬ8 2.®d6f Фа8 3.?)c7t &b8
(3...Sxc7 4.®xf8f+-) 4.£ia6t Фа8 5>b8t!!
Sxb8 6.£>c7#
2.Bd6f Фе8 3>xe5t ^f7
Or З...Ф<18 4.®d6f, then 5.Self and mate
on e6.
4.2>d6t &g8 5.®e6f ФЬ8 6.4)f7t &g8
6...§xf7 7.®xc8|+-
7.&h6f ФЬ8 8>g8t’’ Sxg8 9.&f7#
(1 point)
Ex. 23-4
P.Morphy - Bryan
New York 1859
l.e5!
I>b4f Фе8 2.e5 Bg5 3.h4 a5 4.®xb6+- is
equally good.
l... Wg5 2.h4! Wg4 3.Wa3f
З...Фе8 4.®e7#
Paris 1900
l.£a6t &a8 2&xc7t
(1 point)
2...ФБ8
If 2...Sxc7, then 3.Sd8t+-
3.&a6f Фа8 4.Sb7!!+-
(1 point)
White threatens Sb8|.
4...e2 5.Sb8f! Sxb8 6.S)c7#
Ex. 23-7
Nikolov — Slavcev
Correspondence 1963
l.Sf8f!
And Black resigned, in view of:
l...Sxfl8
Or l...lxf8 2.®g8#.
2.Wg8t Sxg8 3.^f7#
(1 point)
229
Solutions
Ex. 23-8
The end of a study by
A.Seletskv
1933
(1 point)
There is only a draw to be had after 1 .£)e6
®f3! 2.®g8t 2>c8 3.®xc8t Фа7=.
1...ЛхЬ7 2.&d7!+-
(1 point)
If 2.£>e6? ®f7 3.&c7t, then З...ФБ8
4.2>a6t Фс8! 5.®b8t &d7 6.®xb7t Фе6=.
2...®d8 3.®b8f!! ®xb8 4.^b6#
Ex. 23-9
Oltschewski-Ischernik
Corr. 1979
l.e7I! Sxf3 2.e8®t Sffi 3.®e6f &h8 4.&f7t
&g8
Or 4...§xf7 5>e8t+-.
5.^h6f ^h8 6>g8t! Sxg8 7.&f7#
(1 point)
Ex. 23-10
Scheschukov - Garmaschev
USSR 1979
l...^x£2f!
(1 point)
l...£)g4 2.®xf6 jkxf2t З.ФЬ 1 £>xf6+ is not
so good.
2.&x£2
If 2.ФЫ then 2...jLxel— +.
2...^g4t
2...®b6f 3.£>d4 £>g4t—+ is equally good.
3.&gl ®b6t-+
(1 point)
4.&Ы
Or 4.ftd4 ®xd4t 5.®xd4 Sxelt 6.1fl
2xd4-+.
4...&£2t 5.&gl 2>h3t 6.&hl Wglf 7.§xgl
S)£2#
Ex. 23-11
A.Salvio
1792
1.Фс2
Or 1.2)c5 &al 2.Фс2 Фа2 3Ad3 Фа1
4.£)cl a2 5.£)b3#. (also 1 point)
l...&al 2Лк1 a2 3.2>b3#
(1 point)
Ex. 23-12
D.Ponziani
1792
l.?)c3!
(1 point)
You need two more moves to mate after
l.£)cl+—. So only 1 point.
l... &hl 2.&e4
The mate takes longer after 2.£)e2 ФЬ2
3.£d4 ФЫ 4.&f5 ФЬ2 5.&еЗ ФЫ 6.®)fl
h2 7.&g3#.
2...&h2
Or 2...h2 3.^g3#.
3.&d2 &hl 4ЛМ1 h2 5.&g3#
(1 point)
230
Scoring
Maximum number of points is 19
17 points and above ►Excellent
14 points and above >Good
10 points >Pass mark
If you scored less than 10 points, we recommend that you read the
chapter again and repeat the exercises which you got wrong.
231
24
Contents
S Gambits
S A lead in development and
gambits
S Guidelines for defending
against a gambit
Diagram 24-1
8
7
6
5
4
3
2
1
abcdefgh
Gambits
A gambit is 'an opening in which one player offers to give
up material, usually a pawn, sometimes a piece or more,
in the expectation of gaining a positional advantage.'
(The Oxford Companion to Chess)
One of the advantages that is often gained by gambit
play is rapid development, and we already know
how important that is. For this reason, a gambit in
the skilled hands of a tactical player is a powerful
weapon. He ought to try to open up the game, to
develop his pieces swiftly, and to prepare an attack
against the opposing king. Further sacrifices should
also be considered, if they strengthen the attack.
Y.Neishtadt - N.N.
Simultaneous game 1950
1.е4 e5 2.1,с4 21К 3.d4
Diagram 24-1
White offers this thematic sacrifice to speed up his
development and to open diagonals and files. This
type of play is encountered not only in the Centre
Game and Bishops Opening, but also in the Scotch
Gambit and in some variations of the Two Knights
Defence.
3...exd4
It is difficult for Black to decline the offer.
3...^xe4 is not so good, because of 4.dxe5 and the
threat is 5.®d5 or first 5 Jbcf/TL
4.&B
Of course, 4.®xd4?! does not fit in with the previous
move. After 4...?k6 Black would gain valuable time
for the development of his pieces.
4...&xe4
Black can also play 4...£lc6 and transpose to the
Two Knights Defence. But there are reasons why
the text move is absolutely playable: Black takes a
central pawn and can later hope for superiority in the
centre.
5.®xd4
5...£}d6? is bad, since the black knight would
then get in the way of its own d-pawn. White can
Gambits
get a strong attack after 6.0-0!. On 6...^xc4 there
follows 7.Helf! Ле7 8.®xg7 Hf8 9.Л1161+- and
Black loses his f8-rook for starters.
6.&g5Де7 7.<йсЗ
Diagram 24-2
White develops his pieces very quickly. Black
already has to play very carefully and must endeavour
to complete his development with appropriate
haste.
7...0-0?!
This is a very natural move. But now his opponent
knows where he should be aiming his attack: at the
kingside! Black should delay castling and first bring
the other pieces into the game. For example: 7...c6
8.0-0-0 d5 9.Shel Леб 10.®h4 ^bd7^ or 7...&c6
8.®h4 d6 9.0-0-0 Леб 10Лх13 ®d7 and Black now
even has the choice of which side to castle.
8.0-0-0 &c6?!
It is very hard to play against a gambit. Accurate
defence is often of the essence. A better move would
be 8...c6, intending d5. The knight can then go to d7,
in order to support its colleague on f6. With the text
move, Black may win a tempo for his development,
but this is not the way to stop the forthcoming white
kingside attack.
9.Wh4 d6 10.td3!
An important move. White is threatening ЛхйЗ, and
by doing so provokes a pawn move which noticeably
weakens the black castled position.
10...h6?
Better would be 10...g6 ll.^hel (with the threat
Йхе7) 11...Леб 12.Лс4! ^h5! (but not 12...Лхс4
13.Sxe7! ^xe7 14.jlxf6±) and Black can still
defend.
Diagram 24-3
И.ЛхЬб!
A typical sacrifice, which opens up Black’s castled
position.
Il...gxh6
A more stubborn defence would be 11...^g4
12.JLg5 Jlxg5t 13.^xg5 ^h6±.
12.Wxh6 ^b4?
Black wants to swap off the dangerous bishop, but
when he does that, the rook comes into play.
After 12...&e5 comes 13.^xe5 dxe5:
Diagram 24-2
abcdefgh
Diagram 24-3 A
abcdefgh
233
Opening 2
And here not 14.jLh7t ^xh7 15.§xd8, due to
15...jlg5t!-+, but rather 14.Shel!. The threat is Йхе5
or simply Se3-g3 with a powerful attack. Black has
no defence.
Instead of that, Neishtadt himself recommended
14.®g5*H? ФЬ8 15.JH5, but after this Black can
still fight on: 15...^h7 16.®h5 &g5t 17.f4 JLxf4f
18.ФЫ ixf5 19.Sxd8 ixc2t 2О.Фхс2 Saxd8±.
13.&g5!
White wants to mate. There is also the very good
and somewhat simpler 13.®g5t ^h8 14.®h4f and
then ®xb4.
13...£ixd3t
After 13... Jld7 there comes 14.ih7t &h8
15.Sd4+- and then §h4.
14.Sxd3 Д6 15.Sg3 Ig6
Diagram 24-4
16.^e6!
To fend off the immediate mate on g7, Black has
to surrender his queen on d8 and play 16...^e8
if 16...fxe6 then 17.®xg6f ФЬ8 18.®g7#.
1-0
How should you defend against a gambit?
Should you accept your opponent’s sacrifice, or is it
more advisable to decline it?
There is no universal answer to this question. But
here are some guidelines to help you make a correct
decision:
1) You must generally be prepared to return any
material you have won, in order to complete your
development.
2) Capablanca’s rule: do not win a pawn if it costs
you more than two tempi!
3) Central pawns are generally more valuable than
wing pawns, so accepting the sacrifice of a central
pawn is usually the best option. Also, it is often
not possible to decline the sacrifice of a central pawn
without it working out to your disadvantage.
4) It is even more important than in other open-
ings to bring your pieces into the game rapidly and
to be thinking about the safety of your king.
5) Be on the lookout for chances for a
counterattack.
234
Gambits
The following game illustrates some of these ideas.
R.Spielmann - A.Alekhine
Stockholm 1912
1.е4 e5 2.Дс4 3.d4 exd4 4.^B JLc5
Alekhine plays the opening solidly and strives for
rapid development of his forces.
4...d5!? 5.exd5 JLb4f 6.c3 ®e7t is another
possibility for Black while we saw 4...<йхе4 in the
first game.
5.0-0
What should Black play after 5.e5?
5...d5! is the standard reply in such cases: 6.exf6
(if 6.JLb5T then 6...^fd7 7.kg5 Ле7) 6...dxc4 7.fxg7
Sg8 leads to complicated play, with good chances
for Black.
5...d6
5...^xe4?! is worse, on account of 6.Sei d5 7dlxd5!
®xd5 8.^c3! and White wins the knight back with a
strong attack.
5...£k6 leads to the so-called Max Lange Attack.
6 .c3!?
Diagram 24-5
White really wants to play a genuine gambit.
6... d3!?
A good practical decision. After 6...dxc3 7.^xc3
0-0 8.jlg5 the white pieces come into play quickly.
Black does not want to let the opposing knight get
to c3.
7 .Wxd3 ^c6 8.b4
A more prudent course would be 8.jlg5 h6 9.JLh4
JLg4 10.^bd2 ^e5 (A.Alekhine), and then ll.^xe5
dxe5 12.®g3! Wxd2 13.JLxf6 gxf6 14.®xg4 ®g5
15.®f3=.
8...ДЬ6 9.b5 ^a5 (A^xc4) 10.e5
Diagram 24-6
White is playing aggressively and Black must
defend.
10...dxe5 ll.Wxd8f &xd8 12.ДхГ e4 13.&e5
(Д^аЗ) 13...tc5!
Now the king can go to e7.
14.^d2 Sfi8
The threat is ...jld6 winning a piece.
Diagram 24-5
abcdefgh
Diagram 24-6
abcdefgh
235
Opening 2
ГЯ
rjrt-Z
Diagram 24-7
abcdefgh
Diagram 24-8
abcdefgh
Diagram 24-9
abcdefgh
15.^dc4 ^xc4 16.ILxc4 Фе7 17.Jlg5
Diagram 24-7
17..J.d6?
A very risky move. Black would be better off
continuing with his development: 17...JLe6! 18.Sael
^d6 19.JH4 JLxc4 2O.^xc4t Феб and after 21.Лхс7
Sac8 22.jLg3 there comes 22...jLxf2f 23.JLxf2 Sxc4
with a level position.
18.f4?I
The correct move is 18.йае1! Д6 (if 18...jlxe5,
then 19.Sxe4 and White wins the bishop back)
19.£f3&d7 2O.^d4±.
18...Д61?
Black is intending to continue with ...h6.
19.g41.e6 2O.Sfel
Diagram 24-8
20.. .e3!
A surprise. White was hoping for 2O...ixe5 21.fxe5
ixc4 22.йхе4+-
21.1d3I?
White continues trying to keep the position
complicated. Other possibilities are:
a) 21.^g2 ixe5 22.fxe5 ixc4 23.Sxe3 Ф17 24.exf6
gxf67 (A.Alekhine)
b) 21.f5 Дхе5 22.Дхе6 ДхсЗ 23.ixe3 ^xg4?
(V. Panov)
c) 21.ixe6 Фхеб 22.Sxe3 ic5 23.f5t Фе7
24.ixf6t gxf6 25.^c6t! Ф17 26.^d4 Sg8 27.Sg3 a6
28.bxa6 Эхабоо with approximate equality.
Diagram 24-9
21...Фе81?
Black struggles for the initiative. He hopes to be
able to exploit in the future the weaknesses which
White’s pawns have left behind in their own camp.
The threat is ...Лхе5 and then ...^xg4.
22.h3
After 22.йхеЗ there follows 22...Лс5.
22...^d5 23.6?
If 23.Jlxh7 then 23...£lxf4 24.JLxf4 Hxf4+
(A.Alekhine).
The text move is too optimistic. The correct idea is
23.Ле4! and if 23...^xf4, then 24.jbcf4 Sxf4 25.JLxb7
Sd8 26.£ld3 and White is well placed.
23...Дхе5 24.fxe6 ДхсЗ 25.ДхЬ7
236
Gambits
Threatening jLg6f. Spielmann conducts the whole
game in gambit style. It is remarkable how calmly
Alekhine fends off all the threats.
25...&f4!
25...SI3? would be bad: 26.ig6f &f8 27.Sfl
(A.Alekhine)
Alekhine also thought that after 25...^Ie7 26.Sadl
(Q26.jle4!?) 26...jLxel there would follow 27.Hd7
JLb4 28.Лхе7 Лхе7 29.Jlg6t+- but he overlooked
the defence 27...Sf6!.
Thus the game continuation is best.
26.Sadl
The final attempt at an attack.
26...1xel 27.Sd7 (ASe7t) 27...M4!
0-1
Black has found a simple defence.
27...&e2t 28.&g2 gf2f 29.&hl Ш would be
more complicated after 3O.55xg7 (A.Alekhine), but
Black has a win here too: 3O...Sflf 31.S$?g2 (31.ФЬ2
JLd6f 32.&g2 gf2t 33.&hl gh2#) 31...^f4t!
32.&xfl e2t-+.
237
Exercises
> Ex. 24-1 < ★ A
> Ex. 24-4 < ★★
abcdefgh
abcdefgh
Ex. 24-2 <
> Ex. 24-5 < ★ A
abcdefgh
abcdefgh
>Ex.24-3< ★★ A
>Ex.24-6< ★★
abcdefgh
abcdefgh
238
Exercises
abcdefgh
>Ex. 24-104 ★★ A
8
7
6
5
4
3
2
1
abcdefgh
> Ex. 24-114
>Ex. 24-84 ★★
abcdefgh
8
7
6
5
4
3
2
1
abcdefgh
abcdefgh
> Ex. 24-124 ★★
abcdefgh
239
Solutions
Ex. 24-1
Ex. 24-2
Finn - Newuent
AJDenker - LAvram
New York 1980
USA 1940
l.e4 e5 2.^f3 ^сб З.Лс4 ^f6 4.d4 exd4
5.0-0 Лс5 (5...^xe4 6.Sei d5 7.Jlxd5 Sxd5
8.£k3 ®a5 9.^xe4 JLe6=) 6.e5
Diagram Ex. 24-1
6...d5!
(1 point)
7.exfi6 dxc4: 8.Self
8.fxg7 Sg8 9.^g5 Де7 1О.^хе7 Фхе7
1 l.£lbd2 Sxg7 12.£ixc4 Деб 13.Sei ФЕ8?
8...te6 9.&g5
9.fxg7 Sg8 10.^g5 ie7 (10...®d5 П.^сЗ
®f5 12.^e4 Sxg7 13.£h4+-) П.^хе7 Фхе7
(11...®хе7 12.^xd4 0-0-0) 12.^bd2 ®d5?
9...Ш5
9...®xf6 Ю.^хеб fxe6 1 l.®h5t+-
Ю.&сЗ 11Лке4&£8
Good alternatives to the text move are
H...ib6 and 11...0-0-0!?.
12.^xf7 &xf7 13.^g5t &g8
The following long variation is not forced,
but is given to illustrate the possibilities for
both sides: 13...^g6 14.fxg7 (O14.£ixe6!?)
ixg7 15.Sxe6t ^f6 16.g4 ®d5 17.Ш
&f7 18.Ш @c5 19.®f3 Shf8 2O.b4! £ixb4
21.®e4 ^g8 22.^h5 (S.Lepeshkin) and now
22...®d5!+.
14.g4!
14.^xe6 Se8!=
14...Wxft>?
Of course, not 14...@xg4t?? 15.®xg4 JLxg4
16.f7#. But better would be 14...®g6.
After 14...®d5 15.£lxe6 £le5? comes 16.f7t!
&x£7 17.^g5t &g8 - see Ex. 24-2.
15.Sxe6Wd8 16.®BWd7
See Ex. 24-3
18.Sxe5! ®xe5 19.W6+-
(2 points)
1-0
Ex. 24-3
Finn — Neweent
New York 1980
White must play very energetically or else
Black will develop his pieces. Next came:
17.Se7!!+-
(2 points)
Black resigned in view of 17...®xe7
(17...txe7 18.®f7#; 17...^xe7 18.®f7#)
18.®d5t+-
Ex. 24-4
B.Avrukh - A.Skripchenko
Linares 2001
l.e4 e5 2.jLc4 ^lf6 3.d4 exd4 4.^f3 &xe4
5.®xd4 E)f6 6.£k3 c6 7.&g5 d5 8.0-0-0
le7 9.®h4 &bd7 (a9...te6S) lO.Shel
dxc4 llJLxfiS gxf6 12Ae4 0—0 13.£lg3 ФБ8
14.^if5 lc5 (O14...M4) 15.Ш (Q15.Se4)
15...c3 16.Se4 ®b6 17.b3 Sg8 18.®xf7 ®a5
19.Sxd7^a3t 20.ФЫ ®xf5
Diagram Ex. 24-4
21.§e8!+-
(2 points)
But not 21.@xg8t?? ^xg8 22.Se8t due to
22...if8.
After the text move Black resigned in view
of 21...©g6 (21...ixd7 22.®xg8#; 21...1f8
22.Sxf8+-) 22.Sxg8t ®xg8 23.®xf6f+-.
240
Solutions
Ex. 24-5
M.Euwe - R.Reti
Amsterdam 1920
l.e4 e5 2Af3 Sk6 З.Дс4 £)f6 4.d4 exd4
5.0-0 £ixe4 6.Sel d5 7.JLxd5 ®xd5
Diagram Ex. 24-5
8.&c3!
(1 point)
8...Wa5
8...®d8!? 9.Sxe4f (9.^xe4 ie7) 9...te7
10Axd4 f5 ll.Sf4 0-0 12.^xc6 ®xdlt
13.^xdl bxc6=
9.^xd4?
Better is 9Axe4 &,e6= after which Black
will castle queenside.
9...^xd4 10.Wxd4f5 ll.JLg51=fc5! 12.Wd8f
Ф17 13.^ixe4 fxe4 14.Sadi jLd6! 15.Wxh8
Wxg5 16.f4Wh4 17.Sxe4 Д113! 18.Wxa8-+
See Ex. 24-6
Ex. 24-6
M.Euwe — R.Reti
Amsterdam 1920
18...^c5f!
(1 point)
19.&Ы
19.&fl ®£2#
19...i,xg2t! 20.&xg2 ®g4f 21.&fl W£3t
22.&el ®f2#
(1 point)
Ex. 24-7
.Martinez Galan - N.Garcia Vicente
Canete 1994
l.e4 e5 2.£if3 ^сб 3.d4 exd4 4,jkc4 £if6
5.0—0 £)xe4 6.Sel d5 7.JLxd5 ®xd5 8.?lc3
®a5 9.®>xe4 JLe6 10.£)eg5 0—0—0 П.&хеб
feed 12.Sxe6 &16 13.®e2?! (O13j,g5=)
13...Ш1 14.1d2? (14.®e4 She8 15.^d2
^e5 16.Sxe8 2)xf3t 17.gxf3 ixh2f 18.&g2
§xe8+; 14.h3 Hhe8)
Diagram Ex. 24-7
14...d3!
(2 points)
15.We4
15.cxd3 £)d4!—+ or 15.®xd3? &xh2f—+.
15...&d4-+ 16.g4 &xf3t 17.®xf3 ®xh2f
18.&fl Sh£8 19.®g2 Hx£2f 20.®x£2
2О.Фх£2 Sf8f-+
20...®hlt-+
White resigned, in view of 21.®gl Sf8t-+.
Ex. 24-8
VAntoshin - A.Khasin
Moscow 1955
l.e4 e5 2.£}f3 ^c6 3.JLc4 ^f6 4.d4 exd4
5.0-0 £ixe4 6.Sei d5 7JLxd5 ®xd5 8.^c3
®a5 9.^xe4 JLe6 10.^eg5 0-0-0 П.^хеб
Бсеб 12.Sxe6^d6 13.&g5 Sde8 14.®e2
Diagram Ex. 24-8
14...^d7!=
(2 points)
Black fights for the open file. 14...Sxe6 is
not so bad (1 point), nor 14...Sef8 (1 point),
but the move in the game is more logical.
15.Se4
If 15.Sei, then Black plays 15...®xelf
16.®xel Sxe6?.
15...W6 16.Sel Sxe4 17.Wxe4 Wxe4
18.Sxe4Se8=
У2-У2
Ex. 24-9
R.Greger - P.Nielsen
Valby 1991
l.e4 e5 2.jLc4 ^f6 3.d4 exd4 4.^f3 ^c6
5.0-0 ^xe4 6.Sel d5 7Jbcd5 ®xd5 8Ac3
®a5 9.?W4 £le6 10.JLd2 jLb4 1 lAxd4 ^xd4
12.c3 &>e7 13.cxd4 ®d5 14.if4 c6 15.^c3
®d7 16,®a4
In the game, Black saw White’s idea and
played the correct 16...b5’.= 17.®a5 0-0
18.Sadl Sfe8 19.h3 У2-У2.
241
Solutions
Instead of that, 16...0-0?! would have lead
to the test position.
Diagram Ex. 24-9
17.d5!
(1 point)
This is the only way for White to get an
advantage.
17..JLB
17...cxd5? 18.®xd7+- or 17...&rd5?
18.2)xd5+-.
18.dxc6
Or 18.d6if6 19.Sadl±.
18...bxc6 19.Sadl±
Ex. 24-10
Variation from the game
P.Romanovsky - A.Rabinovich
USSR Ch, Moscow 1920
l.e4 e5 2.^f3 З.Яс4 ^f6 4.d4 exd4
5.0-0 £ixe4 6.Hel d5 7.jbcd5 ®xd5 8.^c3
®c4 (8...®a5) 9Axe4 Яеб 10.jLg5°° ЯЬ4
П.ЬЗ®а6? (11...Ш5!? 12.c3 f5!) 12.£xd4!
In the game Black spotted the danger and
played the superior 12...0-0, but
despite that he was unable to save his inferior
position, and he eventually lost:
13.£xe6 fxe6 14.c3 l.a3 15.b4 gf5 16.®b3
£e5 17.b5 ^f3t 18.gxf3 Sxb5 19.®dl ib2
20.5Ы ixc3 21.gxb5 ®xb5 22.§e3 <£a5
23.Sd3 c5 24,Sd7 c4 25.Ш ®h5 26.ixg7
®g6t 27.ФА id8 28.ЯсЗ М4 29.®d4 1-0.
12...Яхе1? would have lead to the test
position.
Diagram Ex. 24-10
13.&c5!
13.^xe6 jLxf2t! 14.ФхЕ2 fxe6 15.^c5
is not so good (1 consolation point for this
variation), on account of 15...0-0f!-+.
13...Wb6 14.^dxe6
(2 points)
14...&tf2t 15.&x£2 fee6 16>d7t &f8
17.&g3! Bxc5
17...^ie5 18.&xe6t &g8 19.®xg7#
18.Sflt @6 19.Sx£5t exf5 2O.Bxf5t &e8
21.@e6f &£8+-
See Ex. 24-11
Ex. 24-11
Variation from the game
RRomanovsky - A.Rabinovich
USSR Ch, Moscow 1920
22.1cl!+-
(2 points)
22.ЯеЗ!+- is equally good.
22.® d7 is not bad (1 point), but the
activation of the bishop decides things
immediately.
22...Se8
Or 22...a5 23.ia3t £ib4 24.c3+-.
23.<ta3t ^e7 24.<txe7t Sxe7
See Ex. 24-12
Ex. 24-12
Variation from the game
P.Romanovsky — A.Rabinovich
USSR Ch, Moscow 1920
The strongest continuation is
25>6t!+-
(2 points)
Black loses a rook:
а) 25...Фе8 26.®c8t Ф17 27.®xh8+-
b) 25...&g8 26.®c8t ±f7 27.Bxh8+-
c) 25...§f7 26.®c8t Фе7 27.®xh8+-
Only 1 point for 25.®c8f.
242
Scoring
Maximum number of points is 21.
18 points and above > Excellent
15 points and above >Good
11 points................>Pass mark
If you scored less than 11 points, we recommend that you read the
chapter again and repeat the exercises which you got wrong.
★ ★ ★
The following final test will highlight your individual strengths and weaknesses in the various
areas of chess we have studied: tactics, positional play, strategy, the calculation of variations,
the opening and the endgame.
This will give you a better idea of where you need to take special care!
243
Final Test
>F-1< ★
abcdefgh
>F-4< ★
abcdefgh
>F-2<
abcdefgh
>F-5< ★ A
abcdefgh
>F-3<
abcdef gh
>F-6< ★★★ A
abcdefgh
244
Final Test
>F-7< ★★ Д
8
7
6
5
4
3
2
1
abcdefgh
>F-10< ★★ Д
abcdefgh
>F-8<
abcdefgh
abcdefgh
245
Final Test
abcdefgh
>F-14< ★★ Д
abcdefgh
>F-15< ★
abcdef gh
246
Final Test
>F-19 < ★ ★★ A
abcdefgh
>F-22< ★★ A
abcdefgh
abcdefgh
>F-23< ★ ★
abcdefgh
>F-21<
8
7
6
5
4
3
2
1
abcdefgh
>F-24<
abcdef gh
247
Solutions
F-l
Tactics/Chapter 7
W.Steinitz - M.Walsh
Simultaneous game, Great Britain 1870
l.^e6f!
(1 point)
l... &e8
l...fxe6 2.jLa5t b6 3.®xd3 bxa5 4.®c3+—
2.&bc7#
F-2
Endgame /Chapter 4
l.f4!
(2 points)
But not l.&g2?, because of 1..T4! 2,ФЬЗ
&d3! 3.&h4 Фе2! 4.&g4 ФеЗ-+.
1... ФеЗ 2.&g2 &xf4 3.&£2=
F-3
Endgame /Chapter 4
l...f4!
(2 points)
But not 1...ФеЗ? 2.f4!=. See F-2.
2.&E2
2.&g2 ФеЗ-+
2...&d3 3.&fl ФеЗ 4.Фе1 &xf3-+
If you did not solve exercises 2 and 3, we
recommend that you repeat Chapter 4.
F-4
Tactics/Chapter 15
S.Tarrasch - N.Mannheimer
Breslau 1879
Li.g7t! ®xg7 2.®e8f+-
(1 point)
1-0
F-5
Tactics/Chapter 1
.Blackburne - J.Hanham
New York 1889
l.Wxh7t!!+-
Black resigned, in view of 1...ФхЬ7 2.Sh3t
&g7 3.1h6t ФЬ7 4.1xf8#.
(1 point)
F-6
Tactics/Chapter 13
A.Miles - J.Timman
Amsterdam 1985
l.txe5!
I.®d5t? You get only 1 consolation point
for this, as Black has the following defence:
1...SF7! 2.JLxe5 ®xd5 3.cxd5 fxe5
l...fce5 2.Wd5!t+-
(3 points)
Black resigned, because of 2,..®xd5
3.^xe7t+-.
F-7
Tactics/Chapter 2
Schitkevic - Fain
Minsk 1930
l.^xe5!
(1 point)
l... jLxdl 2.jLb5t c6 3.dxc6
(another 1 point)
3...e6
3...®c7 4.cxb7t &d8 5 Axf7#
4.cxb7t Фе7 5.^c6f 6.£}xd8 Sxd8
7.^xdl+—
1-0
F-8
Endgame/Chapter 10
1...Фс7!
(1 point)
Not 1...Фа7?, on account of 2.a5 (also good
is 2.Феб Фаб 3^d6!+—) 2...bxa5 З.Фха5+—.
2.Фа6
2.c5 bxc5 З.Фхс5=
2...Фс6 З.Фа7 Фс7!=
(1 point)
248
Solutions
F-9
Strategy/Chapter 8
F-ll
Tactics/Chapter 21
M.Botvinnik - P.Keres
A.Yusupov - V.Salov
USSR Ch, Moscow 1952
l.e5!
(2 points)
1 point for l.Sdl. After the text move,
White obtains control over the important
d6-square.
1...Ы5 2.&e4
2...^c7 3.^d6 <йе8 and now 4.<йс8
(M.Botvinnik), 4.^xf7 and 4.jLxg6 all win.
3.^d6
The threat is 4.^c8 or 4.^xf7 Sxf7
(4...&xf7 5 JLe6t!) 5.jLe6+- (M.Botvinnik).
3...Wc7 4.jLe4 ^e6
4...Sxd6!? 5.exd6 ®xd6 6.jLxd5 cxd5
7.He5+— (M.Botvinnik)
5.Wh4 g6 6.jLxd5! cxd5 7.Scl
7.Se3 would be worse, on account of
7...Sxd6!± (M.Botvinnik).
7...Wd7 8.Sc3 a»±
See F10.
F-10
Calculating variations/Chapter 18
M.Bptyinnik-RKeres
USSR Ch, Moscow 1952
1.^6!
(1 point)
l.Sh3?! f5! 2.exf6?? ®xd6 would not be so
good (M.Botvinnik).
l...Sfe8
If l...See8, then 2.^h6f ФЬ8 3.®f6f 2>g7
4.£)xf7t+— while l...gxf5 loses after 2.Sg3t
ФЬ8 3.®f6t+-.
(1 point)
2.^h6f!? (Xf7) 2...Ф18 З.Ш6 £ig7 4.Sc£3+-
The threat is 5.®xf7t Sxf7 6.Sxf7t ®xf7
7.Sxf7# (M.Botvinnik).
4...Sc8 5.£lxf7 Se6 6.®g5 £)f5 7.5)h61==fg7
8.g4
1-0
Paris rapid 1991
l...®xe7!I
(1 point)
2.£)xc3
2.&xe7 Sdlt 3.&g2 Ed2-+
(1 point)
2..Ж4 3.Wb2 Sd3 4.&e2 ©elf 5.&g2
Sd2 6.®xe5 ®xe2f 7.ФЬЗ ®xh2f 8.<&g4
We2f 9.&h3 Wflt 10.&g4 Sd8 ll.We7
SfB 12.e4 13.Ф113 h5 14.Б4 Whl#
F-12
Tactics/Chapter 21
.Polgar - N.Short
Monaco 1993
l.g5I!
(1 point)
Nothing is achieved by l.Sa5 (1 consolation
point) l...Sb7.
If l.Sd6 (also 1 consolation point) then
l...Se5t and 2...^g6.
I...ficg5 2.Sd8!
(2 points)
Black resigned, since he can no longer stop
the passed pawn.
F-13
Positional play/Chapter 20
i--:—:-----------------------
M.Botvinnik - LKan
USSR Ch, Leningrad 1939
l.£e4!
(2 points)
This is how White takes control of the
d5-square.
l... Wd8 2.&xftt
Not 2.^xc5?, due to 2...®b6.
2...Wxffi З.Де4±
White is set to occupy the d5-square.
249
Solutions
F-14
Tactics/Chapter 23
P.Stamma
1792
Equally good is 1.Фс2! Фа2 2.£)f3 Фа1
3.^d4 Фа2 4.£le2 Фа1 5.£>cl a2 б.&ЬЗ#.
1...Фа2 2.&c5 Фа1 З.Фс2 Фа2 4.&d3
The knight goes to cl.
4...Фа1 5.^cl a2 6.&b3#
(2 points)
F-15
Tactics/Chapter 5
Feldman - Amman
1956
1.4)xe6f Фе8 2>fBf!!
(1 point)
2,..lxfB 3.£>g7#
Or 3.-§)c7#.
F-16
Endgame/Chapter 16
1 .Фе5?^еЗ-+
l... gxh6
l...g5?? 2,h7+-
2 .Фе5
(2 points)
2...h5 З.ФхВ h4 4.&g4 Фй> 5.&h3 &g5
6.&g2=
F-18
Tactics/Chapter 15
A. Petrosian — Moldogaliev
1969
l.Sh8f!!
(1 point)
1...ФхЬ8
1...Ф17 2.®g6t Фе7 3.®xg7t &d6 4,Sxd8t
2.®h5t+-
Black resigned in view of 2...&g8 (2...Д116
3.®xh6t &g8 4.1еб#) 3.^e6t 4.®17#.
(1 point)
F-19
Calculating variations/Chapter 18
G.Greco
V.Khenkin - Lebedev
1792
l.&f4!
Not l.®g5t ^h2 and White can no longer
win, because Black has a stalemate defence,
e.g. after 2.®d2 Black plays 2...Ф11 1!.
l...flWt
Or 1...ФЫ 2>e2! (2.&g3? fW) 2...&g2
3.&g4 &gi 4,&g3 fi® 5,®h2#.
2.&g3+-
(2 points)
1-0
F17
Endgame/Chapter 22
1961
l.Wa5!
(1 point)
l.JLxa6 (1 consolation point) achieves
nothing after l...®xa6, as 2.jLxd4?? fails to
2...Sd8-+. If l.JLxd4 JLxd4 2.jLxa6 (also 1
consolation point) then 2...jbcf2t=.
I...^c7 2.®6!+-
(2 points)
1-0
F-20
Tactics/Chapter 11
Durao -Catozzi
V.De Barbieri
1927
Lh6!
Dublin 1957
1.2f4t ФИ5 2.2h4f!! gxh4 3.g4#
(1 point)
250
Solutions
F-21
Tactics/Chapter 17
E.Cook
F-23
Positional play/Chapter 6
The end of a study by
1864
l.Sb7t
(1 point)
1...&C8 2.Sb5!
(1 point)
2...C1W 3.Sc5t®xc5=
(1 point)
F-22
Strategy/Chapter 14
V.Smyslov - L.Polugaevslq
Palma de Mallorca 1970
l.Sd2!
(2 points)
White wants to double his rooks and
exploit the open file. l.Sd3 (1 point) is not so
accurate, since Black can attack this rook.
2...c6 2.Shdl
Taking control of the d-file.
3...f6 4.Sd8 &£7 5.Sxe8 Фхе8 6.1a3 &d5
7.146 Sa8 8.c4 &e7 9.1c7!? В 10.Sd8t
Ф<711.с5±
G.Hillyard
1982
l.&h5!
1 consolation point for 1 ,£)g6.
I...&xf8 2.Ф116О Фе8 3.&g7 &d7 4.&xg8
Феб 5.&g7O+-
(2 points)
F-24
Positional play/Chapter 12
Based on the game
Daseschku - Kalomeres)
Romania 1950
l>g7t
(1 point)
l.Welf? ФЬЗ=
1...&ЬЗ 2.&d2! blW 3.®c3t &a4 4.®xc2f
Wxc2f 5.Фхс2+—
(1 point)
Scoring
If you scored less than 24 points, we recommend that you read
again those chapter dealing with the areas where you made a lot
of mistakes and repeat the exercises which you got wrong.
251
Index of composers and analysts
The names of the analysts are printed in italics. H Hillyard,G. 251 Horowitz,!. 159
A Abbott J. 93 Afek,Y. 93, 170 Alekhine,A. 235-237 Averbakh,Y. 46 Averbakh,Y. 190 Avtsarov,B. 220 Horwitz,B. 64 J Junker,K. 221 К Kling,J. 71 Kohnlein,E 229
В BanJ.107 Belikov,E. 220 Bettman,H. 98 Bianchetti,R. 48 Bondarenko,E 72 Bottachi,A. 98 Botvinnik,M. 145, 193, 249 Bron,V. 170 Koranyi,A. 220 Kosolapov,N. 99 Kosyrev,V. 164 Kubbel,L. 72, 117, 122 L Lasker,Em. 202 Lebedev,A. 98 Lepeshkin,S. 240 Lewitt,M. 219
C CapablancaJ. 101 CapablancaJ. 129, 136 Chandler 57 Chepizhny,V. 94 Cook,E. 251 Cozio 182, 183 Lokker,M. 95 Lolli,G. 157 Loyd,S. 92, 94, 99 Lucena 222 M Mattison,H. 106, 117 Mednis,E. 131
D Dall Ava,A. 219 De Barbieri,V. 250 De Feijter,C. 213 Dritina,!. 106 Dvoretsky, M. 135, 136 Melnichenko,E. 209 Moravec, J. 106 N Nadareishvili,G. 166 Neishtadt, К 61, 234 Neustadtl,H. 102
E Emmrich,K. 219 Euwe,M. 192 Nimzowitsch, A. 112 Nimzowitsch,A. 88, 110 О
G Greco,G. 250 Grigoriev,N. 51, 52, 172 Grin,A. 98 Gurvitch,A. 93 Ojanen,A. 220 P Panov, V. 236 Perlis,J. 219 252
Petrosian,T. 147
Pogosiants,E. 71
Ponziani,D. 230
Prokes,L. 52, 220
R
Reti,R. 166, 170
Reti,R. 31, 32
Rinck,H. 121, 170, 180
S
Salvio,A. 230
Salvioli,C. 108
Schett,S. 94
Schdnberger,T. 98
Selesniev,A. 165, 180
Seletsky,A. 230
Shumov,!. 32
Skuja,R. 205
Speckmann,W. 99
Spielmann,R. 176
Stamma,P. 250
Szentgydrgyi,E. 98
T
Talaber,L. 98
Tarrasch,S. 80, 113
Tarrasch,S. 66, 110
Troitzky,A. 117
U
UchoaJ. 219
Uhlmann,D. 118
Uljanov,D. 98
V
Von Holzhausen,W. 216
W
Wennik,G. 98
Z
Zhuravlev 108, 135
253
Index of games
Numbers in bold type indicate that the player
named first had Black.
A
Aaron,M. - Botvinnik,M. 201
- Trifunovic,P. 81
Abrahams - Winter 185
Adamek,Z. - Jirovsky,P. 27
Adianto,U. - Baburin,A. 19
Adorjan,A. - Hiibner,R. 165
Alekhine,A. - CapablancaJ. 118, 151
- Euwe,M. 173
- Freyman 154
- Mikenas,V. 150
-N.N. 225
- Spielmann,R. 235
-Tarrasch,S. 61
Alexander - Mabs 60
Allies - Morphy,P. 41
Amman - Feldman 250
Anand,V. - Svidler,P. 72
Anastasian,A. - Yusupov,A. 89
Anderssen,A. - Loewenthal,]. 15
Antoshin,V. - Khasin,A. 242
— Tolush,A. 81
Armando - Yusupov,A. 40
Aronin,L. - Mikenas,V. 117
Atlas,R. - Kabatianski,A. 26
Averbakh,Y. -Taimanov,M. 145
Avrarn,!. - Denker,A. 240
Avrukh,B. - Skripchenko,A. 240
В
Babula,V. - Kaminski,M. 68
Baburin,A. - Adianto,U. 19
Bagirov,V. - Yusupov,A. 123
Baird,D. - Jackson,E. 15
Balashov,Y. - Yusupov,A. 190
Bansdorf - Lipola 80
Basl - Kruta 180
Bastrikov - Jakovlev 112
Bazan,O. - Olafsson,F. 110
Bednarski - Sydor 42
Belawenez - Johelsson 27
Berglund,A. - Svedenborg,P. 27
Berkes,F. - PolgarJ. 149
Berliner,H. - Rott 18
Bernard, R. - Sznapik,A. 189
Bernstein,О - MetgerJ. 226
Bhend,E. - Gast,J. 9
Biesbardis - Borisov 81
BlackburneJ. - Hanham J. 248
- Steinitz,W. 15
-Tarrasch,S. 80
- ZukertortJ. 75
Blaschack - Witkowski,S. 60
Bledow,L. - Horwitz,B. 28
Boden,S. - Schulder 12
Bom - Gnauk 16
Bdnsch,U. - Psakhis,L. 189
-Yusupov,A. 130
Bogoljubow,E. - Monticelli 154
- Spielmann,R. 175
BolbochanJ. - Fischer,R. 89
- Geller,E. 199
Boleslavsky,!. - Geller,E. 199
- Smyslov,V. 200
Bondarevsky,!. - Botvinnik,M. 117
- Lisitsin,G. 171
Borbeli - Karaksoni 167
Borisenko,G. - Smyslov,V. 201
Borisov - Biesbardis 81
Botvinnik,M. - Aaron,M. 201
-Bondarevsky,!. 117
- Donner,J. 195
- Flohr,S. 192
- Kan,I. 249
- Keres,P. 200, 249
- Kotov,A. 117
- Ljutov 154
- Schmid,L. 41
- Sorokin,N. 145
Bouaziz,S. - Lobron,E. 15
Bronstein,D. - Keres,P. 26
Bryan - Morphy,P. 229
Buckley,G - N.N. 27
Buecker,S. - Yusupov,A. 34
Buehl,W. - Olesen,M. 22
Buescher,A. - Giese,E 222
Byrne,R. - Reshevsky,S. 76
254
с
Cafferty,B. - Ingram,А. 40
Campos,M. - Smith,К. 214
Canal,E. - N.N. 15
Capablanca,J. - Alekhine,A. 118, 151
- Nimzowitsch,A. 141
- Ragozin,V. 129, 135
- Villegas,B. 183
- Yates,E 173
Cardoso,R. - Engels,L. 55
Carlsen,M. - Yusupov,A. 155
Casper,T. - Yusupov,A. 9
Catozzi - Durao 250
Cazenove J. - Hull 11
Celander - Yusupov,A. 155
Chalupnik,M. - Solozhenkin,E. 12
Chaplinsky- Ustinov 175
Chekhover,V.-Makogonov,M. 117
Chennikov - Radchenko 225
Chernin,A. - Stohl,I. 126
Chernov - Oplackin 32
Chigorin,M.-Janowski,D. 126
- Schlechter,C. 170
- Steinitz,W. 179
-Tarrasch,S. 165
-Winawer,S. 179
Chistiakov,A. - Kogan,W. 61
- Petrosian,T. 199
Clarke,P. - Petrosian,T. 200
Cohn,E. - Spielmann,R. 204
Cousigne - Yusupov,A. 66
Cramer,A. - Zilverberg,P. 61
Cserna,L. - Djurkovic,M. 60
Csom,I. - Ghitescu,T. 208
CuadrasJ. - Pomar Salamanca,A. 190
D
Daseschku - Kalomeresky 251
Dautov,R. - Polgar,J. 200
Denker,A. - AvramJ. 240
Deutsch - Vukovic,V. 61
Disti - Rozsypal 56
Djuric,S.-Yusupov,A. 137
Djurkovic,M. - Cserna,L. 60
Dlugy,M. - Popovic,P. 189
Dolmatov,S. - Kupreichik,V. 113
Domuls - Kazhoks 80
Donner,J. - Botvinnik,M. 195
Dragunov — Odrukovskij 224
Dreev,A. - Yusupov,A. 57
Durao - Catozzi 250
Duras,O. - Nimzowitsch,A. 88
- Spielmann,R. 154
E
Eckart -Tarrasch,S. 154
Eff,W. - Gaensmantel,A. 26
Effel - Enit 149
Eliskases,E. - Van den Berg,C. 117
Engels,L. - Cardoso,R. 55
Enit - Effel 149
Estrin,Y. - Nezhmetdinov,R. 65
Euwe,M. - Alekhine,A. 173
- Jutte 39
- Reti,R. 241
- Romanowski,P. 23
Everz - Kiffmeyer,C. 185
F
Fain — Schitkevic 248
Fedder - Westerinen,H. 229
Feldman - Amman 250
Fernandez - Pahtz,!!!. 126
Ferraro,F. - Navarro,T. 76
Finn - Newgent 240
Fischer,R. - BolbochanJ. 99
- Geller,E. 90
- Ghitescu,T. 75
- Gligoric,S. 90
- Keres,P. 83
- Olafsson,F. 88
- Spassky,B. 80, 88
- Steinmeyer,R. 90
Fleischmann - N.N. 185
Flohr,S. - Botvinnik,M. 192
Forgacs,L. - Spielmann,R. 209
Forintos -Tomovic 180
Freyman - Alekhine,A. 154
Frydman,P. - Vukovic,V. 55
Fuchs,R. - Pietzsch,W. 171
255
Index of games
Furman,S. - Suetin,A. 199 Hansen,E. - Nimzowitsch,A. 126 Hansen,R. - Yusupov,A. 174
G Gaensmantel,A. - Eff,W. 26 Gajduk - Goljak 209 Garcia Vicente,N. - Martinez Galan,J. 241 Garmaschev - Scheschukov 230 Gast,J. - Bhend,E. 9 Geller,E. - BolbochanJ. 199 - Boleslavsky,!. 199 - Fischer,R. 90 - Simagin,V. 146 -Taimanov,M. 145, 146 Georgadze,T. - Yusupov,A. 128 Gerlinger - Spielmann,R. 179 Gerusel,M. - Sosonko,G. 11 Ghitescu,T. - Csom,L 208 - Fischer,R. 75 Giegold - Schatz 110 Giese,E - Buescher,A. 222 Gleizerov,E. - Korneev,O. 186 Glienke,M. - Yusupov,A. 135 Gligoric,S. - Fischer,R. 90 - Karpov,A. 145 — Smyslov, V. 131 Gluhouski - Kondrakov 60 Gnauk - Bom 16 Goldberg,G. - Model,A. 20 Goljak - Gajduk 209 Graf-Stivenson - Karff 74 Gratias,S. - Heintze,M. 22 Greco,G. - N.N. 20, 20, 223 Greger,R. - Nielsen,P. 241 Greville - Harrwitz. D. 32 Grigorian,K. - Gulko,В. 209 Grob,H. - Yates,E 199 Griinfeld,E. - Spielmann,R. 176 Gulko,B. - Grigorian,K. 209 - Kupreichik,V. 72 Gurevich,M. - Short,N. 15 -Yusupov,A. 126 Hardin - Nikonov 155 Harrwitz,D. - Greville 32 Heintze,M. - Gratias,S. 22 Hellinger,A. - Mischke,C. 138 Heuacker - N.N. 189 Hodgson,J. - Yermolinsky,A. 71 Holzhauer,M. - Yusupov,A. 121 Horwitz,B. - Bledow,L. 28 Hiibner,R. - Adorjan,A. 165 Hull - Cazenove,}. 11 Hurme,H. — Pinter,J. 126 I Ingram,A.- CafFerty,B. 40 J Jackson,E. - Baird,D. 15 Jakobjanz - Swinarjow 26 Jakobsen - Taimanov,M. 229 Jakovlev - Bastrikov 112 Jamieson,!. - Kynoch,R. 26 Janowski,D. - Chigorin,M. 126 - N.N. 229 Jansson,B. - Pytel,K. 126 Jirovsky,P. - Adamek,Z. 27 Johelsson - Belawenez 27 Johner - Madl 189 Josephson,A. - Votruba,P. 81 Jutte - Euwe,M. 39 К Kabatianski,A. - Atlas,R. 26 Kalomeresky - Daseschku 251 Kaminski,M. - Babula,V. 68 Kamyshev - Sokolsky 9 Kan,I. - Botvinnik,M. 249 Kandolin - Ojanen,K. 225 Kanzaveli,V. - Running,}. 77 Kapengut,A. - Shereshevsky,M. 189 Karaksoni - Borbeli 167
H Hahn-Tarrasch,S. 190 Hanham,J. - BlackburneJ. 248 Karff - Graf-Stivenson 74 Karlsson,L - Rogard 16 Karpov,A. - Gligoric,S. 145
256
- Unzicker,W. 146
Kazhoks - Domuls 80
Keres,P. - Botvinnik,M. 200, 249
- Bronstein,D. 26
- Fischer, R. 83
- Lilienthal,A. 193
Khalifman,A. - Yusupov,A. 199
Khasin,A. - Antoshin,V. 241
Khatib - Yusupov,A. 41, 41
Khenkin,V. - Lebedev 250
Kholmov, R. - Kotov,A. 118
Kiffmeyer,C. - Everz 185
Kindermann,S. - Yusupov,A. 71
Kmoch,H. - Nimzowitsch,A. 203
- Prinz 71
Kofman - Kotlerman 150
Kogan,В. - Seirawan,Y 127
Kogan,W. - Chistiakov,A. 61
Kolisch - Maczuski 55
Kondrakov - Gluhouski 60
Korchnoi,V. - Yusupov,A. 126
Korneev,О. - Gleizerov,E. 186
Koschtenko - Lerner 26
Kotlerman - Kofman 150
Kotov,A. - Botvinnik,M. 117
- Kholmov,R. 118
Kratkovsky - Lapshis 155
Krogius,N. - Lisitsin,G. 150
Kruglikov,A. - Linder,0. 60
Kruta - Basl 180
Kupreichik,V. - Dolmatov,S. 113
- Gulko,B. 76
- Shereshevsky,M. 15
Kvicala - Pilar 229
Kynoch,R. - Jamieson,!. 26
L
Laiwa - Urdis 80
Lapshis - Kratkovsky 155
Larsen,B. - Spassky,B. 189
Larsen,S.-Yusupov,A. 174
Lasker,Em. - Meyer 8
- Ragozin,V. 151
-Tarrasch,S. 204
-Tartakower,S. 194
LautierJ. - Yusupov,A. Ill
Lebedev - Khenkin,V. 250
Lee,E - Pillsbury,H. 23
Lerner - Koschtenko 26
Levchenkov,V. - Sveshnikov,E. 183
Lilienthal,A. - Keres,P. 193
Linder,О. - Kruglikov,A. 60
Lipola - Bansdorf 80
Lisitsin,G. - Bondarevsky,!. 171
- Krogius,N. 150
-Taimanov,M. 65
Ljubojevic,L. - Yusupov,A. 72
Ljutov - Botvinnik,M. 154
Lobron,E. - Bouaziz,S. 15
-Yusupov,A. 136
Loewenthal,}. - Anderssen,A. 15
- Morphy,P. 80
Lohmann,H. -Teschner,R. 54
Lorenz - Scholz 189
Lund,A. - Spatz, H. 27
Lutz,C. - Short,N. 148
-Yusupov, A. 146
Lyttelton,G. - Morphy,P. 40
M
Mabs - Alexander 60
Maczuski - Kolisch 55
Madl - Johner 189
Makogonov,M.- Chekhover,V. 117
Mannheimer,N. -Tarrasch,S. 248
Mantefel - Presnjakov 65
Marco,G. - Pillsbury,H. 84
- Von Popiel,!. 77
Marco,M. - Salter 15
Maroczy,G. - Marshall,E 45
Marshall,E - Maroczy,G. 45
Martin,B. - Yusupov,A. 112
Martinez GalanJ. - Garcia Vicente,N. 241
Mecking,H. -Medina Garcia,A. 208
Medina Garcia,A. -Mecking,H. 208
-Tal,M. 189
Medor - Zunker 76
Meek,A. - Morphy,P. 30, 39
- N.N. 54
Menchik,V. - Stahlberg,G. 208
257
Index of games
MetgerJ. - Bernstein,0. 226
Meyer - Lasker,Em. 8
Mieses,J. - Von Bardeleben,C. 154
Mikenas,V. - Alekhine,A. 150
-Aronin,L. 117
Mikhalevski,V. - Siegel,G. 154
Miles,A. -TimmanJ. 248
Mischke,C. - Hellinger,A. 138
Model,A. - Goldberg,G. 20
Moldogaliev - Petrosian,A. 250
Moldojarov - Samochanov 205
Monticelli - Bogoljubow,E. 154
Morphy,A. - Morphy,P. 40
Morphy,P. - Allies 41
- Bryan 229
- Loewenthal,J. 80
- Lyttelton,G. 40
- Meek,A. 30, 39
- Morphy,A. 40
- N.N. 16, 179, 223
MureyJ. -Titenko,V. 171
N
Natopov - Rasdobarin 184
Navarro,T. - Ferraro,E 76
Nei,I - Petrosian,T. 60
Neishtadt,Y. - N.N. 232
NemetJ. - Yusupov,A. 136
Newgent - Finn 240
Nezhmetdinov,R. - Estrin,Y. 65
Nielsen,P. - Greger,R. 241
Nikolaev,B. - Rubinstein,A. 88
Nikolic,P. - Yusupov,A. Ill
Nikolov - Slavcev 229
Nikonov - Hardin 155
Nimzowitsch,A. - CapablancaJ. 141
- Duras,O. 88
- Hansen,E. 126
- Kmoch,H. 203
- Vukovic,V. 83
NunnJ. - Petursson,M. 67
- Yusupov,A. 66
О
Odrukovskij - Dragunov 224
Ojanen,K. - Kandolin 225
— Peretz,M. 15
Olafsson,F. - Bazan,O. 110
- Fischer,R. 88
Olesen,M. - Buehl,W. 22
Oltschewski - Tschernik 230
Oplackin - Chernov 32
Ostojic,P. - Pytel,K. 113
P
Pahtz,Th. - Fernandez 126
Panno,O. - Portisch,L. 71
Panov,V. - Taimanov,M. 208
Pavelchak - N.N. 179
Peretz,M. - Ojanen,K. 15
Perlis,J. - Schlechter,C. 184
Petrosian,A. - Moldogaliev 250
Petrosian,T. - Chistiakov,A. 199
- Clarke,P. 200
- Nei,I. 60
-Pilnik,H. 147
- Simagin,V. 120
— Spassky, В. 127
Petursson,M. - NunnJ. 67
Pfleger,H. - Vasiukov,E. 179
Pietzsch,W. - Fuchs,R. 171
Pilar - Kvicala 229
Pillsbury,H. - Lee,F. 23
- Marco,G. 84
Pilnik,H. - Petrosian,T. 147
Pimenov - Stolberg 170
Pinter,J. - Hurme,H. 126
Piotrowski - Tannenberg 209
Pirrot,D. - Yusupov,A. 136
Polgar,J. - Berkes,F. 149
- Dautov,R. 200
- Short,N. 249
Polugaevsky,L. - Smyslov,V. 251
Pomar Salamanca,A. - CuadrasJ. 190
Ponomarev,R. - Pugacev 60
Popovic,P. - Dlugy,M. 189
Portisch,L. - Panno,O. 71
-Tal,M. 223
Presnjakov - Mantefel 65
Prinz - Kmoch,H. 71
258
Psakhis,L. - Bdnsch,U. 189
Pugacev - Ponomarev,R. 60
Pytel,K. - Jansson,B. 126
- Ostojic,P 113
R
Rabinovich,A. - Romanovsky,P. 242
Radchenko - Chennikov 225
Ragozin,V. - CapablancaJ. 129, 135
- Lasker,Em. 151
Rasdobarin - Natopov 184
Ravinsch - Tamm 80
Reefschlager,H. - Seppeur,R 167
Reiner - Steinitz,W. 10
Reshevsky,S. - Byrne,R. 76
Reti,R. - Euwe,M. 241
-Tartakower,S. 61
Richter,K. - N.N. 202
Riemann-Tarrasch,S. 154
Rodriguez - Weisman 171
Rogard - Karlsson,L. 16
Romanovsky, P. - Euwe,M. 23
- Rabinovich,A. 242
Ros,J. - Torbjernsson 10
Rott - Berliner,H. 18
Rozentalis,E. - Wahls,M. 126
-Yusupov, A. 146
Rozsypal - Disti 56
RubinettiJ. - Yusupov,A. 11
Rubinstein,A. - Nikolaev,B. 88
- Samisch,E 89
- Spielmann,R. 194
-Tarrasch,S. 82, 96
Running,J. - Kanzaveli,V. 77
S
SamischjE - Rubinstein,A. 89
Salov,V. - Yusupov,A. 249
Salter - Marco,M. 15
Samochanov - Moldojarov 205
Sandler - Woizechowski 208
Sax,G.-Yusupov,A. 118
Schatz - Giegold 110
Scheeren,P. - Yusupov,A. 22
Scheschukov - Garmaschev 230
Schitkevic - Fain 248
Schlechter,C. - Chigorin,M. 170
- Perlis,J. 184
-Wolf,H. 166
Schlosser,P. - Yusupov,A. 8
Schmid,L. - Botvinnik,M. 41
Scholz - Lorenz 189
Schulder - Boden,S. 12
Seirawan,Y. - Kogan,B. 127
Seppeur,R. - Reefschlager,H. 167
Shapiro,D. - Yusupov,A. 72
Shereshevsky,M. - Kapengut 189
- Kupreichik,V. 15
Shirov,A. - Yusupov,A. 130
Short,N. - Gurevich,M. 15
- Lutz,C. 148
- PolgarJ. 249
-Yusupov,A. 135
Siegel,G. - Mikhalevski,V. 154
Simagin,V. - Geller,E. 146
- Petrosian,T. 120
Skripchenko,A. - Avrukh,B. 240
Skuratow- Swedtchikow 186
Slavcev - Nikolov 229
Smith,B. - Yusupov,A. 136
Smith,K. - Campos,M. 214
Smyslov,V. - Boleslavsky,!. 200
- Borisenko,G. 201
- Gligoric,S. 145
- Polugaevsky,L. 251
Sokolsky - Kamyshev 9
Solozhenkin,E. - Chalupnik,M. 12
Sorokin,N. - Botvinnik,M. 145
Sosonko,G. - Gerusel,M. 11
Spassky,B. - Fischer,R. 80, 88
- Larsen,В. 189
- Petrosian,T. 127
Spatz,H. - Lund,A. 27
Spielmann,R. - Alekhine,A. 235
- Bogoljubow,E. 175
- Cohn,E. 204
- Duras,O. 154
- Forgacs,L. 209
- Gerlinger 179
- Griinfeld,E. 176
259
Index of games
- Rubinstein,A. 194
- Tartakower,S. 179
Stahlberg,G. - Menchik,V. 208
-Taimanov,M. 145
Steinitz,W - BlackburneJ. 15
- Chigorin,M. 179
- Reiner 10
- Walsh,M. 248
Steinmeyer,R. - Fischer,R. 90
StohlJ. - Chernin,A. 126
Stolberg - Pimenov 170
Suetin,A. - Furman,S. 199
-Yusupov, A. 180
Sugar - Vegh 56
Svedenborg,P. - Berglund,A. 27
Sveshnikov,E. - Levchenkov,V. 183
Svidler, P. - Anand, V. 72
Swedtchikow - Skuratow 186
Swinarjow - Jakobjanz 26
Sydor - Bednarski 42
Sznapik,A. - Bernard,R. 189
T
Taimanov,M. - Averbakh,Y 145
- Geller,E. 145, 146
- Jakobsen 229
- Lisitsin,G. 65
- Panov,V. 208
- Stahlberg,G. 145
Tal,M. - Medina Garcia,A. 189
- Portisch,L. 223
Tamm - Ravinsch 80
Tannenberg - Piotrowski 209
Tarrasch,S. - Alekhine,A. 61
- BlackburneJ. 80
- Chigorin,M. 165
- Eckart 154
- Hahn 190
- Lasker,Em. 204
- Mannheimer,N. 248
- Riemann 154
- Rubinstein,A. 82, 89
Tartakower,S. - Lasker,Em. 194
- Reti,R. 61
- Spielmann,R. 179
- Yates,E 107
Teschner,R. - Lohmann,H. 54
TimmanJ. - Miles,A. 248
Timoschenko,G.-Yusupov,A. 136
Titenko,V. - MureyJ. 171
Tolush,A. - Antoshin,V. 81
Tomovic - Forintos 180
-Vidmar 170
Torbjernsson,T. - Ros,J. 10
TrifunoviCjP. - Aaron,M. 81
Tschernik - Oltschewski 230
U
Unzicker,W - Karpov,A. 146
Urdis - Laiwa 80
Ustinov - Chaplinsky 175
V
Van den Berg,C. - Eliskases,E. 117
Van der WielJ. - Yusupov,A. 40
Vasiukov,E. - Pfleger,H. 179
Vegh - Sugar 56
Vidmar-Tomovic 170
Villegas,В. - CapablancaJ. 183
Von Bardeleben,C. - MiesesJ. 154
Von Popiel,!. - Marco,G. 77
Votruba,P. - Josephson,A. 81
Vukovic,V - Deutsch 61
- Frydman,P. 55
- Nimzowitsch,A. 83
W
Wahls,M. - Rozentalis,E. 126
Walsh,M. - Steinitz,W 248
Weisman - Rodriguez 171
Westerinen,H. - Fedder 229
Winawer,S. - Chigorin,M. 179
Winter - Abrahams 185
Witkowski,S - Blaschack 60
Woizechowski - Sandler 208
Wolf,H. - Schlechter,C. 166
Y
Yates,F. - CapablancaJ. 173
-Grob,H. 199
260
-Tartakower,S. 107
Yermolinsky,A. - Hodgson J. 71
Yusupov,A. - Anastasian,A. 89
- Armando 40
- Bagirov,V. 123
- Balashov,Y. 190
- Bdnsch,U. 130
- Buecker,S. 34
- Carlsen,M. 155
- Casper,T. 9
- Celander 155
- Cousigne 66
- Djuric,S. 137
- Dreev,A. 57
- Georgadze,T. 128
- Glienke,M. 135
- Gurevich,M. 126
- Hansen,R. 174
- Holzhauer,M. 121
- Khalifman,A. 199
- Khatib 41, 41
- Kindermann,S. 71
- Korchnoi,V. 126
- Larsen,S. 174
- LautierJ. Ill
- Ljubojevic,L. 72
- Lobron,E. 136
- Lutz,C. 146
- Martin,B. 112
- NemetJ. 136
- Nikolic,P. Ill
- NunnJ. 66
- Pirrot,D. 136
— Rozentalis,E. 146
- RubinettiJ. 11
- Salov,V. 249
-Sax,G. 118
- Scheeren,P. 22
- Schlosser,P. 8
- Shapiro,D. 72
-Shirov,A. 130
- Short,N. 135
— Smith,B. 136
- Suetin,A. 180
-Timoschenko,G. 136
-Van derWielJ. 40
Z
Zilverberg,P. - Cramer,A. 61
ZukertortJ. - BlackburneJ. 75
Zunker - Medor 76
261
Recommended books
Tactics How to beat your dad at chess Author: Murray Chandler Publisher: Gambit ISBN 1-901983-05-0 Positional play The Game of Chess Author: Siegbert Tarrasch Publisher: Dover ISBN 978-0486254470
Understanding Chess Tactics Author: Martin Weteschnik Publisher: Quality Chess ISBN 91-975244-2-5 Calculating variations Tactical Play (School of Chess Excellence 2) Author: Mark Dvoretsky Publisher: Olms ISBN 978-3283004170 Strategy Laskers Manual of Chess Author: Emanuel Lasker Publisher: Dover ISBN 978-0486206400 Masters of the chessboard Author: Richard Reti Publisher: Dover ISBN 978-0486233840
The opening Catastrophe in the Opening Author: Yakov Neishtadt Publisher: Pergamon ISBN 0080231225 My System Author: Aron Nimzowitsch Publisher: Quality Chess ISBN 978-9197600538
The endgame
Dvoretsky’s Endgame Manual
Author: Mark Dvoretsky
Publisher: Russell Enterprises
ISBN 978-1888690286
Yusupov Chess Academy Training programme 2008-2009
Chess seminars - Seminar tournament 2009 - Distance learning - Summer camp for children
This programme is for ambitious club players who would like to improve their chess with the
help of FIDE Senior Trainer and Grandmaster Artur Yusupov.
Yusupov Chess Academy, Hagenthalerstrasse 19, 89264 Weissenhorn, Germany
Tel: +49-7309-426059
Fax: +49-7309-426069
E-mail: Nadja.Jussupow@t-online.de
For more information see Artur’s Internet page: www.jussupow.de
Understanding Chess Tactics
FIDE Master Martin Weteschnik
Brief Description:
"Chess is 99% tactics" is an old saying. This may be an
exaggeration, but even the remaining 1 % still depends
on tactics. When Martin Weteschnik started working as
a trainer in his local chess club, he quickly realized that
even the stronger club players had great weaknesses
in their tactical play. He also discovered that simply
asking them to solve a huge number of puzzles did not
fix the problem. These players clearly needed a good
book, but when Weteschnik looked for it he found
nothing suitable, so he decided to write it himself.
Summary:
An effective practical guide to improving tactical play
in chess.
Quotes:
"An instant classic"-- German Chess Monthly
An effective guide to a vital part of chess.
This book is a fully revised English version of a Ger-
man book that is considered a "classic".
About the author:
Martin Weteschnik lives in Frankfurt am Main, Germany. After studies in German and Philosophy he
went to live in Japan for a year to study its culture. Later he lived in America for five years where he
learned to play chess at the age of 25.
He beat his first professional player after just one year of playing, but then decided to concentrate on
the theory of chess rather than a playing career. He studied the chess classics and went back to Europe
to deepen his understanding of the royal game. He is now a highly successful trainer and coach. His main
area of expertise is in tactical play, and he states that the most dramatic increases in playing strength,
even for experienced tournament players, are achieved by the systematic acquisition of tactical knowl-
edge.
Understanding Chess Tactics has been translated into German and is forthcoming in Russian, Italian and
Polish.
$24.95 £13.99 €19.99
240 pages Released 2006
ISBN: 91-975244-2-5
My System
Aron Nimzowitsch
Brief Description:
For the first time, an English-speaking audience can ap-
preciate the true nature of this famous, classic chess book
as this brand-new translation recreates the author's origi-
nal intention. Not to have read My System is regarded as
a shocking gap in a chess player's education, but English
speakers had only poor translations that toned down or
even deleted many passages because the translators feared
Nimzowitsch's famous biting wit would be controversial.
Nimzowitsch's ideas about how to play better chess have
had a profound influence on modern chess thinking. It is
commonly agreed that almost every chess master in the
world has studied Nimzowitsch’s work. This is the first new
English translation in decades and, unlike previous transla-
tions, does not censor or dilute the author’s writing.
"One of the most stimulating books ever written about
chess." - Reuben Fine, American chess grandmaster
Every leading trainer in the world recommends it!
One of the most widely read chess books ever.
Perhaps the most influential chess book in history.
Arguably the most famous chess book ever written.
It lifts the amateur's understanding to master level.
Artur Yusupov, a world-class grandmaster, recently said My
System was his favourite chess book and provided a
foreword for the book.
About the author:
Aron Nimzowitsch (1886-1935) was one of the greatest chess players of his day, ranked just behind the
famous World Champions Alekhine and Capablanca. However, his reputation as an author is higher still,
and he influenced modern chess thinking more than any other author.
$29.95 £14.99 €21.99
288 pages Released 2006
ISBN: 91-976005-3-9
Games/Chess
ARTUR YUSUPOV
BUILD UP YOUR CHESS
THE FUNDAMENTALS
Build up your Chess with
Artur Yusupov is for chess
players who want to build
their skills on solid founda-
tions. Yusupov guides the
reader towards a higher
level of chess understand-
ing using carefully select-
ed positions and advice.
This new understanding is
then tested by a series of
puzzles.
Artur Yusupov, from Germany, was
ranked No. 3 in the world from
1986 to 1992, just behind the
legendary Karpov and Kasparov.
He has won everything there is to
win in chess except for the World
Championship. In recent years he
has mainly worked as a chess trainer
with players ranging from current
World Champion Vishy Anand and
many other top grandmasters,
to talented juniors and local
amateurs in Germany.
€ 23.99 £15.99 $29.95
ISBN 978-1-906552-01-5
9 781906 552015
5 2 9 9 5>
UALITY CHESS www.qualitychessbooks.com