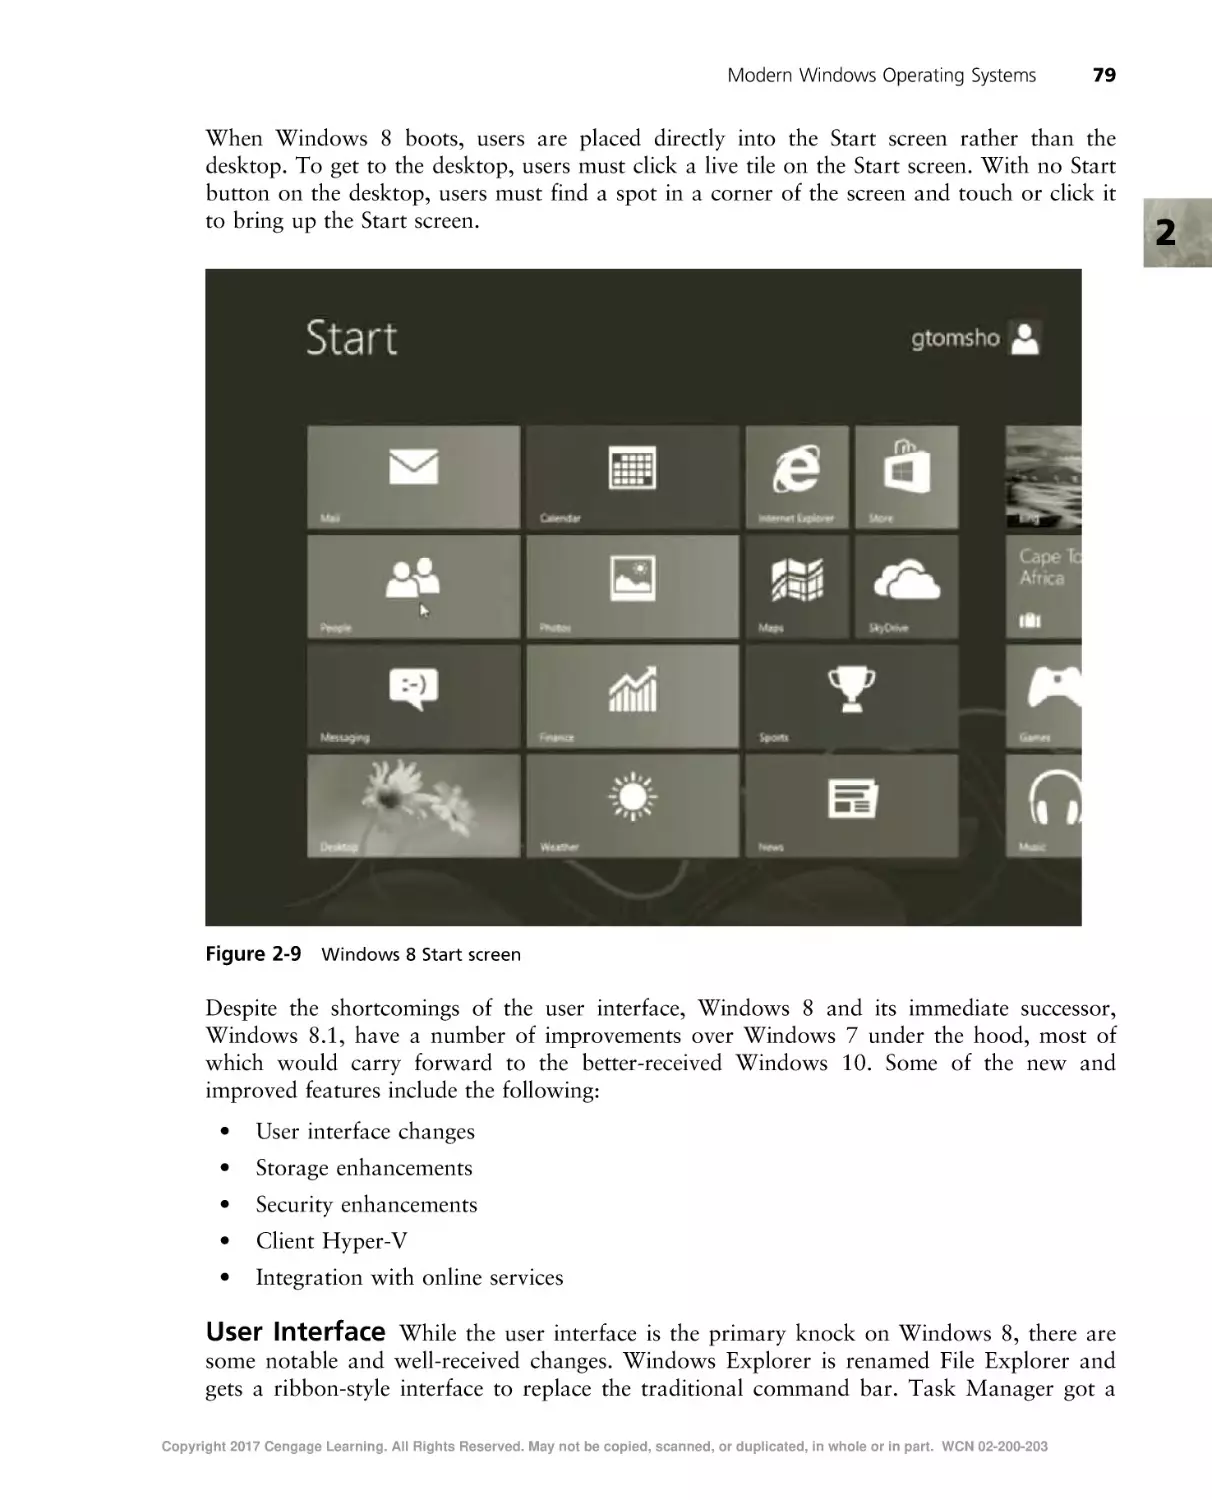
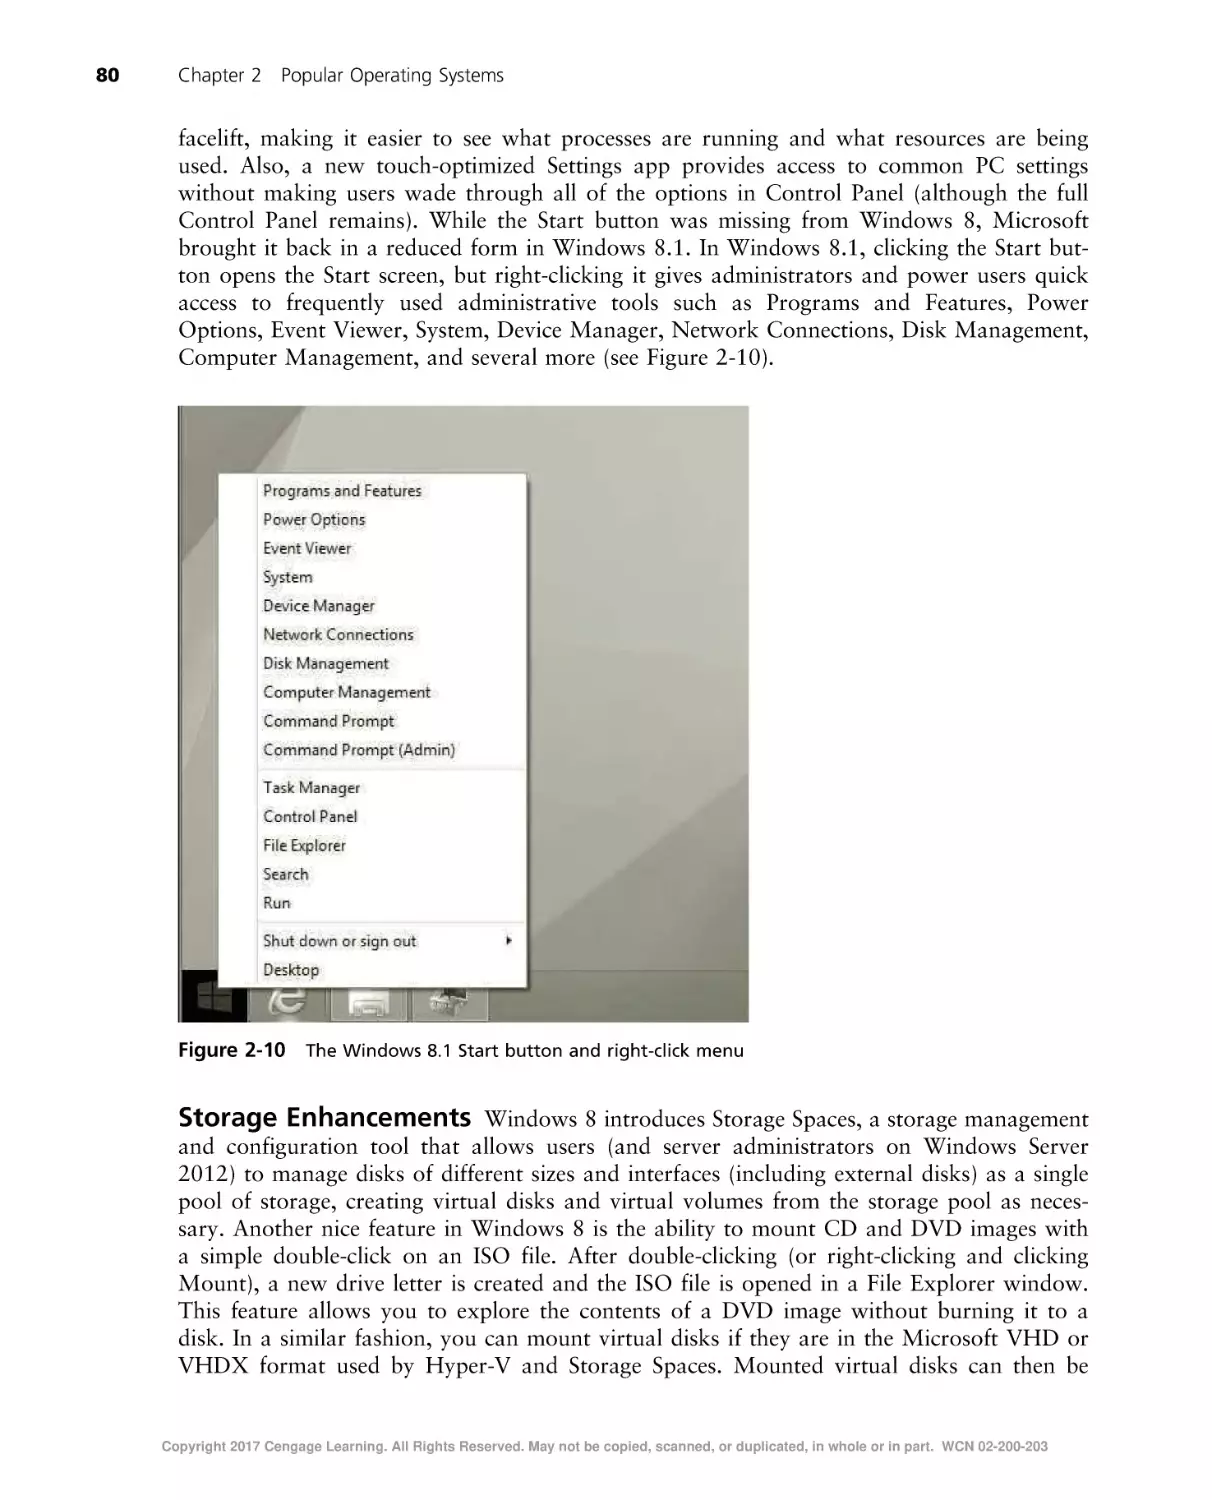
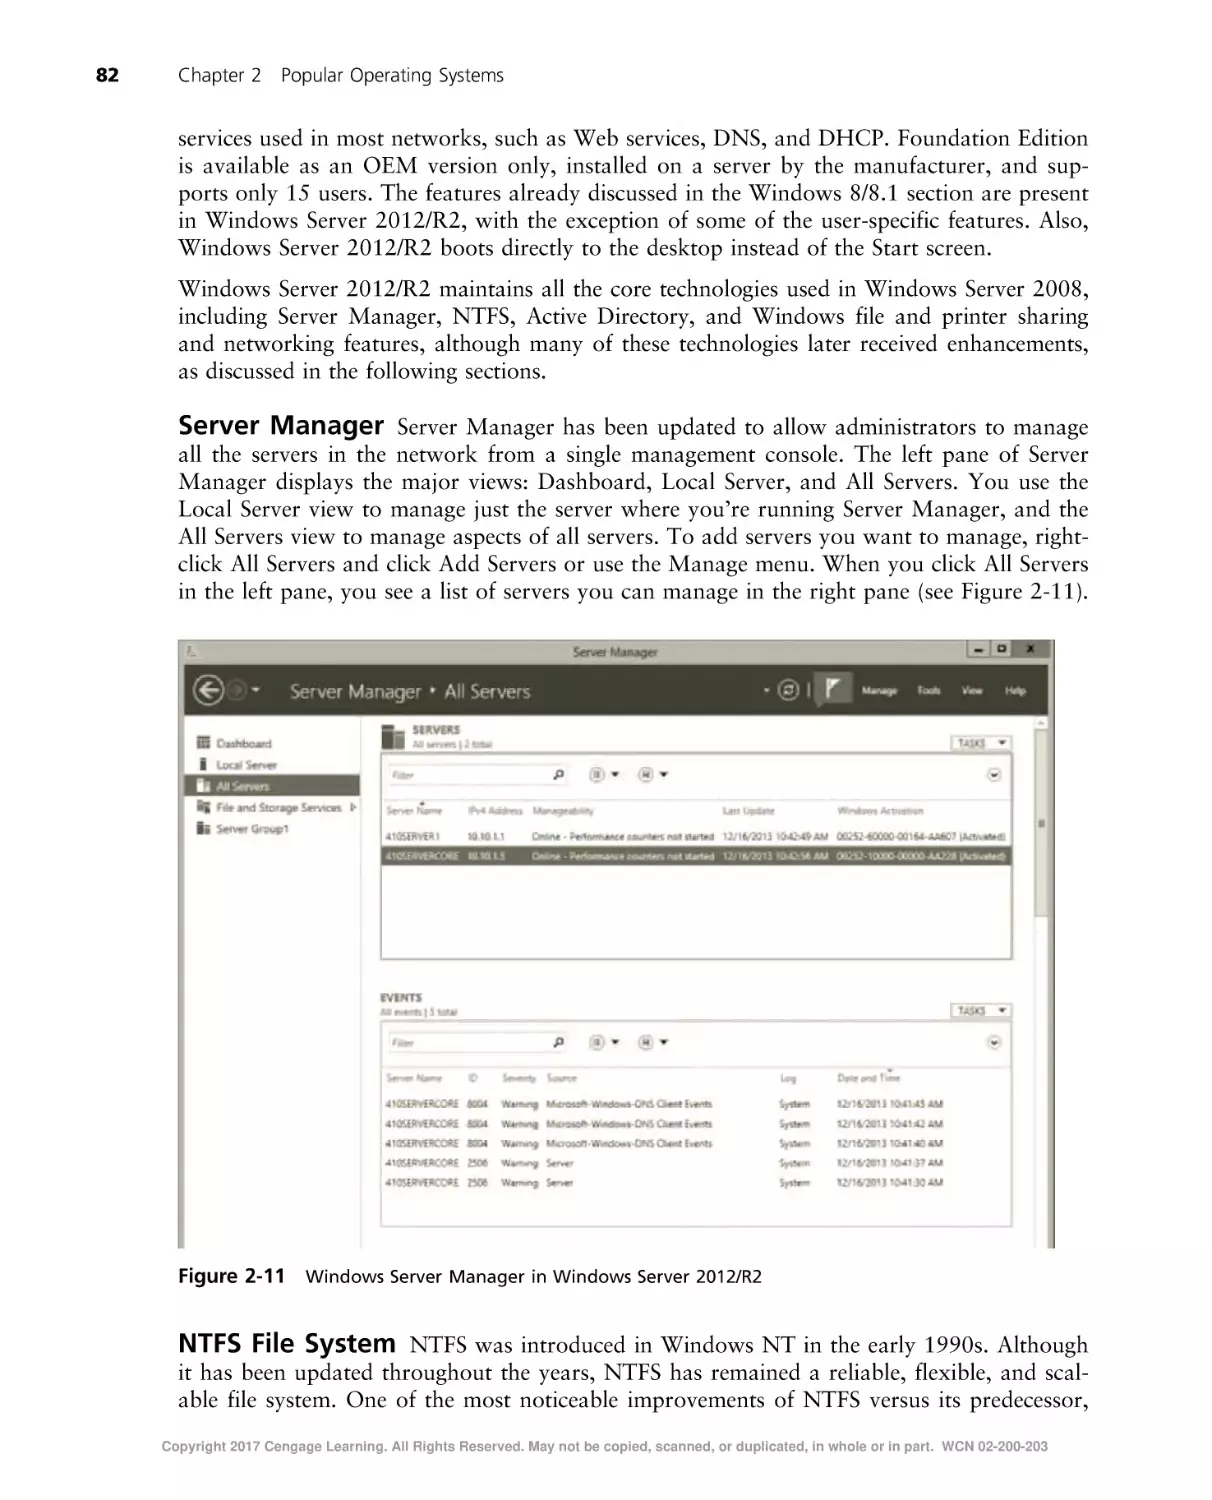
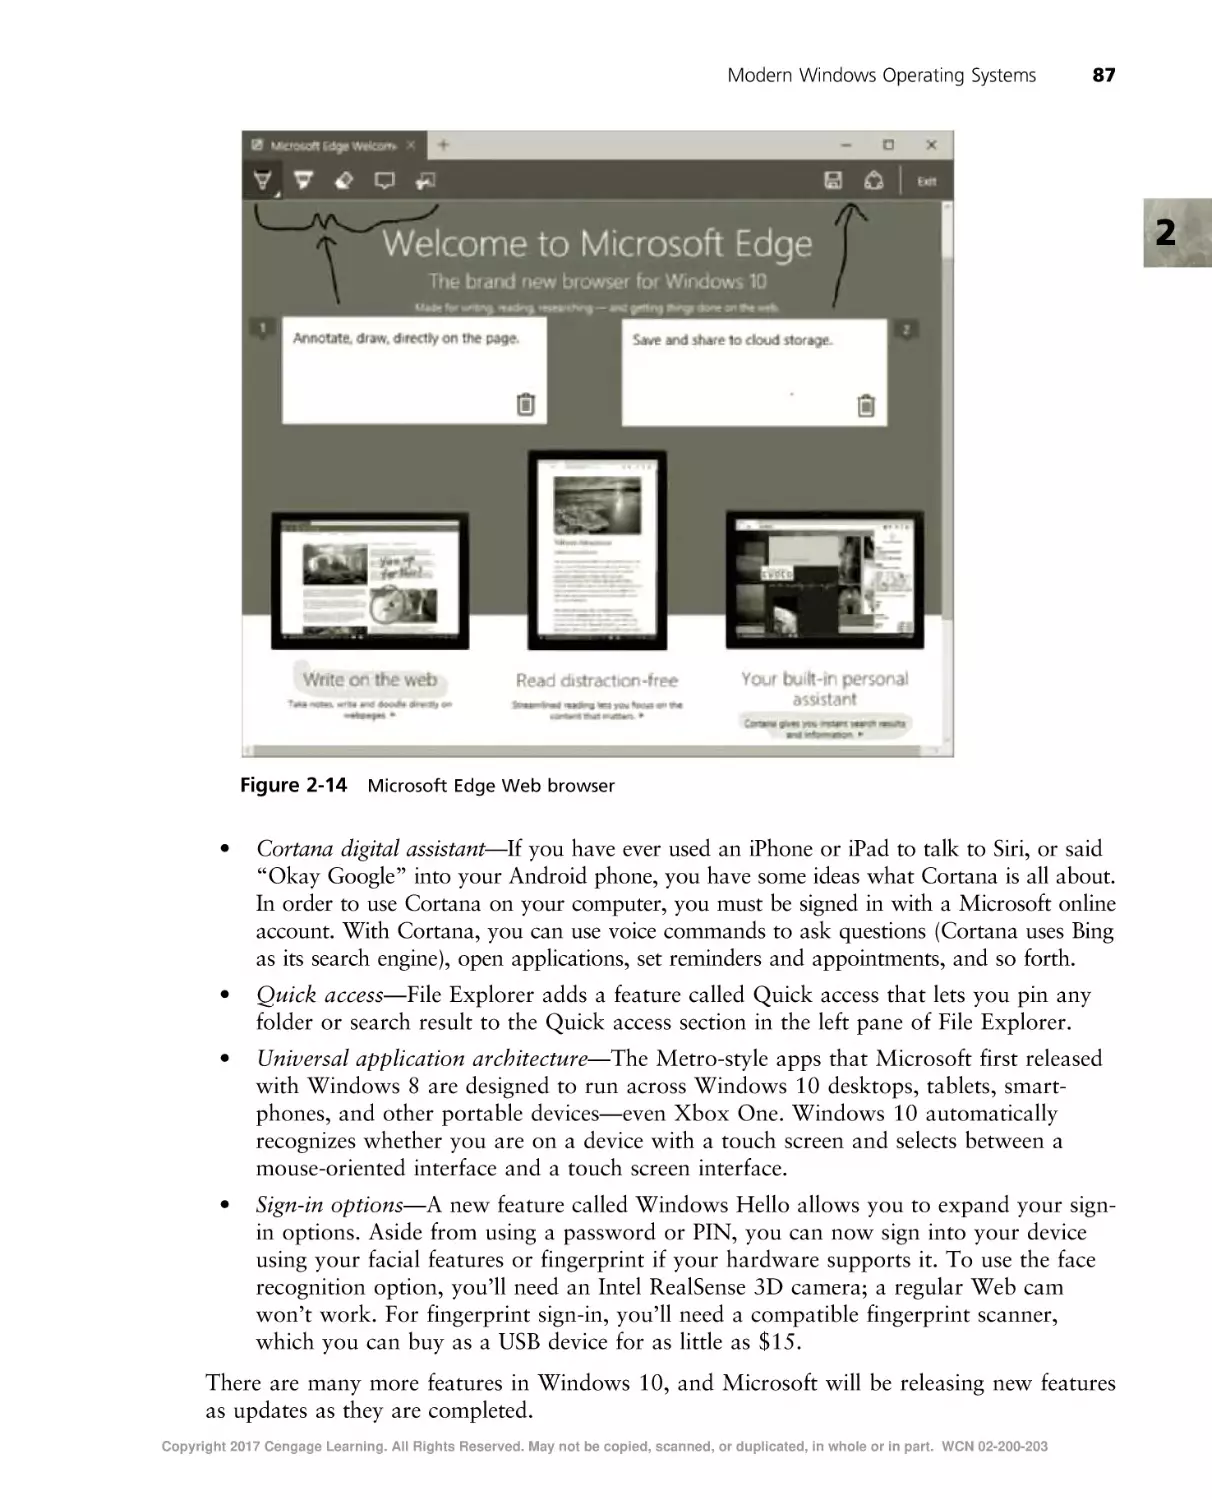
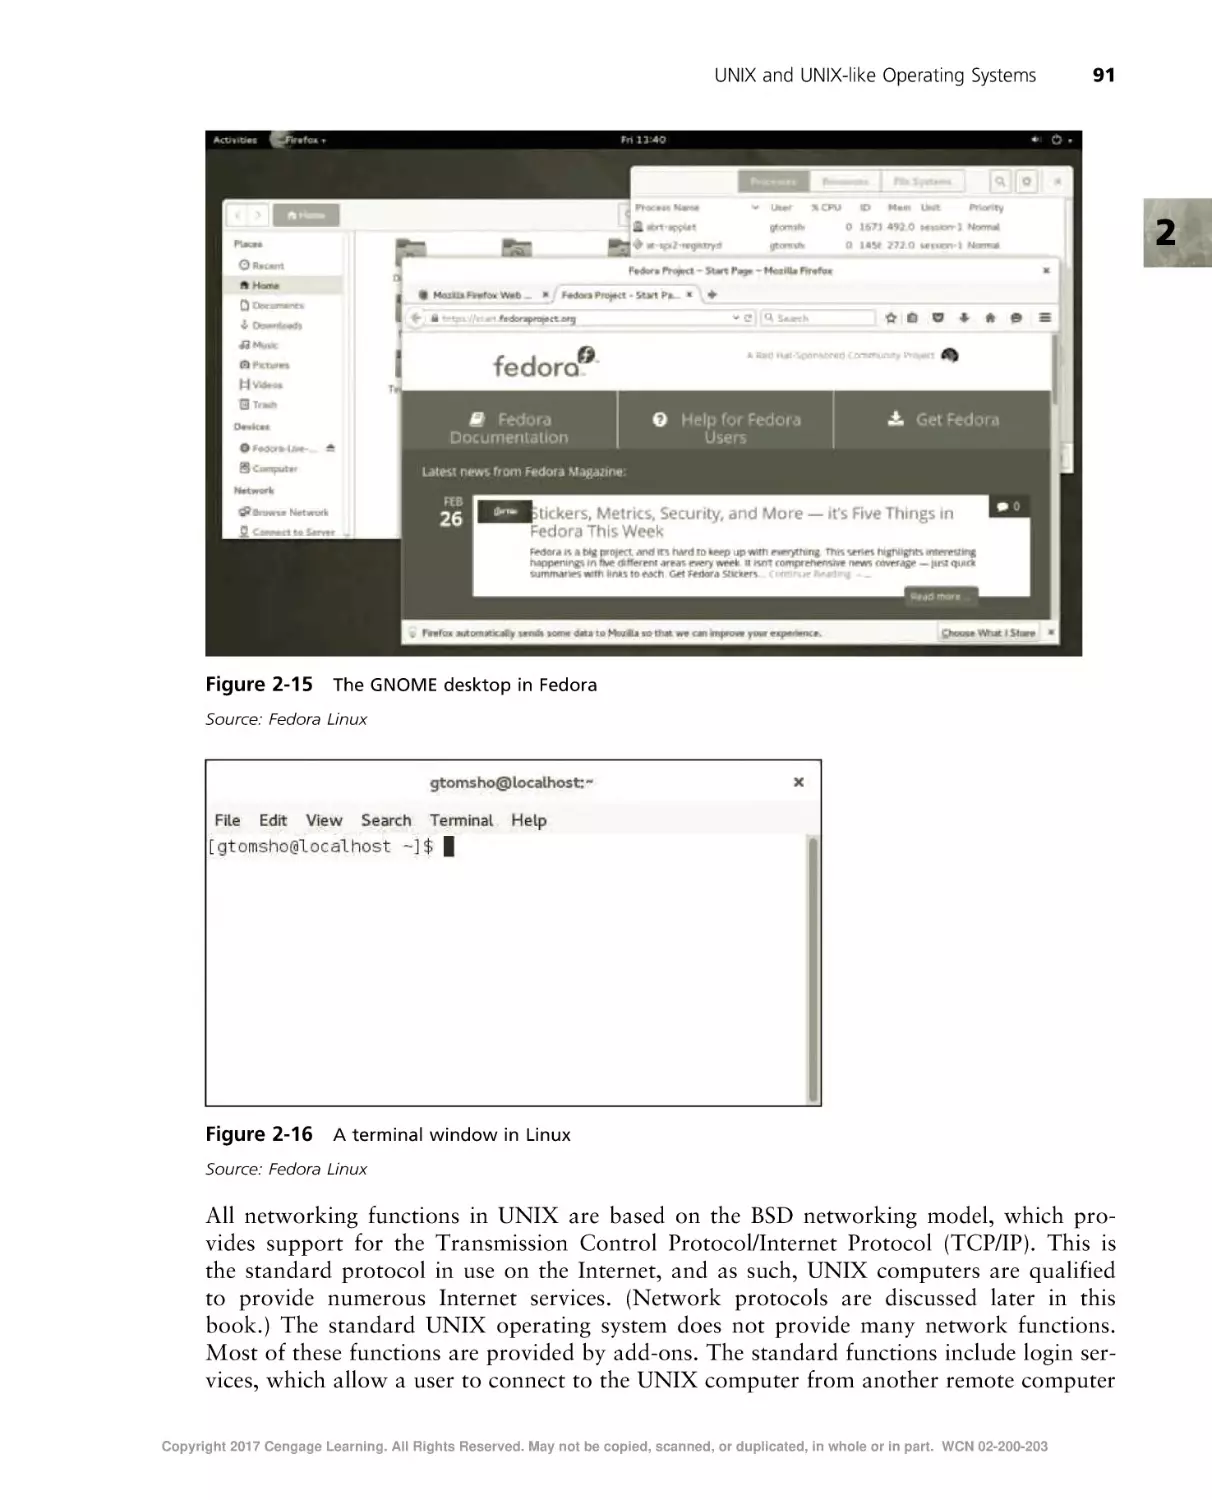
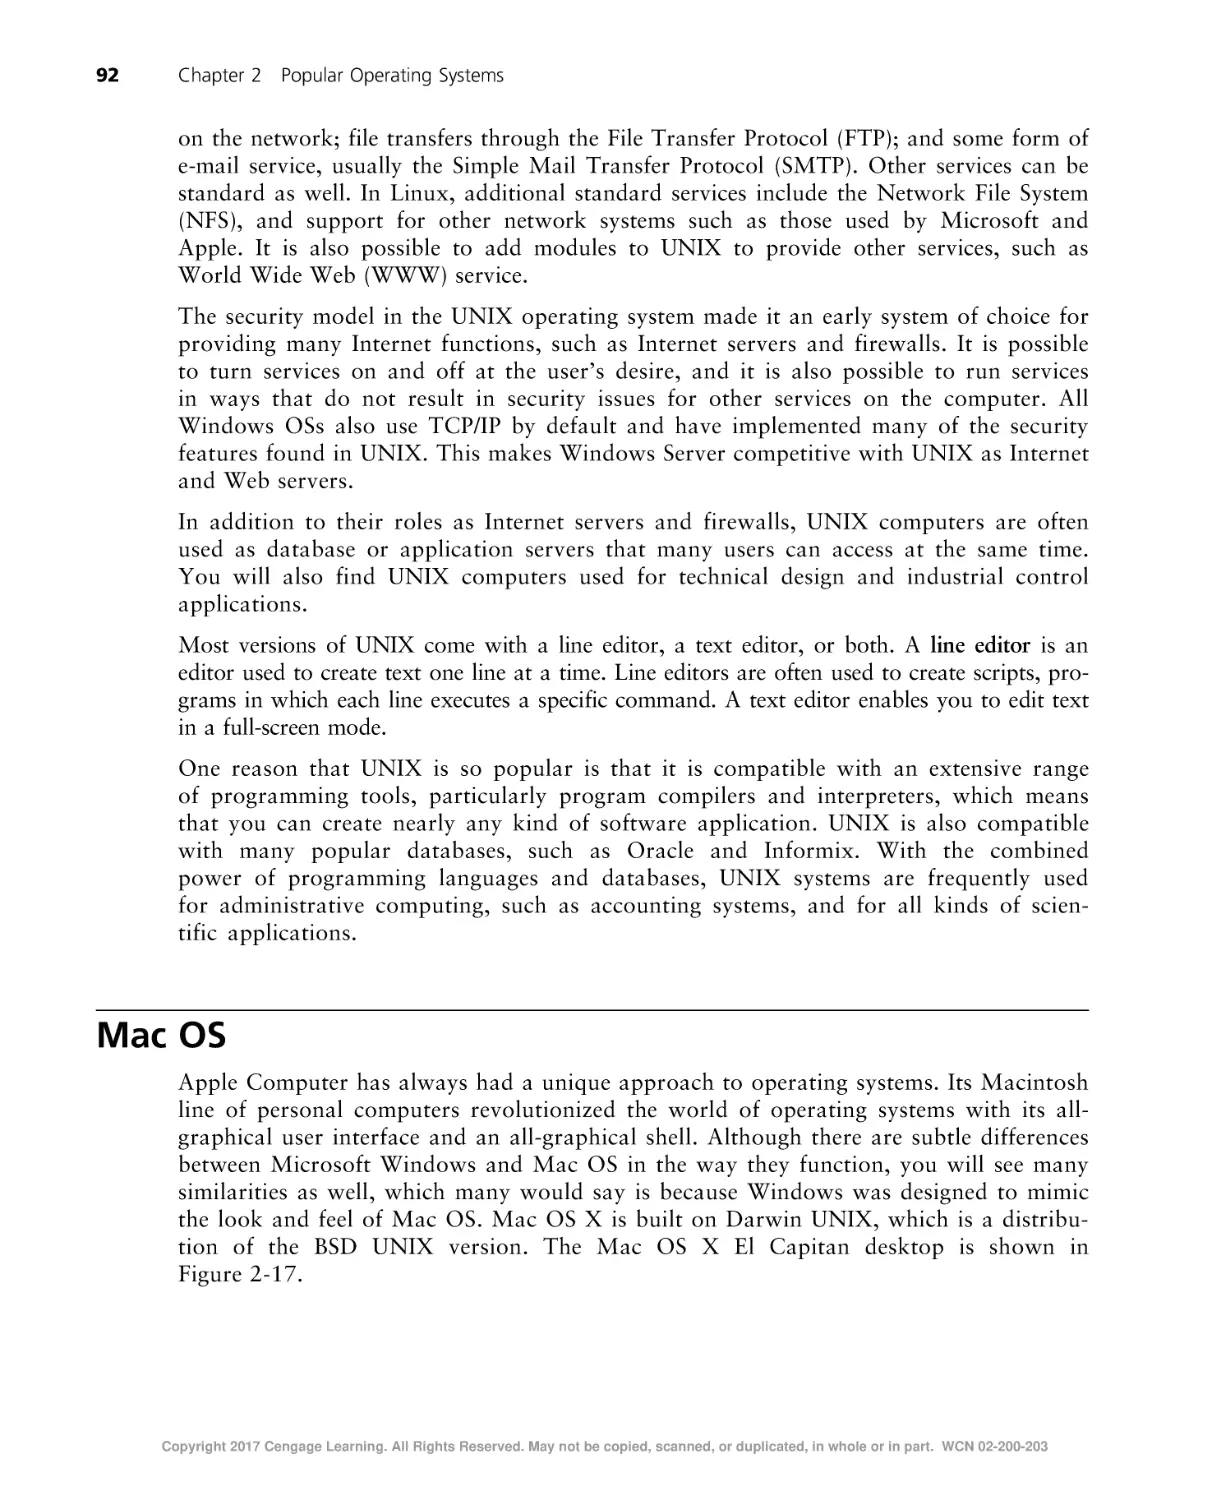
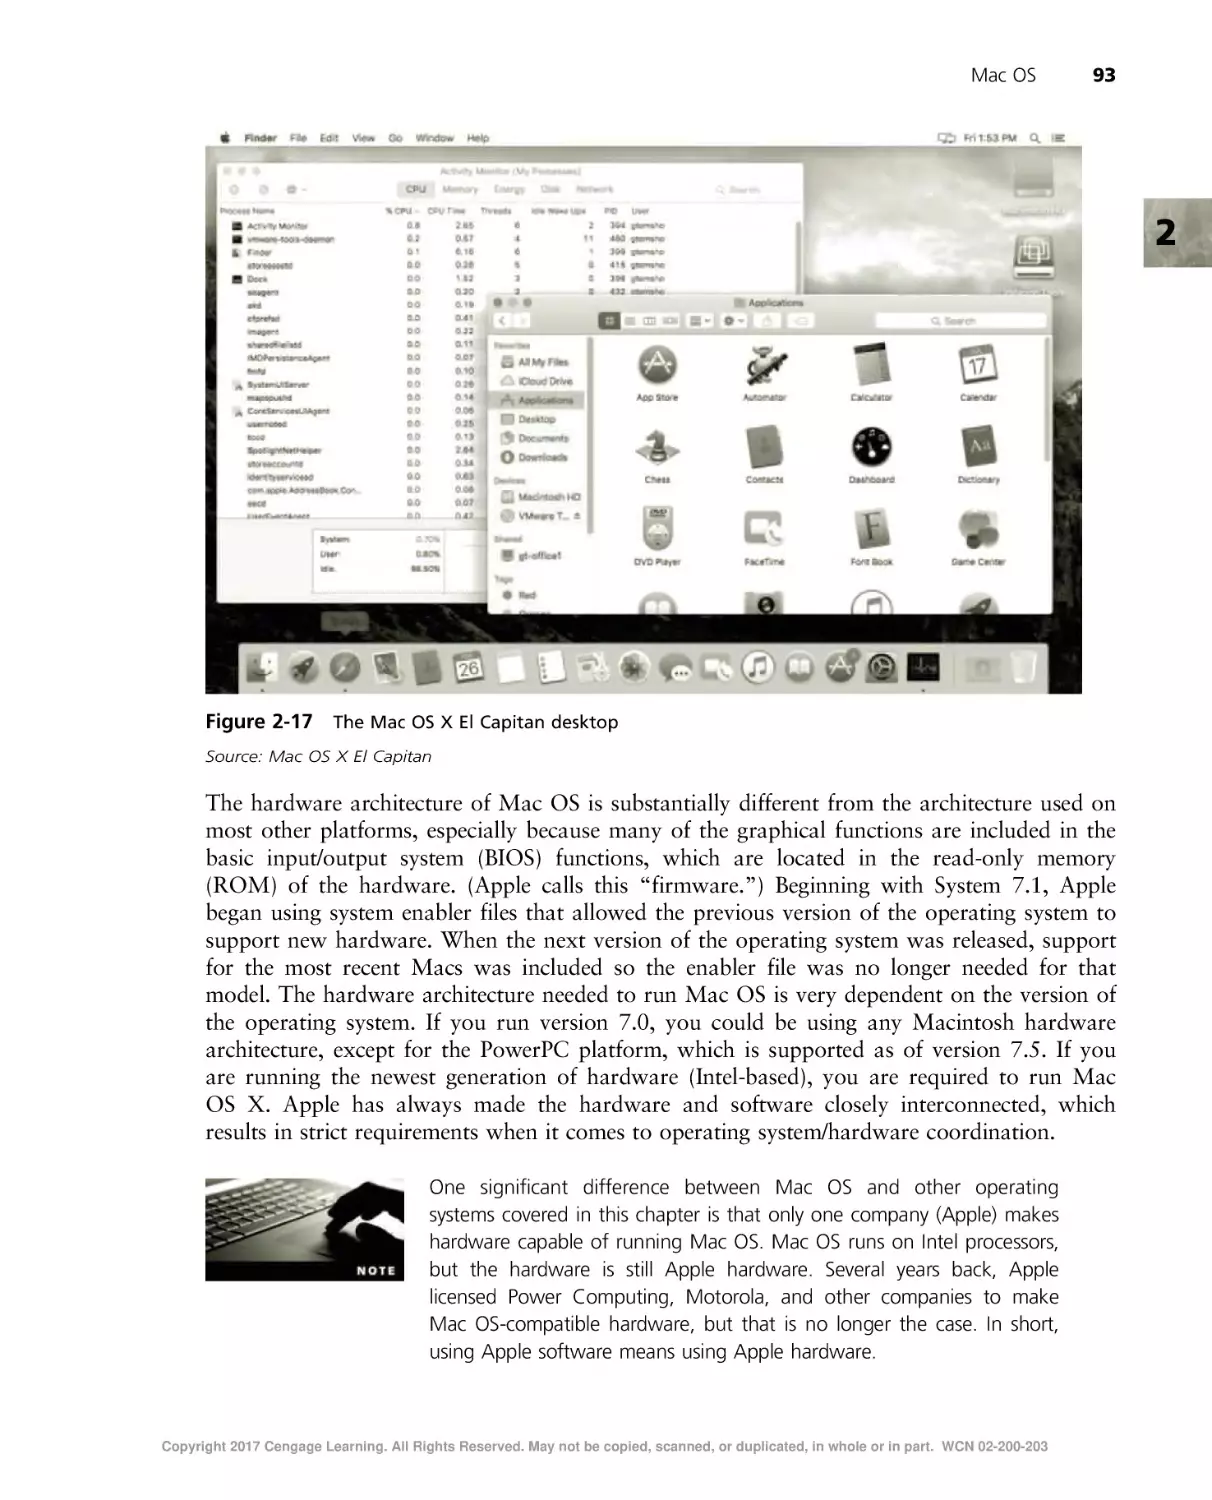
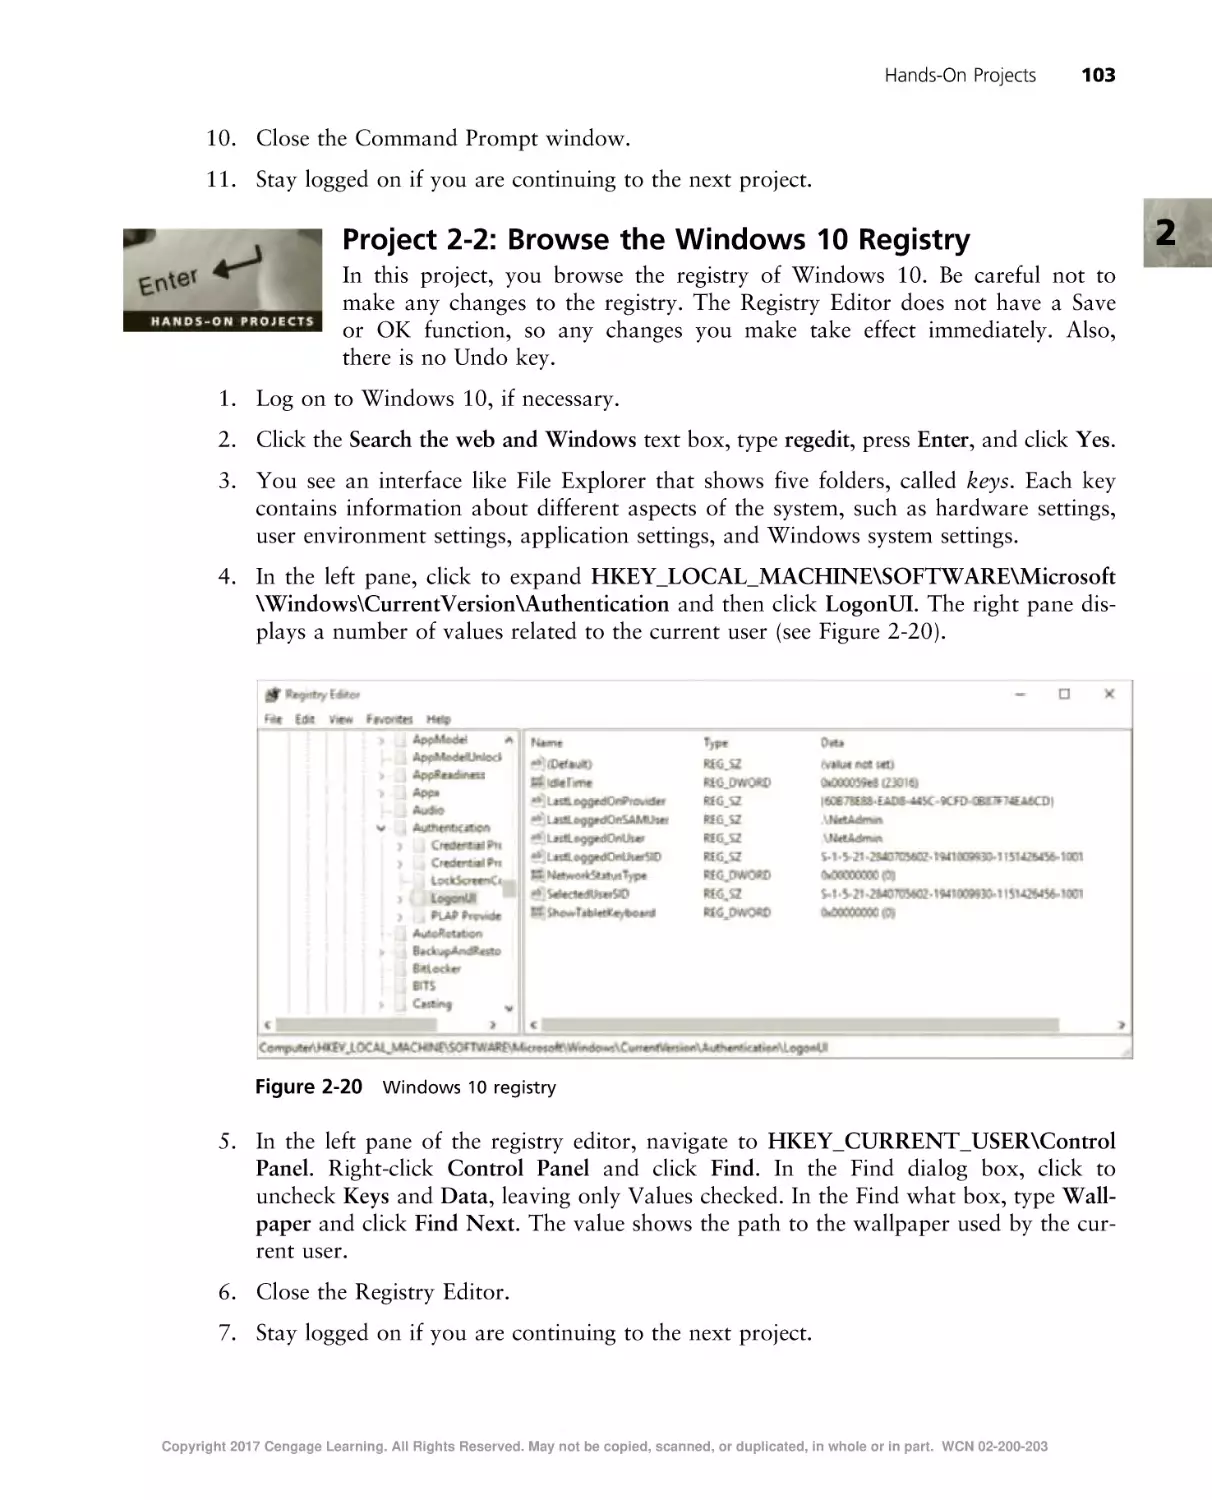
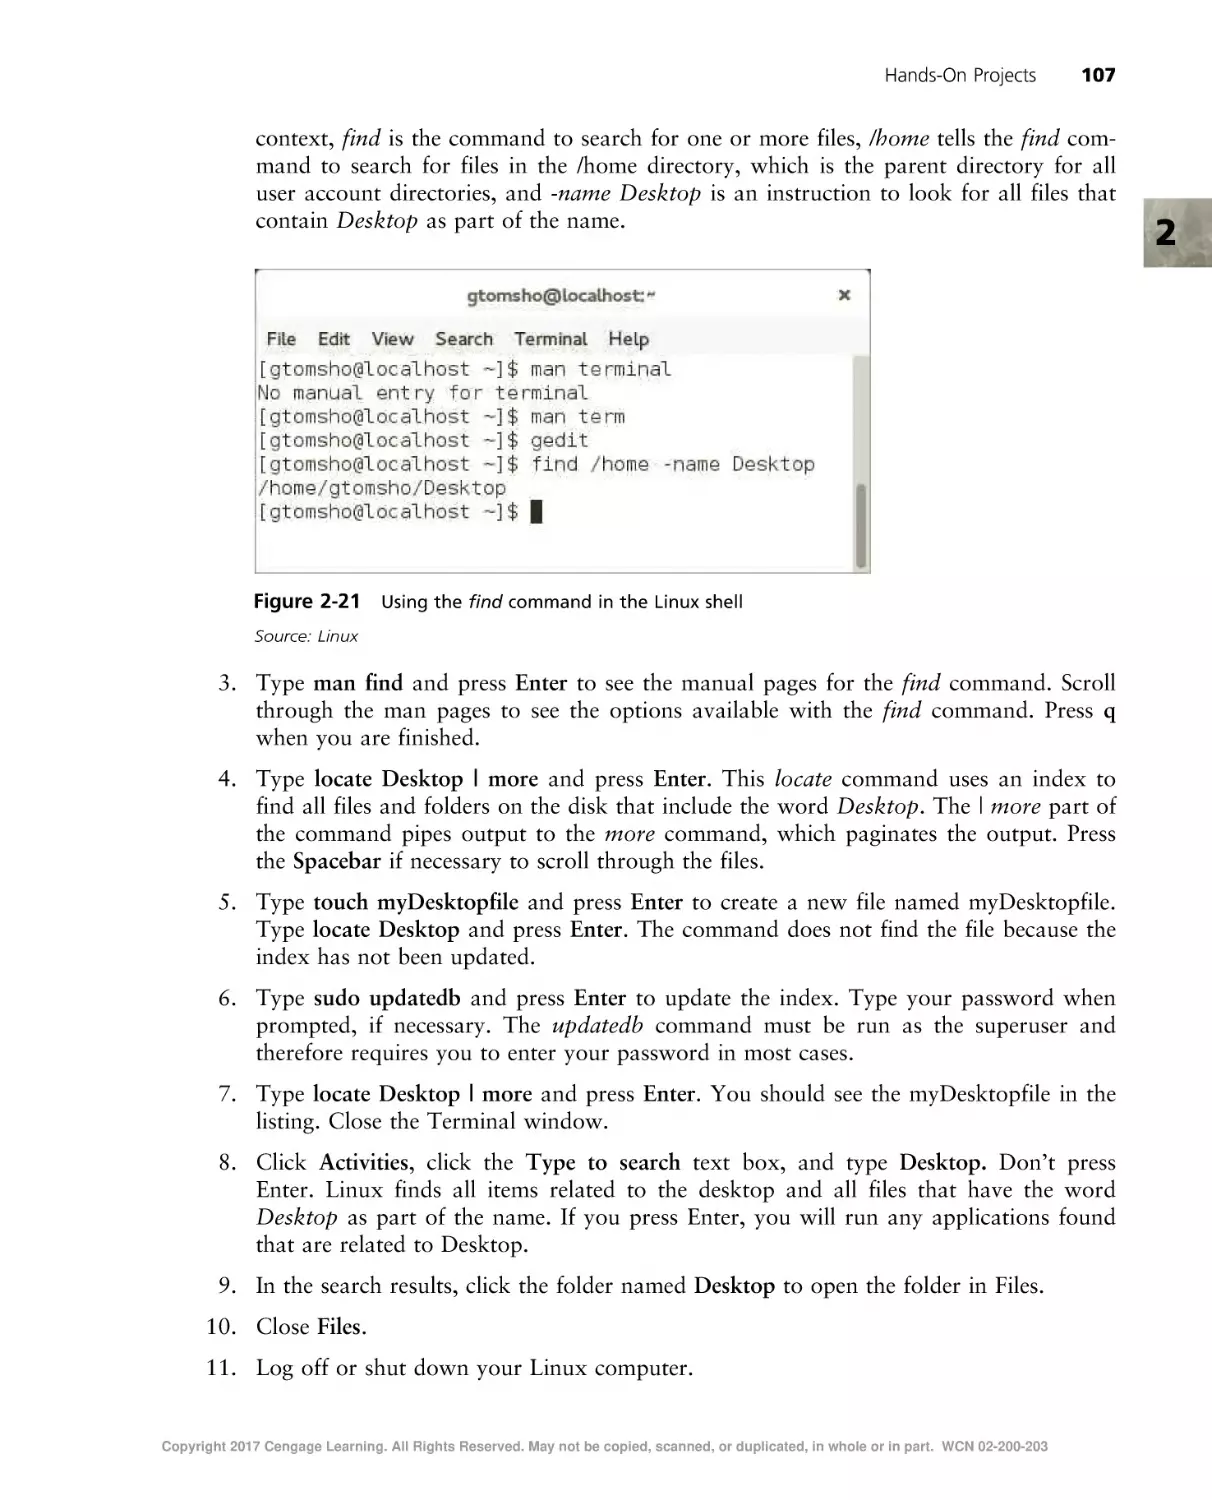
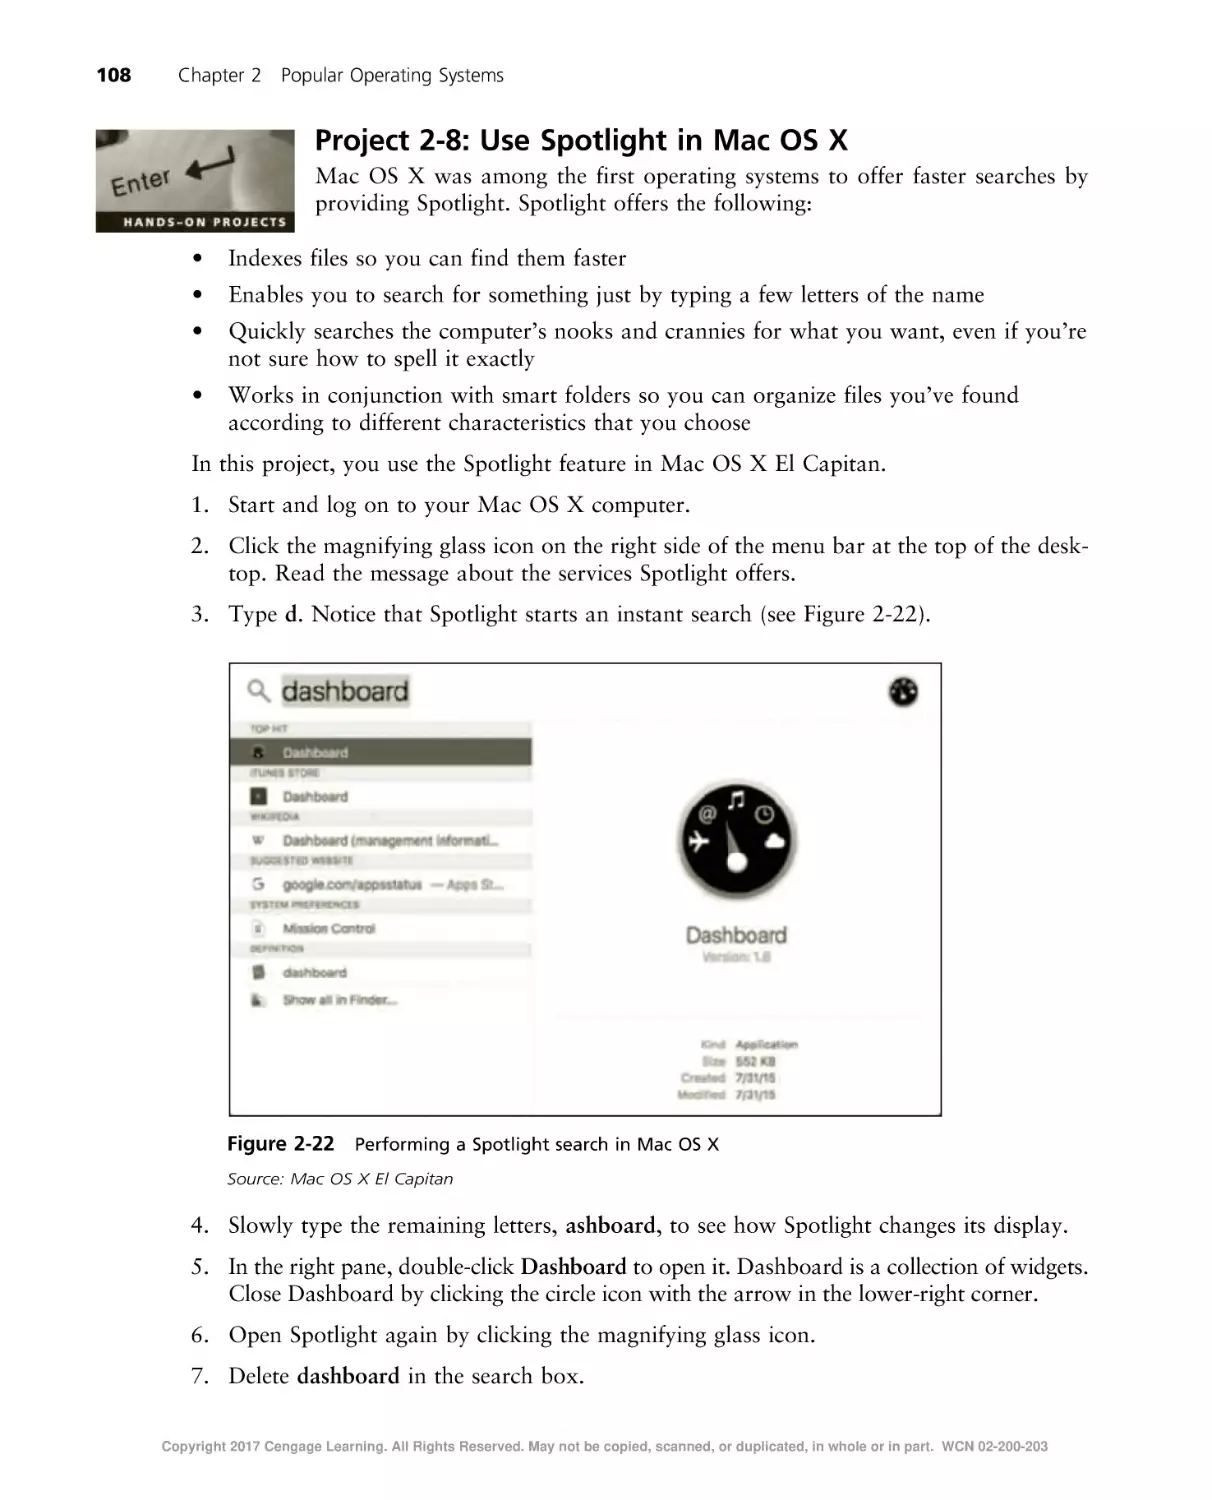
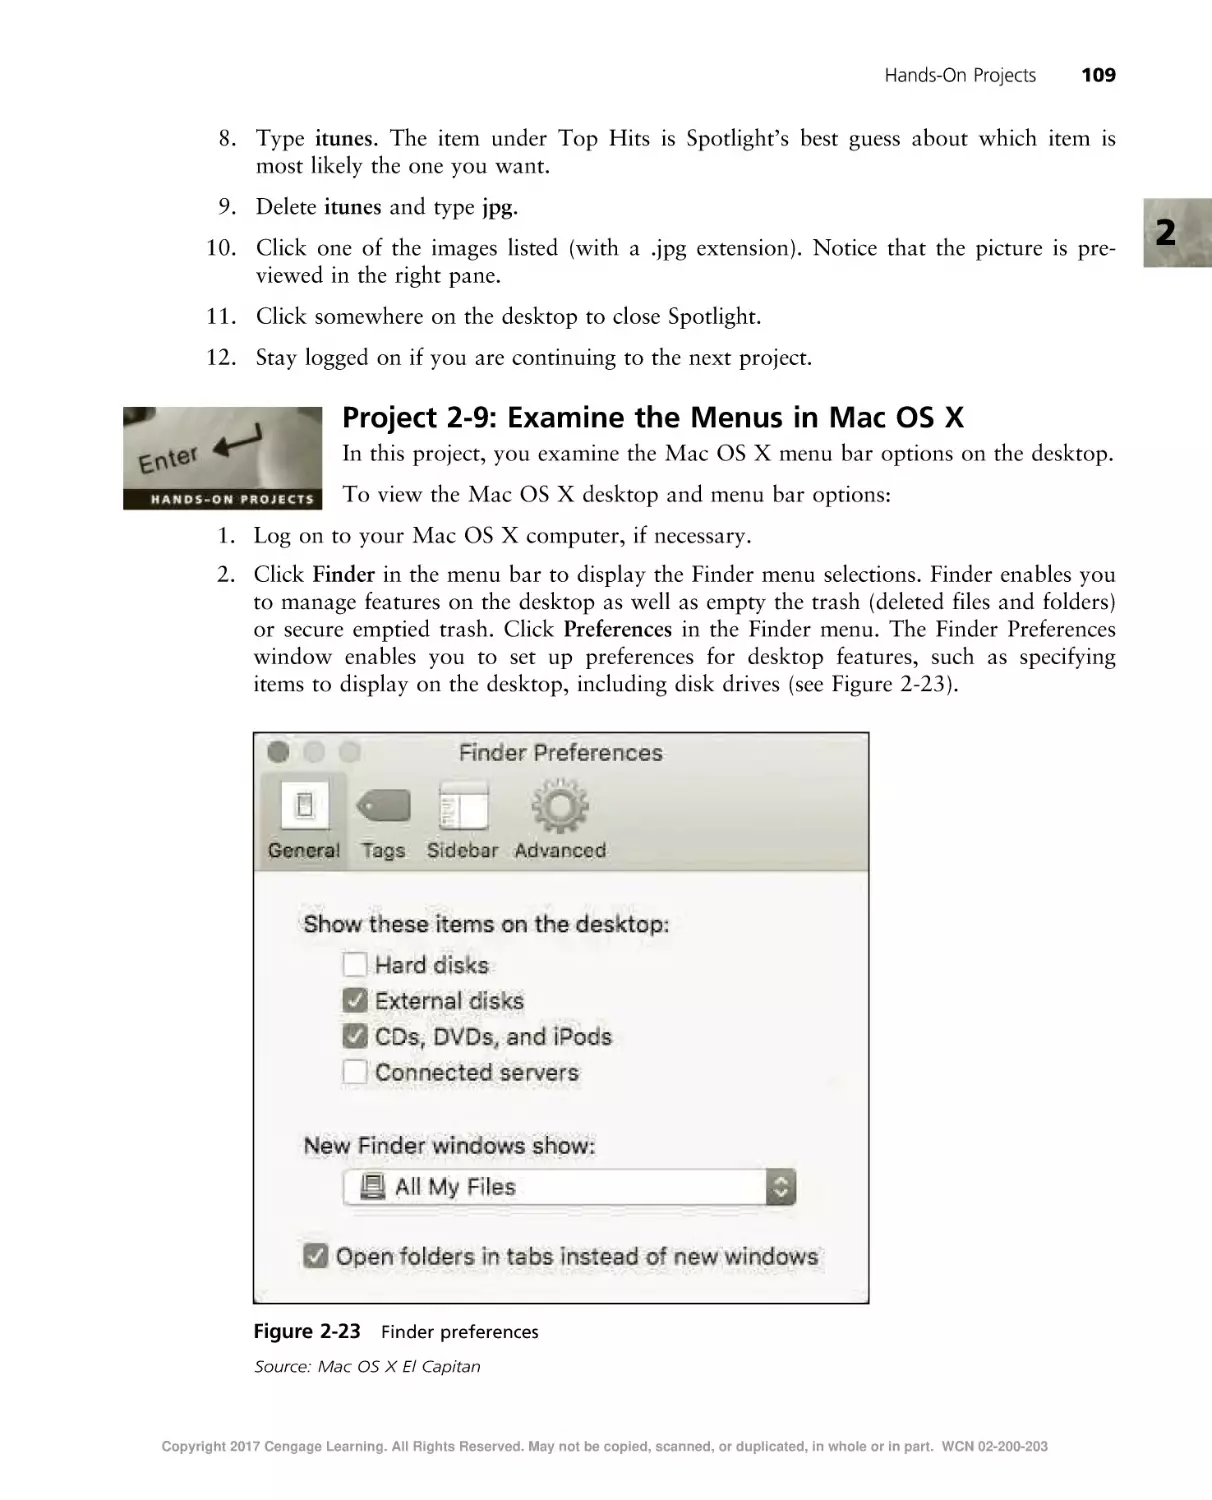
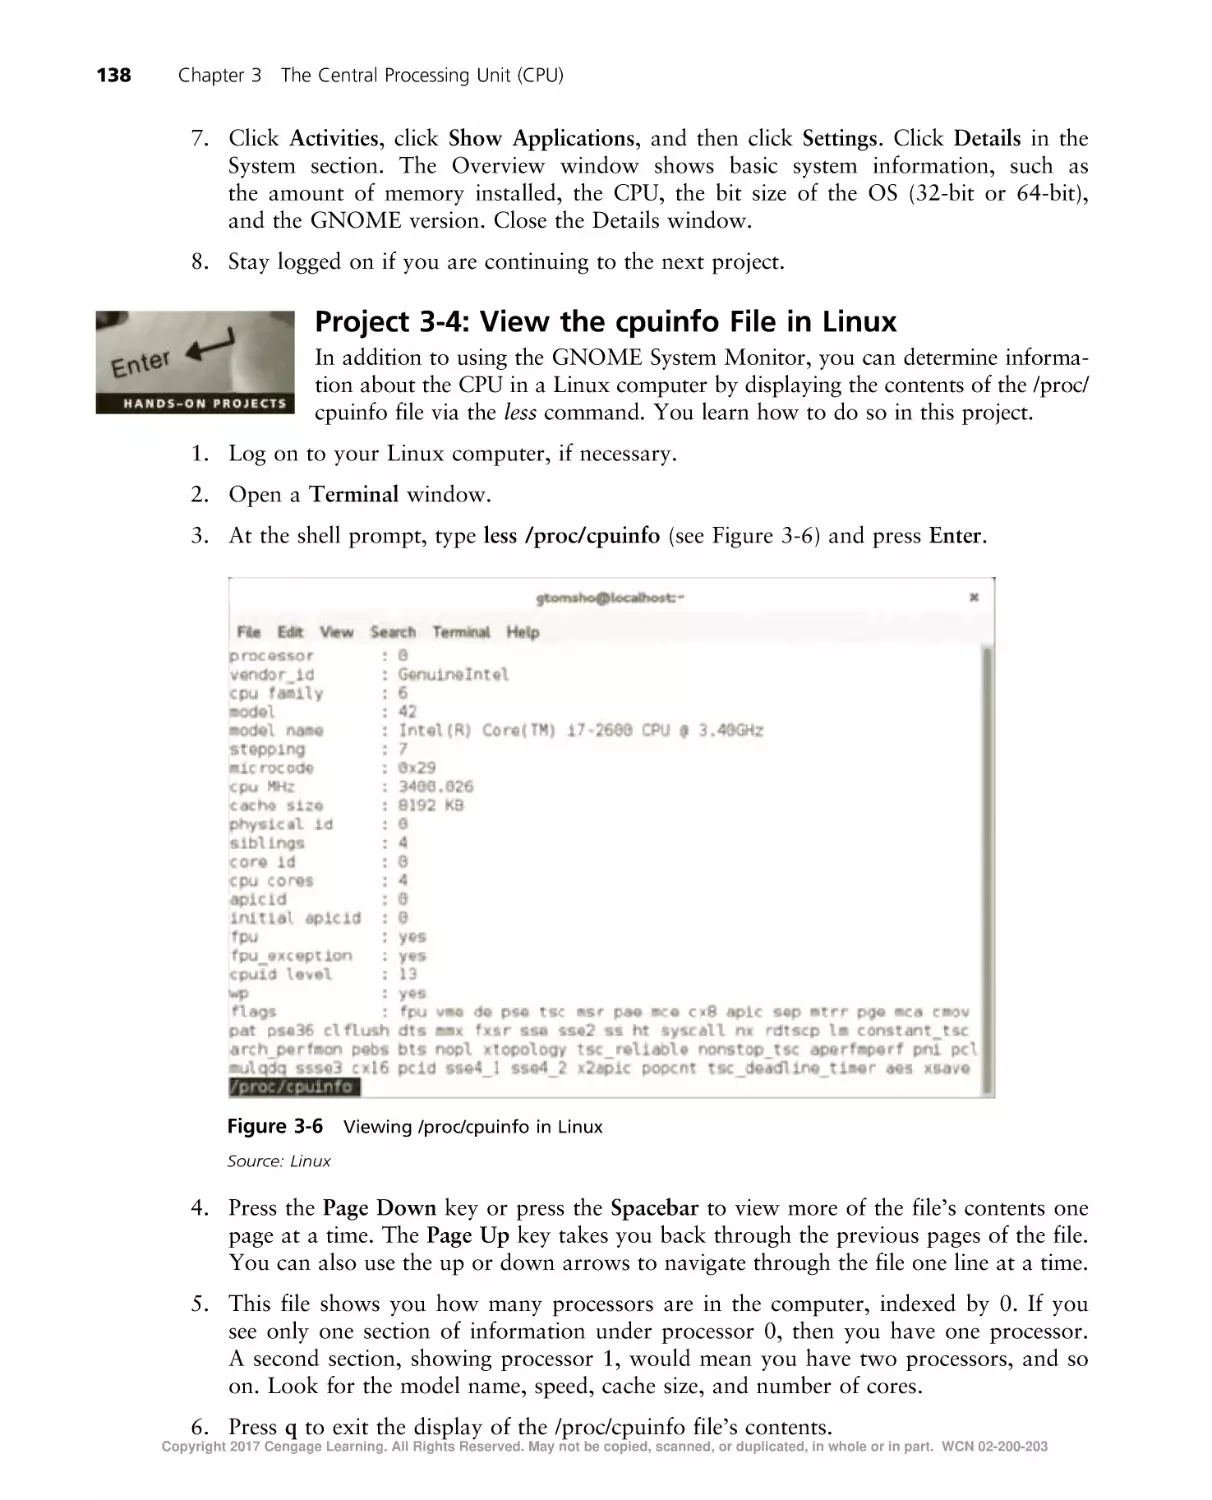
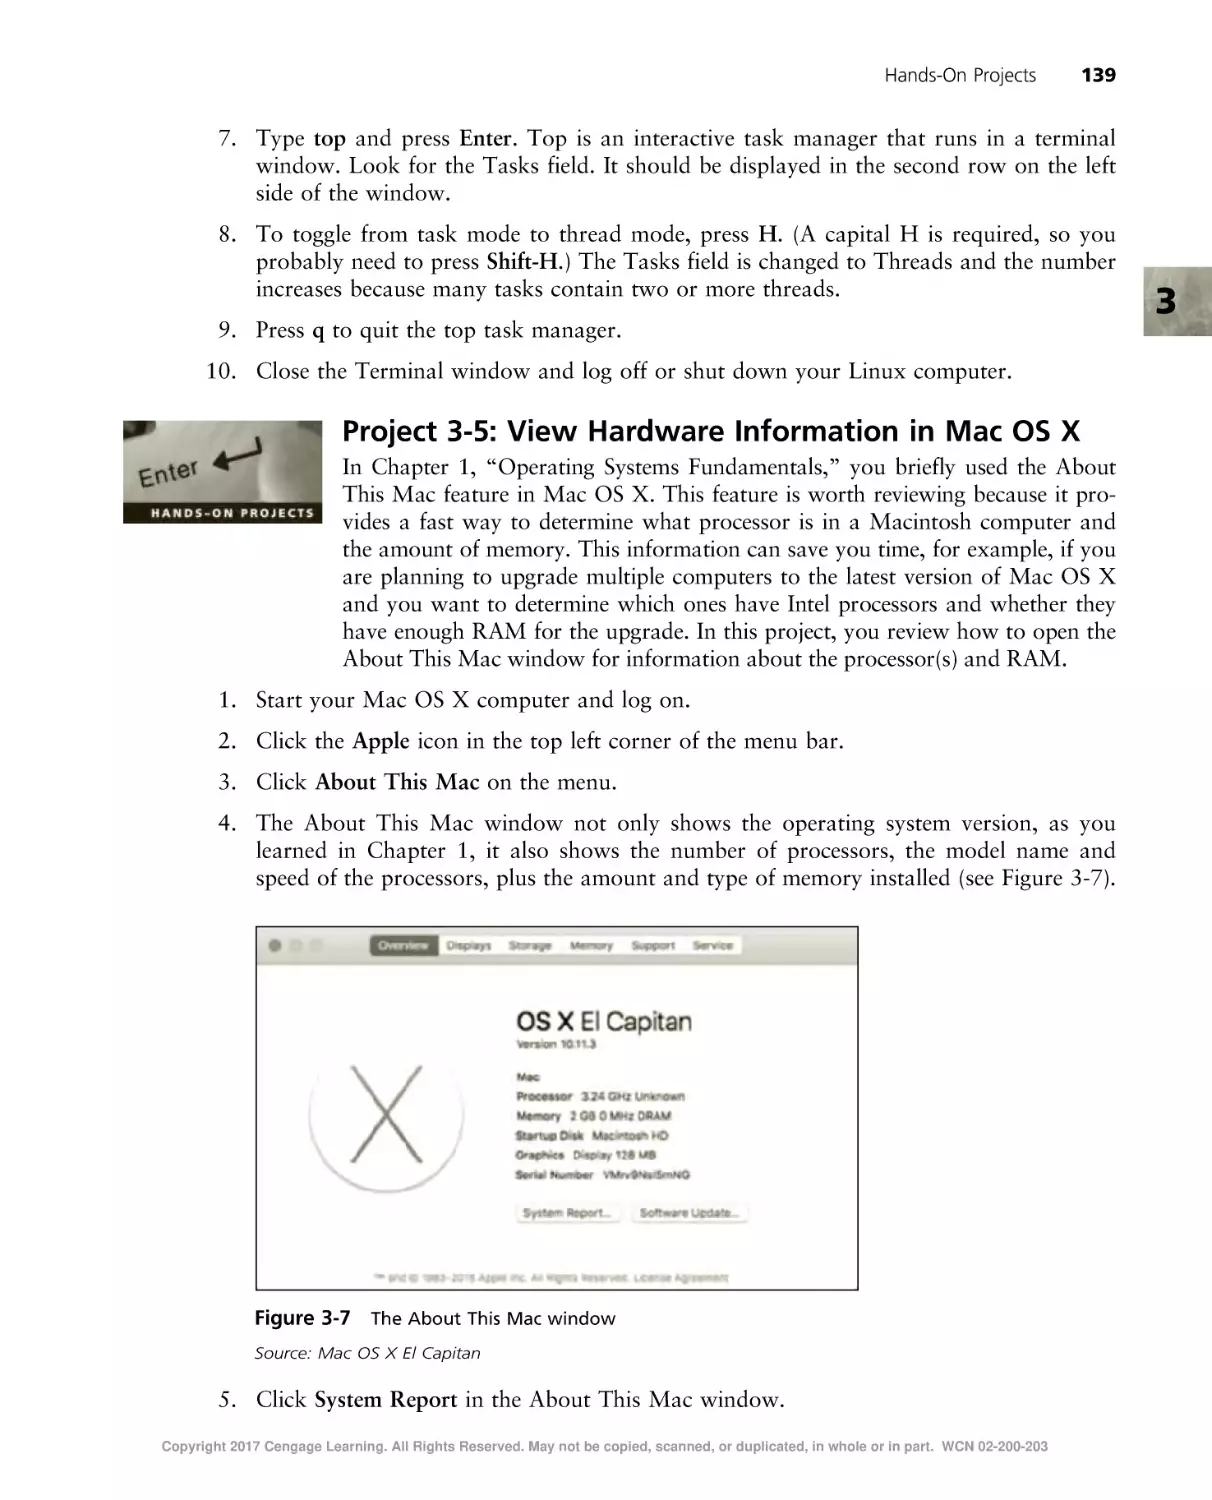
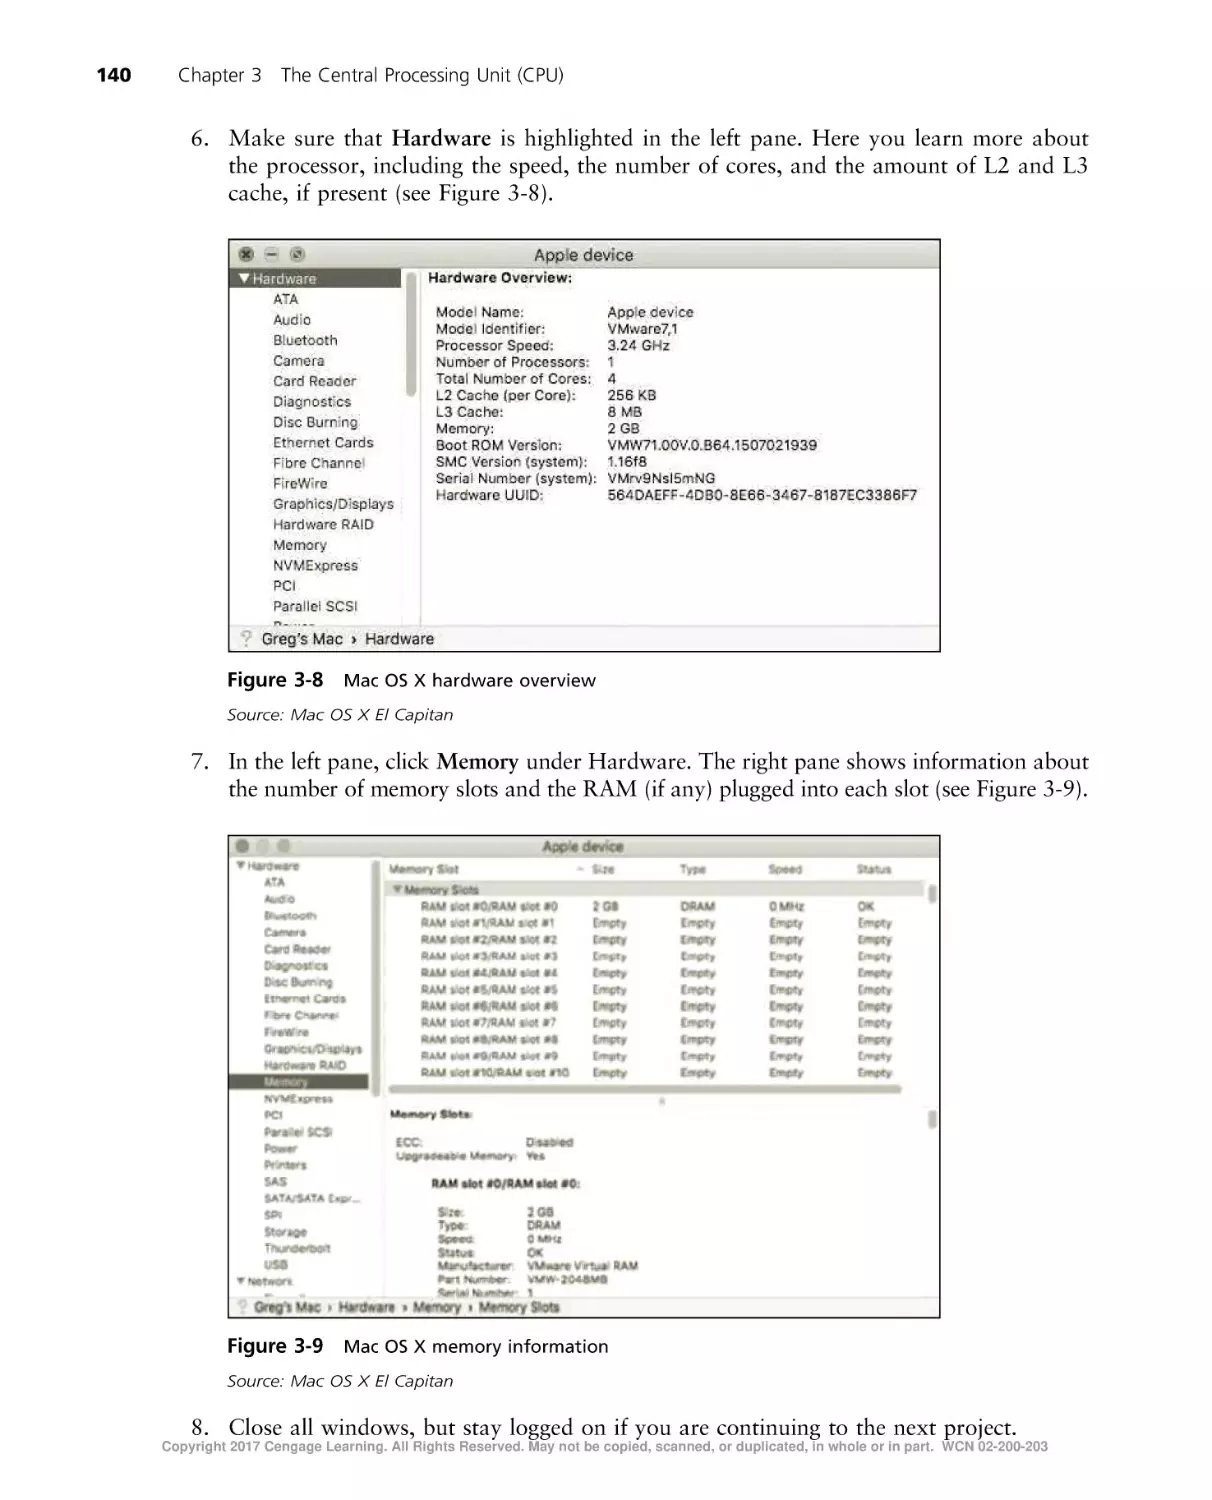
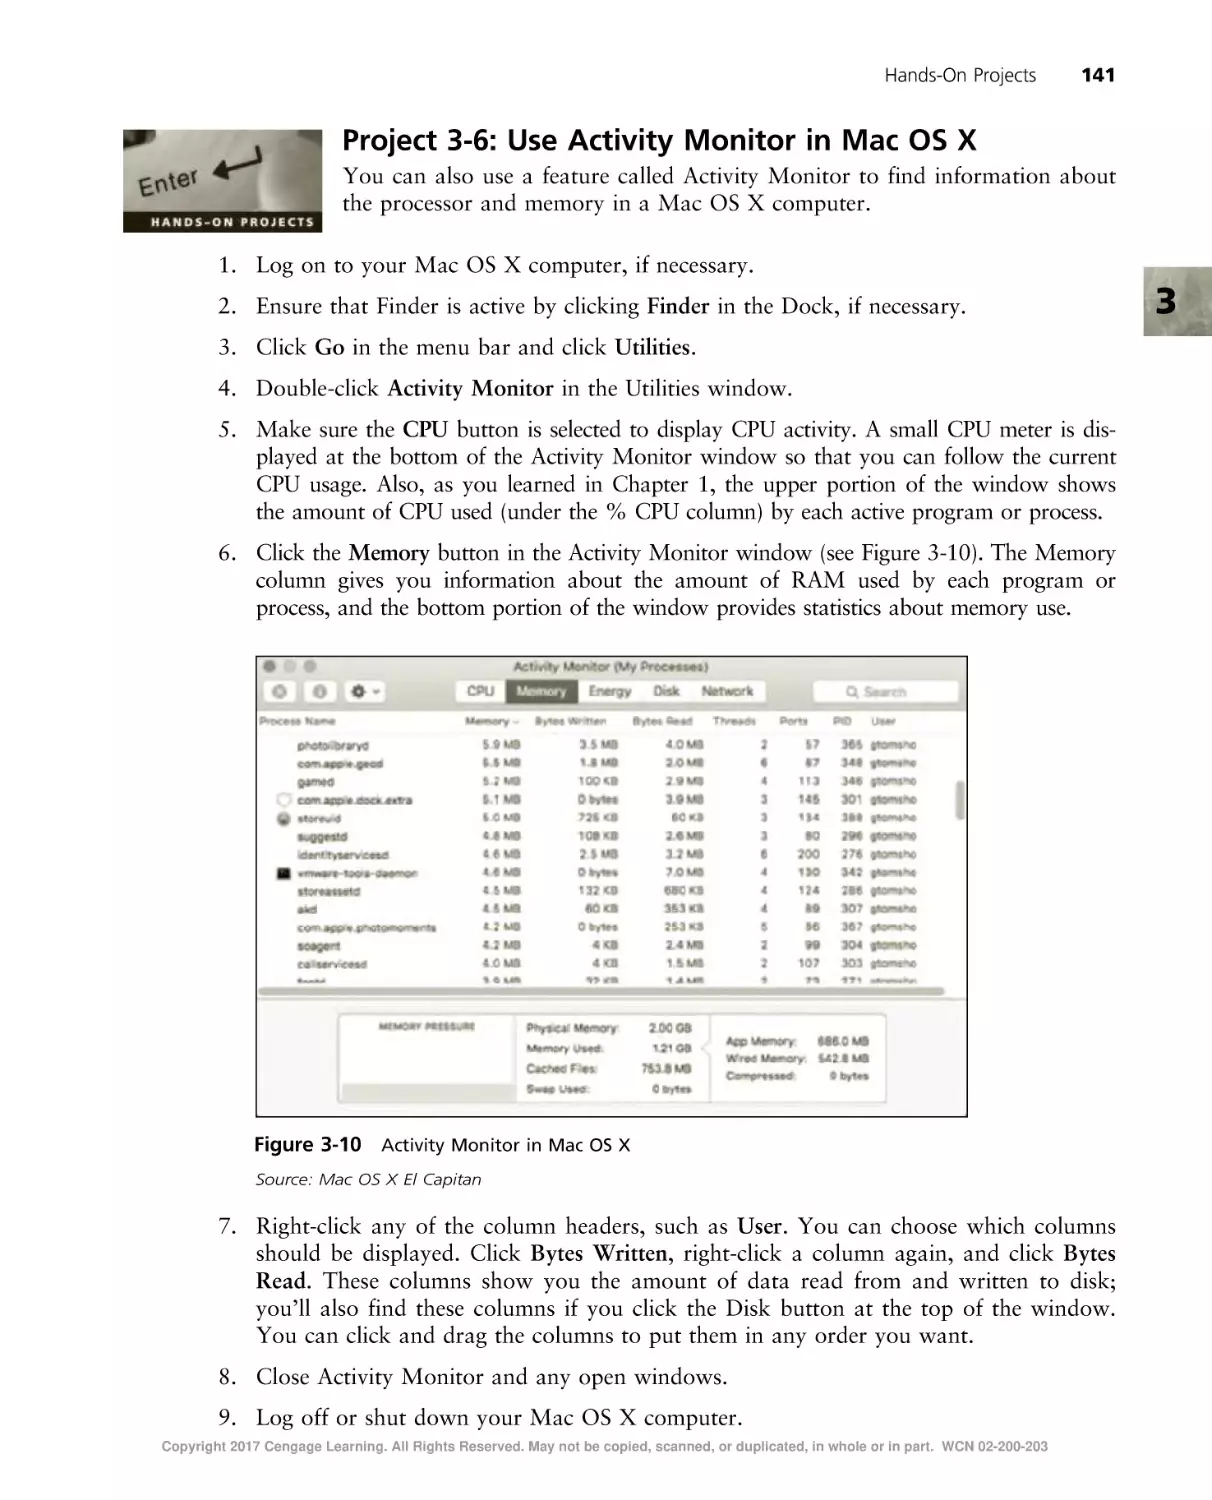
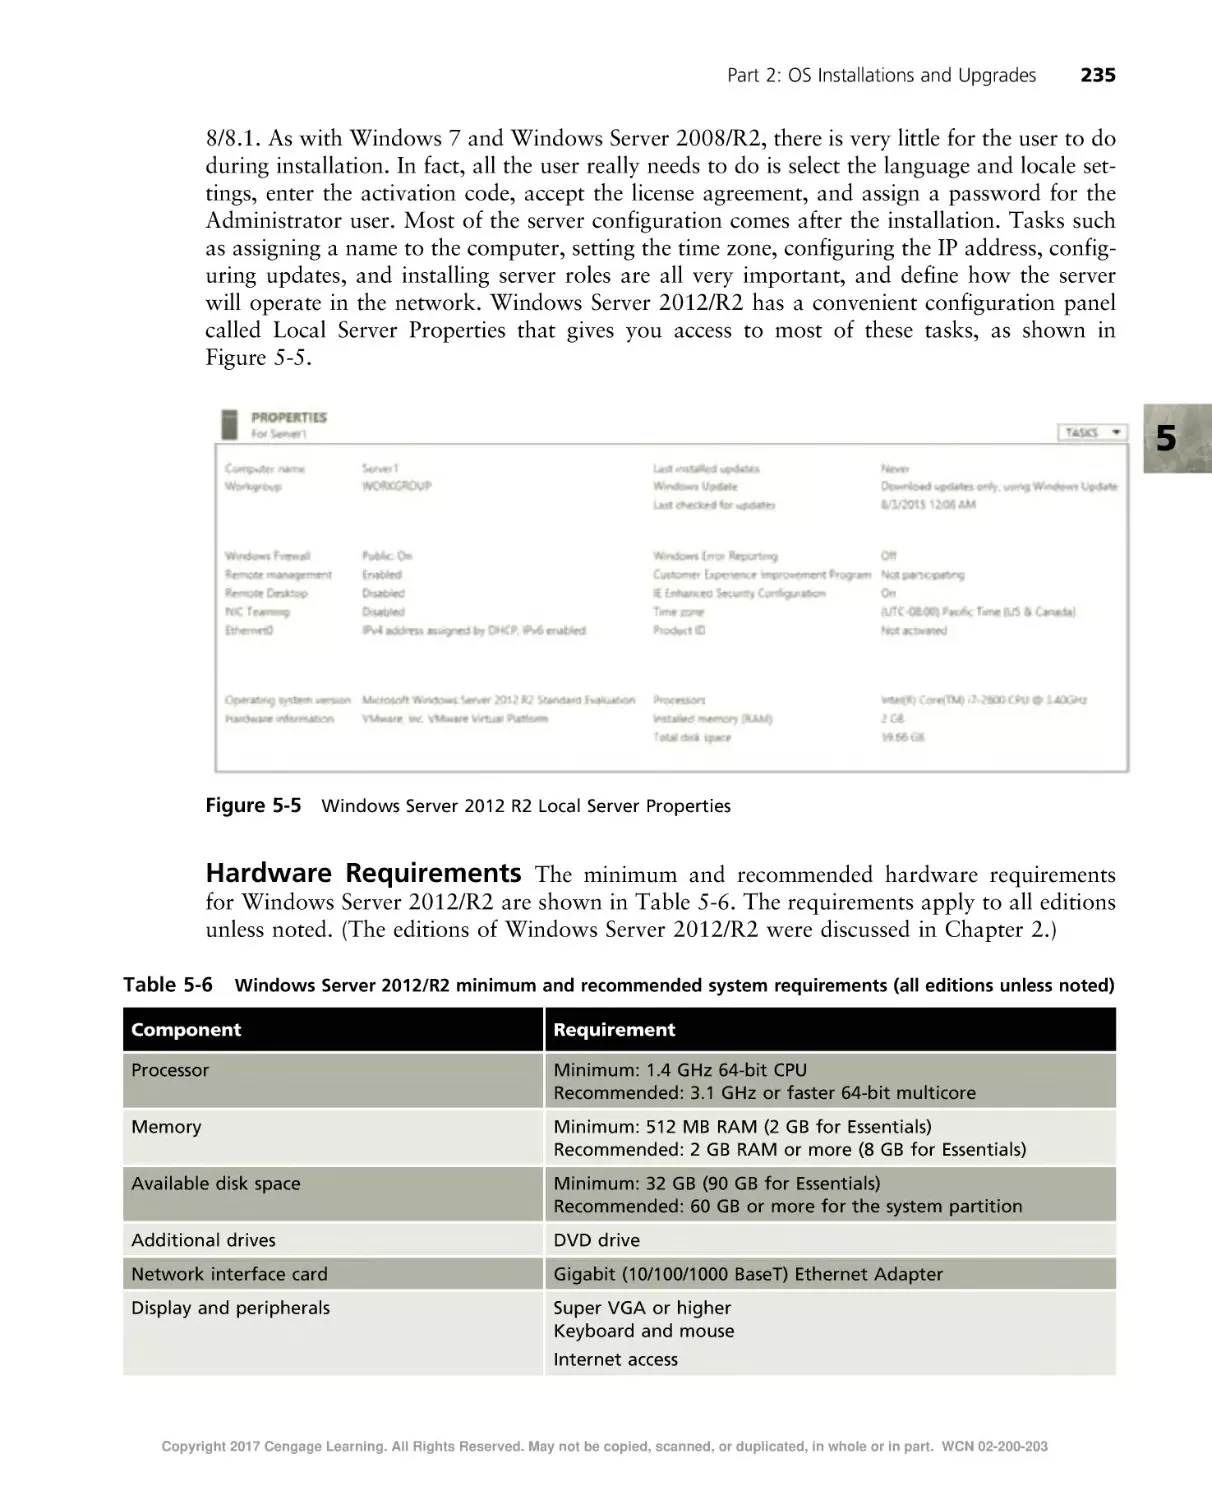
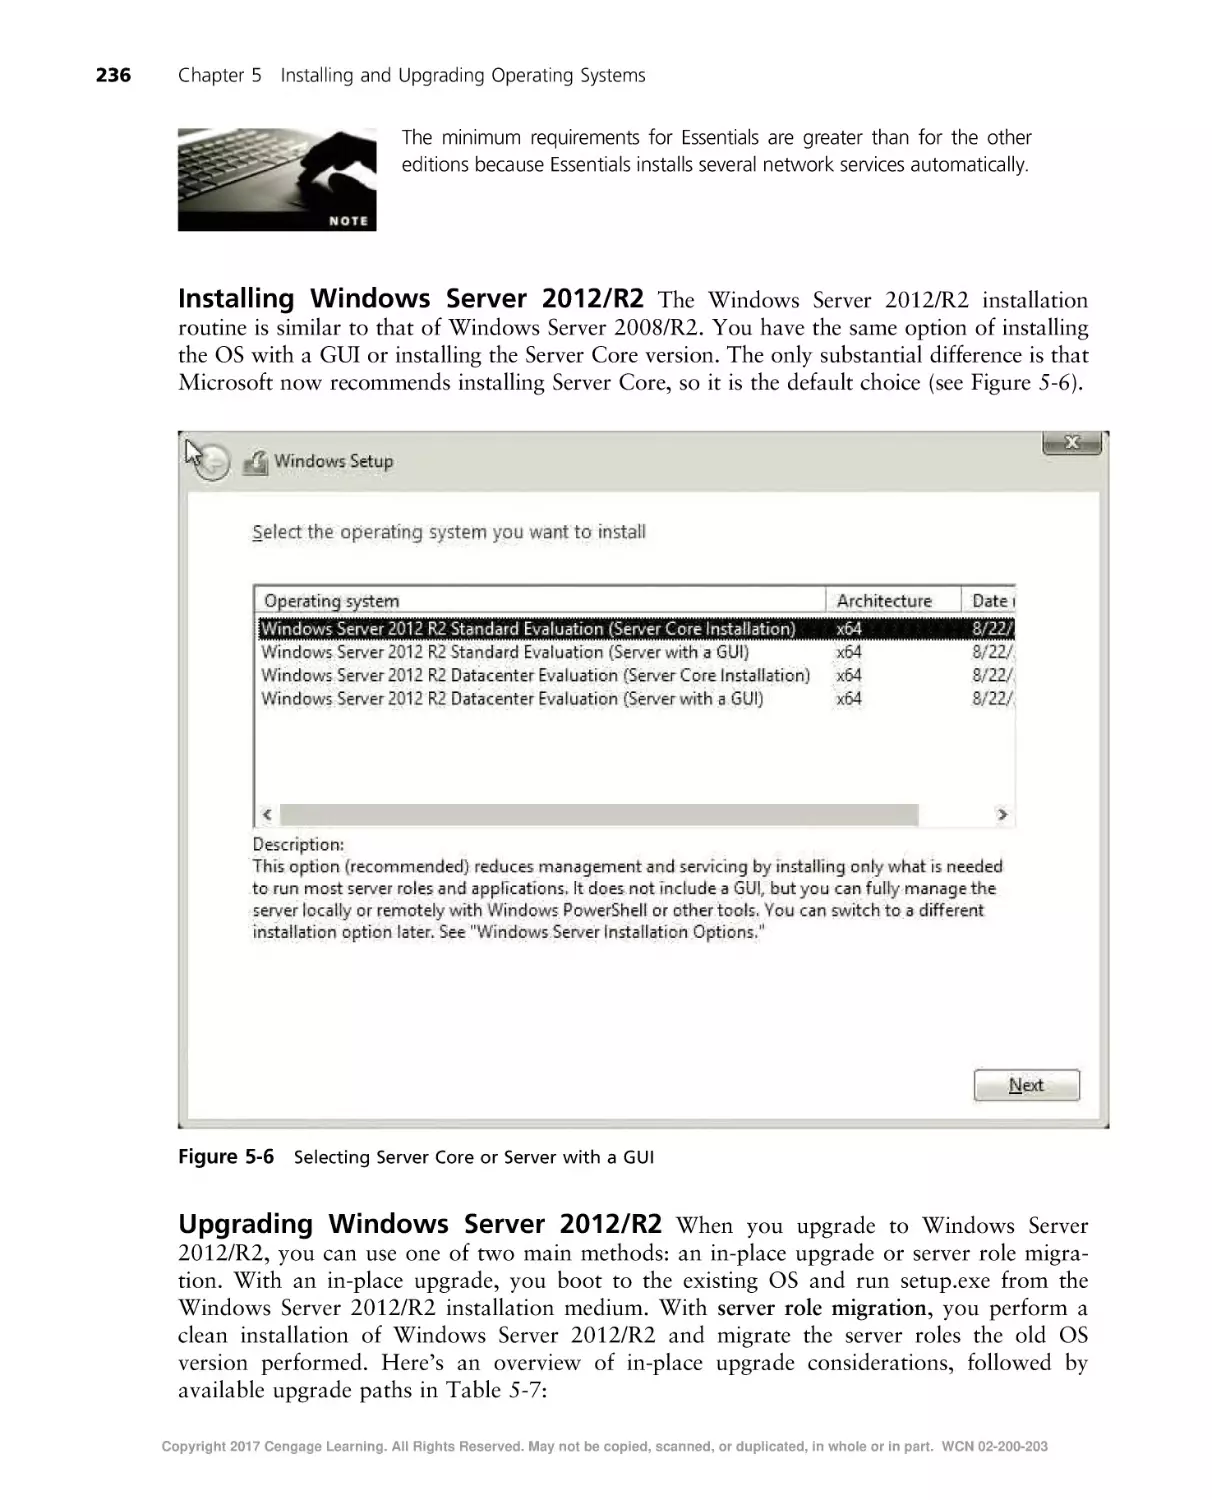
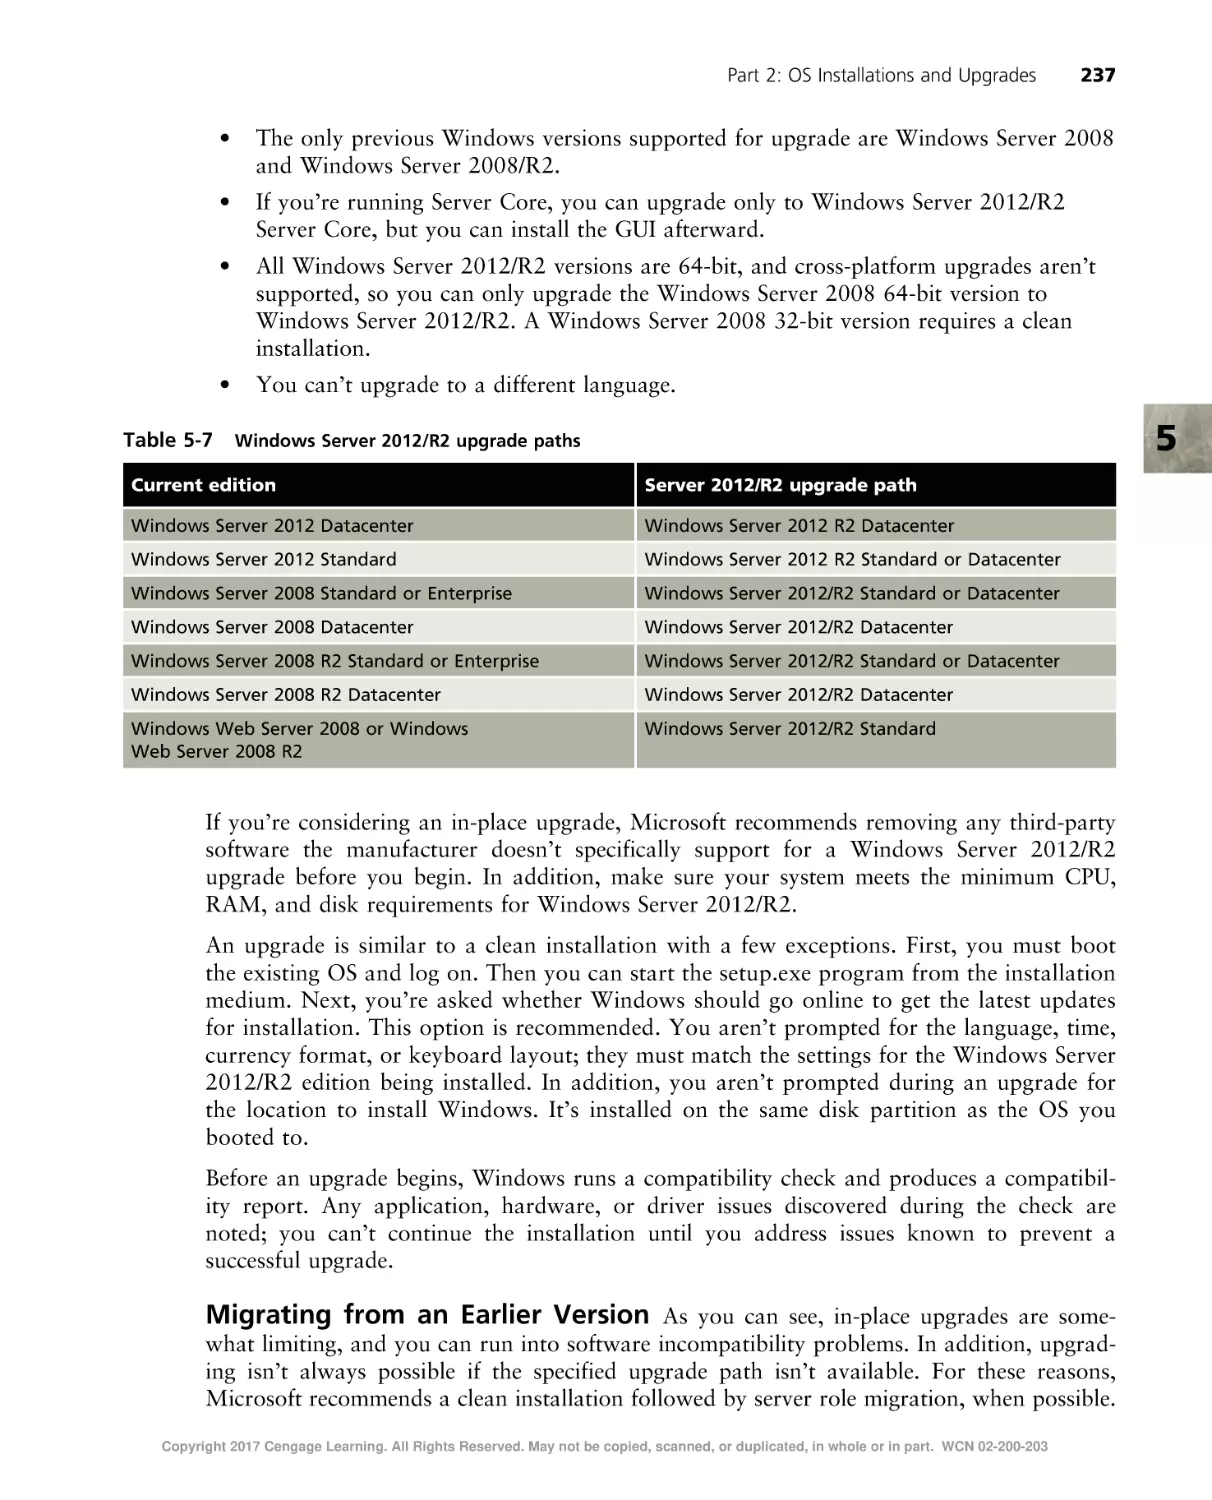
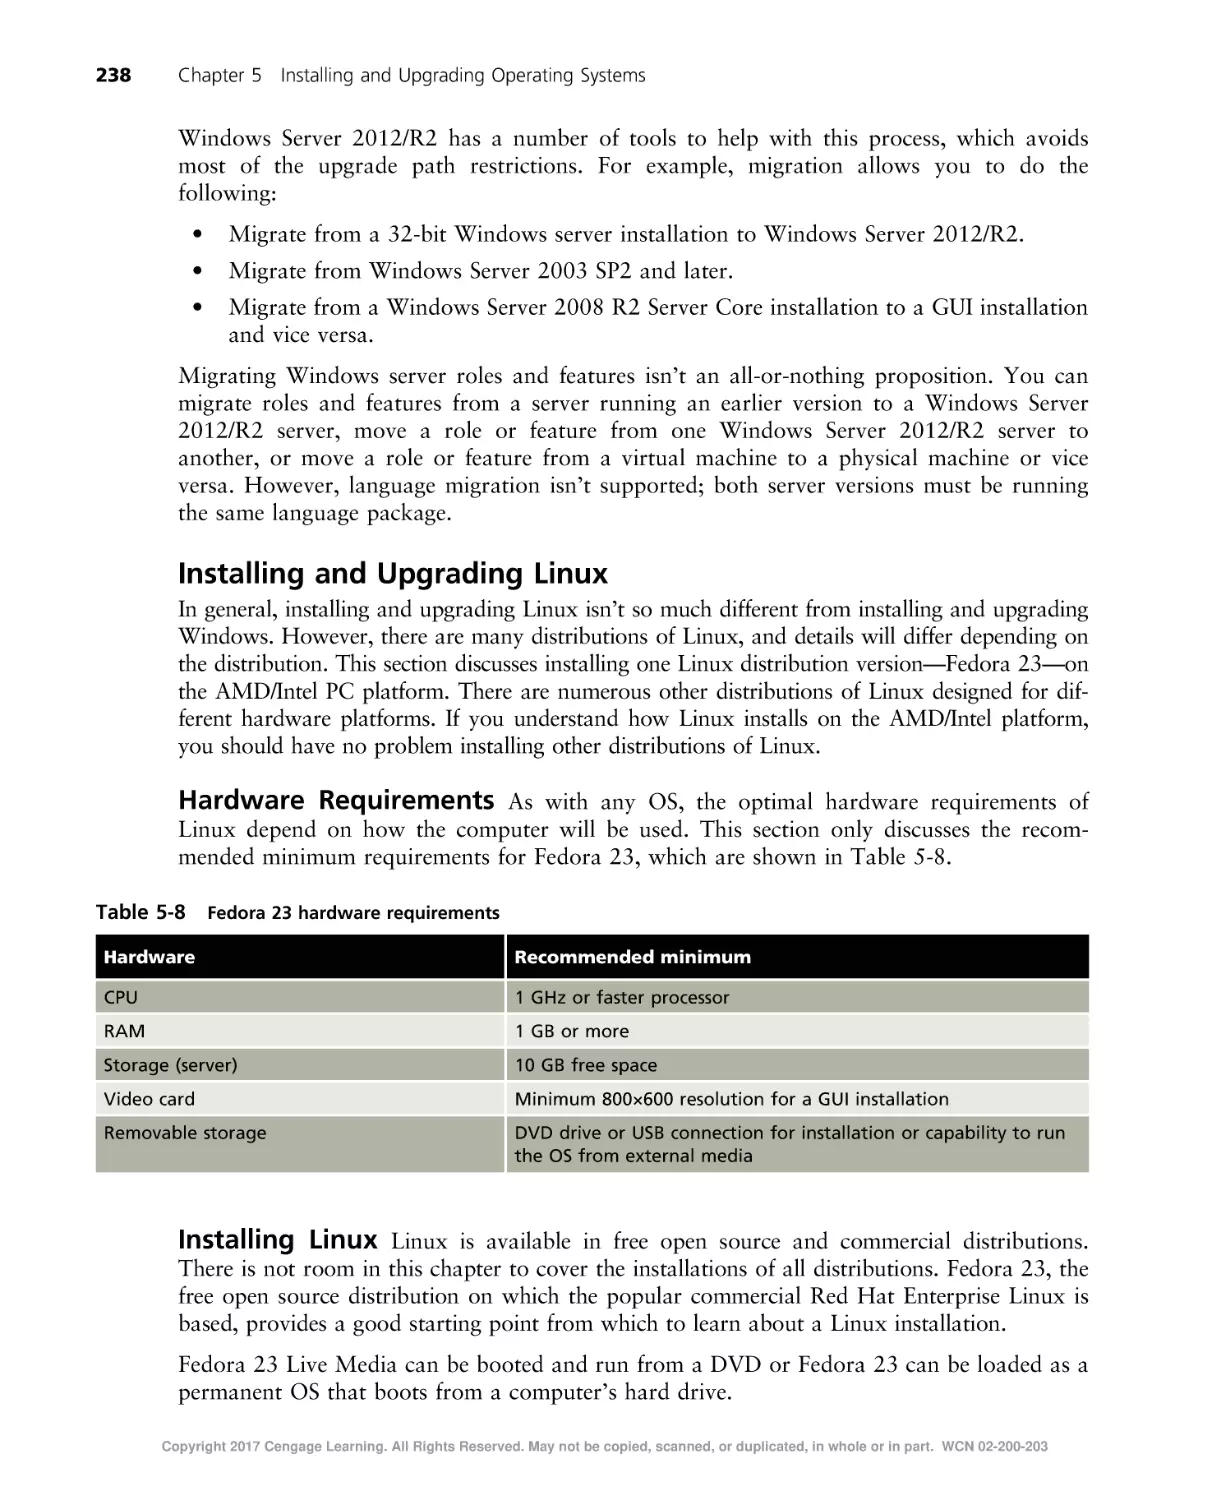
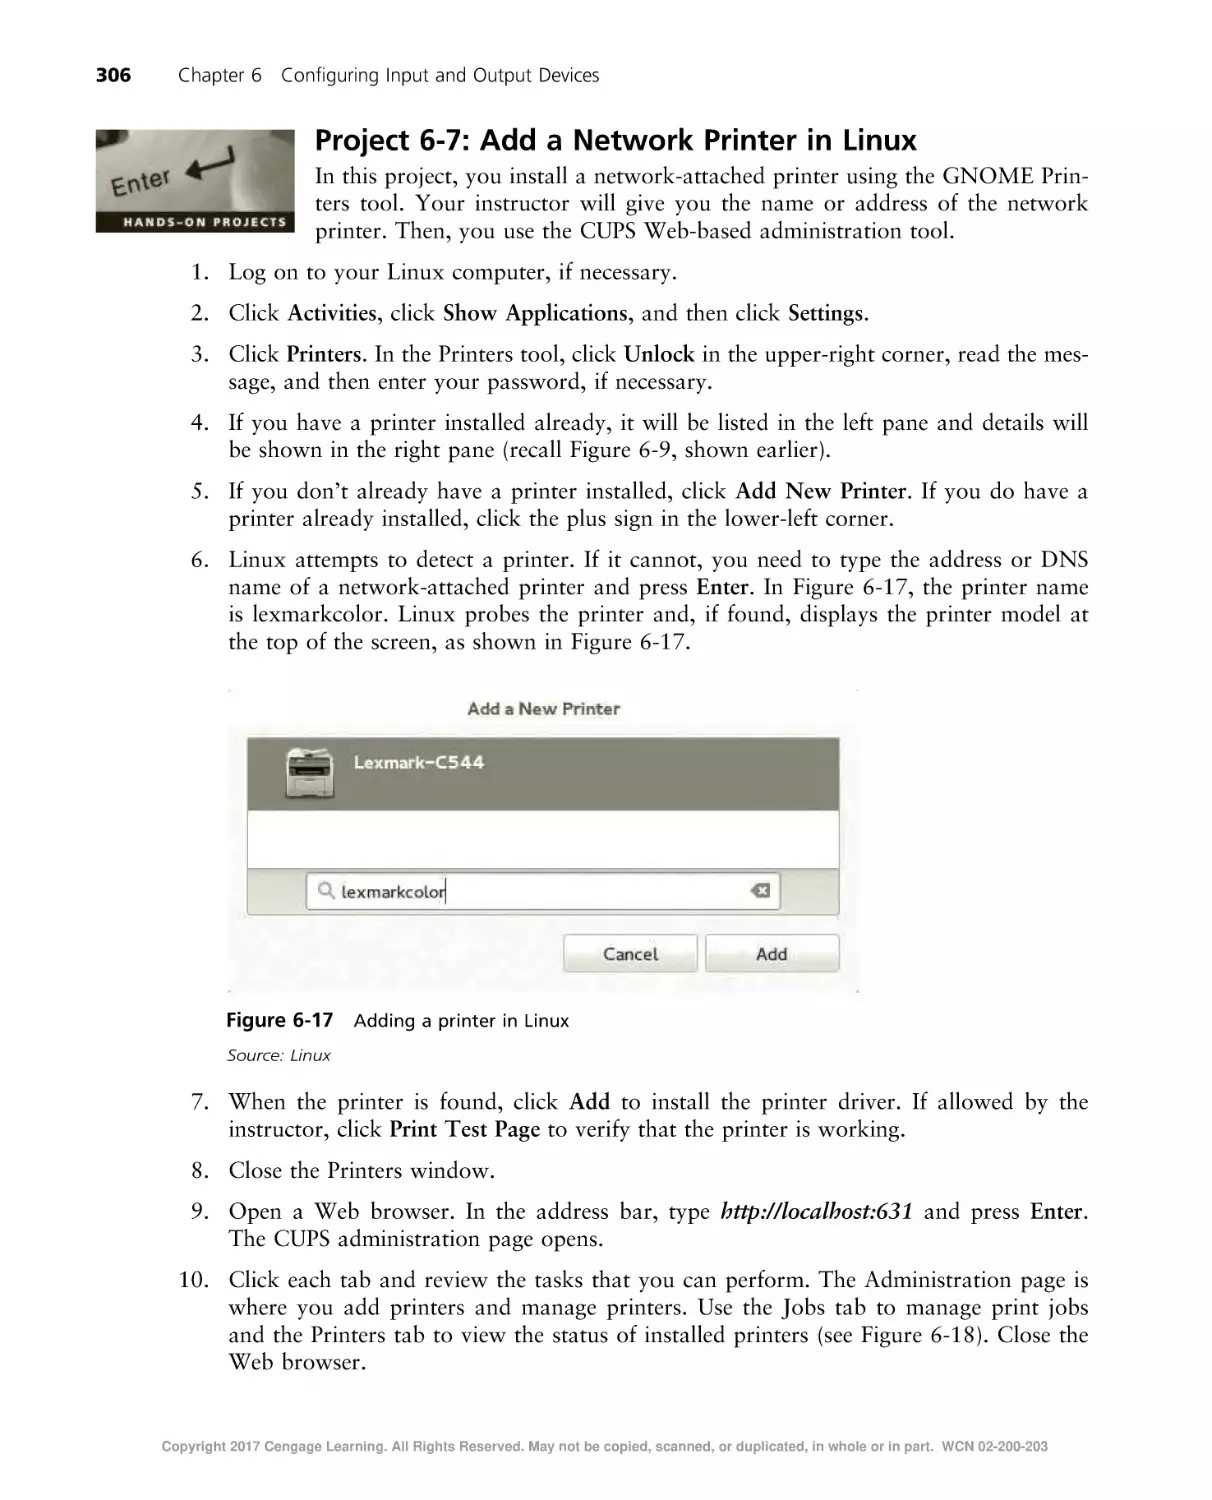
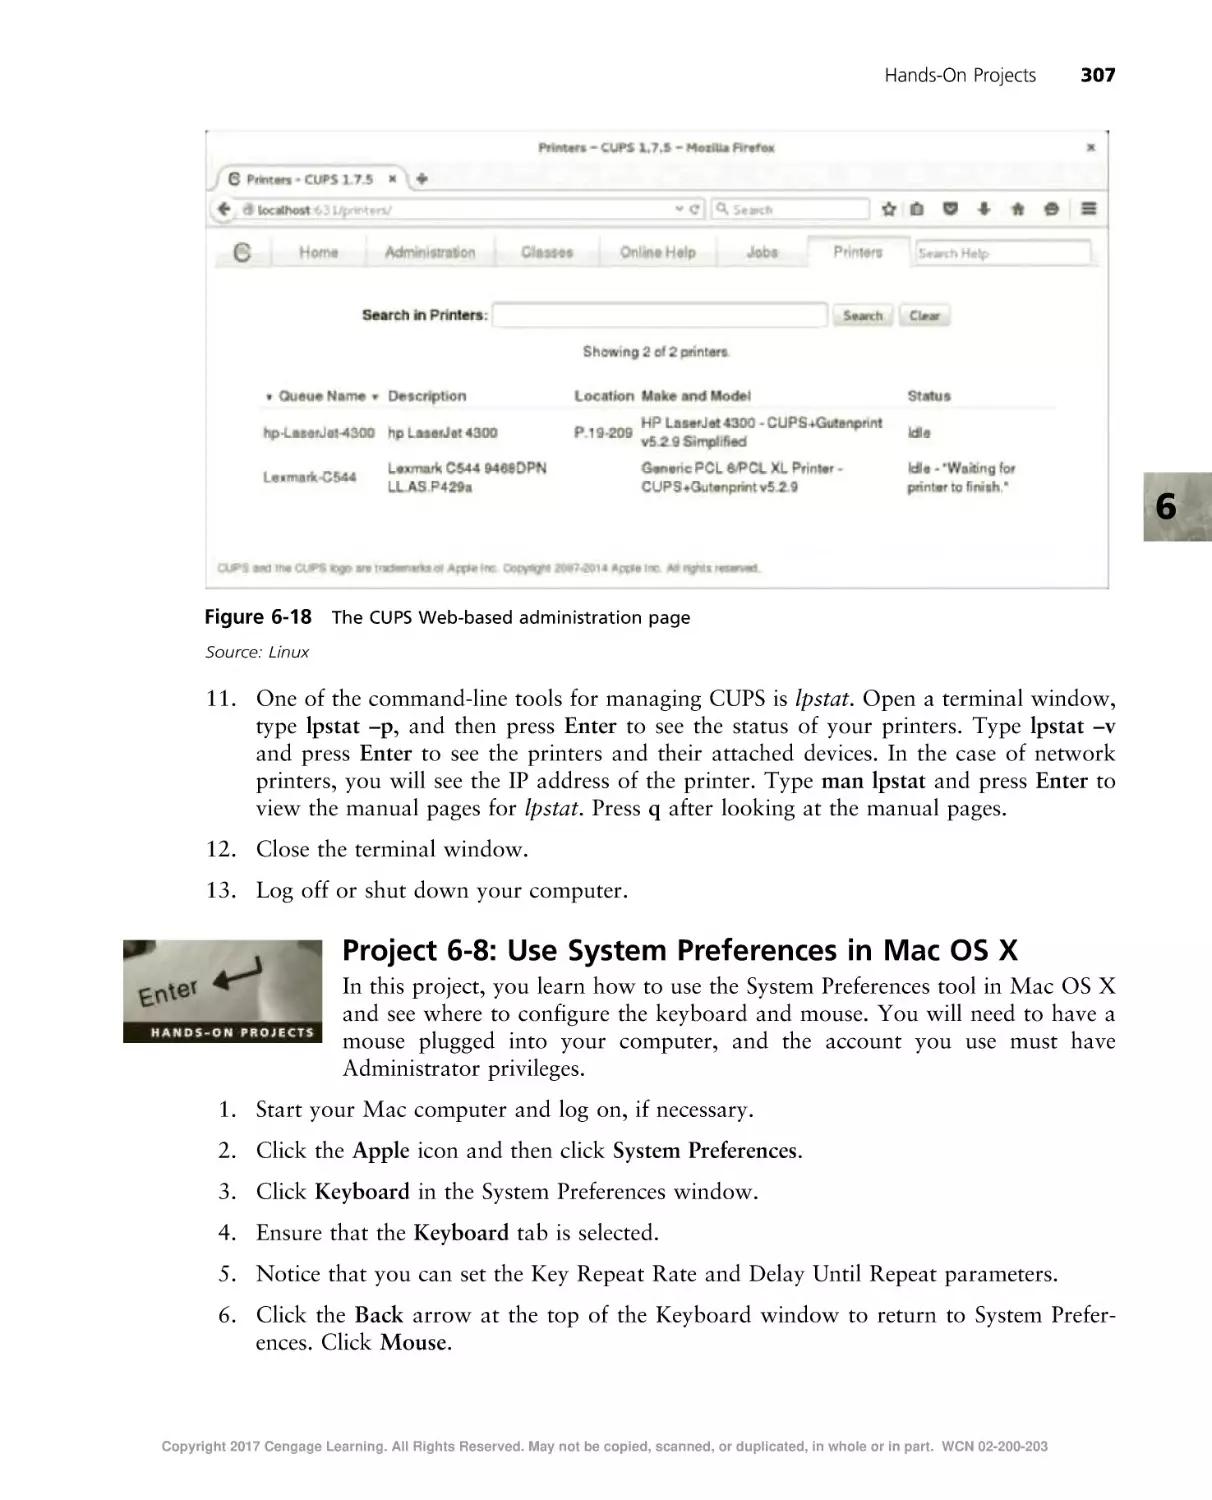
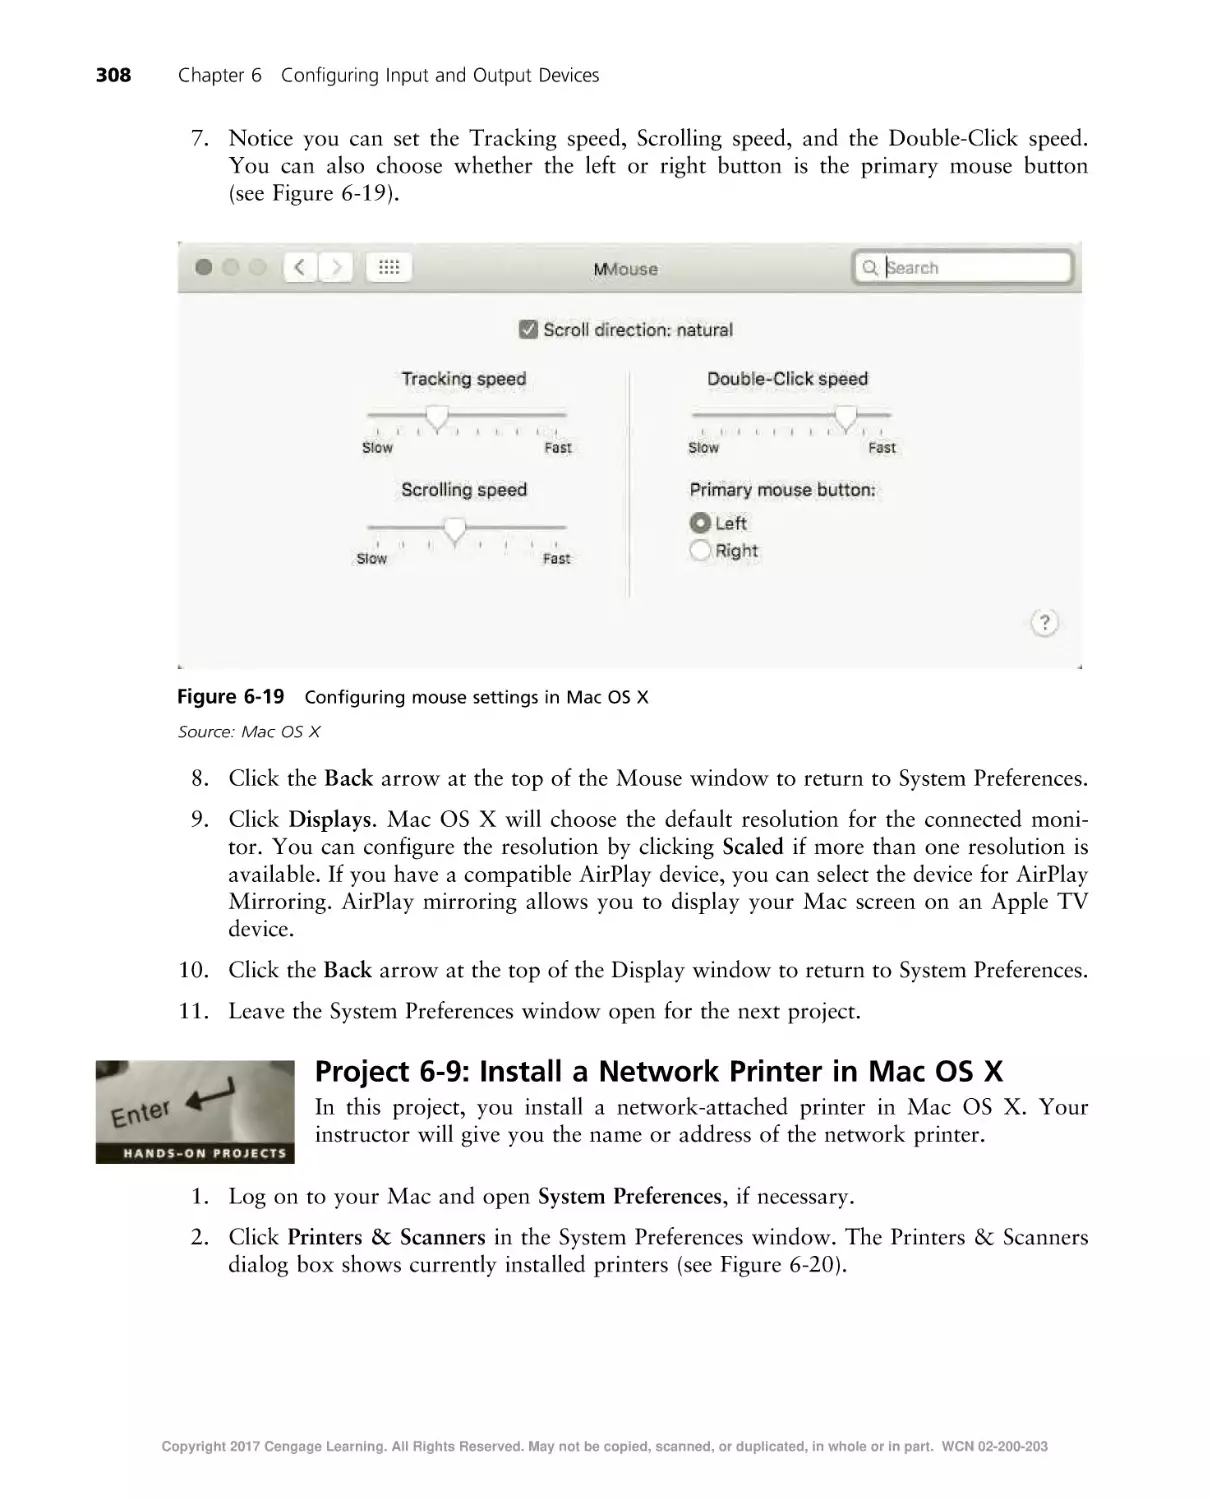
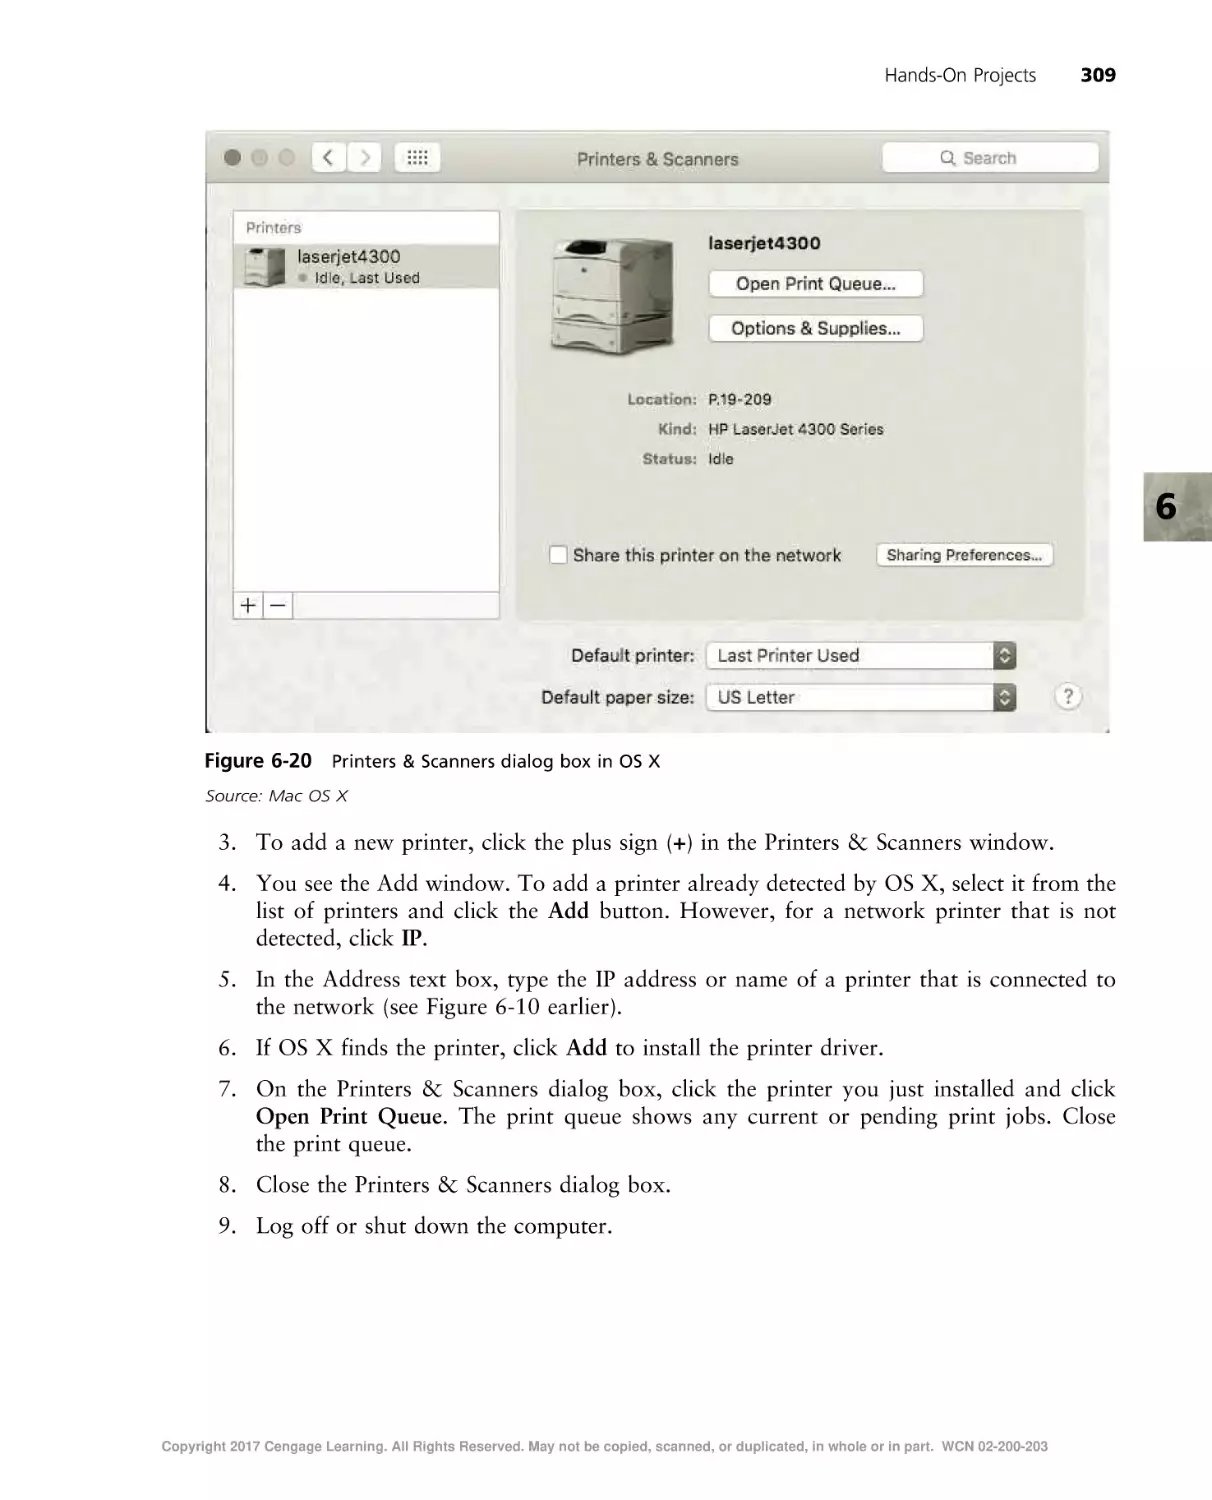
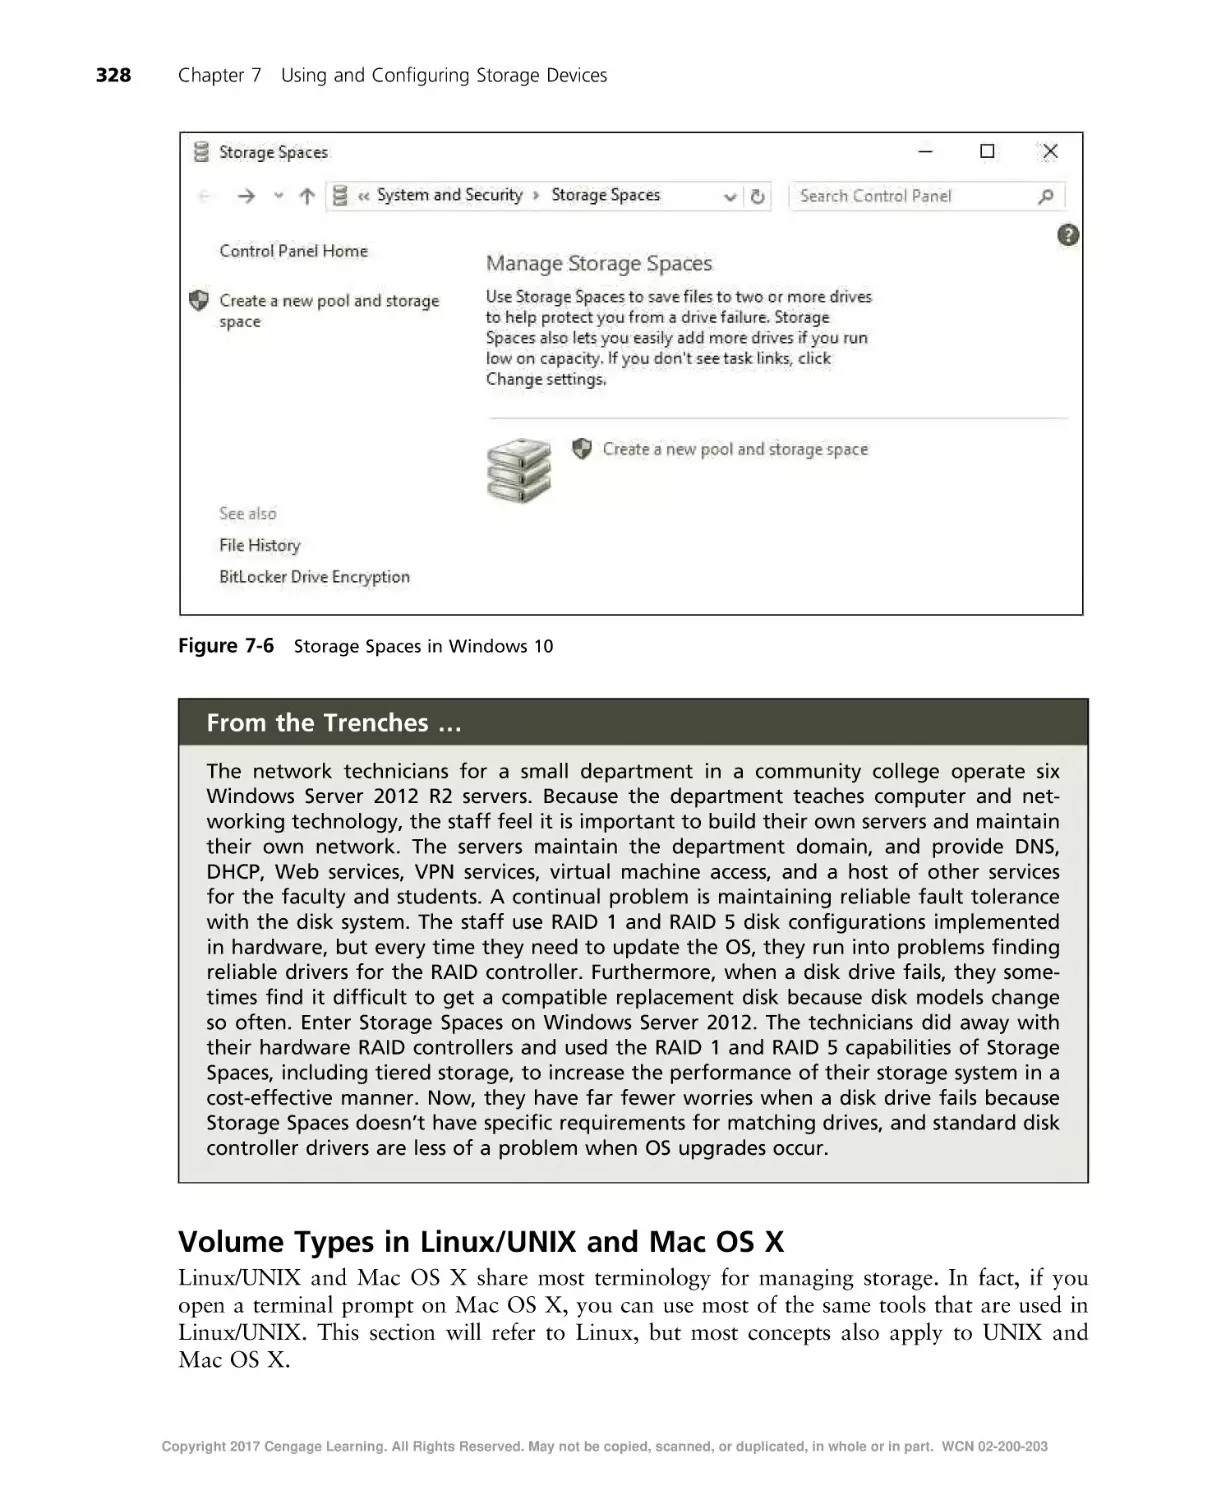
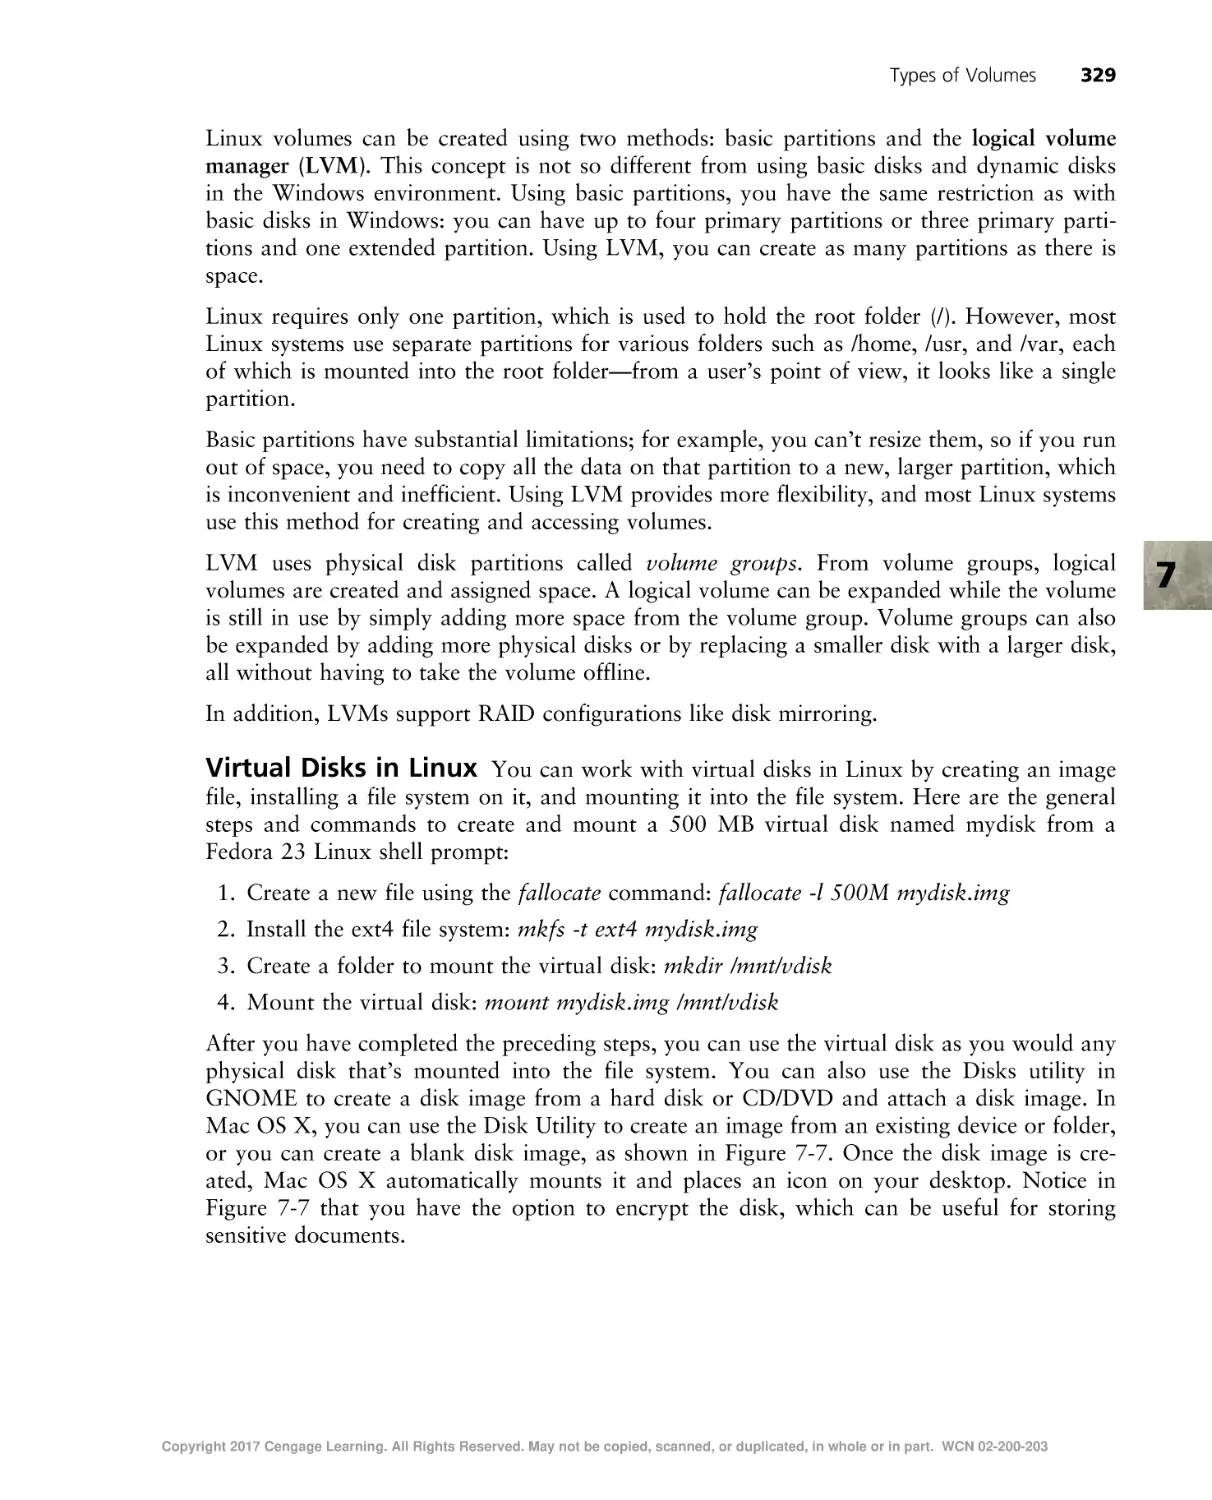
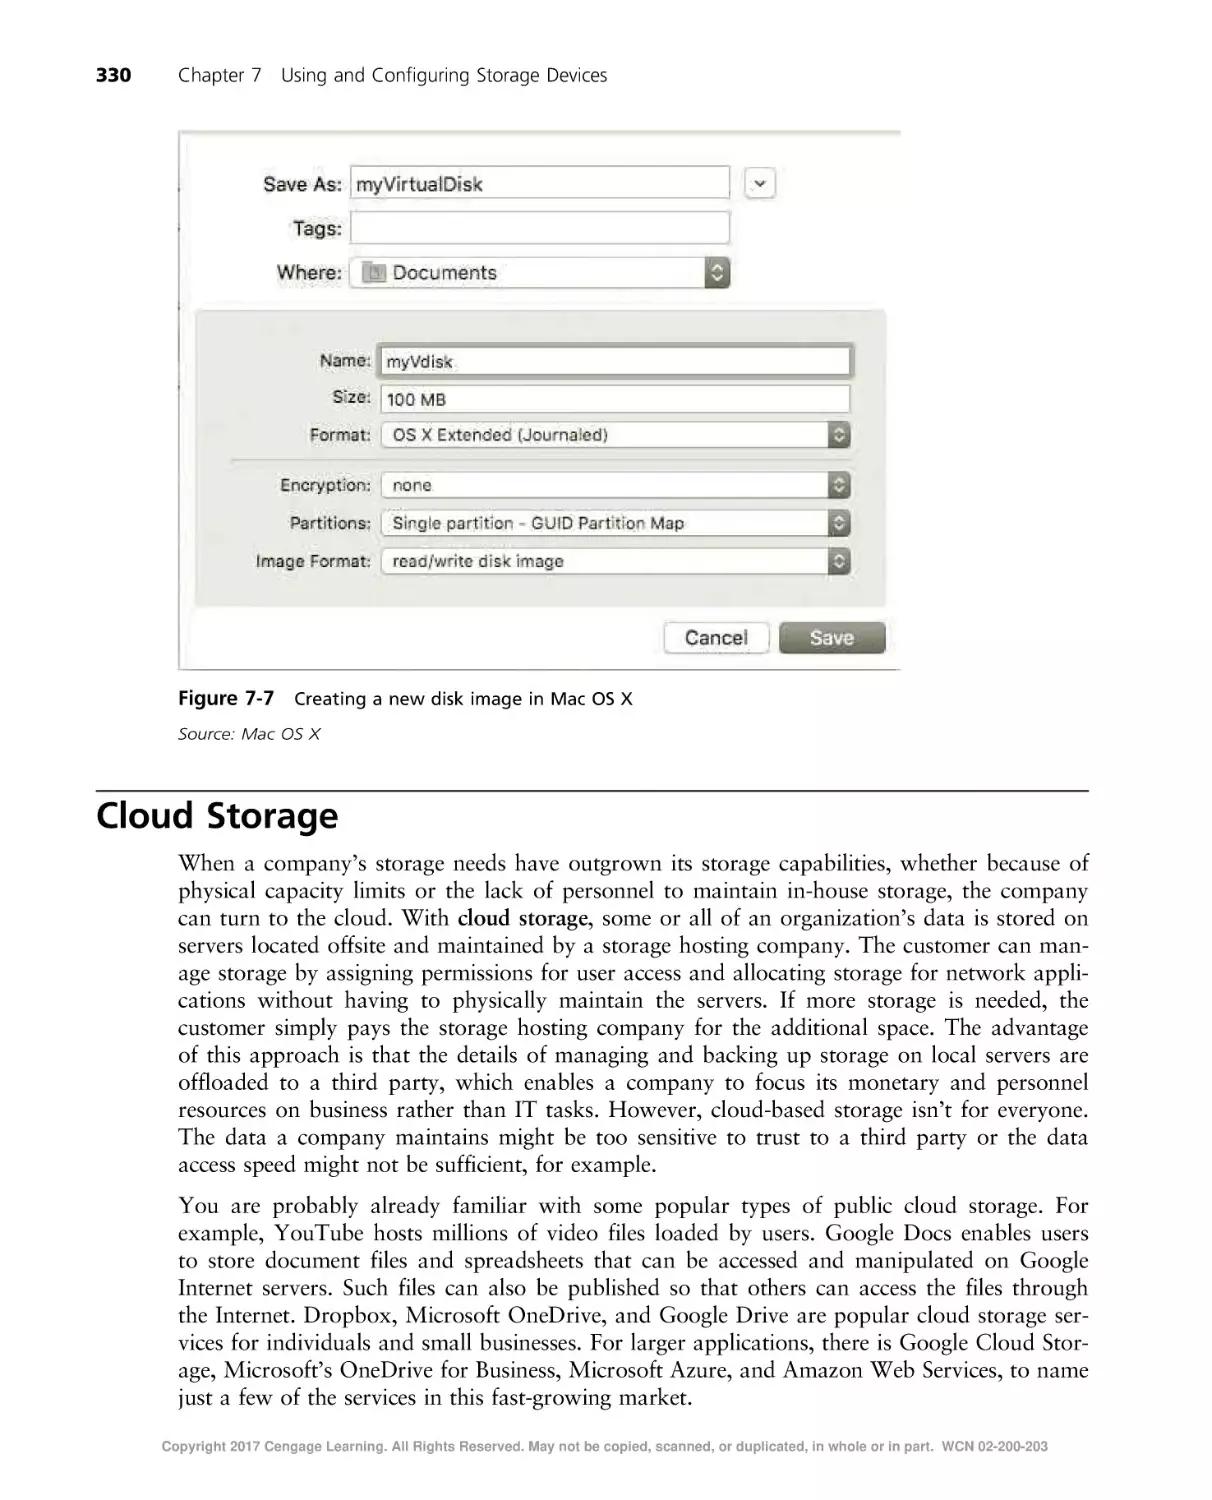
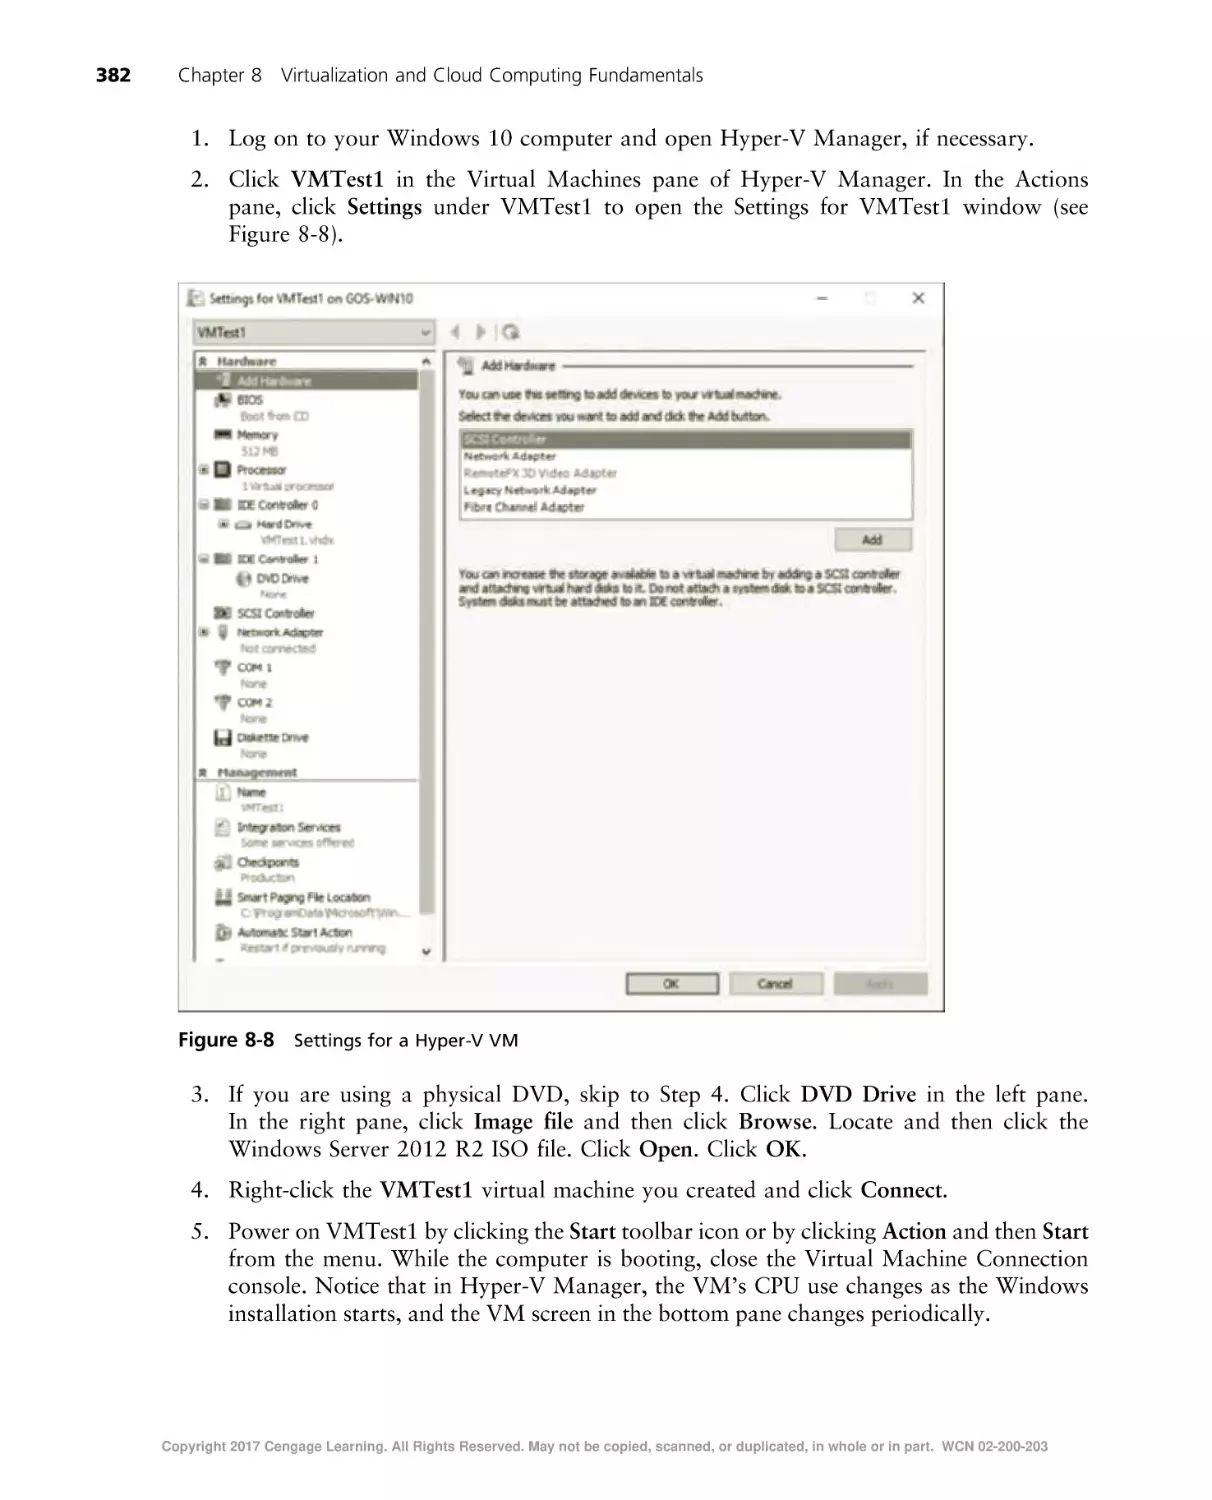
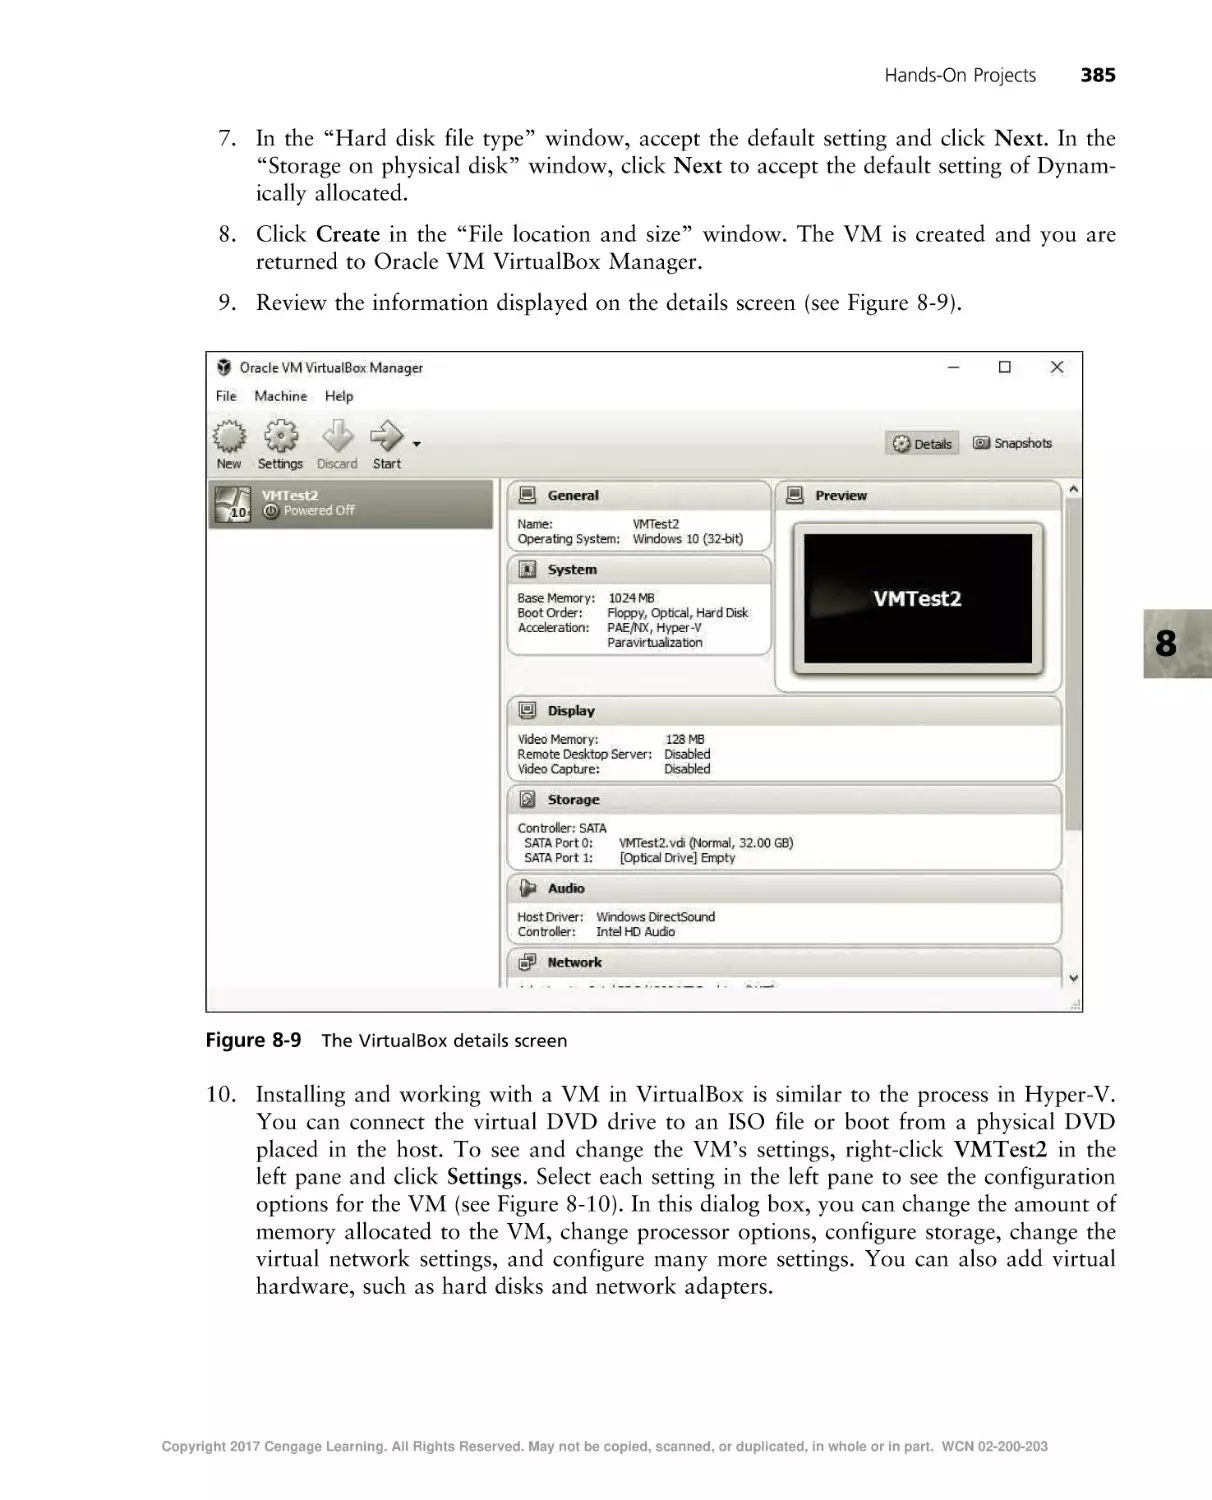
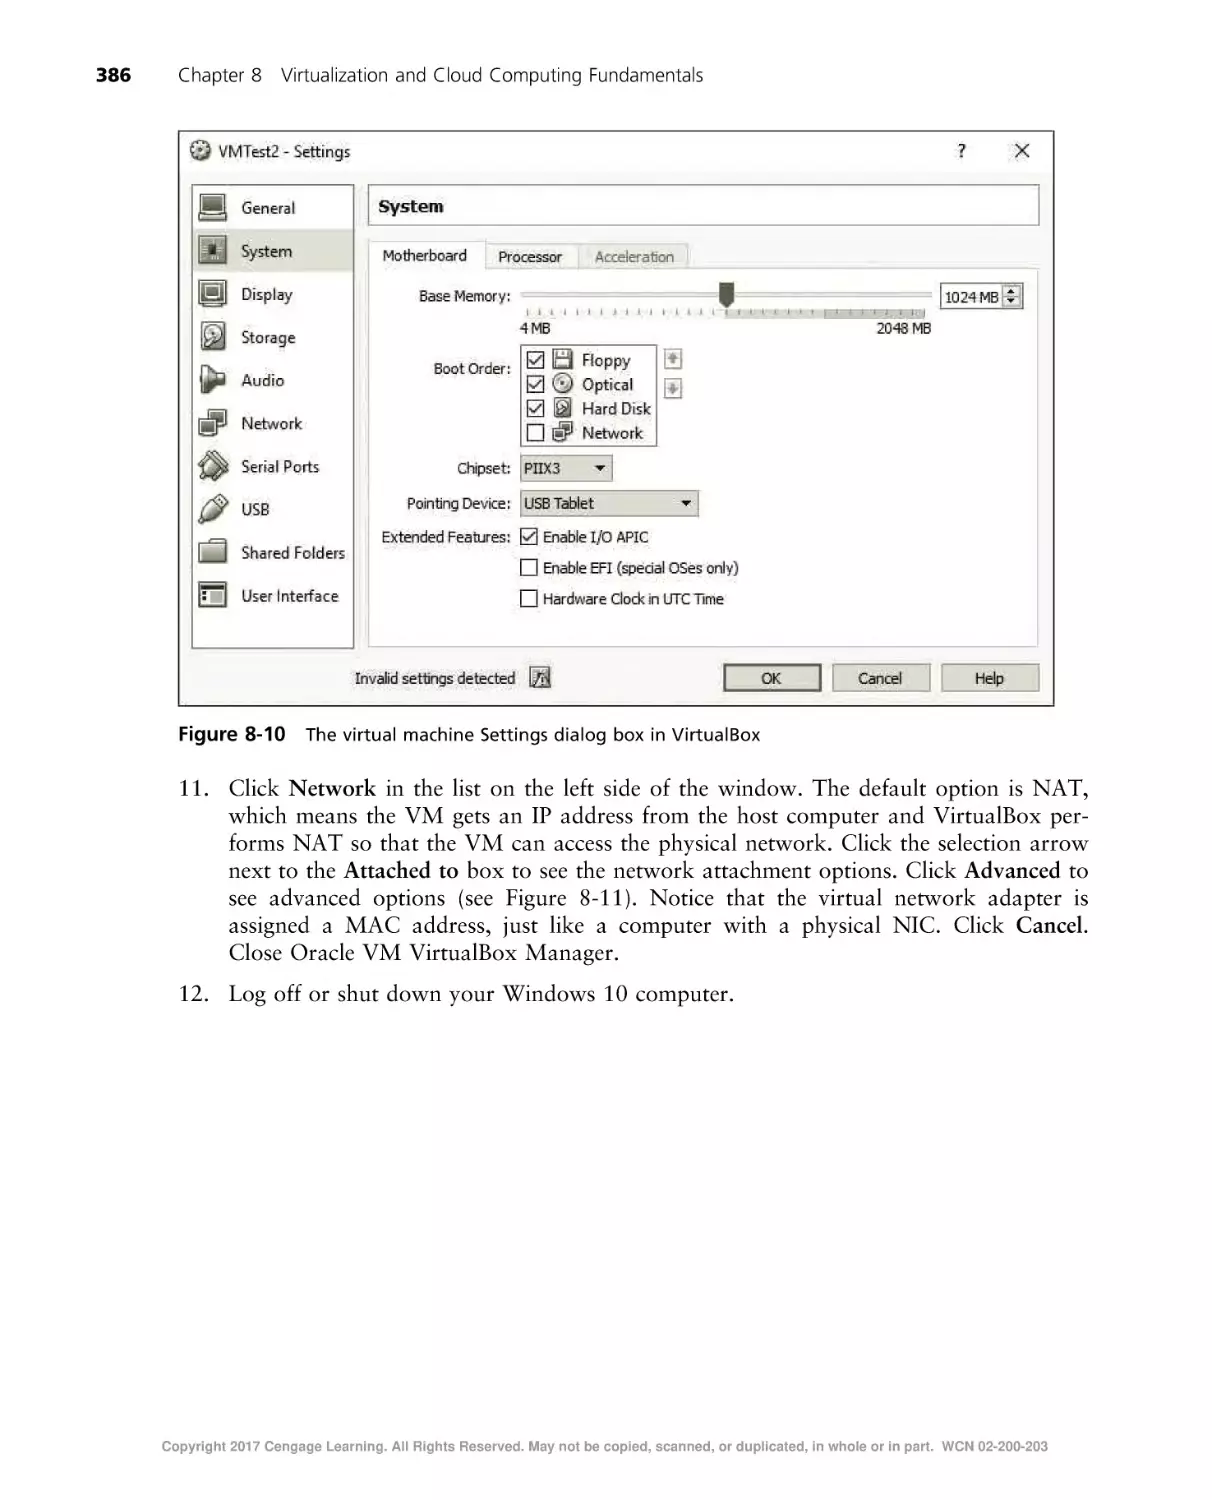
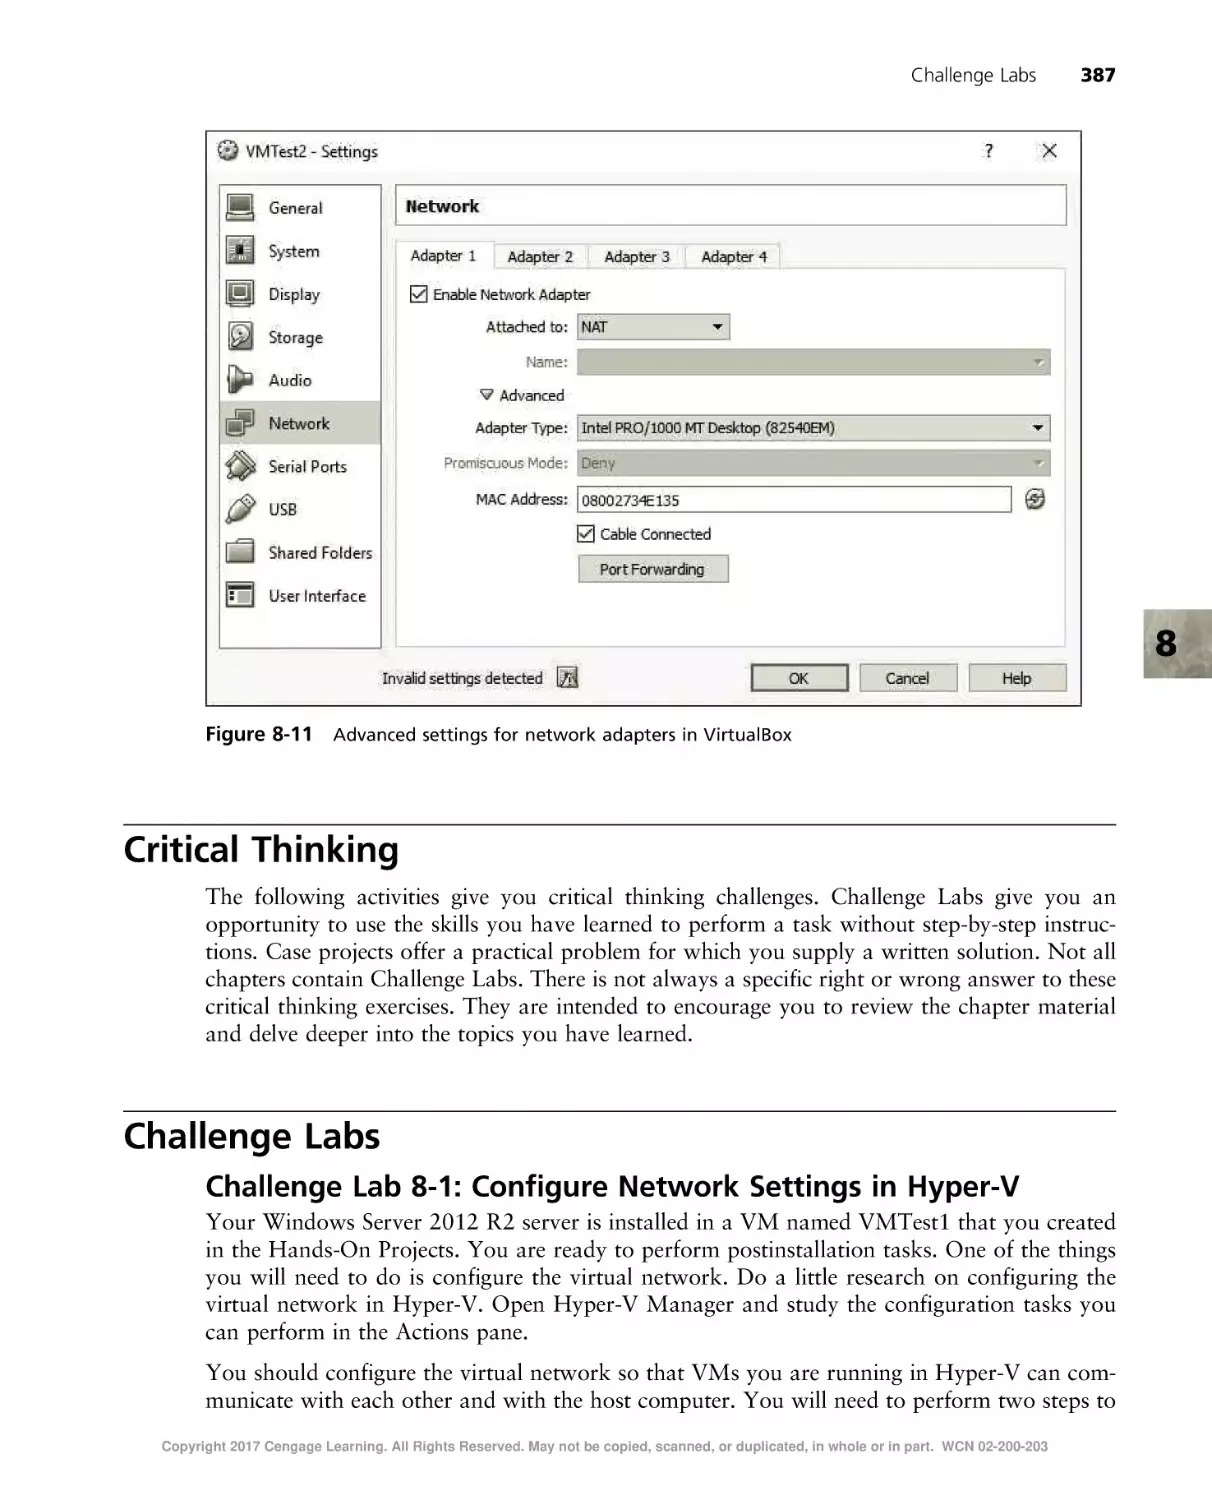
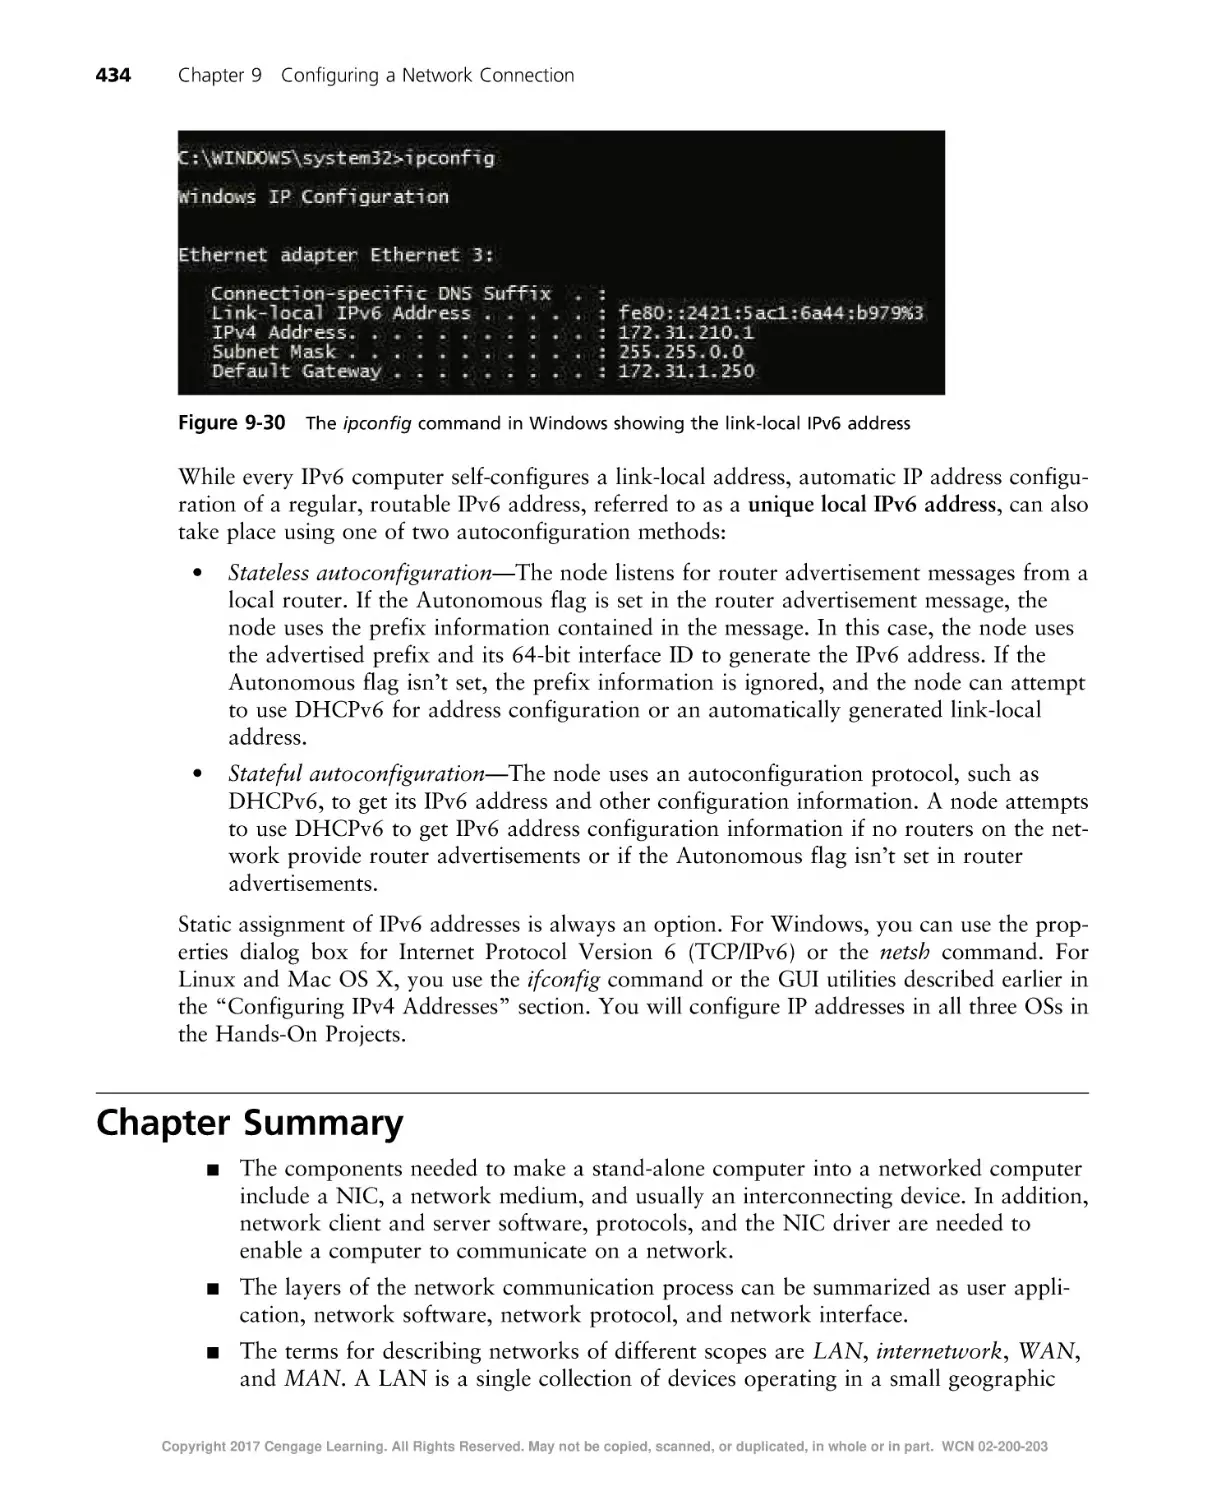
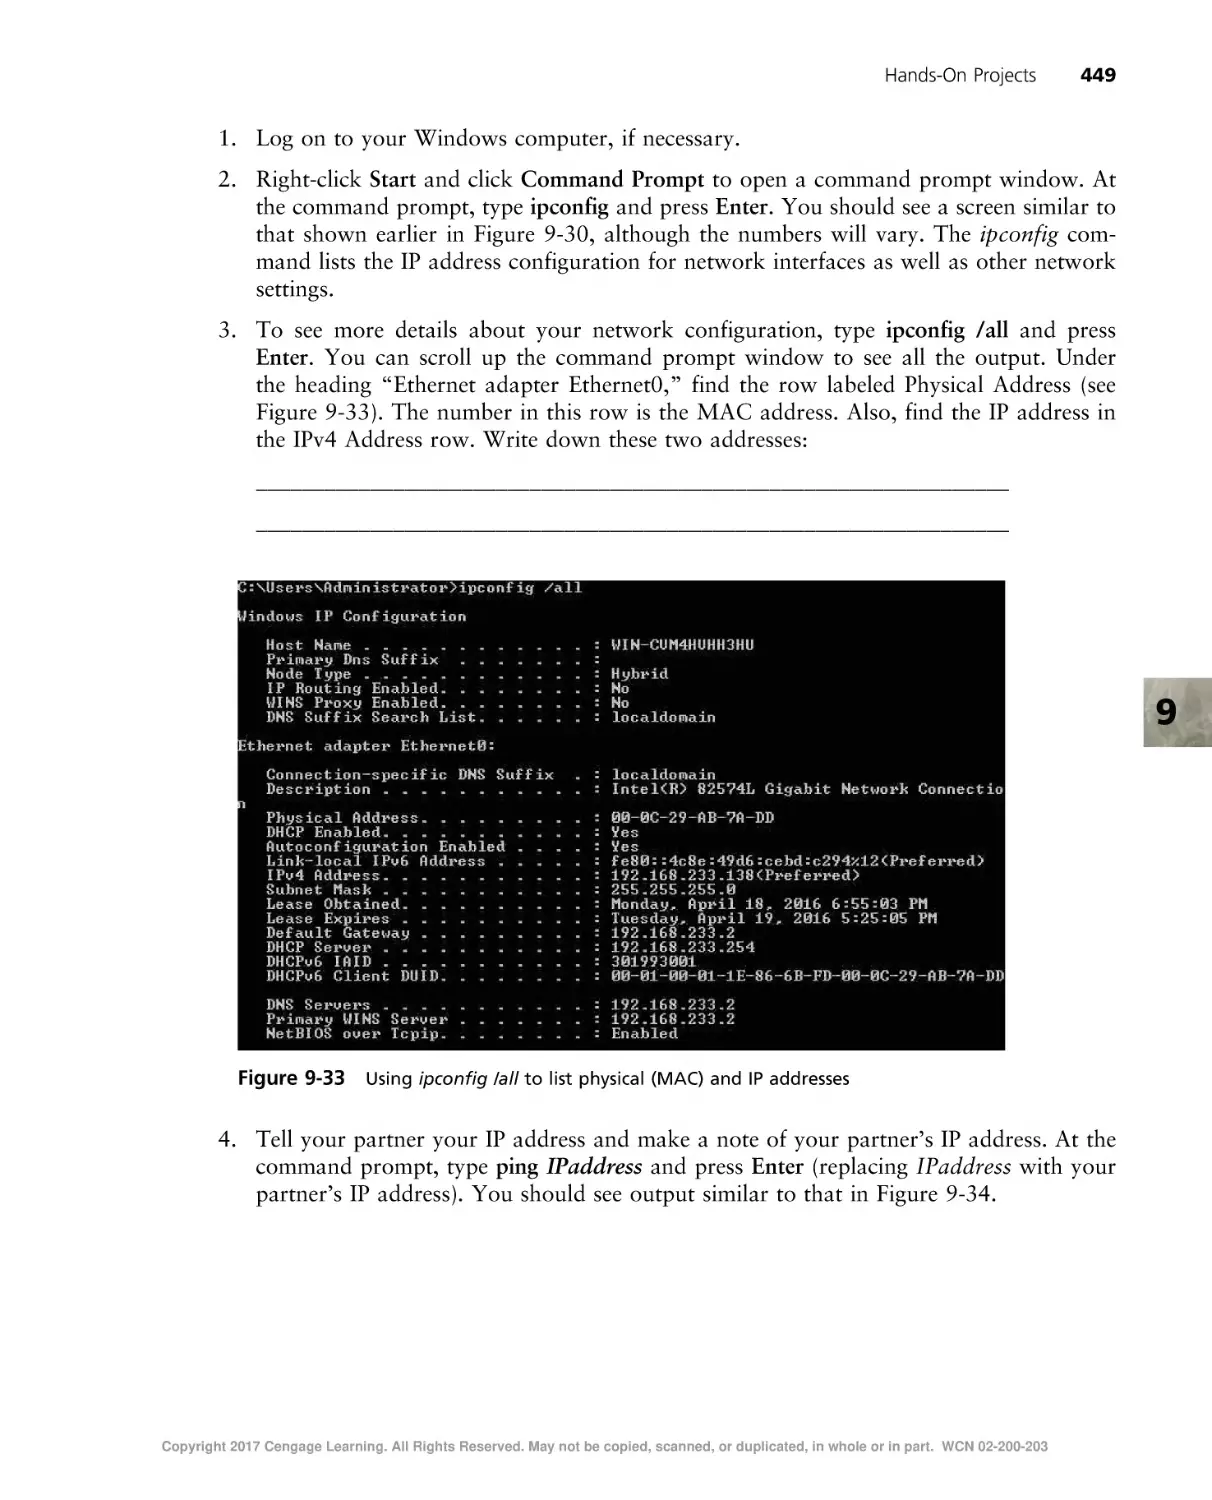
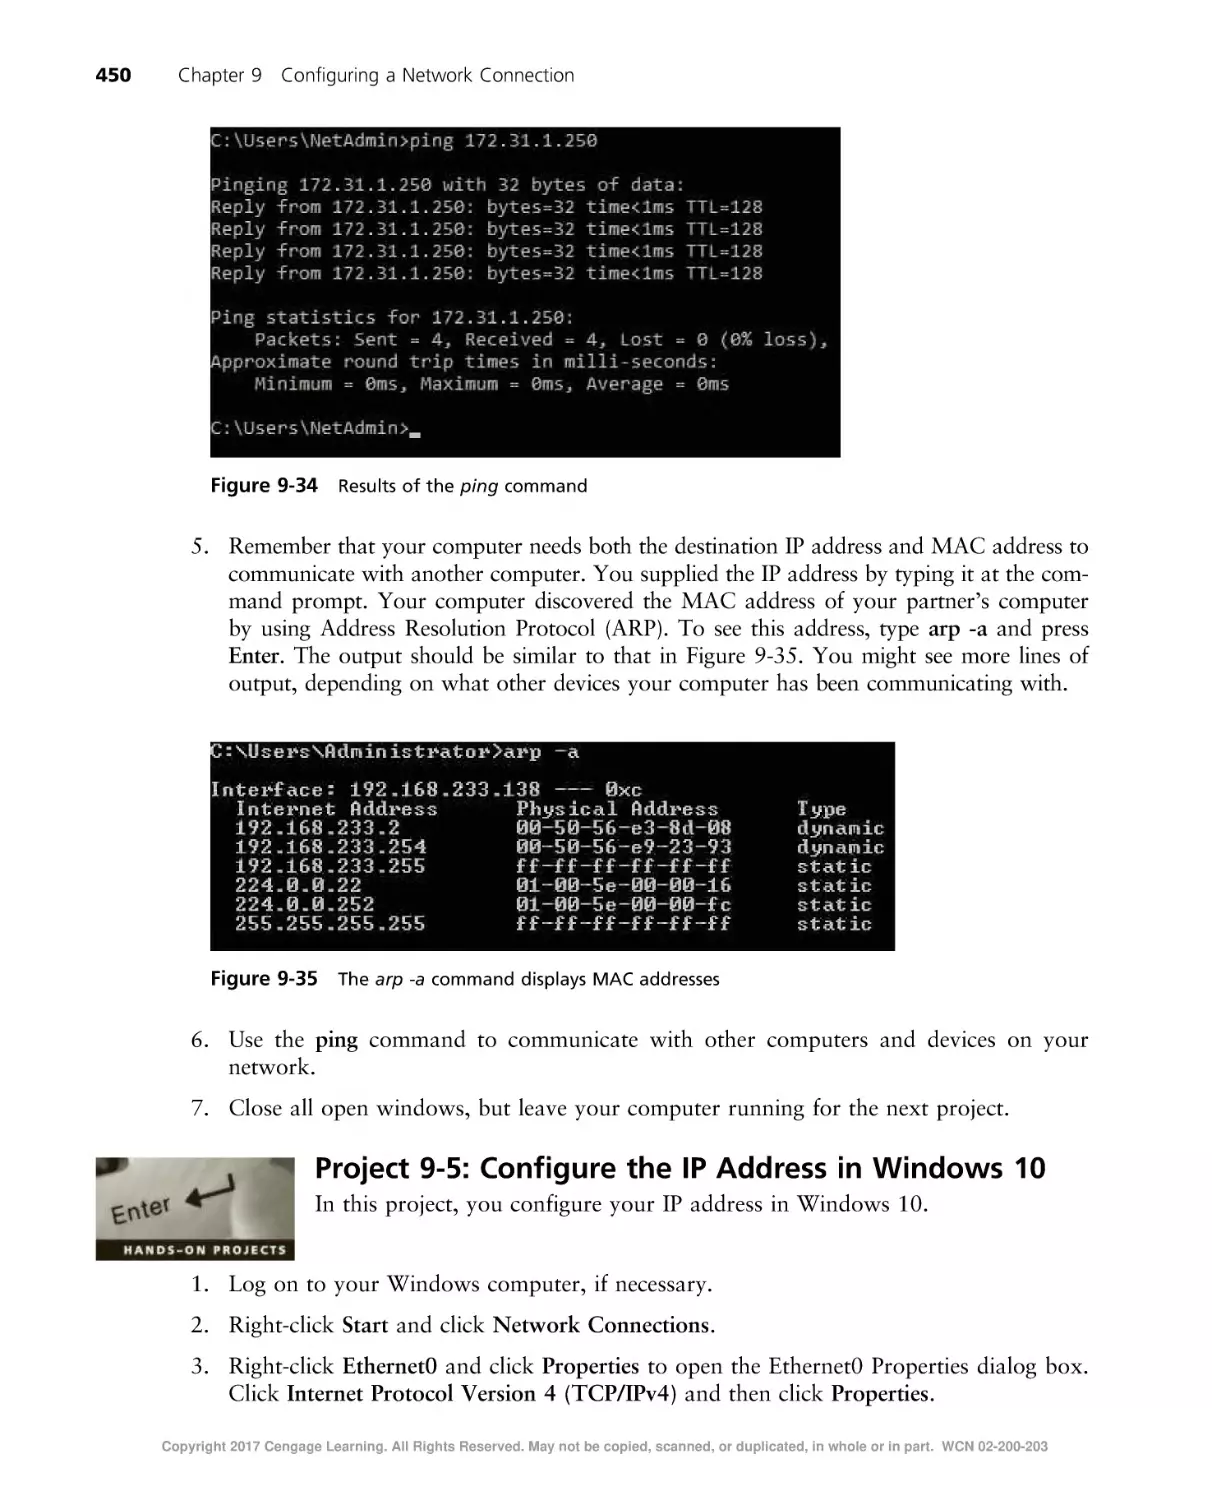
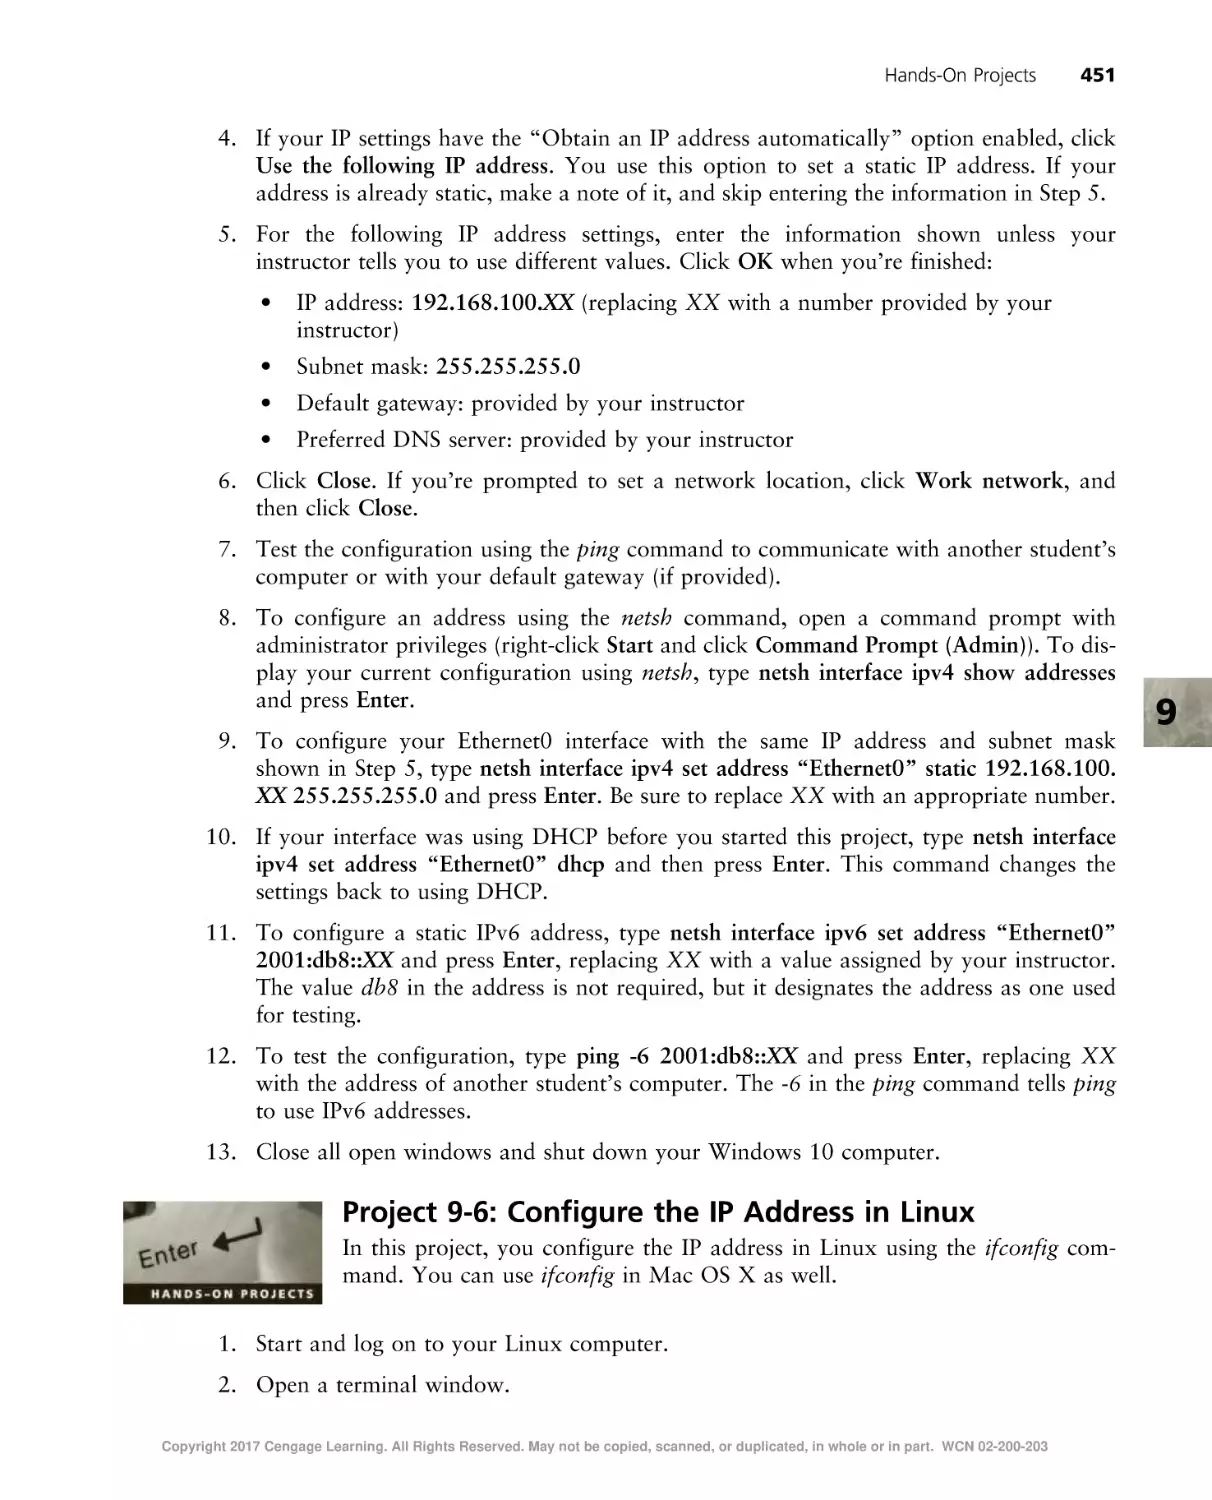
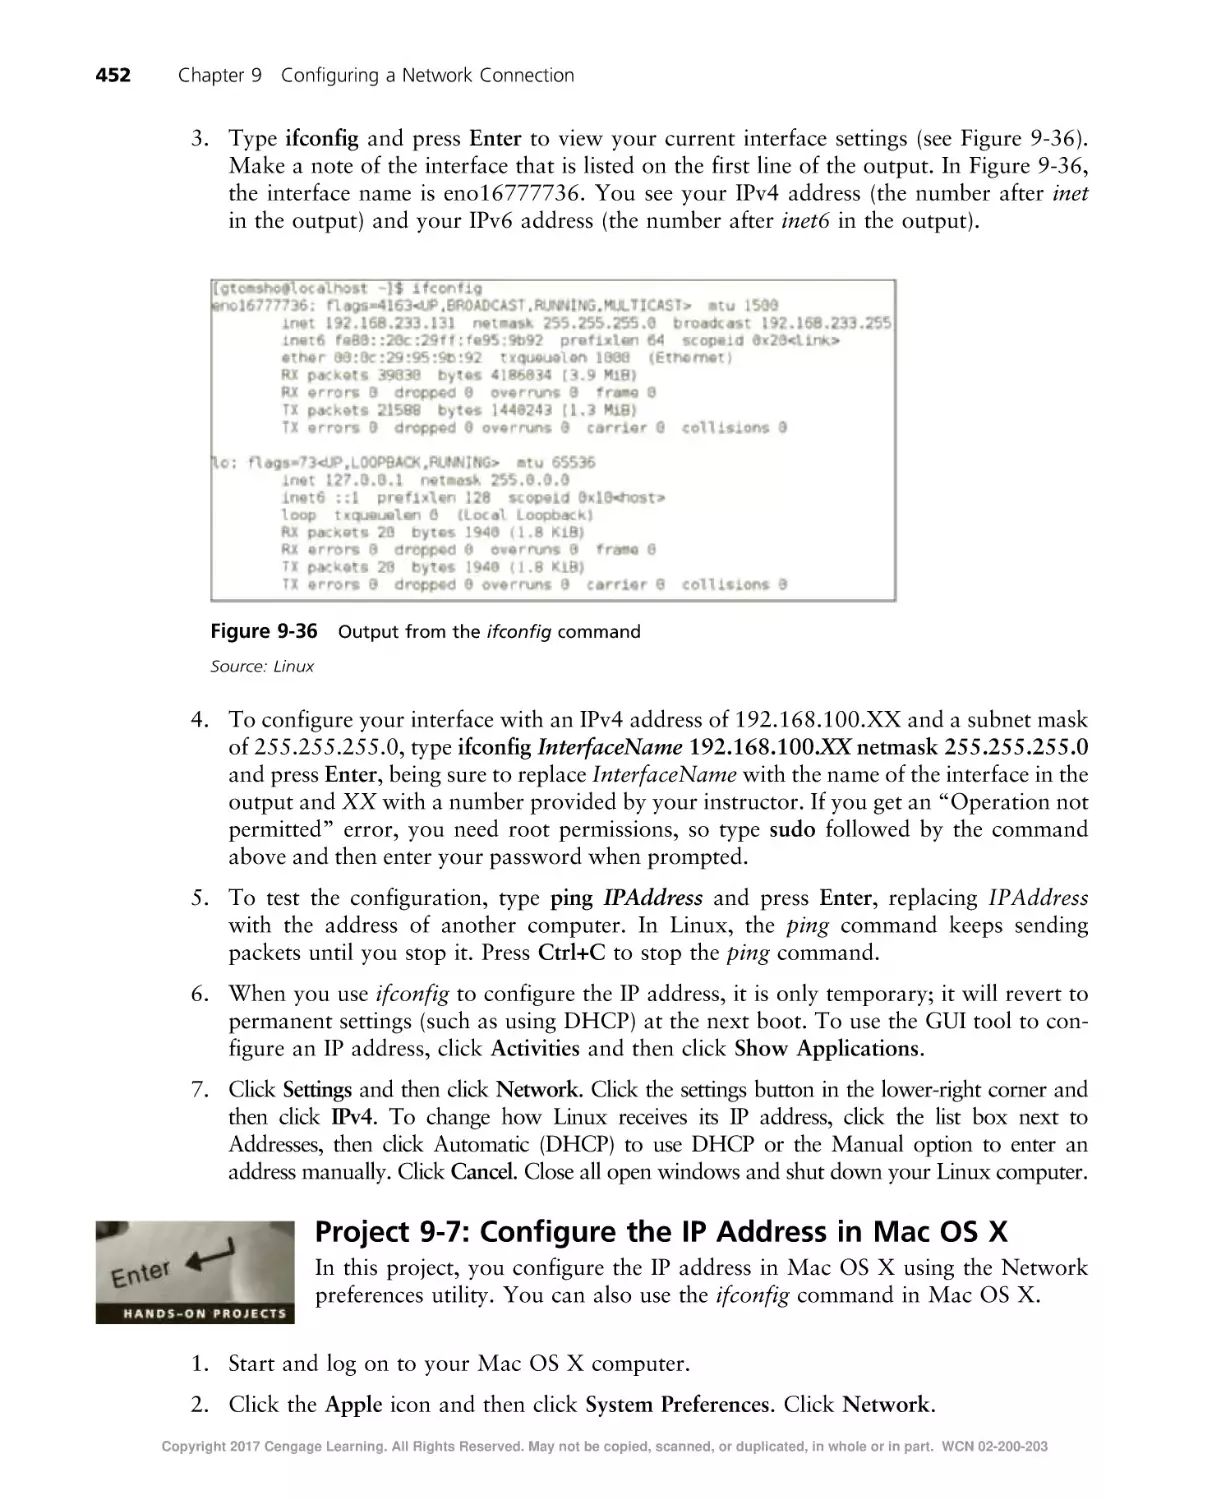
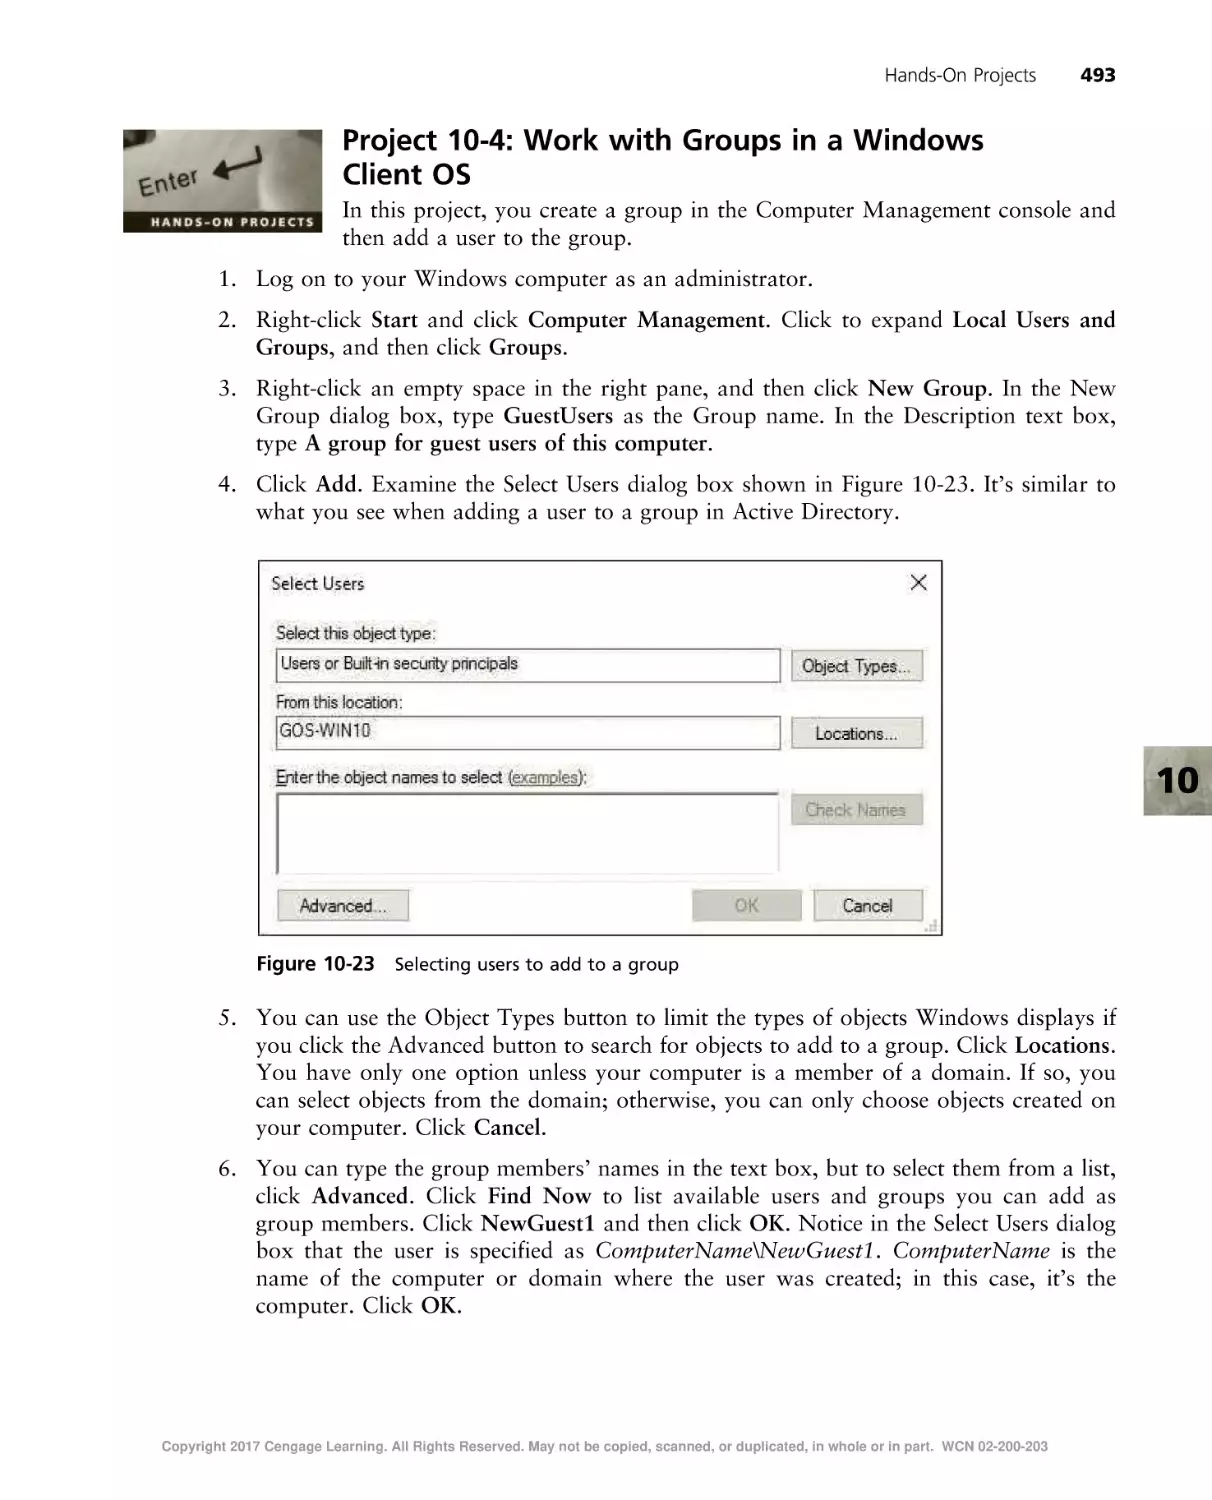
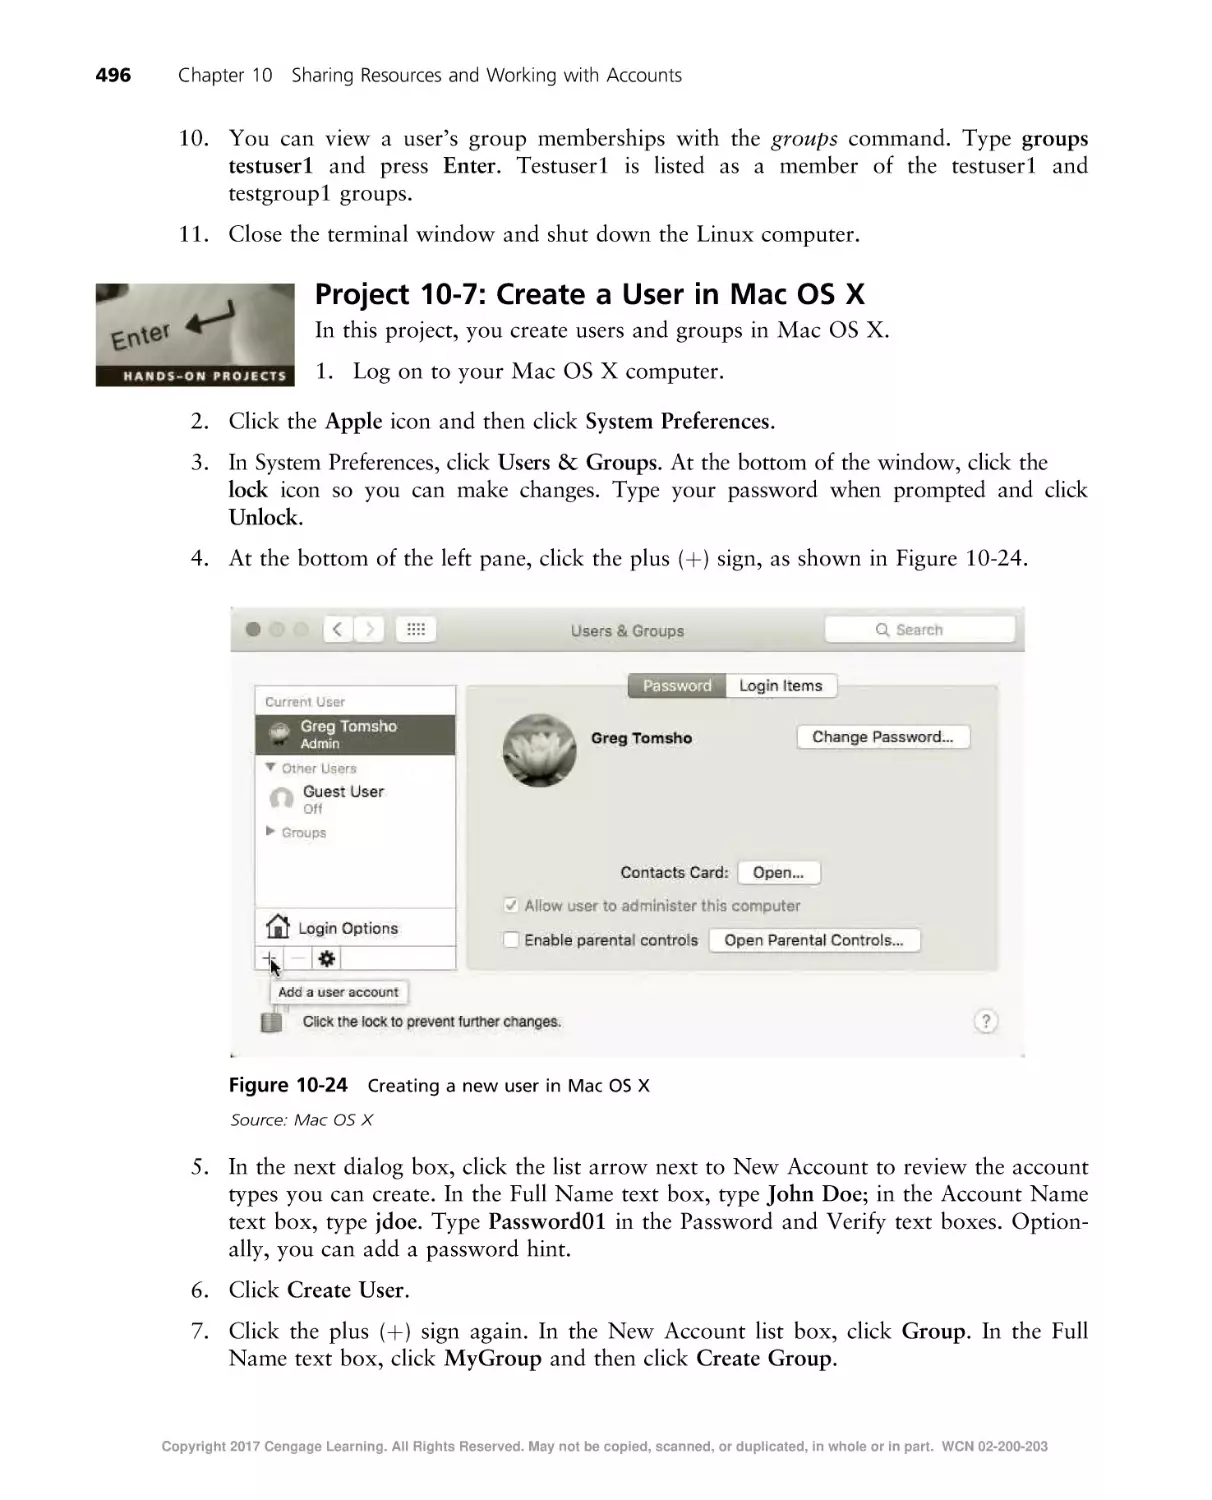
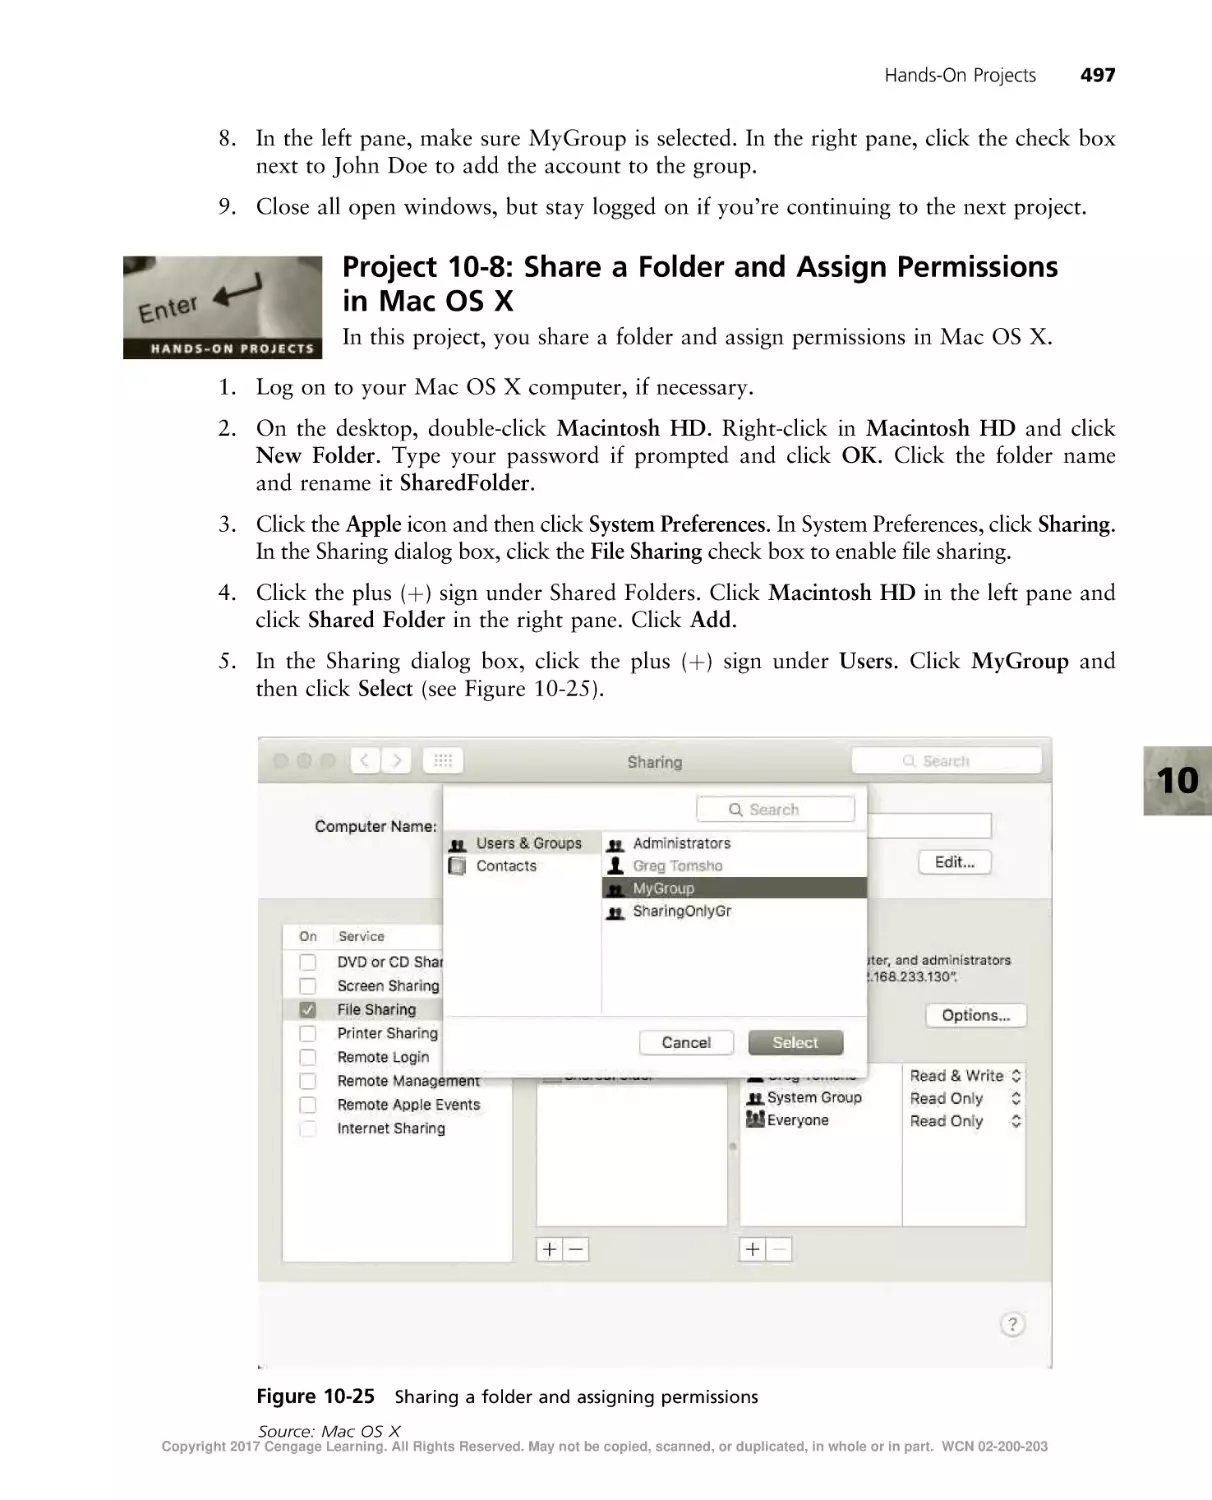
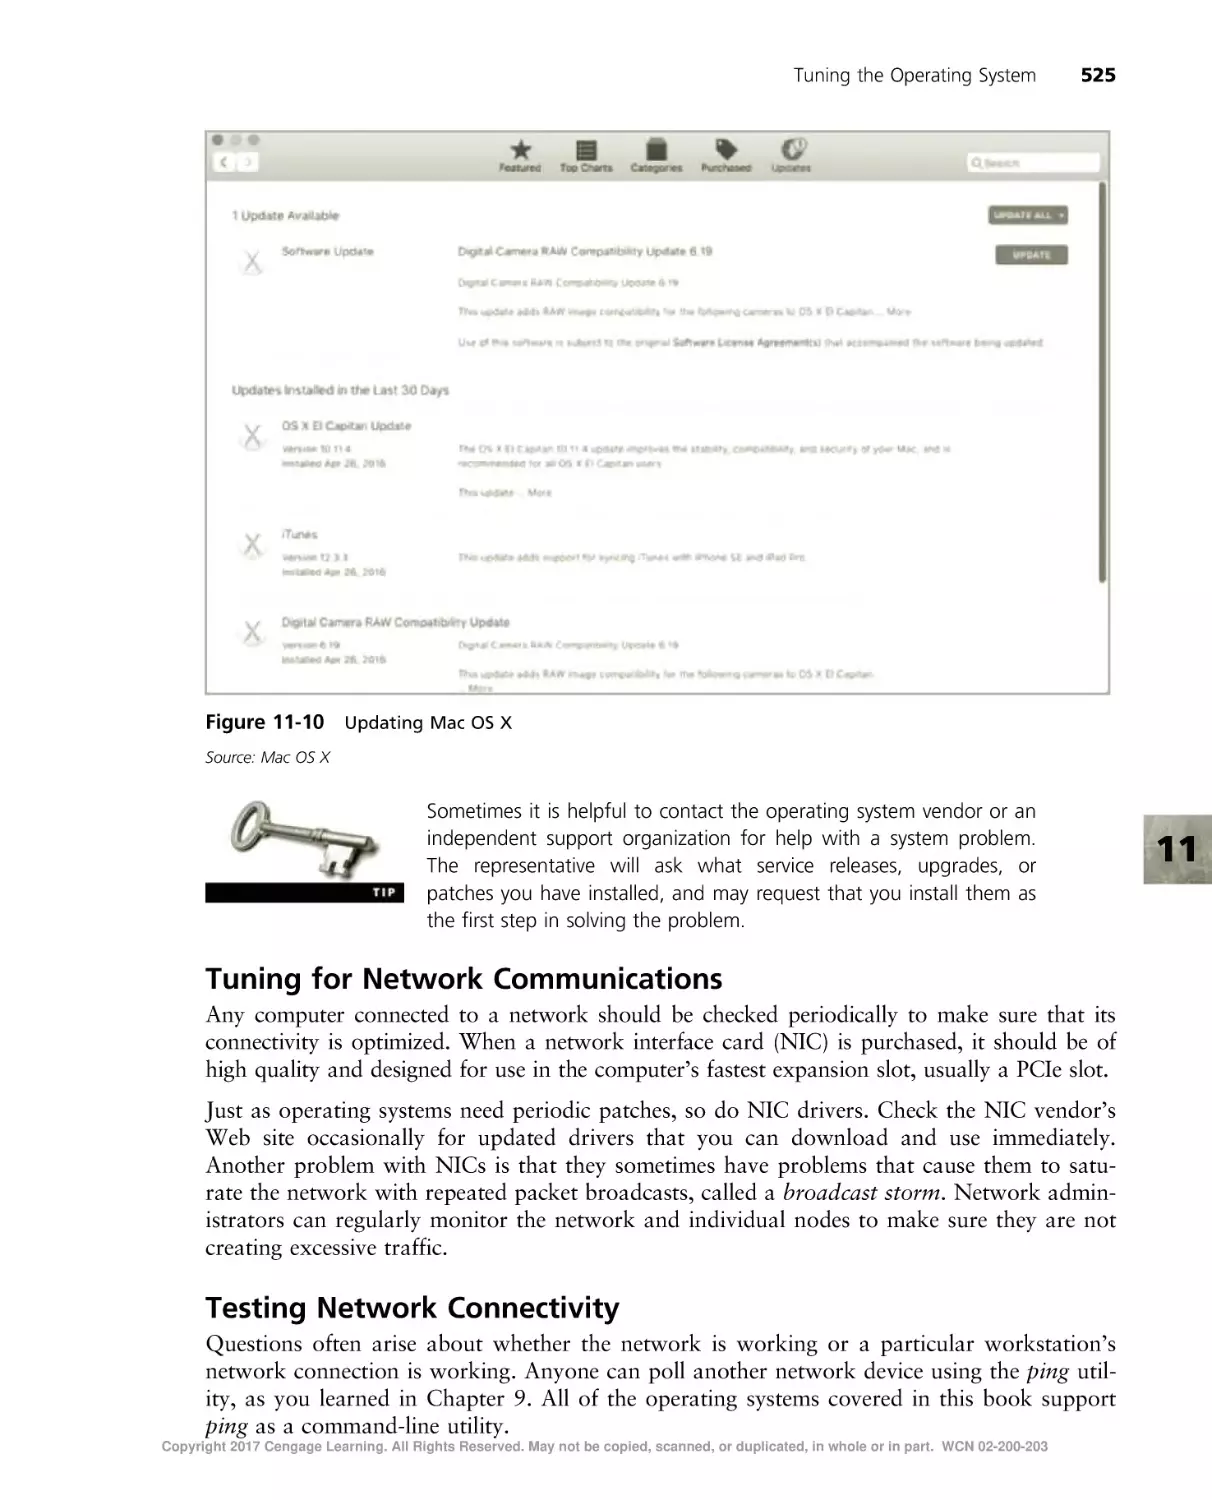
/


Текст
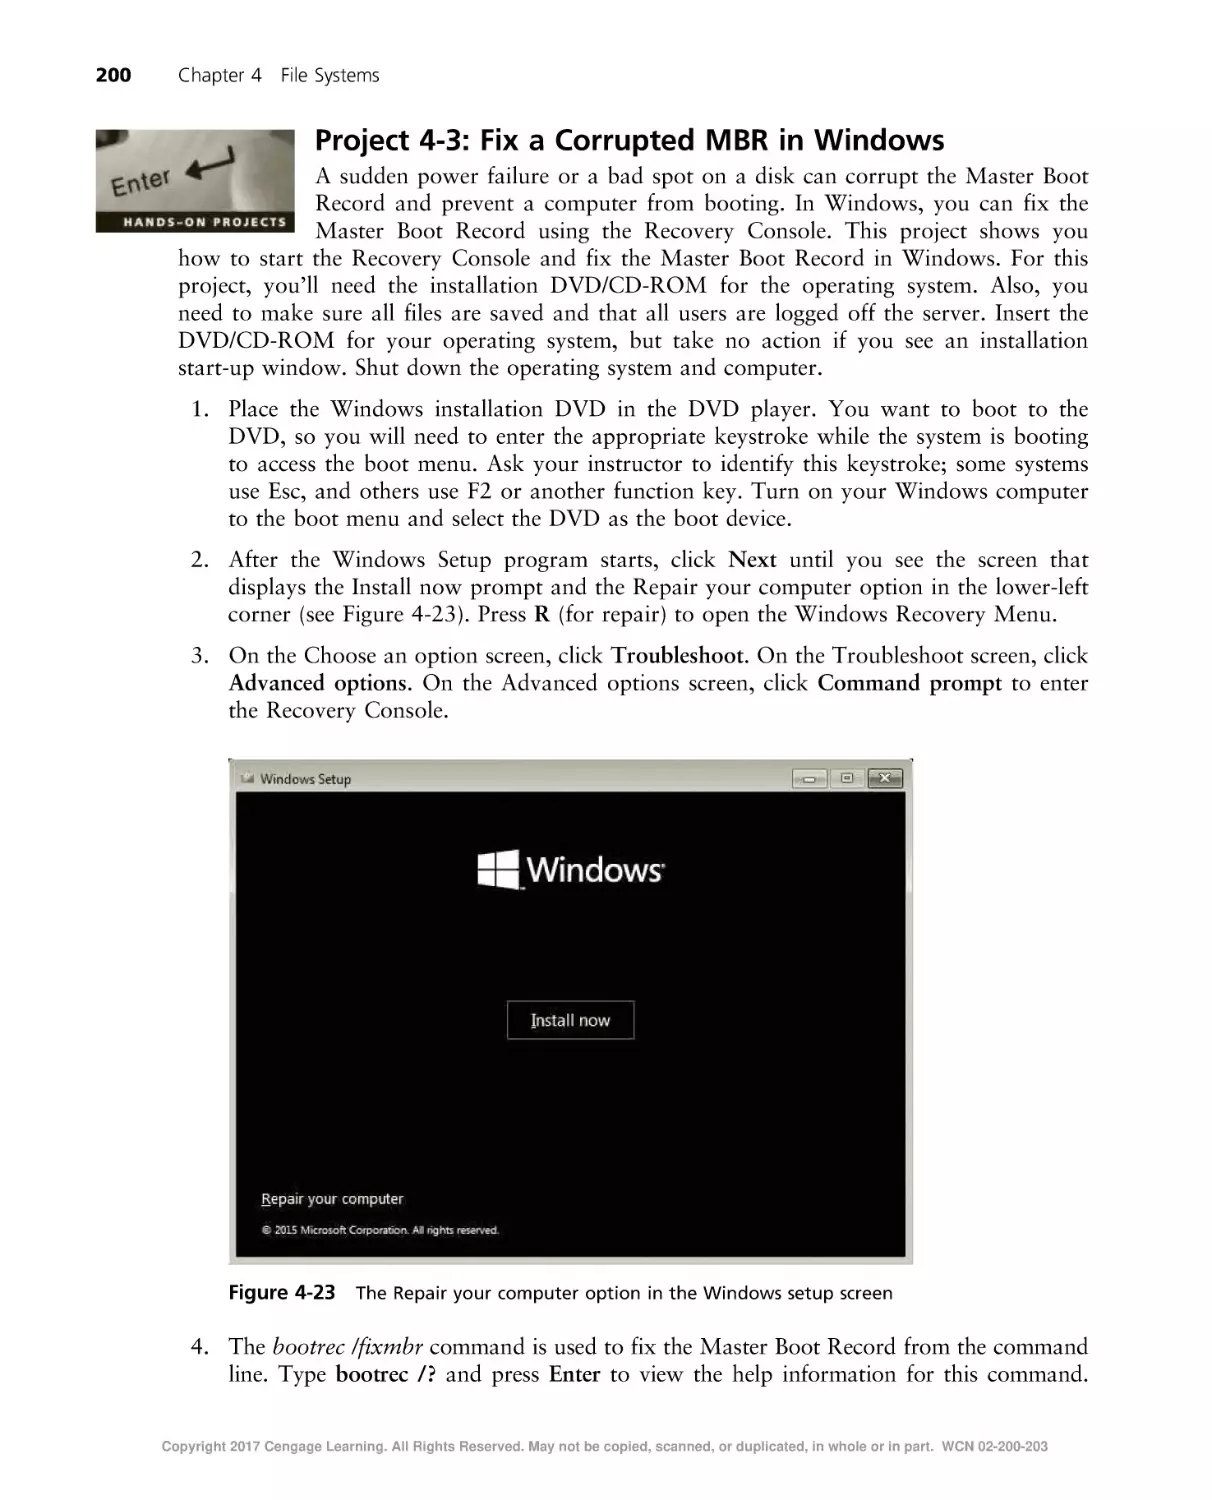
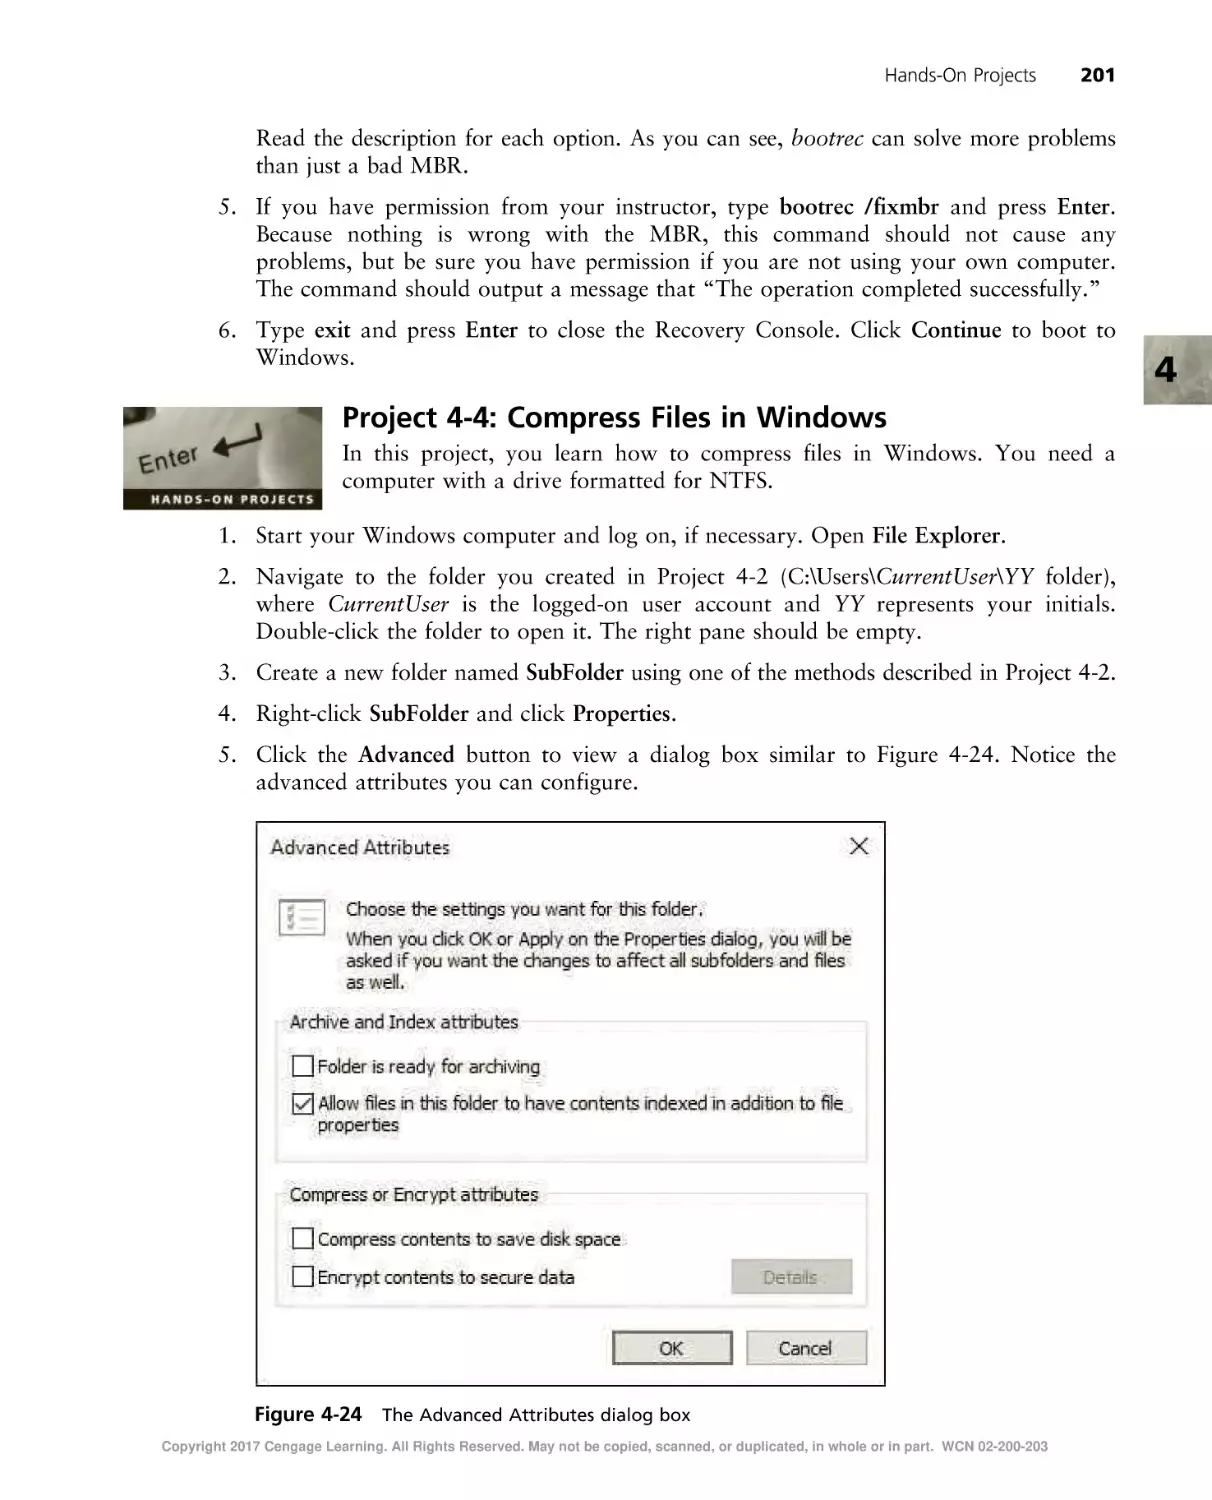
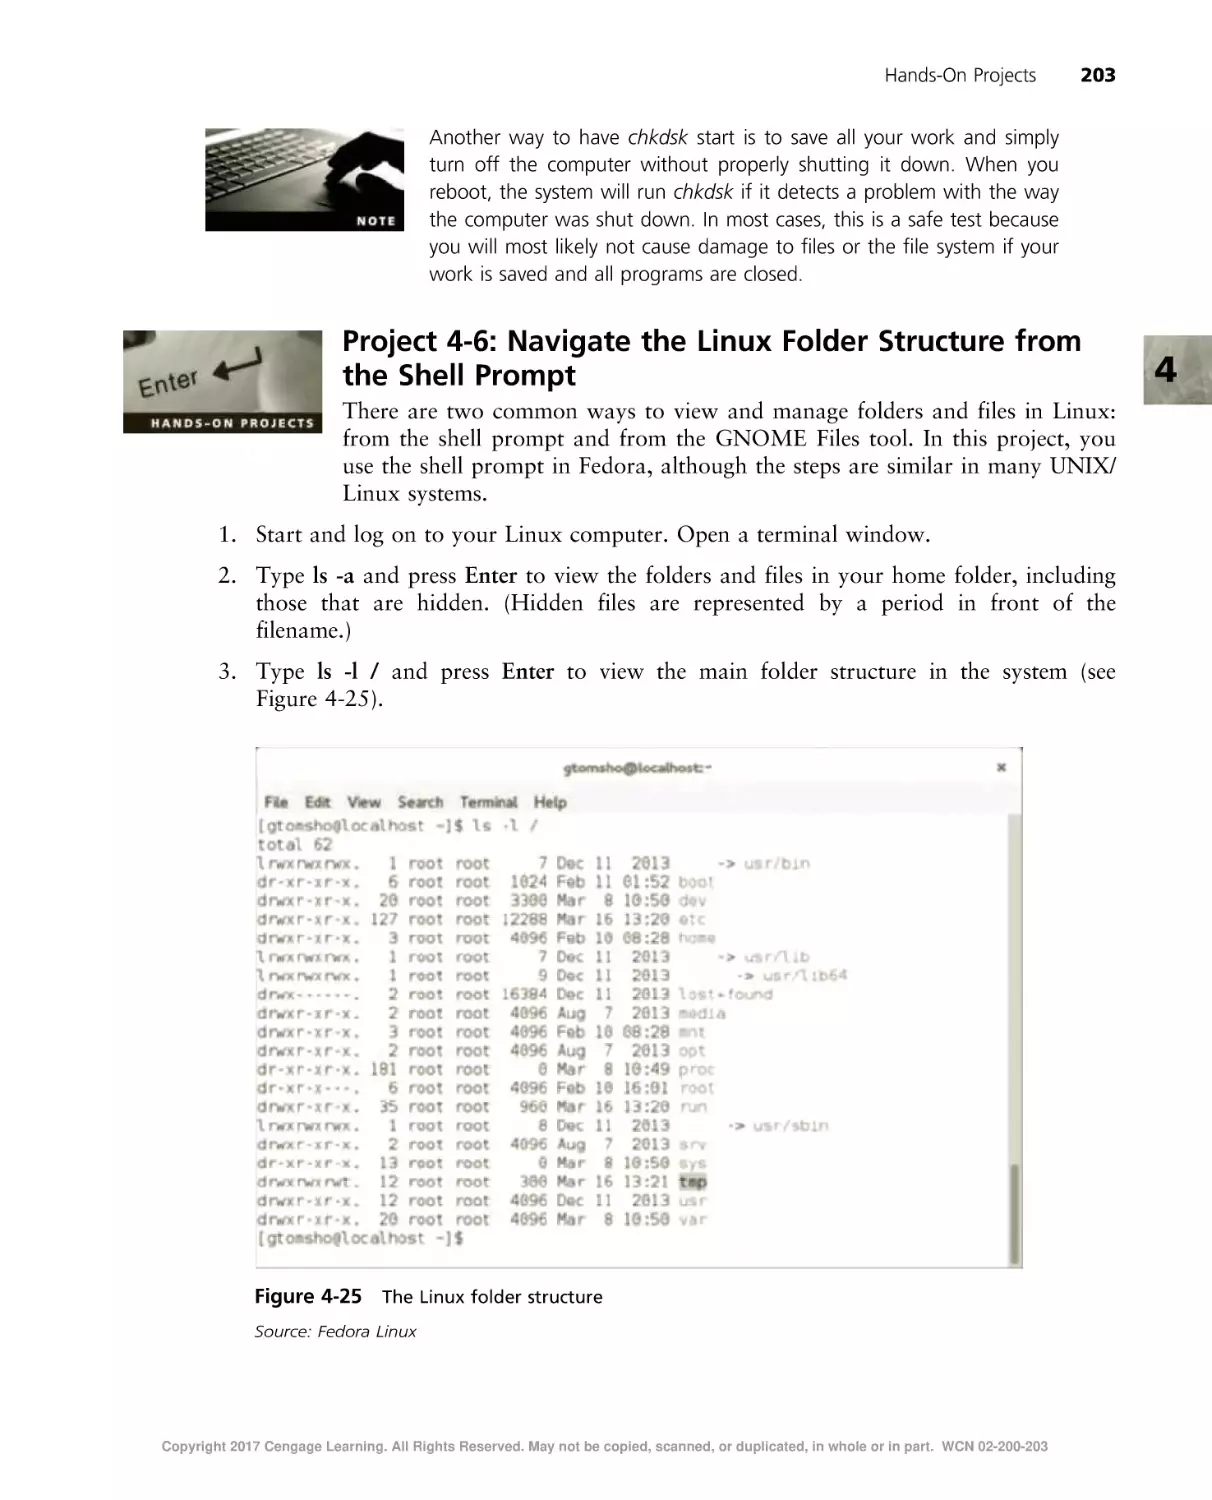
Copyright 2017 Cengage Learning. All Rights Reserved. May not be copied, scanned, or duplicated, in whole or in part. WCN 02-200-203
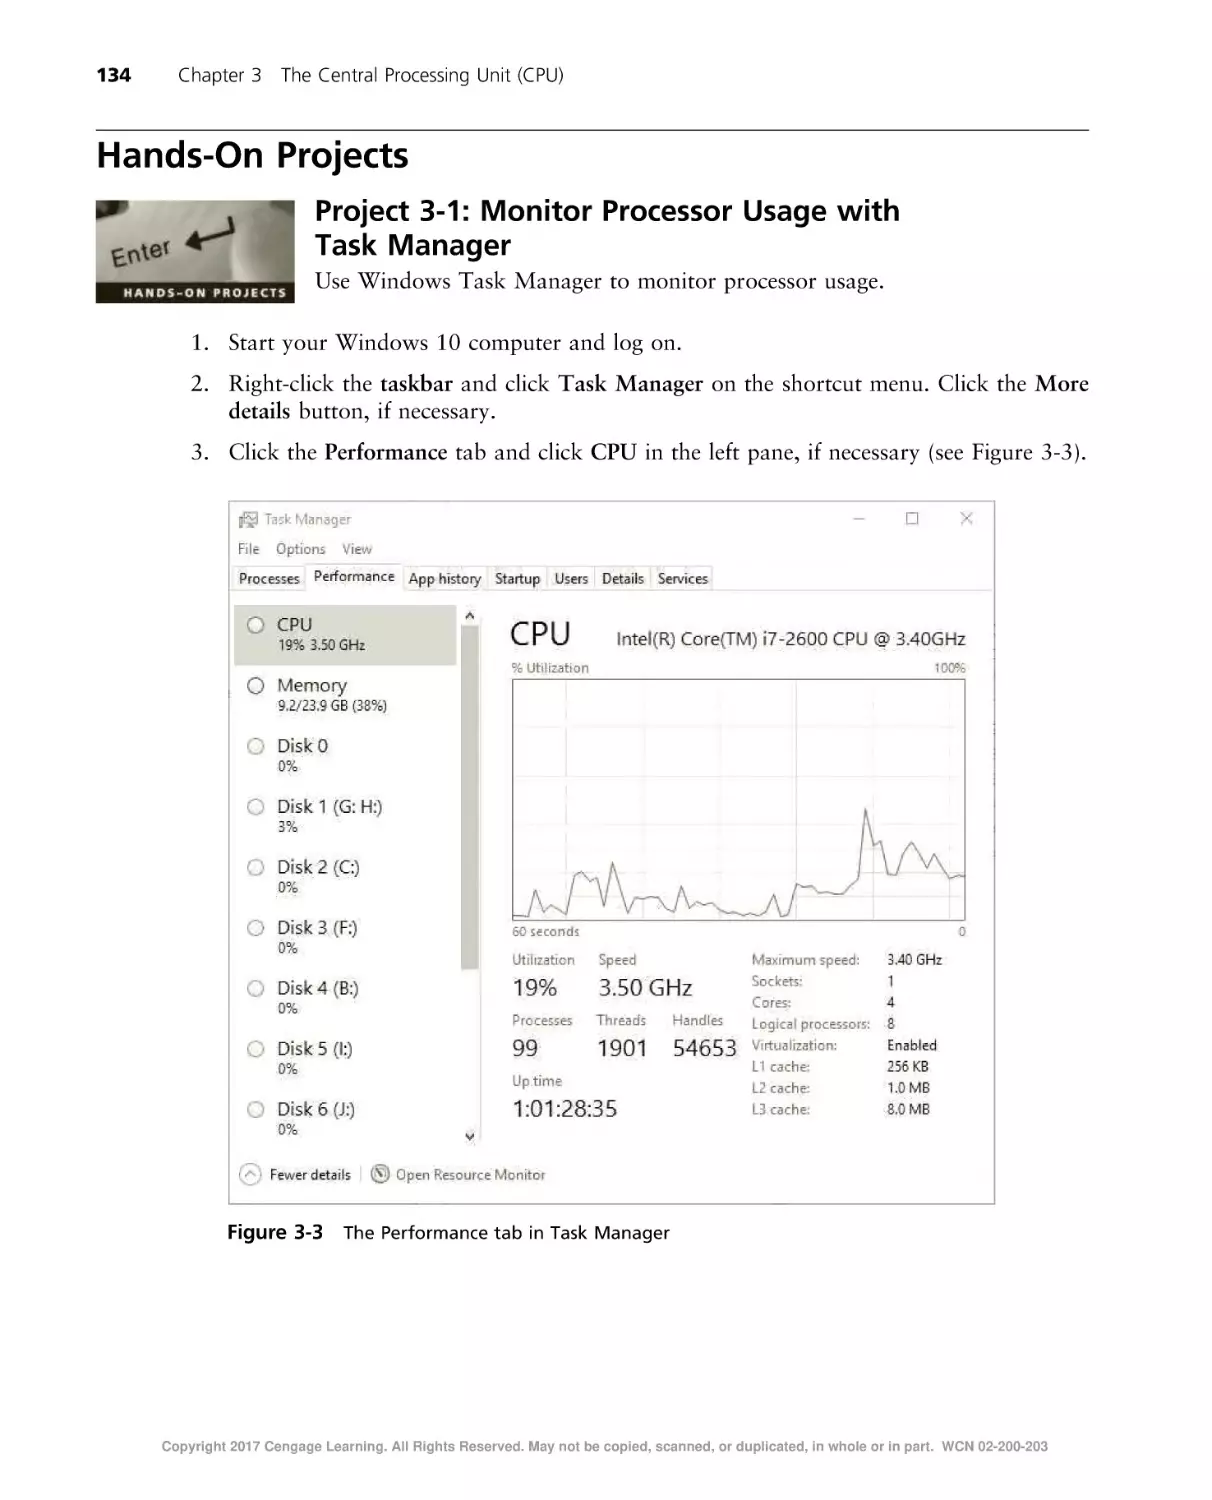
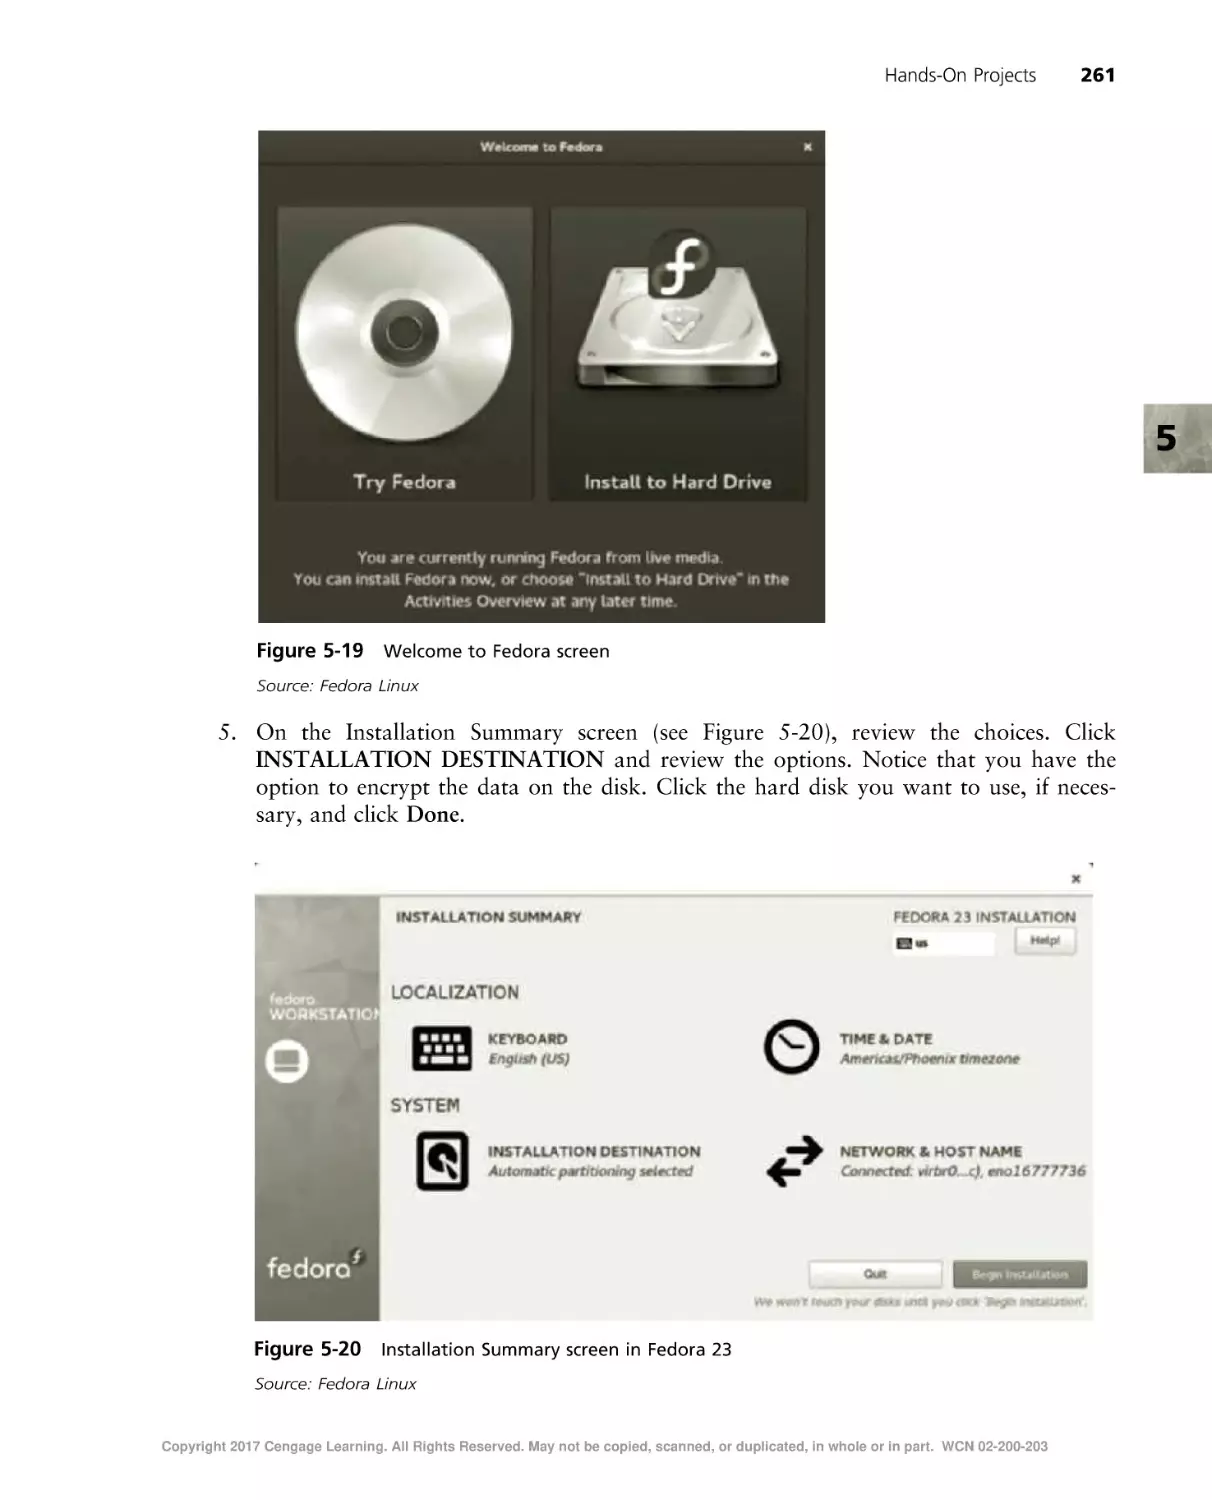
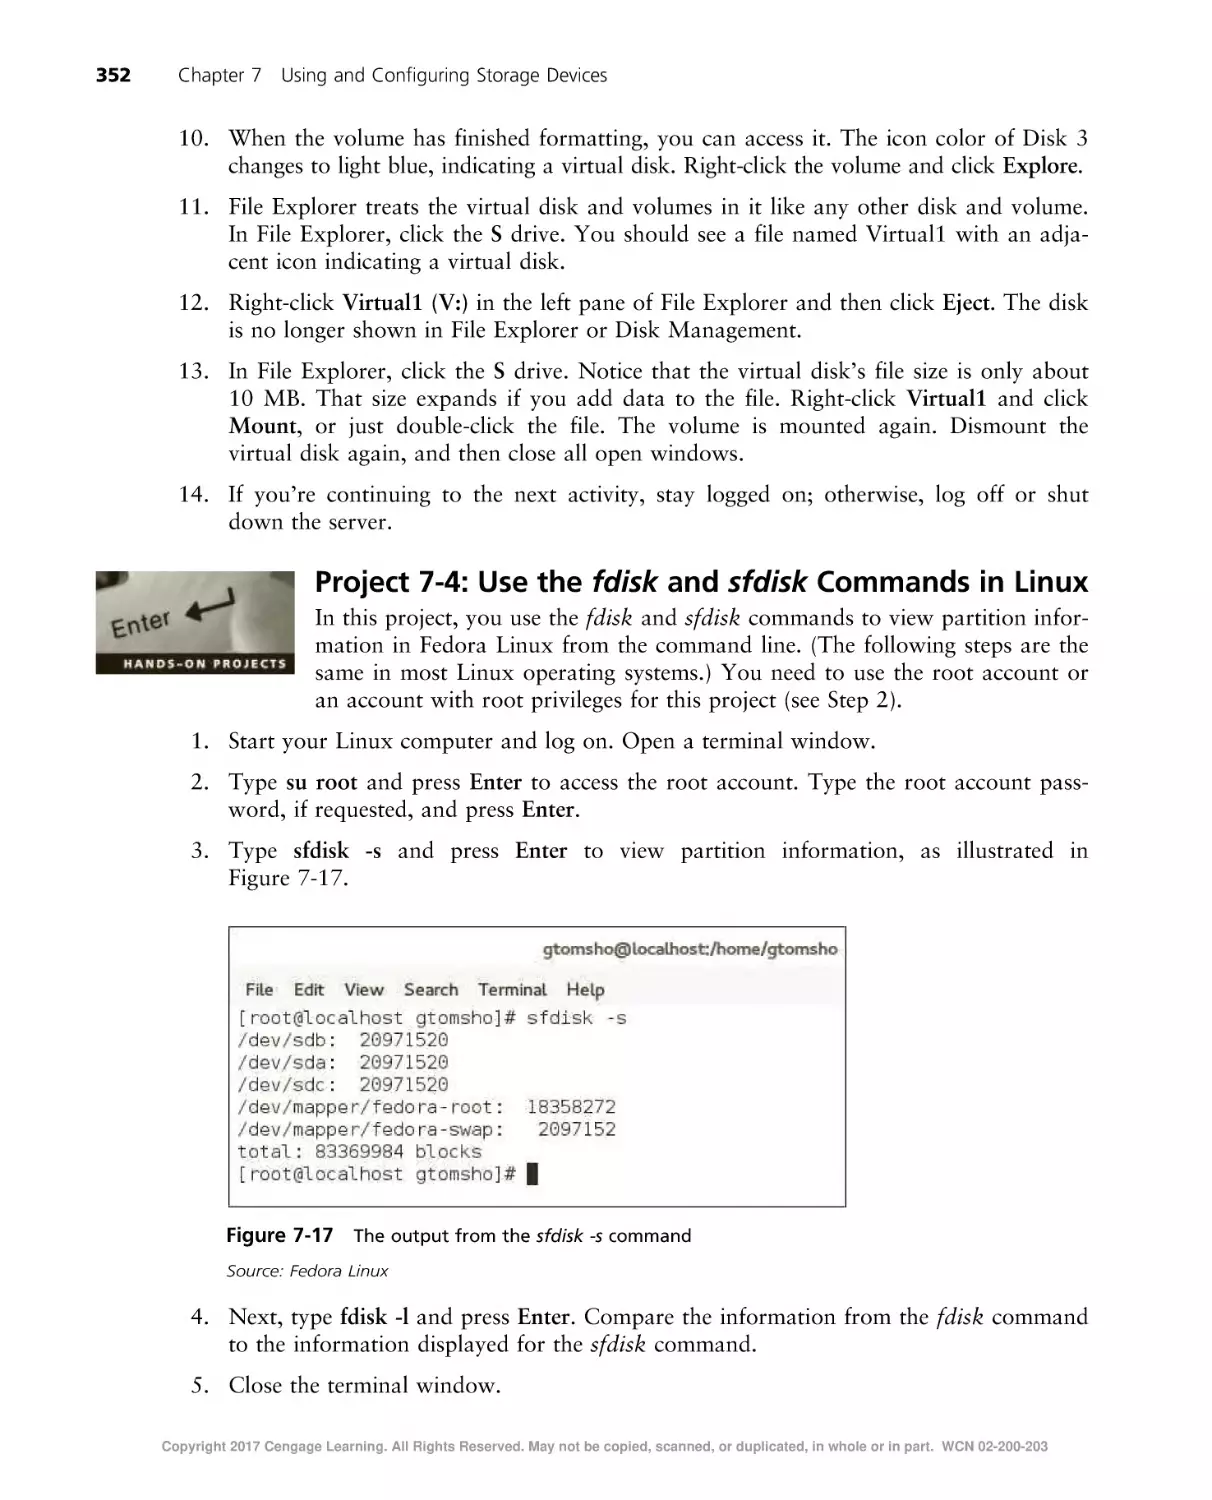
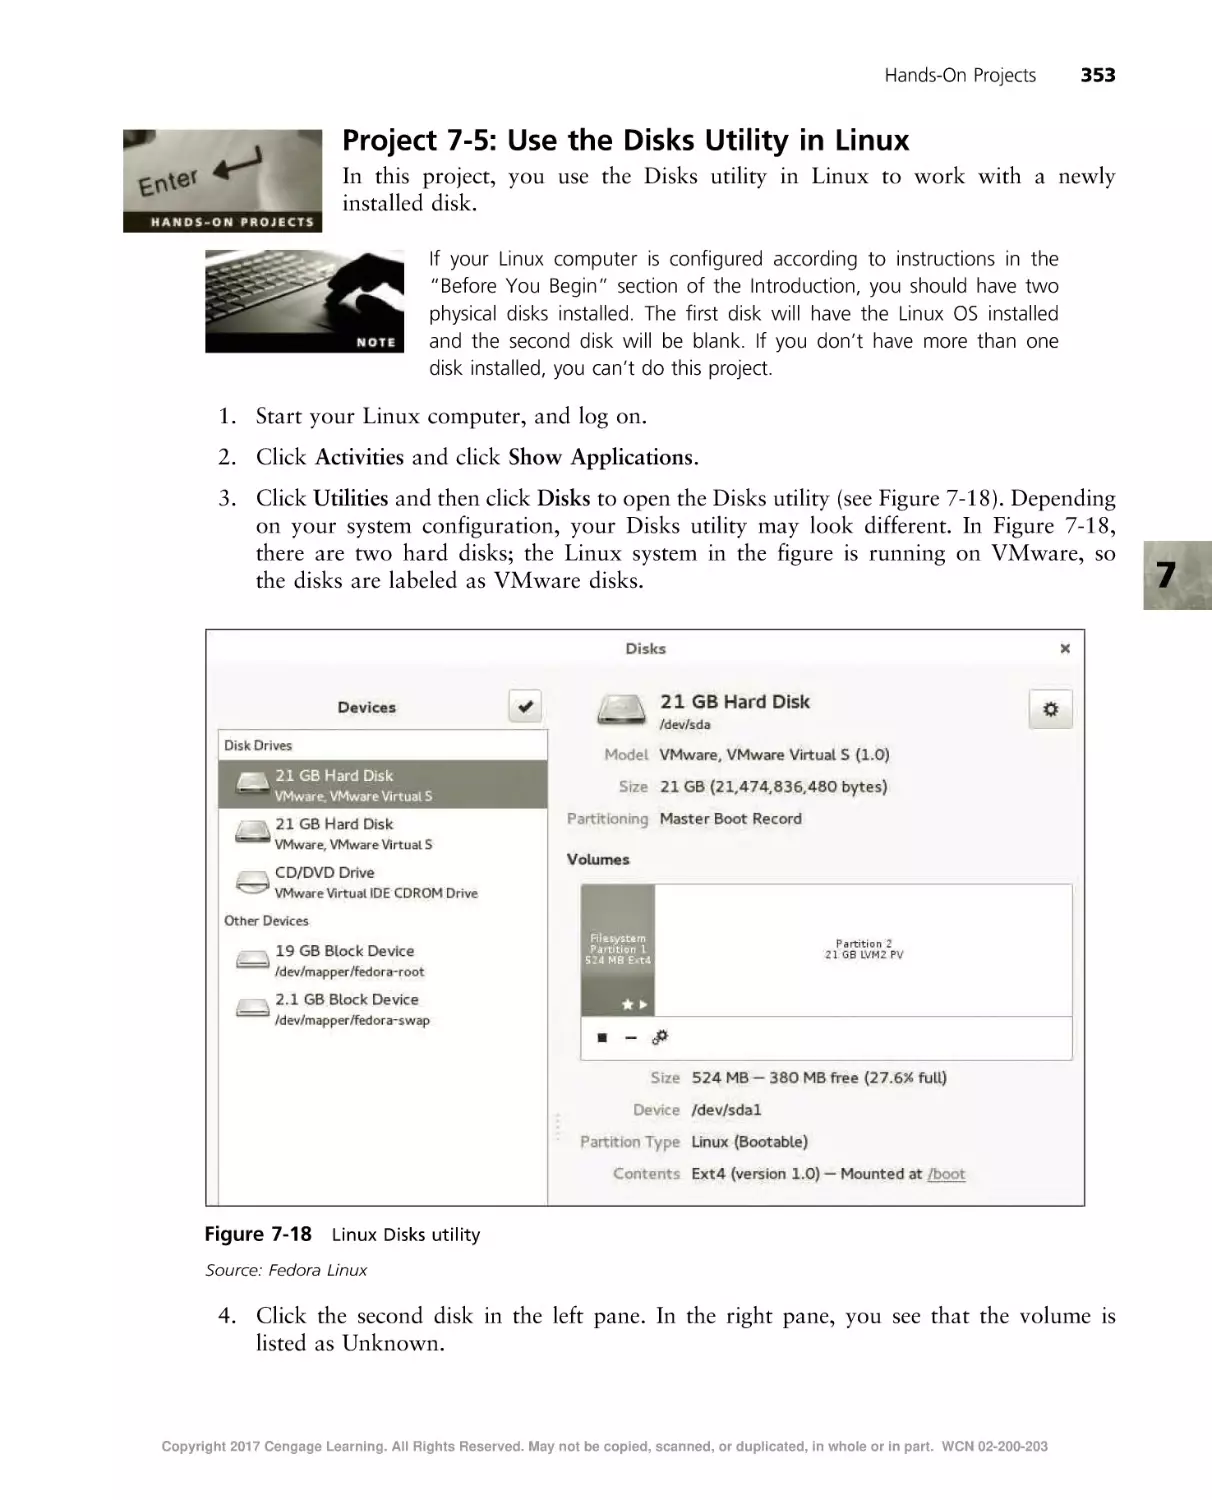
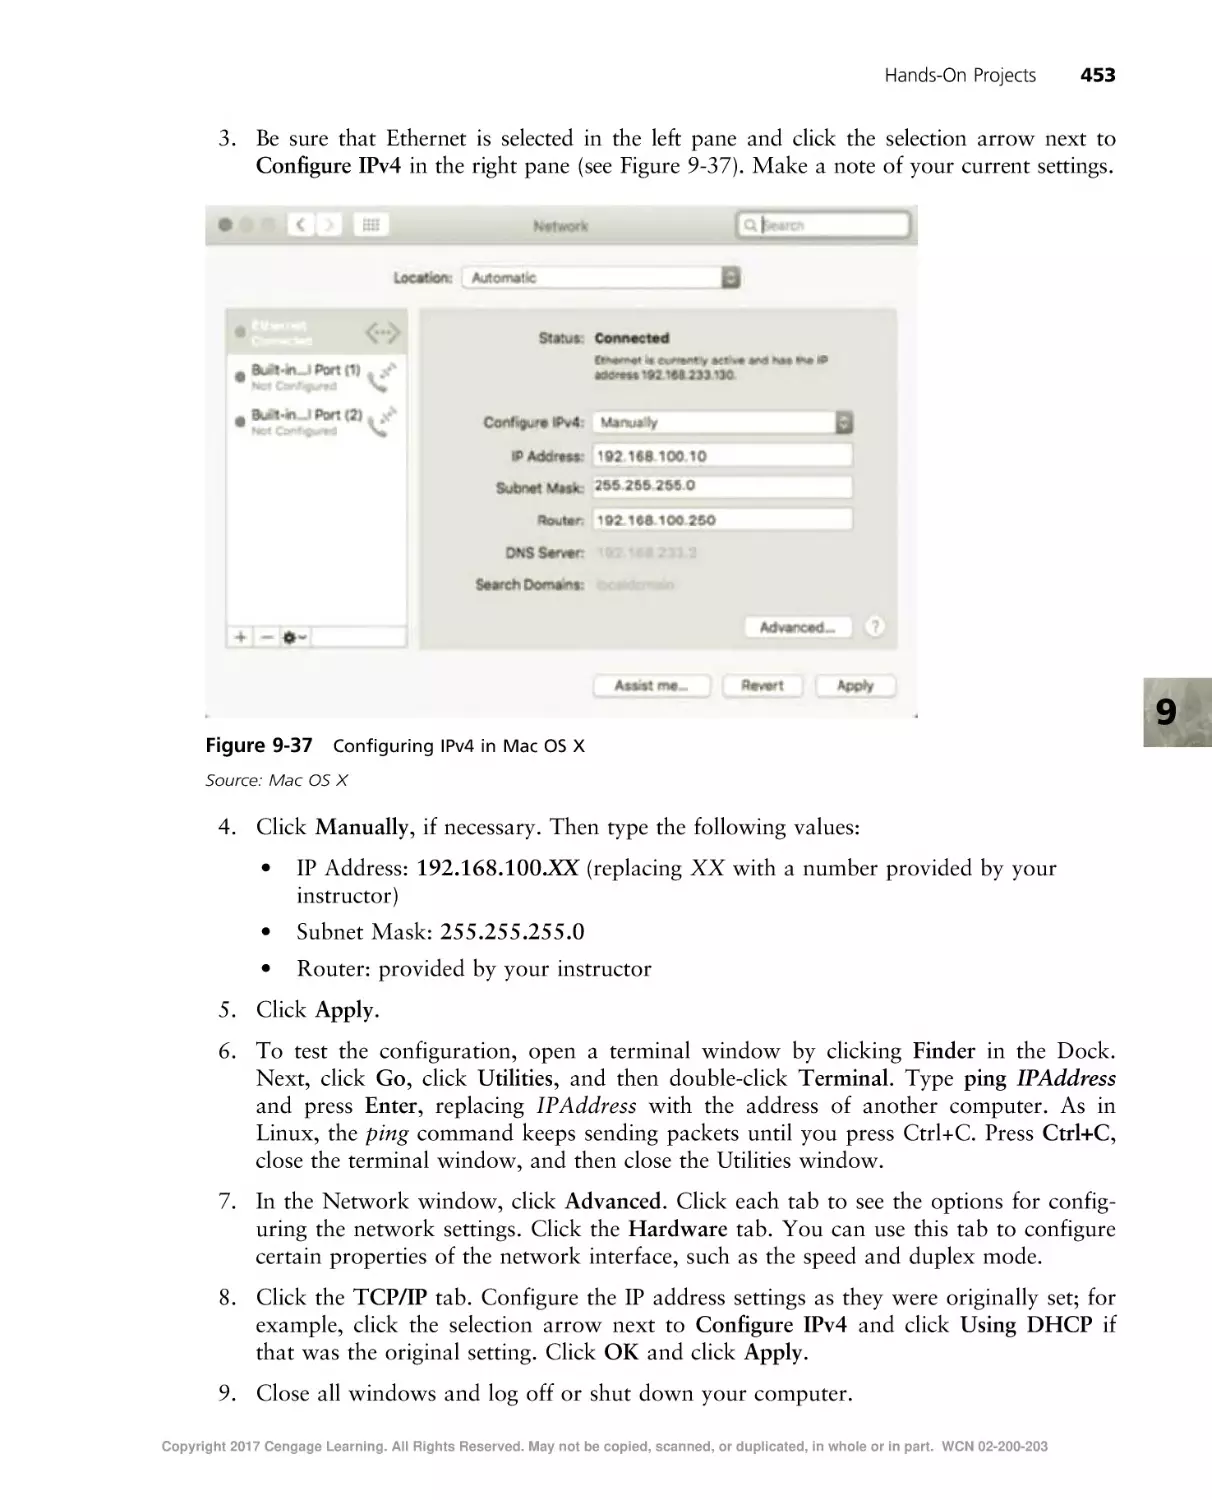
This is an electronic version of the print textbook. Due to electronic rights restrictions,
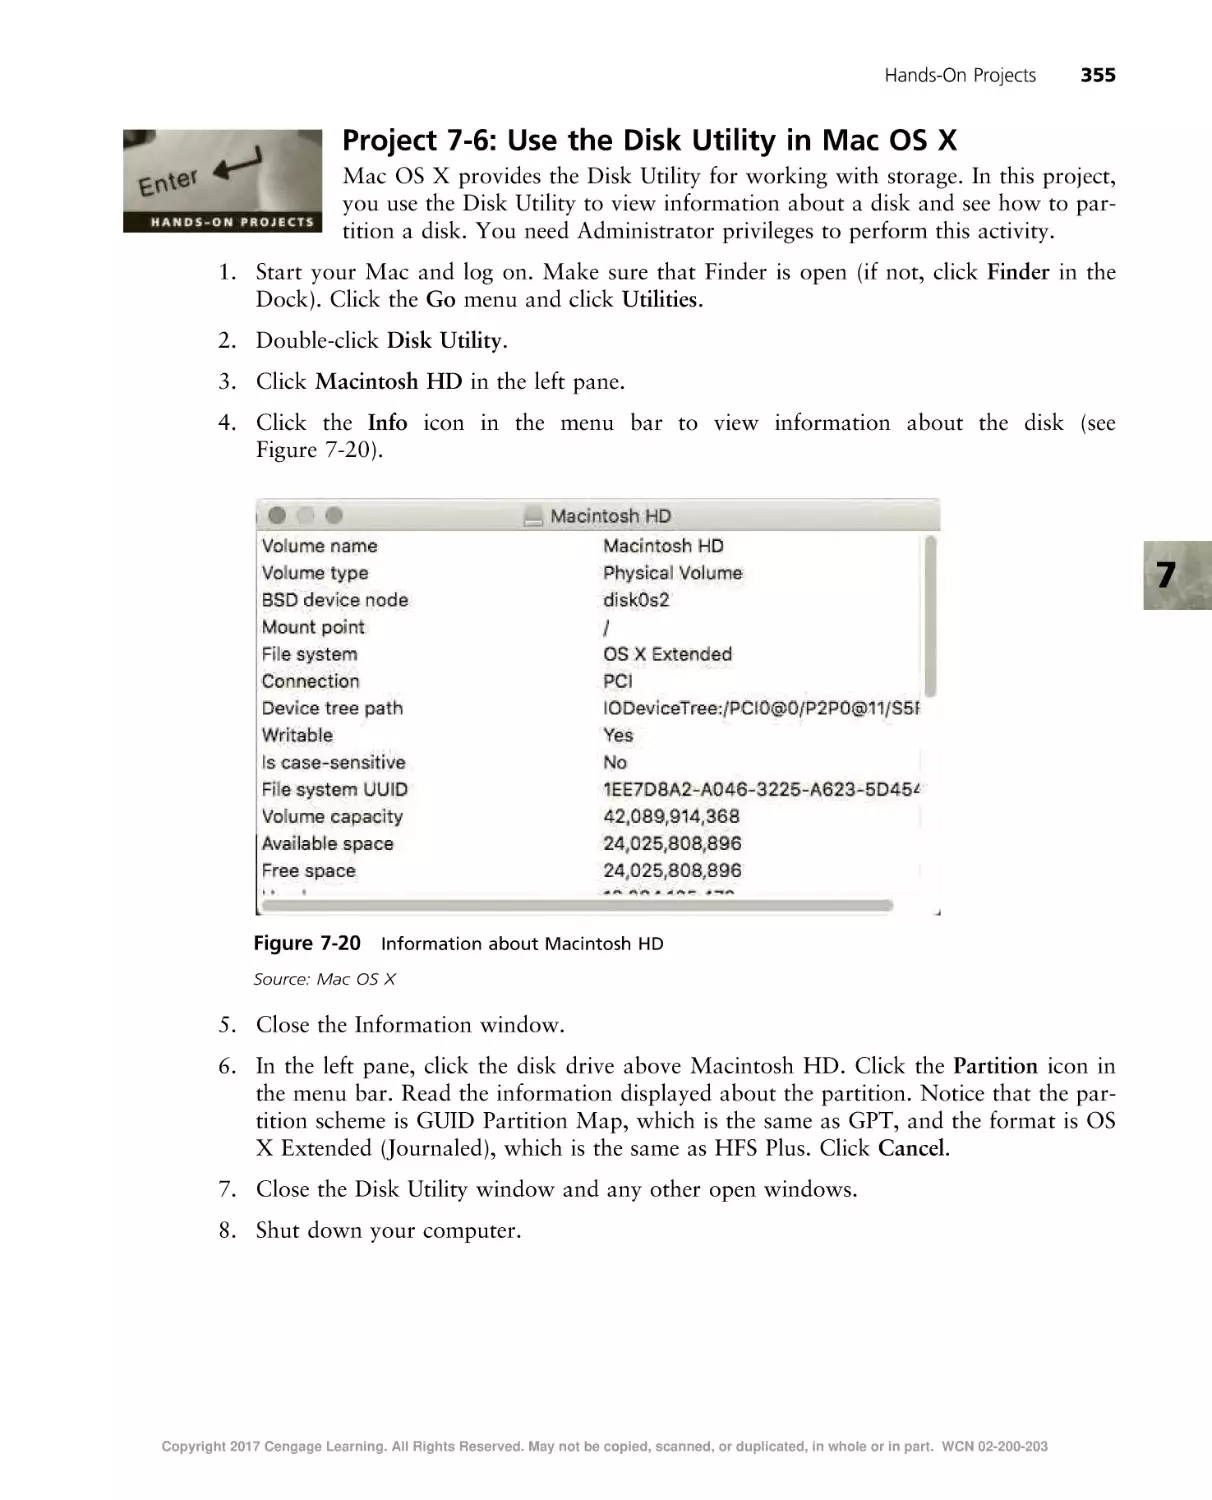
some third party content may be suppressed. Editorial review has deemed that any suppressed
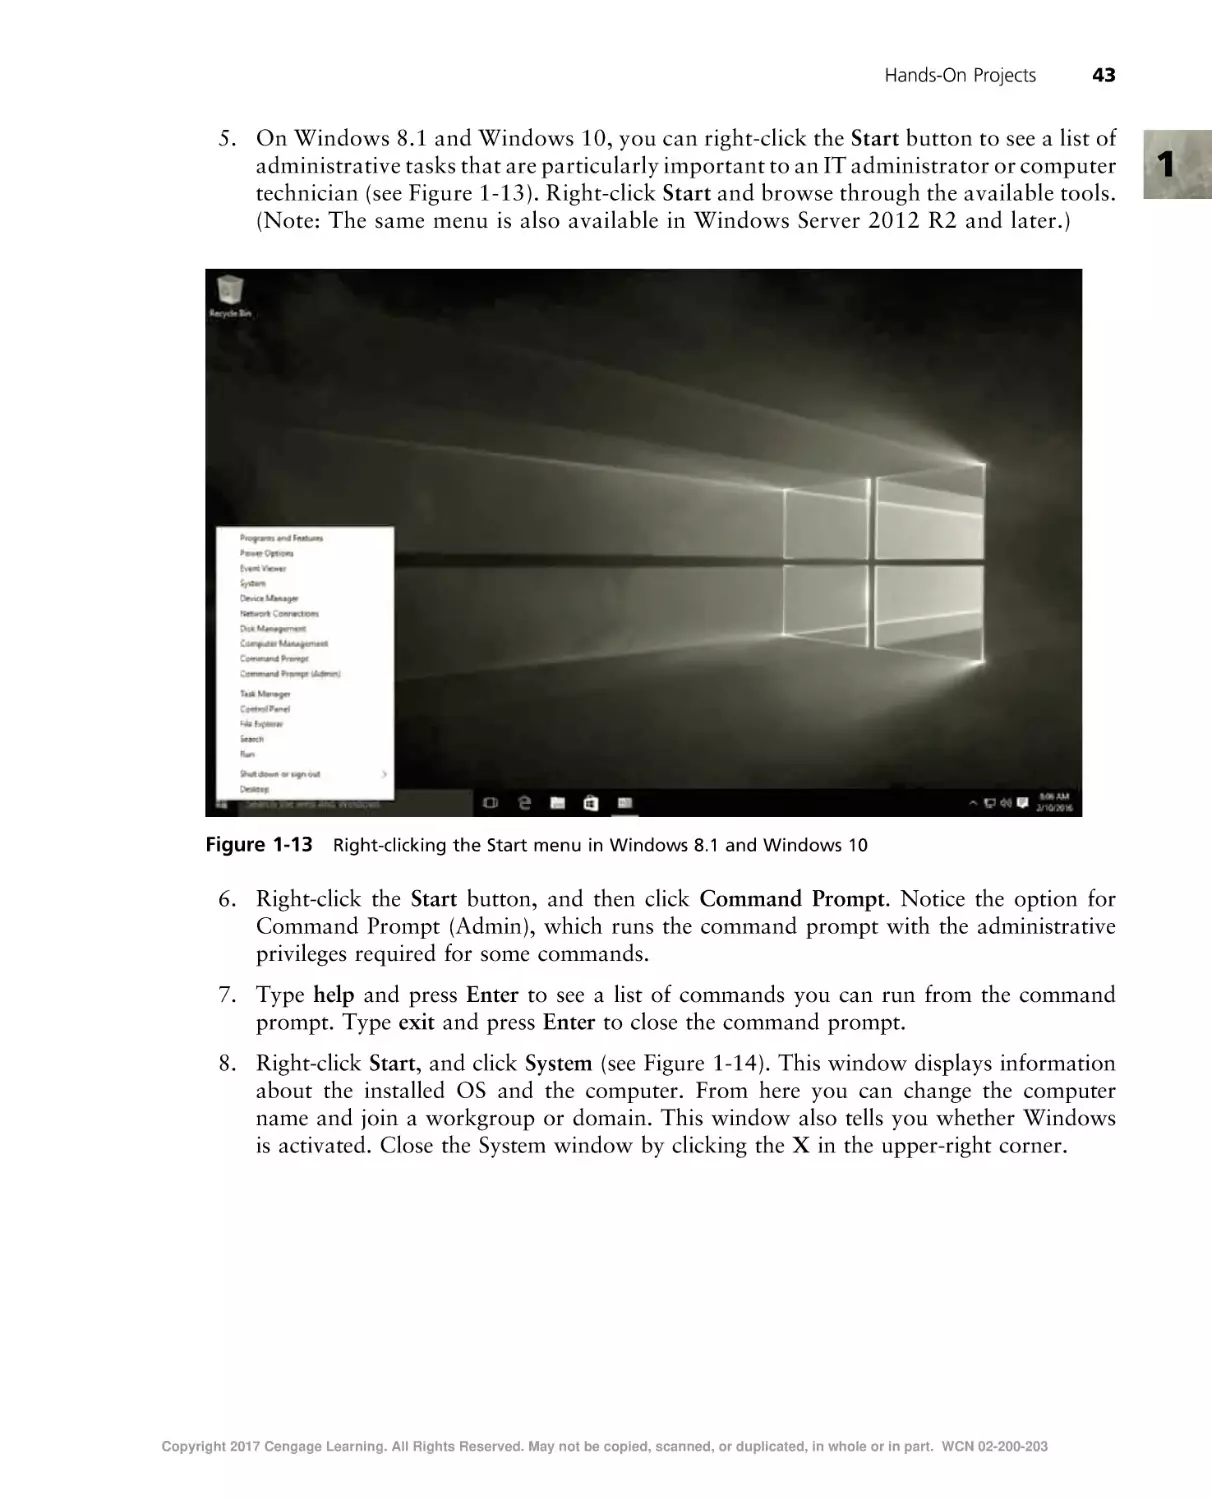
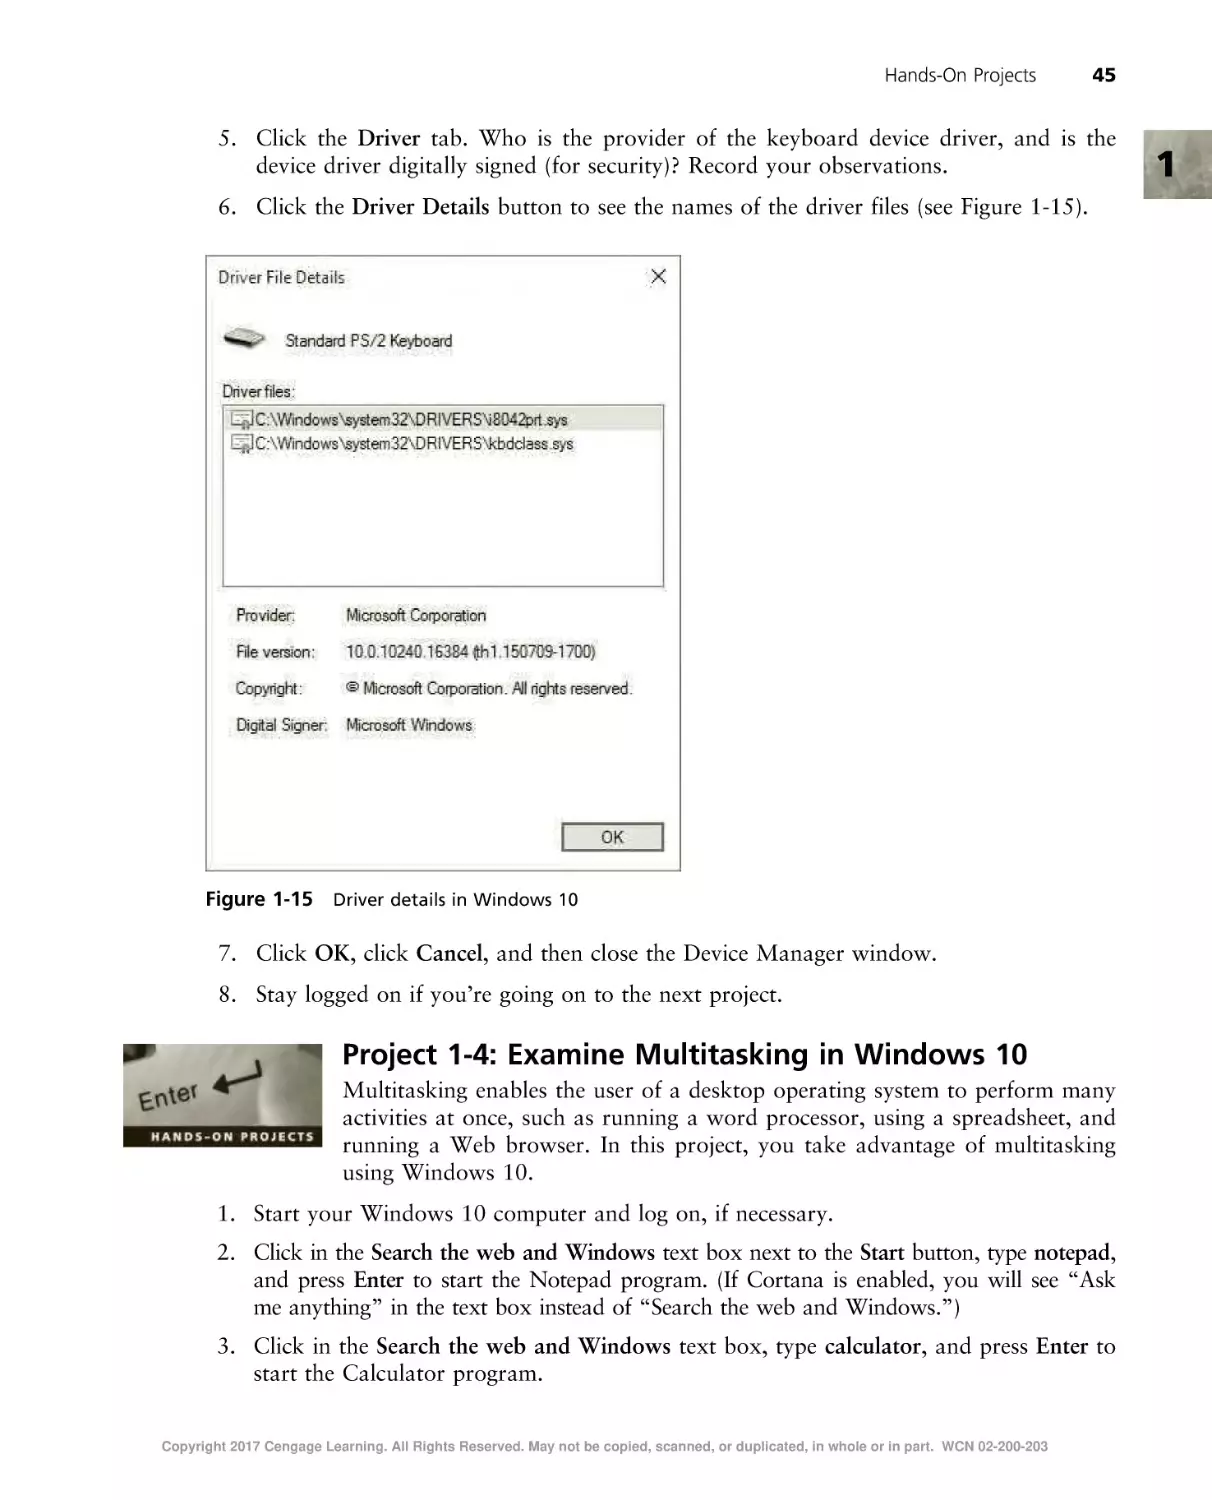
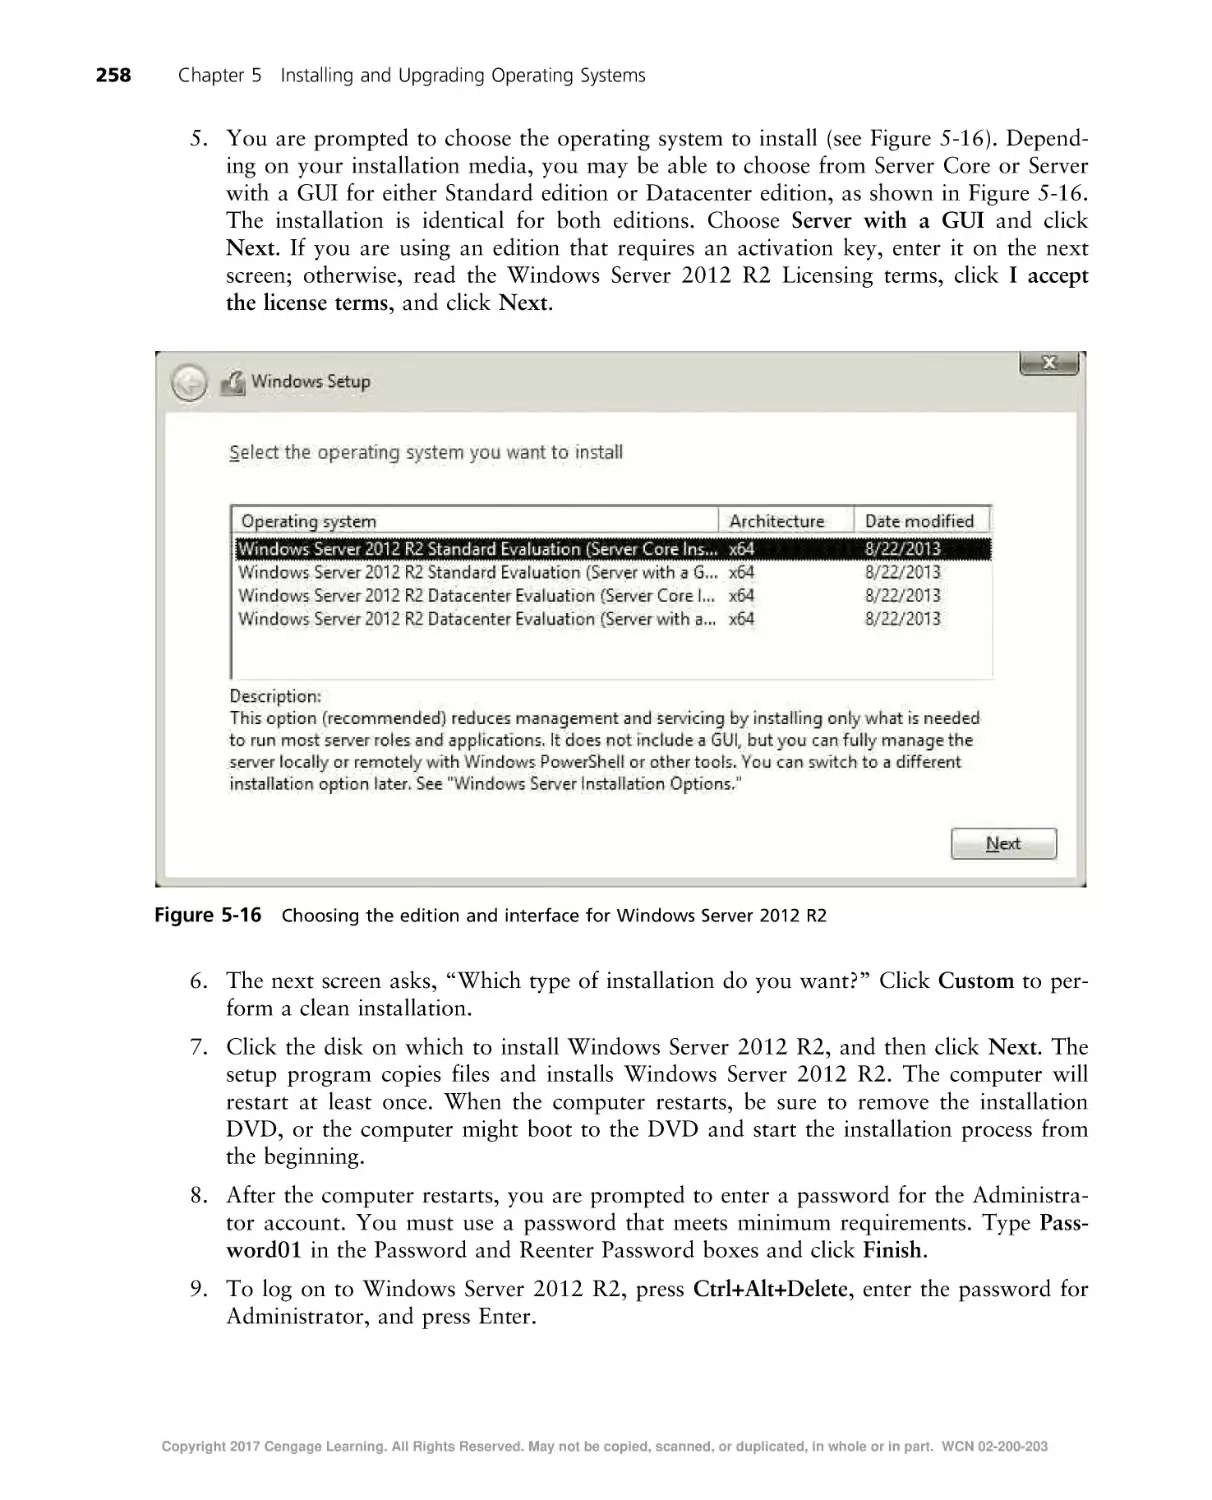
content does not materially affect the overall learning experience. The publisher reserves the right
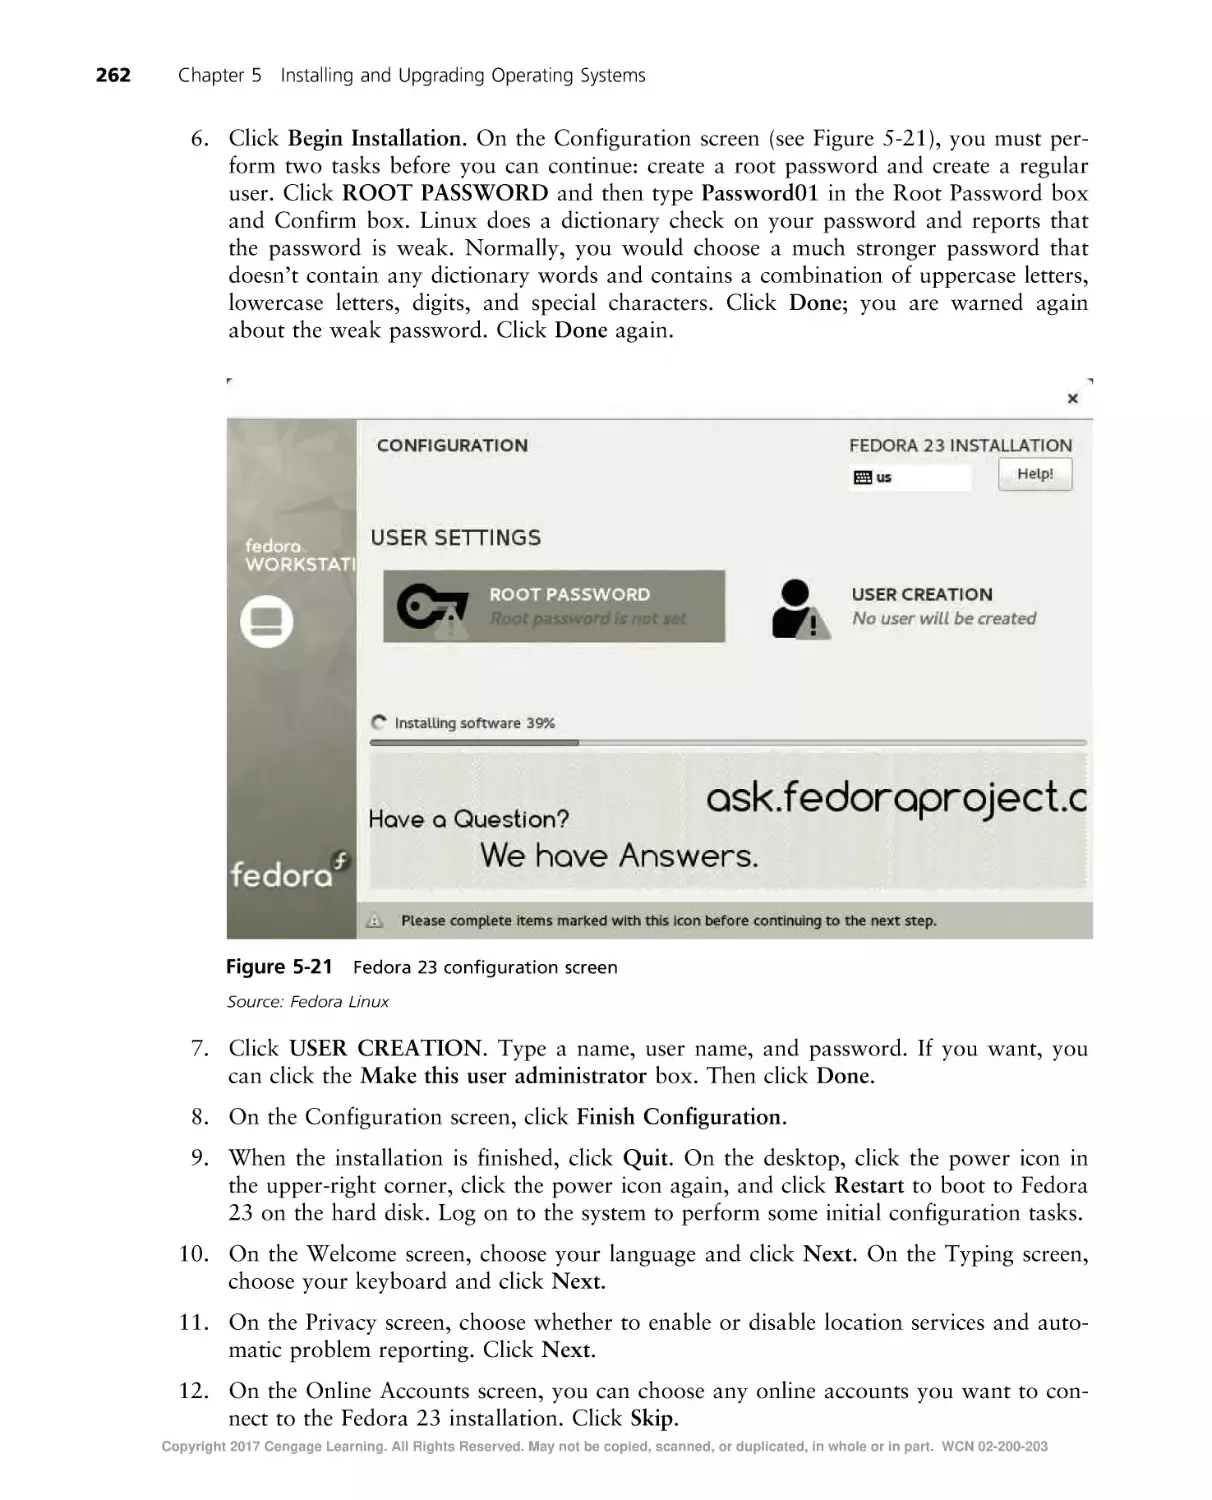
to remove content from this title at any time if subsequent rights restrictions require it. For
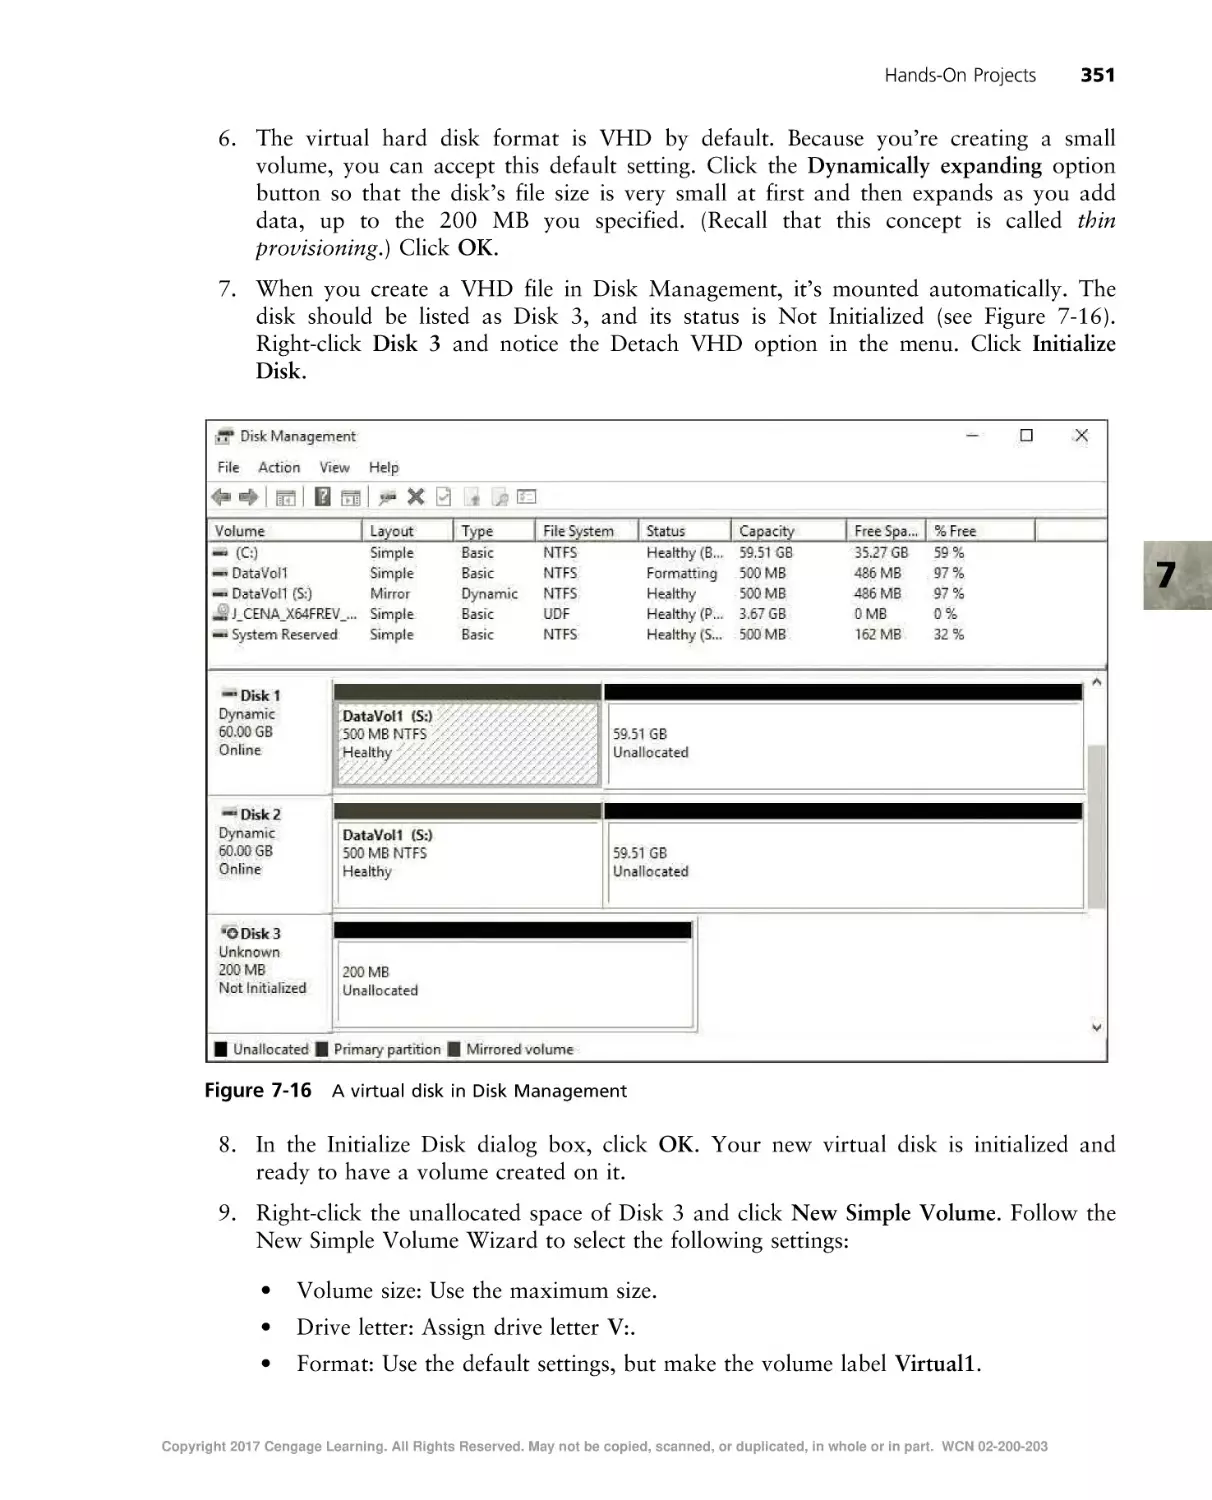
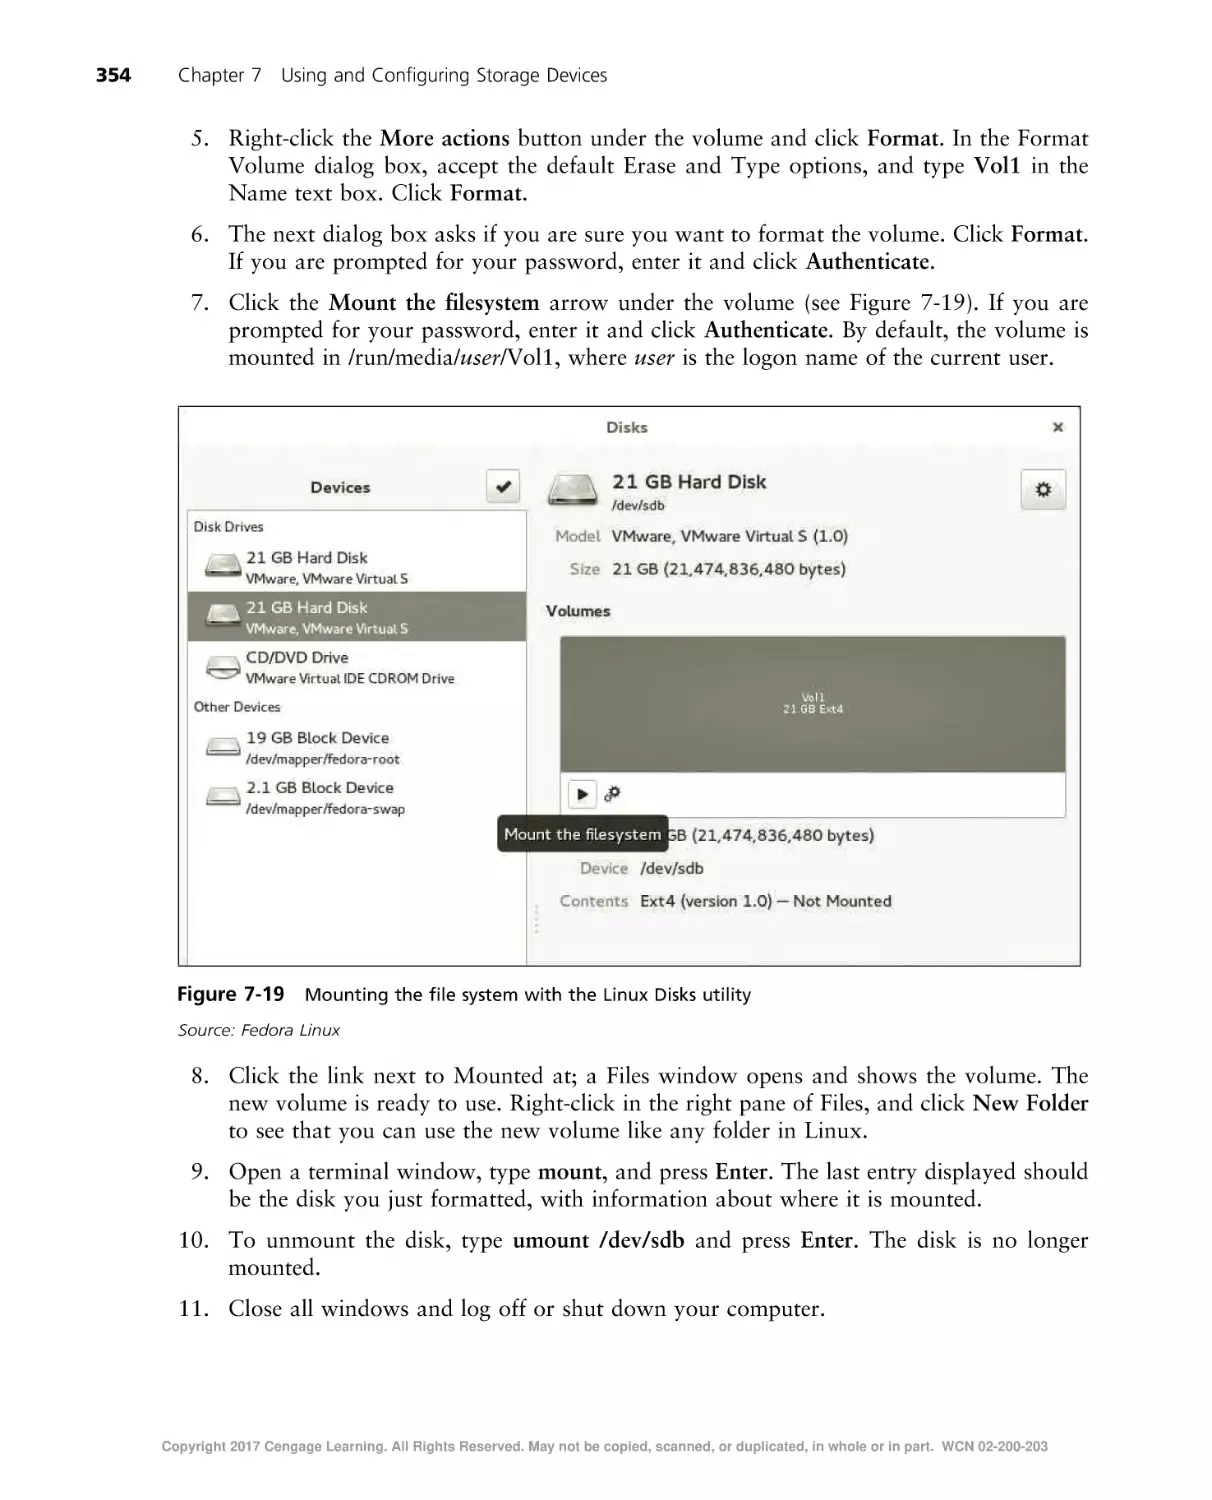
valuable information on pricing, previous editions, changes to current editions, and alternate
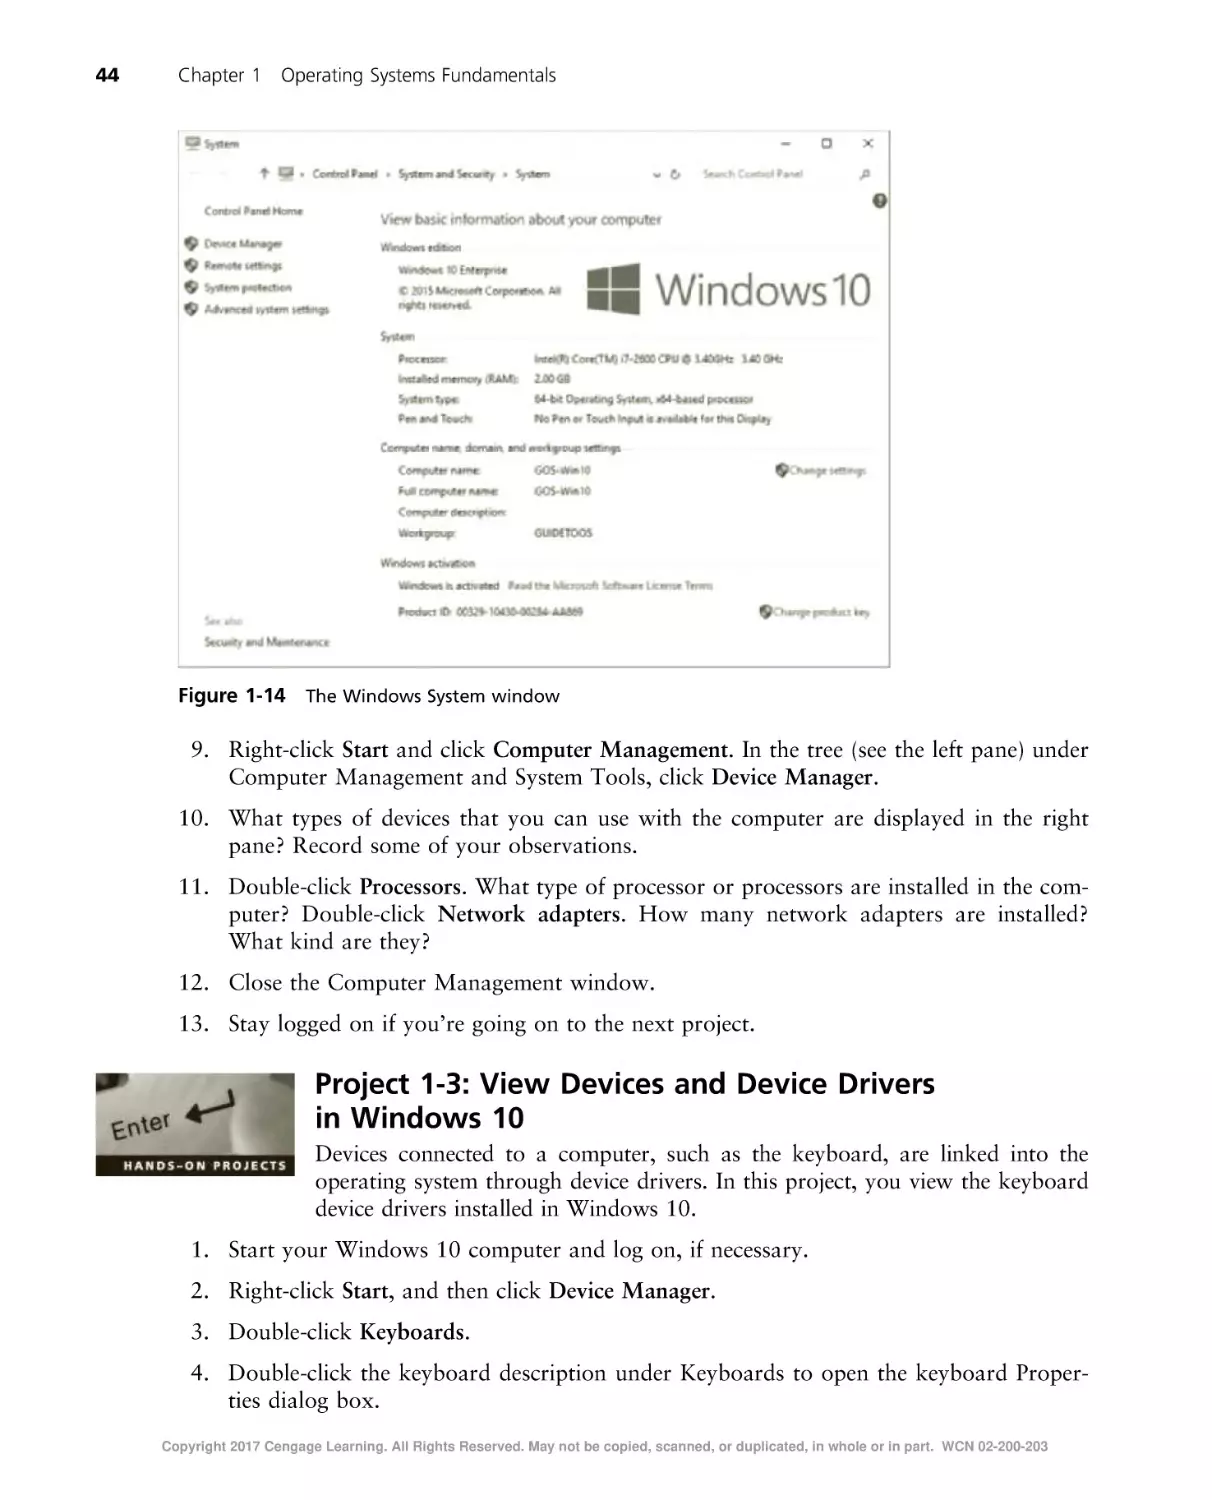
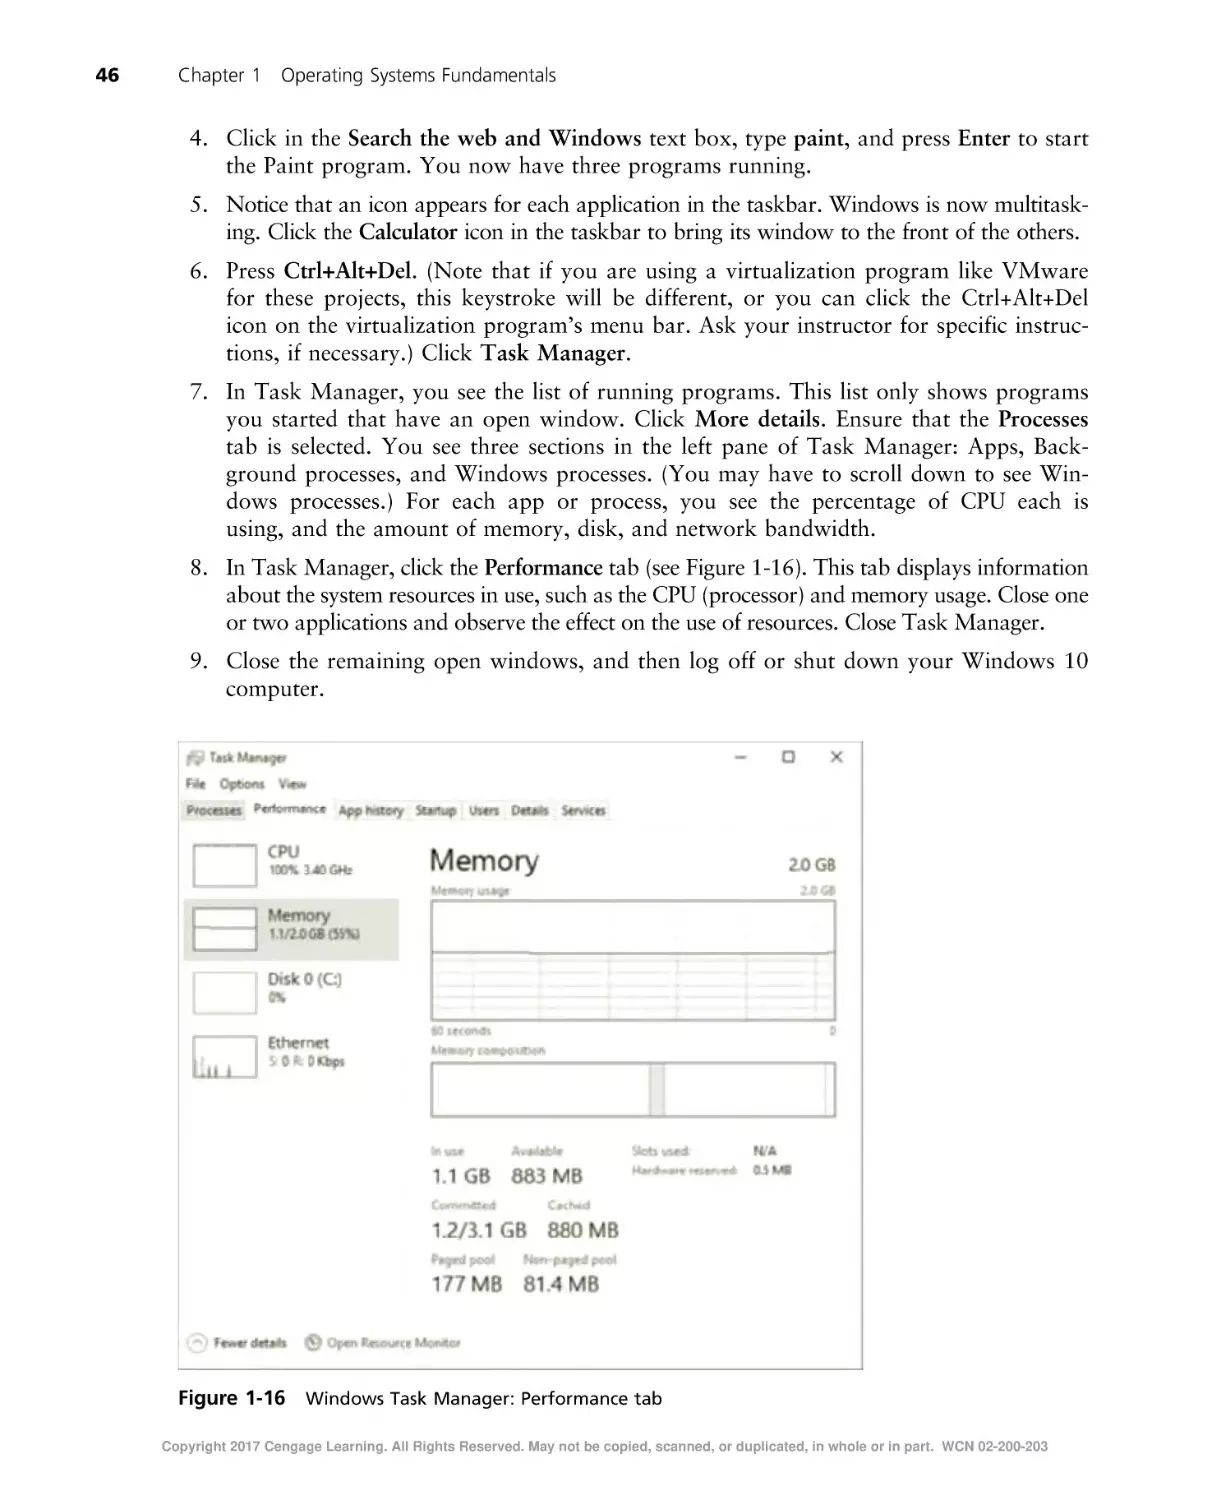
formats, please visit www.cengage.com/highered to search by ISBN, author, title, or keyword for
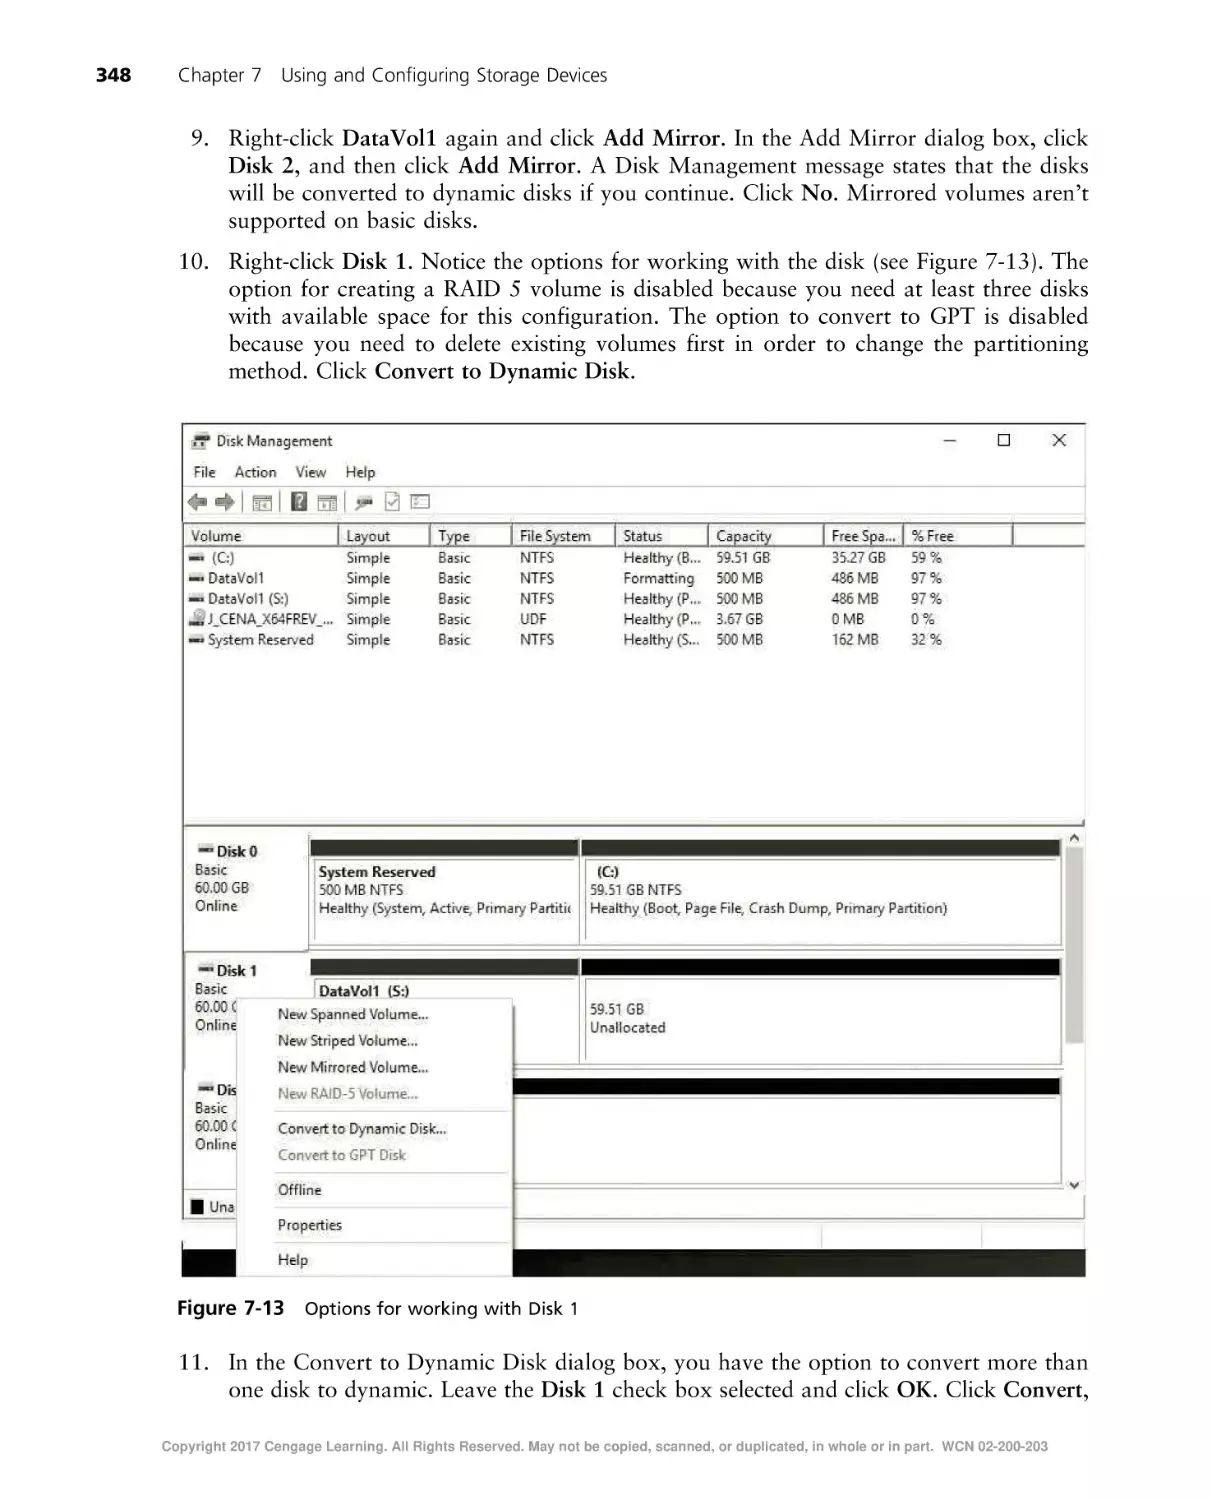
materials in your areas of interest.
Important notice: Media content referenced within the product description or the product
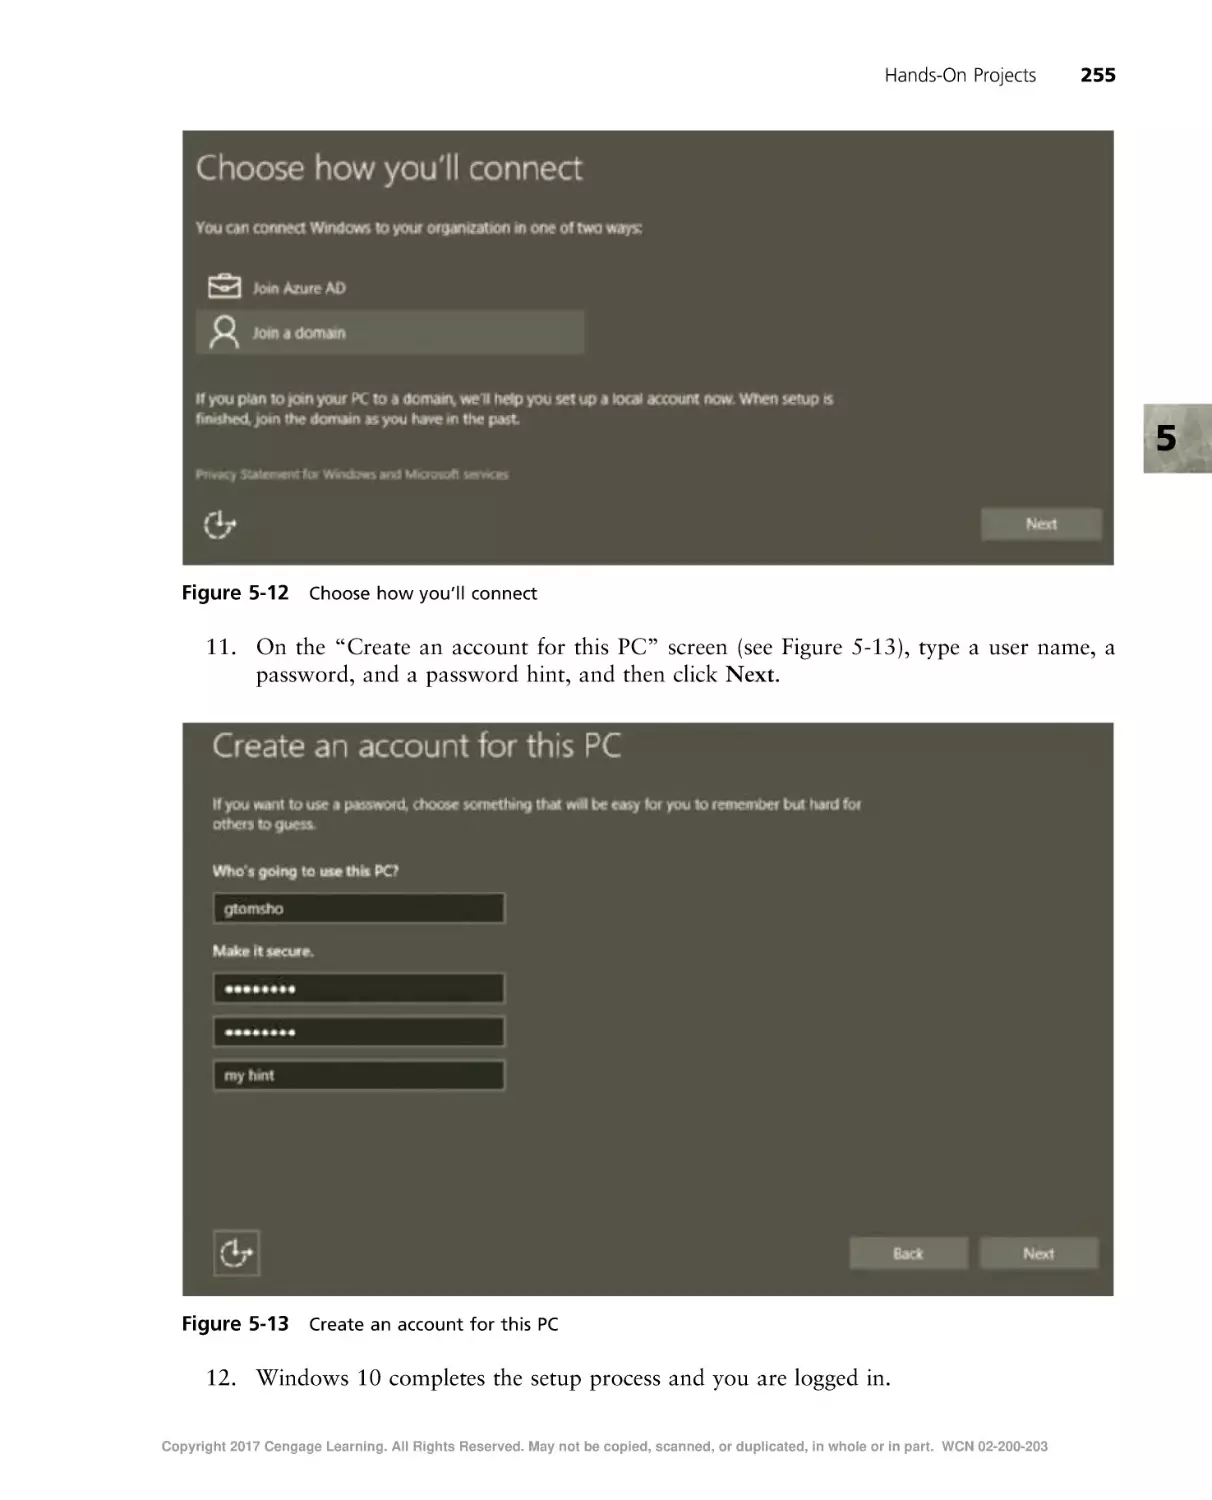
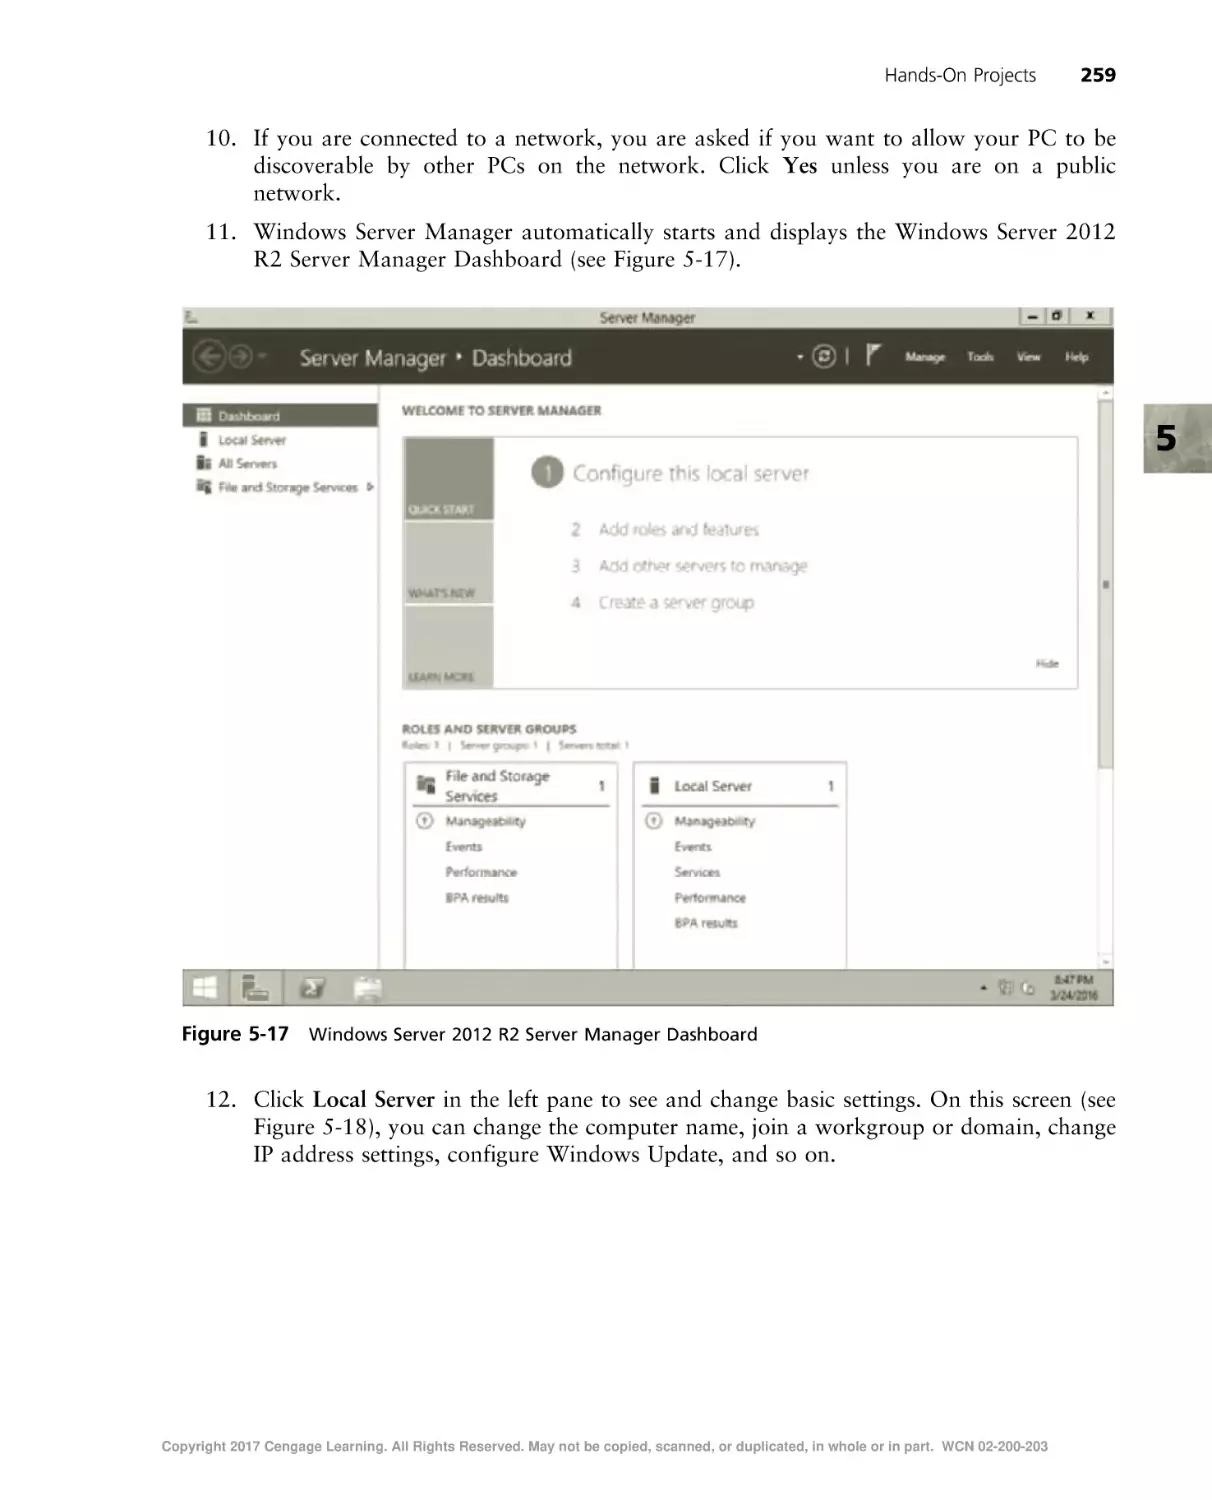
text may not be available in the eBook version.
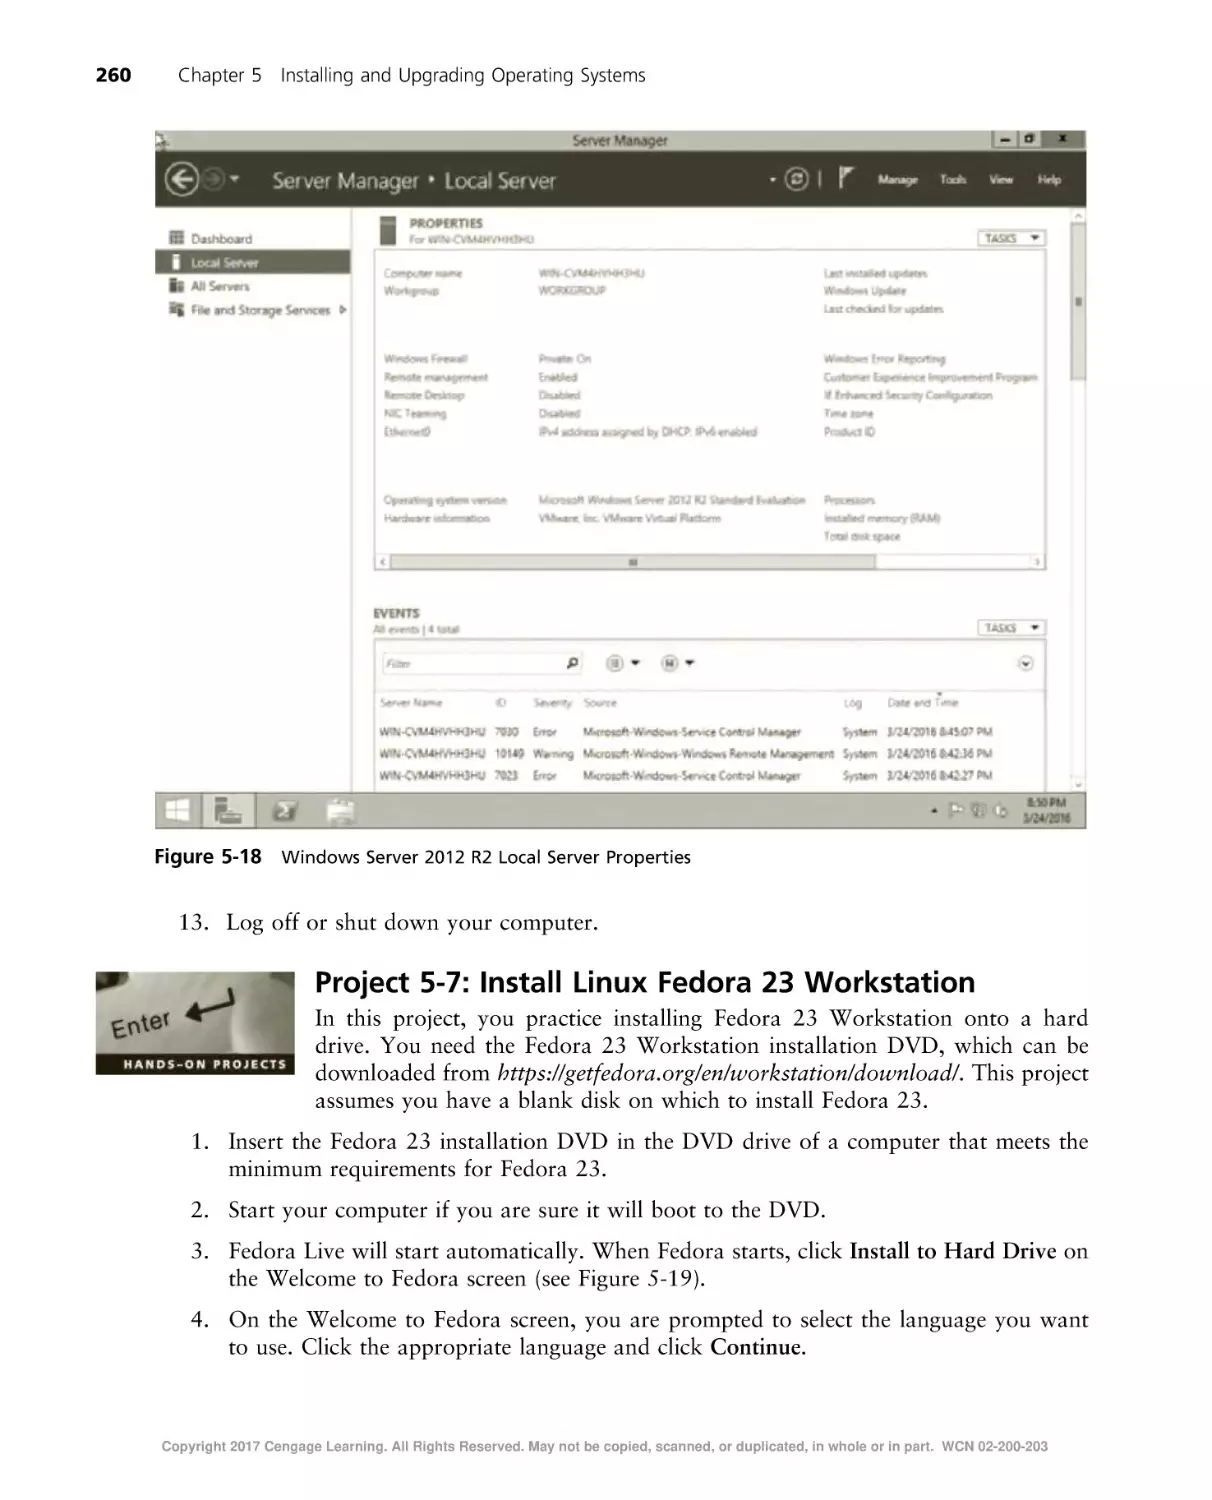
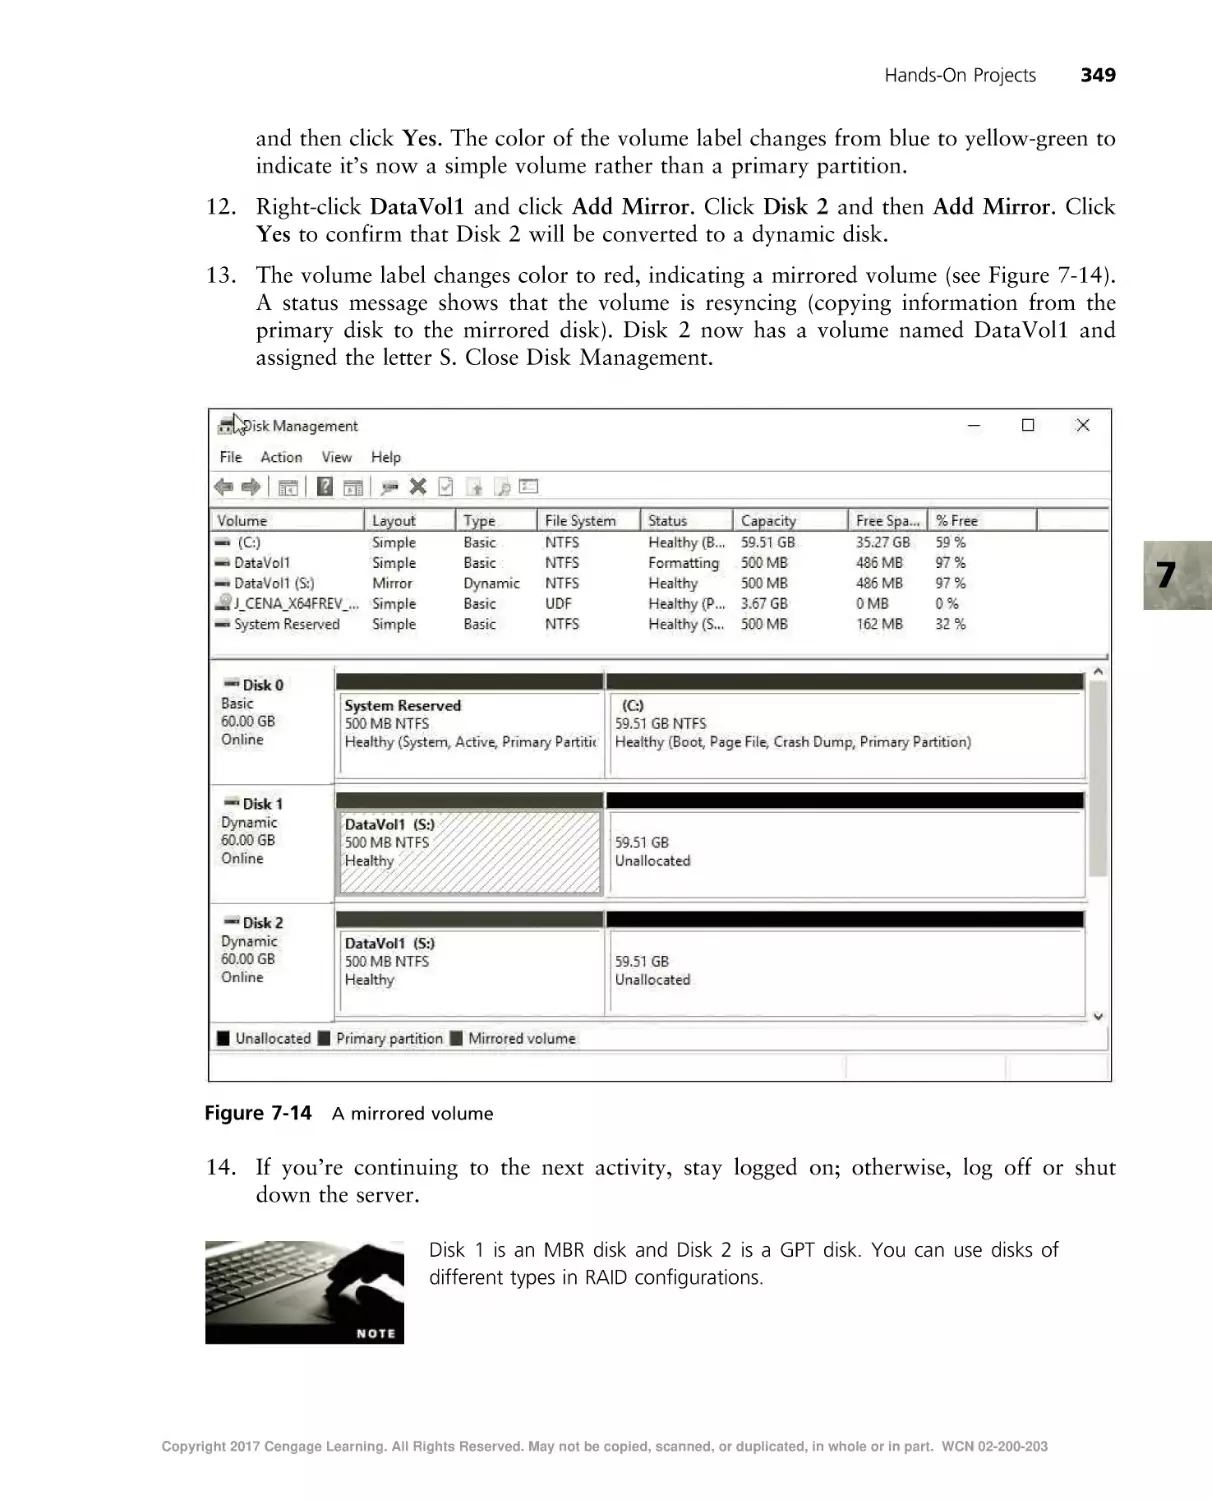
Copyright 2017 Cengage Learning. All Rights Reserved. May not be copied, scanned, or duplicated, in whole or in part. WCN 02-200-203
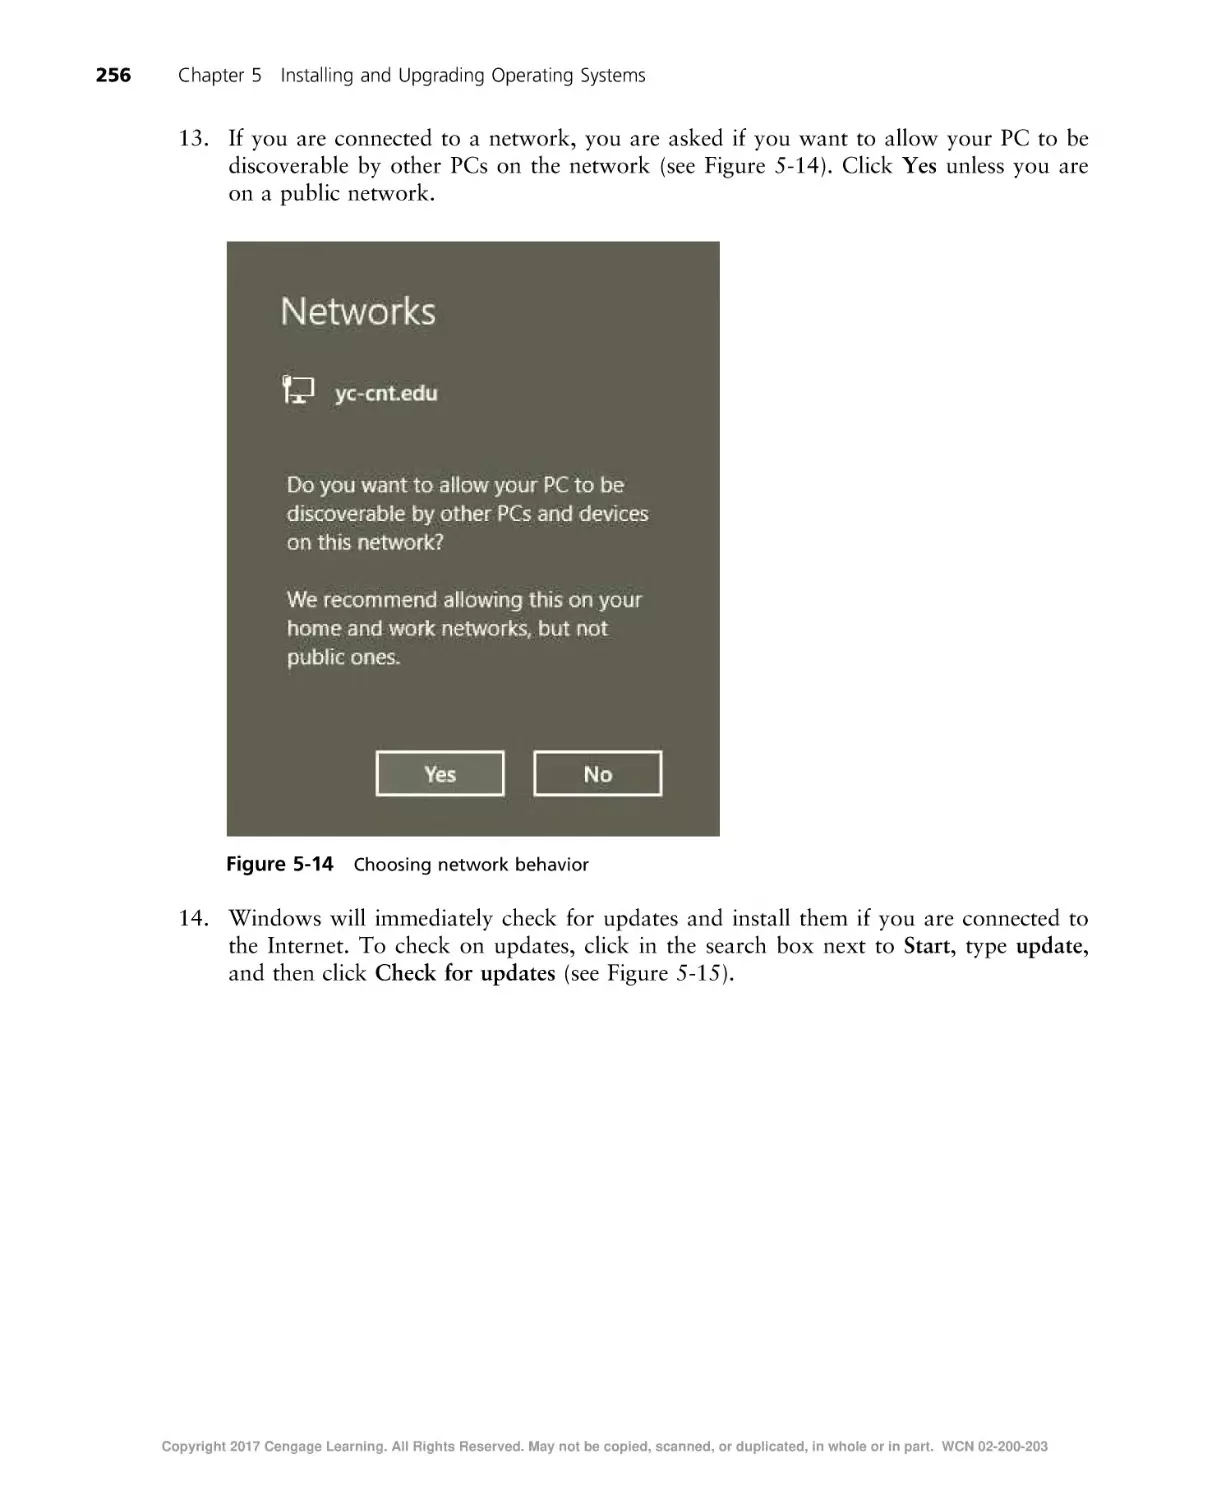
Copyright 2017 Cengage Learning. All Rights Reserved. May not be copied, scanned, or duplicated, in whole or in part. WCN 02-200-203
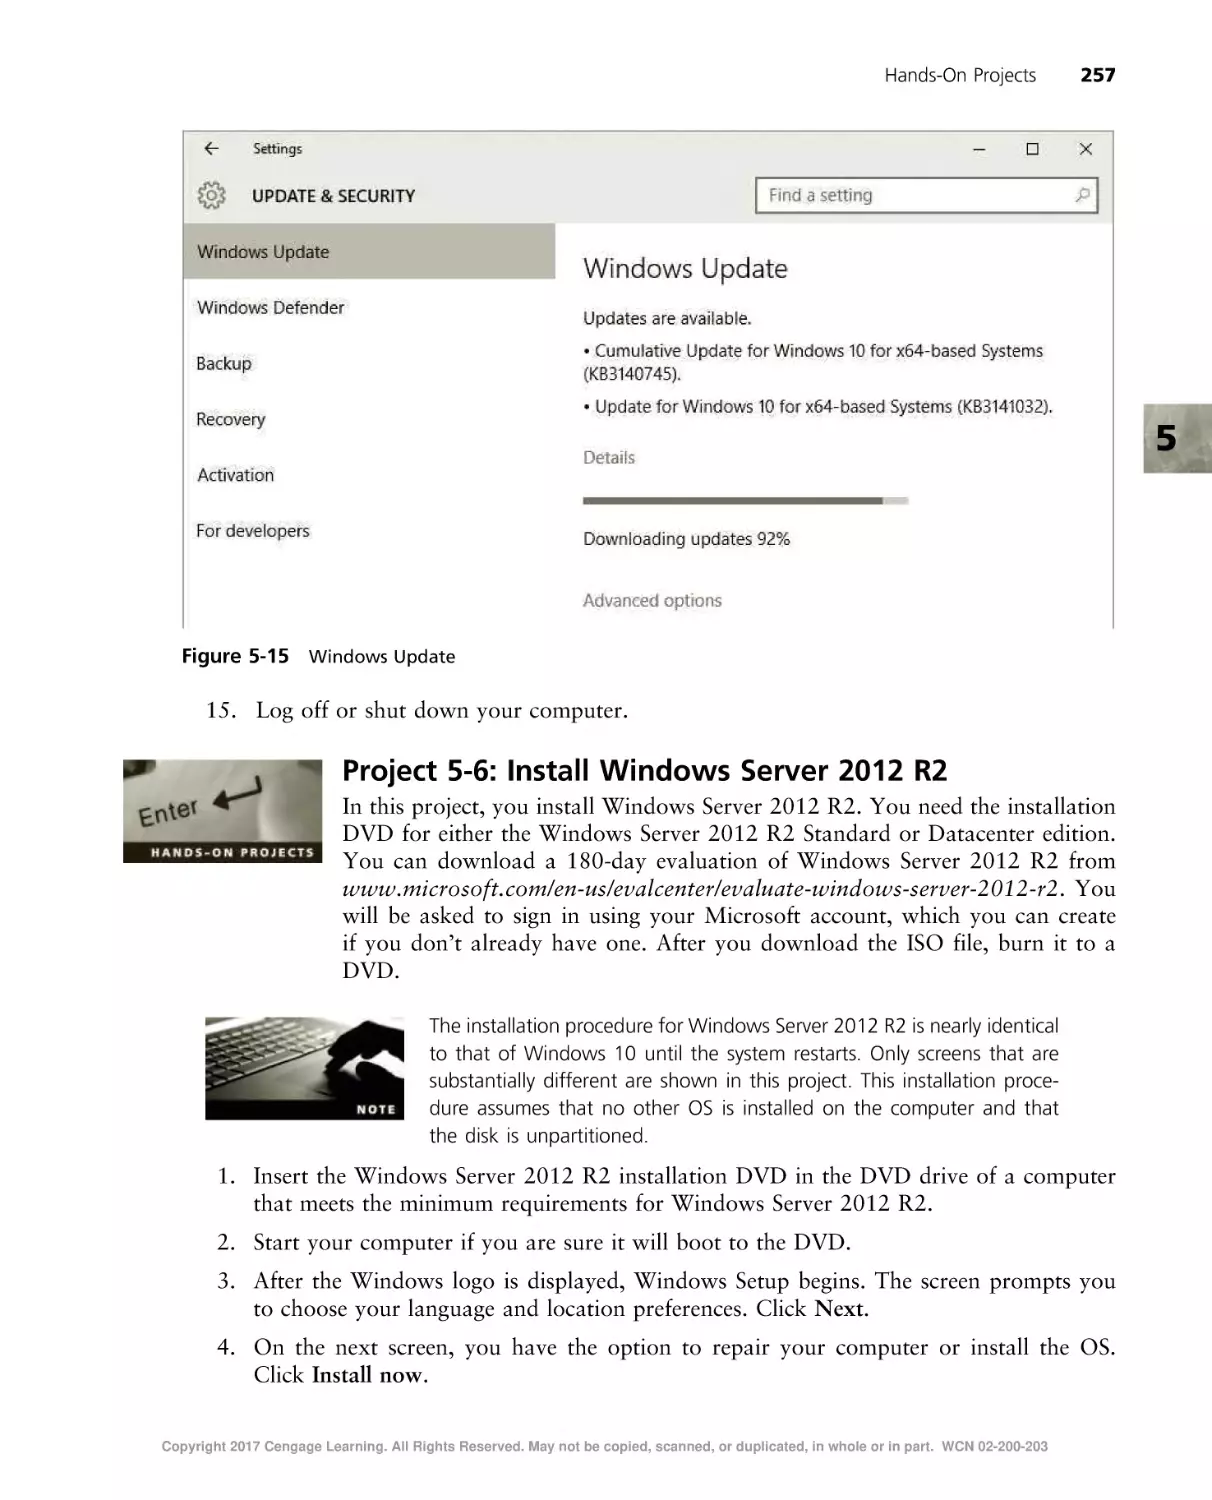
Guide to Operating Systems
Fifth Edition
Greg Tomsho
Australia • Brazil • Mexico • Singapore • United Kingdom • United States
Copyright 2017 Cengage Learning. All Rights Reserved. May not be copied, scanned, or duplicated, in whole or in part. WCN 02-200-203
Guide to Operating Systems, 5th edition
© 2017, 2012, 2007 Cengage Learning
Greg Tomsho
ALL RIGHTS RESERVED. No part of this work covered by the copyright
herein may be reproduced or distributed in any form or by any means,
except as permitted by U.S. copyright law, without the prior written
permission of the copyright owner.
GM, Science, Technology, & Math:
Balraj Kalsi
Senior Product Director, Computing:
Kathleen McMahon
Product Team Manager: Kristin McNary
Associate Product Manager: Amy Savino
SOURCE FOR ILLUSTRATIONS: Copyright © Cengage Learning.
All screenshots, unless otherwise noted, are used with permission from
Microsoft Corporation. Microsoft® is a registered trademark of the
Microsoft Corporation.
Director, Development: Julia Caballero
For product information and technology assistance, contact us at
Cengage Learning Customer & Sales Support, 1-800-354-9706
Content Development Manager,
Computing: Leigh Hefferon
For permission to use material from this text or product,
submit all requests online at www.cengage.com/permissions.
Further permissions questions can be e-mailed to
permissionrequest@cengage.com.
Managing Content Developer:
Emma Newsom
Senior Content Developer:
Natalie Pashoukos
Product Assistant: Abigail Pufpaff
Vice President, Marketing Services:
Jennifer Ann Baker
Marketing Coordinator: Cassie Cloutier
Senior Content Project Manager:
Brooke Greenhouse
Production Director: Patty Stephan
Library of Congress Control Number: 2016942762
ISBN: 978-1-305-10764-9
Cengage Learning
20 Channel Center Street
Boston, MA 02210
USA
Art Director: Diana Graham
Cover Image(s): © iStock.com/xiaoke ma
Cengage Learning is a leading provider of customized learning solutions
with employees residing in nearly 40 different countries and sales in more
than 125 countries around the world. Find your local representative at
www.cengage.com.
Cengage Learning products are represented in Canada by Nelson
Education, Ltd.
To learn more about Cengage Learning, visit www.cengage.com.
Purchase any of our products at your local college store or at our preferred
online store www.cengagebrain.com.
Notice to the Reader
Publisher does not warrant or guarantee any of the products described herein or perform any independent analysis in connection with any of the product information contained herein. Publisher does not assume, and expressly disclaims, any obligation to obtain and include information other than that provided to it by the
manufacturer. The reader is expressly warned to consider and adopt all safety precautions that might be indicated by the activities described herein and to avoid all
potential hazards. By following the instructions contained herein, the reader willingly assumes all risks in connection with such instructions. The publisher makes no
representations or warranties of any kind, including but not limited to, the warranties of fitness for particular purpose or merchantability, nor are any such representations implied with respect to the material set forth herein, and the publisher takes no responsibility with respect to such material. The publisher shall not be liable
for any special, consequential, or exemplary damages resulting, in whole or part, from the readers’ use of, or reliance upon, this material.
Printed in the United States of America
Print Number: 01
Print Year: 2016
Copyright 2017 Cengage Learning. All Rights Reserved. May not be copied, scanned, or duplicated, in whole or in part. WCN 02-200-203
Brief Contents
INTRODUCTION . . . . . . . . . . . . . . . . . . . . . . . . . . . . . . . . . . . . . . . . . . . . . . . . . . . . . . . . . . . . . . . . . xv
CHAPTER 1
Operating Systems Fundamentals . . . . . . . . .
CHAPTER 2
Popular Operating Systems . . . . . . . . . . . . . .
CHAPTER 3
The Central Processing Unit (CPU) . . . . . . . . .
CHAPTER 4
File Systems . . . . . . . . . . . . . . . . . . . . . . . . . .
CHAPTER 5
Installing and Upgrading Operating Systems .
CHAPTER 6
Configuring Input and Output Devices. . . . . .
........................................... 1
. . . . . . . . . . . . . . . . . . . . . . . . . . . . . . . . . . . . . . . . . . 55
. . . . . . . . . . . . . . . . . . . . . . . . . . . . . . . . . . . . . . . . . 113
. . . . . . . . . . . . . . . . . . . . . . . . . . . . . . . . . . . . . . . . . 145
. . . . . . . . . . . . . . . . . . . . . . . . . . . . . . . . . . . . . . . . . 211
. . . . . . . . . . . . . . . . . . . . . . . . . . . . . . . . . . . . . . . . . 265
CHAPTER 7
Using and Configuring Storage Devices . . . . . . . . . .
CHAPTER 8
Virtualization and Cloud Computing Fundamentals .
CHAPTER 9
Configuring a Network Connection . . . . . . . . . . . . .
CHAPTER 10
Sharing Resources and Working with Accounts . . . .
CHAPTER 11
Operating Systems Management and Maintenance .
APPENDIX A
Operating System Command-Line Commands . . . . .
. . . . . . . . . . . . . . . . . . . . . . . . . . . . . . . . . . . . 313
. . . . . . . . . . . . . . . . . . . . . . . . . . . . . . . . . . . . 357
. . . . . . . . . . . . . . . . . . . . . . . . . . . . . . . . . . . . 389
. . . . . . . . . . . . . . . . . . . . . . . . . . . . . . . . . . . . 457
. . . . . . . . . . . . . . . . . . . . . . . . . . . . . . . . . . . . 501
. . . . . . . . . . . . . . . . . . . . . . . . . . . . . . . . . . . . 541
GLOSSARY . . . . . . . . . . . . . . . . . . . . . . . . . . . . . . . . . . . . . . . . . . . . . . . . . . . . . . . . . . . . . . . . . . . . 551
INDEX . . . . . . . . . . . . . . . . . . . . . . . . . . . . . . . . . . . . . . . . . . . . . . . . . . . . . . . . . . . . . . . . . . . . . . . . 565
Copyright 2017 Cengage Learning. All Rights Reserved. May not be copied, scanned, or duplicated, in whole or in part. WCN 02-200-203
v
Copyright 2017 Cengage Learning. All Rights Reserved. May not be copied, scanned, or duplicated, in whole or in part. WCN 02-200-203
Table of Contents
INTRODUCTION . . . . . . . . . . . . . . . . . . . . . . . . . . . . . . . . . . . . . . . . . . . . . . . . . . . . . . . . . . . . . . . . . xv
CHAPTER 1
Operating Systems Fundamentals . . . . . . . . . . . . . . . . . . . . . . . . . . . . . . . . . . . . . . . . . . . . . . . . . . . . 1
An Introduction to Operating Systems . . . . . . . . . . . . . . . . . . . . . . . . . . . . . . . . . . . . . . . . . . . . . . . 3
Desktop Versus Server Operating System . . . . . . . . . . . . . . . . . . . . . . . . . . . . . . . . . . . . . . . . . . . 4
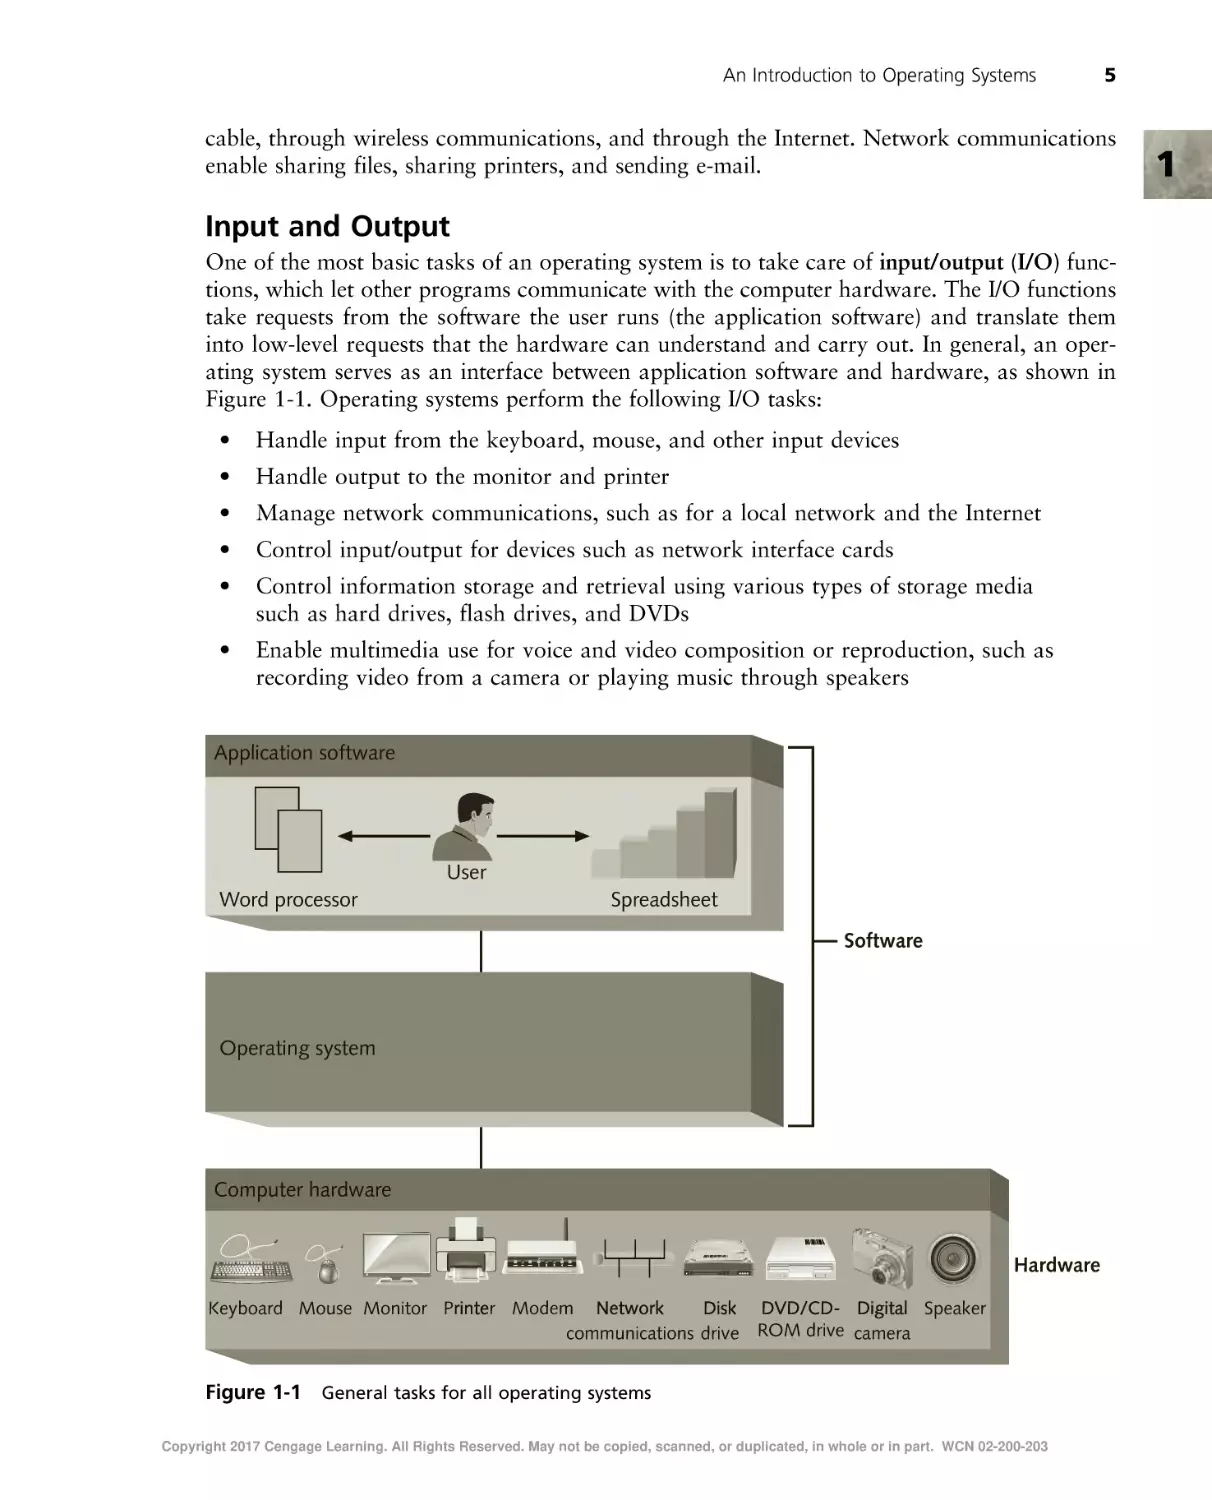
Input and Output . . . . . . . . . . . . . . . . . . . . . . . . . . . . . . . . . . . . . . . . . . . . . . . . . . . . . . . . . . 5
A Short History of Operating Systems . . . . . . . . . . . . . . . . . . . . . . . . . . . . . . . . . . . . . . . . . . . . . . .
6
Understanding How Operating Systems Work . . . . . . . . . . . . . . . . . . . . . . . . . . . . . . . . . . . . . . . . . .
The Kernel . . . . . . . . . . . . . . . . . . . . . . . . . . . . . . . . . . . . . . . . . . . . . . . . . . . . . . . . . . . . .
Resource Managers . . . . . . . . . . . . . . . . . . . . . . . . . . . . . . . . . . . . . . . . . . . . . . . . . . . . . . . .
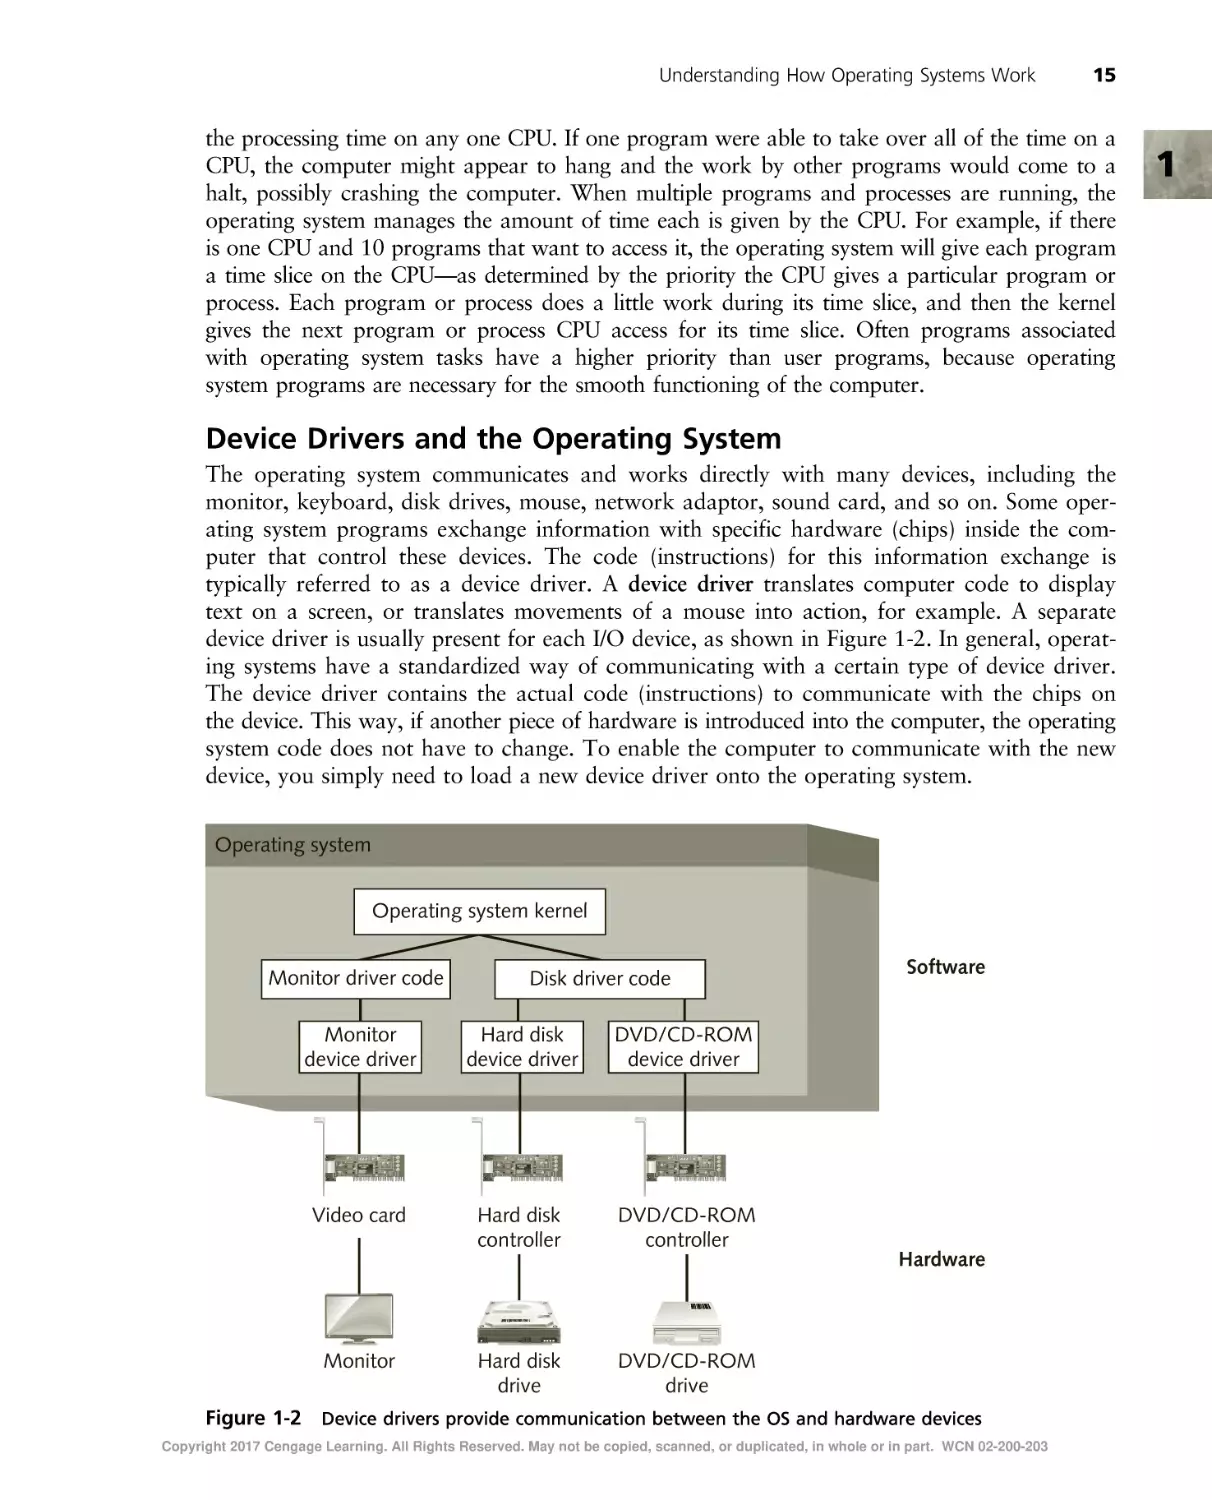
Device Drivers and the Operating System . . . . . . . . . . . . . . . . . . . . . . . . . . . . . . . . . . . . . . . . . .
The Role of Application Software . . . . . . . . . . . . . . . . . . . . . . . . . . . . . . . . . . . . . . . . . . . . . . .
The Role of the BIOS . . . . . . . . . . . . . . . . . . . . . . . . . . . . . . . . . . . . . . . . . . . . . . . . . . . . . . .
A Summary of Operating System Elements . . . . . . . . . . . . . . . . . . . . . . . . . . . . . . . . . . . . . . . . .
13
13
14
15
16
18
20
Types of Operating Systems . . . . . . . . . . . . . . . . . . . . . . . . . . . . . . . . . . . . . . . . . . . . . . . . . . . . .
Time Sharing . . . . . . . . . . . . . . . . . . . . . . . . . . . . . . . . . . . . . . . . . . . . . . . . . . . . . . . . . . . .
Real-Time Systems . . . . . . . . . . . . . . . . . . . . . . . . . . . . . . . . . . . . . . . . . . . . . . . . . . . . . . . .
Multiuser Systems . . . . . . . . . . . . . . . . . . . . . . . . . . . . . . . . . . . . . . . . . . . . . . . . . . . . . . . . .
21
23
24
24
Single Tasking Versus Multitasking . . . . . . . . . . . . . . . . . . . . . . . . . . . . . . . . . . . . . . . . . . . . . . . . . 27
Single-User Versus Multiuser Operating Systems . . . . . . . . . . . . . . . . . . . . . . . . . . . . . . . . . . . . . . . . . 31
Current Operating Systems . . . . . . . . . . . . . . . . . . . . . . . . . . . . . . . . . . . . . . . . . . . . . . . . . . . . . . 32
Chapter Summary . . . . . . . . . . . . . . . . . . . . . . . . . . . . . . . . . . . . . . . . . . . . . . . . . . . . . . . . . . . . 33
Key Terms . . . . . . . . . . . . . . . . . . . . . . . . . . . . . . . . . . . . . . . . . . . . . . . . . . . . . . . . . . . . . . . . 34
Review Questions . . . . . . . . . . . . . . . . . . . . . . . . . . . . . . . . . . . . . . . . . . . . . . . . . . . . . . . . . . . . 37
Hands-On Projects . . . . . . . . . . . . . . . . . . . . . . . . . . . . . . . . . . . . . . . . . . . . . . . . . . . . . . . . . . . 41
Critical Thinking . . . . . . . . . . . . . . . . . . . . . . . . . . . . . . . . . . . . . . . . . . . . . . . . . . . . . . . . . . . . 51
Case Projects . . . . . . . . . . . . . . . . . . . . . . . . . . . . . . . . . . . . . . . . . . . . . . . . . . . . . . . . . . . . . . . 52
CHAPTER 2
Popular Operating Systems . . . . . . . . . . . . . . . . . . . . . . . . . . . . . . . . . . . . . . . . . . . . . . . . . . . . . . . . 55
Early Microsoft Operating Systems . . . . . . . . . . . . . . . . . . . . . . . . . . . . . . . . . . . . . . . . . . . . . . . . .
MS-DOS and PC DOS . . . . . . . . . . . . . . . . . . . . . . . . . . . . . . . . . . . . . . . . . . . . . . . . . . . . . .
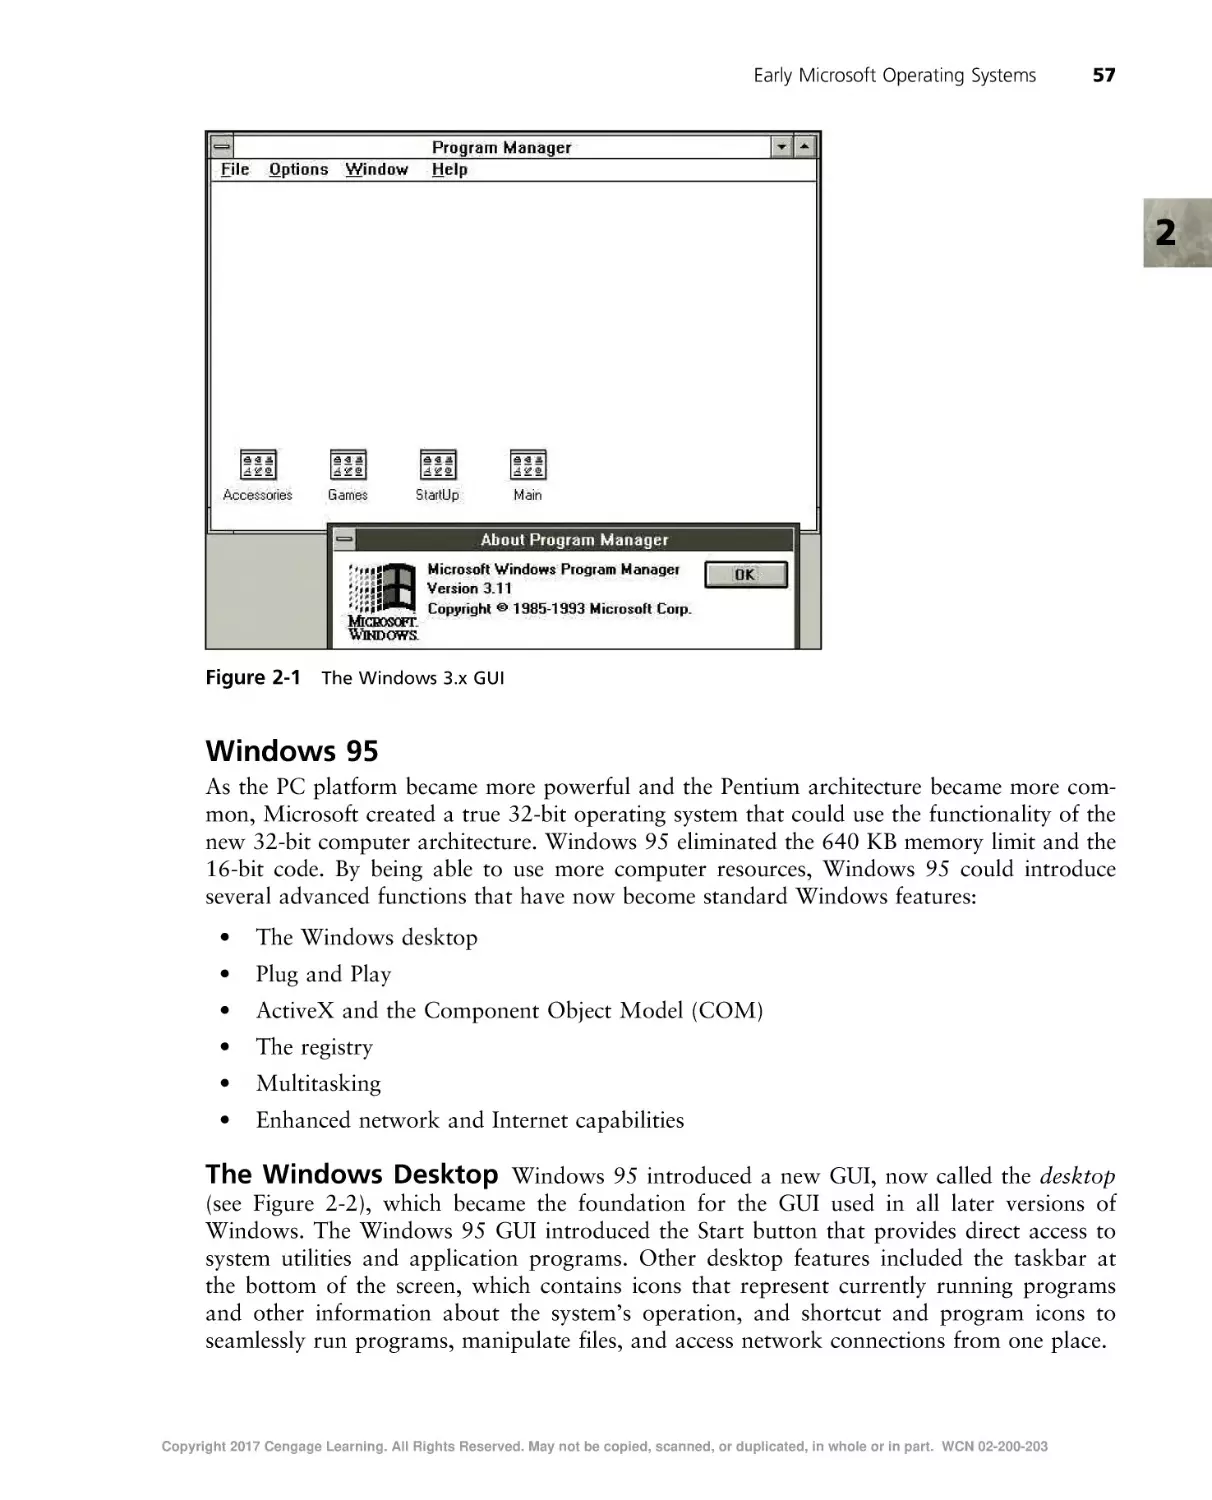
Windows 3.x . . . . . . . . . . . . . . . . . . . . . . . . . . . . . . . . . . . . . . . . . . . . . . . . . . . . . . . . . . . .
Windows 95 . . . . . . . . . . . . . . . . . . . . . . . . . . . . . . . . . . . . . . . . . . . . . . . . . . . . . . . . . . . .
Windows 98/Me . . . . . . . . . . . . . . . . . . . . . . . . . . . . . . . . . . . . . . . . . . . . . . . . . . . . . . . . . .
Windows NT . . . . . . . . . . . . . . . . . . . . . . . . . . . . . . . . . . . . . . . . . . . . . . . . . . . . . . . . . . . .
Windows 2000 . . . . . . . . . . . . . . . . . . . . . . . . . . . . . . . . . . . . . . . . . . . . . . . . . . . . . . . . . . .
Windows 2000 Server and Windows 2000 Professional . . . . . . . . . . . . . . . . . . . . . . . . . . . . . . . . .
Windows 2000 Server, Advanced Server, and Datacenter Server . . . . . . . . . . . . . . . . . . . . . . . . . . . .
Windows XP and Windows Server 2003 . . . . . . . . . . . . . . . . . . . . . . . . . . . . . . . . . . . . . . . . . .
Windows Server 2003/R2 . . . . . . . . . . . . . . . . . . . . . . . . . . . . . . . . . . . . . . . . . . . . . . . . . . . .
56
56
56
57
59
60
61
63
63
65
66
Modern Windows Operating Systems . . . . . . . . . . . . . . . . . . . . . . . . . . . . . . . . . . . . . . . . . . . . . . .
Windows Vista/Windows 7 . . . . . . . . . . . . . . . . . . . . . . . . . . . . . . . . . . . . . . . . . . . . . . . . . . .
Windows Server 2008/R2 . . . . . . . . . . . . . . . . . . . . . . . . . . . . . . . . . . . . . . . . . . . . . . . . . . . .
Windows 8/8.1 . . . . . . . . . . . . . . . . . . . . . . . . . . . . . . . . . . . . . . . . . . . . . . . . . . . . . . . . . . .
Windows Server 2012/R2 . . . . . . . . . . . . . . . . . . . . . . . . . . . . . . . . . . . . . . . . . . . . . . . . . . . .
Windows 10 . . . . . . . . . . . . . . . . . . . . . . . . . . . . . . . . . . . . . . . . . . . . . . . . . . . . . . . . . . . .
68
68
75
78
81
84
Copyright 2017 Cengage Learning. All Rights Reserved. May not be copied, scanned, or duplicated, in whole or in part. WCN 02-200-203
vii
viii
Table of Contents
Windows Server 2016 . . . . . . . . . . . . . . . . . . . . . . . . . . . . . . . . . . . . . . . . . . . . . . . . . . . . . .
88
UNIX and UNIX-like Operating Systems . . . . . . . . . . . . . . . . . . . . . . . . . . . . . . . . . . . . . . . . . . . . . 88
Mac OS . . . . . . . . . . . . . . . . . . . . . . . . . . . . . . . . . . . . . . . . . . . . . . . . . . . . . . . . . . . . . . . . . . 92
Mac OS X . . . . . . . . . . . . . . . . . . . . . . . . . . . . . . . . . . . . . . . . . . . . . . . . . . . . . . . . . . . . . . 95
Mac OS X 10.11 El Capitan . . . . . . . . . . . . . . . . . . . . . . . . . . . . . . . . . . . . . . . . . . . . . . . . . . 96
Chapter Summary . . . . . . . . . . . . . . . . . . . . . . . . . . . . . . . . . . . . . . . . . . . . . . . . . . . . . . . . . . . . 96
Key Terms . . . . . . . . . . . . . . . . . . . . . . . . . . . . . . . . . . . . . . . . . . . . . . . . . . . . . . . . . . . . . . . . 97
Review Questions . . . . . . . . . . . . . . . . . . . . . . . . . . . . . . . . . . . . . . . . . . . . . . . . . . . . . . . . . . . . 99
Hands-On Projects . . . . . . . . . . . . . . . . . . . . . . . . . . . . . . . . . . . . . . . . . . . . . . . . . . . . . . . . . . 101
Critical Thinking . . . . . . . . . . . . . . . . . . . . . . . . . . . . . . . . . . . . . . . . . . . . . . . . . . . . . . . . . . . 111
Case Projects . . . . . . . . . . . . . . . . . . . . . . . . . . . . . . . . . . . . . . . . . . . . . . . . . . . . . . . . . . . . . . 111
CHAPTER 3
The Central Processing Unit (CPU) . . . . . . . . . . . . . . . . . . . . . . . . . . . . . . . . . . . . . . . . . . . . . . . . . . 113
Understanding CPUs . . . . . . . . . . . . . . . . . . . . . . . . . . . . . . . . . . . . . . . . . . . . . . . . . . . . . . . . . 114
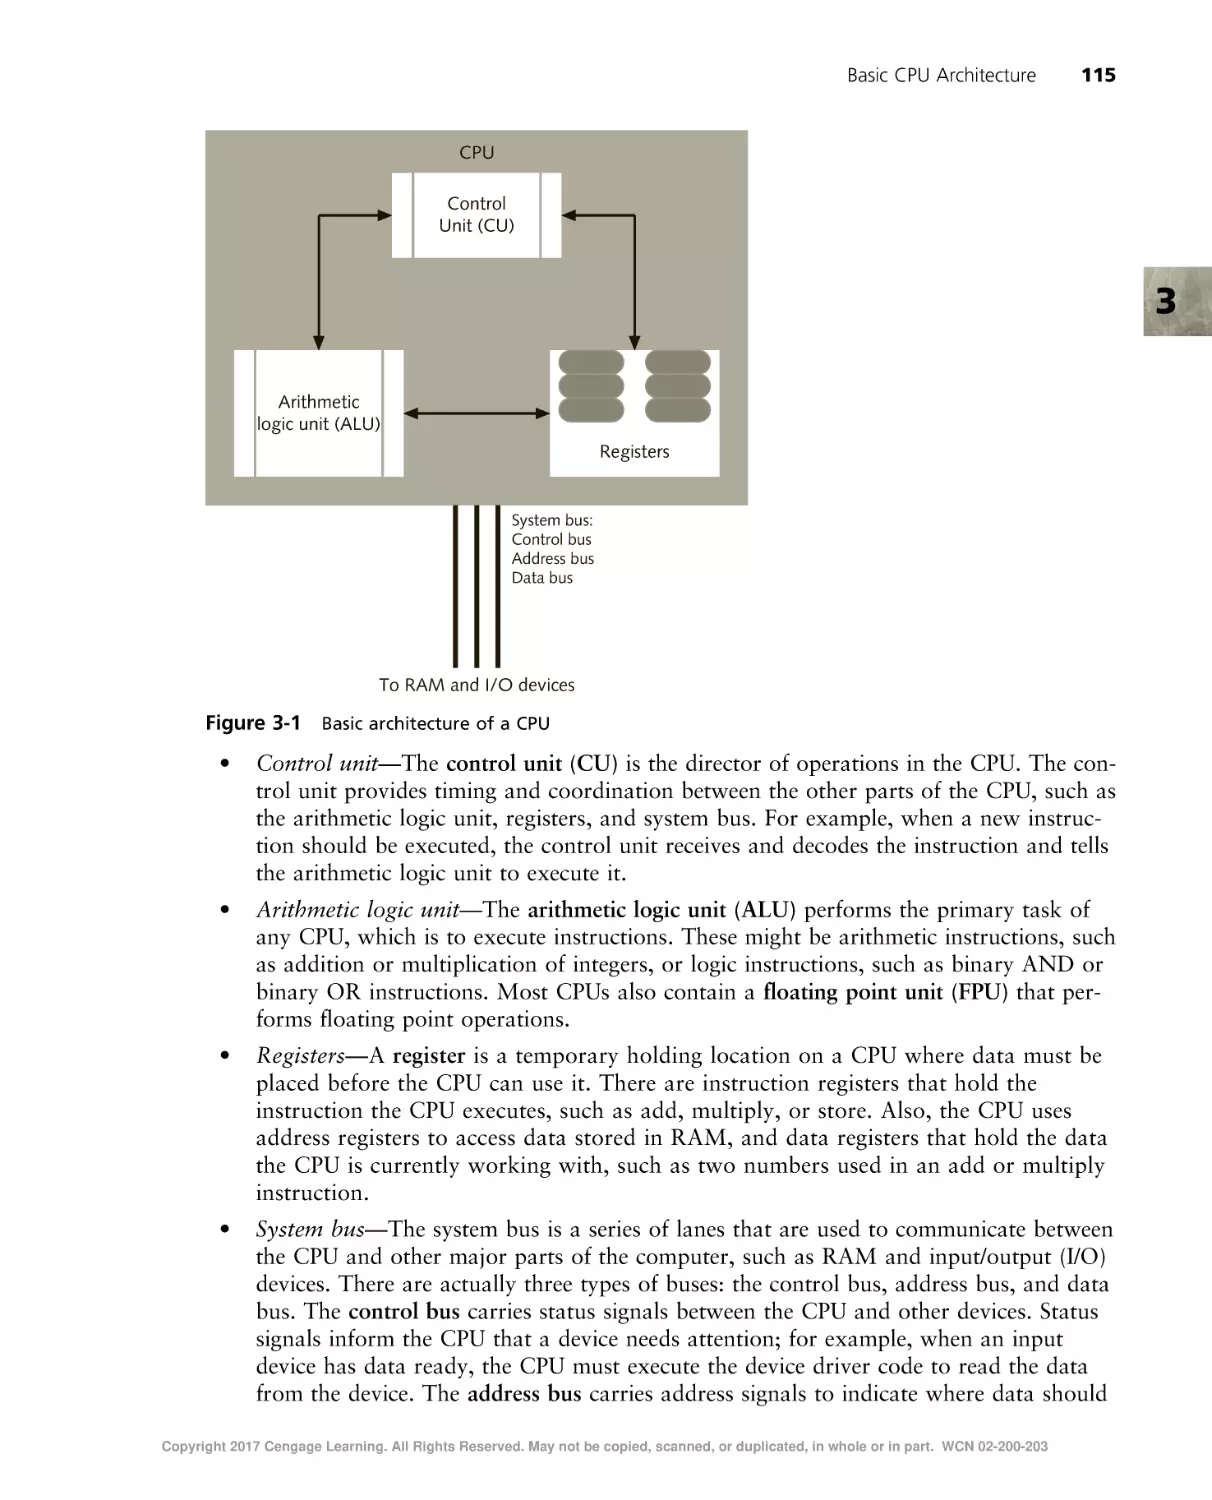
Basic CPU Architecture . . . . . . . . . . . . . . . . . . . . . . . . . . . . . . . . . . . . . . . . . . . . . . . . . . . . . . .
Design Type. . . . . . . . . . . . . . . . . . . . . . . . . . . . . . . . . . . . . . . . . . . . . . . . . . . . . . . . . . . . .
Speed . . . . . . . . . . . . . . . . . . . . . . . . . . . . . . . . . . . . . . . . . . . . . . . . . . . . . . . . . . . . . . . . .
Cache . . . . . . . . . . . . . . . . . . . . . . . . . . . . . . . . . . . . . . . . . . . . . . . . . . . . . . . . . . . . . . . . .
Address Bus . . . . . . . . . . . . . . . . . . . . . . . . . . . . . . . . . . . . . . . . . . . . . . . . . . . . . . . . . . . . .
Data Bus . . . . . . . . . . . . . . . . . . . . . . . . . . . . . . . . . . . . . . . . . . . . . . . . . . . . . . . . . . . . . . .
Control Bus . . . . . . . . . . . . . . . . . . . . . . . . . . . . . . . . . . . . . . . . . . . . . . . . . . . . . . . . . . . . .
CPU Scheduling . . . . . . . . . . . . . . . . . . . . . . . . . . . . . . . . . . . . . . . . . . . . . . . . . . . . . . . . . .
114
116
119
120
121
121
122
122
Popular PC Processors . . . . . . . . . . . . . . . . . . . . . . . . . . . . . . . . . . . . . . . . . . . . . . . . . . . . . . . .
Intel . . . . . . . . . . . . . . . . . . . . . . . . . . . . . . . . . . . . . . . . . . . . . . . . . . . . . . . . . . . . . . . . . .
AMD . . . . . . . . . . . . . . . . . . . . . . . . . . . . . . . . . . . . . . . . . . . . . . . . . . . . . . . . . . . . . . . . .
Other Processors . . . . . . . . . . . . . . . . . . . . . . . . . . . . . . . . . . . . . . . . . . . . . . . . . . . . . . . . . .
123
123
127
127
Chapter Summary . . . . . . . . . . . . . . . . . . . . . . . . . . . . . . . . . . . . . . . . . . . . . . . . . . . . . . . . . . . 129
Key Terms . . . . . . . . . . . . . . . . . . . . . . . . . . . . . . . . . . . . . . . . . . . . . . . . . . . . . . . . . . . . . . . 129
Review Questions . . . . . . . . . . . . . . . . . . . . . . . . . . . . . . . . . . . . . . . . . . . . . . . . . . . . . . . . . . . 131
Hands-On Projects . . . . . . . . . . . . . . . . . . . . . . . . . . . . . . . . . . . . . . . . . . . . . . . . . . . . . . . . . . 134
Critical Thinking . . . . . . . . . . . . . . . . . . . . . . . . . . . . . . . . . . . . . . . . . . . . . . . . . . . . . . . . . . . 142
Challenge Labs . . . . . . . . . . . . . . . . . . . . . . . . . . . . . . . . . . . . . . . . . . . . . . . . . . . . . . . . . . . . . 142
Case Projects . . . . . . . . . . . . . . . . . . . . . . . . . . . . . . . . . . . . . . . . . . . . . . . . . . . . . . . . . . . . . . 142
CHAPTER 4
File Systems . . . . . . . . . . . . . . . . . . . . . . . . . . . . . . . . . . . . . . . . . . . . . . . . . . . . . . . . . . . . . . . . . . . 145
Understanding File System Functions . . . . . . . . . . . . . . . . . . . . . . . . . . . . . . . . . . . . . . . . . . . . . . .
User Interface . . . . . . . . . . . . . . . . . . . . . . . . . . . . . . . . . . . . . . . . . . . . . . . . . . . . . . . . . . . .
Hierarchical Structure . . . . . . . . . . . . . . . . . . . . . . . . . . . . . . . . . . . . . . . . . . . . . . . . . . . . . .
File Metadata . . . . . . . . . . . . . . . . . . . . . . . . . . . . . . . . . . . . . . . . . . . . . . . . . . . . . . . . . . . .
Storage Device Space Organization . . . . . . . . . . . . . . . . . . . . . . . . . . . . . . . . . . . . . . . . . . . . . .
146
146
146
152
153
Windows File Systems . . . . . . . . . . . . . . . . . . . . . . . . . . . . . . . . . . . . . . . . . . . . . . . . . . . . . . . .
FAT16 and Extended FAT16 . . . . . . . . . . . . . . . . . . . . . . . . . . . . . . . . . . . . . . . . . . . . . . . . . .
FAT32 . . . . . . . . . . . . . . . . . . . . . . . . . . . . . . . . . . . . . . . . . . . . . . . . . . . . . . . . . . . . . . . .
FAT64 . . . . . . . . . . . . . . . . . . . . . . . . . . . . . . . . . . . . . . . . . . . . . . . . . . . . . . . . . . . . . . . .
NTFS . . . . . . . . . . . . . . . . . . . . . . . . . . . . . . . . . . . . . . . . . . . . . . . . . . . . . . . . . . . . . . . . .
163
163
164
165
165
Copyright 2017 Cengage Learning. All Rights Reserved. May not be copied, scanned, or duplicated, in whole or in part. WCN 02-200-203
Table of Contents
ix
Resilient File System (ReFS) . . . . . . . . . . . . . . . . . . . . . . . . . . . . . . . . . . . . . . . . . . . . . . . . . . . 173
CDFS and UDF . . . . . . . . . . . . . . . . . . . . . . . . . . . . . . . . . . . . . . . . . . . . . . . . . . . . . . . . . . 174
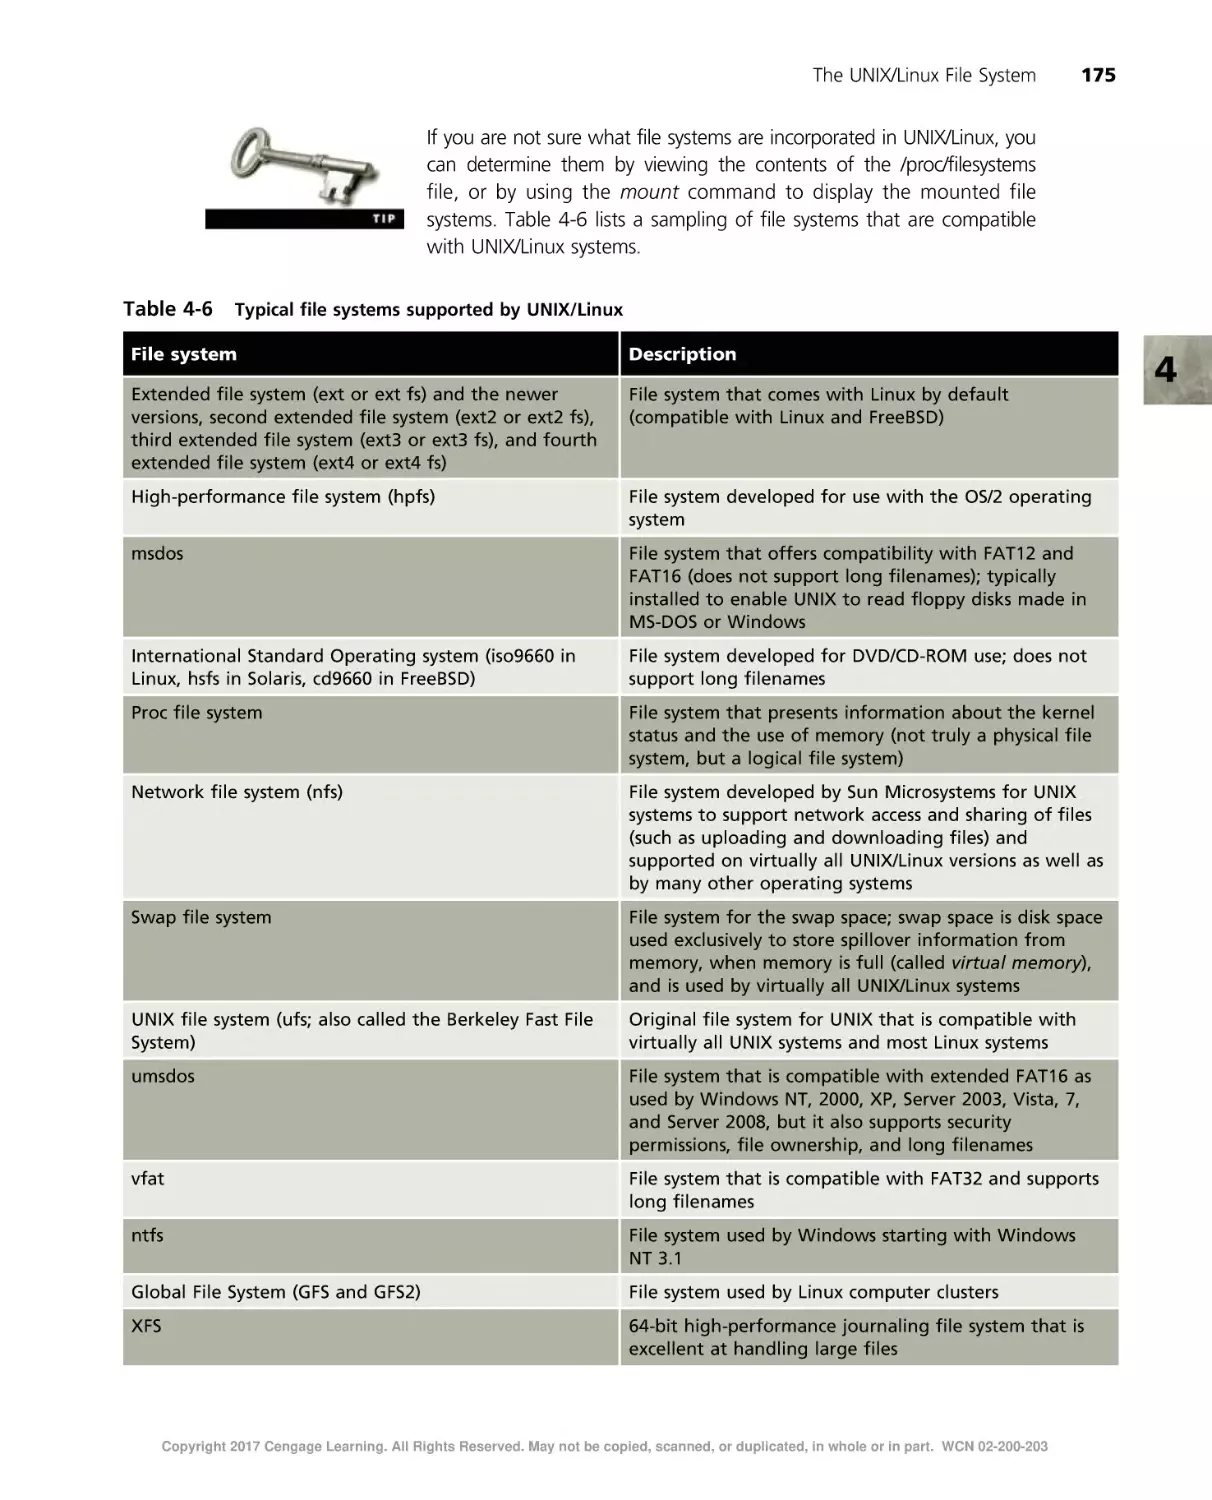
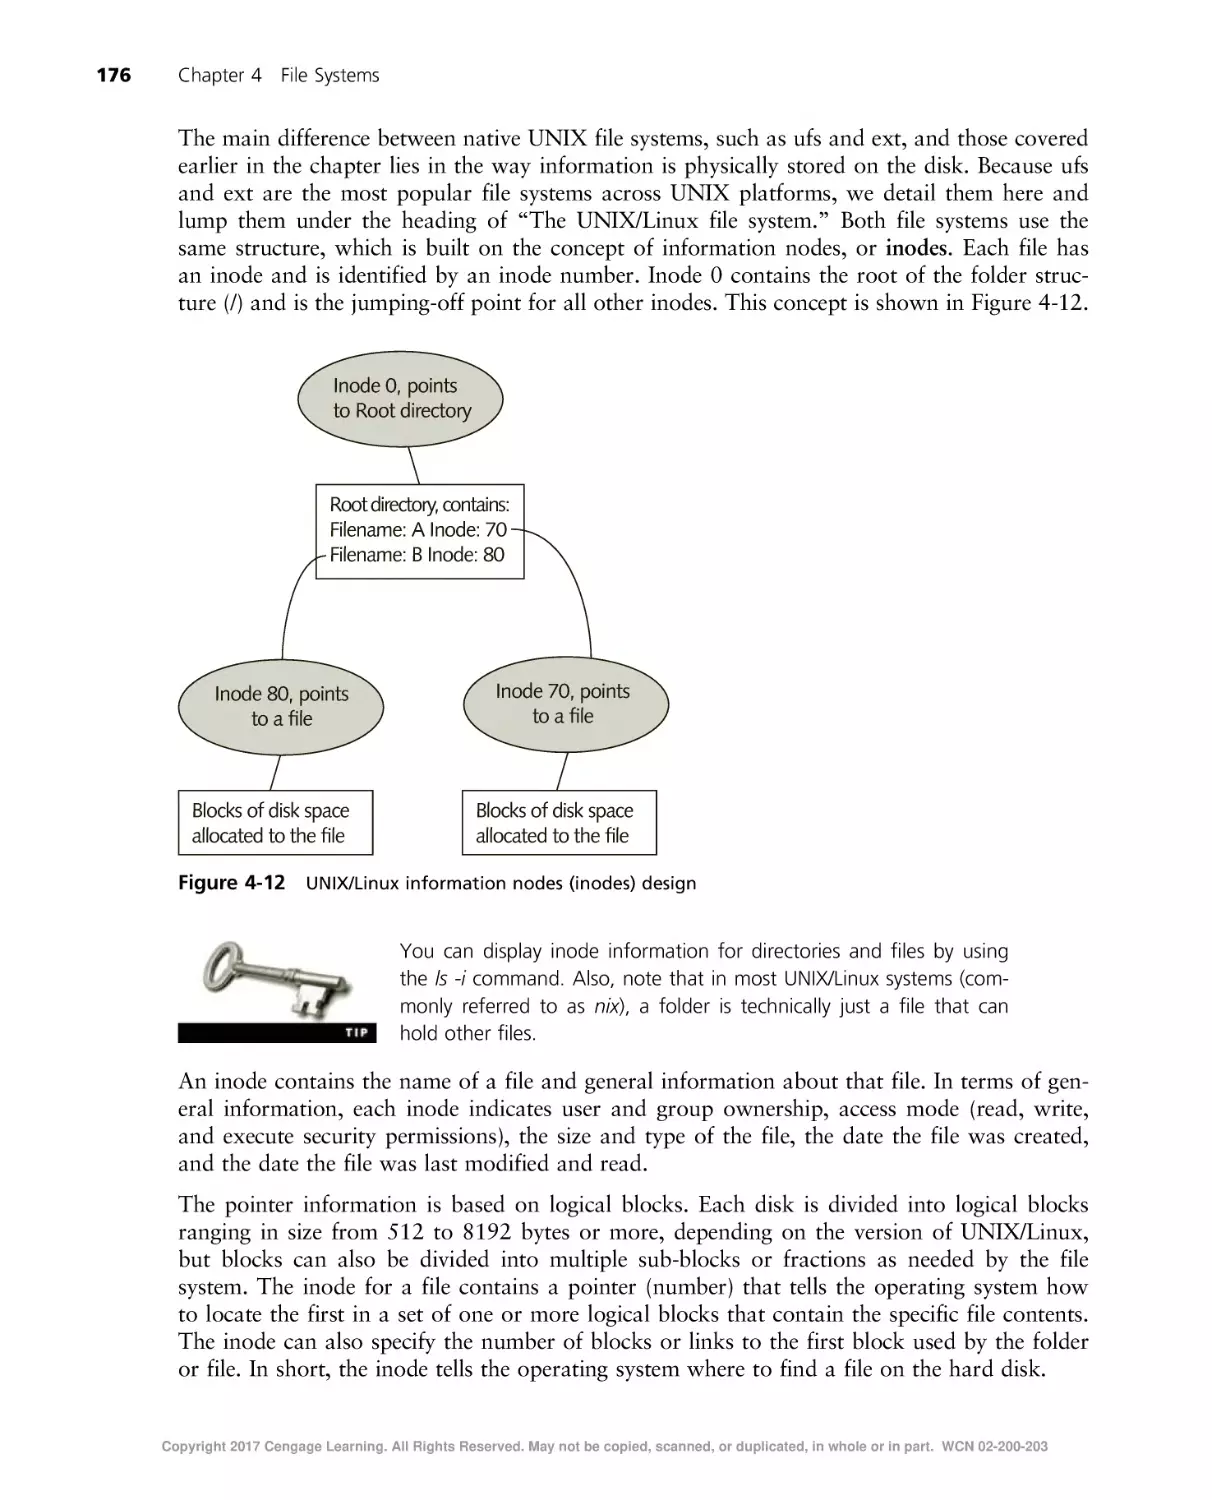
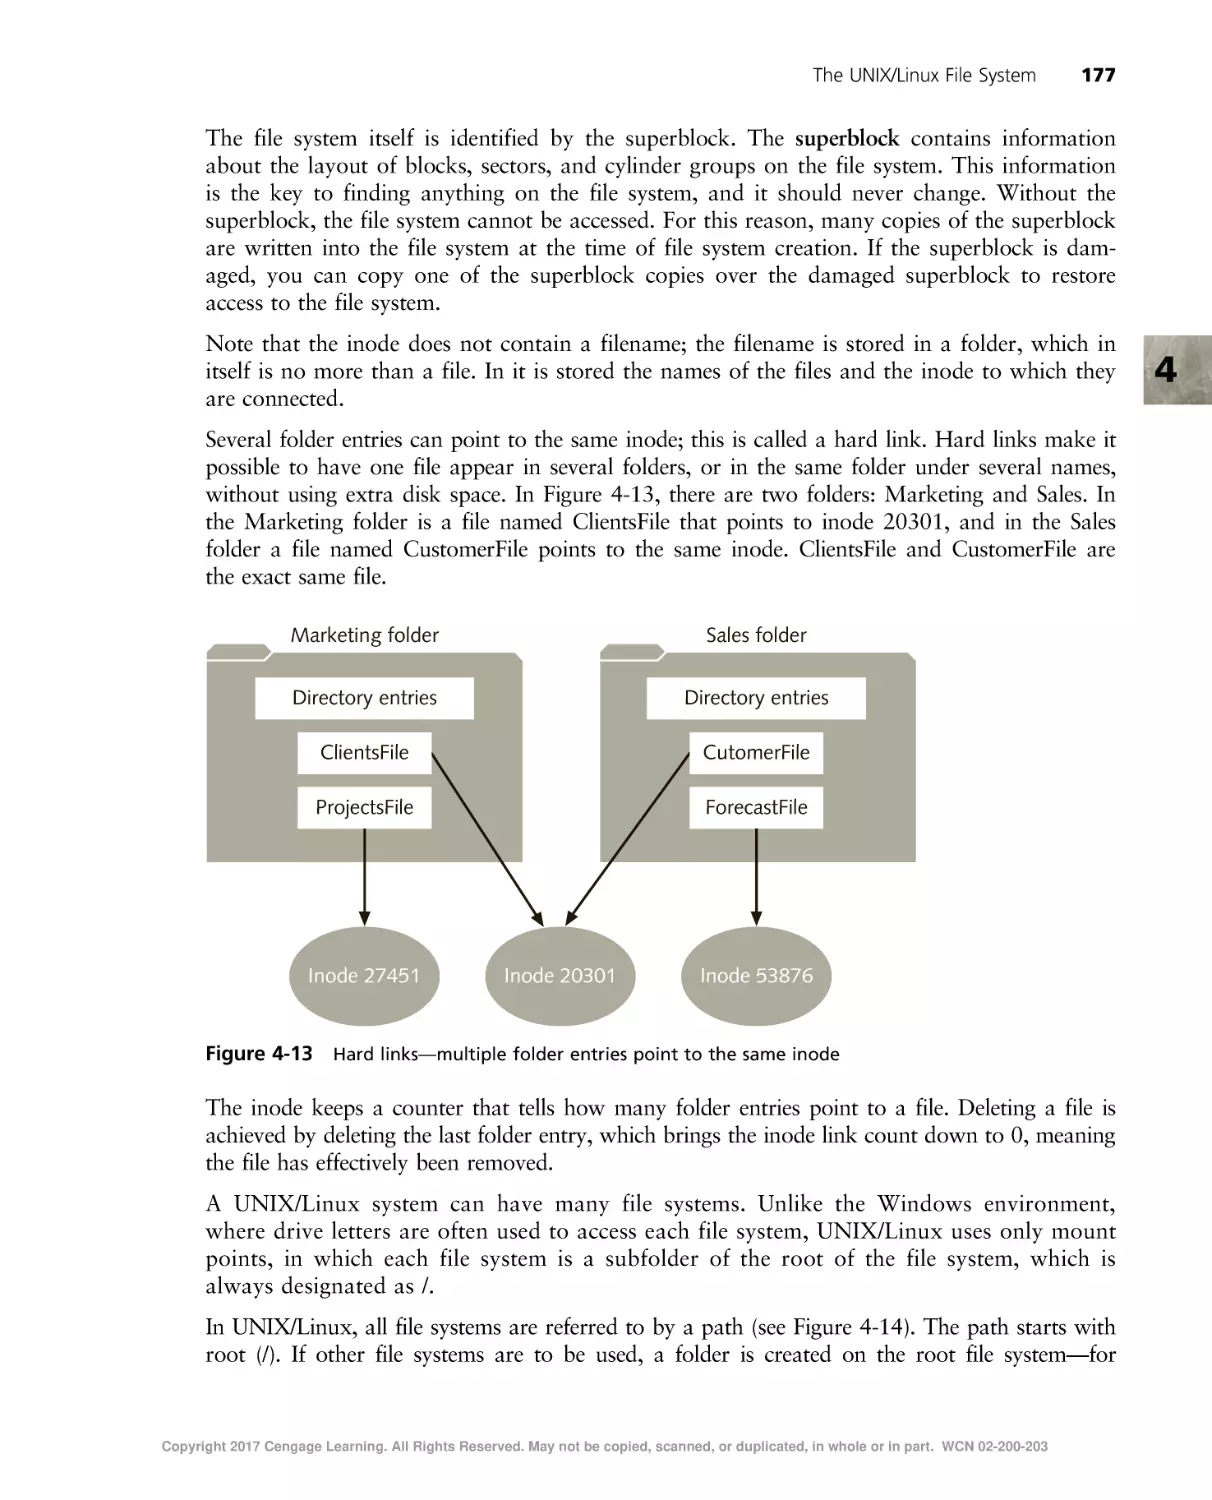
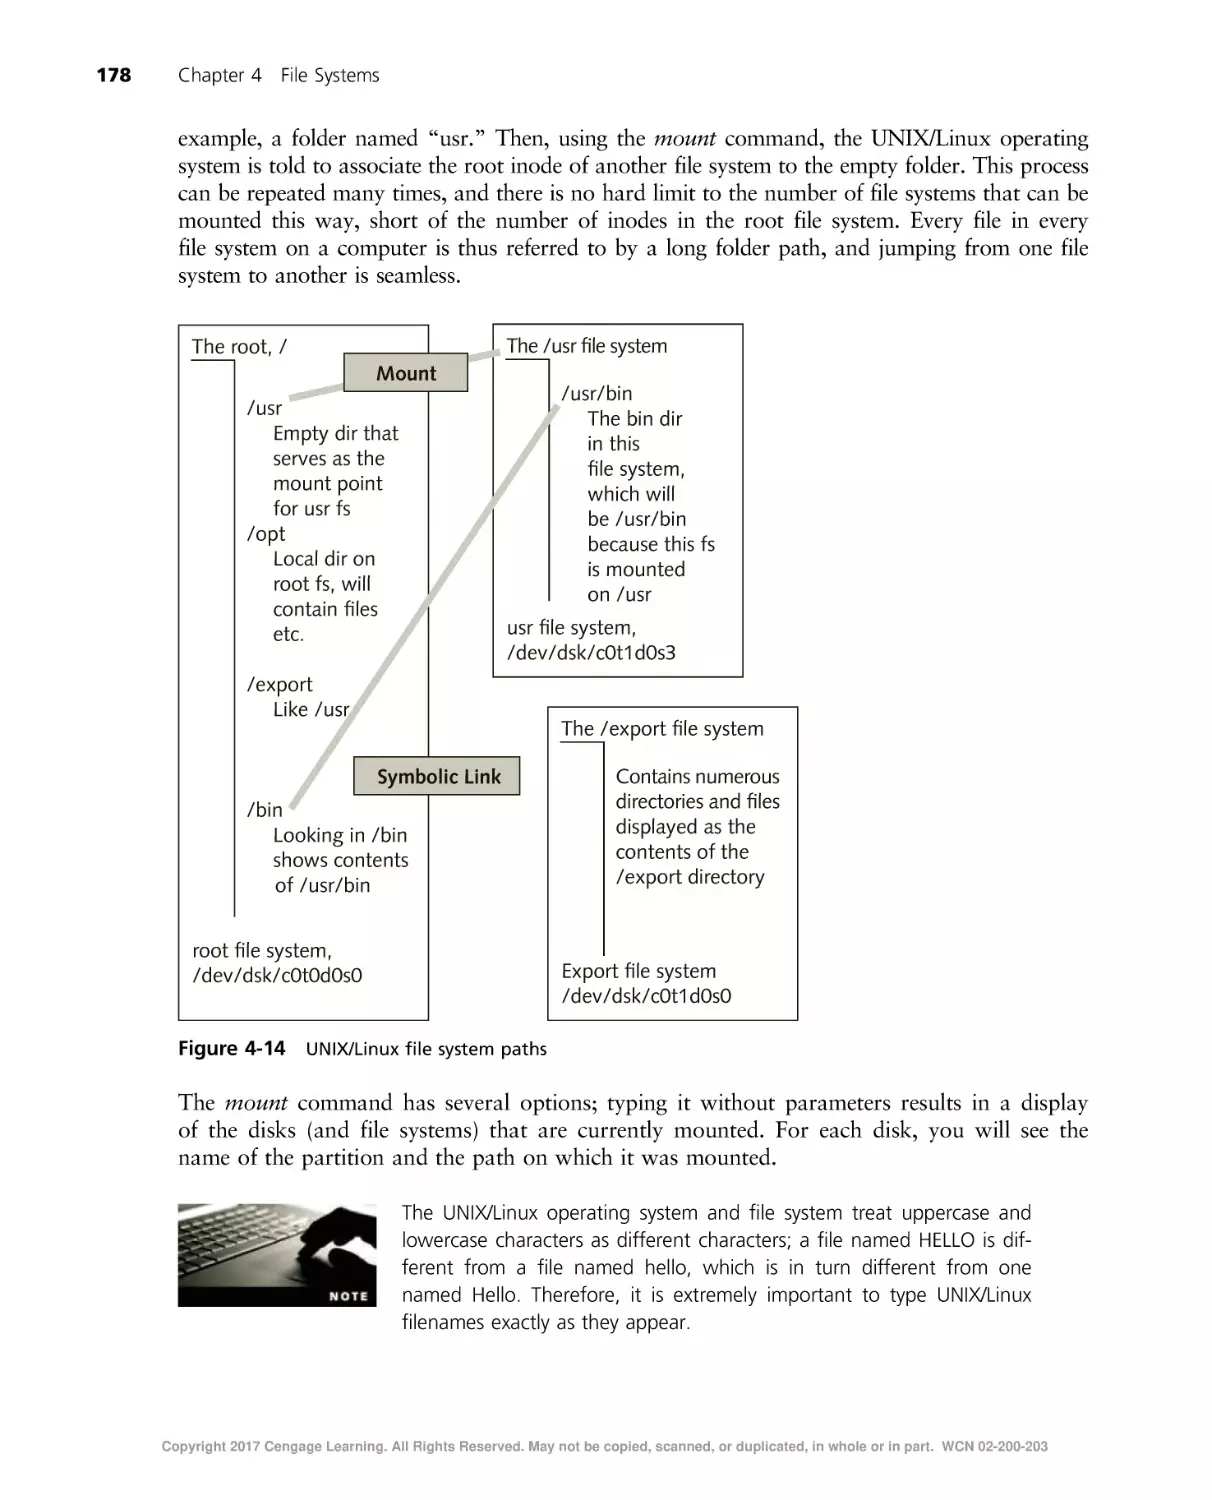
The UNIX/Linux File System . . . . . . . . . . . . . . . . . . . . . . . . . . . . . . . . . . . . . . . . . . . . . . . . . . . . 174
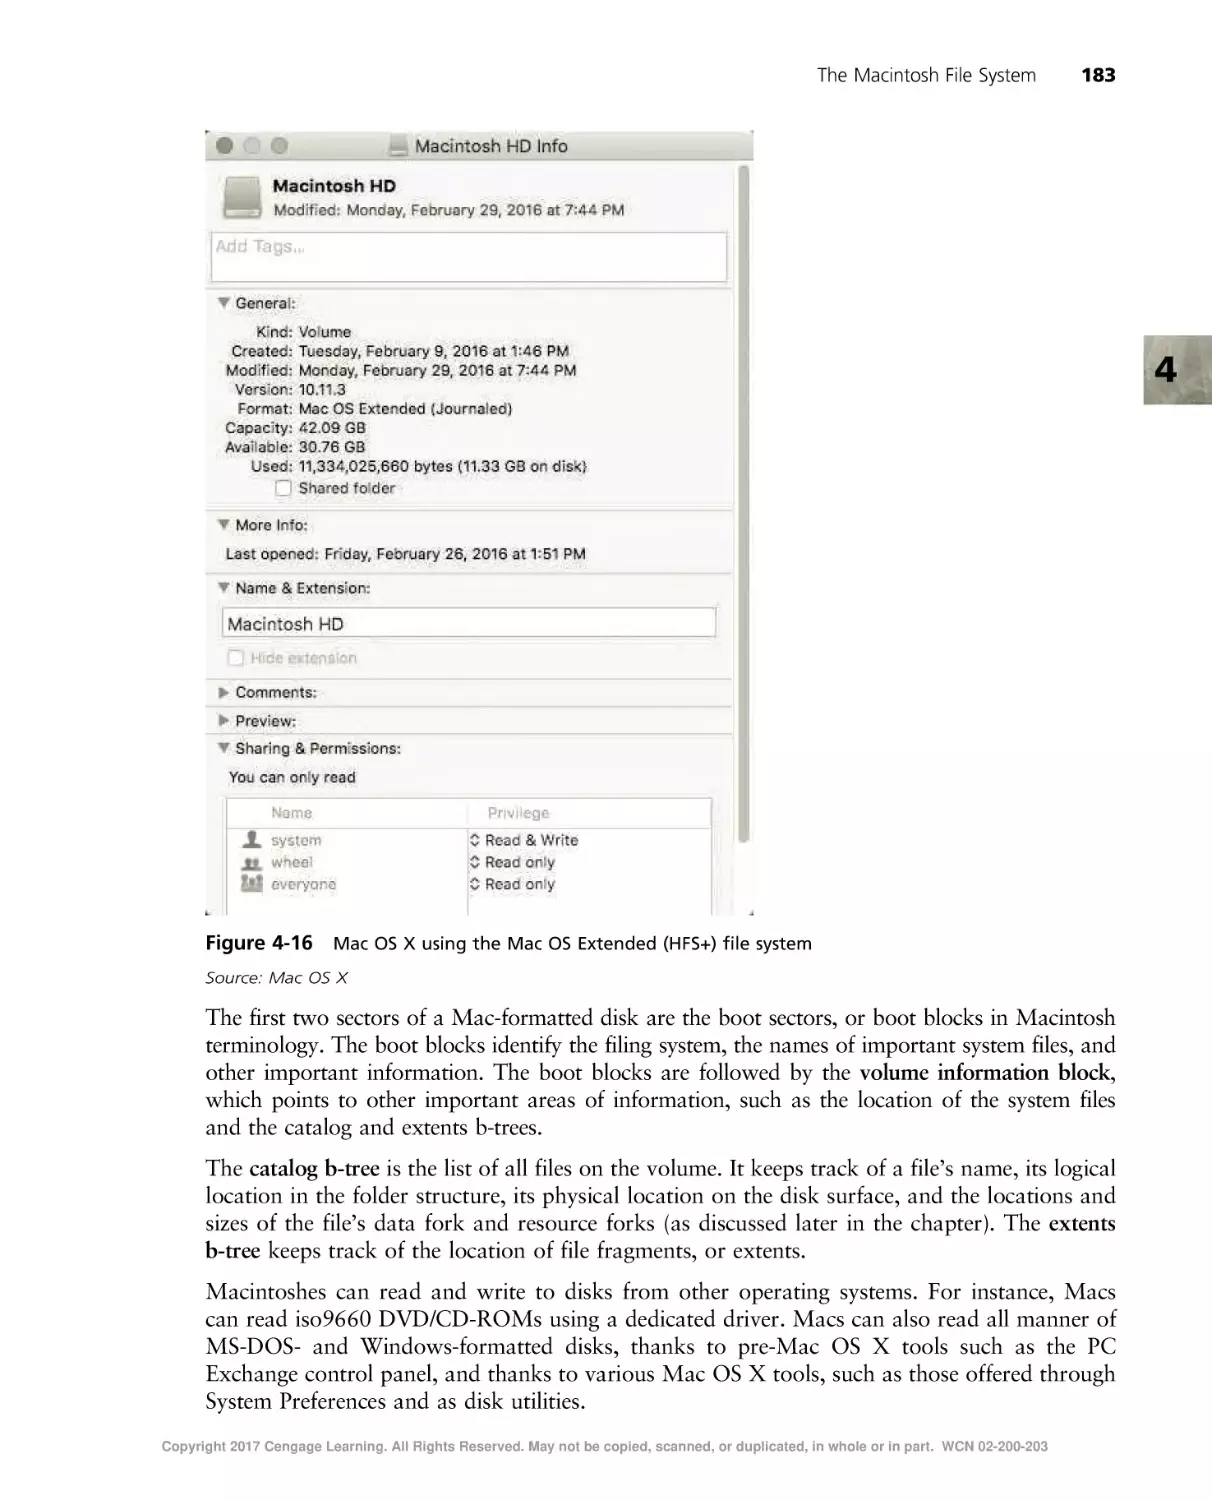
The Macintosh File System . . . . . . . . . . . . . . . . . . . . . . . . . . . . . . . . . . . . . . . . . . . . . . . . . . . . . 182
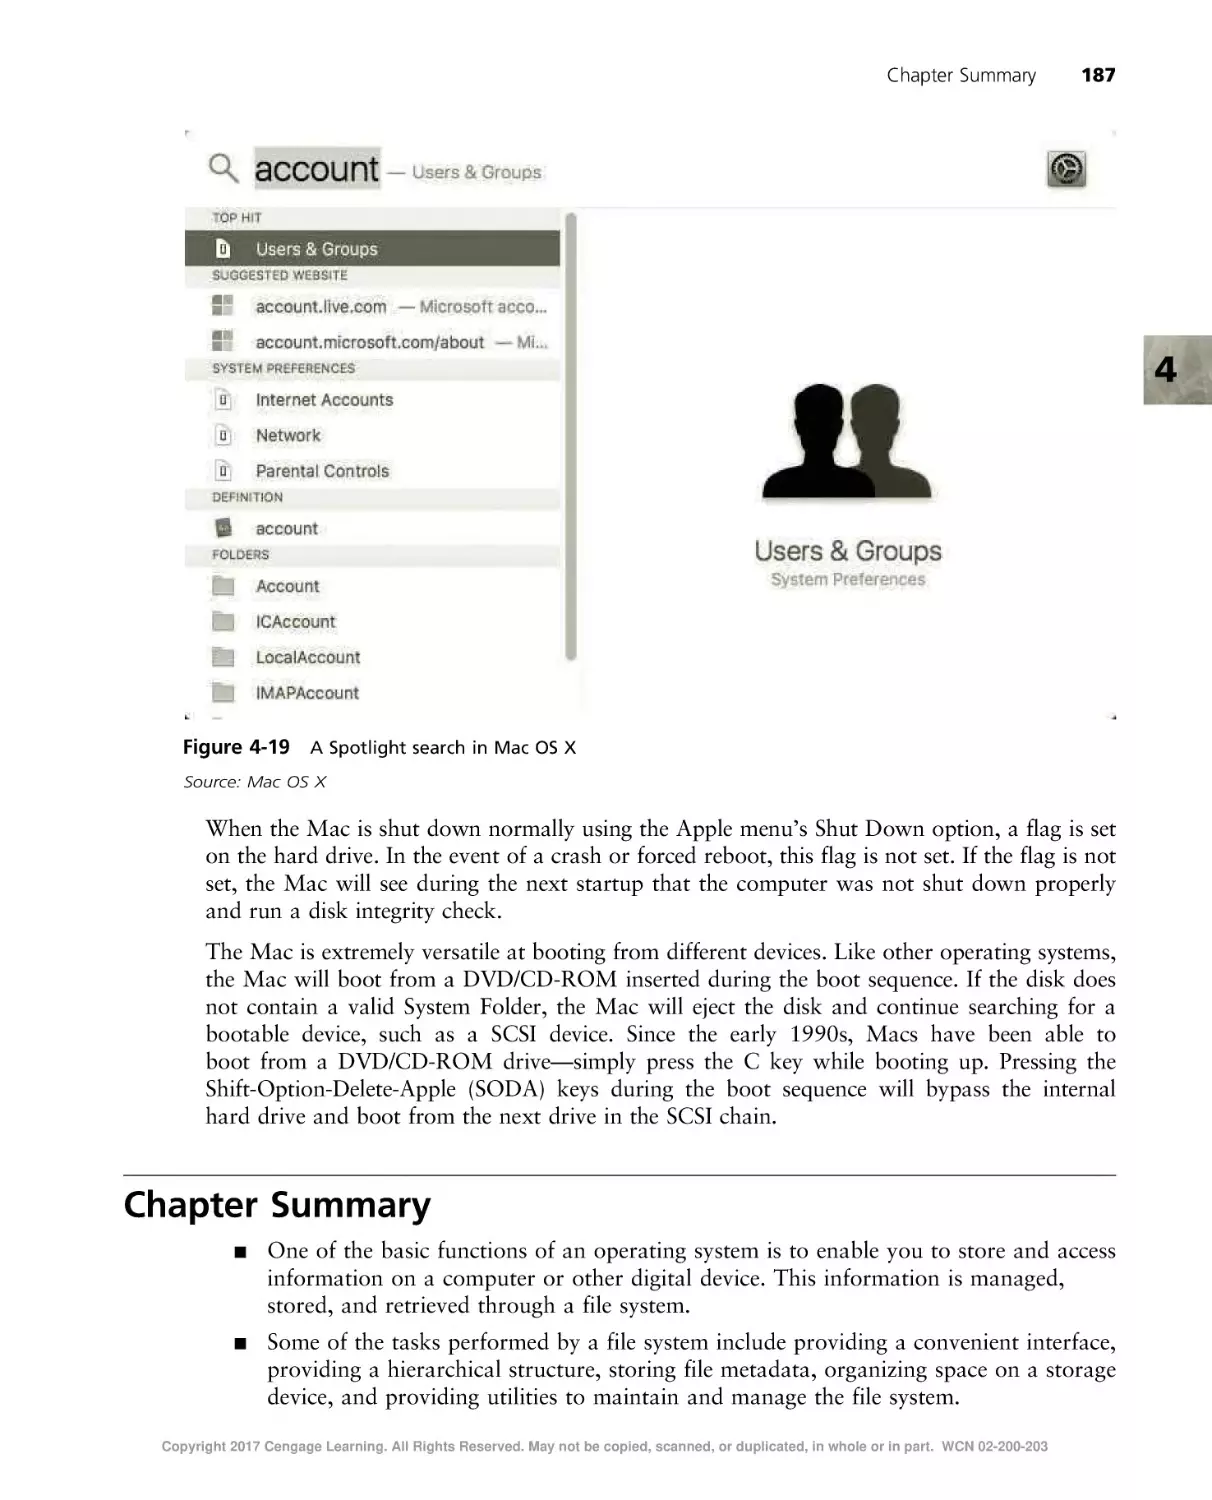
Chapter Summary . . . . . . . . . . . . . . . . . . . . . . . . . . . . . . . . . . . . . . . . . . . . . . . . . . . . . . . . . . . 187
Key Terms . . . . . . . . . . . . . . . . . . . . . . . . . . . . . . . . . . . . . . . . . . . . . . . . . . . . . . . . . . . . . . . 188
Review Questions . . . . . . . . . . . . . . . . . . . . . . . . . . . . . . . . . . . . . . . . . . . . . . . . . . . . . . . . . . . 192
Hands-On Projects . . . . . . . . . . . . . . . . . . . . . . . . . . . . . . . . . . . . . . . . . . . . . . . . . . . . . . . . . . 196
Critical Thinking . . . . . . . . . . . . . . . . . . . . . . . . . . . . . . . . . . . . . . . . . . . . . . . . . . . . . . . . . . . 207
Challenge Labs . . . . . . . . . . . . . . . . . . . . . . . . . . . . . . . . . . . . . . . . . . . . . . . . . . . . . . . . . . . . . 208
Case Projects . . . . . . . . . . . . . . . . . . . . . . . . . . . . . . . . . . . . . . . . . . . . . . . . . . . . . . . . . . . . . . 208
CHAPTER 5
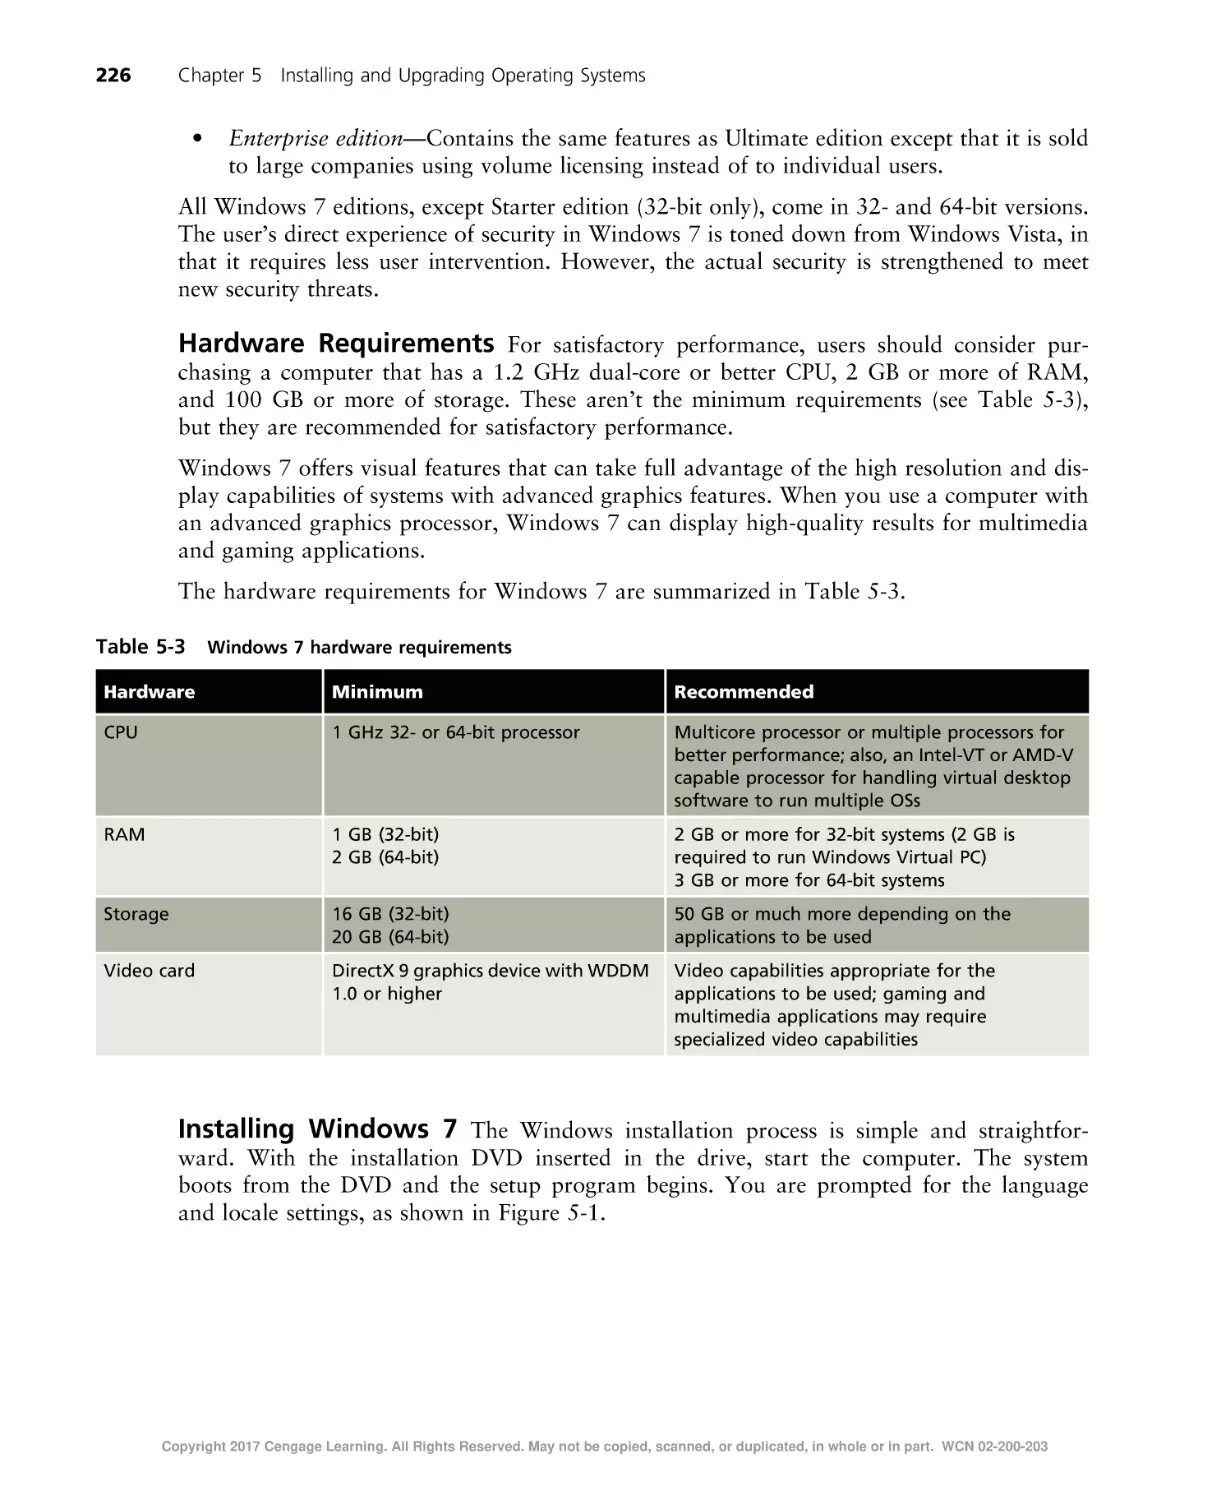
Installing and Upgrading Operating Systems . . . . . . . . . . . . . . . . . . . . . . . . . . . . . . . . . . . . . . . . . . 211
Part 1: Introduction and Initial Preparations . . . . . . . . . . . . . . . . . . . . . . . . . . . . . . . . . . . . . . . . . .
Introduction to Installing an OS . . . . . . . . . . . . . . . . . . . . . . . . . . . . . . . . . . . . . . . . . . . . . . . .
Preparing for Installation . . . . . . . . . . . . . . . . . . . . . . . . . . . . . . . . . . . . . . . . . . . . . . . . . . . .
Checking the Hardware . . . . . . . . . . . . . . . . . . . . . . . . . . . . . . . . . . . . . . . . . . . . . . . . . . . . .
Checking Drivers . . . . . . . . . . . . . . . . . . . . . . . . . . . . . . . . . . . . . . . . . . . . . . . . . . . . . . . . .
Ensuring Hardware Compatibility . . . . . . . . . . . . . . . . . . . . . . . . . . . . . . . . . . . . . . . . . . . . . . .
Migrating to a New OS . . . . . . . . . . . . . . . . . . . . . . . . . . . . . . . . . . . . . . . . . . . . . . . . . . . . .
Deciding Whether to Perform an Upgrade or Clean Installation . . . . . . . . . . . . . . . . . . . . . . . . . . . .
Preparing for an Upgrade or Migration . . . . . . . . . . . . . . . . . . . . . . . . . . . . . . . . . . . . . . . . . . .
Making Backups Before Migrating to a New OS . . . . . . . . . . . . . . . . . . . . . . . . . . . . . . . . . . . . .
Conducting a Test Migration . . . . . . . . . . . . . . . . . . . . . . . . . . . . . . . . . . . . . . . . . . . . . . . . . .
Training . . . . . . . . . . . . . . . . . . . . . . . . . . . . . . . . . . . . . . . . . . . . . . . . . . . . . . . . . . . . . . .
212
212
214
214
216
217
217
218
218
221
223
224
Part 2: OS Installations and Upgrades . . . . . . . . . . . . . . . . . . . . . . . . . . . . . . . . . . . . . . . . . . . . . .
Installing and Upgrading Windows 7 . . . . . . . . . . . . . . . . . . . . . . . . . . . . . . . . . . . . . . . . . . . . .
Installing and Upgrading Windows 10 . . . . . . . . . . . . . . . . . . . . . . . . . . . . . . . . . . . . . . . . . . . .
Installing and Upgrading Windows Server 2008/R2 . . . . . . . . . . . . . . . . . . . . . . . . . . . . . . . . . . . .
Installing and Upgrading Windows Server 2012/R2 . . . . . . . . . . . . . . . . . . . . . . . . . . . . . . . . . . . .
Installing and Upgrading Linux . . . . . . . . . . . . . . . . . . . . . . . . . . . . . . . . . . . . . . . . . . . . . . . .
Installing and Upgrading Mac OS X . . . . . . . . . . . . . . . . . . . . . . . . . . . . . . . . . . . . . . . . . . . . .
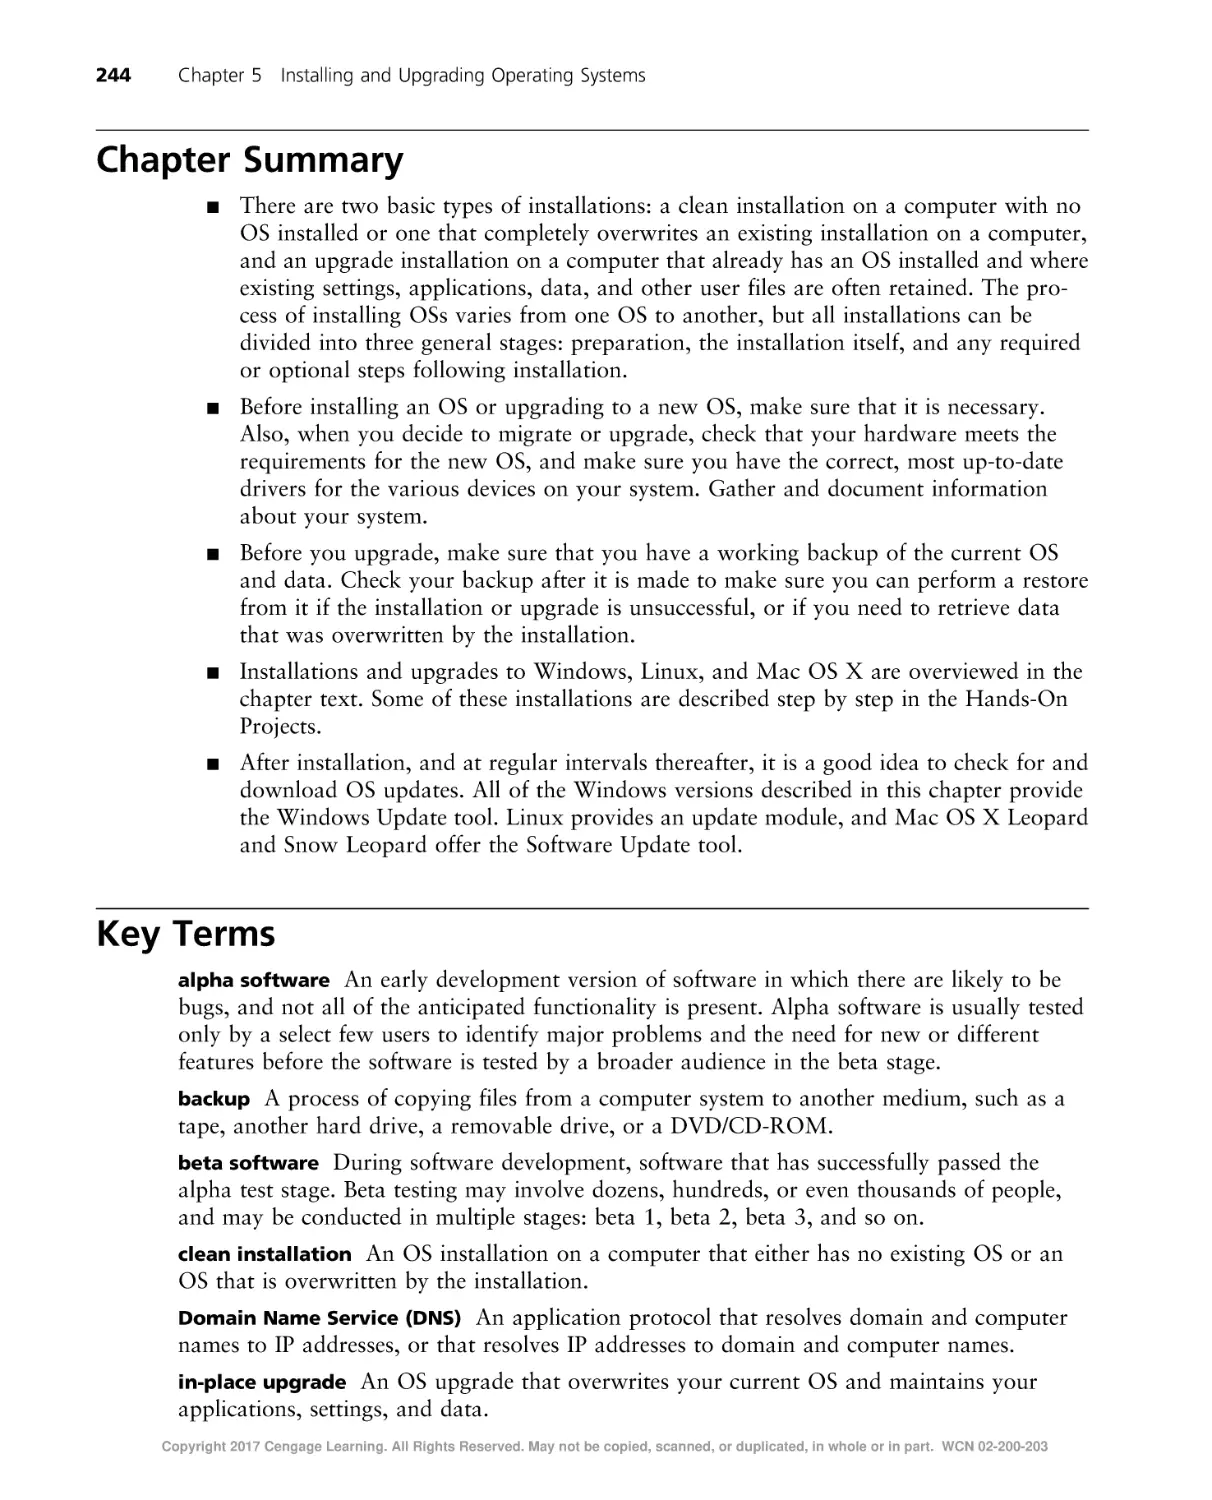
Regular Updates for OSs. . . . . . . . . . . . . . . . . . . . . . . . . . . . . . . . . . . . . . . . . . . . . . . . . . . . .
225
225
229
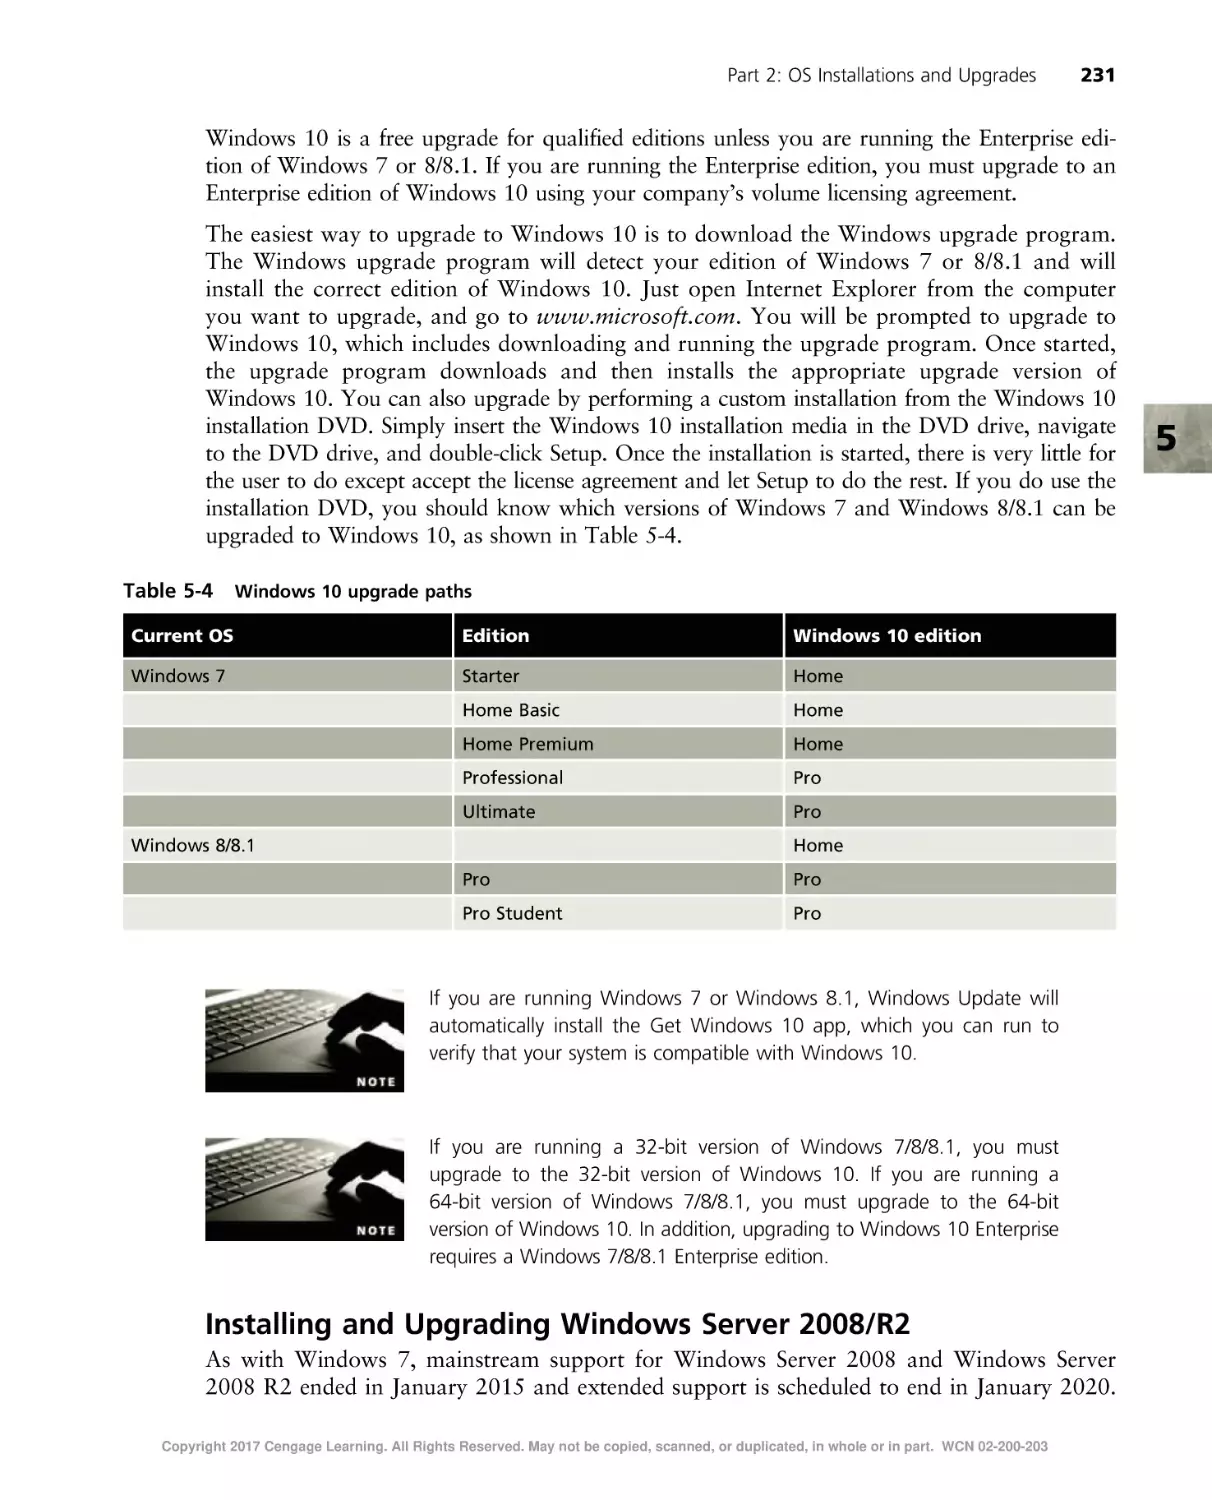
231
234
238
239
242
Chapter Summary . . . . . . . . . . . . . . . . . . . . . . . . . . . . . . . . . . . . . . . . . . . . . . . . . . . . . . . . . . . 244
Key Terms . . . . . . . . . . . . . . . . . . . . . . . . . . . . . . . . . . . . . . . . . . . . . . . . . . . . . . . . . . . . . . . 244
Review Questions . . . . . . . . . . . . . . . . . . . . . . . . . . . . . . . . . . . . . . . . . . . . . . . . . . . . . . . . . . . 245
Hands-On Projects . . . . . . . . . . . . . . . . . . . . . . . . . . . . . . . . . . . . . . . . . . . . . . . . . . . . . . . . . . 248
Critical Thinking . . . . . . . . . . . . . . . . . . . . . . . . . . . . . . . . . . . . . . . . . . . . . . . . . . . . . . . . . . . 263
Challenge Labs . . . . . . . . . . . . . . . . . . . . . . . . . . . . . . . . . . . . . . . . . . . . . . . . . . . . . . . . . . . . . 263
Case Projects . . . . . . . . . . . . . . . . . . . . . . . . . . . . . . . . . . . . . . . . . . . . . . . . . . . . . . . . . . . . . . 263
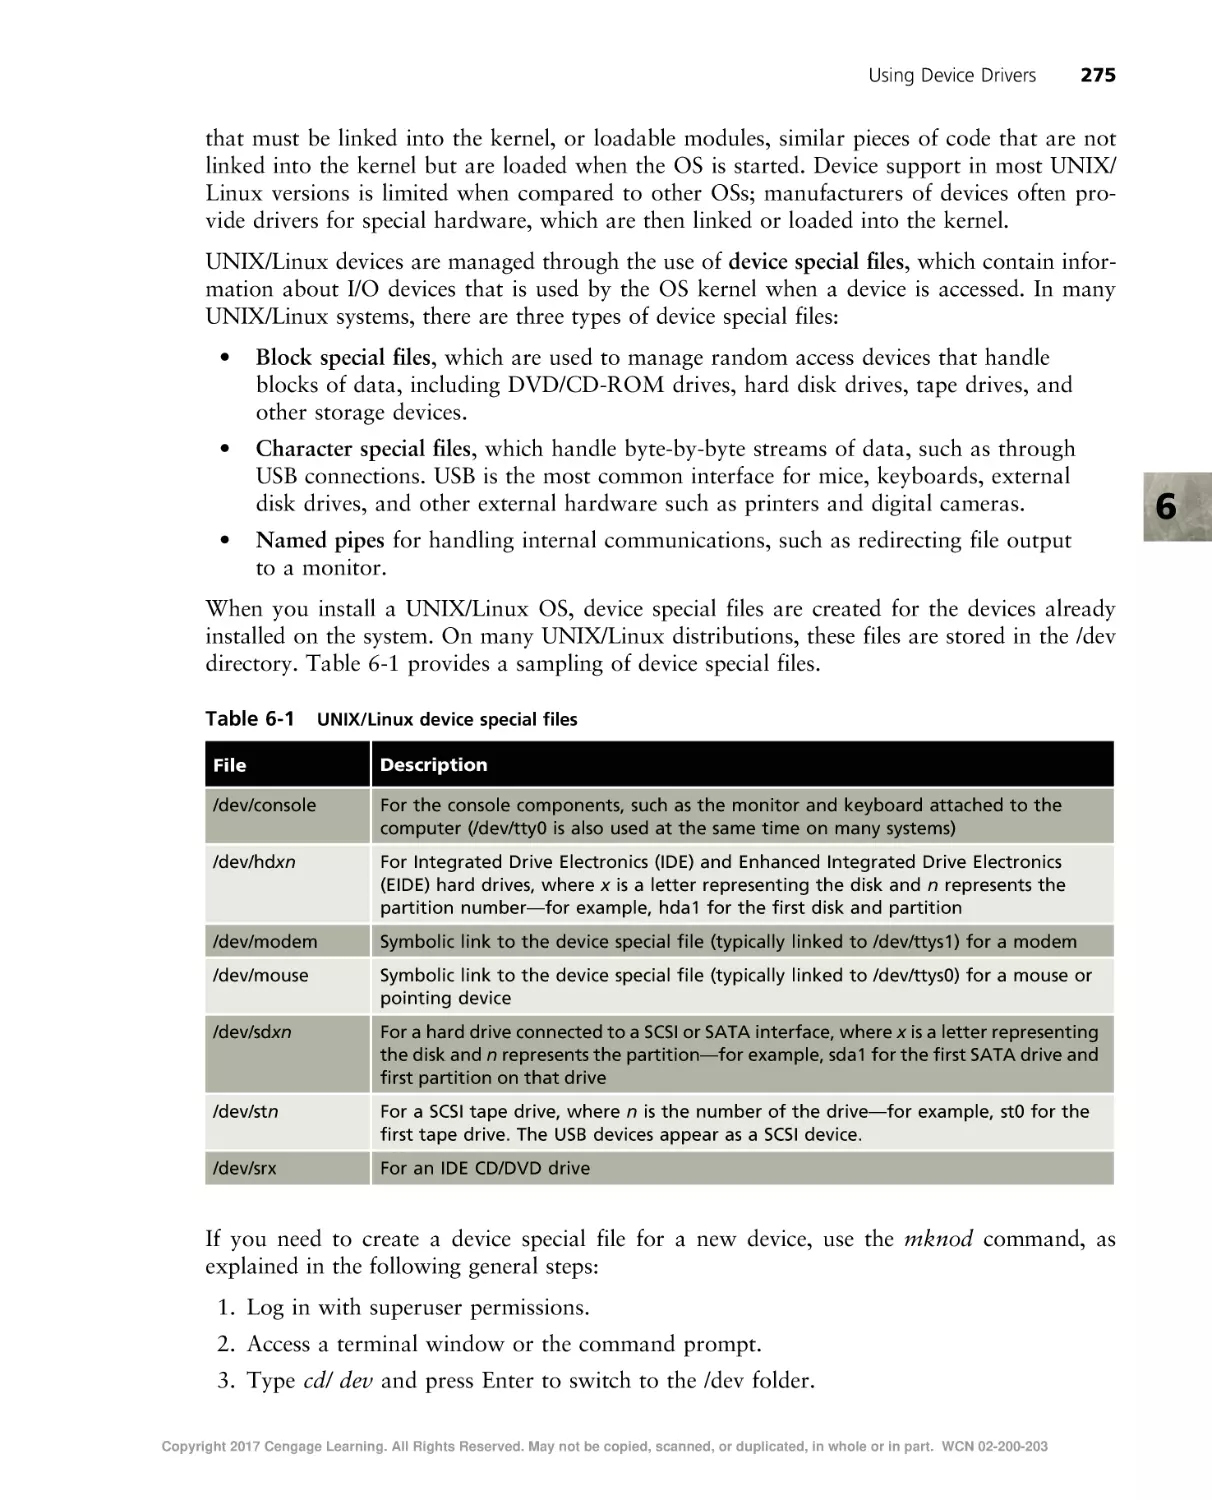
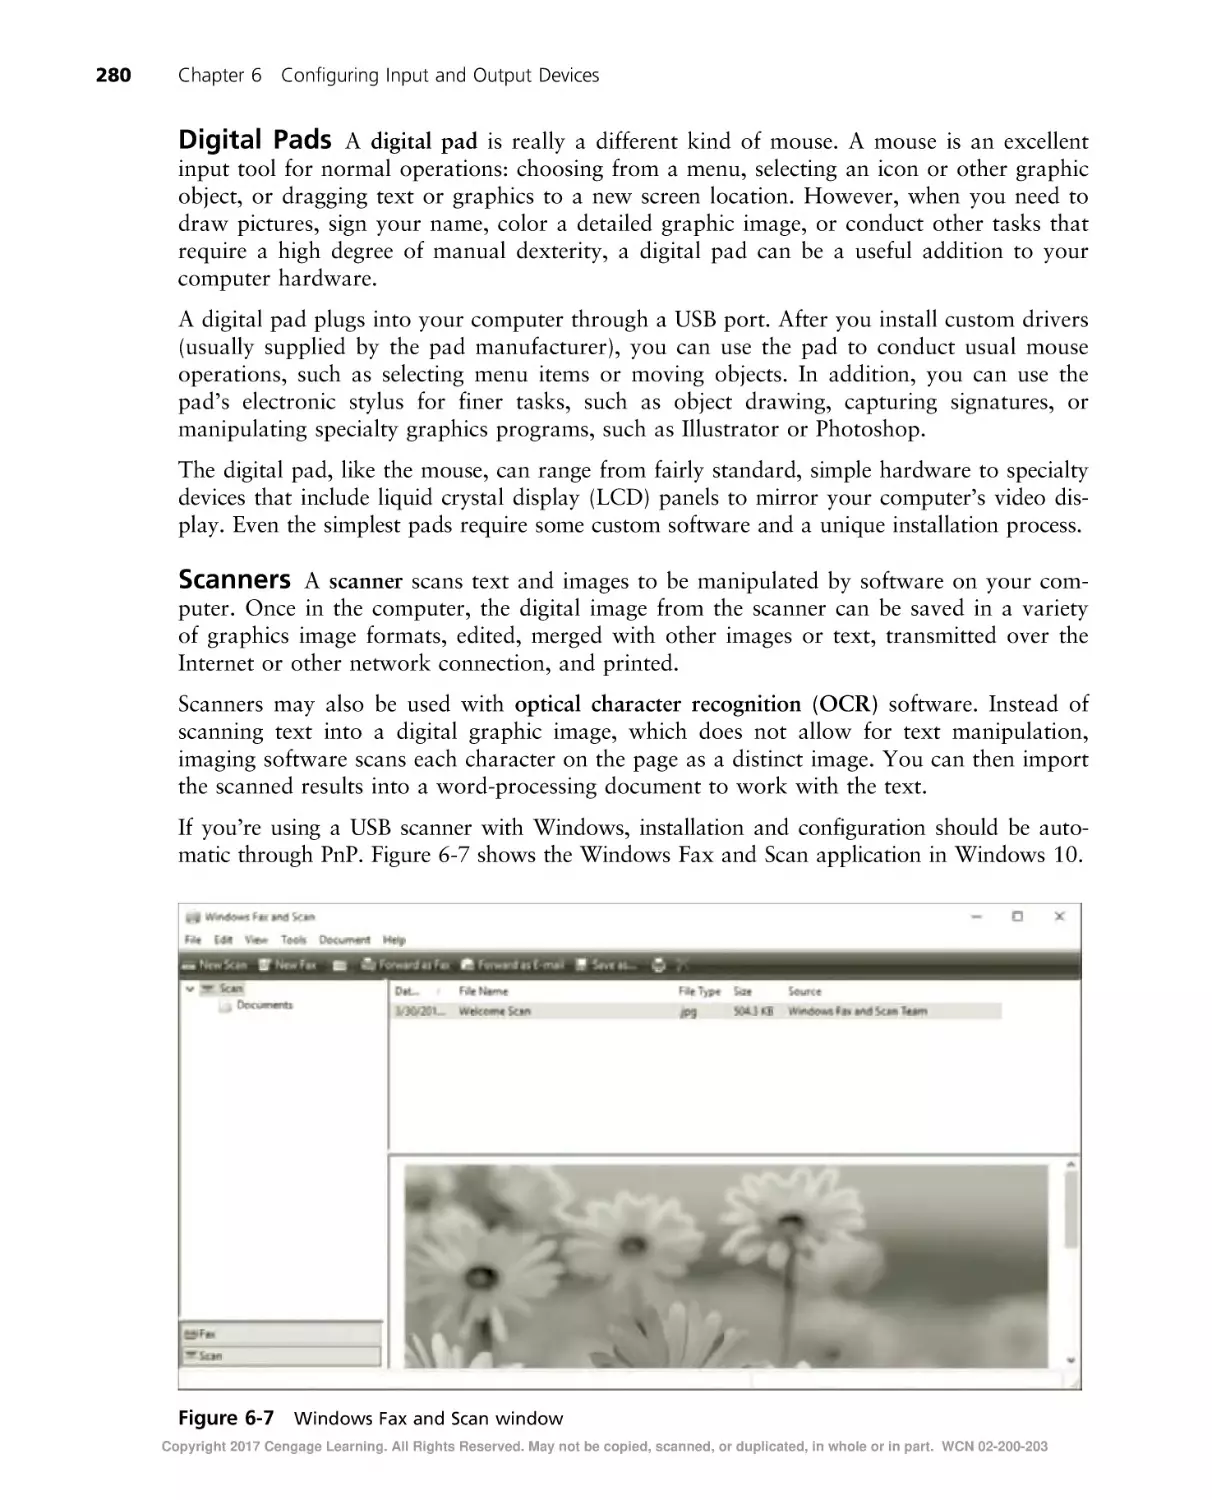
CHAPTER 6
Configuring Input and Output Devices. . . . . . . . . . . . . . . . . . . . . . . . . . . . . . . . . . . . . . . . . . . . . . . 265
OSs and Devices: An Overview . . . . . . . . . . . . . . . . . . . . . . . . . . . . . . . . . . . . . . . . . . . . . . . . . . 266
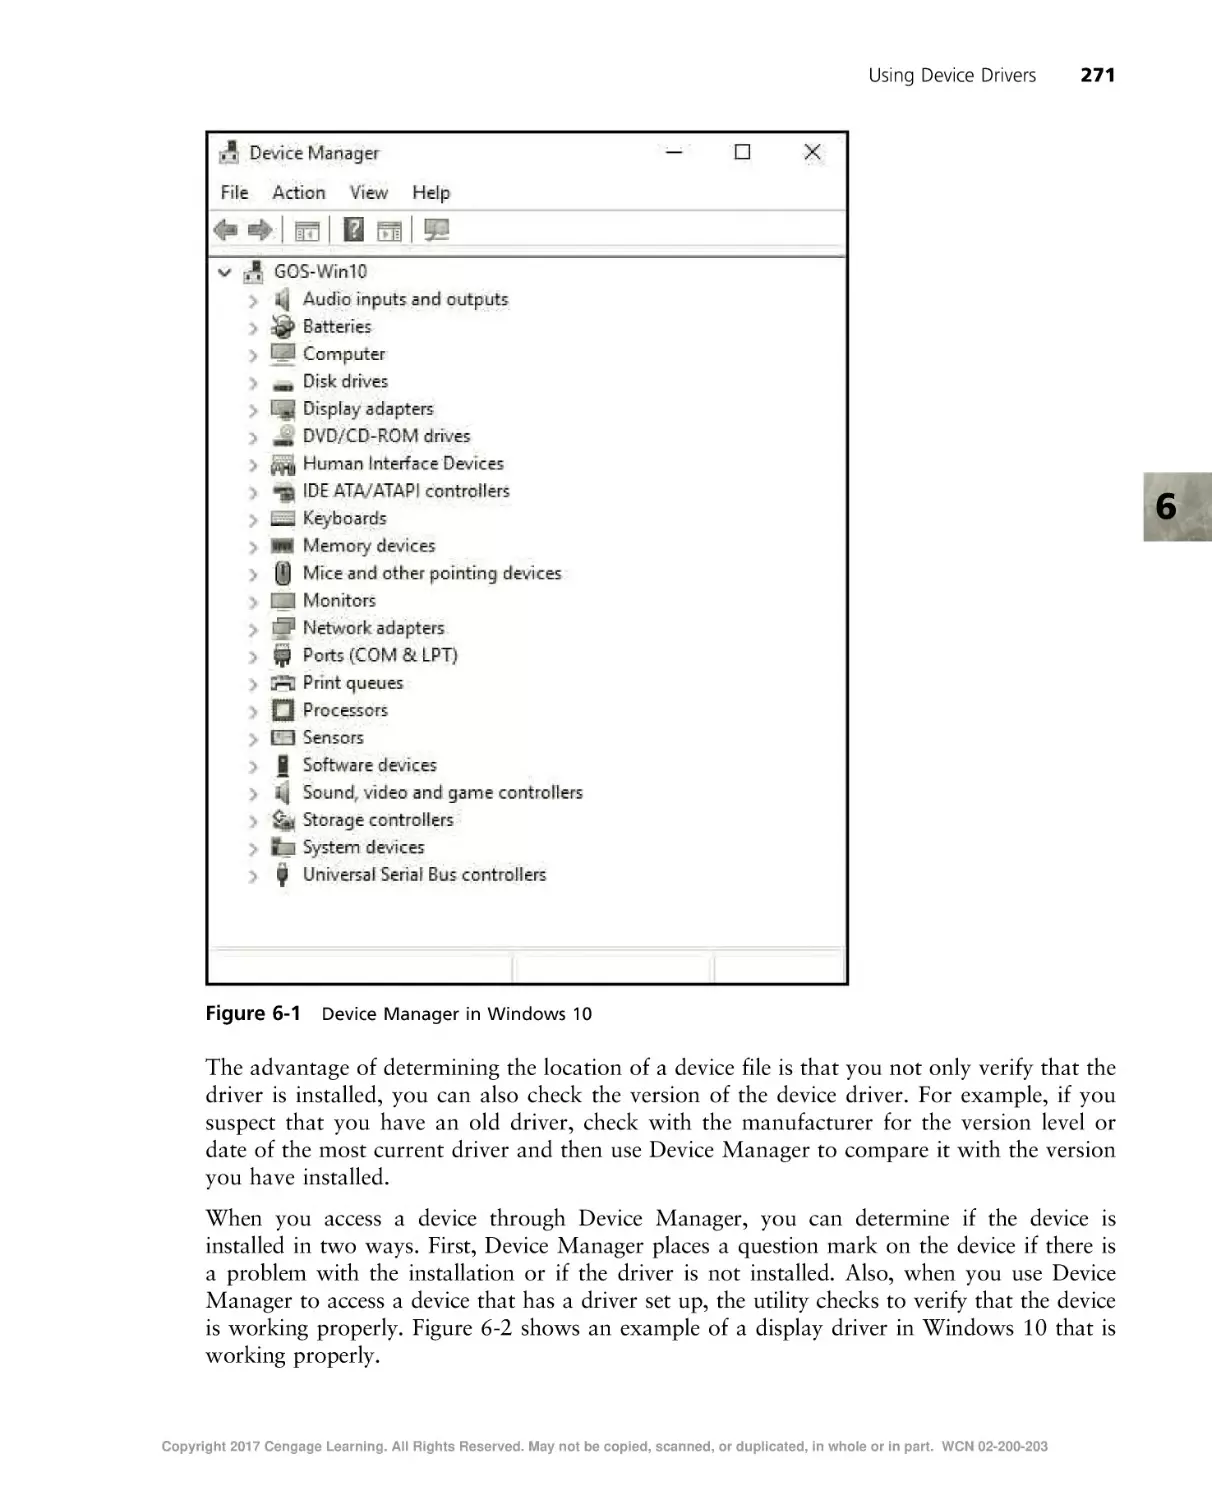
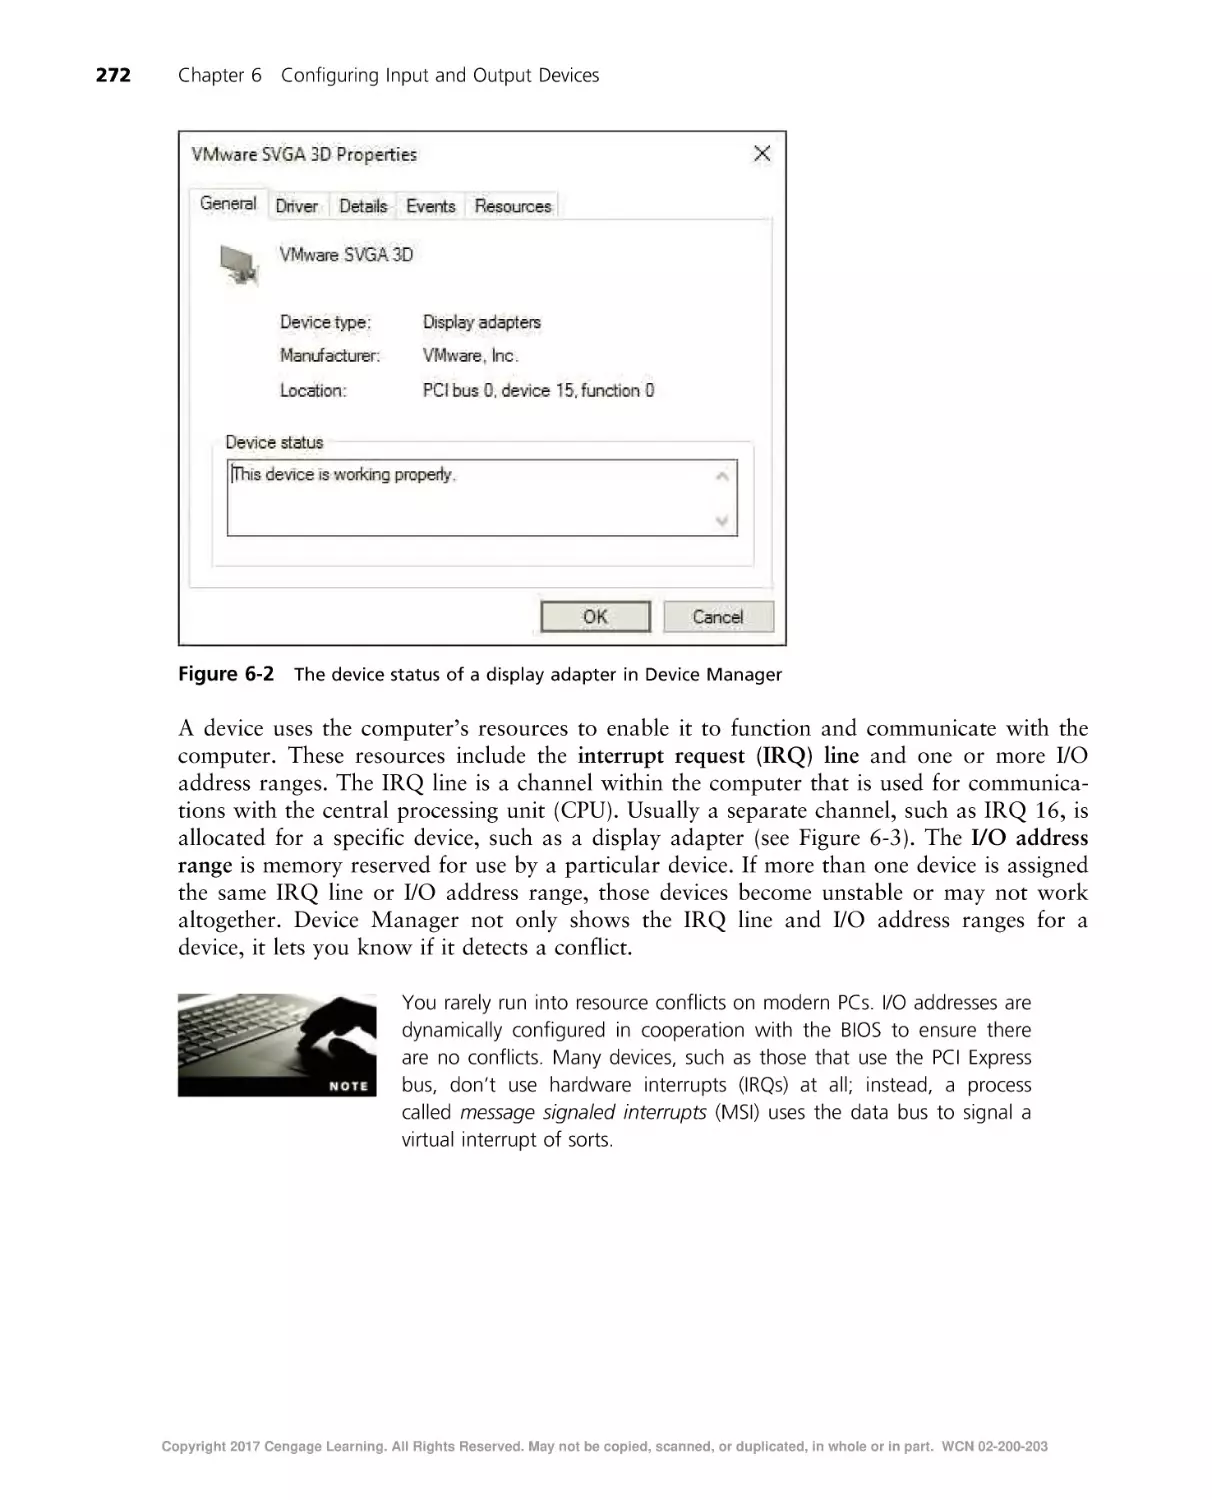
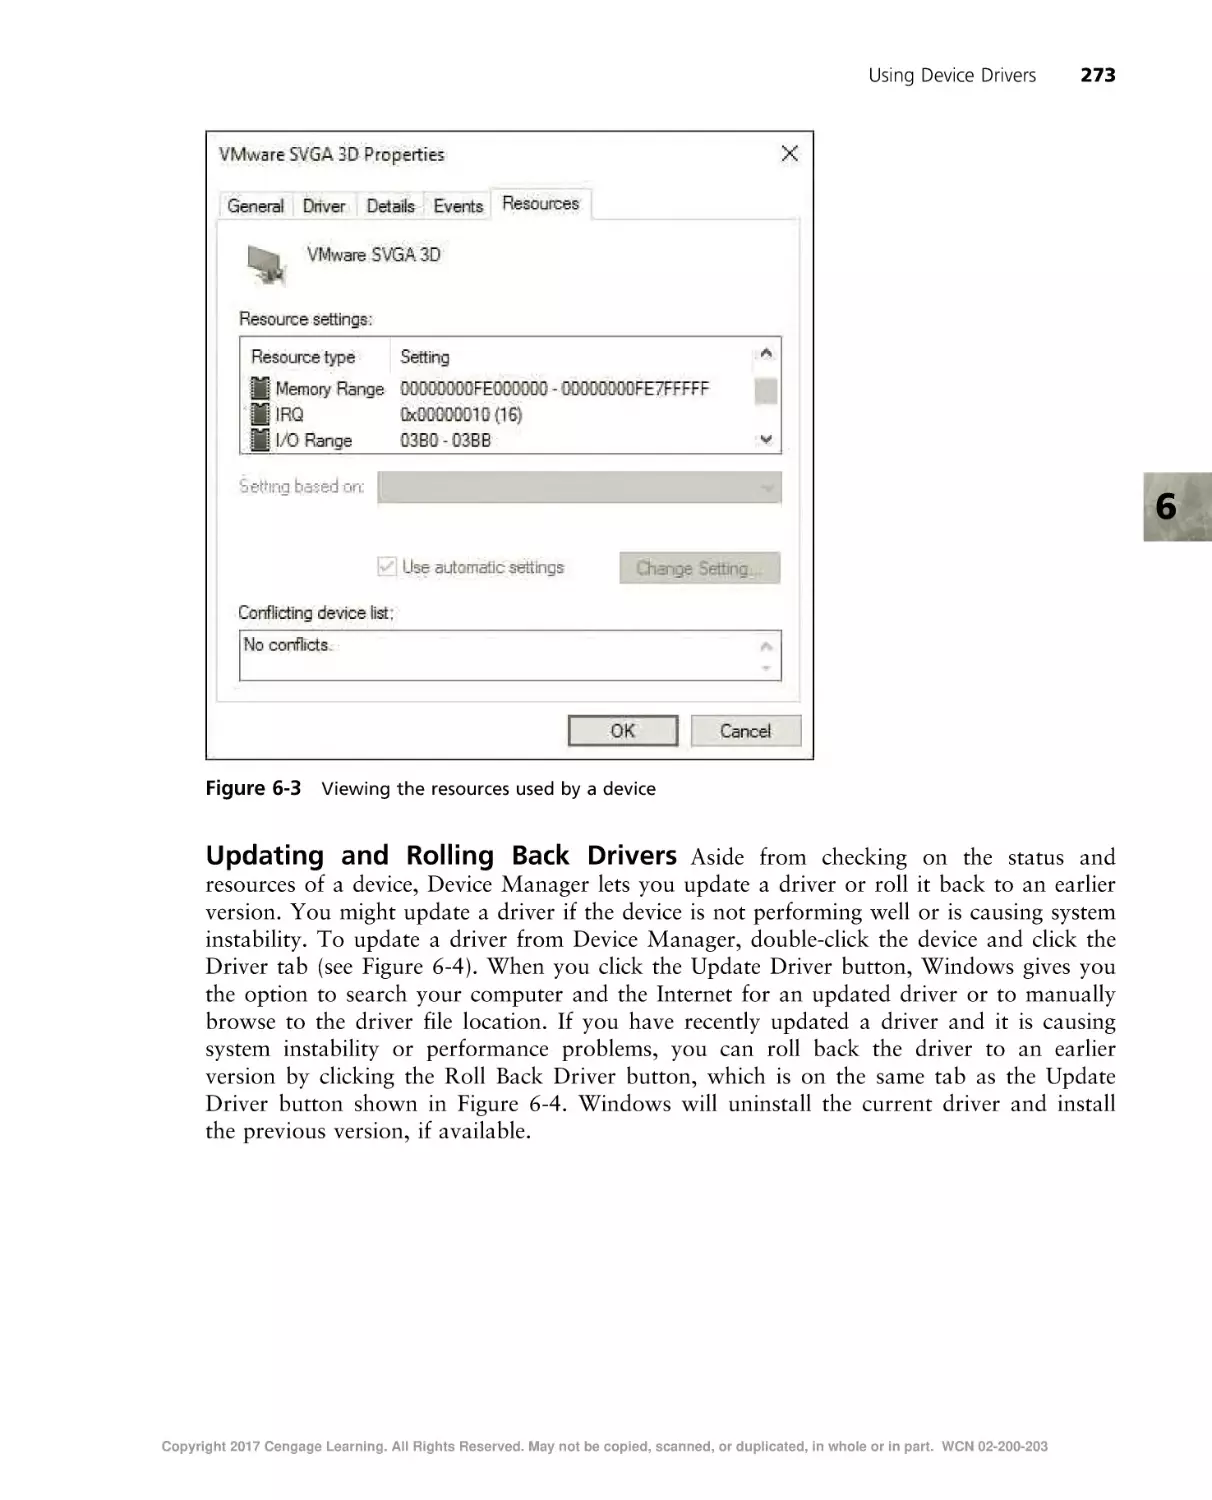
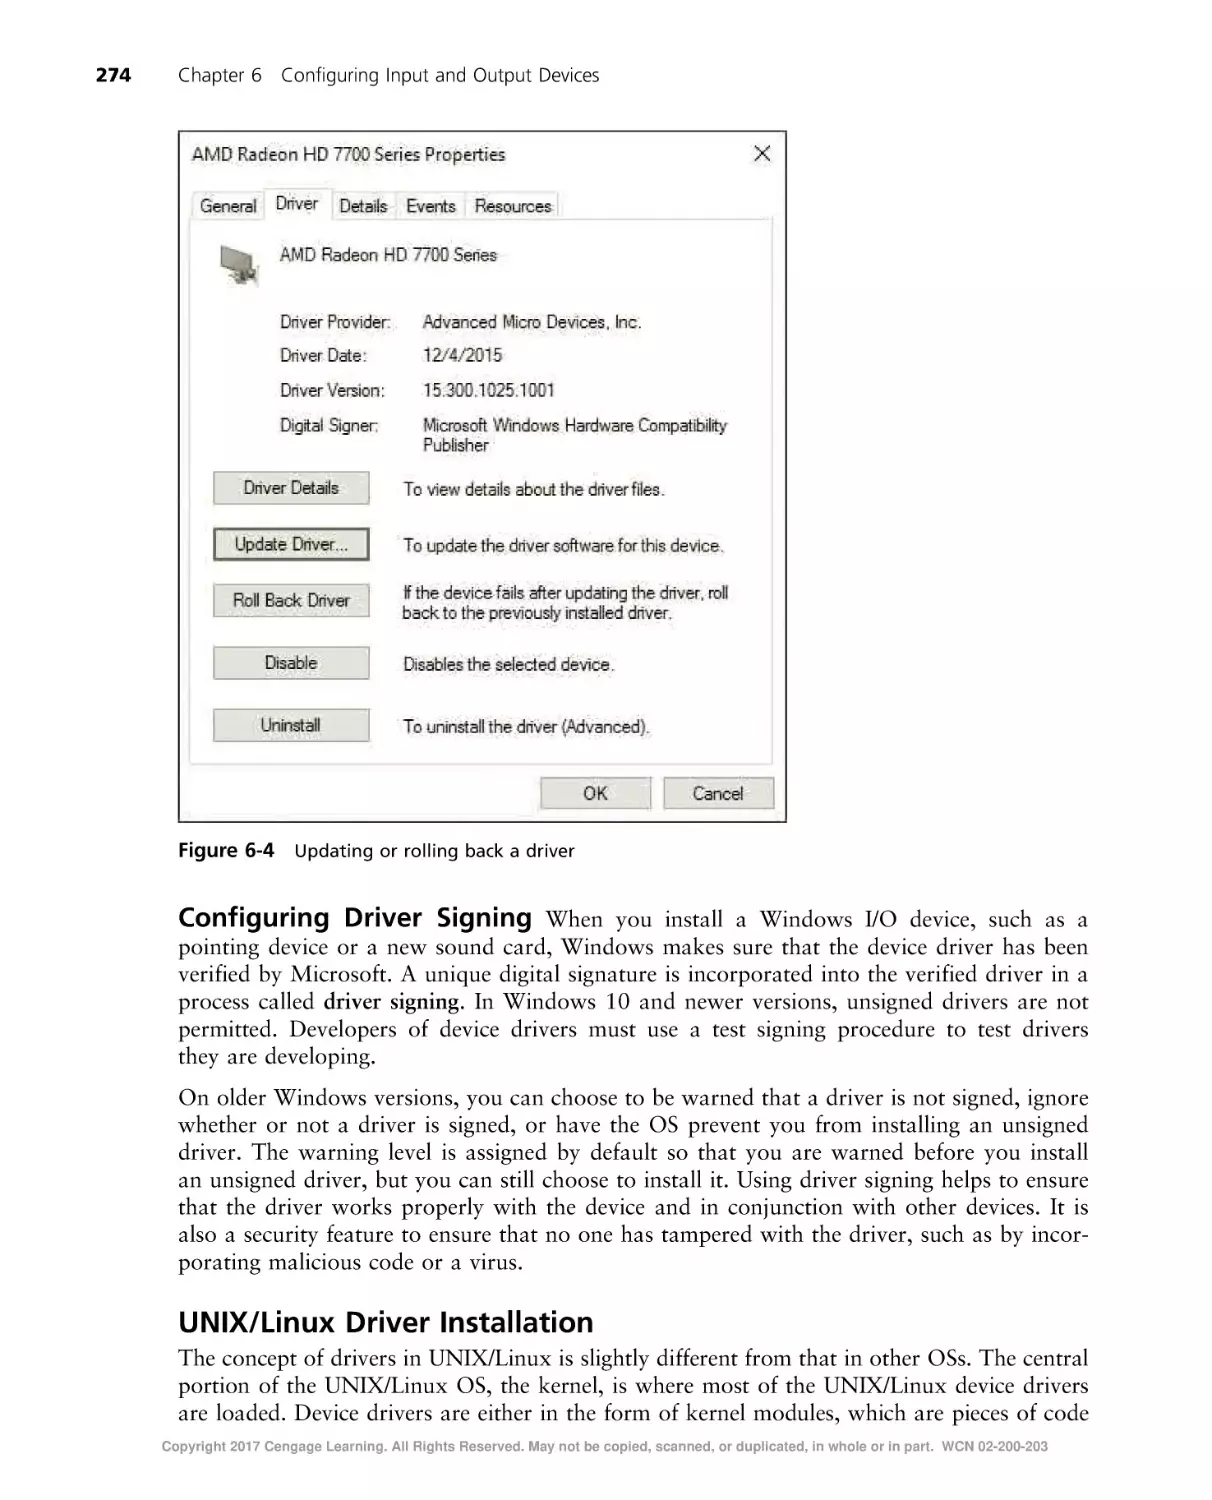
Using Device Drivers . . . . . . . . . . . . . . . . . . . . . . . . . . . . . . . . . . . . . . . . . . . . . . . . . . . . . . . . . 267
Manufacturer Driver Installation. . . . . . . . . . . . . . . . . . . . . . . . . . . . . . . . . . . . . . . . . . . . . . . . 269
Copyright 2017 Cengage Learning. All Rights Reserved. May not be copied, scanned, or duplicated, in whole or in part. WCN 02-200-203
x
Table of Contents
Windows Driver Installation . . . . . . . . . . . . . . . . . . . . . . . . . . . . . . . . . . . . . . . . . . . . . . . . . . 269
UNIX/Linux Driver Installation . . . . . . . . . . . . . . . . . . . . . . . . . . . . . . . . . . . . . . . . . . . . . . . . 274
Mac OS X Driver Installation . . . . . . . . . . . . . . . . . . . . . . . . . . . . . . . . . . . . . . . . . . . . . . . . . 276
Standard Input Devices . . . . . . . . . . . . . . . . . . . . . . . . . . . . . . . . . . . . . . . . . . . . . . . . . . . . . . . .
Mouse and Keyboard Drivers . . . . . . . . . . . . . . . . . . . . . . . . . . . . . . . . . . . . . . . . . . . . . . . . .
Touch Input Drivers . . . . . . . . . . . . . . . . . . . . . . . . . . . . . . . . . . . . . . . . . . . . . . . . . . . . . . .
Other Input Devices . . . . . . . . . . . . . . . . . . . . . . . . . . . . . . . . . . . . . . . . . . . . . . . . . . . . . . . .
277
277
279
279
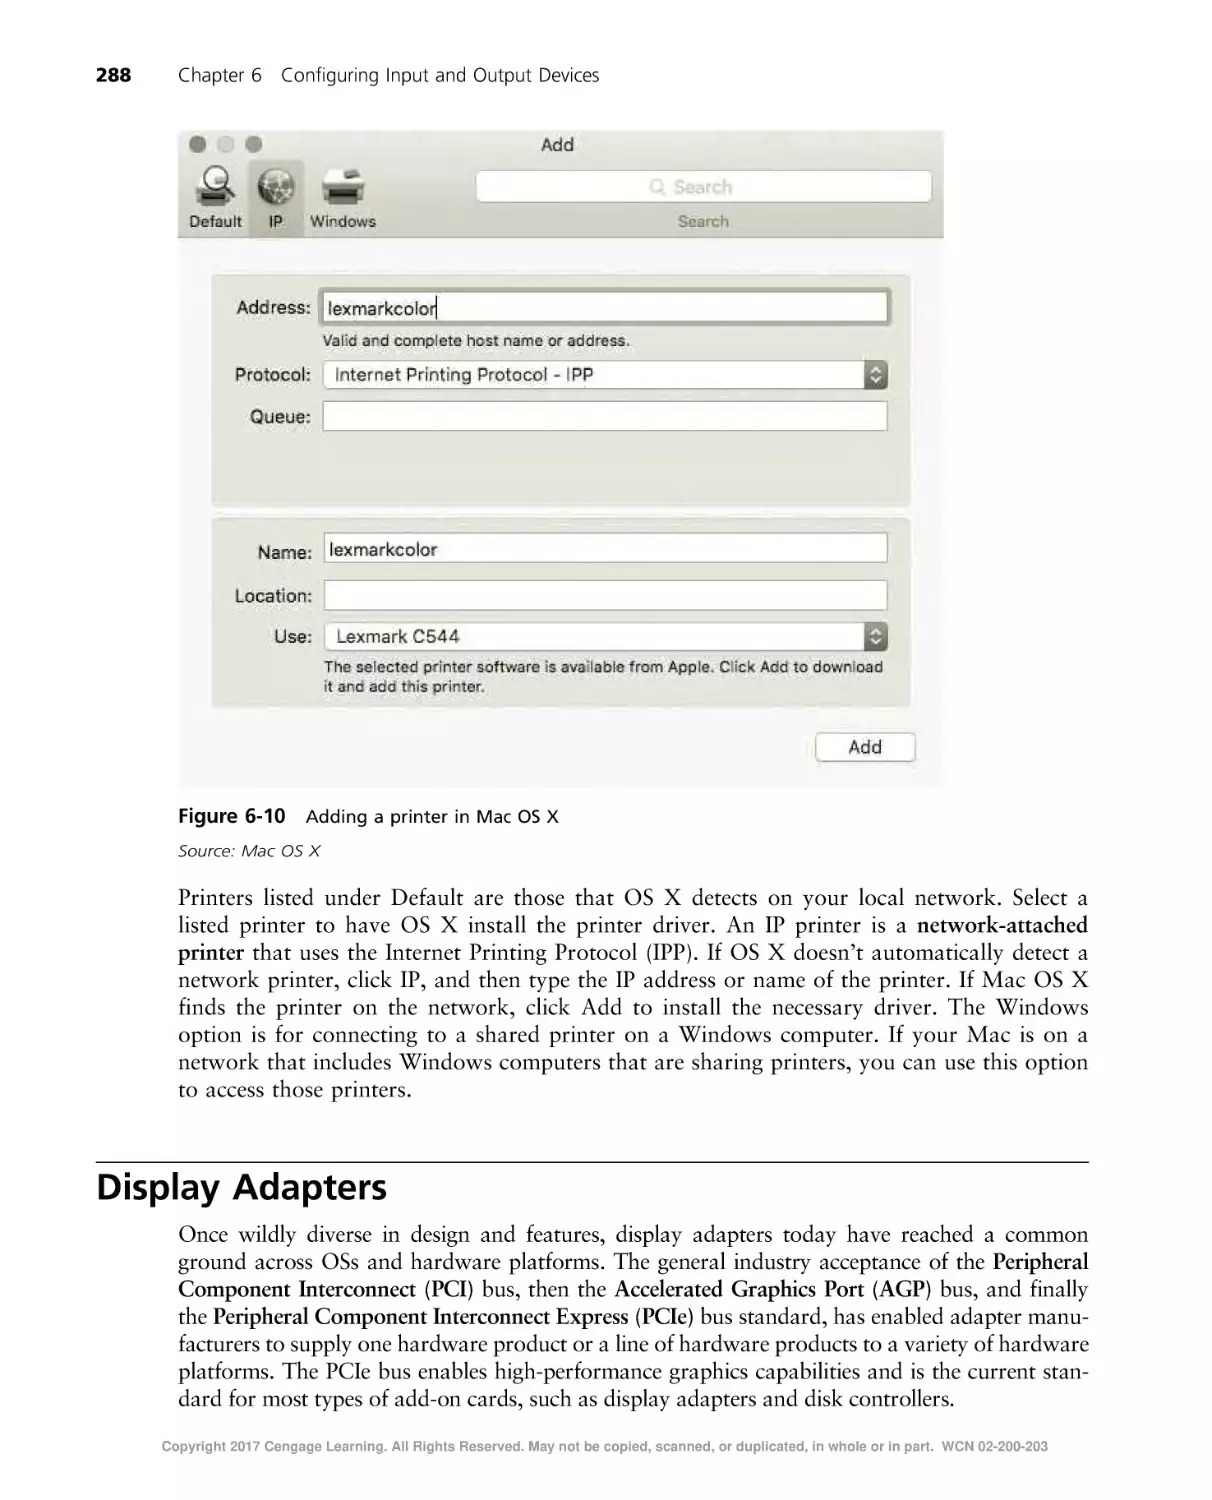
Printers . . . . . . . . . . . . . . . . . . . . . . . . . . . . . . . . . . . . . . . . . . . . . . . . . . . . . . . . . . . . . . . . . .
Printer Types . . . . . . . . . . . . . . . . . . . . . . . . . . . . . . . . . . . . . . . . . . . . . . . . . . . . . . . . . . . .
Printer Connections . . . . . . . . . . . . . . . . . . . . . . . . . . . . . . . . . . . . . . . . . . . . . . . . . . . . . . . .
Installing Printers . . . . . . . . . . . . . . . . . . . . . . . . . . . . . . . . . . . . . . . . . . . . . . . . . . . . . . . . .
283
283
285
285
Display Adapters. . . . . . . . . . . . . . . . . . . . . . . . . . . . . . . . . . . . . . . . . . . . . . . . . . . . . . . . . . . .
Basic Display Adapter Technology . . . . . . . . . . . . . . . . . . . . . . . . . . . . . . . . . . . . . . . . . . . . . .
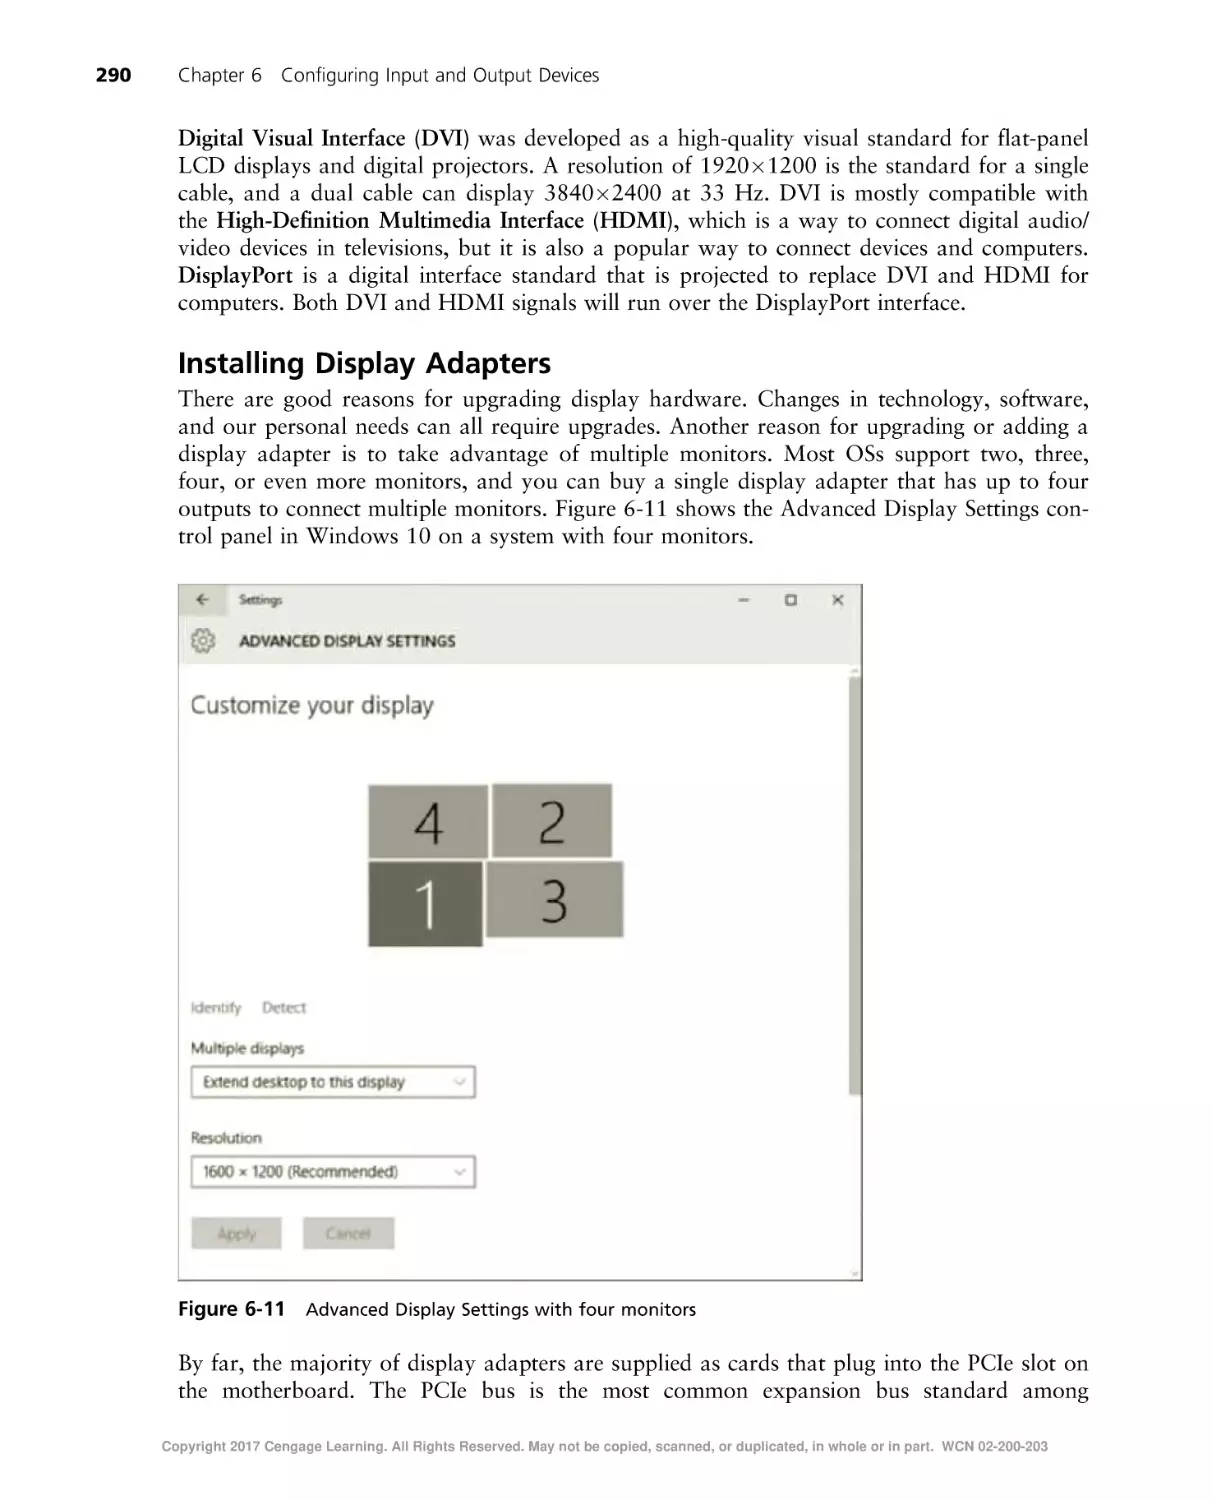
Installing Display Adapters . . . . . . . . . . . . . . . . . . . . . . . . . . . . . . . . . . . . . . . . . . . . . . . . . . .
Sound Cards . . . . . . . . . . . . . . . . . . . . . . . . . . . . . . . . . . . . . . . . . . . . . . . . . . . . . . . . . . . .
Other Output Devices . . . . . . . . . . . . . . . . . . . . . . . . . . . . . . . . . . . . . . . . . . . . . . . . . . . . . .
288
289
290
291
291
Installing Circuit Boards . . . . . . . . . . . . . . . . . . . . . . . . . . . . . . . . . . . . . . . . . . . . . . . . . . . . . . . 291
Chapter Summary . . . . . . . . . . . . . . . . . . . . . . . . . . . . . . . . . . . . . . . . . . . . . . . . . . . . . . . . . . . 292
Key Terms . . . . . . . . . . . . . . . . . . . . . . . . . . . . . . . . . . . . . . . . . . . . . . . . . . . . . . . . . . . . . . . 293
Review Questions . . . . . . . . . . . . . . . . . . . . . . . . . . . . . . . . . . . . . . . . . . . . . . . . . . . . . . . . . . . 295
Hands-On Projects . . . . . . . . . . . . . . . . . . . . . . . . . . . . . . . . . . . . . . . . . . . . . . . . . . . . . . . . . . 298
Critical Thinking . . . . . . . . . . . . . . . . . . . . . . . . . . . . . . . . . . . . . . . . . . . . . . . . . . . . . . . . . . . 310
Challenge Labs . . . . . . . . . . . . . . . . . . . . . . . . . . . . . . . . . . . . . . . . . . . . . . . . . . . . . . . . . . . . . 310
Case Projects . . . . . . . . . . . . . . . . . . . . . . . . . . . . . . . . . . . . . . . . . . . . . . . . . . . . . . . . . . . . . . 310
CHAPTER 7
Using and Configuring Storage Devices . . . . . . . . . . . . . . . . . . . . . . . . . . . . . . . . . . . . . . . . . . . . . . 313
An Overview of Computer Storage . . . . . . . . . . . . . . . . . . . . . . . . . . . . . . . . . . . . . . . . . . . . . . . .
What Is Storage? . . . . . . . . . . . . . . . . . . . . . . . . . . . . . . . . . . . . . . . . . . . . . . . . . . . . . . . . . .
Reasons for Storage . . . . . . . . . . . . . . . . . . . . . . . . . . . . . . . . . . . . . . . . . . . . . . . . . . . . . . . .
Storage Access Methods . . . . . . . . . . . . . . . . . . . . . . . . . . . . . . . . . . . . . . . . . . . . . . . . . . . . .
314
314
315
316
Configuring Local Disks . . . . . . . . . . . . . . . . . . . . . . . . . . . . . . . . . . . . . . . . . . . . . . . . . . . . . . . 318
Disk Capacity and Speed . . . . . . . . . . . . . . . . . . . . . . . . . . . . . . . . . . . . . . . . . . . . . . . . . . . . 319
Disk Interface Technologies . . . . . . . . . . . . . . . . . . . . . . . . . . . . . . . . . . . . . . . . . . . . . . . . . . . 320
Types of Volumes . . . . . . . . . . . . . . . . . . . . . . . . . . . . . . . . . . . . . . . . . . . . . . . . . . . . . . . . . . . 322
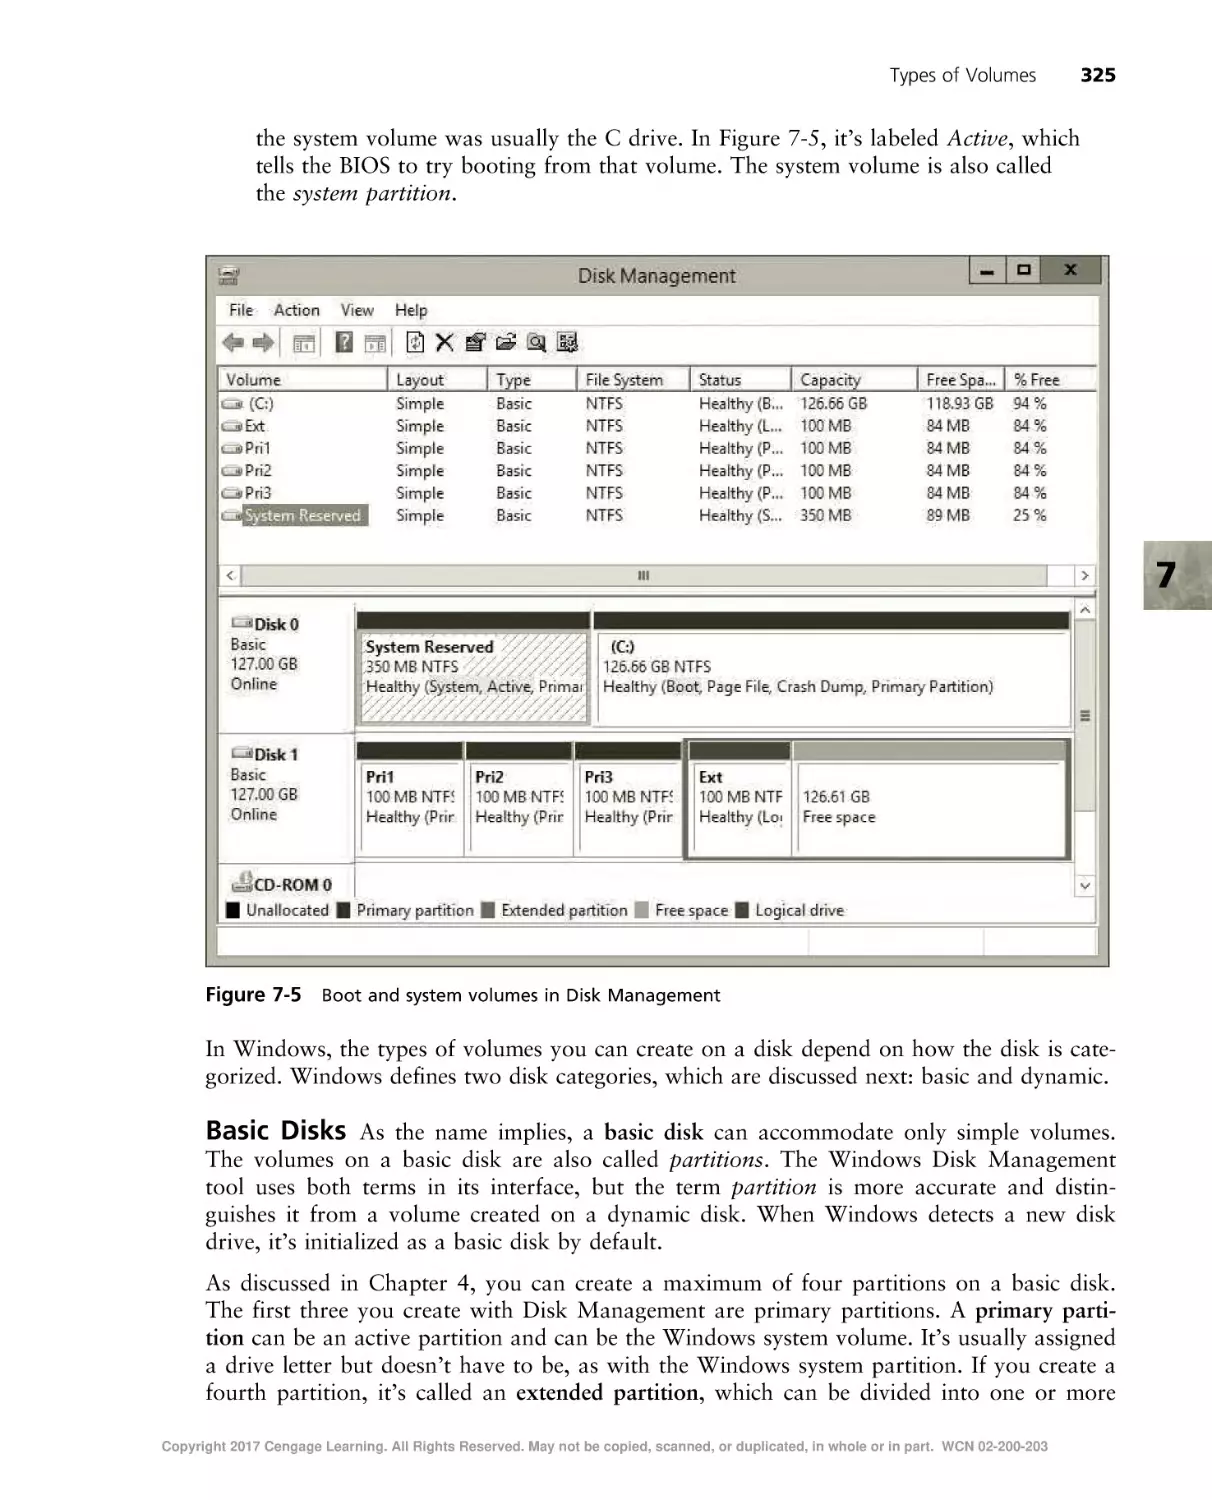
Windows Volumes and Disk Types . . . . . . . . . . . . . . . . . . . . . . . . . . . . . . . . . . . . . . . . . . . . . . 324
Volume Types in Linux/UNIX and Mac OS X . . . . . . . . . . . . . . . . . . . . . . . . . . . . . . . . . . . . . . . 328
Cloud Storage . . . . . . . . . . . . . . . . . . . . . . . . . . . . . . . . . . . . . . . . . . . . . . . . . . . . . . . . . . . . . 330
Tapes and Tape Drives . . . . . . . . . . . . . . . . . . . . . . . . . . . . . . . . . . . . . . . . . . . . . . . . . . . . . . .
DAT Drives . . . . . . . . . . . . . . . . . . . . . . . . . . . . . . . . . . . . . . . . . . . . . . . . . . . . . . . . . . . . .
DLT and SDLT Drives . . . . . . . . . . . . . . . . . . . . . . . . . . . . . . . . . . . . . . . . . . . . . . . . . . . . . .
AIT and S-AIT Drives . . . . . . . . . . . . . . . . . . . . . . . . . . . . . . . . . . . . . . . . . . . . . . . . . . . . . .
LTO Drives . . . . . . . . . . . . . . . . . . . . . . . . . . . . . . . . . . . . . . . . . . . . . . . . . . . . . . . . . . . . .
331
331
332
332
332
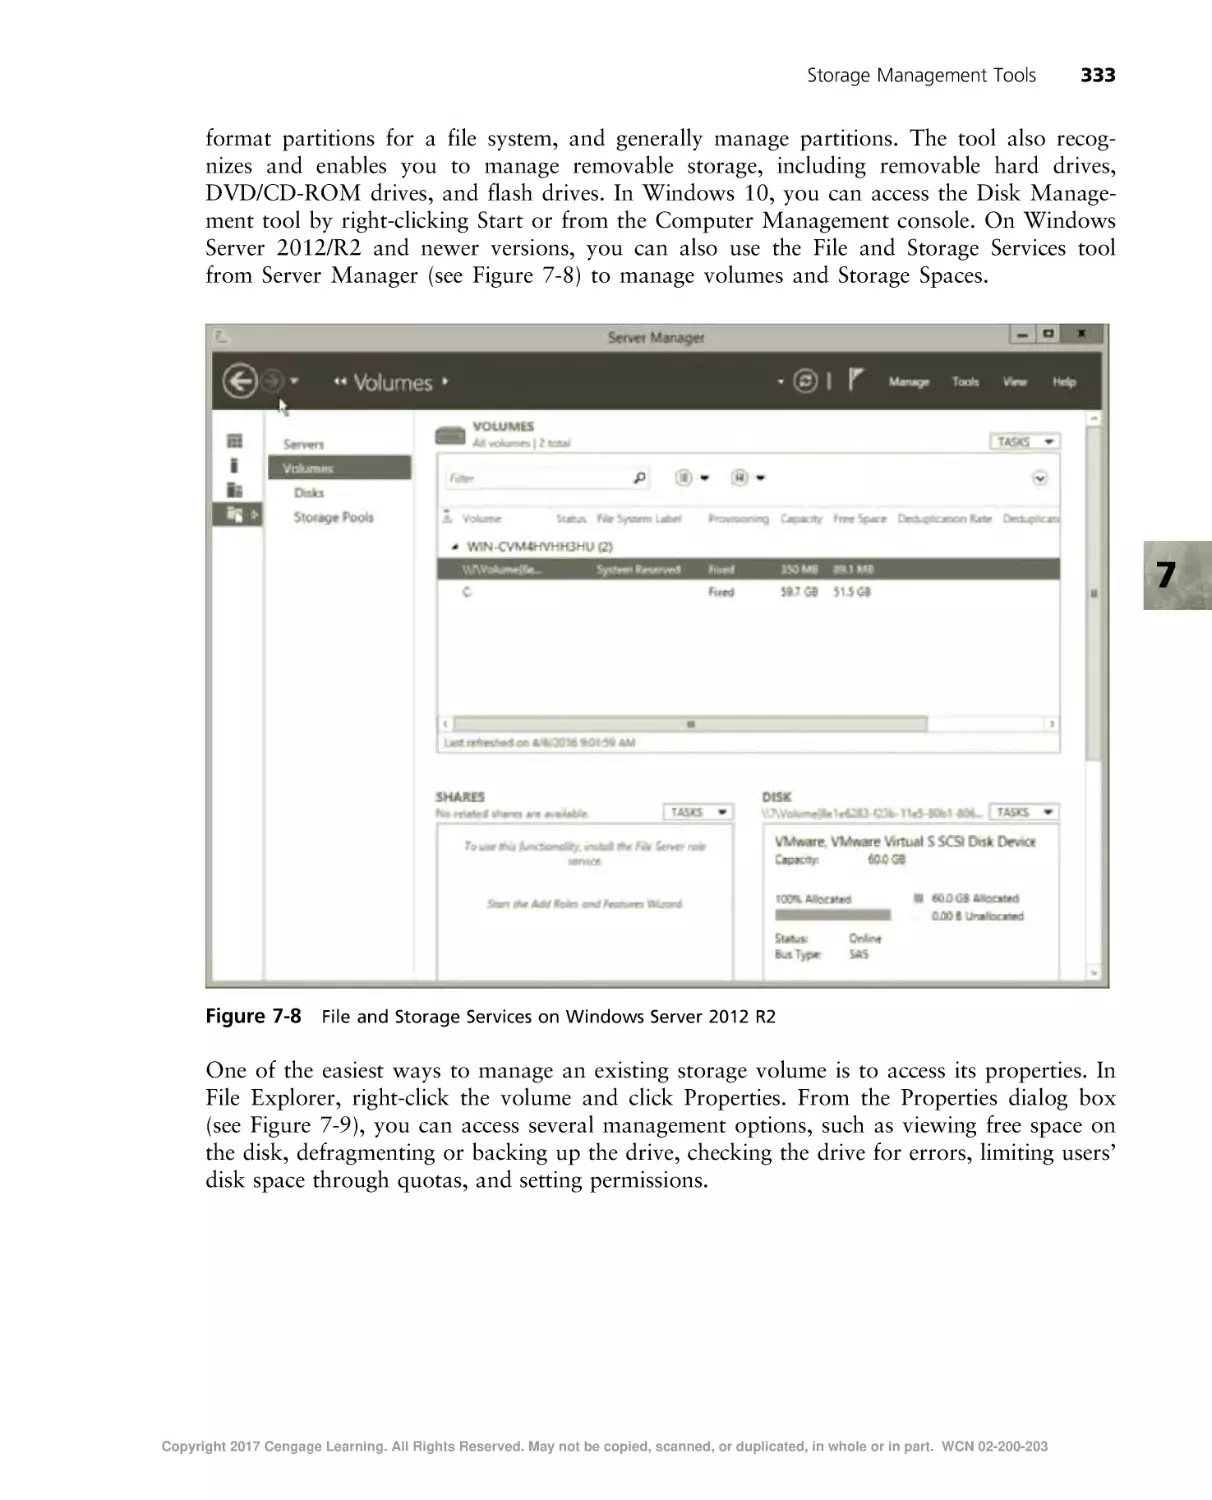
Storage Management Tools . . . . . . . . . . . . . . . . . . . . . . . . . . . . . . . . . . . . . . . . . . . . . . . . . . . . .
Windows Storage Management Tools . . . . . . . . . . . . . . . . . . . . . . . . . . . . . . . . . . . . . . . . . . . .
Disk Management Tools in UNIX/Linux . . . . . . . . . . . . . . . . . . . . . . . . . . . . . . . . . . . . . . . . . .
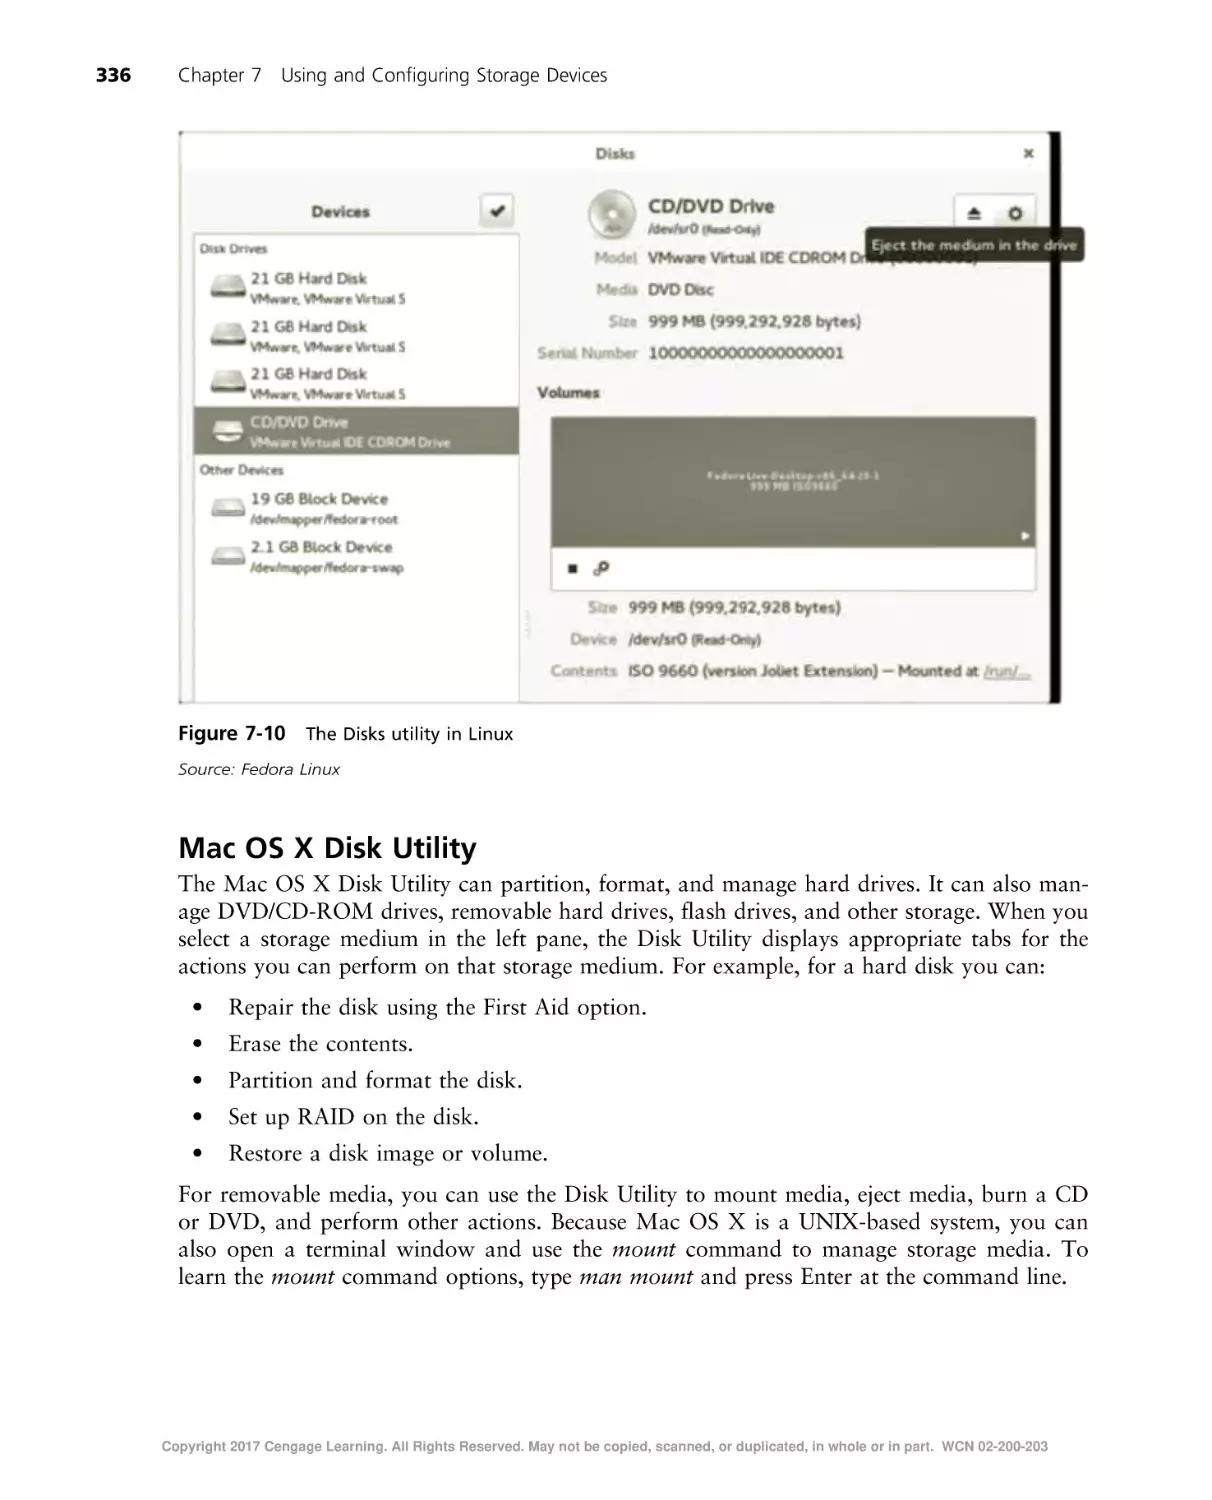
Mac OS X Disk Utility . . . . . . . . . . . . . . . . . . . . . . . . . . . . . . . . . . . . . . . . . . . . . . . . . . . . . .
332
332
334
336
Chapter Summary . . . . . . . . . . . . . . . . . . . . . . . . . . . . . . . . . . . . . . . . . . . . . . . . . . . . . . . . . . . 337
Copyright 2017 Cengage Learning. All Rights Reserved. May not be copied, scanned, or duplicated, in whole or in part. WCN 02-200-203
Table of Contents
xi
Key Terms . . . . . . . . . . . . . . . . . . . . . . . . . . . . . . . . . . . . . . . . . . . . . . . . . . . . . . . . . . . . . . . 337
Review Questions . . . . . . . . . . . . . . . . . . . . . . . . . . . . . . . . . . . . . . . . . . . . . . . . . . . . . . . . . . . 340
Hands-On Projects . . . . . . . . . . . . . . . . . . . . . . . . . . . . . . . . . . . . . . . . . . . . . . . . . . . . . . . . . . 344
Critical Thinking . . . . . . . . . . . . . . . . . . . . . . . . . . . . . . . . . . . . . . . . . . . . . . . . . . . . . . . . . . . 356
Case Projects . . . . . . . . . . . . . . . . . . . . . . . . . . . . . . . . . . . . . . . . . . . . . . . . . . . . . . . . . . . . . . 356
CHAPTER 8
Virtualization and Cloud Computing Fundamentals . . . . . . . . . . . . . . . . . . . . . . . . . . . . . . . . . . . . . 357
Virtualization Fundamentals . . . . . . . . . . . . . . . . . . . . . . . . . . . . . . . . . . . . . . . . . . . . . . . . . . . . 358
Hosted Virtualization . . . . . . . . . . . . . . . . . . . . . . . . . . . . . . . . . . . . . . . . . . . . . . . . . . . . . . . . .
Hosted Virtualization Applications . . . . . . . . . . . . . . . . . . . . . . . . . . . . . . . . . . . . . . . . . . . . . .
Hosted Virtualization Products . . . . . . . . . . . . . . . . . . . . . . . . . . . . . . . . . . . . . . . . . . . . . . . . .
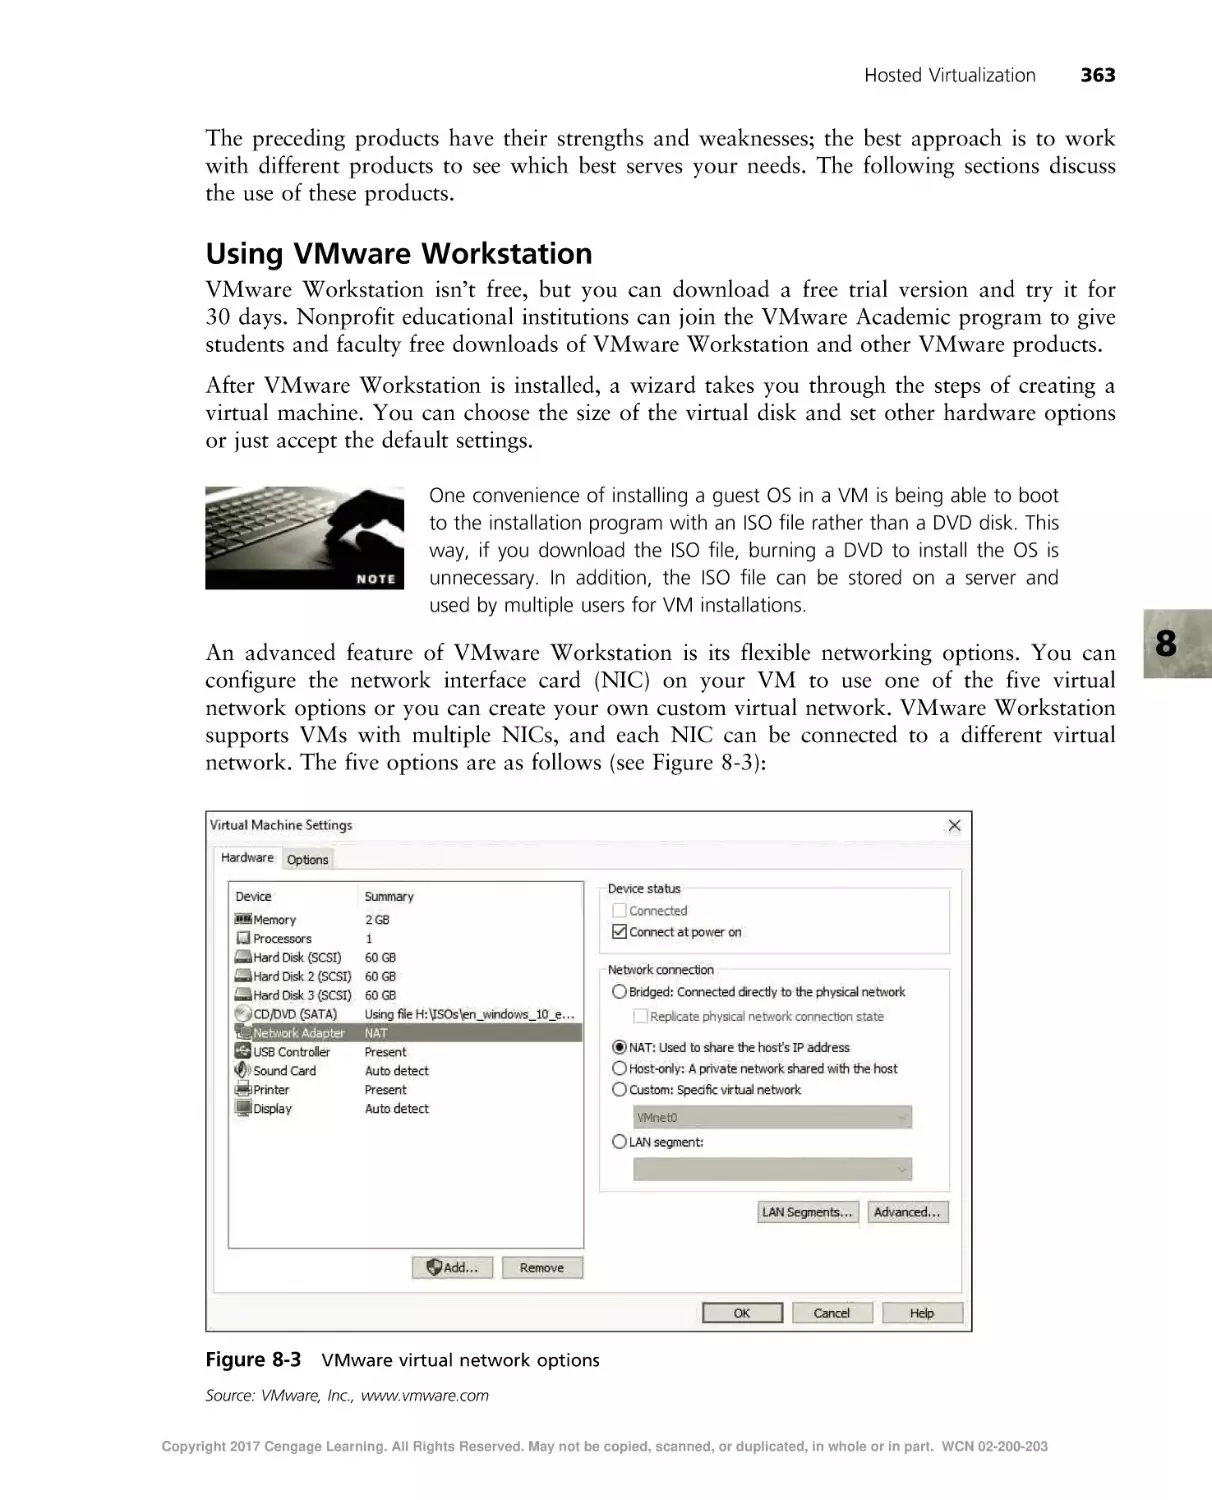
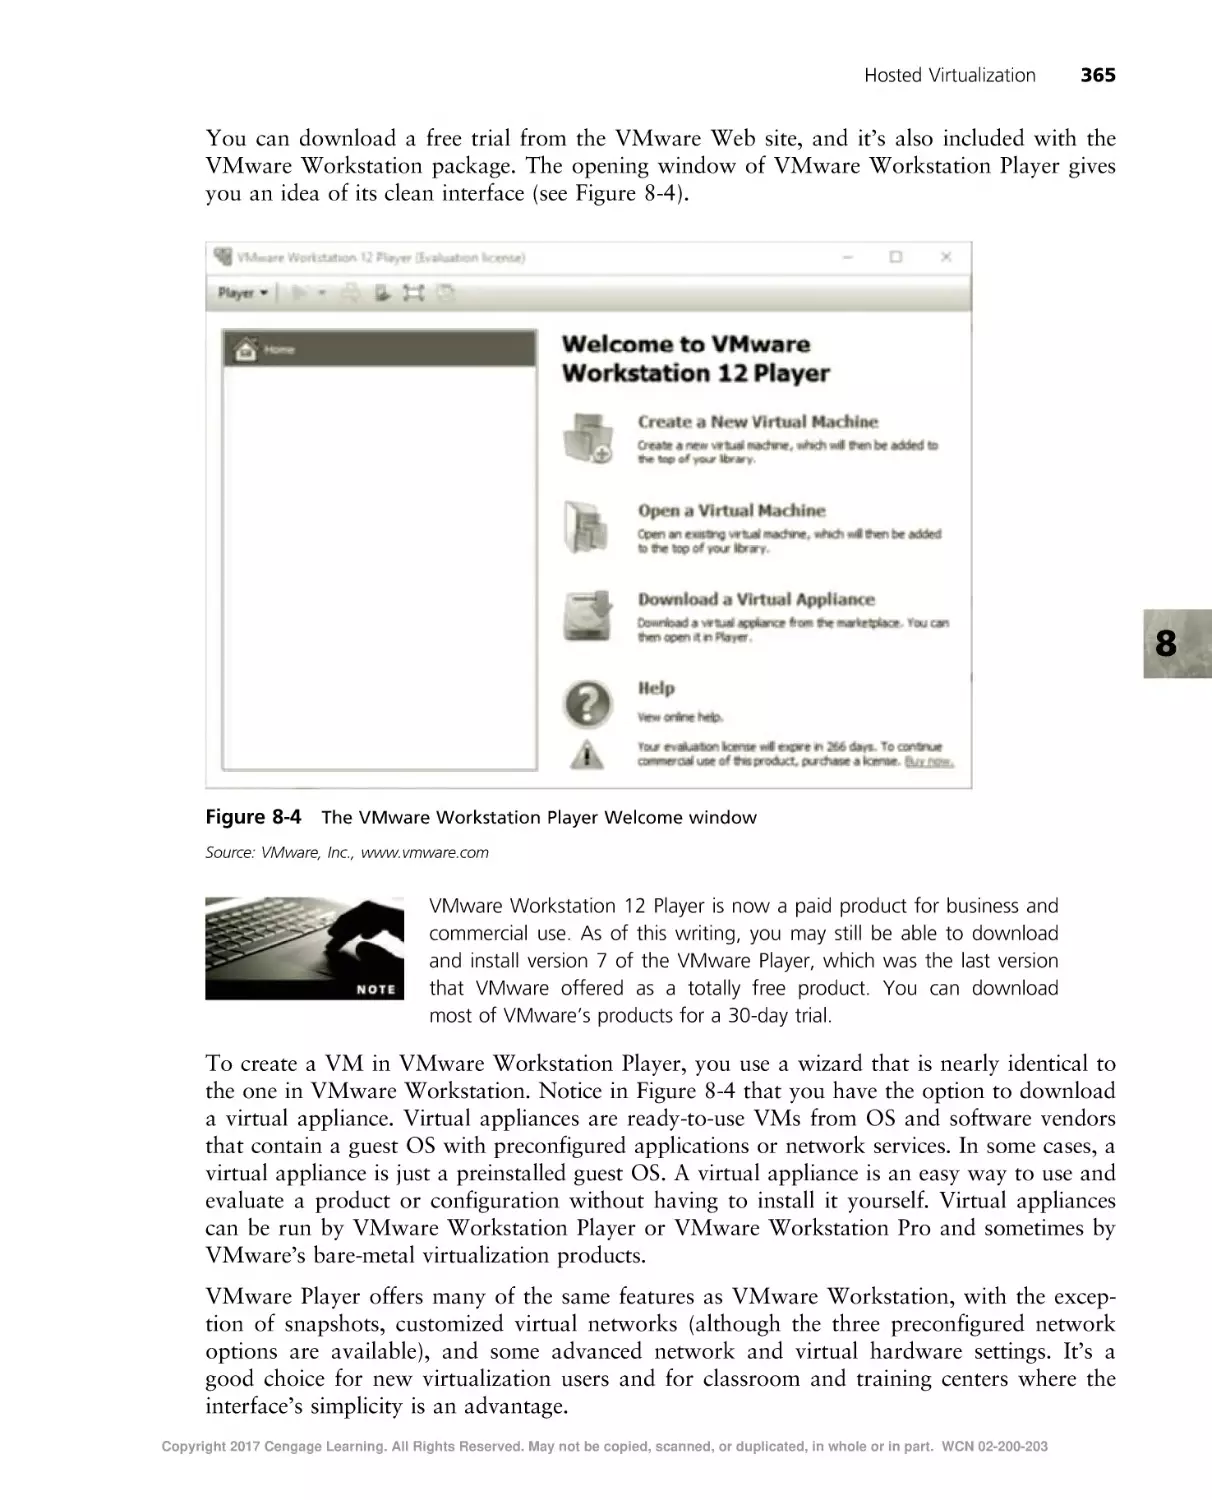
Using VMware Workstation . . . . . . . . . . . . . . . . . . . . . . . . . . . . . . . . . . . . . . . . . . . . . . . . . .
Using VMware Workstation Player . . . . . . . . . . . . . . . . . . . . . . . . . . . . . . . . . . . . . . . . . . . . . .
Using Microsoft Virtual PC . . . . . . . . . . . . . . . . . . . . . . . . . . . . . . . . . . . . . . . . . . . . . . . . . . .
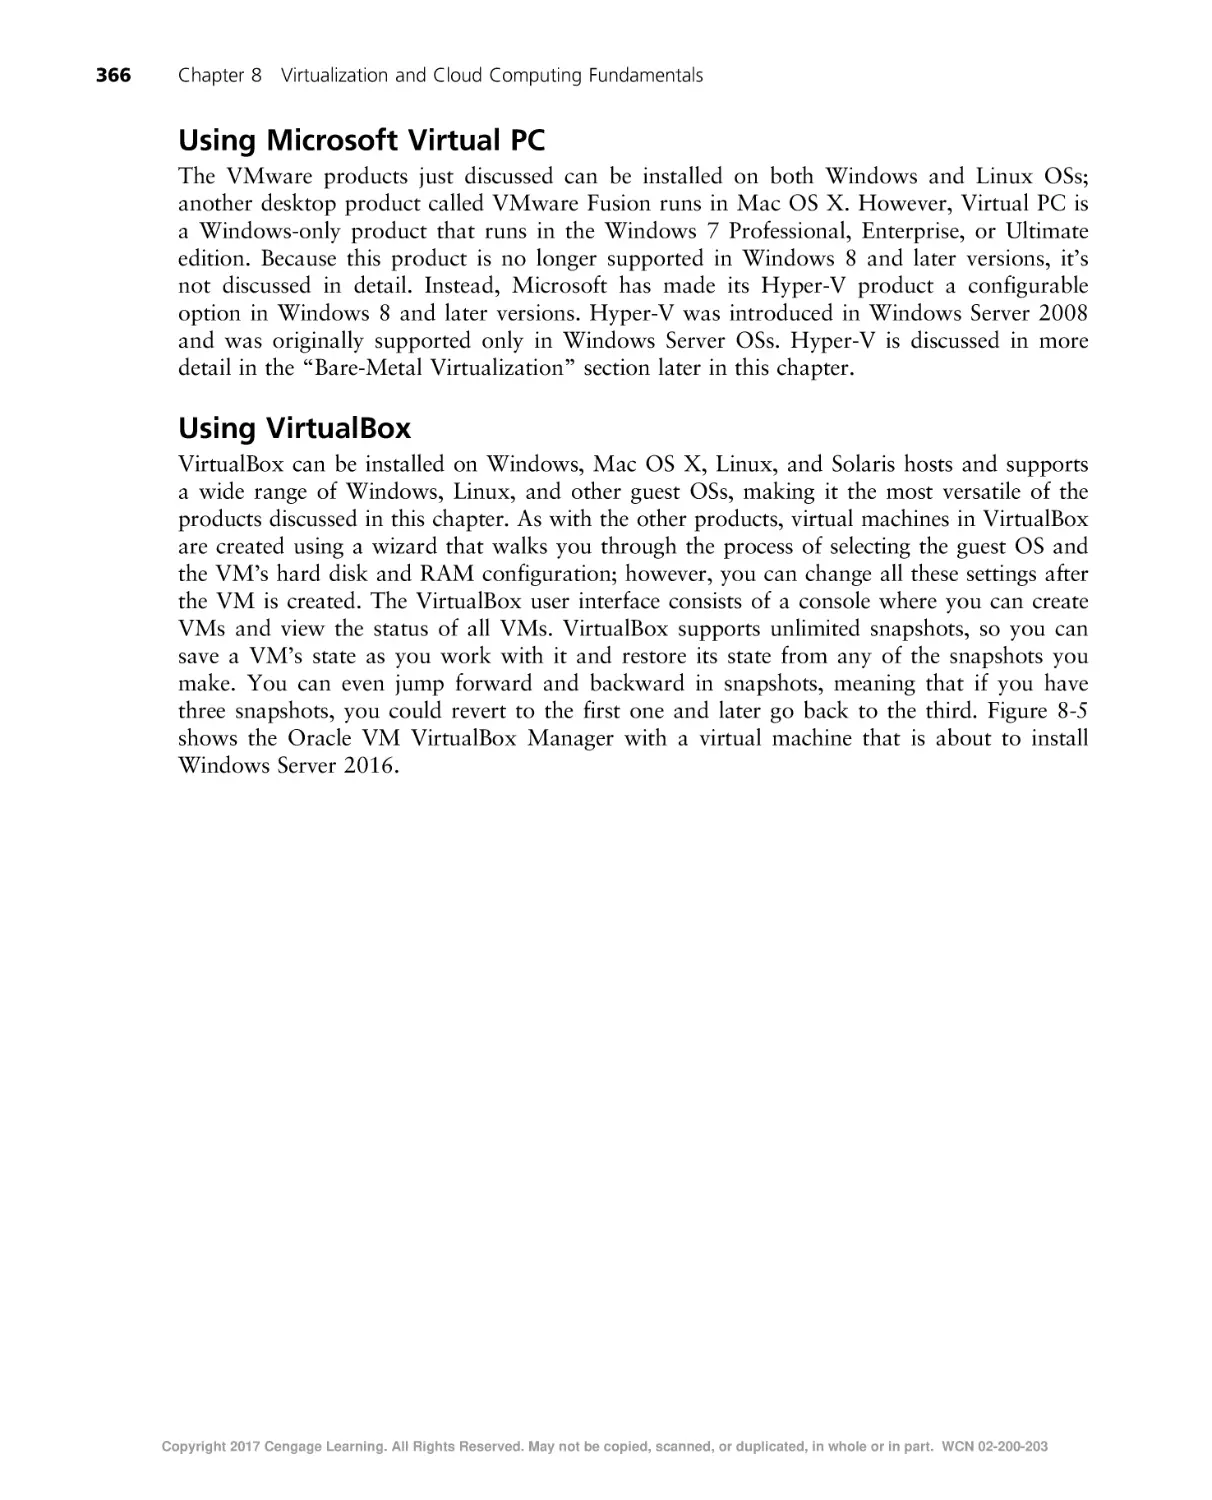
Using VirtualBox . . . . . . . . . . . . . . . . . . . . . . . . . . . . . . . . . . . . . . . . . . . . . . . . . . . . . . . . .
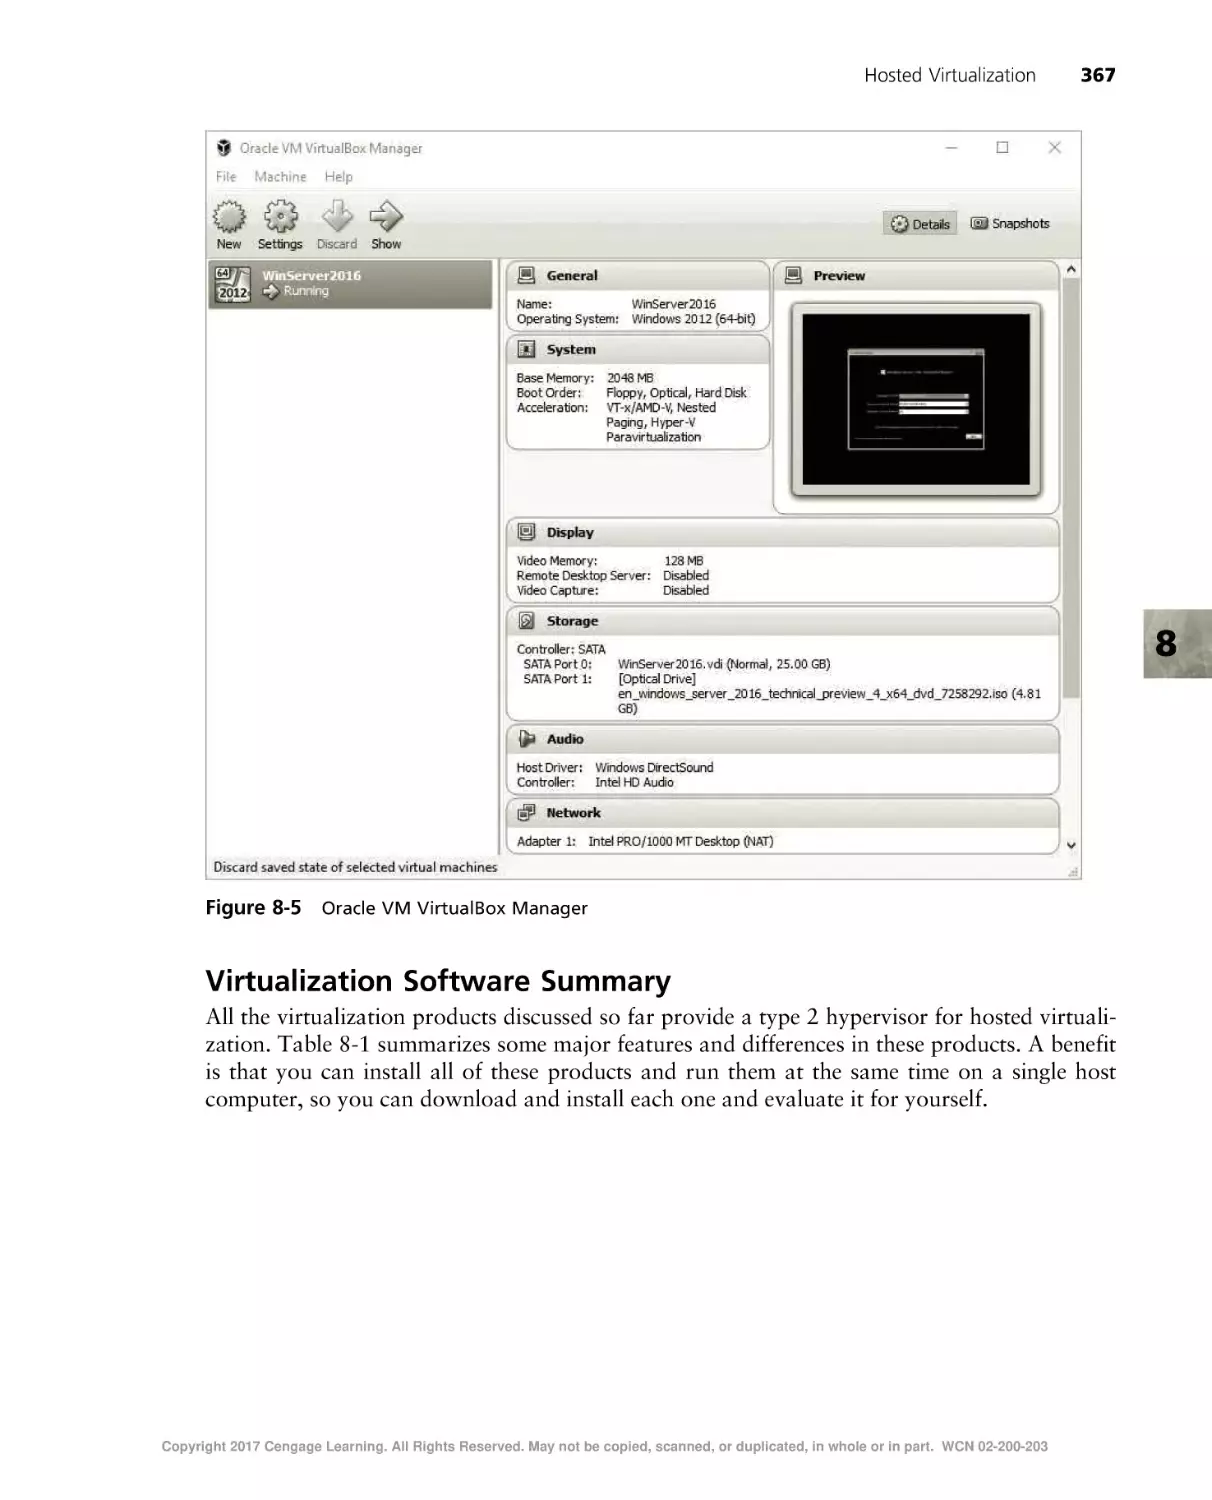
Virtualization Software Summary . . . . . . . . . . . . . . . . . . . . . . . . . . . . . . . . . . . . . . . . . . . . . . .
361
361
362
363
364
366
366
367
Bare-Metal Virtualization . . . . . . . . . . . . . . . . . . . . . . . . . . . . . . . . . . . . . . . . . . . . . . . . . . . . . . 368
Bare-Metal Virtualization Applications . . . . . . . . . . . . . . . . . . . . . . . . . . . . . . . . . . . . . . . . . . . . 368
Bare-Metal Virtualization Products . . . . . . . . . . . . . . . . . . . . . . . . . . . . . . . . . . . . . . . . . . . . . . 370
Cloud Computing . . . . . . . . . . . . . . . . . . . . . . . . . . . . . . . . . . . . . . . . . . . . . . . . . . . . . . . . . . .
Software as a Service . . . . . . . . . . . . . . . . . . . . . . . . . . . . . . . . . . . . . . . . . . . . . . . . . . . . . . .
Platform as a Service . . . . . . . . . . . . . . . . . . . . . . . . . . . . . . . . . . . . . . . . . . . . . . . . . . . . . . .
Infrastructure as a Service . . . . . . . . . . . . . . . . . . . . . . . . . . . . . . . . . . . . . . . . . . . . . . . . . . . .
Private Cloud Versus Public Cloud . . . . . . . . . . . . . . . . . . . . . . . . . . . . . . . . . . . . . . . . . . . . . .
372
373
374
374
375
Chapter Summary . . . . . . . . . . . . . . . . . . . . . . . . . . . . . . . . . . . . . . . . . . . . . . . . . . . . . . . . . . . 375
Key Terms . . . . . . . . . . . . . . . . . . . . . . . . . . . . . . . . . . . . . . . . . . . . . . . . . . . . . . . . . . . . . . . 376
Review Questions . . . . . . . . . . . . . . . . . . . . . . . . . . . . . . . . . . . . . . . . . . . . . . . . . . . . . . . . . . . 377
Hands-On Projects . . . . . . . . . . . . . . . . . . . . . . . . . . . . . . . . . . . . . . . . . . . . . . . . . . . . . . . . . . 379
Critical Thinking . . . . . . . . . . . . . . . . . . . . . . . . . . . . . . . . . . . . . . . . . . . . . . . . . . . . . . . . . . . 387
Challenge Labs . . . . . . . . . . . . . . . . . . . . . . . . . . . . . . . . . . . . . . . . . . . . . . . . . . . . . . . . . . . . . 387
Case Projects . . . . . . . . . . . . . . . . . . . . . . . . . . . . . . . . . . . . . . . . . . . . . . . . . . . . . . . . . . . . . . 388
CHAPTER 9
Configuring a Network Connection . . . . . . . . . . . . . . . . . . . . . . . . . . . . . . . . . . . . . . . . . . . . . . . . . 389
The Fundamentals of Network Communication . . . . . . . . . . . . . . . . . . . . . . . . . . . . . . . . . . . . . . . .
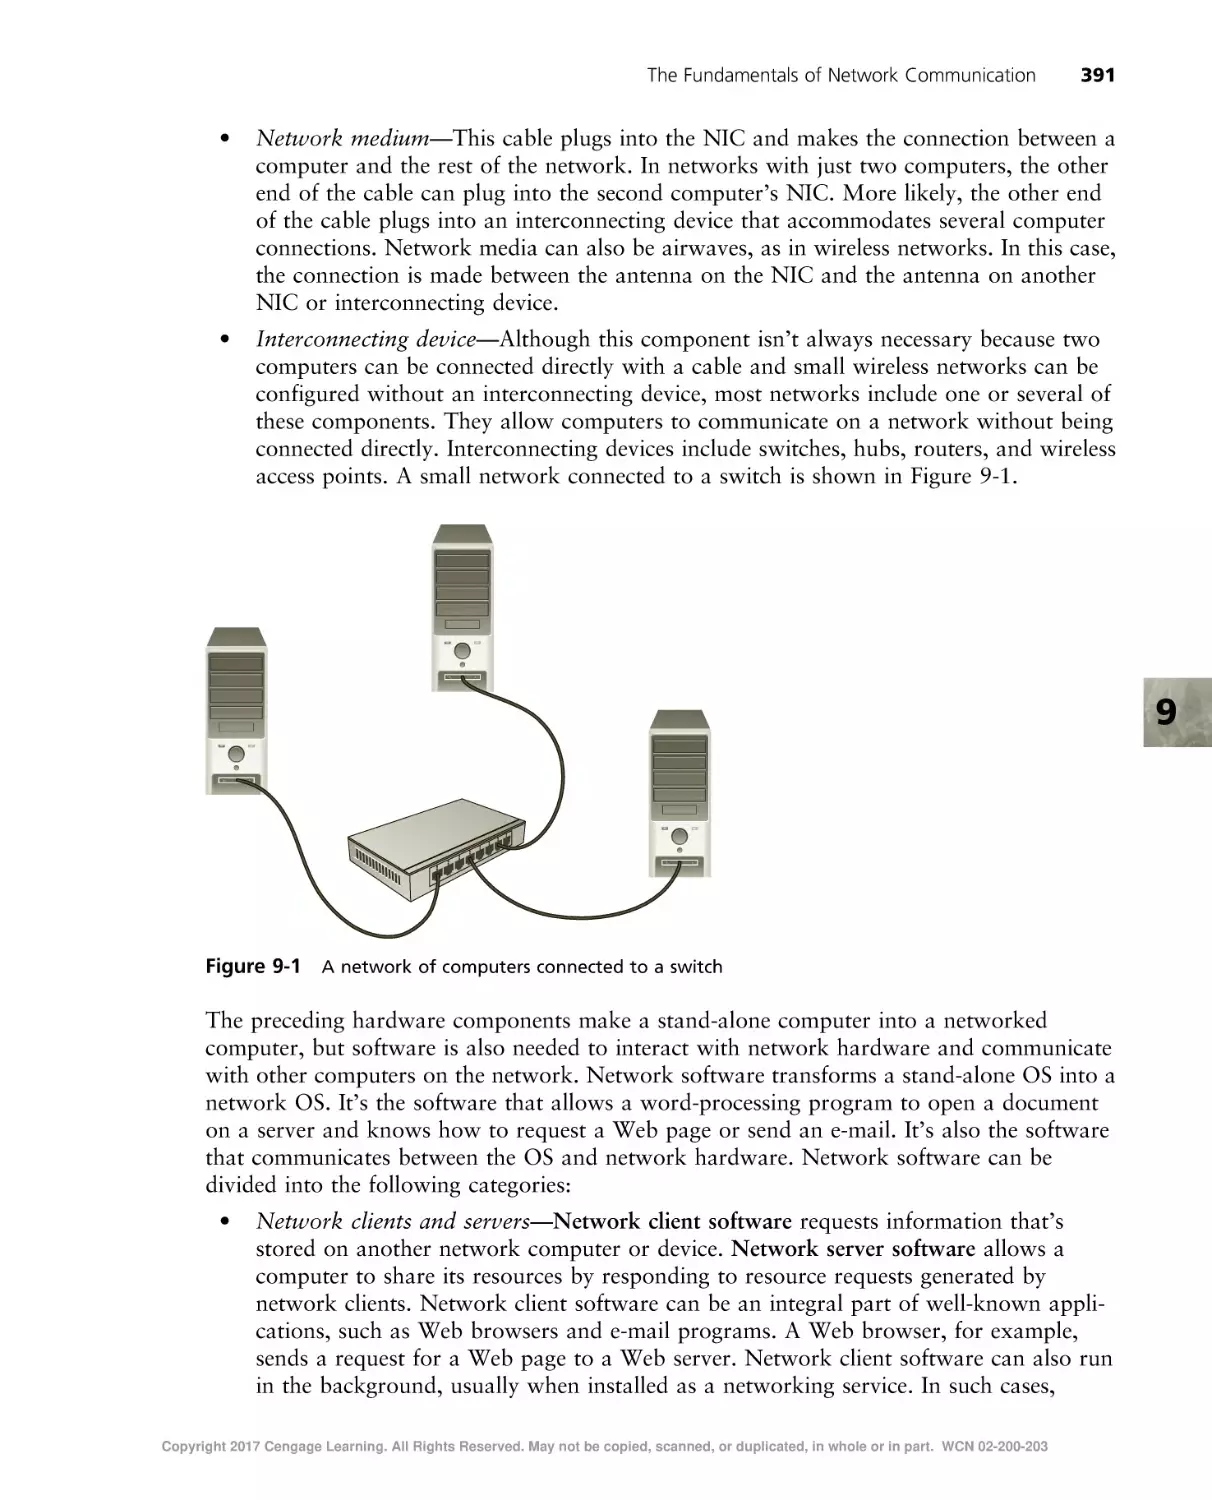
Network Components . . . . . . . . . . . . . . . . . . . . . . . . . . . . . . . . . . . . . . . . . . . . . . . . . . . . . .
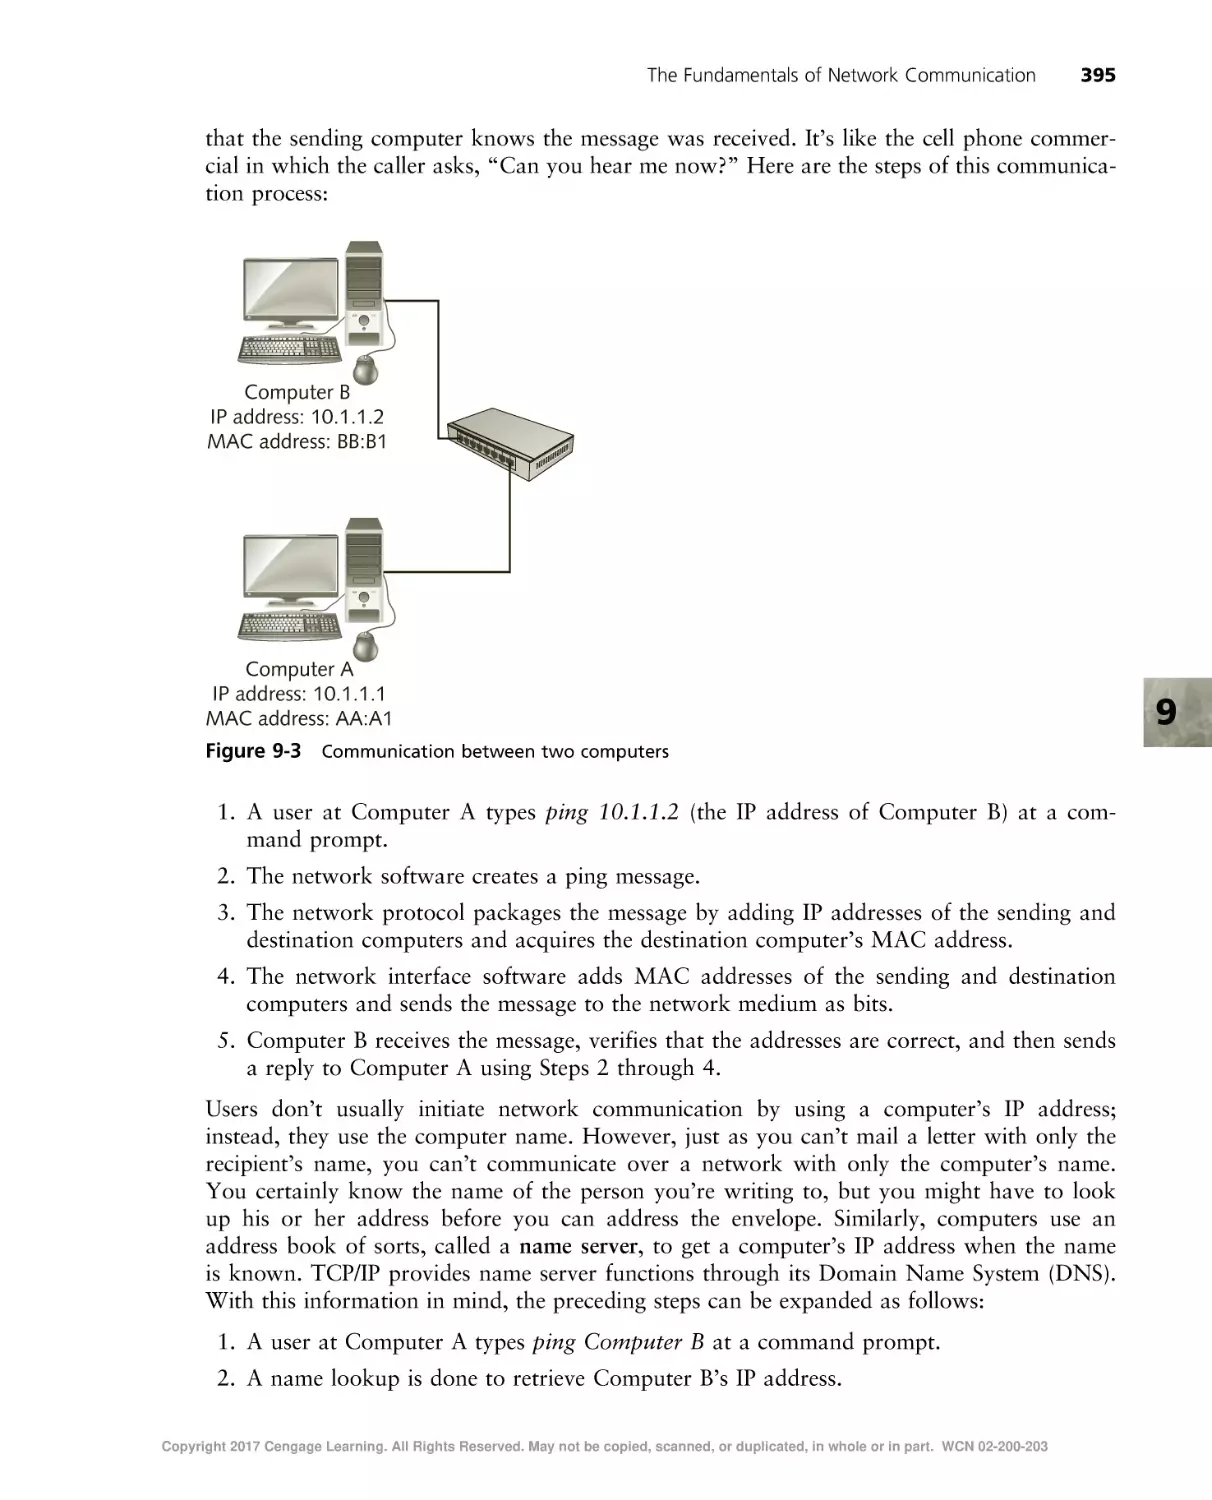
Steps of Network Communication . . . . . . . . . . . . . . . . . . . . . . . . . . . . . . . . . . . . . . . . . . . . . . .
Layers of the Network Communication Process . . . . . . . . . . . . . . . . . . . . . . . . . . . . . . . . . . . . . .
How Two Computers Communicate on a LAN . . . . . . . . . . . . . . . . . . . . . . . . . . . . . . . . . . . . . .
390
390
392
393
394
Network Terminology . . . . . . . . . . . . . . . . . . . . . . . . . . . . . . . . . . . . . . . . . . . . . . . . . . . . . . . .
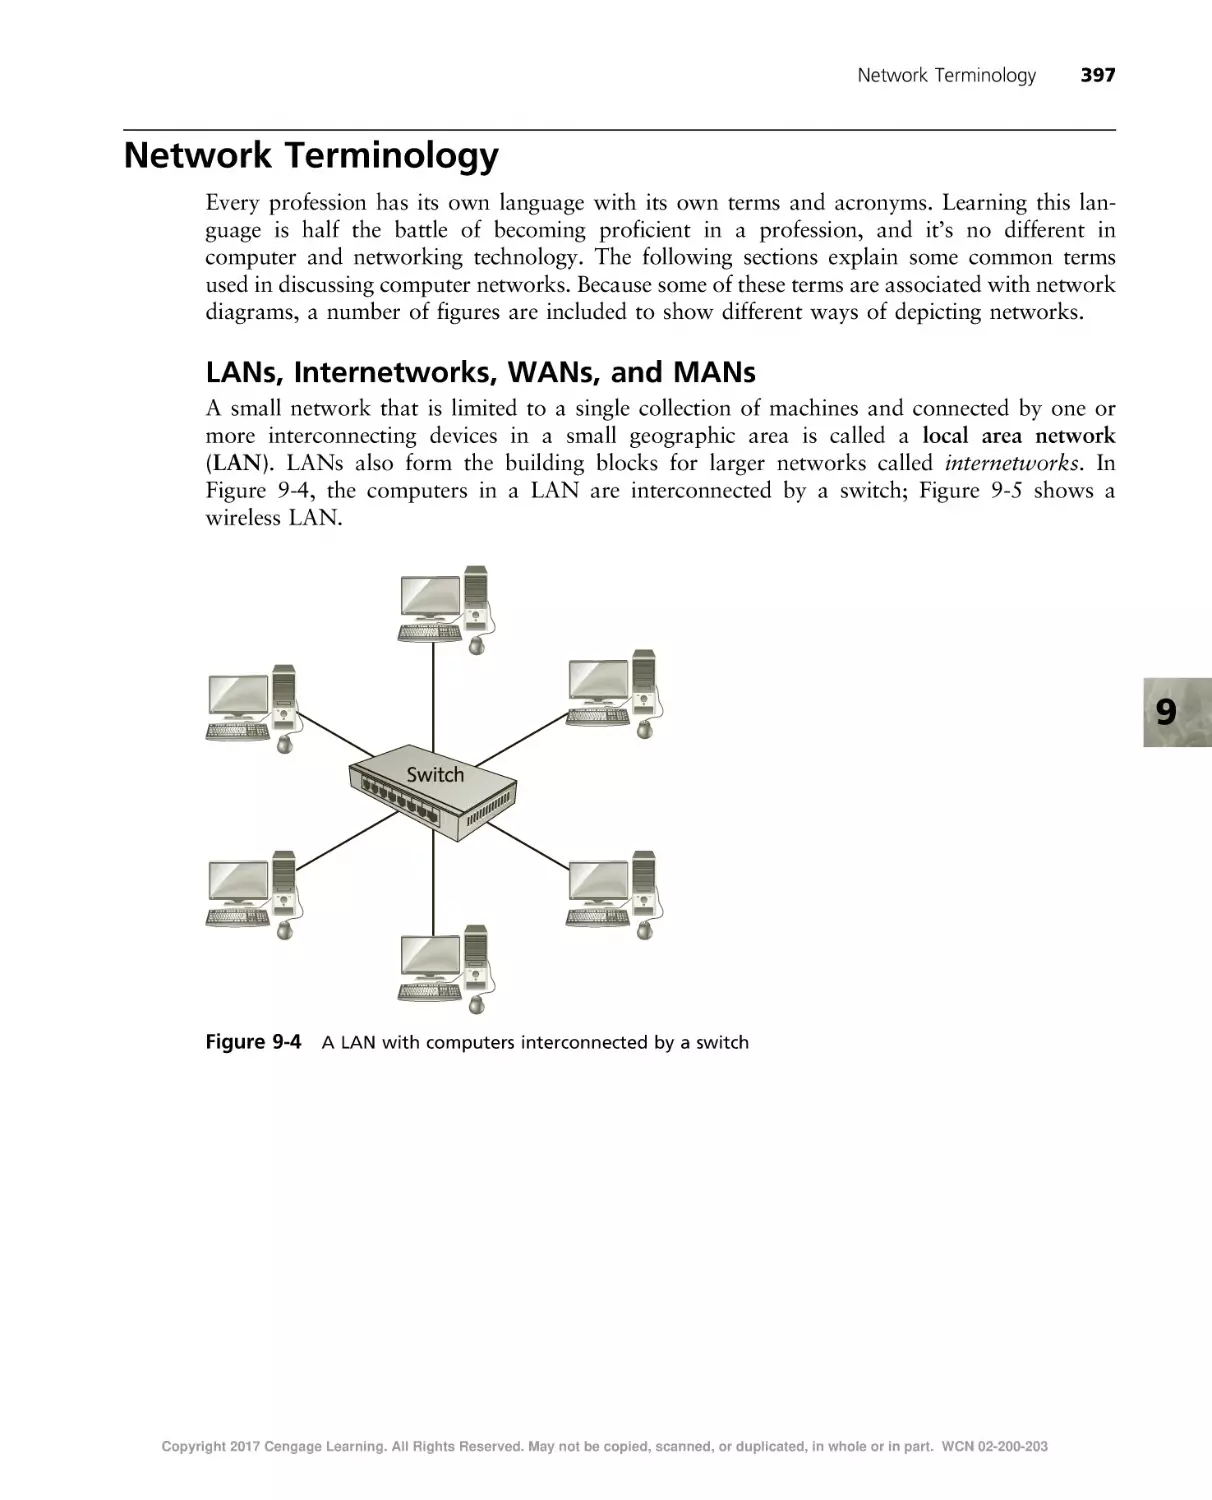
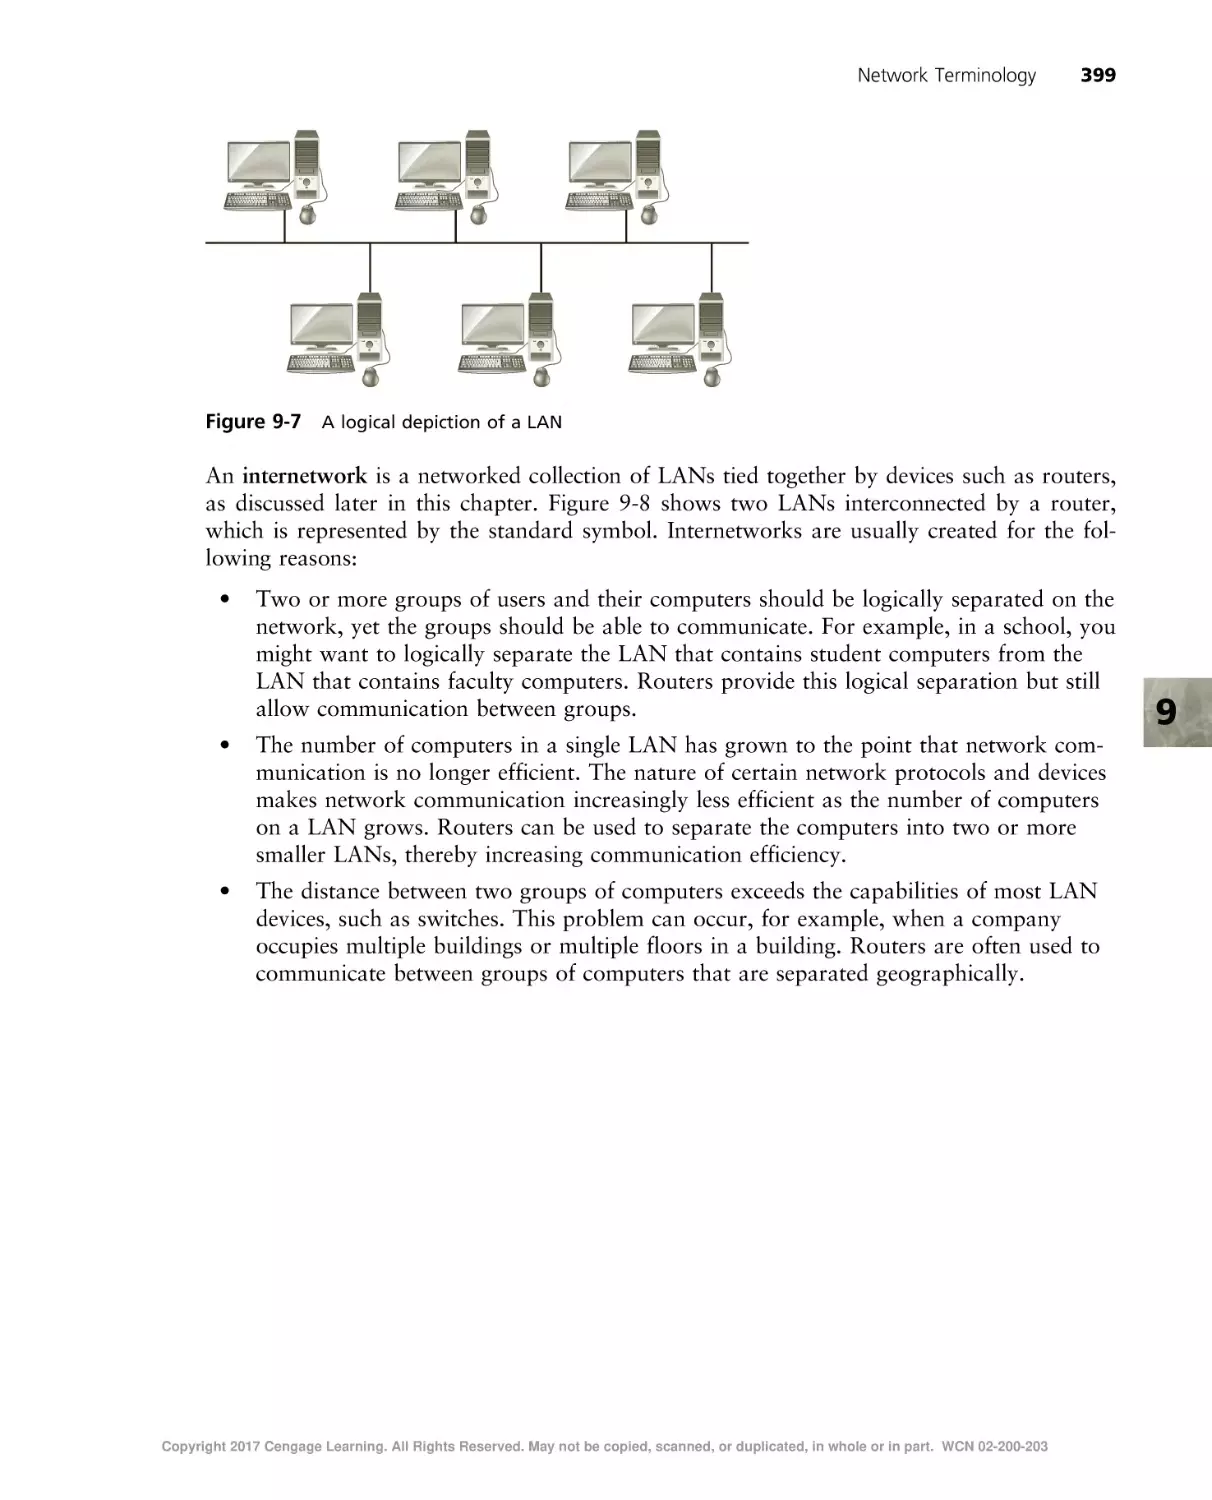
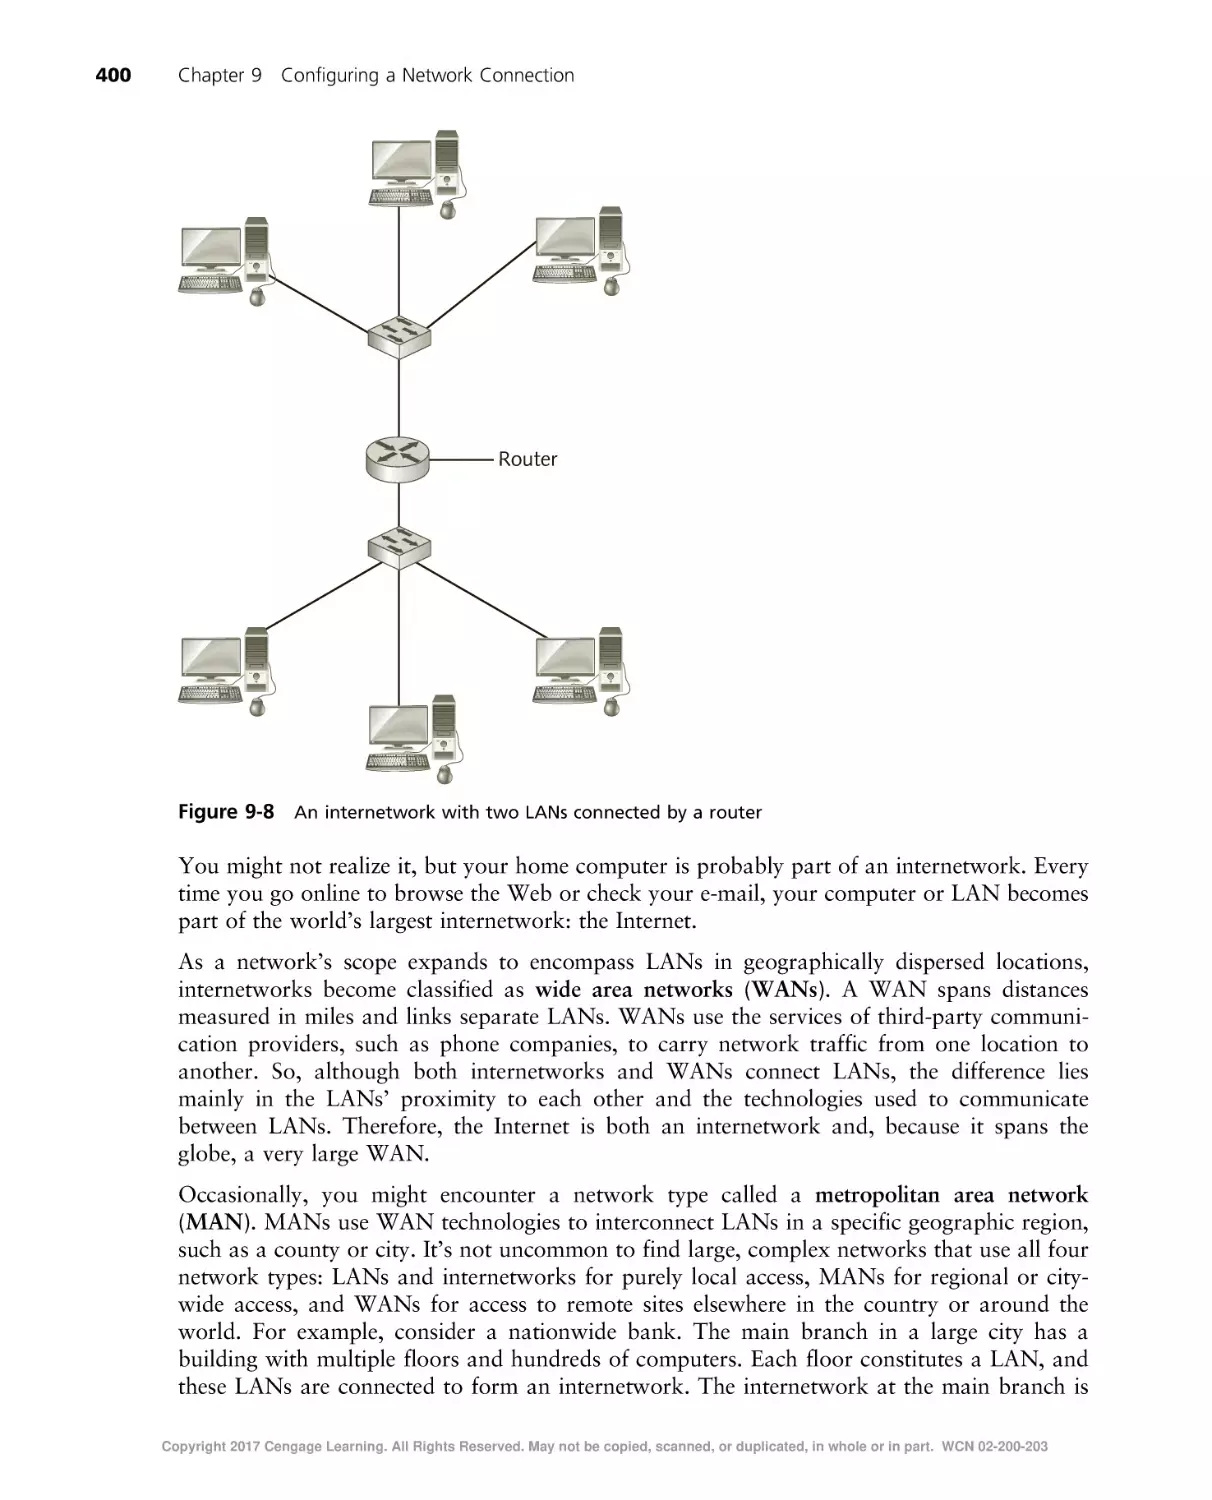
LANs, Internetworks, WANs, and MANs . . . . . . . . . . . . . . . . . . . . . . . . . . . . . . . . . . . . . . . . . .
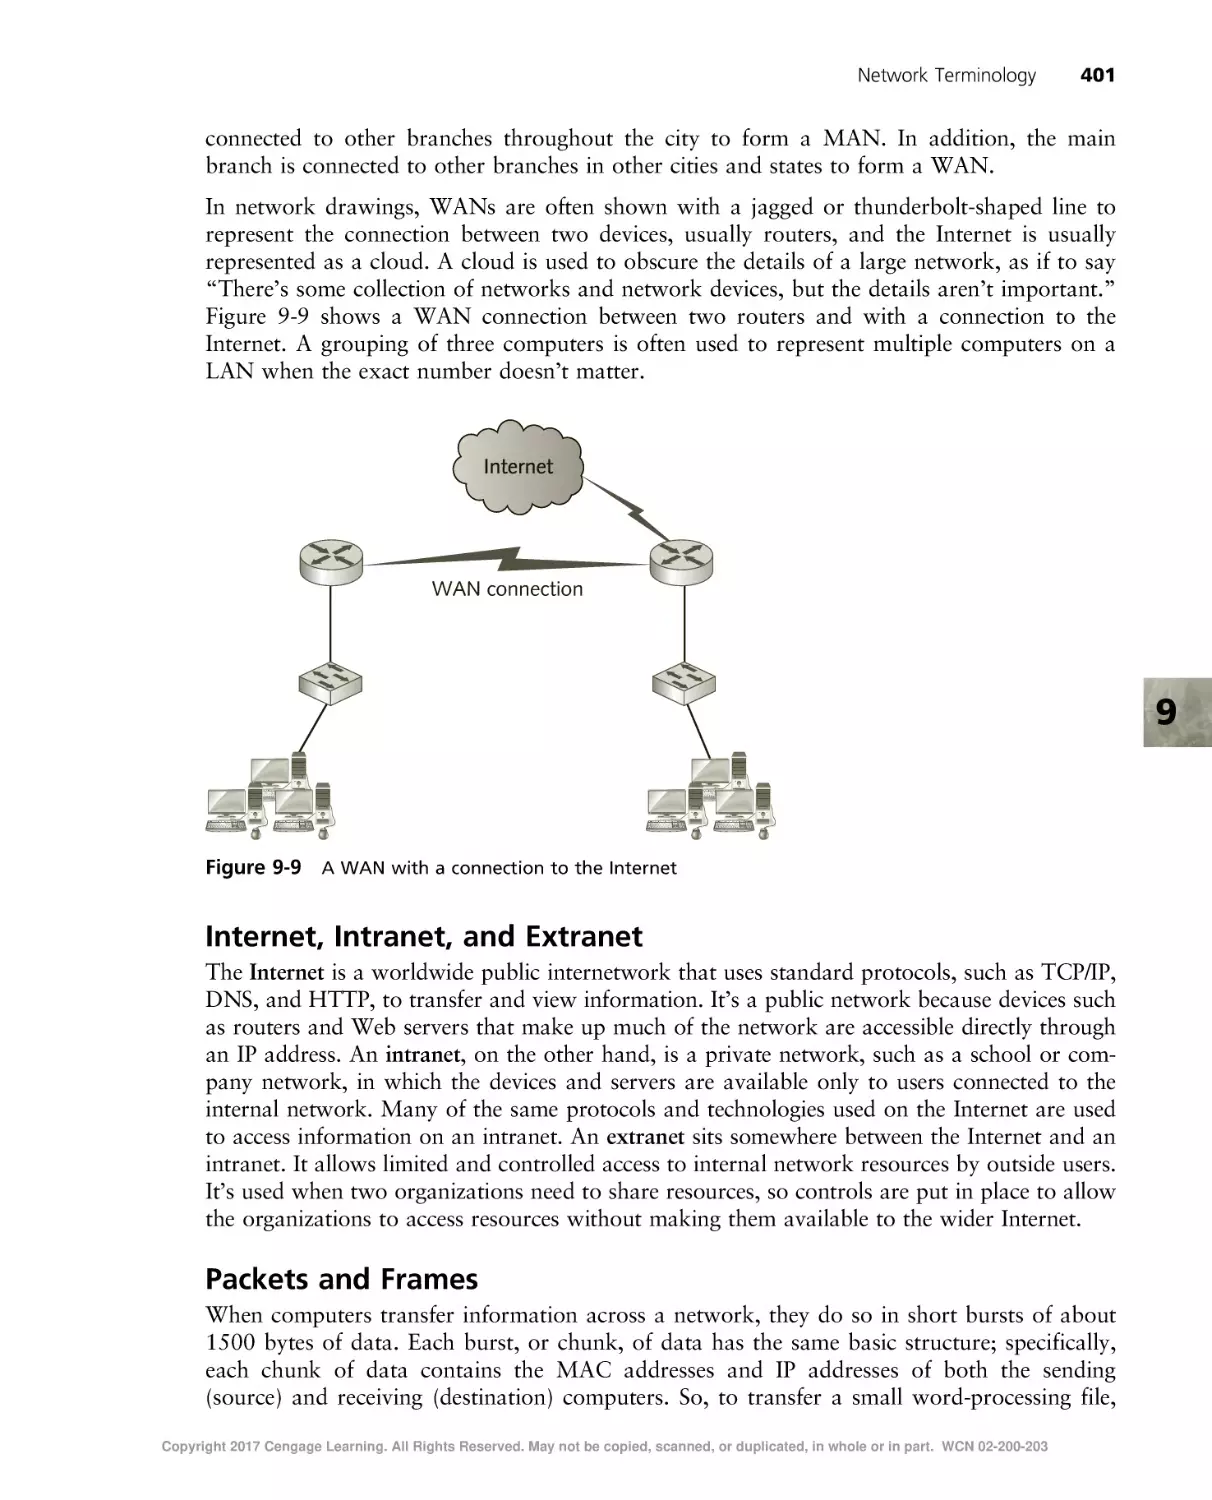
Internet, Intranet, and Extranet . . . . . . . . . . . . . . . . . . . . . . . . . . . . . . . . . . . . . . . . . . . . . . . .
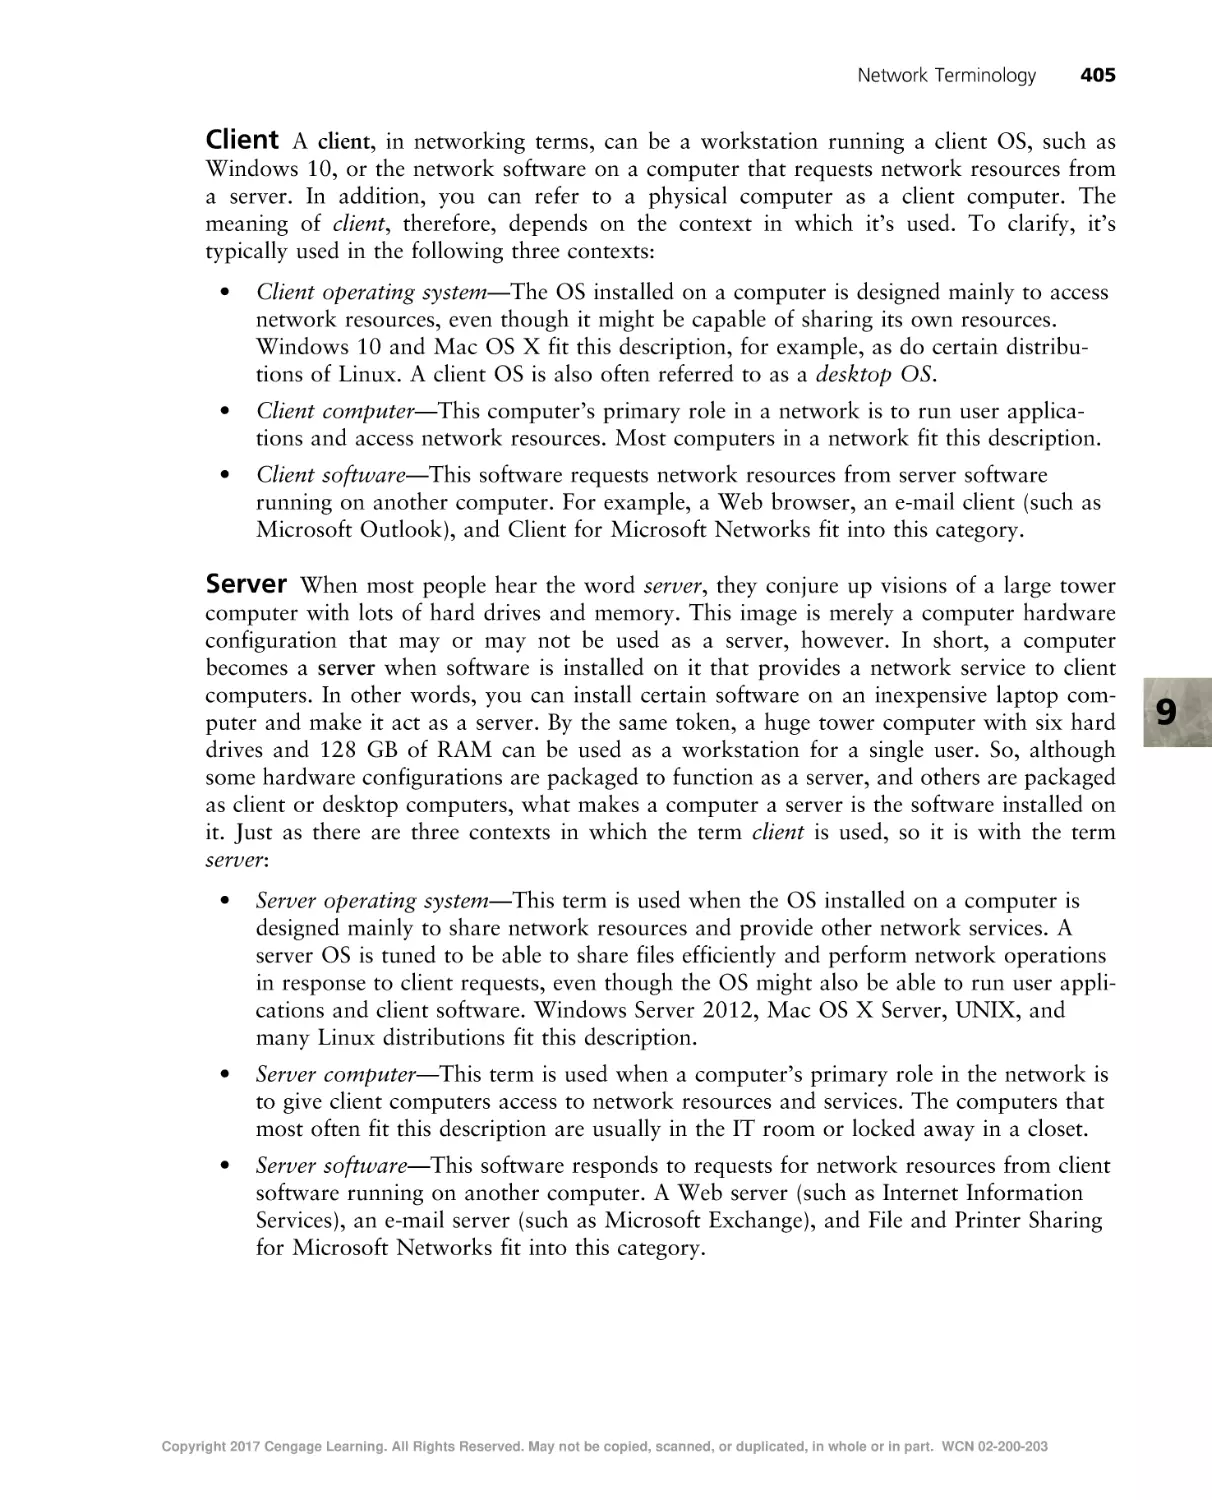
Packets and Frames . . . . . . . . . . . . . . . . . . . . . . . . . . . . . . . . . . . . . . . . . . . . . . . . . . . . . . . .
Clients and Servers . . . . . . . . . . . . . . . . . . . . . . . . . . . . . . . . . . . . . . . . . . . . . . . . . . . . . . . .
Peer-to-Peer and Client/Server Networks . . . . . . . . . . . . . . . . . . . . . . . . . . . . . . . . . . . . . . . . . . .
397
397
401
401
404
406
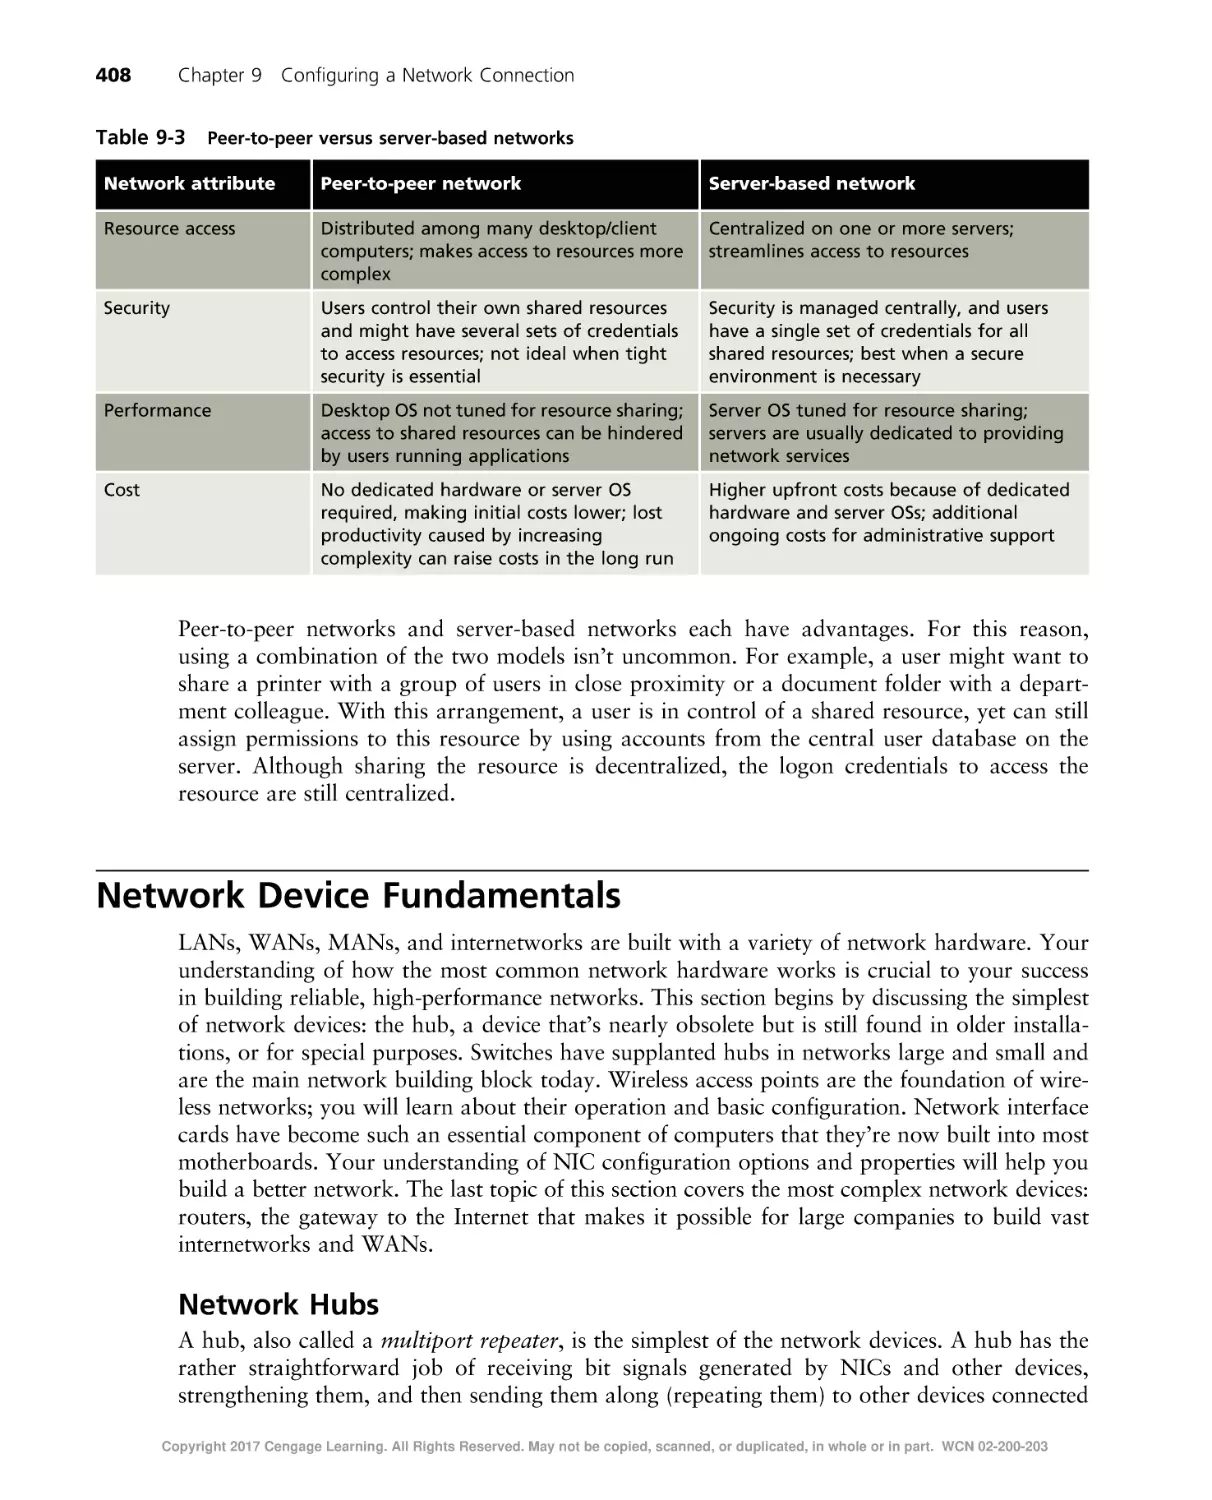
Network Device Fundamentals . . . . . . . . . . . . . . . . . . . . . . . . . . . . . . . . . . . . . . . . . . . . . . . . . . . 408
Network Hubs . . . . . . . . . . . . . . . . . . . . . . . . . . . . . . . . . . . . . . . . . . . . . . . . . . . . . . . . . . . 408
Copyright 2017 Cengage Learning. All Rights Reserved. May not be copied, scanned, or duplicated, in whole or in part. WCN 02-200-203
xii
Table of Contents
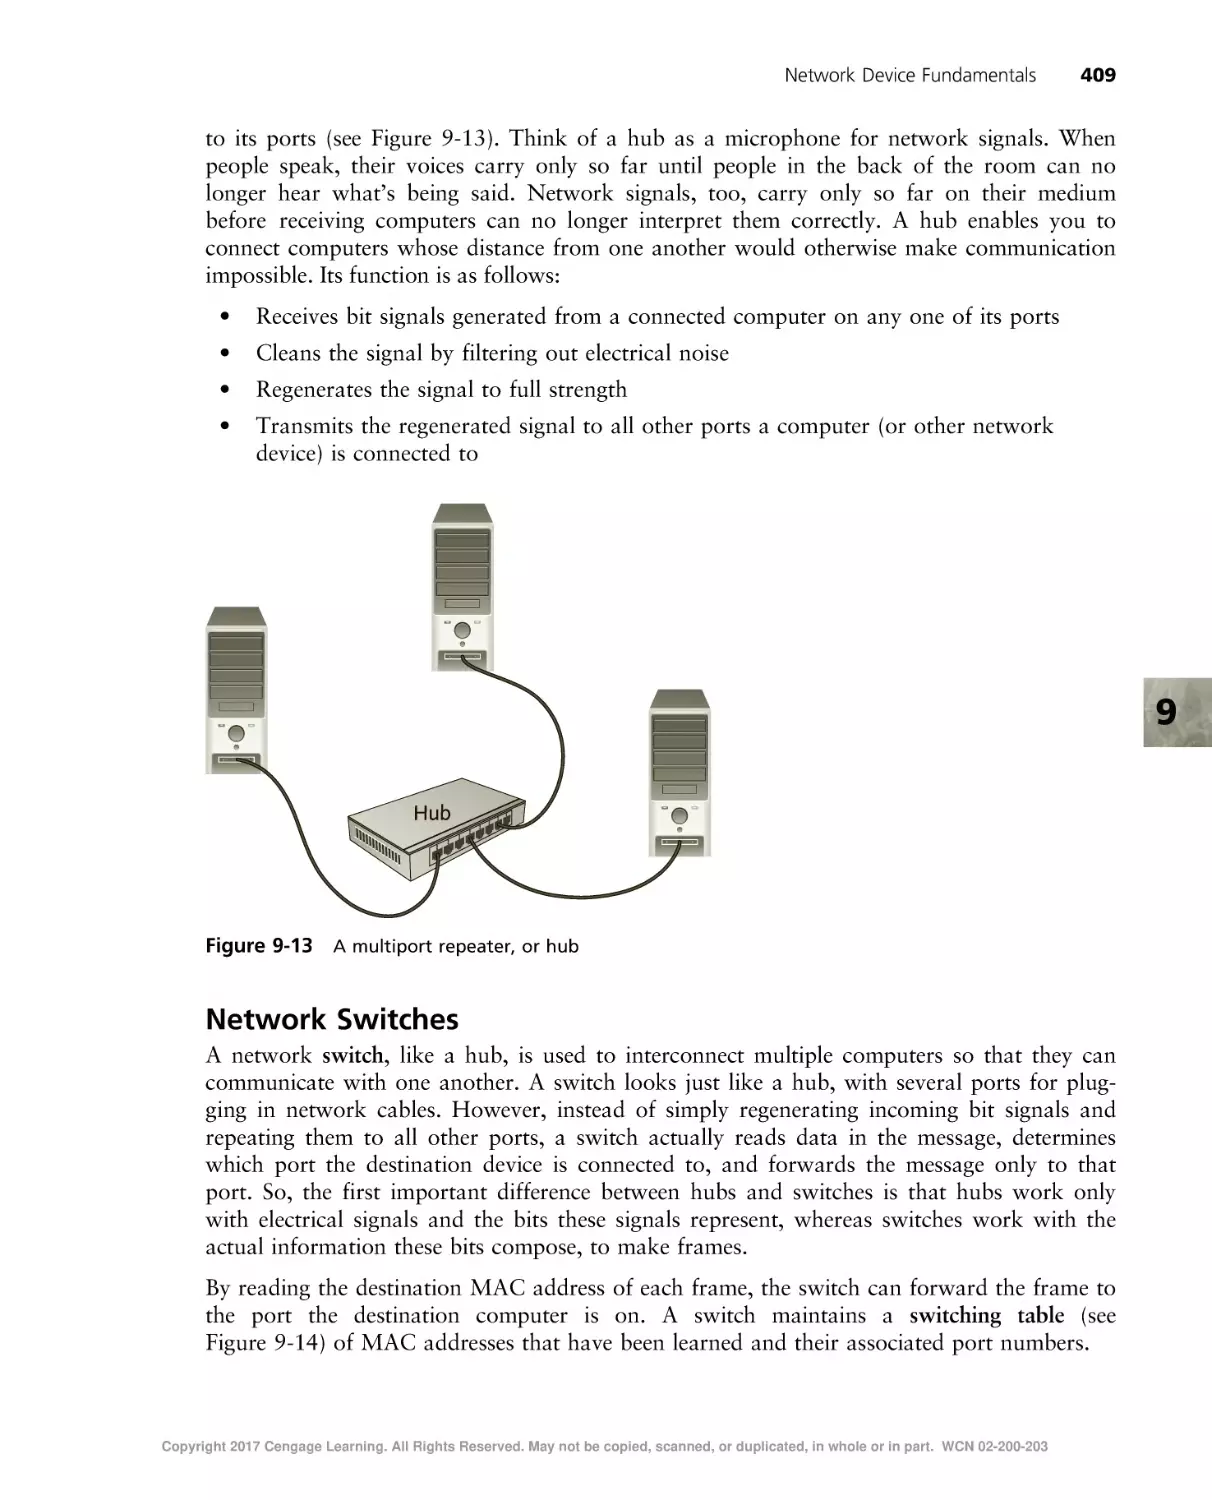
Network Switches . . . . .
Wireless Access Points . .
Network Interface Cards .
Routers. . . . . . . . . . . .
Network Media . . . . . .
.
.
.
.
.
.
.
.
.
.
.
.
.
.
.
.
.
.
.
.
.
.
.
.
.
.
.
.
.
.
.
.
.
.
.
.
.
.
.
.
.
.
.
.
.
.
.
.
.
.
.
.
.
.
.
.
.
.
.
.
.
.
.
.
.
.
.
.
.
.
.
.
.
.
.
.
.
.
.
.
.
.
.
.
.
.
.
.
.
.
.
.
.
.
.
.
.
.
.
.
.
.
.
.
.
.
.
.
.
.
.
.
.
.
.
.
.
.
.
.
.
.
.
.
.
.
.
.
.
.
.
.
.
.
.
.
.
.
.
.
.
.
.
.
.
.
.
.
.
.
.
.
.
.
.
.
.
.
.
.
.
.
.
.
.
.
.
.
.
.
.
.
.
.
.
.
.
.
.
.
.
.
.
.
.
.
.
.
.
.
.
.
.
.
.
.
.
.
.
.
.
.
.
.
.
.
.
.
.
.
.
.
.
.
.
.
.
.
.
.
.
.
.
.
.
.
.
.
.
.
.
.
.
.
.
.
.
.
.
.
.
.
.
.
.
.
.
.
.
.
.
.
.
.
.
.
.
.
.
.
409
411
411
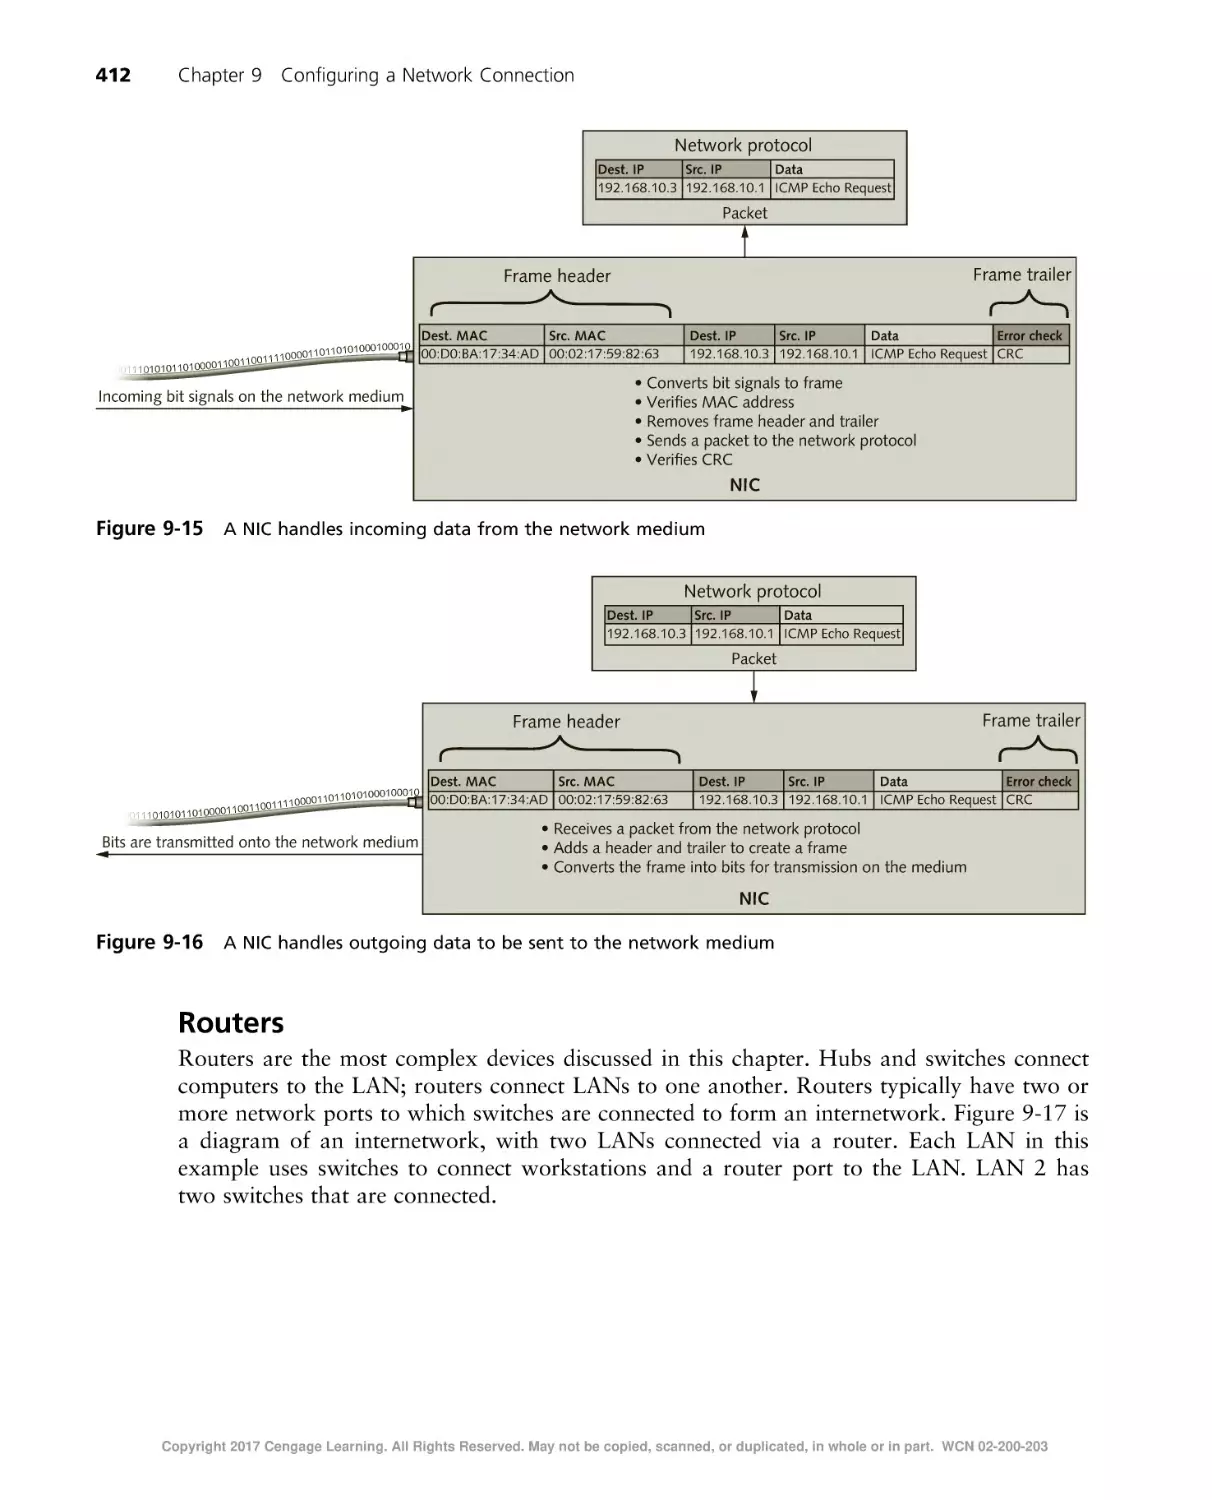
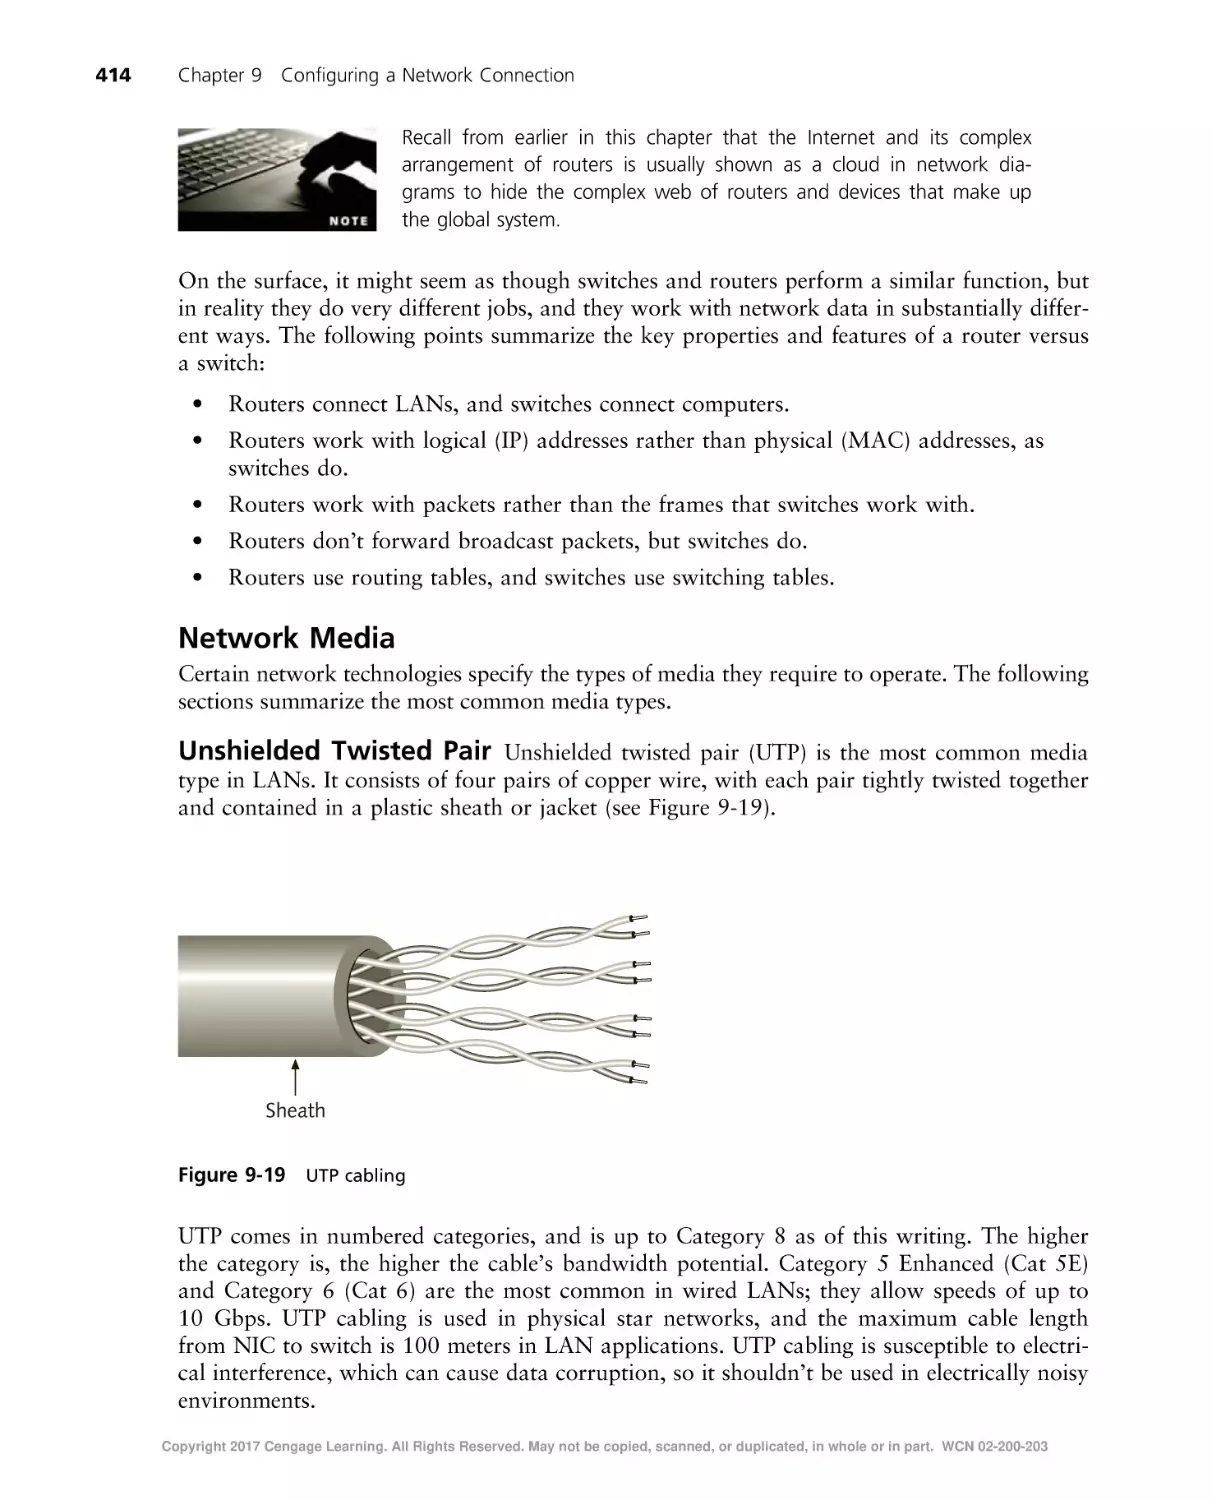
412
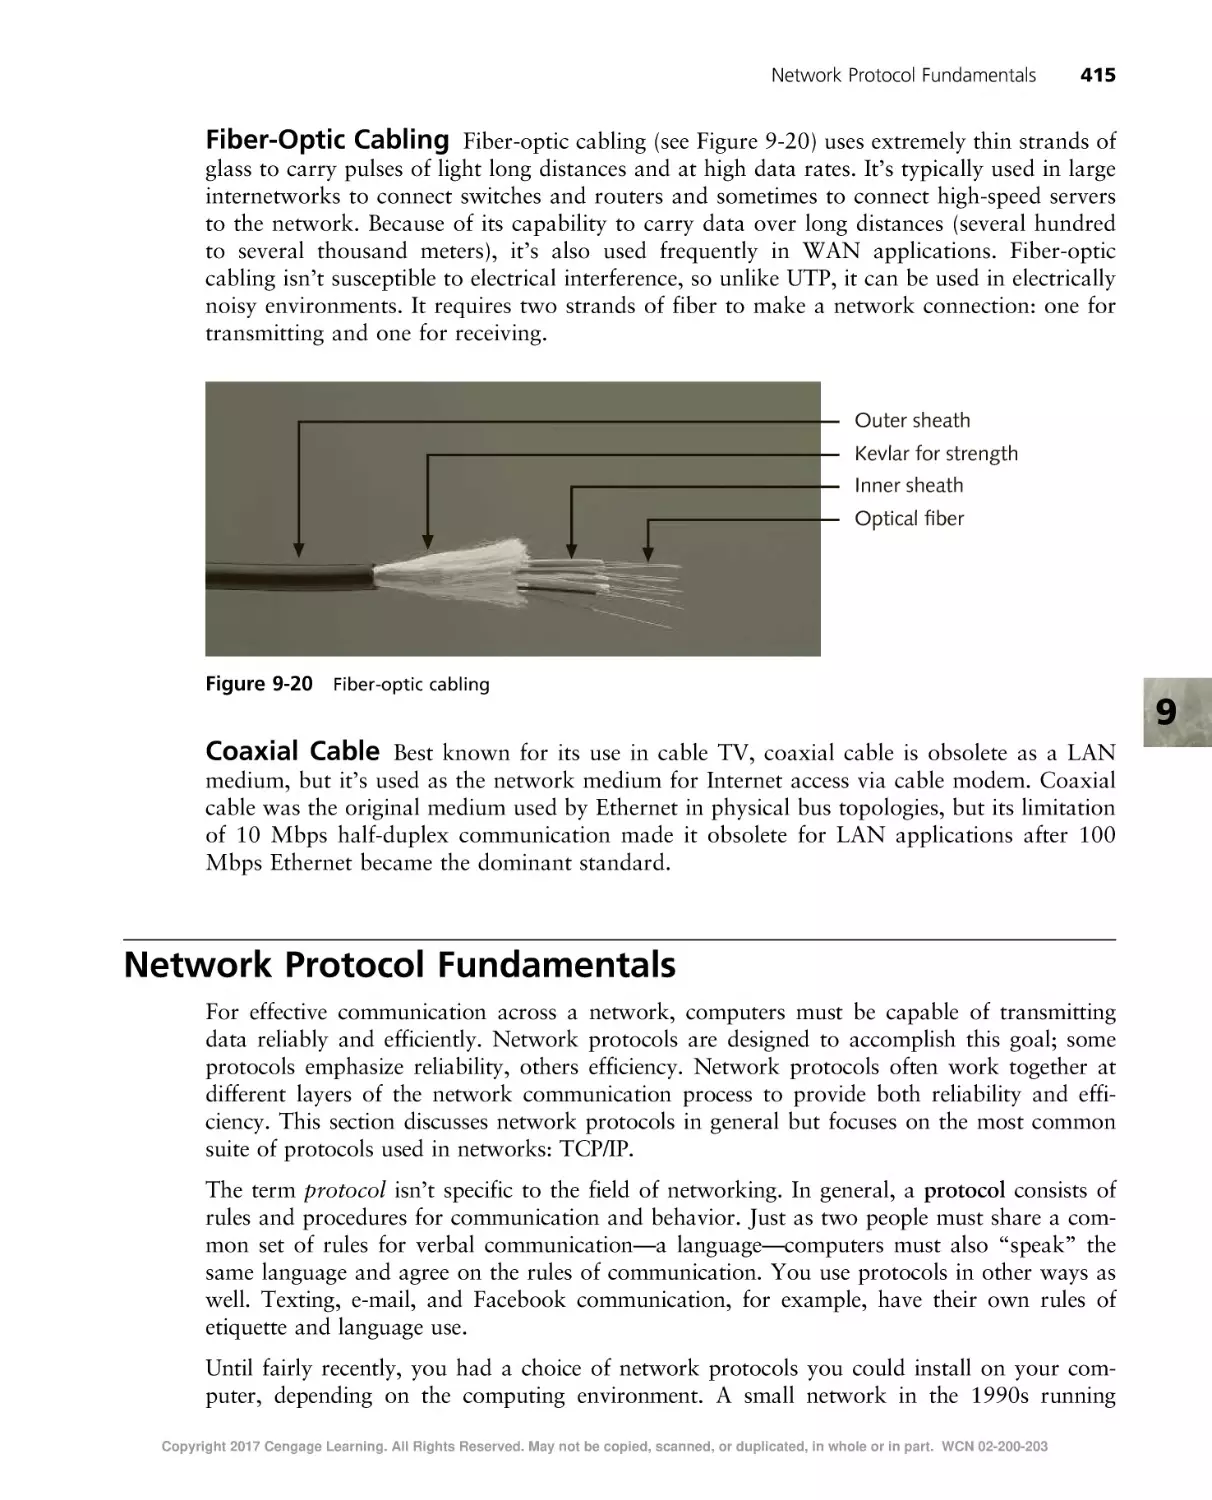
414
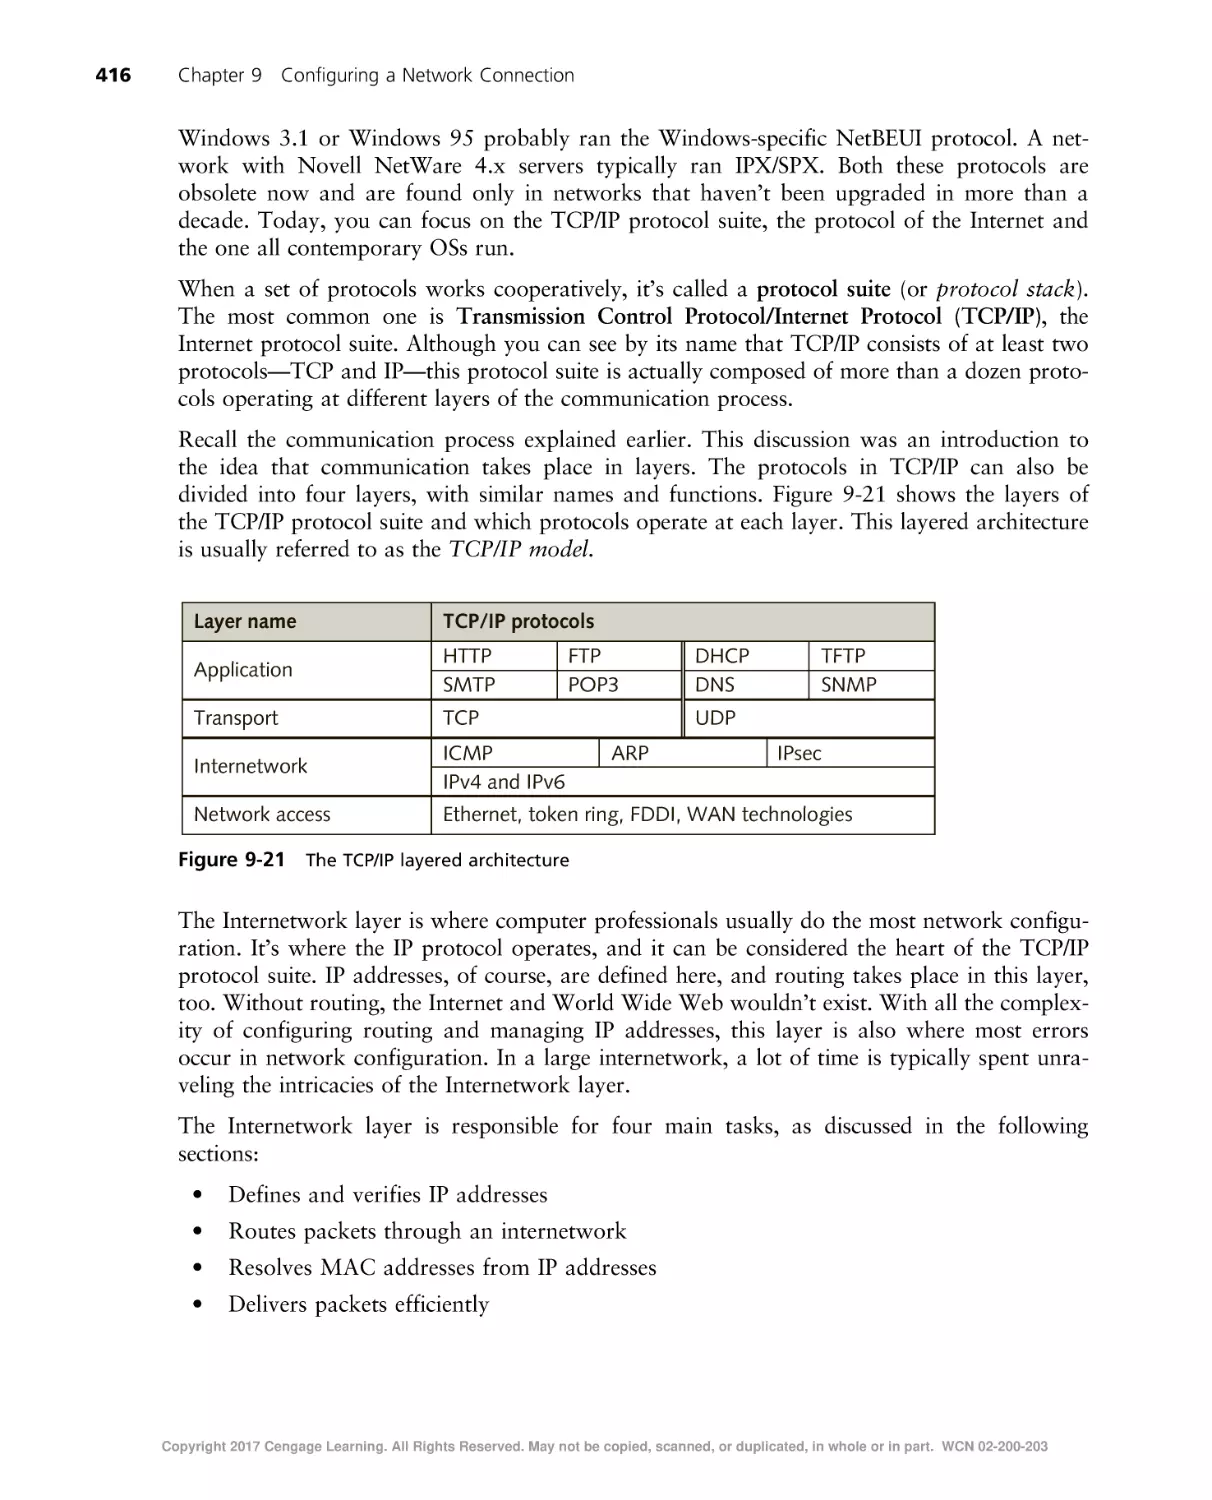
Network Protocol Fundamentals . . . . . . . . . . . . . . . . . . . . . . . . . . . . . . . . . . . . . . . . . . . . . . . . . . 415
Internet Protocol Version 4 . . . . . . . . . . . . . . . . . . . . . . . . . . . . . . . . . . . . . . . . . . . . . . . . . . . 417
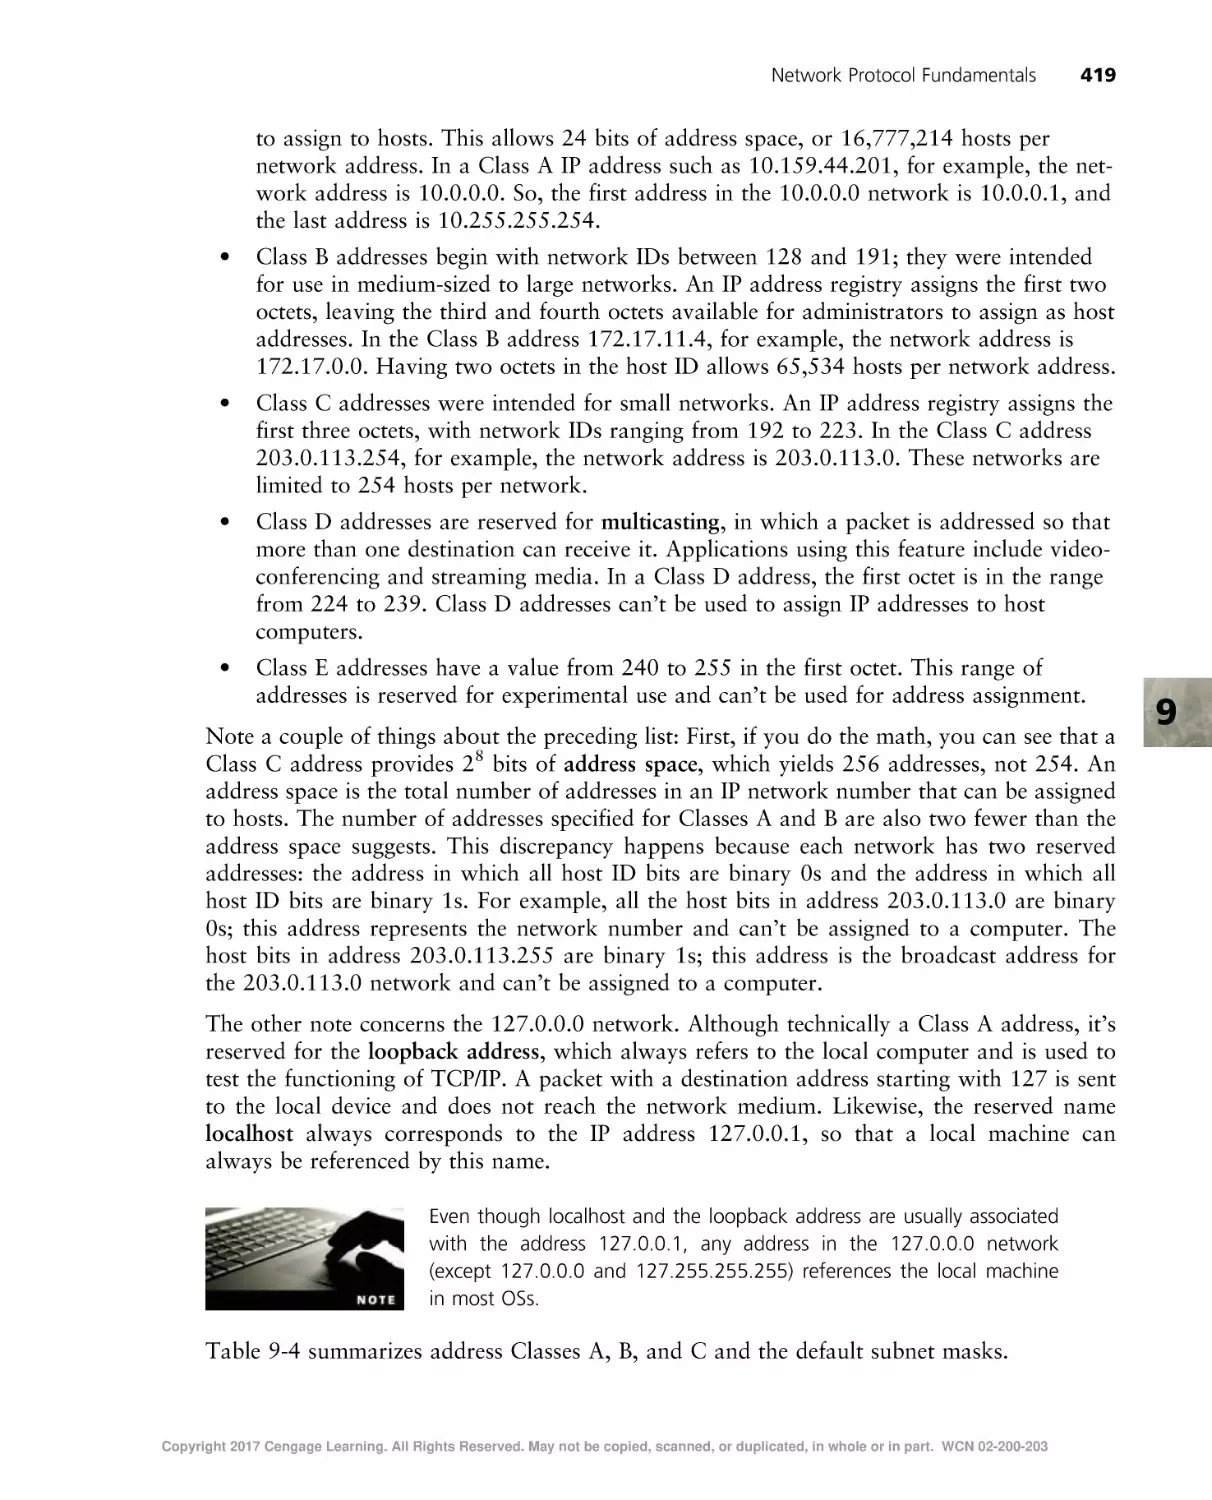
Internet Protocol Version 6 . . . . . . . . . . . . . . . . . . . . . . . . . . . . . . . . . . . . . . . . . . . . . . . . . . . 420
Introducing the OSI Model of Networking . . . . . . . . . . . . . . . . . . . . . . . . . . . . . . . . . . . . . . . . . . . 421
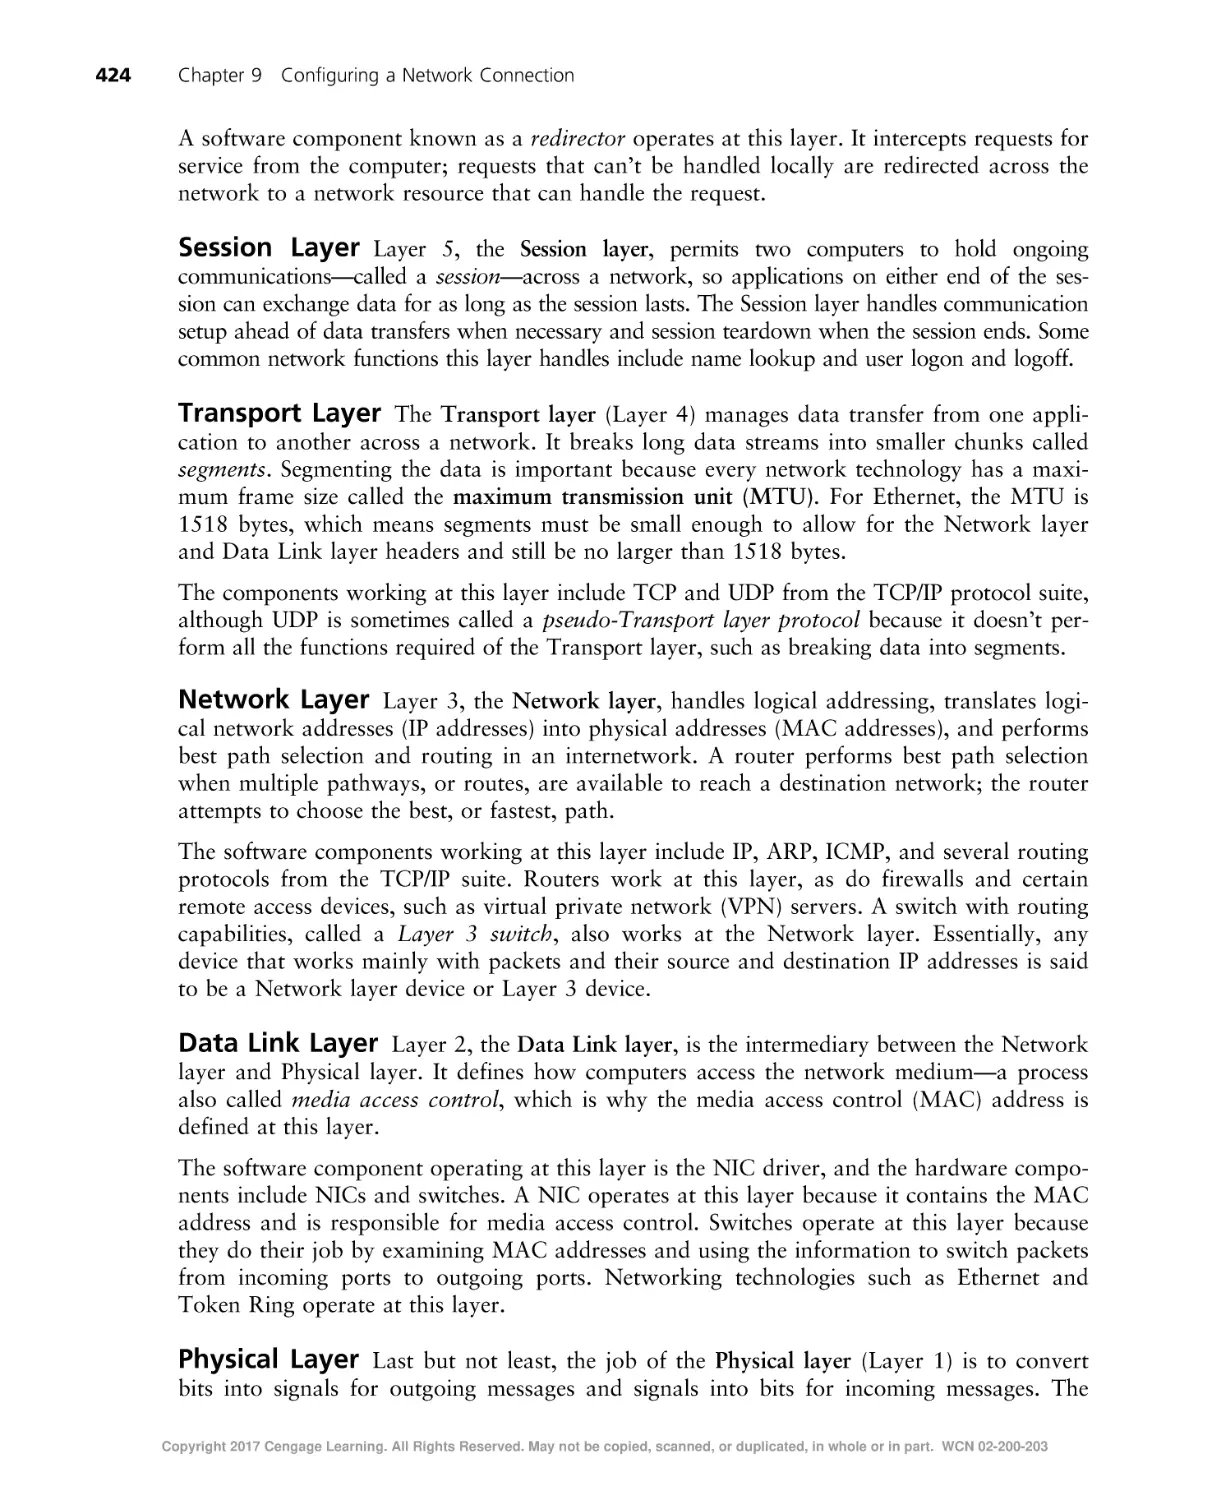
Structure of the OSI Model . . . . . . . . . . . . . . . . . . . . . . . . . . . . . . . . . . . . . . . . . . . . . . . . . . . 422
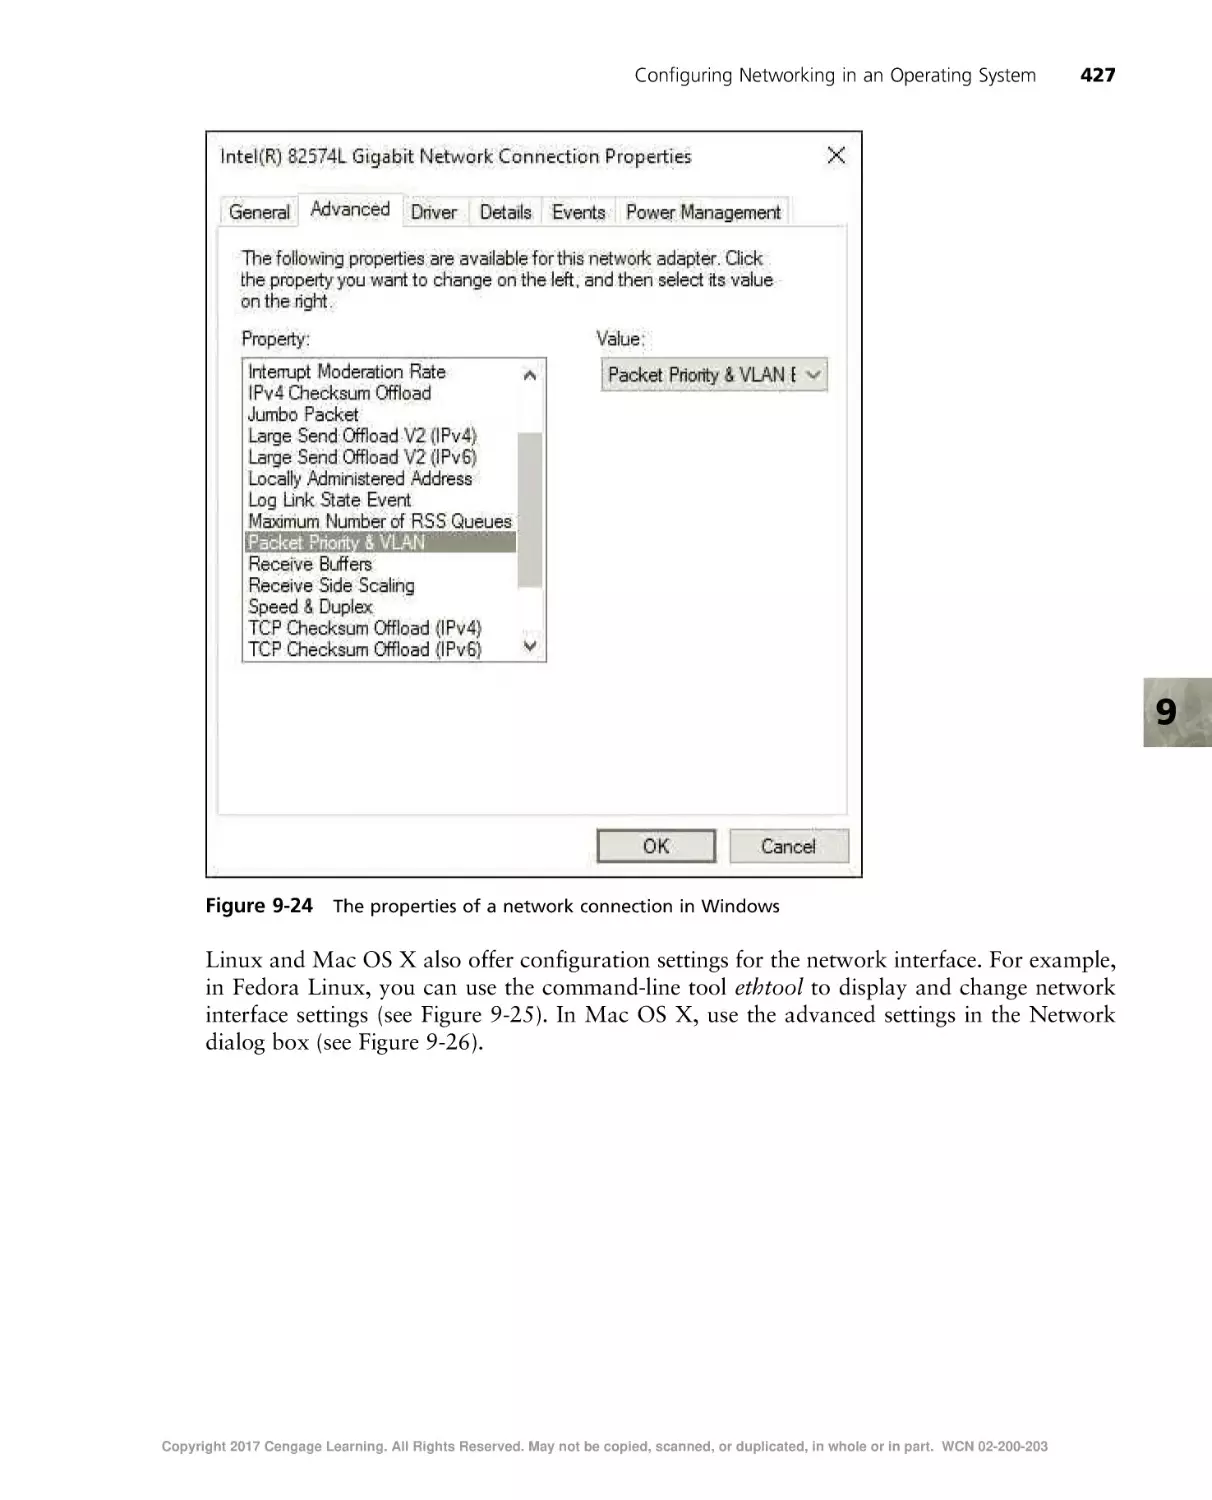
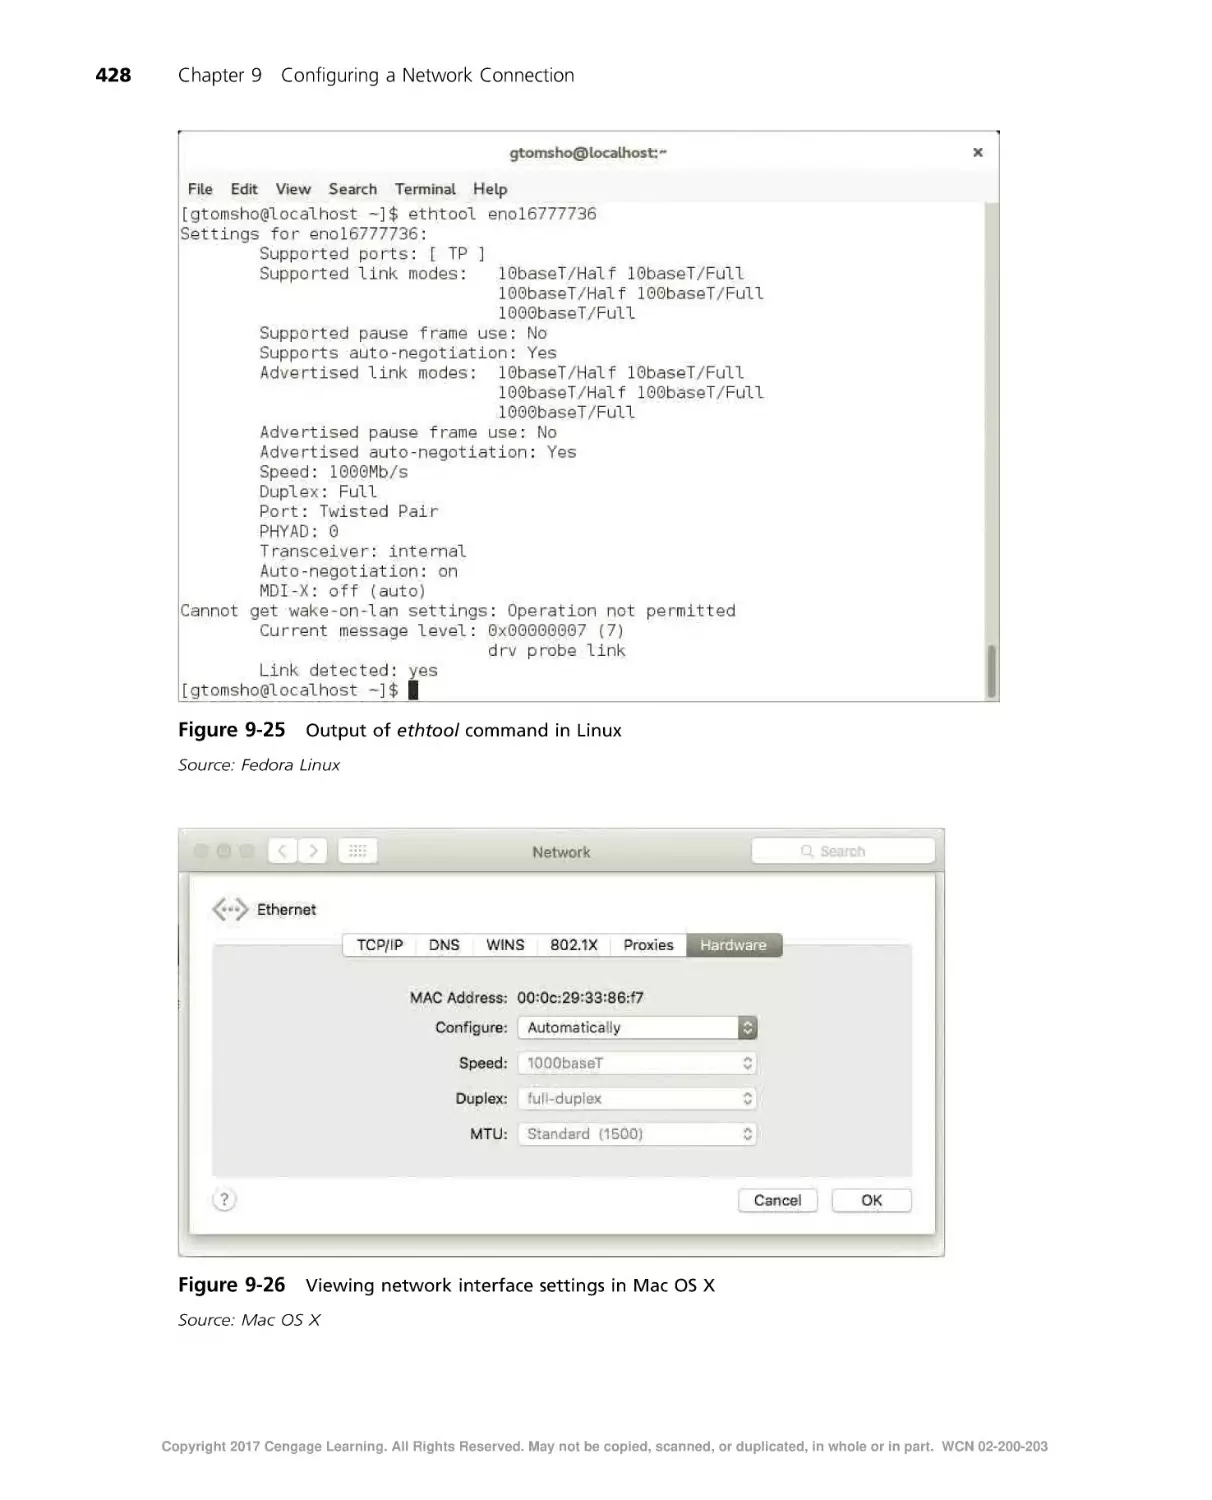
Configuring Networking in an Operating System . . . . . . . . . . . . . . . . . . . . . . . . . . . . . . . . . . . . . . .
Configuring the Network Interface . . . . . . . . . . . . . . . . . . . . . . . . . . . . . . . . . . . . . . . . . . . . . .
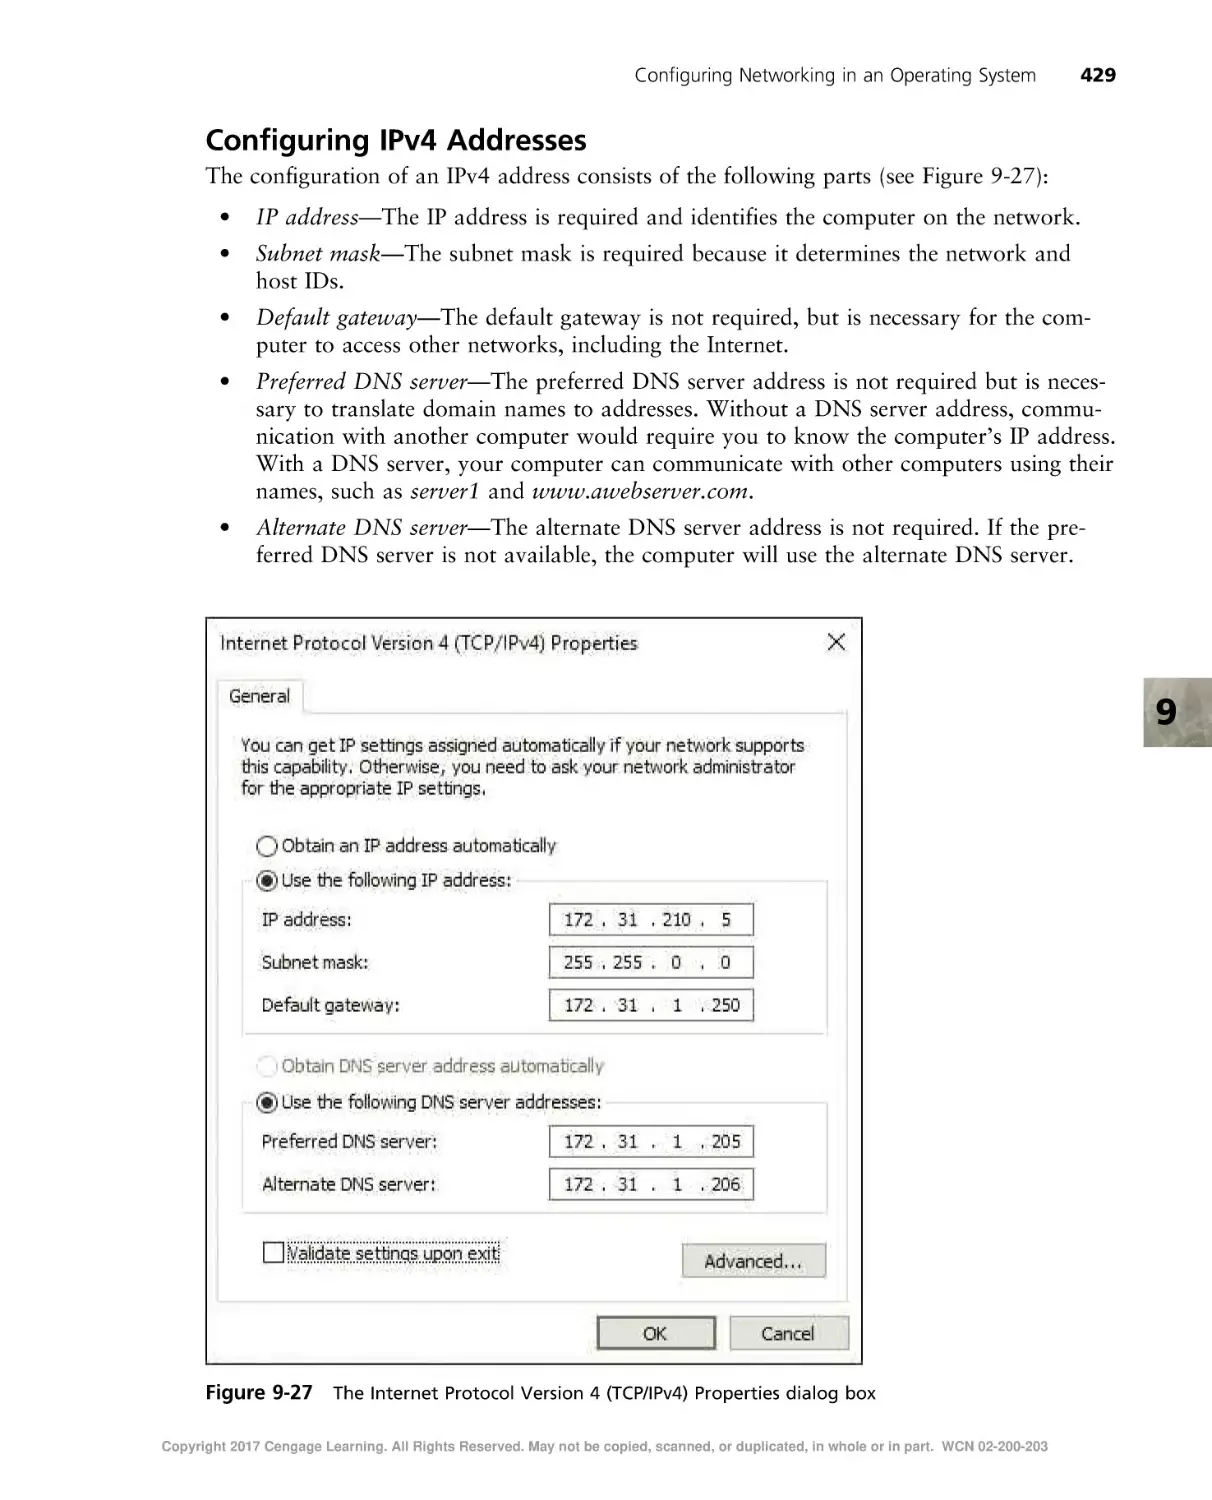
Configuring IPv4 Addresses . . . . . . . . . . . . . . . . . . . . . . . . . . . . . . . . . . . . . . . . . . . . . . . . . . .
Configuring IPv6 Addresses . . . . . . . . . . . . . . . . . . . . . . . . . . . . . . . . . . . . . . . . . . . . . . . . . . .
426
426
429
433
Chapter Summary . . . . . . . . . . . . . . . . . . . . . . . . . . . . . . . . . . . . . . . . . . . . . . . . . . . . . . . . . . . 434
Key Terms . . . . . . . . . . . . . . . . . . . . . . . . . . . . . . . . . . . . . . . . . . . . . . . . . . . . . . . . . . . . . . . 435
Review Questions . . . . . . . . . . . . . . . . . . . . . . . . . . . . . . . . . . . . . . . . . . . . . . . . . . . . . . . . . . . 439
Hands-On Projects . . . . . . . . . . . . . . . . . . . . . . . . . . . . . . . . . . . . . . . . . . . . . . . . . . . . . . . . . . 444
Critical Thinking . . . . . . . . . . . . . . . . . . . . . . . . . . . . . . . . . . . . . . . . . . . . . . . . . . . . . . . . . . . 454
Challenge Labs . . . . . . . . . . . . . . . . . . . . . . . . . . . . . . . . . . . . . . . . . . . . . . . . . . . . . . . . . . . . . 454
Case Projects . . . . . . . . . . . . . . . . . . . . . . . . . . . . . . . . . . . . . . . . . . . . . . . . . . . . . . . . . . . . . . 454
CHAPTER 10
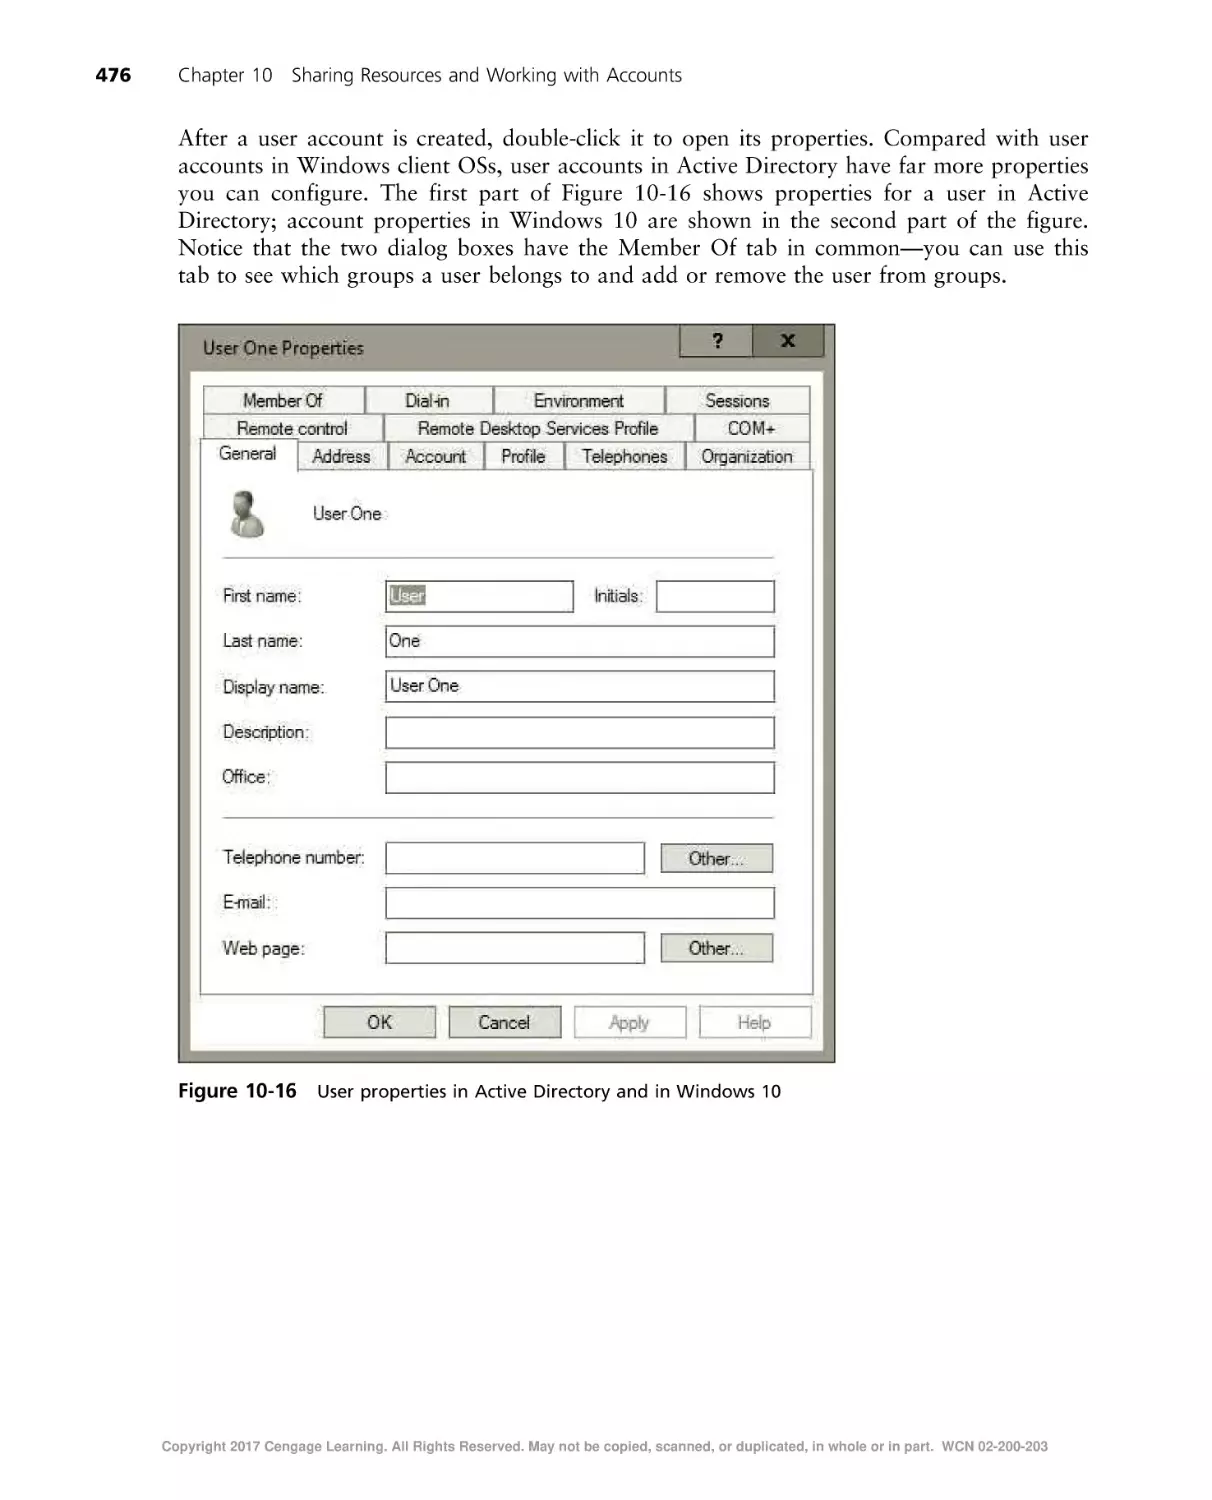
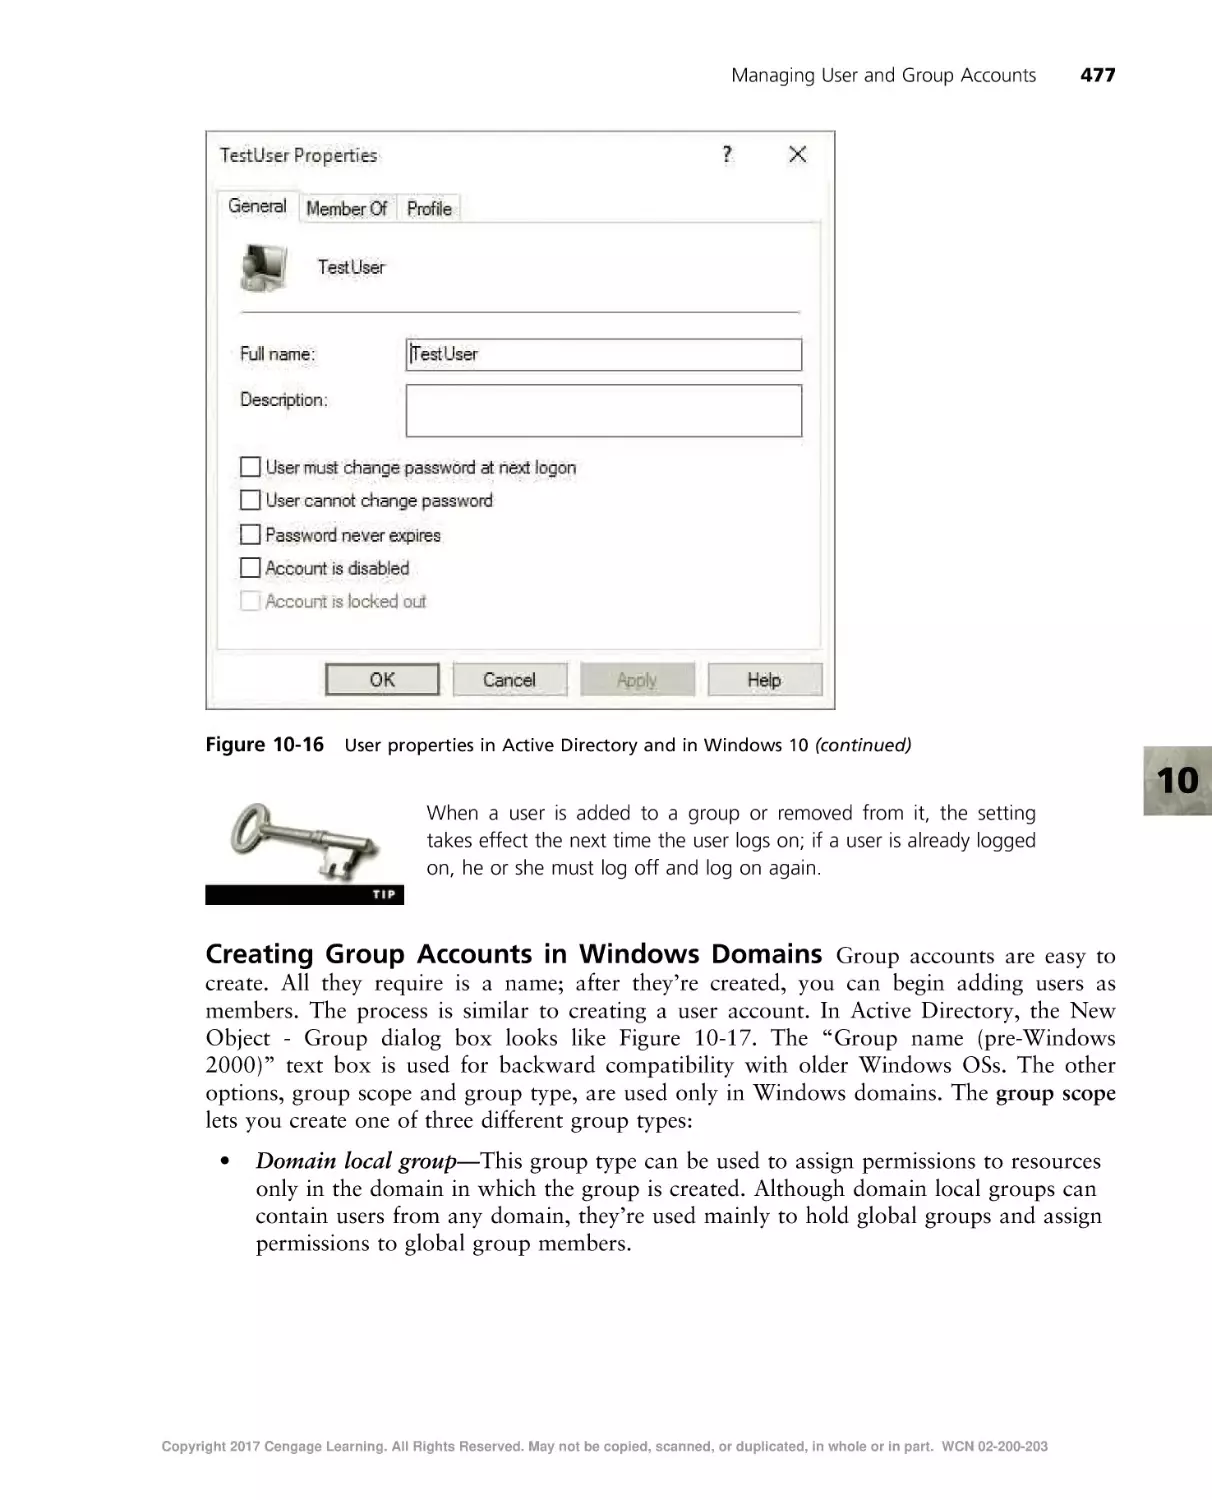
Sharing Resources and Working with Accounts . . . . . . . . . . . . . . . . . . . . . . . . . . . . . . . . . . . . . . . . 457
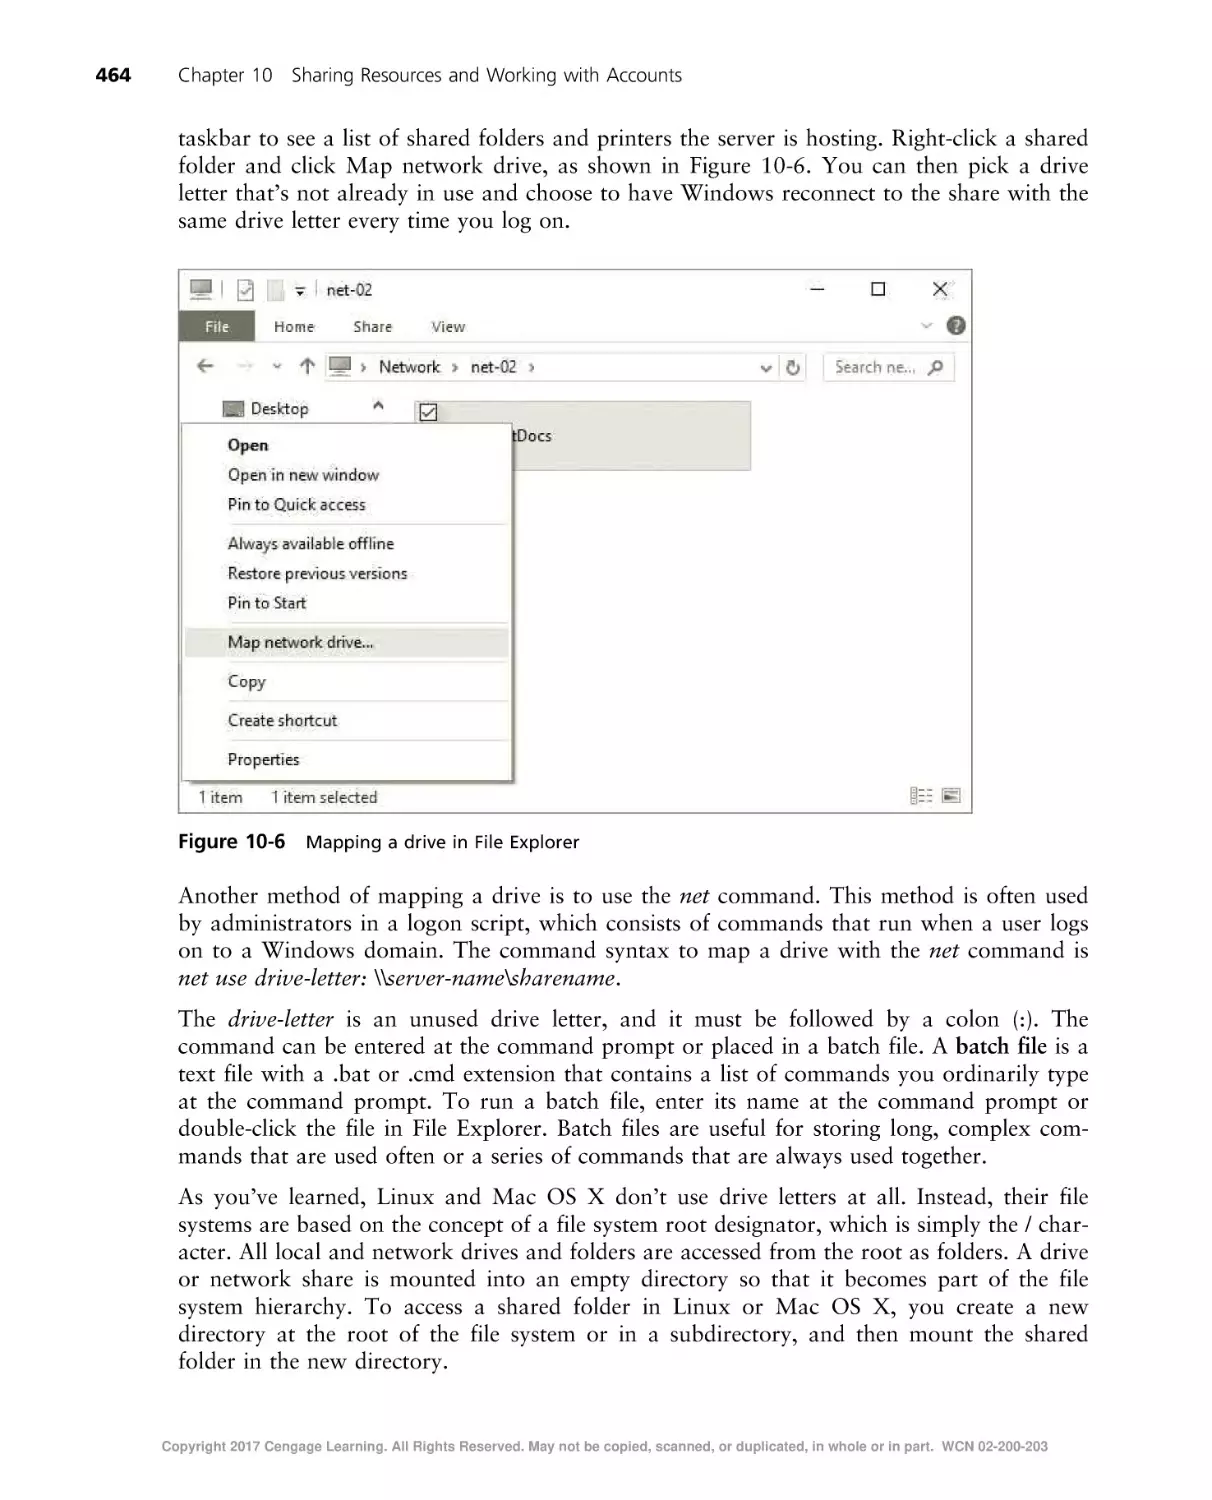
File and Printer Sharing . . . . . . . . . . . . . . . . . . . . . . . . . . . . . . . . . . . . . . . . . . . . . . . . . . . . . . .
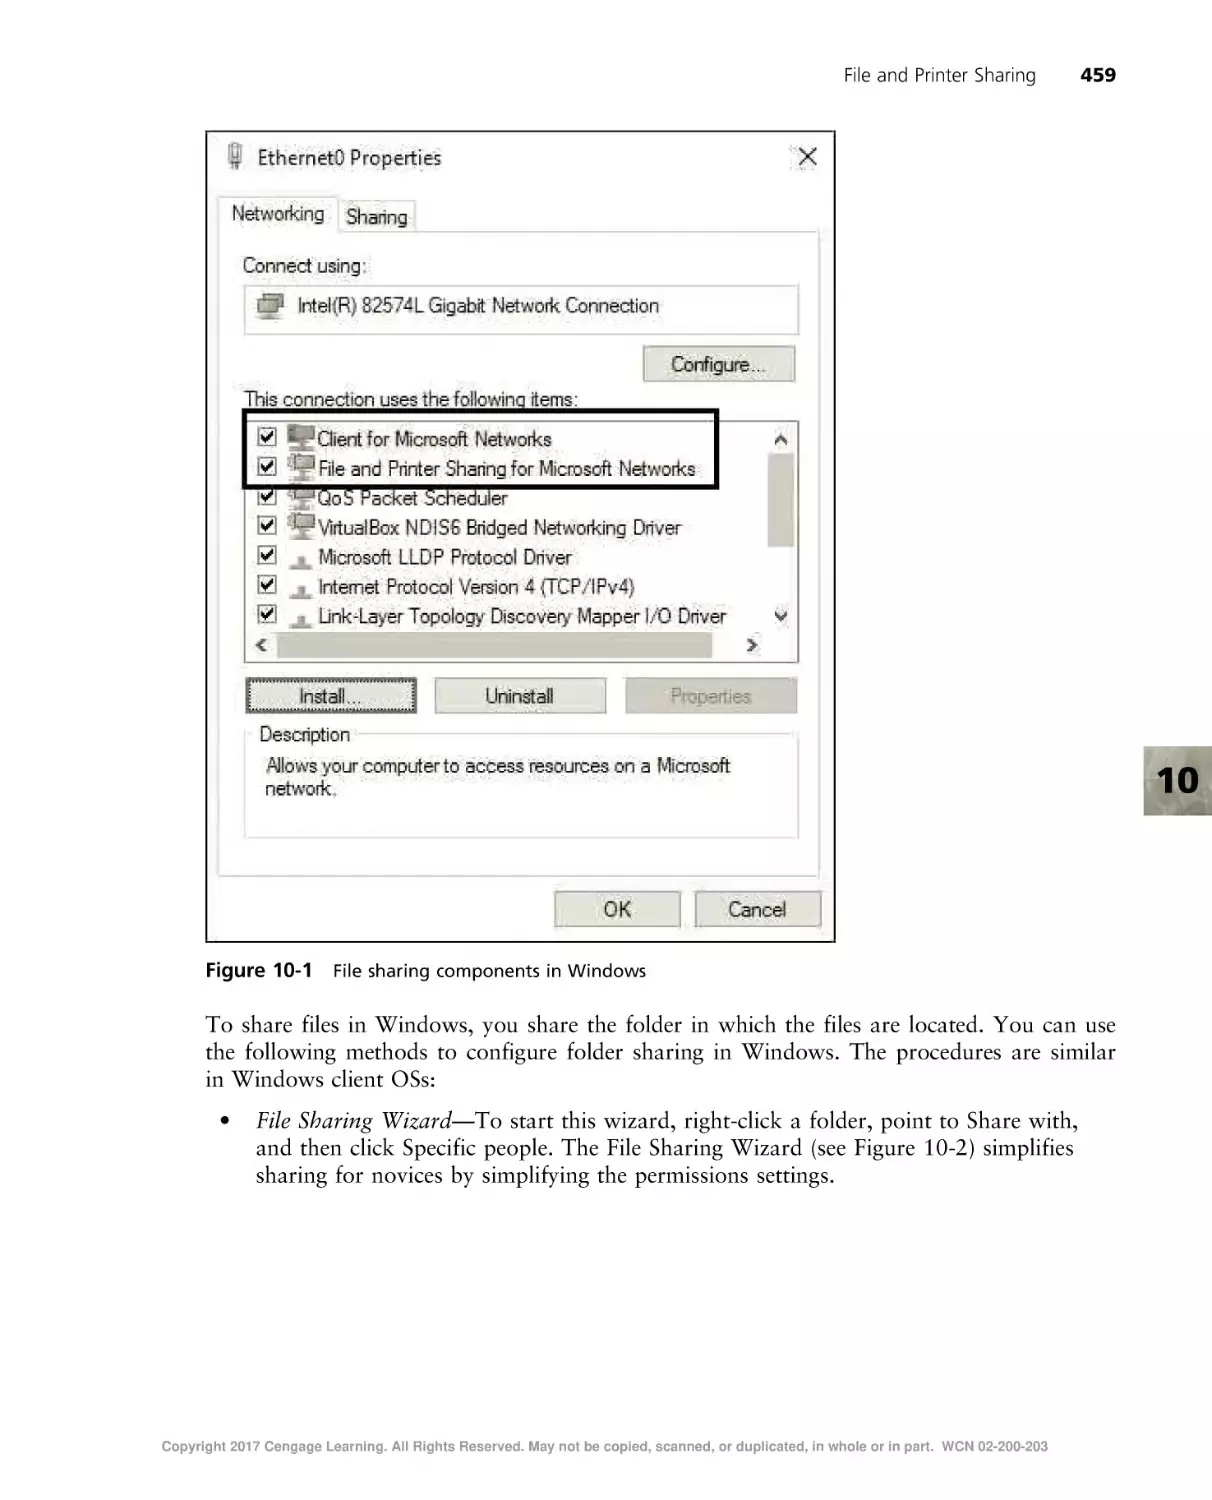
Sharing Files in Windows . . . . . . . . . . . . . . . . . . . . . . . . . . . . . . . . . . . . . . . . . . . . . . . . . . . .
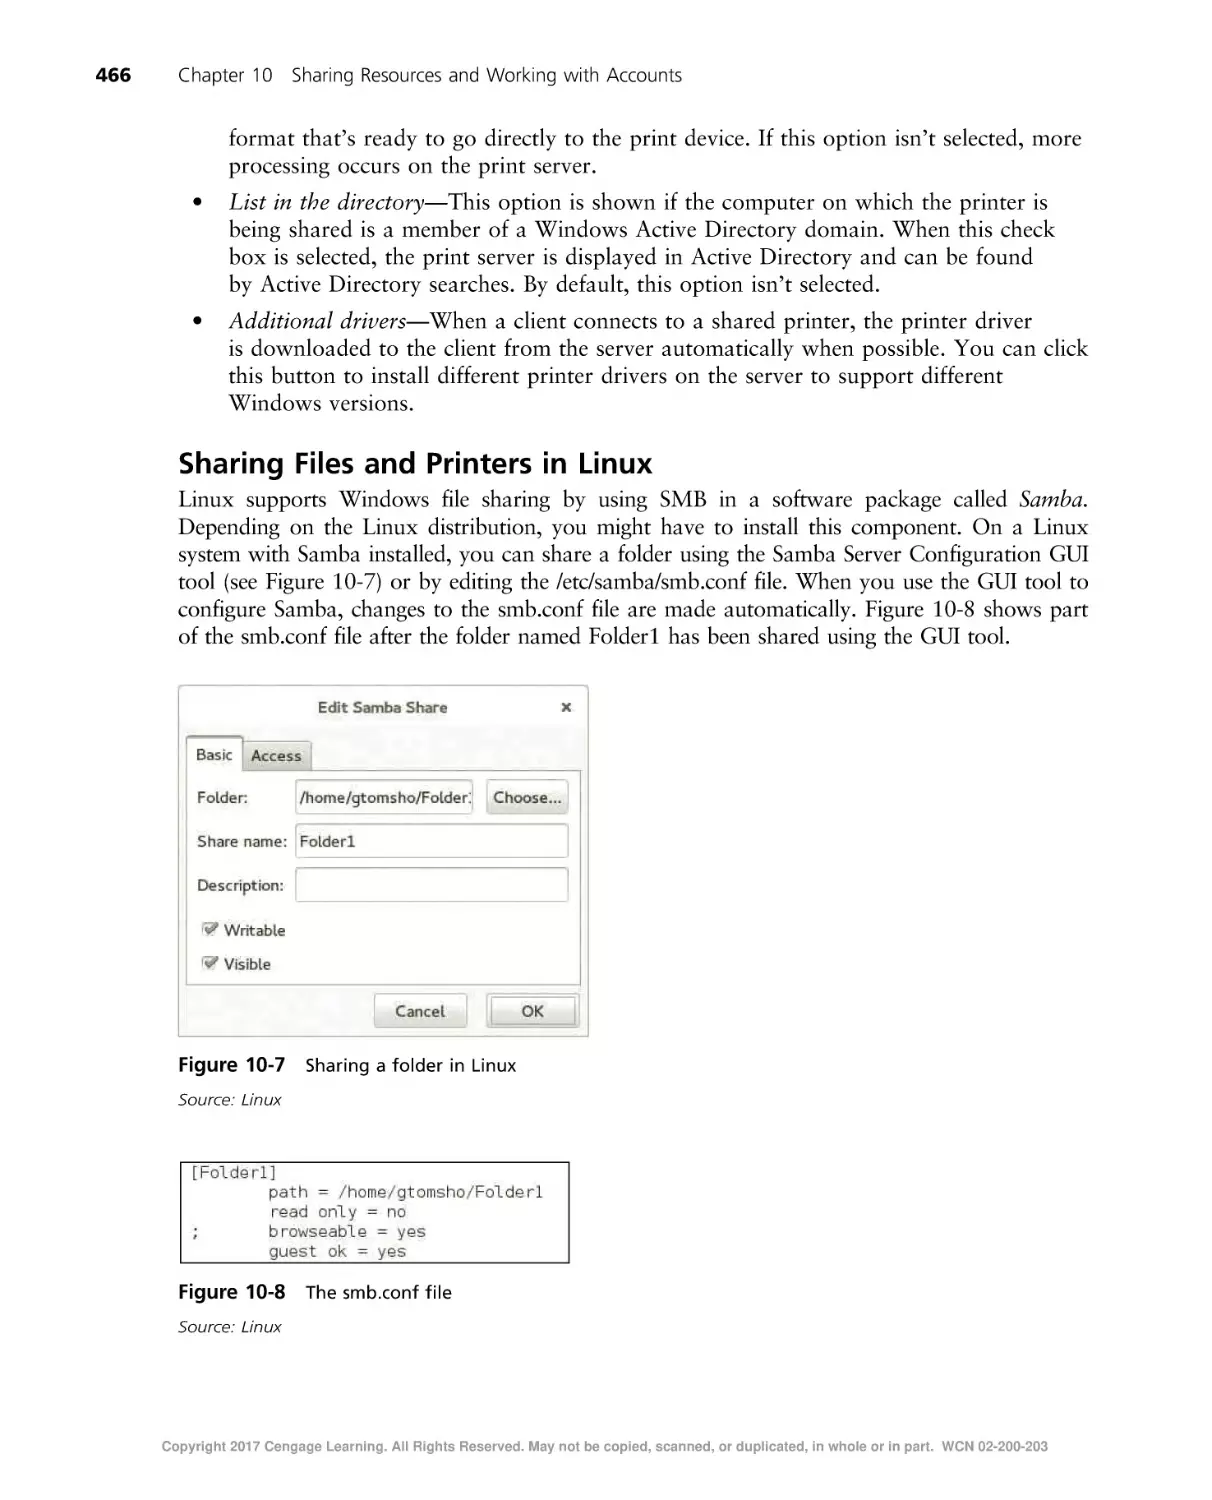
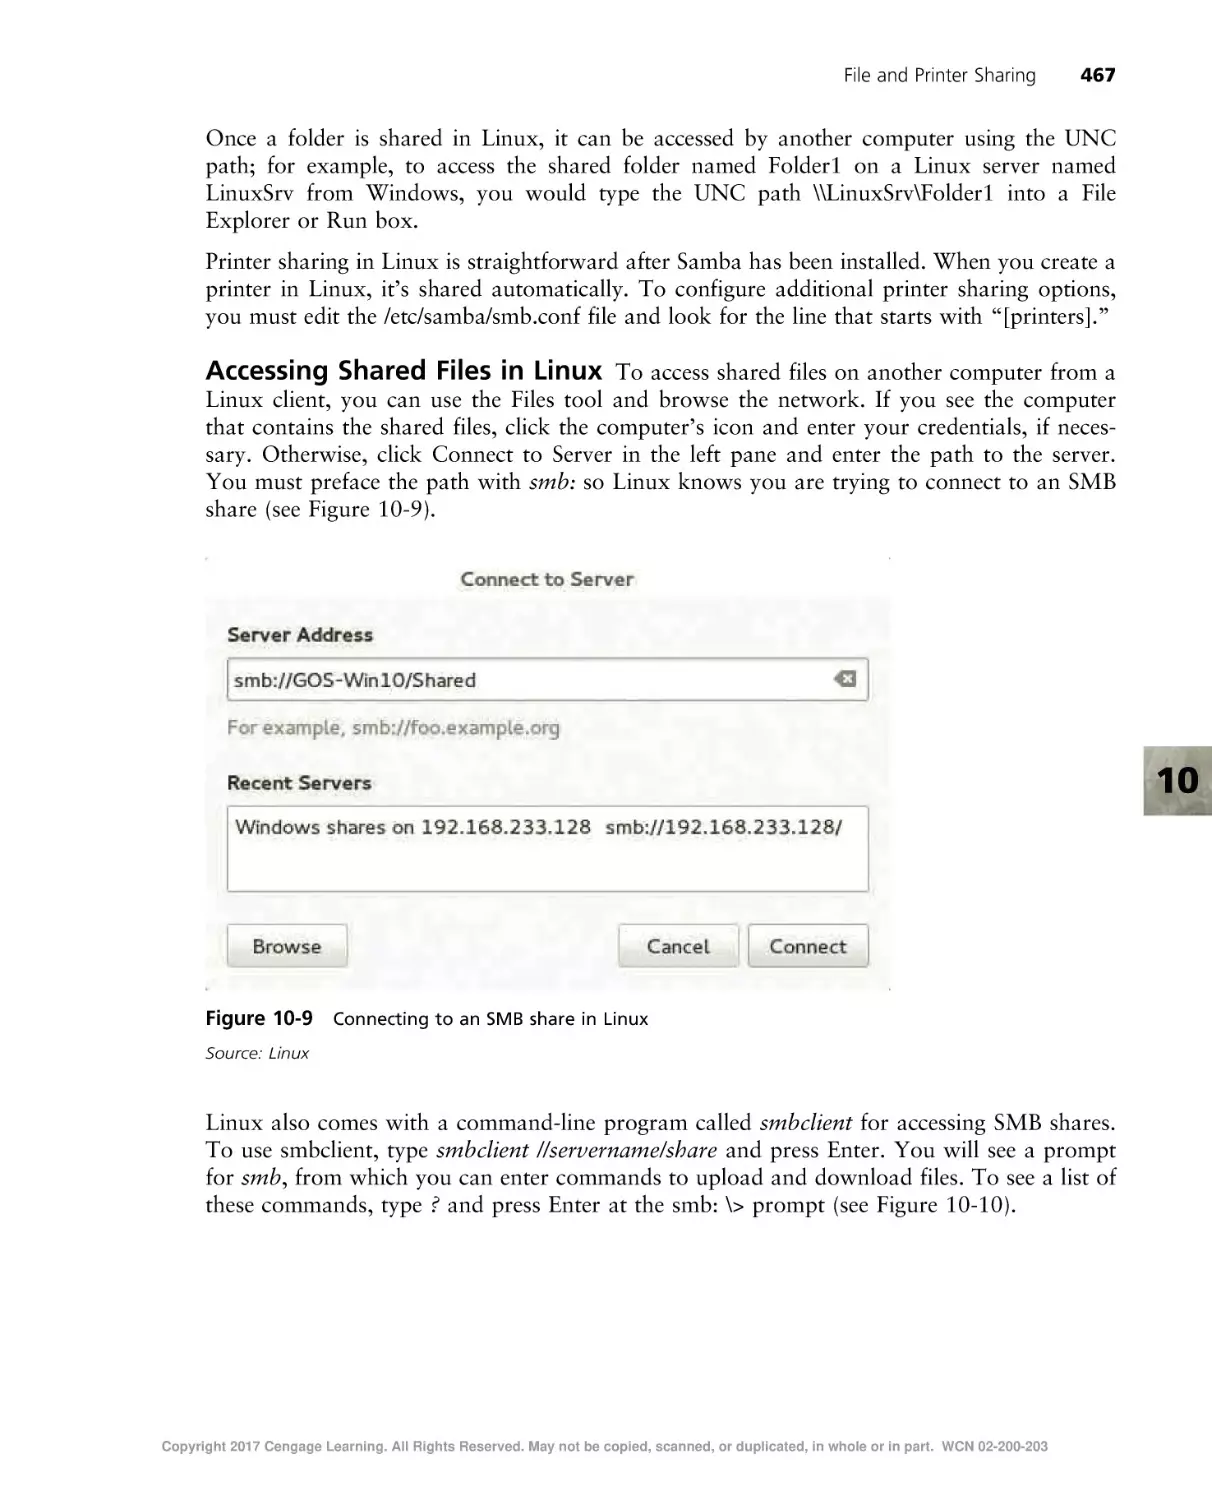
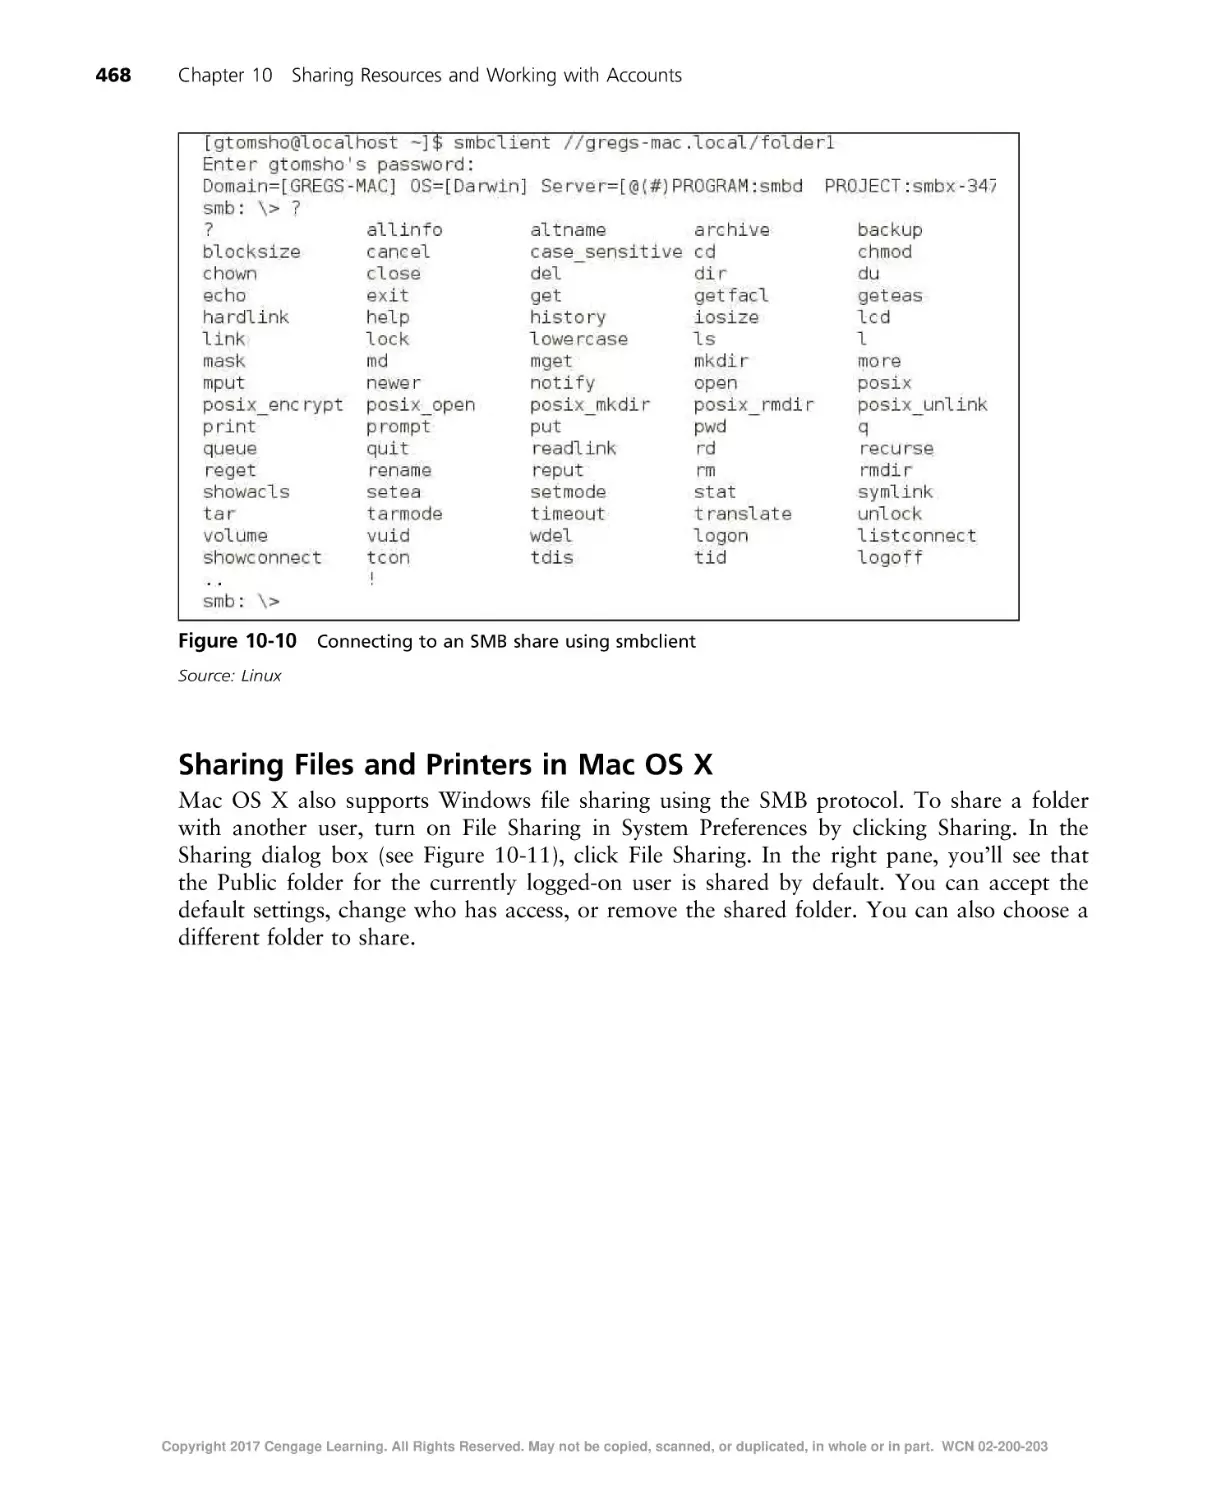
Sharing Files and Printers in Linux . . . . . . . . . . . . . . . . . . . . . . . . . . . . . . . . . . . . . . . . . . . . . .
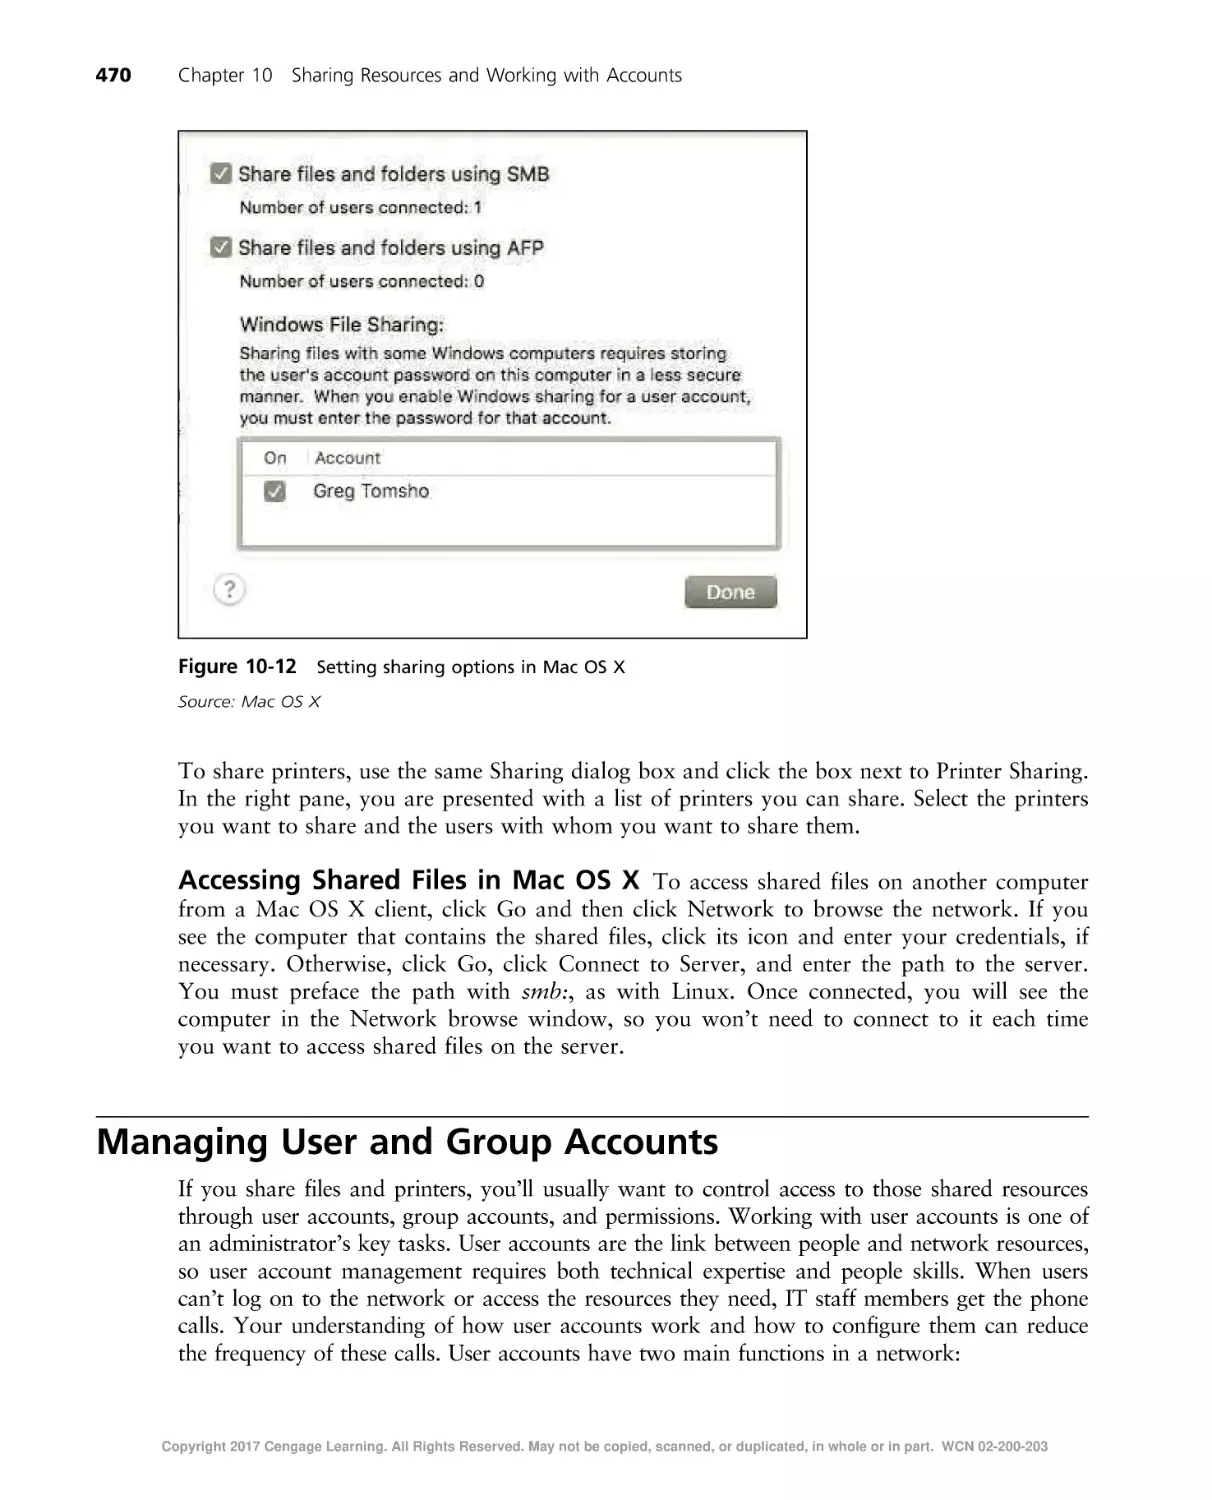
Sharing Files and Printers in Mac OS X . . . . . . . . . . . . . . . . . . . . . . . . . . . . . . . . . . . . . . . . . . .
458
458
466
468
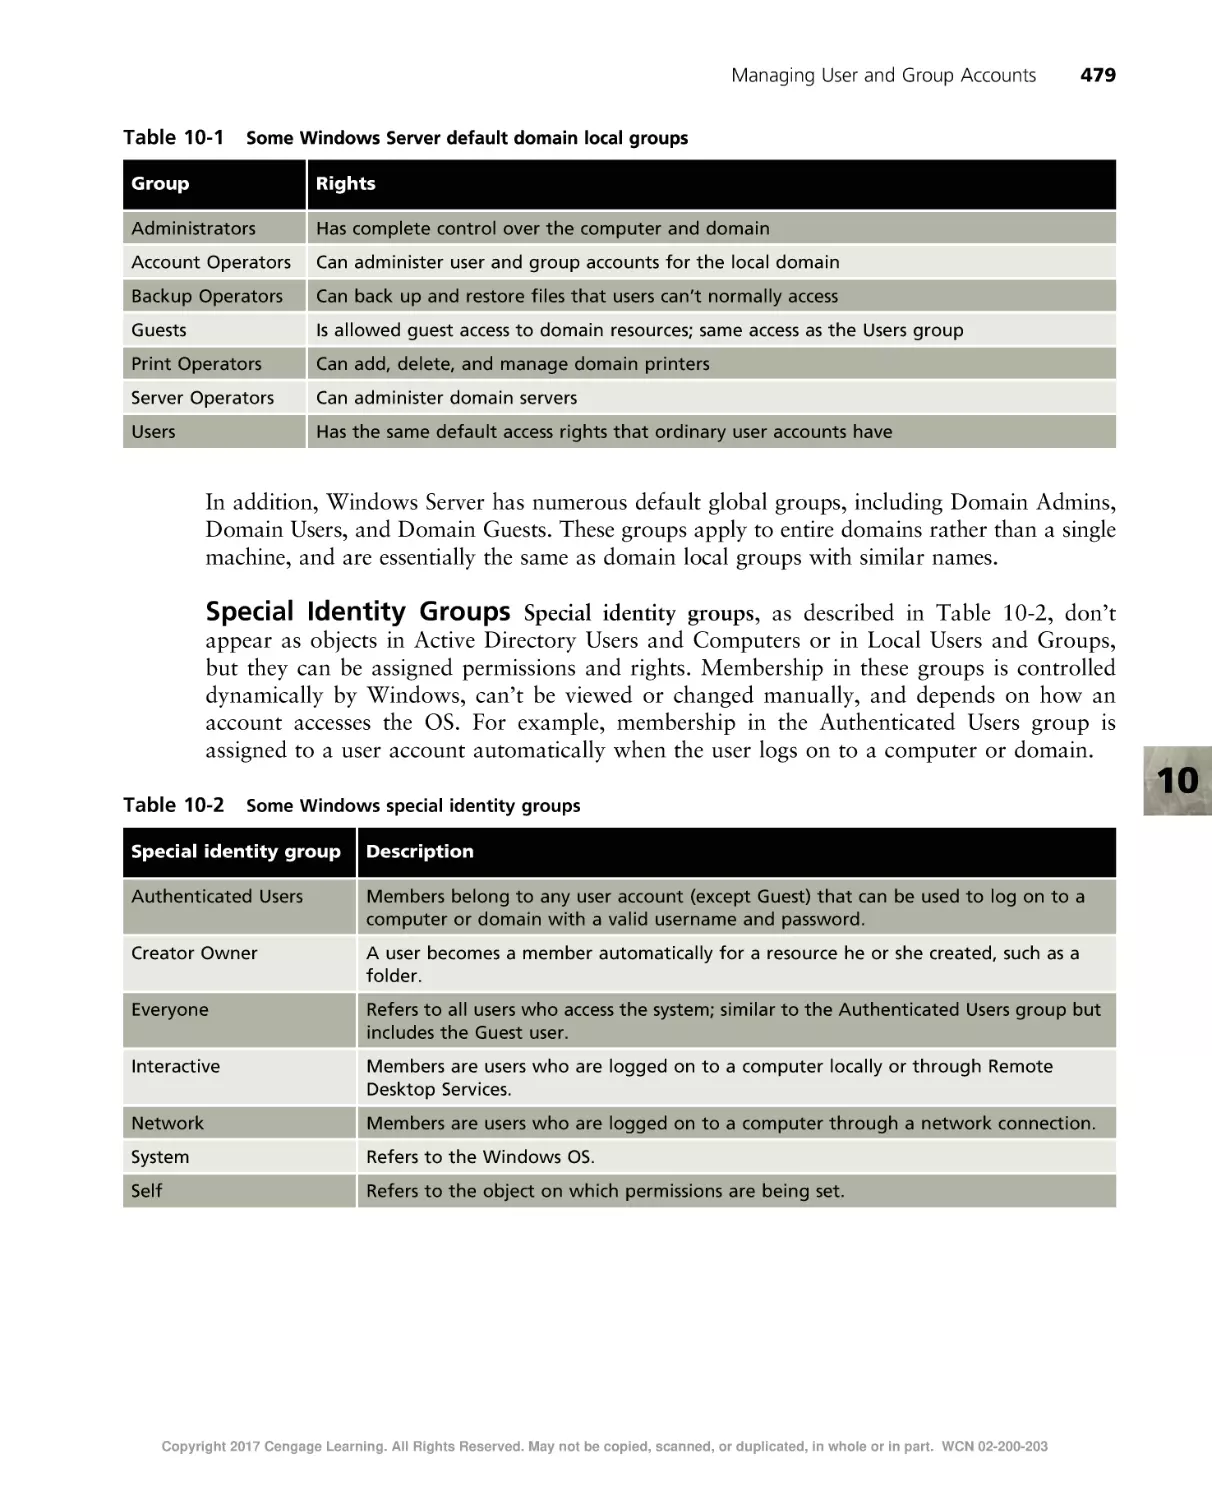
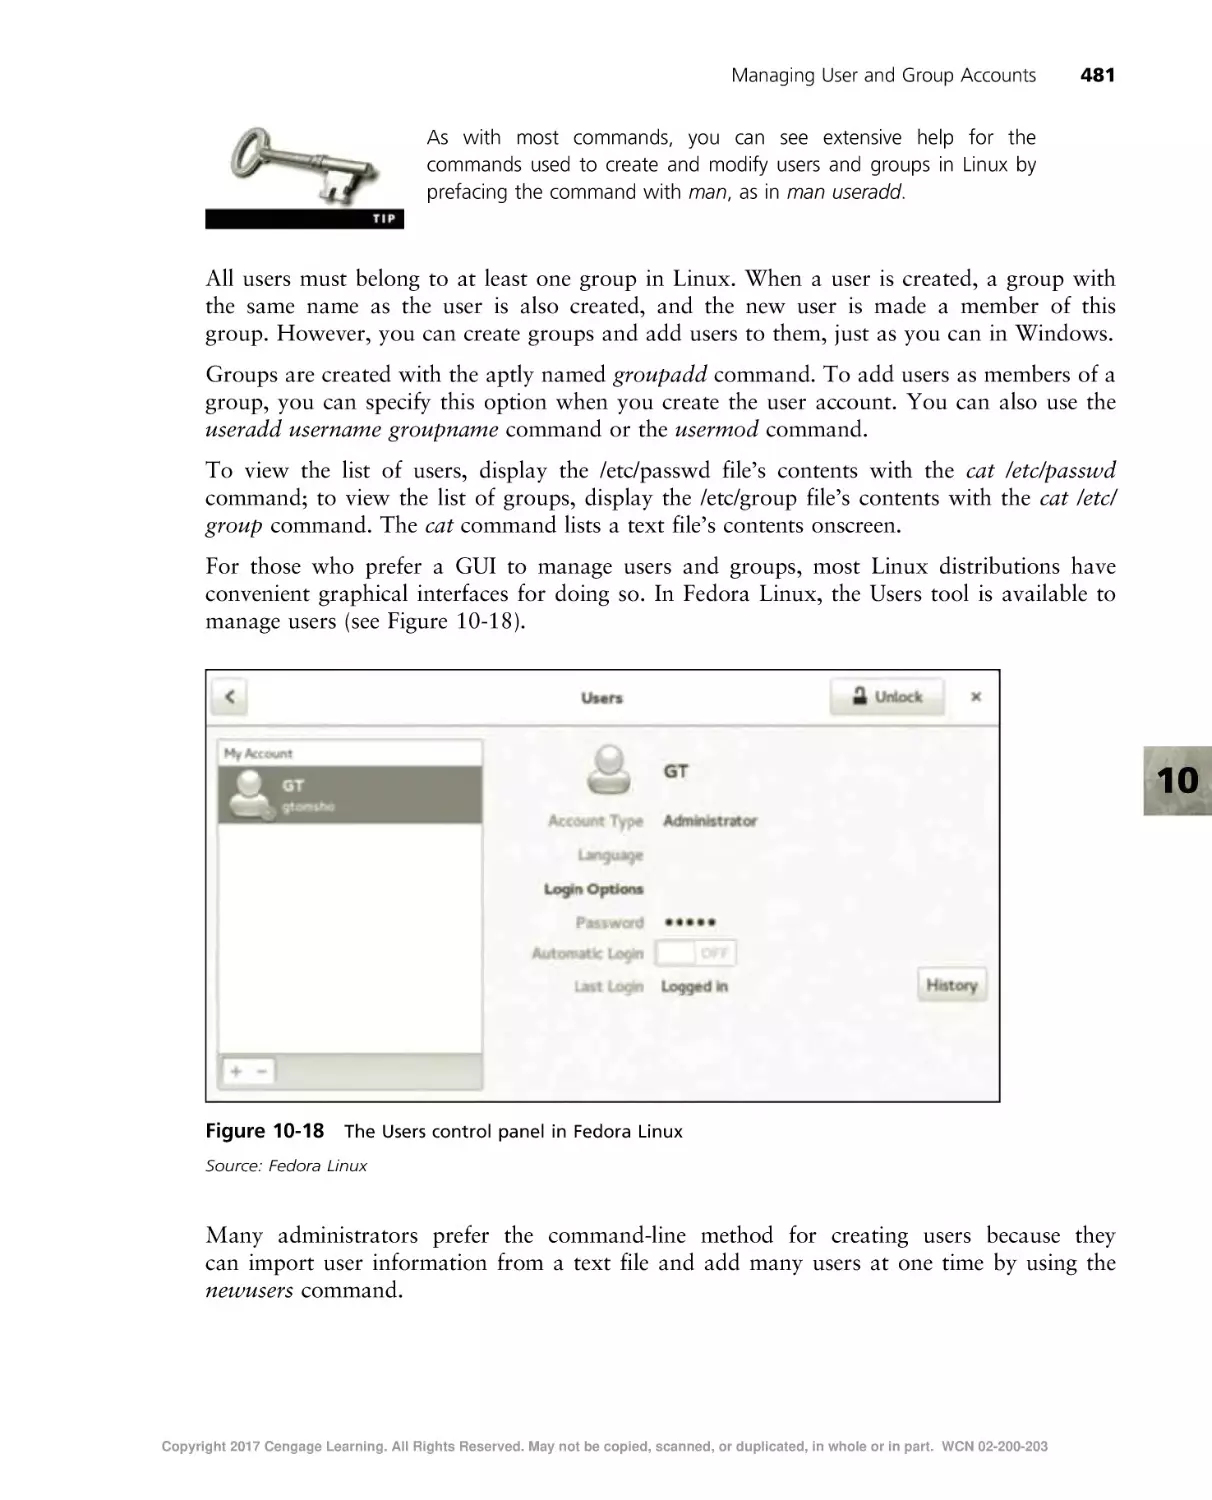
Managing User and Group Accounts . . . . . . . . . . . . . . . . . . . . . . . . . . . . . . . . . . . . . . . . . . . . . . .
Account and Password Conventions . . . . . . . . . . . . . . . . . . . . . . . . . . . . . . . . . . . . . . . . . . . . .
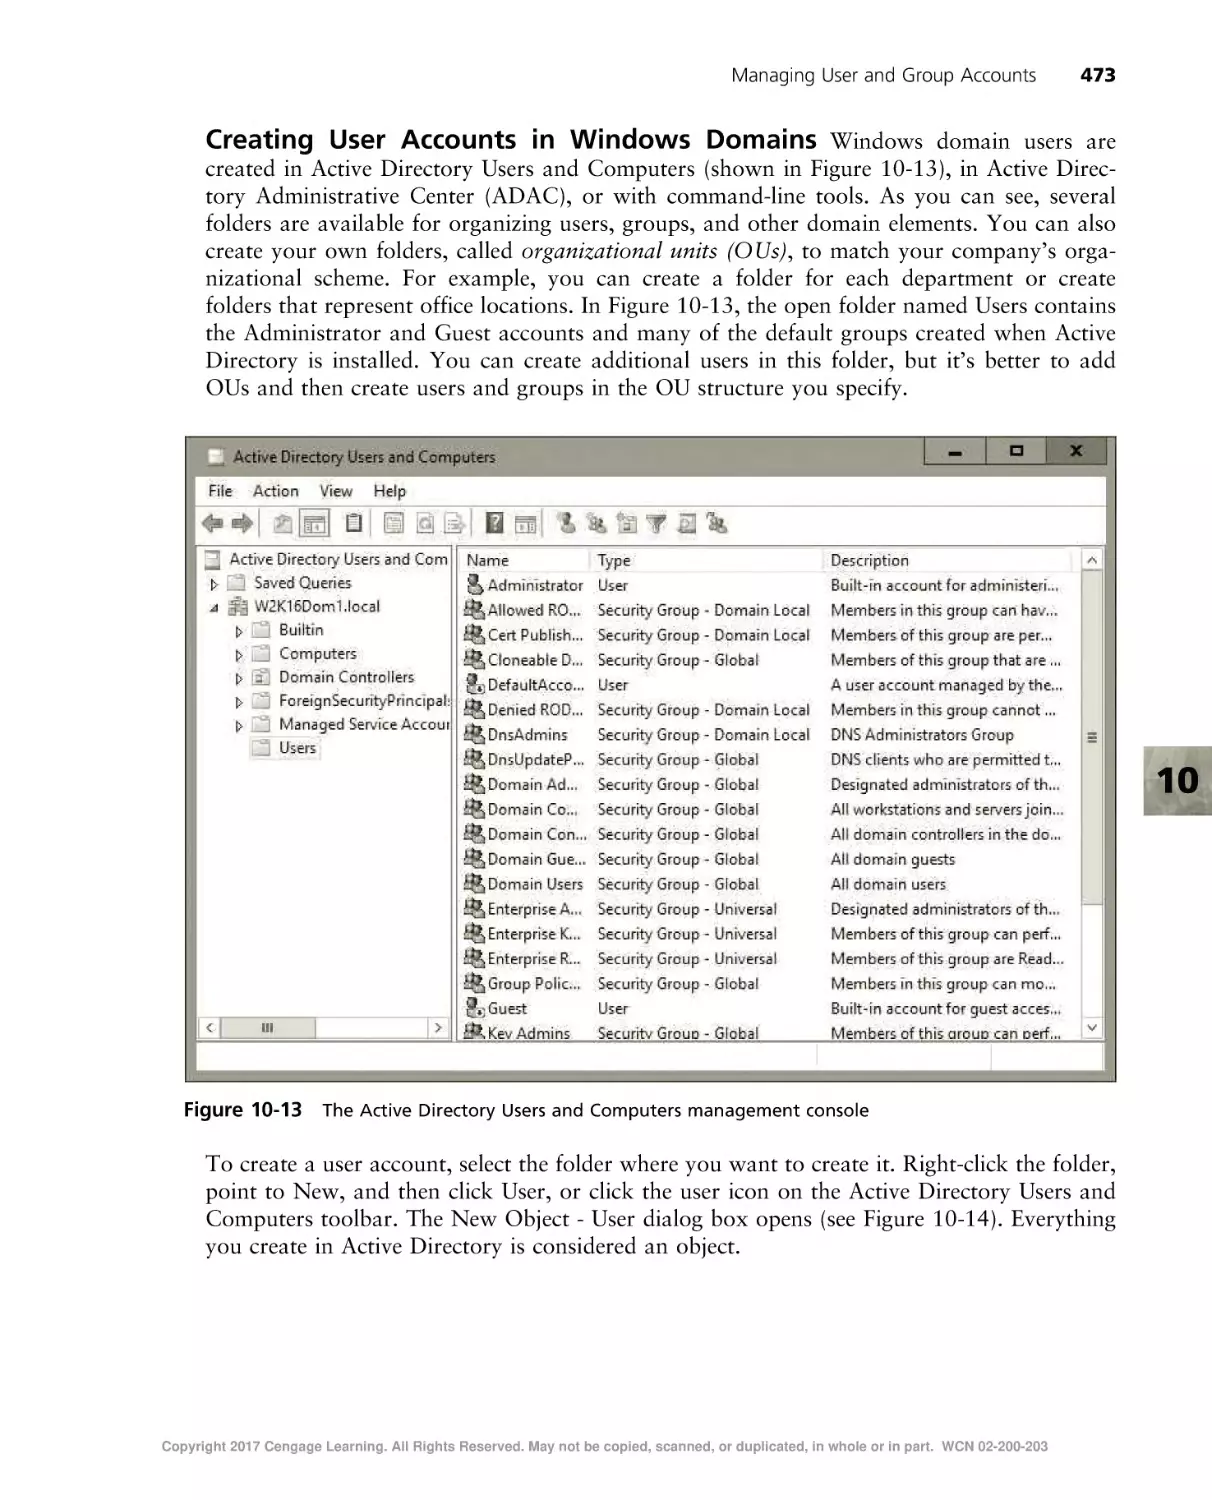
Working with Accounts in Windows . . . . . . . . . . . . . . . . . . . . . . . . . . . . . . . . . . . . . . . . . . . . .
Working with Accounts in Linux . . . . . . . . . . . . . . . . . . . . . . . . . . . . . . . . . . . . . . . . . . . . . . .
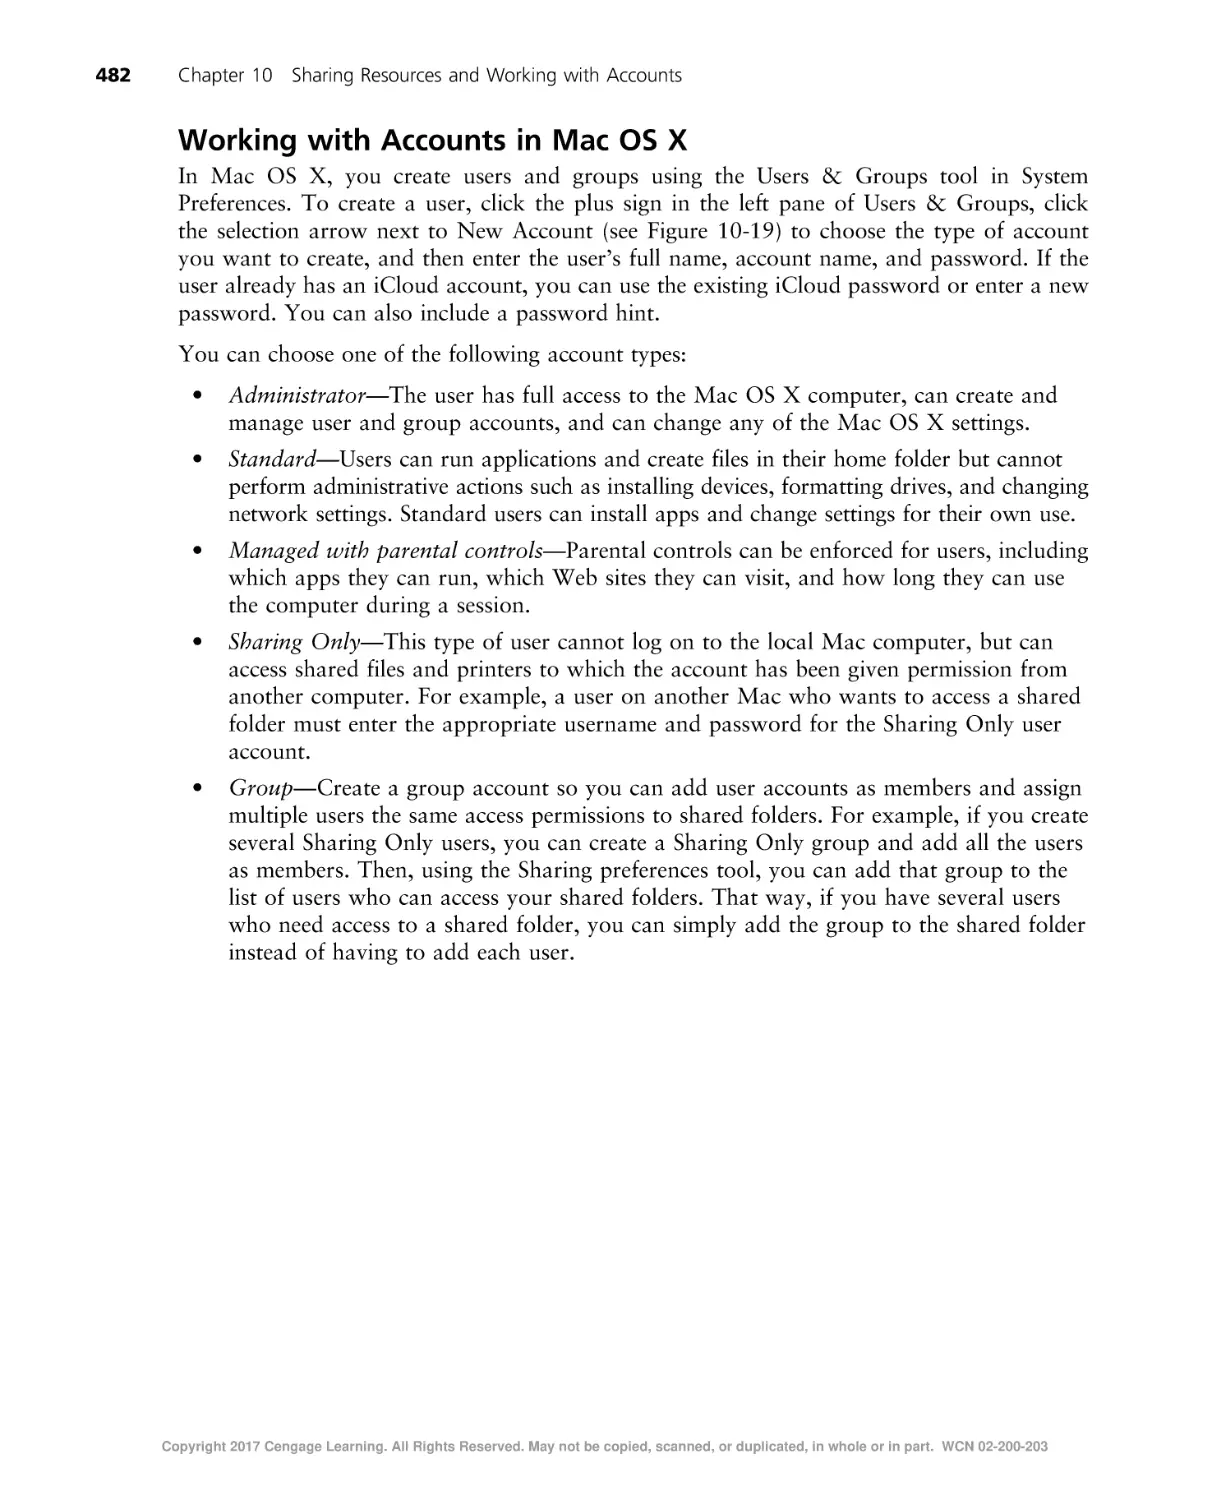
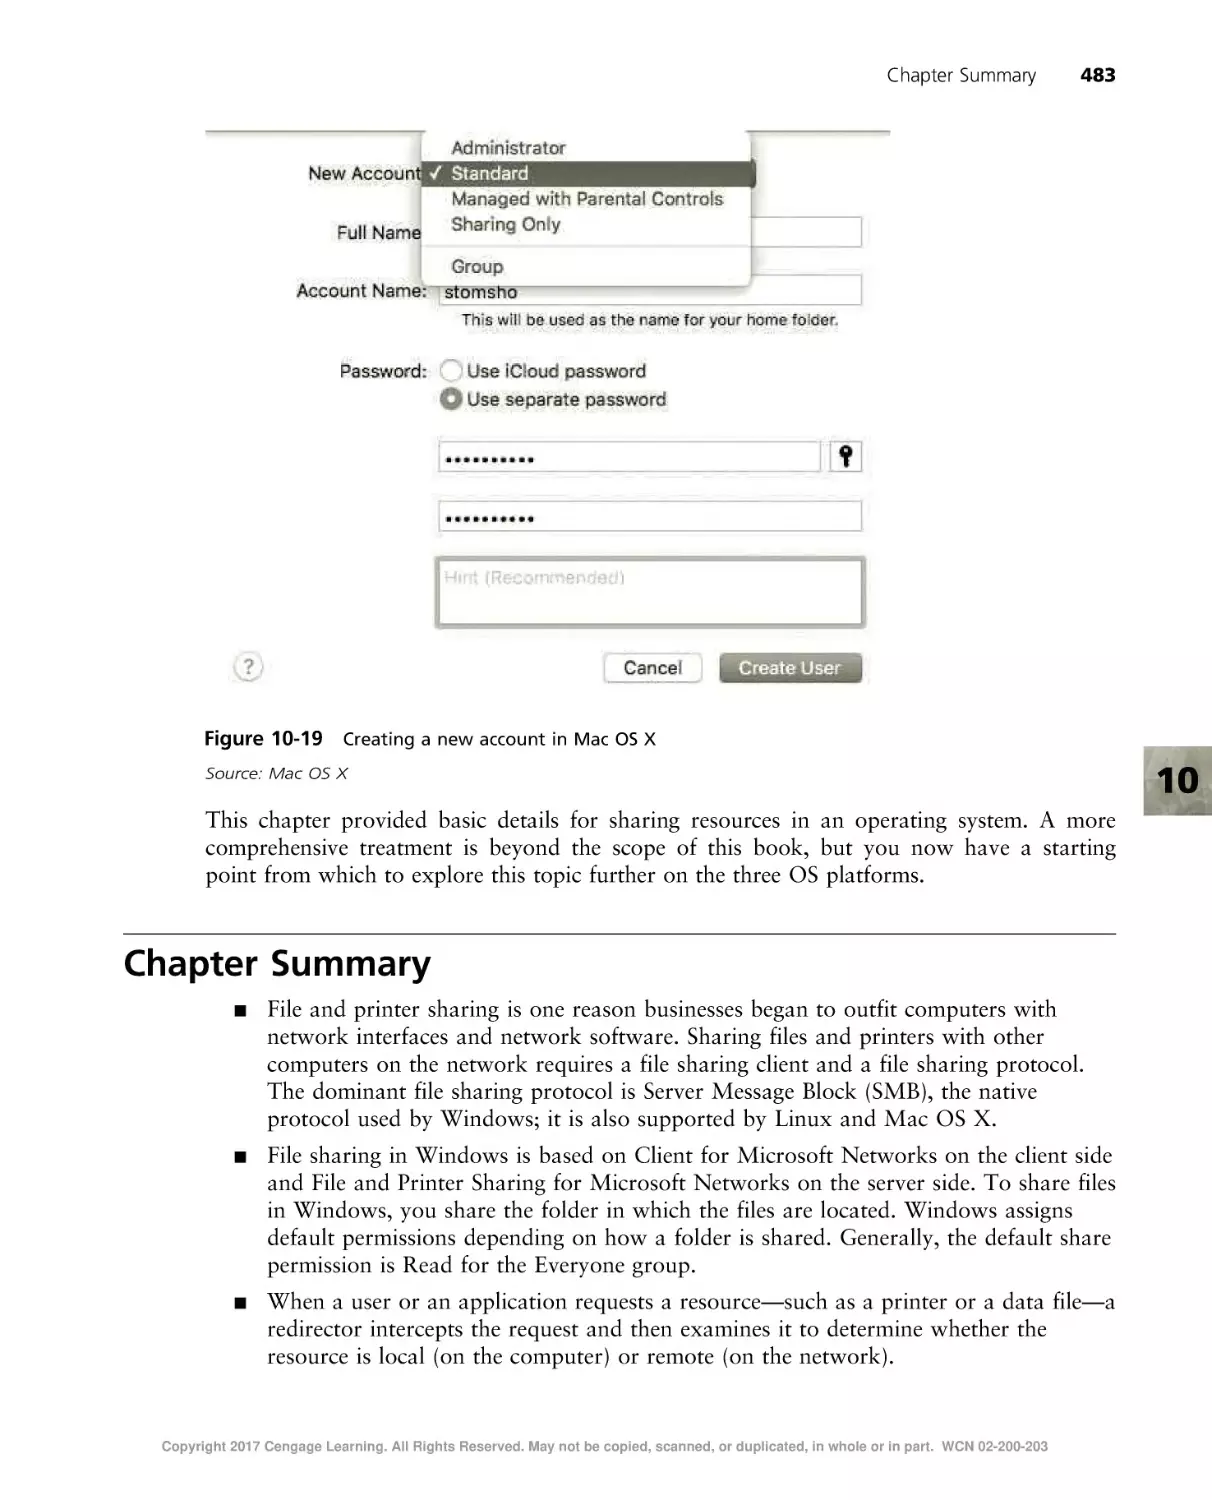
Working with Accounts in Mac OS X . . . . . . . . . . . . . . . . . . . . . . . . . . . . . . . . . . . . . . . . . . . .
470
471
472
480
482
Chapter Summary . . . . . . . . . . . . . . . . . . . . . . . . . . . . . . . . . . . . . . . . . . . . . . . . . . . . . . . . . . . 483
Key Terms . . . . . . . . . . . . . . . . . . . . . . . . . . . . . . . . . . . . . . . . . . . . . . . . . . . . . . . . . . . . . . . 484
Review Questions . . . . . . . . . . . . . . . . . . . . . . . . . . . . . . . . . . . . . . . . . . . . . . . . . . . . . . . . . . . 485
Hands-On Projects . . . . . . . . . . . . . . . . . . . . . . . . . . . . . . . . . . . . . . . . . . . . . . . . . . . . . . . . . . 487
Critical Thinking . . . . . . . . . . . . . . . . . . . . . . . . . . . . . . . . . . . . . . . . . . . . . . . . . . . . . . . . . . . 498
Challenge Labs . . . . . . . . . . . . . . . . . . . . . . . . . . . . . . . . . . . . . . . . . . . . . . . . . . . . . . . . . . . . . 498
Case Projects . . . . . . . . . . . . . . . . . . . . . . . . . . . . . . . . . . . . . . . . . . . . . . . . . . . . . . . . . . . . . . 498
CHAPTER 11
Operating Systems Management and Maintenance . . . . . . . . . . . . . . . . . . . . . . . . . . . . . . . . . . . . . 501
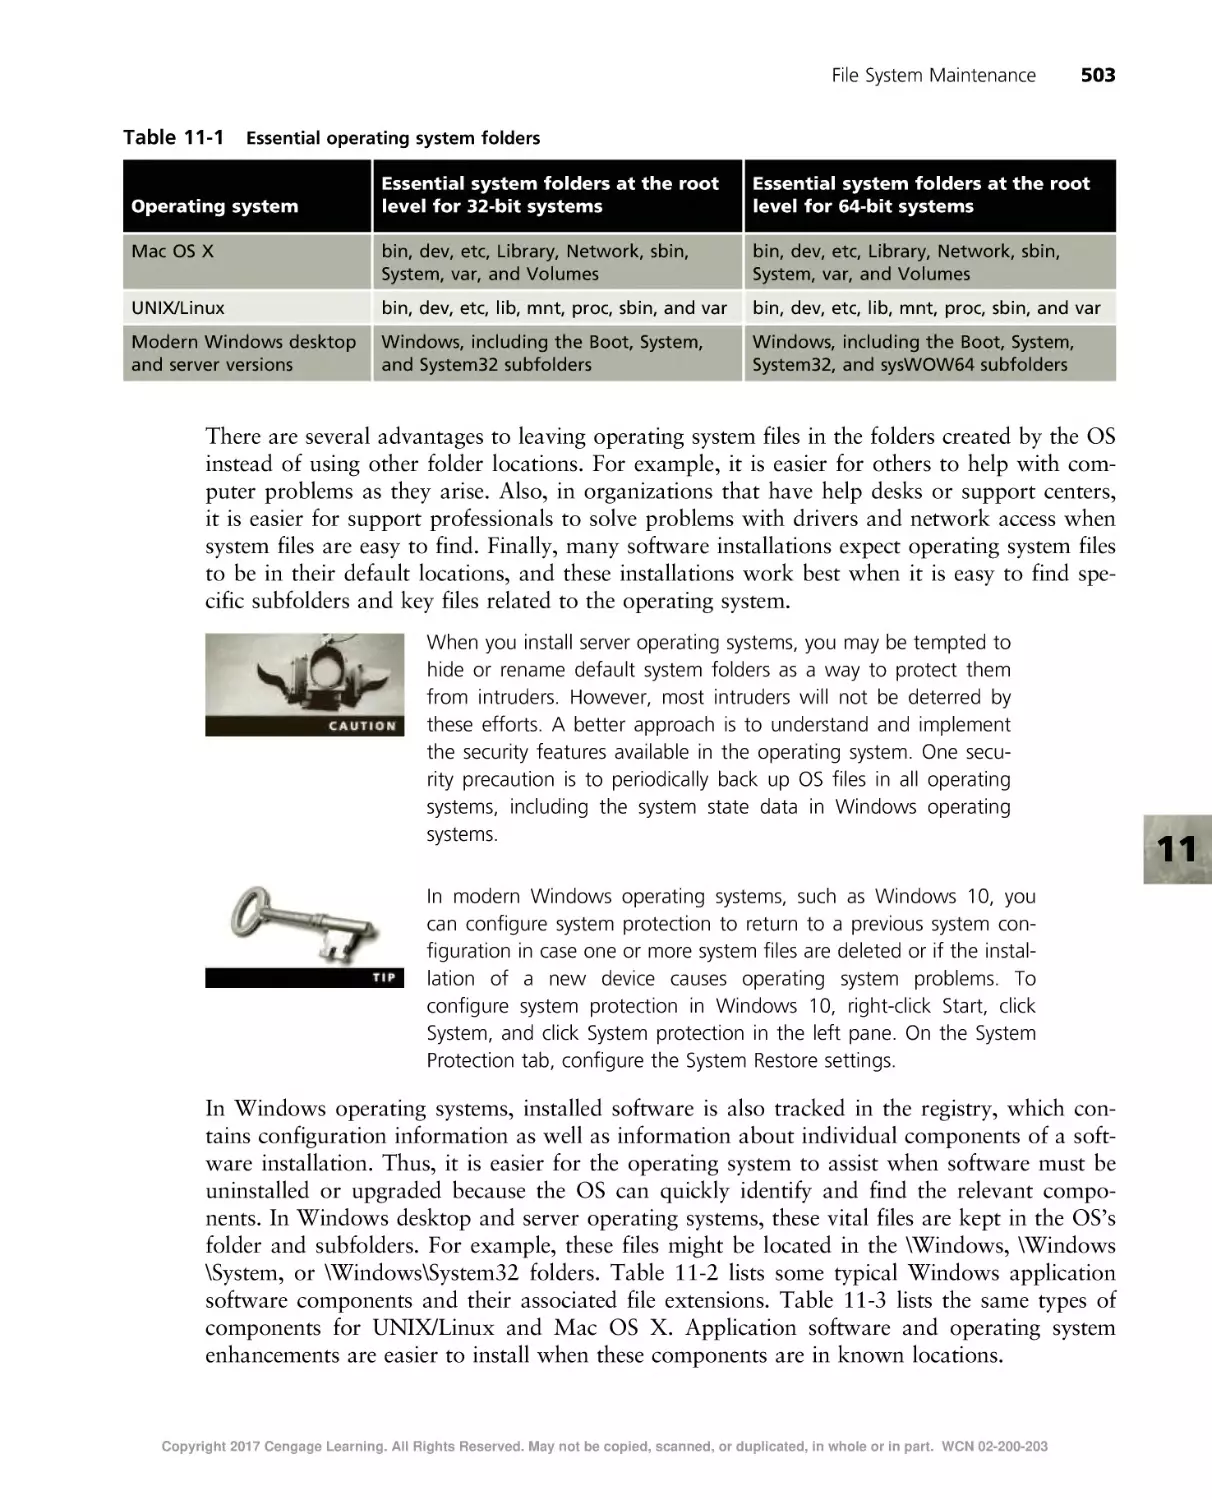
File System Maintenance . . . . . . . . . . . . . . . . . . . . . . . . . . . . . . . . . . . . . . . . . . . . . . . . . . . . . . . 502
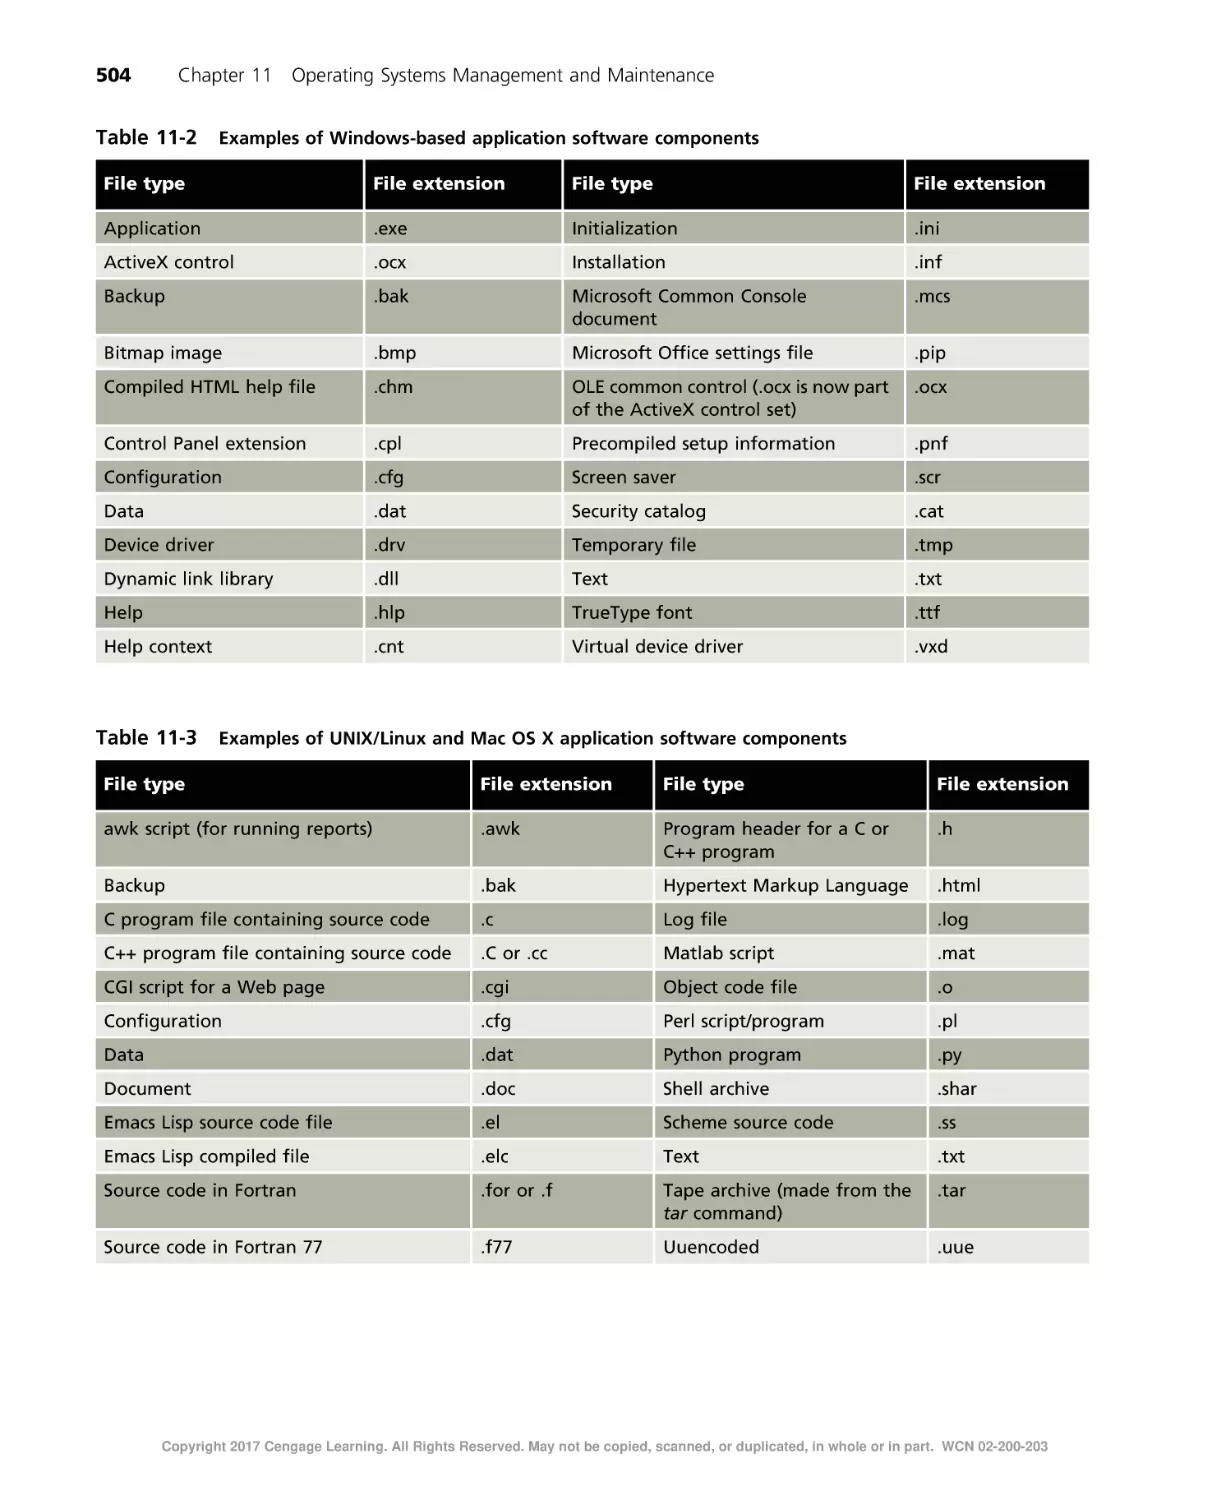
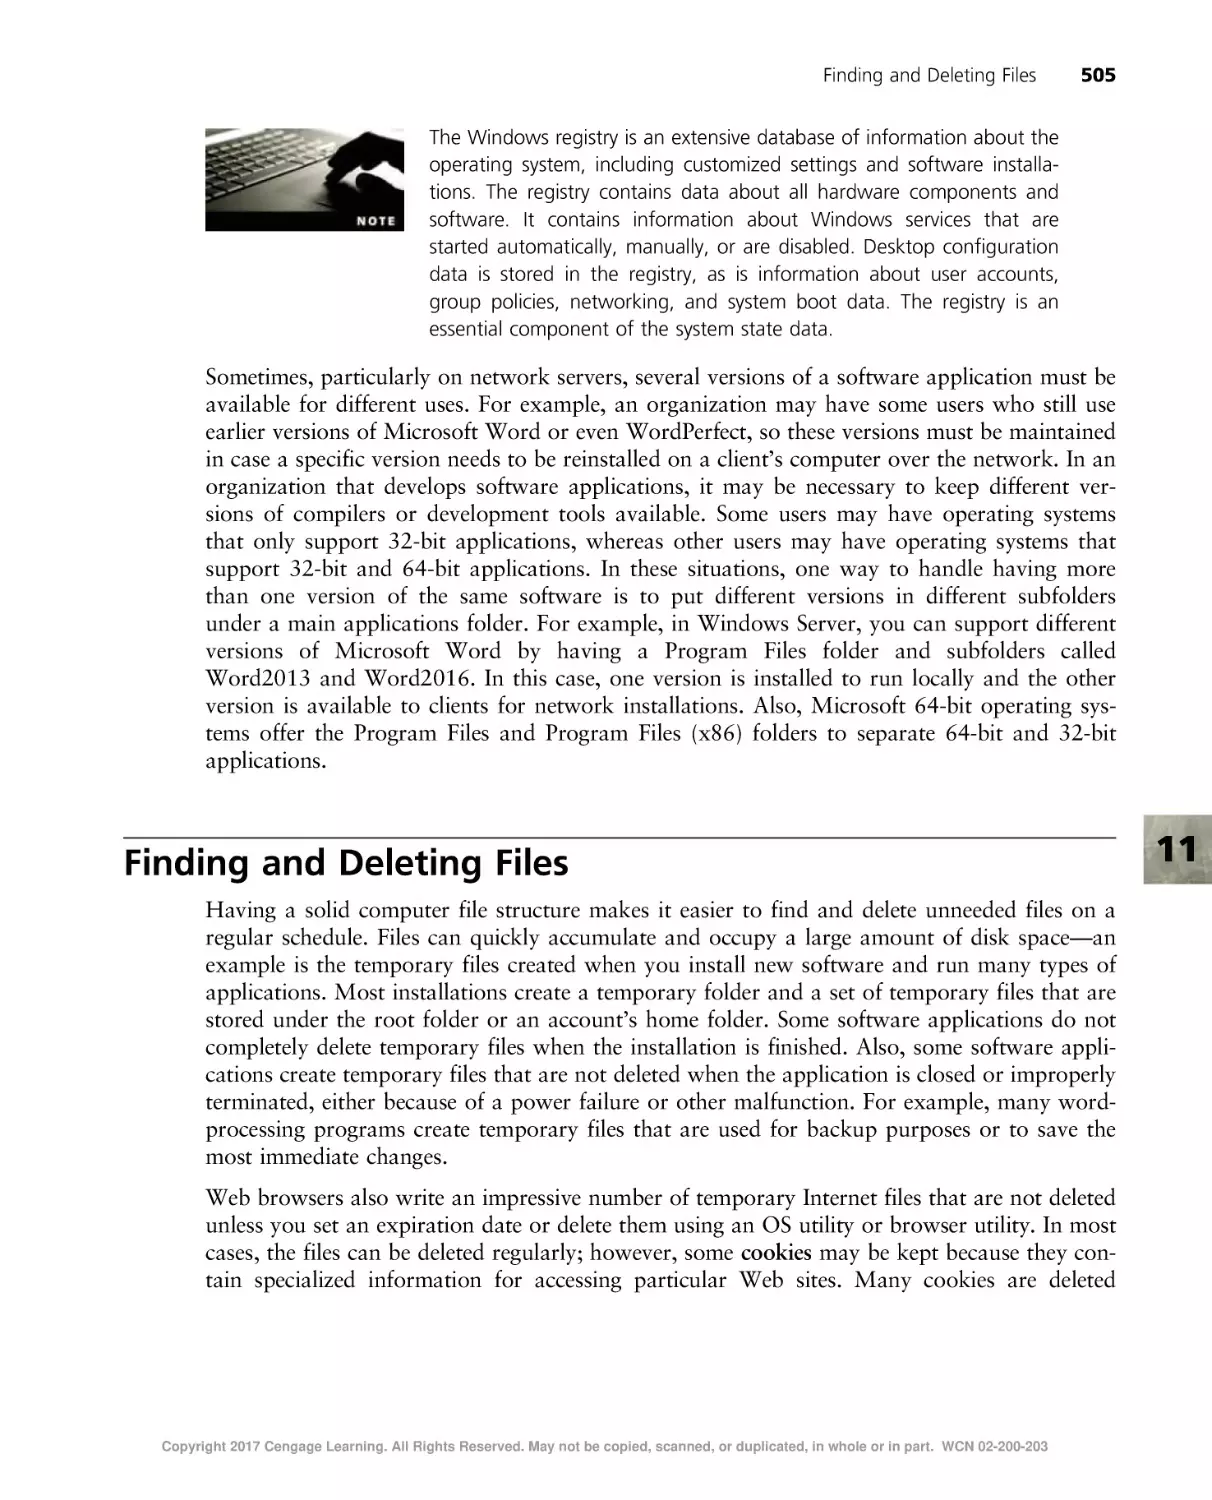
Finding and Deleting Files . . . . . . . . . . . . . . . . . . . . . . . . . . . . . . . . . . . . . . . . . . . . . . . . . . . . . . 505
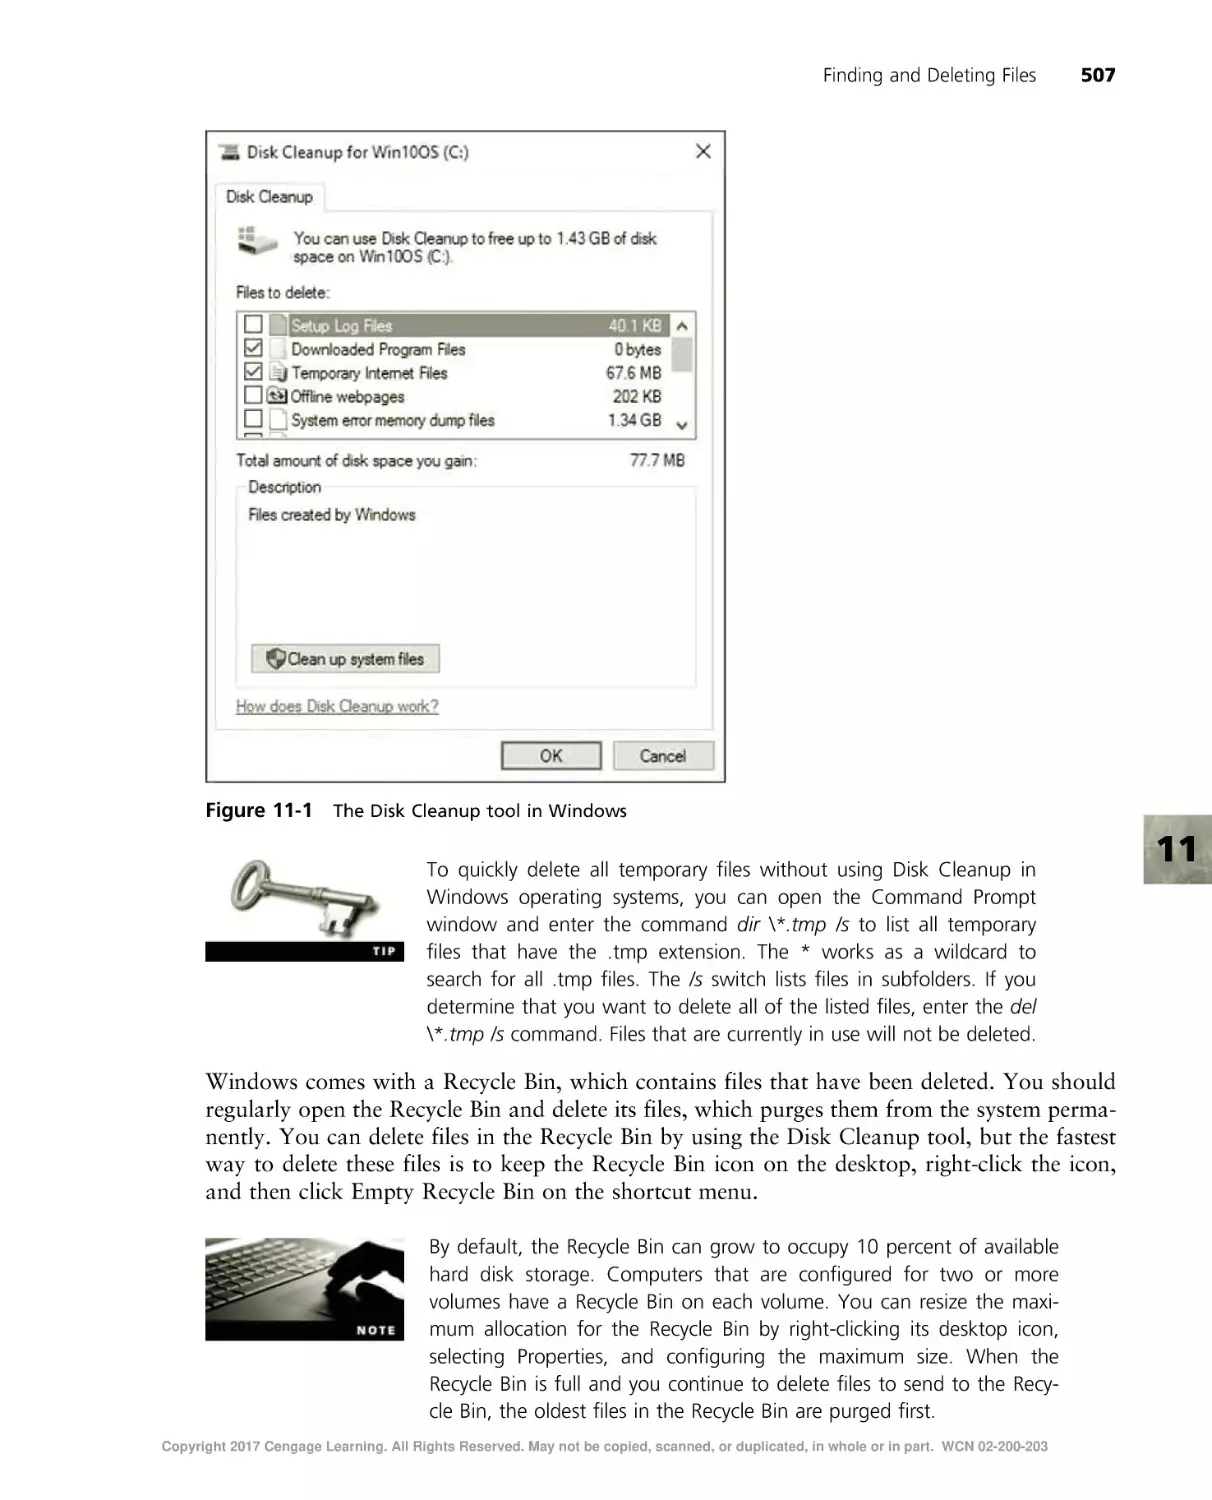
Deleting Temporary Files in Windows . . . . . . . . . . . . . . . . . . . . . . . . . . . . . . . . . . . . . . . . . . . . 506
Deleting Files in UNIX/Linux . . . . . . . . . . . . . . . . . . . . . . . . . . . . . . . . . . . . . . . . . . . . . . . . . . 508
Copyright 2017 Cengage Learning. All Rights Reserved. May not be copied, scanned, or duplicated, in whole or in part. WCN 02-200-203
Table of Contents
xiii
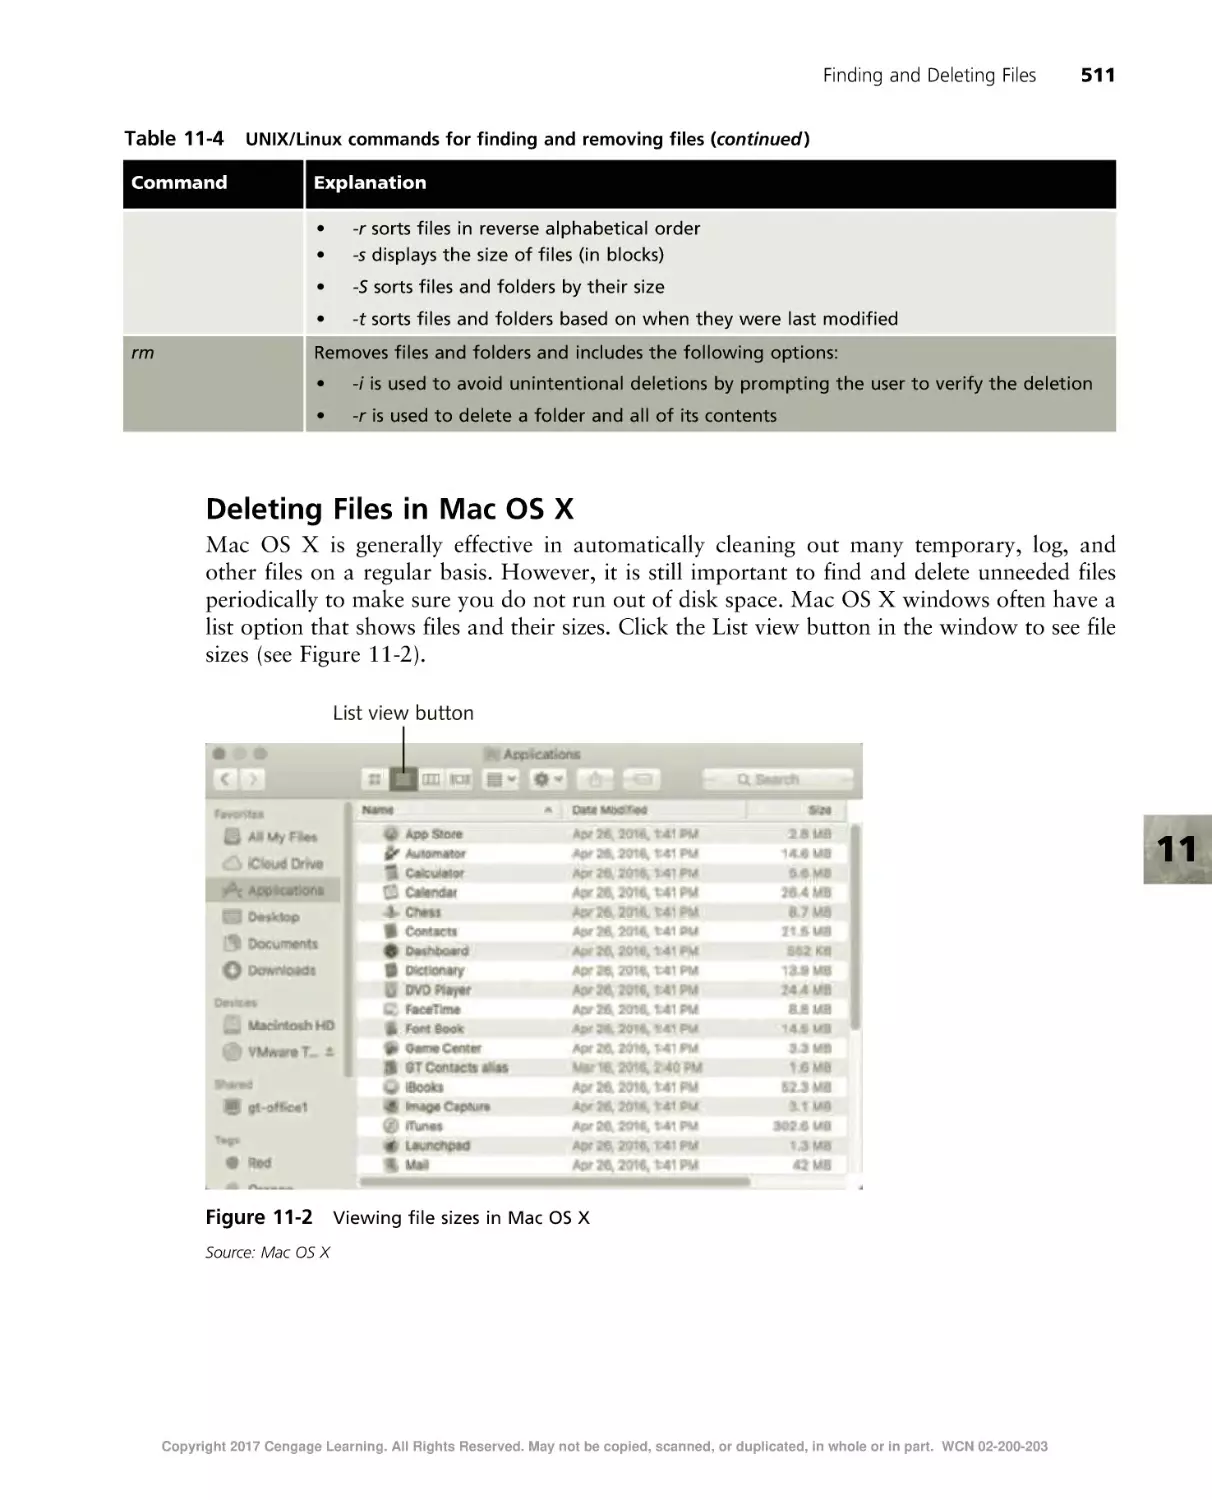
Deleting Files in Mac OS X . . . . . . . . . . . . . . . . . . . . . . . . . . . . . . . . . . . . . . . . . . . . . . . . . . . 511
Maintaining Disks . . . . . . . . . . . . . . . . . . . . . . . . . . . . . . . . . . . . . . . . . . . . . . . . . . . . . . . . . . .
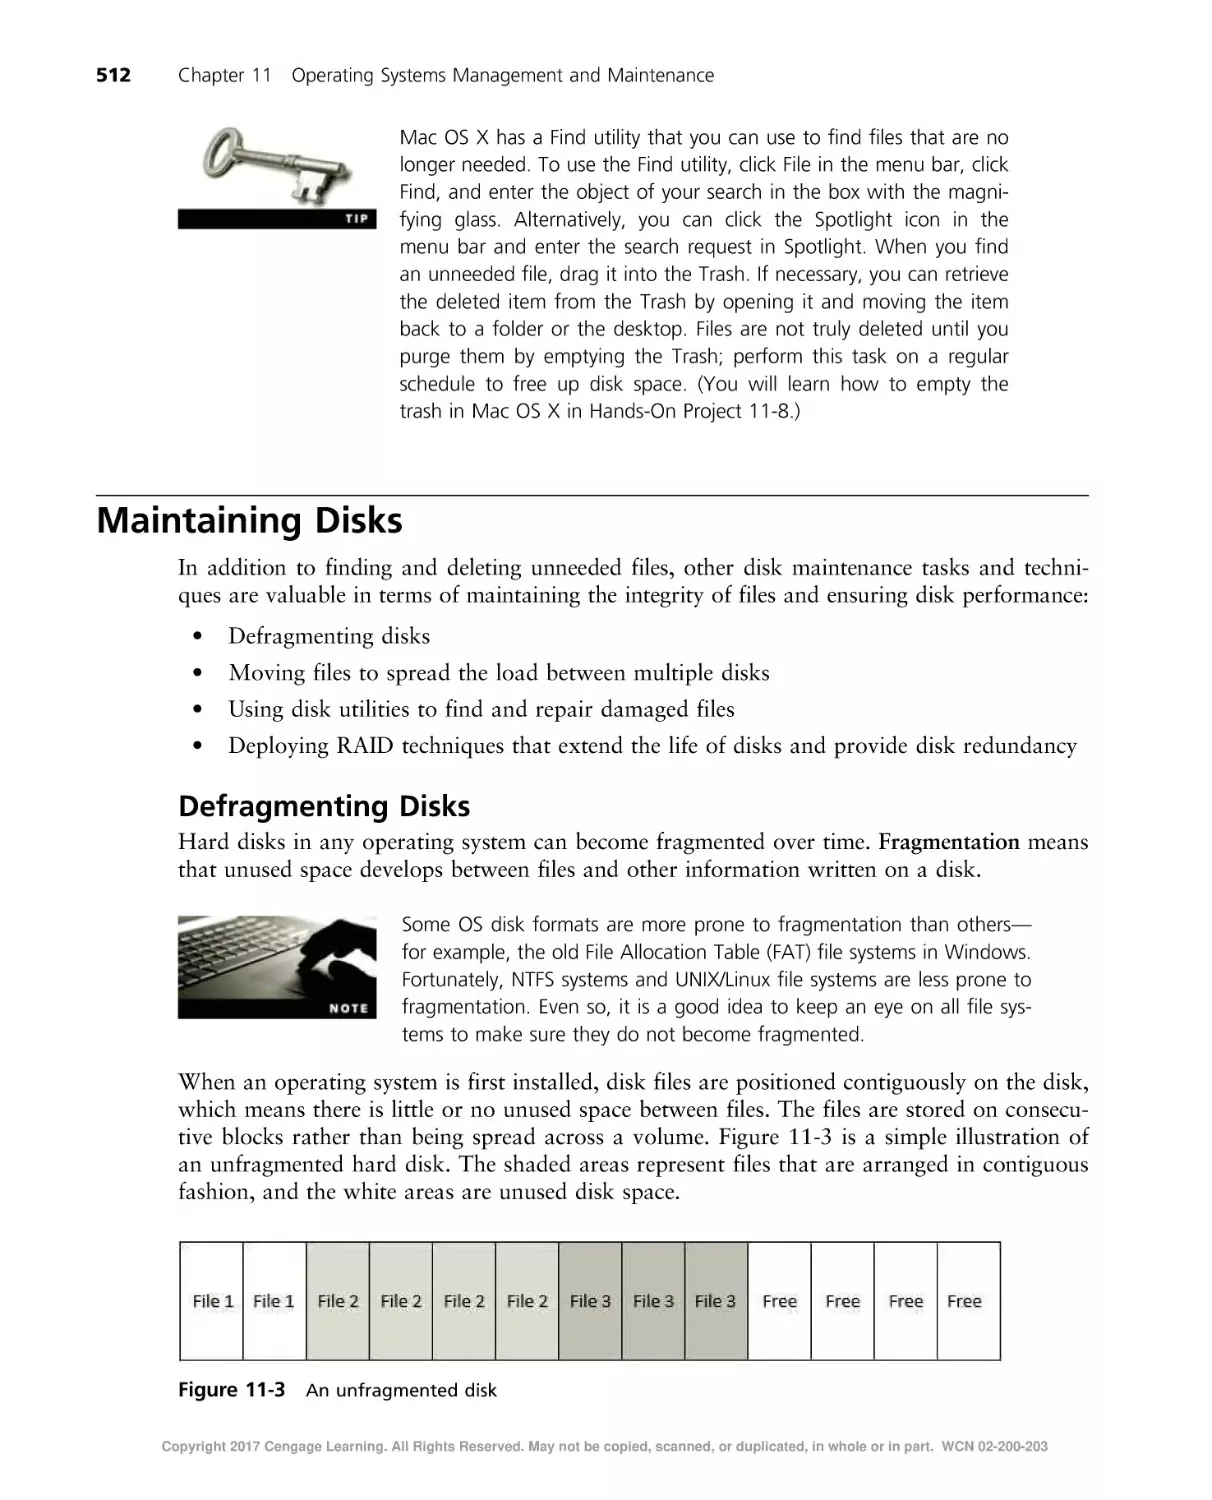
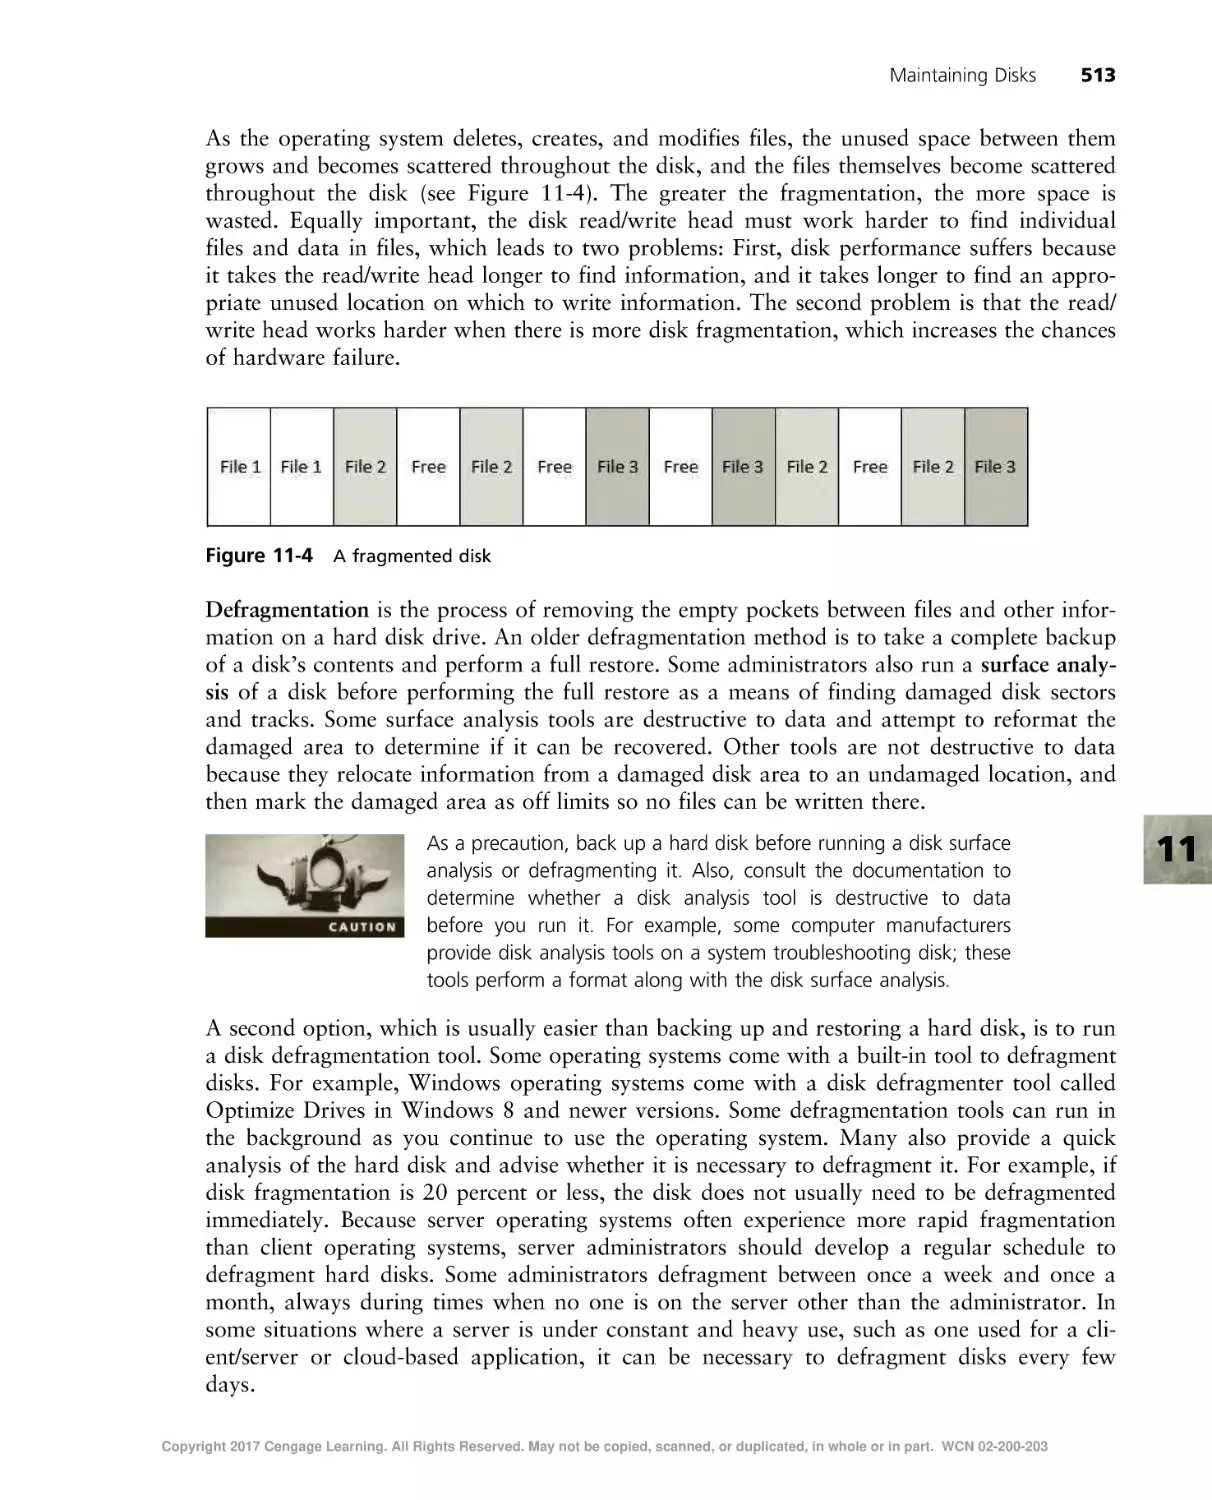
Defragmenting Disks . . . . . . . . . . . . . . . . . . . . . . . . . . . . . . . . . . . . . . . . . . . . . . . . . . . . . . .
Moving Disk Files to Spread the Load . . . . . . . . . . . . . . . . . . . . . . . . . . . . . . . . . . . . . . . . . . . .
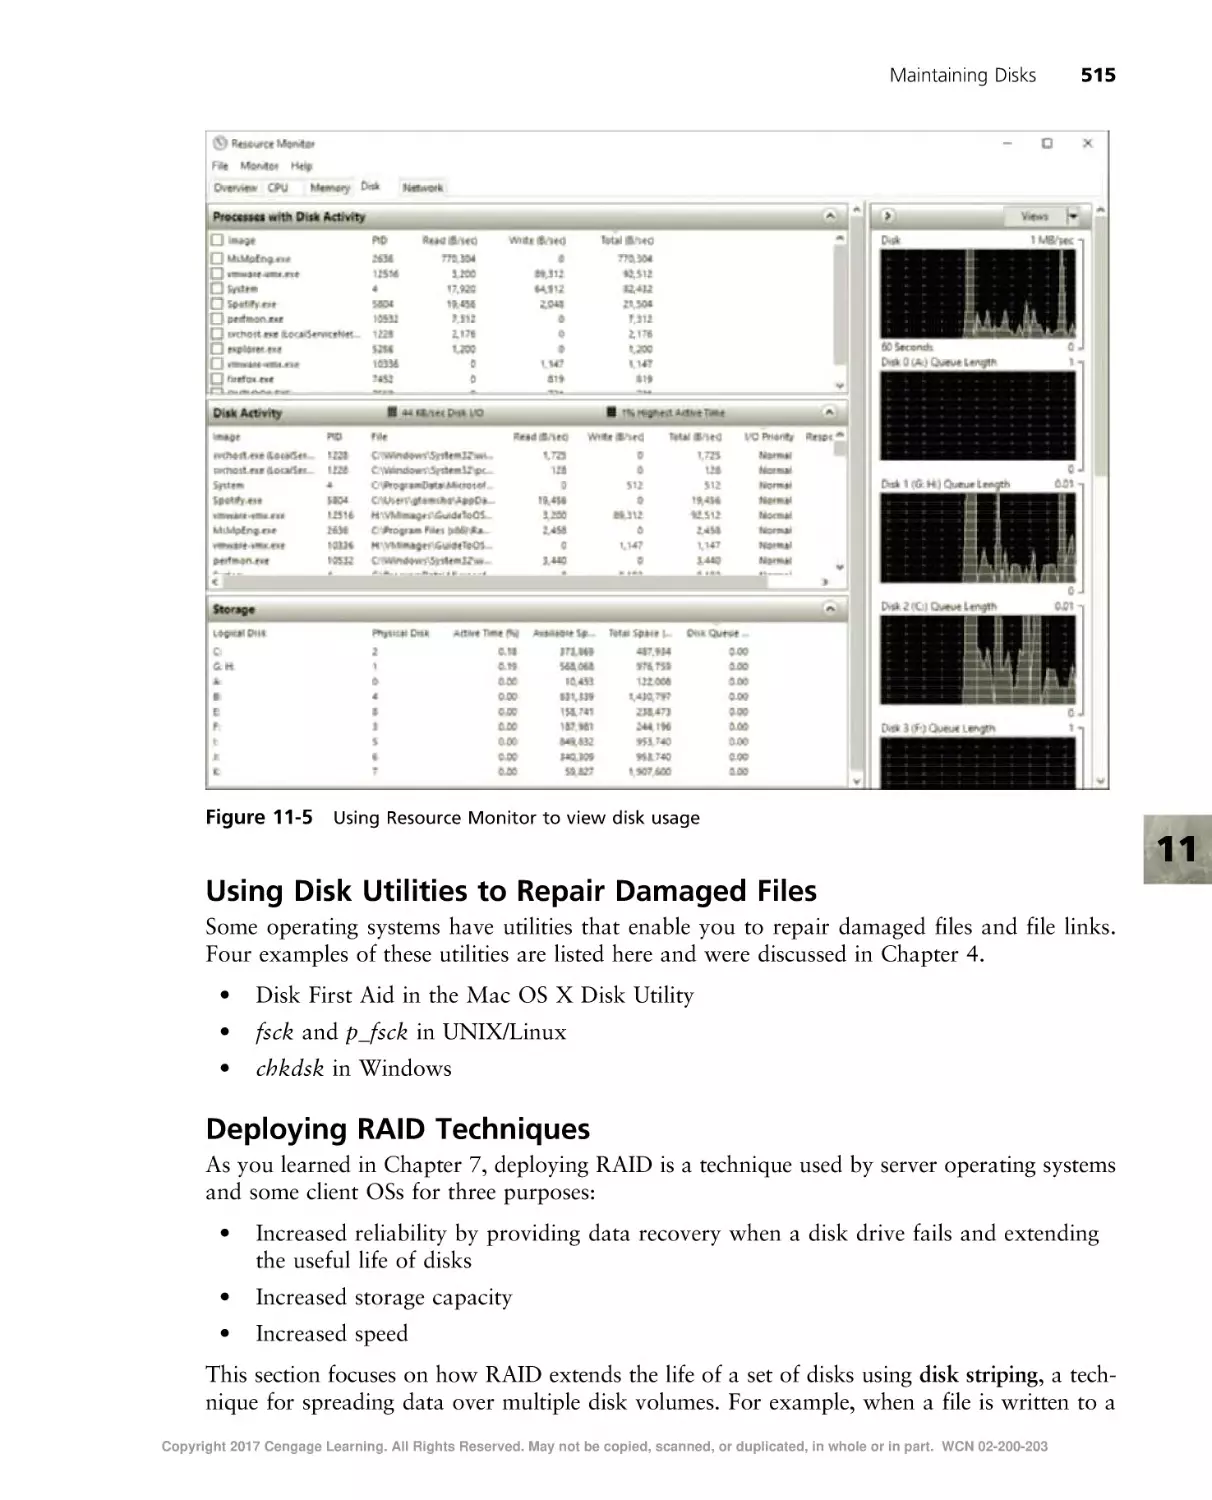
Using Disk Utilities to Repair Damaged Files . . . . . . . . . . . . . . . . . . . . . . . . . . . . . . . . . . . . . . . .
Deploying RAID Techniques . . . . . . . . . . . . . . . . . . . . . . . . . . . . . . . . . . . . . . . . . . . . . . . . . .
512
512
514
515
515
Making Backups . . . . . . . . . . . . . . . . . . . . . . . . . . . . . . . . . . . . . . . . . . . . . . . . . . . . . . . . . . . . 516
Optimizing Software Installation . . . . . . . . . . . . . . . . . . . . . . . . . . . . . . . . . . . . . . . . . . . . . . . . . . 518
Tuning the Operating System . . . . . . . . . . . . . . . . . . . . . . . . . . . . . . . . . . . . . . . . . . . . . . . . . . . .
Tuning Virtual Memory . . . . . . . . . . . . . . . . . . . . . . . . . . . . . . . . . . . . . . . . . . . . . . . . . . . . .
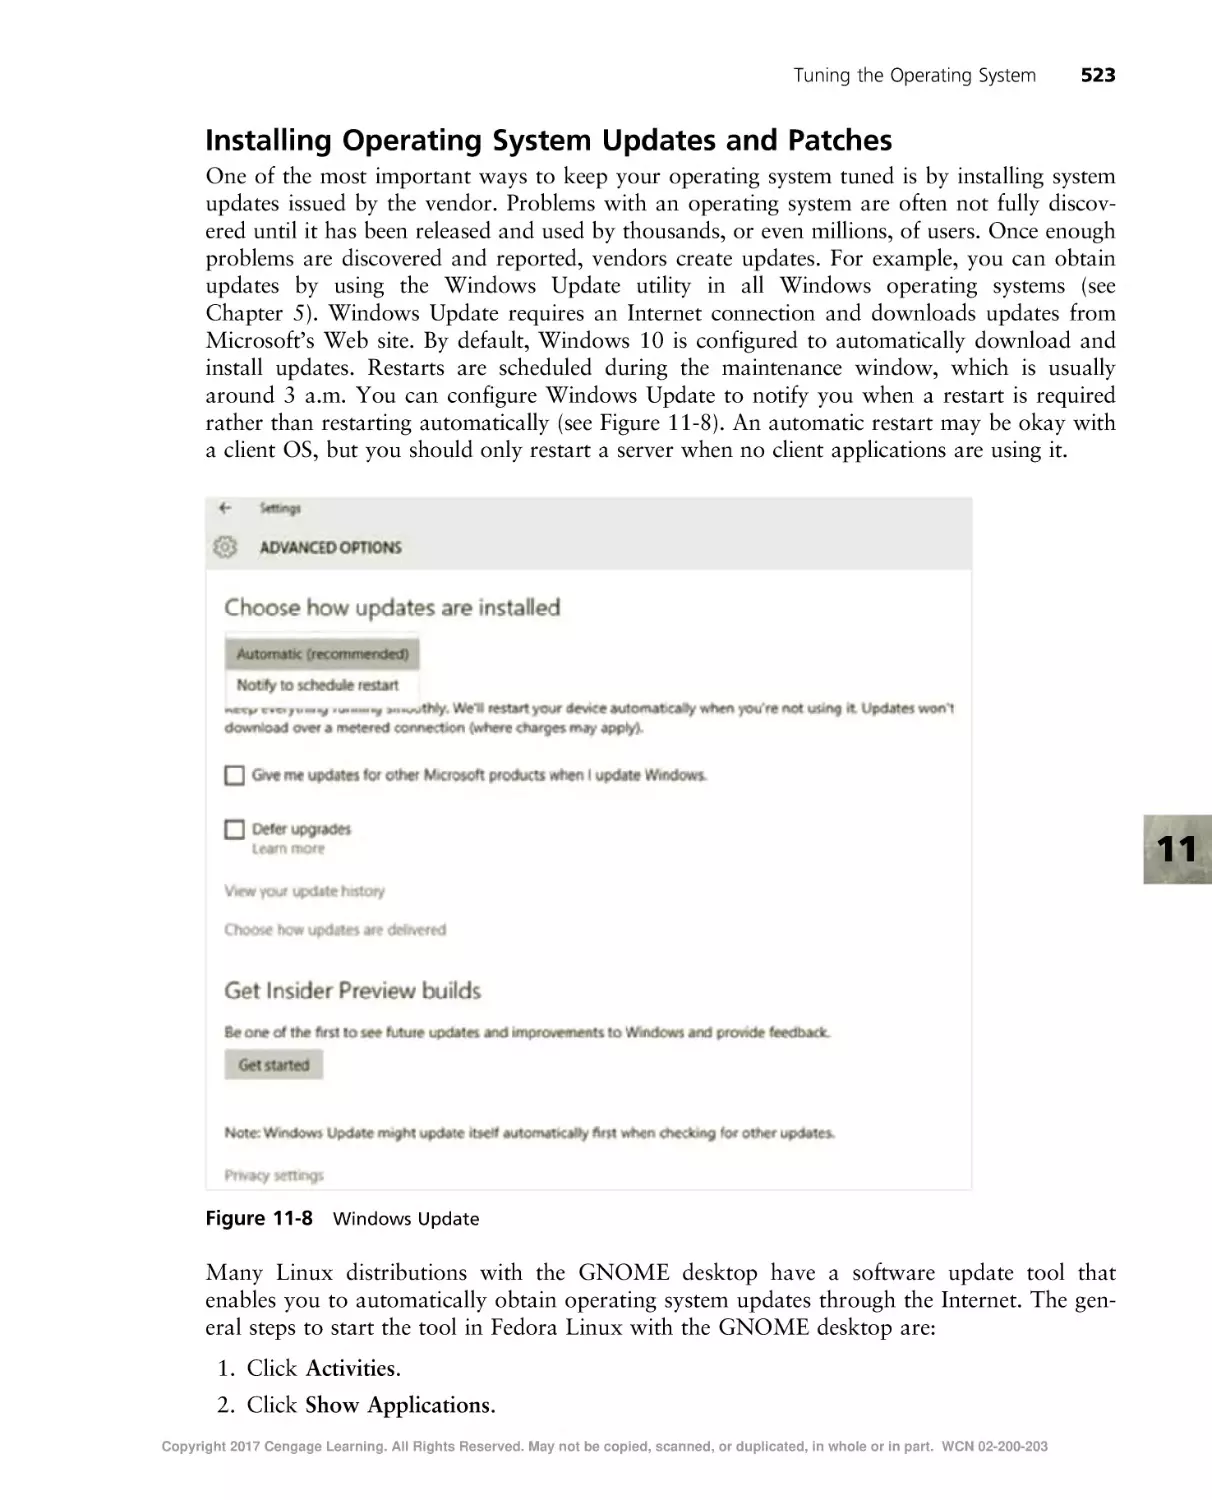
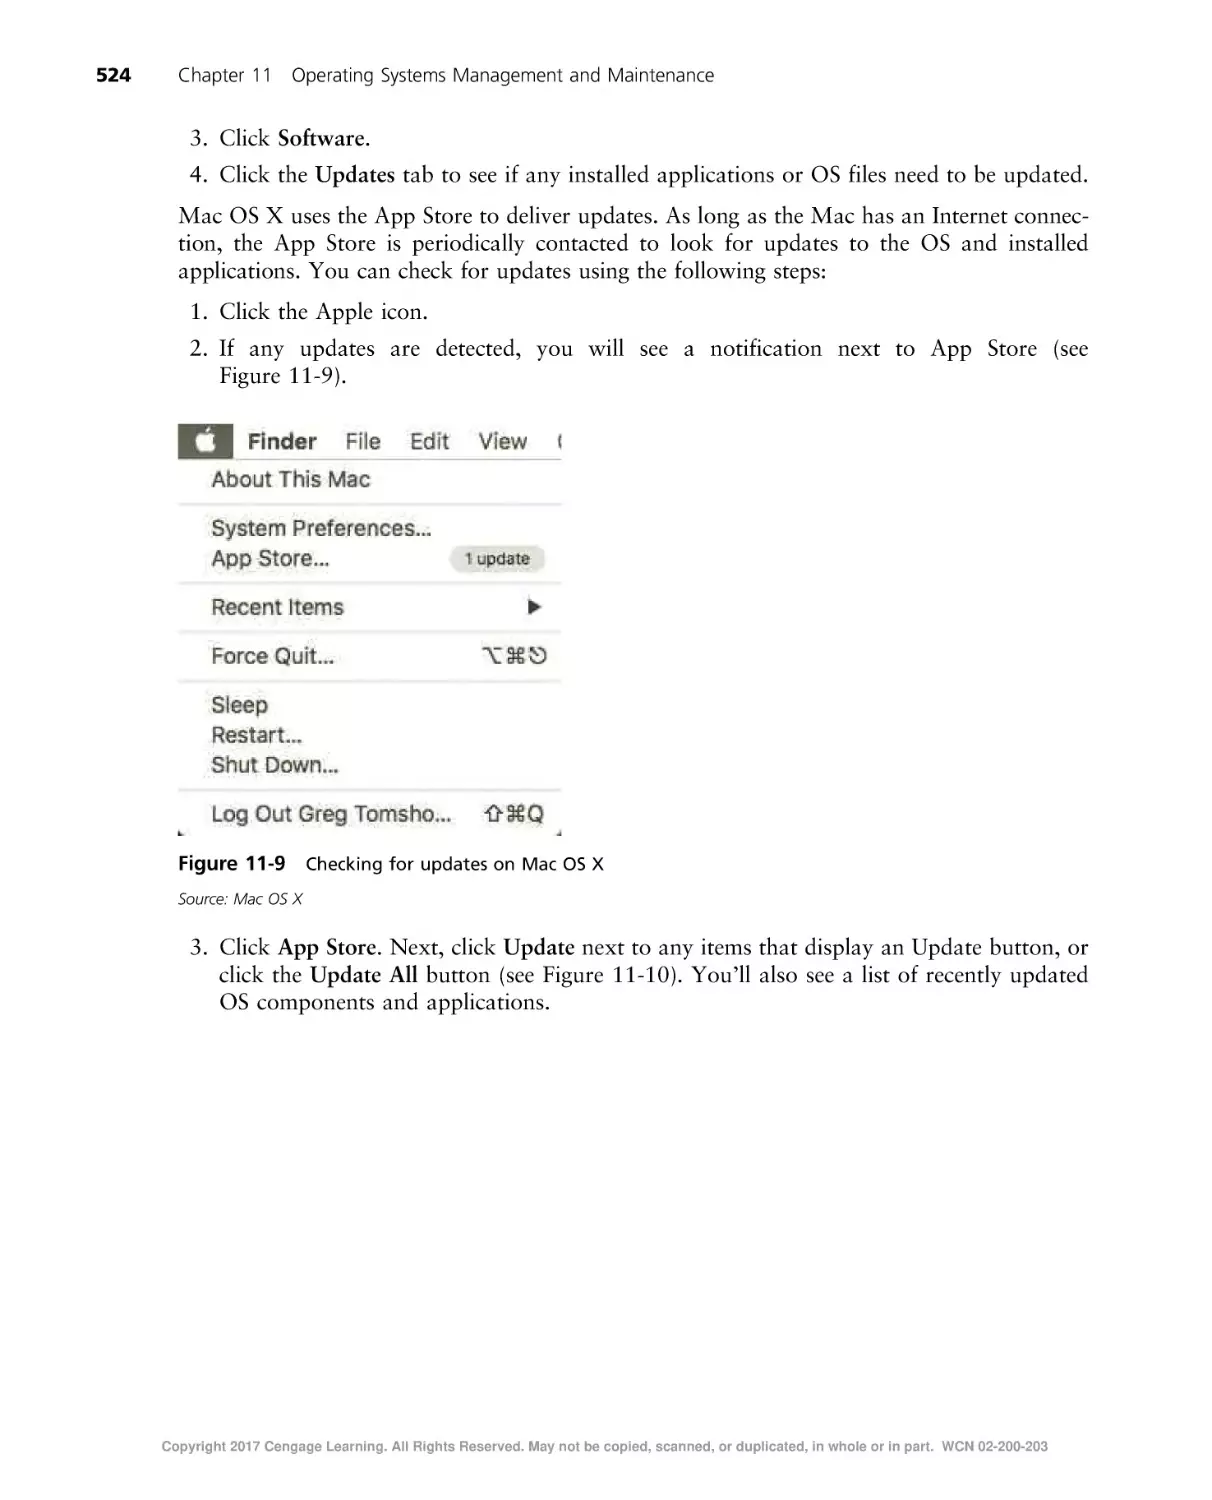
Installing Operating System Updates and Patches . . . . . . . . . . . . . . . . . . . . . . . . . . . . . . . . . . . . .
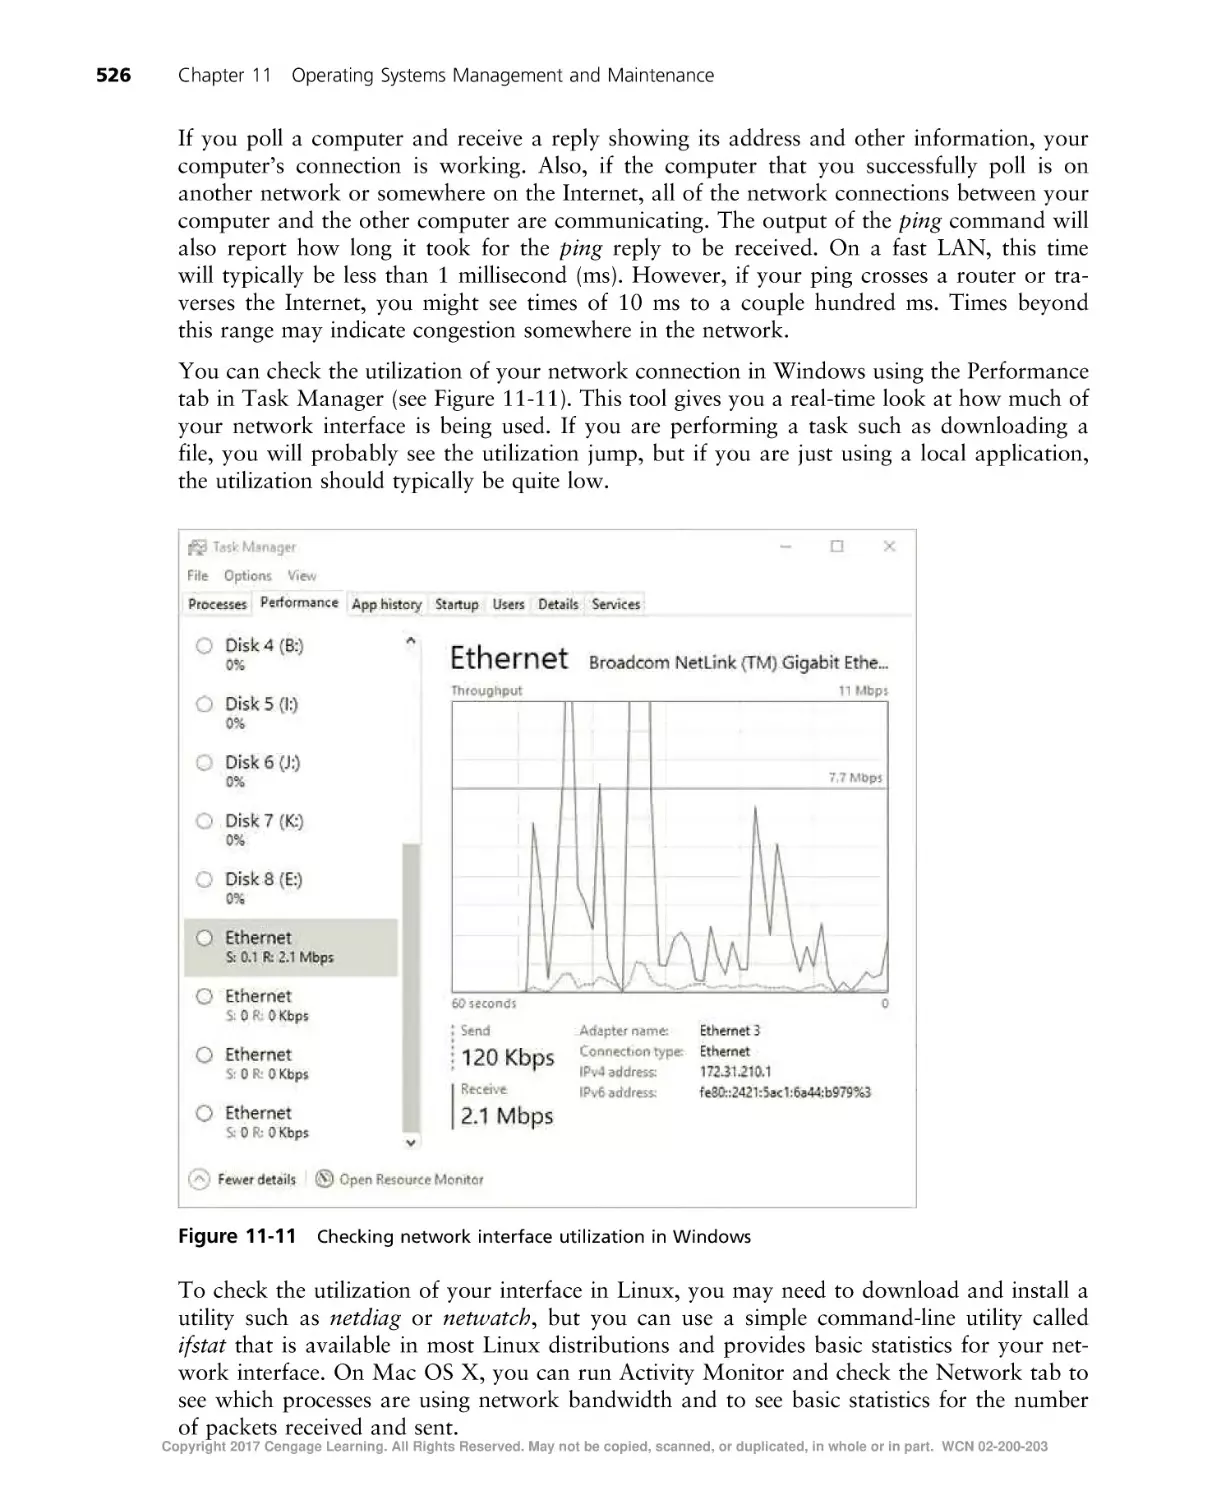
Tuning for Network Communications . . . . . . . . . . . . . . . . . . . . . . . . . . . . . . . . . . . . . . . . . . . .
Testing Network Connectivity . . . . . . . . . . . . . . . . . . . . . . . . . . . . . . . . . . . . . . . . . . . . . . . . .
520
521
523
525
525
Chapter Summary . . . . . . . . . . . . . . . . . . . . . . . . . . . . . . . . . . . . . . . . . . . . . . . . . . . . . . . . . . . 527
Key Terms . . . . . . . . . . . . . . . . . . . . . . . . . . . . . . . . . . . . . . . . . . . . . . . . . . . . . . . . . . . . . . . 527
Review Questions . . . . . . . . . . . . . . . . . . . . . . . . . . . . . . . . . . . . . . . . . . . . . . . . . . . . . . . . . . . 528
Hands-On Projects . . . . . . . . . . . . . . . . . . . . . . . . . . . . . . . . . . . . . . . . . . . . . . . . . . . . . . . . . . 532
Critical Thinking . . . . . . . . . . . . . . . . . . . . . . . . . . . . . . . . . . . . . . . . . . . . . . . . . . . . . . . . . . . 538
Challenge Labs . . . . . . . . . . . . . . . . . . . . . . . . . . . . . . . . . . . . . . . . . . . . . . . . . . . . . . . . . . . . . 539
Case Projects . . . . . . . . . . . . . . . . . . . . . . . . . . . . . . . . . . . . . . . . . . . . . . . . . . . . . . . . . . . . . . 539
APPENDIX A
Operating System Command-Line Commands . . . . . . . . . . . . . . . . . . . . . . . . . . . . . . . . . . . . . . . . . 541
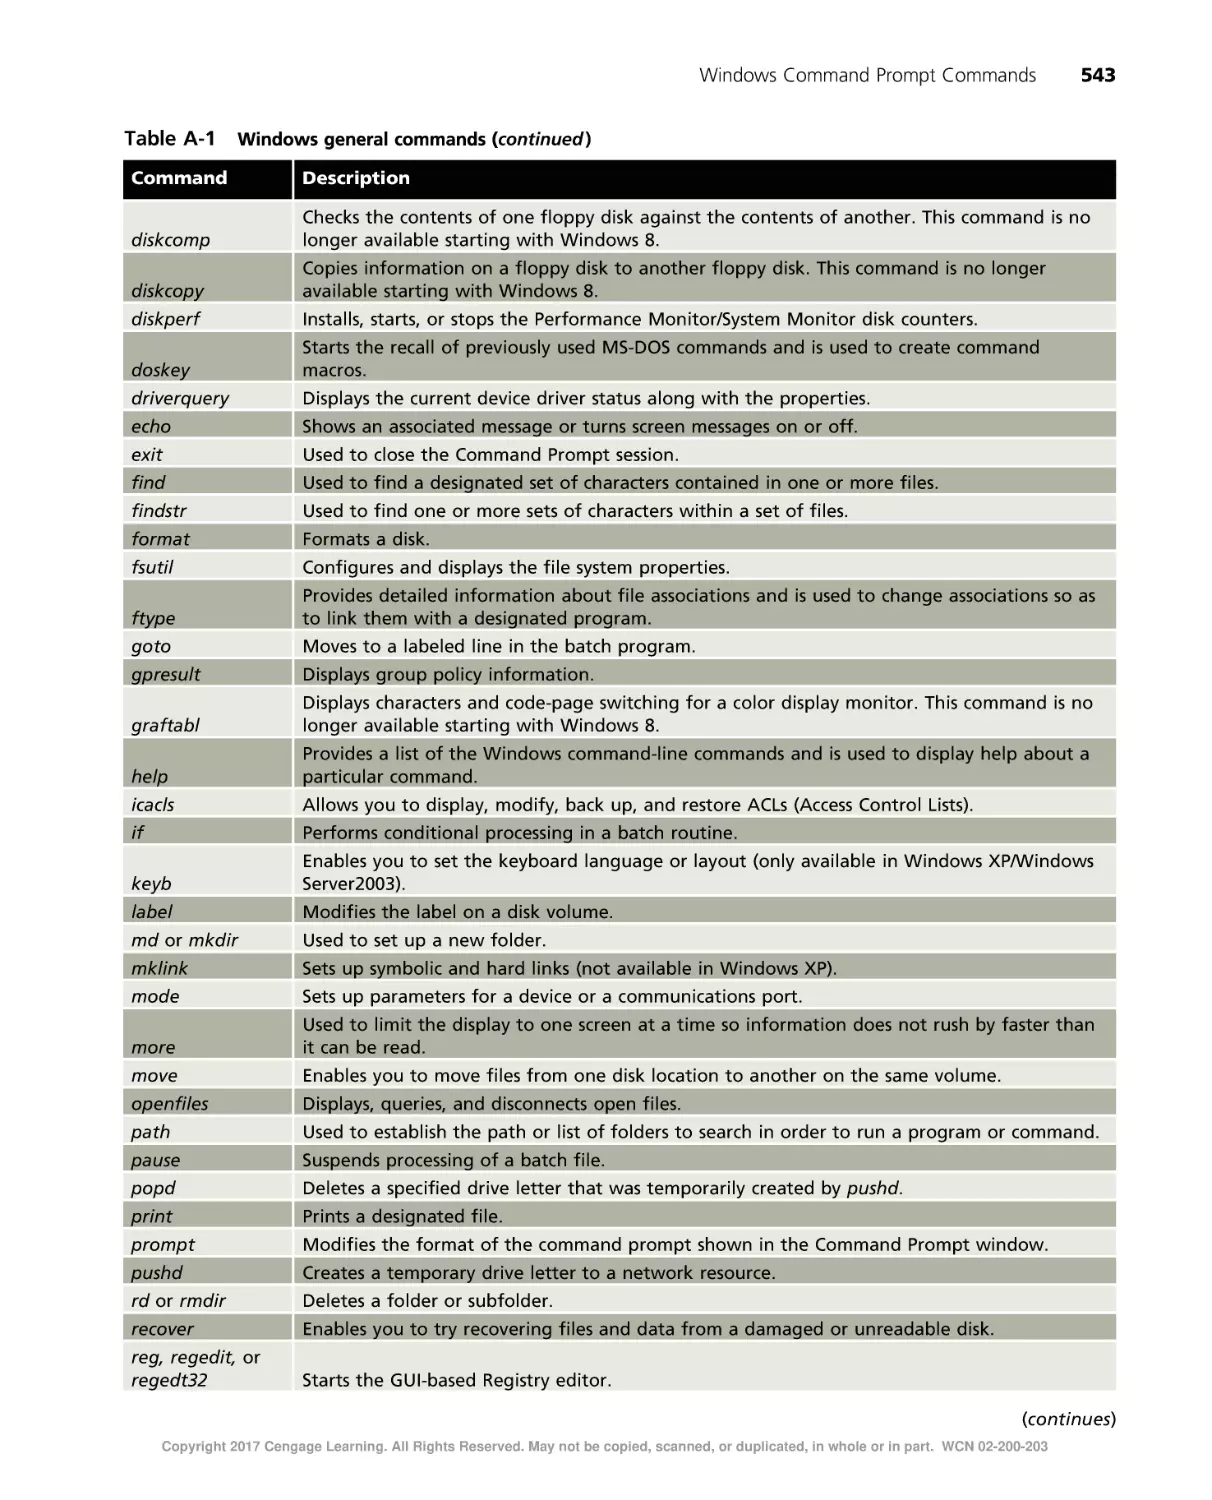
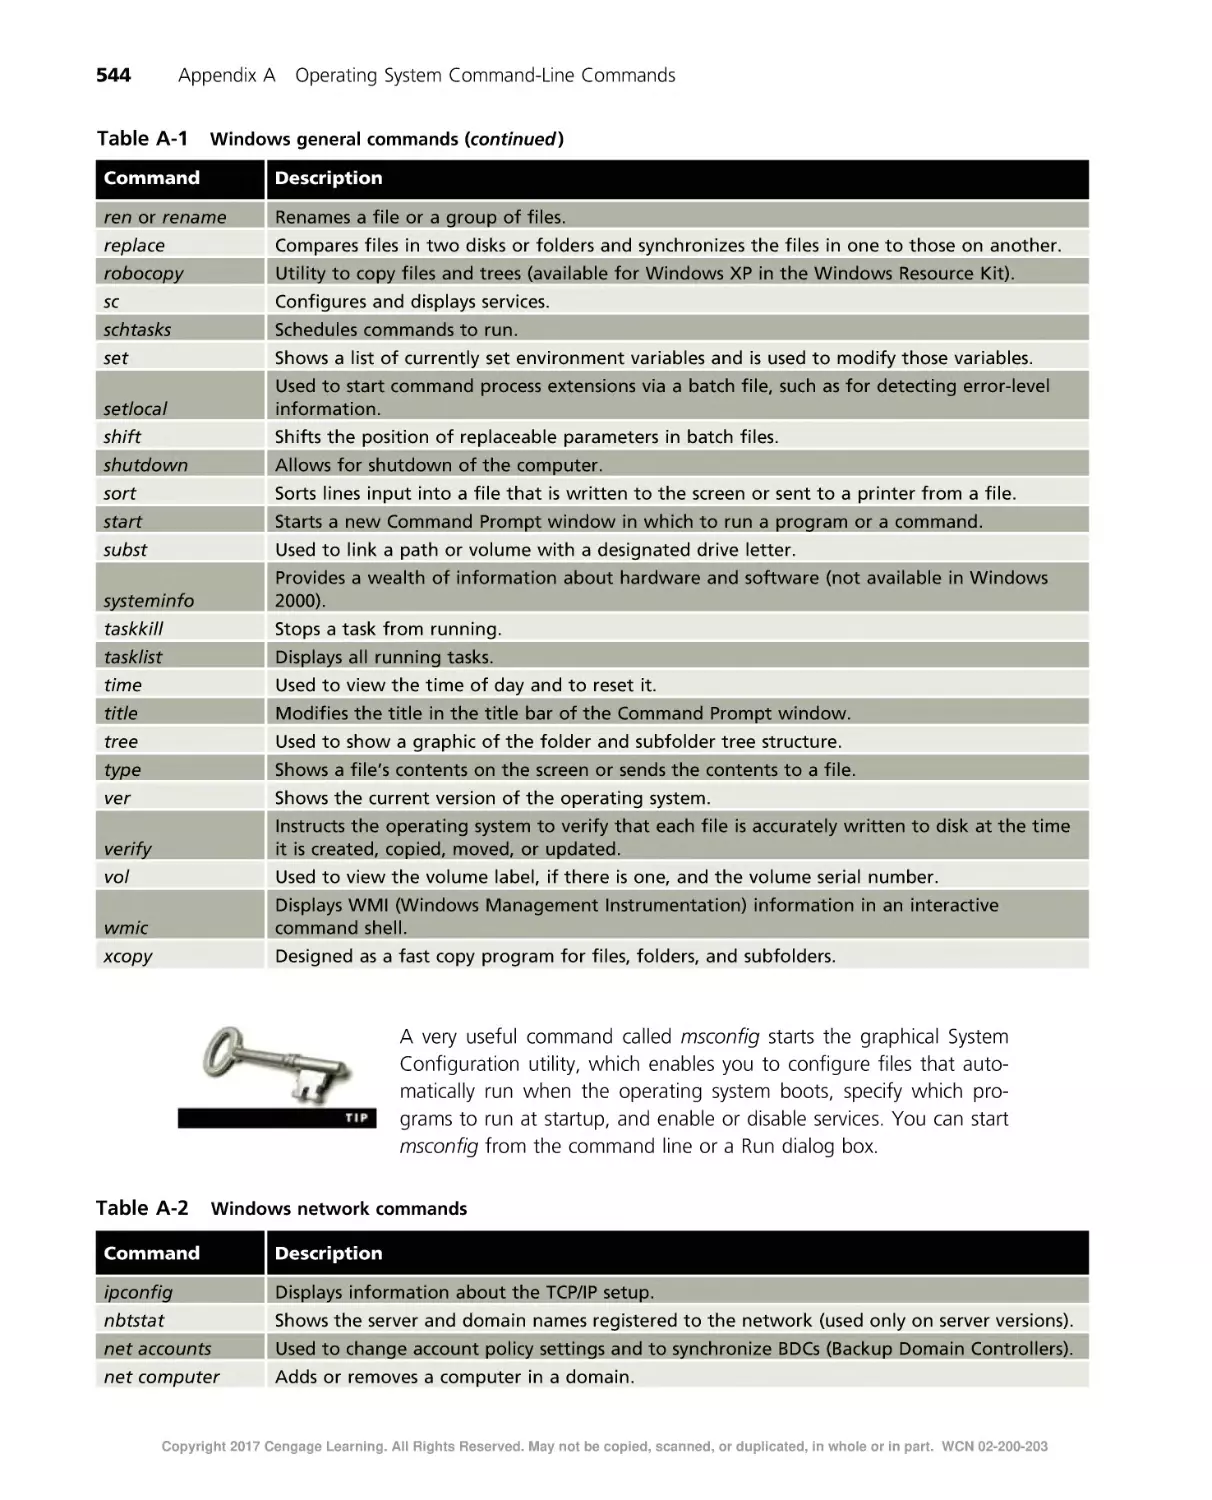
Windows Command Prompt Commands . . . . . . . . . . . . . . . . . . . . . . . . . . . . . . . . . . . . . . . . . . . . 541
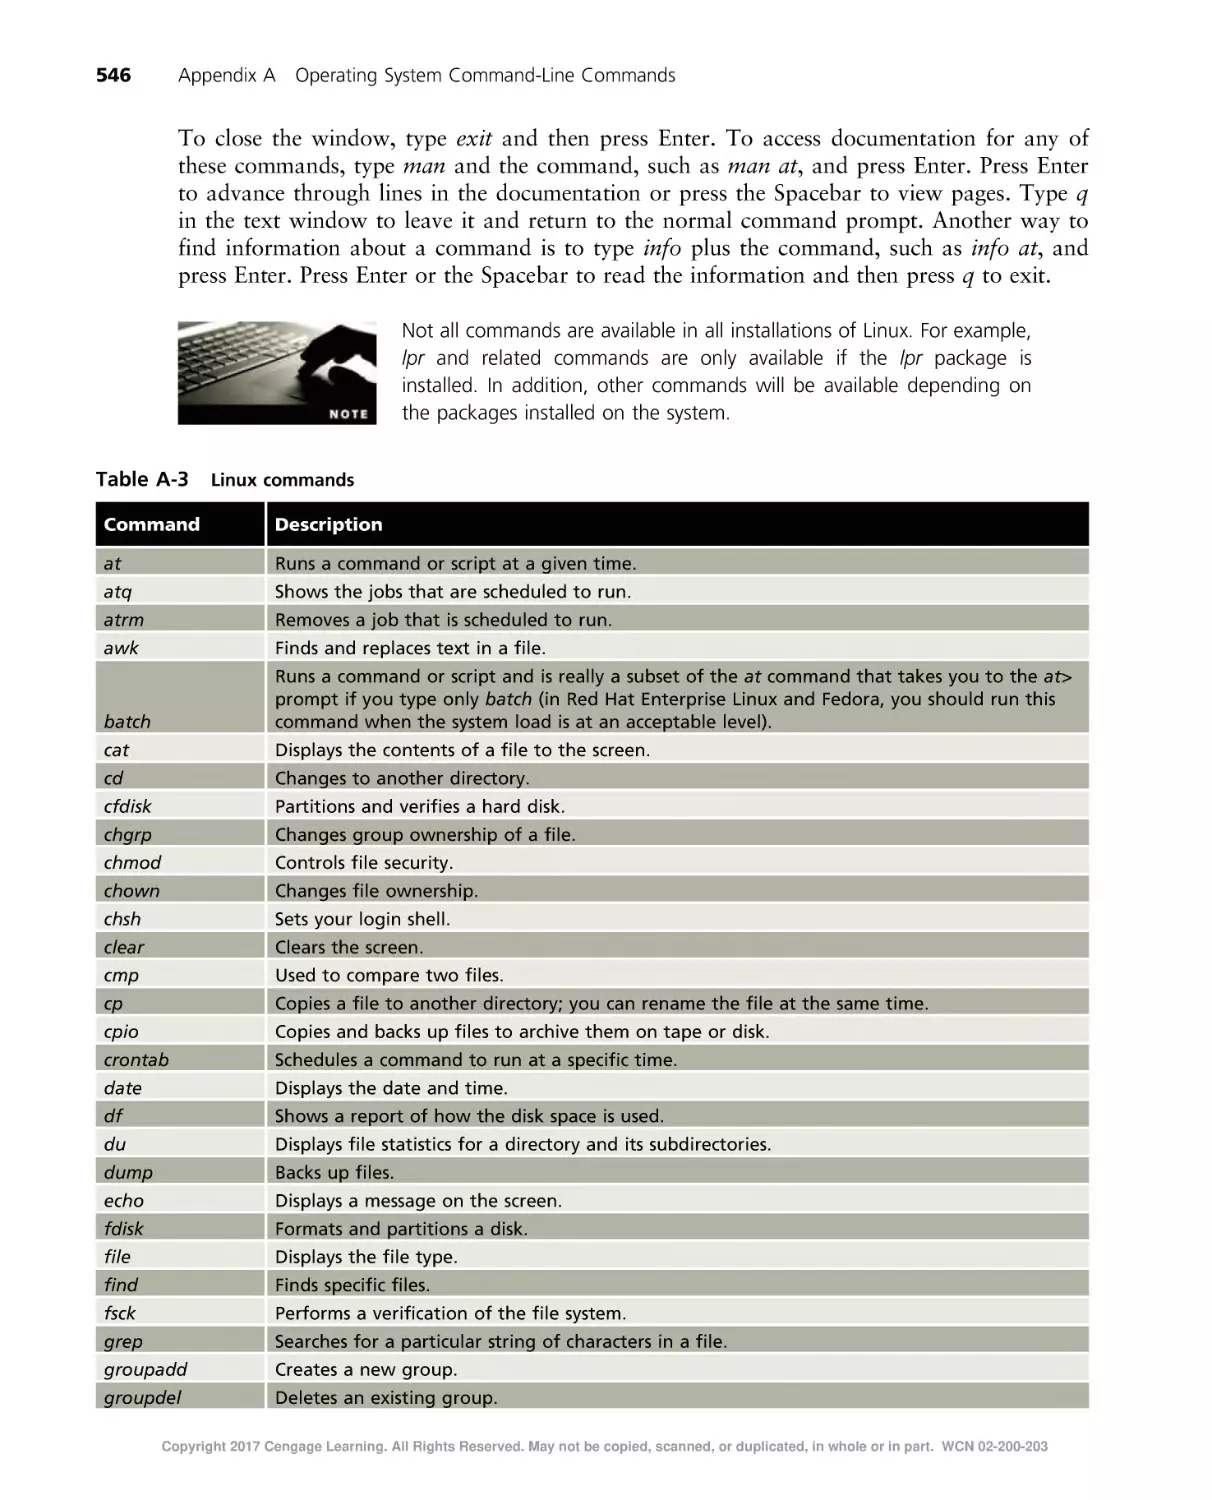
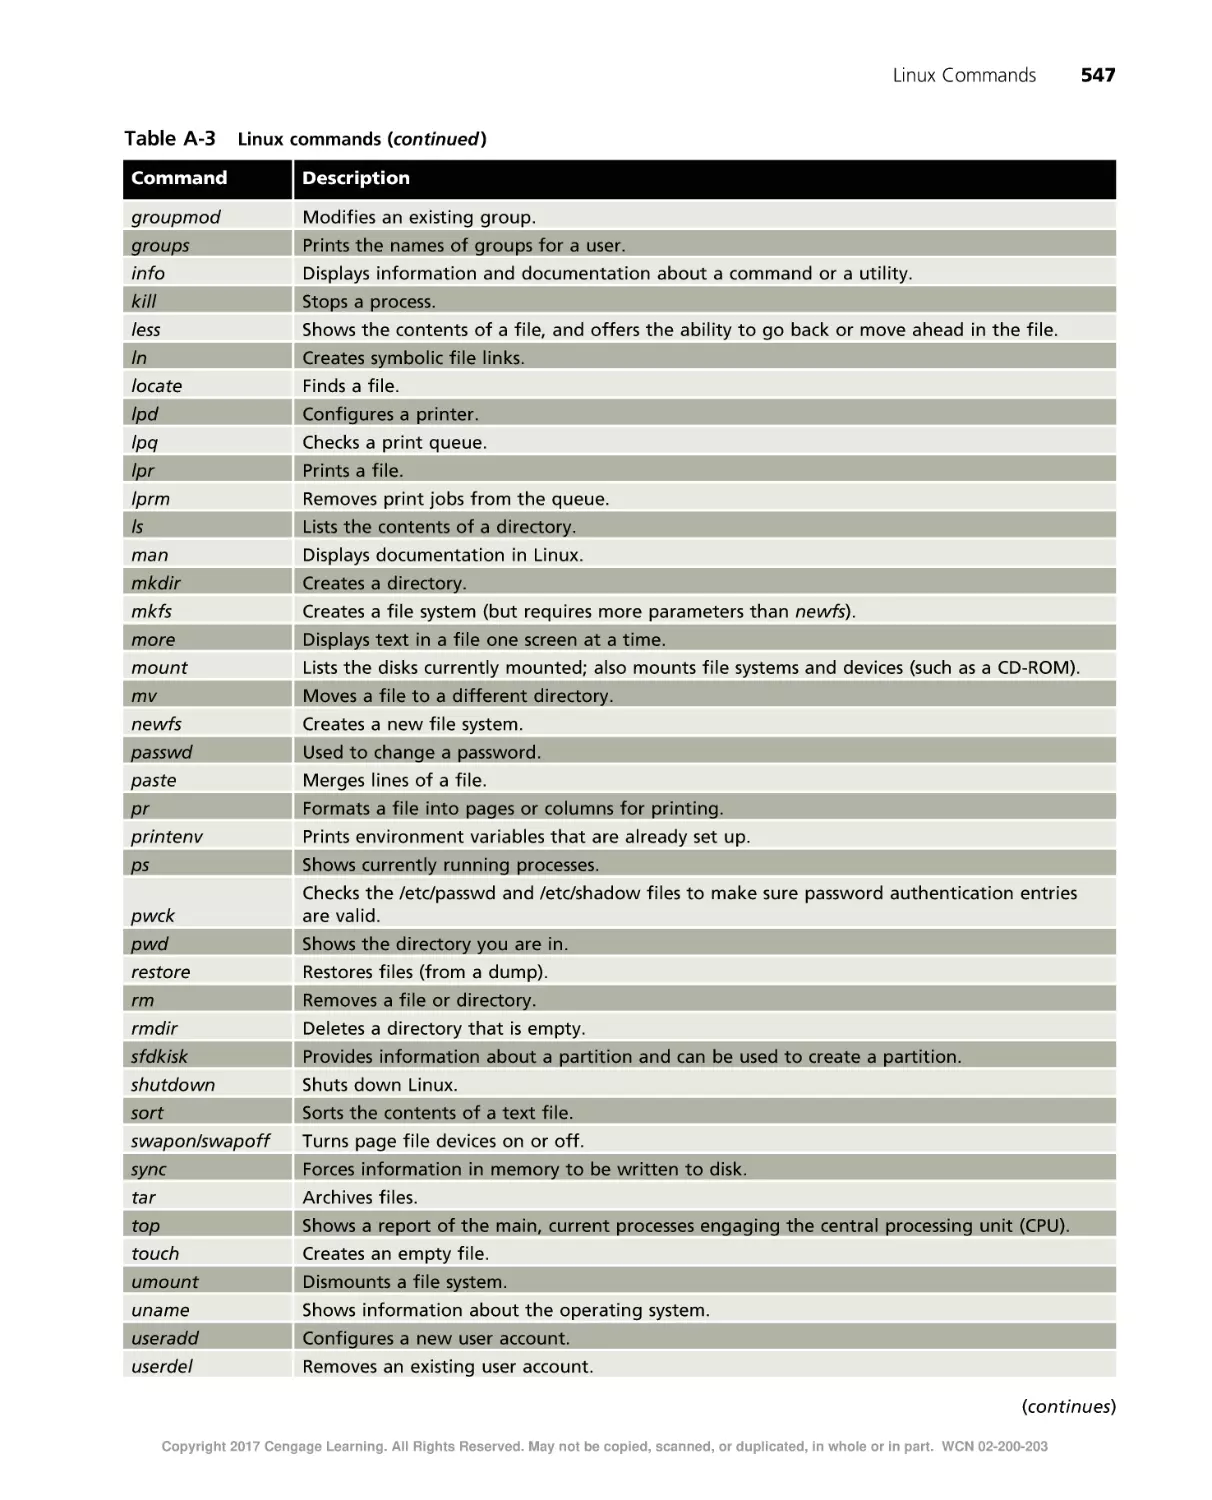
Linux Commands . . . . . . . . . . . . . . . . . . . . . . . . . . . . . . . . . . . . . . . . . . . . . . . . . . . . . . . . . . . 545
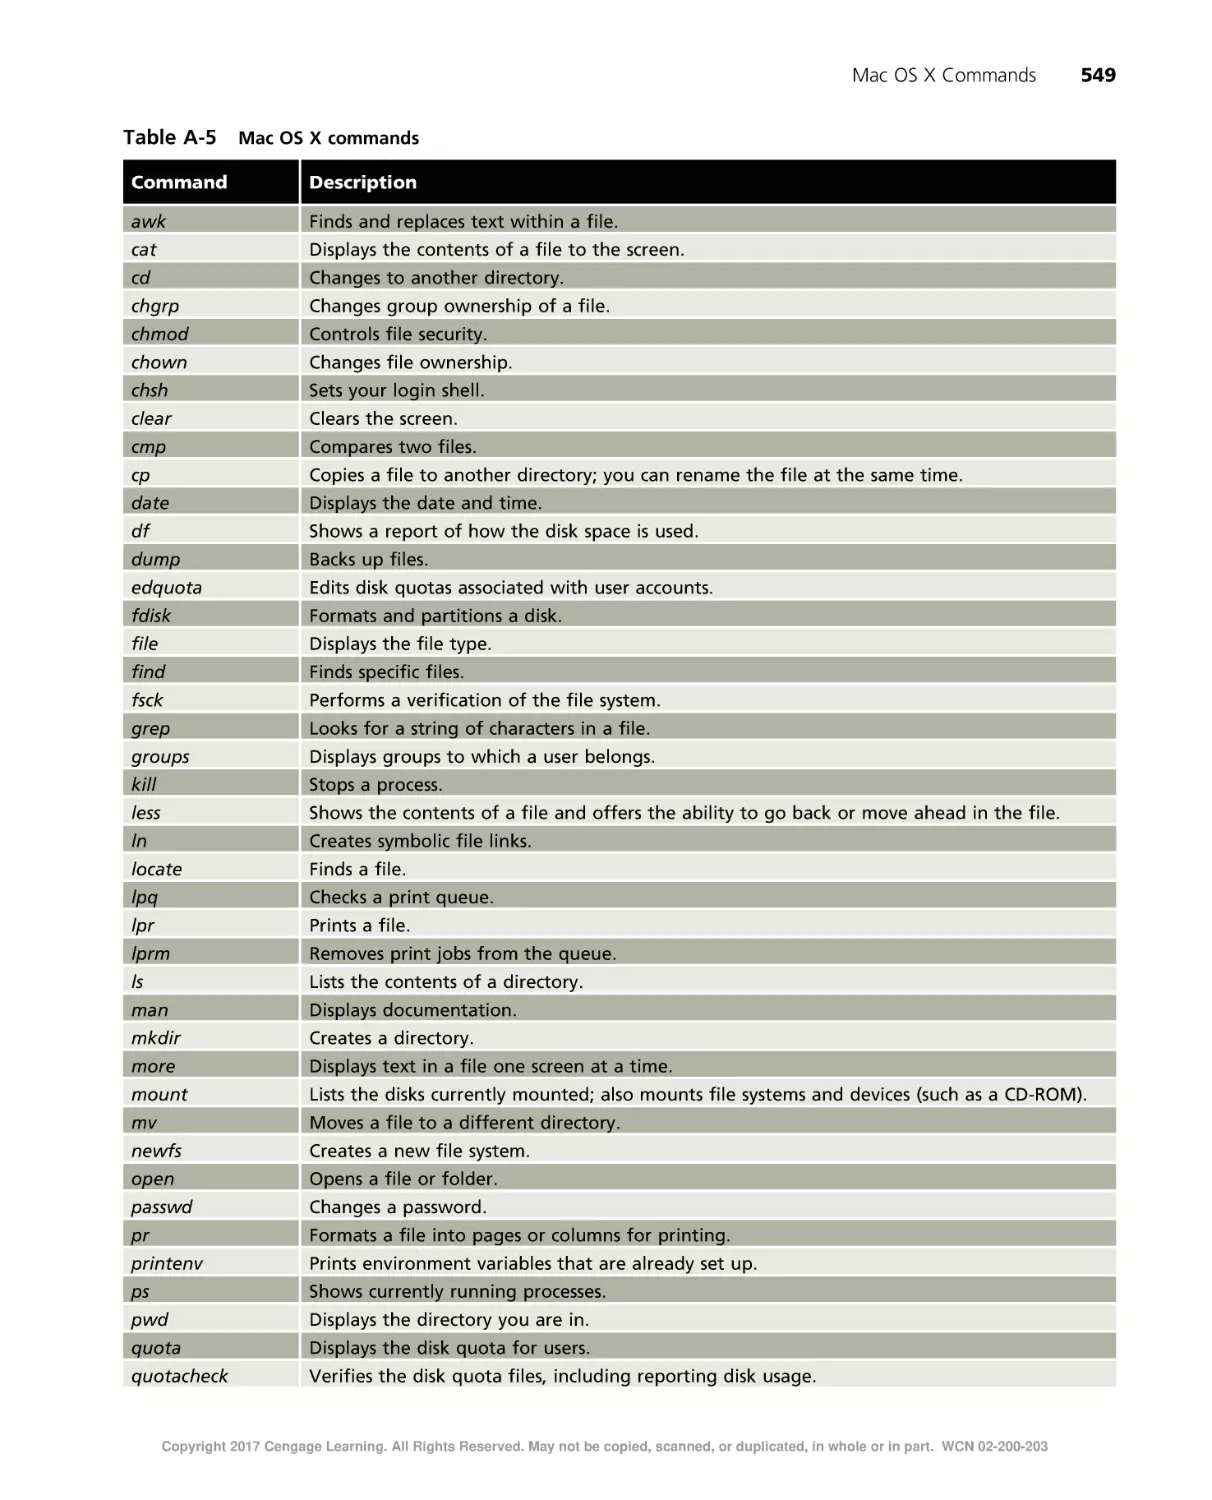
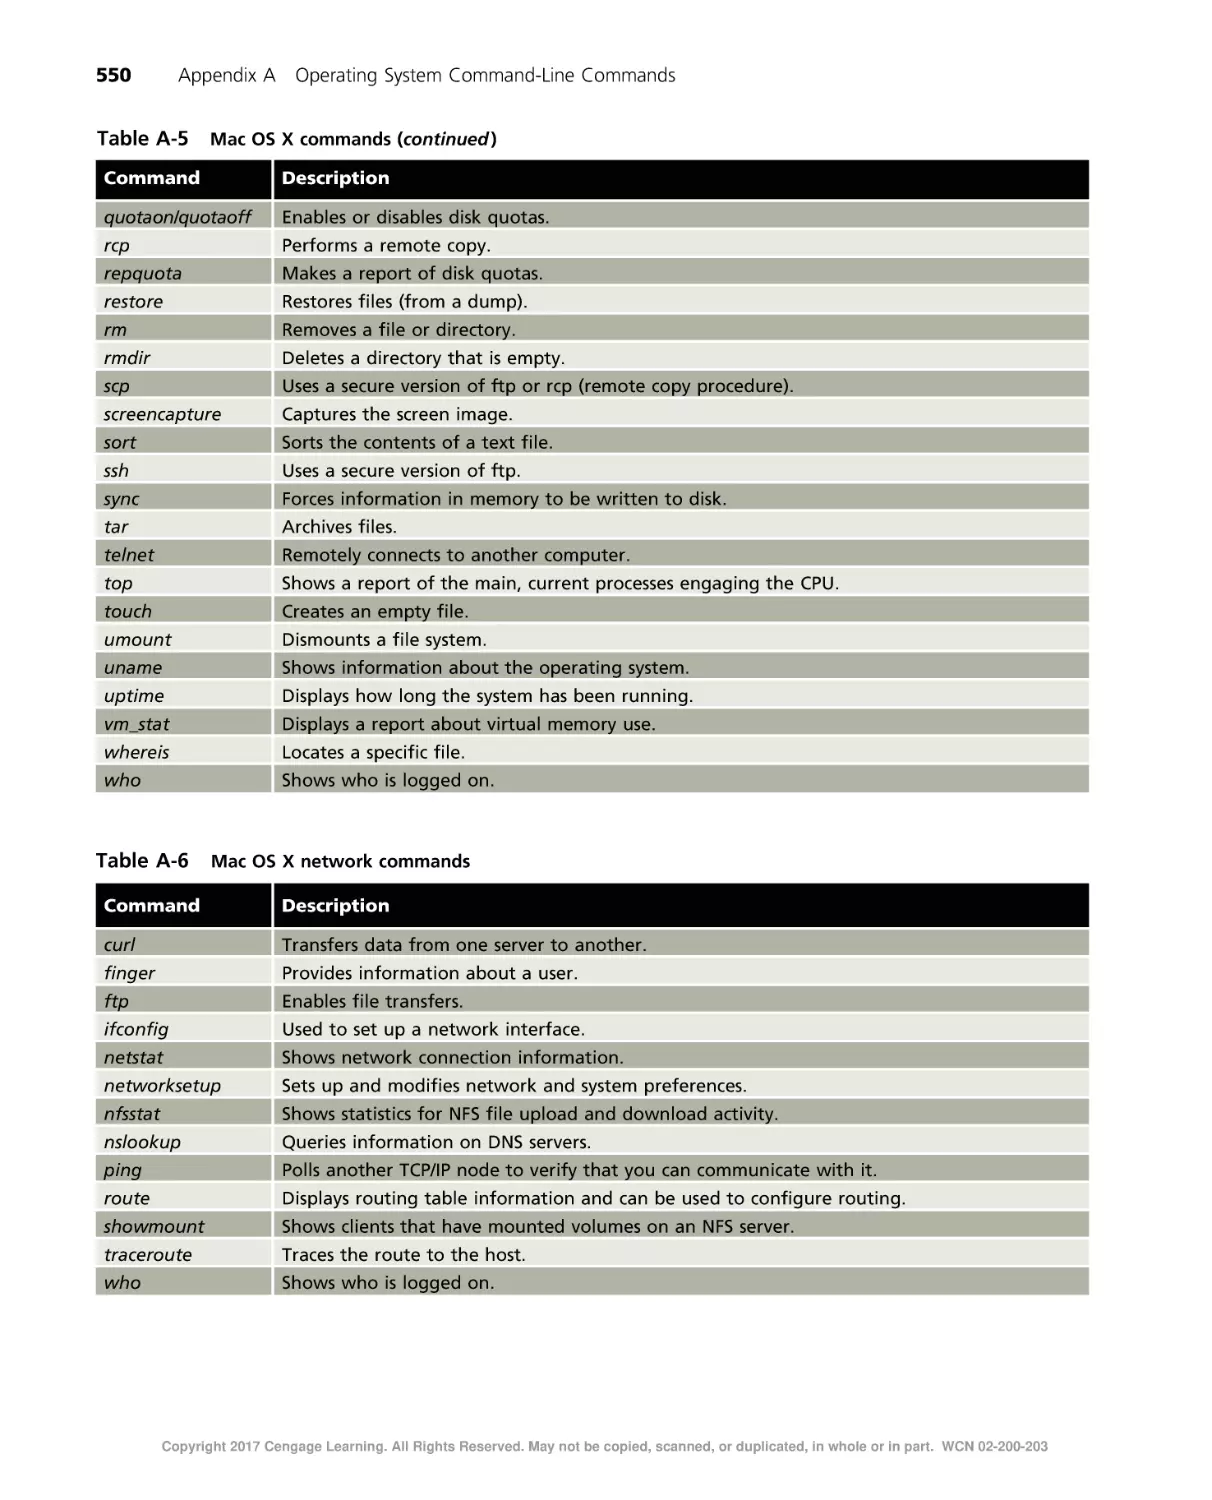
Mac OS X Commands . . . . . . . . . . . . . . . . . . . . . . . . . . . . . . . . . . . . . . . . . . . . . . . . . . . . . . . . 548
GLOSSARY . . . . . . . . . . . . . . . . . . . . . . . . . . . . . . . . . . . . . . . . . . . . . . . . . . . . . . . . . . . . . . . . . . . . 551
INDEX . . . . . . . . . . . . . . . . . . . . . . . . . . . . . . . . . . . . . . . . . . . . . . . . . . . . . . . . . . . . . . . . . . . . . . . . 565
Copyright 2017 Cengage Learning. All Rights Reserved. May not be copied, scanned, or duplicated, in whole or in part. WCN 02-200-203
Copyright 2017 Cengage Learning. All Rights Reserved. May not be copied, scanned, or duplicated, in whole or in part. WCN 02-200-203
Introduction
If you use a computer, you also use a computer operating system to tap into the
computer’s power. The more you know about a computer’s operating system, the more you
are able to enjoy the full versatility of your computer. This book opens the door to understanding your computer’s operating system. Also, the book enables you to understand
many types of operating systems so you can compare the advantages of each for your personal and professional use.
In this book, you learn about the most popular operating systems in use today:
●
Windows, with emphasis on Windows 10 and Windows Server 2012, and coverage of
Windows Server 2016
●
UNIX/Linux, with emphasis on Fedora 23
●
Mac OS X, with emphasis on El Capitan
The book starts at a basic level and builds with each chapter to put you on track to become
an accomplished user of each operating system.
You learn the operating systems in clear language through a hands-on, practical approach. An
advantage of studying several operating systems is that you can compare the functions of each
side-by-side as you learn. If you are taking an introductory operating systems course or an
operating systems survey course, this book offers a strong foundation for mastering operating
systems. Also, if you are preparing for one or more computer certifications, such as for hardware systems, networking, programming, or security, you’ll find this book provides a vital
Copyright 2017 Cengage Learning. All Rights Reserved. May not be copied, scanned, or duplicated, in whole or in part. WCN 02-200-203
xv
xvi
Introduction
background for your preparations. The book is particularly useful as background for the
CompTIA A+ certification. If you are relatively new to computers, the book starts with the
basics to build your confidence. If you are more experienced in computers, you’ll find lots of
useful information to further build your repertoire of knowledge and experience.
The Intended Audience
Guide to Operating Systems, Fifth Edition is written in straightforward language for anyone
who uses a computer and wants to learn more. No prior computer experience is required,
although some previous basic experience with a computer is helpful. The hands-on projects
in this book use a variety of operating systems. You can learn the concepts if you have
access to one or a combination of the operating systems presented. The more operating systems that are available to you, the better the opportunity to compare their features. For the
most part, the projects can be performed in a classroom, computer lab, or at home.
What’s New to this Edition
Guide to Operating Systems, Fifth Edition is extensively updated to include the most current
operating systems and operating system features. This includes all-new coverage of Windows 10,
Windows Server 2012, Windows Server 2016, Fedora Linux with the GNOME desktop, and
Mac OS X El Capitan. Coverage of legacy operating systems is greatly reduced to provide mainly
an historical perspective.
The book also includes extensive updates for new hardware and new operating system
installation and management activities. New hardware coverage includes the latest CPUs
and peripheral devices. The interaction of operating systems and new storage devices is
also significantly updated, as well as new networking capabilities, including wireless networking advances and cloud computing. An entire chapter has been added for operating
system virtualization, including VMware, Microsoft Hyper-V, and VirtualBox.
Screen captures, figures, and tables are virtually all new. The hands-on projects are fully
updated or are all new for the new operating systems. A new end-of-chapter section called Challenge Labs gives readers one or more hands-on activities that require research and synthesis of
information already learned.
Chapter Descriptions
The chapter coverage is balanced to give you a full range of information about each topic.
The following is a summary of what you will learn in each chapter. Besides the instruction
provided throughout the chapter text, you can build on your knowledge and review your
progress using the extensive hands-on projects, challenge labs, case projects, key terms, and
review questions at the end of each chapter.
●
Chapter 1: Operating Systems Fundamentals gives you a basic introduction to operating
systems, including the types of operating systems and how they work. You also learn
about the history of operating systems.
Copyright 2017 Cengage Learning. All Rights Reserved. May not be copied, scanned, or duplicated, in whole or in part. WCN 02-200-203
Introduction
●
●
●
xvii
Chapter 2: Popular Operating Systems presents in-depth descriptions of modern Windows OSs, Linux and UNIX, and Mac OS X. You also briefly learn about earlier
Microsoft operating systems. This chapter gives you a starting point from which to
compare features of operating systems and to understand advancements in the latest
versions.
Chapter 3: The Central Processing Unit (CPU) enables you to understand how processors work and the essential characteristics of modern processors. The chapter concludes with an overview of popular modern processors.
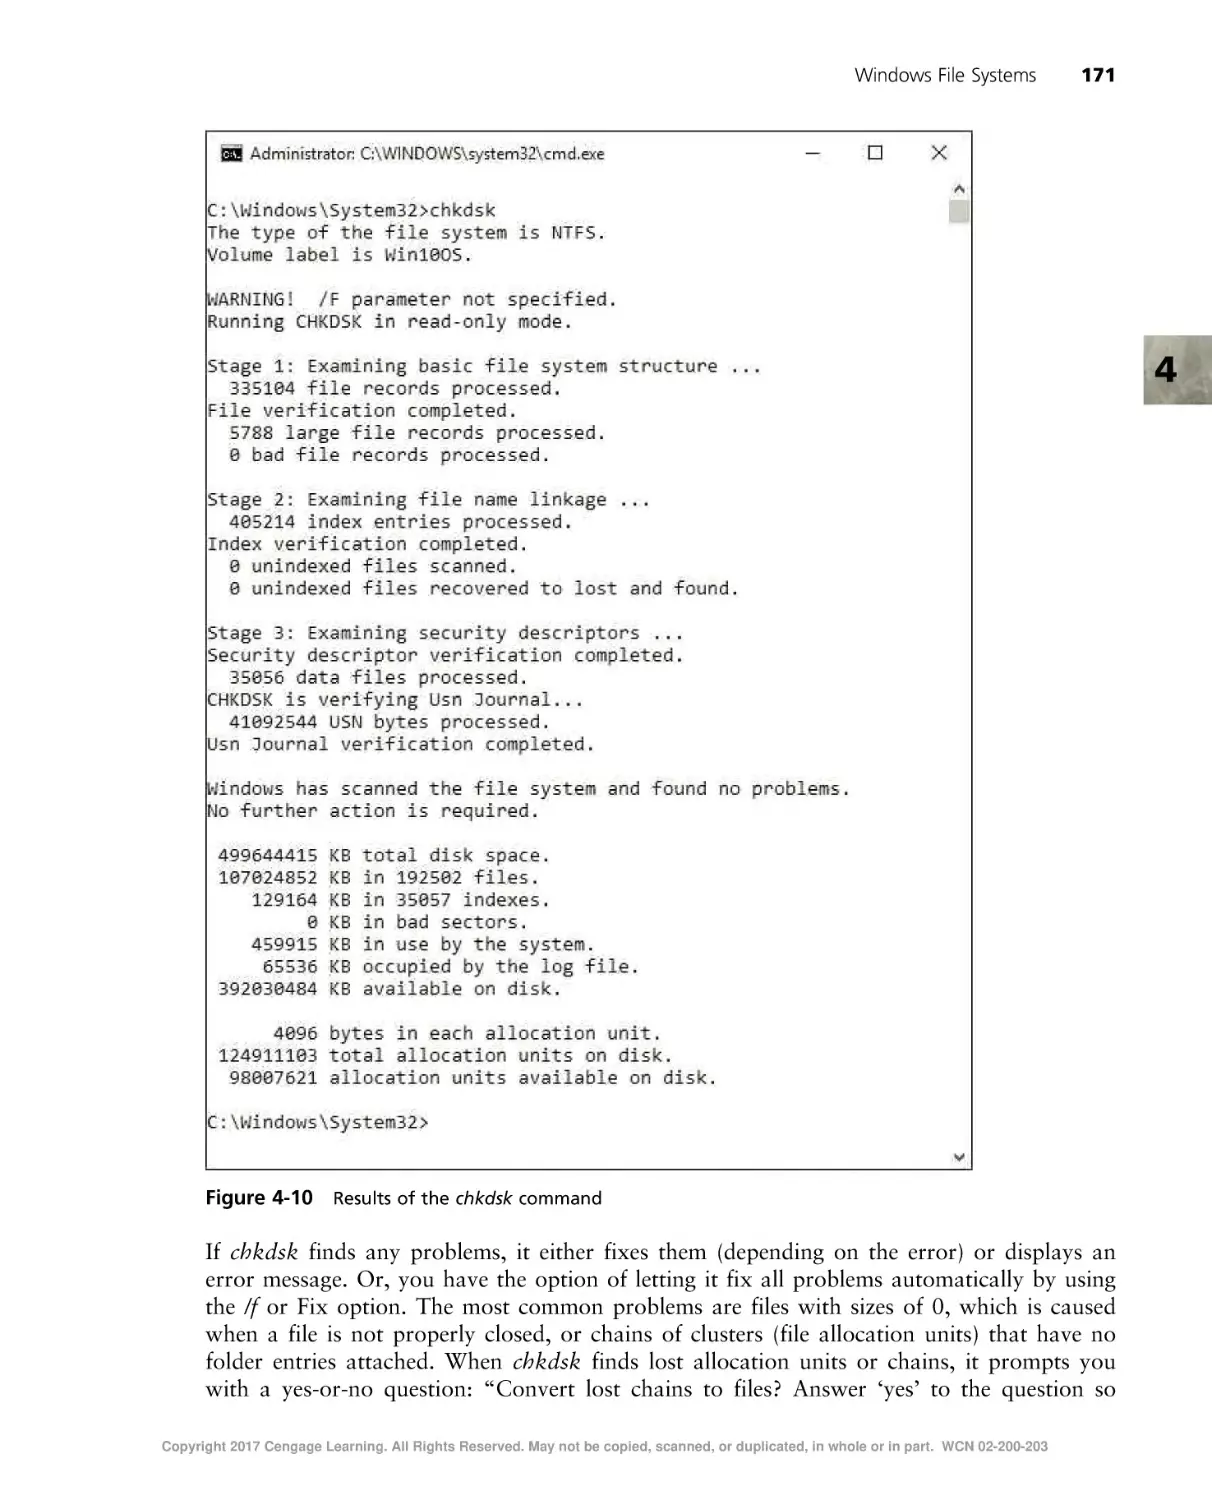
Chapter 4: File Systems explains the functions common to all file systems and then
describes the specific file systems used by different operating systems, from a brief
introduction to FAT to more in-depth coverage of NTFS, ufs/ext, HFS, and HFS+.
●
Chapter 5: Installing and Upgrading Operating Systems shows you how to prepare for
installing operating systems and then shows you how to install each operating system discussed in this book. You learn about installing operating systems from scratch and how
to upgrade operating systems.
●
Chapter 6: Configuring Input and Output Devices explains how devices such as monitors,
keyboards, mice, disk drives, network cards, and other devices interface with operating
systems. You learn about the latest input and output technologies for modern operating
systems and computers.
●
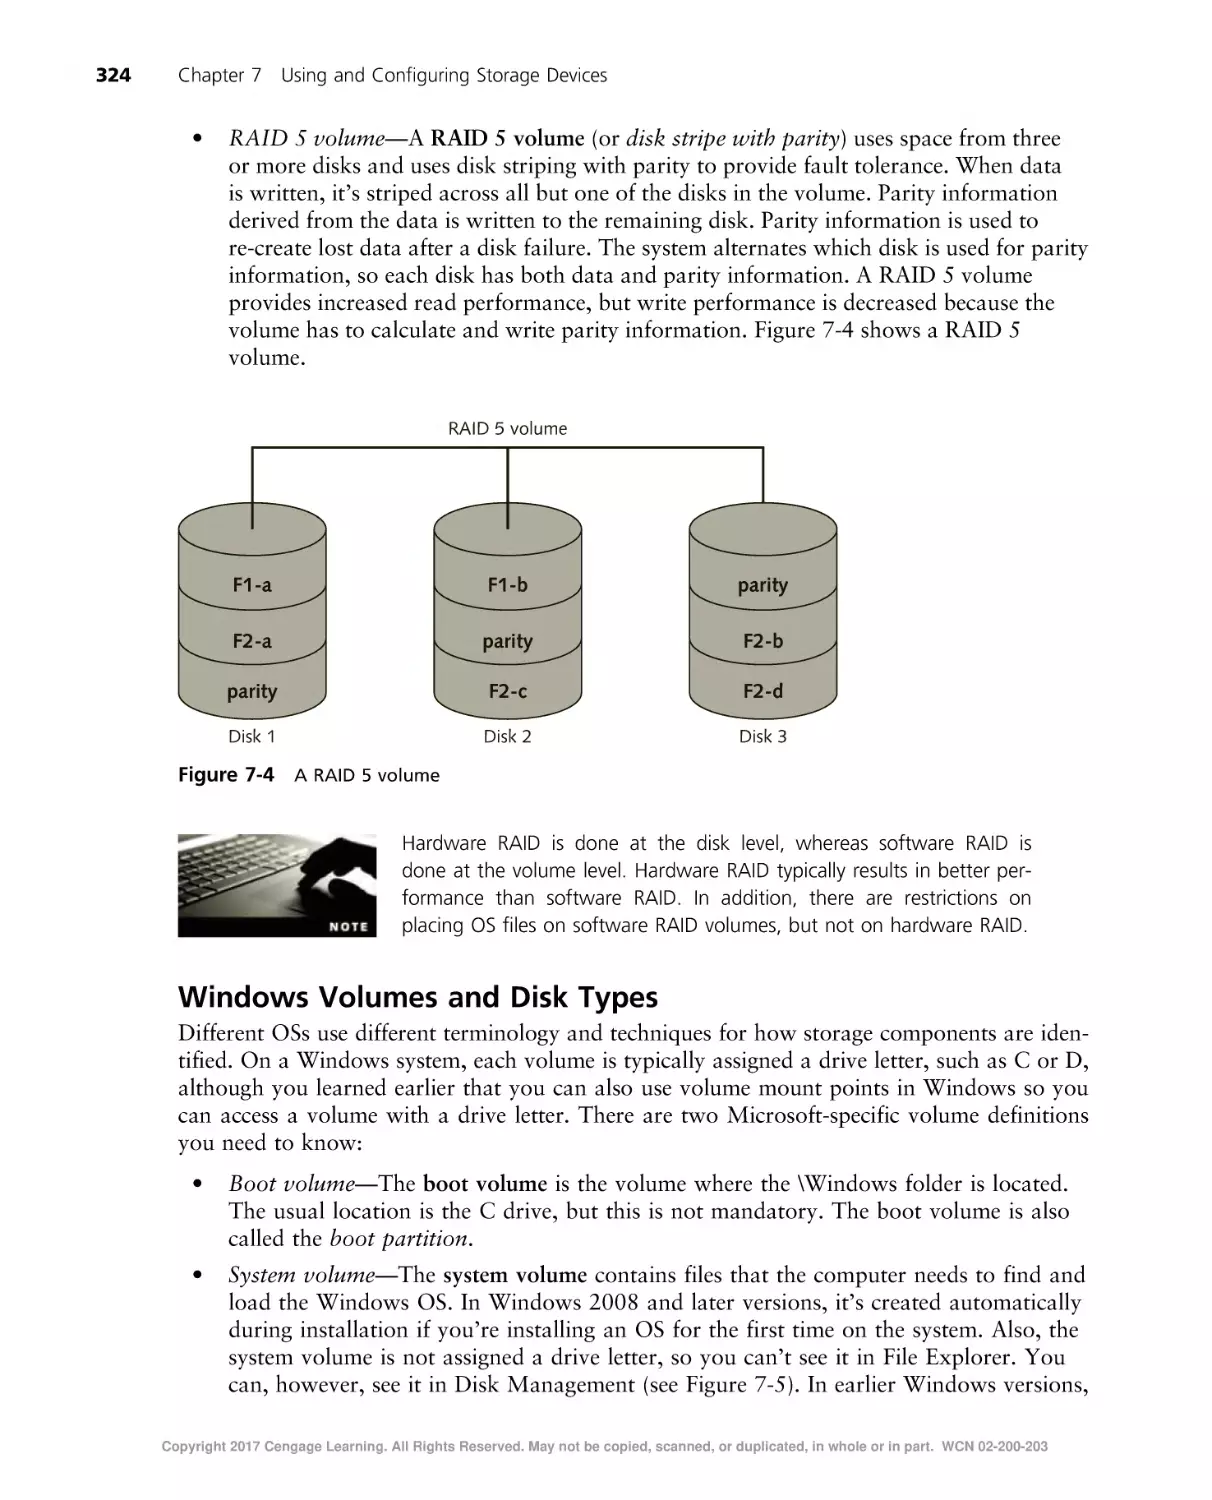
Chapter 7: Using and Configuring Storage Devices describes popular storage devices,
including hard drives, removable drives, RAID, CD and DVD technologies, flash and
solid-state drive storage, network storage, USB devices, and the latest emerging technologies. Storage device configuration is covered for the operating systems and you learn
how to perform backups for Windows, UNIX/Linux, and Mac OS X operating systems.
●
Chapter 8: Virtualization and Cloud Computing Fundamentals introduces you to virtualization, its terminology, and some of the popular virtualization products that can
be used on the OSs this book discusses.
●
●
Chapter 9: Configuring a Network Connection provides an introduction to how networks function, including network technologies and protocols. You learn how to configure protocols in each operating system and you learn about the basic structure of
local and wide area networks. You also learn how operating systems interface with
networks.
Chapter 10: Sharing Resources and Working with Accounts shows you many ways to
share resources through a network, including sharing disks, folders, and printers.
Besides covering how to share resources, the chapter also discusses how to secure them
through accounts, groups, and access privileges.
●
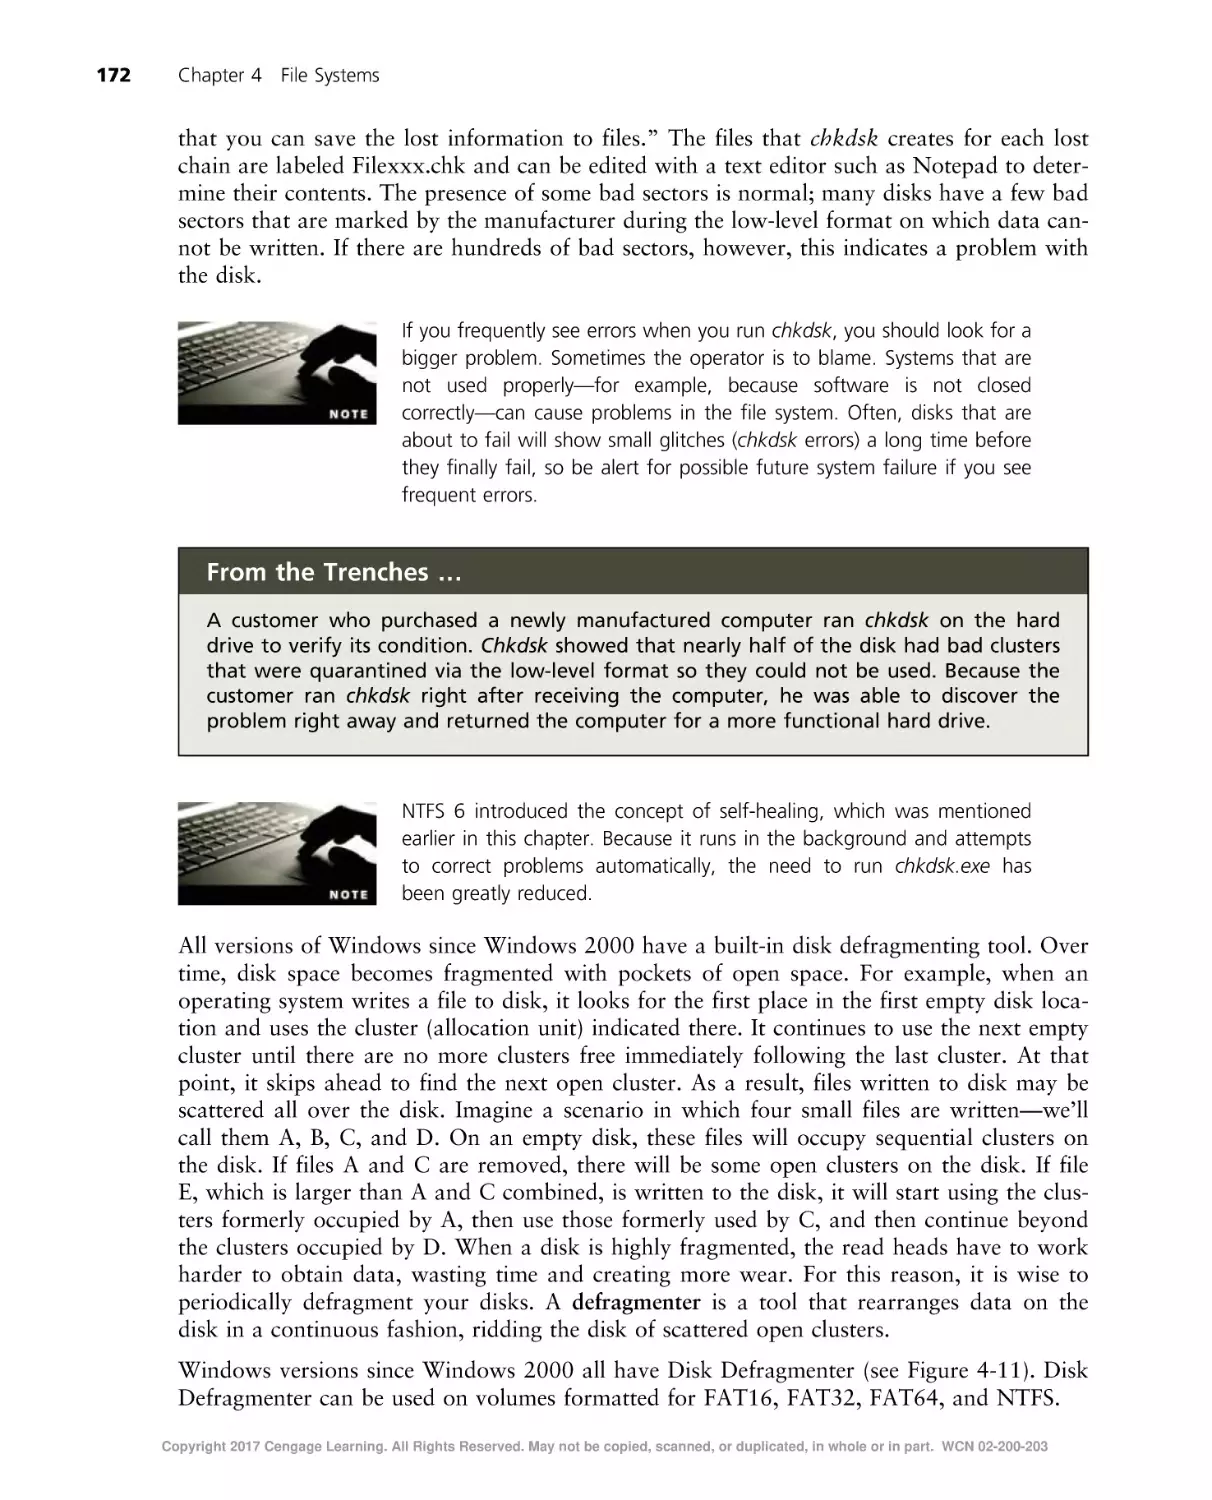
Chapter 11: Operating Systems Management and Maintenance presents many techniques for maintaining systems, such as cleaning up unused files, defragmenting disks,
making file system repairs, tuning virtual memory, and addressing problems. The chapter also addresses planning for backups and how to tune systems for top performance.
●
Appendix A: Operating System Command-Line Commands shows you how to access the
command line in each operating system and presents tables that summarize general and
network commands. This appendix provides a place to quickly find or review the operating system commands.
Copyright 2017 Cengage Learning. All Rights Reserved. May not be copied, scanned, or duplicated, in whole or in part. WCN 02-200-203
xviii
Introduction
Features
To aid you in fully understanding operating system concepts, there are many features in this
book designed to improve its pedagogical value.
●
Chapter Objectives. Each chapter in this book begins with a detailed list of the concepts to be mastered within that chapter. This list provides you with a quick reference
to the contents of each chapter as well as a useful study aid.
●
Illustrations and Tables. Numerous illustrations of operating system screens and concepts aid you in the visualization of common setup steps, theories, and concepts. In
addition, many tables provide details and comparisons of both practical and theoretical information.
●
From the Trenches Stories and Examples. Each chapter contains boxed text with examples from the author’s extensive experience to add color through real-life situations.
●
Chapter Summaries. Each chapter’s text is followed by a summary of the concepts it has
introduced. These summaries provide a helpful way to recap and revisit the ideas covered in
each chapter.
●
Key Terms. A listing of the terms that were introduced throughout the chapter, along
with definitions, is presented at the end of each chapter.
●
Review Questions. The end-of-chapter assessment begins with a set of review questions that reinforce the ideas introduced in each chapter.
●
Hands-On Projects. The goal of this book is to provide you with the practical knowledge
and skills to install and administer desktop and server operating systems as they are
employed for personal and business use. To this end, along with theoretical explanations,
each chapter provides numerous hands-on projects aimed at providing you with realworld implementation experience.
●
Critical Thinking Sections. The end-of-chapter Critical Thinking section gives you more
opportunities for hands-on practice with Challenge Labs, which enable you to use the
knowledge you’ve gained from reading the chapter and performing hands-on projects to
solve more complex problems without step-by-step instructions. This section also
includes Case Projects that ask you to evaluate a scenario and decide on a course of
action to propose a solution. These valuable tools help you sharpen decision-making,
critical thinking, and troubleshooting skills.
Text and Graphic Conventions
Whenever appropriate, additional information and activities have been added to this book
to help you better understand what is being discussed in the chapters. Icons throughout the
text alert you to additional materials. The icons used in this textbook are as follows:
The Note icon is used to present additional helpful material related
to the subject being described.
Copyright 2017 Cengage Learning. All Rights Reserved. May not be copied, scanned, or duplicated, in whole or in part. WCN 02-200-203
Introduction
xix
Tips are included from the author’s experience to provide extra information about how to configure an operating system, apply a concept, or
solve a problem.
Cautions are provided to help you anticipate potential problems or mistakes so you can prevent them from happening.
Each hands-on project in this book is preceded by the HandsOn Projects icon and a description of the practical exercise that follows.
Case Project icons mark each case project. Case projects are more
involved, scenario-based assignments. In each extensive case example,
you are asked to implement what you have learned.
MindTap
MindTap for Guide to Operating Systems is an online learning solution designed to help
students master the skills they need in today’s workforce. Research shows that employers
need critical thinkers, troubleshooters, and creative problem-solvers to stay relevant in our
fast-paced, technology-driven world. MindTap helps users achieve this with assignments
and activities that provide hands-on practice, real-life relevance, and mastery of difficult
concepts. Students are guided through assignments that progress from basic knowledge and
understanding to more challenging problems.
All MindTap activities and assignments are tied to learning objectives. The hands-on
exercises provide real-life application and practice. Readings and “Whiteboard Shorts” support the lecture, while “In the News” assignments encourage students to stay current. Preand post-course assessments allow you to measure how much students have learned using
analytics and reporting that makes it easy to see where the class stands in terms of progress,
engagement, and completion rates. You can use the existing content and learning path or
pick and choose how the material will wrap around your own content. You control what
the students see and when they see it. Learn more at www.cengage.com/mindtap/.
Instructor Resources
Everything you need for your course in one place! This collection of book-specific lecture
and class tools is available online via www.cengage.com/login. Access and download
PowerPoint presentations, images, the Instructor’s Manual, and more.
●
Electronic Instructor’s Manual—The Instructor’s Manual that accompanies this book
includes additional instructional material to assist in class preparation, including suggestions for classroom activities, discussion topics, and additional quiz questions.
Copyright 2017 Cengage Learning. All Rights Reserved. May not be copied, scanned, or duplicated, in whole or in part. WCN 02-200-203
xx
Introduction
●
●
Solutions—The instructor’s resources include solutions to all end-of-chapter material,
including review questions and case projects.
Cengage Learning Testing Powered by Cognero—This flexible, online system allows
you to do the following:
Author, edit, and manage test bank content from multiple Cengage Learning
solutions.
Create multiple test versions in an instant.
Deliver tests from your LMS, your classroom, or wherever you want.
●
●
PowerPoint presentations—This book comes with Microsoft PowerPoint slides for
each chapter. They’re included as a teaching aid for classroom presentations, to make
available to students on the network for chapter review, or to be printed for classroom
distribution. Instructors, please feel free to add your own slides for additional topics
you introduce to the class.
Figure files—All the figures and tables in the book are reproduced in bitmap format.
Similar to the PowerPoint presentations, they’re included as a teaching aid for classroom presentations, to make available to students for review, or to be printed for
classroom distribution.
About the Author
Greg Tomsho is director of the Computer Networking Technology Department and Cisco Academy at Yavapai College in Prescott, Arizona. He has earned the CCNA, MCTS, MCSA, Aþ,
Networkþ, Securityþ, Serverþ, and Linuxþ certifications. A former software engineer, technical
support manager, and IT director, he has more than 30 years of computer and networking experience. His other books include MCSA Guide to Installing and Configuring Microsoft Windows
Server 2012/R2; MCSA Guide to Administering Microsoft Windows Server 2012/R2; MCSA
Guide to Configuring Advanced Microsoft Windows Server 2012/R2 Services; MCTS Guide
to Windows Server 2008 Active Directory Configuration; MCTS Guide to Microsoft Windows
Server 2008 Applications Infrastructure Configuration; Guide to Networking Essentials; Guide
to Network Support and Troubleshooting; and A+ CoursePrep ExamGuide.
Acknowledgments
I would like to thank the team at Cengage Learning for this opportunity to improve and
expand on the fifth edition of this book. This team includes Kristin McNary, Product Team
Manager; Natalie Pashoukos, Senior Content Developer; Brooke Greenhouse, Senior Content
Project Manager; and Serge Palladino, Nicole Spoto, and Danielle Shaw of Manuscript Quality Assurance, who tested projects for accuracy. Thanks also go to my development editor,
Dan Seiter, for his guidance in creating a polished product. Additional praise and special
thanks go to my beautiful wife, Julie; our daughters, Camille and Sophia; and our son,
Michael. As always, they have been patient and supportive throughout the process and I
truly appreciate their support.
Copyright 2017 Cengage Learning. All Rights Reserved. May not be copied, scanned, or duplicated, in whole or in part. WCN 02-200-203
Introduction
xxi
Reviewers
Guy Garrett, M.S., M.B.A.
Associate Professor, Cybersecurity & Information Technology
Manager, Network Systems Technology/Cybersecurity Program
Gulf Coast State College
Panama City, FL
Emily Harrington
CIT Coordinator/Faculty
Pitt Community College
Winterville, NC
Todd Koonts, MSIT, CCE
Program Chair
CTI/Information Assurance and Digital Forensics
Central Piedmont Community College
Charlotte, NC
Before You Begin
The importance of a solid lab environment can’t be overstated. This book contains handson projects that require a variety of operating systems, including Windows 10, Linux
Fedora 23, and Mac OS X El Capitan. Using virtualization can simplify the lab environment. For example, you can use VMware Player, VMware Workstation, VirtualBox, and
other products to install Windows and Linux in a virtual machine, regardless of the OS
running on your physical computer. Installing Mac OS X in a virtual machine running
on Windows requires some creativity, but it can be done. If you want to run El Capitan
as a VMware virtual machine running on Windows, do a little Internet research on the
topic. The following section lists the requirements for completing hands-on activities and
challenge labs.
Lab Setup Guide
Most of the hands-on projects and challenge labs require a Windows 10, Linux Fedora 23,
or Mac OS X El Capitan computer. The computers should have a connection to the Internet, but only a few of the activities actually require Internet access. The use of virtual
machines is highly recommended.
Windows 10 Computers
●
●
●
●
Windows 10 Enterprise or Education Edition is recommended, but other versions are
acceptable
An account that is a member of the local Administrators group
Workgroup name: Using the default workgroup name (“Workgroup”) is acceptable,
but the name is not important
Memory: 1 GB required, 2 GB or more recommended
Copyright 2017 Cengage Learning. All Rights Reserved. May not be copied, scanned, or duplicated, in whole or in part. WCN 02-200-203
xxii
Introduction
●
●
●
●
Hard disk 1: 60 GB or more (Windows installed on this drive)
Hard disk 2: Unallocated 60 GB or more
IP address via DHCP server or static if required on your network
Internet access
Fedora 23 Computers
●
Fedora 23 Linux locally installed (a live CD boot will work for some activities, but not all)
●
An administrator account and access to the root password
Memory: 1 GB
●
●
Hard disk 1: 60 GB or more (Fedora 23 installed on this drive)
Hard disk 2: 20 GB or more
●
IP address via DHCP server or static if required on your network
●
Internet access
●
Mac OS X Computers
●
Mac OS X El Capitan
●
An administrator account and access to the root password
●
Memory: 1 GB
Hard disk 1: 60 GB or more (Mac OS X El Capitan installed on this drive)
●
●
●
IP address via DHCP server or static if required on your network
Internet access
Additional Items
●
●
●
Windows 10 installation media (DVD or .iso file)—Using an evaluation copy
is acceptable. You can download evaluation copies of Windows from
www.microsoft.com/en-us/evalcenter/
Windows Server 2012 R2 installation media (DVD or .iso file)—Using an evaluation
copy is acceptable
Linux Fedora 23 installation media (DVD or .iso file)
Copyright 2017 Cengage Learning. All Rights Reserved. May not be copied, scanned, or duplicated, in whole or in part. WCN 02-200-203
chapter
1
Operating Systems Fundamentals
After reading this chapter and completing the
exercises, you will be able to:
●
●
●
●
●
●
●
Explain basic operating system concepts
Understand the history of operating system development
Discuss how operating systems work
Describe the types of operating systems
Discuss single tasking versus multitasking
Differentiate between single-user and multiuser operating systems
List and briefly describe current operating systems
Copyright 2017 Cengage Learning. All Rights Reserved. May not be copied, scanned, or duplicated, in whole or in part. WCN 02-200-203
1
2
Chapter 1 Operating Systems Fundamentals
Computers come in many and varied physical forms. There are supercomputers that
perform complex computing tasks at incredible speeds, business servers that provide
enterprise-level networked applications, desktop and laptop PCs, tablets, smartphones, and
wearable computers. Plus, there are many devices you may not even think of as having a computer, such as those embedded in everyday devices like cars, televisions, and even dishwashers.
Without an operating system, however, these devices are only a collection of electronic parts.
It takes an operating system to turn a computer into a functioning device for work or play.
The operating system is the software that starts the basic functions of a computer, displays
documents on the computer’s monitor, accesses the Internet, and runs applications—it transforms the computer into a powerful tool. There are many kinds of operating systems, but
only a few have captured a wide audience. Server operating systems like Windows Server
2016 and UNIX run on network servers, and client operating systems like Windows 10, Mac
OS X, and Ubuntu Linux run on desktop computers. Some operating systems are very specialized and rarely seen, such as those that run the electronics in a car. Others are ubiquitous,
such as Android and iOS, which run mobile devices.
This book is your guide to the most popular operating systems. In the beginning chapters,
you take an in-depth look at popular desktop or client operating systems: Windows 10,
Windows 8.1, Windows 7, UNIX/Linux (particularly Linux), and Mac OS X El Capitan.
Later in the book, you examine popular server operating systems: Windows Server 2016,
Windows Server 2012, and UNIX/Linux. (Note that several distributions of Linux/UNIX can
be either client or server operating systems.) This chapter sets the foundation for understanding
desktop and server operating systems by introducing you to concepts that apply to most operating systems. With this knowledge under your belt, you will have a solid frame of reference to
understand operating system specifics as they are discussed in later chapters.
About the Hands-On Projects
Be sure to read and complete the activities in the “Before You Begin” section of the
Introduction. The Hands-On Projects in this book require that you first set up your lab
environment so it is ready to go. The “Before You Begin” section gives you stepby-step instructions for the suggested lab configuration to use with all activities in
this book.
Completing the Hands-On Projects is important because they contain information
about operating systems that is best understood through hands-on experience. If for
some reason you can’t do some of the projects, you should at least read through
each one to make sure you don’t miss important information.
Copyright 2017 Cengage Learning. All Rights Reserved. May not be copied, scanned, or duplicated, in whole or in part. WCN 02-200-203
An Introduction to Operating Systems
3
An Introduction to Operating Systems
Before we discuss how an operating system works, let’s review the basic functions of any computer. A computer’s functions and features can be broken down into the three basic tasks all
computers perform: input, processing, and output. Information is input to a computer from a
device such as a keyboard or from a storage device such as a hard drive; the central processing unit (CPU) processes the information, and then output is usually created. The following
example illustrates the process:
•
Input A user running a word-processing program types the letter A on the keyboard,
Input—
which results in sending a code to the computer representing the letter A.
•
Processing The computer’s CPU determines what letter was typed by looking up the
Processing—
keyboard code in a table.
•
Output The CPU sends instructions to the graphics cards to display the letter A,
Output—
which is then sent to the computer monitor.
The three functions described above involve some type of computer hardware, but the hardware is controlled and coordinated by the operating system. Without an operating system,
every application you use would have to know the details of how to work with each of the
hardware devices. Without the operating system to coordinate things, only one application
could run at a time. So, you couldn’t open a Web browser while working on a Word document, for example. The operating system can be seen as the go-between for the applications
you run and the computer hardware.
In a nutshell, an operating system (OS) is a specialized computer program that provides the
following features:
•
User interface—The user interface provides a method for users to interact with the
computer, usually with a keyboard and mouse or touch screen. A user clicks, touches,
or types; the computer processes the input and provides some type of output.
•
File system—The file system is the method by which an OS stores and organizes files
and manages access to files on a storage device, such as a hard drive.
•
Processes and services—A process is a program that’s loaded into memory and run by
the CPU. It can be an application a user interacts with, such as a word-processing program or a Web browser, or a program with no user interface that communicates with
and provides services to other processes. This type of process is usually called a service
in Windows and a daemon in Linux, and is said to run in the background because
there’s no user interface.
•
Kernel The kernel is the heart of the OS and runs with the highest priority. It scheKernel—
dules processes to run, making sure high-priority processes are taken care of first;
manages memory to ensure that two applications don’t attempt to use the same memory space; and makes sure I/O devices are accessed by only one process at a time, in
addition to other tasks.
Each of the above OS components are discussed in more detail throughout this book. For
now, let’s look more closely at various types of OSs.
Copyright 2017 Cengage Learning. All Rights Reserved. May not be copied, scanned, or duplicated, in whole or in part. WCN 02-200-203
1
4
Chapter 1 Operating Systems Fundamentals
Desktop Versus Server Operating System
A computer program is a series of instructions executed by the computer’s CPU. A computer
program can be large and complex, like an operating system, or it can be small and fairly simple, such as a basic app running on a mobile device. What’s special about an operating system
program compared to an app is that the operating system is loaded when the computer is turned
on and remains running until you turn the computer off. Its job is to make the computer useful
so you can run apps, access the Internet, and communicate with other computers.
While there are many types of OSs, and they are designed for different purposes, this book
focuses on desktop or client OSs, and server OSs. A desktop operating system, or client operating system, is typically installed on a personal computer (PC) that is used by one person at
a time, and is almost always connected to a network, either wired or wirelessly. The hardware used with a client OS can be in several forms, such as:
•
A full desktop computer consisting of separate components for the monitor, CPU
box, keyboard, and mouse
•
A portable or laptop unit that combines the monitor, CPU box, keyboard, and
pointing device in an all-in-one device that is easy to carry
•
A combination such as the iMac computer in which the monitor and CPU are in one
unit with a separate keyboard and mouse
•
A fourth category, often referred to as a 2-in-1, consists of a large tablet computer
such as the iPad Pro or Microsoft Surface, along with a detachable keyboard
A server operating system is usually installed on a more powerful computer that typically has a
wired connection to a network, and can act in many roles to enable multiple users to access
information, such as e-mail, files, and software. The server hardware can also take different
forms, including traditional server hardware, rack-mounted server hardware, and blade servers.
The traditional server, often used by small or medium-sized businesses, consists of a monitor,
CPU box, keyboard, and mouse. Rack-mounted servers are CPU boxes mounted in racks
that can hold multiple servers. Each rack-mounted server typically has its own power cord
and network connection—but these servers often share one monitor and pointing device.
Depending on the height of the rack and the height of the servers, one rack can hold a few
servers or several dozen. Blade servers conserve even more space than rack-mounted servers;
each blade server typically looks like a card that fits into a blade enclosure. The blade enclosure is a large box with a backplane that contains slots for blade servers; the box provides
cooling fans, electrical power, connection to a shared monitor and pointing device, and even
network connectivity, depending on the blade enclosure. A single blade enclosure can house
over 100 blade servers. Medium-sized and large organizations use rack-mounted and blade
servers to help conserve space and to consolidate server management.
Visit www.hpe.com, www.dell.com, or www.supermicro.com to view
examples of traditional, rack-mounted, and blade servers. Also, note
that the actual hardware design of rack-mounted and blade servers
varies by manufacturer.
Modern desktop and server operating systems are designed to enable network communications so that the operating systems can communicate with one another over a network
Copyright 2017 Cengage Learning. All Rights Reserved. May not be copied, scanned, or duplicated, in whole or in part. WCN 02-200-203
An Introduction to Operating Systems
5
cable, through wireless communications, and through the Internet. Network communications
enable sharing files, sharing printers, and sending e-mail.
Input and Output
One of the most basic tasks of an operating system is to take care of input/output (I/O) functions, which let other programs communicate with the computer hardware. The I/O functions
take requests from the software the user runs (the application software) and translate them
into low-level requests that the hardware can understand and carry out. In general, an operating system serves as an interface between application software and hardware, as shown in
Figure 1-1. Operating systems perform the following I/O tasks:
•
Handle input from the keyboard, mouse, and other input devices
•
Handle output to the monitor and printer
•
Manage network communications, such as for a local network and the Internet
•
Control input/output for devices such as network interface cards
•
Control information storage and retrieval using various types of storage media
such as hard drives, flash drives, and DVDs
•
Enable multimedia use for voice and video composition or reproduction, such as
recording video from a camera or playing music through speakers
Application software
User
Word processor
Spreadsheet
Software
Operating system
Computer hardware
Hardware
Keyboard Mouse Monitor Printer Modem Network
Disk DVD/CD- Digital Speaker
communications drive ROM drive camera
Figure 1-1 General tasks for all operating systems
Copyright 2017 Cengage Learning. All Rights Reserved. May not be copied, scanned, or duplicated, in whole or in part. WCN 02-200-203
1
6
Chapter 1 Operating Systems Fundamentals
A Short History of Operating Systems
The history of operating systems is a very elaborate subject. As a matter of fact, there are
many books on this subject. This short history is not meant to be comprehensive; it merely
presents enough background information to show how some of the features in modern PCs
and PC operating systems developed.
Initially, computers were used as large automated calculators to solve all sorts of mathematical and statistical problems. Computers were extremely large, often taking up entire rooms.
Although you can legitimately trace the history of today’s digital computers back 100 years
or more, no practical designs were used by significant numbers of people until the late 1950s.
Scientists programmed these computers to perform precise tasks. The operating systems were
rudimentary, often not able to do more than read punch cards or tape and write output to
Teletype machines (machines resembling typewriters). A tape or deck of cards was loaded, a
button was pushed on the machine to indicate the input was ready, and the machine started
to read the tape and perform the operations requested. If all went well, the work was done
and the output was generated. This output would be sent to the Teletype, and that was that.
Yes, there was computer history before this point, but it did not involve any sort of operating
system. Any program that the computer ran had to include all logic to control the computer.
Because this logic was rather complex, and not all scientists were computer scientists, the
operating system was a tool that allowed non-computer scientists to use computers. The OS
reduced programming work and increased efficiency. Obviously, there was not all that much
to “operate” on—mainly the punch card and punch tape readers for input and the Teletype
printer for output. There also was not that much to operate with; memory capacity was very
limited and the processing speed of the computer was slow by our standards (but fast for that
time). The art in operating systems design, therefore, largely was to keep them very small and
efficient.
It took only a few decades for computer applications to evolve to appeal to a broader audience. Although computers of the late sixties and early seventies were crude by today’s standards, they were quite capable and handled extremely complex tasks. These computers
contributed to the development of space travel, submarine-based ballistic missiles, and a growing global financial community. Computers of this time used only a few kilobytes of RAM
and rudimentary storage of only a few megabytes. This period also saw the beginning of a
global, computer-based communications system called the Internet. Applications became logically more complex, requiring larger programs and large amounts of data.
From the Trenches …
In the 1990s, student registration, accounting, student aid, and all other administrative
functions in a state’s community college system were performed on one large computer
at each community college—that had only 4 MB of RAM. The system administrators of
those computers considered these machines to have more than enough memory to run
all administrative functions for a single college. Today, those functions are performed at
each location on servers; each server is much smaller in physical size, and each uses tens
of GB or more of RAM.
Copyright 2017 Cengage Learning. All Rights Reserved. May not be copied, scanned, or duplicated, in whole or in part. WCN 02-200-203
A Short History of Operating Systems
7
As always, necessity was the mother of invention. Input and output devices were created, and
computer memory capacity and speed increased. With more devices to manage, operating
systems became more complex and extensive, but the rule of thumb—small
small and fast
fast—
—was
—was
still extremely important. This round of evolution, which really began to take off in the midseventies, included the display terminal, a Teletype machine with a keyboard that did not
print on paper, but projected letters on a screen (commonly referred to as a cathode ray tube
or CRT). The initial CRT was later followed by a terminal that could also show simple graphics; the terminal looked like an early computer, but it was only a monitor and a keyboard
without a CPU or processing capability. The magnetic tape drive, used to store and retrieve
data and programs on tape, could store more and was less operator intensive than paper
tape. It was quickly followed by numerous manifestations of magnetic disks.
The next evolution was the ability to share computer resources among various programs. If a
computer was very fast and could quickly switch among various programs, you could do several tasks seemingly at once and serve many people simultaneously. Some of the operating
systems that evolved in this era are long lost to all but those who worked directly with them.
However, there are some notable players that were responsible for setting the stage for the
full-featured functionality we take for granted today. Digital Equipment Corporation’s
(DEC’s) PDP series computers, for example, ran the DEC operating system, simply known as
OS, in one version or another. A popular one was OS/8, which came in various versions, such
as Release 3Q; OS/8 was released in 1968. PDP-8 computers were general-purpose machines
that at one time were the top-selling computers across the world. The PDP series could also
run Multics, which was the basis for the development of the first version of UNIX, a multiuser, multitasking operating system. (Multics is widely considered to be the first multiuser,
multitasking operating system. You’ll learn about multitasking later in the chapter.)
To find out more about the once popular PDP-8 computers, visit
www.cs.uiowa.edu/~jones/pdp8.
The original UNIX was developed at AT&T Bell Labs in 1969 by Kenneth Thompson and
Dennis Ritchie as an improvement on Multics. Later, DEC VAX computers used Virtual
Memory System (VMS), a powerful, multitasking, multiuser operating system that was strong
on networking. IBM mainframes made a series of operating systems popular, starting with
GM-NAA I/O in the early sixties and later with System/360. Many others would follow,
including CICS, which is still in use today.
Programming computers at this time was still a very complicated process best left to scientists.
In the mid-1960s, right after the first interactive computer game was invented at the Massachusetts Institute of Technology (MIT), a simple programming language was developed
at Dartmouth College, aimed at the nonprogrammer. It was dubbed BASIC, or Beginner’s
All-purpose Symbolic Instruction Code, and became a widely used programming language
for many years to follow. A few years later, in 1975, Bill Gates discovered BASIC, and
became interested enough to write a compiler for it. (A compiler is software that turns computer code written by people into code that is understood by computers.) Gates then sold the
compiler to a company called Micro Instrumentation Telemetry Systems (MITS). MITS was
the first company to produce a desktop computer that was widely accepted and could conduct
Copyright 2017 Cengage Learning. All Rights Reserved. May not be copied, scanned, or duplicated, in whole or in part. WCN 02-200-203
1
8
Chapter 1 Operating Systems Fundamentals
useful work at the hands of any knowledgeable programmer. That same year, Gates dropped
out of Harvard to dedicate his time to writing software. Other programming languages introduced around this time included Pascal, C, and other versions of BASIC supplied by various
computer manufacturers. Only a couple of years later, Gates’ new company (Microsoft) and
others adapted popular mainframe and minicomputer programming languages, such as
FORTRAN and COBOL, so they could be used on desktop computers. There were also proprietary languages that gained some popularity
popularity—languages primarily designed for database
programming, for example—but they didn’t last and aren’t significant to this book.
The introduction of the microcomputer in the mid-1970s was probably the most exciting thing
to happen to operating systems. These machines typically had many of the old restrictions,
including slow speed and little memory. Many microcomputers came with a small operating
system and Read-Only Memory (ROM) that did no more than provide an elementary screen,
keyboard, printer, and disk input and output. Gates saw an opportunity and put together a
team at Microsoft to adapt a fledging version of a new microcomputer operating system called
86-DOS, which ran on a prototype of a new microcomputer being developed by IBM called
the personal computer. 86-DOS was originally written by Tim Paterson (from Seattle Computer Products) as the Quick and Dirty Operating System (QDOS) for the new 8086 microprocessor. 86-DOS (or QDOS) evolved in 1980 through a cooperative effort between Paterson
and Microsoft into the Microsoft Disk Operating System, or MS-DOS. MS-DOS was designed
as a command-line interface, which means that users typed in commands instead of using the
graphical user interface (GUI) point-and-click method that is common today.
The original MS-DOS did not offer a GUI desktop from which to click
menus and icons. The command-line interface is available in modern
Windows operating systems, as well as in Linux and Mac OS X. Some
server administrators prefer to use a command-line interface because it
offers more individualized and specialized control over the operating
system. You’ll have an opportunity to use command-line interfaces in
Windows, Linux, and Mac OS X throughout the projects in this book.
MS-DOS became a runaway success for Microsoft, and it was the first widely distributed
operating system for microcomputers that had to be loaded from disk or tape. There were earlier systems, including Control Program/Monitor (CP/M), that used some features and concepts of the existing UNIX operating system designs, but when IBM adopted MS-DOS for its
PC (calling it PC DOS), the die was cast.
What did MS-DOS do? It provided the basic operating system functions described earlier in this
chapter, and it was amazingly similar to what was used before on larger computers. It supported basic functions, such as keyboard, disk, and printer I/O—and communications. As time
went on, more and more support functions were added, including support for such things as
hard disks. Then along came the Apple Macintosh in 1984, with its GUI and mouse pointing
device, which allowed users to interact with the operating system on a graphical screen. The
mouse allowed users to point at or click icons or to select items from menus to accomplish
tasks. Initially, Microsoft chose to wait on development of a GUI, but after Microsoft saw the
successful reception of the interface on Apple computers, it developed one of its own.
When the Macintosh was introduced, it seemed light years ahead of the IBM PC. Its operating
system came with a standard GUI at a time when MS-DOS was still based on entering text
Copyright 2017 Cengage Learning. All Rights Reserved. May not be copied, scanned, or duplicated, in whole or in part. WCN 02-200-203
A Short History of Operating Systems
9
commands. Also, the Macintosh OS managed computer memory closely for the software,
something MS-DOS did not do. And, because Mac OS managed all computer memory for
the application programs, you could start several programs and switch among them. Mac OS
was also years ahead in I/O functions such as printer management. In MS-DOS, a program
had to provide its own drivers for I/O devices; MS-DOS provided only the most rudimentary
interface. On Mac OS, many I/O functions were part of the operating system.
Microsoft, however, did not stay behind for long. In 1985, Microsoft shipped an extension to
its DOS operating system, called Microsoft Windows, which provided a GUI and many of the
same functions as Mac OS. The first Windows was really an operating “environment” running on top of MS-DOS, made to look like a single operating system. Today’s Windows is
no longer based on DOS and is a full-fledged operating system.
Although Apple was six years ahead of Microsoft in offering a friendly
GUI-based OS, Apple ultimately fell well behind Microsoft in sales
because it chose not to license the Mac OS to outside hardware
vendors.
Numerous incarnations of operating systems have come and gone since those days. Today,
both Windows and Mac OS X are very similar in what they can do and how they do it; they
have a wealth of features and drivers that make the original DOS look elementary. Their principal functions are unchanged, however: to provide an interface between the application programs and hardware, and to provide a user interface for basic functions, such as file and disk
management.
Let’s review the important pieces of operating system development history. Although pre1980s computing history is interesting, it doesn’t hold much relevance to what we do with
computers today. Tables 1-1 and 1-2 show the major milestones in operating system development. The tables summarize 8-, 16-, 32-, and 64-bit operating systems. In general, a 64-bit
operating system is more powerful and faster than a 32-bit system, which is more powerful
and faster than a 16-bit system, and so on. You will learn more about these differences in
Chapter 2, “Popular Operating Systems,” and Chapter 3, “Operating System Hardware
Components.”
Table 1-1
Operating system releases from 1968 to 1999
Operating
system
Approximate
date
Bits
Comments
UNIX (Bell/
AT&T)
1968
8
First widely used multiuser, multitasking operating system for
minicomputers.
CP/M
1975
8
First operating system that allowed serious business work on small
personal computers. VisiCalc, a spreadsheet application released in
1978, was the first business calculation program for CP/M, and to a
large extent made CP/M a success.
MS-DOS
1980
16
First operating system for the very successful IBM PC family of
computers. Lotus 1-2-3 was to MS-DOS in 1981 what VisiCalc was to
CP/M. Also in 1981, Microsoft introduced the first version of Word for
the PC.
(continues)
Copyright 2017 Cengage Learning. All Rights Reserved. May not be copied, scanned, or duplicated, in whole or in part. WCN 02-200-203
1
10
Chapter 1 Operating Systems Fundamentals
Table 1-1
Operating system releases from 1968 to 1999 (continued )
Operating
system
Approximate
date
Bits
Comments
PC DOS
1981
16
IBM version of Microsoft MS-DOS.
Mac OS
1984
16
The first widely distributed operating system that was totally
graphical in its user interface. Also, Mac OS introduced the use of a
mouse to PC-based systems.
Mac System
Software 5
1987
16
Mac OS implemented cooperative multitasking so that more than one
application could be run at one time.
Mac System
Software 6
1988
16
Mac OS was significantly stabilized and was also adapted to run on
portable computers.
Windows 3.0
1990
16
First usable version of a graphical operating system for the PC.
Linux 0.01
1991
16
Linus Torvalds made the first version of Linux available through an
FTP download site.
Mac System
Software 7
1991
32
Mac OS was redesigned to have a new interface, more applications,
and to use 32-bit addressing.
MCC Interim
Linux
1992
16
The first actual distribution of Linux was offered through the
University of Manchester in England.
Windows for
Workgroups
(Windows
3.11)
1993
16
First version of Microsoft Windows with peer-to-peer networking
support for the PC.
Windows NT
(New
Technology)
1993
32
Microsoft first attempt to bring a true 32-bit, preemptive,
Microsoft’s
multitasking operating system with integrated network functionality
to the world of personal computing. Windows NT was later offered in
a Workstation version and a Server version.
Red Hat
Linux, SUSE,
and the
Linux kernel
1.0
1994
16/32
Linux kernel version 1.0 was released, as were the first distributions of
Red Hat Linux and SUSE Linux.
Windows 95
1995
16/32
An upgrade to Windows 3.x, mostly 32-bit code, with a much
improved user interface and increased support for hardware. It
offered native support to run 32-bit applications and many
networking features. Windows 95 represented a different direction
than Windows NT because it was intended to provide backward
compatibility for 16-bit applications, and it continued to allow
applications to directly access hardware functions.
Windows 98
1998
32
Implemented many bug fixes to Windows 95, more extended
hardware support, and was fully 32-bit.
GNOME 1.0
desktop
1999
16/32
The GNOME 1.0 desktop (similar in function to Windows) became
available as free software and grew to become one of the most
popular UNIX/Linux desktops.
Copyright 2017 Cengage Learning. All Rights Reserved. May not be copied, scanned, or duplicated, in whole or in part. WCN 02-200-203
A Short History of Operating Systems
Table 1-2
11
Operating system releases from 2000 to the present
1
Operating
system
Approximate
date
Bits
Comments
Windows
2000
2000
32
A major revision of the Windows NT operating system; Windows 2000
was much faster and more reliable than Windows NT. The Windows
2000 kernel contained over twice the lines of code used in Windows
NT. Windows 2000 came in several versions, including Professional,
Server, Advanced Server, and Datacenter.
Windows
Millennium
Edition (Me)
2000
32
Microsoft operating system upgrade of Windows 98, designed
Microsoft’s
specifically for the home user, with improved multimedia capabilities.
Mac OS X
2001
32
Introduced as a significant departure from the earlier Mac OS versions
because it was rewritten to have UNIX-based Darwin as the
foundation for the operating system code. Updated versions of Mac
OS X continue to be issued with the Snow Leopard version (Mac OS X
10.6) at this writing.
Linux kernel
2.4
2001
32/64
Enabled compatibility with Plug and Play devices, including USB
devices.
Windows XP
2001
32/64
The successor to Windows Me and Windows 2000 Professional,
available in four editions: Home, Professional, Tablet PC, and Media
Center. The Home Edition was a 32-bit system that focused on home
use for photos, music, and other multimedia files. The Professional
Edition, available in 32-bit and 64-bit versions, was intended for office
and professional users who needed more computing power and
extensive networking capabilities. The Tablet PC Edition was tailored
for tablet PCs that use speech and pen capabilities and offered great
mobility, such as native wireless communications. Finally, the Media
Center Edition was for enhanced digital media use involving
television, audio, video, and graphics.
Windows
Server 2003
2003
32/64
Available in Standard Edition, Web Edition, Enterprise Edition, and
Datacenter Edition, this operating system was designed as a server
platform for Microsoft’s .NET initiative, which integrated all types of
devices—PCs, handheld computers, cell phones, and home
appliances—for communications over the Internet.
Linux kernel
2.6
2003
32/64
Provided support for larger file system storage, new CPUs, more
stable 64-bit CPU support, and support for many more simultaneous
users.
Windows
Vista
2006
32/64
Introduced a newer security philosophy that employed a restricted
user account control mode. Came in five editions: Home Basic, Home
Premium, Business, Enterprise, and Ultimate.
Windows
Server 2003
R2 2006
32/64
An interim release, called Release 2 (R2), of Windows Server 2003 for
compatibility with Windows Vista and to add new features,
particularly for medium-sized and large organizations. Offered the
same editions as Windows Server 2003.
Windows
Server 2008
2008
32/64
Employed the new security philosophy begun with Windows Vista
and extended security for servers in part by offering greater
modularity to achieve a smaller attack profile. The main editions
included Standard, Enterprise, Datacenter, Web, and HPC (High
Performance Computing).
(continues)
Copyright 2017 Cengage Learning. All Rights Reserved. May not be copied, scanned, or duplicated, in whole or in part. WCN 02-200-203
12
Chapter 1 Operating Systems Fundamentals
Table 1-2
Operating system releases from 2000 to the present (continued )
Operating
system
Approximate
date
Bits
Comments
Mac OS X
Snow
Leopard
2009
32/64
Dropped support for PowerPC processors and switched to using only
Intel processors.
Windows 7
2009
32/64
Employed enhanced security features, with fewer headaches and
stumbling blocks for the user, compared to Windows Vista. Offered
many new desktop features. The editions included Home Basic, Home
Premium, Professional, Enterprise, and Ultimate.
Windows
Server 2008
R2
2009
64
only
An interim release (Release 2 or R2) for Windows Server 2008 that
included built-in compatibility with Windows 7. It had desktop
changes similar to Windows 7. Offered the same versions as Windows
Server 2008. Microsoft’s current plans are only to develop new
operating systems for 64-bit computers.
Chrome OS
2009
32/64
An OS based on the Linux kernel and developed by Google. Chrome
OS is intended to be an online OS, meaning that you must be
connected to the Internet to get the best use of it. Chrome OS runs
primarily Web applications and is only available pre-installed on a
device from a manufacturer, such as a Chromebook.
Linux Kernel
3.0
2011
32/64
New features include automatic defragmentation, a feature to wake
up a computer from a wireless interface (Wake on WLAN), support for
containers (a type of virtualization), and support for new devices.
Windows
8/8.1
2012/2013
32/64
Windows 8 was Microsoft’s
Microsoft first attempt to unify the mobile and
desktop computing space. The touch-centric interface was not well
accepted; to mollify users, Microsoft quickly released Windows 8.1,
which walked back some of the disliked user interface changes from
previous Windows versions.
Windows
Server 2012/
R2
2012/2013
64
only
Windows Server 2012 was released along with Windows 8 and had
the same user-interface problems. Windows Server 2012 R2 was
released along with Windows 8.1. Windows Server 2012/R2 made
substantial enhancements to its virtualization engine, Hyper-V, and
added cloud-centric features. Windows Server 2012/R2 had Standard
and Datacenter editions along with Foundation and Essentials.
Enterprise edition was later dropped.
Linux Kernel
4.0
2015
32/64
This release includes live updating of the kernel without requiring a
system shutdown, a feature called lazytime that supports better file
time stamping, and a number of driver and performance enhancements.
Windows 10
2015
32/64
Windows 10 finished walking back the user interface problems of
Windows 8 while providing a single OS that worked well on the
desktop as well as on touch-centric mobile devices like the Microsoft
Surface. Speculation is that Windows 10 may be the last named
version of Windows.
Mac OS X El
Capitan
2015
32/64
This release includes the Split View feature, an updated Spotlight
search app, and new swipe gestures.
Windows
Server 2016
2016
64
only
Windows Server 2016 is slated for release about the time this book
goes to press (fall 2016). This version emphasizes virtualization,
flexible storage solutions, and cloud computing, and includes a
version called Nano Server that has a very small footprint for
embedded and virtual deployments.
Copyright 2017 Cengage Learning. All Rights Reserved. May not be copied, scanned, or duplicated, in whole or in part. WCN 02-200-203
Understanding How Operating Systems Work
13
Check out Paul Thurrott’s SuperSite for Windows at: http://winsupersite.
com/server/windows-server-0 to read about the latest in Windows 10
and Windows Server.
All of these PC operating systems changed the roles of the big machines’ dynasty. Many big
machines are now obsolete; others are used for calculation and data storage as back-end functions for the PC. Even in this arena, they are threatened today as PC operating systems and
hardware extend further and further.
Many older operating systems are no longer around because of hardware changes. In
Chapter 3, you look more closely at hardware architecture and what it means for the operating
system. A good example of hardware that is no longer feasible to run an OS is the Z80 CPU
produced by Zilog. Zilog manufactures semiconductors and created the first microprocessor.
When the cheaper and more flexible Intel 8088 and 8086 microprocessors were introduced in
the IBM PC, the MS-DOS platform was a more attractive choice for most users. The Z80 and
its CP/M operating system slowly died out. The same happened to some operating systems
that used IBM PC hardware for other reasons. A prime example is IBM’s own OS/2 operating
system, first released in 1987 and developed jointly with Microsoft. The OS/2 system required
extensive hardware, and it could not run older MS-DOS applications. Many people wanted to
continue to run MS-DOS applications, so OS/2 was not a big hit. Because new software for
OS/2 was slow to come and offered no substantial new features, people were hesitant to use
it. Today, you will find OS/2 mainly in environments where it is used to interface to large
IBM mainframes with custom-developed applications. For an operating system to be successful,
many things must work together: availability of hardware and application programs, the
right mix of features, and good timing. Try Hands-On Project 1-1 at the end of this chapter
to learn more about the history of operating systems.
Understanding How Operating Systems Work
Many elements go into enabling an operating system to work with the computer on which it
is loaded. These include:
•
The kernel
•
Resource managers
•
Device drivers
•
Application software
•
BIOS
In the next sections you learn about each of these elements. The sections are followed by a
summary to help you put the information together.
The Kernel
The kernel consists of the essential program code of the operating system. To help illustrate this
concept, you might draw a parallel to a general contractor on a job site. The general contractor
is there to schedule all the specific tasks that must be completed to finish the job and to ensure
that
allCengage
the subcontractors
have the
resources
and tools
to ordo
their
jobs
in a timely
Copyright
2017
Learning. All Rights Reserved.
May necessary
not be copied, scanned,
or duplicated,
in whole
in part.
WCN
02-200-203
1
14
Chapter 1 Operating Systems Fundamentals
manner. Tasks are scheduled, resources are allocated, and then tasks are terminated and
resources released so they can be used for other tasks. Scheduling computer processes and managing resources, such as memory and processing time, are key tasks of the OS kernel.
The term kernel has evolved from the UNIX operating system, but is
also used to apply to the core code in the Windows and Mac OS X
operating systems. In UNIX and Linux systems, the basic interface with
the kernel is called the shell, which is a program that enables users to
execute commands. You learn how to identify the UNIX/Linux shell in
the Hands-On Projects in Chapter 2.
The jobs performed by the kernel can include:
•
Managing interactions with the CPU
•
Starting, managing, and scheduling programs that handle I/O activities, including
device and networking activities
•
Handling basic computer security
•
Managing use of the computer’s memory (RAM)
•
Managing priority levels assigned to programs and computer processes
In Windows systems, the name of the kernel file is ntoskrnl.exe. In Mac OS X, the kernel is
called XNU. The actual kernel name in Linux depends on the distribution and release of
Linux. You can determine information about the kernel by using the uname -sr command
in Linux (see Hands-On Project 1-5 to learn how to execute the uname command).
UNIX and Linux are available in distributions. A distribution is an issuance of UNIX or Linux that is based on a standard kernel, but that also
has customizations added by a particular private or commercial development group. For example, Red Hat Enterprise Linux has customizations that are useful for organizations and businesses; this distribution
is sold through the Red Hat company. GNU Linux is a distribution built
on a Linux kernel, but with added tools from the GNU Project and the
Free Software Foundation. GNU Linux is free. Fedora Linux is sponsored
by Red Hat to serve as a development vehicle for testing customizations
that may or may not be incorporated into Red Hat Enterprise Linux.
Fedora Linux is offered free as a way to encourage the public to test
new features prior to incorporating them into Red Hat Enterprise Linux.
Resource Managers
One of the functions of the operating system is to manage RAM and central processor use.
For example, programs and devices require access to memory. If two devices or programs
use the same memory space at the same time, they will not function properly, and they
might cause the computer and operating system to hang. Even the computer’s CPU contains
memory that must be properly managed to avoid problems. The operating system uses specialized programs called resource managers to help ensure that memory is used properly and
there are no memory conflicts.
The operating system also manages how programs access the processing capabilities of the CPU.
Even if a computer has two or more CPUs, it is still important that one program not dominate
Copyright 2017 Cengage Learning. All Rights Reserved. May not be copied, scanned, or duplicated, in whole or in part. WCN 02-200-203
Understanding How Operating Systems Work
15
the processing time on any one CPU. If one program were able to take over all of the time on a
CPU, the computer might appear to hang and the work by other programs would come to a
halt, possibly crashing the computer. When multiple programs and processes are running, the
operating system manages the amount of time each is given by the CPU. For example, if there
is one CPU and 10 programs that want to access it, the operating system will give each program
a time slice on the CPU
CPU—as determined by the priority the CPU gives a particular program or
process. Each program or process does a little work during its time slice, and then the kernel
gives the next program or process CPU access ffor its time slice. Often programs associated
with operating system tasks have a higher priority than user programs, because operating
system programs are necessary for the smooth functioning of the computer.
Device Drivers and the Operating System
The operating system communicates and works directly with many devices, including the
monitor, keyboard, disk drives, mouse, network adaptor, sound card, and so on. Some operating system programs exchange information with specific hardware (chips) inside the computer that control these devices. The code (instructions) for this information exchange is
typically referred to as a device driver. A device driver translates computer code to display
text on a screen, or translates movements of a mouse into action, for example. A separate
device driver is usually present for each I/O device, as shown in Figure 1-2. In general, operating systems have a standardized way of communicating with a certain type of device driver.
The device driver contains the actual code (instructions) to communicate with the chips on
the device. This way, if another piece of hardware is introduced into the computer, the operating
system code does not have to change. To enable the computer to communicate with the new
device, you simply need to load a new device driver onto the operating system.
Operating system
Operating system kernel
Monitor driver code
Disk driver code
Monitor
device driver
Hard disk
device driver
DVD/CD-ROM
device driver
Video card
Hard disk
controller
DVD/CD-ROM
controller
Hard disk
drive
DVD/CD-ROM
drive
Monitor
Software
Hardware
Figure 1-2 Device drivers provide communication between the OS and hardware devices
Copyright 2017 Cengage Learning. All Rights Reserved. May not be copied, scanned, or duplicated, in whole or in part. WCN 02-200-203
1
16
Chapter 1 Operating Systems Fundamentals
If a particular device is not working, one way to troubleshoot the
problem is to obtain and install the latest driver for that device,
which can usually be downloaded from the manufacturer’s Web site.
For example, high-capacity removable hard drives that connect through a Universal Serial
Bus (USB) were introduced after some earlier operating systems were written. Thus, earlier
versions of operating systems did not natively support USB-based removable hard drives.
However, because removable hard drives are similar to other types of disk drives, early versions of operating systems could be adapted to use removable hard drives by loading a few
simple drivers for the operating system. You may encounter device drivers that interface
with your operating system for other devices, including:
•
Fixed internal hard disk drives (HDDs) and solid state drives (SSDs)
•
Computer monitors
•
Keyboards
•
Mouse and trackball devices
•
Remote communications modems
•
Printers and scanners
•
Tape drives, flash drives, hard drives, and other removable media
•
Digital cameras and video hardware
•
MP3 players or other audio hardware
•
DVD/CD-ROM drives
•
Gaming interfaces
•
PDA (personal digital assistant) interfaces
•
Wired and wireless network interfaces
•
USB interfaces
The Role of Application Software
In addition to communicating with computer hardware, the operating system communicates
with the application software running on the computer, as shown in Figure 1-3. Application
software is a fairly vague term; it can mean a word processor, spreadsheet, database, computer game, or many other types of applications. Basically, application software is any program a user might choose to run on the computer. If an application program accesses a
piece of hardware, it sends a request to the operating system to execute the job. For example,
the application program may have to access the keyboard to see if a user has pressed a key,
or might need to access the monitor to show the user a message. This makes the application
programmer’s job easier because she does not have to know exactly how to manipulate the
chips in the computer to communicate with the keyboard, monitor, or printer. She only has
to know how to communicate with the operating system.
Copyright 2017 Cengage Learning. All Rights Reserved. May not be copied, scanned, or duplicated, in whole or in part. WCN 02-200-203
Understanding How Operating Systems Work
17
1
Application software
User
Word processor
Spreadsheet
Software
Operating system
Application
programming
interfaces (APIs)
Screen
driver
Screen
Keyboard
driver
Keyboard
Mouse
driver
Mouse
Serial
Serial
driver
Disks
Others
File system code
Disk driver code
Print
driver
Printer
Hard disk
driver
DVD/CD-ROM
driver
Hard disk
controller
DVD/CD-ROM
controller
Hardware
Monitor
Keyboard
Mouse
Hard disk
drive
DVD/CD-ROM
driver
Modem
Figure 1-3 Application programs communicate with hardware through the operating system
In its most basic form, an operating system manages the communication among the application
programs, the user, and the computer. This level of management allows application programmers to concentrate on applications that will run on any hardware, as long as the operating system can control them. In other words, an application program can submit a general request to
the operating system, such as “write this information to disk,” and the operating system handles
the details. The application programmer doesn’t have to worry about how to queue data,
update the disk directory, or physically copy data from memory to the disk drive.
In early operating systems, programmers designed code to directly access hardware and
improve overall application performance. This practice can make hardware response fast,
Copyright 2017 Cengage Learning. All Rights Reserved. May not be copied, scanned, or duplicated, in whole or in part. WCN 02-200-203
18
Chapter 1 Operating Systems Fundamentals
but there are serious drawbacks. A significant drawback is that memory is often required for
directly managing the hardware. If a memory block is programmed for use that conflicts with
the same (or a part of the same) memory block used by other hardware or the operating system, the hardware devices involved may become unstable or the operating system may crash.
Another drawback is incompatibility with other software that also needs to use the hardware
or that uses the same memory block, which can cause the software applications to hang or
crash. A third drawback is that direct access to hardware devices makes a system more vulnerable to malicious software (malware) or an attacker. Such access, for example, can allow
malware to damage a disk or extensively damage disk files.
Windows operating systems from Windows 2000 forward do not allow the
programmer to directly access hardware. Instead, the programmer must call
on an intermediary process that decides how to handle the request. This
design makes it more difficult for an application program to crash a computer, such as when two application programs access the same memory
location at the same time. This was a significant problem in earlier versions
of Windows, such as Windows 3.x, Windows 95, and Windows 98.
The Role of the BIOS
An essential step in starting a computer is to load the basic input/output system, or BIOS.
The BIOS is low-level program code that:
•
Resides on a chip on the computer’s motherboard
•
Initiates and enables communications with hardware devices
•
Performs tests at startup, such as memory and hardware component tests, which as a
group are called the power-on self test (POST)
•
Conducts basic hardware and software communications inside the computer
•
Starts a full-fledged operating system that interfaces with the user
Every PC has a BIOS, which is stored in a flash memory chip. Flash memory, which you are
familiar with from using thumb drives, does not lose its memory contents when the computer is
turned off. In early PCs, the BIOS was stored in a read-only memory (ROM) chip, but the only
way you could update the BIOS was to replace the chips, a major inconvenience to say the least.
When a computer is built, the BIOS is configured with a default set of parameters. The BIOS
configuration stores information about the amount of RAM, the storage devices, and other
I/O devices on the computer. The BIOS configuration is stored in a memory chip called complementary metal oxide semiconductor (CMOS). A CMOS chip uses a low-power memory
technology that is powered by a small battery. Users can make changes to the BIOS configuration by accessing the BIOS setup screen before the computer boots. Figure 1-4 shows a
sample BIOS setup screen on a computer. Whenever you turn on your PC, the machine
wakes up and begins executing the startup program inside the BIOS. This program initializes
the screen and keyboard, tests computer hardware, such as the CPU and memory, initializes
the hard disk and other devices, and then loads the main operating system—Windows
—Windows 10 or
—
Linux, for example—that provides more advanced functionality for application programs.
Figure 1-5 illustrates the main operating system components, including the relationship of an
operating system to the BIOS.
Copyright 2017 Cengage Learning. All Rights Reserved. May not be copied, scanned, or duplicated, in whole or in part. WCN 02-200-203
Understanding How Operating Systems Work
19
1
Figure 1-4 Sample BIOS setup screen
Application software
User
Word processor
Spreadsheet
Operating system
API (application programming interface)
Software
Operating system kernel
BIOS
Device
drivers
Resource
managers
Optional drivers
for other functions
and devices
Computer hardware
Hardware
CPU
Disk drives DVD/CD- Tape drive Monitor Printer
ROM drive
Mouse Keyboard
Figure 1-5 General operating system design
Copyright 2017 Cengage Learning. All Rights Reserved. May not be copied, scanned, or duplicated, in whole or in part. WCN 02-200-203
20
Chapter 1 Operating Systems Fundamentals
If a computer is turned on but cannot access a device, such as the main
disk drive, check the BIOS settings to make sure that the BIOS knows
about the device and is correctly configured for it. If several BIOS settings are changed or the computer won’t boot, consider changing the
CMOS battery. Also, on many computers you can set up a password in
the BIOS to control who can start the operating system or who can
access a particular drive at startup. You can access the BIOS settings
when the computer starts by pressing a designated key. On many computers, this key is F1, F2, or ESC—check the screen when the computer
boots, or consult your computer’s documentation.
A Summary of Operating System Elements
The elements in Figure 1-5 include the following, from the application down:
•
Application software, such as a spreadsheet or a word processor.
•
Application programming interface. An application programming interface (API) is
software designed to communicate with the application software and the user. The API
is program code that is like a specialized “hook” into the operating system. It translates
requests from an application into code that the operating system kernel can understand
and pass on to the hardware device drivers, and translates data from the kernel and
device drivers so the application can use it. This is the part of the operating system that
is most visible to users. For example, a word-processing application may request to
create a specific display of characters on the monitor, and the API translates the request
from the application to the kernel. Another example is the use of messaging APIs,
which enable an e-mail program to send a message through the operating system to a
computer network or the Internet.
•
BIOS, which provides the basic I/O functions to communicate with system devices,
such as the monitor, the keyboard, and disks. It usually loads other operating system
components on startup.
•
Operating system kernel, the core of the operating system that coordinates operating
system functions, such as control of memory, CPU access, and storage. The kernel
communicates with the BIOS, device drivers, and the API to perform these functions.
It also interfaces with the resource managers.
•
Device drivers, programs that take requests from the API via the kernel and translate
them into commands to manipulate specific hardware devices, such as disks, keyboards, monitors, and printers.
•
Resource managers, programs that manage computer memory and central processor use.
•
Optional drivers, for other functions and devices, such as sound.
•
Computer hardware, such as storage devices, CPU, mouse, keyboard, monitor, and printer.
Although all operating systems incorporate the basic I/O functions, the operating systems you
are accustomed to, such as Mac OS X, Microsoft Windows, or UNIX/Linux, include many
additional functions. These functions include network services such as those included with
the TCP/IP protocol, file systems, and the ability to work with multimedia files like audio
and video files.
Copyright 2017 Cengage Learning. All Rights Reserved. May not be copied, scanned, or duplicated, in whole or in part. WCN 02-200-203
Types of Operating Systems
21
The Hands-On Projects at the end of this chapter enable you to view the interfaces (desktops)
of Windows 10, Linux, and Mac OS X—all of which enable users to interact with the
operating system.
Types of Operating Systems
There are many types of computer operating systems, which work in very different ways and
are intended for very different purposes. To a large extent, the functions required by a computer dictate what the operating system will do and how. As an example, the computer in a
microwave oven needs device drivers for the light-emitting diode (LED) display, numeric keypad, and door-closing switches, whereas the computer in a television needs drivers to monitor
the remote control and tell the tuner to change the channel. The same goes for various types
of small and large computers; a computer designed to handle a high volume of numerical
operations for many users needs different functions than the PC used to run a word
processor.
In general, operating systems are organized by the size, type, and purpose of the computer
on which they run. For example, PC-class computers are designed for individual users to
perform tasks, such as word processing, database and spreadsheet management, and networking with other computers. Over the years, PCs have become faster, more complex,
and more powerful, offering the user more features. As a result, many PCs can now handle
complex operations that go beyond simply running a user’s application software. This
ability has resulted in advanced operating systems that are designed to provide complex
graphical user interfaces and advanced services and applications. The lines of division by
size, type, and purpose are therefore getting more vague every day. Hardware is becoming
more compact, but capable of doing more, and operating systems are getting larger and
more complex.
One example of how PC operating systems have become more complex is the comparison of lines of code. Windows 3.1, released in
1992, had about 3 million lines of code, whereas modern OSs like Mac
OS X and recent Windows versions have more than 50 million lines of
code.
For instance, in the seventies, corporate computing was confined to mainframe- and
minicomputer-class devices. These were refrigerator-sized or larger computers that
required a full staff to manage them, and large, expensive air-conditioned rooms to hold
them. The operating systems for these machines were quite complex and often included
such intrinsic functions as text editing (not quite “word processing” by today’s standards),
database management, networking, and communications. There were few PC-class devices
at the time. Those that were available were capable of minimal functionality, and used
what could only be described as rudimentary operating systems. Many of those early
devices didn’t support any storage hardware (disk drives), or if they did, it was frequently
serial, low-density tape. In this comparison, it should be easy to see that “in the old days,”
operating systems for large machines were very different from operating systems used for
smaller machines.
Copyright 2017 Cengage Learning. All Rights Reserved. May not be copied, scanned, or duplicated, in whole or in part. WCN 02-200-203
1
22
Chapter 1 Operating Systems Fundamentals
From the Trenches …
In the early 1990s, one of the authors managed the installation of a new IBM 9000-class
mainframe. Installing the hardware and operating system, plus porting (relocating) programs and data from the previous mainframe, was such a complex process that it took
several months to plan and many more months to test and execute. The computer equipment was so large that it was delivered by a moving van. Compare that task to setting
up a new PC server and operating system, which requires very little space and can take
as little as a few hours to a few days to complete.
At the same time, applications for these early large machines were written with efficient code
so they could maximize all of the resources on the computer. As a result, appearance, programming, and management were very terse and basic.
To a lesser extent, this is still true today. There are still “big” machines and “small” machines,
except that much of today’s computer equipment is no longer physically large. The days of
room-sized or even refrigerator-sized computers are nearly gone. A “big” machine today
simply has more processing power, more memory, more storage (disk drive capacity), and
better network connectivity. Very high-capacity computing is often accomplished by linking
together several servers to appear as one.
Some of today’s supercomputers are still physically large, such as those
made by the Cray supercomputer company (visit www.cray.com). A
supercomputer is one that has extreme processing power and speed
to handle complex computations that are beyond the reach of other
computers. A supercomputer might be used to simulate constantly
changing and complex molecular structures, for example.
To operate today’s more powerful computers, more powerful and more capable operating systems are employed. For example, a company that sells Internet access and Web hosting to
thousands of other users—an Internet service provider (ISP), for instance—requires computers
capable of performing multiple tasks for many users at the same time.
Although the computers used for such large installations typically don’t look much different
from the PC or Macintosh designed for a single user, they are quite different inside. They
have powerful multitasking, multiuser capabilities with high-speed network connections.
Also, they may include multiple CPUs and have more powerful I/O capabilities. The differences are significant, but also subtle. For example, Linux is a popular desktop operating
system (used by a single person) based on UNIX, and it is also used to host Web servers,
mail servers, and other Internet-related multiuser applications. Again, the hardware for a
single-user Linux computer is likely much different from that of a Linux computer used to
host Internet services, even though the operating system is the same. On the other hand, even
with the enhanced hardware, an ISP wouldn’t likely replace Linux or any other server
operating system, such as Windows Server 2016, with a system intended for the desktop,
such as Windows 10.
Copyright 2017 Cengage Learning. All Rights Reserved. May not be copied, scanned, or duplicated, in whole or in part. WCN 02-200-203
Types of Operating Systems
23
So-called high-end workstations are used by engineers for graphical design, or by editors for
film design and animation. Again, these machines may look much like a school or home PC,
but inside they include extremely fast hard disk controllers, 3D graphics interfaces, lots of
memory, and often support for multiple CPUs. The needs of these workstations are very different from the multitasking, multiuser needs of an Internet server, but they too have special
requirements that can’t be met by some operating systems. Although some graphics applications use Linux or UNIX, the Windows and Mac OS X operating systems are more popular
foundations for these applications, and can be used for powerful business applications
as well.
So, there must be other factors that differentiate high-end and low-end computers. The main
factor is the application software used with the computers. Again, the differentiation among
computers is getting less defined. You have seen some of these factors, but the confusing concept is that even high-end applications can often run on what are considered low-end
machines on the same operating system. When this is the case, the main differentiating factor
is the hardware: the speed of the disk controller, size and speed of the storage media, amount
and speed of memory, size of the data pathways in the computer (such as 32-bit, 64-bit, or
larger), or speed and number of CPUs.
One way to look at computer and operating systems is to consider them in terms of one or
more of the following characteristics:
•
Time sharing
•
Real-time
•
Multiuser
Time Sharing
A time-sharing system is a central computer system that is used by multiple users and
applications simultaneously. Mainframe computers typically fall into this category. These
computers are used to conduct massive calculations or manipulate huge amounts of data.
Mainframe computers, such as IBM System z mainframes, are used at scientific institutions,
banks, and insurance companies. They are built to quickly perform tasks, such as keeping
track of thousands of checking account balances. Most of their work is done in batches,
using batch processing—such as clearing two million checks and updating their associated
bank accounts—instead of single, sequential repetitive tasks. When the batch process is
finished—all checks have been posted, for example—the statements can be printed. Contrast
this approach to that of smaller computers, such as PCs, that are interactive and use sequential processing, where each process request is completed and the data returned before the
next process is started.
Big batch processing jobs, or multiple batch jobs that must occur in a
specific order on large computers, are often scheduled to run after
work hours because they require so many machine resources. This
makes batch processing less convenient than the instant response you
get with a sequential process.
Copyright 2017 Cengage Learning. All Rights Reserved. May not be copied, scanned, or duplicated, in whole or in part. WCN 02-200-203
1
24
Chapter 1 Operating Systems Fundamentals
Besides batch processing, many clerks, customer representatives, and ATM machines often
use a mainframe to do daily transactions. They all share the resources, or processor time, of
the large machine, which is why such machines are called time-sharing systems.
From the Trenches …
A downside of batch processing is that if the order of processing is inadvertently changed, the result may be a disaster to the data. A bank experienced this problem when
performing its fiscal year-end closing. Some preliminary financial calculations and database updates were scheduled after all files were formally closed for the fiscal year. To
restore the files to their year-end condition, it was necessary to restrict access to the
mainframe the next day, and the batch processes were rescheduled. No new business
could be done on the mainframe for a day until the data was restored and corrected.
Real-Time Systems
A real-time operating system (RTOS) receives and processes inputs and produces the required
outputs in a specified amount of time. It is more important for the response time of an
RTOS to be consistent than fast, although RTOSs are also built for speed. For example,
an RTOS might be used in an industrial plant to control machinery. Inputs to the computer
controlling the machinery dictate how the machines respond; the responses must be consistent and predictable, or the entire process may be thrown off.
Examples of RTOSs include VxWorks from Wind River Systems, QNX, and Windows CE.
These OSs are typically used in embedded systems, which means the computer has a dedicated function within a larger system such as a piece of machinery. Examples of embedded
systems include the computer that runs all the systems of a modern automobile or the
computers that run the robots on an automated assembly line.
Multiuser Systems
A multiuser system supports multiple users who access the hardware and software of the
computer and operating system. Both time-sharing and real-time systems can be multiuser
systems. To review, time sharing is a method for enabling multiple users to share in using
CPU resources, such as through terminals or computers with terminal software. A terminal
consists of a keyboard and monitor without a CPU. For example, a time-sharing mainframe
was originally accessed by running cables from terminals to a specialized communications
box connected to the mainframe, creating a multiuser system, as shown in Figure 1-6. In
time sharing, users may experience delays as the processor and operating system handle all
of the processing requests and processing time becomes available. Today, multiple users typically access mainframes through a computer network.
Servers, such as a Linux server or Windows Server 2016, can provide computer access to
multiple users over a network, as shown in Figure 1-7. In this environment, multiple users
can do many different things on the multiuser computer at the same time. Access to resources
is designed to be instantaneous by all users. Most modern OSs run both on personal computers and servers and are considered multiuser operating systems. Even though Windows 10,
Copyright 2017 Cengage Learning. All Rights Reserved. May not be copied, scanned, or duplicated, in whole or in part. WCN 02-200-203
Types of Operating Systems
25
for example, doesn’t typically have multiple monitors and keyboards attached to it with several users running applications, these OSs can support multiple user connections through a
network.
Terminal controller
Mainframe
Terminal directly
connected by a cable
Figure 1-6 Time-sharing mainframe with terminals
Windows 10
Linux
Windows 10
Mac OS X
Windows Server 2016
Figure 1-7 Using a network to access a Windows server
Copyright 2017 Cengage Learning. All Rights Reserved. May not be copied, scanned, or duplicated, in whole or in part. WCN 02-200-203
1
26
Chapter 1 Operating Systems Fundamentals
In a departure from mainframes and time sharing, one of the newer approaches to multiuser
operations is the use of client/server systems. On a multiuser mainframe, all of the work is
typically done on the big machine, including running programs, storing data, and accessing
data. In the client/server model, only some of the work is done on the central servers. In a
client/server system, the servers may hold all the data and files, and may even perform some
of the database functions or calculations required, but much of the work, such as running
programs, is performed on the client side—on the computer at the user’s desk. If you have
used PC-class computers in a networked environment, chances are you have used the client/
server model, at least to some degree. In fact, accessing the Internet with a Web browser is a
client/server activity. The Web browser runs on the user’s client computer, and it requests
Web pages from a Web server.
Operating system differences are beginning to narrow, but the applications that run on them
help differentiate how the computer is used and classified. Client/server computing was not
possible until the PC was introduced. After all, it requires a computer at the user’s desk,
which was not available until the introduction of the PC.
Client/server computing coupled with the Internet opened the way to an even more efficient and powerful computing model called cloud computing. Cloud computing involves
providing a host of scalable Web-based applications and services over the Internet or a
private network that are used by clients through Web browsers or specialized apps. The
servers and resources available through the apps are depicted as available in a cloud
because there are many resources, but they appear to be available from one unified
resource (see Figure 1-8). You might compare this technology to using telephone
services. There are many telephone companies and telephone technologies (such as land
lines, satellite phones, and cell phones), but to the user they appear as one giant
resource. In cloud computing, the user experiences programs and data as if they are
installed on the user’s computer, but in truth a small portion is on the local computer
and all other resources are on servers and other devices in the cloud. Microsoft describes
three types of cloud models:
•
Private cloud
cloud—In which computing resources are kept within an organization and used
exclusively by that organization
•
Hosted private cloud
cloud—In which resources are made available through a third-party
outsourcer, but are only accessible to users within a specific organization
•
Public cloud
cloud—In which a variety of resources are available to any organization
through a third party and each organization subscribes only to specific resources,
which may be shared by other organizations
Copyright 2017 Cengage Learning. All Rights Reserved. May not be copied, scanned, or duplicated, in whole or in part. WCN 02-200-203
Single Tasking Versus Multitasking
27
1
Desktop
computer
Smartphone
Laptop
Storage
resources
Smartphone
Tablet
Web-based
software
applications
Desktop
computer
E-mail and
messaging
Virtual
servers
Desktop
computer
Databases
Tablet
Desktop
computer
Laptop
Laptop
Tablet
Figure 1-8 Cloud computing
Common cloud service providers include Amazon Web Services (AWS), Microsoft Azure,
and Dropbox. AWS and Microsoft Azure are full-service cloud computing companies that
can offer customers anything from cloud storage to an entire network of servers and services.
Dropbox, as you may know, is a cloud storage company that provides seamless access to
files through the Internet.
Single Tasking Versus Multitasking
A few aspects of operating systems deserve a closer look. As pointed out earlier, today’s PC
operating systems go way beyond basic I/O. In practice, almost every resource in the computer, such as the memory and the microprocessor (CPU), is managed by the operating
system. This is both good and bad; it results in a lot more consistency and a lot of added
functionality. However, application programs can no longer directly access hardware in creative ways as they could before, particularly under MS-DOS and in early Windows systems.
Copyright 2017 Cengage Learning. All Rights Reserved. May not be copied, scanned, or duplicated, in whole or in part. WCN 02-200-203
28
Chapter 1 Operating Systems Fundamentals
A good example is the chip used to produce sound. This chip includes an electronic timer that can
be accessed by external programs. Many older MS-DOS programs used this chip as a timer to
halt program execution for a specified period of time. This was done by manipulating the internal
workings of the chip directly from the application program, without the intervention of MS-DOS.
Some earlier versions of Windows, such as Windows 3.x, 95, 98, and ME, enable programs to
directly access hardware, whereas all Windows OSs built on the Windows NT foundation—
which includes Windows NT, Windows 2000, and all versions of Windows since Windows
XP—do not. A disadvantage of systems such as Windows 95/98, which enable programs to
directly access hardware, is that these operating systems are more prone to unexpected hangs, system instability, or crashes when a problem occurs in software as it is accessing the hardware.
One of the major reasons for giving the operating system so much control over resources is to
facilitate multitasking, a technique that allows a computer to run two or more programs at
the same time. Multitasking is typically achieved by splitting processor time between applications and switching so rapidly that the user is not aware of any discontinuity.
There are two general types of multitasking. The first method is known as cooperative multitasking. In this method, the operating system hands over control to a program, sits back, and
waits for the program to hand control back to the operating system. The assumption here is
that the program will do some work, and then give control back to the operating system. If
for some reason the program does not hand control back to the operating system, the program will hog the CPU until its operations are complete, while all other programs on the computer are on hold. If the program does not release control—for example, because it is stuck in
an endless loop—the operating system may never regain control. As a result, no other programs can run until the computer is restarted—an undesirable scenario. This could also be a
problem if some of the programs on the computer are time sensitive. If a program must collect
data every second, or regularly update a clock, a cooperative multitasking environment may
cause trouble. You will find this behavior in older operating systems such as early Windows
versions. If you print a word-processing file and try to play Solitaire at the same time, you
will find that you cannot play a card until the print job is finished. Figure 1-9 shows the
basic concept of cooperative multitasking.
OS gives control to
Program One.
Program One performs
some functions, and then
returns control to the OS.
Program Two performs
some functions, and then
returns control to the OS.
OS gives control back to
Program One.
OS gives control to
Program Two.
And so on ...
Figure 1-9 Cooperative multitasking basics
Copyright 2017 Cengage Learning. All Rights Reserved. May not be copied, scanned, or duplicated, in whole or in part. WCN 02-200-203
Single Tasking Versus Multitasking
29
A better method is the second alternative, preemptive multitasking, illustrated in Figure 1-10.
Modern operating systems developed since the early 2000s use preemptive multitasking. These
systems include all Windows OSs since Windows XP, along with Mac OS X and all Linux/
UNIX variations. In preemptive multitasking, the operating system is in control of the computer at all times. It lets programs execute a little bit of code at a time, but immediately after
the code executes, it forces the program to relinquish control of the CPU back to the
operating system. It then takes the next program and repeats the same process. Because
the operating system is in charge, it has a lot of control over how much of the computer’s
resources are allocated to each program. As a result, the computer must use more of its
processor power and memory to support the operating system, but the behavior of programs
and the computer as a whole are a little more predictable. Playing Solitaire while printing a
word-processing file within a preemptive multitasking system is not a problem—both processes get enough CPU time to do their jobs—and the user is often unaware that the system
has been rapidly switching between tasks.
Linux/UNIX OSs have always included preemptive multitasking since the
original UNIX developed by Bell Labs in the 1970s.
A few cycles are run
under control of the
operating system.
Program Three
A few cycles are run
under control of the
operating system.
Program Two
Program One
Operating system
A few cycles are run
under control of the
operating system.
Internal
tasks
A few cycles are run
under control of the
operating system.
Although other programs are
running, the OS is firmly in control
and will take over when it pleases.
Internal
tasks
Etc.
Etc.
Figure 1-10 Preemptive multitasking basics
Some older operating systems, such as MS-DOS, were single-tasking operating systems. A
single-tasking operating system executes one program at a time (see Figure 1-11). To do something else, one program must be stopped and a new program must be loaded and executed.
Because multiple programs are not trying to use the same resources, single-tasking operating
systems are a lot simpler. These systems, however, are considered older technology, and as
new operating systems are released, they are seldom single-tasking. New single-tasking
Copyright 2017 Cengage Learning. All Rights Reserved. May not be copied, scanned, or duplicated, in whole or in part. WCN 02-200-203
1
30
Chapter 1 Operating Systems Fundamentals
operating systems are found only in computers with very limited processor capacity, such as
older personal digital assistants (PDAs), which have long since been replaced by smartphones
and tablets that sport their own multitasking OSs.
Application runs. When it
needs a function from the
operating system, it will ask
the operating system to do
what it needs.
Application
Operating
system
Operating system
starts the application
program and gives it
control of the
system.
Application
runs.
Operating system
does what is asked
and returns control
to the application.
Figure 1-11 Single-tasking operating system
A special note must be made of a hybrid system called a task-switching operating system. This
system offers many of the device management functions of the multitasking operating system,
and it can load multiple application programs at once. It will actively execute only one of
these programs, however. If the user wants to use another application, she can ask the
operating system to switch to that task. When the switch is made, the operating system gives
control to the newly selected task. Obviously, many of the problems associated with switching
among various applications and their use of various devices do not have to be addressed,
making this a less complicated type of operating system than a true multitasking system. This
system is also considered an older technology that isn’t used in any of the new PC operating
systems. Many earlier versions of Mac OS are task switching, as are some of the operating
systems found on much older PCs, such as the Atari ST series, which focused on the home
computer market. You can see the concept of task switching in Figure 1-12.
S
t
a
r
t
S
t
a
r
t
1
2
Program One
runs until the
user instructs the
computer to go
to Program Two.
Operating system
starts Programs
One and Two,
gives control to
Program One.
Program Two
runs until the
user instructs the
computer to go
to Program One.
Operating system
prepares to give control
to Program Two, then
gives control to
Program Two.
Operating system
prepares to give control
to Program One, then
gives control to
Program One.
Figure 1-12 Task switching
Copyright 2017 Cengage Learning. All Rights Reserved. May not be copied, scanned, or duplicated, in whole or in part. WCN 02-200-203
Single-User Versus Multiuser Operating Systems
31
Multitasking should not be confused with multithreading. Multithreading is the ability of programs to be written so that they run several program code blocks, called threads, independently. For example,
a database program might run a thread to pull data from the database
and another thread to simultaneously sum figures to create a subtotal.
You learn more about multithreading in Chapter 3.
Single-User Versus Multiuser Operating Systems
Some operating systems, in addition to being able to run multiple programs at the same time
with multitasking technology, allow multiple users to use an application simultaneously. These
systems are known as multiuser operating systems. By definition, a multiuser system is almost
a multitasking system. Most multiuser systems use preemptive, multitasking technology. The
desktop operating systems covered in this book initially were designed as single-user systems
(only one user at a time), with the exception of UNIX and Linux, which have always been
multiuser operating systems by design. From the start, all Windows server systems, from
Windows NT onward, were designed as full-featured multiuser systems. Mac OS X Server is
also a full-featured multiuser system. The desktop versions of operating systems, such as
Windows 10 and Mac OS X, are also multiuser systems, but they do not have the full multiuser capacity of the server systems. All of these desktop systems are intended to handle only
10 to 20 simultaneous users before they bog down under the load. A server system is designed
to handle hundreds of users at once.
While modern OSs are multitasking as well as multiuser, Windows 98 was a good example of
an operating system that was multitasking but not multiuser. Windows 98 could handily run
a word-processing program while running a Web browser and an e-mail client for a single
user, but it wasn’t designed to run applications for multiple users simultaneously. Table 1-3
compares single-user and multiuser operating systems.
Table 1-3
Comparing single-user and multiuser operating systems
Single-user operating system
Multiuser operating system
Handles only one user at a time
Handles multiple users at a time
Some older desktop operating systems are only singleuser
All server operating systems are multiuser, and some
desktop operating systems have limited multiuser
capability
Some single-user operating systems do not use
multitasking and some do
Always employs multitasking
Single-user systems that can use multitasking may use
either cooperative or preemptive multitasking
Uses preemptive multitasking
Copyright 2017 Cengage Learning. All Rights Reserved. May not be copied, scanned, or duplicated, in whole or in part. WCN 02-200-203
1
32
Chapter 1 Operating Systems Fundamentals
Current Operating Systems
The operating systems surveyed in this book are the most common in today’s computing
environments, and they fall into several families:
•
Windows 7, 8.1, and 10
•
Windows Server 2008, 2012, and 2016
•
The different distributions of UNIX/Linux operating systems, focusing particularly on
Fedora, which is used as a leading-edge development environment for the popular Red
Hat Enterprise Linux (new features in Red Hat Enterprise Linux come from Fedora)
•
Apple Macintosh Mac OS X (version 10.11 El Capitan)
Windows 8 was not well-received and almost all systems that were initially configured with Windows 8 were upgraded to Windows 8.1
when it became available, so this book does not cover features particular
to Windows 8.
In Chapter 2, you learn about these families in more detail. This section provides a brief
summary.
At the time of this writing, three popular desktop operating systems were used most frequently
in corporate America—Windows
—Windows 7, 8.1, and 10. These three operating systems offer a stable
—
work environment that is appealing for office use. Further, Microsoft continually issues
updates for Windows systems that increase their security and performance. It is also possible
to find some corporate users hanging on to older versions of Windows and even MS-DOS,
but they have become rare. The most popular Microsoft server operating systems are
Windows Server 2008/R2 and Windows Server 2012/R2. Support for Windows Server 2003
has ended and most companies have upgraded or are upgrading to a newer version of
Windows Server. Windows Server 2016 will be released about the time this book publishes,
and features and screenshots will be based on preview release 4.
The multiuser UNIX operating system has been popular among industrial-strength users for
many years. It is especially appealing to members of the scientific and research communities
for its power to perform complex tasks and maintain large databases. There are many flavors
of UNIX, but the two main design standards are the Berkeley Software Distribution (BSD)
standard and the System V Release 4 (SVR4) standard. This book focuses on SVR4 UNIX.
Linux is a UNIX look-alike system that is popular as a server operating system in business,
education, and government and is rapidly replacing UNIX. Linux operating system distributions are particularly popular for servers and are gaining ground on the desktop, in part
because they take advantage of a huge open source software community. Open source software is typically developed by hundreds or thousands of volunteers, relies on peer review,
contains code in the public domain, and is typically distributed for free.
You can learn more about open source software at www.opensource.
org and sourceforge.net.
Copyright 2017 Cengage Learning. All Rights Reserved. May not be copied, scanned, or duplicated, in whole or in part. WCN 02-200-203
Chapter Summary
33
The Mac OS X operating system for Apple Macintosh computers is popular in the educational and graphics sectors, particularly for video editing and desktop publishing. Its use in
the corporate world is often for these applications, and it is also very popular among home
users. Corporate users sometimes regard Mac OS X as difficult to set up for networking in a
medium-sized to large organization with complex networks, although Apple has addressed
many of these concerns. Mac OS X is popular with home users because the desktop is intuitive and home network setup is user friendly. Also, some home users are already familiar
with Mac OS X from using it at school.
In Chapter 2, you will take a much closer look at the individual operating systems mentioned
here. You will find out more about the hardware required to run each operating system, and
which versions you will see in which environments. Try the Hands-On Projects at the end of
Chapter 1 to learn more about the Windows-based, Linux, and Mac OS X operating systems,
including how to use tools for obtaining system information, how to view device drivers, how
to see multitasking in operation, and how to use desktop applications.
Chapter Summary
■
All computers perform three basic tasks: input, processing, and output. An operating
system is a specialized computer program that provides a user interface, file system,
processes and services, and a kernel.
■
An operating system provides the foundation upon which to run the components of a
computer and execute applications.
■
A basic task of an operating system is to enable a computer to perform I/O
functions so that it can use software applications and communicate with computer
hardware.
■
Two common types of operating systems are desktop (or client) and server operating
systems.
■
The history of operating systems and computers represents a progression from physically
huge computers to large computers to desktop-sized computers that have powerful
processing capabilities and operating systems.
■
Device drivers can extend the native functions of an operating system to provide
access and control over different types of devices, such as printers and DVD
drives.
■
The BIOS is low-level program code that operates between the computer hardware
and a higher-level operating system to initiate communications with hardware devices,
perform hardware tests at startup, and enable the startup of the higher-level operating
system.
■
An operating system may be geared to run a large mainframe computer or a small PC.
However, small PC systems can now be very powerful; when combined, they can be
used in many places instead of mainframe systems.
■
Operating systems can be understood in terms of characteristics such as time sharing,
real-time operation, and multiuser capabilities.
Copyright 2017 Cengage Learning. All Rights Reserved. May not be copied, scanned, or duplicated, in whole or in part. WCN 02-200-203
1
34
Chapter 1 Operating Systems Fundamentals
■
From a user standpoint, one of the most significant advances in operating systems was
the refinement of the GUI, as seen in the development of Windows-based and Mac OS
systems.
■
Early operating systems tended to be single tasking, but modern systems are largely
multitasking.
■
A true multiuser system is one in which multiple users access and run a single application on a single computer at the same time.
■
Current popular operating systems include Windows 7, 8.1, and 10, Server 2008/R2,
Server 2012/R2, Server 2016, UNIX/Linux, and Mac OS X El Capitan. Of the systems
listed, the server operating systems are primarily discussed in the last three chapters of
the book, along with some networking basics.
Key Terms
application programming interface (API) Functions or programming features in an
operating system that programmers can use for network links, links to messaging services,
or interfaces to other systems.
application software A word processor, spreadsheet, database, computer game, or other
type of application that a user runs on a computer. Application software consists of
computer code that is formatted so the computer or its operating system can translate the
code into a specific task, such as writing a document.
basic input/output system (BIOS) Low-level program code that conducts basic hardware
and software communications inside the computer. A computer’s BIOS basically resides
between computer hardware and the higher-level operating system, such as UNIX or
Windows.
batch processing A computing style frequently employed by large systems. A request for a
series of processes is submitted to the computer; information is displayed or printed when
the batch is complete. Batches might include the processing for all of the checks submitted to
a bank for a day, or for all of the purchases in a wholesale inventory system, for example.
Compare to sequential processing.
Beginner’s All-purpose Symbolic Instruction Code (BASIC) An English-like computer
programming language originally designed as a teaching tool, but which evolved into a
useful and relatively powerful development language.
blade enclosure A large box with slots for blade servers; the box also provides cooling fans,
electrical power, connection to a shared monitor and pointing device, and even network
connectivity. The actual design depends on the manufacturer.
blade server A server unit that looks like a card that fits into a blade enclosure. Blade
servers are intended to save space. See blade enclosure.
client/server systems A computer hardware and software design in which different portions
of an application execute on different computers, or on different components of a single
computer. Typically, client software supports user I/O and server software conducts
database searches, manages printer output, and the like.
Copyright 2017 Cengage Learning. All Rights Reserved. May not be copied, scanned, or duplicated, in whole or in part. WCN 02-200-203
Key Terms
35
cloud computing A computing technology that provides a host of scalable Web-based
applications and services over the Internet or a private network used by clients through Web
browsers.
command-line interface An interface that enables the user to display a command line from
which to enter commands. These interfaces include the Command Prompt window in
Windows operating systems and the terminal window in Linux and Mac OS X.
complementary metal oxide semiconductor (CMOS) A type of memory that stores a
computer’s BIOS configuration. A CMOS chip uses a low-power memory technology that is
powered by a small battery.
computer program A series of instructions executed by the computer’s CPU.
cooperative multitasking A computer hardware and software design in which the operating
system temporarily hands off control to an application and waits for the application to
return control to the operating system. Compare to preemptive multitasking.
desktop operating system A computer operating system that is typically installed on a PC,
usually used by one person at a time, and may or may not be connected to a network. Also
called a client operating system.
device driver Computer software designed to provide the operating system and application
software access to specific computer hardware.
distribution An issuance of UNIX or Linux that is based on a standard kernel, but that also
has customizations added by a particular private or commercial development group.
embedded system A computer that has a dedicated function within a larger system, such as
a piece of machinery.
file system The method by which an OS stores and organizes files and manages access to
files on a storage device.
graphical user interface (GUI) An interface between the user and an operating system that
presents information in an intuitive graphical format, including multiple colors, figures,
icons, windows, toolbars, and other features. A GUI is usually deployed with a pointing
device, such as a mouse, to make the user more productive.
hardware The physical devices in a computer, including the CPU, circuit boards (cards),
disk drives, monitor, and modem.
input/output (I/O) Input is information taken in by a computer device to handle or process;
an example is characters typed at a keyboard. Output is information sent out by a computer
device after the information is handled or processed; an example is the display of typed
characters on the monitor.
kernel An essential set of programs and computer code built into a computer operating
system to control processor, disk, memory, and other functions central to a computer’s basic
operation. The kernel communicates with the BIOS, device drivers, and the API to perform
these functions. It also interfaces with the resource managers.
Microsoft Disk Operating System (MS-DOS) The first widely distributed operating system for
microcomputers, created by Tim Paterson and a team at Microsoft that included Bill Gates.
This generic computer code was used to control many basic computer hardware and
software functions. MS-DOS is sometimes referred to as DOS.
Copyright 2017 Cengage Learning. All Rights Reserved. May not be copied, scanned, or duplicated, in whole or in part. WCN 02-200-203
1
36
Chapter 1 Operating Systems Fundamentals
multitasking A technique that allows a computer to run two or more programs at the same
time.
multithreading Running several program processes or parts (threads) at the same time.
multiuser system A computer hardware and software system designed to service multiple
users who access the computer’s hardware and software applications simultaneously.
operating system (OS) A specialized computer program that provides a user interface, file
system, services, and a kernel to a computer. An OS runs on computer hardware and
facilitates application execution.
power-on self test (POST) Tests, such as memory and hardware component tests, that are
run by the BIOS when a computer starts and that must complete before the operating
system is loaded. See basic input/output system (BIOS).
preemptive multitasking A computer hardware and software design for multitasking of
applications in which the operating system retains control of the computer at all times. See
cooperative multitasking for comparison.
process A program that is loaded into memory and run by the CPU. It can be an
application a user interacts with, such as a word-processing program or a Web browser, or
a program with no user interface that communicates with other processes and provides
services to them.
rack-mounted server CPU boxes mounted in racks that can hold multiple servers, each with
its own power cord and network connection—and that often share one monitor and
pointing device.
read-only memory (ROM) Memory that contains information that is not erased when the
power is removed from the memory hardware.
real-time operating system (RTOS) An operating system that receives and processes inputs
and produces the required outputs in a specified amount of time.
resource managers Programs that manage computer memory and CPU use.
sequential processing A computer processing style in which each operation is submitted,
acted upon, and the results displayed before the next process is started. Compare to batch
processing.
server operating system A computer operating system usually found on more powerful
PC-based computers than those used for desktop operating systems. A server OS is
connected to a network and can act in many roles to enable multiple users to access
information via e-mail, files, software, and other means.
service A process that runs in the background because there is no user interface. See
process.
shell An interface that enables users to interact with an operating system kernel. The shell
enables the user to execute commands. See kernel.
single-tasking A computer hardware and software design that can manage only a single
task at a time.
single-user system A computer hardware and software system that enables only one user to
access its resources at a particular time.
Copyright 2017 Cengage Learning. All Rights Reserved. May not be copied, scanned, or duplicated, in whole or in part. WCN 02-200-203
Review Questions
37
supercomputer A computer that has extreme processing power and speed to handle
complex computations that are beyond the reach of other computers.
task switching A hybrid between single-tasking and multitasking that permits the user or
application software to switch among multiple single-tasking operations.
time-sharing system A central computer system, such as a mainframe, that is used by
multiple users and applications simultaneously.
user interface A component of an operating system that provides a method for users to
interact with the computer, usually with a keyboard and mouse or touch screen.
Review Questions
1. Which of the following is a basic function all computers perform? (Choose all that
apply.)
a.
processing
b. Internet access
c.
graphics
d. input
e.
e-mail
f.
output
2. Which of the following executes instructions provided by computer programs?
a.
NIC
b. USB
c.
CPU
d. drive
3. The large bank where you work uses an older mainframe to make a customer service
database available for complex reports and queries about customer profiles. Which of
the following occurs when 12 users run large reports on the mainframe at the same
time?
a.
batching
b. interfacing
c.
overload
d. time sharing
4. Which of the following is a feature typically provided by an operating system? (Choose
all that apply.)
a.
file system
b. spreadsheet
c.
database app
d. kernel
Copyright 2017 Cengage Learning. All Rights Reserved. May not be copied, scanned, or duplicated, in whole or in part. WCN 02-200-203
1
38
Chapter 1 Operating Systems Fundamentals
5. What is another name for a client operating system?
a.
real-time operating system
b. multiuser operating system
c.
server operating system
d. desktop operating system
6. While on a coffee break, your colleague asserts that cooperative multitasking is the best
operating system design. What is your response? (Choose all that apply.)
a.
A disadvantage of cooperative multitasking is that it relies on each program to
decide when to give control back to the operating system.
b. Cooperative multitasking can be faster than other forms of multitasking because it
increases the clock speed of the processor.
c.
Cooperative multitasking OSs can get stuck in an endless loop.
d. Modern operating systems use preemptive multitasking so that the operating
system is fully in control.
7. You are called into a small business in which 25 people are using one Windows 10
computer to share files. The business wants you to diagnose why file sharing is often
slow or seems to grind to a halt. What is your assessment?
a.
Windows 10 is only meant for 20 or fewer simultaneous users. The company
should upgrade to a server system.
b. Windows 10 is working in batch mode and should be reset for multitasking mode.
c.
The company should switch to Windows 7.
d. Windows 10 is experiencing task locks and task locking should be turned off.
8. Which type of server plugs into slots in an enclosure that contains a backplane?
a.
rack-mounted
b. blade
c.
tower
d. mainframe
9. What is the core code of an operating system called?
a.
kernel
b. blade
c.
driver
d. bus
Copyright 2017 Cengage Learning. All Rights Reserved. May not be copied, scanned, or duplicated, in whole or in part. WCN 02-200-203
Review Questions
39
10. You are using e-mail to send a message over the Internet. Which of the following types
of software acts like a hook in the operating system to enable e-mail transmissions over
the Internet?
a.
software compiler
b. hook driver
c.
Internet translator
d. application programming interface
11. Which of the following operating systems only comes in a 64-bit version and not a
32-bit version?
a.
Mac OS X Leopard
b. Linux
c.
Windows Server 2016
d. Windows 10
e.
No current operating system operates only on a 64-bit computer.
12. Which processor was used in the original IBM PC?
a.
Zilog Z80
b. Motorola 68000
c.
AMD Opteron
d. Intel 8088
13. Which of the following operating systems are multitasking systems? (Choose all
that apply.)
a.
MS-DOS
b. Windows 10
c.
Mac OS X
d. Linux
14. To help manage access to the CPU, programs and processes are assigned which of the
following by the operating system?
a.
a time-stamp
b. 100 KB of RAM
c.
a program unit interval
d. a priority
Copyright 2017 Cengage Learning. All Rights Reserved. May not be copied, scanned, or duplicated, in whole or in part. WCN 02-200-203
1
40
Chapter 1 Operating Systems Fundamentals
15. Today’s class discussion is a comparison of high-end computers and lower-end computers. Which of the following factors help to differentiate these types of computers?
(Choose all that apply.)
a.
number of CPUs
b. size of the monitor
c.
size of the data pathways in the computer
d. number of USB ports
16. Where is a computer’s BIOS typically stored in modern computers?
a.
RAM
b. flash memory
c.
ROM
d. hard disk
17. Which of the following is performed by the BIOS? (Choose all that apply.)
a.
runs the power-on self test
b. starts the operating system
c.
manages the file system
d. allocates memory to applications
18. Operating systems that give programs direct access to manipulating hardware are more
susceptible to which of the following problems? (Choose all that apply.)
a.
malicious software vulnerabilities
b. runaway BIOS
c.
memory block conflicts that make hardware devices unstable
d. CPU clocking problems
19. Which type of operating system is most likely to be part of an embedded system?
a.
task-switching
b. cooperative multitasking
c.
real-time
d. time sharing
20. What are two types of cloud computing models? (Choose two.)
a.
private cloud
b. public cloud
c.
preemptive cloud
d. cooperative cloud
Copyright 2017 Cengage Learning. All Rights Reserved. May not be copied, scanned, or duplicated, in whole or in part. WCN 02-200-203
Hands-On Projects
41
Hands-On Projects
1
Please read the “Before You Begin” section of this book’s Introduction
for details on the suggested lab configuration for all the projects.
At the end of each chapter in this book, Hands-On Projects give you direct experience in
applying what you have learned about operating systems. As you are completing the HandsOn Projects, keep a lab book, notebook, or word processor handy so you can record your
findings for later reference.
These projects use a variety of OSs, including a Windows client and a Windows server. For
people who use a Windows client, note that the instructions apply to Windows 10. For projects that use a Windows server, instructions will apply to Windows Server 2012 R2. Projects
that use Linux will use Fedora 23 with the default GNOME desktop, and those that use Mac
OS X will use El Capitan. Other OS versions and releases can be used with small changes to
the instructions. The Linux projects are tailored for the Fedora 23 distribution. If you choose
to use a different Linux distribution, plan to use one with the GNOME desktop; the steps in
the Hands-On Projects will still apply in most cases. All of the Linux commands you learn to
use in the terminal window will work on any Linux distribution and desktop, and in many
UNIX distributions as well. The Mac OS X projects primarily use the default Mac OS X
desktop. Because Mac OS X is built on BSD UNIX (the Darwin distribution), some projects
also use the terminal window in Mac OS X for practicing UNIX commands.
In some Windows projects, you may see the User Account Control
(UAC) box, which is used for security to help thwart intruders. If you
see this box, click Continue. Because computer setups may be different,
the box is not mentioned in the actual project steps.
Table 1-4
Which operating system is used in each project?
Operating system
Projects
Any
1-1
Windows 10
1-2 through 1-4
Fedora Linux
1-5 and 1-6
Mac OS X El Capitan
1-7 and 1-8
Project 1-1: Explore the History of the Computer
The Internet can be a rich source of information about the history of computers. In this project, you use the Internet to review the history of computers,
software, and the Internet. You will need a computer with any OS installed
that has access to the Internet.
Copyright 2017 Cengage Learning. All Rights Reserved. May not be copied, scanned, or duplicated, in whole or in part. WCN 02-200-203
42
Chapter 1 Operating Systems Fundamentals
1. Start and log on to any computer with Internet access and a Web browser. Open a
Web browser and go to www.computerhistory.org/timeline.
2. Determine the answers to the following:
a. Which three PCs were released in 1977?
b. What was the first non-kit PC developed in 1973?
c. What important data storage medium was released in 1983?
d. What does ASCII stand for, and in what year did it come out?
e. What was the name of the first fully transistorized computer, which was developed
in 1955?
f. What input and output devices were used by the Manchester Mark I computer?
g. In what year was the World Wide Web born via the development of Hypertext
Markup Language (HTML), and who developed HTML?
3. Visit the Hobbes’ Internet Timeline 10 (Hobbes’ Internet Timeline Copyright © 1993–
2016 by Robert H. Zakon) by accessing www.zakon.org/robert/internet/timeline.
Determine the answers to the following:
a. BITNET, one of the predecessors of the Internet, was launched in 1981. What does
BITNET stand for?
b. What worm struck the Internet in 2001?
c. What food could you order through the Internet in 1994?
d. What famous person sent an e-mail in 1976?
e. What country offered Internet voting for local elections in 2005?
f. In 2008, what kind of network did NASA test?
4. Close your browser.
Project 1-2: Explore the Windows 10 Interface
A good place to start learning about an operating system is to perform a preliminary exploration of its user interface and the tools available to work with
and manage the system. In this project, you explore the Windows 10 interface
and some of its tools.
1. Start your Windows 10 computer. If necessary, log on by pressing Ctrl+Alt+Del.
2. Enter your user name, password, and domain name (if required), and then press Enter
or click the Submit button.
3. Notice the taskbar, which is at the bottom of the desktop on most systems.
4. Click Start to view the available applications you can run and tasks you can complete.
Record some of the options.
Copyright 2017 Cengage Learning. All Rights Reserved. May not be copied, scanned, or duplicated, in whole or in part. WCN 02-200-203
Hands-On Projects
43
5. On Windows 8.1 and Windows 10, you can right-click the Start button to see a list of
administrative tasks that are particularly important to an IT administrator or computer
technician (see Figure 1-13). Right-click Start and browse through the available tools.
(Note: The same menu is also available in Windows Server 2012 R2 and later.)
Figure 1-13 Right-clicking the Start menu in Windows 8.1 and Windows 10
6. Right-click the Start button, and then click Command Prompt. Notice the option for
Command Prompt (Admin), which runs the command prompt with the administrative
privileges required for some commands.
7. Type help and press Enter to see a list of commands you can run from the command
prompt. Type exit and press Enter to close the command prompt.
8. Right-click Start, and click System (see Figure 1-14). This window displays information
about the installed OS and the computer. From here you can change the computer
name and join a workgroup or domain. This window also tells you whether Windows
is activated. Close the System window by clicking the X in the upper-right corner.
Copyright 2017 Cengage Learning. All Rights Reserved. May not be copied, scanned, or duplicated, in whole or in part. WCN 02-200-203
1
44
Chapter 1 Operating Systems Fundamentals
Figure 1-14 The Windows System window
9. Right-click Start and click Computer Management. In the tree (see the left pane) under
Computer Management and System Tools, click Device Manager.
10. What types of devices that you can use with the computer are displayed in the right
pane? Record some of your observations.
11. Double-click Processors. What type of processor or processors are installed in the computer? Double-click Network adapters. How many network adapters are installed?
What kind are they?
12. Close the Computer Management window.
13. Stay logged on if you’re going on to the next project.
Project 1-3: View Devices and Device Drivers
in Windows 10
Devices connected to a computer, such as the keyboard, are linked into the
operating system through device drivers. In this project, you view the keyboard
device drivers installed in Windows 10.
1. Start your Windows 10 computer and log on, if necessary.
2. Right-click Start, and then click Device Manager.
3. Double-click Keyboards.
4. Double-click the keyboard description under Keyboards to open the keyboard Properties dialog box.
Copyright 2017 Cengage Learning. All Rights Reserved. May not be copied, scanned, or duplicated, in whole or in part. WCN 02-200-203
Hands-On Projects
45
5. Click the Driver tab. Who is the provider of the keyboard device driver, and is the
device driver digitally signed (for security)? Record your observations.
6. Click the Driver Details button to see the names of the driver files (see Figure 1-15).
Figure 1-15 Driver details in Windows 10
7. Click OK, click Cancel, and then close the Device Manager window.
8. Stay logged on if you’re going on to the next project.
Project 1-4: Examine Multitasking in Windows 10
Multitasking enables the user of a desktop operating system to perform many
activities at once, such as running a word processor, using a spreadsheet, and
running a Web browser. In this project, you take advantage of multitasking
using Windows 10.
1. Start your Windows 10 computer and log on, if necessary.
2. Click in the Search the web and Windows text box next to the Start button, type notepad,
and press Enter to start the Notepad program. (If Cortana is enabled, you will see “Ask
me anything” in the text box instead of “Search the web and Windows.”)
3. Click in the Search the web and Windows text box, type calculator, and press Enter to
start the Calculator program.
Copyright 2017 Cengage Learning. All Rights Reserved. May not be copied, scanned, or duplicated, in whole or in part. WCN 02-200-203
1
46
Chapter 1 Operating Systems Fundamentals
4. Click in the Search the web and Windows text box, type paint, and press Enter to start
the Paint program. You now have three programs running.
5. Notice that an icon appears for each application in the taskbar. Windows is now multitasking. Click the Calculator icon in the taskbar to bring its window to the front of the others.
6. Press Ctrl+Alt+Del. (Note that if you are using a virtualization program like VMware
for these projects, this keystroke will be different, or you can click the Ctrl+Alt+Del
icon on the virtualization program’s menu bar. Ask your instructor for specific instructions, if necessary.) Click Task Manager.
7. In Task Manager, you see the list of running programs. This list only shows programs
you started that have an open window. Click More details. Ensure that the Processes
tab is selected. You see three sections in the left pane of Task Manager: Apps, Background processes, and Windows processes. (You may have to scroll down to see Windows processes.) For each app or process, you see the percentage of CPU each is
using, and the amount of memory, disk, and network bandwidth.
8. In Task Manager, click the Performance tab (see Figure 1-16). This tab displays information
about the system resources in use, such as the CPU (processor) and memory usage. Close one
or two applications and observe the effect on the use of resources. Close Task Manager.
9. Close the remaining open windows, and then log off or shut down your Windows 10
computer.
Figure 1-16 Windows Task Manager: Performance tab
Copyright 2017 Cengage Learning. All Rights Reserved. May not be copied, scanned, or duplicated, in whole or in part. WCN 02-200-203
Hands-On Projects
47
Project 1-5: Explore the Fedora Linux Interface
In this project, you briefly explore the Fedora 23 desktop and view some of
the common tools available in Fedora 23. While you can use other versions
of Linux, Fedora 23 is suggested for these projects because they are written
with that distribution in mind. Note that Fedora 23 comes with the GNOME
desktop by default.
1. Start your Linux computer and log on.
2. Notice the bar at the top of the desktop. This is the top panel, which contains the
Activities menu, a digital clock, and a place to access settings for the network, control
the sound volume, and log on and off from the system. Click Activities to access common tasks.
3. In the Activities Overview window (see Figure 1-17), you have access to common
applications such as a Web browser, e-mail client, image browser, and file browser.
Click the Show Applications icon (it looks like a square grid of white dots) at the
bottom of the screen to see more tasks and apps.
Figure 1-17 Fedora 23 with the GNOME desktop and Activities Overview window
Source: Fedora 23 (Linux)
4. Click Settings to see a list of settings tools. Click Details near the bottom of the All Settings window (see Figure 1-18). The Overview window displays basic information
about the system hardware as well as the GNOME version. Close the Details window.
Copyright 2017 Cengage Learning. All Rights Reserved. May not be copied, scanned, or duplicated, in whole or in part. WCN 02-200-203
1
48
Chapter 1 Operating Systems Fundamentals
Figure 1-18 The All Settings window in Linux
Source: Fedora 23 (Linux)
5. Click Activities and click the Show Applications icon. Click Utilities to see a list of utilities that come with Fedora, including a calculator, disk management utilities, and system monitoring.
6. Click Terminal to open the terminal application, which provides a command-line interface to Linux, much like the command prompt in Windows. In the terminal window,
type uname –a to see detailed version information for the Linux OS and the kernel.
7. Type man ls and press Enter. The resulting display provides documentation about the
ls command that is used to list files. (The man command is used to access the Linux
online help.)
8. Press the Spacebar to page through the manual information for the ls command. Keep
pressing the Spacebar until you reach the end of the documentation. Press q to exit the
manual documentation.
9. Type ls -la and press Enter to view information about files.
10. Click the X in the upper-right corner of the terminal window to close it and return to
the desktop.
11. On the far right side of the top panel, click the power icon. A small panel opens. Here you
can adjust the sound volume, manage network connections, view information about the
current user, log off the system, and shut down or lock the system, among other things.
On the lower-right side of the open panel, click the power icon. You are informed that the
system will power off in 60 seconds. Click Cancel if you are continuing to the next project.
Copyright 2017 Cengage Learning. All Rights Reserved. May not be copied, scanned, or duplicated, in whole or in part. WCN 02-200-203
Hands-On Projects
49
Project 1-6: View Device Drivers in Linux
In this project, you list the contents of a particular driver file in Fedora Linux,
but the same procedures apply to many versions of UNIX/Linux. In this example, the sda file contains driver information pertaining to hard drives.
1. Start your Fedora Linux system and log on, if necessary. In the panel at the top of
the desktop, click Activities, click Show Applications, click Utilities, and then click
Terminal. (Remember these steps to open a Linux terminal window, as you will be
doing so frequently throughout the book. Later instructions simply tell you to open a
terminal window.)
2. Type ls -l /dev and press Enter to display the contents of the /dev directory, which contains the Linux device drivers.
3. To see information about the hard disk driver, type ls –l /dev/sda and press Enter.
Notice in the output the word disk, which indicates the driver is for a disk device.
Device drivers will be discussed in more detail in Chapter 6, “Configuring Input and
Output Devices.”
4. Type exit and press Enter to close the terminal window, or close the window by clicking the X in the upper-right corner.
Project 1-7: Explore the Mac OS Interface
This project enables you to briefly explore the Mac OS X El Capitan desktop.
Depending on the setup of your Mac OS X system, you may or may not need
an account and password to access the operating system.
1. Boot the Mac OS X system. If you need to provide logon information, enter your name
and password and press Enter or Return. (If you are using a Mac keyboard, the key is
labeled Return. On PCs, the key is labeled Enter. Throughout this book, the term Enter
will be used, but just substitute Return if you are using a Mac keyboard.)
2. Notice the menu options in the menu bar at the top of the screen and record them (see
Figure 1-19).
3. Next, observe the bar that appears at the bottom of the screen (by default on most systems). This is called the Dock.
4. Point to each icon in the Dock to see what it does and record some of the icon names.
(Note that the contents of the Dock can be customized, so different systems may have
different icons.)
5. Click the Go menu at the top of the desktop. From here, you can explore files, view the
network, access the iCloud drive, and open applications and utilities.
6. Click an open area of the desktop to close the Go menu.
7. Click the Apple icon at the far left side of the menu bar. Click About This Mac to see
information about the system. Explore each of the six tabs in the About This Mac
Copyright 2017 Cengage Learning. All Rights Reserved. May not be copied, scanned, or duplicated, in whole or in part. WCN 02-200-203
1
50
Chapter 1 Operating Systems Fundamentals
window (see Figure 1-19). Close the About This Mac window by clicking the red X at
the top of the window.
Figure 1-19 Mac OS X El Capitan desktop and About This Mac window
Source: Mac OS X El Capitan
8. Click Help on the menu bar at the top of the desktop. Click Mac Help.
9. Type Using USB devices in the Spotlight search box, which includes a magnifying glass
icon. Press Enter and notice the range of topics from which to choose.
10. Close the Mac Help window by clicking the red button on the upper-left side of the
window. An X appears in the button when you point to it.
11. Click Go in the menu bar at the top of the screen. Click Utilities.
12. Double-click Terminal. Use the scroll bar, if necessary, to find the Terminal icon.
13. Type man ls and press Enter to view documentation about the ls command.
14. Press the Spacebar to page through the documentation.
15. Press q to exit the documentation and return to the command prompt in the terminal
window.
16. Type ls -la and press Enter to see a listing of files similar to those you saw with Fedora.
17. Click the Terminal menu at the top of the desktop and click Quit Terminal.
18. Close the Utilities window. Stay logged on to your Mac OS X computer if you are continuing to the next project.
Copyright 2017 Cengage Learning. All Rights Reserved. May not be copied, scanned, or duplicated, in whole or in part. WCN 02-200-203
Critical Thinking
51
Project 1-8: Examine Multitasking in Mac OS X
Mac OS X is another example of a multitasking operating system in which
you can run several applications at the same time. This project enables you to
start three applications in Mac OS X to demonstrate multitasking.
1. Start your Mac OS X computer and log on, if necessary. Double-click Macintosh HD
on the desktop.
2. Double-click the Applications folder.
3. Double-click TextEdit. Notice that TextEdit is added to the Dock when you start the
program.
4. Click the Applications window to bring it to the front, and then double-click Calculator. Calculator is added to the Dock.
5. Click the Applications window and double-click Safari. Note that you can also start
Safari from its icon in the Dock.
6. Click the Applications window to activate it. Note that Go is displayed as an option in
the menu bar at the top of the screen. Next, click Go in the menu bar and click
Utilities.
7. Double-click Activity Monitor in the Utilities window.
8. Make sure that CPU is selected at the top of the Activity Monitor window. Click the
% CPU column heading to sort programs by activity. Notice the changes (or lack of
them) in CPU activity as you close windows in the following steps. (If necessary, move
or maximize the Activity Monitor window so it is not obscured by other windows as
they are clicked.)
9. Click the Utilities window and close it.
10. Click the Calculator on the desktop or its icon in the Dock to bring it to the front.
Click Calculator in the menu bar at the top of the desktop and click Quit Calculator.
You can also click the red X on the upper-left side of the application’s window.
11. Close TextEdit and Safari. Note any changes in Activity Monitor.
12. Close Activity Monitor.
13. Notice that the icons from the applications you just closed are removed from the Dock
(except Safari, which is always on the Dock).
14. Shut down or log off your Mac OS X computer.
Critical Thinking
The following activities give you critical thinking challenges. Challenge Labs give you an
opportunity to use the skills you have learned to perform a task without step-by-step instructions. Case Projects present a practical problem for which you supply a written solution. Not
Copyright 2017 Cengage Learning. All Rights Reserved. May not be copied, scanned, or duplicated, in whole or in part. WCN 02-200-203
1
52
Chapter 1 Operating Systems Fundamentals
all chapters contain Challenge Labs. There is not always a specific right or wrong answer to
these critical thinking exercises. They are intended to encourage you to review the chapter
material and delve deeper into the topics you have learned.
Case Projects
Case Project 1-1: Basic Operating System Functions
The Lawson City and County Planning Department has recently received a
new budget allocation to purchase new desktop and server systems. Because
the budget has been strapped for many years, the department hasn’t been
able to upgrade its systems. Most of the desktop computers are running Windows XP or Windows 7. The server systems are Windows Server 2003 and
Windows Server 2008. The department has network and Internet connectivity
through a combination of older wired and wireless technologies.
Before they begin making decisions, the planning office managers ask you to
make a presentation to cover the basics of operating systems. They ask you
to begin the presentation by explaining basic functions that operating systems
perform. Create a presentation and give it to the class or your instructor. Consider using diagrams or slides.
Case Project 1-2: Device Drivers
This is a follow-on case project to Case Project 1-1.
One of the managers has heard that current device drivers are important to
consider when choosing an operating system. Improve your presentation by
including an explanation of device drivers and why they are important.
Case Project 1-3: Choose a New Server
This is a follow-on case project to Case Project 1-1.
High on the list of needs is implementing a new server. A small committee of
planning department employees has been formed to look at options for a
server operating system. What options should they consider, which do you
recommend, and why do you recommend them? Write a short memo for your
instructor.
Case Project 1-4: Choose New Desktop Systems
This is a follow-on case project to Case Project 1-1.
What desktop operating systems might be used to replace the Windows XP and
Windows 7 computers? What operating system capabilities should the planning
department look for when replacing these computers? Also, how might system
costs affect the decision? Write a short memo for your instructor.
Copyright 2017 Cengage Learning. All Rights Reserved. May not be copied, scanned, or duplicated, in whole or in part. WCN 02-200-203
Case Projects
53
Case Project 1-5: A Problem with a Newly Released
Operating System
While the planning department is researching computer options, a computer
support person comes across an article in a computer magazine about a
newly released operating system that is experiencing frequent memory and
CPU problems, such as slow or no response when accessing disk drives or
displaying characters on the monitor. What might be the cause of these
problems? Write a short memo for your instructor.
Copyright 2017 Cengage Learning. All Rights Reserved. May not be copied, scanned, or duplicated, in whole or in part. WCN 02-200-203
1
Copyright 2017 Cengage Learning. All Rights Reserved. May not be copied, scanned, or duplicated, in whole or in part. WCN 02-200-203
chapter
2
Popular Operating Systems
After reading this chapter and completing the
exercises, you will be able to:
●
●
●
●
Describe early Microsoft operating systems and their characteristics
Identify the features of modern Microsoft operating systems
Identify the features and characteristics of UNIX and UNIX-like
operating systems
Identify the features and characteristics of Mac OS and Mac OS X
Copyright 2017 Cengage Learning. All Rights Reserved. May not be copied, scanned, or duplicated, in whole or in part. WCN 02-200-203
55
56
Chapter 2 Popular Operating Systems
This chapter examines the features of the most popular operating systems as well
as their general characteristics, strengths, and weaknesses. Chapter 1 provided a brief historical survey of operating systems. This chapter takes a closer look at early Microsoft
operating systems that laid the groundwork for current desktop and server operating
systems. You will then focus on these more recent operating systems, which include
Windows 7 and later versions, Windows Server 2012 and later versions, as well as
UNIX/Linux and Mac OS X El Capitan. This overview will provide the background you need
to choose the operating system that is best suited for a particular work or home environment, and
to determine which operating system to use when new computers are installed or existing computers are upgraded. Likewise, you will be able to identify situations in which the wrong operating
system is used.
System hardware requirements for the current operating systems discussed
in this book are listed in Chapter 5.
Early Microsoft Operating Systems
Earlier operating systems were very primitive compared to those available today. They laid the
groundwork for the look and feel, features, and characteristics of current operating systems.
This section describes some early Microsoft operating systems and shows the progression
from these systems to more modern ones.
MS-DOS and PC DOS
Microsoft’s original operating system for the IBM PC hardware platform was called
MS-DOS, or more simply, DOS. The version of MS-DOS that ran on early IBM computers
was called PC DOS because it was customized and marketed by IBM. Most programs operating under DOS used a simple text-based, command-line user interface similar to what you
see when you open a command prompt on a modern Windows computer. Both versions
could only access up to 640 KB of memory.
Windows 3.x
Microsoft released the first version of Windows in 1984, implementing a graphical user interface (GUI) to compete with the Apple Macintosh. This early version of Windows was quite
slow and not well accepted. Windows 3.1 in the early 1990s was the first popular, usable
Microsoft GUI, and it paved the way for Windows to become the dominant PC operating
system (see Figure 2-1).
Copyright 2017 Cengage Learning. All Rights Reserved. May not be copied, scanned, or duplicated, in whole or in part. WCN 02-200-203
Early Microsoft Operating Systems
57
2
Figure 2-1 The Windows 3.x GUI
Windows 95
As the PC platform became more powerful and the Pentium architecture became more common, Microsoft created a true 32-bit operating system that could use the functionality of the
new 32-bit computer architecture. Windows 95 eliminated the 640 KB memory limit and the
16-bit code. By being able to use more computer resources, Windows 95 could introduce
several advanced functions that have now become standard Windows features:
•
The Windows desktop
•
Plug and Play
•
ActiveX and the Component Object Model (COM)
•
The registry
•
Multitasking
•
Enhanced network and Internet capabilities
The Windows Desktop Windows 95 introduced a new GUI, now called the desktop
(see Figure 2-2), which became the foundation for the GUI used in all later versions of
Windows. The Windows 95 GUI introduced the Start button that provides direct access to
system utilities and application programs. Other desktop features included the taskbar at
the bottom of the screen, which contains icons that represent currently running programs
and other information about the system’s operation, and shortcut and program icons to
seamlessly run programs, manipulate files, and access network connections from one place.
Copyright 2017 Cengage Learning. All Rights Reserved. May not be copied, scanned, or duplicated, in whole or in part. WCN 02-200-203
58
Chapter 2 Popular Operating Systems
Figure 2-2 The Windows 95 desktop shortcuts, Start button, and taskbar
Plug and Play Plug and Play (PnP) was possibly the most exciting hardware feature
introduced in Windows 95 and continued in later versions of Windows (except Windows
NT). PnP enables the operating system to automatically detect newly installed hardware.
Before PnP, devices had to be configured using hardware in the form of little switches or
jumpers on the expansion card or motherboard. This manual configuration was fraught
with difficulties due to resource conflicts and the risk of incorrect switch or jumper settings.
PnP put the configuration of devices in the hands of software, which is not a perfect solution, but it is considerably better than manual configuration.
ActiveX and the Component Object Model (COM) Much of the easy manipulation of the user interface in Windows 95 was made possible by a Microsoft technology
called ActiveX. ActiveX, along with its parent, the Component Object Model (COM), is
a standardized way for objects to communicate with each other. These objects include
programs, files, computers, printers, control panels, windows, and icons.
The Registry Windows 95 also introduced a new way of storing and managing operating system information. Up to this point, such information was kept in files in various locations on the hard disk. The new concept was called the registry, a database that stores
operating system information, information about hardware and software configuration, and
Copyright 2017 Cengage Learning. All Rights Reserved. May not be copied, scanned, or duplicated, in whole or in part. WCN 02-200-203
Early Microsoft Operating Systems
59
general information that is shared by parts of the operating system or application programs
to make COM and ActiveX work. You explore the registry in Hands-On Project 2-2.
The registry is a hierarchical database that provides the following information:
•
Operating system configuration
•
Service and device driver information and configuration
•
Software and application parameters
•
Hardware configuration
•
Performance information
•
Desktop configuration
Multitasking Multitasking in Windows 95 was cooperative for 16-bit applications, but
preemptive for 32-bit applications. Windows 95 introduced a task supervisor, which detects
tasks that appear stuck, and presents the option to close hung tasks without having to
restart the operating system. A hung task occurs when an application no longer responds
to keyboard or mouse input. In earlier versions of Windows, and sometimes even with
Windows 95 and later, a hung task could hang the entire OS, requiring a restart and reboot
of the computer. Starting with Windows 95 and preemptive multitasking, a hung task did
not hang the entire system and only the problematic task had to be restarted.
Enhanced Network and Internet Capabilities The networking functionality in
Windows 95 was substantially extended from earlier versions of Windows. Unlike earlier
versions of Windows, in Windows 95 the network drivers were part of the Windows operating system. In all but the early versions of Windows 95, all the networking code was written
as a 32-bit application. This resulted in a significant boost in network performance. When
Windows 95 was released, Microsoft did not support Internet connectivity, but by 1997,
Microsoft integrated Internet access through its Web browser, Internet Explorer, and the
ability to share computer resources over the Internet into its operating systems.
Windows 98/Me
Windows 98 and its slightly newer sibling, Windows Millennium Edition (Me), were similar
to Windows 95 in many ways. They ran on similar computers and provided roughly the
same capabilities. Windows Me included all Windows 98 features but expanded multimedia
and networking capabilities.
Windows 98 The Windows 98 user interface differed slightly from Windows 95, with
little changing of the desktop’s appearance except for the ability of Windows 98 to view
items on the desktop as a Web page, a feature called Active Desktop.
Some of the additional changes from Windows 95 to Windows 98 included:
•
Expanded PnP support
•
Automatic registry checks and repairs
•
Advanced power management features
Copyright 2017 Cengage Learning. All Rights Reserved. May not be copied, scanned, or duplicated, in whole or in part. WCN 02-200-203
2
60
Chapter 2 Popular Operating Systems
•
Support for new hardware standards such as Universal Serial Bus (USB)
•
Improved cooperative multitasking for 16-bit applications
•
Greater integration of Internet and networking features
•
Extended multimedia support
•
Expanded support for high-speed networking
•
Ability to perform upgrades over the Internet
Windows 98 also supported newer hardware standards, such as Universal Serial Bus (USB)
1.0, a relatively high-speed (at the time) input/output (I/O) port, and updated standards for
multimedia, data storage, and networking.
USB is a bus standard that enables you to attach all types of devices—
keyboards, cameras, pointing devices, telephones, tape drives, and flash
memory, for example—to
—to one bus port on a computer. Up to 127 devices
—
can be attached to one port, and it is not necessary to power off the
computer when you attach a device. USB was developed to replace the
traditional serial and parallel bus technologies on computers.
Windows Millennium Edition (Me) Windows Millennium Edition (Me) was developed for home computer users, not office or professional users, and it implemented applications that appealed to home users more than Windows 95 or 98. These applications
included playing music, storing family photos, playing games, and accessing the Internet.
Windows Me offered better support for infrared devices, such as Infrared Data Association
(IrDA) support, and implemented the enhanced PnP standard, called Universal Plug and
Play (UPnP). UPnP is a set of protocols that allows network devices to be automatically discovered and configured by network client computers. While Windows Me brought a number of enhancements to the Windows OS, its hardware support and reliability problems
hampered its success in the marketplace. Customers opted to stay with Windows 98 until
Windows XP came out in late 2001.
Windows NT
While Microsoft was developing the Windows line of operating systems to run on the lower
end of IBM PC hardware, it also developed a high-end operating system intended for powerful workstations and servers. This OS was called Windows New Technology, or Windows
NT. Over the course of its development, Windows NT supported the IBM PC architecture,
the Alpha architecture, and for a while, the PowerPC architecture, as each of these hardware
platforms gained its time in the industry spotlight. The idea was to make an operating system
that could be used on some very powerful computers. One very significant difference between
Windows 95/98 (often referred to as Windows 9x) and Windows NT was that the operating
system kernel in Windows NT ran in privileged mode, which protected it from problems created by a malfunctioning program or process. Privileged mode gives the operating system an
extra level of security from intruders, and prevents system crashes due to out-of-control
applications.
Copyright 2017 Cengage Learning. All Rights Reserved. May not be copied, scanned, or duplicated, in whole or in part. WCN 02-200-203
Early Microsoft Operating Systems
61
Windows NT 4.0 was the first widely successful version of Windows NT.
It was released at about the same time as Windows 95 and sported the
new Windows 95 look.
2
Windows NT was offered in two versions: Windows NT Workstation and Windows NT
Server. Windows NT Workstation was the operating system for users who needed a highend, stable, and secure graphical operating system. Windows NT Server was designed as a
multiuser server operating system for access over a network. For all the changes inside the
operating system, however, Windows NT looked remarkably like Windows 9x on the outside. Users could easily move from the Windows desktop OS (Windows 9x) to Windows
NT because of the familiar user interface.
Networking Support Windows NT supported network connectivity protocols that
were compatible with IBM mainframes, UNIX computers, Macintosh computers, Novell
NetWare servers, all Windows-based computers, and others. It also supported high-speed
networking connectivity and remote access over telephone lines or the Internet.
Security Security was a significant feature of Windows NT. The operating system
required the user to log on and be authenticated by submitting a username and password
to gain access to the computer. Windows NT 4.0 Server had a C2 top-secret security rating
from the United States government. The C2 rating means that the Windows NT Server
network operating system provided security at many levels, including the following:
•
File and folder protection
•
User accounts and passwords
•
File, folder, and account auditing
•
File server access protection on a network
•
File server management controls
The domain was an integral part of the Windows NT security model. In every Windows NT
domain, there was one Primary Domain Controller (PDC). The PDC computer was responsible for keeping all usernames and passwords for all users who wanted to contact the
domain. Any other server that was part of the domain could request password and permission information from the PDC. This allowed a user to sign on to the domain once and gain
access to any server that was a member of the domain, a feature called single sign-on. In
addition to user and password information, the PDC could also contain system policies,
which provided general information on what users were allowed to do on certain computers
on the network, down to what function and features of the user interface should be enabled.
Windows 2000
Built on the Windows NT technology, Microsoft Windows 2000 was a more robust operating system. The operating system represented a significant rewrite of the Windows NT kernel,
and ran about 30 percent faster than Windows NT. Also, like its Windows NT predecessor,
Windows 2000 used preemptive multitasking and multithreading, and the kernel ran in privileged mode.
Copyright 2017 Cengage Learning. All Rights Reserved. May not be copied, scanned, or duplicated, in whole or in part. WCN 02-200-203
62
Chapter 2 Popular Operating Systems
Windows 2000 had more advanced networking support than Windows NT and supported
new networking technologies, such as virtual private networks (VPNs). A VPN is a private
network that is like an encrypted tunnel through a larger network—such as the Internet, an
enterprise network, or both—and is restricted only to designated member clients. With a
VPN, you can securely access network resources on a private home or company network
from anywhere you have Internet access.
People who have experience troubleshooting problems with mismatched drivers, or who have
overwritten portions of the operating system in previous versions of Windows, appreciated
the built-in protection of the core operating system files and driver-signing features of
Windows 2000. Windows 2000 kept a copy of operating system files in a safe place, so if a
critical file was overwritten or deleted, the operating system automatically replaced it. Driver
signing means that you can set up all drivers so they cannot be inadvertently overwritten by
earlier driver versions, and only certified versions of drivers can be installed.
New features in Windows 2000 included:
•
Active Directory—Active Directory is a database used to store information about
resources such as user accounts, computers, and printers; it groups resources at different levels (hierarchies) for local and universal management. These groupings are called
containers because they are like storage bins that can hold network resources and other
bins at lower levels. Active Directory also provides a centralized means to quickly find
a specific resource through indexing. Active Directory was only available on the server
version of Windows 2000.
•
Distributed network architecture—Windows
—Windows 2000 offered new ways to distribute
—
network and management resources to match the needs of most types of networks.
In Windows 2000 Server, multiple servers could be designated as domain controllers, each containing a copy of Active Directory and able to verify a user who
wanted to log on to the network. This was an important change from Windows NT
Server 4.0, in which one server, the PDC, maintained the master copy of account
and security information; and one or more servers, called backup domain controllers (BDC), kept copies of this information as a backup. On Windows 2000 Server,
each computer that had Active Directory installed was referred to as a Domain
Controller (DC).
•
Kerberos security—Kerberos is a security system and authentication protocol that
authenticates users and grants or denies access to network resources based on a user’s
log-on name and password. The primary goal of Kerberos is to prevent unauthorized
users from accessing computer and network resources. Kerberos works through a special communications protocol that enables a client to initiate contact with a server and
request secure communication. The server responds by providing an encryption key
that is unique to that communication session, and it does so by using a protected communication called a ticket. Windows 2000 Server and Professional and all successive
versions of Windows support Kerberos.
•
IntelliMirror—IntelliMirror was a concept built into Windows 2000. It was intended to
enable Windows 2000 clients to access the same desktop settings, applications, and
data from wherever they accessed the network, even if they were not on the network.
IntelliMirror also used information in Active Directory to ensure that consistent
Copyright 2017 Cengage Learning. All Rights Reserved. May not be copied, scanned, or duplicated, in whole or in part. WCN 02-200-203
Early Microsoft Operating Systems
63
security and group policies applied to the client, and that the client’s software was
upgraded or removed on the basis of a central management scheme.
•
International language compatibility—Windows
—Windows 2000 supported more languages and
—
language capabilities than previous versions of Windows, and included Hindi, Chinese,
and multiple versions of English. This feature was important because servers are used
all over the world.
Windows 2000 Server and Windows 2000 Professional
Microsoft offered versions of Windows 2000 designed for server and workstation implementations. The basic server version was called Windows 2000 Server, and Windows 2000
Professional was designed for workstations. When it introduced Windows 2000, Microsoft’s
overall goal was to combine Windows 2000 Server and Windows 2000 Professional on a
server-based network to achieve a lower total cost of ownership (TCO). The TCO is the
total cost of owning a network, including hardware, software, training, maintenance, and
user support costs. Windows 2000 Professional was intended as a reliable, easy-to-configure,
workstation operating system to be used in a business or professional environment. Recognizing that professionals are highly mobile, Windows 2000 Professional was designed to
work equally well on a desktop computer or a notebook computer. Windows 2000 Server
was intended to play a key management role on the network by administering Active
Directory and a multitude of network services. By combining Windows 2000 Professional
workstations and Windows 2000 Server on the same network, along with Active Directory,
it was possible to centralize software updates and workstation configuration via a server.
Windows 2000 Server supported up to four processors, while Windows 2000 Professional
supported up to two. Windows 2000 Server also offered more services and user connectivity
options that are appropriate for a server instead of a workstation. These services included the
following:
•
The capability to handle virtually unlimited numbers of users simultaneously (depending on the hardware platform; Windows 2000 Professional is designed for up to 10
simultaneous users only)
•
Active Directory management
•
Network management
•
Web-based management services
•
Network-wide security management
•
Network storage management
•
Remote network access, network-wide communications services, and high-speed
network connectivity
•
Application services management
•
Network printer management through Active Directory
Windows 2000 Server, Advanced Server, and Datacenter Server
Windows 2000 Server was divided into three different products to match the network application: Windows 2000 Server, Windows 2000 Advanced Server, and Windows 2000
Copyright 2017 Cengage Learning. All Rights Reserved. May not be copied, scanned, or duplicated, in whole or in part. WCN 02-200-203
2
64
Chapter 2 Popular Operating Systems
Datacenter Server. Windows 2000 Server provided a comprehensive set of server and Web
services for up to four processor systems, and supported up to 4 GB of RAM. Windows
2000 Advanced Server was intended for high-end enterprise networks that require up to
eight processor servers, clustered servers, or both. Clustering is a technique in which two or
more servers are linked to equally share the server processor load, server storage, and other
server resources (see Figure 2-3). Windows 2000 Advanced Server also had the ability to
handle up to 8 GB of RAM. Windows 2000 Datacenter Server was targeted for large
database and data manipulation services. The Datacenter version supported 64 GB of RAM,
clustering, and individual servers with up to 32 processors.
Clustered
servers acting
as one
Windows 2000 Server
Workstation
Windows 2000 Server
Connecting hub
Windows 2000 Server
Workstation
Workstation
Workstation
Workstation
Figure 2-3 Server clustering
Microsoft discontinued support for all versions of Windows 2000 Server
in 2010.
Copyright 2017 Cengage Learning. All Rights Reserved. May not be copied, scanned, or duplicated, in whole or in part. WCN 02-200-203
Early Microsoft Operating Systems
65
Windows XP and Windows Server 2003
Windows 2000 evolved into two products, both containing the core elements of the
Windows 2000 kernel: Windows XP and Windows Server 2003. Windows XP was the desktop version of the operating system, while Windows Server 2003 was the server version. Both
of these operating systems offered a refreshed desktop GUI, with changes apparent in the
two-column Start menu, as shown in Figure 2-4.
Figure 2-4 The Windows XP desktop and Start menu
In addition to the new GUI, Windows XP and Windows Server 2003 offered more capabilities
for keeping photo albums, playing music, running video and audio files, playing games, and
using other multimedia applications. Windows XP and Windows Server 2003 also offered
better Internet security through a built-in firewall and the ability to remotely control the
computer over an Internet connection via a tool called Remote Desktop. Remote Desktop is
designed to be secure; the computer being controlled must first grant access. Another feature
introduced with Windows XP was that you had to activate it after installation. The OS could
be activated automatically online or by calling Microsoft with the activation key that came
with the system. The activation code is linked to a particular computer on which the operating
system resides. System activation is a mechanism to help ensure that software is not pirated.
Windows XP came in several versions, including Windows XP Home, Windows XP Professional, Windows XP Tablet PC, Windows XP Media Center, and Windows XP 64-Bit.
Copyright 2017 Cengage Learning. All Rights Reserved. May not be copied, scanned, or duplicated, in whole or in part. WCN 02-200-203
2
66
Chapter 2 Popular Operating Systems
Windows XP Home and Professional Editions Windows XP, which stands for
“Windows Experience,” originally came in two versions: Windows XP Professional and
Windows XP Home Edition. Windows XP Professional was intended for office and professional use. This version of Windows XP had the ability to create accounts for different
users who might use the operating system. Windows XP Professional, like Windows 2000
Professional, could be used as a small server for up to 10 users. Windows XP Home Edition
was meant to be the next upgrade from Windows 9x/Me, and was a scaled-down version of
Windows XP Professional. For example, user accounts could not be created in Windows XP
Home Edition. Another difference was that Windows XP Professional could run on
computers using up to two processors and on 64-bit Itanium computers, whereas Windows
XP Home Edition ran only on 32-bit single-processor computers.
Windows XP contained many other new features, including the ability to configure themes for
the desktop, a better help system, and plenty of troubleshooting tools. And, while the kernel for
Windows XP was vastly different from that of Windows 9x, you could still run many programs
written for Windows 9x using the Windows XP Program Compatibility Wizard. These features
and more made Windows XP a mainstay in homes and businesses for years to come. Windows
XP lasted as the Windows flagship OS from 2001 to 2007, when Windows Vista was introduced. Even then, people were not eager to give up Windows XP, and it remains today in
many homes and businesses even though Microsoft ended support for it in April 2014.
Windows Server 2003/R2
Windows Server 2003 came in four versions, which were similar to the versions that were
available for Windows 2000 Server: Standard Edition, Enterprise Edition, Datacenter
Edition, and Web Edition. An upgrade from Windows 2000, Windows Server 2003 contained new features, including:
•
The GUI interface used with Windows XP
•
Improvements for faster network logon authentication through Active Directory
•
Several hundred new group policies that can be set to manage user workstations via
Active Directory
•
New tools for managing server resources
•
Ability to run on 64-bit Itanium processors
•
Remote server management through the Remote Desktop tool
•
Enhanced ability for users to run programs on the server, through Microsoft Terminal
Services
•
Runtime code for the Windows .NET development environment to run applications
through the Internet on all types of devices
Microsoft listened to the demands for tighter security in their operating systems. With
Windows Server 2003, they took a step in that direction. After the initial installation, most
Windows server features had to be set up manually, which was a change from previous versions of the operating system, where many functions were set up by default. In Windows
Server 2003, you set up only the functions you wanted to use. (Operating system installation
is covered in Chapter 5.)
Copyright 2017 Cengage Learning. All Rights Reserved. May not be copied, scanned, or duplicated, in whole or in part. WCN 02-200-203
Early Microsoft Operating Systems
67
Windows Server 2003 Release 2 (R2) was an interim version of Windows Server. It upgraded
Windows Server 2003 with many new features that were then incorporated into Windows
Server 2008 and beyond. Some of the Windows Server 2003 R2 enhancements included a
new version of the Microsoft Management Console (MMC), faster code execution (depending on the server hardware), a new Print Management Console, strong integration with
.NET Framework, and improved security. Organizations that used Active Directory, Distributed
File System (DFS), clustered servers, and group policies found valuable new features for managing their enterprise networks. Microsoft continued to emphasize improvements in security for all
of its operating systems, and Windows Server 2003 R2 was no exception. From the security
standpoint, the R2 version came with a new Windows Firewall, first introduced in Windows
XP Service Pack 2. The R2 version also integrated new security patches into the operating
system code, and added a new feature, called Post-Setup Security Updates, to guide server
managers through new configuration activities related to patches and updates.
Windows Server 2003 R2 offered many new features that organizations wanted for even
more reliable, heavy-duty, and uninterrupted computing. Some of these features are summarized here:
•
Better performance
•
Improved group policy management
•
MMC 3.0 and the Print Management Console
•
New server clustering capabilities
•
Virtual server options
•
Dynamic Systems Initiative
•
Better identity and access management
•
Better options for branch office servers
•
DFS enhancements
•
Subsystem for UNIX-based applications
•
Improved storage management
From the Trenches …
A college had limited IT server staff who were familiar with the Windows Server 2003
operating system. With the release of Windows Server 2003 R2, they used the Print
Management Console to give access to the help desk personnel. The help desk was able
to set up, reset, check status, and customize printers on the network. All of this took
place remotely at the help desk. Customers were happy that they got immediate assistance
and did not have to wait for a technician to come to their office. The server staff were also
pleased that they did not have to make as many trips out of the office to fix problems.
Microsoft ended support of Windows Server 2003 in July 2015, and has urged companies to
move to Windows Server 2008 or Windows Server 2012.
Copyright 2017 Cengage Learning. All Rights Reserved. May not be copied, scanned, or duplicated, in whole or in part. WCN 02-200-203
2
68
Chapter 2 Popular Operating Systems
Modern Windows Operating Systems
While many Windows XP and Windows Server 2003 computers are still operating, both OSs
are now considered legacy systems. Microsoft no longer supports them or earlier Windows
versions, and users should update their computers to more recent versions to ensure better
reliability and security. Even Windows 7 and Windows Vista, which are described next, no
longer receive mainstream support from Microsoft. Extended support ends for Vista in April
2017 and in January 2020 for Windows 7.
Windows Vista/Windows 7
Microsoft Windows Vista, released in January 2007, is a workstation operating system
that followed Windows XP. Features in Windows Vista grew out of Windows XP and the
development process for Microsoft Windows Server 2008. Not long afterward, in July
2009, Windows 7 was introduced. Like Windows Me, Windows Vista was not well
received, which is why Windows 7 was introduced fairly quickly after it was apparent
that Windows Vista was struggling in the marketplace (people still loved Windows XP).
This section focuses on Windows 7, which is far more prevalent in homes and businesses
even in 2016, even though most of what is discussed applies equally to Windows Vista as
well. In addition, most features were carried forward from Windows 7 to Windows 8/8.1
and Windows 10.
Windows 7 was geared to make desktop computing more intuitive and more reliable for
users than previous versions of Windows. For example, every computer user has had trouble
finding a specific document or file they know is buried in a folder somewhere. Windows 7 is
designed to enable users to quickly find documents, files, and resources—even if they don’t
remember the exact location. This is accomplished through enhanced search facilities and
new ways to organize information.
In terms of security and reliability, Windows 7 has more built-in security features than previous versions and requires less rebooting. For instance, the Windows 7 firewall is enhanced to
monitor both incoming and outgoing communications. When used with Windows 7, Internet
Explorer has stronger security to avoid spyware and malicious software attacks. Further,
when you install a software patch to enhance security or for other reasons, there are fewer
instances that require you to reboot the computer right away, which makes your system
more reliable.
Code enhancements “under the hood” in Windows 7 make this operating system about a
third faster than Windows XP and Windows 2000. In terms of what you see on the desktop, Windows 7 provides what Microsoft calls a “unified presentation subsystem for
Windows,” which means that the windows you see are consistently designed and offer
many new features for quickly accessing information. The new desktop presentation,
called Aero (Authentic, Energetic, Reflective, and Open), also enables organizations to
more effectively manage user desktops for uniformity and to reduce common problems in
computer use. To the developer, the unified subsystem means there is a more consistent set
of application programming interfaces (APIs) for linking programs with the operating
Copyright 2017 Cengage Learning. All Rights Reserved. May not be copied, scanned, or duplicated, in whole or in part. WCN 02-200-203
Modern Windows Operating Systems
69
system. Visually, Aero can use 3D graphics accelerators to render transparent and other
visual effects called “Glass” display effects.
For most users, the reasons to upgrade to Windows 7 include greater speed, more productivity
through the use of intuitive features, uniformity of the desktop, and greater security and
reliability. These factors are particularly important to users who rely on a computer for
school, work, entertainment, and important functions in a home.
While many home users upgrade their OS for new features,
corporate IT departments often upgrade only when there is a business reason for doing so. Business reasons may include new features
that increase employee productivity, but many businesses only
upgrade because the OS is no longer supported with security and
reliability enhancements.
Windows 7 implements many new features that represent changes from earlier Windows
operating systems. A sampling of new features includes:
•
Desktop and windows interface
•
Libraries
•
Folder resource sharing options
•
Reliability features
•
Security features
•
User Account Protection
•
Management options
Each of these is explained in the following sections.
Desktop and Windows Interface When you use Windows 7, you’ll notice that, as
in Windows XP, there is a Start button on the taskbar. The taskbar can contain icons for
currently running programs or ones you can choose to run. A notification area on the
right side contains the time and other elements, such as the speaker volume. Windows 7
also has a feature called desktop gadgets (first introduced with Vista), or small applications for readily accessing information and tools, such as a clock, calendar, or weather
updates.
Desktop gadgets posed a security risk, and support for them ceased
starting with Windows 8.
The Windows 7 Search box at the bottom of the Start menu is an important feature that
enables fast searching for a specific document or file. The Search feature provides very fast
Copyright 2017 Cengage Learning. All Rights Reserved. May not be copied, scanned, or duplicated, in whole or in part. WCN 02-200-203
2
70
Chapter 2 Popular Operating Systems
searches for resources. Figure 2-5 shows the Windows 7 Start menu with the Search box at
the bottom and the desktop with a clock gadget and a CPU meter gadget running on the
right side.
Figure 2-5 The Windows 7 desktop and Start menu
As in previous Windows versions, the Windows 7 Control Panel is the place to configure your computer. Control Panel still offers the Classic view, which is comparable to
pre-Windows XP versions. You can also see Control Panel contents in the Category view
introduced in Windows XP. When you use the Category view, the presentation of information is designed to more quickly address a specific task, such as configuring a network
connection. Figure 2-6 shows a list of the Control Panel categories in Windows 7.
Copyright 2017 Cengage Learning. All Rights Reserved. May not be copied, scanned, or duplicated, in whole or in part. WCN 02-200-203
Modern Windows Operating Systems
71
2
Figure 2-6 Windows 7 Control Panel categories
Libraries A library is an innovation for organizing files from multiple locations on your
computer and the network. Libraries can be optimized based on the content of the files,
such as documents, music, pictures, and videos. A library is not really a folder in the traditional sense, such as Documents. It is a dynamic folder that houses files from one or more
different locations.
Folder Resource Sharing Options Sharing folders over a network is a powerful
tool for making information resources available to multiple network users (see Chapter 10).
In Windows 7, you have the option to configure folder sharing in one of two ways:
(1) by selecting the folder and clicking the Share with button in the Explorer window or
(2) by right-clicking the folder and clicking Share with. After you elect to share a folder,
you see the Sharing Wizard that enables you to specify which users can access the folder
(see Figure 2-7). You can choose from a list of users who have accounts on the computer
or you can use the Find button to locate other users on a network, such as those in Active
Directory. There are three permission levels:
•
Read Permissions to open and view the file
Read—
•
Read/write—Permissions to view, use, and change the file contents, and to remove the
file
•
Owner—Permissions to view, use, and change the file contents as well as change
permissions on the file
Copyright 2017 Cengage Learning. All Rights Reserved. May not be copied, scanned, or duplicated, in whole or in part. WCN 02-200-203
72
Chapter 2 Popular Operating Systems
Figure 2-7 Sharing a folder in Windows 7
As in Windows XP, a Windows 7 folder or file also has file permissions that control who
accesses the folder or file. If the file permissions deny access to a user or group, that person
or group will not have share access. File permissions are configured by right-clicking the
folder or file, clicking Properties, and clicking the Security tab.
In addition to the Sharing Wizard, users can specify the use of a file on the basis of a personal or public profile established on their computers. Files not to be shared can be saved
into a personal profile and files to be shared can be saved into a public profile.
Reliability Features Windows 7 has features for increased reliability so users experience fewer interruptions and information is kept intact. These features include the following:
•
Startup Repair Tool
Tool—Automatically launched when a boot problem is detected. It can
detect and solve driver problems, incorrect startup settings, and corrupted startup
information on the disk.
•
New code to prevent interruptions—Additional safeguards to prevent system crashes
and hangs.
•
Self-diagnosis for problems—Built-in diagnostics for common hardware problems, such
as disk or memory failures.
•
Restart Manager—Reduces the number of times you have to reboot your computer due
to installed updates or patches. Instead of rebooting the entire computer, certain processes that are updated can simply be restarted.
•
Service-failure recovery—The operating system can automatically detect when a service
has failed and attempt to restart it.
Copyright 2017 Cengage Learning. All Rights Reserved. May not be copied, scanned, or duplicated, in whole or in part. WCN 02-200-203
Modern Windows Operating Systems
73
Security Features Building a secure operating system means building in security from the
ground up. If you are a user of earlier Windows operating systems, you are probably aware of
the continual need to install security updates and patches. Because computer attackers use a
multitude of ways to invade operating systems, manufacturers have had to plug all kinds of
unanticipated holes. Today we know more about how systems are attacked and there are more
available defenses. In Windows 7 and beyond, Microsoft is working to change coding structures
at the foundation of the operating system to reduce the opportunities for attackers. Besides
locking down the code, Microsoft has implemented additional security features, including:
•
A more comprehensive firewall
•
User Account Protection
•
Built-in security software to find and eliminate malicious software
•
Status information
The Windows firewall monitors traffic going into and coming out of the computer. This capability was initially implemented in Windows XP with Service Pack 2. Another firewall element
used in Windows 7 is the ability to link it to the use of group policy settings. This means that
a server manager can set up a group policy to have consistent desktop and system settings on
that server’s clients. In an office or organization, the group policy configuration can be used to
ensure that all users have enabled the firewall and are using exactly the same security settings
within the firewall. Even if a user changes his or her firewall settings, the group policy ensures
the settings are back the next time that user logs on (or the group policy can be set to prevent
users from changing firewall settings). Having consistent firewall settings is vital for an organization, because its network is no more secure than the least secure client.
Another feature of the Windows firewall is that it is compatible with IP Security (IPsec).
IPsec is a set of secure communications standards and standards for encryption to protect
network communications between computers. IPsec is supported by Microsoft and other
server systems, such as all Windows systems since Windows 2000 Server and Linux.
User Account Protection (UAP) was introduced in Windows Vista and is intended to make user
accounts more secure. UAP enables the user account administrator to better protect accounts by
controlling permissions and by limiting the software applications that can be run from an
account. UAP protects the registry and specified folders so their contents are only available to a
specific user. If you regularly use virus checking or other system protection software, you have
probably noticed that the software often corrects changes to a computer’s registry that have been
introduced by malicious software. UAP is designed to address this important security problem.
Some users log on to their computers using an account that has Administrator permissions.
Because this type of account can make significant changes to the operating system, there is a
risk in running all applications with Administrator permissions in effect. UAP limits the permissions given to applications so that system-wide changes are not made inadvertently or
through malicious software. One downside to UAP is that some applications you could formerly run in Windows XP may not run in new versions of Windows.
In Windows 7, Microsoft has integrated programs to search for and eliminate malicious
software, including viruses, worms, and Trojan horses. If the integrated programs cannot
successfully delete specific malicious software, they may instead be able to block the effect
of the malicious software on the local computer.
Copyright 2017 Cengage Learning. All Rights Reserved. May not be copied, scanned, or duplicated, in whole or in part. WCN 02-200-203
2
74
Chapter 2 Popular Operating Systems
Windows 7 also includes what Microsoft calls Windows Service Hardening. One common
avenue for attackers is through an open service, such as through FTP. Windows Service Hardening limits the effect a service can have in Windows, so attacks are limited or thwarted.
It can be difficult for a user to determine if new security patches and other updates are implemented on a computer. Windows 7 provides status information to show whether recent patches
and updates have been installed. This is part of Microsoft’s Network Access Protection initiative
for networks using Windows client OSs (Windows Vista and later) and Windows Server OSs
(Windows Server 2008 and later). These servers have the ability to set up network access
protection that is enforced on all clients, such as maintaining security patches and updates.
Windows 7 Management Options Windows 7 and later extend the TCO initiatives of Microsoft to save on support costs incurred by users and organizations. Windows 7
comes with more group policy settings than earlier Windows versions, which means that
computers in an office, department, or organization can be standardized for easier use. For
example, if all users in the customer service department in a business use the same order
entry program, that program can be set up to start the same way on all department
computers via group policy. A customer service representative can go to any computer in
the department and access the program in a familiar way. By creating consistency in the
way computer systems are used, group policy saves on support costs.
Sometimes one computer is used by many people, such as a public computer in a coffee shop
or library. In this situation, one computer might have different group policies, depending
on who logs on. Windows 7 includes the Group Policy Management Console (GPMC).
The GPMC enables the computer’s administrator to configure different group policies for
different kinds of users.
In Windows 7 it is more difficult to change system settings and files, such as the registry,
because the system can be configured so that only an authorized installer makes these
changes—instead of users or software that do not have authorization. This system protection is accomplished through the Windows Resource Protection (WRP) feature.
For more versatile management, Windows 7 brings back the Administrative Tools menu
first introduced in Windows NT. To access the Administrative Tools menu, click Start,
click Control Panel, click System and Security, and click Administrative Tools. Some of the
Administrative Tools that are available include:
•
Computer Management
Management—Opens the Computer Management tool that provides access
to many general management functions, such as Event Viewer, Shared Folders, Task
Scheduler, Reliability and Performance, Device Manager, Disk Management, and
Services and Applications.
•
Performance Monitor
Monitor—Shows monitors for utilization of the CPU, disk, network, and
memory.
•
Task Scheduler—Permits you to set up tasks or applications to run at a certain time,
such as starting a backup at 6:00 p.m.
•
Event Viewer—Enables you to access the computer system’s logs to track activities and
errors.
Copyright 2017 Cengage Learning. All Rights Reserved. May not be copied, scanned, or duplicated, in whole or in part. WCN 02-200-203
Modern Windows Operating Systems
75
Windows Server 2008/R2
Windows Server 2008 was released by Microsoft in February 2008 and Windows Server
2008 R2 was released in October 2009. It is available in versions similar to Windows
Server 2003. Windows Server 2008 and Windows Vista share the same code base and thus
the same new features, as do Windows Server 2008 R2 and Windows 7.
Windows Server 2008 R2 is the first Windows OS not to be available in
a 32-bit version; it is only available in a 64-bit version.
Compared with its predecessors, Windows Server 2008 and Windows Server 2008 R2
include some new and enhanced features:
•
Active Directory
•
Failover clustering
•
Hyper-V
•
Self-healing NTFS
•
Server Core
•
Server Manager
Active Directory With Windows Server 2008, a read-only domain controller (RODC) was
implemented. This is great for servers in locations that do not have the desired security for a
domain controller. Hackers cannot make changes at remote locations that would then be replicated to the main domain controller at the corporate headquarters. In addition, RODCs limit
the amount of sensitive information stored on the server, such as user passwords.
Failover Clustering Failover clustering is a server OS feature in which two or more servers are tightly linked; one server is the active server and the others are considered standby
servers. The active server provides services to network clients while the standby servers monitor the availability of the active server. If the active server fails, one of the standby servers
(as determined by an algorithm) begins providing its network services. Failover clustering is
enhanced significantly in Windows Server 2008 Enterprise and Datacenter editions with the
addition of a cluster validation wizard. This wizard runs validation tests on the servers you
are going to cluster. It tests the software and hardware on each server and provides a report
on how well failover clustering will run.
Hyper-V Microsoft rolled out Hyper-V in Windows Server 2008; a stand-alone release of
Hyper-V Server is available. It allows the server to run multiple independent operating
systems at the same time on the same hardware. Hyper-V allows server administrators to
combine multiple virtual servers on one physical server.
Self-Healing NTFS In the past, if you experienced problems with NTFS volumes on a
disk, you used Chkdsk.exe to fix the problem. This meant taking down the volume to run
the utility. With self-healing NTFS, the utility runs in the background to correct hard disk
Copyright 2017 Cengage Learning. All Rights Reserved. May not be copied, scanned, or duplicated, in whole or in part. WCN 02-200-203
2
76
Chapter 2 Popular Operating Systems
problems. The availability of the file system is far greater than the previous way of using the
Chkdsk.exe utility, data is preserved as much as possible, and better reports are provided to
describe modifications made to the volume.
Server Core Microsoft describes Server Core as being “designed for use in organizations
that either have many servers, some of which need only to perform dedicated tasks but with
outstanding stability, or in environments where high security requirements require a minimal
attack surface on the server.” Server Core is a bare-bones installation with a limited GUI
that is meant to reduce hacker attacks to the operating system. It is ideal for branch offices,
remote locations, and office servers.
Server Manager Server Manager combines and replaces the Manage Your Server,
Configure Your Server, and Security Configuration Wizards found in Windows Server 2003.
It centralizes these features and provides one location to set up, deploy, and manage servers,
add server roles, and check the status of servers. Figure 2-8 shows the Server Manager.
Figure 2-8 Windows Server 2008 Server Manager
Windows Server 2008/R2 supports up to 64 physical processors in a system and up to
64 TB of RAM. Windows Server 2008/R2 is available in Datacenter Edition, Enterprise
Edition, Standard Edition, and Web Server Edition. The Web Server edition does not support Windows Hyper-V and cannot be configured as a domain controller.
Copyright 2017 Cengage Learning. All Rights Reserved. May not be copied, scanned, or duplicated, in whole or in part. WCN 02-200-203
Modern Windows Operating Systems
77
Some of the new, updated, and enhanced features found in Windows Server 2008 R2
include:
•
Integration with Windows 7
•
File services management
•
Scalability
•
Reliability
•
Virtualization
•
Web platform updates
Integration with Windows 7 The features described here are only available to
Windows 7 client computers attached to Windows Server 2008 R2 systems. Mobile connectivity
is becoming more important as organizations are finding ways to do more with fewer resources.
As discussed under Windows 2000, a popular way to remotely connect to the corporate servers
is via a VPN. Users will most likely need to install a VPN client on their mobile device and then
establish a connection. This can be time-consuming and difficult. Many times, it requires the
assistance of the company help desk or even the server administrator.
Microsoft introduced DirectAccess to provide the functionality of a VPN without the hassles
of setting one up and then initiating it each time you want access to the remote network.
The remote computer is automatically authenticated before the user logs on. Thus, when
the user logs on, the process is very fast and requires very little effort. This allows Windows
Server 2008 R2 to manage the Windows 7 client without waiting for the client to log on.
DirectAccess uses IPsec encryption over the Internet to protect the organization’s data.
Organizations are turning more to centralized applications on the corporate server. This
reduces the costs of remote and branch IT groups. It also puts a greater burden on the
connections between the branch group and organization headquarters. On one hand,
centralized applications save money, but on the other, there is the additional cost of increased
bandwidth. The BranchCache feature allows the remote network to cache frequently accessed
applications and information at the branch office, greatly reducing the traffic over the
network link.
File Services Management With the price of server storage declining and the centralization of data in storage area networks (SANs), the management and security of this data
is becoming increasingly important. A SAN is a fast network that contains components
that can be shared for storage and access to the storage. Windows File Classification
Infrastructure (FCI) provides the information you need to manage the data. It automates
the classification of data based on predefined categories, including what is contained in the
data. If the data contains sensitive information, FCI may move this information to a more
secure server and even encrypt it.
Scalability Windows Server 2008 R2 includes components to help reduce the number of
physical servers. This reduces the organization’s costs for servers, administrators, physical
space, and power consumption. Windows Server 2008 R2 supports up to 256 logical
processors along with Hyper-V, which supports up to 64 logical processors.
Copyright 2017 Cengage Learning. All Rights Reserved. May not be copied, scanned, or duplicated, in whole or in part. WCN 02-200-203
2
78
Chapter 2 Popular Operating Systems
Reliability Windows Hardware Error Architecture (WHEA) now supports memory and
cache error recovery. This is done without the application or the operating system being
aware of the process. Windows Server 2008 R2 also supports “hot add” capabilities for
memory, processors, and I/O resources. A server administrator can add memory, processors,
and I/O resources to a server when the need arises without taking the server down, reconfiguring it, and then rebooting it. In today’s 24/7 world of operations, reliability and uptime
are critical to the success of the organization. This is accomplished through Dynamic
Hardware Partitioning.
Virtualization Modern data centers rely heavily on virtualization to keep operational
costs as low as possible both for power consumption and the purchase of new physical
servers. Windows Server 2008 R2 provides Hyper-V for server virtualization, which includes
Live Migration. This allows the server administrator to move a virtual machine from one
physical server to another. The users of the server will see no service interruption.
Virtual machines are growing in popularity because it is easy to set them up quickly on servers already in the data center. Management of virtual machines becomes a growing task as
the number of these machines increases. Windows Server 2008 R2 provides enhancements
that assist the server administrator, such as Hyper-V Management Console and System
Center Virtual Machine Manager 2008.
Web Platform Updates Internet Information Services (IIS) 7.5 and enhanced support
for .NET on Server Core are two of the Web platform updates in Windows Server 2008 R2.
IIS 7.5 provides centralized Web management, more reliability, and improved security.
There is also a new administration console called IIS 7.5 Manager. This console allows for
both local and remote administration. Configuration management allows Web site administrators to delegate control over content to the owners of the information. IIS 7.5 comes with
enhanced troubleshooting tools such as the failed request tracing tool, which keeps a record
of failed requests based on a set of rules the server administrator creates. Finally, IIS 7.5
provides a better server footprint. It has a modular architecture so that the server administrator can load just the modules needed for the specific type of Web services being offered.
This, along with the Windows Server 2008 R2 Server Core option, reduces the amount of
code and thus the vulnerability to attack.
Windows 8/8.1
Windows 8 was released in October 2012 and was intended to unify the operating system
user interface and code base to work on mobile touch-centric devices as well as traditional
desktops. Just a year later, in October 2013, Microsoft released Windows 8.1 to correct for
some egregious miscalculations, not the least of which was the abandonment of the beloved
Start button. The touch-centric interface of Windows 8 was not well received, particularly
because so few Windows mobile devices were in use and very few people had a touch screen
as their desktop or laptop monitor. The mouse and keyboard were still the input devices of
choice on the vast majority of Windows systems.
In Windows 8, the Windows Start button is replaced by the Start screen (see Figure 2-9),
which contains live tiles you can press or click to start applications or access the desktop.
Copyright 2017 Cengage Learning. All Rights Reserved. May not be copied, scanned, or duplicated, in whole or in part. WCN 02-200-203
Modern Windows Operating Systems
79
When Windows 8 boots, users are placed directly into the Start screen rather than the
desktop. To get to the desktop, users must click a live tile on the Start screen. With no Start
button on the desktop, users must find a spot in a corner of the screen and touch or click it
to bring up the Start screen.
Figure 2-9 Windows 8 Start screen
Despite the shortcomings of the user interface, Windows 8 and its immediate successor,
Windows 8.1, have a number of improvements over Windows 7 under the hood, most of
which would carry forward to the better-received Windows 10. Some of the new and
improved features include the following:
•
User interface changes
•
Storage enhancements
•
Security enhancements
•
Client Hyper-V
•
Integration with online services
User Interface While the user interface is the primary knock on Windows 8, there are
some notable and well-received changes. Windows Explorer is renamed File Explorer and
gets a ribbon-style interface to replace the traditional command bar. Task Manager got a
Copyright 2017 Cengage Learning. All Rights Reserved. May not be copied, scanned, or duplicated, in whole or in part. WCN 02-200-203
2
80
Chapter 2 Popular Operating Systems
facelift, making it easier to see what processes are running and what resources are being
used. Also, a new touch-optimized Settings app provides access to common PC settings
without making users wade through all of the options in Control Panel (although the full
Control Panel remains). While the Start button was missing from Windows 8, Microsoft
brought it back in a reduced form in Windows 8.1. In Windows 8.1, clicking the Start button opens the Start screen, but right-clicking it gives administrators and power users quick
access to frequently used administrative tools such as Programs and Features, Power
Options, Event Viewer, System, Device Manager, Network Connections, Disk Management,
Computer Management, and several more (see Figure 2-10).
Figure 2-10 The Windows 8.1 Start button and right-click menu
Storage Enhancements Windows 8 introduces Storage Spaces, a storage management
and configuration tool that allows users (and server administrators on Windows Server
2012) to manage disks of different sizes and interfaces (including external disks) as a single
pool of storage, creating virtual disks and virtual volumes from the storage pool as necessary. Another nice feature in Windows 8 is the ability to mount CD and DVD images with
a simple double-click on an ISO file. After double-clicking (or right-clicking and clicking
Mount), a new drive letter is created and the ISO file is opened in a File Explorer window.
This feature allows you to explore the contents of a DVD image without burning it to a
disk. In a similar fashion, you can mount virtual disks if they are in the Microsoft VHD or
VHDX format used by Hyper-V and Storage Spaces. Mounted virtual disks can then be
Copyright 2017 Cengage Learning. All Rights Reserved. May not be copied, scanned, or duplicated, in whole or in part. WCN 02-200-203
Modern Windows Operating Systems
81
used as if they were a physical disk attached to the system with a drive letter assigned.
Storage and storage devices are discussed in more detail in Chapter 7.
Security Enhancements Windows 8 adds the option to sign in with a Microsoft
online account rather than using a local user account and password. In addition, you can
sign in using a PIN or a picture password instead of a traditional password. To use a picture
password, you choose a picture and then use a touch screen to create a combination of lines,
circles, and taps. To use the picture password when you sign in, you repeat the pattern you
created on the displayed picture. Windows 8 also offers a variety of controls to allow
parents to monitor their children’s activities. And, if your system starts acting up, new
recovery options allow you to refresh your PC without losing any files or reset the machine
to factory settings and completely start over.
Client Hyper-V Microsoft brings the success of Hyper-V on Windows Server OSs to its
client line of OSs starting in Windows 8. Client Hyper-V uses the same virtualization
technology that is found on Windows Server, allowing you to run multiple OSs on a single
physical computer. This feature allows you to upgrade to the latest Windows version and
still be able to run older versions of Windows in a virtual machine. For example, if you
have an application designed for Windows XP, Windows Vista, or even earlier versions
that will not run in Windows 8 and later versions, you can run the application in a virtual
machine with the required guest OS installed.
Online Services Users who choose to sign in using a Microsoft online account gain the
benefits of synchronized applications and settings between devices. In addition, the client
necessary to access Microsoft’s OneDrive cloud storage service is built into Windows 8. As
part of the Windows 8 user interface makeover, Microsoft introduced Windows Store apps
that run on desktop and mobile computers alike. These touch-centric apps run full-screen in
Windows 8, but Microsoft changed course in Windows 10, allowing Windows Store apps to
be run in a window like most other programs.
Windows Server 2012/R2
Windows Server 2012/R2 is Microsoft’s deep dive into the private cloud. This new version is
chock-full of new tools and features designed to help server administrators increase the availability of network services and limit security risks. Microsoft has also emphasized features
that help datacenter operators deploy and manage a private cloud. Windows Server 2012/R2
comes in two primary editions and two special editions. Standard and Datacenter editions
return from Windows Server 2008, but there is no longer an Enterprise edition. Standard
Edition is suitable for most mid-sized to large companies, while Datacenter Edition is
designed for organizations that rely heavily on Hyper-V virtualization. The two special editions
are Essentials and Foundation. Essentials is aimed at small businesses with 25 or fewer
users. It supports most of the roles and features in Standard and Datacenter editions, but
some roles have restrictions or limited functions. Essentials Edition is automatically configured as a root domain controller, which is the first domain controller installed in an Active
Directory forest. Foundation Edition, the entry-level Windows Server 2012/R2 edition, is
suitable for small businesses that need to purchase a complete server solution for file and
printer sharing, centralized control over user accounts and network resources, and common
Copyright 2017 Cengage Learning. All Rights Reserved. May not be copied, scanned, or duplicated, in whole or in part. WCN 02-200-203
2
82
Chapter 2 Popular Operating Systems
services used in most networks, such as Web services, DNS, and DHCP. Foundation Edition
is available as an OEM version only, installed on a server by the manufacturer, and supports only 15 users. The features already discussed in the Windows 8/8.1 section are present
in Windows Server 2012/R2, with the exception of some of the user-specific features. Also,
Windows Server 2012/R2 boots directly to the desktop instead of the Start screen.
Windows Server 2012/R2 maintains all the core technologies used in Windows Server 2008,
including Server Manager, NTFS, Active Directory, and Windows file and printer sharing
and networking features, although many of these technologies later received enhancements,
as discussed in the following sections.
Server Manager Server Manager has been updated to allow administrators to manage
all the servers in the network from a single management console. The left pane of Server
Manager displays the major views: Dashboard, Local Server, and All Servers. You use the
Local Server view to manage just the server where you’re running Server Manager, and the
All Servers view to manage aspects of all servers. To add servers you want to manage, rightclick All Servers and click Add Servers or use the Manage menu. When you click All Servers
in the left pane, you see a list of servers you can manage in the right pane (see Figure 2-11).
Figure 2-11 Windows Server Manager in Windows Server 2012/R2
NTFS File System NTFS was introduced in Windows NT in the early 1990s. Although
it has been updated throughout the years, NTFS has remained a reliable, flexible, and scalable file system. One of the most noticeable improvements of NTFS versus its predecessor,
Copyright 2017 Cengage Learning. All Rights Reserved. May not be copied, scanned, or duplicated, in whole or in part. WCN 02-200-203
Modern Windows Operating Systems
83
FAT32, is file and folder permissions. Since its debut in Windows NT, NTFS has added
many new features, including disk quotas, built-in file compression and encryption,
BitLocker drive encryption, and a host of performance and reliability improvements.
Active Directory Active Directory is the foundation of a Windows network environment. This directory service enables administrators to create and manage users and
groups, set network-wide user and computer policies, manage security, and organize
network resources. With Active Directory, you transform a limited, nonscalable workgroup network into a Windows domain with nearly unlimited scalability. Windows Server 2012/R2
continues to add features to Active Directory, including an easy-to-use Recycle Bin to restore
deleted objects, and a user interface to create password policies that can be applied to individual
users and groups.
New Features in Windows Server 2012/R2 Microsoft has added several new
features and improved a host of existing features to make Windows Server 2012/R2 a
secure, highly available, enterprise-class server OS. Microsoft’s emphasis on the private
cloud is clear, with several features focused on this burgeoning sector of IT. Some of the
new and improved features are discussed briefly in the following list and covered in more
detail in later chapters.
•
Server Core—Server Core has no taskbar or Start screen, just a command prompt window on a black background. Its use might not be obvious, but Server Core has quite a
bit going on under the hood. Server Core’s lightweight interface hides powerful server
capabilities that aren’t encumbered by a resource-intensive GUI. A fresh installation of
Server Core uses a little more than 5 GB of disk space compared with more than 9 GB
for a fresh installation of Windows Server 2012/R2 with a GUI. A major enhancement
made to Server Core in Windows Server 2012/R2 is the ability to switch between
Server Core mode and GUI mode. In the Windows Server 2008 version, after you
installed it in Server Core mode or GUI mode, you couldn’t switch to the other mode.
•
Minimal Server Interface—The benefits of Server Core mode are substantial, but some
people just can’t live without being able to point and click. Microsoft recognized this
fact and found a happy medium between Server Core mode and the full GUI: Minimal
Server Interface (also called MinShell). Minimal Server Interface allows users to perform most local management tasks with a GUI tool but lacks many aspects of the full
user interface.
•
Hyper-V 3.0—Hyper-V is the Windows Server virtualization environment introduced
in Windows Server 2008. Although it’s not new, the enhancements in Hyper-V version
3.0 make Windows Server a leader in virtualization software. Hyper-V 3.0 is a major
component of Microsoft’s private cloud initiative and includes these new features: multiple concurrent live migrations, Hyper-V Replica, support for up to 32 virtual processors, virtual machines with up to 32 GB of RAM, and several additional performance
and reliability enhancements.
•
PowerShell 4.0—PowerShell is a command-line interactive scripting environment that
provides the commands for almost any management task in a Windows Server 2012/R2
environment. It can be used much like a command prompt, where you enter one command at a time and view the results, or as a powerful scripting engine that enables
Copyright 2017 Cengage Learning. All Rights Reserved. May not be copied, scanned, or duplicated, in whole or in part. WCN 02-200-203
2
84
Chapter 2 Popular Operating Systems
you to create and save a series of commands for performing complex tasks. Although
PowerShell 1.0 was introduced in 2006, it has been substantially enhanced in Windows
Server 2012/R2 with more than 50 new cmdlets, job scheduling, enhanced autocompletion, and improved performance.
•
Storage Spaces—As discussed in the sections on Windows 8, Storage Spaces provides
administrators with the ability to manage storage of different sizes and interfaces, creating virtual disks that can be anything from a simple volume to a fault-tolerant RAID 5.
•
Resilient File System—Resilient File System (ReFS) is a new file system in Windows
Server 2012/R2 that’s intended for large data storage applications that require a high
degree of reliability. It’s largely backward-compatible with NTFS but doesn’t support
some features, such as file-based compression, disk quotas, and Encrypting File
System (EFS).
•
Dynamic Access Control
Control—Dynamic Access Control (DAC) gives you fine-tuned control over shared resources without some of the limitations of traditional file permissions. DAC works alongside traditional permissions, giving administrators more
flexibility in assigning access to resources. Traditional permissions are based on user
and group accounts, and in a large network with hundreds or thousands of users
and resources, group-based permissions can be limiting and complex. DAC allows
classifying data and assigning permissions by user attributes rather than group
memberships. As a simple example, a folder can be classified as belonging to the
Accounting Department, making access available only to users whose Department
attribute equals Accounting, or the folder can be classified as highly sensitive so that
its contents are encrypted automatically, relieving an administrator from having to
encrypt it manually.
From the Trenches …
The Computer Networking Technology department at a college runs its own network,
including routers, switches, and Windows servers. The servers used hardware RAID controllers for fault-tolerant disk storage. However, every time the OS was updated or a
disk needed to be replaced, the RAID controllers seemed to have problems. For example,
when the servers were upgraded from Windows Server 2008 R2 to Windows Server 2012,
the drivers for the RAID controllers weren’t available. The department turned to Storage
Spaces, the new feature in Windows Server 2012, so that standard disk controllers could
be used while maintaining fault tolerance with virtual RAID disks. Now, disk space can be
expanded simply by adding a new disk without the need to worry about compatibility
with the existing disks. In addition, there is no further need to be concerned about
updated drivers for finicky RAID controllers.
Windows 10
Windows 10 is the current release of the client version of Windows, and some say it may be
the last numbered release of Windows, with enhancements coming as regular feature updates
automatically when they are released. Windows 10 was released in July 2015. What, no
Windows 9, you might ask? Microsoft decided to forego Windows 9 and leap directly from
Copyright 2017 Cengage Learning. All Rights Reserved. May not be copied, scanned, or duplicated, in whole or in part. WCN 02-200-203
Modern Windows Operating Systems
85
Windows 8.1 to Windows 10. The official explanation is that the new Windows was too big
a leap forward to advance just one version number, but some suspect it was a way for
Microsoft to distance itself from what is considered a poor showing with Windows 8. In
fact, Microsoft offered a free upgrade to Windows 10 during its first year of availability to
anyone who possessed a valid license for Windows 7 or Windows 8/8.1.
Windows 10 builds on the successful features of Windows 8/8.1, discards some of the less
successful, and brings back some popular Windows 7 features that had been left out of
Windows 8. Some of the key features of Windows 10 include:
•
Virtual desktops—A feature long available on Linux desktop managers, virtual
desktops let users create multiple desktops and switch between them to access open
application windows that were started in each desktop. To create a new desktop,
click the new Task View icon on the taskbar, and click the plus sign that appears in
the bottom right of the screen. Alternatively, press Windows+Ctrl+D to create a new
desktop and switch to it. To move an open application window to a different desktop, press the Task View icon, right-click the window you want to move, click Move
to, and select the desktop you want (see Figure 2-12). In the figure, you see the Task
View icon to the right of the Search bar on the taskbar, and you can see two desktops. The window with Microsoft Edge, the new Windows Web browser, is about to
be moved to Desktop 2. Virtual desktops help you organize your workspace and
easily switch between sets of applications you are working on, making multitasking
more efficient.
Figure 2-12 Windows 10 virtual desktops
Copyright 2017 Cengage Learning. All Rights Reserved. May not be copied, scanned, or duplicated, in whole or in part. WCN 02-200-203
2
86
Chapter 2 Popular Operating Systems
•
Return of the Start button—The Start button is back and is a hybrid between the
Windows 7 Start button and the Windows 8 Start screen. There are essentially two
columns; the left column looks somewhat like the old Windows 7 Start button, with
frequently used applications and shortcuts to settings and a power button for logoff/shutdown options. The right pane looks like a scaled-down version of the Start
screen from Windows 8, with live tiles pointing to apps you can run (see Figure 2-13).
For IT pros and power users, the right-click functionality of the Start button added
with Windows 8.1 remains.
Figure 2-13 Windows 10 Start button
•
Microsoft Edge Web browser
browser—Microsoft started from scratch to come up with Microsoft Edge, an eventual replacement for Internet Explorer. Edge is a slimmed-down Web
browser built around standards such as HTML5, but it doesn’t support ActiveX controls, so you can’t get rid of Internet Explorer right away if you need those capabilities.
However, it does have a built-in PDF reader and Adobe Flash Player. It integrates
nicely with Microsoft’s new digital assistant, Cortana (discussed next), has a reading
mode, and supports annotations directly on Web pages that can be stored and shared
in the cloud (see Figure 2-14).
Copyright 2017 Cengage Learning. All Rights Reserved. May not be copied, scanned, or duplicated, in whole or in part. WCN 02-200-203
Modern Windows Operating Systems
87
2
Figure 2-14 Microsoft Edge Web browser
•
Cortana digital assistant
assistant—If you have ever used an iPhone or iPad to talk to Siri, or said
“Okay Google” into your Android phone, you have some ideas what Cortana is all about.
In order to use Cortana on your computer, you must be signed in with a Microsoft online
account. With Cortana, you can use voice commands to ask questions (Cortana uses Bing
as its search engine), open applications, set reminders and appointments, and so forth.
•
Quick access—File Explorer adds a feature called Quick access that lets you pin any
folder or search result to the Quick access section in the left pane of File Explorer.
•
Universal application architecture—The Metro-style apps that Microsoft first released
with Windows 8 are designed to run across Windows 10 desktops, tablets, smartphones, and other portable devices—even Xbox One. Windows 10 automatically
recognizes whether you are on a device with a touch screen and selects between a
mouse-oriented interface and a touch screen interface.
•
Sign-in options—A new feature called Windows Hello allows you to expand your signin options. Aside from using a password or PIN, you can now sign into your device
using your facial features or fingerprint if your hardware supports it. To use the face
recognition option, you’ll need an Intel RealSense 3D camera; a regular Web cam
won’t work. For fingerprint sign-in, you’ll need a compatible fingerprint scanner,
which you can buy as a USB device for as little as $15.
There are many more features in Windows 10, and Microsoft will be releasing new features
as updates as they are completed.
Copyright 2017 Cengage Learning. All Rights Reserved. May not be copied, scanned, or duplicated, in whole or in part. WCN 02-200-203
88
Chapter 2 Popular Operating Systems
Windows Server 2016
Still under development at this writing, Windows Server 2016 comes with the Windows 10
user interface and builds upon features found in Windows Server 2012/R2. Here are a few
of the highlights you can expect to find in Windows Server 2016, which was due to be
released in the fall of 2016:
•
Hyper-V A host of improvements to Hyper-V are included in the new Windows
Hyper-V—
Server 2016, including nested virtualization (the ability to run a virtual machine in a
virtual machine), Linux Secure Boot, production checkpoints, hot add and remove for
memory and network adapters, and many more.
•
Nano Server—Nano Server is a new install option for Windows Server 2016.
It goes beyond Server Core, with an even smaller footprint, and doesn’t
support a local logon—all management tasks are done remotely. Nano Server is
designed for single-task virtual machines, a DNS server, a storage host, or a
Web server.
•
Failover clusters—Failover clusters can now be upgraded from Windows Server
2012 R2 to Windows Server 2016 without Hyper-V or file server cluster
downtime.
•
Windows Containers—Windows Server 2016 expands its virtualization options
with Windows Server Containers and Hyper-V Containers. Containers allow
you to run applications that are isolated from one another, improving
reliability. Windows Server Containers provide a moderate level of isolation
while sharing various system libraries and Hyper-V Containers give
you virtual-machine levels of isolation without the resource overhead
of an actual virtual machine.
UNIX and UNIX-like Operating Systems
The UNIX operating system comes in many different formats. Of all the operating
systems covered in this book, it is the oldest, most diverse, and most complicated.
The reason for this is that one manufacturer does not have the exclusive license for
UNIX. After UNIX was developed at AT&T, the company never formally licensed the
kernel to prevent others from using it and implementing their own specialized utilities.
AT&T used the operating system within the company and made the source code available outside the company. The end result is that there are many UNIX versions with
many diverse utilities.
Versions of UNIX today adhere to one of the two main design standards: the Berkeley
Software Distribution (BSD) standard or the System V Release 4 (SVR4) standard. Examples
of BSD-style UNIX include the freely available NetBSD and FreeBSD operating systems, as
well as the commercially available BSDi UNIX. SVR4 versions include freely available versions of Linux and commercial versions such as Oracle (formerly Sun Microsystems) Solaris
and SCO UNIX. All UNIX systems include security features. Table 2-1 lists several versions
of UNIX or UNIX-like OSs, along with the manufacturer and origin. It also includes Web
addresses to check for additional information.
Copyright 2017 Cengage Learning. All Rights Reserved. May not be copied, scanned, or duplicated, in whole or in part. WCN 02-200-203
UNIX and UNIX-like Operating Systems
Table 2-1
89
UNIX or UNIX-like OSs
Version
Manufacturer/source
Origin
Web address
AIX
IBM
A combination of SVR4
and BSD
www 03.ibm.com/
www–
systems/power/
software/aix/
Debian
Debian
BSD
www.debian.org
Fedora
Fedora (supported by
Red Hat)
SVR4
https://getfedora.org
FreeBSD
The FreeBSD Project
BSD
www.freebsd.org
HURD
GNU
BSD
www.gnu.org/software/
hurd/hurd.html
Mac OS X
Apple Computer
BSD (Darwin UNIX)
www.apple.com
NetBSD
The NetBSD Project
BSD
www.netbsd.org
OpenBSD
The OpenBSD Project
BSD
www.openbsd.org
Red Hat Linux
Red Hat
SVR4
www.redhat.com
Solaris
Oracle
BSD
www.oracle.com
openSUSE
MicroFocus
SVR4
www.suse.com
Turbolinux
Turbolinux, Inc.
SVR4
www.turbolinux.com
Ubuntu
Canonical
BSD
www.ubuntu.com
This book uses Linux for its UNIX examples; Linux is modeled after UNIX and shares many
of the same features and commands. Most Linux versions are available free of charge, but
some enhanced versions of Linux must be purchased. Linux is considered “UNIX-like” based
on standards that were developed after UNIX originally came out. Linux runs on Intel-based
and AMD-based processors.
There are a number of Linux versions available worldwide. Red Hat Linux, Ubuntu,
and Debian are well known in the United States, but are also popular worldwide.
OpenSUSE Linux is another popular product, especially in Europe. The product comes
in both a professional and personal version. Turbolinux is the leading Linux distributor in
the Asian-Pacific region. It provides workstation, desktop, and server versions of its
product.
Because UNIX comes in such a wide variety of implementations, it runs on almost any hardware. There are UNIX versions available for all hardware mentioned up to this point. For this
reason, it is hard to define exactly what specifications a platform should meet to run UNIX.
UNIX is a true multitasking, multiuser operating system. This means, as explained before, that
it can fully serve all the computing needs of multiple users running multiple applications at the
same time. Depending on the hardware, a single UNIX computer can support from one to
several thousand users.
After startup, UNIX typically presents you with a request for a login, or username, followed by a request for a password. The username and password you provide determine
Copyright 2017 Cengage Learning. All Rights Reserved. May not be copied, scanned, or duplicated, in whole or in part. WCN 02-200-203
2
90
Chapter 2 Popular Operating Systems
what privileges you will be granted on the system. When your identity has been verified,
you are presented with a shell—that is, the user interface. This is another point
where UNIX is substantially different from most other operating systems: by default,
most UNIX versions come with several different shells, and it is up to users to pick the
shell they want to use. Different shells provide different levels of functionality, but all of
the shells function much like the shell in a Windows command prompt, with a series of
built-in commands and the ability to call external commands (operating system commands
that are stored in a separate program file on disk) and application programs simply by
typing commands at the command line.
The most popular UNIX shells are the Bourne shell (sh), its cousin the Bourne Again shell
(bash), and a version of the Bourne shell called the C shell (csh), in which some of the commands are formatted to be similar to the C programming language. Overall, these shells
function in the same way: you get a prompt, you type a command, and they do what you
ask. When you are done with the shell, you can exit using the exit command. Typically, this
returns you to the login prompt. Try Hands-On Project 2-5 to determine which UNIX shell
you are using.
Many versions of UNIX can also provide you with a GUI. The most popular interface is
the X11 Window System, known commonly as X Window. X Window is similar to
other windowed interfaces. A unique feature of X Window is that it is network enabled.
Using an X terminal, it is possible to run X Window and all the application programs on
a remote UNIX computer, and to remotely interact with your applications. One UNIX
system can support many X terminals and users. X Window, however, is an optional
part of many UNIX versions. Just as there are many different UNIX versions, there are
also many different versions of X Window. Linux generally uses a version called Xfree
that can be obtained for free. X Window, by default, does not include programs analogous to Windows Explorer for managing files, or the Windows-based Start menu for
starting programs, but many utilities are available to provide file and application
management.
Fedora Linux, for example, offers an X Window-like GUI interface called GNOME (see
Figure 2-15), which can be installed or omitted. Even when GNOME is installed, you
can still execute regular Linux commands by starting the terminal emulation program
window shown in Figure 2-16. To start the terminal emulation program in Fedora, for
instance, click Activities, Show Applications, Utilities, and then click Terminal. HandsOn Project 2-6 enables you to learn more about the Fedora GNOME interface, while
Hands-On Project 2-7 helps you to learn about the find command in a terminal
window.
Copyright 2017 Cengage Learning. All Rights Reserved. May not be copied, scanned, or duplicated, in whole or in part. WCN 02-200-203
UNIX and UNIX-like Operating Systems
91
2
Figure 2-15 The GNOME desktop in Fedora
Source: Fedora Linux
Figure 2-16 A terminal window in Linux
Source: Fedora Linux
All networking functions in UNIX are based on the BSD networking model, which provides support for the Transmission Control Protocol/Internet Protocol (TCP/IP). This is
the standard protocol in use on the Internet, and as such, UNIX computers are qualified
to provide numerous Internet services. (Network protocols are discussed later in this
book.) The standard UNIX operating system does not provide many network functions.
Most of these functions are provided by add-ons. The standard functions include login services, which allow a user to connect to the UNIX computer from another remote computer
Copyright 2017 Cengage Learning. All Rights Reserved. May not be copied, scanned, or duplicated, in whole or in part. WCN 02-200-203
92
Chapter 2 Popular Operating Systems
on the network; file transfers through the File Transfer Protocol (FTP); and some form of
e-mail service, usually the Simple Mail Transfer Protocol (SMTP). Other services can be
standard as well. In Linux, additional standard services include the Network File System
(NFS), and support for other network systems such as those used by Microsoft and
Apple. It is also possible to add modules to UNIX to provide other services, such as
World Wide Web (WWW) service.
The security model in the UNIX operating system made it an early system of choice for
providing many Internet functions, such as Internet servers and firewalls. It is possible
to turn services on and off at the user’s desire, and it is also possible to run services
in ways that do not result in security issues for other services on the computer. All
Windows OSs also use TCP/IP by default and have implemented many of the security
features found in UNIX. This makes Windows Server competitive with UNIX as Internet
and Web servers.
In addition to their roles as Internet servers and firewalls, UNIX computers are often
used as database or application servers that many users can access at the same time.
You will also find UNIX computers used for technical design and industrial control
applications.
Most versions of UNIX come with a line editor, a text editor, or both. A line editor is an
editor used to create text one line at a time. Line editors are often used to create scripts, programs in which each line executes a specific command. A text editor enables you to edit text
in a full-screen mode.
One reason that UNIX is so popular is that it is compatible with an extensive range
of programming tools, particularly program compilers and interpreters, which means
that you can create nearly any kind of software application. UNIX is also compatible
with many popular databases, such as Oracle and Informix. With the combined
power of programming languages and databases, UNIX systems are frequently used
for administrative computing, such as accounting systems, and for all kinds of scientific applications.
Mac OS
Apple Computer has always had a unique approach to operating systems. Its Macintosh
line of personal computers revolutionized the world of operating systems with its allgraphical user interface and an all-graphical shell. Although there are subtle differences
between Microsoft Windows and Mac OS in the way they function, you will see many
similarities as well, which many would say is because Windows was designed to mimic
the look and feel of Mac OS. Mac OS X is built on Darwin UNIX, which is a distribution of the BSD UNIX version. The Mac OS X El Capitan desktop is shown in
Figure 2-17.
Copyright 2017 Cengage Learning. All Rights Reserved. May not be copied, scanned, or duplicated, in whole or in part. WCN 02-200-203
Mac OS
93
2
Figure 2-17 The Mac OS X El Capitan desktop
Source: Mac OS X El Capitan
The hardware architecture of Mac OS is substantially different from the architecture used on
most other platforms, especially because many of the graphical functions are included in the
basic input/output system (BIOS) functions, which are located in the read-only memory
(ROM) of the hardware. (Apple calls this “firmware.”) Beginning with System 7.1, Apple
began using system enabler files that allowed the previous version of the operating system to
support new hardware. When the next version of the operating system was released, support
for the most recent Macs was included so the enabler file was no longer needed for that
model. The hardware architecture needed to run Mac OS is very dependent on the version of
the operating system. If you run version 7.0, you could be using any Macintosh hardware
architecture, except for the PowerPC platform, which is supported as of version 7.5. If you
are running the newest generation of hardware (Intel-based), you are required to run Mac
OS X. Apple has always made the hardware and software closely interconnected, which
results in strict requirements when it comes to operating system/hardware coordination.
One significant difference between Mac OS and other operating
systems covered in this chapter is that only one company (Apple) makes
hardware capable of running Mac OS. Mac OS runs on Intel processors,
but the hardware is still Apple hardware. Several years back, Apple
licensed Power Computing, Motorola, and other companies to make
Mac OS-compatible hardware, but that is no longer the case. In short,
using Apple software means using Apple hardware.
Copyright 2017 Cengage Learning. All Rights Reserved. May not be copied, scanned, or duplicated, in whole or in part. WCN 02-200-203
94
Chapter 2 Popular Operating Systems
Versions of Mac OS prior to 8.0 were not multitasking; they were essentially task switching
with the aid of MultiFinder. In Mac OS version 8.0 and newer, multitasking is a standard feature of the operating system that is available to all applications. When more than one application is active, the CPU resources are shared among them.
Peer-to-peer networking has been a standard feature of Mac OS since its inception. Older versions used a protocol called AppleTalk, which originated in the Macintosh world. AppleTalk
remained compatible with Mac OS versions up through Leopard (Mac OS X 10.5; El Capitan, the current version as of this writing, is Mac OS X 10.11), and could be networked to
any other Mac simply by plugging in a few cables and configuring some software. Apple
implemented LocalTalk networking hardware with every Macintosh printer port, which provided a combined networking and serial solution in one inexpensive interface. Through the
use of optional clients, or through servers that can provide AppleTalk-compatible services,
many Macintoshes could also be networked easily to other networks.
Mac OS was always meant to be a desktop operating system, and there are no extended security features to keep users from getting access to files on the local computers. For networking,
Mac OS allows the user to generate user profiles. A user can be given a username and a password. Based on this combination, a user may access some of the resources made available on
the network. Mac OS can use its networking features to share printer and disk resources. In
version 8.x and later, extensions let the Macintosh share resources using protocols other than
AppleTalk, including TCP/IP, the standard Internet protocol, which enables greater flexibility
in how Macs can be networked. Beginning with Mac OS X version 10.6 (Snow Leopard),
AppleTalk is no longer supported. Snow Leopard supports TCP/IP networking.
Throughout its history, Mac OS has been known for its support of graphics, video, and sound
capabilities. In this respect, Mac OS has been ahead of the industry. Because Apple has had
tight control over both the Macintosh hardware architecture and operating system, and
because it chose to actively enhance the audiovisual functions of both hardware and software,
the Mac and the Mac OS are favored by people in the graphics, sound, and video fields. Macintosh computers are used in many different environments, especially those that deal with the
creative process. The Mac font management and ColorSync color matching technologies have
endeared it to graphic arts and prepress professionals, while QuickTime has made the Mac
popular for multimedia sound and video production. You will also find many Macs in educational environments. The home computer market has a small but substantial share of computers running Mac OS. MacBook Air notebook computers continue to be popular, even in
organizations that have settled primarily on the Windows-Intel platform.
Mac OS 9.x introduced features for better hardware and Internet access. For example,
version 9.1 introduced a Printer Sharing panel to manage and share a USB printer on a network. There is a capability to connect to another computer over the Internet by using the
Point-to-Point Protocol (PPP), a network communications protocol designed for remote communications. (You will learn more about protocols later in this book.) Mac OS 9.x added Personal Web Sharing for creating a Web page that others can access over the Internet or
through a private network. Also, Mac OS 9.x included a runtime execution tool for running
Java applets from the Finder tool. The Network Assist Client tool can be used by network
administrators to control the computer.
Copyright 2017 Cengage Learning. All Rights Reserved. May not be copied, scanned, or duplicated, in whole or in part. WCN 02-200-203
Mac OS
95
Mac OS X
Mac OS X, where X means version 10, is a significant update because it sports the “Aqua”
interface. One of the main changes for users of Mac OS 9.x and earlier is that some programs and utilities were replaced. The Apple menu can no longer be customized as in the
past. New menu features include System Preferences, which is similar to the Control Panel
on Windows systems. System Preferences enables you to set functions such as the time and
date, display settings, startup functions, energy saving functions, and network functions. The
Dock function can be customized through the System Preferences tool for the applications
you want to include. Through Dock, you can start multiple applications and switch between
them in a multitasking environment.
Out of the box, Mac OS X is configured so that different users can access the operating
system in their own workspaces, without affecting other users. If one user wants to log out
so that another user can access Mac OS X, the first user can now select the new Log Out
option from the Apple menu, instead of turning off the computer and then rebooting.
Many windows in Mac OS X now can be customized so that their contents appear in
columns, similar to Windows-based systems. Also, the title bar in a window displays buttons
to close, minimize, or maximize (zone) that window. Throughout each window, the icons
have a modern look. Also, some windows have “drawers” that slide out like file cabinet
drawers to offer information.
Internet connectivity is enhanced in Mac OS X through the Internet Connect tool, which performs functions that users of previous Mac OS versions associated with the Remote Access
tool. Internet Connect enables you to set up an Internet connection, configure a modem, and
monitor the status of a connection. Internet applications include the Mail application from
Apple, which is used for e-mail; and Internet Explorer, a Web browser from Microsoft. Some
notable changes and enhancements of Mac OS X that have occurred through the years include:
•
Mac OS X 10.6 Snow Leopard
Leopard—This was the first version of Mac OS X that would
support only Intel-based processors. A download called Rosetta could be installed to
retain support for PowerPC applications.
•
Mac OS X 10.7 Lion—With the success of the iPad and iOS, it was only natural for
Apple to incorporate some of the popular features found in iOS into Mac OS X. Mac
OS X Lion included Launchpad to easily browse installed applications, and the use of
multi-touch gestures was expanded for hardware that supported it. Mission Control
unified a number of utilities into a single interface.
•
Mac OS X 10.8 Mountain Lion—The success of iOS on mobile devices continued to
color Mac OS X with support for iMessage, iWork, and iCloud, along with Notification
Center. In addition, all software updates were available only through the App Store.
•
Mac OS X 10.9 Mavericks—Running on Intel 64-bit processors, Mavericks was a modest release with mostly minor feature and performance improvements. This was also the
first departure from using big cat names for each Mac OS X release. From here on, at
least for a while, well-known California locations would be used to name the OS.
•
Mac OS X 10.10 Yosemite—Yosemite gave Mac OS X a face lift, with a user interface
that was based on iOS 7, giving window edges a more flat appearance. Probably the
biggest new feature is called Handoff, which allows users of iOS 8.1 and later mobile
Copyright 2017 Cengage Learning. All Rights Reserved. May not be copied, scanned, or duplicated, in whole or in part. WCN 02-200-203
2
96
Chapter 2 Popular Operating Systems
devices to “hand off” work in progress (such as SMS messages, e-mails, and phone
calls) from their mobile device to their Mac.
Mac OS X 10.11 El Capitan
Mac OS X 10.11 El Capitan is the current release of Mac OS X that started shipping in September 2015. Most would not call this a major release, but there are some improvements to features and performance. A feature called Split View lets you work in two applications at the
same time, with each application snapped to opposite sides of the screen (see Figure 2-18). The
Spotlight search app was updated, Pinned Sites lets you easily recall your favorite Web sites,
and some new swipe gestures were added to apps. Finally, El Capitan introduces Metal for
Mac, a set of 3D development tools for designing games and other 3D apps.
Figure 2-18 Split View on Mac OS X El Capitan
Source: Mac OS X El Capitan
Chapter Summary
■
Early computer operating systems were primitive compared to current operating
systems, but they were significant during their time and moved us toward a desktop
computing environment. Server operating systems followed to allow for file sharing
and printing.
■
Windows, Macintosh, and Linux/UNIX are popular current operating systems, with
new releases announced on a regular basis. Each release has new features and
enhancements.
Copyright 2017 Cengage Learning. All Rights Reserved. May not be copied, scanned, or duplicated, in whole or in part. WCN 02-200-203
Key Terms
97
■
Server operating systems have evolved to allow clustering, virtual servers, self-healing
NTFS, a storage manager for SANS, single sign-on, network management, and security features.
■
Mac OS X is built on Darwin UNIX, which is a distribution of the BSD UNIX
version. Mac OS X 10.11 El Capitan is the latest Mac OS X release.
Key Terms
activate To register your copy of a Windows operating system, starting with the Windows
XP version. Without this activation, you can only run your operating system for a very brief
time.
Active Directory A Windows Server installable service that consists of a database of
computers, users, shared printers, shared folders, and other network resources and resource
groupings used to manage a network and enable users to quickly find a particular resource.
ActiveX An internal programming standard that allows various software running under the
Windows operating system to communicate with Windows and other programs.
Berkeley Software Distribution (BSD) A variant of the UNIX operating system upon which
a large proportion of today’s UNIX software is based.
client In a networking environment, a computer that handles certain user-side software
operations. For example, a network client may run software that captures user data input
and presents output to the user from a network server.
clustering The ability to share computing load and resources by linking two or more
discrete computer systems (servers) to function as though they are one.
Component Object Model (COM) Standards that enable a software object, such as a graphic,
to be linked from one software component to another one.
Distributed File System (DFS) A set of client and server services to organize distributed
shared files into a logical file system.
domain A logical grouping of Windows computers and computer resources that helps
manage these resources and user access to them.
driver signing Setting up all drivers so that they cannot be inadvertently overwritten by
earlier driver versions and only certified versions of drivers can be installed.
external commands Operating system commands that are stored in separate program files
on disk. When these commands are required, they must be loaded from disk storage into
memory before they are executed.
failover clustering A group of two or more servers configured so that if one server fails,
another server can resume the services the first one was providing.
File Classification Infrastructure (FCI) A system that allows files to be located on servers in
an organization based on predetermined naming conventions.
gadgets Small applications for readily accessing information and tools.
Hyper-V A Windows feature that allows a server to run multiple independent operating
systems at the same time and to run multiple virtual servers on one physical server.
Copyright 2017 Cengage Learning. All Rights Reserved. May not be copied, scanned, or duplicated, in whole or in part. WCN 02-200-203
2
98
Chapter 2 Popular Operating Systems
Infrared Data Association (IrDA) A group of peripheral manufacturers that developed a set
of standards for transmitting data using infrared light. Printers were some of the first devices
to support the IrDA specifications.
IP Security (IPsec) A way to secure Internet Protocol (IP) traffic by encrypting and
authenticating each packet.
Kerberos A security system and authentication protocol that authenticates users and grants
or denies access to network resources based on a user’s log-on name and password.
Kerberos creates a unique encryption key for each communication session.
library A combination of folders that can be in any location on the local computer or the
network.
line editor An editor that is used to create text one line at a time.
Microsoft Management Console (MMC) A flexible system that allows server administrators
to configure the servers and monitor their function in one place.
.NET Framework A large library, available to all programming languages supported by
.NET, that allows multiple programming languages to use code from other languages.
peer-to-peer networking A network setup in which any computer can communicate with other
networked computers on an equal or peer-like basis without going through an intermediary,
such as a server or network host computer. Mac OS is a peer-to-peer operating system.
Plug and Play (PnP) Software utilities that operate with compatible hardware to facilitate
automatic hardware configuration. Windows versions starting with 95 recognize PnP
hardware when it is installed, and in many cases can configure the hardware and install
required software without significant user intervention.
Print Management Console A console that allows a system administrator to manage
printers and printing throughout the network.
privileged mode A feature of the operating system kernel introduced in Windows NT that
protected it from problems created by a malfunctioning program or process.
registry A Windows database that stores information about a computer’s hardware and
software configuration.
Server Core A scaled-back version of Windows Server 2008 in which all configurations and
maintenance are done via the command-line interface.
storage area network (SAN) A set of storage devices that appear to the server to be locally
attached, but in fact are on their own network with access granted to the server.
System V Release 4 (SVR4) A variation of the UNIX operating system. It is very popular
today along with the Berkeley Software Distribution (BSD).
task supervisor A process in the operating system that keeps track of applications running
on the computer and the resources they use.
total cost of ownership (TCO) The cost of installing and maintaining computers and
equipment on a network. TCO includes hardware, software, maintenance, and support costs.
Universal Plug and Play (UPnP) An initiative of more than 80 companies to develop products
that can be quickly added to a computer or network. These products include intelligent
appliances for the home. For more information, go to http://openconnectivity.org/upnp.
Copyright 2017 Cengage Learning. All Rights Reserved. May not be copied, scanned, or duplicated, in whole or in part. WCN 02-200-203
Review Questions
99
Universal Serial Bus (USB) A serial bus designed to support up to 127 discrete devices with
data transfer speeds up to 5 Gbits/s (gigabits per second).
User Account Protection (UAP) A feature of some Microsoft operating systems that allows
for better protection of user accounts by controlling permissions and limiting the software
applications that can be run from an account.
virtual private network (VPN) A private network that is like an encrypted tunnel through a
larger network—such as the Internet, an enterprise network, or both—and is restricted to
designated member clients.
Windows Hardware Error Architecture (WHEA) An architecture that supports memory and
cache error recovery without the operating system being aware of the process.
X Window A windowed user interface for UNIX and other operating systems.
Review Questions
1. What was the original Microsoft operating system for the IBM PC?
a.
Windows 3.1
b. Windows 1.0
c.
MS-DOS
d. Windows 95
2. Windows 2000 Server was the first Windows server to contain Active Directory. True
or False?
3. What does it mean if a driver is signed?
a.
The driver file contains a digital certificate.
b. Only certified versions of drivers can be installed.
c.
The driver can only work in Windows 10 and later versions.
d. The driver must be installed on a server.
4. What is the default authentication protocol used by Windows 2000 Server and later
versions?
a.
Kerberos
b. MS-CHAP
c.
PAP
d. IntelliMirror
5. In Windows Server 2003, most features and services are installed and enabled by
default. True or False?
6. With which client OS does Windows Server 2008 share the same code base?
a.
Windows Server 2003
b. Windows XP
c.
Windows Vista
d. Windows Server 2003 R2
Copyright 2017 Cengage Learning. All Rights Reserved. May not be copied, scanned, or duplicated, in whole or in part. WCN 02-200-203
2
100
Chapter 2 Popular Operating Systems
7. Self-Healing NTFS is a process to repair disk drives on an off-line server. True or False?
8. What feature introduced with Windows Server 2008 provides only a limited GUI?
a.
Active Directory
b. Server Core
c.
Plug and Play
d. RODC
9. Which of the following best describes a virtual private network (VPN)?
a.
a stand-alone virtual network
b. a virtual network residing within one computer
c.
a private network that is like an encrypted tunnel through a larger network
d. a network that can only be observed from the outside on rare occasions
10. Windows Server 2008 R2 supports up to 64 physical processors. True or False?
11. What features available starting with Windows Server 2008 R2 provide the functionality
of a VPN without requiring users to initiate a connection each time they want one?
a.
remote desktop protocol
b. IntelliMirror
c.
Hyper-V
d. DirectAccess
12. FCI automates data classification based on predefined categories. True or False?
13. Windows 8 has a Start button that supports only right-click functionality. True or
False?
14. The X Window-like GUI interface in Red Hat Linux is called which of the following?
a.
KDE
b. RDP
c.
BSD
d. GNOME
15. Which of the following best describes Hyper-V?
a.
the fifth version of the overdrive section on the Intel chip
b. a method to increase the speed of memory access on a personal computer
c.
the server virtualization code used to create multiple logical servers on one physical
server
d. extremely fast communication over the USB port
16. Looking at Windows Server 2008 R2, which of the following statements is true?
a.
It was released in both a 32-bit and 64-bit version.
b. It shares a core operating system with Windows Vista.
c.
It supports Live Migration.
d. It has integration features with Windows XP and Windows Vista.
Copyright 2017 Cengage Learning. All Rights Reserved. May not be copied, scanned, or duplicated, in whole or in part. WCN 02-200-203
Hands-On Projects
101
17. What was the first version of Windows Server to come in Essentials and Foundation
editions?
a.
Windows Server 2016
b. Windows Server 2012
c.
Windows Server 2008
d. Windows Server 2003
18. What are the two main design standards to which most versions of UNIX adhere?
(Choose two.)
a.
BSD
b. USB
c.
SVR4
d. SCO
19. What company supports Fedora Linux?
a.
Oracle (formerly Sun Microsystems)
b. Red Hat
c.
IBM
d. Hewlett-Packard (HP)
20. Virtualization allows you to do which of the following?
a.
Combine multiple physical servers into one logical server.
b. Run a live and test environment on separate physical servers.
c.
Set up multiple operating systems on one physical server.
d. Access multiple physical servers through one virtual console.
Hands-On Projects
In some Windows projects you may see the User Account Control
(UAC) box, which is used for security to help thwart intruders. If you
see this box, click Yes to continue. Because computer setups may be
different, the box is not mentioned in the actual project steps.
Project 2-1: Use the Windows Search Function
Windows 10 offers a convenient search program to quickly find files and start
applications. In this project you learn how to use the “Search the web and
Windows” search box in Windows 10.
1. Start and log on to your Windows 10 computer. Click the Search the web and Windows text box next to the Start button. (Note that if Cortana is enabled, the search
box will display the prompt “Ask me anything.”)
Copyright 2017 Cengage Learning. All Rights Reserved. May not be copied, scanned, or duplicated, in whole or in part. WCN 02-200-203
2
102
Chapter 2 Popular Operating Systems
2. Type file. Notice that the operating system interactively searches as you are typing (see
Figure 2-19).
Figure 2-19 Windows 10 “Search the web and Windows” search box
3. Click File Explorer in the search results menu to start File Explorer.
4. Close the File Explorer window.
5. As an alternative, you can start a program by entering its file name in the search box.
Click the Search the web and Windows text box. Type explorer.exe. Press Enter or
click explorer.exe in the search results to start File Explorer.
6. Close File Explorer.
7. Click the Search the web and Windows text box.
8. Type cmd and press Enter. You’ll see the Command Prompt window.
9. In the Command Prompt window, type dir at the command prompt and press Enter to
list the directories and files in your current directory. Type dir /a and press Enter. You
will see a long list of files and directories, including system and hidden files. The /a
option in the dir command specifies that all files should be listed.
Copyright 2017 Cengage Learning. All Rights Reserved. May not be copied, scanned, or duplicated, in whole or in part. WCN 02-200-203
Hands-On Projects
103
10. Close the Command Prompt window.
11. Stay logged on if you are continuing to the next project.
Project 2-2: Browse the Windows 10 Registry
In this project, you browse the registry of Windows 10. Be careful not to
make any changes to the registry. The Registry Editor does not have a Save
or OK function, so any changes you make take effect immediately. Also,
there is no Undo key.
1. Log on to Windows 10, if necessary.
2. Click the Search the web and Windows text box, type regedit, press Enter, and click Yes.
3. You see an interface like File Explorer that shows five folders, called keys. Each key
contains information about different aspects of the system, such as hardware settings,
user environment settings, application settings, and Windows system settings.
4. In the left pane, click to expand HKEY_LOCAL_MACHINE\SOFTWARE\Microsoft
\Windows\CurrentVersion\Authentication and then click LogonUI. The right pane displays a number of values related to the current user (see Figure 2-20).
Figure 2-20 Windows 10 registry
5. In the left pane of the registry editor, navigate to HKEY_CURRENT_USER\Control
Panel. Right-click Control Panel and click Find. In the Find dialog box, click to
uncheck Keys and Data, leaving only Values checked. In the Find what box, type Wallpaper and click Find Next. The value shows the path to the wallpaper used by the current user.
6. Close the Registry Editor.
7. Stay logged on if you are continuing to the next project.
Copyright 2017 Cengage Learning. All Rights Reserved. May not be copied, scanned, or duplicated, in whole or in part. WCN 02-200-203
2
104
Chapter 2 Popular Operating Systems
Project 2-3: Work with MMC and Group Policy Editor
In this project, you use the Microsoft Management Console (MMC) and load
a snap-in called Local Group Policy Editor. Group Policy is used to configure
aspects of your system, including the working environment. In a Windows
domain, the IT administrator can configure Group Policy on Windows servers
that are pushed down to domain members to maintain a consistent security
and working environment for all client computers.
1. Log on to Windows 10, if necessary.
2. Click the Search the web and Windows text box, type mmc, press Enter, and click Yes.
3. In the console that opens, click File and click Add/Remove Snap-in. In the Add or
Remove Snap-ins dialog box, browse through the available snap-ins. Scroll down and
click Group Policy Object Editor (part of the name may be cut off), and then click Add.
4. In the Select Group Policy Object window, click Finish. Click OK.
5. In the left pane of the console, click to expand Local Computer Policy, Computer Configuration, and Windows Settings. Then click Security Settings. In the right pane,
double-click Account Policies and then Password Policy. This is where policies are configured that control password and account lockout settings.
6. In the left pane, click to expand User Configuration and Administrative Templates,
and then click Control Panel. The right pane displays a number of settings for Control
Panel. The Control Panel can be completely disabled or customized with these settings.
7. Browse through some additional settings. In a domain environment, the administrator
can configure any of these settings to affect selected users and computers in the
domain. Close the console. When prompted to save the settings, click No.
8. Stay logged on if you are continuing to the next project.
Project 2-4: Libraries and the Quick Access List in
Windows 10
In this project, you create a new library in Windows 10, do a search, and then
pin the search results to the Quick access list in File Explorer.
1. Log on to Windows 10, if necessary.
2. Open File Explorer by right-clicking Start and clicking File Explorer.
3. To work with libraries, you must enable them in the Navigation pane. To do so, click
View in the File Explorer menu bar, and then click Navigation pane. Click to select
Show libraries. (If Show libraries is already checked, skip this step.)
4. In the left pane of File Explorer, right-click Libraries, point to New, and click Library.
Type Programs and press Enter to give the new library a name.
5. Right-click Programs, and click Properties. Click Add to add a new folder. Navigate to
the C: drive and click Program Files (x86). Click Include folder.
Copyright 2017 Cengage Learning. All Rights Reserved. May not be copied, scanned, or duplicated, in whole or in part. WCN 02-200-203
Hands-On Projects
105
6. Click Add to add a new folder. Navigate to the C: drive and click Program Files. Click
Include folder.
7. Click Change library icon. Choose an icon from the list and click OK. Click OK to finish creating your library. Click to expand Programs. In the right pane, you see a list of
files and folders contained in the two folders.
8. Click the Search Programs text box at the top right of the File Explorer window, and
type Internet. This search will show all files and folders whose name or contents contain the word “Internet.”
9. Click the Home menu in File Explorer and then click Pin to Quick access. A new item
is added under the Quick access list in the left pane of File Explorer. You see a search
icon named Internet. Click Internet to see the search results in the right pane. From
now on, you can click the Internet search icon in the Quick access list to repeat the
search results. Close File Explorer.
10. Log off or shut down your Windows 10 computer.
Project 2-5: Determine the Shell in Linux
In this project, you learn how to determine what shell you are using while in
the Linux operating system. The shell serves as an interface between the user
and the operating system—for example, when the user instructs the operating
system to execute a program or command.
1. Start your Linux computer and log on.
2. Access the shell prompt by opening a terminal window in the Linux GNOME interface. To open a terminal window, click Activities, click the Show Applications icon,
click Utilities, and click Terminal.
3. Look at the shell prompt. The $ prompt means that you are in either the Bourne,
Bourne Again, or Korn shell.
4. At the shell prompt, type echo $SHELL, making sure that the word “SHELL” is in all
capital letters. Press Enter. A response of /bin/bash means you are using the Bourne
Again shell. If /bin/sh appears, you are in the Bourne shell. A response of /bin/ksh signifies the Korn shell.
5. If you got an error message in Step 4, enter echo $shell, making sure that the word
“shell” is in all lowercase letters. You should see the response /bin/csh, which means
that you are in the C shell.
6. At the shell prompt, type man bash and press Enter to read the online manual information about the Bourne Again shell, which is the default shell used in Fedora and Red
Hat Linux distributions.
7. Press the Spacebar one or two times to continue reading the introductory information
about the Bourne Again shell. When you are finished reading the first few pages, press
q to exit the documentation.
8. Close the terminal window, but stay logged on to Linux for the next project.
Copyright 2017 Cengage Learning. All Rights Reserved. May not be copied, scanned, or duplicated, in whole or in part. WCN 02-200-203
2
106
Chapter 2 Popular Operating Systems
Project 2-6: Create a Shortcut on the Linux
Activities Dash
In this project, you start a program from the Activities dash and then create a
shortcut on the Activities dash.
1. From your Linux desktop, click Activities. You see a list of icons in a panel called the
dash on the left side of the screen.
2. Click Files (the icon that looks like a filing cabinet) to open Files, the Linux GNOME
file manager.
3. Notice that a new item is placed next to the Activities menu. The active application is
shown here. Click Files next to Activities to see a list of options. You can open a new
window, perform tasks specific to the application, view the application’s preferences,
get help, and quit.
4. Click the Files window again. Click Computer in the left pane to open the root of the
file system. Double-click Home to open the home folder for the current user. Close
Files.
5. Click Activities, click Show Applications, and then click Utilities. Right-click Terminal and click Add to Favorites. From now on, you can open a terminal window
directly from the Activities dash. Click the Activities menu to show the desktop
again.
6. Click Activities and then click the Terminal icon to start a shell prompt in a terminal
window. Type gedit and press Enter to start the GNOME text editor. This editor is
like Windows Notepad but has more features. Type your name and the name of the
class you are taking, and then click Save.
7. When prompted, type myfile as the name of the file, click Documents in the left pane,
and click Save.
8. Open Files by clicking Activities and clicking Files. Double-click Documents in the right
pane to see the file you just created. Also notice that Files appears in the Applications
menu next to Activities. Close Files. Notice that gedit now appears in the Applications
menu. Close gedit. Close the terminal window.
9. Stay logged on if you are continuing to the next activity.
Project 2-7: Find Files in Linux
In Linux, you can search for a file using the find command from the Terminal
window. Alternatively, you can use the search tool in the GNOME Activities
menu.
1. Open a terminal window. (Hint: You just created a shortcut to it in the previous
project.)
2. At the shell prompt, type find /home -name Desktop and press Enter to search for the
desktop directory within your account’s home directory (see Figure 2-21). In this
Copyright 2017 Cengage Learning. All Rights Reserved. May not be copied, scanned, or duplicated, in whole or in part. WCN 02-200-203
Hands-On Projects
107
context, find is the command to search for one or more files, /home tells the find command to search for files in the /home directory, which is the parent directory for all
user account directories, and -name Desktop is an instruction to look for all files that
contain Desktop as part of the name.
Figure 2-21 Using the find command in the Linux shell
Source: Linux
3. Type man find and press Enter to see the manual pages for the find command. Scroll
through the man pages to see the options available with the find command. Press q
when you are finished.
4. Type locate Desktop | more and press Enter. This locate command uses an index to
find all files and folders on the disk that include the word Desktop. The | more part of
the command pipes output to the more command, which paginates the output. Press
the Spacebar if necessary to scroll through the files.
5. Type touch myDesktopfile and press Enter to create a new file named myDesktopfile.
Type locate Desktop and press Enter. The command does not find the file because the
index has not been updated.
6. Type sudo updatedb and press Enter to update the index. Type your password when
prompted, if necessary. The updatedb command must be run as the superuser and
therefore requires you to enter your password in most cases.
7. Type locate Desktop | more and press Enter. You should see the myDesktopfile in the
listing. Close the Terminal window.
8. Click Activities, click the Type to search text box, and type Desktop. Don’t press
Enter. Linux finds all items related to the desktop and all files that have the word
Desktop as part of the name. If you press Enter, you will run any applications found
that are related to Desktop.
9. In the search results, click the folder named Desktop to open the folder in Files.
10. Close Files.
11. Log off or shut down your Linux computer.
Copyright 2017 Cengage Learning. All Rights Reserved. May not be copied, scanned, or duplicated, in whole or in part. WCN 02-200-203
2
108
Chapter 2 Popular Operating Systems
Project 2-8: Use Spotlight in Mac OS X
Mac OS X was among the first operating systems to offer faster searches by
providing Spotlight. Spotlight offers the following:
•
Indexes files so you can find them faster
•
Enables you to search for something just by typing a few letters of the name
•
Quickly searches the computer’s nooks and crannies for what you want, even if you’re
not sure how to spell it exactly
•
Works in conjunction with smart folders so you can organize files you’ve found
according to different characteristics that you choose
In this project, you use the Spotlight feature in Mac OS X El Capitan.
1. Start and log on to your Mac OS X computer.
2. Click the magnifying glass icon on the right side of the menu bar at the top of the desktop. Read the message about the services Spotlight offers.
3. Type d. Notice that Spotlight starts an instant search (see Figure 2-22).
Figure 2-22 Performing a Spotlight search in Mac OS X
Source: Mac OS X El Capitan
4. Slowly type the remaining letters, ashboard, to see how Spotlight changes its display.
5. In the right pane, double-click Dashboard to open it. Dashboard is a collection of widgets.
Close Dashboard by clicking the circle icon with the arrow in the lower-right corner.
6. Open Spotlight again by clicking the magnifying glass icon.
7. Delete dashboard in the search box.
Copyright 2017 Cengage Learning. All Rights Reserved. May not be copied, scanned, or duplicated, in whole or in part. WCN 02-200-203
Hands-On Projects
109
8. Type itunes. The item under Top Hits is Spotlight’s best guess about which item is
most likely the one you want.
9. Delete itunes and type jpg.
10. Click one of the images listed (with a .jpg extension). Notice that the picture is previewed in the right pane.
11. Click somewhere on the desktop to close Spotlight.
12. Stay logged on if you are continuing to the next project.
Project 2-9: Examine the Menus in Mac OS X
In this project, you examine the Mac OS X menu bar options on the desktop.
To view the Mac OS X desktop and menu bar options:
1. Log on to your Mac OS X computer, if necessary.
2. Click Finder in the menu bar to display the Finder menu selections. Finder enables you
to manage features on the desktop as well as empty the trash (deleted files and folders)
or secure emptied trash. Click Preferences in the Finder menu. The Finder Preferences
window enables you to set up preferences for desktop features, such as specifying
items to display on the desktop, including disk drives (see Figure 2-23).
Figure 2-23 Finder preferences
Source: Mac OS X El Capitan
Copyright 2017 Cengage Learning. All Rights Reserved. May not be copied, scanned, or duplicated, in whole or in part. WCN 02-200-203
2
110
Chapter 2 Popular Operating Systems
3. Click each of the buttons in the Finder Preferences window as listed below:
•
General Specify items to display on the desktop, such as hard drives, and determine
General—
where to open windows and set folder properties.
•
Tags—Color-code labels used in windows so that windows can be sorted by
color.
•
Sidebar—Designate what appears in the Sidebar shown in open windows. For
example, you can display links for quick access to devices, documents, and shared
resources.
•
Advanced—Configure options for file extensions, emptying the trash (deleted
files), and where to perform searches.
4. Close the Finder Preferences window.
5. Click File in the menu bar and review the options in the File menu. From here you can
open a new Finder window, open and create files, and save items to a portable drive.
6. Point to Edit in the menu bar and notice the options that can be used while editing,
such as cut and copy. (These options are only available if you are editing a file.)
7. Point to View in the menu bar. Notice the options that can be used to manage the
presentation of items in a window, such as displaying items as icons or a list.
8. Point to Go in the menu bar and notice its options. From here, you can open various
locations on your computer, including network locations and iCloud Drive.
9. Point to Window in the menu bar and review the menu options. If you have multiple
windows open, you can move through them using this menu.
10. Point to Help in the menu bar to see the Spotlight capability for searching.
11. Move the pointer to a blank area of the desktop and click to close the Help menu.
12. Stay logged on if you are continuing to the next project.
Project 2-10: Review the Applications in Mac OS X
Mac OS X comes with many applications. In this activity you review the
applications included with the Mac OS X operating system.
1. Log on to your Mac OS X computer, if necessary.
2. Click Go in the menu bar. (Hint: If regular menu options such as Finder and Go aren’t
displayed, click the Finder icon on the Dock—usually the leftmost icon that looks like a
blue and gray smiling face.)
3. Click Applications.
4. Scroll through the available applications.
5. Double-click Dictionary. Dictionary is an application that enables you to quickly look
up the meaning of a word or determine its spelling.
6. Type folder in the Spotlight box.
Copyright 2017 Cengage Learning. All Rights Reserved. May not be copied, scanned, or duplicated, in whole or in part. WCN 02-200-203
Case Projects
111
7. Read the definition for folder. Close the Dictionary window.
8. Double-click TextEdit in the Applications window. Like most OSs, Mac OS X has a
basic text editor. Close TextEdit.
9. Double-click Safari in the Applications window. Safari is the native Mac OS X Web
browser. Close Safari.
10. Double-click LaunchPad in the Applications window. LaunchPad provides another
method for starting applications in Mac OS X. Click Notes. Notice that you only need
to single-click the application icon to start it. Leave Notes open.
11. Click the Safari icon in the Dock. Press and hold the green maximize button in Safari,
and then slide the Safari window to the left side of the screen until it snaps into place.
Double-click the Notes window; it snaps into place on the right side of the screen. This
is called Split View.
12. Close the Safari window and the Notes window. Close the Applications window.
13. Log off or shut down your Mac OS X computer.
Critical Thinking
The following activities give you critical thinking challenges. Challenge Labs give you an
opportunity to use the skills you have learned to perform a task without step-by-step instructions. Case Projects present a practical problem for which you supply a written solution. Not
all chapters contain Challenge Labs. There is not always a specific right or wrong answer to
these critical thinking exercises. They are intended to encourage you to review the chapter
material and delve deeper into the topics you have learned.
Case Projects
The following scenario is used for Case Projects 2-1 through 2-6:
Darts is a sporting goods company with outlets in most of the western states. This company has
a network of 10 servers and 273 client computers that have the following operating systems:
•
Eight Windows Server 2008 servers
•
Two Linux servers running Red Hat Linux Enterprise
•
20 computers running Mac OS X version 10.7 Lion
•
32 computers running Windows 10
•
80 computers running Windows 8.1
•
46 computers running Windows Vista
•
95 computers running Windows XP
Darts realizes that with the projected growth of the company, they need to upgrade the
computers and servers on their network.
Copyright 2017 Cengage Learning. All Rights Reserved. May not be copied, scanned, or duplicated, in whole or in part. WCN 02-200-203
2
112
Chapter 2 Popular Operating Systems
Case Project 2-1: Accounting Department Upgrade
The Accounting Department has all of the Windows XP computers. The
accounting director wants to upgrade to Windows 10. What are the advantages of upgrading for this department in terms of the enhanced operating
system functions that are available in Windows 10? What are some possible
disadvantages?
Case Project 2-2: Legacy Billing System
If the Accounting Department does upgrade to Windows 10, will the department be able to run a legacy 16-bit billing program that was designed for
Windows XP?
Case Project 2-3: New Computer for the Marketing
Department
The Marketing Department uses the Mac OS X version 10.7 Lion computers.
Because they plan to purchase new computers, what is the newest Mac operating system to which they can upgrade? What would be the advantage of this
upgrade for their department?
Case Project 2-4: President’s Problem
The president of Darts is convinced that the processor on his Windows Vista
system is overloaded. How can you help him determine if there is a problem
with the processor?
Case Project 2-5: Chief Financial Officer’s Concerns
The new chief financial officer believes that all of the Windows XP computers
should be upgraded to Windows 10 because Windows 8.1 was not well
received in the marketplace. What are the advantages and disadvantages of
upgrading to Windows 10 compared to Windows 8.1? Include a discussion
of the total cost of the upgrade (TCO).
Case Project 2-6: Server Upgrades
What would be the advantage of upgrading the Windows Server 2008 servers,
and if you recommend upgrading them, what operating system do you recommend? Why?
Copyright 2017 Cengage Learning. All Rights Reserved. May not be copied, scanned, or duplicated, in whole or in part. WCN 02-200-203
chapter
3
The Central Processing Unit (CPU)
After reading this chapter and completing the
exercises, you will be able to:
●
●
Describe the function and features of CPUs
Identify features of popular CPUs from various manufacturers
Copyright 2017 Cengage Learning. All Rights Reserved. May not be copied, scanned, or duplicated, in whole or in part. WCN 02-200-203
113
114
Chapter 3 The Central Processing Unit (CPU)
Operating systems and hardware work together to make computers useful for
business, educational, personal, network, and cloud computing applications. The features of
an operating system used for a particular application depend on the capabilities of the
hardware. In many cases, modern operating systems do not support older hardware. When
you upgrade an operating system, you may need to upgrade the hardware to match the new
operating system’s capabilities.
This chapter focuses on the CPU and its surrounding electronics, including CPU architecture,
clock speeds, and buses. In addition, you learn how CPUs are used by particular operating
systems.
Understanding CPUs
As you learned in Chapter 1, “Operating Systems Fundamentals,” one of the main functions
of the operating system is to provide the interface between the various application programs
running on a computer and the hardware inside. Central to understanding the hardware is
the system architecture of the computer, which is built around the CPU, or processor. The
system architecture includes the number and type of CPUs in the hardware, and the communication routes, called buses, between the CPUs and other hardware components, such as
memory and disk storage. A bus is a path or channel between a computer’s CPU and the
devices it manages, such as memory and I/O devices.
The CPU is the chip that performs the actual computational and logic work. Most modern
PCs have one such chip, and are referred to as single-processor computers. In reality, to ensure
complete functionality, the CPU requires several support chips, such as chips that help manage
communications with devices and device drivers.
Chip technology continues to develop with the addition of multicore processors. A processor
core is the part of a CPU that reads and executes very basic instructions, such as reading and
writing data from and to memory or executing an arithmetic operation. CPUs were originally
created to have only one core and thus perform only one instruction at a time. A multicore
processor has two or more cores—for example, a dual-core processor contains two cores and
a quad-core processor has four. The most processor cores used in traditional PC desktops
and servers is 16 as of this writing, but high-end CPUs, such as Intel’s Knights Landing, have
up to 72 cores. Development continues in this area, and scientists so far have put as many as
1000 cores on a single CPU chip.
Some computers have multiple physical CPUs; many have two, and some have as many as 128 or
more. This type of computer is generally referred to as a multiprocessor computer. You will take
a closer look at single-processor, multiprocessor, and multicore computers later in this chapter.
Basic CPU Architecture
We will discuss different design types of CPUs and various components of a CPU, but before we
do, let’s take a look at its basic architecture. Most CPUs are composed of the following elements
(see Figure 3-1):
Copyright 2017 Cengage Learning. All Rights Reserved. May not be copied, scanned, or duplicated, in whole or in part. WCN 02-200-203
Basic CPU Architecture
115
CPU
Control
Unit (CU)
3
Arithmetic
logic unit (ALU)
Registers
System bus:
Control bus
Address bus
Data bus
To RAM and I/O devices
Figure 3-1 Basic architecture of a CPU
•
Control unit
unit—The control unit (CU) is the director of operations in the CPU. The control unit provides timing and coordination between the other parts of the CPU, such as
the arithmetic logic unit, registers, and system bus. For example, when a new instruction should be executed, the control unit receives and decodes the instruction and tells
the arithmetic logic unit to execute it.
•
Arithmetic logic unit
unit—The arithmetic logic unit (ALU) performs the primary task of
any CPU, which is to execute instructions. These might be arithmetic instructions, such
as addition or multiplication of integers, or logic instructions, such as binary AND or
binary OR instructions. Most CPUs also contain a floating point unit (FPU) that performs floating point operations.
•
Registers—A register is a temporary holding location on a CPU where data must be
placed before the CPU can use it. There are instruction registers that hold the
instruction the CPU executes, such as add, multiply, or store. Also, the CPU uses
address registers to access data stored in RAM, and data registers that hold the data
the CPU is currently working with, such as two numbers used in an add or multiply
instruction.
•
System bus—The system bus is a series of lanes that are used to communicate between
the CPU and other major parts of the computer, such as RAM and input/output (I/O)
devices. There are actually three types of buses: the control bus, address bus, and data
bus. The control bus carries status signals between the CPU and other devices. Status
signals inform the CPU that a device needs attention; for example, when an input
device has data ready, the CPU must execute the device driver code to read the data
from the device. The address bus carries address signals to indicate where data should
Copyright 2017 Cengage Learning. All Rights Reserved. May not be copied, scanned, or duplicated, in whole or in part. WCN 02-200-203
116
Chapter 3 The Central Processing Unit (CPU)
be read from or written to in the system’s memory. The data bus carries the actual data
that is being read from or written to system memory.
While modern CPUs are much more complex than the simple block
diagram in Figure 3-1, most CPUs follow the basic design and contain
the elements described.
CPUs can be classified by several hardware elements, the most important of which are:
•
Design type
•
Speed
•
Cache
•
Address bus
•
Data bus
•
Control bus
•
CPU scheduling
Each of these elements is considered in the following sections.
Design Type
Two general CPU designs are used in today’s computers: Complex Instruction Set Computing
(CISC) and Reduced Instruction Set Computing (RISC). The main difference between the two
is the number of different instructions the chip can process and the complexity of the instructions. When a program executes on a computer, the CPU reads instruction after instruction
from the program to perform the tasks specified in the program. When the CPU has read
such an instruction, it carries out the associated operations. The CPU can process as many
as 20 million complex operations per second on the low end, and several billion on the high
end. Clock speed and CPU design are the factors that determine how fast operations are
executed. It is convenient for the programmer to have many instructions available to perform
many different operations.
Let’s say, for example, that the programmer wants to multiply two numbers. It would be
convenient to give the CPU the two numbers, then tell it to multiply them and display the
result. Because different kinds of numbers (such as integers and real numbers) must be treated differently, it would be nice if there were functions to perform this multiplication on all
number types. You can see that as we require the CPU to perform more and more functions,
the number of instructions can rapidly increase. The instruction set, or the list of commands
the CPU can understand and carry out, can become quite complex as programs perform
more functions. A processor that works like this is called a CISC CPU.
CISC and RISC CPUs differ in the following ways:
•
Complex versus simple instructions—CISC CPUs are generally more complex, meaning
each instruction does more work than a single RISC instruction. Some instructions
carried out by CISC CPUs may require several RISC instructions to perform the same
task. For example, say you want to add two numbers that are stored in memory
Copyright 2017 Cengage Learning. All Rights Reserved. May not be copied, scanned, or duplicated, in whole or in part. WCN 02-200-203
Basic CPU Architecture
117
locations X and Y and store the result back in memory location X. The CISC CPU
code might look like the following:
add X, Y
Behind the scenes, the CPU must load the data from location X into one of its registers,
load the data from location Y into another one of its registers, perform the calculation,
the result of which is stored in another register, and then move the result back into memory location X. To perform the same task with a RISC processor, you might have several
instructions:
load R1, X
load R2, Y
add R1, R2
stor R1, X
In the above example, the RISC CPU requires four instructions: two to load the numbers to be added from memory (X and Y) into registers (R1 and R2), one to perform
the addition, and one to store the result from its register (R1) back to memory (X). As
you can see, CISC instructions are much more complex because they do a lot of work
that doesn’t require specific instructions, whereas RISC CPUs require the programmer
(or compiler) to explicitly write those instructions. Based on the above example, what
advantage is there in using a RISC CPU? It has to do with clock cycles.
•
Clock cycles—The single add instruction on a CISC CPU might take four CPU clock
cycles, whereas each of the four instructions carried out by the RISC CPU will take one
clock cycle each. In this example, it takes both CPU types the same number of clock
cycles to perform the same task. Some instructions on CISC CPUs might require one
clock cycle; others might need two, four, or more clock cycles. Conversely, most
instructions on RISC CPUs take only one clock cycle. Because the instructions on RISC
CPUs take a uniform number of clock cycles, designers can use this fact to their
advantage with pipelining.
•
Pipelining Pipelining is the ability of the CPU to perform more than one task on a
Pipelining—
single clock cycle. For example, if you have a series of additions to perform, a RISC
processor doesn’t have to wait for all four instructions to complete before it moves on
to the next addition. While the second load instruction of the first addition is being
performed, the RISC processor can be loading the first value for the next addition.
While pipelining does occur in CISC CPUs, the varying number of cycles it takes to
complete each instruction makes pipelining more difficult and not as effective, compared
to RISC CPUs. Figure 3-2 shows how pipelining and the number of cycles required per
instruction can affect execution time. In the figure, a CISC CPU and RISC CPU are
each performing a series of three additions. With the CISC CPU, only three instructions
are required, but each instruction takes four clock cycles and the first instruction is
completed before the second instruction is started. With the RISC CPU, each addition
takes four instructions of one clock cycle each, but using pipelining, the second addition
is started while the first addition is still under way, allowing the RISC CPU to complete
all three additions in only six cycles, as opposed to 12 cycles for the CISC CPU.
Copyright 2017 Cengage Learning. All Rights Reserved. May not be copied, scanned, or duplicated, in whole or in part. WCN 02-200-203
3
118
Chapter 3 The Central Processing Unit (CPU)
CISC CPU
Three additions in 12 clock cycles
1
2
3
4
5
Clock cycles
6
7
8
add (2nd addition)
add (1st addition)
9
10
11
12
add (3rd addition)
RISC CPU
Three additions in 6 clock cycles
1
load
2
load
load
Clock cycles
3
4
add
stor
load
add
load
load
5
stor
add
6
stor
1st addition
2nd addition
3rd addition
Figure 3-2 CISC processing versus RISC processing using pipelining
•
Hardware versus microcode—Because CISC instructions are so complex, there is actually a small program inside the chip that must interpret and execute each instruction.
This small program is called microcode. RISC instructions are all executed directly by
the CPU hardware, with no microcode middleman. This approach makes for faster
execution of individual instructions.
•
Compiler A compiler is a computer program that takes a high-level language like C#
Compiler—
or Java and turns it into assembly code that is executed by the CPU. Due to the
complexity of CISC-based instructions, the compiler has less work to do because the
high-level language code need not be broken down into as many assembly language
steps. Taking the example of an addition instruction from before, the C# or Java code
might look like the following:
X = X + Y;
The compiler then translates that statement into assembly code for a CISC CPU. The
assembly code might also be a single line of code:
add X, Y
By comparison, several lines of code might be needed when the compiler translates the statement into assembly code for a RISC CPU:
load R1, X
load R2, Y
add R1, R2
stor R1, X
Copyright 2017 Cengage Learning. All Rights Reserved. May not be copied, scanned, or duplicated, in whole or in part. WCN 02-200-203
Basic CPU Architecture
119
After a high-level language program is compiled to assembly language,
another step called assembly is needed before it can be executed by
the CPU. Assembly translates assembly code into machine code. With
machine code, each assembly language statement is translated into a
series of numbers—for example, the statement load R1, X might be
translated to something like 09 101 2215. Remember, computers can
only interpret numeric values; the software they run translates numbers
into human-readable form, and vice versa.
•
Number and usage of registers—As mentioned, a register is a temporary holding location on a CPU where data must be placed before the CPU can use it. Because so much
room is used for microcode on CISC CPUs, there are far fewer registers than on a
RISC chip, which doesn’t use microcode. The more registers there are, the more simultaneous operations the CPU can perform, as you saw with pipelining. One of the reasons pipelining is easier with RISC CPUs is because there are more registers to store
data for pipelined instructions. In addition, CISC CPUs erase their registers after each
instruction and require them to be reloaded with each successive instruction, whereas
RISC CPUs can leave data in registers until the register is needed for another operation.
CISC and RISC CPUs continue to be produced. The debate between
which is better is muddied by the inclusion of CISC features in RISC CPUs
and RISC features in CISC CPUs. Intel processors are still considered
to be CISC.
Speed
The speed of a CPU defines how fast it can perform operations. There are many ways to
indicate speed, but the most frequently used indicator is the internal clock speed of the CPU.
As you may know, a CPU runs on a very rigid schedule along with the rest of the computer.
The clock provides this schedule to make sure that all the chips know what to expect at a
given time. The internal clock speed tells you how many clock pulses, or ticks, are available
per second. Typically, the CPU performs some action on every tick. The more ticks per
second there are, the faster the CPU executes commands, and the harder the electronics on
the CPU must work. The clock speed for a CPU can be lower than 1 million ticks per second
(1 megahertz or MHz) or higher than 4 billion ticks per second (4 gigahertz or GHz). The
faster the clock is, the faster the CPU, and the more expensive the hardware. Also, as more
components are needed to make a CPU, the chip uses more energy to do its work. Part of
this energy is converted to heat, causing faster CPUs to run warmer, which requires more
fans in the chassis. Overheating of computer components in general and CPUs in particular
is a constant battle faced by IT departments; it requires considerable investment in the cooling
systems of data centers.
Copyright 2017 Cengage Learning. All Rights Reserved. May not be copied, scanned, or duplicated, in whole or in part. WCN 02-200-203
3
120
Chapter 3 The Central Processing Unit (CPU)
From the Trenches …
A college upgraded from 1.8 GHz computers to a model running at 3.06 GHz. The computers were plugged in and ran for about five minutes before the video became scrambled and stopped working. Several calls were made to customer service; after four days
of work, technicians determined that the computers had a heating problem. The computers
were built at sea level, where they worked just fine, but the college was in a city at an
elevation of over 5000 feet. Air contains fewer molecules as the altitude increases.
Molecules hitting the surface of the CPU carry away the heat, and at higher elevations,
there aren’t as many molecules, so there is less air movement to cool the warmer CPUs.
These warmer CPUs were overheating the video circuitry and causing the problems. The
manufacturer’s addition of dual-chassis fans to each computer corrected the problem.
In addition to performing fast operations inside the CPU, the chips must be able to communicate with the other chips in the computer. This is where the external clock speed of the CPU
comes in. While a CPU may run internally at a speed of 3 GHz, it typically uses a lower
clock speed to communicate with the rest of the computer. The reason for the lower speed is
again cost, to a large extent. It would be extremely expensive to make every component
in the computer run as fast as the CPU. Therefore, the other components in the computer
typically run at a reduced clock rate. Usually, the external clock speed is one-half, one-third,
one-fourth, or one-eighth the speed of the internal CPU clock.
Cache
If a CPU wants to get a few numbers out of memory, and its internal clock speed is four
times faster than its external clock speed, it obviously must wait on the external clock,
which could be very inefficient. To avoid this problem, modern CPUs have cache memory
built into the chip. Cache memory works by providing extremely fast access to data so the
CPU doesn’t have to wait for main RAM. While the CPU is executing program code, instructions or data that are most likely to be used next are fetched from main memory and placed
in cache memory. When the CPU needs the next bytes of data or the next instruction, it
looks in cache first. If the information cannot be found, the CPU then fetches it from main
memory. The more often the CPU can find the data in cache, the faster the program will
execute. There are different levels of cache, with each successive level becoming larger, but
slower:
•
Level 1 cache—Level 1 (L1) cache is the fastest of the cache types; usually it runs at
the same speed as the CPU, so the CPU won’t have to wait for data if it can be
found in L1 cache. However, L1 cache is the least plentiful—typically 8 to 32 KB
per processor core—so it can’t hold much data. L1 cache is usually divided into two
parts: instruction cache and data cache. L1 cache is always an integral part of the
CPU chip on modern CPUs.
•
Level 2 cache—Level 2 (L2) cache is somewhat slower than L1 cache, but much larger.
Many CPUs today have 256 KB of L2 cache per processor core. The combination of
L1 cache and L2 cache greatly increases the chances that the data the CPU needs will
Copyright 2017 Cengage Learning. All Rights Reserved. May not be copied, scanned, or duplicated, in whole or in part. WCN 02-200-203
Basic CPU Architecture
121
be located in cache, so the CPU will not have to access much slower main memory.
L2 cache is also an integral part of the CPU chip on modern CPUs.
•
•
Level 3 cache—Level 3 (L3) cache, until the last several years, was not part of the CPU
chip, but was instead a part of the motherboard. This meant that L3 cache could be
fairly large, but considerably slower than L1 and L2 cache. On the more advanced
CPUs, L3 cache is part of the CPU and is shared among the CPU cores. L3 cache can
often be found in sizes of 8 MB, 16 MB, and greater.
Level 4 cache—Level 4 (L4) cache, if it exists, will usually be found on the motherboard. If a CPU has L1, L2, and L3 cache and is installed on a motherboard that has
built-in cache, the cache on the motherboard will become L4 cache. If a CPU only has
L1 and L2 cache, the motherboard cache will become L3 cache. The exception is the
high-end version of some CPUs that are starting to come with on-board L4 cache.
Some of these high-end CPUs have as much as 128 MB of L4 cache that is shared
among the CPU cores.
The amount of cache, especially for larger CPUs, determines the speed of the CPU. In many
cases, up to 95 percent of the data a CPU needs to transfer to and from memory is present in
one of the caches when the CPU needs it. A specialized piece of hardware called the cache
controller predicts what data will be needed, and makes that data available in cache before
it is needed. Most modern CPUs can also use the cache to write data to memory and ensure
that the CPU will not have to wait when it wants to write results to memory. You can see
that intelligent, fast cache controllers and large amounts of cache are important components
for increasing the speed of a CPU.
Address Bus
The address bus is an internal communications pathway that specifies the source and target
addresses for memory reads and writes. It is instrumental in the transfer of data to and from
computer memory. The address bus typically runs at the external clock speed of the CPU.
The address, like all data in the computer, is in digital form and is conveyed as a series of
bits. The width of the address bus is the number of bits that can be used to address memory.
A wider bus means the computer can address more memory, and therefore store more data
or larger, more complex programs. For example, a 16-bit address bus can address 64 kilobytes, or KB (65,536 bytes) of memory, and a 32-bit address bus can address roughly 4 billion
bytes, or 4 gigabytes (GB) of memory. Modern processors have a 64-bit address bus, allowing
them to address 16 terabytes (TB) of memory.
Data Bus
The data bus allows computer components, such as the CPU, display adapter, and main
memory, to share information. The number of bits in the data bus indicates how many bits
of data can be transferred from memory to the CPU, or vice versa, in a single operation. A
CPU with an external clock speed of 1 GHz will have 1 billion ticks per second to the external bus. If this CPU has a 16-bit data bus, it could theoretically transfer 2 GB (2,000,000,000
bytes) of data to and from memory every second. (One byte consists of 8 bits, so 1 billion
16 bits/8 bits per second ¼ 2 GB per second.) A CPU with an external clock speed of 1 GHz
and a 64-bit data bus could transfer as much as 8 GB per second (1 billion 64 bits/8 bits
Copyright 2017 Cengage Learning. All Rights Reserved. May not be copied, scanned, or duplicated, in whole or in part. WCN 02-200-203
3
122
Chapter 3 The Central Processing Unit (CPU)
per byte). That is four times as much data in the same time period, so in theory, the CPU will
work four times as fast.
There are a couple of catches here. First, the software must be able to instruct the CPU to use
all of the data bus, and the rest of the computer must be fast enough to keep up with the
CPU. Most CPUs work internally with the same number of bits as on the data bus. In other
words, a CPU with a 64-bit data bus can typically perform operations on 64 bits of data at a
time. Almost all CPUs can also be instructed to work with chunks of data narrower than the
data bus width, but in this case the CPU is not as efficient because the same number of clock
cycles is required to perform an operation, whether or not all bits are used. All Windows
versions from Windows XP forward include a 64-bit version, and starting with
Windows Server 2008 R2, all server versions are 64-bit only.
Control Bus
The CPU is kept informed of the status of the computer’s resources and devices, such as the
memory and disk drives, by information transported on the control bus. The most basic
information transported across the control bus indicates whether a particular resource is
active and can be accessed. If a disk drive becomes active, for example, the disk controller
provides this information to the CPU over the control bus. Other information that may be
transported over the control bus includes whether a particular function is for input or output.
Memory read and write status is transported on this bus, as well as interrupt requests (IRQs).
An interrupt request is a request to the processor to “interrupt” whatever it is doing to take
care of a process, such as a read from a disk drive, which in turn might be interrupted by
another process, such as a write into memory.
CPU Scheduling
CPU scheduling determines which process to execute when multiple processes are waiting to
run. For example, if you have three applications open on your computer, each application
must be scheduled to get CPU time. The CPU switches between the applications very quickly
based on factors like priority, so users don’t typically notice that this switching, or timeslicing, is occurring. CPU scheduling is not a function built into the CPU; rather, it is a function of the operating system. However, the architecture of the CPU can greatly facilitate a
system’s ability to efficiently schedule multiple processes. Recall from Chapter 1 that a
process is a program that’s loaded into memory and run by the CPU. Most PC operating
systems of the 1970s and 1980s were basically single threaded, meaning they could only
schedule the process to run as a whole. Beginning with the Windows NT operating system,
the use of CPU scheduling algorithms began to evolve to allow multithreading, which is the
ability to run two or more parts of a process, known as threads, at the same time. A thread
is the smallest piece of computer code that can be independently scheduled for execution.
For example, if a user is running a word processor, one thread might accept input from the
keyboard and format it on the screen while another thread does a spell check as the user
types. Switching between threads takes a considerable number of CPU instructions to accomplish, so it was only practical to begin including this feature in OSs when CPUs became
powerful enough to support it. Modern CPUs with multiple cores are designed specifically
for multithreading, so switching between threads is extremely efficient when compared to
the operation in older CPUs. Some Intel CPUs contain a feature called Hyper-Threading.
Copyright 2017 Cengage Learning. All Rights Reserved. May not be copied, scanned, or duplicated, in whole or in part. WCN 02-200-203
Popular PC Processors
123
Hyper-Threading (HT) allows two threads to run on each CPU core simultaneously. In some
ways, this feature doubles the amount of work a CPU can do. When monitoring a CPU with
a program such as Task Manager, each CPU core is actually seen as two logical processors,
so a 4-core CPU will be reported as having 8 logical processors.
3
Popular PC Processors
The following sections provide an overview of the CPUs found in PCs and of more powerful
64-bit processors that are available for PCs and servers.
Intel
The most popular CPUs used in PCs today are designed by Intel. The first player in this line of
processors was the 8088, the CPU found in the original IBM PC. Early Intel CPUs were identified by model numbers: 8088, 8086, 80286, 80386, and 80486. The model numbers are sometimes shown without the 80 prefix, or are preceded by an “i,” as in 80486, 486, or i486. The
Pentium family of chips followed the 486 (penta means five in Greek). Pentium chips are sometimes identified with just a P and a number—for example, P4 for Pentium 4. Table 3-1 lists
single-processor Intel CPUs, including the Celeron, Pentium III, and Pentium 4. The Intel
Itanium and Itanium 2 are 64-bit processors designed for higher-end PCs and servers. Notice
the trends in Table 3-1 toward ever-faster internal and external clock speeds, more and larger
cache, and increasing capability to handle multimedia and large amounts of data.
Table 3-1
Single-core Intel CPUs
CPU
Year
introduced
Data bus/
address
bus bits
Internal
clock
speed
External
clock
speed
Cache
Comments
8088
1978
8/20
4 8 MHz
4–8
4 8 MHz
4–8
No
CPU of the first IBM PC.
8086
1978
16/20
4 16 MHz
4–16
4 16 MHz
4–16
No
First Intel CPU to have a 16-bit
data path.
80286
1982
16/24
8 40 MHz
8–40
8 40 MHz
8–40
No
Beginning of the 80x86 line.
80386SX
1985
16/24
16 40 MHz
16–40
16 40 MHz
16–40
No
Less expensive version of 386 chip;
supported only 16-bit data bus.
80386DX
1985
32/24
16 40 MHz
16–40
16 40 MHz
16–40
No
Introduced 32-bit data bus.
80486SX
1989
16/24
16 80 MHz
16–80
16 40 MHz
16–40
Yes
Less expensive version of 486 chip;
supported only 16-bit data bus.
80486DX
1989
32/24
16 120 MHz
16–120
16 40 MHz
16–40
Yes
First Intel chip to use different
internal and external clocks,
include a math coprocessor, and
include L1 cache on the chip as well
as features for external L2 cache.
Pentium
1993
32/28
16 266 MHz
16–266
16 66 MHz
16–66
Yes
More instructions added and L1
cache was made more efficient.
(continues)
Copyright 2017 Cengage Learning. All Rights Reserved. May not be copied, scanned, or duplicated, in whole or in part. WCN 02-200-203
124
Chapter 3 The Central Processing Unit (CPU)
Table 3-1
Single-core Intel CPUs (continued )
Year
introduced
Data bus/
address
bus bits
Internal
clock
speed
External
clock
speed
Cache
Comments
Pentium
Pro
1995
64/28
33 200 MHz
33–200
33 50 MHz
33–50
Yes
Optimized for running 32-bit
instructions. Intel also released
the Multimedia Extension (MMX),
with new instructions to deal with
multimedia and handling large
amounts of data.
Pentium II
1997
64/36
66 550 MHz
66–550
66
66–100
MHz
Yes
Inclusion of L1 cache running at
internal clock speed as well as L2
cache running at external or twice
the external clock speed; both
were built right onto the CPU
module.
Xeon
1998
64/36
500 MHz–
MHz
3.66 GHz
400–800
MHz
Yes
Offered as a version of the
Pentium II and Pentium III
processors. Used a new L2 caching
technique that was twice as fast as
non-Xeon processors. The newer
Xeon MP chips also had a new
instruction set that improved
video, encryption, and
authentication performance—
features important for busy Web
servers. It also used HyperThreading technology, and L3
cache of 512 KB, 1 MB, or 2 MB
was available.
Celeron
1998
64/36
850 MHz–
MHz
3.06 GHz
66–800
MHz
Yes
Low-end processor for PC
multimedia and home markets.
Pentium III
1999
64/36
600 MHz–
MHz
1.2 GHz
100–133
MHz
Yes
Introduced Streaming SIMD
Extensions. SIMD, which stands for
single-instruction, multiple-data
stream processing, is an
instruction set designed to
provide better multimedia
processing.
Pentium 4
2001
64/36
1.3
1.3–3.88
GHz
400–1066
MHz
Yes
Included two math coprocessors;
also used execution-based cache.
Extreme Edition supported HyperThreading, a technology that
enables a single processor to
appear to the operating system
as two separate processors.
The Pentium 4 had a similar
architecture to the Xeon MP
but added an execution-based
cache, which was even faster
than the original Xeon cache.
CPU
Copyright 2017 Cengage Learning. All Rights Reserved. May not be copied, scanned, or duplicated, in whole or in part. WCN 02-200-203
Popular PC Processors
Table 3-1
125
Single-core Intel CPUs (continued )
CPU
Year
introduced
Data bus/
address
bus bits
Internal
clock
speed
External
clock
speed
Cache
Comments
Itanium
2001
64/128
733
733–800
MHz
266 MHz
Yes
First RISC-based Intel chip, 64-bit
with EPIC architecture; designed
for high-end PC workstations and
servers.
Itanium 2
2002
64/128
1.3 1.5 GHz
1.3–1.5
400 MHz
Yes
Extended the Itanium family of
CPU chips; optimized for dualprocessor servers and
workstations.
Pentium M
2003
64/36
900 MHz–
MHz
2.26 GHz
400–533
MHz
Yes
Pentium M referred to a group of
mobile single-core processors.
Multicore
processors
Table 3-2 lists Intel multicore processors starting with the
Pentium D.
A very important feature of Intel CPUs is backward compatibility,
which means that a significant number of features from an older chip
can function on a newer chip. For example, code written to run on an
8088 processor runs on a newer CPU without change. Because the
8088 code is 16-bit code, it does not use many of the advanced features of the newer CPUs, and it runs more slowly than code written
especially for the CPU. Backward compatibility is one of the major reasons for the success of the Intel line of CPUs. The Itanium line of Intel
CPU chips is not backward-compatible.
The Intel Itanium and Itanium 2 processors are a significant departure from previous Intel
processors in two respects: they are built on the RISC-based EPIC architecture and they are
64-bit chips. The Itanium features the complete EPIC design allotment of 256 64-bit registers
that can operate as rotating registers. In order to use the capabilities of the Itanium 64-bit
processor, the operating system and applications must be recompiled or rewritten to use
64-bit processing.
The Intel Itanium processor is intended for very large-scale operations
that match powerful mainframes. For this reason, the chip architecture
and bus design include the capability to run more than 1000 processors
as a group.
Initially, processors were developed with one core, which executed the program instructions.
Today, these cores are independent of each other and are packaged on a single chip. Some
processors today contain 6, 8, 12, 16, and even more cores. Multicore processors are the
norm today, and even smartphones and tablets frequently contain two or four cores.
Copyright 2017 Cengage Learning. All Rights Reserved. May not be copied, scanned, or duplicated, in whole or in part. WCN 02-200-203
3
126
Chapter 3 The Central Processing Unit (CPU)
Table 3-2 lists multicore Intel CPUs along with the number of cores and the cache size.
Notice that the Intel Core i3, i5, and i7 processors have bus speeds referred to in terms of
GT/s, or gigatransfers per second.
These tables are not intended to be comprehensive; rather, they are
intended to show the progression of CPUs and CPU architecture
through the years.
Table 3-2
Multicore Intel CPUs
CPU
Year
introduced
Cores
Speed
Bus speed
Cache
Pentium D
2005
2
2.64–3.60
3.60 GHz
533 1055 MHz
533–1055
1 MB
1–2
Xeon
2005
2–8
8
1.68 3.73 GHz
1.68–3.73
667 1600 MHz
667–1600
2
2–24
MB
Itanium
2006
2–4
4
1.40 1.73 GHz
1.40–1.73
400 667 MHz
400–667
8
8–24
MB
Intel Core Solo
2006
1
1.06–1.86
1.86 GHz
533 667 MHz
533–667
2 MB
Intel Core Duo
2006
2
1.06–2.33
2.33 GHz
533 667 MHz
533–667
2 MB
Pentium Dual-Core
2007
2
1.60–3.33
3.33 GHz
800 1066 MHz
800–1066
1 MB
1–2
Intel Core 2 Duo
2007
2
1.86–3.33
3.33 GHz
800 1333 MHz
800–1333
3 MB
3–6
Intel Core 2 Quad
2007
4
2.33–3.00
3.00 GHz
1066 1333 MHz
1066–1333
4
4–12
MB
Intel Core 2 Extreme
2008
2
2.00–3.20
3.20 GHz
1066 1600 MHz
1066–1600
6
6–12
MB
Atom
2008
1
800 MHz–2.13
2.13 GHz
400 533 MHz
400–533
512 KB–1
KB MB
Intel Core i7
2009
4–6
6
1.06 3.33 GHz
1.06–3.33
2.5 GT/s–4.8
GT/s 4.8 GT/s
4
4–12
MB
Intel Core i5
2009
2–4
4
1.06 3.76 GHz
1.06–3.76
2.5 GT/s
3–8 MB
Intel Core i3
2010
2
1.20–3.06
3.06 GHz
2.5 GT/s
4 MB
Table 3-2 stops with processors released in 2010, but that doesn’t mean Intel stopped developing new CPUs. For the most part, Intel has maintained the same naming structure for its
products, with new processors named Pentium, Core i3, Core i5, and Core i7. Intel differentiates its models by adding a number and microarchitecture code name after the name of the
CPU. Microarchitecture is the description of a CPU’s internal circuitry, defining characteristics such as the technology used to create the chip, the supported instruction set, the bit size,
and so forth. For example, the Intel Core i7-5820 Haswell-E is a 6-core process running
at 3.3 GHz based on the Haswell microarchitecture, which was released in 2013. The most
current microarchitecture, released in 2015, is called Skylark. It has bus transfer speeds up
to 8 GT/s, up to 128 MB L4 cache, and four cores; it runs at speeds up to 4 GHz.
Try Hands-On Projects 3-1 through 3-6 to practice monitoring processor
usage and obtain information on the CPU in Windows-based, Linuxbased, and Mac-based operating systems.
Copyright 2017 Cengage Learning. All Rights Reserved. May not be copied, scanned, or duplicated, in whole or in part. WCN 02-200-203
Popular PC Processors
127
AMD
Advanced Micro Devices, Inc. (AMD) manufactures CPU chips that compete with Intel
PC chips. Table 3-3 lists single-core AMD chips, some of which are still being manufactured. More recent versions of these chips use multicore technology, and are listed in
Table 3-4.
Table 3-3
3
Single-core AMD processors
Processor
Latest clock speeds
(MHz or GHz)
Compares to Intel chip
System bus speed (MHz)
AMD-K6-2
166–475 MHz
Pentium II, Celeron
66, 95, 100
AMD-K6-III
350–450 MHz
Pentium II
100
Duron
1–1.3 GHz
Celeron
200
Athlon
Up to 1.9 GHz
Pentium III
200
Athlon Model 4
Up to 1.4 GHz
Pentium III
266
Athlon MP
1.4–2.1 GHz
Pentium III
200 to 400+
Athlon XP
Up to 2.2 GHz
Pentium 4
266, 333, 400
Opteron (64-bit)
1.4
1.4–2.0
GHz
Itanium
244
Table 3-4
Multicore AMD processors
Processor
Clock speeds (MHz or GHz)
Cores
Compares to Intel chip
Athlon II
1.8–3.3 GHz
2–4
Intel Core 2 Duo
Phenom II
2.5–3.5 GHz
2–6
Intel Core 2 Quad
Phenom
1.8–2.6 GHz
3–4
Intel Core 2 Quad
Athlon X2
2.3–2.8 GHz
2
Intel Core 2 Duo
Opteron 4000 Series
1.7
1.7–2.8
GHz
8–12
Itanium/Xeon
Opteron 6000 Series
1.7
1.7–2.4
GHz
6
Itanium/Xeon
Like Intel, AMD continues to develop CPUs with names based on the series, such as Athlon
and FX, and the core architecture, such as Zambezi and Vishera. As of 2016, one of AMD’s
most current processors for desktop computers is the FX-8320 Vishera, which sports 8 cores
running at up to 4.7 GHz, with 8 MB L2 and 8 MB L3 cache.
Other Processors
In addition to Intel and its direct competitors, several other manufacturers produced processors for various types of computers, including Motorola, PowerPC, SPARC, and Alpha
chips.
Motorola Motorola chips were typically found in Macintosh computers. Its line of CISC
CPUs is used in many older Macintosh computers, as well as in many older UNIX
Copyright 2017 Cengage Learning. All Rights Reserved. May not be copied, scanned, or duplicated, in whole or in part. WCN 02-200-203
128
Chapter 3 The Central Processing Unit (CPU)
computers. The popular models were the 68000, 68020, 68030, and 68040. The development of the chips’ features was roughly similar to the development in the Intel line; the
68020 showed many similarities to the 80286, the 68030 was similar to the 80386, and
the 68040 was similar to the 80486. Motorola has discontinued these chips.
PowerPC This line of chips used different instruction sets and a different general architecture than the Motorola 68xxx line, and was developed jointly by Apple Computer, IBM,
and Motorola, an alliance referred to as AIM. These RISC chips were known as the
PowerPC line. In 2005, Apple moved to using Intel chips and Motorola left the CPU
manufacturing business.
SPARC SPARC, which stands for Scalable Processor Architecture, is a RISC processor
designed by Sun Microsystems and continued with Oracle Corporation’s acquisition of
Sun Microsystems. SPARC CPUs have gone through many incarnations, and the RISC
processor is the most popular on the market today. The SPARC M7 from Oracle is the
current version of the SPARC processor. It is a 64-bit chip with 64-bit address and data
buses. The SPARC M7 contains 32 cores, runs at speeds up to 4.1 GHz, and has an L3
cache of 64 MB.
Primarily, you will see various implementations of the UNIX operating system running on
these CPUs, performing high-end engineering and networking duties. The most popular
operating system that uses the chip is Oracle Corporation’s Solaris. (Solaris is SunOS with
a desktop window system.) Dell and HP have announced they will resell Oracle Solaris for
their platforms.
Alpha Another CPU of interest is the Alpha CPU, originally designed by Digital Equipment Corporation (DEC). DEC was purchased by Compaq, which in turn was purchased
by HP. The Alpha CPU was found in older high-end HP Compaq servers; it had a 64-bit
data bus and a 64-bit address bus. The internal clock speed could be as high as 1.3 GHz. It
was the first chip to reach a speed of 1 GHz. The Alpha used a traditional 64 KB L1 cache
and an external L2 cache that could go up to 8 MB. Similar to the SPARC, Alpha chips
were widely used in the UNIX environment. Also like the SPARC, Alpha chips were found
in computers that had heavy networking, engineering, and graphics duties. Many proprietary
devices, such as file servers, firewall products, and routers, ran custom operating systems
based on an Alpha architecture.
HP has moved away from Alpha chips in its high-end server computers,
replacing the Alpha with the Intel chipset. HP continued development
of the Alpha into 2004, production through 2006, and support
through 2011.
There are many other CPUs, but many of the details about these chips are beyond the focus
of this book. The CPUs discussed here are the most popular in PCs today and the most
often used by the operating systems covered in this book.
Copyright 2017 Cengage Learning. All Rights Reserved. May not be copied, scanned, or duplicated, in whole or in part. WCN 02-200-203
Key Terms
129
Chapter Summary
■
One of the main functions of the operating system is to provide the interface between
the various application programs running on a computer and the hardware inside.
Processor hardware improvements have marched steadily from the early 8088 chip
to the modern 64-bit multicore processors. Operating systems paralleled these changes
to take advantage of the capabilities of new processors at each stage of development.
Processors continue to become faster and more efficient.
■
Most CPUs are composed of a control unit, arithmetic logic unit, registers, and a
system bus, which is composed of a control bus, address bus, and data bus.
■
CPUs can be classified by several elements, including design type, speed, cache,
address bus, data bus, control bus, and CPU scheduling. Design types include CISC
and RISC. CISC makes programming less complex but RISC can be faster in many
instances.
■
The amount of cache is critical to a CPU’s overall speed because it is much faster than
RAM. Modern CPUs have L1, L2, L3, and sometimes L4 cache built into the processor chip.
■
CPU scheduling allows an operating system to schedule multiple processes or threads.
Multicore processors facilitate efficient CPU scheduling.
■
Intel processors are the most popular CPUs in PCs today, but AMD processors are
also frequently used. Some processors come with 16 or more cores. The most current
Intel microarchitecture is called Skylake, which has bus transfers up to 8 GT/s.
Among the most current AMD processors is the FX Vishera line of processors, which
have up to 8 cores.
■
Other processors include the Motorola, PowerPC, the SPARC, and the Alpha.
Key Terms
address bus An internal communications pathway inside a computer that specifies the
source and target address for memory reads and writes.
arithmetic logic unit (ALU) A component of a CPU that executes instructions.
backward compatibility The ability of features from an older chip to function on a newer
chip.
bus A path or channel between a computer’s CPU and the devices it manages, such as
memory and I/O devices.
cache controller Internal computer hardware that manages the data going into and loaded
from the computer’s cache memory.
cache memory Special computer memory that temporarily stores data used by the CPU.
Cache memory is physically close to the CPU and is faster than standard system memory,
enabling faster retrieval and processing time.
Copyright 2017 Cengage Learning. All Rights Reserved. May not be copied, scanned, or duplicated, in whole or in part. WCN 02-200-203
3
130
Chapter 3 The Central Processing Unit (CPU)
compiler A computer program that takes a high-level language like C# or Java and turns it
into assembly code that is executed by the CPU.
Complex Instruction Set Computing (CISC) A computer CPU architecture in which
processor components are reconfigured to conduct different operations as required. Such
computer designs require many instructions and more complex instructions than other
designs. Compare to Reduced Instruction Set Computing (RISC).
control bus An internal communications pathway that keeps the CPU informed of the status
of particular computer resources and devices, such as memory and disk drives.
control unit (CU) A component of a CPU that provides timing and coordination between the
other parts of the CPU, such as the arithmetic logic unit, registers, and system bus.
core The part of a processor used to read and execute instructions.
data bus An internal communications pathway that carries data between the CPU and
memory locations.
external clock speed The speed at which the processor communicates with the memory and
other devices in the computer; usually one-fourth to one-half the internal clock speed.
floating point unit (FPU) A component of a CPU that executes floating point mathematical
operations.
Hyper-Threading (HT) A feature of some Intel CPUs that allows two threads to run on each
CPU core simultaneously.
instruction set In a computer CPU, the group of commands (instructions) the processor
recognizes. These instructions are used to conduct the operations required of the CPU by the
operating system and application software.
internal clock speed The speed at which the CPU executes internal commands, measured in
megahertz (millions of clock ticks per second) or gigahertz (billions of clock ticks per
second). Internal clock speeds can be as low as 1 MHz or more than 4 GHz.
interrupt request (IRQ) A request to the processor so that a currently operating process, such
as a read from a disk drive, can be interrupted by another process, such as a write into memory.
level 1 (L1) cache Cache memory that is part of the CPU hardware. See cache memory.
level 2 (L2) cache Cache memory that is somewhat slower than L1 cache but is much larger.
See cache memory.
level 3 (L3) cache Cache memory that is slower than L1 or L2 cache but is much larger.
L3 cache is located on the CPU chip on most modern CPUs, and is shared among multiple
cores. See cache memory.
level 4 (L4) cache Cache memory that is found on some advanced modern CPUs. See cache
memory.
microarchitecture The description of the internal circuitry of a CPU that defines
characteristics such as the technology used to create the chip, the supported instruction set,
and the bit size.
microcode A small program inside a CISC CPU that must interpret and execute each
instruction.
multiprocessor computer A computer that uses more than one CPU.
Copyright 2017 Cengage Learning. All Rights Reserved. May not be copied, scanned, or duplicated, in whole or in part. WCN 02-200-203
Review Questions
131
multithreading Running several processes or parts (threads) of processes at the same time.
pipelining A CPU design that permits the processor to operate on one instruction at the
same time it is fetching one or more subsequent instructions from the operating system or
application.
Reduced Instruction Set Computing (RISC) A computer CPU design that dedicates processor
hardware components to certain functions. This design reduces the number and complexity
of required instructions and often results in faster performance than CISC CPUs. Compare
to Complex Instruction Set Computing (CISC).
register A temporary holding location in a CPU where data must be placed before the CPU
can use it.
single-processor computer A computer capable of supporting only a single CPU.
system architecture The computer hardware design that includes the processor (CPU) and
communication routes between the CPU and the hardware it manages, such as memory and
disk storage.
thread The smallest piece of computer code that can be independently scheduled for execution.
Review Questions
1. Which component of the CPU is responsible for executing arithmetic and logic
instructions?
a.
CU
b. ALU
c.
data bus
d. control bus
2. Instruction pipelining is a processing technique that allows the processor to operate
on one instruction at a time with the pipeline keeping the instructions in order.
True or False?
3. Which part of a CPU carries signals to indicate where data should be read from or
written to in the system’s memory?
a.
register
b. data bus
c.
control unit
d. address bus
4. Which of the following is true about CISC CPUs?
a.
They have a simple instruction set.
b. They require a more complex compiler.
c.
They use microcode.
d. Pipelining is easy.
Copyright 2017 Cengage Learning. All Rights Reserved. May not be copied, scanned, or duplicated, in whole or in part. WCN 02-200-203
3
132
Chapter 3 The Central Processing Unit (CPU)
5. Which of the following is used to keep the CPU informed of the status of resources and
devices connected to the computer?
a.
control bus
b. ALU
c.
microcode
d. pipeline
6. What type of computer program takes a high-level language and turns it into assembly
code?
a.
interpreter
b. compiler
c.
assembler
d. translator
7. What was the first widely used personal computer CPU manufactured by Intel?
a.
RISC
b. 80286
c.
Alpha
d. 8088
8. Where must data be placed on a CPU before it can use the data for arithmetic
instructions?
a.
FPU
b. register
c.
data bus
d. CU
9. Manufacturers rate their CPU speeds based on which characteristic?
a.
external clock speed
b. pipelining speed
c.
internal clock speed
d. core speed times the number of cores
10. Which of the following is true about RISC CPUs versus CISC CPUs? (Choose all that
apply.)
a.
They use microcode.
b. They use a complex compiler.
c.
They use more registers.
d. They have complex instructions.
Copyright 2017 Cengage Learning. All Rights Reserved. May not be copied, scanned, or duplicated, in whole or in part. WCN 02-200-203
Review Questions
133
11. Which cache level provides the fastest access to its data?
a.
L1
b. L2
c.
L3
d. L4
12. A CPU with an external clock speed of 2 GHz and a 64-bit data bus can transfer how
much data per second?
a.
8 GB/s
b. 16 GB/s
c.
32 GB/s
d. 128 GB/s
13. The list of commands a CPU can execute is referred to as which of the following?
a.
instruction set
b. instruction cache
c.
data set
d. data cache
14. AMD manufactures which of the following chips? (Choose all that apply.)
a.
Atom
b. Duron
c.
Xeon
d. Phenom
15. Which manufacturer developed the Celeron line of CPUs?
a.
Intel
b. Apple
c.
Motorola
d. AMD
16. Which line of CPUs is a RISC processor?
a.
68000
b. Atom
c.
SPARC
d. Pentium D
Copyright 2017 Cengage Learning. All Rights Reserved. May not be copied, scanned, or duplicated, in whole or in part. WCN 02-200-203
3
134
Chapter 3 The Central Processing Unit (CPU)
Hands-On Projects
Project 3-1: Monitor Processor Usage with
Task Manager
Use Windows Task Manager to monitor processor usage.
1. Start your Windows 10 computer and log on.
2. Right-click the taskbar and click Task Manager on the shortcut menu. Click the More
details button, if necessary.
3. Click the Performance tab and click CPU in the left pane, if necessary (see Figure 3-3).
Figure 3-3 The Performance tab in Task Manager
Copyright 2017 Cengage Learning. All Rights Reserved. May not be copied, scanned, or duplicated, in whole or in part. WCN 02-200-203
Hands-On Projects
135
4. Watch the CPU history graph and note how it changes over time. Open and close a
Web browser three or four times. Look at the CPU history graph now. You should
see a distinct increase in CPU utilization.
5. Review the other information you can learn about the CPU. In Figure 3-3, you see the
CPU model at the top of the graph. Below the graph, you see the maximum speed of
the CPU, the number of cores, the number of logical processors, and the amount of
L1, L2, and L3 cache, as well as other information. Your display will likely look different depending on the type of CPU running on your system. Can you tell by looking at
Figure 3-3 if the CPU that is being monitored supports Hyper-Threading? How can
you tell?
6. Close Task Manager. Stay logged on if you are continuing to the next project.
Do not leave Task Manager running in the background when you
are not using it. Task Manager uses CPU and memory resources
and could slow down the computer.
Project 3-2: Check Processor Status in
Device Manager
Most Windows-based systems can report on whether the processor (or any
other hardware device) is working properly. This project shows you how to
check the status of the processor.
1. Log on to your Windows computer, if necessary.
2. Right-click Start, and click Device Manager.
3. Double-click Processors (see Figure 3-4). How many processors are displayed? Doubleclick a processor in the list.
Copyright 2017 Cengage Learning. All Rights Reserved. May not be copied, scanned, or duplicated, in whole or in part. WCN 02-200-203
3
136
Chapter 3 The Central Processing Unit (CPU)
Figure 3-4 Viewing processors in Device Manager
4. Click the General tab, if necessary. The General tab shows the manufacturer and model
of the CPU, and the Device status box shows the status.
5. Click the Details tab. Here, you can see a variety of information about the device and
the device driver. Click the selection arrow under Property and browse through the
properties. Click Power data to see the various power states supported by the CPU.
6. Click Cancel to close the Processor Properties dialog box, and then close Device
Manager.
7. Log off or shut down your Windows computer.
Copyright 2017 Cengage Learning. All Rights Reserved. May not be copied, scanned, or duplicated, in whole or in part. WCN 02-200-203
Hands-On Projects
137
Project 3-3: Use System Monitor in Linux
The GNOME desktop in Linux offers the System Monitor tool for tracking
processor activity. In this project, you learn how to use the System Monitor
tool.
1. Start your Linux computer and log on.
2. Click Activities and click Show Applications. Click Utilities and then click System
Monitor.
3. Click the Resources tab, if necessary (see Figure 3-5).
Figure 3-5 System Monitor in Linux
Source: Linux
4. If your computer has more than one processor, you’ll see a color-coded line for each
processor in the CPU History section of System Monitor. (Figure 3-5 shows there are
four processors.)
5. Notice the Memory and Swap History section of System Monitor. The Memory information shows the amount of memory that is currently in use, as a percentage of the
total amount of memory. In Figure 3-5, 795.9 MiB (or MB), or 81.4 % of the total
memory is in use in a computer that has 977.3 MiB (or MB) of RAM. Review the
memory statistics for your computer.
6. Open and close several applications, such as a Web browser, terminal window, and
file editor. Return to System Monitor to see the changes in the graphs. Close System
Monitor and any open windows.
Copyright 2017 Cengage Learning. All Rights Reserved. May not be copied, scanned, or duplicated, in whole or in part. WCN 02-200-203
3
138
Chapter 3 The Central Processing Unit (CPU)
7. Click Activities, click Show Applications, and then click Settings. Click Details in the
System section. The Overview window shows basic system information, such as
the amount of memory installed, the CPU, the bit size of the OS (32-bit or 64-bit),
and the GNOME version. Close the Details window.
8. Stay logged on if you are continuing to the next project.
Project 3-4: View the cpuinfo File in Linux
In addition to using the GNOME System Monitor, you can determine information about the CPU in a Linux computer by displaying the contents of the /proc/
cpuinfo file via the less command. You learn how to do so in this project.
1. Log on to your Linux computer, if necessary.
2. Open a Terminal window.
3. At the shell prompt, type less /proc/cpuinfo (see Figure 3-6) and press Enter.
Figure 3-6 Viewing /proc/cpuinfo in Linux
Source: Linux
4. Press the Page Down key or press the Spacebar to view more of the file’s contents one
page at a time. The Page Up key takes you back through the previous pages of the file.
You can also use the up or down arrows to navigate through the file one line at a time.
5. This file shows you how many processors are in the computer, indexed by 0. If you
see only one section of information under processor 0, then you have one processor.
A second section, showing processor 1, would mean you have two processors, and so
on. Look for the model name, speed, cache size, and number of cores.
6. Press q to exit the display of the /proc/cpuinfo file’s contents.
Copyright 2017 Cengage Learning. All Rights Reserved. May not be copied, scanned, or duplicated, in whole or in part. WCN 02-200-203
Hands-On Projects
139
7. Type top and press Enter. Top is an interactive task manager that runs in a terminal
window. Look for the Tasks field. It should be displayed in the second row on the left
side of the window.
8. To toggle from task mode to thread mode, press H. (A capital H is required, so you
probably need to press Shift-H.) The Tasks field is changed to Threads and the number
increases because many tasks contain two or more threads.
9. Press q to quit the top task manager.
10. Close the Terminal window and log off or shut down your Linux computer.
Project 3-5: View Hardware Information in Mac OS X
In Chapter 1, “Operating Systems Fundamentals,” you briefly used the About
This Mac feature in Mac OS X. This feature is worth reviewing because it provides a fast way to determine what processor is in a Macintosh computer and
the amount of memory. This information can save you time, for example, if you
are planning to upgrade multiple computers to the latest version of Mac OS X
and you want to determine which ones have Intel processors and whether they
have enough RAM for the upgrade. In this project, you review how to open the
About This Mac window for information about the processor(s) and RAM.
1. Start your Mac OS X computer and log on.
2. Click the Apple icon in the top left corner of the menu bar.
3. Click About This Mac on the menu.
4. The About This Mac window not only shows the operating system version, as you
learned in Chapter 1, it also shows the number of processors, the model name and
speed of the processors, plus the amount and type of memory installed (see Figure 3-7).
Figure 3-7 The About This Mac window
Source: Mac OS X El Capitan
5. Click System Report in the About This Mac window.
Copyright 2017 Cengage Learning. All Rights Reserved. May not be copied, scanned, or duplicated, in whole or in part. WCN 02-200-203
3
140
Chapter 3 The Central Processing Unit (CPU)
6. Make sure that Hardware is highlighted in the left pane. Here you learn more about
the processor, including the speed, the number of cores, and the amount of L2 and L3
cache, if present (see Figure 3-8).
Figure 3-8 Mac OS X hardware overview
Source: Mac OS X El Capitan
7. In the left pane, click Memory under Hardware. The right pane shows information about
the number of memory slots and the RAM (if any) plugged into each slot (see Figure 3-9).
Figure 3-9 Mac OS X memory information
Source: Mac OS X El Capitan
8. Close all windows, but stay logged on if you are continuing to the next project.
Copyright 2017 Cengage Learning. All Rights Reserved. May not be copied, scanned, or duplicated, in whole or in part. WCN 02-200-203
Hands-On Projects
141
Project 3-6: Use Activity Monitor in Mac OS X
You can also use a feature called Activity Monitor to find information about
the processor and memory in a Mac OS X computer.
1. Log on to your Mac OS X computer, if necessary.
2. Ensure that Finder is active by clicking Finder in the Dock, if necessary.
3. Click Go in the menu bar and click Utilities.
4. Double-click Activity Monitor in the Utilities window.
5. Make sure the CPU button is selected to display CPU activity. A small CPU meter is displayed at the bottom of the Activity Monitor window so that you can follow the current
CPU usage. Also, as you learned in Chapter 1, the upper portion of the window shows
the amount of CPU used (under the % CPU column) by each active program or process.
6. Click the Memory button in the Activity Monitor window (see Figure 3-10). The Memory
column gives you information about the amount of RAM used by each program or
process, and the bottom portion of the window provides statistics about memory use.
Figure 3-10 Activity Monitor in Mac OS X
Source: Mac OS X El Capitan
7. Right-click any of the column headers, such as User. You can choose which columns
should be displayed. Click Bytes Written, right-click a column again, and click Bytes
Read. These columns show you the amount of data read from and written to disk;
you’ll also find these columns if you click the Disk button at the top of the window.
You can click and drag the columns to put them in any order you want.
8. Close Activity Monitor and any open windows.
9. Log off or shut down your Mac OS X computer.
Copyright 2017 Cengage Learning. All Rights Reserved. May not be copied, scanned, or duplicated, in whole or in part. WCN 02-200-203
3
142
Chapter 3 The Central Processing Unit (CPU)
Critical Thinking
The following activities give you critical thinking challenges. Challenge Labs give you an
opportunity to use the skills you have learned to perform a task without step-by-step instructions. Case projects offer a practical problem for which you supply a written solution. Not all
chapters contain Challenge Labs. There is not always a specific right or wrong answer to these
critical thinking exercises. They are intended to encourage you to review the chapter material
and delve deeper into the topics you have learned.
Challenge Labs
Challenge Lab 3-1: Work with Task Manager in Windows
In this challenge lab, you explore Task Manager in more depth. You may have to
research how to perform some of the tasks. Once you are finished, you will answer some
questions.
On your Windows computer, start Task Manager and be sure you see the Processes, Performance, and other tabs. From the Processes tab, right-click any process and click Go to
details. You see more information about the process in the Details tab. Sort the list of processes by name and then by status. In the Details tab, add columns that report the total
CPU time used by the process and the number of threads in the process.
Questions:
1. What did you do to sort the list of processes?
2. How did you add columns to the Details tab?
3. What process used the most CPU time? What do you think is the purpose of this process?
Case Projects
Mile High University has a network of servers and desktop computers that were installed in
2000. The hardware consists of the following components:
•
25 PowerPC Macintosh computers
•
Four Dell Pentium 4 servers
•
Two HP servers running on the Alpha CPU
•
160 desktop computers running on the AMD Duron CPU
•
25 desktop computers running on the Intel Core Duo CPU
•
45 desktop computers running on the Pentium 4 CPU
Using the information you learned in this chapter and previous chapters, you will be able to
make informed recommendations in the following case projects.
Copyright 2017 Cengage Learning. All Rights Reserved. May not be copied, scanned, or duplicated, in whole or in part. WCN 02-200-203
Case Projects
143
Case Project 3-1: Server Upgrades
The new Director of Information Technology has asked you to recommend a
strategy to upgrade the servers on their network. Recommendations on server
hardware, CPU chip set, speed, and caching are needed. You should also
recommend which servers to upgrade first and determine whether any servers
are still appropriate to keep.
Case Project 3-2: Desktop Computing
The director has evaluated your server recommendations and asks you to
design a strategy for upgrading the desktop hardware. He feels that most of
the university’s desktop computers need to be replaced. You should explain
your strategy.
Case Project 3-3: Hardware Overheating
The university is having some problems with the desktop computer that runs
the Intel Core Duo CPU. The computers will suddenly scramble the display
screens and freeze. Because of this, the university wants to stay away from
having desktops running any of the Intel CPUs. What would you recommend
to address the problem? Research some of the causes of overheating hardware
and suggest possible remedies. In addition, what desktop CPUs would you recommend for replacing their older hardware? Provide an explanation for your
recommendation and what the university should do in the future.
Copyright 2017 Cengage Learning. All Rights Reserved. May not be copied, scanned, or duplicated, in whole or in part. WCN 02-200-203
3
Copyright 2017 Cengage Learning. All Rights Reserved. May not be copied, scanned, or duplicated, in whole or in part. WCN 02-200-203
chapter
4
File Systems
After reading this chapter and completing the
exercises, you will be able to:
●
●
●
●
List the basic functions common to all file systems
Use and describe the file systems used by Windows OSs
Use and describe the file systems used by UNIX and Linux systems,
including ufs and ext
Use and describe the Mac OS X Extended (HFS+) file system
Copyright 2017 Cengage Learning. All Rights Reserved. May not be copied, scanned, or duplicated, in whole or in part. WCN 02-200-203
145
146
Chapter 4 File Systems
In this chapter, you learn the general characteristics and functions of file systems,
including their organization and specific features. You then explore the file systems used by
Windows, UNIX/Linux, and Macintosh operating systems. You also learn about the tools
available for file systems, such as tools for locating files and fixing damaged files.
Understanding File System Functions
One of the basic functions of an operating system is to enable you to store and access information on a computer or other digital device. This information might be letters, a report,
spreadsheet files, your favorite music, or pictures of your family. All of this vital information
is managed, stored, and retrieved through a file system. In one sense, a file system is like your
personal assistant, properly saving and keeping track of the location of your important data.
The file system allocates locations on a disk for storage and keeps a record of where specific
information is kept. When you need the information, the file system consults its records to
determine the location and then retrieves the information. Some file systems also implement
recovery procedures when a disk area is damaged or when the operating system unexpectedly
goes down, such as during a power failure.
To fulfill all these functions, the file systems used by computer operating systems perform the
following general tasks:
•
Provide a convenient interface for users and applications to open and save files
•
Provide a hierarchical structure to organize files
•
Store file metadata to provide detailed information about files
•
Organize space on a storage device
User Interface
When a user double-clicks a file to open it, the user interface calls the file system with a
request to open the file. The file type determines exactly how the file is opened. If the file is
an application, the application is loaded into memory and run by the CPU. If the file is a
document, the application associated with the document type is loaded into memory and
opens the file. For example, on Windows computers, if you double-click the Budget.xls file,
the Excel application is loaded into memory and then opens the file. If a user creates a file
or changes an existing file and wants to save it, the application calls the file system to store
the new or changed file on the disk. Most users of an OS interact with the file system by
using a file manager program, such as File Explorer in Windows or Files in the GNOME
desktop in Linux. As a future computer or network professional, you need to have a deeper
understanding of how a file system works so that you can make informed choices when you
need to install a file system or troubleshoot file system-related problems.
Hierarchical Structure
The overall purpose of a file system is to create a structure for filing data. The analogy that is
typically used for a file system is that of file cabinets, file drawers, and file folders. For
Copyright 2017 Cengage Learning. All Rights Reserved. May not be copied, scanned, or duplicated, in whole or in part. WCN 02-200-203
Understanding File System Functions
147
example, the computer could be considered the file cabinet and the disk drives the drawers.
Within each drawer (drive), information is organized into hanging folders, manila folders,
and individual documents (files), as shown in Figure 4-1.
4
Subfolders
Files
Folders
Disk drives
Computer
Figure 4-1 A file system metaphor
A file is a set of data that is grouped in some logical manner, assigned a name, and stored on
the disk. As the file is stored, the file system records where the file is located on the disk so
that it has a way to later retrieve that file. Whenever the file is needed, the operating system
is given the filename, and it retrieves the data in the file from the disk.
The data contained in files can be text, images, music and sounds, video, or Web pages. But
no matter what kind of data is stored in the file system, it must be converted into digital
format—a series of 1s and 0s—that the computer understands. The operating system, along
with the applications you use for word processing, graphics, and so on, performs this function of converting data into digital format for the computer, and back into the end-user
format as text or pictures, for example.
Moreover, there must be a way to write digital information to disk, track it, update it when
necessary, and call it back when the user or a user-controlled program wants it. To achieve
all this, the operating system typically groups file data in some logical way, creates a record
Copyright 2017 Cengage Learning. All Rights Reserved. May not be copied, scanned, or duplicated, in whole or in part. WCN 02-200-203
148
Chapter 4 File Systems
of this structure, and builds a folder or directory to track the type of data stored in each file.
A folder or directory is an organizational structure that contains files and may additionally
contain subfolders (or subdirectories) under it. The folder connects names to the files that
are stored on the disk, which makes it easy for users and programs to obtain the right data
at the right time. Windows systems use the terms folder and subfolder and Linux/UNIX
systems have historically used the terms directory and subdirectory. In this book, we will use
the terms folder and subfolder because many Linux/UNIX systems have begun to use those
terms.
Designing a Folder Structure For users, one of the most important features of a
file system is the ability to store information according to a pattern of organization
that is enabled by the use of folders. For example, in Windows OSs, the system files
are organized in the \Windows folder. In UNIX, many system files are located in the
/etc folder, while in Mac OS X, the folder called System contains the Mac OS X critical
system files.
Folders can be organized in a hierarchy that is similar to a tree structure. For example,
in Windows 10, the \Windows folder contains subfolders such as \Windows\AppPatch,
\Windows\Boot, \Windows\Help, \Windows\Media, \Windows\System, and \Windows\System32.
Many of these subfolders contain subfolders under them, such as the restore and spool
subfolders under the System32 subfolder, giving the folder system a tree-like structure. In
Red Hat Enterprise Linux, Fedora, and other Linux versions, the /etc folder has many
subdirectories—/etc/cron.d,
—/etc/cron.d, /etc/fonts, /etc/java, /etc/security, and /etc/sysconfig, to name a
—
few. Building a hierarchy of folders and subfolders enables you to fine-tune the organization
of files and folders in a methodical way so that information is easy to find and use.
Without a well-designed folder structure, it is common for a hard disk to become cluttered
and disorganized with a plethora of files and application software. Some personal computer
users keep most of their files in the computer’s primary level or root folder, or they load all
application software into a single folder. As a partial solution, some application software
programs use an automated setup that suggests folders for new programs, such as creating
new subfolders under the Program Files folder in many Windows systems—but some users
still have difficulty organizing files. A chaotic file structure makes it difficult to run or
remove programs or determine the most current versions. It also makes users spend unproductive time looking for specific files.
In Windows 7 and later versions, a library is a collection of folders
whose contents can be located anywhere on the local computer or its
network, but it appears to the user as if it is in a single location. A
library is a convenient way to access folders in different locations from
one central location.
To avoid confusion, carefully design the file and folder structure from the start, particularly on servers that are accessed by many users. Plan to design a folder structure that
complements the one already set up by the operating system, and then implement access
controls that prevent unauthorized users from bypassing the structure. The default
Copyright 2017 Cengage Learning. All Rights Reserved. May not be copied, scanned, or duplicated, in whole or in part. WCN 02-200-203
Understanding File System Functions
149
operating system structure, along with the structure that you add, might consist of
folders for the following:
•
Operating system files (typically set up by the operating system)
•
Software applications (often set up both by the operating system, the software
applications that you install, and decisions you make about how to install those
applications)
•
Work files, such as word-processing, graphics, spreadsheet, and database files
(set up by you and by applications such as Microsoft Word)
•
Public files that you share over the network (set up by you)
•
Utilities files (set up by the operating system, the utilities applications, and your
decisions about how to install specific utilities)
•
Temporary files (set up by the operating system, applications that use temporary
files, and your decisions about where to store temporary files)
Keeping temporary files for an extended period is a security risk. Temporary
files should be purged as soon as they are no longer needed.
In deciding how to allocate folders for specific types of files, consider following some
general practices. For instance, the root folder should not be cluttered with files or too
many directories or folders. Each software application should have its own folder or
subfolder so updates and software removal are easy to administer. For easy access control, similar information should be grouped, such as accounting systems or office productivity software. Operating system files should be kept separate and protected so
important files are not accidentally deleted by a user. On Windows systems, some critical
files are hidden from casual users and marked as system files so they cannot be easily
deleted. In addition, most OS files are protected by access controls. Directories and
folders should have names that clearly reflect their purposes. For example, consider a
law office administrator who uses legal time-accounting software, legal forms software,
Microsoft Office, confidential and shared spreadsheets, and Word documents—all on a
computer running Windows 10. The same office administrator also maintains specialized
Web pages for the law firm’s Web site. The folder structure from the root might be as
follows:
•
Windows for the system files (the default folder set up by the operating system)
•
Program Files for general software and utilities (the default folder set up by the
operating system)
•
Documents and Settings for work files such as Word documents and confidential
spreadsheets (the default folder set up by the operating system)
•
Shared for spreadsheets that are shared over the network (a sample folder the user
could set up, or the user could employ the default Public Documents folder set up by
the operating system, as noted below)
Copyright 2017 Cengage Learning. All Rights Reserved. May not be copied, scanned, or duplicated, in whole or in part. WCN 02-200-203
4
150
Chapter 4 File Systems
•
Forms for specific types of forms used by the legal forms software (a sample folder the
user might set up)
•
Inetpub for Web pages (a sample folder the user might set up in conjunction with the
installation of Web design software)
By default, Windows Vista and later versions create a \Users\Public\Public
Documents folder for sharing. Some users choose to use this folder for
sharing files over a network. However, make sure that you know what
security is set on shared folders so you do not host unwelcome guests.
In server environments, the IT administrator typically disables the use of
Public folders. You will learn about file system security later in this
chapter.
Each major folder has subfolders to keep grouped files or application software separate. For
example, the Program Files folder contains subfolders for each different software package,
such as \Program Files\Microsoft Office for the Microsoft Office software, and \Program
Files\Time Accounting for the legal time-accounting software folder. The Users username
folder would have a Documents subfolder to contain confidential spreadsheets and Word
documents, while shared spreadsheets would be in the Public Documents folder. Figure 4-2
illustrates this folder structure.
Folders off the root
Windows
Inetpub
Users
Program Files
Microsoft
Office
Legal
Forms
Time
Accounting
Shared
Forms
Clipart
Utilities
Templates
Queries
Contracts
Court
Public
username
Public
Documents
Documents
Tax
Wills
Real Estate
Bankruptcy
Figure 4-2 Sample folder structure for a Windows-based system
For Linux systems, such as Red Hat Enterprise Linux or Fedora, a typical folder structure
already provided by the operating system is as follows:
•
bin for user programs and utilities (binary files)
•
sbin for system administration utilities (system binary files)
Copyright 2017 Cengage Learning. All Rights Reserved. May not be copied, scanned, or duplicated, in whole or in part. WCN 02-200-203
Understanding File System Functions
151
•
lib for runtime library files needed by programs stored in the /bin and /sbin directories
•
usr for user files and programs
•
var for files in which content often varies or for files that are used only temporarily
•
tmp for files used only temporarily
•
dev for devices
•
mnt for DVD/CD-ROM drives, flash drives, and other removable media
•
etc for system and configuration files
•
root for files used by the root account
•
home for users’ home directories (or folders) and typically stored in subfolders
named for each user
•
proc for system resource tracking
Figure 4-3 shows Fedora root folders in the GNOME Files tool. In Linux, the term root
folder is used in two ways. One way is to refer to the root or main level from which all
folders are created. All of the folders in the previous list are in the root, which is designated
as /. The other root folder is the folder named /root, which is used as the home folder by the
root account. Recall that the root account has complete permission to all files and applications on a Linux system.
Figure 4-3 Fedora root folders in the GNOME Files tool
Source: Fedora Linux
Copyright 2017 Cengage Learning. All Rights Reserved. May not be copied, scanned, or duplicated, in whole or in part. WCN 02-200-203
4
152
Chapter 4 File Systems
Windows operating systems use backslashes to designate a folder, but
UNIX and Linux use a forward slash. For example, the main level root is
/ and the bin folder is denoted as /bin.
You can view folders in Linux from the command line—for example, by using a terminal
window—and from the Files tool, as demonstrated in Hands-On Project 4-7.
In Mac OS X, the default folder structure created by the operating system from the root
level includes:
•
Applications for Mac OS X software applications
•
System for Mac OS X system files
•
Library for library files (such as fonts)
•
Users for user accounts, with subfolders for each user account to store files
•
Documents for documents
Do Hands-On Projects 4-2, 4-4, and 4-6 to practice making folders in different operating
systems.
File Metadata
In addition to the names of files and where to find them on the disk, folders (and individual
files) may store information about the file or folder or the data contained in them. This information is referred to as metadata. Metadata is information that describes data but is not
the actual data itself. The name of a file is considered metadata, as is the information in the
following list:
•
Date and time the folder or file was created
•
Date and time the folder or file was last modified
•
Date and time the folder or file was last accessed
•
Folder or file size
•
Folder or file attributes, such as security information, or whether the folder
or file was backed up
•
Whether the information in a folder or file is compressed or encrypted
Not all file systems store all of the metadata listed above.
Figure 4-4 illustrates some of the metadata that is stored for a file in Windows 10; this metadata can be displayed using File Explorer. As you learn later in this chapter, the way in
which this information is stored depends on the design of the file system.
Copyright 2017 Cengage Learning. All Rights Reserved. May not be copied, scanned, or duplicated, in whole or in part. WCN 02-200-203
Understanding File System Functions
153
4
Figure 4-4 Windows file metadata
In Hands-On Project 4-2, you view folder and file information in File Explorer. Also, Hands-On
Projects 4-7 and 4-8 give you experience viewing folders and files using the Files tool in Linux
and the Macintosh HD desktop icon in Mac OS X.
Storage Device Space Organization
This section discusses storage in the context of mechanical hard disk
drives (HDDs); however, the concepts and procedures are the same for
solid-state drives (SSDs). The differences are primarily in their physical
characteristics. For example, HDDs have platters and read/write heads,
but SSDs do not.
When a hard disk is delivered from the manufacturer, it is low-level formatted. A low-level
format is a software process that marks the location of disk tracks and sectors. Every disk is
Copyright 2017 Cengage Learning. All Rights Reserved. May not be copied, scanned, or duplicated, in whole or in part. WCN 02-200-203
154
Chapter 4 File Systems
divided into tracks, which are like several circles around a disk. The number of tracks on a
hard disk depends on the disk size and manufacturer. Each track is divided into sections of
equal size called sectors. Figure 4-5 illustrates a hard disk divided into tracks and sectors on a
platter.
Tracks
Sectors
within a
track
Figure 4-5 Disk tracks and sectors on a platter
Block Allocation The operating systems discussed in this book use a method called
block allocation to keep track of where specific files are stored on the disk. Block allocation
divides the disk into logical blocks called clusters or allocation units in Windows systems,
which in turn correlate to a group of sectors on the disk.
Block allocation data is stored on the disk itself using one of two techniques. One technique uses a fixed portion of the disk to store this data—for example, the file allocation
table (FAT) file system initially implemented in MS-DOS and supported by all versions of
Windows and most other OSs. The other technique uses various locations on the disk to
store a special type of file that is used for folder and file allocation information; examples
include the New Technology File System (NTFS) and the UNIX/Linux file systems. On
NTFS-formatted disks, the allocation table is called the Master File Table (MFT), which
is discussed later in the chapter. As you can imagine, the areas of the disk in which allocation information and folder information are stored are very important; without this data,
it would be impossible to access any of the files on the system without using specialized
disk repair tools.
If a system uses a specific area or set of areas on the disk to store this file allocation data,
obviously that disk area is accessed frequently. This is why many problems in accessing
disk files arise as problems in file allocation tables and folder information. Because this
data is also stored in a location separate from the actual file, you can see that when there is
Copyright 2017 Cengage Learning. All Rights Reserved. May not be copied, scanned, or duplicated, in whole or in part. WCN 02-200-203
Understanding File System Functions
155
a problem with the disk, some of the folder or allocation data may not match the data actually stored on the disk. These occurrences are less common today, but it is very important to
exercise proper care of disks to minimize such problems.
Proper disk care includes regularly maintaining a Windows disk
through defragmenting (discussed later in this chapter), periodically
deleting unused files (see Chapter 11), maintaining good security
(see Chapter 10), implementing protection from viruses and malicious
software, and providing stable power (such as through an uninterruptible power supply or UPS).
All operating systems have special tools that let you check, and sometimes repair, common
file system and disk problems. Some operating systems can perform checks on the file system
on an ongoing basis. These tools are discussed in more detail later in this chapter.
Partitions Before a file system can be placed on a hard disk, the disk must be partitioned
and formatted. Partitioning is the process of blocking a group of tracks and sectors to be
used by a particular file system, such as FAT or NTFS. After a disk is partitioned, it must be
high-level formatted (or simply formatted) so that the partition contains the disk divisions
and patterns needed by a particular operating system to store files. With today’s technology
creating disks of greater capacity, and as disks are used in more diverse applications, sometimes it is desirable to have more than one file system on a single disk, which is accomplished by having a partition for each file system. You might need multiple file systems to
allow the installation of Windows 10 alongside Windows 7, or to install Red Hat Enterprise
Linux and Windows 10 on the same computer, for example. Multiple operating systems
may be required on a single system to accommodate certain applications designed for
Linux and other applications designed for Windows 10.
The use of virtualization can provide some of the same benefits, and
more, of installing multiple OSs on a computer system. Its use is generally preferred over installing multiple OSs on separate disk partitions.
Virtualization is discussed in Chapter 8.
When you want to have multiple file systems on one disk, you can partition the disk so that
different file systems can be installed on different disk partitions. You can also create partitions in one operating system to segment a single physical drive, the hard disk in a computer, into multiple logical volumes to which you can assign distinct drive letters. This
technique of dividing a hard disk into multiple logical drives is very useful for organizing
file storage, and was necessary with older operating systems, such as MS-DOS and Windows 3.1, which did not recognize very large hard drives.
Figure 4-6 illustrates a Windows 10 system that has multiple partitions (FAT32, NTFS, and
Universal Disk Format or UDF, a format used for DVDs and other optical media) used for
segmenting data on a hard disk.
Copyright 2017 Cengage Learning. All Rights Reserved. May not be copied, scanned, or duplicated, in whole or in part. WCN 02-200-203
4
156
Chapter 4 File Systems
Figure 4-6 Multiple partitions used in one Windows 10 system
Partitioning can typically be done only on hard disks, SSDs, or large
removable disks. Low-capacity media do not support partitioning
because there simply is not enough room on these low-capacity disks
to make partitioning practical. Also, some larger-capacity media, such
as DVDs, CDs, and tapes, are not partitioned by the user.
The logical programming that creates disk partitions resides at an even lower level than the
actual file system, and it lets you divide the disk into “slices.” The slices are done at the lowlevel format portion of the disk, and are stored in special sections of the hard drive itself,
separate from the operating system. Obviously, the partitioning scheme must be communicated to the operating system and file system. On most disks, there is a separate area that
stores the partition information. This area has room to hold information about a set number
of partitions. Whenever you create a partition, information about it is stored in this special
area of the disk. On systems in the IBM/Intel PC hardware architecture, for example, there
is typically room to store information for up to four partitions on each disk. This area is
known as the partition table in MS-DOS, Mac OS, and Windows, and the disk label in
UNIX/Linux. In addition to the disk label and partition table, another piece of disk is
Copyright 2017 Cengage Learning. All Rights Reserved. May not be copied, scanned, or duplicated, in whole or in part. WCN 02-200-203
Understanding File System Functions
157
reserved, known as the boot block in UNIX/Linux and Mac OS X, or the Master Boot
Record (MBR) in MS-DOS and Windows. In Windows systems, the MBR can be up to
512 bytes long and consists of four elements:
•
The boot program, which examines the partition table to determine the partition from
which to boot (the active partition) and enables the program code in the active partition’s start area to execute and then point to the code that starts the operating system
•
The disk signature, which stores information about the disk and is used by management software such as the Windows registry
•
The partition table for the active partition
•
The end-of-MBR marker, which signifies where the MBR contents end on the disk
Hands-On Project 4-3 shows you how to repair an MBR or a damaged boot sector in
Windows 10.
Not all operating systems support partitions in the same way, which you will discover in the
following sections on file systems for individual operating systems. Each operating system
also uses specific utilities to create partitions. When a disk partition is created, the file
system is stored inside the partition. The folder structures are then built inside the file system. When files are stored on the disks, they are given some space inside the partition, and
data about the files is written in the folder area.
Windows supports two types of drive partitioning: basic and dynamic. Basic disks are the
default type and have been around since the early 1980s, starting with the original IBM
PC. Basic disks support up to four partitions per hard drive: four primary partitions or
three primary partitions and one extended partition. The extended partition may then be
divided further into logical drives (see Figure 4-7). Each of these logical drives can hold an
individual FAT16, FAT32, or NTFS file system. Under control of the operating system, up
to 26 logical drives (pointers to separate file systems), each with its own file system, can be
active at one time. In Figure 4-7, the disk is divided into three primary partitions, one with
FAT32 and two with NTFS, and the extended partition is divided into two logical drives,
one with FAT (FAT16) and one with NTFS. Free space is also still available on the extended
partition to create additional logical drives.
Figure 4-7 A disk with primary and extended partitions
Microsoft generally refers to a partition that has a file system installed
as a volume. In most cases, this book will do the same.
Copyright 2017 Cengage Learning. All Rights Reserved. May not be copied, scanned, or duplicated, in whole or in part. WCN 02-200-203
4
158
Chapter 4 File Systems
Each volume is usually assigned a letter followed by a colon: A:, B:, C:, and so on through Z:.
This design lets you easily address the individual file systems by specifying a drive letter.
Letters A: and B: were traditionally reserved for two removable file systems on floppy disk
drives. Because floppy drives are no longer found on modern systems, the A: and B: drive
letters can be used for any storage medium. Typically, C: is reserved for the first volume, and
is normally the system that contains the Windows OS. All other file systems located on fixed
disks and controlled by the hard disk drivers in the operating system follow in sequential
order. So, a machine with two hard disks of two partitions each will have the drive letters C:
for the first volume on the first disk, D: for the second volume on the first disk, E: for the first
volume on the second disk, and F: for the second volume on the second disk. Disks that
require special drivers, such as DVD/CD-ROM drives or removable disks, can be assigned any
unused drive letter. By default, they will be assigned the next letter after the drive letter used by
the last hard disk. In the previous example, a DVD/CD-ROM drive would be drive G:.
Since Windows XP, you can access a volume as a folder on another NTFS volume. This
means that instead of assigning a drive letter to a volume, you mount the volume in an
empty folder on an NTFS volume that is assigned a drive letter. When you format a disk
using the Windows Disk Management utility, you have the option to mount the disk instead
of assigning a drive letter (see Figure 4-8). The empty folder into which a volume is mounted
is called a volume mount point.
Figure 4-8 Using a volume mount point in Windows
In earlier versions of Windows, it was common to use the fdisk utility to partition hard
disks. However, in versions of Windows starting with Windows 2000, you typically partition disks during the installation of the operating system and can add or reconfigure partitions after the operating system is installed. During the installation, it is necessary to
partition at least the area on which the operating system is loaded. If your disks are currently unpartitioned, Windows will provide the option to automatically create the necessary
volumes: one called System Reserved that is active and holds the boot configuration data
Copyright 2017 Cengage Learning. All Rights Reserved. May not be copied, scanned, or duplicated, in whole or in part. WCN 02-200-203
Understanding File System Functions
159
and another that will be assigned the C: drive and hold the Windows OS. The System
Reserved volume is about 500 MB and is not assigned a drive letter.
After the operating system is loaded, you can use the Disk Management tool to partition
additional free space and disks. Refer to Figure 4-6 for an example of the Disk Management
tool in Windows 10. The fastest way to access the Disk Management tool in Windows 8.1
and later versions is to right-click Start and then click Disk Management in the menu. The
tool can also be accessed from the Control Panel and the Computer Management console.
You learn more about managing disks with this tool in Chapter 7.
Formatting After you partition a disk, it is time to place the file system on the partition
using the process called formatting. When you first install a Windows operating system,
Windows will automatically create and format the necessary partitions, as mentioned, or
you can create and format the partitions manually. The installation process then creates the
folder structure and writes the OS files to the disk. After the operating system is installed,
you can use the Disk Management tool to create additional volumes. Another option for
formatting a hard disk is to use the format command from the Command Prompt window.
This command writes all of the file system structure to the disk. As with many system-level
commands, format includes several additional switches that modify precise program operation. You can view a list of these switches by typing format /? in the Command Prompt window. See Table 4-1 for a list of format switches.
Commands frequently use switches. A switch in a command changes
the way a particular command operates. In many operating systems,
these extra commands follow a forward slash and take the form of a
letter or combination of letters, such as the dir command in Windows
systems, which shows the contents of one or more directories and can
take several switches or arguments, including /p (pause when the
screen is full) and /s (include subdirectories). In UNIX/Linux systems, the
command switches frequently begin with one (-) or two (--) dashes.
Formatting a disk removes all data that was on the disk. On disks that have never been
formatted, the format command writes new sector and track markers on the disk. On disks
used previously, you can use the /q (quick format) option. This tells format to dispense with the
disk check and simply write a new root folder and FAT or MFT. Using the /q switch makes the
format operation a lot faster, but it also skips the detailed checking of the disk, which can cause
trouble later if an application tries to write information to a bad disk location.
Table 4-1
Format command switches
Switch
Function
/v:label
Specifies the volume label
/q
Uses a quick format technique that does not check the disk for damaged clusters or bad spots
/f:size
Specifies the size of the floppy disk to format (such as 160, 180, 320, 360, 720, 1.2, 1.44, or 2.88,
where the file sizes are in KB or MB)
/fs:filesystem
Specifies whether to format for FAT16, FAT32, or NTFS
(continues)
Copyright 2017 Cengage Learning. All Rights Reserved. May not be copied, scanned, or duplicated, in whole or in part. WCN 02-200-203
4
160
Chapter 4 File Systems
Table 4-1
Format command switches (continued )
Switch
Function
/t:tracks
Designates the number of tracks on a side (disks can be formatted on both sides)
/n:sectors
Designates how many sectors are in a track
/c
NTFS only: this causes files created on the volume to be compressed
/p:count
Write zeros in all sectors for the number of times specified in the count parameter. This option
causes all data on the disk to be overwritten with 0 bits for security reasons to ensure that no
data is recoverable. This is not valid with the /q switch.
/X
Forces the volume to dismount first, if necessary
/R:revision
UDF only: forces a specific UDF format revision
/L
NTFS only: use large file records
/A:size
Overrides the default allocation unit (cluster) size
/N:sectors
Specifies the number of sectors per track.
/S:state
Specifies support for short filenames. The state is either “enable” or “disable.” Short names are
disabled by default.
/I:state
ReFS only: Specifies whether integrity should be enabled on the new volume. The state is either
“enable” or “disable.” Integrity is enabled on storage that supports data redundancy by default.
It is possible to run Windows operating systems and UNIX/Linux
systems on one machine. For example, if you only format a portion
of a partitioned hard disk for Windows, you can format another
portion for UNIX/Linux if you save the room required by the operating
system—but it is advised that you use the appropriate disk formatting
utility for your UNIX/Linux operating system or let the UNIX/ Linux
installation program do the formatting.
The boot block is placed in the first sector on the disk, which also contains the root folder (the
highest-level folder). The root folder is also where the system stores file information, such as
name, start cluster, file size, file modification date and time, and file attributes (file characteristics
such as Hidden, Read-only, Archive, and so on). The root folder on every partition has a fixed
size that can contain a maximum of 512 entries in FAT16 and unlimited entries in FAT32 and
NTFS. Each entry corresponds with a cluster address or sector on the disk. When the file system
performs its format operation, it divides the disk into clusters that are sequentially numbered.
Each of the two copies of the FAT has exactly one entry for each cluster.
When a file is stored to disk, its data is written in the clusters on the disk. The filename is
stored in the folder, along with the number of the first cluster in which the data is stored.
When the operating system fills the first cluster, data is written to the next free cluster on
the disk. The FAT entry corresponding with the first cluster is filled with the number of the
second cluster in the file. When the second cluster is full, the operating system continues to
write in the next free cluster. The FAT entry for the second cluster is set to point to the cluster number for the third cluster, and so on. When a file is completely written to the disk, the
FAT entry for the final cluster is filled with all 1s, which means the end of the file. At this
time, the folder entry for the file is updated with the total file size. This is commonly
referred to as the linked-list method.
Copyright 2017 Cengage Learning. All Rights Reserved. May not be copied, scanned, or duplicated, in whole or in part. WCN 02-200-203
Understanding File System Functions
161
Clusters are of a fixed length, and if a file does not exactly match the space available in the
clusters it uses, you can end up with some unused space at the end of a cluster. This is a little wasteful, and it also explains why a file’s folder entry must include the exact file size. The
operating system sets all FAT entries to 0s when it formats the disk, indicating that none of
the clusters is being used. When you write a file to disk, the operating system finds free
space on the disk simply by looking for the next FAT entry that contains all 0s. In most
cases, the format command reads every address on the disk to make sure they are usable.
Unusable spots are marked in the FAT as bad clusters, and these areas are never used for
file storage. The format command then writes a new root folder and file allocation table,
and the disk is ready for use.
When formatting a hard disk, the size of each entry in the FAT16 table is 16 bits long on
any disk larger than 16 MB. On a hard disk, several sectors are combined into a cluster;
exactly how many sectors per cluster depends on the size of the hard disk.
Recall that the largest possible partition in a FAT16 file system is 4 GB. Keep in mind that
the smallest allocation unit is one cluster. If you store a file that is 300 bytes long on a file
system that has clusters of 64 KB, you will waste a lot of space. For this reason, smaller
cluster sizes are generally considered desirable. As a result, Windows systems using FAT
with large hard disks frequently have many hard disk partitions.
Each partition stores an extra copy of the FAT in case the first copy gets damaged. However, there is only one copy of the root folder on each partition. This concept is shown in
Figure 4-9.
Partition boot record (1 sector)
Main FAT table (size is up to two clusters,
for either FAT16 or FAT32—clusters can
be 512 bytes to 64 KB in size).
Backup FAT table (same size as main FAT).
Root directory, room for 512 entries in
FAT16—unlimited in FAT32.
Data area (size varies). Here all other
files and directories are stored. Site
measured in clusters, which are
composed of groups of sectors.
Figure 4-9 Typical FAT directory structure
Copyright 2017 Cengage Learning. All Rights Reserved. May not be copied, scanned, or duplicated, in whole or in part. WCN 02-200-203
4
162
Chapter 4 File Systems
The FATs and root folder are found at the beginning of each partition, and they are always
at the same location. This makes it possible for the boot program to easily find the files
needed to start the operating system. Other directories in the file system are specialized
files. They are identical to any other file in the operating system, with the exception of having the folder attribute set in their own folder entry. There can be a virtually unlimited number of directories, with a virtually unlimited number of files in each (limited only by the
amount of storage space on the disk).
The FAT folder structure is simple. In each folder entry, information about the file is stored,
including the filename, the file revision date and time, the file size, and the file attributes.
The filename consists of two parts: the name and the extension, which contains up to three
characters. Extensions can have a special meaning. For example, files with a .sys extension
are generally device drivers; files with .com or .exe extensions are program files the operating system can execute; and files with the .bat extension are batch files of commands that
can be executed as if they were typed in a command prompt window. The filename and
extension are separated by a period.
Apart from the filename, each folder entry also contains some status bits that identify the
type of filename contained in each entry. The status bits in use are Volume, Folder, System,
Hidden, Read-only, and Archive. The Volume bit indicates a file system volume label, or a
nickname for the file system. The volume name can be set with the /v option of the format
command, or by using the volume command. The volume name appears at the top of folder
listings (using the dir command). The Folder bit is used to signify that a file contains folder
data and should be treated as a folder by the file system. Folders may in turn contain
subfolders, as long as the names of all subfolders in a path do not exceed 80 characters.
You will see a folder marked with a <DIR> label when you use the dir command in the
Command Prompt window, or it will be designated with a file folder icon in File Explorer.
The four remaining attributes indicate additional information about a file. Files that are
part of the operating system and should not be touched by programs or users are marked
with a System or S flag. Files that should not be visible to the user are known as Hidden
files and are marked with the H bit. Files that should not be written to are known as Readonly files and are marked with the R flag. Lastly, files that should be backed up the next
time a backup is made are said to have the Archive, or A flag, set.
Overall, there are four optional flags—H, S, R, and A. You can use the attrib command at
the Command Prompt to look at or set these attributes. Typing attrib followed by a folder
name shows all of the attribute settings for all the files, whereas typing attrib followed by a
filename shows only attributes specific to that file. The attrib command can also be used to
set file attributes. To do this, you follow the attrib command with the attribute letter, then
the þ sign to set the attribute or the sign to unset it, and then the filename in question.
To make a file named test.txt hidden, for example, you would type attrib +h test.txt. If you
then typed dir, you would not see the test.txt file, but if you typed attrib test.txt, you would
once again see test.txt, with the letter H in front of it, letting you know it is a Hidden file.
A file with the S attribute set is also not displayed in dir listings, but you can view it with
the attrib command, and you can remove the System attribute with attrib as well.
Table 4-2 shows the various arguments and switches you can use with the attrib command.
Copyright 2017 Cengage Learning. All Rights Reserved. May not be copied, scanned, or duplicated, in whole or in part. WCN 02-200-203
Windows File Systems
Table 4-2
163
Attribute command (attrib) arguments and switches
Argument/switch
Description
r
Read-only file attribute
a
Archive file attribute
s
System file attribute
h
Hidden file attribute
i
Not a content-indexed file attribute; the contents of the file will not be included in the
search index
x
No scrub file attribute; only supported on ReFS file systems
v
Integrity attribute; only supported on ReFS file systems
/s
Processes files in all folders in the specified path
/d
Processes folders as well as files
Windows File Systems
Windows XP through Windows Server 2008 R2 support three file systems: extended FAT16,
FAT32, and NTFS. Windows 8, Windows Server 2012, and later versions also support ReFS.
All of these operating systems also support file systems for DVD/CD-ROM drives and USB
devices like flash drives.
FAT16 and Extended FAT16
The extended FAT16 file system under Windows evolved from the FAT16 system used in
early versions of MS-DOS and Windows (3.x/95/98/Me). An extended file system can be
divided into multiple logical file systems. FAT uses a file allocation table to store folder information about files, such as filenames, file attributes, and file location. The “16” in FAT16
means that this file system uses 16-bit entries in the file allocation table and uses 216 clusters.
Remember that clusters are blocks of space containing one or more sectors into which the
disk is divided.
In extended FAT16, the maximum size of a volume is 4 GB, and the maximum size of a file
is 2 GB. One advantage to using the extended FAT16 file system is that it has been around
for a long time, and even non-Windows operating systems, such as UNIX/Linux, can read
disks written in FAT16 format. Further, because the file system is simple, relatively little can
go wrong, which makes it a stable file system.
Originally, FAT16 used “8.3” filenames, which can be up to eight characters long followed
by a period and an extension of three characters, such as Filename.ext. Examples of extensions are .txt for text files, .doc or .docx for word-processing files, .xls or .xlsx for Excel
Copyright 2017 Cengage Learning. All Rights Reserved. May not be copied, scanned, or duplicated, in whole or in part. WCN 02-200-203
4
164
Chapter 4 File Systems
spreadsheets, and so on. The limitations of this naming convention contributed to the development and use of long filenames (LFNs) in extended FAT16. An LFN:
•
Can contain as many as 255 characters
•
Is not case sensitive
•
Cannot include characters such as “ / \ [ ] : ; =, (this applies both to 8.3 filenames
and LFNs)
Because LFN characters are stored in Unicode, a coding system that allows for representation
of any character in any language, it is possible to use most legitimate characters in Windows
in a filename (see the previous bulleted list for some exceptions). The advantage of LFNs and
Unicode is that LFNs can be read by other operating systems, including Mac OS and UNIX/
Linux systems (such as on a Windows 2008 server that has file services installed for Mac OS
and UNIX/Linux clients).
Until fairly recently, letters and digits were represented by ASCII (American Standard Code
for Information Interchange, pronounced as-key) values. The problem with this standard is
that it uses an entire byte to represent each character, which limits the number of characters
that can be represented to 255. This is not enough to handle all the characters needed to represent world languages, which use several different alphabets (Greek, Russian, Japanese, and
Hindi, for example). ASCII deals with this problem by employing many different character
sets, depending on the characters you’re trying to represent. The Unicode Consortium, a
not-for-profit organization, represents an alternative in which there is a single, unique code
for each possible character in any language. The first 128 characters in Unicode are the 128
ASCII characters. Unicode allows over a million characters to be defined. It includes distinct
character codes for all modern languages and many historic scripts like Egyptian hieroglyphs.
To the user who communicates primarily in English, Unicode will not make a big difference,
but in this age of worldwide communication, it is a necessity.
FAT32
Starting with Windows 95 Release 2, all Windows versions support FAT32. FAT32 is
designed to accommodate larger-capacity disks than FAT16 and avoid the problem of cluster
size limitations. A file allocation table entry in FAT32 is 32 bits in length and FAT32 supports up to 228 clusters (this figure is not to the 32nd power because some extra space is
reserved for the operating system). In FAT32, the root folder does not have to be at the
beginning of a volume; it can be located anywhere. Also, FAT32 can use disk space more
efficiently than FAT16 because it can use smaller cluster sizes. FAT32 partitions have a theoretical size of 2 terabytes (TB); however, the largest volume that can be formatted is 32 GB
(still much larger than FAT16). The maximum file size in FAT32 is raised to 4 GB.
FAT32 shares characteristics of extended FAT16, such as the double FAT structure at the
beginning of a partition for fault tolerance and the use of LFNs and Unicode.
Sometimes users choose to employ extended FAT16 or FAT32 because they are familiar with
these file systems or they have dual-boot systems, such as a system with Windows XP and
the older Windows 98. Another reason for using extended FAT16 or FAT32 is that these
file systems offer fast response on small, 1 or 2 GB partitions.
Copyright 2017 Cengage Learning. All Rights Reserved. May not be copied, scanned, or duplicated, in whole or in part. WCN 02-200-203
Windows File Systems
165
Windows file systems can be converted from FAT16 or FAT32 to NTFS, either during
installation or at a later date. If you convert at a later date, use the convert command in
the Command Prompt window. However, you cannot convert from NTFS to FAT16 or
FAT32, except by reformatting to use FAT16 or FAT32 and then performing a full
restore. You can use the Windows Backup tool to perform a backup or a restore from a
previous backup.
If a partition is set up for FAT and is 2 GB or smaller, Windows will format it as FAT16
during installation (if the option to use FAT is selected). Partitions that are over 2 GB are
formatted as FAT32.
FAT64
FAT64, also known as exFAT, is a proprietary file system. Microsoft introduced it for mobile
personal storage needs to handle large files. As the size of pictures, videos, and other media
files grows, the file size limits of FAT16 and FAT32 are an important consideration. The
size limit for FAT16 is 2 GB minus one byte, and for FAT32 it is 4 GB minus one byte.
FAT64 with a limit of 16 EB is a good choice for USB flash devices when you will be storing
very large files.
FAT64 is available starting in Service Pack 1 for Windows Vista. It is also available for
Linux from a third party. Apple added support in Mac OS X Snow Leopard in late 2010.
NTFS
NTFS is the primary Windows file system for all Windows operating systems starting with
Windows NT 3.1. It is a modern system designed for the needs of a networked
environment.
The way NTFS keeps track of files and clusters is a little different from that of FAT file
systems. Rather than using a structure of FATs and directories, NTFS uses a Master File
Table (MFT). Like the FATs and directories, this table is located at the beginning of the partition. The boot sector is located ahead of the MFT. Following the MFT, there are several
system files that the file system uses to make all the features of NTFS work. Note that the
MFT in itself is nothing more than a file on the file system, as are all other system files. The
second file on the disk is a copy of the first three records of the MFT. This ensures that if the
MFT is damaged, it can be re-created. File number five, known as $, contains the entries in
the root folder, whereas file number six, known as $Bitmap, contains data about which clusters on the disk are in use. Normally, the MFT and related files take up about 1 MB of disk
space when the disk is initially formatted.
When a file is created in NTFS, a record for that file is added to the MFT. This record
contains all standard information, such as filename, size, dates, and times. It also contains
additional attributes, such as security settings, ownership, and permissions. If there is not
enough room in an MFT record to store security settings, the settings that don’t fit are put
on another cluster somewhere on the disk, and the MFT record points to this information.
If a file is very small, there is sometimes enough room in the MFT record to store the file
data. If there is not enough room, the system allocates clusters elsewhere on the disk. The
Copyright 2017 Cengage Learning. All Rights Reserved. May not be copied, scanned, or duplicated, in whole or in part. WCN 02-200-203
4
166
Chapter 4 File Systems
MFT record reflects the sequence of clusters that a file uses. The attributes can generally be
repeated; it is possible to have a whole series of different security attributes for different
users. It is also possible to have multiple filenames that refer to the same file, a technique
known as hard linking. This is a feature, also available in UNIX/Linux file systems, that
is sometimes used to make the same file appear in multiple directories without having to
allocate disk space for the file more than once.
NTFS is referred to in two ways. The first is by the actual release numbering and the second is the more accepted way, which very roughly
refers to a Windows operating system. Table 4-3 shows the five versions
of NTFS, the operating system they correspond to, and the generally
accepted version number for NTFS.
Table 4-3
NTFS versions
Official version number
Generally accepted version
number
1.0
NTFS
1.1
NTFS
1.2
NTFS 4
Windows NT 3.51 and NT 4.0
3.0
NTFS 5.0
Windows 2000
3.1
NTFS 5.1/5.2
Windows XP/Windows Server 2003/Windows
Server 2008/Vista
3.1
NTFS 6.0
Windows Server 2008 R2/Windows 7 and
later
Windows operating system
Some of the basic features incorporated into NTFS include:
•
Long filenames
•
Built-in security features
•
Better file compression than FAT
•
Ability to use larger disks and files than FAT
•
File activity tracking for better recovery and stability than FAT
•
Portable Operating System Interface for UNIX (POSIX) support
•
Volume striping and volume extensions
•
Less disk fragmentation than FAT
As a full-featured network file system, NTFS is equipped with security features that meet
the U.S. government’s C2 security specifications. C2 security refers to high-level,
“top-secret” standards for data protection, system auditing, and system access, which are
required by some government agencies. One security feature is the ability to establish the
type of access allowed for users of folders and files within folders. The file and folder
Copyright 2017 Cengage Learning. All Rights Reserved. May not be copied, scanned, or duplicated, in whole or in part. WCN 02-200-203
Windows File Systems
167
access can be tailored to the particular requirements of an organization. For example, the
system files on a server can be protected so only the server administrator has access.
A folder of databases can be protected with read access, but no access to change data;
also, a public folder can give users in a designated group access to read and update files,
but not to delete files.
File compression is a process that significantly reduces the size of a file by removing unused
space within it or using compression algorithms. Some files can be compressed by more than
40 percent, saving important disk space for other storage needs. This is particularly useful for
files that are accessed infrequently. NTFS provides the ability to compress files as needed. Try
Hands-On Project 4-4 to compress files in Windows.
NTFS can be scaled to accommodate very large files, particularly for database applications.
A Microsoft SQL Server database file might be 20 GB or larger, for example. This means
an organization can store pictures, scanned images, and sound clips in a single database.
The NTFS system can support files up to 264 bytes (in theory).
Another NTFS feature is journaling, the ability to keep a log or journal of file system activity.
This is a critical process if there is a power outage or hard disk failure. Important information can be retrieved and restored in these situations. FAT does not offer this capability.
NTFS supports POSIX standards to enable portability of applications from one computer
system to another. POSIX was initially developed as a UNIX standard designed to ensure
portability of applications among various versions of UNIX, but now POSIX is used by
other file systems and operating systems as well. NTFS follows the POSIX 1 standard,
which includes case-sensitive filenames and use of multiple filenames (called hard links, a
concept discussed later in this chapter). For example, the files Myfile.doc and MYFile.doc
are considered different files (except when using File Explorer or the Command Prompt
window).
An important volume-handling feature of NTFS is the ability to create extensions on an existing volume, such as when new disk storage is added. Another feature is volume striping,
which is a process that equally divides the contents of each file across two or more volumes
to extend disk life, enable fault tolerance features, and balance the disk load for better
performance.
Last, NTFS is less prone to file corruption than FAT in part because it has a hot fix capability,
which means that if a bad disk area is detected, NTFS automatically copies the information
from the bad area to another disk area that is not damaged.
In addition to the NTFS 4 features already described, NTFS 5 adds several new features:
•
Ability to encrypt files
•
No system reboot required after creating an extended volume
•
Ability to reduce drive designations
•
Indexing for fast access
Copyright 2017 Cengage Learning. All Rights Reserved. May not be copied, scanned, or duplicated, in whole or in part. WCN 02-200-203
4
168
Chapter 4 File Systems
•
Ability to retain shortcuts and other file information when files and folders are placed
on other volumes (In Windows systems, a shortcut is a link or icon that can start
software in the same location or in a different location through a simple mouse click
or double-click.)
•
Ability to establish disk quotas
With NTFS 5, files can be encrypted so that their contents are available only to those granted
access. Also, volume extensions can be set up without the need to reboot the system. (In
NTFS 4, you must reboot after adding an extension to an existing volume.) Volume mount
points, as previously discussed, can be created as a way to reduce the number of drive designations for multiple volumes, instead of designating a new drive for each new volume. In
Windows, a mount point appears to the user as a folder, but it is really a link to a hard
drive, DVD/CD-ROM drive, or other storage medium. NTFS 5 incorporates fast indexing in
conjunction with Active Folder to make file searching and retrieval faster than in NTFS 4.
A new technique called Distributed Link Tracking is available in NTFS 5 so that shortcuts
you have created are not lost when you move files to another volume. Finally, NTFS 5
enables you to set up disk quotas to control how much disk space users can occupy. Disk
quotas are a vital tool for disk capacity planning to ensure that there is enough disk space
for all server operations and critical files.
The latest version of NTFS, referred to as NTFS 6, adds several new features:
•
Transactional NTFS
•
Partition resizing
•
Self-healing
Transactional NTFS is used to perform operations on an NTFS volume in transaction mode;
that is, all specified file system transactions take place or none of them takes place. You can
package registry and file system operations in a transaction so that all of the operations take
place or none of them succeed. If one of the file system operations does not work, then everything is aborted and nothing takes place. Transactional NTFS is used heavily in Windows
Server 2008.
Beginning with Windows Vista, Microsoft allowed for the expanding and shrinking of partitions, so you could adjust the amount of space used by a volume without having to delete the
partition and reformat the disk. The capability is still very limited and there are third-party
products that are more capable and robust.
In the past, if you had problems with NTFS volumes on your disk, you used chkdsk.exe
to fix the problem. This meant taking down the volume to run the utility. With selfhealing NTFS, the utility runs in the background to correct hard disk problems. The
availability of the file system is far greater than the previous way using the chkdsk.exe
utility, data is preserved as much as possible, and better reports are provided to describe
modifications made to the volume. Table 4-4 compares FAT16, FAT32, FAT64, and
NTFS.
Copyright 2017 Cengage Learning. All Rights Reserved. May not be copied, scanned, or duplicated, in whole or in part. WCN 02-200-203
Windows File Systems
Table 4-4
169
FAT16, FAT32, FAT64, and NTFS compared
Feature
FAT16
FAT32
FAT64 (exFAT)
NTFS
Total volume size
2 GB
2–4
2 TB to 16 TB
512 TB
2 TB
Maximum file size
4 GB
4 GB
16 EB (exabytes); 1 EB
equals a billion
gigabytes
Theoretical limit of
264 bytes
Compatible with
floppy disks
Yes
No
No
No
Security
Limited security
based on attributes
and shares
Limited security
based on attributes
and shares
Limited security
based on attributes
and shares
Extensive security
and auditing options
File compression
Supported with
extra utilities
Supported with
extra utilities
Supported with extra
utilities
Supported as part of
NTFS
File activity tracking
None
None
None
Tracking via a log
POSIX support
None
Limited
Limited
POSIX 1 support
Hot fix
Limited
Limited
Yes
Yes
Large database
support
Limited
Yes
Yes
Yes
Multiple disk drives
in one volume
No
No
No
Yes
When you copy a file from an NTFS system to a FAT16 or FAT32
system, the security permissions of the file are lost because
permissions are not supported in FAT16 or FAT32.
Basic and Dynamic Disks Basic disks use traditional disk partitioning techniques,
meaning they are limited to four primary partitions or three primary partitions and one
extended partition. Windows 2000 Server introduced dynamic disks, which do not use traditional partitioning techniques. Dynamic disks make it possible to set up a large number of
volumes on one disk and provide the ability to extend volumes onto additional physical
disks. You can convert basic disks to dynamic disks using the Disk Management tool.
NTFS File System and Disk Utilities Sometimes disk performance is affected by
corrupted files, or when the file allocation table loses pointers to certain files. You can correct these problems and maintain the integrity of the data by periodically running the
“Check disk” utility, called chkdsk. All versions of Windows starting with Windows 2000
come with chkdsk, which is run from the Command Prompt window or by clicking Start,
Copyright 2017 Cengage Learning. All Rights Reserved. May not be copied, scanned, or duplicated, in whole or in part. WCN 02-200-203
4
170
Chapter 4 File Systems
clicking Run, entering chkdsk, and pressing OK. The chkdsk utility can detect and fix an
extensive set of file system problems in FAT and NTFS systems. Table 4-5 presents a list of
the switches that are available for this utility and Figure 4-10 illustrates chkdsk results for a
computer running Windows 10.
Table 4-5
Chkdsk switch options
Switch/parameter
Purpose
[volume] (such as C:)
Specifies that chkdsk check only the designated volume
[filename] (such as *.dll)
Enables a check of the specified file or files only
/c
For NTFS only, chkdsk uses an abbreviated check of the folder structure
/f
Instructs chkdsk to fix errors that it finds and locks the disk while checking
/i
For NTFS only, chkdsk uses an abbreviated check of indexes
/L:size
For NTFS only, enables you to specify the size of the log file created by the disk
check
/r
Searches for bad sectors, fixes problems, and recovers information (if possible, or
use the recover command afterward)
/v
On FAT, shows the entire path name of files; on NTFS, shows clean-up messages
associated with errors
/b
In NTFS only, clears the list of bad clusters stored on the volume and rescans
everything. This feature was added in Vista.
/x
Dismounts or locks a volume before starting (/f also dismounts or locks a volume)
In Hands-On Project 4-5, you run chkdsk in Windows.
In Windows versions starting with Windows 2000, chkdsk runs automatically at bootup if it detects that the operating system was previously shut
down with a file system problem, or shut down before the operating
system had the opportunity to clean up temporary files on the disk.
Copyright 2017 Cengage Learning. All Rights Reserved. May not be copied, scanned, or duplicated, in whole or in part. WCN 02-200-203
Windows File Systems
171
4
Figure 4-10 Results of the chkdsk command
If chkdsk finds any problems, it either fixes them (depending on the error) or displays an
error message. Or, you have the option of letting it fix all problems automatically by using
the /f or Fix option. The most common problems are files with sizes of 0, which is caused
when a file is not properly closed, or chains of clusters (file allocation units) that have no
folder entries attached. When chkdsk finds lost allocation units or chains, it prompts you
with a yes-or-no question: “Convert lost chains to files? Answer ‘yes’ to the question so
Copyright 2017 Cengage Learning. All Rights Reserved. May not be copied, scanned, or duplicated, in whole or in part. WCN 02-200-203
172
Chapter 4 File Systems
that you can save the lost information to files.” The files that chkdsk creates for each lost
chain are labeled Filexxx.chk and can be edited with a text editor such as Notepad to determine their contents. The presence of some bad sectors is normal; many disks have a few bad
sectors that are marked by the manufacturer during the low-level format on which data cannot be written. If there are hundreds of bad sectors, however, this indicates a problem with
the disk.
If you frequently see errors when you run chkdsk, you should look for a
bigger problem. Sometimes the operator is to blame. Systems that are
not used properly—for example, because software is not closed
correctly—can cause problems in the file system. Often, disks that are
about to fail will show small glitches (chkdsk errors) a long time before
they finally fail, so be alert for possible future system failure if you see
frequent errors.
From the Trenches …
A customer who purchased a newly manufactured computer ran chkdsk on the hard
drive to verify its condition. Chkdsk showed that nearly half of the disk had bad clusters
that were quarantined via the low-level format so they could not be used. Because the
customer ran chkdsk right after receiving the computer, he was able to discover the
problem right away and returned the computer for a more functional hard drive.
NTFS 6 introduced the concept of self-healing, which was mentioned
earlier in this chapter. Because it runs in the background and attempts
to correct problems automatically, the need to run chkdsk.exe has
been greatly reduced.
All versions of Windows since Windows 2000 have a built-in disk defragmenting tool. Over
time, disk space becomes fragmented with pockets of open space. For example, when an
operating system writes a file to disk, it looks for the first place in the first empty disk location and uses the cluster (allocation unit) indicated there. It continues to use the next empty
cluster until there are no more clusters free immediately following the last cluster. At that
point, it skips ahead to find the next open cluster. As a result, files written to disk may be
scattered all over the disk. Imagine a scenario in which four small files are written—we’ll
call them A, B, C, and D. On an empty disk, these files will occupy sequential clusters on
the disk. If files A and C are removed, there will be some open clusters on the disk. If file
E, which is larger than A and C combined, is written to the disk, it will start using the clusters formerly occupied by A, then use those formerly used by C, and then continue beyond
the clusters occupied by D. When a disk is highly fragmented, the read heads have to work
harder to obtain data, wasting time and creating more wear. For this reason, it is wise to
periodically defragment your disks. A defragmenter is a tool that rearranges data on the
disk in a continuous fashion, ridding the disk of scattered open clusters.
Windows versions since Windows 2000 all have Disk Defragmenter (see Figure 4-11). Disk
Defragmenter can be used on volumes formatted for FAT16, FAT32, FAT64, and NTFS.
Copyright 2017 Cengage Learning. All Rights Reserved. May not be copied, scanned, or duplicated, in whole or in part. WCN 02-200-203
Windows File Systems
173
4
Figure 4-11 Disk Defragmenter in Windows 10
Windows versions after XP come with a Disk Cleanup utility that deletes temporary Internet
files, temporary program files, program files that are not used, and files in the Recycle Bin.
To start this utility from File Explorer, right-click the disk and click Properties. From the
General tab, click Disk Cleanup.
Care should be taken to use only utilities designed to work with
NTFS; serious damage can occur if other utilities are used. If utilities designed for MS-DOS or Windows 95/98/Me are used on
NTFS file systems, they may reach incorrect conclusions regarding
file system layout. This can result in loss of data, damaged files,
or even destruction of the complete file system and all of its
contents.
Resilient File System (ReFS)
ReFS became available starting with Windows Server 2012. The main use of Resilient File
System (ReFS) is in large file-sharing applications where volumes are managed by Storage
Spaces (which was introduced in Chapter 2). Although ReFS is mostly backward-compatible
with NTFS, it doesn’t support file compression, disk quotas, and EFS (Encrypting File
System). Also, Windows can’t be booted from an ReFS volume. ReFS can repair minor
Copyright 2017 Cengage Learning. All Rights Reserved. May not be copied, scanned, or duplicated, in whole or in part. WCN 02-200-203
174
Chapter 4 File Systems
problems with the file system automatically and supports volume sizes up to 1 yottabyte
(YB, a trillion terabytes). ReFS works with Storage Spaces to repair disk failure caused by
corruption, whether from software or hardware problems. Unlike other fault-tolerant disk
options, such as RAID 1 and RAID 5, which can only recover from failures, ReFS can also
correct some types of data corruption automatically. This capability, when used with Storage
Spaces, allows the creation of highly reliable and scalable disk systems without using RAID
disk controllers and the sometimes wasteful disk allocation schemes RAID configurations
require. Because of the features ReFS doesn’t support, this file system isn’t intended as a
replacement for NTFS. ReFS is best for supporting volumes for high-availability applications
that use very large files but don’t require user-specific features, such as disk quotas and EFS.
CDFS and UDF
Windows operating systems since Windows 2000 recognize some additional file systems used
by peripheral storage technologies. Three are mentioned here. The CD-ROM File System
(CDFS) is supported so that operating systems can read and write files to DVD/CD-ROM
drives. DVD/CD-ROM capability is important for loading the operating systems and sharing
DVD/CD-ROM drives on a network. The Universal Disk Format (UDF) file system is also
used on DVD/CD-ROMs; it allows for larger file storage to accommodate movies and
games.
The UNIX/Linux File System
The UNIX file system works a little differently from anything discussed up to this point.
“UNIX file system” is really a misnomer. In reality, many different file systems can be used,
but some are more “native” to specific UNIX operating systems than others. Most versions
of UNIX and Linux support the UNIX file system (ufs), which is the original native UNIX
file system. Ufs is a hierarchical (tree structure) file system that is expandable, supports large
storage, provides file and folder security, and is reliable. In fact, many qualities of NTFS are
modeled after ufs. Ufs supports journaling so that if a system crashes unexpectedly, it is possible to reconstruct files or to roll back recent changes, resulting in minimal or no damage to
the integrity of the files or data. Ufs also supports hot fixes to automatically move data on
damaged portions of disks to areas that are not damaged.
In Linux, the native file system is called the extended file system (ext or ext fs), which is
installed by default. Ext is modeled after ufs, but the first version contained some bugs,
supported files to only 2 GB, and did not offer journaling. However, in Linux, ext provides an advantage over all other file systems because it enables the full range of built-in
Linux commands, file manipulation, and security. Newer versions of Linux use either the
second (ext2), third (ext3), or fourth (ext4) versions of the extended file system. Ext2 is a
reliable file system that handles large disk storage. Ext3 has enhancements of ext2 with the
addition of journaling. Ext4 supports file sizes up to 16 TB.
Copyright 2017 Cengage Learning. All Rights Reserved. May not be copied, scanned, or duplicated, in whole or in part. WCN 02-200-203
The UNIX/Linux File System
175
If you are not sure what file systems are incorporated in UNIX/Linux, you
can determine them by viewing the contents of the /proc/filesystems
file, or by using the mount command to display the mounted file
systems. Table 4-6 lists a sampling of file systems that are compatible
with UNIX/Linux systems.
Table 4-6
Typical file systems supported by UNIX/Linux
File system
Description
Extended file system (ext or ext fs) and the newer
versions, second extended file system (ext2 or ext2 fs),
third extended file system (ext3 or ext3 fs), and fourth
extended file system (ext4 or ext4 fs)
File system that comes with Linux by default
(compatible with Linux and FreeBSD)
High-performance file system (hpfs)
File system developed for use with the OS/2 operating
system
msdos
File system that offers compatibility with FAT12 and
FAT16 (does not support long filenames); typically
installed to enable UNIX to read floppy disks made in
MS-DOS or Windows
International Standard Operating system (iso9660 in
Linux, hsfs in Solaris, cd9660 in FreeBSD)
File system developed for DVD/CD-ROM use; does not
support long filenames
Proc file system
File system that presents information about the kernel
status and the use of memory (not truly a physical file
system, but a logical file system)
Network file system (nfs)
File system developed by Sun Microsystems for UNIX
systems to support network access and sharing of files
(such as uploading and downloading files) and
supported on virtually all UNIX/Linux versions as well as
by many other operating systems
Swap file system
File system for the swap space; swap space is disk space
used exclusively to store spillover information from
memory, when memory is full (called virtual memory
memory),
and is used by virtually all UNIX/Linux systems
UNIX file system (ufs; also called the Berkeley Fast File
System)
Original file system for UNIX that is compatible with
virtually all UNIX systems and most Linux systems
umsdos
File system that is compatible with extended FAT16 as
used by Windows NT, 2000, XP, Server 2003, Vista, 7,
and Server 2008, but it also supports security
permissions, file ownership, and long filenames
vfat
File system that is compatible with FAT32 and supports
long filenames
ntfs
File system used by Windows starting with Windows
NT 3.1
Global File System (GFS and GFS2)
File system used by Linux computer clusters
XFS
64-bit high-performance journaling file system that is
excellent at handling large files
Copyright 2017 Cengage Learning. All Rights Reserved. May not be copied, scanned, or duplicated, in whole or in part. WCN 02-200-203
4
176
Chapter 4 File Systems
The main difference between native UNIX file systems, such as ufs and ext, and those covered
earlier in the chapter lies in the way information is physically stored on the disk. Because ufs
and ext are the most popular file systems across UNIX platforms, we detail them here and
lump them under the heading of “The UNIX/Linux file system.” Both file systems use the
same structure, which is built on the concept of information nodes, or inodes. Each file has
an inode and is identified by an inode number. Inode 0 contains the root of the folder structure (/) and is the jumping-off point for all other inodes. This concept is shown in Figure 4-12.
Inode 0, points
to Root directory
Root directory, contains:
Filename: A Inode: 70
Filename: B Inode: 80
Inode 80, points
to a file
Inode 70, points
to a file
Blocks of disk space
allocated to the file
Blocks of disk space
allocated to the file
Figure 4-12 UNIX/Linux information nodes (inodes) design
You can display inode information for directories and files by using
the ls -i command. Also, note that in most UNIX/Linux systems (commonly referred to as nix
nix), a folder is technically just a file that can
hold other files.
An inode contains the name of a file and general information about that file. In terms of general information, each inode indicates user and group ownership, access mode (read, write,
and execute security permissions), the size and type of the file, the date the file was created,
and the date the file was last modified and read.
The pointer information is based on logical blocks. Each disk is divided into logical blocks
ranging in size from 512 to 8192 bytes or more, depending on the version of UNIX/Linux,
but blocks can also be divided into multiple sub-blocks or fractions as needed by the file
system. The inode for a file contains a pointer (number) that tells the operating system how
to locate the first in a set of one or more logical blocks that contain the specific file contents.
The inode can also specify the number of blocks or links to the first block used by the folder
or file. In short, the inode tells the operating system where to find a file on the hard disk.
Copyright 2017 Cengage Learning. All Rights Reserved. May not be copied, scanned, or duplicated, in whole or in part. WCN 02-200-203
The UNIX/Linux File System
177
The file system itself is identified by the superblock. The superblock contains information
about the layout of blocks, sectors, and cylinder groups on the file system. This information
is the key to finding anything on the file system, and it should never change. Without the
superblock, the file system cannot be accessed. For this reason, many copies of the superblock
are written into the file system at the time of file system creation. If the superblock is damaged, you can copy one of the superblock copies over the damaged superblock to restore
access to the file system.
Note that the inode does not contain a filename; the filename is stored in a folder, which in
itself is no more than a file. In it is stored the names of the files and the inode to which they
are connected.
Several folder entries can point to the same inode; this is called a hard link. Hard links make it
possible to have one file appear in several folders, or in the same folder under several names,
without using extra disk space. In Figure 4-13, there are two folders: Marketing and Sales. In
the Marketing folder is a file named ClientsFile that points to inode 20301, and in the Sales
folder a file named CustomerFile points to the same inode. ClientsFile and CustomerFile are
the exact same file.
Marketing folder
Sales folder
Directory entries
Directory entries
ClientsFile
CutomerFile
ProjectsFile
ForecastFile
Inode 27451
Inode 20301
Inode 53876
Figure 4-13 Hard links—multiple folder entries point to the same inode
The inode keeps a counter that tells how many folder entries point to a file. Deleting a file is
achieved by deleting the last ffolder entry, which brings the inode link count down to 0, meaning
the file has effectively been removed.
A UNIX/Linux system can have many file systems. Unlike the Windows environment,
where drive letters are often used to access each file system, UNIX/Linux uses only mount
points, in which each file system is a subfolder of the root of the file system, which is
always designated as /.
In UNIX/Linux, all file systems are referred to by a path (see Figure 4-14). The path starts with
root (/). If other file systems are to be used,
d, a folder is created on the root file system
system—for
Copyright 2017 Cengage Learning. All Rights Reserved. May not be copied, scanned, or duplicated, in whole or in part. WCN 02-200-203
4
178
Chapter 4 File Systems
example, a folder named “usr.” Then, using the mount command, the UNIX/Linux operating
system is told to associate the root inode of another file system to the empty folder. This process
can be repeated many times, and there is no hard limit to the number of file systems that can be
mounted this way, short of the number of inodes in the root file system. Every file in every
file system on a computer is thus referred to by a long folder path, and jumping from one file
system to another is seamless.
The /usr file system
The root, /
Mount
/usr
Empty dir that
serves as the
mount point
for usr fs
/opt
Local dir on
root fs, will
contain files
etc.
/usr/bin
The bin dir
in this
file system,
which will
be /usr/bin
because this fs
is mounted
on /usr
usr file system,
/dev/dsk/c0t1d0s3
/export
Like /usr
The /export file system
Symbolic Link
/bin
Looking in /bin
shows contents
of /usr/bin
root file system,
/dev/dsk/c0t0d0s0
Contains numerous
directories and files
displayed as the
contents of the
/export directory
Export file system
/dev/dsk/c0t1d0s0
Figure 4-14 UNIX/Linux file system paths
The mount command has several options; typing it without parameters results in a display
of the disks (and file systems) that are currently mounted. For each disk, you will see the
name of the partition and the path on which it was mounted.
The UNIX/Linux operating system and file system treat uppercase and
lowercase characters as different characters; a file named HELLO is different from a file named hello, which is in turn different from one
named Hello. Therefore, it is extremely important to type UNIX/Linux
filenames exactly as they appear.
Copyright 2017 Cengage Learning. All Rights Reserved. May not be copied, scanned, or duplicated, in whole or in part. WCN 02-200-203
The UNIX/Linux File System
179
As mentioned, a folder is nothing more than a special file. There are several other special files
in the UNIX/Linux file system. For example, disks themselves are referenced by a special
inode called a device. There are two types of devices: raw devices and block devices. A raw
device has no logical division in blocks, whereas a block device does. Every device the UNIX/
Linux computer uses must be represented by a device inode, whether it is a disk, a serial port,
or an Ethernet (network) card. These devices have special parameters in the inode that enable
the OS to figure out how to get to them. All partitions of all disks appear as devices.
For example, an ext3 partition on a hard disk may be represented as /dev/hda1. Devices
are normally kept in the /dev or /devices folder. When you look at the output of the mount
command, you will see your disks referenced this way.
The symbolic link is another special feature of the UNIX/Linux file system we should mention here. As previously indicated, it is possible to link multiple folder entries to one inode.
For this to work, the inode and the folder entry must be on the same disk partition. If you
want to link a folder entry to a file that is on a different partition, you must use a
symbolic link. This is a special file that has a flag set in the inode to identify it as a symbolic link. The content of the file is a path that, when followed, leads to another file.
Note that a hard link, when created, must point to a valid inode and will therefore always
be valid. A symbolic link is merely a pointer to a file. It is possible to create symbolic links
that point to files that do not exist, or to remove the file to which a symbolic link points
without removing the link. In such cases, you might end up with a symbolic link that
appears to be a valid file when viewed in a folder, but when opened returns a “no such
file” error. Another interesting effect of using symbolic links is that it is possible to create
loops. You can make a Folder A, which contains a Folder B, which contains a link back to
Folder A. However, this can become extremely confusing. Hard links and symbolic links
are made with the ln command. The ln command used with no options makes a hard
link, and with the -s option makes a symbolic link. The first option is the name of the
existing file, followed by the name of the link you want to create.
One way to save time in typing is to create a link to a folder that has
a long path. For example, assume that you store many files in the
/user/bus/inventory folder. Each time you want to see a listing of
that folder, you must type ls /user/bus/inventory. If you enter ln
/ user/bus/inventory to create a link to that folder, in the future you
only have to type ls inventory to see its contents. To learn more
about the ln command, type man ln in a terminal or command
prompt window, and then press Enter. Man is the command for
displaying the contents of the online manual pages for a specific
command, such as ls.
As with all other operating systems discussed so far, you first have to partition a disk to use
the UNIX/Linux file system. The command used to partition the disk differs slightly from
one version of UNIX to another. In most UNIX systems, either fdisk or format does the job.
Typing man fdisk or man format and pressing Enter at the command prompt gives you
an overview of available command options. Figure 4-15 shows the man page for the fdisk
command in Fedora Linux.
Copyright 2017 Cengage Learning. All Rights Reserved. May not be copied, scanned, or duplicated, in whole or in part. WCN 02-200-203
4
180
Chapter 4 File Systems
Figure 4-15 The man page for the fdisk command
Source: Fedora Linux
Once a partition is made, it is time to create the file system. To do this, you must know the
device name of the partition on which you want to create the file system. This name can be
obtained from the print partition table command in fdisk or format. The most convenient
way to create a new file system is with the newfs command. Simply type newfs, followed by
the name of the device. After you confirm that you want to create a new file system, you will
see a progress report that shows you where copies of the superblocks are written, as well as
some information about the cylinder group and the number of inodes. When newfs is completed, you can make a mount point for the new file system using the mkdir command.
(Note that a mount point in UNIX/Linux is nothing more than an empty folder—the disk
location in which the file system contents will appear.) If, for example, you created a file system
on /dev/sdb1 and you want to mount it in the /test mount point, you type mkdir /test. Next, you
mount the file system by typing mount /dev/sdb1 /test, and now you are ready to use the new file
system. Newfs is available in many versions of UNIX, such as in Solaris UNIX, but it is not
available in all versions of Linux, including Red Hat Enterprise Linux and Fedora. In UNIX/
Linux varieties where newfs is not available, mkfs should be used instead. (Mkfs is available in
Red Hat Enterprise Linux and Fedora.) The use of mkfs is less desirable because it requires the
user to specify many parameters, such as the size of the file system, the block size, number of
inodes, number of superblock copies and their locations, and a few others, depending on the version of UNIX/Linux. The newfs utility takes care of all these details automatically.
UNIX/Linux is very picky when it comes to file system consistency. If it finds problems on the
file system in the inodes, superblock, or folder structures, it will shut down. When you save a
file to disk, the system first stores part of the data in memory, until it has time to write the file
Copyright 2017 Cengage Learning. All Rights Reserved. May not be copied, scanned, or duplicated, in whole or in part. WCN 02-200-203
The UNIX/Linux File System
181
to disk. If for some reason your computer stops working before the data is written to disk,
you can end up with a damaged file system. This is why UNIX/Linux machines should always
be shut down using the proper commands, which ensure that all data is stored on disk before
the machine is brought down. In normal operation, all data waiting to be saved to disk in
memory is written to disk every 30 seconds. You can manually force a write of all data
in memory by using the sync command. When the system is properly shut down, the file systems are unmounted. Whenever the machine starts up, UNIX/Linux checks the file systems to
make sure they are all working properly. To do this, the operating system verifies the integrity
of the superblock, the inodes, all cluster groups, and all folder entries. The program that
performs this operation is the file system checker, also known as fsck.
You can manually run fsck at any time to perform file system
checks after the system is up, but take great care when doing
this. If data on the disk is changed while an fsck is in progress,
the results may be disastrous. The most common problems found
when fsck is run are unlinked inodes, folder entries with no associated inodes, and wrong free block counts. All of these can be a
result of a system that was not properly shut down. If these errors
occur frequently, hardware failure may be imminent.
Table 4-7 presents a summary of useful commands for managing UNIX/Linux file systems.
Table 4-7
UNIX/Linux file system commands
Command
Description
cat
Displays the contents of a file to the screen
cd
Changes to another folder
cp
Copies a file to another folder (and you can rename the file at the same time)
fdisk
Formats and partitions a disk in some UNIX systems, such as Linux
format
Formats and partitions a disk in some UNIX systems, such as Solaris
ls
Lists contents of a folder
mkdir
Creates a folder
mkfs
Creates a file system (but requires more parameters than newfs)
mount
Lists the disk currently mounted; also mounts file systems and devices (such as a
DVD/CD-ROM)
mv
Moves a file to a different folder
newfs
Creates a new file system in some versions of UNIX/Linux
rm
Removes a file or folder
sync
Forces information in memory to be written to disk
touch
Creates an empty file
umount
Unmounts a file system
Copyright 2017 Cengage Learning. All Rights Reserved. May not be copied, scanned, or duplicated, in whole or in part. WCN 02-200-203
4
182
Chapter 4 File Systems
The Macintosh File System
The original Macintosh Filing System (MFS) of 1984 was limited to keeping track of 128
documents, applications, or folders. This was a reasonable limit when the only storage device
was a 400 KB floppy disk drive. As larger disks became available, however, the need for
folders and subfolders became obvious, and Apple responded with the Hierarchical Filing
System (HFS) in 1986.
Like FAT16, HFS divides a volume into, at most, 216 (65,536) units. (Volume is the Mac term
for a disk or disk partition.) On PC systems, these units are called clusters or allocation units.
On the Mac, they are called allocation blocks, but the principle is the same. Interestingly,
while UNIX/Linux and Windows operating systems report file sizes in terms of their actual
size, the Macintosh operating system sometimes reports file sizes in terms of logical size,
based on the number of allocation blocks occupied by the file. The best way to view the
actual size of a file is to use the Mac’s Get Info option, which shows many other types of
information about a file.
In 1998, Apple released Mac OS 8.1, which introduced a new disk format, Hierarchical
Filing System Extended Format. This format was variously referred to as Mac OS HFS+,
Mac OS Extended, or Mac OS Extended (HFS+), which is used today in Mac OS X. The
newer HFS+ format increases the number of allocation blocks per volume to 232. This
format creates smaller allocation blocks (clusters) and more efficient disk utilization. Systems that use Mac OS 8.1 or later can format disks in either the Mac OS Standard (HFS)
or Mac OS Extended (HFS+) format. However, Macintoshes with pre-8.1 versions of the
OS can’t read disks in Extended format. Volumes that are smaller than 32 MB must also
continue to use Standard format.
In Mac OS X version 3.0, Mac OS Extended (HFS+) includes several new features:
•
An optional case-sensitive format to make the file system more compatible with
other UNIX/Linux systems
•
Journaling, which is turned on by default (see Figure 4-16) so that data can be
recovered from a journal file if a disk or system problem occurs while data is being
updated or modified
•
The ability to store up to 16 TB of data, which is particularly important for the
Mac OS X Server version
Copyright 2017 Cengage Learning. All Rights Reserved. May not be copied, scanned, or duplicated, in whole or in part. WCN 02-200-203
The Macintosh File System
183
4
Figure 4-16 Mac OS X using the Mac OS Extended (HFS+) file system
Source: Mac OS X
The first two sectors of a Mac-formatted disk are the boot sectors, or boot blocks in Macintosh
terminology. The boot blocks identify the filing system, the names of important system files, and
other important information. The boot blocks are followed by the volume information block,
which points to other important areas of information, such as the location of the system files
and the catalog and extents b-trees.
The catalog b-tree is the list of all files on the volume. It keeps track of a file’s name, its logical
location in the folder structure, its physical location on the disk surface, and the locations and
sizes of the file’s data fork and resource forks (as discussed later in the chapter). The extents
b-tree keeps track of the location of file fragments, or extents.
Macintoshes can read and write to disks from other operating systems. For instance, Macs
can read iso9660 DVD/CD-ROMs using a dedicated driver. Macs can also read all manner of
MS-DOS- and Windows-formatted disks, thanks to pre-Mac OS X tools such as the PC
Exchange control panel, and thanks to various Mac OS X tools, such as those offered through
System Preferences and as disk utilities.
Copyright 2017 Cengage Learning. All Rights Reserved. May not be copied, scanned, or duplicated, in whole or in part. WCN 02-200-203
184
Chapter 4 File Systems
The Mac OS has always supported what might be called medium-length filenames of up to 31
characters. The use of a period as the first character in a filename is discouraged because older
versions of the operating system used a period as the first character of invisible driver files.
Any character may be used in a filename except the colon, which is used internally by the
Mac OS as a folder separator, equivalent to slashes in other OSs. For this reason, Macintosh
paths are written as colon-separated entities:
Hard Drive:System Folder:Preferences:Finder Prefs
UNIX/Linux and Windows operating systems use filename extensions such as .txt and .gif to
identify file types. The Mac uses type codes and creator codes. As an example, files created
with Apple’s SimpleText text editor have a type code of APPL and a creator code of ttxt.
When a user double-clicks such a file, the Mac knows it must open the file with an application (type code APPL) and a creator code of ttxt. You can view a file’s creator code, such
as a JPEG file for a graphic, by using the file’s Get Info option, as shown in Figure 4-17.
In Hands-On Project 4-9, you view file types in Mac OS X.
Figure 4-17 Using the Get Info option for a JPEG file
Source: Mac OS X
The type and creator codes facilitate the Mac’s use of icons. Documents do not store their
own icons; instead, the Mac gets the icon from the creating application. Instead of accessing
the application each time the icon must be displayed, the Mac stores the icons and file associations in invisible files called the desktop databases. Each disk or volume has its own desktop
databases. “Rebuilding the desktop” on a Macintosh means rebuilding these database files,
and is a common troubleshooting step when icons appear incorrectly. You can rebuild the
desktop on a disk at startup by holding down the command and option keys. For removable
Copyright
2017
Cengage
Learning.
Rights Reserved.
not be copied,
duplicated, inthe
whole
or in part. WCN 02-200-203
media,
hold
down
theAllcommand
andMayoption
keysscanned,
beforeorinserting
disk.
The Macintosh File System
185
One way in which Macintosh files are unique is that they can contain two parts, or forks: the
data fork and the resource fork. The data fork contains frequently changing information, such
as word-processing data, while the resource fork contains fixed information, including a
program’s icons, menu resources, and splash screens. One advantage of resource forks for
programmers is that they modularize the program. For instance, it becomes very easy to
change the text of a warning dialog or the name of a menu item without having to change
the underlying code, so customization and internationalization are easier.
Folders can be created using the New Folder option in the Finder’s File menu and in the Save
and Save As dialog boxes in most applications. All volumes have two special, invisible folders:
Trash and Desktop. If you move a file’s icon from a USB drive to the desktop, the file still
resides in the USB drive’s Desktop folder. Likewise, you can move the file’s icon to the Trash
can without deleting it, and it will still reside in the USB drive’s Trash folder. You can prove
this to yourself by ejecting the USB drive and inserting it in another Macintosh. The files will
appear on the desktop, and the Trash can will bulge.
Apple’s equivalent of the UNIX/Linux symbolic link and Windows shortcut is the alias, which
was introduced in System 7.0 in 1991. Files, folders, applications, and disks can be aliased. The
system-level Alias Manager keeps track of the original item, even if it is moved or renamed. The
word alias is added to the filename when the alias is created, and the filename is presented in italicized text. Beginning in OS 8.5, aliases also have small arrows on their icons, similar to shortcuts in Windows-based operating systems. In Hands-On Project 4-9, you create an alias.
Mac OS X comes with two important disk utilities: Disk Utility for managing disk drives and
Disk First Aid for repairing disk problems. Figure 4-18 shows Disk Utility after running First
Aid on Macintosh HD.
Figure 4-18 Mac OS X Disk Utility running First Aid
Source: Mac OS X
Copyright 2017 Cengage Learning. All Rights Reserved. May not be copied, scanned, or duplicated, in whole or in part. WCN 02-200-203
4
186
Chapter 4 File Systems
Older versions of Mac OS X came with the Sherlock program, which can search disks for filenames and text within files. These operations are extremely fast because Sherlock pre-indexes
local disks, just as search engines index Web pages. Because indexing takes significant processor
time, it can be scheduled for times when the computer is not heavily used. Sherlock also
functions as a program for querying multiple Internet search engines or the site search engines
available on many Web sites.
Spotlight replaced Sherlock in Mac OS X 10.4 Tiger, although Sherlock continued to ship
with Mac OS until it was officially retired with the release of Mac OS X 10.5 Leopard. Mac
OS X users have always faced the same problems as Windows users when it comes to organizing and finding files. Nothing is more frustrating than knowing you have created and
saved a document, spreadsheet, song, or photo and being unable to find it. Spotlight does the
following for you:
•
Indexes files so you can find them faster
•
Enables you to search for something just by typing a few letters of the name
•
Quickly searches the computer’s nooks and crannies for what you want, even if you’re
not sure how to spell it exactly
•
Works in conjunction with the smart folders capability so you can organize files you’ve
found according to different characteristics you choose
One reason for Spotlight’s speed is that it indexes not only by filenames, but by metadata
associated with documents, such as the author, creation, date, and lots of other information.
It also indexes based on individual words inside regular text files, word-processing files,
and even PDF files used by Adobe. Spotlight does not work on files in the UNIX system and
kernel. For these files you have to use UNIX commands, such as find or locate. (The find
command is discussed in Chapter 11 and Appendix A.)
Start Spotlight by clicking the blue magnifying-glass icon to the right of the clock at the top of
the desktop. You can enter one or more words on which to search, or even just one or two
letters. As soon as you start typing, Spotlight displays what it finds, updating the display
with each letter you type. When you start typing, you’ll notice the speed of this tool.
Figure 4-19 shows a Spotlight search on the word account.
Copyright 2017 Cengage Learning. All Rights Reserved. May not be copied, scanned, or duplicated, in whole or in part. WCN 02-200-203
Chapter Summary
187
4
Figure 4-19 A Spotlight search in Mac OS X
Source: Mac OS X
When the Mac is shut down normally using the Apple menu’s Shut Down option, a flag is set
on the hard drive. In the event of a crash or forced reboot, this flag is not set. If the flag is not
set, the Mac will see during the next startup that the computer was not shut down properly
and run a disk integrity check.
The Mac is extremely versatile at booting from different devices. Like other operating systems,
the Mac will boot from a DVD/CD-ROM inserted during the boot sequence. If the disk does
not contain a valid System Folder, the Mac will eject the disk and continue searching for a
bootable device, such as a SCSI device. Since the early 1990s, Macs have been able to
boot from a DVD/CD-ROM drive—simply press the C key while booting up. Pressing the
Shift-Option-Delete-Apple (SODA) keys during the boot sequence will bypass the internal
hard drive and boot from the next drive in the SCSI chain.
Chapter Summary
■
One of the basic functions of an operating system is to enable you to store and access
information on a computer or other digital device. This information is managed,
stored, and retrieved through a file system.
■
Some of the tasks performed by a file system include providing a convenient interface,
providing a hierarchical structure, storing file metadata, organizing space on a storage
device, and providing utilities to maintain and manage the file system.
Copyright 2017 Cengage Learning. All Rights Reserved. May not be copied, scanned, or duplicated, in whole or in part. WCN 02-200-203
188
Chapter 4 File Systems
■
Besides creating and modifying files, the file system should also offer the ability to
defragment files, compress file contents, ensure file and data integrity, secure files, and
control removable storage media.
■
Before a file system can be placed on a hard disk, the disk must be partitioned and
formatted. Partitioning is the process of blocking a group of tracks and sectors to be
used by a particular file system, such as FAT or NTFS.
■
The main file systems used in Windows since Windows 2000 are extended FAT16,
FAT32, and NTFS. In FAT16 and FAT32, the file system creates a file allocation table
to store information about files. FAT32 is more robust than FAT16, and provides
for the use of more clusters and larger partitions.
■
FAT64 (exFAT) is mainly used for personal mobile storage devices like flash drives.
■
NTFS is the native file system for Windows 2000 and later; it offers the advantages of
better security, larger disk and file sizes, better management tools, and greater stability
than FAT16 and FAT32.
■
ReFS (Resilient File System) became available starting with Windows Server 2012.
The main use of ReFS is in large file-sharing applications where volumes are managed
by Storage Spaces. ReFS is mostly backward-compatible with NTFS, but it doesn’t
support file compression, disk quotas, and EFS.
■
Chkdsk is an important disk verification and repair utility that works for FAT16,
FAT32, and NTFS.
■
UNIX and Linux support many different file systems, but typically they employ ufs or
ext.
■
Ufs and ext use information nodes (inodes) to organize information about files. Also,
a UNIX/Linux system can have many file systems mounted as subfolders of the root.
■
Different varieties of UNIX/Linux use different file system utilities, such as fdisk and
format, to partition and format disks. The fsck (file system checker) utility is used to
verify the integrity of UNIX/Linux file systems.
■
Mac OS X uses the Mac OS Extended (HFS+) file system, which is an enhancement
of HFS and was introduced in 1998 with Mac OS 8.1. Like NTFS, the Mac OS
Extended file system makes more efficient utilization of disk space and supports
larger disk sizes, and in Mac OS X version 10.3 and higher, it offers a case-sensitive
capability, journaling, and support for 8 EB disk storage.
■
Two important Mac OS X disk tools include the Disk Utility and Disk First Aid.
Key Terms
8.3 filenames An older filename format in which the name of the file can be up to eight
characters long, followed by a period and an extension of three characters. See also
extension.
active partition The logical portion of a hard disk drive that is currently being used to store
data. In a PC system, the partition that contains the bootable operating system.
Copyright 2017 Cengage Learning. All Rights Reserved. May not be copied, scanned, or duplicated, in whole or in part. WCN 02-200-203
Key Terms
189
alias In the Macintosh file system, a feature that presents an icon representing an executable
file. Equivalent to the UNIX/Linux link and the Windows shortcut.
allocation block In the Macintosh file system, a division of hard disk data, equivalent to the
Windows disk cluster. Each Macintosh volume is divided into 216 (65,535) individual units.
bad clusters On a hard disk drive, areas of the surface that cannot be used to safely store
data. Bad clusters are usually identified by the format command or one of the hard drive
utilities, such as chkdsk or fsck.
block allocation A hard disk configuration scheme in which the disk is divided into logical
blocks, which in turn are mapped to sectors, heads, and tracks.
block device In the UNIX/Linux file system, a device that is divided or configured into
logical blocks. See also raw device.
boot block The UNIX/Linux and Mac OS X equivalent of the Windows Master Boot
Record (MBR), the area of the hard disk that stores partition information for the disk. For
example, on a Mac-formatted disk, the first two sectors are boot blocks that identify the
filing system, the names of important system files, and other important information. See also
volume information block.
catalog b-tree In the Macintosh file system, a list of all files on a given volume. Similar to a
folder in the Windows file system.
CD-ROM File System (CDFS) A 32-bit file system used on CD-ROMs and DVDs.
cluster In Windows-based file systems, a logical block of information on a disk containing
one or more sectors. Also called an allocation unit.
creator codes Hidden file characteristics in the Macintosh file system that indicate the
program (software application) that created the file. See type code.
data fork The portion of a file in the Macintosh file system that stores the variable data
associated with the file. Data fork information might include word-processing data,
spreadsheet information, and so on.
defragmenter A tool that rearranges data on a disk in a continuous fashion, ridding the
disk of scattered open clusters.
directory An organizational structure that contains files and may additionally contain
subdirectories under it. A directory contains information about files, such as filenames, file
sizes, date of creation, and file type. More commonly referred to as a folder in modern OSs.
disk label The UNIX/Linux equivalent of a partition table in MS-DOS or Windows systems.
The disk label is a table containing information about each partition on a disk, such as the
type of partition, size, and location.
disk quota Allocation of a specific amount of disk space to a user or application with the
ability to ensure that the user or application cannot use more disk space than is specified in
the allocation.
Distributed Link Tracking A technique introduced in NTFS 5 so that shortcuts, such as those
on the desktop, are not lost when files are moved to another volume.
extended file system (ext or ext fs) The file system designed for Linux that is installed by
default in Linux operating systems.
Copyright 2017 Cengage Learning. All Rights Reserved. May not be copied, scanned, or duplicated, in whole or in part. WCN 02-200-203
4
190
Chapter 4 File Systems
Extended (HFS+) A file system released in 1998 with Mac OS 8.1 and the file system used in
Mac OS X.
extension In MS-DOS and Windows-based systems, the part of a filename that typically
identifies the type of file associated with the name. File extensions are typically three
characters long and include standard notations such as .sys, .exe, .bat, and so on.
extents b-tree A file system component that keeps track of the location of file fragments, or
extents, in the Mac OS HFS file system.
file A set of data that is grouped in some logical manner, assigned a name, and stored on
the disk.
file allocation table (FAT) A file management system that defines the way data is stored on a
disk drive. The FAT stores information about a file’s size and physical location on the disk.
file attributes File characteristics stored with the filename in the disk folder; attributes
specify certain storage and operational parameters associated with the file, such as hidden,
read-only, archive, and so on.
file system A design for storing and managing files on a disk drive.
folder See directory.
formatting The process of installing a file system on a disk partition.
hard link In Windows versions starting with Windows 2000 and UNIX/Linux, a file
management technique that permits multiple folder entries to point to the same file.
Hierarchical Filing System (HFS) An early Apple Macintosh file system storage method that
uses a hierarchical folder structure.
high-level formatting A process that prepares a disk partition (or removable media) for a
specific file system.
hot fix A procedure used by a file system that can detect a damaged disk area and then
automatically copy information from that area to another disk area that is not damaged.
inode Short for “information node.” In UNIX/Linux, a system for storing key information
about files.
journaling The ability of a file system or software (such as database software) to track file
changes so that if a system crashes unexpectedly, it is possible to reconstruct files or to roll
back changes with minimal or no damage.
linked list Used in FAT file systems so that when a file is written to disk, each cluster
containing that file’s data has a pointer to the location of the next cluster of data.
logical drive A software definition that divides a physical hard drive into multiple drives for
file storage.
long filename (LFN) A name for a file, folder, or folder in a file system in which the name
can be up to 255 characters in length. Long filenames in Windows, UNIX/Linux, and Mac
OS systems are also POSIX compliant in that they honor uppercase and lowercase
characters.
low-level format A software process that marks tracks and sectors on a disk. A low-level
format is necessary before a disk can be partitioned and formatted.
Copyright 2017 Cengage Learning. All Rights Reserved. May not be copied, scanned, or duplicated, in whole or in part. WCN 02-200-203
Key Terms
191
Macintosh Filing System (MFS) The original Macintosh filing system, introduced in 1984.
MFS was limited to keeping track of 128 documents, applications, or folders.
Master Boot Record (MBR) An area of a hard disk in MS-DOS and Windows that stores
partition information about the disk. MBRs are not found on disks that do not support
multiple partitions.
Master File Table (MFT) A storage organization system used with the NTFS file system. The
MFT is located at the beginning of the partition.
metadata Information that describes data but is not the actual data.
mount A process that makes a disk partition or volume available for use by the operating
system.
New Technology File System (NTFS) The file storage system that is the native system in
Windows versions starting with Windows NT.
partitioning Blocking a group of tracks and sectors to be used by a particular file system,
such as FAT or NTFS. Partitioning is a hard disk management technique that permits the
installation of multiple file systems on a single disk or the configuration of multiple logical
hard drives that use the same file system on a single physical hard drive.
partition table A table containing information about each partition on a disk, such as the
type of partition, size, and location. Also, the partition table provides information to the
computer about how to access the disk.
physical drive A hard drive in a computer that you can physically touch and that can be
divided into one or more logical drives.
Portable Operating System Interface for UNIX (POSIX) A UNIX standard designed to ensure
portability of applications among various versions of UNIX.
raw device In the UNIX/Linux file system, a device that has not been divided into logical
blocks. See also block device.
Resilient File System (ReFS) A file system in Windows Server 2012 and later that is used in
large file-sharing applications and that can correct some types of data corruption
automatically.
resource fork In the Macintosh file system, the portion of a file that contains fixed
information, such as a program’s icons, menu resources, and splash screens.
root folder The highest-level folder in the structure of files and folders in a file system.
sectors Equally sized portions of a disk track. See tracks.
Spotlight The new way to search in Mac OS X, starting with version 10.4 Tiger. Spotlight
stores a virtual index of everything on the system.
status bits Bits used as part of a folder entry to identify the type of file contained in each
entry. The status bits in use are Volume, Folder, System, Hidden, Read-only, and Archive.
superblock In the UNIX/Linux file system, a special data block that contains information
about the layout of blocks, sectors, and cylinder groups on the file system. This information
is the key to finding anything on the file system, and it should never change.
switch An operating system command option that changes the way certain commands
function. Command options, or switches, are usually entered as one or more letters,
Copyright 2017 Cengage Learning. All Rights Reserved. May not be copied, scanned, or duplicated, in whole or in part. WCN 02-200-203
4
192
Chapter 4 File Systems
separated from the main command by a forward slash (/) in Windows and by a dash (-) in
UNIX/Linux.
symbolic link A special file in the UNIX/Linux file system that permits a folder link to a file
that is on a different partition.
tracks Concentric rings that cover an entire disk like grooves on a phonograph record. Each
ring is divided into sectors in which to store data.
type code In the Macintosh file system, embedded file information that denotes which
applications were used to create the files. Mac OS type codes are used in much the same
way as Windows file extensions that identify file types with .txt, .doc, and other extensions.
See creator codes.
Unicode A 16-bit character code that allows for the definition of up to 65,536 characters.
Universal Disk Format (UDF) A removable disk formatting standard used for large-capacity
CD-ROMs and DVD-ROMs.
UNIX file system (ufs) A file system supported in most versions of UNIX/Linux; ufs is a
hierarchical (tree structure) file system that is expandable, supports large storage, provides
excellent security, and is reliable. Ufs employs information nodes (inodes).
volume A portion of a disk that has a file system installed and is ready to be accessed for
data storage and retrieval.
volume information block On a Mac-formatted disk, the sector after the boot blocks. See
also boot block. The volume information block points to other important areas of
information, such as the location of the system files and the catalog and extents trees.
volume label A series of characters, commonly used as a nickname, that identify a volume.
volume mount point An empty folder into which a volume is mounted. See mount.
Review Questions
1. As you are using some files on a workstation running Linux, you determine that a few
of the files seem to be corrupted. What should you do?
a.
Close all files and applications and run fsck.
b. Start DiskScan to check for file links.
c.
Reformat your disk using the format command.
d. Use the Disk Check utility, which can be run at any time.
2. You are installing Windows 10 on a new disk that has only been low-level formatted.
What is the first thing you need to do to prepare the disk?
a.
Use Disk Scrub to ensure there are no bad spots on the disk.
b. Format the disk for NTFS.
c.
Partition the disk.
d. Initialize the disk with the root folder.
Copyright 2017 Cengage Learning. All Rights Reserved. May not be copied, scanned, or duplicated, in whole or in part. WCN 02-200-203
Review Questions
193
3. You need to create a new folder in a Linux system and you choose to do so from a
terminal window. Which of the following commands enables you to create a folder?
a.
fdisk
b. mkdir
c.
mkfs
d. mkfsdir
4. What file system is used on a hard disk in a computer running Mac OS X?
a.
Macintosh Filing System (MFS)
b. Macintosh Network File System (MNFS)
c.
Extended file system (ext)
d. Mac OS Extended (HFS+) file system
5. Your assistant has documentation that shows how to modify a device file in Linux, but
the documentation does not mention which folder to find the file in. Which folder
should you suggest?
a.
/mnt
b. /var
c.
/dev
d. /proc
6. On a Windows-based system, which of the following are contained in the Master Boot
Record? (Choose all that apply.)
a.
disk signature
b. boot program
c.
boot block
d. partition table for the active partition
7. You developed a proposal for the president of your company several months ago. You
know you saved it, but you are not sure where. You created the proposal on your Mac
OS X El Capitan computer. Which of the following is the easiest option for finding the
document? (Choose all that apply.)
a.
Use Get Info on each of the folders that you think the document might be in.
Check the creation date. When you find dates that look promising, open the folder
and check the documents.
b. Use the search tool Sherlock to search for text within files.
c.
Use the UNIX command-line prompt to search your Mac for the proposal using
find or locate.
d. Use Spotlight to search for the document on your Mac.
Copyright 2017 Cengage Learning. All Rights Reserved. May not be copied, scanned, or duplicated, in whole or in part. WCN 02-200-203
4
194
Chapter 4 File Systems
8. You need to find the date and time a file was created and the file’s size. Where should
you look?
a.
in the volume label
b. in the Master File Table
c.
in the file metadata
d. in the file allocation table
9. You need to find out more about the fdisk utility and the commands associated with it
before you set up a new Linux system in addition to the one you are already using.
What command can you use on your present system to find out more about fdisk?
a.
man fdisk
b. fdisk /?
c.
fdisk /help
d. find fdisk
10. Mac OS X files can contain which of the following? (Choose all that apply.)
a.
application generator
b. data fork
c.
extension marker
d. resource fork
11. Users on your organization’s Windows Server 2012 R2 server are beginning to take up
excessive disk space on the NTFS volumes. You have plenty of disk space now, but
you’re concerned about this situation in the future. What can you do?
a.
Enforce stronger security so it is harder for users to write files to their home
directories.
b. Establish disk quotas.
c.
Encrypt portions of the users’ home directories so they can only be used by the
Administrator account.
d. Use bigger blocks for the partition.
12. In which file system would you find the Master File Table?
a.
FAT12
b. NFS
c.
NTFS
d. ufs
13. What command in Windows Server 2012 can you use to format a disk for FAT32?
a.
fdisk:FAT32
b. format /fs:FAT32
c.
part /FAT32
d. mkdisk FAT32
Copyright 2017 Cengage Learning. All Rights Reserved. May not be copied, scanned, or duplicated, in whole or in part. WCN 02-200-203
Review Questions
195
14. You are installing a file-sharing application on a Windows Server 2012 R2 server in
which the volumes are managed by Storage Spaces and fault tolerance is a major
consideration. Which file system should you use?
a.
FAT64
b. ReFS
c.
NTFS
d. ext4
15. In what file system(s) would you find inodes? (Choose all that apply.)
a.
FAT16
b. ufs
c.
ext3
d. NTFS
16. The president of your company uses Mac OS X and wants to find out more about a
file, such as whether the file is a TIFF document. What tool should she use?
a.
the Get Info option for the file
b. Explorer
c.
Files
d. the Window options for the file
17. Which of the following is a process that marks the location of tracks and sectors on a
disk?
a.
disk tracking
b. a low-level format
c.
a high-level format
d. etching
18. In FAT32, file characteristics such as Hidden and Read-only are examples of
___________________.
a.
cluster designations
b. formatting properties
c.
file attributes
d. properties applied only to files and folders in the root
19. You run a computer support business and one of your customers calls to say he formatted his hard drive because it seemed to contain lots of bad clusters. The problem is
that now the operating system won’t start. What might be the problem?
a.
He performed a quick format that does not fix bad clusters.
b. A hard disk can only be formatted once.
c.
He formatted using the wrong driver.
d. Formatting the disk destroyed all the files on it, including the operating system files.
Copyright 2017 Cengage Learning. All Rights Reserved. May not be copied, scanned, or duplicated, in whole or in part. WCN 02-200-203
4
196
Chapter 4 File Systems
20. Which of the following holds information about the layout of blocks and sectors in the
UNIX file system?
a.
root
b. file allocation table
c.
superblock
d. folder flag
Hands-On Projects
Project 4-1: Explore the File System in Windows
File systems store and manage files, like a personal assistant to the file system
user. In this project, you employ File Explorer to view folders and files in
Windows. Also, you view the information that is stored for files.
1. Start your Windows 10 computer and log on. Right-click Start and click File
Explorer.
2. In the left pane, click to expand This PC, if necessary. Double-click Local Disk (C:) to
view folders and files on the hard drive.
3. In the right pane, double-click Windows to view more folders and files.
4. Click the View menu and then click Content in the Layout section of the Ribbon to
change the view of the folders and files.
5. Click to select the File name extensions and Hidden items check boxes, if they are not
already checked. You’ll see additional folders and file extensions.
6. Close File Explorer.
7. Stay logged on if you are continuing to the next project.
Project 4-2: Create Folders in Windows
When you use an operating system, you will often need to create a new folder.
In this project, you learn how to create a new folder in Windows.
1. Start your Windows 10 computer and log on, if necessary. Right-click Start and click
File Explorer.
2. In the left pane, click to expand This PC, if necessary. Double-click Local Disk (C:) to
view folders and files on the hard drive.
3. In the right pane, double-click the Users folder and then double-click the folder that
has the same name as the account you used to log on.
4. Click the Home tab on the Ribbon and click New folder.
Copyright 2017 Cengage Learning. All Rights Reserved. May not be copied, scanned, or duplicated, in whole or in part. WCN 02-200-203
Hands-On Projects
197
5. Type your initials and then the word folder. For example, the user entered “GTfolder”
as the folder name in Figure 4-20. Press Enter. (Don’t delete this folder because you
will use it again in Hands-On Project 4-3.)
4
Figure 4-20 Creating a folder in Windows 10
6. Right-click the folder you just created and click Properties to view its associated
properties. Click each tab to quickly get an overview of the kinds of properties you
can configure for the folder.
7. Click Cancel.
8. Another method for creating a folder is available in File Explorer. Open File Explorer,
and then click the Folder icon in the Quick access menu, next to the name of the folder
you are viewing. (In Figure 4-20, it is the Folder icon next to NetAdmin on the upperleft side of the window.) You see a new folder, ready to be named. Click the down
arrow next to the folder icon you just clicked, and click Undo to remove the folder
you just created (see Figure 4-21). Close File Explorer.
Copyright 2017 Cengage Learning. All Rights Reserved. May not be copied, scanned, or duplicated, in whole or in part. WCN 02-200-203
198
Chapter 4 File Systems
Figure 4-21 Undoing an action in File Explorer
9. Yet another way to create a folder in File Explorer is to right-click anywhere in the
window’s white space, point to New, and click Folder. (If you like to use the keyboard
rather than the mouse, click Ctrl+Shift+N to create a new folder.) Undo the creation of
this new folder.
10. To create a folder at the Windows Command Prompt, right-click Start and click Command Prompt. The prompt shows the path in the file hierarchy where any file system
command you enter will be applied by default. The Command Prompt opens in
C:\Users\CurrentUser, where CurrentUser is the currently logged-on user.
11. Type dir and press Enter. Notice the folder you created earlier. To create a new folder
named MyDocs, type mkdir MyDocs and press Enter. To verify that the folder was
created, type dir and press Enter.
12. Type cd mydocs and press Enter. (Remember that Windows folder names and filenames
are not case sensitive, so you don’t have to capitalize these names in commands.)
Notice that the prompt changes by adding MyDocs to the path. Type dir and press
Enter.
13. The dir command shows two folders named “.” and “..”. These are more like placeholders than actual folders. The “.” folder simply refers to the current folder and the
“..” folder refers to the parent folder. Type cd . and press Enter; you’ll see that your
Copyright 2017 Cengage Learning. All Rights Reserved. May not be copied, scanned, or duplicated, in whole or in part. WCN 02-200-203
Hands-On Projects
199
prompt doesn’t change because the command basically tells the operating system to
“go to the current folder.” Type cd .. and press Enter to return to the C:\Users\Current
User folder.
14. Navigate to the root of the drive by typing cd \ and pressing Enter. The prompt
changes to C:\> to indicate that you are in the C:\ folder, which is the root of C:.
Close the command prompt. Figure 4-22 shows the commands you entered and their
output, although some of the dir output has been omitted to save space.
15. Shut down your Windows computer in preparation for the next project.
Figure 4-22 A series of file system commands at a Windows command prompt
Copyright 2017 Cengage Learning. All Rights Reserved. May not be copied, scanned, or duplicated, in whole or in part. WCN 02-200-203
4
200
Chapter 4 File Systems
Project 4-3: Fix a Corrupted MBR in Windows
A sudden power failure or a bad spot on a disk can corrupt the Master Boot
Record and prevent a computer from booting. In Windows, you can fix the
Master Boot Record using the Recovery Console. This project shows you
how to start the Recovery Console and fix the Master Boot Record in Windows. For this
project, you’ll need the installation DVD/CD-ROM for the operating system. Also, you
need to make sure all files are saved and that all users are logged off the server. Insert the
DVD/CD-ROM for your operating system, but take no action if you see an installation
start-up window. Shut down the operating system and computer.
1. Place the Windows installation DVD in the DVD player. You want to boot to the
DVD, so you will need to enter the appropriate keystroke while the system is booting
to access the boot menu. Ask your instructor to identify this keystroke; some systems
use Esc, and others use F2 or another function key. Turn on your Windows computer
to the boot menu and select the DVD as the boot device.
2. After the Windows Setup program starts, click Next until you see the screen that
displays the Install now prompt and the Repair your computer option in the lower-left
corner (see Figure 4-23). Press R (for repair) to open the Windows Recovery Menu.
3. On the Choose an option screen, click Troubleshoot. On the Troubleshoot screen, click
Advanced options. On the Advanced options screen, click Command prompt to enter
the Recovery Console.
Figure 4-23 The Repair your computer option in the Windows setup screen
4. The bootrec /fixmbr command is used to fix the Master Boot Record from the command
line. Type bootrec /? and press Enter to view the help information for this command.
Copyright 2017 Cengage Learning. All Rights Reserved. May not be copied, scanned, or duplicated, in whole or in part. WCN 02-200-203
Hands-On Projects
201
Read the description for each option. As you can see, bootrec can solve more problems
than just a bad MBR.
5. If you have permission from your instructor, type bootrec /fixmbr and press Enter.
Because nothing is wrong with the MBR, this command should not cause any
problems, but be sure you have permission if you are not using your own computer.
The command should output a message that “The operation completed successfully.”
6. Type exit and press Enter to close the Recovery Console. Click Continue to boot to
Windows.
Project 4-4: Compress Files in Windows
In this project, you learn how to compress files in Windows. You need a
computer with a drive formatted for NTFS.
1. Start your Windows computer and log on, if necessary. Open File Explorer.
2. Navigate to the folder you created in Project 4-2 (C:\Users\CurrentUser\
CurrentUser YY folder),
CurrentUser\
where CurrentUser is the logged-on user account and YY represents your initials.
Double-click the folder to open it. The right pane should be empty.
3. Create a new folder named SubFolder using one of the methods described in Project 4-2.
4. Right-click SubFolder and click Properties.
5. Click the Advanced button to view a dialog box similar to Figure 4-24. Notice the
advanced attributes you can configure.
Figure 4-24 The Advanced Attributes dialog box
Copyright 2017 Cengage Learning. All Rights Reserved. May not be copied, scanned, or duplicated, in whole or in part. WCN 02-200-203
4
202
Chapter 4 File Systems
6. Click Compress contents to save disk space and click OK.
7. Click OK to exit the folder’s Properties dialog box.
8. Notice the change to the SubFolder icon. It now displays two blue arrows pointing
toward each other in the upper-right corner, indicating that the folder and its contents
are compressed.
9. Double-click SubFolder to open it. Right-click in the right pane, point to New, click Text
Document, and press Enter to keep the default name. Notice that the file displays the
two blue arrows to indicate it is compressed. All files that are placed in a compressed
folder are automatically compressed.
10. Close File Explorer.
11. Stay logged on if you are continuing to the next project.
You cannot compress a folder that is encrypted.
Project 4-5: Run chkdsk in Windows
Chkdsk is an important utility included in Windows that verifies the integrity
of a disk and its file system. It also can fix problems that it encounters. In
this project, you run chkdsk to see how it works.
1. Log on to your Windows computer, if necessary. Right-click Start, and then click Command
Prompt (Admin) to run the command prompt as an administrator. Click Yes at the UAC
prompt, if necessary.
2. Type chkdsk and press Enter.
3. Chkdsk examines your disk drive and verifies the integrity of the file system. If any
errors are found, they will be reported but not fixed. Notice the second line of output
from the command that reads “WARNING! /F parameter not specified. Running
CHKDSK in read-only mode.” This means that errors will not be fixed.
4. Type chkdsk /f and press Enter. You see a prompt indicating that chkdsk cannot run
because the volume is in use. You cannot run chkdsk with the /f parameter on the
drive where Windows is installed unless you run the command before Windows starts.
If you type Y, chkdsk /f will run the next time Windows starts. Type N and press
Enter.
5. Close the Command Prompt window.
6. Log off or shut down your Windows computer.
Copyright 2017 Cengage Learning. All Rights Reserved. May not be copied, scanned, or duplicated, in whole or in part. WCN 02-200-203
Hands-On Projects
203
Another way to have chkdsk start is to save all your work and simply
turn off the computer without properly shutting it down. When you
reboot, the system will run chkdsk if it detects a problem with the way
the computer was shut down. In most cases, this is a safe test because
you will most likely not cause damage to files or the file system if your
work is saved and all programs are closed.
Project 4-6: Navigate the Linux Folder Structure from
the Shell Prompt
There are two common ways to view and manage folders and files in Linux:
from the shell prompt and from the GNOME Files tool. In this project, you
use the shell prompt in Fedora, although the steps are similar in many UNIX/
Linux systems.
1. Start and log on to your Linux computer. Open a terminal window.
2. Type ls -a and press Enter to view the folders and files in your home folder, including
those that are hidden. (Hidden files are represented by a period in front of the
filename.)
3. Type ls -l / and press Enter to view the main folder structure in the system (see
Figure 4-25).
Figure 4-25 The Linux folder structure
Source: Fedora Linux
Copyright 2017 Cengage Learning. All Rights Reserved. May not be copied, scanned, or duplicated, in whole or in part. WCN 02-200-203
4
204
Chapter 4 File Systems
4. At the Linux shell prompt, you see a “~” character, which indicates you are in your
home folder. Type cd / and press Enter to move to the root; notice how the prompt
changes.
5. Type cd and press Enter to go back to your home folder. Notice the prompt again.
Type cd / and press Enter. You can also go to your home folder by typing cd ~ and
pressing Enter.
6. Type cd /home and press Enter. Type ls and press Enter. You see a list of all the home
folders. You might see folders other than your own, depending on how many users are
on your Linux computer.
7. Type cd username, where username is the account you used to log on. If you are in the
correct folder, the prompt again changes to ~.
8. Type mkdir Folder1 and press Enter to create a new folder in your home folder. Type
cd folder1 and press Enter. If you used the folder capitalization specified in both
commands, you will receive an error because Linux considers Folder1 and folder1 to
be different names.
9. Type cd Folder1 and press Enter. Your prompt changes to indicate you are in the
Folder1 folder.
10. Type ls and press Enter. There is no output because the folder is empty, or at
least it seems that way. Like Windows, Linux has two folders named “.” and
“..”, but they are hidden files. Type ls –a and press Enter to see all files, including
hidden files.
11. Type touch newfile1 and press Enter. The touch command creates a new file or updates
the time stamp on an existing file. Type ls -l and press Enter.
12. Close the terminal window but stay logged on if you are continuing to the next
project.
Project 4-7: Navigate the Linux Folder Structure
in Files
As mentioned in the previous project, there are two common ways to view
and manage folders and files in Linux: from the shell prompt and from the
GNOME Files tool. In this project, you use the Files tool in Fedora, although
the steps are similar in many UNIX/Linux systems.
1. Log on to your Linux computer, if necessary.
2. To open the Files tool, click Activities and then click the Files icon.
3. Files places you in the Home folder by default. You see the Folder1 folder you created
using the mkdir command in the preceding project. Double-click Folder1.
4. You see the file you created using the touch command in the preceding project.
Copyright 2017 Cengage Learning. All Rights Reserved. May not be copied, scanned, or duplicated, in whole or in part. WCN 02-200-203
Hands-On Projects
205
5. In the left pane, double-click Computer to go to the root of the file system. (The Computer
entry should be listed under the Devices category in the left pane of Files—you
—you may need
—
to scroll the left pane to see it.) Double-click the home folder.
6. Double-click the folder that represents your home folder. Right-click Folder1, view the
options, and then click Compress.
7. The compression function is different in Linux than in Windows. In Linux a new file is
created from the folder and its contents are called a compressed tar file by default. See
Figure 4-26. Notice also that the system creates the compressed tar file in your home
directory. Click Create, and then click Close. You see a new file named Folder1.tar.gz
in your home directory.
Figure 4-26 Creating a compressed file in Linux
Source: Fedora Linux
8. Close Files and log off or shut down your Linux computer.
Project 4-8: Navigate the Mac OS X Folder Structure
In this project, you learn to use the Macintosh HD desktop icon in Mac OS X
to access files and folders.
1. Start and log on to your Mac OS X computer. Double-click the Macintosh HD icon on
the desktop.
2. Double-click the Users folder. You should see a folder for each user account on the
system, and a Shared folder.
3. Double-click your account’s home folder, which looks like a house.
4. Your home folder contains a combination of folders and files. Typically, documents
that you create using this account are placed in the Documents folder. There are also
folders in which to store Downloads, Movies, Music, Pictures, and so on, as shown in
Figure 4-27.
Copyright 2017 Cengage Learning. All Rights Reserved. May not be copied, scanned, or duplicated, in whole or in part. WCN 02-200-203
4
206
Chapter 4 File Systems
Figure 4-27 The home folder for a user in Mac OS X
Source: Mac OS X
5. Click the File menu at the top of the desktop, and then click New Folder.
6. Type Folder1 as the folder name and press Enter.
7. Right-click Folder1 and then click Compress “Folder1”. Notice that a new file named
Folder1.zip is created in your home folder.
8. Click the Go menu at the top of the desktop, and then click Utilities.
9. Double-click Terminal in the Utilities window.
10. Type ls and press Enter to view the contents of your home folder. You see the folder
you created in Step 6.
11. Type mkdir Folder2 and press Enter.
12. Type ls and press Enter to verify that your folder was created. Note that you also used
the ls and mkdir commands in Linux to work with files.
13. Click the Terminal menu at the top of the desktop, and then click Quit Terminal.
14. Close the Utilities window, but stay logged on if you are continuing to the next project.
Project 4-9: Create Aliases with Mac OS X
Mac OS X includes the Get Info option to allow you to view file types. Also,
aliases are a useful feature in Macintosh file systems. Like shortcuts in
Windows, aliases let you create custom icons and names to place on your
desktop, menus, or elsewhere to point to other applications. Aliases give you multiple ways
to access the same application and let you easily place these access points in various convenient locations. In this project, you view the file type of an application and create an alias.
1. From your Mac OS X desktop, click Go in the menu bar at the top of the desktop and
then click Applications.
2. Click Contacts. (Don’t double-click, because you do not want to open the application.)
Copyright 2017 Cengage Learning. All Rights Reserved. May not be copied, scanned, or duplicated, in whole or in part. WCN 02-200-203
Critical Thinking
207
3. Click the File menu and then click Get Info. Review the information you see. Close the
Contacts Info window.
4. Make sure Contacts is still selected, and then click the File menu and click Make Alias.
5. If necessary, click to move the cursor to the box under the Contacts icon and change
the text to insert your initials before Contacts. For example, the user entered GT Contacts
as the alias in Figure 4-28.
4
Figure 4-28 Creating a new alias in Mac OS X
Source: Mac OS X
6. Right-click the new alias and click Copy. Right-click the desktop and click Paste Item.
The new alias is copied to the right side of the desktop.
7. Double-click the alias on the desktop to see that it opens the Contacts application.
8. Log off or shut down your Mac OS X computer.
Although an alias only points to the actual application, you can treat an
alias like an application. For example, you can drag a file onto an alias
icon to open the file with the application to which the alias points.
You can also create an alias for a folder instead of an application,
which lets you save files into a folder by choosing its alias. Further, you
can create an alias from a network connection so you can open the
server it represents simply by double-clicking the alias icon.
Critical Thinking
The following activities give you critical thinking challenges. Challenge Labs give you an
opportunity to use the skills you have learned to perform a task without step-by-step instructions. Case projects offer a practical problem for which you supply a written solution. Not all
Copyright 2017 Cengage Learning. All Rights Reserved. May not be copied, scanned, or duplicated, in whole or in part. WCN 02-200-203
208
Chapter 4 File Systems
chapters contain Challenge Labs. There is not always a specific right or wrong answer to these
critical thinking exercises. They are intended to encourage you to review the chapter material
and delve deeper into the topics you have learned.
Challenge Labs
Challenge Lab 4-1: Work with Disk Management in Windows
In this challenge lab, you explore the Windows Disk Management tool. You may have to
research how to do some of the tasks. Once you are finished, you will answer some questions. You will need a second disk of at least 20 GB installed on your Windows computer.
•
Install a second disk on your Windows computer of at least 20 GB, if necessary.
•
Delete any existing partitions from the new disk.
1. What type of disk is it: basic or dynamic?
•
Create a new 3 GB volume named Vol1 and format it using a file system that supports
file and folder permissions. Use the default drive letter.
2. What format did you choose?
3. What type of partition was created (primary, extended, logical drive)?
•
Create three additional volumes of 3 GB each named Vol2, Vol3, and Vol4. Accept the
default options each time.
4. For each partition, what was the partition type you created?
5. Explain what happened when you created the fourth volume.
•
Convert the disk to a dynamic disk. (Convert only the new disk you installed; do not
convert Disk 0, which is the Windows boot disk.)
6. How did this change the way the volumes and partitions are labeled?
•
Close Disk Management.
Case Projects
GT Yummy Ice Cream is a company that produces ice cream and sells it to distributors in North
America. The company’s headquarters are in a large building in downtown Chicago. All of
the senior management
management—the president and all vice presidents—use Macintosh computers with
the Mac OS X operating system. The Marketing Department uses Windows 10, as does the
Accounting Department. The Manufacturing and Operations Department uses workstations
running Linux, which have specialized software for their area, including a complex inventory
and distribution client/server system. The servers used by the company include a combination
of Windows Server 2008 R2 and Windows Server 2012 R2. There has been some turnover in
the company’s Computer Support area, so you have been hired as a consultant to provide help.
Copyright 2017 Cengage Learning. All Rights Reserved. May not be copied, scanned, or duplicated, in whole or in part. WCN 02-200-203
Case Projects
209
Case Project 4-1: Train a New Vice President in Using
Mac OS X Folders
A new vice president has just been hired, and she is not familiar with Macintosh
computers. You have been asked to provide her with a set of simple written
instructions for how to access the documents in the home folder, which were
left by her predecessor. Also, provide instructions for how to create a new
folder in Mac OS X. Note that both the predecessor and the new vice president
have the same user account name, which is VP Financials. Finally, the vice president needs your advice for creating a folder structure under her home folder.
She wants a separate location for each of the following:
•
Rulings by the board of directors
•
Financial spreadsheets
•
Word-processed documents that pertain to her division
•
Word-processed documents that relate to senior management activities
•
Marketing reports
Explain how you would set up the folder structure and what you would name
the folders.
Case Project 4-2: Determine Whether a File System is
Mounted for a DVD/CD-ROM Drive
An inventory specialist in the Manufacturing and Operations Department
needs to determine what file systems are mounted on his Linux computer
because he is not sure that the DVD/CD-ROM drive is properly mounted.
Explain the steps he should use to determine the mounted file systems, and
note which file system should be mounted for the DVD/CD-ROM drive.
Case Project 4-3: Choose a File System for Windows 10
A new computer has just been purchased for the accounting manager. The
company purchased the computer without an operating system because they
already have extra licensed copies of Windows 10. You need to set up the
computer. What Windows 10 file system do you implement, recognizing that
the accounting manager needs a secure system? Explain your decision and
briefly discuss the advantages of this file system. Also, the accounting manager
asks you to set up a preliminary folder structure to contain:
•
Accounting reports
•
Word-processed documents
•
Department memos
•
Personnel evaluations
Explain where you would set up this folder structure and show how you
would name the new folders.
Copyright 2017 Cengage Learning. All Rights Reserved. May not be copied, scanned, or duplicated, in whole or in part. WCN 02-200-203
4
210
Chapter 4 File Systems
Case Project 4-4: The Advantages of the Windows
Server 2012 File System
GT Yummy Ice Cream has just hired a new person who is training to be a
Windows Server administrator. She has worked with computers in many
capacities, but has never managed a Windows Server 2012 server. You are
asked to train her, and as part of the orientation to Windows Server 2012,
you decide to explain the advantages of its file system. Create a short report
that summarizes the advantages you will discuss in your training.
Case Project 4-5: Repair a File Problem
The copywriter in the Marketing Department uses a Windows 10 computer
that has some problems. Each time the copywriter accesses certain files, he
sees an error message. He is concerned because the files will be used for an
upcoming catalog that will go into print soon. Explain the steps needed to fix
these files. The files are on the D: drive and the Windows OS is installed on
the C: drive.
Copyright 2017 Cengage Learning. All Rights Reserved. May not be copied, scanned, or duplicated, in whole or in part. WCN 02-200-203
chapter
5
Installing and Upgrading
Operating Systems
After reading this chapter and completing the
exercises, you will be able to:
●
●
●
●
Explain the overall process of installing and upgrading operating
systems
Prepare to install an operating system and understand the factors
involved in an upgrade
Install and upgrade the following operating systems and
understand the various options:
Windows 7 and Windows 10
Windows Server 2008 and Windows Server 2012
Linux using the Fedora 23 distribution
Mac OS X El Capitan
Obtain operating system patches and minor upgrades via the
Internet
Copyright 2017 Cengage Learning. All Rights Reserved. May not be copied, scanned, or duplicated, in whole or in part. WCN 02-200-203
211
212
Chapter 5 Installing and Upgrading Operating Systems
For many, the installation or upgrade of an operating system (OS) sounds like a
daunting task. This chapter takes the mystery out of the process by showing you, step by
step, how to install or upgrade modern OSs. First you learn some of the basic tasks and planning you must do before installing or upgrading an OS, and then you step through actual
installations and upgrades in the Hands-On Projects at the end of the chapter. When you are
finished, you will know how to prepare for an OS installation or upgrade; what to expect,
what to watch for, and what to avoid during the process; and how to update your OS once
it is installed. It is beyond the scope of this book to cover all possible options and settings, so
only typical installations and upgrades are presented. For easier reading, the chapter is divided
into two parts:
•
Part 1: Introduction and Initial Preparations
•
Part 2: OS Installations and Upgrades
Part 1: Introduction and Initial Preparations
In Part 1, you learn general concepts about OS installations and upgrades. You also learn
how to make advance preparations to help maximize the success of an installation, such as
by verifying hardware and hardware drivers, backing up OSs before starting, and conducting
a test upgrade.
Introduction to Installing an OS
There are two basic types of OS installations: clean installations and upgrade installations.
A clean installation is performed in one of the following scenarios:
•
The installation is performed on a computer that has no OS installed (a new hard drive
or one that has been formatted)
•
The computer has an OS already installed; it is deleted and replaced by the new OS
•
The computer has an OS installed and the new OS is installed on another volume,
making it possible to boot either to the old OS or the new one
An upgrade installation occurs on a computer that already contains an earlier version of the
OS. The upgrade replaces the earlier version with a new version, and usually retains some or
all of the original settings, user accounts, applications, data files, and other existing user files.
The process of installing an OS varies from one OS to another, but certain features are common to all installations. OS installation can be divided into three general stages: preparation,
the installation itself, and the configuration tasks performed following the installation.
Preparing for installation involves the following:
•
Choosing a computer configuration that meets or exceeds the minimum requirements
for the OS you are installing
•
Ensuring that all computer hardware is operating correctly
•
Having the OS installation media available (DVDs, ISO files, setup programs) and any
license or activation codes
Copyright 2017 Cengage Learning. All Rights Reserved. May not be copied, scanned, or duplicated, in whole or in part. WCN 02-200-203
Part 1: Introduction and Initial Preparations
213
•
Understanding the general features of the OS you are installing so you can decide
which modules to install and which to omit
•
Having device drivers that might not be included with the OS installation files. This
preparation is particularly important for disk controllers. (During the Windows installation process, you will be prompted to add drivers for any disks that are not recognized by the setup program.)
•
Having accurate information available about your computer and peripheral devices
•
Being aware of the network environment in which you are installing the OS; this
preparation may involve having information about how and where the computer
should be connected to the network or having Wi-Fi access information,
knowing how IP addressing is done on the network, and knowing what to name
the computer
During the installation, you may need to provide some or all of the following information:
•
Where (in which drive, folder, or path) to install the OS and what to name the folder
that contains the OS
•
Whether you want to perform a clean installation or an upgrade and the name(s) the
OS uses for these different installation types (for example, Windows uses the term
Custom install for a clean installation)
•
Information about you, your company, and your computer; this information might
include your name, company name, computer name, or workgroup name
•
A license or activation code that verifies your right to install the OS
•
Which components of the OS you want to install
After you complete an installation, keep the product key, ID number, or activation code in a
safe place so you can reinstall the OS in the event that your computer or hard drive fails.
Also, always keep the installation DVDs and other media in a safe place after completing the
installation.
Modern OSs can automatically detect and configure devices such as monitors, keyboards,
printers, mice, network cards, video cards, and sound cards, as long as the OS has the appropriate device driver as part of the installation media. However, automatic detection may also
misidentify a device, and you might need to reinstall the correct driver.
Some installation programs are primarily GUI-based or use a combination of GUI- and textbased screens. Modern versions of Windows, Linux, and Mac OS X primarily use GUI
screens during an installation, and they use automated “wizards” to step you through
the process. OSs can usually be installed from DVDs, and in many cases over a network.
(Network installations are not covered in this book.)
The installation itself consists of some or all of the following general functions:
•
Running the installation program
•
Gathering system information
•
Determining which elements of the OS will be installed
•
Copying OS files to your computer
Copyright 2017 Cengage Learning. All Rights Reserved. May not be copied, scanned, or duplicated, in whole or in part. WCN 02-200-203
5
214
Chapter 5 Installing and Upgrading Operating Systems
•
Configuring devices and drivers
•
Restarting the system and finalizing configuration of devices
For most OSs, device and driver configuration is part of the installation process. The Plug
and Play (PnP) feature automatically configures internal and external devices as part of the
installation and at startup whenever a new device is added.
Windows 95 was the first OS to be compatible with PnP. Besides Windows,
UNIX/Linux distributions and Mac OS X are also PnP compatible.
Even with a PnP-capable OS, you may have to configure devices to work optimally with the
OS. For example, your computer may detect a video card in the system and a monitor, but it
may not have the correct or newest driver for the card. Also, the monitor settings may need
to be configured for optimal performance. In some cases, the OS may search for and download the correct driver automatically, or you might have to supply a disc or flash drive that
contains the driver or download it manually.
Preparing for Installation
Before you can install any OS, you must make a few advance preparations. Naturally, you
must select a computer on which you will install the OS. You might have an existing computer or a new computer that was purchased specifically for the OS. The “computer” may
also be a virtual machine in which the “hardware” is virtual hardware emulated by virtual
machine software, such as VMware or Microsoft Hyper-V. (Virtualization is discussed in
more detail in Chapter 8.) In any case, the computer must meet the minimum specifications
for the OS you are installing. Most commonly, the minimum specifications cover the speed
and type of CPU, the amount of memory, and the amount of free disk space.
Checking the Hardware
First, and most important, the machine must be working correctly. If you have defective
hardware, such as a bad disk drive, a bad DVD/CD-ROM drive, or a bad memory chip, the
OS installation can be extremely difficult or impossible. Most OSs interface with the hardware on many levels.
Before you begin an installation, you should be sure that all hardware needed for the installation is turned on and ready for use, including the computer, monitor, and any external
peripheral devices, such as USB devices and external disk drives.
You should remove or disconnect any removable media that contain important data or that are not necessary for the installation. In
general, an OS installation will not destroy data on removable
media, unless it is specifically instructed to do so. However, if important data is backed up and removable media are taken out of their
drives or disconnected, there is no chance of losing anything.
You should also have available information about your hardware, including how many hard
disks you have, their size, and their type, such as SAS or SATA disks. (You learn about these
Copyright 2017 Cengage Learning. All Rights Reserved. May not be copied, scanned, or duplicated, in whole or in part. WCN 02-200-203
Part 1: Introduction and Initial Preparations
215
disks in Chapter 7, “Using and Configuring Storage Devices.”) You should also know how
much memory you have in your machine. For any expansion cards, such as your video
card, network card, sound card, and disk controllers, you should know the make and
model. If you have a printer, modem, scanner, or other device, you should keep the device
driver disks handy and know their types. Table 5-1 is an example of how you might organize
this information for installation.
Table 5-1
Hardware component information
Component
Description/setting
CPU (type and bit
size)
The computer’s basic input/output system (BIOS) knows the CPU information, and the OS
should automatically make all required adjustments. One caveat, however, is that the bit
size (32-bit or 64-bit) of the CPU must match the bit size of the OS you are installing.
Amount of RAM
Your OS should automatically detect the amount of random access memory (RAM) in your
computer. However, guidelines supplied with your OS tell you how much RAM is
recommended. You should know how much you have to ensure that minimum
requirements are met.
Type of buses
Before you install the OS, you might want to install any expansion cards you want to use.
You’ll need to know what expansion buses your computer supports and how many slots
are available before you purchase the expansion cards. Examples of expansion bus slot
types include PCI Express, PCI-X, and PCI.
Hard disk(s)
You need to know the type and size of your hard disks and whether they are empty or
have a file system installed. If you are doing an upgrade or installing alongside an
existing OS, you need to know how much free space is available. Most new hardware
includes BIOS routines to automatically detect the type of hard drive installed, as well as
critical drive settings.
Keyboard
Unless your keyboard has special features that require custom drivers, the type of
keyboard you have should not be a factor during OS installation.
Mouse
The type of mouse or pointing device can be important; there can be differences between
a wired mouse and a wireless mouse. In some cases, a custom driver may be needed for a
mouse that has extra features.
Video card
Most modern OSs will detect your video card and automatically include required drivers.
However, special features of your video card may become available only with the use of a
special driver provided by the manufacturer. This is particularly true of video cards that
support multiple monitors.
DVD/CD-ROM type
Your OS automatically detects this information.
Sound card
Some OSs include drivers for common sound card hardware. If your card isn’t one of the
popular models, make sure you have the required drivers supplied by the card’s
manufacturer.
Network interface
card (NIC)
Most OSs will automatically detect your NIC. However, it may still be a good idea to use
the manufacturer’s custom drivers for best performance.
Printer
You should have custom drivers from your printer manufacturer.
Other input/output
(I/O) devices
If your OS doesn’t detect other hardware during the installation, you must understand
hardware basics and have access to any custom drivers required to make it function
properly with your OS. Most motherboards come with a DVD that contains drivers for all
the on-board devices, but it’s a good idea to check the motherboard manufacturer’s Web
site and see if there are updated drivers for the OS you are installing.
Copyright 2017 Cengage Learning. All Rights Reserved. May not be copied, scanned, or duplicated, in whole or in part. WCN 02-200-203
5
216
Chapter 5 Installing and Upgrading Operating Systems
Chapter 6, “Configuring Input and Output Devices,” and Chapter 7,
“Using and Configuring Storage Devices,” provide more detailed information on devices and device drivers.
Some cards installed in the computer include their own settings. In the Intel PC architecture,
these cards must often be configured to interface with the computer in a certain way.
Modern OSs use the PnP capability to do this. If you install an OS that supports PnP, card
configuration is usually automatic. If you do not use an OS that supports PnP, or if you
install a component that does not support PnP, you may be in for a few surprises. Many
PnP cards come with a utility that lets you configure them to work in non-PnP mode; this
utility is usually included on the manufacturer’s disk with the drivers.
All modern Windows OSs support PnP. Most Linux distributions also support PnP, but the
use of drivers in Linux can be more complex than in Windows systems, so there can be occasional problems in detecting PnP cards and devices in Linux. If a detection problem occurs,
contact the card or device manufacturer. Interface cards in the Apple Mac architecture don’t
usually need any special configuration for the hardware to work properly because Mac OS X
is specifically designed for Mac hardware.
Newer hardware may have BIOS settings that can turn PnP compatibility
on or off. PnP should be enabled by default. If it isn’t, check your
computer’s BIOS documentation to find out how to turn it on before
installing a new OS. USB devices, such as flash or removable hard
drives, can be hot-plugged into a computer and recognized because
they are equipped with PnP capability. A hot-plug device can be
installed and removed from the computer while the computer is on
and the OS is running.
Checking Drivers
Many devices, such as DVD drives, SCSI drives, network interface cards, printers, and scanners, require special drivers to work correctly. In general, drivers are included on the disks
that come with the devices, but often these disks do not include drivers for all possible OSs
or the most up-to-date drivers. Also, your device may not be on the list of drivers that come
with the OS, which can result in some installation problems.
If you install drivers that came with your hardware, the hardware should operate properly.
However, in some cases, you may get significantly better performance by installing later
drivers that you secure from the manufacturer. The easiest way to access the latest drivers is
to go to the hardware manufacturer’s Web site for drivers and support information, or
contact the manufacturer and ask for the latest driver disks for your device.
Copyright 2017 Cengage Learning. All Rights Reserved. May not be copied, scanned, or duplicated, in whole or in part. WCN 02-200-203
Part 1: Introduction and Initial Preparations
217
Even though you may have driver disks on hand, it is best to obtain
recent drivers because driver updates often fix bugs or performance
problems in older versions. In some cases, your strategy may involve
reading forums about manufacturers’ devices so you are aware of
any problems with the newest drivers. For example, a new driver
that is relatively untested in the market may have some problems, in
which case you want to use the driver issued just prior to the newest
driver.
You should also check the documentation that came with any hardware you want to use
with your new OS. In many cases, the manufacturer includes a disclaimer indicating which
OSs are certified for use with particular hardware.
Ensuring Hardware Compatibility
Because of the wide range of hardware available today, you will find that many OSs have
certain hardware requirements. These are usually listed on the vendor’s Web site or in the
OS’s documentation. Some OSs enable you to look up compatible hardware online. For
example, you can find compatibility information for Windows servers on Microsoft’s
Windows Server Catalog Web site, at www.windowsservercatalog.com/
www.windowsservercatalog.com/. For client OSs such
as Windows 10, go to the Windows Compatibility Products List Web site: https://sysdev
.microsoft.com/en-us/hardware/lpl/. Red Hat has a certified products catalog that combines
.microsoft.com/en-us/hardware/lpl/
Red Hat hardware, software, and plug-in compatibility information into a single publication
(https://access.redhat.com/ecosystem/). For Mac OS X, use Apple Macintosh hardware such
as the iMac to ensure compatibility.
If you are installing the OS on a virtual machine, the virtual machine
software allows you to select the OS you are installing and the virtual
machine is configured appropriately to ensure the virtual hardware is
compatible.
Migrating to a New OS
No matter how comfortable you are with an OS, there comes a time when you must upgrade
or migrate to the next version. In this context, an upgrade refers to an installation in which
the original settings and user files are retained; we use migration to more broadly refer to
moving from one OS to another, which may or may not involve implementing a new
computer.
For instance, a migration may be necessary when you find that your current OS version does
not support new software or certain devices you want to use. Also, older versions of OSs
don’t have the new security features required for safer network and Internet access, or to
protect e-mail systems. Whether it is a small upgrade to fix bugs or a larger upgrade or
migration, many of the procedures are similar to those required for an initial installation. In
this section, you’ll learn about general upgrade and migration considerations, backup and
safety recommendations, and the specific steps and possible pitfalls involved in upgrading or
migrating computer OSs.
Copyright 2017 Cengage Learning. All Rights Reserved. May not be copied, scanned, or duplicated, in whole or in part. WCN 02-200-203
5
218
Chapter 5 Installing and Upgrading Operating Systems
Deciding Whether to Perform an Upgrade or Clean Installation
When you consider migrating to a newer OS version, decide whether you can perform an
upgrade installation or whether you need to do a clean installation. An upgrade installation
can be an advantage in that it typically costs less to purchase an upgrade license than a new
license for an OS. In many cases, you can also elect to retain your existing settings, data files,
and applications, which can save time and money.
Alternatively, the advantage of a clean installation is that you can start fresh by reformatting
the hard disk used by the OS, which enables disk problems to be identified and remedied
before they become a headache later. In some cases, reformatting may also help your system
to run faster. The downside of a clean installation is that it takes extra time to configure the
OS, restore data files, and reinstall applications.
Although it takes time to reinstall applications, the reinstallation may
solve problems with applications that don’t work properly or that
have become sluggish. When you reinstall applications, also plan to
apply application updates that manufacturers often distribute through
the Internet.
In some cases, you need to perform a clean installation because the new OS version does not
support your old hardware. For example, organizations that were using Windows XP may
need to upgrade to Windows 10 because Windows XP is no longer supported; the computers
running Windows XP will probably not meet the minimum requirements of Windows 10, so
clean installations on new hardware are required.
Preparing for an Upgrade or Migration
Before you upgrade or migrate, the first thing to consider is whether this step is truly necessary. For example, will it enable you or your organization to perform tasks or use software
you can’t use now? Will it save money in the long run by increasing productivity or enabling
new services? Is your current OS no longer supported, or does it have security vulnerabilities
that a new OS resolves?
If you are certain that an upgrade or migration is necessary and desirable, then you must
make sure you have the necessary hardware and software (including device drivers) for the
new OS version, as well as information about your computer that may be needed. You
should also make a complete backup of your current system and data before starting. If you
are upgrading or migrating more than two or three computers at once, consider performing a
test upgrade or migration on one or two computers to identify and solve possible problems.
These types of considerations are discussed in the following sections.
If you are upgrading or migrating a large number of desktop or server
OSs, investigate automated installation methods, such as Microsoft’s
unattended installation option, or large-scale installation options such
as Windows Deployment Services (available in Windows Server). There
is not room in this chapter to discuss these automated techniques, but
it is important to be aware they are available.
Copyright 2017 Cengage Learning. All Rights Reserved. May not be copied, scanned, or duplicated, in whole or in part. WCN 02-200-203
Part 1: Introduction and Initial Preparations
219
Deciding to Upgrade or Migrate When new versions of OSs are released that
promise new features, bug fixes, enhanced capabilities, and more speed, it is tempting to jump
immediately on the upgrade bandwagon. However, before taking such a step, especially in a
large production environment, you should carefully consider whether you need to upgrade or
migrate and whether the time is right. Although newer versions of OSs promise great new features, you should ask yourself whether you actually need the new functionality. Objective
analysis of the situation may show that an upgrade or migration may not be cost effective. In
other cases, the result might significantly lower the total cost of ownership (TCO) if the OS
you are upgrading to can be more easily managed. For example, Group Policy is a feature
that works in Windows domains to manage security, configuration, settings, and other configurable features on Windows client computers. Generally speaking, Microsoft enhances the
capabilities of Group Policy with each release of its server and client OS versions, making
newer OSs easier to manage while improving security in an enterprise network.
In some cases, moving to a new OS has little immediate effect on the functions performed by
the computers and users for which you are responsible. However, you may want to upgrade
to newer hardware for warranty, performance, and reliability reasons. In this case, your old
OS may not support the new hardware features, making your decision to upgrade to a
newer version an easy and necessary one.
Sometimes OS vendors publish a list of the applications tested on
the new OS. These tests may not be comprehensive enough to
ensure that all features of the applications work properly, or that
they work on all types of computers. Install the new OS and the
applications your organization uses on a test computer so that
you can verify them before implementing them on a large scale.
Experience has also shown that it is best not to upgrade or migrate shortly after a new OS is
released. If you can put off moving to a new OS for several months, or maybe even a year,
you benefit from the experiences of many other users solving problems that might have been
yours. If you wait, you will have access to many patches and bug fixes that are not available
for early releases. If you feel you must upgrade or migrate soon after a new version is
released, consider using the test strategy covered later in this chapter.
The OS Version Development Cycle Some OS vendors offer prerelease or beta
software for you to try. Microsoft, for example, typically offers prereleases in the form of
alpha software, beta versions, and release candidate (RC) versions. Alpha software is an
early development version of software in which there are likely to be bugs, and not all of
the anticipated software functionality is present. Beta software has successfully passed the
alpha test stage. Beta testing may involve dozens, hundreds, or even thousands of people,
and may be conducted in multiple stages, such as beta 1, beta 2, and so on. Beta software
likely still has bugs, but is at a more tested stage. A release candidate (RC) is software at
the final stage of testing by vendors and users before the official release that is sold commercially. A release candidate is usually tested by a very large audience of customers.
When an OS has been well tested and contains all of the new features, it is ready to go to
market. At this stage Microsoft calls the software a release to manufacturing (RTM)
version. Never install anything other than an official release or RTM version of an OS on
production computers because preliminary versions can have bugs, security vulnerabilities,
Copyright 2017 Cengage Learning. All Rights Reserved. May not be copied, scanned, or duplicated, in whole or in part. WCN 02-200-203
5
220
Chapter 5 Installing and Upgrading Operating Systems
and reliability problems. In addition, some OS vendors put a time limit on preliminary
releases so that they stop working or receiving updates after a specified date.
A production computer is any computer used to perform real work. If it
were to become unusable for any reason, it would cause an inconvenience, hinder workflow, or cause data to be lost.
If you plan to implement a new OS for an organization, consider
obtaining an alpha or beta version, and put it on a machine used
specifically for testing. Use this computer for training and investigation to learn about the new features of the OS and how they will
affect your work environment, particularly your existing software.
Virtual machines are excellent choices for testing preliminary software
releases because they can be quickly built and just as quickly
removed when you are finished with them.
Checking Hardware and Software Before you decide to upgrade or migrate, you
should carefully check the affected computers against the requirements of the new OS. As
already noted, newer OSs often require more advanced hardware, including increased
memory, disk space, CPU speed, and sometimes even improved display properties. Take
special note of the hardware installed in the computer, such as network cards, scanners,
sound cards, and other devices that require special drivers. If your organization supports
many computers, consider obtaining network software that can automatically inventory
the hardware components of the computers on your network. Or, you can inventory the
hardware yourself, as illustrated in the example hardware inventory list in Table 5-2.
Table 5-2
Sample hardware inventory for multiple computers
Computer ID
CPU/clock speed
RAM
Disk capacity
DVD/CD-ROM
Video
Special devices
CFNP9012
2.8 GHz
4 GB
750 GB
DVD/CD-ROM
On board
None
D3FX1931
3.2 GHz
8 GB
1 TB
Blu-ray disc and
DVD/CD-ROM
VisionTEK
PCIe
Tablet
…
…
…
…
…
…
…
Also, before you migrate to a new OS, make sure that the current drivers for I/O devices
and storage media work with the new version, or that drivers are available for these devices
on the new OS. It is a good idea to contact hardware vendors and get some assurance that
their devices will continue to work properly after the upgrade. Do not leave this to chance;
older or discontinued hardware may not be supported in newer OS versions.
The issue of drivers is another reason to delay your migration until an
OS has been on the market for several months. Sometimes OS vendors
release a system before hardware manufacturers have had time to
develop and test new drivers. Waiting to migrate usually means there
will be more drivers—and hardware—available to use with an OS.
Copyright 2017 Cengage Learning. All Rights Reserved. May not be copied, scanned, or duplicated, in whole or in part. WCN 02-200-203
Part 1: Introduction and Initial Preparations
221
Make sure that you have all the device drivers needed for the hardware available on a DVD,
flash drive, or removable hard drive. If there are drivers that exist only on the hard disk of
the computer, copy them to a flash drive, removable hard drive, or some other safe place.
Otherwise, if the installation fails, you will not have the drivers you need to get the computer back to work. If there are new drivers for the new version of the OS, keep them
handy, as well as copies of your current drivers. You will then be able to reinstall the old
OS if you cannot complete the upgrade for some reason.
It is also a good idea to keep detailed records of custom software settings—changes in the
default settings for the OS and other software—so that these custom settings can be restored
if necessary after any OS or other software upgrade. For example, it is not uncommon for
users to modify display or other settings after they run an OS for a while; they may use an
automated backup program, run special disk tools on a regular basis, or have customized
network settings. Upgrade installations may reset some settings to their defaults, which may
not be what you want.
Determine what software is used on systems prior to an upgrade or migration so that you
can check to see if there are any compatibility problems. Windows 10 has a Program
Compatibility Troubleshooter that can help you configure an application that will run on
an older Windows version but won’t run on Windows 10.
Another way to run older applications on new operating systems is
to use virtualization. Using a virtualization program such as VMware
Player, Hyper-V, or VirtualBox, you can run the old OS as a virtual
machine in the new OS. In addition, some virtualization programs let
you create a virtual machine from your physical computer, a process
called physical to virtual (P2V). Using this procedure, the OS and
applications on your old computer are put into virtual disks that are
attached to a virtual machine you can run in your new OS.
Making Backups Before Migrating to a New OS
A backup involves copying files from a computer system to another medium, such as tape, a
DVD, another hard drive, or a removable drive. It is essential to have a complete backup of
your old OS, software, and data before beginning a migration. Making backups of software
and data is also a very important part of day-to-day computer operation because unexpected
things happen, such as hard disk crashes or unintentional file deletions. As OSs and
computers get more complicated, failures can even happen for unexplainable reasons during
normal computer operation. If you use computers long enough, eventually you will lose
critical information. Backups are essential to recovering from such a loss.
Most OSs have a backup utility, and software vendors offer many other choices that provide
plenty of additional backup options.
If a program is lost, you may be able to simply reinstall it, but when
data files are lost, the damage may take hours or days to repair. For
this reason, regular backup of your system during normal operations
and full backup prior to an upgrade are necessities.
Copyright 2017 Cengage Learning. All Rights Reserved. May not be copied, scanned, or duplicated, in whole or in part. WCN 02-200-203
5
222
Chapter 5 Installing and Upgrading Operating Systems
Consider the following points when backing up your information:
•
Close all open windows and save all files before starting a backup because many
backup tools do not back up open files.
•
Make sure that you have the software needed to restore the backups under both
the old and new OSs. There is nothing more frustrating than having a backup but
not being able to restore it. Even though you probably tested the backup and
restore software with the old OS, there is no guarantee it will work properly with
the new one. Before you perform an upgrade, you should test the restore software,
preferably by making a backup and restoring it to the computer you set up to test
the new OS.
•
Make sure that you make a full backup of the system. You should make a backup of
the entire contents of all disks connected to the computer, not just the disk the OS is
installed on.
When you perform a backup, make sure that you back up critical
system files, such as the system state data in Windows desktop and
server OSs, which includes the registry. In the backup utility that comes
with these OSs, and for some third-party utilities, you can manually
select a system state backup. Another way to make sure that you have
a backup of all files, including system files, is to perform an image
(binary) backup by using tools in the OS’s backup software or third-party
software. Disk imaging software vendors include Paragon, Acronis, and
Symantec.
Some computers you upgrade will not have a built-in drive, such as a tape drive or dedicated
backup drive, that is suitable to make a full backup. In this situation, consider using a removable external hard drive or a network drive. Another option is to back up to another
computer on the network that is equipped with an appropriate backup device. Keep in mind
that almost all OSs support easily removable external drives that connect to the USB,
FireWire, or eSATA port on a computer. It is worth the money to have one of these devices
handy to make full backups before an upgrade installation. Chapter 7 and Chapter 11 provide more information about backups.
Upgrading an OS can be very simple; it may take only 20 minutes, and
you may never need the backup media you created or the test
system you used to verify the restore would work properly. However, if
the upgrade does not go as planned, you will be very happy to have
the backup. The time spent backing up, including testing the
backup, can prevent many headaches and problems with your system
upgrade.
Copyright 2017 Cengage Learning. All Rights Reserved. May not be copied, scanned, or duplicated, in whole or in part. WCN 02-200-203
Part 1: Introduction and Initial Preparations
223
From the Trenches …
A small credit union was migrating from an older UNIX server to a new Linux server.
They used third-party backup software that was advertised as supporting both OSs, so
they did not run a test to ensure the software worked with both OSs. After upgrading
to the Linux server, the information on the tapes made from the old UNIX system could
not be read by the new Linux server. In fact, the backup could not be read even by the
old UNIX system. Fortunately, the credit union staff had not dismantled the old UNIX system before discovering this problem.
Conducting a Test Migration
You should plan to test an upgrade or migration before you apply it to a production computer.
If you have only one or two computers to upgrade or migrate, this may not be an option, but
when you have five or more computers to upgrade or migrate, it can be beneficial to perform
a test on one or more.
The purpose of a test is to simulate what would happen in a real upgrade or migration and
discover any problems that might occur. To run the test, you need a working computer that
closely resembles the computers you will be upgrading or migrating. Choose a computer that
resembles the “lowest common denominator” of the computers you are upgrading or migrating, in terms of their amount of memory, CPU speed, size of the hard disk, and any connected devices. You should also install all software that is typically found on a production
computer in your situation. If you are in a network environment, connect the computer to
the network and make sure everything is fully functional. You should be able to use this
machine as if it were a production computer. At the beginning of the test, this computer will
run the old version of the OS, the version you currently run on your production computers.
Part of the test is to practice upgrading or migrating this OS.
Consider using virtual machines as part of your upgrade test. Virtual
machines don’t test hardware compatibility, but you can at least
install the applications in the new OS on a virtual machine to verify
that the applications will work correctly.
When the test computer is fully functional, you can perform the upgrade or migration. It is
helpful to take specific notes describing the steps of the installation, any problems that
arose, and what you did about them. Also note any questions you had about the installation,
and any information you had to look up to complete the installation. Write down the names
of any drivers that you needed. These notes will serve as a guide in later installations.
When there are many computers to upgrade or migrate, it is common to do so over a period
of several weeks or months, so having notes on the exact steps of the process will help you
remember the information you need and the problems you found. Another approach is to
create a written checklist that documents the upgrade or migration process step by step,
including how to handle problems as well as special driver and software installations and
configurations.
Copyright 2017 Cengage Learning. All Rights Reserved. May not be copied, scanned, or duplicated, in whole or in part. WCN 02-200-203
5
224
Chapter 5 Installing and Upgrading Operating Systems
Once you complete the upgrade or migration on the test computer and immediately deal with
any software issues that arise, test the computer for a couple of days. Perform tasks that you
would normally perform, and take note of any changes in the computer and the user
interface.
If you find no apparent problems, you may want to ask an experienced user whose computer
is on the list to be upgraded or migrated to use the test computer for work for a few days.
Keep in close communication with this person, taking note of any problems and anything
that does not work properly. After moving to a new OS, one of the first things to check is
whether all application software functions normally. Sometimes after upgrades or migrations,
particular functions in software packages do not work, or work differently. If there are problems, chances are they will not surface until a user tries to access a certain function you
never thought to test.
During the testing phase for an upgrade installation, ensure that the upgrade did not change
any settings or move or remove files or programs. If you encounter significant problems with
hardware or software, delay the upgrade or migration until they are resolved. Just as a prerelease test will uncover major and minor problems with a new OS design, an upgrade or
migration test can uncover conflicts between the new OS and your particular system
configuration.
After resolving any problems, repeat the test installation process. Install the old OS, then all
software, then upgrade or migrate the OS, and make the changes you think will resolve the
issues you encountered earlier. Test the computer yourself for a couple of days, and then let
a user test the computer. In this way, you have another chance to test the upgrade or migration and your installation notes.
These tests can be time consuming; you may need a week or longer to get through them. In
some cases, you may perform many test installations before you get every detail worked out.
Or, you may decide after repeated tries that the upgrade or migration will not work and
cancel the plan. Either way, the test results, when carefully documented, will tell you what
to expect. Obviously it is better to find out in a test situation that an OS upgrade or migration won’t work for you. Your test results can also be used to explain to employees and management why an upgrade or migration should or should not be carried out. If you decide that
the plan should proceed, you will know the steps, you will know what to expect, and you
will be efficient in performing the upgrade or migration.
Training
In small to large organizations that migrate to a new desktop OS, it is important to arrange
for user training. This training might be in the form of classes, training videos, training
DVDs, or other means. The important thing is to ensure that users have the opportunity to
learn the new OS. There is an initial expense for training, but the return on investment
(ROI) can be worth it in terms of user productivity as well as user morale.
Also, training for server administrators on new server systems is important. Training the
server administrators will help them understand the new features of the server and how to
best use those features to improve reliability, security, and productivity.
Copyright 2017 Cengage Learning. All Rights Reserved. May not be copied, scanned, or duplicated, in whole or in part. WCN 02-200-203
Part 2: OS Installations and Upgrades
225
Part 2: OS Installations and Upgrades
The second half of this chapter focuses on the practical steps to install and upgrade the OSs
discussed in this book. For each OS you learn:
•
Information about OS versions
•
Minimum and recommended hardware configurations
•
Installation steps
•
Upgrade steps
•
How to install minor upgrades or patches (minor enhancements or fixes are often made
available through the Internet on a weekly, monthly, or as-needed basis)
Installing and Upgrading Windows 7
Mainstream support for Windows 7 ended in January 2015, but it’s still widely used in business and at home. Extended support for Windows 7 is scheduled to end in January 2020.
The editions available in Windows 7 include:
•
Starter edition—A stripped-down version of Windows 7 that offers limited functions,
including fewer desktop display options. It is often preinstalled on netbook computers,
which are small portable or laptop computers that have limited computing capabilities
and are designed for lightweight portability. Netbook computers are generally used for
Web access, e-mail, and basic document creation. Starter edition could originally handle only three simultaneously open applications, but this restriction no longer applies.
•
Home basic edition—Just
—Just a step above Starter edition, the Home Basic edition is
—
intended for Web surfing, e-mail, photos, music, and basic document handling. It has
only limited support for the Aero desktop feature.
•
Home premium edition—Offers more digital capabilities than Home Basic edition for
expanding home entertainment, use of photos, and more capable document handling.
Home Premium is particularly well suited to entertainment activities involving games,
TV, music, and multimedia. Home Premium edition provides full support for the Aero
desktop.
•
Professional edition—A platform for accomplishing professional activities on the computer in a home, small office, or larger office work environment. Windows Professional
is well suited to setting up projectors, networks, printers, and other shared resources. It
enables the user to set up automatic backups in a home or work context.
•
Business edition—Intended for business users to enable the use of business applications,
network mobility throughout an office, and for remote access, document collaboration,
versatile backup and shadow copy capabilities, and strong security. Business edition is
also well adapted for membership in a Windows Server domain.
•
Ultimate edition—A union of the home entertainment and business productivity capabilities of the Home Premium and Business editions. Ultimate edition also offers
advanced battery management for portable computers and the most advanced security
protection, including BitLocker Drive Encryption. BitLocker is a whole-disk encryption
system that can prevent the system from booting without the necessary key.
Copyright 2017 Cengage Learning. All Rights Reserved. May not be copied, scanned, or duplicated, in whole or in part. WCN 02-200-203
5
226
Chapter 5 Installing and Upgrading Operating Systems
•
Enterprise edition—Contains the same features as Ultimate edition except that it is sold
to large companies using volume licensing instead of to individual users.
All Windows 7 editions, except Starter edition (32-bit only), come in 32- and 64-bit versions.
The user’s direct experience of security in Windows 7 is toned down from Windows Vista, in
that it requires less user intervention. However, the actual security is strengthened to meet
new security threats.
Hardware Requirements For satisfactory performance, users should consider purchasing a computer that has a 1.2 GHz dual-core or better CPU, 2 GB or more of RAM,
and 100 GB or more of storage. These aren’t the minimum requirements (see Table 5-3),
but they are recommended for satisfactory performance.
Windows 7 offers visual features that can take full advantage of the high resolution and display capabilities of systems with advanced graphics features. When you use a computer with
an advanced graphics processor, Windows 7 can display high-quality results for multimedia
and gaming applications.
The hardware requirements for Windows 7 are summarized in Table 5-3.
Table 5-3
Windows 7 hardware requirements
Hardware
Minimum
Recommended
CPU
1 GHz 32- or 64-bit processor
Multicore processor or multiple processors for
better performance; also, an Intel-VT or AMD-V
capable processor for handling virtual desktop
software to run multiple OSs
RAM
1 GB (32-bit)
2 GB (64-bit)
2 GB or more for 32-bit systems (2 GB is
required to run Windows Virtual PC)
3 GB or more for 64-bit systems
Storage
16 GB (32-bit)
20 GB (64-bit)
50 GB or much more depending on the
applications to be used
Video card
DirectX 9 graphics device with WDDM
1.0 or higher
Video capabilities appropriate for the
applications to be used; gaming and
multimedia applications may require
specialized video capabilities
Installing Windows 7 The Windows installation process is simple and straightforward. With the installation DVD inserted in the drive, start the computer. The system
boots from the DVD and the setup program begins. You are prompted for the language
and locale settings, as shown in Figure 5-1.
Copyright 2017 Cengage Learning. All Rights Reserved. May not be copied, scanned, or duplicated, in whole or in part. WCN 02-200-203
Part 2: OS Installations and Upgrades
227
5
Figure 5-1 Choosing language and locale settings in Windows 7 setup
After clicking Next, you click Install now and setup continues. You must accept the license
terms and then choose the type of installation you want (see Figure 5-2).
Copyright 2017 Cengage Learning. All Rights Reserved. May not be copied, scanned, or duplicated, in whole or in part. WCN 02-200-203
228
Chapter 5 Installing and Upgrading Operating Systems
Figure 5-2 Choosing an Upgrade or Custom installation in Windows 7
Your choices are Upgrade and Custom (advanced). For a clean installation, choose Custom
(advanced). An upgrade installation can only be started if you boot the system to an existing
OS. Next, you choose where to install Windows. If your disk is empty, as in Figure 5-3, you
can accept the default option, and Windows will create a 300 MB System Reserved partition
for the boot files and assign the remaining disk space to the C: drive where Windows is
installed. Optionally, you can create your own partitions or delete existing partitions by
clicking Drive options.
Copyright 2017 Cengage Learning. All Rights Reserved. May not be copied, scanned, or duplicated, in whole or in part. WCN 02-200-203
Part 2: OS Installations and Upgrades
229
5
Figure 5-3 Choosing where to install Windows
Next, Windows copies files needed for installation and the installation continues. Your computer will restart once or twice during installation; when it is complete, you are prompted to
create a user and a name for your computer and then create a password. You are then
prompted to configure Windows Updates, set the time and time zone, and select your
network location (Home, Work, or Public). Windows finalizes settings, the desktop appears,
and installation is complete.
Most editions of Windows 7 require you to enter the activation code
during installation. An exception is the Enterprise edition, which allows
centralized activation for volume license holders.
Upgrading to Windows 7 There are two approaches to upgrading to Windows 7.
One upgrade path is to go from one edition of Windows 7 to a more full-featured edition.
You can perform this type of upgrade by purchasing the Windows Anytime Upgrade for
Windows 7. Another path is to upgrade from Windows XP or Windows Vista to Windows
7. We’ll forego the details of the upgrade paths because at this point in the Windows 7 lifecycle, most updates will be to a more current version of Windows, such as Windows 10.
Installing and Upgrading Windows 10
The actual installation process for Windows seems to become more streamlined and hands-off
with each successive version. The installation process for Windows 10 doesn’t differ substantially from that of Windows 7 or Windows 8/8.1 until the initial installation is over and you
are asked whether you want to customize settings or use express settings. If you customize
settings, you can specify how much information your computer should send to Microsoft
for personalizing your experience, whether you want your location and browsing information shared with Windows and apps, whether to send diagnostics to Windows, and whether
Copyright 2017 Cengage Learning. All Rights Reserved. May not be copied, scanned, or duplicated, in whole or in part. WCN 02-200-203
230
Chapter 5 Installing and Upgrading Operating Systems
you should connect automatically to wireless and shared networks. If you choose Customize,
you’ll see the screen in Figure 5-4.
Figure 5-4 Customizing settings in Windows 10
After you customize settings or accept the express settings, you’ll be asked how you want to
connect to your organization’s network if you’re using the Enterprise or Education edition.
For all other editions, you’ll be asked to sign in to your PC using a Microsoft account. You
can create a new Microsoft account or use an existing account by entering your e-mail
address. If you want to sign in with a local user account, you are given that option as well.
After you log on, Windows finishes installing and configuring your system and displays the
Windows desktop. You will have an opportunity to install Windows 10 in a Hands-On
Project at the end of the chapter.
All Windows 10 editions except Enterprise require you to enter an activation key during the installation process.
Upgrading to Windows 10 If you want to upgrade to Windows 10 on a computer
with an existing OS installed, you have a number of options. Free in-place upgrades to
Windows 10 are supported for Windows 7 and Windows 8/8.1. An in-place upgrade essentially
overwrites your current OS installation and maintains your applications, settings, and data.
Copyright 2017 Cengage Learning. All Rights Reserved. May not be copied, scanned, or duplicated, in whole or in part. WCN 02-200-203
Part 2: OS Installations and Upgrades
231
Windows 10 is a free upgrade for qualified editions unless you are running the Enterprise edition of Windows 7 or 8/8.1. If you are running the Enterprise edition, you must upgrade to an
Enterprise edition of Windows 10 using your company’s volume licensing agreement.
The easiest way to upgrade to Windows 10 is to download the Windows upgrade program.
The Windows upgrade program will detect your edition of Windows 7 or 8/8.1 and will
install the correct edition of Windows 10. Just open Internet Explorer from the computer
you want to upgrade, and go to www.microsoft.com. You will be prompted to upgrade to
Windows 10, which includes downloading and running the upgrade program. Once started,
the upgrade program downloads and then installs the appropriate upgrade version of
Windows 10. You can also upgrade by performing a custom installation from the Windows 10
installation DVD. Simply insert the Windows 10 installation media in the DVD drive, navigate
to the DVD drive, and double-click Setup. Once the installation is started, there is very little for
the user to do except accept the license agreement and let Setup to do the rest. If you do use the
installation DVD, you should know which versions of Windows 7 and Windows 8/8.1 can be
upgraded to Windows 10, as shown in Table 5-4.
Table 5-4
Windows 10 upgrade paths
Current OS
Edition
Windows 10 edition
Windows 7
Starter
Home
Home Basic
Home
Home Premium
Home
Professional
Pro
Ultimate
Pro
Pro
Pro
Pro Student
Pro
Windows 8/8.1
Home
If you are running Windows 7 or Windows 8.1, Windows Update will
automatically install the Get Windows 10 app, which you can run to
verify that your system is compatible with Windows 10.
If you are running a 32-bit version of Windows 7/8/8.1, you must
upgrade to the 32-bit version of Windows 10. If you are running a
64-bit version of Windows 7/8/8.1, you must upgrade to the 64-bit
version of Windows 10. In addition, upgrading to Windows 10 Enterprise
requires a Windows 7/8/8.1 Enterprise edition.
Installing and Upgrading Windows Server 2008/R2
As with Windows 7, mainstream support for Windows Server 2008 and Windows Server
2008 R2 ended in January 2015 and extended support is scheduled to end in January 2020.
Copyright 2017 Cengage Learning. All Rights Reserved. May not be copied, scanned, or duplicated, in whole or in part. WCN 02-200-203
5
232
Chapter 5 Installing and Upgrading Operating Systems
Windows Server 2008/R2 was widely adopted by IT departments. This section will lump
together Windows Server 2008 and Windows Server 2008 R2 using the /R2 nomenclature
to refer to both versions, while pointing out differences between the two releases as necessary. Most of the new features of Windows Server 2008/R2 were discussed in Chapter 2,
but because Windows Server 2008 came five years after Windows Server 2003, there were
many significant changes, most of which were carried over to Windows Server 2012. Some
of the new features are:
•
Centralized server management through the Server Manager tool
•
Improved security
•
Enhanced Web hosting services
•
Hyper-V to create a virtual server environment
•
Windows Server Core for running a server strictly through a command-line interface
with a smaller network footprint
•
Windows PowerShell, which provides a command-line and shell-based environment for
creating time-saving computer management scripts
The following list shows some of the enhancements made with Windows Server 2008 R2.
•
Active Directory enhancements, such as the Active Directory Administrative Center
tool for centralizing tasks related to Active Directory and the Active Directory Recycle
Bin that allows administrators to easily restore deleted objects
•
File classification and file management tasks to improve file and folder organization
•
Hyper-V (virtualization) enhancements, including better processor and networking
support, and live migration, which allows administrators to move a virtual machine
from one server to another with little to no downtime
•
Windows AppLocker to better manage how clients access applications and server scripts
•
New PowerShell commands to provide better script-based management of Windows
servers
The main editions of Windows Server 2008/R2 are:
•
Standard edition—Designed for basic everyday server needs for small to large businesses, such as file and printer sharing, basic network services including Domain Name
Service (DNS), and general management of network access. (DNS is an application
protocol that resolves domain and computer names to IP addresses or IP addresses to
domain and computer names.)
•
Enterprise edition—Meets the needs of organizations that deploy networks with applications and Web services requiring high-end servers and a high level of productivity. This
edition helps facilitate scaling server services upward as an organization grows, and it
provides full clustering services for joining multiple servers in a fail-safe environment.
•
Datacenter edition—Targeted for organizations that have mission-critical applications
that use large databases of information.
•
Web Server edition—Intended for hosting and deploying Web services and Web applications. This edition is optimized for Microsoft Internet Information Services for Web servers.
Copyright 2017 Cengage Learning. All Rights Reserved. May not be copied, scanned, or duplicated, in whole or in part. WCN 02-200-203
Part 2: OS Installations and Upgrades
233
•
Itanium edition—Designed for servers that use the Intel Itanium 64-bit processor but
can still run both 32- and 64-bit applications. This OS enables resource-intense applications, such as the accounting system for a large corporation.
•
Windows Server 2008 R2 Foundation edition—A less full-featured edition intended for
small businesses as a file and print server, terminal server, or domain controller (to
manage a Windows Server domain). This edition was new to R2.
Microsoft also offers Windows High-Performance Computing (HPC)
Server 2008, which is a specialized edition used to cluster highperformance computers to simulate supercomputing capabilities, with
support for thousands of CPU cores.
The Standard, Enterprise, and Datacenter editions of the original release of Windows Server
2008 come in 32-bit and 64-bit versions. Starting with Windows Server 2008 R2, only a
64-bit version is available. Also, you can purchase these editions with Microsoft Hyper-V to
create a virtual server. A virtual server is a computer that can be configured to run multiple
virtual machines. A virtual machine is a discrete OS running inside virtual server software,
such as Hyper-V, on one computer. Multiple virtual machines can run on one virtual server.
For example, one virtual server might house three virtual machines, each running its own
copy of Windows Server 2008/R2, and two virtual machines, each running a Linux server distribution. In this example, one computer is performing as five servers. Using a virtual server
consolidates server management and space and reduces expenses for electricity, resulting in
financial savings and increased server manager productivity. As mentioned, virtualization is
discussed in more detail in Chapter 8.
Hardware Requirements The hardware requirements for Windows Server 2008/R2
are pretty standard for all the primary editions, with the exception of the Itanium edition
because it requires a specific CPU. Table 5-5 lists the hardware requirements. Also, be
aware that the requirement for the 32-bit version of Windows only applies to the original
release, not R2.
Table 5-5
Windows Server 2008/R2 minimum and recommended system requirements (all editions unless noted)
Component
Requirement
Processor
Minimum: 1 GHz for x86 CPU or 1.4 GHz for x64 CPU
Recommended: 2 GHz or faster
(Itanium CPU required for Itanium edition)
Memory
Minimum: 512 MB RAM
Recommended: 2 GB RAM or more
Available disk space
Minimum: 10 GB
Recommended: 40 GB or more
Additional drives
DVD-ROM
Display and peripherals
Super VGA or higher
Keyboard and mouse
Copyright 2017 Cengage Learning. All Rights Reserved. May not be copied, scanned, or duplicated, in whole or in part. WCN 02-200-203
5
234
Chapter 5 Installing and Upgrading Operating Systems
In Table 5-5, x86 means 32-bit and x64 means 64-bit.
Installing Windows Server 2008/R2 There are several ways to install Windows
Server 2008. These methods include:
•
Traditional DVD clean installation
•
Unattended installation that uses specialized files for automating the installation of one
or more servers without server administrator intervention
•
Installation into a virtual machine, such as in Hyper-V
•
Windows Deployment Services, which is a Windows Server 2008 application feature
that enables multiple OSs to be installed from a master server over a network
The details of each installation method vary and are too complex to cover in this book.
However, the installation steps used for a traditional DVD clean installation are the main
steps used for any installation, and are almost identical to a Windows 7 installation.
Upgrading to Windows Server 2008/R2 Microsoft recommends that you perform a clean installation of Windows Server 2008/R2 rather than perform an upgrade.
A server installation affects many more people than a workstation installation. Also, a server
is likely to have more critical applications, databases, and other mission-critical information
vital to an organization. In an upgrade, there is a greater possibility that compatibility problems or unexpected problems may result with applications and data. It is generally safer to
fully back up data, perform a clean installation, reinstall applications, restore data, and
spend several weeks testing the new system before releasing it live to users. Because mainstream support for Windows Server 2008/R2 has ended, this book will forego the details of
upgrading to Windows Server 2008/R2, as most upgrades should probably be focused on
Windows Server 2012 or newer versions.
When testing a new server installation, plan to involve users in the testing
so they can help to find problems with the applications and data that
are important to them.
Performing an upgrade to Windows Server 2008 is similar to performing a clean installation, but existing applications and data are retained.
Installing and Upgrading Windows Server 2012/R2
Windows Server 2012 was released to manufacturing in August 2012 with Windows 8, and
Windows Server 2012 R2 was released in August 2013 with Windows 8.1. Most of the new
features and the various editions were discussed in Chapter 2, but some of the other notable
changes from Windows Server 2008/R2 included dropping support for the Itanium processor,
dropping Enterprise edition, and the adoption of the Metro-style user interface from Windows
Copyright 2017 Cengage Learning. All Rights Reserved. May not be copied, scanned, or duplicated, in whole or in part. WCN 02-200-203
Part 2: OS Installations and Upgrades
235
8/8.1. As with Windows 7 and Windows Server 2008/R2, there is very little for the user to do
during installation. In fact, all the user really needs to do is select the language and locale settings, enter the activation code, accept the license agreement, and assign a password for the
Administrator user. Most of the server configuration comes after the installation. Tasks such
as assigning a name to the computer, setting the time zone, configuring the IP address, configuring updates, and installing server roles are all very important, and define how the server
will operate in the network. Windows Server 2012/R2 has a convenient configuration panel
called Local Server Properties that gives you access to most of these tasks, as shown in
Figure 5-5.
5
Figure 5-5 Windows Server 2012 R2 Local Server Properties
Hardware Requirements The minimum and recommended hardware requirements
for Windows Server 2012/R2 are shown in Table 5-6. The requirements apply to all editions
unless noted. (The editions of Windows Server 2012/R2 were discussed in Chapter 2.)
Table 5-6
Windows Server 2012/R2 minimum and recommended system requirements (all editions unless noted)
Component
Requirement
Processor
Minimum: 1.4 GHz 64-bit CPU
Recommended: 3.1 GHz or faster 64-bit multicore
Memory
Minimum: 512 MB RAM (2 GB for Essentials)
Recommended: 2 GB RAM or more (8 GB for Essentials)
Available disk space
Minimum: 32 GB (90 GB for Essentials)
Recommended: 60 GB or more for the system partition
Additional drives
DVD drive
Network interface card
Gigabit (10/100/1000 BaseT) Ethernet Adapter
Display and peripherals
Super VGA or higher
Keyboard and mouse
Internet access
Copyright 2017 Cengage Learning. All Rights Reserved. May not be copied, scanned, or duplicated, in whole or in part. WCN 02-200-203
236
Chapter 5 Installing and Upgrading Operating Systems
The minimum requirements for Essentials are greater than for the other
editions because Essentials installs several network services automatically.
Installing Windows Server 2012/R2 The Windows Server 2012/R2 installation
routine is similar to that of Windows Server 2008/R2. You have the same option of installing
the OS with a GUI or installing the Server Core version. The only substantial difference is that
Microsoft now recommends installing Server Core, so it is the default choice (see Figure 5-6).
Figure 5-6 Selecting Server Core or Server with a GUI
Upgrading Windows Server 2012/R2 When you upgrade to Windows Server
2012/R2, you can use one of two main methods: an in-place upgrade or server role migration. With an in-place upgrade, you boot to the existing OS and run setup.exe from the
Windows Server 2012/R2 installation medium. With server role migration, you perform a
clean installation of Windows Server 2012/R2 and migrate the server roles the old OS
version performed. Here’s an overview of in-place upgrade considerations, followed by
available upgrade paths in Table 5-7:
Copyright 2017 Cengage Learning. All Rights Reserved. May not be copied, scanned, or duplicated, in whole or in part. WCN 02-200-203
Part 2: OS Installations and Upgrades
Table 5-7
237
•
The only previous Windows versions supported for upgrade are Windows Server 2008
and Windows Server 2008/R2.
•
If you’re running Server Core, you can upgrade only to Windows Server 2012/R2
Server Core, but you can install the GUI afterward.
•
All Windows Server 2012/R2 versions are 64-bit, and cross-platform upgrades aren’t
supported, so you can only upgrade the Windows Server 2008 64-bit version to
Windows Server 2012/R2. A Windows Server 2008 32-bit version requires a clean
installation.
•
You can’t upgrade to a different language.
5
Windows Server 2012/R2 upgrade paths
Current edition
Server 2012/R2 upgrade path
Windows Server 2012 Datacenter
Windows Server 2012 R2 Datacenter
Windows Server 2012 Standard
Windows Server 2012 R2 Standard or Datacenter
Windows Server 2008 Standard or Enterprise
Windows Server 2012/R2 Standard or Datacenter
Windows Server 2008 Datacenter
Windows Server 2012/R2 Datacenter
Windows Server 2008 R2 Standard or Enterprise
Windows Server 2012/R2 Standard or Datacenter
Windows Server 2008 R2 Datacenter
Windows Server 2012/R2 Datacenter
Windows Web Server 2008 or Windows
Web Server 2008 R2
Windows Server 2012/R2 Standard
If you’re considering an in-place upgrade, Microsoft recommends removing any third-party
software the manufacturer doesn’t specifically support for a Windows Server 2012/R2
upgrade before you begin. In addition, make sure your system meets the minimum CPU,
RAM, and disk requirements for Windows Server 2012/R2.
An upgrade is similar to a clean installation with a few exceptions. First, you must boot
the existing OS and log on. Then you can start the setup.exe program from the installation
medium. Next, you’re asked whether Windows should go online to get the latest updates
for installation. This option is recommended. You aren’t prompted for the language, time,
currency format, or keyboard layout; they must match the settings for the Windows Server
2012/R2 edition being installed. In addition, you aren’t prompted during an upgrade for
the location to install Windows. It’s installed on the same disk partition as the OS you
booted to.
Before an upgrade begins, Windows runs a compatibility check and produces a compatibility report. Any application, hardware, or driver issues discovered during the check are
noted; you can’t continue the installation until you address issues known to prevent a
successful upgrade.
Migrating from an Earlier Version As you can see, in-place upgrades are somewhat limiting, and you can run into software incompatibility problems. In addition, upgrading isn’t always possible if the specified upgrade path isn’t available. For these reasons,
Microsoft recommends a clean installation followed by server role migration, when possible.
Copyright 2017 Cengage Learning. All Rights Reserved. May not be copied, scanned, or duplicated, in whole or in part. WCN 02-200-203
238
Chapter 5 Installing and Upgrading Operating Systems
Windows Server 2012/R2 has a number of tools to help with this process, which avoids
most of the upgrade path restrictions. For example, migration allows you to do the
following:
•
Migrate from a 32-bit Windows server installation to Windows Server 2012/R2.
•
Migrate from Windows Server 2003 SP2 and later.
•
Migrate from a Windows Server 2008 R2 Server Core installation to a GUI installation
and vice versa.
Migrating Windows server roles and features isn’t an all-or-nothing proposition. You can
migrate roles and features from a server running an earlier version to a Windows Server
2012/R2 server, move a role or feature from one Windows Server 2012/R2 server to
another, or move a role or feature from a virtual machine to a physical machine or vice
versa. However, language migration isn’t supported; both server versions must be running
the same language package.
Installing and Upgrading Linux
In general, installing and upgrading Linux isn’t so much different from installing and upgrading
Windows. However, there are many distributions of Linux, and details will differ depending on
the distribution. This section discusses installing one Linux distribution version—Fedora 23—on
the AMD/Intel PC platform. There are numerous other distributions of Linux designed for different hardware platforms. If you understand how Linux installs on the AMD/Intel platform,
you should have no problem installing other distributions of Linux.
Hardware Requirements As with any OS, the optimal hardware requirements of
Linux depend on how the computer will be used. This section only discusses the recommended minimum requirements for Fedora 23, which are shown in Table 5-8.
Table 5-8
Fedora 23 hardware requirements
Hardware
Recommended minimum
CPU
1 GHz or faster processor
RAM
1 GB or more
Storage (server)
10 GB free space
Video card
Minimum 800×600 resolution for a GUI installation
Removable storage
DVD drive or USB connection for installation or capability to run
the OS from external media
Installing Linux Linux is available in free open source and commercial distributions.
There is not room in this chapter to cover the installations of all distributions. Fedora 23, the
free open source distribution on which the popular commercial Red Hat Enterprise Linux is
based, provides a good starting point from which to learn about a Linux installation.
Fedora 23 Live Media can be booted and run from a DVD or Fedora 23 can be loaded as a
permanent OS that boots from a computer’s hard drive.
Copyright 2017 Cengage Learning. All Rights Reserved. May not be copied, scanned, or duplicated, in whole or in part. WCN 02-200-203
Part 2: OS Installations and Upgrades
239
In one sense, the Fedora 23 installation from the Live Media DVD is not fully representative
because you first start Fedora 23 from the DVD (and load it into memory), boot into the
OS’s GNOME desktop, and click an icon on the desktop to install Fedora 23 on the hard
drive. In many other Linux distributions, including the non-Live Media Fedora 23 distribution, you boot from the DVD and can install Linux without first starting the OS. However,
once you get started with the installation using either method, the installation steps are very
similar to those of any Linux distribution.
Linux comes with the complete source code for the kernel, all the drivers, and most of the
utilities. In particular, it comes with many program development tools, such as compilers
for creating executable files that users can run on the computer. Linux distributions also
often come with many appealing applications, such as OpenOffice.org, which is a free office
suite distribution that is compatible with Microsoft Office.
When you run the live media version of Fedora 23 from the DVD, there
are typically fewer applications available than when you install Linux
onto the hard drive and simultaneously load a full range of open source
applications, such as program language compilers.
Although most Linux distributions can be used as desktop or server OSs, some distributions
have a specific version for the desktop and another version for a server. Server versions usually work the same way as desktop versions, but come with software intended for server
environments, such as DNS and DHCP server software, Web server software, e-mail server
software, account management software, and so on.
Upgrading Linux In Linux, the upgrade process works like the installation process.
You start the installation in the normal way, and then choose to perform an upgrade. The
installer asks for some basic system information, such as which language and keyboard to
use. Also, it checks to determine what hard disks to use for the installation. It then gets
most of the system information previously stored on the hard disk by the old OS. The
appropriate system files are replaced, and the installer asks if you want to customize
the package installation. If you select Yes, you can choose specific elements to install or
update for each previously installed package. Note that many libraries and programs will
be replaced, and if you add software to the computer, you should check carefully to ensure
that everything still works as expected after installation.
An important caveat in Linux upgrades is that many configuration
files are overwritten during the upgrade. The e-mail system, printing
system, window system, and network services may be reconfigured.
You should make sure you have backups of these files before you
begin an upgrade, and double-check configuration files on these
services to make sure they did not change.
Installing and Upgrading Mac OS X
The installation of Mac OS X uses a graphical interface and a Setup Assistant that functions
like the Windows setup wizards. Early versions of Mac OS X up through Mac OS X
Leopard can be installed on a computer with a PowerPC processor chip. Mac OS X Leopard
Copyright 2017 Cengage Learning. All Rights Reserved. May not be copied, scanned, or duplicated, in whole or in part. WCN 02-200-203
5
240
Chapter 5 Installing and Upgrading Operating Systems
can also be installed on a computer that has an Intel processor. Mac OS X Snow Leopard
and later versions can only be installed on an Intel-based computer.
Besides the desktop editions of Mac OS X such as Mac OS X El Capitan, there are also server
editions of Mac OS X Server. Mac OS X Server was released as a separate product with every
desktop version of Mac OS X through Snow Leopard. Starting with Mac OS X Lion, Apple
no longer produces a separate server version; rather, users can install an OS X Server addon package through the Mac App Store for about $20 U.S. The server add-on package includes
a number of server applications:
•
File sharing
sharing—Allows more powerful file sharing between Macs, PCs, iPads, and iPhones
•
Caching server
server—Speeds downloads and uploads between devices on the network and
with cloud-based applications such as App Store, iTunes Store, and iBooks Store
•
Profile manager
manager—Simplifies the deployment and configuration of Apple devices by
centralizing the management of user accounts, mail, calendar, contacts, and so forth
•
Time machine—Makes any Mac act as a Time Machine backup location for all Macs
on the network
•
Xcode server—Provides team software development tools
•
Wiki server—Provides a Web server with the capability for users to collaborate on
Web pages, including blogs, uploads, and collaboration histories
•
Calendar, contacts, and mail servers—Allows you to share calendars and contacts, and
to manage e-mail with Mac e-mail clients on the Mac, iPad, iPhone, and PCs
•
Xsan 4—Provides a scalable storage solution for centralized data
Hardware Requirements for Mac OS X Server Add-On The Mac OS X
Server add-on requirements are shown in Table 5-9. The current version, as of this writing,
requires the Mac to run Mac OS X El Capitan.
Table 5-9
Mac OS X Server hardware requirements and recommendations
Requirement
Mac computer running Mac OS X El Capitan
2 GB RAM
10 GB available disk space
Some features require a valid Apple ID
Some features require an Internet connection
Installing Mac OS X Installations of recent versions of Mac OS X are geared toward
upgrades because it is assumed that you are already running some version of Mac OS X.
You upgrade your current version of Mac OS X by downloading an installer from the App
Store and then running the installer app, which installs the most current version of the OS
on your system. Upgrading to Mac OS X El Capitan using this method is a safe bet for
most Mac models from 2008 onward and for Macs running Snow Leopard or newer
Copyright 2017 Cengage Learning. All Rights Reserved. May not be copied, scanned, or duplicated, in whole or in part. WCN 02-200-203
Part 2: OS Installations and Upgrades
241
versions. In addition, you should make sure your current Mac OS X and the installed apps
are up to date before performing the upgrade.
While using the downloadable installer is the easiest way to install the newest Mac OS X on
your Mac, you may want to perform a DVD installation—for example, if you must replace
your disk. You can create a bootable DVD and perform a clean installation of the OS if you
want. To create a bootable DVD, follow these general steps:
•
Download the installer for the current version from the Mac App Store.
•
Open a terminal window.
•
Run the createinstallmedia command, which is located in the installer program. The
createinstallmedia command requires a series of complex options that will be different
depending on the Mac you use, so it is not detailed here. To learn more about creating a
bootable DVD, do an Internet search for “make a bootable Mac OS X installer disk.”
•
Boot from the DVD and start the installation, as described next.
A number of third-party DVD creators for Mac OS X will create a bootable DVD you can use to install Mac OS X.
Performing a Clean Installation from a DVD A Macintosh will boot from the DVD
drive only if instructed to do so. Simply hold down the option key when you turn on the
computer and then select the option to boot from the Mac OS X Installation DVD.
Here are the general steps for installing Mac OS X from scratch:
1. Insert the Mac OS X Installation DVD.
2. Turn on the Macintosh and hold down the option key as it boots.
3. In the OS X Startup Manager, choose the installer drive, and then click the arrow to
continue.
4. Click Agree to accept the license agreement.
5. In the Install Mac OS X window, click the drive on which to install the OS.
Before you click Install in the window, notice the Customize button
that you can click to customize components that will be installed. Also,
you can choose to erase and reformat the drive before you click Install.
You might do this, for example, if you suspect the drive has some bad
spots or you want to be certain to overwrite any existing data on the
drive and start fresh. To do so, click Utilities in the Mac OS X Installer
menu bar and then click Disk Utility. Select the drive in the left pane
and use the Disk Utility to erase and then format the drive.
6. Click Install. You will be prompted for the administrator password.
7. Wait for the installation process to finish; the computer will restart at least once.
8. In the Welcome window, select the country or region and click Continue.
Copyright 2017 Cengage Learning. All Rights Reserved. May not be copied, scanned, or duplicated, in whole or in part. WCN 02-200-203
5
242
Chapter 5 Installing and Upgrading Operating Systems
9. Select the keyboard layout, such as U.S., in the Select Your Keyboard window. Click
Continue.
10. In the Do You Already Own a Mac window, select the appropriate option to transfer
information to the new Mac, and then click Continue. The options include:
•
From another Mac
•
From another volume on this Mac
•
From a Time Machine backup
•
Do not transfer my information now
At this point you may need to take appropriate steps for the option you selected. For
example, if you have a Time Machine backup on a USB removable hard drive, you
need to connect the drive. Time Machine is the software used to back up a Mac.
11. If you see the Select a Wireless Service window, which is likely if you have a modern Mac,
select your wireless service from the list. Also, enter the wireless service password if needed,
such as that for WPA2 (Wi-Fi Protected Access 2) wireless security. Click Continue.
12. In the Sign in with Your Apple ID window, enter your ID, if applicable, for access to
the iTunes store, iCloud, and the Apple Store. If you don’t have an Apple ID for these
services, leave this information blank. Click Continue.
13. Provide your personal information, including your first and last name, address, and
e-mail address, in the Registration Information window. Click Continue.
14. In the A Few More Questions window, enter your answers in the appropriate boxes,
including where you will primarily use the computer and what you do for a living. Click
Continue.
15. In the Create Your Account window, enter your account name, a short name, the account
password, a confirmation of the password, and a password hint. Click Continue.
16. In the Select a Picture For This Account window, select the source for the picture, such
as the picture library. Click Continue.
17. In the Thank You window, you see a summary of what the Mac is set up to do, such as
organizing your work and e-mail. Click Go to access the Mac.
Mac OS X comes with Migration Assistant to help you transfer user
accounts, files, applications, and computer settings from another
Macintosh computer. To run Migration Assistant, make sure Finder is
running, click Go in the menu bar, click Utilities, and double-click
Migration Assistant.
Regular Updates for OSs
Every OS vendor has a mechanism to provide bug fixes, security patches for threats such as
worms and viruses, and interim upgrades between major releases of their OS. You’ve already
been introduced to the Windows Update feature, which should be used following a Windows
installation or upgrade. This section briefly reviews the update features of the OSs covered in
this book.
Copyright 2017 Cengage Learning. All Rights Reserved. May not be copied, scanned, or duplicated, in whole or in part. WCN 02-200-203
Part 2: OS Installations and Upgrades
243
Windows Updates Beginning with the Windows 98 release, Microsoft includes
Windows Update, a Web-based function that allows you to download and install fixes,
updates, and enhancements to your Windows OS.
An easy way to start Windows Update in Windows Vista/7, Windows Server 2008, or
Windows Server 2008/R2 is to connect to the Internet, click Start, type Windows Update in
the Start Search or “Search programs and files” box, and then click Windows Update.
When you click Check (or Scan) for updates, Windows Update will automatically scan
your computer to determine your OS and check on the installed updates. It then provides
you with a list of updates that you can download and install on your computer.
You should download and install any Critical Updates and Service Packs
(SPs) listed for your system. These updates will fix known bugs, security
issues, and other problems that should be addressed as soon as
possible.
Linux Updates Fedora and other Linux systems come with an update module for obtaining the latest updates. In Fedora 23 with the GNOME desktop, you can manually obtain and
install updates by clicking Activities, Show Applications, and then Software. Click the Updates
tab to list any new updates. You have the option to install the updates or not. To configure
automatic updates, open a shell prompt, type dnf install dnf-automatic, and press Enter.
Next, you must edit the /etc/dnf/automatic.conf file to specify the schedule. Finally, enable
and run the update timers using systemctl:
systemctl enable dnf-automatic.timer && systemctl start dnf-automatic.timer
Mac Updates Mac OS X El Capitan provides updates through the App Store. Check to
see if updates are available by clicking the Apple icon in the menu bar and looking for the
App Store. If updates are available, you will be informed how many there are (see
Figure 5-7). Click the button next to App Store to have Mac OS X download and install
the updates. OS X will also display a notification when updates are available; you can
choose to install them immediately or wait until later.
Figure 5-7 Checking for updates in Mac OS X
Copyright
2017 Cengage
All Rights Reserved. May not be copied, scanned, or duplicated, in whole or in part. WCN 02-200-203
Source:
Mac OSLearning.
X El Capitan
5
244
Chapter 5 Installing and Upgrading Operating Systems
Chapter Summary
■
There are two basic types of installations: a clean installation on a computer with no
OS installed or one that completely overwrites an existing installation on a computer,
and an upgrade installation on a computer that already has an OS installed and where
existing settings, applications, data, and other user files are often retained. The process of installing OSs varies from one OS to another, but all installations can be
divided into three general stages: preparation, the installation itself, and any required
or optional steps following installation.
■
Before installing an OS or upgrading to a new OS, make sure that it is necessary.
Also, when you decide to migrate or upgrade, check that your hardware meets the
requirements for the new OS, and make sure you have the correct, most up-to-date
drivers for the various devices on your system. Gather and document information
about your system.
■
Before you upgrade, make sure that you have a working backup of the current OS
and data. Check your backup after it is made to make sure you can perform a restore
from it if the installation or upgrade is unsuccessful, or if you need to retrieve data
that was overwritten by the installation.
■
Installations and upgrades to Windows, Linux, and Mac OS X are overviewed in the
chapter text. Some of these installations are described step by step in the Hands-On
Projects.
■
After installation, and at regular intervals thereafter, it is a good idea to check for and
download OS updates. All of the Windows versions described in this chapter provide
the Windows Update tool. Linux provides an update module, and Mac OS X Leopard
and Snow Leopard offer the Software Update tool.
Key Terms
alpha software An early development version of software in which there are likely to be
bugs, and not all of the anticipated functionality is present. Alpha software is usually tested
only by a select few users to identify major problems and the need for new or different
features before the software is tested by a broader audience in the beta stage.
backup A process of copying files from a computer system to another medium, such as a
tape, another hard drive, a removable drive, or a DVD/CD-ROM.
beta software During software development, software that has successfully passed the
alpha test stage. Beta testing may involve dozens, hundreds, or even thousands of people,
and may be conducted in multiple stages: beta 1, beta 2, beta 3, and so on.
clean installation An OS installation on a computer that either has no existing OS or an
OS that is overwritten by the installation.
Domain Name Service (DNS) An application protocol that resolves domain and computer
names to IP addresses, or that resolves IP addresses to domain and computer names.
in-place upgrade An OS upgrade that overwrites your current OS and maintains your
applications, settings, and data.
Copyright 2017 Cengage Learning. All Rights Reserved. May not be copied, scanned, or duplicated, in whole or in part. WCN 02-200-203
Review Questions
245
live migration A feature of virtualization that allows a virtual machine to be moved from
one server to another with little or no downtime.
migration Moving from one OS to another OS, which may or may not involve
implementing a new computer as well.
netbook computers Small portable or laptop computers that have limited computing
capabilities and are designed to be lightweight and portable. Netbook computers are
generally used for Web access, e-mail, and basic document creation.
production computer Any computer used to perform real work; it should be protected
from problems that might cause an interruption in workflow or loss of data.
release candidate (RC) The final stage of software testing by vendors before cutting an
official release that is sold commercially. A release candidate is usually tested by a very large
audience of customers. Some vendors may issue more than one release candidate if problems
are discovered in the first RC.
release to manufacturing (RTM) A version of a Microsoft OS that is officially released to be
sold and has gone through the alpha, beta, and release candidate phases prior to official
release.
server role migration An alternative to a Windows server OS upgrade in which you
perform a clean installation of Windows Server 2012/R2 and migrate the server roles the old
OS version performed.
upgrade installation An OS installation on a computer that already has an earlier version
of the OS; the upgrade replaces the earlier version with a new version, often with the option
to retain some or all of the original settings, user accounts, applications, data files, and other
existing user files.
virtual machine A discrete OS running inside virtual server or virtual desktop software,
such as Hyper-V, on one computer. Multiple virtual machines can run on one virtual server.
See virtual server.
virtual server A server computer that can be configured to run multiple virtual machines
with multiple server or desktop OSs. See virtual machine.
Review Questions
1. Your manager is very interested in having a new version of an OS, and wants you to
install a beta version to use on a server so that your company can be one of the first to
take advantage of the new features. What is your advice?
a.
Beta versions are usually very stable and this is a good decision to help stay ahead
of the competition.
b. Beta versions are often sold at a lower cost, which would offer savings to the
company.
c.
OS vendors often provide extensive onsite help to users of beta systems in a production environment.
d. A safer path is to wait for an official release and to avoid using a beta system in a
production environment.
Copyright 2017 Cengage Learning. All Rights Reserved. May not be copied, scanned, or duplicated, in whole or in part. WCN 02-200-203
5
246
Chapter 5 Installing and Upgrading Operating Systems
2. Under which conditions should you consider a clean installation? (Choose all that
apply.)
a.
The installation is performed on a computer that has no OS installed.
b. You want to replace the current OS but maintain all your settings.
c.
You don’t want to have to reinstall applications.
d. You want to be able to boot to your old OS and the new OS.
3. Which of the following should you do prior to creating a backup in preparation for an
OS upgrade? (Choose all that apply.)
a.
Be sure you have the software needed to perform a restore on old and new OSs.
b. Unmount the disk being backed up.
c.
Close active windows and programs.
d. Mount all volumes in a volume mount point.
4. You are in a committee meeting in which the members are debating whether the
Windows XP Professional computers in a laboratory can be directly upgraded to
Windows 10 for free. What is your recommendation?
a.
Check Windows Help on each computer.
b. Purchase all new computers because Windows 10 can rarely run on computers
suited for Windows XP.
c.
Configure the XP computers for the Enterprise edition first.
d. You will need to perform a clean installation of Windows 10.
5. Which of the following is true about Windows Server 2012?
a.
You can upgrade from Windows Server 2003/R2 SP2.
b. You can upgrade from Windows Server 2008 x86.
c.
You can upgrade from Server Core to Server with a GUI.
d. You can’t upgrade to a different language.
6. You are running Windows Server 2008 x86 on a 32-bit CPU. You want to upgrade to
Windows Server 2012/R2. What can you do?
a.
Run the Windows Server Upgrade program and insert the Windows Server 2012/
R2 installation DVD.
b. First, upgrade to Windows Server 2008/R2, and then upgrade to Windows Server
2012/R2.
c.
Install Windows Server 2012/R2 on a new computer and migrate server roles.
d. Back up the computer and perform a clean installation of Windows Server 2012/
R2, then restore the data and applications.
Copyright 2017 Cengage Learning. All Rights Reserved. May not be copied, scanned, or duplicated, in whole or in part. WCN 02-200-203
Review Questions
247
7. You need to perform a backup in Windows that includes the registry. Which type of
backup should you perform?
a.
system state backup
b. data drive backup
c.
scheduled backup
d. incremental backup
8. When you install an OS on a computer with a hard drive that has been formatted and
does not contain a previous OS, you perform a ___________________ installation.
a.
clean
b. update
c.
upgrade
d. new
9. Which key should you press to boot a Macintosh computer from an installation DVD?
a.
Esc
b. Option
c.
Ctrl
d. Apple
10. Choosing the Customize button during a Mac OS X installation allows you to
___________________.
a.
select which OS to install
b. choose the installation location
c.
choose various OS components you want to install
d. repartition the hard drive for a different file system
11. Which of the following are possible ways to install Windows Server 2008? (Choose all
that apply.)
a.
from a set of floppy disks combined with a CD-ROM
b. using an unattended installation
c.
into a virtual machine
d. through Windows Deployment Services
12. You have a Windows Server 2008 server with a 2 GHz, 32-bit processor and 4 GB of
memory. You plan to upgrade it to Windows Server 2012/R2. When you attempt the
upgrade, the Setup program stops with a message that it cannot continue. Which of
the following might be the problem?
a.
There is not enough memory for the upgrade.
b. You must have a quad-core processor.
c.
You didn’t run the setup routine from Windows Server 2008.
d. Windows Server 2012/R2 requires a 64-bit processor.
Copyright 2017 Cengage Learning. All Rights Reserved. May not be copied, scanned, or duplicated, in whole or in part. WCN 02-200-203
5
248
Chapter 5 Installing and Upgrading Operating Systems
13. Mac OS X El Capitan can run on which of the following processors?
a.
PowerPC G3
b. PowerPC G5
c.
AMD M4
d. Intel
14. Each OS upgrade is different, but which of the following are general steps you should
conduct with every upgrade? (Choose all that apply.)
a.
Test the upgrade on a non-production computer.
b. Don’t upgrade as soon as the new OS is released; wait a few months.
c.
Back up all data and applications before starting the upgrade.
d. Format the installation disk before starting the upgrade.
15. You have purchased a computer that is loaded with Windows 7 Home Premium. After
using the computer for several months, you decide you want to upgrade to Windows
10. Which of the following Windows 10 editions can be upgraded from Windows 7
Home Premium?
a.
Enterprise
b. Home
c.
Pro
d. Starter
16. Which of the following is true about the Enterprise edition of Windows 10?
a.
It’s only available if it’s pre-installed by a computer vendor.
b. You can upgrade to it from Windows Home Premium.
c.
You don’t need to enter an activation key during installation.
d. It’s only available in a 64-bit version.
Hands-On Projects
Project 5-1: Change BIOS Settings to Boot to a DVD
Your hardware system BIOS controls many basic functions of your computer.
This chapter discusses the need to be able to boot from a DVD. You can find
out how your system BIOS handles DVD booting by displaying the BIOS
Setup or Configuration screen on your computer.
1. Start your Windows or Linux computer. You must watch carefully for a message that
tells you which key to press to enter the BIOS setup. You may also consult the system
documentation or ask an instructor. The F1, F2, Esc, and Del keys are commonly used
to access BIOS setup. Another way to enter BIOS setup is to hold down a key on the
keyboard while booting. The BIOS sometimes generates a keyboard error message and
gives you the option to go into setup.
Copyright 2017 Cengage Learning. All Rights Reserved. May not be copied, scanned, or duplicated, in whole or in part. WCN 02-200-203
Hands-On Projects
249
2. Once you are in the BIOS setup, look for settings for boot order or boot sequence. For
example, Figure 5-8 displays the PhoenixBIOS Setup Utility with the Boot tab selected.
Some BIOS setup routines require you to use the keyboard rather than the mouse to navigate; the navigation keys are often shown on the bottom of the screen, as in Figure 5-8.
5
Figure 5-8 BIOS setup program showing boot options
3. Use the appropriate keys to change the order of boot devices.
4. If available (and with your instructor’s permission), choose a DVD or CD-ROM drive,
and then save and exit the Setup or Configuration screen.
5. Insert a Windows or Linux OS installation disk and reboot the computer. You may see
a message that says, “Press any key to boot to the DVD/CD.” Your computer should
boot to the installation disk. Do not install the OS now.
6. Restart the computer, change the boot order back to the hard drive, and remove the
installation disk. Save the configuration and exit.
Project 5-2: Document Installed Software in Windows
Before performing a clean installation or upgrading an OS, it is important to
know what software is currently installed in the current OS. If you have to
do a clean installation or the update doesn’t correctly recognize the installed
software, you need to have an accurate inventory of all your applications (not
those that come with the OS, but those you install after the OS installation) so
they can be reinstalled in the new OS, if necessary. This project shows you
where to look for installed applications in Windows 10.
Copyright 2017 Cengage Learning. All Rights Reserved. May not be copied, scanned, or duplicated, in whole or in part. WCN 02-200-203
250
Chapter 5 Installing and Upgrading Operating Systems
1. Start your Windows computer and log on if necessary.
2. Right-click Start and click Control Panel.
3. In Control Panel, click Programs and then click Programs and Features. You will see a
list of installed programs, as shown in Figure 5-9.
Figure 5-9 A list of installed programs in Windows
4. Taking a screen shot is probably the easiest way to record the list. In Windows 10, you
click in the search box next to Start and type snip. In the search results, click Snipping
Tool.
5. In Snipping Tool, click New. Position the mouse in the upper-left corner of the Control
Panel window and click and drag until the window is highlighted. When you release
the mouse button, the Snipping Tool will open with your screen shot. If you have
more programs than will fit on one screen, scroll down and create another screen
shot. You can print or save the screen shots.
6. Verify that you have the necessary installation media or setup programs and license
codes for all your installed applications before you begin an OS update. If you only
have setup files for downloaded applications, be sure to save them on external media
before you begin the installation.
7. Close all open windows.
8. Log off or shut down your Windows computer.
Copyright 2017 Cengage Learning. All Rights Reserved. May not be copied, scanned, or duplicated, in whole or in part. WCN 02-200-203
Hands-On Projects
251
Project 5-3: Document Installed Software in Mac OS X
This project helps you document the installed applications in Mac OS X.
1. Start your Mac OS X computer and log on if necessary. Click Go and click
Applications.
2. The Applications folder displays all installed applications on your Mac, including those
that came with the OS and those you installed manually. Scroll through the applications. Take a screen shot of the Applications folder by pressing Shift+Command+4
and then dragging over the area you want to capture. If you are using a PC keyboard,
you can use Shift+Windows+4. The screen shot is saved to your Mac desktop.
3. Close the Applications window.
4. If you only want to view the list of applications you installed from the App Store, click
the Apple icon, and then click App Store. Click Purchased in the menu bar and sign in
with your Apple ID, if necessary. You will see a list of purchased apps.
5. If you only installed apps from the App Store, you probably don’t need to document
your installed apps. When you install the upgrade, you can connect to the App Store
and download any software you previously purchased. Close all open windows and
then log off or shut down your Mac.
Project 5-4: Document Installed Software in Linux
This project helps you document the installed applications in Linux Fedora 23
with GNOME.
1. Start your Linux computer and log on, if necessary. Click Activities and Show
Applications.
2. You will see applications that came installed with Linux and those you installed after
Linux was installed. To take a screen shot, press Shift+PrtScn on your keyboard. Click
and drag the cursor over the area you want to capture. The screen shot is saved to the
Pictures folder.
3. You can also use the ScreenShot utility by clicking the search box at the top of the
screen and typing screen. In the search results, click Screenshot. You can take a screen
shot of the whole screen, the current window, or a specific area (see Figure 5-10).
When you finish, close the Take Screenshot window.
Copyright 2017 Cengage Learning. All Rights Reserved. May not be copied, scanned, or duplicated, in whole or in part. WCN 02-200-203
5
252
Chapter 5 Installing and Upgrading Operating Systems
Figure 5-10 The Linux Screenshot application
Source: Fedora Linux
4. To see a list of installed applications using the command line, open a terminal window,
type rpm –qa, and press Enter. You will see a more complete list of applications than
you were able to obtain simply by using the Applications menu in the GNOME
desktop.
5. You can view each screen of output. Type rpm –qa | more and press Enter. Press Space
to scroll through each page of output. Press q to quit before viewing all pages.
6. To redirect the output to a file, type rpm –qa > softwarelist.txt and press Enter.
Type cat softwarelist.txt and press Enter to see the created file. Close the terminal
window.
The command to view installed software packages is different in various
UNIX systems. For example, you enter pkginfo in Solaris, swlist in HP
UNIX, pkg_info -a in FreeBSD, and lslpp -L all in IBM’s AIX.
It is highly recommended that you use virtualization software to perform the Hands-On Projects that walk you through the installation of
various OSs. If you use virtualization software such as VMware Player,
VirtualBox, or Hyper-V, you will not need physical installation media.
You can connect the virtual DVD drive to the installation media ISO
Copyright 2017 Cengage Learning. All Rights Reserved. May not be copied, scanned, or duplicated, in whole or in part. WCN 02-200-203
Hands-On Projects
253
file, and your virtual machine will boot from the ISO file. If you are
using virtualization, do not burn a DVD and insert it into the DVD
drive, as instructed in the following projects; connect the virtual
DVD drive to the ISO file instead.
Project 5-5: Install Windows 10
In this project, you install Windows 10 using the DVD installation method.
Before you start, you will need the Windows 10 installation DVD. You can
get a 90-day evaluation of Windows 10 Enterprise Edition from the Technet
Evaluation Center at www.microsoft.com/en-us/evalcenter/evaluate-windows10-enterprise. You will be asked to sign in using your Microsoft account; you
can create an account if you don’t already have one. After you download the
ISO file, burn it to a DVD.
1. Insert the Windows 10 installation DVD in the DVD drive of a computer that meets
the minimum requirements for Windows 10.
2. Start your computer if you are sure it will boot to the DVD. (Refer to Hands-On
Project 5-1 for details on booting via a DVD.)
3. After the Windows logo is displayed, Windows Setup begins. The screen prompts you to
choose your language and location preferences (see Figure 5-1 earlier in this chapter).
Click Next.
4. On the next screen, you have the option to repair your computer or install the OS.
Click Install now.
5. If you are using an edition that requires an activation key, enter it on the next screen
and click Next; otherwise, read the Windows 10 Licensing terms, click I accept the
license terms, and click Next.
6. The next screen asks, “Which type of installation do you want?” (see Figure 5-2 earlier
in this chapter). Click Custom: Install Windows only (advanced) to perform a clean
installation.
7. If you already have an OS installed, your disks will be partitioned like they are in
Figure 5-11; otherwise, your screen will look like Figure 5-3 (shown earlier). If you
already have an OS installed and you want to keep it on your computer, you will
need another partition or disk on which to install Windows 10. To delete the old OS,
click each partition and click Delete. This project assumes that you have a blank disk
on which to install Windows 10. (The name of the disk will include the words “Unallocated Space.”).
Copyright 2017 Cengage Learning. All Rights Reserved. May not be copied, scanned, or duplicated, in whole or in part. WCN 02-200-203
5
254
Chapter 5 Installing and Upgrading Operating Systems
Figure 5-11 A system with a Windows OS already installed
8. Click the disk on which to install Windows 10, and then click Next. The setup program copies files and installs Windows 10. The computer will restart at least once.
When the computer restarts, be sure to remove the installation DVD, or the computer
might boot to the DVD and start the installation process from the beginning.
9. After the computer restarts, you are prompted to use Express settings or Customize
settings. Click Use Express settings. The system restarts.
10. If you are using the Enterprise evaluation edition or the Education edition, you are
prompted to choose how you’ll connect to the network (see Figure 5-12). Click Join a
domain and then click Next.
Copyright 2017 Cengage Learning. All Rights Reserved. May not be copied, scanned, or duplicated, in whole or in part. WCN 02-200-203
Hands-On Projects
255
5
Figure 5-12 Choose how you’ll connect
11. On the “Create an account for this PC” screen (see Figure 5-13), type a user name, a
password, and a password hint, and then click Next.
Figure 5-13 Create an account for this PC
12. Windows 10 completes the setup process and you are logged in.
Copyright 2017 Cengage Learning. All Rights Reserved. May not be copied, scanned, or duplicated, in whole or in part. WCN 02-200-203
256
Chapter 5 Installing and Upgrading Operating Systems
13. If you are connected to a network, you are asked if you want to allow your PC to be
discoverable by other PCs on the network (see Figure 5-14). Click Yes unless you are
on a public network.
Figure 5-14 Choosing network behavior
14. Windows will immediately check for updates and install them if you are connected to
the Internet. To check on updates, click in the search box next to Start, type update,
and then click Check for updates (see Figure 5-15).
Copyright 2017 Cengage Learning. All Rights Reserved. May not be copied, scanned, or duplicated, in whole or in part. WCN 02-200-203
Hands-On Projects
257
5
Figure 5-15 Windows Update
15. Log off or shut down your computer.
Project 5-6: Install Windows Server 2012 R2
In this project, you install Windows Server 2012 R2. You need the installation
DVD for either the Windows Server 2012 R2 Standard or Datacenter edition.
You can download a 180-day evaluation of Windows Server 2012 R2 from
www.microsoft.com/en-us/evalcenter/evaluate-windows-server-2012-r2. You
will be asked to sign in using your Microsoft account, which you can create
if you don’t already have one. After you download the ISO file, burn it to a
DVD.
The installation procedure for Windows Server 2012 R2 is nearly identical
to that of Windows 10 until the system restarts. Only screens that are
substantially different are shown in this project. This installation procedure assumes that no other OS is installed on the computer and that
the disk is unpartitioned.
1. Insert the Windows Server 2012 R2 installation DVD in the DVD drive of a computer
that meets the minimum requirements for Windows Server 2012 R2.
2. Start your computer if you are sure it will boot to the DVD.
3. After the Windows logo is displayed, Windows Setup begins. The screen prompts you
to choose your language and location preferences. Click Next.
4. On the next screen, you have the option to repair your computer or install the OS.
Click Install now.
Copyright 2017 Cengage Learning. All Rights Reserved. May not be copied, scanned, or duplicated, in whole or in part. WCN 02-200-203
258
Chapter 5 Installing and Upgrading Operating Systems
5. You are prompted to choose the operating system to install (see Figure 5-16). Depending on your installation media, you may be able to choose from Server Core or Server
with a GUI for either Standard edition or Datacenter edition, as shown in Figure 5-16.
The installation is identical for both editions. Choose Server with a GUI and click
Next. If you are using an edition that requires an activation key, enter it on the next
screen; otherwise, read the Windows Server 2012 R2 Licensing terms, click I accept
the license terms, and click Next.
Figure 5-16 Choosing the edition and interface for Windows Server 2012 R2
6. The next screen asks, “Which type of installation do you want?” Click Custom to perform a clean installation.
7. Click the disk on which to install Windows Server 2012 R2, and then click Next. The
setup program copies files and installs Windows Server 2012 R2. The computer will
restart at least once. When the computer restarts, be sure to remove the installation
DVD, or the computer might boot to the DVD and start the installation process from
the beginning.
8. After the computer restarts, you are prompted to enter a password for the Administrator account. You must use a password that meets minimum requirements. Type Password01 in the Password and Reenter Password boxes and click Finish.
9. To log on to Windows Server 2012 R2, press Ctrl+Alt+Delete, enter the password for
Administrator, and press Enter.
Copyright 2017 Cengage Learning. All Rights Reserved. May not be copied, scanned, or duplicated, in whole or in part. WCN 02-200-203
Hands-On Projects
259
10. If you are connected to a network, you are asked if you want to allow your PC to be
discoverable by other PCs on the network. Click Yes unless you are on a public
network.
11. Windows Server Manager automatically starts and displays the Windows Server 2012
R2 Server Manager Dashboard (see Figure 5-17).
5
Figure 5-17 Windows Server 2012 R2 Server Manager Dashboard
12. Click Local Server in the left pane to see and change basic settings. On this screen (see
Figure 5-18), you can change the computer name, join a workgroup or domain, change
IP address settings, configure Windows Update, and so on.
Copyright 2017 Cengage Learning. All Rights Reserved. May not be copied, scanned, or duplicated, in whole or in part. WCN 02-200-203
260
Chapter 5 Installing and Upgrading Operating Systems
Figure 5-18 Windows Server 2012 R2 Local Server Properties
13. Log off or shut down your computer.
Project 5-7: Install Linux Fedora 23 Workstation
In this project, you practice installing Fedora 23 Workstation onto a hard
drive. You need the Fedora 23 Workstation installation DVD, which can be
downloaded from https://getfedora.org/en/workstation/download/. This project
assumes you have a blank disk on which to install Fedora 23.
1. Insert the Fedora 23 installation DVD in the DVD drive of a computer that meets the
minimum requirements for Fedora 23.
2. Start your computer if you are sure it will boot to the DVD.
3. Fedora Live will start automatically. When Fedora starts, click Install to Hard Drive on
the Welcome to Fedora screen (see Figure 5-19).
4. On the Welcome to Fedora screen, you are prompted to select the language you want
to use. Click the appropriate language and click Continue.
Copyright 2017 Cengage Learning. All Rights Reserved. May not be copied, scanned, or duplicated, in whole or in part. WCN 02-200-203
Hands-On Projects
261
5
Figure 5-19 Welcome to Fedora screen
Source: Fedora Linux
5. On the Installation Summary screen (see Figure 5-20), review the choices. Click
INSTALLATION DESTINATION and review the options. Notice that you have the
option to encrypt the data on the disk. Click the hard disk you want to use, if necessary, and click Done.
Figure 5-20 Installation Summary screen in Fedora 23
Source: Fedora Linux
Copyright 2017 Cengage Learning. All Rights Reserved. May not be copied, scanned, or duplicated, in whole or in part. WCN 02-200-203
262
Chapter 5 Installing and Upgrading Operating Systems
6. Click Begin Installation. On the Configuration screen (see Figure 5-21), you must perform two tasks before you can continue: create a root password and create a regular
user. Click ROOT PASSWORD and then type Password01 in the Root Password box
and Confirm box. Linux does a dictionary check on your password and reports that
the password is weak. Normally, you would choose a much stronger password that
doesn’t contain any dictionary words and contains a combination of uppercase letters,
lowercase letters, digits, and special characters. Click Done; you are warned again
about the weak password. Click Done again.
Figure 5-21 Fedora 23 configuration screen
Source: Fedora Linux
7. Click USER CREATION. Type a name, user name, and password. If you want, you
can click the Make this user administrator box. Then click Done.
8. On the Configuration screen, click Finish Configuration.
9. When the installation is finished, click Quit. On the desktop, click the power icon in
the upper-right corner, click the power icon again, and click Restart to boot to Fedora
23 on the hard disk. Log on to the system to perform some initial configuration tasks.
10. On the Welcome screen, choose your language and click Next. On the Typing screen,
choose your keyboard and click Next.
11. On the Privacy screen, choose whether to enable or disable location services and automatic problem reporting. Click Next.
12. On the Online Accounts screen, you can choose any online accounts you want to connect to the Fedora 23 installation. Click Skip.
Copyright 2017 Cengage Learning. All Rights Reserved. May not be copied, scanned, or duplicated, in whole or in part. WCN 02-200-203
Case Projects
263
13. On the Ready to Go screen, click Start using Fedora. You see a Getting Started
(GNOME Help) window that provides tutorials for using GNOME.
14. Log off and shut down the computer.
Critical Thinking
The following activities give you critical thinking challenges. Challenge Labs give you an
opportunity to use the skills you have learned to perform a task without step-by-step instructions. Case projects offer a practical problem for which you supply a written solution. Not all
chapters contain Challenge Labs. There is not always a specific right or wrong answer to these
critical thinking exercises. They are intended to encourage you to review the chapter material
and delve deeper into the topics you have learned.
Challenge Labs
Challenge Lab 5-1: Perform a Windows 7/Windows 10 Dual Boot
In this challenge lab, you start from a Windows 7 computer and install Windows 10 while
maintaining your Windows 7 installation. Answer the following questions in preparation for
this installation:
•
What hardware considerations must you take into account before performing the
installation? Think about CPU requirements, disk requirements, and memory requirements, plus anything else you can think of.
•
What will you need to have on hand before starting the installation?
•
What tasks should you perform before beginning the installation?
•
What are some of the critical choices you must make during the installation from the
time you power on your Windows 7 computer to the time that file copying begins?
Case Projects
Merlinos Mills is a company that produces flours and grains for grocery stores. It owns mills
and distribution centers in the northwestern and midwestern United States. The headquarters
in Bend, Oregon employs more than 400 people, most of whom use computers. Also, the
headquarters has 28 servers, all running Microsoft Windows Server 2008 Enterprise Edition.
The company employees use a full range of OSs, including Windows Vista, Windows 7,
Windows 8.1, and Mac OS X Mavericks.
The management of Merlinos Mills wants each department to upgrade to newer OSs. Also,
they are very concerned about network security, and they want to install new servers and
upgrade their current servers to OS versions that take better advantage of security features.
Your role in the process is to work with each department to help ensure that the installations
and upgrades go smoothly.
Copyright 2017 Cengage Learning. All Rights Reserved. May not be copied, scanned, or duplicated, in whole or in part. WCN 02-200-203
5
264
Chapter 5 Installing and Upgrading Operating Systems
Case Project 5-1: Determine Preliminary Steps
The master distribution center in Bend, Oregon includes 42 people, including
nine Windows Vista users, 22 people using Windows 7 Professional, and 11
people using Windows 8.1. The distribution center is slated to upgrade its
computers to Windows 10 Pro. What preliminary steps should be taken before
starting the upgrades on these computers? In general, are there any problems
involved in upgrading to Windows 10 from each of these OSs?
Case Project 5-2: Decide to Upgrade or Not
The distribution center’s nine Windows Vista users are all certain they need to
upgrade to Windows 10 Pro to perform their work. However, the 33 people in
the distribution center who are running Windows 8.1 and Windows 7 Professional are currently able to use all software, such as office software, customized
distribution software, and inventory software that is integrated with the distribution software. They are resisting the upgrade to Windows 10 Pro, and the
distribution manager asks for your opinion about whether to upgrade these computers. Should they upgrade from Windows 8.1 and Windows 7 to Windows 10?
Case Project 5-3: Install Windows 10 Pro
After considering the issues in Case Project 5-2, management has decided that
the distribution center will replace the computers running Windows Vista and
Windows 7, and purchase new machines with Windows 10 Pro. The Windows 8.1
users already have computers that can run Windows 10 for a possible
upgrade. The user support person for the distribution center has not performed an installation for Windows 10. Tell her generally what to expect
when performing this installation.
Case Project 5-4: Move to Windows Server 2012 R2
The IT Department has already been testing Windows Server 2012 R2, and
some time ago purchased licenses to convert all of its Windows Server 2008
Enterprise Edition servers to Windows Server 2012 R2 Enterprise Edition.
Two of the servers are running the Server Core installation of Windows Server
2008. Two other servers are running the 32-bit edition of Windows Server
2008. Management wants all servers to run the Server with a GUI installation.
Explain the general process the department must follow to convert to Windows
Server 2012 R2. Include any caveats or problems they might encounter.
Case Project 5-5: Upgrade to Mac OS X El Capitan
The Marketing Department strictly uses computers that run Mac OS X
Mountain Lion and plans to upgrade to Mac OS X El Capitan. What steps
should it follow for the upgrade?
Copyright 2017 Cengage Learning. All Rights Reserved. May not be copied, scanned, or duplicated, in whole or in part. WCN 02-200-203
chapter
6
Configuring Input
and Output Devices
After reading this chapter and completing the
exercises, you will be able to:
●
●
●
●
●
●
Understand how OSs interface with input and output devices
Explain the need for device drivers and install devices and drivers
Describe popular input device technologies
Discuss the types of printers and install printers
Explain display adapter technologies
Install circuit boards for new devices
Copyright 2017 Cengage Learning. All Rights Reserved. May not be copied, scanned, or duplicated, in whole or in part. WCN 02-200-203
265
266
Chapter 6 Configuring Input and Output Devices
Input and output devices enable people to communicate with the computer and
enable the computer to communicate with people. The keyboard is an example of an input
device through which you issue commands and enter text. A computer monitor is an
output device that enables the computer to communicate back, showing the results of your
work in text or rendering eye-catching graphics. A printer lets you output your work on
the printed page.
This chapter describes how OSs interface with input and output devices, such as through device
drivers. You learn general techniques for installing devices and device drivers for each OS. You
also learn about many types of input and output devices, such as keyboards, mice, monitors,
scanners, and printers. Further, you learn how to install printers in a variety of OSs.
OSs and Devices: An Overview
As you learned in Chapter 1, a primary function of any OS is to provide basic input/output
(I/O) support for application software—that is, to translate requests from application software
into commands that the hardware can understand and carry out. For example, the OS must:
•
Handle input from the keyboard, mouse, and other input devices
•
Handle output to the screen, printer, and other output devices
•
Control information storage and retrieval using various types of disk and optical
drives
•
Support communications with remote computers through a network
An OS accomplishes these tasks in two ways: through software—device driver code within the
OS itself, as well as accessing third-party device driver software—and through hardware
controlled by the OS. Specifically, the OS controls chips and circuits inside a computer that
communicate with specific input or output devices. Device drivers perform the actual communication between the physical device and the OS. The particular configuration of device
drivers and adapters varies, but they function in the same way in each OS.
Likewise, setting up or installing input, output, or storage devices involves three general steps
across OSs:
1. Install the device drivers that are required.
2. Connect the input, output, or storage device.
3. Turn on the device, if necessary, and follow any configuration instructions.
Installing and configuring storage devices is covered in Chapter 7.
Copyright 2017 Cengage Learning. All Rights Reserved. May not be copied, scanned, or duplicated, in whole or in part. WCN 02-200-203
Using Device Drivers
267
Using Device Drivers
A device driver is software that enables the OS and application software to access specific
computer hardware, such as a monitor or disk drive. A separate device driver is usually
needed for each input or output device used on the computer. The OS provides the basic I/O
support for your printer and other hardware, but it doesn’t support specific features of individual devices. For that, you need a driver, which may be supplied by the hardware manufacturer or the producer of the OS. (See the discussion of driver software in Chapter 1.)
Computer monitors, flash drives, printers, and disk drives are so much a part of using a computer that it might be surprising that a device driver is necessary for each. However, when you
consider that there are thousands of devices and device manufacturers, it makes sense. If all
computer OS vendors attempted to incorporate code for all of the possible devices, the OS
code would be huge and probably slow. Also, the OS would have to be updated each time a
new device or manufacturer came on the market. The advantages of using device drivers are:
•
Only essential code is necessary to build into the OS kernel for maximum performance.
•
Use of specific devices does not have to be linked to a single OS.
•
In a competitive marketplace, the number of I/O devices can expand in virtually
unlimited directions to offer computer users a broad range of device selections,
functions, and features.
•
New devices can come on the market without requiring extensive updates to OSs.
Many hardware manufacturers make drivers for current OSs available as a free download
from the Internet or supply a DVD/CD-ROM with the device. While OS vendors supply drivers for many devices as part of the OS installation package, you should generally use the
manufacturer’s driver, if available, instead of the driver supplied with the OS. Although
many OS drivers for specific hardware were developed by the hardware manufacturer in
cooperation with the OS producer, they may be generic
generic—designed to support a range of hardware models—or they may be older than the specific hardware you are installing. Using the
driver available on the Internet gives you a better chance of having the latest version, and it
often provides bug fixes and performance optimizations as well.
Even if your hardware is brand new, it is good practice to check the
manufacturer’s Web site for newer driver software. Drivers are usually
designated by version number, and sometimes with a date. Drivers
with later version numbers and dates may contain fixes for problems
identified with earlier releases, and they sometimes enable or improve
the performance of some hardware features.
For example, to find drivers for a broad range of Epson hardware products, go to
www.epson.com, click Support, and then pick your device from the list or search for it by
name. Most manufacturers have Web sites that contain support for their products, including
troubleshooting tips and downloadable drivers.
Copyright 2017 Cengage Learning. All Rights Reserved. May not be copied, scanned, or duplicated, in whole or in part. WCN 02-200-203
6
268
Chapter 6 Configuring Input and Output Devices
Remember that you can usually guess the home page for major companies. Simply type www.companyname.com in the address line of
your browser, where companyname is the name of the manufacturer
of your hardware product. If this doesn’t work, use a Web search
engine to search for information about a particular company or
product.
The procedure for installing drivers varies slightly with the source of the driver and the OS
you are using. If you download a new driver from a manufacturer’s Web site, you’ll probably
have to uncompress the file before you can use it.
For example, Microsoft has included built-in zip support in its OSs since the late 1990s. PC
users can also use the PKZIP or WinZip compression and decompression utilities. Many software producers distribute software that is bundled and compressed with the PKZIP/WinZip
format. Compression software not only reduces the size of the supplied files by removing
redundant information, it also groups multiple files into a single distribution file. Distribution
files may be supplied in self-extraction format, an executable file that decompresses the
archive and expands individual files. PC-executable files normally use an .exe file extension.
If you download a driver archive that includes this extension, it is a self-extracting file. If
the file includes a .zip extension, you can open it directly within the OS; Windows File
Explorer supports zip files and can open them just like a normal folder. You can also use a
stand-alone program such as PKZIP or WinZip to expand the archive before installing the
driver software.
If your OS does not include built-in zip support or you want the
PKZIP or WinZip software, you can download it from a variety of
Web sites. Other programs perform similar functions. One resource for
a wide variety of shareware, freeware, and inexpensive software is
www.tucows.com/downloads.
Since version 10.3 Tiger, Mac OS X has had built-in zip support. Mac OS X users can use
ZIP-format archives, but a more common format is StuffIt, a utility similar to PKZIP, which
also bundles multiple files into a single distribution archive. StuffIt products are available for
Windows, Linux, and Mac OS X OSs, and for some versions of UNIX. StuffIt files can be
self-extracting, or you can use StuffIt Expander or another utility to expand the archive into
its individual components. To obtain this utility, visit my.smithmicro.com. StuffIt also supports ZIP format, and it lets you retrieve compressed or archived files from Macintosh
users. The basic StuffIt Expander is a free download, and you can purchase the full-blown
StuffIt Deluxe so you can create archives for Mac and Windows environments. The
third-party ZIP utilities available for the Mac don’t always produce files that are compatible
with Windows systems. The StuffIt Expander software, on the other hand, works both ways
quite well.
UNIX/Linux system users may retrieve drivers and other software in a tar format. Tar files
are also archives that group multiple files into a single distribution file. Tar doesn’t compress
the files; it merely groups files to make it easier to copy and distribute multiple files together.
You may find that a tar archive is also zipped. UNIX/Linux systems also have a zip command
that is compatible with the PKZIP software. You can use StuffIt or a UNIX/Linux version of
Copyright 2017 Cengage Learning. All Rights Reserved. May not be copied, scanned, or duplicated, in whole or in part. WCN 02-200-203
Using Device Drivers
269
unzip to expand the compressed tar archive into an uncompressed file, and then you can issue
a UNIX/Linux tar command to extract individual files from the archive.
Once you locate the driver you want to use, you generally have three choices for installation,
depending on the source of the driver: you can use your OS’s installation utility, the Plug and
Play (PnP) feature, or the installation utility provided by the hardware manufacturer. Procedures are slightly different among OSs, and precise steps differ depending on the equipment
(a printer installs differently from a sound card, for example), but the general process is very
similar. The following sections discuss manufacturer driver installation and specific steps for
installing devices in OSs.
From the Trenches …
An IT professional was called to help a company president’s administrative assistant with
a printer problem during a board of director’s meeting. She tried all types of troubleshooting steps, from turning the printer off and on to testing the network and looking
for a paper jam in the printer. After working on the problem for quite some time (and
delaying the meeting), the IT professional realized that the printer driver had been
removed from the OS used to print the documents. After a quick download and installation from the manufacturer’s Web site, the printer was back up and printing correctly.
Manufacturer Driver Installation
When you use a hardware manufacturer’s installation utility, the process is usually fully automatic and well documented. In fact, newer printers, plotters, and other devices frequently
come with extensive support material on a DVD or CD-ROM. You might be presented with
video or animated training material to teach you how to install or use the device. You
shouldn’t have to know much about the way your OS installs drivers or interfaces with the
device you’re installing because the manufacturer’s installation routine handles it all for you.
Because each manufacturer has a different procedure with different devices and different OSs,
it is difficult to document each system and device type. In general, however, the procedure is
to double-click an installation program or insert a DVD/CD-ROM into a drive and either
wait for a program to start automatically or run a setup or install utility. Then, simply follow
on-screen prompts. If you run into problems, look for a disk-based tutorial or go to the manufacturer’s Web site to search for more information. Some software suppliers also include .txt
files on installation disks to present new information or tips for the installer. You can use
Notepad or any text editor to look for these files and read them.
Windows Driver Installation
There are several ways to install drivers in Windows. The easiest way to install a driver for a
new system is to use the PnP capability to automatically detect the new hardware and install
drivers. Another way to install new devices and drivers is to use the Add a device wizard in
Windows. You can also use Device Manager to install a new driver, update an existing one,
or roll back a driver to a previous version. Each of these methods is explained in the
following sections.
Copyright 2017 Cengage Learning. All Rights Reserved. May not be copied, scanned, or duplicated, in whole or in part. WCN 02-200-203
6
270
Chapter 6 Configuring Input and Output Devices
Using PnP to Install a Device and Driver You can quickly install a new printer,
for example, by following these general steps:
1. Install any software drivers that are required.
2. Connect the printer to the computer.
3. Plug the printer into a power outlet and turn it on.
4. Follow any configuration instructions.
When the printer is turned on, the OS recognizes that a new piece of hardware is attached
and tries to locate the drivers for it. If Windows already has a built-in driver for this device,
the OS finds the driver on the Windows distribution disk or DVD/CD-ROM. Otherwise,
you must insert the manufacturer’s DVD/CD-ROM into an appropriate drive when the OS
asks for it.
Using a Windows Wizard to Install a Device and Driver If Windows doesn’t
recognize newly installed hardware, or if you want to conduct an installation manually or
start automatic procedures to detect a hardware device because PnP did not work initially,
use the Add a device wizard. In Windows 7 and later versions, open Control Panel and
click Add a device under the Hardware and Sound category. Windows will search for the
device you are trying to install.
If you have a driver from the device manufacturer, you should probably use it to ensure that
the latest driver is installed. When you use the wizard, the drivers may not be the most current ones because Windows uses the drivers from its installation media.
Using Device Manager to Install or Update a Driver If you need to install a
device driver, update one for a device that is already installed, or roll back a driver to an
earlier version, Device Manager (see Figure 6-1) offers a convenient way to accomplish the
task. You can also use Device Manager to:
•
Determine the location of device driver files
•
Check to make sure a device is working properly
•
Determine if there is a resource conflict for a device
Copyright 2017 Cengage Learning. All Rights Reserved. May not be copied, scanned, or duplicated, in whole or in part. WCN 02-200-203
Using Device Drivers
271
6
Figure 6-1 Device Manager in Windows 10
The advantage of determining the location of a device file is that you not only verify that the
driver is installed, you can also check the version of the device driver. For example, if you
suspect that you have an old driver, check with the manufacturer for the version level or
date of the most current driver and then use Device Manager to compare it with the version
you have installed.
When you access a device through Device Manager, you can determine if the device is
installed in two ways. First, Device Manager places a question mark on the device if there is
a problem with the installation or if the driver is not installed. Also, when you use Device
Manager to access a device that has a driver set up, the utility checks to verify that the device
is working properly. Figure 6-2 shows an example of a display driver in Windows 10 that is
working properly.
Copyright 2017 Cengage Learning. All Rights Reserved. May not be copied, scanned, or duplicated, in whole or in part. WCN 02-200-203
272
Chapter 6 Configuring Input and Output Devices
Figure 6-2 The device status of a display adapter in Device Manager
A device uses the computer’s resources to enable it to function and communicate with the
computer. These resources include the interrupt request (IRQ) line and one or more I/O
address ranges. The IRQ line is a channel within the computer that is used for communications with the central processing unit (CPU). Usually a separate channel, such as IRQ 16, is
allocated for a specific device, such as a display adapter (see Figure 6-3). The I/O address
range is memory reserved for use by a particular device. If more than one device is assigned
the same IRQ line or I/O address range, those devices become unstable or may not work
altogether. Device Manager not only shows the IRQ line and I/O address ranges for a
device, it lets you know if it detects a conflict.
You rarely run into resource conflicts on modern PCs. I/O addresses are
dynamically configured in cooperation with the BIOS to ensure there
are no conflicts. Many devices, such as those that use the PCI Express
bus, don’t use hardware interrupts (IRQs) at all; instead, a process
called message signaled interrupts (MSI) uses the data bus to signal a
virtual interrupt of sorts.
Copyright 2017 Cengage Learning. All Rights Reserved. May not be copied, scanned, or duplicated, in whole or in part. WCN 02-200-203
Using Device Drivers
273
6
Figure 6-3 Viewing the resources used by a device
Updating and Rolling Back Drivers Aside from checking on the status and
resources of a device, Device Manager lets you update a driver or roll it back to an earlier
version. You might update a driver if the device is not performing well or is causing system
instability. To update a driver from Device Manager, double-click the device and click the
Driver tab (see Figure 6-4). When you click the Update Driver button, Windows gives you
the option to search your computer and the Internet for an updated driver or to manually
browse to the driver file location. If you have recently updated a driver and it is causing
system instability or performance problems, you can roll back the driver to an earlier
version by clicking the Roll Back Driver button, which is on the same tab as the Update
Driver button shown in Figure 6-4. Windows will uninstall the current driver and install
the previous version, if available.
Copyright 2017 Cengage Learning. All Rights Reserved. May not be copied, scanned, or duplicated, in whole or in part. WCN 02-200-203
274
Chapter 6 Configuring Input and Output Devices
Figure 6-4 Updating or rolling back a driver
Configuring Driver Signing When you install a Windows I/O device, such as a
pointing device or a new sound card, Windows makes sure that the device driver has been
verified by Microsoft. A unique digital signature is incorporated into the verified driver in a
process called driver signing. In Windows 10 and newer versions, unsigned drivers are not
permitted. Developers of device drivers must use a test signing procedure to test drivers
they are developing.
On older Windows versions, you can choose to be warned that a driver is not signed, ignore
whether or not a driver is signed, or have the OS prevent you from installing an unsigned
driver. The warning level is assigned by default so that you are warned before you install
an unsigned driver, but you can still choose to install it. Using driver signing helps to ensure
that the driver works properly with the device and in conjunction with other devices. It is
also a security feature to ensure that no one has tampered with the driver, such as by incorporating malicious code or a virus.
UNIX/Linux Driver Installation
The concept of drivers in UNIX/Linux is slightly different from that in other OSs. The central
portion of the UNIX/Linux OS, the kernel, is where most of the UNIX/Linux device drivers
are loaded. Device drivers are either in the form of kernel modules, which are pieces of code
Copyright 2017 Cengage Learning. All Rights Reserved. May not be copied, scanned, or duplicated, in whole or in part. WCN 02-200-203
Using Device Drivers
275
that must be linked into the kernel, or loadable modules, similar pieces of code that are not
linked into the kernel but are loaded when the OS is started. Device support in most UNIX/
Linux versions is limited when compared to other OSs; manufacturers of devices often provide drivers for special hardware, which are then linked or loaded into the kernel.
UNIX/Linux devices are managed through the use of device special files, which contain information about I/O devices that is used by the OS kernel when a device is accessed. In many
UNIX/Linux systems, there are three types of device special files:
•
Block special files, which are used to manage random access devices that handle
blocks of data, including DVD/CD-ROM drives, hard disk drives, tape drives, and
other storage devices.
•
Character special files, which handle byte-by-byte streams of data, such as through
USB connections. USB is the most common interface for mice, keyboards, external
disk drives, and other external hardware such as printers and digital cameras.
•
Named pipes for handling internal communications, such as redirecting file output
to a monitor.
When you install a UNIX/Linux OS, device special files are created for the devices already
installed on the system. On many UNIX/Linux distributions, these files are stored in the /dev
directory. Table 6-1 provides a sampling of device special files.
Table 6-1
UNIX/Linux device special files
File
Description
/dev/console
For the console components, such as the monitor and keyboard attached to the
computer (/dev/tty0 is also used at the same time on many systems)
/dev/hdxn
For Integrated Drive Electronics (IDE) and Enhanced Integrated Drive Electronics
(EIDE) hard drives, where x is a letter representing the disk and n represents the
partition number—for example, hda1 for the first disk and partition
/dev/modem
Symbolic link to the device special file (typically linked to /dev/ttys1) for a modem
/dev/mouse
Symbolic link to the device special file (typically linked to /dev/ttys0) for a mouse or
pointing device
/dev/sdxn
For a hard drive connected to a SCSI or SATA interface, where x is a letter representing
the disk and n represents the partition—for example, sda1 for the first SATA drive and
first partition on that drive
/dev/stn
For a SCSI tape drive, where n is the number of the drive—for example, st0 for the
first tape drive. The USB devices appear as a SCSI device.
/dev/srx
For an IDE CD/DVD drive
If you need to create a device special file for a new device, use the mknod command, as
explained in the following general steps:
1. Log in with superuser permissions.
2. Access a terminal window or the command prompt.
3. Type cd/ dev and press Enter to switch to the /dev folder.
Copyright 2017 Cengage Learning. All Rights Reserved. May not be copied, scanned, or duplicated, in whole or in part. WCN 02-200-203
6
276
Chapter 6 Configuring Input and Output Devices
4. Use the mknod command, and then enter the device special file name, such as ttys42.
Next, enter the file type, such as character (c) or block (b), and a major and minor
node value used by the kernel. (Check with the device manufacturer for these values.)
For example, you might type mknod ttys20 c 8 68, and press Enter for a new device.
Some versions of UNIX/Linux also support the makedev command for
creating a device special file. To determine which commands are supported in your UNIX/Linux version and learn the syntax, use the man
mknod or man makedev command to view the documentation.
To view the I/O device special files that are already on your system, use the ls command to
see all of the files in the /dev folder. You can view all the PCI (and PCI Express) devices
installed on a Fedora Linux system using lspci. Another command, lshw, provides detailed
system information, including installed devices and disks.
Mac OS X Driver Installation
Mac OS X systems come with device drivers for most hardware that connects to these
systems. When you obtain new hardware, make sure that you have an installation
DVD/CD-ROM from the hardware manufacturer. The general steps for installing new hardware on a Mac OS X system are:
1. Shut down the OS and turn off the computer.
2. Attach the new hardware.
3. Restart the computer and OS.
4. Insert the DVD/CD-ROM for the hardware.
5. Run the installer program on the DVD/CD-ROM for that hardware.
If you are having problems with hardware in Mac OS X, it may be
necessary to reinstall the OS. In earlier versions of Mac OS X, you
can insert the Mac OS X Install Disk 1 DVD/CD-ROM, select the Mac
OS X disk as the destination, click Options, and select Archive and
Install. In Mac OS X v10.3 and later versions, insert the installation
disk and double-click Install Mac OS X; the installation will retain
your previous settings and software.
Now that you’re familiar with device drivers and the basic process of installing devices and
drivers in various OSs, it’s time to survey the types of input and output devices and get a
more in-depth look into how they relate to OSs.
Copyright 2017 Cengage Learning. All Rights Reserved. May not be copied, scanned, or duplicated, in whole or in part. WCN 02-200-203
Standard Input Devices
277
Standard Input Devices
There are several standard and universal computer input devices: the keyboard, the mouse,
and the touch pad. The keyboard is the most important input device; other important devices
include the mouse and touch pad as well as the mouse alternatives, such as a trackball, stylus,
and pointing stick. Touch input has become popular; iPads, smartphones, book readers, and
tablet touch screens are part of the daily routine for many people.
Mouse and Keyboard Drivers
Because the I/O routines for the mouse and keyboard are highly standardized across OSs,
it is unlikely that you will need to interact with the OS to set up these devices. Although
mice and keyboards do use device drivers, unlike printers and other output devices, these
drivers are standard and are usually included as part of the OS. The OS provides only general support for output devices like printers; it includes routines to send data out through a
USB port, for example, and to receive data sent to the computer from a device connected
to this port, but it has no intrinsic routines to support specific printer brands, models, or
capabilities. For keyboards and mice, however, most OSs contain intrinsic routines to handle them.
Wireless mice and keyboards are available from computer manufacturers and third-party
vendors. You may purchase them as a package or separately. Each device requires batteries
to operate, along with a USB receiver for communication between the device and computer. Wireless mice and keyboard packages normally have one USB receiver that both
the mouse and keyboard use. Bluetooth mice and keyboards are also available; some
come with a USB option and others are Bluetooth only. Almost all mice are now optical.
They use either an LED or a laser to illuminate the surface on which they are used, and
they contain an optical sensor (a very small camera) that takes thousands of pictures per
second. The pictures are compared to calculate the direction and speed of the optical
mouse.
Some older mice use a ball on the underside that rotates as you move
them across a desk or mouse pad. They are becoming rare as the optical mouse has become the preferred device.
A wired mouse or keyboard uses a USB port, similar to the way a printer uses a USB port.
(A wireless mouse uses a receiver.) Like a printer or other output device, a wired keyboard
or mouse can also come with drivers and additional software on DVD/CD-ROM. Some OSs
include a custom keyboard configuration utility, such as the one from Windows 10, shown in
Figure 6-5.
Copyright 2017 Cengage Learning. All Rights Reserved. May not be copied, scanned, or duplicated, in whole or in part. WCN 02-200-203
6
278
Chapter 6 Configuring Input and Output Devices
Figure 6-5 Keyboard settings in Windows 10
As you can see from this figure, the degree of configuration is minimal, which points out the
standard nature of the keyboard itself and the drivers that support it. Earlier OSs—
particularly non-Windows systems—may have even more limited keyboard configuration
options. You plug it in and it either works or not.
As with the keyboard, the intrinsic OS mouse drivers may offer customization options to the
user. Mouse preferences in Mac OS X El Capitan are shown in Figure 6-6.
Copyright 2017 Cengage Learning. All Rights Reserved. May not be copied, scanned, or duplicated, in whole or in part. WCN 02-200-203
Standard Input Devices
279
Figure 6-6 Mac OS X mouse settings
Source: Mac OS X El Capitan
Typically, the configuration routines let you set the double-click speed, calibrate mouse
movement and direction based on how you hold the mouse as you roll it around the desk,
customize the pointer graphic, and a variety of other features. In addition to having special
features to enhance the function of the mouse itself, manufacturers’ drivers usually provide
additional levels of user configuration, such as options to help you quickly find the cursor
on the screen or to select a window just by pointing to the title bar.
Touch Input Drivers
Touch input devices also use device drivers. In most cases, the drivers are included in the OS
or preloaded by the computer manufacturer. With a touch screen, you can open files, select
items on the screen, and move items with the touch of your finger. Multi-touch technology
allows you to use multiple fingers to resize a window, scroll through documents, or page forward or back in your Web browser. To use multi-touch, you need a laptop or monitor
equipped with multi-touch technology. Windows 7 and newer versions as well as Linux/
Fedora support multi-touch capabilities. Apple has incorporated the touch technology used
in the iPad and iPhone into Mac OS X.
A touch pad is another type of touch input. Touch pads are usually found below the keyboard on laptops, but they are also available as a peripheral for desktop computers. A touch
pad is a surface that converts finger motion and position to a point on your screen.
Other Input Devices
The keyboard and mouse are ubiquitous and standard. If your computing needs stop with fairly
common business applications such as word processing, spreadsheets, and databases, you probably won’t need anything more. On the other hand, if you need your computer for graphics
design, Web page development, playing games, making video calls, digital photography,
or movie or sound editing, you will use one or more specialty input devices, such as digital
pads, scanners, joysticks and gamepads, digital sound input, and digital picture and video
input/output. The following sections introduce these devices.
Copyright 2017 Cengage Learning. All Rights Reserved. May not be copied, scanned, or duplicated, in whole or in part. WCN 02-200-203
6
280
Chapter 6 Configuring Input and Output Devices
Digital Pads A digital pad is really a different kind of mouse. A mouse is an excellent
input tool for normal operations: choosing from a menu, selecting an icon or other graphic
object, or dragging text or graphics to a new screen location. However, when you need to
draw pictures, sign your name, color a detailed graphic image, or conduct other tasks that
require a high degree of manual dexterity, a digital pad can be a useful addition to your
computer hardware.
A digital pad plugs into your computer through a USB port. After you install custom drivers
(usually supplied by the pad manufacturer), you can use the pad to conduct usual mouse
operations, such as selecting menu items or moving objects. In addition, you can use the
pad’s electronic stylus for finer tasks, such as object drawing, capturing signatures, or
manipulating specialty graphics programs, such as Illustrator or Photoshop.
The digital pad, like the mouse, can range from fairly standard, simple hardware to specialty
devices that include liquid crystal display (LCD) panels to mirror your computer’s video display. Even the simplest pads require some custom software and a unique installation process.
Scanners A scanner scans text and images to be manipulated by software on your computer. Once in the computer, the digital image from the scanner can be saved in a variety
of graphics image formats, edited, merged with other images or text, transmitted over the
Internet or other network connection, and printed.
Scanners may also be used with optical character recognition (OCR) software. Instead of
scanning text into a digital graphic image, which does not allow for text manipulation,
imaging software scans each character on the page as a distinct image. You can then import
the scanned results into a word-processing document to work with the text.
If you’re using a USB scanner with Windows, installation and configuration should be automatic through PnP. Figure 6-7 shows the Windows Fax and Scan application in Windows 10.
Figure 6-7 Windows Fax and Scan window
Copyright 2017 Cengage Learning. All Rights Reserved. May not be copied, scanned, or duplicated, in whole or in part. WCN 02-200-203
Standard Input Devices
281
If the built-in Windows Fax and Scan application doesn’t suit your needs, you can usually
install custom drivers and custom scanning software supplied by the scanner manufacturer.
In most cases, the driver software—usually a driver with user interface and scanner
control—automatically links with a variety of graphics software. If you’re using Photoshop,
for example, the scanner may show up as an add-in; if you’re using a Microsoft product
such as Publisher or Picture Manager, you’ll see a scanner icon on your toolbar. When you
click the icon, the scanner software will load so you can use the scanner. These drivers and
the user interface interact with the OS to control the USB port and capture data supplied by
the scanner.
Joysticks, Gamepads, and Other Controllers If you run computer simulations,
are involved in game development, or enjoy playing games on your computer, you’ll most
likely have a need for alternative input devices. Some of these may include joysticks and
gamepads along with flight yoke systems and other devices.
A joystick is more like a mouse than a digital pad. Like a mouse, the joystick uses a mechanical
or optical device to rotate one or more potentiometers. Changing resistance tells the joystick
driver what value to feed to the OS and any associated application software. You use the
joystick for three-dimensional movement of an on-screen cursor or other object, such as a car,
airplane, or cartoon character. Just as the digital pad makes it easier to input handwriting,
picture retouching, and the like, the joystick offers much more control than a mouse when it
comes to detailed movements of graphical screen objects. Although games are the primary
application for joysticks, Mac users sometimes use them to supplement mouse functionality.
Joysticks can be used for virtually any application input task, given the proper driver.
In addition to the three-dimensional movements of the vertical joystick, it usually includes
one or more push-button switches that can be associated with gun firings, boxing swings,
menu selection, and so on. Like the digital pad, the joystick uses the PC and Mac’s USB
port. Potentiometer settings or switch closures are sent through the USB port as positive/negative pulses or as variable values on a scale. The OS’s basic port I/O routines grab this data,
and then it is up to the associated application—a game, for example—to interpret this data
in a meaningful way.
Joysticks continue their development to keep up with the games that are being created.
There are flight yoke systems, 3D joysticks, attack joysticks, and much more. Logitech and
Saitek are just a couple of the vendors that are very active in this arena.
Gamepads come in a wide variety of designs. As the name suggests, they are primarily
designed for interaction with games, and include multiple buttons, wheels, or balls to effect
movement of a variety of on-screen objects. As with the joystick, the gamepad sends standard signals to the USB port, where the OS I/O routines take the data and pass it off to
an application program or custom driver for interpretation. Gamepads from Logitech,
Microsoft, and Saitek have become very sophisticated. Some are wireless, some are programmable, and some have LCD displays. There are even vendors that allow your Wii Remote and
PS3 controllers to connect to your computer not only to play games, but to control your
computer. Apple supports gamepads and sells third-party models on its Web site.
Digital Sound Input Every Mac, PC, and workstation computer is supplied with some
kind of digital sound card for sound input and output. It may be built into the motherboard
Copyright 2017 Cengage Learning. All Rights Reserved. May not be copied, scanned, or duplicated, in whole or in part. WCN 02-200-203
6
282
Chapter 6 Configuring Input and Output Devices
or be a separate card. You can connect a microphone to your computer’s USB port and
record voice mail that you can include with electronic mail, for example, or for narration
of slide presentations. Along with your webcam, you can use the microphone to make
audio and video calls with Skype and other VoIP (Voice over Internet Protocol) applications.
Skype is application software that allows you to make calls with or without video over the
Internet. It can also be used for instant messaging and video conferencing (connecting multiple locations via video).
You can download custom sounds or music from Internet sites, such as iTunes, for use
within software applications. Voice input to word-processing and other programs is important for people who are unable to use a keyboard or mouse. You can capture digital sound
from a digital recorder or digital camera directly into your computer without having to do
any conversion in the process. You can also copy digital audio directly from a recorder to
your hard drive in much the same way you would copy digital information from one hard
drive to another.
There are multiple professional audio I/O standards, but most devices come with a USB
port. All you need is a USB cable. Whether you use audio I/O ports or a USB port depends
on the external hardware you will interface with your computer. Some high-end digital cameras include more than one digital I/O port, so you can choose which format to use based
on personal preference, your need to interface with other users, or which interface you can
find. Even high-end digital cameras include a USB port, and most require custom driver software. Also, like scanners, they can usually be controlled and accessed from inside application software, such as digital audio or video editing packages. Once the driver is installed,
you can transfer audio information through the USB port from the application you are
using to manipulate the audio files.
Digital Picture and Video Input/Output Digital picture and video I/O works similarly to digital audio I/O. You need a digital I/O interface and drivers to allow your OS to
recognize and use the USB device. As with digital audio, you import digital images into
whatever application software you are using for picture or video editing. In some cases,
you use a utility supplied by the interface manufacturer to import the digital image, then
launch another application, such as Adobe Premier or Photoshop, to conduct the actual editing. On the other hand, some manufacturers include the ability to link their hardware
drivers directly into editing software so you can import and export digital files from an
external camera and edit the video or still images from the same application.
USB ports are the standard way to connect most devices to a computer. USB 1.0 (version 1.0) had a data transfer rate of 1.5 Mbps. USB
2.0 increased that rate significantly to 480 Mbps and was referred to as
Hi-Speed. With SuperSpeed USB 3.0, the data transfer rate has
increased to up to 5.0 Gbps, and the newer SuperSpeedþ USB 3.1
standard ups that rate to 10 Gbps.
1394 Technology IEEE 1394 (or 1394a) is the original specification for a high-speed
digital interface that supports data communication at 100, 200, or 400 megabits per second
(Mbps). The newer 1394b specification enables communications at 800 Mbps, 1.6 Gbps,
and 3.2 Gbps.
Copyright 2017 Cengage Learning. All Rights Reserved. May not be copied, scanned, or duplicated, in whole or in part. WCN 02-200-203
Printers
283
IEEE 1394a and 1394b are technologies currently targeted at multimedia peripherals, which
include digital camcorders, music systems, DVDs, digital cameras, and digital TVs. The
IEEE 1394b standard also enables data transfer over regular twisted-pair (copper wire) network cable and glass and plastic fiber-optic cable.
FireWire, an IEEE 1394 implementation for bus communications, was developed by Apple
Computer and Texas Instruments and is used in computers built by those companies. IEEE
1394 is also known as i.Link (Sony), Lynx (Texas Instruments), and the High Performance
Serial Bus (HPSB). The 1394 Trade Association reports that over 2 billion FireWire ports
have shipped worldwide. While there is a considerable installed base of 1394 devices, the
increases in speed realized by USB 3.0 and USB 3.1 have substantially reduced the popularity
and growth of the 1394 standard.
The Institute of Electrical and Electronics Engineers (IEEE) is an international organization of scientists, engineers, technicians, and educators
that plays a leading role in developing standards for computers, network
cabling, and data transmissions, and for other electronics areas, such as
consumer electronics and electrical power. Also, visit www.1394ta.org
for links to information and vendors that support 1394 technologies.
Printers
A printer is an important part of nearly every computer installation. The following sections
outline the most popular types of printers and printer connections. You also learn how to
install printers.
Printer Types
The following types of printers are the most popular today:
•
Inkjet printers create characters by squirting tiny droplets of ink directly onto the page.
Full color—even photographic quality—printing with inkjets is quite common today.
Small, quiet, and inexpensive, these printers are popular personal printers in many
offices, and dominate the market for schools and homes. Models that deliver color and
high resolution are used for proofing by graphics designers and printers, as well as
home and office users. With the popularity of digital electronic cameras, highresolution inkjet printers are used to produce photograph-like output on heavy, slick
paper, much like photographic paper stock.
•
Laser printers use an imaging technology similar to copiers to produce computer
output, and are probably the most popular printer for business text and graphics.
A typical laser printer contains its own CPU and memory because printed pages are
first produced electronically within the printer. Laser printer prices, including those for
color printers, have declined sharply over the years so that even small businesses, home
offices, and individuals can now afford them.
•
Multifunction printers combine color inkjet or laser printing, scanning, copying, and
faxing into one physical device. Multifunction printers are good for locations that do not
Copyright 2017 Cengage Learning. All Rights Reserved. May not be copied, scanned, or duplicated, in whole or in part. WCN 02-200-203
6
284
Chapter 6 Configuring Input and Output Devices
have a lot of desktop space, and can be purchased for as little as $100. The downside to
a multifunction printer is that if it breaks, you lose all functions rather than just one.
The cost of printing is more than just the expense of the printer. Ink
and laser cartridges add to printing costs. Depending on the cost of
the cartridges and the number of pages you can print with each one,
many people find that a less expensive printer may cost more in the
long run. For example, if you print a high volume of documents, it can
be cheaper to use a laser printer than an inkjet printer because one
laser cartridge can print tens of thousands of sheets, while one inkjet
cartridge may only print hundreds.
In addition to traditional printers, another printer-like device called a plotter is popular in
engineering, architecture, and other fields where hard copy output (such as blueprints) won’t
fit on standard paper sizes or can’t be produced by standard character or graphics printers.
Plotter design is more complex than that of printers, and uses pen and control mechanisms.
As with printers, plotters require special drivers to enhance the OS’s intrinsic capabilities,
but the process of installing plotter hardware and software is similar to that for printers.
Likewise, plotters can be installed on a company’s network or your computer’s USB port in
much the same way as printers. (See the next section, “Printer Connections.”)
Aside from the three major printer types, other printer designs are used in specialized arenas.
•
3D printers use an additive process to create one layer of the object at a time.
They build the parts from drawings that are cross-sectioned into thousands of layers.
There are companies that will create your 3D object from the computer file you
send them.
•
Label printers produce labels and are useful for an eBay seller or shipping business.
They only produce labels and do not interfere with other printers attached to your
computer.
•
Dot-matrix (impact) printers produce characters by slamming a group of wires (dots)
from a rectangular grid onto a ribbon and then to paper. Although dot-matrix printers
have declined in popularity, you’ll still find them behind sales counters to support
point-of-sale (POS) computers in some businesses. They are also still used when a
computer fills out forms or when multiple copies of the same document are needed
simultaneously.
•
Line printers are generally used on older mainframes. These impact printers print an
entire line at a time rather than a character at a time. Line printers are fast but
extremely noisy because the “line” is usually a metal chain. They use some form of
tractor feed or pin feed. Line printers are rare these days; you may see them in government agencies, colleges, universities, or other venues that require large amounts of
paper output, particularly output with multiple copies.
Vestiges of the line printer still remain: the main printer port on a PC is
designated LPT1, which stands for line print terminal 1. It is doubtful
that many PCs were ever connected to a true line printer, but this big
machine terminology stays with us.
Copyright 2017 Cengage Learning. All Rights Reserved. May not be copied, scanned, or duplicated, in whole or in part. WCN 02-200-203
Printers
285
•
Thermal-wax transfer printers exist in two basic designs. One uses rolls of plastic film
coated with colored wax, which is melted onto the page one primary color at a time.
A second type, known as phase change, melts wax stored in individual colored sticks
and sprays the molten, colored wax onto the page. These printers generally produce
high-quality color output, but they are also relatively slow. In addition, these printers
frequently require special paper, which adds to the cost of the printed output.
Thermal-wax transfer and dye sublimation printers are used in many graphics
applications when high-quality, color printed output is required.
•
Dye sublimation (sometimes shortened to dye sub) printers have a design that takes
the concept of atomizing waxy colors onto paper a step further. Dye sub printers don’t
just melt pigments and spray them onto the paper, they vaporize them. Colored gas
penetrates the surface of the paper to create an image on the page. Dye sub printers
produce high-quality output. Moreover, they can mix and blend colors to produce
output at near-photographic quality.
High-speed copiers, printers, and most other printing devices found in a printing shop are
now connected to a network, which allows the device to receive materials electronically
from any computer connected to the network. The operator of these printing devices schedules printing in accordance with the instructions submitted electronically with the
materials.
Printer Connections
Most printers today come standard with a USB port. However, wireless printing provides
freedom for computer users and allows printing from handheld devices such as tablets and
smartphones. You can print from anywhere in your home, office, or around the world.
Many printers have a direct network connection option that lets you place the printer on a
local area network (LAN), where it can be shared by all the computers attached to the
LAN. If a particular printer doesn’t include a networked option, you can purchase a network
printer interface from a third party. These interfaces have one or more network ports plus
one or more printer ports. You connect the network on one side and plug in the printer on
the other.
It is generally more efficient to use a direct network-attached printer rather than a printer
attached to a computer and configured for sharing on the network. Using a printer attached
to a computer can be a drain on the computer’s resources when others are using the printer,
and a network interface is always on, making the printer always available to network users.
Installing Printers
OSs provide one or more ways to install printers because printing is vital to outputting documents from word processors, spreadsheets, graphics programs, and other software. In the following sections, you learn how to install a printer in the OSs that are the focus of this book.
Installing Windows Printers In Windows, many printers can be installed by connecting them to the computer and then letting PnP initiate the installation, as discussed earlier in this chapter. Another option is to connect the printer and use the Add a device
wizard, which was also discussed earlier. However, if an installation DVD/CD-ROM comes
Copyright 2017 Cengage Learning. All Rights Reserved. May not be copied, scanned, or duplicated, in whole or in part. WCN 02-200-203
6
286
Chapter 6 Configuring Input and Output Devices
with the printer, the best approach is to insert the DVD/CD-ROM and follow the instructions. You should not connect the printer until you are instructed to do so. Finally, if you
need to perform a manual installation or initiate automatic detection and setup of a new
printer, you can use the Add a printer option in Control Panel, as shown in Figure 6-8.
Windows will attempt to find a printer connected to your computer or on the network. If
no printer is detected, you will be prompted to install one manually.
Figure 6-8 Add a printer option in Windows 10
Installing UNIX/Linux Printers When a print job is sent from an application, a print
spooler accepts the job and stores it in a print queue, a temporary file used to store jobs
until they can be sent to the printer. When the printer is ready, the print spooler sends the
job from the queue to the printer. The most common Linux printing system is the Common
UNIX Printing System (CUPS). With CUPS, the print spooler is called the CUPS daemon, a
service that runs on Linux.
Windows also uses a print queue, but users do not have to configure
the print queue on a Windows system when installing a new printer.
Older Linux distributions might use the Line Printer Daemon (LPD) printing system. LPD
works in a similar manner to CUPS, but CUPS is used in more contemporary distributions
and has more features than LPD.
Most of the CUPS configuration files are in /etc/cups. For example, the configuration file for
the CUPS daemon is /etc/cups/cupsd.conf, and installed printer configurations are found in
/etc/cups/printers.conf. If you have a printer that is directly connected to the computer,
the CUPS daemon will usually detect and install it automatically, placing an entry in the
Copyright 2017 Cengage Learning. All Rights Reserved. May not be copied, scanned, or duplicated, in whole or in part. WCN 02-200-203
Printers
287
printers.conf file. For printers that are not detected, or for network printers, you can edit the
printers.conf file directly, but it is better to run the Printers tool in Fedora Linux, as shown
in Figure 6-9. The figure shows a network-attached HP LaserJet printer. To access the Printers tool, click Activities, Show Applications, Settings, and then double-click Printers. To
add a new printer, click the plus sign on the lower-left side of the Printers tool, or if no printers are currently installed, click the Add New Printer button. Another option is to use the
CUPS Web administration tool by opening a Web browser to http://localhost:631.
6
Figure 6-9 Adding a printer in Linux
Source: Linux
A printer connected to one computer can be used to print jobs from
another computer. Every computer that wants to use a printer, whether
remotely or locally, must first create a print queue for that printer. If
one computer has the printer connected and three other Linux computers want to use the printer, a print queue for that printer must be created on all four computers. When a print job is submitted, it is queued
in the local print queue. From there, it is submitted to the print queue
of the computer to which the printer is connected, and then it spools
to the printer.
Installing Mac OS X Printers In Mac OS X, most printer drivers are already installed
when you install the OS. If not, make sure that the printer you buy has a DVD/CD-ROM
to install the new printer driver. To set up a printer, use the Printers & Scanners utility in
System Preferences and click the plus sign to add the new printer.
Depending on the setup of your computer, you can add or configure the following types of
printers (see Figure 6-10).
•
Default
•
IP
•
Windows
Copyright 2017 Cengage Learning. All Rights Reserved. May not be copied, scanned, or duplicated, in whole or in part. WCN 02-200-203
288
Chapter 6 Configuring Input and Output Devices
Figure 6-10 Adding a printer in Mac OS X
Source: Mac OS X
Printers listed under Default are those that OS X detects on your local network. Select a
listed printer to have OS X install the printer driver. An IP printer is a network-attached
printer that uses the Internet Printing Protocol (IPP). If OS X doesn’t automatically detect a
network printer, click IP, and then type the IP address or name of the printer. If Mac OS X
finds the printer on the network, click Add to install the necessary driver. The Windows
option is for connecting to a shared printer on a Windows computer. If your Mac is on a
network that includes Windows computers that are sharing printers, you can use this option
to access those printers.
Display Adapters
Once wildly diverse in design and features, display adapters today have reached a common
ground across OSs and hardware platforms. The general industry acceptance of the Peripheral
Component Interconnect (PCI) bus, then the Accelerated Graphics Port (AGP) bus, and finally
the Peripheral Component Interconnect Express (PCIe) bus standard, has enabled adapter manufacturers to supply one hardware product or a line of hardware products to a variety of hardware
platforms. The PCIe bus enables high-performance graphics capabilities and is the current standard for most types of add-on cards, such as display adapters and disk controllers.
Copyright 2017 Cengage Learning. All Rights Reserved. May not be copied, scanned, or duplicated, in whole or in part. WCN 02-200-203
Display Adapters
289
Basic Display Adapter Technology
If you are using a PC with a monitor, you have a display adapter card already installed in
your computer. The display adapter is part of a standard computer package. No matter
what computer platform you are using, the basic display consists of a number of pixels horizontally and a number of pixels vertically. A pixel, remember, is a picture element—actually
a small dot of light
light—that represents one small portion of your overall screen display.
In general, as you display more pixels on the screen, you’ll need a larger monitor to comfortably read the displayed data. For a given size of screen, higher-resolution displays can present
more data at a time, but this data is presented in a smaller format. Most monitors today offer
an optimal resolution setting that you should use. However, most OSs allow you to change
the resolution if you want.
Current OSs support devices with the full range of resolution, so the major considerations in
choosing an adapter are its resolution capabilities, the amount of memory included with the
adapter, the type of video processor, and cost. More memory on the adapter generally means
faster performance when rendering screen images; also, when it comes to processors, display
adapters may have their own CPU or accelerator to speed things up. As noted previously,
you should also consider what kind of monitor you need as you decide on the screen
resolution.
Another aspect of screen resolution isn’t often discussed: the density of the displayed image,
or bit density. A resolution of 1024768 simply means that images are displayed with 1024
dots of light from left to right and 768 dots of light from top to bottom. However, there is a
third consideration to the display, the bit density—the number of dots of light that can be
crammed into an inch of display. When you consider graphics programs such as Photoshop
or CorelDRAW, or choose a digital camera or other image source, this aspect of resolution
becomes important.
These dots are referred to in terms of dots per inch (dpi) for printers and pixels per inch (ppi)
for monitors. These two terms have been used interchangeably, but they are specific to the
device you are using.
When you view graphics on your computer monitor, its bit density
will be less than that of your printer. Your printer may be able to
reproduce 600, 1200, 1440, or 2880 dpi, or more for some applications. It is important to know this third dimension when you specify
printers, plotters, scanners, digital cameras, video editing software,
and graphics programs. Print resolution, for example, may be more
precise than the resolution of the monitor. The printer may show
imperfections that the monitor does not display.
Standard video adapters have color depth capabilities that depend on the OS, software drivers, and video adapter memory. They range from 16 colors at the very low end to 64-bit
color. Most computers are set to run at 24-bit or 32-bit color.
Larger monitors are also the norm. For example, a 19-inch display or larger is now common.
With a 19-inch monitor, you can routinely set a resolution of 12801024 and still see everything you need to see.
Copyright 2017 Cengage Learning. All Rights Reserved. May not be copied, scanned, or duplicated, in whole or in part. WCN 02-200-203
6
290
Chapter 6 Configuring Input and Output Devices
Digital Visual Interface (DVI) was developed as a high-quality visual standard for flat-panel
LCD displays and digital projectors. A resolution of 19201200 is the standard for a single
cable, and a dual cable can display 38402400 at 33 Hz. DVI is mostly compatible with
the High-Definition Multimedia Interface (HDMI), which is a way to connect digital audio/
video devices in televisions, but it is also a popular way to connect devices and computers.
DisplayPort is a digital interface standard that is projected to replace DVI and HDMI for
computers. Both DVI and HDMI signals will run over the DisplayPort interface.
Installing Display Adapters
There are good reasons for upgrading display hardware. Changes in technology, software,
and our personal needs can all require upgrades. Another reason for upgrading or adding a
display adapter is to take advantage of multiple monitors. Most OSs support two, three,
four, or even more monitors, and you can buy a single display adapter that has up to four
outputs to connect multiple monitors. Figure 6-11 shows the Advanced Display Settings control panel in Windows 10 on a system with four monitors.
Figure 6-11 Advanced Display Settings with four monitors
By far, the majority of display adapters are supplied as cards that plug into the PCIe slot on
the motherboard. The PCIe bus is the most common expansion bus standard among
Copyright 2017 Cengage Learning. All Rights Reserved. May not be copied, scanned, or duplicated, in whole or in part. WCN 02-200-203
Installing Circuit Boards
291
computer hardware manufacturers, including Intel-based computers, Macintosh computers,
and workstations designed for UNIX, Oracle, and other systems. As with printers and other
hardware, display adapters are installed in two phases: hardware and software.
Installing any display adapter card is similar to installing circuit boards, as detailed in the last
section of this chapter. Thanks to the industry’s adoption of the PCIe bus standard and similarities among computer case designs, the installation procedure should be the same across
platforms.
Sound Cards
High-quality sound output and even high-quality recording capabilities have become more
important to a broader range of computer users. Businesses use sound as part of documentation or training, sales presentations, and even for music and motion video productions.
The sound card comes preinstalled, and the OS includes integral support for sound input and
output on newer computers. However, drivers for individual pieces of sound hardware must
be installed, as described earlier in the chapter.
Sound devices are of two general types: hardware integrated with the motherboard and bus
cards, which are installed into a bus slot in the same way as a display adapter (see the last
section of this chapter). Increasingly you will see sound cards built into the motherboard.
This approach provides the easiest installation because the hardware is always there, and all
you might need to do is install or configure drivers. The downside to motherboard sound
hardware, as with built-in disk controllers, video adapters, and other devices, is that it may
be harder to update or change the hardware.
Other Output Devices
Today’s computer marketplace offers so many output options that it would be impossible to
cover them all here. Digital video, for example, is a popular consumer and professional feature in computers. Adapter cards are available that let you capture and output digital video
to a camera or DVR, and are coupled with capable, low-cost video editing software to help
you use them.
Enhanced sound output is also now reasonably priced. Multiport sound cards are available
that permit a computer to serve as a fully digital, multichannel recorder for sound studio
applications.
As you interact with a variety of computer systems and read specifications for products from
a variety of industries, be aware of what hardware and software may be driving the features
you are using or reading about. Also, be aware that specialty software is probably required
to make everything work properly.
The next section outlines the general steps for installing all types of cards.
Installing Circuit Boards
Today’s computer hardware is pretty rugged. Still, perhaps the biggest enemy of the devices
supplied on circuit boards or cards is static electricity
electricity—high-voltage, low-current charges that
Copyright 2017 Cengage Learning. All Rights Reserved. May not be copied, scanned, or duplicated, in whole or in part. WCN 02-200-203
6
292
Chapter 6 Configuring Input and Output Devices
can exist between any two devices, including human bodies. Static discharges are obvious
when the voltage is great enough to cause a spark to jump between objects, or from an object
to your finger. However, you can damage delicate computer parts with voltages below this
sparking level.
To avoid damage to circuit boards during installation, follow these simple guidelines:
•
Leave the card inside its protective cover until you are ready to install it.
•
Disconnect all power to the computer.
•
Prepare the computer by removing the case and any slot covers for the slots you will use.
•
Touch a grounded part of the computer to discharge any static. The computer case is
a good choice. Then, without removing your hand from the computer, open the bag
and remove the card you are about to install. Once you have the card in your hands,
you can stop touching the case.
Electrostatic discharge (ESD) straps can be used to prevent damage to
your computer and cards. An ESD strap usually consists of a wrist strap
with a grounding cord to clip to the computer’s metal frame.
Insert the card carefully into the chosen slot and press it firmly into place. It is helpful
to wiggle the card into position, pressing first one end, then the other, until it is firmly
seated. You’ll quickly get the hang of it as you work with more cards. Just remember that
the card itself is quite rugged. Except for static discharge, it isn’t likely that you’ll hurt a
modern computer card during installation.
•
Chapter Summary
■
An OS handles input and output device communications through device drivers
(software) and through hardware such as controller and adapter boards.
■
Device drivers are often provided with an OS, but the most up-to-date device drivers
come directly from each device manufacturer.
■
Manufacturer device and device driver installations are typically performed from a
manufacturer’s DVD/CD-ROM. Up-to-date drivers can usually be downloaded from
the manufacturer’s Web site.
■
You can install devices and drivers in Windows using PnP, the Add a device wizard,
Control Panel options, and Device Manager. Also, plan to configure driver signing to
ensure successful and secure device driver installations.
■
UNIX/Linux systems use device special files for managing input and output devices.
■
For Mac OS X devices, most drivers come with the OS or can be installed from an
installation DVD/CD-ROM provided by the device manufacturer.
■
Common input devices include mice, keyboards, touch inputs, digital pads, scanners,
joysticks, gamepads, digital sound devices, digital picture devices, and a variety of
devices that use USB or 1394 technology.
Copyright 2017 Cengage Learning. All Rights Reserved. May not be copied, scanned, or duplicated, in whole or in part. WCN 02-200-203
Key Terms
293
■
Printers are common output devices. The most common types are inkjet and laser
printers.
■
Most OSs include tools for installing printers, such as the Add a device wizard in
Windows, Printers in Fedora Linux, and the Printers & Scanners Utility in Mac OS X.
■
Besides printers, other examples of common output devices include display adapters
and sound cards. Today, many other output devices are available for high-end audio
and video processing.
Key Terms
3D printer A printer that uses an additive process to create one layer at a time of a three-
dimensional object.
Accelerated Graphics Port (AGP) A bus standard that has been replaced by the PCI Express
or PCIe standard.
block special file In UNIX/Linux, a file used to manage random access devices that handle
blocks of data, including DVD/CD-ROM drives, hard disk drives, tape drives, and other
storage devices.
character special file An I/O management file in UNIX/Linux used to handle byte-by-byte
streams of data, such as through a USB connection, including printers and network
communications.
device special file A file used in UNIX and Linux for managing I/O devices. The file can be
one of two types: a block special file or a character special file.
digital pad An alternative input device frequently used by graphic artists and others who
need accurate control over drawing and other data input.
Digital Visual Interface (DVI) A high-quality visual standard for connecting flat-panel LCD
displays and digital projectors.
DisplayPort A digital interface standard that is projected to replace DVI and HDMI for
computers.
dot-matrix (impact) printer An impact character printer that produces characters by
arranging a matrix of dots.
dots per inch (dpi) Used to measure the resolution of a printer; the number of dots
contained in an inch.
driver signing A digital signature that Microsoft incorporates into driver and system files as
a way to verify the files and to ensure that they are not inappropriately overwritten.
dye sublimation A printer technology that produces high-quality color output by creating
“sublimated” color mists that penetrate paper to form characters or graphic output.
gamepad An input device primarily designed for interaction with games. It includes multiple
buttons, wheels, or balls to effect movement of a variety of on-screen objects.
High-Definition Multimedia Interface (HDMI) A high-quality visual standard for connecting
digital audio and video devices.
Copyright 2017 Cengage Learning. All Rights Reserved. May not be copied, scanned, or duplicated, in whole or in part. WCN 02-200-203
6
294
Chapter 6 Configuring Input and Output Devices
inkjet printer A printer that forms characters and images by spraying droplets of ink from a
nozzle print head onto the paper.
Institute of Electrical and Electronics Engineers (IEEE) An international organization of
scientists, engineers, technicians, and educators that plays a leading role in developing
standards for computers, network cabling, and data transmissions, and for other electronics
areas, such as consumer electronics and electrical power.
interrupt request (IRQ) line A channel within the computer that is used for communications
with the CPU.
I/O address range A range of memory addresses used to temporarily store data that is
transferred between a computer device or component and the CPU.
joystick An input device shaped like a stick that allows for three-dimensional movement of
an on-screen cursor or other object, such as a car, airplane, or cartoon character.
label printers Special-purpose printers that produce labels only.
laser printer A high-quality page printer design that is popular in office and other
professional applications.
line printer A printer design that prints a full line of character output at a time; it is used for
high-speed output requirements.
LPT1 The primary printer port designation on many desktop computers; also designated as
line print terminal 1.
multifunction printers Printers that combine printing, scanning, and faxing in one physical
device. They can be color inkjet or laser printers.
named pipe In UNIX/Linux, a device special file for handling internal communications, such
as redirecting file output to a monitor.
network-attached printer A printer that has a network interface, is connected to the
network, and can be accessed by computers on the network via a host name or IP address.
optical character recognition (OCR) Imaging software that scans each character on the page
as a distinct image and is able to recognize the character.
Peripheral Component Interconnect (PCI) A bus standard that has been replaced by the PCI
Express or PCIe standard.
Peripheral Component Interconnect Express (PCIe) A bus standard that has enabled adapter
manufacturers to supply one hardware product to a variety of hardware platforms.
pixel Short for picture element; the small dots that make up a computer screen display.
pixels per inch (ppi) A unit used to measure the resolution of a display screen; the number
of dots (pixels) contained in an inch.
plotter Computer hardware that produces high-quality printed output, often in color, by
moving ink pens over the surface of paper. Plotters are often used with computer-aided
design (CAD) and other graphics applications.
print job The data or document sent from an application to a printer and accepted by the
print spooler.
print queue A temporary file used to store a print job until it can be sent to the printer.
Copyright 2017 Cengage Learning. All Rights Reserved. May not be copied, scanned, or duplicated, in whole or in part. WCN 02-200-203
Review Questions
295
print spooler A process that accepts print jobs from applications, stores them in the print
queue, and then sends them to the printer when the print device is ready.
scanner A digital image created from a hard copy that is then transmitted to the computer.
tar A UNIX file archive utility.
thermal-wax transfer printer A printer that creates high-quality color printed output by
melting colored wax elements and transferring them to the printed page.
Review Questions
1. The tar format for retrieving drivers is used in which of the following?
a.
Windows 10
b. Windows Server 2012
c.
UNIX/Linux
d. Windows 7
2. What communicates between the OS and computer devices?
a.
device driver
b. OS kernel
c.
applications
d. user interface
3. You need to check a printer parameter for a Linux printer. In what directory should
you look for information about the printer configuration?
a.
/dev/printers
b. /bin/ptr
c.
/usr/printer
d. /etc/cups
4. When a Linux application prints a document, what accepts the document and stores it
in a temporary location before it is sent to the printer?
a.
print device
b. print spooler
c.
printer service
d. printer process
5. You support the Windows 10 computers in your organization. A new network interface driver has been issued to plug a security hole. Which tool would you use to
quickly install this driver update?
a.
Device Manager
b. Add Network Interface Wizard
c.
PnP
d. Registry editor
Copyright 2017 Cengage Learning. All Rights Reserved. May not be copied, scanned, or duplicated, in whole or in part. WCN 02-200-203
6
296
Chapter 6 Configuring Input and Output Devices
6. On a Mac OS X computer, what is the name for a 1394 port?
a.
Centronics
b. FireWire
c.
RS232
d. USB
7. The Accounting Department needs to purchase a printer that prints receipts for customers. The department also needs three-part carbonless paper. What type of printer
would you recommend? (Choose all that apply.)
a.
inkjet printer
b. laser printer
c.
thermal-wax printer
d. dot-matrix impact printer
8. Which of the following might be attached to a computer through a USB port? (Choose
all that apply.)
a.
mouse
b. keyboard
c.
printer
d. video display adapter
9. What type of port is typically used for a scanner?
a.
DVI
b. AGP
c.
USB
d. SCSI
10. You installed a new printer in Red Hat Enterprise Linux, but when you print the test
page, several characters are not printing correctly. Which of the following should you
do first?
a.
Use a different printer cable.
b. Obtain the latest printer drivers from the printer manufacturer’s Web site.
c.
Reconfigure the speed of the printer port.
d. Return the printer for a refund.
11. Your organization often receives long paper forms to complete and return. Which of
the following tools can you use to convert these forms to digital format for faster
completion using a word processor? (Choose two.)
a.
SCSI interpreter
b. scanner
c.
digital picture I/O
d. OCR software
Copyright 2017 Cengage Learning. All Rights Reserved. May not be copied, scanned, or duplicated, in whole or in part. WCN 02-200-203
Review Questions
297
12. After you install a new sound card and its related device drivers, your monitor frequently pauses or stops working until you reboot. Which of the following is most likely
to be the problem?
a.
You need a new monitor.
b. You need a new display adapter.
c.
There is an I/O address range conflict.
d. You need to update the driver.
13. You are the computer support person in your small company. One of the employees
has installed an off-brand network interface card (NIC) and its drivers on his Windows
10 computer. Now the OS will not run several network-related programs, such as
e-mail, a calendar scheduling program, and programs used for remote database access.
You suspect a driver problem, so you uninstall the NIC driver and the NIC, and then
install a NIC that is known to be Windows 10 compatible. How can you prevent this
problem from happening the next time the user installs a device?
a.
Configure driver signing.
b. Disable Control Panel.
c.
Set up a device block.
d. Configure a firewall.
14. Which command in Linux enables you to create a device special file?
a.
tty
b. mknod
c.
mkspc
d. devmake
15. When you create a device special file in Linux, in what folder should it be stored?
a.
/etc
b. /dev
c.
/sbin
d. /tmp
16. Where are print jobs stored before being sent to the print device?
a.
spooler
b. job file
c.
print queue
d. printer cache
17. What is the most common printing system used in contemporary Linux distributions?
a.
Print Management
b. IPP
c.
LPD
d. CUPS
Copyright 2017 Cengage Learning. All Rights Reserved. May not be copied, scanned, or duplicated, in whole or in part. WCN 02-200-203
6
298
Chapter 6 Configuring Input and Output Devices
18. A friend was installing a circuit board and damaged it by creating a static discharge at
the time of installation. How can this be avoided?
a.
Remove all batteries from circuit boards prior to installation.
b. Scrape the contacts on the circuit board before you install it.
c.
Turn the computer off, then ground yourself by touching the computer case.
d. Only purchase self-grounding circuit boards.
19. In UNIX and Linux, which of the following is true about device drivers? (Choose all
that apply.)
a.
They must be written in C or Pascal.
b. They can be loadable modules.
c.
They can be NLMs.
d. They must never be kernel modules.
20. Which is the most common expansion bus used in personal computers?
a.
PCIe
b. PCI-X
c.
ISA
d. AGP
Hands-On Projects
Project 6-1: Use the Add a Device Wizard in Windows 10
The Add a device wizard is a valuable tool for installing all types of devices
and drivers. In this project, you use the wizard in Windows 10. You need an
account that has Administrator privileges; also, your computer should not
have newly installed hardware, so that you can manually practice the full range of steps. You do
not need to have a connected printer to complete these steps.
1. Start your Windows 10 computer and log on.
2. Right-click Start, and click Control Panel. Make sure the Category View by option is
selected. Click Hardware and Sound, and then click the Add a device link (see
Figure 6-12).
Copyright 2017 Cengage Learning. All Rights Reserved. May not be copied, scanned, or duplicated, in whole or in part. WCN 02-200-203
Hands-On Projects
299
6
Figure 6-12 Starting the Add a device wizard
3. Windows looks for a device to add. If Windows can’t find one, you must use a different method. For example, to add a printer, click Advanced printer setup from the
Devices and Printers section of Control Panel. To add other devices, you can try Device
Manager. Click Cancel.
4. To add a printer, click the Advanced printer setup link. Windows looks for a printer to
install.
5. When Windows stops looking for the printer, click The printer that I want isn’t listed.
6. From the Add Printer dialog box (see Figure 6-13), you have several choices, including
the option to add a shared, network, or Bluetooth printer.
Copyright 2017 Cengage Learning. All Rights Reserved. May not be copied, scanned, or duplicated, in whole or in part. WCN 02-200-203
300
Chapter 6 Configuring Input and Output Devices
Figure 6-13 Adding a printer manually
7. Click Add a local printer or network printer with manual settings. Click Next.
8. Use the default port selection, which is LPT1 (Printer Port), and click Next.
9. In the Manufacturer box, click HP, and in the Printers box, click HP Color LaserJet
1600 Class Driver. On this screen, you also have the option to supply a disk or get
the driver via Windows Update. Click Next.
10. You can leave the default name for the printer on the next screen. Click Next.
11. On the next screen, click Do not share this printer, and then click Next.
12. Windows installs the printer driver and gives you the option to print a test page.
Because you aren’t installing an actual printer, click Finish.
13. Close all open windows, but stay logged on if you are continuing to the next project.
Project 6-2: Install a Network Printer in Windows 10
In this project, you install a network-attached printer in Windows 10. Your
instructor will have to give you the name or address of the network printer.
1. Log on to your Windows 10 computer, if necessary.
2. Right-click Start, and click Control Panel. Make sure the Category View by option is
selected. Click Hardware and Sound, and click the Advanced printer setup link.
Copyright 2017 Cengage Learning. All Rights Reserved. May not be copied, scanned, or duplicated, in whole or in part. WCN 02-200-203
Hands-On Projects
301
3. Windows looks for a printer. If Windows can’t find it, click The printer that I want
isn’t listed.
4. To add a network printer, click Add a printer using a TCP/IP address or hostname.
Click Next.
5. In the next window, type the name or IP address of the printer in the Hostname or IP
address text box. Click Next.
6. Windows connects to the printer and installs the drivers. In the Printer name text box,
type a descriptive name or accept the default name. Click Next.
7. In the Printer Sharing window, click Do not share this printer, and then click Next.
(You can share the printer later by accessing the printer properties.)
8. Click Print a test page if desired, and click Finish.
9. Close all open windows, but stay logged on if you are continuing to the next project.
Project 6-3: Use Device Manager in Windows 10
In this project, you use Device Manager to view where to install or update a
driver in Windows 10. You also use this utility to determine if a device is
working properly and to view other information about the device.
1. Log on to your Windows 10 computer, if necessary. Right-click Start and click Device
Manager.
2. Click to expand Display adapters.
3. Double-click the specific adapter under Display adapters.
4. Make sure that the General tab is displayed. You see the device status, which tells you
the device is working properly.
5. Click the Driver tab (see Figure 6-14). Notice that you can click the Update Driver button to obtain an updated driver or install a driver if one is not already installed. Also,
click the Roll Back Driver button to revert to a previously installed driver if there is a
problem with an updated driver. (This button is disabled if you are installing the first
driver.) You can click Disable to disable a device without actually installing it, and
you can click the Uninstall button to remove a driver.
Copyright 2017 Cengage Learning. All Rights Reserved. May not be copied, scanned, or duplicated, in whole or in part. WCN 02-200-203
6
302
Chapter 6 Configuring Input and Output Devices
Figure 6-14 The Driver tab
6. Click the Driver Details button.
7. Display drivers usually have a number of associated files. The Driver File Details dialog
box lets you view the name and location of the driver files. Click OK.
8. Click the Resources tab to see the resource settings for the display adapter. Notice
there are one or more I/O ranges, one or more memory ranges, and an IRQ setting. A
message at the bottom of the dialog box tells you if any conflicts are detected.
9. Click Cancel and then close Device Manager.
10. Stay logged on if you are continuing to the next project.
Project 6-4: Configure Mouse Settings in Windows 10
In this project, you view the settings available for your mouse in Windows 10.
1. Log on to your Windows 10 computer, if necessary.
2. Right-click Start, and click Control Panel. Click the selection arrow next to View by
and click Small icons.
Copyright 2017 Cengage Learning. All Rights Reserved. May not be copied, scanned, or duplicated, in whole or in part. WCN 02-200-203
Hands-On Projects
303
3. Click Mouse to open the Mouse Properties window (see Figure 6-15). Review the
options available for changing the behavior of the mouse.
6
Figure 6-15 Mouse Properties window
4. Click the Pointers tab. Click the selection arrow under Scheme and click Windows
Inverted (extra large) (system scheme). Click OK.
5. Move your mouse around the screen to see how it changes when you are inside a window. In Control Panel, click Mouse again.
6. Click the Pointers tab and select Windows Default (system scheme) to set the mouse
pointer back to its original settings.
7. Click the Pointer Options tab, and review the options available. Click the Show location of pointer when I press the CTRL key check box. Click OK.
8. Press Ctrl. Notice the concentric circles displayed around the mouse pointer, which
help you locate the mouse pointer easily. The circles are very helpful when you are
using multiple monitors.
Copyright 2017 Cengage Learning. All Rights Reserved. May not be copied, scanned, or duplicated, in whole or in part. WCN 02-200-203
304
Chapter 6 Configuring Input and Output Devices
9. In Control Panel, click Mouse again. Click the remaining tabs to see the other mouse
configuration options. Click Cancel when you are finished.
10. Log off or shut down your computer.
Project 6-5: View Devices in Linux
As you learned earlier, in many UNIX/Linux systems, the device special files
are contained in the /dev folder. In this project, you examine the contents of
that folder using Fedora 23 Linux. Then, you use the lshw command to view
a detailed listing of hardware.
1. Start your Linux computer and log on, if necessary.
2. Open a terminal window. Type ls/ dev | more and press Enter. (The more command
enables you to view the file listing one screen at a time.)
3. Press the Spacebar to scroll through each screen and see a listing of device special files.
(Note that you can press q at any time to exit the listing and go back to the shell
prompt.)
4. Type lshw | more and press Enter. Scroll through the listing of devices. You’ll see
entries for motherboard devices, including the CPU. Press q, if necessary, to exit the
listing.
If the lshw command is not available, type sudo yum install lshw and
press Enter.
5. Type lshw –class disk | more and press Enter to limit the display to disk devices. Press
q, if necessary. Close the terminal window.
6. Stay logged on if you are continuing to the next project.
Project 6-6: Use the Settings Menu in Linux
In Fedora 23 Linux with the GNOME desktop, you can configure devices
using the Settings menu. This menu enables you to configure Bluetooth
devices, desktop effects, the keyboard, monitor, mouse, and other devices and
settings. In this project, you use the Settings menu to review settings for one or
more monitors connected to the computer, and to review mouse settings.
1. Log on to your Linux computer, if necessary.
2. Click Activities, click Show Applications, and then click Settings. Notice the many
devices and settings that can be configured (see Figure 6-16).
Copyright 2017 Cengage Learning. All Rights Reserved. May not be copied, scanned, or duplicated, in whole or in part. WCN 02-200-203
Hands-On Projects
305
6
Figure 6-16 The Linux All Settings window
Source: Linux
3. Click Displays. Click the monitor icon; it may display a name or it may be labeled
Unknown Display. If more than one monitor is attached, you will see a monitor icon
for each.
4. You can change the resolution on most monitors, and some allow you to change other
settings, such as the refresh rate.
5. Click Cancel and then click the arrow in the upper-left corner of the Displays window
to return to the All Settings window.
6. Click Mouse & Touchpad.
7. Review the available settings and then click the arrow in the upper-left corner of the
Mouse & Touchpad window to return to the All Settings window.
8. Click Sound. Click each tab to review the available sound options, and then click the
arrow in the upper-left corner of the Sound window to return to the All Settings window. Close the All Settings window.
9. Stay logged on if you are continuing to the next project.
Copyright 2017 Cengage Learning. All Rights Reserved. May not be copied, scanned, or duplicated, in whole or in part. WCN 02-200-203
306
Chapter 6 Configuring Input and Output Devices
Project 6-7: Add a Network Printer in Linux
In this project, you install a network-attached printer using the GNOME Printers tool. Your instructor will give you the name or address of the network
printer. Then, you use the CUPS Web-based administration tool.
1. Log on to your Linux computer, if necessary.
2. Click Activities, click Show Applications, and then click Settings.
3. Click Printers. In the Printers tool, click Unlock in the upper-right corner, read the message, and then enter your password, if necessary.
4. If you have a printer installed already, it will be listed in the left pane and details will
be shown in the right pane (recall Figure 6-9, shown earlier).
5. If you don’t already have a printer installed, click Add New Printer. If you do have a
printer already installed, click the plus sign in the lower-left corner.
6. Linux attempts to detect a printer. If it cannot, you need to type the address or DNS
name of a network-attached printer and press Enter. In Figure 6-17, the printer name
is lexmarkcolor. Linux probes the printer and, if found, displays the printer model at
the top of the screen, as shown in Figure 6-17.
Figure 6-17 Adding a printer in Linux
Source: Linux
7. When the printer is found, click Add to install the printer driver. If allowed by the
instructor, click Print Test Page to verify that the printer is working.
8. Close the Printers window.
9. Open a Web browser. In the address bar, type http://localhost:631 and press Enter.
The CUPS administration page opens.
10. Click each tab and review the tasks that you can perform. The Administration page is
where you add printers and manage printers. Use the Jobs tab to manage print jobs
and the Printers tab to view the status of installed printers (see Figure 6-18). Close the
Web browser.
Copyright 2017 Cengage Learning. All Rights Reserved. May not be copied, scanned, or duplicated, in whole or in part. WCN 02-200-203
Hands-On Projects
307
6
Figure 6-18 The CUPS Web-based administration page
Source: Linux
11. One of the command-line tools for managing CUPS is lpstat. Open a terminal window,
type lpstat –p, and then press Enter to see the status of your printers. Type lpstat –v
and press Enter to see the printers and their attached devices. In the case of network
printers, you will see the IP address of the printer. Type man lpstat and press Enter to
view the manual pages for lpstat. Press q after looking at the manual pages.
12. Close the terminal window.
13. Log off or shut down your computer.
Project 6-8: Use System Preferences in Mac OS X
In this project, you learn how to use the System Preferences tool in Mac OS X
and see where to configure the keyboard and mouse. You will need to have a
mouse plugged into your computer, and the account you use must have
Administrator privileges.
1. Start your Mac computer and log on, if necessary.
2. Click the Apple icon and then click System Preferences.
3. Click Keyboard in the System Preferences window.
4. Ensure that the Keyboard tab is selected.
5. Notice that you can set the Key Repeat Rate and Delay Until Repeat parameters.
6. Click the Back arrow at the top of the Keyboard window to return to System Preferences. Click Mouse.
Copyright 2017 Cengage Learning. All Rights Reserved. May not be copied, scanned, or duplicated, in whole or in part. WCN 02-200-203
308
Chapter 6 Configuring Input and Output Devices
7. Notice you can set the Tracking speed, Scrolling speed, and the Double-Click speed.
You can also choose whether the left or right button is the primary mouse button
(see Figure 6-19).
Figure 6-19 Configuring mouse settings in Mac OS X
Source: Mac OS X
8. Click the Back arrow at the top of the Mouse window to return to System Preferences.
9. Click Displays. Mac OS X will choose the default resolution for the connected monitor. You can configure the resolution by clicking Scaled if more than one resolution is
available. If you have a compatible AirPlay device, you can select the device for AirPlay
Mirroring. AirPlay mirroring allows you to display your Mac screen on an Apple TV
device.
10. Click the Back arrow at the top of the Display window to return to System Preferences.
11. Leave the System Preferences window open for the next project.
Project 6-9: Install a Network Printer in Mac OS X
In this project, you install a network-attached printer in Mac OS X. Your
instructor will give you the name or address of the network printer.
1. Log on to your Mac and open System Preferences, if necessary.
2. Click Printers & Scanners in the System Preferences window. The Printers & Scanners
dialog box shows currently installed printers (see Figure 6-20).
Copyright 2017 Cengage Learning. All Rights Reserved. May not be copied, scanned, or duplicated, in whole or in part. WCN 02-200-203
Hands-On Projects
309
6
Figure 6-20 Printers & Scanners dialog box in OS X
Source: Mac OS X
3. To add a new printer, click the plus sign (+) in the Printers & Scanners window.
4. You see the Add window. To add a printer already detected by OS X, select it from the
list of printers and click the Add button. However, for a network printer that is not
detected, click IP.
5. In the Address text box, type the IP address or name of a printer that is connected to
the network (see Figure 6-10 earlier).
6. If OS X finds the printer, click Add to install the printer driver.
7. On the Printers & Scanners dialog box, click the printer you just installed and click
Open Print Queue. The print queue shows any current or pending print jobs. Close
the print queue.
8. Close the Printers & Scanners dialog box.
9. Log off or shut down the computer.
Copyright 2017 Cengage Learning. All Rights Reserved. May not be copied, scanned, or duplicated, in whole or in part. WCN 02-200-203
310
Chapter 6 Configuring Input and Output Devices
Critical Thinking
The following activities give you critical thinking challenges. Challenge Labs give you an
opportunity to use the skills you have learned to perform a task without step-by-step instructions. Case projects offer a practical problem for which you supply a written solution. Not all
chapters contain Challenge Labs. There is not always a specific right or wrong answer to these
critical thinking exercises. They are intended to encourage you to review the chapter material
and delve deeper into the topics you have learned.
Challenge Labs
Challenge Lab 6-1: Connect to a Shared Printer
In this challenge lab, you want to share the network printer you installed in Project 6-2 and
connect to it from your Linux computer. Research the requirements to share the printer on
the Windows 10 computer and then find out how to connect to it from a Linux computer.
Then, if possible, perform the necessary steps. Answer the following questions:
•
What did you do to share the printer on the Windows 10 computer?
•
What is the name of the protocol Linux uses to access shared Windows printers and
files?
•
What steps were required on the Linux computer to find the shared printer and
install the printer driver to access the shared printer?
Case Projects
Hard Rock makes hard candies that are sold worldwide. One of its specialties is fruit-flavored
candies, such as papaya, guava, grapefruit, kiwi, orange, banana, and watermelon. Hard
Rock employs 328 people and makes extensive use of computers and networks in the business. Users in the business office have Windows 10. The candy kitchen staff all use Mac OS
X, while the shipping unit prefers Fedora Linux. The IT unit uses Fedora Linux for its own
desktop computing needs and supports eight Windows Server 2012 R2 servers.
Case Project 6-1: Install Printers
The business office has just received three new laser printers for installation
and wants you to train the printer support coordinator to install printers for
the Windows 10 computers. The laser printers have network interfaces and
are connected to the network. The printers are named Laser1, Laser2, and
Laser3. The business office has three rooms with a network-attached printer
in each room. Describe the steps required to install the printers in each room.
Copyright 2017 Cengage Learning. All Rights Reserved. May not be copied, scanned, or duplicated, in whole or in part. WCN 02-200-203
Case Projects
311
Case Project 6-2: Check the Printer Status for
Troubleshooting in Fedora 23 Linux
The shipping unit has a Fedora 23 Linux computer to which it has connected
three printers for different uses. One is a color laser printer, one is an inkjet
printer, and a third is a dot-matrix printer. The shipping unit is having trouble
with the laser printer and wants to check its status. What tools might be useful
for this purpose in troubleshooting the problem?
Case Project 6-3: Solve a Driver Problem in Windows 10
A user downloaded and installed a new driver for her video card on her
Windows 10 computer. Now, the user complains that the monitor occasionally flickers and goes black for a few seconds. The system has restarted twice.
What should be done to solve this problem?
Copyright 2017 Cengage Learning. All Rights Reserved. May not be copied, scanned, or duplicated, in whole or in part. WCN 02-200-203
6
Copyright 2017 Cengage Learning. All Rights Reserved. May not be copied, scanned, or duplicated, in whole or in part. WCN 02-200-203
chapter
7
Using and Configuring
Storage Devices
After reading this chapter and completing the
exercises, you will be able to:
●
●
●
●
●
●
Describe computer storage
Configure local disks
Work with different types of volumes and virtual disks
Describe cloud storage
Describe tape drive technologies
Work with storage management tools
Copyright 2017 Cengage Learning. All Rights Reserved. May not be copied, scanned, or duplicated, in whole or in part. WCN 02-200-203
313
314
Chapter 7 Using and Configuring Storage Devices
Configuring storage is usually one of the first tasks you need to perform on a new
computer; this is particularly true of servers. In the past, computer storage was simply a disk
controller and one or two hard drives, but advanced storage solutions are now available to
provide fault tolerance and high performance. This chapter covers the basics of computer storage, and then explains how to configure local disks. With virtualization becoming such an
important part of computer environments, it’s no surprise that more OSs support creating
and mounting virtual disks. This chapter describes the basic steps to work with virtual disks.
A major enhancement to configuring storage in Windows is Storage Spaces, a new storage
model.
An Overview of Computer Storage
One of the main reasons people use computers is to create, receive, and download files and
documents of every type. Everything is stored on digital media now
now—documents, e-mail,
music, photographs, videos—and this trend is continuing. In addition, people want instant
access to whatever they store. Just about every large Internet company has its own version of
cloud storage, from Dropbox to iCloud to OneDrive. Dozens of cloud storage services are
competing to store your files, and although these services are convenient and seemingly work
by magic, they all start with a computer and some hard drives. The following sections cover
some basics of computer storage: what it is, why you need it, and the common methods for
accessing storage.
What Is Storage?
Generally speaking, storage is any digital medium that data can be written to and later
retrieved. Technically, this definition includes random access memory (RAM), but the term
computer storage generally means long-term storage in which data is maintained without a
power source. For example, RAM only holds data when it has electrical power—this is
referred to as volatile storage. Long-term storage maintains data when the power is turned
off, and is referred to as nonvolatile storage. Long-term storage includes the following types
of media:
•
USB memory sticks (flash drives)
•
Secure Digital (SD) cards and Compact Flash (CF) cards
•
CDs and DVDs
•
Magnetic tape
•
Solid-state drives
•
Hard disk drives
This discussion centers on internal computer storage, which is based on hard disk drives
(HDDs), although solid-state drives (SSDs) are rapidly closing the price and performance
gap with HDDs. SSDs are very popular for applications requiring greater speed, smaller size,
and lower power requirements. An SSD uses flash memory and the same type of high-speed
interfaces (usually SATA or the newer SATA Express) as traditional hard disks. An SSD has
no moving parts, requires less power, and is faster and more resistant to shock than an
Copyright 2017 Cengage Learning. All Rights Reserved. May not be copied, scanned, or duplicated, in whole or in part. WCN 02-200-203
An Overview of Computer Storage
315
HDD, but the cost is higher per gigabyte than an HDD. Also, SSDs don’t yet have the
capacity of HDDs, so discussions of computer storage are mainly about traditional HDD
storage. Nonetheless, most of the discussion of HDD storage applies to SSDs as well, and as
technology progresses and prices drop, SSDs will continue to replace HDDs in devices that
require high speed and smaller sizes.
Reasons for Storage
Every computer needs some amount of storage, and servers generally require more than client
computers because one of the server’s main purposes is to store and serve files when they’re
requested. The following list isn’t exhaustive, but it covers most uses of computer storage:
•
Operating system files—The OS itself requires substantial storage. The files that make
up the OS include boot files, the kernel, device drivers, user interface files, and all the
files for additional features you can install. Together, they add up to around 20 GB
for a typical Windows 10 and Mac OS X installation, and 8 to 10 GB for Windows
Server 2012 and Fedora 23, depending on installed options.
•
User applications—On client computers, user applications often use the most storage
space, especially if users are running entire office suites and multimedia applications
like photo editing programs.
•
User documents—User documents might take up the most space if pictures, videos,
and audio files are being stored on the computer. If a server is being used to store the
files of dozens or hundreds of users, their documents might be the largest use of disk
space on servers. Using disk quotas on servers that store user files is a good idea so that
a single user can’t monopolize disk space—for example, by storing an entire collection
of movies on a network server.
•
Virtual memory—Most OSs use virtual memory to supplement physical RAM. Virtual
memory is disk space that is used to store the least recently used pages of memory
when more physical RAM is needed but not available. For example, if you have five
applications open but you haven’t used three for several minutes, and then you open
another application, the ones that haven’t been used recently may be written to virtual
memory if there is not enough free physical RAM. In Windows, virtual memory is
stored as a file called pagefile.sys, which is usually located at the root of the C: drive.
In Linux/UNIX OSs, virtual memory is implemented as a swap partition, a separate
partition on the disk set aside exclusively for virtual memory. The size of virtual
memory varies depending on how much RAM is installed, memory use patterns, and
other factors, but it is usually 1 GB or larger on modern systems.
•
Log files—Most OSs maintain log files to which various system components and
applications can write when an event occurs. Log files can be used to track down
system or security problems. Log files can slowly eat up disk space unless you keep
an eye on their size and delete or archive them periodically.
•
Virtual machines—If a server is a virtualization server, you need plenty of space to
store files for virtual hard disks. Because it is so widely used, virtualization is one of the
largest uses of disk space on servers.
•
Database storage—If a server is running one or more databases, disk storage requirements vary depending on the size of the databases. Because databases can grow
Copyright 2017 Cengage Learning. All Rights Reserved. May not be copied, scanned, or duplicated, in whole or in part. WCN 02-200-203
7
316
Chapter 7 Using and Configuring Storage Devices
dynamically, it’s a good idea to store them on a drive separate from the drive where
the OS is installed, preferably on a volume that can have its capacity expanded if
needed.
When deciding how much disk space you need for a computer, you should take all the preceding uses into account. Remember that certain storage benefits from being on separate
disks from the one where the OS is stored. This advice is particularly true of virtual memory,
but ideally, the volume on which the OS is stored should be a separate drive from most other
storage uses.
Storage Access Methods
This discussion of storage access methods revolves around where storage is located in relation to the server. There are four broad categories of storage access methods:
•
Local storage
•
Direct-attached storage (DAS)
•
Network-attached storage (NAS)
•
Storage area network (SAN)
Local Storage Local storage has been around as long as computers, but the interfaces to
storage media have improved as speed and capacity requirements have grown. Local storage
is the focus of this chapter; disk interface technologies are discussed later in the “Configuring
Local Disks” section.
Local storage can be defined as storage media with a direct, exclusive connection to the
computer’s system board through a disk controller. Local storage is almost always inside
the computer’s case, and is attached to the disk controller via internal cables and powered
by the computer’s internal power supply. The term local storage usually refers to HDDs or
SSDs instead of CD/DVDs or other types of media. Local storage provides rapid and exclusive access to storage media through ever-faster bus technologies. The downside of local
storage is that only the system where it’s installed has direct access to the storage medium.
Data on disks can be shared through network file sharing, but the system with the installed
storage must fulfill requests for shared data.
Direct-Attached Storage Direct-attached storage (DAS) is similar to local storage in
that it’s connected directly to the server using it. In fact, local storage is a type of DAS
because DAS includes hard drives mounted inside the server case. However, DAS can also
refer to one or more HDDs in an enclosure with its own power supply. In this case, the
DAS device is connected to a server through an external bus interface, such as eSATA,
SCSI, USB, FireWire, or Fibre Channel.
A DAS device with its own enclosure and power supply can usually be configured as a disk
array, such as a RAID configuration (discussed later in the “Types of Volumes” section).
Although most DAS devices provide exclusive use to a single computer, some have multiple
interfaces so that more than one computer can access the storage medium simultaneously.
Most of the related discussion later in this chapter also applies to DAS devices because the
computer usually sees an externally attached DAS device as local storage.
Copyright 2017 Cengage Learning. All Rights Reserved. May not be copied, scanned, or duplicated, in whole or in part. WCN 02-200-203
An Overview of Computer Storage
317
The term DAS was created to distinguish it from storage connected to
a network, such as NAS and SAN.
Network-Attached Storage Network-attached storage (NAS), sometimes referred to
as a storage appliance, has an enclosure, a power supply, slots for multiple HDDs, a network interface, and a built-in OS tailored for managing shared storage. An NAS is designed
to make access to shared files easy to set up and easy for users to access. Because an NAS is
typically dedicated to file sharing, it can be faster than a traditional server in performing this
task because a server often shares its computing and networking resources among several
duties. An NAS shares files through standard network protocols, such as Server Message
Block (SMB), Network File System (NFS), and File Transfer Protocol (FTP). Some NAS
devices can also be used as DAS devices because they often have USB, eSATA, or other
interfaces that can be attached directly to a computer.
Storage Area Network The most complex type of storage is a storage area network
(SAN), which uses high-speed networking technologies to give servers fast access to large
amounts of shared disk storage. To the server OS, the storage a SAN manages appears to
be physically attached to the server. However, it’s connected to a high-speed network technology and can be shared by multiple servers. The most common network technologies
used in SANs are Fibre Channel and iSCSI. These technologies are designed to connect
large arrays of hard drive storage that servers can access and share. Client computers access
shared data by contacting servers via the usual method, and the servers retrieve the
requested data from the SAN devices and pass it along to the client computer. Figure 7-1
shows a SAN using Fibre Channel, in which disk arrays are connected to a Fibre Channel
switch and servers are connected to the Fibre Channel network as well as a traditional network. In this arrangement, all servers have access to the storage medium, which can be
shared and allocated as needed.
SANs use the concept of a logical unit number (LUN) to identify a unit of storage. A LUN is
a logical reference point to a unit of storage that could refer to an entire array of disks, a
single disk, or just part of a disk. To the server using the SAN, the LUN is easier to work
with because the server doesn’t have to know how the storage is provided; it only needs to
know how much storage is available.
Copyright 2017 Cengage Learning. All Rights Reserved. May not be copied, scanned, or duplicated, in whole or in part. WCN 02-200-203
7
318
Chapter 7 Using and Configuring Storage Devices
SAN Storage Device
3456
012
78
78
3456
912
STOP
PostScript®RIP2
Linotype
File Server
3456
012
78
78
3456
912
STOP
PostScript®RIP2
Linotype
SAN Switch
Web Server
Windows client
LAN Switch
Linux client
SAN Storage Device
Application Server
Mac client
Figure 7-1 A storage area network
SANs are often used by server clusters so that all cluster members have access to shared
storage for the purposes of load balancing and fault tolerance.
Configuring Local Disks
Configuration of local disks can be divided into two broad categories: physical disk properties
and logical properties. Physical disk properties, which must be considered before purchasing
disk drives for a server, include disk capacity, physical speed, and the interface for attaching
a disk to the system. Logical disk properties include its format and the partitions or volumes
created on it. Before you get too far into these properties, however, let’s review some diskstorage terms, most of which were introduced in Chapter 4:
•
Disk drive—A disk drive is a physical component with a disk interface connector (such
as SATA or SCSI) and a power connector. A mechanical disk drive (usually called an
HDD) has one or more circular magnetic platters that store the data’s actual bits and
one or more read/write heads—one for each side of the magnetic platters. The platters
spin at high speed, and the read/write heads move from the inside of the platter to the
outside to read data on the disk. An SSD has a disk interface and power connector but
has flash memory chips instead of magnetic platters, and there are no read/write heads
or other moving parts.
•
Volume—Before an OS can use a disk drive, a volume must be created on the drive. A
volume is a logical unit of storage that can be formatted with a file system. A disk drive
can contain one or more volumes of different sizes. Disk drive space that hasn’t been
assigned to a volume is said to be unallocated. Volumes can also span two or more
Copyright 2017 Cengage Learning. All Rights Reserved. May not be copied, scanned, or duplicated, in whole or in part. WCN 02-200-203
Configuring Local Disks
319
disks in an arrangement called RAID. Volumes, including RAID volumes, are discussed
in more detail later in the “Types of Volumes” section.
•
Partition—This older term means the same thing as volume, but is used with basic
disks. The term partition is still used at times, but in Windows it has largely been
replaced by volume.
•
Formatting Before an OS can use a volume, the volume must be formatted. As you
Formatting—
learned in Chapter 4, formatting prepares a disk with a file system that is used to
organize and store files. There are different format standards; the format you choose
for a disk depends on how the disk will be used. Disk formats were discussed in
Chapter 4.
Disk Capacity and Speed
The disk capacity you need depends entirely on how the disk will be used. Will it be a system
disk for storing the OS and related files, a disk for storing documents and other files, a filesharing disk, a disk storing a database, or maybe one that stores virtual machines? Perhaps
you plan to have a combination of uses, but in general, distinct types of data should be kept
on separate disks so that you can optimize some of the disk’s logical properties for the type
of data it will store. Before we talk more about disk capacities, review Table 7-1 for a list of
storage capacity units.
Table 7-1
Storage unit equivalents
Storage measurement
Bytes
Base 2 (binary) equivalents
Kilobyte (KB)
1,024
210
Megabyte (MB)
1,048,576
220
Gigabyte (GB)
1,073,741,824
230
Terabyte (TB)
1,099,511,627,776
240
Petabyte (PB)
1,125,899,906,842,624
250
Exabyte (EB)
1,152,921,504,606,846,976
260
Zettabyte (ZB)
1,180,591,620,717,411,303,424
270
One byte is 8 bits; bytes are represented by a capital B, while bits are
represented by a small b.
Keep in mind that you might not be basing disk capacity decisions on a single disk because
you could be configuring an array of disks in a RAID. HDD capacities are now measured in
hundreds of gigabytes, with two, four, and eight terabyte disks being common. (Remember
that one terabyte equals 1000 gigabytes.) Disk capacity is fairly inexpensive, and having
more than you need is better than having less. Here are some considerations for deciding
how much disk capacity to buy and how many disks to use in a server:
Copyright 2017 Cengage Learning. All Rights Reserved. May not be copied, scanned, or duplicated, in whole or in part. WCN 02-200-203
7
320
Chapter 7 Using and Configuring Storage Devices
•
On servers or high-performance workstations, the OS installation should be on a
separate disk from the data and applications to get the best performance. An SSD is
a good candidate for the OS installation disk.
•
Virtual memory should be on its own disk, if possible (pagefile.sys on Windows systems or the swap partition on Linux/UNIX systems). An SSD is also a good candidate
for virtual memory. If a separate disk is impractical, at least try to put virtual
memory on its own volume.
•
Take fault tolerance into account by using a RAID, which combines multiple disks to
make a single volume so that data stored on the volume is maintained even if a disk
fails. However, overall storage capacity is diminished.
The speed of HDDs is affected by a number of factors. For example, the disk interface technology is an important performance factor, as you will learn in the next section. Other factors include rotation speed and the amount of cache memory installed. The rotation speed
of disk platters in HDDs ranges from about 5400 revolutions per minute (rpm) to 15,000
rpm, with speeds of 7200 and 10,000 rpm in between. A server should be outfitted with an
HDD that rotates at a minimum of 7200 rpm, but for high-performance applications, look
for 10,000 or 15,000 rpm drives.
Even for desktop computers, you should look for HDDs with a rotation
speed of 7200 rpm or faster. You can still purchase 5400 rpm HDDs,
but they are low-end models that will likely become obsolete in the
coming years.
The amount of cache in an HDD allows the drive to buffer read and write data locally,
which speeds overall disk access. Cache sizes of 32 and 64 MB are common for server-class
drives, but some very fast drives might have as little as 16 MB. The key factor for disk performance is how fast data can be read from and written to the disk—the data rate. When
researching disks for performance factors, look for the sustained data rate the manufacturer
claims, which tells you how fast the drive can transfer data for an extended period.
Disk Interface Technologies
The disk interface connects a disk to a computer system, usually with some type of cable. The
cable acts as a bus that carries data and commands between the disk and computer. The faster
the bus, the faster the system can read from and write to the disk. The most common types of
disk interfaces for locally attached disks are SATA, SAS, and SCSI. Each technology has
advantages and disadvantages, as you will learn in the following sections.
You might also find a few parallel ATA (PATA) or Integrated Drive Electronics (IDE) drives on the low end and Fibre Channel drives on the
high end, but for locally attached drives, the most common by far are
SATA, SAS, and SCSI. IDE drives are nearly obsolete, and Fibre Channel
drives are most likely to be used in SANs.
Serial ATA Drives Serial ATA (SATA) drives have mostly replaced PATA drives
and have several advantages over this older technology, including faster transfer times and
Copyright 2017 Cengage Learning. All Rights Reserved. May not be copied, scanned, or duplicated, in whole or in part. WCN 02-200-203
Configuring Local Disks
321
smaller cable size. Whereas the older PATA interface is limited to about 167 megabytes per
second (MB/s), SATA drives boast transfer times of up to 6 gigabits per second (Gb/s; 600
MB/s) and higher. SATA drives are inexpensive, fast, and fairly reliable. They’re a good fit
both for client computers and lower-end servers. The SATA standard has evolved from
SATA 1.0, which supports transfer speeds of 1.5 Gb/s (150 MB/s), to the current SATA
3.2, which supports speeds of up to 16 Gb/s (or 1.6 gigabytes per second, GB/s). However,
most readily available devices support SATA 2.0 (3 Gb/s) or SATA 3.0 (6 Gb/s). Even with
their high transfer rates, however, SATA drives take a back seat to SCSI and SAS drives in
the enterprise server realm.
SCSI and SAS Drives Small computer system interface (SCSI) drives have been a
mainstay in enterprise-class servers for decades, and this drive technology has endured
through more than a half-dozen upgrades. The most recent SCSI variation, developed in
2003, is Ultra-640, with up to 640 MB/s transfer rates. SCSI is a parallel technology,
like PATA, and has probably reached its performance limits. SCSI, however, has always
provided high reliability and enterprise-level command features, such as error recovery
and reporting. Its successor is serial attached SCSI (SAS), which maintains the high reliability and advanced commands of SCSI and improves performance, with transfer rates
of up to 6 Gb/s and higher speeds under way. SAS enjoys the benefit of having bus compatibility with SATA, so SATA drives can be connected to SAS backplanes. A backplane
is a connection system that uses a printed circuit board instead of traditional cables to
carry signals.
The SAS standard offers higher-end features than SATA drives. SAS drives usually have
higher rotation speeds and use higher signaling voltages, which allow their use in server
backplanes. Overall, SAS is considered the more enterprise-ready disk interface technology,
but enterprise features come with a price—SAS drives are more expensive than SATA drives.
As with many other things, disk technologies have a trade-off between performance and reliability versus price.
Partitioning Methods Most OSs, including Windows, Mac OS X, and Linux/UNIX,
offer two methods for partitioning disks. The most common method, Master Boot
Record (MBR), has been around since DOS. MBR partitions support volume sizes of up
to 2 TB. MBR-based disks have the advantage of being compatible with most OSs, old
and new.
The second and newer method is GUID Partitioning Table (GPT). GPT disks became an
option when HDDs larger than 2 TB started becoming common. GPT-partitioned disks
support volume sizes of up to 18 exabytes (EB, which is one million terabytes); however,
most file systems are only able to support a fraction of that size. For example, Windows
file systems currently support volume sizes only up to 256 TB. You can convert an MBR
disk to GPT and vice versa, but you must delete existing partitions first, which erases all
data, so if you choose to convert, be sure to have a current backup. In addition to larger
volume sizes, GPT partitions offer improved reliability in the form of partition table
replication (a backup copy of the partition table) and Cyclic Redundancy Check (CRC)
protection of the partition table.
Copyright 2017 Cengage Learning. All Rights Reserved. May not be copied, scanned, or duplicated, in whole or in part. WCN 02-200-203
7
322
Chapter 7 Using and Configuring Storage Devices
GPT partitions contain an area on the disk called the “protective MBR,”
which is maintained for backward compatibility with disk utilities that
work only with MBR disks.
Types of Volumes
When you create a volume, most OSs have provisions for creating a variety of volume types,
from simple single-disk volumes to fault-tolerant multi-disk RAID volumes. Redundant array
of independent disks (RAID) is a disk configuration that uses space on multiple disks to form
a single logical volume. Most RAID configurations offer fault tolerance, and some enhance
performance. RAID is commonly configured in one of two ways: by the storage controller in
hardware and via the OS storage system in software. Hardware RAID provides better performance by offloading the OS from having to perform the processes involved in RAID, and
hardware RAID controllers usually have more options for RAID configurations. Many OSs
support at least the three most common configurations: RAID 0, RAID 1, and RAID 5. The
following are some of the most common volume types supported by most OSs.
•
Simple volume—A simple volume resides on a single disk. Simple volumes can be
extended (made larger) using the OS’s disk utilities if unallocated space is available on
the disk. A simple volume can also be shrunk. On some OSs, a simple volume can be
extended on the same disk or to multiple disks as long as they have unallocated space.
•
Spanned volume—A spanned volume extends across two or more physical disks. For
example, a simple volume that has been extended to a second disk is a spanned volume. When the first disk has filled up, subsequent disks are used to store data. Spanned
volumes don’t offer fault tolerance; if any disk fails, data on all disks is lost. There’s
also no performance advantage in using a spanned volume compared to a volume that
resides on a single disk.
•
RAID 0 volume—A RAID 0 volume extends across two or more disks, but data is written to all disks in the volume equally. For example, if a 10 MB file is written to a RAID
0 volume with two disks, 5 MB is written to each disk. A RAID 0 volume must use at
least two disks but can use many more than that; for example, Windows supports RAID
0 volumes with up to 32 disks. RAID 0 volumes don’t offer fault tolerance, but they do
have a read and write performance advantage over spanned and simple volumes because
multiple disks can be accessed simultaneously to read and write files. A RAID 0 volume
is also referred to as a striped volume because data is said to be striped across each disk.
The Windows system and boot volumes can’t be on a striped volume. Figure 7-2
shows a RAID 0 volume with two files, F1 and F2. F1 has two parts, F1-a and F1-b,
striped across the two disks, and F2 has four parts that are striped across the two
disks.
Copyright 2017 Cengage Learning. All Rights Reserved. May not be copied, scanned, or duplicated, in whole or in part. WCN 02-200-203
Types of Volumes
323
RAID 0 volume
F1-a
F1-b
F2-a
F2-b
F2-c
F2-d
Disk 1
Disk 2
Figure 7-2 A RAID 0 volume
•
RAID 1 volume—A RAID 1 volume (or mirrored volume) uses space from two disks
and provides fault tolerance. Data written to one disk is duplicated, or mirrored, to
the second disk. If one disk fails, the other disk has a good copy of the data, and the
system can continue to operate until the failed disk is replaced. The space used on both
disks in a mirrored volume is the same. Mirrored volumes might have a disk read
performance advantage, but they don’t have a disk write performance advantage.
Figure 7-3 shows a RAID 1 volume with the same two files; however, instead of being
spread across the disks, they are duplicated so that the contents of disk 1 are also on
disk 2.
RAID 1 volume
F1-a
F1-a
F1-b
F1-b
F2-a
F2-a
F2-b
F2-b
F2-c
F2-c
F2-d
F2-d
Disk 1
Disk 2
Figure 7-3 A RAID 1 volume
Copyright 2017 Cengage Learning. All Rights Reserved. May not be copied, scanned, or duplicated, in whole or in part. WCN 02-200-203
7
324
Chapter 7 Using and Configuring Storage Devices
•
RAID 5 volume—A RAID 5 volume (or disk stripe with parity) uses space from three
or more disks and uses disk striping with parity to provide fault tolerance. When data
is written, it’s striped across all but one of the disks in the volume. Parity information
derived from the data is written to the remaining disk. Parity information is used to
re-create lost data after a disk failure. The system alternates which disk is used for parity
information, so each disk has both data and parity information. A RAID 5 volume
provides increased read performance, but write performance is decreased because the
volume has to calculate and write parity information. Figure 7-4 shows a RAID 5
volume.
RAID 5 volume
F1-a
F1-b
parity
F2-a
parity
F2-b
parity
F2-c
F2-d
Disk 1
Disk 2
Disk 3
Figure 7-4 A RAID 5 volume
Hardware RAID is done at the disk level, whereas software RAID is
done at the volume level. Hardware RAID typically results in better performance than software RAID. In addition, there are restrictions on
placing OS files on software RAID volumes, but not on hardware RAID.
Windows Volumes and Disk Types
Different OSs use different terminology and techniques for how storage components are identified. On a Windows system, each volume is typically assigned a drive letter, such as C or D,
although you learned earlier that you can also use volume mount points in Windows so you
can access a volume with a drive letter. There are two Microsoft-specific volume definitions
you need to know:
•
Boot volume—The boot volume is the volume where the \Windows folder is located.
The usual location is the C drive, but this is not mandatory. The boot volume is also
called the boot partition.
•
System volume—The system volume contains files that the computer needs to find and
load the Windows OS. In Windows 2008 and later versions, it’s created automatically
during installation if you’re installing an OS for the first time on the system. Also, the
system volume is not assigned a drive letter, so you can’t see it in File Explorer. You
can, however, see it in Disk Management (see Figure 7-5). In earlier Windows versions,
Copyright 2017 Cengage Learning. All Rights Reserved. May not be copied, scanned, or duplicated, in whole or in part. WCN 02-200-203
Types of Volumes
325
the system volume was usually the C drive. In Figure 7-5, it’s labeled Active, which
tells the BIOS to try booting from that volume. The system volume is also called
the system partition.
7
Figure 7-5 Boot and system volumes in Disk Management
In Windows, the types of volumes you can create on a disk depend on how the disk is categorized. Windows defines two disk categories, which are discussed next: basic and dynamic.
Basic Disks As the name implies, a basic disk can accommodate only simple volumes.
The volumes on a basic disk are also called partitions. The Windows Disk Management
tool uses both terms in its interface, but the term partition is more accurate and distinguishes it from a volume created on a dynamic disk. When Windows detects a new disk
drive, it’s initialized as a basic disk by default.
As discussed in Chapter 4, you can create a maximum of four partitions on a basic disk.
The first three you create with Disk Management are primary partitions. A primary partition can be an active partition and can be the Windows system volume. It’s usually assigned
a drive letter but doesn’t have to be, as with the Windows system partition. If you create a
fourth partition, it’s called an extended partition, which can be divided into one or more
Copyright 2017 Cengage Learning. All Rights Reserved. May not be copied, scanned, or duplicated, in whole or in part. WCN 02-200-203
326
Chapter 7 Using and Configuring Storage Devices
logical drives, each assigned a drive letter. A logical drive on an extended partition can hold
the boot volume, but it can’t hold the system volume because it can’t be marked as active.
The Windows boot and system volumes can only be created on basic
disks.
Dynamic Disks If you need more than a simple volume, you must convert a basic disk
to a dynamic disk. Volumes created on dynamic disks can span multiple disks and be
configured for fault tolerance by using RAID. A dynamic disk can hold the Windows boot
partition or system partition, but only if you convert the disk to dynamic after Windows is
already installed on the volume. You can create up to 128 volumes on a dynamic disk.
To convert a basic disk to dynamic in Disk Management, simply right-click the disk and
click Convert to Dynamic Disk. Existing volumes on the basic disk are converted to simple
volumes on the dynamic disk, and all data on the disk is maintained. You can convert a
dynamic disk to basic in the same manner, but you must first delete existing volumes on
the dynamic disk; existing data will be lost.
If you attempt to create a volume type on a basic disk that isn’t supported, Windows prompts you to convert it to dynamic before you can
proceed. For example, if you attempt to create a mirrored (RAID 1) volume on a basic disk, you will be prompted to convert the disk to
dynamic first.
Virtual Disks Starting with Windows 8 and Windows Server 2012, you can mount virtual hard disks (VHD files) and use them as though they were regular volumes. A VHD file
is the format that virtual machines running in Hyper-V use for virtual disks. The Disk Management snap-in has options to create and mount virtual disks, but you can also mount a
VHD simply by double-clicking it in File Explorer or by right-clicking it and clicking
Mount.
You might want to use virtual disks instead of physical volumes to store data. Virtual disks
have the advantage of being very portable. Because a virtual disk is just a file on an existing
physical volume, you can copy it to any location quickly and easily for the purposes of
backing up data on the virtual disk or allowing it to be used by another computer.
Virtual disks can have a .vhd or .vhdx extension. Windows Server 2012/
R2 can mount either file type. The VHDX format, introduced in Windows
Server 2012 Hyper-V, has more capacity (up to 64 TB), protection from
corruption, and performance improvements than the VHD format.
Storage Spaces Storage Spaces, a new feature starting with Windows Server 2012, provides flexible provisioning of virtual storage. It uses the flexibility available with virtual
disks to create volumes from storage pools. A storage pool is a collection of physical disks
Copyright 2017 Cengage Learning. All Rights Reserved. May not be copied, scanned, or duplicated, in whole or in part. WCN 02-200-203
Types of Volumes
327
from which virtual disks and volumes are created and assigned dynamically. Volumes created from storage pools can be simple volumes, striped volumes, or fault-tolerant RAID
volumes.
Unlike traditional physical disks and volumes created in Disk Management, Storage Spaces
can allocate storage by using thin provisioning. Thin provisioning uses dynamically expanding
disks so that you can provision a large volume, even if you have the physical storage for a
volume only half the size. Later, you can add physical disks, and Storage Spaces expands
into the additional storage as needed. If the disk pool becomes full, Windows takes it offline
to alert you that you need to add physical storage to the pool.
Storage Spaces uses the concept of just a bunch of disks (JBOD), in which two or more
disks are abstracted to appear as a single disk to the OS but aren’t arranged in a specific
RAID configuration. JBOD gives you more flexibility because you can simply add a physical
disk to a storage pool, and existing volumes can grow into the new space as needed. You
can even add external disks to a pool via an external bus architecture, such as SAS or
eSATA.
Storage Spaces brings storage flexibility to a Windows server for a fraction of the cost of a
traditional SAN, which before Storage Spaces was the best way to achieve similar storage
features and performance. Storage Spaces offers the following features that are usually
found only in traditional SAN-based storage arrays:
•
Disk pooling
pooling—A collection of physical disks viewed as a single storage space from
which volumes can be provisioned for the server’s use.
•
Data deduplication—A new feature in Windows Server 2012 that finds data duplicated
on a volume multiple times and reduces it to a single instance, thereby reducing space
used on the volume. Data deduplication is a role service that can be installed and then
enabled on volumes separately.
•
Flexible storage layouts—Storage Spaces has three storage options, called storage
layouts: simple space, which can be a simple volume or RAID 0 volume; mirror space,
which is the same as a RAID 1 volume; and parity space, which is the same as a
RAID 5 volume.
•
Storage tiering
tiering—A new feature in Windows Server 2012 R2, storage tiering combines
the speed of SSDs with the low cost and high capacity of HDDs. You can add SSDs to
a storage pool with HDDs, and Windows keeps the most frequently accessed data on
the faster SSD disks and moves less frequently accessed data to HDDs. This scheme
improves performance substantially without the expense of moving all storage to costly
SSDs.
Storage Spaces is managed in Windows 10 using the Storage Spaces control panel under
System and Security (see Figure 7-6). In Windows Server 2012, open Server Manager, click
File and Storage Services, and then click Storage Pools. To use Storage Spaces, you need at
least one hard disk that is unallocated—in other words, a disk that has not been partitioned.
Copyright 2017 Cengage Learning. All Rights Reserved. May not be copied, scanned, or duplicated, in whole or in part. WCN 02-200-203
7
328
Chapter 7 Using and Configuring Storage Devices
Figure 7-6 Storage Spaces in Windows 10
From the Trenches …
The network technicians for a small department in a community college operate six
Windows Server 2012 R2 servers. Because the department teaches computer and networking technology, the staff feel it is important to build their own servers and maintain
their own network. The servers maintain the department domain, and provide DNS,
DHCP, Web services, VPN services, virtual machine access, and a host of other services
for the faculty and students. A continual problem is maintaining reliable fault tolerance
with the disk system. The staff use RAID 1 and RAID 5 disk configurations implemented
in hardware, but every time they need to update the OS, they run into problems finding
reliable drivers for the RAID controller. Furthermore, when a disk drive fails, they sometimes find it difficult to get a compatible replacement disk because disk models change
so often. Enter Storage Spaces on Windows Server 2012. The technicians did away with
their hardware RAID controllers and used the RAID 1 and RAID 5 capabilities of Storage
Spaces, including tiered storage, to increase the performance of their storage system in a
cost-effective manner. Now, they have far fewer worries when a disk drive fails because
Storage Spaces doesn’t have specific requirements for matching drives, and standard disk
controller drivers are less of a problem when OS upgrades occur.
Volume Types in Linux/UNIX and Mac OS X
Linux/UNIX and Mac OS X share most terminology for managing storage. In fact, if you
open a terminal prompt on Mac OS X, you can use most of the same tools that are used in
Linux/UNIX. This section will refer to Linux, but most concepts also apply to UNIX and
Mac OS X.
Copyright 2017 Cengage Learning. All Rights Reserved. May not be copied, scanned, or duplicated, in whole or in part. WCN 02-200-203
Types of Volumes
329
Linux volumes can be created using two methods: basic partitions and the logical volume
manager (LVM). This concept is not so different from using basic disks and dynamic disks
in the Windows environment. Using basic partitions, you have the same restriction as with
basic disks in Windows: you can have up to four primary partitions or three primary partitions and one extended partition. Using LVM, you can create as many partitions as there is
space.
Linux requires only one partition, which is used to hold the root folder (/). However, most
Linux systems use separate partitions for various folders such as /home, /usr, and /var, each
of which is mounted into the root folder—from a user’s point of view, it looks like a single
partition.
Basic partitions have substantial limitations; for example, you can’t resize them, so if you run
out of space, you need to copy all the data on that partition to a new, larger partition, which
is inconvenient and inefficient. Using LVM provides more flexibility, and most Linux systems
use this method for creating and accessing volumes.
LVM uses physical disk partitions called volume groups. From volume groups, logical
volumes are created and assigned space. A logical volume can be expanded while the volume
is still in use by simply adding more space from the volume group. Volume groups can also
be expanded by adding more physical disks or by replacing a smaller disk with a larger disk,
all without having to take the volume offline.
In addition, LVMs support RAID configurations like disk mirroring.
Virtual Disks in Linux You can work with virtual disks in Linux by creating an image
file, installing a file system on it, and mounting it into the file system. Here are the general
steps and commands to create and mount a 500 MB virtual disk named mydisk from a
Fedora 23 Linux shell prompt:
1. Create a new file using the fallocate command: fallocate -l 500M mydisk.img
2. Install the ext4 file system: mkfs -t ext4 mydisk.img
3. Create a folder to mount the virtual disk: mkdir /mnt/vdisk
4. Mount the virtual disk: mount mydisk.img /mnt/vdisk
After you have completed the preceding steps, you can use the virtual disk as you would any
physical disk that’s mounted into the file system. You can also use the Disks utility in
GNOME to create a disk image from a hard disk or CD/DVD and attach a disk image. In
Mac OS X, you can use the Disk Utility to create an image from an existing device or folder,
or you can create a blank disk image, as shown in Figure 7-7. Once the disk image is created, Mac OS X automatically mounts it and places an icon on your desktop. Notice in
Figure 7-7 that you have the option to encrypt the disk, which can be useful for storing
sensitive documents.
Copyright 2017 Cengage Learning. All Rights Reserved. May not be copied, scanned, or duplicated, in whole or in part. WCN 02-200-203
7
330
Chapter 7 Using and Configuring Storage Devices
Figure 7-7 Creating a new disk image in Mac OS X
Source: Mac OS X
Cloud Storage
When a company’s storage needs have outgrown its storage capabilities, whether because of
physical capacity limits or the lack of personnel to maintain in-house storage, the company
can turn to the cloud. With cloud storage, some or all of an organization’s data is stored on
servers located offsite and maintained by a storage hosting company. The customer can manage storage by assigning permissions for user access and allocating storage for network applications without having to physically maintain the servers. If more storage is needed, the
customer simply pays the storage hosting company for the additional space. The advantage
of this approach is that the details of managing and backing up storage on local servers are
offloaded to a third party, which enables a company to focus its monetary and personnel
resources on business rather than IT tasks. However, cloud-based storage isn’t for everyone.
The data a company maintains might be too sensitive to trust to a third party or the data
access speed might not be sufficient, for example.
You are probably already familiar with some popular types of public cloud storage. For
example, YouTube hosts millions of video files loaded by users. Google Docs enables users
to store document files and spreadsheets that can be accessed and manipulated on Google
Internet servers. Such files can also be published so that others can access the files through
the Internet. Dropbox, Microsoft OneDrive, and Google Drive are popular cloud storage services for individuals and small businesses. For larger applications, there is Google Cloud Storage, Microsoft’s OneDrive for Business, Microsoft Azure, and Amazon Web Services, to name
just a few of the services in this fast-growing market.
Copyright 2017 Cengage Learning. All Rights Reserved. May not be copied, scanned, or duplicated, in whole or in part. WCN 02-200-203
Tapes and Tape Drives
331
Cloud storage is a comparatively new model in data storage. As you learned in Chapter 1,
many services are being offered in the cloud, but the companies that provide cloud storage services use many of the technologies discussed in this chapter.
Tapes and Tape Drives
Tape backup systems are a relatively inexpensive and traditional choice for backing up large
amounts of data. Tapes use magnetic storage and record data in sequential order. The disadvantage of sequential access is that in order to find a file recorded near the end of the tape, the
tape drive has to first go through all of the preceding data. This means access to data is typically much slower than that for a removable hard drive, which uses direct access. Tapes, however, are reliable and the technology is well tested because it has been around a long time.
Tapes are most popular for long-term storage, such as backups, or for archiving data that will
be stored off-site. With the capacity of disk drives growing into terabytes, a constant need
exists to develop tape technologies that can store more and more data on a single tape. The
following sections briefly describe several types of tape storage systems. For most tape systems, the actual tape capacity is stated in terms of whether the stored data is compressed.
Compressing the data on the tape typically doubles the noncompressed capacity. Table 7-2
lists tape media and their capacities.
Table 7-2
Tape media capacities
Tape medium
Capacity (compressed)
Digital audio tape (DAT)
Up to 72 GB
Digital linear tape (DLT)
Up to 1.6 TB
Super digital linear tape (SDLT)
Up to 2.4 TB
Advanced intelligent tape (AIT) and super advanced
intelligent tape (S-AIT)
Up to 1.3 TB
Linear tape open (LTO)
Up to 1.6 TB
DAT Drives
Digital audio tape (DAT) drives use a 4-mm tape. The most common use is the digital
data storage (DDS) format. The first DDS (DDS-1) standard has a capacity of 2 GB (4 GB compressed). The current standard is DDS-5, which has a storage capacity of 36 GB (72 GB
compressed). The DDS format standard is backward-compatible; for example, you can upgrade
to a DDS-5 tape drive and still read DDS-4 tapes. DAT tapes are typically rated to have an
archival life of about 10 years. DAT is still used for audio recordings, but its use for data storage
has mostly been replaced by other tape technologies.
Copyright 2017 Cengage Learning. All Rights Reserved. May not be copied, scanned, or duplicated, in whole or in part. WCN 02-200-203
7
332
Chapter 7 Using and Configuring Storage Devices
DLT and SDLT Drives
Digital linear tape (DLT) drives use half-inch-wide magnetic tapes to record data. These tapes
record data in tracks that run the whole length of the tape. Each tape contains 128, 168,
208, 240, 352, or 488 tracks, and the data is recorded on the first track from the beginning
to the end of the tape. Then, the tape is reversed and the data is written from the end to the
beginning. This continues until all the tracks are full. Using this track system with high-speed
search capability, a file can often be found in a few seconds, although the search might take a
little over a minute, depending on the file’s location on the tape. DLT tape drives are used in
many automated tape backup systems.
Super digital linear tape (SDLT) drives use both magnetic and optical recording methods.
This method, along with laser technology, more accurately writes data to the tape and allows
for greater density of information—up to 2.4 TB compressed. DLT and SDLT tapes have an
archival life of up to 30 years, and some tape manufacturers rate their tapes at up to 500,000
tape passes.
AIT and S-AIT Drives
Advanced intelligent tape (AIT) drives were introduced in 1996 and are used mainly in midrange servers. The tapes for this drive have an erasable memory chip inside the cartridge that
stores the information normally written at the beginning of a tape. This provides the information necessary to fast forward and pinpoint the desired information. AIT drives started with a
capacity of 35/90 GB (native/compressed) of recorded data. Today, the super advanced intelligent tape (S-AIT) has a capacity of 500 GB/1.3 TB (native/compressed). AIT and S-AIT tapes
can sustain up to 30,000 tape passes and have an archival life of around 30 years.
LTO Drives
The linear tape open (LTO) drive is most widely accepted in the high-end server market
because of its high-speed performance. LTO is an open standards tape technology, which
means that the standards are open to the public and are nonproprietary. The LTO Ultrium
format was developed so that LTO tapes could be used in existing DLT tape drives for faster
conversion to LTO Ultrium tape technology.
LTO Ultrium tape drives offer fast data transfer speeds of up to 240 MB/s for noncompressed data and 120 MB/s for compressed data. LTO tapes can sustain up to 260 tape
passes and have an archival life of 15 to 30 years.
Storage Management Tools
This section covers some of the operating system tools and commands used to manage storage
devices. Also, you will find step-by-step instructions for using some of these tools in the
Hands-On Projects at the end of the chapter.
Windows Storage Management Tools
All modern Windows OSs offer the Windows Disk Management tool for hard drives as well
as removable storage. For a hard drive, this tool enables you to create and delete partitions,
Copyright 2017 Cengage Learning. All Rights Reserved. May not be copied, scanned, or duplicated, in whole or in part. WCN 02-200-203
Storage Management Tools
333
format partitions for a file system, and generally manage partitions. The tool also recognizes and enables you to manage removable storage, including removable hard drives,
DVD/CD-ROM drives, and flash drives. In Windows 10, you can access the Disk Management tool by right-clicking Start or from the Computer Management console. On Windows
Server 2012/R2 and newer versions, you can also use the File and Storage Services tool
from Server Manager (see Figure 7-8) to manage volumes and Storage Spaces.
7
Figure 7-8 File and Storage Services on Windows Server 2012 R2
One of the easiest ways to manage an existing storage volume is to access its properties. In
File Explorer, right-click the volume and click Properties. From the Properties dialog box
(see Figure 7-9), you can access several management options, such as viewing free space on
the disk, defragmenting or backing up the drive, checking the drive for errors, limiting users’
disk space through quotas, and setting permissions.
Copyright 2017 Cengage Learning. All Rights Reserved. May not be copied, scanned, or duplicated, in whole or in part. WCN 02-200-203
334
Chapter 7 Using and Configuring Storage Devices
Figure 7-9 The properties of a volume in Windows
Disk Management Tools in UNIX/Linux
Common command-line utilities for managing, formatting, and partitioning disks on UNIX/
Linux systems are fdisk, format, sfdisk, and cfdisk. You learned about fdisk and format in
Chapter 4. The sfdisk and cfdisk utilities enable you to verify partitions, list information
about partitions, such as their size, and repartition a disk. Linux operating systems offer
fdisk, sfdisk, and cfdisk, but not format, which is used on some UNIX systems.
Further, UNIX/Linux systems offer the mount command-line utility, introduced in Chapter 4,
to mount a file system so that you can use a disk partition, virtual disk, DVD/CD-ROM
drive, or flash drive. Normally, when you boot UNIX/Linux, the main file systems are
mounted as part of the boot process—for example, the ext4 file system in Linux. However,
you may need to manually mount file systems for DVD/CD-ROM or flash drives (although
these are automatically detected and mounted in modern Linux operating systems). For
example, to mount a DVD/CD-ROM drive, you would use the following command:
mount -t iso9660 /dev/cdrom /mnt/cdrom or mount -t iso9660 /dev/cdrom /cdrom
For a DVD formatted for the udf file system, use:
mount -t udf /dev/cdrom /mnt/cdrom or mount -t udf /dev/cdrom /cdrom
Copyright 2017 Cengage Learning. All Rights Reserved. May not be copied, scanned, or duplicated, in whole or in part. WCN 02-200-203
Storage Management Tools
335
The -t iso9660 portion of the first command mounts the iso9660 (CD-ROM) file system. The
-t udf portion of the second command is for the Universal Disk Format file system, which is a
file system that supplants iso9660 for DVDs and other optical media. Further, these commands mount the device, /dev/cdrom, to the mount point, /mnt/cdrom or /cdrom, so that
after the DVD or CD-ROM file system is mounted, you can view its files by viewing the contents of /mnt/cdrom or /cdrom.
Use the umount command to unmount a file system. For example, you would enter umount
/mnt/cdrom or umount /cdrom to unmount the file system for a DVD/CD-ROM drive.
Table 7-3 summarizes UNIX/Linux commands for disk management. These commands typically have many different options, which are documented in the online manual pages. For
example, to learn more about the mount command, use the command man mount to read
the documentation.
Table 7-3
Summary of UNIX/Linux disk management commands
Command
Explanation
cfdisk
Partitions and verifies a hard disk
cpio
Copies and backs up files to archive them on tape or disk
dump
Backs up particular files or an entire file system and offers levels to
specify the degree to which to back up files; use the restore command to
restore files backed up by dump
fdisk
Maintains disk partitions, including creating and deleting partitions and
flagging the active partition
format
Partitions and formats a disk in some UNIX distributions, but not in Linux
mount
Connects or mounts a file system for access in the directory tree
restore
Restores an entire file system or only specific files backed up by the
dump command
tar
Copies files to an archive medium and can restore files; this command is
traditionally popular with server administrators
sfdisk
Provides information about a partition and can be used to create a
partition (Caution: This command does not work with PC systems that
use a GUID Partitioning Table)
umount
Disconnects or unmounts a file system partition from access in the
directory tree
xfsdump
Backs up files in the XFS file system; the ext file system is the default
option in Linux, but Linux also supports XFS
xfsrestore
Restores files backed up by xfsdump
If you use Linux with the GNOME desktop, you can use the Disks tool to manage disk storage. For example, to unmount a DVD from the Disks utility, click the CD/DVD drive in the
left pane and click the Eject button in the right pane (see Figure 7-10).
Copyright 2017 Cengage Learning. All Rights Reserved. May not be copied, scanned, or duplicated, in whole or in part. WCN 02-200-203
7
336
Chapter 7 Using and Configuring Storage Devices
Figure 7-10 The Disks utility in Linux
Source: Fedora Linux
Mac OS X Disk Utility
The Mac OS X Disk Utility can partition, format, and manage hard drives. It can also manage DVD/CD-ROM drives, removable hard drives, flash drives, and other storage. When you
select a storage medium in the left pane, the Disk Utility displays appropriate tabs for the
actions you can perform on that storage medium. For example, for a hard disk you can:
•
Repair the disk using the First Aid option.
•
Erase the contents.
•
Partition and format the disk.
•
Set up RAID on the disk.
•
Restore a disk image or volume.
For removable media, you can use the Disk Utility to mount media, eject media, burn a CD
or DVD, and perform other actions. Because Mac OS X is a UNIX-based system, you can
also open a terminal window and use the mount command to manage storage media. To
learn the mount command options, type man mount and press Enter at the command line.
Copyright 2017 Cengage Learning. All Rights Reserved. May not be copied, scanned, or duplicated, in whole or in part. WCN 02-200-203
Key Terms
337
Chapter Summary
■
Storage is any digital medium that data can be written to and later retrieved. Long-term
storage includes USB drives, SD cards, CDs/DVDs, magnetic tape, SSDs, and HDDs.
■
All computers require at least some storage, but servers usually require more than
client computers. Storage is needed for OS files, page files, log files, virtual machines,
database files, and user documents, among others.
■
The main methods of storage access are local, DAS, NAS, and SAN. Local and DAS
are similar methods, but DAS can also be a separate unit attached through an external
interface. NAS is a stand-alone storage device with a network interface. A SAN is the
most complex storage device; it uses high-speed networking technologies to provide
shared storage.
■
Configuration of local disks can be divided into two broad categories: physical disk
properties and logical properties. Physical properties include disk capacity, rotation
speed, and the disk interface technology. SATA and SAS are the most common
disk interfaces.
■
Disk types include basic disks, dynamic disks, and virtual disks. Partitioning types
include MBR and GPT. Volume types include simple, spanned, RAID 0, RAID 1,
and RAID 5.
■
Storage Spaces, a new feature starting with Windows 8/8.1 and Windows Server
2012/R2, provides flexible provisioning of virtualized storage by using storage pools.
A storage pool is a collection of physical disks from which virtual disks and
volumes are created and assigned dynamically.
■
Storage Spaces uses the concept of just a bunch of disks (JBOD), in which two or
more disks are abstracted to appear as a single disk to the OS but aren’t arranged in
a specific RAID configuration.
■
With cloud storage, some or all of an organization’s data is stored on servers located
offsite and maintained by a storage hosting company.
■
Tape backup systems are a relatively inexpensive and traditional choice for backing up
large amounts of data. Tapes use magnetic storage and record data in sequential order.
There are several types of tape devices, including DAT, DLT, SDLT, AIT, and LTO.
■
Storage management tools in Windows include Disk Management and File and Storage Services. Linux has a number of command-line tools, such as fdisk, format, and
mount, plus the Disks GUI tool. Mac OS X includes many of the same Linux
command-line tools, plus the Disk Utility tool.
Key Terms
advanced intelligent tape (AIT) A tape drive that has an erasable memory chip and a
capacity of up to 1.3 TB.
backplane A connection system that uses a printed circuit board instead of traditional cables
to carry signals.
Copyright 2017 Cengage Learning. All Rights Reserved. May not be copied, scanned, or duplicated, in whole or in part. WCN 02-200-203
7
338
Chapter 7 Using and Configuring Storage Devices
basic disk A traditional Windows or DOS disk arrangement in which the disk is partitioned
into primary and extended partitions. A basic disk can’t hold volumes spanning multiple
disks or be part of a RAID.
boot volume The volume where the \Windows folder is located—usually the C drive, but
this location is not mandatory. The boot volume is also referred to as the boot partition.
cloud storage A storage paradigm in which an individual’s or company’s storage is hosted
by a third party and accessed over the Internet.
digital audio tape (DAT) A tape system that uses 4-mm tape and has a capacity of up to 72 GB.
digital linear tape (DLT) A tape system that uses half-inch magnetic tapes and has a capacity
of up to 1.6 TB.
direct-attached storage (DAS) A storage medium directly connected to the server using it.
DAS differs from local storage in that it includes externally connected HDDs in an enclosure
with a power supply.
disk drive A physical component with a disk interface connector (such as SATA or SCSI)
and a power connector.
dynamic disk A disk arrangement that can hold up to 128 volumes, including spanned
volumes, striped volumes, and RAID volumes.
extended partition A division of disk space on a basic disk that must be separated into
logical drives; it can’t be marked active and can’t hold the Windows system volume.
GUID Partitioning Table (GPT) A disk-partitioning method that supports volume sizes of up
to 18 exabytes.
just a bunch of disks (JBOD) A disk arrangement in which two or more disks are abstracted
to appear as a single disk to the OS but aren’t arranged in a specific RAID configuration.
linear tape open (LTO) A tape drive used in the high-end server market; it has a storage
capacity of up to 1.6 TB.
local storage Storage media with a direct and exclusive connection to the computer’s system
board through a disk controller.
logical unit number (LUN) A logical reference point to a unit of storage that could refer to
an entire array of disks, a single disk, or just part of a disk.
logical volume manager (LVM) A method of creating volumes in Linux that uses physical
disk partitions called volume groups to create logical volumes.
Master Boot Record (MBR) A disk-partitioning method that supports volume sizes of
up to 2 TB.
network-attached storage (NAS) A storage device that has an enclosure, a power supply,
slots for multiple HDDs, a network interface, and a built-in OS tailored for managing
shared files and folders.
pagefile.sys A system file in Windows used as virtual memory; it is also used to store data
produced when the system crashes (dump data), which is used for troubleshooting.
partition A logical unit of storage that can be formatted with a file system; it is similar to a
volume but used with basic disks.
Copyright 2017 Cengage Learning. All Rights Reserved. May not be copied, scanned, or duplicated, in whole or in part. WCN 02-200-203
Key Terms
339
primary partition A division of disk space on a basic disk used to create a volume. It can be
assigned a drive letter, be marked as active, and contain the Windows system volume.
RAID 0 volume A volume that extends across two or more dynamic disks, but data is
written to all disks in the volume equally; it provides no fault tolerance but does provide a
performance advantage over simple or spanned volumes.
RAID 1 volume A volume that uses space from two dynamic disks and provides fault
tolerance. Data written to one disk is duplicated, or mirrored, to the second disk. If one disk
fails, the other disk has a good copy of the data, and the system can continue to operate
until the failed disk is replaced. This volume is also called a mirrored volume.
RAID 5 volume A volume that uses space from three or more dynamic disks and uses disk
striping with parity to provide fault tolerance. When data is written, it’s striped across all
but one of the disks in the volume. Parity information derived from the data is written to the
remaining disk, which is used to re-create lost data after a disk failure. This volume is also
called a disk stripe with parity.
redundant array of independent disks (RAID) A disk configuration that uses space on
multiple disks to form a single logical volume. Most RAID configurations provide fault
tolerance, and some enhance performance.
Serial ATA (SATA) A common disk interface technology that’s inexpensive, fast, and fairly
reliable, with transfer speeds up to 6 Gb/s; it is used both in client computers and low-end
servers and replaces the older parallel ATA (PATA) technology.
serial attached SCSI (SAS) A newer, serial form of SCSI with transfer rates of up to 6 Gb/s
and higher; the disk technology of choice for servers and high-end workstations. See also
small computer system interface (SCSI).
simple volume A volume that usually resides on a single basic or dynamic disk.
small computer system interface (SCSI) An older parallel bus disk technology still used on
some servers, although it has reached its performance limits at 640 MB/s transfer rates.
solid-state drive (SSD) A type of storage medium that uses flash memory, has no moving
parts, and requires less power than a traditional HDD. It is faster and more shock resistant
than a traditional HDD, but it costs more per gigabyte and doesn’t have as much capacity
as an HDD.
spanned volume A volume that extends across two or more physical disks; for example, a
simple volume that has been extended to a second disk is a spanned volume.
storage appliance See network-attached storage (NAS).
storage area network (SAN) A storage device that uses high-speed networking technologies
to give servers fast access to large amounts of shared disk storage. To the server OS, the
storage a SAN manages appears to be physically attached to the server.
storage layout The method used to create a virtual disk with Storage Spaces; the three
methods include simple, mirror, and parity. See also Storage Spaces.
storage pool A collection of physical disks from which virtual disks and volumes are
created and assigned dynamically.
Storage Spaces A new feature in Windows 8/8.1 and Windows Server 2012/R2 and later
versions that provides flexible provisioning of virtualized storage.
Copyright 2017 Cengage Learning. All Rights Reserved. May not be copied, scanned, or duplicated, in whole or in part. WCN 02-200-203
7
340
Chapter 7 Using and Configuring Storage Devices
storage tiering A feature of Storage Spaces that combines the speed of SSDs with the low
cost and high capacity of HDDs to create high-performance volumes.
super advanced intelligent tape (S-AIT) A tape system technology that has an erasable
memory chip and a capacity of up to 1.3 TB.
super digital linear tape (SDLT) A tape system that uses both magnetic and optical recording
and has a tape capacity of up to 2.4 TB.
swap partition In Linux/UNIX OSs, a separate partition on the disk set aside exclusively for
virtual memory.
system volume A volume that contains the files a computer needs to find and load the
Windows OS. See also volume.
thin provisioning A method for creating virtual disks in which the virtual disk expands
dynamically and uses space from the storage pool as needed until it reaches the specified
maximum size.
VHD file The format that virtual machines running in Hyper-V use for their virtual disks.
VHD files can also be created and mounted with Disk Management and used like physical
disks.
virtual memory Disk space that stores the least recently used pages of memory when more
physical RAM is needed, but not available.
volume A logical unit of storage that can be formatted with a file system.
Review Questions
1. Which of the following is an example of long-term storage? (Choose all that apply.)
a.
magnetic tape
b. CPU cache
c.
SSD
d. RAM
2. Which of the following is true about an SSD?
a.
It uses magnetic platters.
b. It has no moving parts.
c.
It uses a proprietary interface.
d. It uses EPROM.
3. Which of the following is an example of what a computer stores? (Choose all that
apply.)
a.
virtual memory
b. log files
c.
working memory
d. documents
Copyright 2017 Cengage Learning. All Rights Reserved. May not be copied, scanned, or duplicated, in whole or in part. WCN 02-200-203
Review Questions
341
4. Which of the following is true about a page file?
a.
It should be stored on a separate disk from the Windows folder.
b. It’s usually stored in fast random access memory.
c.
Windows stores frequently accessed drivers in it.
d. It is usually smaller than 50 MB.
5. Local storage is rarely direct-attached storage. True or False?
6. You want shared network storage that’s easy to set up and geared toward file sharing
with several file-sharing protocols, but you don’t want the device to be dedicated to file
sharing. What should you consider buying?
a.
SAN
b. DAS
c.
NAS
d. LAS
7. What type of interface are you likely to find that connects a DAS device to the server
that uses it?
a.
SATA
b. IDE
c.
PATA
d. eSATA
8. You have four servers that need access to shared storage because you’re configuring
them in a cluster. Which storage solution should you consider for this application?
a.
NAS
b. SAN
c.
SCSI
d. DAS
9. Which of the following is defined as a physical component with a disk interface connector?
a.
format
b. partition
c.
volume
d. disk drive
10. You have installed a new disk and created a volume on it. What should you do before
you can store files on it?
a.
Format it.
b. Partition it.
c.
Initialize it.
d. Erase it.
Copyright 2017 Cengage Learning. All Rights Reserved. May not be copied, scanned, or duplicated, in whole or in part. WCN 02-200-203
7
342
Chapter 7 Using and Configuring Storage Devices
11. On your Windows server, you’re planning to install a new database application that uses
an enormous amount of disk space. You need this application to be highly available,
so you need a disk system with the capability to auto-correct from disk errors and data
corruption. You also want a flexible storage solution that makes it easy to add space and
supports deduplication. Which of the following is the best option?
a.
MBR disk with chkdsk
b. NTFS format with EFS
c.
ReFS format and Storage Spaces
d. GPT disk with shadow copies
12. Which of the following commands can verify a new partition you have configured in
Linux? (Choose all that apply.)
a.
chkdsk
b. vdisk
c.
fdisk
d. sfdisk
13. Which disk interface technology transfers data over a parallel bus?
a.
SATA
b. USB
c.
SAS
d. SCSI
14. What is created automatically when you install Windows Server 2012 R2 on a system
with a disk drive that has never had an OS installed on it before?
a.
system volume
b. dynamic disk
c.
GPT
d. extended partition
15. What type of volumes or partitions can be created on a basic disk? (Choose all that
apply.)
a.
spanned volume
b. striped partition
c.
extended partition
d. simple volume
16. Which of the following is true about GPT disks?
a.
They support a maximum volume size of 2 TB.
b. GPT is the default option when initializing a disk in Disk Management.
c.
They use CRC protection for the partition table.
d. You can’t convert a GPT disk to MBR.
Copyright 2017 Cengage Learning. All Rights Reserved. May not be copied, scanned, or duplicated, in whole or in part. WCN 02-200-203
Review Questions
343
17. You have a server with Windows Server 2012 R2 installed on Disk 0, a basic disk.
You use the server to store users’ documents. You have two more disks that you
can install in the server. What should you do if you want to provide fault tolerance
for users’ documents?
a.
Convert Disk 0 to dynamic. Create a striped volume using Disk 0, Disk 1, and
Disk 2.
b. Create a RAID 1 volume from Disk 1 and Disk 2.
c.
Convert the new disks to GPT. Create a spanned volume using Disk 1 and Disk 2.
d. Create a RAID 5 volume from Disk 0, Disk 1, and Disk 2.
18. You need a disk system that provides the best performance for a new application that
frequently reads and writes data to the disk. You aren’t concerned about disk fault
tolerance because the data will be backed up each day; performance is the main
concern. What type of volume arrangement should you use?
a.
spanned volume
b. RAID 1 volume
c.
RAID 0 volume
d. RAID 5 volume
19. You are ordering eight new desktop computers for your small business. Which of the
following hard drive technologies is likely to be used in the new computers?
a.
SATA
b. PATA
c.
SCSI
d. SAS
20. You come across a file with a .vhd extension on your Windows 10 computer’s hard
disk. What should you do to see this file’s contents?
a.
Right-click the file and click Open.
b. Open the file in Notepad.
c.
Burn the file to a DVD.
d. Mount the file.
Copyright 2017 Cengage Learning. All Rights Reserved. May not be copied, scanned, or duplicated, in whole or in part. WCN 02-200-203
7
344
Chapter 7 Using and Configuring Storage Devices
Hands-On Projects
Project 7-1: Use the Windows Disk Management Tool
In this project, you use the Windows Disk Management tool to view existing
volumes and create a new volume.
If your Windows 10 computer is configured according to instructions in
the “Before You Begin” section of the Introduction, you should have
three physical disks. Disk 0 has the Windows OS installed, and Disk 1
and Disk 2 are empty and offline. If you only have two disks in your
system, you can still perform this activity. If you only have one disk in
your system but have some unallocated space, you can perform this
activity with minor changes (see your instructor). If you have no additional disks and no unallocated space, you cannot perform this activity.
1. Start your Windows 10 computer and log on.
2. Right-click Start and click Disk Management.
3. If you see a message about initializing a disk, click OK. There are two panes in Disk
Management: The upper pane shows a summary of configured volumes and basic
information about each volume. The lower pane shows installed disks and how each
disk is being used.
4. Right-click the (C:) volume in the upper pane and note some of the options you have.
5. In the lower pane, find Disk 1. If its status is online and initialized, skip to the next
step; otherwise, right-click Disk 1 and click Online. Right-click it again and click
Initialize Disk to open the dialog box shown in Figure 7-11. Leave the default option
MBR selected, and click OK.
Copyright 2017 Cengage Learning. All Rights Reserved. May not be copied, scanned, or duplicated, in whole or in part. WCN 02-200-203
Hands-On Projects
345
7
Figure 7-11 Initializing a disk in Disk Management
6. Right-click the unallocated space of Disk 1, and notice the options for making the
unallocated space into a new volume. In Windows XP and Windows Server 2003, the
term partition was used instead of volume. In Windows Vista and Windows Server
2008 and newer versions, the term volume is often used instead when preparing disks
for use.
7. Click New Simple Volume to start the New Simple Volume Wizard. In the welcome
window, click Next.
8. In the Specify Volume Size window, type 500 to make a 500 MB volume, and then
click Next.
9. In the Assign Drive Letter or Path window, you have the option to assign a drive letter
or mount the new volume into a folder on another volume. From the drop-down menu
next to “Assign the following drive letter,” click drive letter S, and then click Next.
(If the S drive isn’t available, ask your instructor which drive letter to select.)
10. In the Format Partition window, click the File system list arrow, and note the available
options. Click NTFS to select it as the file system. In the Volume label text box, type
DataVol1, and then click Next.
Copyright 2017 Cengage Learning. All Rights Reserved. May not be copied, scanned, or duplicated, in whole or in part. WCN 02-200-203
346
Chapter 7 Using and Configuring Storage Devices
11. Review the settings summary, and then click Finish. Watch the space where the new
volume has been created. After a short pause, the volume should begin to format.
When formatting is finished, the volume status should be Healthy (Primary Partition).
12. Close all open windows. Stay logged on if you’re continuing to the next project; otherwise, log off or shut down your computer.
Project 7-2: Work with Volumes in Disk Management
In this project, you examine the options for working with basic and dynamic
disks.
The size of your disks may not match the size of the disks shown in the
figures in this activity.
1. Log on to your Windows 10 computer, if necessary.
2. Right-click Start and click Disk Management. Notice that Disk 0 has two volumes:
System Reserved and (C:). These volumes contain the system and boot partitions for
Windows, so be careful not to make any changes to Disk 0.
3. Disk 1 and Disk 2 are basic disks. Disk 1 contains the DataVol1 volume you created in
the previous project.
4. Right-click DataVol1 and notice the options for working with this volume (see
Figure 7-12). It’s a basic disk, so if you choose an option not supported by a basic
disk, you’re prompted to convert the disk to dynamic. If you were working with
a FAT/FAT32 volume, you would not have the option to extend, shrink, or add a
mirror.
Copyright 2017 Cengage Learning. All Rights Reserved. May not be copied, scanned, or duplicated, in whole or in part. WCN 02-200-203
Hands-On Projects
347
7
Figure 7-12 Options for NTFS volumes
5. Right-click DataVol1 again, if necessary, and click Extend Volume. In the Extend
Volume Wizard welcome window, click Next.
6. In the Select Disks window, you have the option of adding disks to which to extend. If
you do so, you’re prompted to convert the disk to dynamic because basic disks don’t
support extending to other disks (disk spanning). In the “Select the amount of space in
MB” text box, type 500, which makes the volume 1 GB. Click Next.
7. In the Completing the Extend Volume Wizard window, click Finish. The disk is
extended to about 1000 MB.
8. In Disk Management, right-click DataVol1 and then click Shrink Volume to open the
Shrink S: dialog box. In the “Enter the amount of space to shrink in MB” text box,
type 500 and click Shrink. The volume is back to 500 MB.
Copyright 2017 Cengage Learning. All Rights Reserved. May not be copied, scanned, or duplicated, in whole or in part. WCN 02-200-203
348
Chapter 7 Using and Configuring Storage Devices
9. Right-click DataVol1 again and click Add Mirror. In the Add Mirror dialog box, click
Disk 2, and then click Add Mirror. A Disk Management message states that the disks
will be converted to dynamic disks if you continue. Click No. Mirrored volumes aren’t
supported on basic disks.
10. Right-click Disk 1. Notice the options for working with the disk (see Figure 7-13). The
option for creating a RAID 5 volume is disabled because you need at least three disks
with available space for this configuration. The option to convert to GPT is disabled
because you need to delete existing volumes first in order to change the partitioning
method. Click Convert to Dynamic Disk.
Figure 7-13 Options for working with Disk 1
11. In the Convert to Dynamic Disk dialog box, you have the option to convert more than
one disk to dynamic. Leave the Disk 1 check box selected and click OK. Click Convert,
Copyright 2017 Cengage Learning. All Rights Reserved. May not be copied, scanned, or duplicated, in whole or in part. WCN 02-200-203
Hands-On Projects
349
and then click Yes. The color of the volume label changes from blue to yellow-green to
indicate it’s now a simple volume rather than a primary partition.
12. Right-click DataVol1 and click Add Mirror. Click Disk 2 and then Add Mirror. Click
Yes to confirm that Disk 2 will be converted to a dynamic disk.
13. The volume label changes color to red, indicating a mirrored volume (see Figure 7-14).
A status message shows that the volume is resyncing (copying information from the
primary disk to the mirrored disk). Disk 2 now has a volume named DataVol1 and
assigned the letter S. Close Disk Management.
7
Figure 7-14 A mirrored volume
14. If you’re continuing to the next activity, stay logged on; otherwise, log off or shut
down the server.
Disk 1 is an MBR disk and Disk 2 is a GPT disk. You can use disks of
different types in RAID configurations.
Copyright 2017 Cengage Learning. All Rights Reserved. May not be copied, scanned, or duplicated, in whole or in part. WCN 02-200-203
350
Chapter 7 Using and Configuring Storage Devices
Project 7-3: Work with Virtual Disks in Windows
In this project, you create and mount a virtual disk, and then view it in Disk
Management and File Explorer.
1. Log on to your Windows 10 computer, if necessary.
2. Open Disk Management. Click the Action menu, and then click Create VHD.
3. In the Create and Attach Virtual Hard Disk dialog box, click Browse.
4. Click DataVol1 (S:) and then type Virtual1 in the File name text box. Click Save.
5. In the “Virtual hard disk size” text box, type 200 to create a 200 MB virtual disk (see
Figure 7-15).
Figure 7-15 Configuring a virtual hard disk
Copyright 2017 Cengage Learning. All Rights Reserved. May not be copied, scanned, or duplicated, in whole or in part. WCN 02-200-203
Hands-On Projects
351
6. The virtual hard disk format is VHD by default. Because you’re creating a small
volume, you can accept this default setting. Click the Dynamically expanding option
button so that the disk’s file size is very small at first and then expands as you add
data, up to the 200 MB you specified. (Recall that this concept is called thin
provisioning.) Click OK.
7. When you create a VHD file in Disk Management, it’s mounted automatically. The
disk should be listed as Disk 3, and its status is Not Initialized (see Figure 7-16).
Right-click Disk 3 and notice the Detach VHD option in the menu. Click Initialize
Disk.
7
Figure 7-16 A virtual disk in Disk Management
8. In the Initialize Disk dialog box, click OK. Your new virtual disk is initialized and
ready to have a volume created on it.
9. Right-click the unallocated space of Disk 3 and click New Simple Volume. Follow the
New Simple Volume Wizard to select the following settings:
•
Volume size: Use the maximum size.
•
Drive letter: Assign drive letter V:.
•
Format: Use the default settings, but make the volume label Virtual1.
Copyright 2017 Cengage Learning. All Rights Reserved. May not be copied, scanned, or duplicated, in whole or in part. WCN 02-200-203
352
Chapter 7 Using and Configuring Storage Devices
10. When the volume has finished formatting, you can access it. The icon color of Disk 3
changes to light blue, indicating a virtual disk. Right-click the volume and click Explore.
11. File Explorer treats the virtual disk and volumes in it like any other disk and volume.
In File Explorer, click the S drive. You should see a file named Virtual1 with an adjacent icon indicating a virtual disk.
12. Right-click Virtual1 (V:) in the left pane of File Explorer and then click Eject. The disk
is no longer shown in File Explorer or Disk Management.
13. In File Explorer, click the S drive. Notice that the virtual disk’s file size is only about
10 MB. That size expands if you add data to the file. Right-click Virtual1 and click
Mount, or just double-click the file. The volume is mounted again. Dismount the
virtual disk again, and then close all open windows.
14. If you’re continuing to the next activity, stay logged on; otherwise, log off or shut
down the server.
Project 7-4: Use the fdisk and sfdisk Commands in Linux
In this project, you use the fdisk and sfdisk commands to view partition information in Fedora Linux from the command line. (The following steps are the
same in most Linux operating systems.) You need to use the root account or
an account with root privileges for this project (see Step 2).
1. Start your Linux computer and log on. Open a terminal window.
2. Type su root and press Enter to access the root account. Type the root account password, if requested, and press Enter.
3. Type sfdisk -s and press Enter to view partition information, as illustrated in
Figure 7-17.
Figure 7-17 The output from the sfdisk -s command
Source: Fedora Linux
4. Next, type fdisk -l and press Enter. Compare the information from the fdisk command
to the information displayed for the sfdisk command.
5. Close the terminal window.
Copyright 2017 Cengage Learning. All Rights Reserved. May not be copied, scanned, or duplicated, in whole or in part. WCN 02-200-203
Hands-On Projects
353
Project 7-5: Use the Disks Utility in Linux
In this project, you use the Disks utility in Linux to work with a newly
installed disk.
If your Linux computer is configured according to instructions in the
“Before You Begin” section of the Introduction, you should have two
physical disks installed. The first disk will have the Linux OS installed
and the second disk will be blank. If you don’t have more than one
disk installed, you can’t do this project.
1. Start your Linux computer, and log on.
2. Click Activities and click Show Applications.
3. Click Utilities and then click Disks to open the Disks utility (see Figure 7-18). Depending
on your system configuration, your Disks utility may look different. In Figure 7-18,
there are two hard disks; the Linux system in the figure is running on VMware, so
the disks are labeled as VMware disks.
Figure 7-18 Linux Disks utility
Source: Fedora Linux
4. Click the second disk in the left pane. In the right pane, you see that the volume is
listed as Unknown.
Copyright 2017 Cengage Learning. All Rights Reserved. May not be copied, scanned, or duplicated, in whole or in part. WCN 02-200-203
7
354
Chapter 7 Using and Configuring Storage Devices
5. Right-click the More actions button under the volume and click Format. In the Format
Volume dialog box, accept the default Erase and Type options, and type Vol1 in the
Name text box. Click Format.
6. The next dialog box asks if you are sure you want to format the volume. Click Format.
If you are prompted for your password, enter it and click Authenticate.
7. Click the Mount the filesystem arrow under the volume (see Figure 7-19). If you are
prompted for your password, enter it and click Authenticate. By default, the volume is
mounted in /run/media/user/Vol1,
user/Vol1, where user is the logon name of the current user.
user
Figure 7-19 Mounting the file system with the Linux Disks utility
Source: Fedora Linux
8. Click the link next to Mounted at; a Files window opens and shows the volume. The
new volume is ready to use. Right-click in the right pane of Files, and click New Folder
to see that you can use the new volume like any folder in Linux.
9. Open a terminal window, type mount, and press Enter. The last entry displayed should
be the disk you just formatted, with information about where it is mounted.
10. To unmount the disk, type umount /dev/sdb and press Enter. The disk is no longer
mounted.
11. Close all windows and log off or shut down your computer.
Copyright 2017 Cengage Learning. All Rights Reserved. May not be copied, scanned, or duplicated, in whole or in part. WCN 02-200-203
Hands-On Projects
355
Project 7-6: Use the Disk Utility in Mac OS X
Mac OS X provides the Disk Utility for working with storage. In this project,
you use the Disk Utility to view information about a disk and see how to partition a disk. You need Administrator privileges to perform this activity.
1. Start your Mac and log on. Make sure that Finder is open (if not, click Finder in the
Dock). Click the Go menu and click Utilities.
2. Double-click Disk Utility.
3. Click Macintosh HD in the left pane.
4. Click the Info icon in the menu bar to view information about the disk (see
Figure 7-20).
7
Figure 7-20 Information about Macintosh HD
Source: Mac OS X
5. Close the Information window.
6. In the left pane, click the disk drive above Macintosh HD. Click the Partition icon in
the menu bar. Read the information displayed about the partition. Notice that the partition scheme is GUID Partition Map, which is the same as GPT, and the format is OS
X Extended (Journaled), which is the same as HFS Plus. Click Cancel.
7. Close the Disk Utility window and any other open windows.
8. Shut down your computer.
Copyright 2017 Cengage Learning. All Rights Reserved. May not be copied, scanned, or duplicated, in whole or in part. WCN 02-200-203
356
Chapter 7 Using and Configuring Storage Devices
Critical Thinking
The following activities give you critical thinking challenges. Challenge Labs give you an
opportunity to use the skills you have learned to perform a task without step-by-step instructions. Case projects offer a practical problem for which you supply a written solution. Not all
chapters contain Challenge Labs. There is not always a specific right or wrong answer to these
critical thinking exercises. They are intended to encourage you to review the chapter material
and delve deeper into the topics you have learned.
Case Projects
Case Project 7-1: Deal with a Disk Crash
Last week, a disk on a Windows Server 2012 system that contained CSM
Tech Publishing’s current project manuscripts crashed. Fortunately, there was
a backup, but all files that had been added or changed that day were lost. No
RAID configurations were in use. A new disk had to be purchased for overnight delivery, and the data had to be restored. A couple days of work were
lost. The owner of CSM Tech wants to know what can be done to prevent
the loss of data and time if a disk crashes in the future. The server currently
has two disks installed: one for the Windows boot and system volumes and
one for manuscript files. The disk used for manuscript files is about one-third
full. There’s enough money in the budget to purchase up to two new drives if
needed. What solution do you recommend, and why?
Case Project 7-2: Create Flexible Storage
It’s been six months since the disk crash at CSM Tech Publishing, and the
owner is breathing a little easier because of the solution you implemented in
Case Project 7-1. Business is good, and the current solution is starting to run
low on disk space—less than 20 percent of free space remains. In addition,
the owner has some other needs that might require more disk space, and he
wants to keep the data on separate volumes (what he calls drives). He wants
a flexible solution in which drives and volumes aren’t restricted in their configuration. He also wants to be able to add storage space to existing volumes
easily without having to reconfigure existing drives. He has the budget to add
a disk storage system that can contain up to 10 HDDs. Which Windows feature can accommodate these needs, and how does it work?
Copyright 2017 Cengage Learning. All Rights Reserved. May not be copied, scanned, or duplicated, in whole or in part. WCN 02-200-203
chapter
8
Virtualization and Cloud
Computing Fundamentals
After reading this chapter and completing the
exercises, you will be able to:
●
●
●
●
Describe the components of virtualization
Use and describe hosted virtualization
Use and describe bare-metal virtualization
Describe cloud computing
Copyright 2017 Cengage Learning. All Rights Reserved. May not be copied, scanned, or duplicated, in whole or in part. WCN 02-200-203
357
358
Chapter 8 Virtualization and Cloud Computing Fundamentals
OS virtualization has become a mainstream technology in both small and large networks.
Large companies use it to consolidate server hardware and make efficient use of server processing power and network bandwidth. Individuals use virtualization to quickly try a new
operating system without having to install the OS to their hard disk. IT professionals use
virtualization to perform testing and what-if scenarios. Software developers can test their
applications on multiple OSs and multiple versions of an OS without having to configure
multiple physical computers. The ability to work at one physical Windows, Mac, or Linux
workstation while using one, two, three, or even a dozen other OSs running on virtual
machines opens up a world of possibilities. Users and IT professionals can become proficient
on multiple OSs while owning just a single physical computer and data center administrators benefit from the ease in which virtual servers can be deployed and managed compared
to their physical counterparts.
This chapter introduces you to virtualization, its terminology, and some of the popular virtualization products that can be used on the OSs this book has discussed.
Virtualization Fundamentals
Virtualization is a process that creates a software environment to emulate a computer’s
hardware and BIOS, allowing multiple OSs to run on the same physical computer at the
same time. This environment can be installed on most current OSs, including Windows,
Linux, and Mac OS. In this case, a picture is worth a thousand words, so examine
Figure 8-1. It shows a Windows 10 client running a Windows Server 2016 (technical preview)
virtual machine that uses VMware Workstation virtualization software. Notice the two Start
buttons: one on the host desktop and one on the virtual machine.
Copyright 2017 Cengage Learning. All Rights Reserved. May not be copied, scanned, or duplicated, in whole or in part. WCN 02-200-203
Virtualization Fundamentals
359
8
Figure 8-1 Windows Server 2016 running as a virtual machine in Windows 10
Like all technologies, virtualization comes with a collection of terms that define its operation
and components:
• A virtual machine (VM) is the virtual environment that emulates a physical computer’s
hardware and BIOS. A guest OS is the operating system installed on a VM.
• A host computer is the physical computer on which VM software is installed and
VMs run.
• Virtualization software is used for creating and managing VMs and creating the virtual
environment in which a guest OS is installed. Examples of this software are VMware
Workstation, Oracle VirtualBox, and Microsoft Hyper-V.
• The hypervisor is the part of virtualization software that creates and monitors the virtual
hardware environment, which allows multiple VMs to share physical hardware resources.
On a host computer, the hypervisor acts somewhat like an OS kernel, but instead of scheduling processes for access to the CPU and other devices, it schedules VMs. It’s sometimes
called the virtual machine monitor (VMM). There are two types of hypervisors:
A type 1 hypervisor implements OS virtualization by running directly on the
host computer’s hardware and controls and monitors guest OSs. It also controls
Copyright 2017 Cengage Learning. All Rights Reserved. May not be copied, scanned, or duplicated, in whole or in part. WCN 02-200-203
360
Chapter 8 Virtualization and Cloud Computing Fundamentals
access to the host’s hardware and provides device drivers for guest OSs. Also called
bare-metal virtualization, it’s used mainly for server virtualization in data centers.
Examples include VMware ESX Server, Citrix XenServer, and Microsoft
Hyper-V Server.
A type 2 hypervisor implements OS virtualization by being installed in a generalpurpose host OS, such as Windows 10 or Linux, and the host OS accesses host
hardware on behalf of the guest OS. Also called hosted virtualization, it’s used
mostly for desktop virtualization solutions. Examples include VMware Player and
Workstation, Oracle VirtualBox, and OpenVZ for Linux.
• A virtual disk consists of files on the host computer that represent a virtual machine’s
hard drive.
• A virtual network is a network configuration created by virtualization software and
used by virtual machines for network communication.
• A snapshot is a partial copy of a VM made at a particular moment; it contains changes
made since the VM was created or since the last snapshot was made. It is used to
restore the VM to its state when the snapshot was taken.
Figure 8-2 illustrates the virtualization process. The hypervisor on the host is running two
VMs connected to a virtual network, which in turn has a connection to the physical network
so that the VMs can communicate on it.
Host/physical
computer
Hypervisor
VM1
VM2
Virtual network
Host
physical NIC
Physical network
switch
Figure 8-2 How virtualization works
Copyright 2017 Cengage Learning. All Rights Reserved. May not be copied, scanned, or duplicated, in whole or in part. WCN 02-200-203
Hosted Virtualization
361
One of the best ways to understand a technology is to understand why it’s used. The reasons
to use virtualization are many and varied. They are best discussed by splitting the topic into
the two main types of virtualization: hosted and bare-metal.
Hosted Virtualization
As mentioned, hosted virtualization uses a type 2 hypervisor, which is installed on a standard
desktop or server OS. It has the advantage of supporting a wider variety of guest OSs than
bare-metal virtualization, mostly because the guest OS uses the host OS to access host
hardware, so there are few incompatibility problems between the guest OS and hardware. For
example, you can run a distribution of Linux in a virtual machine on a host computer, even if
you can’t install Linux directly on the physical machine because of driver incompatibilities.
Another advantage of hosted virtualization is that it’s easy and straightforward to use. With
hosted virtualization, you install the virtualization software on your computer and begin creating virtual machines. There are few hardware requirements, and most products run on
Windows versions starting with Windows XP as well as Mac OS X and most Linux distributions. All you need are enough memory to support the host and guest OSs, adequate CPU
power, and enough free disk space to store the virtual disk. A system running Windows 10
with 4 GB of RAM, a 2.0 GHz CPU, and a hard drive with 40 GB of free space can run
Linux and Windows Server 2016 virtual machines at the same time. Performance might not
be stellar, but the virtual machines should work well enough for experimenting or training,
which are among the main reasons for using hosted virtualization.
Hosted Virtualization Applications
Hosted virtualization is flexible and easy to use, so its applications continue to grow as
people find different uses for it. Some common applications include the following:
•
OS training
training—In the classroom and at home, learning multiple OSs has often been a
problem of not having enough computers or a lack of compatibility between the OS
and available computers. With virtualization, a computer can have a host OS installed,
such as Windows 10, and have virtual machines for numerous Linux distributions,
Windows 7, Windows Server 2016, and even Novell NetWare. If you want to learn
about past OSs, you can install Windows 3.11, DOS, or OS/2, assuming you can find
installation media for them. In addition, you can run multiple VMs at the same time by
using a virtual network, which enables you to work with both client and server OSs in
situations that would normally take two or more physical computers.
•
Software training
training—Students and employees can be trained on new software packages
by giving them VMs with preinstalled software.
•
Application isolation—Not all software plays well together, so if an application
conflicts with other installed software, it can be installed in its own VM, effectively
isolating it from the host machine’s installed software.
•
Network isolation—Installing certain networking services, such as DHCP, can wreak
havoc with an existing network. Virtual networks can be isolated from the rest of the
network, however, so you can experiment with these services without causing conflicts.
Copyright 2017 Cengage Learning. All Rights Reserved. May not be copied, scanned, or duplicated, in whole or in part. WCN 02-200-203
8
362
Chapter 8 Virtualization and Cloud Computing Fundamentals
•
Software development
development—Software developers often need to design software that works
on multiple OSs and OS versions. Testing on VMs makes this process easier than using
a physical computer for each OS to be tested.
•
What-if scenarios—If you want to try out a software package or see whether a configuration option you read about will actually improve performance, you might not want
to risk destabilizing your computer. You can install software and make configuration
changes safely on a VM before making the commitment on your production computer.
•
Use of legacy applications—If you have a favorite application that won’t run on a
newer OS, you don’t have to forego the latest software technology because of one
application. You can install the old OS in a VM and run your legacy application on it.
•
Physical-to-virtual conversion—Your six-year-old machine is getting slow and unreliable, so you bought a new desktop computer. However, you have several applications
on your old computer and no longer have the installation media. You can convert your
old computer to a virtual machine, and then keep all the software and run it on your
new desktop computer as a VM. You’ll probably even see a speed boost.
As you can see, virtualization can bring plenty of benefits to your computing experience. You
have many choices of products, and the good news is that many are free. The following
section describes some products for hosted virtualization.
Hosted Virtualization Products
Several hosted virtualization products are available. The following are the most well known:
•
VMware Workstation Pro—VMware, the virtualization pioneer in the PC world,
released VMware Workstation in 1999. Of the hosted virtualization products, it offers
the most features, including multiple snapshots, extensive guest OS support, and nested
virtualization (the capability to run a virtual machine inside another virtual machine).
•
VMware Workstation Player
Player—This version of VMware Workstation has a streamlined
user interface and fewer advanced features than Workstation Pro, but it maintains
excellent guest OS support. The current version (Workstation 12 Player) is free for
personal, noncommercial use, but it costs about $150 for business or commercial use
as of this writing.
•
Microsoft Virtual PC
PC—This free download from Microsoft enables you to create and
run virtual machines. XP mode is a feature available only in Windows 7 Professional or
Ultimate that integrates Windows XP virtual machine applications with the Windows 7
desktop. Virtual PC is no longer available in Windows 8 and later versions.
•
VirtualBox—Originally developed by Innotek, VirtualBox is now developed by Oracle
Corporation. Two versions are available: a proprietary version that’s free for home
users and can be purchased for enterprise use, and a free open-source version with a
reduced feature set. VirtualBox runs on Linux, Mac OS X, or Windows hosts. The
proprietary version has features similar to VMware Workstation.
For more information on virtualization products, the platforms they
run on, and supported guest OSs, review the article at http://en.wiki
pedia.org/wiki/Comparison_of_platform_virtual_machines.
Copyright 2017 Cengage Learning. All Rights Reserved. May not be copied, scanned, or duplicated, in whole or in part. WCN 02-200-203
Hosted Virtualization
363
The preceding products have their strengths and weaknesses; the best approach is to work
with different products to see which best serves your needs. The following sections discuss
the use of these products.
Using VMware Workstation
VMware Workstation isn’t free, but you can download a free trial version and try it for
30 days. Nonprofit educational institutions can join the VMware Academic program to give
students and faculty free downloads of VMware Workstation and other VMware products.
After VMware Workstation is installed, a wizard takes you through the steps of creating a
virtual machine. You can choose the size of the virtual disk and set other hardware options
or just accept the default settings.
One convenience of installing a guest OS in a VM is being able to boot
to the installation program with an ISO file rather than a DVD disk. This
way, if you download the ISO file, burning a DVD to install the OS is
unnecessary. In addition, the ISO file can be stored on a server and
used by multiple users for VM installations.
An advanced feature of VMware Workstation is its flexible networking options. You can
configure the network interface card (NIC) on your VM to use one of the five virtual
network options or you can create your own custom virtual network. VMware Workstation
supports VMs with multiple NICs, and each NIC can be connected to a different virtual
network. The five options are as follows (see Figure 8-3):
Figure 8-3 VMware virtual network options
Source: VMware, Inc., www.vmware.com
Copyright 2017 Cengage Learning. All Rights Reserved. May not be copied, scanned, or duplicated, in whole or in part. WCN 02-200-203
8
364
Chapter 8 Virtualization and Cloud Computing Fundamentals
•
Bridged This option connects the VM’s virtual network to the physical network, and
Bridged—
the VM acts like any other computer on the physical network, including having an IP
address on the physical network. This option was illustrated in Figure 8-2, which
showed that the virtual network has a (virtual) connection to the host’s physical NIC.
•
NAT Using this default option, the host computer’s IP address is shared with the VM
NAT—
by using Network Address Translation (NAT). The main difference between the NAT
and Bridged options is that VMs are assigned an IP address from the host computer
rather than the physical network, and the host translates the address for incoming and
outgoing packets. This option is more secure than the Bridged option because the VM
isn’t directly accessible on the network. However, it’s not a viable option for a VM
that provides server functions to the host network.
•
Host-only—This option isolates the VM from the host network and only allows
network communication between VMs running on the host and the host computer. It’s
the most secure configuration and has the lowest risk that the VM will cause problems
with the host network. This configuration works well when you have multiple VMs
that must communicate with one another but you don’t need to access computers or
devices outside the host.
•
Custom—You can use this option to connect the VM to a virtual network created with
the virtual network editor, a tool accessible from the Edit menu in VMware Workstation.
With a custom network, you assign a subnet to the network, and you have the option of
using DHCP to assign IP addresses to connected VMs. With the virtual network editor,
you can make the custom virtual network bridged, NAT, or host-only.
•
LAN segment
segment—LAN segments are private networks that can be shared with other
VMs running on the same host. LAN segments are isolated from the host machine and
the host network. This setting is useful when the VM must be completely isolated.
Other virtualization software vendors use different terms to describe
virtual networks, but the concepts are the same.
After the virtual machine is installed, you use it as you would any computer, except there are
no physical on/off buttons.
VMware Tools, which is a collection of tools and drivers, should be installed in the guest OS
to ensure the best performance and ease of use. It adds optimized network, video, and disk
drivers and guest-host integration tools that allow dragging and dropping files and cut-andpaste operations between the guest OS and host OS.
Other advanced features are available for developers, which is why VMware Workstation is
generally considered the flagship hosted virtualization product. However, if you don’t need
all the bells and whistles, try VMware Workstation Player.
Using VMware Workstation Player
VMware Workstation Player is a stripped-down version of VMware Workstation Pro that
still offers the basics of desktop virtualization in a streamlined and easy-to-use interface.
Copyright 2017 Cengage Learning. All Rights Reserved. May not be copied, scanned, or duplicated, in whole or in part. WCN 02-200-203
Hosted Virtualization
365
You can download a free trial from the VMware Web site, and it’s also included with the
VMware Workstation package. The opening window of VMware Workstation Player gives
you an idea of its clean interface (see Figure 8-4).
8
Figure 8-4 The VMware Workstation Player Welcome window
Source: VMware, Inc., www.vmware.com
VMware Workstation 12 Player is now a paid product for business and
commercial use. As of this writing, you may still be able to download
and install version 7 of the VMware Player, which was the last version
that VMware offered as a totally free product. You can download
most of VMware’s products for a 30-day trial.
To create a VM in VMware Workstation Player, you use a wizard that is nearly identical to
the one in VMware Workstation. Notice in Figure 8-4 that you have the option to download
a virtual appliance. Virtual appliances are ready-to-use VMs from OS and software vendors
that contain a guest OS with preconfigured applications or network services. In some cases, a
virtual appliance is just a preinstalled guest OS. A virtual appliance is an easy way to use and
evaluate a product or configuration without having to install it yourself. Virtual appliances
can be run by VMware Workstation Player or VMware Workstation Pro and sometimes by
VMware’s bare-metal virtualization products.
VMware Player offers many of the same features as VMware Workstation, with the exception of snapshots, customized virtual networks (although the three preconfigured network
options are available), and some advanced network and virtual hardware settings. It’s a
good choice for new virtualization users and for classroom and training centers where the
interface’s simplicity is an advantage.
Copyright 2017 Cengage Learning. All Rights Reserved. May not be copied, scanned, or duplicated, in whole or in part. WCN 02-200-203
366
Chapter 8 Virtualization and Cloud Computing Fundamentals
Using Microsoft Virtual PC
The VMware products just discussed can be installed on both Windows and Linux OSs;
another desktop product called VMware Fusion runs in Mac OS X. However, Virtual PC is
a Windows-only product that runs in the Windows 7 Professional, Enterprise, or Ultimate
edition. Because this product is no longer supported in Windows 8 and later versions, it’s
not discussed in detail. Instead, Microsoft has made its Hyper-V product a configurable
option in Windows 8 and later versions. Hyper-V was introduced in Windows Server 2008
and was originally supported only in Windows Server OSs. Hyper-V is discussed in more
detail in the “Bare-Metal Virtualization” section later in this chapter.
Using VirtualBox
VirtualBox can be installed on Windows, Mac OS X, Linux, and Solaris hosts and supports
a wide range of Windows, Linux, and other guest OSs, making it the most versatile of the
products discussed in this chapter. As with the other products, virtual machines in VirtualBox
are created using a wizard that walks you through the process of selecting the guest OS and
the VM’s hard disk and RAM configuration; however, you can change all these settings after
the VM is created. The VirtualBox user interface consists of a console where you can create
VMs and view the status of all VMs. VirtualBox supports unlimited snapshots, so you can
save a VM’s state as you work with it and restore its state from any of the snapshots you
make. You can even jump forward and backward in snapshots, meaning that if you have
three snapshots, you could revert to the first one and later go back to the third. Figure 8-5
shows the Oracle VM VirtualBox Manager with a virtual machine that is about to install
Windows Server 2016.
Copyright 2017 Cengage Learning. All Rights Reserved. May not be copied, scanned, or duplicated, in whole or in part. WCN 02-200-203
Hosted Virtualization
367
8
Figure 8-5 Oracle VM VirtualBox Manager
Virtualization Software Summary
All the virtualization products discussed so far provide a type 2 hypervisor for hosted virtualization. Table 8-1 summarizes some major features and differences in these products. A benefit
is that you can install all of these products and run them at the same time on a single host
computer, so you can download and install each one and evaluate it for yourself.
Copyright 2017 Cengage Learning. All Rights Reserved. May not be copied, scanned, or duplicated, in whole or in part. WCN 02-200-203
368
Chapter 8 Virtualization and Cloud Computing Fundamentals
Table 8-1
Comparing features of hosted virtualization software
VMware
Workstation Pro
VMware
Workstation Player
Microsoft Virtual
PC
Oracle VirtualBox
Price
$249 or free with
Academic Program
membership
Free for versions 7
and earlier or for
noncommercial use,
$149 otherwise
Free
Free
Host OS support
Windows, Linux, Mac
OS X (with VMware
Fusion)
Windows, Linux
Windows
Windows, Linux, Mac
OS X, Solaris
Guest OS support
Windows, several
Linux distributions,
NetWare, Solaris,
DOS
Same as Workstation
Pro
Windows XP and
later
Windows, several
Linux distributions,
Solaris, Mac OS X
Server, DOS, OS/2,
others
Snapshots
Unlimited
None
One (with Disk Undo
enabled)
Unlimited
Virtual network
options
Bridged, NAT, hostonly, custom, LAN
segments
Bridged, NAT, hostonly, custom, LAN
segments
Bridged, NAT,
internal (guest-toguest only)
Bridged, NAT, hostonly, internal
Host integration
tools
VMware Tools, Unity
VMware Tools, Unity
Integration Services,
XP mode
Guest additions,
seamless mode
Other features
Screen capture,
developer tools
Command-line
management
interface, built-in
remote desktop,
developer
programming
interface, opensource edition
Bare-Metal Virtualization
Bare-metal virtualization products (type 1 hypervisors) are targeted mainly for production
virtualization in data centers. These products are installed directly on hardware and have
more stringent host machine requirements than hosted products. Because they’re targeted for
IT departments, they have more features for managing VMs and have a performance advantage over hosted virtualization products. Their installation and use tend to require more
sophisticated, knowledgeable users. Before learning about specific products, take a look at
some applications for bare-metal virtualization products.
Bare-Metal Virtualization Applications
Bare-metal virtualization products come with a price tag for the virtualization software, the
hardware to run it, or both. When considering whether to use virtualization in an IT data
Copyright 2017 Cengage Learning. All Rights Reserved. May not be copied, scanned, or duplicated, in whole or in part. WCN 02-200-203
Bare-Metal Virtualization
369
center, most IT managers look for a return on their investment in real money or in productivity
gains. The following applications show that bare-metal virtualization can deliver both:
• Consolidate servers—Server consolidation is probably the original reason for using
bare-metal virtualization. It has the following benefits:
Retire old or unreliable hardware: Converting physical machines to VMs and running them on the latest hardware means you can get rid of old hardware, thereby
gaining a reliability advantage and avoiding the tedious task of reinstalling and
reconfiguring a server OS on new hardware. You might also improve performance.
Make optimal use of multicore, high-performance servers: Some server roles, such
as Active Directory, should be the only major network service running on a server.
With multicore server CPUs, you’re likely to waste a lot of the server’s power if
you install a single-role OS. Instead, run two, three, or more VMs on the server,
making optimal use of the available performance.
Maintain application separation: Some applications and services run best when
they’re the only major application installed on an OS. You avoid OS resource
conflicts and gain stability and reliability.
Reclaim rack or floor space: By consolidating a dozen physical servers into three
or four host servers, you’re no longer tripping over a plethora of towers or
wondering whether your rack can handle one more server. You can even clear
enough room for an easy chair and a reading lamp so that you can catch up on
the latest technical journals in comfort!
Reduce cooling and power requirements: By reducing the number of servers (even
with higher-performance machines), you usually save money on the costs of cooling
and powering a data center, especially when you reduce hundreds of servers down
to dozens of virtualization servers.
• Test installations and upgrades—Before you install a major software package or
upgrade on your server, create a copy of the VM (referred to as cloning in some
products), and go through a test run to iron out any potential problems or conflicts.
If something goes wrong on the production VM, you can revert to a snapshot.
• Test a preconfigured application—Are you unsure whether the application the vendor
wants to sell you is right for your company? Some vendors offer virtual appliances you
can use to evaluate the application without having to install it.
• Test what-if scenarios—You can create a virtual network and run clones of your production VMs to test ideas for improving your network’s performance, functionality,
and reliability. This type of testing on live production systems is never a good idea, but
it’s ideal on virtual machines.
• Live migration—Virtual machines can be migrated to new hardware while they’re
running for performance or reliability improvements with practically no downtime.
Live migration features also ensure VM fault tolerance in clustered server environments.
• Dynamic provisioning
provisioning—Advanced VM management systems can deploy VMs and storage dynamically to meet application requirements. This advanced feature has uses in
clustered computing and cloud computing.
Copyright 2017 Cengage Learning. All Rights Reserved. May not be copied, scanned, or duplicated, in whole or in part. WCN 02-200-203
8
370
Chapter 8 Virtualization and Cloud Computing Fundamentals
VMs that run distributed server applications, such as Active Directory,
in which multiple servers synchronize a common database with one
another, shouldn’t be backed up or moved by copying the virtual
hard disk because it might result in database inconsistencies. Use
only backup and migration tools approved for the virtualization
software.
Bare-Metal Virtualization Products
VMware dominated the type 1 hypervisor category for years, but now you have a choice of
products. The following are the most common bare-metal virtualization products:
•
Microsoft Hyper-V
Hyper-V—Hyper-V was introduced with Windows Server 2008 and can be
installed as a server role, in which case the hypervisor is installed as a layer of software
between Windows Server and the server hardware. Windows Server acts as a parent or
management OS for VMs installed with Hyper-V. Hyper-V is included with Windows
Server at no additional cost, or you can download the stand-alone Hyper-V Server free
from the Microsoft Web site. (You can install Hyper-V Server directly on the server,
with only a command-line interface available for rudimentary management tasks; it’s
managed remotely by another Windows Server computer.) Hyper-V supports advanced
features, such as host server clustering and live migration, and requires a 64-bit CPU
with virtualization extensions enabled on the host system. Virtualization extensions
offload some virtualization work to the CPU and are present on most current CPUs.
A big advantage of using Hyper-V is that Microsoft provides virtual instances of the
OS with no additional licensing fees. For example, Windows Server 2012 Standard
Edition allows you to run two virtual instances (or two VMs) of the OS at no additional cost. Datacenter Edition allows an unlimited number of virtual instances.
Hyper-V has guest OS support for Windows Server OSs (Windows 2000 Server
and later), SUSE and Red Hat Enterprise Linux distributions, Windows client OSs
(Windows XP and later), and more.
Microsoft has made Hyper-V available with Windows client OSs, too. You can enable
Hyper-V in Windows 8 and later versions by opening Programs and Features in
Control Panel and clicking “Turn Windows features on or off.” After Hyper-V is
installed, you need to restart your computer and open Hyper-V Manager (see
Figure 8-6) from Administrative Tools in Control Panel.
Copyright 2017 Cengage Learning. All Rights Reserved. May not be copied, scanned, or duplicated, in whole or in part. WCN 02-200-203
Bare-Metal Virtualization
371
8
Figure 8-6 The Hyper-V Manager console
•
Citrix XenServer
XenServer—This open-source hypervisor uses Linux as a management OS on the
host. It’s available free or as a commercial edition that adds enterprise-level features,
such as fault tolerance, performance management, and host power management.
A number of modified Linux versions and Solaris can run as the management OS, and
like Hyper-V, a XenServer host computer requires a 64-bit CPU with virtualization
extensions to run Windows guest OSs. Guest OS support includes most Windows OSs,
starting with Windows XP, and SUSE, Red Hat, and CentOS Linux distributions.
To manage your host and VMs, you download and install XenCenter on a Windows
computer or use a command-line interface on the host computer. XenCenter provides
virtual machine management, monitoring, and administration from any Windows OS.
•
VMware vSphere—vSphere includes VMware ESX Server, which is installed directly on
the physical server without a management OS. After ESX Server is installed, a basic
command-line console based on Linux is available for simple configuration tasks, such
as IP address configuration. Most configuration tasks are performed from a remote
client OS using vSphere Client, which is downloaded and installed on a Windows or
Linux OS. You can also create, manage, and access VMs via a Web browser. ESX
Server has the broadest guest OS support of the type 1 hypervisors, including Windows
versions back to Windows 3.1, more than a dozen Linux distributions, Novell
NetWare, and Solaris.
All these products have extensive management tools for managing up to hundreds of hosts
and a wide array of storage resources. These tools are available for a fee from virtualization
software vendors. For example, Microsoft offers System Center Virtual Machine Manager
(SCVMM) for managing Hyper-V and ESX Server hosts. XenServer offers versions with
Copyright 2017 Cengage Learning. All Rights Reserved. May not be copied, scanned, or duplicated, in whole or in part. WCN 02-200-203
372
Chapter 8 Virtualization and Cloud Computing Fundamentals
different levels of management, depending on which product you purchase, and VMware
sells vCloud Suite to manage an infrastructure as a service (IaaS) cloud computing environment. All these products are designed to provide a secure, reliable, and highly available
virtualization infrastructure.
The basic tasks of creating and accessing VMs on bare-metal virtualization software are similar to using desktop products: A wizard walks you through the procedures. The real differences lie in host and resource management and the capability to give IT managers the tools
needed to virtualize a data center, not just one or two servers. This section serves as an introduction to available products so that you have a starting point for doing your own research
in the expanding field of virtualization.
From the Trenches …
The author of this book runs an academic department that teaches computer networking
technology. To facilitate online and hybrid classes, department staff use Windows Server
2012 R2 with Hyper-V and an add-on product called Virtual Machine Manager from
Microsoft to provide students with remote access via a Web browser to virtual machines
they use for lab exercises. A single physical server supports over 100 virtual machines running various OSs, including Windows 7, Windows Server 2008, Windows 10, Linux, and
Windows Server 2012/R2. The server has two quad-core Xeon CPUs, 64 GB of RAM, two
terabytes of disk space, and four 1000BaseT Ethernet ports. To access a virtual machine,
students point their Web browser to the server’s address and log on. Their logon ID is
paired with one or more VMs to which they are assigned. The students can start, log
on, and use their VM to complete lab activities. The server can efficiently run about
30 VMs simultaneously, and if students forget to shut down their VM, a PowerShell
script runs every 10 minutes automatically and shuts down any VMs that have been running longer than four hours. This is an example of virtualization and private cloud
computing.
Cloud Computing
Many people rely on the Internet’s services for communication, research, and entertainment.
This trend has continued to the point that many functions once handled in a company’s IT
center are now handled by servers on the Internet
Internet—what’s referred to as cloud computing.
Cloud computing is a networking model in which data, applications, and processing power
are managed by servers on the Internet; users of these resources pay for what they use rather
than for the equipment and software needed to provide resources. It’s like paying only for cell
phone minutes you use instead of paying for the towers and switching equipment needed to
make your phone work.
The word cloud is used to obscure the details of equipment and software that actually provide
resources. For the most part, customers don’t care whether equipment consists of Windows or
Linux servers, large tower computers, or rack-mounted computers, as long as it works.
Copyright 2017 Cengage Learning. All Rights Reserved. May not be copied, scanned, or duplicated, in whole or in part. WCN 02-200-203
Cloud Computing
373
For many companies, cloud computing’s allure is based on the following benefits:
•
Reduced physical plant costs—Having fewer servers means less space is needed to
house them, and less electricity and cooling are required to keep servers running.
•
Reduced upfront costs—Paying only for services and software that are used means a
company can avoid the startup costs of purchasing a lot of expensive hardware and
software.
•
Reduced personnel costs—Having fewer servers and applications to support means
fewer IT employees are needed to support hardware and applications.
Although cloud computing has seemingly limitless applications, three main categories of cloud
computing have taken center stage:
•
Software as a service
•
Platform as a service
•
Infrastructure as a service
The phrase as a service simply means that the resource resides on another server or network
than the one using the resource, and customers use it as a paid service. You might also hear
the term SPI model, which is based on the combination of the three aforementioned “as a
service” terms (Software, Platform, Infrastructure).
Software as a Service
Software as a service (SaaS) is also called hosted applications or on-demand applications
because the customer doesn’t actually buy any software that’s installed on its own equipment. Instead, the customer pays for the use of applications that run on a service provider’s
network. The most well-known examples are Google Apps and Microsoft Office 365, which
a business or a home user can use to run hosted applications, such as e-mail, calendar, wordprocessing, and spreadsheet programs. More complex applications involve large database
systems, such as payroll services from ADP and customer relationship management software
offered by companies such as Salesforce.com.
SaaS is usually offered as a subscription based on the number of people using the application.
It takes the burden of installation and maintenance off the customer so that companies can
focus on maintaining their LANs and Internet access instead of maintaining hundreds of
copies of an installed application. In addition, customers can take advantage of new software
editions much faster than with the standard deployment times of traditional application
upgrades. Some application upgrades require client computer or OS upgrades, but with
SaaS, the vendor handles infrastructure upgrades when needed.
In addition, SaaS is available anywhere the customer has a connection to the Internet. Mobile
users and telecommuters have access to the same applications they use in the office without
having to install the software on their laptops or home computers. Some applications can’t
even be installed on home computers, but with SaaS, the software runs on remote servers,
so local installations aren’t necessary.
Copyright 2017 Cengage Learning. All Rights Reserved. May not be copied, scanned, or duplicated, in whole or in part. WCN 02-200-203
8
374
Chapter 8 Virtualization and Cloud Computing Fundamentals
Platform as a Service
Platform as a service (PaaS)—also called hosted platform—is similar to SaaS, but the
customer develops applications with the service provider’s tools and infrastructure. After
applications are developed, they can be delivered to the customer’s users from the provider’s
servers. This setup differs from SaaS, in which the service provider owns the applications
delivered to users; with PaaS, the customer develops and owns the application and then
delivers it to a third party.
Developers who use PaaS can take advantage of many of the same benefits enjoyed by SaaS
users. In addition, after an application is developed with PaaS, the developer can usually
deploy the application immediately to customers who access it as a hosted application. The
same operating environment used to develop the application is used to run it, which bypasses
the sometimes complex and problem-prone process of migrating from a traditional development environment to a production environment.
The most common PaaS products are Salesforce.com’s Apex, Azure for Windows, Google’s
App Engine for Python and Java, WaveMaker for Ajax, and Engine Yard for Ruby on Rails.
Others are available, but details on these development platforms are beyond the scope of this
book. PaaS is still an evolving model for application development, and platforms will come
and go as developers weed out what works and what doesn’t. Developing in the cloud is likely
here to stay because it offers benefits that aren’t usually available in a locally managed environment. In addition, because small businesses and individual developers have access to expensive,
full-featured development environments, entrepreneurs can be on an equal footing with the big
boys, which increases competition and innovation—and that’s always a good thing.
Infrastructure as a Service
Infrastructure as a service (IaaS), or hosted infrastructure, allows companies to use a vendor’s
storage or even entire virtual servers as needed. Traditionally, if a company needs another
100 GB of storage to house a new database, it has to buy a new hard drive—assuming the
server can accommodate a new hard drive. By using IaaS, the company simply pays for
another 100 GB of space without worrying about how that space is actually provided. In
addition, if a customer needs another server to handle its application workload, it simply
pays for the amount of processing and storage the additional server actually requires instead
of paying for the physical device. In most cases, IaaS servers run as virtual machines on more
powerful physical servers.
IaaS differs from other hosted services because customers mostly rent the resources they’re
using but are still responsible for application installations and upgrades. Although IT staff
can be reduced because the IaaS vendor handles physical device upkeep, customers still need
IT staff to configure and manage applications and server OSs.
IaaS isn’t just for server infrastructure. Companies can “upgrade” to the latest OSs and desktop applications by using virtualized desktops through their IaaS providers. By accessing
desktops remotely, IaaS customers can use thin clients (client computers with minimal
hardware resources) or computers with older OSs to make use of the latest desktop OSs and
applications. This IaaS feature, virtual desktop infrastructure (VDI), is becoming a popular
way for companies to deliver desktop OSs and applications rather than use traditional
methods of installing OSs and applications locally.
Copyright 2017 Cengage Learning. All Rights Reserved. May not be copied, scanned, or duplicated, in whole or in part. WCN 02-200-203
Chapter Summary
375
Examples of IaaS include Amazon Web Services (AWS), Rackspace Cloud, and Microsoft
Azure, but many more companies and products are getting into this burgeoning market.
You may hear the term anything as a service, which is abbreviated as
XaaS. There are also variations on the preceding services, such as storage
as a service (SaaS), database as a service (DaaS), and network as a service
(NaaS). Other “as a service” functions will undoubtedly be created.
Cloud computing relies heavily on virtualization, which allows a cloud service provider to
offer a flexible computing environment to its customers and get the most out of its physical
computing devices. With virtualization, a provider can quickly deploy additional computing
power for a customer simply by clicking a configuration check box to add more virtual
CPUs. Entire virtual servers can be deployed within seconds; using virtual disks, customers
can get access to more storage quickly and easily.
Cloud computing isn’t for every company or situation, but it offers a flexible array of services
that can complement an IT department’s existing resources and sometimes replace them. The
trend toward cloud computing is growing with no abatement in site.
Private Cloud Versus Public Cloud
The preceding cloud technologies have been discussed in the context of a third party providing
services to customers via the Internet
Internet—a public cloud solution. In a public cloud, computing
resources and their management are the responsibility of the cloud service provider. This
arrangement allows a company to focus on its primary business rather than a large IT infrastructure. However, because the cloud resources are in someone else’s hands, you must
depend on the provider to ensure the reliability and security of the provided service and your
data. In addition, you are depending on Internet providers to connect your location with the
cloud service provider. If the Internet goes down anywhere in that path, you will be unable
to access the cloud service.
Many companies deliver cloud services to their own employees through the use of virtualization
technologies, such as VMware and Microsoft Hyper-V
Hyper-V—a private cloud. VDI, cloud storage,
and SaaS are commonly accessed as private cloud services deployed from the company’s own
data center instead of using a public cloud service. This setup gives a company more control
and more security, yet provides its employees many of the benefits of cloud computing. The
drawback is the up-front and ongoing costs of maintaining a large IT infrastructure.
Chapter Summary
■
Virtualization is a process that creates a software environment to emulate a
computer’s hardware and BIOS, allowing multiple OSs to run on the same physical
computer at the same time.
■
Virtualization can be divided into two categories: hosted virtualization and bare-metal
virtualization. Hosted virtualization uses a type 2 hypervisor and bare-metal virtualization uses a type 1 hypervisor.
Copyright 2017 Cengage Learning. All Rights Reserved. May not be copied, scanned, or duplicated, in whole or in part. WCN 02-200-203
8
376
Chapter 8 Virtualization and Cloud Computing Fundamentals
■
Hosted virtualization products are installed on a desktop OS and include VMware
Workstation, Virtual PC, and VirtualBox.
■
Bare-metal virtualization products are targeted mainly for production virtualization
in data centers. These products are installed directly on hardware and have more
stringent host machine requirements than hosted products. Bare-metal virtualization
software is used in data centers, is installed on servers, and includes products such
as Microsoft Hyper-V, VMware vSphere, and Citrix XenServer.
■
Cloud computing is a networking model in which data, applications, and processing
power are managed by servers on the Internet. Users of these resources pay for
what they use rather than for the equipment and software needed to provide
resources. Cloud computing models include SaaS, PaaS, and IaaS.
Key Terms
bare-metal virtualization A system in which the hypervisor implements OS virtualization
by running directly on the host computer’s hardware and controls and monitors guest OSs.
See also virtualization.
cloud computing A networking model in which data, applications, and processing power
are managed by servers on the Internet; users of these resources pay for what they use rather
than for the equipment and software needed to provide resources.
guest OS The operating system installed on a virtual machine.
host computer The physical computer on which virtual machine software is installed and
virtual machines run.
hosted virtualization A system in which the hypervisor implements OS virtualization by
being installed in a general-purpose host OS, such as Windows 10 or Linux, and the host
OS accesses host hardware on behalf of the guest OS. See also virtualization.
hypervisor The component of virtualization software that creates and monitors the virtual
hardware environment, which allows multiple VMs to share physical hardware resources.
infrastructure as a service (IaaS) A category of cloud computing in which a company can
use a provider’s storage or virtual servers as its needs demand; IaaS is also called hosted
infrastructure.
platform as a service (PaaS) A category of cloud computing in which a customer develops
applications with the service provider’s development tools and infrastructure. After
applications are developed, they can be delivered to the customer’s users from the provider’s
servers. PaaS is also called hosted platform.
private cloud Cloud services that a company delivers to its own employees.
public cloud Cloud services delivered by a third-party provider.
snapshot A partial copy of a virtual machine made at a particular moment; it can be used
to restore the virtual machine to its state when the snapshot was taken. See also virtual
machine (VM).
software as a service (SaaS) A category of cloud computing in which a customer pays for
the use of applications that run on a service provider’s network; SaaS is also called hosted
applications.
Copyright 2017 Cengage Learning. All Rights Reserved. May not be copied, scanned, or duplicated, in whole or in part. WCN 02-200-203
Review Questions
377
virtual disk Files stored on the host computer that represent a virtual machine’s hard disk.
virtual machine (VM) A software environment that emulates a physical computer’s
hardware and BIOS.
virtual network A network configuration created by virtualization software and used by
virtual machines for network communication.
virtualization A process that creates a software environment to emulate a computer’s
hardware and BIOS, allowing multiple OSs to run on the same physical computer at the
same time.
Review Questions
1. Which of the following can best be described as developing applications by using a
service provider’s development tools and infrastructure?
a.
hosted applications
b. hosted networking
c.
hosted platforms
d. hosted infrastructure
2. Which of the following is a partial copy of a VM made at a particular moment that
enables you to restore the VM’s state?
a.
incremental backup
b. virtual disk
c.
load balancing
d. snapshot
3. What can be defined as software that creates and monitors the virtual hardware
environment?
a.
host computer
b. hypervisor
c.
snapshot
d. guest OS
4. Bare-metal virtualization is best for desktop virtualization. True or False?
5. If you want your virtual machine to have direct access to the physical network, which
virtual network option should you configure?
a.
bridged
b. NAT
c.
host-only
d. internal
Copyright 2017 Cengage Learning. All Rights Reserved. May not be copied, scanned, or duplicated, in whole or in part. WCN 02-200-203
8
378
Chapter 8 Virtualization and Cloud Computing Fundamentals
6. Which of the following is the virtual environment that emulates a physical computer’s
hardware and BIOS?
a.
virtual machine
b. guest OS
c.
host computer
d. snapshot
7. Which component of virtualization allows multiple VMs to share physical hardware
resources?
a.
virtual machine
b. snapshot
c.
host computer
d. hypervisor
8. Which of the following is true about bare-metal virtualization?
a.
It supports a wider variety of guest OSs.
b. It uses the host OS to access hardware.
c.
It uses a type 1 hypervisor.
d. VMware Workstation Player is an example.
9. Which virtual network configuration shares an IP address with the host computer?
a.
bridged
b. NAT
c.
host-only
d. LAN segment
10. Which virtual network configuration is isolated from the host computer?
a.
bridged
b. NAT
c.
host-only
d. LAN segment
11. On which host OS can you run Hyper-V?
a.
Mac OS X
b. Windows 10
c.
Ubuntu Linux
d. Solaris
Copyright 2017 Cengage Learning. All Rights Reserved. May not be copied, scanned, or duplicated, in whole or in part. WCN 02-200-203
Hands-On Projects
379
12. Which feature provided by some virtualization products allows you to move a VM to a
new host computer while the VM is running?
a.
live migration
b. snapshots
c.
VM cloning
d. dynamic provisioning
13. Which of the following are reasons to use bare-metal virtualization?
a.
retiring old hardware
b. reusing older computers
c.
reducing cooling
d. reclaiming floor space
14. Which feature of some virtualization products allows you to deploy VMs and storage
as needed and has uses in cloud computing?
a.
live migration
b. snapshots
c.
VM cloning
d. dynamic provisioning
15. When did Microsoft introduce the Hyper-V product?
a.
with Windows Server 2012
b. with Windows Server 2008
c.
with Windows Vista
d. with Windows 7
16. In which cloud computing model does Google Apps best fit?
a.
IaaS
b. PaaS
c.
SaaS
d. DaaS
Hands-On Projects
Project 8-1: Enable Hyper-V for Windows 10
In this project, you enable Hyper-V on a Windows 10 computer.
1. Start and log on to your Windows 10 computer.
2. Right-click Start and click Control Panel. In Control Panel, click Programs.
3. Under Programs and Features, click Turn Windows features on or off.
Copyright 2017 Cengage Learning. All Rights Reserved. May not be copied, scanned, or duplicated, in whole or in part. WCN 02-200-203
8
380
Chapter 8 Virtualization and Cloud Computing Fundamentals
4. Click Hyper-V to select it. Click the plus sign to see the options under Hyper-V. You
will enable the management tools and the Hyper-V platform. Click OK.
5. When prompted, click Restart now to finish the installation.
6. When Windows restarts, log on, click in the search box next to the Start button, and
type admin. In the search results, click Administrative Tools.
7. In Administrative Tools, double-click Hyper-V Manager. In the next project, you will
create a virtual machine and explore the settings. Leave Hyper-V Manager open if you
are continuing to the next project.
Project 8-2: Create a VM in Hyper-V
You have installed the Hyper-V role on Windows 10 and are ready to create a
virtual machine.
1. Log on to your Windows 10 computer and open Hyper-V Manager, if necessary. If
your Windows 10 computer is not selected in the left pane, click Connect to Server in
the Actions pane, click Local computer, and then click OK.
2. In the Actions pane, click New, and then click Virtual Machine.
3. Read the information in the Before You Begin window. You can create a default virtual
machine simply by clicking Finish in this window, but for this activity, click Next.
4. In the Name text box, type VMTest1. You can choose a location to store the virtual
machine configuration, but for this activity, accept the default location of C:\ProgramData
\Microsoft\Windows\Hyper-V by clicking Next.
5. In the Specify Generation window, you choose whether to create a generation 1 or
generation 2 virtual machine. Leave the default selection, Generation 1, and click
Next.
6. In the Assign Memory window, type 512 in the Startup memory text box, and then
click Next.
7. In the Configure Networking window, leave the default option, Not Connected. Click
Next.
8. In the Connect Virtual Hard Disk window, you can enter the virtual hard disk’s name,
size, and location. By default, the size is 127 GB, and Hyper-V assigns the hard disk the
same name as the VM, with the extension .vhdx. You can also use an existing virtual
disk or attach one later. Write down the location where Hyper-V stores the virtual hard
disk by default, in case you want to access the virtual disk later. Click Next to accept the
default settings.
9. In the Installation Options window, click the Install an operating system later option
button, if necessary. Click Next.
10. The Completing the New Virtual Machine Wizard window displays a summary of
your virtual machine configuration. Click Finish. After the virtual machine is created,
Copyright 2017 Cengage Learning. All Rights Reserved. May not be copied, scanned, or duplicated, in whole or in part. WCN 02-200-203
Hands-On Projects
381
you return to Hyper-V Manager and see your new VM in the Virtual Machines pane
of Hyper-V Manager (see Figure 8-7).
11. Leave Hyper-V Manager open if you’re continuing to the next activity.
8
Figure 8-7 Hyper-V Manager with a VM
Project 8-3: Install Windows Server 2012 R2 in a VM
You have created a virtual machine and are ready to install Windows Server
2012 R2 as a guest OS using the installation DVD. You need the installation
media for Windows Server 2012 R2.
You can download an ISO file for a trial version of Windows Server
2012 R2 from https://www.microsoft.com/en-us/evalcenter/evaluate
-windows-server-2012-r2. Once downloaded, you can burn a DVD or
attach the ISO file to the virtual DVD drive on your virtual machine.
These steps assume you have an ISO file that you will attach to the
VM’s virtual DVD.
You can also use Windows Server 2016, if it’s available, for this project. Only
the preview was available at the time of this writing, so Windows Server 2012
was used.
Copyright 2017 Cengage Learning. All Rights Reserved. May not be copied, scanned, or duplicated, in whole or in part. WCN 02-200-203
382
Chapter 8 Virtualization and Cloud Computing Fundamentals
1. Log on to your Windows 10 computer and open Hyper-V Manager, if necessary.
2. Click VMTest1 in the Virtual Machines pane of Hyper-V Manager. In the Actions
pane, click Settings under VMTest1 to open the Settings for VMTest1 window (see
Figure 8-8).
Figure 8-8 Settings for a Hyper-V VM
3. If you are using a physical DVD, skip to Step 4. Click DVD Drive in the left pane.
In the right pane, click Image file and then click Browse. Locate and then click the
Windows Server 2012 R2 ISO file. Click Open. Click OK.
4. Right-click the VMTest1 virtual machine you created and click Connect.
5. Power on VMTest1 by clicking the Start toolbar icon or by clicking Action and then Start
from the menu. While the computer is booting, close the Virtual Machine Connection
console. Notice that in Hyper-V Manager, the VM’s CPU use changes as the Windows
installation starts, and the VM screen in the bottom pane changes periodically.
Copyright 2017 Cengage Learning. All Rights Reserved. May not be copied, scanned, or duplicated, in whole or in part. WCN 02-200-203
Hands-On Projects
383
To see a description of any toolbar icon, hover your mouse pointer
over it.
6. Double-click the VM screen at the bottom of Hyper-V Manager to open the Virtual
Machine Connection console. Begin the installation of Windows Server 2012 R2 by
clicking Next on the Windows Setup window. From here, the installation steps are the
same as installing in a physical computer. As a reminder, review Project 5-6, which
walked you through the process of installing Windows Server 2012 R2.
7. After Windows Server 2012 R2 is installed, close the Virtual Machine Connection
console and shut down the virtual machine by right-clicking VMTest1 and clicking
Shut Down. Click Shut Down again to confirm, if necessary.
8. Leave Hyper-V Manager open if you’re continuing to the next activity.
Project 8-4: Work with Virtual Machines in Hyper-V
Manager
You have installed a test VM that you can use to become familiar with managing
virtual machines in Windows Server 2012 R2. In the following steps, you create
a checkpoint, make some changes to the OS, and revert to the checkpoint.
1. Log on to your Windows 10 computer and open Hyper-V Manager, if necessary.
2. Right-click VMTest1 and click Connect.
3. Power on VMTest1 by clicking the Start toolbar icon.
4. After Windows Server 2012 R2 boots, log on and open Notepad, and then type your
name in a new text document. Don’t close Notepad or save the file yet. Click the Save
toolbar icon or click Action and then Save from the menu of the Virtual Machine
Connection console.
5. Close the Virtual Machine Connection console. In Hyper-V Manager, notice that the
State column for the VM displays Saved or Saving. After the state has been saved,
open the Virtual Machine Connection console by double-clicking VMTest1. Start the
VM by clicking the Start toolbar icon. You’re right where you left off in Notepad.
6. Save the Notepad file to your desktop as file1.txt, and then exit Notepad.
7. Click the Checkpoint toolbar icon or click Action and then Checkpoint from the menu.
When prompted to enter a name for the checkpoint, type BeforeDeletingFile1, and then
click Yes. In the status bar of the Virtual Machine Connection console, you see a progress bar that reads Taking checkpoint.
8. After the checkpoint is finished, minimize the VM, and note that the checkpoint is
listed in the Checkpoints section of Hyper-V Manager. Maximize the VM, and delete
the Notepad file you created. Empty the Recycle Bin to make sure the file is deleted.
9. Click the Revert toolbar icon or click Action and then Revert from the menu.
Copyright 2017 Cengage Learning. All Rights Reserved. May not be copied, scanned, or duplicated, in whole or in part. WCN 02-200-203
8
384
Chapter 8 Virtualization and Cloud Computing Fundamentals
10. Click Revert when prompted. The VM displays a message that it’s reverting. When the
desktop is displayed again, you should see the Notepad file back on the desktop. Close
the Virtual Machine Connection console.
11. In Hyper-V Manager, right-click VMTest1 and click Shut Down. When prompted,
click the Shut Down button. The Status column displays Shutting Down Virtual
Machine.
12. After the VM state changes to Off, delete the checkpoint by right-clicking
BeforeDeletingFile1 in the Checkpoints section and clicking Delete Checkpoint. Click
Delete to confirm.
13. Close Hyper-V Manager, but stay logged on to Windows 10 if you are continuing to
the next project.
Project 8-5: Download and Install VirtualBox
In this project, you download and install VirtualBox.
1. Log on to your Windows 10 computer, if necessary.
2. Start a Web browser, and go to www.virtualbox.org. In the left pane, click Downloads.
Under VirtualBox binaries, click VirtualBox version for Windows hosts, where version
is the current VirtualBox version.
3. After downloading the file, start the installation of VirtualBox. Follow the prompts and
leave the default options selected.
4. When the installation is finished, VirtualBox should automatically start. If not,
double-click the Oracle VM VirtualBox shortcut on your desktop to start Oracle VM
VirtualBox Manager.
5. You’re ready to create a virtual machine. Leave Oracle VM VirtualBox Manager running for the next project.
Project 8-6: Create a Virtual Machine in VirtualBox
In this project, you create a virtual machine in VirtualBox.
1. If necessary, start Oracle VM VirtualBox Manager.
2. Click New to start the Create Virtual Machine wizard.
3. In the “Name and operating system” window, type VMTest2 in the Name text box.
4. Click the selection arrow next to the Type box, and review the guest OSs that are supported. Click Microsoft Windows.
5. Click the selection arrow next to the Version box and click the name of any OS. Click
Next.
6. In the Memory size window, accept the default setting and click Next. In the Hard
Disk window, accept the default setting and then click Create.
Copyright 2017 Cengage Learning. All Rights Reserved. May not be copied, scanned, or duplicated, in whole or in part. WCN 02-200-203
Hands-On Projects
385
7. In the “Hard disk file type” window, accept the default setting and click Next. In the
“Storage on physical disk” window, click Next to accept the default setting of Dynamically allocated.
8. Click Create in the “File location and size” window. The VM is created and you are
returned to Oracle VM VirtualBox Manager.
9. Review the information displayed on the details screen (see Figure 8-9).
8
Figure 8-9 The VirtualBox details screen
10. Installing and working with a VM in VirtualBox is similar to the process in Hyper-V.
You can connect the virtual DVD drive to an ISO file or boot from a physical DVD
placed in the host. To see and change the VM’s settings, right-click VMTest2 in the
left pane and click Settings. Select each setting in the left pane to see the configuration
options for the VM (see Figure 8-10). In this dialog box, you can change the amount of
memory allocated to the VM, change processor options, configure storage, change the
virtual network settings, and configure many more settings. You can also add virtual
hardware, such as hard disks and network adapters.
Copyright 2017 Cengage Learning. All Rights Reserved. May not be copied, scanned, or duplicated, in whole or in part. WCN 02-200-203
386
Chapter 8 Virtualization and Cloud Computing Fundamentals
Figure 8-10 The virtual machine Settings dialog box in VirtualBox
11. Click Network in the list on the left side of the window. The default option is NAT,
which means the VM gets an IP address from the host computer and VirtualBox performs NAT so that the VM can access the physical network. Click the selection arrow
next to the Attached to box to see the network attachment options. Click Advanced to
see advanced options (see Figure 8-11). Notice that the virtual network adapter is
assigned a MAC address, just like a computer with a physical NIC. Click Cancel.
Close Oracle VM VirtualBox Manager.
12. Log off or shut down your Windows 10 computer.
Copyright 2017 Cengage Learning. All Rights Reserved. May not be copied, scanned, or duplicated, in whole or in part. WCN 02-200-203
Challenge Labs
387
8
Figure 8-11 Advanced settings for network adapters in VirtualBox
Critical Thinking
The following activities give you critical thinking challenges. Challenge Labs give you an
opportunity to use the skills you have learned to perform a task without step-by-step instructions. Case projects offer a practical problem for which you supply a written solution. Not all
chapters contain Challenge Labs. There is not always a specific right or wrong answer to these
critical thinking exercises. They are intended to encourage you to review the chapter material
and delve deeper into the topics you have learned.
Challenge Labs
Challenge Lab 8-1: Configure Network Settings in Hyper-V
Your Windows Server 2012 R2 server is installed in a VM named VMTest1 that you created
in the Hands-On Projects. You are ready to perform postinstallation tasks. One of the things
you will need to do is configure the virtual network. Do a little research on configuring the
virtual network in Hyper-V. Open Hyper-V Manager and study the configuration tasks you
can perform in the Actions pane.
You should configure the virtual network so that VMs you are running in Hyper-V can communicate with each other and with the host computer. You will need to perform two steps to
Copyright 2017 Cengage Learning. All Rights Reserved. May not be copied, scanned, or duplicated, in whole or in part. WCN 02-200-203
388
Chapter 8 Virtualization and Cloud Computing Fundamentals
configure the virtual network. You will also need to configure the Windows Server 2012 R2
VM with an appropriate IP address to communicate with the host computer. You should test
communication between the physical computer and the host computer using the Ping utility.
When you are finished, answer the following questions:
•
What setting in Hyper-V did you access to configure the virtual network?
•
What type of virtual network did you configure?
•
After you configured the virtual network, what did you have to do to make sure your
VM used the virtual network?
•
What IP address did you configure on your VM? What command did you use to ping
the host computer?
Case Projects
Case Project 8-1: Test Software
Your boss wants to purchase a graphics design application to be distributed
to approximately 40 users in the company. Although the vendor says the
application has broad OS support, your boss wants to be sure it will work on
the five different OSs (two versions of Windows, two versions of Linux, and
the latest Mac OS X) running on the company’s user workstations. He wants
you to verify compatibility by using evaluation copies of the software without
disrupting users or their computers. You have the installation disks for all five
OSs your company uses, but you don’t have a lot of computers available to
install the OSs. What’s your plan?
Case Project 8-2: A Small Business Startup IT Solution
You’ve been called in to consult with a small startup company that needs advice
on how to set up its computer systems and network. The startup company does
not have a lot of money to invest in the necessary IT infrastructure, but it will
have 30 employees that use computers to run a variety of applications, many
of which are server-based. The company wants to run Windows 10 and Mac
OS X client stations, and it will need Windows Server and Red Hat Enterprise
server. The company already has cabling and switches in place to connect its
computers to a LAN, and it has a 50 Mbps Internet connection. What do you
advise for this small business to satisfy its IT needs?
Copyright 2017 Cengage Learning. All Rights Reserved. May not be copied, scanned, or duplicated, in whole or in part. WCN 02-200-203
chapter
9
Configuring a Network Connection
After reading this chapter and completing the
exercises, you will be able to:
●
●
●
●
●
●
Explain the fundamentals of network communication
Define common networking terms
Compare and describe network device types
Configure and describe network protocols
Describe the OSI model of networking
Configure networking in an operating system
Copyright 2017 Cengage Learning. All Rights Reserved. May not be copied, scanned, or duplicated, in whole or in part. WCN 02-200-203
389
390
Chapter 9 Configuring a Network Connection
In only a few decades, computer networks have evolved from a complex technology
accessible to only the most tech-savvy users to being part of most people’s everyday lives.
Computer networks can be found in almost every business, school, and home. Their use is
available to anyone with a computer and a network connection, but installation and upkeep
of all but the smallest networks still require considerable know-how. This chapter starts you
on the path toward acquiring the skills you need to work with network devices and configure
an operating system to work in a network. Proper configuration of an operating system in a
network is paramount to your overall understanding of operating systems. You cannot properly configure and troubleshoot the operation of a client or server computer in a network
unless you have a solid understanding of the technologies and protocols used in building a
network and connecting devices to a network.
This chapter begins by discussing the fundamentals of network communication. Many new
terms are introduced and defined, and you will learn the fundamentals of the TCP/IP protocol
and the OSI model of networking.
The Fundamentals of Network Communication
A computer network consists of two or more computers connected by some kind of transmission medium, such as a cable or airwaves. After they’re connected, correctly configured computers can communicate with one another. The primary motivations for networking are to
share resources, such as printers and hard drives; to share information, such as wordprocessing files; and to communicate by using applications such as e-mail. These motivations
are important, especially for businesses, but another motivating factor for both businesses
and home users is to “get online”—to access the Internet. The Internet, with its wealth of
information, disinformation, fun, and games, has had a tremendous impact on how and why
networks are used. Indeed, many of the networking technologies described in this book were
developed as a result of the Internet explosion.
You might know how to use a network already; in particular, you probably know how to use
programs that access the Internet, such as Web browsers and e-mail programs. To understand
how networks work, however, you need to learn about the underlying technologies and processes used when you open a Web browser or an e-mail program. A good place to start is
with the components that help turn a stand-alone computer into a networked computer.
Network Components
Imagine a computer with no networking hardware or software. It’s hard to imagine now, but
a computer’s main purpose once was to run applications such as word processors and spreadsheets, not Web browsers and e-mail. Such computers had neither the hardware nor software
needed to run networked programs, which is why they were called stand-alone computers.
If you wanted to network a computer, you had to add these required components:
•
Network interface card (NIC)—A NIC (pronounced nick) is an add-on card that’s
plugged into a motherboard expansion slot and provides a connection between the
computer and the network. Most computers have a NIC built into the motherboard, so
an additional card is not necessary.
Copyright 2017 Cengage Learning. All Rights Reserved. May not be copied, scanned, or duplicated, in whole or in part. WCN 02-200-203
The Fundamentals of Network Communication
391
•
Network medium—This cable plugs into the NIC and makes the connection between a
computer and the rest of the network. In networks with just two computers, the other
end of the cable can plug into the second computer’s NIC. More likely, the other end
of the cable plugs into an interconnecting device that accommodates several computer
connections. Network media can also be airwaves, as in wireless networks. In this case,
the connection is made between the antenna on the NIC and the antenna on another
NIC or interconnecting device.
•
Interconnecting device—Although this component isn’t always necessary because two
computers can be connected directly with a cable and small wireless networks can be
configured without an interconnecting device, most networks include one or several of
these components. They allow computers to communicate on a network without being
connected directly. Interconnecting devices include switches, hubs, routers, and wireless
access points. A small network connected to a switch is shown in Figure 9-1.
9
Figure 9-1 A network of computers connected to a switch
The preceding hardware components make a stand-alone computer into a networked
computer, but software is also needed to interact with network hardware and communicate
with other computers on the network. Network software transforms a stand-alone OS into a
network OS. It’s the software that allows a word-processing program to open a document
on a server and knows how to request a Web page or send an e-mail. It’s also the software
that communicates between the OS and network hardware. Network software can be
divided into the following categories:
•
Network clients and servers—Network client software requests information that’s
stored on another network computer or device. Network server software allows a
computer to share its resources by responding to resource requests generated by
network clients. Network client software can be an integral part of well-known applications, such as Web browsers and e-mail programs. A Web browser, for example,
sends a request for a Web page to a Web server. Network client software can also run
in the background, usually when installed as a networking service. In such cases,
Copyright 2017 Cengage Learning. All Rights Reserved. May not be copied, scanned, or duplicated, in whole or in part. WCN 02-200-203
392
Chapter 9 Configuring a Network Connection
it enables programs without built-in client software to access shared network resources
on other computers. For example, Client for Microsoft Networks, which is installed
automatically in Windows, allows a word-processing program to open a file that’s
shared on another Windows computer or print to a printer attached to another
Windows computer. In this setup, server software called File and Printer Sharing for
Microsoft Networks receives the request from the client and provides access to the
shared file or printer.
•
Protocols—When clients and servers need to send information on the network, they
must pass it to network protocols, which define the rules and formats a computer must
use when sending information across the network. A network protocol can be likened
to a human language. Just as two people communicate by speaking the same language,
two computers communicate by using the same protocol. An example of a network
protocol is TCP/IP. Network protocols perform all the behind-the-scenes tasks required
to handle networking functions and most of their complexity.
•
NIC device driver—After a network protocol has formatted a message correctly, it
hands the data off to the NIC driver for transmission onto the network. NIC drivers
receive data from protocols and then forward it to the physical NIC, which transmits
the data onto the medium. The reverse is also true. When data arrives at the NIC
from the medium, the NIC hands it off to the NIC driver, which then hands it off to
network protocols. Every NIC installed in a computer must have an associated
device driver installed in the OS. The device driver software manages the details of
communicating with the NIC hardware to send data to network media and receive
data from it.
The term NIC device driver is often shortened to NIC driver, which is the
term used throughout this book.
Each of these software components plays a role in the steps of network communication, as
described in the next section.
Steps of Network Communication
Most network communication starts with a user who needs to access a resource on another
computer, such as a Web server or file server. A user’s attempt to access network resources
is summarized in these basic steps:
1. An application tries to access a network resource by attempting to send a message to it.
2. Network client software detects the attempt to access the network. Client software
formats the message generated by the application and passes the message on to the
network protocol.
3. The protocol packages the message in a format suitable for the network and sends it to
the NIC driver.
4. The NIC driver sends the data in the request to the NIC, which converts it into the necessary signals to be transmitted across the network medium.
Copyright 2017 Cengage Learning. All Rights Reserved. May not be copied, scanned, or duplicated, in whole or in part. WCN 02-200-203
The Fundamentals of Network Communication
393
Remember that there are two sides to a communication session—a client tries to access network resources and a server provides those resources. The steps taken on the server side are
essentially the reverse of those on the client side:
1. The NIC on the server receives signals from the network medium and converts them
into message data, which is read by the NIC driver.
2. The NIC driver passes the message to the network protocol.
3. The network protocol determines which server software the message is targeting and
passes the message to the designated software. Remember that a computer can have
many clients and servers running at the same time. For example, a computer running
Windows Server 2016 might be acting both as a mail server and as a file server. Each
server function requires different server software.
4. The server software receives the message and responds by sending the requested data to
the client computer, using the steps outlined previously.
Layers of the Network Communication Process
Each step a client takes to access network resources is often referred to as a layer in the network communication process. Each layer has a specific function, and all the layers work
together. Figure 9-2 and Table 9-1 depict this process. Keep in mind that the previous steps
simplified the communication process, which is one reason the layered approach is so effective: Complex concepts can be described in simple steps.
Sending machine
Receiving machine
user application
user application
network software
network software
network protocol
network protocol
network interface
network interface
network medium
Figure 9-2 Layers of the network communication process
Copyright 2017 Cengage Learning. All Rights Reserved. May not be copied, scanned, or duplicated, in whole or in part. WCN 02-200-203
9
394
Chapter 9 Configuring a Network Connection
Table 9-1
Layers of the network communication process
Step
Description
Layer
1
An application tries to access a network resource.
User application
2
Client software detects the attempt to access the network and
passes the message on to the network protocol.
Network client or server software
3
The protocol packages the message in a format suitable for the
network and sends it to the NIC driver.
Network protocol
4
The NIC driver sends the data in the request to the NIC, which
converts it into the necessary signals to be transmitted across
the network medium.
Network interface
The four steps outlined in Table 9-1 give you a basic understanding of the layered approach
to networking. A more detailed model for network communication—a universal standard for
teaching and designing network communication called the OSI model
model—is discussed later in
this chapter.
How Two Computers Communicate on a LAN
The layers of the network communication process provide an overview of how network communication works. However, there are few details on what each layer accomplishes. This discussion focuses on computer addresses and how they’re used during network
communication.
In a network that uses a protocol such as TCP/IP (the most common network protocol),
computers have two addresses: a logical address and a physical address. The logical address
is the IP address, and the physical address is called the Media Access Control (MAC) address.
You can look at these two addresses much like those used to send mail through the postal
system. When a letter is mailed in the United States, it requires a street address and a zip
code. The zip code gets the letter to the correct region of the country, and the street address
gets the letter to the correct home or business.
The MAC address is stored as part of the physical NIC, which is why
the MAC address is referred to as the physical address.
You can liken the zip code to the logical or IP address and the street address to the physical
or MAC address. When a message is sent on a network, the IP address is used to get the message to the correct network, and the MAC address gets the message to the correct computer
on the network. If the sender and receiver are on the same network, the IP address in the
message is used mainly to ascertain the destination computer’s MAC address.
For example, Figure 9-3 shows two computers connected to a switch. Computer A wants to
communicate with Computer B. One of the simplest forms of communication is a ping command, which sends a message from one computer to another, essentially asking the other
computer whether it’s listening on the network. If a computer receives a ping, it replies so
Copyright 2017 Cengage Learning. All Rights Reserved. May not be copied, scanned, or duplicated, in whole or in part. WCN 02-200-203
The Fundamentals of Network Communication
395
that the sending computer knows the message was received. It’s like the cell phone commercial in which the caller asks, “Can you hear me now?” Here are the steps of this communication process:
Computer B
IP address: 10.1.1.2
MAC address: BB:B1
Computer A
IP address: 10.1.1.1
MAC address: AA:A1
Figure 9-3 Communication between two computers
1. A user at Computer A types ping 10.1.1.2 (the IP address of Computer B) at a command prompt.
2. The network software creates a ping message.
3. The network protocol packages the message by adding IP addresses of the sending and
destination computers and acquires the destination computer’s MAC address.
4. The network interface software adds MAC addresses of the sending and destination
computers and sends the message to the network medium as bits.
5. Computer B receives the message, verifies that the addresses are correct, and then sends
a reply to Computer A using Steps 2 through 4.
Users don’t usually initiate network communication by using a computer’s IP address;
instead, they use the computer name. However, just as you can’t mail a letter with only the
recipient’s name, you can’t communicate over a network with only the computer’s name.
You certainly know the name of the person you’re writing to, but you might have to look
up his or her address before you can address the envelope. Similarly, computers use an
address book of sorts, called a name server, to get a computer’s IP address when the name
is known. TCP/IP provides name server functions through its Domain Name System (DNS).
With this information in mind, the preceding steps can be expanded as follows:
1. A user at Computer A types ping Computer B at a command prompt.
2. A name lookup is done to retrieve Computer B’s IP address.
Copyright 2017 Cengage Learning. All Rights Reserved. May not be copied, scanned, or duplicated, in whole or in part. WCN 02-200-203
9
396
Chapter 9 Configuring a Network Connection
3. The network software creates a ping message.
4. The network protocol packages the message by adding IP addresses of the sending and
destination computers and acquires the destination computer’s MAC address.
5. The network interface software adds MAC addresses of the sending and destination
computers and sends the message to the network medium as bits.
6. Computer B receives the message, verifies that the addresses are correct, and then sends
a reply to Computer A using Steps 3 through 5.
Next, examine an example of using a network to save a word-processing document to a
Windows server and see how the layers of the network communication process are used.
Several components are involved in this task, as you will see in Hands-On Project 9-3. In
the example shown in Table 9-2, a user at Client A is running a word-processing program,
such as Microsoft Word, and wants to save the file to a shared folder on another Windows
computer named Server X.
Table 9-2
Saving a file with the network communication process
Step
Description
Layer
1
The user on Client A clicks Save in the word-processing program and chooses a
shared folder on Server X to save the file.
User application
2
Client for Microsoft Networks detects the attempt to access the network,
formats the message, and passes the message to the network protocol.
Network software
3
The network protocol (in this case, TCP/IPv4) packages the message in a format
suitable for the network interface and sends it to the NIC driver.
Network protocol
4
The NIC driver sends the data in the request to the NIC (in this case, Ethernet0),
which converts it into signals to be transmitted across the network medium.
Network interface
5
Server X’s NIC receives the message from the network medium, processes it,
and sends the data to TCP/IPv4.
Network interface
6
TCP/IPv4 on Server X receives the message from the NIC, processes it, and sends
the data to the network software (in this case, File and Printer Sharing for
Microsoft Networks).
Network protocol
7
File and Printer Sharing for Microsoft Networks formats the message and
requests that the OS save the file to the disk.
Network software
In Table 9-2, there’s no “User application” step on the server. When a
server is involved, the last step is typically handled by network software,
such as File and Printer Sharing for Microsoft Networks, a Web server,
or other server software.
Now that you have an idea of how network communication occurs, you can learn some
common terms for describing networks and network components in the next section. Along
the way, you see more illustrations of different types of networks.
Copyright 2017 Cengage Learning. All Rights Reserved. May not be copied, scanned, or duplicated, in whole or in part. WCN 02-200-203
Network Terminology
397
Network Terminology
Every profession has its own language with its own terms and acronyms. Learning this language is half the battle of becoming proficient in a profession, and it’s no different in
computer and networking technology. The following sections explain some common terms
used in discussing computer networks. Because some of these terms are associated with network
diagrams, a number of figures are included to show different ways of depicting networks.
LANs, Internetworks, WANs, and MANs
A small network that is limited to a single collection of machines and connected by one or
more interconnecting devices in a small geographic area is called a local area network
(LAN). LANs also form the building blocks for larger networks called internetworks. In
Figure 9-4, the computers in a LAN are interconnected by a switch; Figure 9-5 shows a
wireless LAN.
9
Switch
Figure 9-4 A LAN with computers interconnected by a switch
Copyright 2017 Cengage Learning. All Rights Reserved. May not be copied, scanned, or duplicated, in whole or in part. WCN 02-200-203
398
Chapter 9 Configuring a Network Connection
Wireless tablet
Wireless PC
Wireless
access point
Wireless laptop
Figure 9-5 A wireless LAN
LANs are represented in other ways, as in Figure 9-6; note the different symbols for a hub
and a switch. Figure 9-7 shows a logical depiction of the same network; a logical depiction
leaves out details such as interconnecting devices, showing only the computers that make up
the network.
LAN using a hub
LAN using a switch
Figure 9-6 A LAN with a symbolic hub (left) and a symbolic switch (right)
Copyright 2017 Cengage Learning. All Rights Reserved. May not be copied, scanned, or duplicated, in whole or in part. WCN 02-200-203
Network Terminology
399
Figure 9-7 A logical depiction of a LAN
An internetwork is a networked collection of LANs tied together by devices such as routers,
as discussed later in this chapter. Figure 9-8 shows two LANs interconnected by a router,
which is represented by the standard symbol. Internetworks are usually created for the following reasons:
•
Two or more groups of users and their computers should be logically separated on the
network, yet the groups should be able to communicate. For example, in a school, you
might want to logically separate the LAN that contains student computers from the
LAN that contains faculty computers. Routers provide this logical separation but still
allow communication between groups.
•
The number of computers in a single LAN has grown to the point that network communication is no longer efficient. The nature of certain network protocols and devices
makes network communication increasingly less efficient as the number of computers
on a LAN grows. Routers can be used to separate the computers into two or more
smaller LANs, thereby increasing communication efficiency.
•
The distance between two groups of computers exceeds the capabilities of most LAN
devices, such as switches. This problem can occur, for example, when a company
occupies multiple buildings or multiple floors in a building. Routers are often used to
communicate between groups of computers that are separated geographically.
Copyright 2017 Cengage Learning. All Rights Reserved. May not be copied, scanned, or duplicated, in whole or in part. WCN 02-200-203
9
400
Chapter 9 Configuring a Network Connection
Router
Figure 9-8 An internetwork with two LANs connected by a router
You might not realize it, but your home computer is probably part of an internetwork. Every
time you go online to browse the Web or check your e-mail, your computer or LAN becomes
part of the world’s largest internetwork: the Internet.
As a network’s scope expands to encompass LANs in geographically dispersed locations,
internetworks become classified as wide area networks (WANs). A WAN spans distances
measured in miles and links separate LANs. WANs use the services of third-party communication providers, such as phone companies, to carry network traffic from one location to
another. So, although both internetworks and WANs connect LANs, the difference lies
mainly in the LANs’ proximity to each other and the technologies used to communicate
between LANs. Therefore, the Internet is both an internetwork and, because it spans the
globe, a very large WAN.
Occasionally, you might encounter a network type called a metropolitan area network
(MAN). MANs use WAN technologies to interconnect LANs in a specific geographic region,
such as a county or city. It’s not uncommon to find large, complex networks that use all four
network types: LANs and internetworks for purely local access, MANs for regional or citywide access, and WANs for access to remote sites elsewhere in the country or around the
world. For example, consider a nationwide bank. The main branch in a large city has a
building with multiple floors and hundreds of computers. Each floor constitutes a LAN, and
these LANs are connected to form an internetwork. The internetwork at the main branch is
Copyright 2017 Cengage Learning. All Rights Reserved. May not be copied, scanned, or duplicated, in whole or in part. WCN 02-200-203
Network Terminology
401
connected to other branches throughout the city to form a MAN. In addition, the main
branch is connected to other branches in other cities and states to form a WAN.
In network drawings, WANs are often shown with a jagged or thunderbolt-shaped line to
represent the connection between two devices, usually routers, and the Internet is usually
represented as a cloud. A cloud is used to obscure the details of a large network, as if to say
“There’s some collection of networks and network devices, but the details aren’t important.”
Figure 9-9 shows a WAN connection between two routers and with a connection to the
Internet. A grouping of three computers is often used to represent multiple computers on a
LAN when the exact number doesn’t matter.
Internet
WAN connection
9
Figure 9-9 A WAN with a connection to the Internet
Internet, Intranet, and Extranet
The Internet is a worldwide public internetwork that uses standard protocols, such as TCP/IP,
DNS, and HTTP, to transfer and view information. It’s a public network because devices such
as routers and Web servers that make up much of the network are accessible directly through
an IP address. An intranet, on the other hand, is a private network, such as a school or company network, in which the devices and servers are available only to users connected to the
internal network. Many of the same protocols and technologies used on the Internet are used
to access information on an intranet. An extranet sits somewhere between the Internet and an
intranet. It allows limited and controlled access to internal network resources by outside users.
It’s used when two organizations need to share resources, so controls are put in place to allow
the organizations to access resources without making them available to the wider Internet.
Packets and Frames
When computers transfer information across a network, they do so in short bursts of about
1500 bytes of data. Each burst, or chunk, of data has the same basic structure; specifically,
each chunk of data contains the MAC addresses and IP addresses of both the sending
(source) and receiving (destination) computers. So, to transfer a small word-processing file,
Copyright 2017 Cengage Learning. All Rights Reserved. May not be copied, scanned, or duplicated, in whole or in part. WCN 02-200-203
402
Chapter 9 Configuring a Network Connection
only one burst of data transfer might be needed, but large photo or music files are first
divided into several hundred or even thousands of chunks before they’re transferred. After
each chunk of data is sent, the computer pauses momentarily. Data is transferred in this
way for a number of reasons:
•
If an error occurs during transmission of a large file, only the chunks of data involved
in the error have to be sent again, not the entire file.
•
The pause between bursts might be necessary to allow other computers to transfer data
during pauses.
•
The pause allows the receiving computer to process received data, such as writing it to
disk.
•
The pause allows the receiving computer to receive data from other computers at the
same time.
•
The pause gives the sending computer an opportunity to receive data from other computers and perform other processing tasks.
To use another analogy, you can look at chunks of data as sentences people use when
speaking. Pauses in conversation give listeners an opportunity to register what has been said
and possibly get a word in themselves.
To get an idea of how many chunks of data are involved in transferring
a typical file, a 3-minute music file is about 3 million bytes (3 MB) of
data, which takes about 2000 chunks of data.
Packets The chunks of data sent across the network are usually called packets or frames.
Packet, the more well-known term, is often used generically, but it does have a particular
meaning: It’s a chunk of data with source and destination IP addresses (as well as other IP
protocol information) added to it. Figure 9-10 shows a representation of data to be transferred, and Figure 9-11 shows the packets created after the data has been broken into
chunks and IP addresses added.
Copyright 2017 Cengage Learning. All Rights Reserved. May not be copied, scanned, or duplicated, in whole or in part. WCN 02-200-203
Network Terminology
403
Lorem ipsum dolor sit amet, consectetuer adipiscing elit. Maecenas porttitor congue massa. Fusce
posuere, magna sed pulvinar ultricies, purus lectus malesuada libero, sit amet commodo magna eros
quis urna.
Nunc viverra imperdiet enim. Fusce est. Vivamus a tellus.
Pellentesque habitant morbi tristique senectus et netus et malesuada fames ac turpis egestas.
Proin pharetra nonummy pede. Mauris et orci.
Lorem ipsum dolor sit amet, consectetuer adipiscing elit. Maecenas porttitor congue massa. Fusce
posuere, magna sed pulvinar ultricies, purus lectus malesuada libero, sit amet commodo magna eros
quis urna.
Nunc viverra imperdiet enim. Fusce est. Vivamus a tellus.
Pellentesque habitant morbi tristique senectus et netus et malesuada fames ac turpis egestas. Proin
pharetra nonummy pede. Mauris et orci.
Figure 9-10 Original data
Dest: IP: 172.16.1.2,
Source IP: 172.16.1.1
Lorem ipsum dolor sit amet, consectetuer adipiscing elit. Maecenas porttitor
congue massa. Fusce posuere, magna sed pulvinar ultricies.
Dest: IP: 172.16.1.2,
Source IP: 172.16.1.1
purus lectus malesuada libero, sit amet commodo magna eros quis urna. Nunc
viverra imperdiet enim. Fusce est. Vivamus a tellus.
Dest: IP: 172.16.1.2,
Source IP: 172.16.1.1
Pellentesque habitant morbi tristique senectus et netus et malesuada fames
ac turpis egestas. Proin pharetra nonummy pede. Mauris et orci
Dest: IP: 172.16.1.2,
Source IP: 172.16.1.1
Lorem ipsum dolor sit amet, consectetuer adipiscing elit. Maecenas porttitor
congue massa. Fusce posuere, magna sed pulvinar ultricies
Dest: IP: 172.16.1.2,
Source IP: 172.16.1.1
Pellentesque habitant tristique senectus et netus et malesuada fames ac turpis
egestas. Proin pharetra nonummy pede. Mauris et orci.
Figure 9-11 Data divided into several packets
Using the U.S. mail analogy, you can look at a packet as an envelope with the zip code added but
not the street address. In relation to the layers of the network communication process, packets
are generated and processed by the network protocol.
Frames A frame is a packet with the source and destination MAC addresses added to it.
In addition, frames have an error-checking code added to the back end of the packet, so
the packet is “framed” by MAC addresses (and other network interface information) on
one end and an error-checking code on the other. A frame is like a letter that’s addressed,
stamped, and ready to deliver.
Copyright 2017 Cengage Learning. All Rights Reserved. May not be copied, scanned, or duplicated, in whole or in part. WCN 02-200-203
9
404
Chapter 9 Configuring a Network Connection
Frames are essentially the final state of data before it’s placed on the network medium as
bits. The network interface is the layer of the network communication process that works
with frames. Figure 9-12 shows what the packets from Figure 9-11 look like after the
frame information is added.
Dest MAC,
Source MAC
Dest IP,
Source IP
Lorem ipsum dolor sit amet, consectetuer adipiscing elit.
Maecenas porttitor congue massa. Fusce posuere,
magna sed pulvinar ultricies,
Error check
Dest MAC,
Source MAC
Dest IP,
Source IP
purus lectus malesuada libero, sit amet commodo
magna eros quis urna. Nunc viverra imperdiet enim.
Fusce est. Vivamus a tellus.
Error check
Dest MAC,
Source MAC
Dest IP,
Source IP
Pellentesque habitant morbi tristique senectus et netus
et malesuada fames ac turpis egestas. Proin pharetra
nonummy pede. Mauris et orci
Error check
Dest MAC,
Source MAC
Dest IP,
Source IP
Lorem ipsum dolor sit amet, consectetuer adipiscing elit.
Maecenas porttitor congue massa. Fusce posuere,
magna sed pulvinar ultricies
Error check
Dest MAC,
Source MAC
Dest IP,
Source IP
Pellentesque habitant tristique senectus et netus et
malesuada fames ac turpis egestas. Proin pharetra
nonummy pede. Mauris et orci.
Error check
Figure 9-12 The packets are now frames and ready for delivery
The error-checking code at the end of a frame is called a cyclical redundancy check (CRC).
The process of adding IP addresses and then MAC addresses to chunks of data is called
encapsulation. Information added at the front of data is called a header, and information
added at the end of data is called a trailer. Data is encapsulated several times as it works
its way down from the sending application and makes it to the network interface as a
frame. When the destination computer receives the frame, the process is reversed as the network interface de-encapsulates the frame (has the header and trailer removed) so that it
becomes a packet again. This process continues until the packet arrives at the receiving
application or service as the original data. This process is all part of the layered approach to
networking.
Clients and Servers
You’ve already learned about the role of client network software and server network
software. Unfortunately, the world of networking sometimes uses the same terms to discuss
two different things. The following sections clarify what these terms mean and how their
meanings can differ depending on how they’re used.
Copyright 2017 Cengage Learning. All Rights Reserved. May not be copied, scanned, or duplicated, in whole or in part. WCN 02-200-203
Network Terminology
405
Client A client, in networking terms, can be a workstation running a client OS, such as
Windows 10, or the network software on a computer that requests network resources from
a server. In addition, you can refer to a physical computer as a client computer. The
meaning of client, therefore, depends on the context in which it’s used. To clarify, it’s
typically used in the following three contexts:
•
Client operating system—The OS installed on a computer is designed mainly to access
network resources, even though it might be capable of sharing its own resources.
Windows 10 and Mac OS X fit this description, for example, as do certain distributions of Linux. A client OS is also often referred to as a desktop OS.
•
Client computer
computer—This computer’s primary role in a network is to run user applications and access network resources. Most computers in a network fit this description.
•
Client software—This software requests network resources from server software
running on another computer. For example, a Web browser, an e-mail client (such as
Microsoft Outlook), and Client for Microsoft Networks fit into this category.
Server When most people hear the word server, they conjure up visions of a large tower
computer with lots of hard drives and memory. This image is merely a computer hardware
configuration that may or may not be used as a server, however. In short, a computer
becomes a server when software is installed on it that provides a network service to client
computers. In other words, you can install certain software on an inexpensive laptop computer and make it act as a server. By the same token, a huge tower computer with six hard
drives and 128 GB of RAM can be used as a workstation for a single user. So, although
some hardware configurations are packaged to function as a server, and others are packaged
as client or desktop computers, what makes a computer a server is the software installed on
it. Just as there are three contexts in which the term client is used, so it is with the term
server:
•
Server operating system—This term is used when the OS installed on a computer is
designed mainly to share network resources and provide other network services. A
server OS is tuned to be able to share files efficiently and perform network operations
in response to client requests, even though the OS might also be able to run user applications and client software. Windows Server 2012, Mac OS X Server, UNIX, and
many Linux distributions fit this description.
•
Server computer—This term is used when a computer’s primary role in the network is
to give client computers access to network resources and services. The computers that
most often fit this description are usually in the IT room or locked away in a closet.
•
Server software—This software responds to requests for network resources from client
software running on another computer. A Web server (such as Internet Information
Services), an e-mail server (such as Microsoft Exchange), and File and Printer Sharing
for Microsoft Networks fit into this category.
Copyright 2017 Cengage Learning. All Rights Reserved. May not be copied, scanned, or duplicated, in whole or in part. WCN 02-200-203
9
406
Chapter 9 Configuring a Network Connection
Microsoft refers to server software components as services. Other OSs
use other terms; for example, in Linux/UNIX, server software components are referred to as daemons.
As you can see, the lines between a client computer and a server computer are often blurred
because OSs are designed as network operating systems, and most can take on the roles of
both server and client. As you’re learning, however, the language of networking is often
imprecise, and you must pay attention to the context in which networking terms are used
to grasp their meaning. As you get more comfortable with all the terms and better understand how networks work, the nuances of the terminology will fall into place.
Peer-to-Peer and Client/Server Networks
Network models, which define how and where resources are shared and how access to these
resources is regulated, fall into two major types: peer-to-peer and client/server. Client/server
networks are the most common in business settings, but understanding both types is essential, especially as they compare with one another.
Peer-to-peer networks running Windows OSs are referred to as workgroup networks, and client/server networks running Windows Server
are called domain-based networks.
In a peer-to-peer network, most computers function as clients or servers as circumstances dictate. For example, a computer can act as a server by sharing a printer it’s connected to and
simultaneously act as a client by accessing a file shared by another computer on the network.
In this type of network, there’s no centralized control over who has access to network
resources; each user maintains control over his or her own shared resources. The computers
in peer-to-peer networks usually run desktop or client OSs.
In a peer-to-peer network, every user must act as the administrator of his or her computer’s
resources. Users can give everyone unlimited access to their resources or grant restricted (or
no) access to other users on the network. To grant this access, users must create user
accounts and passwords for each user who will access shared resources on their computers.
The username and password for accessing a computer are called credentials. If you have five
computers in a peer-to-peer network, each user might have to remember as many as five different sets of credentials. Because of the lack of centralized authority over resources,
controlled chaos is the norm for all but the smallest peer-to-peer networks, and security can
be a major concern because not all users might be educated in creating secure passwords.
Another issue that affects peer-to-peer networks is data organization. If every machine can be
a server, how can users keep track of what information is stored on which machine? If five
users are responsible for a collection of documents, any of those users might have to search
through files on all five machines to find a document. The decentralized nature of peerto-peer networks makes locating resources more difficult as the number of peers increases.
In a server-based network, certain computers take on specialized roles and function mainly as
servers, and ordinary users’ machines tend to function mainly as clients. Windows Server
Copyright 2017 Cengage Learning. All Rights Reserved. May not be copied, scanned, or duplicated, in whole or in part. WCN 02-200-203
Network Terminology
407
2012, Red Hat Enterprise Linux, and UNIX are OSs designed primarily for server use. In
these networks, servers have centralized authority over who has access to network resources,
mainly by providing an environment in which users log on to the network with a single set of
credentials maintained by one or more servers running a server OS. Server OSs are designed
to handle many simultaneous user logons and requests for shared resources efficiently. In
most cases, servers are dedicated to running network services and shouldn’t be used to run
user applications. You want to reserve servers’ CPU power, memory, and network performance for user access to network services.
When you’re using Windows server OSs in a server-based network with centralized logons,
you’re running a Windows domain. A domain is a collection of users and computers whose
accounts are managed by Windows servers called domain controllers. Users and computers
in a domain are subject to network access and security policies defined by a network administrator and enforced by domain controllers. The software that manages centralized access
and security is a directory service. On Windows servers, the directory service software is
Active Directory; this software is what makes a Windows server a domain controller.
The Linux OS supports a centralized logon service called Network Information Service (NIS),
but more often Linux administrators use a service compatible with Active Directory, called
Lightweight Directory Access Protocol (LDAP), if they want to use a directory service. A
directory service is one of several network services usually found only on server OSs running
in a server-based network. Other services include the following:
•
Naming services—Translate computer names to their addresses.
•
E-mail services—Manage incoming and outgoing e-mail from client e-mail programs.
•
Application services—Grant client computers access to complex applications that run
on the server.
•
Communication services—Give remote users access to an organization’s network.
•
Web services—Provide comprehensive Web-based application services.
Unlike peer-to-peer networks, server-based networks are easier to expand. Peer-to-peer networks should be limited to 10 or fewer users, but server-based networks can handle anywhere from a handful to thousands of users. In addition, multiple servers can be configured
to work together, which enables administrators to add more servers to share the load when
an application’s performance wanes or to provide fault tolerance if a server’s hardware
malfunctions.
Table 9-3 summarizes the strengths and weaknesses of peer-to-peer/workgroup and
server/domain-based networks.
Copyright 2017 Cengage Learning. All Rights Reserved. May not be copied, scanned, or duplicated, in whole or in part. WCN 02-200-203
9
408
Chapter 9 Configuring a Network Connection
Table 9-3
Peer-to-peer versus server-based networks
Network attribute
Peer-to-peer network
Server-based network
Resource access
Distributed among many desktop/client
computers; makes access to resources more
complex
Centralized on one or more servers;
streamlines access to resources
Security
Users control their own shared resources
and might have several sets of credentials
to access resources; not ideal when tight
security is essential
Security is managed centrally, and users
have a single set of credentials for all
shared resources; best when a secure
environment is necessary
Performance
Desktop OS not tuned for resource sharing;
access to shared resources can be hindered
by users running applications
Server OS tuned for resource sharing;
servers are usually dedicated to providing
network services
Cost
No dedicated hardware or server OS
required, making initial costs lower; lost
productivity caused by increasing
complexity can raise costs in the long run
Higher upfront costs because of dedicated
hardware and server OSs; additional
ongoing costs for administrative support
Peer-to-peer networks and server-based networks each have advantages. For this reason,
using a combination of the two models isn’t uncommon. For example, a user might want to
share a printer with a group of users in close proximity or a document folder with a department colleague. With this arrangement, a user is in control of a shared resource, yet can still
assign permissions to this resource by using accounts from the central user database on the
server. Although sharing the resource is decentralized, the logon credentials to access the
resource are still centralized.
Network Device Fundamentals
LANs, WANs, MANs, and internetworks are built with a variety of network hardware. Your
understanding of how the most common network hardware works is crucial to your success
in building reliable, high-performance networks. This section begins by discussing the simplest
of network devices: the hub, a device that’s nearly obsolete but is still found in older installations, or for special purposes. Switches have supplanted hubs in networks large and small and
are the main network building block today. Wireless access points are the foundation of wireless networks; you will learn about their operation and basic configuration. Network interface
cards have become such an essential component of computers that they’re now built into most
motherboards. Your understanding of NIC configuration options and properties will help you
build a better network. The last topic of this section covers the most complex network devices:
routers, the gateway to the Internet that makes it possible for large companies to build vast
internetworks and WANs.
Network Hubs
A hub, also called a multiport repeater, is the simplest of the network devices. A hub has the
rather straightforward job of receiving bit signals generated by NICs and other devices,
strengthening them, and then sending them along (repeating them) to other devices connected
Copyright 2017 Cengage Learning. All Rights Reserved. May not be copied, scanned, or duplicated, in whole or in part. WCN 02-200-203
Network Device Fundamentals
409
to its ports (see Figure 9-13). Think of a hub as a microphone for network signals. When
people speak, their voices carry only so far until people in the back of the room can no
longer hear what’s being said. Network signals, too, carry only so far on their medium
before receiving computers can no longer interpret them correctly. A hub enables you to
connect computers whose distance from one another would otherwise make communication
impossible. Its function is as follows:
•
Receives bit signals generated from a connected computer on any one of its ports
•
Cleans the signal by filtering out electrical noise
•
Regenerates the signal to full strength
•
Transmits the regenerated signal to all other ports a computer (or other network
device) is connected to
9
Hub
Figure 9-13 A multiport repeater, or hub
Network Switches
A network switch, like a hub, is used to interconnect multiple computers so that they can
communicate with one another. A switch looks just like a hub, with several ports for plugging in network cables. However, instead of simply regenerating incoming bit signals and
repeating them to all other ports, a switch actually reads data in the message, determines
which port the destination device is connected to, and forwards the message only to that
port. So, the first important difference between hubs and switches is that hubs work only
with electrical signals and the bits these signals represent, whereas switches work with the
actual information these bits compose, to make frames.
By reading the destination MAC address of each frame, the switch can forward the frame to
the port the destination computer is on. A switch maintains a switching table (see
Figure 9-14) of MAC addresses that have been learned and their associated port numbers.
Copyright 2017 Cengage Learning. All Rights Reserved. May not be copied, scanned, or duplicated, in whole or in part. WCN 02-200-203
410
Chapter 9 Configuring a Network Connection
Computer B
IP address: 10.1.1.2
MAC address: BB:B1
Switch
Computer C
IP address: 10.1.1.3
MAC address: CC:C1
Computer D
IP address: 10.1.1.4
MAC address: DD:D1
Computer A
IP address: 10.1.1.1
MAC address: AA:A1
Figure 9-14 Switches maintain a switching table
MAC addresses consist of 12 hexadecimal digits. Figure 9-14 uses
shorter addresses only as an example.
A switch’s operation can be summarized in these steps:
1. The switch receives a frame.
2. The switch reads the source and destination MAC addresses.
3. The switch looks up the destination MAC address in its switching table.
4. The switch forwards the frame to the switch port to which the computer that owns the
MAC address is connected.
5. The switching table is updated with the source MAC address and port information.
Copyright 2017 Cengage Learning. All Rights Reserved. May not be copied, scanned, or duplicated, in whole or in part. WCN 02-200-203
Network Device Fundamentals
411
Wireless Access Points
Not all networks require a cable to tether the computer to a switch or hub. Wireless networks have become ubiquitous on college and corporate campuses and in many public locations, such as airports and libraries. At the heart of a wireless LAN is the wireless access
point (AP). An AP is a lot like a hub, in that all computers send signals through it to communicate with other computers. The obvious difference is that signals don’t travel through a
physical medium; they travel through the airwaves as radio signals.
Again, an AP is much like a wired hub—all stations hear all network data transmitted by all
other wireless devices in the network. All communication goes to the AP, which then retransmits or repeats the transmission to the destination station. However, unlike hubs, communication between two stations requires an extra step. The destination device sends an
acknowledgement back to the sending device to indicate that the frame was received. When
the sending device receives the acknowledgement, it knows that no error has occurred.
Network Interface Cards
Attaching a computer to a network requires a NIC to create and mediate the connection
between the computer and the networking medium. The networking medium might be copper wire, fiber-optic cable, or the airwaves, but in all cases, data is represented as bit signals
that the NIC transmits or receives.
For incoming data, the NIC must be able to interpret the signals used for the network
medium, which are electrical for copper wire, light for fiber-optic cable, or radio waves for
wireless networks. These signals are then converted to bits and assembled into frames. For
outgoing data, the NIC converts frame data into bits and transmits them to the medium in
the correct signal format. The following list summarizes the tasks a NIC and its driver
perform:
•
Provide a connection from the computer to the network medium.
•
For incoming messages, receive bit signals and assemble them into frames, verify the
frame’s destination address, remove the frame header and trailer, and transfer the
packet to the network protocol.
•
For outgoing messages, receive packets from the network protocol and create frames
by adding source and destination MAC addresses and error-checking data.
•
Convert the frame data into bit signals in a format suitable for the network medium
and transmit the signals.
Figure 9-15 shows a NIC handling incoming data, and Figure 9-16 shows a NIC handling
outgoing data.
Copyright 2017 Cengage Learning. All Rights Reserved. May not be copied, scanned, or duplicated, in whole or in part. WCN 02-200-203
9
412
Chapter 9 Configuring a Network Connection
Network protocol
Dest. IP
Src. IP
Data
192.168.10.3 192.168.10.1 ICMP Echo Request
Packet
Frame trailer
Frame header
0100010
1011010100
11100001
10011001
10011101010110100001
Dest. MAC
Src. MAC
00:D0:BA:17:34:AD 00:02:17:59:82:63
Dest. IP
Src. IP
Data
Error check
192.168.10.3 192.168.10.1 ICMP Echo Request CRC
• Converts bit signals to frame
• Verifies MAC address
• Removes frame header and trailer
• Sends a packet to the network protocol
• Verifies CRC
Incoming bit signals on the network medium
NIC
Figure 9-15 A NIC handles incoming data from the network medium
Network protocol
Dest. IP
Src. IP
Data
192.168.10.3 192.168.10.1 ICMP Echo Request
Packet
Frame trailer
Frame header
10110101
11100001
10011001
10011101010110100001
000100010
Bits are transmitted onto the network medium
Dest. MAC
Src. MAC
00:D0:BA:17:34:AD 00:02:17:59:82:63
Dest. IP
Src. IP
Data
Error check
192.168.10.3 192.168.10.1 ICMP Echo Request CRC
• Receives a packet from the network protocol
• Adds a header and trailer to create a frame
• Converts the frame into bits for transmission on the medium
NIC
Figure 9-16 A NIC handles outgoing data to be sent to the network medium
Routers
Routers are the most complex devices discussed in this chapter. Hubs and switches connect
computers to the LAN; routers connect LANs to one another. Routers typically have two or
more network ports to which switches are connected to form an internetwork. Figure 9-17 is
a diagram of an internetwork, with two LANs connected via a router. Each LAN in this
example uses switches to connect workstations and a router port to the LAN. LAN 2 has
two switches that are connected.
Copyright 2017 Cengage Learning. All Rights Reserved. May not be copied, scanned, or duplicated, in whole or in part. WCN 02-200-203
Network Device Fundamentals
413
LAN 1
LAN 2
Figure 9-17 Two LANs connected by a router to make an internetwork
A router enables multiple LANs to communicate by forwarding packets from one LAN to
another. It also forwards packets from one router to another when LANs are separated by
multiple routers. The Internet is built on a vast collection of LANs, all interconnected via
routers. Figure 9-18 shows a small business network connected to its Internet service provider (ISP), then to several other Internet routers, and ultimately to a Web server on the
Cengage.com network.
Internet router
ISP
Internet router
Small business
Internet router
Switch
Cengage.com Web server
Figure 9-18 Routers interconnect LANs to form the Internet
Copyright 2017 Cengage Learning. All Rights Reserved. May not be copied, scanned, or duplicated, in whole or in part. WCN 02-200-203
9
414
Chapter 9 Configuring a Network Connection
Recall from earlier in this chapter that the Internet and its complex
arrangement of routers is usually shown as a cloud in network diagrams to hide the complex web of routers and devices that make up
the global system.
On the surface, it might seem as though switches and routers perform a similar function, but
in reality they do very different jobs, and they work with network data in substantially different ways. The following points summarize the key properties and features of a router versus
a switch:
•
Routers connect LANs, and switches connect computers.
•
Routers work with logical (IP) addresses rather than physical (MAC) addresses, as
switches do.
•
Routers work with packets rather than the frames that switches work with.
•
Routers don’t forward broadcast packets, but switches do.
•
Routers use routing tables, and switches use switching tables.
Network Media
Certain network technologies specify the types of media they require to operate. The following
sections summarize the most common media types.
Unshielded Twisted Pair Unshielded twisted pair (UTP) is the most common media
type in LANs. It consists of four pairs of copper wire, with each pair tightly twisted together
and contained in a plastic sheath or jacket (see Figure 9-19).
Sheath
Figure 9-19 UTP cabling
UTP comes in numbered categories, and is up to Category 8 as of this writing. The higher
the category is, the higher the cable’s bandwidth potential. Category 5 Enhanced (Cat 5E)
and Category 6 (Cat 6) are the most common in wired LANs; they allow speeds of up to
10 Gbps. UTP cabling is used in physical star networks, and the maximum cable length
from NIC to switch is 100 meters in LAN applications. UTP cabling is susceptible to electrical interference, which can cause data corruption, so it shouldn’t be used in electrically noisy
environments.
Copyright 2017 Cengage Learning. All Rights Reserved. May not be copied, scanned, or duplicated, in whole or in part. WCN 02-200-203
Network Protocol Fundamentals
415
Fiber-Optic Cabling Fiber-optic cabling (see Figure 9-20) uses extremely thin strands of
glass to carry pulses of light long distances and at high data rates. It’s typically used in large
internetworks to connect switches and routers and sometimes to connect high-speed servers
to the network. Because of its capability to carry data over long distances (several hundred
to several thousand meters), it’s also used frequently in WAN applications. Fiber-optic
cabling isn’t susceptible to electrical interference, so unlike UTP, it can be used in electrically
noisy environments. It requires two strands of fiber to make a network connection: one for
transmitting and one for receiving.
Outer sheath
Kevlar for strength
Inner sheath
Optical fiber
Figure 9-20 Fiber-optic cabling
Coaxial Cable Best known for its use in cable TV, coaxial cable is obsolete as a LAN
medium, but it’s used as the network medium for Internet access via cable modem. Coaxial
cable was the original medium used by Ethernet in physical bus topologies, but its limitation
of 10 Mbps half-duplex communication made it obsolete for LAN applications after 100
Mbps Ethernet became the dominant standard.
Network Protocol Fundamentals
For effective communication across a network, computers must be capable of transmitting
data reliably and efficiently. Network protocols are designed to accomplish this goal; some
protocols emphasize reliability, others efficiency. Network protocols often work together at
different layers of the network communication process to provide both reliability and efficiency. This section discusses network protocols in general but focuses on the most common
suite of protocols used in networks: TCP/IP.
The term protocol isn’t specific to the field of networking. In general, a protocol consists of
rules and procedures for communication and behavior. Just as two people must share a common set of rules for verbal communication—a language—computers must also “speak” the
same language and agree on the rules of communication. You use protocols in other ways as
well. Texting, e-mail, and Facebook communication, for example, have their own rules of
etiquette and language use.
Until fairly recently, you had a choice of network protocols you could install on your computer, depending on the computing environment. A small network in the 1990s running
Copyright 2017 Cengage Learning. All Rights Reserved. May not be copied, scanned, or duplicated, in whole or in part. WCN 02-200-203
9
416
Chapter 9 Configuring a Network Connection
Windows 3.1 or Windows 95 probably ran the Windows-specific NetBEUI protocol. A network with Novell NetWare 4.x servers typically ran IPX/SPX. Both these protocols are
obsolete now and are found only in networks that haven’t been upgraded in more than a
decade. Today, you can focus on the TCP/IP protocol suite, the protocol of the Internet and
the one all contemporary OSs run.
When a set of protocols works cooperatively, it’s called a protocol suite (or protocol stack).
The most common one is Transmission Control Protocol/Internet Protocol (TCP/IP), the
Internet protocol suite. Although you can see by its name that TCP/IP consists of at least two
protocols—TCP and IP—this protocol suite is actually composed of more than a dozen protocols operating at different layers of the communication process.
Recall the communication process explained earlier. This discussion was an introduction to
the idea that communication takes place in layers. The protocols in TCP/IP can also be
divided into four layers, with similar names and functions. Figure 9-21 shows the layers of
the TCP/IP protocol suite and which protocols operate at each layer. This layered architecture
is usually referred to as the TCP/IP model.
Layer name
TCP/IP protocols
Application
HTTP
SMTP
Transport
TCP
Internetwork
ICMP
IPv4 and IPv6
Network access
Ethernet, token ring, FDDI, WAN technologies
FTP
POP3
DHCP
DNS
TFTP
SNMP
UDP
ARP
IPsec
Figure 9-21 The TCP/IP layered architecture
The Internetwork layer is where computer professionals usually do the most network configuration. It’s where the IP protocol operates, and it can be considered the heart of the TCP/IP
protocol suite. IP addresses, of course, are defined here, and routing takes place in this layer,
too. Without routing, the Internet and World Wide Web wouldn’t exist. With all the complexity of configuring routing and managing IP addresses, this layer is also where most errors
occur in network configuration. In a large internetwork, a lot of time is typically spent unraveling the intricacies of the Internetwork layer.
The Internetwork layer is responsible for four main tasks, as discussed in the following
sections:
•
Defines and verifies IP addresses
•
Routes packets through an internetwork
•
Resolves MAC addresses from IP addresses
•
Delivers packets efficiently
Copyright 2017 Cengage Learning. All Rights Reserved. May not be copied, scanned, or duplicated, in whole or in part. WCN 02-200-203
Network Protocol Fundamentals
417
Internet Protocol Version 4
Internet Protocol version 4 (IPv4), or just IP, is an Internetwork layer protocol that provides
source and destination addressing and routing for the TCP/IP protocol suite. IPv4 is the most
common IP version in networks and the first version that was in widespread use. Earlier versions never really made it out of the lab. One of IP’s most important functions is the definition of a logical address, called an IP address. IPv4 defines a 32-bit dotted decimal address:
172.31.149.10, for example. Each grouping of numbers separated by a dot (period) is an
8-bit value called an octet that can range from 0 to 255. Because an IP address has
32 bits, a total of 232 addresses are possible—that’s approximately 4 billion addresses,
which certainly seems like a lot, but many are wasted, and available addresses to assign
to Internet devices are running out.
Part of an IP address specifies the network ID, and the rest of the address specifies a unique
host ID in the network. For example, in the address 172.31.149.10, 172.31 is the network
ID and 149.10 is the host ID. Determining which part of the IP address is the network ID
and which part is the host ID depends on the subnet mask, another 32-bit dotted decimal
number consisting of a contiguous series of binary 1 digits followed by a contiguous series
of binary 0 digits. A contiguous series of eight binary 1s equals the decimal value 255. For
example, a typical subnet mask is 255.0.0.0 or 255.255.0.0. In these two examples, for each
255 in the subnet mask, the corresponding octet of the IP address is part of the network ID.
For example, you might configure a computer with the following IP address and subnet
mask:
IP address: 10.1.221.101
Subnet mask: 255.0.0.0
Because the first octet of the subnet mask is 255 (a series of eight binary 1s), the first octet of
the IP address is the network ID, which is 10. The network ID is written as 10.0.0.0, and the
host ID is 1.221.101. Understand, however, that the network ID and host ID are used
together when configuring a computer’s IP address, so you will always see them written as
10.1.221.101.
Now take this example:
IP address: 172.31.100.6
Subnet mask: 255.255.0.0
The first two octets of the subnet mask are 255 (a total of 16 contiguous binary 1s), so the
network ID is 172.31, which is written as 172.31.0.0. The host ID is 100.6. When referring
to the network ID, you always fill in the host part of the address with 0s.
Continuing with this pattern, say you have the following IP address and subnet mask:
IP address: 192.168.14.250
Subnet mask: 255.255.255.0
This combination gives you the network ID 192.168.14.0 and the host ID 250. You can’t
have a subnet mask like 255.0.255.0 because the network ID must be contiguous.
Copyright 2017 Cengage Learning. All Rights Reserved. May not be copied, scanned, or duplicated, in whole or in part. WCN 02-200-203
9
418
Chapter 9 Configuring a Network Connection
IPv4 Address Classes When you enter an IP address in the Internet Protocol Version 4
(TCP/IPv4) Properties dialog box in Windows, as shown in Figure 9-22, Windows fills in a
subnet mask automatically. You can change this value if needed. Windows bases the suggested subnet mask on the class of the IP address you enter.
Figure 9-22 A subnet mask based on the address class
IP addresses are categorized in ranges referred to as Classes A, B, C, D, or E. Only IP
addresses in the A, B, and C classes can be assigned to a network device (host). Although
the IP address class system has been superseded by a more flexible way to manage IP
addresses, called Classless Interdomain Routing (CIDR), the class system is a basis for determining which part of an IP address is the network ID and which part is the host ID. The
first octet of an address denotes its class. Review the following facts about IP address
classes:
•
The value of the first octet for Class A addresses is between 1 and 127. Class A
addresses were intended for use by large corporations and governments. An IP address
registry assigns the first octet, leaving the last three octets for network administrators
Copyright 2017 Cengage Learning. All Rights Reserved. May not be copied, scanned, or duplicated, in whole or in part. WCN 02-200-203
Network Protocol Fundamentals
419
to assign to hosts. This allows 24 bits of address space, or 16,777,214 hosts per
network address. In a Class A IP address such as 10.159.44.201, for example, the network address is 10.0.0.0. So, the first address in the 10.0.0.0 network is 10.0.0.1, and
the last address is 10.255.255.254.
•
Class B addresses begin with network IDs between 128 and 191; they were intended
for use in medium-sized to large networks. An IP address registry assigns the first two
octets, leaving the third and fourth octets available for administrators to assign as host
addresses. In the Class B address 172.17.11.4, for example, the network address is
172.17.0.0. Having two octets in the host ID allows 65,534 hosts per network address.
•
Class C addresses were intended for small networks. An IP address registry assigns the
first three octets, with network IDs ranging from 192 to 223. In the Class C address
203.0.113.254, for example, the network address is 203.0.113.0. These networks are
limited to 254 hosts per network.
•
Class D addresses are reserved for multicasting, in which a packet is addressed so that
more than one destination can receive it. Applications using this feature include videoconferencing and streaming media. In a Class D address, the first octet is in the range
from 224 to 239. Class D addresses can’t be used to assign IP addresses to host
computers.
•
Class E addresses have a value from 240 to 255 in the first octet. This range of
addresses is reserved for experimental use and can’t be used for address assignment.
Note a couple of things about the preceding list: First, if you do the math, you can see that a
Class C address provides 28 bits of address space, which yields 256 addresses, not 254. An
address space is the total number of addresses in an IP network number that can be assigned
to hosts. The number of addresses specified for Classes A and B are also two fewer than the
address space suggests. This discrepancy happens because each network has two reserved
addresses: the address in which all host ID bits are binary 0s and the address in which all
host ID bits are binary 1s. For example, all the host bits in address 203.0.113.0 are binary
0s; this address represents the network number and can’t be assigned to a computer. The
host bits in address 203.0.113.255 are binary 1s; this address is the broadcast address for
the 203.0.113.0 network and can’t be assigned to a computer.
The other note concerns the 127.0.0.0 network. Although technically a Class A address, it’s
reserved for the loopback address, which always refers to the local computer and is used to
test the functioning of TCP/IP. A packet with a destination address starting with 127 is sent
to the local device and does not reach the network medium. Likewise, the reserved name
localhost always corresponds to the IP address 127.0.0.1, so that a local machine can
always be referenced by this name.
Even though localhost and the loopback address are usually associated
with the address 127.0.0.1, any address in the 127.0.0.0 network
(except 127.0.0.0 and 127.255.255.255) references the local machine
in most OSs.
Table 9-4 summarizes address Classes A, B, and C and the default subnet masks.
Copyright 2017 Cengage Learning. All Rights Reserved. May not be copied, scanned, or duplicated, in whole or in part. WCN 02-200-203
9
420
Chapter 9 Configuring a Network Connection
Table 9-4
IPv4 address class summary
Class
A
B
C
Value of first octet
0–127
128–191
192–223
Default subnet mask
255.0.0.0
255.255.0.0
255.255.255.0
Number of network ID bits
8
16
24
Maximum number of hosts/network
16,777,214
65,534
254
Number of host bits
24
16
8
Internet Protocol Version 6
IPv4 has been the driving force on the Internet for decades and continues to be the dominant
protocol in use. However, it’s showing its age as more and more IPv4 address space is used
up and workarounds for security and quality of service must be put in place. IPv4 was developed more than 40 years ago, so it seems natural that as all other aspects of technology
slowly get replaced, so will IPv4. This section discusses that replacement: Internet Protocol
version 6 (IPv6). IPv6 addresses look very different from IPv4 addresses, and unlike IPv4,
IPv6 addresses have a built-in hierarchy and fields with a distinct purpose. Configuring an
IPv6 address is clearly different from configuring an IPv4 address. The transition from IPv4
to IPv6 won’t happen overnight, so methods have been developed to allow IPv4 and IPv6
networks to coexist and communicate with one another.
This section doesn’t attempt to give you a full explanation of IPv6 and its many complexities;
there are entire books on this topic. However, this section addresses the key aspects of the
IPv6 protocol and what you need to know to configure and support a computer using IPv6.
The Internet Engineering Task Force (IETF) started development on IPng (IP next generation)
in 1994, and it was later named IPv6. IPv6 was developed to address IPv4’s shortcomings.
Some of the improvements of IPv6 over IPv4 include the following:
•
Larger address space—IPv4 addresses are 32 bits, which theoretically provide four billion
addresses. IPv6 addresses are 128 bits, meaning there are 340 trillion trillion trillion possible addresses. It’s probably safe to say that running out of IPv6 addresses is unlikely.
•
Hierarchical address space—Unlike IPv4, in which numbers in the address have little
meaning other than the address class, network ID, and host ID, IPv6 addresses have a
more defined structure. For example, the first part of an address can indicate a particular organization or site.
•
Autoconfiguration—IPv6 can be self-configuring or autoconfigured from a router or
server running IPv6 or through DHCPv6.
•
Built-in Quality of Service (QoS) support
support—IPv6 includes built-in fields in packet headers to support QoS strategies without having to install additional protocol components,
as IPv4 does. QoS strategies are used to prioritize data packets based on the type or
urgency of information they contain.
•
Built-in support for security—From the ground up, IPv6 is built to support secure protocols, such as Internet Protocol Security (IPsec), whereas IPv4’s support for IPsec is an
add-on feature.
Copyright 2017 Cengage Learning. All Rights Reserved. May not be copied, scanned, or duplicated, in whole or in part. WCN 02-200-203
Introducing the OSI Model of Networking
421
•
Support for mobility—With its built-in support for mobility, routing IPv6 packets generated by mobile devices over the Internet is more efficient than with IPv4.
•
Extensibility—IPv6 uses extension headers instead of IPv4’s fixed-size 40-byte header.
Extension headers allow adding features to IPv6 simply by adding a new header.
IPv6 Addresses An IPv6 address is 128 bits rather than the 32 bits in an IPv4 address.
This length increases the number of possible addresses from about 4 billion in IPv4 to 3.4
1038 addresses (that’s 34 followed by 37 zeros!) in IPv6. Unless IP addresses are assigned to
every star in the universe, it’s safe to say enough IPv6 addresses will be available.
Unlike IPv4 addresses, which are specified in dotted decimal notation in 8-bit sections, IPv6
addresses are specified in hexadecimal format in 16-bit sections separated by a colon, as in
this example: 2001:1b20:302:442a:110:2fea:ac4:2b.
If one of the 16-bit numbers doesn’t require four hexadecimal digits, the leading 0s are
omitted. Furthermore, some IPv6 addresses contain consecutive 0s in two or more 16-bit
sections, so a shorthand notation is used to eliminate consecutive 0 values. Two colons
replace two or more consecutive 0 values, as the following example shows:
•
Longhand notation: 2001:DB8:0:0:0:2ed3:340:ab
•
Shorthand notation: 2001:DB8::2ed3:340:ab
The host ID of an IPv6 address is typically 64 bits and uses the interface’s MAC address to
make up the bulk of the address. Because a MAC address is only 48 bits, the other 16 bits
come from the value FF-FE inserted after the first 24 bits of the MAC address. In addition, the first two zeros that compose most MAC addresses are replaced with 02. For
example, given the MAC address 00-0C-29-7C-F9-C4, the host ID of an IPv6 address is
02-0C-29-FF-FE-7C-F9-C4.
Introducing the OSI Model of Networking
The Open Systems Interconnection (OSI) reference model for networking explains how networks behave within an orderly, seven-layered model for networked communication. The
OSI model isn’t specific to a particular network protocol and can be applied to most networking protocols past and present. Many of the networking hardware and software components
discussed in this chapter can be identified as working in one or more of the OSI model
layers.
Although the OSI model isn’t specific to one set of protocols, it’s the standard model for discussing, teaching, and learning the field of computer networking. It’s unlikely you’ll have a
course in networking that doesn’t at least mention the OSI model, and some courses you
take will likely cover it in more detail than this chapter.
Several networking models have sought to create an intellectual framework for clarifying network concepts and activities, but none has been as successful as the OSI model, which was
originally proposed by the International Organization for Standardization (ISO). This model
is sometimes called the ISO/OSI reference model.
Copyright 2017 Cengage Learning. All Rights Reserved. May not be copied, scanned, or duplicated, in whole or in part. WCN 02-200-203
9
422
Chapter 9 Configuring a Network Connection
ISO isn’t an acronym; it comes from the Greek prefix iso, which means
equal or the same. The ISO, based in Geneva, Switzerland, is a network
of national standards institutes from 161 countries. The expanded
name differs from language to language. For example, in France the
organization is called the Organisation Internationale de Normalisation.
The term ISO gives the network of institutes a common name.
The OSI reference model has become a key part of networking, in large part because it’s a
common framework for developers and students of networking to work with and learn from.
The attempt to develop a working set of protocols and technologies based on the OSI model
and put these efforts into common use never materialized, partly because existing protocols,
such as TCP/IP, were already entrenched in the marketplace. However, the OSI reference
model has a prominent place in networking as a model and teaching tool. This section briefly
covers the model’s seven-layer organization, the function of each layer, and the networking
devices and components operating at each layer.
The set of protocols developed to conform to the OSI model is called
ISO. You can view the fruits of these labors at www.protocols.com/
pbook/iso.
Structure of the OSI Model
The OSI model divides network communication into the seven layers shown in Figure 9-23.
7
Application
6
Presentation
5
Session
4
Transport
3
Network
2
Data Link
1
Physical
Figure 9-23 The seven layers of the OSI reference model
Copyright 2017 Cengage Learning. All Rights Reserved. May not be copied, scanned, or duplicated, in whole or in part. WCN 02-200-203
Introducing the OSI Model of Networking
423
Here are two mnemonics to help you remember the seven layers
of the OSI reference model. From the bottom up, starting with the
Physical layer, the mnemonic is “People Do Not Throw Sausage Pizza
Away.” From the top down, starting with the Application layer, try
“All People Studying This Need Drastic Psychotherapy” or “All People
Seem To Need Data Processing.”
At the top, the Application layer provides interfaces that enable user applications—such as
File Explorer or Microsoft Word—to access network services. These user applications aren’t
part of the OSI model, but communicate with its top layer. On the other hand, some user
applications, such as Web browsers and e-mail programs, are integrated with functions of
the Application layer (as well as the Presentation and Session layers).
At the bottom of the OSI model, the Physical layer is where the network medium and the signals traversing it reside. All the activities needed to handle network communication occur
between the top and bottom layers. To comprehend how a network works as a whole, you
simply need to understand how each layer functions, what networking components and
devices operate at each layer, and how the layers interact with one another.
Each layer in the OSI model has its own well-defined functions, and the functions of each
layer communicate and interact with the layers immediately above and below it. For example, the Transport layer works with the Network layer below it and the Session layer above
it. The Application layer, although not having a layer above it, interacts with user applications and network services.
When discussing devices or protocols in relation to the OSI model,
the OSI layer number is often used rather than its name. For example, you hear terms such as Layer 3 switch or Layer 7 gateway.
Application Layer The Application layer (Layer 7) provides interfaces for applications
to access network services, such as file sharing, message handling, and database access. It
also handles error recovery for applications, as needed.
Common protocols at the Application layer include HTTP, FTP, SMB/CIFS, TFTP, and
SMTP. Computers with network OSs and some security devices operate at Layer 7 because
they work with these Application layer protocols.
Presentation Layer The Presentation layer (Layer 6) handles data formatting and
translation. For outgoing messages, it converts data into a format specified by the Application layer, if necessary; for incoming messages, it reverses the conversion if required by the
receiving application. In short, Layer 6 “presents” data in a suitable format to the Application layer. The Presentation layer handles protocol conversion, data encryption and
decryption, data compression and decompression, data representation incompatibilities
between OSs, and graphics commands.
An example of functionality at this level is a Web browser that connects to a secure Web
server with encryption protocols that must encrypt data before it’s transferred to the server
and decrypt data arriving from the Web server.
Copyright 2017 Cengage Learning. All Rights Reserved. May not be copied, scanned, or duplicated, in whole or in part. WCN 02-200-203
9
424
Chapter 9 Configuring a Network Connection
A software component known as a redirector operates at this layer. It intercepts requests for
service from the computer; requests that can’t be handled locally are redirected across the
network to a network resource that can handle the request.
Session Layer Layer 5, the Session layer, permits two computers to hold ongoing
communications—called a session—
session across a network, so applications on either end of the session can exchange data for as long as the session lasts. The Session layer handles communication
setup ahead of data transfers when necessary and session teardown when the session ends. Some
common network functions this layer handles include name lookup and user logon and logoff.
Transport Layer The Transport layer (Layer 4) manages data transfer from one application to another across a network. It breaks long data streams into smaller chunks called
segments. Segmenting the data is important because every network technology has a maximum frame size called the maximum transmission unit (MTU). For Ethernet, the MTU is
1518 bytes, which means segments must be small enough to allow for the Network layer
and Data Link layer headers and still be no larger than 1518 bytes.
The components working at this layer include TCP and UDP from the TCP/IP protocol suite,
although UDP is sometimes called a pseudo-Transport layer protocol because it doesn’t perform all the functions required of the Transport layer, such as breaking data into segments.
Network Layer Layer 3, the Network layer, handles logical addressing, translates logical network addresses (IP addresses) into physical addresses (MAC addresses), and performs
best path selection and routing in an internetwork. A router performs best path selection
when multiple pathways, or routes, are available to reach a destination network; the router
attempts to choose the best, or fastest, path.
The software components working at this layer include IP, ARP, ICMP, and several routing
protocols from the TCP/IP suite. Routers work at this layer, as do firewalls and certain
remote access devices, such as virtual private network (VPN) servers. A switch with routing
capabilities, called a Layer 3 switch, also works at the Network layer. Essentially, any
device that works mainly with packets and their source and destination IP addresses is said
to be a Network layer device or Layer 3 device.
Data Link Layer Layer 2, the Data Link layer, is the intermediary between the Network
layer and Physical layer. It defines how computers access the network medium—a process
also called media access control, which is why the media access control (MAC) address is
defined at this layer.
The software component operating at this layer is the NIC driver, and the hardware components include NICs and switches. A NIC operates at this layer because it contains the MAC
address and is responsible for media access control. Switches operate at this layer because
they do their job by examining MAC addresses and using the information to switch packets
from incoming ports to outgoing ports. Networking technologies such as Ethernet and
Token Ring operate at this layer.
Physical Layer Last but not least, the job of the Physical layer (Layer 1) is to convert
bits into signals for outgoing messages and signals into bits for incoming messages. The
Copyright 2017 Cengage Learning. All Rights Reserved. May not be copied, scanned, or duplicated, in whole or in part. WCN 02-200-203
Introducing the OSI Model of Networking
425
types of signals generated depend on the medium; for example, wire media, such as twistedpair cable, use electrical pulses, fiber-optic media use pulses of light, and wireless media use
radio waves. At this layer, details are specified for creating a physical network connection,
such as the type of connectors used to attach the medium to the NIC. The network components working at the Physical layer include all the cables and connectors used on the
medium plus repeaters and hubs.
The unit of information at each layer of the OSI model is called a protocol data unit (PDU). For example, at the top three layers, the PDU is
simply called data. At the Transport layer, the PDU is called a segment;
at the Network layer, it is called a packet; and at the Data Link layer, it
is called a frame.
Summary of the OSI Model The OSI model is a helpful way to categorize and compartmentalize networking activities, and most discussions of protocol suites and networking
software use its terminology. Table 9-5 summarizes the actions occurring at each layer. Even
though most protocol suites don’t adhere strictly to this model (perhaps because so many of
them were already implemented in some form before the model’s development), they still
incorporate its concepts.
Table 9-5
OSI model summary
Layer
PDU
7. Application
Data
6. Presentation
Protocols/
software
9
Devices
Function
HTTP, FTP, SMTP,
DHCP
Computers
Provides programs with access to network
services
Data
Redirectors
N/A
Handles data representation to application
and data conversions, ensures that data can
be read by the receiving system, and
handles encryption and decryption
5. Session
Data
DNS, authentication
protocols
N/A
Establishes, maintains, and coordinates
communication between applications
4. Transport
Segment
TCP, UDP
N/A
Ensures reliable delivery of data, breaks
data into segments, handles sequencing
and acknowledgements, and provides flow
control
3. Network
Packet
IP, ICMP, ARP
Routers,
firewalls,
Layer 3
switches
Handles packet routing, logical addressing,
and access control through packet
inspection
2. Data Link
Frame
Ethernet, token
ring, FDDI, NIC
drivers
Switches,
NICs
Provides physical device addressing, deviceto-device delivery of frames, media access
control, and MAC addresses
1. Physical
Bits
N/A
Network
media, hubs/
repeaters,
connectors
Manages hardware connections, handles
sending and receiving binary signals, and
handles encoding of bits
Copyright 2017 Cengage Learning. All Rights Reserved. May not be copied, scanned, or duplicated, in whole or in part. WCN 02-200-203
426
Chapter 9 Configuring a Network Connection
Although not all networking protocols adhere to the OSI model, a network administrator’s clear understanding of the functions at each layer
is essential in troubleshooting networks and network equipment and in
understanding how network devices operate.
There is a lot more to say about network devices, protocols, network models, and IPv6 and
IPv4 addresses, but this book is about operating systems, so we’ll turn our attention now to
configuring networking in an operating system.
Configuring Networking in an Operating System
Network configuration in an operating system follows a similar pattern as the steps in the network communication process, the TCP/IP model, and the OSI model. All the functions of the
network model must be accounted for, and some but not all might require some level of configuration. We’ll start at the bottom, where the physical aspects of the network exist.
Configuring the Network Interface
The network interface is where the NIC and its driver lives; it comprises the Physical and
Data Link layers of the OSI model. In most cases, you don’t have to configure the network
interface; if a NIC is installed, the OS will usually install the proper driver and the network
interface is ready to go. However, it’s possible you will need to install a new or different
driver if an update becomes available, if the OS is unable to install a driver, or if the OS
installs the wrong driver. Installing and updating device drivers was discussed in Chapter 6.
Some network interface drivers provide a number of configuration options. For example, in
Figure 9-24, the properties of the Windows network connection have more than 20 configuration options. Some of the options include the speed and duplex mode of the connection,
the number of buffers the connection should use, and whether packet prioritization should
be enabled. The particular options for a network connection depend on the features of the
NIC and its driver.
Copyright 2017 Cengage Learning. All Rights Reserved. May not be copied, scanned, or duplicated, in whole or in part. WCN 02-200-203
Configuring Networking in an Operating System
427
9
Figure 9-24 The properties of a network connection in Windows
Linux and Mac OS X also offer configuration settings for the network interface. For example,
in Fedora Linux, you can use the command-line tool ethtool to display and change network
interface settings (see Figure 9-25). In Mac OS X, use the advanced settings in the Network
dialog box (see Figure 9-26).
Copyright 2017 Cengage Learning. All Rights Reserved. May not be copied, scanned, or duplicated, in whole or in part. WCN 02-200-203
428
Chapter 9 Configuring a Network Connection
Figure 9-25 Output of ethtool command in Linux
Source: Fedora Linux
Figure 9-26 Viewing network interface settings in Mac OS X
Source: Mac OS X
Copyright 2017 Cengage Learning. All Rights Reserved. May not be copied, scanned, or duplicated, in whole or in part. WCN 02-200-203
Configuring Networking in an Operating System
429
Configuring IPv4 Addresses
The configuration of an IPv4 address consists of the following parts (see Figure 9-27):
•
IP address—The IP address is required and identifies the computer on the network.
•
Subnet mask—The subnet mask is required because it determines the network and
host IDs.
•
Default gateway—The default gateway is not required, but is necessary for the computer to access other networks, including the Internet.
•
Preferred DNS server
server—The preferred DNS server address is not required but is necessary to translate domain names to addresses. Without a DNS server address, communication with another computer would require you to know the computer’s IP address.
With a DNS server, your computer can communicate with other computers using their
names, such as server1 and www.awebserver.com.
•
Alternate DNS server
server—The alternate DNS server address is not required. If the preferred DNS server is not available, the computer will use the alternate DNS server.
9
Figure 9-27 The Internet Protocol Version 4 (TCP/IPv4) Properties dialog box
Copyright 2017 Cengage Learning. All Rights Reserved. May not be copied, scanned, or duplicated, in whole or in part. WCN 02-200-203
430
Chapter 9 Configuring a Network Connection
When you assign a computer an IP address, there are some rules to remember:
•
A host can be assigned an IP address only in the range of Class A, Class B, or Class C
addresses.
•
All hosts on the same network must have the same network ID in their IP addresses.
The term network in this case means a group of computers connected to one or more
switches (or access points), and not separated by a router.
•
All host IDs on the same network must be unique.
•
You can’t assign an IP address in which all the host ID bits are binary 0. This type of
IP address is reserved as the network ID. For example, IP address 10.1.0.0 with subnet
mask 255.255.0.0 is reserved to identify network 10.1.
•
You can’t assign an IP address in which all the host ID bits are binary 1. This type of
IP address is reserved as the network broadcast address. For example, IP address
10.1.255.255 with subnet mask 255.255.0.0 has all host ID bits set to binary 1 and is
reserved as the broadcast address for the 10.1.0.0 network.
•
Computers assigned different network IDs can communicate only by sending packets to
a router, which forwards the packets to the destination network.
•
The default gateway address assigned to a computer must have the same network ID as
that computer. For example, if a computer’s IP address is 192.168.1.100 with subnet
mask 255.255.255.0, the default gateway address must be in the 192.168.1.0 network;
for example, 192.1681.250 is a valid address in that network.
•
The DNS server address simply needs to point to the address of a DNS server that may
or may not be on the same network as the computer.
Configuring an IPv4 Address in Windows Windows is configured to obtain an
IP address automatically by default. This means that Windows uses the Dynamic Host Configuration Protocol (DHCP) to request an IP address configuration from a DHCP server.
DHCP is a TCP/IP protocol used to automatically configure IP addresses. When a computer
running DHCP client software needs an IP address, it sends a message to the network
requesting one. A DHCP server on the network replies with an IP address and subnet
mask; optionally, it can also reply with a default gateway and DNS server addresses. If a client computer is configured to use DHCP but no DHCP server responds to the request for an
address, the computer assigns an automatic private IP addressing (APIPA) address. An
APIPA address always begins with 169.254 and has a 255.255.0.0 subnet mask. A computer with an APIPA address is not assigned a default gateway because APIPA addresses
cannot be used outside the local network and cannot be routed, so they have limited utility.
DHCP is the most common way for computers to get an IP address configuration; however,
sometimes you need to configure a static IP address, which is a manually configured IP
address. For example, most servers require a static IP address, or you may need to configure
static IP addresses if there is no DHCP server on your network.
You can configure a static IPv4 address in Windows using a GUI (as shown in Figure 9-27)
or the command line. You can try both methods in the Hands-On Projects. The GUI method
Copyright 2017 Cengage Learning. All Rights Reserved. May not be copied, scanned, or duplicated, in whole or in part. WCN 02-200-203
Configuring Networking in an Operating System
431
is accessed from the properties window of a network connection. To configure an IPv4
address from the command line, use the netsh command from a command prompt. You
can use the netsh command for a wide variety of network configuration tasks. To see a list
of netsh commands, type netsh /? at the command prompt. To configure the IP address of a
network interface, you need to know the name of the interface. Windows names its network
interfaces Ethernet0, Ethernet1, and so on. You can find the name of your interface from the
Network Connections control panel, by typing netsh interface show interface from the command prompt, or by typing ipconfig from the command prompt. To configure the IP
address of an interface named Ethernet0 to 10.1.1.1 with subnet mask 255.255.0.0, use this
command:
netsh interface ipv4 set address "Ethernet0" static 10.1.1.1 255.255.0.0
You can include the default gateway by adding the address to the end of the command:
netsh interface ipv4 set address "Ethernet0" static 10.1.1.1 255.255.0.0 10.1.1.250
To set the primary DNS server for the computer to 10.1.1.100, use the following command:
netsh interface ipv4 set dns "Ethernet0" static 10.1.1.100 primary
To view your IP address configuration, use the ipconfig command. For extended IP configuration information, use ipconfig /all. You’ll use ipconfig in the Hands-On Projects.
Configuring an IPv4 Address in Linux and Mac OS X As with Windows, most
Linux distributions use automatically assigned IP addresses using DHCP by default. If you
need to configure a static address in Linux, use the ifconfig command from a shell prompt.
As with the Windows netsh command, you need to know the name of your network interface, which you can find out by typing ifconfig and pressing Enter to display your current
interface configuration. Linux names its interfaces enoNumber, where Number is an 8-digit
number. You might also see Linux interface names such as eth0 and eth1. To configure an
IP address on an interface named eth0, use the following command from the shell prompt:
ifconfig eth0 10.1.1.1 netmask 255.255.0.0
To configure a default gateway in Linux, use the route command:
route add default gw 10.1.1.250
To configure a DNS server in Linux, you must configure the /etc/resolv.conf file and add an
entry that looks like:
nameserver 10.1.1.100
Most Linux installations that include a GUI have a GUI tool for configuring the IP address
settings. For example, in Fedora 23, you can find the Network utility by clicking Activities,
Show Applications, Settings, and then Network. To configure an IP address, click the settings icon and then click IPv4. If you want to use DHCP, leave the setting configured to
Automatic (DHCP); otherwise, click Manual to see the dialog box in Figure 9-28.
Copyright 2017 Cengage Learning. All Rights Reserved. May not be copied, scanned, or duplicated, in whole or in part. WCN 02-200-203
9
432
Chapter 9 Configuring a Network Connection
Figure 9-28 Configuring an IP address in Linux
Source: Fedora Linux
As with Linux, you can configure an IP address in Mac OS X using the ifconfig command at
a shell prompt. To use a GUI in Mac OS X, click the Apple icon, click System Preferences,
and then click Network to see the window shown in Figure 9-29.
Copyright 2017 Cengage Learning. All Rights Reserved. May not be copied, scanned, or duplicated, in whole or in part. WCN 02-200-203
Configuring Networking in an Operating System
433
9
Figure 9-29 Configuring an IP address in Mac OS X
Source: Mac OS X
Configuring IPv6 Addresses
Like IPv4, IPv6 can configure itself automatically, which is the preferred method of IPv6 configuration. Static configuration is also an option, when necessary. A computer with IPv6
enabled is always automatically assigned a link-local IPv6 address. A link-local address
always begins with fe80 and is self-configuring, using the MAC address or a random value
for the host ID. Link-local addresses can’t be routed and are somewhat equivalent to APIPA
addresses in IPv4. These addresses can be used for computer-to-computer communication in
small networks where no routers are needed. When you display your IP configuration in
Windows, Linux, or Mac OS X, you will see your link-local IPv6 address, as shown in the
output of the ipconfig command in Figure 9-30.
Copyright 2017 Cengage Learning. All Rights Reserved. May not be copied, scanned, or duplicated, in whole or in part. WCN 02-200-203
434
Chapter 9 Configuring a Network Connection
Figure 9-30 The ipconfig command in Windows showing the link-local IPv6 address
While every IPv6 computer self-configures a link-local address, automatic IP address configuration of a regular, routable IPv6 address, referred to as a unique local IPv6 address, can also
take place using one of two autoconfiguration methods:
•
Stateless autoconfiguration—The node listens for router advertisement messages from a
local router. If the Autonomous flag is set in the router advertisement message, the
node uses the prefix information contained in the message. In this case, the node uses
the advertised prefix and its 64-bit interface ID to generate the IPv6 address. If the
Autonomous flag isn’t set, the prefix information is ignored, and the node can attempt
to use DHCPv6 for address configuration or an automatically generated link-local
address.
•
Stateful autoconfiguration—The node uses an autoconfiguration protocol, such as
DHCPv6, to get its IPv6 address and other configuration information. A node attempts
to use DHCPv6 to get IPv6 address configuration information if no routers on the network provide router advertisements or if the Autonomous flag isn’t set in router
advertisements.
Static assignment of IPv6 addresses is always an option. For Windows, you can use the properties dialog box for Internet Protocol Version 6 (TCP/IPv6) or the netsh command. For
Linux and Mac OS X, you use the ifconfig command or the GUI utilities described earlier in
the “Configuring IPv4 Addresses” section. You will configure IP addresses in all three OSs in
the Hands-On Projects.
Chapter Summary
■
The components needed to make a stand-alone computer into a networked computer
include a NIC, a network medium, and usually an interconnecting device. In addition,
network client and server software, protocols, and the NIC driver are needed to
enable a computer to communicate on a network.
■
The layers of the network communication process can be summarized as user application, network software, network protocol, and network interface.
■
The terms for describing networks of different scopes are LAN, internetwork, WAN,
and MAN. A LAN is a single collection of devices operating in a small geographic
Copyright 2017 Cengage Learning. All Rights Reserved. May not be copied, scanned, or duplicated, in whole or in part. WCN 02-200-203
Key Terms
435
area. An internetwork is a collection of LANs tied together by routers, and a WAN
and MAN are geographically dispersed internetworks.
■
Packets and frames are the units of data handled by different network components.
Packets, which are processed by the network protocol, are units of data with
the source and destination IP addresses added. Frames, which are processed by the
network interface, have MAC addresses and an error-checking code added to the
packet.
■
A client is the computer or network software that requests network data, and a server
is the computer or network software that makes network data available to requesting
clients.
■
A peer-to-peer network model has no centralized authority over resources; a serverbased network typically uses a directory service for centralized logon, security settings,
and resource management.
■
LANs, WANs, MANs, and internetworks are built with a variety of network hardware. Network hubs take incoming bit signals and repeat them at their original
strength out of all connected ports. Network switches read the destination MAC
address in the frame to determine which port the destination device is connected to
and forward the frame only to that port. Access points are a central device in a wireless network and perform a function similar to hubs. Network interface cards create
and mediate the connection between the computer and network medium. Routers
connect LANs to one another and forward packets from one LAN to another,
according to the destination IP address specified in the packet. Routers use routing
tables to determine where to forward packets.
■
TCP/IP is the main protocol suite used in networks. Like most facets of networking,
TCP/IP takes a layered approach and is organized into four layers: Application,
Transport, Internetwork, and Network access.
■
The Open Systems Interconnection (OSI) reference model for networking explains
how networks behave within an orderly, seven-layered model for networked communication. The OSI model isn’t specific to a particular network protocol and can be
applied to most networking protocols past and present.
■
Network configuration in an operating system follows a similar pattern as the steps in
the network communication process, the TCP/IP model, and the OSI model. All the
functions of the network model must be accounted for, and some but not all might
require some level of configuration.
Key Terms
access point (AP) A wireless device that serves as the central connection point of a wireless
LAN and mediates communication between wireless computers.
Active Directory The directory service used by Windows servers.
address space The number of addresses available in an IP network number that can be
assigned to hosts.
Copyright 2017 Cengage Learning. All Rights Reserved. May not be copied, scanned, or duplicated, in whole or in part. WCN 02-200-203
9
436
Chapter 9 Configuring a Network Connection
Application layer Layer 7 in the OSI model, which provides interfaces that enable
applications to request and receive network services. See also Open Systems Interconnection
(OSI) reference model.
automatic private IP addressing (APIPA) A private range of IP addresses assigned to an
APIPA-enabled computer automatically when an IP address is requested via DHCP but no
DHCP server responds to the request. See also Dynamic Host Configuration Protocol
(DHCP).
client The term used to describe an OS designed mainly to access network resources, a
computer’s primary role in a network (running user applications and accessing network
resources), and software that requests network resources from servers.
credentials A username and password or another form of identity used to access a
computer.
Data Link layer Layer 2 in the OSI model, which is responsible for managing access to the
network medium and delivery of data frames from sender to receiver or from sender to an
intermediate device, such as a router. See also Open Systems Interconnection (OSI) reference
model.
directory service The software that manages centralized access and security in a server-
based network.
domain A collection of users and computers in a server-based network whose accounts are
managed by Windows servers called domain controllers. See also domain controller.
domain controller A computer running Windows Server with Active Directory installed; it
maintains a database of user and computer accounts as well as network access policies in a
Windows domain. See also directory service.
Dynamic Host Configuration Protocol (DHCP) An Application layer protocol used to
configure a host’s IP address settings dynamically.
encapsulation The process of adding header and trailer information to chunks of data.
extranet A private network that allows limited and controlled access to internal network
resources by outside users, usually in a business-to-business situation.
frame A packet with source and destination MAC addresses added and an error-checking
code added to the back end. Frames are generated and processed by the network interface.
See also packet.
header Information added to the front end of a chunk of data so it can be correctly
interpreted and processed by network protocols.
Internet A worldwide public internetwork that uses standard protocols, such as TCP/IP,
DNS, and HTTP, to transfer and view information.
Internet Protocol version 4 (IPv4) A connectionless Internetwork layer protocol that
provides source and destination addressing and routing for the TCP/IP protocol suite; IPv4
uses 32-bit dotted decimal addresses.
Internet Protocol version 6 (IPv6) A connectionless Internetwork layer protocol that
provides source and destination addressing and routing for the TCP/IP protocol suite. IPv6
uses 128-bit hexadecimal addresses and has built-in security and QoS features.
Copyright 2017 Cengage Learning. All Rights Reserved. May not be copied, scanned, or duplicated, in whole or in part. WCN 02-200-203
Key Terms
437
internetwork A networked collection of LANs tied together by devices such as routers. See
also local area network (LAN).
intranet A private network in which devices and servers are available only to users
connected to the internal network.
IP address A 32-bit dotted decimal address used by IP to determine the network a host
resides on and to identify hosts on the network at the Internetwork layer.
link-local IPv6 address Similar in function to IPv4 APIPA addresses, link-local IPv6
addresses begin with fe80, are self-configuring, and can’t be routed. See also Automatic
private IP addressing (APIPA).
local area network (LAN) A small network limited to a single collection of machines and
linked by interconnecting devices in a small geographic area.
localhost A reserved name that corresponds to the loopback address in an IP network. See
also loopback address.
loopback address An address that always refers to the local computer; in IPv4, it’s
127.0.0.1, and in IPv6, it’s ::1. This address is used to test TCP/IP functionality on the local
computer.
maximum transmission unit (MTU) The maximum frame size allowed to be transmitted
across a network medium.
metropolitan area network (MAN) An internetwork confined to a geographic region, such
as a city or county; a MAN uses third-party communication providers to supply
connectivity between locations. See also internetwork.
multicasting A network communication in which a packet is addressed so that more than
one destination can receive it.
name server A computer that provides the service of name-to-address resolution; for
example, it resolves a host and domain name to an IP address.
network Two or more computers connected by a transmission medium that allows them to
communicate.
network client software An application or OS service that can request information stored
on another computer.
network interface card (NIC) A device that creates and mediates the connection between a
computer and the network medium.
Network layer Layer 3 of the OSI model, which handles logical addressing and routing of
PDUs across internetworks. See also Open Systems Interconnection (OSI) reference model.
network protocols The software that defines the rules and formats a computer must use
when sending information across the network.
network server software The software that allows a computer to share its resources by
fielding requests generated by network clients.
octet An 8-bit value; a number from 0 to 255 that’s one of the four numbers in a dotted
decimal IP address.
Open Systems Interconnection (OSI) reference model ISO Standard 7498 defines a frame
of reference for understanding networks by dividing the process of network communication
Copyright 2017 Cengage Learning. All Rights Reserved. May not be copied, scanned, or duplicated, in whole or in part. WCN 02-200-203
9
438
Chapter 9 Configuring a Network Connection
into seven layers. Each layer is defined in terms of the services and data it handles on behalf
of the layer above it and the services and data it needs from the layer below it.
packet A chunk of data with source and destination IP addresses (as well as other IP
information) added to it. Packets are generated and processed by network protocols.
peer-to-peer network A network model in which all computers can function as clients or
servers as needed, and there’s no centralized control over network resources.
Physical layer Layer 1, the bottom layer of the OSI model, transmits and receives signals
and specifies the physical details of cables, NICs, connectors, and hardware behavior. See
also Open Systems Interconnection (OSI) reference model.
Presentation layer At Layer 6 of the OSI model, data can be encrypted and/or compressed
to facilitate delivery. Platform-specific application formats are translated into generic data
formats for transmission or from generic data formats into platform-specific application
formats for delivery to the Application layer. See also Open Systems Interconnection (OSI)
reference model.
protocol Rules and procedures for communication and behavior. Computers must use a
common protocol and agree on the rules of communication.
protocol suite A set of protocols working cooperatively to provide network
communication. Protocols are “stacked” in layers, and each layer performs a unique
function required for successful communication. Also called a protocol stack.
router A device that enables LANs to communicate by forwarding packets from one LAN
to another. Routers also forward packets from one router to another when LANs are
separated by multiple routers.
server The term used to describe an OS designed mainly to share network resources, a
computer with the main role of giving client computers access to network resources, and the
software that responds to requests for network resources from client computers.
server-based network A network model in which servers take on specialized roles to
provide client computers with network services and to maintain centralized control over
network resources.
Session layer Layer 5 of the OSI model, which is responsible for setting up, maintaining,
and ending communication sequences (called sessions) across a network. See also Open
Systems Interconnection (OSI) reference model.
stand-alone computer A computer that doesn’t have the necessary hardware or software to
communicate on a network.
static IP address A manually configured IP address.
subnet mask A 32-bit dotted decimal number consisting of a contiguous series of binary 1
digits followed by a contiguous series of binary 0 digits. The subnet mask determines which
part of an IP address is the network ID and which part is the host ID.
switch A network device that reads the destination MAC addresses of incoming frames to
determine which ports should forward the frames.
switching table A table of MAC address and port pairs that a switch uses to determine
which port to forward frames it receives.
Copyright 2017 Cengage Learning. All Rights Reserved. May not be copied, scanned, or duplicated, in whole or in part. WCN 02-200-203
Review Questions
439
trailer Information added to the back end of a chunk of data so it can be correctly
interpreted and processed by network protocols.
Transmission Control Protocol/Internet Protocol (TCP/IP) The most common protocol suite,
the default protocol in contemporary OSs, and the protocol of the Internet.
Transport layer Layer 4 of the OSI model, which is responsible for reliable delivery of data
streams across a network. Layer 4 protocols break large streams of data into smaller chunks
and use sequence numbers and acknowledgements to provide communication and flow
control. See also Open Systems Interconnection (OSI) reference model.
unique local IPv6 address An address for devices on a private network that can’t be routed
on the Internet.
wide area networks (WANs) Internetworks that are geographically dispersed and use thirdparty communication providers to supply connectivity between locations. See also
internetwork.
Review Questions
1. An IPv6 address is made up of how many bits?
a.
32
b. 48
c.
64
d. 128
e.
256
2. The subnet mask of an IP address does which of the following?
a.
provides encryption in a TCP/IP network
b. defines network and host portions of an IP address
c.
allows automated IP address configuration
d. allows users to use a computer’s name rather than its address
3. What’s the term for each grouping of 8 bits in an IP address?
a.
quartet
b. quintet
c.
hexadecimal
d. octet
4. Which of the following IPv6 features is an enhancement to IPv4? (Choose all that
apply.)
a.
larger address space
b. works at the Internetwork and Transport layers
c.
built-in security
d. connectionless communication
Copyright 2017 Cengage Learning. All Rights Reserved. May not be copied, scanned, or duplicated, in whole or in part. WCN 02-200-203
9
440
Chapter 9 Configuring a Network Connection
5. Which protocol can configure a computer’s IP address and subnet mask automatically?
a.
TCP
b. IP
c.
ARP
d. DNS
e.
DHCP
6. When a Windows computer is configured to use DHCP but no DHCP server is available, what type of address is configured automatically for it?
a.
PAT
b. APIPA
c.
NAT
d. static
7. Which OSI layer determines the route a packet takes from sender to receiver?
a.
7
b. 1
c.
3
d. 4
8. Which of the following best describes a MAC address?
a.
a 24-bit number expressed as 12 decimal digits
b. an address with 12 hexadecimal digits
c.
a 48-bit number composed of 12 octal digits
d. a dotted decimal number burned into the NIC
9. Which OSI model layer takes a large chunk of data from the Application layer and
breaks it into smaller segments?
a.
Network access
b. Internetwork
c.
Transport
d. Application
10. You have just installed a new NIC in your PC to replace the old one that had started
malfunctioning. What additional software must be installed to allow the OS to communicate with the new NIC?
a.
network application
b. device driver
c.
BIOS
d. protocol
Copyright 2017 Cengage Learning. All Rights Reserved. May not be copied, scanned, or duplicated, in whole or in part. WCN 02-200-203
Review Questions
441
11. Which of the following requests information stored on another computer?
a.
NIC
b. network client
c.
network server
d. network protocol
e.
device driver
12. Choose the correct order for the process of a user attempting to access network
resources:
1. network protocol
2. application
3. network client
4. NIC driver
a.
4, 2, 1, 3
b. 3, 2, 1, 4
c.
1, 4, 2, 3
d. 2, 3, 1, 4
e.
3, 1, 2, 4
13. TCP/IP is an example of which of the following?
a.
NIC
b. network client
c.
network server
d. network protocol
e.
device driver
14. In network communication, what address is used to deliver a frame to the correct
computer on the network? (Choose all that apply.)
a.
MAC
b. logical
c.
IP
d. physical
15. What type of message is used to determine whether a computer is listening on the
network?
a.
MAC
b. ping
c.
IP
d. TCP
Copyright 2017 Cengage Learning. All Rights Reserved. May not be copied, scanned, or duplicated, in whole or in part. WCN 02-200-203
9
442
Chapter 9 Configuring a Network Connection
16. What does TCP/IP use to look up a computer’s IP address when its name is known?
a.
DNS
b. ping
c.
MAC
d. TCP
17. What is the unit of information that contains MAC addresses and an error-checking
code that’s processed by the network interface layer?
a.
packet
b. ping
c.
frame
d. chunk
18. Data is processed from the time an application creates it to the time it reaches the network medium. This process includes adding information such as addresses and is called
___________________.
a.
packetization
b. encapsulation
c.
de-encapsulation
d. layering
19. You’re the network administrator for a company that has just expanded from one floor
to two floors of a large building, and the number of workstations you need has doubled from 50 to 100. You’re concerned that network performance will suffer if you
add computers to the existing LAN. In addition, new users will be working in a separate business unit, and there are reasons to logically separate the two groups of computers. What type of network should you configure?
a.
WAN
b. MAN
c.
internetwork
d. extended LAN
20. Which of the following best describes a client?
a.
A computer’s primary role in the network is to give other computers access to network resources and services.
b. A computer’s primary role in the network is to run user applications and access
network resources.
c.
It’s the software that responds to requests for network resources.
d. The OS installed on a computer is designed mainly to share network resources.
Copyright 2017 Cengage Learning. All Rights Reserved. May not be copied, scanned, or duplicated, in whole or in part. WCN 02-200-203
Review Questions
443
21. You work for a small company with four users who need to share information on their
computers. The budget is tight, so the network must be as inexpensive as possible.
What type of network should you install?
a.
server-based network
b. peer-to-peer network
c.
wide area network
d. storage area network
22. Which of the following characteristics is associated with a peer-to-peer network?
(Choose all that apply.)
a.
decentralized data storage
b. inexpensive
c.
user-managed resources
d. centralized control
e.
uses a directory service
23. A device interconnects five computers and a printer in a single office so users can share
the printer. This configuration is an example of which of the following?
a.
LAN
b. MAN
c.
WAN
d. internetwork
24. A company has just made an agreement with another organization to share their two
networks’ resources by using TCP/IP protocols. What best describes this arrangement?
a.
MAN
b. LAN
c.
intranet
d. extranet
25. You have installed Windows Server 2012 on a new server and want to centralize user
logons and security policies. What type of software should you install and configure on
this server?
a.
naming services
b. application services
c.
communication services
d. directory services
Copyright 2017 Cengage Learning. All Rights Reserved. May not be copied, scanned, or duplicated, in whole or in part. WCN 02-200-203
9
444
Chapter 9 Configuring a Network Connection
Hands-On Projects
Project 9-1: Upgrade a Stand-Alone Computer to a
Networked Computer
In this project, you install a NIC and connect it to an interconnecting device
with a cable. This project can be done in groups or as an instructor demonstration. It’s intended only to familiarize you with the hardware components
needed to make a stand-alone computer into a networked computer. You will
need a computer, a network interface card (NIC), a patch cable, and a switch.
A USB NIC is a good option if you don’t want to open the computer case.
Even though most computers have a built-in NIC, you may need to add a
stand-alone NIC if the built-in interface fails or you want a computer with
two or more NICs, a common feature on servers.
1. Install the NIC, following the steps your instructor provides. This process might
involve opening the computer case or simply plugging a USB NIC into a USB slot.
2. Turn on the computer. If necessary, insert a disk that contains the NIC driver and follow the instructions for installing it.
3. Using the supplied cable, plug one end into the NIC and the other end into the interconnecting device, which should be a hub or a switch.
4. Examine the indicator lights on the NIC and the hub or switch. There might be one or
two lights on each port of the device, depending on its features. At least one indicator
on the NIC and on each port of the hub or switch is usually referred to as a link light.
The link light glows when a data connection has been made between the NIC and the
hub or switch. Your instructor can supply more details about the indicator lights available on your hub or switch.
5. When the computer is finished booting, view your IP address settings by opening
a command prompt and typing ipconfig (for a Windows computer) or ifconfig (for a
Linux or Mac OS X computer).
6. If your classmates are plugged into the same switch, exchange IP addresses with them
and then type ping IPaddress and press Enter, replacing IPaddress with the IP address
of one of your classmates. You’ll work more with ping in other Hands-On Projects in
this chapter.
7. Shut down the computer, and then unplug and put away the cables.
Copyright 2017 Cengage Learning. All Rights Reserved. May not be copied, scanned, or duplicated, in whole or in part. WCN 02-200-203
Hands-On Projects
445
Project 9-2: Examine NIC Properties in Windows 10
In some of the following Hands-On Projects, you will work with network settings. Note that the name of the interface referenced in these
projects (for example, Ethernet0) may be different from the actual interface name on your computer. Substitute the correct interface name, if
necessary.
When you describe a NIC as a component of networking, you’re referring to
both the hardware NIC and its driver. NIC drivers are configured in the OS
in which they’re installed and control certain operational aspects of the network interface as a whole. In this project, you examine the properties of your
installed NIC. You also use the NIC’s MAC address to look up the vendor.
Not all NICs or NIC drivers have equivalent features, so your NIC might
have more or fewer features than are described here.
1. Start your Windows computer and log on.
2. Right-click Start, and click Network Connections. (You can get to Network Connections in Windows 7 and earlier versions by going to Control Panel, opening Network
and Sharing Center, and clicking Change adapter settings). Right-click Ethernet0 and
click Status. The Ethernet0 Status window shows a summary of information about
your network connection. To see more information, click Details to open the Network
Connection Details window (see Figure 9-31).
The ipconfig /all command shows much of the same information
shown in the Network Connection Details window.
Copyright 2017 Cengage Learning. All Rights Reserved. May not be copied, scanned, or duplicated, in whole or in part. WCN 02-200-203
9
446
Chapter 9 Configuring a Network Connection
Figure 9-31 The Network Connection Details window
3. The Network Connection Details window shows information about your connection,
including the NIC model, the physical (MAC) address, and your IP address configuration. Write down your MAC address, which you will use later to look up the NIC
vendor. Review the remaining information, and then click Close.
MAC address: _________________________________
4. In the Ethernet0 Status window, click Properties. In the Ethernet0 Properties dialog
box, click the Configure button under the “Connect using” text box. In the Network
Connection Properties dialog box, click the Advanced tab (see Figure 9-32). Your NIC
might have fewer, more, or different options.
Copyright 2017 Cengage Learning. All Rights Reserved. May not be copied, scanned, or duplicated, in whole or in part. WCN 02-200-203
Hands-On Projects
447
9
Figure 9-32 Viewing advanced settings in the Network Connection Properties dialog box
5. Review the available properties for your NIC. When you select a property, you can see
its possible values in the Value drop-down list.
6. Click Speed & Duplex (or Link Speed and Duplex), and then click the Value list arrow
to see the possible values. On most NICs, the default value is Auto Negotiation, which
means the NIC and switch exchange signals to determine the optimum operational
mode. Other modes usually include combinations of 10, 100, and 1000 Mbps, fullduplex, and half-duplex. Normally, you don’t need to change these values unless autonegotiation fails to work. If this happens, you’ll probably see the link status light
change from on to off repeatedly or never turn on at all.
7. Click the Locally Administered Address property. (It might also be listed as Network
Address, Physical Address, or MAC Address.) In most cases, this property’s value is
set to Not Present. You can use this property to override the NIC’s burned-in MAC
address by entering a new address in the Value text box. Normally, however, you
shouldn’t override the burned-in MAC address because if you duplicate an existing
Copyright 2017 Cengage Learning. All Rights Reserved. May not be copied, scanned, or duplicated, in whole or in part. WCN 02-200-203
448
Chapter 9 Configuring a Network Connection
address accidentally, it can cause a loss of communication. Click Cancel to close the
Network Connection Properties dialog box.
8. Close the Ethernet0 Status window and the Network Connection Details window.
9. Start a Web browser, and go to www.coffer.com/mac_find.
10. In the “MAC Address or Vendor to look for” text box, type the first six digits of the
MAC address you wrote down in Step 3. You don’t need to enter the hyphen between
each pair of digits, but you do need to enter the leading zeros. Click string to find the
vendor of the MAC address. Knowing the vendor can help you track down devices
that might be causing problems on your network.
11. Close all open windows. Stay logged on if you’re continuing to the next project.
Project 9-3: View TCP/IP Layers in Windows 10
In this project, you view the properties of your computer’s local area connection and identify the TCP/IP layers.
1. Log on to your Windows computer, if necessary.
2. Right-click Start, and click Network Connections.
3. Right-click Ethernet0 and click Properties to open the Ethernet0 Properties dialog box.
4. The “Connect using” text box displays the network interface card. In the list box
under it, you see several items. Client for Microsoft Networks, File and Printer Sharing
for Microsoft Networks, Internet Protocol Version 4, and Internet Protocol Version 6
are the items you’re interested in right now, as they’re the most necessary software
components for making network communication work. For each component, write
down which TCP/IP layer or layers you think it operates in:
•
NIC displayed in the “Connect using” text box: _____________________________
•
Client for Microsoft Networks: _____________________________
•
File and Printer Sharing for Microsoft Networks: _____________________________
•
Internet Protocol Version 4: _____________________________
•
Internet Protocol Version 6: _____________________________
5. Close all open windows, but leave your computer running for the next project.
Project 9-4: Use ipconfig, ping, and arp in Windows 10
In this project, you use command-line tools to view your network configuration and test your computer’s capability to communicate with other computers. The ipconfig command displays the IP address configuration of network
interfaces. The ping command sends a message to a computer to verify the
capability to communicate with it, and the arp command displays the MAC
(physical) addresses your computer has discovered. You will work with one
or more partners in this project.
Copyright 2017 Cengage Learning. All Rights Reserved. May not be copied, scanned, or duplicated, in whole or in part. WCN 02-200-203
Hands-On Projects
449
1. Log on to your Windows computer, if necessary.
2. Right-click Start and click Command Prompt to open a command prompt window. At
the command prompt, type ipconfig and press Enter. You should see a screen similar to
that shown earlier in Figure 9-30, although the numbers will vary. The ipconfig command lists the IP address configuration for network interfaces as well as other network
settings.
3. To see more details about your network configuration, type ipconfig /all and press
Enter. You can scroll up the command prompt window to see all the output. Under
the heading “Ethernet adapter Ethernet0,” find the row labeled Physical Address (see
Figure 9-33). The number in this row is the MAC address. Also, find the IP address in
the IPv4 Address row. Write down these two addresses:
__________________________________________________________________
__________________________________________________________________
9
Figure 9-33 Using ipconfig /all to list physical (MAC) and IP addresses
4. Tell your partner your IP address and make a note of your partner’s IP address. At the
command prompt, type ping IPaddress and press Enter (replacing IPaddress with your
partner’s IP address). You should see output similar to that in Figure 9-34.
Copyright 2017 Cengage Learning. All Rights Reserved. May not be copied, scanned, or duplicated, in whole or in part. WCN 02-200-203
450
Chapter 9 Configuring a Network Connection
Figure 9-34 Results of the ping command
5. Remember that your computer needs both the destination IP address and MAC address to
communicate with another computer. You supplied the IP address by typing it at the command prompt. Your computer discovered the MAC address of your partner’s computer
by using Address Resolution Protocol (ARP). To see this address, type arp -a and press
Enter. The output should be similar to that in Figure 9-35. You might see more lines of
output, depending on what other devices your computer has been communicating with.
Figure 9-35 The arp -a command displays MAC addresses
6. Use the ping command to communicate with other computers and devices on your
network.
7. Close all open windows, but leave your computer running for the next project.
Project 9-5: Configure the IP Address in Windows 10
In this project, you configure your IP address in Windows 10.
1. Log on to your Windows computer, if necessary.
2. Right-click Start and click Network Connections.
3. Right-click Ethernet0 and click Properties to open the Ethernet0 Properties dialog box.
Click Internet Protocol Version 4 (TCP/IPv4) and then click Properties.
Copyright 2017 Cengage Learning. All Rights Reserved. May not be copied, scanned, or duplicated, in whole or in part. WCN 02-200-203
Hands-On Projects
451
4. If your IP settings have the “Obtain an IP address automatically” option enabled, click
Use the following IP address. You use this option to set a static IP address. If your
address is already static, make a note of it, and skip entering the information in Step 5.
5. For the following IP address settings, enter the information shown unless your
instructor tells you to use different values. Click OK when you’re finished:
•
IP address: 192.168.100.XX (replacing XX with a number provided by your
instructor)
•
Subnet mask: 255.255.255.0
•
Default gateway: provided by your instructor
•
Preferred DNS server: provided by your instructor
6. Click Close. If you’re prompted to set a network location, click Work network, and
then click Close.
7. Test the configuration using the ping command to communicate with another student’s
computer or with your default gateway (if provided).
8. To configure an address using the netsh command, open a command prompt with
administrator privileges (right-click Start and click Command Prompt (Admin)). To display your current configuration using netsh, type netsh interface ipv4 show addresses
and press Enter.
9. To configure your Ethernet0 interface with the same IP address and subnet mask
shown in Step 5, type netsh interface ipv4 set address “Ethernet0” static 192.168.100.
XX 255.255.255.0 and press Enter. Be sure to replace XX with an appropriate number.
10. If your interface was using DHCP before you started this project, type netsh interface
ipv4 set address “Ethernet0” dhcp and then press Enter. This command changes the
settings back to using DHCP.
11. To configure a static IPv6 address, type netsh interface ipv6 set address “Ethernet0”
2001:db8::XX and press Enter, replacing XX with a value assigned by your instructor.
The value db8 in the address is not required, but it designates the address as one used
for testing.
12. To test the configuration, type ping -6 2001:db8::XX and press Enter, replacing XX
with the address of another student’s computer. The -6 in the ping command tells ping
to use IPv6 addresses.
13. Close all open windows and shut down your Windows 10 computer.
Project 9-6: Configure the IP Address in Linux
In this project, you configure the IP address in Linux using the ifconfig command. You can use ifconfig in Mac OS X as well.
1. Start and log on to your Linux computer.
2. Open a terminal window.
Copyright 2017 Cengage Learning. All Rights Reserved. May not be copied, scanned, or duplicated, in whole or in part. WCN 02-200-203
9
452
Chapter 9 Configuring a Network Connection
3. Type ifconfig and press Enter to view your current interface settings (see Figure 9-36).
Make a note of the interface that is listed on the first line of the output. In Figure 9-36,
the interface name is eno16777736. You see your IPv4 address (the number after inet
in the output) and your IPv6 address (the number after inet6 in the output).
Figure 9-36 Output from the ifconfig command
Source: Linux
4. To configure your interface with an IPv4 address of 192.168.100.XX and a subnet mask
of 255.255.255.0, type ifconfig InterfaceName 192.168.100.XX netmask 255.255.255.0
and press Enter, being sure to replace InterfaceName with the name of the interface in the
output and XX with a number provided by your instructor. If you get an “Operation not
permitted” error, you need root permissions, so type sudo followed by the command
above and then enter your password when prompted.
5. To test the configuration, type ping IPAddress and press Enter, replacing IPAddress
with the address of another computer. In Linux, the ping command keeps sending
packets until you stop it. Press Ctrl+C to stop the ping command.
6. When you use ifconfig to configure the IP address, it is only temporary; it will revert to
permanent settings (such as using DHCP) at the next boot. To use the GUI tool to configure an IP address, click Activities and then click Show Applications.
7. Click Settings and then click Network. Click the settings button in the lower-right corner and
then click IPv4. To change how Linux receives its IP address, click the list box next to
Addresses, then click Automatic (DHCP) to use DHCP or the Manual option to enter an
address manually. Click Cancel. Close all open windows and shut down your Linux computer.
Project 9-7: Configure the IP Address in Mac OS X
In this project, you configure the IP address in Mac OS X using the Network
preferences utility. You can also use the ifconfig command in Mac OS X.
1. Start and log on to your Mac OS X computer.
2. Click the Apple icon and then click System Preferences. Click Network.
Copyright 2017 Cengage Learning. All Rights Reserved. May not be copied, scanned, or duplicated, in whole or in part. WCN 02-200-203
Hands-On Projects
453
3. Be sure that Ethernet is selected in the left pane and click the selection arrow next to
Configure IPv4 in the right pane (see Figure 9-37). Make a note of your current settings.
Figure 9-37 Configuring IPv4 in Mac OS X
Source: Mac OS X
4. Click Manually, if necessary. Then type the following values:
•
IP Address: 192.168.100.XX (replacing XX with a number provided by your
instructor)
•
Subnet Mask: 255.255.255.0
•
Router: provided by your instructor
5. Click Apply.
6. To test the configuration, open a terminal window by clicking Finder in the Dock.
Next, click Go, click Utilities, and then double-click Terminal. Type ping IPAddress
and press Enter, replacing IPAddress with the address of another computer. As in
Linux, the ping command keeps sending packets until you press Ctrl+C. Press Ctrl+C,
close the terminal window, and then close the Utilities window.
7. In the Network window, click Advanced. Click each tab to see the options for configuring the network settings. Click the Hardware tab. You can use this tab to configure
certain properties of the network interface, such as the speed and duplex mode.
8. Click the TCP/IP tab. Configure the IP address settings as they were originally set; for
example, click the selection arrow next to Configure IPv4 and click Using DHCP if
that was the original setting. Click OK and click Apply.
9. Close all windows and log off or shut down your computer.
Copyright 2017 Cengage Learning. All Rights Reserved. May not be copied, scanned, or duplicated, in whole or in part. WCN 02-200-203
9
454
Chapter 9 Configuring a Network Connection
Critical Thinking
The following activities give you critical thinking challenges. Challenge Labs give you an
opportunity to use the skills you have learned to perform a task without step-by-step instructions. Case projects offer a practical problem for which you supply a written solution. Not all
chapters contain Challenge Labs. There is not always a specific right or wrong answer to these
critical thinking exercises. They are intended to encourage you to review the chapter material
and delve deeper into the topics you have learned.
Challenge Labs
Challenge Lab 9-1: Build a Functioning TCP/IP Network
This Challenge Lab should be done in groups. You will need at least three computers, patch
cables, and a switch for each group. The computers can run Windows, Linux, or Mac OS X.
You should build a network, configure TCP/IP on each computer, and test communication
among the computers. Here are the requirements:
1. Use a TCP/IP Class A address for the IP addresses with an appropriate subnet mask.
2. Test communication among all computers.
3. Answer the following questions.
•
What IP network address did you use?
•
What subnet mask did you use?
•
What command did you use to test communication?
•
What would you need to add to the network to gain access to other networks,
including the Internet? How would your TCP/IP configuration change?
Case Projects
Case Project 9-1: Peer-to-Peer or Server-Based Network?
Networking Gadgets, Inc. currently employs eight people but plans to hire 10
more in the next four months. Users will work on multiple projects, and only
users assigned to a project should have access to the project files. You’re
instructed to set up the network to make it easy to manage and back up, yet
still provide centralized storage for project files. Would you choose a peerto-peer network, a server-based network, or a combination? Why?
Case Project 9-2: Peer-to-Peer or Server-Based Network?
CNT Books hired you as a productivity consultant. Currently, it employs six
people who will be moving into a new office space. You are to configure a
network that allows them to share files and printers. Employees must also be
Copyright 2017 Cengage Learning. All Rights Reserved. May not be copied, scanned, or duplicated, in whole or in part. WCN 02-200-203
Case Projects
455
able to control resources on their own machines. The company wants the least
expensive solution and only minimal training for employees. Would you
choose a peer-to-peer network or a server-based network? Write a list of supplies you might need to purchase to perform this task. What computer configuration tasks might you need to perform?
Case Project 9-3: What Type of Network?
CNT Books has expanded considerably since you got the network up and running three years ago. The company now occupies an entire floor in the building, and its LAN has grown to include several servers and more than 60
workstations. CNT Books has recently purchased another book company and
needs more space and computers. Expansion plans include leasing another
floor four stories above the current offices in the same building and adding
35 workstations and at least one more server immediately, with additional
equipment purchases expected. What type of network is called for—LAN,
WAN, MAN, or internetwork? What additional devices might be needed to
ensure efficient network communication?
Case Project 9-4: Troubleshoot an IP Configuration
You work at a help desk and have just received a call from an employee who
says she can’t access network resources. You want the employee to view her IP
address configuration. Write an e-mail to the employee explaining what
command-line program to use and how she can use it to find the information
you need. After following your instructions, the employee tells you that her IP
address is 169.254.14.11 with the subnet mask 255.255.0.0. What conclusion
can you make from this information?
Copyright 2017 Cengage Learning. All Rights Reserved. May not be copied, scanned, or duplicated, in whole or in part. WCN 02-200-203
9
Copyright 2017 Cengage Learning. All Rights Reserved. May not be copied, scanned, or duplicated, in whole or in part. WCN 02-200-203
chapter
10
Sharing Resources and Working
with Accounts
After reading this chapter and completing the
exercises, you will be able to:
●
●
Configure file and printer sharing
Manage user and group accounts
Copyright 2017 Cengage Learning. All Rights Reserved. May not be copied, scanned, or duplicated, in whole or in part. WCN 02-200-203
457
458
Chapter 10 Sharing Resources and Working with Accounts
One of the primary reasons networks were built was to facilitate the sharing of
information. In this chapter, you learn about sharing files and printers in Windows, Linux,
and Mac OS X. In order to secure access to shared files, you need to configure user and
group accounts, then assign permissions to these accounts to determine who can access the
shared resources and what type of access they have (read or write, for example). You will
learn about different types of user accounts and groups, how to create them, and how to
assign permissions to shared resources.
File and Printer Sharing
File and printer sharing is one reason businesses began to outfit computers with network
interfaces and network software. Sharing files and printers with other computers on the
network requires a file sharing client and a file sharing protocol. The dominant file sharing
protocol is Server Message Block (SMB), the native protocol used by Windows; it is also supported by Linux and Mac OS X. Network File System (NFS) is the native Linux/UNIX file
sharing protocol, and it is supported by Windows and Mac OS X. The protocol you use
depends on which client OS is most prevalent on your network
network—for most networks, it is
Windows, so the SMB protocol is the focus of this chapter.
NFS support for Windows is available in Windows Server 2008 and in
Windows Vista and later versions.
Printer sharing also uses the SMB protocol in Windows, Linux, and Mac OS X. The native
Linux printer sharing protocols are line printer daemon/line printer remote (LPD/LPR) and
Common UNIX Printing System (CUPS). CUPS has become the more popular protocol
because it is based on the Internet Printing Protocol (IPP).
Sharing Files in Windows
File sharing in Windows is based on Client for Microsoft Networks on the client side and
File and Printer Sharing for Microsoft Networks on the server side. To see these client/server
components, view the properties of your network connection, as shown in Figure 10-1.
Neither Client for Microsoft Networks nor File and Printer Sharing for Microsoft Networks
has any configuration options other than the ability to disable them on a particular network
connection.
Copyright 2017 Cengage Learning. All Rights Reserved. May not be copied, scanned, or duplicated, in whole or in part. WCN 02-200-203
File and Printer Sharing
459
10
Figure 10-1 File sharing components in Windows
To share files in Windows, you share the folder in which the files are located. You can use
the following methods to configure folder sharing in Windows. The procedures are similar
in Windows client OSs:
•
File Sharing Wizard
Wizard—To start this wizard, right-click a folder, point to Share with,
and then click Specific people. The File Sharing Wizard (see Figure 10-2) simplifies
sharing for novices by simplifying the permissions settings.
Copyright 2017 Cengage Learning. All Rights Reserved. May not be copied, scanned, or duplicated, in whole or in part. WCN 02-200-203
460
Chapter 10 Sharing Resources and Working with Accounts
Figure 10-2 The File Sharing Wizard
•
Advanced Sharing dialog box—To open this dialog box, click Advanced Sharing in
the Sharing tab of a folder’s Properties dialog box. The dialog box has the following
options (see Figure 10-3):
Copyright 2017 Cengage Learning. All Rights Reserved. May not be copied, scanned, or duplicated, in whole or in part. WCN 02-200-203
File and Printer Sharing
461
Figure 10-3 The Advanced Sharing dialog box
Share this folder: To enable folder sharing, click this check box.
Share name: Users see the folder share name in the Network folder of File Explorer
or when using the net share command. In other words, it’s the name you use to
access the folder with the UNC path (\\server\share name). You can add or remove
share names. A single folder can have multiple share names and different permissions,
a different number of simultaneous users, and caching settings for each share name.
Limit the number of simultaneous users to: In Windows Server, the default limit
is 16,777,216, which is practically unlimited. In Windows client OSs, up to 20 users
can access a share simultaneously.
Comments: You can enter a description of the share’s contents and settings in this
text box.
Permissions: Click this button to open the Permissions dialog box.
Caching: This option controls how offline files are configured. Offline files enable
users to disconnect from the network and still have access to the shared files they
were using.
•
Shared Folders snap-in—Use this component of the Computer Management console
(see Figure 10-4) to monitor, change, and create shares on the local computer or a
remote computer. To create a share, right-click the Shares node under the Shared
Folders snap-in and click New Share. The Create A Shared Folder Wizard walks you
through the processes of selecting a folder to share or creating a new folder to
share, naming the share, configuring offline files, and setting permissions.
Copyright 2017 Cengage Learning. All Rights Reserved. May not be copied, scanned, or duplicated, in whole or in part. WCN 02-200-203
10
462
Chapter 10 Sharing Resources and Working with Accounts
Figure 10-4 The Shared Folders snap-in
When using file sharing in Windows, note that users are subject both to share permissions
and NTFS permissions when accessing files over the network. You learned about NTFS
permissions in Chapter 4. Share permissions are somewhat simpler, and there are only three
(see Figure 10-5):
Figure 10-5 Viewing share permissions
•
Read Users can view contents of files, copy files, run applications and script files,
Read—
open folders and subfolders, and view file attributes.
Copyright 2017 Cengage Learning. All Rights Reserved. May not be copied, scanned, or duplicated, in whole or in part. WCN 02-200-203
File and Printer Sharing
463
•
Change—Users
—Users have all the permissions granted by Read, as well as the ability to
—
create files and folders, change their contents and attributes, and delete files and folders.
•
Full Control
Control—Users have all the permissions granted by Change; they can also change
file and folder permissions as well as take ownership of files and folders.
Windows assigns default permissions depending on how a folder is shared. Generally, the
default share permission is Read for the Everyone group. On FAT/FAT32 volumes, share
permissions are the only way to secure files accessed through the network because these file
systems don’t support local file permissions.
Sharing files on the network isn’t difficult in a Windows environment. Nonetheless, you
should be familiar with some techniques and options before setting up a file sharing server.
Accessing Shared Files in Windows A file sharing client requests access to shared
files and printers on a network server. When a user or an application requests a resource—
such as a printer or a data file—a redirector intercepts the request and then examines it to
determine whether the resource is local (on the computer) or remote (on the network). If
the resource is local, the redirector sends the request to the local software component for
processing. If the resource is remote, the redirector sends the request over the network to
the server hosting the resource.
With redirectors, network resources can be accessed as though they were local. For example,
a user or user application doesn’t distinguish between a printer connected to a local USB
port and one connected to the network. In addition, with drive mapping, shared network
folders are accessed just like a drive that’s physically attached to the system—at least from
the user’s point of view. In Windows, the redirector component is part of Client for
Microsoft Networks. The two most common ways to access a shared resource in Windows
are by using the UNC path and mapping a drive.
The UNC path is used to access a shared folder, and has the syntax \\server-name\
sharename. The server-name is the name of the computer where the shared resource
resides. You can also use the server’s IP address in place of its name. The sharename is
the name given to the folder or printer when it was shared. You can directly access a subfolder or file in the share by continuing the UNC path, as in \\server-name\sharename\
subfolder\file
subfolder\
\file.extension.
Linux and Mac OS X systems also use the UNC path to access shared
resources, but forward slashes are used in place of backslashes.
You can use the UNC path to access shared folders and printers, but you must type the path
every time you need it or create a shortcut with the UNC path as the target. In Windows,
one common method of simplifying access to shared files (particularly those that are used
often) is drive mapping, which associates a drive letter with the UNC path to a shared
folder. Drives are usually mapped by using File Explorer or the net command. To use File
Explorer, simply type the server portion of the UNC path in the Search text box on the
Copyright 2017 Cengage Learning. All Rights Reserved. May not be copied, scanned, or duplicated, in whole or in part. WCN 02-200-203
10
464
Chapter 10 Sharing Resources and Working with Accounts
taskbar to see a list of shared folders and printers the server is hosting. Right-click a shared
folder and click Map network drive, as shown in Figure 10-6. You can then pick a drive
letter that’s not already in use and choose to have Windows reconnect to the share with the
same drive letter every time you log on.
Figure 10-6 Mapping a drive in File Explorer
Another method of mapping a drive is to use the net command. This method is often used
by administrators in a logon script, which consists of commands that run when a user logs
on to a Windows domain. The command syntax to map a drive with the net command is
net use drive-letter: \\server-name\sharename.
The drive-letter is an unused drive letter, and it must be followed by a colon (:). The
command can be entered at the command prompt or placed in a batch file. A batch file is a
text file with a .bat or .cmd extension that contains a list of commands you ordinarily type
at the command prompt. To run a batch file, enter its name at the command prompt or
double-click the file in File Explorer. Batch files are useful for storing long, complex commands that are used often or a series of commands that are always used together.
As you’ve learned, Linux and Mac OS X don’t use drive letters at all. Instead, their file
systems are based on the concept of a file system root designator, which is simply the / character. All local and network drives and folders are accessed from the root as folders. A drive
or network share is mounted into an empty directory so that it becomes part of the file
system hierarchy. To access a shared folder in Linux or Mac OS X, you create a new
directory at the root of the file system or in a subdirectory, and then mount the shared
folder in the new directory.
Copyright 2017 Cengage Learning. All Rights Reserved. May not be copied, scanned, or duplicated, in whole or in part. WCN 02-200-203
File and Printer Sharing
465
Sharing Printers in Windows To understand how to work with and share printers
in a Windows environment, first you need to know the terminology for defining the components
of a shared printer:
•
Print device—The physical printer to which print jobs are sent. There are two basic
types of print devices:
Local print device: A printer connected to a port on a computer with a parallel or
USB cable or through a TCP/IP port, which is used to access a printer attached
directly to the network through the printer’s NIC
Network print device: A printer attached to and shared by another computer
•
Printer The icon in the Printers folder that represents print devices. Windows
Printer—
programs use a printer driver to format the print job and send it to the print device
or print server. A printer can be a local printer, which prints directly to a local or
network print device, or a network printer, which prints to a print server.
•
Print server
server—A Windows computer that shares a printer. It accepts print jobs from
computers on the network and sends jobs to the printer.
•
Print queue—A storage location for pending print jobs. In Windows, the print queue is
implemented as a folder (by default, C:\Windows\System32\Spool\Printers) where files
are stored until they’re sent to the print device or print server.
A configured print server can perform a host of functions that aren’t possible when users’
computers print directly to a print device:
•
Access control
control—
—Using
—
Using permissions, administrators can control who may print to a
printer and manage print jobs and printers.
•
Printer pooling
pooling—A single printer represents two or more print devices. The print
server sends the job to the print device that’s least busy.
•
Printer priority—Two or more printers can represent a single print device. In this
case, printers can be assigned different priorities so that jobs sent to the higher-priority
printer are printed first.
•
Print job management
management—Administrators can pause, cancel, restart, reorder, and
change preferences on print jobs waiting in the print queue.
•
Availability control
control—Administrators can configure print servers so that print jobs
are accepted only during certain hours of the day.
To configure a print server, you just need to share a printer. After a printer is installed,
right-click its icon, click Printer properties, and then click the Sharing tab. The Sharing tab
of a print server’s Properties dialog box contains the following options:
•
Share this printer
printer—
—When
—
When this check box is selected, the print server is shared. By
default, everyone is assigned print permissions to shared printers.
•
Share name—By default, it’s the name of the print server in the Printers folder. You
can enter a shorter share name or one that’s easier to remember.
•
Render print jobs on client computers—When
—When this check box is selected (the default
—
setting), client computers process the print job and send it to the print server in a
Copyright 2017 Cengage Learning. All Rights Reserved. May not be copied, scanned, or duplicated, in whole or in part. WCN 02-200-203
10
466
Chapter 10 Sharing Resources and Working with Accounts
format that’s ready to go directly to the print device. If this option isn’t selected, more
processing occurs on the print server.
•
List in the directory—This option is shown if the computer on which the printer is
being shared is a member of a Windows Active Directory domain. When this check
box is selected, the print server is displayed in Active Directory and can be found
by Active Directory searches. By default, this option isn’t selected.
•
Additional drivers—When a client connects to a shared printer, the printer driver
is downloaded to the client from the server automatically when possible. You can click
this button to install different printer drivers on the server to support different
Windows versions.
Sharing Files and Printers in Linux
Linux supports Windows file sharing by using SMB in a software package called Samba.
Depending on the Linux distribution, you might have to install this component. On a Linux
system with Samba installed, you can share a folder using the Samba Server Configuration GUI
tool (see Figure 10-7) or by editing the /etc/samba/smb.conf file. When you use the GUI tool to
configure Samba, changes to the smb.conf file are made automatically. Figure 10-8 shows part
of the smb.conf file after the folder named Folder1 has been shared using the GUI tool.
Figure 10-7 Sharing a folder in Linux
Source: Linux
Figure 10-8 The smb.conf file
Source: Linux
Copyright 2017 Cengage Learning. All Rights Reserved. May not be copied, scanned, or duplicated, in whole or in part. WCN 02-200-203
File and Printer Sharing
467
Once a folder is shared in Linux, it can be accessed by another computer using the UNC
path; for example, to access the shared folder named Folder1 on a Linux server named
LinuxSrv from Windows, you would type the UNC path \\LinuxSrv\Folder1 into a File
Explorer or Run box.
Printer sharing in Linux is straightforward after Samba has been installed. When you create a
printer in Linux, it’s shared automatically. To configure additional printer sharing options,
you must edit the /etc/samba/smb.conf file and look for the line that starts with “[printers].”
Accessing Shared Files in Linux To access shared files on another computer from a
Linux client, you can use the Files tool and browse the network. If you see the computer
that contains the shared files, click the computer’s icon and enter your credentials, if necessary. Otherwise, click Connect to Server in the left pane and enter the path to the server.
You must preface the path with smb: so Linux knows you are trying to connect to an SMB
share (see Figure 10-9).
10
Figure 10-9 Connecting to an SMB share in Linux
Source: Linux
Linux also comes with a command-line program called smbclient for accessing SMB shares.
To use smbclient, type smbclient //servername/share and press Enter. You will see a prompt
for smb, from which you can enter commands to upload and download files. To see a list of
these commands, type ? and press Enter at the smb: \> prompt (see Figure 10-10).
Copyright 2017 Cengage Learning. All Rights Reserved. May not be copied, scanned, or duplicated, in whole or in part. WCN 02-200-203
468
Chapter 10 Sharing Resources and Working with Accounts
Figure 10-10 Connecting to an SMB share using smbclient
Source: Linux
Sharing Files and Printers in Mac OS X
Mac OS X also supports Windows file sharing using the SMB protocol. To share a folder
with another user, turn on File Sharing in System Preferences by clicking Sharing. In the
Sharing dialog box (see Figure 10-11), click File Sharing. In the right pane, you’ll see that
the Public folder for the currently logged-on user is shared by default. You can accept the
default settings, change who has access, or remove the shared folder. You can also choose a
different folder to share.
Copyright 2017 Cengage Learning. All Rights Reserved. May not be copied, scanned, or duplicated, in whole or in part. WCN 02-200-203
File and Printer Sharing
469
Figure 10-11 Sharing a folder in Mac OS X
Source: Mac OS X
After you have chosen the folder you want to share and set the permissions, click Options to
turn on sharing for SMB if you want to share your files with Windows or Linux users. For
Windows file sharing, you must enable sharing for each user (see Figure 10-12).
Copyright 2017 Cengage Learning. All Rights Reserved. May not be copied, scanned, or duplicated, in whole or in part. WCN 02-200-203
10
470
Chapter 10 Sharing Resources and Working with Accounts
Figure 10-12 Setting sharing options in Mac OS X
Source: Mac OS X
To share printers, use the same Sharing dialog box and click the box next to Printer Sharing.
In the right pane, you are presented with a list of printers you can share. Select the printers
you want to share and the users with whom you want to share them.
Accessing Shared Files in Mac OS X To access shared files on another computer
from a Mac OS X client, click Go and then click Network to browse the network. If you
see the computer that contains the shared files, click its icon and enter your credentials, if
necessary. Otherwise, click Go, click Connect to Server, and enter the path to the server.
You must preface the path with smb:, as with Linux. Once connected, you will see the
computer in the Network browse window, so you won’t need to connect to it each time
you want to access shared files on the server.
Managing User and Group Accounts
If you share files and printers, you’ll usually want to control access to those shared resources
through user accounts, group accounts, and permissions. Working with user accounts is one of
an administrator’s key tasks. User accounts are the link between people and network resources,
so user account management requires both technical expertise and people skills. When users
can’t log on to the network or access the resources they need, IT staff members get the phone
calls. Your understanding of how user accounts work and how to configure them can reduce
the frequency of these calls. User accounts have two main functions in a network:
Copyright 2017 Cengage Learning. All Rights Reserved. May not be copied, scanned, or duplicated, in whole or in part. WCN 02-200-203
Managing User and Group Accounts
471
•
Provide a method for users to authenticate themselves to the network—Using
—Using a
—
username and password is the most common way for users to log on to a network and
gain access to network resources. This process is called authentication. User accounts
can also contain restrictions about when and where a user can log on. Administrators
use user accounts to assign permissions to network resources and define the types of
actions a user can perform on the system, such as installing software, configuring
hardware, or accessing files. This process is called authorization. Many tasks require
elevated access, such as administrator access in Windows or root access in Linux.
•
Provide detailed information about a user
user—User accounts can hold information such
as a user’s phone number, office location, and department. This information can be
used in a company directory or by the IT department to identify users for support
purposes.
Group accounts are used to organize users so that resource permissions and rights can be
managed more easily than working with dozens or hundreds of user accounts. For example,
an administrator can make a group account for each department in the company and add
the users in each department as members of the corresponding group. Then, when a department creates a shared folder and documents for its users, the administrator just needs to
assign permission to the group, which gives all its members the necessary permission. If a
user changes departments, the administrator moves the account from one group to another,
thereby changing the resources to which the user has permissions.
Account and Password Conventions
In a small network with only a few users and network resources, establishing a naming
convention for accounts might be more trouble than it’s worth. When you’re working with
dozens of servers and hundreds or thousands of users, however, a scheme for naming user
and group accounts as well as network devices is crucial. For user accounts, considerations
for a naming convention include the following:
•
Should user account names have a minimum and maximum number of characters?
•
Should the username be based on the user’s real name? If security is of utmost importance, should usernames be more cryptic and difficult to guess?
•
Some OSs distinguish between uppercase and lowercase letters. Should usernames contain both as well as special characters, such as periods and underscores?
There’s no right or wrong answer to these questions, but after you devise a policy, you
should stick to it so that when it’s time to create a new user account, your naming conventions make the process straightforward.
Passwords are also part of creating user accounts. The considerations for password naming
conventions include the following:
•
Minimum length—In environments where a user account is based on a user’s real
name, all that’s needed to access the account is to correctly guess the password. Longer
passwords are harder to guess and therefore more secure.
Copyright 2017 Cengage Learning. All Rights Reserved. May not be copied, scanned, or duplicated, in whole or in part. WCN 02-200-203
10
472
Chapter 10 Sharing Resources and Working with Accounts
•
Complexity requirements—Using
—Using uppercase and lowercase letters along with numbers
—
and special symbols (such as @, $, and %) makes passwords considerably more difficult to guess, even with password-guessing software.
•
User or administrator created
created—In most cases, users create their own passwords after
an administrator gives them an initial password. However, to ensure that passwords
are complex enough, administrators can use dictionary attacks and other brute-force
methods to attempt to crack them.
•
Password change frequency—Many networks require frequent password changes to
enhance security. However, if changes are required too frequently, users are more apt
to write down their passwords, which is a major security risk.
There are other considerations for working with passwords, some of which are particular to
the OS on which the user account is created. You learn more about password-handling
options in the next section.
Group account names also warrant careful planning. The group name should reflect the
group membership or the resource to which the group is assigned permissions or rights. For
example, the group name might simply be a department name, or it might reflect a resource
permission assignment, such as NAS_4thFloor, which indicates that group members have
access to the NAS server on the 4th floor. In some cases, a group name might reflect the
role that group members have in the company, such as supervisors, administrators, or executives. The most important aspect of naming conventions is establishing and sticking to them;
only users who are well versed in these conventions should be allowed to create accounts.
Working with Accounts in Windows
This section discusses user and group accounts in Windows Server 2016 with Active
Directory; you will also work with accounts in a Windows 10 client OS in the Hands-On
Projects at the end of this chapter. A key point to remember when working with accounts in
Active Directory is that they’re used to log on to the Windows domain and can access
resources on all computers that are domain members. By contrast, an account created in a
Windows client OS is used only to log on to a particular computer and access resources
only on that computer.
When Windows is installed, two users are created: Administrator and Guest. On a Windows
Server 2016 domain controller, the Guest account is disabled, and in Windows 10, both
Administrator and Guest are disabled. In Windows 10, you create a user with administrator
privileges during installation. The Guest account is rarely used and poses a security risk,
which is why it’s disabled. You can enable the account if you like, but best practices dictate
creating new accounts for guest users of your network. The Administrator account has full
access to a computer, and in a Windows domain, the domain Administrator account’s access
is extended to all computers that are domain members. You must carefully consider who can
log on as Administrator and who is a member of the Administrators group.
Copyright 2017 Cengage Learning. All Rights Reserved. May not be copied, scanned, or duplicated, in whole or in part. WCN 02-200-203
Managing User and Group Accounts
473
Creating User Accounts in Windows Domains Windows domain users are
created in Active Directory Users and Computers (shown in Figure 10-13), in Active Directory Administrative Center (ADAC), or with command-line tools. As you can see, several
folders are available for organizing users, groups, and other domain elements. You can also
create your own folders, called organizational units (OUs), to match your company’s organizational scheme. For example, you can create a folder for each department or create
folders that represent office locations. In Figure 10-13, the open folder named Users contains
the Administrator and Guest accounts and many of the default groups created when Active
Directory is installed. You can create additional users in this folder, but it’s better to add
OUs and then create users and groups in the OU structure you specify.
10
Figure 10-13 The Active Directory Users and Computers management console
To create a user account, select the folder where you want to create it. Right-click the folder,
point to New, and then click User, or click the user icon on the Active Directory Users and
Computers toolbar. The New Object - User dialog box opens (see Figure 10-14). Everything
you create in Active Directory is considered an object.
Copyright 2017 Cengage Learning. All Rights Reserved. May not be copied, scanned, or duplicated, in whole or in part. WCN 02-200-203
474
Chapter 10 Sharing Resources and Working with Accounts
Figure 10-14 Creating a user in Active Directory
You don’t have to fill in all the fields, but you must enter names in the Full name and User
logon name text boxes. The user logon name isn’t case sensitive, so if the logon name is
JSmith, the user can log on with jsmith or JSMITH or any combination of uppercase and
lowercase letters. The drop-down list next to the User logon name text box shows the
default domain to which the user logs on. In a network with multiple domains, the user
might need to log on to the network with the syntax LogonName@domain, which is the
user principal name (UPN). In most cases, however, a user needs only the logon name to
log on. After entering the full name and user logon name, you click Next to see the window
shown in Figure 10-15, where you enter the password and confirm it. The password is case
sensitive. As you can see, the password isn’t shown as you type it for security reasons. You
can also choose the following options for the user’s initial logon and password:
Copyright 2017 Cengage Learning. All Rights Reserved. May not be copied, scanned, or duplicated, in whole or in part. WCN 02-200-203
Managing User and Group Accounts
475
Figure 10-15 Setting the password and additional account options
•
User must change password at next logon—The user is prompted to change the
password at the next logon. Administrators sometimes create accounts with a default
password based on the user’s name or phone number that must be changed at the next
logon. This option can also be set when users forget their passwords and the support
staff changes passwords for them.
•
User cannot change password
password—
—When
—
When the administrator wants to maintain control of
passwords, this option can be set to prevent users from changing their own. It’s also
used when multiple users have a common generic account for logging on (such as
“salesperson”).
•
Password never expires—Users can be required to change their passwords periodically.
If this option is set, users aren’t subject to the password change requirement.
•
Account is disabled
disabled—If a user account is created several days before it will be used, the
account can be disabled at first and then enabled when the user joins the company.
In addition, if a user leaves the company or will be gone for an extended period, the
account can be disabled. When a user leaves the company, the account is often disabled
rather than deleted so that the replacement can use the same account after it is
renamed and the password is changed. In this way, the new user has all the same
permissions and rights as the previous user.
Copyright 2017 Cengage Learning. All Rights Reserved. May not be copied, scanned, or duplicated, in whole or in part. WCN 02-200-203
10
476
Chapter 10 Sharing Resources and Working with Accounts
After a user account is created, double-click it to open its properties. Compared with user
accounts in Windows client OSs, user accounts in Active Directory have far more properties
you can configure. The first part of Figure 10-16 shows properties for a user in Active
Directory; account properties in Windows 10 are shown in the second part of the figure.
Notice that the two dialog boxes have the Member Of tab in common—you can use this
tab to see which groups a user belongs to and add or remove the user from groups.
Figure 10-16 User properties in Active Directory and in Windows 10
Copyright 2017 Cengage Learning. All Rights Reserved. May not be copied, scanned, or duplicated, in whole or in part. WCN 02-200-203
Managing User and Group Accounts
477
Figure 10-16 User properties in Active Directory and in Windows 10 (continued)
When a user is added to a group or removed from it, the setting
takes effect the next time the user logs on; if a user is already logged
on, he or she must log off and log on again.
Creating Group Accounts in Windows Domains Group accounts are easy to
create. All they require is a name; after they’re created, you can begin adding users as
members. The process is similar to creating a user account. In Active Directory, the New
Object - Group dialog box looks like Figure 10-17. The “Group name (pre-Windows
2000)” text box is used for backward compatibility with older Windows OSs. The other
options, group scope and group type, are used only in Windows domains. The group scope
lets you create one of three different group types:
•
Domain local group—This group type can be used to assign permissions to resources
only in the domain in which the group is created. Although domain local groups can
contain users from any domain, they’re used mainly to hold global groups and assign
permissions to global group members.
Copyright 2017 Cengage Learning. All Rights Reserved. May not be copied, scanned, or duplicated, in whole or in part. WCN 02-200-203
10
478
Chapter 10 Sharing Resources and Working with Accounts
•
Global group—The default option, global groups contain users from the domain in
which they’re created, but they can be assigned permissions to resources in other
domains in a multidomain network. Their main purpose is to group users who require
access to similar resources.
•
Universal group—This group type is used in multidomain networks; users from any
domain can be members and can be assigned permissions to resources in any domain.
Figure 10-17 Creating a group in Active Directory
A detailed discussion of group scope is beyond the scope of this book.
For a complete discussion, see MCSA Guide to Installing and Configuring
Microsoft Windows Server 2012/R2 (Cengage Learning, 2015, ISBN
9781285868653).
The Group type option is set to Security by default. Distribution groups are used only for
tasks like sending all group members an e-mail when you run an Active Directoryintegrated e-mail program, such as Microsoft Exchange.
Windows Default Groups Aside from groups you create to organize users and
assign permissions, Windows defines some default groups, which have preassigned rights
that apply to all group members. Table 10-1 shows the most important default domain
local groups in Windows Server running Active Directory. The table also shows the rights
assigned to these groups.
Copyright 2017 Cengage Learning. All Rights Reserved. May not be copied, scanned, or duplicated, in whole or in part. WCN 02-200-203
Managing User and Group Accounts
Table 10-1
479
Some Windows Server default domain local groups
Group
Rights
Administrators
Has complete control over the computer and domain
Account Operators
Can administer user and group accounts for the local domain
Backup Operators
Can back up and restore files that users can’t
can normally access
Guests
Is allowed guest access to domain resources; same access as the Users group
Print Operators
Can add, delete, and manage domain printers
Server Operators
Can administer domain servers
Users
Has the same default access rights that ordinary user accounts have
In addition, Windows Server has numerous default global groups, including Domain Admins,
Domain Users, and Domain Guests. These groups apply to entire domains rather than a single
machine, and are essentially the same as domain local groups with similar names.
Special Identity Groups Special identity groups, as described in Table 10-2, don’t
appear as objects in Active Directory Users and Computers or in Local Users and Groups,
but they can be assigned permissions and rights. Membership in these groups is controlled
dynamically by Windows, can’t be viewed or changed manually, and depends on how an
account accesses the OS. For example, membership in the Authenticated Users group is
assigned to a user account automatically when the user logs on to a computer or domain.
Table 10-2
Some Windows special identity groups
Special identity group
Description
Authenticated Users
Members belong to any user account (except Guest) that can be used to log on to a
computer or domain with a valid username and password.
Creator Owner
A user becomes a member automatically for a resource he or she created, such as a
folder.
Everyone
Refers to all users who access the system; similar to the Authenticated Users group but
includes the Guest user.
Interactive
Members are users who are logged on to a computer locally or through Remote
Desktop Services.
Network
Members are users who are logged on to a computer through a network connection.
System
Refers to the Windows OS.
Self
Refers to the object on which permissions are being set.
Copyright 2017 Cengage Learning. All Rights Reserved. May not be copied, scanned, or duplicated, in whole or in part. WCN 02-200-203
10
480
Chapter 10 Sharing Resources and Working with Accounts
From the Trenches …
The author manages a small departmental network and hires students to help with
classroom lab maintenance. Sometimes, the tasks performed by students require administrative access to the client workstations. In Windows, a domain administrator has full
permissions and rights to all client and server computers in the domain. However, it is
not good security practice to give all users domain administrator access. The goal is to
give students temporary administrator access to client workstations when they need it
but not to provide them with the administrator account username and password. The
solution is to use groups wisely. A Global group called clientAdmins is created in
the domain; then, using a feature of Group Policy, this group is made a member of the
Administrators local group on the client workstations. When students need to perform a
task that requires local administrator access, their user accounts are added as members
of the clientAdmins Global group. When they log on to client workstations, they have
local administrator access. When they finish the task, their accounts are removed from
the clientAdmins group and their privileges revert to regular user privileges.
Working with Accounts in Linux
User and group accounts in Linux have the same purposes as in Windows: user authentication
and authorization. Linux OSs also have a default user named root who has full control over
all aspects of the system. As in Windows, the root user account is used only when you’re performing tasks that require root privileges, such as creating additional system users. In fact,
some Linux distributions require creating a user during installation because logging on as
root isn’t allowed; you can access root privileges only by entering a special command.
Most Linux administration takes place at the command line. In its simplest form, user
creation is a matter of using the useradd newuser command; you replace newuser with the
logon name for the user account you’re creating. Then you create a password for the user with
the passwd newuser command. Both the logon name and password are case sensitive in Linux.
On most Linux systems, you can’t run useradd and similar commands unless you’re logged
on as the root user or you preface the command with sudo, as in sudo useradd newuser.
The sudo command, which stands for “superuser do,” executes the command with root
privileges. If you know you will use many commands that require root privileges, you can
change to the root user temporarily with the su command (which means “switch user”).
This command attempts to switch to the root user when no user is specified, and you must
enter the root user’s password when prompted.
When some commands are entered with a username, as in passwd testuser, the command is
executed only for the specified user account. If the commands are entered without a
username, they’re executed only for the current user. For example, users or administrators
can change a user’s password with the passwd command. You can change user information
with the usermod command and delete users with the deluser command.
The useradd command has many options. For example, you can specify a different home
directory and assign group memberships. You practice using this command in a Hands-On
Project at the end of this chapter.
Copyright 2017 Cengage Learning. All Rights Reserved. May not be copied, scanned, or duplicated, in whole or in part. WCN 02-200-203
Managing User and Group Accounts
481
As with most commands, you can see extensive help for the
commands used to create and modify users and groups in Linux by
prefacing the command with man, as in man useradd.
All users must belong to at least one group in Linux. When a user is created, a group with
the same name as the user is also created, and the new user is made a member of this
group. However, you can create groups and add users to them, just as you can in Windows.
Groups are created with the aptly named groupadd command. To add users as members of a
group, you can specify this option when you create the user account. You can also use the
useradd username groupname command or the usermod command.
To view the list of users, display the /etc/passwd file’s contents with the cat /etc/passwd
command; to view the list of groups, display the /etc/group file’s contents with the cat /etc/
group command. The cat command lists a text file’s contents onscreen.
For those who prefer a GUI to manage users and groups, most Linux distributions have
convenient graphical interfaces for doing so. In Fedora Linux, the Users tool is available to
manage users (see Figure 10-18).
10
Figure 10-18 The Users control panel in Fedora Linux
Source: Fedora Linux
Many administrators prefer the command-line method for creating users because they
can import user information from a text file and add many users at one time by using the
newusers command.
Copyright 2017 Cengage Learning. All Rights Reserved. May not be copied, scanned, or duplicated, in whole or in part. WCN 02-200-203
482
Chapter 10 Sharing Resources and Working with Accounts
Working with Accounts in Mac OS X
In Mac OS X, you create users and groups using the Users & Groups tool in System
Preferences. To create a user, click the plus sign in the left pane of Users & Groups, click
the selection arrow next to New Account (see Figure 10-19) to choose the type of account
you want to create, and then enter the user’s full name, account name, and password. If the
user already has an iCloud account, you can use the existing iCloud password or enter a new
password. You can also include a password hint.
You can choose one of the following account types:
•
Administrator The user has full access to the Mac OS X computer, can create and
Administrator—
manage user and group accounts, and can change any of the Mac OS X settings.
•
Standard—
Standard—
—Users
Users can run applications and create files in their home folder but cannot
perform administrative actions such as installing devices, formatting drives, and changing
network settings. Standard users can install apps and change settings for their own use.
•
Managed with parental controls—Parental controls can be enforced for users, including
which apps they can run, which Web sites they can visit, and how long they can use
the computer during a session.
•
Sharing Only—This type of user cannot log on to the local Mac computer, but can
access shared files and printers to which the account has been given permission from
another computer. For example, a user on another Mac who wants to access a shared
folder must enter the appropriate username and password for the Sharing Only user
account.
•
Group—Create a group account so you can add user accounts as members and assign
multiple users the same access permissions to shared folders. For example, if you create
several Sharing Only users, you can create a Sharing Only group and add all the users
as members. Then, using the Sharing preferences tool, you can add that group to the
list of users who can access your shared folders. That way, if you have several users
who need access to a shared folder, you can simply add the group to the shared folder
instead of having to add each user.
Copyright 2017 Cengage Learning. All Rights Reserved. May not be copied, scanned, or duplicated, in whole or in part. WCN 02-200-203
Chapter Summary
483
Figure 10-19 Creating a new account in Mac OS X
Source: Mac OS X
This chapter provided basic details for sharing resources in an operating system. A more
comprehensive treatment is beyond the scope of this book, but you now have a starting
point from which to explore this topic further on the three OS platforms.
Chapter Summary
■
File and printer sharing is one reason businesses began to outfit computers with
network interfaces and network software. Sharing files and printers with other
computers on the network requires a file sharing client and a file sharing protocol.
The dominant file sharing protocol is Server Message Block (SMB), the native
protocol used by Windows; it is also supported by Linux and Mac OS X.
■
File sharing in Windows is based on Client for Microsoft Networks on the client side
and File and Printer Sharing for Microsoft Networks on the server side. To share files
in Windows, you share the folder in which the files are located. Windows assigns
default permissions depending on how a folder is shared. Generally, the default share
permission is Read for the Everyone group.
■
When a user or an application requests a resource—such as a printer or a data file—a
redirector intercepts the request and then examines it to determine whether the
resource is local (on the computer) or remote (on the network).
Copyright 2017 Cengage Learning. All Rights Reserved. May not be copied, scanned, or duplicated, in whole or in part. WCN 02-200-203
10
484
Chapter 10 Sharing Resources and Working with Accounts
■
To understand how to work with and share printers in a Windows environment, first
you need to know the terminology for defining the components of a shared printer:
print device, printer, print server, and print queue.
■
Linux supports Windows file sharing by using SMB in a software package called
Samba. Depending on the Linux distribution, you might have to install this
component. On a Linux system with Samba installed, you can share a folder using the
Samba Server Configuration GUI tool or by editing the /etc/samba/smb.conf file.
■
Mac OS X also supports Windows file sharing using the SMB protocol. To share a
folder with another user, turn on File Sharing in System Preferences by clicking
Sharing. In the Sharing dialog box, click File Sharing.
■
If you share files and printers, you’ll usually want to control access to those shared
resources through user accounts, group accounts, and permissions. Working with user
accounts is one of an administrator’s key tasks. User accounts are the link between
people and network resources, so user account management requires both technical
expertise and people skills.
■
You can specify many more user account properties in Active Directory than you can
in Windows 10.
■
User and group accounts in Linux have the same purposes as in Windows: user
authentication and authorization. Linux OSs also have a default user named root who
has full control over all aspects of the system.
■
In Mac OS X, you create users and groups using the Users & Groups tool in System
Preferences. To create a user, click the plus sign in the left pane of Users & Groups,
click the selection arrow next to New Account to choose the type of account you
want to create, and then enter the user’s full name, account name, and password.
Key Terms
authentication The process of identifying who has access to the network. The most
common form of authentication is a logon with a username and password.
authorization The process of granting or denying an authenticated user’s access to network
resources.
batch file A text file that contains a list of commands you ordinarily type at the command
prompt.
default groups Special groups with rights already assigned; these groups are created during
installation in a Windows environment.
domain local group A group scope recommended for assigning rights and permissions to
domain resources.
global group A group scope used mainly to group users from the same domain who have
similar access and rights requirements. A global group’s members can be user accounts and
other global groups from the same domain. See also group scope.
Copyright 2017 Cengage Learning. All Rights Reserved. May not be copied, scanned, or duplicated, in whole or in part. WCN 02-200-203
Review Questions
485
group scope A property of a group that determines the reach of a group’s application in a
domain—for example, which users can be group members and to which resources a group
can be assigned rights or permissions.
Network File System (NFS) The native Linux/UNIX file sharing protocol.
redirector An OS client component that intercepts resource requests and determines whether
the resource is local or remote.
Server Message Block (SMB) The Windows file sharing protocol; SMB is also supported by
Linux and Mac OS X as Samba.
special identity group A type of group in Windows in which membership is controlled
dynamically by Windows, can’t be viewed or changed manually, and depends on how an
account accesses the OS. For example, membership in the Authenticated Users group is
assigned to a user account automatically when the user logs on to a computer or domain.
universal group A group scope that can contain users from any domain and be assigned
permissions to resources in any domain. See also group scope.
Review Questions
1. Which of the following is the correct syntax for mapping drive letter W to a shared
folder named Accounting on the Finance server?
a.
net use W: \\Finance\Accounting
b. net share W: \\Accounting\Finance
c.
net use W: \\Accounting\Finance
d. net share W: \\Finance\Accounting
2. A text file that contains a list of commands is called which of the following?
a.
logon process file
b. service file
c.
task file
d. batch file
3. Which of the following is the default protocol Windows uses to share folders?
a.
NFS
b. SMB
c.
WPA
d. FTP
4. Which of the following is the native Linux/UNIX file sharing protocol?
a.
NFS
b. SMB
c.
WPA
d. FTP
Copyright 2017 Cengage Learning. All Rights Reserved. May not be copied, scanned, or duplicated, in whole or in part. WCN 02-200-203
10
486
Chapter 10 Sharing Resources and Working with Accounts
5. Which of the following is a native printer sharing protocol used on Linux? (Choose all
that apply.)
a.
CUPS
b. PPP
c.
NFS
d. LPD
6. Which of the following group scopes can only contain users from the domain in which
the group is created?
a.
global
b. domain local
c.
universal
d. distribution
7. Which of the following is not a Windows share permission?
a.
Read
b. Write
c.
Change
d. Full Control
8. Which component of a file sharing client determines whether the resource is local or
remote?
a.
redirector
b. SMB
c.
active directory
d. UNC path
9. Which of the following correctly specifies a file named salaries.xls in a shared folder
named Budget on a server named Accounting when accessing the file remotely from a
Windows computer?
a.
\\Accounting.budget.salaries.xls
b. /Accounting/Budget/salaries.xls
c.
\\Budget.Accounting\salaries.xls
d. \\Accounting\Budget\salaries.xls
10. What is a storage location for pending print jobs?
a.
print queue
b. print server
c.
print directory
d. print path
Copyright 2017 Cengage Learning. All Rights Reserved. May not be copied, scanned, or duplicated, in whole or in part. WCN 02-200-203
Hands-On Projects
487
11. What file can you edit on a Linux system to configure shared folders using Samba?
a.
/samba/smb.cnf
b. /etc/smb/samba.conf
c.
/etc/samba/smb.conf
d. /smb/samba.cnf
12. Which of the following is a Linux command to access shared files using Samba?
a.
netsh
b. samba
c.
smbclient
d. nfsclient
13. Which of the following defines the types of actions a user can perform on a system?
a.
authentication
b. authorization
c.
logon
d. permission
14. A user has called you to complain that he does not have access to a file. While on the
phone, you add the user to the appropriate group that has permission to access the file.
You ask the user to try to access the file again, but he still cannot. What should you do?
a.
Tell the user to log off and log on again.
b. Delete the user account and re-create it.
c.
Add the user to the permission list for the file.
d. Shut down the server and restart it.
15. Which group scope can be used to assign permissions to resources only in the domain
in which the group is created?
a.
global
b. universal
c.
domain local
d. local
Hands-On Projects
Project 10-1: Map a Drive Letter in Windows
In this project, you create a shared folder and then map a drive letter to it.
You wouldn’t normally map a drive letter to a share on your own computer,
but this project shows you how to perform the process without using a second
computer.
Copyright 2017 Cengage Learning. All Rights Reserved. May not be copied, scanned, or duplicated, in whole or in part. WCN 02-200-203
10
488
Chapter 10 Sharing Resources and Working with Accounts
1. Start your Windows computer and log on.
2. Click Start, and then click File Explorer. Click This PC in the left pane, and then click
Local Disk (C:).
3. Create a folder named MyShare. Right-click MyShare, point to Share with, and click
Specific people. You see that the currently logged-on user has the permission level
Owner. You can add users who may access the share in this dialog box, but because
only you will access it, click Share. You’re notified that the folder is now shared, and
you see the path listed as \\ComputerName\MyShare, where ComputerName is the
name of your computer (see Figure 10-20). Click Done.
Figure 10-20 Sharing a folder in Windows
4. Click in the Search text box on the taskbar, type \\localhost, and press Enter. The
\\localhost refers to your own computer, so a window opens and displays available
shares, including MyShare. Normally, you wouldn’t map a drive to a folder on your
own computer, and you would replace localhost with the name of a server hosting the
share. You’re using localhost just for practice. Click the search result.
5. In File Explorer, right-click MyShare and click Map network drive. You can choose a
drive letter to map to this share. Click the Drive list arrow and click X:. Click to clear
the Reconnect at sign-in check box. If you leave this option selected, the drive is
mapped to the share each time you log on. Notice that you can also choose to connect
to the share with different credentials (username and password). Click Finish.
6. A File Explorer window opens and displays the share’s contents (it’s currently empty).
Close all windows. Click Start and then click File Explorer. You see the drive letter and
share name listed under This PC. Right-click MyShare (\\localhost) (X:) and click
Disconnect to delete the drive mapping. (You might need to press F5 to refresh the
File Explorer window and see that the drive mapping has been deleted.)
Copyright 2017 Cengage Learning. All Rights Reserved. May not be copied, scanned, or duplicated, in whole or in part. WCN 02-200-203
Hands-On Projects
489
7. Open a command prompt window. To map a drive letter from the command line, type
net use x: \\localhost\MyShare and press Enter. You should see the message “The
command completed successfully.” To display current connections to shared resources,
type net use and press Enter.
8. Click in the File Explorer window. The X drive letter is listed under This PC again.
9. At the command prompt, type net use /? and press Enter to see a list of options for the
net use command. You can use the /persistent option to make a drive mapping
reconnect each time you log on. You can also connect with a different set of credentials. Type net use x: /delete and press Enter to delete the drive mapping, and then
close the command prompt window. In File Explorer, verify that the drive mapping
has been deleted.
10. To create a batch file for mapping a drive, open Notepad and type the following two
lines:
net use x: /delete
net use x: \\localhost\MyShare
11. The first command deletes any existing drive mappings for the X drive. Click File and
then Save As from the menu. In the left pane of the Save As dialog box, click Desktop.
Click the Save as type list arrow, and then click All Files. In the File name text box,
type mapX.bat and click Save. Close Notepad. Batch files can come in handy if you
need to connect to another computer periodically but don’t want a permanent drive
mapping. Batch files are especially useful if you need to enter long commands because
you don’t have to remember and re-enter them each time you need them.
12. On your desktop, double-click mapX. In File Explorer, verify that the X drive mapping
has been created. Right-click MyShare (\\localhost) (X:) and click Disconnect.
13. To review what you’ve learned, write the command to map drive letter G to a share
named Accounting on a server named Finance:
___________________________________________________________________________
14. Close all open windows, and leave Windows running for the next project.
To learn more about creating and using batch files in Windows, read
the TechNet article at https://technet.microsoft.com/en-us/library/
bb490869.aspx.
Project 10-2: Create and Connect to a Shared Printer
in Windows
This project walks you through the process of creating a printer, sharing it,
and then connecting to the shared printer. Note that you won’t actually
connect to a physical printer.
Copyright 2017 Cengage Learning. All Rights Reserved. May not be copied, scanned, or duplicated, in whole or in part. WCN 02-200-203
10
490
Chapter 10 Sharing Resources and Working with Accounts
1. If necessary, log on to your Windows computer.
2. Click in the Search text box on the taskbar, type Devices and Printers, and press
Enter. Click Add a printer in the Devices and Printers window. Windows searches for
devices. Click The printer that I want isn’t listed.
3. Click Add a local printer or network printer with manual settings, and then click Next.
In the “Choose a printer port” window, leave the default option Use an existing port
selected, and then click Next. In the “Install the printer driver” window, you would
normally select the printer’s manufacturer and model, but because there’s no physical
printer, just accept the default selection and then click Next.
4. In the “Type a printer name” window, click Next. In the Printer Sharing window,
make sure Share this printer so that others on your network can find and use it is
selected. For the share name, type MyPrinter, and then click Next. Click to clear the
Set as the default printer check box (note that you might not see this check box). If
you were actually installing a printer, you would click “Print a test page,” but for this
project, just click Finish.
5. To connect to a shared printer, ask your instructor whether a printer share is set up or
you can use another student’s shared printer. In Windows, you can’t connect to your
own printer, as you did with the shared folder. Click in the Search text box on the
taskbar, type \\computer,
computer, where computer is the name of the computer sharing the
computer
printer, and press Enter.
6. When the window opens, right-click the shared printer and click Connect. In the
Devices and Printers window, verify that the printer was created. It’s listed as “Printer
make and model on computer,” where Printer make and model is the make and model
of the printer and computer is the name of the computer on which the printer is
shared.
7. Close all open windows but stay logged on if you’re continuing to the next project.
Project 10-3: Create Users in a Windows Client OS
In this project, you create a user in the Computer Management console.
1. Log on to your Windows computer, if necessary. There are two tools for creating user
accounts in a Windows client OS. One is User Accounts in Control Panel, which is
used mostly for home users. The other tool is Local Users and Groups in the Computer
Management console. Local Users and Groups gives administrators more control over
user properties and has more in common with Active Directory Users and Computers,
so it’s used in this project.
Copyright 2017 Cengage Learning. All Rights Reserved. May not be copied, scanned, or duplicated, in whole or in part. WCN 02-200-203
Hands-On Projects
491
2. Right-click Start and click Computer Management. In the left pane, click to expand Local
Users and Groups, which has two folders under it: Users and Groups. Click Users to display
a list of users in the right pane (see Figure 10-21). Notice that the Administrator,
DefaultAccount, and Guest users in the figure are shown with a black arrow in a white
circle to indicate that the accounts are disabled.
Figure 10-21 Viewing Users in Computer Management
3. Right-click an empty space in the right pane and click New User. In the New User
dialog box, type NewGuest1 as the User name. In the Full name text box, type New
Guest User 1, and in the Description text box, type A new guest user account.
4. Type guestpass in the Password text box and again in the Confirm password text box.
5. Leave the User must change password at next logon check box selected (see
Figure 10-22), and click Create. The New User dialog box clears so you can create
another user. Click Close.
Copyright 2017 Cengage Learning. All Rights Reserved. May not be copied, scanned, or duplicated, in whole or in part. WCN 02-200-203
10
492
Chapter 10 Sharing Resources and Working with Accounts
Figure 10-22 Creating a user in Windows 10
6. In Local Users and Groups, double-click NewGuest1 to view its properties. Click the
Member Of tab. By default, all new users are put in a group called Users; this is also
the case when a user is created in Active Directory. Click Cancel.
7. Click the Groups folder in the left pane to see a list of default groups that Windows
creates. Double-click the Users group. You’ll see a list of users who are members of
the Users group, including NewGuest1. You’ll probably also see some special groups
named Authenticated Users and INTERACTIVE, which are internal groups used by
Windows. Click Cancel.
8. Log off Windows. When the logon window opens, New Guest User 1 is shown as a
user. Click New Guest User 1. Type guestpass in the Password text box and press
Enter, or click the arrow to log on. When prompted to change your password, click
OK, and then type Password01 in the New password and Confirm password text
boxes. Press Enter or click the arrow.
9. In the message box stating that the password has been changed, click OK. Do not sign
in, but leave Windows running for the next project.
Copyright 2017 Cengage Learning. All Rights Reserved. May not be copied, scanned, or duplicated, in whole or in part. WCN 02-200-203
Hands-On Projects
493
Project 10-4: Work with Groups in a Windows
Client OS
In this project, you create a group in the Computer Management console and
then add a user to the group.
1. Log on to your Windows computer as an administrator.
2. Right-click Start and click Computer Management. Click to expand Local Users and
Groups, and then click Groups.
3. Right-click an empty space in the right pane, and then click New Group. In the New
Group dialog box, type GuestUsers as the Group name. In the Description text box,
type A group for guest users of this computer.
4. Click Add. Examine the Select Users dialog box shown in Figure 10-23. It’s similar to
what you see when adding a user to a group in Active Directory.
10
Figure 10-23 Selecting users to add to a group
5. You can use the Object Types button to limit the types of objects Windows displays if
you click the Advanced button to search for objects to add to a group. Click Locations.
You have only one option unless your computer is a member of a domain. If so, you
can select objects from the domain; otherwise, you can only choose objects created on
your computer. Click Cancel.
6. You can type the group members’ names in the text box, but to select them from a list,
click Advanced. Click Find Now to list available users and groups you can add as
group members. Click NewGuest1 and then click OK. Notice in the Select Users dialog
box that the user is specified as ComputerName\NewGuest1. ComputerName is the
name of the computer or domain where the user was created; in this case, it’s the
computer. Click OK.
Copyright 2017 Cengage Learning. All Rights Reserved. May not be copied, scanned, or duplicated, in whole or in part. WCN 02-200-203
494
Chapter 10 Sharing Resources and Working with Accounts
7. NewGuest1 is listed as a member of the group. Click Create to finish creating the group,
and then click Close.
8. NewGuest1 is now a member of both the GuestUsers and Users groups. Remember
that the result of changing group membership takes effect the next time the user logs
on. If you wanted to remove NewGuest1 from the default Users group, you would
double-click the Users group, right-click NewGuest1, and click Remove. However,
doing so removes NewGuest1 from the list of users in the Windows 10 logon window.
For now, leave this account as a member of both groups. Log off Windows for the
next project.
Project 10-5: Share a Folder and View Permissions
In this project, you use the File Sharing Wizard to see how it sets permissions
automatically.
1. Log on to your Windows computer, if necessary.
2. Right-click Start and click File Explorer. Click Local Disk (C:) in the left pane. Create a
folder named TestShare1 at the root of the C drive.
3. Open the TestShare1 folder’s Properties dialog box, and click the Security tab. Click the
Users entry in the top section, and make a note on the following line of the permissions
assigned to the Users group. Click Cancel to close the Properties dialog box.
___________________________________________________________________________
4. Right-click TestShare1, point to Share with, and click Specific people to start the File
Sharing Wizard.
5. Type newguest1 in the text box, and then click Add. New Guest User 1 is added. Click
the list arrow in the Permission Level column next to New Guest User 1, and make
sure Read is selected.
6. Click Share. The UNC path for the share is displayed. Click Done.
7. Right-click TestShare1 and click Properties. Click the Sharing tab, and then click
Advanced Sharing.
8. Click Permissions. The Administrators and Everyone groups have Full Control permission
to the share. As you will see in the next step, the NTFS permissions restrict New Guest
User 1’s permissions to Read & execute, List folder contents, and Read, which effectively
allows the user to open and view the file. Click Cancel twice.
9. In the TestShare1 folder’s Properties dialog box, click the Security tab. Click New
Guest User 1, and notice that the account’s NTFS permissions are Read & execute,
List folder contents, and Read.
10. Close all open windows and then log off or shut down your Windows computer.
Copyright 2017 Cengage Learning. All Rights Reserved. May not be copied, scanned, or duplicated, in whole or in part. WCN 02-200-203
Hands-On Projects
495
Project 10-6: Work with Users and Groups
in Linux
In this project, you create users with the useradd command and groups with
the groupadd command. Next, you add users as members of these groups
with the useradd and usermod commands.
1. Log on to your Linux computer and open a terminal window.
2. At the shell prompt, type man useradd and press Enter to get an overview of the man
pages for the useradd command. Press the Page Up and Page Down keys to scroll
through the man pages. Type q when you’re finished.
3. To view current users on the Linux system, type cat /etc/passwd and press Enter.
Another way to view a text file is with the less option. Type less /etc/passwd and
press Enter. Use the arrow keys or Page Up and Page Down keys to scroll through the
file. Many of the user accounts you see in this file are system accounts that are not
used to log on to the OS. Type q to quit.
4. Display the list of groups by typing less /etc/group and pressing Enter. When you’re
finished, type q.
5. To create a user, type useradd testuser1 and press Enter. If you aren’t logged on as
root, you see a message stating that permission is denied. Type su and press Enter to
switch to the root user, if necessary; type your password when prompted. The last
character in the prompt changes from a $ to a # to indicate that you’re now operating
as the root user.
6. Type useradd testuser1 and press Enter. To create a password for the user, type passwd
testuser1 and press Enter. Type Password01 and press Enter. (Notice that your
keystrokes aren’t displayed.) You see a message that the password is bad and fails a
dictionary check. However, the password is still accepted, and you’re prompted to
retype it. Type Password01 and press Enter again. You should see a message stating
“passwd: all authentication tokens updated successfully.”
If you don’t enter the same password when asked to retype it, you get
a message stating that the passwords don’t match, and you’re
prompted to try again.
7. Create another user with the logon name testuser2.
8. Type less /etc/passwd, press Enter, and page to the bottom of the file, where you see
the users you created. Type q and then display the group file to see that groups named
testuser1 and testuser2 were also created. (Hint: Remember that you can use the arrow
keys to scroll through recently used commands.)
9. Type groupadd testgroup1 and press Enter. To add testuser1 to testgroup1, type
usermod -a -G testgroup1 testuser1 and press Enter. Repeat the command for testuser2.
Type cat /etc/group and press Enter to list all groups. You should see the new group at
the end of the file along with a list of its members.
Copyright 2017 Cengage Learning. All Rights Reserved. May not be copied, scanned, or duplicated, in whole or in part. WCN 02-200-203
10
496
Chapter 10 Sharing Resources and Working with Accounts
10. You can view a user’s group memberships with the groups command. Type groups
testuser1 and press Enter. Testuser1 is listed as a member of the testuser1 and
testgroup1 groups.
11. Close the terminal window and shut down the Linux computer.
Project 10-7: Create a User in Mac OS X
In this project, you create users and groups in Mac OS X.
1. Log on to your Mac OS X computer.
2. Click the Apple icon and then click System Preferences.
3. In System Preferences, click Users & Groups. At the bottom of the window, click the
lock icon so you can make changes. Type your password when prompted and click
Unlock.
4. At the bottom of the left pane, click the plus (þ) sign, as shown in Figure 10-24.
Figure 10-24 Creating a new user in Mac OS X
Source: Mac OS X
5. In the next dialog box, click the list arrow next to New Account to review the account
types you can create. In the Full Name text box, type John Doe; in the Account Name
text box, type jdoe. Type Password01 in the Password and Verify text boxes. Optionally, you can add a password hint.
6. Click Create User.
7. Click the plus (þ) sign again. In the New Account list box, click Group. In the Full
Name text box, click MyGroup and then click Create Group.
Copyright 2017 Cengage Learning. All Rights Reserved. May not be copied, scanned, or duplicated, in whole or in part. WCN 02-200-203
Hands-On Projects
497
8. In the left pane, make sure MyGroup is selected. In the right pane, click the check box
next to John Doe to add the account to the group.
9. Close all open windows, but stay logged on if you’re continuing to the next project.
Project 10-8: Share a Folder and Assign Permissions
in Mac OS X
In this project, you share a folder and assign permissions in Mac OS X.
1. Log on to your Mac OS X computer, if necessary.
2. On the desktop, double-click Macintosh HD. Right-click in Macintosh HD and click
New Folder. Type your password if prompted and click OK. Click the folder name
and rename it SharedFolder.
3. Click the Apple icon and then click System Preferences. In System Preferences, click Sharing.
In the Sharing dialog box, click the File Sharing check box to enable file sharing.
4. Click the plus (þ) sign under Shared Folders. Click Macintosh HD in the left pane and
click Shared Folder in the right pane. Click Add.
5. In the Sharing dialog box, click the plus (þ) sign under Users. Click MyGroup and
then click Select (see Figure 10-25).
10
Figure 10-25 Sharing a folder and assigning permissions
Source: Mac OS X
Copyright 2017 Cengage Learning. All Rights Reserved. May not be copied, scanned, or duplicated, in whole or in part. WCN 02-200-203
498
Chapter 10 Sharing Resources and Working with Accounts
6. Notice that the default permission is Read Only for MyGroup. Click the arrow next to
Read Only in the MyGroup row to see the possible permission settings. Click Read &
Write. To remove a user or group from the permission list, click the user or group and
click the minus (–) sign. Close the Sharing dialog box.
7. Shut down your Mac OS X computer.
Critical Thinking
The following activities give you critical thinking challenges. Challenge Labs give you an
opportunity to use the skills you have learned to perform a task without step-by-step instructions. Case projects offer a practical problem for which you supply a written solution. Not all
chapters contain Challenge Labs. There is not always a specific right or wrong answer to these
critical thinking exercises. They are intended to encourage you to review the chapter material
and delve deeper into the topics you have learned.
Challenge Labs
Challenge Lab 10-1: Create Users in Linux with the
newusers Command
This lab can be done in groups. In this lab, you create Linux users in batch mode with the
newusers command, which accepts a text file as input. Use the man pages for the newusers
command and create a correctly formatted file to use as input to the newusers command.
Five new users should be created, and each user should be new in the system. The users’
UIDs should be specified in the file and be in the range of 5001 to 5005. The primary group
name should be the same as the user’s logon name. The user’s full name can be whatever you
like. The home directory should be /home/
/home/username, and the user’s default shell should be /
bin/bash. After you’re finished, print the input file you created and submit it to your
instructor.
Case Projects
Case Project 10-1: Put It All Together
You need to set up a network that meets the following requirements:
•
Automatic IP address configuration
•
Name resolution
•
Centralized account management
•
Capability to store files in a centralized location easily
Copyright 2017 Cengage Learning. All Rights Reserved. May not be copied, scanned, or duplicated, in whole or in part. WCN 02-200-203
Case Projects
499
Write a memo explaining what services must be installed on the network to
satisfy each requirement.
Case Project 10-2: Share Files with Multiple OSs
You have been called in to consult for a company that is running 15 Windows
10 computers, two Linux computers, and three Mac OS X computers. Your
boss wants all of these computers to be able to share files. What file sharing
protocol do you recommend and why? Should you configure this network as a
peer-to-peer network or as a client/server network? Explain your answer.
10
Copyright 2017 Cengage Learning. All Rights Reserved. May not be copied, scanned, or duplicated, in whole or in part. WCN 02-200-203
Copyright 2017 Cengage Learning. All Rights Reserved. May not be copied, scanned, or duplicated, in whole or in part. WCN 02-200-203
chapter
11
Operating Systems Management
and Maintenance
After reading this chapter and completing the
exercises, you will be able to:
●
●
●
●
●
●
Explain file system maintenance techniques for different operating
systems
Perform regular file system maintenance by finding and deleting
unused files and folders
Perform disk maintenance that includes defragmenting, relocating
files and folders, running disk and file repair utilities, and selecting
RAID options
Explain the types of backups and develop a backup plan
Explain how to install software for best performance
Tune operating systems for optimal performance
Copyright 2017 Cengage Learning. All Rights Reserved. May not be copied, scanned, or duplicated, in whole or in part. WCN 02-200-203
501
502
Chapter 11 Operating Systems Management and Maintenance
Computer operating systems are similar to cars in that they need regular maintenance
to achieve the best performance. A new car, like a new computer, delivers fast response, and
every component usually functions perfectly. To keep the car at its best, you must perform
regular maintenance, such as changing the oil and performing tune-ups. If you neglect this
maintenance, the car’s performance suffers and the wear shows quickly. Maintenance is just
as important for computers because it does not take long for an operating system, software,
and hardware to degrade in performance. Operating system maintenance consists of deleting
unnecessary files, tuning memory, regularly backing up files, defragmenting disks, and repairing damaged files. Maintenance is particularly important for networked computer systems
because a poorly responding computer has an impact on network operations.
In this chapter, you learn a variety of techniques for maintaining and tuning workstations
and servers. One of the most important steps in disk and file maintenance is to start with a
well-designed folder structure, which makes finding unused files and folders a straightforward
process. Two other important tasks are performing regular backups and running disk maintenance utilities. How and where software is installed is also vital to how a computer performs.
Finally, there are tuning options that can immediately enhance performance, such as adjusting
virtual memory.
File System Maintenance
Successful file system maintenance is closely linked to a computer’s folder structure. On desktop and server operating systems, a well-planned folder structure makes it easy to locate files,
update files, share folders and files, back up and archive files, and delete unwanted files. In
addition, on server operating systems, well-designed folder structures help network performance and security. The importance of a well-designed folder structure and the default folder
structures for Windows, Linux/UNIX, and Mac OS X were described in Chapter 4. As a
reminder, here are some basic rules for creating and maintaining a folder structure:
•
Keep a manageable number of folders in the root folder.
•
Keep operating system files in the default folders recommended by the vendor.
•
Keep different versions of software in their own folders.
•
Keep data files in folders on the basis of their functions.
•
Design home folders to match the functions of users in an organization.
•
Group files with similar security needs within the same folders.
Operating system folders are typically placed in the root folder and have appropriate subfolders under a main folder. It’s important that you know the locations of system files so you
know where to look if you need to troubleshoot a problem with system files. Table 11-1 illustrates typical locations for system files in various operating systems.
Copyright 2017 Cengage Learning. All Rights Reserved. May not be copied, scanned, or duplicated, in whole or in part. WCN 02-200-203
File System Maintenance
Table 11-1
503
Essential operating system folders
Essential system folders at the root
level for 32-bit systems
Essential system folders at the root
level for 64-bit systems
Mac OS X
bin, dev, etc, Library, Network, sbin,
System, var, and Volumes
bin, dev, etc, Library, Network, sbin,
System, var, and Volumes
UNIX/Linux
bin, dev, etc, lib, mnt, proc, sbin, and var
bin, dev, etc, lib, mnt, proc, sbin, and var
Modern Windows desktop
and server versions
Windows, including the Boot, System,
and System32 subfolders
Windows, including the Boot, System,
System32, and sysWOW64 subfolders
Operating system
There are several advantages to leaving operating system files in the folders created by the OS
instead of using other folder locations. For example, it is easier for others to help with computer problems as they arise. Also, in organizations that have help desks or support centers,
it is easier for support professionals to solve problems with drivers and network access when
system files are easy to find. Finally, many software installations expect operating system files
to be in their default locations, and these installations work best when it is easy to find specific subfolders and key files related to the operating system.
When you install server operating systems, you may be tempted to
hide or rename default system folders as a way to protect them
from intruders. However, most intruders will not be deterred by
these efforts. A better approach is to understand and implement
the security features available in the operating system. One security precaution is to periodically back up OS files in all operating
systems, including the system state data in Windows operating
systems.
In modern Windows operating systems, such as Windows 10, you
can configure system protection to return to a previous system configuration in case one or more system files are deleted or if the installation of a new device causes operating system problems. To
configure system protection in Windows 10, right-click Start, click
System, and click System protection in the left pane. On the System
Protection tab, configure the System Restore settings.
In Windows operating systems, installed software is also tracked in the registry, which contains configuration information as well as information about individual components of a software installation. Thus, it is easier for the operating system to assist when software must be
uninstalled or upgraded because the OS can quickly identify and find the relevant components. In Windows desktop and server operating systems, these vital files are kept in the OS’s
folder and subfolders. For example, these files might be located in the \Windows, \Windows
\System, or \Windows\System32 folders. Table 11-2 lists some typical Windows application
software components and their associated file extensions. Table 11-3 lists the same types of
components for UNIX/Linux and Mac OS X. Application software and operating system
enhancements are easier to install when these components are in known locations.
Copyright 2017 Cengage Learning. All Rights Reserved. May not be copied, scanned, or duplicated, in whole or in part. WCN 02-200-203
11
504
Chapter 11 Operating Systems Management and Maintenance
Table 11-2
Examples of Windows-based application software components
File type
File extension
File type
File extension
Application
.exe
Initialization
.ini
ActiveX control
.ocx
Installation
.inf
Backup
.bak
Microsoft Common Console
document
.mcs
Bitmap image
.bmp
Microsoft Office settings file
.pip
Compiled HTML help file
.chm
OLE common control (.ocx is now part
of the ActiveX control set)
.ocx
Control Panel extension
.cpl
Precompiled setup information
.pnf
Configuration
.cfg
Screen saver
.scr
Data
.dat
Security catalog
.cat
Device driver
.drv
Temporary file
.tmp
Dynamic link library
.dll
Text
.txt
Help
.hlp
TrueType font
.ttf
Help context
.cnt
Virtual device driver
.vxd
Table 11-3
Examples of UNIX/Linux and Mac OS X application software components
File type
File extension
File type
File extension
awk script (for running reports)
.awk
Program header for a C or
C++ program
.h
Backup
.bak
Hypertext Markup Language
.html
C program file containing source code
.c
Log file
.log
C++ program file containing source code
.C or .cc
Matlab script
.mat
CGI script for a Web page
.cgi
Object code file
.o
Configuration
.cfg
Perl script/program
.pl
Data
.dat
Python program
.py
Document
.doc
Shell archive
.shar
Emacs Lisp source code file
.el
Scheme source code
.ss
Emacs Lisp compiled file
.elc
Text
.txt
Source code in Fortran
.for or .f
Tape archive (made from the
tar command)
.tar
Source code in Fortran 77
.f77
Uuencoded
.uue
Copyright 2017 Cengage Learning. All Rights Reserved. May not be copied, scanned, or duplicated, in whole or in part. WCN 02-200-203
Finding and Deleting Files
505
The Windows registry is an extensive database of information about the
operating system, including customized settings and software installations. The registry contains data about all hardware components and
software. It contains information about Windows services that are
started automatically, manually, or are disabled. Desktop configuration
data is stored in the registry, as is information about user accounts,
group policies, networking, and system boot data. The registry is an
essential component of the system state data.
Sometimes, particularly on network servers, several versions of a software application must be
available for different uses. For example, an organization may have some users who still use
earlier versions of Microsoft Word or even WordPerfect, so these versions must be maintained
in case a specific version needs to be reinstalled on a client’s computer over the network. In an
organization that develops software applications, it may be necessary to keep different versions of compilers or development tools available. Some users may have operating systems
that only support 32-bit applications, whereas other users may have operating systems that
support 32-bit and 64-bit applications. In these situations, one way to handle having more
than one version of the same software is to put different versions in different subfolders
under a main applications folder. For example, in Windows Server, you can support different
versions of Microsoft Word by having a Program Files folder and subfolders called
Word2013 and Word2016. In this case, one version is installed to run locally and the other
version is available to clients for network installations. Also, Microsoft 64-bit operating systems offer the Program Files and Program Files (x86) folders to separate 64-bit and 32-bit
applications.
Finding and Deleting Files
Having a solid computer file structure makes it easier to find and delete unneeded files on a
regular schedule. Files can quickly accumulate and occupy a large amount of disk space—an
example is the temporary files created when you install new software and run many types of
applications. Most installations create a temporary folder and a set of temporary files that are
stored under the root folder or an account’s home folder. Some software applications do not
completely delete temporary files when the installation is finished. Also, some software applications create temporary files that are not deleted when the application is closed or improperly
terminated, either because of a power failure or other malfunction. For example, many wordprocessing programs create temporary files that are used for backup purposes or to save the
most immediate changes.
Web browsers also write an impressive number of temporary Internet files that are not deleted
unless you set an expiration date or delete them using an OS utility or browser utility. In most
cases, the files can be deleted regularly; however, some cookies may be kept because they contain specialized information for accessing particular Web sites. Many cookies are deleted
Copyright 2017 Cengage Learning. All Rights Reserved. May not be copied, scanned, or duplicated, in whole or in part. WCN 02-200-203
11
506
Chapter 11 Operating Systems Management and Maintenance
because they only take up space and contain no information the user needs. Some users regularly delete all cookies because new ones are created anyway when users re-access Web sites.
Cookies are text files that have the preface cookie:—for example, in many Windows operating
systems, a cookie created after you access the Microsoft Web site from your account is
cookie:accountname@microsoft.com. Temporary Internet files often have extensions such as
.html, .htm, .jpg, and .gif.
It is a good practice to implement a regular schedule for finding and deleting unneeded files.
The following sections explain these methods in different operating systems.
Deleting files is vital for making the best use of disk storage
resources, and it can help extend the life of hard disks. One rule of
thumb is that hard disk drives should be kept less than 80 percent
full. Otherwise, the drive is subject to excessive wear, and is more
likely to have problems or fail.
Deleting Temporary Files in Windows
Temporary files accumulate in Windows operating systems and can be deleted using several
approaches. In Windows, temporary files are typically located in the \Temp and \Windows
\Temp folders, or in users’ home folders. Temporary Internet files from Internet Explorer are
stored in the Users\
Users\accountname
accountname\AppData\Local\Microsoft\Windows\Temporary
accountname
\AppData\Local\Microsoft\Windows\Temporary Internet
Files folder.
Temporary Internet files can also be stored in other locations, depending
on the operating system, Web browser in use, and individual settings
specified by the user.
A convenient way to delete unneeded files in Windows operating systems is to use the Disk
Cleanup tool. You can start this tool by typing Disk Cleanup in the search text box on the
taskbar and then clicking Disk Cleanup.
When you start Disk Cleanup (see Figure 11-1), it scans your disk to determine the amount
of space that can be restored after removing specific types of files. In Windows 8 and later
versions, the Disk Cleanup tool is scheduled to automatically run on the system drive where
Windows is installed whenever the computer is idle for an extended period.
Copyright 2017 Cengage Learning. All Rights Reserved. May not be copied, scanned, or duplicated, in whole or in part. WCN 02-200-203
Finding and Deleting Files
507
Figure 11-1 The Disk Cleanup tool in Windows
To quickly delete all temporary files without using Disk Cleanup in
Windows operating systems, you can open the Command Prompt
window and enter the command dir \*.tmp /s to list all temporary
files that have the .tmp extension. The * works as a wildcard to
search for all .tmp files. The /s switch lists files in subfolders. If you
determine that you want to delete all of the listed files, enter the del
\*.tmp /s command. Files that are currently in use will not be deleted.
Windows comes with a Recycle Bin, which contains files that have been deleted. You should
regularly open the Recycle Bin and delete its files, which purges them from the system permanently. You can delete files in the Recycle Bin by using the Disk Cleanup tool, but the fastest
way to delete these files is to keep the Recycle Bin icon on the desktop, right-click the icon,
and then click Empty Recycle Bin on the shortcut menu.
By default, the Recycle Bin can grow to occupy 10 percent of available
hard disk storage. Computers that are configured for two or more
volumes have a Recycle Bin on each volume. You can resize the maximum allocation for the Recycle Bin by right-clicking its desktop icon,
selecting Properties, and configuring the maximum size. When the
Recycle Bin is full and you continue to delete files to send to the Recycle Bin, the oldest files in the Recycle Bin are purged first.
Copyright 2017 Cengage Learning. All Rights Reserved. May not be copied, scanned, or duplicated, in whole or in part. WCN 02-200-203
11
508
Chapter 11 Operating Systems Management and Maintenance
Another approach to deleting temporary files in Windows is to use the search function in File
Explorer. In File Explorer, go to the root of the drive from which you want to delete temporary files, and then type *.tmp in the search box. When the search is complete, select all the
files and press Del on your keyboard.
Deleting Files in UNIX/Linux
You can view UNIX/Linux files by using the ls command along with one or more of the following options for listing particular file qualities:
•
-a lists all files, including hidden files
•
-C formats the listing in columns for easier reading
•
-d lists folders
•
-f displays files in an unsorted list
•
-F identifies the list’s contents as folders, executable files, and symbolic links
•
-i displays the inode number for each file (see Chapter 4 for an explanation of inodes)
•
-l presents a detailed information listing, including permissions and file size
•
-n displays the user identification numbers (UIDs) and group identification numbers
(GIDs) of those who have access to files
•
-r sorts files in reverse alphabetical order
•
-s displays the size of files (in blocks)
•
-S sorts files and folders on the basis of size
•
-t sorts files and folders based on when they were last modified
For example, to list all files, including hidden files, use the command ls -a. If you are only
looking for large files, use the command ls -sa to show file and folder sizes for all listings,
including hidden files. You can use the command ls -la to show more detailed information,
including file and folder sizes and the permissions associated with each file and folder. Notice
that you can combine options, such as using the -la option to show detailed information for
all files, including hidden files.
Files and folders are deleted in UNIX/Linux using the remove (rm) command. Two options
commonly added to this command are -i and -r. The -i or interactive option results in a
prompt that asks if you really want to delete the file or folder; the -r or recursive command
is used to delete an entire folder’s contents, including all its subfolders and files.
Use the rm -r command carefully; it deletes all files and subfolders
within a folder. When you delete a folder, you should add the -i
option, such as in rm -ir foldername, so that the operating system
asks you to verify the deletion first.
For example, let’s say you want to list all files in the /home/mjackson/docs folder that end
with .txt so you can determine whether to delete them. You would enter:
ls -a /home/mjackson/docs/*.txt
Copyright 2017 Cengage Learning. All Rights Reserved. May not be copied, scanned, or duplicated, in whole or in part. WCN 02-200-203
Finding and Deleting Files
509
In the preceding command, the * is a wildcard that lists all files ending in .txt. To delete the
files, you would enter:
rm /home/mjackson/docs/*.txt
As another example, assume that you want to delete your /work folder, but first you want to
view its contents, including hidden files. As a safety precaution, you also want the command
to include a prompt that queries whether you really want to delete the folder and its contents. You would enter the following commands:
ls -a /work
rm -ri /work
If the /work folder is in your home folder, you can use the ~ symbol
to represent your home folder path, no matter what folder you are
currently in. In the preceding example, you could enter ls -a ~/work
and then enter rm -ri ~/work.
In the Linux GNOME Files tool, you can delete a file by browsing to the folder that contains
it, clicking the appropriate file in the display of the folder’s contents, and pressing the Del key
on your keyboard.
To find a file, use the find command. You can use this command and its various options to
find files based on their filenames, file size, and the last time they were accessed or modified.
You can also use wildcard characters. For example, to find and print a list of all temporary
files modified in the last 30 days, you could enter find -name temp* -mtime -30 -print.
(Hands-On Project 11-5 shows you how to delete temporary files in UNIX/Linux.)
The find command has options that let you search for files using several criteria:
•
-atime for last accessed time
•
-ctime for last changed time of file attributes
•
-mtime for last modification time of file data
•
-name for the filename (wildcards can be used)
•
-print to print the results of the search
•
-size for file size (in blocks or bytes; bytes are specified by a c after the size value)
•
-user to find files by ownership
For example, assume that you are looking for a file called file1 to delete from your home
folder. To find the file, you would use the following command:
find ~ -name file1
As another example, consider a server administrator who wants to find all files in the /usr
folder that are owned by the user lpadron. To find the files, he would use the following
command:
find /usr -user lpadron
Copyright 2017 Cengage Learning. All Rights Reserved. May not be copied, scanned, or duplicated, in whole or in part. WCN 02-200-203
11
510
Chapter 11 Operating Systems Management and Maintenance
To search all folders under the root and find all files owned by user lpadron, enter the following command:
find / -user lpadron
To find all files owned by user lpadron and then delete them, you can use the | symbol with
the rm command:
find / -user lpadron | rm
Like the Recycle Bin in Windows, the Linux GNOME Files tool offers a trash can for deleting files permanently. The trash can appears in the left pane of the Files tool and is aptly
named Trash. Periodically view the contents of Trash and then purge the files by clicking
Trash in Files and clicking Empty.
UNIX/Linux provides commands to help you assess the allocation of disk space in a file
system. One command is df
df, which provides statistics on the total number of blocks in a file
system, the number used, the number available, and the percent of capacity used. While
the df command provides information for the file system as a whole, the du command displays similar statistics for a given folder and its subfolders or for a particular subfolder.
Table 11-4 lists a summary of the UNIX/Linux commands discussed in this section.
Table 11-4
UNIX/Linux commands for finding and removing files
Command
Explanation
df
Reports how disk space is employed, including free and used space on a mounted file system
du
Displays file statistics for a folder and its subfolders
find
Finds specific files and includes these options:
ls
•
-atime for last accessed time
•
-ctime for last changed time
•
-mtime for last modification time
•
-name for the filename (wildcards can be used)
•
-print to print the results of the search
•
-size for file size (in blocks or bytes; bytes are specified by a c after the size value)
•
-user to find files by ownership
Lists files and includes these options:
•
-a lists all files, including hidden files
•
-C formats the listing in columns for easier reading
•
-d lists folders
•
-f displays files in an unsorted list
•
-F identifies the list’s contents as folders, executable files, and symbolic links
•
-i displays the inode number for each file
•
-l presents a detailed information listing, including permissions and file size
•
-n displays the user identification numbers (UIDs) and group identification numbers
(GIDs) of those who have access to files
Copyright 2017 Cengage Learning. All Rights Reserved. May not be copied, scanned, or duplicated, in whole or in part. WCN 02-200-203
Finding and Deleting Files
Table 11-4
Command
UNIX/Linux commands for finding and removing files (continued )
Explanation
•
•
rm
511
-r sorts files in reverse alphabetical order
-s displays the size of files (in blocks)
•
-S sorts files and folders by their size
•
-t sorts files and folders based on when they were last modified
Removes files and folders and includes the following options:
•
-i is used to avoid unintentional deletions by prompting the user to verify the deletion
•
-r is used to delete a folder and all of its contents
Deleting Files in Mac OS X
Mac OS X is generally effective in automatically cleaning out many temporary, log, and
other files on a regular basis. However, it is still important to find and delete unneeded files
periodically to make sure you do not run out of disk space. Mac OS X windows often have a
list option that shows files and their sizes. Click the List view button in the window to see file
sizes (see Figure 11-2).
List view button
11
Figure 11-2 Viewing file sizes in Mac OS X
Source: Mac OS X
Copyright 2017 Cengage Learning. All Rights Reserved. May not be copied, scanned, or duplicated, in whole or in part. WCN 02-200-203
512
Chapter 11 Operating Systems Management and Maintenance
Mac OS X has a Find utility that you can use to find files that are no
longer needed. To use the Find utility, click File in the menu bar, click
Find, and enter the object of your search in the box with the magnifying glass. Alternatively, you can click the Spotlight icon in the
menu bar and enter the search request in Spotlight. When you find
an unneeded file, drag it into the Trash. If necessary, you can retrieve
the deleted item from the Trash by opening it and moving the item
back to a folder or the desktop. Files are not truly deleted until you
purge them by emptying the Trash; perform this task on a regular
schedule to free up disk space. (You will learn how to empty the
trash in Mac OS X in Hands-On Project 11-8.)
Maintaining Disks
In addition to finding and deleting unneeded files, other disk maintenance tasks and techniques are valuable in terms of maintaining the integrity of files and ensuring disk performance:
•
Defragmenting disks
•
Moving files to spread the load between multiple disks
•
Using disk utilities to find and repair damaged files
•
Deploying RAID techniques that extend the life of disks and provide disk redundancy
Defragmenting Disks
Hard disks in any operating system can become fragmented over time. Fragmentation means
that unused space develops between files and other information written on a disk.
Some OS disk formats are more prone to fragmentation than others—
for example, the old File Allocation Table (FAT) file systems in Windows.
Fortunately, NTFS systems and UNIX/Linux file systems are less prone to
fragmentation. Even so, it is a good idea to keep an eye on all file systems to make sure they do not become fragmented.
When an operating system is first installed, disk files are positioned contiguously on the disk,
which means there is little or no unused space between files. The files are stored on consecutive blocks rather than being spread across a volume. Figure 11-3 is a simple illustration of
an unfragmented hard disk. The shaded areas represent files that are arranged in contiguous
fashion, and the white areas are unused disk space.
Figure 11-3 An unfragmented disk
Copyright 2017 Cengage Learning. All Rights Reserved. May not be copied, scanned, or duplicated, in whole or in part. WCN 02-200-203
Maintaining Disks
513
As the operating system deletes, creates, and modifies files, the unused space between them
grows and becomes scattered throughout the disk, and the files themselves become scattered
throughout the disk (see Figure 11-4). The greater the fragmentation, the more space is
wasted. Equally important, the disk read/write head must work harder to find individual
files and data in files, which leads to two problems: First, disk performance suffers because
it takes the read/write head longer to find information, and it takes longer to find an appropriate unused location on which to write information. The second problem is that the read/
write head works harder when there is more disk fragmentation, which increases the chances
of hardware failure.
Figure 11-4 A fragmented disk
Defragmentation is the process of removing the empty pockets between files and other information on a hard disk drive. An older defragmentation method is to take a complete backup
of a disk’s contents and perform a full restore. Some administrators also run a surface analysis of a disk before performing the full restore as a means of finding damaged disk sectors
and tracks. Some surface analysis tools are destructive to data and attempt to reformat the
damaged area to determine if it can be recovered. Other tools are not destructive to data
because they relocate information from a damaged disk area to an undamaged location, and
then mark the damaged area as off limits so no files can be written there.
As a precaution, back up a hard disk before running a disk surface
analysis or defragmenting it. Also, consult the documentation to
determine whether a disk analysis tool is destructive to data
before you run it. For example, some computer manufacturers
provide disk analysis tools on a system troubleshooting disk; these
tools perform a format along with the disk surface analysis.
A second option, which is usually easier than backing up and restoring a hard disk, is to run
a disk defragmentation tool. Some operating systems come with a built-in tool to defragment
disks. For example, Windows operating systems come with a disk defragmenter tool called
Optimize Drives in Windows 8 and newer versions. Some defragmentation tools can run in
the background as you continue to use the operating system. Many also provide a quick
analysis of the hard disk and advise whether it is necessary to defragment it. For example, if
disk fragmentation is 20 percent or less, the disk does not usually need to be defragmented
immediately. Because server operating systems often experience more rapid fragmentation
than client operating systems, server administrators should develop a regular schedule to
defragment hard disks. Some administrators defragment between once a week and once a
month, always during times when no one is on the server other than the administrator. In
some situations where a server is under constant and heavy use, such as one used for a client/server or cloud-based application, it can be necessary to defragment disks every few
days.
Copyright 2017 Cengage Learning. All Rights Reserved. May not be copied, scanned, or duplicated, in whole or in part. WCN 02-200-203
11
514
Chapter 11 Operating Systems Management and Maintenance
In Windows 8, Windows Server 2012, and later versions of both, the
disk defragmentation tool defrag.exe is scheduled to run automatically
on all volumes when the system is idle, so manual defragmentation is
rarely needed.
From the Trenches …
A new server administrator checked the server at her company and found that the hard
drive was severely fragmented. She felt it should be defragmented right away and
started the process. To her horror, the defragmentation tool caused the Microsoft
Exchange Server process to stop executing on the computer. All e-mail processing was
down until the Exchange Server could be rebooted. She quickly learned that defragmentation is safer to run on a server that is taken offline after business hours.
If a disk contains an error, the Optimize Drives tool in Windows
detects the error and requires that it be repaired prior to defragmenting the disk. Errors can be repaired using the chkdsk utility, which is
discussed later in this chapter.
In UNIX/Linux and Mac OS X, file systems are designed to reduce the need for defragmenting a disk. These file systems first write to a hidden journal, which is loaded into memory;
the contents are then written to disk in a linear fashion, not sequentially. Writing in linear
fashion means that the data is temporarily stored and written all at one time in contiguous
spaces. Writing in sequential fashion means the data is not stored, but is written as soon as
it is created to whatever disk areas are immediately open. Using a hidden journal and writing
data in linear fashion means that these file systems use methods that minimize fragmentation,
which is why defragmentation tools are usually not included with them.
As with any system, an alternative to defragmenting disks on UNIX/
Linux and Mac OS X systems is to perform a full backup and restore.
Moving Disk Files to Spread the Load
Another technique that can help extend the life of disk drives is to spread files evenly across
them when there are multiple disks. This technique is used mainly on computers with
multiple-user access, such as servers, and on computers with frequent disk activity. Before
files are moved, the server administrator examines disk and file activity to determine how to
spread files across the disk drives to achieve even loading. Also, files must be moved based
on their functions so files that contain related information are on the same drive.
Disk activity is monitored in Windows operating systems using Task Manager, Resource
Monitor, and Performance Monitor. Performance Monitor provides the most in-depth information and can be configured to log information to a file so activity can be examined over a
longer period of time. For a quick look at current disk utilization, use Resource Monitor (see
Figure 11-5).
Copyright 2017 Cengage Learning. All Rights Reserved. May not be copied, scanned, or duplicated, in whole or in part. WCN 02-200-203
Maintaining Disks
515
Figure 11-5 Using Resource Monitor to view disk usage
Using Disk Utilities to Repair Damaged Files
Some operating systems have utilities that enable you to repair damaged files and file links.
Four examples of these utilities are listed here and were discussed in Chapter 4.
•
Disk First Aid in the Mac OS X Disk Utility
•
fsck and p_fsck in UNIX/Linux
•
chkdsk in Windows
Deploying RAID Techniques
As you learned in Chapter 7, deploying RAID is a technique used by server operating systems
and some client OSs for three purposes:
•
Increased reliability by providing data recovery when a disk drive fails and extending
the useful life of disks
•
Increased storage capacity
•
Increased speed
This section focuses on how RAID extends the life of a set of disks using disk striping, a technique for spreading data over multiple disk volumes. For example, when a file is written to a
Copyright 2017 Cengage Learning. All Rights Reserved. May not be copied, scanned, or duplicated, in whole or in part. WCN 02-200-203
11
516
Chapter 11 Operating Systems Management and Maintenance
striped disk set, portions of the file are spread across the set. Striping ensures that the resulting
load from reading and writing to disks is spread evenly across the set of disks. This approach
avoids placing extra load on one or two disks that are then likely to wear out sooner.
As you learned, there are several common RAID levels, but only those that use disk striping
techniques distribute the load across multiple disks: RAID 0 (disk striping) and RAID 5 (disk
striping with parity). Another RAID level that was not discussed in Chapter 7, RAID 10 (also
called RAID 1+0), provides striping plus mirroring.
RAID levels 2, 3, and 4 are rarely used because levels 1, 5, and 10 provide better fault tolerance. The two general ways to deploy RAID are hardware RAID and software RAID. Hardware RAID is controlled through a specialized adapter that has its own RAID software on a
chip, which usually provides extra redundancy and backup. Software RAID is set up and
managed by the server operating system, and does not have as many redundancy features as
hardware RAID. Generally speaking, software RAID is slower than hardware RAID.
Making Backups
In Chapter 5, you learned that it is vital to back up your operating system and data files
before an operating system upgrade. It is also essential to back up these files as a regular
maintenance practice, as discussed in Chapter 7. Disk drives fail, files can be lost or corrupted,
and database files can lose synchronization on any workstation or server. The best line of
defense is to develop a strong backup plan. Most computer operating systems have built-in
backup utilities, or backup software can be purchased separately. Typically, backups are written to tape or to a removable hard drive, but other backup options include flash drives, CDs,
and DVDs, depending on the space required, the type of backup, and the required reliability
of the media. Chapter 7 covers these different media and includes information about their projected life spans.
There are several types of backups. One type is called a binary backup because it backs up the
disk contents in binary format to create an exact image of the disk contents. The advantages
of this type of backup are its simplicity of operation and its inclusion of everything on the
disk. The disadvantages are that in many versions, you cannot restore individual files or
folders, and that when you perform a restore, the target disk drive must be the same size or
larger than the disk drive from which the backup was made.
Another backup type is called a full file-by-file backup, in which all of the disk contents are
backed up, but as individual folders and files. This type of backup is commonly used on
workstations because it enables you to restore a single folder or a set of files without restoring
the entire disk’s contents. Full file-by-file backups are also performed on servers, depending on
the backup scheme that is in place. Some backup schemes call for a full file-by-file backup to
be performed at the end of each workday, as long as the total amount of information on the
disks is not prohibitive. If the disks hold a great amount of information, it is common to perform a full file-by-file backup once a week and partial backups on the other days of the week.
There are typically two kinds of partial backups—differential and incremental. A differential
backup only backs up files that have changed since the last full backup. An incremental
backup backs up any files that have changed since the last full or incremental backup.
Copyright 2017 Cengage Learning. All Rights Reserved. May not be copied, scanned, or duplicated, in whole or in part. WCN 02-200-203
Making Backups
517
The differences between using differential or incremental backups as opposed to full backups
depend on the amount of media required for these backups, such as tapes or DVDs, and the
number of days of work that must be restored when a complete restore is necessary.
A basic backup scheme for a business might be to perform a full file-by-file backup to tape
each Saturday evening and to perform differential backups to tape Monday through Friday.
The business might also have four sets of tapes that are rotated each week. The first tape set
would be used in week 1, the second tape set in week 2, and so on. In this way, if one tape set
goes bad, one of the other tape sets from a previous week can be used to restore a server. In
this scenario, if a catastrophic disk failure occurs on Thursday, the business can recover after
the disk drive or drives are replaced by restoring the full file-by-file backup from the previous
Saturday and then restoring the differential backup from Wednesday night. If the business had
been performing incremental backups, it would restore the full file-by-file backup from Saturday and then restore the incremental backups from Monday, Tuesday, and Wednesday.
For small server and individual workstation backups, a simple solution is to use the ability of
the native backup software to periodically back up new files and file modifications on the
same day they are made. Mac OS X Time Machine, for example, enables you to leave a
removable hard drive connected to the computer so it can back up any file changes shortly
after they occur. This backup technique can be performed to supplement a full backup.
Another option is to always have an internal disk or removable disk connected so that the
native backup software automatically performs an image or full file-by-file backup at a scheduled time each day or one day during the week. Windows operating systems enable this type
of regular backup.
Some removable disks provide software to perform backups, including software that regularly backs up recent changes to files.
Whether you are a home user, have a client computer in a business, or manage a server, it is
important to develop a solid backup strategy. Consider the following elements as you develop
your approach:
•
Determine what information needs to be backed up and how often—Some files, such
as the operating system files, need only infrequent backups—for example, after you
change the settings on your computer or install new software. More frequent backups
are required for other information, such as new word-processing files, spreadsheets,
and other documents that you create daily. Develop a plan that enables you to back up
the operating system as needed and to back up specific files as often as they are modified or are created.
•
Use scheduling software—Windows native backup software, Mac OS X Time
Machine, open source backup software for UNIX/Linux, and other third-party software can help you schedule backups. Set up the scheduling software to make sure
backups are regularly performed so you don’t inadvertently miss a backup.
•
Choose the right backup media—Many kinds of backup media exist, including dedicated internal hard drives for backups, removable hard drives or flash drives, DVDs,
and tapes. Choose the media that match your backup needs. For example, if you are a
Copyright 2017 Cengage Learning. All Rights Reserved. May not be copied, scanned, or duplicated, in whole or in part. WCN 02-200-203
11
518
Chapter 11 Operating Systems Management and Maintenance
home user who does not plan to store backups for years and years, a removable hard
drive might match your needs. For personal information that needs to be stored for
years, such as tax returns and precious family photos, use long-lasting DVDs for
backup. If you are a server administrator who needs to back up and store large
amounts of data for years or decades, consider using reliable, high-quality tapes and a
tape subsystem.
•
Rotate backup media—Even the longest-lasting backup medium can be damaged or
broken accidentally. To protect against failures, rotate the media every week, every two
weeks, or once a month, depending on the value of your data. Rotating media means
having one or more full sets of media. If you are a home user, you might rotate the
media once a month; a server administrator might rotate every week. For example, if it
takes four tapes to back up the data files on your server, purchase an extra set of four
tapes. Use one set one week and use the other set the second week, and then rotate the
two sets every other week. For even better backup assurance, such as for a server in a
credit union, purchase three or four sets of tapes so that each set is used only one week
per month.
•
Store a set of backups in an off-site location—Supplement your rotation strategy by
storing one full set of backups in an off-site location, such as a bank vault. You might
rotate one set to the off-site location once a month. If your home or place of business is
damaged by a fire or flood, at least your data will be protected.
•
Regularly use file repair tools and a virus checker
checker—Regularly run file repair software,
such as chkdsk or fsck, to make sure the data you back up is usable. Also, regularly
scan with a virus checker so you do not back up viruses or malware.
•
Investigate third-party backup software—After you develop your backup plan, you
may discover that the backup software that comes with your operating system does not
fully match your needs. For example, a server administrator may want to use backup
software that helps track all media in a tape rotation or stored off site. In this case,
investigate commercial and open source backup software to find a match for your
needs.
Optimizing Software Installation
The following list provides some general guidelines for optimizing software installation and
uninstallation:
•
One aspect of software installation already discussed in this chapter is to plan and set
up a well-organized folder structure. The folder structure influences ease of installation,
provides the ability to keep different versions in separate places, and enables you to
smoothly uninstall software. The following is a checklist of additional guidelines for
software installation:
Make sure that the software is compatible with your operating system.
Check the central processing unit (CPU), RAM, disk storage, audio, video, and
other requirements to make sure your computer is a match for the software.
Copyright 2017 Cengage Learning. All Rights Reserved. May not be copied, scanned, or duplicated, in whole or in part. WCN 02-200-203
Optimizing Software Installation
519
Find out if there are different installation options, such as one with or without
tutoring applications to help you learn the software.
Use the utilities provided by the operating system for installing or uninstalling applications. In particular, Windows operating systems usually have a Windows-compatible
setup program that comes with the software. Also, use the Programs and Features tool
in the Windows Control Panel to uninstall applications (see Figure 11-6).
11
Figure 11-6 Programs and Features in Control Panel
When you need to remove an application in Windows, always use
the uninstall capability in Control Panel. This practice helps to ensure
that all components are removed, such as .dll and configuration files,
so that the system folders do not become cluttered with files that are
no longer needed. If you don’t use the uninstall tools and instead
simply delete the program’s subfolder, such as the one in the Program Files folder, you might see delays in the operating system and
other unexpected consequences.
•
Check the vendor’s “bug” list for the software to make sure the bugs will not affect the
way you use it. Bug lists are often posted on the vendor’s Web site in the software
support area.
•
Make sure that the software is well documented and supported by the vendor and that
the vendor can provide the required drivers, if applicable.
•
Determine in advance how to back up important files associated with the software, and
find the locations and purposes of all program and data files, including hidden files.
Copyright 2017 Cengage Learning. All Rights Reserved. May not be copied, scanned, or duplicated, in whole or in part. WCN 02-200-203
520
Chapter 11 Operating Systems Management and Maintenance
•
Determine whether running the program requires adjustments to page or swap files
used by the operating system. (Page files and swap files are discussed in the next
section.)
•
Find out what temporary files are created by the program and where they are created.
•
For Windows-based software, always install the latest versions of components, including .dll, .ocx, .ini, .inf, and .drv files. These files are generally available directly from
the software vendor or the vendor’s Web site.
•
Do not mix .inf and driver files between different versions of Windows because other
software on the computer may no longer work as a result.
•
Always keep service packs and program patches up to date for all software. Service
packs are issued to fix software problems, address compatibility issues, and add
enhancements.
Installing software on a network server requires some additional considerations:
•
Make sure there are enough licenses to match the number of users or that you have
metering software that limits simultaneous use to the number of valid licenses.
•
Determine the network load created by software, such as client/server, cloud, database,
and multimedia applications.
•
Consider purchasing management software, such as Microsoft System Center Configuration Manager, that can automatically update software across the entire system when
there is a new release. This ensures that all users have the same version of wordprocessing or database software, for example.
•
Determine whether the software will be used in a cloud, client/server, or terminal
server/remote desktop services environment, or if it will be loaded directly onto server
clients.
•
Determine whether the server or client workstations must be tuned for the software in
a particular way, such as by modifying page files or registry entries.
•
For operating systems that support two or more file systems, make sure the software is
compatible with the file system used by the operating system.
Tuning the Operating System
After an operating system is installed, you may notice that it doesn’t perform as well as you
expected or that performance seems to suffer with time. Just as a car needs periodic tuning,
so do desktop and server operating systems. One critical reason for tuning operating systems
is that slow workstations and servers have a cumulative impact on a network. Sometimes,
poor network performance is not the result of network problems or too little bandwidth;
instead, a preponderance of workstations and servers cannot keep up with the network. This
Copyright 2017 Cengage Learning. All Rights Reserved. May not be copied, scanned, or duplicated, in whole or in part. WCN 02-200-203
Tuning the Operating System
521
is an often overlooked area that can result in significant savings for an organization if
addressed. It is much less expensive to tune servers and workstations (often at no cost) than
to invest in faster, very expensive network devices such as routers and switches. There are
many ways to tune operating systems to achieve better performance, including tuning virtual
memory, installing operating system updates and patches, and tuning for optimal network
communications.
Tuning Virtual Memory
Most operating systems supplement RAM by employing virtual memory techniques. Virtual
memory is disk storage used when there is not enough RAM for a particular operation or
for all processes currently in use. The operating system can swap to disk (virtual memory)
the processes and data in RAM that temporarily have a low priority or are not currently in
use. When the operating system needs to access certain information on a disk, it swaps
other information to disk and reads the information it needs back into RAM using a process
called paging. The information that is swapped back and forth from RAM to disk and vice
versa is stored in a specially allocated disk area called the page file, paging file, or swap file.
(In UNIX/Linux, this area is called the swap file system.)
Some operating systems that use virtual memory and paging enable you to tune the page file
by adjusting its size. Tuning the page file can result in better operating system performance.
Virtual memory in Windows operating systems is adjusted to set an initial size and a maximum size to which it can grow. Generally, the rule for sizing the page file is to set the initial
size to 1.5 times the amount of RAM. The maximum page file size should allow for adequate
growth to handle the most active times. In Windows 8, Windows Server 2012, and later versions, the paging file size is configured by default to be automatically managed by Windows
(see Figure 11-7). You can change this configuration and specify a size and location for the
paging file; however, if you are using a solid state disk (SSD) for the Windows system disk,
you should let Windows manage the paging file size. In addition, because the paging file is
extensively used, you should locate it on a separate physical disk from the Windows system
disk (where the \Windows folder is located). By doing so, you reduce disk contention because
the system disk is also heavily used. This advice extends to Linux/UNIX systems—the swap
partition should be located on a separate disk from the Linux/UNIX system files. Also, on a
Windows system, you can free up considerable space on the system disk by moving the page
file to another volume or disk. You learn where to configure the paging file in Hands-On
Project 11-3 and in Challenge Lab 11-1.
Copyright 2017 Cengage Learning. All Rights Reserved. May not be copied, scanned, or duplicated, in whole or in part. WCN 02-200-203
11
522
Chapter 11 Operating Systems Management and Maintenance
Figure 11-7 Configuring the paging file in Windows
Windows operating systems also offer Performance Monitor for monitoring paging and many other activities, but a discussion of Performance Monitor is beyond the scope of this chapter. To access
Performance Monitor, right-click Start, click Computer Management,
click to expand Performance in the left pane, and then click Monitoring Tools.
In UNIX/Linux, you can use the vmstat command-line utility to monitor paging. Paging in
UNIX/Linux is accomplished with a swap file system, which is automatically created when
you install most UNIX/Linux distributions. If a swap file system is not already created, you
can use the mkfs command in Linux to create it. The swap file system is mounted like any
other file system. If it is consistently more than 80 percent full, increase its size. Also, if
there is a regularly high rate of swapping, consider spreading the swap space over multiple
disks on different controllers.
In Mac OS X, there is no option for turning on or configuring virtual memory because it is
always enabled. The use of virtual memory is built into the operating system and is not subject to user intervention.
Copyright 2017 Cengage Learning. All Rights Reserved. May not be copied, scanned, or duplicated, in whole or in part. WCN 02-200-203
Tuning the Operating System
523
Installing Operating System Updates and Patches
One of the most important ways to keep your operating system tuned is by installing system
updates issued by the vendor. Problems with an operating system are often not fully discovered until it has been released and used by thousands, or even millions, of users. Once enough
problems are discovered and reported, vendors create updates. For example, you can obtain
updates by using the Windows Update utility in all Windows operating systems (see
Chapter 5). Windows Update requires an Internet connection and downloads updates from
Microsoft’s Web site. By default, Windows 10 is configured to automatically download and
install updates. Restarts are scheduled during the maintenance window, which is usually
around 3 a.m. You can configure Windows Update to notify you when a restart is required
rather than restarting automatically (see Figure 11-8). An automatic restart may be okay with
a client OS, but you should only restart a server when no client applications are using it.
11
Figure 11-8 Windows Update
Many Linux distributions with the GNOME desktop have a software update tool that
enables you to automatically obtain operating system updates through the Internet. The general steps to start the tool in Fedora Linux with the GNOME desktop are:
1. Click Activities.
2. Click Show Applications.
Copyright 2017 Cengage Learning. All Rights Reserved. May not be copied, scanned, or duplicated, in whole or in part. WCN 02-200-203
524
Chapter 11 Operating Systems Management and Maintenance
3. Click Software.
4. Click the Updates tab to see if any installed applications or OS files need to be updated.
Mac OS X uses the App Store to deliver updates. As long as the Mac has an Internet connection, the App Store is periodically contacted to look for updates to the OS and installed
applications. You can check for updates using the following steps:
1. Click the Apple icon.
2. If any updates are detected, you will see a notification next to App Store (see
Figure 11-9).
Figure 11-9 Checking for updates on Mac OS X
Source: Mac OS X
3. Click App Store. Next, click Update next to any items that display an Update button, or
click the Update All button (see Figure 11-10). You’ll also see a list of recently updated
OS components and applications.
Copyright 2017 Cengage Learning. All Rights Reserved. May not be copied, scanned, or duplicated, in whole or in part. WCN 02-200-203
Tuning the Operating System
525
Figure 11-10 Updating Mac OS X
Source: Mac OS X
Sometimes it is helpful to contact the operating system vendor or an
independent support organization for help with a system problem.
The representative will ask what service releases, upgrades, or
patches you have installed, and may request that you install them as
the first step in solving the problem.
Tuning for Network Communications
Any computer connected to a network should be checked periodically to make sure that its
connectivity is optimized. When a network interface card (NIC) is purchased, it should be of
high quality and designed for use in the computer’s fastest expansion slot, usually a PCIe slot.
Just as operating systems need periodic patches, so do NIC drivers. Check the NIC vendor’s
Web site occasionally for updated drivers that you can download and use immediately.
Another problem with NICs is that they sometimes have problems that cause them to saturate the network with repeated packet broadcasts, called a broadcast storm. Network administrators can regularly monitor the network and individual nodes to make sure they are not
creating excessive traffic.
Testing Network Connectivity
Questions often arise about whether the network is working or a particular workstation’s
network connection is working. Anyone can poll another network device using the ping utility, as you learned in Chapter 9. All of the operating systems covered in this book support
ping as a command-line utility.
Copyright 2017 Cengage Learning. All Rights Reserved. May not be copied, scanned, or duplicated, in whole or in part. WCN 02-200-203
11
526
Chapter 11 Operating Systems Management and Maintenance
If you poll a computer and receive a reply showing its address and other information, your
computer’s connection is working. Also, if the computer that you successfully poll is on
another network or somewhere on the Internet, all of the network connections between your
computer and the other computer are communicating. The output of the ping command will
also report how long it took for the ping reply to be received. On a fast LAN, this time
will typically be less than 1 millisecond (ms). However, if your ping crosses a router or traverses the Internet, you might see times of 10 ms to a couple hundred ms. Times beyond
this range may indicate congestion somewhere in the network.
You can check the utilization of your network connection in Windows using the Performance
tab in Task Manager (see Figure 11-11). This tool gives you a real-time look at how much of
your network interface is being used. If you are performing a task such as downloading a
file, you will probably see the utilization jump, but if you are just using a local application,
the utilization should typically be quite low.
Figure 11-11 Checking network interface utilization in Windows
To check the utilization of your interface in Linux, you may need to download and install a
utility such as netdiag or netwatch, but you can use a simple command-line utility called
ifstat that is available in most Linux distributions and provides basic statistics for your network interface. On Mac OS X, you can run Activity Monitor and check the Network tab to
see which processes are using network bandwidth and to see basic statistics for the number
of packets received and sent.
Copyright 2017 Cengage Learning. All Rights Reserved. May not be copied, scanned, or duplicated, in whole or in part. WCN 02-200-203
Key Terms
527
Chapter Summary
■
Successful file system maintenance is closely linked to a computer’s folder structure.
On desktop and server operating systems, a well-planned folder structure makes it
easy to locate files, update files, share folders and files, back up and archive files, and
delete unwanted files.
■
The file structure established on a computer should be easy to maintain over the long
term. Keeping files in a logical structure means it is easier to identify files that don’t
belong, that are out of date, or may be causing problems.
■
One important practice for maintaining an operating system is to regularly find and
delete unused files. Disk space is often at a premium, and there is no reason to leave
unused files on a system because they are easy to delete. To find and delete unused
files, use the Disk Cleanup tool in Windows, the find, ls, and rm commands in Linux,
and the Find utility in Mac OS X.
■
Other ways to maintain disks include defragmenting them, moving files to relatively
unused disks, finding and repairing disk problems, and setting up RAID. Some operating systems have built-in utilities that can determine if disks are fragmented and
then defragment them. Regularly defragmenting disks is an inexpensive method of
extending disk life and improving performance. Disk scan and repair tools are another
inexpensive way to address disk problems and prevent them from growing more serious. Equalizing the disk load by periodically moving files is an effective way to extend
the life of disks. RAID techniques are also frequently used to extend disk life and to
protect data when a disk fails.
■
An important part of maintaining a system is to make regular backups. Backups can
be vital when a hard disk fails or after you delete files you wish you had retained.
Backups can also be used to restore drivers or other operating system files that were
damaged or overwritten.
■
An important consideration for optimizing software installations is to make sure the
software is compatible with the computer hardware and operating system. When
uninstalling software, use the uninstall options built into the operating system.
■
All operating systems should be tuned periodically. Adjusting paging is one way to tune
for better performance. Another way is to keep current with operating system patches
and updates. Networked systems should be tuned so that NIC drivers are kept current
and checked to ensure that no NIC is causing excessive network traffic. TCP/IP-based
network systems include the ping utility for testing a network connection.
Key Terms
binary backup A technique that backs up the entire contents of one or more disk drives in a
binary or image format.
cookie A text-based file used by Web sites to obtain information about a user, such as the
user’s name, the user’s password to access the site, and information about how to customize
the Web page display.
Copyright 2017 Cengage Learning. All Rights Reserved. May not be copied, scanned, or duplicated, in whole or in part. WCN 02-200-203
11
528
Chapter 11 Operating Systems Management and Maintenance
defragmentation The process of removing empty pockets between files and other
information on a hard disk drive.
differential backup A method that only backs up files that have changed since the last full
backup.
disk striping A disk storage technique that divides portions of each file over all volumes in a
set as a way to minimize wear on individual disks.
fragmentation The accumulation of empty pockets of space between files on a disk due to
frequent writing, deleting, and modifying of the files and their contents.
full file-by-file backup A technique that backs up the entire contents of one or more disk
drives, including all folders, subfolders, and files, so that any of these contents can be
restored.
incremental backup A method that only backs up files that have changed since the last full
or incremental backup.
page file Also called the paging file or swap file, an allocated portion of disk storage
reserved to supplement RAM when the available RAM is exceeded. See swap file.
service packs Software “fixes” issued by a vendor to repair software problems, address
compatibility issues, and add enhancements.
surface analysis A disk diagnostic technique that locates and marks damaged disk areas.
Some surface analysis tools are destructive to data because they also format the disk. Other
tools can run without altering data, except to move it from a damaged location to one that
is not.
swap file Also called the page file, paging file, or swap file system, an allocated portion of
disk storage reserved to supplement RAM when the available RAM is exceeded. See page
file.
virtual memory Disk storage used when there is not enough RAM for a particular operation
or for all processes currently in use.
Review Questions
1. After you start your Windows 10 computer, you attempt to access your organization’s
network to open an inventory program, but you can’t make a network connection.
Which of the following commands tests your computer’s ability to connect to the
network?
a.
find net
b. net test
c.
ping
d. listen
Copyright 2017 Cengage Learning. All Rights Reserved. May not be copied, scanned, or duplicated, in whole or in part. WCN 02-200-203
Review Questions
529
2. When examining the contents of the Windows folder in Windows 10, which of the
following subfolders would you expect to find? (Choose all that apply.)
a.
sbin
b. System
c.
etc
d. System32
3. Your organization’s Windows Server 2012 server has 8 GB of RAM but has been running a little slow, so you decide to check the virtual memory configuration. You find
that the paging file is located on the C: drive, where Windows is installed. The paging
file is about 12 GB. Is there anything you can do to configure the paging file for optimal performance?
a.
Decrease the paging file size to 4 GB.
b. Move it to another disk.
c.
Increase the paging file size to 24 GB.
d. No, it is configured optimally.
4. How can you purge a file in Mac OS X?
a.
Send the file to the Trash and then delete it from the Trash.
b. Right-click the file and click Purge.
c.
Copy the file to another hard drive and then delete it.
d. Mac OS X files are always purged as soon as they are deleted.
5. You want to check on the size of virtual memory on your Linux computer. Where
should you look?
a.
the /vmem folder
b. the swap file system
c.
the /etc/swapconfig.cnf file
d. the pagefile.sys file
6. Your Linux workstation runs slowly when you use certain applications. You decide to
determine how much virtual memory is used when you run these applications. Which
of the following commands enables you to determine virtual memory usage?
a.
sfiles
b. vmstat
c.
netstat
d. vfiles -s
Copyright 2017 Cengage Learning. All Rights Reserved. May not be copied, scanned, or duplicated, in whole or in part. WCN 02-200-203
11
530
Chapter 11 Operating Systems Management and Maintenance
7. Which of the following utilities in Windows 10 can find and delete temporary files created by programs?
a.
Disk Tracker
b. Recovery Console
c.
File Manager
d. Disk Cleanup
8. How do you check for software updates in Mac OS X?
a.
Click the Apple icon and then click App Store.
b. Click Go and then click System Update.
c.
Click Go, click Utilities, and then click Updates.
d. Click the Apple icon, click System Preferences, and then click Updates.
9. Which Windows tool lets you monitor paging activity?
a.
Device Manager
b. Performance Monitor
c.
Disk Management
d. Storage Spaces
10. In Linux, you are preparing to delete the tprice user account because this user has just
left the company. However, before you delete the account, you want to list all files
owned by tprice so you can decide which files to keep. What command enables you to
view all files owned by the tprice account?
a.
ls -owner tprice
b. lsuser tprice
c.
find / -user tprice
d. scan -owner tprice
11. Temporary Internet files often have which of the following extensions? (Choose all that
apply.)
a.
.html
b. .cooky
c.
.gif
d. .htm
12. Which of the following RAID levels involve disk striping? (Choose all that apply.)
a.
level 0
b. level 1
c.
level 5
d. level 10
Copyright 2017 Cengage Learning. All Rights Reserved. May not be copied, scanned, or duplicated, in whole or in part. WCN 02-200-203
Review Questions
531
13. How are files stored on the disk when an OS is first installed?
a.
randomly
b. alphabetically
c.
contiguously
d. fragmented
14. In Windows operating systems, which of the following methods backs up any files that
have changed since the last full or incremental backup?
a.
copy
b. incremental
c.
daily
d. differential
15. Which backup scheme requires the fewest tapes to perform a full restore?
a.
full backup plus differential
b. full backup plus daily
c.
daily backup plus incremental
d. full backup plus incremental
16. What is the default Windows Update configuration in Windows 10?
a.
manually download, automatic install
b. automatically download, prompt to install
c.
disabled
d. automatically download and install
17. When you attempt to access an application in Mac OS X, you see a message that the
disk is corrupted. Which of the following tools enables you to examine the disk, find
the problem, and attempt to fix it?
a.
Inode Checker
b. chkdsk
c.
Disk First Aid in the Disk Utility
d. File Checker in the Preferences window
18. Your Windows 10 workstation hard drive seems to be laboring to find files, possibly
because you added and deleted hundreds of files without performing any special disk
maintenance. What is the most likely problem?
a.
The defrag program is not scheduled to run.
b. The chkdsk program is not working properly.
c.
The page file is too small.
d. Automatic disk cleanup is not working.
Copyright 2017 Cengage Learning. All Rights Reserved. May not be copied, scanned, or duplicated, in whole or in part. WCN 02-200-203
11
532
Chapter 11 Operating Systems Management and Maintenance
19. You use the Internet frequently. What simple step should you perform on a regular
basis to maintain your computer?
a.
Tune your Internet browser to automatically shrink all cookies.
b. Reset the protocol binding order in the Web browser to give priority to HTTP
communications because accessing multiple sites can change the binding order.
c.
Check to make sure that your browser’s speed is always maintained between
1 Mbps and 20 Mbps.
d. Use your browser or an operating system utility to regularly delete temporary
Internet files.
20. This morning you modified five large data files in your home folder in Linux, and now
you want to find and delete the files because you no longer need them. Which of the
following commands can you use to list and sort files based on the time they were
modified?
a.
locate -d
b. ls -t
c.
rm -m
d. df -d
Hands-On Projects
Project 11-1: Use Disk Cleanup in Windows
In this project, you use the Disk Cleanup tool in Windows to delete temporary
Internet files and temporary files created by applications. You need Administrator privileges for this project.
1. Start and log on to your Windows computer.
2. In the search box on the taskbar, type Disk Cleanup and then click Disk Cleanup in
the search results.
3. In the Disk Cleanup: Drive Selection dialog box, be sure that the drive where Windows
is installed is selected, and click OK.
4. In the Disk Cleanup for (C:) dialog box (see Figure 11-12), click to select the boxes for
Temporary Internet Files and Temporary files. Remove checks from any other boxes.
Click OK.
Copyright 2017 Cengage Learning. All Rights Reserved. May not be copied, scanned, or duplicated, in whole or in part. WCN 02-200-203
Hands-On Projects
533
Figure 11-12 Cleaning up files with Disk Cleanup
5. Click Delete Files to verify that you want to delete the files. The Disk Cleanup utility
begins. Depending on how many files you’re deleting, the process could take a few seconds or several minutes.
6. Stay logged on if you are continuing to the next project.
Project 11-2: Use Programs and Features in Windows
In this project, you use the Programs and Features tool in Windows to see
options for changing or uninstalling a program.
1. Log on to your Windows computer, if necessary. Right-click Start and click Control
Panel.
2. If Control Panel is in Category view, click the Uninstall a program link under Programs. If Control Panel is in icon view, click Programs and Features.
3. Click a program in the list (see Figure 11-13). Notice that the option bar just above the
list of programs displays the options available for the program. Possible options
include Uninstall, Change, and Repair.
Copyright 2017 Cengage Learning. All Rights Reserved. May not be copied, scanned, or duplicated, in whole or in part. WCN 02-200-203
11
534
Chapter 11 Operating Systems Management and Maintenance
Figure 11-13 Uninstalling or changing a program
4. Click other programs to view the options that appear.
5. Close the Program and Features window and any other open windows. Stay logged on
if you are continuing to the next project.
Project 11-3: View Virtual Memory Configuration
in Windows
In this project, you view the virtual memory configuration in Windows.
1. Log on to your Windows computer, if necessary. Right-click Start and click System.
2. Click Advanced system settings in the left pane.
3. In the System Properties dialog box, click the Advanced tab.
4. On the Advanced tab, click Settings under the Performance section.
5. Click the Advanced tab in the Performance Options dialog box.
6. Under Virtual memory, you can see the total amount of virtual memory that has been
allocated. Click the Change button.
7. At the bottom of the Virtual Memory dialog box, notice the minimum, recommended,
and currently allocated sizes set for virtual memory.
8. Notice the check box (Automatically manage paging file size for all drives) at the top of
the dialog box. If you cleared this check box, you could make changes to virtual memory, if needed. For example, you could put the page file on a different physical disk to
optimize performance. For now, leave the check box selected. Click Cancel to close the
Virtual Memory dialog box.
9. Click Cancel in the Performance Options dialog box and then click Cancel in the
System Properties dialog box.
10. Close all open windows but stay logged on if you are continuing to the next activity.
Copyright 2017 Cengage Learning. All Rights Reserved. May not be copied, scanned, or duplicated, in whole or in part. WCN 02-200-203
Hands-On Projects
535
Project 11-4: Check Network Utilization in Windows
In this project, you check network utilization in Windows using Task
Manager.
1. Log on to Windows, if necessary. Right-click the taskbar and click Task Manager.
2. Click More details, if necessary, to see more information in the Performance tab. Click
the Performance tab.
3. In the left pane, click Ethernet. In the right pane, you see a graph of network utilization
on the Ethernet interface. Create some network activity by opening a Web browser and
browsing to some Web sites. You should see activity in the graph. Keep the Web
browser window open.
4. To see more details of network usage, click Open Resource Monitor at the bottom of
the Task Manager window. Click the Network tab.
5. The top pane displays processes that are using the network. Your browser should be
displayed in the list. Browse to some other Web sites, such as Microsoft.com or
Espn.com, to create some network traffic. The graphs in the right pane should show
plenty of activity (see Figure 11-14).
11
Figure 11-14 Monitoring network activity with Resource Monitor
6. Close Resource Monitor and Task Manager.
7. Close all open windows and shut down Windows.
Copyright 2017 Cengage Learning. All Rights Reserved. May not be copied, scanned, or duplicated, in whole or in part. WCN 02-200-203
536
Chapter 11 Operating Systems Management and Maintenance
Project 11-5: Delete Files in Linux
In this project, you create a couple of test files and then practice deleting them
in Linux. Log on to your account for this project rather than the root account.
1. Start and log on to your Linux computer. Open a terminal window.
2. Create two files that you can practice deleting. First, type touch practice1.tmp and
press Enter. Next, type touch practice2.tmp and press Enter.
3. Type ls *.tmp and press Enter. You can see the files you just created.
4. Type rm *.tmp and press Enter. If prompted, type Y and press Enter to confirm the
files’ removal.
5. Type ls *.tmp and press Enter. No files are found.
6. Create the two files again by entering the commands from Step 2.
7. Type find / -type f –name “*.tmp” and press Enter. This command finds all files with
the .tmp extension in the entire file system. You may see some “access denied” errors
as the find command attempts to look in folders for which you don’t have permission.
8. To delete all files with the .tmp extension, type find / -type f –name “*.tmp” -delete
and press Enter.
9. Type ls *.tmp and press Enter to verify that the files have been deleted.
10. Type clear and press Enter to clear the terminal window. Leave the window open for
the next project.
Project 11-6: Use df and du in Linux
In this project, you use the df and du commands in Linux to examine disk
space use.
1. If necessary, access the command line by opening a terminal window.
2. Type df -a and press Enter to view information about all mounted file systems.
3. Type df /var and press Enter to view information about the file system in which that
folder resides.
4. Switch to a folder of your choice. For example, you can type cd /usr and press Enter.
5. Type du | more and press Enter to view the size of each subfolder within the main
folder. Use the Spacebar to advance one screen at a time or type q to exit the listing of
information.
6. Stay logged on if you are continuing to the next project.
Copyright 2017 Cengage Learning. All Rights Reserved. May not be copied, scanned, or duplicated, in whole or in part. WCN 02-200-203
Hands-On Projects
537
Project 11-7: Use the fsck Command in Linux
In this project, you learn more about the fsck command in Linux by reviewing
its online documentation.
1. Log on to your Linux computer and open a terminal window, if necessary.
2. Type man fsck and press Enter.
3. Use the Spacebar to scroll forward one page at a time or use the up and down arrows
to scroll up or down one line at a time.
4. Unfortunately, you can’t run fsck while the file system is mounted, but if you use
Linux, you should be familiar with this command in case you need to perform file system maintenance. Press q to exit the documentation when you are finished.
5. Close the terminal window and shut down Linux.
Project 11-8: Perform Disk Maintenance in
Mac OS X
In this project, you empty the trash and use Disk First Aid in Mac OS X.
1. Start and log on to your Mac OS X computer. Click the Trash icon on the Dock to
view its contents.
2. Make sure there are no files you want to salvage from the trash. If you want to salvage
files, drag them out of the trash and into the appropriate folder or folders.
3. Click Finder on the menu bar.
4. Click Empty Trash.
5. Click Empty Trash again to confirm that you want to permanently delete the files.
In Mac OS X, the Trash icon appears either as an empty wire basket
on the Dock or as a can with papers inside.
6. Click Go in the menu bar, click Utilities, and double-click Disk Utility.
7. Click Macintosh HD in the left pane.
8. Click the First Aid button at the top of the Disk Utility window (see Figure 11-15).
Copyright 2017 Cengage Learning. All Rights Reserved. May not be copied, scanned, or duplicated, in whole or in part. WCN 02-200-203
11
538
Chapter 11 Operating Systems Management and Maintenance
Figure 11-15 The Disk Utility in Mac OS X running First Aid
Source: Mac OS X
9. Click Run.
10. Click Show Details to see the progress and status.
11. If the disk needs to be repaired, you’ll see messages in red and the recommendation to
run the Disk Repair utility. If you see this recommendation, click OK and then click
Repair Disk. Otherwise, wait until the verification process is complete and click Done.
12. Close all open windows and shut down your computer.
In some cases when disk repair is necessary, the Repair Disk option
will not start. In such cases, try starting the disk repair by first booting
from the installation DVD and then using Disk Utility from the installation DVD. Another option is to run fsck from a terminal window.
Critical Thinking
The following activities give you critical thinking challenges. Challenge Labs give you an
opportunity to use the skills you have learned to perform a task without step-by-step instructions. Case projects offer a practical problem for which you supply a written solution. Not all
chapters contain Challenge Labs. There is not always a specific right or wrong answer to these
critical thinking exercises. They are intended to encourage you to review the chapter material
and delve deeper into the topics you have learned.
Copyright 2017 Cengage Learning. All Rights Reserved. May not be copied, scanned, or duplicated, in whole or in part. WCN 02-200-203
Case Projects
539
Challenge Labs
Challenge Lab 11-1: Change Virtual Memory Settings
in Windows
In this lab, you will change virtual memory settings on a Windows 10 computer. You want
to make your virtual memory a fixed size and, if possible, move it to another physical disk
on your computer. Get your instructor’s approval if you plan to use classroom computers
for this lab. Set the virtual memory to 1.5 times the size of physical RAM and move the
page file to a different disk. If you don’t have a second disk, move the page file to a different
volume. (If you only have one volume, don’t move the page file.) Answer the following
questions:
•
How did you check the amount of RAM installed on your computer?
•
What did you have to do before you could change the virtual memory settings?
•
What are the advantages of moving the page file to a different disk?
Case Projects
The National Center for Weather Research (NCWR) is funded by 22 state universities and
eight foundations to study weather patterns, forecasting, cloud seeding, and other weather
phenomena. NCWR’s building has a network consisting of 295 workstations, including systems that run Linux, Mac OS X, and Windows 10. There are also Windows Server 2012/R2
servers on the network. All users have access to the Internet.
Case Project 11-1: Discuss Options for Additional
Storage
More than 50 users who run Windows 10 are certain they need to purchase additional disks because they are nearly out of space. However, the
budget is tight and it is important to eliminate unnecessary purchases.
What options can you explain to them before their department heads
order new disks?
Case Project 11-2: Repair Disk and File Problems
Your boss hired a new computer professional who formerly worked as a
database support specialist in the business office, but who is relatively
inexperienced in operating systems. The boss assigned you to train your
new colleague. Today you will teach him how to find and repair disk
and file problems. Explain the tools available for the following operating
systems:
•
Linux
•
Mac OS X
•
Windows 10
Copyright 2017 Cengage Learning. All Rights Reserved. May not be copied, scanned, or duplicated, in whole or in part. WCN 02-200-203
11
540
Chapter 11 Operating Systems Management and Maintenance
Case Project 11-3: Outline Maintenance Tasks on
Mac OS X
The director of publications uses Mac OS X and has been working on so
many projects for the past six months that she hasn’t had time to perform
maintenance tasks. She wants to spend some time tomorrow morning on
these tasks. What maintenance tasks do you recommend?
Copyright 2017 Cengage Learning. All Rights Reserved. May not be copied, scanned, or duplicated, in whole or in part. WCN 02-200-203
Appendix
A
Operating System
Command-Line Commands
You can accomplish many tasks by using command-line commands in an operating
system, including creating a user account or configuring a network interface card (NIC).
Many UNIX/Linux users prefer using commands instead of graphical user interface (GUI)
utilities because the commands are so universal and are often quicker to execute. Windows
and Mac OS X users often find commands to be powerful, step-saving tools. For example,
the Windows systeminfo command provides an instant snapshot of the hardware and software used on a computer. The following sections provide tables for quick reference to operating system commands. Two tables are presented for each operating system discussed in
this book. For Windows, Fedora/Red Hat Enterprise Linux, and Mac OS X, one table lists
general commands and one lists commands that relate to network functions.
Windows Command Prompt Commands
Table A-1 presents general Command Prompt window commands for Windows versions
from XP and later, except as noted in the Description column. Table A-2 presents Command
Prompt window commands for network functions in Windows. The following steps explain
how to open the Command Prompt window in Windows 8.1 and later versions:
1. Right-click Start.
2. Click Command Prompt or Command Prompt (Admin) if the commands require administrator access.
Starting with Windows Vista, Microsoft introduced a powerful new
command-line scripting environment called PowerShell. PowerShell
allows administrators to manage almost every aspect of the OS environment using the command line and PowerShell scripts. PowerShell is a
subject for an entire book and is not covered here, but you can learn
more about it at https://msdn.microsoft.com/en-us/library/ms714469%
28v=vs.85%29.aspx.
Copyright 2017 Cengage Learning. All Rights Reserved. May not be copied, scanned, or duplicated, in whole or in part. WCN 02-200-203
541
542
Appendix A
Operating System Command-Line Commands
You can run many commands by typing them in the search box on the
taskbar. However, when you use commands in this way, the Command
Prompt window often closes before you can view the results of the
command. You can also type cmd and press Enter in the search box.
To find out more about a general command when you are using the Command Prompt window, type help plus the command, such as help attrib, and press Enter. To learn more about
a network command, such as the net command, type net /? and press Enter, or type the full
command set and /?, such as net accounts /?, and press Enter. To leave the Command
Prompt window, type exit and press Enter.
The following is only a partial list of commands available in Windows.
Many more are available, especially on a Windows Domain Controller.
For a full list, see https://technet.microsoft.com/en-us/library/cc754340%
28v=ws.11%29.aspx.
Table A-1
Windows general commands
Command
Description
assoc
Used to view and change file associations in Windows.
at
Enables you to schedule one or more programs to run at a designated date and time. This
command has been replaced by schtasks in Windows 8 and later versions.
attrib
Enables you to view the attributes set for a file and to change one or more attributes.
bcdedit
Manages the boot configuration data (BCD) store.
break
Causes the system to check for a break key only during standard operations, such as while
making input or output (break
break off
off) or during all program execution options (break on).
cacls
Enables you to view the attributes set for a file and to change one or more attributes.
call
Enables you to call a batch program from another one.
cd or chdir
Enables you to change to a different folder or to view the name of the current folder.
chcp
Used to view the currently active code page number or to set a different code page number.
chkdsk
Used to report the disk file system statistics and to correct file system errors such as lost
clusters (for FAT and NTFS).
chkntfs
Used to report the disk file system statistics and to correct file system errors such as lost
clusters (for NTFS).
cls
Clears the information currently displayed on the screen.
cmd
Used to start a new NT DOS Virtual Machine (NTDVM) session or new command-line session.
color
Sets up the foreground and background screen colors.
comp or fc
Enables you to compare the information in two files or in two sets of files to determine the
differences in content.
compact
Compresses files and subfolders within a folder or removes the compression attribute.
convert
Converts a FAT-formatted volume to NTFS at the time a server is booted.
copy
Copies files from one disk location to another.
date
Enables you to view the date and to reset it.
del or erase
Deletes specified files on a volume.
dir
Lists files and subfolders within a folder.
Copyright 2017 Cengage Learning. All Rights Reserved. May not be copied, scanned, or duplicated, in whole or in part. WCN 02-200-203
Windows Command Prompt Commands
Table A-1
543
Windows general commands (continued )
Command
Description
diskcomp
Checks the contents of one floppy disk against the contents of another. This command is no
longer available starting with Windows 8.
diskcopy
Copies information on a floppy disk to another floppy disk. This command is no longer
available starting with Windows 8.
diskperf
Installs, starts, or stops the Performance Monitor/System Monitor disk counters.
doskey
Starts the recall of previously used MS-DOS commands and is used to create command
macros.
driverquery
Displays the current device driver status along with the properties.
echo
Shows an associated message or turns screen messages on or off.
exit
Used to close the Command Prompt session.
find
Used to find a designated set of characters contained in one or more files.
findstr
Used to find one or more sets of characters within a set of files.
format
Formats a disk.
fsutil
Configures and displays the file system properties.
ftype
Provides detailed information about file associations and is used to change associations so as
to link them with a designated program.
goto
Moves to a labeled line in the batch program.
gpresult
Displays group policy information.
graftabl
Displays characters and code-page switching for a color display monitor. This command is no
longer available starting with Windows 8.
help
Provides a list of the Windows command-line commands and is used to display help about a
particular command.
icacls
Allows you to display, modify, back up, and restore ACLs (Access Control Lists).
if
Performs conditional processing in a batch routine.
keyb
Enables you to set the keyboard language or layout (only available in Windows XP/Windows
Server2003).
label
Modifies the label on a disk volume.
md or mkdir
Used to set up a new folder.
mklink
Sets up symbolic and hard links (not available in Windows XP).
mode
Sets up parameters for a device or a communications port.
more
Used to limit the display to one screen at a time so information does not rush by faster than
it can be read.
move
Enables you to move files from one disk location to another on the same volume.
openfiles
Displays, queries, and disconnects open files.
path
Used to establish the path or list of folders to search in order to run a program or command.
pause
Suspends processing of a batch file.
popd
Deletes a specified drive letter that was temporarily created by pushd.
print
Prints a designated file.
prompt
Modifies the format of the command prompt shown in the Command Prompt window.
pushd
Creates a temporary drive letter to a network resource.
rd or rmdir
Deletes a folder or subfolder.
recover
Enables you to try recovering files and data from a damaged or unreadable disk.
reg, regedit, or
regedt32
Starts the GUI-based Registry editor.
(continues)
Copyright 2017 Cengage Learning. All Rights Reserved. May not be copied, scanned, or duplicated, in whole or in part. WCN 02-200-203
544
Appendix A
Table A-1
Operating System Command-Line Commands
Windows general commands (continued )
Command
Description
ren or rename
Renames a file or a group of files.
replace
Compares files in two disks or folders and synchronizes the files in one to those on another.
robocopy
Utility to copy files and trees (available for Windows XP in the Windows Resource Kit).
sc
Configures and displays services.
schtasks
Schedules commands to run.
set
Shows a list of currently set environment variables and is used to modify those variables.
setlocal
Used to start command process extensions via a batch file, such as for detecting error-level
information.
shift
Shifts the position of replaceable parameters in batch files.
shutdown
Allows for shutdown of the computer.
sort
Sorts lines input into a file that is written to the screen or sent to a printer from a file.
start
Starts a new Command Prompt window in which to run a program or a command.
subst
Used to link a path or volume with a designated drive letter.
systeminfo
Provides a wealth of information about hardware and software (not available in Windows
2000).
taskkill
Stops a task from running.
tasklist
Displays all running tasks.
time
Used to view the time of day and to reset it.
title
Modifies the title in the title bar of the Command Prompt window.
tree
Used to show a graphic of the folder and subfolder tree structure.
type
Shows a file’s contents on the screen or sends the contents to a file.
ver
Shows the current version of the operating system.
verify
Instructs the operating system to verify that each file is accurately written to disk at the time
it is created, copied, moved, or updated.
vol
Used to view the volume label, if there is one, and the volume serial number.
wmic
Displays WMI (Windows Management Instrumentation) information in an interactive
command shell.
xcopy
Designed as a fast copy program for files, folders, and subfolders.
A very useful command called msconfig starts the graphical System
Configuration utility, which enables you to configure files that automatically run when the operating system boots, specify which programs to run at startup, and enable or disable services. You can start
msconfig from the command line or a Run dialog box.
Table A-2
Windows network commands
Command
Description
ipconfig
Displays information about the TCP/IP setup.
nbtstat
Shows the server and domain names registered to the network (used only on server versions).
net accounts
Used to change account policy settings and to synchronize BDCs (Backup Domain Controllers).
net computer
Adds or removes a computer in a domain.
Copyright 2017 Cengage Learning. All Rights Reserved. May not be copied, scanned, or duplicated, in whole or in part. WCN 02-200-203
Linux Commands
Table A-2
545
Windows network commands (continued )
Command
Description
net config
Shows the started services that can be configured from this command, such as the Server and
Workstation services.
net continue
Resumes a service that has been paused.
net file
Shows the currently open shared files and file locks and is used to close designated files or to
remove file locks.
net group
Shows the existing global groups and is used to modify those groups.
net help
Displays help information for the net command.
net helpmsg
Used to determine the meaning of a numeric network error message.
net localgroup
Shows the existing local groups and is used to modify those groups.
net name
Used to display, add, or remove computer names that can participate in the Messenger service.
net pause
Pauses a service.
net print
Used to view and manage queued print jobs by computer, share name, and job number.
net send
Sends a message to designated users or to all users currently connected to the server.
net session
Shows the users currently connected to the server and is used to disconnect designated user
sessions or all user sessions.
net share
Used to create, delete, or show information about a shared resource.
net start
Shows the started services or is used to start a designated service.
net statistics
Shows the accumulated statistics about the server or workstation service.
net stop
Stops a network service on a server.
net time
Used to synchronize the server’s clock with that of another computer in the same domain or
in a different domain, or to view the time set on another computer in the same domain or in
a different domain.
net use
Shows information about shared resources or is used to configure, connect, and disconnect
shared resources.
net user
Used to view, add, or modify a user account set up on the server or in a domain.
net view
Presents a list of domains, the computers and servers in a domain, and all resources shared by
a computer in a domain.
netsh
Allows you to display and modify the network configuration.
netstat
Used to display information about the Transmission Control Protocol/Internet Protocol (TCP/
IP) session at the server.
nslookup
Queries information on Domain Name System (DNS) servers.
ping
Used to poll another TCP/IP node to verify that you can communicate with it.
tracert
Used to view the number of hops and other routing information on the path to the specified
server or host.
Linux Commands
The commands presented in Table A-3 are general Linux commands, and the commands
in Table A-4 are network-related commands. If you are using the GNOME interface in
Fedora or Red Hat Enterprise Linux, open a terminal window using the following steps:
1. Click Activities.
2. Click Show Applications.
3. Click Utilities and then click Terminal.
Copyright 2017 Cengage Learning. All Rights Reserved. May not be copied, scanned, or duplicated, in whole or in part. WCN 02-200-203
546
Appendix A
Operating System Command-Line Commands
To close the window, type exit and then press Enter. To access documentation for any of
these commands, type man and the command, such as man at, and press Enter. Press Enter
to advance through lines in the documentation or press the Spacebar to view pages. Type q
in the text window to leave it and return to the normal command prompt. Another way to
find information about a command is to type info plus the command, such as info at, and
press Enter. Press Enter or the Spacebar to read the information and then press q to exit.
Not all commands are available in all installations of Linux. For example,
lpr and related commands are only available if the lpr package is
installed. In addition, other commands will be available depending on
the packages installed on the system.
Table A-3
Linux commands
Command
Description
at
Runs a command or script at a given time.
atq
Shows the jobs that are scheduled to run.
atrm
Removes a job that is scheduled to run.
awk
Finds and replaces text in a file.
batch
Runs a command or script and is really a subset of the at command that takes you to the at>
prompt if you type only batch (in Red Hat Enterprise Linux and Fedora, you should run this
command when the system load is at an acceptable level).
cat
Displays the contents of a file to the screen.
cd
Changes to another directory.
cfdisk
Partitions and verifies a hard disk.
chgrp
Changes group ownership of a file.
chmod
Controls file security.
chown
Changes file ownership.
chsh
Sets your login shell.
clear
Clears the screen.
cmp
Used to compare two files.
cp
Copies a file to another directory; you can rename the file at the same time.
cpio
Copies and backs up files to archive them on tape or disk.
crontab
Schedules a command to run at a specific time.
date
Displays the date and time.
df
Shows a report of how the disk space is used.
du
Displays file statistics for a directory and its subdirectories.
dump
Backs up files.
echo
Displays a message on the screen.
fdisk
Formats and partitions a disk.
file
Displays the file type.
find
Finds specific files.
fsck
Performs a verification of the file system.
grep
Searches for a particular string of characters in a file.
groupadd
Creates a new group.
groupdel
Deletes an existing group.
Copyright 2017 Cengage Learning. All Rights Reserved. May not be copied, scanned, or duplicated, in whole or in part. WCN 02-200-203
Linux Commands
Table A-3
547
Linux commands (continued )
Command
Description
groupmod
Modifies an existing group.
groups
Prints the names of groups for a user.
info
Displays information and documentation about a command or a utility.
kill
Stops a process.
less
Shows the contents of a file, and offers the ability to go back or move ahead in the file.
ln
Creates symbolic file links.
locate
Finds a file.
lpd
Configures a printer.
lpq
Checks a print queue.
lpr
Prints a file.
lprm
Removes print jobs from the queue.
ls
Lists the contents of a directory.
man
Displays documentation in Linux.
mkdir
Creates a directory.
mkfs
Creates a file system (but requires more parameters than newfs).
more
Displays text in a file one screen at a time.
mount
Lists the disks currently mounted; also mounts file systems and devices (such as a CD-ROM).
mv
Moves a file to a different directory.
newfs
Creates a new file system.
passwd
Used to change a password.
paste
Merges lines of a file.
pr
Formats a file into pages or columns for printing.
printenv
Prints environment variables that are already set up.
ps
Shows currently running processes.
pwck
Checks the /etc/passwd and /etc/shadow files to make sure password authentication entries
are valid.
pwd
Shows the directory you are in.
restore
Restores files (from a dump).
rm
Removes a file or directory.
rmdir
Deletes a directory that is empty.
sfdkisk
Provides information about a partition and can be used to create a partition.
shutdown
Shuts down Linux.
sort
Sorts the contents of a text file.
swapon/swapoff
Turns page file devices on or off.
sync
Forces information in memory to be written to disk.
tar
Archives files.
top
Shows a report of the main, current processes engaging the central processing unit (CPU).
touch
Creates an empty file.
umount
Dismounts a file system.
uname
Shows information about the operating system.
useradd
Configures a new user account.
userdel
Removes an existing user account.
(continues)
Copyright 2017 Cengage Learning. All Rights Reserved. May not be copied, scanned, or duplicated, in whole or in part. WCN 02-200-203
548
Appendix A
Table A-3
Operating System Command-Line Commands
Linux commands (continued )
Command
Description
usermod
Modifies an existing user account.
users
Lists currently logged-in users.
vmstat
Displays a report about virtual memory use.
whereis
Locates information about a specific file, such as a program.
who
Shows who is logged on.
Table A-4
Linux network commands
Command
Description
finger
Provides information about a user.
ftp
Enables file transfers.
ifconfig
Sets up a network interface.
ipchains
Manages a firewall. This command has largely been replaced by system-config-firewall on
most modern Linux systems.
netstat
Shows network connection information.
nfsstat
Shows statistics for Network File System (NFS) file upload and download activity.
nslookup
Queries information on Domain Name System (DNS) servers.
ping
Polls another TCP/IP node to verify that you can communicate with it.
rcp
Copies files between two computers.
route
Displays routing table information and can be used to configure routing.
showmount
Shows clients that have mounted volumes on an NFS server.
traceroute
Traces the route to the host.
who
Shows who is logged on.
wvdial
Controls a Point-to-Point Protocol (PPP)-based modem dialer.
Mac OS X Commands
The Mac OS X kernel (also called Darwin, the open source core of OS X) is based on Berkeley
Software Distribution (BSD) UNIX, which means that you can access a terminal window and
execute UNIX commands. To open the Mac OS X terminal window:
1. Make sure Finder is open or click the Finder icon in the Dock.
2. Click Go in the menu bar.
3. Click Utilities.
4. Double-click Terminal.
Tables A-5 and A-6 list commands that you can use in the Mac OS X terminal window.
Notice that these commands are nearly identical to those available in Linux, including the
use of man to read manual pages and info to learn more about a command.
Copyright 2017 Cengage Learning. All Rights Reserved. May not be copied, scanned, or duplicated, in whole or in part. WCN 02-200-203
Mac OS X Commands
Table A-5
549
Mac OS X commands
Command
Description
awk
Finds and replaces text within a file.
cat
Displays the contents of a file to the screen.
cd
Changes to another directory.
chgrp
Changes group ownership of a file.
chmod
Controls file security.
chown
Changes file ownership.
chsh
Sets your login shell.
clear
Clears the screen.
cmp
Compares two files.
cp
Copies a file to another directory; you can rename the file at the same time.
date
Displays the date and time.
df
Shows a report of how the disk space is used.
dump
Backs up files.
edquota
Edits disk quotas associated with user accounts.
fdisk
Formats and partitions a disk.
file
Displays the file type.
find
Finds specific files.
fsck
Performs a verification of the file system.
grep
Looks for a string of characters in a file.
groups
Displays groups to which a user belongs.
kill
Stops a process.
less
Shows the contents of a file and offers the ability to go back or move ahead in the file.
ln
Creates symbolic file links.
locate
Finds a file.
lpq
Checks a print queue.
lpr
Prints a file.
lprm
Removes print jobs from the queue.
ls
Lists the contents of a directory.
man
Displays documentation.
mkdir
Creates a directory.
more
Displays text in a file one screen at a time.
mount
Lists the disks currently mounted; also mounts file systems and devices (such as a CD-ROM).
mv
Moves a file to a different directory.
newfs
Creates a new file system.
open
Opens a file or folder.
passwd
Changes a password.
pr
Formats a file into pages or columns for printing.
printenv
Prints environment variables that are already set up.
ps
Shows currently running processes.
pwd
Displays the directory you are in.
quota
Displays the disk quota for users.
quotacheck
Verifies the disk quota files, including reporting disk usage.
Copyright 2017 Cengage Learning. All Rights Reserved. May not be copied, scanned, or duplicated, in whole or in part. WCN 02-200-203
550
Appendix A
Table A-5
Operating System Command-Line Commands
Mac OS X commands (continued )
Command
Description
quotaon/quotaoff
Enables or disables disk quotas.
rcp
Performs a remote copy.
repquota
Makes a report of disk quotas.
restore
Restores files (from a dump).
rm
Removes a file or directory.
rmdir
Deletes a directory that is empty.
scp
Uses a secure version of ftp or rcp (remote copy procedure).
screencapture
Captures the screen image.
sort
Sorts the contents of a text file.
ssh
Uses a secure version of ftp.
sync
Forces information in memory to be written to disk.
tar
Archives files.
telnet
Remotely connects to another computer.
top
Shows a report of the main, current processes engaging the CPU.
touch
Creates an empty file.
umount
Dismounts a file system.
uname
Shows information about the operating system.
uptime
Displays how long the system has been running.
vm_stat
Displays a report about virtual memory use.
whereis
Locates a specific file.
who
Shows who is logged on.
Table A-6
Mac OS X network commands
Command
Description
curl
Transfers data from one server to another.
finger
Provides information about a user.
ftp
Enables file transfers.
ifconfig
Used to set up a network interface.
netstat
Shows network connection information.
networksetup
Sets up and modifies network and system preferences.
nfsstat
Shows statistics for NFS file upload and download activity.
nslookup
Queries information on DNS servers.
ping
Polls another TCP/IP node to verify that you can communicate with it.
route
Displays routing table information and can be used to configure routing.
showmount
Shows clients that have mounted volumes on an NFS server.
traceroute
Traces the route to the host.
who
Shows who is logged on.
Copyright 2017 Cengage Learning. All Rights Reserved. May not be copied, scanned, or duplicated, in whole or in part. WCN 02-200-203
Glossary
3D printer A printer that uses an additive process to create
Application layer Layer 7 in the OSI model, which provides
one layer at a time of a three-dimensional object.
interfaces that enable applications to request and receive
network services. See also Open Systems Interconnection
(OSI) reference model.
8.3 filenames An older filename format in which the name of
the file can be up to eight characters long, followed by a
period and an extension of three characters. See also
extension.
Accelerated Graphics Port (AGP) A bus standard that has
been replaced by the PCI Express or PCIe standard.
access point (AP) A wireless device that serves as the central
connection point of a wireless LAN and mediates communication between wireless computers.
activate To register your copy of a Windows operating
system, starting with the Windows XP version. Without
this activation, you can only run your operating system for
a very brief time.
Active Directory The directory service used by Windows
servers; a Windows Server installable service that consists of a
database of computers, users, shared printers, shared folders,
and other network resources and resource groupings used to
manage a network and enable users to quickly find a particular resource.
application programming interface (API) Functions or
programming features in an operating system that programmers can use for network links, links to messaging services,
or interfaces to other systems.
application software A word processor, spreadsheet,
database, computer game, or other type of application that a
user runs on a computer. Application software consists of
computer code that is formatted so the computer or its
operating system can translate the code into a specific task,
such as writing a document.
arithmetic logic unit (ALU) A component of a CPU that
executes instructions.
authentication The process of identifying who has access to
the network. The most common form of authentication is a
logon with a username and password.
authorization The process of granting or denying an
authenticated user’s access to network resources.
active partition The logical portion of a hard disk drive that
automatic private IP addressing (APIPA) A private range of
is currently being used to store data. In a PC system, the
partition that contains the bootable operating system.
IP addresses assigned to an APIPA-enabled computer automatically when an IP address is requested via DHCP but no
DHCP server responds to the request. See also Dynamic Host
Configuration Protocol (DHCP).
ActiveX An internal programming standard that allows
various software running under the Windows operating
system to communicate with Windows and other programs.
address bus An internal communications pathway inside a
computer that specifies the source and target address for
memory reads and writes.
address space The number of addresses available in an IP
network number that can be assigned to hosts.
advanced intelligent tape (AIT) A tape drive that has an
erasable memory chip and a capacity of up to 1.3 TB.
alias In the Macintosh file system, a feature that presents
an icon representing an executable file. Equivalent to the
UNIX/Linux link and the Windows shortcut.
allocation block In the Macintosh file system, a division of
hard disk data, equivalent to the Windows disk cluster. Each
Macintosh volume is divided into 216 (65,535) individual
units.
alpha software An early development version of software
in which there are likely to be bugs, and not all of the anticipated functionality is present. Alpha software is usually tested
only by a select few users to identify major problems and the
need for new or different features before the software is tested
by a broader audience in the beta stage.
backplane A connection system that uses a printed circuit
board instead of traditional cables to carry signals.
backup A process of copying files from a computer system
to another medium, such as a tape, another hard drive, a
removable drive, or a DVD/CD-ROM.
backward compatibility The ability of features from an
older chip to function on a newer chip.
bad clusters On a hard disk drive, areas of the surface that
cannot be used to safely store data. Bad clusters are usually
identified by the format command or one of the hard drive
utilities, such as chkdsk or fsck.
bare-metal virtualization A system in which the hypervisor
implements OS virtualization by running directly on the
host computer’s hardware and controls and monitors guest
OSs. See also virtualization.
basic disk A traditional Windows or DOS disk arrangement
in which the disk is partitioned into primary and extended
partitions. A basic disk can’t hold volumes spanning multiple
disks or be part of a RAID.
basic input/output system (BIOS) Low-level program code
that conducts basic hardware and software communications
Copyright 2017 Cengage Learning. All Rights Reserved. May not be copied, scanned, or duplicated, in whole or in part. WCN 02-200-203
551
552
Glossary
inside the computer. A computer’s BIOS basically resides
between computer hardware and the higher-level operating
system, such as UNIX or Windows.
batch file A text file that contains a list of commands you
ordinarily type at the command prompt.
batch processing A computing style frequently employed by
large systems. A request for a series of processes is submitted
to the computer; information is displayed or printed when
the batch is complete. Batches might include the processing
for all of the checks submitted to a bank for a day, or for
all of the purchases in a wholesale inventory system, for
example. Compare to sequential processing.
Beginner’s All-purpose Symbolic Instruction Code (BASIC)
boot volume The volume where the \Windows folder is
located—usually the C drive, but this location is not mandatory. The boot volume is also referred to as the boot
partition.
bus A path or channel between a computer’s CPU and the
devices it manages, such as memory and I/O devices.
cache controller Internal computer hardware that manages
the data going into and loaded from the computer’s cache
memory.
cache memory Special computer memory that temporarily
stores data used by the CPU. Cache memory is physically
close to the CPU and is faster than standard system memory,
enabling faster retrieval and processing time.
An English-like computer programming language originally
designed as a teaching tool, but which evolved into a useful
and relatively powerful development language.
catalog b-tree In the Macintosh file system, a list of all files on a
Berkeley Software Distribution (BSD) A variant of the
CD-ROM File System (CDFS) A 32-bit file system used on
UNIX operating system upon which a large proportion of
today’s UNIX software is based.
character special file An I/O management file in UNIX/
beta software During software development, software that
has successfully passed the alpha test stage. Beta testing may
involve dozens, hundreds, or even thousands of people, and
may be conducted in multiple stages: beta 1, beta 2, beta 3,
and so on.
binary backup A technique that backs up the entire contents
given volume. Similar to a folder in the Windows file system.
CD-ROMs and DVDs.
Linux used to handle byte-by-byte streams of data, such as
through a USB connection, including printers and network
communications.
clean installation An OS installation on a computer that
either has no existing OS or an OS that is overwritten by the
installation.
of one or more disk drives in a binary or image format.
client The term used to describe an OS designed mainly to
blade enclosure A large box with slots for blade servers; the
access network resources, a computer’s primary role in a
network (running user applications and accessing network
resources), and software that requests network resources
from servers.
box also provides cooling fans, electrical power, connection
to a shared monitor and pointing device, and even network
connectivity. The actual design depends on the
manufacturer.
blade server A server unit that looks like a card that fits into
a blade enclosure. Blade servers are intended to save space.
See blade enclosure.
block allocation A hard disk configuration scheme in which
the disk is divided into logical blocks, which in turn are
mapped to sectors, heads, and tracks.
block device In the UNIX/Linux file system, a device that is
divided or configured into logical blocks. See also raw device.
block special file In UNIX/Linux, a file used to manage
random access devices that handle blocks of data, including
DVD/CD-ROM drives, hard disk drives, tape drives, and
other storage devices.
boot block The UNIX/Linux and Mac OS X equivalent of
the Windows Master Boot Record (MBR), the area of the
hard disk that stores partition information for the disk.
For example, on a Mac-formatted disk, the first two sectors
are boot blocks that identify the filing system, the names
of important system files, and other important information.
See also volume information block.
client/server systems A computer hardware and software
design in which different portions of an application execute
on different computers, or on different components of a
single computer. Typically, client software supports user I/O
and server software conducts database searches, manages
printer output, and the like.
cloud computing A networking model in which data,
applications, and processing power are managed by servers
on the Internet; users of these resources pay for what they use
rather than for the equipment and software needed to provide
resources.
cloud storage A storage paradigm in which an individual’s
or company’s storage is hosted by a third party and accessed
over the Internet.
cluster In Windows-based file systems, a logical block of
information on a disk containing one or more sectors. Also
called an allocation unit.
clustering The ability to share computing load and resources
by linking two or more discrete computer systems (servers) to
function as though they are one.
Copyright 2017 Cengage Learning. All Rights Reserved. May not be copied, scanned, or duplicated, in whole or in part. WCN 02-200-203
Glossary
553
command-line interface An interface that enables the user to
data fork The portion of a file in the Macintosh file system
display a command line from which to enter commands.
These interfaces include the Command Prompt window in
Windows operating systems and the terminal window in
Linux and Mac OS X.
that stores the variable data associated with the file. Data
fork information might include word-processing data,
spreadsheet information, and so on.
compiler A computer program that takes a high-level lan-
guage like C# or Java and turns it into assembly code that is
executed by the CPU.
complementary metal oxide semiconductor (CMOS) A type
of memory that stores a computer’s BIOS configuration. A
CMOS chip uses a low-power memory technology that is
powered by a small battery.
Complex Instruction Set Computing (CISC) A computer
CPU architecture in which processor components are
reconfigured to conduct different operations as required.
Such computer designs require many instructions and more
complex instructions than other designs. Compare to
Reduced Instruction Set Computing (RISC).
Data Link layer Layer 2 in the OSI model, which is
responsible for managing access to the network medium and
delivery of data frames from sender to receiver or from sender
to an intermediate device, such as a router. See also Open
Systems Interconnection (OSI) reference model.
default groups Special groups with rights already assigned;
these groups are created during installation in a Windows
environment.
defragmentation The process of removing empty pockets
between files and other information on a hard disk drive.
defragmenter A tool that rearranges data on a disk in a
continuous fashion, ridding the disk of scattered open
clusters.
Component Object Model (COM) Standards that enable a
desktop operating system A computer operating system
software object, such as a graphic, to be linked from one
software component to another one.
that is typically installed on a PC, usually used by one person
at a time, and may or may not be connected to a network.
Also called a client operating system.
computer program A series of instructions executed by the
computer’s CPU.
device driver Computer software designed to provide the
control bus An internal communications pathway that
operating system and application software access to specific
computer hardware.
keeps the CPU informed of the status of particular
computer resources and devices, such as memory and disk
drives.
control unit (CU) A component of a CPU that provides
device special file A file used in UNIX and Linux for
managing I/O devices. The file can be one of two types: a
block special file or a character special file.
timing and coordination between the other parts of the CPU,
such as the arithmetic logic unit, registers, and system bus.
differential backup A method that only backs up files that
cookie A text-based file used by Web sites to obtain infor-
digital audio tape (DAT) A tape system that uses 4-mm tape
mation about a user, such as the user’s name, the user’s
password to access the site, and information about how to
customize the Web page display.
and has a capacity of up to 72 GB.
cooperative multitasking A computer hardware and soft-
ware design in which the operating system temporarily
hands off control to an application and waits for the
application to return control to the operating system.
Compare to preemptive multitasking.
have changed since the last full backup.
digital linear tape (DLT) A tape system that uses half-inch
magnetic tapes and has a capacity of up to 1.6 TB.
digital pad An alternative input device frequently used by
graphic artists and others who need accurate control over
drawing and other data input.
Digital Visual Interface (DVI) A high-quality visual standard
core The part of a processor used to read and execute
for connecting flat-panel LCD displays and digital projectors.
instructions.
direct-attached storage (DAS) A storage medium directly
creator codes Hidden file characteristics in the Macintosh
connected to the server using it. DAS differs from local
storage in that it includes externally connected HDDs in
an enclosure with a power supply.
file system that indicate the program (software application)
that created the file. See type code.
credentials A username and password or another form of
identity used to access a computer.
data bus An internal communications pathway that carries
data between the CPU and memory locations.
directory An organizational structure that contains files
and may additionally contain subdirectories under it. A
directory contains information about files, such as filenames,
file sizes, date of creation, and file type. More commonly
referred to as a folder in modern OSs.
Copyright 2017 Cengage Learning. All Rights Reserved. May not be copied, scanned, or duplicated, in whole or in part. WCN 02-200-203
554
Glossary
directory service The software that manages centralized
access and security in a server-based network.
disk drive A physical component with a disk interface
connector (such as SATA or SCSI) and a power connector.
disk label The UNIX/Linux equivalent of a partition table in
MS-DOS or Windows systems. The disk label is a table
containing information about each partition on a disk, such
as the type of partition, size, and location.
disk quota Allocation of a specific amount of disk space to a
dye sublimation A printer technology that produces high-
quality color output by creating “sublimated” color mists
that penetrate paper to form characters or graphic output.
dynamic disk A disk arrangement that can hold up to 128
volumes, including spanned volumes, striped volumes, and
RAID volumes.
Dynamic Host Configuration Protocol (DHCP) An Application
layer protocol used to configure a host’s IP address settings
dynamically.
user or application with the ability to ensure that the user or
application cannot use more disk space than is specified in the
allocation.
embedded system A computer that has a dedicated function
within a larger system, such as a piece of machinery.
disk striping A disk storage technique that divides portions
information to chunks of data.
of each file over all volumes in a set as a way to minimize
wear on individual disks.
Extended (HFS+) A file system released in 1998 with Mac OS
DisplayPort A digital interface standard that is projected to
replace DVI and HDMI for computers.
Distributed File System (DFS) A set of client and server
services to organize distributed shared files into a logical file
system.
Distributed Link Tracking A technique introduced in NTFS 5
so that shortcuts, such as those on the desktop, are not lost
when files are moved to another volume.
encapsulation The process of adding header and trailer
8.1 and the file system used in Mac OS X.
extended file system (ext or ext fs) The file system designed
for Linux that is installed by default in Linux operating
systems.
extended partition A division of disk space on a basic disk
that must be separated into logical drives; it can’t be marked
active and can’t hold the Windows system volume.
extension In MS-DOS and Windows-based systems, the
a standard kernel, but that also has customizations added by
a particular private or commercial development group.
part of a filename that typically identifies the type of file
associated with the name. File extensions are typically
three characters long and include standard notations such
as .sys, .exe, .bat, and so on.
domain A collection of users and computers in a server-
extents b-tree A file system component that keeps track of
based network whose accounts are managed by Windows
servers called domain controllers. See also domain
controller.
the location of file fragments, or extents, in the Mac OS HFS
file system.
distribution An issuance of UNIX or Linux that is based on
domain controller A computer running Windows
Server with Active Directory installed; it maintains a database of user and computer accounts as well as network
access policies in a Windows domain. See also directory
service.
external clock speed The speed at which the processor
communicates with the memory and other devices in the
computer; usually one-fourth to one-half the internal clock
speed.
external commands Operating system commands that are
assigning rights and permissions to domain resources.
stored in separate program files on disk. When these commands are required, they must be loaded from disk storage
into memory before they are executed.
Domain Name Service (DNS) An application protocol that
extranet A private network that allows limited and
resolves domain and computer names to IP addresses, or that
resolves IP addresses to domain and computer names.
controlled access to internal network resources by outside
users, usually in a business-to-business situation.
dot-matrix (impact) printer An impact character printer that
failover clustering A group of two or more servers config-
produces characters by arranging a matrix of dots.
ured so that if one server fails, another server can resume the
services the first one was providing.
domain local group A group scope recommended for
dots per inch (dpi) Used to measure the resolution of a
printer; the number of dots contained in an inch.
driver signing A digital signature that Microsoft incorpo-
rates into driver and system files as a way to verify the files
and to ensure that they are not inappropriately
overwritten.
file A set of data that is grouped in some logical manner,
assigned a name, and stored on the disk.
file allocation table (FAT) A file management system that
defines the way data is stored on a disk drive. The FAT stores
information about a file’s size and physical location on the disk.
Copyright 2017 Cengage Learning. All Rights Reserved. May not be copied, scanned, or duplicated, in whole or in part. WCN 02-200-203
Glossary
555
file attributes File characteristics stored with the filename in
hard link In Windows versions starting with Windows 2000
the disk folder; attributes specify certain storage and operational parameters associated with the file, such as hidden,
read-only, archive, and so on.
and UNIX/Linux, a file management technique that permits
multiple folder entries to point to the same file.
hardware The physical devices in a computer, including the
File Classification Infrastructure (FCI) A system that allows
CPU, circuit boards (cards), disk drives, monitor, and modem.
files to be located on servers in an organization based on
predetermined naming conventions.
header Information added to the front end of a chunk of
file system A design for storing and managing files on a disk
data so it can be correctly interpreted and processed by
network protocols.
drive; the method by which an OS stores and organizes files
and manages access to files on a storage device.
Hierarchical Filing System (HFS) An early Apple Macintosh
floating point unit (FPU) A component of a CPU that
executes floating point mathematical operations.
folder See directory.
formatting The process of installing a file system on a disk
file system storage method that uses a hierarchical folder
structure.
High-Definition Multimedia Interface (HDMI) A high-
quality visual standard for connecting digital audio and video
devices.
partition.
high-level formatting A process that prepares a disk parti-
fragmentation The accumulation of empty pockets of space
tion (or removable media) for a specific file system.
between files on a disk due to frequent writing, deleting, and
modifying of the files and their contents.
host computer The physical computer on which virtual
frame A packet with source and destination MAC addresses
hosted virtualization A system in which the hypervisor
added and an error-checking code added to the back end.
Frames are generated and processed by the network interface.
See also packet.
full file-by-file backup A technique that backs up the entire
contents of one or more disk drives, including all folders, subfolders, and files, so that any of these contents can be restored.
gadgets Small applications for readily accessing information
and tools.
machine software is installed and virtual machines run.
implements OS virtualization by being installed in a generalpurpose host OS, such as Windows 10 or Linux, and the
host OS accesses host hardware on behalf of the guest OS.
See also virtualization.
hot fix A procedure used by a file system that can detect a
damaged disk area and then automatically copy information
from that area to another disk area that is not damaged.
Hyper-Threading (HT) A feature of some Intel CPUs that
gamepad An input device primarily designed for interaction
allows two threads to run on each CPU core simultaneously.
with games. It includes multiple buttons, wheels, or balls to
effect movement of a variety of on-screen objects.
Hyper-V A Windows feature that allows a server to run
multiple independent operating systems at the same time and
to run multiple virtual servers on one physical server.
global group A group scope used mainly to group users from
the same domain who have similar access and rights requirements. A global group’s members can be user accounts and
other global groups from the same domain. See also group
scope.
graphical user interface (GUI) An interface between the user
and an operating system that presents information in an
intuitive graphical format, including multiple colors, figures,
icons, windows, toolbars, and other features. A GUI is
usually deployed with a pointing device, such as a mouse, to
make the user more productive.
group scope A property of a group that determines the reach
of a group’s application in a domain—for example, which
users can be group members and to which resources a group
can be assigned rights or permissions.
hypervisor The component of virtualization software that
creates and monitors the virtual hardware environment,
which allows multiple VMs to share physical hardware
resources.
I/O address range A range of memory addresses used to
temporarily store data that is transferred between a computer
device or component and the CPU.
in-place upgrade An OS upgrade that overwrites your current
OS and maintains your applications, settings, and data.
incremental backup A method that only backs up files that
have changed since the last full or incremental backup.
Infrared Data Association (IrDA) A group of peripheral
machine.
manufacturers that developed a set of standards for transmitting data using infrared light. Printers were some of the
first devices to support the IrDA specifications.
GUID Partitioning Table (GPT) A disk-partitioning method
infrastructure as a service (IaaS) A category of cloud com-
that supports volume sizes of up to 18 exabytes.
puting in which a company can use a provider’s storage or
guest OS The operating system installed on a virtual
Copyright 2017 Cengage Learning. All Rights Reserved. May not be copied, scanned, or duplicated, in whole or in part. WCN 02-200-203
556
Glossary
virtual servers as its needs demand; IaaS is also called hosted
infrastructure.
intranet A private network in which devices and servers are
inkjet printer A printer that forms characters and images by
IP address A 32-bit dotted decimal address used by IP to
spraying droplets of ink from a nozzle print head onto the
paper.
determine the network a host resides on and to identify hosts
on the network at the Internetwork layer.
inode Short for information node. In UNIX/Linux, a system
for storing key information about files.
IP Security (IPsec) A way to secure Internet Protocol (IP)
input/output (I/O) Input is information taken in by a com-
journaling The ability of a file system or software (such as
puter device to handle or process; an example is characters
typed at a keyboard. Output is information sent out by a
computer device after the information is handled or processed; an example is the display of typed characters on the
monitor.
database software) to track file changes so that if a system
crashes unexpectedly, it is possible to reconstruct files or to
roll back changes with minimal or no damage.
Institute of Electrical and Electronics Engineers (IEEE) An
international organization of scientists, engineers, technicians,
and educators that plays a leading role in developing standards for computers, network cabling, and data transmissions, and for other electronics areas, such as consumer
electronics and electrical power.
instruction set In a computer CPU, the group of commands
(instructions) the processor recognizes. These instructions are
used to conduct the operations required of the CPU by the
operating system and application software.
internal clock speed The speed at which the CPU executes
internal commands, measured in megahertz (millions of clock
ticks per second) or gigahertz (billions of clock ticks per
second). Internal clock speeds can be as low as 1 MHz or
more than 4 GHz.
Internet A worldwide public internetwork that uses
standard protocols, such as TCP/IP, DNS, and HTTP, to
transfer and view information.
Internet Protocol version 4 (IPv4) A connectionless
available only to users connected to the internal network.
traffic by encrypting and authenticating each packet.
joystick An input device shaped like a stick that allows
for three-dimensional movement of an on-screen cursor
or other object, such as a car, airplane, or cartoon
character.
just a bunch of disks (JBOD) A disk arrangement in which
two or more disks are abstracted to appear as a single disk
to the OS but aren’t arranged in a specific RAID
configuration.
Kerberos A security system and authentication protocol that
authenticates users and grants or denies access to network
resources based on a user’s log-on name and password.
Kerberos creates a unique encryption key for each communication session.
kernel An essential set of programs and computer code built
into a computer operating system to control processor, disk,
memory, and other functions central to a computer’s basic
operation. The kernel communicates with the BIOS, device
drivers, and the API to perform these functions. It also
interfaces with the resource managers.
label printers Special-purpose printers that produce labels only.
Internetwork layer protocol that provides source and
destination addressing and routing for the TCP/IP protocol
suite; IPv4 uses 32-bit dotted decimal addresses.
laser printer A high-quality page printer design that is
popular in office and other professional applications.
Internet Protocol version 6 (IPv6) A connectionless Inter-
hardware. See cache memory.
network layer protocol that provides source and destination
addressing and routing for the TCP/IP protocol suite. IPv6
uses 128-bit hexadecimal addresses and has built-in security
and QoS features.
internetwork A networked collection of LANs tied together
by devices such as routers. See also local area network
(LAN).
interrupt request (IRQ) A request to the processor so that a
currently operating process, such as a read from a disk drive,
can be interrupted by another process, such as a write into
memory.
level 1 (L1) cache Cache memory that is part of the CPU
level 2 (L2) cache Cache memory that is somewhat slower
than L1 cache but is much larger. See cache memory.
level 3 (L3) cache Cache memory that is slower than L1 or
L2 cache but is much larger. L3 cache is located on the CPU
chip on most modern CPUs, and is shared among multiple
cores. See cache memory.
level 4 (L4) cache Cache memory that is found on some
advanced modern CPUs. See cache memory.
library A combination of folders that can be in any location
on the local computer or the network.
interrupt request (IRQ) line A channel within the computer
line editor An editor that is used to create text one line at
that is used for communications with the CPU.
a time.
Copyright 2017 Cengage Learning. All Rights Reserved. May not be copied, scanned, or duplicated, in whole or in part. WCN 02-200-203
Glossary
557
line printer A printer design that prints a full line of charac-
Master Boot Record (MBR) A disk-partitioning method that
ter output at a time; it is used for high-speed output
requirements.
supports volume sizes of up to 2 TB; an area of a hard disk in
MS-DOS and Windows that stores partition information
about the disk. MBRs are not found on disks that do not
support multiple partitions.
linear tape open (LTO) A tape drive used in the high-end
server market; it has a storage capacity of up to 1.6 TB.
link-local IPv6 address Similar in function to IPv4 APIPA
addresses, link-local IPv6 addresses begin with fe80, are
self-configuring, and can’t be routed. See also Automatic
private IP addressing (APIPA).
linked list Used in FAT file systems so that when a file is
Master File Table (MFT) A storage organization system
used with the NTFS file system. The MFT is located at the
beginning of the partition.
maximum transmission unit (MTU) The maximum frame
size allowed to be transmitted across a network medium.
written to disk, each cluster containing that file’s data has a
pointer to the location of the next cluster of data.
metadata Information that describes data but is not the
live migration A feature of virtualization that allows a
metropolitan area network (MAN) An internetwork
virtual machine to be moved from one server to another with
little or no downtime.
local area network (LAN) A small network limited to a
single collection of machines and linked by interconnecting
devices in a small geographic area.
local storage Storage media with a direct and exclusive
actual data.
confined to a geographic region, such as a city or county; a
MAN uses third-party communication providers to supply
connectivity between locations. See also internetwork.
microarchitecture The description of the internal circuitry of a
CPU that defines characteristics such as the technology used to
create the chip, the supported instruction set, and the bit size.
connection to the computer’s system board through a disk
controller.
microcode A small program inside a CISC CPU that must
localhost A reserved name that corresponds to the loopback
Microsoft Disk Operating System (MS-DOS) The first widely
address in an IP network. See also loopback address.
logical drive A software definition that divides a physical
hard drive into multiple drives for file storage.
logical unit number (LUN) A logical reference point to a unit
of storage that could refer to an entire array of disks, a single
disk, or just part of a disk.
logical volume manager (LVM) A method of creating
interpret and execute each instruction.
distributed operating system for microcomputers, created by
Tim Paterson and a team at Microsoft that included Bill
Gates. This generic computer code was used to control many
basic computer hardware and software functions. MS-DOS is
sometimes referred to as DOS.
Microsoft Management Console (MMC) A flexible system
that allows server administrators to configure the servers and
monitor their function in one place.
volumes in Linux that uses physical disk partitions called
volume groups to create logical volumes.
migration Moving from one OS to another OS, which may
or may not involve implementing a new computer as well.
long filename (LFN) A name for a file, folder, or folder in a
file system in which the name can be up to 255 characters in
length. Long filenames in Windows, UNIX/Linux, and Mac
OS systems are also POSIX compliant in that they honor
uppercase and lowercase characters.
mount A process that makes a disk partition or volume
loopback address An address that always refers to the local
computer; in IPv4, it’s 127.0.0.1, and in IPv6, it’s ::1. This
address is used to test TCP/IP functionality on the local
computer.
low-level format A software process that marks tracks and
available for use by the operating system.
multicasting A network communication in which a packet is
addressed so that more than one destination can receive it.
multifunction printers Printers that combine printing, scan-
ning, and faxing in one physical device. They can be color
inkjet or laser printers.
multiprocessor computer A computer that uses more than
one CPU.
sectors on a disk. A low-level format is necessary before a
disk can be partitioned and formatted.
multitasking A technique that allows a computer to run two
LPT1 The primary printer port designation on many desktop
computers; also designated as line print terminal 1.
multithreading Running several program processes or parts
Macintosh Filing System (MFS) The original Macintosh
multiuser system A computer hardware and software system
filing system, introduced in 1984. MFS was limited to
keeping track of 128 documents, applications, or folders.
designed to service multiple users who access the computer’s
hardware and software applications simultaneously.
or more programs at the same time.
(threads) at the same time.
Copyright 2017 Cengage Learning. All Rights Reserved. May not be copied, scanned, or duplicated, in whole or in part. WCN 02-200-203
558
Glossary
name server A computer that provides the service of
name-to-address resolution; for example, it resolves a host
and domain name to an IP address.
named pipe In UNIX/Linux, a device special file for handling
internal communications, such as redirecting file output to a
monitor.
services and data it handles on behalf of the layer above it
and the services and data it needs from the layer below it.
operating system (OS) A specialized computer program that
provides a user interface, file system, services, and a kernel to
a computer. An OS runs on computer hardware and facilitates application execution.
.NET Framework A large library, available to all programming languages supported by .NET, that allows multiple
programming languages to use code from other languages.
optical character recognition (OCR) Imaging software that
netbook computers Small portable or laptop computers
packet A chunk of data with source and destination IP
that have limited computing capabilities and are designed
to be lightweight and portable. Netbook computers are
generally used for Web access, e-mail, and basic document
creation.
network Two or more computers connected by a transmission
medium that allows them to communicate.
network client software An application or OS service that
scans each character on the page as a distinct image and is
able to recognize the character.
addresses (as well as other IP information) added to it.
Packets are generated and processed by network protocols.
page file Also called the paging file or swap file, an allocated
portion of disk storage reserved to supplement RAM when
the available RAM is exceeded. See swap file.
pagefile.sys A system file in Windows used as virtual mem-
can request information stored on another computer.
ory; it is also used to store data produced when the system
crashes (dump data), which is used for troubleshooting.
Network File System (NFS) The native Linux/UNIX file
partition A logical unit of storage that can be formatted with
sharing protocol.
network interface card (NIC) A device that creates and
mediates the connection between a computer and the network
medium.
Network layer Layer 3 of the OSI model, which handles
logical addressing and routing of PDUs across internetworks.
See also Open Systems Interconnection (OSI) reference
model.
network protocols The software that defines the rules and
formats a computer must use when sending information
across the network.
network server software The software that allows a com-
puter to share its resources by fielding requests generated by
network clients.
network-attached printer A printer that has a network
a file system; it is similar to a volume but used with basic
disks.
partition table A table containing information about each
partition on a disk, such as the type of partition, size, and
location. Also, the partition table provides information to the
computer about how to access the disk.
partitioning Blocking a group of tracks and sectors to be
used by a particular file system, such as FAT or NTFS.
Partitioning is a hard disk management technique that
permits the installation of multiple file systems on a single
disk or the configuration of multiple logical hard drives that
use the same file system on a single physical hard drive.
peer-to-peer network A network model in which all
computers can function as clients or servers as needed, and
there’s no centralized control over network resources.
interface, is connected to the network, and can be accessed by
computers on the network via a host name or IP address.
Peripheral Component Interconnect (PCI) A bus standard
network-attached storage (NAS) A storage device that has
Peripheral Component Interconnect Express (PCIe) A bus
an enclosure, a power supply, slots for multiple HDDs, a
network interface, and a built-in OS tailored for managing
shared files and folders.
standard that has enabled adapter manufacturers to supply
one hardware product to a variety of hardware platforms.
New Technology File System (NTFS) The file storage system
that is the native system in Windows versions starting with
Windows NT.
octet An 8-bit value; a number from 0 to 255 that’s one of
the four numbers in a dotted decimal IP address.
Open Systems Interconnection (OSI) reference model ISO
Standard 7498 defines a frame of reference for understanding networks by dividing the process of network communication into seven layers. Each layer is defined in terms of the
that has been replaced by the PCI Express or PCIe standard.
physical drive A hard drive in a computer that you can
physically touch and that can be divided into one or more
logical drives.
Physical layer Layer 1, the bottom layer of the OSI model,
transmits and receives signals and specifies the physical
details of cables, NICs, connectors, and hardware behavior.
See also Open Systems Interconnection (OSI) reference
model.
pipelining A CPU design that permits the processor to oper-
ate on one instruction at the same time it is fetching one or
Copyright 2017 Cengage Learning. All Rights Reserved. May not be copied, scanned, or duplicated, in whole or in part. WCN 02-200-203
Glossary
559
more subsequent instructions from the operating system or
application.
print queue A temporary file used to store a print job until it
pixel Short for picture element; the small dots that make up a
computer screen display.
print spooler A process that accepts print jobs from applica-
pixels per inch (ppi) A unit used to measure the resolution of
can be sent to the printer.
tions, stores them in the print queue, and then sends them
to the printer when the print device is ready.
a display screen; the number of dots (pixels) contained in an
inch.
private cloud Cloud services that a company delivers to its
own employees.
platform as a service (PaaS) A category of cloud computing
privileged mode A feature of the operating system kernel
introduced in Windows NT that protected it from problems
created by a malfunctioning program or process.
in which a customer develops applications with the service
provider’s development tools and infrastructure. After applications are developed, they can be delivered to the customer’s
users from the provider’s servers. PaaS is also called hosted
platform.
plotter Computer hardware that produces high-quality
printed output, often in color, by moving ink pens over the
surface of paper. Plotters are often used with computer-aided
design (CAD) and other graphics applications.
Plug and Play (PnP) Software utilities that operate with
compatible hardware to facilitate automatic hardware
configuration. Windows versions starting with 95 recognize
PnP hardware when it is installed, and in many cases can
configure the hardware and install required software without
significant user intervention.
Portable Operating System Interface for UNIX (POSIX) A
UNIX standard designed to ensure portability of applications
among various versions of UNIX.
power-on self test (POST) Tests, such as memory and hard-
ware component tests, that are run by the BIOS when a
computer starts and that must complete before the operating
system is loaded. See basic input/output system (BIOS).
preemptive multitasking A computer hardware and soft-
ware design for multitasking of applications in which the
operating system retains control of the computer at all times.
See cooperative multitasking for comparison.
Presentation layer At Layer 6 of the OSI model, data can be
encrypted and/or compressed to facilitate delivery. Platformspecific application formats are translated into generic data
formats for transmission or from generic data formats into
platform-specific application formats for delivery to the
Application layer. See also Open Systems Interconnection
(OSI) reference model.
primary partition A division of disk space on a basic disk
used to create a volume. It can be assigned a drive letter, be
marked as active, and contain the Windows system volume.
print job The data or document sent from an application to a
printer and accepted by the print spooler.
Print Management Console A console that allows a system
administrator to manage printers and printing throughout the
network.
process A program that is loaded into memory and run by
the CPU. It can be an application a user interacts with,
such as a word-processing program or a Web browser, or
a program with no user interface that communicates with
other processes and provides services to them.
production computer Any computer used to perform real
work; it should be protected from problems that might cause
an interruption in workflow or loss of data.
protocol Rules and procedures for communication and
behavior. Computers must use a common protocol and agree
on the rules of communication.
protocol suite A set of protocols working cooperatively to
provide network communication. Protocols are “stacked” in
layers, and each layer performs a unique function required
for successful communication. Also called a protocol stack.
public cloud Cloud services delivered by a third-party provider.
rack-mounted server CPU boxes mounted in racks that can
hold multiple servers, each with its own power cord and
network connection—and that often share one monitor and
pointing device.
RAID 0 volume A volume that extends across two or more
dynamic disks, but data is written to all disks in the volume
equally; it provides no fault tolerance but does provide a
performance advantage over simple or spanned volumes.
RAID 1 volume A volume that uses space from two dynamic
disks and provides fault tolerance. Data written to one disk is
duplicated, or mirrored, to the second disk. If one disk fails,
the other disk has a good copy of the data, and the system
can continue to operate until the failed disk is replaced. This
volume is also called a mirrored volume.
RAID 5 volume A volume that uses space from three or more
dynamic disks and uses disk striping with parity to provide
fault tolerance. When data is written, it’s striped across all
but one of the disks in the volume. Parity information derived
from the data is written to the remaining disk, which is used
to re-create lost data after a disk failure. This volume is also
called a disk stripe with parity.
raw device In the UNIX/Linux file system, a device that has
not been divided into logical blocks. See also block device.
Copyright 2017 Cengage Learning. All Rights Reserved. May not be copied, scanned, or duplicated, in whole or in part. WCN 02-200-203
560
Glossary
read-only memory (ROM) Memory that contains informa-
scanner A digital image created from a hard copy that is then
tion that is not erased when the power is removed from the
memory hardware.
transmitted to the computer.
real-time operating system (RTOS) An operating system
that receives and processes inputs and produces the required
outputs in a specified amount of time.
redirector An OS client component that intercepts resource
requests and determines whether the resource is local or
remote.
Reduced Instruction Set Computing (RISC) A computer
CPU design that dedicates processor hardware components
to certain functions. This design reduces the number and
complexity of required instructions and often results in faster
performance than CISC CPUs. Compare to Complex
Instruction Set Computing (CISC).
redundant array of independent disks (RAID) A disk
configuration that uses space on multiple disks to form a
single logical volume. Most RAID configurations provide
fault tolerance, and some enhance performance.
register A temporary holding location in a CPU where data
must be placed before the CPU can use it.
registry A Windows database that stores information about
a computer’s hardware and software configuration.
release candidate (RC) The final stage of software testing by
vendors before cutting an official release that is sold commercially. A release candidate is usually tested by a very large
audience of customers. Some vendors may issue more than
one release candidate if problems are discovered in the first
RC.
release to manufacturing (RTM) A version of a Microsoft
OS that is officially released to be sold and has gone through
the alpha, beta, and release candidate phases prior to official
release.
sectors Equally sized portions of a disk track. See tracks.
sequential processing A computer processing style in
which each operation is submitted, acted upon, and the
results displayed before the next process is started. Compare
to batch processing.
Serial ATA (SATA) A common disk interface technology
that’s inexpensive, fast, and fairly reliable, with transfer
speeds up to 6 Gb/s; it is used both in client computers and
low-end servers and replaces the older parallel ATA (PATA)
technology.
serial attached SCSI (SAS) A newer, serial form of SCSI with
transfer rates of up to 6 Gb/s and higher; the disk technology
of choice for servers and high-end workstations. See also
small computer system interface (SCSI).
server The term used to describe an OS designed mainly to
share network resources, a computer with the main role of
giving client computers access to network resources, and the
software that responds to requests for network resources
from client computers.
server-based network A network model in which servers
take on specialized roles to provide client computers with
network services and to maintain centralized control over
network resources.
Server Core A scaled-back version of Windows Server 2008
in which all configurations and maintenance are done via the
command-line interface.
Server Message Block (SMB) The Windows file sharing
protocol; SMB is also supported by Linux and Mac OS X as
Samba.
server operating system A computer operating system
2012 and later that is used in large file-sharing applications
and that can correct some types of data corruption
automatically.
usually found on more powerful PC-based computers than
those used for desktop operating systems. A server OS is
connected to a network and can act in many roles to enable
multiple users to access information via e-mail, files, software, and other means.
resource fork In the Macintosh file system, the portion of a
server role migration An alternative to a Windows server
file that contains fixed information, such as a program’s
icons, menu resources, and splash screens.
OS upgrade in which you perform a clean installation of
Windows Server 2012/R2 and migrate the server roles the
old OS version performed.
Resilient File System (ReFS) A file system in Windows Server
resource managers Programs that manage computer
memory and CPU use.
root folder The highest-level folder in the structure of files
service A process that runs in the background because there
is no user interface. See process.
and folders in a file system.
service packs Software “fixes” issued by a vendor to repair
router A device that enables LANs to communicate by
software problems, address compatibility issues, and add
enhancements.
forwarding packets from one LAN to another. Routers also
forward packets from one router to another when LANs are
separated by multiple routers.
Session layer Layer 5 of the OSI model, which is responsible
for setting up, maintaining, and ending communication
Copyright 2017 Cengage Learning. All Rights Reserved. May not be copied, scanned, or duplicated, in whole or in part. WCN 02-200-203
Glossary
561
sequences (called sessions) across a network. See also Open
Systems Interconnection (OSI) reference model.
storage appliance See network-attached storage (NAS).
shell An interface that enables users to interact with an
operating system kernel. The shell enables the user to execute
commands. See kernel.
high-speed networking technologies to give servers fast access
to large amounts of shared disk storage. To the server OS, the
storage a SAN manages appears to be physically attached to
the server.
simple volume A volume that usually resides on a single
basic or dynamic disk.
single-processor computer A computer capable of supporting
only a single CPU.
single-tasking A computer hardware and software design
that can manage only a single task at a time.
single-user system A computer hardware and software
system that enables only one user to access its resources at
a particular time.
small computer system interface (SCSI) An older parallel
bus disk technology still used on some servers, although it has
reached its performance limits at 640 MB/s transfer rates.
storage area network (SAN) A storage device that uses
storage layout The method used to create a virtual disk with
Storage Spaces; the three methods include simple, mirror, and
parity. See also Storage Spaces.
storage pool A collection of physical disks from which vir-
tual disks and volumes are created and assigned dynamically.
Storage Spaces A new feature in Windows 8/8.1 and
Windows Server 2012/R2 and later versions that provides
flexible provisioning of virtualized storage.
storage tiering A feature of Storage Spaces that combines
the speed of SSDs with the low cost and high capacity of
HDDs to create high-performance volumes.
subnet mask A 32-bit dotted decimal number consisting of a
particular moment; it can be used to restore the virtual
machine to its state when the snapshot was taken. See also
virtual machine (VM).
contiguous series of binary 1 digits followed by a contiguous
series of binary 0 digits. The subnet mask determines which
part of an IP address is the network ID and which part is the
host ID.
software as a service (SaaS) A category of cloud computing
super advanced intelligent tape (S-AIT) A tape system
in which a customer pays for the use of applications that run
on a service provider’s network; SaaS is also called hosted
applications.
super digital linear tape (SDLT) A tape system that uses both
snapshot A partial copy of a virtual machine made at a
solid-state drive (SSD) A type of storage medium that uses
flash memory, has no moving parts, and requires less power
than a traditional HDD. It is faster and more shock resistant
than a traditional HDD, but it costs more per gigabyte and
doesn’t have as much capacity as an HDD.
spanned volume A volume that extends across two or more
physical disks; for example, a simple volume that has been
extended to a second disk is a spanned volume.
special identity group A type of group in Windows in which
membership is controlled dynamically by Windows, can’t be
viewed or changed manually, and depends on how an account
accesses the OS. For example, membership in the Authenticated Users group is assigned to a user account automatically
when the user logs on to a computer or domain.
Spotlight The new way to search in Mac OS X, starting
with version 10.4 Tiger. Spotlight stores a virtual index of
everything on the system.
stand-alone computer A computer that doesn’t have the
necessary hardware or software to communicate on a network.
static IP address A manually configured IP address.
status bits Bits used as part of a folder entry to identify the
type of file contained in each entry. The status bits in use are
Volume, Folder, System, Hidden, Read-only, and Archive.
technology that has an erasable memory chip and a capacity
of up to 1.3 TB.
magnetic and optical recording and has a tape capacity of up
to 2.4 TB.
superblock In the UNIX/Linux file system, a special data
block that contains information about the layout of blocks,
sectors, and cylinder groups on the file system. This information is the key to finding anything on the file system, and it
should never change.
supercomputer A computer that has extreme processing
power and speed to handle complex computations that are
beyond the reach of other computers.
surface analysis A disk diagnostic technique that locates and
marks damaged disk areas. Some surface analysis tools are
destructive to data because they also format the disk. Other
tools can run without altering data, except to move it from a
damaged location to one that is not.
swap file Also called the page file, paging file, or swap file
system, an allocated portion of disk storage reserved to supplement RAM when the available RAM is exceeded. See page file.
swap partition In Linux/UNIX OSs, a separate partition on
the disk set aside exclusively for virtual memory.
switch A network device that reads the destination MAC
addresses of incoming frames to determine which ports
should forward the frames. Also, an operating system command option that changes the way certain commands
Copyright 2017 Cengage Learning. All Rights Reserved. May not be copied, scanned, or duplicated, in whole or in part. WCN 02-200-203
562
Glossary
function. Command options, or switches, are usually entered
as one or more letters, separated from the main command by
a forward slash (/) in Windows and by a dash (-) in UNIX/
Linux.
switching table A table of MAC address and port pairs that
a switch uses to determine which port to forward frames it
receives.
symbolic link A special file in the UNIX/Linux file system
that permits a folder link to a file that is on a different
partition.
system architecture The computer hardware design that
includes the processor (CPU) and communication routes
between the CPU and the hardware it manages, such as
memory and disk storage.
System V Release 4 (SVR4) A variation of the UNIX
operating system. It is very popular today along with the
Berkeley Software Distribution (BSD).
system volume A volume that contains the files a computer
needs to find and load the Windows OS. See also volume.
tar A UNIX file archive utility.
task supervisor A process in the operating system that keeps
track of applications running on the computer and the
resources they use.
task switching A hybrid between single-tasking and
multitasking that permits the user or application software
to switch among multiple single-tasking operations.
thermal-wax transfer printer A printer that creates
high-quality color printed output by melting colored wax
elements and transferring them to the printed page.
thin provisioning A method for creating virtual disks in
which the virtual disk expands dynamically and uses space
from the storage pool as needed until it reaches the specified
maximum size.
thread The smallest piece of computer code that can be
independently scheduled for execution.
time-sharing system A central computer system, such as a
mainframe, that is used by multiple users and applications
simultaneously.
total cost of ownership (TCO) The cost of installing and
maintaining computers and equipment on a network. TCO
includes hardware, software, maintenance, and support costs.
tracks Concentric rings that cover an entire disk like grooves
on a phonograph record. Each ring is divided into sectors in
which to store data.
trailer Information added to the back end of a chunk of data
so it can be correctly interpreted and processed by network
protocols.
Transmission Control Protocol/Internet Protocol (TCP/IP)
The most common protocol suite, the default protocol in
contemporary OSs, and the protocol of the Internet.
Transport layer Layer 4 of the OSI model, which is responsible for reliable delivery of data streams across a network.
Layer 4 protocols break large streams of data into smaller
chunks and use sequence numbers and acknowledgements to
provide communication and flow control. See also Open
Systems Interconnection (OSI) reference model.
type code In the Macintosh file system, embedded file
information that denotes which applications were used to
create the files. Mac OS type codes are used in much the same
way as Windows file extensions that identify file types with
.txt, .doc, and other extensions. See creator codes.
Unicode A 16-bit character code that allows for the definition
of up to 65,536 characters.
unique local IPv6 address An address for devices on a
private network that can’t be routed on the Internet.
Universal Disk Format (UDF) A removable disk formatting
standard used for large-capacity CD-ROMs and DVD-ROMs.
universal group A group scope that can contain users from
any domain and be assigned permissions to resources in any
domain. See also group scope.
Universal Plug and Play (UPnP) An initiative of more than
80 companies to develop products that can be quickly
added to a computer or network. These products include
intelligent appliances for the home. For more information,
go to http://openconnectivity.org/upnp.
Universal Serial Bus (USB) A serial bus designed to support
up to 127 discrete devices with data transfer speeds up to
5 Gbits/s (gigabits per second).
UNIX file system (ufs) A file system supported in most ver-
sions of UNIX/Linux; ufs is a hierarchical (tree structure) file
system that is expandable, supports large storage, provides
excellent security, and is reliable. Ufs employs information
nodes (inodes).
upgrade installation An OS installation on a computer that
already has an earlier version of the OS; the upgrade
replaces the earlier version with a new version, often with
the option to retain some or all of the original settings, user
accounts, applications, data files, and other existing user
files.
User Account Protection (UAP) A feature of some Microsoft
operating systems that allows for better protection of user
accounts by controlling permissions and limiting the software
applications that can be run from an account.
user interface A component of an operating system that
provides a method for users to interact with the computer,
usually with a keyboard and mouse or touch screen.
Copyright 2017 Cengage Learning. All Rights Reserved. May not be copied, scanned, or duplicated, in whole or in part. WCN 02-200-203
Glossary
VHD file The format that virtual machines running in
Hyper-V use for their virtual disks. VHD files can also be
created and mounted with Disk Management and used like
physical disks.
virtual disk Files stored on the host computer that represent
a virtual machine’s hard disk.
virtual machine (VM) A software environment that emulates
a physical computer’s hardware and BIOS.
563
multiple OSs to run on the same physical computer at the
same time.
volume A logical unit of storage that can be formatted with a
file system.
volume information block On a Mac-formatted disk, the
sector after the boot blocks. See also boot block. The
volume information block points to other important areas
of information, such as the location of the system files and
the catalog and extents trees.
virtual memory Disk space that stores the least recently used
pages of memory when more physical RAM is needed, but
not available.
volume label A series of characters, commonly used as a
virtual network A network configuration created by virtua-
volume mount point An empty folder into which a volume
lization software and used by virtual machines for network
communication.
is mounted. See mount.
virtual private network (VPN) A private network that is like
an encrypted tunnel through a larger network—such as the
Internet, an enterprise network, or both—and is restricted to
designated member clients.
virtual server A server computer that can be configured to
nickname, that identify a volume.
wide area networks (WANs) Internetworks that are
geographically dispersed and use third-party communication
providers to supply connectivity between locations. See also
internetwork.
Windows Hardware Error Architecture (WHEA) An archi-
run multiple virtual machines with multiple server or desktop
OSs. See virtual machine.
tecture that supports memory and cache error recovery
without the operating system being aware of the
process.
virtualization A process that creates a software environ-
X Window A windowed user interface for UNIX and other
ment to emulate a computer’s hardware and BIOS, allowing
operating systems.
Copyright 2017 Cengage Learning. All Rights Reserved. May not be copied, scanned, or duplicated, in whole or in part. WCN 02-200-203
Copyright 2017 Cengage Learning. All Rights Reserved. May not be copied, scanned, or duplicated, in whole or in part. WCN 02-200-203
Index
3D printers, 284
application software, 16–18
testing installations and upgrades, 369
1394 technology, 282–283
arithmetic logic unit (ALU), 115
testing what-if scenarios, 369
A
attrib command, 162–163
access methods, storage, 316–318
access point (AP), 411
account and password conventions,
471–472
authentication, 471
authorization, 471
autoconfiguration
stateful, 434
stateless, 434
activate, 65
Active Directory, 62, 75, 407
active partition, 157
ActiveX, 58
address bus, 121
address space, 419
addresses, IP, 417
advanced intelligent tape (AIT) drives,
332
Advanced Server, Windows 2000,
63–64
Advanced Sharing dialog box,
460–461
AGP (Accelerated Graphics Port) bus,
288
automatic private IP addressing (APIPA),
430
B
backplane, 321
backup(s), 221
before migrating to new operating
system, 221–223
binary, 516
batch file, 464
batch processing, 23
BDC (backup domain controllers), 62
Beginner’s All-purpose Symbolic
Instruction Code (BASIC), 7
incremental, 516
binary backups, 516
making, 516–518
BIOS (basic input/output system), 18–20
backup domain controllers (BDC), 62
bad clusters, 161
Alpha CPU, 128
bare-metal virtualization, 360,
368–372
applications, 368–370
products, 370–372
AMD processor, 127
application services, 407
basic disk, 169, 325–326
Beta software, 219
allocation blocks, 182
application programming interface
(API), 20
BASIC (Beginner’s All-purpose
Symbolic Instruction Code), 7
full file-by-file, 516
backward compatibility, 125
Application layer (Layer 7), OSI model,
423
VMware vSphere, 371
Berkeley Software Distribution (BSD),
88
alias, 185
API (application programming interface),
20
Microsoft Hyper-V, 370–371
differential, 516
backup strategy, 517–518
ALU (arithmetic logic unit), 115
Citrix XenServer, 371
basic input/output system (BIOS),
18–20
AIT (advanced intelligent tape) drives,
332
Alpha software, 219
bare-metal virtualization products,
370–372
bare-metal virtualization applications,
368–370
blade enclosure, 4
blade servers, 4
block(s). See also superblock
allocation, 154–155, 182
boot, 157
device, 179
special files, 275
superblock, 177
volume information, 183
dynamic provisioning, 369
boot block, 157
live migration, 369
boot program, 157
server consolidation, 369
boot volume, 324
testing a preconfigured application,
369
BSD (Berkeley Software Distribution),
88
Copyright 2017 Cengage Learning. All Rights Reserved. May not be copied, scanned, or duplicated, in whole or in part. WCN 02-200-203
565
566
Index
buses
Accelerated Graphics Port (AGP),
288
address, 121
control, 115, 122
data, 116, 121–122
Peripheral Component Interconnect
Express (PCIe), 288
C
Client Hyper-V, 81
Linux commands, 545–548
client operating system, 4, 405
Mac OS X commands, 548–550
client software, 405
client/server networks, 406–408
client/server systems, 26
cache controller, 121
cache memory, 120
catalog b-tree, 183
cathode ray tube (CRT), 7
CDFS (CD-ROM File System), 174
CD-ROM File System (CDFS), 174
central processing units (CPUs)
address bus, 121
basic architecture, 114–115
communication services, 407
clock cycles, 117
communications, tuning for network,
525
cloning, 369
compiler, 118
cloud computing, 26, 372–375
complementary metal oxide semiconductor (CMOS), 18
benefits of, 373
cache, 120–121
Common UNIX Printing System
(CUPS), 458
categories of, 373–375
defined, 372
infrastructure as a service, 374–375
platform as a service, 374
private cloud versus public cloud, 375
software as a service, 373
cloud storage, 330–331
clustering, 64
failover, 75
Complex Instruction Set Computing
(CISC), 116
Component Object Model (COM), 58
computer program, 4
computer storage, 314
computers. See also supercomputer
client, 405
host, 359
multiprocessor, 114
netbook, 225
cache, 120–121
CMOS (complementary metal oxide
semiconductor), 18
production, 219
control bus, 122
coaxial cable, 415
server, 405
data bus, 121–122
COM (Component Object Model), 58
stand-alone, 390
design type, 116–119
Command Prompt commands, Windows,
541–545
scheduling, 122–123
speed, 119–120
understanding, 114
character special files, 275
chkdsk utility, 169–172, 515
circuit boards, installing, 291–292
CISC (Complex Instruction Set Computing), 116
Citrix XenServer, 371
command-line commands, operating
system (OS), 541–545
configuring
input/output (I/O) devices, 265–311
IPv4 address in Linux and Mac OS X,
431–433
Linux commands, 545–548
IPv4 address in Windows, 430–431
Mac OS X commands, 548–550
IPv4 addresses, 429–430
Windows Command Prompt
commands, 541–545
IPv6 addresses, 433–434
command-line interface, 8
commands
Linux, 545–548
local disks, 318–322
network connection, 389–455
network interface, 426–428
Classless Interdomain Routing (CIDR),
418
Mac OS X, 548–550
networking in an operating system,
426–434
clean installation, 212
Windows Command Prompt,
541–545
storage devices, 313–356
client, 62, 405
client computer, 405
commands, operating system (OS)
command-line, 541–550
connections, printer, 285
connectivity, testing network, 525–526
Copyright 2017 Cengage Learning. All Rights Reserved. May not be copied, scanned, or duplicated, in whole or in part. WCN 02-200-203
Index
567
deleting temporary files in Windows,
506–508
Digital Equipment Corporation (DEC),
128
designing folder structure, 148–152
digital linear tape (DLT) drives, 332
control unit (CU), 115
desktop databases, 184
digital modems, 280
controllers, 281
desktop operating system, 4, 405
digital pads, 280
device drivers
digital picture and video input/output
(I/O), 282
control bus, 115, 122
Control Panel, using to install device
and driver, 270
miscellaneous, 281
cookies, 505
Linux, 49
cooperative multitasking, 28
operating system and, 15–16
Cortana digital assistant, 87
Windows 10, 44–45
CPUs. See central processing units
Digital Visual Interface (DVI), 290
direct-attached storage (DAS), 316–317
device drivers, using, 267–276
creator codes, 184
configuring driver signing, 274
credentials, 406
Mac OS X driver installation, 276
CRT (cathode ray tube), 7
CU (control unit), 115
manufacturer driver installation, 269
CUPS daemon, 286
UNIX/Linux driver installation,
274–276
D
using Control Panel to install device
and driver, 270
DAC (Dynamic Access Control), 84
using Device Manager to install or
update drivers, 270–273
damaged files, using disk utilities to
repair, 515
DAT (digital audio tape) drives, 331
data bus, 116, 121–122
data deduplication, 327
using PnP to install device and driver,
270
using Windows Wizard to install
device and driver, 270
data fork, 185
Device Manager, using to install or
update drivers, 270–273
Data Link layer (Layer 2), OSI model,
424
device special files, 275
database storage, 315–316
Datacenter Server, Windows 2000,
63–64
devices
configuring input/output (I/O),
265–311
operating systems (OSs) and, 266
DEC (Digital Equipment Corporation),
128
standard input, 277–283
default groups, 478–479
using and configuring storage,
313–356
defragmentation, defined, 513
defragmenter tool, 172
defragmenting disks, 512–514
deleting files, finding and, 505–512
deleting temporary files in Windows,
506–508
Mac OS X, 511–512
digital sound input, 281–282
using Control Panel to install, 270
directory, 148
directory service, 407
disk defragmenter, 173
disk drive, 318
disk files, moving to spread load,
514–515
disk interface technologies, 320–322
partitioning methods, 321–322
serial ATA (SATA) drives, 320–321
serial attached SCSI (SAS) drives, 321
small computer system interface
(SCSI) drives, 321
disk label, 156
disk management tools, in UNIX/Linux,
334–336
disk pooling, 327
disk quotas, 168
disk signature, 157
disk storage options
basic and dynamic disks, 325–326
RAID arrays, 322–324
solid state drives (SSDs), 314
virtual disks, 326
using PnP to install, 270
disk stripe with parity, 324
using Windows Wizard to install, 270
disk striping, 516
DFS (Distributed File System), 67
disk utilities
differential backup, 516
Mac OS X, 336
digital audio tape (DAT) drives, 331
using to repair damaged files, 515
Copyright 2017 Cengage Learning. All Rights Reserved. May not be copied, scanned, or duplicated, in whole or in part. WCN 02-200-203
568
Index
configuring, 274
disks
basic, 325–326
drivers
embedded systems, 24
encapsulation, 404
defragmenting, 512–514
checking, 216–217
ESD (electrostatic discharge), 292
dynamic, 326
device, 15–16
extended FAT16, 163–164
surface analysis of, 513
mouse and keyboard, 277–279
extended file system (ext fs), 174
virtual, 326
touch input, 279
Extended Hierarchical Filing System,
182
using Control Panel to install, 270
disks, maintaining, 512–516
extended partition, 325
using Control Panel to install device
and, 270
external clock speed, 120
using device, 267–276
external commands, 90
moving disk files to spread load,
514–515
using Device Manager to install or
update, 270–273
extranet, 401
using disk utilities to repair damaged
files, 515
using PnP to install device and, 270
defragmenting disks, 512–514
deploying RAID techniques,
515–516
using Windows Wizard to install
device and, 270
display adapters, 288–291
basic technology, 289–290
drives
advanced intelligent tape (AIT),
332
installing, 290–291
DisplayPort, 290
digital audio tape (DAT), 331
Distributed File System (DFS), 67
digital linear tape (DLT), 332
F
failover clustering, 75
FAT (file allocation table), 154
FAT16, 163–164
FAT32, 164–165
FAT64, 165
fault tolerance, 320, 322–324
DVD/CD-ROM, 333–336
FCI (File Classification Infrastructure),
77
linear tape open (LTO), 332
fiber-optic cabling, 415
super digital linear tape (SDLT),
332
Fibre Channel, 316, 317
DLT (digital linear tape) drives, 332
DNS (Domain Name Service), 232
tape, 331–332
file allocation table (FAT), 154
domain, 61, 407
USB flash, 316, 317
file attributes, 152
distributed link tracking, 168
distributed network architecture, 62
distribution, 14
domain controllers, 407
DVD/CD-ROM drives, 333–336
domain local group, 477
DVI (Digital Visual Interface), 290
Domain Name Service (DNS), 232
dye sublimation printers, 285
dot-matrix printers, 284. See also
impact printers
Dynamic Access Control (DAC), 84
dots per inch (dpi), 289
dynamic disk, 169, 326
file, 147
File Classification Infrastructure (FCI),
77
file metadata, 152–153
file services management, 77
File Sharing Wizard, 459–460
file system, 3, 146
dpi (dots per inch), 289
Dynamic Host Configuration Protocol
(DHCP), 430
driver installations
dynamic provisioning, 369
maintenance, 502–505
E
understanding functions, 146–163
Mac OS X, 276
manufacturer, 269
UNIX/Linux, 274–276
driver signing, 62
early Microsoft operating system,
56–66
e-mail services, 407
Macintosh, 182–187
UNIX/Linux, 174–181
Windows, 163–174
file-by-file backup, full, 516
Copyright 2017 Cengage Learning. All Rights Reserved. May not be copied, scanned, or duplicated, in whole or in part. WCN 02-200-203
Index
files
Google Apps, 373
comparing features of, 368
block special, 275
graphical user interface (GUI), 8
products, 362–363
character special, 275
group accounts
using Microsoft Virtual PC, 366
device special, 275
moving disk, 514–515
page, 521
sharing, 458–470
sharing in Linux, 466–467
sharing in Mac OS X, 468–470
sharing in Windows, 458–463
swap, 521
using disk utilities to repair damaged,
515
creating in Windows domains,
477–478
using VirtualBox, 366–367
using VMware Workstation,
363–364
in Windows, 472
working with, in Linux, 480–481
using VMware Workstation Player,
364–365
working with, in Mac OS X, 482–483
virtualization software summary,
367–368
group scope, 477
groups
domain local, 477
569
hosted virtualization applications,
361–362
global, 478
application isolation, 361
universal, 478
network isolation, 361
guest OS, 359
OS training, 361
GUI (graphical user interface), 8
physical-to-virtual conversion, 362
deleting temporary files in Windows,
506–508
GUID Partitioning Table (GPT), 321
software development, 362
H
software training, 361
Mac OS X, 511–512
UNIX/Linux, 506–509
hard linking, 166
VHD, 326
files, finding and deleting, 505–512
files in Windows, deleting temporary,
506–508
hardware, 3
use of legacy applications, 362
what-if scenarios, 362
hosted virtualization products, 362–363
flash drives, USB, 316, 317
HDMI (High-Definition Multimedia
Interface), 290
Microsoft Virtual PC, 362
flexible storage layouts, 327
header, 404
VirtualBox, 362–363
floating point unit (FPU), 115
HFS (Hierarchical Filing System), 182
VMware Workstation Player, 362
folder, 148
Hierarchical Filing System (HFS), 182
VMware Workstation Pro, 362
designing structure, 148–152
format command switches, 159–160
formatting, 159–163
FPU (floating point unit), 115
fragmentation, defined, 512
frames, 403–404
fsck utility, 515
hierarchical structure, 146–148
HT (Hyper-Threading), 122
High-Definition Multimedia Interface
(HDMI), 290
Hyper-Threading (HT), 122
high-level format, 155
hypervisor, 359
host computer, 359
hosted applications. See software as a
service (SaaS)
Hyper-V, 75, 88
I
impact printers, 284. See also dot-matrix
printers
full file-by-file backup, 516
hosted infrastructure. See infrastructure
as a service (IaaS)
G
hosted platform. See platform as a
service (PaaS)
gadgets, 69
hosted private cloud model, 26
infrastructure as a service (IaaS),
374–375
game pads, 281
hosted virtualization, 360, 361–368
inkjet printers, 283
global group, 478
applications, 361–362
incremental backup, 516
Infrared Data Association (IrDA), 60
Innotek, 362
Copyright 2017 Cengage Learning. All Rights Reserved. May not be copied, scanned, or duplicated, in whole or in part. WCN 02-200-203
570
Index
inodes, 176
ensuring hardware compatibility, 217
intranet, 401
in-place upgrade, 230
introduction and initial preparations,
212–224
I/O (input/output), 5
input devices, miscellaneous, 279–283
1394 technology, 282–283
digital pads, 280
digital picture and video input/output
(I/O), 282
digital sound input, 281–282
joysticks, game pads, and miscellaneous controllers, 281
scanners, 280–281
input devices, standard, 277–283
mouse and keyboard drivers, 277–279
touch input drivers, 279
input drivers, touch, 279
input/output (I/O) functions, 5
installation
clean, 212
making backups before migrating to
new operating system, 221–223
address range, 272
I/O (input/output) devices, configuring,
265–311
migrating to new operating system,
217
display adapters, 288–291
preparing for installation, 214
installing circuit boards, 291–292
training, 224
miscellaneous input devices, 279–283
version development cycle, 219–220
miscellaneous output devices, 291
operating systems (OSs) and devices,
266
installing and upgrading Windows 7,
225–229
printers, 283–288
hardware requirements, 226
sound cards, 291
installing and upgrading Windows 10,
229–231
standard input devices, 277–283
installing and upgrading Windows Server 2008/R2, 231–234
hardware requirements, 233
installing and upgrading Windows Server 2012/R2, 234–238
using device drivers, 267–276
IP address, 417
IP Security (IPsec), 73
IPv4 address
Mac OS X driver, 276
hardware requirements, 235
configuring, 429–430
optimizing software, 518–520
migrating from earlier version,
237–238
configuring in Linux and Mac OS X,
431–433
upgrade, 212
installing
Linux, 238–239
operating system (OS) updates and
patches, 523–525
installing and upgrading Linux, 238–239
hardware requirements, 238
installing and upgrading Mac OS X,
239–242
hardware requirements, 240
installing and upgrading operating
systems, 212–243
checking drivers, 216–217
checking hardware, 214–216
checking software and hardware,
220–221
conducting test migration, 223–224
deciding to perform upgrading/cleaning installation, 218–219
Institute of Electrical and Electronics
Engineers (IEEE), 282–283
instruction set, 116
Intel CPUs
configuring in Windows, 430–431
IPv4 address classes, 418–420
IPv6 address, 421
configuring, 433–434
multicore, 126
single-core, 123–125
IntelliMirror, 62–63
IrDA (Infrared Data Association), 60
IRQs (interrupt requests), 122
lines, 272
interconnecting device, 391
internal clock speed, 119
J
international language compatibility, 63
journaling, 167
Internet, 390, 401
joysticks, 281
Internet Printing Protocol (IPP), 458
just a bunch of disks (JBOD), 327
Internet Protocol version 4 (IPv4), 417
K
Internet Protocol version 6 (IPv6),
420–421
Kerberos, 62
internetworks, 397–401
kernel, 3, 13–14
interrupt requests (IRQs), 122
keyboard drivers, mouse and, 277–279
Copyright 2017 Cengage Learning. All Rights Reserved. May not be copied, scanned, or duplicated, in whole or in part. WCN 02-200-203
Index
L
disk capacity and speed, 319–320
Mac OS X 10.10 Yosemite, 95–96
label printers, 284
disk interface technologies, 320–322
Mac OS X 10.11 El Capitan, 96
571
laser printers, 283
local print device, 465
Mac OS X printers, installing, 287–288
Layer 3 switch, 424
local storage, 316
Mac updates, 243
level 1 (L1) cache, 120
localhost, 419
level 2 (L2) cache, 120–121
log files, 315
Macintosh Filing System (MFS),
182–187
level 3 (L3) cache, 121
logical drives, 155
level 4 (L4) cache, 121
logical unit number (LUN), 317
file system maintenance, 502–505
library, 71
logical volume manager (LVM), 329
finding and deleting files, 505–508
Lightweight Directory Access Protocol
(LDAP), 407
loopback address, 419
maintaining disks, 512–516
low-level format, 153
making backups, 516–518
line printers, 284
LPT1, 284
linear tape open (LTO) drives, 332
LTO (linear tape open) drives, 332
linked-list method, 160
link-local IPv6 address, 433
Linux
accessing shared files in, 467–468
commands, 545–548
device drivers, 49
M
Mac OS, 92–94
Mac OS interface, 49–50
Mac OS X, 95–96
accessing shared files in, 470
maintenance procedures, standard
operating and
optimizing software installation,
518–520
tuning operating system (OS), 520–526
manufacturer driver installation, 269
Master Boot Record (MBR), 157, 321
Master File Table (MFT), 154, 165
maximum transmission unit (MTU), 424
MBR (Master Boot Record), 157
Fedora interface, 47–48
clean installation from DVD,
241–242
file system, 174–181
commands, 548–550
hardware requirements, 238
Disk Utility, 336
installing and upgrading, 238–239
driver installation, 276
IPv4 address, configuring in, 431–433
finding and deleting files, 511–512
sharing files and printers in, 466–467
hardware requirements, 240
metropolitan area network (MAN),
397–401
updates, 243
installing and upgrading, 239–242
MFS (Macintosh Filing System), 182–187
virtual disks in, 329–330
IPv4 address, configuring in, 431–433
MFT (Master File Table), 154, 165
volume types in, 328–330
multitasking, 51
working with accounts in, 480–481
media access control, 424
Media Access Control (MAC) address,
394
memory, tuning virtual, 520–526
metadata, 152
sharing files and printers in, 468–470
Micro Instrumentation Telemetry Systems (MITS), 7–8
live migration, 232
updates, 243
microarchitecture, 126
load, moving disk files to spread,
514–515
volume types in, 328–330
microcode, 118
working with accounts in, 482–483
Microsoft Disk Operating System
(MS-DOS), 8, 56
local area networks (LANs), 397–401
computers communicating on,
394–396
local disks
configuring, 318–322
Mac OS X 10.6 Snow Leopard, 95
Mac OS X 10.7 Lion, 95
Mac OS X 10.8 Mountain Lion, 95
Mac OS X 10.9 Mavericks, 95
Microsoft Edge Web browser, 86–87
Microsoft Hyper-V, 370
Microsoft Management Console
(MMC), 67
Copyright 2017 Cengage Learning. All Rights Reserved. May not be copied, scanned, or duplicated, in whole or in part. WCN 02-200-203
572
Index
Microsoft Office 365, 373
Microsoft operating system, early
MS-DOS and PC DOS, 56
Windows 3.x, 56–57
Windows 95, 57–59
Windows 98, 59–60
Windows 98/Me, 59
UNIX/Linux, 334–335
network components, 390–392
mouse and keyboard drivers, 277–279
steps of, 392–393
MS-DOS (Microsoft Disk Operating
System), 8
tuning for, 525–526
multicasting, 419
multicore AMD processor, 127
multicore Intel CPUs, 126
network components, 390–392
interconnecting device, 391
network clients and servers, 391–392
network interface card (NIC), 390
multifunction printers, 283–284
Windows 2000, 61–63
network medium, 391
multiport repeater, 408
Windows 2000 Advanced Server,
63–64
Windows 2000 Datacenter Server,
63–64
multiprocessor computer, 114
multitasking, 28
Mac OS X, 51
Windows 2000 Professional, 63
Windows 10, 45–46
Windows 2000 Server, 63–64
Windows 95, 59
Windows Millennium Edition (Me),
60
multithreading, 31, 122
multiuser operating system, 31
NIC device driver, 392
protocols, 392
network connection configuring,
389–455
configuring networking in an operating system, 426–434
fundamentals of network communication, 390–396
multiuser system, 24–27
network device fundamentals,
408–415
Windows Server 2003/R2, 66–67
N
network protocol fundamentals,
415–421
Windows XP, 65
name server, 395
Windows XP Home Edition, 66
named pipes, 275
Windows XP Professional Edition, 66
naming services, 407
Windows NT, 60–61
Windows Server 2003, 65
Microsoft Virtual PC, 362, 366
Nano Server, 88
migration, 217
NAS (network attached storage), 317
from earlier version, 237–238
netbook computers, 225
live, 232
.NET Framework, 67
to new operating system, 217
server role, 236
mirrored volume, 323. See also RAID 1
volume
miscellaneous controllers, 281
MITS (Micro Instrumentation Telemetry Systems), 7–8
MMC (Microsoft Management Console),
67
network, 390
components of, 390–392
OSI model of networking, 421–426
network connectivity, testing, 525–526
network devices, 408–415
coaxial cable, 415
fiber-optic cabling, 415
network hubs, 408–409
network interface cards, 411–412
network media, 414–415
terminology, 397–408
network switches, 409–410
virtual, 360
Network Address Translation (NAT),
364
network client software, 391
network communication
mount, 158
computers communicating on a LAN,
394–396
mount command
fundamentals of, 390–396
Mac OS X, 336
network terminology, 397–408
layers of, 393–394
routers, 412–414
unshielded twisted pair, 414
wireless access points, 411
Network File System (NFS), 458
network hubs, 408–409
Network Information Service (NIS), 407
network interface cards (NICs), 390,
411–412
Copyright 2017 Cengage Learning. All Rights Reserved. May not be copied, scanned, or duplicated, in whole or in part. WCN 02-200-203
Index
network interface, configuring,
426–428
Network layer (Layer 3), OSI model,
424
network media, 414–415
networking
configuring in an operating system,
426–434
OSI model of, 421–426
coaxial cable, 415
New Technology File System (NTFS),
154, 165–170
fiber-optic cabling, 415
NIC device driver, 392
unshielded twisted pair, 414
nonvolatile storage, 314
network medium, 391
network print device, 465
network protocols, 392, 415–421
NTFS (New Technology File System),
154, 165–170
O
Internet Protocol version 4 (IPv4),
417
OCR (optical character recognition),
280
Internet Protocol version 6 (IPv6),
420–421
on-demand applications. See software
as a service (SaaS)
IPv4 address classes, 418–420
Open Systems Interconnection (OSI)
reference model, 421–426
IPv6 addresses, 421
network, resource sharing over,
457–499
Application layer (Layer 7), 423
Data Link layer (Layer 2), 424
Network layer (Layer 3), 424
managing user and group accounts,
470–483
Physical layer (Layer 1), 424–425
network switches, 409–410
network terminology, 397–408
clients, 405
extranet, 401
frames, 403–404
Internet, 401
internetworks, 397–401
intranet, 401
LANs, 397–401
MANs, 397–401
OSI model of networking, 421–426
OSs (operating systems)
configuring networking in, 426–434
desktop, 4–5
device drivers and, 15–16
devices, 266
elements, 20–21
features, 3
how they work, 13–21
introduction to, 3
server, 4–5
short history of, 6–13
single-user versus multiuser, 31
training, 361
file and printer sharing, 458–470
network server software, 391
573
Presentation layer (Layer 6), 423–424
Session layer (Layer 5), 424
types of, 21–27
UNIX and UNIX-like operating systems, 88–96
updates and patches, 523–525
updates for, 242
OSs (operating systems), current, 32–33
OSs (operating systems), early
Microsoft
structure of, 422–423
MS-DOS and PC DOS, 56
summary of, 425–426
Windows 3.x, 56–57
Transport layer (Layer 4), 424
Windows 95, 57–59
operating and maintenance procedures,
standard
file system maintenance, 502–505
finding and deleting files, 505–508
maintaining disks, 512–516
making backups, 516–518
packets, 402–403
optimizing software installation,
518–520
peer-to-peer and client/server networks, 406–408
tuning operating system (OS),
520–526
Windows 98, 59–60
Windows 98/Me, 59
Windows 2000, 61–63
Windows 2000 Advanced Server,
63–64
Windows 2000 Datacenter Server,
63–64
Windows 2000 Professional, 63
Windows 2000 Server, 63–64
servers, 405–406
operating system files, 315
Windows Millennium Edition (Me),
60
WANs, 397–401
Oracle Corporation, 362
Windows NT, 60–61
organizational units (OUs), 473
Windows Server 2003, 65
network-attached storage (NAS), 317
Copyright 2017 Cengage Learning. All Rights Reserved. May not be copied, scanned, or duplicated, in whole or in part. WCN 02-200-203
574
Index
OSs (operating systems), early
Microsoft (continued )
Windows Server 2003/R2, 66–67
Windows XP, 65
Windows XP Home Edition, 66
Windows XP Professional Edition, 66
OSs (operating systems), tuning,
520–526
Alpha, 128
AMD, 127
Intel, 123–126
Motorola, 127–128
PowerPC, 128
SPARC, 128
PDC (Primary Domain Controller), 61
Presentation layer (Layer 6), OSI model,
423–424
Primary Domain Controller (PDC), 61
primary partition, 325
print device, 465
local, 465
network, 465
print job management, 465
installing operating system (OS)
updates and patches, 523–525
peer-to-peer networking, 94
testing network connectivity,
525–526
Peripheral Component Interconnect
(PCI), 288
tuning for network communications,
525
Peripheral Component Interconnect
(PCI) bus, 288
tuning virtual memory, 521–522
Peripheral Component Interconnect
Express (PCIe) bus, 288
printer pooling, 465
physical drive, 155
printer priority, 465
Physical layer (Layer 1), OSI model,
424–425
printers, 283–288, 465
OSs (operating systems) command-line
commands, 541–550
Linux commands, 545–548
Windows Command Prompt
commands, 541–545
peer-to-peer networks, 406–408
Print Management Console, 67
print queue, 286, 465
print server, 465
print spooler, 286
printer connections, 285
3D, 284
picture, digital, 282
dot-matrix, 284
output devices, miscellaneous, 291
ping utility, 525–526
dye sublimation, 285
P
pipelining, 117
impact, 284
packets, 402–403
pixel, 289
inkjet, 283
packs, service, 520
pixels per inch (ppi), 289
installing UNIX/Linux, 286–287
page file, 521
platform as a service (PaaS), 374
installing Windows, 285–286
pagefile.sys, 315
plotters, 284
label, 284
parity, 324
PnP (Plug and Play), 58
laser, 283
partition, 319
using to install device and driver, 270
line, 284
extended, 325
Point-to-Point Protocol (PPP), 94
Mac OS X, installing, 287–288
primary, 325
Portable Operating System Interface for
UNIX (POSIX), 166
multifunction, 283–284
system, 325
printer connections, 285
partition table, 156
POSIX (Portable Operating System
Interface for UNIX), 166
partitioning, 155–159
POST (power-on self test), 18
sharing in Linux, 466–467
partitioning disks, methods for,
321–322
power-on self test (POST), 18
sharing in Mac OS X, 468–470
PowerPC, 128
sharing in Windows, 465–466
ppi (pixels per inch), 289
thermal-wax transfer, 285
PC DOS, 56
PPP (Point-to-Point Protocol), 94
types, 283–285
PC processors
preemptive multitasking, 29
patches, installing operating system
(OS) updates and, 523–525
sharing, 458–470
private cloud, 375
Copyright 2017 Cengage Learning. All Rights Reserved. May not be copied, scanned, or duplicated, in whole or in part. WCN 02-200-203
Index
private cloud model, 26
register, 115
number and usage of, 119
privileged mode, 60
575
Server
Windows 2000, 63–64
process, 3
registry, 58–59
Windows 2000 Advanced, 63–64
production computers, 219
release candidate (RC), 219
Windows 2000 Datacenter, 63–64
protocol, 415
release to manufacturing (RTM), 219
Windows 2003, 65
protocol suite (protocol stack), 416
reliability, 78
server computer, 405
pseudo-Transport layer protocol, 424
Resilient File System (ReFS), 84,
173–174
Server Core, 76
public cloud, 375
public cloud model, 26
Server Manager, 76
resource fork, 185
Server Message Block (SMB), 458
resource managers, 14–15
Q
QDOS (Quick and Dirty Operating
System), 8
resource sharing over network,
457–499
Quick access, 87
Quick and Dirty Operating System
(QDOS), 8
R
server role migration, 236
file and printer sharing, 458–470
server software, 405
managing user and group accounts,
470–483
server-based network, 406–407
Restart Manager, 72
RISC (Reduced Instruction Set Computing), 116
rack-mounted servers, 4
ROM (read-only memory), 18
RAID (redundant array of inexpensive
disks), 322
server operating system, 4, 405
servers, 405–406
service, 3
service packs, 520
service-failure recovery, 72
routers, 412–414
Session layer (Layer 5), OSI model, 424
arrays, 322–324
RTM (release to manufacturing), 219
sharing
techniques, 515–516
RTOS (real-time operating system), 24
file, 458–470
S
files and printers in Linux, 466–467
RAID 0 volume, 322. See also striped
volume
RAID 1 volume, 323. See also mirrored
volume
RAID 5 volume, 324. See also disk
stripe with parity
raw device, 179
RC (release candidate), 219
S-AIT (super advanced intelligent tape),
332
files and printers in Mac OS X,
468–470
files in Windows, 458–463
SANs (storage area networks), 77,
317–318
printer, 458–470
SATA (Serial ATA), 320–321
printers in Windows, 465–466
scalability, 77
sharing over network, resource,
457–499
read-only memory (ROM), 18
Scalable Processor Architecture
(SPARC), 128
real-time operating system (RTOS), 24
scanners, 280–281
redirector, 463
SDLT (super digital linear tape) drives,
332
shell, 14
sectors, 154
sign-in options, 87
self-healing NTFS, 75–76
simple volume, 322
sequential processing, 23
single sign-on, 61
serial ATA (SATA) drives, 320–321
single-core AMD processor, 127
serial attached SCSI (SAS) drives, 321
single-core Intel CPUs, 123–125
Reduced Instruction Set Computing
(RISC), 116
redundant array of independent disks
(RAID), 322
arrays, 322–324
ReFS (Resilient File System), 84,
173–174
file and printer sharing, 458–470
managing user and group accounts,
470–483
Copyright 2017 Cengage Learning. All Rights Reserved. May not be copied, scanned, or duplicated, in whole or in part. WCN 02-200-203
576
Index
single-processor computers, 114
virtual memory, 315
storage
single-tasking operating system, 29–30
access methods, 316–318
storage spaces, 326–328
single-user operating system, 31
cloud, 330–331
storage tiering, 327
Skylark, 126
database, 315–316
small computer system interface (SCSI)
drives, 321
defined, 314–315
striped volume, 322. See also RAID 0
volume
snapshot, 360
software application, 16–18
software as a service (SaaS), 373
software installation, optimizing,
518–520
software training, 361
solid-state drives (SSDs), 314
sound cards, 291
sound input, digital, 281–282
spanned volume, 322
SPARC (Scalable Processor Architecture), 128
special identity groups, 479–480
Spotlight, 186–187
stand-alone computers, 390
direct-attached, 316–317
local, 316
network-attached, 317
nonvolatile, 314
striping, disk, 516
subnet mask, 417
super advanced intelligent tape (S-AIT),
332
overview of, 314–318
super digital linear tape (SDLT) drives,
332
reasons for, 315–316
superblock, 177
volatile, 314
supercomputer, 22
storage access methods, 316–318
surface analysis of disk, 513
direct-attached storage, 316–317
SVR4 (System V Release 4), 88
local storage, 316
swap file, 521
network-attached storage, 317
swap partition, 315
storage area network, 317–318
switching table, 409–410
storage area networks (SANs), 77,
317–318
storage devices, using and configuring,
313–356
symbolic link, 179
system architecture, 114
system partition, 325
standard input devices, 277–283
cloud storage, 330–331
System V Release 4 (SVR4), 88
standard operating and maintenance
procedures
configuring local disks, 318–322
system volume, 324–325
storage management tools, 332–336
T
tapes and tape drives, 331–332
tape drives, tapes and, 331–332
file system maintenance, 502–505
finding and deleting files, 505–508
maintaining disks, 512–516
making backups, 516–518
optimizing software installation,
518–520
tuning operating system (OS),
520–526
Startup Repair Tool, 72
types of volumes, 322–330
storage layouts, 327
storage management tools, 332–336
Windows, 332–334
tapes and tape drives, 331–332
task-switching operating system, 30
TCO (total cost of ownership), 63
storage pool, 326
temporary files in Windows, deleting,
506–508
storage, reasons for
thermal-wax transfer printers, 285
database storage, 315–316
thin provisioning, 327
log files, 315
thread, 122
operating system files, 315
time-sharing system, 23–24
user applications, 315
time-slicing, 122
static IP address, 430
user documents, 315
tools
status bits, 162
virtual machines, 315
stateful autoconfiguration, 434. See also
autoconfiguration
stateless autoconfiguration, 434. See
also autoconfiguration
Startup Repair, 72
Copyright 2017 Cengage Learning. All Rights Reserved. May not be copied, scanned, or duplicated, in whole or in part. WCN 02-200-203
Index
storage management, 332–336
disk management tools in, 334–336
UNIX/Linux, disk management,
334–336
driver installation, 274–276
Windows storage management,
332–334
total cost of ownership (TCO), 63
touch input drivers, 279
tracks, 154
trailer, 404
Transmission Control Protocol/Internet
Protocol (TCP/IP), 416
Transport layer (Layer 4), OSI model,
424
tuning for network communications,
525
tuning operating system (OS), 520–526
installing operating system (OS)
updates and patches, 523–525
testing network connectivity,
525–526
tuning for network communications,
525
tuning virtual memory, 521–522
tuning virtual memory, 521–522
type codes, 184
U
UAP (User Account Protection), 73
UDF (Universal Disk Format), 155, 174
unique local IPv6 address, 434
universal application architecture, 87
Universal Disk Format (UDF), 155, 174
finding and deleting files, 508–511
volume types in, 328–330
UNIX/Linux printers, installing,
286–287
unshielded twisted pair (UTP), 414
updates
Linux, 243
Mac, 243
for operating systems, 242
Windows, 243
UNIX/Linux
working with, in Mac OS X, 482–483
user and group accounts, managing,
470–483
account and password conventions,
471–472
creating group accounts in Windows
domains, 477–478
creating user accounts in Windows
domains, 473–477
special identity groups, 479–480
working with accounts in Linux,
480–481
upgrading Linux, installing and,
238–239
hardware requirements, 238
upgrading Mac OS X, installing and,
239–242
hardware requirements, 240
upgrading Windows 7, installing and,
225–229
hardware requirements, 226
upgrading Windows 10, installing and,
229–231
upgrading Windows Server 2008/R2,
installing and, 231–234
hardware requirements, 233
upgrading Windows Server 2012/R2,
installing and, 234–238
migrating from earlier version,
237–238
commands, 181
working with, in Linux, 480–481
upgrade installation, 212
Universal Plug and Play (UPnP), 60
UNIX file system, 174–181
in Windows, 472
Windows default groups, 478–479
hardware requirements, 235
UNIX and UNIX-like operating systems, 88–96
creating in Windows domains,
473–477
updates and patches, installing operating system (OS), 523–525
universal group, 478
Universal Serial Bus (USB), 60
577
working with accounts in Mac OS X,
482–483
working with accounts in Windows,
472
user interface, 3, 146
utilities
chkdsk, 169–172, 515
disk, 515
fsck, 515
ping, 525–526
V
VHD file, 326
video input/output (I/O), digital picture
and, 282
virtual desktops, 85
virtual disks, 326, 360
in Linux, 329–330
UPnP (Universal Plug and Play), 60
virtual machine monitor (VMM), 359
USB (Universal Serial Bus), 60
virtual machines (VMs), 233, 315, 359
flash drives, 316, 317
User Account Protection (UAP), 73
user accounts
virtual memory, 315
tuning, 521–522
virtual network, 360
Copyright 2017 Cengage Learning. All Rights Reserved. May not be copied, scanned, or duplicated, in whole or in part. WCN 02-200-203
578
Index
virtual private networks (VPNs), 62
W
interface, 42–44
virtual server, 233
Web platform updates, 78
multitasking, 45–46
VirtualBox, 362–363, 366–367
Web-based application services, 407
virtualization, 78, 358–361
WHEA (Windows Hardware Error
Architecture), 78
ActiveX and Component Object
Model, 58
wide area networks (WANs), 397–401,
400
enhanced network and Internet capabilities, 59
Windows
multitasking, 59
bare-metal, 368–372
defined, 358
hosted, 361–368
VMware vSphere, 371
VMware Workstation, 363–364
accessing shared files in, 463–464
Windows 95, 57–59
Plug and Play, 58
registry, 58–59
bridged, 364
Command Prompt commands,
541–545
custom, 364
deleting temporary files in, 506–508
Windows 98, 59–60
host-only, 364
group accounts in, 472
Windows 2000, 61–63
LAN segment, 364
IPv4 address, configuring in, 430–431
Active Directory, 62
NAT, 364
sharing files in, 458–463
distributed network architecture, 62
sharing printers in, 465–466
IntelliMirror, 62–63
storage management tools, 332–334
international language compatibility,
63
VMware Workstation Player, 362,
364–365
VMware Workstation Pro, 362
updates, 243
volatile storage, 314
user accounts in, 472
volume groups, 329
Windows 3.x, 56–57
volume information block, 183
Windows 7
volume label, 162
volume mount point, 158
folder resource sharing options,
71–72
volumes, 318–319
hardware requirements, 226
basic disks, 325–326
installing and upgrading, 225–229
dynamic disk, 326
management options, 73–74
mirrored, 323
reliability features, 72
simple, 322
security features, 73–74
spanned, 322
online services, 81
types in Linux/UNIX and Mac OS X,
328–330
security enhancements, 81
VPNs (virtual private networks), 62
Windows 2000 Datacenter Server,
63–64
Windows 2000 Professional, 63
Windows 2000 Server, 63–64
Windows default groups, 478–479
Windows desktop, 57–58
Windows file system, 163–174
extended FAT16, 163–164
FAT32, 164–165
striped, 322
Windows volumes and disk types,
324–325
Windows 2000 Advanced Server, 63–64
FAT16, 163–164
Client Hyper-V, 81
virtual disks, 326
Kerberos, 62
Windows 8/8.1, 78–79
storage spaces, 326–328
types of, 322–330
Windows desktop, 57–58
FAT64, 165
NTFS, 165–168
storage enhancements, 80–81
Windows Hardware Error Architecture
(WHEA), 78
user interface, 79–80
Windows Millennium Edition (Me), 60
Windows 10, 84–87
Windows NT, 60–61
devices and device drivers, 44–45
networking support, 61
installing and upgrading, 229–231
security, 61
Copyright 2017 Cengage Learning. All Rights Reserved. May not be copied, scanned, or duplicated, in whole or in part. WCN 02-200-203
Index
Windows printers, installing, 285–286
Windows Server 2003, 65
Web platform updates, 78
Windows Server 2012/R2, 81–82
Windows Server 2003/R2, 66–67
Active Directory, 83
Windows Server 2008/R2
Dynamic Access Control, 84
Active Directory, 75
hardware requirements, 235
failover clustering, 75
Hyper-V 3.0, 83
file services management, 77
installing and upgrading, 234–238
hardware requirements, 233
Hyper-V, 75
migrating from earlier version,
237–238
installing and upgrading, 231–234
minimal server interface, 83
integration with Windows 7, 77
NTFS file system, 82–83
reliability, 78
PowerShell 4.0, 83–84
scalability, 77
resilient file system, 84
Self-healing NTFS, 75–76
Server Core, 83
Server Core, 76
Server Manager, 82
Server Manager, 76
storage spaces, 84
virtualization, 78
Windows Server 2016, 88
579
Windows Server Containers, 88
Windows Service Hardening, 74
Windows Vista, 68–69
desktop and Windows interface,
69–70
folder resource sharing options, 71–72
library, 71
reliability features, 72
security features, 73–74
Windows Wizard, using to install device
and driver, 270
Windows XP, 65
Home Edition, 66
Professional Edition, 66
wireless access points, 411
X
X Window, 90
Copyright 2017 Cengage Learning. All Rights Reserved. May not be copied, scanned, or duplicated, in whole or in part. WCN 02-200-203
Copyright 2017 Cengage Learning. All Rights Reserved. May not be copied, scanned, or duplicated, in whole or in part. WCN 02-200-203