/


Текст
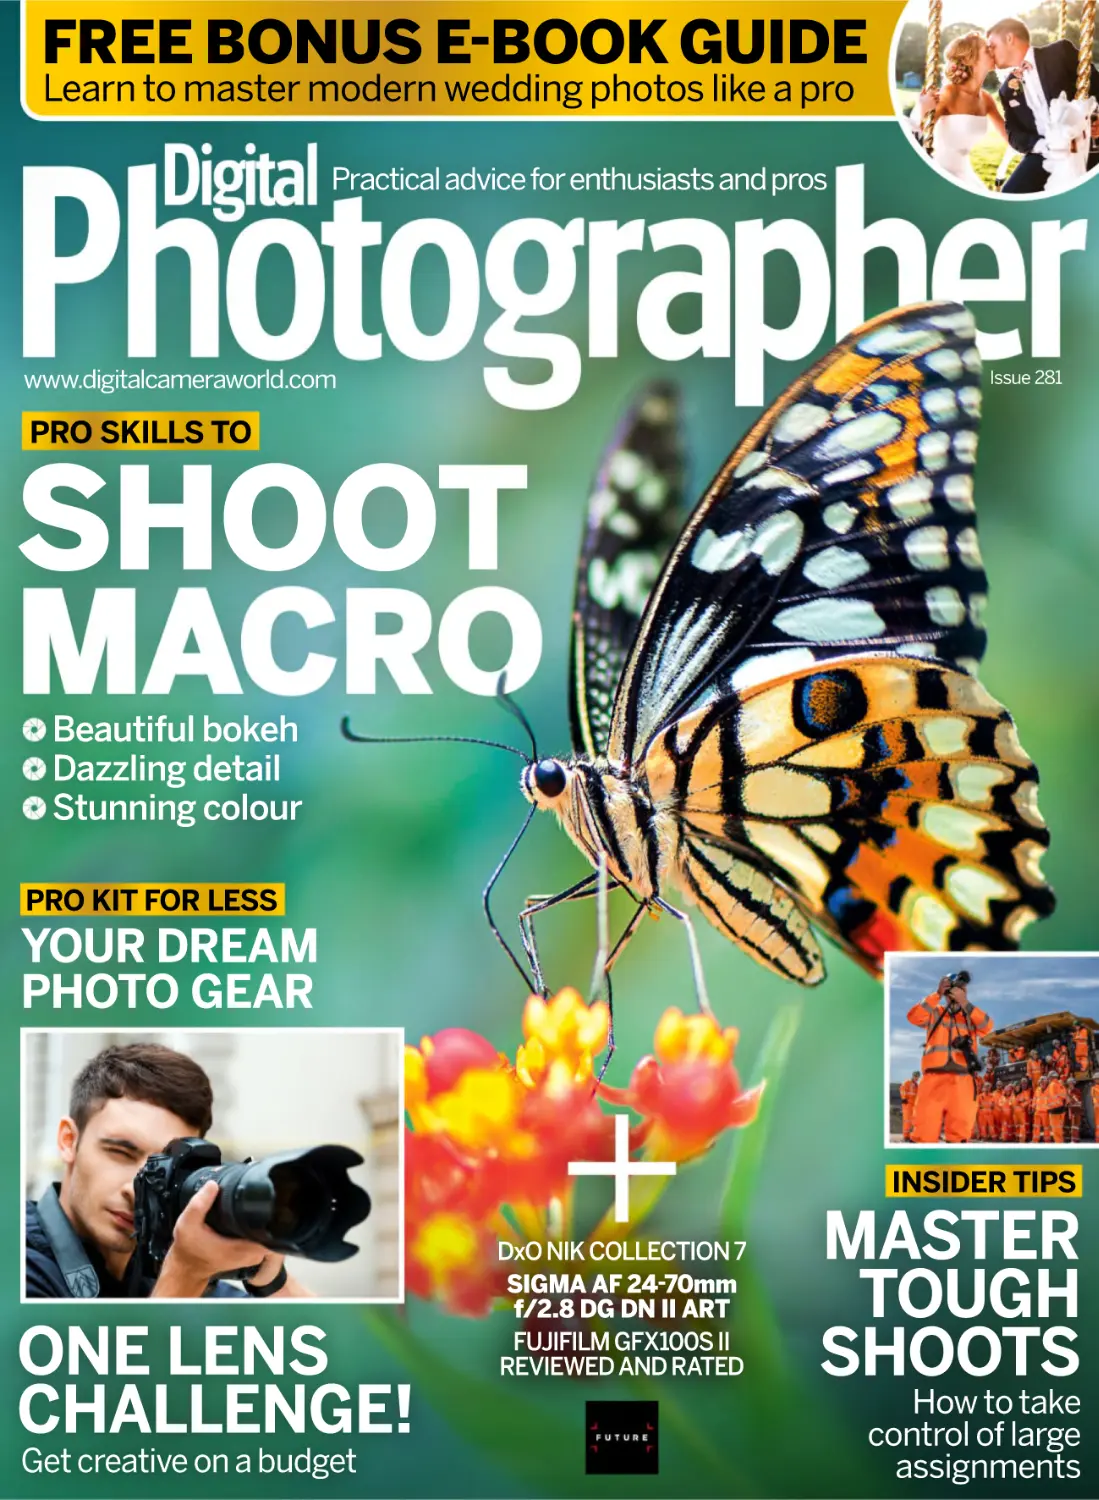
                    FREE BONUS E-BOOK GUIDE
Learn to master modern wedding photos like a pro
Practical advice for enthusiasts and pros

www.digitalcameraworld.com

Issue 281

PRO SKILLS TO

SHOOT
Beautiful bokeh
Dazzling detail
Stunning colour
PRO KIT FOR LESS

YOUR DREAM
PHOTO GEAR

INSIDER TIPS

ONE LENS
CHALLENGE!
Get creative on a budget

DxO NIK COLLECTION 7
SIGMA AF 24-70mm
f/2.8 DG DN II ART
FUJIFILM GFX100S II
REVIEWED AND RATED

MASTER
TOUGH
SHOOTS

How to take
control of large
assignments

© Catherine Régnier

WELCOME

“While the best images are spontaneous, knowing how
and when to shoot them makes the process more fun”
Planning and preparation are
the pro photographer’s secret
weapon. In almost any genre of
the medium, at the professional
level, it is knowing what
conditions you may experience
and which equipment will be
needed that outfits you to
succeed, regardless of your
subject. This is something we learned first-hand when
we joined a commercial shoot in a high-risk location
for our Shoot Like a Pro feature. Turn to p14 of the
magazine to learn how Jon Parker Lee, our guide,
prepared for all the variables to protect both himself
and his kit while delivering a tough brief.
Next, join pro macro photographers Ross Hoddinott
and Catherine Régnier to discover how research can
help you understand your subjects, which will in turn
produce sensational images. You’ll find this cover

feature on p24 of the magazine. Furthering
the theme of being prepared for every occasion,
explore our feature on p36 to find out how to get
the most out of your lenses by working with a limited
number of optics in any situation.
If 2024 is the year that you finally want to turn
professional, be sure to read our career feature on
p66, where you’ll learn to think ahead and consider
which areas of photography you’re strongest in, to
prepare for life as a pro. Meanwhile, we have the
usual array of expert gear reviews for you, along with
our Kit Leaderboard to help you plan your next photo
purchase with ease.
While the best images can often be spontaneous,
knowing how and when to shoot them will make the
process more fun and stress-free. Enjoy your issue!
Peter Fenech, Editor
peter.fenech@futurenet.com

GET IN TOUCH Ask a question, share your thoughts or showcase your photos…

@DPhotographer Tweet
your opinions or images
and see them printed

www.facebook.com/
DigitalPhotographerUK
Share your thoughts and shots

Instagram:
@dphotographermag
Follow and tag us

Email:
team@dphotographer.co.uk
Newsletter: http://bit.ly/DP-news

Website:
Get news, tips and reviews at
www.digitalcameraworld.com
3

Future PLC Quay House, The Ambury, Bath, BA1 1UA

Editorial
Editor Peter Fenech

peter.fenech@futurenet.com

Art Editor Ben Smith
Production Editor Jon Crampin
Technique Editor Kim Bunermann
Head of Art Dean Usher
Content Director Chris George
Contributors
Angela Nicholson, Claire Gillo, James Abbott, Matthew Richards, Mark Deans,
Oksana Zarovna, Tania Delohery-Duffy, Rebecca Greig, Ludovic Micheau
Main cover image
© Jacky Parker Photography/Getty Images
Inset images: © g-stockstudio/Getty Images, Peter Fenech, Tom Calton
Advertising
Media packs are available on request
Head of Market, Advertising Matthew Johnston
matthew.johnston@futurenet.com
Account Manager Matt Bailey
matt.bailey@futurenet.com +44 (0)330 390 6272
International Licensing
Digital Photographer is available for licensing and syndication. To ˡnd out
more, contact us at licensing@futurenet.com or view our available content
at www.futurecontenthub.com
Head of Print Licensing Rachel Shaw licensing@futurenet.com
Subscriptions
New orders: www.magazinesdirect.com 0330 333 1113
Renewals: www.mymagazine.co.uk
Customer service: 0330 333 4333
Email queries: help@mymagazine.co.uk
Group Marketing Director Sharon Todd
Circulation
Newstrade & Retail Category Director Ben Oakden
Production
Head of Production Mark Constance
Senior Ad Production Manager Jo Crosby
Ad Production Coordinator Chris Gozzett
Digital Editions Controller Jason Hudson
Production Manager Vivienne Calvert
Management
Managing Director Stuart Williams
Global Head of Design Rodney Dive
Senior Vice President Kevin Addley
Printed by Buxton Press Limited, Palace Rd, Buxton, SK17 6AE
Distributed by Marketforce UK Limited, 121-141 Westbourne Terrace, London,
W2 6JR www.marketforce.co.uk
For enquiries, please email: mfcommunications@futurenet.com

© Tania Delohery-Duffy

Digital Photographer (ISSN 1477-6650) is published monthly with an extra issue in March by
Future Publishing, Quay House, The Ambury, Bath, BA1 1UA, UK

Our contributors
KIM
BUNERMANN

ROSS
HODDINOTT

Our technique
editor explores
the challenges
of shooting with
just one lens this
month. Turn to
p36 to discover how to make the
most of limited kit. Then, on p56,
Kim explains how to use extreme
perspectives to capture architectural
shots with a difference. She has also
prepared an Affinity tutorial (p62).

As a household
name in nature
photography,
Ross returns to
these pages for
our cover feature
on macro imagery. From p24, he
demonstrates how to finely control
focus in extreme closeup shots and
then on p32, delves into the practice
of fieldcraft, offering advice on how
to find macro subjects to shoot.

Having carved a
name for herself
with her fairytale
style of macro
photography,
Catherine also
contributes to our Magical Macro
feature. On p28, she explains how
to locate the best backgrounds for
luscious bokeh in your closeups
while on p30, she explains how to
light up your macro subjects.

Website:

Website:

Instagram:

digitalcameraworld.com

rosshoddinott.co.uk

@catimini.1979

JON
PARKER LEE

ANOOP
RAGHAVAN
MANIKKOTH

CATHERINE
RÉGNIER

POSTMASTER: Send address changes to Digital Photographer, World Container Inc., c/o BBT
150-15 183rd St, Jamaica, NY 11413, USA
Subscription records are maintained at Future Publishing, c/o Air Business Subscriptions,
Rockwood House, Perrymount Road, Haywards Heath, West Sussex, RH16 3DH. UK
All contents © 2024 Future Publishing Limited or published under licence. All rights reserved.
No part of this magazine may be used, stored, transmitted or reproduced in any way without
the prior written permission of the publisher. Future Publishing Limited (company number
2008885) is registered in England and Wales. Registered ofˡce: Quay House, The Ambury,
Bath BA1 1UA. All information contained in this publication is for information only and is, as far
as we are aware, correct at the time of going to press. Future cannot accept any responsibility
for errors or inaccuracies in such information. You are advised to contact manufacturers and
retailers directly with regard to the price of products/services referred to in this publication.
Apps and websites mentioned in this publication are not under our control. We are not
responsible for their contents or any other changes or updates to them. This magazine is fully
independent and not afˡliated in any way with the companies mentioned herein.
If you submit material to us, you warrant that you own the material and/or have the necessary
rights/permissions to supply the material and you automatically grant Future and its licensees
a licence to publish your submission in whole or in part in any/all issues and/or editions of
publications, in any format published worldwide and on associated websites, social media
channels and associated products. Any material you submit is sent at your own risk and,
although every care is taken, neither Future nor its employees, agents, subcontractors or
licensees shall be liable for loss or damage. We assume all unsolicited material is for publication
unless otherwise stated, and reserve the right to edit, amend, adapt all submissions.
How to order and access back issues If you are an active subscriber, you have instant access to
back issues through your iOS or Android device/s. Your digital magazine entitlement is available
at no additional cost and no further action is required. Pocketmags library may not have access
to the full archive of digital back issues. You will only be able to access the digital back issues
as long as you are an active subscriber. To purchase single back issues (print format only) visit:
magazinesdirect.com (click on ‘Single issues’ tab). Or email: help@magazinesdirect.com For
further help call: +44(0)330 333 1113 Lines are open Mon- Fri 8.30am- 7pm and Sat 10am-3pm UK
time. Magazinesdirect.com is owned and operated by Future Publishing Limited.
For further help call: +44 (0)330 333 1113. Lines are open Mon-Fri 8.30am-7pm and
Sat 10am-3pm (UK time). magazinesdirect.com is
owned and operated by Future Publishing Limited.
BAR rate subscription prices: UK £77.87,
Europe €163, USA $185, Rest of World £142.

RICHARD
KOEK

With years of
experience in
everything from
press photography
to commercial
and industrial
photography, Jon takes us behind the
scenes on a high-stakes commercial
shoot in a potentially hazardous
location for our Shoot Like a Pro
feature on p14. Find out how to
manage large shoots with a cool head.

Nature
photographer and
workshop leader,
Anoop gives us
an insight into
the thought process behind one of
his spectacular wildlife images. On
p74, he explains how he used the
environment to his advantage while
controlling his camera settings for
a fast-moving avian subject.

Website:

Instagram:

Website:

jonparkerlee.com

@anoopmanikkothphotography

richardkoek.com

4

The US annual subscription price is $175.37 Airfreight and mailing in the USA by agent named
World Container Inc., c/o BBT 150-15 183rd St, Jamaica, NY 11413, USA
Application to Mail at Periodicals Postage Prices is Pending at Brooklyn NY 11256.

Richard is an
experienced
travel and
documentary
photographer.
In our interview
this month, he talks about the
creation of his new book, Tokyo
Tokyo, avoiding the stereotypes
of Japanese culture and capturing
the contrasts of this fascinating
city. Turn to p76 to read his story.

Future plc is a public
company quoted on the
London Stock Exchange
(symbol: FUTR)
www.futureplc.com

Chief Executive Ofˡcer Jon Steinberg
Non-Executive Chairman Richard Huntingford
Chief Financial and Strategy Ofˡcer Penny Ladkin-Brand

Tel +44 (0)1225 442 244

We are committed to only using
magazine paper derived from
responsibly managed, certified
forestry and chlorine-free
manufacture. The paper in this
magazine was sourced and produced
from sustainable managed forests,
conforming to strict environmental
and socioeconomic standards.

Contents
Social space

Editing suite

76 Interview

58 Photoshop tutorial

Richard Koek talks about his latest book,
Tokyo Tokyo, and how he captured the city’s
fascinating mix of modern and traditional

James Abbott explains how to create
impactful high-contrast black-and-white
images using Gradient Maps

84 The Gallery

60 Lightroom tutorial

The winning images from the prestigious
World Press Photo contest that shines a light
on many burning issues around the globe

Furthering the black-and-white workflow,
we show you how to avoid flat monochrome
conversions using advanced RAW tools

114 Pro Column

62 Affinity Photo tutorial

Ludovic Micheau discusses the common
themes running through his photography,
music and poetry that influence his creativity

Create abstract architectural images using
the Perspective Tool, blend modes and
Adjustment Layers for an Offset style

24 Magical Macro

We meet Jon Parker Lee in a quarry in
Derbyshire to explore how he manages tough,
high-stakes commercial briefs and prioritises
safety when in dangerous industrial locations

36 Shoot with one lens

66 Career feature

In this feature, Kim Bunermann speaks
to three expert photographers to discover
how they get the most value and the best
images from their favourite lenses

Make this the year that you finally turn pro as
Rebecca Greig explains how to carve yourself
a niche, and discover how to decide which
areas of the medium you’d like to focus on

50 Relight the landscape

72 Career advice

Your flash might not be the first thing you
reach for when shooting landscapes but
Peter Fenech demonstrates how to use
a simple speedlight for amazing effects

Got a question about the business side of
photography? Claire Gillo is on hand with the
answers on portrait posing and flash setups

Capturing tall buildings in cities without
perspective distortion can be a challenge so
Kim Bunermann explains how to push your
compositions to make the most of the effect
6

14

Shoot
one lens

Danger
zone

14 Danger Zone

Two pro photographers serve up a
masterclass on finding and photographing
closeup subjects in the perfect environment

56 Shooting tutorial

36

112 Photo glossary
Photography is full of confusing jargon, so
dive into our helpful digital photography
glossary to demystify the most commonly
used scientific terms and technology to
make informed buying and shooting choices

84
© Rena Effendi/VII Photo, National Geographic Society

Practical skills

Pro advice

© Oksana Zarovna

SEE PAGE 22

© Jon Parker Lee

SUBSCRIBE
AND SAVE
50%!

Gallery: World
Press Photo

© Ross Hoddinott

50

Flash for
landscapes

66

© Kate Hibberd

76

Tokyo
Tokyo

© Peter Fenech

Capture
magical macro

© Richard Koek

24

Find your
niche area

New kit
and reviews
96 Photo Kit Leaderboard
Our real-time guide to all the best cameras,
lenses and other accessories on the market

104 Fujifilm GFX100S II
Welcome updates make this second-generation
camera more refined says Gareth Bevan

106 DxO Nik Collection 7

96

Rod Lawton examines the latest version of
this much-loved suite of software plug-ins

108 Lenses
We test two new lenses, the Sigma 24-70mm f/2.8
DG DN II Art and Yongnuo YN33mm f/1.4 DA DSM

110 Accessories
Fun yet functional products for photographers

104
Reviews

© Gareth Bevan

Photo Kit
Leaderboard

Free ebook to download

Shoot modern
weddings
Wedding photography is exhilarating, fun and uplifting but
its specific demands mean that it can also be fast-paced
and stressful. In this guide, we will explain how to find the
perfect photo opportunities to capture beautiful, tender
moments, use your equipment like a true professional
and, most importantly, create the types of contemporary
photos couples are hoping to see today. Learn to capture
memories for your clients that will last a lifetime.

To claim your free ebook,
visit https://bit.ly/DPH281

Enter our Photocrowd
contests online to win

Affinity prizes
Every month, we team up with Photocrowd – the
world’s leading photography competition platform
– to offer you the chance to win an Affinity Photo
editing software license (worth £60 for Mac or
Windows) and have your images printed in Digital
Photographer. Affinity Photo is a toolset engineered
for modern photography professionals. Whether
you’re editing and retouching images or creating
full-blown multi-layered compositions, it has all the
power and performance you’ll need. For a chance to
win, go to Photocrowd and discover our latest contest.
It’s easy, free and fun – we love seeing your entries!

Visit: www.photocrowd.com/digitalphotographer

Review test shots
We think test shots
are important when
it comes to reviewing
and comparing the
latest kit, but we know
it’s hard to tell the
difference between test
images when they are
printed in the magazine.
You can open, view and
compare test shots from
our kit reviews anywhere you see the
download icon, pictured on the right.

8

YOUR
FREE ASSETS
are available to download
on pages where you
see this icon

DOWNLOAD THE
TEST SHOTS
https://bit.ly/DPH281

LEARN TO EDIT PHOTOS LIKE
A PRO RETOUCHER TODAY

Create the photos you’ve always dreamed of by mastering the essential art of
image editing. The best processing software can be daunting at first but, with
this guide, you’ll become a wizard in both Adobe Photoshop and Lightroom!

ON SALE

NOW

Ordering is easy. Go online at:
Or get it from selected supermarkets & newsagents

© Canon

IN FOCUS

CANON ANNOUNCES EOS R1 FLAGSHIP,
TWO NEW LENSES AND EL-10 SPEEDLITE
Canon has officially announced its EOS R1 flagship as well as its sharpest
ever 35mm lens, a stereoscopic fisheye VR lens and a new EL-10 Speedlite
It’s been a busy month for
Canon, after making an official
announcement for its flagship EOS
R1 full-frame mirrorless camera, two new
lenses swiftly followed in the shape of an RF
35mm F1.4L VCM and RF-S 3.9mm F3.5 STM
Dual Fisheye for VR content, plus the arrival
of a budget-friendly EL-10 Speedlite.
Details for the EOS R1 are still sparse,
though it will inevitably be a speed demon,
using a newly developed Digic Accelerator
image processor, with Canon saying that
“a large volume of data can be processed at
high speeds and delivers never-before-seen

advancements in autofocus”. Canon claims
its latest lens is its sharpest 35mm prime
lens to date. The RF 35mm F1.4L VCM is
the company’s second ‘hybrid’ optic, aimed
at both photographers and videographers
in equal measure. As such, it’s extremely
lightweight at just 555g, boasts a physical
aperture ring and both two Aspheric and
UD elements for better clarity.
The second lens Canon announced this
month is the RF-S 3.9mm F2.5 STM Dual
Fisheye. It’s the follow-up to the Canon RF
5.2mm F2.8L Dual Fisheye, but as the new
model is designed for RF-S mount cameras

and smaller APS-C sensors, it should lower
the barrier to entry for VR content creators.
Last but not least, there’s the new Canon
EL-10 Speedlite. Sitting above the entry-level
EL-100, but below the more advanced EL-5
and flagship EL-1, it offers a wider range
of features including Canon’s latest MultiFunction foot, without breaking the bank.
Apart from the EOS R1, everything is due
out this month, with the RF 35mm costing
£1,800. The RF-S 3.9mm F2.5 STM Dual
Fisheye costs £1,350 and the Speedlite
EL-10 will set you back £329.
canon.co.uk

The Panasonic Lumix S9 is a
pint-sized full-frame camera
for content creators. With new
LUT features and the Lumix Lab app,
Panasonic’s new Lumix S9 camera can
‘shoot to share’ in 30 seconds. The Lumix
S9 is, unsurprisingly, the smallest and
lightest full-frame mirrorless camera in
Panasonic’s lineup, weighing just 403g.
It features a 24.2MP full-frame CMOS
image sensor with the company’s
latest phase detection autofocus and is
supported by Panasonic’s five stops of
five-axis in-body image stabilisation or

10

the 6.5-stop Dual IS 2 with a compatible
lens. To make offloading video even faster,
the Lumix S9 is introducing a new video
format called MP4 Lite. The Lumix S9
will be available from June, with prices
starting at £1,500 for the body only.
Also announced was the Panasonic
Lumix S 26mm f/8 optic, currently the
only pancake lens available in the L-Mount
Alliance. This will be available in late June
for £220. The Lumix S 18-40mm f/4.5-6.3
wide zoom lens will be released later in the
year, with the price yet to be confirmed.
panasonic.com/uk

© Panasonic

Panasonic launches full-frame S9 mirrorless and 26mm pancake lens

IN FOCUS

Fujifilm drops two new cameras and lenses
At the X Summit in Sydney,
Australia, Fujifilm dropped
not one but four exciting new
products: the APS-C X-T50 and mediumformat GFX100S II, plus two lenses in the
shape of its longest-ever GFX telephoto,
a Fujinon GF 500mm f/5.6 R LM OIS WR
and the Fujinon XF 16-50mm f/2.8-4.8 R
LM WR, a reboot of the beloved Fujifilm
XF 18-55mm f/2.8-4 R LM OIS lens.
The GFX100S II is set to be the
company’s lightest-ever 100MP camera
body and features a new 102MP CMOS II
chip with superfast X-Processor 5, a new
low ISO 80 setting, 7fps burst shooting
and a deep learning autofocus algorithm.
See our review on p104 of the magazine.
The Fujifilm X-T50 boasts a new 40.2MP
APS-C stabilised sensor, which claims a
seven-stop advantage and can capture
6K 30p video too. But one talking point
is dominating all others, the addition of
a new Film Simulation dial so that users
can quickly get a retro look. Medium
format cameras aren’t conventionally
used for sports or wildlife, but the Fujinon

© Fujifilm

Fujifilm steals the X Summit show, launching X-T50, GFX100S II, Fujinon
XF 16-50mm f/2.8-4.8 R LM WR and GF 500mm f/5.6 R LM OIS WR

GF 500mm f/5.6 R LM OIS WR makes
these genres a possibility. When used with
the Fujifilm GF1.4x teleconverter, the focal
length can be extended to an incredible
700mm, bringing distant subjects into
view. Fujifilm refreshes the classic XF
16-50mm f/2.8-4.8 R LM WR to fully
resolve all 40.2 million pixels from the
latest Fujifilm sensors and boasts WR too.

The Fujinon XF 16-50mm f/2.8-4.8
R LM WR is available now, priced £699,
with the other three products due to reach
the market in late June. The Fujifilm GFX
100S II has an RRP of £4,999, while the
X-T50 costs £1,299 and the Fujinon GF
500mm f/5.6 R LM OIS WR will set you
back £3,499.
global.fujifilm.com

Sigma launches two new Art zoom lenses
More snippets of photography
news from around the world

Sigma announces new and improved 24-70mm F2.8
DG DN II | Art and 28-45mm f/1.8 DG DN | Art lenses

Third-party lens manufacturer Laowa
has revealed its two debut tilt-shift
lenses at China P&E. The lenses
in question are the Laowa FFII T/S
55mm f/2.8 Macro 1:1 and Laowa FFII
T/S 100mm f/2.8 Macro 1:1, both to
be released for the Fujifilm GF, Sony
E, Canon RF, Nikon Z and L Mount.
Currently, pricing and availability
are yet to be announced.
venuslens.com

WD CREATES THE WORLD’S
LARGEST 6TB HDD DRIVE

© Sigma

Sigma has unveiled its latest Sigma 24-70mm f/2.8 DG DN II Art, the update to the 24-70mm
f/2.8 DG DN Art. The new version is seven per cent smaller and 10 per cent lighter than its
predecessor, weighing 745g and measuring just 87.8x120.2mm. It’s available for E and L Mounts.
Other improvements include the incorporation of Sigma’s Highresponse Linear Actuator motor for the AF actuator, which triples
the maximum drive speed of the original lens. Optical performance
is boosted too, with 19 elements in 15 groups with more aspherical
elements but the same number of six fluorite
low dispersion and two special low dispersion
elements. This is claimed to result in a lens
that meets the resolving needs of the new
generation of high-resolution cameras.
Sigma breaks new ground with its 2845mm f/1.8 DG DN | Art lens, the first zoom
lens of its kind to feature a wide maximum
aperture of f/1.8 for full-frame cameras and
will be available at launch for the Sony E or
L-mounts. It’s made from 18 elements in 15
groups and boasts water- and dust-resistance
too. Both lenses are available now with the
Sigma 24-70mm f/1.8 DG DN II | Art costing
£1,179 and the 28-45mm f/1.8 DG DN | Art
having an RRP of £1,299. sigmauk.com

LAOWA ANNOUNCES TWO
NEW TILT-SHIFT LENSES

While Solid State Drives (SSD) are
preferred by many for their size and
reliability, they also come with a
premium price tag. Western Digital
has just revealed its My Passport
portable HDD, P10 Game Drive and
Professional G-DRIVE® ArmorATD™
will all now be available in maximum
capacities of the record-breaking
mammoth 6TB. Price and release
date is TBA. For more information
visit: westerndigital.com

11

YOUR IMAGES

STORY
BEHIND
THE STILL
Photographer: Axel Breutigam
@axelbreutigamphotography
axelbreutigam.com
Image location: University of
British Columbia, Vancouver, Canada
Type of commission: Personal
Shot details: Leica M 10M, Summicron-M 28
f/2 ASPH, 1/500sec, f/2, ISO 400
“During the Covid-19 pandemic, the deserted campus of
the University of British Columbia (UBC) was the perfect
place for me to practise my architectural photography.
The campus consists of over 200 buildings, most of
which are more than 30 years old. Many of them are also
part of the ‘Brutalist Movement’ of the 1960s and 70s,
so they’re ideal for black-and-white photography.
Exploring a building from all possible angles and
finding the parts of the structure that lead to another
layer of abstraction is what I am seeking visually. So,
giving the subject space and putting it into a reductive
perspective is often necessary. I aim to let the viewer
focus on shapes, surfaces and the uniqueness of urban
environments, simply through artistic presentation.
Getting the right balance of light and shadow is key.
Here, the sun, clouds and the angles of the building
made it easy. I didn’t have to wait for hours to get it
right – for me, getting it right in-camera is crucial.
This photograph was taken with a dedicated blackand-white camera, the Leica M 10M. With this, the
capture of images, the post-processing workflow and the
creation of prints that reflect the photographer’s artistic
vision are the closest thing to working with film and a
darkroom. I only use Lightroom or Photoshop tools that
were already available in an analogue darkroom, such as
the dodge and burn tool, and I don’t use AI tools at all.
The photograph is part of my latest series UBC
Concrete: Different Perspectives of a Campus, a
photobook about a different side of the University of
British Columbia’s campus. It’s not a glossy advertising
brochure, just photos of satisfying artistic scenery.”
Pictured

Pavilion, Buchanan Block D
“This building caught my attention due to its
geometric shape with a ‘look through’ option
to a symmetric building in the background.”
12

STORY BEHIND THE STILL

13

A PR
E
K
I
L
T
SHOO

Peter Fenech meets Jon Parker Lee to discuss the logistics and
planning needed to shoot large-scale commercial assignments
in challenging and sometimes hazardous industrial locations
There’s rarely a dull
day in professional
commercial
photography – every shoot
is different and the range of
subject matter covered means
that you can find yourself
shooting in the office of a CEO
one morning and on the roof
of a new skyscraper in the
afternoon. As someone who
spends a great deal of time

Pictured

Group activity
“One challenge is that
your subjects often don’t
know why you’re there,”
Jon says. “You have to
get them to buy into it.”

14

working indoors on a laptop,
it sounds exciting to me. Of
course, it’s not all fun and the
variety means there’s lots of
pressure to be adaptable and
a huge scope for excessively
ambitious client expectations.
This morning, I find myself on
an early train from Manchester
heading into the Peak District.
I’m due to meet photographer
Jon Parker Lee for a shoot with

one of his corporate clients.
We’ll be visiting a cement works,
shooting in and around the
on-site quarry from which they
extract the raw materials.
As the housing estates
of Greater Manchester turn
to green fields and wooded
embankments, glistening in the
morning sunlight, I consider
how much planning has gone
into the project already, what

kind of obstacles we’ll face on
the shoot and, most pressingly,
what I will look like in a hi-viz
and hard hat.
Jon picks me up from New
Mills Newtown station and
we set off for the quarry. As
we wind our way down the
gorgeous Hope Valley, I ask
Jon about what we can expect
on the shoot and how he has
prepared himself for it.

THE DANGER ZONE

Jon Parker Lee

All main images © Jon Parker Lee

Long-established
as a trusted
photography and
video producer
in and around
Manchester, Jon
cut his teeth in
the high-pressure
world of press photography. This
equipped him with the skills to direct
high-profile people and work in fastpaced environments where efficient
image turnaround is a priority. Today,
Jon’s business focuses on everything
from industrial commercial imagery
to conferences, portraiture, drone
photography and video. For more
information on his work, visit
jonparkerlee.com
@jonparkerlee

15

A PR
E
K
I
L
T
SHOO
“For the shoot today, context
is important – we’ve got to ask
if there are sensitivities that
need to be considered, why are
we shooting the things that we
are and what we are hoping
to achieve. Today it is all about
reflecting the culture of their
brand,” he says.
We arrive in the car park of
the impressive Breedon Hope
Cement Works. We receive a
cheerful welcome in the reception
and are kitted out with the
appropriate PPE, complete with
hard hat, high-visibility clothing
and protective footwear. Before
the shoot begins, I ask Jon about
some common challenges when
working with large corporate
clients such as this.
“Matching expectations is critical
and you have to be realistic,” he
says. “Sometimes people suggest
things without realising what they
are asking for is a four-day shoot,
which they will never be able to
cover with their budget. Most
commercial clients, like today, are
professionals so they know that
already, but some don’t. You have
to talk them through what is and
what isn’t possible.”

Large shoot challenges
How does Jon manage the variables of multi-million pound projects?
The purpose of today’s
shoot was to help Jon’s
client secure permission for
continued work at the quarry.
For a business that supports
many local employees and,
on a larger scale, supplies
many building projects
around the country and
beyond, it’s critical that Jon’s
photos tell an accurate story
of the sustainability efforts
in place. So how does he
meet the expectations of all
parties involved?
“Few people these days
only want one thing to be
shot, so it’s important to
ensure you know what the
priorities are. Where time
is short, you need to make
sure you are capturing what
is most important to them
and ticking items off that list
efficiently,” Jon says.

16

“It’s also important to
know who everybody is –
who is the client, who is the
developer – so I can identify
them and capture them
interacting at key moments,”
he adds.
“Once I have the shot list
completed, a great way that

I can add value for money
for the client is to say ‘While
we’re here, I can shoot this
extra shot to try something
different’. That’s what they
will remember you for.
Also, plan your shoot and
take command of as many
parameters as you can.”

We’re met by Tim Palmer,
Quarries Development Manager,
who leads the way to his office
for a pre-shoot briefing. Tim
outlines his priorities, pointing
out some areas of particular
focus on a fascinating map of the
quarry. With that, we head down
downstairs into Tim’s waiting
vehicle and set off along the maze
of roads and gravel tracks around
the works. As we reach the first
location, high up on a promontory
overlooking the quarry, the true
scale of the operation is dizzying.
Jon instructs Tim to move onto
an embankment of rocks,
carefully positioning himself, his
subject and his off-camera strobe.
I ask him how he can plan such
potentially high-risk shots and
manage wide briefs.
“Where there is a big shoot and
an important event, such as the
completion of a construction
project or the handover of a
building – a multi-million-pound
investment – I would reasonably
be expected to go down a week
or two in advance to do a recce,”
Jon explains.

THE DANGER ZONE

Pictured

Job satisfaction
“Matching your
clients’ expectations
is critical and you have
to be realistic with
them,” Jon says

“You have to be able to think on your feet and
adapt to the environment when plans change.
Practice allows you to manage that pressure”

17

A PR
E
K
I
L
T
SHOO

5

4

Jon’s main gear
Nikon D5 This pro-spec
DSLR camera is Jon’s
workhorse model. It offers
21-megapixel images, which is
more than enough resolution
for the digital usage many of
his corporate clients will ask for.
It has a durable build quality,
which is needed for working
outside in all weather and
environmental conditions,
such as the dusty quarry we
explored. It also provides a fast
12fps burst rate for capturing
fleeting moments on shoots.

1

AF-S Nikkor 24-70mm
f/2.8G ED VR This is
Jon’s standard lens as he can
use it for almost anything
commercial from portraits
to group shots, interiors to
products and press. The
constant f/2.8 aperture makes
it good in failing light too.

3

AF-S Nikkor 70-200mm
f/2.8G ED VR II Jon’s
second lens is perfect for
portrait shots thanks to the
wide f/stop but today, he
also used it to compress
perspective in his group shots,
Nikon D850 Having a
reliable second camera body bringing the faces together
is essential for pro photography and the important background
details closer. A critical
and this Nikon DSLR is perfect
commercial focal range.
for Jon, having the same lens
mount, sensor size and most
importantly, a similar control
Lights and accessories
layout allowing rapid switching
Off-camera flashes are
between the two, without
needed to balance shadows
hesitation. Today, Jon had a
when outside in the natural
different lens on each camera
light, which can’t always
so he could shoot a wide focal
be predicted or controlled.
range without interrupting the
Multiple units are even
flow of the day, capturing candid better so Jon can light larger
moments that might be lost if
groups and overpower strong
he had to change lenses.
midday sunlight.

4

2

5

18

“I need to find out the order of
the day, where it is going to start,
where it is going to end, who is
going to be there and the main
vantage points for capturing
images. By doing this preparation,
I’m not going to be dropped in it
and have to work things out at the
last minute. With that knowledge,
on the day of the shoot, I’ll be
able to get a feeling for when
shots are coming together and
the right time in the itinerary to
capture them.”

To balance the strong midday
light, Jon uses an additional handheld flash to fill in the shadows
on Tim’s face, while being mindful
of the sharp drop into the quarry
just a few feet away. A head for
heights is definitely needed today.
“I try to convince clients about
light. I ask if we can shoot early
or later for good light. They might
not have thought about it, so
it’s good to ask to see what is
possible. They might contribute to
your planning in that respect.”

THE DANGER ZONE

Manage big projects
Don’t overshoot
Jon explains the importance
of recognising when you start
to shoot for your own creative
satisfaction at the expense of
your client’s time. Many highprofile subjects have extreme
time constraints so get the job
done as efficiently as possible.
Balance value for money with
frustrating shoot over-runs.
Make a shot list
Speak to all interested parties
early in the planning process
to identify the most important
shots for your client. Arrange
these in order of importance
and practicality, measured
against the planned timeline of
events on the day of the shoot.

Pictured

Concrete plans
“Preparation means
I won’t be dropped in it
and have to work things
out at the last minute.”

We move on down into the
quarry itself, which seems eerily
empty. The cathedral-like space is
actually a hive of activity, but the
trundling vehicles are high up on
the steps of the quarry face, the
lack of clear scale making them
seem like toy cars. Not everyone
is able to come down here so how
does Jon work with his clients to
arrange clearance?
“Access is critical,” Jon says as
he rattles off some shots of the
area, with a few more portraits
of Tim thrown in. “That is a
skill in its own right, it’s about
being personable. Sometimes
you have to return a favour or
something, but speak to PR and
communications people so they
can pass you onto others within
their organisation who can make
things happen.”
As we leave, Tim points out an
area to avoid – a large fracture
in the rock, high up in the quarry
wall indicates a potential rock
fall. “It could go next year or while
we’re stood here,” he says. I eye
it nervously, but not only am I
dressed in the appropriate gear,
safety is well managed here.

Know everyone’s name
Make sure you know who
everyone is so that you can
identify when important
moments of interaction
are about to happen.

Do a risk assessment
This won’t be necessary on
all commercial shoots, but
where you are shooting clients
in potentially hazardous
locations, be certain to work
out where you can and cannot
shoot. The clients themselves
probably already look after
each other, but it’s your
responsibility to watch out for
the well-being of yourself and
your camera gear.
Turnaround
Be prepared to offer clients
previews or final images within
an hour for launch events or
the next day for less urgent
assignments. Jon advocates
getting shots right in-camera
to cut down on editing.
Be clear on budget
Let clients know what their
suggestions will cost them
to avoid conflict later in the
supply process.

Next, Tim would like a group
shot of the whole workforce.
As we drive back up along the
crest of the quarry, greeted by
panoramic views of the Hope
Valley down to the nearby village
of Hathersage, he puts a call out
across the site on his radio – the
biggest roll call I’ve seen – to
gather the workers. How does Jon
plan to direct such a large group
of non-professional models?
“A big challenge is that often
your subjects don’t know why
you’re there in the first place,
they’ve just been told a shoot is
happening but didn’t necessarily
know they’d be photographed,” he
says. “Sometimes you have to get
your subjects to buy into it – tell
them that while they might be
reluctant today, they can get a
print and in the future, they’ll be
proud to have it as a keepsake.”
We arrive at the meeting place
and, while we wait for everyone
to appear from across the vast
landscape, Jon starts by asking
Daniel, a site colleague, to pose
on one of the oversized quarry
machines, its wheels the same
size as me. Daniel is a great sport
19

A PR
E
K
I
L
T
SHOO

Pictured

Set in stone
Jon only has a short
window to capture the
shot he wants before
the moment is gone

20

THE DANGER ZONE
but is clearly more comfortable
navigating rock faces measuring
several hundred metres than
having his picture taken. Jon
knows he only has a short time
window to capture his character
before he loses patience and the
moment is gone. To make matters
worse, the wind starts to kick up
some dust, despite Tim running a
clean operation, and Jon’s strobes
decide not to fire. Thinking on
his feet, he engages Daniel in
conversation while he works at
fixing the problem. Just as a fleet
of tipping machines roar into the
scene, Jon nabs the shot.
The next challenge is to arrange
more than 20 hardened quarry
workers together for a shoot. Jon
appeals to their sense of humour,
matching their mood to build a
rapport. Balancing the light and
simultaneously getting the quarry
into the shot is tricky so Jon uses
a pair of lights and a long lens to
compress perspective.

“There’s nothing better than a
big bag of lights and kit. Clients
don’t think like we do: they ask
you to shoot the CEO, who’s only
going to be there at noon, right
in the harsh midday sun, with
the logo on the new office she’s
come to open in the background,
which is 25 feet in the air,” he says.
“With as much kit as possible at
your disposal, you’ve got the tools
to adapt – you can put the CEO
up on the balcony of an adjacent
building, with a light on a stand,
using a long lens to make it look
as if she’s in front of the logo.”
This environment is a CMOS
killer, with dust now caked onto
our cameras. Jon knows the
location, however, and so is able
to shoot and move on. “I always
ask if I can have a look around
when I arrive at a new site, as
there’s nothing worse than leaving
a shoot and walking past the
‘boring server room’ that has a
bunch of amazing lights and bags

of atmosphere,” he explains. It’s
critical that Jon’s shots reflect the
immense efforts that the Breedon
team has invested in sustainable
operations – there are jobs and
livelihoods for the local economy
on the line. The stakes are high
but Tim and his people trust Jon
to capture what they need and
their relationship means he also

trusts them to keep him safe
while he’s working.
“People often say photographers
have a ‘good eye’ but it’s more
about preparation,” Jon says
as we start packing up. “You’ve
got to make the most of your
time and access.” As I nod in
agreement, a shower of limestone
chips falls into my Lowepro bag.

Direct large groups

1

Arrange the group In any group shot, it’s
important to arrange the members in some
form of order, usually based on physical height.
Today, Jon was using a large machine as a
prop so placed the taller people at the front
and shorter attendees on the elevated area.

2

Continuous direction Many subjects
in this setting are unfamiliar with how
to pose for photographs, so offer constant
instruction. This not only makes them feel
better but conveys a sense of authority
and professional control over the situation.

3

Test your settings Before you start
to shoot, check your camera and
light settings and test-fire them to identify
problems as early as possible. Knowing your
kit allows you to troubleshoot quickly, as Jon
was forced to do when his lights didn’t fire.

5

Compress the frame Generally, a longer
focal length is better if in doubt. Stand
further back and zoom in to bring the scene
together. Make sure you stop down to f/8 or
above for larger groups to extend the depth
of field over each member and activate VR.

6

4

Balance the light If working outdoors in
the sunlight or in less favourable indoor
lighting, overpower the ambient illumination
with strobes or speedlights. Jon used his
Godox lights to fill in the shadows on the
machine and the faces of his subjects.

Shoot quickly With large groups,
especially in a busy workplace, you only
have a few moments to capture natural
expressions before people lose interest.
Jon often keeps shooting, even as the group
disperses, to capture relaxed behaviour.
21

*

Great reasons to subscribe today
ONEW! DIGITAL ACCESS to 110+ issues when you subscribe to print!**
ODelivered DIRECT TO YOUR DOOR OR DEVICE
22

NEW!

SUBSCRIBE
NOW AND
GET DIGITAL
ACCESS TO
ALL AVAILABLE
BACK ISSUES**

“Subscribe
and get
essential
pro insight
delivered
direct to your
door every
month”

Peter Fenech,
Editor, Digital
Photographer

YOUR SUBSCRIPTION OPTIONS
PRINT ONLY

£19.46

PLUS
DIGITAL
ACCESS

DIGITAL ONLY
**

FOR 6 MONTHS

£16.21
FOR 6 MONTHS

SUBSCRIBE NOW
ONLINE magazinesdirect.com/DPH/D35L
PHONE 0330 333 1113 and quote code ‘D35L’
Terms and conditions: Offer closes 2nd August 2024. Price is guaranteed for the first 6 months, please allow up to 6 weeks for the delivery of your first subscription issue
(up to 8 weeks overseas) the full subscription rate is for 6 months and includes postage and packaging. Pay £19.46 for 6 months, *saving 50% on the cover price. Payment is non-refundable
after the 14-day cancellation period. **Access to the digital library will end with your subscription. For full terms and conditions, visit www.magazinesdirect.com/terms. For enquiries and
overseas rates, please call: +44 (0) 330 333 1113. Lines are open Monday-Friday 8:30am-7pm, Saturday 10am-3pm UK Time (excluding Bank Holidays) or email: help@magazinesdirect.com.
Calls to 0330 numbers will be charged at no more than a national landline call, and may be included in your phone provider’s call bundle.

23

TECHNIQUES
Pictured

Characterful closeup
The best macro shots
feature striking colours,
distance between the
subject and background
and directional lighting
to bring out the texture
and form in the subject

CAPTURE

24

CAPTURE MAGICAL MACRO

Words by Peter Fenech

Work with lighting and backgrounds to create
stunning macro shots with a fairytale atmosphere
thought has gone into the technical
specifics that the creator hasn’t considered
any alternative possibilities. What about
changing the lighting position, shooting at
a different time of the day, or introducing
a natural-yet-colourful background?
Pro shooters in this area know the value
of using their environment, getting to know
how the subjects fit within this niche and
learning to predict when and where photo
opportunities will present themselves.
Over the following masterclass, two pro
photographers with different creative
approaches will guide you through their
working processes and explain how to
turn formulaic macro scenes into artworks
that glow and sparkle. You don’t need lots
of expensive kit, just an eye for the right
lighting and practice at fieldcraft.

Ross Hoddinott
An acclaimed
photographer
and author, Ross
is a specialist in
landscape and
wildlife images but
also a writer and
photographic tutor.
He regularly works for clients such as
the National Trust and Kew Gardens.
rosshoddinott.co.uk

© Ross Hoddinott

ike every genre of photography,
macro and closeup have their
unique challenges. Working with
short focus distances and high
magnifications produces ultrashallow depth-of-field, meaning
that the photographer must work hard to
compose a shot, keep essential details in
focus and light the scene in front of the
camera. It isn’t easy to add lighting when
the camera is close to the subject and even
getting the framing right and lining up the
perfect scene arrangement can be tricky
with timid subjects.
Because it is such a technical area of
photography, macro shots can often lack
creativity. Many images are perfectly
accurate, for example, sharply focused
with a balanced exposure, but so much

25

TECHNIQUES

Control Focus
At higher magnifications,
depth-of-field is much shallower.
Follow our tips to ensure your
focusing technique is flawless
To capture sharp, detailed close-up images,
you need to focus with pinpoint accuracy
and carefully consider the depth of field.
While there will be occasions when you want
to use a shallow zone of focus to capture
more arty results, in most situations, you
will want to maximise – or even artificially
extend – depth of field, to ensure your
subject is acceptably sharp throughout.
However, the depth of field appears to grow
progressively shallower as magnification
is increased – if you are working anywhere
close to 1:1 (life-size), you will notice that
even at smaller f/stops, the zone of focus
is limited. There is no leeway for sloppy
technique or poor focusing.
Some kind of firm support will help you
focus precisely, but not all macro subjects
will allow you to set up a tripod close by and
so you will often have to work handheld.
You might assume that autofocus is your
best bet, but AF can struggle to lock on to
macro subjects and sometimes switching
to manual focusing is the better option. Our
tips will help you overcome the challenges
of working at higher magnifications and
successfully control your focus.

Pictured

The sweet spot
At high magnifications,
the plane of focus is ultrathin, meaning that careful
placement over the
subject is required

26

CAPTURE MAGICAL MACRO

Five top tips to control focus
Every macro pro follows these steps to achieve the sharpest possible images
Support yourself
This might seem
like obvious advice,
but use support when
practical. A tripod is
best but for lowlevel work, consider
using a beanbag.
With your camera
fixed in position, you
can refine focus and
framing. Use your
camera’s monitor
to focus, using the
magnify or zoom
button to enlarge your point of focus for optimum precision. Macro
photographers should consider using a geared tripod head as this
allows you to make micro-adjustments to the composition without
unlocking and locking levers and knobs.

1

Peak-a-boo If your
camera offers focus
peaking, switch it on.
Manual focus combined
with focus peaking can
produce sharp, consistent
results. Peaking works on
the principle that areas of
sharpness also have the
highest peak contrast.
Once activated, your
camera overlays a white
or coloured highlight along
the edges and texture
of all sharp areas via
LiveView (or through a
mirrorless camera’s EVF)
to help you place and
control focus.

3

Get stacked! Stacking (or focus bracketing) is a popular and
useful technique when you can’t generate enough depth-of-field
through aperture choice. This is when the photographer takes a series
of images – each focused at a different point on the subject – and
combines them to extend the depth of field artificially. Many cameras
now automate the process, varying the focal depth by a set amount
over a series of frames. The camera creates the sequence for the
photographer to merge in Photoshop or dedicated stacking software,
such as Helicon or
Zerene. Some cameras
will even create the
stack in-camera. Ideally,
use a tripod when
stacking; each frame
will align more easily.
However, it is possible
to shoot handheld
stacks using a fast,
continuous burst.

4

CORRECT

All images © Ross Hoddinott

Plane sailing Camera placement affects
how much of the subject is in or out
of focus. This is because there is only one
geometrical plane of complete sharpness
and, in most situations, you will want to place
as much of your subject as possible within
this plane. Shooting at a 90-degree angle
to your subject will maximise the depth of
field available to you at any given f/stop. For
example, when
photographing
INCORRECT
a butterfly
with its wings
outstretched,
hold your
camera
parallel to
avoid parts of
your subject
drifting rapidly
out of focus.

5

Switch to manual focus When shooting handheld, autofocus
is typically the best option. But AF has a habit of struggling when
shooting at higher magnifications, partly due to the reduced light and
a reduction in
contrast. Using
the lens’s limiter
switch, which is
designed to limit
the distance range
the lens can focus
to prevent AF from
‘hunting’, may
help. However,
many closeup
photographers
favour the precision
of manual focus –
particularly when
using a tripod.

2

27

TECHNIQUES

Work with backgrounds
Identify the best backgrounds to add an
artistic dimension to your macro photos
In macro photography, control of the
background is essential to give an artistic
dimension to your composition, elevating
it above simple naturalistic photography,
which only captures a record shot of your
subject. That’s why I place backgrounds
on the same level of importance as the
subject and the light. It’s not unusual for
me to abandon the idea of photographing
an insect or a mushroom if the background
doesn’t suit. Indeed, the most common
mistake in macro photography is to

concentrate solely on the sharpness of
your subject and neglect the background.
In my practice, I start by looking at
the surrounding vegetation, colours and
contrasts, such as the reflections of a body
of water between branches. To achieve a
beautiful background, the biggest challenge
is to find the right combination between
your choice of focal length, aperture,
distance from the subject and from your
background, and not forgetting your
positioning in relation to the light.

Catherine Régnier
Although she has
a background
in biochemical
engineering,
Catherine turned to
photography just a
few years ago. She
has already carved
a niche for herself with her magical,
dreamy macro images, which have been
published in various magazines.
@catimini.1979

Create magical bokeh
Work your location to craft macro backgrounds that add drama to your shots

Zoom in Opt for macro lenses with
a focal length of between 100mm and
150mm for full-frame (80mm to 100mm
for APS-C). This will shorten the depth of
field, helping to isolate your subject and
allowing you to play with the colours and
textures of your background.

1

28

Find a location Whether it’s a wetland,
a meadow, forest or even your own garden,
there should be enough vegetation to create
a textured background – think tall grass,
flowers, shrubs and stones. If you take a photo
of an insect with no vegetation around it, the
background will look bland and insipid.

2

Time your shoot There’s nothing like
water drops to create a bubble bokeh in
the background. Set your alarm to get up at
dawn or go out immediately after the rain.
Choose sunrise or sunset to play with the
contrasts in the background or reflections on
the water and gaps of light between the trees.

3

CAPTURE MAGICAL MACRO

Calculate subject
distance
Place your subject and background
for optimal bokeh effects
Your subject must be far enough away
from the background for your bokeh to be
successful. If your subject is surrounded by
vegetation or any other element, you won’t
be able to achieve the desired effect as
these background objects are too close to
the subject and, therefore, similar distances
from the focal plane.
By using a longer lens and a wide
aperture, and by placing your camera so
that background detail is a greater distance
behind the subject, you can more easily
create dreamy bokeh with smooth specular
out-of-focus highlights.

CORRECT
Distance to
subject

Minimum distance
to background

INCORRECT
Pictured

Distance to
subject

Background

Fairytale glow

Shoot wide open For the most
impressive backgrounds, shoot at
either full aperture or a wide aperture. When
you stay below f/5.6, the depth of field is
reduced enough to isolate your subject nicely.
If your background lacks texture, you can
always close the aperture a little more.

All images © Catherine Régnier

Water droplets on
background vegetation
are perfect for creating
diamond-like sparkly
bokeh, adding interest

4

Your position Once you have a subject that’s ideally placed in relation to the background,
experiment with some different angles of view. Rotate around your subject and move closer
or slightly further away from it. Try other angles – you may be pleasantly surprised by the result.

5

29

TECHNIQUES

Pictured

Back-lit beauty
Placing the low sun behind
the subject has created
a striking study of the
insect’s shape and form
by highlighting the wings

30

CAPTURE MAGICAL MACRO

Craft beautiful lighting
Use natural lighting effects to introduce drama to your macro scenes
A beautiful play of light is the best way to
elevate your closeup images above the
ordinary. Unfortunately, this isn’t always easy
to achieve in macro photography, especially
when you are working with natural light and
relying on the weather conditions. Backlighting,
rimlighting and the play of transparencies
are all synonymous with sunlight, but what
happens when the sun isn’t out in force while
you are shooting?
I prefer to include natural lighting effects
in my photographs, so I’m always on the
lookout for the slightest ray of sunshine
when I go out photographing. As much as
I can, I try and incorporate this play of light
into my composition. If the weather remains
overcast, or even rainy, I still aim to create
beautiful bokeh by playing with the light holes
in the vegetation in the background. It’s all
about making the most of the natural light you
have at the time you take your photographs.

Pictured

Natural effect
Careful choice of camera
angle can make best use
of natural light. Here, it
appears the subject is
illuminated from within

Capture glowing light
Create a magical look for your macro and closeup shots

Wait for the light The best times for
your shoots are when the sun is out but
low in the sky, either just after sunrise or
just before sunset. If you’re photographing
in places with a gradient, as I do when I go
into the woods, you can stagger the times.

2

Choose your subject It’s best to shoot
against the light so, facing the sun, look
for subjects where you can make a simple
silhouette. Also, see whether you can shoot
golden halos generated by the sun or areas
made translucent by the sun’s action.

3

Adjust your white balance I often use
the Cloudy sky white balance, even on
sunny days, because I like the way it looks
in macro shots. Then, I adjust it manually to
obtain the colour temperatures that I feel
are best suited to my composition.

5

Photometry The Spot metering mode
is best suited to backlit shots. It avoids
burning whites or blacks that need to be
recovered afterwards. However, you can also
try the Multi metering mode, which may also
be sufficient in certain light conditions.

6

4

Use screen articulation Once you
have found your subject, position
yourself and move your camera to see if you
can include a few rays of sunlight in your
composition. Live View on your articulated
or rotatable screen is useful at this stage.

All images © Catherine Régnier

1

Set your f/stop For dreamy macro
photography, I find that larger apertures
usually offer the best results. However,
depending on the light you want in your
shots, closing the aperture down can achieve
creative effects too, with stronger bokeh.

31

TECHNIQUES

Develop fieldcraft skills
Tiny critters are secretive, camouflaged and easily spooked, so
an understanding of your subjects can maximise your success
To capture great macro shots, you don’t just
need good camera handling skills, you also
need to know where to find subjects and
get them within range of your camera. This
fieldcraft involves preparation, knowledge,
technique and patience, and is an essential
skill if you wish to get close to timid insects.
An understanding of your subject’s
behaviour and favoured habitats will
significantly increase your chances of
capturing standout close-ups. Start by
32

researching potential subjects, for example,
the time of year the different butterflies
emerge, their favoured plants and the range
of environments they inhabit – even a little
knowledge will help you look in the right place
at the right time. Gardens, heaths, wetlands,
woods and meadows are all great habitats
for invertebrates, each attracting different
flora and fauna. Join a local Wildlife Trust or
Butterfly Conservation group to learn about
wildlife and get access to nature reserves.

Having identified hotspots for photogenic
wildflowers and insects, visit regularly to
build up your knowledge of where to locate
invertebrates. Approach timid creatures
slowly and make sure you are familiar with
your camera’s controls so that you can adjust
settings quickly and intuitively. Be careful of
where you tread and kneel – careless feet
can damage or destroy flowers or little
critters. Remember, your subject’s well-being
is always more important than a photo.

CAPTURE MAGICAL MACRO

Ross’s kitbag

TELE-MACRO LENS
A tele-macro, upwards
of 100mm, provides
a larger working distance
and helps you take your
shots from further away

LED LIGHT
A small LED device is a
great accessory, allowing
you to relieve ugly, dark
shadows or to illuminate
your subject creatively

WIMBERLEY PLAMP
Attach one end to a tripod
leg and use the clamp to
hold a light or reflector, or
to stabilise a flower stem

MINI TRIPOD
A mini tripod is great for low-level
work, providing better stability
than a beanbag. The Benbo
Little Tortoise comfortably
supports longer lenses

Ross’s top tips for locating subjects
An expert in macro fieldcraft, Ross Hoddinott values patience and care

Pictured

Seek and find
Planning and knowing
where to look for subjects
are huge contributing
factors in capturing
successful macro shots

Watch and learn Some insects –
particularly certain dragonflies – are
territorial, returning to the same perch.
Therefore, don’t always rush to get your
camera out. It can pay to just observe
your subject and identify any habits
or repetitive behaviour. Once you’ve
identified a favourite perch, wait nearby
with your camera ready, and when the
subject next returns, stealthily move into
a picture-taking position. Ideally, use a
macro lens with a focal length upwards
of 100mm – or a close-focusing telezoom – as longer lenses provide a larger
camera-to-subject distance. The further
away you can stand, the less likely you
are to disturb your subject.

3

Get down and dirty Be prepared to
get down and dirty when shooting little
critters and plant life. When lying prone,
use your elbows to support your setup
or, better still, invest in a beanbag or mini
tabletop-style tripod. Gently move your setup
forward, pushing your lens through grass and
undergrowth to achieve a clean, unobstructed
view of your subject. Keep an eye on shutter
speed, ideally, avoid it dropping much below
1/500sec, otherwise you risk subject motion
ruining your shots. Increase ISO sensitivity
to generate the speed you require. And wear
waterproof trousers to keep yourself dry and
comfortable when the ground is dewy.

2

The early bird… When invertebrates
are cold, they are inactive and far
easier to approach, making early mornings
the ideal time to search for them. The light
is also warmer and softer, helping you
capture attractive, engaging shots. Set
your alarm early and head out into your
garden, or a local wetland or meadow and
carefully and studiously search for subjects
roosting on reeds or clinging to leaves.
Walk slowly and crouch down regularly,
scanning flowers and tall grasses for resting
butterflies, bugs, and bees. Keep to paths
and be careful of where you tread – insects
are vulnerable when they are torpid. Once
your subject has been located, it should be
simple to set up nearby and take photos.

4

All images © Ross Hoddinott

Watch your step When stalking subjects,
always be mindful of where your shadow
falls. If you inadvertently cast your subject into
shade, it is likely to quickly fly away or scurry
off into the distance. Get into a picture-taking
position using slow, deliberate movements.
Invertebrates are also highly sensitive to
sudden movements, so bring your camera up
to your eye in a smooth motion and practise
adjusting your camera’s key controls to work
quickly and intuitively. If your subject flies
off, follow it and watch where it lands so that
you can try again. Be prepared for lots of
frustration and near misses – patience and
perseverance are key when stalking subjects.

1

33

NEXT ISSUE

PLUS

Next issue

FREE
e
Book
GUI

The latest kit reviews, tutorials and
projects to hone your photo skills

DE

PRO SKILLS FOR

INCREDIBLE
BIRD SHOTS
Learn the essential techniques used by the experts

Issue 282 is on sale

2nd August 2024

• Master your wideangle
• Behind the scenes:
pro beauty portraits
• Photoshop, Lightroom
and Affinity skills

Available at www.magazinesdirect.com
*Content subject to change

© Jacky Parker Photography via Getty Images

Read these
essential features:

TECHNIQUES

36

SHOOT WITH ONE LENS
Pictured

Gulls in the wind
An artistic view of
seagulls, conveying a
dynamic motion blur
caused by using a
slower shutter speed

Words by Kim Bunermann

f you ask professional photographers
what is more important, the quality of
the camera body or the quality of the
lens, the majority will say the lens.
In a market flooded with options,
it can be challenging to select the
perfect optic. Of course, all this new lens
technology comes with a higher price
tag, making it even more important to
avoid being swayed by marketing and to
invest in optics that correspond with your
photographic style and objectives.
While you can use multiple lenses for your
work, constantly changing lenses can be
annoying in the long run, not to mention the
additional expense involved. Therefore,

a good lens should be versatile, offering the
ability to use it in various ways and making
it a valuable long-term investment. These
workhorse lenses will provide an efficient
return on your money by meeting most job
requirements in a single purchase. Here, the
ideal focal length range for such a lens will
depend on your typical subjects and should
be determined based on your specific needs.
The choice can often be narrowed
down to prime or zoom lenses, with some
photographers preferring primes for their
superior image quality and others choosing
the flexibility of zoom optics. While prime
lenses have a reputation for creating sharper
images, technological advancements have

narrowed this gap. Prime lenses are often
cheaper, lighter and have higher maximum
aperture settings, making them suitable for
low-light situations and achieving a shallow
depth of field.
Overall, it depends on the subject you
are shooting and on the way you prefer to
work. Over the next few pages, we will delve
into the different types of lenses, from
standard ones to professional gear, looking
at their focal lengths and how they affect
your images. Featuring insights from three
professional photographers, we hope to
offer you comprehensive guidance to help
ensure that your next lens purchase serves
you effectively for a very long time.
37

© Mark Deans

Find the ideal lens for you and discover pro tricks to exploit its versatility

TECHNIQUES

Match your photo needs
Take this quiz to find the perfect focal length range for your subjects

Pictured
By changing the angle,
Oksana Zarovna made use
of an unusual background
to create a portrait
with a unique impact
38

© Oksana Zarovna

Distinctive perspective

Is your subject small?

SHOOT WITH ONE LENS

NO

Do you want to capture the entire scene?

YES
YES

IT DEPENDS

MACRO
Full frame: 50-200mm
APS-C: 34-133mm
Micro 4/3: 25-100mm
Type: Zoom, prime
Subject: Close-ups, nature,
insects, abstract
Works out the smallest
details
Shallow DOF to highlight
elements
Only suitable for this
approach
Our choice: (mirrorless)
Panasonic Lumix S 100mm
f/2.8 Macro

WIDE-ANGLE
Full frame: 14-35mm
APS-C: 10-24mm
Micro 4/3: 7-18mm
Type: Zoom, prime
Subject: Nature, street,
astro, documentary
Inclusive view
Wide depth of field
Barrel distortion, which
makes straight lines appear
to curve outwards

How far away from
you is the subject?

CLOSE

Our choice: (mirrorless)
Sony FE 12-24mm
F2.8 G Master

Are you limited in how
you position yourself in
relation to the subject?
YES
NO

MEDIUM

FAR AWAY

SHORT-MEDIUM
TELEPHOTO

SUPER
TELEPHOTO

Full frame: 70-300mm
APS-C: 46-200mm
Micro 4/3: 35-150mm
Type: Zoom
Subject: Most genres

Full frame: 300-600mm
APS-C: 200-400mm
Micro 4/3: 150-300mm
Type: Zoom
Subject: Wildlife, action,
sports, astro

Versatile lens
Image compression
brings image elements
optically closer together
Focal range may not
be sufficient for creating
detailed close-ups of far
away subjects

Captures the subject
in detail without having to
get too close to dangerous
or faraway subjects
Tripod/monopod
recommended
Can be very heavy

Our choice: (DSLR)
Canon EF 70-300mm f/45.6 IS II USM

Our choice: (DSLR)
Nikkor AF-S 200-500mm
f/5.6E ED VR

TILT-SHIFT
Full frame: 17-100mm
APS-C: 11-67mm
Micro 4/3: 9-50mm
Type: Prime
Subject: Architecture, interior, street,
documentary
Straightens lines when you are close
to the subject, saves editing time
Can create tilt-shift style with shallow
DOF to simulate miniature effect
Challenging in low-light, wide
aperture needed
to get proper
exposure
Our choice:
(DSLR)
Canon TS-E
17mm f/4L

CLASSIC PRIME
Full frame: 35-135mm APS-C: 23-90mm
Micro 4/3: 18-68mm Type: Prime
Subject: Portrait, fashion, architecture, wedding, street, documentary
High end sharpness
Shallow DOF available to set the focus on the subject’s
features while creating atmosphere
85mm and up for flattering portraits
You need to think on your feet
Our choice: (mirrorless)
Sony FE 85mm F1.4 G Master
39

TECHNIQUES

Make it last
Discover tools that will help you get the most out of using ‘just’ one optic

Control the reach

reason not to invest in a fast lens, the point
of creating a shallow depth of field may arise.
As we know, using a wide aperture creates a
shallow depth of field, resulting in blur around
the subject. This is an important consideration
based on your preferred style of photography.
For instance, portrait photographers can
make good use of the effect, while landscape
shooters may not need this visual input.
However, keep in mind that when shooting
with maximum open apertures, the focus area
is reduced. As a consequence, when taking a

portrait with f/1.4, it can be challenging to keep
the subject’s eyes in focus.
Remember that there are different ways of
achieving a shallow DOF beyond simply using
lower f/stop numbers. You can also create this
effect by minimising the distance between
the lens and the subject. Alternatively, use a
focal length that compresses the perspective,
such as 85mm or longer. With this focal length,
you achieve a shallower DOF compared with
a 16mm lens, as the 85mm lens will bring the
background and subject closer together.

© Tania Delohery-Duffy

When purchasing a lens, after the focal length,
the focus is on the aperture possibilities.
Throughout the history of photography, lenses
with large apertures, such as f/1.4, have been
popular and often command higher prices
compared with their f/4 or f/8 counterparts.
This is logical because lower f/stop ratings
enable more light to enter the sensor, making
it possible to use lower ISO settings even
when combined with fast shutter speed or
in low-light scenarios. However, considering
the advancements in camera technology, it’s
worth questioning the necessity of investing in
these ‘fast lenses’.
In the 20th century, photographers
had to use maximum open apertures to
compensate for slow film speeds, allowing
for slightly shorter exposure times. However,
advancements in sensor technology and
in-body image stabilisation (IBIS) now enable
shooting at higher ISO settings without
significant image degradation.
Additionally, AI in post-processing supports
enhancing images affected by noise. Despite
these advancements, many photographers
still hesitate to use ISO values over 5600, even
when there’s no need for concern because of
today’s improved low-light performance. While
some photographers may see this as a good

Pictured

Flying start
Using a versatile medium
telephoto zoom lens allows
Tania Delohery-Duffy to react
quickly to action situations

Tweak the existing focal length of the optic to adapt it to your needs

Lens mount
adapter
Use a lens mount
adapter and you
will be able to adapt
your DSLR lenses for
use with mirrorless
or different-mount
camera bodies. It
can also be used
to expand the
range of third-party
alternatives, enabling
the compatibility of
lenses from different
manufacturers.
40

Teleconverter

Extension tube

Tilt-shift adapter

Reversing ring

Close-up diopter

A teleconverter can
extend the existing
focal length, for
example turning a
300mm lens into
a 600mm optic
when using a 2x
converter. However,
it’s important to note
that the teleconverter
will also reduce the
maximum aperture
by several stops and
cheap options can
lower image quality.

Featuring no glass,
just air, an extension
tube creates extra
space between the
lens and sensor,
resulting in increased
magnification. This
allows the camera to
focus much closer
than the original
minimum focus
distance. Extension
tubes usually come
in sets and can be
combined.

A tilt-shift adapter
allows you to convert
lenses intended for
large sensors into tiltshift lenses that can
be used on cameras
with smaller sensors.
These adapters are
especially useful
for architecture
photographers as
a tilt-shift optic will
correct the distorted
lines in images of
tall buildings.

This tool converts
a regular lens into
a macro lens, no
matter whether it’s
a prime or zoom
optic. The ring
allows you to explore
macro photography
without having to
buy a macro lens.
The reversing ring
attaches to the lens
mount and the lens
is then screwed
on backwards.

This is another tool
that lets you dive into
macro photography
without a macro lens.
Unlike the reversing
ring, the close-up
diopter sits on top of
the lens surface like a
regular circular filter.
When purchasing one
of these, it is essential
to invest in good
optical glass options
to ensure excellent
image quality.

SHOOT WITH ONE LENS

Angle of view
The type of lens you need will depend on how close you are and the angle to your subject

SUPER TELEPHOTO
Angle of view: 4-8°
Full frame: 300-600mm
APS-C: 200-400mm
Micro 3/4: 150-300mm
Common in: Wildlife,
action, sports, astro

SHORT-MEDIUM
TELEPHOTO
Angle of view: 8-34°
Full frame: 70-300mm
APS-C: 45-200mm
Micro 3/4: 35-150mm
Common in:
Wildlife, sports

STANDARD
Angle of view: 18-46°
Full frame: 35-70mm
APS-C: 23-45mm
Micro 3/4: 18-35mm
Common in:
Portrait, fashion,
architecture, wedding,
street, documentary

WIDE-ANGLE
Angle of view: 63-84°
Full frame: 24-35mm
APS-C: 16-23mm
Micro 3/4: 12-18mm
Common in: Nature,
astro, architecture,
street, documentary

© Getty Images

SUPER WIDE-ANGLE
Angle of view: 84-114°
Full frame: 14-24mm
APS-C: 9-16mm
Micro 3/4: 7-12mm
Common in:
Nature, interior

41

TECHNIQUES
Pictured

Neck on the line
Mark’s one lens allrounder turned out to
be a super-zoom lens,
which is useful in his line
of wildlife photography

Get super close
Mark Deans
Mark Deans
is a wildlife
photographer,
based in Aberdeen,
in the north-east of
Scotland. During
the Covid-19
lockdowns, Mark developed an
interest in wildlife photography,
capturing birds in their natural
habitats. His particular niche lies in
discovering and photographing rare
species of birds throughout Scotland.
@markdeans_photography

42

Mark Deans on how to handle the weight
of his all-rounder lens when shooting wildlife
“For wildlife photography, a wide range of
focal lengths is beneficial. You might want to
capture closer subjects, such as a bird in
a nearby tree, however, zooming in close to
the subject and revealing all its features in
rich detail can often set you apart from the
competition. Here, choosing the right lens is
crucial – it should give you wide zoom options
to react quickly and accurately,” says Mark.
“I have been working with a focal length
range of 150-600mm for a while now, and this
durable and flexible range is perfect for my
wildlife photography goals. When I tried the
Sigma 150-600mm F5-6.3 DG OS HSM | C, I

was hooked – so that was it for me, I found the
ideal all-rounder optic,” he adds.
“The only downside of super telephoto
lenses is that they are big and can be quite
heavy. The Sigma optic, for instance, weighs
approx. 2.8kg. Handheld shooting with those
bulky optics is not advisable, so I carry a tripod
with me at all times. The tripod I have is from
Manfrotto, a high-quality manufacturer. Their
tripods might not be the cheapest, however,
the investment will be worth it. I’ve used mine
since the start of my photo journey and do not
plan to change it. It has been heavily used over
the years and has stood the test of time.”

SHOOT WITH ONE LENS

MARK DEANS

MY ONE LENS
The Sigma 150-600mm F5-6.3 |
Contemporary is also suitable for other
subjects/genres like all aspects of sports,
astrophotography and even creating candid
storytelling shots. Although handling the gear
I work with safely is a priority, accidents happen.
I have dropped the lens and it has been soaked on
occasions when I’m outdoors, so the high-quality
build has proved useful more than once.

Mark’s top accessory
Super telephoto lenses can be a challenge when shooting
handheld, so investing in some additional tools is necessary

When shooting with a heavy optic,
the challenge is to keep it still,
so that you can shoot smoothly
without risking camera movement.
This is especially evident when you
zoom into the scene and the extra
weight is noticeable so you will need
to invest in a sturdy tripod or monopod.
Those made out of carbon fibre are light
and strong, while aluminium options
typically weigh more but cost less.

When balancing this amount of weight,
switching from portrait to landscape ratio
can be more challenging and it also puts
the lens mount under strain. Here, options
such as a collar connection, L-brackets or
a tripod foot are great tools to stay flexible
and shift the weight.
Also, bear in mind that you should avoid
using gimbal heads without a lens collar
connection, as these are designed for
more lightweight equipment.

Handle the weight
Weighing nearly 3kg, this lens needs supporting features but that’s not all...
IS/VR
When shooting handheld, activate
IS/VR on the lens to support image
stability. Deactivate the settings when
working with a tripod to avoid vibration
compensation and blurry results

BUILT-IN SENSOR SHIFT
Depending on the lens
manufacturer, the
availability of IS/VR
modes varies. For Sony or
Olympus lenses, activate
the in-camera Sensor
Shift IS as this feature is
universally compatible
ISO
2500

1/1000
sec

400mm

f/10

ISO
2500

1/3200
sec

The focal length
influences the image
quality when shutter
speed settings are not
taken into account. For
clear results, choose a
shutter speed that is at
least double the amount
of the focal length.

600mm

f/5.6

ISO
2500

1/1600
sec

3x © Mark Deans

f/6.3

FOCAL LENGTH

215mm

43

TECHNIQUES

It’s prime
time
Oksana Zarovna
discusses her favoured
focal length and the
benefits of working
with a fixed lens
I currently favour using a 35mm fixed lens
for my photography because it allows me to
effectively capture and convey a compelling
story within a single photo. This can be more
challenging with a 50mm lens, and even more
so with an 85mm lens due to their narrower
field of view. Although an 85mm lens may excel
in capturing and conveying specific emotions,
for storytelling purposes, I definitely prefer the
wider perspective offered by the 35mm lens.
Why do I choose a fixed lens? There are two
reasons. Firstly, when I capture subjects in
motion, having a fixed lens makes it easier for
me to maintain control over the process and
capture the desired composition, although
this is not always the case. Secondly, and more
significantly for me, working with a fixed lens
forces me to think ahead and visualise the
scene in advance. It requires me to approach
the subject from the right distance and select
the ideal angle, which ultimately leads to more
intentional compositions.

Pictured

In the hot seat
A 35mm focal length was
perfect for capturing this
portrait of the girls while
including decorative
elements to bring
everything together

f/4.5

Oksana Zarovna
Oksana Zarovna
is a Ukrainian
photographer, now
living and working in
the Normandy region
of France. She had
previously worked for
an advertising agency for over 10 years
before deciding to follow her passion
for photography. She says photography
gives her the pleasure of being an
observer, watching people and freezing
moments in time.
@xeniazarovna

44

ISO
100

1/160
sec

35mm

SHOOT WITH ONE LENS
OKSANA ZAROVNA

MY ONE LENS
A 35mm lens is suitable for
landscapes, seascapes, documentary
shots on the street, architecture and also
when you want to capture group shots. I shoot
with the Sigma 35mm F1.4 DG HSM | Art lens
and love the maximum
aperture setting of f/1.4
which gives me flexibility
in creating a bokeh on
the go, without the
need to take too
many technical
aspects into
account.

f/5.6

ISO
2500

1/1600
sec

35mm

ISO
160

1/400
sec

When the opportunity to zoom
in or out isn’t available, it can have
a positive impact on your work

35mm

‘Thinking on your feet’ is a phrase that
holds especially true for photographers
who exclusively use prime lenses. It’s
one of the key factors that determines
the success of a shot. While it may
initially seem limiting, considering this
aspect will yield photographic results
that exhibit a noticeable difference in
quality and emotive impact.
As I primarily focus on shooting
documentary stories and my subjects
are often children, I find myself
constantly running, jumping and
chasing after them to capture authentic
frames. Sometimes, to achieve the
desired composition, I need to quickly
adjust my position to get closer or
further away, so that all subjects in
the process take the right places.
Over time, you will notice that a zoom
lens has its benefits and comfortability,
however, composing with a prime means
that you focus more on the scene you
are capturing because you have to.
It’s essential to think with both your
feet and your head. By doing so, you
will have the opportunity to improve
your photography skills and uncover
perspectives that may have been
overlooked when relying on a zoom
lens. Physically moving around to find
the best composition, leads to a deeper
understanding of framing, perspective,
and composition.

f/5.6

ISO
2500

1/1600
sec

5x © Oksana Zarovna

f/2.2

Thinking
on your feet

35mm

45

Pictured

Clear as mud

TECHNIQUES

Capture candid
action shots
Tania Delohery-Duffy
on the lens she never
leaves behind when
capturing fast action
With action photography, it’s often safer to be
away from the scene, especially with sports
such as motocross. This is where you need a
lens with a longer range, so you don’t have to
get too close. However, when you want to shoot
some filler images to build up a story, getting
images of prep work and riders getting ready,
you would ideally shoot with a shorter focal
length – in a dusty environment, the last thing

Using a fast shutter
speed enabled Tania to
capture sharp details,
showcasing the flying
dirt to highlight the
speed of the rider

Tania Delohery-Duffy
Based in Oxfordshire,
UK, Tania operates
under the business
name Reminiscent
Imagery. Her area
of expertise lies in
capturing the dynamic
essence of motocross sport. While
Tania herself is an avid motorcyclist,
she initially got into motorcross due
to her partner’s interest and has since
been captivated by the adrenaline rush,
noise and fast-paced action.
reminiscentimagery.com
@reminiscentimagery

f/4.5

ISO
400

1/1600
sec

70mm

you want is to be swapping lenses and getting
all that dust on your sensor, so a zoom lens
comes in handy.
The Sigma 70-200mm F2.8 DG OS HSM |
Sports is my favourite lens. It gives me next to
no chromatic aberration compared with other
lenses I’ve owned and the images are sharp
and clear. With this focal length range, I can
take almost any shot I need, whether I’m out
on the track capturing the action, or in the pits
taking a candid shot. What’s more, especially
when you’re in an environment like motocross
where it gets dusty, wet and mucky, this lens is
weather-sealed.

Protect your kit
Extend your equipment’s life by preventing dust, dirt and water getting in
Maintenance and consistency is key. If
you’re in a dusty environment, make it
a priority to stop all that dirt from building
up. When I’m on the track, I carry my lens
brush, air blower, cloth and lens cleaner.
With action photography, it’s all too easy
to get caught up in the moment and snap
away without checking the lens. I give
the equipment a dusting off and
sometimes the lens needs a proper
clean with the lens cleaner.
Although my gear claims to be
weatherproof, I don’t trust anything with
water. I have a rain cover for my gear. If
it’s been a damp day, never leave your
equipment in the bag after a shoot.

46

Dry it off thoroughly and leave it out to
prevent condensation from building up
inside the lens. I also clean the body with
a soft toothbrush to get any dirt out of the
little crevices.

f/3.5

ISO
160

1/2000
sec

178mm

SHOOT WITH ONE LENS

TANIA
DELOHERY-DUFFY

MY ONE LENS

47

2x © Tania Delohery-Duffy

The Sigma 70-200mm F2.8 | Sports
is really versatile. I also love using it for
landscape and wildlife. It came in handy
during a commercial shoot for a scaffolding
company when I needed to capture the
scaffolders working two stories up. I found the
images are sharpest at 135mm but don’t be
afraid to push the lens to its limits. It does well
at all focal lengths and environments.

TECHNIQUES

When should you invest in a new
lens or swap camera systems?
Tania explains why she eventually decided to purchase new gear
My previous camera was a Canon, the
cheapest model that I could buy in Currys
at the time while working on a small budget.
It wasn’t weather-resistant in the slightest.
Needless to say, I needed an upgrade when
it finally broke down on me. At that time,
I decided to move over to Nikon.
I chose the Sigma, having experienced the
durability and superior image quality of the
OS Sport range. Although I feel that having a

lens with an even longer focal range could be
beneficial for some shots, for the extra price
and weight, there’s no need for me. If you have
had the same experience, here a teleconverter
is a great solution as it just adds a couple of
more grams while being much more affordable
than buying a new optic.
If you are not happy with your lens or want to
try working with different systems, think about
renting some equipment before immediately

investing in new gear. This way you familiarise
yourself with the gear and can test if it is right
for you. To help keep the costs down and stick
to the budget, I always buy second-hand from
the London Camera Exchange. When doing
so, ask yourself what are the priorities for your
photography and what type of lens features
will support you in your goals. Go through your
budget and keep looking online for offers or
second-hand options – you might be lucky.

Always keep an eye on
maintaining your gear,
it will lengthen its life
and let you keep up
high-quality work

48

f/3.5

ISO
200

1/1250
sec

116mm

© Tania Delohery-Duffy

Pictured

Dusty business

SHOOTING SKILLS

THE LANDSCAPE

Add creative flash to scenic shots to balance
exposure and introduce controlled effects
Flash is synonymous with portrait
and event photography – the
speedlight is an essential tool in the
kitbag of photographers working in these
areas. However, many photographers would
not stop to consider the use of a speedlight
as a beneficial tool for shooting landscapes.
Scenic imagery usually focuses on the
interplay of natural light, such as that
found at sunrise or sunset, and the land,
so almost all attention is directed at
controlling the ambient conditions.

50

However, there are occasions when
natural light is difficult to shape to meet your
requirements. This is often encountered
when shooting in shaded locations, such as
at the base of high cliffs or under a forest
canopy, where significant light fall-off results
in underexposed foregrounds. While this
may not cause irretrievable loss of shadow
detail, colours can become dulled and the
sensation of a loss of depth is introduced.
In these circumstances, blending in a
small amount of fill light from an external

Words and images by: Peter Fenech
Difficulty level: Advanced
Time taken: 2 hours

flash can lift shadows and add shaping to
foreground elements. Care must be taken
to prevent the artificial illumination from
becoming too evident, the most likely
cause of which would be a discrepancy in
the relative temperature of the natural and
additional flash lighting.
Used in moderation, flash can give your
landscape shots a unique sense of energy
and with more advanced shooting setups, it
is possible to overpower the ambient light
and create your own structure. Let’s dive in.

RELIGHT THE LANDSCAPE

What you’ll need
Wideangle lens
One or more speedlights
Radio triggers
Tripod
Pictured

Out of the woods
There are times when natural
light is difficult to manage,
such as in shaded locations,
where using flash can lift
shadows and add shape to
foreground elements

51

SHOOTING SKILLS

Shooting steps

1

Add your flash Attach a speedlight to the hotshoe. Since our goal
is to add a spread of light to the foreground, we can comfortably use
on-camera flash, unlike in portrait photography where directional light
is better. Set the zoom to the widest setting to avoid spotlighting.

2

3

Take a meter reading Evaluative metering is the best choice
for this type of shot as the aim is to create an average exposure
for the ambient lighting first. As usual, meter from the highlights,
such as the bright flowers of this wild garlic, to centre the histogram.

4

Blend the flash Starting at approximately one-quarter power,
reduce the flash output until it fills the scene without overpowering
the natural light. If the shadows remain too harsh, raise the flash head
further to bounce the light throughout the landscape and feather it.

6

5
52

Spread the light further To maximise the softness of the flash
lighting and extend the coverage over the foreground, employ the
wide panel and reflector card on the flash unit. Aim the flash head to
45° degrees to prevent harsh shadows and clipped highlights on foliage.

Control colour temperature Consider white balance and select
an appropriate setting for the lighting. Using colour temperature
control allows a finer balance of warm and cool colours than a WB
preset as flash light will be a higher temperature than ambient sunlight.

Push the ambient light Once the flash level is set, push the
exposure to allow more ambient light in, for a softer blend. Start at
around +0.5 stop, increasing this if needed, while monitoring highlights
for clipping. Keep the f/stop set to the optimum for depth-of-field.

RELIGHT THE LANDSCAPE

The setup
SPEEDLIGHT FLASH
More effective than a
built-in flash for coverage
of the landscape

POLARISER
Reducing sheen on
vegetation allows for less
intrusive flash reflections

WIDE-STANDARD
LENS
We used a 24mm optic
but anything from 28mm
down to 12mm will
exaggerate foregrounds

LOW-LEVEL TRIPOD
A support that gets the
camera close to the
ground allows shots with
increased depth

Get it off-camera
For more advanced lighting choice,
wireless flash setups are the key
For our shot, an on-camera speedlight
did the trick, but we also took some
frames with the flash off-camera. This
allows more complex lighting setups and
light painting techniques.
For example, with the speedlight
wirelessly controlled, we were able to
fill shadows on the distant trees and even
create the impression of sunlight flowing
into the scene through the canopy. A
two-light setup combined foreground
fill with an artistic flare effect for the
final shot, right down to the appropriate
highlights on the tree branches.

53

SHOOTING SKILLS

Editing steps

1

Set tonal limits Begin by setting the Black and White points
for your image. This will allow you to control the range of tonal
information within the scene, from the darkest shadows to the brightest
highlights. Drag each slider until just before clipping starts to occur.

2

3

Dodge and Burn The flash has flattened contrast in the extreme
foreground but shaded the leaves further back. Add some
microcontrast back into the closest examples. Using the Brush Tool in
Camera Raw (K), increase the Clarity and Exposure of highlight areas.

4

Blend frames Here, we shot multiple frames, with the flash in
different positions. Open these as layers in Photoshop and mask
some areas, such as one frame where we used a flash to simulate
sunlight. Mount the camera on a tripod, so the frames overlap perfectly.

6

5
54

Reduce the highlights The flash has taken care of the shadows
in the foreground, but watch out for clipped highlights. By lowering
the flash output, we’ve avoided extreme overexposure of the flowers,
but a negative Highlights slider setting reveals more detail in the plants.

Localise colour The scene lacks ambience, so we used the Color
Grading panel to add a natural sunlight tone to the highlights and
a touch of green to the midtones. This restored some of the colour
variety that had been flattened by the white balance setting in-camera.

Add global contrast After blending in more frames with flash on
the background trees to tie the lighting together and the on-camera
flash filling the foreground, we added a Curves Adjustment Layer for
image-wide contrast. Check the histogram for any late-stage clipping.

RELIGHT THE LANDSCAPE

Pictured

Natural light only
This scene is fine as it is, but
there are some distractingly
deep shadows and bright
highlights that can’t be
managed in a single frame
using only natural illumination

BEFORE

AFTER

Pictured

Creative lighting
With flash, we were able to create
an HDR-like effect but with greater
control over the light direction.
Highlights were exposed in-camera
while flash lifted the shadows
and introduced a sunset effect

55

AFTER

SHOOTING SKILLS

Scale the heights
Discover new perspectives and create
a fresh view for your architectural images
Photographing architecture in a busy
city can be challenging. With lots of
people around and limited flexibility
in movement, it’s often difficult to control
the distance between you and the subject of
interest. This can make capturing subjects
like skyscrapers with a straight, optically
undistorted approach challenging unless
you’re using a dedicated shift lens designed to
correct distorted lines, or are willing to spend
hours in post-production.
While taking a higher viewpoint could be
one solution, the limited opportunities mean
you risk simply recreating frames that already
exist. Instead, taking a different approach by
searching for unique viewpoints can help your
photographs stand out from the crowd.
Leaving the usual eye-level perspective is a
good idea. By exploring different perspectives
you gain the chance to greatly enhance the
impact of your images. For instance, shooting
from a lower angle while pointing the camera
straight up can emphasise the grandeur of
tall buildings and skyscrapers. This technique
allows you to capture unique shapes and
work out geometries in architecture while
incorporating surrounding buildings as
interesting and supportive elements in the

Inset

Main

Sloping lines

Dynamic architecture

Busy streets and
surrounding buildings made
it impossible to get enough
distance between the
architecture and the camera
to create a straight result

By lowering the perspective
and shooting straight up,
the scene is more visually
interesting, while in-camera
settings helped create a
more appropriate exposure

Find your subject This photographic
approach works best when capturing tall
architecture or skyscrapers. If you don’t have
a location in mind, search online for suitable
subjects and possible angles. This will help you
plan your photo shoot with a specific vision.

1
56

frame. By doing this, the foreground, middle
ground, and background comprise elements
that create depth within the shot.
This photographic technique involves being
experimental with a focus on symmetry
and straight lines to create a balanced
composition. Achieving the correct exposure
may be challenging as the high buildings can
block a lot of light entering the scene from
the side. However, by activating supporting incamera settings, you can quickly master this
extreme-angle method.

BEFORE

Shoot in RAW Select this file type in
your camera menu. Recording the frame
in higher quality might be useful if you need
to remove distracting elements during editing.
For example, cropping because there was no
ideal angle or recovering near-clipped tones.

2

Select DRO This feature (Dynamic Range
Optimiser) is designed to automatically
analyse contrast and correct brightness to
enhance the image. It helps you to meter
high-contrast scenes where bright and dark
elements come together in the same frame.

3

All images © Kim Bunermann

Activate grid lines As there will be many
straight lines involved in the composition,
activate the grid lines in your camera menu.
Scroll through the various options available
and once you find a suitable one, adjust your
position to create a well-balanced photograph.

4

Lower your perspective For dramatic
effect, position your camera on the ground
with the lens pointing upwards. Enable the
live view on your LCD screen. If your camera
features an articulated screen, use this to
gain an overview of the composition.

5

Dial in settings Now adjust the exposure
settings – it is best to shoot with a sharp
aperture that doesn’t create a shallow depth
of field. Select f/8, a shutter speed of 1/80sec
and adapt the ISO value to the scene’s lighting
until a more suitable exposure is achieved.

6

57

EDITING SKILLS: PHOTOSHOP

PHOTOSHOP
TUTORIAL

High-contrast B&W
using dodge and burn

Meet the editing pro
James Abbott is a respected
professional photographer
and photography journalist
specialising in shooting and
editing techniques. His book,
The Digital Darkroom, covers
a range of professional image editing skills
in both Adobe Photoshop and Affinity Photo.
@jamesaphoto jamesaphoto.co.uk

Convert to mono Press D on the keyboard
to set the default Palette Colors and make
sure black is in the foreground. Click on the
Create new fill or adjustment layer icon at
the bottom of the Layers panel and select
Gradient Map. This will result in a high contrast
black and white, which is a great starting point.

1

Create eye-catching black-and-white
images in minutes using Photoshop
There are many ways to convert
your images to black and white in
Photoshop and each has its own
set of pros and cons. But one method that
produces a great high-contrast conversion
in a matter of seconds is the Gradient Map.
This technique also produces the perfect
starting point for a high-contrast conversion
that also incorporates dodging and burning.

Add contrast to the sky Create a Levels
Adjustment Layer and, when the dialogue
opens, look at the sky and drag the black and
white points inwards to increase contrast. Here,
black was set to 7 and white to 231. Select the
Gradient Tool and drag upwards to apply the
effect to the sky and adjust if needed.

2

What you’ll
be using
Gradient Map
Levels Adjustment Layers
Gradient Tool
Dodge Tool
Burn Tool

Boost overall contrast Create another
Levels Adjustment Layer and drag the
black and white points inwards to increase
overall contrast. For this image, the black point
was set to 10 and the white point to 245. This
resulted in a punchy black and white that can
be further boosted with dodging and burning.

3

KEY TIP
LAYER DODGING AND BURNING
All images © James Abbott

When working with the Dodge
and Burn Tools, it’s best to set the
Exposure to around five per cent and
paint over the desired area multiple
times for added control. The higher
settings are often too strong.
Dodge to lighten Select the Background
Layer and press Ctrl/Cmd+J to duplicate
it so you are working on the Background copy.
Select the Dodge Tool, set Exposure to five
per cent and use a soft Brush with the desired
Range set. Here, the horizon, mid-ground and
the area around the water were lightened.

4

58

Burn to darken Select the Dodge Tool
and set Exposure to five per cent and the
Range to Shadows, Midtones or Highlights to
target those tonal ranges individually. You can
now paint over areas to darken as required. In
this image, only the foreground was darkened
to help to increase the sense of depth.

5

Inset

Main

Great in colour

Awesome in mono

This image looks great in
colour, but with all the textures
and the natural contrast
within the scene, it’s also
a perfect candidate for a highcontrast mono conversion

With a heavy-handed
approach to contrast and
the added control provided
by dodging and burning, an
interesting colour image has
become a mono masterpiece

BEFORE

AFTER

59

EDITING SKILLS: LIGHTROOM

LIGHTROOM
TUTORIAL

Quick and easy
advanced black & white

Create fine-tuned monochrome photos in
Lightroom with the colour channel controls
Possibly the best way of converting
your colour photos to black-andwhite images is to work with the
RAW files in Lightroom. Converting the image
this way means that not only are you working

with the raw image data, which provides
greater scope for making adjustments, but
the controls available in Lightroom also allow
you to control the way that individual colour
channels are converted to mono.

Correct white balance Getting the white
balance right is important when converting
to black and white because a balanced image
will convert to mono more effectively. First,
try the white balance presets and if they
don’t work, use the Temp and Tint sliders
to perform a custom white balance edit.

2

1

Basic adjustments Make adjustments
as required to process the image in colour.
For this image, Highlights, Shadows, Whites
and Blacks were adjusted along with the
Medium Contrast preset for the Tone Curve.
The image was also processed with brighter
whites to increase contrast.

What you’ll be using
Basic adjustments
White Balance
Masking controls
Tone Curve
Black & White Mix

Control Presence The Presence controls
consist of Texture, which enhances texture
and detail, Clarity, which boosts mid-tone
contrast, and Dehaze, which reduces haze. For
this image, Texture was set to 10 and Clarity
to 5 to enhance detail. You could add more or
go into negative levels depending on your aim.

3

KEY TIP
SEE WHAT WORKS
All images © James Abbott

After clicking the B&W button to
convert to monochrome, experiment
with the Black & White Mix sliders to
see how they adjust tonality before
making your final adjustments.
Not all sliders will have an effect.
Use Masking Masking controls allow you
to make localised adjustments to specific
parts of the image. For this shot, we used the
Brush to paint over dark areas to reveal detail,
a second Brush Mask was painted over parts
of the water to recover highlights and a Radial
Gradient was used to apply a refined vignette.

4

60

Convert to mono Click the B&W button
below the histogram and scroll down to
the Black & White Mix tab. Here, there are
eight sliders to control how colours convert
to mono. Orange was set to +50, Yellow to
+40, Green to +13 and Blue to +30 to create
a custom conversion that suits the scene.

5

Inset

Main

Maintain highlights

Bright B&W

When shooting waterfalls,
it’s common to have to
underexpose the image to
maintain highlight detail,
which naturally results in
a darker image overall

Using carefully chosen basic
adjustments, masking for
localised adjustments and
a custom black-and-white
conversion, the image now
looks bright black and white

AFTER
BEFORE

61

EDITING SKILLS: AFFINITY

AFFINITY
TUTORIAL

Create abstract
urban landscapes

Get creative by applying an offset effect
Modern urban architecture often
involves tall buildings with geometric
shapes and distinctive lines that can
offer great potential for photographic creativity.
To achieve a more abstract look, we can

shoot from extreme angles, but there are also
opportunities for further abstraction in postprocessing. Here, we will guide you through
the simple step-by-step process of creating
an offset look in Affinity Photo 2.0.

Select an image This editing technique
has a more dramatic effect if you select
an image that shows modern buildings that
feature geometric lines and shapes. Frames
that contain a reasonable degree of contrast
will also work well, as the offset technique
makes the images brighter in the process.

2

1

Duplicate layer Copy the Background
layer and set the Blend mode to Screen.
Stay on this layer and select the Perspective
tool found in the Tool panel when clicking on
the arrow. Distort the image by adjusting the
anchor points – drag the points from the
image frame away to avoid losing image parts.

What you’ll be using
Blend mode: Screen
Perspective tool
Recolor Adjustment Layer
Curves Adjustment Layer
Clarity Live Filter

Adjust hues To emphasise the abstract
effect, introduce some colour. To do this,
add a Recolor Adjustment Layer on top of
the duplicated Background Layer. Adjust the
Hue slider to add a colour tint and use the
Saturation slider to control the intensity of the
tint. When you are done, merge both layers.

3

KEY TIP
KEEP EXPERIMENTING
All images © Kim Bunermann

The editing process doesn’t have to stop
there. To try further effects, go into the
Mapping Persona in the heading bar as
option three. Here, you will find various
presets. Control the impact via Tone
Compression and Local Contrast sliders.
Repeat, repeat, repeat Follow this
process until you are happy with the level
of abstraction in the image – there are no limits
so this simply depends on your visual tastes.
In this example, we added two layers of
different distortions and colours – the more
variation, the more extreme the effect.

4

62

Adjust contrast Add a Curve Adjustment
Layer. Now drag the middle dot of the
graph down until a proper contrast is achieved.
To fine-tune the results go to Filters > Sharpen
and select the Clarity option. By increasing this
slider, you will add clarity and underline any
details lost due to the offset technique.

5

Inset

Main

Classic
architecture

Abstract art

The modern building was
captured and edited in a
traditional photographic
approach, showing a frame
that remains true to reality

The structure and colour
of the architecture were
alienated and put in a
different context due to the
editing technique, resulting
in a more interesting frame

AFTER
BEFORE

63

Download our digital editions or buy in print while stocks last

SUBSCRIBE
NOW AND
GET DIGITAL
ACCESS TO
ALL AVAILABLE
BACK ISSUES
See page 22 for details

The digital advantage

Available on

Digital magazines can travel with you – even if you delete them, they are free to download again later.
Subscribe today by visiting our official store, Magazines Direct: bit.ly/3NjZgnf

Apple iOS devices

Android, PC or Mac

Other options

Read us on your iPad, iPhone or Mac
device from the Apple App Store:
apps.apple.com or Apple News+
apple.com/apple-news. Simply
search for Digital Photographer

Zinio:
bit.ly/DPZinio
Pocket Mags:
pocketmags.com

Digital Photographer is available for
Kindle, Nook and more (see right).
It can also be found on the all-youcan-read Readly magazine app:
gb.readly.com

Printed back issues
There’s nothing quite like a printed magazine.
We also sell a limited selection of recent back
copies – issues 275-280 are currently available.
Each issue costs £6.99 for UK deliveries, plus
postage. See the website for overseas dispatch
details. To browse the contents of each issue,
please see the listings on the opposite page.
Visit bit.ly/DPbackissues for your favourite issue

64

Print & Digital

Print & Digital

Print & Digital

Print & Digital

Print & Digital

Issue 280

Issue 279

Issue 278

Issue 277

Issue 276

What’s inside: Get to
grips with landscape shots
under strong summer
lighting. Delve into our
portrait retouching pro
masterclass, with help from
the top photographers in the
industry, and learn how we
shot a stunning solar eclipse.

What’s inside: Shoot your
very best black and white
images, bursting with depth
and drama. Next, learn how
to use shutter speed for
creative effects and take
advice from the pros on how
to market your photography
and maximise your sales.

What’s inside: Explore our
special cover feature on
unique compositions, get to
grips with all of your camera’s
shooting modes and learn
to shoot hand-held images
in low light conditions. Also,
we review Leica’s best-ever
mirrorless camera, the SL3.

What’s inside: Discover
the core editing skills for
stunning landscape images,
shoot abstract photos like
never before, get essential
pro advice on switching
cameras and kickstart your
photo career. Plus, don’t miss
our Fujifilm GFX 100 II review.

What’s inside: Get the
most from your camera
kit by applying our secret
steps to improving image
quality. Next, learn to shoot
incredible street scenes,
capture panoramas and read
our Canon EOS R3 vs Nikon
Z 9 head-to-head test.

Print & Digital

Digital

Digital

Digital

Digital

Issue 275

Issue 274

Issue 273

Issue 272

Issue 271

What’s inside: With exclusive
advice from the winners of
the Photographer of The
Year competition, discover
the essential techniques you
need to know right now. We
also round up the best kit of
2023 in our annual Gear Of
The Year Awards feature.

What’s inside: Shoot goldenhour colours in our dazzling
sunset landscape Creative
Project, capture wildlife shots
in challenging conditions
and, in our main feature, you
can dive into our complete
10-page guide to landscape
photography composition.

What’s inside: Portrait
photography needn’t be
complex. Find out how to
capture top-tier images with
ease. Plus, we have a special
feature on becoming a photoediting maestro, a cityscape
shooting tutorial and a full
review of the Lumix G9 II.

What’s inside: Filters still
have a place in the landscape
photographer’s kitbag, so we
cover the ones you should
own and how to use them.
In our regular Shoot Like
a Pro feature, we shadow a
photographer on a magazine
editorial shoot for key tips.

What’s inside: Autumn is
a popular time for landscape
photography. Our cover
feature explores how best
to capture this colourful
season. If you love black and
white photography, don’t
miss our tutorial on shooting
and editing film-noire scenes.

Digital

Digital

Digital

Digital

Digital

Issue 270

Issue 269

Issue 268

Issue 267

Issue 266

What’s inside: Demystify
video in our behind-thescenes guide to working as
a pro videographer. Get the
best quality from your RAW
files, both at the shooting
and processing stages.
Shoot amazing architectural
images with our pro advice.

What’s inside: Read
Ross Hoddinott’s top tips
for mesmerising macro
photography. We also review
the awesome Nikon Z 8
full-frame mirrorless camera
to see whether it takes the
crown as the best model in
its class and price bracket.

What’s inside: Astro photos
can inspire like no other
genre. Find out how to shoot
nightscapes like a pro. Delve
into our career advice pages
to learn how to take your first
steps towards your dream
photo job. Plus, shoot and
edit summer landscapes.

What’s inside: As part of our
ongoing Masterclass series,
seasoned pro photographer,
Jeremy Flint explains how to
master exposure. We also
round up the best photoediting apps today and
explain how to get incredible
shots from your smartphone.

What’s inside: Shoot great
images at the most popular
times of day – sunrise and
sunset. Go behind the
scenes with a luxury car
photographer. Learn how to
capture impossible macro
photos and shoot emotive
weddings like an expert.

65

GO PRO

FIND YOUR NICHE
Is having a niche necessary? With help from two pro photographers,
Rebecca Greig explores the benefits of finding a unique selling point
Words: Rebecca Greig

66

FIND YOUR NICHE

Pictured

Peak performance
Projects that you are
excited for will unleash
your creativity and
open doors for you

Most professional photographers are more
than capable of taking high-quality pictures
across a variety of genres and styles, so you
might be thinking why not offer a bit of everything?
However, trying to please everyone is often where
things can go wrong. You can spread yourself too
thinly, your portfolio might appear disjointed and
your true skill and passion might seem to be diluted.
If you were going for a job interview as a wine
sommelier, for example, you’d sell your knowledge
of wine and highlight your skills in that specific area.
You wouldn’t tell your prospective employer about
every other alcoholic drink you’ve ever tasted in your
life. In other words, you’d show off your niche skills
and knowledge. So why should that be any different
when selling your skills as a photographer?
Kate Hibberd (@dorset_kate), a photographer
based in Dorset, UK, says, “I definitely see the
difference between work I have taken on because
I needed the income and projects that I have been
excited for. The creativity is unleashed, you produce
your best work and the theory that doors open other
doors often proves true.
“Experiment, work hard, expose yourself to all
types of photography and your niche will find you.
You will grow as a photographer, quickly developing
a key skill set for the genre and start earning the
income you need to quit your day job.”
Finding your niche will help you build a client base
and establish yourself as a credible photographer,
once you have found your feet then you will be able
to stray away from your focus for the right clients if
you want to. Something a little different to challenge
yourself every so often will keep things exciting.
Photographer Ben Blight (@ben_j_blight), also
based in southern England, established himself in
the industry as a motorcycle photographer and
videographer. However, his work is evolving and

ISSUE 279: HOW TO
MARKET YOURSELF

ISSUE 280:
PRO WELLBEING

GET YOUR BACK COPIES HERE: HTTPS://BIT.LY/DPBACKISSUES
67

© Rebecca Greig

Catch up on our career features

GO PRO

Pictured
© Kate Hibberd

Escape the crowd
Although landscape
photography is a
crowded genre, Kate’s
style stands out

Pictured
© Kate Hibberd

Making waves

68

Your portfolio is the way
prospective clients will
find you, so make sure
it reflects your niche

FIND YOUR NICHE

although the subject matter may vary, the overall
style of his captures has become his niche. “What
has been crucial to me starting out, is being able to
display effectively that, although I have a niche, my
style and themes are transferable to other genres
that new clients can use. That means I can reward
myself both with satisfaction and business growth.”

Pictured

Runway success
Experiment, work
hard and try all types
of photography and
your niche will find you

Find out what excites you
The best thing about working as an independent
photographer is that you can choose your focus.
Obviously, some genres of photography are more
in demand than others and some genres are quite
saturated so they will require you to work harder
to be able to stand out. However, your passion and
enjoyment of what you focus on will show in your
work. Photographing something you enjoy is likely
to encourage more creativity and experimentation
and help you to stand out.

Decide on the clients you want
“The first years of a photography business can be
difficult as you fine-tune this, some find it quickly
within the first year or two of business, for others it
can take longer,” says Kate. “There are some lessons
to learn, that is just the nature of putting yourself
out there and stepping out of your comfort zone, but
it always pays off. Finding the right clients will help
you grow into the creative you want to be with the
people you want to work with. And remember, it is
always okay to say ‘no’ if you don’t think a client is
the right fit for you.”
© Rebecca Greig

Be clear about what you offer
by using SEO to your advantage
You will attract the clients that you want if you are
clear about what you offer and the genres you
specialise in. It will also save you time overall as you
won’t need to trawl through jobs that aren’t right for
you and you don’t want to do. Knowing your niche
will enable you to use the correct keywords on your
website so that clients will find you more easily.
For example, ‘south coast photographer’ is going

to be the keyword for hundreds of photographers’
websites, but ‘south coast motorcycle photographer’
is going to start to narrow it down.

Make it work for you
Before committing to a genre, think about how
it might affect your life. If you want to keep your
weekends and evenings free for your personal or
social life, then being a wedding photographer is
not the job for you. Similarly, if you want to travel
and be outside, then a focus on studio photography
won’t be for you either. “There are hundreds of
niches within the photography business and many
are successful in more than one but, essentially,
finding the niche for you and your work-life balance
that can bring in the income you want is the key to
longevity within a creative world,” Kate says.

Change your portfolio to
reflect your specialist genres
Pictured

© Ben Blight

Easy rider
Ben has made his
own niche but his
style is transferable
to other genres

Your portfolio is the main way that prospective
clients will find you, so make sure that it reflects
your niche. Ensure your Instagram grid does not
look disjointed, and that your website displays the
absolute best of your work in your chosen field. Your
portfolio needs to depict what you offer and what
makes you the right person for the job.
69

SOCIAL SPACE

My dream photo kit
With help from used camera gear
specialists MPB, we’ve created an expert
photographer’s fantasy camera kitbag
Yasser Alaa Mobarak specialises in a range
of photo genres from architecture to travel
photography, street photography and street
portraiture. He keeps his kit simple, using
two Nikon DSLR cameras along with
a standard lens. “I like the 18-55mm because
I can shoot architecture, environmental
portraits and street photography all with one
lens,” he says. “And I like the 50mm focal
length for my portrait photographs.”
For his more posed portraiture work, he
would love to use higher-resolution models –
in particular, the Hasselblad medium-format
system – and for his street photography, Leica

Yasser
Alaa
Mobarak
Years active 15
Specialisms
Travel, street,
architecture, street portraiture
Location Alexandria, Egypt
Website yasseralaamobarak.com

70

mirrorless cameras are also on the wishlist.
“The Leica SL2 is smaller and provides great
quality. People on the street think you are
a casual photographer or tourist user rather
than a serious enthusiast or pro. This helps
with candid shooting,” he says.
Yasser highlights the difference in cultural
reactions to street photography in his native
Egypt and says that a smaller camera body
would be better for working inconspicuously.
“Using a Leica would be much easier than
a larger DSLR in Egypt,” he says. “With the
SL2 or a similar camera, I'd be able to access
more places to shoot images discreetly.”

Pictured

IN ASSOCIATION WITH

Face value
For portraiture work,
Yasser would like a
higher-resolution
model, such as the
Hasselblad mediumformat system

DREAM KIT BAG

Yasser’s current kit

NIKON D5600

NIKON D3100

Time used 5 years
This is a reliable
enthusiast-level camera
that is small enough to
go unnoticed when you're
shooting on the go.

Time used 8 years
As an entry-level DSLR,
the D3100 is easy to use,
with a stripped-back
control layout and feature
set that is intuitive to use.

NIKON AF-S DX
ZOOM NIKKOR
18-55mm f/1:3.55.6G ED II
Time used 13 years
It has limited features
but a handy focal range.

AF-S NIKKOR
50mm f/1.8G
Time used 13 years
A favourite lens for many,
the 50mm offers a natural
perspective and a bright
maximum aperture.

NATIONAL
GEOGRAPHIC
AFRICA BAG
Time used 5 years
This Manfrotto-branded
bag is both spacious
and nicely constructed.

Yasser’s dream kit

LEICA SL2
MPB says:
Pairing sophistication
with flexible imaging
capabilities, the SL2
features a 47.3MP
full-frame CMOS
sensor and Maestro III
image processor.

HASSELBLAD
X2D 100C
MPB says:
An unrivalled combination
of form and function, the
X2D 100C establishes
itself as Hasselblad’s
flagship mirrorless
medium-format camera.

LEICA 24-70mm
VARIO-ELMARIT-SL
f/2.8 ASPH
MPB says:
With its universal focal
range and consistently
high aperture, this lens is
suitable for video and still
photography applications.

HASSELBLAD XCD
55mm f/2.5

MANFROTTO
190XPRO3 TRIPOD

MPB says:
A full-frame 43mm focal
length makes this lens
an outstanding option for
full or half-length portraits
and ideal for documentary
and still-life photography.

MPB says:
This tripod can be swung
round horizontally without
removing the head,
so switching between
different frames is more
convenient than ever.

From the experts: Trade-in options
MPB suggests an extra item for Yasser’s dream kitbag – and how to trade in his used kit to get it

x3 © Yasser Alaa Mobarak

Lee Filters Big Stopper
The Lee Filters Big Stopper is a
high-quality 10-stop neutral density
(ND) filter designed for longexposure photography. This filter
allows photographers to drastically
reduce the amount of light entering
the lens, enabling the capture of
stunning, ethereal images with
smooth motion effects in water,
clouds and other moving elements.
The Big Stopper is renowned for
its precision and minimal colour
cast, making it an essential tool
for landscape and architectural
photographers. Yasser’s dream
kit, which includes high-resolution
cameras and versatile lenses, would

greatly benefit
from the creative
possibilities
offered by
this ND filter,
enhancing his
ability to create
dynamic and
atmospheric
images.

Why did MPB choose this item?
MPB suggested adding the Lee
Filters Big Stopper because it
complements Yasser’s Leica SL2
and Hasselblad X2D 100C cameras,
allowing him to experiment with
long-exposure photography.

This filter would be
particularly useful for
Yasser’s architectural
and travel photography,
enabling him to capture
unique, high-quality
images with striking
visual effects. The Big
Stopper’s reputation for
reliability and precision
aligns perfectly with
Yasser’s professional standards.

What are his trade-in options?
Yasser could potentially trade in
his Nikon D3100 camera and Nikon
AF-S DX Zoom-Nikkor 18-55mm lens
to get the Lee Filters Big Stopper.

71

PRO Career advice
COMMUNITY

Best portrait poses

© Claire Gillo

Claire Gillo speaks to a corporate photographer and
answers your questions on flash and portrait poses

Flash... ahhhh!

I would like to become a portrait
photographer, however, I really struggle
to know how to pose my portrait sitters
(mostly my willing friends and family at
the moment) to get flattering results.
Any tips are greatly appreciated!
Julie Brown

Keep practising to
improve your lighting
skills. The more you do,
the more you’ll learn

I haven’t been taking photographs for that
long and consider myself an amateur with
ambition. My preference is to shoot with
natural light, however, there are some
situations where I’m not getting the results
I want. I feel intimidated by the prospect of
using flash but need to bite the bullet if I’m
going to improve. Do you have any tips?
Nicola Hunt
The best way to learn how to use flash is to
have a go. Unless you want strong shadows, it
helps to diffuse or bounce the light in some
way. For example, if you’re taking a portrait
and point the flashgun directly at the model,
the results are likely to be strong directional
light and dark shadows. Switch the flashgun
to fire away from your model and the light will

Camera query
What is the best full-frame camera for under
£1,500? I mostly shoot portraits and, until
now, have made do with an old crop DSLR
and a cheap 50mm lens. It’s time for an
upgrade but I’m unsure of what to go for.
Graham Green
There’s lots of choice on the market, Graham,
but look at the Canon EOS R8 first. This entrylevel full-frame, 24.2MP
CMOS sensor with a max
ISO 102,400 is great for
portraits and retails for
around £1,400 online.

© Claire Gillo

A simple pose, such as a
hand on the hip, can give
the body a better shape

72

bounce back, producing a softer light. This is a
basic trick you can practise to get started.
When it comes to camera settings, you
need to be aware of your shutter speed. Most
cameras automatically sync to capture the
flashlight at 1/250sec or slower. Some can be
altered to shoot at a High Speed Sync (HSS)
setting, meaning you can adjust your shutter
speed to shoot faster (usually 1/1000sec).
The advantage is that you can open your
aperture wider or reduce your ISO setting.
Once you can shoot using one flash, try
adding another to see how you get on. Shoot
with one flash at a time, review the results and
then combine the flashguns. If, after a bit of
practice, you are still struggling, invest in
a course with a professional. There’s nothing
like being shown first-hand how to do it!

There are lots of full frame
cameras for under £1,500,
including the Canon EOS R8

Another great full-frame buy is the Sony
Alpha A7 II. It’s a relatively old camera, but you
can’t beat it for what you pay. The A7 II comes
with a 24.3MP Exmor CMOS sensor, five-axis
in-body image stabilisation plus a weathersealed body. A new one can be picked up for
around £900 or second-hand in excellent
condition for just over £500 from MPB. That
would leave some change to invest in lenses.
Finally, if you want a
camera with a higher
resolution sensor, the Sony
A7R II with its 42.4-millionpixel, full-frame Exmor R
CMOS sensor is your best
option. Again, try looking
on the second-hand market
for a better deal.

© Canon

There are many pose guides out there
that may help you to get started but
beware of cheesy and over-the-top
posing, which can look contrived and fake.
I prefer a more natural look – it’s less
about the pose and more about whether
your sitter looks comfortable in the frame.
If the answer is ‘no’, you need to fix that.
Opening up communication can help,
as you want them to be relaxed. If their
shoulders look tense and lifted, get them
to take a deep breath, scrunch them
up and then relax. Keep dropping your
camera down between shots and chatting
so they aren’t just seeing a lens but rather
connecting with you. For flattering results,
watch out for double chins and if they
have a big belly try sitting them down
and leaning forward onto their arms or
angling them away from the camera.
Small adjustments like this can produce
more flattering results instantly.
At first, it can be hard to direct your
sitter and communicate with them
while thinking about all of your technical
camera settings, but this gets a lot easier
the more you practise.

4x © Stephanie Belton Photography

Stephanie runs
a professional
headshot studio

Visiting clients to
capture images for
their social media

How do I become a corporate photographer?
Corporate photographer Stephanie Belton explains what the
role entails and the challenges of running her own business
Tell us about yourself
and what you do...
Portraiture has always
been my passion and
so I established my own
business in 2006, which
specialises in corporate
photography and personal branding. I also run
a busy professional headshot studio in
St Albans in Hertfordshire. When I am
not behind the camera, I enjoy teaching
photography and mentoring aspiring
photographers. I’ve also had the honour
of delivering multiple masterclasses on
corporate photography at The Societies of
Photographers convention in London. And,
finally, I also offer a range of courses, that can
be found on my website (see below).
So, what does being a corporate
photographer entail? Can you give
us an outline of your typical week?
Firstly, it involves working mainly weekdays,
and term-time, which is the opposite of
wedding photography – that’s ideal for me
as it fits perfectly with family life. On a typical
week, I usually welcome business owners and
other professionals in my studio for individual
headshots for their websites and LinkedIn
profiles. I also visit corporate clients at their
business premises to photograph new joiners
or capture compelling imagery for their
website and social media. This may include
team photos, business action shots showing
collaboration, as well as corporate events such
as panel discussions and conferences.

Do you find any aspects of the job
challenging? Which aspects do you enjoy?
What I find most challenging – but in a good
way – is working to a brief. Understanding
exactly what the business is about, the brand
values and the message the business is
trying to convey… no two jobs are the same.
Another challenge is working with people
who are camera-shy. Most headshot sessions
start with the same warning ‘I hate being
photographed’. But this is where I feel I can
add the most value – putting people at ease,
using the most flattering light and making
the experience as painless as possible. I love
seeing the relief on people’s faces when they
see their photo on my camera and leave the
session with a spring in their step.
Stephanie enjoys
putting people at
ease on shoots

What kit do you take out
with you on a location shoot?
Over the years, I have streamlined my kit to
make it as portable as possible, especially
when travelling into London. Therefore,
I switched to mirrorless with the Sony A9
and it has been a game-changer. Not only is
it lightweight, but I can also shoot silently,
which is perfect for conferences. For superportable lighting, I have my Godox AD200
strobes and I have recently invested in carbon
fibre stands – my back is certainly grateful.
How do you get your work – do you
advertise or do you have repeat clients?
Most of my work comes through word of
mouth and via my website. LinkedIn is the
perfect platform for sharing corporate work
and connecting with existing and potential
clients. Corporate work brings a lot of repeat
work, many clients will book me multiple
times a year.
What top tips would you give to
those who are just starting out?
Practise your portraiture skills with friends
and family, and learn about off-camera flash
so you’re not always at the mercy of natural
light. You don’t need to spend a fortune on
equipment from day one, I just started with
a basic speedlight and a cheap softbox and
built my skills up from there. Once you’re
ready, network, network, network! Make sure
everyone around you knows what you do
because they will be the ones recommending
you to your next client.

To find out more about Stephanie, visit stephaniebelton.com and follow on Instagram @stephaniebelton

73

PRO ANALYSIS

WHY
SHOTS
WORK
Name:

Toss in the meadows

Date:

July 2022

Kit:

Detailed insights
“Blue-cheeked bee-eaters are migratory to this part of the world (Bhigwan, Maharashtra,
India). Flying quickly in indefinite patterns, they swoop down and snatch their prey, then
the bird comes back to the perch and tosses the prey before gulping it down,” Anoop
says. Recording parts of this process offered exhilarating challenges. “It was difficult
to focus on the bird since it was perched among the flowers,” he says. “Also, I had to
increase the shutter speed to 1/3200sec to make sure I froze the action properly.”

Sony A1
Sony FE 600mm f/4 GM OSS
Focal length: 600mm

f/4

ISO
800

1/3200
sec

“I love capturing action shots of wildlife
subjects, especially birds, with end-toend details in the frame. I believe this
is the most difficult kind of photography,
given that to produce such frames, you
need to be in supreme control over
your gear, its capabilities and the
settings. But I love the challenge.”

Shallow depth of field
Anoop captured the scene with a wide aperture of f/4,
creating a shallow depth of field where the focus area
is minimised. Consequently, both the background and
foreground elements aren’t in sharp focus. “While I made
sure to get crisp details on the subjects, the rest of the
elements are blurred,” Anoop says. “This way, the attention
on the subjects remains intact but the feast of colours adds
elements without being distracting within the composition.”

74

PRO ANALYSIS

Anoop Raghavan
Manikkoth
A photographer
originally from Kerala,
India, but currently
based in Dubai, UAE,
Anoop primarily
focuses on capturing
photographs of birds.
He is a brand ambassador for Wild
Roar India and Leofoto Middle East,
a testament to his expertise and
reputation in the industry. Anoop
also leads workshops, supporting
aspiring photographers in the region.
@anoopmanikkothphotography

© Anoop Raghavan Manikkoth

Harmonious colours
“These flowers blossom for a month after
the monsoon in this part of the world,”
Anoop says. “It’s mesmerising to see the
blooming Bhigwan grassland.” The patches
of tiny purple flowers not only add interest
to the composition but also bring in a
patch of colour without overloading the
frame. “I captured the bird tossing the
insect while it was perched on a branch
in the meadow. That meant I could include
these vibrant colours with lots of contrast,”
he adds. To achieve this, he increased
the saturation levels in post-processing.

Foreground interest
Moving away from the usual eye-level perspective is popular
in various genres – not just wildlife, but also landscape,
architecture and action photography. “In my opinion, shooting
from a lower perspective brings out the best in many frames.
This perspective conveys the scene directly to the viewers,”
Anoop says. By going low, Anoop has created a strong
relationship between the subject and the viewer. However,
this angle also naturally adds a foreground element to the
composition, creating further depth and interest. “The vibrant
colours of the flowers are enhanced while the viewer gets
the feeling of being in the meadow themselves,” he adds.

75

INTERVIEW

Richard Koek
on his photographic
portrait of a city with
fascinating contrasts
Words by: Kim Bunermann

RICHARD KOEK
Pictured

Shibuya Crossing
Located in front of Tokyo’s
Shibuya station, the famous
‘scramble crossing’ is the
world’s busiest pedestrian
intersection, with up to
2,500 people using it at once

INTERVIEW

78

RICHARD KOEK

okyo is a vibrant and
multifaceted megapolis that is
home to over 14 million people.
Its combination of ultramodern
and traditional aspects makes
it a fascinating place and a
popular travel destination. Dutch photographer
Richard Koek travelled to Tokyo in 2019 to
capture the essence of the city, resulting in a
new publication by Terra, part of the Lannoo
Publishing Group. In Tokyo Tokyo, Koek has
created an insightful journey into the Japanese
capital, celebrating its people, their culture
and the diverse landscapes that bring the city
to life. Before setting out on this project, Koek
aimed to avoid common misunderstandings
and exotic portrayals of Japanese culture,
instead, seeking out contemporary aspects,
formed from traditions and innovations,
through the intimate portrayal of daily life.
The result is a refreshing perspective.
“Every picture tells a story that is authentic
to my personal experience, but what the viewer
experiences by looking at my photographs
may be completely different,” says Koek. “The
fact my photographs evoke stories in others,
I find more powerful than my own take.”
Koek takes us on a journey, challenging our
prejudices and perceptions, and encapsulating
a rich narrative of Tokyo’s culture and beauty
– from intimate moments of a sumo wrestler
having his hair done to enchanting scenes of
burlesque dancers, a traditional Tebori tattoo
artist putting the finishing touches to an eightyear project and street scenes at the Shibuya
Crossing that look like stills from a movie.

Richard Koek

Pictured

Traditional tattoo
Artist Hori Momo uses
the traditional Tebori
technique of tattooing,
performed with a thin
piece of bamboo called
a nomi, in Meguro City

Richard Koek is a
Dutch-Argentinian
photographer who
gave up practising
law to move to
New York City and
pursue his passion
for photography.
His images have been displayed in the
National Archives of Holland, the Dutch
Ministry of Foreign Affairs and the
Royal Tropical Institute of Amsterdam.
www.richardkoek.com
@richardkoek

79

INTERVIEW

Pictured

Chiyoda City, Tokyo
The East Gardens of the
Imperial Palace are part
of the inner palace area
and open to the public

Richard, how did Tokyo Tokyo come about
and why did the city grab your interest?
I visited Tokyo in 2019, just before the Covid-19
pandemic first hit the Far East. I emailed some
photos to my publisher with a note asking
‘How about a new book?’ They reacted with
enthusiasm – in all honesty, it was probably
because the Tokyo Olympics were coming up
in 2020. We all know how Covid messed that
up in the end, however, the publisher agreed
to the assignment of making my second book.
Tokyo first caught my interest because of
its sheer size – it is absolutely massive. What
caught my interest even more was the fact
that the city did not match my expectations.
It was a completely different city from that
I imagined. However, my imagination was
shaped by what is fed by the mainstream
media, so I felt that I needed to do something
to address this disconnect between the myth
and the reality of Japan.
What techniques or approaches did you
use to capture the unique atmosphere
and energy of this bustling city?
The techniques were similar to those I used
when I made my first book, New York, New
York. I wandered the streets of Tokyo and
captured whatever I deemed beautiful. My
street photography technique involves trying
to blend in with the people or into the street
scene. Being a fly on the wall, observing
intensely and somehow making sense of
80

the visuals that caught my attention. Often,
I could see the potential in a backdrop or
lighting situation and I’d wait there patiently
in the hope that a missing link would make
it complete. However, I also needed to try to
connect with the people living there. Since
I don’t live in Tokyo, I prepared meetings with
locals in the hope that they could introduce
me to certain micro-environments.
You shine a spotlight on some of the
many contrasts that the city has to offer.
How did you manage to visualise this?
The duality of Tokyo is the fabric of mundane
daily life, into which many cultural traditions
are weaved. Visualising this is more a matter
of editing and telling a narrative by mixing this
daily life with the traditional aspects. Here,
I was helped by the book’s graphic designer,
Erik Rikkelman, who did a wonderful job.
How did you approach the ethical
considerations of photographing
people and communities?
The ethical considerations were covered
by the standards to which I hold myself.
I have a set of personal rules – for example,
always approach subjects with respect and
kindness. However, in an environment like
Tokyo, which is so culturally different, it is often
unclear what the right thing to do is. I don’t
know the unwritten rules of how their society
works or what is deemed appropriate, so I did

Richard’s kit
MAIN CAMERA:
SONY ALPHA III

BACKUP CAMERA:
SONY A7R

LEICA SUMMARON-M
35MM F/2.8 M3

TAMRON 17-28MM
F/2.8 DI III RXD

SPIDER X CAMERA
HOLSTER
BACKPACKER KIT

RICHARD KOEK

“I hope to create
a connection between
two worlds – those
of ‘them’ and ‘us’.”
Above

Kokonoe-beya stable
About 20 wrestlers live
in a house in Katsushika
City, Tokyo, practising on
the floor. It is the most
successful stable in terms
of titles won by its wrestlers
Pictured

Splitting hairs
A hairdresser fixes the
wrestler’s hair after
each session, combining
elements of tradition,
beauty and self-care

81

INTERVIEW

Pictured

National dress
The kimono, a
traditional Japanese
garment, combined
with contemporary
handbags and hairstyles

TOKYO
TOKYO

Pictured

Fruitful work
Burlesque dancer
Lune Glitter during her
performance at the
Amaranth Lounge in
Shibuya City, Tokyo

Richard Koek’s
book Tokyo Tokyo
features over 200
colour and 20 blackand-white images
of this vibrant city, where tradition
meets innovation. Published
by Terra, part of the Lannoo
Publishing Group, the book
is priced £55/$70.

RICHARD KOEK
this with trial and error. Sometimes, I asked
permission, sometimes I didn’t. Sometimes,
I let my subjects know I was photographing
them, sometimes I didn’t. It was a constant
battle of choices, but as an outsider, I was
often forgiven for my rudeness. Doing the right
thing doesn’t always align with getting the
right picture but my personal guides helped
me to navigate this.
You were granted rare access to the
Kokonoe-Beya sumo stable in Katsushika
City. How was that for an experience?
Capturing the sumo stable was something
I didn’t think would be possible. I was having
lunch in a restaurant and saw this calendar of
sumo wrestlers on the wall. I took a picture of
that calendar thinking that might literally be as
close as I could get to sumo wrestlers.
Later on, I was introduced to the artist
Hiroko Takahashi. I love her research of
modern design and traditional attire. Her
manager told me she also designed the attire
of a professional sumo stable. I said that it
was one of my dreams to photograph a sumo
stable, but I never asked if I could be given
access – I didn’t want to show the needy
go-getter in me. The next day, we were on our
way to a tea ceremony when he told me: ‘You
are a lucky guy, we are able to visit the sumo
stable for your photos’. So, I visited the stable
– it was a modern building in a residential
area, like a normal house in which the living
room area was turned into the circular dohyo
(arena). Over 20 wrestlers lived in this stable
and on the second floor, there was one huge
room where they all sleep. One wrestler eats
the equivalent of four normal-sized people.
This means that, every day, food has to be
prepared for the equivalent of 100 people –
I found that fact mind-blowing.
Before entering the stable, I was given
certain rules and things I wasn’t allowed
to photograph, so I was a fly on the wall
and photographed the wrestlers without
communicating or interacting with them.
I had to comply with these rules, as it was
a huge honour to be allowed access and
that shouldn’t be taken for granted.
After each practice session, the stable
hairdresser fixes the hair of the wrestlers.
You see this massive man in such a gentle
situation, where self-care, beauty and tradition
are combined. I thought this was a wonderful
juxtaposition on the theme of masculinity.
Were there any particularly challenging
situations that you encountered while
creating your photographic work?
The most challenging situations turned out to
be blessings – the fact that I didn’t speak the
language meant that all I could do was smile
and make gestures. What at first seemed to
be a huge challenge to overcome actually
turned out to be a perfect way to connect.

Above

Junk rock
Guitarist Roku and
violinist Ren performing
as the group Accovio in
Musashino City, Tokyo
Left

Tiny temple
A woman carrying an
umbrella for shade walks
past a temple, almost
hidden on the corner
of a residential street

I was walking around the city with no clue
what people were saying, nor what was
written down – the perfect bubble for any
street photographer. It made me profoundly
happy in what I was doing and that spilled
over to the subjects I encountered. The most
difficult scene to photograph was the mass of
commuters in Shinagawa station. I’m still not
sure it worked, it was difficult to transcend the
enormity of this continuous stream of people
and workers on their way to their desks.
What camera equipment do you use?
I have two Sony Alpha cameras, one with a
35mm Leica lens and one with a wide-angle
zoom lens. The 35mm is my main piece. Also,
a belt clip as I need to have my camera handy
immediately at all times. My memory card,
a charger, battery, my camera. I don’t have
any particular favourite kit items. They are
all tools to me, like a hammer or screwdriver.
How does your work contribute to the
conversation about urban life and culture?
I hope to create a connection between
two worlds – those of ‘them’ and ‘us’. Yes,
there are cherry blossoms, sumo wrestlers,
ceremonies and temples – those elements
all create a realm of ‘them’. However, the look
of a schoolgirl in uniform, a woman walking
on the street, tulips in front of a window or

a man fishing – these are all images we can
identify with and so they create a common
‘us’. I hope to show that life wherever lived is
similar: we all work, we all love, we all bring our
children to school and we all eat. Pointing this
out is telling a story of universal connections
as human beings. When you see the beauty in
that, you can make profound connections and
create peace.
Do you have any tips for aspiring
photographers who want to capture
one of the world’s largest cities?
Although I accomplished the challenge of
making a beautiful book, I need to be aware of
the fact that I didn’t do it alone. I received a lot
of help from many people who believe in my
work. It is important to keep that in mind.
The most important tip is to honour the
mistakes you make because they all taught
me a lesson or brought me to a new level of
awareness. I also learned over the years that
the less I think about why I do things, the more
I bring out the best in me. Simply take action
by following what feels right. I try to stay
kind to people and I ask for help if I want to
photograph a certain situation that is difficult
to access. Most importantly, I try to put my
ego aside. If people have difficulty with me
being there, I simply stop. I never argue with
them – my work is not that important.
83

THE GALLERY
Pictured

Israeli air strikes in Gaza
Mustafa Hassona captured
a resident among the rubble
of destroyed homes in the
Al-Zahra district of Gaza. The
air strikes hit 25 apartment
blocks in the neighbourhood

84

2024 World Press Photo Contest

2024 World Press
Photo Contest

© Mustafa Hassona, Anadolu Images

Founded in 1955, World Press Photo is
an independent, non-profit organisation
based in the Netherlands. The contest
has grown into one of the world’s
most prestigious photo competitions,
rewarding the best in photojournalism
and documentary photography from
around the world. Exhibitions of the
winning images are held in many cities
worldwide, including Amsterdam, London,
Rome, Mexico City, Rio de Janeiro and
Hong Kong, amongst others. Next
year, the contest will celebrate its 70th
anniversary. Visit worldpressphoto.org

85

THE GALLERY

Above

Battle for Sovereignty
A supply ship distributes
oil and food to fishermen
in Zambales province,
Philippines, a government
initiative to help them fight
China’s territorial claims
Right

Looking for Satyrus
Parkev Kazarian, an ethnic
Armenian refugee from
Azerbaijan, now living in
Armenia due to the conflict
in Nagorno-Karabakh
Far right

Insurrection

© Rena Effendi/VII Photo, National Geographic Society

A broken window inside
the Presidential Palace
in Brasilia, after protests
sparked by the defeat of
then-president Bolsonaro

86

© Eddie Jim

© Zied Ben Romdhane

Top left

Gay Space Agency
A project combining fact
and fiction that highlights
the US space program’s
historical exclusion of
LGBTQI+ astronauts
Top right

The Two Walls
A migrant walks on top of
a freight train known as
‘The Beast’ in Mexico,
heading for the US border
Above left

The Escape
A young man bounces off
a fence post in a football
pitch in Gafsa, Tunisia, a
mining region known for its
high youth unemployment
Above

Fighting, Not Sinking
Community elder Lotomau
Fiafia and grandson John,
stand at the point where
the shoreline used to be
on Kioa Island, Fiji

© Gabriela Biló for Folha de São Paulo

© Michael Varcas for The Philippine Star

© Mackenzie Calle

© Alejandro Cegarra

WORLD PRESS PHOTO

87

© Adriana Loureiro Fernandez for The New York Times

THE GALLERY

Pictured

Red Skies,
Green Waters
Neighbours play under
a sky lit by one of the
world’s largest gas
flares in Venezuela

Pictured

War is Personal

© Julia Kochetova

A project combining
photojournalism with
music and text to show
living with war in Ukraine
as an everyday reality

88

Above

Right

Valim-babena

Myanmar Revolution

Dada Paul and his
granddaughter Odliatemix
get ready for church in
Antananarivo, Madagascar

Paul Du, a rebel fighter with
the Karenni Nationalities
Defense Force, is just 19. He
was injured in an artillery
strike three days later

© Ta Mwe Sacca Photo, VII Foundation Frontline Club, W. Eugene Smith Grant

© Lee-Ann Olwage for GEO

WORLD PRESS PHOTO

Below

Saving the Monarchs

Below right

Monitoring milkweed in
Minnesota, USA, a plant
that is key to the recovery
of the monarch butterfly

Silenced Crimes

Bottom

Bottom right

Saving Monarchs II

On the Edge

Butterflies stream through
indigenous fir forests
in the Monarch Butterfly
Biosphere Reserve,
Michoacán, Mexico

A woman rests in a refugee
camp on the AfghanistanPakistan border that
houses Afghan people
deported from Pakistan

© Ebrahim Noroozi, Associated Press

© Jaime Rojo for National Geographic

© Marco Garro

© Jaime Rojo for National Geographic

The experiences of
survivors of crimes against
LGBTQI+ people in Peru

89

YOUR IMAGES

SHOT
OF THE
MONTH
Photographer: Jonas Lindell
Title: Between the waves
Location: Nykarleby, Finland
@jonas.lindell
About the shot: “One summer evening,
I went out with my friend to take some
pictures. At some point, my friend shouted,
‘Keep still for a moment’ and then took a photo
of me on the beach. In return, I aimed my
camera at him and captured this picture as the
waves moved in around him after the sunset.”

Tag us @dphotographermag
for a chance to feature here
Every issue, we’ll be sharing the best images from our
Instagram community. Tag us on @dphotographermag

90

WIN! SAMSUNG
256GB PRO PLUS
MICRO SDXC MEMORY
CARD WITH SD ADAPTER
Every issue, one Digital Photographer
reader wins a Samsung 256GB PRO Plus
MicroSDXC memory card with SD adapter.
Boasting up to 180MB/s and 130MB/s
read/write speeds, the card is perfect for
high-res stills and Ultra HD video. It is the
go-to card for the modern content creator
using mirrorless, smartphone, action
cam and drone cameras. Find out
more at samsung.com/uk/
memory-storage

91

PHOTOCROWD COMPETITION

THE BEST OF GOLDEN HUES
The winners of our latest contest with Photocrowd have been revealed
or our latest competition in association with Photocrowd,
we challenged you to submit your best golden hue
images. After working through all the entries, the
winners have been selected. As a prize, the expert winners
will receive a licence for Affinity Photo professional editing
software. Congratulations to all of the winners – as usual,
the standard of submitted images was extremely high
and it was a difficult task to select the best ones.

F

1ST PLACE WINNER
Photographer Roland Hank
What an image! The colours in this scene certainly hit the brief for this round,
with amazing golden hues in the sky, picked up beautifully by the hazy mist.
There’s a strong focal point too, which is important – many photographers
would be distracted by capturing the strong colour and forget to include
a good subject. It’s a wonderfully atmospheric landscape. Well done!

WIN! Prizes from Affinity
Enter our Abstract Architecture contest before
23rd July for a chance to win Affinity Photo
Modern buildings are the perfect subject and in this competition,
form, structure and patterns are the focus. Show us what you can
do with changing perspectives and other creative approaches.
Enter at photocrowd.com/digitalphotographer from 9th July for
a chance to win a licence to Affinity Photo editing software (worth
£49 for Mac or Windows), a toolset for photography professionals.

92

Whether you’re editing and retouching or creating multi-layered
compositions, Affinity Photo has non-destructive editing, RAW
processing, real-time edits and colour management as standard.
Winners will be notified by email and can choose between Mac,
Windows or iPad versions. The winners will be revealed in issue
283 of Digital Photographer, on sale from 30th August.

GOLDEN HUES

2ND PLACE
When I wake up in
the morning light
Photographer Trevor Cole
There’s an amazing narrative quality to this
shot that gives off National Geographic vibes.
The choice of subject is unconventional for
this round but the golden sky shines through
and bathes the scene in a lovely warm glow.
The eye contact with the boy anchors the
composition and creates great depth, moving
back into the scene. Congratulations on
a perfectly captured moment.

3RD PLACE
The valley of clouds
Photographer adrianpetrisor
This is a magical scene! The directional sidelighting, misty atmosphere and broad scale
make great use of the time of day it was shot
and give it a cinematic feel. The tunnel-like
composition down the valley gives a sense
of direction too, with the illuminated peaks
almost acting as a leading line into the picture.
93

PHOTOCROWD COMPETITION

RUNNER UP
L’ora d’oro
Photographer Natalia Bondarenko
A shot with bags of atmosphere, this
simple composition is calming and
thoughtful. The receding detail and bright
exposure give it a minimalist feel, which is
complemented by the central arrangement
of the trees, making use of negative space
at the top and bottom of the frame.

RUNNERS UP (clockwise from left)
Reflect Square
Photographer Gilbert Claes
With an abstract use of
golden hues, this image of
a reflected building is both
impactful and entertaining.
We know what we are looking
at but it takes a moment for
us to get acquainted with the
subject. The lines of the glass
panes in the nearer building
give a sweeping aesthetic,
while the exposure has been
nicely controlled.
94

Golden dawn
over Yangshuo
Photographer Frederic
Konkel
The thing that stands
out for us is the way the
golden sunlight just kisses
the canopy of trees in
the foreground. This is an
understated composition
that makes great use of the
golden hour but also allows
the natural greens and
cyans to show through.

Sunrise in Turkey
Photographer Janó
Cappadocia is an Instagram
paradise, but the contre-jour
lighting gives the scene a
unique glow. The shot is
pleasantly arranged, with
the balloons the clear focus,
but the landscape beyond
them has been thoughtfully
composed too. Having the
sun just out of shot has
allowed the glow to spread
across the frame.

KIT INTRO

106
DxO Nik
Collection 7

104
Fujifilm
GFX100S II
The GFX system brings
large-sensor photography
to the masses, so what
extra features does this
camera offer?

Rod Lawton tries out
the lastest editon of
the well-loved suite of
software plugins

The expert and independent reviews of gear we’ve bagged this issue
96 Photo Kit Leaderboard

108 Lenses

Check out our exciting new Photo Kit
Leaderboard feature – a real-time guide
to all the best cameras, lenses and other
photography accessories on the market

Every month, we take two professional optics
out into the field. This issue, Matthew Richards
tests the Sigma 24-70mm f/2.8 DG DN II Art
and the Yongnuo YN33mm f/1.4 DA DSM WL

104 Fujifilm GFX100S II

110 Accessories

Welcome updates make this second-generation
Medium Format camera even more refined
than its predecessor says Gareth Bevan

It’s the little things that can enhance your
photography, so we’ve rounded up the best
photo gadgets and gifts to add to your kitbag

Our ratings

Product awards

Lab testing

Our team of trusted and expert
reviewers score gear thoroughly to
help you make better buying choices.

Digital Photographer’s awards are given out
when a product really catches our attention.
Here are our three most used accolades.

Some of our product reviews also
have in-depth lab data, graphs and
scores. This means that the kit has
been subjected to more rigorous
testing. Lens tests are carried out
using Imatest, and cameras are tested
in our laboratory using DxO Analyzer
hardware and software to check the
image noise and dynamic range.

Don’t go there
Could be better
Solid performer
Excellent bit of kit
Best on the market

EDITOR'S
CHOICE

BEST VALUE
AWARD

INNOVATION
AWARD

95

Photo Kit
Leaderboard 2024
Our real-time report on the very best gear available for you right now

Welcome to the Digital
Photographer Photo Kit
Leaderboard! The digital world
moves fast and photo kit comes and goes
in no time at all. The continuous march of
development and progress means there can
be a confusing array of potential cameras,
lenses, software and accessories to choose
from. Some products see yearly updates
and replacements while others stick around

for longer, a testament to their quality,
usefulness, value and popularity.
We review a huge variety of items, but
these summaries are often time-specific to
the tech generation in which the products
were launched. A five-star review might be
awarded for ingenuity, marking something
that is ahead of its time, but several months
later, the competition has caught up.
Conversely, as a product’s price drops over

time, its value proposition may render
it eligible for a bump up in our ratings.
This Leaderboard does not replace our
in-depth reviews, instead, it provides a realtime snapshot of the photography industry,
helping you decide which gear is right for
you, right now. The longer a piece of kit is
ranked, the more points it will accrue –
and that means the better it performs in
our annual Gear of the Year Awards!

OM System OM-1 Mark II

KEY SPECS
VIEWFINDER TYPE
The advent of mirrorless
cameras has meant that
most new cameras offer an
electronic viewfinder. While
some photographers still
prefer an optical VF, an EVF
model allows more camera
settings to be displayed
along with a virtual horizon.
SCREEN RESOLUTION
Most enthusiast and pro
cameras have a main
LCD measuring at least
3 inches, with 3.2in being
more common. Look for a
minimum of 2 million dots
to offer detailed playback.

CAMERA We have a new front-runner in the shape of this
OF THE
MONTH

full-featured Micro Four Thirds workhorse camera

In a world where
bigger sensors have
become more affordable,
with even Medium Format being
available to enthusiasts, the Micro Four
Thirds system might seem as if it’s on
borrowed time. However, both Lumix
and OM System have demonstrated
that there is plenty of life left in the
smaller format. This latest OM System
offering is a pure powerhouse, with
blistering speed, exceptional build
quality and the headline feature, built-in

© James Artaius

What features should you expect
as standard in a camera today?

digital filters. It’s an amazing camera
and retains our coveted Camera of the
Month spot. Will it be able to stay at
the top for a third month? Find out next
issue!Read our review in Issue 280

+20
POINTS

SHUTTER TYPE
A camera might quote
a blistering frame rate of
more than 15fps, but this
might be in electronic
mode. Always check for
a mechanical maximum
rate of at least around 7fps.
VERTICAL GRIP
Fewer pro cameras include
a built-in vertical grip now,
however, the likes of the
Nikon Z9 and Canon EOS
R3 retain them. They aren’t
essential for everyday
shooting but check for
accessory grip availability.

96

SPECIFICATION Resolution 20.4MP Sensor Micro 4/3 Stacked BSI (17.4 x 13 mm) ISO range
ISO 80-25,600 (native), ISO 80-102,400 (expanded) Frame rate 120fps max without blackout
Storage 2x SD UHS-II Battery BLX-1 LCD 3 in vari-angle touch (1.62 million dots) Viewfinder EVF
(5.76 million-dots) 1.65x magnification Weight 511g (body only) Dimensions 138.8 x 91.6 x 72.7mm

PHOTO KIT LEADERBOARD

BEST FULL-FRAME CAMERA
If you’re after maximum quality images, its larger pixels
mean that a full-frame camera is the best place to start
+10

1 Sony A9 III

POINTS

The world’s first full-frame global shutter camera offers a lot for your cash
For the first three months of our Photo
Kit Leaderboard’s run, the A9 III sat in the
envied position of Camera of the Month – the
highest-rated position on the list. Although
it was superseded by the OM-1 Mark II, it is
still a tech monster, packed with the latest
bells and whistles, not least that global shutter

and full-frame sensor. If you want a do-itall camera that offers incredible speed and
futuristic features, then look no further than
this Sony, which still retains the title of best
Full-Frame camera on the market today,
for a balance of specification and value.
QRead our review in Issue 276

SPECIFICATION Resolution 24.6MP Sensor Full-frame EXMOR RS CMOS (35.6mmx23.8mm) ISO range ISO 250-25,600
(native), ISO 125-51,200 (expanded) Frame rate 120fps Storage 1x SD UHS-II, 1x CFEexpress Type A Battery NP-FZ100 LCD 3.2in
TFT (2,095,104 dots) Viewfinder 0.64in Quad-VGA OLED (9,437,184 dots) 0.9x Weight 702g Dimensions 136.1 x 96.9 x 82.9mm

2 Leica SL3

+5

POINTS

Leica is a prestige brand with a unique
appeal. It supplies a generally niche market
and this is reflected in its prices. However,
while expensive by most people’s standards,
the SL3 has plenty of mainstream pro
features. Its 60.3MP full-frame sensor is a

studio photographer’s dream while autofocus
has taken a step up in speed and accuracy.
The build quality is also top-notch. It won’t
be for everyone but it’s currently one of the
most impressive full-frame cameras around.
QRead our review in Issue 278

SPECIFICATION Resolution 60.3MP Sensor Full-frame CMOS (36mm x 24mm) ISO range ISO 50-100,000 Frame rate
Max 15fps (electronic), 7fps (mechanical) Storage 1x SD UHS-II, 1x CFexpress Type B (recommended) Battery Leica BP-SCL6
LCD 3.2in 2,100,000 dots Viewfinder EVF 5,760,000 dots Weight 769g (body only) Dimensions 141.2 x 108 x 84.6mm

3 Nikon Z 8
With a high-resolution 45.7MP full-frame
sensor and 20fps burst shooting, the Z 8 is
the mirrorless successor to the popular D850.
Handling is DSLR-like, which will please D850

users, while the dual card slots offer SD and
XQD/CFexpress compatibility. Built like a tank,
it offers excellent value for pro photographers.
QRead our review in Issue 269

+3

POINTS

SPECIFICATION Resolution 45.7MP Sensor Full-frame (FX) CMOS (35.9mm x 23.9mm) ISO range ISO 64-25,600
Frame rate 20fps (RAW), 30fps (jpeg) Storage 1x SD UHS-II, 1x XQD/CFexpress Type B Battery EN-EL15c LCD 3.2in
(2,100,000 dots) Viewfinder 0.5in OLED (3,690,000 dots) Weight 820g (body only) Dimensions 144 x 118.5 x 83mm

SENSOR SIZES AND CROP FACTORS
Get to grips with the variety of sensor formats available
The range of sensor sizes can be
confusing when gauging lens system
versatility. As sensor size decreases,
crop factor increases as less of the

frame areas is captured compared with
full-frame. However, it is important to
remember that the exact size and crop
factor can differ between camera brands.

Medium Format
(Fujifilm GFX)

Full-frame

APS-H

APS-C

APS-C
(Canon)

Micro
4/3

Sensor area

43.9 x 32.9mm

36 x 24mm

27.9 x 18.6mm

23.6 x 15.7mm

22.2 x 14.8mm

17.3 x 13.0mm

Crop factor

0.79x

1x

1.3x

1.5x

1.6x

2x

39.5mm

50mm

65mm

75mm

80mm

100mm

Type

Comparison (50mm)

97

PHOTO KIT LEADERBOARD

BEST APS-C CAMERA A lighter and more compact body
1 Fujifilm X-T5
Retro power is the order of the day with this APS-C modern classic from Fujifilm

+10
POINTS

The single-digit Fujifilm X-series cameras have settled into a niche of their own, catering not
only to high-level photographers but also to video shooters. The latest version took things up a
notch with the introduction of a new 40.2MP sensor, making it one of the highest-resolution APS-C
models around while maintaining an electronic frame rate of 20fps. Fuji controls take some getting
used to but the compact, high build quality, seven-stop stabiliser and 1/180,000 top shutter speed
make this the perfect travel and documentary camera. It also has the bonus of 6K advanced video.
QRead our review in Issue 263
SPECIFICATION Resolution 40.2MP Sensor APS-C X-Trans CMOS 5 HR (23.5mm x 15.6mm) ISO range ISO 125-12,800 (native),
ISO 64-51,200 (expanded) Frame rate 15fps (mechanical), 20fps (electronic) Storage 2x SD/SDHX/SDHC UHS-II Battery NP-W235
LCD 3in (1,840,000 dots) Viewfinder 0.5-inch, 3,690,000-dot OLED EVF, 100fps refresh Weight 476g (body only) Dimensions 130 x 91 x 64mm

3 Fujifilm X100VI

2 Canon EOS R7
With a 32.5MP sensor and rapid 30fps
burst rate, the EOS R7 easily steps
into the mirrorless shoes of the hugely
popular EOS 7D line of DSLRs. It’s
a great introduction to the RF mount
and offers advanced features galore,
more than enough to satisfy enthusiasts and semi-pros.
QRead our review in Issue 271

+5

POINTS

SPECIFICATION Resolution 32.5MP Sensor APS-C CMOS (22.3mm x 14.8mm) ISO range
ISO 100-32,000 (native) 100-51,200 (expanded) Frame rate 15fps (mechanical) 30fps (electronic)
Storage 2x SD/SDHC/SDXC UHS-II Battery LP-E6NH LCD 2.95in (1,620,000-dots) Viewfinder
0.39in OLED EVF (2,360,000-dots) Weight 612g (body only) Dimensions 132 x 90 x 92mm

BEST MICRO 4/3 CAMERA
Panasonic Lumix GH7

The X-T5 was our first top-place APS-C camera of this
Kit Leaderboard, and this new entry has most of the
same specs crammed into a pocket-sized body,
including the 40MP sensor and
6K video. This kind of extensive
feature list in a compact body
makes it one of the most soughtafter models on the market.
QRead our review in Issue 279

+3

POINTS

SPECIFICATION Resolution 40.2MP Sensor APS-C X-Trans CMOS 5 HR
(23.5mm x 15.6mm) ISO range ISO 125-12,800 (native), ISO 64-51,200
(expanded) Frame rate 11fps (mechanical), 20fps (electronic) Storage 1x SD UHS I
Battery NP-W126S LCD 3in (1,620,000-dot) tilt LCD Viewfinder 3,690,000dot EVF Weight 521g Dimensions 126 x 74.8 x 55.3mm

ESSENTIAL VIDEO FEATURES
Consider these key features for shooting video

Panasonic pushes M43 to new heights once again
The Lumix GH6 proved an incredibly
popular camera and its successor, the
GH7, comes onto the market bang on
cue. Panasonic has cemented itself as
a clear leader in the
field of mirrorless
video and so the GH7
POINTS
prioritises this with
its features, which
include 5.7K 30p ProRes
422 HQ and ProRes
RAW HQ for high-end
grading, 4K 120p and
unlimited recording
with integrated heat
dissipation.
Overall, the new
Lumix is an affordable

video powerhouse that is worthy of
our top spot in the M43 leaderboard
category and is sure to become an
enthusiast filmmaker favourite.

+10

SPECIFICATION Resolution 25.2MP Sensor Micro Four Thirds Live MOS (17.3mm x 13mm)
ISO range 100-25,600 (stills) Frame rate 14fps (mechanical) 75fps (electronic) Storage 1x SD UHS-II, 1x
CFexpress Type B Battery DMW-BLK22 LCD 3in (1,840,000-dot) Viewfinder OLED (3,680,400-dot)
Weight 805g (with battery and card) Dimensions 13.84 x 10.03 x 9.96cm

98

RESOLUTION
While 8K is becoming more
common, for most users 4K
(3840x2160 pixels) is enough.
Full HD (1920x1080) is fine
for social media use.
FRAME RATE
A 24/30p (fps) rate is the
most common and useful for
everyday videography. 120p
or 240p are great for slowmotion work but check this
is available at full resolution.
CROP
On some lower-end cameras,
4K resolution is available but
only in a cropped aspect, which
doesn’t make full use of the
lens coverage. This means you
will need to use a wider lens.

PHOTO KIT LEADERBOARD

BEST MEDIUM FORMAT CAMERA
Fujifilm GFX 100 II

Old-school tech has life in it yet

1 Nikon D850

The latest GF-mount
camera furthers Fujifilm’s
quest to make medium
format accessible to all
Fujifilm reinvented the wheel
with the introduction of its
larger-than-full-frame GFX
cameras. While it’s still more
expensive than consumer
mirrorless cameras, the GFX
100 II and its siblings bring the
higher resolutions associated
with monster cameras like those
from Hasselblad and Phase One
and squash them into DSLR-like
bodies. The GFX 100 II provides
8fps continuous shooting, which is
astonishing for a 102MP camera,

BEST DSLR CAMERA
Arguably the finest
DSLR ever built
for enthusiasts and
semi-professionals
While Nikon’s own D6 and
Canon’s EOS 1DX Mark III sit
at the top of the DSLR tree, the D850 is far more
POINTS
accessible to the masses and is the better choice
for enthusiasts and semi-pros. For a long time,
photographers had to choose between pixels and frame rate,
but despite having a 45.7MP FX-format sensor, the D850
manages to rattle off 7fps or 9fps with the optional battery
grip. This is rapid in DSLR terms and the result is a camera
that is simply untouchable for all-round performance.
Launched in 2017, its AF system, noise performance and
video features still hold their own against newer tech.
QRead our review in Issue 193

+3

+10

while the processor
POINTS
enables 8K video. It
isn’t cheap, and although
it only builds on its predecessor’s
work, this recent model represents
the most well-rounded, mediumformat camera on the market now.
QRead our review in Issue 277

SPECIFICATION Resolution 102MP Sensor GFX CMOS II HS (43.8mm x 32.9mm) ISO range
ISO 80-12,800 (native) 40-102,400 (expended) Frame rate 8fps (mechanical, AF-C) Storage
1x SD UHS- II, 1x CF express Type B Battery NP-W235 LCD 3.2in (2,360,000-dots) Viewfinder
0.64in OLED (9,440,000-dot approx) Weight 867g (body only) Dimensions 152.4 x 117.4 x 98.6mm

BEST EDITING SOFTWARE
DxO Nik Collection 7
DxO claims this is the biggest update yet to its software suite
It has endured multiple owners and developers, but it seems the Nik
Collection is in good hands with the team at DxO. This latest version of the
popular plug-in suite brings a raft of updates, including the new ellipse and
polygon control point masking tools and the better integration of Viveza
tools into Color Efex Pro. The latter filter also sees some major amendments,
with the reintroduction of some global adjustments as dynamic filters.
QRead our review on page 106

SPECIFICATION Resolution 45.7MP Sensor FX-format CMOS (35.9mm x
23.9mm) ISO range ISO 64-25,600 (native) 32-102,400 (expanded)
Frame rate 7fps, 9fps (with MB-D18 grip) Storage 1x SD/SDHC/SDXC
UHS-II, 1x 1x XQD Battery EN-EL18c LCD 3.2in touchscreen (2,359,000-dots)
Viewfinder Optical pentaprism, 100 per cent coverage Weight 1,005g
(incl. battery and card) Dimensions 146 x 124 x 78.5mm

2 Nikon D6
While many pros still use
DSLRs, firmware updates are
less frequent these days. This
upgraded Nikon DSLR flagship
is back on the map, with
increased playback and Flicker
Reduction stability and it’s
great to see continued support for this camera.
QRead our review in Issue 229
SPECIFICATION Resolution 20.8MP Sensor Full-frame CMOS
(36mm x 24mm) ISO range ISO 50-102,400 Frame rate Max 14fps
Storage 2x XQD/CFexpress slots Battery Nikon EN-EL18c
LCD 3.2in 2,359,000 dots Viewfinder EVF 5,760,000 dots
Weight 1,450g (body+battery) Dimensions 160 x 163 x 92mm

3 Canon EOS 90D
Cameras such as the EOS 20D, 30D and 40D
set new precedents for specification
versus price. The EOS 90D was
the last model in that line before
Canon shifted focus to the
R system, so you’ll find much
of the same tech and image
standards but at a bargain price.
QRead our review in Issue 219
SPECIFICATION Resolution 32.5MP Sensor APS-C CMOS (22.3mm x 14.8mm)
ISO range ISO 100 - 25,600 (native), 100 - 51,200 (expanded) Frame rate 10fps
Storage SD / SDHC / SDXC (UHS-II) Battery LP-E6NH LCD 3in (1,040,000-dots)
Viewfinder Optical pentaprism, 100% coverage Weight 701g (w/ battery and card)
Dimensions 140.7 x 104.8 x 76.8mm

99

PHOTO KIT LEADERBOARD

BEST WIDE-ANGLE LENS For even greater frame width
Prime lenses

Zoom lenses

1 Canon RF
35mm f/1.4L VCM
Expectations were high, given that the EF 35mm
f/1.4L II USM is regarded by many as their
favourite prime lens. Thankfully, Canon has risen
to the occasion. QReview: TBA
SPECIFICATION Price £1,819/$1,499 Max aperture f/1.4 Min aperture f/16
Closest focusing distance 0.28m Elements/groups 14/11 Mount Canon RF

2 Laowa 10mm f/2.8 Zero-D

1 Canon RF 10-20mm
f/4L IS STM
We’d never have believed a 10mm zoom lens
was possible for Full-Frame cameras, but
Canon has pushed through another barrier.
QReview: TBA
SPECIFICATION Price £2,579/$2,299 Max aperture f/4 Min aperture f/22 Closest
focusing distance 0.25m Elements/groups 16/12 Mount Canon RF

2 Sigma 14-24mm f/2.8 DG HSM | A

QReview: TBA

QReview: TBA

SPECIFICATION Price £839/$799 Max aperture f/2.8 Min aperture f/22
Closest focusing distance 0.12m Elements/groups 15/9 Mount Canon RF,
Leica L, Nikon Z, Sony E

SPECIFICATION Price £1,269/$1,299 Max aperture f/2.8 Min
aperture f/22 Closest focusing distance 0.26m Elements/groups
17/11 Mount Sigma SA, Canon EF, Nikon F

3 Sigma 14mm f/1.4 DG DN Art

3 Canon RF 14-35mm f/4L IS USM

QReview: Issue 268

QReview: Issue 249

SPECIFICATION Price £1,399/$1,599 Max aperture f/1.4
Min aperture f/16 Closest focusing distance 0.30m
Elements/groups 19/15 Mount Sony E, Leica L

SPECIFICATION Price £1,599/$1,299 Max aperture f/4
Min aperture f/22 Closest focusing distance 0.20m
Elements/groups 16/12 Mount Canon RF

4 Laowa Argus 28mm f/1.2 FF

4 Sony FE 12-24mm f/2.8 G Master

QReview: Issue 272

QReview: Issue 231

SPECIFICATION Price £699/$599 Max aperture f/1.2
Min aperture f/16 Closest focusing distance 0.5m
Elements/groups 13/7 Mount Canon RF, Leica L, Nikon Z, Sony E

SPECIFICATION Price £2,699/$2,898 Max aperture f/2.8
Min aperture f/22 Closest focusing distance 0.28m
Elements/groups 17/14 Mount Sony E

5 Viltrox AF 27mm f/1.2 Pro

5 Sony FE 16-25mm f/2.8 G

QReview: Issue 276

QReview: Issue 280

SPECIFICATION Price £444/$545 Max aperture f/1.2
Min aperture f/16 Closest focusing distance 0.28m
Elements/groups 15/11 Mount Nikon Z (DX), Fujifilm X, Sony E

SPECIFICATION Price £1,249/$1,198 Max aperture f/2.8
Min aperture f/22 Closest focusing distance 0.17m
Elements/groups 16/13 Mount Sony E

LENS FUNCTION
BUTTON

DECLICKABLE APERTURE

Speed up your camera work
with customisable controls

Sometimes changing the aperture settings during
a video clip is unavoidable, especially when shooting
documentary and press content. In these cases,
lenses with a declickable aperture have an advantage,
allowing smooth closing
or opening of the
diaphragm, bypassing
fixed ‘gates’. This results
in less noticeable
exposure changes
during video for a more
professional look.

When handling large optics, the setup
can be front-heavy, making it tricky to
manipulate the camera’s body controls.
This is where lens function buttons
come in – they allow you to assign and
access functions from the lens barrel, keeping one hand supporting
the glass. These buttons also speed up AF access for pre-focusing
duties and provide extra controls for regularly used features. You’ll find
these on many telephoto lenses and other select models.

100

Improve the quality of your video footage

PHOTO KIT LEADERBOARD

BEST STANDARD LENS Essential for all-round use
Prime lenses

Zoom lenses

1 Hasselblad
XCD 90V

1 Sigma 24-70mm
f/2.8 DG OS HSM | Art

This lens has impressed our review team – the
AF performance is excellent and it may well be
the sharpest lens to come through our doors.
QReview: Issue 279

The 24-70mm f/2.8 is a kitbag essential and
this Sigma is arguably the best value model
around, offering great sharpness, build and AF.
QReview: Issue 239

SPECIFICATION Price £4,059/$4,299 Max aperture f/2.5 Min aperture f/32
Closest focusing distance 0.67m Elements/groups 9/6 Mount Hasselblad X

SPECIFICATION Price £1,149/$1,249 Max aperture f/2.8 Min aperture f/22 Closest
focusing distance 0.37m Elements/groups 19/14 Mount Canon EF, Nikon F, Sigma SA

2 Canon RF 50mm f/1.2L USM

2 Sigma 28-45mm f/1.8 DG DN Art

QReview: Issue 218

QReview: TBA

SPECIFICATION Price £2,449/$2,199 Max aperture f/1.2
Min aperture f/16 Closest focusing distance 0.40m
Elements/groups 15/9 Mount Canon RF

3 Nikon Z 85mm f/1.2 S

SPECIFICATION Price £1,299/$1,349 Max aperture f/1.8
Min aperture f/16 Closest focusing distance 0.30m
Elements/groups 18/15 Mount Sony E, Leica L

3 Canon RF 24-105mm f/2.8L IS USM Z

QReview: Issue 267

QReview: Issue 275

SPECIFICATION Price £2,999/$2,597 Max aperture f/1.2
Min aperture f/16 Closest focusing distance 0.85m
Elements/groups 15/10 Mount Nikon Z

SPECIFICATION Price £3,439/$2,999 Max aperture f/2.8
Min aperture f/22 Closest focusing distance 0.45m
Elements/groups 23/18 Mount Canon RF

BEST SPECIALIST LENS

For something a little different

Prime lenses

Zoom lenses

1 Sigma 15mm F1.4 DG
DN Diagonal Fisheye Art

1 Nikon Z 28-400mm
f/4-8 VR

In our review, we found the versatility and quality
of this fisheye lens a winning combination.
The creative possibilities are exciting.
QReview: Issue 277

This superzoom mirrorless lens gives users
everything from wide-angle coverage to supertelephoto reach all in one quality package.
QReview: Issue 280

SPECIFICATION Price £1,859/$1,999 Max aperture f/1.4 Min aperture f/16
Closest focusing distance 0.39m Elements/groups 21/15 Mount Sony E, Leica L

SPECIFICATION Price £1,399/$1,297 Max aperture f/4-8 Min aperture f/45
Closest focusing distance 0.2-1.2m Elements/groups 21/15 Mount Nikon Z

2 TTArtisan Tilt 50mm f/1.4

2 Canon RF 24-240mm f/4-6.3 IS USM

QReview: Issue 262

QReview: Issue 243

SPECIFICATION Price £249/$199 Max aperture f/1.4
Min aperture f/16 Closest focusing distance 0.50m
Elements/groups 7/6Mount SonyE,CanonRF,FujifilmX,NikonZ,LeicaL,M43

SPECIFICATION Price £909/$899 Max aperture f/4-6.3
Min aperture f/36 Closest focusing distance 0.50m
Elements/groups 21/15 Mount Canon RF

3 Fujinon GF30mm f/5.6 T/S

3 Nikkor Z 24-200mm f/4-6.3 VR

QReview: TBA

QReview: Issue 246

SPECIFICATION Price £3,899/$3,999 Max aperture f/5.6
Min aperture f/32 Closest focusing distance 0.30m
Elements/groups 16/11 Mount Fujifilm GF

SPECIFICATION Price £949/$797 Max aperture f/4-6.3
Min aperture f/36 Closest focusing distance 0.50m
Elements/groups 19/15 Mount Nikon Z

101

PHOTO KIT LEADERBOARD

BEST TELEPHOTO LENS Zoom in closer to the action
Prime lenses

Zoom lenses

1 Canon RF 135mm
f/1.8L IS USM

1 Sigma 60-600mm
f/4.5-6.3 DG DN OS | S

Almost 30 years after the launch of its popular EF
mount 135mm, this RF version is a top performer
and a sure-fire hit for R-system portrait shooters.
QReview: Issue 279

Offering a huge 10x zoom, this super telephoto is a
perfect choice for sports and wildlife photographers.
QReview: Issue 271
SPECIFICATION Price £2,099/$1,999 Max aperture f/4.5-6.3
Min aperture f/22-32 Closest focusing distance 0.45m
Elements/groups 27/19 Mount Sony E, Leica L

SPECIFICATION Price £5,799/$5,998 Max aperture f/2.8 Min aperture f/22
Closest focusing distance 2.0m Elements/groups 20/16 Mount Sony E

2 Sony FE 300mm f/2.8 GM OSS

2 Nikkor Z 70-180mm f/2.8

QReview: Issue 275

QReview: Issue 273

SPECIFICATION Price £5,799/$5,998 Max aperture f/2.8
Min aperture f/22 Closest focusing distance 2.0m
Elements/groups 20/16 Mount Sony E

SPECIFICATION Price £1,299/$1,247 Max aperture f/2.8
Min aperture f/22 Closest focusing distance 0.27m
Elements/groups 19/14 Mount Nikon Z

3 Nikon Z 135mm f/1.8 S Plena

3 Sony FE 70-200mm f/2.8 GM OSS II

QReview: TBA

QReview: Issue 258

SPECIFICATION Price £2,649/$2,497 Max aperture f/1.8
Min aperture f/16 Closest focusing distance 0.82m
Elements/groups 16/14 Mount Nikon Z

SPECIFICATION Price £2,479/$2,798 Max aperture f/2.8
Min aperture f/22 Closest focusing distance 0.40m
Elements/groups 17/14 Mount Sony E

4 Canon RF 600mm f/11 IS STM
QReview: Issue 240

4 OM System M.Zuiko Digital ED
40-150mm f/4 Pro QReview: Issue 258

SPECIFICATION Price £829/$799 Max aperture f/11
Min aperture f/11 Closest focusing distance 4.5m
Elements/groups 10/7 Mount Canon RF

SPECIFICATION Price £749/$899 Max aperture f/4
Min aperture f/22 Closest focusing distance 0.70m
Elements/groups 15/9 Mount M4/3

5 Nikon Z 600mm f/4 TC VR S

5 Sigma 70-200mm f/2.8 DG OS HSM | S

QReview: Issue 263

QReview: TBA

SPECIFICATION Price £15,499/$15,497 Max aperture f/4
Min aperture f/22 Closest focusing distance 4.3m
Elements/groups 26/20 Mount Nikon Z

SPECIFICATION Price £1,199/$1,499 Max aperture f/2.8
Min aperture f/22 Closest focusing distance 1.2m
Elements/groups 24/22 Mount Canon EF, Nikon F, Sigma SA

BEST LIGHTING Take full control of the lighting conditions
1 Godox V1Pro

2 Godox VING V860III

SPECIFICATION Price £308/$329
Type Speedlight Compatibility Canon, Nikon,
Sony, Fujifilm,
OM System,
Panasonic, Pentax
Output Gn 92 ,
76W/s
Power source
Internal
(rechargeable)
Weight 580g
(incl. battery)

SPECIFICATION Price £190/$229
Type Speedlight Compatibility Canon, Nikon,
Sony, Fujifilm,
Olympus,
Panasonic,
Pentax Output
Gn 60/197
(ISO 100 m/ft,
200mm) Power
source Internal
(rechargeable)
Weight 530g
(inc battery)

102

3 Canon Speedlite
430EX III-RT

4 Hahnel Modus
600RT Mk II

SPECIFICATION
Price £279/$299
Type Speedlight
Compatibility
Canon Output
Gn 43/141 (ISO
100 m/ft, 105mm)
Power source
4x AA batteries
Weight 295g

SPECIFICATION
Price £249/$283
Type Speedlight
Compatibility
Canon, Nikon, Sony,
Fujifilm, Olympus,
Panasonic Output
Gn 60/197
(ISO 100 m/ft,
200mm) Power
source Internal
(rechargeable)
Weight 540g
(incl. battery)

PHOTO KIT LEADERBOARD

BEST
FILTERS
1 Kenko White
Mist No. 1
SPECIFICATION
Price £32-90/$40-113
Filter material: Optical
glass/aluminium frame
Sizes 49-82mm

2 Hoya
Variable
Density II
SPECIFICATION
Price £99-190/$80-160
Exposure increase:
+1.67 - +8.67 stops
Sizes 52-82mm

TRIPOD
BEST MACRO LENS BEST
Using a tripod is the
For capturing the world up close

key to sharper shots

1 Nikkor Z MC 105mm
f/2.8 VR S

1 Novo Helix
T50 Carbon
Fibre

In our initial review, we called this ‘one
of the best macro lenses we’d used’.
The quality, build and weight make it
a fantastic macro optic.
QReview: Issue 245

SPECIFICATION Price
£299/$309 Construction
Carbon Fibre Leg sections 5

SPECIFICATION Price £1,049/$947 Max aperture f/2.8
Min aperture f/32 Closest focusing distance 0.29m
Elements/groups 16/11 Mount Nikon Z

2 OM System M.Zuiko Digital ED
90mm f/3.5 Macro IS PRO
QReview TBA
SPECIFICATION Price £1,299/$1,500 Max aperture f/3.5
Min aperture f/22 Closest focusing distance 0.22m
Elements/groups 18/13 Mount M43

2 Benro MeFoto
RoadTrip Pro
SPECIFICATION Price
£240/$296 Construction
Carbon Fibre Leg sections 5

3 Canon RF100mm f/2.8L
Macro IS USM
QReview: Issue 254

3 H&Y Revoring
Variable ND &
Circular Polariser
SPECIFICATION Price
£170/$189 (46-62mm)
Exposure increase: +1.5
to +10 stops Sizes 67-82,
46-62, 37-49mm

SPECIFICATION Price £1,369/$1,099 Max aperture f/2.8
Min aperture f/32 Closest focusing distance 0.26m
Elements/groups 17/13 Mount Canon RF

3 3 Legged
Thing Leo 2.0
SPECIFICATION Price
£203/$267 Construction
Carbon Fibre Leg sections 5

4 Sigma 105mm f/2.8 DG
DN Macro Art
QReview: TBA
SPECIFICATION Price £729/$799 Max aperture f/2.8
Min aperture f/22 Closest focusing distance 0.30m
Elements/groups 12/7 Mount Sony E, Leica L

QReview: Issue 248

4 Gitzo Légende
Tripod

SPECIFICATION Price £679/$647 Max aperture f/2.8
Min aperture f/22 Closest focusing distance 0.16m
Elements/groups 10/7 Mount Nikon Z

SPECIFICATION Price
£549/$549 (w/ball head)
Construction Carbon Fibre
Leg sections 4

5 Nikkor Z 50mm f/2.8 Macro

4 Cokin
Nuances
Extreme Z-Pro
Soft Grad ND
SPECIFICATION
Price £148/$150 (3-stop)
Construction Glass
Sizes 84x100mm,
100x150mm, 130x170mm

6 Canon RF 85mm f/2 Macro IS STM
QReview: Issue 242
SPECIFICATION Price £619/$599 Max aperture f/2
Min aperture f/29 Closest focusing distance 0.35m
Elements/groups 12/11 Mount Canon RF

7 AstrHori 25mm f/2.8 Macro
2.0x-5.0x
QReview: TBA
SPECIFICATION Price £2,599/$2,099 Max aperture f/2.8 Min
aperture f/16 Closest focusing distance 37.5-45mm Elements/
groups 10/7 Mount Canon RF, Fuji X, Leica L, Nikon Z, Sony E

5 Benro
Cyanbird
SPECIFICATION Price
£235/$190 (w/N00P
Ball Head) Construction
Carbon Fibre/Aluminium
Leg sections 5

103

REVIEWS

EDITOR'S
CHOICE

Price: £4,999/$ 4,999
Website: fujifilm-x.com

Fujifilm GFX100S II
Gareth Bevan finds that a few choice upgrades create a more refined GFX camera

All images © Gareth Bevan

With the release of the Fujifilm
GFX100S II, it appears that Fujifilm
might have found its rhythm in the
GFX lineup. With its latest model, Fujifilm
simplifies the range, ditching the last of its
50MP medium format cameras with the GFX
50S II and now focusing on two 102MP largesensor cameras. Like the previous model, the
100S II is an attempt to balance affordability
with some of the best aspects of medium
format cameras and be the camera that

104

brings medium format to more people. With
some big shoes to fill, can the GFX100S II
continue the good work of its predecessor?
At first glance, you might not even
notice this is a new camera, apart from the
numerical marking added to the product
name. The GFX100S II uses the same body
as its predecessor, although the giveaway
is the addition of Fujifilm’s Bishamon-Tex
material with its signature Y-shaped pattern.
As with the GFX 100II, I prefer the look of

traditional faux-leather-wrapped cameras,
but the Bishamon-Tex is a lot grippier, which
really helps with the not-so-light GFX cameras
and lenses – although this is technically the
lightest GFX camera yet, at just 883g, which
is impressive when you consider that the
Nikon Z8 weighs 910g.
Mostly, I find the controls easy and intuitive
enough to use with the usual front and rear
wheels. The eight-way autofocus joystick on
the rear is chunky enough to easily find in a
hurry. Like other Fujifilm cameras, the controls
are incredibly customisable, so even if you
aren’t happy with them out of the box, it’s
quick and easy to set it up however you like.
The one button I struggled with a little was
the exposure button – the location next to the
shutter might be perfect, but it’s just a little
too small for my clumsy finger.
As with the previous model, there are dual
UHS-II SD card slots, with CFExpress being
reserved as a key point of difference for the
more expensive GFX100 II. Your experience
might vary depending on the type of SD card
you have, but when testing the camera using
a ProGrade V90 card, I didn’t have any issues
with the camera slowing down to process
images. There is also the ability to record to an
external SSD via USB-C if you prefer that. The
5.76m dot OLED viewfinder is really lovely to

FUJIFILM GFX100S II

use, it is large, bright, and clear for composing
shots. I was testing the GFX100S II alongside
the new Fujifilm X-T50 and taking the same
shot through each viewfinder kept reminding
me how much of a joy medium format GFX
cameras are for composing images.
The headline feature is still the sublime
102MP that impressed so much in the
previous model, although the sensor has
been redesigned slightly from the GFX100S
with new microlenses for better AF and a
new pixel structure that allows the sensor to
adopt a new low ISO of 80. For purposes that
require the ultimate image quality, such as
art reproduction or product photography, you
can’t do much better than this sensor.
However, if you still aren’t impressed by
that 102MP sensor, then the GFX100S II can
also perform the Pixel Shift trickery like other
models to create massive 400MP images.

The camera is also capable of using pixel shift
to merge four shots for true colour. For other
types of photography, 102MP might seem like
overkill, but the benefits of such large files
combined with the cropping capabilities of
your software mean you can digitally zoom
further into your subject without losing quality.
The autofocus was good at recognising a
huge range of animals on my safari testing,
locking on to the animals’ shapes with ease,
and more often than not – when given an
unobstructed view – finding the animals’ eyes.
This isn’t quite as quick as rival full-frame
cameras from Canon and Sony, with the
camera easily getting a little thrown off by
fences or branches that slightly obscured my
animal subjects. The autofocus was also
a bit skittish when there were multiple
subjects in the frame. In a herd of deer, the
camera changed its mind several times in just

Value and the competition
Should you be tempted to switch to MF for your next buy?
The GFX100S II will cost £4,999 ($4,999) at launch, bucking the trend of rising
prices, being a sizable £500 ($1,000) less than the RRP of its predecessor. There are
currently massive savings to be had on both the GFX100S and GFX50S II as Fujifilm
shifts all remaining stock of those two discontinued models.
The GFX range has always offered notably good value compared to other
medium-format cameras and it’s great to see that continue here, with the closest
Hasselblad currently costing $8,199. The 100S II is now the cheapest GFX option but
at full price, is slightly less competitive to full-frame rivals such as the Sony A7R V.

a few seconds about which deer it fancied
focusing on. Speed, as seen in the previous
model, is still fantastic, the camera can pull
from near to far really quickly.
The in-body image stabilisation (IBIS) has
also been increased from six to eight stops
of shake correction (when paired with a
compatible lens). One such lens is the new GF
500mm, and handheld, it was an absolutely
outstanding combination in testing.
The GFX100S II isn’t a groundbreaking
departure from its predecessor. Instead, it
builds upon the excellent foundation of the
GFX100S, incorporating the latest X-Processor
5, enhancing autofocus, shooting speed and
video capabilities while also improving IBIS.
I am also blown away by the capabilities of
the 102MP large sensor. Images are pin-sharp
and the ability to crop into even the smallest
details of the frame is unreal.

Summary
Ease of use
Value for money
Features
Quality of results

Overall
If you have been lusting after the GFX100 II
since its launch last year, but your budget
doesn’t stretch, the GFX100S II might well
scratch that itch. It isn’t revolutionary but it
refines the already excellent predecessor.
105

REVIEWS

Price: £145/$159 (upgrade from £79/$89)
Website: nikcollection.dxo.com

DxO Nik Collection 7
Can this classic photo-editing plug-in suite still turn heads, asks Rod Lawton

All images © Rod Lawton

The DxO Nik Collection now consists
of seven different plug-ins, five of
which are designed to offer creative
inspiration and effects, while two are more
‘corrective’ image enhancement tools. We call
them plug-ins and they can be used from
within Lightroom Classic, Adobe Photoshop,

106

Capture One, DxO PhotoLab and Affinity
Photo, but can also be used on their own as
standalone applications.
We’ve long considered the Nik Collection
to be one of the best photo editing software
suites on the market, so what exactly do you
get? The creative plug-ins include Nik Colour

Efex, Silver Efex, Analog Efex, Viveza, and HDR
Efex, and while there is a degree of crossover
for black-and-white photography and colour
adjustments, each one is aimed at a particular
style or genre of photography.
With Nik Collection 7, Color Efex becomes
the principal photo editing tool, with its
ability to apply over 50 different filter effects,
combine them as presets and mask each one
with DxO’s fast and effective control point
adjustments. Color Efex 7 gets the lion’s share
of updates in this latest version, with new
preset management options, ‘dynamic’ filters
that now include improved HSL controls, grain
effects and DxO’s own contrast-enhancing
ClearView effect. It also has three new filters
taken from the Viveza plug-in to extend its
potential for image enhancement and effects.
Typically, the Nik plug-ins follow a standard
modern layout, with presets in the left
sidebar and manual controls, including
local adjustments, on the right. There are
differences in the details and exact layout,
though – while all the Nik plug-ins share the
same family resemblance, they do operate
slightly differently. It’s not a problem and you
quickly get used to it and think no more about

DxO NIK COLLECTION 7

it, but it’s worth pointing out that not all the
plug-ins are identical.
If you’re launching them from Photoshop,
you have another potential workflow. The Nik
Collection installer adds a Nik Collection 7
palette that you can use to launch the plugins directly. There’s also a section for ‘Meta
presets’, which are automated combinations
of plug-ins and settings you can apply with
a single click – though it’s a relatively small
selection and you can’t create your own. The
Photoshop workflow is interesting because
you can apply the Nik filters to Smart Objects,
meaning that you can go back and change the
filter settings in the non-destructive workflow.
Regarding the quality of the results, Nik
Silver Efex enjoys a near-legendary reputation
amongst black-and-white photographers
for its ability to produce rich, dense and
dramatic monochrome images. It also offers
a set of tools that properly reflect the way
photographers see and manipulate black-andwhite images. For me, though, Color Efex has
always been the star of the show. Its filters are
powerful, inventive and genuinely useful day
to day, and the range of permutations and
presets you can create are practically infinite.

The improvements in Nik Collection 7 make
it better still. I also love Analog Efex, though
its presets can be a little heavy-handed and
its sometimes odd photography jargon firmly
rooted in the Google era – this is the one plugin added by Google during its tenure before
DxO took over. But what other tool gives you
multiple-exposure effects, lens distortion,
motion blur and multi-lens effects like these?
I also like HDR Efex 7, though its HDR
presets can look a little over the top by
today’s standards. If you want naturalistic
high dynamic range imaging, you are better
off in a program such as Lightroom, Capture
One or Affinity Photo, where the HDR tone
mapping is designed to be invisible. Viveza
seems, to me, less valuable. It offers global
and local colour adjustments that you can
apply just as easily in Color Efex. Indeed, Color
Efex 7 now includes three core components
of Viveza as new dynamic filters. Meanwhile,
Dfine seems a rather old-fashioned approach
to removing noise in images that have already
been processed. It does a useful job on noisy
old jpeg files, but if you shoot in RAW format,
you are probably better off with one of the
many RAW denoising tools available today.

Nik Collection: a brief history
Looking back at the fascinating story of this much-loved suite
The Collection began life in the 1990s, as plug-ins for Photoshop and standalones
including Nik Color Efex and Nik Sharpener – Viveza, Dfine, Color Efex Pro, HDR Efex
and Sharpener Pro were added later. In 2012, Google acquired Nik Software and the
applications were all bundled together in the first version of the suite as we know it
today. The following year, Google added Analog Efex and, in 2016, the collection was
made freely available to all. In 2017, Google sold the Nik Collection to DxO, which
has since added Perspective Efex as a further app, built entirely in-house. Now in
its seventh generation, the suite still works well either as plug-ins or standalones.

Nik Sharpener 7, meanwhile, can apply subtle
sharpening enhancements for printed output,
but again seems a bit of a throwback to older
ways of working.
We’ve highlighted some inconsistencies
in the Nik Collection 7 plug-ins and perhaps
some areas for improvement, that might
make it sound like an average sort of product.
It isn’t. The fact is, Color Efex 7, Silver Efex 7,
Analog Efex 7 and even HDR Efex 7 are just so
spectacularly good you could forgive the Nik
Collection 7 anything. Viveza seems less useful
and Dfine and Sharpener are distinctly oldfashioned and limited, but who cares? Those
first four plug-ins are so useful they easily
carry the rest. Nik Collection 7 is not perfect
but it’s so good that it hardly matters.

Summary
Ease of use
Value for money
Features
Quality of results

Overall
After version 6, it was difficult to see where
any improvements could be made. However,
Collection 7 has some clever, useful workflow
updates and improvements to control point
masking also give it formidable new powers.
107

REVIEWS

PRICE:
£1,179/$1,199
FOCUS DISTANCE:
0.17m (W) 0.34m (T)
WEIGHT:
735g/745g

Sigma
24-70mm F2.8 DG DN II A

Technical specs
Manufacturer

Matthew Richards asks whether this updated lens
sets new standards for Sony E and Leica L mounts
Build and handling

Web

sigmauk.com

Elements/construction

19 elements in 15 groups

Angle of view (diagonal)

84.1-34.3 °

Performance

Max aperture

The lens features an HLA (High-response
Linear Actuator) autofocus system. I certainly
found it to be snappy for stills while giving
smooth and virtually silent autofocus for video.
Our lab tests revealed a noticeable drop-off
in sharpness towards the extreme edges
and corners in the original lens, but I found
the Mark II performed extremely well in this
respect. Naturally, it’s not all about sharpness
and the quality of bokeh is lovely and smooth,
with a natural roll-off between focused and
defocused areas. As I’d hoped, the 11-blade
aperture diaphragm helps to retain the quality
of bokeh when stopping down a little, with
nicely rounded bokeh disks.

Min aperture

Verdict
The Sigma 24-70mm F2.8 DG DN II Art is
simply a superb lens. I love its image quality,
accurate AF and extra handling features.

Sigma
24-70mm F2.8 DG DN II Art

Min focus distance
Mount

f/2.8
f/22
0.17m (W) 0.34m (T)
Sony E , Leica L

Filter size

82mm
122mm

Length
Diameter
Weight

88mm
735g (E) 745g (L)

BUILD QUALITY
IMAGE QUALITY
VALUE FOR MONEY
FEATURES

Overall
Top-grade glass and build
Aperture ring and Fn buttons
Super-fast autofocus
Limited mount options
No optical stabiliser

Images by Matthew Richards

I have a history with Sigma 24-70mm ‘trinity’
zooms, having owned the Sigma 24-70mm
F2.8 DG OS HSM for Canon and Nikon DSLRs,
but I really like the handling characteristics of
this Mark II lens. Additions over the original
include an aperture control ring which comes
complete with a click/de-click switch and a
locking switch to avoid accidental operation.
The de-click option is great for shooting
video. Whereas the original lens had an AF-L
function button, the Mark II has two, which is
ideal for portrait orientation shooting. As with
most standard zoom lenses, this one has an
extending inner barrel, so the overall physical
length grows as you zoom from 24mm to
70mm. I didn’t experience any zoom creep
when testing the lens, but it comes with a
zoom lock switch nonetheless. Typical of
upmarket Sigma lenses, it comes supplied
with a high-quality padded soft case.

Model

Above

Above

Corner to corner

Focus fall-off

Even at the shortest focal length of 24mm, sharpness holds up well, right out
to the edges and corners of the image frame, at medium aperture settings

The constant f/2.8 aperture rating allows depth-of-field to be tightly controlled. In
keeping with the trinity lens’s common usage for portraiture, the bokeh is excellent

108

LENSES
DOWNLOAD
TEST DATA
https://bit.ly/DPH281

PRICE:
£215/$268
FOCUS DISTANCE:
0.4m
WEIGHT:
378g

Yongnuo YN33mm
f/1.4 DA DSM WL Pro

Technical specs
Manufacturer

This clever APS-C lens is a not-so-standard prime.
Matthew Richards finds out if it’s worth the hype

Model

Build and handling
I’ve been impressed with Yongnuo primes
for both APS-C and full-frame cameras in
the past. I’ve found they deliver impressive
performance at an outrageously competitive
selling price, but this one adds something new,
with built-in radio frequency communication.
The compact dimensions and lightweight build
made the lens feel at home on my Nikon Z fc.
Though small and light, the lens feels wellbuilt and features extensive weather-seals,
including a rubber gasket on the mounting
plate, which is made from chrome-plated
metal rather than plastic and features goldplated electronic contacts. My only gripe in
terms of handling is that the aperture control
ring turns easily with practically no resistance.

Performance

Verdict
There’s a lot packed into this little lens. I like
the dual-function buttons and dual control
rings, the smaller one of which I’d use for
aperture control. I’m not so happy that this
ring doesn’t have the option of click steps
or a lockable Auto position. Image quality is
satisfying and autofocus proved consistently
accurate in my tests. I’m not sure that I’d ever
use the optional wireless controller, but it’s
a neat extra if you feel the need.

th.hkyongnuo.com/

Elements/construction

11 elements in 9 groups

Angle of view (diagonal)

48.8 °

Max aperture

f/4 - 8

Min aperture

f/16

Min focus distance
Mounts

0.4m
Nikon Z (DX), Sony E, Fujifilm X

Filter size

58mm

Length

89 mm

Diameter

69mm

Weight

378g

BUILD QUALITY
IMAGE QUALITY
VALUE FOR MONEY
FEATURES

Overall
Customisation
RF Wireless control
Good performance and build
Smart extras bring complexity
Loose aperture ring

Images by Matthew Richards

Despite the down-market price tag, the lens
has some quality glass. Centre-sharpness

is very good wide-open at f/1.4, becoming
excellent at f/2. I noticed a little axial
chromatic aberration (aka bokeh fringing)
although the Yongnuo does better than
competing lenses. The nine-blade aperture
helps to retain well-rounded bokeh producing
good smoothness in defocused areas.
Barrel distortion can be noticeable but is
nevertheless of a fairly low grade.

Web

Yongnuo
YN33mm f/1.4 DA DSM WL Pro

Above

Above

At the fringe

Life in colour

This tight central crop of an image taken wide-open at f/1.4 reveals a little axial
chromatic aberration around high-contrast transitions near the plane of focus

Detail is sharply rendered and colours are true to life, offering richness and contrast.
We also liked the depth-of-field wide open at f/1.4 and it offers excellent value overall
109

REVIEWS

A collection of the best fun-yet-functional products out there for photographers

DJI RS 4
Price £469/$549, £619/$719
Website dji.com
A gimbal is a great way to elevate your
video production, enabling you to capture
more dynamic footage without the jitters
and jerks usually associated with handholding a camera. In the past, gimbals
tended to be rather heavy, a pain to set up
and horrendously expensive. Fortunately, as
the RS 4 demonstrates, DJI has put a lot of
effort into addressing these issues.
The RS 4 is intended for lightweight
professional use and weighs 1.4kg, which
means it’s fairly easy to hold and operate.
However, it can cope with payloads up to
3kg in weight which equates to a pretty
substantial mirrorless camera setup.
Furthermore, the arms are Teflon-coated,
making it much easier to make small,
smooth adjustments when balancing your
camera on the gimbal. There’s also a helpful
micro-adjustment knob on the camera
mounting – it would be nice to see this
rolled out to the other adjustment points.
Portrait orientation video is increasingly
important and DJI has made it easy to swap
between the two shooting orientations with
the RS 4. It’s just a case of unclipping the
camera mount and using its alternative
mounting point. DJI has also given the
RS 4 its fourth-generation
stabilisation algorithm and the
end result is effortless supersmooth footage.
The DJI RS 4 is sold
with everything you
need to stabilise a
camera, plus a case
to keep all the pieces
together when it’s
not in use. There’s
also a Combo Kit that
includes DJI’s focus
control system, which
is used to adjust either
the focus or the focal
length of a zoom lens.

110

ACCESSORIES

Deuter Jaypack 34+L
Price £300/$310

Website deuter.com

Deuter’s Jaypack 34+L has been designed for photographers
and uses an internal flexible steel frame to help with load
transfer, balance and comfort during prolonged use. Its external
dimensions are a substantial 60 x 30 x 22cm and it weighs
2.16kg, but Deuter’s Alpine Back System, well-padded adjustable
shoulder straps, sternum strap and stabiliser straps make it
comfortable to carry when fully loaded. There’s also a removable
waist belt with two useful zip-close pockets that can take some
of the weight off your shoulders.
Available in ‘Redwood’ or ‘Black’ colour schemes, the Jaypack
34+L is supplied with plenty of padded dividers to keep your
kit safe in the cavernous main compartment,
which can be accessed via the main rear
opening or the top. There’s room for
a double-gripped camera and a
collection of lenses up to 800mm.
The backpack also comes with
four straps that can be used at
various fixing points to hold
accessories such as a tripod.
There are also a few internal
organiser pockets, external side
pockets for a water bottle and
tripod, and a dedicated laptop
sleeve for up to 15-inch computers.

Lensbaby Omni Rainbow Universal Expansion Pack
Price £89/$90

Website lensbaby.com

The Omni Rainbow Universal Expansion Pack
is an optional extra for Lensbaby’s Omni
Creative Filter System (£109/$100) that can
be used on virtually any lens with a filter
thread. Essentially, the Omni System
comprises a ring that screws
onto the lens filter thread, plus
two magnetic cups that snap
onto the ring to allow the
filter wands to be held over
the lens’s front element
to introduce a range of
effects such as flare and
distortion or additional
colours to the image.
The Rainbow Expansion
Pack has three glass crystal
effect wands and two universal
wands with interchangeable effects
filters. The universal wands each have a small
clamp that you can use to hold the supplied
filter gels or anything else you fancy shooting
through. As you might guess, the wands
can introduce a rainbow of colours and you

just need to position them around the front
element of the lens to give the effect you want
where you want it.
The effects don’t suit every scene or
situation but they add a fun creative
element that can enhance many
images. They can inject some

additional interest into portraits, landscapes
and seascapes – or any other genre of
photography you care to
apply them to.

111

GLOSSARY

DIGITAL PHOTOGRAPHY

GLOSSARY
We explain the essential jargon you need
to demystify modern photo technology

Photography is both an art and a science and, as such, there are a plethora of
confusing technical terms to get to grips with. Luckily, we don’t often need to think
about this jargon, except perhaps when buying a new lens or investing in new tech.
However, understanding how your camera works and what these terms mean can improve
your appreciation of the medium, help you make better buying decisions and shoot better
images as you progress. Here are some of the ones we wish we had known from the beginning.

Acutance

Perspective distortion

The subjective perception of the sharpness
of a photographic image, as defined by the
contrast between edges, independent of
pixel resolution.

Sometimes called converging
verticals, this appears to artificially
angle straight lines inwards towards
the centre of the frame, caused by
parts of the subject being more
distant from the camera than others

Additive colour
Colour created by mixing light from different
light sources, starting with black, red, green
and blue light, which produces the visible
spectrum of light that is captured by our eyes.

Coma

Aspherical element
Any lens element, the surface profile of which
does not form part of a sphere. Used to reduce
aberrations, especially in wide-angle lenses.

Bit depth
The pixel capacity for storage of bits
(digital storage units created per captured
photon of light). Greater bit depth means
more colour information is captured.

Aspect ratio
The shape of an image frame, defined
by the proportional relationship
between the width and the height
of the image sensor.

The distortion of points of light within
an image, usually in a conical shape at
the edges of the frame and often at its
strongest at the maximum aperture.

Demosaic
A digital image processing algorithmic process
by which digital cameras create full-colour
images using the incomplete data collected
by the sensor and Colour Filter Array.

Chrominance
The characteristic of light that causes
the perception of colour when compared
with a reference of the same brightness,
but different hue and saturation.

Diffraction
The blurring effect introduced by the
interference of light travelling through a lens
aperture by the diaphragm blades. Diffraction
is worse at small apertures, eg. f/16 or f/22.

Circle of confusion (COC)
A disc around a point caused by a cone of
light created due to imperfect focusing at
a specific location. Across a whole image,
a wider COC manifests as blurriness.

Flange depth
The distance between the lens mount
of a camera body and the sensor plane.
This can vary between mounts, sensor-lens
designs and camera brands.

CMOS
Complementary Metal-Oxide Semiconductor.
This is the preferred sensor type used in
the majority of modern digital cameras and
replaced the Charge Coupled Devices
(CCD) of older models.

Focal plane

Colour Filter Array

Focus breathing

A mosaic of coloured filters fixed above
a camera’s sensor photosites that enable
the capture of colour information in
a digital image.

A noticeable shift in the field-of-view of a lens
when changing focus position, even if focal
length remains constant. This is problematic
for videography or when focus-stacking.

The position of the light-sensitive surface
within the camera body, which for digital
cameras, is the photosite-containing CMOS
sensor surface.

Clipping
A loss of shadow or highlight texture
through under- or over-exposure,
indicated by a histogram that is biased
to the extreme left or right respectively.

112

Magnification ratio
The size of a projected image
compared with the actual size of
the object. For example, a coin
measuring 22mm is magnified with
a ratio of 1:1 (life size) when the
coin measures 22mm on-sensor,
11mm at 1:2 and 5.5mm at 1:4.

MTF chart

©Marco Bottigelli/Getty Images

Modular Transfer Function. A graphical
representation of the optical performance
of a lens, plotting the resolution and contrast
from the frame centre to the edges.

Resolution
The ability of a camera and lens to render
two points or lines in an image as separate,
influencing apparent sharpness and detail.

Signal gain
Ghosting
Flare or haze effects in the image frame
that are often caused by internal reflections
within the optical system contacting the
sensor multiple times.

Gobo
From ‘go-between’, this is a light modifier,
usually either black or opaque, that can
be placed between the light source and
subject to alter the properties of the
emitted light.

Histogram
A graphical representation of the tonal
information, with highlights on the right
and shadows on the left. A centred data
peak means a balanced exposure.

data that is smaller than a jpeg format file
but offers superior image quality.

High-Efficiency Image File format. An
emerging file format used to contain image

Specular highlights
A spot of light on a reflective surface that
provides a strong visual cue for the shape
of an object. These are often encountered
as eye catchlights in portraiture.

Subtractive colour
Hyperfocal distance

HEIF

The amplification of a signal generated by
the sensor on contact with light. As ISO is
increased, the gain is turned up to simulate
an equivalent sensitivity at a given exposure.

The focus distance at a set aperture that
provides the widest depth of field, using
the equation Hyperfocal Distance =
Focal Length2 / Aperture x COC.

The creation of visible colour through
the selective removal of wavelengths from
white light, often through absorption by
pigments printed on a physical surface.

TTL metering
IBIS
In-Body Image Stabilisation. A system
of compensation for camera movements,
achieved by shifting the position of the
image sensor mounted on a gyro.

Through-the-lens metering is a method of
calculating exposure in flash photography by
measuring the ambient light and adjusting
flash output for a correct subject exposure.

Ultrasonic motor
Luminance
The apparent brightness of a light source
or surface as measured by the intensity
(amount of units) of light emitted from
(or reflected by) an object.

Fluorine coating
A special lens coating incorporating
negatively charged properties applied
to glass elements to repel dust and
water, allowing easy cleaning.

A type of fast and quiet piezoelectric
autofocus motor that makes use of
ultrasonic waves to vibrate a stator
ring pressed against a rotor.

Zone System
Moiré
An aberration caused by a digital sensor
failing to correctly resolve ultra-finely detailed
repeating and overlapping patterns. Manifests
as wavy patterns that don’t exist in the scene.

A standardised numerical system for
calculating exposure in any lighting
conditions. Created by Ansel Adams and
Fred Archer, the system ranges from Zone
0 (pure black) to Zone 10 (pure white).
113

PRO COLUMN

PHOTO POETIC

Ludovic Micheau discusses the converging themes in his
imagery and poetry, and the influences that inspire his art
All images © Ludovic Micheau

fter dedicating eight
years to ecological and
alternative causes in rural
areas by establishing
a permaculture farm in the
Perigord Vert region of the verdurous
countryside of France, when I was
just 21 years old, I now dedicate
myself exclusively to the arts that
drive me day after day. On the one
hand, these arts have been nurtured
by reading books, such as poetry and
philosophical essays, and on the other,
they are inspired by the journeys
I have embarked upon for several
years now, which are probably the
most substantial base of my creativity.
As a minstrel, poet and
photographer, I travel across
Europe from city to city, driven by
the ambitions that fuel my art. My
primary goal is to share the songs

A
PRO BIO

Ludovic Micheau
French artist, poet,
musician and
photographer
Ludovic Micheau is
always seeking new
experiences and
perspectives for his art.
As the solo performer
in his band WoodRat
Flat, Ludovic finds joy
and fulfilment in various
artistic outlets, including
his photography. Having
lived seven years in the
woods, he is now on the
road, filling himself with
new inspiration.
@ludovic_micheau
114

I write and play and, thanks to this,
I now earn a living from it. Equipped
with a camera and lenses that
never leave my side, my second
goal is to capture the dynamic and
polymorphous images of these cities.
These images and elements of life are
integrated into my poetry, with each
collection intended to renew itself.
In a way, photography has been an
unexpected discovery that helped me
to reconnect with real life, far from the
shadowy realm of poets and the dark
basements of musicians. Indeed, like
most photographers, you have to be
there, seeking the magical, capturing

the elusive present and being full
of hope waiting for the miracle
and the beauty of an accident that
sometimes creates amazing pictures.
Since the street is my main
environment, due to my activities as
a street musician, my photography
predominantly features urban scenes,
however, I also appreciate the beauty
of portraits and nature.
Returning to the road with songs
from the first two albums of WoodRat
Flat, my solo project, I will be filling
European streets with my guitar and
my voice for the next few months –
and, of course, taking photographs.

“Photography helped me reconnect
with real life, far from the shadowy
realms of poets and musicians”