/


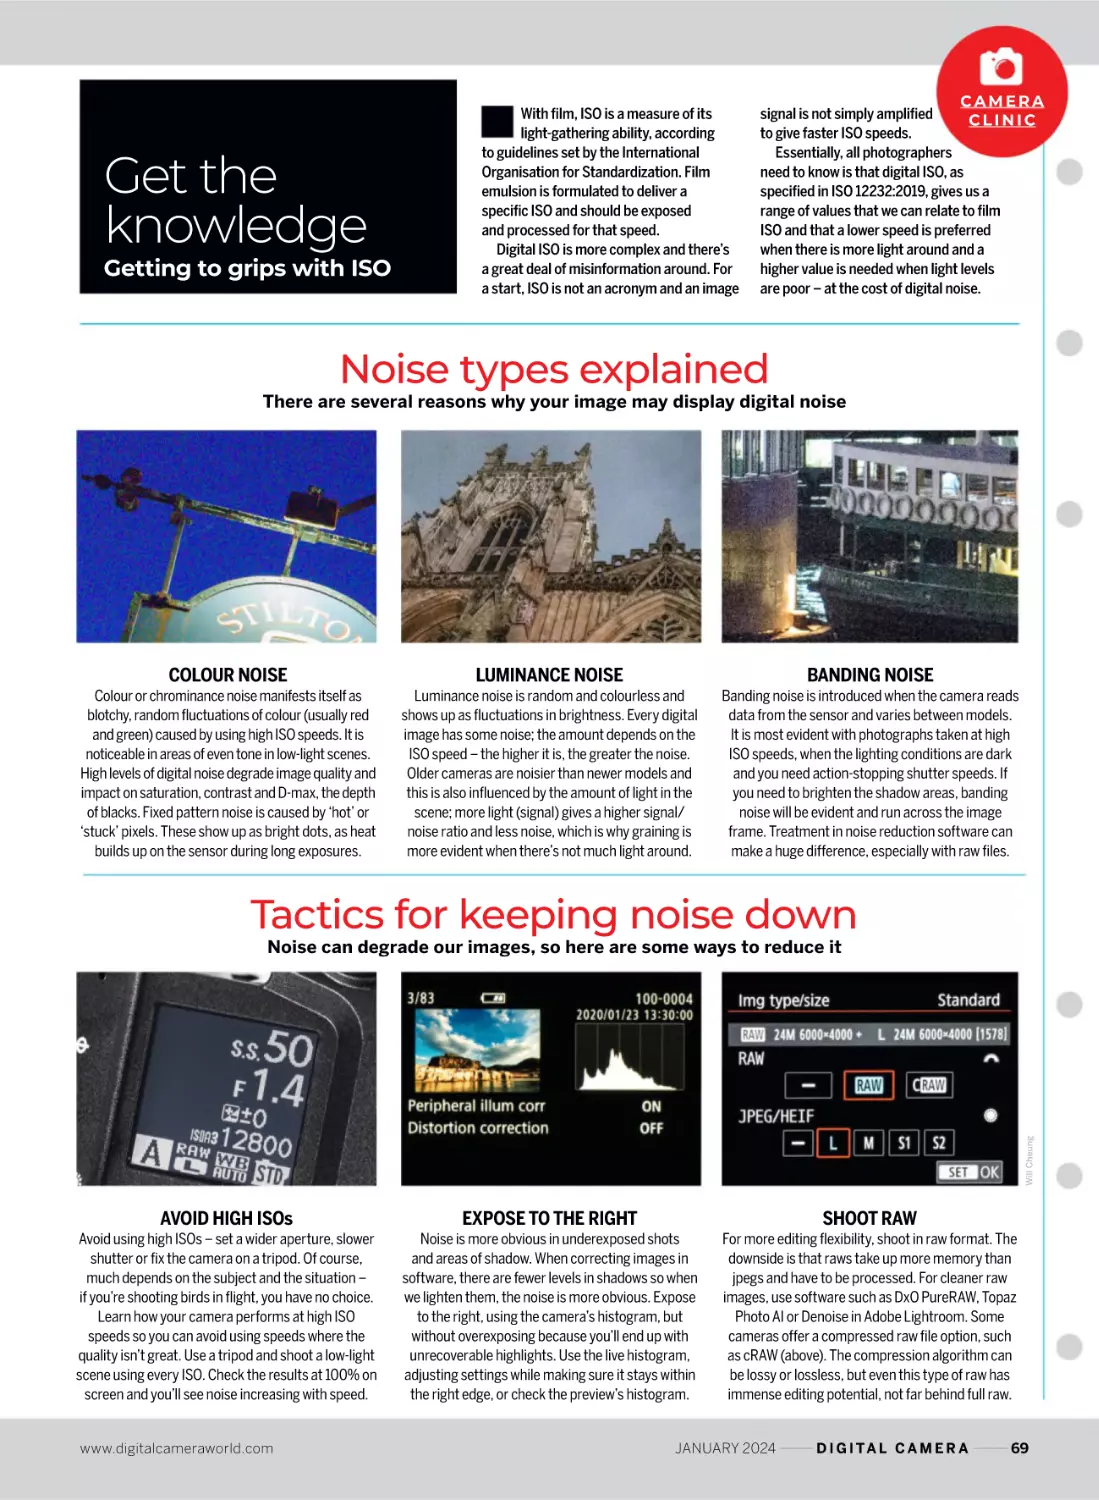


Текст
EDITING MEGAPACK
200+ SOFTWARE EXTRAS! PRESETS, ACTIONS AND MORE FOR LIGHTROOM & PHOTOSHOP
Issue 276 January 2024 www.digitalcameraworld.com
68 MINS
OF VIDEO
TUTORIALS
Lightroom • Photoshop
Camera Raw
Page 77
PHOTO IDEAS FOR
THE NEW YEAR
Take your best-ever shots in 2024!
Technique Settings Editing
TE STE D
Nikon Z f and
OM System TG-7
FREE! WITH THIS ISSUE
PLUS!
6
MINU8
OF VI TES
DEO
Presets & Actions
Mega pack
9 All-new photo
tips cards
50 mins of expert
video tutorials
Essential Photography
Gear Guide Ebook
PHOTO
ACTIVE
HOTSHOTS
PHOTO
ANSWERS
Editorial
Editor Niall Hampton niall.hampton@futurenet.com
Contributing editors Claire Gillo & Marcus Hawkins
Art editor Roddy Llewellyn richard.llewellyn@futurenet.com
Production editor Jon Crampin jon.crampin@futurenet.com
Reviews editor Gareth Bevan gareth.bevan@futurenet.com
Imaging labs manager Ben Andrews ben.andrews@futurenet.com
Contributors
James Abbott, James Artaius, Benedict Brain, Will Cheung, Jon Devo,
Andrew James, Sean McCormack, James Paterson, Matthew Richards
Cover image Getty
Photography Bath Photo Studio
All copyrights and trademarks are recognised and respected
Advertising
Group commercial director Clare Dove clare.dove@futurenet.com
Head of market, advertising Matthew Johnston
matthew.johnston@futurenet.com
Account director Matt Bailey matt.bailey@futurenet.com
Account manager Chelsea Speakman
chelsea.speakman@futurenet.com
Media packs are available on request
Licensing & Syndication
Digital Camera is available for licensing and syndication. To
find out more, contact us at licensing@futurenet.com or view
our available content at www.futurecontenthub.com
Head of print licensing Rachel Shaw licensing@futurenet.com
Subscriptions
Email queries: help@mymagazine.co.uk
New subscribers: www.magazinesdirect.com
Renewal: www.mymagazine.co.uk
Phone orders: 0330 333 1113
Customer service: 0330 333 4333
Magazines marketing director Sharon Todd
Circulation
Head of newstrade Ben Oakden
Production
Head of production US & UK Mark Constance
Production project manager Clare Scott
Senior advertising production manager Jo Crosby
Digital editions controller Jason Hudson
Production manager Vivienne Calvert
Management
Managing director Stuart Williams
Content director Chris George chris.george@futurenet.com
Group art director Warren Brown
Chief revenue officer Zack Sullivan
Printed by
William Gibbons on behalf of Future
Distributed by
Marketforce UK Ltd, 121-141 Westbourne Terrace, London W2 6JR
www.marketforce.co.uk Email: mfcommunications@futurenet.com
Subscription delays
We rely on various delivery companies to get
your magazine to you – many of whom continue
to be impacted by Covid-19. We kindly ask
that you allow up to seven days before
contacting us about a late delivery,
via: help@magazinesdirect.com
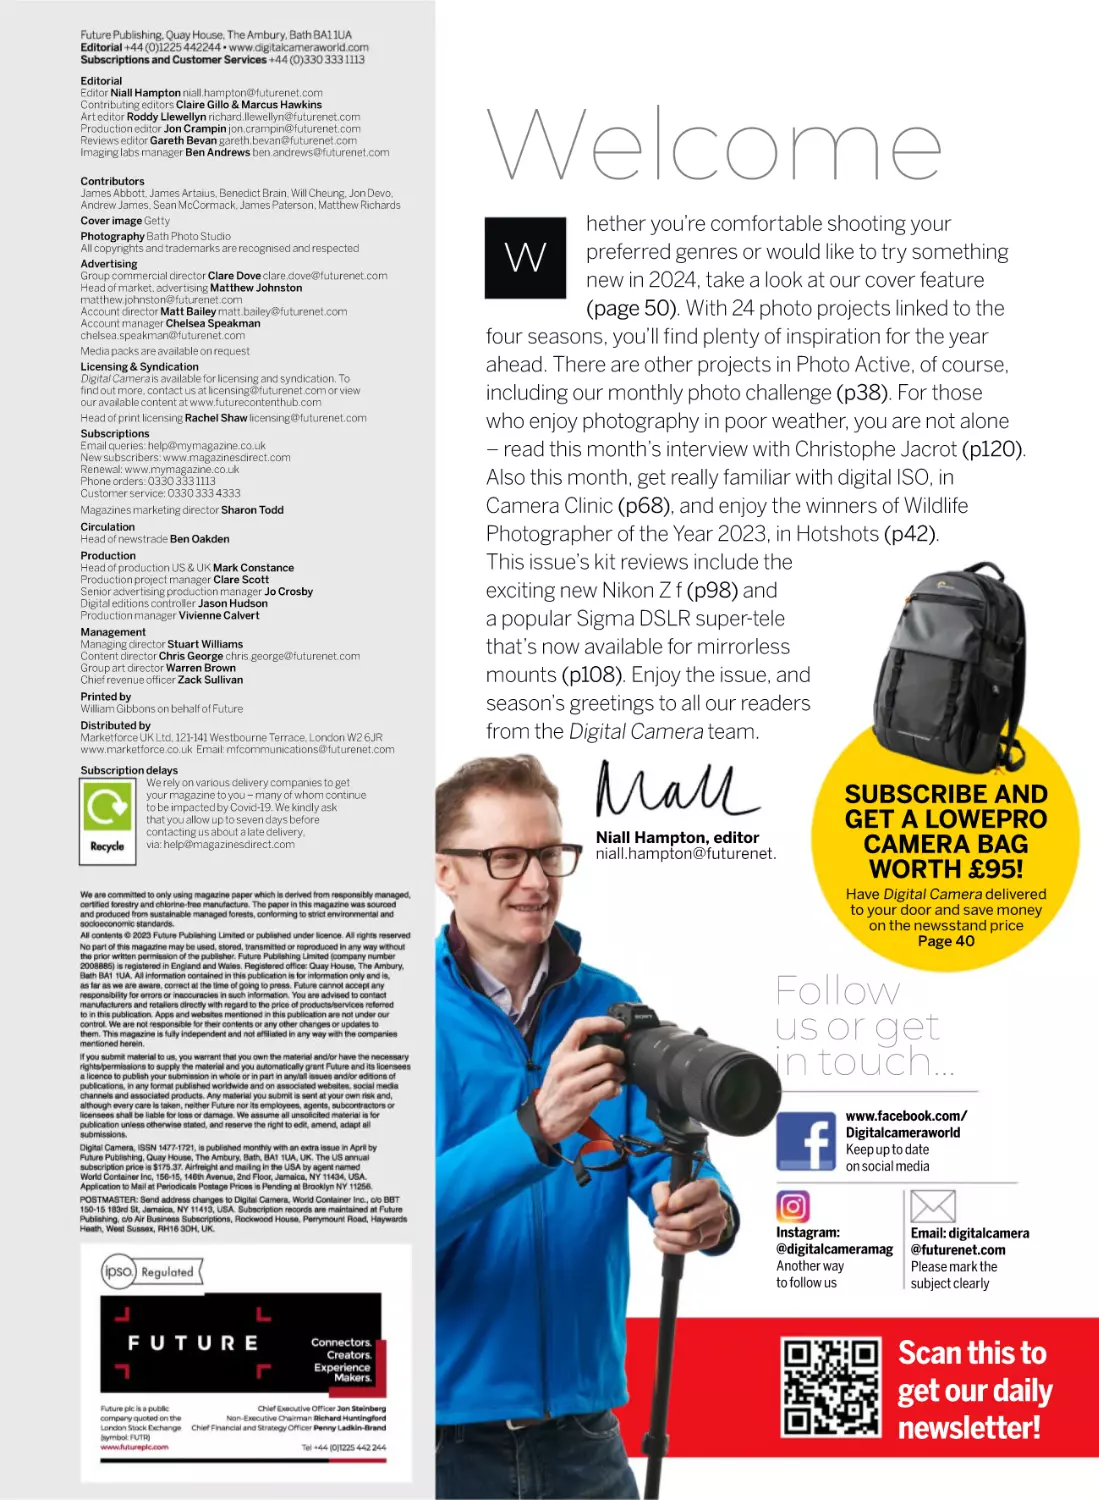
Welcome
hether you’re comfortable shooting your
preferred genres or would like to try something
new in 2024, take a look at our cover feature
(page 50). With 24 photo projects linked to the
four seasons, you’ll find plenty of inspiration for the year
ahead. There are other projects in Photo Active, of course,
including our monthly photo challenge (p38). For those
who enjoy photography in poor weather, you are not alone
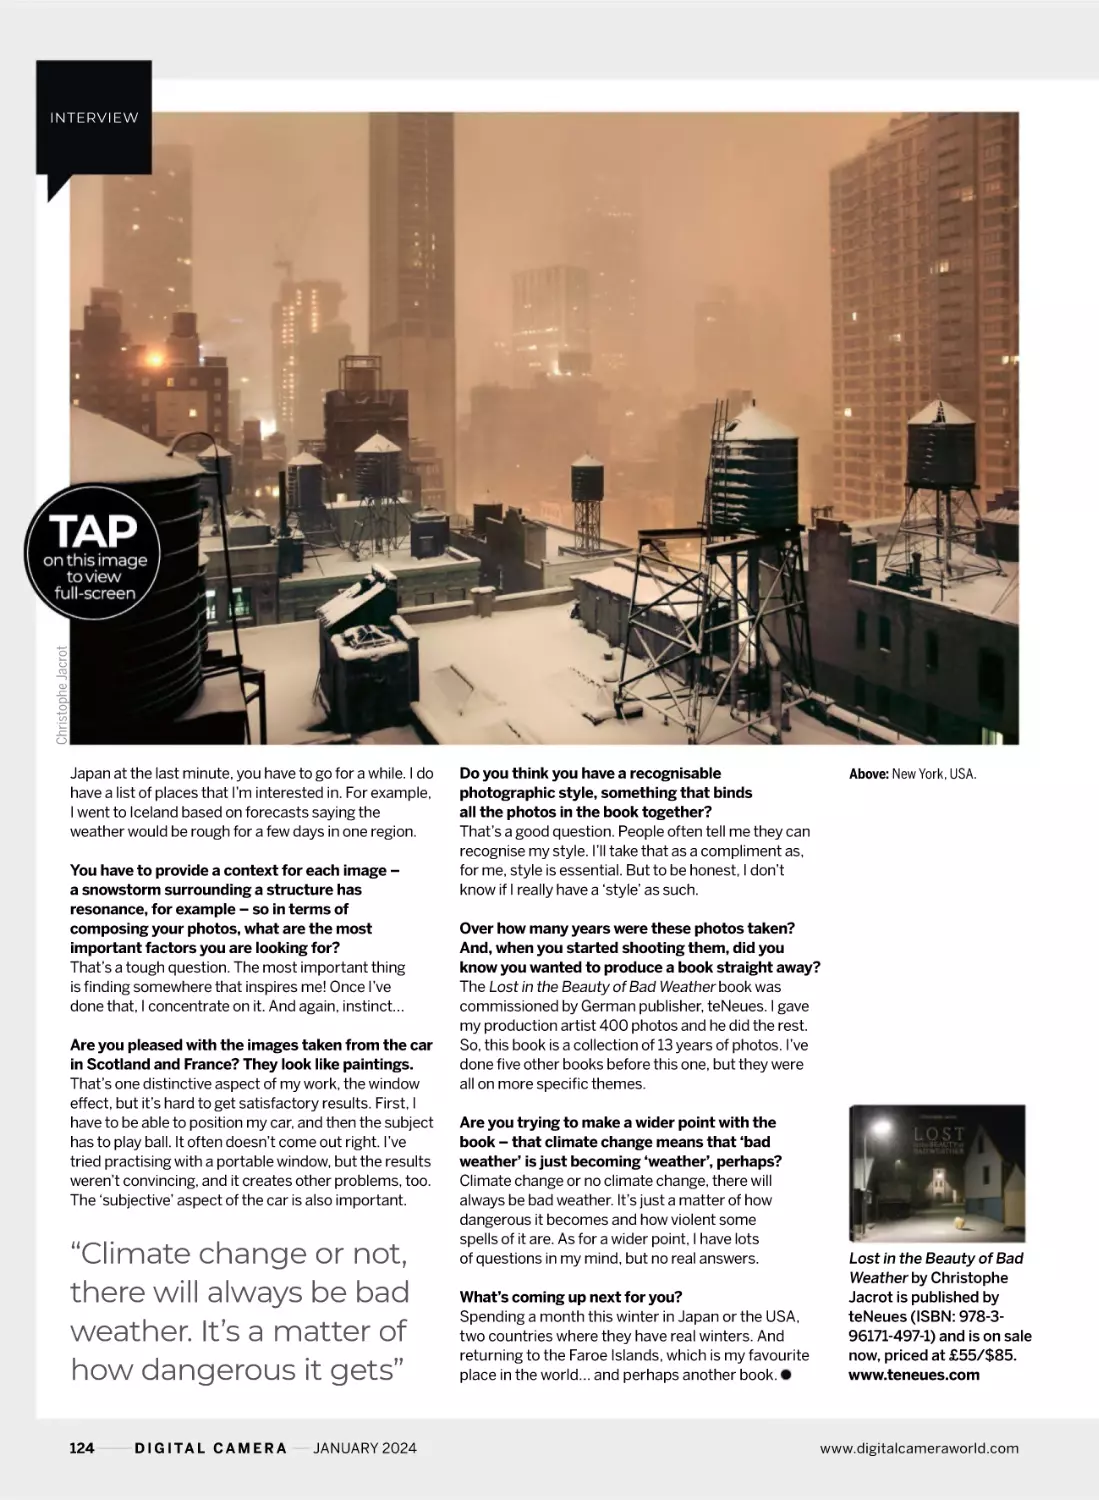
– read this month’s interview with Christophe Jacrot (p120).
Also this month, get really familiar with digital ISO, in
Camera Clinic (p68), and enjoy the winners of Wildlife
Photographer of the Year 2023, in Hotshots (p42).
This issue’s kit reviews include the
exciting new Nikon Z f (p98) and
a popular Sigma DSLR super-tele
that’s now available for mirrorless
mounts (p108). Enjoy the issue, and
season’s greetings to all our readers
from the Digital Camera team.
W
Niall Hampton, editor
niall.hampton@futurenet.
SUBSCRIBE AND
GET A LOWEPRO
CAMERA BAG
WORTH £95!
Have Digital Camera delivered
to your door and save money
on the newsstand price
Page 40
Follow
us or get
in touch…
www.facebook.com/
Digitalcameraworld
Keep up to date
on social media
Instagram:
@digitalcameramag
Another way
to follow us
Email: digitalcamera
@futurenet.com
Please mark the
subject clearly
Scan this to
get our daily
newsletter!
ISSUE 276
JANUARY 2024
Laurent Ballesta /
Wildlife Photographer of the Year
50
PHOTO
PROJECTS
42
Hotshots Category winners
from the Wildlife Photographer
of the Year 2023 competition
77
Practical Photoshop Get the
most out of Lightroom and
Photoshop with our tutorials
Claire Gillo
FOR 2024!
Photo skills
8 One to One
On location in autumnal Bristol with
mist photographer Sam Binding
16
50
Photo Active
Fresh inspiration on every page –
choose from 10 all-new projects
and enter our latest photo challenge
24 fabulous photo
projects for 2024
Take your images up a level this year,
with a raft of creative assignments
68
77
86
4
Camera Clinic
Our new technique series continues,
with the lowdown on digital ISO
Regulars
39 The Art of Seeing
An ode to Christmas by Benedict Brain
42
Hotshots
60
Reader Gallery
Photo Answers
Our expert answers your questions
on a wide range of subjects, plus
Tech Check and Image Rescue
D I G I TA L C A M E R A
Presenting the month’s best images
taken by Digital Camera readers
76
Shot of the Month
90
In Focus
92
Behind the Lens
Practical Photoshop
Tutorials covering the latest features
of Photoshop and Lightroom, plus our
mega collection of software extras
Wildlife Photographer of the Year 2023
96
New full-frame model expands brand’s
retro-styled mirrorless camera line-up
102 OM System Tough TG-7
The latest version of a camera designed
to take a whole lot of punishment
Z 135mm
106 Nikkor
f/1.8 S Plena
A bokeh-tastic new optic for Nikon Z
owners keen for portraiture perfection
A newly published Steve McCurry work
The latest camera kit and accessories
52 Assignments: Portrait Photography
by author Brian Lloyd Duckett
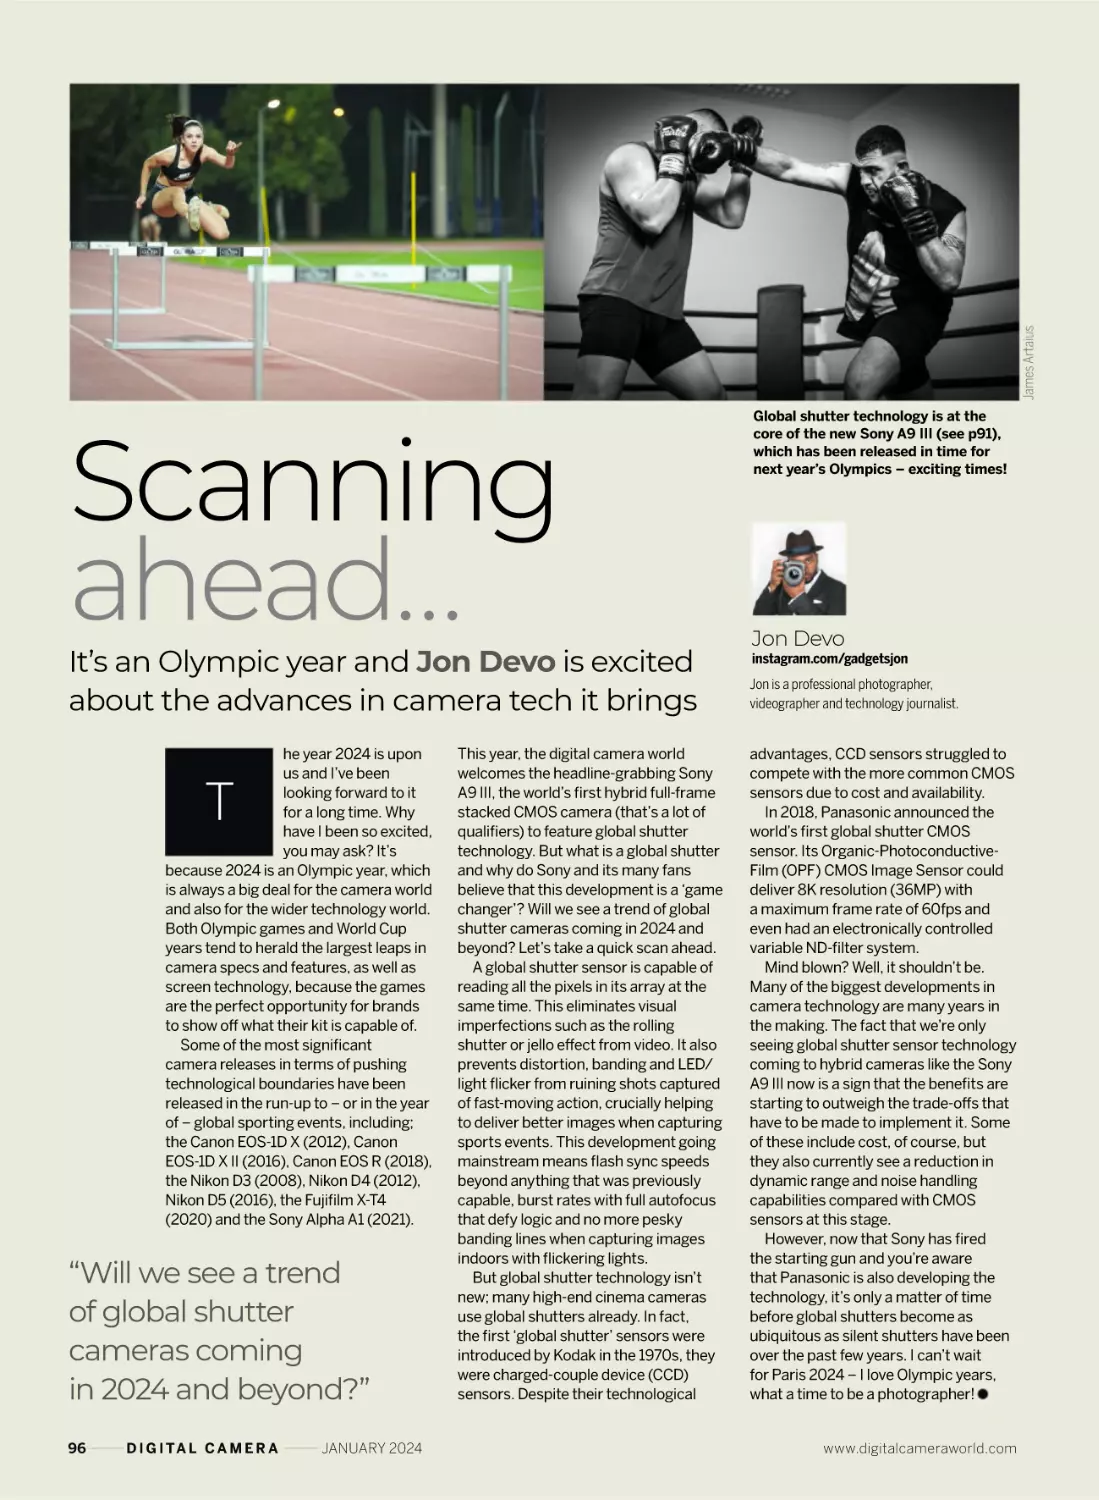
Scanning ahead
The latest dispatch from our
resident tech-spert Jon Devo
120 Interview
JANUARY 2024
Gear & tests
98 Nikon Z f
French photographer Christophe
Jacrot on capturing bad weather
60-600mm
108 Sigma
f/4.5-6.3 DG DN OS S
‘Bigma’ for DSLRs is ported to mirrorless,
for Leica L- and Sony E-mount cameras
111
Camera buyer’s guide
Listings and key specs of all the DSLR
and mirrorless models currently on sale,
plus wise buy recommendations for
various types of photo accessories
NEW:
CAMERA
BUYER’S GUIDE
DSLR & mirrorless models,
plus best-buy accessories
PAGE 111
Contents
Page 40 – subscribe today and get a
Lowepro Adventura
Go BP 150 camera bag
WORTH
£95!
This
month’s
contributors
Christophe Jacrot
Climate photographer
Will Cheung
Philippe Lemonnier
A native of France, Jacrot has
just published his sixth book – we
hear what draws him to the bad
weather he likes to photograph
and why he does it, from page 120
Will Cheung
Photographer and writer
68
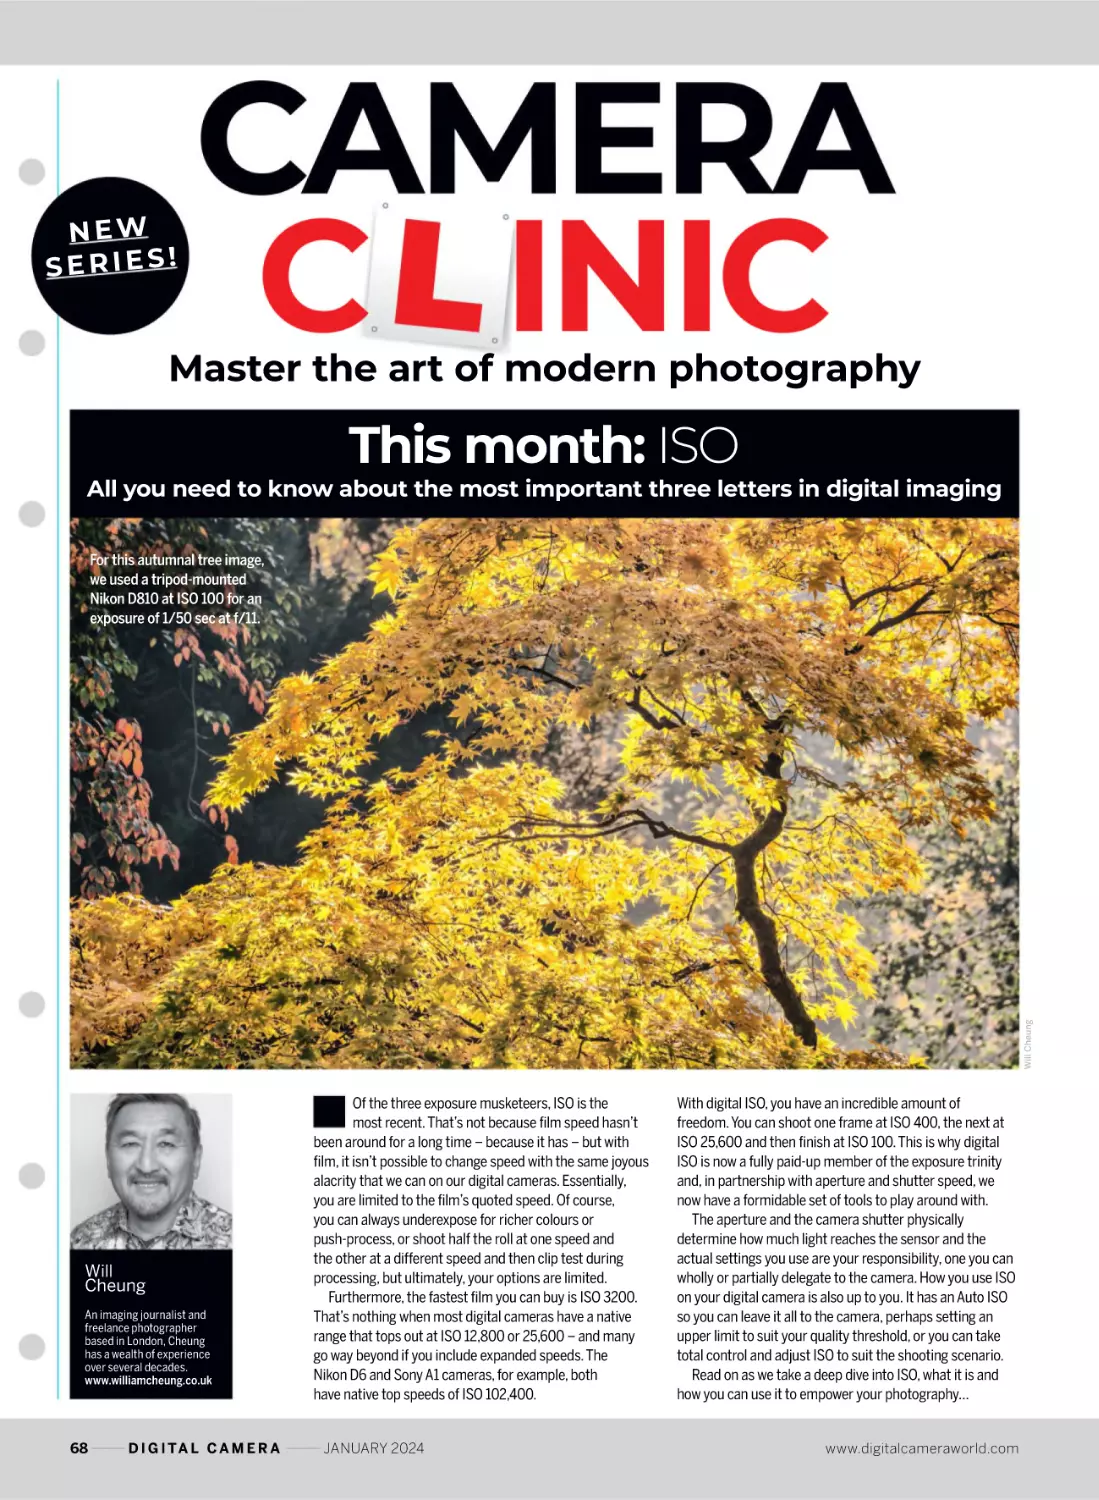
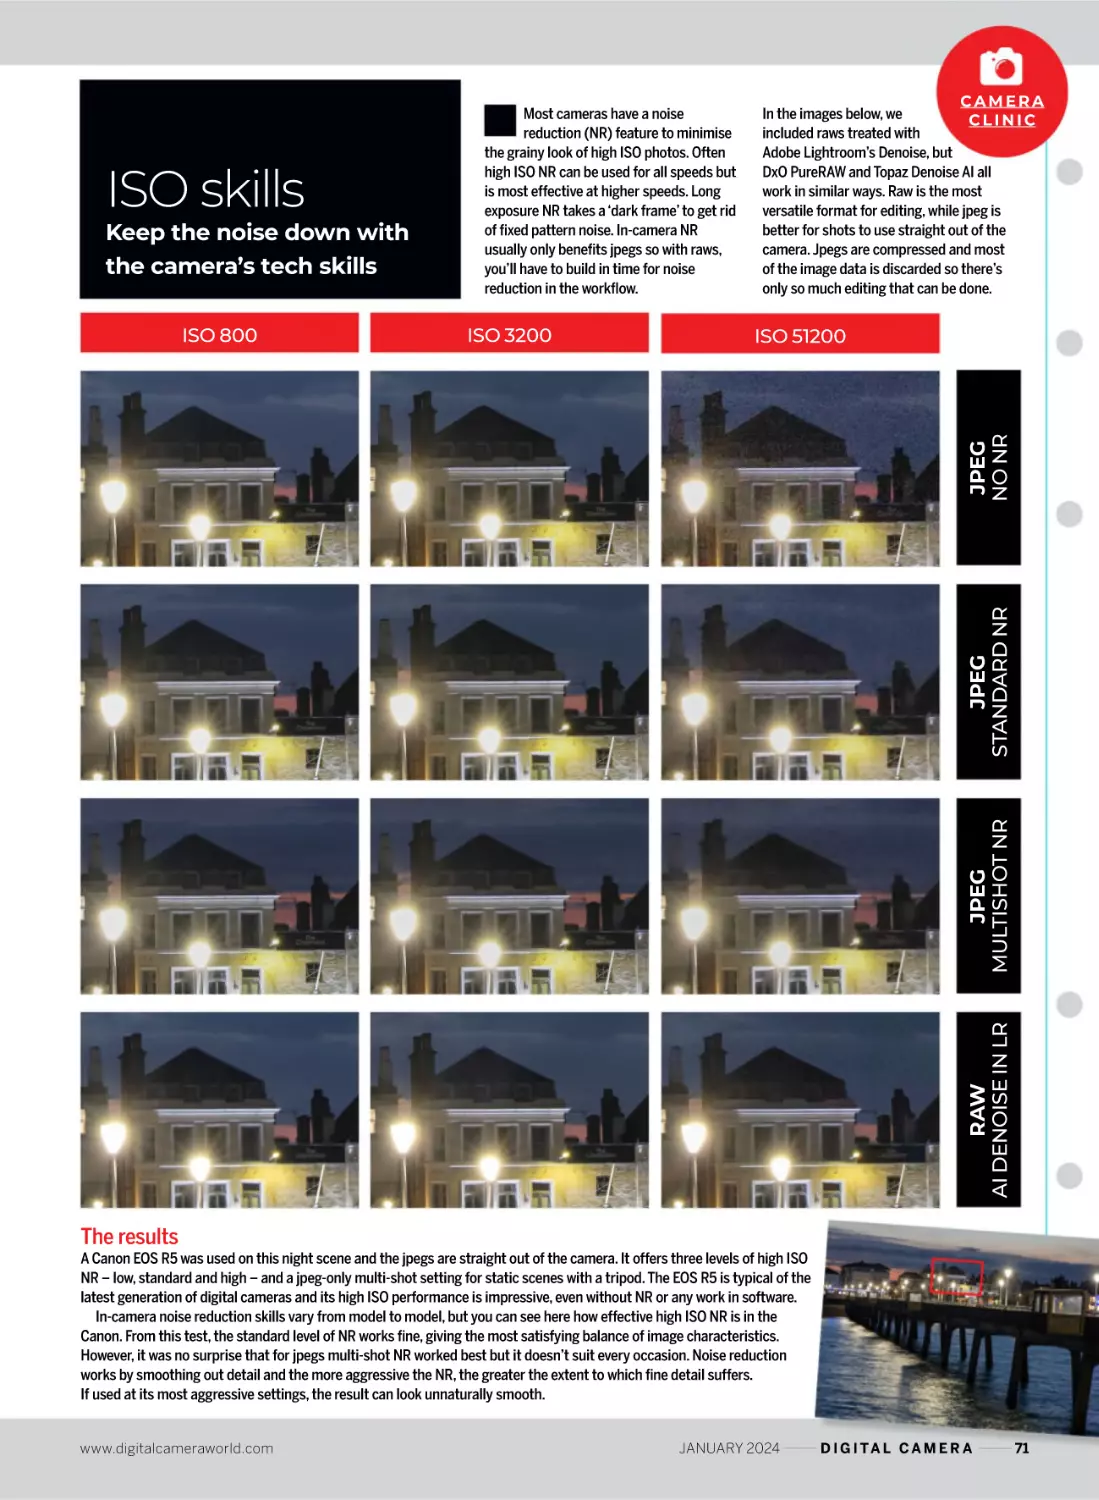
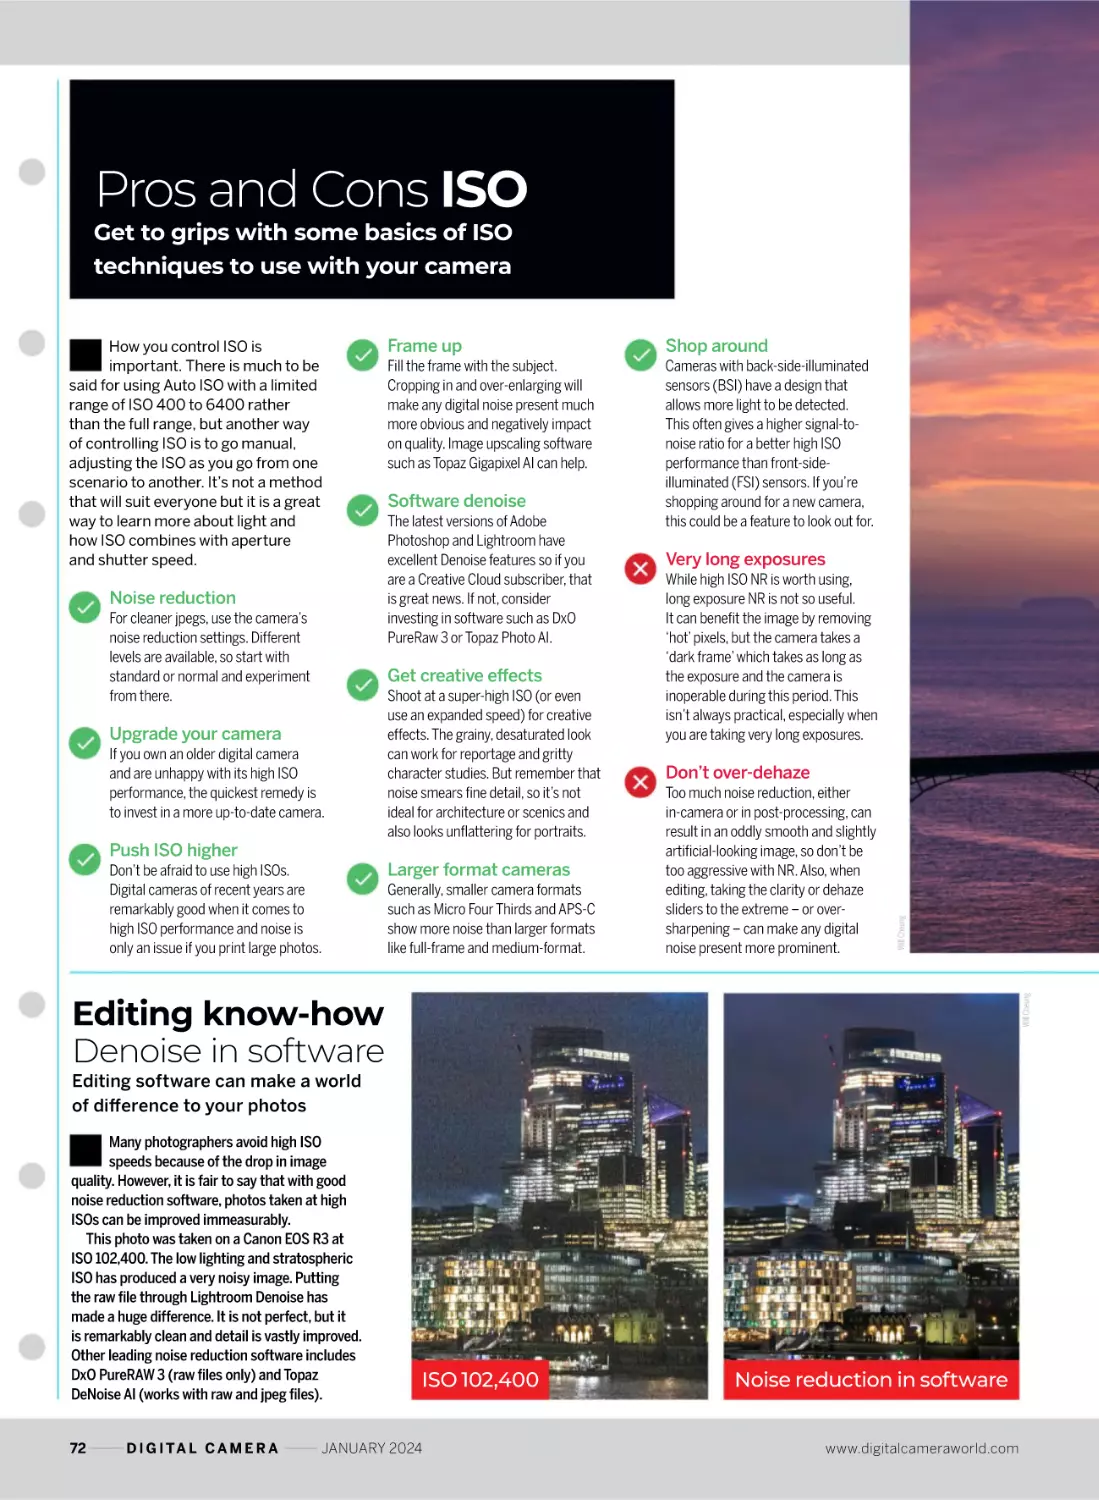
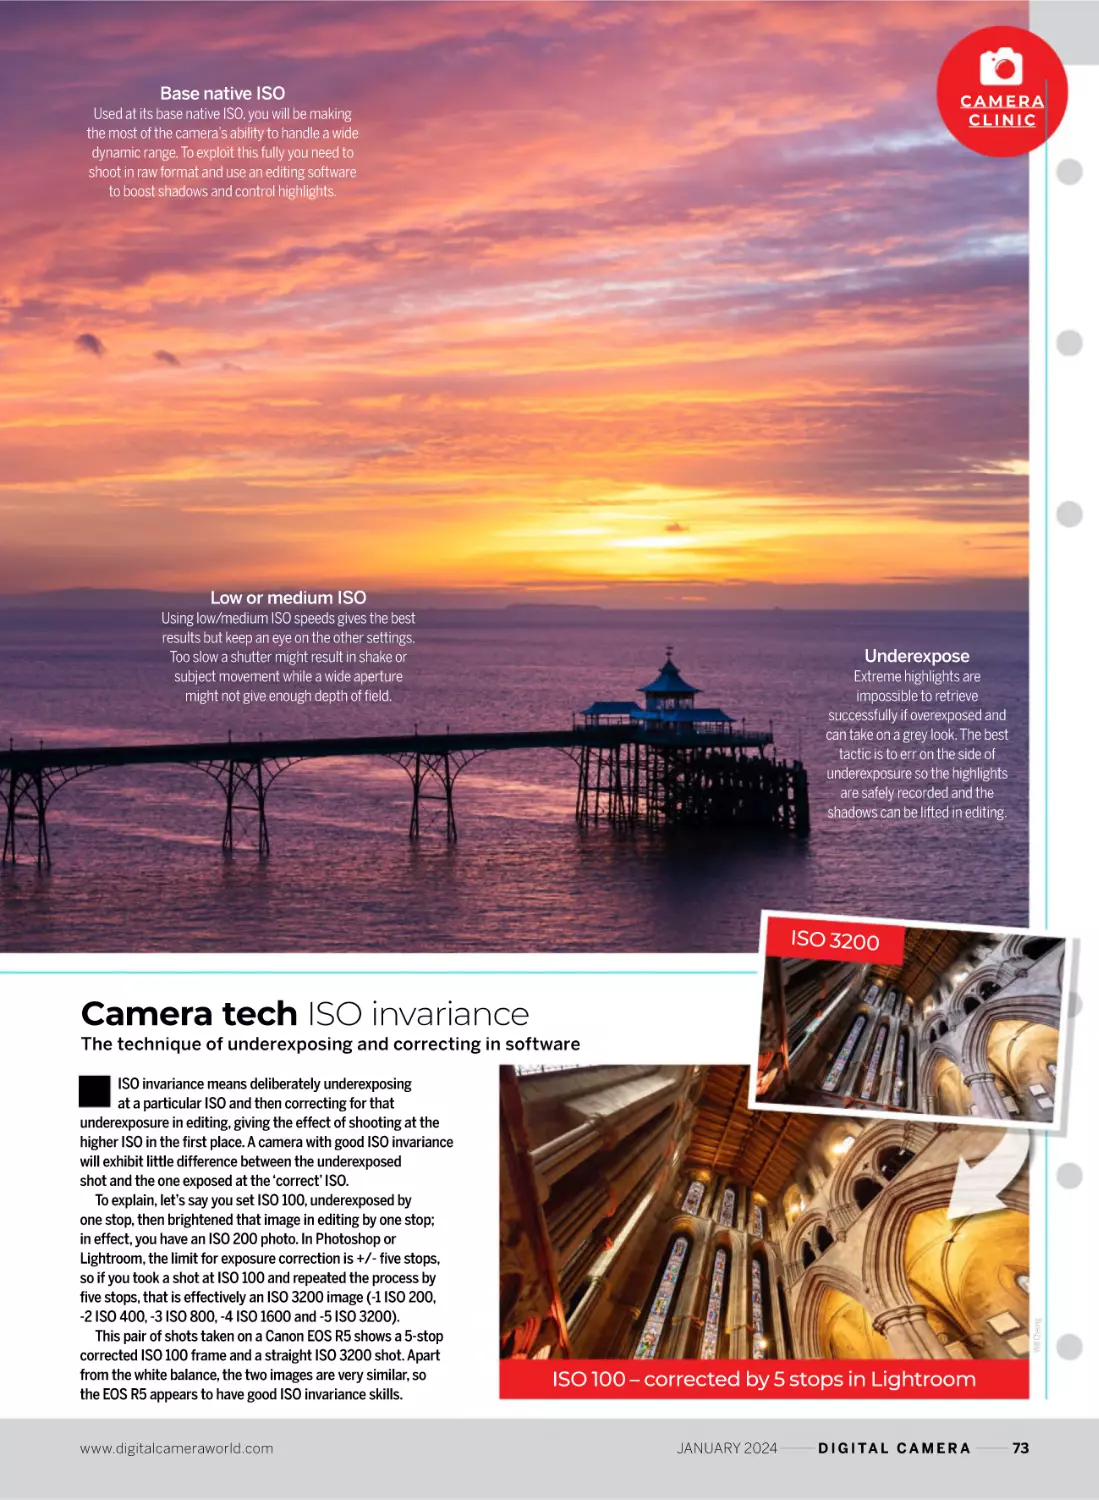
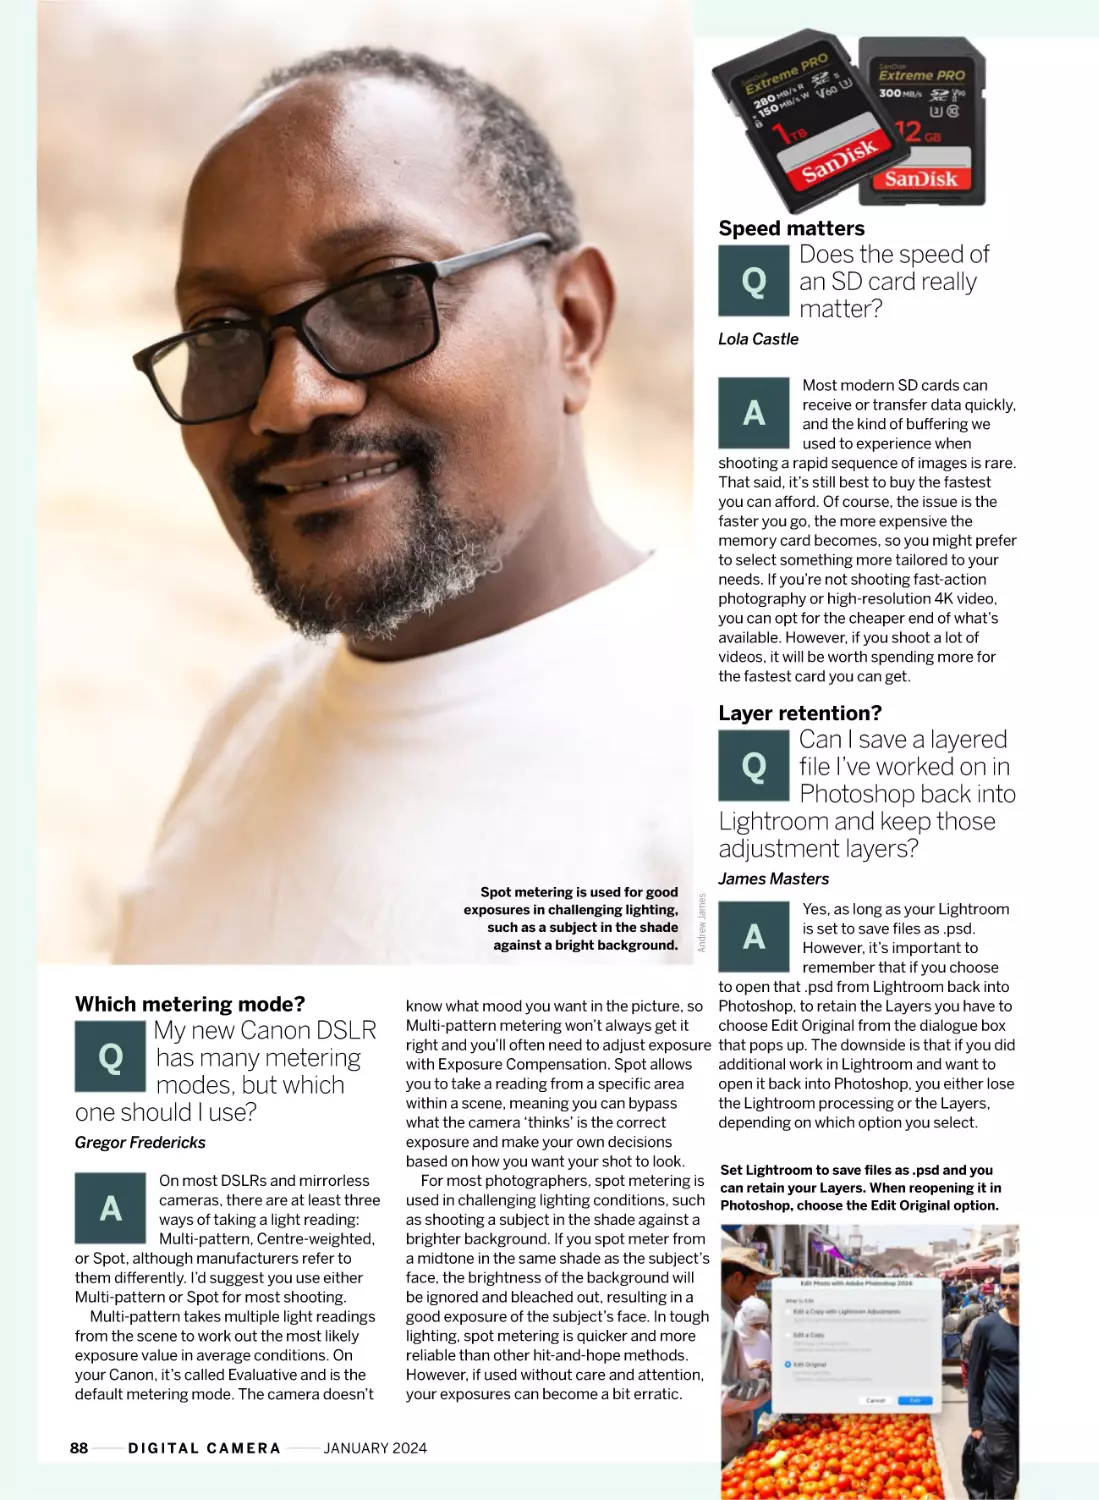
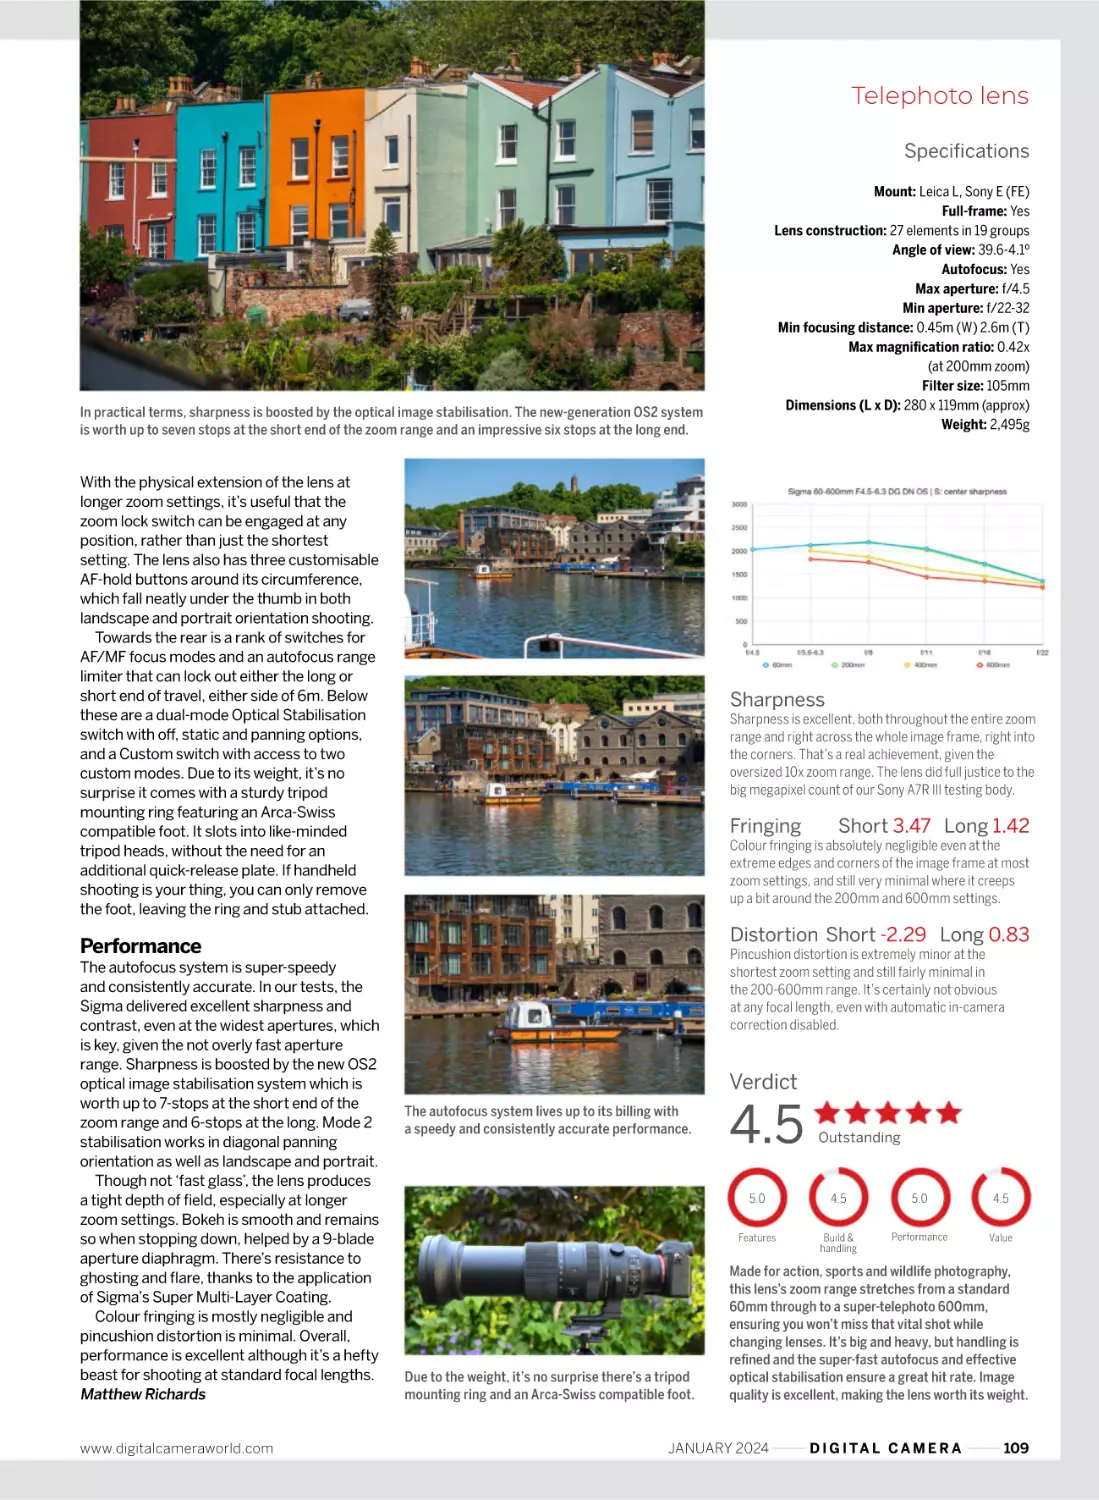
Camera Clinic _ Along with aperture and shutter speed, digital ISO is one-third
of the exposure trinity and offers an incredible amount of freedom. Find out
how to exploit it to the max in part three of our new photo technique series
A fellow of the Royal Photographic
Society and the former editor of
many photography titles, Cheung
is the man behind Camera Clinic,
which continues on page 68
Claire Gillo
Photographer and writer
Digital Camera’s former technique
editor now specialises in creative
and fine-art photography – you
can find her latest photo project
contributions from page 16
Steve McCurry
Photographer
Christophe Jacrot
The Magnum Photos legend
has published a collection of
images on the theme of ‘devotion’.
We go behind the scenes of one
of his images on page 76
120
Jon Devo
Photographer & writer
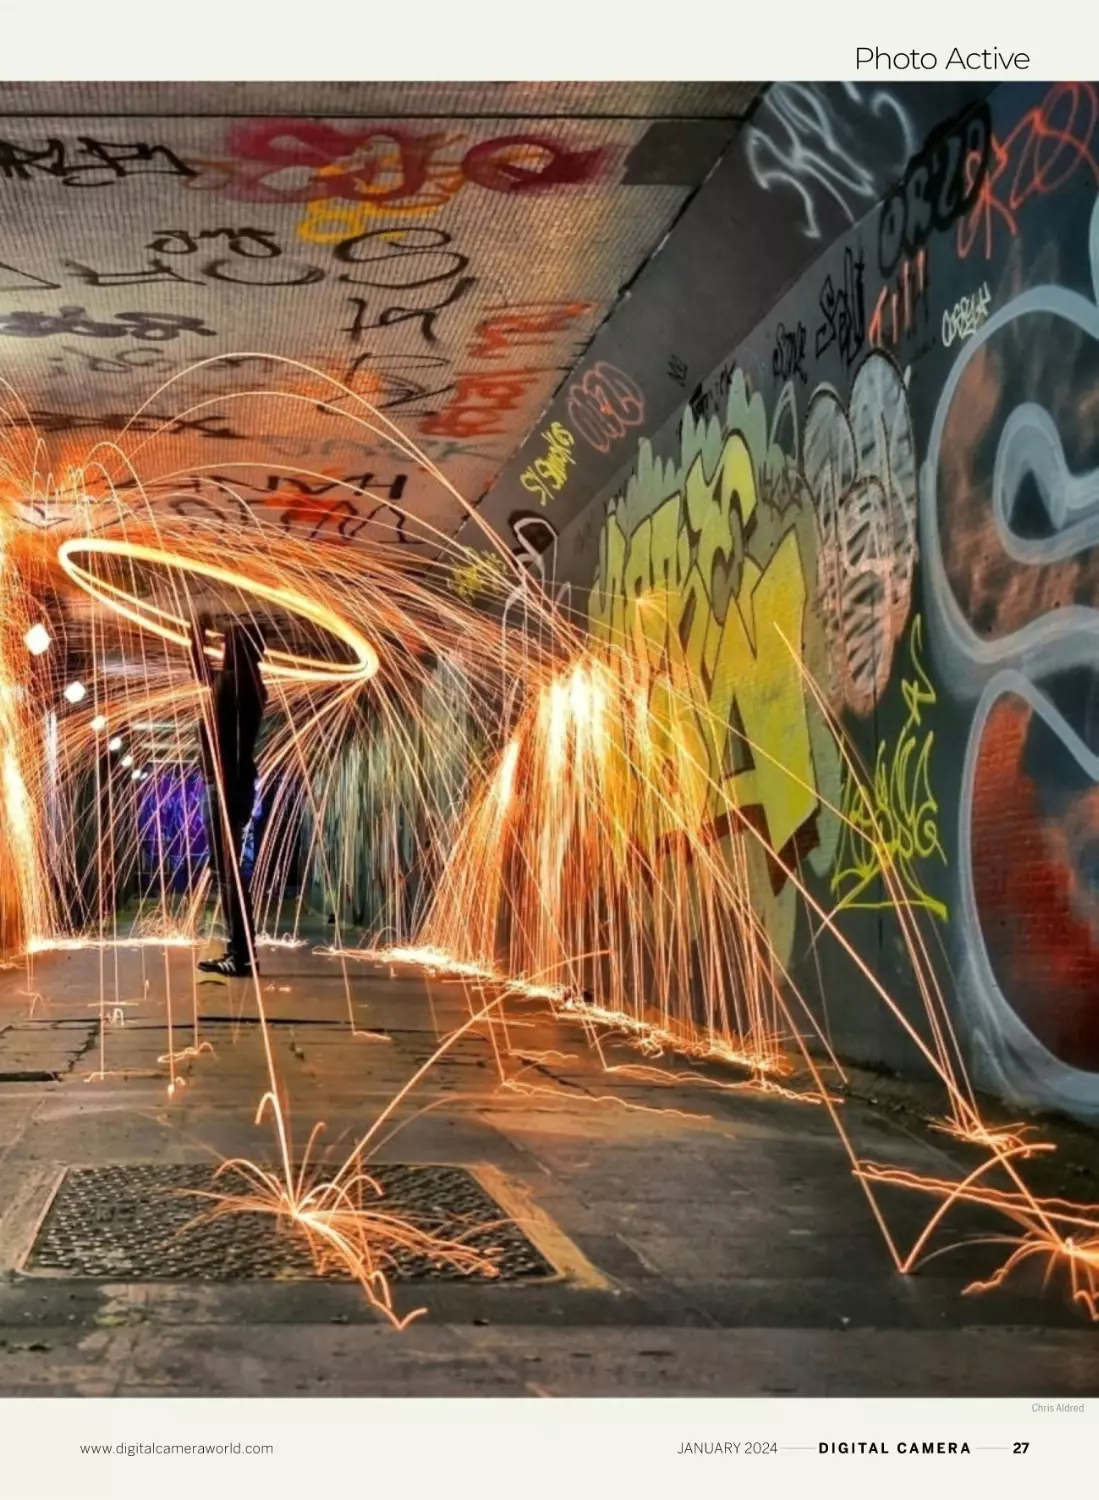
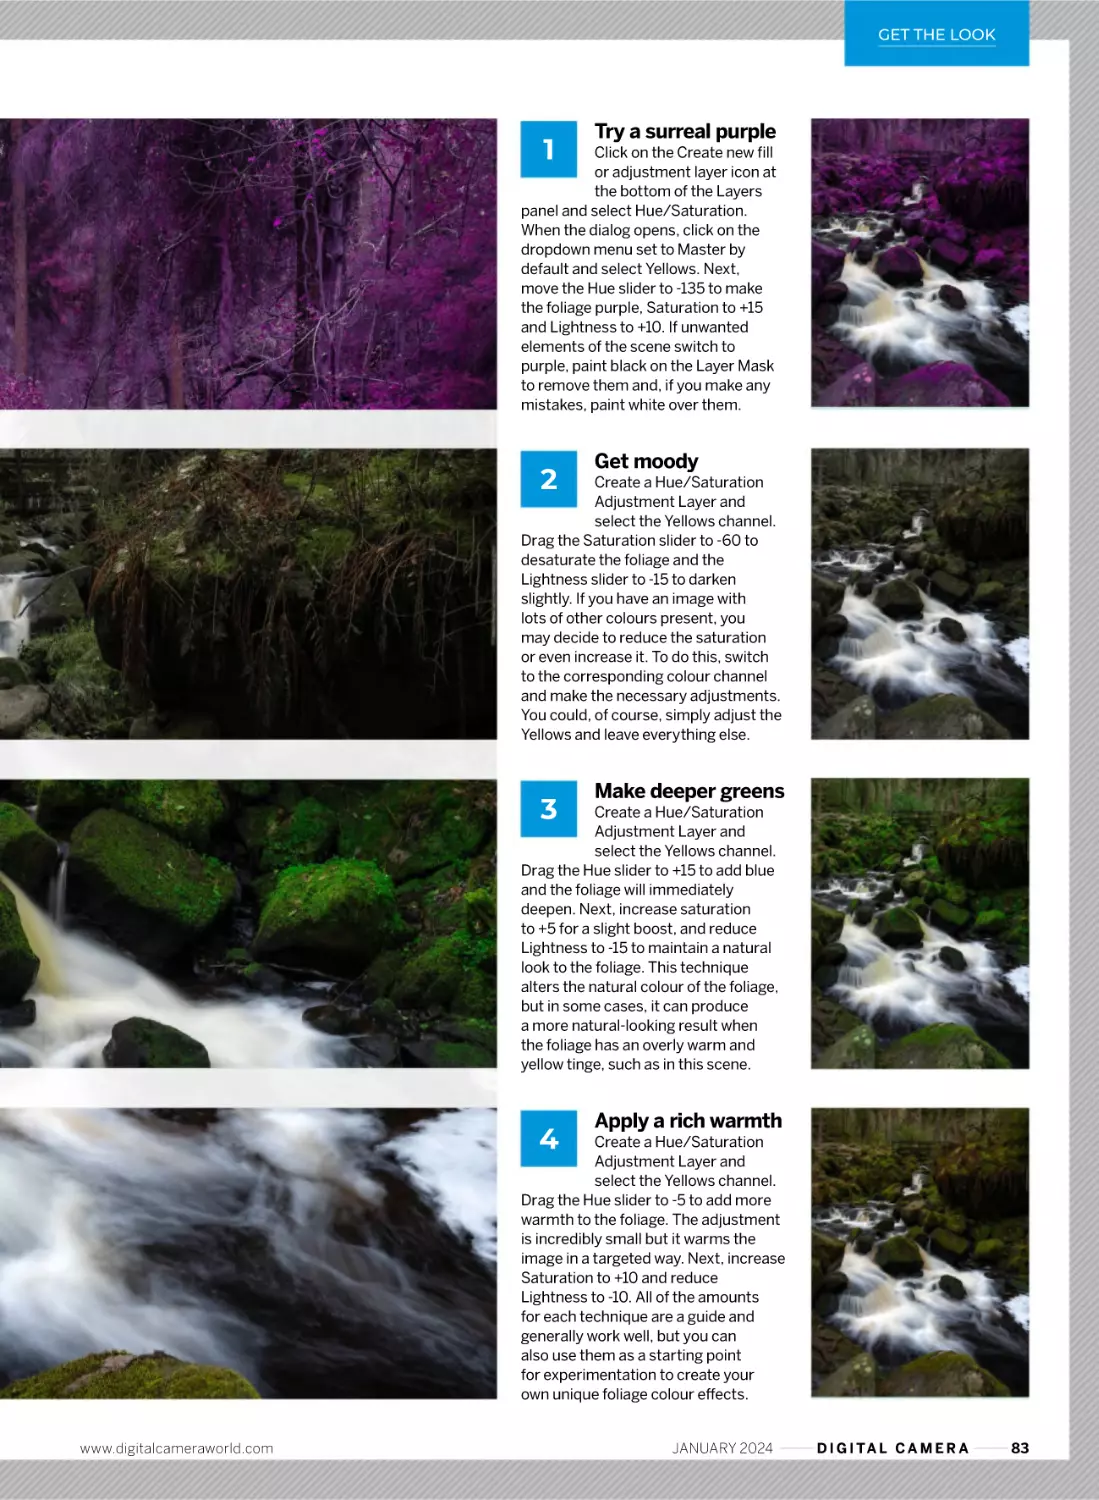
Photo Active _ 10 things to shoot, edit or create this month – learn how to
shoot seascapes in the dark, photograph the moon, use the high-key lighting
technique for winter streetscapes… and spark your creativity with wire wool
Our resident tech columnist
enjoys considering the latest
developments in photography
and digital imaging. Read his
latest dispatch on page 96
Chris Aldred
16
Interview _ Intrepid photographer Christophe Jacrot loves nothing more
than going out to take photographs in the worst possible conditions – we find
out why, by discussing his new photo book Lost in the Beauty of Bad Weather
Brian Lloyd Duckett
Portrait & street photographer
Brian Lloyd Duckett
The author of 52 Assignments:
Portrait Photography, Duckett
explains some of the approaches
and techniques that have worked
well for him, on page 85
JANUARY 2024
D I G I TA L C A M E R A
5
Your gifts
Download your gifts via digitalcameraworld.com/dc276
YOUR PRESETS AND
ACTIONS MEGAPACK
Give your shots a professional look with this huge batch of
software extras for Photoshop, Lightroom and Camera Raw
We’ve curated all the bonus presets, actions, textures – and more – that we gave away
this year into a Mega Pack of software extras, including all those relating to the three
image editing tutorials in this issue. Turn to page 84 to see the full list of what’s included
in your Mega Pack and discover how to download and install them on your computer.
Buyer’s Guide ebook
9 PHOTO TIPS
CARDS TO TAKE
ON LOCATION!
Our latest selection of tips
cards gives wallet-sized advice
on how to take better photos
HOW TO GET YOUR DIGITAL GIFTS
STEP 1
www.digitalcamera
world.com/dc276
Enter the URL www.digitalcameraworld.
com/dc276 into the destination bar
of your internet browser – we’re using
Google Chrome, but other browsers work
in a similar way. Please do not enter it
in any search field or search bar. This
will take you to a page on our website.
D I G I TA L C A M E R A
STEP 3
STEP 2
ENTER THIS URL
6
Featuring over
250 pages of
camera and
lens reviews,
plus buying
advice for
accessories.
See the Gifts
folder in your
download files.
ACCESS YOUR FILES
JUST CLICK THE
HIGHLIGHTED LINK
Click on the link labelled ‘Download the
files for Digital Camera 276’ and your
download will start, delivered from our
own server. Please override any browser
warnings about downloading from a
non-secure source – our server is safe!
JANUARY 2024
Open the .zip
In your Downloads folder, or wherever you
chose to download your files to, double-click
the dcm276-files.zip file icon. Then when it
expands, double-click Digital Camera 276
Files. The download content will display like
this (above), clearly arranged in sub-folders.
Keep Digital Camera 276 files and delete
dcm276-files.zip. Enjoy your digital gifts!
www.digitalcameraworld.com
one
to
one
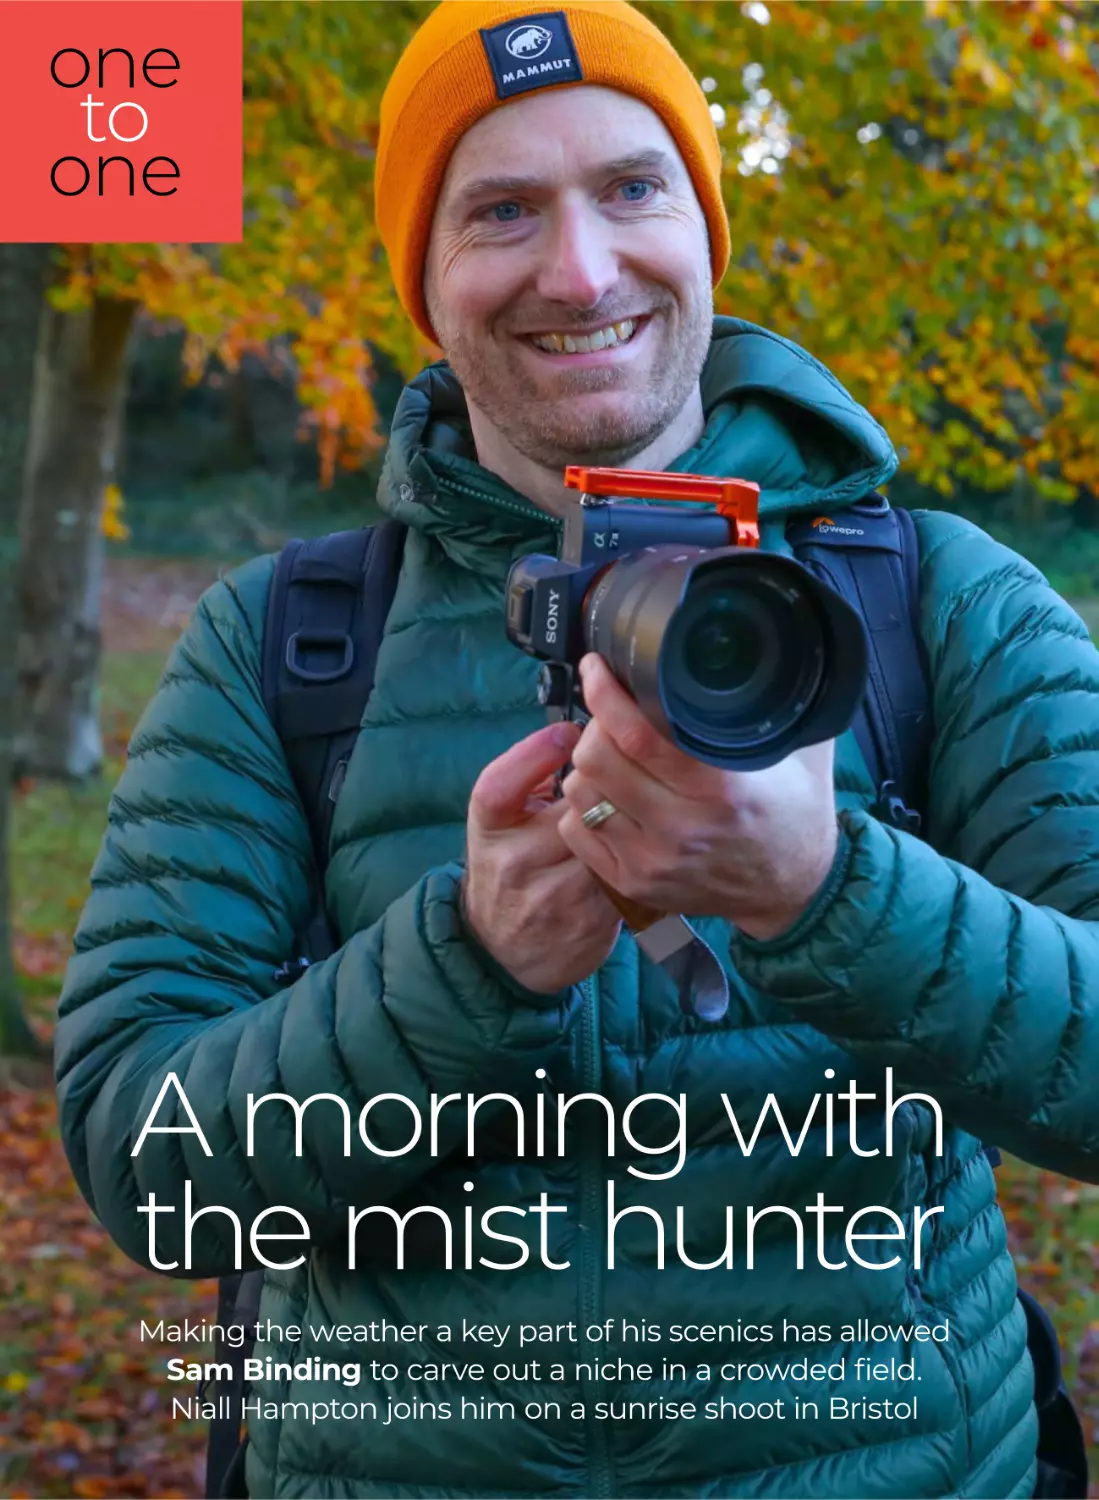
A morning with
the mist hunter
Making the weather a key part of his scenics has allowed
Sam Binding to carve out a niche in a crowded field.
Niall Hampton joins him on a sunrise shoot in Bristol
Autumn landscapes with Sam Binding
Sam Binding
Photographer
Based in south-west England, Binding
calls himself a ‘mist hunter’ but also
shoots landscapes, astro and more.
His work has featured in numerous UK
photo competitions and publications.
sambinding.co.uk
ith his series of
atmospheric
landscape
shots having
piqued our
attention
on Instagram, and with an
intriguing ‘mist hunter’
soubriquet, we were keen
to find out more about Sam
Binding and his photography.
Binding is based in Bristol
and sells prints of images
captured in a range of
W
photographic haunts in southwest England and beyond.
While weather conditions
often feature in landscape
photos, they’re not always the
star. But Binding has chosen to
make mist a key component of
his photography and, in doing
so, has carved out a niche for
himself in a crowded field of
scenics shooters.
Wanting to discover more
about how he approaches his
craft – and why he
The iconic Glastonbury Tor stands majestically over a sea of mist
– taken by Binding using a DJI Air 2: 1/120 sec at f/2.8, ISO 100.
one
to
one
Filters: don’t leave
home without them
“For coastal locations or anywhere where
there’s water, filters are indispensable,”
says Binding. “Today I used six-stop 1
and 10-stop 2 neutral density filters,
plus a polariser 3 . I have started shooting
woodlands with a polariser, too, and it has
completely transformed things – getting
rid of glare from leaves has been a game
changer for me. I also have a Tide Optics
Pro Mist Cinesoft filter 4 , which is great
when shooting at night (pictured, above)
and really makes things glow.”
1
2
3
4
10
D I G I TA L C A M E R A
Top: Binding doesn’t only rely on wide-angles; he likes to pick out details with a long telephoto lens.
Above: His Sony A7 III is always attached to an L-bracket for quick switches of camera orientation.
started hunting misty conditions – we
arrange to meet Binding early one morning
at the Clifton Observatory in Bristol.
The city isn’t unique in claiming to be built
on seven hills, and Clifton Down isn’t even
the tallest of them, but it’s still a formidable
climb with a weighty camera backpack
bouncing around. Binding is waiting for me
at a vantage point overlooking the Avon
Gorge and the Clifton Suspension Bridge,
a local landmark designed by Isambard
I take photos that work
well as prints. It’s where
I want to take things
JANUARY 2024
Kingdom Brunel. With his Sony A7 III set up
overlooking the gorge, Binding explains how
he sees the morning’s shoot progressing.
There’s a small problem to overcome,
though – no mist. Although there has been
plenty of rainfall in the week beforehand,
the conditions aren’t calm enough for mist
to form. Facing weather at odds with what
we had envisaged is nothing new in Britain,
of course, so with a mutual shrug, we decide
to refocus the shoot on the abundance of
autumnal colour that surrounds us.
So what led to Binding’s interest in mist
and becoming a mist hunter, I wonder?
He explains that when he was a new father
and waking up at unpredictable times, he
would regularly see rolling mist outside.
Enchanted, Binding started taking his
Canon EOS 80D – previously used for
shooting family photos – out with him
on his early morning dog walks.
www.digitalcameraworld.com
Autumn landscapes with Sam Binding
06.46am
Camera
Sony A7 III
Lens
Sony FE 14mm F1.8 GM
Exposure
20 secs at f/14, ISO 100
www.digitalcameraworld.com
JANUARY 2024
D I G I TA L C A M E R A
11
one
to
one
07.06am
Photo communities
on social media
Having a social media presence has
helped Binding develop his photography
practice. It has connected him with likeminded people who go out together to
take photos, pool information about
promising weather conditions before
shoots, as well as share technical
insights and general advice. Social media
is also a great way of sharing portfolios of
images and helping generate print sales.
“I’d be out at the crack of dawn walking
around Bristol harbour and another
photographer would be there,” says
Binding. “We’d get chatting and would
connect on Instagram. Now, I have a
large friendship group of people who
I’ve met through my photography.
“The Igers Bristol group gets everyone
together – it’s a real community and is
supportive of many different types of
photography.” (@igersbristol)
Instagram: @sambinding
Camera
Sony A7 III
Lens
Sony FE 24-105mm F4 G OSS
Exposure
30 secs at f/4, ISO 100
Left: Binding looks for image possibilities on the other side of Avon Gorge, to be picked out with
his long lens. The busy road provides great opportunities for capturing long-exposure light trails.
“Some of the photos I posted on Instagram
got noticed by the Bristol community group
and started getting me more exposure,”
Binding explains. “So I started taking more,
working out how other photos I liked were
shot and teaching myself composition.”
“Eventually I upgraded to a Sony and
things have snowballed from there. I’ve
made a name for myself locally as a mist
photographer but I will happily shoot other
images, including astrophotography and
wildlife. I try to take photos that will work
well when they’re printed, as selling prints
is where I want to take things.”
As we look down over the gorge, Binding
points out that when the sun reaches a
certain height, it will emerge from behind
a hill and the landscape will explode with
12
D I G I TA L C A M E R A
JANUARY 2024
colour. When it happens, he’s not wrong –
it looks spectacular. Keen to exploit this
gorgeous golden light, we walk to our next
location, along a path and down some steps
towards the bottom of the gorge. Switching
from his 24-105mm F4 to his 100-400mm
F4.5-5.6, Binding zooms in to shoot some
frames of the detail in the trees on the other
side of the gorge, which have emerged from
the shadows into a riot of greens, yellows
and golds, with denuded tree branches
appearing white in the sunlight.
As it’s mid-November, autumn is in full
swing and our next location showcases
it perfectly. Walking back up the hill, we
emerge onto Clifton Promenade. The
pavements on either side of the road
are flanked with trees which have
www.digitalcameraworld.com
Autumn landscapes with Sam Binding
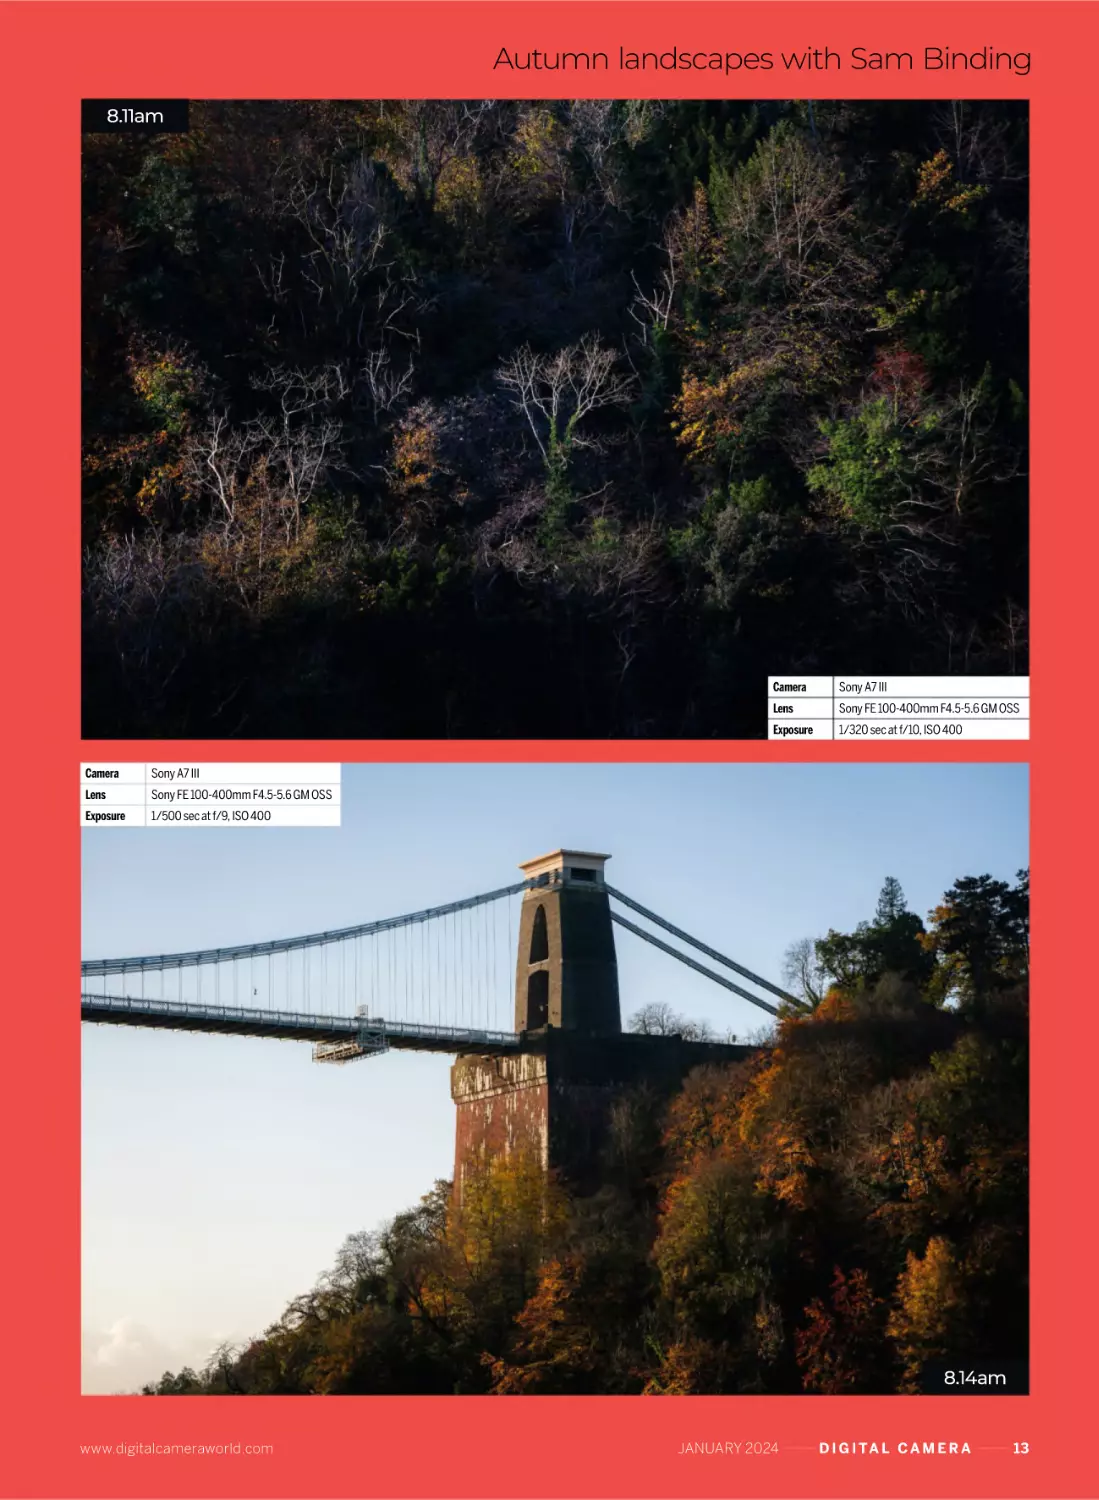
8.11am
Camera
Sony A7 III
Lens
Sony FE 100-400mm F4.5-5.6 GM OSS
Exposure
1/500 sec at f/9, ISO 400
Camera
Sony A7 III
Lens
Sony FE 100-400mm F4.5-5.6 GM OSS
Exposure
1/320 sec at f/10, ISO 400
8.14am
www.digitalcameraworld.com
JANUARY 2024
D I G I TA L C A M E R A
13
one
to
one
1
6
8.34am
3
4
5
2
8
7
Binding’s kit for mist and leaves
What Sam packs in his bag when he goes chasing the weather
1
2
Sony FE 14mm F1.8 GM
3
Sony FE 24-105mm F4 G OSS
“After using a Samyang 14mm for astrophotography,
I switched to this – it’s an amazing wide-angle lens.”
“The first lens I bought, this is just a brilliant allrounder. It’s fairly good in low light and is pretty sharp, too.”
4 Sony FE 100-400mm F4.5-5.6
“Always the first lens in my bag. I love it when I’m out
on a misty morning in a high-up place and picking out details.”
5
DJI Mavic Air 2S
6
3 Legged Thing L bracket
7
Lowepro
ProTactic 450 AW II
“I wanted to have drone images to sell as prints, and
the Mavic Air 2S’s 20MP sensor gives me enough resolution.”
“If you shoot in portrait orientation on a tripod then you
need one of these – it minimises movement and is fast to use.”
“Highly customisable with great capacity. It is also ergonomic
– which is important on mornings when I’m hurtling around.”
3 Legged Thing Brian
“Lightweight but sturdy, this tripod has been put
through mud, sea, snow and frost and it has been brilliant.”
14
Sony A7 III
Lens
Sony FE 100-400mm F4.5-5.6 GM OSS
Exposure
1/80 sec at f/6.3, ISO 500
Sony A7 III
“I started off with a Canon EOS 80D but upgraded to
the A7 III. Its dynamic range is better and it’s great in low light.”
8
Camera
D I G I TA L C A M E R A
JANUARY 2024
Right: Binding using his long lens to compress
the scene at Clifton Promenade in Bristol –
a fantastic location for autumn photography.
covered the ground with leaves, but there is
still plenty of yellow and red in the canopies.
Binding explores photo opportunities on
both sides of the road and, sticking with
his long lens, frames the road traffic out.
Viewing the image previews on the rear
screen, we see a classic autumn picture
that will be a shoo-in for printing.
Calling it a day when the light loses some
of its vibrancy, we retire to a local café
where some of Binding’s prints adorn the
walls. One really stands out – a photo of the
Clifton Suspension Bridge disappearing
into the fog with a car, headlights blazing,
starting its journey across. It’s a great
example of being in the right place at the
right time – when the weather shows up.
Viewing the image previews on
Binding’s rear screen, we see
a classic autumn picture that
will be a shoo-in for printing
www.digitalcameraworld.com
Autumn landscapes with Sam Binding
8.36am
Camera
Sony A7 III
Lens
Sony FE 100-400mm F4.5-5.6 GM OSS
Exposure
1/125 sec at f/5.6, ISO 640
You won’t go wrong if you…
Sam’s top tips for shooting dramatic misty landscapes, if the weather allows
“Take time to get the
composition right – you can’t
go back to fix it afterwards – and
always shoot with a grid overlay.”
1
shoot at the aperture that gives you
sharpness across the image frame. ”
6
“Shoot in manual exposure
mode and use Live View.”
“Try to reduce clutter in an
image – you don’t want the
viewer to ask ‘What’s going on here?’”
2
Editing for photo prints
“Use the electronic horizon line
to level the camera – there’s no
way of rescuing a wonky image that
has been taken on a telephoto lens.”
3
“Know the camera’s limitations
and maximise what it can do
– how it handles digital noise.”
4
5
“Get to know the sweet spot
of all your lenses, so you can
www.digitalcameraworld.com
Always use the camera’s horizon line
and check the exposure histogram.
Binding always shoots raw files and edits his
captures in Lightroom. Having strived to get things
right in-camera, he likes to keep his editing minimal
but it depends on his target audience.
“Images on social media generally do better if they
are colourful, whereas for prints, I don’t want to push
things too far,” he says. “I used to warm my photos
up and increase the saturation, but now I’ve gone
the opposite way and desaturate the images more.”
JANUARY 2024
D I G I TA L C A M E R A
15
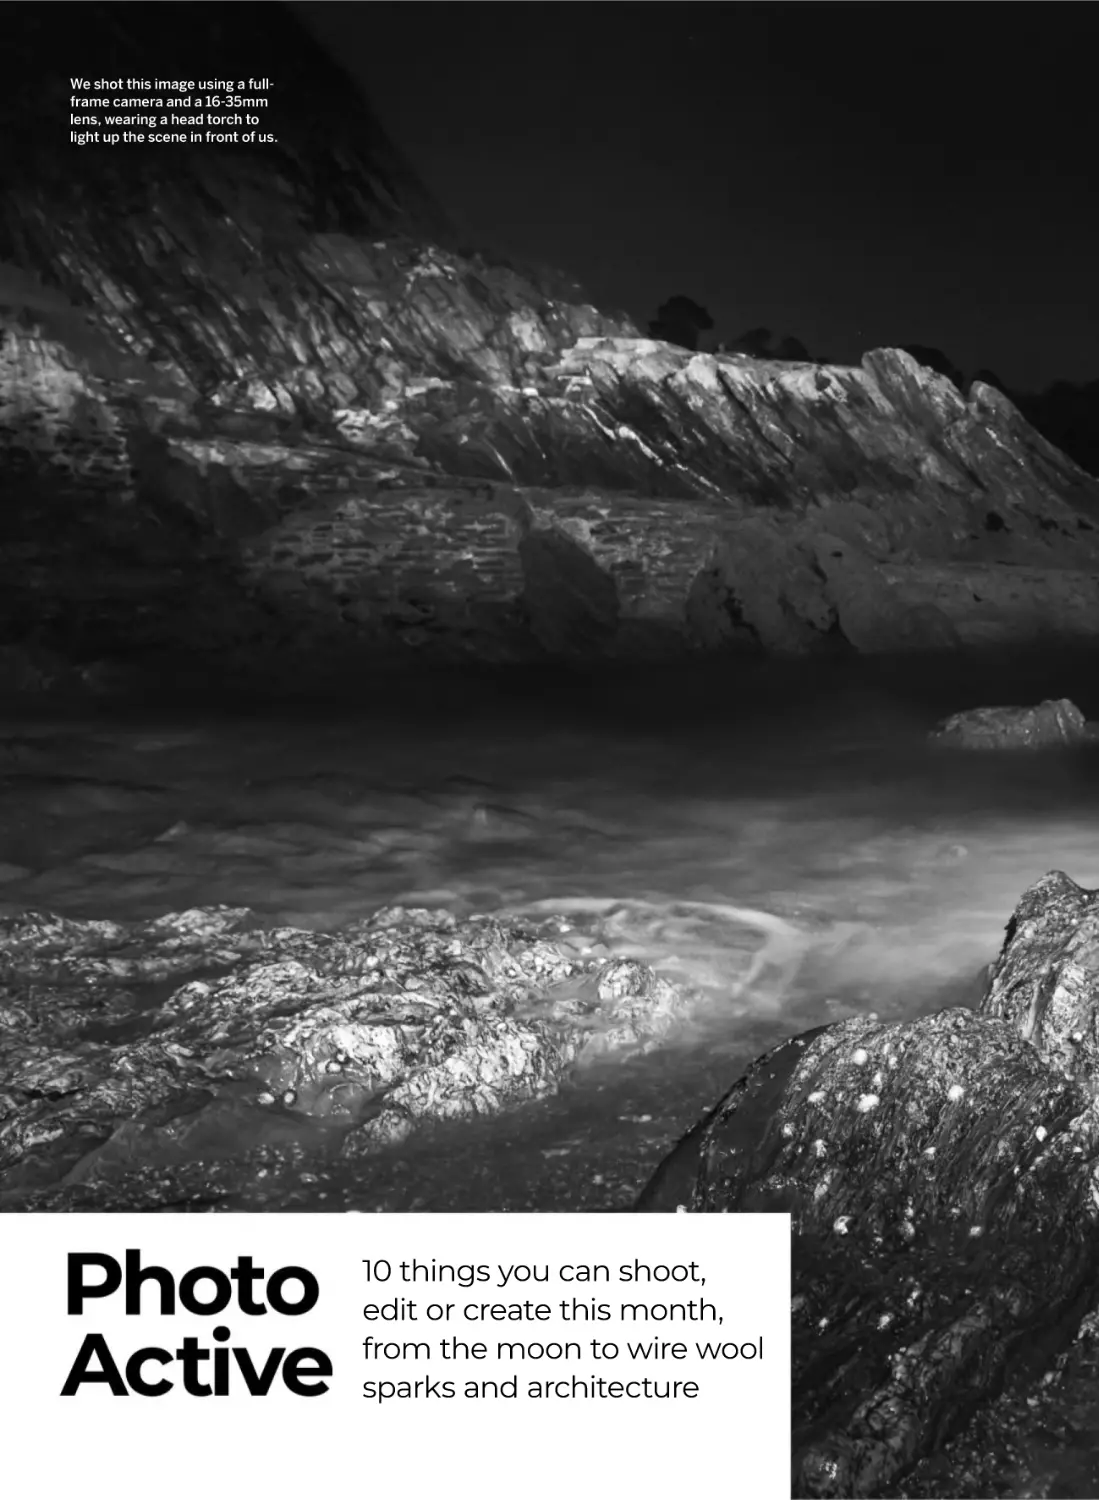
We shot this image using a fullframe camera and a 16-35mm
lens, wearing a head torch to
light up the scene in front of us.
10 things you can shoot,
edit or create this month,
from the moon to wire wool
sparks and architecture
۴IÁ0««(ٳk
Night-time
seascapes
Claire Gillo explains how
to capture coastal shots in
pitch darkness, using only
a tripod and a head torch
he sea is such an amazing
subject to photograph and
its movement is one that
many photographers like to
capture, whatever the time of
day. During the winter months, the sea can be
photographed in many different states – from
pancake flat to ferociously stormy – and also,
surprisingly, in pitch darkness.
First, though, a word of warning. Take care!
It’s easy to get caught out, become cut off
from the tide or get that bit too close to the
edge and suddenly be out of your depth. It isn’t
worth the risk to your kit or, more importantly,
yourself. Always do your research and visit
each location in the daytime to do a recce and
a risk assessment. Also, if you want to follow
in our footsteps and shoot in the dark, we’d
recommend you do so with a companion.
For one, it’s better to share your photography
experience and, secondly, we’re not ashamed
to admit that we find the dark a little scary.
Safety in numbers, as they say!
For this photo project, we shot our image
using a full-frame camera with a 16-35mm
lens. We came down as low as we could for our
composition and as close as we could to the
shoreline without putting ourselves at risk.
Our image was taken in a small cove just
outside the town of Dartmouth in Devon.
T
www.digitalcameraworld.com
JANUARY 2024
f/8
ISO
800
D I G I TA L C A M E R A
Claire Gillo
30
secs
17
2
3
Shoot from a tripod
A support is an essential piece of kit for
this project as any movement will blur and
ruin your image. Before you expose your
scene, secure the tripod in place, looking
for rocks or other sturdy bits of beach or
land to rest it on. Also, to avoid the catches
seizing up, remember to rinse your tripod’s
legs with fresh water as soon as you can.
2
Use a head torch
As it was pitch black on our shoot, we wore
a head torch to see what we were doing.
However, it also served another purpose
– to light up the scene. Experiment with
your shutter setting (we took our shots
at 30 seconds at f/8) and, if you need an
exposure longer than 30 seconds, you
may need to use the Bulb setting with a
remote shutter release. With the shutter
open, paint light around the scene.
3
1
Focus the shot
With no natural light, you’ll need to
use your head torch to focus your shot.
Shine it in the foreground and then set
your AF point on a rock or wherever you
want the focus to be. The other option
is to manually focus your lens and
rotate the focus ring to infinity.
Ali Hooper
1
Composing in the dark
It is incredibly hard to compose a photo
when it’s dark. For this reason, we suggest
visiting the area in the daytime so you have
an idea of what you want to include in the
scene. Think about how the dark is going
to work in your scene and what you want to
reveal. In our image, both the layers of rocks
in the front of the frame and the bank of land
in the background hold the viewer’s interest.
Blend multiple images
With this technique, it can often be tricky to get the effect you’re after in just one shot. When this is the
case, shoot multiple exposures of the same scene, concentrating your light in different areas for each
one. The image above is the result of three 30-second exposures combined together. The easiest way to
blend your images and edit them is in Photoshop, using Layer Masks to hide and reveal isolated areas
accordingly. You can also use the Dodge and Burn tools in Photoshop to make the rock texture pop.
When using the Burn tool, set the Range to Shadows with the Exposure low at around 5%. With
the Dodge tool, set the Range to Highlights, again with a low exposure percentage.
18
D I G I TA L C A M E R A
JANUARY 2024
www.digitalcameraworld.com
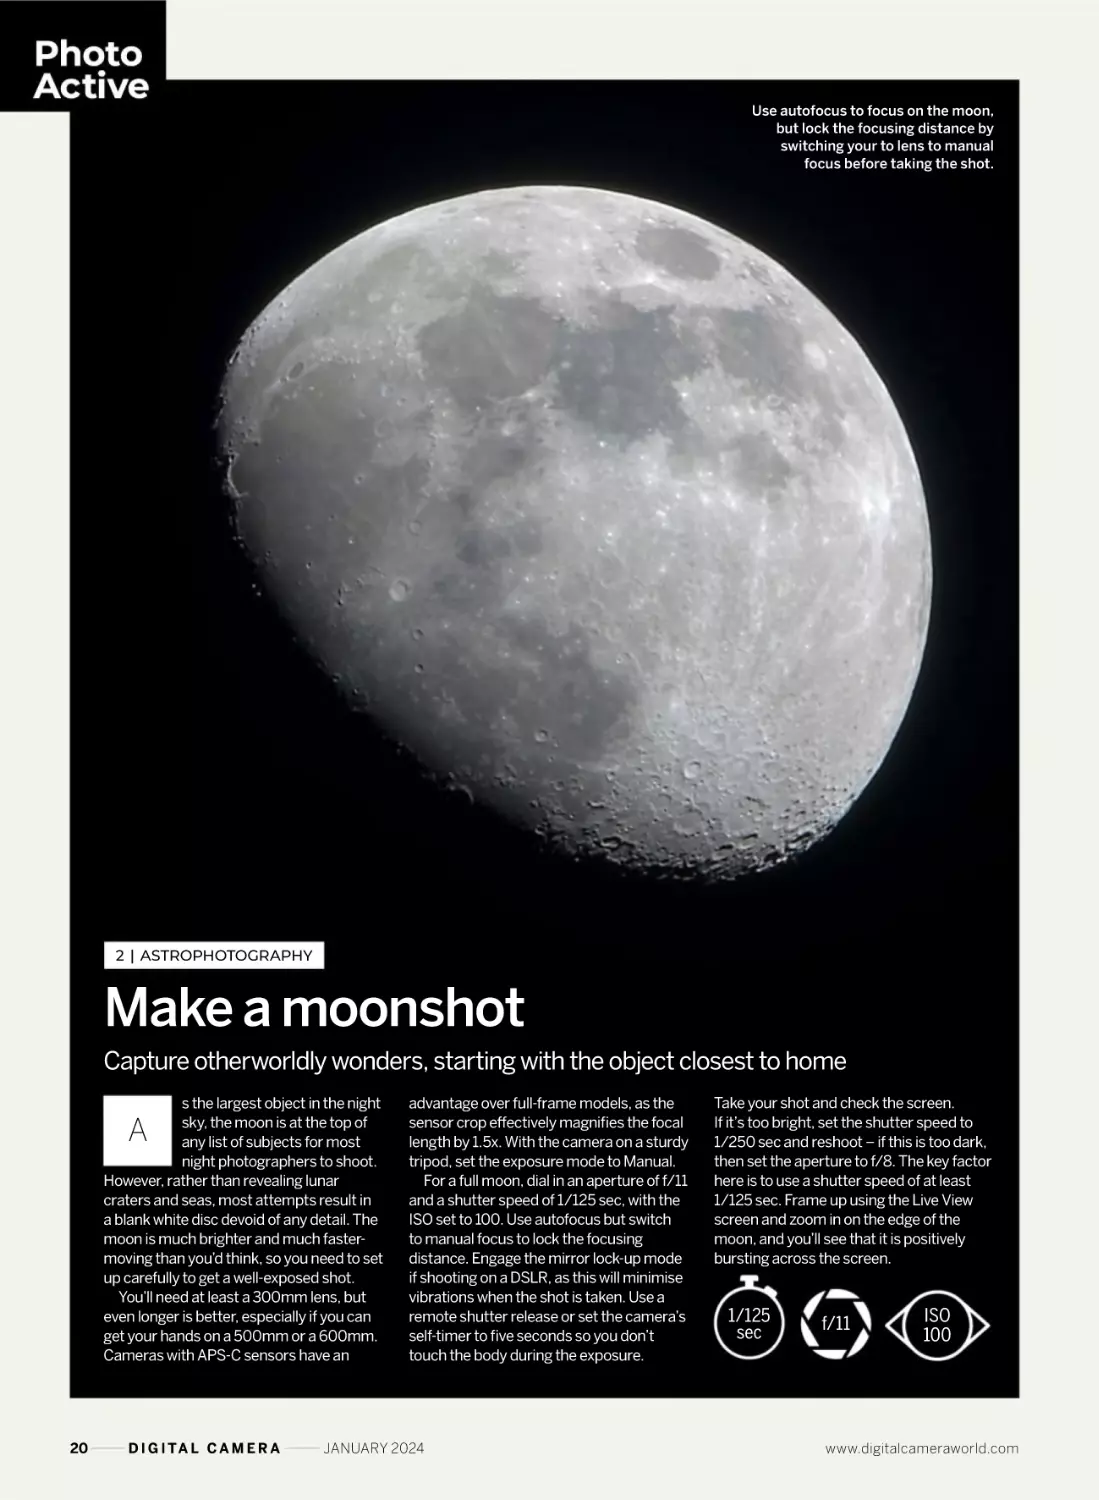
Use autofocus to focus on the moon,
but lock the focusing distance by
switching your to lens to manual
focus before taking the shot.
2 | ASTROPHOTOGRAPHY
Make a moonshot
Capture otherworldly wonders, starting with the object closest to home
s the largest object in the night
sky, the moon is at the top of
any list of subjects for most
night photographers to shoot.
However, rather than revealing lunar
craters and seas, most attempts result in
a blank white disc devoid of any detail. The
moon is much brighter and much fastermoving than you’d think, so you need to set
up carefully to get a well-exposed shot.
You’ll need at least a 300mm lens, but
even longer is better, especially if you can
get your hands on a 500mm or a 600mm.
Cameras with APS-C sensors have an
A
20
D I G I TA L C A M E R A
advantage over full-frame models, as the
sensor crop effectively magnifies the focal
length by 1.5x. With the camera on a sturdy
tripod, set the exposure mode to Manual.
For a full moon, dial in an aperture of f/11
and a shutter speed of 1/125 sec, with the
ISO set to 100. Use autofocus but switch
to manual focus to lock the focusing
distance. Engage the mirror lock-up mode
if shooting on a DSLR, as this will minimise
vibrations when the shot is taken. Use a
remote shutter release or set the camera’s
self-timer to five seconds so you don’t
touch the body during the exposure.
JANUARY 2024
Take your shot and check the screen.
If it’s too bright, set the shutter speed to
1/250 sec and reshoot – if this is too dark,
then set the aperture to f/8. The key factor
here is to use a shutter speed of at least
1/125 sec. Frame up using the Live View
screen and zoom in on the edge of the
moon, and you’ll see that it is positively
bursting across the screen.
1/125
sec
f/11
ISO
100
www.digitalcameraworld.com
USE YOUR
FREE TIPS CARDS
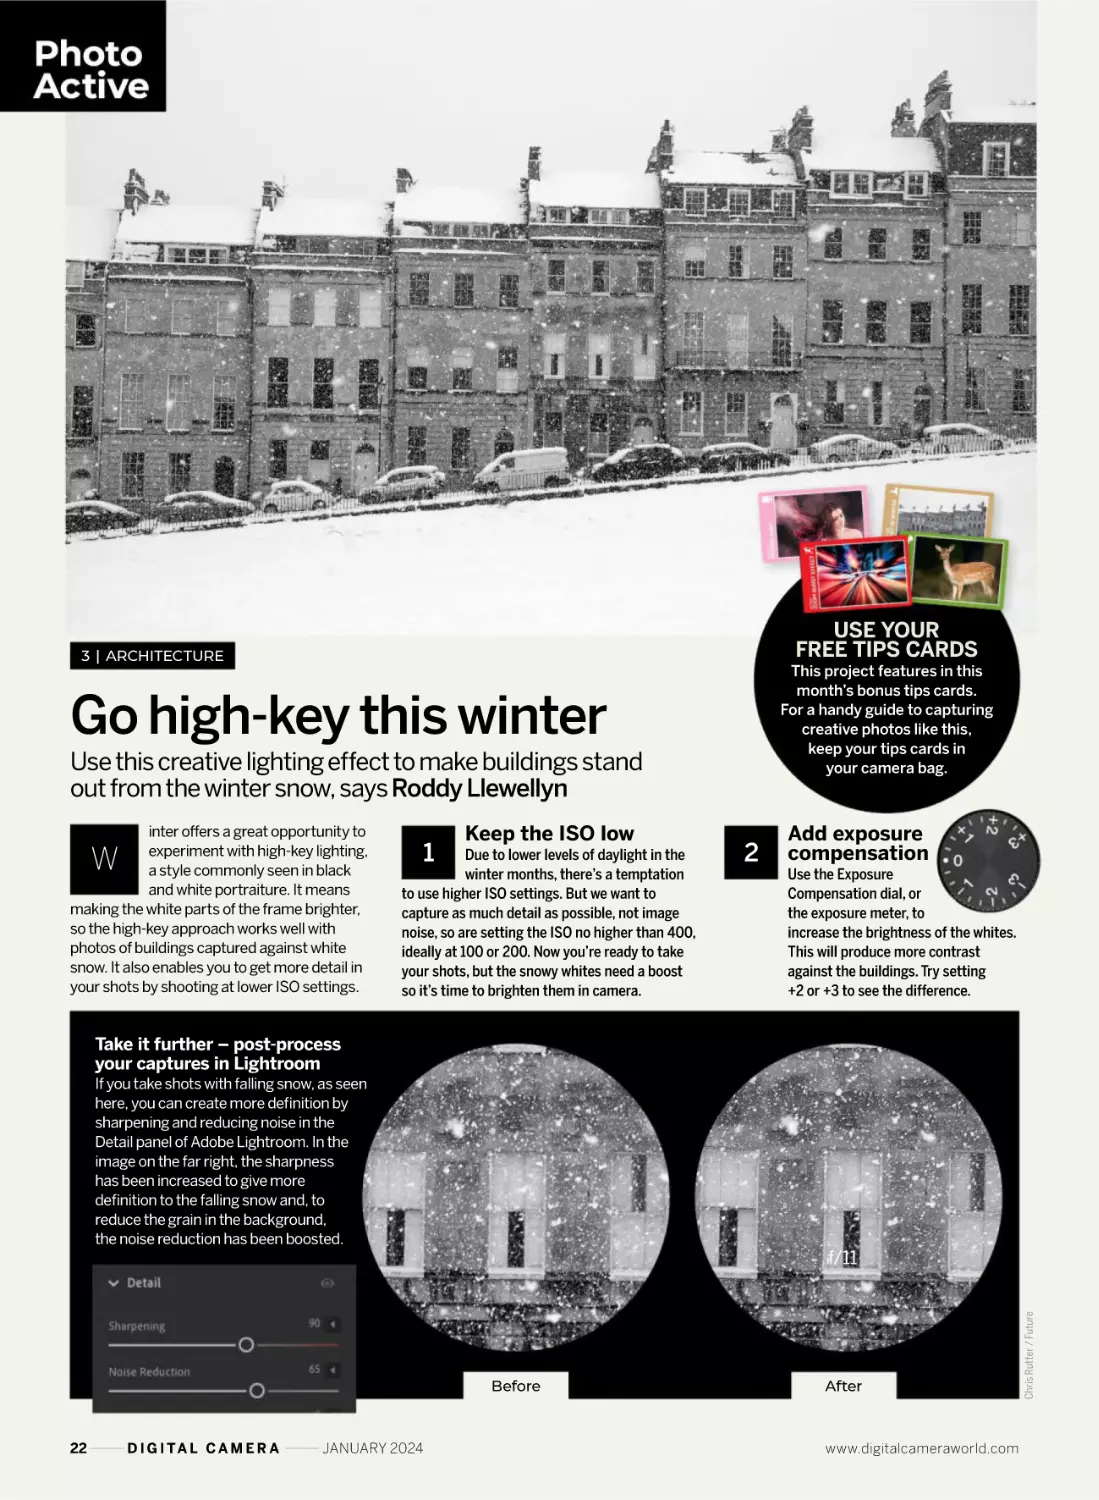
3 | ARCHITECTURE
This project features in this
month’s bonus tips cards.
For a handy guide to capturing
creative photos like this,
keep your tips cards in
your camera bag.
Go high-key this winter
Use this creative lighting effect to make buildings stand
out from the winter snow, says Roddy Llewellyn
inter offers a great opportunity to
experiment with high-key lighting,
a style commonly seen in black
and white portraiture. It means
making the white parts of the frame brighter,
so the high-key approach works well with
photos of buildings captured against white
snow. It also enables you to get more detail in
your shots by shooting at lower ISO settings.
W
1
Keep the ISO low
Due to lower levels of daylight in the
winter months, there’s a temptation
to use higher ISO settings. But we want to
capture as much detail as possible, not image
noise, so are setting the ISO no higher than 400,
ideally at 100 or 200. Now you’re ready to take
your shots, but the snowy whites need a boost
so it’s time to brighten them in camera.
2
Add exposure
compensation
Use the Exposure
Compensation dial, or
the exposure meter, to
increase the brightness of the whites.
This will produce more contrast
against the buildings. Try setting
+2 or +3 to see the difference.
Take it further – post-process
your captures in Lightroom
If you take shots with falling snow, as seen
here, you can create more definition by
sharpening and reducing noise in the
Detail panel of Adobe Lightroom. In the
image on the far right, the sharpness
has been increased to give more
definition to the falling snow and, to
reduce the grain in the background,
the noise reduction has been boosted.
Before
22
D I G I TA L C A M E R A
JANUARY 2024
After
www.digitalcameraworld.com
Chris Rutter / Future
f/11
4 | PHOTOSHOP
Try a two-tone
lighting effect
Claire Gillo explains how
to replicate a two-tone gel
lighting effect in Photoshop
lthough most photographers like
to get everything right in-camera,
there are times when it’s simply
not possible, as you may not have
the equipment or the technical skills to do so.
In this tutorial, we’re going to show you how to
add a two-tone lighting gel effect to your image
in Photoshop. It’s easy to do and only requires
you to use layers and layer masks. If you have
never used these before in Photoshop, watch
a tutorial and get familiar with how they work.
A lighting gel is, essentially, a piece of heatresistant, translucent material that is put in
front of a light source to change the colour of
the light. It is often used in studio and fashion
photography to create a special effect.
When selecting your starting image, it’s easier
to replicate the effect if you have an image that
has been shot against a plain light or dark
background. You may also want to think about
the two colours you want to add to your image.
We opted to add a red and blue effect but there
are many other combinations that work well
together, such as purple and yellow, red and
green and blue and orange. You can experiment
here with alternative combinations.
1
Add two colours
Open your starting image in
Photoshop. Add a new layer and go to Edit
> Fill and under Contents select Color.
Choose a strong blue colour from the
palette. Now add another new layer
and again go to Edit > Fill. This time,
pick a strong red colour from the palette.
24
D I G I TA L C A M E R A
Claire Gillo
A
Switch the background
Here, we’ve used the same effect but our starting image
has a white background, which works just as well. We
opted to use yellow and purple colours for our two-tone
effect, as these colours complement each other. When
replicating the effect, think about how the light is falling
over your subject. Mirror the intensity of the colour with
how your subject has been lit; in a shadowed area, for
example, it would be less intense than in a lighter area.
2
Blending mode
Change the Blending mode settings
on both of your new colour layers to Soft
Light and reduce the opacity of each layer
so that they are down to around 40%.
Next, add a black layer mask (Layer >
LayerMask > Hide all) to each colour
layer and go to the Brush tool.
JANUARY 2024
3
Brush tool
Using a white Brush (opacity 30%,
adjust accordingly) work your way around
to reveal the colour effect. In our image,
we wanted the blue gel effect coming in
from the right and the red from the left,
and included areas with both colours.
Take your time to get this step right.
www.digitalcameraworld.com
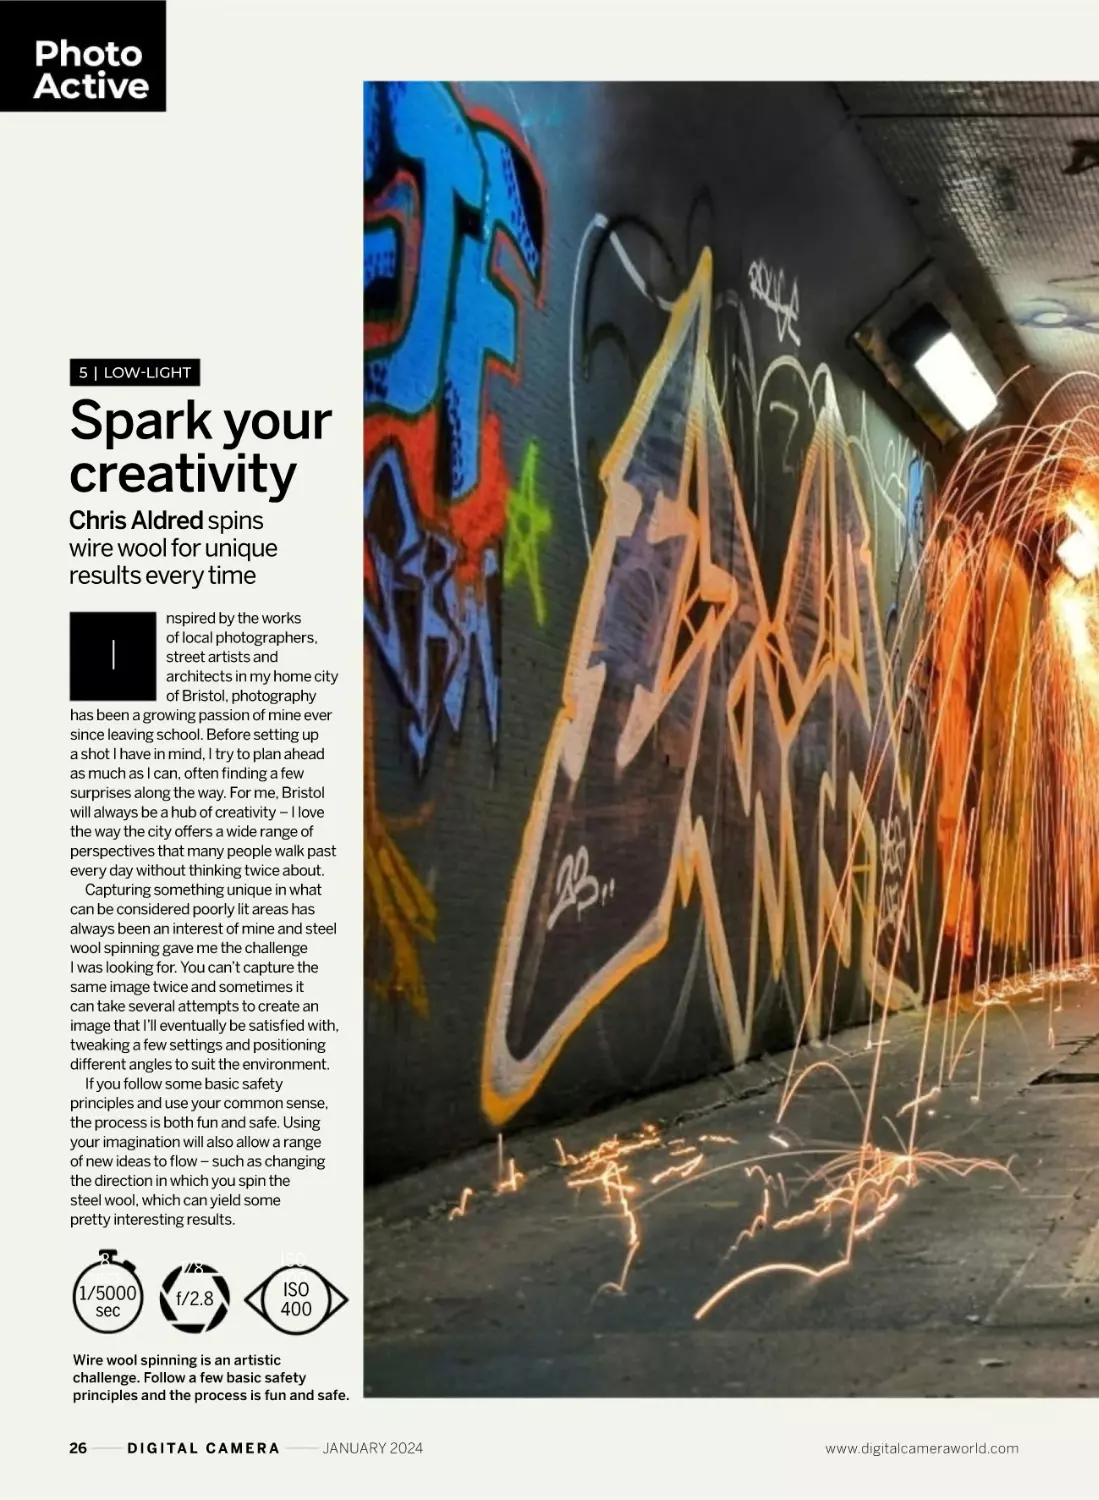
ד۴n áٳnXJRÁ
Spark your
creativity
Chris Aldred spins
wire wool for unique
results every time
nspired by the works
of local photographers,
street artists and
architects in my home city
of Bristol, photography
has been a growing passion of mine ever
since leaving school. Before setting up
a shot I have in mind, I try to plan ahead
as much as I can, often finding a few
surprises along the way. For me, Bristol
will always be a hub of creativity – I love
the way the city offers a wide range of
perspectives that many people walk past
every day without thinking twice about.
Capturing something unique in what
can be considered poorly lit areas has
always been an interest of mine and steel
wool spinning gave me the challenge
I was looking for. You can’t capture the
same image twice and sometimes it
can take several attempts to create an
image that I’ll eventually be satisfied with,
tweaking a few settings and positioning
different angles to suit the environment.
If you follow some basic safety
principles and use your common sense,
the process is both fun and safe. Using
your imagination will also allow a range
of new ideas to flow – such as changing
the direction in which you spin the
steel wool, which can yield some
pretty interesting results.
I
8
secs
1/5000
sec
f/8
f/2.8
ISO
100
ISO
400
Wire wool spinning is an artistic
challenge. Follow a few basic safety
principles and the process is fun and safe.
26
D I G I TA L C A M E R A
JANUARY 2024
www.digitalcameraworld.com
Photo Active
Chris Aldred
www.digitalcameraworld.com
JANUARY 2024
D I G I TA L C A M E R A
27
Six ways to success for long
exposures with wire wool
1
Stabilise
the camera
I always shoot this technique
with a Manfrotto Pixi mini
tripod. It’s small and
extremely strong but most
importantly it allows me to
achieve the low angle that
makes these shots stand out.
Due to the required shutter
speeds, it’s also impossible to
shoot long exposures without
some sort of camera support.
28
D I G I TA L C A M E R A
2
Prepare the wire wool
Steel wool is readily available from most hardware
shops and is extremely cheap to buy. To house the wool,
I place it inside an ordinary kitchen whisk – I’ve found that
it’s best to pull the wool apart before doing this, as this
allows more air to get to the wool and create better sparks.
JANUARY 2024
www.digitalcameraworld.com
3
Dial in the shutter speed
5
Frame up good and wide
The shutter speed is the most crucial setting to get
right. Here, I used 1.3 sec. The next setting is to make sure
you’re shooting in Auto ISO, as you can never guess how
bright the sparks might be. Finally, to get the best optical
performance from the lens, use an aperture of f/5 to f/8.
Due to the experimental style of spinning steel wool,
allow yourself a little breathing room by shooting with a
wider composition than you think you’ll need. I use an
AF-P DX Nikkor 10-20mm and, typically, will zoom out
to 10mm to capture the spark trails as they fly off.
www.digitalcameraworld.com
4
Set the camera’s self-timer
6
Now start the exposure
Placing your camera on a support and using the
self-timer function will allow you to create these images
on your own without having to rely on a friend to help.
I set a 10-second timer, which is just enough time to
get into position, light the wool and start spinning.
For spinning it around me, the whisk is tethered
to my wrist with a flexi cable. To start shooting, I’ll frame
up, start the shutter’s self-timer, get into position and light
the wool. Wearing a hat and a hoodie to keep any small
sparks away from my face, I’ll start spinning the whisk.
JANUARY 2024
D I G I TA L C A M E R A
29
Natalie Jenkins, Week 40: ‘Dappled Light’ (2023)
6 | PHOTO CHALLENGES
How to get out of a creative rut
52frames.com encourages you to shoot creative photos over a year, says Yosef Adest
ow do you trick your brain into
having creative breakthroughs?
The answer is not what you think.
For 624 weeks, I have been
participating in (and running) a free weekly
photography project www.52frames.com,
where a community of photographers submit
a single photo according to a different weekly
challenge. If I’m being honest, most weeks, I’m
tired. Uninspired. This is my ‘default brain’.
But as the Sunday night deadline
approaches, nervous excitement sets in as
I think about what photo to take and I’ll find
myself taping a cardboard cutout I made
onto a small LED panel in my basement.
(Week 40 Challenge: ‘Use a Cucoloris’)
‘Forced creativity’ sounds counterintuitive,
but when you intentionally limit yourself to a
window of time, the inspiration to start the
task becomes stronger and it is this action
of starting, that tricks your brain into a
focused, creative, flow state. Do the thing.
The ebb and flow of the challenges work
by design because, when we have a more
difficult challenge (Week 15: ‘Dreamscape’),
it will be followed by an easier one (Week 16:
‘Get Low’), so there’s less chance of burnout.
Hidden in each challenge is a learning
opportunity. ‘Triangular Composition’ forces
you to think about how to compose your
scene or pose your subjects. ‘Water’ will
focus on fast, or slow shutter speeds.
30
D I G I TA L C A M E R A
Doug Harms, Week 31: ‘Water’ (2023)
Jamie Sloat, Week 36: ‘Triangular Composition’ (2023)
H
With photographic challenges of different intensities every week, the ebb and flow of 52Frames
leads participants to have creative breakthroughs, says founder and participant, Yosef Adest.
But here’s the rub. Consistency is key. You
have to do the thing every week. 52Frames
is not about submitting your best photo
each week, it’s about submitting a photo.
It is a creative exercise. It is the consistency
that forces your brain into creative action.
It is the consistency that allows every fifth,
tenth or hundredth submission to be a
standout. You cannot get to that home run
without swinging a whole lot of times first.
JANUARY 2024
In 52Frames we have one mantra: Embrace
Imperfection. Show up each week, for 52
weeks, and you will experience creative
breakthroughs that you never thought
possible. You will learn new things, have
new experiences, and look back to see
that it’s not just your photography that’s
changed, but your creative outlook on life.
Enter the challenge today
– go to: www.52frames.com
www.digitalcameraworld.com
1
7 | ARCHITECTURE
Baku to
the future
Do some research
Research is important in
my travel photography.
For this shot, I spent a lot
of time looking through
thousands of photos of
this building to learn how
other photographers
captured it. I wanted to be
able to create something
fresh, with a different
interpretation of it.
2
Visit and repeat
I visited the Center daily
for 10 days at different
times so I would be able
to capture the building
in different lighting. On
some days, I went at
10am, 12pm, 2pm, 4pm
and 6pm. Every angle
of the building is suitable
for photography at a
specific time of the day.
Follow these tips for capturing
architectural wonders, says
Yasser Alaa Mobarak
am a travel photographer from
Alexandria in Egypt and would
like to share with Digital Camera
readers how I photographed the
Heydar Aliyev Center in Baku, Azerbaijan.
The Center is a 57,500 m sq building complex
designed by Iraqi-British architect Zaha Hadid
and is noted for its distinctive architecture and
flowing, curved style that eschews sharp angles.
Instagram: @yasseralaamobarak
I
1/400
sec
32
f/14
D I G I TA L C A M E R A
ISO
100
JANUARY 2024
www.digitalcameraworld.com
Add a human touch
To give a sense of scale, I added
a human element to the frame.
I included this element using
architectural lines and curves
to create an interesting scene.
I always like to include single
people to keep things simple and
avoid crowding the composition
– focusing on the position,
direction and spacing of the
human element in every image.
4
Patience brings rewards
When trying to capture a person
passing through the frame, I wait
for a long time until I achieve what
I consider to be the ideal subject.
The contrast between colours is
important to me and I try to apply
it in as many of my photos as
possible. For natural-looking
results, most of the images I
shoot are candid – I just capture
subjects doing what they’re doing.
5
Convert to mono
I always capture my photos in
colour, but I decided to convert
this image to black and white in
post-processing. The female
subject was wearing black
clothes and there was harsh
lighting and shadows; I wanted
the shot to be dramatic but with
no strong colours in the original
capture, I think it definitely
works better in monochrome.
Yasser Alaa Mobarak
3
www.digitalcameraworld.com
JANUARY 2024
D I G I TA L C A M E R A
33
ז۴nz(³!¨0³
Compose scenics with care
Take time to enjoy your surroundings and compose your scenic
shots – this will offer stunning results, says Roddy Llewellyn
ur fast-moving world is often reflected in
our photography, as many people tend
to point and shoot while moving from
one location to the other. One good
piece of advice to consider when you next find
yourself viewing a good scene is to take your time
and relax. Carefully composing your frame well
before pressing the shutter, considering aspects
like composition and colour, can pay dividends.
This month’s cover image is a great example of
a well-thought-out image, where many aesthetic
considerations were made before the shot was
taken. Settings were also taken into account, with
the choice of a narrow aperture of f/11. This photo
O
was taken with a Canon EF 16-35mm f4L IS USM
wide-angle lens, making sure the details from the
foreground to the distance were all kept sharp.
When you aren’t in a rush, it is worth spending
10 to 15 minutes thinking about your scene.
This will also help you enjoy your environment,
which will come across in your photos.
Next time you are out in the field, take a
breath, enjoy your surroundings and consider
your options. If you have a notepad, it is
sometimes worth making notes – a checklist
of what the shot may require, such as a low ISO
setting, a narrow aperture and a slow shutter
speed – before you set up your camera.
USE A TRIPOD
IN WINTER!
As there is far less light during the
day in the winter months, shoot from
a tripod so you can set low ISOs of 100
or 200 and use longer shutter speeds
to capture detailed images.
For some best-buy travel tripod
options, see page 105.
Why this shot works
1
Link the foreground with
background interest
This image has many layers of depth,
with plenty of foreground interest to
attract the viewer. Starting with the
leaves on the shore in the near foreground,
the eye is then drawn to the rock, then
the reflection in the water, finishing
with the mountain range in the distance.
These various layers help generate the
image’s considerable visual interest.
34
D I G I TA L C A M E R A
2
Use a diagonal within
your composition
In this photo, not only does the distant
shoreline fall into the rule of thirds grid
but there is also an additional diagonal
that draws your eye into the image along
the shoreline on the right-hand side.
These two compositional guides help
make this a really strong image which
feels well-balanced in terms of its
composition, and is easy on the eye.
JANUARY 2024
3
Complementary colours
work well together
Orange is the complementary colour of
blue from the colour wheel (below), which
is why this shot works so well. It combines
a cool colour on the left side of the image
with the warmer colour of the orange
leaves on the right. Using the
colour wheel when considering
your shots can create scenes
with great colour harmony.
www.digitalcameraworld.com
Take time to consider the scene in front
of you before setting up your camera.
Focusing on aspects like composition
and colour long before you press
the shutter can pay dividends.
1.3
secs
f/11
ISO
100
ח۴³ÁXnnٳnXI0
Get your
five a day
Getty / West End 61
This Christmas, create
striking HDR-like macro
images from your fridge
t’s hard to miss the photos
that adorn the pages of
supermarket and food
magazines at this time of
year. In the run-up to Christmas, even
the most humble of vegetables is put
through some creative process or
another. So why not put some
vegetables through a creative process
of your own and come up with a macro
picture to grace your kitchen wall?
The subject matter is important.
While you could use almost any fruit or
vegetable, one with a good variation of
tone, shape, texture and colour will get
you the best results. Also, think about
the type of background you want.
Here, we’ve used an old chopping board
that bears the stains and scars from
previous use, but which also adds some
interest. Baskets, battered baking tins
and interesting dishes are other
possibilities for backgrounds.
All you’ll need is your camera, a
standard lens, a tripod and a flash, which
needs to be mounted off-camera. Fire it
via wireless or radio connectivity, if your
equipment supports it, or by using a
flash sync cord, which shouldn’t cost
you more than £15/$18. So let’s
zoom in on our asparagus…
1
Use off-camera flash
2
Shadows and highlights
3
36
Future
I
Position the flash at the head
of the vegetables to help
illuminate the textures.
Making the most of these will
give the shot an HDR effect,
making it much more distinctive.
Add a dark edge
Try using a Lens Correction
Vignette in Photoshop and this
will help give more focus and
attention on the vegetables.
D I G I TA L C A M E R A
USE YOUR
FREE TIPS CARDS
This project features in this
month’s bonus tips cards.
For a handy guide to capturing
creative photos like this,
keep your tips cards in
your camera bag.
www.digitalcameraworld.com
Getty / supermimicry
Photo Active
WIN
A £50 CEWE
WALL ART
VOUCHER!
10 | COMPETITION
Submit your best ‘Light’
photo by midnight on
4 January 2023
‘Light’ photo
challenge
Send us your best image
to win a £50 voucher
towards Cewe Wall Art
The winner of the Music challenge is…
Sylvia Koycheva
In Digital Camera 274, we challenged you to submit your best
image with a music theme. Although the challenge wasn’t limited
to concert photos, our winning shot was the Get Your Rocks Off
frontman Lennie, taken at the UK’s Download Festival. Well done to
Sylvia Koycheva for capturing the atmosphere so well. “I love how
the singer is fully immersed in his performance and channels his
energy to capture the attention of the audience,” she says. “You can
only imagine the excitement of the crowd during this performance.”
he latest theme of our monthly Photo
Challenge is ‘Light’ – the word photography
means ‘drawing with light’, so let’s celebrate
the essential element of the medium.
However you choose to meet this openended brief, we’re looking forward to seeing your best shot!
T
Enter via email or Facebook
Sylvia Koycheva
Email your entry to digitalcamera@futurenet.com with
‘Light challenge’ as the subject, including a brief description
of the image. Or look for the ‘Light challenge’ post at www.
facebook.com/digitalcameraworld and upload your entry
into the feed. Enter by 4 January 2024 (only one image
per reader, please). The winner will be announced in issue
278 (March), on sale 2 February. (Please note that this
competition is only open to readers based in the UK.)
Email your entry to: digitalcamera@futurenet.com
or enter at: www.facebook.com/digitalcameraworld
ABOUT CEWE
CEWE is Europe’s number-one photo printing
company. Using photographer-approved print
processes and materials, CEWE has a wide
range of photo products for you
to explore, including the awardwinning CEWE PHOTOBOOK
and expertly crafted Wall Art
to help you get professional
results with your photos.
Find out more at:
www.cewe.co.uk
38
D I G I TA L C A M E R A
JANUARY 2024
www.digitalcameraworld.com
The art of seeing
Using your own photos for greetings
cards is a great way to share your
work with friends and family – and
it needn’t be too costly, either.
The art
of seeing
Benedict Brain has been on the lookout for an
ironic take on conventional Christmas imagery
ontinuing with the tree
theme from the previous
issue, I thought I’d share
a festive seasonal
Christmas tree-like image
as a celebratory gesture.
OK, so it’s not a real tree, but I’m sure you’ll
agree it looks like one. In the summer, I saw
the photograph at a meteorological station
at Qagortoq, Greenland. I knew the moment
C
Benedict Brain
www.benedictbrain.com
Camera: Fujifilm GFX 50R and GF45mm F2.8 R WR
Exposure: 1/125 sec at f/8, ISO 100
www.digitalcameraworld.com
I saw it that it would feature as my
‘Christmas image’. Most years, I
keep an eye out for an image to use
to celebrate the festive season, even
though, if truth be told, I can be a little
‘Bah humbug!” about Yuletide.
I’m not a massive fan, especially
of the crass consumerism and all its
trimmings – sorry! I also struggle
with the whole Christmas tree thing.
Although I appreciate that they do look
jolly nice and brighten the place up with
a festive vibe, it seems weird to me to
cut a tree down for a few weeks, even
though many are farmed sustainably.
Plastic trees raise other issues, of
course, so although I’m often
conflicted, I usually end up getting one.
Anyhow, I feel happy if a Christmasesque image presents itself sometime
throughout the year. I’ll often make it
into a card to share with friends and
family. Over the years, I have developed
a somewhat ‘deadpan’ aesthetic when
I approach the subject, and there’s
nothing that thrills me more than
finding something that might be a
slightly ironic take on the conventional
imagery associated with the season.
So you can imagine my delight at
finding this image. Stylistically, it aligns
with the approach I’ve been evolving
over the last couple of years; it’s quite
formal, with attention paid to aligning
the verticals and keeping certain
elements symmetrical with only a little
post-processing. This is driven, in part,
by using a medium-format camera.
The format slows me down and makes
me more deliberate in my approach.
It’s also simply an approach I like, and
it works for me, my world view and
what I want to say about it.
As regular readers will know, the
idea of metaphor and how an image
can take on alternative meanings also
interests me. This is not just a record
shot of a meteorological instrument;
it’s also a festive photo! I even like how
the red pipe leads out of the tree as
if it’s somehow hotwired to Santa’s
grotto – or maybe someone’s
just spiked my mince pie!
Anyway, have a happy festive season
everyone. Thanks for reading Digital
Camera magazine and I hope that
2024 is filled with photo fun!
JANUARY 2024
D I G I TA L C A M E R A
39
UK subscription offer
The Perfect
Christmas Gift
for just £51.99
plus
FREE LOWEPRO ADVENTURA
GO BP 150 CAMERA BAG
“Subscribe to
Digital Camera
and get the
world’s favourite
photo magazine
delivered to your
door or device
each month”
WORTH
£95
Niall Hampton
Editor, Digital Camera
Compatible with
most DSLR
and mirrorless
cameras
Compression strap
to cinch up larger
water bottles or
secure a tripod
As part of the
Lowepro Green
line, it’s made with
recycled fabrics
Great reasons
to subscribe to
Digital Camera
magazine today
HURRY!
WHILE
STOCKS
LAST
Never miss an issue
Enjoy 13 issues worth of
Digital Camera for just £51.99
– that’s just £3.99 an issue –
delivered direct to your door
FREE Lowepro Adventura Go
BP 150 camera bag worth £95!
Pay less than you would
in the shops
The latest tips and insights
A Digital Camera subscription
will inspire you to take truly
phenomenal photos every
month and help you get the
best results from your kit
Get a Digital Camera magazine subscription today
YOUR SUBSCRIPTION OPTIONS
PRINT ONLY
£51.99*
13 issues of Digital Camera delivered
to your door and a Lowepro Adventura
Go BP 150 camera bag
DIGITAL ONLY
£42.99*
13 issues of Digital Camera digital
edition for your tablet or device
(No bag included)
SUBSCRIBE NOW
ONLINE magazinesdirect.com/DCMXMAS23
PHONE 0330 333 1113 and quote code ‘XG49’
ǔǔƺȸƬǼȒɀƺɀבhƏȇɖƏȸɵ ِגאאǔǔƺȸȒȵƺȇɎȒȇƺɯɀɖƫɀƬȸǣƫƺȸɀȒȇǼɵًƏȇƳȒȇǼɵƏɮƏǣǼƏƫǼƺȒȇȵȸǣȇɎȵɖȸƬǝƏɀƺɀِ(ǣȸƺƬɎ(ƺƫǣɎȒǔǔƺȸǣɀƏɮƏǣǼƏƫǼƺɎȒÈkɀɖƫɀƬȸǣƫƺȸɀȒȇǼɵِçȒɖȸǕǣǔɎɯǣǼǼƫƺƳƺǼǣɮƺȸƺƳɀƺȵƏȸƏɎƺǼɵɯǣɎǝǣȇהƳƏɵɀƏǔɎƺȸɵȒɖȸˡȸɀɎȵƏɵȅƺȇɎǝƏɀƬǼƺƏȸƺƳِ
Gifts only available to subscribers on the UK mainland with the purchase of a print or premium Digital Camera subscription. In the unlikely event that we run out of this gift, we promise to offer you an alternative gift of the same or greater value.
ǼǼǕǣǔɎɀɖƫɀƬȸǣȵɎǣȒȇɀɯǣǼǼɀɎƏȸɎɯǣɎǝɎǝƺˡȸɀɎƏɮƏǣǼƏƫǼƺǣɀɀɖƺȒȇɀƏǼƺƏǔɎƺȸ(ƺƬƺȅƫƺȸِבאאXǔɵȒɖɯȒɖǼƳǼǣǸƺɵȒɖȸǕǣǔɎɀɖƫɀƬȸǣȵɎǣȒȇɎȒɀɎƏȸɎɯǣɎǝƏȇƺƏȸǼǣƺȸǣɀɀɖƺًɵȒɖƬƏȇƬǝȒȒɀƺƏȇƺƏȸǼǣƺȸǣɀɀɖƺɯǝƺȇȒȸƳƺȸǣȇǕȒȸɵȒɖƬƏȇƬȒȇɎƏƬɎƬɖɀɎȒȅƺȸɀƺȸɮǣƬƺɀِ
Orders purchased for yourself will start with the next available issue – please allow up to 6 weeks for delivery (up to 8 weeks outside of the UK). Payment is non-refundable after the 14-day cancellation period. For full terms and conditions,
visit www.magazinesdirect.com/terms. For enquiries and overseas rates please call: +44 (0)330 333 1113. Lines are open Monday-Friday 8:30am-7pm, Saturday 10am-3pm UK time (excluding Bank Holidays) or email: help@magazinesdirect.com.
Calls to 0330 numbers will be charged at no more than a national landline call and may be included in your phone provider’s call bundle.
www.digitalcameraworld.com
JANUARY 2024
D I G I TA L C A M E R A
41
Laurent Ballesta / Wildlife Photographer of the Year
42
D I G I TA L C A M E R A
JANUARY 2024
www.digitalcameraworld.com
OVERALL WINNER & WINNER, PORTFOLIO AWARD
‘The Golden Horseshoe’ Laurent Ballesta (France)
A tri-spine horseshoe crab moves slowly over the seabed, its golden protective
carapace hiding the 12 appendages of its body. Above the horseshoe crab, a trio
of juvenile golden trevallies are poised to dart down for any edible morsels ploughed
up by its passage. The tri-spine horseshoe crab has survived for more than 300
million years but now faces habitat destruction and overfishing for food – and
for its blood, which is used in the development of vaccines.
However, in the protected waters off Pangatalan Island in The Philippines, there
is hope for its survival. Marine biologist and photographer Laurent Ballesta has
dedicated his life to exploring the oceans and revealing their wonder through art,
leading a series of major expeditions that resulted in many unprecedented images.
Location: Pangatalan Island, Palawan, The Philippines Technical details: Nikon D5
with 13mm f/2.8 lens; 1/25 sec at f/22, ISO 800; Seacam housing and strobes
Hotshots
A selection of the winning entries from 2023’s
Wildlife Photographer of the Year competition
www.digitalcameraworld.com
JANUARY 2024
D I G I TA L C A M E R A
43
Bertie Gregory / Wildlife Photographer of the Year
Hotshots
WINNER, BEHAVIOUR: MAMMALS ‘Whales Making Waves’ Bertie Gregory (UK)
Bertie Gregory tracks a pod of orcas as they prepare to ‘wave wash’ a Weddell seal. These orcas belong to a group that specialises in
hunting seals by charging towards the ice, creating a wave that washes the seal into the water. With rising temperatures melting ice
floes, seals are spending more time on land and so the behaviour of ‘wave washing’ may soon disappear.
Gregory took two month-long expeditions searching for orcas. “We spent every waking minute on the roof of the boat, scanning,”
he says. After battling high winds and freezing conditions, he captured this remarkable behaviour with his drone.
Location: Antarctic Peninsula Technical details: DJI Mavic 2 Pro and Hasselblad L1D-20c with 28mm f/2.8 lens; 1/120 sec at f/4, ISO 100
44
D I G I TA L C A M E R A
JANUARY 2024
Juan Jesús Gonzalez Ahumada / Wildlife Photographer of the Year
WINNER, BEHAVIOUR: AMPHIBIANS
AND REPTILES
‘The Tadpole Banquet’
Juan Jesús Gonzalez Ahumada (Spain)
Toad tadpoles feast on a dead fledgling
sparrow. Common toad tadpoles have varied
diets consisting of algae, vegetation and tiny
swimming invertebrates. As they grow larger,
they become more carnivorous – so when
a banquet like this arrives, they take full
advantage of it. The drama unfolded near
Gonzalez Ahumada’s home when a newly
fledged sparrow launched itself from a nest
on his neighbour’s roof and fell into a nearby
pond, where it drowned. The photographer
had to pick his moment to show the tadpole
formation and the sparrow’s eye.
Location: Ojén, Málaga, Spain
Technical details: Canon EOS R6 with 100mm
f/2.8 lens; 1/80 sec at f/5.6, ISO 320; ring flash
www.digitalcameraworld.com
Lennart Verheuvel / Wildlife Photographer of the Year
Hotshots
WINNER, OCEANS: THE BIGGER PICTURE ‘Last Gasp’ Lennart Verheuvel (Netherlands)
Verheuvel shows the final moments of a beached orca. Lying on its side in the surf, this orca had only a short time left to live. Initially rescued, it
soon became stranded on the beach again and died. A study later revealed that not only was it severely malnourished, it was also extremely sick.
Research shows that orcas in European waters have the world’s highest concentrations of polychlorinated biphenyls. These banned chemicals
can persist for many years in marine food webs, weakening immune systems and reducing breeding success in whales, porpoises and dolphins.
Location: Cadzand-Bad, Netherlands Technical details: Canon EOS R5 with 100-500mm f/4.5-7.1 lens at 100mm; 1/80 sec at f/7.1, ISO 1,250
Mike Korostolev / Wildlife Photographer of the Year
WINNER, UNDERWATER
‘Hippo Nursery’ Mike Korostelev (Russia)
Korostelev reveals a hippopotamus and
her two offspring resting in the shallow
clear-water lake. Hippos produce one calf
every two to three years. Their slow-growing
population is particularly vulnerable to
habitat degradation, drought and illegal
hunting for meat and ivory from their teeth.
Korostelev has been visiting the hippos
in this lake for over two years and knew
they were accustomed to his boat. He spent
just 20 seconds underwater with them
– enough time to take this image from a safe
distance and to avoid alarming the mother.
Location: Kosi Bay, iSimangaliso Wetland
Park, South Africa
Technical details: Canon EOS 5D Mark III
with 17-40mm f/4 lens; 1/320 sec at f/7.1,
ISO 640; Seacam housing
www.digitalcameraworld.com
JANUARY 2024
D I G I TA L C A M E R A
45
Rachel Bigsby / Wildlife Photographer of the Year
WINNER, NATURAL ARTISTRY
‘The Art of Courtship’ Rachel Bigsby (UK)
Bigsby frames a gannet pair against the guanopainted curves of sandstone cliffs. From her boat
and in turbulent seas, she realised that achieving
her vision of showcasing gannets set against the
towering cliffs would be tricky. But as the boat
aligned with the rocks, she spotted this pair
of birds “isolated on a lower ledge, intertwining
their necks and framed by streaks of guano”.
Each summer, the Isle of Noss off the Shetlands
hosts over 22,000 northern gannets, which return
to breed on the ledges carved by the elements. This
species was hardest hit by the 2022 avian flu outbreak.
Location: Noss National Nature Reserve,
Shetland Islands, Scotland
Technical details: Nikon D850 with Sigma 60-600mm
f/4.5-6.3 lens; 1/1,600 sec at f/11, ISO 5,000
46
D I G I TA L C A M E R A
JANUARY 2024
www.digitalcameraworld.com
www.digitalcameraworld.com
JANUARY 2024
D I G I TA L C A M E R A
47
Hotshots
WINNER, RISING STAR PORTFOLIO AWARD
‘The Ice Ibex’ Luca Melcarne (France)
Melcarne makes the most of his mountain guide
skills to reveal the fascinating lives of Alpine
animals. Born in the Vercors mountains of
France, Melcarne is a professional mountain
guide and nature photographer. He is
accustomed to the cold conditions but still needs
to constantly watch the weather before making
his plans. Melcarne’s portfolio highlights the
animals living in the Vercors Regional Natural
Park, where he lives and works. His remarkable
series of images demonstrate how patience,
perseverance and passion are all essential
ingredients for dramatic wildlife photography.
To enable an early ascent into ibex territory,
Melcarne had to ski for six hours before spending
a bitterly cold night in a temporary shelter in the
French Alps. He thawed his camera with his
breath and took the ibex’s portrait.
Location: Vercors Regional Natural Park,
Rhône-Alpes, France
Technical details: Nikon D850 with 600mm
f/4 lens; 1/5,000 sec at f/4.5 (+1EV), ISO 640
Amit Eshel / Wildlife Photographer of the Year
Luca Melcarne / Wildlife Photographer of the Year
WINNER, ANIMALS IN THEIR ENVIRONMENT ‘Life on the Edge’ Amit Eshel (Israel)
Eshel witnesses a dramatic cliffside clash between two Nubian ibex. After hiking to a vantage point on the clifftop, Eshel slowly
crept closer, using a wide-angle lens to set the action of the two opponents against the dramatic backdrop. The battle lasted
for about 15 minutes before one male surrendered and the pair went their separate ways without suffering serious injury.
In the run-up to the mating season, part of the male ibex’s coat darkens and their neck muscles thicken. Rivals will rise
up on their hind legs and ram their heads together with such force that their horns sometimes break as they collide.
Location: Zin Desert, Israel Technical details: Canon EOS R5 with 24-70mm f/2.8 lens at 45mm; 1/800 sec at f/8, ISO 500
48
D I G I TA L C A M E R A
JANUARY 2024
www.digitalcameraworld.com
Agorastos Papatsanis / Wildlife Photographer of the Year
Sriram Murali / Wildlife Photographer of the Year
WINNER, PLANTS AND FUNGI ‘Last Breath of Autumn’ Agorastos Papatsanis (Greece)
Papatsanis reveals the magic of a fungus releasing its spores in the forest. He used his silver photographic umbrella
to stop his camera from getting wet and covered his carefully positioned flash with a plastic bag. The colourful
touches come from the refraction of the light passing through the spore-laden air currents and rain. Parasol
mushrooms release billions of tiny spores from the gills under their cap, which travel in the air currents.
Location: Mount Olympus, Pieria, Greece Technical details: Nikon D810 with 105mm f/2.8 lens;
1/40 sec at f/36, ISO 500; Godox flash and trigger; Leofoto mini tripod
About the
competition
Wildlife Photographer of
the Year is produced by the
Natural History Museum with
an accompanying book and
touring exhibition. The 60th
Wildlife Photographer of the
Year competition closed for
entries on 7 December 2023,
and the winners will be
announced in autumn 2024.
www.nhm.ac.uk/wpy
WINNER, BEHAVIOUR: INVERTEBRATES
‘Lights Fantastic’ Sriram Murali (India)
Murali showcases a night sky and a forest illuminated with fireflies. He combined 50 separate
19-second exposures to show these firefly flashes, produced over 16 minutes in the forest near
his hometown. The firefly flashes begin at twilight with the frequency increasing through the
night until it looks like they are almost pulsing in unison, like a wave across the forest.
Fireflies are, in fact, beetles and the displays of bioluminescence are their way of attracting
mates. Darkness is a necessary ingredient in the success of this process and, while light
pollution affects many nocturnal creatures, these fireflies are especially susceptible.
Location: Anamalai Tiger Reserve, Tamil Nadu, India Technical details: Canon EOS 6D with
24mm f/1.4 lens; 19 secs at f/2, ISO 6,400 (multiple exposures); cable release; Manfrotto tripod
www.digitalcameraworld.com
JANUARY 2024
D I G I TA L C A M E R A
49
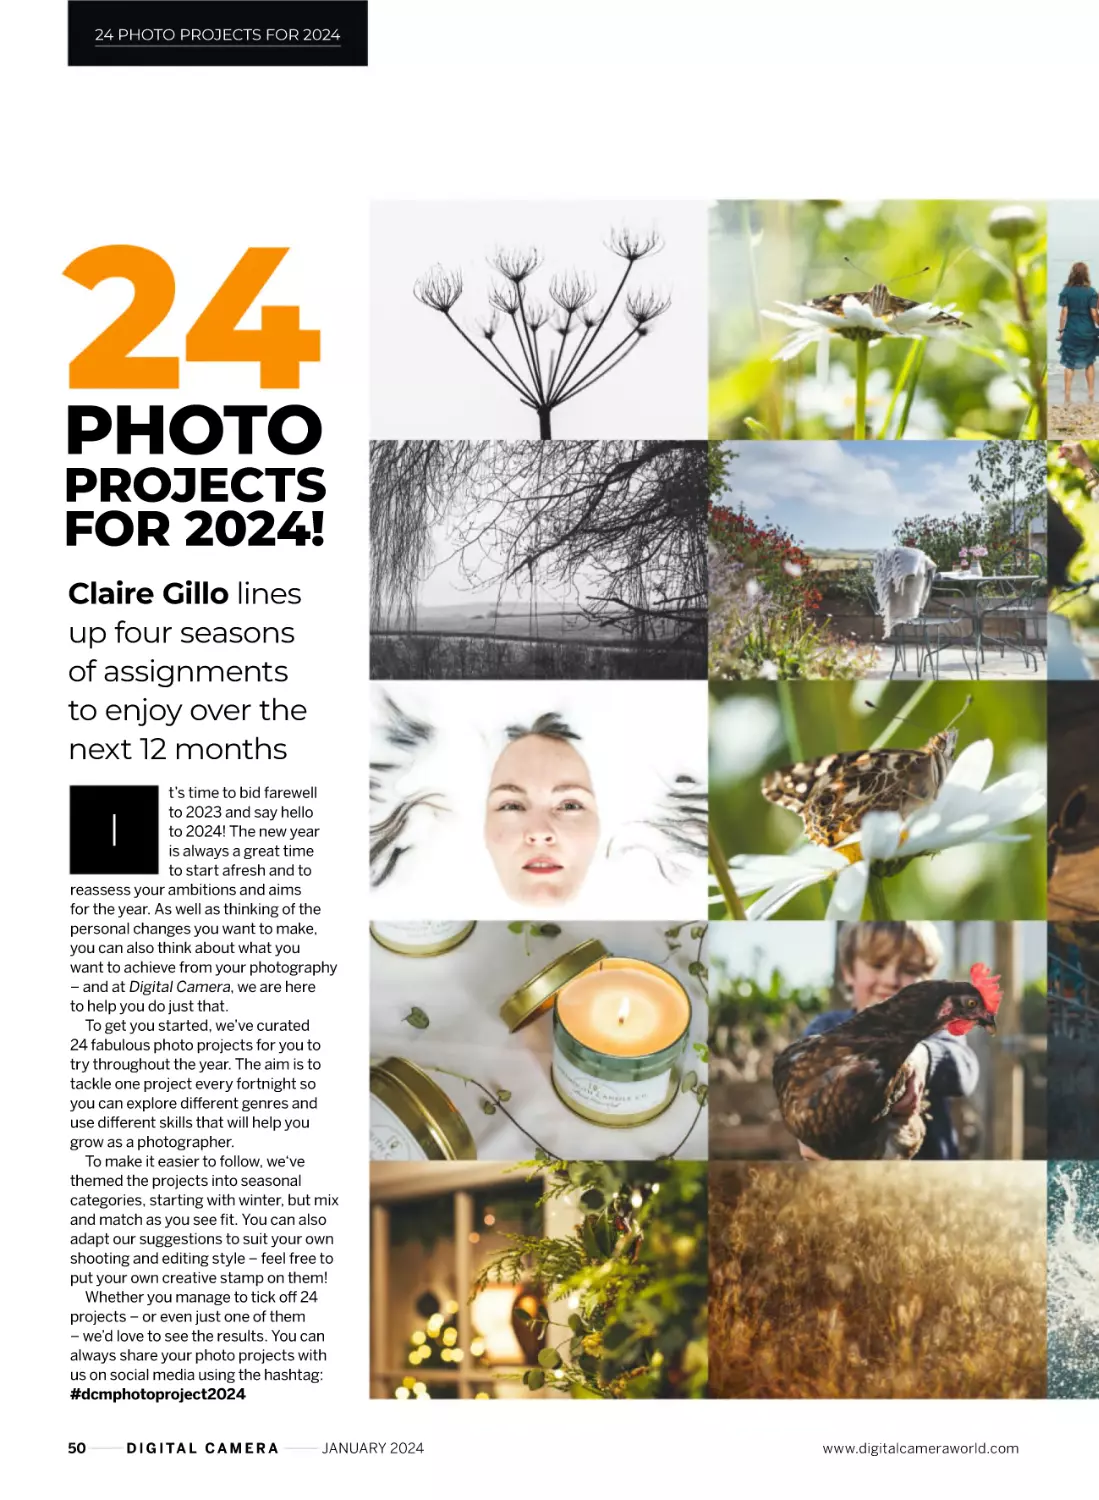
24 PHOTO PROJECTS FOR 2024
PHOTO
PROJECTS
FOR 2024!
Claire Gillo lines
up four seasons
of assignments
to enjoy over the
next 12 months
t’s time to bid farewell
to 2023 and say hello
to 2024! The new year
is always a great time
to start afresh and to
reassess your ambitions and aims
for the year. As well as thinking of the
personal changes you want to make,
you can also think about what you
want to achieve from your photography
– and at Digital Camera, we are here
to help you do just that.
To get you started, we’ve curated
24 fabulous photo projects for you to
try throughout the year. The aim is to
tackle one project every fortnight so
you can explore different genres and
use different skills that will help you
grow as a photographer.
To make it easier to follow, we‘ve
themed the projects into seasonal
categories, starting with winter, but mix
and match as you see fit. You can also
adapt our suggestions to suit your own
shooting and editing style – feel free to
put your own creative stamp on them!
Whether you manage to tick off 24
projects – or even just one of them
– we’d love to see the results. You can
always share your photo projects with
us on social media using the hashtag:
#dcmphotoproject2024
I
50
D I G I TA L C A M E R A
JANUARY 2024
www.digitalcameraworld.com
24 PHOTO PROJECTS FOR 2024
SEND US
YOUR IMAGES!
Want to feature in our gallery? Please
email a high-resolution image (at least
2.5MB) marked ‘Reader Images’ and
including a title and brief description to:
digitalcamera@futurenet.com
or share it on Instagram with the tag:
#digitalcameramag
CONTENTS
WINTER
01 Fabulous flora
02 Bleak landscapes
03 Light the way
04 Serene still life
05 Creative portraiture
06 Festive bokeh
page 52
page 52
page 52
page 52
page 53
page 53
SPRING
07 Bring spring indoors
08 Animal portraits
09 The Bartocha technique
10 Garden lifestyle
11 Beautiful butterflies
12 Wide and shallow
page 54
page 54
page 54
page 54
page 55
page 55
SUMMER
13 Shoot water splashes
14 Divine drinks
15 Summer scenes
16 Perfect portraits
17 Capture fun at a festival
18 Shoot big group photos
page 56
page 56
page 56
page 56
page 57
page 57
Claire Gillo
AUTUMN
www.digitalcameraworld.com
19 Autumn close-up
20 Location portraits
21 Shoot abstract architecture
22 Still life around the house
23 Fire and food
24 Presenting your photos
JANUARY 2024
page 58
page 58
page 59
page 59
page 59
page 59
D I G I TA L C A M E R A
51
24 PHOTO PROJECTS FOR 2024
WINTER
You may think that spring
and summer are the best
times of year to take stunning garden
shots, and while this is true, the winter
garden also has plenty of photographic
opportunities. Look for structural and
skeletal plants such as dead thistles
or cow parsley to shoot as your main
subject. Remember to get down low
to compose your shots. Bring along a
bag or old cushion to save your knees
from getting dirty and wet on the ground.
02
3 TOP TIPS
Convert your images to
black and white. This style
of photography lends itself
to the monochromatic
medium as your winter garden
shots should all be about the
form and structure of the plant.
Isolate your subject. Think about your
background and how to make your
subject stand out. A wide aperture
setting will help you do this.
Consider how you are going to
present your image. A double
or triptych can work well.
Claire Gillo
01
FABULOUS
FLORA
BLEAK LANDSCAPES
Instead of waiting for the perfect golden hour,
embrace the dull weather by shooting bleak
and minimal landscapes this winter. Misty
conditions are ideal and use negative space to aid your
composition. This type of project can be shot in both rural
and urban locations, so wherever you live, you can achieve
great results. Trees work particularly well as a main subject,
but so do man-made structures such as water towers and
industrial power plants. Have a look at the works of Hilla and
Bernd Becher and Josef Koudelka for some inspiration.
3 TOP TIPS
Claire Gillo
LIGHT
THE WAY
Winter months
are the perfect time to
shoot light trails. Head
to the urban environment
or look for a busy and
interesting piece of road
for your location. Essential
kit includes a tripod, high
vis (if you stand near a
road) and a wide-angle
lens. Experiment using
different shutter speed
settings (starting at 30
seconds) to see how they
add to the final effect. The
speed of the traffic and
the number of vehicles
will also affect the result.
52
D I G I TA L C A M E R A
04
SERENE
STILL LIFE
On those days
when it’s freezing cold
or the rain is hammering
down and you can’t face
the outdoors, find some
household objects to create
a simple still-life setup. In
our example, we used some
candles as our main subject
and draped a household
plant around to add some
interest to the shot. Your
background choice is also
important as this sets the
feel and tone of the image.
JANUARY 2024
James Abbott
03
Claire Gillo
When converting your image to black and white, it’s easy
to over-boost the contrast and make the blacks too dark
and the whites too light. Pulling it back a little will let the
image speak for itself.
A wide-angle lens is useful for this style of photography.
When it comes to composing your image, as well as using
the rule of thirds, you can also think more symmetrically.
www.digitalcameraworld.com
24 PHOTO PROJECTS FOR 2024
06
FESTIVE BOKEH
Bokeh comes from the
Japanese word boke, which
means blur or haze. In photography,
you can achieve an easy bokeh effect
using a lens that can be opened to
a wide aperture setting – the wider
the better, so prime lenses are ideal.
You will also need some lights in the
background, and small lights work
best, so Christmas trees are perfect
for this type of effect.
Bounce the flash to achieve a
clean look. You want to avoid
heavy or distracting shadows.
If you’re going to add floating
flowers to the milk, add these after
your model is in position; otherwise,
they will go underneath the water
as your model gets into the bath.
Once you’ve added the milk, the
water cools down reasonably
quickly – be ready to shoot so
that your model doesn’t get cold!
Claire Gillo
This project is easy to do at home
but it will require some planning, milk (around
six litres), a model and flowers, although these
are optional. We shot our image using flash and
elevated our position above the model using a
step ladder. Make sure you have your camera
strapped and secured to your body to avoid
any accidents. To create the milky effect, fill
your bath about halfway with warm water
and then add the milk. If you don’t want to
use fresh milk, you can also use milk powder.
3 TOP TIPS
Claire Gillo
05
CREATIVE
PORTRAITURE
Why not experiment with your
Christmas lights this year to
achieve some great bokeh effects?
Getty
53
24 PHOTO PROJECTS FOR 2024
SPRING
07
BRING SPRING INDOORS
When the first signs of spring start to emerge, we all
seem to breathe a sigh of relief… however, we are also
aware that April showers can go on way beyond April,
so on those rainy days, bring the spring indoors. A flat
lay is a great way to do this and can be achieved in a few easy steps.
1 SET UP THE
BACKGROUND
Lay down a piece of coloured
card on a table and place it
next to a large window. As
you want to make your image
bright and vibrant, coloured
card will work best.
2 BOUNCE
THE LIGHT
To reduce the shadows,
place a reflector on the
opposite side to your main
light source. This lifts the
image and removes the
stronger shadows for
a more even result.
3 SET UP YOUR
CAMERA
08
ANIMAL PORTRAITS
Many animals are born in the
spring, so take advantage of
this to create some characterful animal
portraits. For a winning shot, keep the
focus on the eye or the face of the animal
to create a connection between the subject
and the viewer. Animals can be tricky to
work with (especially those that aren’t
domesticated) so be patient and keep
shooting to ensure you get a winning shot.
54
D I G I TA L C A M E R A
Claire Gillo
Claire Gillo
Claire Gillo
Claire Gillo
Put your camera into
Aperture Priority mode and
set the aperture to f/4 and
the ISO around 200. You can
either shoot this handheld
or on a tripod if your shutter
speed is too slow.
09
THE BARTOCHA
TECHNIQUE
Sandra Bartocha was one of the
first to invent this popular technique where
you layer images on top of each other (often
nature images) to create a beautiful effect.
To achieve this, shoot multiple images of
your subject at different focus points and
then build your image using an editing
software program like Photoshop, where
you can blend multiple layers together.
JANUARY 2024
10
GARDEN LIFESTYLE
The spring garden is the perfect
setting for a lifestyle project.
Although this shot looks as though it has
been taken candidly from behind the
flowers, it has in fact been carefully
composed and thought through to sell the
dream. Placing items such as a blanket and
a magazine on the table adds that lifestyle
element to the scene and enables the
viewer to picture themselves in that setting.
www.digitalcameraworld.com
11
Claire Gillo
24 PHOTO PROJECTS FOR 2024
BEAUTIFUL
BUTTERFLIES
By late spring, many different
varieties of butterfly are starting
to hatch. To shoot our spring butterflies,
we grew them ourselves. We ordered some
caterpillars from Insect Lore (insectlore.
co.uk) and watched them grow from
caterpillars into Painted Lady butterflies –
this is also a particularly interesting project
to do if you have children. When we released
the butterflies into our garden, they were
completely docile, meaning we could spend
time getting them into a good position.
3 TOP TIPS
Head to your back garden or the local park
and look for flowers (such as the daisies in
our example) or for interesting backdrops
where the butterflies can rest.
Use a long lens such as a macro 100mm
prime for best results.
When shooting at a close proximity, your
aperture setting is affected. For example,
our images were shot at f/8, which on a
wide-angle image would be sharp from front
to back. For our butterfly images, f/8 was the
perfect setting as it softened the background
while keeping some of the butterfly sharp,
which was the effect we were after.
12
Claire Gillo
Using a 100mm macro
lens with a wide aperture
will enable you to achieve
fantastic DoF effects, such
as the image on the right.
WIDE AND SHALLOW
As spring leaps into action, you’ll find fields of
flowers starting to bloom. Our instinct and habit
when we shoot a wide-angle shot is to set the
aperture to a narrow setting to keep the scene sharp from front
to back. On this occasion, however, you should do the exact
opposite. Open your aperture to a wide setting and blur the
background and foreground. This works best in-camera if
you have a lens that can go as wide as f/2.8. However, if
you don’t have an f/2.8 optic, shoot as wide as you can
and then exaggerate the blur effect at the editing stage.
3 TOP TIPS
www.digitalcameraworld.com
f/2.8
Getty
Look for a colourful setting. Fields of tulips or lines of
flowers are the perfect arrangement for this technique
(lavender fields also work in the summer months).
Think about where you want your focus to sit in the image.
About a third of the way up often creates a pleasing result.
Plan your shoot to coincide with good weather. Avoid the
brightest part of the day and opt to shoot in softer light
at the beginning or the end of the day.
JANUARY 2024
D I G I TA L C A M E R A
55
24 PHOTO PROJECTS FOR 2024
SUMMER
13
SPLASH & SHOOT
Jumping into the sea or a large body of water is
great fun to do and you can get some eye-catching
photographic results at the same time. To make
sure your shots are sharp, set your camera to fire in the fastest
burst mode you have and ensure your AF setting is set to the
tracking feature, so you can follow your subject. You may need
to get your model to do a few jumps to get the perfect shot.
3 TOP TIPS
It’s all about communication. Speak to your
model first to tell them where they need to jump
so you can be ready to get the action shot.
Shoot a sequence of images and either
pick the best of the bunch or present
them as a sequence.
Sea salt and cameras do not mix! Protect
your camera with a waterproof cover (right)
and keep it clear of any big splashes. A long
lens will help you get close to your subjects.
15
SUMMER SCENES
The first or last light of the
summer day are the best times
to shoot spectacular summer scenes.
Blackpool Sands in Devon, pictured here,
were shining as the sun set behind the
fields. Shoot in raw format and bring those
warm tones back into your image at the
editing stage to make the most out of it.
3 TOP TIPS
14
DIVINE DRINKS
Cold drinks on a hot
summer’s day make the
perfect combination for a winning
photograph. Not only is it better to shoot
into the light here, but you also want to
make sure your drinks are ice-cold so
that they bubble with condensation,
which adds to the overall effect.
Calm and still days are the ideal settings
to shoot scenes like the one below. Have
a recce beforehand to work out the best
spot from which to compose your shot.
Use a wide-angle lens to frame the full
scene and look for curves and shapes
in the landscape to help you with your
composition.
At the editing stage, bring some detail
back into the shadows. You may also
need to warm the shadows up as the
light is much cooler there compared
with the rest of the scene.
3 TOP TIPS
D I G I TA L C A M E R A
PERFECT
PORTRAITS
The long summer days are
blissful and at the start and end of the
day, the light begins to soften meaning
you can achieve excellent results with
your portraits. Coordinate your sitter’s
clothing to match the scenery. In our
example, the girl’s blue flowery dress
matches the flowers on the ground
perfectly. We’ve also added a creative
filter and toned the image to make every
element in the scene work together.
3 TOP TIPS
Think about your setting and how
that adds to the overall look. In the
summer, an outdoor setting such
as a garden is the best way to go.
Open your aperture to a wide
setting to blur the background
and isolate your subject.
Bring in additional props to add
interest to the corner or side of the
frame, but make sure they don’t
become the main focus. Here, we
used a pair of sunglasses as a prop.
56
16
JANUARY 2024
Have fun and engage with your subject
as you are shooting. Although it might
be tricky to think about camera settings
while directing a model, you should
make sure they are comfortable.
If working with children, you need to be
quick as they won’t stand still for long.
To hold their attention, do your research
first – find out their interests so you
can engage with them for longer.
Keep the focus fixed on the face, but if
shooting closer up, focus on the eyes.
www.digitalcameraworld.com
24 PHOTO PROJECTS FOR 2024
17
CAPTURE
FUN AT A
FESTIVAL
Claire Gillo
If you like people-watching and listening
to loud music, there’s nothing better than
photographing a music festival. These
images were taken for the Dart Music
Festival last summer and are the perfect
example of how to get great results…
LOOK FOR LIGHT
CROWD FUN
CAPTURING THE MOMENT
1
2
3
18
SHOOT
BIG GROUP
PHOTOS
As well as photographing the
musicians at a music festival, there
are lots of images to be captured in the
crowd. Look for fun moments, especially
when people are unaware of your presence
for a more candid and natural result.
It’s all about being ready to capture
the perfect moment. A shake of the
head or someone jumping in the air are
always winners. Keep your ISO above
800 to ensure your shutter speed is
fast enough to freeze the action.
Claire Gillo
Photography is all about finding the
best light and this is also the case at
a festival or an event. Natural or ambient
lighting can be used to your advantage
so look for opportune moments with
your subject in the setting.
Shooting a large group of people is never
easy so think of fun ways you can get them
to engage with each other. People feel a lot
less awkward if they have something to do
or are given good direction. These colourful
bridesmaids naturally formed around their
bride, creating the perfect lineup for a
group picture. Luckily, it was a hot day so
it didn’t take much encouragement to get
them to paddle in the water! Make sure you
keep your aperture setting around f/8 so
everyone in the frame stays sharp.
www.digitalcameraworld.com
57
24 PHOTO PROJECTS FOR 2024
AUTUMN
19
ÈÁÈxz!n ³0ٳȨ
As well as offering plenty of opportunities for wideangle shots in the autumn months, the small details
of the season are also a joy to photograph. Look for
slithers of light to frame your subject and when it comes to editing
your images, follow our steps for atmospheric results. We think
Lightroom is one of the best image-editing software programs
for toning and styling your images, so we opted to use this.
OPEN
LIGHTROOM
1
Claire Gillo
Import your images
and then go to
the Develop Module.
Start by adjusting
the controls in the
basic tab. Correct the
Exposure and White
Balance, boost the
Contrast and use
the Whites, Blacks,
Shadows and Highlights
sliders to tone your
image. Also, play
around with the Tone
Curve setting below
for further effects.
COLOUR
GRADING
3
Now take it a
step further
and go to the Color
Grading feature.
This enables you to
colour-tone the midtones, highlights and
shadows separately.
Start by picking your
colour, for example,
warmer mid-tones
and highlights and
cooler shadows; you
can then adjust the
amount added by
clicking further out
on the circle. Again,
less is more so have a
play around for subtle
results like ours.
PROFILE AND PRESETS
2
Profiles and presets are easy
ways of toning and styling your
image and are a great starting
point. You can create your own
or import them. There are
plenty of profiles and presets
for sale on the internet (and
available for free in this issue –
see page 84). We added a touch
of a profile called Soft Fade as
the base for our image. You can
adjust the amount applied by
any profile or preset using the
Amount slider – sometimes
a hint is all you need.
20
LOCATION
PORTRAITS
Although landscape
photographers search for that
perfect autumnal light, portrait
photographers also do the
same when out on location.
This image taken of a girl at
an outdoor adventure club is
the perfect example of what
a setting sun in autumn can
bring to an image.
58
D I G I TA L C A M E R A
3 TOP TIPS
Keep your camera in Aperture Priority
mode and knock the exposure meter
down a stop to ensure your highlights
aren’t overexposing.
Shoot into the light, keeping the
focus on your subject.
Colour is important for a shot like this
so think about what you want your
subject to wear. In our example, the
red jumper is perfectly matched
to the light conditions.
JANUARY 2024
www.digitalcameraworld.com
21
SHOOT ABSTRACT
ARCHITECTURE
Sometimes less is more, such as in
this example of an image of a beach sauna. The
contrast of the patterned orange tiles placed
against a clear blue sky is what makes it such
an effective result. You don’t need to go far to
find this type of image, so have a search around
your local area to see what you can find.
22
STILL LIFE AROUND THE HOME
If you need a day at home, you can still take great
photographs. The home has plenty of areas you
can style, from living room areas to a shelf and dresser in the
bedroom. If you have busy surfaces, remove the clutter and style
your shots using a few books, plants, candles, blankets, cushions
or whatever you have lying around… it’s also a good excuse to
have a clean and sort out household items at the same time.
3 TOP TIPS
Claire Gillo
Claire Gillo
Claire Gillo
Use a tripod (right) as you want to keep your ISO down low
to ensure your shots aren’t grainy. Using a tripod indoors
enables you to keep your ISO low, at 100, as you will need
to use a longer shutter speed.
Unless you have a library of beautiful old books that all
match in colour and style when shooting books, turn them
around so you can’t see the spine to create a neutral look.
For scenes where you have a big difference between the
highlights and shadows of the image, try bracketing
exposures and merge the shots at the editing stage.
23
FIRE AND FOOD
Smoky and fiery conditions are perfect for food
photography in action. Look for flames created by
dripping meat to capture effective results. When it comes to
selecting the right camera settings, don’t be afraid to push the
ISO up if you are shooting in low light. Here, we set ours to 1600
and the aperture at f/2.8 to get a shutter speed of 1/400 sec.
This meant the action of the flame and the hand stayed sharp.
www.digitalcameraworld.com
24
PRESENTING YOUR PHOTOS
On those rainy days later in the year, take time to reflect
on your photography, go through and organise your
photos and edit them accordingly. Try printing out some of your
images, thinking of different ways to present them, and if you
need to share images with a client or a friend then find a pleasing
presentation method, such as the wooden box in our example, or
frame your favourite photos of the year and hang them on a wall.
JANUARY
AUGUST
2024 2018 D I G IDTA
I GLI TA
C ALMCEARM
AE R A 59
59
Reader gallery
Digital Camera readers show how they’ve been getting
creative, submitting images across a range of genres
60
D I G I TA L C A M E R A
JANUARY 2024
www.digitalcameraworld.com
1
‘Aurora’ by Tanya Maria
“Taken at the base of the Great Orme,
Llandudno, in north Wales. The combination
of the aurora dancing in the night sky
created a truly memorable experience for
me, and capturing this on my camera gave
me a real sense of achievement. I wanted
to record a unique and visually stunning
moment that showcases the beauty
of nature and our night skies.”
Instagram: @tanya_captured
momentimages
Digital Camera says:
This fantastic capture by Tanya is enhanced
by the detailed foreground and the inclusion
of stars behind the magnificent colours of
the aurora. It’s out of this world, Tanya!
READER SHOT
OF THE MONTH
Tanya Maria wins a year’s
subscription to Digital
Camera for this image.
Congratulations!
www.digitalcameraworld.com
JANUARY 2024
D I G I TA L C A M E R A
61
Reader gallery
3
‘Take Care’ by Danial Kennedy
“Taken at home in Blaydon, Tyne & Wear. I have always been
interested in macro photography and capturing the intricate details
of everyday objects. This image captures something different about
an item I see all the time and, with the right light, it comes across as
quite striking. I didn’t go into the image thinking about an end result
other than trying out some different angles and trying to show
something that you wouldn’t usually see.”
Instagram: @intheshot_
Digital Camera says:
Danial has turned what could be a quite mundane photo into
one with dynamism. Using a really low and unusual angle and
perspective, he has managed to capture a creative shot, with
great depth of field in the area around the label itself.
2
‘Beach Huts Out to Sea’ by Jo Griffiths
4
‘Meet Me at the Corner?’
by Jacek Durski
“The coast around Margate lends itself to lots of photo
opportunities. During a slow walk along Westbrook, the sun was
strong in the sky and the sea was a stunning azure. I found the
colours of these two beach huts revealing the sea in the background
to be a perfect combination, their colours and the lines of the beach
huts combining to create a doorway to this stunning destination.”
Instagram: @jogriffithsphotography
Shot in Milan, Italy. Jacek liked the non-obvious
and intriguing form of the building. Using carefully
selected contrasts, he tried to underline the
complexity of the form of this building and
highlight the variety of its textures.
Instagram: @jacekdurski
Digital Camera says:
We love this architectural capture – the angle
and the combination of various shapes within the
building make it a really interesting composition that
attracts the eye. Converting to black and white has
enhanced the lines and the contrast in the building –
and including the house plants over the balconies
gives this graphic image some narrative.
Digital Camera says:
A great example of using space and perspective to great effect.
Taken on an iPhone 12, Jo has found a great spot to produce a real
sense of depth between the two beach huts, where the planks of
wood in their walls act as leading lines to the horizon in the distance.
62
D I G I TA L C A M E R A
JANUARY 2024
www.digitalcameraworld.com
Reader gallery
www.digitalcameraworld.com
JANUARY 2024
D I G I TA L C A M E R A
63
64
D I G I TA L C A M E R A
JANUARY 2024
www.digitalcameraworld.com
Reader gallery
5
‘Almost Closing Time’
by Nathan Foin
“Taken on a cold winter night in the
centre of Teignmouth, Devon. This
shot captures a quiet moment in
a town that would normally be
noisier and busier. Using a mist filter
for a more dreamy and surreal look,
I wanted to provide a view into the
everyday lives of the worker and the
shopper. This photo will hopefully
encourage other photographers
to find beauty in the mundane.”
Instagram: @n80photo
Digital Camera says:
We love the colour and movement of
this photo. The intentional inclusion
of the car roof adds to the framing
of the image and draws the viewer
into the shot – great work, Nathan.
www.digitalcameraworld.com
JANUARY 2024
D I G I TA L C A M E R A
65
Reader gallery
6
‘Phewa Lake, Nepal’ by Casper Farrell
“Captured at dawn – each morning, I would walk the shoreline listening for the distant calls of exotic-sounding
birds from the forests that cling to the hillsides surrounding the waters. I like how the small rowing boats are gathered up
in bunches and drift into pleasing angles; I think this captures the essence of Nepal at daybreak, a beautiful and especially
calming experience before the bustle of tourists and pleasure crafts begin to launch across the waters. There is a particular
colour hue in this region of Nepal – softer tones somewhere between hazy green and pale blue, like perpetual dawn.”
Instagram: @casperfarrellphoto
Digital Camera says:
An image that could feature in any glossy travel magazine, Casper has managed to create a real sense of wanderlust.
Look closely and this is a cleverly composed shot: the boat in the foreground draws the viewer to the quartet of boats
fanning out and then further into the amazing view beyond. A great travel photo that has many layers, Casper!
7
‘Caerlaverock Castle’ by Mark Dunbaven
“While Scotland is a place of natural beauty, there
is a darker side. Stunning castles, such as this one in
Caerlaverock, are steeped in history, experiencing brutal
battles as the English tried to take control of them.”
Digital Camera says: A fantastic capture of a
historical building, with a great central focus. Framing
up with the building on the corner, combined with the
moody skies, really draws the viewer into the image.
8
‘Forest of Dean’ by Elena Abraham
“Taken on my Nikon D3300 – I really like the
composition of the image and the symmetry reminds
me of a scene from The Lord of the Rings. I was trying
to capture the onset of autumn, which is reflected in
the leaves changing colour and falling on the ground.”
Digital Camera says:
A pleasing example of a woodland scene, with the leading
lines drawing the eye of the viewer into the distance.
The slight turning of the leaves from green to orange
beautifully captures the start of the autumn season.
SEND US YOUR IMAGES!
Want to feature in our gallery? Please email a high-resolution
image (at least 2.5MB) marked ‘Reader Images’ and
including a title and brief description to:
digitalcamera@futurenet.com
or share it on Instagram with the tag:
#digitalcameramag
JANUARY 2024
D I G I TA L C A M E R A
67
NEW
SERIES!
Master the art of modern photography
This month: ISO
All you need to know about the most important three letters in digital imaging
Will Cheung
For this autumnal tree image,
we used a tripod-mounted
Nikon D810 at ISO 100 for an
exposure of 1/50 sec at f/11.
Will
Cheung
An imaging journalist and
freelance photographer
based in London, Cheung
has a wealth of experience
over several decades.
www.williamcheung.co.uk
68
D I G I TA L C A M E R A
Of the three exposure musketeers, ISO is the
most recent. That’s not because film speed hasn’t
been around for a long time – because it has – but with
film, it isn’t possible to change speed with the same joyous
alacrity that we can on our digital cameras. Essentially,
you are limited to the film’s quoted speed. Of course,
you can always underexpose for richer colours or
push-process, or shoot half the roll at one speed and
the other at a different speed and then clip test during
processing, but ultimately, your options are limited.
Furthermore, the fastest film you can buy is ISO 3200.
That’s nothing when most digital cameras have a native
range that tops out at ISO 12,800 or 25,600 – and many
go way beyond if you include expanded speeds. The
Nikon D6 and Sony A1 cameras, for example, both
have native top speeds of ISO 102,400.
JANUARY 2024
With digital ISO, you have an incredible amount of
freedom. You can shoot one frame at ISO 400, the next at
ISO 25,600 and then finish at ISO 100. This is why digital
ISO is now a fully paid-up member of the exposure trinity
and, in partnership with aperture and shutter speed, we
now have a formidable set of tools to play around with.
The aperture and the camera shutter physically
determine how much light reaches the sensor and the
actual settings you use are your responsibility, one you can
wholly or partially delegate to the camera. How you use ISO
on your digital camera is also up to you. It has an Auto ISO
so you can leave it all to the camera, perhaps setting an
upper limit to suit your quality threshold, or you can take
total control and adjust ISO to suit the shooting scenario.
Read on as we take a deep dive into ISO, what it is and
how you can use it to empower your photography…
www.digitalcameraworld.com
Get the
knowledge
Getting to grips with ISO
With film, ISO is a measure of its
light-gathering ability, according
to guidelines set by the International
Organisation for Standardization. Film
emulsion is formulated to deliver a
specific ISO and should be exposed
and processed for that speed.
Digital ISO is more complex and there’s
a great deal of misinformation around. For
a start, ISO is not an acronym and an image
CAMERA
signal is not simply amplified
CLINIC
to give faster ISO speeds.
Essentially, all photographers
need to know is that digital ISO, as
specified in ISO 12232:2019, gives us a
range of values that we can relate to film
ISO and that a lower speed is preferred
when there is more light around and a
higher value is needed when light levels
are poor – at the cost of digital noise.
Noise types explained
There are several reasons why your image may display digital noise
COLOUR NOISE
LUMINANCE NOISE
BANDING NOISE
Colour or chrominance noise manifests itself as
blotchy, random fluctuations of colour (usually red
and green) caused by using high ISO speeds. It is
noticeable in areas of even tone in low-light scenes.
High levels of digital noise degrade image quality and
impact on saturation, contrast and D-max, the depth
of blacks. Fixed pattern noise is caused by ‘hot’ or
‘stuck’ pixels. These show up as bright dots, as heat
builds up on the sensor during long exposures.
Luminance noise is random and colourless and
shows up as fluctuations in brightness. Every digital
image has some noise; the amount depends on the
ISO speed – the higher it is, the greater the noise.
Older cameras are noisier than newer models and
this is also influenced by the amount of light in the
scene; more light (signal) gives a higher signal/
noise ratio and less noise, which is why graining is
more evident when there’s not much light around.
Banding noise is introduced when the camera reads
data from the sensor and varies between models.
It is most evident with photographs taken at high
ISO speeds, when the lighting conditions are dark
and you need action-stopping shutter speeds. If
you need to brighten the shadow areas, banding
noise will be evident and run across the image
frame. Treatment in noise reduction software can
make a huge difference, especially with raw files.
Tactics for keeping noise down
Will Cheung
Noise can degrade our images, so here are some ways to reduce it
AVOID HIGH ISOs
EXPOSE TO THE RIGHT
SHOOT RAW
Avoid using high ISOs – set a wider aperture, slower
shutter or fix the camera on a tripod. Of course,
much depends on the subject and the situation –
if you’re shooting birds in flight, you have no choice.
Learn how your camera performs at high ISO
speeds so you can avoid using speeds where the
quality isn’t great. Use a tripod and shoot a low-light
scene using every ISO. Check the results at 100% on
screen and you’ll see noise increasing with speed.
Noise is more obvious in underexposed shots
and areas of shadow. When correcting images in
software, there are fewer levels in shadows so when
we lighten them, the noise is more obvious. Expose
to the right, using the camera’s histogram, but
without overexposing because you’ll end up with
unrecoverable highlights. Use the live histogram,
adjusting settings while making sure it stays within
the right edge, or check the preview’s histogram.
For more editing flexibility, shoot in raw format. The
downside is that raws take up more memory than
jpegs and have to be processed. For cleaner raw
images, use software such as DxO PureRAW, Topaz
Photo AI or Denoise in Adobe Lightroom. Some
cameras offer a compressed raw file option, such
as cRAW (above). The compression algorithm can
be lossy or lossless, but even this type of raw has
immense editing potential, not far behind full raw.
www.digitalcameraworld.com
JANUARY 2024
D I G I TA L C A M E R A
69
Perfect examples of ISO control for the best results
Aperture and shutter speed selection play a huge part in photography – now add ISO to the list
ISO
400
1.2
secs
LOW ISO/SLOW SHUTTER SPEED
ISO
400
Will Cheung
West Burton Falls in the Yorkshire Dales was in full flow
and to achieve a milky water result, it required a slow
shutter speed. With the camera and 70-200mm lens on
a tripod, I took my first test shot at a speed of 1.2 secs at
f/22 and ISO 400 and, although that produced a nice blur
in the flowing water, I decided to go even slower. The first
consideration was the tree branches, which I preferred
not to blur. Thankfully, it was a still day so there was no
problem here. To get a longer shutter, I dropped down
from ISO 400 to ISO 100 to give an extra two f/stops
of blur and the final exposure was 5 secs at f/22.
1/800
sec
MEDIUM ISO/FAST SHUTTER
ISO
25,600
Will Cheung
Modern digital cameras are so good that standardising your
photography on ISO 400 or even 800 is no problem and the
results will be first-rate with minimal noise. Being able to
use such a high ISO speed allows plenty of options when it
comes to aperture and shutter choice. This is LMS 46100
Royal Scot, photographed at Appleby station. It was a grey,
cloudy day but using ISO 400 on a Canon EOS R8, a 24MP
full-frame camera meant I could try 1/800 sec at f/8. With
a 35mm focal length, f/8 gave plenty of depth of field, so
the train is fully sharp while 1/800 sec meant there was
no risk of camera shake, as I was moving and shooting
quickly in the crowd to get a people-free shot.
1/60
sec
FAST ISO/FAST SHUTTER
70
D I G I TA L C A M E R A
JANUARY 2024
Will Cheung
Street photography often means having to tap into your
camera’s high ISO skills, especially if you don’t own a fast
aperture lens. For this shot, which was taken on London’s
Tower Bridge, a Nikon D4 camera was fitted with a 24-120mm
f/4 zoom. A few minutes earlier, I had been taking some
skyline shots at ISO 100 with the camera mounted on
a tripod, but seeing this photo opportunity unfolding ahead
of me, I quickly took the camera off the tripod and changed
the ISO to 25,600, the camera’s top native speed. With the
24-120mm wide open at f/4 that ISO enabled me to take
a handheld photo at 1/60 sec. The raw image here has
not been treated in any denoising software.
www.digitalcameraworld.com
ISO skills
Keep the noise down with
the camera’s tech skills
ISO 3200
CAMERA
In the images below, we
CLINIC
included raws treated with
Adobe Lightroom’s Denoise, but
DxO PureRAW and Topaz Denoise AI all
work in similar ways. Raw is the most
versatile format for editing, while jpeg is
better for shots to use straight out of the
camera. Jpegs are compressed and most
of the image data is discarded so there’s
only so much editing that can be done.
ISO 51200
RAW
AI DENOISE IN LR
JPEG
MULTISHOT NR
JPEG
STANDARD NR
JPEG
NO NR
ISO 800
Most cameras have a noise
reduction (NR) feature to minimise
the grainy look of high ISO photos. Often
high ISO NR can be used for all speeds but
is most effective at higher speeds. Long
exposure NR takes a ‘dark frame’ to get rid
of fixed pattern noise. In-camera NR
usually only benefits jpegs so with raws,
you’ll have to build in time for noise
reduction in the workflow.
The results
A Canon EOS R5 was used on this night scene and the jpegs are straight out of the camera. It offers three levels of high ISO
NR – low, standard and high – and a jpeg-only multi-shot setting for static scenes with a tripod. The EOS R5 is typical of the
latest generation of digital cameras and its high ISO performance is impressive, even without NR or any work in software.
In-camera noise reduction skills vary from model to model, but you can see here how effective high ISO NR is in the
Canon. From this test, the standard level of NR works fine, giving the most satisfying balance of image characteristics.
However, it was no surprise that for jpegs multi-shot NR worked best but it doesn’t suit every occasion. Noise reduction
works by smoothing out detail and the more aggressive the NR, the greater the extent to which fine detail suffers.
If used at its most aggressive settings, the result can look unnaturally smooth.
www.digitalcameraworld.com
JANUARY 2024
D I G I TA L C A M E R A
71
Pros and Cons ISO
Get to grips with some basics of ISO
techniques to use with your camera
Noise reduction
For cleaner jpegs, use the camera’s
noise reduction settings. Different
levels are available, so start with
standard or normal and experiment
from there.
Frame up
Shop around
Fill the frame with the subject.
Cropping in and over-enlarging will
make any digital noise present much
more obvious and negatively impact
on quality. Image upscaling software
such as Topaz Gigapixel AI can help.
Cameras with back-side-illuminated
sensors (BSI) have a design that
allows more light to be detected.
This often gives a higher signal-tonoise ratio for a better high ISO
performance than front-sideilluminated (FSI) sensors. If you’re
shopping around for a new camera,
this could be a feature to look out for.
Software denoise
The latest versions of Adobe
Photoshop and Lightroom have
excellent Denoise features so if you
are a Creative Cloud subscriber, that
is great news. If not, consider
investing in software such as DxO
PureRaw 3 or Topaz Photo AI.
Get creative effects
Upgrade your camera
If you own an older digital camera
and are unhappy with its high ISO
performance, the quickest remedy is
to invest in a more up-to-date camera.
Shoot at a super-high ISO (or even
use an expanded speed) for creative
effects. The grainy, desaturated look
can work for reportage and gritty
character studies. But remember that
noise smears fine detail, so it’s not
ideal for architecture or scenics and
also looks unflattering for portraits.
Push ISO higher
Don’t be afraid to use high ISOs.
Digital cameras of recent years are
remarkably good when it comes to
high ISO performance and noise is
only an issue if you print large photos.
Larger format cameras
Generally, smaller camera formats
such as Micro Four Thirds and APS-C
show more noise than larger formats
like full-frame and medium-format.
Very long exposures
While high ISO NR is worth using,
long exposure NR is not so useful.
It can benefit the image by removing
‘hot’ pixels, but the camera takes a
‘dark frame’ which takes as long as
the exposure and the camera is
inoperable during this period. This
isn’t always practical, especially when
you are taking very long exposures.
Don’t over-dehaze
Too much noise reduction, either
in-camera or in post-processing, can
result in an oddly smooth and slightly
artificial-looking image, so don’t be
too aggressive with NR. Also, when
editing, taking the clarity or dehaze
sliders to the extreme – or oversharpening – can make any digital
noise present more prominent.
Will Cheung
How you control ISO is
important. There is much to be
said for using Auto ISO with a limited
range of ISO 400 to 6400 rather
than the full range, but another way
of controlling ISO is to go manual,
adjusting the ISO as you go from one
scenario to another. It’s not a method
that will suit everyone but it is a great
way to learn more about light and
how ISO combines with aperture
and shutter speed.
Will Cheung
Editing know-how
Denoise in software
Editing software can make a world
of difference to your photos
Many photographers avoid high ISO
speeds because of the drop in image
quality. However, it is fair to say that with good
noise reduction software, photos taken at high
ISOs can be improved immeasurably.
This photo was taken on a Canon EOS R3 at
ISO 102,400. The low lighting and stratospheric
ISO has produced a very noisy image. Putting
the raw file through Lightroom Denoise has
made a huge difference. It is not perfect, but it
is remarkably clean and detail is vastly improved.
Other leading noise reduction software includes
DxO PureRAW 3 (raw files only) and Topaz
DeNoise AI (works with raw and jpeg files).
72
D I G I TA L C A M E R A
ISO 102,400
JANUARY 2024
Noise reduction in software
www.digitalcameraworld.com
Base native ISO
CAMERA
CLINIC
Used at its base native ISO, you will be making
the most of the camera’s ability to handle a wide
dynamic range. To exploit this fully you need to
shoot in raw format and use an editing software
to boost shadows and control highlights.
Low or medium ISO
Using low/medium ISO speeds gives the best
results but keep an eye on the other settings.
Too slow a shutter might result in shake or
subject movement while a wide aperture
might not give enough depth of field.
Underexpose
Extreme highlights are
impossible to retrieve
successfully if overexposed and
can take on a grey look. The best
tactic is to err on the side of
underexposure so the highlights
are safely recorded and the
shadows can be lifted in editing.
ISO 3200
Camera tech ISO invariance
ISO invariance means deliberately underexposing
at a particular ISO and then correcting for that
underexposure in editing, giving the effect of shooting at the
higher ISO in the first place. A camera with good ISO invariance
will exhibit little difference between the underexposed
shot and the one exposed at the ‘correct’ ISO.
To explain, let’s say you set ISO 100, underexposed by
one stop, then brightened that image in editing by one stop;
in effect, you have an ISO 200 photo. In Photoshop or
Lightroom, the limit for exposure correction is +/- five stops,
so if you took a shot at ISO 100 and repeated the process by
five stops, that is effectively an ISO 3200 image (-1 ISO 200,
-2 ISO 400, -3 ISO 800, -4 ISO 1600 and -5 ISO 3200).
This pair of shots taken on a Canon EOS R5 shows a 5-stop
corrected ISO 100 frame and a straight ISO 3200 shot. Apart
from the white balance, the two images are very similar, so
the EOS R5 appears to have good ISO invariance skills.
www.digitalcameraworld.com
Will Cheung
The technique of underexposing and correcting in software
ISO 100 – corrected by 5 stops in Lightroom
JANUARY 2024
D I G I TA L C A M E R A
73
Shoot photos
like a pro
rendition, weak colour saturation and
a strong grainy look, so you may
prefer to cap the working range. For
instance, if your camera’s top ISO
speed is 25,600, setting a ceiling of
3200 or 6400 would make sense.
Do this in the ISO speed settings
menu, where you can also often set
the slowest shutter speed when you
want auto ISO to kick into action.
Will Cheung
Leave it to the camera
or take control of ISO?
Most digital cameras have
an Auto ISO setting and
this incredibly useful feature
automatically adjusts speed as you go
from bright light to darker situations.
As a default, the camera will be set
to work with its full native ISO range.
In principle, there’s nothing wrong
with that but the highest speeds can
be disappointing with poor detail
Control your depth
ISO 200 f/11
ISO 800 f/22
ISO 400
ISO 3200
ISO 1600
ISO 25,600
Will Cheung
For this picture of Staithes in Yorkshire, I was
shooting handheld with a 24-105mm lens at
45mm. My aim was to record the foreground
crab pots sharp while having enough depth of
field to retain sharpness in the village backdrop.
The first exposure was 1/160 sec at f/11 at
ISO 200 and a careful check of the preview
showed the village not to be sharp enough. A
quick fix was increasing the ISO to 800 to allow
an aperture of f/22 to give enough depth of field.
Steaming ahead
Will Cheung
Steam re-enactments such as this one at Didcot
Railway Centre organised by TimeLine Events
have great potential for pictures. However, even
when people are posing, it is still important to
keep an eye on the ISO to keep the shutter speed
high enough to stop any subject movement.
While switching to a much higher ISO can
impact on quality, the high ISO performance of
modern cameras is incredibly good, and any
negative impact will only be visible on large prints.
When the boat comes in
Practise adjusting ISO quickly; you never know
when a photo opp might present itself. Here, I was
framed up on Whitby Abbey with the river Esk in
the foreground. It was no more than a record shot,
and I had the camera on a tripod set to ISO 1600.
The lifeboat came into frame, which made for
a good foreground, but at ISO 1600, the exposure
was 1.3 secs at f/4. I changed to ISO 25,600 and
shot at 1/13 sec at f/4, so I got a sharp shot. Both
raw files were denoised in Lightroom.
Camera skills ³ǝƏǼǼȒɯƳƺȵɎǝȒǔˡƺǼƳ
Shooting wide open is a powerful weapon for striking images
74
D I G I TA L C A M E R A
JANUARY 2024
Will Cheung
At their widest apertures, fast prime lenses give wonderful shots with background blur
but in bright light or if you want to use flash, you might run out of shutter speeds. You can
get round it if your camera has an electronic shutter, but these suffer from rolling shutter and
banding in artificial light plus most do not sync with flash. Another option is to use an ND filter.
The simplest solution is to use a slow ISO. Depending on the camera, you may have ISO 50
or 80 (often denoted by L in the ISO dialog box) and using that will avoid overexposure.
This portrait was a daylight shot with flash providing some fill-in. I wanted model Hazel’s
eyes sharp, but not much else, so I had an 85mm f/1.2 lens wide open and used a shutter
speed of 1/100 sec. So being able to use ISO 50 here was invaluable.
www.digitalcameraworld.com
Will Cheung
CAMERA
CLINIC
The magic of motion
ISO 50
Will Cheung
ISO 200
Altering the ISO with a filter can add something
special to your landscapes. Taken in West Bay,
Dorset, the initial shot at ISO 200 and 1/250 sec
at f/22 looks fine with sharp water. I figured a
slower shutter would be better, so I dropped the
ISO to 50 to give an exposure of 1/60 sec at f/11
and added a 3-stop ND filter, taking the shutter
down to 1/8 sec to give more motion in the water.
Get up to speed
ISO 800
Will Cheung
ISO 400
Street photography can catch you on the hop, so
using an Auto ISO range working up to ISO 1600
or 3200 is sound advice. Another option is to set
a high speed manually so you could set ISO 1600
and while there may be a minor pay-off with
image quality, you’ll probably get a fast shutter
to avoid camera shake and subject movement.
If you like to learn about light, you could adjust
the ISO manually as you’re wandering around.
Long shots
ISO 50
Will Cheung
ISO 100
Extreme long exposures are fun to shoot but
can be tricky when the sun is bright – even with
a neutral density filter. A meter reading of this
scene was 1/60 sec at f/11 and ISO 100. Adding a
10-stop ND filter took the shutter down to 15 secs,
but the clouds weren’t moving that fast. Stopping
down to f/22 took the exposure to 60 secs which
was good. A change to ISO 50 gave an exposure
time of 120 secs, long enough to blur the clouds.
When the wind blows
ISO 200
Image stabilisers have made our lives so much
easier, giving us the freedom to take sharp
photographs without any camera support. Here, a
fierce gale was blowing from left to right, buffeting
the camera and photographer. Normally, 0.5 sec is
within reach using the combination of the Canon
EOS R5 and a 50mm lens on a calm evening, but
this night, I had to go up to ISO 6400 to allow
a 1/80 sec shutter speed to get a sharp shot.
ISO 1600
Pro tip ISO quick recall
Customise ISO setup on your camera
How ISO is adjusted varies from camera to camera. It
might be tucked away in the camera menu, available
with a button press or in plain sight on the camera top plate.
Now that we’ve got you thinking a little more deeply about ISO
and its potential, knowing how to access and adjust the feature
quickly is the next step. For speed, it pays to have ISO dedicated
to one of the camera’s most accessible buttons so it can be
varied even with the eye at the viewfinder eyepiece. In the menu shown above, changing the ISO value has
been assigned to the camera’s depth-of-field preview button, which is located on the front of the camera.
www.digitalcameraworld.com
JANUARY 2024
SEND
US YOUR
PHOTOS!
Now you know how to
use ISO like a pro, show
us what you’ve learned
and you could feature
in our Reader Gallery:
digitalcamera@
futurenet.com
D I G I TA L C A M E R A
75
Shot of
the month
A new book by Steve McCurry gathers
photos with a spirituality theme – half of
which have never been published before
eaturing 75 previously
unpublished photographs,
Devotion by Steve McCurry
is a collection of “spiritually
inflected” images from around
the world, taken during the
American photographer’s 40-year career. Being
a follower of Buddhism was one reason for
McCurry wanting to create this collection.
In an unpublished photo that appears in
Devotion, we witness a monk meditating on
a train. Taken in Bangkok, the location is
somewhere that McCurry has visited many
times before and knows particularly well.
“I’ve always been interested in trains and
train stations,” he says. “I had used that
F
Steve McCurry
Photographer
Title: Untitled
Location: Bangkok, Thailand
Date: February 2023
www.stevemccurry.com
76
D I G I TA L C A M E R A
JANUARY 2024
Steve McCurry
Shot of the month
A novice monk meditating on a train in Bangkok,
captured by Steve McCurry on a Leica SL2.
particular station quite a bit when I first went
to Thailand in 1979. There has been talk about
ripping it down, so I went there several times
just to photograph people coming and going,
and the passengers on trains.
“I was fascinated by this young monk who,
I guess, was going back to his monastery,
sitting there waiting and meditating. Sitting in
silence is an integral part of their practice, but
it seemed like an unlikely place to meditate.”
McCurry captured the photo on his Leica SL2
with a 24-90mm lens. He was drawn to the even
light falling on the monk’s face, and there was
enough light elsewhere for the SL2 to work with,
without having to push the ISO beyond 3200.
What McCurry did have to be mindful of was
working around the busy train cleaner, and the
railway timetable – making sure he could get
off if he felt the train starting to move.
Devotion by
Steve McCurry
is published by
Prestel (ISBN:
978-3-79138012-4) and
is on sale now,
priced £50/$65.
www.prestel.com
www.digitalcameraworld.com
FILE & VIDEO
www.digital
cameraworld
.com/dc276
68 S
TE
MINUIDEO
OF V
80
74
Fundamentals: Lens Flare effects in Lightroom
Lens flare is usually avoided as it degrades photos, but
landscape shots can benefit from a subtle flare. Recreate
this effect as a mask or as a custom setting for all masks
BECOME A
LIGHTROOM
MASTER!
76
78
This month…
Tool School: Lens background blur
Even with Photoshop’s blur filters, it is difficult to mimic the
effects of real optical lens blur. Our free adaptive presets can
help separate the subject and background of your images
82
Get the Look: Transform foliage with Hue/Saturation
These Photoshop actions use the yellow channel sliders to alter
foliage in your landscape shots – from deep natural colours to
warm tones and desaturation, plus a few surreal effects
VIDEO TRAINING
The issue 276 download includes video lessons that
build on our tutorials, plus bonus videos with extra tips!
www.digitalcameraworld.com/dc276
BONUS SOFTWARE EXTRAS:
Actions for Photoshop and
two sets of presets for
Lightroom Page 84
CAMERA RAW & LIGHTROOM
Explore the Lens Blur panel
LIGHTROOM
PHOTOSHOP
LIGHTROOM
PHOTOSHOP
Recreate lens flare effects
Transform foliage with Hue/Saturation
Give your shots a simple retro makeover
Actions and what they do
PHOTOSHOP
PHOTOSHOP
PHOTOSHOP
Make a Christmas collage
Time blending your landscape shots
Work with background layers
Download
68 minutes
of video
training
for Lightroom
and Photoshop
FILE & VIDEO
www.digital
cameraworld
.com/dc276
www.digitalcameraworld.com
JANUARY 2024
D I G I TA L C A M E R A
77
TOOL SCHOOL
FILE & VIDEO
www.digital
cameraworld
.com/dc276
Before
After
Explore the new
Lens Blur panel
Get to grips with the new AI-powered tool
for adding realistic lens blur to your photos
lur filters have been around since the
early days of Photoshop, but despite
being relatively easy to blur pixels, it
is tricky to mimic the effects of real
optical lens blur. The challenge is to
create a realistic fall-off around the point of focus, so
the blur gradually becomes stronger the further away
in front or behind the point of focus, just like optical
blur. With the introduction of the new Lens Blur tool,
depth-of-field effects have become a whole lot easier.
Available in Lightroom and Photoshop’s Camera
Raw, the Lens Blur tool employs AI to create a depth
map that mimics in-camera lens blur. Essentially, it
identifies which parts of the scene are closer to the
camera and which are further away. It determines the
subject of the photo and automatically designates it
as your point of focus. From here, you can add
realistic blur and fall-off in front and behind this point.
The tool is still in ‘early access’ mode at the moment,
which means Adobe hasn’t finished working on it.
However, if it doesn’t perform perfectly, there are a
range of manual tools you can use to finish off the job.
B
James
Paterson
With over a decade as a
writer and photographer
behind him, James knows
exactly which Photoshop
and Lightroom tools and
techniques matter most.
78
D I G I TA L C A M E R A
JANUARY 2024
Style your
backgrounds with
our 10 free presets
As well as the new Lens Blur feature,
there are lots of other ways to create
separation between the subject and
background. We’ve supplied a range of
free presets that you can use to alter
the backgrounds in your photos. These
are Adaptive Presets, which means
they work by first isolating the subject
from the background with a mask,
before adding an effect to the
background. As such, if the subject
isolation goes awry, you can always
head to the mask panel to fine-tune
what is included. To import them, go to
the Preset Panel in Camera Raw, click
the 3-dot icon at the top right, choose
Import Presets and navigate to the
supplied Zip file (no need to unzip it).
www.digitalcameraworld.com
TOOL SCHOOL
1
Lens Blur panel
Head to the Lens Blur
panel in Camera Raw
or Lightroom. Click
Apply then adjust the blur slider
to control the strength of the blur.
At the time of writing, Adobe says
Lens Blur is an ‘early access’ tool
and is not yet the finished article.
It is good enough to use, although
you may experience unwanted
effects or strange results in some
images. You can provide feedback
by clicking the link in the panel.
2
Set focus point
The two icons let you
choose a focus point,
which will be isolated
automatically, with the blur
applied in front and behind it. The
subject icon detects and isolates
the subject, while the target icon
lets you change the point of focus.
Check ‘Visualise Depth’ and the
overlay shows warm colours for
closer areas and cool for further
away. The in-focus area is white
as you drag the focal range box.
Bokeh buttons
3
These five buttons let
you fine-tune the look
of the out-of-focus
areas. They affect small specular
highlights, like the bright spots of
foliage in the background here.
Each effect mimics a different
kind of bokeh shape caused by
variations in lenses (hover over
the buttons for a description).
Below it is the Boost slider, which
lets you increase the brightness of
out-of-focus light sources.
WATCH THE
VIDEO!
1
3
2
4
5
6
4
Focal Range
slider
This handy control has
a few uses. First, you
can drag the white rectangle to
shift the point of focus forward or
backwards (double-click to reset).
You can also drag the side of the
box to expand or contract the
depth of field, so you can opt for
a shallow effect or have more of
the subject and scene in focus. If
‘Visualise Depth’ is checked, the
in-focus parts of the frame appear
in white as you adjust the box.
www.digitalcameraworld.com
5
Focus and
Blur brushes
These allow you to
paint to blur or focus
areas, which is helpful for fixing
mistakes. Here, the effect is
messy around the elephant, so
use the blur brush on the sharp
parts and the slider to control the
strength. The grass should be
in focus, so paint with the focus
brush over these areas. Add new
brushes with the plus icon and the
previous brush will be committed
to the overall depth map.
6
Brush tricks
Like all brushes
in Photoshop and
Lightroom, you can
resize the brush tip of the Blur
and Focus brushes using the ]
and [ keys. Shift + ] or [ alters the
feather. Click once, hold Shift and
click again to make a straight line
between two points. If you need
to subtract from the painted area,
hold Alt. The Auto Mask option
in the brush settings makes the
brush seek out edges as you paint
so you can quickly isolate objects.
JANUARY 2024
D I G I TA L C A M E R A
79
FUNDAMENTALS
After
BONUS
FLARE
PRESET
Turn to page 84 to
find out more!
Before
How to create flare
effects in Lightroom
Lens flare is something we try to avoid, but
a subtle effect can enhance your landscapes
e spend a lot of money on lenses that are
designed to minimise flare – those nasty
internal reflections that occur between the
elements in your lens and that can degrade
your photo. Plus, lens flare also looks
unprofessional. So, to reduce the chances of this, we opt
for lenses with special coatings and buy expensive filters.
But then we look at a lot of modern landscape images
and see that there’s subtle flare being used to enhance
them. So should we abandon all hope and just go for the
cheaper option, saving ourselves some money in the
process? No, not at all. It’s far wiser to start with a better
photo and enhance it ourselves. Indeed, creating a
repeatable and recognisable look could become your style.
You might think that creating a flare is something that’s
easy to do in Photoshop but not in Lightroom Classic.
Thankfully, it’s not particularly difficult. You can also save
the effect as a Mask or as a custom setting for all masks.
When you save it as a mask, you have to reshape it for each
image but, as a preset, you can use it on any mask you like.
W
Sean
McCormack
Sean McCormack is
a photographer and
writer, based in Galway.
He’s the author of The
Indispensable Guide
to Lightroom CC.
80
D I G I TA L C A M E R A
JANUARY 2024
FILE & VIDEO
www.digital
cameraworld
.com/dc276
Expert tip:
Saving a preset
To ensure your
preset can be
used with all
mask types
(so that it works
with a Linear
Gradient from
the side, for
example), go
to Preset in
the Mask tool
and, from the
list, choose
‘Save Settings
as New Preset’
and name the
file ‘Flare’.
www.digitalcameraworld.com
FUNDAMENTALS
WATCH THE
VIDEO!
1
3
Radial Gradient
In Masking, go to the
Radial Gradient. Decide
where to place it and
drag it out. If you’re
exaggerating the sun
in the photo, place it
centred there. If you
have light off-screen,
place it coming from
that direction so you
match the light source.
2
Soft transitions
4
Use de-Dehaze
Set Feather to 100 for
really soft transitions.
Using Temperature,
match the light colour
in the shot or make it
warmer. Here, we opted
to give the image some
additional yellow, with
a temperature of 48.
Tone Curve
Open the Tone Curve
inside the Radial
Gradient. Drag the
leftmost point up.
Looking at the Input/
Output in the top left
of the curve, go from
0/0 to 0/68, or similar.
Click to create a second
point about two-thirds
of the way along and
increase this.
www.digitalcameraworld.com
You’ve added colour and tone, now it’s
time to soften the effect. Dehaze is normally used to
remove haze but there is also a negative side to the slider,
which softens the image where it’s used. Bring this to -24.
JANUARY 2024
D I G I TA L C A M E R A
81
GET THE LOOK
WATCH THE
VIDEO!
GET YOUR
FOLIAGE EFFECTS
ACTIONS
Turn to page 84
to find out more!
FILE & VIDEO
www.digital
cameraworld
.com/dc276
Before
Transform foliage
with Hue/Saturation
Give your verdant landscape shots
a visual makeover, transforming the
mood of the image using only the
yellow colour channel in Photoshop
ow that summer has come to an end
and the colder months are upon us,
getting out to shoot can be a battle
with the weather. When the days
are good, they can be amazing. But
when it’s grey and wet outside, getting down to
some photo editing can be the perfect way to keep
the creative juices flowing. And what better images
to work on than those lush green spring and
summer landscapes you shot a few months ago?
We’re going to play with the Hue/Saturation
Adjustment Layer to completely change the way
that greens appear in the landscape. But contrary
to expectation, it’s the yellow rather than the green
colour channel that plays the biggest role in
adjusting foliage. From deepened natural colours
to warmer tones and desaturation, plus a few
surreal effects, we’re going to look at how those
simple sliders can make a huge difference to
your landscape shots.
N
James Abbott
James is a professional
photographer who
specialises in landscape
and portraits. He’s an
advanced Photoshop
user and has created
hundreds of tutorials.
82
D I G I TA L C A M E R A
JANUARY 2024
www.digitalcameraworld.com
GET THE LOOK
1
Try a surreal purple
2
Get moody
3
Make deeper greens
4
Apply a rich warmth
Click on the Create new fill
or adjustment layer icon at
the bottom of the Layers
panel and select Hue/Saturation.
When the dialog opens, click on the
dropdown menu set to Master by
default and select Yellows. Next,
move the Hue slider to -135 to make
the foliage purple, Saturation to +15
and Lightness to +10. If unwanted
elements of the scene switch to
purple, paint black on the Layer Mask
to remove them and, if you make any
mistakes, paint white over them.
Create a Hue/Saturation
Adjustment Layer and
select the Yellows channel.
Drag the Saturation slider to -60 to
desaturate the foliage and the
Lightness slider to -15 to darken
slightly. If you have an image with
lots of other colours present, you
may decide to reduce the saturation
or even increase it. To do this, switch
to the corresponding colour channel
and make the necessary adjustments.
You could, of course, simply adjust the
Yellows and leave everything else.
Create a Hue/Saturation
Adjustment Layer and
select the Yellows channel.
Drag the Hue slider to +15 to add blue
and the foliage will immediately
deepen. Next, increase saturation
to +5 for a slight boost, and reduce
Lightness to -15 to maintain a natural
look to the foliage. This technique
alters the natural colour of the foliage,
but in some cases, it can produce
a more natural-looking result when
the foliage has an overly warm and
yellow tinge, such as in this scene.
Create a Hue/Saturation
Adjustment Layer and
select the Yellows channel.
Drag the Hue slider to -5 to add more
warmth to the foliage. The adjustment
is incredibly small but it warms the
image in a targeted way. Next, increase
Saturation to +10 and reduce
Lightness to -10. All of the amounts
for each technique are a guide and
generally work well, but you can
also use them as a starting point
for experimentation to create your
own unique foliage colour effects.
www.digitalcameraworld.com
JANUARY 2024
D I G I TA L C A M E R A
83
ACTIONS & PRESETS
THIS MONTH’S BONUS SOFTWARE EXTRAS
Improve your shots with
155 Actions and Presets
Transform your photos with our editing mega pack!
Download them all from: www.digitalcameraworld.com/dc276
10 WINTER
PROFILES
Camera Raw
& Lightroom
DRONE
SHOTS
PRESET
Lightroom
84
CITY
AT NIGHT
PRESET
Lightroom
ISSUE 272
ISSUE 272
TWO MOODY
SEASCAPES
PRESETS
Lightroom
FOUR CURVES
ACTIONS
PACK
Photoshop
ISSUE 274
ISSUE 274
12 TONING
PRESETS
PACK
Lightroom
ISSUE 268
FOUR HIGHLIGHT
THE SUBJECT
ACTIONS
Photoshop
ISSUE 272
15 SUNSET
SKIES
PACK
Photoshop
FOUR B&W
ADJUSTMENT
ACTIONS
Lightroom
ISSUE 268
ISSUE 268
10 HAZE
PRESETS
Camera Raw
& Lightroom
ISSUE 264
ISSUE 264
ISSUE 264
FOUR BLENDING
MODES & ADJUSTMENT
LAYER ACTIONS
Photoshop
D I G I TA L C A M E R A
JANUARY 2024
ISSUE 274
VINTAGE
POSTCARD
PRESET
Lightroom
ISSUE 265
12 COLOUR
TONING PROFILES
Camera Raw
& Lightroom
ISSUE 265
FILES & PDFs
www.digital
cameraworld
.com/dc276
ISSUE 265
VIGNETTE
WITH SUBJECT
MASK PRESET
Lightroom
FOUR HUE/
SATURATION
ACTIONS
Photoshop
ISSUE 269
ISSUE 269
12
SHARPENING
ACTIONS
Photoshop
WET PLATE
PORTRAIT
PRESET
Lightroom
ISSUE 273
ISSUE 273
ISSUE 273
TWO
AUTUMN
PRESETS
Lightroom
FOUR LAYER
VISIBILITY
ACTIONS
Photoshop
ISSUE 275
ISSUE 275
FOUR BACKGROUND
DUPLICATION
ACTIONS
Photoshop
MILKY
WAY
PRESET
Lightroom
10 SCATTER
BRUSHES
PACK
Photoshop
ISSUE 275
10 ADAPTIVE
SKY
PRESETS
Lightroom
ISSUE 269
FOUR SPRING &
SUMMER COLOUR
ACTIONS
Photoshop
www.digitalcameraworld.com
ACTIONS & PRESETS
his month, we are
giving away all 243
bonus software extras
bundled with Digital
Camera in 2023 – including a total
of 155 presets and actions. Ready
to use on all your images, these
cover a wide range of genres,
including astrophotography,
portraits, landscapes and more,
so whatever your style, there
will be something for you to
enjoy in our editing megapack.
T
ISSUE 266
How to use your
software extras
Once you have downloaded
the ‘dcm276-files.zip’ file to
your computer, extract it and
put the Actions and Presets
folders where you can easily
access them. These folders
contain the files, PDFs and
installation instructions.
ISSUE 266
ISSUE 266
ISSUE 267
TWO MOODY
PORTRAIT
PRESETS
Lightroom
FOUR DYNAMIC
BLUR
ACTIONS
Photoshop
10 LUMINOSITY
MASKING
ACTIONS
Photoshop
ISSUE 270
ISSUE 270
ISSUE 270
ISSUE 271
10 CURVES
PRESETS
Camera Raw &
Lightroom
GRITTY
HERITAGE
PRESET
Lightroom
FOUR CREATIVE
BLACK & WHITE
ACTIONS
Photoshop
10 HOLIDAY
PRESETS
Camera Raw
& Lightroom
15
PHOTOSHOP
TEXTURES
Photoshop
Instruction PDFs
can be found in
the Gifts folder
of the issue’s
download file
ISSUE 267
TWO COLOUR
GRADING
PRESETS
Lightroom
ISSUE 271
THREE SHALLOW
FOCUS EDIT
PRESETS
Lightroom
ISSUE 267
FOUR MOODY
LANDSCAPE
ACTIONS
Photoshop
ISSUE 271
FOUR ENHANCE
LANDSCAPE
ACTIONS
Photoshop
THIS ISSUE’S TUTORIAL PRESETS & ACTIONS
Once you have downloaded the ‘dcm276-files.zip’ file to your computer, extract it and put the Actions and Presets
folders somewhere you can easily access them. These folders contain the files, PDFs and installation instructions.
10 BACKGROUND
PRESETS
Software: Camera Raw
This pack of presets complements
our Lens Blur tutorial on page 78.
www.digitalcameraworld.com
FLARE PRESET
FOLIAGE EFFECTS
Software: Lightroom
Software: Photoshop
Lens flare is something we try to avoid
but, as seen in our tutorial on page 80,
this preset will add an artistic flare effect.
Actions are saved settings that are applied
to your images. These four foliage effects
can be seen in our tutorial on page 82.
JANUARY 2024
D I G I TA L C A M E R A
85
Photo Answers
Irritated by image noise? Mixed up over memory
ƬƏȸƳɀّ³ƺȇƳژɵȒɖȸɎƺƬǝȇǣȷɖƺƏȇƳƬƏȅƺȸƏ
ȷɖƺɀɎǣȒȇɀژɎȒژdigitalcamera@futurenet.com
Andrew
James
Andrew is a highly
experienced writer
and photographer –
if you have a problem,
he is here to help.
How can noise be visible?
What is image noise
Q and why do we call
something we see
noise, anyway?
Tom Yeoman
Noise is a strange term since we
are talking about something you
see rather than hear. However, any
electronic equipment that records
stills, videos or audio is trying to provide you
with a perfect picture or sound. In most cases
when there is lots of light or sound, this is
achieved to an acceptable standard but the
task becomes harder when there is lower light
or a weaker signal and then noise creeps in.
The term is borrowed from audio – think of
the crackle, hum and hiss of bad audio in a
visual form and we get noise that you see, such
as speckling and a lack of absolute sharpness
that degrades the technical quality of the image.
This mainly happens when we have to boost the
‘signal’ by increasing ISO. Larger sensors in
full-frame DSLRs and mirrorless cameras have
bigger photosites than smaller cameras and
cameraphones, assuming the same pixel count.
Bigger photosites boast greater lightgathering ability, so you get improved signal
and less noise. It’s part of the reason why some
cameras handle the noise generated at higher
ISOs better. If the signal you’re recording is good
– in other words, you have lots of available light
– then the noise is overpowered so it’s invisible.
If the light is poor, making you increase the
sensor’s sensitivity by using a higher ISO, the
noise also gets boosted and becomes visible.
To reduce noise when shooting at a higher
ISO, avoid underexposing an image and then
thinking you can pull detail out of the shadows
in post-processing. You might be able to recover
some detail, but it often creates even uglier
artefacts. Only shoot with as high an ISO as
you need. So, don’t shoot at ISO 6400 when
3200 will give you an acceptable exposure.
86
D I G I TA L C A M E R A
JANUARY 2024
Andrew James
A
Shot at ISO 3200, this image has had no noise processed out. However, because it
was taken on a full-frame camera and exposed correctly, the image noise is negligible.
www.digitalcameraworld.com
What is cross-processing?
The term cross-processing dates back to the
days of film and refers to a technique where
you deliberately process a roll of exposed
film in the wrong chemicals.
Why would you want to do that –
and what was the result?
That depended on which film you put in which
chemicals. For example, cross-processing
C41 colour negative film in the chemicals for
E6 slide film created a blueish, tonally subdued
result. It wasn’t particularly natural looking,
but it became extremely popular as a creative
effect, especially for portraiture.
Avoid shooting on rainy days?
I never get my
Q camera out in bad
weather but saw
several photographers
shooting in my local nature
reserve when it was raining.
What am I missing?
Chrissie Thompson
You’re potentially missing a lot.
I’m not suggesting that you
rush out every time it rains, but
sometimes rain can add to the
mood of a scene by its effect on the subject
or even by being visible in the shot itself.
This autumn, I was wandering around
Westonbirt Arboretum with my camera.
The morning was bright and dry and the
afternoon was dull and damp. Both were
enjoyable, but there’s no doubt the rain
substantially changed the scenes I was
A
Shooting on rainy days can produce a range
of great scenes and colours, but take care not
to expose your camera equipment to the rain.
Cross-processing refers to the technique of processing a roll of exposed film in the wrong
chemicals for creative effect. It’s easy to recreate the look in post-processing with Adobe
Camera Raw or Lightroom Classic, using the red, green and blue channels in Tone Curve.
Do I need to use film to achieve
this creative effect today?
No, it’s easy to recreate the cross-processed look
with digital post-processing in software such as
Adobe Camera Raw or Lightroom Classic.
What’s the quickest way?
There are various ways to do this, but the simplest
method in Lightroom is to use the Tone Curve.
Select each of the red, green and blue channels
separately and play around with pushing and
pulling them until you get an effect you like.
finding. In the wet, leaves glistened on the
ground, droplets of water formed on their
tips and the colours I was seeing became
more saturated. The only downside was
there was less light, so I needed to be more
careful with my photography as slower
shutter speeds mean it’s easy to blur an
image when shooting handheld.
Of course, there is always a risk of getting
rain on the camera and you do need to be
careful because there are so many
electronics in modern cameras that you
want to avoid them getting soaked. Use
a microfibre towel or purpose-made storm
cover to keep them as dry as possible while
shooting. I find keeping raindrops off the
front element of the lens the biggest issue
as this directly impacts image quality, but by
making sure there is a lens hood attached,
and regularly checking the glass is dry, this
can be avoided. I always carry two lens
cloths in case one gets too damp.
Twilight zone
Why is twilight
Q a good time for
landscape
photography?
Todd Larkins
Twilight is the time from the
moment the sun has set until
approximately 40 minutes
afterwards, or at least until the
sky has turned black. This is a specific
period where light levels are rapidly
dropping but there is still some ambient
light available in the sky. Over the years,
I’ve lost count of the times when I’ve seen
Andrew James
A
www.digitalcameraworld.com
Is there a quick recipe I can try?
Drag the Red channel curve down so that
the image becomes much bluer, then create
a shallow S-curve in the green channel,
before finally creating a reverse S-curve
in the blue channel.
Does it work for every image?
You can play around with the colours for every
image, but it doesn’t always feel right. The only
way to decide what you like is to cross-process
a range of subjects and see the results.
Andrew James
Cross-processing explained
Andrew James
Tech Check
Crossprocessing
For many photographers, twilight is a great time
to shoot, with a unique range of colours and
tones, however, the dramatically falling light
also brings some technical challenges.
photographers packing up and heading
off as soon as the sun goes down, but this
is sometimes when things get interesting.
However, dramatically falling light does
present some photographic challenges. The
main one is shutter speed because the low
light makes them slower, so using a tripod
and cable release to trigger your shots is a
good idea. You also need to use white
balance sensibly to make the most of the
atmosphere. Switch off Auto WB, which will
try to neutralise the tones you are getting
and switch to Daylight WB. I find this gives
me the most true-to-the-scene colour. Of
course, by shooting raw, you can tweak
the white balance afterwards if you want.
The shot here is a simple twilight
landscape taken with the camera on
a tripod. You just won’t get these colours –
a strong pink blush and the deep blue
mountains behind – at any other time of
day. Also, try mixing the artificial light of
an urban landscape with the remaining
ambient light in the sky. This is often the
best time to shoot a city as the illuminated
buildings become much more interesting.
JANUARY 2024
D I G I TA L C A M E R A
87
Speed matters
Q
Does the speed of
an SD card really
matter?
Lola Castle
Most modern SD cards can
receive or transfer data quickly,
and the kind of buffering we
used to experience when
shooting a rapid sequence of images is rare.
That said, it’s still best to buy the fastest
you can afford. Of course, the issue is the
faster you go, the more expensive the
memory card becomes, so you might prefer
to select something more tailored to your
needs. If you’re not shooting fast-action
photography or high-resolution 4K video,
you can opt for the cheaper end of what’s
available. However, if you shoot a lot of
videos, it will be worth spending more for
the fastest card you can get.
A
Layer retention?
Can I save a layered
Q file I’ve worked on in
Photoshop back into
Lightroom and keep those
adjustment layers?
Which metering mode?
My new Canon DSLR
Q has many metering
modes, but which
one should I use?
Gregor Fredericks
On most DSLRs and mirrorless
cameras, there are at least three
ways of taking a light reading:
Multi-pattern, Centre-weighted,
or Spot, although manufacturers refer to
them differently. I’d suggest you use either
Multi-pattern or Spot for most shooting.
Multi-pattern takes multiple light readings
from the scene to work out the most likely
exposure value in average conditions. On
your Canon, it’s called Evaluative and is the
default metering mode. The camera doesn’t
A
88
D I G I TA L C A M E R A
James Masters
Andrew James
Spot metering is used for good
exposures in challenging lighting,
such as a subject in the shade
against a bright background.
Yes, as long as your Lightroom
is set to save files as .psd.
However, it’s important to
remember that if you choose
to open that .psd from Lightroom back into
know what mood you want in the picture, so Photoshop, to retain the Layers you have to
Multi-pattern metering won’t always get it
choose Edit Original from the dialogue box
right and you’ll often need to adjust exposure that pops up. The downside is that if you did
with Exposure Compensation. Spot allows
additional work in Lightroom and want to
you to take a reading from a specific area
open it back into Photoshop, you either lose
within a scene, meaning you can bypass
the Lightroom processing or the Layers,
what the camera ‘thinks’ is the correct
depending on which option you select.
exposure and make your own decisions
based on how you want your shot to look.
Set Lightroom to save files as .psd and you
For most photographers, spot metering is can retain your Layers. When reopening it in
used in challenging lighting conditions, such Photoshop, choose the Edit Original option.
as shooting a subject in the shade against a
brighter background. If you spot meter from
a midtone in the same shade as the subject’s
face, the brightness of the background will
be ignored and bleached out, resulting in a
good exposure of the subject’s face. In tough
lighting, spot metering is quicker and more
reliable than other hit-and-hope methods.
However, if used without care and attention,
your exposures can become a bit erratic.
JANUARY 2024
A
2
Image Rescue
3
Landscape rescue in Camera Raw
1
4
the whole area look more gritty.
We also want to warm it up using
the Temperature slider 3 .
To finish off, choose a Radial
Gradient filter and draw an area
over most of the image, leaving just
the corners. Invert the Radial
Gradient and darken the corners of
the frame slightly with the Exposure
slider to knit everything together 4 .
Andrew James
There is a stark and moody landscape
shot hiding in this fairly bland raw file
image, so let’s try and bring it out.
Using Adobe Camera Raw, we’ll start
by changing the composition. In the
Transform Panel, let’s scale the image
up so that the foreground rock becomes
more dominant and acts as an anchor 1 .
Next, in the Masking panel, we’ll choose
the Select Sky option and then darken
the whole of the sky area, moving the
Exposure slider to -50 and boosting
the Clarity to +20 2 .
We also want to select the land area
to make a few adjustments here. We can
do this by selecting another Sky Mask
and inverting it. Now, we can increase the
Clarity and desaturate it a little to make
The key to composition
Q
What’s the key to
a good landscape
photograph?
Keith Long
The key to a good image is
in getting the composition
right. Don’t fret so much
about technical aspects,
such as hyperfocal distances; instead,
concentrate on the arrangement of
the shapes in the frame.
More often than not, it’s what you
leave out, either by using a different
focal length or by moving your position,
that will help you design your image
better. Go out for a few hours and,
rather than shooting everything you
see, slow yourself down and challenge
yourself to come home with one shot
where you have really worked hard to
create balance in your image.
www.digitalcameraworld.com
Andrew James
A
JANUARY 2024
D I G I TA L C A M E R A
89
2
The latest photography news from around the globe
1
1
2
3
1 RF 24-105MM
F2.8L IS USM Z
New hybrid optic for
stills and video is
priced for pros.
2 RF 200-800MM
F6.3-9 IS USM
Offers a terrific
reach but is also
light and compact.
3
RF-S 10-18MM
F4.5-6.3 IS STM
New zoom fills a
gap in wide-angle
RF-S lens offering.
3
Canon unveils trio of new lenses
RF 24-105mm F2.8L IS USM Z pushes the frontiers of lens design and is joined
by the RF 200-800mm F6.3-9 IS USM and the RF-S 10-18mm F4.5-6.3 IS STM
hen Canon launched its RF mirrorless mount in 2018,
it promised that new and never-seen-before lenses
would follow. It has made good on this by releasing
a trio of new optics that straddle the photo and video camps.
The RF 24-105mm F2.8L IS USM Z offers the kit lens-friendly
focal range of 24-105mm but with a constant f/2.8 aperture –
a photographer’s dream, according to Canon. The ‘Z’ in the
title refers to ‘zoom’, which can also be applied smoothly
via the optional PZ-E2 (£1,149/$999) and PZ-E2B
(£1,529/$1,299) power zoom adapters.
W
90
D I G I TA L C A M E R A
JANUARY 2024
Offering a 600mm difference in focal length from wide to
telephoto, the RF 200-800mm F6.3-9 IS USM superzoom
is designed for full-frame cameras and weighs just over 2kg.
The third new lens is the RF-S 10-18mm F4.5-6.3 IS STM,
which boosts the lineup of RF optics for APS-C bodies and is
a compact wide-angle designed for photography and vlogging.
www.canon.co.uk;
£3,440/$2,999 (RF 24-105mm).
£2,300/$1,899 (RF 200-800mm).
£380/$329 (RF-S 10-18mm)
www.digitalcameraworld.com
In Focus
Go to www.digitalcameraworld.com for the latest news, reviews & techniques
Focal point
Rounding up
what’s new
and exciting
Sony’s A9 III packs a punch for
sports and action professionals
and pushes the boundaries of tech.
A9 III: Sony breaks new ground
A new tool for sports photographers working at the top level of their field
howcasing the latest killer camera tech
ahead of the summer Olympics in Paris,
the Sony A9 III offers sports and action
professionals 24.6MP of resolution, captured
via a full-frame global shutter. A ‘transformative’
new development, a global shutter exposes every
frame on the sensor at the same time and
banishes the distortion, flicker and banding
S
Before
produced by conventional sensors when images
are shot at high speed. Other top tech in the A9 III
includes a maximum shutter speed of 1/80,000
sec, the ability to rattle off 120fps images at full
24.6MP resolution, in 14-bit jpeg and raw
formats, up to eight stops of IBIS and phasedetection AF with 759/627 points (stills/video).
www.sony.co.uk; £6,099/$5,998 (body only)
Photo by Fujifilm
hits UK high streets
Fujifilm has refreshed its
photo printing services
across 150 independent
UK retail partners. Fresh
new exteriors will be
rolled out, while inside,
the latest tech will offer
customers a selection of
personalised photo gifts.
www.fujifilm.com/uk
The Photography &
Video Show 2024
Tickets are on sale now
for this leading event,
which returns to the NEC
Birmingham on 16-19
March 2024. For more
information, and to
buy tickets, go to:
bit.ly/dcm274tps2024
After
Radiant Photo goes mobile
Radiant: AI Photo & Video Editor builds on the desktop
app and offers powerful tools in the palm of your hand
egular readers may
recall that we reviewed
the AI-based image
editor Radiant Photo in issue 262
(December 2022). Now the team
is back with a mobile-first version
of the software: Radiant: AI Photo
& Video Editor. This new app for
Android and iOS offers the
convenience and power of the
desktop-based software in
the comfort of your hand.
R
www.digitalcameraworld.com
The Radiant Photo app uses
scene detection, smart presets,
AI enhancement, tone, colour and
details, plus optional portrait tools
and colour grading, to transform
the images in your phone’s
camera roll and sync with your
computer. It will free you up to
spend more time taking photos.
radiantimaginglabs.com; free
(Radiant Photo Mobile); $4/m
(Radiant Photo Mobile Pro)
Radiant Photo uses smart
presets, AI enhancements, scene
detection and colour grading
to transform your images.
JANUARY 2024
DxO updates PureRAW
to version 3.7
While this noise reduction
and lens correction
software already works
as an export plug-in for
Lightroom Classic,
PureRAW 3.7 allows
processed images to be
placed into any Lightroom
Collection or within any
Collection Set.
www.dxo.com; £/$ free
(for PureRAW 3 users)
D I G I TA L C A M E R A
91
Brian Lloyd Duckett
BRIAN LLOYD DUCKETT
Street Photographer and
author of 52 Assignments:
Portrait Photography
www.duckettphotographer.com
n editorial and commercial
photographer, Duckett has
worked for many leading
newspapers and businesses,
but his main passion is street
photography. The principal
and course tutor at Streetsnappers,
a specialist in street photography
workshops and tutorials in London and
cities across Europe, Duckett has just
published his second 52 Assignments
book for Ammonite Press.
A
Brian Lloyd Duckett
Behind
the lens
Above: Try incorporating gestures – they add emotion and drama to a portrait.
Below: A distinctive composition from a shoot with the owner of a classic car.
What first attracted you
to photography, and which
photographers inspired you
when you were starting out?
I was lucky to have a great art teacher
who inspired me from an early age.
At school, I convinced myself that the
guy with the camera around his neck
would be more attractive to girls (not
so, sadly). The people I really looked
up to were the likes of David Bailey,
Lord Snowdon, Norman Parkinson
and Patrick Lichfield – all from that
golden era in the 1960s and 70s. If
I had to name one ’hero’ from the
past it would be David Bailey, whose
irreverent approach chimed with me.
What’s the main appeal of
photographing people for you,
and what makes a great portrait?
I shoot portraits commercially and also
street photography, so people are
always a big factor in my images. I see
a portrait as a challenge – and I love
challenges. It’s a challenge to bring the
best out in your subject, deciding on
the right lighting and finding the right
‘concept’ that works for the shot.
With any great portrait, the first
thing you look at is the lighting and the
quality of light can make or break the
image. And ‘quality’ of lighting doesn’t
mean ‘sophistication’: some of the best
portraits use natural light or a one-light
setup – it’s more about creating the
right feel by getting the light’s direction,
intensity and temperature correct.
Zooming out from that, what makes
a great portrait photographer?
The ability to connect with your
subjects, whether that’s manipulating
them to get what you want – or
encouraging them to relax and be
themselves. I always aim for a relaxed,
comfortable and fun session to loosen
up the subject and get them behaving
normally rather than ‘posing’.
Brian Lloyd Duckett
When you’re not shooting to a brief,
how would you choose one of the
creative options in your repertoire?
Is it down to instinct and experience?
It comes down to instinct and my first
instinct is to keep everything simple. If
I don’t already know the subject, I’ll do
as much research as I can to find out
what makes them tick. This could help
92
D I G I TA L C A M E R A
JANUARY 2024
www.digitalcameraworld.com
Behind the lens
Left: Natural, unposed
settings make lifestyle
portraits authentic.
Below: Soft, natural
outdoor light is ideal
for portraiture.
Brian Lloyd Duckett
Brian Lloyd Duckett
possible. I also shoot street portraits
because my other job as a street
photographer gives me lots of
opportunities to engage with people
on the street. I love the challenge of
approaching strangers and walking
away with a strong portrait. If I’m
shooting commercially, my preference
is always for natural light, whether
outdoors or using window light.
give me a direction for the concept and
it also gives us something to talk about
at the shoot – finding common ground
can help forge a good bond between
photographer and subject.
Is studio lighting as scary to
use as some people think?
Not at all, but it’s easy to overcomplicate things with lighting setups
that are sophisticated beyond the
needs of the job. I see beginners using
three or four lights and I think ‘Why?’
You can achieve incredible results
with just one light, which should always
be your starting point, only adding
more if it’s absolutely necessary.
52 Assignments: Portrait Photography
comes across as accessible and
non-intimidating. Are you pleased
with how the book has turned out?
I have a simplistic approach – shooting
portraits should be fun for both
parties. My aim for this book was to go
beyond ‘This is how you do a three-light
setup’ and offer some alternative fun
ideas. I also wanted to get across that
there are many more ways to approach
the subject than by sitting someone
against a white background and
shooting them with ‘perfect’ lighting.
Was it difficult to come up with the
52 assignments? Are they staples
of the way you like to shoot?
It was certainly fun! I wanted to avoid
the ‘obvious’ scenarios covered by
other books and to offer some projects
that are a little more off-the-wall. And
this is often the starting point when I’m
shooting: ‘How can I do this differently?’
And which styles or techniques
featured in the book do you find
yourself returning to time and again?
Natural light is definitely my thing and
I’ll avoid artificial lighting wherever
“A portrait is a challenge – to bring out
the best in a subject, decide on the right
ǼǣǕǝɎǣȇǕƏȇƳˡȇƳƏƬȒȇƬƺȵɎɎǝƏɎɯȒȸǸɀٺ
www.digitalcameraworld.com
Your images all seem to be intimate
– do you feel that’s the case?
It’s honestly not something I think
about – though I hope the result
reflects an intimate bond with the
subject. Sometimes you have no time
for intimacy, for example, when you
have two minutes to shoot a portrait of
a Prime Minister! But if you invest some
effort into building a relationship with
your subject, it usually pays dividends.
Can the techniques be tackled on a
smartphone, using their clever tech?
Absolutely, many of the techniques
will work using a smartphone. Mobile
technology has come a long way in
the past few years and I’ve seen many
striking portraits created on a phone.
But there are limitations and a lack of
control and it’s perhaps not so easy
to create the subtleties and
the nuances you can with
a ‘proper’ camera.
52 Assignments: Portrait
Photography by Brian Lloyd
Duckett is published by
Ammonite Press (ISBN
978-1-78145-479-4) and
is on sale now, priced
£12.99/$19.99.
www.ammonitepress.com
JANUARY 2024
D I G I TA L C A M E R A
93
James Artaius
Scanning
ahead…
It’s an Olympic year and Jon Devo is excited
about the advances in camera tech it brings
he year 2024 is upon
us and I’ve been
looking forward to it
for a long time. Why
have I been so excited,
you may ask? It’s
because 2024 is an Olympic year, which
is always a big deal for the camera world
and also for the wider technology world.
Both Olympic games and World Cup
years tend to herald the largest leaps in
camera specs and features, as well as
screen technology, because the games
are the perfect opportunity for brands
to show off what their kit is capable of.
Some of the most significant
camera releases in terms of pushing
technological boundaries have been
released in the run-up to – or in the year
of – global sporting events, including;
the Canon EOS-1D X (2012), Canon
EOS-1D X II (2016), Canon EOS R (2018),
the Nikon D3 (2008), Nikon D4 (2012),
Nikon D5 (2016), the Fujifilm X-T4
(2020) and the Sony Alpha A1 (2021).
T
“Will we see a trend
of global shutter
cameras coming
in 2024 and beyond?”
96
D I G I TA L C A M E R A
JANUARY 2024
This year, the digital camera world
welcomes the headline-grabbing Sony
A9 III, the world’s first hybrid full-frame
stacked CMOS camera (that’s a lot of
qualifiers) to feature global shutter
technology. But what is a global shutter
and why do Sony and its many fans
believe that this development is a ‘game
changer’? Will we see a trend of global
shutter cameras coming in 2024 and
beyond? Let’s take a quick scan ahead.
A global shutter sensor is capable of
reading all the pixels in its array at the
same time. This eliminates visual
imperfections such as the rolling
shutter or jello effect from video. It also
prevents distortion, banding and LED/
light flicker from ruining shots captured
of fast-moving action, crucially helping
to deliver better images when capturing
sports events. This development going
mainstream means flash sync speeds
beyond anything that was previously
capable, burst rates with full autofocus
that defy logic and no more pesky
banding lines when capturing images
indoors with flickering lights.
But global shutter technology isn’t
new; many high-end cinema cameras
use global shutters already. In fact,
the first ‘global shutter’ sensors were
introduced by Kodak in the 1970s, they
were charged-couple device (CCD)
sensors. Despite their technological
Global shutter technology is at the
core of the new Sony A9 III (see p91),
which has been released in time for
next year’s Olympics – exciting times!
Jon Devo
instagram.com/gadgetsjon
Jon is a professional photographer,
videographer and technology journalist.
advantages, CCD sensors struggled to
compete with the more common CMOS
sensors due to cost and availability.
In 2018, Panasonic announced the
world’s first global shutter CMOS
sensor. Its Organic-PhotoconductiveFilm (OPF) CMOS Image Sensor could
deliver 8K resolution (36MP) with
a maximum frame rate of 60fps and
even had an electronically controlled
variable ND-filter system.
Mind blown? Well, it shouldn’t be.
Many of the biggest developments in
camera technology are many years in
the making. The fact that we’re only
seeing global shutter sensor technology
coming to hybrid cameras like the Sony
A9 III now is a sign that the benefits are
starting to outweigh the trade-offs that
have to be made to implement it. Some
of these include cost, of course, but
they also currently see a reduction in
dynamic range and noise handling
capabilities compared with CMOS
sensors at this stage.
However, now that Sony has fired
the starting gun and you’re aware
that Panasonic is also developing the
technology, it’s only a matter of time
before global shutters become as
ubiquitous as silent shutters have been
over the past few years. I can’t wait
for Paris 2024 – I love Olympic years,
what a time to be a photographer!
www.digitalcameraworld.com
Nikon Z f _ Old-school looks with
cutting-edge tech lurking inside
102
OM System Tough TG-7 _ Robust
compact gets an update for 2023
106
Nikkor Z 135mm f/1.8 S Plena _
New prime for lovers of bokeh
108
Sigma 60-600mm F4.5-6.3
DG DN OS | S _ Monster super-tele
urely one of the most exciting
camera launches of the year,
Nikon expands its retro-styled
range of mirrorless cameras
by adding a full-frame model,
the Z f. Perhaps by testing the water with the
crop-sensor Z fc, which has apparently done
well for the Big N, the logical next step was
to release a body with a larger sensor.
While the Z f’s design harks back to the
Nikon FM2 film camera, there’s nothing
dated about the tech inside, much of which
comes from the highly regarded Z 8 and Z 9.
So how does the Z f perform in real-world
S
testing? Turn the page to find out. Also
tested this month – and dropped in
a glass of water to check its body sealing
– is the OM System Tough TG-7. This is the
successor to the TG-6 compact and carries
the branding of the company that was
formerly known as Olympus. Check the
TG-7’s robustness credentials on page 102.
Plus, we put a new Nikon prime for
portraiture through its paces, as well as
a Sigma super-telephoto for DSLRs that has
now been ported to mirrorless cameras,
for the Leica L- and Sony E-mounts.
Niall Hampton
The awards bestowed by the Digital Camera lab…
Given to the
top product in
a group test
www.digitalcameraworld.com
For products
that receive five
stars overall
Given to products
that offer superb
value for money
New gear, buying tips and the world’s toughest tests
98
NEW: CAMERA
BUYER’S GUIDE
DSLR & mirrorless models,
plus best-buy products
PAGE 111
Ratings explained
Best in class
Excellent
Good
So-so
Poor
JANUARY 2024
All products reviewed
in KitZone are tested
independently by
photographers with years
of experience, using lab
and real-world testing
D I G I TA L C A M E R A
97
KitZone
Mirrorless Nikon Z f
1
The camera body has
a leather-like textured
finish that adds to the
overall retro charm.
1
2
The 24.5MP full-frame
sensor has a total of
299 autofocus points
spread over the entire
image frame.
2
3
3
The grip is a shallow
bump and not nearly
as deep as those on
a traditional DSLR.
Nikon Z f
£2,299/$1999 (body only)
Nikon’s latest attempt to revive the days of film doubles
down on retro charm, but it has the quality to back it up
w w w. nikon .co.uk
Specifications
Sensor: 24.5MP CMOS full-frame Nikon FX
AF points: 299, 89% x 96% coverage, -10EV
ISO range: 50-64,000 (204,800)
Max image size: 6048 x 4032px
Image stabilisation: Up to 8 stops
Max burst: 7.8fps RAW/JPEG, 30fps JPEG
Video: 4K 60p, 4K 30p, FHD 120p
Viewfinder: 3690k-dot (Quad VGA) OLED
Rear LCD: 3.2-in 2100k-dot vari-angle
TFT touch-sensitive LCD
Memory card: 1 x UHS-II SD, 1 x microSD
Connectivity: USB-C, Micro HDMI, mic,
headphone, Wi-Fi, Bluetooth,
Power: EN-EL15c rechargeable Li-ion
Size (W x H x D): 144 x 103 x 49mm
Weight: 710g (incl battery and memory card)
98
D I G I TA L C A M E R A
JANUARY 2024
he Nikon Z f isn’t the
manufacturer’s first
attempt at reviving the
style of film cameras
for the digital age. The
Nikon D f arrived in 2013 but failed to
garner any sequels. Nikon dipped its
toe in the water again in 2021, with the
Nikon Z fc and got a different reaction.
Nikon claimed that demand for the Z fc
far exceeded its expectations, showing
that there was a serious appetite for
cameras with a vintage aesthetic.
The Nikon Z fc was universally well
received; we gave it a near-perfect
score, enamoured with its vintage
looks but criticising its build quality
and ergonomics. However, after the
release of the Z fc, users demanded
a full-frame version with the same
classic styling, so it was inevitable
that Nikon would deliver just that.
With the release of the Nikon Z f, it
appears that Nikon is fully on board
the vintage-inspired camera train
– the Z f is a full-frame version of
T
the Z fc that is the true digital
successor to the classic Nikon FM2
film camera. Nikon is hoping to answer
the criticisms levelled at the Z fc with
the considerably more expensive
and larger Nikon Z f, but has it done
enough to make this the perfect
camera for vintage enthusiasts?
Key features
Despite its retro exterior, the Nikon
Z f features the latest advancements
from the company’s flagship models,
the Nikon Z 8 and Z 9. Core features
include a 24.5MP full-frame sensor,
powered by the Expeed 7 processor,
which boosts autofocus performance,
expands file format options, improves
in-camera stabilisation and provides
exceptional low-light capabilities with
an ISO range of up to 64,000.
The Nikon Z f boasts the same
impressive autofocus system as the
Z 8 and Z 9, equipped with 299 focus
points that cover a substantial part of
the sensor area. This system is adept
www.digitalcameraworld.com
Nikon Z f Mirrorless
7
4
4
The viewfinder on the
Nikon Z f is a joy to use
– big and clear with a
sharp resolution.
5
5
8
The body is exceptional
quality with a solid
magnesium alloy body
and brass dials.
6
The Z f offers 4K video
recording capabilities,
and records continuously
for up to 125 minutes.
6
Along the top, there are
dials for setting shutter
speed, ISO and exposure
compensation.
9
The LCD screen on the top
plate is limited to showing
the aperture, set on the
front command dial.
Gareth Bevan
The rear LCD is fully
articulating rather than
tilting as seen on cameras
such as the Z 6II.
7
8
at subject tracking, including human
faces and eyes, animals, birds and
vehicles, ensuring precision even in
shooting conditions as dark as -10EV.
Unique to the Nikon Z f is the
introduction of subject detection
algorithms that function seamlessly
in manual focus mode or when using
adapted manual-focus lenses,
enhancing exposure accuracy
based on recognising the subject.
The Nikon Z f is capable of up to
eight stops of image stabilisation
with compatible lenses and offers
pixel shift imaging, which combines
multiple shots to create higherresolution images. It also introduces
the Focus Point VR system, employing
the camera’s focus point to enhance
in-body image stabilisation.
For videographers, the Nikon Z f
offers versatile video recording
capabilities, supporting 4K video
at various frame rates (60p, 30p,
24p) and Full HD up to 120p. Video
enthusiasts will appreciate features
www.digitalcameraworld.com
9
such as focus peaking, zebra stripes,
waveform display in Live View, fine
ISO control and an enhanced video
information display. The camera can
record continuously for up to 125
minutes, making it a viable choice
for extended video projects.
Build and handling
If you’re a fan of vintage-style cameras
like the Nikon FM2, you will like the
Nikon Z f. The body is exceptional
quality with a solid magnesium alloy
body and brass dials that not only feel
much more secure than the Z fc but
will also wear with use the same as
vintage cameras from the past.
Some may dismiss it as a ‘hipster’
camera, but if you are the type of
photographer who cares about your
gear, why wouldn’t you want it to look
this good? The downside of those
stunning looks is that the camera
is heavy and has practically no grip,
making it uncomfortable to hold.
The camera was launched alongside
With its respectable specifications, the Z f is a decent
video camera for anyone creating content for YouTube.
an optional grip from Smallrig – an
admission by Nikon, perhaps, that
ergonomics were compromised
to get the classic look.
For a full vintage effect, the camera
has dials and switches galore, with
dials for shutter speed, ISO, and
exposure. The aperture is controlled
using the front wheel and is displayed
on the small display up top, which is
thankfully larger and easier to read
than the dial on the Z fc. There is also
a switch to flick from stills to video and
from colour to monochrome as well as
through the different shooting modes.
The shutter button on the Z f is
frustratingly sensitive, so you may
end up taking shots of the ground
or before the camera has focused.
The Nikon Z f isn’t all vintage; there
are a few modern twists as well. It has
a fully articulated screen on the rear,
so you can vlog or shoot from awkward
angles, however, the hinge sticks out
awkwardly and the screen does not
fold flush against the back of the
camera. There are all the modern
ports present for charging the battery
in-camera via USB-C or connecting
headphones or microphones.
JANUARY 2024
D I G I TA L C A M E R A
99
KitZone
Gareth Bevan
Mirrorless Nikon Z f
The dynamic range is impressive, with backlit scenes producing
lots of detail in the shadows without blowing out the highlights.
With its 25MP sensor, the images from the Z f are pleasing, reliably solid and large enough to
produce images for most purposes, including professional work for weddings or portraits.
The viewfinder on the Nikon Z f is a
joy to use – big and clear with a sharp
resolution. I tended to flip the screen
and compose images using the
viewfinder for the full film camera
effect. There is a small rubber ring
around the eyepiece which makes
it more comfortable to use, but
also attracts a lot of lint.
An odd addition to the Nikon Z f is its
microSD card slot, which sits alongside
the SD UHS-II slot. MicroSD isn’t fast
enough for many of the camera’s
applications, like 4K video or fast burst
rates, so two SD card slots would have
been better. One downside to Nikon’s
vintage-inspired cameras is that there
are few lenses designed to match.
Unlike Fujifilm or Olympus rivals, where
lenses work on all body styles, most
Nikon Z lenses are styled to match
the modern Z system cameras.
Currently, there are only three lenses
that complete the look of your Nikon
Z f and while you can, of course, use
any Nikon lens on the Z f via the FTZ
adapter, some may struggle to buy into
a vintage design without the lenses to
match. This split has led to issues like
the retro-inspired Nikon lenses
bafflingly not having aperture rings.
When such careful consideration has
been taken to offer the most filmcamera-like experience possible in the
Z f body, that seems like an odd choice.
Performance
With likely the same sensor as the
Nikon Z 6 II, images from the Z f are
reliably solid and 25MP is large enough
to produce pleasing images for almost
any purpose, including professional
work for weddings or portraits. Image
resolution is great; I was limited to the
Rival cameras
Canon EOS R6 Mark II
£2,779/$3,599
A hybrid camera that
packs some firepower,
with 24.2MP stills at
40fps and up to 6K video,
plus AF detection for
trains, planes and horses.
Reviewed: issue 264
100
Fujifilm X-T5
£1,699/$1,699
Takes the X-T4 further in
terms of resolution but is
ideal for those who want
a lightweight camera with
traditional controls and
a 40.2MP resolution.
Reviewed: issue 263
D I G I TA L C A M E R A
JANUARY 2024
Nikon Z fc
£899/$957
This DX-format Z camera
is a pleasure to operate
and captures quality
images to boot. Matching
‘SE’ lenses complement
its good looks.
Reviewed: issue 247
Nikon 40mm lens for my testing but
more premium lenses will likely
produce even more impressive results.
The Expeed 7 processor inside the
Nikon Z f means this camera is the
closest you can get to a Nikon Z 6 III or
Z 7 III right now. The Z f inherits the
autofocus powers from the Nikon Z 8
and Z 9, which means it is much better
at tracking subjects. In my experience,
it’s not up to the level of Sony or Canon.
The processor handled noise well,
with camera noise well controlled and
unnoticeable until upwards of 6400,
and usable until around 12800. The
dynamic range is also impressive, with
strongly backlit scenes still producing
lots of detail in the shadows without
completely blowing out the highlights.
One quirk I noticed occasionally
when shooting on full Auto settings,
was that the camera would make some
surprising choices – either a much
faster shutter speed than necessary,
therefore cranking the ISO high to
compensate or, at the opposite end of
the scale, not pumping the ISO which
meant the shutter speed was low.
Image stabilisation in the Z f is
excellent. I could comfortably get
handheld shots down to around 1/15
sec in low light with no blur from my
hands shaking, although your success
will depend on your own stability.
Having black and white as a
dedicated position on the mode switch
wasn’t initially something I thought I
would need; however, I found myself
flicking the camera into monochrome
mode much more than I anticipated.
Having the mode on the dial removed
the inertia of having to dig into a menu,
and resulted in me shooting more in
both colour and black and white.
The black-and-white conversion
in-camera is well handled. I find the
contrast is spot on in the default mode,
www.digitalcameraworld.com
Nikon Z f Mirrorless
Lab tests
Gareth Bevan
Resolution
The Z f ties with the Canon EOS R6 II for detail, as
both share a near-identical megapixel count. Despite
its smaller sensor size, the 40MP Fujifilm X-T5 beats
the full-frame cameras here for capturing fine detail.
In keeping with the Nikon Z f’s retro film credentials, a dedicated B&W switch sits below
the shutter speed dial and allows you to quickly switch over to monochrome shooting.
Dynamic range
Gareth Bevan
The Z f captures excellent dynamic range. At low to
mid sensitivities it’s better than the Z fc and X-T5,
but increase the ISO and the full-frame Z f pulls
ahead, capturing up to 2 EV more than the EOS R6 II.
Signal to noise ratio (decibels)
The image processor handles noise well – we found noise well controlled and virtually
unnoticeable until upwards of ISO 6400, and usable until we reached around 12,800.
but there are also hard and soft
contrast options depending on your
style. As this is just a conversion,
you can also go into the raw file and
restore the monochrome NEF file
to its full-colour glory, making the
decision to swap into B&W mode less
final for scenes you aren’t sure about.
The Nikon Z f also makes a decent
video camera. While it isn’t being
positioned as a true filmmaker’s
camera, it has respectable video specs
and it looks like a capable camera for
anyone creating video content for
YouTube or social media. With a
fully articulating screen, the camera
is also a great choice for vloggers.
The camera can shoot in 4K up to
60p, although if you drop down to 30p,
the Z f oversamples 6K footage for
better quality. The Z f also packs in
up to eight stops of in-body image
stabilisation with compatible lenses,
and I was able to produce some pretty
smooth footage while panning. For
walking movement, the stabilisation
www.digitalcameraworld.com
struggled, so you may want to invest
in a gimbal for action shots.
Left to its own devices the focus can
be a little slow to adjust to changes,
and sometimes the camera just
wouldn’t refocus automatically despite
a change in subject. A quick tap on the
screen rectified this, but other camera
systems seem a little faster and more
willing to swap focus. Gareth Bevan
The Z f produces a similar degree of image noise
to the EOS R6 II and X-T5, and shows this all the
way through the tested ISO range.
Digital Camera verdict
4.5
The Nikon Z f has a fully articulated screen to allow you
to vlog or shoot from awkward angles. But for a more
realistic film experience, you can use the viewfinder.
Outstanding
5.0
4.5
4.5
4.0
Features
Build &
handling
Performance
Value
The Nikon Z f is sure to stir a wave of nostalgia for
film but its beauty comes at the cost of ergonomics
and a lack of vintage-style lenses for the Z mount
spoils the aesthetic. However, the Z f is the closest
thing to a Z 6 III right now, offering better AF and
subject tracking, as well as solid video performance.
This is the vintage-inspired Nikon we’ve waited for.
JANUARY 2024
D I G I TA L C A M E R A
101
KitZone
Compact OM System Tough TG-7
1
3
The grip on the front
and the thumb rest on
the back both have
textured grooves to
improve handling.
2
The lens is made of
ultra-tough material
but you can also mount
OM’s irising lens.
2
1
3
The camera’s LED
light can be switched
to emit a continuous
light that’s ideal if a
flash is too intrusive.
OM System Tough TG-7
£500/$550
This compact really is tough enough to handle anything
w w w.oms ys tem .com
Specifications
Image sensor: 12MP 1/2.33in CMOS
Processor: TruePic VIII
Lens: 25-100mm (full-frame equivalent) f/2.0-4/9
Autofocus: TTL iESP contrast detect
Stabilisation: Electronic (Movie IS)
ISO: 100-12,800
Burst shooting: 20fps (Pro Capture 10fps)
Buffer: 46 (raw)/74 (jpeg)
Video: 4K 30p, Full HD 120p, HD 240p,
SD 480p (29m59s limit)
Vertical video: Yes
Screen: 3.0 inch LCD, 1.04m-dot
Battery: LI-92B Lithium-ion Battery
Size: (W x D x H) 113.9 x 32.7 x 65.8mm
Weight: 249g (incl battery and memory card)
102
D I G I TA L C A M E R A
JANUARY 2024
eah, that picture on the
following spread? That’s
the OM System Tough
TG-7 sitting in a glass of
water, with a cat taking
a drink for good measure. Why? Well,
why not? After all, the camera is
waterproof – and I mean, seriously
waterproof. Not waterproof like an
iPhone, where you’re scared to take it
into water because it can get damaged
by anything from the pressure in a
shower head to the salt in seawater. No,
the OM System Tough TG-7 is properly
waterproof. So, there it is – just chilling in
a glass of water while I write this review.
The OM System Tough TG-7 is a
compact camera with a difference: it’s
waterproof, shockproof and freezeproof.
It has a GPS as part of a full Field Sensor
System that records things like the
temperature as well as altitude. That’s
ideal for recording precisely what the
conditions are if you’re doing something
like scaling Everest. Or to see how hot it
was on the day you took a photo or what
altitude the plane was flying at when you
took a video of yourself skydiving.
Y
The OM System Tough TG-7 does so
much more than that… but, crucially, not
much more than its predecessor. So how
good is the TG-7 and, if you already own
the Olympus Tough TG-6, would it be
enough to merit an upgrade?
Key features
Let’s start with the crucial stuff: just
how ‘everything-proof’ is this camera?
It’s waterproof to 15m (50ft), which is
as deep as five Olympic swimming
pools, it’s also freezeproof to -10C (14°F),
which is around the average temperature
in Siberia at this time of year. It’s
shockproof to drops from 2.1m (7ft),
so would be able to survive falling off
Shaquille O’Neal’s head, and it’s
crushproof to 100kg (220lbs), which
is the equivalent of being trodden
on by a giant panda.
It also has a full Field Sensor system,
which records GPS (location),
thermometer (air and water
temperature), manometer/barometer
(altitude and water depth) and compass
(direction of filming) data with your
images and videos. This is ideal for
www.digitalcameraworld.com
OM System Tough TG-7 Compact
7
4
The rear screen isn’t
touch control, but colour
is better than the TG-6.
5
5
4
The doors over the card
slots are well protected
with rubber seals.
8
The mode dial offers
Auto, Aperture Priority
and Program modes.
6
The lever in front of the
shutter zooms in or out,
including in macro mode.
9
This switch can quickly
toggle Log mode to record
environmental info.
The control wheel can be
toggled between aperture
and shutter modes.
8
9
7
indexing your files in libraries, creating
geotagged maps and itineraries or
extracting useful info from an excursion.
In terms of traditional camera specs,
we’re looking at a 12MP back-illuminated
1/2.3-inch sensor, with a 4.5-18.0mm
f/2.0-4.9 lens. In full-frame (35mm)
terms that gives you a 25-100mm
equivalent focal range, and it doubles as
a macro lens with 10mm close focusing
(offering 4x optical magnification).
It shoots bursts of up to 20fps, with
a buffer of 74 jpegs or 46 raws. In Pro
Capture mode, where the camera starts
buffering images when you half-press
the shutter, so you capture the moment
before the moment, it boasts a 10fps
burst with five pre-frame shots.
For video, the TG-7 can record 4K up
to 30p, Full HD (1080p) up to 120p and, if
you want to sacrifice resolution for super
slow-mo, you can record in HD (720p)
at 240p or SD (320p) at 480p.
Build and handling
While the core specifications haven’t
seen much change from the TG-6, the
external design of the TG-7 has had an
overhaul. In terms of handling, the front
grip is now much steeper so you can get
a better hold. The grip, along with the
thumb rest on the back, now has
textured grooves that help improve
purchase – which is very welcome,
particularly when the camera is wet
and your fingers are cold.
www.digitalcameraworld.com
Otherwise, the layout and controls
are as you remember them, although
the Olympus logo has now been replaced
by an OM System one, of course. Note
that the rear screen doesn’t offer touch
control (because it is made of thick,
Gorilla Glass-like material so it won’t
break), though the colour reproduction
seems to have been improved over
the previous model.
As a compact camera, the TG-7
primarily offers point-and-shoot
functionality; the mode dial offers
standard auto, Aperture Priority and
Program modes (though there is a
context-sensitive control wheel on top
that can be toggled between aperture
and shutter for manual control
depending on the mode).
A well-located lever sits in front of the
shutter to electronically zoom in or out
(including in macro mode), a tiny record
button, which can be tricky to depress
with gloves on, enables you to quickly
capture video and a switch on top of the
camera can quickly toggle Log mode to
record environmental info (including
GPS data) – great to knock off when
you’re worried about battery life.
The doors leading to connections and
memory card slots are protected like
Fort Knox, with double-locking switches
and thick rubber seals to prevent liquids
or particulates from entering. And yes,
among the connections, there is
a USB-C port for charging.
James Artaius
6
The TG-7’s great macro performance is a huge bonus,
giving you the ability to get close to small creatures
you spot while snorkelling or out on a hike, for example.
Less protected is the camera lens itself,
although like the rear LCD, it’s made of
ultra-tough material that is repellent to
fingerprints, water or grime. Any dirt
that builds up can easily be wiped off
with a T-shirt or napkin – though I would
suggest buying OM’s irising lens cap
that can be mounted to the front,
just to make life a bit easier.
The on-camera flash is worthy of
note, as it can be quickly toggled from
Fill to Red Eye to Slow to Full (manual)
to Remote Control to LED – the latter
emitting a continuous light that can
be great for those moments when
flash is too intrusive.
Also worth noting is that the camera
comes in two colour schemes
JANUARY 2024
D I G I TA L C A M E R A
103
James Artaius
KitZone
Compact OM System Tough TG-7
Video isn’t the TG-7’s strongest suit – the iPhone 15 Pro and Panasonic S5 IIX
shoot ‘better’ video – but for its intended purpose, it is easily good enough.
Performance
There are few surprises here – the TG-7
performs identically to the TG-6. After
all, it features the same image sensor
and image processor, so there’s really no
difference in what the camera can do. It
delivers jpegs straight out of the camera
that look fantastic, with raw files that
offer plenty of latitude for editing, with
electronically stabilised 4K video on
par with what you’d get from a decent
smartphone – along with slow-mo and
James Artaius
– and unlike most cameras, these are
actually functional. The black version
looks more like a standard compact
camera, but the red option is extremely
useful since it makes it much easier to
spot the camera if you drop it at the
bottom of a swimming pool, in the
snow or anywhere else. Trust me –
I’ve almost lost my TG-6 a couple of
times when taking it out in the sea,
and it’s much easier to see a camera
that’s coloured bright red.
The Field Sensor system records data such as GPS, air and water temperature,
altitude and water depth with your images, so you can easily catalogue them.
The 12MP sensor and processor technology is at least a couple of generations old, but the jpegs
the TG-7 produces – not to mention the raw files – are superior to those of the latest iPhone.
104
D I G I TA L C A M E R A
JANUARY 2024
super slow-mo options that are low in
resolution, but still ideal for social media.
In terms of what’s new, the camera
now supports vertical video – so
socialling is a little easier than before.
There’s also a cool new 299-image
interval shooting function, which
enables you to create time-lapse movies,
supported by an intelligent exposure
function that keeps your frames
consistent, even in changeable lighting.
There is also an optional Construction
mode in the Scene menus that caters
to industrial applications for the camera.
They won’t be that useful to most
photographers, but having quick modes
for things like panoramas and document
scanning will make life easier for others.
Another new feature is the remote
control option. Like all OM System
cameras, the TG-7 can be paired with the
OM.share smartphone app. The primary
function here is to quickly transfer your
files for easy sharing, but it can also be
used to shoot remotely from your phone
– perfect if, for example, you want to
leave your camera at the bottom of
a pond and snap pictures of its
inhabitants without getting wet.
www.digitalcameraworld.com
James Artaius
OM System Tough TG-7 Compact
Here’s the TG-7 shooting in extreme low-light conditions without using
its built-in flash. Exposure information: 1/10 sec at f/2, ISO 800.
However, the TG-7 can now be paired
with a dedicated remote control,
meaning that you don’t need to mess
about with the app if you want to take
a quick selfie or shoot a series of stills or
videos remotely. As others have noted,
the long-in-the-tooth tech is outclassed
by modern smartphones. Certainly, the
12MP sensor and TruePix VIII processor
are at least two generations old, but
the jpegs (let alone the raws) the TG-7
produces are superior to those of the
latest iPhone. Not to mention the
features, such as focus stacking, Live
Composite, Pro Capture, 20fps bursts,
full exposure control, adjustable white
balance and true optical zoom.
Granted, video is not the TG-7’s
strongest suit – evidenced by the basic
options on offer. But this isn’t intended
to be the best camera for video, it’s
intended to be the best waterproof
camera. Which it is. The iPhone 15
Pro or Panasonic S5 IIX might shoot
‘better’ video, but can they shoot in a
snowstorm, in a desert or in the middle
of a Tough Mudder contest? For its
intended purpose, the Tough TG-7’s
video is easily good enough.
www.digitalcameraworld.com
The TG-7 has plenty of advanced photographic features, such as focus
stacking, 20fps bursts, adjustable white balance and true optical zoom.
We should mention the camera’s
macro capabilities, too. Most compact
cameras don’t offer this, let alone
waterproof compacts, so for the
TG-7 to feature such great macro
performance is a huge plus. Since this
is an outdoor/travel camera, the ability
to get close to a creature you spot
while snorkelling or out on a hike
really adds value. James Artaius
Yes, it’s a cat drinking from a glass of water
containing the TG-7. Why? Well, for a start,
it shows just how waterproof this camera is.
Digital Camera verdict
4.5
Outstanding
5.0
5.0
4.0
4.0
Features
Build &
handling
Performance
Value
The OM System Tough TG-7 shares many similarities
with the Olympus Tough TG-6 – except for the fact
that the TG-6 has been discontinued and you can’t
buy it any more. Sure, the tech isn’t exactly cutting
edge, but short of adding phase detect autofocus
– which, let’s be honest, isn’t coming to a compact
like this any time soon – or a higher-resolution
sensor, which previous Toughs have had, but
traded up pixels for better low light performance,
what more could we ask for?
You won’t buy this camera for a fancy autofocus
system or millions of megapixels; you’ll buy it if you
want to take great photos while you’re swimming in
the sea or while your children are playing in the sand,
or when you’re hiking through the mud, or when you
might drop it on some rocks, or when you’re in the
freezing snow or the middle of the desert.
The OM System Tough TG-7 remains the best
everything-proof camera on the market, and is an
essential all-round compact camera for holidays,
adventures, travel and everyday photography.
JANUARY 2024
D I G I TA L C A M E R A
105
Specifications
3
Mount: Nikon Z
Full-frame: Yes
Construction: 16 elements in 14 groups
Angle of view: 18.2º
Diaphragm blades: 11
Max aperture: f/1.8
Min aperture: f/16
Min focusing distance: 0.82m/2.69ft
Max magnification ratio: 0.2x
Filter size: 82mm
Dimensions (L x D): 139.5 x 98mm
Weight: 995g
1
2
Nikkor Z 135mm
f/1.8 S Plena
aperture diaphragm helps to maintain
top-quality bokeh when stopping down.
£2,699/$2,497
Build and handling
Practically perfect in every way, super-sharp
yet deliciously blurry and utterly fabulous
w w w. nikon .co.uk
T
Key features
The performance of the Plena is top-drawer, thanks to an
impeccable design that puts its glass at the top of the features
list. The optical path incorporates 16 elements in total and
includes four ED (Extra-low Dispersion) elements, one
aspherical element and one SR (Short-wavelength Refractive)
element. Nikon’s ED glass is renowned for delivering excellent
sharpness, contrast and colour accuracy, even at wide
apertures, while reducing chromatic aberrations. The newer
SR glass further reduces chromatic aberration at the blue end
of the spectrum, while the use of an aspheric element can also
reduce aberrations as well as the physical size of a lens.
Building on the quality of the glass itself, the lens features
ARNEO coating which is particularly effective at minimising
ghosting and flare, as well as Meso Amorphic Coat, which is
even more effective at minimising reflections from light entering
the lens from just about any angle. The overall design aims for
scintillating levels of sharpness, across the whole frame, along
with beautiful bokeh. A particularly well-rounded 11-blade
106
D I G I TA L C A M E R A
JANUARY 2024
1
At the front, the lens has
an 82mm diameter thread
so you can attach filters to it.
2
A pair of programmable
lens-function buttons is
located on the lens barrel.
3
As well as a manual focus
ring, there is also a secondary
customisable control ring.
Matthew Richards
he Nikkor Z 135mm f/1.8 S Plena has a tough act
to follow. We were impressed when we reviewed
the Nikkor Z 85mm f/1.2 S, but the Plena sets out
to take everything to a whole new level. Naturally,
it doesn’t have such a fast aperture rating (which
would be impractical) but the longer focal length still enables a
tight depth of field. We love the way the Plena is perfectly suited
to tight head-and-shoulders portraiture but also for still-life
photography and any time you want to compress perspective
with a medium telephoto focal length while isolating the main
subject within a scene by blurring its surroundings.
As we’ve come to expect from Nikon’s S-line
lenses for its Z-system cameras, build quality
feels robust and solid. For a full-frame
compatible lens that combines a 135mm
telephoto focal length with a fast f/1.8
aperture, it’s not overly large and weighs
just under a kilogram. As such, handling
feels comfortable and assured, even for
lengthy periods of handheld shooting.
Although the autofocus system is fast and
ultra-precise, there’s a wide manual focus
ring, if you prefer to be in control. As usual
with Nikon Z lenses, you can customise this
to take on other functions while in autofocus
mode, or to enable the usual full-time manual
override. A secondary control ring is also on
hand, which is useful for stepless aperture
control when shooting video, or for adjusting
the likes of exposure compensation or ISO.
Given the suitability of the lens for
portraiture, there’s a customisable L-fn
(Lens-function) button which is duplicated,
so that it falls under the thumb in either
landscape or portrait orientation shooting.
Typical uses include AF-On and AF-Hold.
The combination of focal length and
aperture can only result in a large front
element and, sure enough, the lens has a
large 82mm filter attachment thread. Even
so, that’s no larger than you’ll often find in
standard and telephoto f/2.8 trinity zooms.
Performance
Nikon
KitZone
Prime lens Nikkor Z 135mm f/1.8 S Plena
Bokeh is a big selling point of
this lens. It renders highlights
as near-perfect circles.
While the features, specifications, build
quality and handling of the Plena are all
impressive in their own right, everything
comes together to make this lens more
than the sum of its parts. True to its claims,
autofocus is fast and incredibly accurate,
www.digitalcameraworld.com
Chromatic aberration is another common problem
with fast lenses, but the Plena excels with negligible
colour fringing around high-contrast edges.
Matthew Richards
Sharpness
Fast glass can be less than sharp towards the edges of the frame, especially at the widest aperture. The
Plena dispels any concerns with spectacular sharpness and contrast across the entire frame, even at f/1.8.
Sharpness
It’s a testament to the Plena’s design that wide-open
sharpness is so excellent right across the entire
image frame. Stop down to between apertures
between f/2.8 and f/11 and the lens is scarily-sharp
from edge to edge and corner to corner.
Fringing
0.24
Matthew Richards
There’s remarkably little axial chromatic aberration,
even wide-open at f/1.8, while lateral chromatic
aberration (more commonly noticeable towards
the edges and corners of the frame) is also
extremely minimal. And that’s without any
automatic correction being applied.
Distortion
1.01
There’s a slight touch of pincushion distortion
but it’s of such a low order that you generally
won’t notice it in real-world shooting, compared
with taking shots of test charts. Either way,
automatic in-camera correction is available.
The quality of its bokeh is where the Plena lens comes into its own. The bokeh’s smooth silkiness
is gorgeous, with a natural-looking roll-off in the transition between focused and defocused areas.
though it does slow down in tricky conditions
with low-contrast scenes or close-ups,
ensuring it maintains its excellent reliability.
Fast glass can be notorious for being less
than sharp, especially at the widest aperture
and towards the edges and corners of the
frame. The Plena dispels any concerns with
spectacular sharpness and contrast across
the entire image frame, even at f/1.8.
Sharpness gets even better if you stop down.
Longitudinal or ‘axial’ chromatic aberration is
another common problem with fast lenses
but the Plena excels here, too, with negligible
colour fringing around high-contrast edges
just in front of or behind the plane of focus.
Naturally, it’s not just about sharpness. For
this type of lens in particular, the quality of
the bokeh can be even more important as far
www.digitalcameraworld.com
Digital Camera verdict
as discerning photographers are concerned.
And that’s where the Plena comes into its
own. The smooth silkiness of the bokeh is
gorgeous, with a natural-looking roll-off in the
transition between focused and defocused
areas. But that’s not all. Bokeh discs
(typically caused by defocused small areas
of light) are devoid of the dreaded onion-ring
effect, and remain amazingly well-rounded
even out towards the edges and corners of
the frame, rather than taking on the more
common cats-eye shape in appearance.
Bokeh discs also have a soft outline, despite
the lens lacking an apodisation filter, as
featured in some lenses that are built for
bokeh. And the 11-blade aperture helps keep
a nicely rounded shape for bokeh discs when
stopping down a little. Matthew Richards
5.0
A best-in-class product
5.0
5.0
5.0
4.5
Features
Build &
handling
Performance
Value
The Collins English Dictionary gives one definition
of the word Plena as ‘the condition or quality of
being full’ – and this Nikkor lens is certainly full
of goodness. It’s packed with top-quality glass,
high-tech coatings, a super-fast autofocus system
and a really well-rounded 11-blade diaphragm.
Build quality is robust and handling is refined.
The clincher is that it delivers absolutely exquisite
image quality, making it one of the best Nikkor
lenses of all time and one of my personal favourites.
JANUARY 2024
D I G I TA L C A M E R A
107
KitZone
Telephoto lens Sigma 60-600mm F4.5-6.3 DG DN OS Sports
2
1
3
Sigma 60-600mm F4.5-6.3
DG DN OS Sports
£1,999/$1,999
A versatile standard to super-telephoto zoom, but mind the weight
w w w. sigma - global .com
he Sigma 60-600mm F4.5-6.3 DG DN OS Sports for
Sony and L-mount cameras has some history behind
it. In 2001, the so-called ‘Bigma’ was born – a unique
lens for SLRs with a 50-500mm zoom range and an
updated version, weighing 1,840g, was launched in
2010. It was eclipsed in 2018 by the Sigma 60-600mm f/4.5-6.3 DG
OS HSM Sports, weighing 2.7kg. Sigma chose not to add Sony E and
Leica L mount options for mirrorless cameras, instead redesigning
the ‘DN’ mirrorless version, which is still a hefty 2,485g.
A similar contender for Sony shooters is the Tamron 50-400mm
F4.5-6.3 Di III VXD. This one kicks off with the natural perspective of
a 50mm focal length but doesn’t stretch as far into super-telephoto
territory, topping out at 400mm. On the plus side, the Tamron is
about four inches shorter in physical length and less than half the
weight at 1,115g. It’s therefore more manageable for carrying around
and for handheld shooting. It’s also less expensive, but the Sigma is
a more prestigious lens with greater refinement in its handling, as
well as giving a 50 per cent boost in maximum telephoto reach.
T
Key features
Top of the features list is Sigma’s 10x zoom range, making it a sort of
‘superzoom meets super-telephoto’ lens. It has a complex optical
path with no less than 27 separate elements in 19 groups. These
include three SLD (Special Low Dispersion) elements and two
top-grade FLD (‘Fluorite’ Low Dispersion) elements.
While the optical design aims for excellent sharpness and contrast
with minimum aberrations, the autofocus system goes for super-fast
performance with consistent accuracy. It features Sigma’s latest
HLA (High-response Linear Actuator) motor, which enables smooth
autofocus transitions when shooting video and near-silent operation.
108
D I G I TA L C A M E R A
JANUARY 2024
1
Top of the features list
is Sigma’s trademark
10x zoom range. It
has a complex optical
path that features 27
elements in 19 groups.
2
The lens has three
customisable AF-hold
buttons, which fall
neatly under the thumb
in both landscape and
portrait orientations.
3
At the rear, there is
a rank of switches for
AF/MF focus modes
and an autofocus range
limiter that can lock
out both ends of travel.
Given the aperture range of f/4.5-6.3,
camera shake is an issue at the long end
of the zoom range. Cameras with in-body
image stabilisation tend to offer little benefit
at long focal lengths, so Sigma’s OS2 optical
stabilisation system with a newly developed
algorithm is a key feature of the lens. If you
need a greater telephoto reach, the lens
is compatible with Sigma’s 1.4x and 2x
teleconverters, with the inevitable one or two
f/stop reduction in aperture, respectively.
Build and handling
The Sigma feels robust and well-built with its
multiple weather-seals. The construction is
based on a mix of magnesium alloy, carbon
fibre-reinforced polymer and Sigma’s TSC
(Thermally Stable Composite), which has a
low coefficient of expansion and contraction
during temperature changes.
The zoom ring and electronically-coupled
focus ring work with smooth precision but
the lens extends greatly as you go through
the zoom range. Focusing is fully internal,
so the front element neither rotates nor
extends through the focus range. The
minimum focus distance is 0.45m at the
short end of the zoom range and 2.6m at the
long end, with a maximum magnification
ratio of 0.42x at the 200mm mark.
www.digitalcameraworld.com
Telephoto lens
Specifications
Mount: Leica L, Sony E (FE)
Full-frame: Yes
Lens construction: 27 elements in 19 groups
Angle of view: 39.6-4.1º
Autofocus: Yes
Max aperture: f/4.5
Min aperture: f/22-32
Min focusing distance: 0.45m (W) 2.6m (T)
Max magnification ratio: 0.42x
(at 200mm zoom)
Filter size: 105mm
Dimensions (L x D): 280 x 119mm (approx)
Weight: 2,495g
In practical terms, sharpness is boosted by the optical image stabilisation. The new-generation OS2 system
is worth up to seven stops at the short end of the zoom range and an impressive six stops at the long end.
With the physical extension of the lens at
longer zoom settings, it’s useful that the
zoom lock switch can be engaged at any
position, rather than just the shortest
setting. The lens also has three customisable
AF-hold buttons around its circumference,
which fall neatly under the thumb in both
landscape and portrait orientation shooting.
Towards the rear is a rank of switches for
AF/MF focus modes and an autofocus range
limiter that can lock out either the long or
short end of travel, either side of 6m. Below
these are a dual-mode Optical Stabilisation
switch with off, static and panning options,
and a Custom switch with access to two
custom modes. Due to its weight, it’s no
surprise it comes with a sturdy tripod
mounting ring featuring an Arca-Swiss
compatible foot. It slots into like-minded
tripod heads, without the need for an
additional quick-release plate. If handheld
shooting is your thing, you can only remove
the foot, leaving the ring and stub attached.
Sharpness
Sharpness is excellent, both throughout the entire zoom
range and right across the whole image frame, right into
the corners. That’s a real achievement, given the
oversized 10x zoom range. The lens did full justice to the
big megapixel count of our Sony A7R III testing body.
Fringing
Distortion Short -2.29 Long 0.83
Performance
The autofocus system is super-speedy
and consistently accurate. In our tests, the
Sigma delivered excellent sharpness and
contrast, even at the widest apertures, which
is key, given the not overly fast aperture
range. Sharpness is boosted by the new OS2
optical image stabilisation system which is
worth up to 7-stops at the short end of the
zoom range and 6-stops at the long. Mode 2
stabilisation works in diagonal panning
orientation as well as landscape and portrait.
Though not ‘fast glass’, the lens produces
a tight depth of field, especially at longer
zoom settings. Bokeh is smooth and remains
so when stopping down, helped by a 9-blade
aperture diaphragm. There’s resistance to
ghosting and flare, thanks to the application
of Sigma’s Super Multi-Layer Coating.
Colour fringing is mostly negligible and
pincushion distortion is minimal. Overall,
performance is excellent although it’s a hefty
beast for shooting at standard focal lengths.
Matthew Richards
www.digitalcameraworld.com
Short 3.47 Long 1.42
Colour fringing is absolutely negligible even at the
extreme edges and corners of the image frame at most
zoom settings, and still very minimal where it creeps
up a bit around the 200mm and 600mm settings.
Pincushion distortion is extremely minor at the
shortest zoom setting and still fairly minimal in
the 200-600mm range. It’s certainly not obvious
at any focal length, even with automatic in-camera
correction disabled.
Verdict
The autofocus system lives up to its billing with
a speedy and consistently accurate performance.
Due to the weight, it’s no surprise there’s a tripod
mounting ring and an Arca-Swiss compatible foot.
4.5
Outstanding
5.0
4.5
5.0
4.5
Features
Build &
handling
Performance
Value
Made for action, sports and wildlife photography,
this lens’s zoom range stretches from a standard
60mm through to a super-telephoto 600mm,
ensuring you won’t miss that vital shot while
changing lenses. It’s big and heavy, but handling is
refined and the super-fast autofocus and effective
optical stabilisation ensure a great hit rate. Image
quality is excellent, making the lens worth its weight.
JANUARY 2024
D I G I TA L C A M E R A
109
Buyer’s guide
Use our real-world testing scores from across the market
to purchase your next camera with confidence
DSLR & MIRRORLESS CAMERAS
PLUS: Our best-buy accessories
DSLRs
PRODUCT
PRICE WHEN TESTED
SENSOR SIZE/RESOLUTION
CONTACT
REVIEWED
Canon EOS 4000D
£370/$n/a
APS-C, 18MP
www.canon.co.uk
Issue 205
A great but basic beginner DSLR. At just £370 (body only), it’s the cheapest EOS DSLR. Sadly,
it’s let down by a cheap kit lens that’s tough to tolerate, so we suggest buying the better IS lens.
Canon EOS 2000D
£349/$479
APS-C, 24.1MP
www.canon.co.uk
Sensor sizes
at a glance
Three formats
dominate DSLR and
mirrorless cameras…
Issue 206
A better-spec camera than the 4000D but with a modest price bump. Arguably, it’s worth the
extra outlay but, for an extra £200, the EOS 250D is a far better DSLR camera (Rebel T7 in USA).
Canon EOS 250D
£549/$649
APS-C, 24.1MP
www.canon.co.uk
Issue 217
Sold as the Rebel SL3 in the USA, we think it’s the best budget/beginner DSLR with the perfect
blend of power and value. Move beyond snapping with smartphones to taking proper photos.
Canon EOS 850D
£919/$749
APS-C, 24.1MP
www.canon.co.uk
Issue 236
Lightweight & powerful, the EOS 850D/Rebel T8i captures detailed, colourful and sharp images,
plus 4K movies. Features iTR Face and Eye Detection AF, and Auto AF via optical viewfinder.
Canon EOS 77D
£710/$550
APS-C, 24.1MP
www.canon.co.uk
Full-frame
(36 x 24mm)
These imaging sensors
have similar proportions
to a frame of 35mm film.
Issue 193
Key specs are identical to the 800D but extra controls (a top-plate LCD and a rear control
wheel) make dialling in exposure settings quicker. Super image quality – even at high ISOs.
Canon EOS 90D
£1,299/$1,199
APS-C, 32.5MP
www.canon.co.uk
Issue 221
This impressive crop-camera comes with a 32.5MP sensor, rapid 10fps continuous shooting
and 4K video, plus improved handling and decent AF. An ideal APS-C upgrade for enthusiasts.
Canon EOS 7D Mark II
£1,050/$725
APS-C, 20.2MP
www.canon.co.uk
Issue 159
Action-packed APS-C format EOS camera has 65-point AF with advanced tracking, 10fps
continuous shooting, dual DIGIC 6 processors and GPS in a tough, magnesium alloy bodyshell.
Canon EOS 6D Mark II
£1,399/$1,399
Full-frame, 26MP
www.canon.co.uk
Issue 194
APS-C
(≈ 25.1 x 16.7mm)
Based on the Advanced
Photo System film
format from the 1990s.
World’s smallest full-frame DSLR gets a major upgrade over the original 6D with improved speed
and performance. It’s a great all-rounder now, thanks to an improved AF system and burst rate.
Canon EOS 5D Mark IV
£2,869/$2,699
Full-frame, 30MP
www.canon.co.uk
Issue 183
The pro-level, weather-sealed, full-frame EOS 5D Mk IV has a hi-res 30MP sensor and 7fps
frame rate. Specs include 4K video, touchscreen LCD, Wi-Fi and NFC connectivity, and GPS.
Canon EOS 5DS (DS R)
£2,999/$3,699
Full-frame, 50.6MP
www.canon.co.uk
Issue 167
A 50MP DSLR which delivers huge and amazingly detailed hi-res images. The more expensive
5DS R (£3,199/$3,899) adds a low-pass cancellation filter for marginally sharper shots.
Seen something that doesn’t look right? Email us at digitalcamera@futurenet.com with ‘Camera Guide’ in the subject line
www.digitalcameraworld.com
JANUARY 2024
Micro Four Thirds
(17.3 x 13mm)
The 4:3 aspect ratio
allows smaller and
lighter lenses to be used.
D I G I TA L C A M E R A
111
KitZone
Camera buyer’s guide
Wise buys
Landscape
lenses
DSLRs (CONTINUED)
Good, better and
best… three optics
for shooting scenics
PRODUCT
PRICE WHEN TESTED
SENSOR SIZE/RESOLUTION
CONTACT
REVIEWED
Canon EOS-1D X Mk III
£6,999/$6,499
Full-frame, 20.2MP
www.canon.co.uk
Issue 227
The ultimate hybrid DSLR/mirrorless. Superb low-light performance up to ISO 102,400,
plus Deep Learning AF and 5.5K Raw video. It can also capture up to 20fps in Live View mode.
Nikon D7500
£1,049/$997
APS-C, 20MP
www.nikon.co.uk
Issue 193
Steals most of the best bits from the now-discontinued pro-grade D500 and squeezes them
into a smaller, lighter body at a much more affordable price. Superb image quality, great value.
Nikon D780
£2,299/$2,297
Full-frame, 24.5MP
www.nikon.co.uk
Issue 227
Highly capable and entirely natural-feeling DSLR for shooting stills in viewfinder mode with
good Live View, too. Despite its strong credentials, it looks overpriced compared with the Z 6II.
Nikon D850
£2,799/$2,997
Full-frame, 45.7MP
www.nikon.co.uk
Issue 196
Can turn its hand to pretty much anything; capable of stunning images with immense detail. For
Live View and video capture, however, the contrast-detection AF system is inferior to Nikon Z’s.
Sigma 14-24mm
f/2.8 DG HSM
Price: £1,269/$1,299
Verdict: Well-made and
optically excellent, this
lens for Canon and
Nikon DSLRs is a real
bargain. Sharpness is
impressively consistent.
Nikon D6
£6,799/$6,497
Full-frame, 20.8MP
www.nikon.co.uk
Issue 231
Geared mostly towards action, sports and wildlife photography, the D6 is a high-performance
20.8MP DSLR. Stills performance is superb with a fast continuous drive rate and AF system.
Pentax K-70
£829/$647
APS-C, 24MP
https://pentax.eu
Issue 186
Very much a camera of two halves – the K-70’s weighty body and design quirks won’t be
to everyone’s taste, but plenty of top features and great results make it worth considering.
Pentax KF
£849/$847
APS-C, 24MP
https://pentax.eu
Issue 268
Well-made DSLR but essentially a relaunch of the K-70. The merits of this camera’s autofocus
system will be lost unless you are using a newer Pentax lens with an SDM, DC or PLM AF motor.
Pentax K-3 Mark III
£1,899/$1,999
APS-C, 26MP
https://pentax.eu
Issue 247
Fast, powerful and packed with clever features, but also oddly dated, as if Pentax has stepped
back from modern innovations like on-sensor phase detect autofocus and vari-angle screens.
Pentax K-3 III Monochrome
Canon RF
15-35mm f/2.8L
IS USM
Price: £2,389/$2,399
Verdict: Its 35mm reach
offers extra flexibility for
shooting landscapes,
and it features an optical
image stabiliser worth
up to five stops.
Pentax K-1 Mark II
112
D I G I TA L C A M E R A
https://pentax.eu
Not reviewed
£1,799/$1,997
Full-frame, 36.4MP
https://pentax.eu
Issue 204
Initially looks and feels like a throwback to an earlier time but its blunt, weighty handling and
solid, intelligent controls provide relief from today’s touchscreens and digital miniaturisation.
Pentax 645Z
£6,800/$8,500
Medium-format, 51MP
https://pentax.eu
Issue 164
Extraordinarily well-built with excellent ergonomics for its size and supported by a lens
system that boasts 16 different optical options. Pricey when compared to Fujifilm’s GFX 50S II.
What to look for in a… DSLR
Shutter release To shoot, press the shutter
release button. To focus and meter the
scene, half press the shutter release.
Price: £2,385/$2,397
Verdict: Comes with all
the bells and whistles:
phenomenal sharpness,
a customisable control
ring, an assignable
function button and a
multi-function display.
APS-C, 25.7MP
Based on the flagship K-3 Mark III and sporting a brand-new redesigned and optimised sensor,
the K-3 III Monochrome lacks a colour filter and offers three dedicated B&W shooting modes.
Lens release To remove the lens, press the
button and twist the lens anti-clockwise.
Use the protective body cap, so you
don’t leave the sensor exposed to dust.
Nikkor Z
14-24mm f/2.8 S
£2,249/$2,199
Lens A DSLR is far more versatile than a
camera with a fixed lens because you can
change lenses and alter the angle of view.
Hotshoe To attach a flashgun, slot it into
place and tighten the catch on the device.
Command dial The command dial is used
to alter camera settings and adjust features.
LCD screen This displays images while
composing and shooting information.
Some DSLRs have a vari-angle LCD screen.
Back panel controls A handy feature used
to alter settings and navigate menus. Some
cameras have a joystick multi-controller.
Sensor This is where your images are
recorded before being processed and
stored on your memory card.
Viewfinder To compose an image, look
through the viewfinder on the back panel.
Mode dial The mode dial is where you
access the camera’s shooting modes.
For first-time users, the fully Auto mode
selects all the camera settings for you.
Menu button
Access shooting, reviewing and other menu
options, and use the multi-controller and
the OK button to navigate and select.
JANUARY 2024
Connection points To connect your
camera to another device, insert the
cable into the correct port. You can also
connect to a remote shutter release here.
Flash Beginner models and some enthusiast
DSLRs include a built-in pop-up flash unit.
Memory card slot Some DSLRs include
a memory card slot on the bottom of the
camera in the battery compartment.
www.digitalcameraworld.com
Camera buyer’s guide
MIRRORLESS
PRODUCT
PRICE WHEN TESTED
SENSOR SIZE/RESOLUTION
CONTACT
REVIEWED
Canon EOS M50 Mark II
£589/$599
APS-C, 24.1MP
www.canon.co.uk
Issue 242
A compact and capable camera that takes great stills and 1080p video. Ideal for travel, everyday
imaging, plus vlogging and content creation. But if you need to record 4K, it’s not for you.
Canon EOS M6 Mark II
£799/$849
APS-C, 32.5MP
www.canon.co.uk
Wise buys
Tripod heads
Good, better and
best… three heads
for stable shooting
Issue 231
Designed to deliver sharp images for amateurs on the move. It has the same 32.5MP APS-C
sensor as the 90D DSLR but can shoot in 14fps blasts (30fps raw), plus uncropped 4K video.
Canon EOS M5
£780/$n/a
APS-C, 24.2MP
www.canon.co.uk
Issue 188
Flagship M mirrorless for enthusiasts. Shares much of the tech as the 80D but swaps the optical
viewfinder for an electronic version, making this compact system camera a pocket rocket.
Canon EOS R50
£789/$679
APS-C, 24.2MP
www.canon.co.uk
Issue 267
With a 24.2MP APS-C sensor, 4K video, intelligent AF modes, and 15/12fps continuous
shooting, the R50 uses the small and compact size of the M50 and is a great beginner camera.
Canon EOS R10
£899/$979
APS-C, 24.2MP
www.canon.co.uk
Issue 259
This budget, beginner EOS R10 with pro-level autofocus and 15fps speed, 4K 60p imaging
and 120p slow motion at 1080p offers performance that punches well above its weight.
Canon EOS RP
£1,049/$999
Full-frame, 26.2MP
www.canon.co.uk
Issue 214
Ideal for crop-sensor M CSC or EOS DSLR users looking for an affordable full-frame upgrade.
The EOS RP has strong specs and is notably smaller, lighter and cheaper than most rivals.
Canon EOS R7
£1,349/$1,499
APS-C, 32.5MP
www.canon.co.uk
Issue 258
Vanguard Veo 2
BH-50 ball head
Price: £69/$70
Verdict: An inexpensive
and compact ball head.
The Veo 2 BH-50 has
a separate panning
axis and a ‘universal’
Arca-Swiss style,
quick-release plate.
A worthy successor to the 90D and 7D DSLRs, this is the first mirrorless to reach for if you want
the advantages of APS-C with pro-level 15fps speed, intelligent AF, IBIS and image resolution.
Canon EOS R8
£1,649/$1,499
Full-frame, 24.2MP
www.canon.co.uk
Issue 266
The lightest full-frame EOS R camera can shoot it all. Same sensor and processor as the
R6 Mk II, latest AF subject recognition, 24.2MP images and rapid 40fps shooting, but no IBIS.
Canon EOS R6 Mark II
£2,779/$3,599
Full-frame, 24.2MP
www.canon.co.uk
Issue 264
A hybrid camera that packs an obscene amount of firepower, with 24.2MP stills at a startling
40fps and up to 6K video, plus updated AF detection for tracking trains, planes and horses.
Canon EOS R5
£4,299/$3,899
Full-frame, 45MP
www.canon.co.uk
Issue 233
The perfect amalgamation of the EOS R’s full-frame form, the 5D’s function, the pro-grade
autofocus of the flagship EOS-1D X Mark III DSLR: 20fps bursts, IBIS and intelligent Animal AF.
Canon EOS R3
£5,659/$5,999
Full-frame, 24.1MP
www.canon.co.uk
Issue 248
A top-tier tool of choice for working professionals that offers blackout-free 30fps stills and 6K
raw video – plus improved autofocus performance, coupled with ghostly good Eye Control AF.
Manfrotto XPro
3-Way Head
Price: £94/$116
Verdict: Precision
and control – and more
bulk – the XPro’s stubby
handles keep the size
down but can be
extended when needed.
What to look for in a… Mirrorless CSC
Interchangeable lenses
Like a DSLR, a compact system camera
(CSC) doesn’t feature a fixed lens. Instead,
you can swap between lenses depending on
the subject you are shooting or the effect
you want to achieve. The lens mounts on
CSCs are different to those on DSLRs,
which means you can’t use DSLR lenses
on a CSC without purchasing an adapter
to ‘bridge’ the two mounts.
Look, no mirror!
The most significant difference between
a DSLR and a compact system camera is
the lack of a mirror. Not only does this allow
CSCs to be much smaller and lighter, but
it also means they’re much quieter in
operation. As there is no mirror to reflect
the sensor view in a CSC, you will have to
use the Live View monitor or an electronic
viewfinder instead while composing shots.
www.digitalcameraworld.com
Pocketability
Compact system cameras are smaller than
the majority of DSLRs. Rangefinder-style
CSCs are more pocketable than those
styled like compact DSLRs but the grip and
handling of the latter can be an advantage.
Viewfinder – or not
The lack of a mirror means CSCs don’t have
an optical TTL (through the lens) viewfinder
but many DSLRs boast a built-in electronic
viewfinder (EVF), a small screen showing
the Live View. Others can be fitted with a
small viewfinder accessory on the hotshoe.
Flange Focal Distance
The FFD in a CSC is significantly shorter
than in a DSLR. For example, Canon’s EF
and EF-S DSLR mounts have an FFD of
44mm, whereas the Q mount used in
Pentax’s CSC range uses a distance
of just 9.2mm.
Light path
In a DSLR, some light passes through the
mirror to the AF sensor, but the majority is
reflected up to the pentaprism, exposure
meter and viewfinder assembly. This
system takes up a lot of space, though.
Electronic display
In a CSC, the light strikes the sensor, and
an image is generated on the rear screen
and electronic viewfinder, if present.
This means that the body can be much
slimmer and shorter in height.
JANUARY 2024
Arca Swiss D4
tripod head
Price: £960/$1,142
Verdict: Combines a ball
mechanism with geared
axis movements when
required, plus a second
pan axis below the
camera plate for level
panorama shoots.
D I G I TA L C A M E R A
113
Wise buys
Neutral
ƳƺȇɀǣɎɵˡǼɎƺȸɀ
MIRRORLESS (CONTINUED)
Good, better and
best… three options
for long exposures
PRODUCT
PRICE WHEN TESTED
SENSOR SIZE/RESOLUTION
CONTACT
REVIEWED
Fujifilm X-E4
£799/$849
APS-C, 26.1MP
www.fujifilm.com
Issue 243
While its small size and design doesn’t make it quite as versatile as the Fujifilm X-T4,
the X-E4 is capable of producing the same quality images and is easy to carry everywhere.
Fujifilm X-H2
£1,899/$1,999
APS-C, 40.2MP
www.fujifilm.com
Issue 261
An extremely compelling camera at an equally compelling price. With its 40MP
resolution and 8K video, the X-H2 takes on some full-frame big guns at half the price.
Fujifilm X-H2S
£2,499/$2,499
APS-C, 26.1MP
www.fujifilm.com
Issue 258
With double the processing power of its predecessor, it offers a class-leading 40fps continuous
shooting with full autofocus functions. A terrifically powerful companion for sports and wildlife.
Fujifilm X-Pro3
£1,699/$1,999
APS-C, 26.1MP
www.fujifilm.com
Issue 225
With its rangefinder design, the Fujifilm X-Pro3 recaptures the purity and joy of taking
photographs. However, this can sometimes impede your ability to shoot in a modern way.
SRB ND 1000
Price: £32/$44 (67mm)
Verdict: If you don’t
want the fuss of a full
square filter system, this
10-stop circular ND filter
is perfect. In our tests,
we saw a slightly warm
colour cast but that
can be corrected.
Fujifilm X-S10
£949/$999
APS-C, 26.1MP
www.fujifilm.com
Issue 238
The excellent finish, build quality and handling, plus the inclusion of IBIS, give the X-S10 perhaps
the best combination of performance, quality and value in the APS-C mirrorless camera market.
Fujifilm X-S20
£1,249/$1,299
APS-C, 26.1MP
www.fujifilm.com
Issue 271
The perfect camera for most people, with its straightforward controls, excellent fully
automatic modes and its small and compact size, the X-S20 is the hybrid camera to beat.
Fujifilm X-T30 II
£769/$899
APS-C, 26.1MP
www.fujifilm.com
Issue 251
Fujifilm’s pint-sized retro camera doesn’t just look cool but works well, too, with old-school
shutter speed and aperture dials. However, the lack of in-body stabilisation is a shame.
Fujifilm X-T4
£1,549/$1,699
APS-C, 26.1MP
www.fujifilm.com
Issue 231
The X-T4 gains the in-body image stabilisation that the X-T3 lacks and also brings a vari-angle
screen and a faster, quieter shutter mechanism. The improvements to this camera are welcome.
Fujifilm X-T5
£1,699/$1,699
APS-C, 40.2MP
www.fujifilm.com
Issue 263
Takes the much-loved Fujifilm X-T4 further in terms of resolution but is still ideal for shooters
who want a lightweight camera with traditional controls and an excellent 40.2MP resolution.
Formatt Hitech
Firecrest Ultra
Circular 3.0
(10-stop)
Price: £146/$158
Verdict: Offers a step
up in construction and
quality, with excellent
colour fidelity in
photographs.
Fujifilm GFX 50S II
£3,499/$3,999
Medium-format, 51MP
www.fujifilm.com
Issue 248
The lack of 4K video won’t endear it to all, but if speed and video aren’t important then the
advantages of a medium-format sensor can be had for a far more affordable price than before.
Fujifilm GFX 100S
£5,499/$5,999
Medium-format, 102MP
www.fujifilm.com
Issue 241
Far more accessible and more ready for broader use cases than traditional medium-format
cameras. Any compromises made to produce the GFX 100S have not affected its performance.
Camera tech: Crop factors explained
Lee ProGlass
IRND 100mm
10-stop filter
Price: £179/$237
Verdict: Designed for
the ultimate in neutrality
and colour accuracy by
a renowned brand with
a legendary reputation.
114
D I G I TA L C A M E R A
JANUARY 2024
APS-C
While the majority of interchangeable lenses
are designed to fill the proportions of a fullframe sensor, plenty of digital cameras use sensors
that are smaller than full-frame (see page 107). As
they are exposed to a smaller part of the picture
projected by a lens, smaller sensors produce a
magnification effect, with the ‘cropped’ image
looking as though it has been taken with a longer lens.
The focal length of the lens hasn’t increased – a
50mm lens is a 50mm lens, regardless of the camera
it’s attached to – but the ‘crop factor’ of the sensor
makes it appear that it has. Other differences that the
sensor size makes include the larger pixels gathering
light more efficiently so you’ll get cleaner, betterquality images at high ISO settings. Plus, it’s easier
to exploit shallow depth-of-field effects, so that
images have more blur and less sharpness.
Four Thirds
Full-frame sensors provide the standard by which all other sensors can be compared
Full-frame
KitZone
Camera buyer’s guide
Full Frame
No adjustment is
necessary with a fullframe sensor – the
focal length on the
lens is what you get.
Crop factor: 1
APS-C
Most APS-C sensors
have a crop factor
of 1.5, although
with Canon APS-C
cameras, it’s 1.6.
Crop factor: 1.5 or 1.6
Micro Four Thirds
To get a 20mm
equivalent view,
you need a lens
that has a focal
length of 10mm
Crop factor: 2
www.digitalcameraworld.com
Camera buyer’s guide
MIRRORLESS (CONTINUED)
PRODUCT
PRICE WHEN TESTED
SENSOR SIZE/RESOLUTION
CONTACT
REVIEWED
Fujifilm GFX 100
£9,999/$9,999
Medium-format, 102MP
www.fujifilm.com
Issue 220
The Fujifilm GFX 100 is everything you might hope for and more. It is hugely expensive,
but the performance, resolution and image quality you get for that price tag are stunning.
Leica SL2
£5,300/$5,995
Full-frame, 47MP
leica-camera.com
Wise buys
Travel tripods
Good, better and
best… three options
you can depend on
Issue 224
Likely to be sold in small numbers to connoisseurs and certain discerning pros, this
is no overpriced toy. It incorporates a level of design and thought that is rather inspiring.
Leica SL2-S
£3,975/$4,895
Full-frame, 24MP
leica-camera.com
Issue 240
Costs much less than the higher-resolution SL2 but even with such a drastic difference in
price, the compromises are minimal, and the drop in resolution is the only major downside.
Nikon Z 30
£699/$707
APS-C, 20.2MP
www.nikon.co.uk
Issue 260
Aimed at vloggers, for which the vari-angle touchscreen works much better than the tilting
screen of the Z 50. The lack of an EVF isn’t such good news if you primarily shoot stills.
Nikon Z 50
£899/$857
APS-C, 20.9MP
www.nikon.co.uk
Issue 225
Small and simple but power-packed, the Z 50 is capable of fabulous results. The slimline build
brings the benefits of mirrorless; firmware updates have added Eye-Detection AF capabilities.
Nikon Z fc
£899/$957
APS-C, 20.9MP
www.nikon.co.uk
Issue 247
Far from a case of style over substance, this DX-format Z camera is a pleasure to operate
and captures quality images to boot. Matching ‘SE’ lenses complement its good looks.
Nikon Z 5
£1,349/$1,397
Full-frame, 24.3MP
www.nikon.co.uk
Issue 234
Nikon’s most affordable FX Z camera still boasts plenty of top-notch features including IBIS, the
EXPEED 6 processor and dual card slots. Great image quality and 273-point hybrid autofocus.
Nikon Z 6II
£2,079/$1,997
Full-frame, 24.5MP
www.nikon.co.uk
Benro Slim Travel
Price: £69/$114
Verdict: Folding down
to just 32cm and with
a maximum height of
130cm, the aluminium
edition is great value,
and the carbon version
is not too pricey at
£125/$150.
Issue 237
Delivers superb quality for stills and 4K video, and is a brilliant all-rounder, too. With fewer
megapixels to process, the Z 6II beats the Z 7II with a 14fps rather than 10fps drive mode.
Nikon Z 7II
£3,099/$2,997
Full-frame, 45.7MP
www.nikon.co.uk
Issue 239
Matches Nikon’s similarly priced D850 for megapixels but especially when shooting handheld
and for capturing movies, the Z 7II can yield even better results, thanks to features like IBIS.
Nikon Z 8
£3,999/$3,999
Full-frame, 45.7MP
www.nikon.co.uk
Issue 270
The ‘baby Z 9’ inherits the vast majority of its sibling’s specs, including its blisteringly fast
electronic shutter and EXPEED 7 processor, in a more compact and manageable body.
Nikon Z 9
£5,299/$5,497
Full-frame, 45.7MP
www.nikon.co.uk
Issue 250
The flagship Z series camera uses an electronic shutter to blow the D6 DSLR out of the water
for resolution, speed and all-round performance. The Z 9 also boasts Nikon’s best video specs.
Camera tech: AF points explained
Manfrotto
Befree 2N1
Price: £139/$219
Verdict: Like the Benro,
the 2N1 also converts
into a monopod. It’s
taller at 150cm (41cm
when folded), but is only
available in aluminium.
The amount of autofocus points varies between cameras – but in short, the more you pay, the more you get
Entry-level DSLRs have
around seven to nine AF
points, whereas a high-end
mirrorless, such as the Canon
EOS R3, has 4,779. Cameras
that offer a densely populated
array of AF points across the
viewfinder make it easier to
focus on subjects that aren’t
in the centre of the picture.
A large number of AF points
also makes for smoother
focus tracking, as the camera
can ‘hand off’ autofocus from
one point to the next and more
accurately follow a subject
moving across the picture.
www.digitalcameraworld.com
AF point array
AF points are clustered towards the centre
of a DSLR viewfinder. An AF point array
typically contains standard AF sensors that
measure sharpness in one plane and ‘crosstype’ AF sensors that are more precise.
Types of AF point
Beginner cameras may have one
cross-type point, whereas high-end
models have many. Dual cross
points are the most powerful.
Standard
How they work
The AF sensor detects a line of contrast that
‘breaks’ the line of the sensor – such as the
horizon here. The AF system pushes the
lens’s focusing back and forth until the active
sensor is able to find this high-contrast point.
Cross-type
Dual cross
JANUARY 2024
3 Legged Thing
Punks Brian
Price: £269/$300
Verdict: With a beefy
14kg load rating, the
carbon-fibre Brian
stretches to a towering
187cm, yet still folds
down to 41cm.
D I G I TA L C A M E R A
115
KitZone
Camera buyer’s guide
Wise buys
Macro lenses
MIRRORLESS (CONTINUED)
Good, better and
best… three options
for life-size captures
PRODUCT
PRICE WHEN TESTED
SENSOR SIZE/RESOLUTION
CONTACT
REVIEWED
Olympus PEN E-P7
£749/$799
Micro Four Thirds, 20MP
explore.omsystem.com
Issue 245
A fantastic return to form for the PEN series – so stylish that you can take it anywhere, so
simple that beginners can use it and so capable that experts can get sensational results from it.
Olympus OM-D E-M10 IV
£799/$799
Micro Four Thirds, 20MP
explore.omsystem.com
Issue 235
With a 20MP sensor, improved IBIS and a flip-down and tiltable screen, the E-M10 Mark IV
offers plenty of new features, while retaining the Mark III’s 4K video and attractive styling.
OM System OM-1
Nikkor 40mm
f/2.8 G AF-S
DX Micro
Price: £269/$277
Verdict: Typical of
compact, low-cost,
APS-C format macro
lenses. The short focal
length means having
to shoot close to your
subject and the lens is
not particularly refined.
£1,999/$2,199
Micro Four Thirds, 20.4MP
explore.omsystem.com
Issue 254
Packed with bleeding-edge computational photography tech, image stabilisation that blows the
competition out of the water and ISO performance that promises parity with full-frame sensors.
OM System OM-5
£1,199/$1,199
Micro Four Thirds, 20.4MP
explore.omsystem.com
Issue 263
Turns clever computational technology into easy-to-use tools, liberating you from tripods
and filters. It’s an all-in-one tool that will enable you to make the most of your outdoor pursuits.
Panasonic Lumix G9
£1,499/$1,698
Micro Four Thirds, 20.3MP
www.panasonic.com
Issue 200
A fast and effective camera for both 4K video and fast-action photography. Substantial in the
hand, which gives you a good grip especially with longer lenses, the image quality is excellent.
Panasonic Lumix G100
£599/$748
Micro Four Thirds, 20.3MP
www.panasonic.com
bit.ly/dc843
Vloggers and creatives more broadly will enjoy the simplicity of the Lumix G100. With a decent
viewfinder and ‘proper camera’ ergonomics, the G100 has an edge in a competitive market.
Panasonic Lumix GX9
£879/$998
Micro Four Thirds, 20.3MP
www.panasonic.com
Issue 202
On point for specs, size and price but it relies heavily on its menus and touch-screen interface
and can feel fiddly to set up. However, its features and image quality can hardly be criticised.
Panasonic Lumix GH5S
£2,199/$2,498
Micro Four Thirds, 10.2MP
www.panasonic.com
Issue 203
Pros will love its 10-bit 4:2:2 recording and high bit rates. There’s no in-body-stabilisation,
though, and the 10MP resolution is just too low for the GH5S to be a convincing stills camera.
Sigma 105mm
f/2.8 Macro EX
DG OS HSM
Price: £359/$569
Verdict: This optic offers
terrific image quality
and value for money
for more discerning
close-up shooters.
It’s quite big and heavy,
but its 105mm focal
length gives you a better
shooting distance.
Tamron SP
90mm f/2.8 Di
VC USD Macro
Price: £649/$649
Verdict: The latest
version of a legendary
Tamron macro lens is
more expensive but
you get superb image
quality, design and
construction, plus it has
built-in stabilisation.
116
D I G I TA L C A M E R A
Panasonic Lumix GH6
£1,999/$2,198
Micro Four Thirds, 25.2MP
www.panasonic.com
Issue 254
Some may feel that having an MFT sensor and contrast autofocus is outdated, but the GH6
holds its own with cameras almost twice its price in terms of functionality and image quality.
Panasonic Lumix S1
£2,199/$2,498
Full-frame, 24.2MP
www.panasonic.com
Issue 218
The Lumix S1 is a hefty camera that offers excellent performance. It matches both
the Nikon Z 6 and Sony A7 III for image quality, but costs more than either of them.
Camera tech: ISO and image quality
Setting sensor sensitivity can be a compromise: increase the risk of blurred photos, or increase noise?
When you push the ISO higher on
a camera, colours become muddier,
and dynamic range (the amount of detail
captured from shadows to highlights)
drops off. But the most obvious side
effect is an increase in the ‘noise’ – this
is the digital equivalent of film grain but
even less palatable, with the image
covered in ugly coloured speckles.
ISOs in the region of 100 to 400 produce
cleaner, richer and more detailed images;
however, they require more light to make
an exposure. This can be achieved by
shooting with either a larger aperture or
a slower shutter speed – or both. You can
take a picture at low ISOs without making
these adjustments, but it will take longer
to make the exposure and that could
result in a blurred picture if the subject
or the camera move during this time.
JANUARY 2024
102,400
25,600
6,400
1,600
400
Noise
Expanded ISO
settings give
noisier results.
Mid-range
ISO sensitivities
from 400 to 1,600
offer the best
compromise of
sensitivity and
noise.
Blurred
Low ISOs give
cleaner results, but
shutter speeds will
be lower, risking
blur in low light.
www.digitalcameraworld.com
Camera buyer’s guide
MIRRORLESS (CONTINUED)
PRODUCT
PRICE WHEN TESTED
SENSOR SIZE/RESOLUTION
CONTACT
REVIEWED
Panasonic Lumix S1H
£3,599/$3,999
Full-frame, 24.2MP
www.panasonic.com
Issue 232
Good, better and
best… three bags
for use in the field
An interesting ‘bridge’ between system cameras and higher-end cine gear, but while it has the
power for pro video productions, vloggers won’t embrace its size, weight and patchy video AF.
Panasonic Lumix S1R
£3,399/$4,199
Full-frame, 47.3MP
www.panasonic.com
Wise buys
Photo
backpacks
Issue 216
The Lumix S1R is big, hefty and solid and feels like it means business. It handles
well and produces truly excellent image quality – and offers 60p 4K video, too.
Panasonic Lumix S5
£1,799/$1,999
Full-frame, 24.2MP
www.panasonic.com
Issue 235
Shares the impressive 24MP CMOS sensor housed in the S1, but with improved AF. It also
delivers up to 6.5 stops of stabilisation with compatible lenses. As a result, it’s tough to beat.
Panasonic Lumix S5 II
£1,999/$1,997
Full-frame, 24.2MP
www.panasonic.com
Issue 267
Can capture rich stills at up to 30fps in E-Shutter mode and offers unbeatable stabilisation. The
S5 II’s phase hybrid AF system matches or in some cases beats cameras above its price range.
Panasonic Lumix S5 IIX
£2,299/$2,198
Full-frame, 24.2MP
www.panasonic.com
Manfrotto Pro
Light 3N1-36 PL
Issue 272
Extra features over the S5 II, such as SSD recording, HDMI RAW output, ALL-I compression,
Apple ProRes, and Streaming functionality, make the S5 IIX an enticing proposition.
Sigma fp
£1,999/$1,899
Full-frame, 24.6MP
sigmauk.com
Issue 226
The Sigma fp is a fascinating video camera that takes a genuinely fresh approach
but, unfortunately, it feels no more than an interesting alternative in the stills market.
Sigma fp L
£1,999/$2,499
Full-frame, 61MP
sigmauk.com
Issue 244
Price: £119/$223
Verdict: A clever design
makes this backpack
equally adept at storing
camera kit, video gear
or a drone. It can also
take a 15-inch laptop.
The tiny body brings some handling issues and while the new phase-detect AF system is great
for stills, the video AF remains slow and unreliable. Remarkable performance for the price.
Sony Alpha 6100
£679/$748
APS-C, 24MP
bit.ly/dc249
www.sony.co.uk
Brings a host of improvements over the A6000 but they don’t come cheap. The A6100 is
nearly twice the price of the A6000, somewhat limiting its appeal as an entry-level camera.
Sony Alpha 6400
£949/$899
APS-C, 24MP
www.sony.co.uk
Issue 215
For bloggers and vloggers, the Sony A6400 is a dream. But for stills photographers, its high-tech
image capture is poor consolation for its five-year-old design and limited external controls.
Sony Alpha 6600
£1,399/$1,399
APS-C, 24MP
www.sony.co.uk
Issue 226
The A6600’s stunning AF and image stabilisation make it suitable for demanding
stills work, but its still image quality is good rather than class-leading.
Sony Alpha 7 II
£1,499/$1,698
Full-frame, 24.3MP
www.sony.co.uk
Issue 162
Offering all the benefits of a full-frame sensor without the bulk, the A7 II has superb
image stabilisation and produces high-quality images. It’s well worth your attention.
Camera tech: Video resolution
www.digitalcameraworld.com
4K has four times the resolution of Full HD.
The image is made up of more pixels, so
details are rendered with more clarity.
2,160 pixels
4K UHD
Price: £149/$162
Verdict: Fairly slimline,
it’s nevertheless supertough and can squeeze
a lot in. The waist strap
doubles as a utility belt.
3,840 pixels
You get more pixels to play with when you record in 4K
Tenba Axis 24L
Full HD
1,080 pixels
Before starting to record video, the
fundamental decision to make is which
movie-recording size to use. This is largely
determined by three functions: the image size or
resolution, the frame rate (how many images are
recorded each second) and the level of compression.
The choice of resolution is key, as this determines
how much detail can be recorded, with 4K being
offered by the majority of current cameras. There
are, in fact, two 4K standards: TV-friendly 4K UHD
(3,840 x 2,160 pixels) and a wider, more cinematic 4K
‘DCI’ (4,096 x 2,160). If you have space available on
your memory card or external recorder, it pays to
shoot at the highest resolution your camera allows,
as you can always reduce this later. That said,
shooting at a lower resolution usually allows you to
shoot at a faster frame rate for slow-motion playback.
Lowepro
ProTactic
BP 350 AW II
Full HD
4K UHD
1,920 pixels
JANUARY 2024
Price: £199/$229
Verdict: The range’s
mid-sized option, the
Axis 24L can stow one
or two cameras with as
many as eight lenses,
plus a 17-inch laptop
and accessories.
D I G I TA L C A M E R A
117
KitZone
Camera buyer’s guide
Wise buys
Graduated
z(ˡǼɎƺȸɀ
MIRRORLESS (CONTINUED)
Good, better and
best… three options
to balance exposures
PRODUCT
PRICE WHEN TESTED
SENSOR SIZE/RESOLUTION
CONTACT
REVIEWED
Sony Alpha 7 III
£1,999/$1,999
Full-frame, 24.2MP
www.sony.co.uk
Issue 203
A terrific all-rounder – its handling and control layout aren’t perfect, but that’s soon forgotten in
the face of its AF and continuous shooting performance, not to mention its 4K video capabilities.
Sony Alpha 7 IV
£2,399/$2,499
Full-frame, 33MP
www.sony.co.uk
Issue 249
Not an ‘entry level’ full-frame mirrorless – it’s too powerful, too complex and, yes, too expensive
for that. It’s more like a mini-A1 that’s extremely good at everything but less than half the price.
Sony Alpha 7C
£1,899/$1,799
Full-frame, 24.2MP
www.sony.co.uk
Issue 237
Unambitious specifications, particularly in terms of its video capabilities, but its practical
performance, including a handy vari-angle screen and excellent AF, make it an effective camera.
Sony Alpha 7R III
£3,199/$3,198
Full-frame, 42.4MP
www.sony.co.uk
Issue 199
Powerful and versatile but its battery performance is poor next to that of a professional
DSLR. The A7R III’s speed makes it supremely versatile but puts it up against tough rivals.
Cokin Gradual
ND Kit incl holder
Price: £62/$69
Verdict: An inexpensive
entry to graduated
filters and designed for
smaller lenses, with filter
rings up to 82mm. Uses
filters 84mm wide, not
standard 100mm ones.
Sony Alpha 7R IV
£3,499/$3,499
Full-frame, 61MP
www.sony.co.uk
Issue 223
The Sony A7R IV raises the resolution bar for full-frame sensors, but it’s a subtle, incremental
improvement rather than a giant leap forward and this model faces some serious competition.
Sony Alpha 7R V
£3,999/$3,898
Full-frame, 61MP
www.sony.co.uk
Issue 264
While Sony pitches the A7R V as the resolution specialist, it also blurs all the video and sports
boundaries. It’s an amazing technological achievement but is it heading in the right direction?
Sony Alpha 7S III
£3,800/$3,498
Full-frame, 12.1MP
www.sony.co.uk
bit.ly/dc503
Apart from a big and expensive cinema camera, this is the only body that can shoot 4K at 60p
full-frame with no crop, recorded internally in 10-bit 4:2:2 with no limitations on recording time.
Sony Alpha 9 II
£4,699/$4,499
Full-frame, 24.2MP
www.sony.co.uk
Issue 232
Blistering burst speed and AF performance are matched by its superb connectivity, which will be
a game-changer for pros. The A9 II is a powerhouse performer for professional sports shooters.
Sony Alpha 1
Benro Master
100x150mm
Glass filters
Price: £129/$99 each
Verdict: Made of glass
to high standard and
delivers minimum image
degradation. Can be
fitted to Benro’s unique
‘geared’ holder.
£6,499/$6,499
Full-frame, 50.1MP
www.sony.co.uk
Issue 242
A technological triumph, the A1 really can do everything. Previously, cameras might offer speed,
resolution or video capability – the A1 offers all three. Its price is a major obstacle, however.
Sony ZV-E1
£2,350/$2,199
Full-frame, 12.1MP
www.sony.co.uk
Issue 270
An excellent vlogging camera – small, compact and lightweight while packing in features
such as an image-stabilised full-frame sensor, subject recognition and auto-tracking.
Sony ZV-E10
£679/$699
APS-C, 24.2MP
www.sony.co.uk
Issue 246
A good camera for novice vloggers. It has 4K video, Sony’s excellent autofocus system,
a vari-angle screen and a clip-on muffler to cut wind noise. Plus, it’s rather good value, too.
Read all the latest camera
and accessory reviews at:
www.digitalcamera
world.com
Missed a camera review?
Buy a print or digital back issue:
www.magazinesdirect.com/
single-issue
Lee 100mm
ND Grad Hard
Resin filter set
Price: £185/$283
Verdict: A set of three
graduated filters from
one of the best-known
names in quality
photographic filters.
118
D I G I TA L C A M E R A
JANUARY 2024
www.digitalcameraworld.com
INTERVIEW
Christophe
Jacrot
Niall Hampton meets the French photographer
to discover his fascination for extreme conditions
in his book, Lost in the Beauty of Bad Weather
here’s no such thing as
bad weather, so the saying
goes – only the wrong
clothing. While most of
us would be happy to put
up with some discomfort
en route to capturing
a scintillating scenic view, going outdoors
specifically to take photos of appalling weather
conditions is surely not a major motivation.
However, this was the raison d’etre of the
French photographer Christophe Jacrot for his
latest book, Lost in the Beauty of Bad Weather.
T
Christophe
Jacrot
So what motivates Jacrot to document “the
rain, the snow, the wind [and] the cinematic
emotions they conceal”, as he expresses it in
the book’s introduction? We sat down with him
to find out more about him and his project…
What first attracted you to photography,
and what has been your photographic
journey since that point?
I’ve always been fascinated by images,
and the quest to find emotions in them.
I started taking photos when I was about
15 but abandoned it at 18.
Climate photographer
Jacrot’s photographic
journey began as a teenager,
but he switched to making
short films and, aged 45,
took up photography again.
He discovered his niche
when trying to shoot sunny
photos of Paris for a travel
guide company. This gave
him the idea of capturing
the city in the rain and led
to the publication of a book.
His sixth book, Lost in the
Beauty of Bad Weather,
was recently released by
teNeues and features 160
photos of bad weather
taken across the world.
christophejacrot.com
Instagram:
@christophe.jacrot
120
Christophe Jacrot
Five collections of Jacrot’s
photography have been
published: Météores, Snjór,
New York in Black, Neiges,
and Eaux Fortes.
D I G I TA L C A M E R A
JANUARY 2024
www.digitalcameraworld.com
Christophe Jacrot
This page:
Venice, Italy.
www.digitalcameraworld.com
JANUARY 2024
D I G I TA L C A M E R A
121
Christophe Jacrot
INTERVIEW
Christophe Jacrot
How did you get your initial break to
becoming a professional photographer?
I got back into photography after a period of
filmmaking. Not being a writer myself, I didn’t feel
I could live up to my ambitions. Photography was my
passion at age 15, but I was 45 when I caught the bug
again. I took a four-month photojournalism course and
got a commission for a tourist guide, which involved
taking pictures of 200 locations in Paris. The brief was
that they all had to have a ‘sunny atmosphere’. But that
springtime, it never stopped raining! That’s where I got
this urge to take photos in the rain and other types of
awful weather. And I’ve never stopped since.
To capture photos like this – being out in all
weathers and trying to make the most of the
difficult conditions – you must be quite obsessive?
Of course! But then, aren’t all artists a little obsessive?
Top: Norilsk, Russia.
Above: Furka Pass, Uri/Valais,
Switzerland.
Which photographers inspired
you when you were starting out?
Saul Leiter, but I was guided by my instinct. There are
subtle influences, such as Japanese woodblock prints,
which often depict bad weather. I recently discovered
Todd Hido, but I’m careful not to copy him.
“I find the dramatic power of
‘bad’ weather captivating. It has
a beauty that’s austere but real”
122
D I G I TA L C A M E R A
JANUARY 2024
Do you actually enjoy working in such awful
conditions? Under similar circumstances, most
people would be happier to stay indoors…
But that’s life, too! No bad weather means no life!
I find the dramatic power of ‘bad’ weather captivating.
It has a beauty that’s austere but real.
Which camera setup do you use
and why did you choose it?
I always start with a pretty quick shutter speed, as
quick as possible, and ISOs depending on the light.
I never go above 3200. Everything else flows from
there. It’s often a trade-off, especially in low light.
Controlling the shutter speed is my main priority.
www.digitalcameraworld.com
Christophe Jacrot
Christophe Jacrot
Christophe Jacrot
How much additional equipment do you carry
with you when you’re working in such wild weather
– rain covers, lens cloths, spare batteries… and
food and drink to keep you going out in the field?
I have a lumbar compression fracture, so I have to
keep things as light as possible. A camera, a good
zoom lens and that’s it. I don’t want to have to swap
lenses in a storm. Either my car or home is never far
away, so I don’t need to worry about going hungry,
but I often take a snack of dry goat’s cheese. I can stay
outside for hours. The camera is protected by a bag,
and I wear standard gear and a thin glove on my right
hand, which is partly protected by the bag. The wind is
my biggest enemy – I use disposable tissues to wipe
the lens. It’s not what the professionals do but if I took
a special cloth, I’d only be able to use it once. You also
have to deal with the risk of condensation and sudden
temperature changes that cause the lens to fog up.
What are the most extreme lengths you’ve had to
go to when capturing the beauty of bad weather?
I never stray far from the car or my home, but I can
stay out for hours. There’s always a human element in
my photos, so I never venture deep into the wilderness.
Top: New York, USA.
Above: London, UK.
Left: Faroe Islands.
www.digitalcameraworld.com
Christophe Jacrot
How did you pick your shooting locations – do you
just go where you know the weather will be bad?
Just my inspiration. Although I do have a smartphone
app that shows rain forecasts. If there’s a deluge
expected somewhere, I look to see if the location is
interesting. I do a lot of scouting online, although the
48-hour forecasts are never particularly accurate.
Unfortunately, you can’t just hop over to
JANUARY 2024
D I G I TA L C A M E R A
123
Christophe Jacrot
INTERVIEW
Japan at the last minute, you have to go for a while. I do
have a list of places that I’m interested in. For example,
I went to Iceland based on forecasts saying the
weather would be rough for a few days in one region.
You have to provide a context for each image –
a snowstorm surrounding a structure has
resonance, for example – so in terms of
composing your photos, what are the most
important factors you are looking for?
That’s a tough question. The most important thing
is finding somewhere that inspires me! Once I’ve
done that, I concentrate on it. And again, instinct…
Are you pleased with the images taken from the car
in Scotland and France? They look like paintings.
That’s one distinctive aspect of my work, the window
effect, but it’s hard to get satisfactory results. First, I
have to be able to position my car, and then the subject
has to play ball. It often doesn’t come out right. I’ve
tried practising with a portable window, but the results
weren’t convincing, and it creates other problems, too.
The ‘subjective’ aspect of the car is also important.
“Climate change or not,
there will always be bad
weather. It’s a matter of
how dangerous it gets”
124
D I G I TA L C A M E R A
JANUARY 2024
Do you think you have a recognisable
photographic style, something that binds
all the photos in the book together?
That’s a good question. People often tell me they can
recognise my style. I’ll take that as a compliment as,
for me, style is essential. But to be honest, I don’t
know if I really have a ‘style’ as such.
Above: New York, USA.
Over how many years were these photos taken?
And, when you started shooting them, did you
know you wanted to produce a book straight away?
The Lost in the Beauty of Bad Weather book was
commissioned by German publisher, teNeues. I gave
my production artist 400 photos and he did the rest.
So, this book is a collection of 13 years of photos. I’ve
done five other books before this one, but they were
all on more specific themes.
Are you trying to make a wider point with the
book – that climate change means that ‘bad
weather’ is just becoming ‘weather’, perhaps?
Climate change or no climate change, there will
always be bad weather. It’s just a matter of how
dangerous it becomes and how violent some
spells of it are. As for a wider point, I have lots
of questions in my mind, but no real answers.
What’s coming up next for you?
Spending a month this winter in Japan or the USA,
two countries where they have real winters. And
returning to the Faroe Islands, which is my favourite
place in the world… and perhaps another book.
Lost in the Beauty of Bad
Weather by Christophe
Jacrot is published by
teNeues (ISBN: 978-396171-497-1) and is on sale
now, priced at £55/$85.
www.teneues.com
www.digitalcameraworld.com
Next month
SUBSCRIBE
TODAY
AND GET A
LOWEPRO CAMERA
BAG WORTH £95!
Have Digital Camera delivered
to your door and save money
on the newsstand price
Page 40
AFTER
DARK
Go beyond daylight photography
How to shoot the Northern Lights
Light painting And more!
10 all-new photo projects
One to One pro masterclass
Expert editing tutorials
Fujifilm GFX 100 II
Nikkor Z 600mm f/6.3 VR S
Mini test: Flash modifiers
ON SALE Friday 5 January
Contents subject to change
www.digitalcameraworld.com
JANUARY 2024
D I G I TA L C A M E R A
125
Getty
O N TE S T
REGU L ARS
Back issues
Download our digital editions, or buy in print while stocks last
Available on
The digital advantage
Digital magazines can travel with you – even if you delete them,
they are free to download again later. Subscribe today by visiting:
www.magazinesdirect.com/categories/photography-and-design
Available on the following:
Apple iOS devices
Android, PC or Mac
Other options
Get the free Digital Camera app for
your iPad, iPhone or iPod Touch at:
www.bit.ly/app_DCM (UK) or
www.bit.ly/app_DCW (outside UK)
Then browse through our back
issues or buy a subscription (see
page 40 for offers) using the app.
Zinio
www.bit.ly/DCW_Zinio
Pocket Mags
www.pocketmags.com
Digital Camera is available for Kobo,
Kindle, Nook and more (see above).
It can also be found on the all-youcan-read Readly magazine app:
https://gb.readly.com/
Printed back issues
Print issue binders
Prefer print? We also
sell a limited selection
of recent back issues
– issues 268-275 are
currently available. Each
issue costs £5.80, plus postage. Overseas
dispatch costs $13.80, plus postage.
To browse the contents of each issue,
please see the listings on the opposite page.
Keep your magazines together with our binder,
which neatly holds a year’s worth of issues.
www.bit.ly/dcmback
or visit magazinesdirect.com and
click Single Issues in the top toolbar
126
D I G I TA L C A M E R A
JANUARY 2024
www.magazines direct.com/merchandise/
categories/binders
Back issues
Print & Digital
Issue 275
BUY
Dec 2023
Urban scenes: How to find
beauty in buildings / 50 mins
of video tutorials / Panasonic
Lumix G9 II review / Apple
iPhone 15 Pro Max review /
Eight-page Buyer’s Guide /
Landscape PotY Awards
2023 / Greg Oakley interview
Print & Digital
BUY
Issue 270
July 2023
Wildlife special: Capture
creatures and critters like
a pro / 39 minutes of video
tutorials / Portable SSDs
group test / Pink Lady Food
Photographer of the Year
2023 / Nikon Z 8 review /
Mike Will interview
Digital only
Issue 265
BUY
Mar 2023
Filters special: Take creative
control of outdoor exposures
/ Image editors group test /
Google Pixel 7 Pro and GoPro
Hero 11 Black reviews /
Paul Nicklen on the power
of visual storytelling /
Kaylee Greer interview
www.digitalcameraworld.com
Print & Digital
Issue 274
BUY
Nov 2023
Seven steps to stunning
landscapes: Capture your
best-ever scenic shots / 33
mins of video tutorials / Sony
ZV-1 II review / Eight-page
Buyer’s Guide / The Cewe
Photo Awards 2023 / James
and Karla Murray interview
Print & Digital
Issue 269
BUY
June 2023
Travel photo tips: Top
techniques for home and
away / 45 minutes of video
tutorials / ND filters group
test / Concrete in Life
2022 awards / Leica M11
Monochrom review / Andrea
Gjestvang interview
Digital only
Issue 264
BUY
Feb 2023
Painting with light: Light
trails, fire spins, light orbs &
more! / Photo printers group
test / Sony A7R V hands-on
and Canon EOS R6 Mk II
review / Affinity Photo 2
review / Tristan Dicks and
Will Burrard-Lucas interview
Print & Digital
Issue 273
BUY
October 2023
Go for gold: Capture autumn
like a pro / 47 mins of video
tutorials / Sony A6700
review / Eight-page Buyer’s
Guide / The International
Portrait Photographer of
the Year Awards 2023 /
Andy Summers interview
Print & Digital
Issue 268
BUY
May 2023
Master Lightroom: How
to get the most from your
captures / 44 minutes
of video tutorials / Travel
tripods group test / Sony
World Photography Awards
2023 / Pentax KF review /
Graeme Green interview
Digital only
Issue 263
BUY
Jan 2023
Top tips for 2023: Start
planning your best-ever
photo year / 5 best-buy SD
UHS-II cards / Fujifilm X-T5
hands-on and OM System
OM-5 review / Create your
own photobooks / Michael
Freeman interview
Print & Digital
Issue 272
Print & Digital
BUY
Sept 2023
Super Stars: Capture the
night sky with basic kit /
66 minutes of expert video
tutorials / Travel PotY awards
/ Leica Q3 hands-on preview
/ Panasonic Lumix S5 IIX
hands-on preview / Dani
Connor interview
BUY
Spring 2023
Shoot the spring: Capture
spring like a pro with our
in-depth guide / 45 minutes
of video tutorials / Filter
holders group test / Int’l
Garden PotY awards 2023 /
Panasonic Lumix S5 II review
/ Benedict Brain interview
Digital only
Issue 262
BUY
August 2023
Shoot the coast: How to
capture superb seascapes /
45 minutes of expert video
tutorials / The Canarian
Photo Awards 2023 / Canon
EOS R100 review / Fujifilm
X-S20 hands-on preview /
David Hurn interview
Digital only
Digital only
Issue 267
Issue 271
Issue 266
BUY
Apr 2023
Fix your framing: Expert tips
for composing pictures like
a pro / 40 minutes of video
tutorials / Photo backpacks
group test / Close-up PotY
04 showcase / Canon EOS
R8 hands-on review /
Luc Kordas interview
Digital only
BUY
Dec 2022
Master Raw: 10 essential
editing steps for
transforming your captures /
Gift guide: Photo products
for all budgets / Apple
iPhone 14 Pro Max review /
Low-light photography guide
/ Neil Aldridge interview
JANUARY 2024
Issue 261
BUY
Nov 2022
Capture the great outdoors:
43 pages of expert
techniques and kit advice /
Two decades of digital
imaging / Fujifilm X-H2
hands-on / Autumn
photography guide /
Jo Bradford interview
D I G I TA L C A M E R A
127
Trivia quiz
What the f-stop?
with Chris George
1
2
3
How much do you remember about
photography in 2023? Test yourself
with our seasonal trivia quiz!
Leica made
its return
to making
instant cameras
this year, but what was the
new feature of the Sofort 2?
A It gives square prints
B It has a zoom lens
C It records a digital image,
as well as producing a print
D It has rangefinder focusing
Nikon released its first
full-frame retro mirrorless
camera. What was it called?
A Nikon Z fc
B Nikon Df
C Nikon Z1
D Nikon Z f
Sony
stunned the
world with
news of its
upcoming A9 III pro sports camera.
What is its top shutter speed?
A 1/10,000sec
B 1/40,000sec
C 1/80,000sec
D 1/200,000sec
4
Sigma started making
its first lenses for which
lens mount in 2023?
A Canon RF
B Nikon Z
C Sony A
D Fujifilm GF
8
Which compact camera
became unbelievably popular
due to a TikTok craze?
A Kodak Ektar 35
B Leica Q3
C Ricoh GR III
D Fujifilm X100V
5
AI was the big story in photography.
What did Adobe call its new AI
text-to-image generation tool?
A Barfly
B Dragonfly
C Greenfly
D Firefly
9
What feature did GoPro
controversially get rid of for its
latest flagship action camera?
A Image stabilisation
B Front LCD screen
C GPS
D HDR
6
What was the subject of
the overall winner in Wildlife
Photographer of the Year 2023?
A Bees
B Snow leopard
C Crab
D Fish
7
Which company introduced a DSLR
that only shoots in black and white?
A Leica
B Pentax
C Alice
D Polaroid
Which company launched
10 a Plena lens?
A
B
C
D
Laowa
Cosina
Leica
Nikon
How did you do?
10 points You’re a photo mastermind!
8-9 points Fantastic, you’re a brainiac
6-7 points Really good score
4-5 points Respectable, but no cigar
2-3 points We’ll keep your score secret
0-1 points Epic fail
Future
ANSWERS 1 C, 2 D, 3 C, 4 B, 5 D, 6 C, 7 B, 8 D, 9 C, 10 D
130
D I G I TA L C A M E R A
JANUARY 2024
www.digitalcameraworld.com
9000
9001