/


Текст
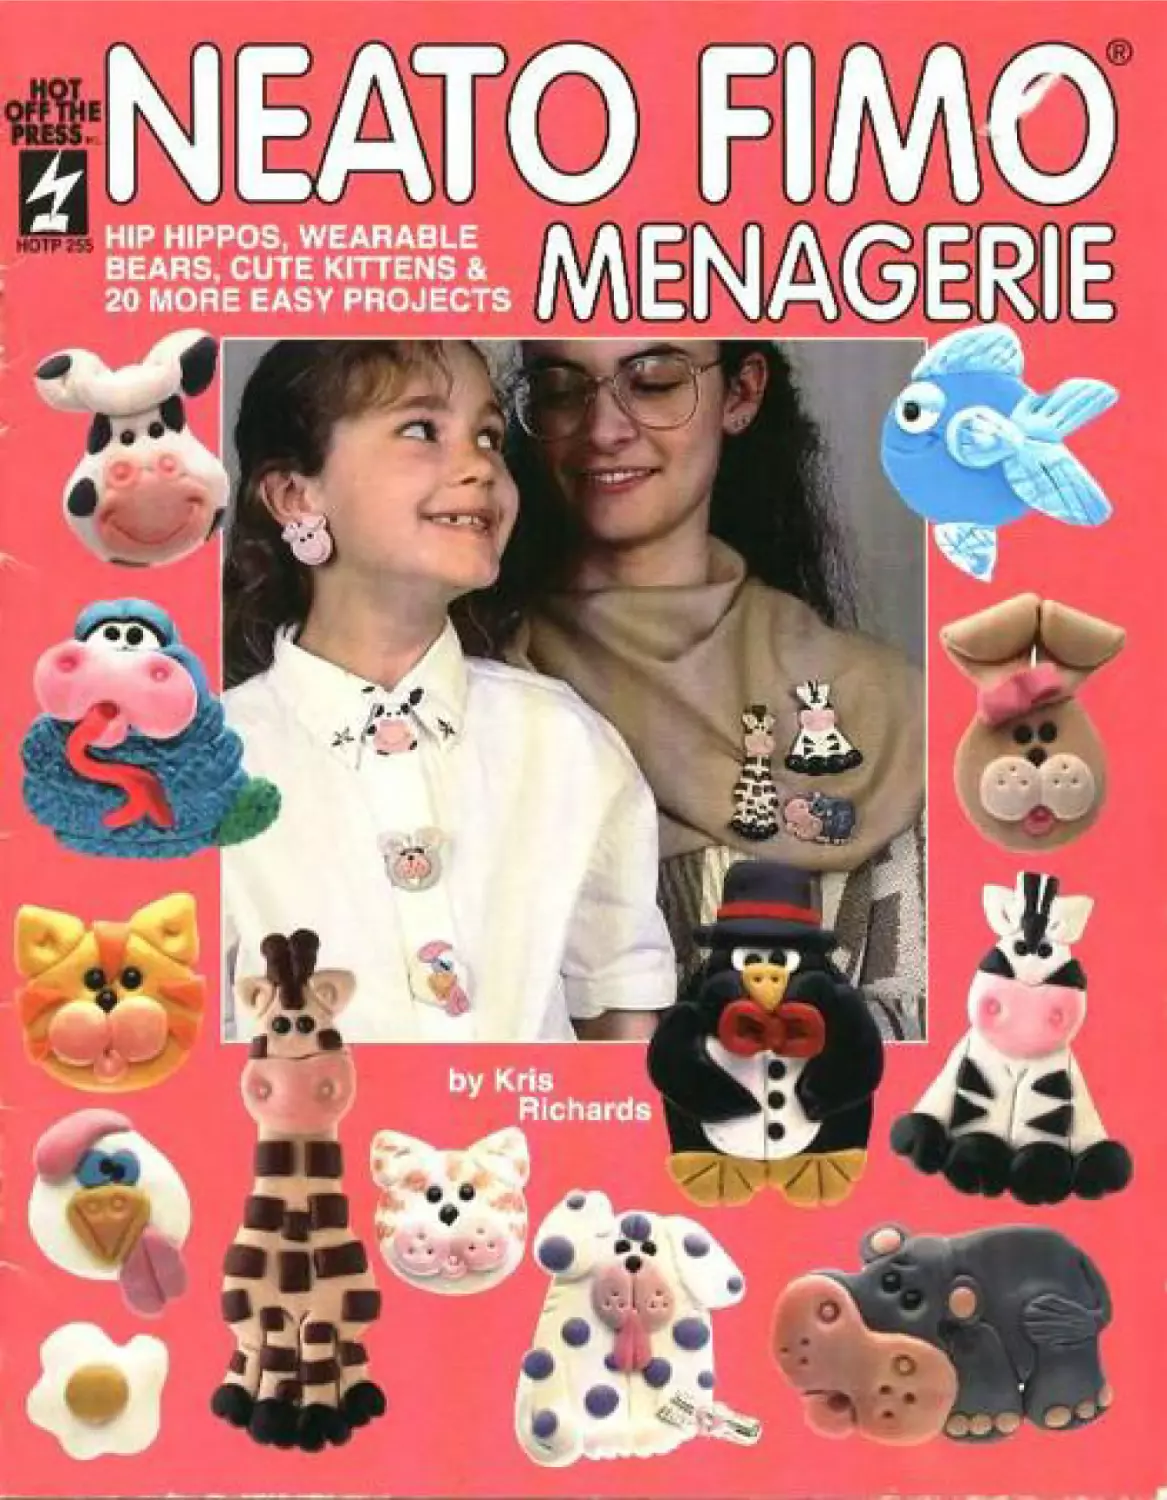
Chubby Tabby,
Willy Siamese & Tiger
3For the muzzle: Roll two pea-sized Fimo1
halls. Flatten xls shown and press on the
lower bee. Pick up the beads by pressing the
small end of the pen tool against each bead. Press
a nose and two eyes on the face. Burnish the
kitten (see inside the front cover). t’sc the loolh-
pkk to nuke whisker itoks m the muzzle. lrse
the wire tod to nuke indcnlaluws in the can.
4 For the tongue: Roll л ’A" ball of Fimo’
ansi fallen. Press to the face as shown. Press
the small end of the pen tod into the tongue for
an 4‘O." Bake ar 250- for 20-25 minutes.
3

2
6 A buibmtxttct * i-
u*cd for th к photo
5	Refer 10 the diagram and use the black or I
brown pen to scnbbte stripes on the face;
let dry at least 10 minutes. Wipe blush on the
muzzle and mouth. Hold the scaler can 10"-12* I
from the faces and spray lightly; lei dry, Repeal
with a second coat. Let dry 15 minutes.
6	Glue the desired jewelry findings on the
buck as near to the top as possible without |
showing from the front.

7	Willy Shuncse: To soften Fimo* see
inside the front cover. For the head: Roll
a 1 “ champagne ball and flatten it into a pan-
cake as shown. Use the knife to press four ’/•"
lines on each side of the head.
о For the ears: Roll two peanut-sired teni
О cotta balls. Flatten each between your
thumb and index finger, forming a triangle as
shown. Press onto the head and use the wire
tool to make indentations.
Q гмне Md luapie
9	For the eyes: Roll two '/*“ light blue balls.
Flatten both and attach to the fact. Use the
knife to make sloping lines in the top of each.
Press on the beads for eyes according to step 3.
1 Л For the muzzle: Roll a grape-sized ball
AV of ierra cotta and flatten as shown. Press
to the face. Use the knife to add a vertical line.
Use the toothpick to add whisker boles. Punch
off a '/«' ball of pink. Divide in half und flatten
each half as shown. Firmly attach both on the
vertical line for a mouth and nose. Press the
small hole of the pen tool on the mouth circle
to indent. Burnish the face (see inside the front
cover). Bake, spray, and mount according to
steps 4-6.
П Tiger: Repeat steps 1-4 using golden
vellow Fimo* for the head and ears and
white for the muzzle and tongue (The propor-
tions are all the same with these exceptions:
use а ’Д" ball for die head, and do not add
whisker holes.) Before baking, flatten a grape-
sized orange ball and cut out stnpes and place
on the head as shown.
1 Л Burnish the face (see inside the front
А л* Bake, blush, spray, and mount
according to steps 4-6.
Boston Brown Bear,
Dinghy Dog& Mini Mouse
For HtMlait Hrown Hear:
Fun»* /ТглА». lerru rtithi
three Лит found Ыаск beads
bastr supplies her tn side the
front corer)
For Dinghy Dog:
Ftmn*. rhiim/jurgnr. w hue. tetra cotta
three .hurti nrand blot 4 beads
blush, cotton swab
light blur шryHc paint, hwr paintbrush
hawr supplies
btuth, colfutt swob
basic supplies
Far Mini Mouse:
Fimef*: gray, white, fifth
three' Лмл? rowaJ bleu 4 Ьгчкб
| Boston Brown Bear: To soften Hmo*
* see inside the front cover. For the head:
Roll a terra oetta ball. Fhuien it to the shape
shown.
2 For the can: Roil two peanut-sized lulls
Hatten each and firmly press <xi the lie*!
I- nr the inner can: Roll two flesh pea sized
Kills Flatten them and lightly press cadi on an
car carter Press the big hole of the pen tool to
падке indrntirtwrtis.
T For the mii/zir: Rol I  peanwi-sizcd ftcsb
•J Kill H.itlcn it and gently prexs it onto the
face. I Ke the knife К» ,жК1 a line dow n the center.
Use tlic toothpick Io add whiter holes. Attach
beads for the eves and nose aecordina to step 3.
page 1. Burmsh the bear (sec inside the front
cover). Bake, spray, and mount according to rteps
4/j, pages bl
, t Dinghy Dog: To Milieu Fimu' we inside
the front cover For the head: R< di n 7.
champagne hail. Ratten to a ftutcakc and burnish
(sec inside the front cover). Use die knife to press
four diagonal lines on each face sale
4
hair
9
mu/zle
5 For lhe ears: Roll two peanut swcd
champagne halls Halton each to pancake*
and gently press <4i the licod. making sure to
point the «MS out. Use Un.- knife to add four lines
to tike outside edge of each.
6 For Uh- eyes: Roll two pea-sired white
halls. Flatten to pancake* .uid gently press
on the face for eyes, иле the knife to make
diagonal lines on the eyes for eyelids. For the
muzdr: Roll and flatten a peanut-sized hall of
champagne as shown Gently press to the face
Shape il. add indentations, and place eyes and
nose according to step 3» page I Make sure tire
eyes are cTvvscycd Press die small bole of the
pen tool л the Ime hast to create a mouth.
7 For the hair: Roll a pea-sized hcill of terra
cotta. Flallrn it to »ixmcakc. Use the
poiicm and knife to cut. Spread the three slice*
арап. Press to the head top.
S Burnish the entire йкх* тм4с the front
cover). Bake aevotding to мер 4, расе I
When cook use the brush to pain! the eyelids
bloc, let dry Spray and mount according to steps
5 and 6. page 2
9 Mini Менем?: To soften Hmo’ чх inside
the front cover Knead a I ball of gras
with a 2* Kall of wlutc to make light gray F'or
lhe head: Roll a I' hall of light gray. Flatten
into a pancake according id page 3. step I
WFor lhe ears: Roll two pea-sized halls of
light gray. Flatten and Use the knife to add
three lines m each <knily press both to the head.
For the teelh: Roll a 'A*while hall Flatten it as
shown and place it an the face. Use lhe knife to
add a vertical line down the middle.
nFor the muzzle: Roll a peenut-sired flesh
hall. Flatten it shghtly. and shape as shown
Geniiv press on the fact so the teeth extend
slightly below it. Add line ami whisker indent»
hints, then place eyes and nose aocotding to step
3. page I.
| For the hair: Knead a crane- м/cd ball of
1 X white with a pea-sized ball of gray. Flatten
it to a pancake. Use the pattern and Knife to cut.
Gently press across the top of die bead. Carl the
ends under slightly to make curly bangs. Burnish
lhe entire face (see insult die from cover). Bake
according to step 4. page I When cool, blush the
muzzle and cars. spray, and mount according to
мера 5-6, page 2.
Pigoletto,
Bow-Eared Bunny & Chicken & Eggs
For Pigoletto:
FitnO9: white, funk
basu supplies (see inside lhefnmt
cover)
For Bo*'-Eared Bunny;
Fima*. champagne. pmk. white
three .brew nnmd black beads
basic supplies
hrr Chicken Л Eggs:
Fima*: Hhttc. golden yellow, pink,
tixhl blue
Гио 1mm round blatk beads
basic supplies
IPlgoktlo: To soften Hmo* see
msidc ilk? from Cover Knead u Г
ball of while with а 7/ ball of pink to
make light pink For Ihr head: Roll а 7.'
hall of light pink and press to flatten as
shown.
2 For Uh* ears: Roll two pea-sized
light pink balls. Flatten each as
shown and fold them over. Firmly press
on the head top.
3For Ihr snout: Roll a peanut sized
light pink ball and flatten it as
shown Firmly press on the bottom center
of the face Use the small hole of the pen
tool to make noMrih on the wut. Attach
the beads for eyes according to step 3.
page I. Burnish the pig (же inside the
front cover!. Bake, spray, and mount
according to steps 4-6u pages 1-2.
4 Bow-Eared Bunny: To soften the
Fimo* «с inside Che front cover For
the hrml: Roll a 7ball of champagne
and flatten into a pancake as shown,
Burnish (see inside the front covert.
ч
1	к
5	For the ears: Roll two peanut-siwd balls of
champagne. Flatten and shape- diem as
show n. lx>Jd over the top У»* of each ear and
lightly press the edge to lite car Рте и the ears to
the bead
6	For the muzzle: Roll two pea-sized white
balls. Hatten and firmly press to the face 11
shown. Use the toothpick io add three holes in a
triangular fuentation to each side
7	For the mouth: Roll а ‘Д* pink bolL Slightly
flatten and press to the face under the checks
Push the small hole of the pen tool against the
mouth to make an “ОЛ Burnish the entire face.
Place the bead eyes and nose according to step 3, i
p»gsl.
8	For the bow: Roll a grape-sized pink ball
uxi flatten io a pancake Use the knife to cut
а Г/F long. У»** wide strip. Using the toothpick,
fold each end to the center and place it over the
beft ear.
9<li*ckcn & E^h: To soften Fima* see
inside the front cover. For the bead: Roll a
Г white ball. Ratten to a pancake as shown.
Burnish (see inside the front cover).
< /| For lhe beak; Roll a peanut-sized ball of
1 v yellow. Flatten into a triangle shape by
pressing between your thumb and index finger.
Lightly press ft on the face. Use the knife to make
two diagonal lines. Use the small hole of the pen
tool to add two nostrils.
UFor the eyes Roll two 'Д’ light blue balls.
Flatten and press on the face, The left ere
should be slightly smaller than the right. Add the
bead eyes according to step 3, page I. The eyes
should ItMik ennsed.
| For the comb and wattle; Roll two peanut-
1 £ sized pink halls. Shape one into a comb and
one into a wattle as shown. Press in place on the
head. Press a line down the wattle center. For
rads n^l- Roll a gnipc-siaed white ball. Hatten.
Use the pattern and cut out the shape with the
knife. Roll it pea-sized yellow balk flatten slightly,
and press ю the white shape for a yolk. Bake
accotding to step 4. page I. Apply bludi to the
beak. Spray, and mount tF»c chicken and eggs
according to steps 5 and 6, page 2.
7
Bossy Bessy
• *
f'ww'-; white. black. flesh
fwa J/wi лу/к/ black beads
pink Muth, cotton swab
basic supplies (set inside rhe front cover)
| To soften Fiino' mx mswfc lie Irnnl cover
I For the hend: Rolla Г while ball I ,
into л pear shaped pancake Д» shown by pinch-
ing your thumb arid index finger together ю
form the head top Burnish the head (sec inside
the from cover).
2 For the ears; Roll two peanut-sued while
balls. Flatten them into ovals and мод
onto the head. For the horn: Roll a I long.
’/Г wide white snake with pointed ends. Press
the horn along lite bottom edge of the ears,
bending the points up.
T For the spots: Roll seven black balls
Flatten eac h and press onio the face ami
ears ax d>own: burnish For the muzzle: Roll a
grape si/cd flesh ball. Flatten it into an oval as
shown Gently press onto the face. Use the knife
to make a smile and the wine tool to make a
dimple in each check and the left ear. Roll two
’f," flesh Kills and press them above the muzzle
fur nostrils. Use the small hole of the pen tool lb
indent each. Lightly burnish the entire muzzle
4 Use tlx |xn tool to place the beads on the
head for eyes (see step Л, pee I). Bake
according to мер *L page I. Lightly blush the
nostrils and smile lines. Spots and mount
according to steps 5-6, page 2.
8
Monkev Business
xtual 21k* ьп
Fimo*. fleth. caramel, whits. gn/drn
Гиг» Jjwjf пнии! black bradt
basic лиррИек (srr insMf rhe front
cover)
2
h*ir
ITo soften Fimo* sec inside the front
cover- For the bead: Roll а Г caramel
hall. Flatten into ж pear-shaped ршкаке as
shown Burnish lhe head I sec inside lhe front
cover).
2 For dir cars: Roll two pea-sized flesh
balls. Flatten each into an oval. Press one
on each side of the bead. Use the w ire tool to
make crescents in tl*c cars. For hair: Roll a
pea-sized caramel ball. Flatten it into a square
эд shown Press it onio lhe head top edge Use
lhe hack edge of live kmlc blade Io add vertical
lines.
3For the muzzle: Roll a pcamu-si/ed flesh
ball Flatten ii into an oval as shown. Press
ii on rhe lower half of the face. Use lhe knife to
cut a mouth. Use Che small bole of lhe pen tool
to push in a mouth hole. Fur ibr nose: Roll a
pewbcdl flesh bttll iiiii ll.ii!. ;i | -i nnwal.
Press it above the nwzxk. Use the toothpeck to
make nostrils For the hand: Roll a peanut
sized caramel ball and flatten. Use ilk1 knife to
cut out Ok hand as shown
4 For Ihr banana: Roll a peanut-sized
yellow' hall into а Г long snake. Slice il in
hall lengthwise for two peels, gently pull it
opart without tearing. Roll a 7: lone white
snake. Insert it into the peel. Burnish both Use
the knife to add lines to 1he banana and peel
Press the lumd on the lower left side of me face.
Insert lhe banana into live hand. curl the fingers
around il. and drape the two peels around lhe
hand. Place rhe banana eivd in ihe nmuth hole.
Add the tead eyes according tn step 3. page I.
Bake, spray, .ind mount according tn steps 4-6,
pages 1-2.
Tuxedo Penguin 9
жти*1 si/c 27Г tall
t i«w< bbui,. white. gotten wlhm. reti
/hr 3mm rtm/xd bkirk htwh
btx.w mpplw* (we hurx/r the front cover}
body
ITo soften the Fima* see inside Uh- Imnrt cover
Fur the body : Roll a I  Ы.н к lull Flatten and
shape as shown above. Burnish the holy imx* abide
the ironi cover). For the head: Roll a peanut-sized
Nbck lull. flatten. and press onto the body. For the
tummy: I latten a grape sized while hall ш shown
Pros to the Ixdy center and burnish. Cui a vertical
line I sc the pen nxtl to place three beads fix buttons
according to step 3. page I L'sc the knife to nuke
stitch marks.
2 For the wingv: Hatten n grape-sized Itbek hall
and cut out two wings Itvss a wine on exh
body side. Ciul 11k- nght wing tip hack Romish IxXh
For the chcckfe: Follow Uh* пшик ntsttuciuwis in
step 3. page I For the rye*: Roll two 7. w lute Kills
and llaitcti. Press together on lhe head Allxh heads
according to step 3. page I. but do not add whisker
holes. For the beak: Roll a pea-sized hall ol yellow
and shape into a triangle (knlly press it between the
cheeks so the base avctiii* tin- eyes. Uvr the touch-
pick to add nostrils.
3For the hat: Flatten □ peanut sized btadk hall
as shown and attach it tolltc hcoul lop. Roll a
17.’ long, wide black snake for a brim. I*russ n to
ilk! hat bottom. Roll a /.* long. wide red snake
and press it to tin- iiat just above ilk- bnm. For the
Imjw tir: I laiteii two pea-si/cd red lulls. Hucc them
%iik by -Mdc jiki under his bcitk. Flatten a 7. ‘ red lull
and pbcc n over the cerite» for a knot. 11» the knife
to prvss in g.uhc» lines
4 For the fed: Roil a pcwtlM sired yelkw hall
xnd flatten it to Л" thkk. Cut rt in kill ши I add
three diagonal lines to each for toev l*rcvs each йхи
to tin- bottom Mik? of the body Burnish the entire
body Bake, spray. and mount according to steps 4Д
pufl^v I -X
10
Somethin’s Fishv
Ft/по*. light Nue, while
two 3mm round black plastic beads
basic supplies (see inside the front cover)
IBlg fish: To soften Fimo* sec inside
ilw Ironl cover, For I hr body: Roll a I’
light bine halt and flatten ru shown above
Use the knife Ю indent a smile a* shown,
Burnish in make sm<KHh (ясе inside the front
cover!.
2 Knead together a I* ball each of light
blue and while until a marbled effect is
achieved. For the fins: Flatten a grape-sized
marbled ball and cut oui a tail as shown.
Hatten and shape a peanut-sized marbled
ball into a lop fin. Repeat for the middle fin.
then for the bottom fin. Place them on the
body.
1 For the rye: Roll a l<" while ball and
fialtvii slightly for an eyeball Press n to
tlx* body above the mtiiIc, Roll a '/#" marbled
hall into an oval. Press it over tlx* eyeball and
shape it for an eyelid Place the head accord-
ing to step 3, page I Bake, spray, and mount
according tn steps 4-6. pages I -2.
| Small lUh: Marble light blue and
** while Fimo’ ns in step 2 For 11 и- body:
Flatten a 7." marbled bail as shown Use tlx
knife K> indent a smile. Burnish Fur the
Ans: Repeat step 2 using the blue Fimo'
proportion* and die patterns at the left, the
tail is a peanut-sized hall, top fin is a pea*
sized ball, and the middle and borttMti fins
arc 7.‘ balls. For the eye: Repeat as above,
substituting a slightly smaller eyeball and
omitting tile eyelid. Make fin indentations as
above. Bake, spray, and mount as above
Hip-1 lippo-I looray
11
JFJffir/’.- gray, flesh
two /mm K>urii! htii< k bead!.
pink blush. < ыюп лн-«Ь
haste supplies fj*,r inside lhefront itrverj
Ilo solieu Fimo* sec inside the front cover.
For the body: Roll в 7, " gray ball. Flatten
it to an oval pancake as shown Burnish the
bodv (sec inside die front cover). For the head:
Roll .i grape-sized gray ball. I-latten and shape
il as shown. Burnish until snnxith. Press it on al
an angle to the front of the body.
2 For lhe legs: Roll two peanut-sized gray
balls. Flatten each and shape as shown
l*rcvs the ends of the legs onto the body center
to extend downward. With the small hole of the
pen tool make three indentairans in each foot
for toes For toenails: Roll six 7.‘ flesh circles
and press one in each toenail depression For
the ears: Roll two pea-sized gray balls. Flatten
slightly. and press one on each side of the head.
From the fledi roll twoV»’ balls for the inner
curs. Flatten slightly, and press in (he center of
like ears.
Q innet car
3Fur the tail: Roll a 7.' wide. 1 ’ long gray
snake. Flatten line end Use the knife to
add hair lines. Bend the snake into an "L” and
press it to the body. Burnish the tail base until it
looks attached to the body For tin- muzzle;
Roll a grape-sized flesh lull Flatten and cut
out. Press to the face. Trim any overlapping
edges with (lie knife, and burnish tire edges
Use tire small hole of the pen tool to make two
nostrils. Use lhe toothpick to add six whisker
boles. Place the eyes according to step Я. page
I Use the knife to make eyebrows
4 For the mouth: Roll a pea м/cd flesh
kill Raiten and press under the muzzle
center Use the small hole of the pen tool co
make an “O.” Bake according to step 4, page I
Add blush to the muzzle, mouth and inner ears.
Spray and mount according Io steps 5-6. page 2.
irfite
Sneaky Snake
ftw*: иТше. tight Ыне. ifasglo pink,
daygtu green
Лю Jnvri rtwuJ black bfttd.4
piпк bluih, ctrfion mi ah
mciaUic Mor acrylic paint
if I liner paintbrush
Mack fine line permanent pen
basic supplies (see inside the front cover)
| To soften Fimo* see inside the front cover.
1 For the hod): Roll а УГ light blue ball and
(latten it, Use the knife to cut out the body.
Press in the indents and coil lines as shown
Bwnish both until smooth (see imide the front
cover), To make scales, trness the knife Made
diagonally back and forth Benets the surface of
the clay.
2 For the head: Roll a peanut sized blue ball
and flatten Press Io the top of the body
For the snout back: Roll a pea-sued blue boll
and 11 alter into die slupc. Lay it across die face
and pre» into place. Leave T* of die Iwad
exposed for the eyes. Burnish For III*1 ryes:
Roll two pea-si/cd white b.dls Flatten them and
prws onto the exposed bond so they touch each
other Place heads according to step 3. page I
3For the snout front: Roll a grape sized
white bal I Flatten il into an oval, dten
pinch il into shape as shown Press it over die
snout back. Use die small hole of tlx* pen tool to
add I wo nostrils For the mouth; Kull a pea
sized white bidl, flatten. anti press under die
snout lor u month For the rutile: Roll a pea
sized green ball. Flatten it slightly into a tear
drop shape as shown Press it to tlx- bottom right
side of the btxiy. Press the small hole ol the pen
tool across lire surface for humps. Fur the
tongue: Roll a 7»** wide, I kmg pink snake
Use the knife to make а 7Г slit in cine end for a
“fork"’ and slightly flatten. Рк-vs the unslit end
cm the mouth piece Press the small hole of the
pen tool on tl to make an "O” in the mouth over
the tongue. Bend the tongue into ao "S" and
lightly press against the body.
4 Hake according to step 4. |Xigr I; let cool.
Use the swab to apply blush to dir snout
Use dir liner to paint the eyelids blue; let dry
Use the pen to draw the eyelid line. Use your
fingertips lo burnish blue paint on the body,
making wre to paint only die blue areas Spray
and mount according to steps 5 and 6, page 2.
Tall Order

ким4 * * * * 9 chamfnixnc. black, terra carta
twtr ,irnm rotiru! black beadf
pink b!u.\h, i otton .wflb
W utpphcy f.v«r inutlr fhr front caver)
ITo soften lhe Fiirn»* mx inside tlx front
cover Fur the ImmIv Mullen а Г churn
pugne lull Cut the body. Use the knife io indent
Ilk* leg line» as shown,
2 For the head: Roll a grape-sized cham-
pagne ball Flatten it into a tear shaped
pancake as shown. Gently press the liead to the
body neck so it overlaps 7>. Burnish lhe body
and bead until smooth (sec inside the front
cover). Use the knife to cut the muzzle line. Use
the small hole of (he pen tool to add two nos-
trils Place the bead* according to step 3. page I
3For lhe horns; Roll л pen-sized terra colia
hall and flatten mtn a circle Cut according
lo the pattern, and press il onio the head be
tween the cars Press a vertical line down the
center will» the knife. Roll two ’/»“ terra cotta
balls. Flatten them, and press one on each half
of tiic him puxe. For the feet: Roll lour pea
sized black bulls, making (wo slightly larger.
Press one chi lire bottom of each kg Use (he
knife to cut а 7Г slice in lhe bottom middle of
each Burnish lhe enure body
4 For the spots: Roll the terra cons into a
7-" thick pancake. Use the knife to cut
small squares u shown above. Press them on
the body, and press three V*" squares on the face
according to the large photo. For the cars: Roll
two pea sized champagne balls. Flatten and
diapc each into a triangle as shown Pless one
on each side of the head. Use the wire tool to
make an indent tn each car Bake according to
step 4. page I. Apply Nush to the muzzle. Spray
and mount according to steps 5 and 6. page 2
14
Yipcs Stripes
f'inui1. while. black
hi f> ,1mm round Ыас к beads
pink blush, cation swtib
black acrylic paint
*d liner paintbrush
basic supplies I see inside the front coyer)
ITo soften Pi mo’ sec insxk the front cover.
For lhe body: Roll л ’/•“ white ball. Raiten
and shape it as shown Use the knife to indent
leg lino as shown For lhe head: Roll a pea
nut-sized while boll. Raven it io a tear-shaped
pancake as shown. Press on the body as in step
2. page 13. Use the knife io indent the muzzle
line Use lhe small hole of tbc pen tool to press
in two nostrils. Place dbc beads according to
step 3. раде I Burnish the head and body <scc
inside the front cover).
2 For the mane: Roll a pea-sized white bull
and flatten it into a square. Press it on the
head top. Add three vertical lines for stripes
with the knife. For the cars: Roll two pea sized
white balls. Flatten them slightly and squeeze
between your thumb and index finger to make
triangle shapes. Press oik on each side of the
mane. Use the knife to make short indents in
each ear center.
3For the stripe»: Roil a grape-sized black
Kill Flatten to □ V-* thick pancake. L'se
lhe knife to cut seven triangles Press four
triangles on the body and three on the face as
shown
4 For the hooves: Roll four peanut-sized
black balk Prevs one at the bott<>m of each
leg Use 11k pattern and knife to make a /•"
vertical indent in the bottom of each as shown
in the large photo. Burnish until smooth. Bake
according io step 4, page I; let cool. Use the
swab to add blush to the muzzle. Шс 11k liner
lo paint two black stripes on the mane Spray
and mouiki according lo steps S and 6, page 1