/


Теги: magazine magazine homebuilding & renovating
Год: 2024


Текст
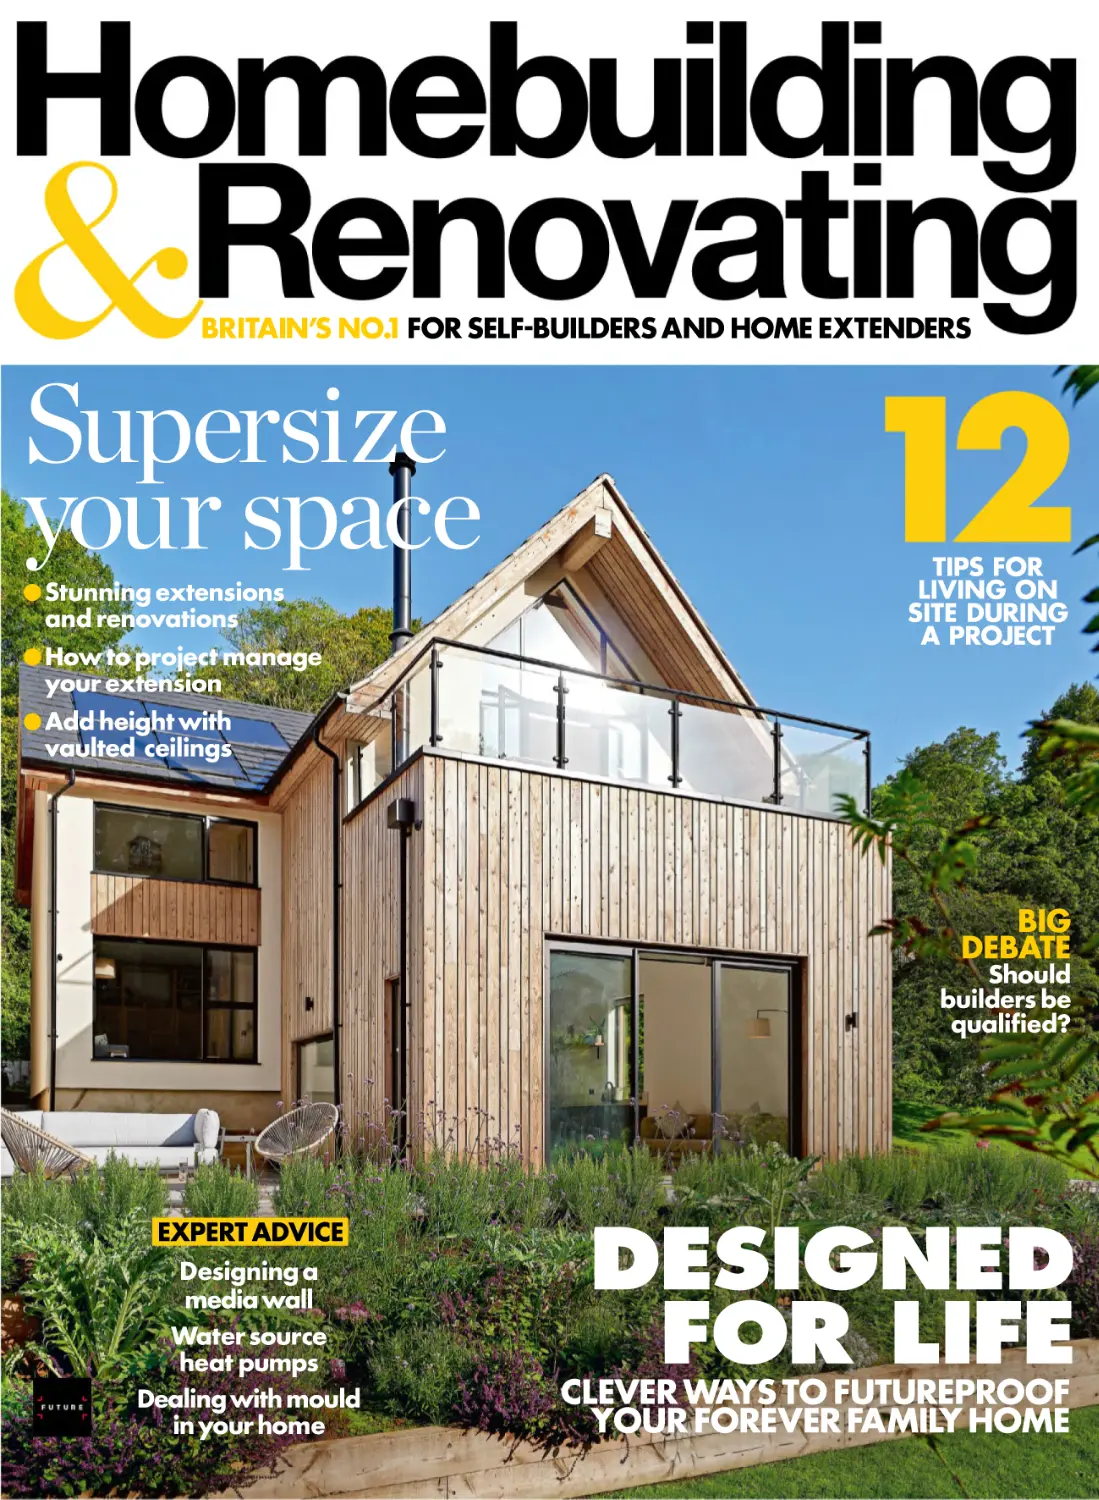
                    BRITAIN’S NO.1 FOR SELF-BUILDERS AND HOME EXTENDERS

Supersize
your space

● Stunning extensions
and renovations

● How to project manage
your extension

TIPS FOR
LIVING ON
SITE DURING
A PROJECT

● Add height with
vaulted ceilings

BIG
DEBATE

Should
builders be
qualified?

EXPERT ADVICE
Designing a
media wall
Water source
heat pumps
Dealing with mould
in your home

DESIGNED
FOR LIFE

CLEVER WAYS TO FUTUREPROOF
YOUR FOREVER FAMILY HOME

ED ITOR’S

LETTE R

Editor Beth Murton has been a
homes journalist and editor for
over 20 years and has renovated
two homes. She is currently
planning her next project

O

ne of the biggest dilemmas any selfbuilder or renovator will face before
starting their project is where they are
going to live during the building work. The cost
savings of living on site might sound appealing, but
can you face living in a building site for months
on end, surrounded by dust? I know the answer
to that was a resounding ‘no’ when I renovated
my house with my husband. At the time we had
a toddler and the thought of navigating daily
life when the house was being stripped bare all
around us wasn’t appealing. We were lucky that we
could move in with my parents (although I’m not
convinced they felt so lucky!) and were still close
by, so that I could be on site each day to deal with
any issues. If you’re weighing up the pros and cons
of where you’re going to live, our guide on page 88
might help you make your final decision.
Talking of saving money, project managing
your own extension can deliver cost benefits, and
it’s therefore a route many self-builders choose
to follow. As our feature on page 105 explains,
however, it’s not for everyone. Organising trades,
arranging deliveries in the right order and being
the first point of contact for any issues isn’t as easy
as it might appear. Our suitability checklist is a
must-read if you’re considering taking on this role.

Elsewhere in the issue, our guide to designing
a lifetime home on page 118 is essential reading
for anyone planning their next project. Creating a
home that not only meets your current needs but
which also has the potential to adapt to changing
needs over time is a smart move, ensuring you
can continue living in your home for as long as
possible. You’ll also find lots of practical advice on
this and many other self-build topics at our next
Homebuilding & Renovating Show at the NEC
Birmingham from 21–24 March. See overleaf for
details on your two free tickets.

SCAN TO
RECEIVE OUR
NEWSLETTER

C O NTRIBUT ORS

ALLAN CORFIELD

MARK BRINKLEY

NATASHA BRINSMEAD

MARK STEVENSON

Founder of Allan Corfield

The author of the ever-popular

Associate editor of

With a career in construction

Architects, he is a regular

Housebuilder’s Bible and

Homebuilding & Renovating,

that spans more than 30

contributor to the magazine,

an incredibly experienced

Natasha has fully renovated

years, Mark was also the

website and our live events.

self-builder.

her Edwardian home.

managing director for Potton.

homebuilding.co.uk 7

Unleash your
imagination & create
your dream home!
For three decades, the Homebuilding
& Renovating Show has been the
trusted companion of homebuilders,
renovators and home improvers,
empowering people all over the UK
to create their dream homes.
The show is a source of inspiration,
knowledge and expert advice, and
can provide you with the tools you
need to embark on a successful
project – however big or small.
See 100s of exhibitors and
1000s of products
Attend inspiring seminars
Visit the Advice Centre
Take part in our masterclasses

Get 2 FREE
tickets worth £36*
Book now at national.homebuildingshow.co.uk/hbr-march
SPONSORS AND PARTNERS

*Offer expires 3pm the day before the show. Saving based on one day ticket door price. Children 16 and under go free.

E D I T ORI AL
EDITORIAL
Editor in Chief Claire Lloyd
Editor Beth Murton
Associate Editor Natasha Brinsmead
Assistant Editor Jo Messenger
Deputy Editor (website) Amy Willis
News Editor Joseph Mullane
Contributions by Seán O’Connell & Alex Burrows
ART
Art Editor Karen Lawson
Group Art Director Alison Walter
Contributions by Bryn Davies
MARKETING
Global Marketing Director Melanie Kay
Associate Marketing Director Eve Mulvaney
Head of Retention Anjuman Tariq
Marketing Manager Alicia Kennedy
ADVERTISING AND EXHIBITIONS SALES TEAMS
Commercial Director Liz Jazayeri
Strategic Partnership Director Jackie Sanders
0330 390 6530 jackie.sanders@futurenet.com
Ad Director Kelly James
0330 390 6543 kelly.james@futurenet.com
MAGAZINE AND WEB PRODUCTION
Group Head of Production Mark Constance
Senior Production Manager Matt Eglinton
Senior Advertising Production Manager Joanne Crosby
Digital Editions Manager Jason Hudson
Production Manager Nola Cokely
Digital Manager Tom Burbridge
Digital Production Executive Nicholas Robertson
Email Delivery Manager Alison Nash
Web Operations Manager Laura Sturgess
PUBLISHING AND EXHIBITIONS MANAGEMENT
Senior Vice President Consumer Kevin Addley
Managing Director Lifestyle Jason Orme
Commercial Finance Director Dan Jotcham
Commercial and Events Director Nick Noble
Director of Content and Product Development Michael Holmes
Content Director (print) Laura Crombie
INTERNATIONAL LICENSING
Head of Print Licensing Rachel Shaw
Homebuilding & Renovating is available for licensing.
To find out more contact us at licensing@futurenet.com or
view our available content at www.futurecontenthub.com
PRINTED BY William Gibbons & Sons
DISTRIBUTED BY Marketforce, 121-141 Westbourne Terrace,
London W2 6JR
www.marketforce.co.uk Tel: 0330 390 7498
Email: hello@marketforce.co.uk

We are committed to only using magazine paper which is derived from responsibly
managed, certified forestry and chlorine-free manufacture. The paper in this
magazine was sourced and produced from sustainable managed forests,
conforming to strict environmental and socioeconomic standards.
All contents © 2024 Future Publishing Limited or published under licence. All rights
reserved. No part of this magazine may be used, stored, transmitted or reproduced
in any way without the prior written permission of the publisher. Future Publishing
Limited (company number 2008885) is registered in England and Wales. Registered
office: Quay House, The Ambury, Bath BA1 1UA. All information contained in this
publication is for information only and is, as far as we are aware, correct at the time
of going to press. Future cannot accept any responsibility for errors or inaccuracies
in such information. You are advised to contact manufacturers and retailers directly
with regard to the price of products/services referred to in this publication. Apps
and websites mentioned in this publication are not under our control. We are not
responsible for their contents or any other changes or updates to them. This magazine
is fully independent and not affiliated in any way with the companies mentioned
herein.
If you submit material to us, you warrant that you own the material and/or have the
necessary rights/permissions to supply the material and you automatically grant
Future and its licensees a licence to publish your submission in whole or in part in any/
all issues and/or editions of publications, in any format published worldwide and on
associated websites, social media channels and associated products. Any material you
submit is sent at your own risk and, although every care is taken, neither Future nor its
employees, agents, subcontractors or licensees shall be liable for loss or damage. We
assume all unsolicited material is for publication unless otherwise stated, and reserve
the right to edit, amend, adapt all submissions.

HERE FOR
EVERY STEP
OF YOUR BUILD

Whether you’re taking on an extension, self-build or
renovation, we’re here as your expert companion to help
you turn your dream home into a reality. Turn to page 64
to subscribe to Homebuilding & Renovating.

18

SPLIT DECISION
The Perkin family wanted a detached
home at the lowest possible cost. The simple
solution was to cut their semi in half

C O NT EN T S
13

INSIGHT
The latest news, products,
workshops, events and ideas
for self-builders, extenders and
renovators everywhere

ON THE COVER

74 GEORGIAN HOMES
REVIVED
Sumptuous properties throughout
the UK sympathetically updated
for the 21st century
ON THE COVER

88 12 THINGS TO
CONSIDER WHEN
LIVING ON SITE
Should you opt for a caravan,
garden room or a rented house?
Here’s everything you need to
consider for your project

10 homebuilding.co.uk

94 CONSERVATORY COSTS
It’s one of the most commonplace
extensions, but what prices
should you expect in 2024?

98 THE HEALTHY HOME
Go green: why indoor plants
enhance wellbeing in the home
ON THE COVER

101 SHOULD BUILDERS BE
FORMALLY QUALIFIED?
A hot topic in construction: should
UK builders be qualified like their
European counterparts?

109 LEVELLING-UP AND
REGENERATION ACT
What you need to know in
relation to your project
ON THE COVER

114 HOW TO DESIGN
A MEDIA WALL
All the elements you need for the
ideal home entertainment system

117 6 OF THE BEST
MASONRY BRICKS
The humble brick – from design
classics to purposeful blocks

ON THE COVER

ON THE COVER

105 PROJECT MANAGING
AN EXTENSION

118 HOW TO DESIGN A
LIFETIME HOME

It may save you money but are
you definitely cut out for the job?

Futureproofing forever homes: the
ultimate in design sustainability

42

30

A MODERN CLASSIC
With abundant natural light thanks to the extensive
glazing system, this contemporary self-build nestled in a
traditional area of Cambridgeshire is a beauty to behold

NATURAL SELECTION
Featuring spectacular wood structures and finishing
throughout, this award-winning renovation of a 1940s semi in
Richmond beautifully connects the inside to the outside

56

66

LESS IS MORE
The Dempsey family renovated and extended their
Georgian villa in Edinburgh to downsize floorspace — by
reconfiguring their home’s layout

129 HOW TO BUILD:
WEATHERTIGHTNESS
In our continuing series, expert
Mark Stevenson advises on how
to make your project secure
ON THE COVER

135 MOULD IN THE HOME
How to get rid of this unsightly
blight and health hazard

139 ASK THE EXPERTS
Wood panelling a staircase,
painting over tiles, locating
drains — and more
ON THE COVER

145 WHAT IS A WATER
SOURCE HEAT PUMP?
All you need to know before
installing this eco-friendly option

STEPPING UP
Quirky and fascinating with a central feature staircase,
this terraced two-bedroom property in Surrey was renovated
by an architect couple in their own idiosyncratic style

ON THE COVER

148 STUNNING
VAULTED CEILINGS
This selection of architectural
spectacles shows you how to
create a wow factor ceiling

SPECIAL WINTER
OFFER
SUBSCRIBE AND
SAVE 40%
See page 64

161 LIVING WITH A HOME
WIND TURBINE
They’re dependent on your
location, but what are the
advantages of owning one?

164 ESSENTIAL PAPERWORK
FOR SELF-BUILDERS
Admin-phobic? Here is what you
need in place for your project

178 AMAZING HOMES
A thoroughly striking modernist
new build in rural Dorset

homebuilding.co.uk 11

INSIGHT
A round-up of the latest self-build and home renovation news,
products and events. By Jennifer Grimble

IMAGE: THE LONDON TILE CO.

New Housing Act becomes law
T

he long-proposed Levelling-up and Regeneration Act
2023 has become enshrined in UK law. The government
hopes the new legislation will “speed up the planning
system, hold developers to account, cut bureaucracy and
encourage more councils to put in place plans to enable the
building of new homes”.
Moving forward, homeowners will be required to provide
less evidence with their applications and will have greater say
over residential developments submitted in their local area,
thanks to ‘street vote’.

However, the Act has also seen an increase in planning fees,
with major applications up by 35% and minors by 25%. The
cost of submitting a full planning application in England is now
£624, while those wanting to alter their home will need to pay
£258. Additionally, application resubmissions in England will
no longer be free. A benefit for homeowners is that amendments
have also been made to Permitted Development rules. Those
with a flat roof can now add solar photovoltaic (PV) panels
without planning permission. Turn to our Planning Clinic on
page 109 for details on the changes that have taken place.

homebuilding.co.uk 13

Planning system
named bigger barrier
to new homes

T

IMAGE: URBAN FRONT

he Federation of Master Builders has released
its 2023 House Builders’ Survey, revealing the
biggest hurdles facing small and medium-sized
housebuilders in England. The planning system was
named the top barrier to more homes, with 55% of
survey respondents naming “inadequate resourcing

of planning departments” as the most significant
cause of delays. Restricted mortgage availability was
the second-biggest barrier, with 51% of members
picking this option, while a lack of available land
came in third (48%). Interestingly, 63% of FMB
members said that the number of small building site
opportunities is decreasing and 60% reported that
the process of obtaining planning consent for such
land is becoming harder. It’s hoped the Levelling-up
and Regeneration Act 2023 will cut this red tape and
make the process of constructing new homes simpler
and quicker.

BUILD EVENTS
21-24 MARCH

NEC HOMEBUILDING &
RENOVATING SHOW
NEC, Birmingham

Visit our NEC show for tailored advice,
access to thousands of products and
expert-led masterclasses covering
everything from building with ICF to
improving thermal performance.

14 homebuilding.co.uk

BUILDING WITH EARTH:
TIMELESS TECHNIQUE FOR
MODERN ARCHITECTURE
A centuries-old construction
technique, rammed earth is
a sustainable, cost-effective
building solution that many
overlook. In this book,
architects from around the
world present their projects
through photographs
and floorplans, allowing
readers to discover how
they utilised rammed
earth to create beautiful,
sustainable homes that
seamlessly integrate into
their natural surroundings.
RRP £20.99

22-23 MARCH

OAKWRIGHTS’
SPRING OPEN DAY
Ayrshire, Scotland

At the Oakwrights Spring Open Day,
enjoy a tour of a real oak frame home and
speak with the owners. You’ll also have
the opportunity to talk through your
ideas with Oakwrights’ Architectural
Design team.
From July to
September 2023,
21% of planning
applications were decided
within the 13-week
statutory time period — a
2% improvement on
the same period
during 2022*

*ACCORDING TO THE LATEST GOVERNMENT DATA

MARVELLOUS MIMIC
Available in eight shades, with
a matte or polished finished,
the new Jurassic Luce marble
effect porcelain tiles from
Stone & Ceramic Warehouse
are a realistic and affordable
alternative to real marble.
Suitable for both walls and
floors, the waterproof tiles come
in four sizes and prices start
from just £86.40/m2.

IMAGE: DANIELA ERASMUS INTERIOR DESIGN

BOOK OF
THE MONTH

I N S I G H T

Bathroom ban

Hot and cold

T

hanks to cutting-edge fan
coil technology, The Radiator
Centre’s brand-new Sofi range
can both heat and cool your home. The
energy-efficient radiators have been
designed to excel in low-temperature

ECO UPCYCLING
Carbon-neutral furniture
company, Another Country,
has teamed up with kitchen
front makers, Husk, on a
new collection of stylish
cabinet doors that can
quickly be installed over
the top of Ikea or Howdens’
units. The AC x Husk range
is available in a natural ash
veneer, or in five earthy
tones, including Mist Green
(pictured) and Devon Red.
An environmentally friendly
alternative to kitchen
makeovers, each cabinet
door is made-to-order to
minimise waste and crafted
from FSC-certified wood that
is sustainably sourced. A
60cm x 80cm painted door
is priced at £250.80, via
www.madebyhusk.com.

environments, allowing you to set
a comfortable indoor temperature
all year round — no matter what the
weather is doing outside. Available in a
wide choice of RAL colours and special
finishes, prices start at £2,030.40.

IMAGE: CROSSWATER

M

yBuilder.com, a platform
that connects homeowners
with local contractors, has
discovered that a third of Brits wouldn’t
allow a tradesperson to use their toilet
while carrying out work in their home.
Surprisingly, the younger generation
were the most reluctant to allow access
to the bathroom — 49% said they
wouldn’t, compared to 20% of over55s. According to the research, 53% of
homeowners also wouldn’t offer their
contractor a cold drink.

I N S I G H T

*ACCORDING TO NEW FINDINGS FROM MARTIN & CO

JTP Bathrooms
has launched a new
kitchen sink mixer,
featuring a textured
handle and an
optional adjustable
hose. The Decor
Single Lever Pull
Out Sink Mixer is
available in Brushed
Bronze, Brushed
Brass, Brushed Black
and Matte Black. The
sink mixer includes
a 15-year guarantee.
From £400.

BOILER GRANT INCREASE A SUCCESS
In October 2023, the government
increased its Boiler Upgrade Scheme
grants from £5,000 to £7,500,
with instantaneous results. In the
first week following the uplift, new
applications reached 1,150, which
is more than three times higher than
the average weekly rate prior to
the change. In the subsequent three
weeks, new applications remained
nearly 60% higher than the previous
weekly average. The scheme, which
is available in England and Wales,
provides financial support to those
wanting to replace their fossil fuel
heating system with a low-carbon
alternative. Thanks to the grant uplift,
the Scheme is now one of the most
generous of its kind in Europe.

IMAGE: QUIET MARK UK

Mix it up

of 18- to 44-year-olds believe they’ll
never be able to buy a home without
financial support from their parents*
THREE

With its curvaceous figure and stylish
matte black fitting, this sleek Dome
Glass Wall Light will certainly bring
a cool contemporary look to the
front of your property. £65 from
coxandcox.co.uk.

PER FE CT

PO R CH

Smart and simple with an industrial
edge, the Kew Up & Down Light is
cast from raw concrete. The two
built-in LEDs boast an impressive
lifespan of 30,000 hours. £90
from gardentrading.co.uk.

LI GHT S

Smart and modern, the Amos Canon
Outdoor Wall Light boasts a stainlesssteel body, upward and downward
illumination and a built-in PIR motion
sensor for security and convenience.
£62 from amoslighting.co.uk.

homebuilding.co.uk 17

R EAL PROJECT
SE LF-BUI LD

Having found their dream location, Beth and Oly
Perkin wanted a detached house, but could only
afford a semi — so they cut the building in half

homebuilding.co.uk 19

HOMEOWNERS Beth and Oly Perkin
LOCATION Bath
PROJECT New-build
four-bedroom home
CONSTRUCTION Timber frame,
with larch cladding and aluminium
double glazing
BUILD ROUTE Main contractor, project
managed by John Turner from Bath
Heritage Building, with help from Oly
BUILD TIME 15 months (including
garage and front garden landscaping)
BUILD COST £2,153sq m (including
landscaping)
WORDS Alexandra Pratt
PHOTOGRAPHY Adam Carter

eth and Oly Perkin viewed over 40 properties and made
offers on eight, but they had always missed out — that is,
until they saw a semi-detached bungalow on a large plot. As a
deceased estate, the building needed attention, but it was under
budget and the semi-rural, wooded setting won the young
couple over immediately.
“It was very tucked away, very hidden,” says Beth. “Yet the
bungalow was just a 15-minute walk from the centre of Bath.
We knew it was an opportunity we wouldn’t get again.”
An additional twist was that the adjoining bungalow was
also available, but the pair couldn’t afford both properties. “We
needed someone to buy the other half,” says Beth. Initially,
Beth and Oly thought to develop the property in tandem with
whoever their new neighbours would turn out to be, but the
stars aligned when Beth was walking in a nearby park and
recognised another couple from previous viewings. Knowing
they were also former acquaintances of Oly’s, Beth approached
them. Unbelievably, the couple agreed to buy the other
bungalow. “It was sheer fluke,” says Oly. “There were lots of
ways it could have fallen through.”
During an extended purchase period, while they waited for
probate to be granted, Beth and Oly explored different options
for the bungalow and completed a pre-planning application
to the local council, which was favourable. “Although we’d
originally planned to renovate together with our new
neighbours, as different ideas and preferences emerged, they
decided, amicably, to take their own routes forward,” says Beth.
DRAWN-OUT PLANNING PROCESS
With the purchase completed, Beth and Oly moved into their
bungalow, in the hope of experiencing a smooth planning
process. “There was no carpet in there, no kitchen sink and no
heating,” recalls Beth. Despite all that, this period proved useful,
as they familiarised themselves with the building, its aspects and
the best views. The property is located next to woodland on the
edge of a conservation area in this UNESCO World Heritage City.
This experience of living in such a special place only cemented
Beth and Oly’s commitment to the project.
When the pair subsequently hired local architecture firm
Hetreed Ross to submit the full planning application, a new
possibility opened up; demolition and rebuild. “We had
originally wanted a detached home, but we had bought a

20 homebuilding.co.uk

R E A L

P R O J E CT

S E L F - B U I L D

“We poured everything into
this and there’s a great deal of
satisfaction that we’ve done it”

semi,” says Beth. “Our architects came up with the idea of
demolishing it, building our own separate house and therefore
paying no VAT.” Luckily, the party wall was strong enough
to cut away Beth and Oly’s bungalow and leave the attached
building unaffected. This plan also had the advantage of
allowing the neighbours to renovate and extend their
now-detached house. “We were lucky — if the party wall
hadn’t been strong enough, the outcome would have been
very different,” explains Beth.
Unfortunately, Beth and Oly’s luck ran out at this point,
and they faced an 18-month planning process, which required
multiple tests and reports. Once the planning and tender
processes concluded and the local firm Bath Heritage
Building had been contracted, almost two years had passed.
The couple’s daughter was born just a few days after the

22 homebuilding.co.uk

demolition, leaving the couple to manage a build during the
early days of parenthood. The limited access to any temporary
accommodation on site also meant they were forced to move
into a rented property during the build.
CONSTRUCTION BEGINS
John Turner of Bath Heritage Building acted as project
manager, with Oly inputting on decisions while keeping their
architect on an hourly rate for ad-hoc site meetings together with
a quantity surveyor. “The whole team were amazing — we got on
really well,” says Oly.
The Perkins were fortunate in that the original foundations
were deemed strong enough to support a two-storey building,
which – due to access issues – they had to stick-build on site
using a timber frame system, as the lighter weight required

R E A L

P R O J E CT

S E L F - B U I L D

The kitchen is the focus of family
life and here the four-metre-high
ceilings accentuate the feeling
of space as well as bouncing the
abundant natural light around.

homebuilding.co.uk 23

An oversized horizontal picture window in the
dining area makes a stunning feature as well as
creating a visual connection with the outdoors.

no extra groundwork. The couple also extended and added a
cantilevered section to the second floor, which enabled them
to create a calm and sophisticated four-bedroom home that
is Scandi-inspired in design and sympathetic to the woodland
setting. “To create that Scandi feel we clad parts of the house in
locally sourced British larch,” says Oly.
SUSTAINABLE ENERGY
With no mains gas available and the new build highly suitable
for alternative forms of energy, Beth and Oly chose to install
an air source heat pump for the underfloor heating, which serves
both floors. This is further enhanced by electricity from a
low-profile solar PV array.
“We don’t yet have a battery because our level of usage
wouldn’t justify the cost,” explains Oly. “However, we do both
have electric cars and we’re currently waiting for an effective
charging unit to be marketed so that we can link the solar
panels to the cars.”

24 homebuilding.co.uk

In addition, the couple also have a woodburning stove in
the main living area. “I love it,” says Oly. “We had timber from
ash dieback and self-seeded trees that needed to come out. I
cut them down during lockdown and now we have 5–10 years’
worth of timber for the woodburner.”
CHANGE OF LIFESTYLE
For both Beth and Oly, living in a new build meant a different way
of living. “We both grew up in period homes, but we don’t miss
those random patches of damp or the draughty windows,” laughs
Beth. By contrast, their interior décor choices are all clean lines,
natural materials and neutral tones.
“When it came to choosing the fittings and fixtures we
wanted high-quality finishes, so we gave a lot of thought to
where we could best compromise,” says Beth. The kitchen
in particular is a careful yet inspired blend of cost-effective
cabinetry supplied by Howdens, teamed with family-friendly
Fenix doors from Husk.

R E A L

Beth, who designed the interiors while she was on maternity
leave, made significant savings on porcelain tiles by importing
directly from Italy for £25sq m, thereby saving £100sq m on
the UK price. “Beth did really well combining tiles,” says Oly.
“She used expensive terrazzo tiles to draw the eye to areas such
as splashbacks, or behind the bath. You don’t notice the other,
less-expensive grey tiles.”
Although Beth and Oly protected most of the original garden
during the build, there is still work to do, especially on the steep
wooded bank. So given it was almost four years before they
could move in, was it all worth the wait?
“The journey has made it even more special,” says Oly.
“We poured everything into this and there’s a great deal of
satisfaction that we’ve done it.” Despite the challenges, Beth
and Oly have been bitten by the self-build bug and don’t rule
out another project in the future. For now, though, Beth says,
“It’s so beautiful we just love living here — and we don’t need
entertainment, as it’s all there outside.”

P R O J E CT

S E L F - B U I L D

best build decision
“Our best build decision was appointing Suzanne
Thurlow at Hetreed Ross as lead architect and Bath
Heritage Building as main contractor, as well as
their fantastic quantity surveyor,” says Oly. “We
couldn’t have afforded the house if we hadn’t used
the contractors we did. They really worked with us
and were very flexible. Yet their standards were still
so high, with details that we never expected — on the
soffits and the ceiling landing, for example. They have
created a wonderful space for us.”

homebuilding.co.uk 25

The master suite enjoys a vaulted ceiling and a private
terrace where a wall of glass provides incredible views
of the woodland beyond. Here and elsewhere, Velux
windows maximise the natural light.

26 homebuilding.co.uk

R E A L

P R O J E CT

S E L F - B U I L D

t he

b u i l d

DEMOLITION “The first day of the project saw our party wall
become our neighbours’ external wall,” says Beth.

HARDCORE BASE The demolition hardcore was crushed on
site to provide a firm base and save the cost of removal.

SITE MEETING One of many site meetings – this one was to
discuss the slab level going down.

FRAME ERECTION The ground-floor timber frame being
constructed, giving a sense of the downstairs room layout.

FIRST FLOOR FRAME The first-floor timber frame goes up with
space for the Velux window that will give views of the valley.

TILING THE ROOF With the rest of the house more or less
constructed, the roof tiles can finally go on.

28 homebuilding.co.uk

R E A L

t he

p l a ns

ENSUITE

BATHROOM

BEDROOM

S E L F - B U I L D

SUPPLIERS
ARCHITECTS Suzanne Thurlow and
Marcus Sill at Hetreed Ross:
www.hetreedross.com

BEDROOM

BEDROOM

P R O J E CT

ENSUITE

BEDROOM

BUILDER Bath Heritage Building:
www.bathheritagebuilding.co.uk
CLADDING Vastern Timber:
www.vastern.co.uk
QUANTITY SURVEYOR Ewan
Fairweather (via Bath Heritage Builders)
ENGINEERED OAK FLOORING
Woodpecker, sourced through Simon Davis:
www.simondavisflooring.co.uk
DECORATIVE BATHROOM TILES
Mandarin Stone: www.mandarinstone.com;
Fired Earth: www.firedearth.com; Claybrook
studios: www.claybrookstudio.co.uk
FLOOR TILES AND PLAIN WALL TILES
Casal Grande Padana:
www.casalgrandepadana.com

FIRST FLOOR

KITCHEN (Cabinetry) Howdens: www.
howdens.com; (doors) Husk: madebyhusk.com
WORKSURFACES Neolith:
www.neolith.com
DOOR KNOBS Corston: www.corston.com
WC

UTILITY

HALL

SNUG

KITCHEN

BATHROOM FIXTURES Lusso Stone:
www.lussostone.com;
Crosswater: www.crosswater.co.uk
STAIRCASE Stairways: www.stairways.co.uk
Beth and Oly’s home is available as a film
location, via www.goodspaces.co.uk and
www.wearefind.com

DINING
AREA

LIVING
AREA

GROUND FLOOR

THE DETAILS
Prominent parts of the exterior
walls of the property are clad in
Vastern Timber’s British larch, laid
vertically. “We opted for Vastern as
we wanted a native timber that had
been sourced locally,” says Oly.

homebuilding.co.uk 29

R EAL PROJECT
C O N T EM P OR A RY S ELF-BUI LD

30 homebuilding.co.uk

With this family home in Cambridge, perfect
proportions and high-quality materials have
proved a winning combination

homebuilding.co.uk 31

t i me l i ne
Plot
purchased
EARLY 2017

Planning application
submitted
MAY 2018

Appointed
architect
JUNE 2017

Work starts
on site
EARLY MAY 2019

Planning permission
approved
SEPT 2018

HOMEOWNERS Matthew and
Anna Cleevely
LOCATION Cambridgeshire
BUILD TIME 12 months
SIZE 300m²
BUILD COST £1m
CONSTRUCTION SYSTEM Masonry
WORDS Alison Wall
PHOTOGRAPHER David Valinsky

First
fix
FEB 2020

Foundations
completed
JULY 2019

Demolition
complete
LATE MAY 2019

Watertight
shell
DEC 2019

Final
decoration
JULY 2020

Second
fix
APRIL 2020

Moved
in
AUG 2020

hen Matthew and Anna Cleevely
set out to sell their period terrace and buy a larger house to
accommodate their growing family, they were determined to
stay in Cambridge — ideally in the same neighbourhood. So
when a perfectly serviceable – if uninspiring – 1970s two-storey
detached house on a nearby site came on the market, they faced
the classic self-build conundrum: should they renovate and
extend or demolish and start again?
Architect Richard Owers, who collaborated with the couple
on the project, takes up the story: “We looked at whether we
could keep the house and perhaps extend it, but Matthew and
Anna decided it would be too much of a compromise, so they
opted to demolish it and rebuild.
“They were living in a Victorian house around the corner,
so they knew the area very well,” he adds. “They didn’t want a
design that was too ostentatious — and this is a very sensitive
area in terms of the surrounding landscape, which was another
reason not to be too loud.”
FAMILY-FRIENDLY DESIGN
What emerged from the couple’s wishlist was a classically
proportioned family home design with a smaller wing to one
side. The decision not to opt for something too flamboyant
proved wise because the planners were content to greenlight
the concept with nothing more than a few minor adjustments,
which was no mean feat, considering the site is in both a flood
zone and a conservation area.
To understand this self-build, it helps to know that Matthew
and Anna prioritised family-friendly features over purely visual
considerations. “Creating a lovely family home meant more
to them than some amazing piece of architecture, although
using quality materials with a minimalist aesthetic was also
important,” says Richard.

32 homebuilding.co.uk

R E A L

P R O J E C T

C O N T E M P O R A RY

S E L F - B U I L D

Three rows of solar panels
installed on the south-facing
roof supply green energy
to the property.

“Using
high-quality
materials
has created
something quite
rich here”

Tiled flooring and
a cloakroom area
with a bespoke
bench are practical
touches in the hall.

34 homebuilding.co.uk

Starting the project as a small family of two adults and one
child, the couple were eager to expand their family with more
children, a dog and chickens, so considered plentiful space for
a growing household as critical.
The build retains a footprint only slightly larger than the
demolished house but the internal space is much greater.
The additional space has been found partly by designing a
steeper roof with a raised ridge height to allow for a third
storey, which accommodates an open-plan home office space.
As this space is situated where the loft would normally be, the
building incorporates a warm roof that retains heat in
the same way as loft insulation.
WITH CHILDREN IN MIND
As well as making the most of the footprint, keeping a
parental eye on young children was also crucial for Matthew
and Anna. For example, a smaller wing contains the master
bedroom on the first floor and a children’s playroom at
ground level, all of which has been stepped back to create a
southwest-facing patio area. That provides a safe space for
the children to play outdoors, with a good visual connection
to the kitchen and the playroom — the geometry and location
of the patio created a fantastic sun trap.
Children’s bedrooms take up most of the first floor.
“Originally, the couple were content with their children all
sleeping in one barn-like room, but I suggested dividing it
asymmetrically into two linked rooms; one large, the other
small,” says Richard. “They also wanted a tiny toddler-sized
door between two of the rooms, plus a little hatch from one
bedroom onto the stairs so that they could call up to the
children. Tiny details like this make this a very playful home.”
The couple’s needs have also been addressed. The top floor
serves as a versatile workspace, particularly for Matthew,
who works predominantly from home, while downstairs
accommodates areas dedicated to their hobbies and interests.
The ground-floor living area, for example, can be separated
into two areas, with acoustic sliding panels to form a smaller,
soundproofed area for Matthew’s cello practice.
And rather than masses of glazing, Anna was keen to add
more wall space so that they could showcase their collection of
paintings. “If in future, they decide to add more glazing to the
garden-facing elevation, strengthening steels embedded into
the brick-and-block structure will allow the solid brick walls to
be removed and the windows installed,” says Richard.
BUILDING STARTS
Aside from the bespoke features, the construction of this
traditional brick-and-block house experienced very few hiccups
— the entire project, from demolition to completion, spanned
just 12 months. Matthew and Anna were heavily involved in the
whole process, helped by the fact that Anna studied architecture.
“A few elements, such as the windows, had longer lead times, but
otherwise, everything was fairly straightforward,” says Richard.
“Demolition of the old house was easy and we made
good progress, partly because the original property was
insubstantial,” he adds. “It was a reasonably straightforward
site, so we could use a traditional trench foundation, apart
from the eastern side, where we installed cantilevered beams to
avoid digging up too close to the neighbours.”

Building suitable drainage systems and flood defence
measures needed a great deal of consideration, however. The
property’s garden sits within zones 2 and 3 flood areas (zone 3
is the most flood-prone). As a form of protection, the ground
floor has been thoughtfully raised by 400mm, and the terrace
at the back of the house has been positioned two metres away
from the flood zone. A sustainable drainage system, which was
a condition of planning, also allows excess surface water to
run off effectively.
MATERIALS PALETTE
The choice of materials for the build was largely influenced by
the architecture of the surrounding houses. Slates were chosen
for the roof to mirror the dominant Victorian roof material used
locally, with a Cambridge buff brick to reflect the brickwork in the
surrounding area.
“Brick, stone and slate is a traditional local materials
palette that brings warmth and familiarity, and using highquality materials has created something quite rich here,”
explains Richard. “As a somewhat architectural reference,
we’ve also included a horizontal band of vertical stone fins on
the front elevation. They are an expensive feature, but they’re

homebuilding.co.uk 35

R E A L

P R O J E C T

C O N T E M P O R A RY

To minimise the amount of dust in the house, oak
flooring was laid in most of the rooms. Meanwhile,
Douglas fir was used for the exposed ceiling beams.

a twist on the more familiar materials and they also help create
unity across the whole front elevation.”
Internally, the garden-facing element of the living room
features exposed Douglas fir timber beams in the ceiling, a
successful touch that Richard has gone on to employ on several
other self-build projects. As Matthew has a severe dust allergy,
hard surface flooring was laid throughout the house, with tiles
in the bathroom, polished concrete in the kitchen and solid oak
elsewhere. “We went for hard surfaces as they don’t harbour
the dust so much,” explains Richard.
Less traditionally, the house features an extensive array of
solar panels and battery storage — the latter being a forwardthinking choice when few households consider the need to
store green energy. Walls are heavily insulated and, mindful
of the overheating risks associated with large areas of glazing,
the window-to-wall ratio has been optimised to achieve a good
thermal environment throughout the year. And in keeping with
its proximity to a County Wildlife Site, with its meadow flora
and fauna, the house incorporates external bird and bat boxes,
including specialist boxes for swallows.
“Matthew and Anna’s main aim was to create a well-designed
and sustainable new home that integrates with the surrounding
area and provides modern, well-lit interiors,” says Richard,
“and I’d like to think we have achieved that.”

S E L F - B U I L D

R E A L

P R O J E C T

C O N T E M P O R A RY

S E L F - B U I L D

A run of skylight windows provide
a generous amount of natural light
for the top-floor space.

homebuilding.co.uk 39

t he

b u i l d

DEMOLITION The original 1970s house was completely
demolished within a couple of weeks.

EXCAVATION Conventional trench foundations were dug and
the site level was raised by 400mm.

FUTURE PLAN A steel frame was erected on the south façade to
allow the installation of continuous glazing at a later date.

ROOF DESIGN The steel frame and timber roof was designed
around the wish for horizontal panoramic views.

HALL CEILING The triple-height entrance hall extends
through the entire height of the house.

UNDERFLOOR HEATING Once watertight, the underfloor
heating was installed across all the floors.

40 homebuilding.co.uk

P R O J E C T

C O N T E M P O R A RY

t he

SECOND FLOOR

HOME
OFFICE

BOILER &
TANK ROOM

CASTING FOUNDATIONS The conventional trench foundations
were cast on site.

S E L F - B U I L D

pl a ns

BRIDGE

R E A L

LOGGIA

BATHROOM
BEDROOM

FIRST FLOOR

UTILITY
BEDROOM
BATHROOM

BEDROOM

BATHROOM

WORKSHOP

BEDROOM
LIVING AREA

HALL

TOP FLOOR VIEW With the steel and timbers in place at roof
level, the distant countryside views were beautifully framed.

KITCHEN

DINING AREA

PLAYROOM

GROUND FLOOR

SUPPLIERS
ARCHITECT Richard Owers, Owers Warwick Architects:
www.owarchitects.com
MAIN CONTRACTOR P B Doyle: www.pbdoyle.com
STRUCTURAL ENGINEER Andrew Firebrace Partnership:
www.afpconsult.co.uk
GLAZING Rationel: www.rationel.co.uk
ROOF SLATES Welsh Slate: www.welshslate.com
HOME OFFICE With openable rooflights and soffits
plastered, the home office was nearly complete.

KITCHEN UNITS Cambridge Kitchens:
www.cambridgekitchens.co.uk

homebuilding.co.uk 41

R EAL PROJECT
S U B U R B A N R E N O VAT I O N

To help create a home that reflected their love of
wood, Tristian and Liz Thornhill chose their
materials with care and consideration

bef ore

42 homebuilding.co.uk

WINNER
B E S T R E N O VAT I O N

homebuilding.co.uk 43

t i me l i ne
Moved into
the house
NOV 2019

First planning
refused
APR 2020

Concept
presentation
DEC 2019

Moved
back in
SEPT 2021

Landscaping and tree planting
conditions approved
OCT 2020

Second planning
application granted
JULY 2020

Demolition
begins
APR 2021

All landscaping
completed
NOV 2022

Builders
finished
OCT 2021

bef ore
HOMEOWNERS
Tristian and Liz Thornhill
LOCATION Richmond,
south-west London
PROPERTY 1940s semi-detached house
PROJECT Rear extension and
loft conversion
CONSTRUCTION Timber frame
BUILD ROUTE Main contractor
project managed with architect
overseeing the build
BUILD COST £280,000
HOUSE SIZE 143m²
WORDS Seán O’Connell
PHOTOS Adam Scott

fter setting their sights on a bigger house,
Tristian and Liz Thornhill were forced into a rethink when they
realised the kind of period property they had in mind was out of
their price range. “So the next best thing was to go for a cheaper
home that we could enlarge and add character to,” says Tristian.
“We set about finding a special architect while in the process
of buying a semi-derelict 1940s semi, who could lift the house
out of the ordinary and design a whole-house renovation,
centred around a rear extension and loft conversion,” continues
Tristian. As a result of Liz spending many hours searching on
the internet, they found Woodrow Vizor Architects and after
meeting with one of the firm’s partners, George Woodrow, they
loved the plans he came up with, which perfectly met the brief
for ‘clean lines, natural materials and a strong connection with
the outdoors’. In many ways, however, that was the easy part.
“Our house is in a conservation area and the planning officer
seemed determined to tighten the rules beyond what had
previously been allowed,” says Tristian. “Our road is a mix of
beautiful Edwardian properties and post-war semis. You’d
think some improvement to the aesthetic appearance of our
house might be welcomed by the council, but it wasn’t. We had
to amend our design substantially to remove timber cladding to
the porch, change the colour of the window frames, reduce the
dormers in the loft and change the roofline of the dormer.”
CONSTRUCTION BEGINS
With the couple and their young son Phineas having moved out
and into rented for four months, the reconstruction finally got
underway. Tristian freely admits it was a scary time — Covid was
playing havoc with the building trade and there were contractors
going bust at a rapid rate, so the couple could only hope they
had chosen wisely on the builder front which, luckily, they had.
“Knowing how much we’d invested in this place, yet seeing it

44 homebuilding.co.uk

R E A L

P R O J E C T

S U B U R B A N

R E N O VAT I O N

The choice of natural
materials creates a
unique look in the
extension. “George
suggested laying
the bricks in the rear
wall on their ends so
more of the beautiful
differences in shade
and texture are
visible,” says Tristian.

with no roof, no first-floor ceiling and with the back of the house
demolished, made us feel very vulnerable,” he says.
With George overseeing the build on a weekly basis, and Tristian
visiting on site most days, the pair gradually felt reassured about
progress — and were confident the contractors, Artifex, would
carry out instructions to the letter. “We missed the worst of the
delays that were a symptom of Covid, so apart from some very long
lead-time kitchen appliances – the inbuilt microwave oven took
eight months to arrive – and a hike in the price of the birch plywood
we ordered late for the joinery, we were okay.” says Tristian.
ATTENTION TO DETAIL
Disruptive though the work was, Tristian always found positives.
“We had so much done, it almost felt like we were starting from
scratch but at least it meant we could get every detail just as we
wanted it,” he says. “For example, the bathroom tiles and the floor
tiles in the kitchen were laid to maximise the flowing lines. “Luckily,
we had a great relationship with George, and his views aligned
with ours, and particularly mine, being a designer myself. He paid
attention to the smallest aspects — and details are everything.”
Another aspect that was well thought through were the original
plans, and Tristian and Liz are justifiably proud of the fact that very
little was changed mid-build, which was a conscious decision to
avoid incurring extra costs.
Other devices were also used to keep down costs and this
included the choice of materials. “We were stripping out costs
wherever we could and instead of the proposed joinery-grade
timber, such as Douglas fir for the flitch beams that span the
extension, we managed to find untreated C24 timber without
the crude construction feel, which saved us about £5,000,” says
Tristian. Opting to use birch ply for the extension walls and
bespoke units in the loft extension and throughout most of the
house was also a means of creating the ‘closer to nature’ feel, and at
the same time it created another saving as it removed the need for
plastering, sanding and decorating.
PRACTICAL TOUCHES
While aesthetics were a must-have, consideration was also given to
environmental aspects, but the couple realised they were limited in
how eco-friendly they could make the house. “We looked into using
an air source heat pump to heat our home, but it wasn’t economically
viable at this stage — we’d had to fit a new gas boiler recently and
replacing that now would be a waste. We weren’t able to insulate
the empty cavity walls at this stage, but with new heating pipes laid
we can retrofit both in the future,” says Tristian. “However, we did
decide on building a ‘timber first’ over steel and concrete extension,
so the floors, side walls and roof are all timber frame with some brick
in the end façade for thermal mass, lateral stability, texture and
heatproof backing for the fire. Along with much-improved insulation
in the loft and floor, we also installed underfloor heating.”
With the first floor also reconfigured to make the space work
better, the family now have a home that serves all their everyday
needs. “In the summer the doors are always open and we’re in the
garden a lot,” says Tristian. “In the winter, the house makes the
most of the light and the garden looks beautiful viewed through
the huge patio doors, even when it’s raining. Our top priority was
ensuring a functional layout, allowing us to move freely and make
good use of the relatively modest space,” says Tristian. “Best of all,
we love spending family time together in our new live-in kitchen.

46 homebuilding.co.uk

“Our top priority
was ensuring a
functional layout,
allowing us to move
freely and make good
use of the relatively
modest space”

R E A L

P R O J E C T

S U B U R B A N

R E N O VAT I O N

Above both the table and the island are
several pendant lamps designed by
Tristian, and which he sells on his website
www.tristianthornhill.com.

homebuilding.co.uk 47

By using slightly lower grades of
timber for the flitch beams and
walls in the extension, Tristian
and Liz gained huge savings while
not having to compromise on the
spectacular finished effect.

R E A L

P R O J E C T

S U B U R B A N

R E N O VAT I O N

spotlight on: the hidden workspace
Working from home has become the new normal for so
many of us, including the Thornhills, who built in a secret
workstation as part of their renovation. It is flanked by
pocket doors that pull out from the wall and fold inwards
to conceal the desk and all its paraphernalia. “We’d
always planned to have this here, for family use, but
during Covid I suddenly had to work from home most of
the time and I adopted it as my office,” says Tristian.
If you want a home office that doesn’t stand out, here
are a few ideas that will allow you to create a discreet
workspace in an everyday living area:
● One of the easiest ways is to build a simple desk with
shelves for storage under your staircase. Not only is it
inconspicuous but it takes up none of your everyday floor
space. And by adding a door, it becomes truly hidden.

● An existing cupboard or wardrobe can be the perfect
place to site a home office. Simply build in a worktop for
your computer and any accessories, plus add the odd shelf
for storing files and paperwork, then at the end of the day
you can close the doors and everything’s out of sight —
and out of mind.
● A desk in your living room might seem anything but
discreet, but place it behind a high-backed sofa and
it becomes invisible. Or place your desk in the corner
behind a freestanding screen or shelf unit.
● If you have the space – and the funds – a stylish
solution is to invest in a piece of furniture that turns
into a workspace. The Bruton home office (£1,285 from
The Dormy House) is an elegant armoire that opens up to
reveal an instant office.

homebuilding.co.uk 51

R E A L

P R O J E C T

S U B U R B A N

R E N O VAT I O N

WOOD WORKS
The timber theme has been carried on
into the top floor where a distinctive
birch ply balustrade (far left)
continues downwards to form part of
the hall staircase. For a sense of unity,
the same plywood was used on the
front of the plentiful storage units in
the master bedroom (above).
TWIN OUTLOOK
The Thornhills had originally
anticipated only being allowed one
rear-facing window in the master
en suite (left). “So we were delighted
when the planner specifically
requested we add one at the front,”
says Tristian.

homebuilding.co.uk 53

R E A L

t he

P R O J E C T

S U B U R B A N

R E N O VAT I O N

SUPPLIERS

p l a ns

MAIN CONTRACTOR
Artifex Construction:
www.artifexconstruction.co.uk
CONSULTING STRUCTURAL
ENGINEERS Jesper Friis:
www.ajbuildingslibrary.co.uk

BEDROOM
EN SUITE

SURVEYOR Bridport MBS:
www.bridportmbs.com

LOFT

PORCELAIN FLOORING
London Stone: www.londonstone.co.uk
WOODEN FLOORING
The Natural Wood Floor Company:
www.naturalwoodfloor.co.uk
BEDROOM

BEDROOM

BATHROOM

BEDROOM

FIRST FLOOR
BEFORE

BEDROOM

BEDROOM

BATHROOM

STUDY

GAS STOVE Flames of Richmond:
www.flamesofrichmond.co.uk
WINDOWS AND FRONT DOOR
Dovista: www.dovista.pl/en
POCKET DOORS
The Pocket Door Company:
www.thepocketdoorcompany.co.uk

FIRST FLOOR
AFTER

WARDROBES AND KITCHEN
UNITS Ikea: www.ikea.com
CEDAR CLADDING Silva timber:
www.silvatimber.co.uk

LIVING
AREA

DINING
AREA

WORKTOPS Euros Stone:
www.eurosstone.com

OFFICE

DINING
AREA

WARDROBE DOORS Naked Kitchens:
www.nakedkitchens.com

KITCHEN
LIVING
ROOM

LIGHTING Litfad: www.litfad.com;
Tristian: www.tristianthornhill.com

UTILITY
SNUG

KITCHEN

WC

GROUND FLOOR
BEFORE

WC

GROUND FLOOR
AFTER

SELECTED COSTS

BUILDING CONTROL £1,200

MAIN CONTRACTOR £180,000

DROPPED KERB £5,400

ARCHITECTS £20,000

THREE BATHROOMS £12,800

SURVEYOR £1,300

KITCHEN AND UTILITY £7,300

STRUCTURAL ENGINEER £4,500

APPLIANCES £5,400

PARTY WALL COSTS £3,000

WARDROBES/LOFT DRAWERS
£7,700

STORAGE AND REMOVALS £2,500

WINDOWS AND FRONT DOOR
INC INSTALLATION £15,000
FLOORING AND EXTERIOR
CLADDING £5,000
GAS STOVE £3,400

homebuilding.co.uk 55

R EAL
EX T EN SI O N

PROJECT
& R E N O VAT I O N

After buying their family home in the
Edinburgh suburb of Portobello, Jonna
and James Dempsey made a strategic
decision to downsize as part of their
renovation and extension project

56 homebuilding.co.uk

homebuilding.co.uk 57

t i me l i ne
Planning application
submitted
APRIL 2018

Work commenced
on site
OCTOBER 2019

Planning application
approved
JUNE 2018

HOMEOWNERS
Jonna and James Dempsey
HOUSE TYPE
Georgian era two-storey villa
HOUSE SIZE 100m2 (10m2 space added
in extension)
BUILD ROUTE Traditional contract
BUILD COST £180,000
WORDS Caroline Ednie
PHOTOGRAPHY David Barbour

First
fix
OCTOBER 2020

Watertight
shell
JUNE 2020

Moved
in
JULY 2021

hen Jonna Dempsey and her husband,
James, moved into their category C-listed Georgian villa in
the Edinburgh suburb of Portobello, they did so with a view
to making it their long-term family home. At the time of
purchase, it had been converted into two flats. So the couple
and their young daughter moved into the upper-level flat,
initially renting out the bottom flat until they were in
a financial and practical position to restore the house to
a single residence again.
“The new extension is smaller than what was there before,
but by making it smaller, we allowed more light into the back
of the house, the configuration of the rooms works better and
there is a clearer access route from all parts of the house to
the garden,” says Jonna.
A STRATEGIC PLAN
“The Dempsey family home is an example of how less can be
more,” says architect Neil Taylor of Edinburgh-based TAP
Architects. “Our original brief was to create an extension to
their house, but in the end the solution was to have less floor
area than we started with!”
In 2018, Jonna and James contacted TAP to discuss their
thoughts on reconfiguring and modernising the building.
“A big part of the brief was to improve the back of the house, to
allow us to have additional living space and a better connection
to the garden,” explains Jonna. “I actually did some drawings,
and Neil came back with two or three different design ideas.
The one we chose was smaller in floor space but irresistible as

“It has made so much difference to our lives and is
a real game-changer for the way we live as a family”
58 homebuilding.co.uk

R E A L

P R O J E C T

E X T E N S I O N

&

R E N O VAT I O N

bef ore

Above: “The challenge was in
making the external curved
wall, as half of the extension is
one metre below garden level,”
says architect Neil Taylor. “So
the base of this curved wall was
acting as a retaining wall.”

The space within the extension, at
the lower level, allows for access
to the garden via a small sunken
courtyard and steps. These various
outdoor spaces and sets of steps
allow the process of moving from the
house into garden to be as enjoyable
(and theatrical) as possible.

it featured a beautiful curved stairwell that echoed the
original Georgian style of the house.”
RECONFIGURING THE FLOORPLANS
Taylor’s design – which the planners liked – involved
demolishing the existing stair tower and constructing a new
single-storey extension. This addition acts as not just a roof
terrace, but also a charming route to the garden from the upper
storey. It also operates as a garden room and an entrance lobby
for the lower level.
The existing house was completely reconfigured as an
upside-down house, with four bedrooms located on the lower
level. On the upper level, the proportions and decorative
features of the original Georgian public rooms made them
ideally suited to the main living spaces. An opening was formed

60 homebuilding.co.uk

in the wall between the two largest public rooms to make a
grand space that runs from front to back.
The kitchen was moved to the front of the house, and the
family bathroom is located to the garden façade. An existing
door opening – which had provided access to an en-suite in the
top of the old stair tower – was used to provide access to the
roof terrace. From there, a curved staircase wraps around the
side of the extension down to the garden level.
UPGRADES AND ENHANCEMENTS
The entire house was upgraded with new heating and electrical
services and the roof space insulated. Structural shoring
works were undertaken to the rear façade where the previous
conversion had destabilised the existing walls.
During the building works, the family rented a flat just around

R E A L

the corner. “We moved out as the whole house was gutted and we
visited about once a week — in terms of the build itself, we didn’t
want to interfere as we very much trusted the builders,” says
Jonna, who took responsibility for sourcing a lot of the furniture
and finishes herself.
“I wanted the house to be in keeping with the Georgian
style,” she continues. “I didn’t want it to be too modern.
We were keen to have a light and spacious feel, but stay
sympathetic to the existing architecture.”
LIGHT AT THE END OF THE TUNNEL
The work was supposed to take between four and six months.
“We had a moving in date of March 2020, but the pandemic
lockdown happened around three days before we could move
in,” says Jonna. “So we had to drop everything and stay in the

P R O J E C T

E X T E N S I O N

&

R E N O VAT I O N

rented flat for the next three months. Even though it was all
finished, we couldn’t actually move in — it was nine months
before we could make the move. But it gave us something to look
forward to during lockdown.”
Making alterations of this kind to a 200-year-old
building was not a straightforward process, and the added
complications of a pandemic did not help, but the family are
pleased that the house has been restored to something close
to its original character, with new additions that will make it
work long into the future.
“The layout and the spaces are just right,” says Jonna. “And
the new connection to the garden is exactly as we had hoped.
The kids can go out to the garden after school and we can see
them. It has made so much difference to our lives. It’s a real
game-changer for the way we live as a family.”

homebuilding.co.uk 61

R E A L

t he
BEDROOM

STORAGE

P R O J E C T

E X T E N S I O N

R E N O VAT I O N

p l a ns
SUPPLIERS

BEDROOM
KITCHEN

ARCHITECTS T.A.P:
www.taparchitects.co.uk
STRUCTURAL ENGINEERS
Entuitive: www.entuitive.com

BATHROOM
BEDROOM

LIVING ROOM

MAIN CONTRACTOR Ramsay
Built Ltd: www.ramsaybuilt.co.uk
UTILITY

STUDIO

&

STORAGE

BATHROOM
DINING ROOM

HALL FLOOR TILES Solus
Ceramics: www.solusceramics.com
GLAZING Ekco Doors and
Windows: www.ekco.co.uk
KITCHEN Stange Kraft Ltd
(Uwe Stange):
www.stangekraft.co.uk
BATHROOM TILES Topps Tiles:
www.toppstiles.co.uk

LOWER FLOOR

GROUND FLOOR

homebuilding.co.uk 63

AMAZING

SUBSCRIPTION

OFFER!

Subscribe and
save 40%

64 homebuilding.co.uk

G R EAT

R EASONS

TO

SU B SCR IBE

BRILLIANT VALUE: PAY £19.80 EVERY 6 MONTHS
EVERY ISSUE DELIVERED DIRECTLY TO YOUR DOOR
FREE TICKETS TO ALL HOMEBUILDING & RENOVATING SHOWS

10
BATHROOM
INNOVATIONS TO
SPLASH OUT ON

PLANNING
ADVICE
Buying land
permission

HOW TO

RENOVATE
Step-by-step guide to getting your
project on the right track

HOW TO SUBSCRIBE

or call 0330 333 1113 and quote code C73S
*Terms & Conditions: Offer closes 8 March 2024. Offer open to new UK subscribers only. Direct Debit offer is available to UK subscribers only. Pay only £19.80 every 6 months, saving 40% on
the cover price. Savings are based on the annual subscription rate. We will notify you in advance of any price changes. Please allow up to six weeks for delivery of your first subscription issue (up
to eight weeks overseas). For full terms and conditions, visit www.magazinesdirect.com terms. For enquiries please call: +44 (0) 330 333 1113. Lines are open Monday–Friday 8:30am–7pm and
Saturday 10am–3pm UK time (excluding Bank Holidays) or email help@magazinesdirect.com. Calls to 0330 numbers will be charged at no more than a national landline call, and may be included
in your phone provider’s call bundle.

homebuilding.co.uk 65

R EAL PROJECT
R E N O VAT I O N

Some said it couldn’t be done, but
Shanka and Walter Mesa Siverio
transformed a period house with a
striking feature at its heart

66 homebuilding.co.uk

t i me l i ne
House
bought
MARCH 2020

Builder
approved
OCTOBER 2020

Garden
works
AUGUST 2020

HOMEOWNERS
Shanka and Walter Mesa Siverio
PROJECT Renovation
LOCATION Worcester Park, Surrey
SIZE 65m2
BUILD TIME Six months
HOUSE COST £416,000
PROJECT COST £45,000
VALUE £520,000
WORDS Ifeoluwa Adedeji
PHOTOGRAPHY Side Spaces/
Lukasz Weil

Added deck
and planters
JULY 2021

Kitchen
finished
MARCH 2020

Internal walls
removed
NOVEMBER 2020

Flooring
laid
APRIL 2020

our years ago, Shanka and Walter Mesa Siverio sold their south
London flat with a view to buying a house in the same area.
However, Shanka was increasingly leaning towards a move to
Surrey to be closer to family — even more so when they came
across a terraced house in Worcester Park that had potential
for renovation. “It’s not the area we were looking for at all, but I
liked the street and we had a friend there who lived in a similar
property,” says Shanka.
The location had the sense of community they sought and the
house had lots of character, too, as well as being on one of the
oldest streets in the town. Shanka and Walter weren’t fazed by
the works and appreciated the unusual arrangement — being
architects, they could see how to make it all work for them.
“When we first visited the property, you would come into the
living room, and then there was a door into the kitchen,” says
Shanka. “It was all very cellular, quite dark.” It had the typically
traditional Victorian setup where you had to go through the
kitchen to get to the downstairs bathroom.
The property clearly required a major overhaul as it was
not only dated, with its 1970s decor, but it wasn’t practical for
modern living. “The garden was in a real state, too. We actually
tackled this first and hacked everything back,” says Shanka.
EMBRACING THE QUIRKS
The unconventional position of the staircase in the centre of the
house intrigued the couple when they first visited the property.
“The charm of the property is the quirkiness of the design,” says
Shanka who carried on the unusual theme by customising the
staircase in her own style. “If I’m completely honest, the stairs
were designed around the idea of having plants, which I love.”
Upstairs on the first floor there are two double bedrooms,
which proved to be perfect for the couple’s needs. They decided
to live there and get to know the property before planning a

68 homebuilding.co.uk

R E A L

P R O J E C T

R E N O VAT I O N

The largely recycled kitchen features
clean simple lines, a modern contrast
against the lively colours and distinct
period features.

homebuilding.co.uk 69

The updated living room
window is thermally
efficient and the slim profile
allows natural light to pour
into the living area.

new layout and starting works. Over a period of six months they
were able to reflect on what they could do with the awkward
spaces on a tight budget. “We started off with a £30,000
budget, but we increased it in order to be able to afford new
windows and doors,” says Shanka. “Our front door is a relatively
expensive one. We felt it was an important feature, and aside
from making a good first impression, it’s essential for safety.”
One would assume that modifying the staircase might have
been their main difficulty, but not so. “While our budget was
really small we had a real challenge moving the bathroom
upstairs and I don’t think anyone’s done that in a house this
size without extending,” says Shanka. The couple were able to
do this by exploiting the space that was taken up by an existing
cupboard, located between the two upstairs bedrooms and
some of the area under the roof.
“We have a butterfly roof that basically dips in the middle,”
explains Shanka. “We went up slightly into that roof area and
added some steps, which meant that we took up less floor space
and used the area within the taller section of the roof.” By
stepping up into the loft above a sloped ceiling we were able to
gain floorspace for the bathroom without eating up too much of
the existing space.
MAPPING OUT
The renovation, which included reconfiguring the ground floor,
was a difficult concept for the builders to grasp and most said it
couldn’t be done. “As architects, we’d made our calculations and
knew we could do it,” says Shanka. In the end, Shanka and Walter
controversially chose the cheapest builder they could find to
carry out works. “Because we were going to be on site we knew
that we could mark everything up for the builder as well as give
them working plans.”
A feature of the first floor that Shanka and Walter are both
pleased with is the cork flooring, which gives them a versatile

70 homebuilding.co.uk

covering that’s insulating, naturally resistant to mould, mildew
and termites — and also highly fire-resistant. To save money
they fitted it themselves. “It’s soft underfoot and comfortable
to sit on,” says Shanka. “It runs throughout the first floor, with
no threshold strips. We also found that by choosing a pale green
cork for the bathroom we could use it to define and separate the
different spaces.”
FINISHING UP
All the flooring on the ground floor was replaced and the
material they chose to install was bamboo, which proved more
challenging to work with. “It wasn’t easy to cut and in hindsight
we’d have invested in better tools,” explains Shanka. “We used a
cork underlay below and used a levelling screed on the concrete
portions of the floor.”
While the builder knocked through to the kitchen,
completing the major structural works, a subcontractor was
engaged to update the plumbing and electrics. For the ground
floor, Shanka and Walter have reclaimed as many elements
of the existing property as possible. They’ve retained all the
existing kitchen units, adding new front panels. Upstairs,
too, they’ve upcycled some of the kitchen units to create a
bathroom cabinet.
Despite the constrictions, Shanka and Walter opened up and
modernised the whole house while retaining its character. For
instance, the panelling in the main bedroom was there when
they moved. “We decided to keep it,” says Shanka. “It just gives
it character, but we painted it and it looks completely different.”
Playing with different colours has enabled an enhancement
of their design in an affordable way. “I think my love of colour
actually comes from my heritage,” says Shanka. “Walter is
Spanish and I’m Sri Lankan. I believe paint is underestimated
as a material. If you don’t have the budget, paint is a really good
alternative to create that kind of visual impact.”

R E A L

P R O J E C T

R E N O VAT I O N

As well as creating a striking
focal point, the powder-coated
metal of the staircase provided a
means for the plants to climb.

homebuilding.co.uk 71

t h e

p l ans
SUPPLIERS

BEDROOM

BATHROOM

ARCHITECTS WSMS Studio:
www.wsms-studio.com

BEDROOM

ENGINEER HCH Consulting:
chunhui.hua@hchltd.co.uk
BUILDER Lays Construction:
www.laysconstruction.co.uk
FIRST FLOOR AFTER

WINDOWS Aspire Bifolds:
www.aspirebifolds.co.uk

BEDROOM

TILES Total Tiles:
www.totaltiles.co.uk

BEDROOM

CORK FLOORING Siesta Cork:
www.siestacorktiles.co.uk
DOWNSTAIRS FLOORING Simply
Bamboo: www.simplybamboo.co.uk
FIRST FLOOR BEFORE

SELECTED COSTS
STAIRS £2,000
KITCHEN

LOUNGE

WC

STUDY/OFFICE

DOOR £5,000
FLOORING £2,000

DINING AREA

HEATING £1,000
ELECTRICS £1,000
GLAZING £12,000

GROUND FLOOR AFTER

WALL REMOVAL £1,000
PLASTERING £1,000
KITCHEN

LOUNGE

WC

MAIN
BATHROOM

DINING AREA

GROUND FLOOR BEFORE

spotlight on: Bespoke Staircase
The stair design was a joint effort by Shanka and Walter,
and they produced detailed drawings so that their metal
worker Matt Kidner could form this in his workshop as
it was something his team had never done before. Shanka
and Walter maintained the central position for the stairs,
but they changed the direction of the bottom three steps
to establish a better flow internally and a good connection
with the kitchen. Matt Kidner worked to deliver the
architect’s vision by designing in the complicated,
hidden fixings for the balusters, allowing the balusters to
‘disappear’ into the ceiling. “The design was very smart
and allowed us to fix into the existing structure with the

72 homebuilding.co.uk

clear lines,” says Shanka. “It’s the portion of the design
that’s hidden but essential to the vision.”
“Turning the steps around allowed us more space in the
kitchen, too, and created a natural continuation from the
entrance,” says Shanka. “The whole concept of the stair
was related to this idea of flows and transitions.”
To create the stairs, they used elements from the
existing timber structure and worked with a close
metalworker friend to realise the turns at the bottom.
The balusters and curved banister were also made in
powder-coated steel and were finished in a dusty pink
and mint green.

R EA L

74 homebuilding.co.uk

PROJECTS

This stunning selection
of projects shows how a
sensitive design approach
yields the best results when
bringing characterful historic
homes up to 21st-century
living standards

Introducing
natural light

WORDS: REBECCA FOSTER IMAGES: ADAM SCOTT

This Georgian-era home was in terrible
condition when Turner Architects were
brought in to make it liveable again. “The
house was leaking and had been left empty
for more than 10 years,” says Paul Turner,
director at the practice. “Our goal was to
uncover the existing features and reinstate
the original layout.” The project also sought
to expand the footprint of the property via a
new rear extension, allowing the communal
family areas to be relocated to the back of
the house.
The extension was conceived around an
internal courtyard, which provides a serene
outdoor space at the heart of the house.
This design feature also helps channel
natural light into the centre of the floorplan,
preventing rooms at the back of the original
period property from feeling gloomy and
light locked. “As well as re-establishing the
layout so there are two good rooms on each
floor, the new plan allows for flexibility and
changing uses as the owners’ needs evolve,”
says Paul. “For instance, the lower-ground
floor could be used as a studio flat, separate
from the rest of the house, if needed.”

homebuilding.co.uk 75

R E A L

P R O J E C T S

IMAGES: ANDY STAGG

New lease of life

Paul Archer Design developed the
plans for the transformation of this
late-Georgian home in south London.
When the owners purchased the Grade
II-listed property it needed serious
attention as the front of the structure
was pulling away from the back.
However, any changes to the fabric of the
house required listed building consent.
“The main reason for the listing is to
preserve the character of the square,
but the special status also covers any
changes to the inside or outside of the
house,” says architect Richard Gill, a
director at the practice. “As soon as you
want to alter anything that comprises
the historic fabric of the building – such
as windows, walls and chimney breasts –
then those elements are protected.”
In addition to the complete renovation
of the property, the project also
encompassed the construction of a glass
infill extension and a contemporary
garden studio. “The infill extension is
formed from structural glass, which rests
on steel brackets hidden in the wall,”
says Richard.
The extension accommodates a
spectacular light-filled kitchen-diner,
which exudes a crisp, contemporary feel.
Though the rest of the house has been
brought up to 21st-century standards,
many of the original features have been
retained to provide a glimpse into the
property’s rich history.

homebuilding.co.uk 77

R E A L

The perfect blend

IMAGES: MARTIN GARDNER

This eye-catching metal and timber-clad extension to a
Georgian vicarage in Hampshire showcases a stunning blend
of traditional and contemporary architectural styles. Designed
by Adam Knibb Architects the new structure replaces a
poorly maintained conservatory that was added to the house
retrospectively and didn’t make the most of the views or
connection to the garden. “We looked to carry out as little
demolition to the existing property as possible,” says Adam
Knibb, director at the practice.
The corner extension has been designed to stand apart from
the historic exterior of the original building, which dates back

P R O J E C T S

to the 18th century. “Externally, the first-floor timber fins look
to provide a contemporary aesthetic while the powder-coated
aluminium cladding below creates a clean and crisp finish,” says
Adam. “The final outcome, although contemporary in form,
blends in harmoniously with its surroundings and is respectful
of the Old Vicarage’s character.”
On the ground floor, a sun-soaked open-plan kitchen-diner
has been thoughtfully incorporated and carefully linked to the
existing floorplan. Large corner sliding doors maximise the
connection to the picturesque garden. The upper level of the
property’s extension accommodates a new en suite bathroom
and dressing room.

21st-century update

reception rooms on the ground floor would allow them to
benefit from tall floor-to-ceiling heights, plenty of natural
light and pleasant views across the crescent and gardens.
“At first the application for listed building consent was refused,”
says Lizzie. “We presented a robust case and at the final hour
the application’s recommendation was overturned and listed
building consent was granted.”
The new kitchen serves up the perfect balance between
modern and period details, featuring an impressively
contemporary open-plan layout with a central island. Historic
features include the intricate ceiling plasterwork, plus
traditional sash windows and shutters.

IMAGES: ADAM SCOTT

Fraher & Findlay Architects are behind the transformation of
this double-fronted Grade II-listed Georgian house in south
London. “Our brief was to reinterpret the internal layout of the
house for a growing creative family,” says Lizzie Fraher, design
director at the practice.
One of the main challenges was moving the kitchen from
its traditional lower-ground-floor location to the level above.
“Traditionally, the kitchen was located in the ancillary spaces
on the lower-ground floor, but these had a poorer quality of
natural light and a more limited head height,” explains Lizzie.
Moving the kitchen, dining and living spaces up to the main

homebuilding.co.uk 81

R E A L

P R O J E C T S

Townhouse transformation

IMAGES: CARL BLANK

Situated in a Shrewsbury conservation area, this
handsome Georgian townhouse was revolutionised
by Base Architects. Though the property was in good
condition when the practice was brought into the project,
a series of historic remodelling works had resulted in
a poorly conceived interior layout that didn’t meet the
occupants’ needs. “The house was built on a significantly
sloping bank, leading to a poor connection with the rear
garden,” says Harry Reece, director at the practice.
The gradient of the land was an important factor in
the design for the new lower-ground floor layout, which
includes a single-storey rear extension that forms a better
connection with the garden. The contemporary new
structure stands apart from the traditional architecture
of the original building, though carefully conceived
design details have been woven in to ensure a harmonious
marriage between old and new.
“We incorporated steel cladding finished with a burnt
orange, oxidized look. This complements the Georgian
handmade bricks on the rear elevation of the house,”
says Harry. Though the lower-ground floor is brimming
with sleek, modern finishes, the ground floor reflects the
property’s traditional Georgian origins.

homebuilding.co.uk 83

IMAGES: JIM STEPHENSON

Painstaking restoration

Inlaid marble fireplaces, exquisite plasterwork and traditional
panelling are just a few of the ornate period features that give
this Grade II-listed house its character. The property, which
dates back to the 1760s, had undergone years of neglect in the
form of poor maintenance and various unsympathetic changes
that damaged the building’s historic character.
Conservation experts Daab Design were appointed to
undo the years of ill-conceived alterations and restore the
house to its former glory. “Original lightwells had been
blocked to create additional areas, large rooms had been
subdivided into offices and corridors, resulting in a lack of
natural light and poor-quality spaces,” says Anaïs Bléhaut,
director at the practice.
The clumsy single-storey additions at the back of the
house were removed and rebuilt in London stock brick to
accommodate a new top-lit stairway. The flight provides a vital
link between the lower lounge, cellar and utility areas to the
kitchen and living space on the floor above.
A team of professional craftspeople were brought in to
rejuvenate the property’s original features, too, restoring
the masonry, ironmongery, plasterwork, panelling and
woodwork. “We carried out extensive poultice cleaning of
all the plasterworks and fine ornaments and careful moulding
and replication of ceiling plaster ornaments,” says Anaïs,
“plus the surgical repair of the stone cantilevered staircase
and Portland stone landings.”

A D V ERTORIA L

Transform
your home

Create your dream space with these stunning bespoke bifold doors

C

onsidering how prominent doors and windows are in
a property, it’s crucial to not just get the best possible
products, but also to engage with an experienced
and reputable business. That’s why Express can bring so
much value and expertise to any home renovation project.
Transforming homes across the UK since 2007, you can
see their remarkable projects for yourself at their website
and how their premium glazing can help you to create a
truly stunning home.
Thanks to their world-class manufacturing base and
extensive experience helping create beautiful homes,
Express are ideally suited to supplying any bespoke bifold
door, sliding doors and window solutions for smaller
homes — including replacement installations. They’re also
equally adept and experienced at providing complex glazing
solutions for luxury homes.
Whether you’re renovating or extending, planning to
refurb or replace, Express Bi-Folding Doors can bring an
element of luxury to any space – regardless of size – to
create your perfect space. So if you’re looking for ideas,
inspiration or assistance in creating your own dream
project, visit their website or one of their showrooms.
Express value every visitor and have their team of specialist
experts on hand who will comprehensively understand your
requirements to help inform your own choice of product to
suit your own individual project.
Visiting an Express showroom makes those key decisions
easier because drawings and ideas are taken from your own
plans and cleverly displayed in life-size houses and interiors
that are specially built to recreate the domestic settings for
which they’re destined!
• Visit the Express website at www.expressbifolds.co.uk
or visit one of their showrooms in Weybridge, Romford,
Leeds or Glasgow.

homebuilding.co.uk 87

EX P ER T

A D V ICE

12 things to
consider when

Can’t decide where to live during your project?
Our top tips will help you make the right choice

S
JO MESSENGER
Is assistant editor
on Homebuilding
and Renovating
magazine and
currently renovating
a 1930s semi.

88 homebuilding.co.uk

hould you stay or should you go?
It’s the million-dollar question
that faces many renovators and
self-builders. While living on site
will save you the cost of renting
somewhere while the work is being carried
out, most builders will tell you that a job
is quicker, more efficient and therefore
probably cheaper if they can tackle the
project in one go.
Living on site has other advantages,
though. “You’ll be able to keep a close eye
on progress — being on site 24/7 means
you’ll be available if your builder has
any questions,” says Rebecca Foster, an
experienced homes and interiors writer.
Being on site every day meant that James
and Sophie Edmondson could deal with
issues as they came up during their selfbuild project. “A window arrived and I could
immediately see we’d underestimated the
size needed,” says James. ‘It was simple
enough to send it back before the carpenters
fitted it, whereas rectifying it at a later date
would have been more expensive and time
consuming.” Before you take the plunge,
take time to weigh up the pros and cons.

Staying on site in a caravan

If your plot is large enough, buying or renting
a caravan is a popular option for self-builders.
Check that site access is wide enough, otherwise
you might have to crane it in at an additional
cost. Ensure you can get insurance cover for your
caravan and contents — a self-build insurance package
should be able to provide this. Buying a new caravan is
an option but a secondhand model will make less of a
dent in your budget. Used caravan prices have increased
due to demand during and after the pandemic, but it’s
possible to find a really good-quality 4-6 berth model
only a few years old for £10,000–£15,000. You also have
the option of reselling it once your project is complete
to recoup costs. “We looked at rented accommodation,
but it was three times the amount we paid for the
caravan,” says Sue Maaz, who, with husband Dick, selfbuilt an oak-frame house in Wiltshire.
If your project is going to take far longer than several
months, a static caravan – while more expensive than
a towing model – comes with the benefit of more space
and dedicated bedrooms. You may need to inform the
planning department of your intention to live in a static
on site while you build — as well as organise council tax,
services, telephone and internet access in advance. On
the plus side, you will need to arrange all these to the
site anyway, for connection to the house.

IMAGE: FUTURE

Invest in a
garden room

Building a more
permanent structure
like an outdoor room
or log cabin offers a similar
solution to a caravan, but can
be repurposed once your build
has been completed. “We had
a client, who opted to move
into a garden studio on their
property during the renovation
of their main residence,” says
Sean Ronnie Hill, director
of architects practice Rise.
“Initially a modest structure,
it was upgraded to make it
habitable and comfortable for
the duration of the renovation.
It not only offered a retreat from
the chaos of construction, it also
ensured that the homeowner
was readily available to address
any unforeseen issues. Postrenovation, it was repurposed
into a home office and a gym.”

Living
in the
property

If you’re thinking
of staying in your
home during a renovation or
while adding an extension, you
should be mentally prepared
and know what to expect.
Depending on the project, you
can choose to live on a separate
floor to the work being carried
out, or seal off rooms for the
duration of the build. You
might find you have to decamp
and move around the property
as the work progresses. The
benefits mean you will save
money and the property will be
more secure, but you shouldn’t
underestimate the upheaval
and mess involved. “The main
issue with living on site for any
client is dust and dirt,” says
Melissa Robinson, architect
and director of MW Architects.
“There is no way to avoid it,
however many sealed doors
and taped joints there are,
it will still get into the areas
you’re living in.”

IMAGE: FUTURE

Living on site in a
caravan can save
on the cost of
renting a house,
but do consider
whether you will
be comfortable
living in it
throughout the
winter months.

Building a
bespoke garden
room could give
you a temporary
living space for
the duration
of your house
renovation or
build, and it
could then be
converted into
a home office
or gym once the
main house is
completed.

homebuilding.co.uk 89

Storage is key

Clear furniture and personal items into
a garage, with friends and family, or into
storage, keeping just the essentials. You
won’t be needing winter coats during the
summer or garden furniture in January. “If you
use a storage facility, make sure it has a flexible
approach to access if you need to get anything,” says
Michelle Harris who renovated a Victorian cottage in
Hertfordshire. “Also take the opportunity to get rid
of stuff you don’t use as you can end up paying more
in storage costs than the items are actually worth.”

IMAGE: FUTURE

Build good relationships

For a smooth running project, set out ground
rules and establish clear boundaries such as
what time the builders can start and finish
and agree their entry and passage through
your home — minimising movement will help dirt being
trodden everywhere. Give them a key so you don’t have to
keep letting everyone in and out. Have regular meetings
and create a schedule of works so everyone is up to speed
with expectations and how things are going. Providing
simple things like a kettle, tea bags and biscuits for the
different trades to use will go a long way, too. “Decide with
your builder in advance who is responsible for tidying up
the various areas of the house,” says Rebecca. “Usually, the
trades you bring in will be responsible for clean-ups and
disposal of rubbish in areas where they’ve been working.”

Pack away as many of your
belongings as possible, only leaving
the essentials you’ll need for the next
few months in the house.

Health and safety
You need to have your wits about you constantly when living on
site — from the initial hazards of demolition and propping up walls
to wiring and plumbing further down the line. Ensure the site is
as clean and tidy as possible and have regular updates with your
contractor about risks and the prevention of accidents.
Plan for
children
and pets

With ladders and stacks of
bricks, living on site might
feel like an adventure playground for
children but the dangers of a building
site are ever present and you need
to be able to completely close off the
construction area with partitions
or hoarding. The noise of drills
and demolition work can frighten
animals. If you have pets, is there
someone you can leave them with
during the day when the noisy work
is being done?

Sleeping arrangements

A house with no home comforts can be a
challenging space to sleep in and lie-ins will be
a thing of the past. Try to give everyone in the
house their own space, no matter how small,
and store clothes and belongings in transparent storage
boxes so their contents are easily visible. “I always made
sure my bedroom was clean and tidy so I had a space to
escape to at night when I was shattered and desperate
for some home comforts,” says Michelle. “And ensure the
windows are covered where you are sleeping — even if it’s
with cardboard or an old sheet. Not just for privacy, but
to keep out the glare of early-morning sunlight.”

homebuilding.co.uk 91

IMAGE: DAVID MEREWETHER

E X P E R T

A D V I C E

L I V I N G

O N

S I T E

If you have room, creating
a temporary kitchen/utility
space somewhere in your
home can make living on
site far easier.

Basic living
requirements

Talk to your builder before
the project commences and
arrange with them to keep
your existing kitchen and bathroom
usable for as long as it’s feasibly possible.

If they have to be ripped out, factor
in a temporary kitchen that has some
storage and also a makeshift worktop,
plumbing for a sink and washing
machine, as well as electrics for some
basic cooking appliances — even if those
are just a microwave and air fryer. The

Secure the site

Make this a priority before your project
starts, securing the perimeter with
fencing or hoarding. If someone strays
onto your land and injures themselves
you may be liable. Install security lights to help deter any
intruders. Restrict delivery of materials only when you
need them — valuable metals like copper and lead as well
as kitchen and heating equipment are a magnet to thieves.
If you have scaffolding, secure access points and consider
installing a scaffold alarm system. Keep power tools and
machinery locked away when the property is empty. Store
any valuables off site.

Dealing with bad weather

Long warm summer days with plenty of
daylight might be the obvious time to carry out
building work, but this isn’t always possible
and extreme weather conditions such as
torrential rain can bring work to a halt and turn your site into
a mud bath — even in August. Make sure the spaces in which
you’re living are warm and dry and materials aren’t exposed to
the elements.

ideal solution would be to have a new
kitchen or bathroom fitted before the
existing ones are ripped out, but that’s
only possible if they’re resited elsewhere
in the house. Finally, confirm with the
builder that they’re providing a portable
toilet on site for the workers.

Don’t be afraid to
ask friends and family
for the odd favour
Living among all the
building work can soon
feel overwhelming, like there’s no
escape. You’ll constantly be reminded
of everything there is still to do and
be tempted to work day and night to
pull ahead. Accept offers of dinner (or
a bath!) at a friend’s house – or enjoy
an occasional family day out – so you
return refreshed and motivated to
carry on. If you know you’re going to
be without a roof for example, or the
power is going to be off for a few days,
maybe plan a weekend away. Adhering
to a schedule of works will allow you to
plan ahead for such times.

homebuilding.co.uk 93

COS T

CLINIC

IMAGES: PHOTOWORD LTD

B U I L D

ADDITIONAL CONTRIBUTIONS BY NATASHA BRINSMEAD

Thinking of getting a conservatory?
Here’s a handy price guide to show you
how much you can expect to pay

W

hen considering
adding more room
to their homes,
people often think about the cost
of a conservatory first. Adding a
conservatory, orangery or garden
room is one of the best ways
to increase the size of a home
because of the fact that it provides
a bright, unique space that can be
used for a variety of reasons. There
are several options, including sun
lounges, playrooms and eating
areas, which are popular uses that
enable customised options.
For individuals who are

94 homebuilding.co.uk

TIM PHILLIPS

Is a quantity surveyor and runs Quantiv.uk,
with almost 30 years of experience across
the commercial and residential sector.
@timphillips71

looking for more room, the
choice between an extension
and a conservatory sometimes
comes down to cost — each
option has a distinct set of pros
and cons. Nevertheless, those
who prefer to keep expenses
under control are often attracted
to the appealing feature that
conservatory costs are typically
lower than those of extensions at
£2,000/m2 or loft conversions
at £1,100/m2, and much quicker
in terms of build time.
We’ll explore expected costs for
different types of conservatories.

We also highlight factors that
could break your budget, as well
as providing useful information to
help you make your decisions.

COST CONSIDERATIONS
When researching ways to
increase space in the home,
always consider how much the
new room will actually add to the
value of your home. This is not just
a consideration for those who plan
to ‘flip on’ the property, even those
who plan to remain still want their
new conservatory to increase the
total value of their home.

TYPICAL COSTS

Building a fully equipped,
straightforward uPVC lean-to
conservatory that is 3m x 3m is
affordable, with an average price
of £12,000. Fully fitted costs for
a luxury hardwood conservatory
with the same measurements and
features can be £30,000 upwards.
Estimating the exact cost of a
conservatory is difficult because
there are so many variables.
To appreciate the possible cost
of your conservatory, you must
have a full understanding of these
factors, which include:
Material uPVC, aluminium
or timber
Size and shape Rectangular,
circular or semi-hexagonal
Glazing Standard, toughened,
solar, low-e, noise-reduction and
other glazing standards
Installation Professional install
or DIY
Location Prices will vary
depending on where you live
Planning permission or
Permitted Development There
will be different costs for each
Additional features For
example, rooflights, sliding doors,
blinds and heating.
While the choice of building
materials has the greatest impact
on cost, you should never sacrifice
on material quality. The final look
of the conservatory is greatly

influenced by the materials that
are selected. Making a wise
decision means avoiding cheap,
flimsy alternatives that could
reduce the value of your home.
In addition to materials, careful
thought should be given to aspects
such as the type of glazing and
whether a solid or glazed roof
is required. Determining these
factors is essential in establishing
a thorough calculation of
conservatory costs as it recognises
their significant impact on the
project dynamics as a whole.
It is the responsibility of
homeowners to carefully review
the inclusions before requesting
quotations. Choosing ‘amazing’
offers may be tempting, but you
should be wary — these offers
frequently leave out important
details like dwarf walls, the
conservatory base, and the
installation procedure. Careful
examination of quotations ensures
you’ve an in-depth understanding
and prevents misunderstandings
that may jeopardise the validity
and financial viability of the
conservatory project.

UPVC OPTION

An affordable option is uPVC — it
is always cheaper than other
materials, i.e. wood or aluminium.
Its widespread use indicates how
well liked it is as the preferred

A WISE
INVESTMENT
While a
hardwood
conservatory
usually costs
more than
other options,
its durability
and low
maintenance
can mean that
it is money
well spent.

material for many homeowners.
It is advised that anyone thinking
about getting a uPVC conservatory
choose one with a steel frame for
reinforcement, as this will ensure
that the structure is sturdy.
A 9m2 white uPVC conservatory
with a polycarbonate roof, lean-to
style, with full side panels and
a pair of French doors, should
start from £7,500, as long as
you fit it all yourself and build
the base and foundations. Other
all-inclusive amounts (as shown in
the table overleaf) include supply,
manufacture, delivery, installation
of the conservatory, the base,
any brickwork, foundations and
any required damp-proofing. This
tends to be the more popular
build option. There are many
options to consider, taking into
account the number of inclusions
and exclusions in the quotation,
installation requirements, and any
differences in quality. Economies
of scale is also a factor.

ALUMINIUM OPTION

Examining the range of prices for
aluminium conservatories reveals
a significant variation. Although it’s
a long-held belief that aluminium is
less expensive than oak, this needs
to be carefully evaluated, especially
when it comes to conservatories.
Stunning modern glass buildings
in aluminium can certainly exceed

IMAGES: PAUL HIGHNAM

The additional value of a
conservatory depends on a
number of variables, such as your
location, the kind of home the
conservatory would complement,
its features, and its planned use.
A well-built conservatory can
increase the value of your house
by 5%–15%, depending on the
quality of the construction and the
conditions of the local housing
market. Speak to a local estate
agent to check the added value.
Knowing the property values
in your area is important. Being
cautious in this way protects
against the possibility of spending
on a conservatory that wouldn’t
result in a corresponding rise in
the value of your home.

homebuilding.co.uk 95

uPVC conservatory*

Average cost

Cost £/m2

Lean-to polycarbonate roof excluding
base 3x3m (DIY)

£7,641

£849/m2

Lean-to polycarbonate roof including
base 3x3m (fully installed)

£12,142

£1,349/m2

Victorian with a polycarbonate roof
4x4m (fully installed)

£17,460

£1,091/m2

Victorian with a self-clean solar glass
roof 4x4m (fully installed)

£20,539

£1,283/m2

*Varying build & style options. Excludes VAT.

IMAGES: PHOTOWORD LTD

WOOD OPTION

the costs related to hardwood
conservatories.
Aluminium is an excellent
material choice for conservatories
because of its thin sightlines, low
maintenance requirements and
excellent thermal efficiency. Costs
for aluminium conservatories are
typically 25% more than those
for uPVC conservatories. This
cost difference is a reflection of
the distinctive qualities and visual
appeal that aluminium offers to a
conservatory building, confirming
its position as a strong alternative
with careful consideration of costs.
Some typical aluminium prices
are shown in the table on the right.

96 homebuilding.co.uk

ADDING
VALUE
Before you
choose a new
conservatory,
always try
to work out
how much it is
going to add
to the value of
your home.

The type of timber selected for the
frame affects the cost of a wooden
conservatory; softwood is a lessexpensive option than hardwood.
Wooden conservatories, especially
those made of hardwood, are
usually the most expensive. They
are also often referred to as
orangeries, sunrooms or garden
rooms, which places them in a
different bracket to uPVC and
aluminium conservatories.
Even though hardwoods such
as oak can be more expensive
initially than their softwood
equivalents, they frequently
turn out to be wise investments.
The entire value of hardwood
conservatories is enhanced
by their longevity and lowmaintenance needs. Also, oak
conservatories are a great way
to improve the long-term appeal
and desirability of traditional-style
or period homes by boosting their
architectural aesthetics.
Most timber frame conservatory
companies can design to your
budget, unlike uPVC conservatories
which are more popular and sit

in a competitive market, timber
conservatories are usually fully
bespoke and entirely unique,
so it’s challenging to provide
approximate costs.
Nevertheless, knowing how
much your conservatory will cost
ahead of time is beneficial. The
Oakfields Group estimates that,
without construction work, the
price range for a high-quality
oak conservatory is between
£2,500 and £3,500/m2. This
variance depends on a number
of factors, including the design’s
complexity, degree of detail and
particular requirements.
For instance, the bare minimum
cost of an oak frame sunroom or
conservatory may be £2,500/
m2. In the case of a conservatory
of 20m2 in total, the projected
cost would be roughly £50,000.
The intricate details and special
qualities of the building have an
impact on this pricing structure,
highlighting how crucial it is
to carefully analyse the design
features and specifications in
order to calculate the total cost.
James Underwood, a regional
design consultant at Oakwrights,
confirms that an authentic estimate
for a 20m2 oak frame garden
room would start from £2,500/
m2, plus VAT. This cost ensures a
build of above-average quality.
Notably, you should consider that
the average cost tends to decrease
for larger builds, due to economy
of scale, given that costs are
distributed over a larger footprint.

HIDDEN COSTS

When you are calculating your
conservatory costs and prices,
be sure to factor in the following
essential factors:

Aluminium conservatory* Average cost
Victorian with a tiled roof
4x4m (fully installed)
£32,000
Victorian with a glass roof
4x4m (fully installed)
*Varying build & style options. Excludes VAT.

£24,600

Cost £/m2
£2,000/m2

£1,538/m2

B U I L D

C L I N I C

regulations, which will incur a fee.
It could cost extra to make sure
you adhere to these regulations,
but doing so is necessary for a
safe and legal conservatory.
Planning permission It’s
important to determine whether
your project requires planning
approval, or if it falls under
Permitted Development. If needed,
budgeting for associated planning
fees guarantees a seamless and
compliant building process.
By taking these factors into
account, you’ll make sure that
your conservatory fulfils your
functional and visual expectations
in addition to assisting you to
develop a more accurate budget.

UNDERSTANDING
YOUR QUOTE

Examining the following factors
in your conservatory quotation
is essential for a thorough
understanding of what’s included
and helps your budgeting:
External doors The price
and practical attributes of
various door types, i.e. bifold,
French or sliding, all differ.
Your conservatory’s general
architecture, accessibility and
aesthetics may all be impacted
by your decision.
Glazing specification It’s
important to fully understand the
kind of glazing that’s mentioned
in the quote. Polycarbonate,
standard, self-cleaning, solarreflective and noise-reducing
glass are among some of the
options, and their costs and
functionalities vary. This has an
impact on your conservatory’s
efficiency and comfort.
Groundworks This comprises
excavation, foundations and
site preparation. To fully grasp
the project’s scope and prevent
unforeseen expenses, it is
important to confirm whether
groundworks are included in
the quotation.
Base The conservatory’s base is
an essential part. It is important to
know if the quote includes base
construction so that the foundation
is appropriately budgeted for.
Dwarf walls These are a

THE RIGHT
FLOORING
Your choice
of flooring is
important.
It should not
only suit the
style of your
conservatory,
but it should
be made of
a material
that suits the
intended use.

feature of some conservatories.
Verifying if the price includes the
construction of these walls
is crucial.
Heating As previously mentioned
above, conservatories usually
need a separate heating system.
Checking whether heating is
included in the quotation assists
in guaranteeing a cosy space all
year round.
Rooflights If your conservatory
has rooflights, it’s critical to
know whether they are manual,
automated or fixed. Although
they could cost more, automatic
rooflights might offer more
ventilation and light control.
Delivery and installation
Verifying if delivery and overall
installation is charged extra or is
included in the quote guarantees
that the price is transparent
overall. If these charges are not
taken into consideration and
your DIY skills aren’t the best, then
this may come as a surprise.
By carefully examining these
factors in your conservatory
quotations, you can make wellinformed decisions, steer clear of
unexpected costs and make sure
that all of your requirements are
met in the finished product.

IMAGES: PHOTOWORD

Heating To ensure year-round
use and avoid discomfort during
the winter months, make sure your
conservatory is well insulated
and has a heating system that is
effective. Popular methods are
electric or wet underfloor heating.
Flooring Your choice of flooring
affects the room’s appearance
and usability. It should be strong
and appropriate for the intended
use and it should blend in with the
overall style.
Window, roof and door
shading Conservatories get hot!
Appropriate shading protects
furniture and occupants (including
pets) from harsh sunlight and
assists in temperature control. It is
a simple approach to creating a
cosy atmosphere.
Linking to house If you’re
joining the conservatory to the
main home, you might need
to make structural alterations,
including adding lintels for
support. This may have an
impact on the overall design as
well as the budget. Accessibility,
aesthetics and the flow between
the home and conservatory
are all impacted by the doors
that lead from the house into
the conservatory. Think about
the materials and style that
complement the overall design as
well as your personal tastes.
Decoration The conservatory’s
overall environment is influenced
by its decoration. The area will
live up to your standards if you
factor this into your cost estimate
from the start.
Lighting This is important for
ambience as well as functionality.
Well-designed lighting can
improve the conservatory’s
usability and visual appeal.
Hopefully your conservatory is
oriented to receive sunlight and
only require lighting at night.
Electrical It is essential to
consider any new electrical work
in your costs, such as outlets or
lighting, you may also need it
for electrically operated blinds or
underfloor heating.
Building Regulations Larger
conservatories and those with
solid roofs will require building

C O S T

homebuilding.co.uk 97

GR E EN

A D V ICE

THE
HEALTHY
HOME
PART TEN:

FLOURISHING
HOMES
Greenery can have a huge impact
on the look and feel of our indoor
spaces, so Oliver Heath discusses
the dos and don’ts of introducing
plants into your home so you can
maximise their benefits

B

y now, we all know the
aesthetic value of bringing
greenery into our homes,
but what about the other benefits
of indoor flora? When considered
correctly, planting can be an
impactful way of enhancing
wellbeing within the home
— removing toxins and CO2,
producing oxygen, even modifying
temperature and humidity.
Plants are literally mini green
superheroes!
There are, however, barriers to
incorporating plants in domestic
environments — from lack of
space to the absence of a green
thumb. We’re going to cover
some of the most effective ways
of troubleshooting the issues and
more, to ensure that your home
really flourishes.

98 homebuilding.co.uk

OLIVER HEATH

Is an expert in biophilic and sustainable
design, and in this series he will help you
to understand how to create a healthy
home. Oliver Heath runs Oliver Heath
Design, a sustainable architecture and
interior design consultancy and practice.

CHOOSING THE RIGHT
HOUSE PLANTS

First, you need to ensure that
wherever you’re placing interior
plants is a space where they
can survive. As discussed in our
previous article on light, greenery
that needs high levels of sunlight
should be placed no further than
one metre away from glazing, and
where this is lacking there needs
to be an appropriate amount of

replicating artificial light. Some
plants, such as ferns, prefer lowlevel lighting and are a great way
of injecting greenery into darker
spaces such as rooms below
ground level or those that are
north facing.
When considering the types
of plants you want in your home,
also take into account how often
you’re going to be able to water
them — and be honest with
yourself! Over or under watering
a plant is an easy way to put any
flora in poor health, even the more
robust species. If you’re keen to
invest in your indoor setup you
can purchase self-watering and

T H E

H E A LT H Y

H O M E

self-irrigating planting systems,
ranging from simple drip feeders
to complex systems. Whether
your plants are relying on you or
an automated system to water
them, it’s worth investing in a soil
moisture meter to ensure you’re
not being a little too generous or
frugal with your H2O.

LOOKING AFTER
YOUR PLANTS

While plants are an excellent way
of bringing nature into our homes,
there are a few things to note prior
to bringing greenery indoors.
Plants, like most living things,
require water to survive and
they can impact humidity both
positively and negatively.
Ensure that plants have the
proper potting medium to
drain water efficiently with a
little gravel at the base. Where
possible, have stones over the top
of the potting mix to safeguard
against soil moisture negatively
contributing to humidity levels.
Planting can also be used to
impact household acoustics in
the same way as furnishings
and fixtures. Dampen sound in
rooms and create an oasis of calm
by using large leafy plants such
as monstera where you want a
quieter space. Make sure that if
you’re bringing in these larger
climbing plants you also have the
necessary structure to support
them as they grow, such as stakes
or a moss pole.
Growing plants also need to
be repotted from time to time, to
avoid issues such as root rot and
soil compaction. Interior plants
are also impacted by seasons and
the time of day. So research the
best month or time of day to repot,
or even when to water a plant as
each species may be different.

SPACE SAVERS

Many of us struggle to navigate
the layout of our homes due to a
lack of space, and quite often this
is even before we’ve factored in
the addition of indoor planting.
The best way to approach this is to
start to consider the ‘non-spaces’

— sometimes the most impactful
place for a plant isn’t the floor, but
could be on the top of furniture,
fixed to the wall or suspended
from the ceiling.
Incorporating a planted picture
frame, for example, many of which
come with their own easy-tomanage irrigation systems, is an
effective way of both introducing
planting in a space-saving manner
and decorating blank walls.
A scaled-down version of the
green walls you might see in a
hotel lobby or retail space, these
wall-mounted planters are readily
available at different sizes and
from different manufacturers.
To really create a sense of
wonder, and if you have the ceiling
height to do so, consider hanging
planting. This can be incorporated
through a simple macramé
planter basket, or a more complex
hybrid approach of planting
within light fixtures, which is
becoming increasingly popular in
homes where space is lacking.

GIVE IT A GO

There are many ways to approach
planting in the home, but what’s
paramount is that whatever you’re
introducing to your space is right
for you and your lifestyle. So
whether you’re a seasoned pro
or a fledgling when it comes to
interior planting, greenery is a
great way of creating a flourishing
home to live and grow in.

VERDANT LIVING
Top: a plant subscription box – such as one from
Leaf Envy – can be a great way to start your
houseplant journey.
Above: choose your mix of plants carefully to
ensure they are suitable for the light and humidity
levels of your space. These plants are from a
selection at Dobbies.

homebuilding.co.uk 99

EX PER T

A D V ICE

Our expert builder offers his views on
this contentious issue, along with tips
on how to make sure you find a suitably
qualified person for your project

A
BUILDER’S
VIEW
SHOULD BUILDERS
BE FORMALLY
QUALIFIED?

W

hether or not builders
should be qualified is
one of the most talkedabout topics in the construction
world, and has been for decades.
Bizarrely, anyone can walk into a
residential property, say they’re
any trade and start work. This is
why ‘cowboy builders’ get away
with so much. They can give a
homeowner all the talk and madeup references without having ever
even painted a wall, let alone
built an extension. We are not
regulated as an industry, which
I find insane.

Regulating trades

It is different in Germany, Holland
and most of Europe, as well as

ANDY STEVENS

Is an award-winning builder and
broadcaster. You can find him on
Instagram @andystevenstv

North America and Australia.
The only trades here in the UK
who are legitimately qualified
and can self-certify their work are
electricians and gas engineers. So
why on earth aren’t we regulated
across all other trades here in
the UK? Why on earth don’t us
tradespeople have to be qualified
to work in your homes?
It is slightly different on bigger
commercial sites as you must
have a Construction Skills
Certification Scheme (CSCS)
card, which involves an element
of qualification, but it’s not like
it should be. Obtaining one of
these means simply spending a
few hours answering questions
in a classroom, but even this isn’t

regulated and anyone can set
up their own training company to
give out these cards. I have lost
count of the messages and emails
I receive offering me CSCS cards
on the cheap.

The value of trades

So why don’t we have to be
qualified to work in your homes?
In my opinion, this stems from
how the construction industry is
regarded in society. When I was
at school in the 1980s and early
1990s, you were told you had to
go to university to succeed in life or
you would end up in construction.
Today, kids are still told this. My
two children are nine and 11 and
this has already been drummed

homebuilding.co.uk 101

IMAGE: JONATHAN GOOCH

B U I L D E R ’ S

into them. However, some of us are
better vocationally than we are at
sitting exams. I am one of them.
I simply couldn’t do exams and
therefore didn’t go to university.
However, working from the age
of 12 and learning from the older
guys on site gave me incredible
training and life skills.
A career as a tradesperson is
largely still looked down upon
in Britain. I find this very sad as
I am exceptionally proud of the
houses I have built over the years;
the awards I have won for my
outstanding craftsmanship and the
skills I have learnt from far superior
trades. I still look in awe at a lot
of trades and the unbelievable
skills they have. What some
people can do with a trowel,
a bit of wood, some stone etc
should be celebrated. It’s simply
breathtaking! A friend of mine,
who is a plasterer, worked
in Germany for 14 years and
he was staggered that people
celebrated his skill set way more
than they do here in the UK.

Making a change

How do we improve this? The
image of the industry needs to
change to attract and inspire
youngsters who will actually strive
to be in it. With more people
coming in and the industry held
in a higher regard, it might then
make the government look at
us in a different manner. All
apprenticeships should have a

need to start our business with
at least some knowledge of how
to run it.
We have to get rid of the cowboy
builders who take people’s money
and leave a dangerous, halffinished home. This is what gives
the industry such a bad image,
which isn’t fair on the vast majority
of us who are highly skilled. It is
simply staggering that we’re in the
year 2024 and our trades aren’t
regulated in any way, meaning
anyone can set foot in your home
and pretend they’re capable.

Assurances for
homeowners

In the meantime, what can
homeowners do to make sure they
get the right trades in who are
properly experienced and will do
what they say they can do? During
the last few years of talking at
the Homebuilding & Renovating
exhibitions, this is one of the
subjects I speak about most.
First, word of mouth is foolproof.
Your friends, family, work
colleagues and neighbours are
going to tell you the truth about
good and bad builders they’ve
had in. Second, follow your
builder on social media — we
use this as our marketing tool.
It costs us nothing and we can
demonstrate with videos and
photos the quality of our work.
You can build a relationship with
us before you’ve even met us by
following our work on these social

“It is simply staggering that we’re in the year
2024 and our trades aren’t regulated in any way”
centrally regulated qualification
included, so people come out
having achieved a certain
standard and are therefore then
regulated and certified. Part of
apprenticeships should also advise
and teach people how to run a
business including tax, marketing,
insurance, accounting, budgeting,
contracts etc. Around 92% of us
trades will be self-employed at
some stage in our career, so we

V I E W

media platforms. Third, meet us
and ask all the questions you need
to. Finally, go and look at the job
we are on when we’re not on site.
The homeowner is more likely to be
completely honest about our work,
manners, timekeeping and tidiness
if we’re not there at the time.
There are also a huge number
of membership platforms for
tradespeople to join such as
Checkatrade, the Federation of

Master Builders, Mybuilder, Rated
People. This costs quite a bit of
money to be part of, and despite
promises of certain checks, I
personally wouldn’t recommend
them. Just take a look at the way
we all use social media now — my
belief is a lot of these membership
companies could be gone soon, as
us trades won’t need them.
The industry is changing
and moving forward with new
technology, and the ways in which
us trades work and generate new
business is also changing as a
result of that. It’s just a shame we
aren’t getting the backing from the
government to become properly
regulated and centrally certified.
But I believe this will change, and
when it does, it will make our
already amazing industry even
better. Not just for us trades, but for
all homeowners as well.

homebuilding.co.uk 103

EX T EN S ION

MA S TER CLA S S

PROJECT
MANAGING
EXTENSIONS

What’s involved with the role of project managing an
extension, and is this a job you should consider taking
on yourself or is it best left to the experts?

IMAGE: RICHARD KIELY / OAKWRIGHTS

A

re you considering taking
on the role of extension
project manager for your
own build? You wouldn’t be alone
as many people choose to take
charge of their own extensions.
That said, when building an
extension there are some important
considerations to bear in mind
before you make your final
decision. Rather than attempting
to do it yourself, it may make far
more sense to use the services
of a professional who has lots of
experience with the type of project
you’re undertaking. To ensure
your extension runs smoothly
from start to finish, getting the

right person in the role of project
manager can be key.

THE ROLE

Before you even think about
whether project managing your
own extension is right for you, it’s
vital that you understand exactly
what being a project manager
entails and the full requirements
of the role. In short, a project
manager on a build project of
any kind – be that an extension,
renovation or self-build – is there to
coordinate everything and to see
that the extension is completed on
time, within the client’s budget and
to the expected standards.

NATASHA
BRINSMEAD

Is associate editor and
has renovated her own
Edwardian home.

Coordinating a project means
managing the various trades
involved in an extension (builders,
plumbers, electricians, roofers and
so on) to work on each element
of the job at the right time. In
addition, a project manager must
liaise with and organise suppliers
and designers. For example, the
kitchen supplier, glazing supplier
and flooring fitter. They might also

homebuilding.co.uk 105

IMAGE: RICHARD KIELY / OAKWRIGHTS

organise other essentials, such as
skip hire and schedule deliveries
of materials in such a way that
they won’t cause delays or clash
with one another. Finally, they
should also have a great set of
contacts in order to get you the
best possible prices on the
materials and products you want.
Very often, the people who act as
project managers will also have
another role too.
“A professional project manager
(PM) may well have an additional
role in the project, such as being
the architect or quantity surveyor,
for example, but this does not
take away from the skills that they
will bring once they put their PM
hat on,” says leading chartered
surveyor, Bob Branscombe.

TAKING ON THE ROLE

There are many benefits of project
managing your extension as
opposed to handing over the reins
to someone else. “Ultimately, there
are two big reasons to manage
your own extension project: control
and cash,” says Jason Orme, an
experienced self-builder and the
former editor of Homebuilding
& Renovating magazine. “The
control is arguably more important,
because taking on the builder’s
project management role enables
you to ensure every decision

106 homebuilding.co.uk

HIRING
THE TEAM
Phil and Claire
Baker took
on the role
of project
managers for
the extension
of their 1960s
bungalow.
“We found
a very good
local builder
to do the
groundworks,
stonework
and internal
fittings, and
we also
employed
a plumber,
electrician
and kitchen
installer,”
says Phil.

is yours to make. That’s a big
win when it comes to the larger
decisions – such as choosing the
key trades, like bricklayers – but
also pretty arduous when it comes
to the ‘I’m not too sure I really care’
decisions which have less of a cost,
performance or visual impact.”

THE RIGHT SKILL SET

Certain skills come in handy when
it comes to project managing your
extension. It will help if these come
naturally. Ask yourself the following
questions before you commit:
Do you have any
experience? It really does helps
if you’ve carried out an extension
before if you’re thinking of project
managing. Even if you’ve only
modernised or renovated, some
knowledge of building projects will
be really useful.
Are you organised? Natural
organisers will find project
managing far easier than those
who like ‘winging it’. “Running
a good to-do list is key to every
successful project,” says author
of Housebuilder’s Bible and
experienced builder Mark Brinkley.
“Some people do this entirely in
their heads, but most of us need
to write it down in order not to
overlook items. The to-do list needs
to be updated frequently, and also
to be acted on.”

Are you good with numbers?
If you don’t want to go over budget,
a head for numbers is crucial.
Are you good at
negotiating? Confident
negotiation skills are hugely
important when it comes to project
managing — from getting the best
deals on materials to juggling
niggles between trades. And don’t
forget the neighbours, either. “It is
well worth taking time out to chat to
neighbours and explain what you
are doing and when you plan to
do it,” suggests Mark. “They tend
to be far more amenable if you can
give them confidence that you are
managing the process properly so
that it will be as quick and painless
as possible.”
Do you understand how to
order building materials? It
may well be the case that ordering
materials will fall to you, as project
manager. “Many subcontractors
work on a labour-only basis and
expect you to have purchased
all the materials they need and
for them to be ready on site at the
scheduled hour,” explains Mark.
“If you haven’t a clue, then this
would be a useful moment to hire
the services of a quantity surveyor.”
Are you a ditherer? If so, then
now could be a good time to ditch
the idea. Decisions come hard and
fast and too much dithering wastes

E X T E N S I O N

time and money. You need to avoid
a change of mind at the last minute.

BENEFITS OF THE ROLE

If you do decide to take on the
responsibility of project managing
your own extension, what benefits
can you expect to enjoy?
Considerable savings You can
expect to save between 10-20% of
the overall costs of the project by
taking on this role yourself.
Personal team selection You
get to choose the people who will
be working on your extension
rather than just being presented
with a team who you might not
have a good rapport with.
No unwanted surprises As
you’ll be overseeing each step of
the build, there’s less chance you’ll
find that a decision has been made
on your behalf that you wouldn’t
have made yourself.
Greater control As project
manager, you’ll have more control
over the final outcome — that could
be something as little as realising
before it’s too late that the wall
tiles about to go up are slightly
the wrong shade or that the light
positioning needs tweaking a bit.

IMAGE: DAVID BURTON

DISADVANTAGES

Just as there are upsides to project
managing your own extension,
there are also downsides.
It’s hard work Don’t
underestimate the practical side
alongside the ‘overseeing’ side.
“Tasks such as keeping the site tidy,
stacking and storing materials, site
security, taking in deliveries and
temporary weatherproofing all
fall on the project manager,” says
Mark Brinkley.
Greater risks “Savings may be
made, if you’re organising and
employing the various contractors
directly and ordering materials, but
with it comes greater involvement
and risk,” says architect David
Nossiter. “Contractors charge
what are termed preliminary costs.
These are the overheads of the site
set up and daily organisation, as
well as profit and it is these areas
where savings may be made. You
would be dealing with items on

a daily basis, ordering materials
in good time, arranging for
deliveries, licences, organising
trades, dealing with building
control and working against an
overall programme. You’d also
be responsible for health and
safety on site. If you are let down
by a subcontractor or by materials
not arriving on time, you are
responsible for any delays.”
Timescales are usually
longer Project management is
full time. Unless you’re dedicating
all your time to the role, then you
may well need to accept that your
extension will take a good few
weeks or months extra to complete.
You’ll be in the firing line As
the first point of contact, if things go
wrong, trades, planning officers
and angry neighbours will come
directly to you with their complaints
or issues. Be prepared to do plenty
of negotiating.
You may lack contacts Those
who usually project manage – be
that an architect or main contractor
– will usually have a hefty list
of trusted contacts in terms of
tradespeople and suppliers.

SUITABLE CANDIDATES
Of course, there are many project
management routes to consider
alongside taking a DIY approach.
Main contractor In general,
a main contractor will be your
builder — who came with trusted
recommendations. Your main

M A S T E R C L A S S

contractor will either employ all
various trades directly, or will have
a selection of third-party trades
who they regularly use. They can
make sure that the right trades
or suppliers are there at the right
time and can check that work is
completed to a high standard.
Package company If you’re
building an oak-framed extension,
the supplier can often oversee the
whole thing — from design stages
right up to completion. They’ll have
builders and suppliers who they
regularly work with.
Architect/designer If you’ve
hired an architect to design your
extension, many will also take on
the role of project manager. They
usually have excellent contacts and
will be able to answer all queries.

TYPICAL COSTS
SCHEDULING
Amanda
Goddard
project
managed
her and
husband Eric’s
renovation/
extension.
“I made
sure every
day that
the building
work was
on track and
that the build
team had
everything
they needed,”
she says.

One of the main reasons people
decide to project manage their
own extension is to save money —
but how much is that?
“The fees are generally
estimated in the first place by a
percentage proportion of the
estimated cost of the project — this
gives the PM an idea of the fee
level they’re quoting,” explains
Bob Branscombe. “Make sure
you convert this estimate into a
fixed lump-sum agreement for
the services, otherwise you’re at
the mercy of rising construction
costs and variations, which will
compound in your fees.”

P L A NNING

CLINIC

Levelling-up and
Regeneration Act
Planning expert Simon Rix
offers advice on what these latest
planning policy changes mean for
self-builders and renovators

T

he Levelling-up and
Regeneration Act 2023 has
been a long time coming.
It is a new law recently passed by
Parliament that was expected late
in 2022, then in the spring of 2023,
but it only finally emerged through
what seemed like a tortuous
legislative process at the end of
October 2023. This delay was
a pain for some of my clients
as they had to wait for the final
version to be published before
we could finally submit their
planning applications.
That’s because the new law
has significant implications for
self-builders and renovators. It
includes changes that will shape
planning permission policies as
well as how decisions are taken.
In this article I’ll cover the key
aspects of these changes, offering
my thoughts on how they could
impact you.

IMAGE: FRENCH + TYE

SUPPORT FOR SELF AND
CUSTOM BUILDERS
One of the stated objectives of the
Levelling-up and Regeneration
Act is to encourage and facilitate
the development of more selfand custom-build housing. The
law requires the government to
develop further plans to support
this objective. These are not yet

SIMON RIX
Is a professional
planning
consultant and
runs Planix.
UK Planning
Consultants Ltd.

available, so watch out for more
details over the coming months.
CHANGED
PRIORITIES
Changes will
mean a firm
focus on a
brownfieldfirst approach,
highlighting
the importance
of projects
such as this
striking
contemporary
home by Gruff
Architects in
south London.

PRIORITISING LAND
PREVIOUSLY DEVELOPED
The new law reaffirms the
government’s commitment to
a ‘brownfield first’ approach
in housing development, i.e.
emphasising the use of previously
developed land, including for the
construction of self- and custombuild homes. This doesn’t mean
all other types of land are banned
from development, though, but
it does mean such schemes will
require more justification. A

well-referenced and persuasive
Planning Policy Statement is
thus an even more important part
of any planning application for
projects that aren’t on previously
developed land.

THE UPDATING OF
LOCAL PLANNING
POLICIES

The new Levelling-up and
Regeneration Act introduces
substantial changes to how
local councils develop their own
planning policies. For example, the
importance of ‘supplementary’
local planning policy documents

homebuilding.co.uk 109

P L A N N I N G

will be upgraded. But it’s the speed
of change of local planning policies
that will be most keenly felt. Up to
now, each local council area has
had to produce a new set of local
planning policies on a ‘regular’
basis, but in reality, this can often
take a very long time. That means
applicants haven’t had to get to
grips with new local policies very
often, but on the downside many
policies were getting very old and
inappropriate.
From now on, local councils
will have to streamline this
process, so new local planning
policies will come more frequently.
Hopefully this will mean some
more helpful policies being
adopted, but either way, this new
increased pace of change will mean
using a professional planning
consultant, like myself, will be
even more important.

THE NEW ‘STREET
VOTES’ SYSTEM

IMAGE: MARTIN GARDNER

New Street Development Orders
will be a way for local residents
in a small area to group together
to get permission for changes in
their area (for certain specified
classes of development), without

needing to make separate planning
applications. This has been
possible on a parish-wide level for
a while, through neighbourhood
development orders, but the new
system will be even more localised.

NEW NATIONAL
AND REGIONAL
PLANNING POLICIES

AN ACCENT
ON ECO
There will
be a strong
emphasis
on ensuring
designs
take into
consideration
measures such
as building
orientation
to prevent
overheating,
as in this
Dorset selfbuild by Ström
Architects.

The introduction of new ‘national
development management
policies’ is another substantial
change to the system. These
new, detailed national planning
policies will define various legal
standards against which all
planning applications will be
assessed. They will cover aspects
like heritage, climate change and
the greenbelt. They will be more
relevant to decision-makers
too. Until now, if your local
planning policy didn’t “agree”
with the National Planning Policy
Framework, then the local policy
took precedence. From now on,
both local and national policies
will need to be fully considered.
Also, until this new Act was
passed, it was sometimes possible
to get consent for a development
even if it didn’t comply with

the local planning policies,
if there were other ‘material
considerations’ that indicated it
should be approved. The new law
has raised that bar in that those
material considerations would
now need to ‘strongly’ indicate
that the planning application
should be approved.
There will also be a return to
regional planning policies that can
define what can be built where.
These will cover London, and
other areas with regional mayors,
like Manchester, as well as in any
other area where two or more local
councils decide to get together to
form their own combined policies.

AMENDING PLANNING
PERMISSIONS

Sometimes, realities on the
ground mean that some details
of a planning consent that has
been approved need to be changed
to allow a workable building to
be constructed.
If these changes are small there
has, for many years, been the
option of avoiding a whole new
planning application by applying
either for a non-material or a
minor-material amendment.

C L I N I C

P L A N N I N G

Each of these requires a different
process but decisions for both
are often challenged in court
as the definitions aren’t terribly
clear. There are also huge
variations in decisions from one
council to another.
The new system is designed
to clarify and standardise the
definitions and introduce a new
level of slightly less minor changes
that can be fast-track approved.
These will be for material (but
not substantial) amendments, as
long as their effect would not be
“substantially different from that
of the existing permission”.

NEW LOCAL
‘DESIGN CODES’

Local councils will also soon be
expected to develop and adopt
their own design codes. These
will set out what types of designs
would be acceptable in different
situations. They should help
planning applicants understand
how their projects will be
required to create ‘healthy, safe,
beautiful, green, environmentally
responsive, sustainable and
distinctive places’.

PROTECTION OF
HERITAGE ASSETS

Heritage assets include listed
buildings, monuments and
whole conservation areas, as
well as World Heritage Sites,
of course. Locally listed and
some other buildings count, too.
From now on, councils will need
to consider the desirability of
both preserving and enhancing
such heritage assets, both
during their policy-making and
whenever they are deciding on
individual planning applications.
They will need to also consider
encouraging creative approaches
to development in order to help
with both these preserving and
enhancing objectives.
Also, a new enforcement power
has been introduced for local
councils, thanks to the creation of
an option to serve temporary stop
notices for unauthorised works to
listed buildings.

OTHER NEW
ENFORCEMENT
POWERS

Another major change in the
planning enforcement rules is
that the four-year rule for some
breaches of planning control in
England has now been extended
to 10 years. This means that, for
all types of development, councils
will now have 10 years to deal
with someone who has not got
the correct planning permission.
Although the four-year rule has
gone, if your breach happened
more than 10 years ago, you can,
and probably should, still apply
for a Lawful Development
Certificate to confirm that it is

C L I N I C

a zero rating is required before any
building work can start.

CLIMATE CHANGE

One of the last amendments to
the new law that were agreed to
in Parliament, before it was
finalised, was a requirement for
a big emphasis on the need to
mitigate and adapt to climate
change in the new national
development management
policies mentioned earlier.
Again, more details are yet
to come, but it’s likely that you
will need to think about your
development’s layout more,
including to accommodate
requirements for sustainable

“One of the stated objectives of the Levelling-up and
Regeneration Act is to encourage and facilitate the
development of more self- and custom-build houses”
too late for any enforcement
action and thus what exists there
now is legal.
Also, enforcement warning
notices will be a new discretionary
measure available to councils as a
step before formal enforcement
proceedings are started.
There will also be a ban on
appeals against enforcement
action where that action has
followed the submission of a
planning application relating to
the same issue.

NEW INFRASTRUCTURE
LEVY TO REPLACE CIL

In England, outside London, a new
Infrastructure Levy will replace
the current CIL (Community
Infrastructure Levy). Not every
council in England currently
operates a CIL scheme but they
will all be obliged to impose the
new Infrastructure Levy. While
not all details have been finalised,
it seems likely that self- and
custom-build homes will continue
to be exempt from the significant
levy payable by other developers.
Note that specific confirmation of

wastewater recycling, as well
as making sure your building
orientation can help mitigate
against overheating. Trees can
also be used to provide shade
and support a wider reduction
in temperatures.
You should also consider
providing electric vehicle
charging points and carefully
think about design features such
as building materials, window
size and location, insulation
and ventilation. Height of floor
levels in flood risk areas and flood
defences may also be important.

IMPLEMENTATION

A lot of the changes from this
new law will not come into effect
immediately. The government
still needs to work out many of
the details through a process
called “secondary legislation” all
of which takes time. But we are of
course not that far from a general
election now, so implementation
timescales could shift, and any new
government that might get elected
could have its own ideas for further
changes to the planning system.

homebuilding.co.uk 113

T HE

R O OM

PLA NNER

A

Stylish and practical, include a
modern design to create a focal
point in your living room

114 homebuilding.co.uk

WORDS: JO MESSENGER

huge trend in modern
schemes, a media wall
is a centralised hub that
includes everything
from the TV to gaming
equipment and a sound system with
all the wires and cabling hidden away
behind a stud wall for a sleek and
uncluttered look.
Before you start to plan yours, there
are key things to consider to ensure
your design has the desired outcome.
For example, do you want your wall
to be a standout feature or to blend in
with the rest of your scheme? If your
budget won’t stretch to a bespoke piece
there are many off-the-shelf options
worth considering. To really personalise
your wall, think about including extras
such as integrated lighting or even a
contemporary built-in fireplace for
added impact in your space.

BESPOKE VS OFF THE SHELF
A custom-built design will be made to your
exact specifications to fit perfectly into a space.
Depending on the size and scale of what you
want to achieve, a competent DIY-er with the
skills to build a studwork wall may want to take
on the project themselves. Your room size and
layout will likely have an effect on where you
position the wall, but where possible avoid a
location that is near a door or is affected by
sunlight or glare from a window. While often
sited centrally on a main wall, it’s possible to
build a media wall as a room feature such as a
partition to create a cosy snug area in an openplan scheme. A modular off-the-shelf design,
starting from £400–£500, is a more affordable
option but will have a freestanding appearance.
Expect to pay £2,000–£4,000+ for a bespoke
design, depending on your requirements.

SEEK PROFESSIONAL ADVICE
It’s essential to ensure there are
enough sockets and ethernet points at
the start so they can be positioned out
of view. Think about what you want to
include, like a Sky box, DVD/BluRay
player, subwoofer, freestanding
speakers or sound bar, as well as
consoles and WiFi router extensions.
An electrician or smart tech installer
will be able to advise you on this
as well as things like ventilation
to prevent electrical devices from
overheating. They can also install
integrated lighting such as wall lights
or LED strips before decorating begins.
Ensure there is access to the back
of the TV and other devices for any
repairs and updates to avoid having
to remove plasterboard or joinery in
the future.

FACTOR IN STORAGE
At the planning stage, think about
your storage requirements. Now
is the time to consider whether
you want to include elements
such open shelving for books
or to display accessories, or
drawers and cupboards to store
things such as a music collection

or gaming paraphernalia.
In many cases, the answer
will probably be a mix of
both. This would also be the
time to decide if you want
to conceal the TV behind
closed doors when not in
use, especially in a multifunctional space.

Push
to open or
handleless doors
will give your design
a streamlined finish.
For subtle interest
choose a more
textured surface
material

INCLUDE A FIREPLACE
Media walls can also be a contemporary
alternative to a traditional fireplace. Instead of
having to incorporate the fire into an existing
chimney breast you can build a media wall
to your own specifications, incorporating a
specially designed electric or gas fire into it.
While these are the most common options, it is
possible to have a media wall designed around
a real fire or woodburning stove.

IMAGE: CUSTOM BUILT MEDIA CENTRE, NEVILLE JOHNSON

STYLE & MATERIALS
Designing from scratch will allow you to dictate
the look and finish of your media wall. Usually
made from plasterboard or MDF they can be
decorated with paint or wallpaper to blend in
with the rest of your scheme. Alternatively, you
can choose a decorative finish such as timber
cladding to create an eye-catching design
feature. It’s important to consider the position of
your TV – if it’s too high on the wall it can distort
the picture and be uncomfortable to watch.

homebuilding.co.uk 115

6

UNIQUE FORM
Designed by Mole Architects, Fijal
House was built with an angled
brick façade using Caxton Ghost
White clay facing bricks from Bea
Clay Solutions. POA

O F

THE

B ES T

TRADITIONAL APPEAL
Furness Brick’s weathered range
replicates the unique colours and
textures of bricks from the past
and includes this Chapel Blend
laid in a Flemish Bond. POA

COLOUR CONTRAST
Phi Design and Build used Ketley
Bricks smooth Staffordshire blue
perforated bricks for the external
walls of this contemporary
extension. Around £75m2

M A S O N RY
B R I C K S

ADDED INTEREST
Made from concrete, Marshall’s
Kensington Stock is a modern
take on a traditional buff facing
brick, enhanced with occasional
contrasting black bricks. POA

MATERIAL MIX
Blockley’s Synthesis S12 Mosaic
and Blockley’s Black Smooth
bricks from Michelmersh were
used in this project to contrast
with the smooth render. POA

BEYOND THE PALE
Stack bonded to create a
geometric pattern, YARD
Architects used Marziale bricks
by Wienerberger to build this
wraparound extension. POA

WORDS: JO MESSENGER IMAGES: (TOP LEFT) MATTHEW SMITH ARCHITECTURAL PHOTOGRAPHY;
(TOP RIGHT & BOTTOM RIGHT) RICHARD CHIVERS; (BOTTOM CENTRE) BECCY LANE

Strong, durable and easy to maintain — the design
possibilities of this classic building material are endless

homebuilding.co.uk 117

D ES I GN

MA STER CLA S S

How to
design a
lifetime home

Architect Allan Corfield explains how to design a lifetime home that will
not only meet your present needs, but is capable of easily adapting over
time as they change — all while providing a stylish place to live

118 homebuilding.co.uk

self-build project. Your requirements – and therefore the
spaces you inhabit – will have to be designed to either change
with you or be futureproofed from the start. For example, do
you want to have a staircase wide enough in the future to cater
for a stairlift, or an area to include a lift shaft at a later date?
To help you plan a home that will evolve with your changing
needs over time, we’ve outlined the top futureproofing features
that should be designed into any lifetime home.

CAREFULLY PLANNING YOUR ACCESS

This is one area where it really will pay off to think ahead. As
mobility decreases, it’s vital to ensure that it’s easy to get from

IMAGE: JEREMY PHILLIPS

uite a common desire for anyone currently
carrying out a self-build, renovation or
conversion is the need for their property to
act as a futureproofed lifetime home. For
anyone with the intention of calling their
house a home for the foreseeable future, the
priority should be to create a property that
has the potential to adapt to changing needs
as time progresses.
As such, it’s important to communicate to your design team
from the off that you want to build a lifetime home and are
actively promoting these principles in every area of your

homebuilding.co.uk 119

IMAGE: SIMON MAXWELL.

SMOOTH ACCESS
Level access to
the front door
of your home,
which may
require a gently
sloping ramp
as shown in this
image, are key
design features
of a lifetime
home.

120 homebuilding.co.uk

the car to your front door. So do consider accessible
garden design alongside the design of the house itself.
Designing an integrated or linked garage is the
best solution. But if your budget or available space
won’t allow for it, then planning a parking bay close
to your entrance (ideally less than 10 metres away)
is important .
You must also think carefully about the surface
material and the gradient of the route to the front
door. It should ideally be 1-in-20, or shallower.
Smooth, flat surfaces such as concrete or resin will
be much easier to cross with a wheelchair, or for
someone with limited mobility, than undulating
stones or gravel, which is a potential trip hazard.
But it’s not just your driveway that will need easy,
level access to the front door. Introducing a ramp as
part of the design will ensure safe access is built in

from the outset. When building a new home, it’s also
likely to be a requirement of Building Regulations.

INCORPORATE LEVEL THRESHOLDS

Once you reach your house, it’s important to
streamline entry through the front door (or the
access route/entrance most often used). This means
a wide enough door leaf. For an accessible home, I
would recommend going larger than Building Regs
standards, with a minimum of 900mm.
You will also need a level threshold. Most door
suppliers will provide an option of a level threshold
(15mm maximum step). This means you’ll always
have one accessible route in and out of your building
— adequate as a minimum requirement.
However, you don’t just go in and out of one door
in your home, so don’t limit yourself in the future.

IMAGE: MATTHEW HERITAGE

Aim to stick to level
thresholds throughout your
floorplan to make life a little
easier as time progresses.

IMAGE: SIMON MAXWELL.

IMAGE: JEREMY PHILLIPS

ALL FLOOR ACCESS
This home lift disappears completely when
stationed on the floor above, leaving the ceiling
with a flush finish.

WIDEN YOUR ENTRANCES
The entrance hall is nice and roomy in
this futureproofed home and it has an
extra-wide front door, too.

homebuilding.co.uk 121

Incorporating an annexe into your house design
is a great way to ensure you can accommodate
multiple generations at once in your home — this
can include grown-up children returning home.
for extended periods.

122 homebuilding.co.uk

M A S T E R C L A S S

IMAGE: JEREMY PHILLIPS

D E S I G N

In addition, make at least one door (or route) to the
garden fully accessible. This will ensure that you can
still enjoy your outdoor space in later years.

IMAGE: BORDER OAK

GO LARGE ON ROOM AND
CORRIDOR CIRCULATION SPACE

Unfortunately, in the UK we have become used to
mass-produced houses with small doors, narrow
circulation spaces and low ceiling heights. Many
period homes also have little in the way of circulation
space, with priority being given to the rooms
themselves. However, if you’re intending to stay in
a home for the next 30-50 years, you really do want
to go as large as is practical when it comes to your
hallway design as well as with landings and corridors.
For wheelchair users, wider doors and circulation
spaces will be easier to navigate, and will make
the whole house accessible rather than just
certain areas. For doors, 900mm (or wider) is
recommended, with a minimum corridor width of
1200mm. If you go wider then you could even start
to utilise the corridor as a study space, too — or add
in low-level window seating.
Adding volume and light to what could be a dark,
utilitarian circulation space can also transform the
linking spaces, which are often forgotten about.

CONSIDER INSTALLING A LIFT

Adding a home lift into your design will sit at the
more expensive end of the scale when it comes to

GROUND FLOOR LIVING
A ground floor bedroom can be such a handy
feature to include in your house design, whether
it is to be used by guests now or by homeowners
in the future.

futureproofing solutions. However, if you can’t have
all of your accessible accommodation on the ground
floor or still want to see that view from the top floor,
then it might be a cost worth investing in.
It’s important to design in a home lift from
the start, and specify one that’s large enough to
accommodate a wheelchair and an additional
person. Alternatively, if you do not have the budget
or requirement at this stage, it’s good to identify a
potential place where a lift could be added, making
sure you allow enough space for the lift shaft and
any associated equipment when planning the house.
Home lifts range from £15,000 to £35,000, and no
longer have to look like bland utilitarian access lifts.

ENCOMPASS THE NEEDS OF ALL
THE HOME’S OCCUPANTS

It can be challenging enough designing a home for
one set of needs and requirements, but designing for
three different generations under one roof is not for
the faint-hearted.
A detailed and well-thought-out brief will identify
everyone’s priorities and almost as importantly, the
things they don’t want. It’s key to work out how the
family dynamic will work: do you have your own

homebuilding.co.uk 123

IMAGE: SYMPHONY KITCHENS

D E S I G N

M A S T E R C L A S S

Many kitchen companies
now offer ranges specifically
for accessible homes.

entrances, do you all eat together, and so on. These
choices will have a big impact on design and budget.
You could create versatile living spaces – which can
be easily shared or divided – and a large kitchendiner at the heart of the home.
It’s also really important if an elderly occupant
is downsizing that they still maintain some sense
of independence. This could be in the form of their
own entrance, their own bathroom and perhaps
even their own self-contained annexe within the
home. Consider how accessible the whole house is
for them. If it’s over two or more storeys, a stairlift
or lift can ensure they, too, can reach other areas of
the home.

INCLUDE A GROUND-FLOOR SUITE

One of the most useful design ideas we incorporate
into all of our homes at the practice is a bedroom suite
on the ground floor — a must if you’re planning to
futureproof your house. It may be that this space is
initially used as a snug, home office, sleepover space
for children or a guest bedroom until your later years.

“For a futureproofed kitchen, important areas to
consider are worktop heights, lowered sinks and
food prep areas with wheelchair space beneath”
If you don’t want to add an en suite to this room
from the outset, then make sure that you locate it
next to an accessible bathroom, or that services
are in place in an adjacent room so that you’re
not having to install these at a later date. By doing
so, you can add in another door to the bathroom
and create a ground floor master suite when the
appropriate time comes.
Under Building Regulations, you must provide
an accessible toilet that has space and provision for
a future shower room. However, I would suggest
putting this in from the outset.

BE CLEVER AND IMAGINATIVE WITH
YOUR KITCHEN DESIGN
When designing a kitchen that will continue to serve
you well for many years to come, there are certain

homebuilding.co.uk 125

D E S I G N

features that can really make life much easier.
Important areas to consider are worktop heights,
lowered sinks, front and back taps, rise-and-fall
worktops and hobs, and food preparation areas with
space beneath for wheelchair access.
You could also consider including handy
integrated features such as pull-out worktops
beneath eye-level ovens, push-click operated
kitchen units and remote control extractor hoods.
Many kitchen companies now offer ranges that
include these kinds of features so you shouldn’t
have to look too hard to find them. Both Howdens
and Magnet Trade offer all their kitchen ranges as
‘inclusive kitchens’.

INTEGRATE SMART HOME FEATURES
While you might not have thought to look into how
to design a smart home when considering how
your home will work as you grow older, most of us
are becoming more tech-savvy. To the younger
generations, it’s second nature.
Linking everyday tasks to a smart home system
such as Loxone will add automated control to
heating, lighting and security. It’s important when
considering a smart home system that it isn’t overly
complicated and makes tasks easier — being able to
close the blinds at night without getting up, turning
the heating on, switching lights on and off – all from
an app on your phone or a remote control – will all
help make your life easier.
You can also integrate smart locks that don’t rely
on keys and can be opened remotely if an accident
happens. Linking cameras and medical alert devices
could allow family or the emergency services to find
out immediately about any falls.
If you integrate some of the ideas in this article,
along with the Lifetime Homes’ principles, you will
create a stunning home for now and the future.

IMAGE: JEREMY PHILLIPS

SMART LIVING
In this stylish self-build – designed to be fully
accessible – underfloor heating provides a
comfortable even heat and most of the doors
can be controlled automatically. Other features
that can make life easier include digital showers
and automatic lighting.

M A S T E R C L A S S

homebuilding.co.uk 127

EX PER T

HOW
TO
BUILD
A
HOUSE
PART NINE:

IMAGE: POTTON

MARK STEVENSON

Has worked in construction for 30 years and
following a long career in housebuilding
he became managing director for Potton,
designers and manufacturers of bespoke
self-build homes.

ACHIEVING
WEATHERTIGHT
In our in-depth series, self-build
expert Mark Stevenson shares
the stages of building your own
home, from foundations through
to completion. This month, he
looks at making your build
weathertight with roof coverings

A D V ICE

O

ne of the most significant
milestones for any selfbuilder is making their
project weathertight. Speaking
from experience, once this is
achieved you can breathe a sigh of
relief knowing your future home is
safe and secure and protected from
the elements. This month I’ll set
out what’s involved and will explain
the main elements of work needed
to achieve this key milestone.
When we talk about achieving
weathertight, we don’t mean that
the full extent of the external
superstructure must be completed.
From a builder’s point of view,
weathertight is the point when the
roof coverings and windows and
doors are installed and therefore
the build is protected, and trades
can progress internally. This

month I will focus on the actual
roof coverings.
For self-builds with
straightforward architectural
designs, achieving weathertight
is simple and involves no more
than a couple of trades (roof tilers
and window installers). For more
complex designs that incorporate
complex geometry and maybe a
multitude of roof coverings or an
array of architectural features,
achieving weathertight can be
quite a challenge.

ROOFING
MATERIAL OPTIONS

The choice of roofing materials has
a major impact on the appearance
of your home as well as the budget
you’ll need. These days there’s
an abundance of options, all of

homebuilding.co.uk 129

Metal roofing systems In recent years, metal roofing
systems have grown in popularity and offer a very
modern industrialised look. As the system comes in
long sheets with standing seams that are interlocked,
they are very reliable in use and can be laid to a very
low pitch. There’s a tremendous amount of choice
when it comes to metal but be warned, traditional
materials such as lead, copper or zinc can be expensive
so consider the imitation options which, in my opinion,
look just as good.
Single ply roofing membranes With the growing
popularity of flat roofs for modern self-builds, single
ply membranes have emerged as the de facto choice.
The materials they’re made from are flexible, UV
resistant and come with warranties — typically for up
to 25 years. Single ply membranes are so reliable that
they’re often used as the waterproofing membrane
for green roofs.

MAKING A BUILD
WEATHERTIGHT QUICKLY

WORKING
WITH OAK
This cottage
renovation features
an extension
by Welsh Oak
Frame. More
straightforward
roof designs can
help you achieve the
weathertight stage
a bit faster.

which will come with their own technicalities and
implications. Here are the main choices.
Concrete roof tiles These are a popular choice for
self-builders on a budget. They come in all sorts of
colours, shapes and sizes and are usually interlocking
— making them easy to lay and durable in use. As you’d
expect, concrete is heavy, so a roof with these tiles will
need to be engineered to carry the weight.
Clay roof tiles Manufactured from natural materials
so have an improved look over concrete and are suited
to heritage-style properties. In my experience, clay
tiles keep their colour longer than concrete and are
a better-quality product. Machine manufactured
interlocking clay tiles are as easy to lay as their concrete

The speed in which a build can be made weathertight
will depend on a variety of factors. If you want to get
weathertight faster, keep these aspects in mind:
Reduce the complexity of the architectural design
Juliet balconies, solar panels and double-height
windows are all great features to have, but each one
adds a level of complexity and involves an additional
trade, making it more complex and difficult to build. In
simplistic terms, the answer is to strip these features
back to remove the complexity and avoid the need to
juggle the cats. While this might solve one problem,
we must remember that it’s these features that make
our self-builds unique and if you let the builders take
charge of design, you’ll quickly find you’ll be building
a boring box and not a house you want to live in. From
an architectural point of view, the solution is to form a
working partnership between the architect and your
builder so that the essential features are retained but
in a manner that can be easily constructed.

IMAGE: NIKHILESH HAVAL

“Once your self-build is weathertight, you can breathe a sigh of relief,
knowing your future home is safe, secure and protected from the elements”

130 homebuilding.co.uk

counterparts but watch out for handmade clay tiles,
such as peg tiles and pantiles, which require a high level
of competence to achieve a satisfactory look.
Slate roof tiles A long-lasting and high-quality roofing
solution that’s suitable across a variety of projects.
Slate is a natural product — extremely durable and
reliable. Dependent on the specific product, tiles may
need sorting so they sit together consistently without
steps and staggers. Slate is imported to the UK from
Spain and China. Composite slate tiles, which are an
artificial alternative, are growing in popularity due
to their lower cost and ease of use. Unfortunately, as
they’re composite, they’re very uniform which can
make a roof look a little too manufactured!

Employ good planning and coordination skills
The roof structure and its coverings are one of the
most complex areas of any build and therefore careful
planning and coordination is needed to sequence the
work and keep it progressing quickly. It seems obvious
to say that the roof structure should be built to provide
the support required for the roof coverings it carries.
This means that all the structural timbers should be
in place and features like valleys should be prepared
ready to receive the weatherproof coverings. As well as
the structural work being complete, you’ll also need a
plan about how best to coordinate the build of features
such as roof windows, dormers and chimneys. While
there are always choices about what should be done

IMAGE: JOSEPH HOLDER/OAKWRIGHTS

E X P E R T

when, it’s always best for these to have been built first
before asking the roofer to finish the roof finishings on
site. A tricky area to coordinate are low-level roof areas
that might become obstructed by access scaffolding to
the main roof. Typically, these include single-storey
extensions, hips to chimneys, porch roofs and so
on. As roof tilers resist working in cramped spaces
below scaffolding, these areas are commonly left until
later meaning that the build cannot be made fully
weathertight until the scaffold is stripped and the lowlevel areas finished. Alternatively, with a bit of good
planning, it may be possible to complete the low-level
roof finishes early and then bridge over the finished
areas with ladder beams, which are incorporated into
the scaffolding.
Adopt modular construction methods Traditional
roof structures using trusses or even loose timbers
take a long time to build, with lots of working at height
and additional work needed, such as insulation fitting
before the coverings can commence. Given the extent
of work involved, this approach has a greater risk of
delay, particularly when building in winter. If speed
is important, an alternative might be to consider a
modular roofing solution using insulated panels called
SIPs to form the roof structure. The SIPs panels are

prepared off site and lifted into place using cranes to
speed up the build process and reduce the man hours
on site. Adopting a SIPs solution also makes it much
easier to form habitable rooms in roof spaces without
the need for additional structural work or insulation
materials. Modular construction techniques have also
been extended to building elements such as dormer
windows. For a premium, it’s possible to have these
factory manufactured ready for lifting into position
using cranes.
Package up and delegate the problem The best way
to get rid of the headache associated with achieving
weathertight is to package up the problem by
employing a contractor to do all the work necessary
to make the build weathertight. Traditionally this
would have been a builder but these days timber
frame manufacturers and package companies are
increasingly supporting self-builders by offering to
deliver a weathertight service as part of the timber
frame package.

THINGS TO LOOK OUT FOR

When trying to get to the point of making your build
weathertight, there are some key factors to which you
need to be paying particular attention:

A D V I C E

CLAY TILING
This oak
frame
build by
Oakwrights
features
high-quality
handmade
clay roof
tiles from
Lifestiles’s
Ashbury
range.

E X P E R T

type and trays will also be needed to build into walls
and connect onto the dressings. Focus on the interfaces
between the construction elements and pay careful
attention to the construction details to check that
these have been meticulously followed.
Keep maintenance at the forefront of your
decision making The building and the roof coverings
will need to be maintained from time to time. Roofs
are difficult to access so when things go wrong
maintenance gets expensive. It’s therefore a good
idea to use materials with a long service life and avoid
complicated details, such as hidden gutters, which
might look fantastic on paper but are a defect in waiting
if they aren’t regularly cleaned and maintained.
Plan out the penetrations Inevitably, the roof will
require several penetrations to accommodate roof
windows, solar panels, soil and vent pipes, extractor
fans and flues. Save money and time by getting these
professionally installed when completing the roof
coverings. Don’t risk a botch by cutting them in after.
Single-point responsibility Wherever possible, it’s
best to appoint contractors in packages where singlepoint responsibility is maintained. When it comes
to roofing, this means only using competent roofing
contractors that are able to offer the full package
including the roof coverings, installation of flashings
and trims and the installation of roof windows and
solar panels etc.
• Next month I’ll continue with the theme of
achieving weathertight and will cover everything
you need to know about windows and doors.

SLEEK LOOKS
Zinc roofing
gives this
barn-style
extension a
modern look.

IMAGE: MATTHEW SMITH

Always follow the manufacturer’s instructions
In our wet UK climate, your choice of roofing system
will be continuously tested. It’s therefore essential
that guarantees are maintained by strictly installing
the materials as per the manufacturer’s guidance and
in accordance with the Building Regulations. Things
to focus on here would be getting the tile gauge right,
nailing patterns and fitting the associated fittings
correctly, such as GRP dry valleys and tile clips etc.
Failure to do this could lead to leaks or tiles blowing off
and an absence of a warranty when you most need it.
Ventilation is key to preventing long-term defects
By living in the houses we build, materials are subjected
to conditions that could lead to condensation which,
in time, can cause long-term defects. To combat this,
it’s essential that condensation risk is eliminated and
adequate ventilation is provided either via the eaves
and ridge or by using a breathable roofing underlay.
From a practical point of view this means making
sure the construction is carried out as per the detailed
design and ensuring that ventilation zones are not
blocked. Ideally, roofing underlays should have a slight
sag to direct any water away from nail holes and the gap
between the underlay and any insulation should be
sufficient to maintain ventilation requirements.
Get to know your lead flashings from your soakers
and saddles The roof coverings themselves are not
enough to prevent water leaking into the house. Where
roof coverings turn corners, abut walls or dress around
dormers and chimneys etc, valleys and flashings will
be needed to form a waterproof barrier. The type of
flashing detail will vary from roofing type to roofing

A D V I C E

EX PER T

A D V ICE

THE RENOVATION
MOULD IN THE HOME
As well as looking unsightly, the presence of
mould in our homes can lead to serious health
issues. Ian Rock offers advice on how to treat it
and prevent it coming back
Types of mould

IAN ROCK
Chartered
Surveyor Ian
Rock FRICS
is author of
the Haynes
Period Property
Manual and
the Haynes
Victorian House
Manual.

D

octors have long been
aware of the links between
mould growth and ill
health, particularly among the
young, the elderly and people with
respiratory conditions, such as
asthma. Yet there’s comparatively
little awareness of what actually
causes the problem that can
become an issue in our homes if it’s
not effectively mitigated. Mould is
a living organism that proliferates
in the indoor environment if
conditions are favourable. So it
may come as a surprise to learn
that renovated properties can
be especially prone to the sort of
conditions where occupants suffer
from respiratory illnesses, allergies
and fungal infections.

The word ‘mould’ is a collective
term for spore-producing
hyphomycetes fungi. When
allowed to propagate some
moulds can produce mycotoxins,
so inhaling excessive quantities
of airborne particles may lead to
allergic reactions with symptoms
such as wheezing and itchy eyes
or skin caused by irritation of
mucous membranes in the eyes
and respiratory tract. There are
several different types of mould
but the ones most commonly found
in our homes are the black and
green varieties, both of which can
be harmful to health. Green mould
typically has a fluffy appearance
and is often found growing on
damp walls, inside cupboards and
on carpets. Black mould is more
common and a toxic micro fungus
variety stachybotrys chartarum
is often detected on cellulose-rich
building materials in damp or
water-damaged buildings.

Indoor air quality

Moulds are a natural part of our
ecosystem. Microscopic spores

invisible to the naked eye are
present in the air we breathe
interspersed with dust particles.
Problems only start to develop
where the spores land on surfaces
prone to excessive moisture, which
in some homes may be related
to modern occupancy lifestyles
that generate large quantities of
water vapour. Any building, old
or new, can potentially be at risk,
but mould is more likely to flourish
with high levels of indoor humidity
typically caused by condensation,
water leaks or penetrating damp.

Visual impact

As well as potentially endangering
occupants’ health, mould growth
can obviously have a detrimental
effect on a property’s visual appeal
and hence its market value. Estate
agents know only too well that if
potential buyers are accosted by
rampant mould the ‘yuck factor’
will very likely be reflected in the
price they’re prepared to offer!
In our experience as chartered
surveyors, poor indoor air quality
and mould staining are often
associated with properties that

homebuilding.co.uk 135

E X P E R T

have been partially refurbished
to reduce air leakage and heat
loss. The problem with improved
airtightness is that unless the
works are carried out as part of a
carefully coordinated programme
there’s a danger that it can lead
to poor air quality with stale air
not being replaced at a sufficient
rate. Problems tend to be more
pronounced in older properties
with solid masonry walls and
blocked up fireplaces. A classic
example might be a self-contained
flat in a cheaply built block with
newly installed double-glazed
windows. A combination of
airtight windows with little or no
air extraction from kitchens and
bathrooms causes water vapour
to become trapped, resulting in
high humidity and condensation
forming on uninsulated external
walls. Activities that generate
water vapour – such as cooking
with gas and hot steamy showers
– will exacerbate the problem.
Especially if bathrooms and
kitchens are poorly ventilated.

Relative humidity

In severely affected properties
there’s normally an unmistakable
damp mouldy odour accompanied
by outbreaks of black speckled
mould on cold spots, such as
window and door reveals.
However, not all outbreaks of
mould in the home are visible to
the naked eye or detectable by
the average human nose. So to
determine whether a property is at
risk you need to gauge how moist
the indoor air is. Relative Humidity
(RH) measures how close the air
in a building is to being saturated,
telling you in percentage terms
how much water vapour is in the
air compared to the maximum
possible at that temperature. The
‘dew point’ is the temperature at
which the air reaches saturation
point at 100% RH. Warmer air
can hold more water vapour, so
as the temperature drops, the
RH will increase until it reaches
100%. At this point, it’s saturated
and can’t hold any more water
vapour so it offloads it in the form

of condensation (if the air pressure
remains constant). A hygrometer
– which measures humidity – is
an instrument now available as a
digital app (dependent on your
mobile device’s sensors).
To avoid the risk of harmful
moulds developing, relative
humidity should be maintained
below 80% and ideally no more
than 65%. One thing to bear in
mind is that measurements taken
in the atmosphere of a room tend
to be lower than ones taken next
to the surface of main walls. So
a relatively safe reading in your
living space could be misleading if
the equivalent figure in the ‘danger
zone’ next to the wall is redlining
above 80% which could be
enough to promote mould growth
even before condensation occurs.

Suitable solutions

The first step to eradicate the
risk of mould infestation in the
home is to reduce moisture levels
to prevent future spore growth.
A dehumidifier is useful for this
purpose as a temporary measure
until permanent improvements
have ensured that the building
functions satisfactorily in future.
Where you’ve got visible mould
staining, the contamination can
normally be removed from hard
surfaces by cleaning with a
weak bleach solution, specialist
mould remover or steriliser spray
(wearing appropriate PPE). This
is important because old mould
growth, even when inactive and
powdery, can still be potentially

EXTRACTION
Above left:
installing
extractor
fans in humid
spaces such
as bathrooms
can help to
prevent the
growth of
mould in your
home. Airflow
QuietAir
Extractor
Fan QT100
QT120,
certified by
Quiet Mark.
DEHUMIDIFY
Above right:
using a
dehumidifier,
such as this
one from
VonHaus, can
be a simple
way to reduce
the humidity
levels in
your home.

A D V I C E

detrimental to health if spores
are inhaled. Any severely
contaminated porous materials
like damp plasterboard or mouldy
carpets need to be replaced.
Once the building fabric has
been allowed to dry out, relative
humidity levels should ideally be
maintained below 65%.
As noted earlier, inadequate
levels of ventilation are a major
part of the problem, especially
when combined with high levels of
indoor humidity. So it’s advisable
to install efficient modern extractor
fans in kitchens, bathrooms,
cloakrooms and utility rooms.
Humidistat fans are particularly
useful because they operate
automatically when humidity
levels become dangerously
high. Functioning trickle vents
in windows have a role to play
to help disperse humid air, and
reinstating original ventilation
paths from fireplaces etc can also
improve air quality.
Where it’s practical to install
a mechanical ventilation system
this can be an ideal solution for
maintaining consistent humidity
levels in the home.
To finish the job, cold surfaces
around the envelope of the
building should be insulated,
particularly walls, window reveals
and lofts. The final remedy to
deter mould growth is to review
any lifestyle changes that could
be made to help reduce indoor
moisture, such as cutting back
where possible on boiling food
and indoor clothes drying.

homebuilding.co.uk 137

Got a burning question about your self-build, extension or renovation project
that you need answering? Drop us a line by emailing homebuilding@futurenet.com
and your question could be answered by one of our magazine experts

KITCHEN ISLANDS

IMAGE: SECOND NATURE

ASHLEIGH
HANWELL
Is a senior
designer at
Second Nature.

What size should my kitchen island be?

The size of the island plays a crucial role in enhancing
both functionality and aesthetic appeal. There isn’t
a one-size-fits-all approach with islands because the
shape of your kitchen and your proposed purpose for
your island will affect its size and shape. The main thing
to keep in mind is adequate clearance around the island
to ensure you can walk around it and that you’re able to
open doors and appliances. We’d recommend leaving
at least one metre of clearance space on either one or
two sides of the island.
It can be tempting to get carried away and opt for a
large island, but it’s important to ensure that it matches

the rest of your kitchen’s scale. On average, a standard
kitchen island tends to measure around 80 x 40 inches,
but larger kitchens can easily accommodate much
bigger designs.
If you’re planning to integrate appliances within the
island, then the design needs to meet the minimum size
requirements. Or if you’re looking for predominantly
storage and seating, the stools need to be measured
so they can be neatly tucked underneath. If there isn’t
room for a standalone island, homeowners often opt for
peninsulas or moveable islands – like kitchen blocks – to
allow complete flexibility.

PANELLING KNOW-HOW

STEVE
JENKINS Is
a journalist
and a painter
and decorator
with all-round
building skills.

Start by envisioning your desired
panelling style, be it the clean lines
of a Shaker design, the charm
of decorative bead moulding,
or the sophistication of vertical
wainscoting. Once your vision is
clear, meticulous planning is key.
As well as your chosen mouldings
and/or panelling, you will need:
● Tape measure
● Spirit level
● Angle finder
● Mitre box
● Fresh bladed saw or mitre saw
● Wood glue or small nails
● Caulk or decorators filler
● Clean cloth

1

Measure up and mark
Get a spirit level and mark
straight up from where the
side of the stairs (this is known as the
wall string) and the skirting board
at the bottom meet. Draw a line up
to 100cm (in this case were are
placing the dado rail at 100cm).
Then head to the top of the stairs
and do the same at the top of the
stairs where the wall string meets
the skirting board.

What’s the best way to add stair panelling?
Next you will need to draw a line
from the two top points that you’ve
just marked out. You can measure
up 100cm every three or four
treads, mark and then join up with
a straight edge. Or use string and
drawing pins and mark a point at
every metre along the length of the
string, then use a straight edge to
draw a straight line from the bottom
to the top point.

2

Cut and attach
moulding
Now you need to introduce
your moulding to create a dado
rail. You’ll need an angle finder to
get the right cuts. Next, match up
the angle finder with your pencil
marks and note the angle and halve
for your cuts. For example, if the
angle is 130º, your cut will need
to be 65º.
Now mark the angles on your
moulding and cut them with your
saw. A mitre saw is a good choice
as it allows you to set the angle on
the saw. Now attach the moulding
to the wall with wood glue and/or
small nails.

3

Calculate panel
measurements
Now measure the horizontal
length from the top of the stairs to
the bottom of the stairs. Extend
your vertical line from the bottom
of the stairs to get an accurate
measurement.
Decide how many panels you
want, three or four is a typical
choice on standard stairs. Then
decide on the gap you want, a
100mm gap is a good choice for
100cm high panelling.
Now work out where the verticals
for the panels are going to go. Take
the overall horizontal measurement
you took earlier and take away the
gaps. If you’re having four panels
there will be three gaps. So if your
overall horizontal measurement
was 3000mm, take off the gaps –
300mm – and divide by the number
of panels e.g. 3000mm – 300mm =
2700mm ÷ 4 = 675mm. This is the
size of each panel.
Mark the measurements along
the vertical and using a spirit level
mark where the vertical of the
panels are going to go. Finally mark
the angles, these are the same as
the gaps – 100mm – for uniformity.
A simple way to do this is to get a
piece of scrap wood that is 100mm
deep. Place against the underneath
of the dado rail, place a pencil on
the outside edge and run up the
wall. Do the same for the bottom.

IMAGE: NEVILLE JOHNSON

4

Cut, fix and paint
You will now have a
pencil outline of where the
moulding needs to go. Work on one
panel at a time and remember to
measure on the right side of the line
— so you have the 100mm gap all
round. You can start on any side.
Measure the length and use the
angle finder to get the angle and
half to get the cutting angle. Cut
and fix to the wall. Repeat until all of
the mouldings are added for every
panel. Leave to dry for 24 hours
and fill, if needed, with some caulk
or decorators filler, and then paint
in your chosen colour.

A S K

IMAGE: GETTY IMAGES

MARK
BRINKLEY Is the
author of the
ever-popular
Housebuilder’s
Bible and an
experienced
builder.

PHIL
MESSENGER
Is founder of
Messenger
Bespoke and
has been a
joiner for more
than 30 years.

Q & A

Who can tell me the location of my drains?

Inside a house, there is a web of small waste pipes
running from sinks, basins, showers and toilets. These
all feed into a soil stack, which drops down into an
underground pipe, which then, in theory, falls gently
away from the house towards public sewers or an onsite tank, depending on how the system is set up.
Your local water company will hold maps of drainage
runs, which will show the depth of the drains. These
maps aren’t always completely accurate but they
usually give a good indication of the state of play. The
main drains usually run under the street. Connections
often involve digging roadworks to gain access, the
kind of event that requires traffic control. Such works are
expensive but, in the great scheme of things, they’re still
usually cheaper than the alternatives.
It’s possible that you’ll have access to shared drains
that collect foul waste from a group of homes before
entering the main or public sewers in the road. This
is typical on housing estates and for terraced homes.
Locating these drains run can be a complicated

CARPENTRY ADVICE

E X P E R T S

undertaking and you may have to organise drainage
surveys and enlist the help of a drainage contractor with
camera equipment to help build up your own map.

How do I fit skirting board
like a pro?

While traditionalists and homeowners
renovating period properties might
still want real wood, most carpenters
prefer to use MDF, which is more stable
than wood. It won’t shrink over time –
causing splitting – and doesn’t contain
knots that require a sealing solution.
They also come primed for painting.
For a professional finish on internal
and external corners, invest in an
electric mitre saw to cut perfect angles
— you’ll get a cleaner cut than with a
handsaw. While some DIYers might
be tempted to use a grab adhesive to
attach skirting to a wall, the correct way
is to use screws. This is because walls
aren’t perfectly straight and screws will
pull the board in tight.
For masonry walls, use a masonry
drill with wall plugs and screws,
positioning them every 450-500mm
along the wall. For studwork walls, you

should screw skirting into the timber
studs behind the plasterboard with just
screws. I always use a 4mm countersink
drill bit which drills a conical hole so
the screw head is positioned below
the surface of the material used. This
ensures a smooth finish once wood filler
is used on the hole. I prefer a powdered
filler that’s mixed with water as a two
pack filler dries really hard and takes
much longer to sand to a smooth finish.
If you’re using MDF, use mitre fix glue
on external corners as it dries quickly
and doesn’t require pinning like wood.
Sand off the mitres to round off sharp
edges. Any gaps in internal corners can
be filled with decorators caulk.
Apply two coats of undercoat and
two coats of paint, rubbing down with
fine sandpaper between each one for
a sleek finish. If you are using wood this
will need to be knotted and primed first.

?

myth BUSTER

Electric radiators
aren’t energy
efficient
Electric radiators can
help you become more
energy efficient because
of their controllability.
Each radiator comes
with a timer, allowing
you to set it to come on
at the precise required
time. Some also come
with smart technology,
allowing you to control
it via an app on your
phone. And since 2018,
all-electric radiators
have been built with
‘open window’ sensors.
If the sensor detects a
draught from an open
window or door, it will
automatically switch the
radiator off to prevent
heat waste.
Nick Duggan is
director of The
Radiator Centre

IMAGE: GETTY IMAGES

SEARCH FOR DRAINS

T H E

homebuilding.co.uk 141

PAINTING TILES

IMAGE: ANNIE SLOAN

GABRIELLA
DYSON Is a
lover of all
things interior
design and has
spent the past
decade writing
for various
publications.

142 homebuilding.co.uk

Can I paint over old kitchen tiles?

If your budget is limited or you don’t
have the time to commit to a full
renovation, painting tiles is a quick
and affordable way to transform
your space. However,it requires
meticulous preparation and careful
technique to ensure the paint
adheres properly and withstands
the test of time in a moisture-rich
environment like a kitchen or
bathroom. Preparing your tiles
for painting is non-negotiable.
Many people dive straight into
painting, overlooking the crucial
steps of cleaning and sanding
first. However, tiles will need to be
completely free from dirt, grime
and grease.
You can use a commercial
bathroom cleaner for this with an
abrasive sponge or wire wool.
Remember to clean the grout as
well. If you notice any mould stains,
use a fungicidal spray or common
household bleach to remove this

prior to painting. If the mould
stains persist after cleaning, you
may need to re-grout them before
painting, or use a grout pen after
you’ve finished the job. Fill any
hairline cracks or chips with an
epoxy resin. Make sure you wash
everything down with warm water
to remove any residue from sprays
and resins, then make sure your
tiles are completely dry before
moving on to the priming and
painting stage.
Don’t neglect to use a primer
for this task. This will help tile
paint stick to the surface and will
increase the longevity of your tiles.
Look for a high-adhesion primer
specifically designed for tiles. It’s
a good idea to use a small brush
for this job. Use thin coats and
allow the primer to dry completely
between each layer. You should
lightly sand the tiles once you are
satisfied they have been primed, as

this will ensure the topcoat adheres
to the surface.
Choose a multi-surface paint or
brand specifically designed for
using on tiles and use a small brush
or foam roller. You can paint over
grout and use a grout pen to fill it
back in later if you wish.
Make sure you’ve wiped any
excess paint off your brush or
roller before applying. Too much
paint will look messy and show
your brushstrokes. Once you have
finished painting, avoid using any
water in the space for at least 24
hours. Chalk paint will also adhere
to bathroom tiles, but after painting
your tiles should be sealed with
either Chalk paint wax or lacquer
and if you opt to use a stencil on
your tiles, make sure that you don’t
overload it with paint. This can
cause your stencil to bleed and ruin
your design. Use a small sponge
for optimum results.

A S K

LAWN UPKEEP

IMAGES: (LEFT AND FAR RIGHT) GETTY IMAGES; (CENTRE) BATHROOM MOUNTAIN

IMAGE: GETTY IMAGES

DAVID
HEDGES
GOWER
Is chairman
of The Lawn
Association,
an educational
platform for
homeowners,
professionals
and media.

T H E

E X P E R T S

Q & A

What is lawn aeration and when should I do it?

Aeration is an often-overlooked
aspect of garden landscaping that
involves perforating the soil with
small holes to allow air, water and
nutrients to penetrate to the grass
roots and improve the overall health
of a lawn.
The main reason for aerating is
to tackle soil compaction, where
too many solid particles in a
certain volume or space prevent
proper circulation of air, water
and nutrients within the soil. This
isn’t merely about poking holes, it’s
about reinstating the balance of air
and water in the soil. Ideally, soils
should maintain around 25% water
storage and 25% air space.
Natural occurrences like
droughts or excessive rainfall can
upset this balance, impacting soil
structure. Aeration, particularly
using hollow tines, is the most
effective method, aiding in
improving surface drainage, soil
structure, and facilitating the growth
of grass through enhanced access
to fertilisers, natural rainfall, and
deeper root systems.
The optimal time for aeration
typically spans from September
through May when wetter periods
occur, allowing for better soil
manipulation. Leaving the holes
open post-aeration, in most cases,
aids continuous water movement
through the soil. It can also help to

remove thatch by vigorously raking
with a lawn rake. Mounds of moss
and dead grass will come up,
which is a good sign.
There are three primary methods
for lawn aeration, easily executed
with either a machine or handheld
tools for smaller lawns:
Hollow tine aeration This
technique – though potentially
harder work – is the most effective
for lawns. Tools simplify this process
by extracting tiny cores of soil to
create holes. Doing this annually
leads to consistent soil improvement
and stronger, more resilient
grasses. Depending on how the
tool you have works, you push the
tool into the ground to extract these
cores of soil.

Solid tine aeration This method
primarily creates holes but doesn’t
alleviate compaction effectively.
While it’s not designed for this
purpose, it might be suitable for
maintaining already ideal soils,
although it’s a challenging and
possibly temporary solution. A solid
tining tool works by punching holes
into the ground, which can be a
machine (as pictured above) with
spikes on a roller that you simply
push along.
Slit tine aeration This nondisruptive method allows water
percolation and light pruning of
grasses. However, its impact on soil
is minimal, requiring frequent effort
for noticeable effects, much like
using a garden fork.

W H AT ’ S O N w w w. h o m e b u i l d i n g . c o . u k

Understanding the Future
Homes Standard
Keep up to speed with what we know so
far about the government’s Future Homes
Standard that will ensure that all new homes
built from 2025 produce 75–80% less carbon
emissions to help tackle climate change.

Tips on changing a sink tap
Knowing how to replace a tap is a handy skill
to have as a DIYer. Discover the professional
secrets behind how to update your older
bathroom sink fittings for more contemporary
models, or fix a dripping tap — and all the
tools you will need.

Stop condensation from ruining
your home
From humidity to lack of ventilation, locate the
causes and the problems that can arise from
condensation – and its potential health issues
– so that you can banish the annoyance from
your home for good.

homebuilding.co.uk 143

What is a water
source heat pump?
GR EEN

CLINIC

Discover whether this eco-friendly option could be a smart move for
your home, plus what you need to consider before installing one

W

ROBIN
WHITLOCK
Is a journalist
who covers
climate change
and renewable
energy.

ater source heat pumps (WSHP) are a
lot less common than ground source
or air source heat pumps, but they
are much more effective due to the stability of the
heat extractable from a water source. The major
disadvantage is that the building where the heat
pump is to be installed needs to be in close proximity
to a large water source for the heat pump to operate
effectively. Let’s look at what water source heat pumps
are, as well as the different types of system that are
available, the costs involved in installing and running
one, as well as how big a body of water your home
needs to be beside.

WHAT IS A WATER SOURCE
HEAT PUMP?

Water source heat pumps consist of a series of fluidfilled submerged pipes that extract heat from a river,
lake, large pond or borehole. They generally need a large
amount of water in order to work effectively, which is
why ground source and air source heat pumps tend to be
more popular, along with the fact that less equipment is
needed for those systems.
They operate by sourcing heat from a body of water
and converting it into heat for the home. This is achieved
through the circulation of a water and anti-freeze

mix (brine) through a collector, submerged in a water
resource, that absorbs heat energy from the water. The
brine is then compressed so that the heat delivered to the
building is at a higher temperature and then circulated
through the heating system — usually taking place
in radiators or underfloor heating and a hot-water
cylinder for hot water.

DIFFERENT TYPES OF WATER SOURCE
HEAT PUMPS

There are four different types of water source heat
pump – closed loop systems, open loop systems, hybrid
systems and solar assisted systems.
● Closed loop systems The closed loop systems consist
of sealed pipes containing antifreeze fluid, which are
submerged beneath the water surface. The water heats
the fluid in the pipes, which is then returned to the
heat pump.
● Open loop systems In open loop systems, water
is extracted from the water resource directly and
this then flows through the heat pump, which
extracts the heat from it. These systems can be more
efficient than closed loop water source heat pumps,
but permission is required from the Environment
Agency (EA) or Scottish Environment Protection
Agency (SEPA) to extract the water from the water

IMAGE: GETTY IMAGES

You will need access to a large body of water
such as a river or lake in order to have a
water source heat pump

G R E E N

FIND THE
SOURCE
Grants are
available for
switching
to a WSHP
under the
government’s
current Boiler
Upgrade
Scheme.

C L I N I C

resource and subsequently discharge it back into
the water resource.
● Hybrid systems Hybrid heat pumps integrate
a second heating source operating alongside
the water source heat pump. These systems are
generally used in older homes that are more
difficult to insulate.
● Solar-assisted systems Solar-assisted water
source heat pumps add a solar thermal panel to the
system alongside the heat pump.

Water source heat pumps are typically installed
inside a building or an outbuilding and pipes are laid
from there to the edge of the water source, where
they are buried in a trench around 0.5 metres deep
and around 40cm wide. At the water’s edge the pipes
connect to a lake collector or a pond mat, consisting
of loops of pipe within which is the water and
refrigerant mix. The lake collectors are constructed
outside of the water and then sunk to the bottom
of the water resource where they are held in situ by
weights. Pond mats are coils of pipe attached to a
corrosion-resistant steel frame, saving space where
the water resource is smaller in size.
Underfloor heating or larger radiators may
increase the cost of installation and the building
also needs to be well insulated. Most planning
authorities will treat a water source heat pump as
a ‘permitted development’, meaning that it can
be installed without having to obtain planning
permission first.
Water source heat pumps could be especially
attractive to community energy projects. The
government assisted in 2015 by providing a map
showing the most suitable water resources,

“Water and anti-freeze mix (brine) is circulated
through a collector that absorbs heat energy from
the water by compressing the brine”
recommending that urban locations near fastflowing rivers were probably the best places to
install this technology.

PROS AND CONS

There are several things to weigh up if you are
considering this system:
• Pros Heat pumps of all types are more costeffective than electric or coal heating systems,
but not necessarily so when they replace gas
heating, although they do, of course, have lower
carbon emissions.
One of the key benefits of a water source heat
pump is that they are more efficient than ground
and air source heat pumps. This is due to the heat
transfer in water being so much better and also that

water temperature tends to be more stable, i.e.
an average of between 7 and 12˚C, throughout the
year. This is higher than the average winter air and
ground temperature.
• Cons The house or other building in which the
heat pump is installed needs to be near a large water
resource, or the heat pump will not work at maximum
efficiency. There also needs to be sufficient space to
install the pipes between the water resource and the
building and there needs to be enough room inside the
building for the heat pump’s compressor.

IMAGE: GETTY IMAGES

INSTALLATION REQUIREMENTS

TYPICAL COSTS

The overall price of having a heat pump installed into
your home will vary between installers, according
to a spokesperson from Vaillant. Additionally,
underfloor heating and larger radiators may increase
the installation cost. However, there are some general
guidelines as to the total cost.
“Typically, the total cost of installing a water source
heat pump into your home will reach approximately
£10,000,” says Vaillant’s representative. “While this
seems rather high, it’s important to understand the
cost-saving benefits on offer from having a WHSP
installed on your property.
“On average, homes with a water source heat
pump compared to a traditional heating method
stand to save around 15 percent on their heating bills
annually. Better yet, with proper use, maintenance
and servicing, a water source heat pump will last
anywhere from 15 to 50 years. This extends much
further than traditional combi-boilers, which are
usually recommended for replacement at around the
10-year mark.
“There are grants and incentives on offer for
homeowners who look to make the switch, though
we recommend reviewing government guidance
before making a decision.”

homebuilding.co.uk 147

A R C HI T EC T U R A L

148 homebuilding.co.uk

MOOD BOA R D

A

OPT FOR A BARREL VAULTED CEILING
Barrel vaulted ceilings provide an eyecatching, unusual feature that helps
maximise light and increase ventilation. Less
traditional than vaulted ceilings with a classic
peak apex, their curved design makes them a
favourite with those building modern homes.
The glulam arches of this barrel ceiling –
created in a self-build designed by Andrew
Birds of Birds Portchmouth Russum – were
treated with Fiddes wood oil to give them a
white tint. They were inspired by a French
wine barrel with two wings either side for the
living and bedroom spaces.

WORDS: NATASHA BRINSMEAD IMAGE: SIMON MAXWELL

Adding a sense of space as well as creating instant
wow factor, these architectural ceiling designs can
transform the look and the feel of your home. Get
inspired with these fantastic examples

lthough self building is the perfect
time to incorporate a vaulted ceiling
into your home design, it’s not
the only opportunity to incorporate them.
Anyone thinking about adding an extension,
or those carrying out conversions to barns,
former industrial buildings or in their own
lofts, can all create stunning vaulted ceilings.
While we tend to be more accustomed to
flat ceilings in our homes, with some forward
planning, vaulted ceilings can add so much
interest and volume to any interior — plus
they can inject wow factor to both doubleand single-storey spaces. From curved forms
to angular shapes, these types of ceiling
design can suit both contemporary and
traditional homes, too.
While there are several different types
of designs you could choose from, the term
vaulted ceiling is generally used to describe
a ceiling that extends up from the walls of a
room, angling upwards. This creates a much
greater ceiling height than the standard flat
ceiling in the UK, which is usually around
eight feet.
Vaulted ceilings can also be used to create
double-height spaces, extending right up
from the ground floor to the underside of
the first floor roof, or in rooms on the upper
storeys of the house.

homebuilding.co.uk 149

COMBINE WITH A GALLERIED LANDING
Galleried landings are brilliant design features
for a number of reasons and are generally only
possible in houses with vaulted ceilings, where
the extra vertical space allows for them to be
successfully incorporated.
Not only will a galleried landing beneath a
double-height vaulted ceiling add real wow
factor upon entering a home, but it is also a
lovely feature on the first floor, where it will make
the spaces feel more open and give a great view
over the area below.
The contemporary space has been fitted with
an eye-catching metal balustrade to finish off the
landing, lending it an industrial feel. The natural
plaster finish, from Clayworks, lends texture to
this vaulted ceiling.

150 homebuilding.co.uk

IMAGE: JAMES BRITTAIN

DESIGN IN A ‘BRIDGE LANDING’
TO LINK FIRST-FLOOR SPACES
When it comes to converting a barn
successfully, there are several important
factors to bear in mind.
Barn conversions can often boast
breathtaking voluminous vaulted
ceilings, but while these look amazing,
providing access between the first floor
rooms above can prove troublesome.
Designing in a ‘bridge’ landing can
prove the perfect solution for linking up
the first floor accommodation within a
dramatic vaulted space.
In this award-winning barn conversion
project (left) designed by Hudson
Architects, the bedrooms are located
at either side of the building and are
connected by a central bridge landing
that doesn’t interfere with the large
glazed openings or the impressive
original trusses.

M O O D B O A R D

IMAGE: SIMON MAXWELL

MAKE A SMALL SPACE FEEL BIGGER
Creating extra space within a home is often a top priority for
many homeowners — which is where vaulted ceilings can prove
beneficial. A large extension may not always be possible due to
planning constraints or for practical reasons, but by introducing
a vaulted ceiling, the feeling of having added extra space can
be achieved.
Within this renovated home (left), designed by POW
Architects, the semi-vaulted ceiling helps to visually increase
the size of the living room by creating the illusion of additional
space. It also provides scope for a further bedroom on the upper
floor to the other side of the layout.

BUILD A PARTIALLY VAULTED CEILING
There is no real reason why a vaulted ceiling has to span
the entire length and breadth of a space — in many cases,
keeping just a section of the ceiling full height can make
more sense. Where top floor accommodation can’t be left
open to a fully vaulted ceiling due to restrictions on space,
partial vaulting can look equally effective and add visual
interest. This idea is also a useful way of adding height in
one-and-half storey homes.
In this SIPs and oak frame self-build project (above) –
designed by Carpenter Oak – the first floor galleried landing
sits beneath a sloping ceiling. Rooflights allow the light to
flood down to the ground floor below.

homebuilding.co.uk 151

ADD WARMTH WITH A TIMBER-CLAD CEILING
Including bare timber features in your interior scheme is a
surefire way to inject plenty of character, warmth and rustic
appeal. Plus when it’s used as a cladding material for a vaulted
ceiling, the beauty of timber is really allowed to shine.
In this stunning Scandi-inspired dining/living room (right),
the barrel vaulted ceiling has been finished with pale, narrow
strips of timber cladding. The industrial-looking flue that emerges
from the woodburning stove serves to draw the eyes upwards
towards the vertical proportions of the space, while the simple
rooflight that has been punched into the ceiling ensures the room
is full of natural light.

MAXIMISE LIGHT WITH A GLAZED GABLE
Pairing a vaulted ceiling with a glazed gable
end is not only a great way of bringing natural
light into rooms with these soaring ceilings,
but will also add a dramatic feel to the space.
If you’re concerned about your privacy being
compromised with such large expanses of
glazing, consider using frosted glass or a
decorative window film as has been done in this
minimalist bathroom above, designed by WG+P.

IMAGE: SIMON MAXWELL

IMAGE: DAVID BARBOUR

M O O D B O A R D

EXPOSE RAFTERS AND TRUSSES FOR
ADDED CHARACTER
Leaving beams, rafters and other structural
elements on show can add plenty of character
and charm to homes both new and old. Vaulted
ceilings provide the ideal opportunity to leave
the structure of the room on show — both in the
case of lofty double-height vaulted ceilings, but
also in single-height rooms, as this example goes
to show. This charming bedroom in a self-build
(right) has been built into the roof space and the
distressed ‘faux’ rafters were actually added in
simply to provide more interest — they serve no
structural purpose. It’s a clever way of injecting
character into a traditional new home.

homebuilding.co.uk 153

IMAGE: NIGEL RIGDEN

DRAW IN LIGHT FROM ABOVE
Vaulted ceilings can provide an ideal means of introducing natural light from above.
Installing rooflights or structural glazing in your ceiling are two simple ways of
achieving this. High-level glazing is also a possibility with vaulted ceilings — clerestory
windows work particularly well and look really dramatic when spanning the full
width of a room. In addition, this type of high-level window avoids any issues with
overlooking. In this single-storey property (below), the partially vaulted ceiling has
provided scope to introduce a high-level window above the sliding doors, bringing
extra light into the space.

INCREASE HEADROOM IN A
LOFT CONVERSION
Think vaulted ceilings should be reserved
for large, open houses only? Think again
— they can actually be an incredibly
useful feature for smaller rooms, or those
with limited head height.
In loft conversions or for rooms on the
first floor of dormer bungalows, vaulted
ceilings can often be the only way to get
the head height needed for the rooms to
be usable and comfortable.
This guest bedroom in a chapel
conversion (right), designed by Evolution
Design, maximises the available space
thanks to built-in storage. The vaulted
ceiling gives the bedroom a fresh, open
feel despite its compact proportions.

IMAGE: CHRIS HUMPHREYS

M O O D B O A R D

ADD ‘PODS’ FOR PRIVACY
While large open-plan
spaces with soaring vaulted
ceilings look striking, it can
be a challenge to make them
feel welcoming, intimate and
cosy down below. What can
sometimes work better than an
open-plan layout is a ‘broken
plan’ setup, whereby some
form of divides are employed
to help break up the expanses
of space but without completely
shutting each of the rooms off
from one another.
Creating ‘pods’ with
dividing walls that span just a
section of the space can help
zone areas, without fear of
losing the beautiful vaulted
ceiling above.
In the master bedroom suite
of this barn-style self build by
Oakwrights (right), a wall has
been built to sit just below the
A-frame of the vaulted ceiling
in order to make the en suite
behind feel more private.

homebuilding.co.uk 155

M O O D B O A R D

ADD A WARM FEEL TO YOUR BATHROOM
Vaulted ceilings should not simply be the reserve of your main
living spaces. They can also work very well in bathrooms —
particularly those that would otherwise have limited head
height. They also add warmth and a characterful feeling. In the
200-year-old period house above, the en-suite bathroom has
low vaulted ceilings and original windows, so the challenge
for Simon Taylor Furniture was to design every aspect to suit the
unusual shape. The shower enclosure screen had to be made
bespoke to fit with the angles and ceiling height.

KEEP THE STRUCTURE EXPOSED
It’s not just timber beams and rafters that can be left exposed
on vaulted ceilings — steel ties can also look extremely stylish
and give contemporary and traditional interiors, like the above
bedroom, a modern industrial edge.
This calming bedroom features an exposed glulam beam
and the steel ties that also make up the ceiling structure have
also been left visible. Juxtaposed with the thoughtfully relaxing
interior of the room, they add an interesting touch to the space,
which is located in the extension of this former bungalow.

IMAGE: DAVID BARBOUR

IMAGE: SIMON MAXWELL

COMBINE WITH
A MEZZANINE
Mezzanines are a great
way of gaining additional
floorspace under a vaulted
ceiling, and creating
both single- and doubleheight zones in one area.
Mezzanines can be put to
good use as studies, play
rooms or TV snugs.
In this stunning chapel
conversion (left), huge steel
beams were designed and
fitted to support the mezzanine
that now sits at the front of the
building, over the main living
area. It ensures that the full
height of the original building
can be enjoyed when entering
the house.
The extra level provides a
home office at the same time
as preventing the space from
seeming too cavernous.

homebuilding.co.uk 157

THE UK’S LEADING
LAND AND RENOVATION
FINDING SERVICE

14,000+
LISTINGS

Find plot listings curated in one place that you can filter by area,
property type and budget.
Be the first to know when new plot listings come to market with alerts.
Subscribe to Plotfinder and get two free tickets to all
IMAGE: GETTY IMAGES

Homebuilding & Renovating Shows.

Visit plotfinder.net to find out more

HO W

GR EE N

IS

Y OU R

HOME?

LIVING
WITH A
WIND
TURBINE
Is a wind turbine a practical
addition for your home?
Tim Pullen revealed his own
experiences of installing one to
help you make the right choices

W

IMAGE: ALAMY

ind turbines, unlike
solar panels, are all
about location. They
need good wind speed and wind
unobstructed by buildings, hills,
trees and the like. Once there is
an awareness of wind turbines, it’s
likely to be the location that drives
the thinking. In my own case I
have a smallholding that provides
plenty of space for a turbine. I am
on top of a hill with good wind and
when the funds became available,
it seemed only natural to consider
putting a turbine up.

KEY CONSIDERATIONS
The decision needs to start from
the knowledge that there is

good wind. In my own case, the
Windspeed Database indicated
that the average for my location
was 5.2 metres per second (m/s).
Given that the absolute minimum
for a viable installation is 5.0m/s,
that was not overly reassuring.
But the database information
is based on the postcode which
covers 1km2, so I invested £500 in
an anemometer and monitored
actual wind speed for two years.
That showed that the average for
my specific location was actually
5.8m/s (for context, a realistic
maximum for most of the UK
would be 7m/s) which was far more
encouraging, indicating that mine
was a good location.

CHOOSING THE
CORRECT TURBINE

The right turbine is the result of
a number of factors. The first is
whether your site is best served
with a roof-mounted (and
probably vertical axis machine)

or freestanding. The probability
is that this is best decided with
the input from the installation
company. They should also advise
on size — 2kW to 2.5kW being
typical for a domestic machine.
Then we get into technical
issues like start-up speed and
cut-out speed — that is the wind
speed needed to get the turbine
generating and the wind speed at
which the machine shuts down
to preserve itself. But without
developing an intimate knowledge
of turbine performance it is a
matter of due diligence; checking
out the manufacturer and the
installer. If they both have a good
record then they are likely to
propose a good machine.

PLANNING CONSENT

Then there is planning consent,
requirements for which vary with
the four home nations. And an
application must have details of
the turbine that is being proposed,

homebuilding.co.uk 161

H O W

G R E E N

I S

Y O U R

H O M E ?

COST AND SAVINGS

Realistically a good-quality
turbine, installed and connected
to the grid and the house will cost
upwards of £7,000. That will buy a
2.5kW machine that will produce
around 5,000kWh per year. Valuing
that energy is tricky given the way
electricity prices have fluctuated
in the last year or so and with the
amount of the generated energy
that can be used in the home.
Assuming a typical 40% in-house
consumption then it has a value of
£1,350 per year giving a five-year
payback on investment. Of that,
£900 is savings on electricity

In my own case it requires no
intervention on my part at all. The
system automatically determines
that the first call is to my house
and when I cannot use that
production the surplus is shipped
out to the grid. This all happens
automatically and I am totally
unaware of where the electricity I
am using is coming from. What I am
aware of is my electricity bill which
is around £40 per month.

MAINTENANCE
AND RELIABILITY

In the main, good-quality turbines
are inherently reliable. They

“Assuming a typical house consumption, a 2.5kW
wind turbine has an annual value of £1,350, giving
a five-year payback on investment”
purchased from the grid and £450
from sale of surplus electricity to
the grid.

HOW TO USE
THE ENERGY

You need a turbine that has control
electronics that allow it to be
connected to the house and the
grid. That will enable it to deliver
as much energy as possible to the
house, maximising its value, and
as little as possible to the grid.

are designed and constructed to
withstand the elements — even
quite extreme weather. But like all
things, they are not perfect. In my
own case last year a bearing on one
of the blades failed (after five years
operation). The failure damaged
other components making it an
expensive and time-consuming
problem but that is the only failure
we have had. Annual maintenance
is generally all that is required.
Cost will vary with the machine

TURBINE
POWER
Whether
it is worth
investing in
a wind turbine
will primarily
be dependent
on your
property’s
location.

and the installation company but
is likely to be around £200 per
year. There are ‘consumables’ to
consider — like brake pads, oil and
grease that may add to the cost. The
installation company should be
offering this service so be sure that
you are happy to have a long-term
relationship with that company.
After six months or so, you
will no longer notice that the
turbine is there. Initially it will
have an impact as it can be seen,
it has movement and noise. But
that quickly fades — for you and
your neighbours. Interaction is
minimal as a smart meter will be
needed and that will have the dual
function of indicating how much
energy you have generated and
how much you have exported.
You will have to organise the
annual maintenance, just as
you do with the boiler, but it is
not that onerous. With some
machines there may be an issue
with the turbine shutting down
in exceptionally high winds, but
that is usually simply a matter of
switching it back on again.
In the right situation, a wind
turbine is undoubtedly the right
idea. The trick is establishing that
it is the right situation. Find a
good installer then living with it
is relatively painless.

IMAGE: ALAMY

together with its height and the
amount of noise it makes. On that
issue most good turbines produce
very little noise, similar to that in
a library. But local authorities put
great weight on this, so having the
figures to hand is always helpful.
If the desire is for something
bigger than a typical domestic
machine, 5kW say, then you
will also need the consent of the
Distribution Network Operator
(DNO — the people that operate
the grid). They will determine if
there is sufficient capacity in the
grid to accept the input from your
proposed machine. The reality is
that the grid across most of the
country is near capacity and it
may not be possible to connect
anything over 2.5kW to the grid.
It needs checking.

homebuilding.co.uk 163

EX P ER T

A D V ICE

Y

ou’ve discharged all of the pre-commencement
conditions of your planning consent, your
building regulation drawings have been
approved and you are finally ready to start your build,
but have you ensured you have all the necessary
paperwork in place before you begin on site? From
arranging site insurance, to completing a Community
Infrastructure Levy exemption form, there are some
key things every self-builder needs to check off their
list before beginning making a start.

Be prepared by knowing
about the different
documents you need in
place for your self-build.

164 homebuilding.co.uk

THE COMMUNITY
INFRASTRUCTURE LEVY

The Community Infrastructure Levy (CIL) is a charge
applied by around two-thirds of local authorities in
England and Wales on new development, including
new homes, to help fund local infrastructure projects

WORDS: MICHAEL HOLMES IMAGE: POLLY ELTES PHOTOGRAPHY

Get the correct paperwork and
insurances in place for your selfbuild to ensure your project runs
smoothly and is covered for any
possible eventuality

PART EIGHT
ESSENTIAL
PAPERWORK

such as roads, schools and healthcare. The CIL liability on the
average-sized self-build measuring 247m² could be an eyewatering £23,465, but fortunately self-builders are exempt from
CIL, as long as they comply with the rules. There is no appeals
process for failing to comply with the regulations and many selfbuilders have had to pay charges or a fine for non compliance, so
read the small print to avoid a very expensive error.
To find out if your local authority charges CIL or is planning
to, visit the planning pages on its website or phone to ask for
details of its CIL schedule/draft schedule. The Community
Infrastructure Levy cannot be charged retrospectively, so if
it applies to your project you, or the agent who submitted the
planning application on your behalf, will have been notified in
writing at the time planning permission was granted.
You (or your agent with your approval) must complete:
● Assumption of Liability Form (CIL Form 2)
● A Self-build Exemption Form Part 1 (Form 7)
● A Commencement Notice (CIL Form 6)
● Self-build Exemption Form Part 2 (CIL Form 7).
Failure to complete all of the forms correctly could mean full
CIL liability is payable. Complete the first three steps before
commencement of the development as defined by Section 56 of
Part III of the Town and Country Planning Act 1990; the fourth
step must be undertaken after completion of the build.

Applicants claiming the exemption must sign a legal
declaration that the project is a self-build and provide evidence
that this is the case, within six months of the completion date.
If within three years the property is either sold or the whole
property let out, the full Community Infrastructure Levy charge
becomes payable. In this case, you must notify the charging
authority in writing within 14 days.
The most common error is commencement of development
prior to securing the exemption. Once work has started you
cannot retrospectively apply for a self-build exemption — even
if it was an innocent mistake on your part. Failure to issue a
commencement notice (CIL Form 6) to the charging authority
prior to work starting on site is another common error. This
will not trigger full CIL liability for permissions granted after
1 September 2019 but will result in a surcharge being payable,
equal to 20% of the chargeable amount or £2,500, whichever
is the lesser amount.
It’s worth noting that as part of the new Levelling-up and
Regeneration Act, the government has announced that a new
Infrastructure Levy will replace the current CIL (Community
Infrastructure Levy), although full details are yet to be confirmed
about the exact changes and when they will be introduced (see
page 109 for more details concerning the Levelling-up and
Regeneration Act).

homebuilding.co.uk 165

E X P E R T

SELF-BUILD INSURANCE

There are misconceptions that lead some self-builders to think
that they don’t need to take out site insurance, believing their
builder’s insurance will cover all risks, but this isn’t the case. It’s
worth noting that more often than not self-build lenders like
to see proof of a suitable policy before releasing funds, either
from a main contractor or a self build insurance policy, or a
combination, so it will likely be a necessity if you need tohave
a self-build mortgage to fund your build.
What your self-build insurance policy needs to cover will
depend on your approach to the build phase of the project, but
there are some key areas all self-builders need insurance cover
for. Public liability insurance is essential from the day you
exchange contracts on a building plot to protect against risk of
injury claims from the public, even if they are trespassing.
If you are using a main contractor, then risks to the work
in progress on site, materials on site, plant and tools, etc.
against losses resulting from fire, theft, vandalism, flood and
storm damage, will be covered by the contractor under their

‘contractors all risk insurance’, together with employer’s liability
insurance for their employees. You should insist on seeing proof
of their valid, up-to-date insurance cover and make sure the level
is sufficient for the value of your project.
If you plan to employ subcontractors yourself, or supply any
of your own materials, tools or plant, or to work on the project
yourself, or with friends and family, you will need to take out
your own self-build insurance, equivalent to ‘contractor’s all
risk insurance’.
Taking out site insurance after you have started the build is

“Insist on seeing proof of your contractor’s
valid, up-to-date insurance cover and make
sure the level is sufficient for your project”
short-sighted. “You will need Public Liability insurance for the
plot of land as soon as you take ownership,” say the experts at
Self-Build Zone. Starting your insurance part way through the
build won’t be any cheaper, as your insurer will probably still
charge you the same premium they would have at the outset. Do
check the small print for things like the duration of the cover and
the renewal process. If it doesn’t automatically renew after 12
months but the build is still ongoing, you’ll need to contact your
provider to ensure adequate cover continues.
“If you do have a problem with your build, how you make a
claim will depend on the section of your insurance policy that
applies,” explains Self-Build Zone. “You will need to check your

A D V I C E

Certificate of Insurance and policy wording for details of the
cover provided. This may then be referred by the underwriter to
an independent loss adjuster for review and reporting for a final
decision to be made.”
The cost of self-build insurance is calculated according to
the value of the works (the build cost), so will range from a few
hundred pounds to a few thousand.

HEALTH AND SAFETY

Construction sites are dangerous places and the importance of
risk management should not be underestimated. Responsibility
for Health and Safety on a self-build site will depend on how you
plan to approach the construction phase of the project.
If you are using a main contractor to undertake the build
i.e. a single building firm, then responsibility for Health and
Safety under the 2015 Construction (Design and Management)
Regulations (known as CDM 2015) will be part of their normal
duties as a builder. As you are a ‘domestic client’, the contractor
will take on the ‘client’ duties required by CDM 2015, too, such

as preparing the Pre-Construction Information Pack, Risk
Assessment and Method Statements (RAMS) and Construction
Phase Plan (CPP) which together, form the key documents
required to operate the site safely and lawfully. The contractor
will also be responsible for issuing an F10 to the Health and
Safety Executive (HSE) if the job is notifiable because the
document will either :
● Last longer than 30 working days and have more than 20
workers working at the same time at any point on the project
● Or exceed 500 person days.
They must secure the site with fencing, provide welfare
facilities, first aid kit, fire fighting equipment and display their
insurance documents and construction site risk warning signs.
They must also check everyone working on site or visiting is
wearing appropriate personal protective equipment (PPE).
If more than one contractor is being engaged, e.g. separate
groundworker, bricklayers, carpenters etc, then responsibility
for CDM can be delegated to an architectural designer who will
take on the role of ‘Principal Designer’ under CDM. They will
need to be formally engaged in this capacity and will charge a
fee for preparing the necessary documents, and checking that
each contractor issues their own RAMS and CPP. They will need
to attend the monthly project progress meetings, report to the
project manager, and take responsibility for the Health and
Safety File to be kept on site.
Where there is a builder managing the project, but other
contractors are engaged directly by the self-builder to undertake
certain trades, e.g. electrical, plumbing, plastering, CDM rules
place a duty on the builder controlling the programme to take

homebuilding.co.uk 167

E X P E R T

on responsibility for Health and Safety for the whole project, as
‘Principal Contractor’. The scope of service and fee for the role
of Principal Contractor should be included in their contract and
they must therefore take on the duties of the ‘Client’ too. Bona
fide contractors supplying materials as well as labour must also
produce their own RAMS and CPP. Labour-only subcontractors
come under their employer’s responsibility.
It is possible to coordinate CDM yourself as a self-builder
but you would be taking on the full responsibility of ‘Principal
Contractor’. As such, the Health and Safety Executive (HSE)
would consider you as a commercial ‘employer’ with all of the
responsibilities and liability that entails. For most self builders,
responsibility for CDM 2015 is best left to a Principal Designer,
and then passed on to a Principal Contractor. To avoid
liability, both should be formally appointed to take on these
responsibilities and paid accordingly.

STRUCTURAL WARRANTY

IMAGE: POLLY ELTES PHOTOGRAPHY

If you’re buying a new home with a mortgage, lenders will insist

on there being a structural warranty in place from the developer,
or the alternative accepted by many, but not all lenders, the
CML Professional Consultants Certificate (PCC). Even if you
are buying using cash, your solicitor will advise you to make
sure a warranty is in place, as within the first 10 years following
completion, any future buyer requiring a mortgage will face the
same requirement from their lender.
If you’re building your own home, lenders will be equally
adamant that the works have been supervised and inspected
by a qualified professional and a warranty – which provides
insurance protection against latent structural defects, or a
PCC – are in place.
If you are employing a single main contractor they may offer
the option of a warranty through the National House Building
Council (NHBC) or another provider. If you are using several
contractors for different trades, are doing the work yourself, or
do not take up the offer of a warranty through your contractor,
then you will need to arrange a self-build warranty. There
are several providers, with Self-Build Zone, LABC Warranty,
Protek, and BuildSafe being among the best-known names.
Cover typically costs around 1% of the total build cost. The
warranty inspector will check the plans and specification ahead
of commencement of construction and confirm acceptance,
or conditional acceptance subject to amendments. They will
then visit the site at key stages in the construction programme
to check workmanship and compliance with the approved
drawings to ensure structural integrity. They will then do a
final inspection and check that the project has been signed off
as complete for building control, prior to issuing the warranty.

A D V I C E

Be aware that structural
warranties are separate
from building control.

It’s important to note that a warranty is distinct and separate
from building control — though both private companies
and Local Authority Building Control (LABC) do offer these
services bundled together, often with a cost saving as the
construction drawings and specification details only have to be

checked through once.
Each insurer offers different policy terms, so it’s worth
checking the small print to find out exactly what is covered.
Typically, major faults in the design and construction will be
covered, but snagging defects are excluded. As a general rule:
the wider the cover, the more expensive the policy.

“If you’re building your own home, lenders
will be adamant that insurance against
structural defects are in place”
A warranty should be arranged well before work starts
on site to give time for the plans to be checked. You can
expect to see the price of cover rise sharply if work has
commenced already and even double in price if you apply for
a retrospective warranty.
A few self-builders opt for an architect’s certificate, now
standardised as the Council of Mortgage Lenders Professional
Consultants Certificate (PCC). This is a statement confirming
that the build has been supervised and constructed in
accordance with accepted building practices. While cheaper
than a warranty, it typically only covers six years (although
this can be extended to 10 years with an additional policy).
The CML PCC is not a warranty or structural defects liability
cover underwritten by an insurance policy. Any issues that
arise are claimed against the architect’s professional indemnity
insurance, and you will need to be able to prove negligence to

homebuilding.co.uk 169

E X P E R T

“If you buy your own materials for your
contracted builders, you can benefit from
zero VAT on new dwellings”

A D V I C E

If you employ VAT-registered builders to construct your new
home VAT will be applied at 0% on all eligible materials. If
you buy materials yourself, you can still benefit from the zero
rate of VAT on new dwellings through the DIY Housebuilders
Scheme (Notice VAT431NB for new builds and Notice VAT431C
for conversions). The scheme allows you to reclaim VAT from
HMRC that you have paid out for your project if you are:
● Building a new dwelling
● Converting a building into a new dwelling (first time
conversion)

● The supply of labour only or the joint supply of labour
and materials should be at the zero rate (0%) for new builds
and at the reduced rate, currently 5%, for conversions and
renovations that bring a dwelling that has not been lived in for
10 years back into use as a dwelling. At the end of the project,
the owner can reclaim the 5% VAT on eligible joint supply of
labour and materials.
Obtain and keep all relevant invoices to ensure that you
can recover all eligible VAT. Remember, you can recover the
eligible VAT on invoices that include both eligible and noneligible items.
Examples of the materials you can claim VAT back under the
scheme:
● All materials normally incorporated in a new dwelling — all
construction materials, for example, concrete, blocks, bricks,
insulation, sand, cement, plaster, timber, roofing, stairs,
windows, guttering, doors, paint, etc
● Electrical and plumbing materials
● Fitted furniture such as kitchen units and worktops

● Bringing an existing dwelling that has not been lived in for 10
years back into use.
To be eligible, the project has to create a new dwelling in its
own right. Extensions, refurbishments and annexes do not
create a new dwelling in their own right, and so are not eligible.
Your project must be lawful i.e. have planning permission,
for personal occupation by you or a family member and
evidence of completion must be provided. Some planning
permissions include conditions or restrictions on use or
occupancy, which may mean that the project is not eligible. If
your project changes in nature during the course of works (e.g.
from an extension to a demolition and new build), then to be
eligible you must obtain planning permission confirming this
before works continue.
For every self-build, HMRC will request to see:
● Valid planning permission, including your detailed plans
● Evidence of completion (usually a completion certificate,
habitation certificate or a valuation office listing letter).
Many self-builders regularly overlook this area, but you
should ensure that you are charged the correct rate(s) of VAT
on all costs associated with your project. Getting this right is
very important, as HMRC will not refund any VAT that has
been incorrectly charged.
For new builds, conversions and renovations that bring a
dwelling that has not been lived in for 10 years back into use as
a dwelling:
● The supply of materials only is always at the standard rate of
VAT — currently 20%. You can recover all of the VAT incurred
on eligible materials via the scheme at the end of the project.

● Extractor fans
● Fittings, such as light fittings, wooden floor systems,
linoleum, floor tiles, door furniture, fireplaces and fires, fixed
towel rails, mirrors, solar panels, boilers, sewage treatment
plants, TV aerials, curtain poles
● Swimming pools and saunas inside or linked to the new
dwelling
● Delivery charge included on an invoice for materials.
Materials you cannot claim VAT back on include:
● Equipment hire, for example, scaffolding, JCB hire (machine
only), WC hire, etc
● Consumables, for example, paintbrushes, hand tools, etc
● Professional fees, for example, architects’ fees, Standard
Assessment Procedure (SAP) Calculations, project manager
● Kitchen appliances, including those integrated, for example
hob, oven, dishwasher
Bedroom furniture, bathroom furniture, such as vanity units
and freestanding units
● Carpets
● Delivery costs, when separately invoiced by a courier.
You cannot recover VAT on materials supplied by builders or
others who are not VAT registered.
Only one claim is allowed and all relevant documentation
and invoices have to be submitted to HMRC within three
months of your self-build project completion certificate being
issued. You do not have to do anything at the outset of your
project, but it’s essential you keep hold of any invoices and
receipts from day one to ensure that you can successfully
claim back the VAT.

make a successful claim, which is not a simple, inexpensive or
pleasant process.

RECLAIMING VAT

homebuilding.co.uk 171

NE X T

M ON T H

IMAGES: (CLOCKWISE FROM TOP LEFT) JULIET MURPHY, PETE HELME, NICK GUTTRIDGE

Essential tips on extending
a semi-detached house
Modern glazing solutions
— bifolds, rooflights,
glazed gables and more...
Expert guide to designing
a self-build house
Kitchen design ideas for
a new-look space
APRIL 2024 ISSUE
ON SALE 7 MARCH

homebuilding.co.uk 177

A MA ZING

HOMES

Come into view
A

cquiring a three-acre site on the edge of a
village in Dorset, the owners of this striking
home contacted Tony Holt Design to create
a new-build house to replace an existing 1,500ft²
bungalow. Although located in a rural setting,
the three-acre plot remained within the village
settlement boundary, thus avoiding the constraints
imposed by greenbelt restrictions.
The site offers awe-inspiring 360-degree views
of the surrounding countryside and the client’s
vision was to design an ultra-contemporary house
that would serve as a prominent landmark within
its setting. To maximise the breathtaking views,
the architect proposed an upside-down layout with
the main living areas situated on the first floor.
The finished house comprises two spacious boxes
connected by a vertical link made entirely of glass.
Offsetting the boxes and considering the path of the

178 homebuilding.co.uk

sun ensures that all of the internal areas benefit from
maximum natural light, while a first-floor terrace
includes an external staircase to provide direct
access to the garden.
Consideration of the orientation and placement of
the glazing maximised energy efficiency along with
substantial insulation and airtightness measures
within the timber frame construction. The use
of triple glazing and solar glass further improved
thermal performance, and the integration of solar PV,
an air-source heat pump and battery storage resulted
in minimal power requirements.
Natural stone was used as an external material to
anchor the house harmoniously within the site and
lend a sense of permanence to the surroundings.
The combination of render, porcelain cladding and
extensive glazing gives the building a lightweight
and contemporary aesthetic.

WORDS: JO MESSENGER

Capturing the plot’s panoramic vista and maximising energy efficiency were
paramount to the design of this rural home by Tony Holt Design

9000

9001