/


Текст
CHESS TACTICS
FOR CHAMPIONS
ASll-PBV STEP GUIDE ГО USING IACTICS AND COMBINATIONS THE POLGAR WAV
SUSAN POLGAR PAUL TRUONG
Chess Tactics
for Champions
I
A STEP-BY-STEP GUIDE TO
USING TACTICS AND COMBINATIONS
by Susan Polgar and Paul Truong
Random House
Puzzles 6 Games
New York Toronto London Sydney Auckland
Copyright © 2006 by Zsuzsanna Pol gar and Hoainhan Truong
All rights reserved. No part of this book may be reproduced in any form
or by any means, electronic or mechanical, including photocopying,
recording, or by any information storage and retrieval system,
without the written permission of the publisher. Published in the
United States by Random House Puzzles & Games, an imprint of
The Random House Information Group, a division of Random House,
Inc., New York, and simultaneously in Canada by Random House
of Canada Limited, Toronto.
RANDOM HOUSE is a registered trademark of Random House, Inc.
Please address inquiries about electronic licensing of any products for
use on a network, in software or on CD-ROM to the Subsidiary Rights
Department, Random House Information Group, fax 212-572-6003.
This book is available at special discounts for bulk purchases for sales
promotions or premiums. Special editions, including personalized covers,
excerpts of existing books, and corporate imprints, can be created in
large quantities for special needs. For more information,
write to Random House, Inc., Special Markets/Premium Sales,
1745 Broadway, MD 6-2, New' York, NY 10019
or e-mail specialmarkets@randomhouse.com.
Visit the Random House Puzzles & Games Web site:
www.puzzlesatrandom.com
First Edition
Printed in the United States of America
10 987654321
ISBN-13: 978-0-8129-3671-1
ISBN-10: 0-8129-3671-X
CONTENTS
Foreword by Anatoly Karpov vii
Preface; What Are Tactics in Chess? ix
TACTICAL ELEMENTS TO WIN MATERIAL DR CHECKMATE
1. Forks and Double Attacks 3
2. Pins 27
3. Deflection/Removing the Guard 51
4. Discoveries 75
5. Double Check 89
6. Skewers 103
7. Trapping Pieces 117
8. Decoys 131
9. Intermediate Moves 145
10. Pawn Promotion 163
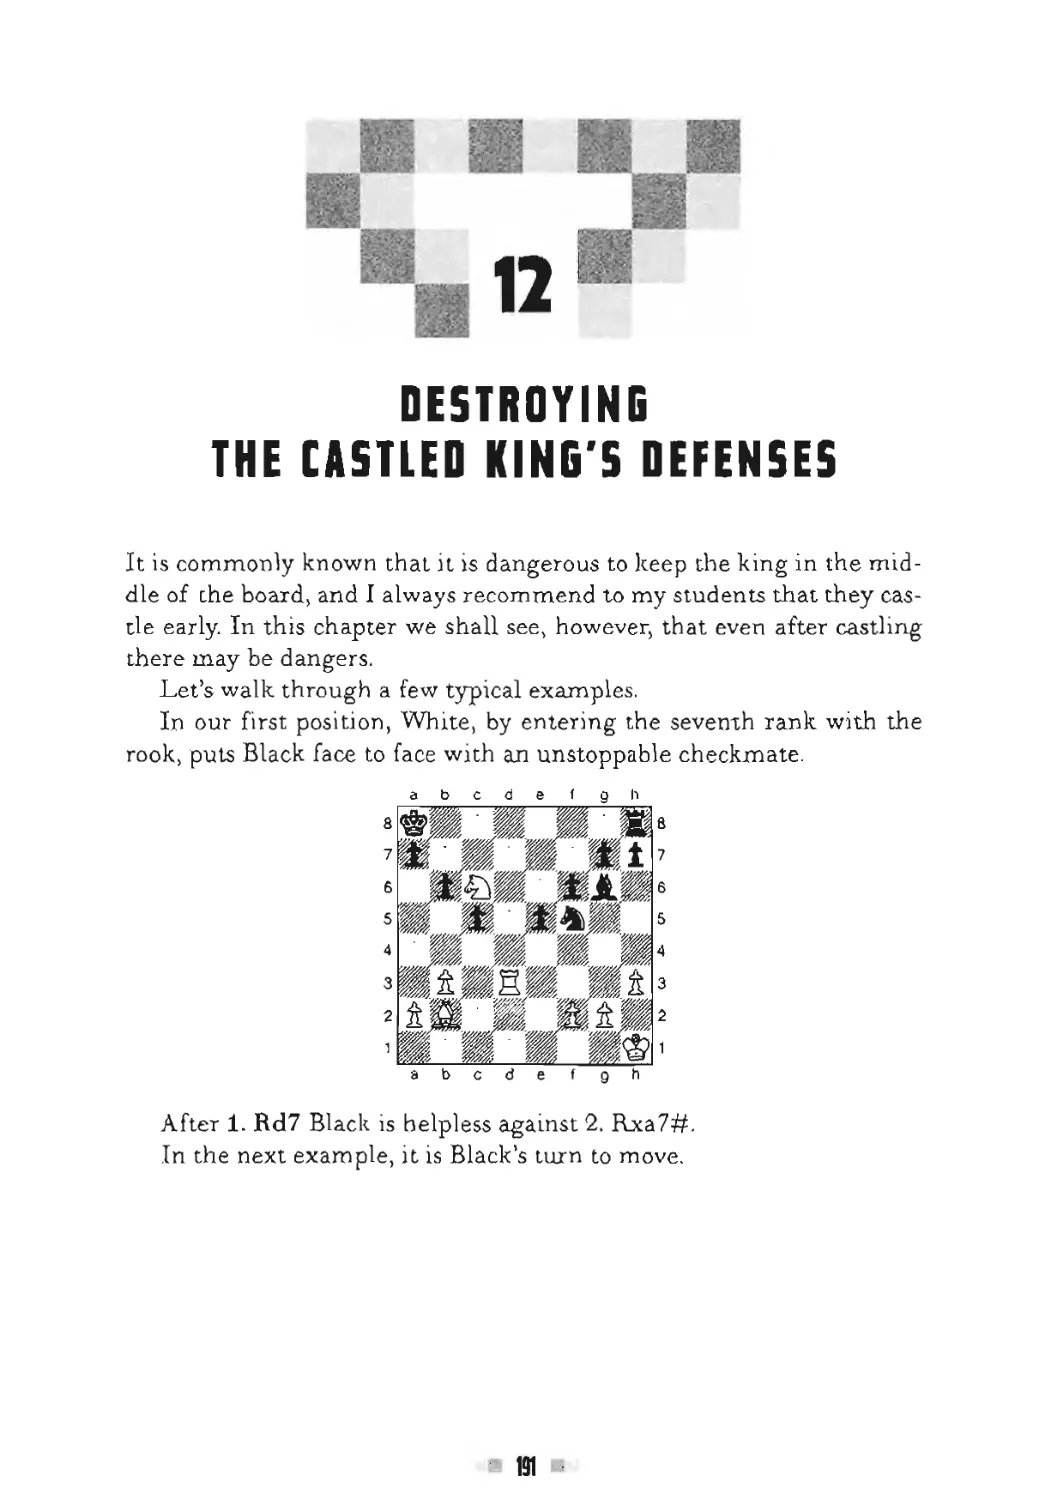
11. The Back-Rank Problem 177
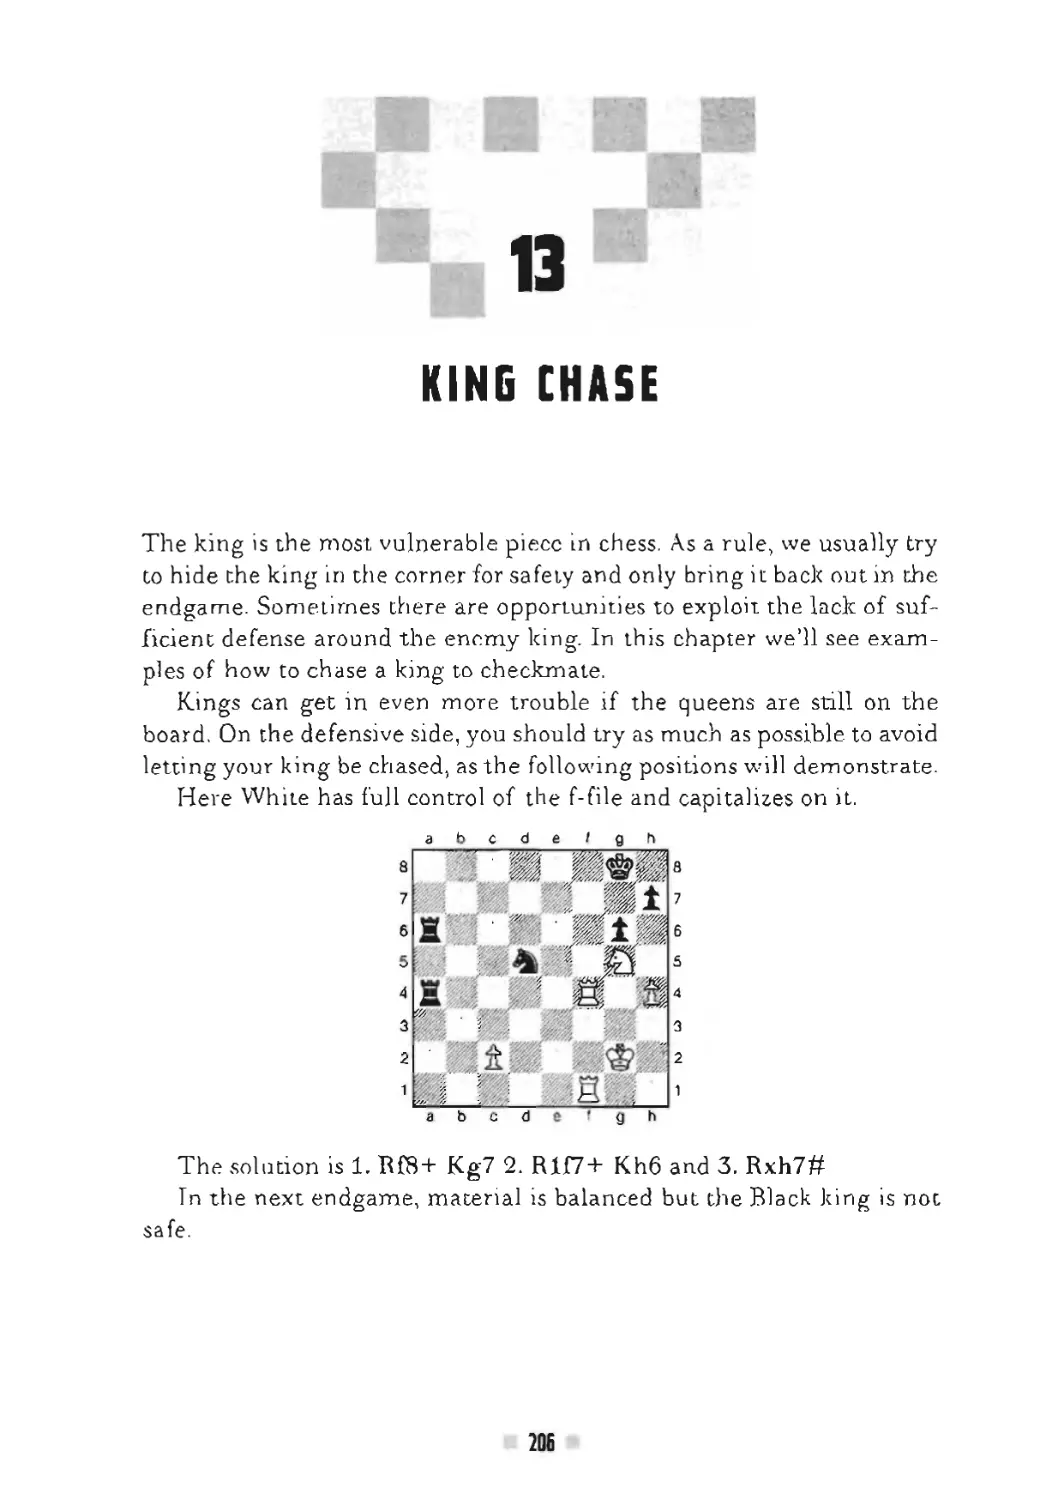
12. Destroying the Castled King's Defenses 191
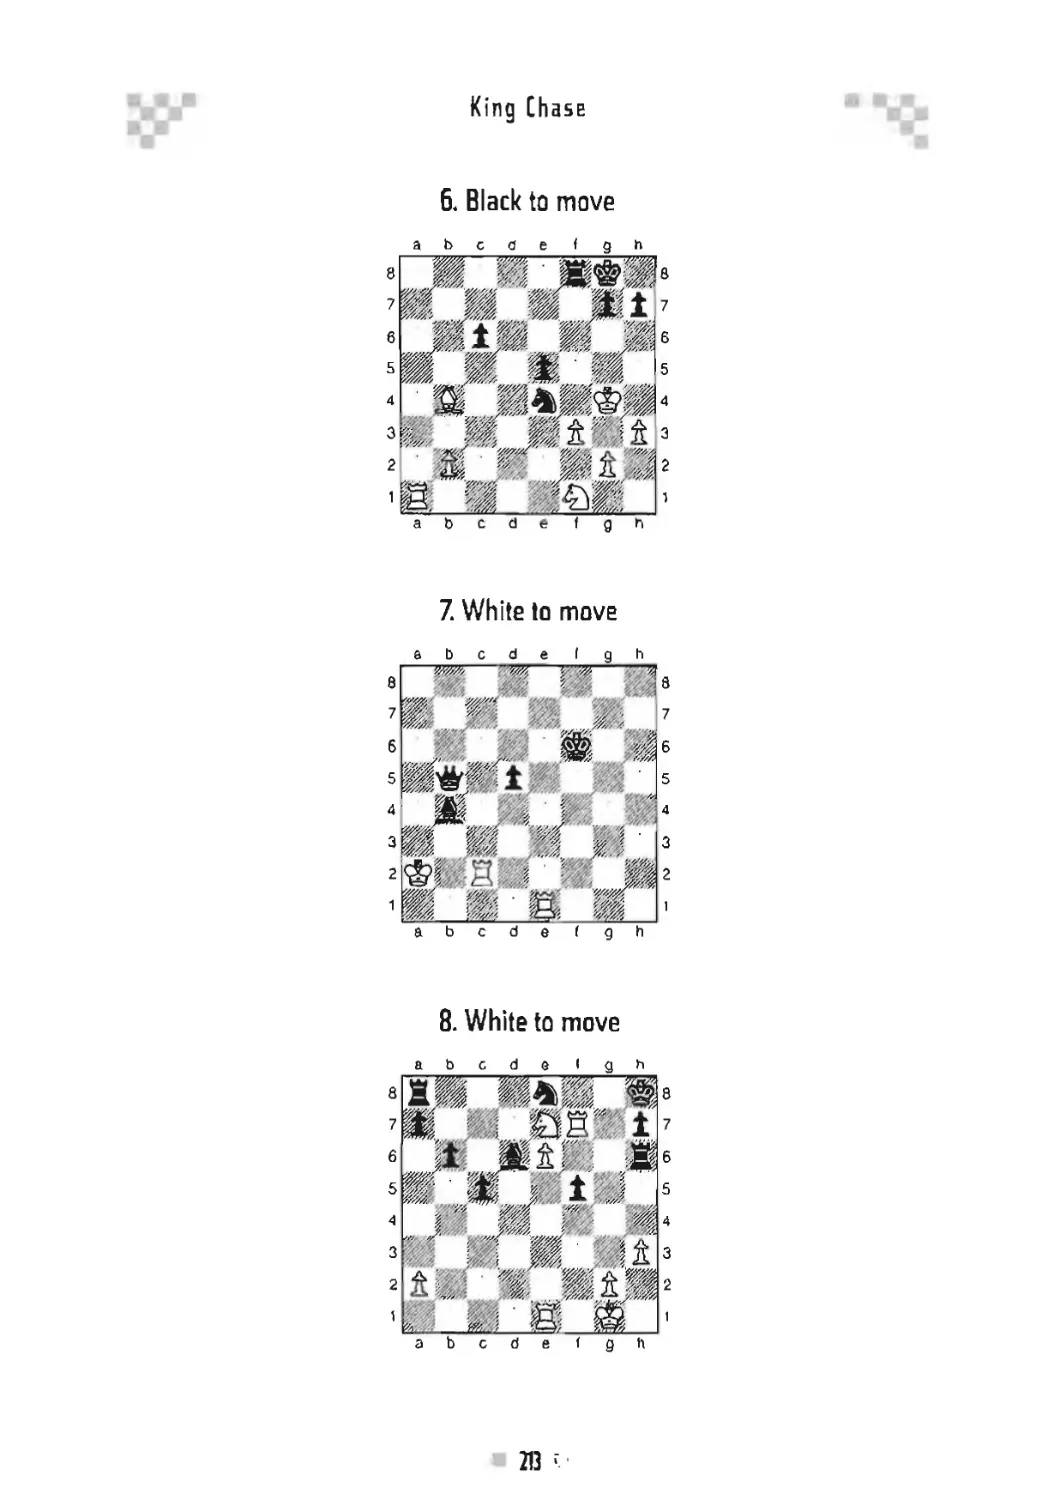
13. King Chase 206
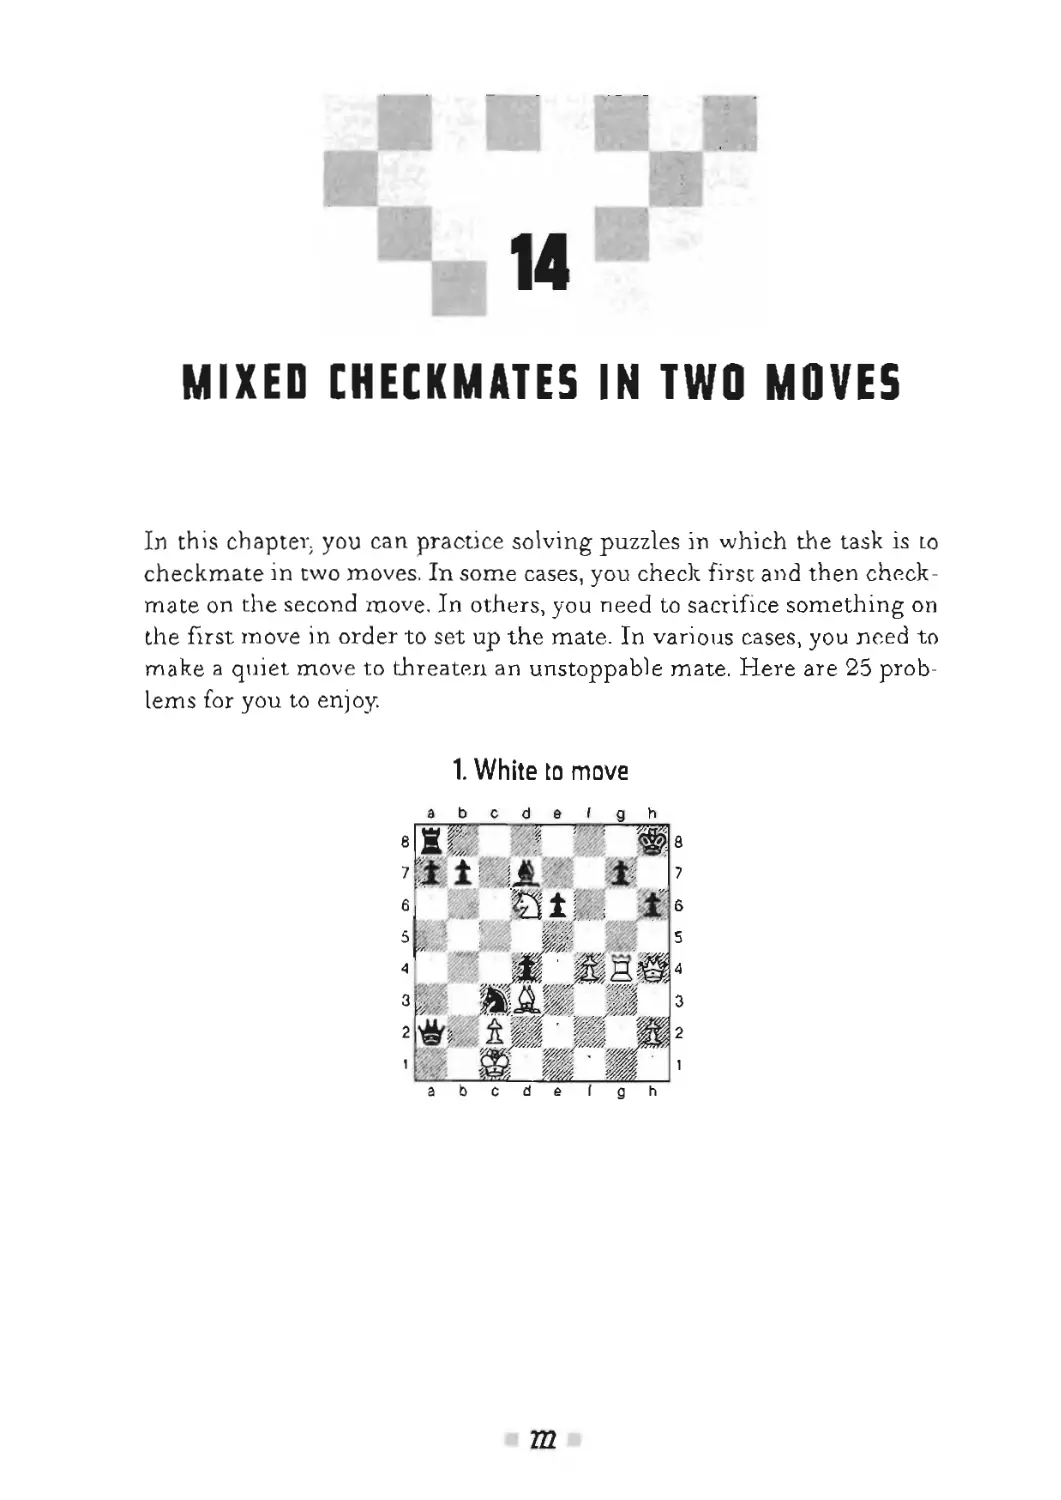
14. Mixed Checkmates in Two Moves 222
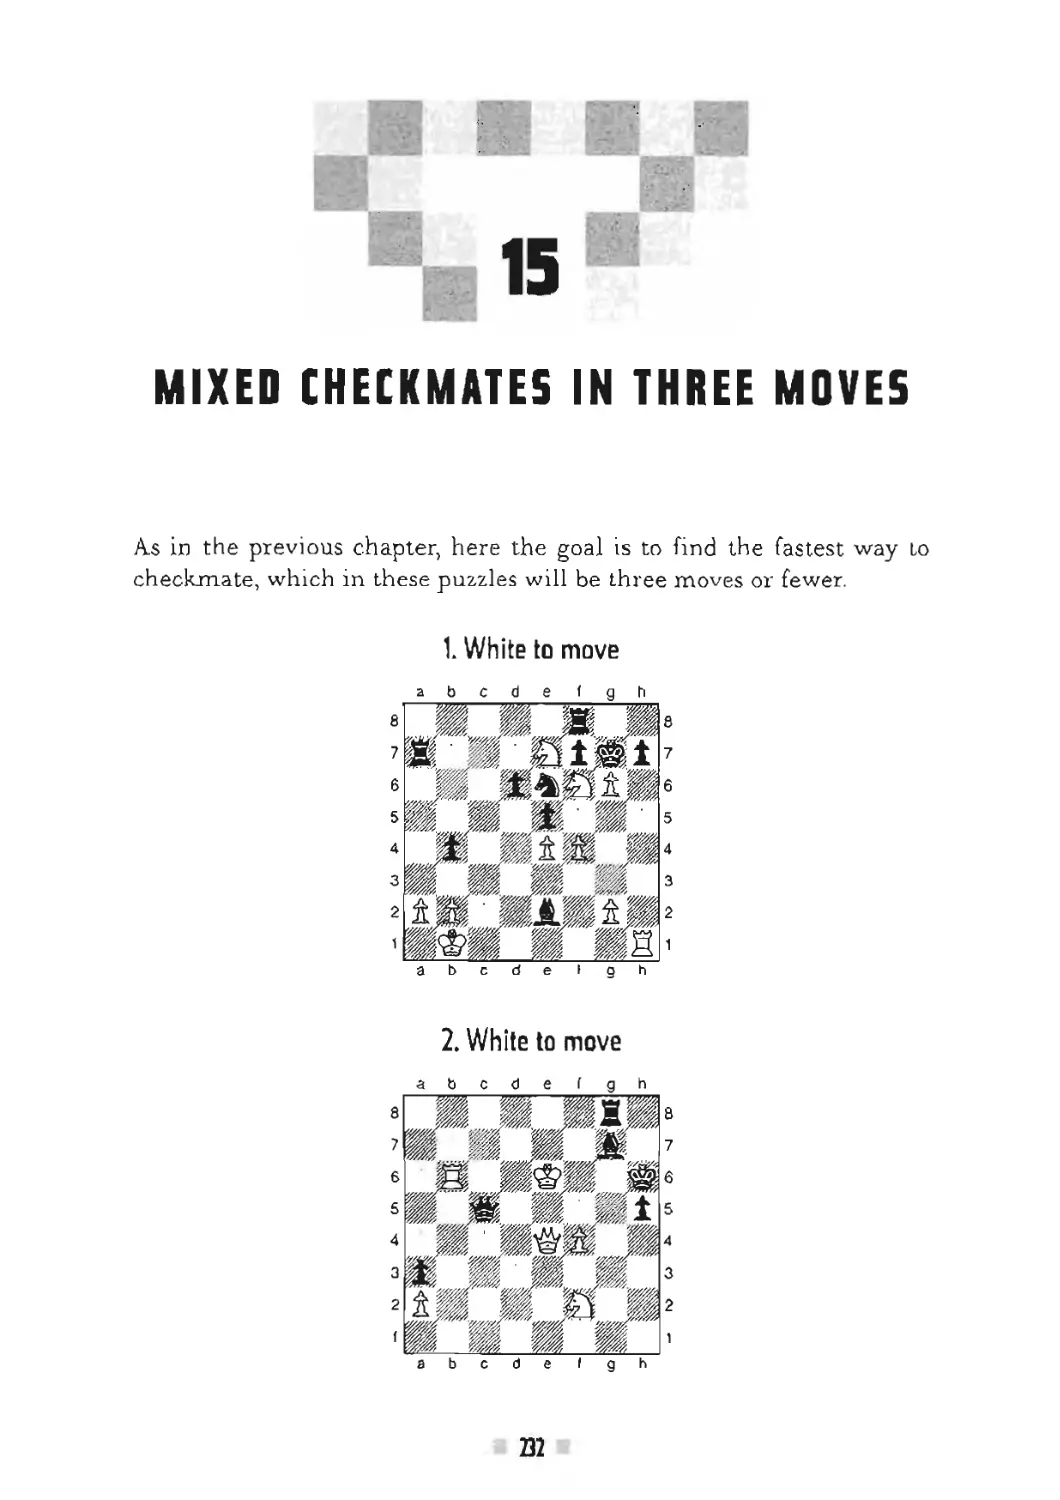
15. Mixed Checkmates in Three Moves 232
1Б. Mixed Checkmates in Four Moves 242
Contents
TACTICS TO SAVE THE GAME
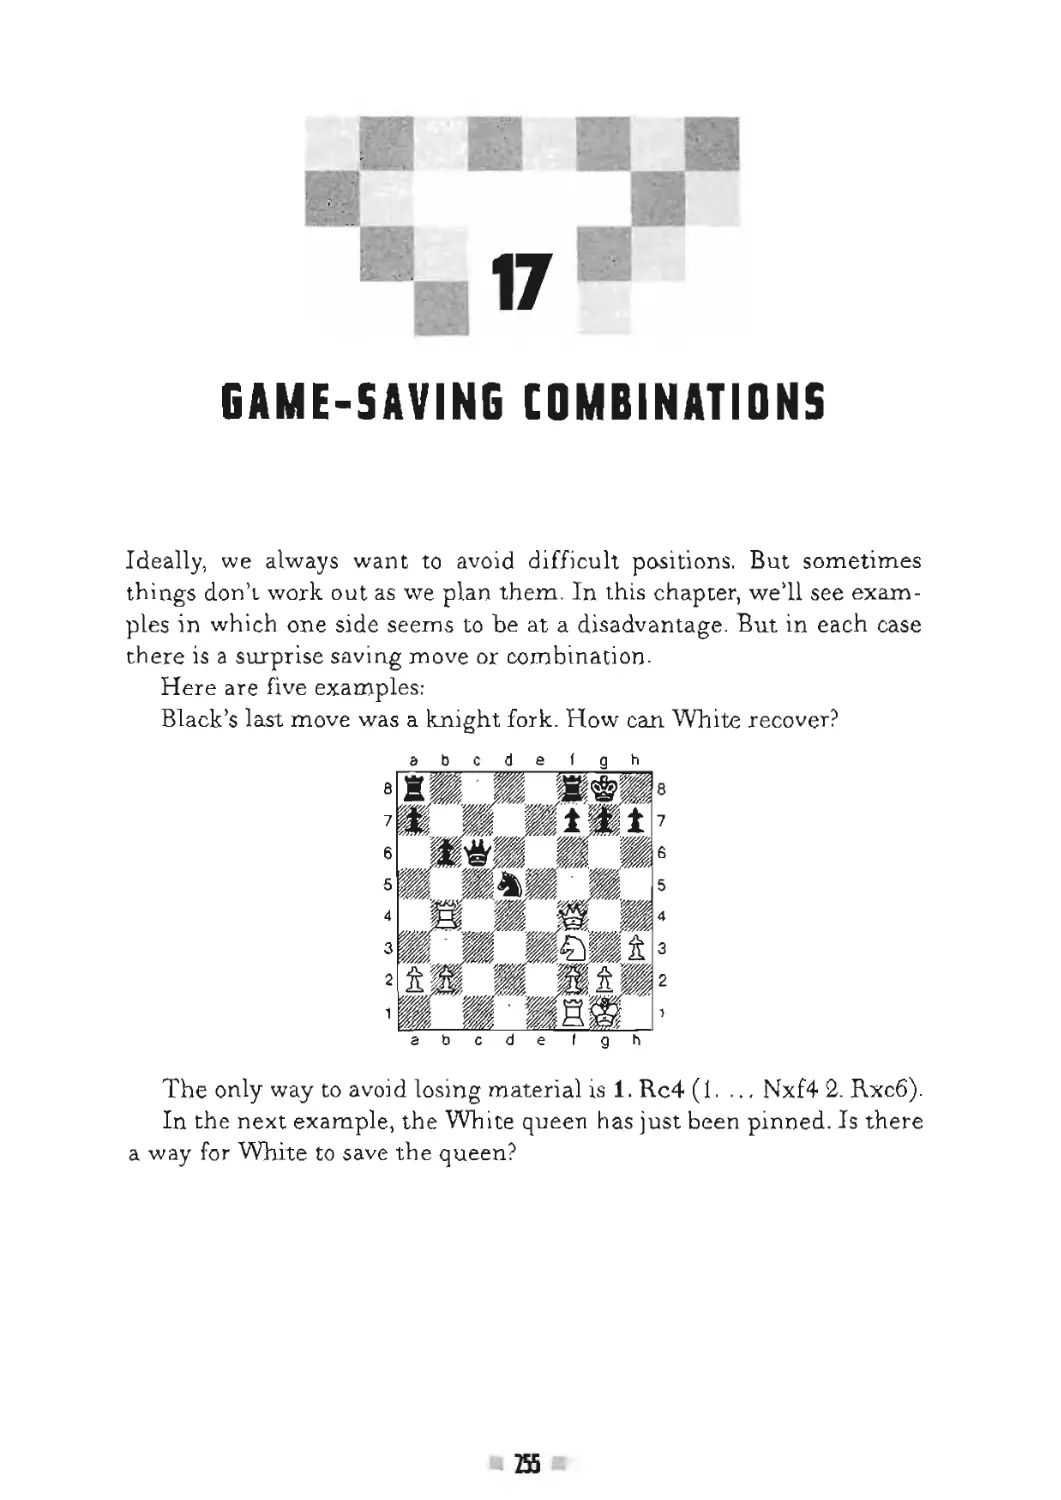
17. Game-Saving Combinations 255
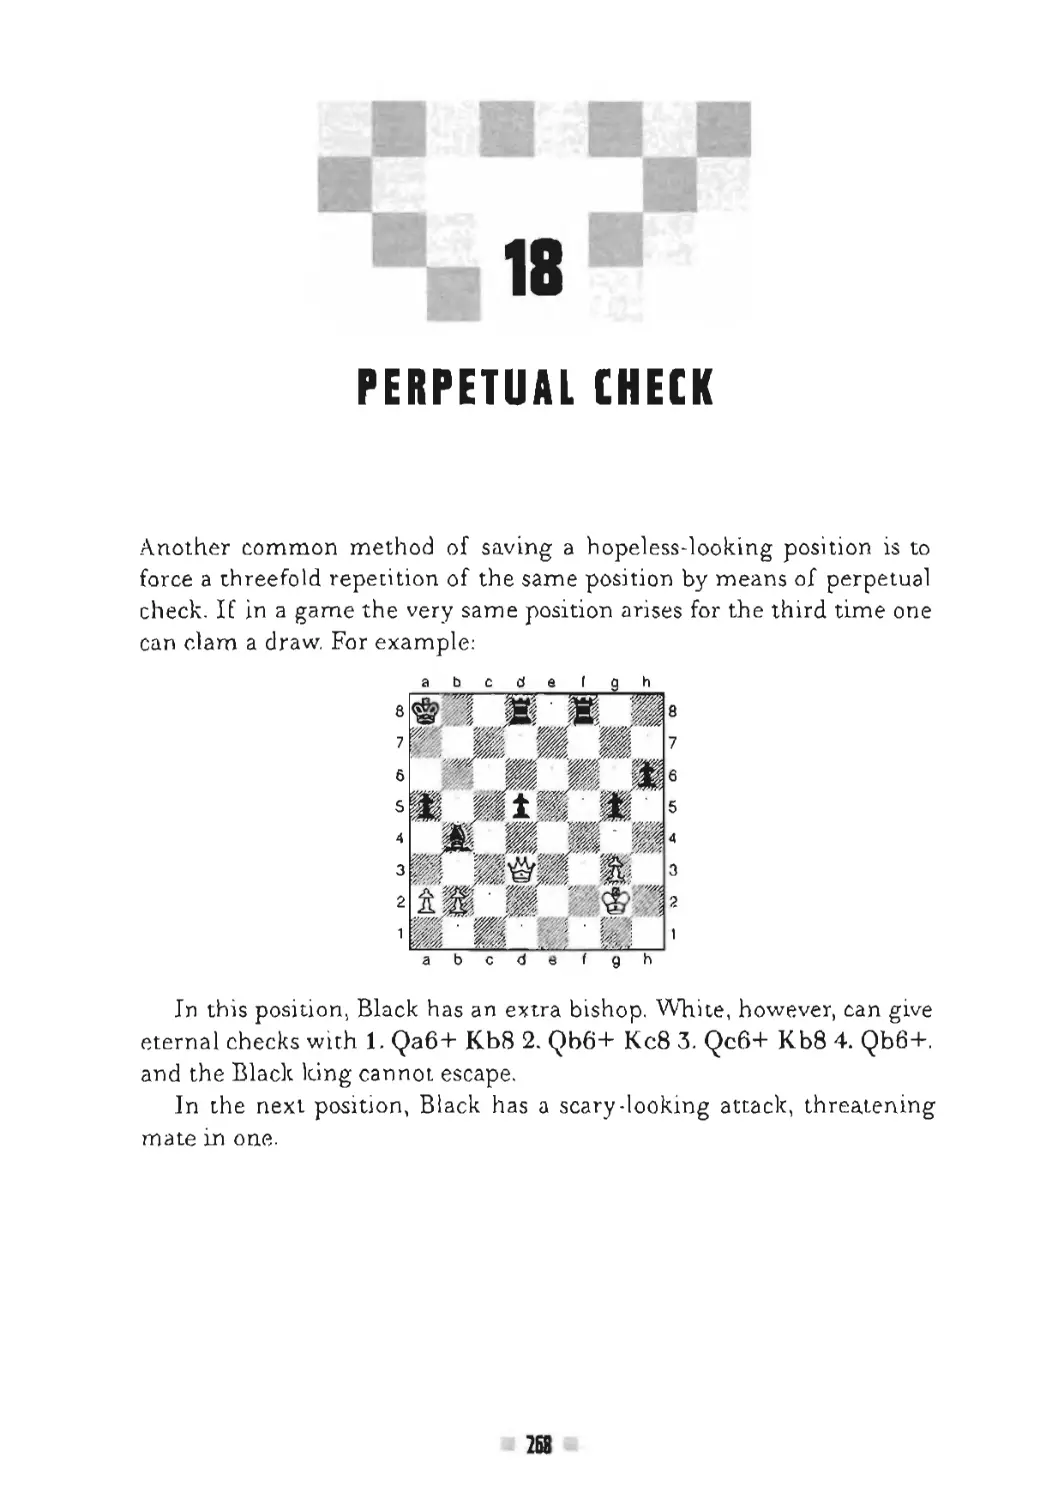
18. Perpetual Check 268
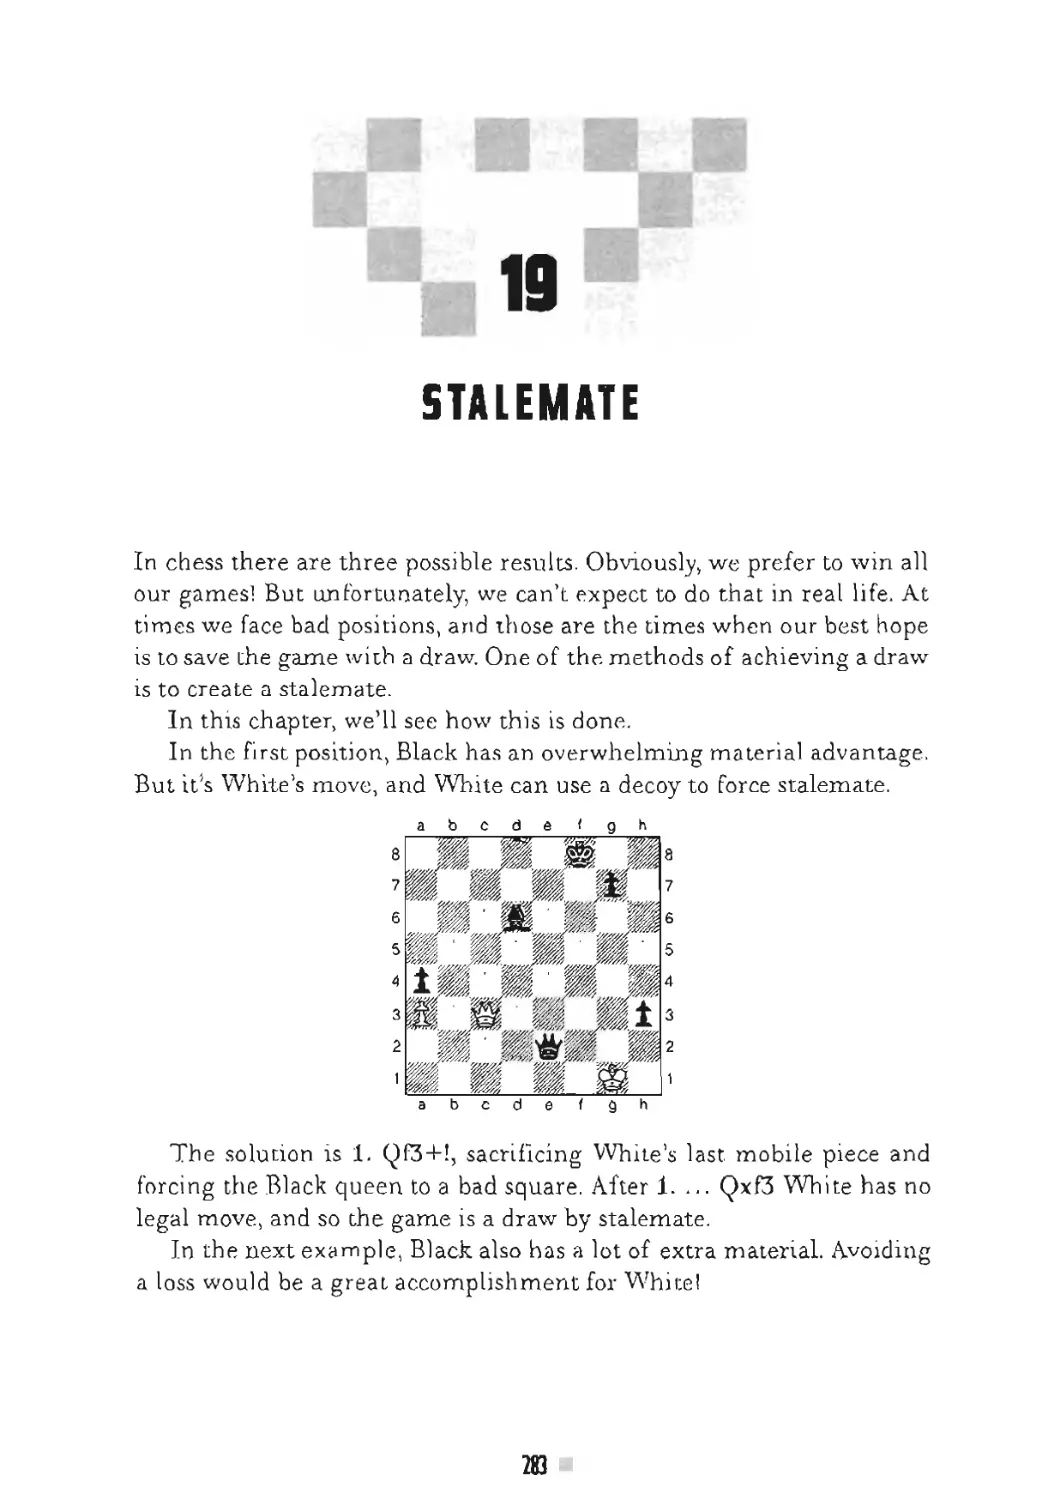
15. Stalemate 283
OTHER IDEAS
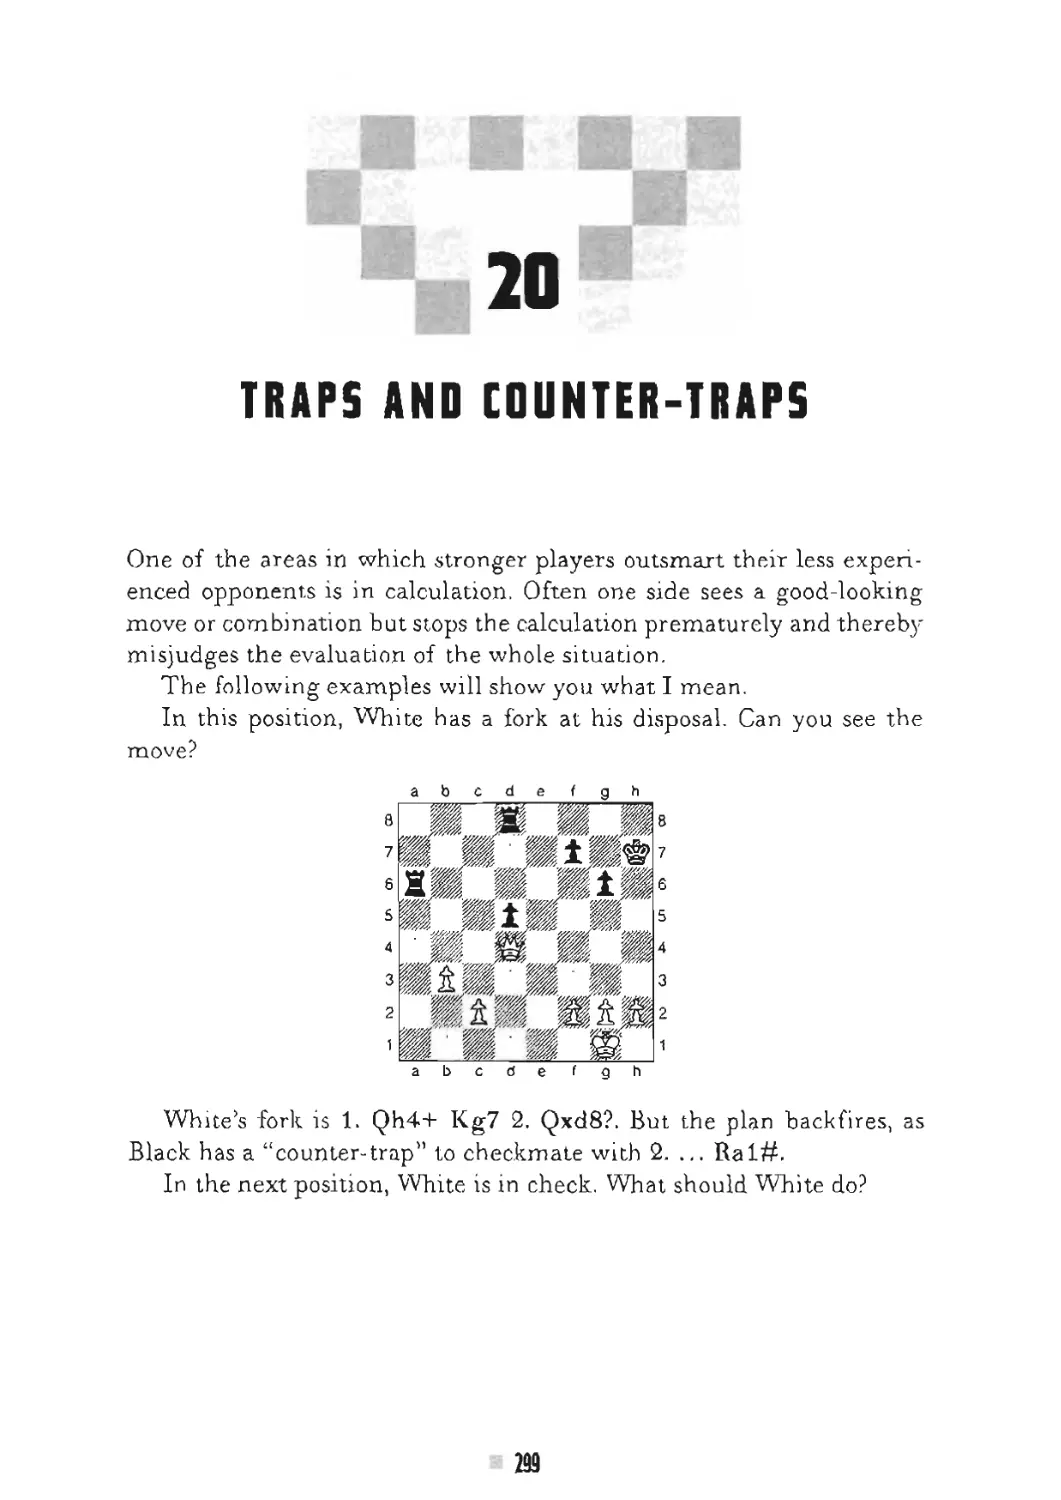
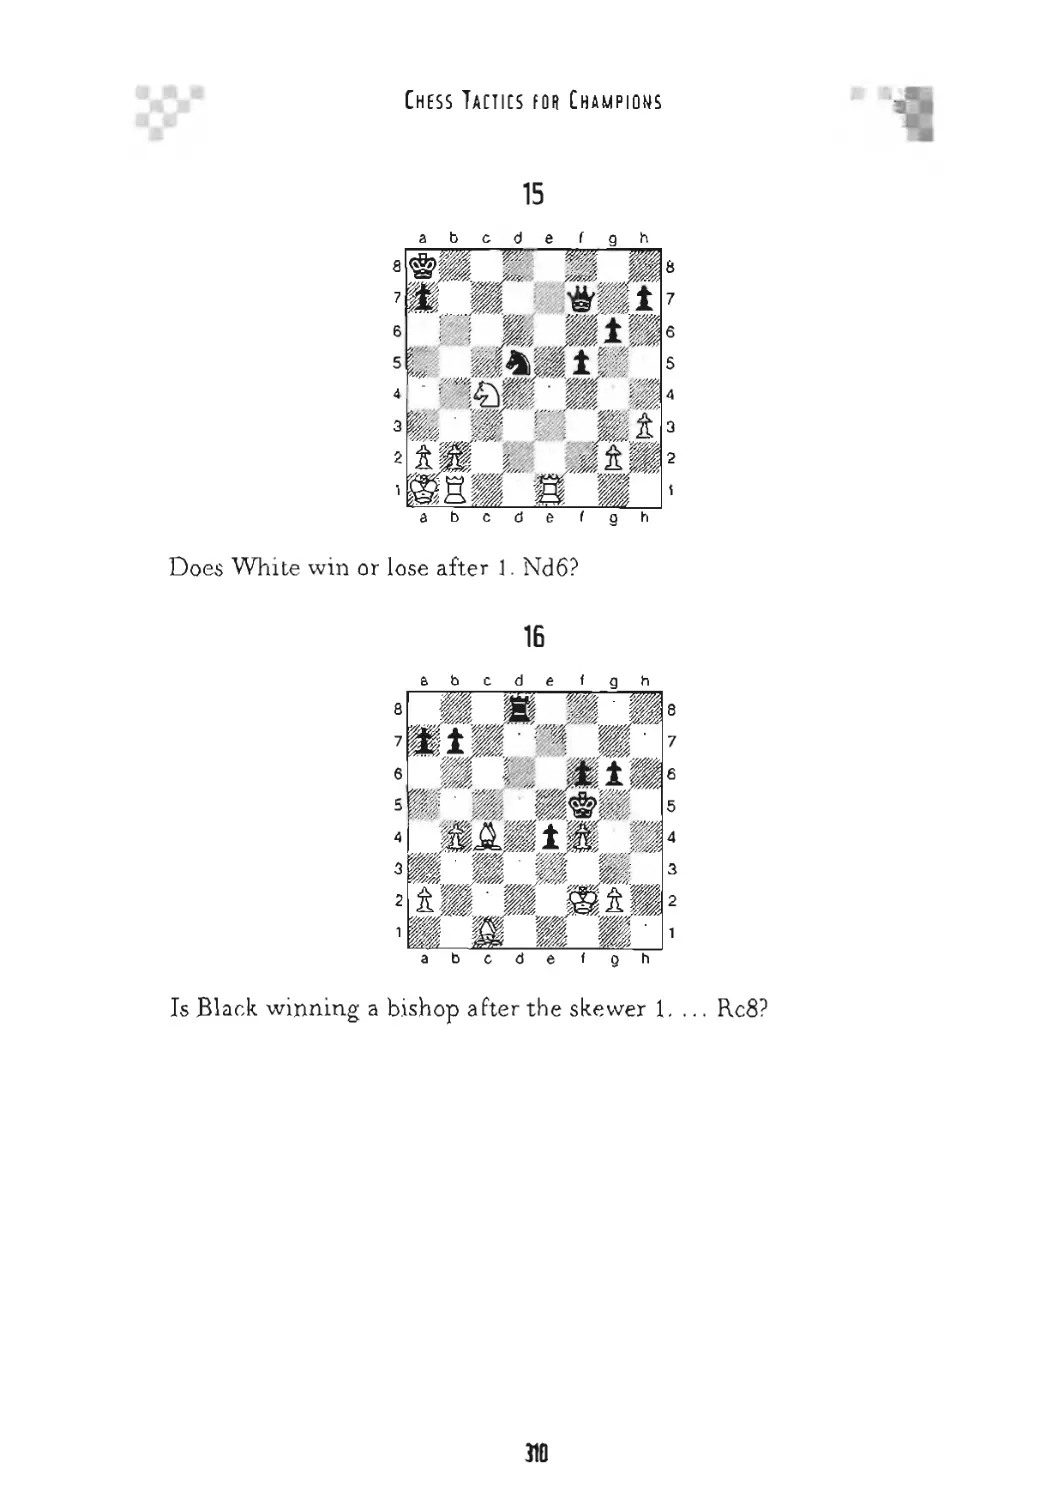
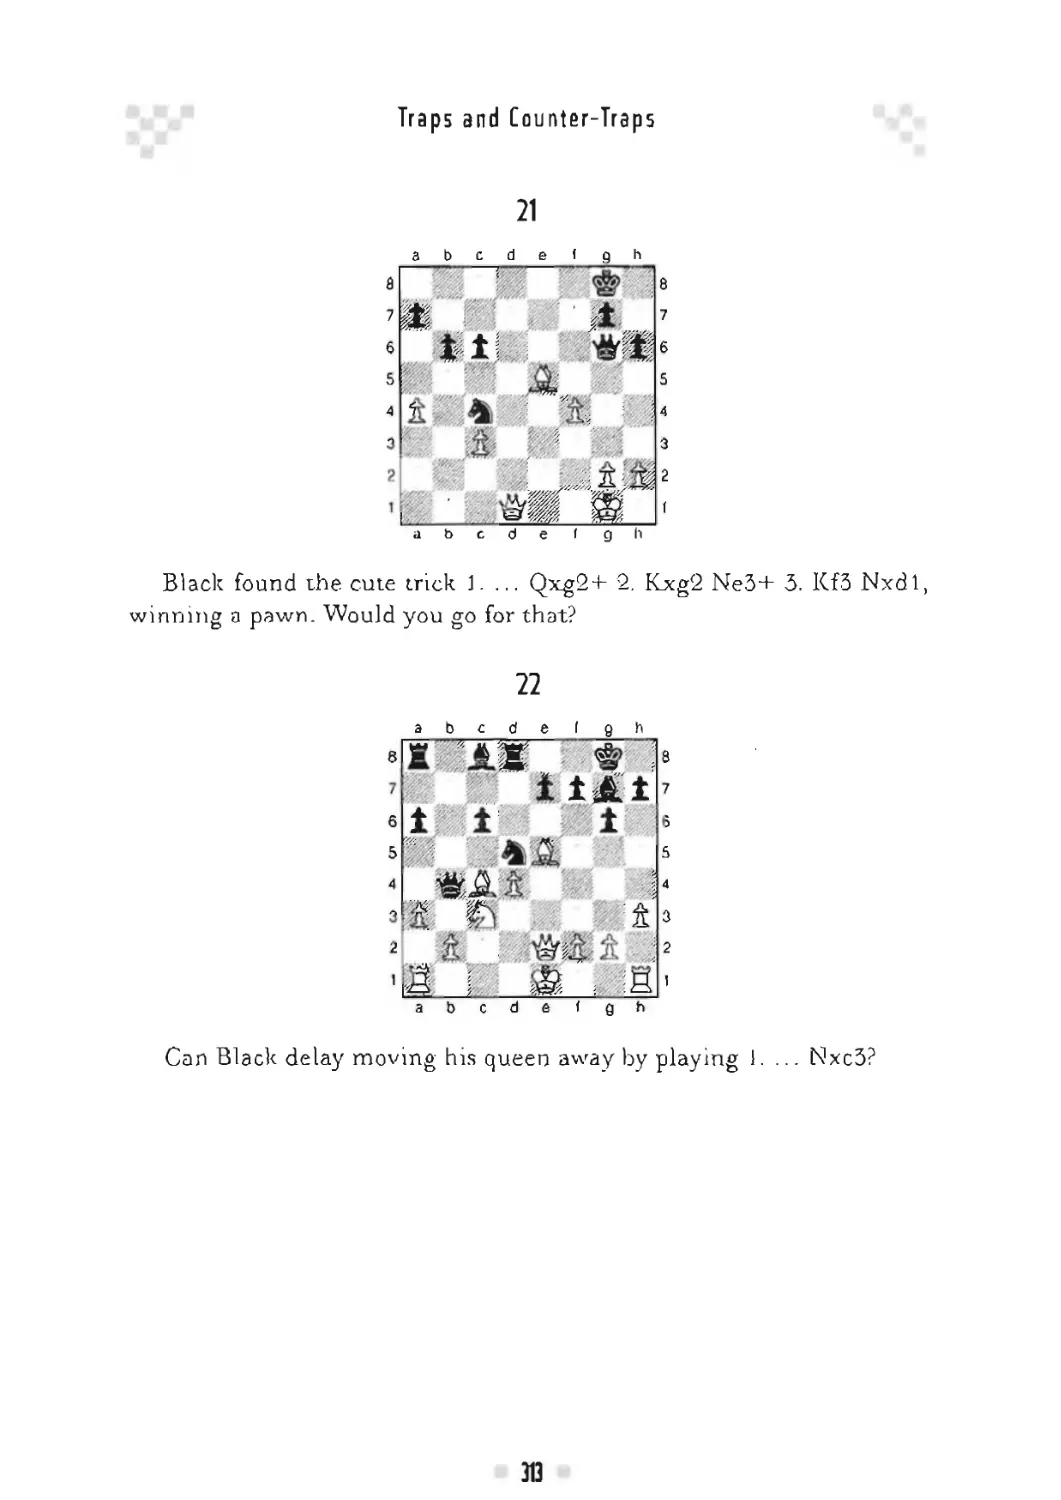
20. Traps and Counter-Traps 299
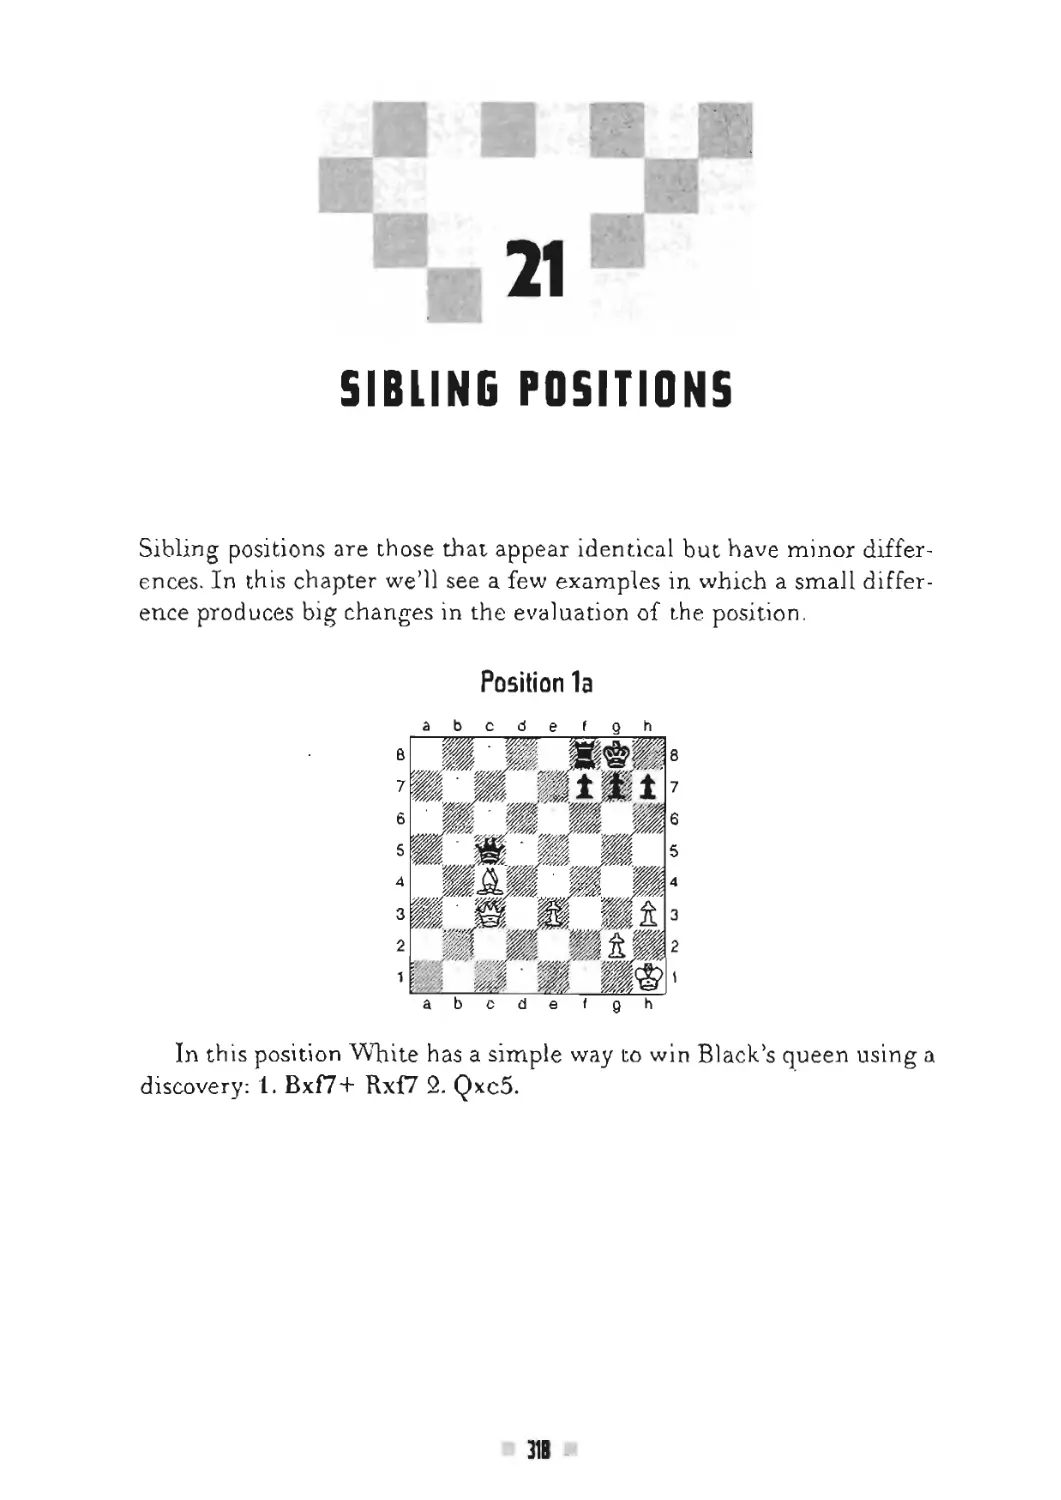
21. Sibling Positions 318
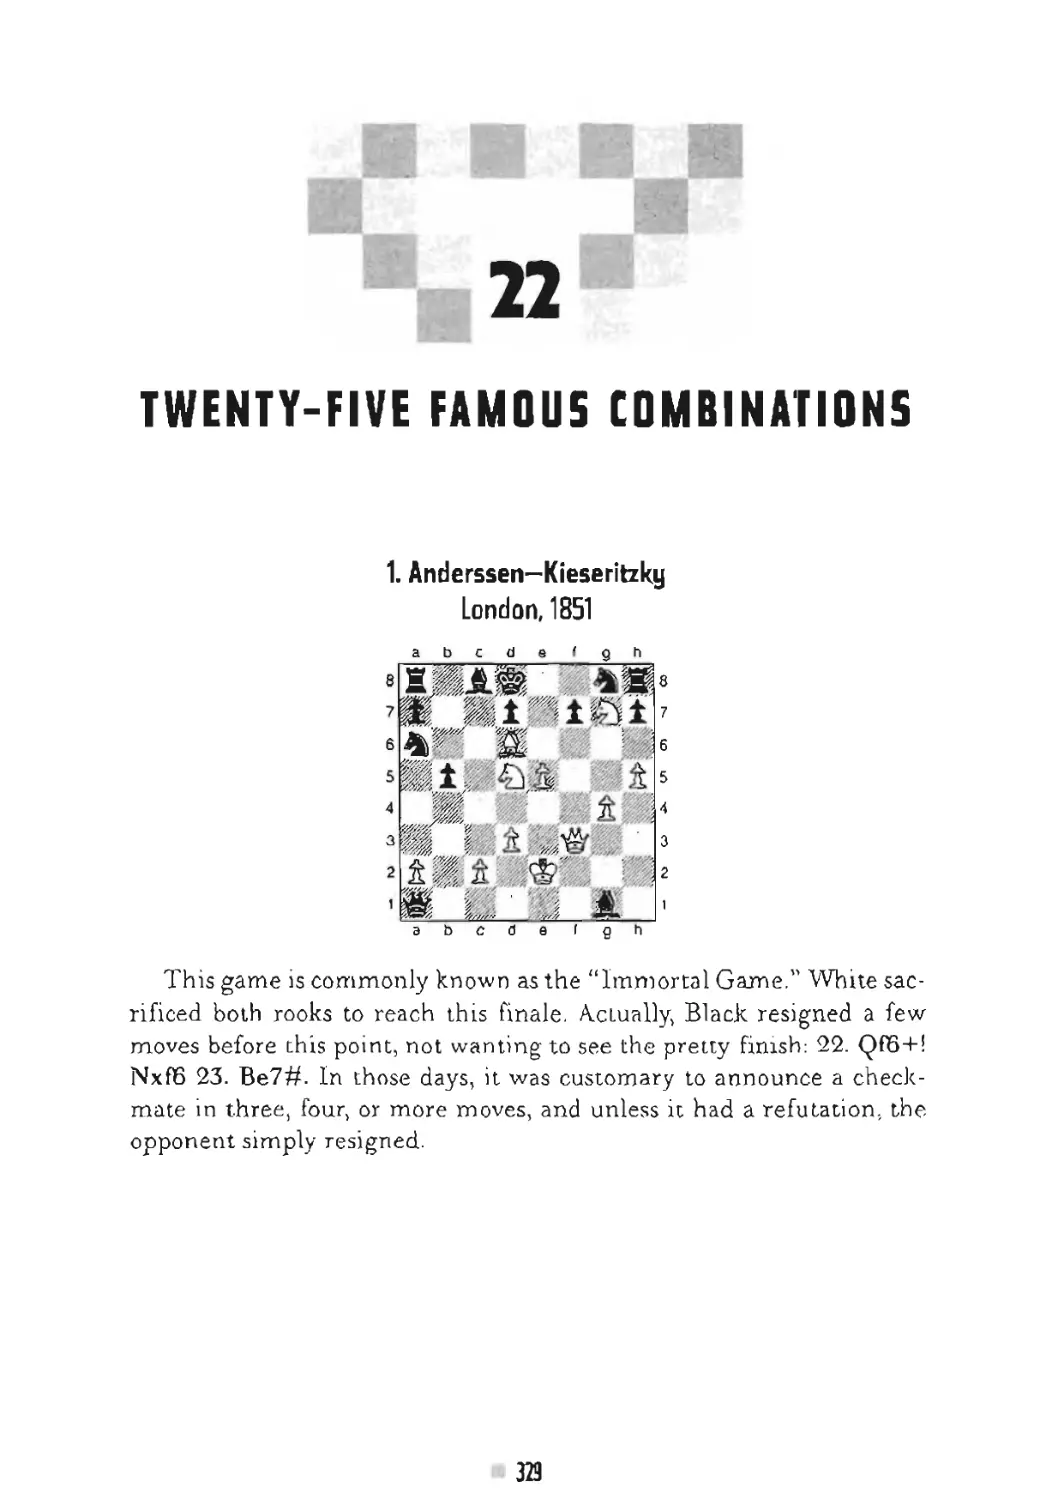
22. Twenty-five Famous Combinations 329
vi
FOREWORD
By Grandmaster Anatoly Karpov
World Champion 1975-1985
It is a pleasure for me to make a contribution to this important work by
grandmaster and world champion Susan Polgar.
Thanks to the unique method of chess training Susan and her sisters,
Judith and Sofia, received as children, Susan grew into one of the
world’s most formidable tacticians. Her daily practice on tactical prob-
lems sharpened her skill to an extraordinary degree and helped her
reach the pinnacle of chess. Here in this book she shares'with you what
she has learned.
The hundreds of tactical exercises here range from very simple one-
move checkmates to more difficult mates in four. Susan also covers such
important topics as trapping pieces, decoys, stalemate combinations, in-
termediate moves, and others. These are not “problems” but practical
situations as are to be found in actual games. The positions have been
chosen or created to have maximum instructive value. The author
stresses the importance of recognizing patterns, which is the best possi-
ble advice for the player who wishes to see combinations and threats
with greater accuracy.
Every player who aspires to improve his or her play—and results!—
will benefit greatly from the study of Susan Polgar s vital book.
vii
PREFACE
What Are Tactics in Chess?
When we talk about a tactic, we refer to a tool that helps us gain some
kind of advantage. It can lead to material gain or even to checkmate. In
this book I will show you many examples of the tactical elements in
both of those groups: combinations that aim to win material, and others
that lead to checkmate.
In some combinations, a player sacrifices a valuable piece or two to
achieve checkmate. In others, a player makes a temporary sacrifice to
win material. We will often see a player create multiple simultaneous
threats, which the opponent cannot meet all at once. But all the exam-
ples in this book have one thing in common: one side (usually White)
makes a forcing move, and regardless of Black’s reply, White either wins
material or checkmates.
It is usually not a good idea to gamble and set up unsound traps in
the hope that your opponent will fall into them. You should always as-
sume that your opponent will find the best possible move. Only then can
you objectively find the sound and correct combination.
For example, say you have a choice between:
a) winning a pawn and transposing to a clearly better endgame that
is likely, however, to stretch out to a long game; or
b) making a tricky move where the opponent loses immediately in
all variations, unless he finds the only good move, in which case
you lose.
ix
Chess Tactics
for Champions
TACTICAL ELEMENTS TO WIN
MATERIAL OR CHECKMATE
F0RK5 AND DOUBLE ATTACKS
A double attack (or fork) is an attack against two or more enemy targets
at the same time. It may be a simultaneous attack on two different
enemy pieces or it may be a threat of checkmate combined with an at-
tack on an enemy piece.
All pieces are capable of forking, but the most powerful forking piece
is the knight. Usually, the fork is a very deadly tactical tool, but in some
cases it can be met successfully.
Here are a couple of basic examples of double attacks. First, a minia-
ture game that demonstrates well the idea of our subject:
1. d4 Nf6 2. Nf3 c5 3. Bf4 cxd4 4. Nxd4
a b c d e f g h
a b c d a I g h
And now, 4. ... e5l, the first fork. 5. Bxe5 Qa5 + , the second fork, al-
ready winning the bishop on e5.
The next example is simple. White trades a pair of rooks and then
wins Black’s bishop. Can you figure out how?
3
Chess Taciics for Champions
The solution is: 1. Rd7+ Rxd7 2. Rxd7+, and after any king move,
such as 2. ... Kg8, simply 3. Rxb7.
In the next position, White needs to give up a pawn in order to force
the Black king into a fork.
a b c d e f g h
a b c d e 1 g h
1. f5 + . Black has no choice but to capture the pawn. 1. ... Kxf5, and
now 2. Nd4+ forks the Black king and queen.
In the next example, White needs to force the Black king to a square
where it can be forked by the knight.
4
Forks and Double Attacks
abode f g h
a b c d e f g h
The solution is 1. Qc4+, and now after either 1. ... Kb8 or 1. ... Kb6,
White forks king and queen with 2. Nd7+.
In the next example, the fork does not achieve anything.
White can fork king and rook with 1. Qd5 + . However, after 1. ... Qf7
(or even 1, ... Rbf7 or 1. ... Rff7), the Black rook is safe.
5
Chess Tactics гон Champions
Susans Corner
Susan Polgar—Boguslavsky
Budapest, 1984
In this position, I traded rooks with 28- Rxe8+ Nxe8 and won the
knight with the fork 29. Qf8+, 1—0.
The following 50 puzzles will give you the opportunity to practice
your skill with forks. The solutions are at the end of the chapter.
1. White to move
Forks and Double Attacks
2. White to move
3. White to move
4. White to move
1
Chess Tactics for Champions
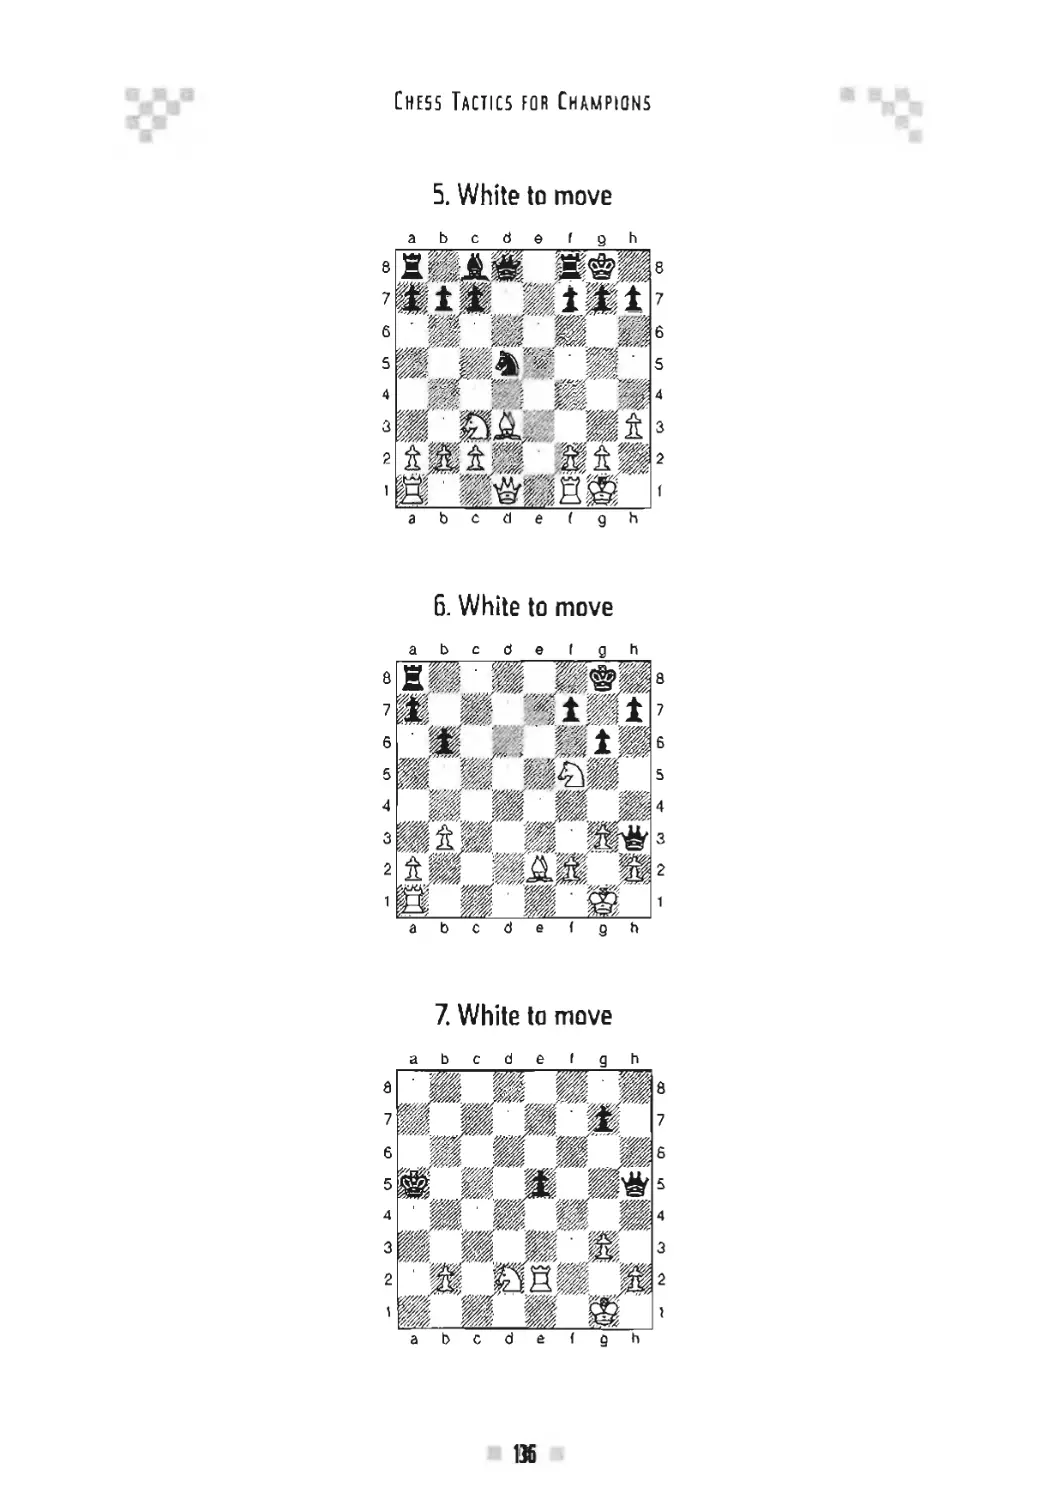
5. White to move
6. White to move
abode f g b
abode I g h
7. White to move
abode f g h
a b c d e f g h
В
Forks and Double Attacks
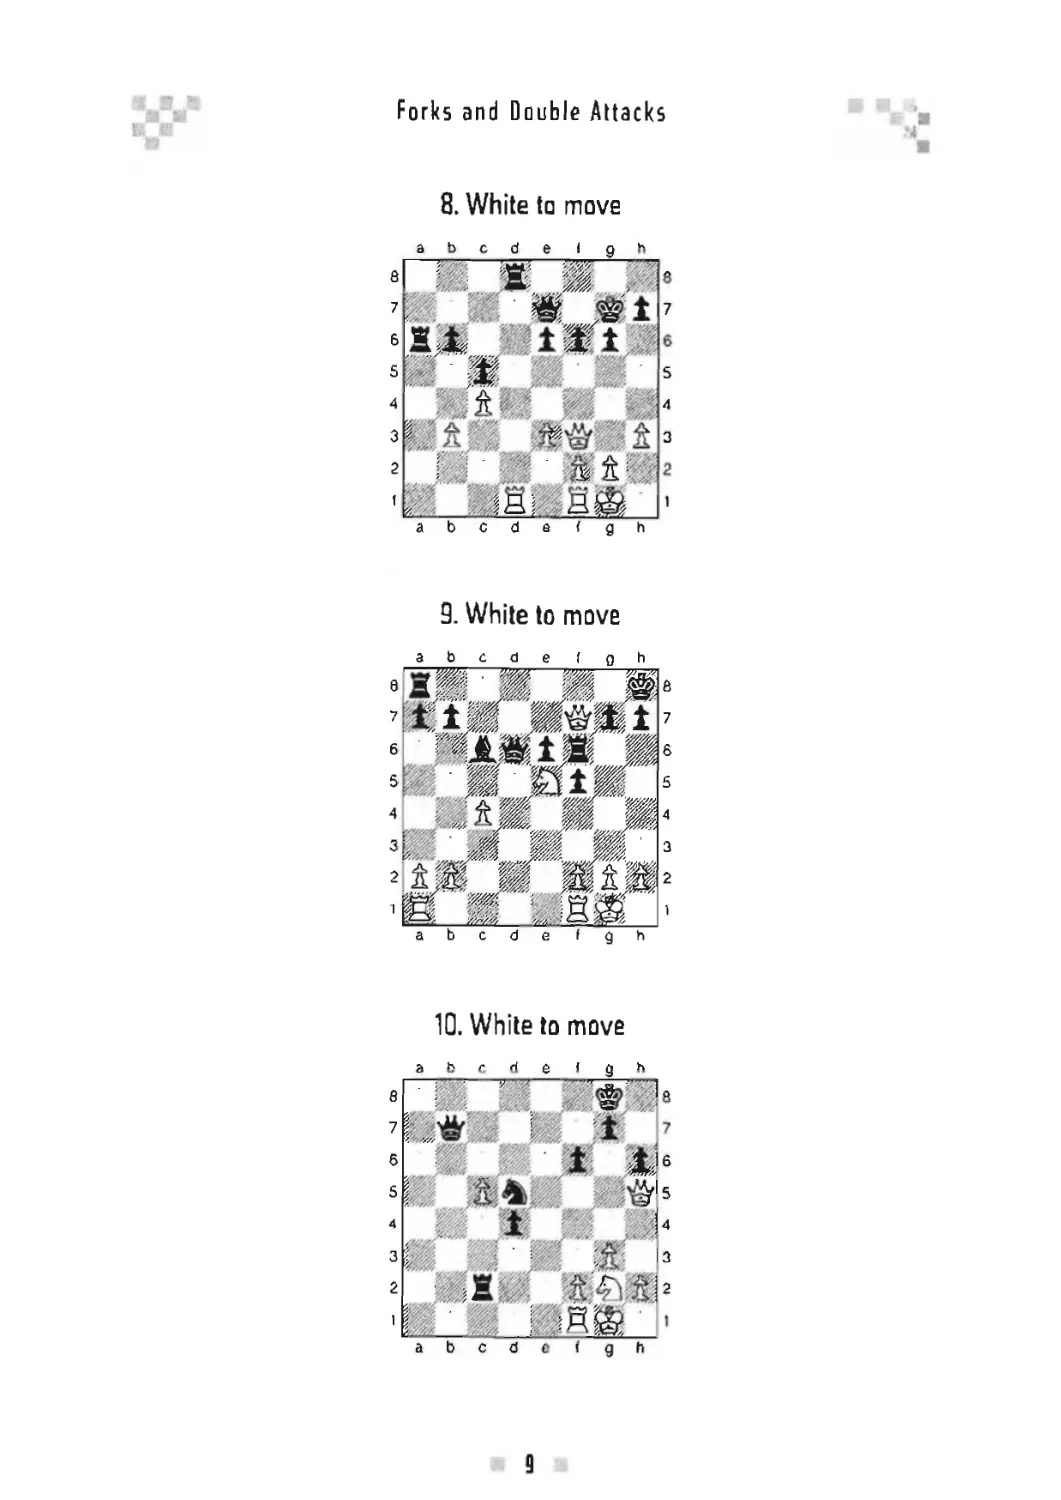
8. White to move
10. White to move
9
Chess Tactics роя Champions
11 White to move
12. White to move
13. White to move
10
Forks and Double Attacks
14. White to move
15. White to move
16. White to move
11
Chess Tactics for Champions
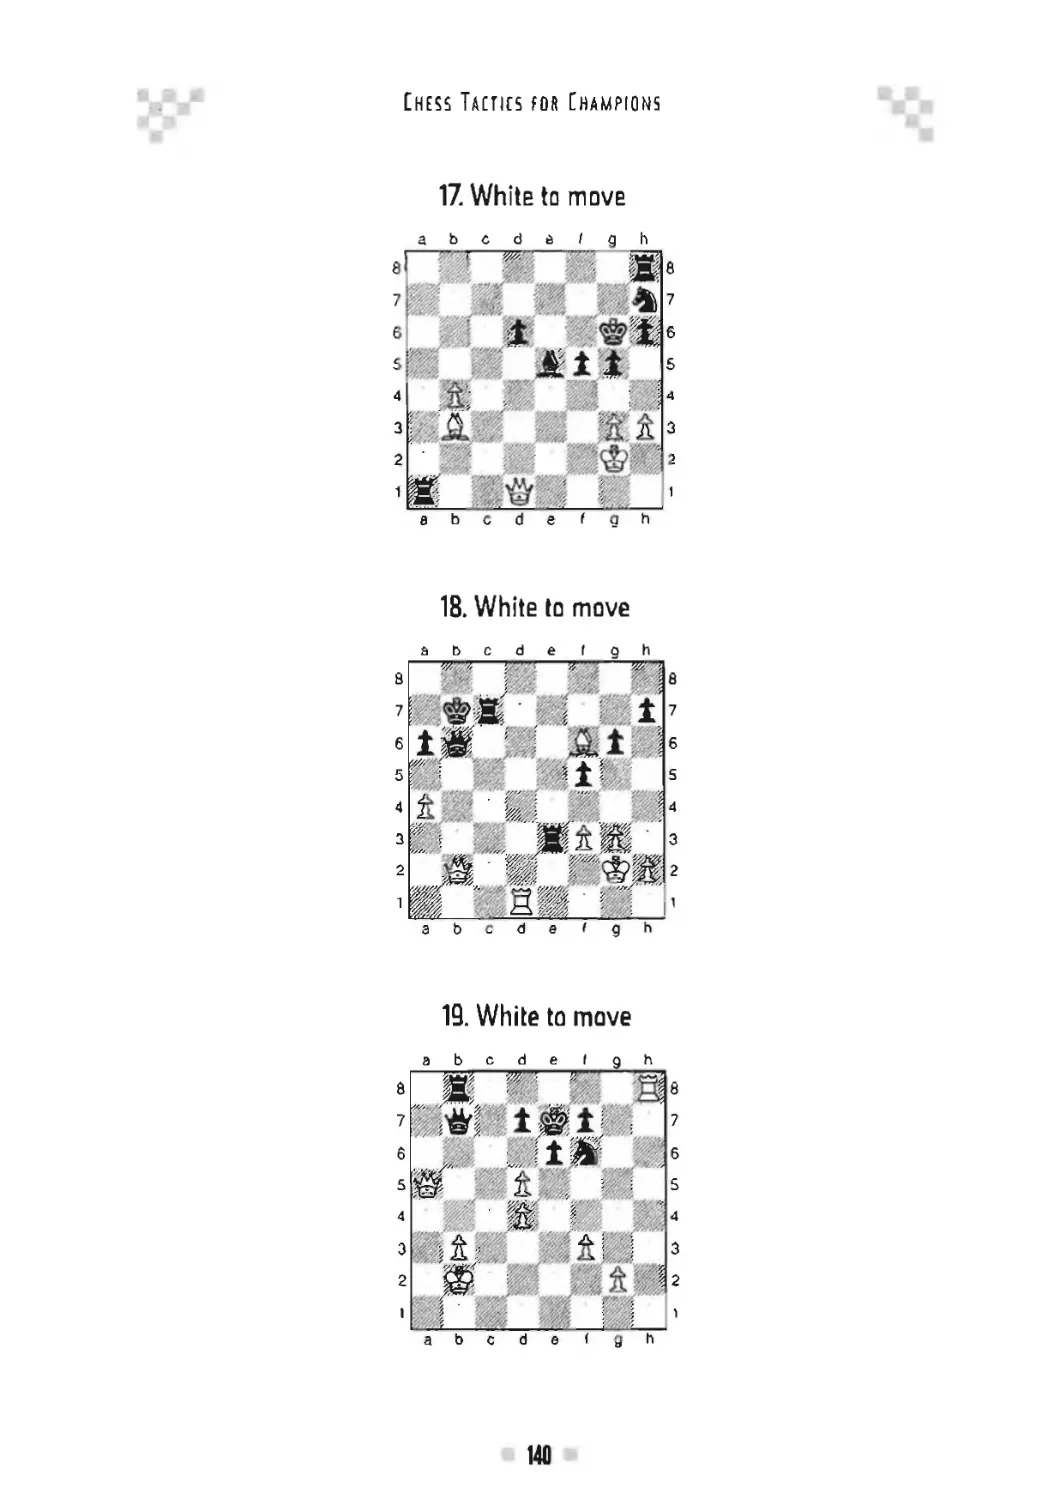
17. White to move
18. White to move
19. White to move
12
Forks and Double Attacks
20. White to move
21. White to move
22. White to move
13
Снess Tactics for Champions
23. White to move
24. White to move
25. White to move
14
Forks and Double Attacks
26. White to move
27. White to move
28. White to move
15
Chess Tactics for Champions
29. Black to move
30. White to move
31. White to move
ifi
Forks and Double Attacks
32. White to move
33. White to move
34. White to move
17
Chess Tactics for Champions
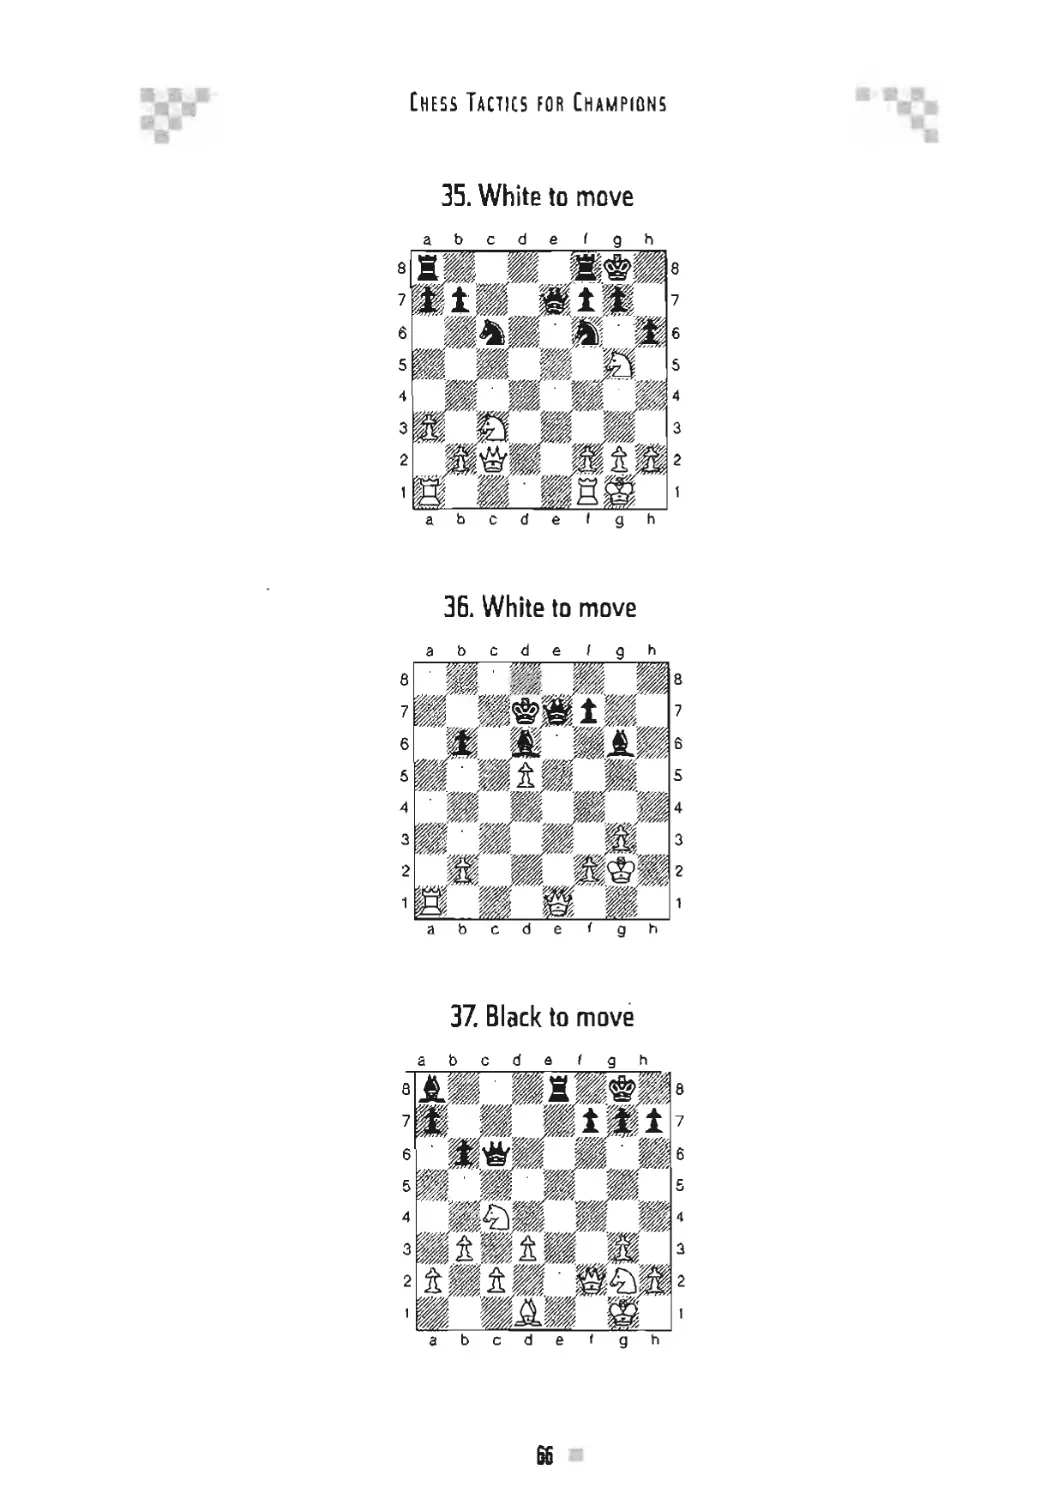
35. White to move
ЗБ. Black to move
37. White to move
а Ь c d e f g h
a b c d e f g h
18
Forks and Double Attacks
38. White to move
39. Black to move
40. Black to move
19
Chess Tactics for Champions
41. White to move
42. White to move
43. White to move
a b c d e f g b
a b c d e f g h
20
Forks and Double Attacks
44. White to move
45. White to move
46. White to move
abode f g h
a b c d e I g h
21
Chess Tactics for Champions
47. White to move
48. White to move
49. Black to move
22
Forks and Double Attacks
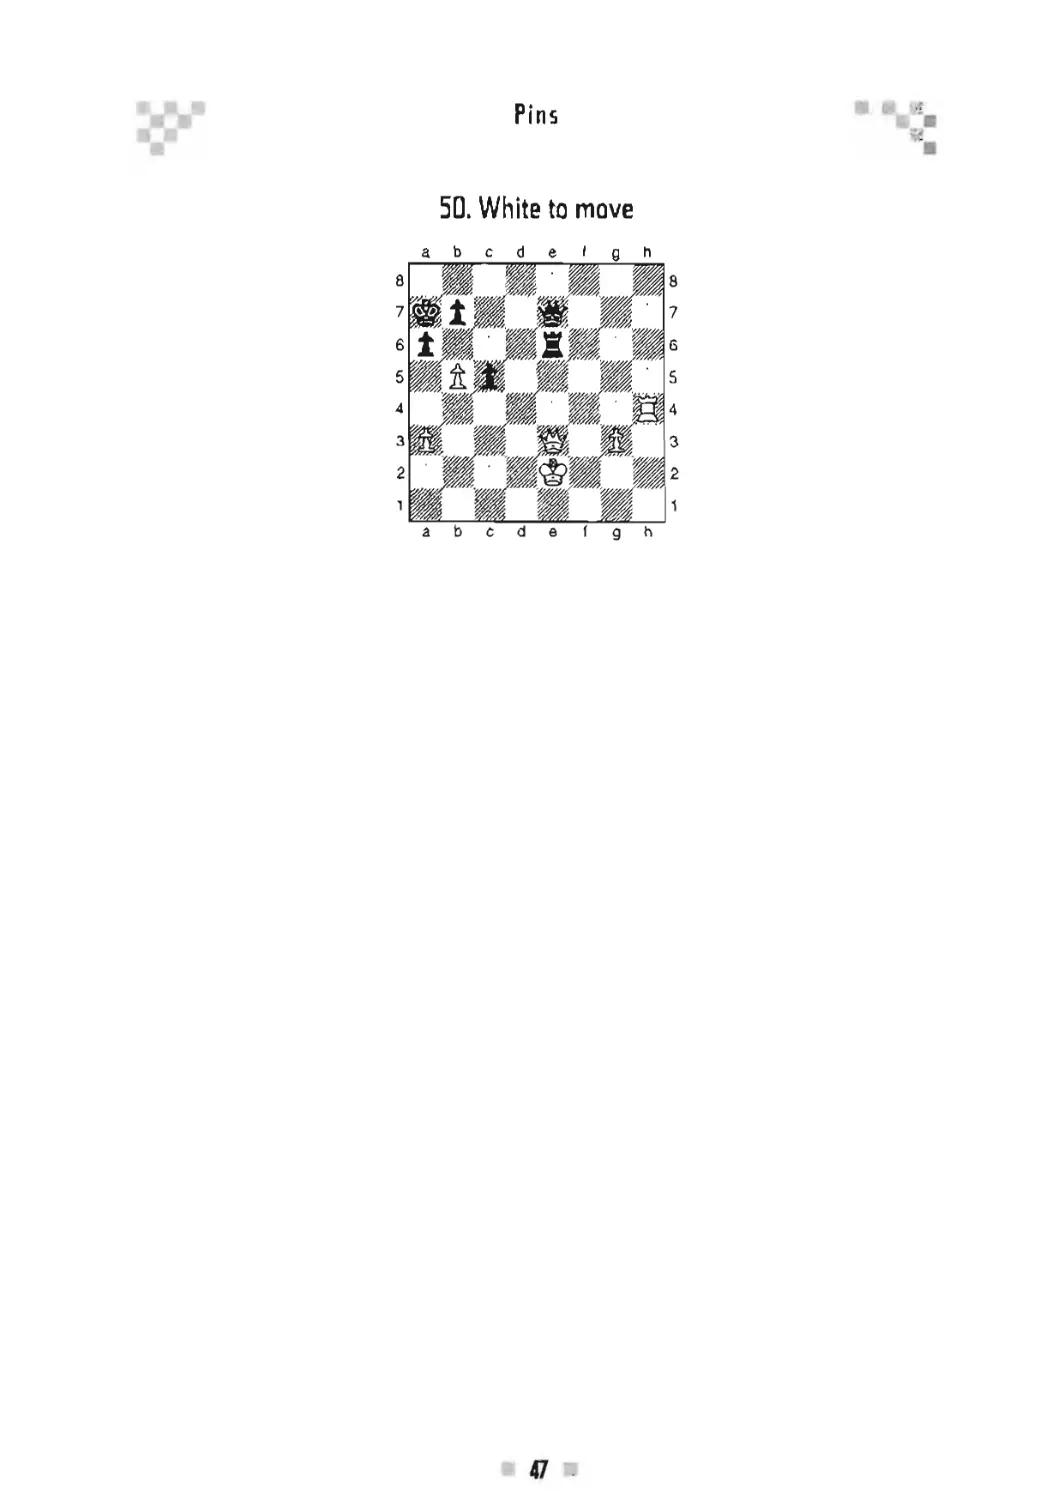
5D. Black to move
23
Chess Tactics for Champions
Solutions
1. 1. Rf6T (intermediate move)
Kg 7 2. Rb6 forks both Black
bishops,
2. The first step is to chase the
Black knight away from c6 with
1. d5 Ne5 and then fork with 2.
Qa4+.
3. Look for the unprotected piece
on c5! I. Bxe6 fxe6 2.QK5+.
4. It would be a blunder to grab
the hanging rook, as White's
back rank is weak. The right
answer is: I. Qxc7 + Kxc7 2.
Nd5 + .
5. Here White needs to find a
pretty queen sacrifice: 1. Qxe7!
Rxe7 2. Nf6+. It is also
important to see that after J. ...
Qd44- White saves the queen, by
blocking the check with 2. Qe3.
6. Here the d-pawn is the hero! 1.
d4 Ng6 2. d5.
7. White wins a rook with 1. Qd6+
Qxd6 2. exd6+.
8. By trading rooks with 1. Rxd8
Qxd8, White forces the Black
queen to leave rhe seventh rank.
Then 2. Qb7+ forks.
9. White wins a rook with 1. Qxf6l
gxf6 2. Nf7 + .
10. With a smart decoy, I. Qe84
Kh7, White forces the Black
king into a fork with 2. Qe44.
11. After the obvious-looking 1. Qd7
Black is okay after 1. ... Rg8.
The right answer is: 1. Bxg7+!
Kxg7 2. Qd74.
12. White’s knight on d4 is under
EX
attack and Black is even
threatening checkmate in one.
White can solve all those
problems and even win an
exchange. 1. Nf54! gxf5 2. Qg54.
13. White sacrifices the queen to
remove the guard of the e6
pawn. 1, Qxf7+! Rxf7 2. Nxe6+.
14. White could win the exchange
back by capturing on f7 right
away. But with a nice queen
sacrifice in the corner, 1. Qh84!
Kxh8 2. Nxf74, White wins a
whole rook.
15. Here White combines a
checkmate threat with attacking
Black’s bishop. 1. Qd3 Rad8 (1.
... g6 2. Qxd6) 2. Qh7+ Kf8 3.
Qh8#.
16. White trades with I. Bxd7 Qxd7,
and now that the bishop on c5 is
unprotected the fork is played: 2.
Qc44. On the other the
immediate 1. Qe4+ is not
sufficient, because of 1 ... Веб.
17. White could give a knight fork if
Black’s knight were not
protecting the c7 pawn.
Therefore, White trades with 1.
Вхаб Ьхаб and then 2. Nxc74.
18. In this example, White needs to
remove the guard of the crucial
d5 square. It can be
accomplished by 1. e5 Ne8 and
now White wins the rook in the
corner with 2. Qd5+,
24
Forks and Double Attacks
19. Here White uses the decov
J
method by sacrificing a rook: 1.
Rd8-H, forcing the Black queen
to be the victim of a fork: 1. ...
Qxd8 2. Nf7+.
20. White wms at least a piece with
1. Rxc6! bxcfi 2. Qxc6+ and then
takes the unprotected rook on ad.
21. Black would be doing okay if
the rook were not on b8, an
unprotected square. With a
smart exchange sacrifice, White
gains a material advantage. 1.
Rxf61 gxf6 2. Qg3 + . The
immediate 1. Qg3 is not so
successful because of 1. ... Rb6.
22, With a simple trade White
removes the guard of the d5
pawn (the black knight): 1. Bxf6
Qxf6 and then 2. Qxd5 + forks.
23. Again Black has a problem with
the rook on an unsafe square.
After a decoy check, 1. Qc4+,
die Black king is forced to step
on the h-file: 1. ... Kh8 and then
2. Qh4H- wins.
24. In this position White uses a pin
to decoy the Black king into a
fork: l.Nb6+ Kb8 2. Nd7+.
25. Black seems r.o do fine, except
for having the rook on an
unprotected square. All of a
sudden, the White queen swings
over to the other side of the
board: 1. Qb8+ Kg7 2. Qb24.
26. White would have some
advantage after 1. Ne6 Qg8 2.
Rd8-i-, but. White should not
settle for that. With the right
move White forces the Black
king into a fork: I. Rd8+! Kxd8
2. Nefi-b.
27. This idea is a famous opening
trap employed in many similar
positions. After a harmless-
looking trade with 1. Bxf6 Bxf6
White creates a double threat
with: 2. Qe4 g6 (2. ... Rb8 3.
Qxh7#) 3. Qxa8 winning a rook.
28. In this position material is
balanced, but White can force a
trade that will result m a fork to
win a rook; 1. Qb6+ Qxb6 2.
cxh6+.
29. Here Black, with a tricky move,
creates a double threat by
playing; 1. ... Qc3 (with the
main idea of 2. ... Qe 1 #) 2. Qd 1
Qc5+ forks.
30. With a temporary queen
sacrifice White wins material. 1.
Ng6! Qxf5 (after 1. ... Rd7 2.
Ne7+ White gains even more) 2.
Nxe7+.
31. White sacrifices a knight to win
back more material; 1. Nxg6 + !
hxg6 2. Qh4+ Kg8 3. Rxe7.
32. White disconnects Black’s king
and rook with 1. Qg5-r Kh8 and
now 2. Qh6 wins with dual
checkmate threats on f8 and h7.
33. In this example, two of Black’s
pieces are on unprotected
squares. After the intermediate
check 1. QdSd- Nf8 White forks
by 2. Qa5.
34. White's f7 pawn seems to be
falling. For example, 1. Bxd6
Ra2+, followed by 2. ... Kxf7.
However, the f7 pawn can be
25
Chess Tactics for Champions
used in a very beneficial way; 1.
f8Q+! Kxf8 and now 2. Bxd6 + ,
35. As in the previous example, here
too White needs to promote the
pawn by 1. g8Q+1 Kxg8 and
then 2. Nf6+.
36. Black has a way to sacrifice the
queen and get two rooks and a
knight in exchange: 1. ... Qxc3!
2. Rxc3 Nxdl 3. Qd2 Nxc3.
37. Here White needs to trade first,
followed by a decoy combination.
1. Bxg7 Qxg7 2. Qxeo! Qxe5 3.
Nf74, winning a piece.
38. Amazingly, White here is able to
force the Black king to either g8
or h7, where it can be forked: 1.
Rb8+ Kg7 2. Rg8+! (this is the
key move!) 2. ... Kxg8 3. Nf6+.
39. After a simple check, by
sacrificing the bishop Black
forces the White king into a
fork: 1. ... Nc3+ 2. Kai Bb2+! 3.
Kxb2 Nd 1 A.
40. Here Black simplifies the
position by a double sacrifice: 1.
... Qxf4! 2. Qxf4 RglA 1 3. KxgJ
Nxe24.
41. First a decoy, then a queen sac
and finally the fork: 1. Qh4+
Kg7 2. Qxd8! Qxd8 3. Neb 4.
42. 1. Nc74 is an obvious fork idea,
but for now the Black queen is
stopping it. White has an
unexpected way to make this
idea work, however: 1. Qd4
Qxd4 2. cxd4 Nc6 3. Nc7+.
43. Again the knight is the hero! 1.
Nf6+ Kg7 2. Qxf84! Kxf8 3.
Nxh7+.
44. 1. Rxa7 Rxa7 2. Rxd4! exd4 3.
Bxd44. Now Black is almost
saved with 3. ... Rg7, but 4. h6
wins by using the pin.
45. Pawns can fork tool 1. g6+ Kg8
2. Bc44 Kh8 3. g7 + .
46. This is one of the prettiest
forking ideas Г know. After a
queen sacrifice White uses an
underpromotion! l.Rc84
Rxc8 2. Qxa74! Kxa7 3.
bxc8N4l,
47. As in the previous diagram, a
queen sacrifice and a knight
promotion! 1. Qe8+ Kf6 2.
Qxe64! Kxe6 3. d8N+!.
48. A fun example of a decoy to
achieve a fork. 1. d54! Kxd5 2.
c44! Kxc4 3. Nd2+.
49. Black has a cute way to win a
piece: 1 ... Bxc3 2. bxc3 Nd5! 3.
Qxc4 Nxe34.
50. By giving two simple checks
Black forces the White king into
a fork: 1. ... Rel 4 2. Kg2 R8e24
3. Kf3 Re3+.
2
PINS
A pin always has three participants: the pinning piece, the pinned piece,
and a piece behind the pinned piece which is located on the same line.
There are two different kinds of pins: absolute pins and relative pins. In
an absolute pin, the pinned piece has no legal move because the piece
behind it is the king, which would be exposed to check. In a relative pin,
the pinned piece may move, but that would cause some kind of prob-
lem, like losing a piece or allowing checkmate.
Pieces able to make pins are the queen, the rook, and the bishop.
Some basic examples follow:
a b c cl e ! 9 h
a b c d e f g h
The White bishop on f3 is pinning Black’s knight on c6. This is an ab-
solute pin. The knight absolutely cannot move. White can take advantage
of Black’s temporary problem by playing 1. Ne5, attacking the knight a
second time. Black’s knight is lost. If White misses this opportunity bv
making a casual move like 1. Riel, Black has time to get out of the pin by
playing 1. ... Kb6 or to prevent the Neb move by playing 1. ... f6.
27
Chess Tactics for Champions
In the next position, White uses an existing pin to create a new pin!
abode I g h
a b c d e f g h
The correct move to win Black’s queen is 1. Rg3. If Black captures
with the pinned f-pawn by 1. ... fxg3, the answer is 2. Qxg4+ with de-
cisive material gain.
In the next position, we see pins from every direction.
abode ( g h
ь b c d e < q h
White wins the knight with 1, Qxd5. The queen cannot be captured
by either pawn because of absolute pins by the rook on el and the bishop
on b5. If Black plays 1. ... cxb5 White wins material by taking Black’s
rook on a8 with 2. Qxa8+.
Here’s a short game where the pm plays a crucial role.
1. e4 c6
This is the Caro-Kann Defense.
2. d4 d5 3. Nc3 dxe4 4. Nxe4 Nd7 5. Qe2
Not a good move but a very tricky one. It is better to develop the bish-
ops and knights before bringing out the queen.
5. ... g6??
28
Pins
Black falls into the trap. Much better is 5. ... еб. After Black’s error,
can you find the checkmate in one for White?
6. Nd6# smothered mate with the help of an absolute pin.
Л typical misconception is to believe that every pm is good. Here, for
example, a pin backfires.
If White makes the natural move 1. Bf4 to pin the Black rook, all of
a sudden Black not only saves the rook but even wins a piece by making
a discovery (see chapter 4) with 1. ... Rel+ followed by 2. Kh2 Qxf4+.
79
Chess Tactics for Champions
Susans Corner
Susan Polgar—Idicki
Brussels, 1985
а о c d e I g h
a b c d e i g h
Here I found a quick way to win material with 1. Веб pinning the
Black queen. Black’s best option is 1. ... Nxc6 and then 2. Qxb5. My op-
ponent resigned a few moves later.
Following are 50 exercises involving pins for you to enjoy.
1. White to move
30
Pins
2. While to move
3. Black to move
4. Black to move
31
Chess Tactics foh Champions
5. White to move
6. White to move
7. White to move
Pins
8. Black to move
9. White to move
10. White to move
33
Chess Tactics for Champions
11. White to move
12. White to move
13. White to move
34
Pins
14. White to move
15. White to move
1Б. White to move
35
Chess Tactks for Champions
17. White to move
18. White to move
19. White to move
36
Pins
20. White to move
21. White to move
22. White to move
37
Chess Tactics for Champions
23. White to move
24. White to move
25. White to move
38
Pins
26. White to move
27. White to move
28. White to move
19
Chess Tactics for Champions
29. Black to move
30. White to move
31. White to move
40
Pins
32. White to move
33. White to move
34. White to move
41
Chess Tactics for Champions
35. White to move
36. White to move
37. Black to move
42
Pins
38. White to move
39. White to move
40. White to move
41
Chess Tactics for Champions
41. Black to move
42. White to move
43. Black to move
44
Pins
44. White to move
45. White to move
46. White to move
а Ь c d ft I g h
45
Chess Tactics for Champions
47. White to move
48. Black to move
49. White to move
46
Pins
50. White to move
a b c d e I g h
47
Chess Tactics fоя Champions
Solutions
1. White can fork in one move hj'
using an existing pin; 1. Rh5+.
2. Both of Black's knights are
pinned. White takes advantage
of this with 1. Nd5. If the Black
king walks out of both pins with
1. ... Ke8, it walks into the fork
2. Nxc7+.
3. White has two pieces (rook and
knight) on unprotected squares.
Black creates a relative pin to
wm a piece with 1. ... Qb4.
4. White has just played Nf4-e6,
forking Black's queen, rook, and
bishop. Thanks to the pin on the
f2 pawn, Black starts a mating
attack with L. ... Qg3.
5. A simple relative pin with 1.
Qf8.
6. The Black king is in trouble
because of the opened diagonals
a1-h8 and a2-g8. Because of the
pin on Black's knight on сб,
White can win material with; L.
Bd4+ Nxd4 2. Rxc7.
7. This is a classic example of the
cross-pin (a double pin on the
same piece): I. Qd8.
8. Another exercise for the cross-
pin. I. ... Qh6. After 2. Kf2,
Rae8 decides the game.
9. The Black pieces are overworked.
White severs the connection
between the Black queen and
knight, seeing that Black’s
bishop is pinned and can’t take
the White knight; 1. Ng5.
10. White forces mate in two moves
thanks to a pin: 1. Rxh6 + Kg8 2.
Rd8#.
11. Right now there is no pin, but
with a decoy check White forces
the Black king to the same
diagonal as the rook on d3; 1.
Bb3 + Kh7 and now 2. Bc2 pins
and wins the rook.
12. As in the previous example,
White forces Black’s king to the
same file as the queen and then
pins. 1. Re44 Kf8 2. Rf4 (or 2.
Rfl).
13. Black’s bishop on e7 is pinned.
T hat fact allows the following
mate in two; 1. Qxf6+ Ke8 2.
Qxe7#.
14, White forces the Black king to
the fifth rank with 1. Rb4+ Kh5
and then pins with 2. Rb5.
15. Black's suffering is caused by
White’s combination of two
elements; the back-rank
problem and the pin. After 1.
Rd8+ Black has no choice but to
block with I. ... Re8 and then
White wins the queen after 2.
Rxe8+ Rxe8 3. Qxf4,
16. Here White creates a pin on the
f7 pawn with 1. Qh74 Kf8 and
then forks with 2. Nxe6+ to win
Black’s queen after 2. ... fxe6 3.
Qxc7.
17. With a simple check White
forces the Black king to the a7-
gl diagonal by 1. Rc8+ Ka7 and
48
Pins
then uses the newly created pin:
2. Re8.
18. White makes a temporary
exchange sacrifice with I. R.\'f6
Rxf6 and then uses the pin by 2.
go to win the rook.
19. White can force mate in two by
1. BC4+ Ka8 and now, taking
advantage of the pin on the a7
pawn, 2. Nb6#.
20. White pins by 1. Rdl, which
Black cannot get out of in time.
For example: 1. ... f5 2. Ba2 or 1.
... Kf7 2. Ba2 Кеб 3. e4.
21. Black’s knight on f6 is pinned.
With the intermediate move 1.
g4, attacking Black’s bishop first,
White wins che knight after 1.
... Веб 2. g5.
22. White wins a piece by chasing
the knight away with 1. g4 Nd6
and then uses the pin with 2. g5.
23. White trades queens with 1.
Qxa6 bxa6 and then pins with 2.
Be5.
24. A similar idea to that of number
16. Did you recognize the
pattern? L. Qh7+ Kf8 2. Ne6+.
25. The g6 pawn is pinned, which is
why 1. Nxf5+ is possible. After
1. ... Kh5 2. Be2# the game
ends.
26. With the trade 1. Qxe5 + Rxe5
White forces the Black rook to
the a 1 -h8 diagonal, where the
Black king resides, then pins
with 2. Bd4.
27. We see the pinning idea of Be2-
c4. But first we need to remove
the guard (the knight on b2) of
the c4 square: 1. Rxb2l Bxb2 2.
Bc4.
28. Black’s bishop is pinned. All
White needs to do is to attack it
several more times; 1. Rdel Rb7
2. Bc5 Bxc5 5. Rxe8.
29. White’s bishop on g2 is pinned,
which allows Black a beautiful
queen sacrifice to mate in two
moves: 1. ... Qxh3 + ! 2. Nxh3
Rxh3#.
30. White wins material with 1.
Nd64 exd6 2. Bxd8.
31. A cute combination to win
material: 1. Rxc8! Qxc8 2. Ne7 +
Rxe7 3. Qxc8+.
32. With a nice combination, White
takes advantage of the pin on
the knight on f6. L Ng6+I hxg6
2. Qh44- Nh5 3. Qxe7.
33. White wins a rook by 1. Rh8-r
Kg7 2. Qxe5-H Rxe5 3. Rxc8. The
other move order, 1. Qxe5? R-xe5
2. Rh84, doesn’t work because
Black mates with 1. ... Qcl#.
34. White wins a bishop after 1.
Rxb5! Rxb5 2. Qxa4 pinning the
rook.
35. The Black queen is pinned.
While uses this to give an
impressive checkmate after 1.
Re7l QxhS 2. Rxe7#.
36. With a pretty queen sacrifice
White forces mate in two. 1.
Qxc8+! Bxc8 2. Rd8#.
37. Checkmate in two; 1. ... Rxh3+!
2. Kxh3 Qh5#.
38. Black’s knight is pinned. See
how While takes advantage of
this; 1. Qxa6! bxa6 2. Rb8#.
49
Chess Tactics for Champions
39. The Black queen, is taboo, as
after 1. Qxc6 Blade gives a back-
rank mate. But White can
sacrifice the queen with 1. Rxd8!
Qxa4, as after 2. Bh6 Black is
lost.
40. At first, it does not seem to
matter which rook to trade and
then pin. But after 1. Rcxd7+?
Rxd7 2. Qb5 Black escapes with
2. ... Re7 The correct solution
is. 1. Rdxd7+ Rxd7 2. Qb5
creating a cross-pin (2. .. ,Re7 3.
Qxe8 wins the Black queen).
41. This example is a parade of
pins! 1. ... Rel! A decoy! 2. Qxel
Nxf3+ and White’s queen is lost.
42. The weakest point in Black’s
camp is f7, which is where
White strikes: 1. Bxf7 + ! Rxf7 2.
Qc4.
43. Black’s queen is under attack,
yet because of the pin on the g2
pawn, Black can ignore that and
play 1. ... Rxh3+!, and if 2.
Bxh3 Qxh3+ 3. Kgl Qxg2#.
44. White can capture a pawn by 1.
Nxh6 + , but there is a better
solution: 1. B.18-H Nxf8 2. Nf6+.
45. This looks like a simple puzzle,
but there is more to it. After 1.
Bc5 Black has a counter-pin
with 1. . . Bb6, but 2. Qf4+
decides the game for White.
46. White wins a piece by clearing
the f-file. 1. Bxe5 Qxe5 2. Qxe5
dxe5 3. Rxe6.
47. A very common pinning trick: 1.
Rc8+ Bf8 2. Bh6.
48. White's bishop is pinned. Black
needs to bring more
ammunition to cake advantage
of this-. 1. ... Re8 2. f4 Reel (a
second attack on the pinned
bishop) 3. Rf2. (White protects it
just in time) 3. ... Bf81
(threatening Bf8-c5) 4. Rd8.
White tries defending by
creating a pin on the Black
bishop, but Black gets out of it
with the simple 4. ... Kg7. Now
White can’t avoid losing
material,
49. White creates a nice mating net;
1. Bg6! Qxa3 2. Rxe8#.
50. White seems to be in serious
trouble, as the queen is pinned.
But White turns things around
with 1. Ьб+I Kxb6 2. Rh6. A
cross-pin! 2. ... Rxh6 3. Qxe7. If
1. ... Kb8 2. Rh8+, and Black
has a back-rank problem.
50
3
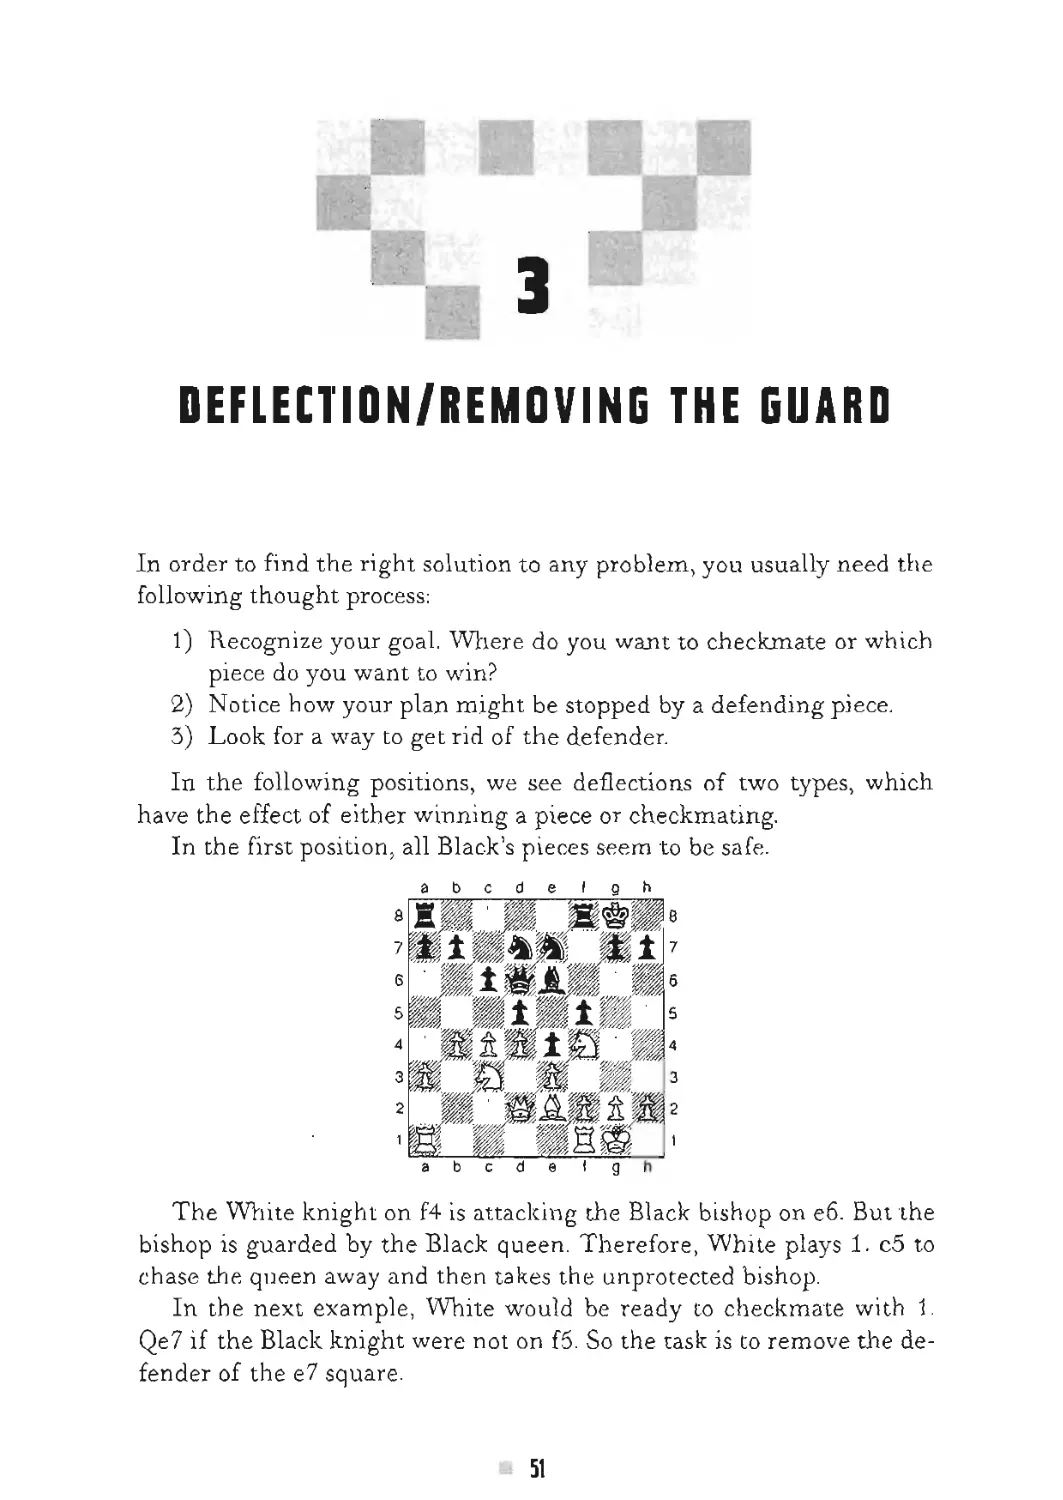
DEFLECTION/REMOVING THE GUARD
In order to find the right solution to any problem, you usually need the
following thought process:
1) Recognize your goal. Where do you want to checkmate or which
piece do you want to win?
2) Notice how your plan might be stopped by a defending piece.
3) Look for a way to get rid of the defender.
In the following positions, we see deflections of two types, which
have the effect of either winning a piece or checkmating.
In the first position, all Black’s pieces seem to be safe.
a b c d e I q h
The White knight on f4 is attacking the Black bishop on еб. But the
bishop is guarded by the Black queen. Therefore, White plays 1. c5 to
chase the queen away and then takes the unprotected bishop.
In the next example, White would be ready to checkmate with 1.
Qe7 if the Black knight were not on f5. So the task is co remove the de-
fender of the e7 square.
51
Chess Tactics for Champions
After 1. Bxf5, if Black recaptures with 1. ... exf5> the game ends after
2. Qe7#. If Black does not recapture, then Black simply loses the knight
In the next position, the target is the Black rook on d8. It seems to be
safe right now, since two pieces are protecting it. But with the right
move, White can get rid of both of them.
abode f g h
abode f g h
After 1. Nx.fB+ Black’s queen and king are forked, so the only rea-
sonable response is to recapture with 1. ... Rxf6. But then White gets the
unprotected rook with 2. Rxd8+.
In the next example, a piece (the queen) is not able to perform two
duties.
52
Deflectiоn/Removing the Guard
a b c d e f g h
a b c d e 1 g h
The correct move is 1. Bxg4 (but not 1, Rxd5? because after the in-
termediate moves 1. ... Nxe3+ 2. Kcl Nxd5 Black stands better) 1. ...
Qxg4 and White wins a rook with 2. Rxd5. Now Black can’t win the
rook back with either 2. ... Qxg2+ 5. Qd2 or 2. ... Qe4+ 3. Rd3.
In the next example. White can almost give checkmate with Bxf7—
if only the Black bishop on h5 were not defending the C7 pawn!
That explains why White is willing to sacrifice even the queen with
1. Qxh5! If Black accepts the ‘'gifb; with 1. ... Nxh5, the game ends
right away with 2. Bxf7#, If Black doesn’t take the queen (the best op-
tion), then White has just won a bishop.
53
Chess Tactics for Champions
Susan's Corner
Koch—Susan Polgar
Au be rvillers, 1989
It is obvious that the White king lacks defense. Right now, the f2
square is still guarded by White’s queen. I found a way to deflect the de-
fender of the f2 square. Can you see the right move?
My opponent resigned after 43. ... Rdl + 1, seeing that checkmate
was unavoidable after either 44. Qxdl Qf2# or 44. Kxdl Qxfl#.
Now that you understand the importance of removing the guard, try
solving the following 50 puzzles.
1. White to move
a b c d e f g h
a b c d e < g h
54
De fl e c t i on/Rem о vi n g the Guard
2. White to move
3. Black to move
4. White to move
55
Chfss Tactics for Champions
5. White to move
6. White to move
7 White to move
5Б
Def I ection/Removin g the Guard
8. White to move
9. White to move
10. White to move
57
Chess Tactics for Champions
11. White to move
12. White to move
13. White to move
58
Deflection/Removing the Guard
14. White to move
15. White to move
16. White to move
Chess Tactics foft Champions
17. White to move
18. White to move
19. White to move
60
□ efIecti□ n/Remоving the Guard
21. White to move
a b c d e f g h
a b c d a t g h
22. White to move
61
Chess Tactics for Champions
23. White to move
24. White to move
25. Black to move
62
Deflection/Removing the Guard
26. Black to move
27 White to move
28. White to move
6]
Chess Taciks for Champions
29. White to move
31. White to move
fi4
Deflection/Removing the Guard
32. White to move
33. White to move
34. White to move
65
Chess Tactics for Champions
35. White to move
36. White to move
37. Black to move
Def 1 ection/Remоving the Guard
38. White to move
39. White to move
40. White to move
abode f q h
a b c d e f g n
67
Chess Tactics for Champions
41. White to move
42. White to move
43. White to move
Deflection/Removing the Guard
44. White to move
45. Black to move
46. White to move
Chess Tactics for Champions
47. Black to move
48. White to move
49. White to move
70
Deflection/Removing the Guard
5D. White to move
a b c d e I g h
a b c d e 1 g h
71
Chess Tactics for Champions
Solutions
1. White’s aim is to checkmate
with Bg7T6, but now the Black
queen is stopping that. So White
deflects the queen with 1. Qg5
and if 1. ... Qxg3 2. Bf6#.
2. Here the weak spot is on g7. The
guard is the knight on e8. So; I..
Rxe8+! Rxe8 2. Qxg7#.
3. White is threatening checkmate
on h8. But Black can checkmate
in two by deflecting the VXTiite
queen from the defense of the
b2 square: 1. ... Rgl +! 2. Qxgl
Qb2#.
4. White has a strong attack on the
h7 square. However, Black’s
queen is holding off the offense.
Here is how to make it work: I.
Ra8! Qxa8 2. Qxh7# or 1. ...
Rb8 2. Rxb8 Qxb8 3. Qxh7#.
5. With a simple check White
makes the Black king move and
give up protecting the queen. 1.
Rf4+ Ke8 2. Qxg7.
6. Black’s rook is protected by the
knight. The task is easy: remove
the guard! 1. Bxc6+ bxc6 2. Rxa7.
7. White would be ready to
checkmate on the h-file except
for Black’s bishop in the way. So:
1. Qxd8+! Rxd8 2. Rh4#.
8. With a rook sacrifice, White
wins Black’s queen. 1. Rg8+!
Kxg8 2. Qxe7.
9. Here the key square is e5. 1.
Ra8! Qxa8 2. Be5# or 1. ... Bc8
2. Rxc8l Qxc8 3. Be5#.
10. The Black queen is only
protected by the knight. With a
simple trade White wins rhe
queen. 1. Nxf6+ Bxf6 2. Qxd7.
11. With a bishop sacrifice White
gainsan exchange. 1. Bh7-1-1
Kxh7 2. Rxf8. Even worse is 1.
... К 1'7 2. Qf3+ Ke 7 3. Qxf8#.
12. With a simple check White
pushes the Black king away
from protecting the queen. 1.
Nf6+ Kh8 2. Qxh6#.
13. The immediate 1. Bb54- would
be blocked by 1. ... c6. That
explains White’s next move,
which forces checkmate in two.
1. Nxc7+! Bxc7 2. Bb5#.
14. There is a nice "family fork" in
sight on e.6. 1. Bxd5 Nxd5 2.
Ne6+.
15. Black’s rook (on f8) is
overworked. 1. Qxf5 Rxf5 2.
Rxc8+.
16. White can force checkmate in
three by; 1. Nd6+ Kb8 2.
Qxd8+.
17. Ry sacrificing a rook White wins
Black’s queen. 1. Ra8 + ! Kxa8 2.
Qxa6 + .
18. Black’s queen seems to be
sufficiently protected. But after
J. Bxg7-H the Black king must
give up its guard. 1. ... Kxg7 2.
Qxe7 and White gains
significant material advantage.
19. Here there is a smothered mate
on the horizon. All White needs
DefIectiоп/Removing the Guard
to do is to trade queens with I.
Qxd6 Nxd6 and then 2. Nc7#.
20. Here the weak point is on f7. 1,
Qxc4! bxc4 2. Rxf7#.
21. The Black king is in an
awkward position and White
takes advantage of it like this: 1.
Qxe3-H Qxe5 2. Nf7#.
22. After a nice queen sacrifice
White’s e-pawn becomes the
hero of the gam el 1. Qxf5+!
gxf5 2, e6#,
23. Wfhite gives up a rook to get the
queen: 1. Rf8+! Kxf8 2. Qxe6 or
1. ... Ke 7 2. Re8 + ! Kxe8 3.
Qxe6.
24. The Black king is in a tight
position. The idea Nh5xf6# is in
view. 1. Qg4+! Qxg4 2. Nxf6#,
25. White has neglected king safety
and that allows the following
impressive move: 1. ... Qa5! 2.
Qxa5 Nc2#.
26. Black could checkmate with
Qh I if White’s queen were not
guarding that square from a
distance. Here is how Black can
either gain serious material
advantage or give checkmate: 1.
... Rxc2! 2. Qxc2Qhl# or 2.
Qb7 Rxc8 5. Qxc8 Qhl#.
27. This is a famous opening trap m
the Dutch Defense. White
checkmates in two moves: 1.
Qxh5+! Rxh5 2. Bg6#.
28. Both the White queen and rook
are under attack, yet White has
a winning combination because
of a nice checkmate idea: 1.
Qxh7! Rxh7 2. R.f8#.
29. Black is relying on the pin on
the c-file to avoid losing the
queen. With the following rook
sacrifice, White “unpins" the
bishop on co. 1. Rd8+! Rxd8 2.
Bxe5.
30. White is in check, but can win a
rook as follows: 1. Qxd5 cxdo 2.
Rxf7.
31. There’s a checkmate idea on the
horizon with Rb3-b7, but right
now two Black pieces are
guarding the b7 square. White
can remove both guards at once:
1. Qxc5+! Qxc5 2. R3b7#.
32. Black’s knight on f6 is in WTiite’s
way. 1. Qxe4+! Nxe4 2. Bxf7#.
33. This is a Tine example, where
White moves the rook to a
square where it is doubly
attacked. Either of Black pieces
can take the rook, resulting in
different problems. 1. Re8l Qxe8
2. Qh4# or 1. ... Rxe8 2. Qg7#.
Ignoring the sacrifice does not
help either; 1. .., Qg5 2. Qh8+I
Rxh8 3. Rxh8#.
34. By opening the b-file White can
force checkmate in two moves: 1.
Rxa5+I bxa5 2. Qb7#.
35. Black’s last move (h7-h6)
attacked White’s knight on g5.
White needs to deflect Black’s
knight from f6. 1. Nd5! Qd6 2.
Nxf6+ Qxf6 3. Qh7#.
36. 'Die first move is a very natural
skewer with 1. Ra7+; but Black
can block it by I. ... Bc7. Now
the king becomes overworked: 2.
Rxc7+> Kxc7 3. Qxe7+.
Chess Tactics for Champions
37. The idea Black uses here
resembles the one we saw in
position 33. 1. ... Rel+! 2. Qxel
Qxg2# or 2. Nxel Qhl#.
38. Black’s king is protecting the
queen. There is a way to chase
the king away from the sixth
rank. 1. Bf8+ Kg6 2. Bf7+> Kxf7
3. Qxh5+.
39. Black can get out of the first
skewer safely, 1. Qal+ Kb7, but
after the second one Black Loses
badly: 2. Всб+! Кхсб 3. Qxa8~.
40. The key square is: c7. 1. QaT^'
Qxa4 2. Nc7+ Kf8 3. Rxd8+ Qe8
4. Rxe8#.
41. Black has a back-rank problem.
White needs to deflect either
Black’s knight or rook (on h8)
away from the b8-square. 1.
Qxhb! Rxh6 2. Rb8+ Nxb8 3.
Rxb8# or 1. ... Rc8 2. Qxc6 +!
Rxc6 3. Rb8#.
42. Both White rooks are lined up
along the h-file, ready for action.
Only Black’s bishop on e5 is in
the way. 1. Qxe5! Rxe5 2. Rh8+
Kg7 3. Rlh7#.
43. After the simple check 1. Qc4+
Kb8, Black’s queen becomes
overworked: 2. Rxd7l Qxd7 3.
Qxg8+ or 1. ... Qc7 2. Qxg8 + .
44. The Black king is out in the
open, but right now the Black
queen guards the crucial f7-
square. l.Rhl! Qxh 1 2. Qf7 +
Kh6 3. Re6#.
45. Black’s bishop on 13 is clearly
very powerful. Black wants to
get a rook (or queen) to hl, but
first the h5 square must be made
available for the rook. 1. ...
Qxf4! 2, exf4 Rh5 followed by 3.
... Rhl#.
46. Black is offering a trade of
queens and also threatening to
checkmate on g2. White can
remove the guard of the Black
queen (the knight on b6). 1.
Nd7 + I Nxd7 2. Qxd5 or 1. ...
Kc8 2- Nxb6+ axbb 3. Qxd5.
47. The White queen protects the
rook on dl. The goal is to lure it
away: 1. ... Qc6 2. Qxc6 Bxdl 4
3. Kg2 Ьхсб or 2. Qe2 Rxd 1 + 3.
Qxd 1 Qxb5 and Black wins a
rook in both variations.
48. The knight on f6 is indirectly
protected because of the pin on
the еб-pawn. With two smart
pawn moves White can unpin
the pawn: 1. c4 Qa5 2. b4 Qxb4
3. exf6.
49. Here the point is to make the F6-
square available for the White
knight, i. Qxd4! Nxd4 2. Nf6d-
Kf8 3. Bh6#.
50. The Black queen is surrounded
by too many enemy pieces.
White needs to attack the queen
with Bd5, but the knight on f6 is
guarding that square for now. 1.
Rxf6! gxf6 2. Bd5 traps the
queen.
74
4
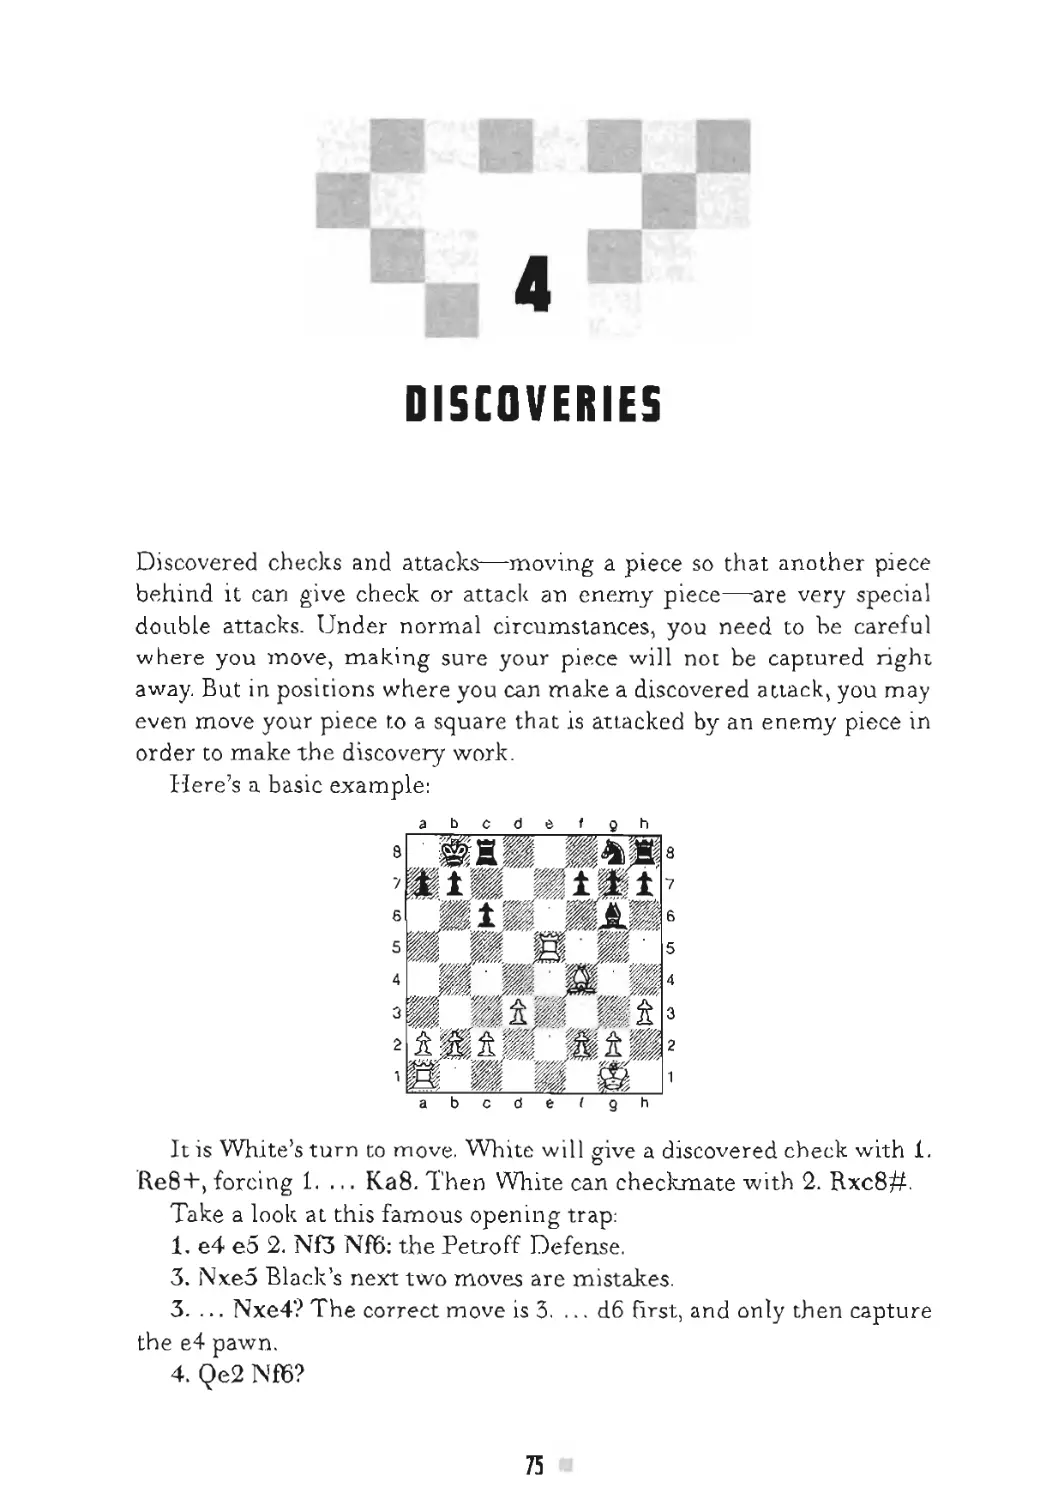
DISCOVERIES
Discovered checks and attacks—-moving a piece so that another piece
behind it can give check or attack an enemy piece—-are very special
double attacks. Under normal circumstances, you need to be careful
where you move, making sure your piece will not be captured right
away. But in positions where you can make a discovered attack, you may
even move your piece to a square that is attacked by an enemy piece in
order to make the discovery work.
Here’s a basic example:
It is White’s turn to move. White will give a discovered check with 1.
Re8+, forcing 1. ... Ka8. Then White can checkmate with 2. Rxc8#.
Take a look at this famous opening trap:
1. e4 e5 2. Nf3 Nf6: the Petro ff Defense.
3. Nxe5 Black’s next two moves are mistakes.
3. ... Nxe4? The correct move is 3. ... d6 first, and only then capture
the e4 pawn.
4. Qe2 Nffi?
75
[hess Taeiies for Champions
a b c d e t g n
a b c d e I у h
A.nd now 5. Nc6+ wins the Black queen.
In the next position, White needs to push the Black king into the dis-
covery.
White achieves this by trading rooks with 1. Rxg8 + Kxg8 and then
winning the rook with 2. Ne3+ discovered check.
The next example is similar to what we just saw. In this position, the
goal is to force the Black king into a discovery.
76
Discoveries
After 1. Ng6+, the only answer is 1. ... Kh7 and then 2. Ne7+ wins
the Black queen, a decisive material advantage for White.
As dangerous as discoveries are, not all of them have a devastating ef-
fect. This one is an example of effective defense.
Black can try a double attack by discovery with 1. ... Nb7. But White
is safe either by blocking with 2. Rd5 or by creating a counterthreac
(checkmate on g7) with 2. Qg3.
Susans Corner
Herendi—Susan Polgar
Kecskemet 1984
a b c d e I g h
a b c d e f g h
The Black king has lost the right to castle. But White has a more se-
rious tactical problem. The knight on g6 is surrounded by too many
Black pieces. The simplest way to win is a discovery combination. 15. ...
Chess Tactics for Champions
Qxg6 and White resigned because if 16. Qxg6 then 16. ... Bd4+ wins
the queen on g6.
Following are 25 puzzles for you to practice with. The last two involve
the “mill,” which uses the discovery element repeatedly.
78
Discoveries
3. White to move
a b c d ft f q h
a b c d e f g h
4. White to move
5. White to move
79
Chess Tactics for Champions
6. White to move
7. White to move
8. White to move
> BO
Discoveries
9. Black to move
10. White to move
11. White to move
81
Chess Taeties for Champions
12. White to move
13. White to move
14. White to move
abode f g h
a b c d e 1 g h
82
Discoveries
15. White to move
16. White to move
a b c d e f g h
6
7
6
5
4
3
2
1
8
7
6
5
A
3
2
1
a b c d e I g h
17. White to move
Chess Tactics еоя Champions
18. White to move
19. White to move
20. Black to move
84
Discoveries
21. White to move
22. White to move
23. White to move
85
Chess Tactics for Champions
24. White to move
25. White to move
86
Discoveries
Solutions
1. With the simple rook trade 1.
Rxb8+ Kxb8, White forces the
Black king into a discovery; 2.
e6+ Kc8 3. exf7.
2. Here the action is on the c-file.
l.Nb5! Rxb5 2. Rxc6.
3. The bishop has many moves that
give a discovered check. The
only good one is 1. Bg6+, to
maJte sure that alter 1. ... Kg8,
the king will not be able to
escape to f7 alter 2. Qh7#.
4. The Black bishop on b7 is
unprotected. White takes
advantage of this by 1. Ng5!
Qxg5 2. Bxb7, and Black’s rook
is trapped in the corner.
5. White to move and checkmate
in two: 1. Bh61- Kh7 2. Bf8#.
6- The action here is along the a2-
g8 diagonal. The best way to use
the opportunity is 1. Rxd8 Rxd8
2. Ne5+. Less effective is the
immediate 1. Ne5, which also
results in some material gain.
7. This is a tricky position. It seems
there are two good moves (1.
Rb4 and 1. Re2). But only one of
them actually works. If 1. Re2,
Black escapes thanks to an
intermediate check after 1. ...
Qd7 2. Qxd7 Rbl + . The correct
move is 1. Rb4, and after 1. ...
Qd7 2. Qxd7 Nxd7 3. Rxb2,
White wins a rook.
8. If the White knight were able to
move away with a check, the
Black queen would fall. With a
check along rhe h-file White is
able to force the Black king to
g8, which is the goal. 1. Rh4+
Kg8 2. Nf6+ gxf6 3. Rxa4.
9. With a simple check, Black
forces White to the danger zone:
the f-file. 1. ... Rhg84- 2. Kf 1
and now the discovered check
wins the queen: 2. ... Bd6 + .
10. If the c4-pawn were not there,
White would have powerful
discovered checks available. So:
L c5l dxc5 and now 2. Rg5+ or
2. Rd6+.
11. This is an unusual example
where the king is the star: 1,
Kg5+ Kg7 2. Kf5#.
12. Black is up a bishop, but White
has a beautiful way to proceed
with an attack against the king.
1. Qg5l hxg5 2. hxg5#. If 1. ...
Kh8 2. Rxh6 + .
13. White can force checkmate in
two moves with a knight
sacrifice. 1. Ng6+! hxg6 2.
hxg3#.
14. Black has problems along the
a 1 -h8 diagonal. Opening it
directly with 1. Ne6 does not
work because of the
intermediate check 1. ... Qc6+
(1. ... fxe6?2. Qh8+ Kf7 3.
Rh7+ winning the Black queen)
followed by 2. f3 fxe6. The
correct move is 1.Rh8+!,
forcing the Black king to the
“hot” diagonal. 1. ... K_xh8 2.
Ne6+.
87
Chess Tactics for Champions
15. This is a very important pattern,
which occurs often in practical
play. White threatens checkmate
on g7 with J. Qg4, and after
Black defends by 1. ... g6, White
wins the Black queen with 2.
Nh6+.
16. By opening the Long (al-h8)
diagonal, White combines a
checkmate threat with an attack
on Black's queen: 1. Nd51 exd5 2-.
Qh8#.
17. After a nice exchange sacrifice.
Black should not recapture,
because that would lose even
more material I. Rxe6 + ! Вхеб
(or 1. ... fxe6 2. Bg6+) 2. Bb5 +
axb5 3. Qxd4.
18. White has no obvious way to
take advantage of the knight
jump from e4. You need to
notice a cute checkmate idea: 1.
Nf6+! Kxf6 2. Nh5+ Kf7 3.
Qh7#.
19. If White captures the rook on f7,
Black gives perpetual checks
starting with 1. ... Qf24. White
has a combination to simplify
the position and win a rook
along the way. 1. Qxg74-| Rxg7
2. Rxg7+ Kh8 3. Rg5 + .
20. Black forces the White king into
a discovery with I. ... Ng3+ 2.
Kh2 and now he checkmates in a
few moves: 2. ... Ne4+ 3. g3 (or
3. Khl Nf2#) 3. ... Rf2+ 4. Khl
Nxg3#.
21. All of Black’s pieces are on the
queenside and Black's problem is
that they are far away from
protecting the king. 1. Qh6l gxh6
(if 1. ... Kg8 2. Rxf5) 2. Rxf5T
Kg8 3. Rg34- and White wins.
22. Black is behind in development.
White has a combination that
results in either winning
material or checkmate. 1. Nxf7l
Kxf7 2. Bh54 Ke 7 (or 2. ... KgS
3. Bf7#) 3. Rf7+ Ke8 4. Rxg7#.
23. Here White needs to make two
sacrifices to gain a material
advantage. 1. Rxg71 Kxg7 2.
Qxd7l Qxd7 3. еб+ Kf8 4. exd7.
24. White uses the “mill,” which
are repetitive discovered checks.
1. Rg7-r Kf8 2. Rxd7+ Kg8, and
now again forces the Black king
back to the discovery: 3. Rg7 +
Kf8 4. Rb7+ Kg8 5. Rxb8+ N£8
6. Rxf8#.
25. White can pick up Black’s pieces
on the seventh rank one by one
using the “mill” method: 1.
Rxb'7+ Ka8 2. Rxe7 + Kb8 3.
Rb7+ Ka8 4. Rxf7+Kb8 5.
Rb7+ Ka8 6. Rxg74 Kb8 7.
Rb7+ Ka8, and now from the
other side, winning the Black
queen with 8. Rb4+ Ka7 9.
Rxh4.
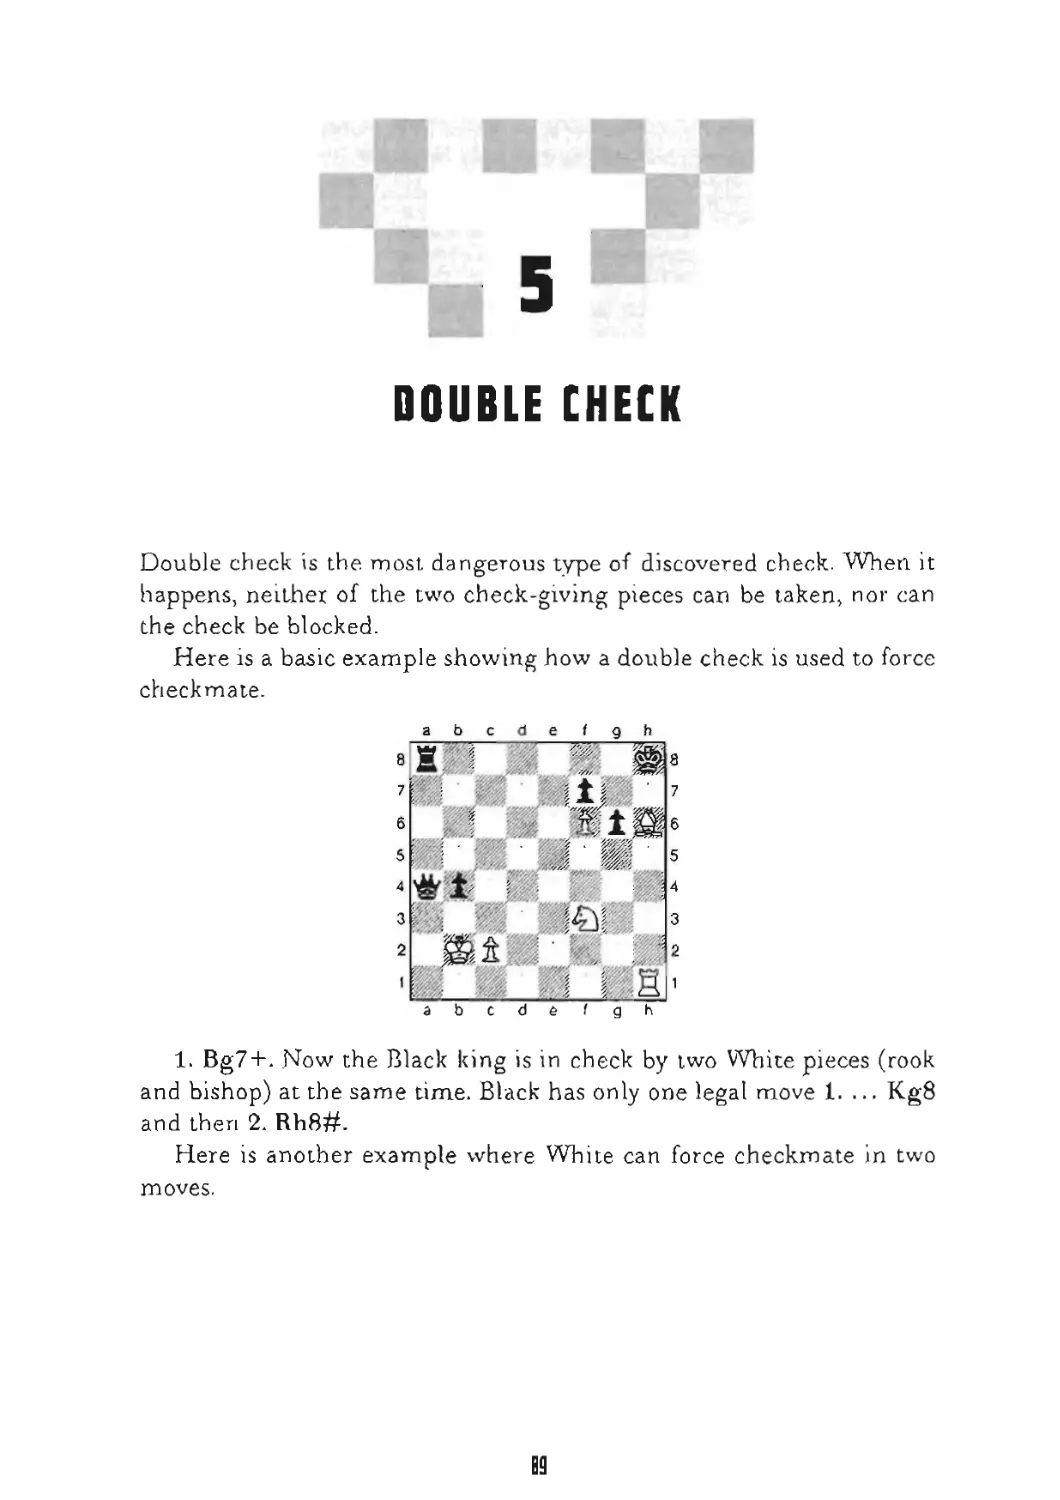
DOUBLE CHECK
Double check is the most dangerous type of discovered check. When it
happens, neither of the two check-giving pieces can be taken, nor can
the check be blocked.
Here is a basic example showing how a double check is used to force
checkmate.
1. Bg7+. Now the Black king is in check by two White pieces (rook
and bishop) at the same time. Black has only one legal move 1. ... Kg8
and then 2. Rh8#.
Here is another example where White can force checkmate in two
moves.
Chess Tactics for Champions
1. Nb5+. Double check. But not 1. Ne6+ because Black blocks the
check with 1. ... b6. 1. ... Ka8 and 2. Nc7#.
In the following position, White uses the same method to checkmate
quickly.
The only right move is 1. R4e7+ followed by 1. ... Kh6 2. Rh8#.
In the next example, White uses the same tool to win material,
a b c d e < g h
abode f g h
90
Double Check
Black has a significant material advantage. But White can. turn
things around with 1. Rxh7+! Kxh7 and now 2. N.f6 + (double check) 2.
... Kg7 3. Nxd7.
In the following famous miniature (Reti—Tartakower, Vienna 1910).
White uses the double check motif as early as move 10 to decide the
game.
1. e4 об 2. d4 d5 3. Nc3 dxe4 4. Nxe4 Nf6 5. Qd3 e5?
This is a premature and dubious aggression.
6. dxe5 Qa5+ 7. Bd2 Qxe5 8. 0—0—0 Nxe4?
A blunder that allows White to checkmate in three moves by force.
a b c d e f g h
9. Qd8+! Kxd8 10. Bg5+ (double check) Kc7 (after 10. ... Ke8 11.
Rd8#) 11. Bd8# 1-0.
91
Chess Tactics for Champions
Susans Corner
A. Grosar—Susan Polgar
Nova Gorica, 1991
a b c d e f g h
a b c d e I g h
Here I sacrificed my bishop with 31. ... Bxg3! hoping for 32. hxg3
Qh 1+1 33. Kxhl Rh4+ (double check) 34. Kgl Rh 1#. My opponent de-
clined the sacrifice but still lost anyway after 32. Rg2 Bxh2+ 33. Kfl
Qh3 34. Qd2Rxe3.
Below are 25 practice examples:
1. White to move
92
Double Check
2. White to move
3. White to move
4. White to move
Chess Tactics for Champions
5. White to move
abode ( g h
a b c d e f g h
6. White to move
7. Black to move
94
Double Check
8. White to move
9. White to move
10. White to move
35
Chess Tactics foh Champions
11. White to move
12. White to move
13. White to move
abode f g h
a b c d e < g h
9Б
Double Check
14. White to move
15. White to move
15. White to move
97
Chess Tactics for Champions
17. White to move
18. White to move
19. White to move
98
Double Check
20. Black to move
abode f g h
a b c. d 6 I g h
21. Black to move
22. White to move
99
Chess Tactics for Champions
23. White to move
24. White to move
25. White to move
Ш0
Double Check
Solutions
1. White checkmates in two; 1.
Bd64 Ke8 2. Rf8#.
2. The White knights and queen
cooperate nicely co checkmate in
two moves; I. Nd6+ Kd8 2,
Qe8#.
3- Here White checkmates with
two double checks in a row! 1.
Rxb7-r Ka8 2. Rb8#.
4. The White queen is under
attack. But the beauty of double
check is that neither of the two
checking pieces can ever be
taken! 1. Nxd64- Ke7 2. Nf5#.
5. After the double check, look for
the checkmate in the corner! 1.
Ng64 КТ7 2. Nxh8#.
6- Here there are two equally good
solutions: 1, Nh5H- Kh7 2. Qg7#
or 1. Ne8+ with the same idea.
7. The Black bishop is hanging, but
Black can ignore that. 1. ...
Nd4+ 2. Kef Nc2#.
8. After a trade with 1, Roca 7 4
Kxa7, White wins the queen
with a double check; 2. Nb5 +
Kb7 5. Nxc3.
9. White forces the Black king into
a discovery with I. Rg'l + Kb8
and White checkmates with 2.
Rc8#.
10. The discovery is set on the b-file,
but there is no immediate knight
jump that wins for White. First,
White uses a decoy to lure the
Black queen to an unfortunate
square. 1. Be4+! Qxe4 and now
the double check 2. Nd6+ Kc6 3.
Nxe4 wins the queen.
11. With a double check White
forces Black into a skewer: 1.
Be6+ Kd8 2. Rc8+ Ke7 3. Rxh8.
12. White sacrifices a bishop by 1.
Bb7 + ! Kxb7 and promotes the
pawn to checkmate! 2. c8Q#.
13. White checkmates in two moves
by opening the a-file; 1. Qb6+!
cxb6 2. axb6#.
14. The Black king tries to run away
from trouble to the queenside
via об. But White can stop it! 1.
Be8+! Kxe8 2. Qf7#.
15. A pretty combination co force
checkmate in two; 1. Qf8+! Bxf8
2, Ng7# or 2. Nc7#.
16. Both the White knight and the
rook on b 1 are in danger. But
when you have a double check at
hand, neither can be taken. 1.
Nd7+ Kc8 2. Rb8#.
17. Here White has two ways to give
double check, but only one of
them reaches the desired goal: 1.
Bc6+ Ka6 (or I........Kc8 2.
Re8#) 2. Bb7 + (another double
check!) 2. ... Ka5 3. Ra6#.
18. With a beautiful queen sacrifice,
White forces checkmate. I.
Qxh6 + ! gxh6 2. Re8$. Running
away does not help either: I. ...
Kg8 2. Qh7+Kf8 3. Qh8#.
19. With an obvious check, White
forces the Black king to g8: 1.
Rhfl + K.g8 and then two double
101
Chess Tactics for Champions
checks end the game: 2. Nf6+
Kf8 3. Nd7#.
20. White has a material advantage
and Black’s king is in a dubious
position. But it is Black's move,
and with, an impressive queen
sacrifice Black forces checkmate
in three! 1. ... Qhl-H 2. Kxh 1
Bf5+ 5. Kh2RTl#.
21. After the previous example, this
should be easier. Black uses the
same idea. 1. ... Qfl +! 2. Kxfl
Bd5+ 3. Ke I RfJ#.
22. White forces checkmate in no
more than three moves: 1. Rf8+!
KxfS 2. Ng6# or 1. ... Kh7 2.
Bg8+ Kh8 3. Ng6#.
23. The knight on e3 is ready to
jump, but right now cannot
attack the Black queen. The first
move is a decoy: 1. Bb4! Qxb4
and now the double check 2.
Nd5+ (2. Nc2+ is not effective
as Black has 2, ... Qxe I +) 2. ...
Kd6 3. Nxb4.
24. With a rook sacrifice, White
checkmates in three: 1. Rb8+1
Kxb8 2. Na6+ Kc8 3. Rb8#.
25. After a gorgeous queen
sacrifice, three (!) double checks
follow and checkmate: 1. ...
Qxg2 + ! 2. Kxg2 Rg3+ 3. Kh2
Rg2+ 4. Khl Rh2+ 5. Kgl
Rhl#.
W2
6
SKEWERS
The skewer is another very powerful tactical tool. It always has three
participants; two enemy pieces lined up on the same file, rank, or di-
agonal, and an attacker that attacks the front piece along the same
line. Once the front piece moves away, the piece behind can be cap-
tured.
Unlike a pin, which attacks a weaker piece shielding a stronger piece
behind it, such as the queen or king, a skewer attacks the stronger piece
that is shielding a weaker piece behind it on the same line. When the at-
tacked piece moves, the weaker piece behind it is vulnerable.
Here are three simple examples to demonstrate the idea of the
skewer.
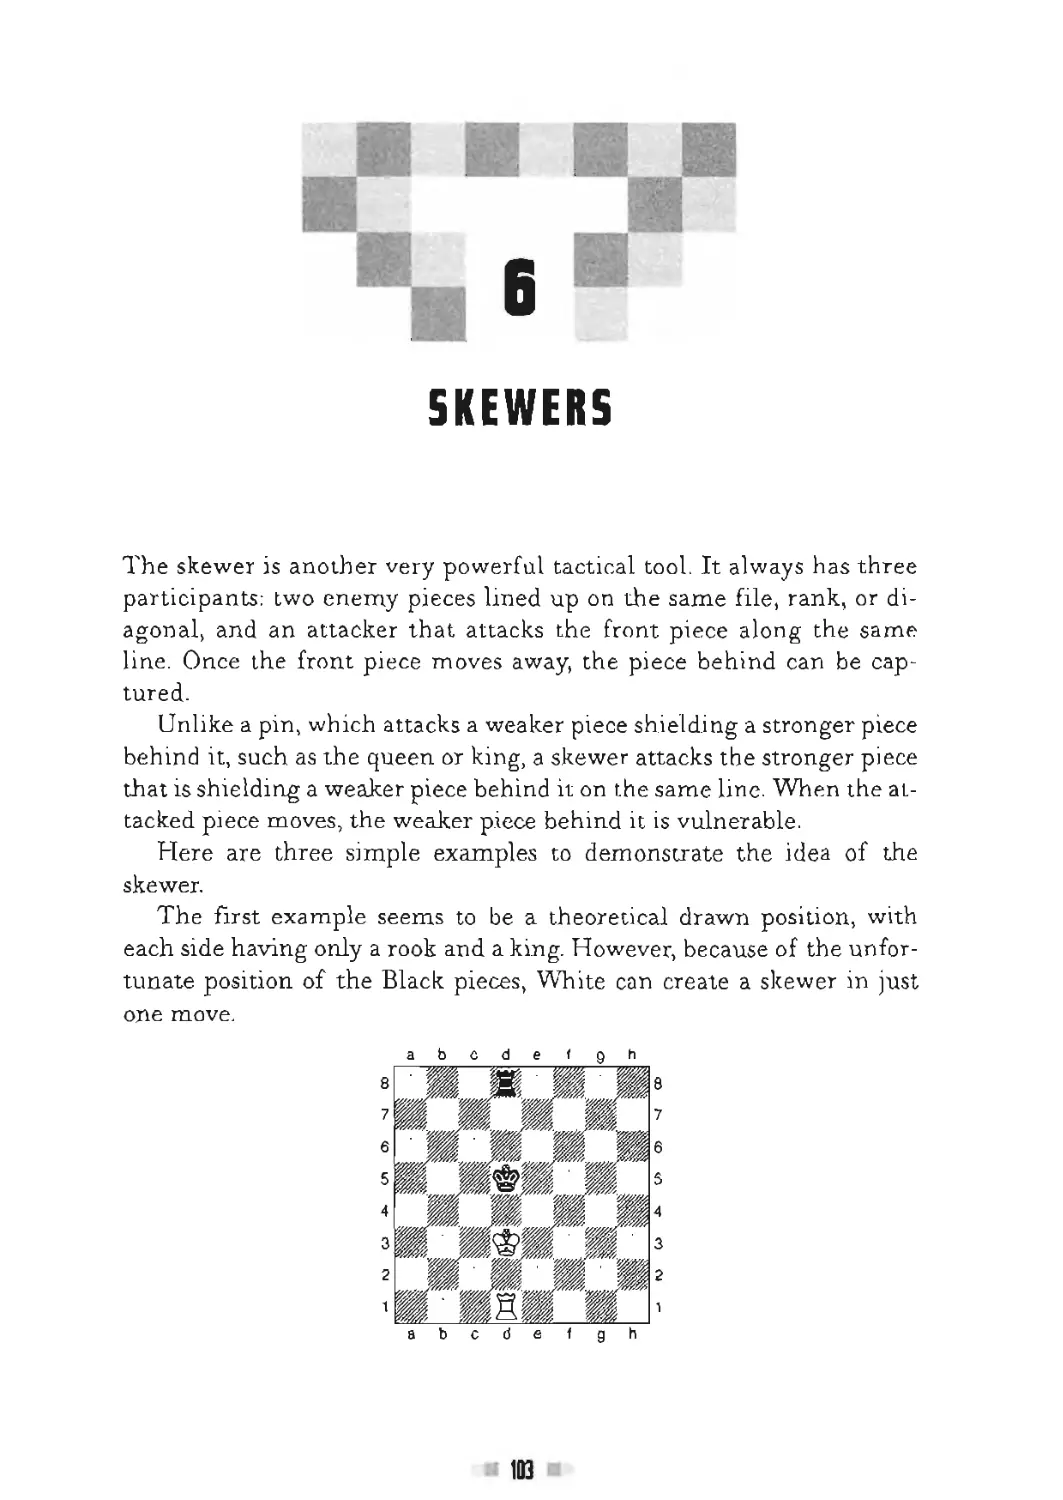
The first example seems to be a theoretical drawn position, with
each side having only a rook and a king. However, because of the unfor-
tunate position of the Black pieces, White can create a skewer in just
one move.
abode 1 9 h
a b c d e 1 g h
103
Chess Tactics for [hampions
While actually has four different ways to create a discovered check: 1.
Ke3+, 1. Ke2+, 1. Kc2+, or 1. Kc3+. Each produces a skewer and wins
the Black rook on the next move.
In the next position, material is balanced.
But after trading with 1. Nxe5 Kxe5, White can skewer with 2.
Bg7+. After 2. ... Ke-4, White simply captures the rook in the corner
with 3, Bxal
In some cases, you may need to sacrifice to create a skewer:
abode f g h
a b c d e f g h
White sacrifices the queen with 1. Qxd4+! cxd4 but wins it right
back after 2. Bxd4+ Кеб 3. Bxh8.
In this example, White employs a decoy to achieve the same goal:
104
Skewers
a b c d e I g h
abode I g h
The immediate check with 1. Qa8+ does not achieve much, as the
Black queen on g2 is protected at the moment by the rook. Therefore,
White first sacrifices the bishop with 1. Be4+1 to lure the Black queen
to e4 and away from the protection of the rook. 1. ... Qxe4 and now 2.
Qa8+ Kd6 3. Qxe4 wins the queen.
In the next endgame, Black seems to have the advantage, but ...
By sacrificing the knight, White opens the b-file and creates a suc-
cessful skewer with 1. Na4+! bxa4 and 2. Rb8+ winning Black’s queen.
Chess Tactics for Champions
Susans Corner
Susan Polgar—De Armas
Thessalonica, 1988
a b c d e f g h
a b c d e f g h
This is a game from my first Olympiad. After my next move, 43.
Rcl + , my opponent resigned because of 43. ... Kb4 44. Rbl+ or 43. ...
Ka4 44. Rat+ Kb3 45. Rbl+. Black cannot avoid the skewer in either
case and loses the rook on b8.
And here are 25 practice examples.
1. White to move
a h c d a f g h
a b c d e t g h
106
Skewers
2. White to move
a b c d e t g h
a b c d e f g h
3. Black to move
4. White to move
107
Chess Taetics for Champions
5. Black to move
5. Black to move
a b c d e f g h
a b c d e f g h
7. White to move
IDS
Skewers
8. White to move
9. White to move
10. White to move
109
Chess Tactics for Champions
11 Black to move
12. White to move
13. Black to move
HO
Skewers
14. White to move
15. White to move
16, White to move
Chess Taeties for Champions
17. White to move
18. White to move
19. White to move
abode < q h
112
Skewers
20. Black to move
21. White to move
22. White to move
Chess Tactics for Champions
23. White to move
24. White to move
25. White to move
Skewers
Solutions
1. With an exchange sacrifice
White wins a bishop: 1. Rxf6!
Kxf6 2. Bh4+ Ke5 3. Bxd8.
2. After a simple trade, White's
dark-squared bishop is ready to
skewer: 1. Nxc7 Qxc7 2, Bf4.
3. Black wins a rook with 1. ...
Qxa7-H 2. Qxa7 Ra 1 + 5. Kb4
Rxa7.
4. White wins a knight with 1.
Qh8+! Nxh8 2. Rxh8+ Ke7 3.
Rxc8. But not 1. Qxg6 fxg6 2.
Rh8 + , because 2. ... Bg8 blocks!
5. There are too many White pieces
on the fourth rank: 1. ... Bxb4 2.
Kxb4 Ra4+ 3. Kc3 Rxg4.
6. With 1. ... Qh5+ Black forces
the White king to the same
diagonal that the White queen is
on. 2. Kg3 and now the skewer
with 2. ... Qh4+ 3. Kf3 Qxe 1.
7. Using the “stair” method, White
forces the Black king to the sixth
rank: 1. Ra7+ Kg6 2. Rb6+, and
after 2. ... Kh5 the best
continuation is 3. g4+ Kxg4 4.
Rxh6.
8. Check and skewer! 1. Qd64 Kf6
2. Qd8+ КГ5 3. Qxh4.
9. As the White rooks are doubled
on the b-file, in reality they both
eye the b7-square: 1. Rb7+- Rxb7
2. Rxb7-i- Кеб 3. Rxg7, winning
a bishop.
10. White vx iris a rook after 1.
B.xf54- Kxf5 2. Bc2+ Ke5 3.
Bxh7.
11. Black wins one of the two
bishops after 1. ... Re2 2. Вс I
Rd.
12. White wins a rook with a queen
sacrifice: t. Qxf8+I Kxf8 2.
Rh8+ Kf7 3. Rxd8.
13. Black takes advantage of the fact,
that White’s rook is on an
unprotected square and on the
same rank as the king. 1. ...
Bxc4+ 2. bxc4 Rb2+ 3. Ke3
Rxh2.
14. White wins Black’s queen
quickly: 1. b4+ Ka4 2. Qxa6+
Kxb4 3. Qxal.
15. Black’s problem is that both the
king and queen, are on the sixth
rank. 1. Qxf8+! Rxf8 2. Rxh6 +
Kd5 5. Rxa6.
16. A check followed bv a skewer
J
wins the Black queen. 1. Qa3 +
Kc4 2. Qa2+ Kc5 3. Qx(7.
17. Here rhe hero is White’s b-pawn.
It also involves a discovered
check. 1. b5+ Kxc5 2. b6+ Kxb6
3. Rxd5.
18. A nice decoy pawn sacrifice: t.
c5+!. After either capture White
skewers. J.......Kxc5 2. Be3+ or
1. ... Qxc5 2. Bf84,
19. Black’s queen is getting trapped,
as after 1. Bd21 Qxc4 2. Rc1.
Black can avoid checkmate only
by giving up the queen.
20. After an unexpected mate
threat, Black can skewer. 1. ...
Qc6 2. f3 Qb5.
115
Chess Tactics for Champions
21. After 1. Rb3+ Kf6 2. Qh8+ Black
cannot hang on to the queen.
22. After two checks comes a skewer.
1. Ra8+ Kg7 2. Rxf7+ Kh6 3.
Rh8+, winning Black's queen.
23. Black’s bishop gets trapped after
1. Rb3, since 1. ... Bb4 allows 2.
Rxb4! cxb4 3. Bxb4+ Кеб 4. Bxf8.
24. After a series of forced
moves, White wins Black’s
rook on e4. 1. Qxf8 + ! Kxf8 2.
Rc8+ Ke7 3. Re8+ Kf6 4.
Rxe4.
25. White wins the Black rook on
aS; 1. Rf8+ Rxf8 2. Rjcf8+ Ka7
3. Ra8+ Kb6 4. Rxa3.
116
TRAPPING PIECES
Trapping a piece is one of the simpler tactical concepts in chess. You at-
tack a piece. That piece either cannot escape at all or can escape only to
another unsafe square. One major goal in chess is to trap the opponent’s
king and to checkmate it. In this chapter, however, we shall see only ex-
amples of trapping other pieces.
First, let us see three short games where pieces get trapped early.
Modern Defense
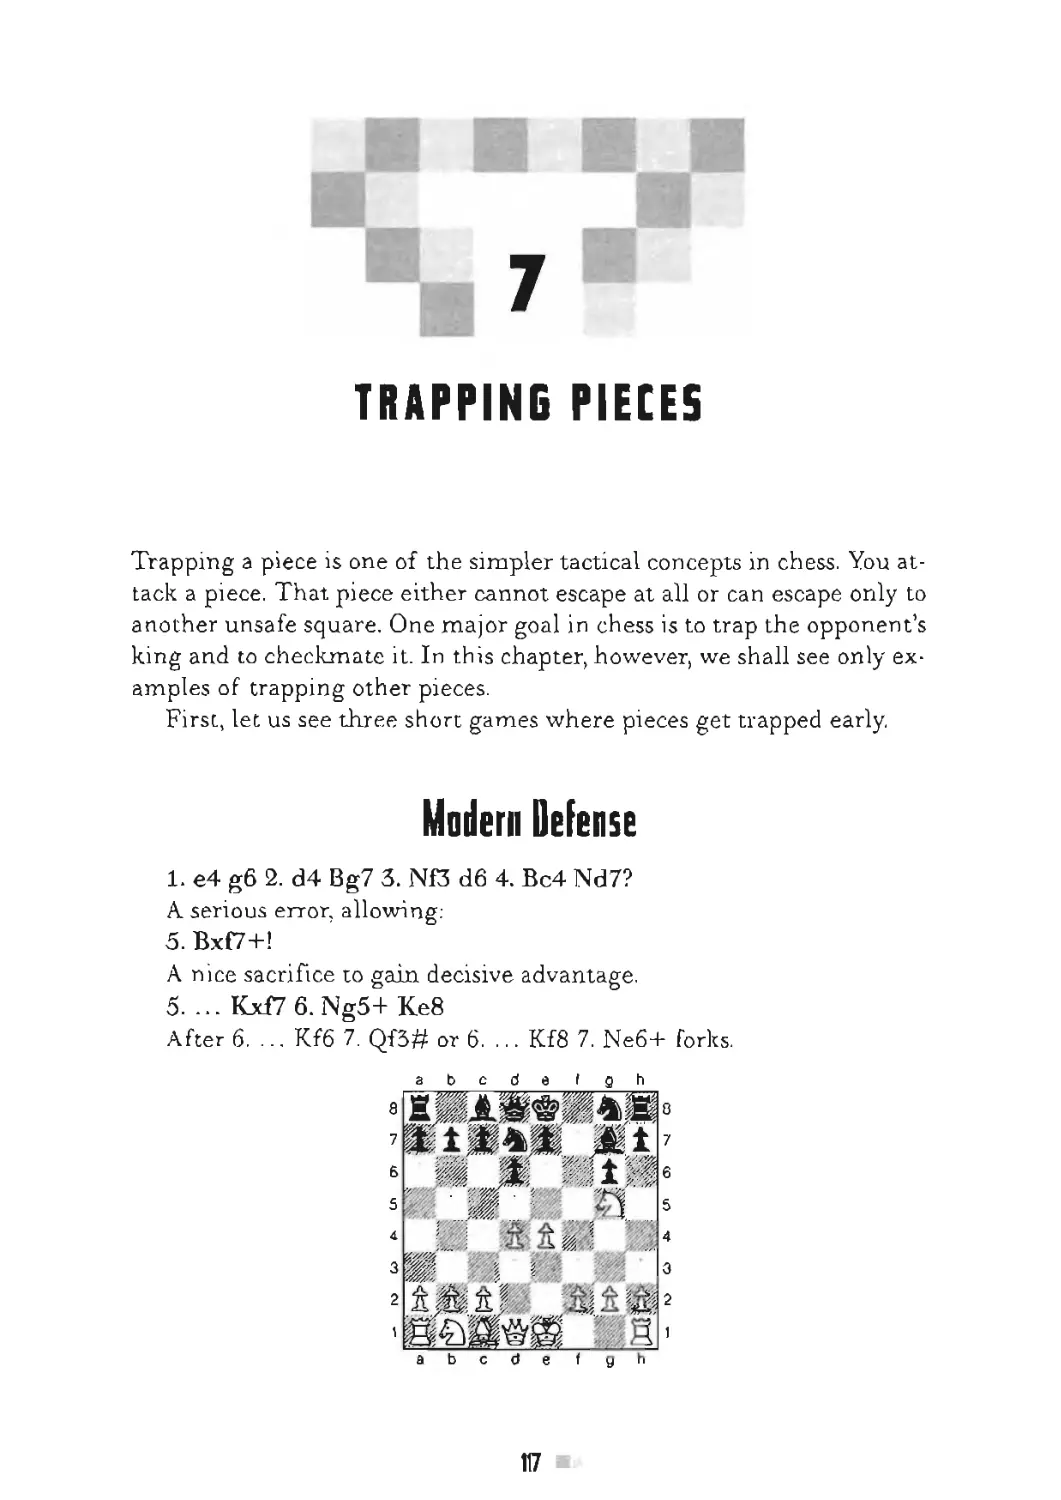
1. e4 g6 2. d4 Bg7 3. N£3 d6 4. Bc4 Nd7?
A serious error, allowing:
5. Bx£7+!
A nice sacrifice to gain decisive advantage.
5. ... Kxf7 6. Ng5+ Ke8
After 6. ... Kf6 7. Qf3# or 6. ... Kf8 7. Ne6+ forks.
a b c d e I g h
a b c d e f g h
П7
[HESS ГАСИЕВ FDR CHAMPIONS
And now 7, Ne6 traps the Black queen.
In the next miniature, White is not careful with his queen.
Caro-Kann Defense
1. e4 c6 2. d4 d5 3. e5 Bf5 4. Bd3 Bxd3 5. Qxd3 e6 6. Ne2 c5 7. c3
Ne7 8. Qb5+ Qd7 9. Qxc5?
White is too greedy...
a b c d e f g h
a b c d e < g h
9. ... Nf5!
Creating a discovered attack. The only escape is to 10. Qa5 after
which 10. ... b6 traps the queen.
Oueen's Gambit Accepted
1. d4 d5 2. c4 dxc4 3. еЗ b5
It is not a good idea to hang on to the c4 pawn.
4. a4 c6 5. axb5 cxb5?
This is pure trouble.
a b c d e f g h
a b e d e f g h
ПВ
Trapping Pieces
White traps the Black rook in the corner along the opened long diag-
onal with 6. Qf5.
In the following diagram., it is Black to move. With a quiet move,
Black can set up an unstoppable threat to trap White’s queen.
The White queen threatens to capture the pawn on c5. The queen can
also move to b7. However, after 1. ... Qc8 both of those options are
taken away. In addition, Black prepares Bd7-e6 to trap the White queen.
White cannot save it.
In the next endgame, the Black rook (or knight) surprisingly gets in
trouble.
a b c d e t g h
After 1. BR), the only rook move that holds the knight is 1. ... Rd6
but then 2. Вe7 unexpectedly traps the rook.
119
Chess Tactics for Champions
Susans Corner
Susan Polgar— Geller
Aruba, 1992
This is the final part of one of my all-time favorite games. At first
glance, it seems that Black has everything tinder control. After 19. Nd4,
Black has planned an intermediate move—trading on g3—and then the
Black queen is home free (on c7). But after a harmless-looking quiet
move, 19. Be51, Black cannot avoid losing material. My world-famous
opponent played 19. ... Bib, allowing the queen trap with 20- Nd4 and
then resigned after 20. ... Nxe5 21. Nxc6 Nf4 22. Qe3 Nexd3 23, e5!.
After 19. ... Nxe5 20. Nxe5 Qc7, Black would avoid losing the queen but
would lose a knight after 21. Qxh5.
Now here are 25 practice puzzles for trapping pieces.
I White to move
120
Trapping Pieces
2. White to move
3. White to move
4 White to move
121
[hess Taciies far Champions
5. White to move
6. Black to move
7. White to move
m
Trapping Pieces
8. White to move
9. White to move
10. White to move
abcdefgh
a b c d e I g h
123
Chess Tactics for Champions
11. White to move
12. Black to move
13. White to move
124
Trapping Pieces
14 White to move
15. Black to move
16. White to move
125
Chess Tactics for Champions
17. White to move
18. White to move
19. White to move
126
Trapping Pieces
20. White to move
21. White to move
22. White to move
127
Chess Tactics for Champions
23. White to move
24. White to move
25. White to move
128
Trapping Pieces
Solutions
1. White traps Black's bishop: 1. co.
2. Again a White pawn traps
Black’s bishop: I. f6.
3. The Black queen is surrounded
by too many White pieces: I.
Rd2.
4. White is in check, but can get
out by trapping the rook in the
corner: 1. Kg7.
5. White makes a discovered
attack, 1, Reel, and Black's
queen is in trouble. Best for
Black is the cross-pin 1. ... Ba6,
but the bishop is still lost.
6. White cannot avoid material loss
after 1. ... R8a2, For example,2.
Nxa2 Rxel# or 2. Qxa2 Qxc3 3.
Qf2 R_xcl.
7. After the discovered attack 1.
Nd5, the Black queen has no
hiding place.
8. The Black knight on b2 is too
deep in enemy territory. After 1.
Bbo it has no road back.
9. The Black queen has no place to
move; all White needs to do is to
attack it: 1. Bg5! hxg5 2. hxgo.
10. A simple discovery works: I.
Nf6-r Kh8, and after 2. Bxb7
Black's rook is trapped.
11. This example demonstrates well
the power of the pair of bishops.
1. Ba6Rc6 (1. ... Rad 2. Bb7) 2.
Bb7.
12. White’s rook finds itself among
too many Black pieces: 1. ... Kf8
2. Re6 Kf7.
13. After the knight trade 1. Nxd4
Qxd4, White wins material by 2.
Bf3,
14. Black has broken the opening
rule: “Do not bring out your
queen too early!'1 1. Be2 Qg6 2.
Nh4 and the queen is trapped.
15. White’s bishop on f3 gets trapped
after 1. ... Bxf5 2. exf5 e4.
16. “A knight on the rim is dim,” as
the saying goes. A perfect
example: 1, Qb4 Qxb4 2. cxb4.
17. By threatening checkmate with
1. ... Qg5, Black forces 2. Qf3,
and so can trap the queen with
2. ... Bg4. If 3. h4 Qg6 and
Black is winning. White’s best is
3. e4 Bxf5 4. Bxg5 hxg5, but
Black has still won a bishop.
18. After the intermediate check 1.
Nd5 + Кеб, White not only stops
Black’s checkmate threat on g2
but also traps the queen with 2.
Nf4.
19. Black’s bishop has no escape
after I. c3 Ba5 2. h4 Bb6 3. a5.
20. Black’s knight cannot get away
from the attacks: 1. e5 Nh5 2. g4.
21. Another example where the
bishop pair traps a rook: 1. Bd4
Rf8 2. Bg7.
22. Whi te traps Black’s rook in an
unusual way: 1. Nd6l (threatening
2. Ne8+) 1. ... exd6 2. cxdb.
23. White takes away the queen’s
last retreats to b6 or c5 by 1.
Na4. Now Black has no way to
129
Chess Tactics for Champions
rescue the queen. For example:
1. ... b5 2. a3 Qxa4 3. b3.
24. The White knights trap Black’s
queen. 1. Nb3 Qa4 (or 1. ...
Qxa2 2. Nc3) 2. Nc3 Qb4 3. a3.
25. Here’s a cute simplification
combination involving a fork: 1.
Qh8-H Kxh8 2. Nxf7-b Kg7 3.
Nxe5 and the Black knight has
no way out.
130
8
DECOYS
The idea of a decoy is to lure an enemy piece го an unfavorable position,
thereby enabling the other side to gain some kind of advantage. We
may want to make a decoy combination to checkmate or to create a fork,
pin, skewer or other tactical motif to gain material.
Here are some simple examples.
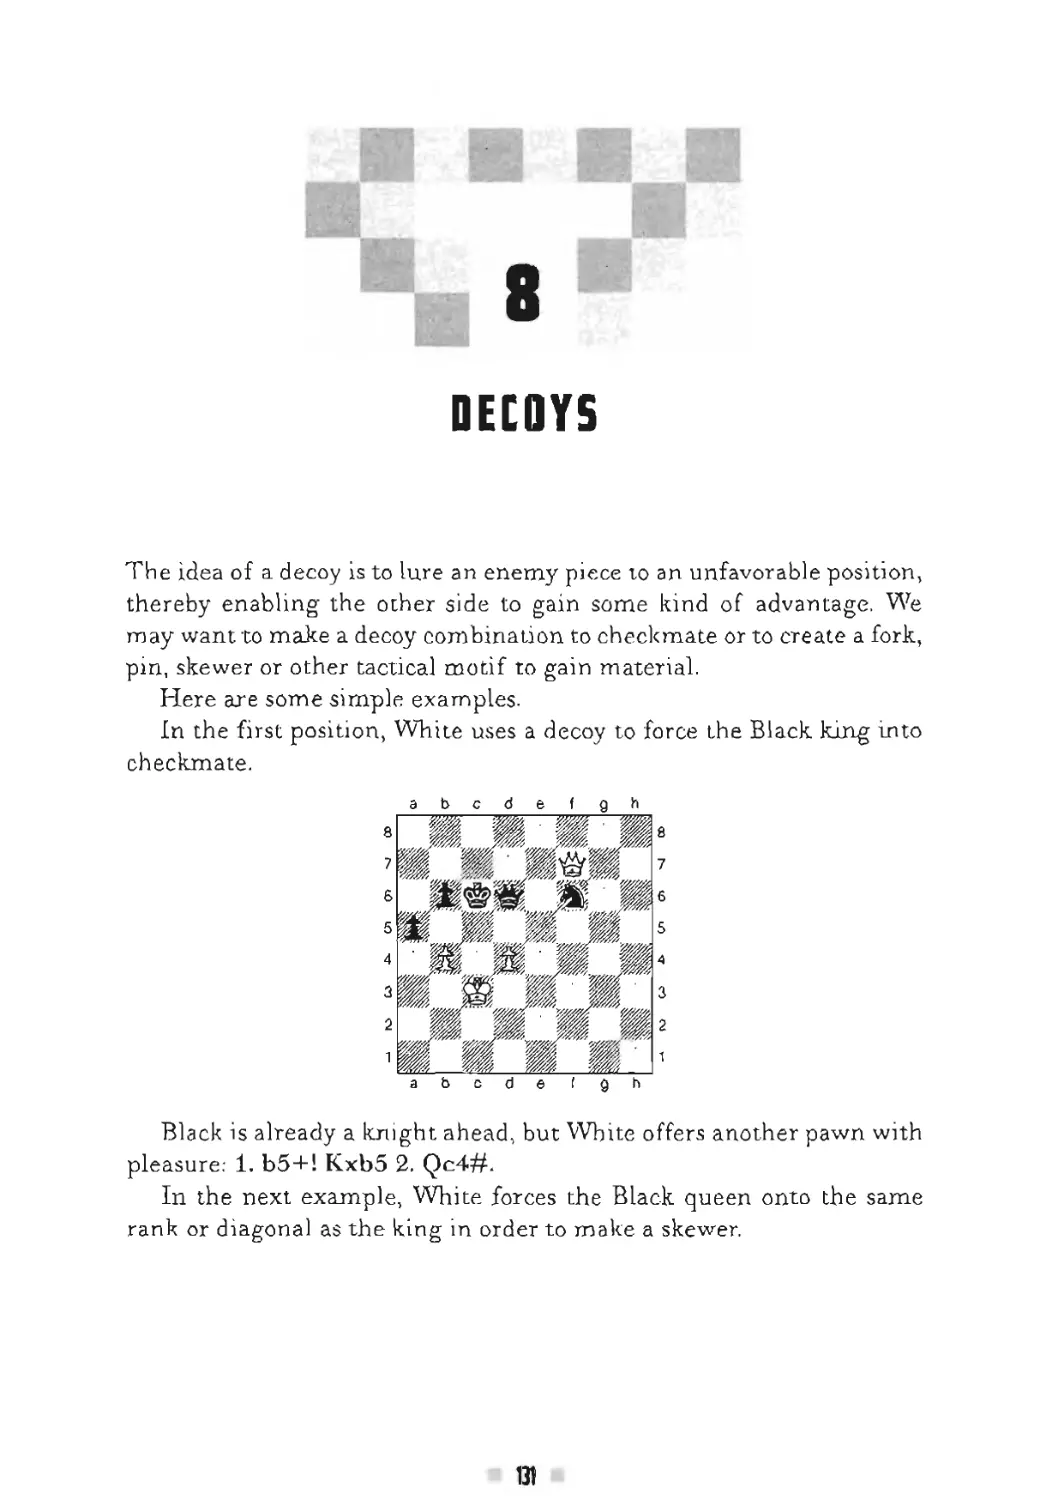
In the first position, White uses a decoy to force the Black king into
checkmate.
a b c d e f g h
a b c d e t g h
Black is already a knight ahead, but White offers another pawn with
pleasure: 1. b5+! Kxb5 2. Qc4#.
In the next example, White forces the Black queen onto the same
rank or diagonal as the king in order to make a skewer.
131
Chess Tactics for Champions
White offers his rook with 1. Rd8L Now Black has no option but to
lose the queen.
1. ... Qxd8.
Or 1. ... Qg7 2. Bd4+; 1. ... Qg6 2. Rd6-r; 1. ... Qg5 2. Bxh4 pinning
the Black queen.
2. Bxh4+ Kg6 3. Bxd8.
In all these variations, White wins the Black queen.
In the next position, White decoys the Black queen to a square where
it will get in trouble because of a discovery.
a b c d e I g h
a b c d e < g h
White sacrifices the rook with 1. Rh3!, to tempt 1. ... Qxh3, when
Black loses the queen after 2. g5 +! Kxg5 3. Bxh3.
In the next example, Black lures the White king onto the “deadly”
h-file.
Decoys
abode f g h
abode f q h
After sacrificing the rook, with j. ... Rhl+! 2. Kxhl, Black makes
sure that the king does not come back to safety (gl) with 2. ... Bxf2.
White is now helpless againstthe upcoming checkmate with R.a8~h8.
The next position is pretty amazing. Black seems to have an over-
whelming material advantage. However ...
abode I 9 h
White turns things around by promoting the d-pawn with 1. d8Q+!
and after 1. ... Kxd8 White lakes the rook and forks with 2, Nxf7+.
Chess Tactics for Champions
Susans Corner
Susan Polgar-Karolyi
Hungary, 1990
Here I noticed a potential fork: 25, Nf5+! gxf5 26. Rxd8 and if 26. ...
Qxd8 27. Ne6+ forking. In the game, the Black king got into trouble: 26.
... Qxc5 27. Rcl Qe7 28. Qg3 + Kh6 (28. ... Ng6 29. Rc7) 29. Rg8 and
Black resigned.
Here are 25 positions for you to practice decoy tactics.
1. White to move
B4
Decoys
2. White to move
3. White to move
4. White to move
135
Chess Tactics for Champions
5. White to move
6. White to move
7. White to move
1И
Decoys
8. White to move
9. White to move
10. White to move
[hess Tactics for Champions
11. White to move
12. White to move
13. White to move
138
Decoys
14. White to move
16. Black to move
a b c d e f g n
a b c d e f g n
B9
[hess Tactics for Champions
17. White to move
18. White to move
19. White to move
140
Decoys
2Q. White to move
21. White to move
141
Chess Tactics юй Champions
23. Bfack to move
24. White to move
25. White to move
М2
Decoys
Solutions
1. White sacrifices a bishop io force
Black’s king into a fork: 1, Bxg7+!
K_xg7 2. Nh5+ Kh8 3. Nxf4.
2. White’s queen is hanging and
Black is also threatening mate in
one move. White can solve al)
these problems and win a rook
with: 1. Qxg8 + ! Kxg8 2. Nf6 +
Kg7 3. Nxe4.
3. Black is ahead in material, but a
bishop sacrifice forces the Black
queen into a fork: 1. Ra5-M Qxa5
2. Nb7+ Kc7 3. Nxa5.
4. With a simple check, White
pushes the Black king onto the
same file as the Black queen: 1.
Qg3+ Kf5 2. Qf3 + (skewer) 2.
...Кеб 3. Qxf8.
5. After a knight trade, I. Nxd5
Qxd5, the Black queen appears
on an unfortunate square: 2.
Bxh7+! (discovered attack) 2. ...
Kxh7 3. Qxd5.
6. White seems to be in trouble.
But by almost trapping the
Black queen with 1. Bg4!, White
“invites” 1. ... Qxg4, when
White forks with 2. Nh6+ Kg7
5. Nxg4.
7. With a rook sacrifice, White
achieves a fork to win tire Black
queen. 1. Rxe5+! Qxe5 2. Nc4+
Kb4 3. Nxe5.
8. If White promotes the b-pawn,
Black also gets a chance to
promote the h-pawn and with
check! Therefore, the correct
answer is to give up the f-pawii
by 1. f8Q+!. so that after 1. ...
Kxf8 the other pawn can
promote with check! 2. b8Q+
Kf7 3. Qxh2.
9. White can force mate in two
moves: t. Bf7 + ! Kxf7 2. Qe6#.
10. By means of a nice queen
sacrifice, White wins at least a
piece or mates. 1. Qxd6+! Kxd6
2. Ba5#.
11. With a tricky rook sacrifice, 1.
Rd8+!, White forces Black into a
pin, and after 1. ... Kxd8, White
freely captures Black’s queen
with 2. Qxc6.
12. After the direct 1. e4+, Black
can escape to d4. That is why
White gives up the rook to block
that square. 1. Rd4+! exd4 2.
e4#.
13. White forces mate in two moves:
1. Ra8+! Kxa8 2. Qa7#.
14. After the bishop sacrifice 1.
Bc4+! Qxc4, the Black queen
arrived on an unfortunate spot,
as White has a discovery at
hand; 2. Nf6+ Kg7 3. Qxc4.
15. After solving position 12, this
should be a familiar idea! 1.
Rc74! Bxc7 2. d7#.
16. After 1. ... Rai +! 2. Kxal, the
White king gets into a pin and
Black wins after 2. ... Nxb3+ 3.
Kb2 Nxa5.
17. An impressive queen sacrifice
leads to mate in two! 1. Qh54!
143
Chess Tactics for Champions
Kxh5 2. Bf7# or 1. ...Kg7 2.
Qf7#.
18. After a simple queen trade, 1.
Qxb6+ Kxb6, White forks and
wins a rook with 2. Bd4+ Ka5 3.
Bxe3.
19. With a pawn sacrifice, White
forces the Black king to d6. 1,
d6+! Kxd6 2. Qc5#.
20. White forces mate in three by
sacrificing a rook to push the
Black king into a pin. 1. Rh8+!
Kxh8 2. Qxh6+ Kg8 3. Qxg7#.
21. After a rook sacrifice, l.Rh8+!
Kxh8, White makes a quiet
move, but Black is helpless
against the upcoming mate
along the h-file. 2. Bxf7 Nd5 3.
Rhl#.
22, First White forces the Black
bishop to g8 by I. Qf8+ Bg8 and
then mates in two; 2. Qf6+! Bxf6
3. Bxfb#.
23. With a pretty queen sacrifice, 1.
... Qh 1 + 1 2. Kxh 1, Black creates
a “killer” double check: 2. ...
Rh4+ 3. Kgl Rhl#.
24. An idea similar to the previous
example: 1. Qxg8+! Kxg8 2.
Bd5+Kh8 3. Rg8#.
25. Black is about to mate on Ъ2. So
White must keep giving checks:
1. Rh8+! Kx.h8 2. Qh5+ Kg8 3.
Qh74 Kf8 4. Qh8#.
144
9
INTERMEDIATE MOVES
An intermediate move is also known as an in-between move, or by its
German name, zwischenzug. The idea is to postpone an obvious move
(such as a recapture or moving a piece away from attack) and instead
play a check or other forcing move. It is perhaps the most commonly
overlooked motif of all among strong players.
Here are a few introductory examples.
In the position below, White is counting on the pin on the d-file with
the rook.
a b c d e f g h
a b c d e I g n
1. Qxe5? If 1. ... dxe5 then 2. Rxd7 and the pin has done its job. But
Black has the in-between move 1. ... Qg4. Now Black has two threats:
checkmate on g2 and the attack on the White queen, since there is no
longer a pin on the d-file.
Some intermediate moves look good but don’t have the intended re-
sult. In the following position, White has just pushed the d-pawn to d5.
Instead of playing the natural 1. ... Qg6> Black decides to play the in-
termediatemove 1. ... Rfe8?.
145
Chess Tactics for Champions
After 2. dxc6 Rxe6 Black would be all right. However, White can win
a piece with 2, Qxe4! Rxe4 3. dxc6.
In the next example, the White rook is attacking Black queen. But
Black does not have to move it!
Instead, Black wins the knight with 1. ... Bxe4 2. Rxf7 (or even
worse is 2. Qxe4 Qxf2+) 2. ... Bxd3.
In the next position, Black carelessly trades rooks with 1. ... Rxcl?.
What is wrong with that move?
Intermediate Moves
abode f 9 h
abode f g h
Well, the problem with that move is that White does not have to re-
capture. Instead, White mates in two moves with 2.Qh7 + KfB 3. Qh8#.
It would have been better for Black to prevent the entrance of the White
queen on the Ringside with l...g6.
1 о о
In the next position White has the opportunity to make a fork with
Lbo. Does it work?
abode f g h
abode f 9 b
Black can try l...Nxc3 hoping for 2,Bxc3 Bxb5. But White has the
much better move 2.Qd3! threatening to mate on h7> After Black stops
that threat by 2...g6, White simply recaptures with З.ВхсЗ and main-
tains the fork on the Black knight and bishop. 2..,Ne4 does not improve
Black’s case either after 3.Qxe4Bxb5 (3...f5 4.Qxe6+) 4.Qh7#.
147
Chess Tactics for Champions
Susans Corner
Baumgartner—Susan Polgar
San Bernardino, 1987
abode f g h
abode I g h
Here I could have played 29. ... Qxe2 right away (allowing 30. Qxc4),
sacrificing an exchange. But there is a much better choice: 29. ... Be5+.
At this point my opponent resigned in view of the following variations:
30. g3 Qxe2 31. Qxc4 Qxf24 32. Khl Nxg3#; or 30. Kgl Qxcl+ 31. Nxcl
Rxcl + 32. Qfl Bh2+ 33. Kxh2 Rxfl; or 30. f4 Bxf4+ 31. Nxf4 Qxcl with
a significant material advantage for Black.
Here are 25 exercises for practicing intermediate moves.
abode t g h
abode i g h
White would like to capture the Black knight on a5 but the bishop on
c3 is in a pin. How should White solve this problem?
148
Intermediate Moves
2
Black is offering to trade queens. How can White win a piece along
the way?
How can White gain a material advantage?
U9
Chess Tactics for Champions
4
abode t g h
abode t g h
White can win the exchange. Can you see how?
abode I g h
8
7
6
5
4
3
2
1
White has a dangerous attack on the kingside. Both bishops are
pointing coward the Black king. After the immediate 1. Bxf6, however,
there is a problem. How can White fix the problem?
150
Intermediate Moves
White can take advantage of the fact that the Black queen is on an
unprotected square. How?
abode < g h
abode ( g h
This position seems about equal. Black is offering to trade knights.
But White can gain serious material advantage. What is the right move?
Chess Tactics for Champions
How can White gain a serious material advantage?
Black has just attacked the White queen. Yet White has a winning
combination. What is the right continuation?
152
Intermediate Moves
10
Black has an extra knight. But with the right continuation White can
win it back. How?
a D c d & f g Л
a b с d e 1 g h
The Black bishop is pinned. After 1. ... ВхсЗ, Black loses the rook on
e3. But with an intermediate check, Black can improve the position of
the rook first.
1Я
Chess Tactics for Champions
12
Again White can take advantage of the fact that the Black queen is
on an unprotected square. What should White play?
13
a b c d e f g It
a b c d e I g h
White has a back-rank problem. What should White do to fix it?
154
Intermediate Moves
14
How can White win material?
White can use the existing pin (on the Black queen) to gam material.
How?
155
Chess Tactics for Champions
16
How can White take advantage of die unfortunate position of the
Black pieces?
It seems that White has two ways to accomplish the same goal. But
only one of them works. Which one?
Intermediate Moves
18
Black has just captured White’s rook on el. The obvious reply would
be 1. Kxel. Does White have a better option?
19
How can White win a piece?
157 й
Chess Tactics for Champions
20
White’s last move was 1. Bxd6., capturing a Black knight. Black can
choose which White bishop to capture or look for something even better.
21
Black made an error by playing 1. ... axb4? in this position. Can you
show why this was a mistake?
Intermediate Moves
22
All four rooks are hanging. How can White come out of this mess
ahead?
23
a b c d e < g h
White’s last move was to capture the Black queen. Does Black have a
better choice than recapturing with 1. ... gxf5?
153
Chess Tactics for Champions
24
White can capture the Black queen but Black will still have a mate-
rial advantage. How can White win the game quickly?
25
White has just played Nc3-b5 attacking the Black queen. How should
Black react?
160
ntermediate Moves
Solutions
1. An intermediate check with t.
Qfl +! (1. Bxe5 dxe5 2. Qxe5 isn’t
good enough because after 2. ...
Nc6 Black is clearly better with
an extra pawn) 1. ... Qf5 (or 1. ...
Kg8 2. Bxa5) 2. Qxf5+! (another
important in-between move!
White would spoil everything
with 2. Bxa5? Why? Because
Black would then win White’s
queen with 2. ... Bd4+ forcing
the king away from protecting
the queen: 3. Kh2 Qxfl.) 2. ...
gxf5 and only now 3. Bxa5.
2. 1. Nd5! Qxb3 2. Nxe7+ An
important intermediate checkl
2. .., Khd 3. ajcbS.
3, White wins a piece with t.
Rxd6lRxc3 2. Rd8 + Kg7 3.
bxc3.
4. White wins the exchange after
1. Ng4! Qxg3 (1. ... Rc6 2.
Nf6 + !) 2. Nxf6+ gxf6 3. hxg3.
5. 1. Bc3 (but not 1. Bxf6 because
of 1. ... Qxe 1 # ) 1. ... Qb6 and
now 2. Bxf6 gxf6 (or 2, ... g6 3.
Qh6) 3. Qxh7#.
6. White wins a bishop by 1. Rxb5l
Qxa3 2. Rb7+ Rf7 3. Rxf7+
Kxf7 4. bxa3.
7. 1. Qb31 and after 1. ... Qxb3 2.
Nxe7+ Khd 3. cxb3.
8. By offering a trade with 1. Qd4!
Qxd4 (1. ... f6 2. Qxe5 fxe5 3.
Rxbd+) 2. Rxb8+ Kg7 3. exd4.
9. 1. Qf4+! Qxf4 and the in-between
move 2. Rxe8+ Kc7 3. gxf4.
10. 1. Qc3! Qxc3 (1. ... f6 2. Qxe5
fxe5 3. Rxh5+) 2. Rxh5+ Kg7 3.
Nxc3 winning a piece.
11. Black wins a piece with 1. ...
Re 1+2. Kc2Bxc3.
12. White wins a piece because
Black’s knight on f6 is on an
unprotected square. l.Ne4!
Qxel (1. ... Nxe4 2. Qxa5) 2.
Nxf6+ Khd 3. Rfxel.
13- 1. f3l (1. Rxb7 is forbidden
because of 1. ... Rcl + . But why
doesn’t 1. h3 serve the same
purpose as 1. f3? Well, if Black
should retreat the knight, then it
would. However, Black would
have the intermediate move; 1.
... Be4 followed by 2. Rel Nf6,
protecting everything just in
time.) 1. ... Ne3 2. Rxb7 and
Black loses a piece and has
nothing left but a couple of
checks (2. ... Rcl+ 3. Kf2 Ndl +
4. Ke2).
14. 1. Nd7! (1. Ng4 is not as good
because of t. ... Rc6) 1. ... Qxg3
(1. ... Rc6 2. Qxc7 Rxc7 3.
Nxb8; 1. ... Qxd7 2. Qxb8+) 2.
Nxf6+ gxf6 3. hxg3.
15. Correct is 1. Rdl! Qxb3 2.
Rxdd+ Kf7 3. axb3.
16. This is a similar idea to position
8. 1. Qc4! Qxc4 2. Rxa8+ Kh7 3.
bxc4.
17. 1. Rc8! (but not 1. Rd5 Qb8) 1.
... Qxe3 2. Rxdd+ Kh7 3.
fxe3.
161
Chess Гап its for Champions
18. Yes, 1. Rxf5l Kg7 (1. ... Rxf5 2.
Bxf5+ Kg7 3. Kxel or 1. ... Rfe8
2. Re5 + Kg7 5. Rxel) 2. Kxel. A
mistake is 1. Kxel, when after 1.
... Re8+ Black is okay. Nor does
1. Bxf5+ Rxf5 2. Rxf5 Re7 do
much for White.
19. 1. Rxd7! Qxcl and the
intermediate check: 2. Rd8+
Re8 3. Rxe8+ Bxe8 4. Nxcl.
20. After I. ... R_xb3? White has no
problems after 2. Be5+ Kf7 3.
fxe4 Bxe4 4. d6. But Black gains
a material advantage after: 1. ...
e3-H 2. КхеЗ Rxb3+ 3. Ke2
exd6.
21. 1. Bxc51 Qxc5 and a discovery
with 2. axb4 Qxc4 3. R_xa8.
22, A brilliant intermediate move: 1.
Bc6+1 Kxc6 (or 1. ... Nxc6 2.
Rxf7+ Кеб 3. Rxc8; 1. ... Rxc6
2. Rxf7) 2. Rh6+ Kd7 3. Rxf7
winning the exchange.
23. Yes, 1. ... Nxel! 2. Qxf7 Nf3#.
Or 2. Kfl Nf3+ 3. Ke2 Nd4+ 4.
Kd3 Nxf5.
24. White goes for the king! 1.
Qg51 Qg6 2. Qxh5+ Kg8 3.
Bxg6 fxg6 4. Qxg6+ Kh8 5.
Qg7#.
25. There is no need to move the
queen away. 1. ... fxg2! 2.
Nxc7 (2. Kxg2 Qd7) 2. ...
Nf4 3. Qb3 Ngxh3+ 4.
Qxh3+ Bxh3 followed by 5. ...
Ne2.
162
PAWN PROMOTION
Pawns are the least valuable pieces at the beginning of the game. But
they have great potential if they can reach the other side of the board
and are promoted to a much stronger piece. Most of the time, you wih
not have a chance to promote a pawn until the endgame, but there are
plenty of exceptions. In this chapter I’ll show you situations where the
pawn is close to promotion but needs some special help or combination
to get through.
Material is balanced. White has a small combination, however,
which either wins a piece or promotes the e-pawn. The solution is 1.
Rxd6! Kxd6 2. e7 and the pawn promotion cannot be stopped.
In the next endgame position, very few pieces remain on the board.
IQ
Chess Tactics for Champions
a b c d e f g h
a b c d e f g h
A.S we know, a lone bishop is not capable of winning all by itself So
in this case the e7 pawn is the crucial piece. White first needs to protect
the pawn with 1. Kd6, threatening to checkmate with 2. Bg6#. When
Black stops that threat with 1. ... Nf4, White strikes from the other side
with 2. Bb5 + , chasing Black’s king away from e8, 2. ... Kf7, after which
White is free to promote the pawn with 3. e8Q+.
In the next example, White’s a-pawn is just one square away from
promotion. But the Black queen is stopping it from behind.
a b c d e f g h
abode f g h
Here White forces the exchange of queens with 1. Qc4+ Qxc4 2.
Nxc4 and now Black cannot prevent the pawn promotion.
In the following simple-looking endgame, Black has a material
advantage, but that is about to change when White finds the right
move ....
164 :
Pawn Promotion
a b c d e f g h
a b c d e f g h
White uses a pawn sacrifice to lock up the diagonal with 1. e5! dxe5
and only now 2, h7. It’s a big mistake to push the h-pawn right away
with 1. h7, allowing 1. ... Bd4, preventing the pawn promotion.
Let’s see how White gets the h-pawn promoted in the next endgame:
With two simple checks: 1. Bc2+ Kd5 2. Bb3 + Kc5 and then 3. Bg8,
cutting off Black’s rook from the queening square h8. If White plays 1.
Bb3 instead, Black can play 1. ... Rh8 and the rook can never be dis-
lodged.
Chess Tactics for Champions
Susans Corner
Van Wely—Susan Polgar
Amsterdam, 1990
abcdefgh
abode r g h
My opponent has just attacked my rook on e2. If I move it, my bishop
on e3 will be in danger. That is why I looked for a way to give up my rook
but promote my c-pawn. 28. ... c2 and White cannot prevent ... Rb8-
bl + . 29. Bxe2 Rbl+ and White resigned.
And here are the 25 practice examples:
1 White to move
a b c d e f g h
a b e d e f g h
166
Pawn Promotion
2. White to move
3. White to move
4. Black to move
abode f g h
157
Chess Tactics for Champions
5. White to move
6. White to move
7. White to move
abode I g h
a b c d e 1 g n
1Б8
Pawn Promotion
9. White to move
10. Black to move
Chess Tactics for Champions
11. White to move
12. White to move
13. Black to move
170
Pawn Promotion
15. White to move
16. Black to move
171
Chess Tactics for Champions
17. White to move
18. White to move
172
Pawn Promotion
20. Black to move
21. White to move
22. Black to move
Chess Tactics for Champions
23. Black to move
24. White to move
25. White to move
174
Pawn Promotion
Solutions
1. With a nice queen sacrifice,
White forces the Black king to
leave the corner, allowing the h-
pawrj to promote with
checkmate: 1. Qg7+! Kxg7 2.
h8Q#.
2. White needs to remove the
guard of the a8 promotion
square: 1, Rxc61 Kxc6 2. a8Q+.
3. Here White uses a discovery to
help the e-pawn promote: 1.
Qxd6! Qxd6 2. e7+ Kh7 3. e8Q.
4. With a nice decoy combination,
Black mates in three moves by
promoting the e-pawn: 1. ...
Qd1 +! 2. Rxdl e2+ 3. Kh 1
exdlQ#.
5. The simple I. c7 does not lead to
any gain after 1. ... Nc6. The
impressive solution is: 1. Rxa7!
Rxa7 2. c7.
6. A queen sacrifice leads to
serious material gain for White:
1. Qxh7! Rxh7 2. gxh7 Ke7 3.
h8Q.
7. After 1. e7 Black only has bad
choices. If 1. ... Qxc3 White has
an intermediate check with 2.
exd8Q + . Also, the Black rook
cannot keep protecting the
queen (on d2) and the
promotion square (e8)
simultaneously.
8. A typical breakthrough
example: 1, Qxc6l dxc6 2. d7.
9. With the help of a pin, and
removing the guard, White
succeeds in promoting the e-
pawn. 1. Rxf6’ Rxf6 2. e8Q.
10. After the immediate pawn push
1. ... h2, White can defend by
retreating the rook to the first
rank. That is why the right
move is to clog up the first rank
with 1. ... Rcl! 2. Kxcl and only
now 2. ... h2.
11. Black threatens checkmate with
... Qf6-fl. But it is White’s turn:
1. Qxf71 Qxf7 2. c7.
12. If Black’s rook were not on d8,
White could promote the d-
pawn with a discovered check.
So White needs to deflect the
rook: 1. Ra8l Rxa8 2. d8Q + .
13. With a rook sacrifice, Black can
promote the b3 pawn: 1. ...
RcI +! 2. Rxcl Rxcl+ 3. Kxcl
bxa2.
14. White gives up the rook, but
promotes the c6 pawn: 1. Rd8 + I
Kxd8 2. cxb7.
15. First, an intermediate check with
1. Qg8+ Kb7 and now a
breakthrough combination: 2.
Qxe61 dxe6 3. d7.
16. White’s pieces are all on the
kingside. After a nice
simplifying combination, the
White king ends up too far away
to catch Black's queenside
pawns. 1. ... Qxf2+! 2. Qxf2
Rxf2+ 3. Kxf2 b3 4. axb3 a3l
(but not 4. ... axb3? 5. Ne4 b2 6.
Nc3) 5. Ne4 a2.
175
Chess Tactics for Champions
17. The goal is to lure the Black
king out of g8: 1. Bvh7 + ! Rxh7
2. Rxh7 Kxh7 3. g8Q+.
18. White Forces checkmate in four
moves: l.Qxa8+! Kxa8 2. b7+
Kb8 3. Re8 + Ka7 4. Ra8# or 2.
... Ka7 3. b8Q+ Ka6 4. Qb7#.
19. Endgames with opposite-color
bishops often end as draws. Here
Black has a nice “petite”
combination to win: 1. ...
Rxfl + ! 2. Rxfl e3 3. Kg2 e2.
20. After 1. ... c2 White stops the
pawn promotion with 2. Kd6.
Black first deflects the White
rook from the c-file: 1. ... Rb7l
2. ВлЬ7 c2.
21. A nice knight sacrifice: 1. Ne7+!
Nxe7 2. exd6 Kf8 3. d7.
22. Black is in check, yet manages to
win! 1. ... Qd3! 2. Rxd3+ exd3
or 2. Qxd3+ exd3 3. Rai Bxg4.
23. 1. ... c4!! This is one of the most
amazing moves I have ever seen!
2. Rb4 (2. Re6 cxb2 3. Rel c3 4.
Rbl c2; 2. Nxc4c2) 2. ... a5 3.
Nxc4 (3. Rxc4 cxb2) 3. ... c2.
This is the only solution to win
the game!
24. After 1. bxc7 cxd4 the c7 pawn is
lost. Here is the right sequence:
1. Rd8 + ! Rxd8 2. bxc7 Rc8 3.
Rdl Rxc7 4. Rd8#. Black
suffered from a back-rank
problem.
25. After queen and rook sacrifices,
White comes out ahead: t. Qxd8!
Rxd8 2. Rxd7+! Rxd7 3. f8Q.
176
11
THE BACK-RANK PROBLEM
The back-rank problem occurs when a king is in danger of being
checkmated on the eighth rank (for Black) or the first rank (for White)
because:
a) in one direction the king’s escape is barred by the edge of the
board;
b) its escape in the other direction is usually blocked by its own
pieces.
We also can use the same term for situations where a king is impris-
oned on the a- or h-file (sometimes called “corridor” mates).
Here are a few basic examples. In some positions., one side can force
checkmate within a couple of moves. In others, the opponent can either
give up a piece (or pieces) or allow the checkmate.
abode f g h
a b c d e f g h
In this position, White has only a minimal material advantage but
can significantly increase it with the right move. 1. g3! Now the Black
177
Chess Taciies for Champions
bishop is attacked. When the bishop moves, for example 1. ... Bg5, then
the f-file is cleared and White mates with 2. Rf8#. If the bishop stays
put, White simply takes it.
In the next example, the Black queen stops the immediate back-rank
checkmate.
abode I g h
a b c d e f g h
So White’s first task is to get rid of the guard by trading queens with
1. Qxe5 dxeo and then 2. Rh8+ and Black cannot avoid checkmate.
In the next position, White needs to find a pretty sacrifice in order to
achieve the goal of creating a back-rank mate.
White forces mate in two with 1. Qh8+! Kxh8 2. RfB#.
In the next example, White uses an unusual pin:
178
The Back-Rank Problem
After 1. Qxd5! Black cannot recapture with 1. ... Bxd5 because the
bishop is pinned: 2. Rc8# on the back rank would follow.
Susan's Corner
Susan Polgar-Yudasin
Munich, 1991
It seems White has to move the queen. But chat is not the only choice-
25. exf6! The White queen cannot be taken because of the weakness of
the back rank. The game continued 25. ... gxJB 26. Qxf6 c3 27. Ne4 c2
28. Qh6 Bg6 29. Nfl5+ Kh8 30. Ne8 1—0. Mace cannot be avoided.
Now let’s practice this motif with the following 25 examples.
179
Chess Tactics for Champions
1. White to move
2. White to move
3. White to move
180
The Back-Rank Problem
4. White to move
5. White to move
6. White to move
181
Chess Tactics for Champions
8. White to move
9. White to move
182
The Back-Rank Problem
10. White to move
11. Black to move
12. White to move
183
Chess Tactics for Champions
13. Black to move
14. White to move
15. Black to move
184
The Back-Rank Problem
16. Black to move
17. Black to move
IB. Black to move
a b c d e f g h
a b c d e I g h
185
Chess Tactics for Champions
19. White to move
20. Black to move
21. Black to move
186
The Back-Rank Problem
22. White to move
23. White to move
187
Chess Tactics for Champions
25. Black to move
a b c d e f g h
a b c d e f g h
188
The Back-Rank Problem
Solutions
1. White needs to deflect Black’s
bishop from the f8 square. 1.
Rd8+!Bxd8 2. Qf8#,
2. White forces mate in two: 1.
Rxb8+! Kxb8 2. Qd8#<
3. Starting with a nice queen
sacrifice, White mates in three:
1. Qxc7+I Rxc7 2. Rxd8+ Rc8 3.
Rcxc8#.
4. A quiet move by White and
Black cannot avoid Losing the
queen or getting mated on the
back rank. 1. Ne7l Qxe7 2.
Rc8+. After 1.... g6 2. Rc8 pins
the Black queen.
5. White wins a rook or
checkmates. 1. Qxb8! Rxb8 2.
Re8+ Rxe8 3. Rxe8#.
6. White sacrifices the queen and
checkmates in just two moves. 1.
Qxf8+! Kxf8 2, Re8#. On the
other hand, 1. Re8 does not work
because Black can trade queens
with 1. ... Qc6+.
7. Black gives up the rook on the
d-file to open the e-file! 1. ...
Rdl + ! 2. Nxdl Rel#.
8. After 1. Qb5l Black either has to
give up the queen or allow a
back-rank mate. 1. ... Qxb5 2.
Rxd8+.
9. White makes a pretty double
attack with: 1. Qa3l. Now Black’s
rook is under attack and also
there is a threat of 2. Qf8#.
After 1. ... Rxa3 the game ends
with 2. Rxc8#.
10, Here White needs to remove the
guard of the c8 square. 1. e8Q+!
Bxe8 2. Rc8#.
11. After 1. ... Qhl + White can
defend by blocking the check
with 2. Qgl. The correct
solution is: 1. ... Qxf4+1 2. Qxf4
Rhl#.
12. With the quiet 1. Re 1, White
stops the Black king from
running away, and threatens 2.
Rh8#. After 1. ... Kg8 2. Re8#
ends the game.
13. Black has to watch out, as after
1. ... Qxd6? White captures 2.
Qxc8#. But with a surprising
quite move, 1. ... Re8l,
exploiting White’s back-
rank problem, Black wins a
piece. 2. h3 Qxd6 or 2. Qxd7
Rel#.
14. Using a pin on the g-file, White
deflects Black’s rook. 1. Rxf6!
Rxf6 2. Qb84- and checkmate on
the following move.
15. White offers to trade queens, but
Black can ignore this by 1. ...
Rd8! as after 2. Qxe7 comes
Rxdl#.
16. Black wins a piece thanks to
White’s lack of defense on the
back rank. 1. ... Rxc3! 2. bxc3
Qbl+.
17. Black’s bishop is under attack,
but it doesn’t have to be moved.
1. ... Rd8! 2. Nxc6 Rd! + or 2.
Nf3 Rd! + 3. Nel Qxe5.
3 IM
Chess Tactics for Champions
18. Surprisingly, Black does not have
to move the queen: 1. ,.. Rxe2l
and if 2. Rxb6 Ret#.
19. White forces a nice checkmate
in three with: 1. Qxc8+1 Kxc8 2.
Ba6+ Kb8 3. Rd8#.
20. Black takes advantage of the
weakness of the side of the
board (the а-file) instead of the
back rank. This is practically
identical to the back-rank
problem. 1. ... Qbl + I 2. Rxbl
Nxb3+- 3. axbS Ra6#.
21. With two deflections, Black
achieves the goal; 1. ... Rxf4! 2.
Qxf4 Qxe2l 3. Rxe2 Rbl+.
22. White forces mate in four: 1.
Bxc7+! RxC7 2. Rxd8+ Rc8 3.
Ra8+! Kxa8 4. Rxc8#.
23. White starts with a pretty queen
sacrifice, throws in a rook, and
mates in four moves: 1. Qxh7+!
Nxh7 2. Rd84-Nf8 3. Rh8-H
Kxh8 4. Rxf8#.
24. After a nice exchange sacrifice,
1. Rxd8 + I Rxd8, White is able
to draw a mating net with 2.
Nf6.
25. Black forces checkmate in
four: 1. ... Qxdl +1 2. Nxd 1
Nf3+! 3. Qxf3 Rel+ 4. Bfl
Rxfl#.
IM
DESTROYING
THE CASTLED KING'S DEFENSES
It is commonly known that it is dangerous to keep the king in the mid-
dle of the board, and I always recommend to my students that they cas-
tle early. In this chapter we shall see, however, that even after castling
there may be dangers.
Let’s walk through a few typical examples.
In our first position, White, by entering the seventh rank with the
rook, puts Black face to face with an unstoppable checkmate.
After 1. Rd7 Black is helpless against 2. Rxa7#.
In the next example, it is Black’s turn to move.
191
Chess Taeties for Champions
With a rook sacrifice, Black forces mate in two. 1. ... Rxa3+! 2. bxa3
Qxa3#.
In the next position, the two sides have castled on opposite sides. As
so often happens in such situations, it is a race to see who checkmates
first.
abode f g h
e b c d e I g h
White brings the queen closer to the opponent’s king with 1. Qh4,
forcing further weakening of the Black kingside. After 1. ... h5 comes a
pretty finish: 2. Qxh5+! gxh5 3.Rxh5#
In the next ease, White is ready for the sacrifice.
192
Destroying the Castled King's Defenses
1. Rxg7! Bxg7. Or 1. ... Nxg7 2. Qxh6+ Kg8 3. Qh7#. Now a quiet
but killing move: 2. Qf5 Ng5 3. Rx.g5! Qxg5 4. Qh7#.
In this example, White has a brilliant idea.
abode t g h
White has a beautiful queen sacrifice to force checkmate. 1. Qg6!
£xg6 2. Nxg6+! hxg6 3* Rh3#.
193
Chess Tactics for Champions
Susans Comer
1 Horvath—Susan Polgar
Hungary, 1981
a b c d e 1 g h
a b c d e < g h
Can you see how I ended the game quickly? After my next move, 22.
... Bxg2+1, my opponent resigned in view of 23. Kxg2 QC3#.
Here are 25 positions where you can practice attacking the castled
king.
1. White to move
Destroying the Castled King’s Defenses
2. White to move
3. White to move
a b c d e I g h
a b c d e 1 g h
4. White to move
195
Chess Tactics for Champions
5. White to move
6. White to move
7 Black to move
Destroying the Castled Kings Defenses
8. White to move
a b c <J e f g h
9. White to move
10. White to move
197
Chess Tactics for Champions
11. White to move
12. White to move
Abode t g h
abode f g h
13. White to move
19S
Destroying the Castled King's Defenses
14. White to move
15. White to move
15. White to move
abode f g h
a b c d e f g h
199
Chess Tactics for Champions
17. White to move
18. White to move
abode f g h
a b c d a I g h
19. White to move
200
Destroying the Castled King's Defenses
20. White to move
21. White to move
22. White to move
201
ft 0
II »
Chess Tactics for Champions
23. White to move
24. White to move
25. Black to move
202
Destroying the Castled King's Defenses
Solutions
1. With a rook sacrifice White
opens the h - file for a checkmate:
1. Rxh7 + I Kxh7 2. Qh5#.
2. White uses a pin (on the g7
pawn) to force a weakness: 1. f6
g6, and then 2. Qh6 puts Black
in front of an unsolvable
problem—stopping 3. Qg7#-
3. White’s bishop on Г6 rules. If
White could get a rook to h8 the
game would be over. After a
rook sacrifice White achieves
that: 1. Rxh51 gxh5 2.
Rxh5.
4. Here the idea is similar to the
previous example; a nice
cooperation between the White
rook and bishop: 1. Qxa7+! Kxa7
2. axb64 Kb8 3. Ra8#.
5. In this example, White
checkmates in two moves
demonstrating the optimal
power of the pair of bishops: 1.
Qxc.6 + 1 bxc6 2. Ba6#.
6, Black has an extra knight, but
White has a winning
combination: 1. Rxh7+! Kxh7 2.
Qxf7+ Kh6 5. Rh 1 4-.
7. Black wins with a very beautiful
queen move: 1. ... Qa3l. If
White captures the queen, 2.
bxa3, Black checkmates with a
discovered check, 2. ... bxa3#. If
White captures the bishop, 2.
ЬхсЗ, checkmate follows in two
moves: 2. ... bxc3+ 3. Kai
Qb2#.
8. If you remember position #2,
finding the solution here should
be easy: J. h6 g6 2. Qf6.
9. Here a simple quiet move,
l.Qe4, decides the game because
Black’s c7 pawn is pinned.
10. This is a perfect demonstration
of the successful collaboration of
White’s pair of bishops and
knight: 1. Qxb5! gxh5 2. Bxh7#.
Instead, Black could settle for
""only” losing a knight after 1.
... Bxg5 2. Qxg5.
11. White wins by creating a double
attack: 1. Qh5 h6 2. Qxf74-,
12. Checkmate in four! (. Rxg7+!
Kxg7 2. Qg5+ Kh8 3. Qf6 + Kg8
4. RgL#.
13. Black threatens to mate in one,
but with four forceful moves
White gets there first: I. Rxh7+l
Kxh7 2. Qh5+ Kg8 3. Qf7+ Kh8
4. Qxg7#. Not accepting the
sacrifice by 1. ... Kg8 ends the
game even quicker: 2. Rhxg7+
Kh8 (or 2. ... Kf8 3. Raf7#) 3.
Qh5#.
14. With a standard rook sacrifice
White forces mate in three or
four moves: I. Rxg6+! fxgb 2.
Qxg6+ Kh8 3. RC8#. Black can
only delay the end by one move
by declining the sacrifice. 1. ..,
Kh8 2. Rh6+ Kg8 3. Qh7+ Kf8
4. Qxf7# or 1. ... Kf8 2.Rxf7-H
Kxf7 (2. ... Ke8 3. Rg8+ Kxf7 4.
Qg6ft) 3. Qf5+ Ke8 4. Rg8#.
203
Chess Tactics for Champions
.15. Here we see the most typical
bishop sacrifice that arises in the
French Defense. 1. Bxh7+!
Kxh7 (after 1. ... Kh8 2. Qh5
Black is no better) 2. Qh5+ I(g8
3. Ng5 (now White threatens
mate with 4. Qh7) 3. ... Rd8
(making room for the king to
run; the only other option was to
give up the queen with 3. ...
Qxg5 4. Qxg5) 4. Qh7 + Kf8 and
5. Qh8#.
16. Here White has a decisive
winning combination, thanks to
the pin along the a2-g8
diagonal. J. Rxg6l hxg6 (if 1. ...
Bf6 2. Rhgl hxg6 3. Qxg6) 2.
Qxg6 Bf6 3. Bxg7 Bxg7 and
Black is helpless after 4. Rg 1.
17. In this brilliant combination,
White puts the queen under
double attack: 1. Qg61l,
threatening 2. Qg7#. After 1. ...
Rg8 White offers the queen a
second time with 2. Qxh7+!
Kxh7 followed by 3. Rh3#. If 1.
... hxg6 2. Rh3# or 1. ... fxg6
2. Nxg6-H hxg6 3. Rh3l-
followed hy checkmate on the
next move.
18. Seeing a White pawn on f6 is a
hint to try to get the queen co g7
with mate. This is how White
gets there: 1. Rxh.71 Kxh7 (if 1.
... Qxd3 2. Rg7+ Kh8 3. Qh4#).
Now White gains the important
tempo (gain of time) by giving
check: 2. Qh4+ Kg8 and 3. Qh6
Qxd3 (or any other Black
response) 4. Qg7#.
19. White has an obvious attack
against the Black king. Though
down a rook, White can build an
amazing mating net just in time:
1. Rf5! (threatening 2. Qxh6-H!
Kxh6 5. Rho#) 1. ... exfo 2.
Nxf5 Qxc3 3. Qxh6+ Kg8 4.
Qg7#.
20. While’s knight on h6 is hanging.
If the knight moves away, Black
will be safe. But White strikes
immediately: 1. Rxg7! Kxg7 2.
Qg5+Kh8 3. Qf6# or 2. ...Kf8
3. Qg8+ Ke7 4. Qxf7#.
21. With a pretty queen sacrifice,
White forces mate in three: 1.
Qxh6-H gxh6 2. Rxh6-r Kg7 3.
Nf5#.
22. Black is a pawn up. Unless
White shows something
immediate, White is in trouble.
White can take advantage of the
lack of coordination among the
Black pieces. 1. Rxf6l gxf6 2.
Qg4+ I<h8 and now an
important discovery; 3. d5! Qxd5
4. Bxf6#.
23. White destroys Black’s defense
on the kingside with: 1. Bxg6!
hxg6 2. Qxg6+ Ng7 followed by
3. Rf7 Bf8 and now either 4.
Ne4 or 4. Rdxd7 leads to a
winning position. 1. ... Nf6 does
not help, as White responds
with 2. Rxf6l Bxf6 3. Bxe8+
Kh8 4. Rxd7.
24. This is the famous Lasker
combination, where White
sacrifices both bishops to open
the g- and h-files in front of
204
Destroying the Castled King's Delenses
Black’s king; 1, Bxh7+! Kxh7
(after 1. ... Kh8 2. Qh5 Black
cannot escape with 2. ... f6
because of 5. Bg6+ Kg8 4.
Qh7#) 2. Qh5 + Kg8 3- Bxg7!
Kxg7 (or 3. ... f5 4. Be5 R.f6 5.
Rf3) 4. Qg4+ Kh7 (4. ... Kf6 5
Qg5#) and White brings the
rook into the game with 5. Rf3,
deciding the issue.
25. Black forces checkmate in three
moves by opening the h-file. 1.
... Rxh2+! 2. Kxh2 Qh4+ 3.
Kgl Ne2#.
205
KING CHASE
The king is the most vulnerable piece in chess. As a rule, we usually try
to hide the king in the corner for safety and only bring it back out in the
endgame. Sometimes there are opportunities to exploit the lack of suf-
ficient defense around the enemy king. In this chapter we’ll see exam-
ples of how to chase a king to checkmate.
Kings can get in even more trouble if the queens are still on the
board. On the defensive side, you should try as much as possible to avoid
letting your king be chased, as the following positions will demonstrate.
Here White has full control of the f-file and capitalizes on it.
The solution is 1. RC8 + Kg7 2. Rff7+ Kh6 and 3. Rxh7#
Tn the next endgame, material is balanced but the Black king is not
safe.
206
King Chase
a b c d e f g h
abode f g b
White quickly forces promotion of the d6 pawn: 1. Bc6+ Kd8 2.
Bb6+ Kc8 and now 3. d7+ Kb8 4. d8Q#.
In the next position, White again chases the Black king toward the
other side of the board.
a b c d e ( g h
a b c d e I g h
Black is suffering because the king is stuck in the middle of the
board. 1. Qf7+ Kd6 2. Nc4+ Kc5 3. Qd54 Kb4 4. a3+ Ka4 5. Nc3#.
Here are two short games that end with king chases.
Greco-Unknown
Europe, 1620
1. e4 e5 2. Nf3 fb?
This is a common, yet inferior, move played by beginners to protect
the pawn on e5.
3. Nxe5
White sacrifices the knight to open the position in front of the Black
king and gets ready for the chase.
207
Chess Tactics for Champions
3. ... fxe5 4. Qh5+ Ke7
After 4. ... g6 the White queen just captures the pawn on e5, forking
the Black king and rook.
5. Qxe5+ КГ7
6. Bc4+ Kg6
A more stubborn defense is 6. ... d5, but White gets a winning posi-
tion after 7. Bxd5+ Kg6 8. h4 h5 9. Bxb7! and if 9. ... Bxb7 10. Qf5+.
7. Qf5+ Kh.6 11. d4+ discovered check. 8. ... g5 9. h4
Using the existing pin on the cl-h6 diagonal and also opening the h-
file for the rook. Black is completely lost.
9. ... Kg7 10. Qf7+ Kh6 11. hxg5#.
In the next game, White uses the Smith-Morra Gambit of the Sicil-
ian Defense.
Motwani—Rockwell
Dundee, 1974
1. e4 c5 2. d4 cxd4 3- NC3 d6 4. Bc4 h6
A waste of time.
5. c3 dxc3?
This is already a serious mistake.
208
King Chase
a b c d e f g h
a b c d e f g h
б. ВкГ7-Н
A. pretty combination. It is not a good idea for Black to accept the sac-
rifice, as we shall see.
6. ... Kxf7
Better is 6. ... Kd7, but White has a clearly superior position anyway
after the simple 7. Nxc3, as the Black king will never be able to castle.
7. Ne54-
Here comes the first of many checks exploiting the pin on Black's d6-
pawn.
7. ... Kf6
After 7. ... dxe5 Black loses the queen by 8. Qxd8. If 7. ... Ke8 8.
Qh5 + , or 7. ... Кеб leads to a king-chase as in the game by 8. Qd5+ KF6
9. Qf7+ Kxe5 10. Bf4+ Kxe4 11. Nxc3+ Kd3 12. 0-0-0#.
8. Qf3+ Кхеб
Black wins another piece but the king goes more and more into
White’s territory.
9. Qf4+ Kd4
If 9. ... Кеб the game ends with 10. Qf5#.
10. Be3+ Kd3
White mates after 10. ... Kc4 by 11. Na3+ ICb4 12. eo+ Ka5 13. b4+
Ka4 14. Qc4 Веб 15. Qb6 + Kxa3 16. Bel#.
11. Na3
Preparing the participation of the rook on al.
11. ... c2
If Black plays 11. ... cxb2 12. Rdl+ Kc3 13. Bd2+ Rd 4 14. Bb4#.
12, 0-0
209
Chess Tactics for Champions
White finally completes development. All of White’s pieces are ready
to attack Black’s wandering king!
12. ... h5
White’s answer would be similar against other Black responses.
13. Radl + cxdlQ 14. Rxdl+ Ke2 15. Qf3#.
a b c d e f g h
Susans Corner
Susan Polgar—Voiska
Budapest, 1992
This game is from the 1992 Women’s World Rapid Championship,
which I won. Here I found a nice combination to force the Black king
out of safety.
30. Rxffi! gxffi 31. Qh7+ Kf8 32. Qh8+ Ke7
Now a second rook sacrifice!
21И
King Chase
33. Rxe6+! fxe6 34. Qg7+ Ke8
Or 34. ... Kd6 35. Ne4#; or 34. ... Kd8 35. Qf8#.
35. Qg8+ Ke7 36. Qf7+ and Black resigned, as checkmate, is un-
avoidable on the next move.
Now let’s practice chasing the king!
1. White to move
a b c d e fgh
a b c d e f 9 h
2. Black to move
abode < g h
a b c d e f g h
211
Chess Tactics tor Champions
3. White to move
4. White to move
5. White to move
» 212
King Chase
6. Black to move
7. White to move
8. White to move
213 '
Chess Tactics for Champions
9. Black to move
TO. White to move
11. White to move
214
King Chase
12. White to move
13. White to move
14. White to move
215
Chess Tactics for Champions
15. White to move
1Б. White to move
17. White to move
216
King Chase
18. White to move
19. White to move
20. White to move
217
Chess Tactics for Champions
21. Black to move
22. Black to move
23. Black to move
a b c d e 1 g h
a b c d e I g h
21B
King Chase
24. White to move
25. White to move
219
Chess Tactics for Champions
Solutions
1. The Black king is already out in
the “wild”; only two more
checks and the chase is over; 1.
Qf5+ Kh4 2. Qh5#.
2, Black has just sacrificed the
queen to set up a forced mate in
three: 1. ... 1’2+ 2. Ke2 Bg4+ 3.
Kd3 Nb4#.
3. Here White needs to sacrifice a
bishop to lure Black’s king out of
its safe spot. 1. Bh6 + ! Kxh6 2.
Qf8+ K.g5 3. h4#. Also I. ...
Kh8 results in checkmate after
2. Qf8+ Ng8 3. Qg7#.
4. White has given up the queen to
achieve this position. Now, after
two checks, the third one ends the
game; 1. Bc4+ Kf5 2. g4+ Kg6 (or
2. ... Ke4 3. Nd2#) 3. Nh4#.
5. Black has an extra bishop but
cannot avoid getting
checkmated: 1. Qh7+ Kf8 2.
Qh8+ Ke7 3. Qxg7#.
6. The Black knight on e4 does not
allow the White king to retreat
via g3. So, after 1. ... Rf4+ the
only response is 2. Kh5 and then
checkmate in two follows with 2.
... g6+ 3. Kh6 Rh4#.
7. This is the famous “ladder
mate” when the two rooks work
together perfectly; 1. Rf2+ Kg5
2. Rgl+ Kh4 3. Rh2#.
8, Black is a bishop and a pawn
ahead, but White can force
checkmate in three by t. Rf8+
Kg7 2. Rg8+ Kf6 and 3. Nd5#.
9. Black’s rook on c2 is under
attack, but there’s no need co
worry: 1. ... Qel +! 2. ICxc2
Qcl + 3. Kd3 Qd2#.
10. Black’s extra rook does not help
save the game. 1. Qg7+ Кеб (or
1. ... Ke8 2. Qg8#) 2. Qf6+ Kd5
and a pawn mates with 3. c4#.
11. After two simple checks, 1.
Rgl + Kf8 2. Bb4+ Ke8, the
third one ends the game; 3.
Rg8#.
12. We see here the optimal
harmony among the White
pieces, resulting in checkmate:
1. Bb4+ Kg8 2. Nf6+ Kh8 3.
Rxh7#.
13. When a king wanders around in
the middle of the board with
queens still in play, the result is
often like this; 1. Be3+ Kb4 2.
Qb3+ Ka5 3. Qxbo#.
14. After the obvious checks, Black
can only choose whether to get
mated by White’s knight or
queen: 1. Qf5+ Kf7 2. Qxf6+
and either 2. ... Kg8 3. Ne7# or
2. ... Ke8 3. Qe7#.
15. Black has three extra pieces, yet
White forces checkmate in
three: 1. Qh7+ Kf8 2. Qh8+ Ke7
3. Qf6#.
16. White continues the chase with
1. Ne5+ Kb5 2. Bc4+ Ka5 3.
Bb4+ Ka4 4. axb3#.
17. A good demonstration of the
power of a queen and rook
220
King Chase
working together. 1. Qh7+ Kf6 2.
Rh6+ Kg5 3. Qg6+ Kf4 4. Rh4#.
18. White can capture Black’s
knight on g5, but there is a
much better choice; 1. Qh8+ Kf7
2. Qg74 Кеб (2. ... Ke8 3.
Qg8#) 3. Qf6+ Kd5 4. c4#.
19. White wins by a pretty queen
sacrifice based on a double check
and chasing Black’s king right to
the middle of the board; 1.
Qxc6-H Кхсб 2. Ne5+ Kc5 3.
Nd3+ Kd4 4. c3#.
20. White just needs to keep chasing
Black’s king until... 1. Bd3+
Kh5 2. Rh5+ Kg4 3. f34 Kf4,
and the final check comes; 4.
g'3#.
21. The two Black rooks will not
leave White’s king in peace; 1.
... R8a2+ 2. Kc3 Rcl + 3. Kd4
(or 3. Kb4 c5#) 3. ... Rd2+ 4.
Bd3 Rxd3#.
22. After the natural 1. ... Qxf2+ 2.
Kdl Black has a pretty queen
sacrifice to force checkmate in
three; 2. ... Qf 1 +! 3. Rxf I
Rxfl + 4. Kc2 Bd3#.
23. White threatens checkmate in
one, but it is Black’s turn to start
checking: 1. ... Qdl + 2. Kc3
Qc2+ 3. Kb4 Qb3+ 4. Ka5 Qb5#.
24. By sacrificing the queen White
forces checkmate in five moves
or fewer; 1. Qh6 + ! Kxh6 2.
B.1144 Kg5 and now a rook
sacrifice: 3. f4+ Kxh4 4. g34
Kh3 5. Bfl#.
25. After a few simple checks, 1.
Rf8+ Kb7 2. Rb84- Ka6 3. b5+
cxb5 4. axb5+ Kao, White mates
with 5. Bel#.
221
MIXED CHECKMATES IN TWO MOVES
In this chapter you can practice solving puzzles in which the task is lo
checkmate in two moves. In some cases, you check first and then check-
mate on the second move. In others, you need to sacrifice something on
the first move in order to set up the mate. In various cases, you need to
make a qmet move to threaten an unstoppable mate. Here are 25 prob-
lems for you to enjoy.
1. White to move
222
Mixed Checkmates in Two Moves
2. White to move
3. White to move
4. White to move
223
Chess Tactics for Champions
5. White to move
6. White to move
224
Mixed Checkmates in Two Moves
8. White to move
9. White to move
10. White to move
225
Chess Tactics edr Champions
11. Black to move
12. White to move
13. Black to move
226
Mixed Checkmates in Two Moves
14. White to move
15. White to move
15. White to move
227
[hess Tactics for Champions
17. White to move
18. White to move
19. White to move
220
Mixed Checkmates in Two Moves
20. White to move
21. White to move
22. White to move
a b c d e f g h
a b c d e 1 g h
229
Chess Tactics fdh Champions
2Э. White to move
24. White to move
25. White to move
230
Mixed Checkmates in Two Moves
Solutions
1. 1. Qxh6+! gxh6 2. Nf7#.
2. 1, Bb6+! axb6 2. Re8#.
3. t. Nb5+l cxb5 2, Nb7#.
4. 1. Qxh7-H Kxh7 2. Rh5#.
5. 1. Nh6+ K_h8 2. g7#.
6. 1. Qg8-H Nxg8 2. R18#.
7. 1. Qf7+! Nxf7 2. exf7#.
8. t. Qxe5 + I dxe5 2, Ba3#.
9. 1.RB1 + Kg6 2. Rh6#.
10. 1. Qxb8+! Rxb8 (or 1. ... Kd7)
2. Rb5#.
11. 1. ... Qf2+! 2. Rxf2Rxf2#.
12. 1. Qc7+! Nxc7 2. Bxd4#.
13. 1. ... Qxg5 + ! 2. fxg5 R_xg5#.
14. 1. Ng6+1 hxg6 2. hxg5#.
15. 1. Nxf6+ Kh8 2. Rxh7#.
16. 1. a5+ Kb5 2. Qc4#.
17. 1. Qxa7+I Nxa7 2. Rxa7#.
18. 1. Qb8+1 Rxb8 2. Nc7#.
19. 1. f6 Rxd6 2. Rh8#.
20. 1. Qe8+ Rd8 2. d7#.
21. 1. d5+ Ke5 2. Rc4#.
22. 1. Rg7+ Kxf6((. ... Ke8 2.
Qe3#) 2. Qd4-#.
23. 1. Rf8+ Kg7 2. Ne6#.
24. 1. Ng5~H Qxg5 2. Qe8#.
25. !.Rc5 + !bxc5 2. Bc7#.
231
15
MIXED CHECKMATES IN THREE MOVES
As in the previous chapter, here the goal is to find the fastest way to
checkmate, which in these puzzles will be three moves or fewer.
L White to move
2. White to move
a b c d e f g h
a b c d e f g h
232
Mixed Checkmates in Three Moves
3. White to move
4. White to move
5. White to move
233
Chess Tactics for Champions
6. White to move
Z White to move
8. White to move
234
Mixed Checkmates in Three Moves
9. White to move
10. White to move
11. White to move
2»
Chess Tactics for Champions
12. White tn move
13. White to move
14. White to move
236
Mixed Checkmates in Three Moves
15. White to move
16. White to move
1Z Black to move
a b с c e f g h
a b c d e I g b
237
Chess Taciics fdr Champions
?
3
18. White to move
19. White to move
20. White to move
238
Mixed Checkmates in Three Moves
21. White to move
22. White to move
23. White to move
239
Chess Tactics for Champions
24. White to move
25. White to move
abode I g h
a b c d e f g h
240
Mixed Checkmates in Three Moves
Solutions
1.1. Ne8-H Rxe8 2. R.xh7+ Kf8 (or
2. ... Kf6) 3.'Rxf7#.
2, 1. Kf7 + ! Qxb6 2. Ng4+’hxg4 3.
Qhl#.
3. 1. Qxg7-H Kxg7 2. Bb2-b Kg8 3.
Bxh7#.
4. 1. Qxa6+! Ьхаб 2. Bd5+ Ka7 3.
ВЬб#.
5. 1. Nxg6+! hxg6 2. Rf8-r Kh7 3.
Rb2#.
6. 1. Rxh7+1 Kxh7 (or 1. ... Kg8 2.
Ne7+ Kxh7 3. Qh5ft) 2. Qh5+
Kg8 3. Ne7#.
7. I. Qxd2-H Bxd2 2. Rd4-H exd4
3. e4#.
8. 1. Bf7+! Nxf7 2. Qxc6+ Kd8 3.
Nxf7#.
9. 1. b7+ Rxb7 2. Qa6+ Ra7 3.
Qxa7#.
10. 1. Rb8 + ! Kxb8 2. Rbl+ Ka8 3.
Bc6# or 1. ... Rxb8 2. Bc64 Rb7
3. Re8#.
11. 1. Nb5-H Rxb5 2. Rc4+! Kxc4 3.
Re4#.
12. 1. ВЪЗ-Н axb5 2. Nc7+! Rxc7 3.
Rd8#.
13. 1. Nb5+ Кеб 2. Qd5-H Nxd5 3.
exd5#.
14. 1. Qh6 -H Nxh6 2. Bxh6+ Kg8 3.
f7#.
15. 1. c5+ Kg6 2. f5+ Kxh7 3.
Rh2#.
16. 1. Rh5+! gxb5 2. Qf5+ Kh4 3.
Qxh5#.
17. 1. ... Rxh3+! 2. gxh3 QT24 3.
Kb 1 Bd5#.
18. 1.... Qd2 + ! 2. Bxd2 Rf2+ 3.
Qg2 Rfxg2#.
19. 1. Ne7+ Kh8 2. Qxh7+! Kxh7 3.
Bg6#.
20. 1. Bg6+ Kg7 2. Qh7+ Kf8 3.
Qxf7#.
21. l.Bc4+Kh8(orl. ...Kf8 2.
Qf7#) 2. Qxh7 + ! Kxh7 3. Rh3#.
22. 1. Qxg74! Kxg7 2. Rg3+ Kh6 3.
Bel#.
23. 1. Bh7+ 1018 2. Bg6+ Kg8 3.
Bf7#.
24. 1. Bf8+ Bh5 2. Qxh5+! gxh5 3.
Rh6#.
25. 1. Rh6+! gxh6 2. Rg8+ Kh7 3.
Nf6#.
241
16
MIXED CHECKMATES IN FOUR MOVES
In this chapter you have the opportunity to practice a slightly more dif-
ficult task. Try to see four moves ahead to figure out checkmates.
Twenty-five problems appear below for your solving pleasure.
L White to move
a b c d e < g h
a b c d e f g h
242
Mixed Checkmates in Four Moves
2. Black to move
3. White to move
4. Black to move
243
Chess Tactics for Champions
5. White to move
Б. White to move
7 White to move
244
Mixed Checkmates in Four Moves
8. White to move
9. White to move
10. Black to move
245
Chess Tactics for Champions
11. White to move
12. White to move
13. White to move
246
Mixed Checkmates in Four Moves
14. White to move
15. White to move
16. White to move
247
Chess Tactics for Champions
17 White to move
18. White to move
19. White to move
248
Mixed Checkmates in Four Moves
20. White to move
21. White to move
22. Black to move
249
Chess Tactics for Champions
23. White to move
24. White to move
25. White to move
2W
Mixed Checkmates in Four Moves
Solutions
1. 1. Qh7 + ! Kxh7 2. Rxg74 Kh8 3.
Rh7 + Kg8 4. Rbg7#.
2. 1. ... Qe 1 + 2. Kxe 1 Bg34 3. К fl
Rdl-H 4. Bxdl Rel#.
3. 1. Rd8+ Kb7 2. Rb84! Kxh8 3.
Qh6 + Bh7 4. Qxg7#.
4. 1. ... Rxal4! 2. Kxal Rfl + 3.
Ka2 axb3 + (or 3. ... Bxb5+) 4.
KaSRal#.
5. I. Ne7+! Bxe7 2. Qxh7+! Kxh7
3. Rh5+ Kg8 4. Rh8#.
6. I. Rd8 + ! Rxd8 (or 1. ... Qc8 2.
Na64 Ka8 3. Qb8+! Qxb8 4.
Nc7#) 2. Na6 + Ka8 3. Qb8+!
Rxb8 4. Nc7#.
7. 1. Bg7 + I Rxg7 2. Qf8+ RgB 3.
Ng6-H hxgb 4. Qb6#.
8. 1. Ne7-f- Kh8 2. Qg8 + ! Rxg8 3.
Nxg6+ hxg6 4. Rh4#.
9. 1. Qxe5 + ! dxe5 2. Bxe5+ f6 3.
Bxf6+! RxC6 4. Rg8#.
10. 1. ... Nf5+ 2. Ke2 Rd2+ 3. Kf 1
Rd l-i- 4. Kg2Rgl#. If 4. Ke2
Rel#.
11. 1. N’c6+ Kb 7 (or J. ... Kc8 2.
Qf8+ Kd7 3. Ne5#) 2. Qa74- Kc8
5. Qb84 Kd7 4. Qd8#.
12. 1. Ra6-H bxa6 2. Qc6+ Ka7 3.
Qc7+ Ka8 4. Bc6#.
13. I. Qf6+ Kg8 2. Rg3+ Kf8 3.
Qh6+ Ke7 4. Qd6#.
14. 1. Qxh7 + ! Kxh7 2. Ng6+! Kxg6
(2. ... Kg8 3. Rh8#) 3. f5+ Kg5
4. Nf3#.
15. 1. Qxh7-H Kxh7 2. Rh3-f- Kg7 3.
Bh6+-КВ7 4. B£8#.
16. 1. Ba74 Ka8 2. Bb6+ Kb8 3.
Qa7+ Kc8 4. Qxc7#.
17. 1. Rg7+ Kh8 2. Rh7-f- Kg8 3.
Rcg7+ Kf8 4. Rh8#.
18. 1. Qe8+ Kh7 2. Qh8+J Kxh8 (or
2. ... Kg6 3. Qxh5+ Kf6 4.
Rd6#) 3. Rxh5+ Kg8 4. Ra8#.
19. 1. Bb5+ Kd8 2. Rd7+ Kc8 (or 2.
... Ke8 Nd6#) 3. Nd6 Kb8 4.
Rb7#.
20. 1. Qxg7 + 1 Kxg7 2. h6+ Kg8 3.
Nf6+ Kh8 4. Rxi'8#.
21. 1. Rh8-H Kxh8 2. Qh6+ Kg8 3.
Nxf6+ Kf7 4. Qxg7#.
22. 1. ... Nf3+ 2. Kfl Nxh2+ 3. Ke I
№4 4. Kfl Rhl#.
23. 1. Qxg7+! Rxg7 2. Rxg74 Nxg7
3. Nf6+ Kb8 4. Nxf7#.
24. 1. Rxa 7-H Kxa7 2. Qa5+ Kb7 3.
Ba6+ Ka7 4. Bc8#.
25. 1. Kxe4+ Kh7 2. Kf4+ Kh6 3.
g5+ Kh5 4. g4#.
251
TACTICS TO
SAVE THE GAME
17
SAME-SAVING COMBINATIONS
Ideally, we always want to avoid difficult positions. But sometimes
things don’t work out as we plan them. In this chapter, we’ll see exam-
ples in which one side seems to be at a disadvantage. But in each case
there is a surprise saving move or combination.
Here are five examples:
Black’s last move was a knight fork. How can White recover?
The only way to avoid losing material is 1. Rc4 (1. ... Nxf4 2. Rxc6).
In the next example, the White queen has just been pinned. Is there
a way for White to save the queen?
255
Chess Tactics for Champions
Yes,thanks to the intermediate check 1.Bb3+ followed by 1. ... Ke7
2. Bd5.
Here the Black bishop is in an unpleasant pin. How can it get out of
the pin?
Black needs to put the rook on a light square where the bishop will be
able to protect it: 1. ... Ra8. Another idea, bringing the king closer with
1. ... Kg6, is too slow, as after 2. Ne4 followed by 3. Nd6 the Black bishop
is lost. Now after 2- Ne4 Bb7 Black is safe.
In this position, Black threatens mate on h2 while also threatening to
take the knight on d6.
256
Бэте-Saving Combinations
a b c d e f g h
a b с б e < g h
White solves all difficulties with a “petite” combination. 1. Qxg7+!
Kxg7 2. Nf5+ КПЗ 3. Nxg3.
Mere White seems to be in trouble. How can the g2-pawn be pre-
vented from promoting?
a b c d e f g h
abode 1 g h
After 1. Ng6+ the Black king has only bad squares to move to, which
allow White to catch the pawn. 1. .., Kg3 2. Nf4 glQ 3. Ne2+. Other
choices on the first move lead to similar ends, such as 1.Kh3 2. Nf4+;
1. ... Kg4 2. Ne5+ Kg3 3. Nf3; or 1. ... Kg5 2. Nf4 glQ 3. Nh3+.
257
Chess Tactics for Champions
' i
Susans Corner
Sznapik—Susan Polgar
Budapest 1993
White has just played R.c2-c7, entering the seventh rank and attack-
ing my queen. Moving the queen would allow White to take the pawn
on e6. Black is already a pawn up, so all I need is to keep it and to avoid
getting my king in trouble.
28. ... Rac8!
With the help of White’s back-rank problem, this move forces the
trade of White’s most active piece (the rook on c7).
29. Rxc8 Rxc8 30. Rxc8+ Qxc8
The point is that now after 31. Qxe64- Qxe6 32. Nxe6, Black wins the
pawn back with 32. ... Bxb2.
I won shortly after 31. Ne2 Bxb2.
Here are 20 examples to practice getting out of difficult situations.
258
Game-Saving Combinations
1. White to move
2. Black to move
3. Black to move
a b c d e I g h
259
Chess Taffies for Champions
.'2
1
4. Black to move
5. White to move
6. Black to move
260
Game-Saving Combinations
7. Black to move
8. Black to move
9. Black to move
261
Chess Tactics гоя Champions
10. Black to move
11. Black to move
12. Black to move
2Б2
Game-Saving Combinations
13. Black to move
14. Black to move
15. Black to move
263
Chess Tactics сон Champions
16. Black to move
abode I g h
a b c d e f g h
17. Black to move
a b c d e f g h
a b c d e f g h
18. Black to move
abode I g h
a b c d e < g h
264
Game-Saving Combinations
19. Black to move
20. Black to move
2Б5
Chess Tactics for Champions
Solutions
1. Both the White rook and knight
are under attack. White saves
both pieces by moving the
knight away lo protect the rook:
l.Nd2.
2. Black’s king lacks defenders.
White is threatening mate in
five with 1. Qh6+ Kg8 2. Bh7 +
Kh8 3. Bg64- Kg8 4. Qh7+ Kf8
5. Qxf7#. Also Nd4-f5 is a major
threat. But Black has a way to
turn things around, thanks to a
fork: 1. ... Qxc3-H 2. Kxc3
Nxe4+. Black also has an
advantage after 2. Kbl Qel-r 3.
Kb2 Qxl'2t- followed by 4. ...
Nxe4.
3- Black’s knight on f5 is pinned.
By using another pin along the
d-file Black avoids losing
material: 1. ... Ng3+! 2. Bxg3
Qxe4.
4. Black has a material advantage,
but White has two different
mate-in-one threats. This is a
typical example of how the
defensive side is able to trade
queens, thus ending the attack.
1. ... Qcl + . With this check
Black forces the White king to
the second rank: 2. Kg2 and then
2. ... Qc2+ 3. Qxc2 Bxc2.
5. White’s king seems to be under
serious attack. But after 1. Qf8+
Kh7 2. Qxf7+ (fork) 2. ... Kh8
3. Qxf3 White is completely
safe.
6. White threatens 1. Qh7#. The
king cannot run away with к ...
Kg8 because of 2. Qh7+ Kf8 3.
Qh8#. But Black can force a
trade of queens with 1. ... Qh4+
2. Kg2 Qg5+ to rescue the game.
7. Here Black has a significant
material advantage but faces the
threat of 1. Rh8#. With the
following combination Black
avoids the mate and still stays a
pawn ahead. 1. ... Be4+! 2. fxe4
Rxh61 3. Rxh6 Kxg7. White’s
best choice is to give perpetual
check, starting with 3. Rf7+.
8. White threatens 1. Qxb7#. It
seems the only way to defend
against that threat is 1, ... Qf3,
but that leaves the knight on h4
hanging. Thanks to a fork, Black
has a cute simplification
combination; 1. ... Qg5H 2.
Qxg5 Nf3+ 3. Kg2 Nxg5 and
Black maintains a material
advantage.
9- White has a far-advanced
c-pawn, which is almost
unstoppable. But after the
following series of forced moves,
Black’s king catches the passed
pawn just in time; 1. ... Rh3+ 2.
Kd4 Rxc3 3. Kxc3 Kd7.
10. White’s threat is 1. Qh7#.
Because of the pin on the f7
pawn, White’s queen on g6 is
taboo. But with a smart queen
sacrifice Black not only avoids
2Б6 >
Game-Saving Combinations
getting checkmated but also
wins a piece: 1. ... Qxc4+! 2.
bxc4 fxg6.
11. White has two threats: 1. Qg7#
and t. Qxh7#. Black stops both
after I . Qa6+ 2. КЫ Qd34- 3.
Kci Qg6.
12. The pin on the g7 pawn looks
devastating. But Black is saved
after I. ... Rxc44- 2. Bxc4 Be3+
3. Kc2 Bxh6.
13- Black's bishop on d8 is pinned; it
cannot move away, nor can it be
protected in one move. After the
intermediate check I. ... Ral +
2. Кh2 Black has 2. ... Kd 1 to
save the bishop.
14. Here the Black queen is pinned.
Again, after an intermediate
check, 1, ... Be34- 2. Kh 1, Black
can interpose with 2. ... Bd4 to
avoid any loss of material.
15. White threatens 1. Qb7#. None
of the Black pieces can defend
the b7 square in one move. The
solution to the problem is 1. ...
Nd3+ 2. Ke2 and now 2. ... Nc5
comes just in time.
16. Black's bishop and knight are
forked. If Black could maintain
the pin on the d4 pawn, the
knight on e5 would be safe.
Black therefore attacks the rook
on a4 with 1. ... b5 and after the
rook moves away by 2. Ra5 or 2.
Ra 1, Black plays 2. ... Bb6
without losing either minor
piece.
17. White's attack along the h-file
looks scary. There are
checkmates threatened with
both 1. Qh7# and 1. Qh8#. 1. ...
f6 does not help, as mate follows
after 2. Be6+. Black needs to
block the h-file by 1. ... Bg5+ 2.
K.bI and 2. ... Bh6.
18. White threatens 1. Nf6#. Also,
the g7 pawn is very dangerous as
it is about to be promoted; for
example after 1. ... f5 2.Nf6 + .
But Black can do better than
that, with; 1. ... Ra84 2. Kbl
and now Black pins White’s
knight by 2. ... Bf5. White loses
the knight, since after 3. Rel
Black can put more pressure on
the pin with 3. ... Re8.
19. White has a very powerful
battery set up along the a 1 -h8
diagonal, already threatening 1.
Qg7# or 1. Qh8#. But Black saves
the game by forcing the trade of
queens with 1. ... Qd 1 -I- 2. Kh2
and now the pin 2. ... Qd6.
20. Black’s queen and rook are
forked. Black can try to pin
White’s knight with 1. ... Rd5,
but that would allow another
devastating pin, 2. Bf3. On the
other hand, 1. ... Qd5 does the
job as after 2. Bc4 Qa5 3. Qxa5
Rxa5 Black saves both pieces.
267
18
PERPETUAL CHECK
Another common method of saving a hopeless-looking position is to
force a threefold repetition of the same position by means of perpetual
check. If in a game the very same position arises for the third time one
can clam a draw. For example:
In this position, Black has an extra bishop. White, however, can give
eternal checks with 1. Qa6+ Kb8 2. Qb6+ Kc8 3. Qc6+ Kb8 4. Qb6+.
and the Black king cannot escape.
In the next position, Black has a scary-looking attack, threatening
mate in one.
268
Perpetual Check
abode ( g h
a b c d e f q h
But White can save the game by checking along the b-file: 1. Rb7+
Ka8 2. Rb8 + Ka7 3. Rb7 + .
In the following endgame, Black has two extra bishops and things
look bleak for White. But with the help of perpetual checks. White saves
the game.
The solution is: 1. Nd3 + Ke4 2. №+ Ke5 3. Nd3+.
Here Black has an extra bishop so White should be happy to draw the
game.
Chess Tactics for Champions
The saving combination starts with the double check 1. Rxh5+!.
Black cannot accept the sacrifice because if 1. . ..Kxhb 2. Qg5#. After 1.
Kg?, White gives perpetual check with 2. Qh6+ КП5 3. Qg5+ Kg7
4. Qh6 + .
In the next endgame, Black has a material advantage but White has
a way to create unavoidable perpetual check.
1. RfB!. Black can now capture the pawn right away or delay it by giv-
ing a few checks first, but in either case White gives endless checks on
the f-Hle with the rook. 1. ... Qxe3 2. Rf7+ Kg8 3. Rf6+ Kg7 4. Rf7+
Kh8 5. RC8 + . White only needs to be careful after, for example, 1. Rf8
Qd.2+, to move to a square (fl or h 1) where the e3 pawn will not be cap-
tured with check.
27D
Perpetual [heck
Susans Corner
Brenninkmeijer-Susan Polgar
Amsterdam, 1990
a b c cJ e < g h
abode < g h
White has an extra knight with only a pawn as compensation for
Black. However, I found a way to force a draw by perpetual check with
35. ... Rc2+ 36. Kbl Rb2+ 37. Kcl Rc2+ 38. КЫ Rb2+ and a draw
was agreed.
Here are 25 practice puzzles with the theme of perpetual check.
1. White to move
271
Chess Tactics for Champions
2. White to move
3. White to move
abode < g h
a b c d e ( g h
4. White to move
272
Perpetual Check
5. White to move
6. White to move
7. Black to move
273
Chess Tactics for Champions
8. White to move
9. White to move
10. White to move
274
Perpetual Check
11. White to move
a b c d 6 f q h
a b c d e f g h
12. White to move
13. White to move
275
Chess Tactics for Champions
14. While io move
15. White to move
1Б. White to move
276
Perpetual Check
17. White to move
18. Black to move
19. White to move
277
Chess Tactics for Champions
20. White to move
21. White to move
22. White to move
27fl
Perpetual Check
23. White to move
24. White to move
25. White to move
279
£kes$ Tactics tor Champions
Solutions
1. Black has an extra bishop, but
White can force a draw bv
perpetual check: I. Nc7+ Ke 7 2.
Nd5+ KeS 5. Nc7+.
2. Black, having a significant,
material advantage, made a
careless last move, Ь7-Ь5,
allowing White to escape with:
1. Qxg6+ Kh8 2. Qxh6+ Kg8 3.
Qg6+.
3. Two rooks on the seventh rank
work together wonderfullv as
О J
this example shows: I. Rxg7 +
Kh8 2. Rh7 + Kg8 3. Rhg74- Kh8
(it would be tragic for Black to
go the other way, as after 5. ...
Kf8 4. Rcf7# Black even loses) 4.
Rh7 + and there is no escape
from the checks.
4. Black has a material advantage,
but this is a tricky position for
both sides. After I. Rg5d- Kh7?
White even wins with 2. Kf21,
deal ing rhe first rank for
©
White’s rook to checkmate on
hl. After j. ... Kh8 White must
settle for a draw by perpetual
checks with 2. Rh5+ Kg8 3.
Rg5+ Kh8 4. Rh5+. After 1. ...
К h8, the attempt 2. Kf2 would
backfire, as now Black can
capture 2. ... Nxf6 and after 3.
Rh 1 -I- blocks with 3. ... Nh7.
5. This idea is similar lo that in
number 3, when two rooks work
together on the seventh rank.
Here, however, thev do the same
f -J
thing but vertically: 1. R2g7 +
Kh6 2. Rg6+ Kh7 3. R6g74 and
Black's king cannot, escape the
checks.
6. White’s position would look
pretty grim (down a rook) were,
it not Гот perpetual checks: ).
Qal-Ь. Now the only thing Black
can do is interpose the rook with
1. ... Rg7, but the checks keep
coming: 2. Qa8+ Rg8 5. Qa l + .
7. WTiite’s attack looks
overwhelming, but there’s no
escape from the checks after I.
.. Qe3+2. Kh 1 Qe4+3. Kg I
Qe3+- 4. Khl Qe44 or 2. Ql'2
Qcl+ 5. Qfl Qe3+.
8. Black has some deadly threats
along the а-file. Yet with a nice
rook sacrifice White can save the
game. 1. Rxg6+1 fxg6 2. Qxg6+
Kh8 5. Qh6+ Kg8 4. Qg6+ Kh8
5. Qh6+. After 1. ... Kh7 White
sacrifices the rook again with 2.
Rh6+! in order to achieve a
draw: 2. ... Kxh6 3. Qg54 Kh7
4. Qxh5+ Kg7 5. Qg5+.
9. Both White rooks are attacked
by the Black bishops. With a
pretty rook sacrifice White can
create a perpetual check patterns
1. R.xb6+! cxb6 2. Ra8+ Kc7 3.
Ra7-r Kh8 4. Ra84 and the king
has no escape.
10. White, down a knight, is happy
to save the game with 1. Bh6d-
Kg8 2. Rdg I 4’ Bxgl 3. Rxgl 4-
280
Perpetual Check
T(h8 and then 4. Bg74- Kg8 5.
Bh6+ Kh8 6. Bg7 + ,
11. Here White uses a stalemate
idea, and if Black refuses to
capture White’s last mobile
piece, then the game ends in
perpetual check; 1. Rf7 + Ke8 (1.
... Kxf7 results in immediate
stalemate) 2. Re7+ Kd8 3. Rd7+
Kc8 4. Rc7+ Kb8 5. Rb7+ Ka8 6.
Ra7+.
12. Black is clearly ahead in
material, but White, starting
with a quiet move, can force a
draw with; 1. Rb8 b5 2. Rb74-
Ka8 3. Rb8+Ka7 4. Rb7-b.
13. After 1. NhbH- Kh8, White uses
the idea of a back-rank mate to
force a draw by perpetual
check; 2. Nf74 Kg8 (of course
not 2. ... Rxf7? 3. Re8+ Rf8 4.
Rxf8#) 5. Nh6T Kh8 4. Nf7 +
and Black had better settle for a
draw.
14. An amazing position! White has
an extra queen and knight, but
White's king is not exactly home
safe! Black sacrifices another
piece from the few that remain!
I. ... Bb7 +! (White must not
accept the offer, as after 2. Kxb7
Kd7! White cannot stop 3. ...
RhbS#) 2. Kb5 Ra6+. Now
W'hite is better off repeating
moves with 3. Kc6 Bb74,
because after 3. Ka4 Bc4, White
can only delay but not prevent
the checkmate with b6-bo.
.15. With a beautiful queen sacrifice,
White saves a seemingly lost
game; 1. Qxh7+! Kxh7 2. Rh6+
Kg8 3. Ne7+ Rg7 4. Nf5+ Kg8
5. Ne7+.
16. Black has an extra rook and
knight, but White, giving up
another rook, can force
perpetual checks: 1. Rxh7+!
Qxh7 2. Qxf84- Qg8 5. Qh64.
17, After 1. Nf5+ Black has to play
1. ... Kg8 because after 1. ...
J<h8 White mates in two with 2.
g74 Kg8 3. Nh6'/A After the
correct I. ... Ifg8 White can
rescue the game with 2. Ne7+
Kg7 5. Nf5-b.
18. White has a big material
advantage and an attack. Rut
Black can get out of trouble
with a miraculous combination:
1. ... Qh3+’ 2. Kxh3 Rh6T 3.
Kg4 Rg6+ 4. Kf5 Rf6+ 5. Kg4
Rg6+ 6. Kh3 Rh6-K Of course,
it would be tragic if White were
to avoid i.he draw with 3. Kg2, as
then Black plays 3. ... Rxh.2#.
19. Black’s last move was Qf7-d5,
threatening Qxg2# and
attacking White’s knight on c5.
But White has an amazing
resource: 1. Qxa74! Kxa7 2.
Ra3+ Kb8 3. Na6+ (using the
pin along the b-file) 3. ... K.a7 4.
Nc54- (4. Nc7+ also works) 4. ...
Kb8 5. Na6 + .
20. This example shows nice
cooperation between a rook and
knight. I. Qxa5+! Kxa5 2. Nc6+
K.a6 3. Nb4+ Ka7 4. Nc6+. Black
even loses after 2. ... Ka4 3.
Rb4#_
281
Chess Tactics tor Champions
2i. A pretty example of the
perpetual idea: 1. Rf8-H Kg6 (if
1. ... Kxf8? White wins Black’s
queen after the discovery 2.
Bxg7 + Kxg7 3. Qxe4) 2. Rf6 +
Kh7 3. Rh6 + I (the same idea
from the ocher side!) 3. ... Kg8
(if 3. ... Kxh6? 4. Bxg7+) 4.
Rh8+! Kf7 5. Rf8+ and going
around the circle starts all over
again!
22. Black is up a bishop yet White
can save the game: I. Qh7+!
Kxh7 2. Nf8+ Kh8 3. Ng6+ Kh7
4. Nf8+ and the Black king
cannot escape the perpetual
checks.
23. Here White is able to force a
draw thanks to a discovered
check. 1. Ra8+! Kc7 (if 1. ...
Kxa8 2. c7+ and White wins) 2.
Ra7 + Kc8 3. Ra8+ Kc7 4. Ra7+
with a draw.
24. Here again we see the strength
of the two rooks on the seventh
rank: 1. Qxg6+! fxg6 2. Rhg7 +
Kh8 3. Rh7-(- Kg8 4. Rhg7+ Kf8
5. Rgf7 + Kg8 6. Rg7+ draw.
25- Black has just offered to trade
queens by playing Qxal. After a
nice rook sacrifice, 1. Rxh7+I
Kxh7, and a series of accurate
checks, White forces a draw. 2.
Qg6 + Kh8 3. Qh6+ Kg8 4.
Qe6f- (but not 4. Qg6 + , which
allows 4. ... Qg7 to block the
checks) 4. ... Kf8 5. Qd6+ Ke8 6.
Qe6-b КГ8 7. Qd6+ Kf7 8. Qe6 +
Kg7 9. Qg6 + Kh8 10. Qh6+ Kg8
LI. Qe6 + .
282
19
STALEMATE
In chess there are three possible results. Obviously, we prefer to win all
our games' But unfortunately, we can’t expect to do that in real life. At
times we face bad positions, and those are the times when our best hope
is to save the game with a draw. One of the methods of achieving a draw
is to create a stalemate.
In this chapter, we’ll see how this is done.
In the first position, Black has an overwhelming material advantage.
But it’s White’s move, and White can use a decoy to force stalemate.
a b c d e < g h
a b c d e < 9 h
The solution is 1. Qf3+1, sacrificing White’s last mobile piece and
forcing the Black queen to a bad square. After 1. ... Qxf3 White has no
legal move, and so the game is a draw by stalemate.
In the next example, Black also has a lot of extra material. Avoiding
a loss would be a great accomplishment for White!
283
Chess Tactics for Champions
The White king can’t move so all White needs to do is to get rid of
the queen with 1. Qg8+!, and no matter which Black piece captures the
queen, White is stalemated.
Here, Black is up by only one pawn but it is far advanced, giving
Black a serious advantage.
a b c d e f g h
a b c d e f g h
It’s hard to imagine that in one move the game will end in a draw.
The White king has several free squares to move to and the White rook
is also active. Yet after 1. Re8+! Black is forced to accept the “gift,” and
after 1. ... Rxe8 White is stalemated.
Here again Black has a. material advantage. However, White’s rook is
pinning Black’s bishop and White threatens mate on the next move. It’s
Black’s move.
2Я4
Stalemate
Blade can escape by forcing a stalemate with 1. ... Qh2+ 2. Kg4. Ac-
cepting the sacrifice with 2. Kxb2 is immediate stalemate, 2. ... Qg3+.
Also, 2. ... Qh.3-r 3. Kxh3 does the job. 3. Kxg3, stalemate.
In this rook endgame, Black has only one extra pawn but it seems
that White cannot avoid thfe coming checkmate on a3.
Notice that neither White's king nor pawns has any legal moves. So
all White needs to do to get rid of his rooks! 1. Rxb8+! Kxb8 2. Rh8+
Kb7 3. Rb8+! Kxb8 stalemate.
285
Chess Tactics for Champions
Susans Corner
Susan Polgar—Hort
Prague, 1995
White is up a knight and two pawns. My opponent played 43.
Rxh6, which I didn’t worry about, and Black resigned after 44. Ra2 Ra7
45. Rc6,1-0.
He missed a rare opportunity to try to play for stalemate. 43. ... a2
44. Rxa2 Rxg2+ (but not 44. ... Rxa2? 45. Re8+) 45. Rxg2 Ral4. It’s
true that I can escape the checks, but I would have to find some accurate
moves to release the Black king from the stalemate position. 46. Kf2
Rfl + (or 46. ... Ra2+ 47. Ke3 Re2+ 48. Kd4 Rd2+ 49. Kc5) 47. Ke3
Rf34 (47. ... Rel4- 48. Kd4Rdl+ 49. Kc5) 48. Kd4 Rf4+ 49. Ne4.
And now; 25 practice examples.
1. Black to move
286
к
Stalemate
2. White to move
3. Black to move
a b c d e I g h
a b c d e t g h
4. Black to move
i 287
Chess Tactics for Champions
5. White to move
6. Black to move
7. Black to move
288
Stalemate
8. White to move
9. White to move
10. White to move
289
Chess Tactics for Champions
i
a
11. Black to move
12. Black to move
13. White to move
a b c d e f g h
a b c d e f g h
290
5l a I emate
14, White to move
15. White to move
16. Black to move
291
Chess Tactics for Champions
17. White to move
18. White to move
19. White to move
292
к
It)
Stalemate
20. White to move
21. White to move
22. White to move
a b c d e I g h
a b c d в t g h
293
Chess Tactics for Champions
23. Black to move
24. White to move
25. Black to move
294
k
Stalemate
Solutions
1. White has an ezxtra knight and
pawn, and Black is in check. Yet
after 1. .,. Qxf7 +! 2. Qxf7 the
game ends in a draw by
stalemate.
2. In this queen endgame, Black
has three extra pawns. White
can escape only by sacrificing
the queen with 1. Qb64! Qxb6
stalemate.
3. Black, down a full rook, is very
lucky to be able to save the game
with !_.... Qcl4! 2. Qxcl
stalemate.
4. Right now, Black's king can
move co g8. Rut after a smart
queen sacrifice, 1. ... Qxd5+!
2. Qxd5, none of the Black
pieces can move and the game
ends in a draw.
5. Black’s e-pawn is very close to
the promotion square. In fact,
Black would have an easy win if
the a2 pawn were not on the
board. Now White lias a nice
saving combination. 1. Rxe2!
Rxe2 stalemate.
6. White has an extra bishop, which
normally would be a winning
advantage. But Black has a
surprising move to save the game:
1. ... Qg44! 2. fxg4 stalemate. If
the White king moves out of
check instead, Black just takes
White’s bishop on a4.
7. White has two queens and Black
only one. Black can force a draw
cither by repetition of moves or
by stalemate as follows; 1. ...
Qcl 4! 2. Kh2 (or 2. Qxcl
stalemate) 2. ... Qf4+! 3. Qxf4
stalemate.
8. This is a very rare stalemate
with many pieces on the board.
Normally stalemate only occurs
in the endgame. 1. Rxd84 Kxd8
2. Qd 141 Qxdl, and due lo all
th.e pins, none of White's pieces
can move.
9. This is a perfect example,
demonstrating that even in a
seemingly totally winning
endgame, caution is needed!
Black's last move allowed White
a nice escaping combination.- I.
Rgl! Rxgl stalemate.
10, Black’s d-pawn is awfully close
to promotion. 1. g5 would be
checkmate if the g-pawn was
nor. pinned. But it is. On the
other hand, Black’s d-pawn is
awfully close to promotion. So
it's best to save the game! 1.
Qf4 r ! Qxf4 stalemate.
11. Black’s only hope is to get rid of
both rooks to draw by stalemate.
The question is which rook to
sacrifice first. The correct order
is: 1. ... Rh2-I ! 2. Kxh2Rg24!
3. Kht Rgl4! 4. Kh2 Rg24! 5.
Kxg2 stalemate. The other way
doesn’t work: after 1. ... Rh34
2. Kg! Rhl 4 5. KxhL Rh24 4.
Kgl Rg24 5. Kfl Rgl4 6. Ke.2
the king runs away to rhe
queenside: 6. ... Rel4 7. Kd5
295
Chess Tactics for Champions
Rd 14 8. Kc4Rct4 9. Kd5 Rd 14
10, Кеб.
12. The only mobile Black piece is
the queen. So all Black needs to
do is to give it up, making sure
the bind around the Black king
remains. 1. ... Qxh24l 2. KfJ
Qe24! 3. Kgl Qg2+! 4. Kxg2
stalemate.
13. Black has a huge material
advantage. White’s only hope is
stalemate. But for now the king
has plenty of places to go. But
after 1. Qa44 Kb7 White can
give up the queen in a way that
achieves stalemate! 2. Qb3+!
Qxb3.
14. This is a two-move stalemate
combination. On the first move
White plays a decoy, forcing^
Black’s king to the g-file. 1.
Rh54 Kg8 2. Rg54! Qxg5
stalemate.
15. Blade is better, with four pawns
for a knight. White has a very
surprising way to force stalemate:
l.Nh6+!Kxh6(1. ... Kh8?
would lose at once, as 2. Nf7
mates, and after 1. ,.. KfB? White
skewers with 2. Rg84 winning
Black's rook) 2. Rg8! A brilliant
move, “trapping” Blacksrook! 2.
... Rxg8 stalemate.
16. White is up a rook and also
threatens mate in one. Black,
with three smart moves in a row,
creates an unexpected stalemate!
1. ... f6+l 2. Qxf6 Qh44| 3.
Kxh4 g54! 4. Kxg5 draw.
17. Here White’s king is already in a
stalemate position; the only
thing left to do is to get rid of
White’s queen and rook. 1.
Rh84! Kxh8 2. Qh 1 4 Kg8 3.
Qh84! Kxh8 stalemate.
18. White’s king and pawn have no
moves, so the task is to give up
the two rooks. 1. Rf84 Bg8 2.
Rxg84! Kxg8 3. Rf84! Kxf8
stalemate.
19. After a pretty queen sacrifice,
White needs to get rid of the last
movable pawn: 1. Qxg74! Kxg7
2. h64! Kxh6 stalemate.
20. As in the previous position,
WHite sacrifices the queen and
then with a pawn check creates a
stalemate: 1. Qc64 Kb8 2. Qb74t
Kxb7 3. a64 Kb8 stalemate.
21. White’s king is out in the open
and faces many dangers, but
there is a saving combination: 1.
Rf84! Rxf8 2. Qxg74! Kxg7
scalemate,
22. White gets rid of one piece at a
time: 1. Be3! Qxe3 2. Qf2l Qxf2
(now the stalemate pattern is
created) 3. a54! Kxa5 stalemate.
23. Despite being a queen down,
Black can save the game with: t
... blQl 2, Qxb 1 stalemate.
24. White’s king cannot move, nor
can the knight or either pawn.
Here is how White sacrifices the
remaining pieces; 1. Rc84l Rxc8
2. Rxc84 Kxc8 3. Qc74! Kxc7
stalemate.
25. 1. .., ВГ64! forces White to
capture with 2. Qxf6 and now that
a stalemate pattern is created, all
Black needs to do is 2. ... Rb 141
3. Kxbl to achieve the goal.
296
OTHER IDEAS
20
TRAPS AND COUNTER-TRAPS
One of the areas in which stronger players outsmart their less experi-
enced opponents is in calculation. Often one side sees a good-looking
move or combination but stops the calculation prematurely and thereby
misjudges the evaluation of the whole situation.
The following examples will show you what I mean.
In this position, White has a fork at his disposal. Can you see the
move?
abcdefgh
abode f g h
White’s fork is 1. Qh4+ Kg7 2. Qxd8?. But the plan backfires, as
Black has a “counter-trap” to checkmate with 2. ... Rai#.
In the next position, White is in check. What should White do?
299
Chess Tactics for Champions
It would be a serious mistake to pin with 1. Rg3? because Black can
fork with L ... Ne2+. Much better is the safer I. Kf 1.
In the following position, White can take the Black knight right away
with 1. dxc6 or can play 1. Qcl (the best move). But there’s another move
that looks good ...
a b c d e I q h
abode < g h
White can try to be fancy and pin the knight with 1. Rel?, but Black
then has an unexpected escape from the pin with 1. ... Qa7! 2. Qxa7
Nxa7.
In the next position, White spots an opportunity to win a rook by
using a pin.
300
Traps and Counter-Traps
What happens if White plays 1. Qxc6? An unpleasant surprise fol-
lows: L ... dlQ-h deflecting the rook from the b-file. After 2. Rxdl the
pin is released so Black can capture 2. ... bxc6, winning material.
Next comes a famous miniature.
Queens Gambit Declined
1. d4 d5 2. c4 e6 3. Nc3 Nfl6 4. Bg5 Nbd7 5. cxd5 exd5
а Б c cJ e f g b
abode ( 9 h
It seems that White can exploit the pin on the knight on f6 and play
6. Nxd5, but an unpleasant surprise would follow: 6. ... Nxd51, sacrific-
ing the queen temporarily. 7. Bxd8 Bb4+ 8. Qd2 Bxd2+ 9. Kxd2 Kxd8
and Black wins material.
301
Chess Tactics for Champions
Susans Corner
Susan Polgar—Jun Xie
Jaen, 199Б
This was the seventh match game of my world championship match
versus the Chinese world champion. Here she noticed an interesting
combination and decided to surprise me with 15. ... N£52. At first, I
thought I might be in trouble after 16. exf5 Bc4. But then I noticed the
winning way. 17. Qd.4. I would have a slightly worse endgame after 17.
Ne4 Bxd2+ 18. Qxd2 Qxd2+ 19. Kxd2 Rxe4. 17. ... Bxc3. After 17. ...
Bxe2, I intended to play 18. Qxb4, when Black has only one discovered
check and nothing more. 18. Bxc3 Rxe2+. I believe my opponent
stopped her calculations at this point when she played 15. ... Nf5, as-
suming that if 19. Kdl then 19. ... Qd5 defends against all three threats
(the queen and the bishop en prise and 20. Qg7#). Or if I play 19. Kfl
then the rook moves somewhere with discovered check....
But after 19. Kfl! Black is the one getting in trouble. None of the dis-
covered checks achieve anything. 19. ... Qxc3. After the natural-looking
19. ... Re4+ 20. Qxc4! Qxf5 (20. ... Rxc4 21. Bxa5 Rxc2 22. Bc3) 21.
Qd5 Rxf4+ 22. Kgl, White is safe. 20. bxc3 Re4+ 21. Kf2 Rxd4 22.
cxd4. As a result of the complications, White has won the exchange. We
played on for a while, but eventually I converted my material advantage
to a victory on move 44.
Hereare25 practice puzzles'
Traps and Counter-Traps
White’s best choice here is 1. Rd8+ Bf8 2. Rfdl, with threats such as
3. Rxf8+ Ktxffi 4. Rd8#). But what is wrong with 1, Qxc3?
abode < g h
abode f g h
Can Biack vise the pin on the d-file and win a piece with 1. ... Qxe4?
303
Chess Tactics for Champions
Can White win a bishop using a discovery with 1. Qxc4- dxc4 2. d-5+?
Should White be happy noticing 1. Rhl?
304
Traps and Counter-Traps
5
a b c d e I g h
abode i g h
Is 1. ... Qxc.5 a good idea?
6
a b c d e f о h
a b c d e I g h
Black can fork White's bishop and knight with 1. ... Qe5. Is that a
good idea?
305
Chess Tactics for Champions
Black has a pin on the first rank, Can it be exploited immediately by
playing 1. ... Ba3?
Can Black win a pawn with 1. ... Nxd5 2, cxd5 Bxc3?
306
Traps and Counter-Traps
What is Black’s best choice: 1. ... R_xb2+, (. ,.. QxeS, or 1. ... Qf6?
Can Rlack win a piece with t ... Qxb5?
307
Chess Tactics for Champions
11
Should Black play 1. ... Qxg6 with the idea 2. Bxg6 Rxdl + 3. Kh2
Rhl#?
12
Is 1, Rg7 a winning move?
308
Traps and Counter-Traps
13
Black’s correct plan is to get a rook co h6 with checkmate to follow.
Which is the best way to do it: 1. ... Rxc5 2. bxc5 Re6, or 1. ... R8e6?
a b c d e f g h
a b c d e f g h
Is White winning a piece by the pin 1. Be4?
309
Chess Tactics for Champions
15
Does White win or lose after 1. Nd6?
16
Is Black winning a bishop after the skewer 1, ... Rc8?
310
Traps and Counter-Traps
17
Is it safe for White to take the pawn with 1. Bxe6?
18
Does the combination 1. Rxe7 Kxe7 2. Bxb4+ work?
ЗП
Traps and Counter-Traps
Black found the cute trick 1. ... Qxg2+~ 2. K_xg2 Ne3+ 3. Kf3 Nxdl,
winning a pawn. Would you go for that?
Can Black delay moving his queen away by playing J. ... Nxc3?
313
Chess Tactics for Champions
Black can win White's bishop. What is the correct order of moves
1. ,.. a2 or 1. ... Rd2+.
Is 1. Bc4 a good choice?
314
Traps and Counter-Traps
25
abode
a b c d e I g h
Black is a pawn ahead. Is trading queens with I. ... Qd5+ the right
continuation?
315
Chess Tactics for Champions
Solutions
1. 1. Qxc3? would work after 1. ...
Bxc3?, due to Black’s back-rank
weakness, as White mates with
2. Rd8#. But after 1. ... Qxfl -H
2. B_xfl Bxc3 Black comes out
ahead.
2. No, because after 1. ... Qxe4?
White can get out of the pin by
an intermediate check with 2.
Qh6+ and then capture Black’s
queen.
3. No, because the Black queen
can evade the d4-d5 discovery
threat after 1. Qxc4? with 1. ...
Qe3-f- and then White’s queen
goes.
4. No, because after 1. Rh 1? Black
wins material after 1. ... Rfl4-.
5. No, after 1. ... Qxc5? Whi te
simply trades with 2. Rxd8+.
Now after 2. ... Rxd8 the Black
rook no longer pins the bishop
on e3 and therefore White can
capture with 3. Bxc5. If Black
recaptures w’ith 2. ... Kxd8
White wins with the 3. Nxb7 +
fork.
6. No. After 1. ... Qe5? White has a
tricky combination wir.h 2. Bf4!
Qxf4, creating a fork with 3.
Nd54-, and resulting in material
gain.
7. This is a typical situation in
which a pin backfires, resulting
in a discovery. 1. ... Ba3? 2.
Bh6+! Kxh.6 3. Rxel and White
wins the exchange.
8. No. After 1. ... Nxd5? 2. cxd5
Bxc3 White comes out ahead
after the cross-pin 3. Qd2!.
9. The best move is 1. ... Qf6. Here
is what’s wrong with the other
two choices; 1. ... Rxb24- 2.
Qxb2 Bxb2 3, Bxf7 Bxcl 4. Kxcl
and 1. ... Qxe6 2. Qxb5! Qxe 1 3.
Qa4+.
10. No. After 1. ... Qxb3? 2. Qe8+
Kb7 White gets rid of the
pinning piece with 3. Qxc6 + I
Kxc6 4. cxb3.
11. Nice idea, but it does not work.
1. ... Qxg6? (1. ... hxg6 is
better) 2. Qxh7-H Kxh7 3.
Bxg6+ K_xg6 4. Rxd8 or 2. ...
Kf8 5. Qh8+ Qg8 (3. ... Ke7 4.
Qxd84 Kxd8 5. Bxg6+) 4.
Qxg8+ Kxg8 5. Bh7-H and
White wins the exchange in all
variations.
12. Yes! After the cross-pin 1. Rg7l
Rg8, White has a winning
check: 2. Qf5-f.
13- The right answer is 1.... R8e6
2. Nxe6 Rxe6. On the other
hand 1. ... Rxc5 fails to 2. Rxe4!
Rxe4 3. Rxe4 and the rook on c5
is trapped!
14. No. After 1. Be4 Black escapes
trouble with 1. ... Ng3-H 2. Bxg3
Qxe4! thanks to the pin along
the d file. A better move is I. QC4
and if 1. ... Rj<d3? then 2. Be4.
15. 1. Nd6? loses after 1. ... Nb4!
and 2. Nxf7 Nc2# or 2. Re8+
Traps and Counter-Traps
Qxe8 3. Nxe8 Nc2#. Much
better is 1. Rbdl.
16- No. In fact, 1. ... Rc8? loses after
2. g4~H Kxg4 and the fork 3.
Веб 4.
17. Yes, it is. After 1. Вхеб! Веб
White can block the pin with 2.
ВГ5+ Kg8 3. Be4.
18. No, because after 1. Rxe7?
Rxa5+ 2. Kxa5 Kxe7 Black has a
winning pawn endgame. For
example: 3. Kxb4 Kf6 4. Kc4 Kf5
5. Kd4 Kxf4.
19. No. After 1. Qd6? Nxfl 2. Qd8+
Black will play 2. ... Rf8! (but
not 2. ... Rxd8? 5. Rxd8+ Rf8 4.
Rxf8#). A better choice is 1.
Rel.
20. Amazingly yes! 1. ... Bf6? 2. Qh4!
Bxh4 3. Nxg6+ Kf6 4. Nxh4.
21. You should not. J. ... Qxg24-? 2.
Kxg2 Ne3+ 3. Kf3 Nxdl would
be a mistake, since the Black
knight is trapped after 4. c4 g6 5.
Ke2.
22. It is not recommended. Black
loses the queen after 1. ... Nxc3?
2. Bxf7-r I Kxf7 3. Qf3+ Kg8 4.
axb4 or 2. ... Kf8 3. Bxg7+
Kxg7 4. Qe54- Kxf7 5. axb4.
23. 1. ... a2? is a mistake due to 2.
Re5+! (but not 2. Bxa2? Rd2-l-
forking) 2. ... Kf8 (or 2. ... Re7
3. Rxe7+ Kxe7 4. Bxa2) 3. Bxa2
Rd2+ and 4. Re2. The correct
move order is 1. ... Rd2+ 2. Ke3
a2.
24. No. After 1. Bc4?Rxfl + 2. Qxfl
Rxfld- 3. Kxfl Bb5 cross-pins
and Black wins. 7'he correct
continuation is 1. Rxg6 + Kh8 2.
Вз<Н6+ Kg7 3. Rg64- Kh8 4.
Qh5#.
25- No. In fact it’s a serious mistake.
1. ... Qd5? 2. Rf3! and now
Black cannot avoid losing a
piece. For example, 2. ... Qxd3
3. Nxe7+ or 2. ... Qe6 3. Nxe7+
Qxe7 4. Qd5+, forking the king
and rook.
317
21
SIBLING POSITIONS
Sibling positions are chose that appear identical but have minor differ-
ences. In this chapter we’ll see a few examples in. which a small differ-
ence produces big changes in the evaluation of the position.
Position 1a
In this position White has a simple way to win Black’s queen using a
discovery: 1. Bxf7+ Rxf7 2. Qxc5.
318
Sibling Positions
Position 1b
Here we have changed the position only slightly by putting White’s
pawn on h2 instead of h3. This tiny change makes a huge difference!
Now, after the same combination, 1. Bxf7+ Rxf7 2. Qxc5, Black mates
with 2. ... Rfl#.
Position 1c
8
7
6
5
4
3
2
I
a b c d e I g h
a b c d e l g h
Compared to position lb, here the White e-pawn is on e4 instead of
e3. How does this matter? Now after 1. Bxf7 + Rxf7 2. Qxc5 Rfl + White
can block the check with 3. Qgl and. reach a winning pawn endgame
after 3. ... Rxgl + 4. Kxgl.
Л9
Chess Tactics fqa Champions
Position 2a
In this position, White can win the Black bishop by a simple fork
with 1. Qg2+.
Now let’s move the Black, bishop one square up co b3. Now 1. Qg2+
does nothing.
Position 2b
But, there’s another fork: 1. QB74-.
Now we move the. bishop to c4.
no
Sibling Positions
Position 2c
This time the fork comes from another square: 1. Qg4+.
In the next endgame, Black has a material advantage.
Position 3a
a b c d e । g h
a b c d e ( g h
But White can reverse that using a small forking combination with 1.
Rxh7+ Kxh7. Even worse would be 1. ... Kg8 allowing 2. Nf6 mate. 2.
Ng5+ Kg6 3. Nxh3.
О о
Now let’s move the Black pawn from h7 to g7.
321
Chess Taedes for Champions
Position 3b
Here White has a different trick available: 1. Rd8+, forcing the Black
king to an unfortunate place: 1. ... Kh7 and now another fork, this time
with: 2. Ng5 + .
In the next position, we relocate the Black pawn from g7 to f5 and
add an extra pawn on h6.
Position 3c
abode f g h
abode f g h
None of the fork tricks work here, but White can weave a mating net
around the Black king with 1. Nfl5.
In this example, Black’s queen and rook are forked. The question is,
can Black get out of it without losing material?
322
Sibling Positions
Position 4a
8
7
6
5
4
3
2
Black has two tries, 1. ... Rc6 and 1. ... Qc6. After 1. ... Rc6 Black
loses apiece: 2. Bxb6 Rxc2 3. Bxd8. But 1. ... Qc6 (2. Qxc6 Rxc6) saves
the day.
Let’s make a tiny modification in the position by moving the White
king from gl to hl and the White queen from c2 to c3.
Position 4b
8
7
6
5
4
3
2
The method used in position 4a doesn’t work here because after 1. ...
Qc6 2. Bxf6 the White queen is on a protected square. However, because
of the difference in the White king's position, Black has another way to
get out of trouble, 1. ... Qb5.
Now let’s put the White king on h2 and the White queen on cl.
323
Chess Tactics for Champions
Position 4c
Neither of the saving techniques used above works, but the interme-
diate check 1. ... Qd6+ does.
In the next example, the Black rook and knight are forked. How can
Black save both?
Position 5a
The solution is 1 ... Nf5.
But if we put the Black pawn on f5 instead of eb, Black has to look
for a different way to save the two attacked pieces.
324
Sibling Positions
Position 5b
a t> c d e f g h
a b c d e f g h
The correct answer now is 1. ... Re4.
Compare the following to position 5b with the pawn moved from c6
to e6.
Position 5c
Here Black has a new way to save both pieces: 1. ... Nc6.
In position 6a, Black has just attacked the White queen. The question
is, can White trap the Black queen?
325
Chess Tactics for Champions
Position 6a
abode f Q h
a b c d e 1 g h
1. Qxe8+? is wrong because after i. ... Nxe8 2. g3 the Black queen
can retreat along the newly opened diagonal d8-h4. How about 1. g3
Rxe3 2. Rxe3? Did Black just lose a rook? The rescue attempt 2. ... Ndo?
fails to the intermediate check 3. Re8+. But after 1. g3 Rxe3 2. Rxe3, 2.
... Bxf4 solves all of Black’s problems. Therefore, White’s best choice is
1. Qd3, giving up the F4 pawn.
Position 6b
There are two small changes from position 6a. Black has an addi-
tional pawn on b6 and Black’s bishop is on d7 instead of d6. This second
difference means that Black can’t save the game by taking the f-pawn
with the bishop.
Now let’s see how Black can get out of trouble after 1. g3 Rxe3 2.
Rxe3. Because the e8 square is guarded by the bishop, the knight is free
to jump. 2. ... Nd5 (2. ... Ng4 works too) 3. gxh4 Nxe3.
326
Sibling Positions
Position 6c
In position 6c the pieces are all in the same places as in position 6b,
except that the Black rook and knight have been switched. Now after the
obvious attempt to trap Black’s queen with 1. g3, Black saves the game
with the pin 1. ... Rg6. However, after 1. Qe7! Black is in trouble. The
bishop on d7 is under attack and if it moves, 1. ... Bc6, then 2. g3. The
2. ... Kg6 pin doesn’t work anymore because the rook itself is pinned.
Position 6d
3
2
3
2
We made some more changes here, though most pieces are still in fa-
miliar positions. The question remains: Will r.he Black queen be trapped
or not?
After 1. g3 Black can try a counterattack with 1. ... Bd4, but White
wins a piece after 2. Qxd4 cxd4 3. gxh4.
327
Chess Tactics юн Champions
Position бе
a b с d e I g h
a b c d e f g h
And here’s our final examination of the siblings based on position 6a.
Now L g3 is out of the question, since the White queen itself is on an
unprotected square. However, 1. Qxe7! Bxe7 2. g3 traps the Black
queen, and after 2. ... Qfb 3. Bxf6 White will be up the exchange. On
the other hand, 1. Qxb6? is wrong, as after 1. ... Nxb6 2. g3 Black wins
material with 2. ... Rxe2 3. gxh4 Bxb2.
328
TWENTY-FIVE FAMOUS COMBINATIONS
1. Anderssen-Kieseritzky
London, 1851
a b c d s ( a h
abode I g h
This game is commonly known as the "Immortal Game,” White sac-
rificed both rooks to reach this finale. Actually, Black resigned a few
moves before this point, not wanting to see the pretty finish: 22. Qfl5+!
Nxf6 23. Be7#. In those days, it was customary to announce a check-
mate in three, four, or more moves, and unless it had a refutation, the
opponent simply resigned.
329
Chess Tactics for Champions
2. Anderssen—Dufresne
Berlin, 1852
a b c d e Г g h
This game is called the “Evergreen.” It offers another brilliant, com-
bination by the great 19^-century German master, 21. Qxd7+! With
this combination White forces mate in four moves. 21. ... Kxd7 22.
B£5+ Ke8 (or 22. ... Kc6 23. Bd7#) 23. Bd7+ Kf8 24. Bxe7#. It is an in-
teresting coincidence that these two most famous old combinations both
end with a bishop mate on e7!
3. Paulsen—Morphy
New York, 1857 '
a b c d e f g h
This masterpiece was played by the legendary American chess genius
Paul Morphy. 17. ... Qxf3L Black sacrifices the queen for only a bishop,
and of course the move opens the g-file in front of the White king.
18. gxf3 Rg6+ 19. КЫ Bh3 20. Rdl
330
Twenty-five Famous Combinations
The game would come to a quick end after 20. Rgl Rxgl + 21. Kxgl
Rel+.
A more stubborn defense is 20. Qd5, with the idea 20. ... Bg2+ 21.
Kgl Bxf3+ 22. Qxg6. Black is also better after 20. ... f5! 21. Rdl (or 21.
Qc4+ Kf8, but not 21. ... Kh8 22. Qf7) 21. ... Bg2+ 22. Kgl Bxf3+ 23.
Kfl Bxdl and Black equalizes the material balance while maintaining a
very strong attack against the White king.
20* ... Bg2 + 21. Kgl BxJ3 + 22. Kfl Bg2 +
Even faster is 22. ... Rg2 23. Qd3 Rxf2+ 24. Kg 1 Rg2+ 25. Kfl
Rgl#.
23. Kgl Bh3+
Again, more precise is 23. ... Be4+ 24. Kfl Bf5.
24. Khl Bxf2
Black threatens mate with Bg2, so White is forced to give up the
queen.
25. Qfl Bxfl 26. Rxfl Re2
Black is two pawns up and still has a strong attack.
27. Rai Rh6 28. d4 Be3, White resigned.
4. Morphy—Duke of Brunswick and Count Isouard
Paris, 1858
a b c d e I g h
a b c d e f g h
This is another gem by the American legend. 13. Rxd7! Rxd7 14.
Rdl. Black is pinned from all sides. 14. ... Qe6 15. Bxd7 + Nxd7 and
now a pretty finish with 16. Qb8+! Nxb8 17. Rd8#.
331
Chess Tactics for Champions
1 Em. Lasker-Bauer
Amsterdam, 1889
Emanuel Lasker was the second official world champion. He reigned
for 27 years! In the game against Bauer, Lasker introduces this type of
double bishop sacrifice. Today we refer to it as the “Lasker Combina-
tion.”
15. Bxh7+!
Instead, if 15. Qxh5 f5, White does not achieve anything.
15. ... Kxh7 16. Qxh5+ Kg8 17. Bxg7!l
This is the whole point of the first sacrifice.
17. ... Kjxg7 18. Qg4+ Kh7 19. Rf3
White brings an additional piece to the attack and Black can only
postpone resignation by giving up the queen.
19. ... e5 20. Rh3 + Qh6 21. Rxh6+ Kxh6
Black has narrowly escaped mate, but 22. Qd7! wins one of the two
Black bishops and the game. Black played on for another 16 moves and
lost.
332 й
Twenty-five Famous Combinations
Б. Steinitz—von Bardeleben
Hastings, 1895
a b c d e f g h
abode I Sb
This is the most famous combination by the first official world cham-
pion.
22. Rxe7 + !
The start of a brilliant combination that ends in checkmate after 14
moves in the main variation.
22. ... KfB
If 22. ... Qxe7 23. Rxc84- Rxc8 24. Qxc8+. After 22. ... Kxe7 23.
Rel + (23. Qb4+ also leads to a win) 23. ... Kd6 24. Qb4+ Rc5 (24. ...
Kc6 25. Rel# or 24. ... Kc7 25. Ne6 + Kb8 26. Qf4+ Rc7 27. Nxc7 Qxc7
28. Re8#) 25. Re6 + .
23. Ш7+!
But not 23. Qxd75? Rxcl+ and Black mates.
23. ... Kg8!
After 23. ... Qxf7 White wins by 24. Rxc8T Rxc8 25. Qxc8+ Qe8 26.
Nxh7+.
24. Rg7+!
Continuing the chase!
24. ... Kh8!
If the king runs the other way with 24. ... Kf8, then 25. Nxh7+ ICxg7
26. Qxd7+.
25. Rxh7+!
At this point, von Bardeleben disappeared from the tournament hall
without resigning (later he notified his opponent by means of a note),
presumably foreseeing the following line: 25. ... Kg8 26. Rg74- Kh8
Chess Tactics for Champions
27. Qh4+ Kxg7 28. Qh7+ Kf8 29. Qh84- Ke7 30. Qg74- Ke8 31. Qg8 +
Ke7 32. Qf7+ Kd8 53. Qf8+ Qe8 34. Nf7+ Kd7 35. Qd6#.
7. Rotlewi-Rubinstein
Lodz, 1907
a b c d e I g h
a b c d e f g h
In this position it is clear that Black is better developed, with both
rooks occupying open files. Also, White’s king is not quite safe. The ques-
tion is how does Black transform these advantages to a win?
1. ... Rxc3!I Sacrificing the queen. 2. gxh4 Rd2!l Another beautiful
move, this time to deflect the White queen from the e4 square. 3. Qxd2
Bxe44- 4. Qg2 Rh3! This move is possible because of the pin along the
a8-hl diagonal. 5. Bd4Bxd4, and Black won.
8. Levitzky-Marshall
Breslau, 1912
abode I g h
a b c d e I g h
334
Twenty-five Famous Combinations
Here Black has more than one way to win, but he chooses the most
brilliant one. 1. ... Qg31! and White resigned. After 2. Qxg3 Ne24- 3.
Khl Nxg3 + 4. Kgl Ne24- 5. Kh 1 Rc3, Black has a winning endgame;
White has no compensation for Black’s extra knight. Even worse is 2.
hxg3 Ne2# or 2. fxg5 Ne2+ 3. Khl Rxfl#.
9. Ed. Lasker—George Thomas
London, 1912
a b c d e I g h
a b c d e I g b
11. Qxh7 + I! After 11. Nxf6+ gxf6! rhe Black queen protects h7. This
spectacular combination kicks off a Idng-hunt...
11. ... Kxh7 12. Nxffi+ Kh6
The only escape. If 12. ... Kh8 13. Ng6#.
13. Neg4+ Kg5 14. И44- Kf4 15. g3 + KT5 16. Be2+
Less impressive but one move faster is 16. 0—0 followed by 17. Nh2#.
16. ... Kg2 17. Rh2+ Kgl
Chess Tactics tor Champions
18. Kd2# Castling queenside (18, O-O-O) would have done it tool
What an amazing combination!
10. Rodzinski—Alekhine
Paris, 1913
Black, in elegant style, has already sacrificed the rook on a8. Now
White’s king gets in trouble. 13. ... Qxd3! 14. cxd4, and now Black of-
fers the other rook. 14. ... Be7! 15. Qxh8 Bh4#.
11. Bernstein—Capablanca
Moscow, 1914
White is a pawn up and everything seems safe after 27. ... Nxc3 28.
Rxc3 Rxc3 29. Rxc3 After 29. ... Qbl + 30. Qfl Rdl? Black’s back rank
remains weak and White mates with 31. Rc8 + . But Black had the much
better move 29. ... Qb2l, exploiting White’s back-rank problem. White
resigned because he could not avoid losing at least a rook.
Twenty-five Famous Combinations
12. Capabianca-Fonaroff
New York, 1918
As in the last position, here the Cuban world champion uses the
weakness of the opponent’s back rank with a brilliant combination, 20.
Nh64- Kh8 21. Qxe5! Qxe5 22. Nxf7 + !. White won.
13. Adams—Torre
New Orleans, 1920
a b c d e I 9 h
a b c d e f g h
This is probably one of the best-known combinations in the world.
White starts a “dance” to deflect the Black queen from the protection of
the back rank.
18. Qg4! Qb5.
The queen sacrifice cannot be accepted because of 18. ... Qxg4? 19.
Rxe8+ Rxe8 20. Rxe8#.
19. Qc4!l
337
Chess Tactics fdk Champions
Amazingly, White can put the queen under double attack and yet be
safe!
19. ... Qd7
Another incredible queen move follows.
20. Qc7!l Qb5
If 20. ... Qa4 21. Re4.
21. a4!
This is an important move to gain a tempo for the next rook move.
But 21. Qxb7? is a mistake because White also has a back-rank problem:
21. ... Qxe2! 22. Rxe2 Rcl 4-.
21. ... Qxa4 22. Re4!Qb5
On a quiet move like 22. ... h6, White wins a rook with 23. Qxc8!
Rxc8 24. Rxa4.
23. Qxb71!
Finally, the Black queen has no escape. 1—0.
14. Alekhine-Yates
London, 1922
abode f g h
a b c d e f g h
This masterpiece is a great example of the king being used as part of
the attacking force. 37. Rxg7 White sacrifices the knight. 37. ... Rxfb
38. Ke5!. Now the Black rook is trapped, as after 38. ... Raf8 or 38. ...
Rff8 White mates in two moves along the seventh rank. 1—0.
О
138
Twenty-five Famous Combinations
15. Reti—Bogolyubov
New York, 1924
This combination is based on Black's back-rank, problem. At first
glance, the game is approximately even with opposite-colored bishops.
But despite the absence of most pieces on the board, White finds a way
to win: 24. ВГ7+ Kh8 25. Be8!, 1-0.
16. Torre—Em. Lasker
Moscow, 1925
This is a wonderful example of the “mill.” 25. Bf€J! A queen sacrifice!
25. ... Qxh5 26. Rxg7 + Kh8 And now the “back and forth” starts to
pick up the Black pieces. 27. Rxf7 + Kg8 28. Rg7+ Kh8 29. Rxb7 + Kg8
30. Rg7+ Kh8 31. Rxa7+ Kg8 32. Rg7+ Kh8 33. Rg5+ Finally pick-
ing up the queen. 33. ... Kh7 34. Rxh5 Kg6 35. Rh3 Kxf6 36. Rxh6+
and Black resigned, as White has too many extra pawns.
B9
Chess Tactics for Champions
17. Alekhine—Mindeno
Holland, 1933
White sacrificed a piece earlier to open the h-file for the attack. The
difficulty is that the Black king is about to escape via f7. But Alekhine
finds a brilliant way to prevent that just in time. 16. Ne5!l Threatening
mate along the h-file. 16. ... dxe5 (after 16. ... Qxe5 17. Qxe5 dxe5 18.
g6, Black can’t stop the mate threat) 17. g6! Again blocking the king’s
escape on f7. 17. ... Qxg6 18. Qc4+! Now after either the rook or queen
blocks on f7, 19. Rh8# ends the game. 1—0.
18. Botvinnik—Capablanca
Holland, 1938
Black is one pawn ahead but White has a far advanced passed pawn
on e6 and better coordination of his pieces, with which he can develop
an attack against the Black king.
340
Twenty-five Famous Combinations
30. Ba3’!
Deflecting the Rlack queen from the defense of the kingside.
30. ... Qxa3 31. Nh5+! gxh5 32. Qg5+ Kf8 33. Qxf6+- Kg8 34. e7
Another good way to end the game was 54. Qf7 + Kh8 55. g3! and the
White king finds escape on h5.
34. ... Qcl4
Now the only task left is to hide from the checks.
35. Kf2 Qc2+ 36. Kg3 Qd3+ 37. Kh4 Qe4+ 38. Kxh5 Qe2+
Trading queens with 58. ... Qg6+ doesn't help because after 59.
Qxg6 + hxg6+ 40. K.xg6 the pawn promotes with checkmate.
39. Kh4 Qe4+ 40. g4 Qel+ 41. Kh5 and finally Black ran out of
checks. 1—0.
19. Fischer— Reshevsky
New York, 1958
abode ( g h
abode < g h
The 15-year-old Bobby Fischer caught the American chess icon
Samuel Reshevsky after only nine moves: 10. Bxf7+! Kxf7 After 10. ...
Rxf7 11. Ne6 Black's queen is trapped. 11. Ne6! Here Black gave up the
queen with 11. ... dxe6 and after 12. Qxd8 got a hopeless position and
later lost the game. After 11. ... Кхеб, the Black king would be chased
out and checkmated quickly with 12. Qd5+ Kf5 12. g4+! Kxg4 13-Rg1 +
and Black has no defense. 1—0.
341
Chess Tactics for Champions
20. Petrosian—Pachman
Bled, 1961
a b c d e t g h
a b c d e f g h
Former World Champion Tigran Petrosian was famous for his posi-
tional play, but as this combination, proves, he was an awesome tactician
too. 19. Qxfb+! An impressive queen sacrifice to get the Black king out
in the open. 19. ... KxflB 20. Be5+ Kg5 and now the point—a quiet
move—21. Bg7! and Black cannot prevent checkmate in a few moves
after either the White h- or f-pawn gets involved. 1—0.
21. Fischer—Benko
New York, 1963
a b c d e ( g h
White’s most obvious try, 19. e5, fails, as Black can hold on after 19.
... f5!. That is why White had to find a way to stop that defense. 19. RfB!
blocks the f-pawn. Now after either 19. ... Bxf6 or 19. ... dxc3, White
wins with 20. e5. Instead, after 19. ... Kg8 20. e5 h6 21. Ne2, White
342
Twenty-five Famous Combinations
simply moves the knight out of the danger. If Black, takes the rook with.
21. ... Bxf6, he cannot prevent the checkmate after 22. Qxh6; or after 21.
... Nb5 White responds with 22. Qf5. 1—0,
22. Larsen—Spassky
Belgrade, 1970
abode t g h
a b c d e f g h
This game was played during the “USSR. Versus the Rest of the
World” match. The White king never castled and never made it to
safety. Boris Spassky, who was the reigning world champion, found a
quick way to end the game, 14, ... Rhl! 15. Rxhl g2 16- Rfl Trying to
save the rook with 16. Rgl does not help either: 16. ... Qh4+ 17. Kdl
Qhl 18. Qc3 Qxgl+ 19. Kc2 Qf2 20. gx£5 Qxe2 21. Na3 Bb4 22. Qxb4
Qd3 + 23. Kdl glQ#. 16. ... Qh4+ 17. Kdl gxflQ+ and White resigned
because after 18. Bxfl Bxg44 White gets mated in two more moves: 19.
Kcl Qel+20. Qdl Qxdl#. 0-1.
343
Chess Tactics for Champions
23. Spassky-Fischer
Reykjavik, 1972
a b c d e f g h
a b c d e I g h
This is game five of the “chess match of the 20th century” between
Boris Spassky and Bobby Fischer. Here the American hero found a “pe-
tite” combination that caused his opponent to resign. 27. ... Bxa4l. After
28. Qxa4 Qxe4 Black has dual threats—mate on g2 and el. And after 29.
Kf2 Nd3+ ends White’s hopes. 0—1.
24. Karpov—Csom
Bad Lauterberg,1977
a b c d e 1 g h
a b c d a t g h
Black has a material advantage» but White’s attack on the Black king
comes too fast. 50. Nf5! With this move White created two powerful
threats: 51. Qh2+ and mate in two with 51. Rh7+ Nxh7 52. Qg7#. 1—0.
344
Twenty-five Famous Combinations
25. Anand—Kasparov
New York, 1995
This position was reached in the 11th game of the PCA World Cham-
pionship, which was held on the top floor of the World Trade Center.
The opponents were the Indian chess genius Viswanathan “Vishy*'
Anand and one of the best chess players ever, Garry Kasparov. Anand no-
ticed the following combination too late: 31. ... Rxc2l. It “only1’ wins an
additional pawn after 32. Rxc2 Rb3 + 53. Ka2 Re3 + , but two extra
pawns with no compensation for the opponent is a winning advantage
on the grandmaster level. 0—1.
Susans Corner
Susan Polgar-Chiburdanidze
Cal via, 2904
145
Chess Таеlies for Champions
This game was played at the chess Olympiad during the USA-
Georgia match. Here I noticed a fascinating combination connected to
the just weakened dark-square diagonal (al -h8).
14. Nxe5H
The following variation is what would have happened had Black ac-
cepted the sacrifice with 14, ... dxe5. White would have had a winning
attack after 15. Qxe5 f6 (or 15. ... Ng2+ 16. Rxg2 f6 17. Be6+) 16. Qxf4
gxf5 17. gxf6 + and now either 17. ... Kh8 18. f7+ or 17. ... Kf7 18.
Rg7+ Ke8 19. Qe5+ would have ended the game instantly.
14. ... Nxe2
After the game my opponent told me that she did not overlook my
combination but was hoping for this counter-trap.
On 14. ... gxf5, again 15. Nc6 wins.
Also, a pretty variation would decide the game after 14. ... Qe7. Now
it seems that White is in trouble because the knight cannot move.
However, there is a hidden resource in 15. Be4!I Another stunning
sacrifice to liberate the knight. 15. ... Bxe4 (If 15. ... dxe5 16. Bxb7
Qxb7 17. Qxe5 f6 18. Qxf4 and White is two pawns up.) 16. Nc6! (But not
16. Nxg6 fxg6! and the Black king escapes via f7.) 16. ... Nd3+ 17. Kfl
and Black loses the queen or gets mated.
The possible refutation 14. ... Qe8 is somewhat different. Still 15.
Be4l! Bxe4 but now the knight is unable to move away to attack the
Black queen. 16. Ng4! Nd5+ 17. Qxd3! Bxd3 18. Nh6#.
15. Nxf7H
The second combination! It would have been a big mistake to take
the knight with 15. Kxe2 dxe5 16. Qxe5?? because 16. ... Re8 pins the
queen.
15. ... Nxc3
After 15. ... Kxf7 I planned 16. Qg7+ Ke8 17. Bf6 and Blacks posi-
tion is hopeless, for example: 17. ... Rf7 18. Qg8+ Rf8 19. Qe6+ fol-
lowed by mate.
16. Nh6+!
This is the whole idea! Black comes out ahead after 16. Nxd8 Rxd8
17. Be6+ Kf8 18. dxc3 and now 18. ... Re8.
16. ... Kg7 17. Bxc3+ RI6 18. Bxf6+ Qxl6 19. gxf6+ Kxh6
346
Twenty-five Famous Combinations
My opponent and I both saw this variation in опт heads at move 13.
Unfortunately for my opponent, she forgot that she no longer had her
rook, on f8.
20. Веб
I will regret this move for the rest of my life. I was short on time so I
did not notice the worthy end of this nice combination: 20. Rbl! and
Black is helpless against Rb3-h3 (20. ... gxf5 21. Rb3).
If Black insists on avoiding checkmate by playing 20. ... Bf3 21. Rb3
Bh5, trouble comes from the other side: 22. Be4, and Black loses more
material. This is one of those combinations when everything just clicks'
Naturally, because of my significant material advantage I had a win-
ning position anyway. My opponent resigned on move 39.
347
GAMt-S/CHESS
U.S.A. $17.95 Can $25.45
CHESS TACTICS FOR CHAMPIONS
’’What a brilliant combination! Susan Polgar. one or the world’s strongest
GRANDMASTERS. KNOWN FOR HER TACTICAL PLAY, SHARES HER KNOWLEDGE IN A
BOOK IHAI IS BOTH HIGHLY INSTRUCTIVE AND VERY ENJOYABLE.’’
-GRANDMASTER BORIS SPASSKY. 1М9-Ю7*
^s-ery good chess player knows that chess is ninety-nine percent tactics.With the aid
of tactical combinations and traps, the world’s best players are able to instantly gain die
upper hand and force their opponents into retreat. In Chess Tacticsfor Chatnpions.Svrsan
Polgar. the top-ranked female chess player in die United States, reveals the tactics that
made her a four-time World Champion. For intermediate to advanced players, this
book includes:
• Powerful combinations designed to win material and lead to checkmate
• Simple .and effective tactics, including one-move checkmates
• Instruction on trapping pieces and setting up decoys
* TkAINING ON HOW TO MANEUVER A MATE IN FOUR MOVES
SUSAN Polgar is a four-time Women's World Champion and the top-ranked
miiiiniimw
'ates. She is also the author, with Paul Truong,
o’. PAUL Truong is an eleven-rime National
I an award-winning chess author.
2HESS I«cries FUR C
Cover photograph C Paul Truong
David М<Кл
KinA'm Hou* 1‘uzulrt
New Yori. N Y
w ww punkwtnndcnn rum