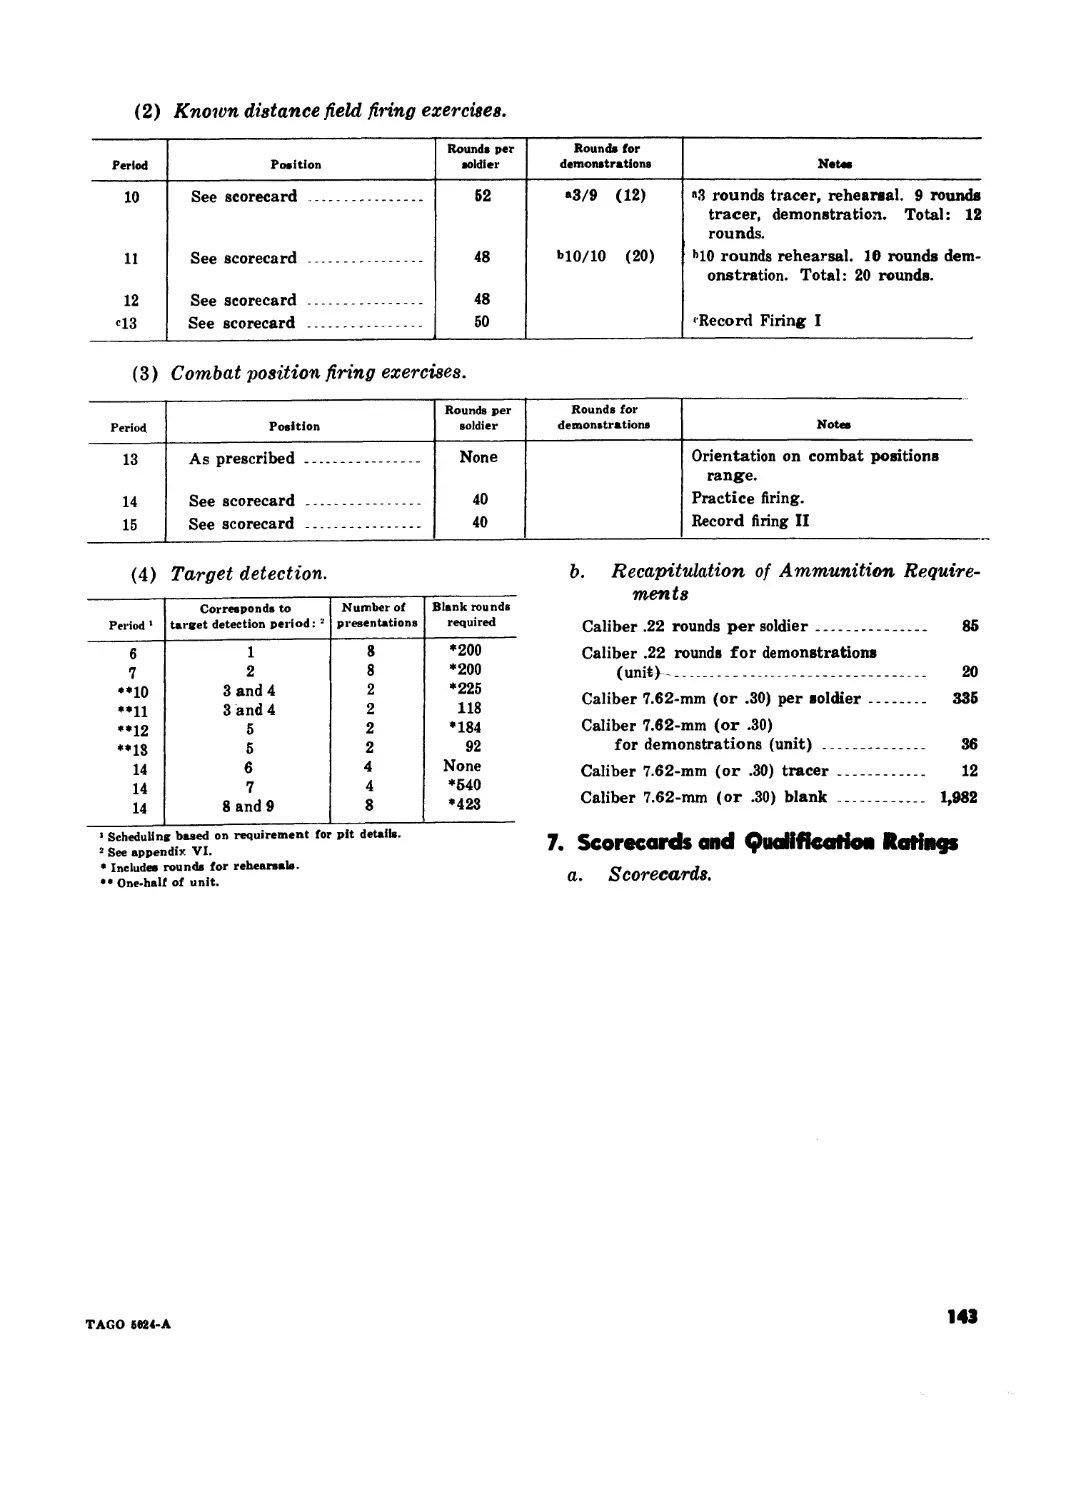
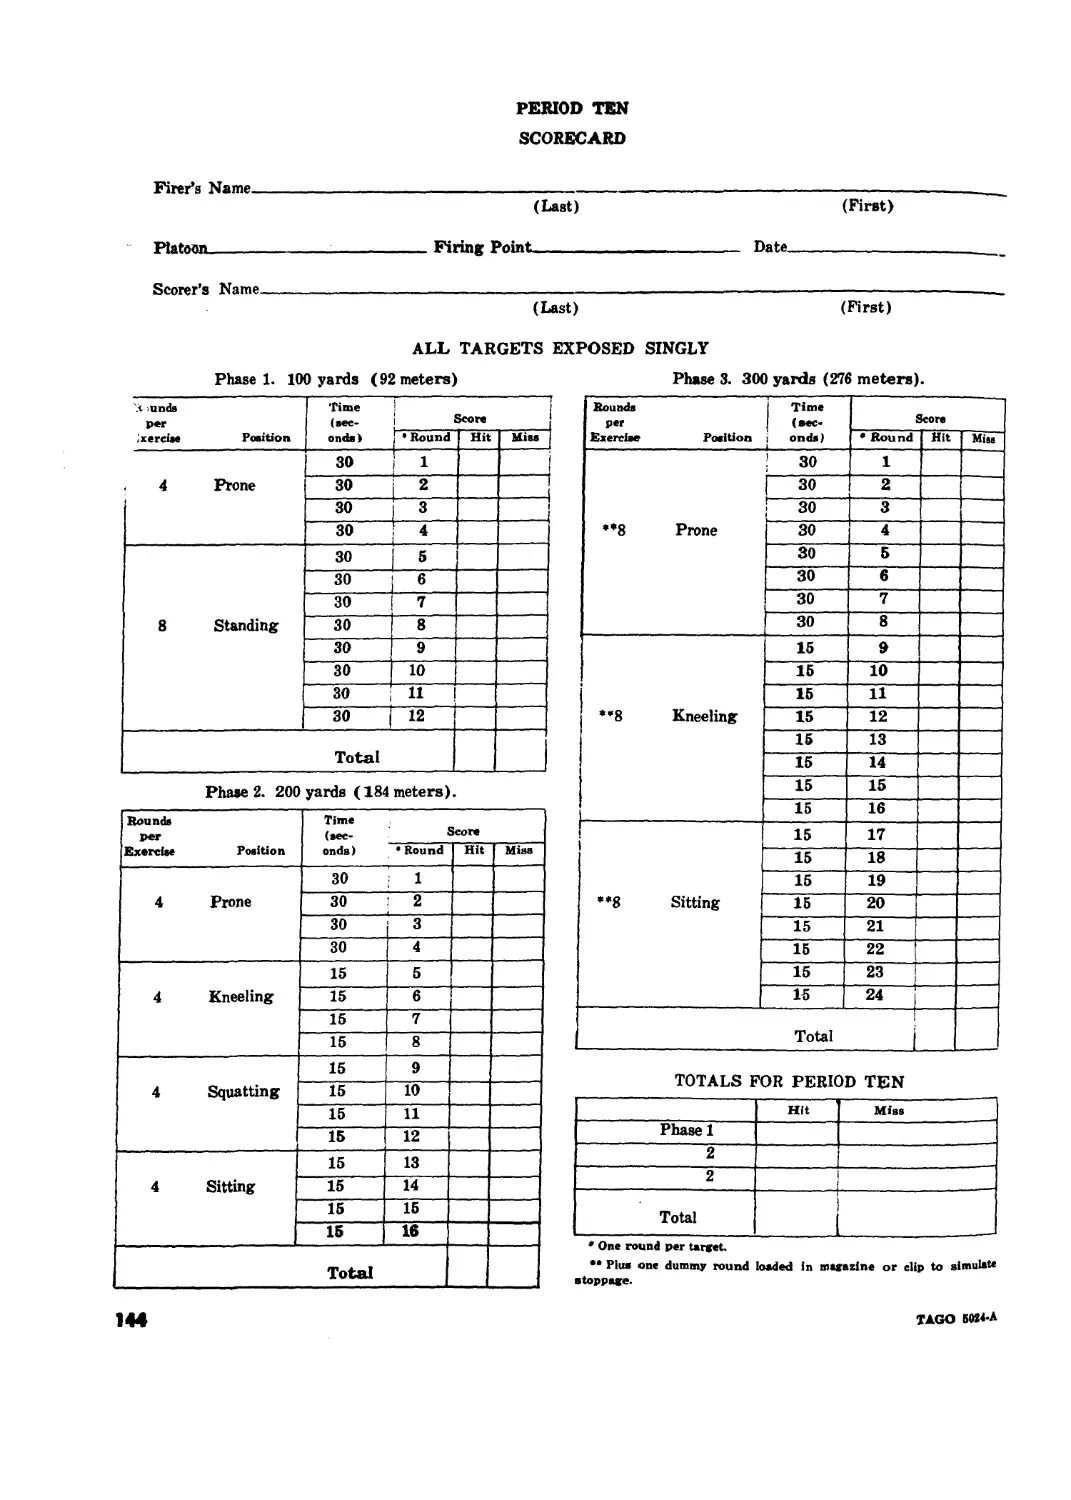
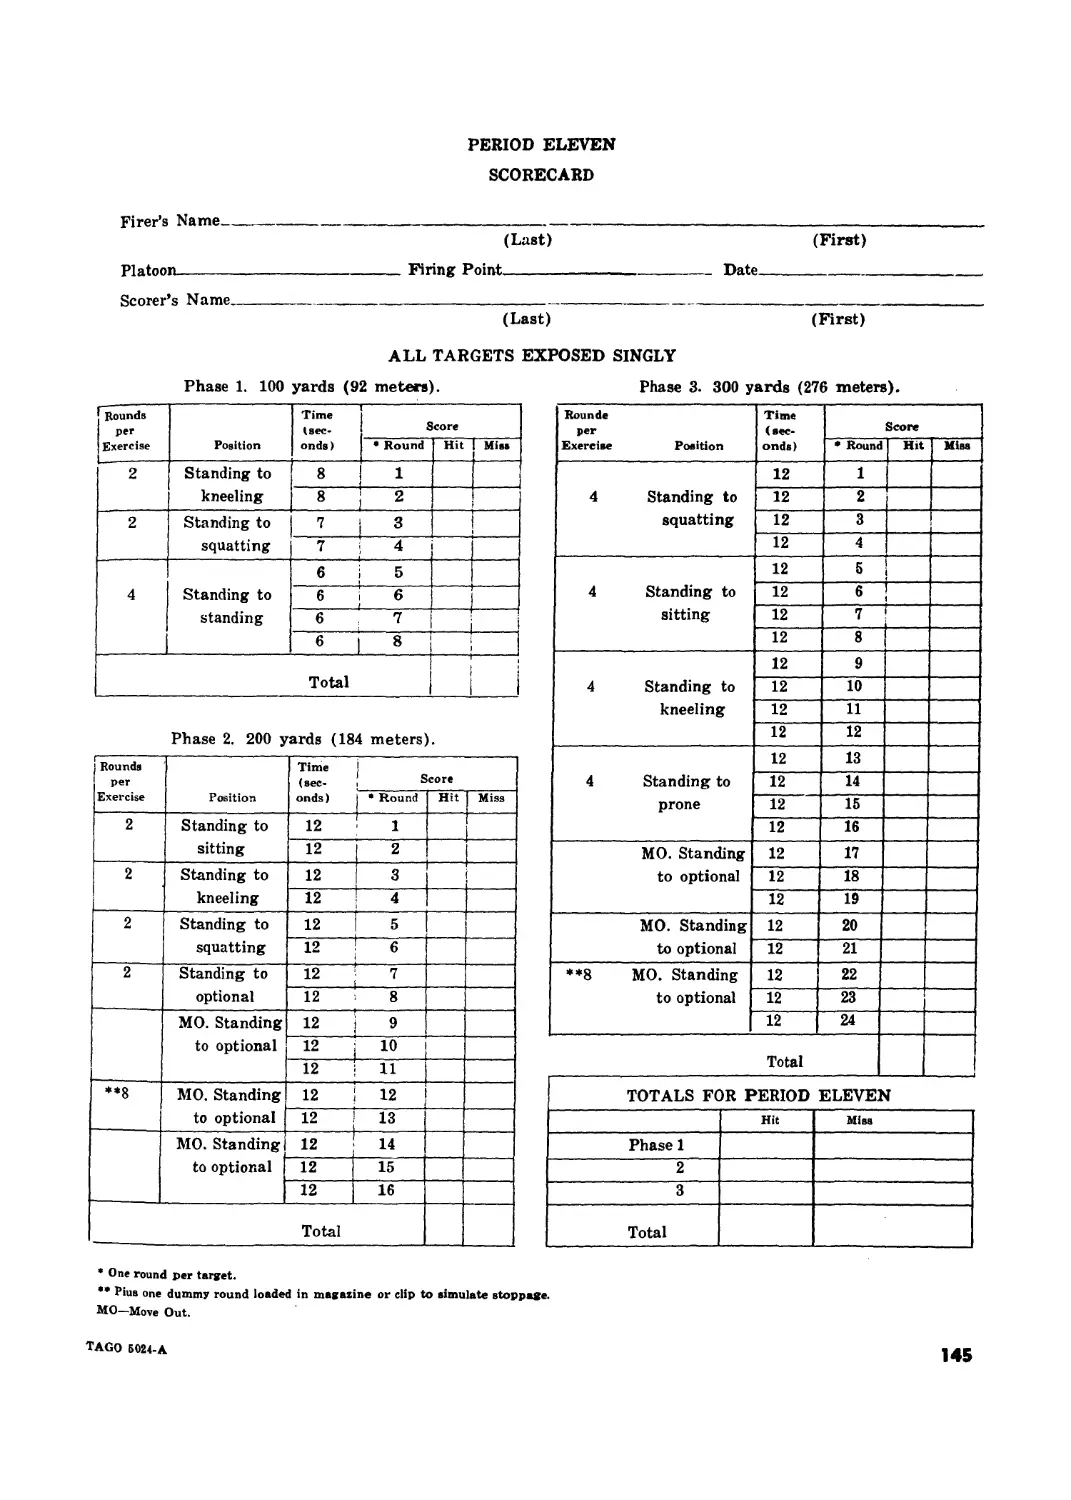
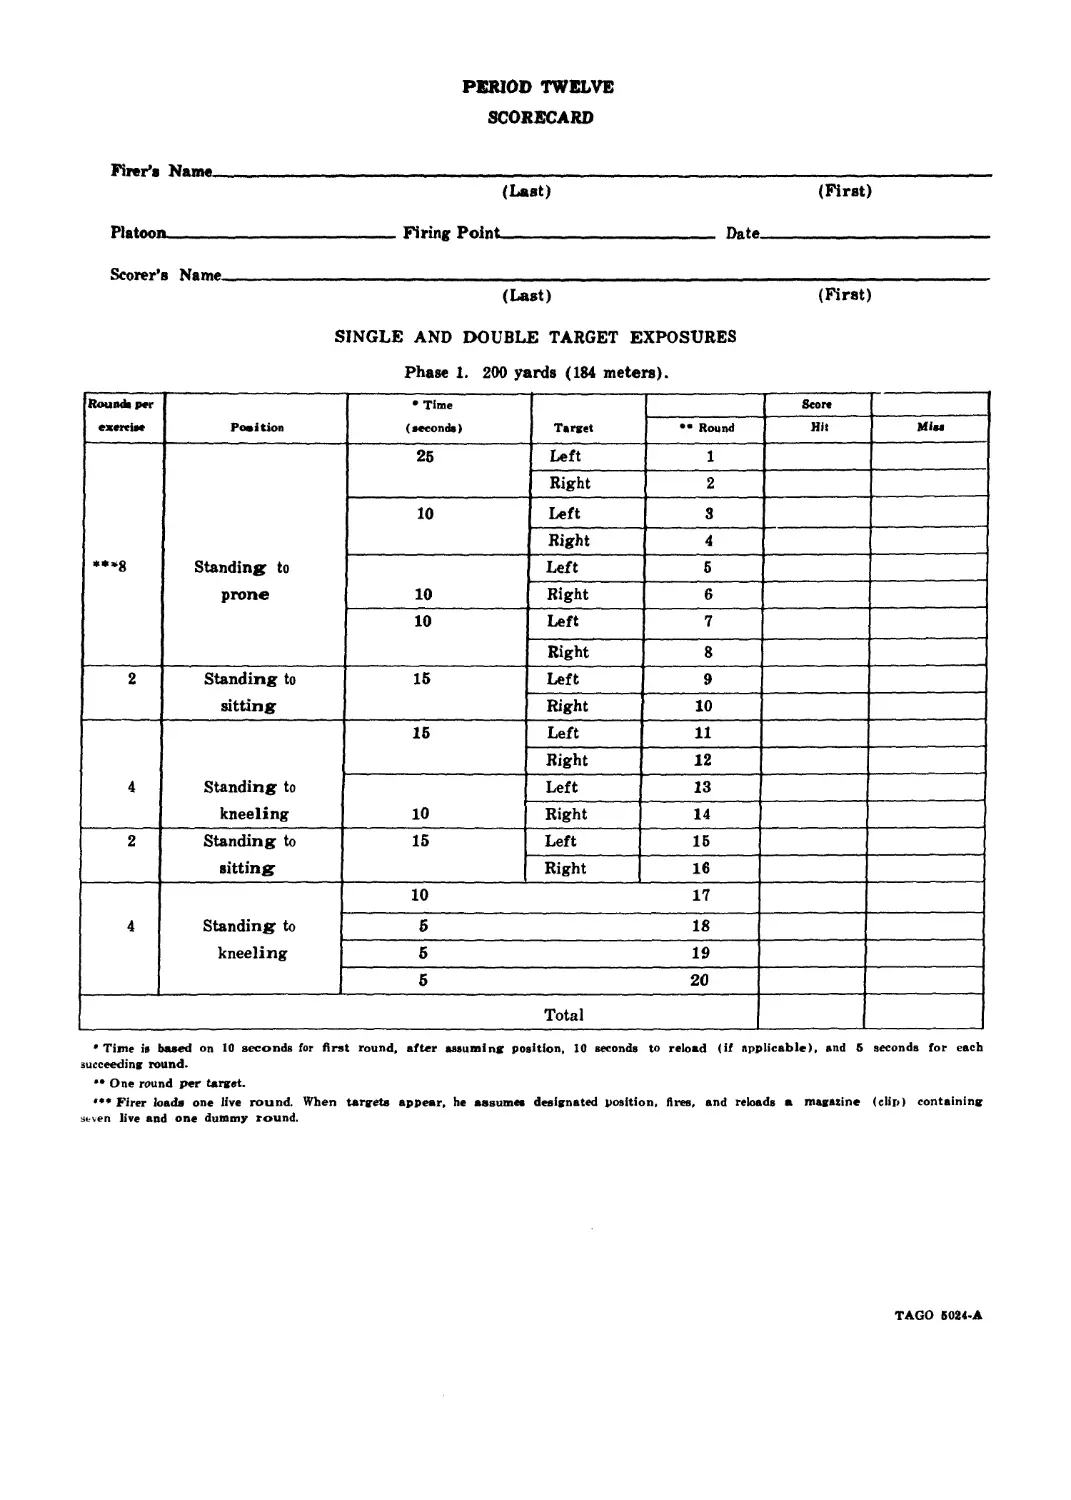
/


Теги: weapons
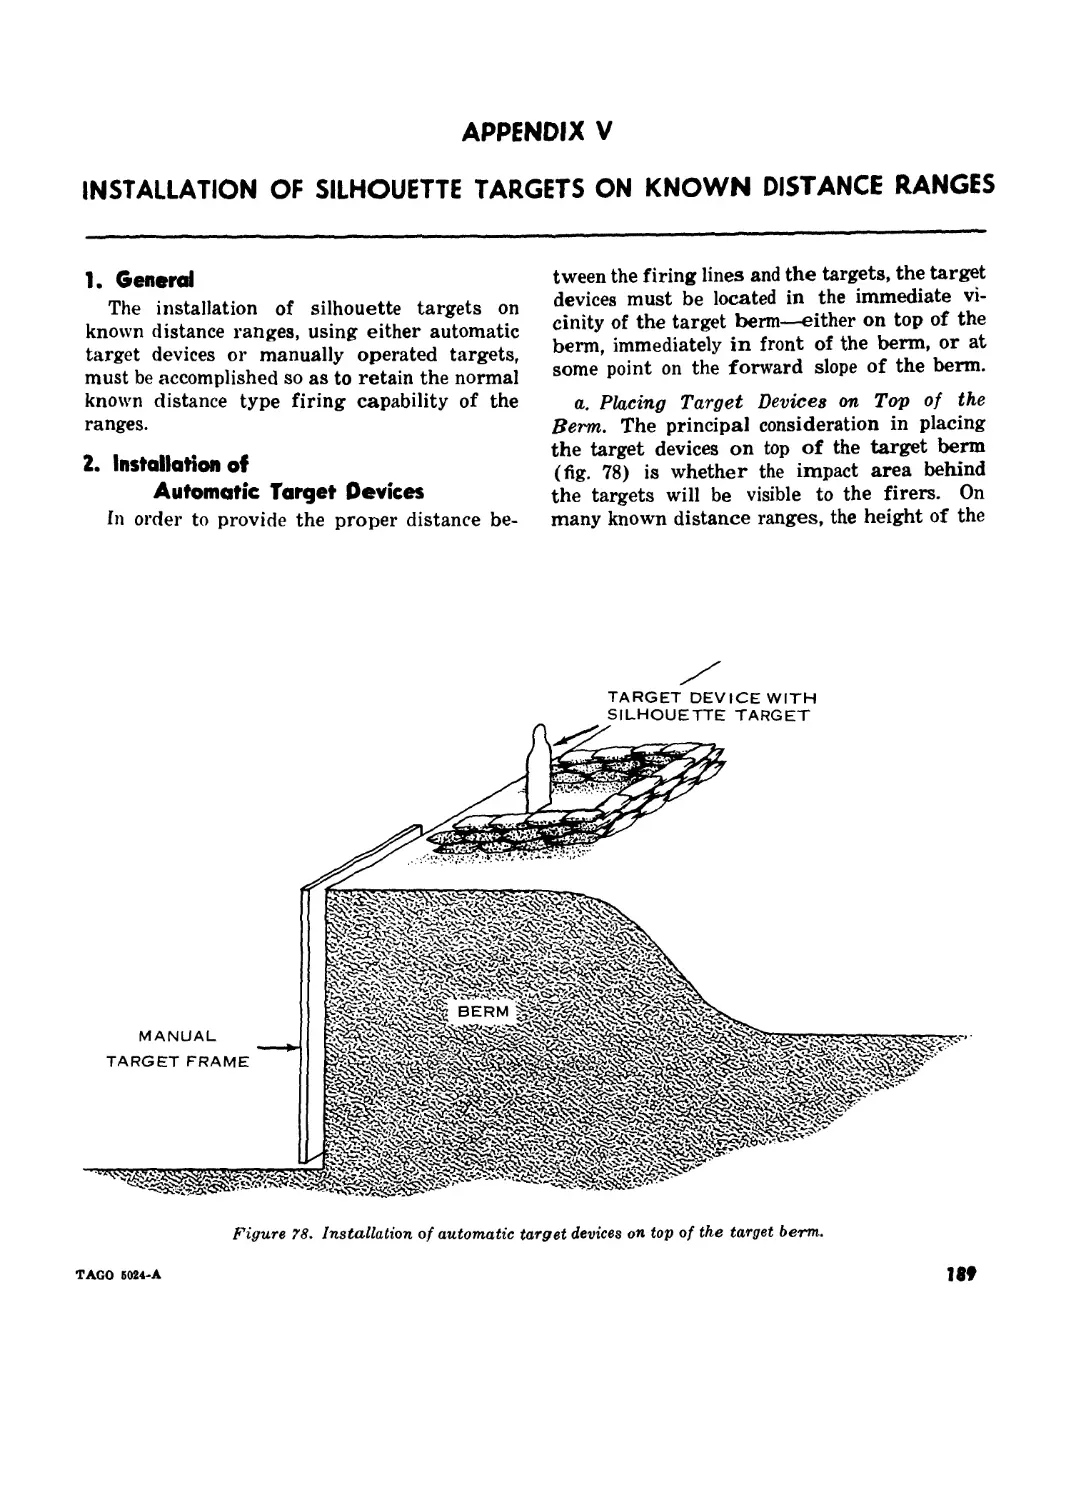
Год: 1964


Текст
MHI
СоруЗ
FM 23-71
DEPARTMENT OF THE ARMY FIELD MANUAL
RIFLE
MARKSMANSHIP
HEADQUARTERS,
DEPARTMENT OF THE ARMY
JULY 1964
*FM 23-71
Field Manual
No. 23-71
HEADQUARTERS
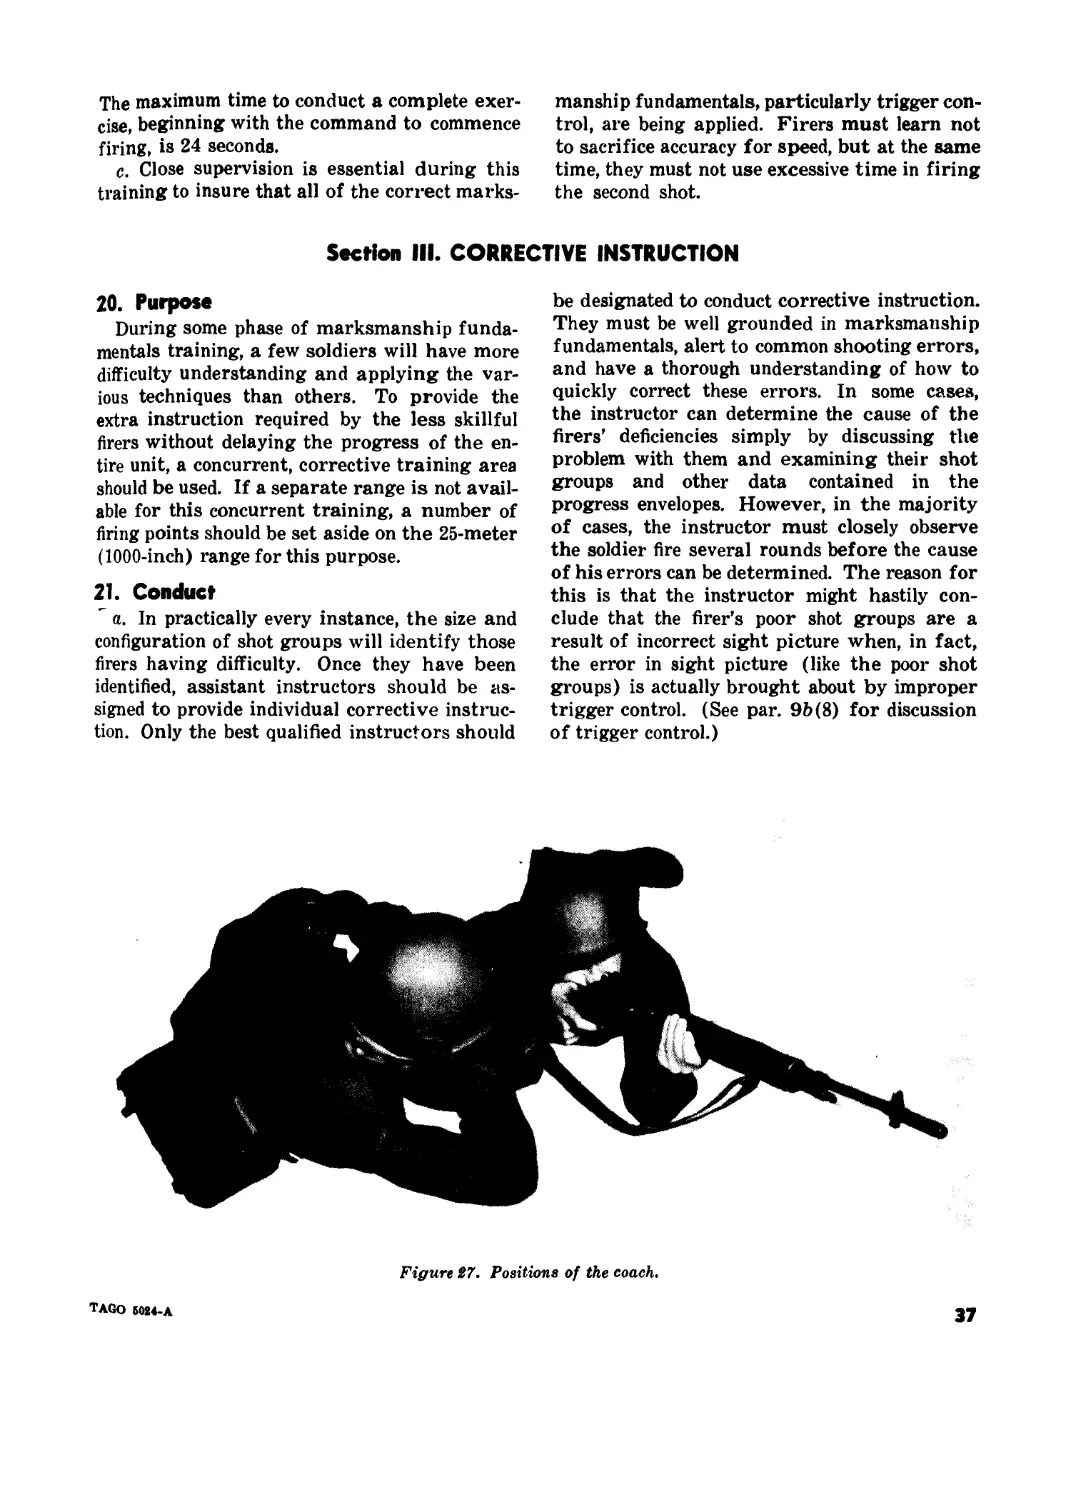
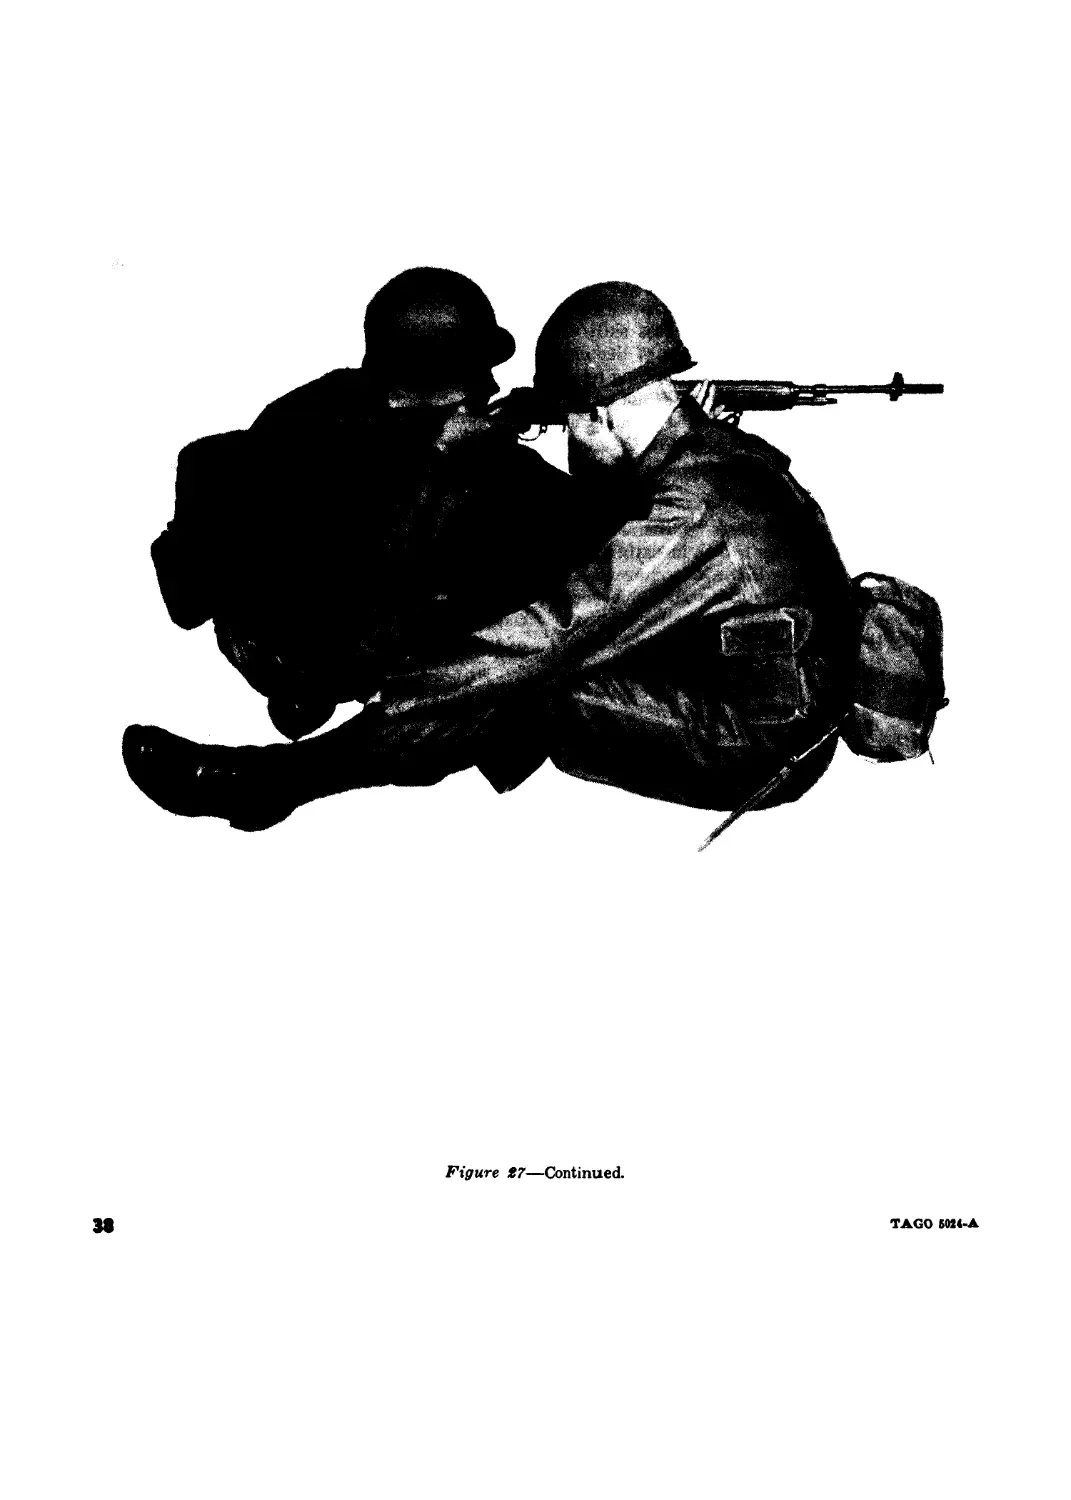
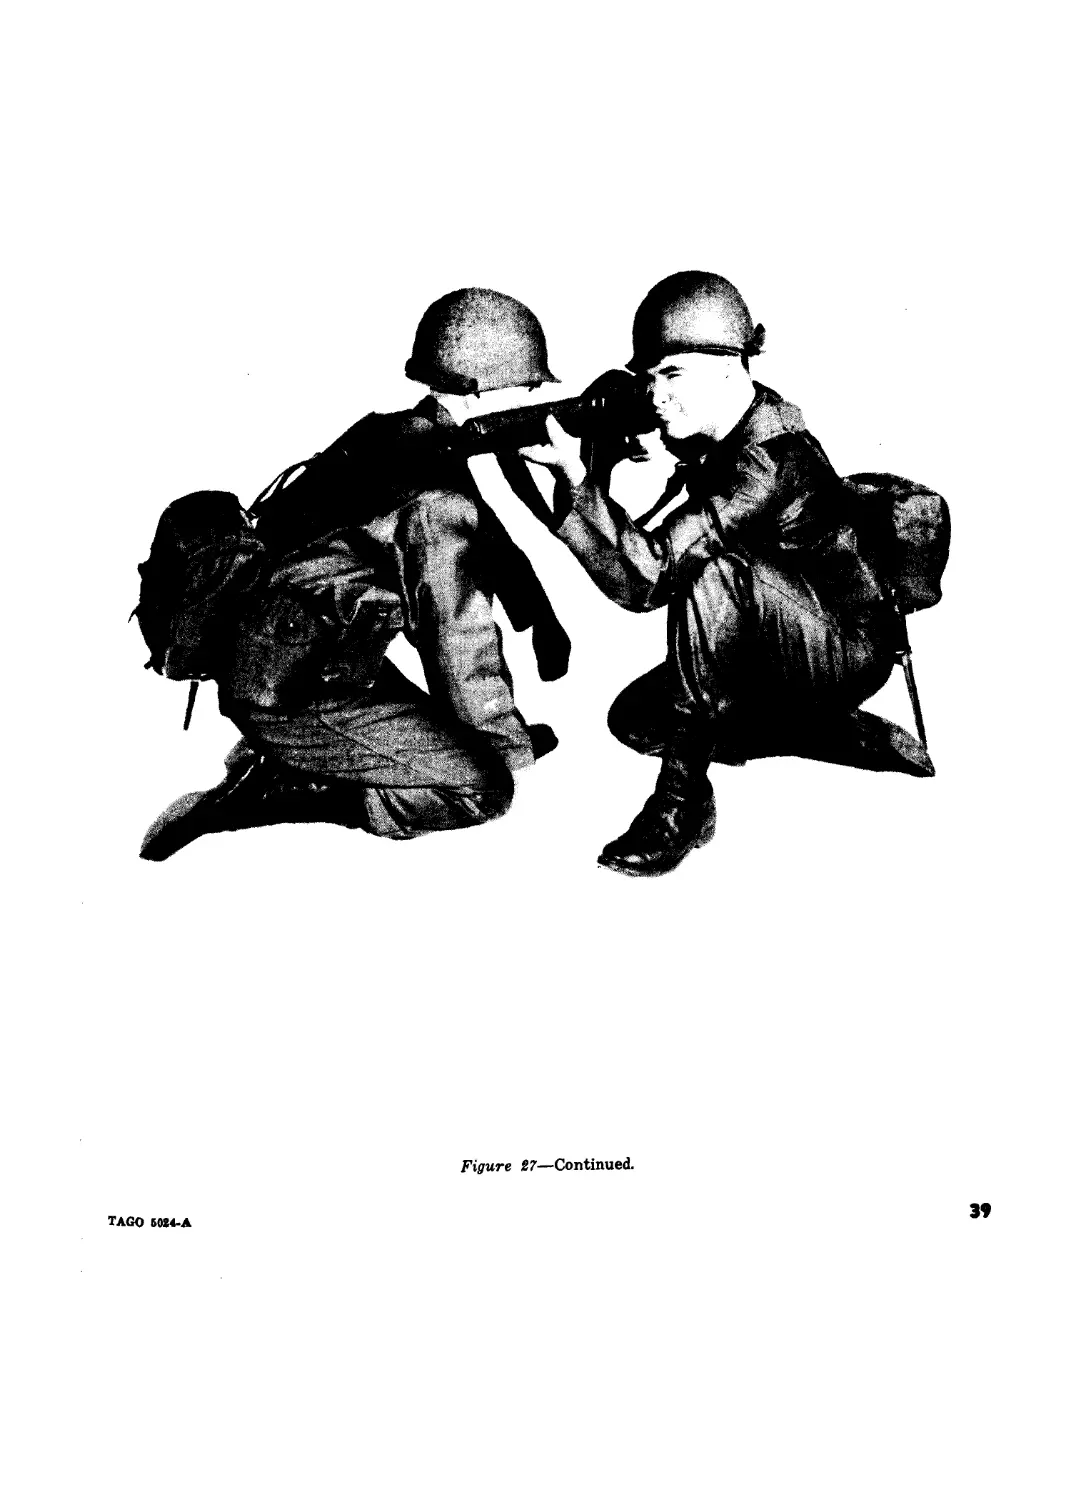
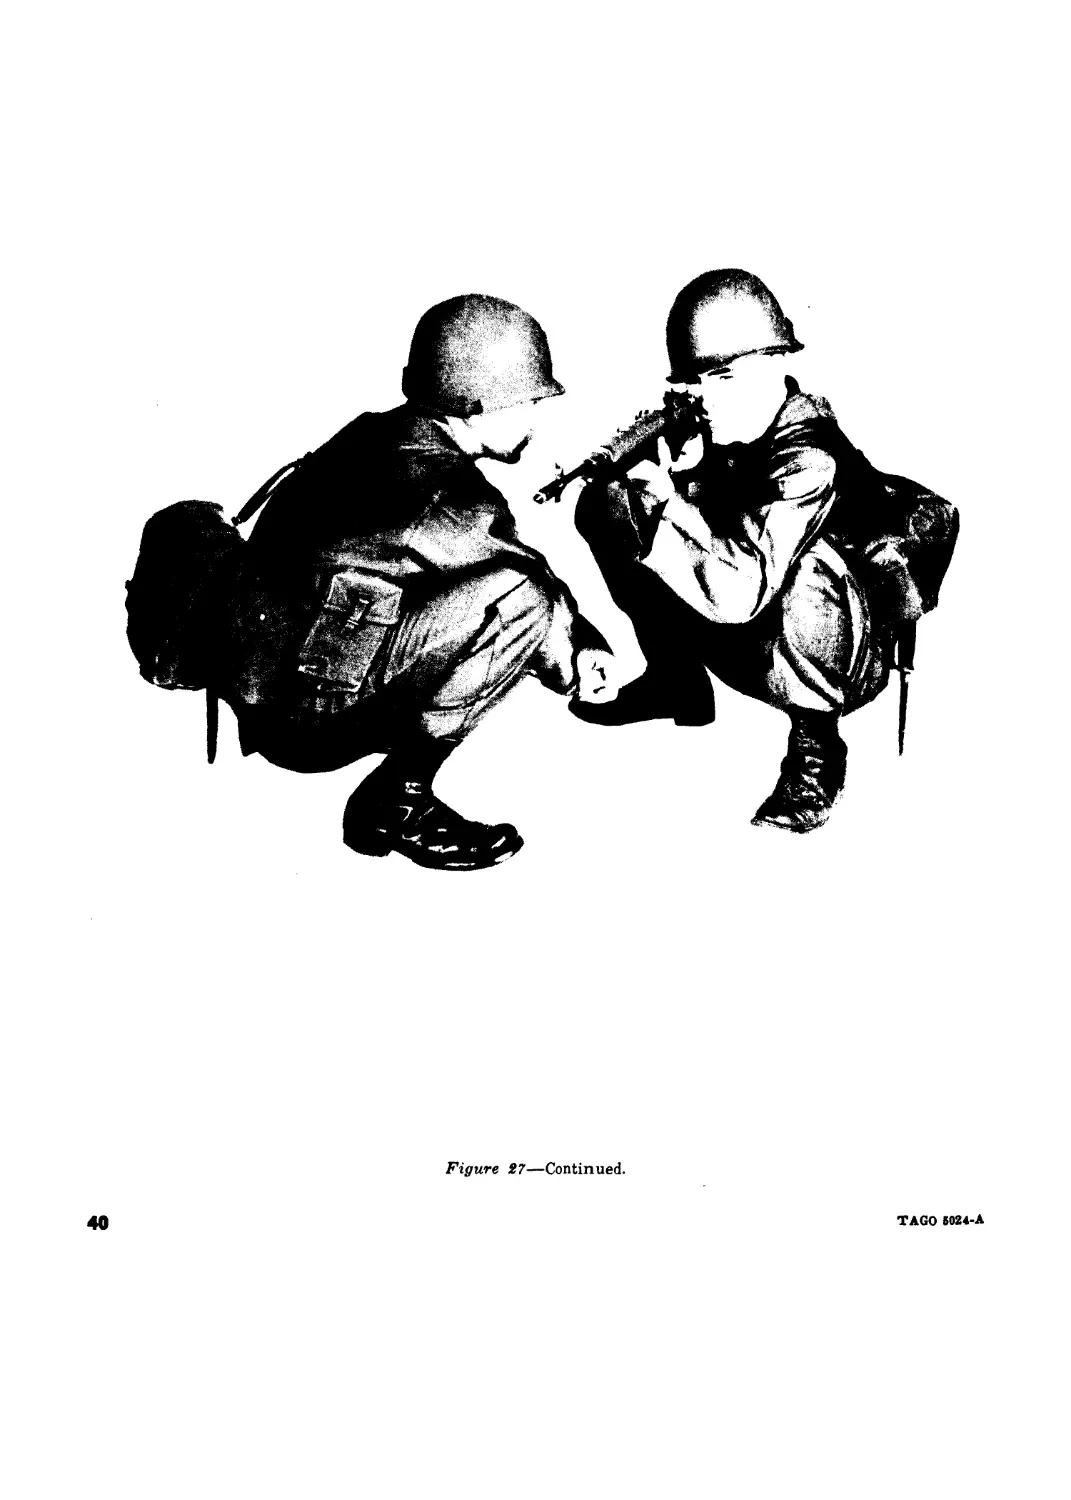
DEPARTMENT OF THE ARMY
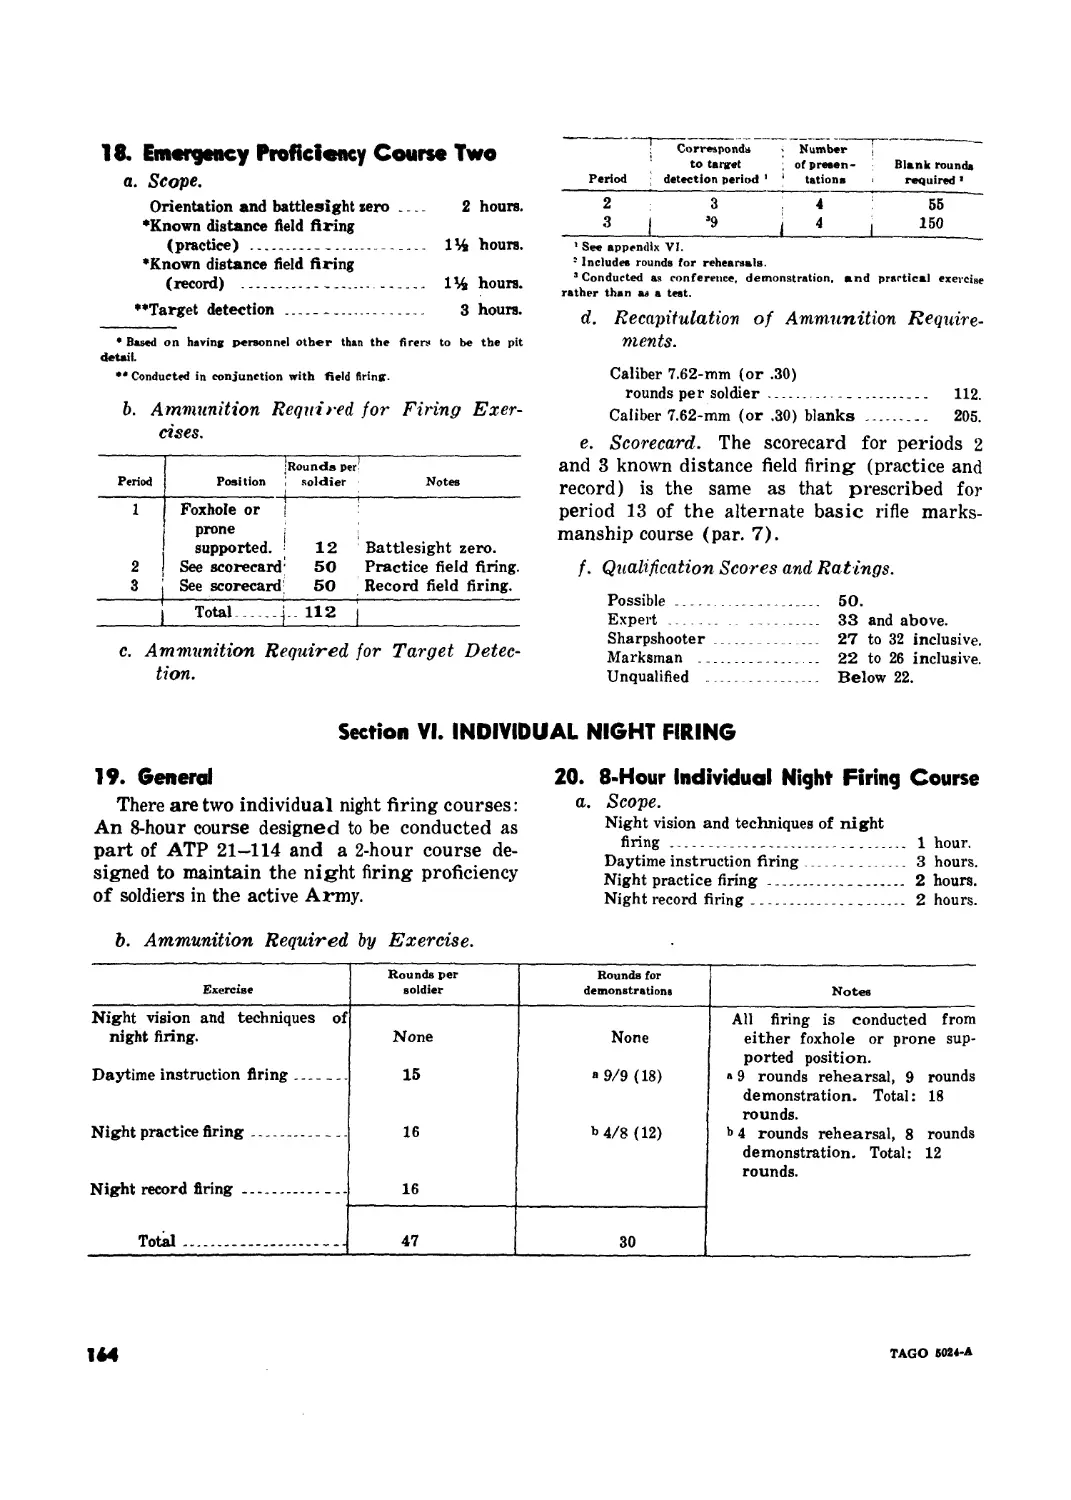
Washington, D. C., 27 July 196и
RIFLE MARKSMANSHIP
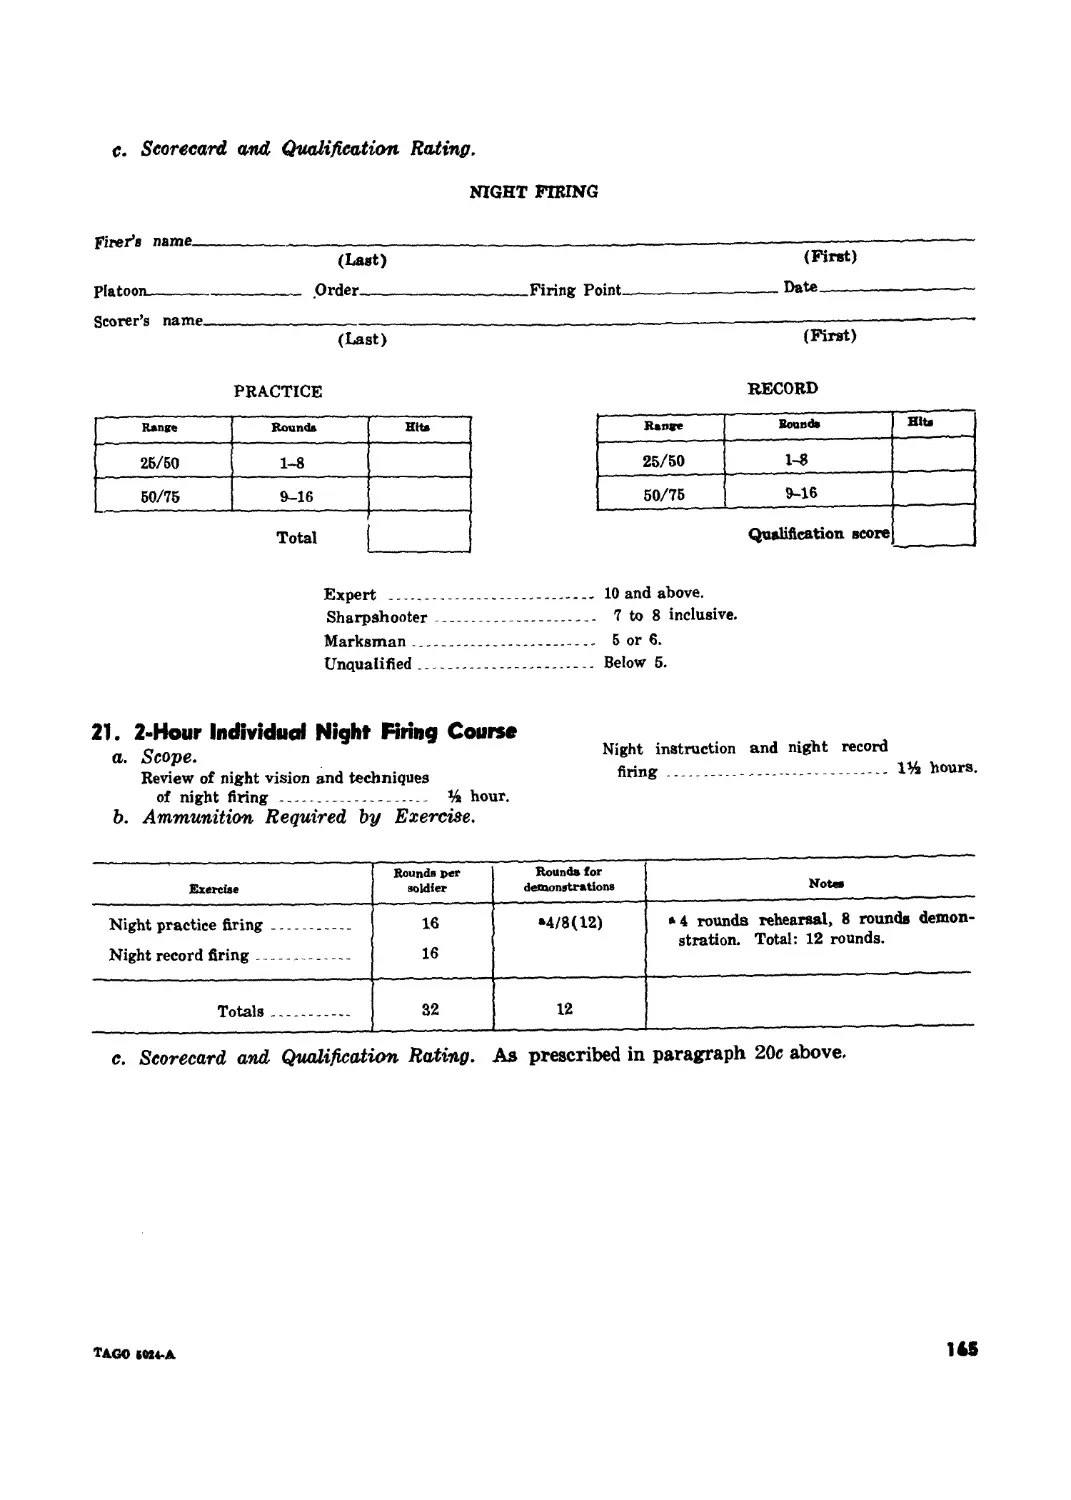
Paragraph* Page
Chapter 1. INTRODUCTION 1-5 3
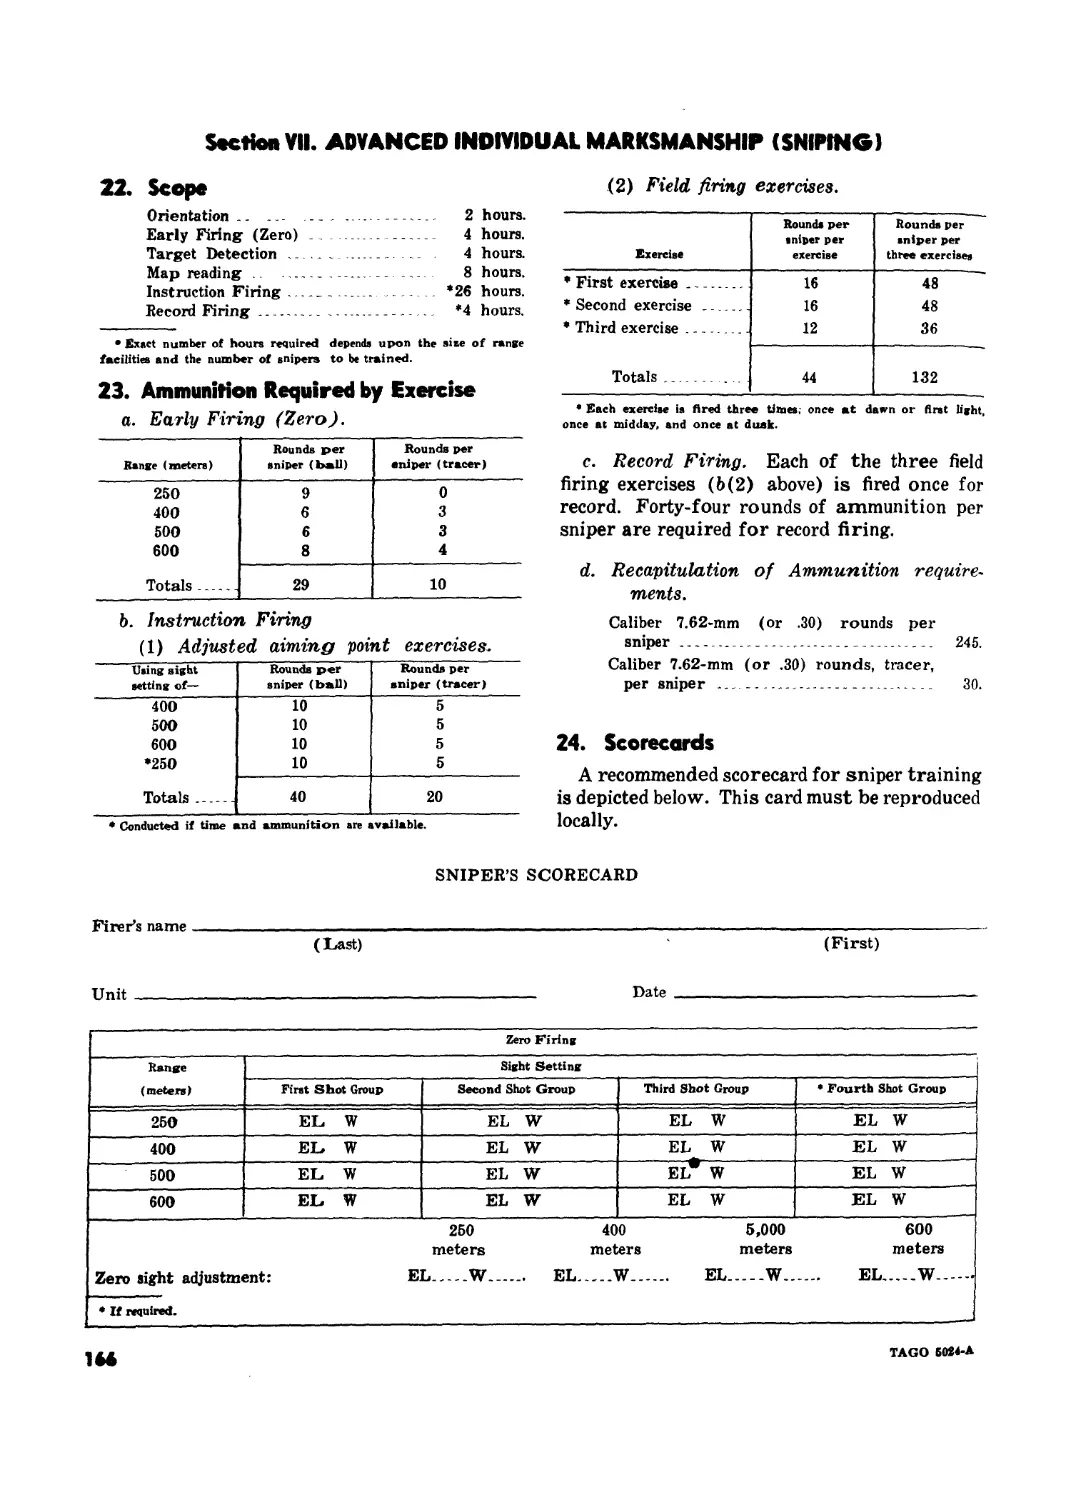
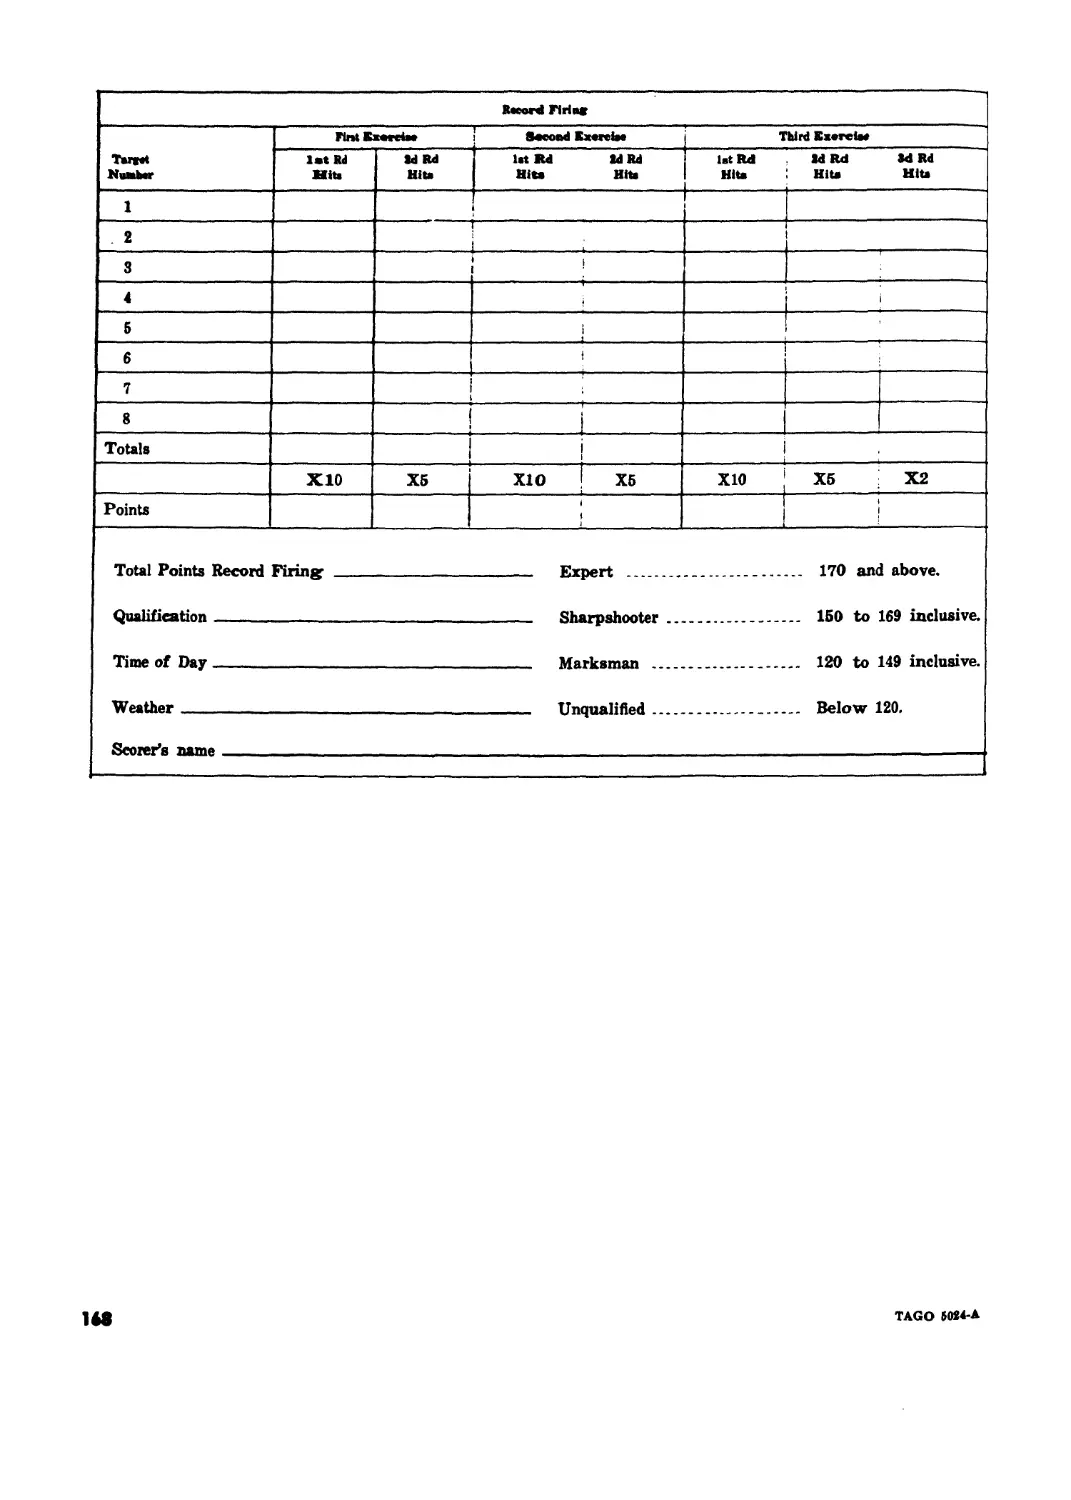
2. RIFLE MARKSMANSHIP FUNDAMENTALS
Section I. General 6-8 5
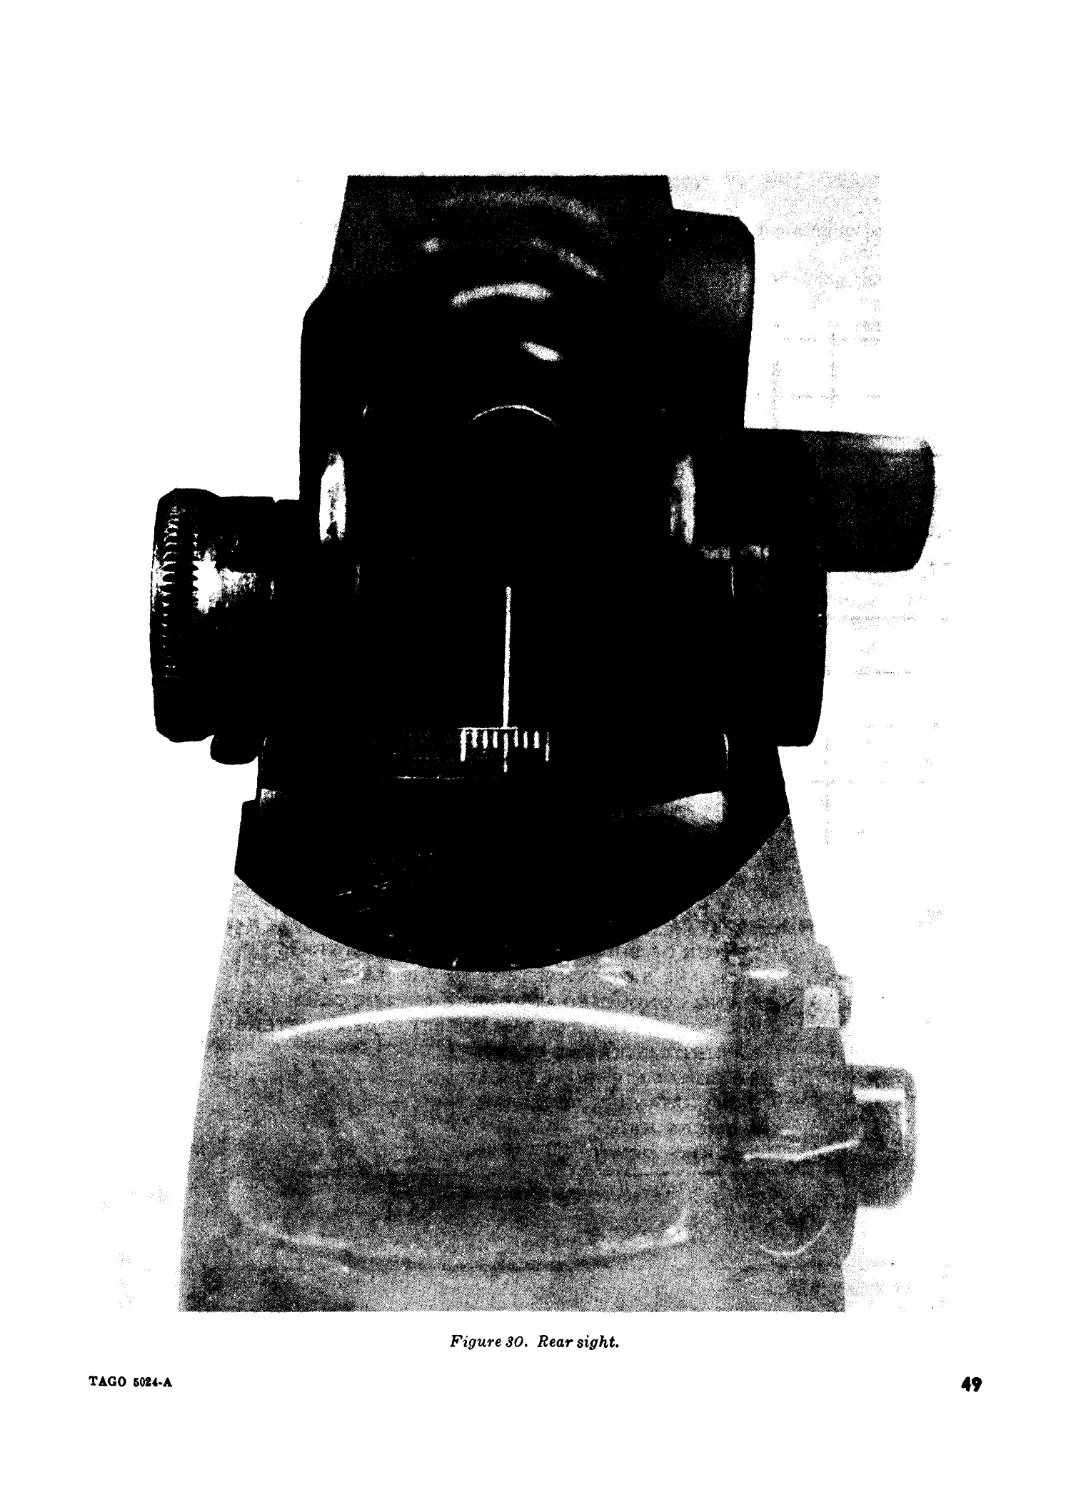
II. Marksmanship fundamentals . .. 9-19 6
III. Corrective instruction .. 20-21 37
IV. Conduct of firing 22-23 44
Chapter 3. SIGHT ADJUSTMENTS, BATTLESIGHT ZERO, AND
PROGRESS CHECKS
Section I, Sight adjustment . 24-27 48
IL Battlesight zero 28-31 51
III. Progress check 32-34 54
Chapter 4. FIELD FIRING
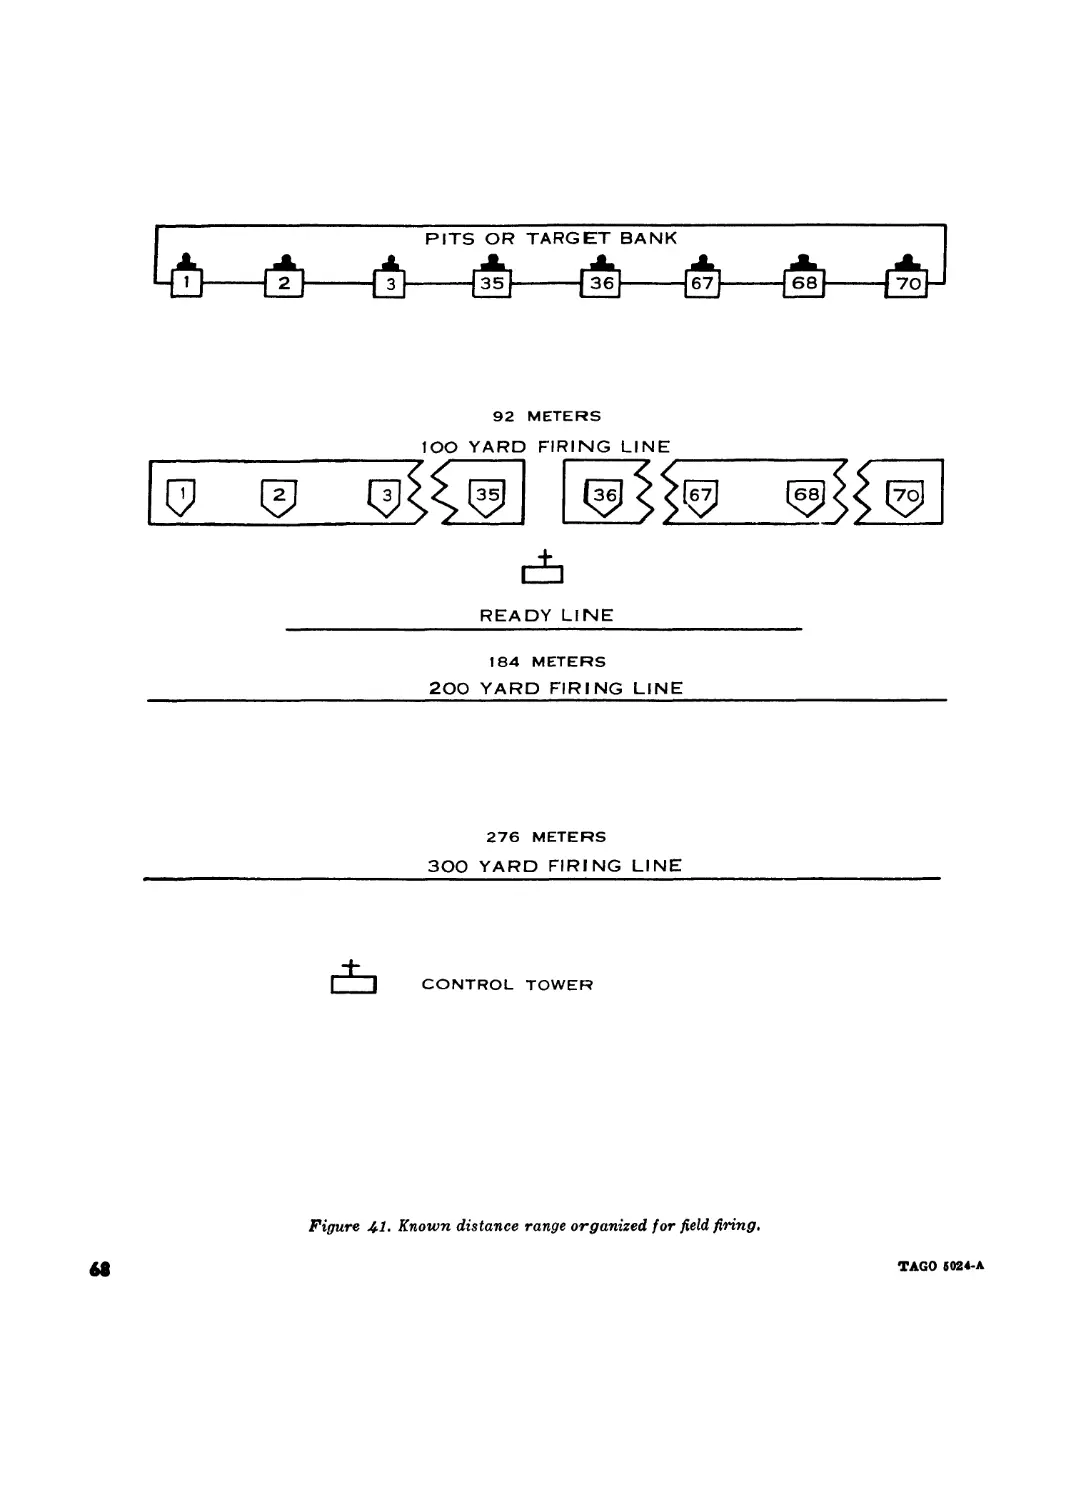
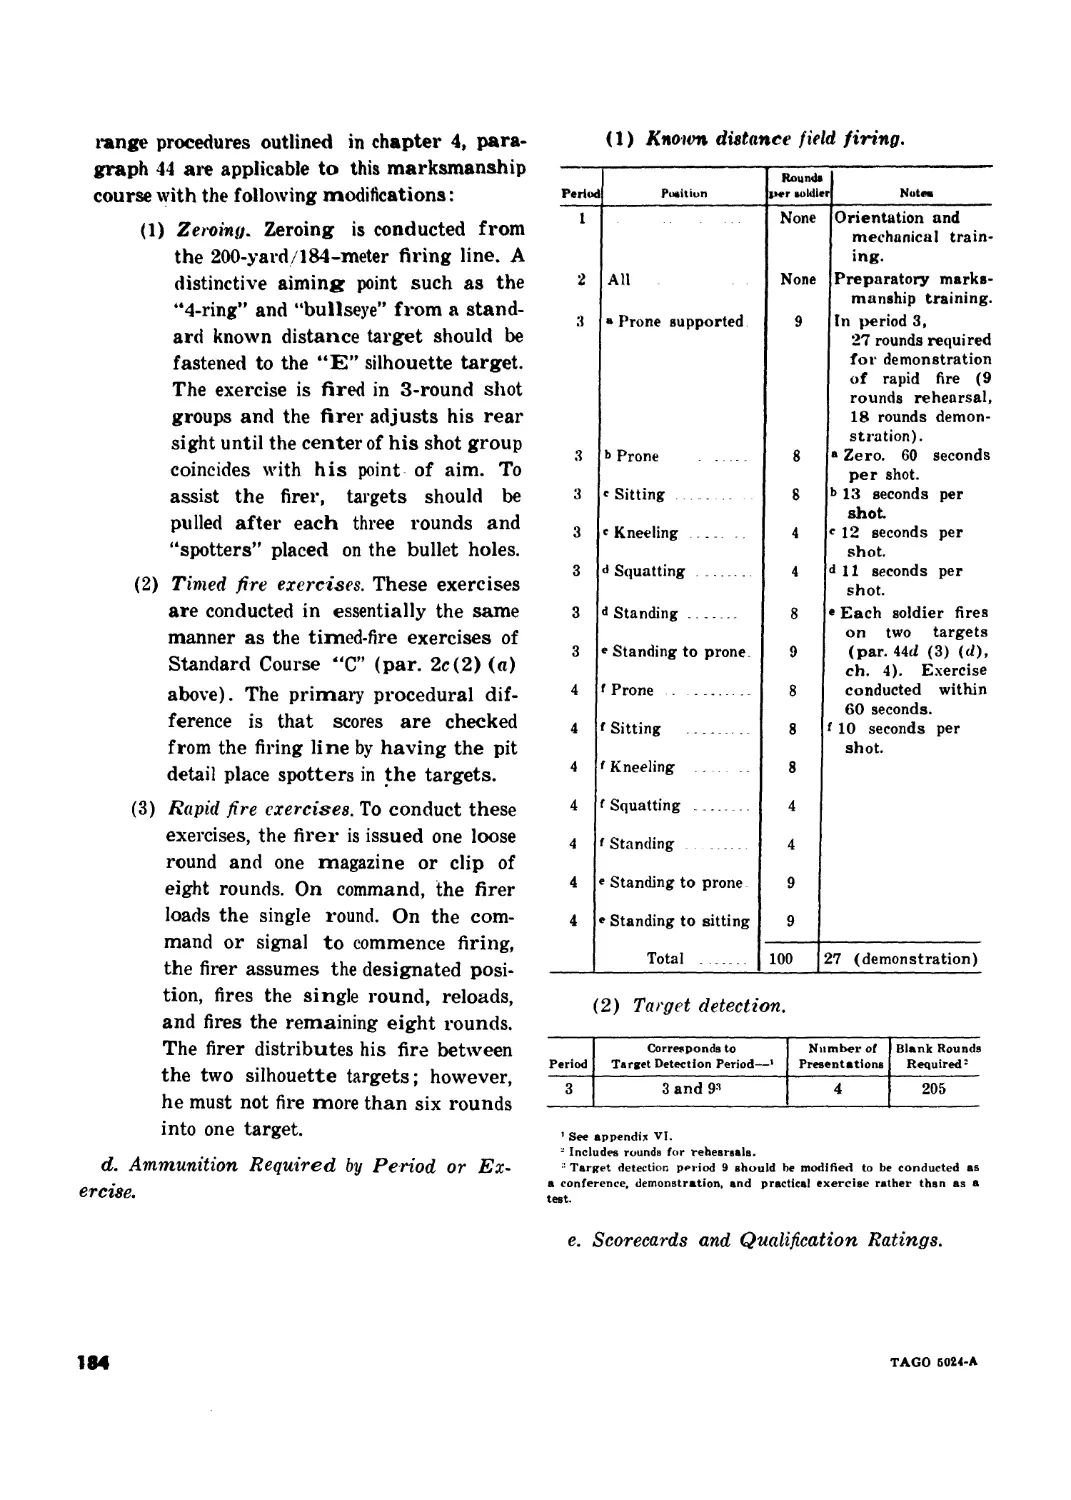
Section I. Conduct of instruction 35-41 57
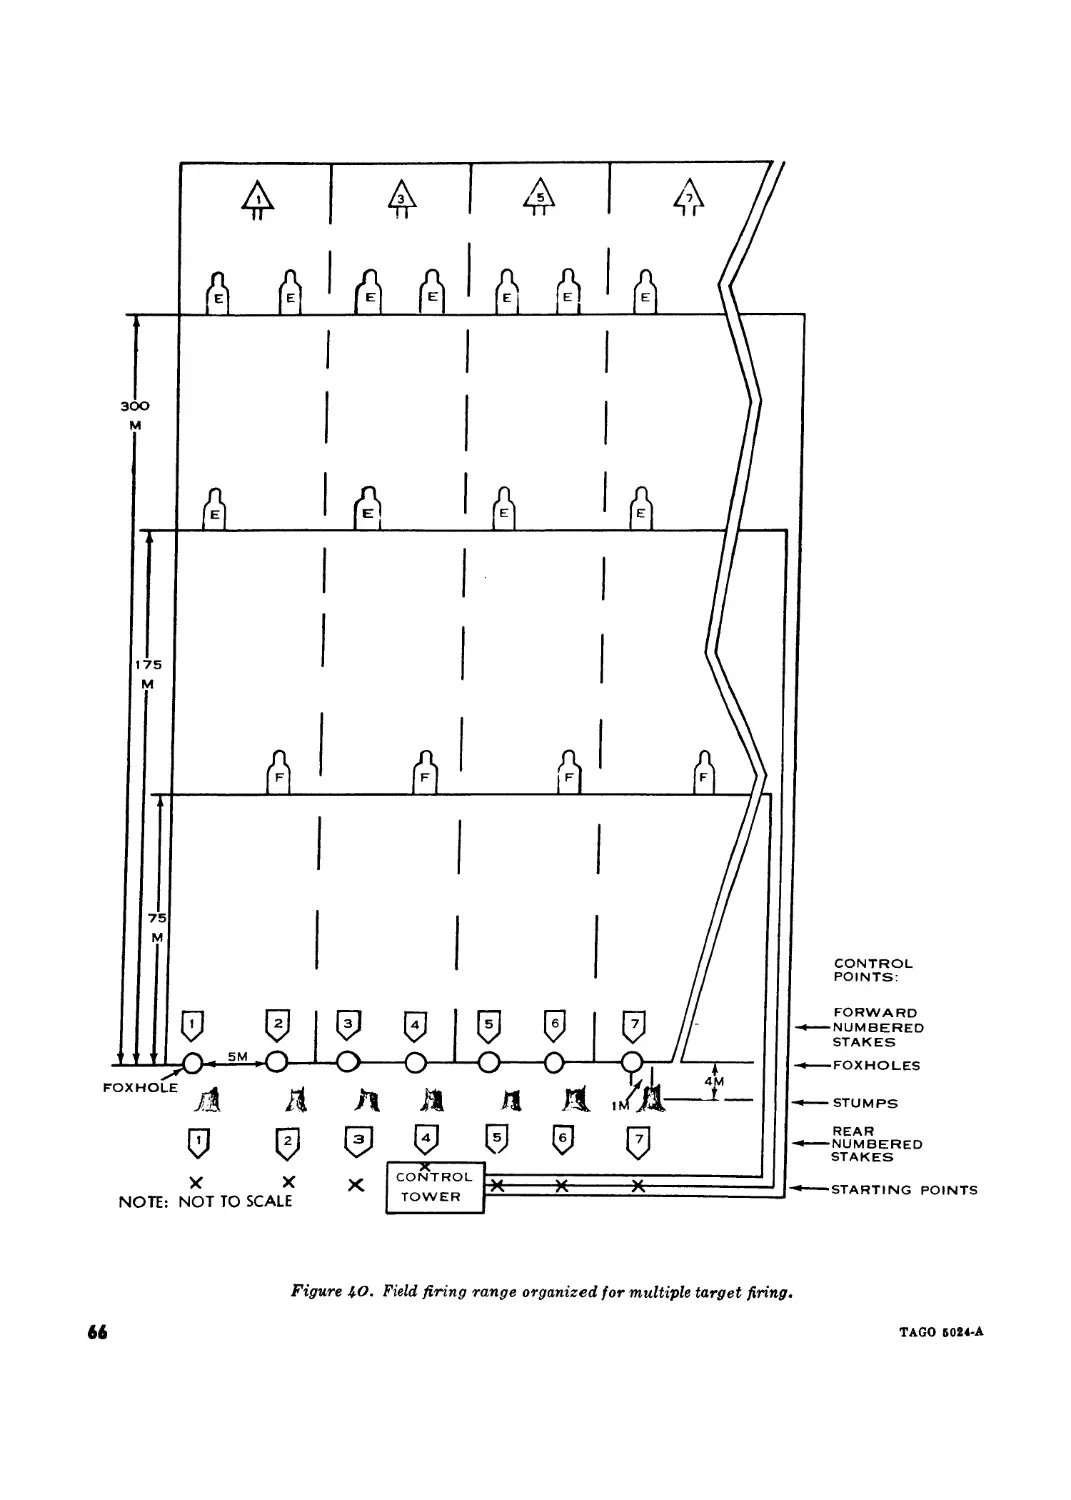
II. Range operation 42-44 60
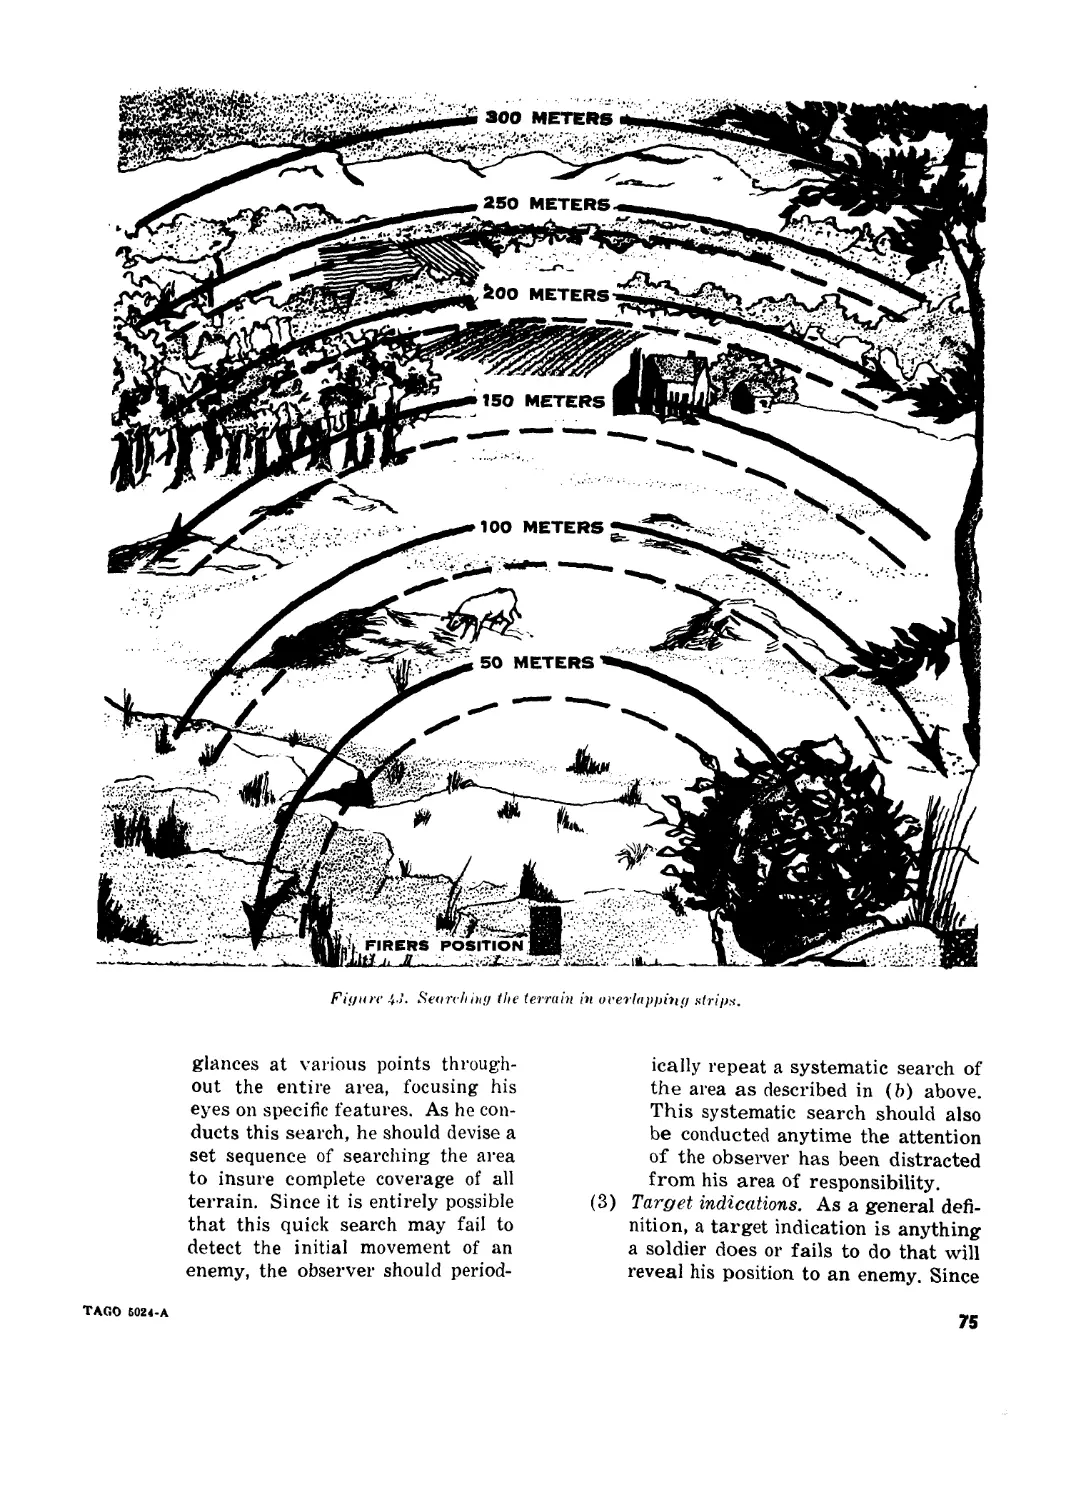
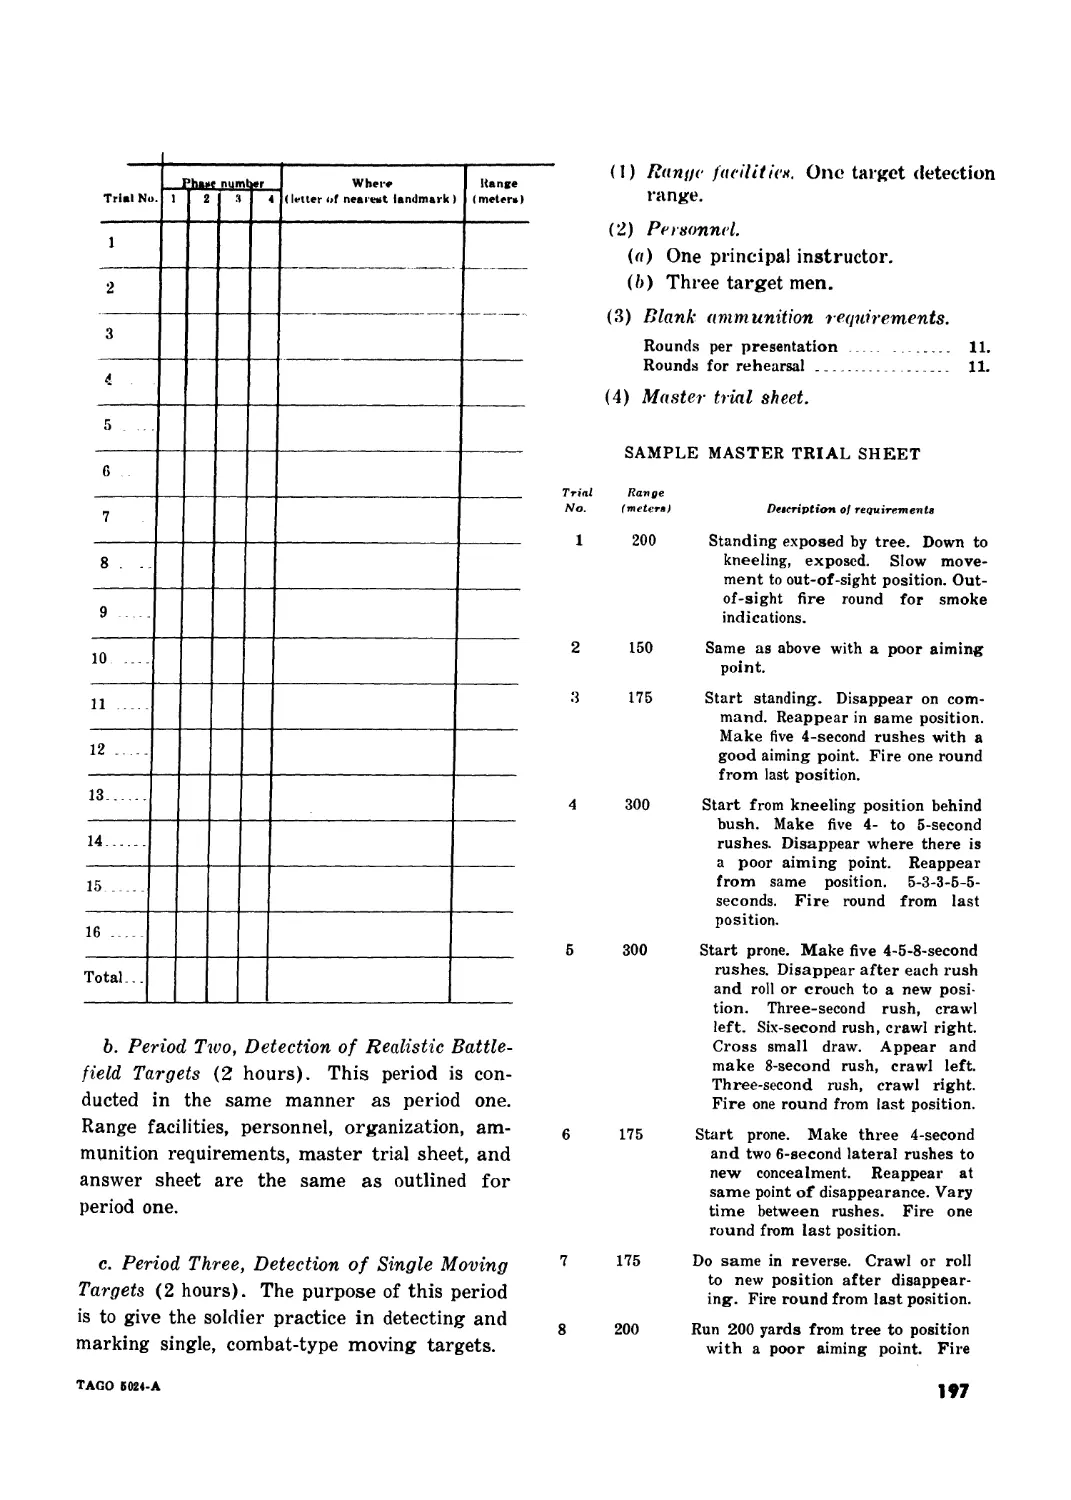
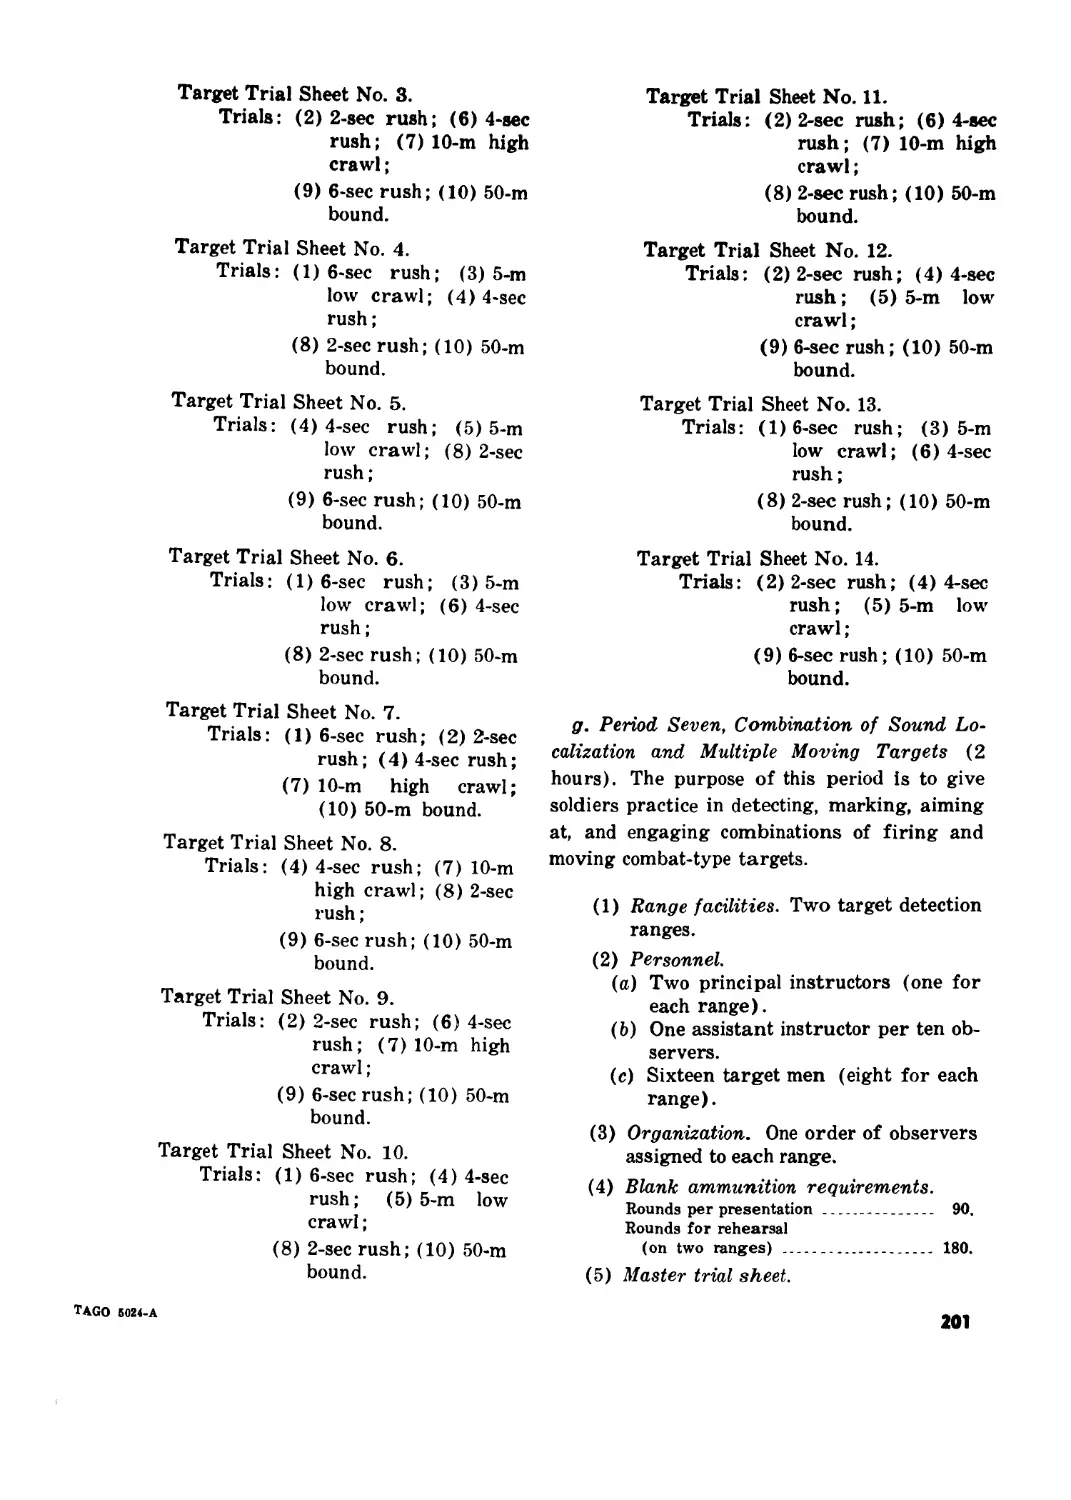
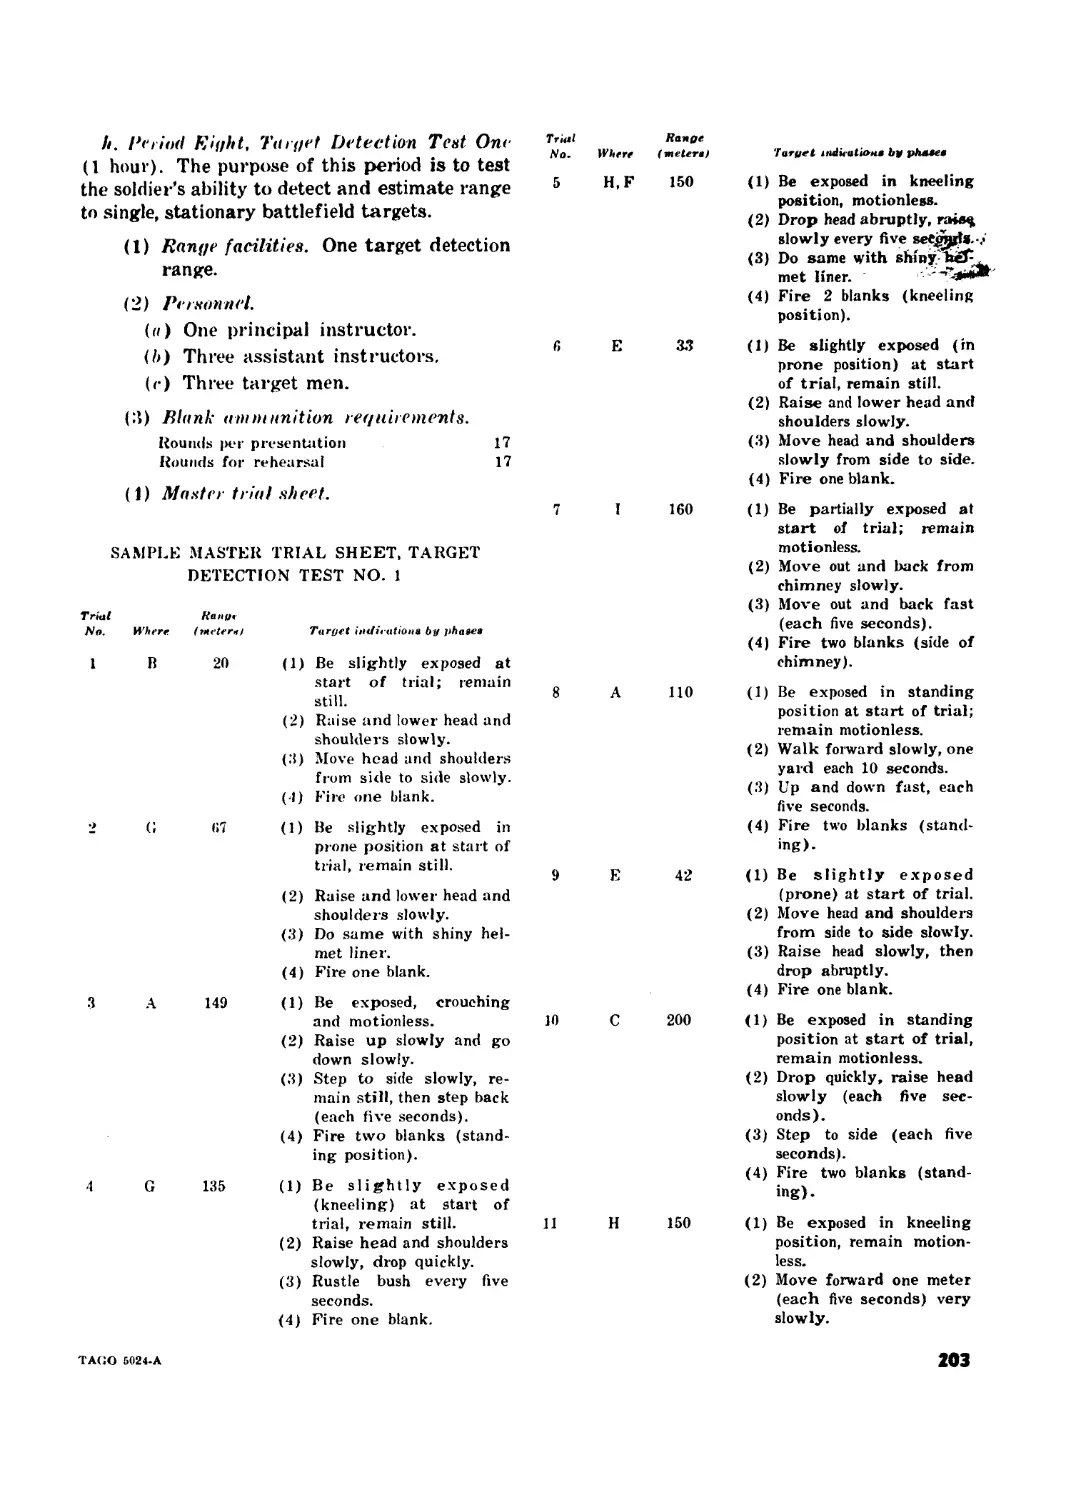
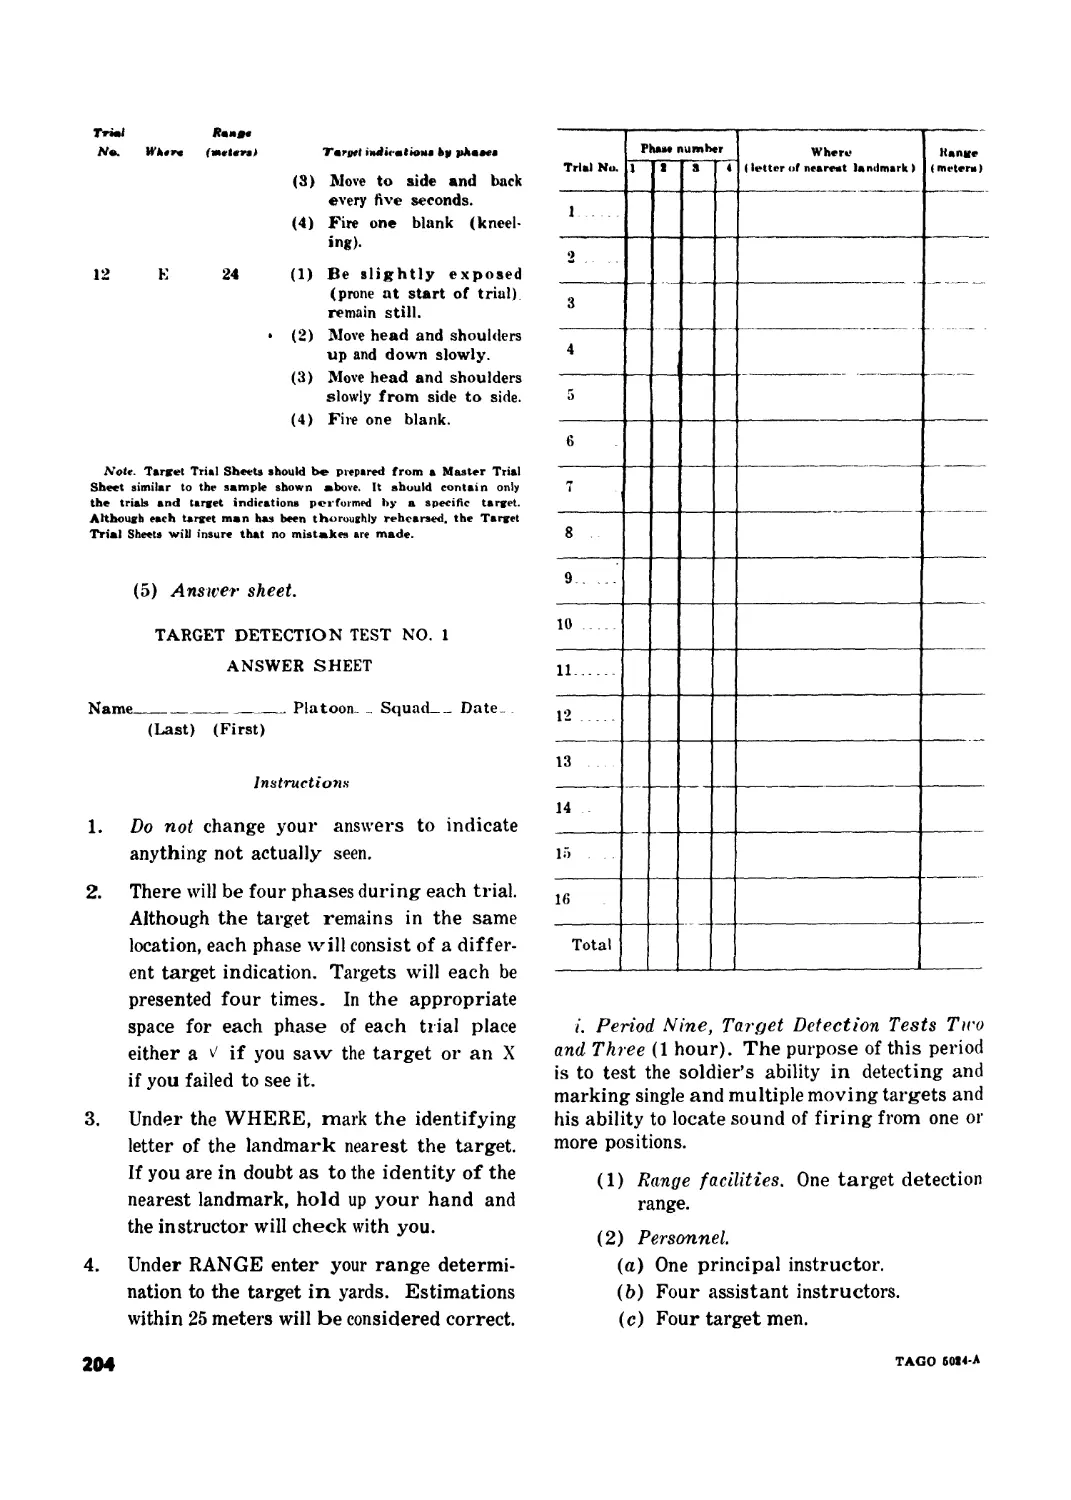
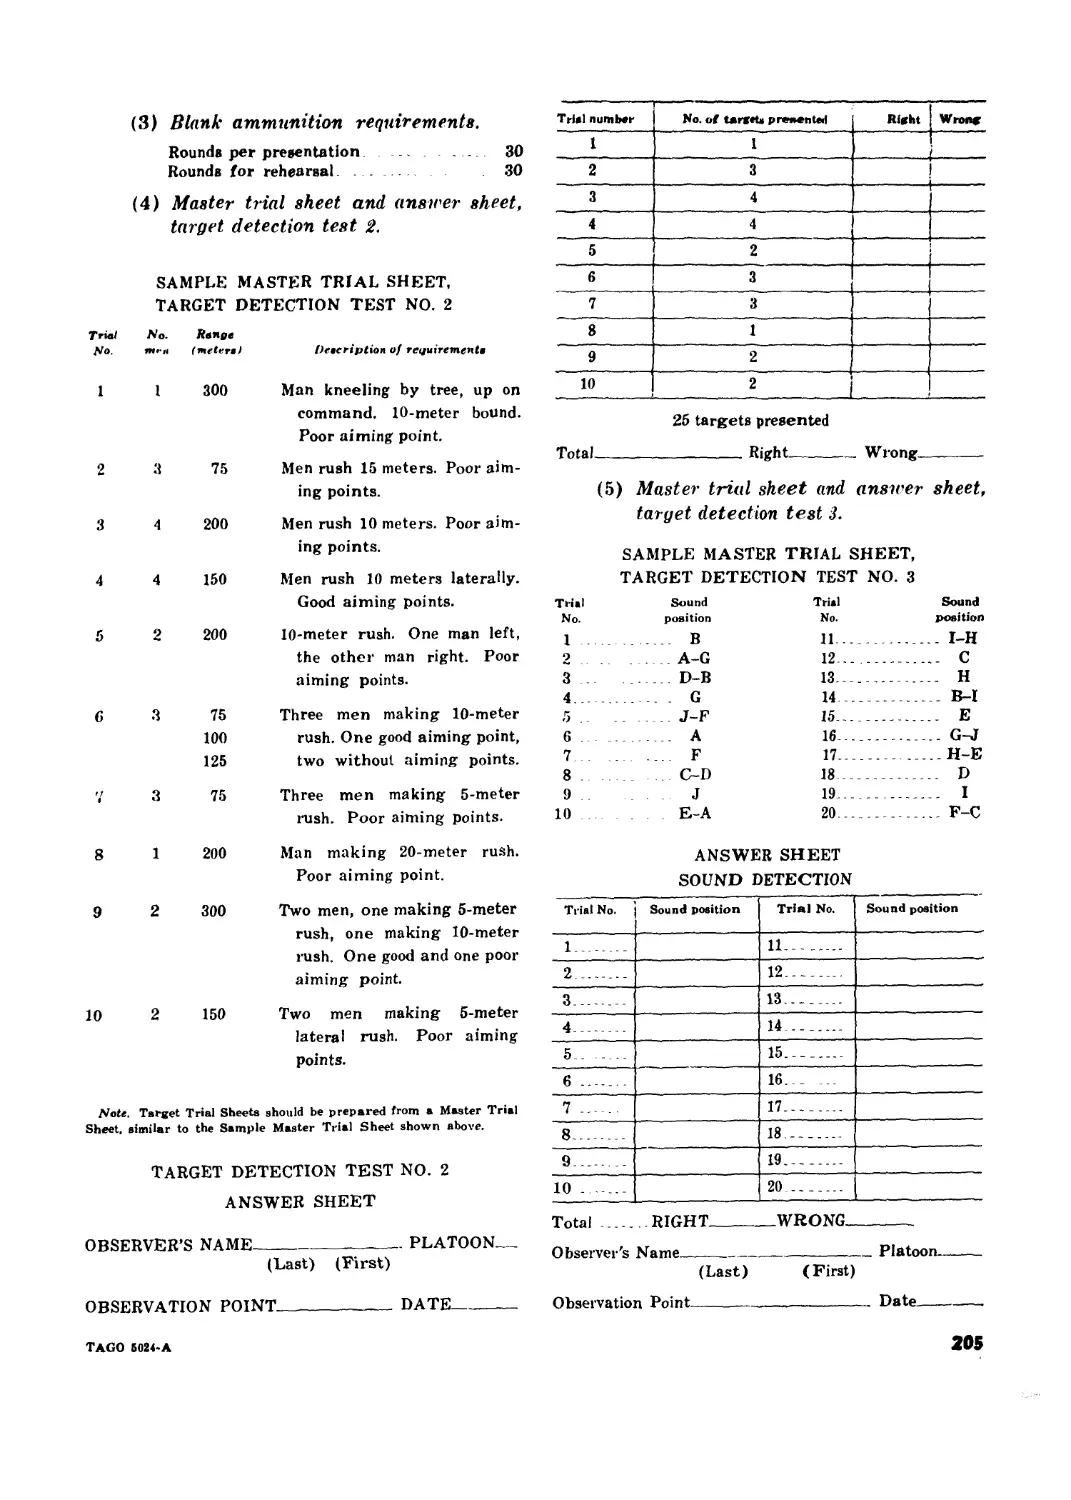
Chapter 5. TARGET DETECTION
Section I. General .... .................. 45-46 71
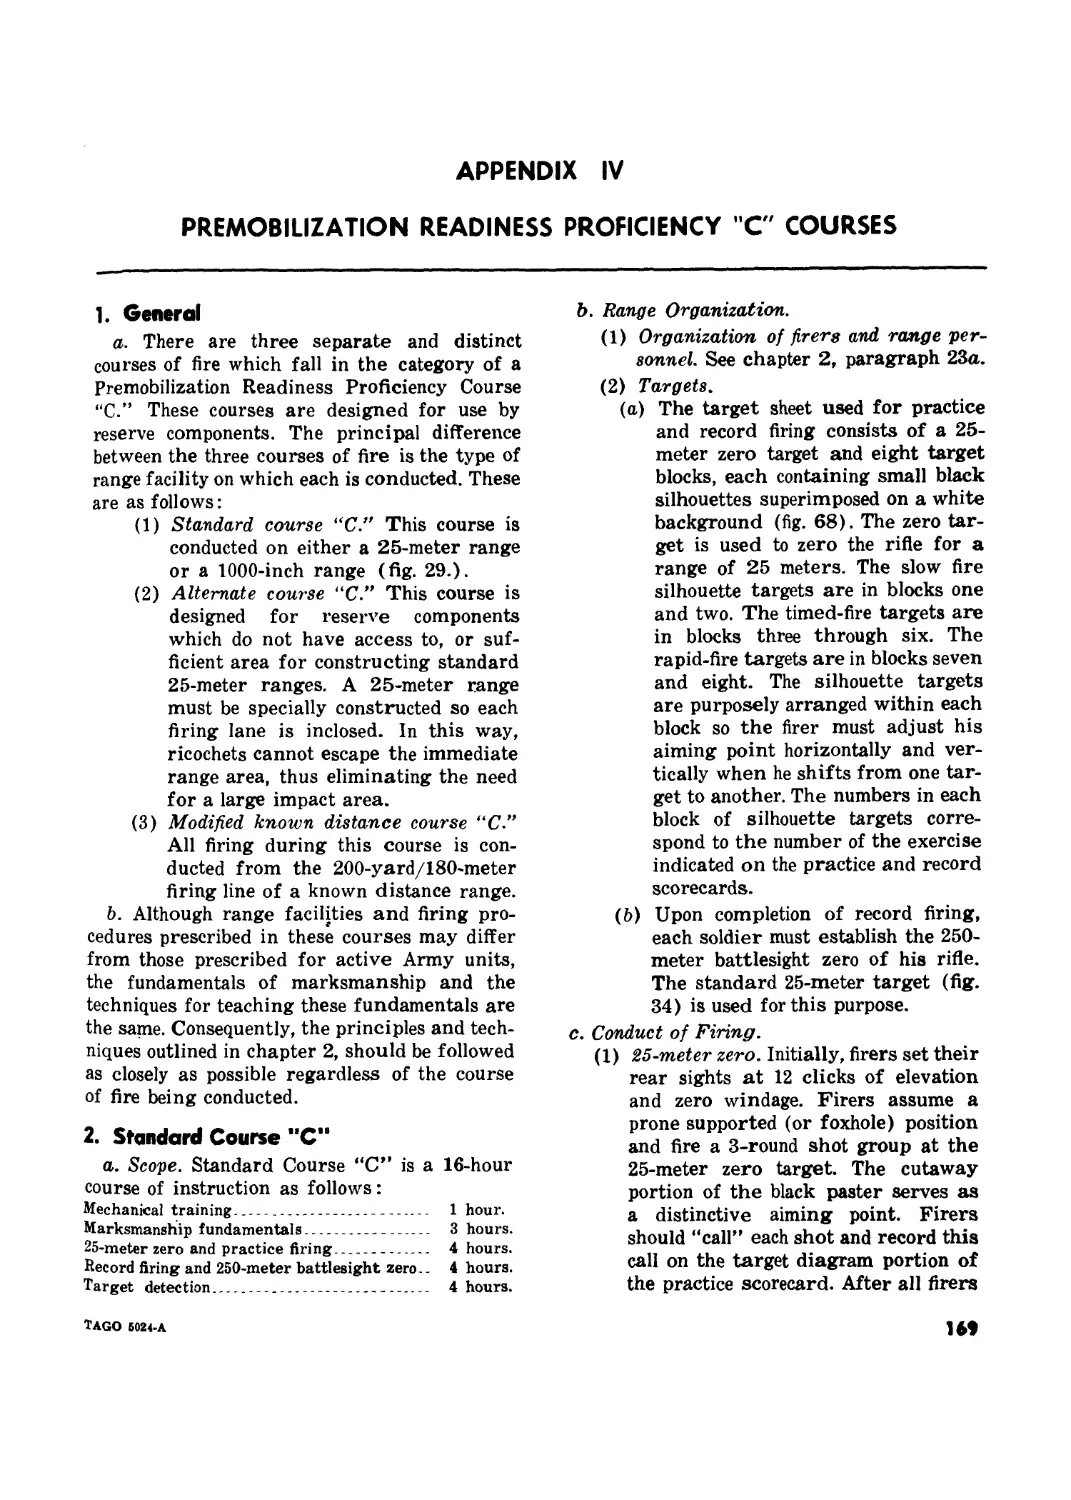
II. Range organization and management 47-50 71
III. Conduct of training .. 51-53 73
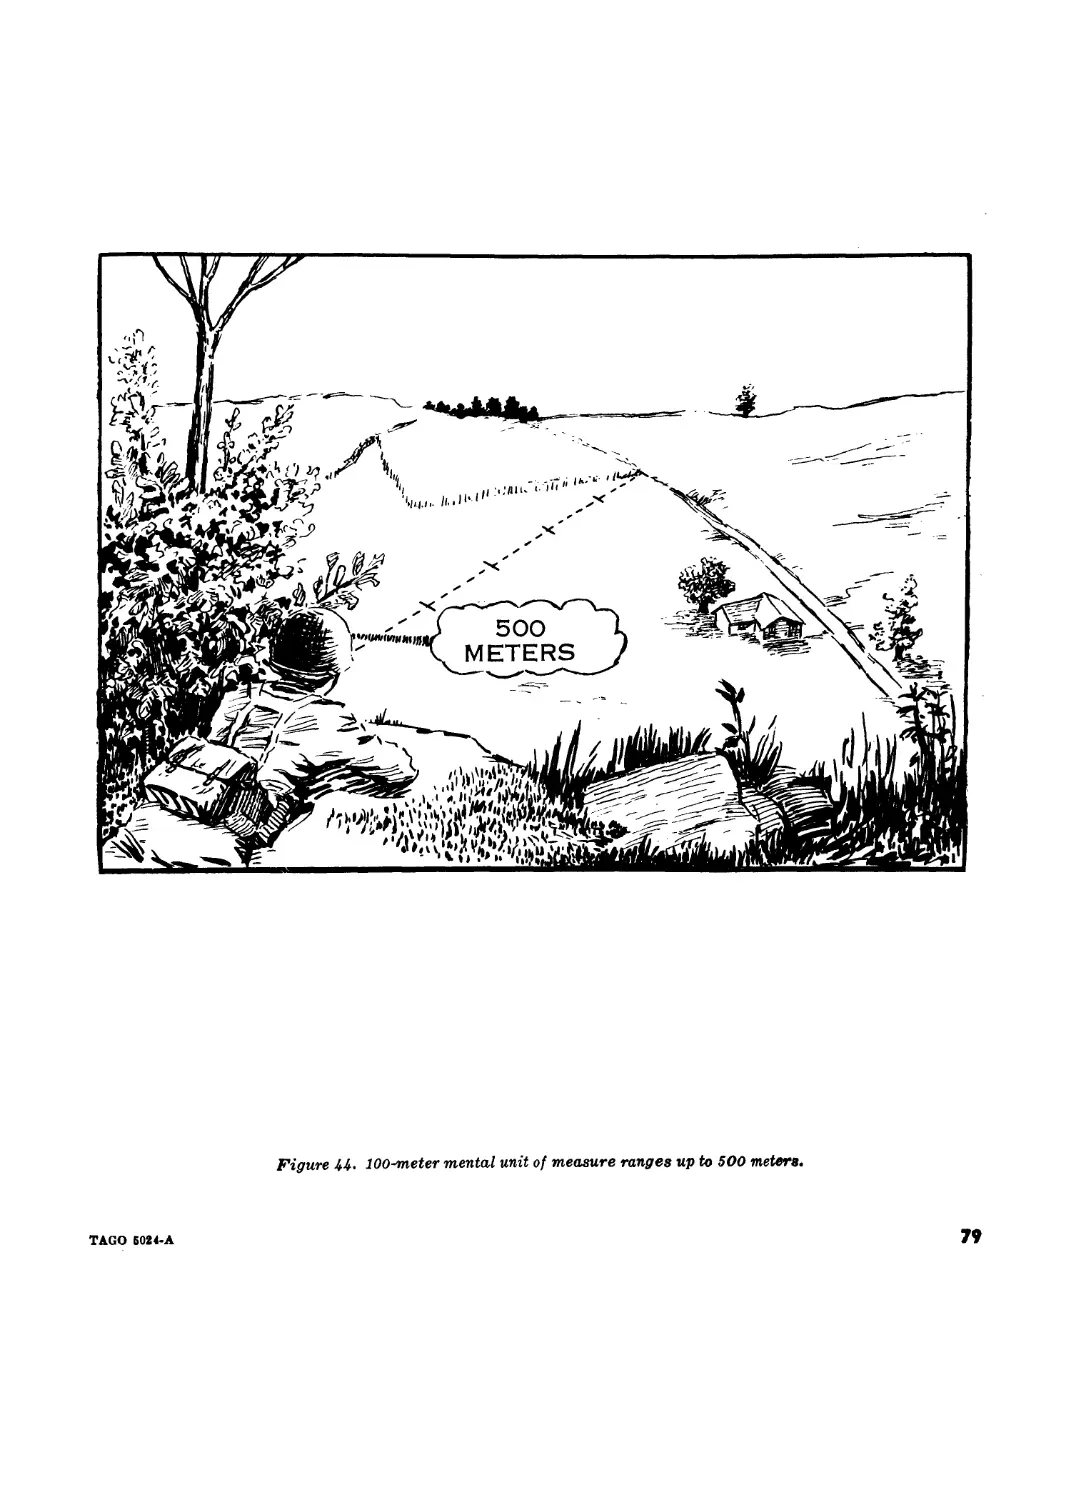
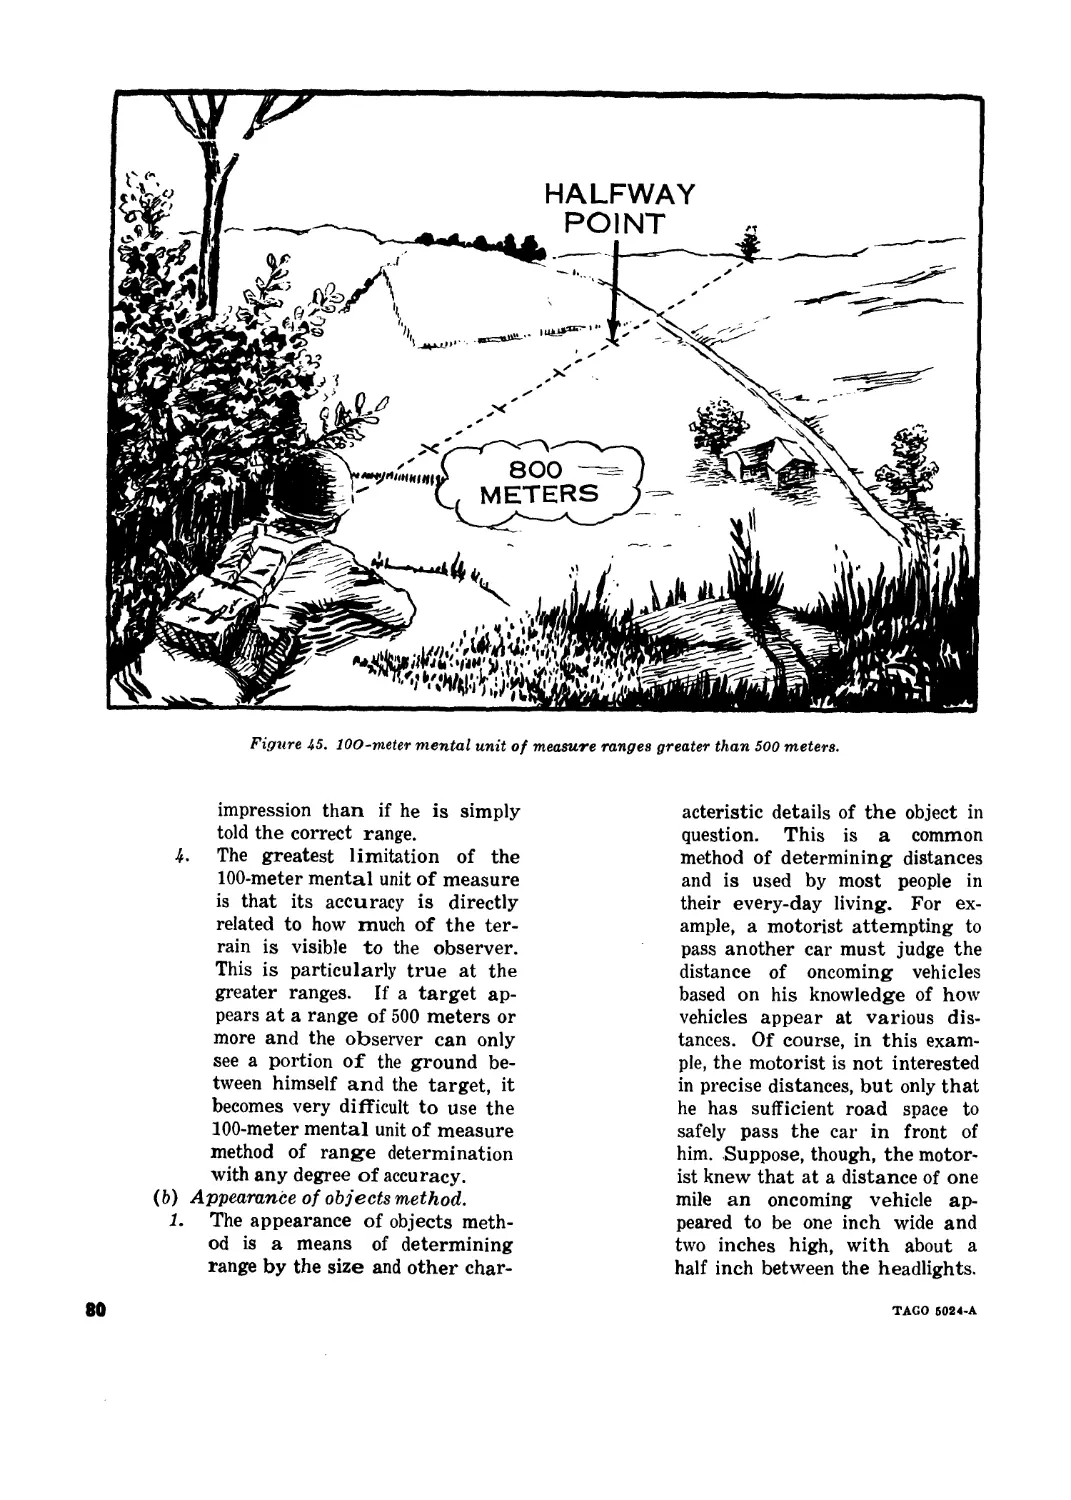
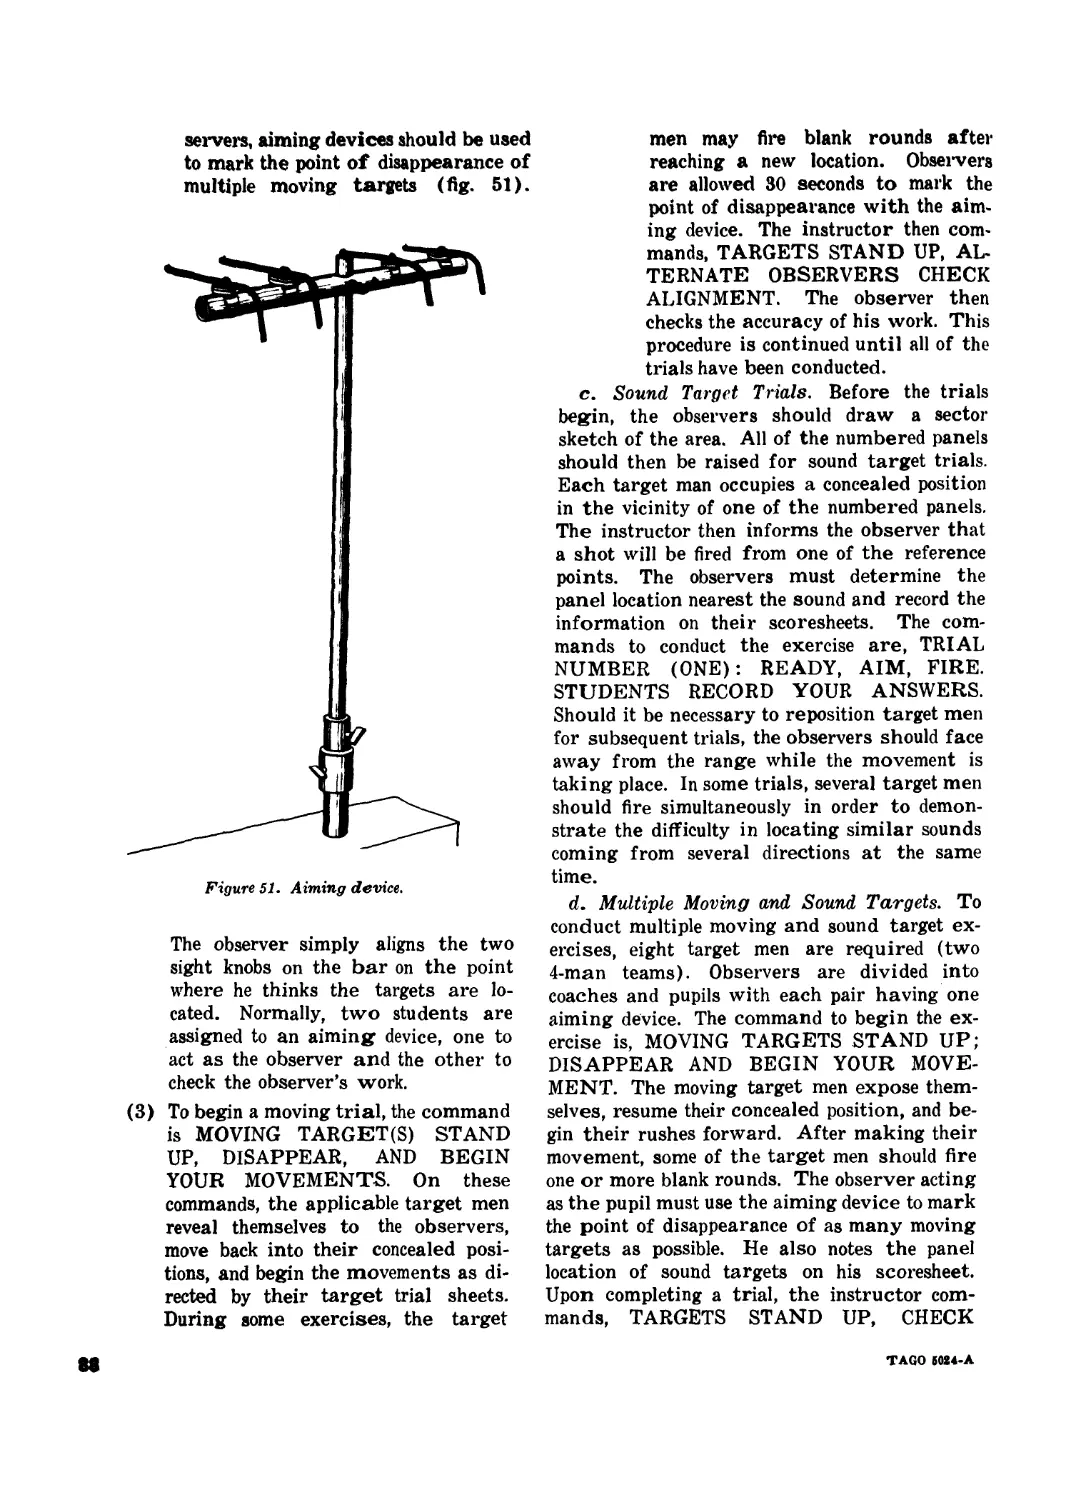
IV. Practical exercises and tests 54-56 85
Chapter 6. RECORD FIRING
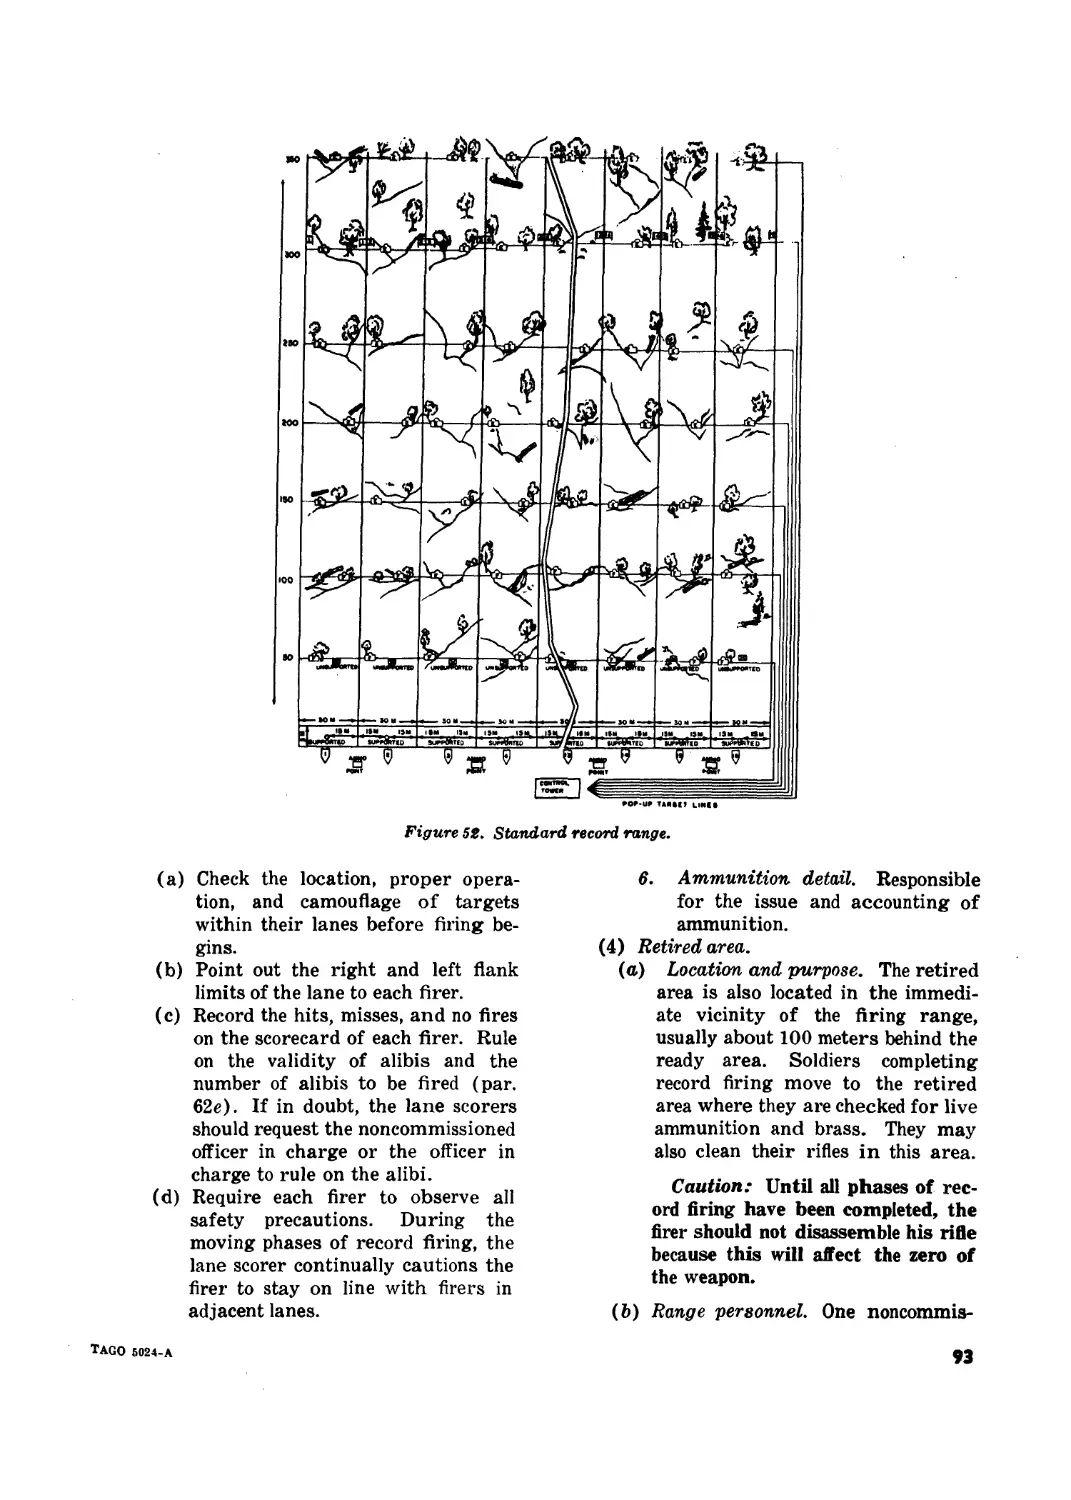
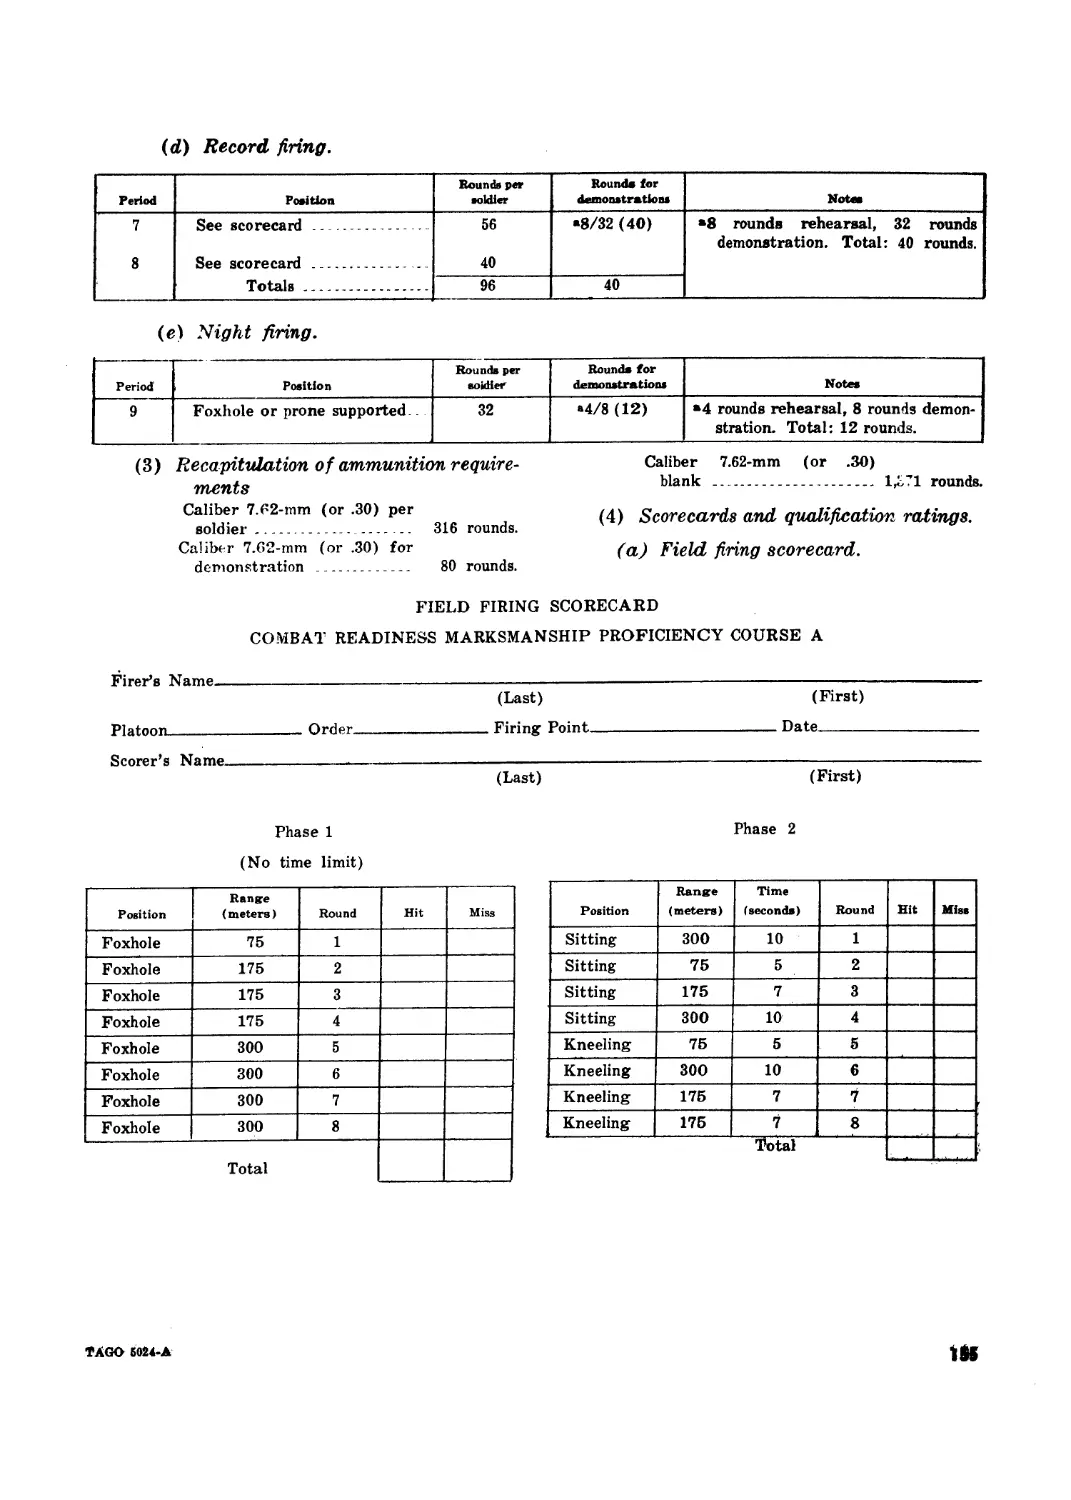
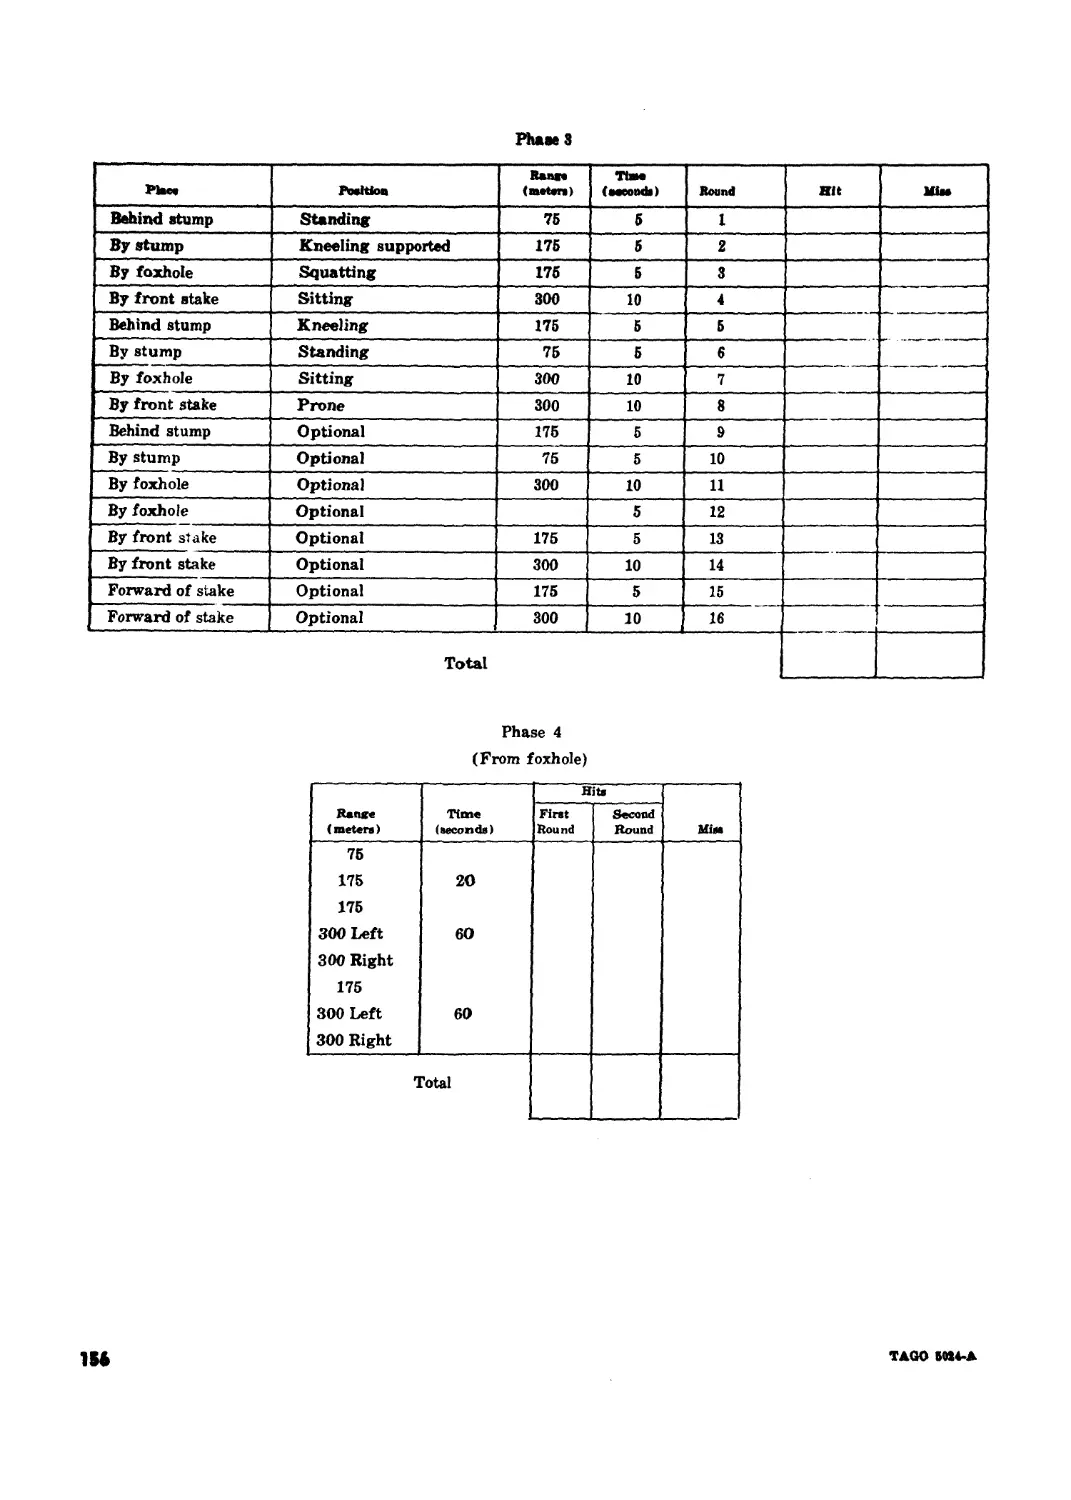
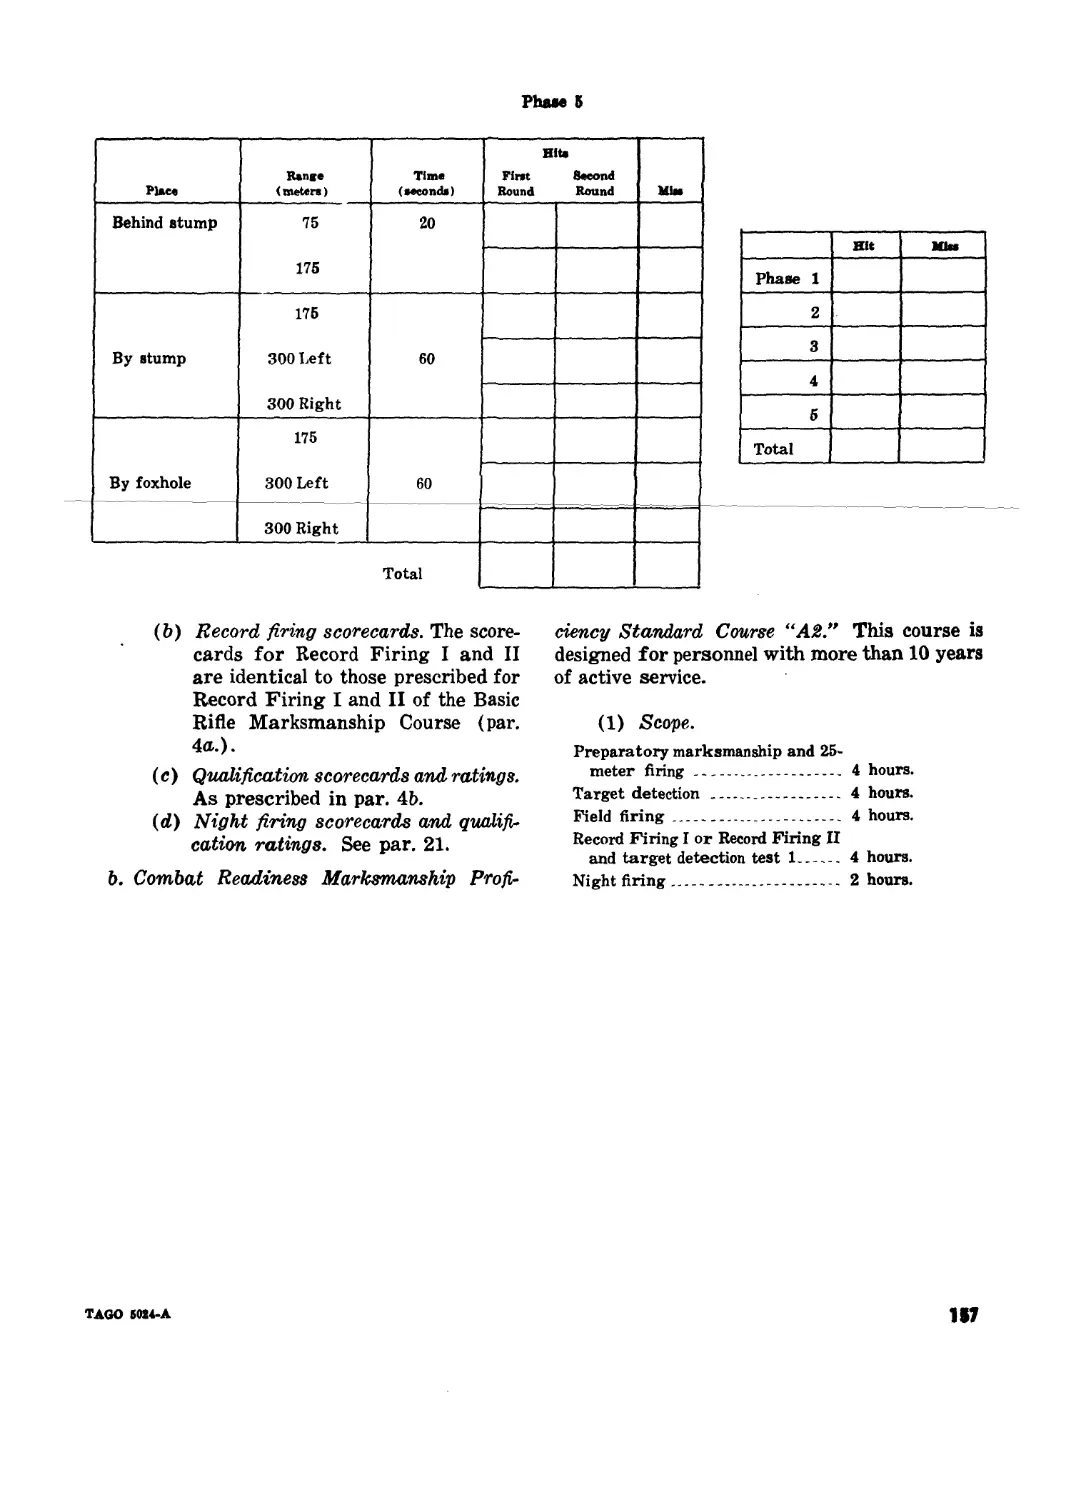
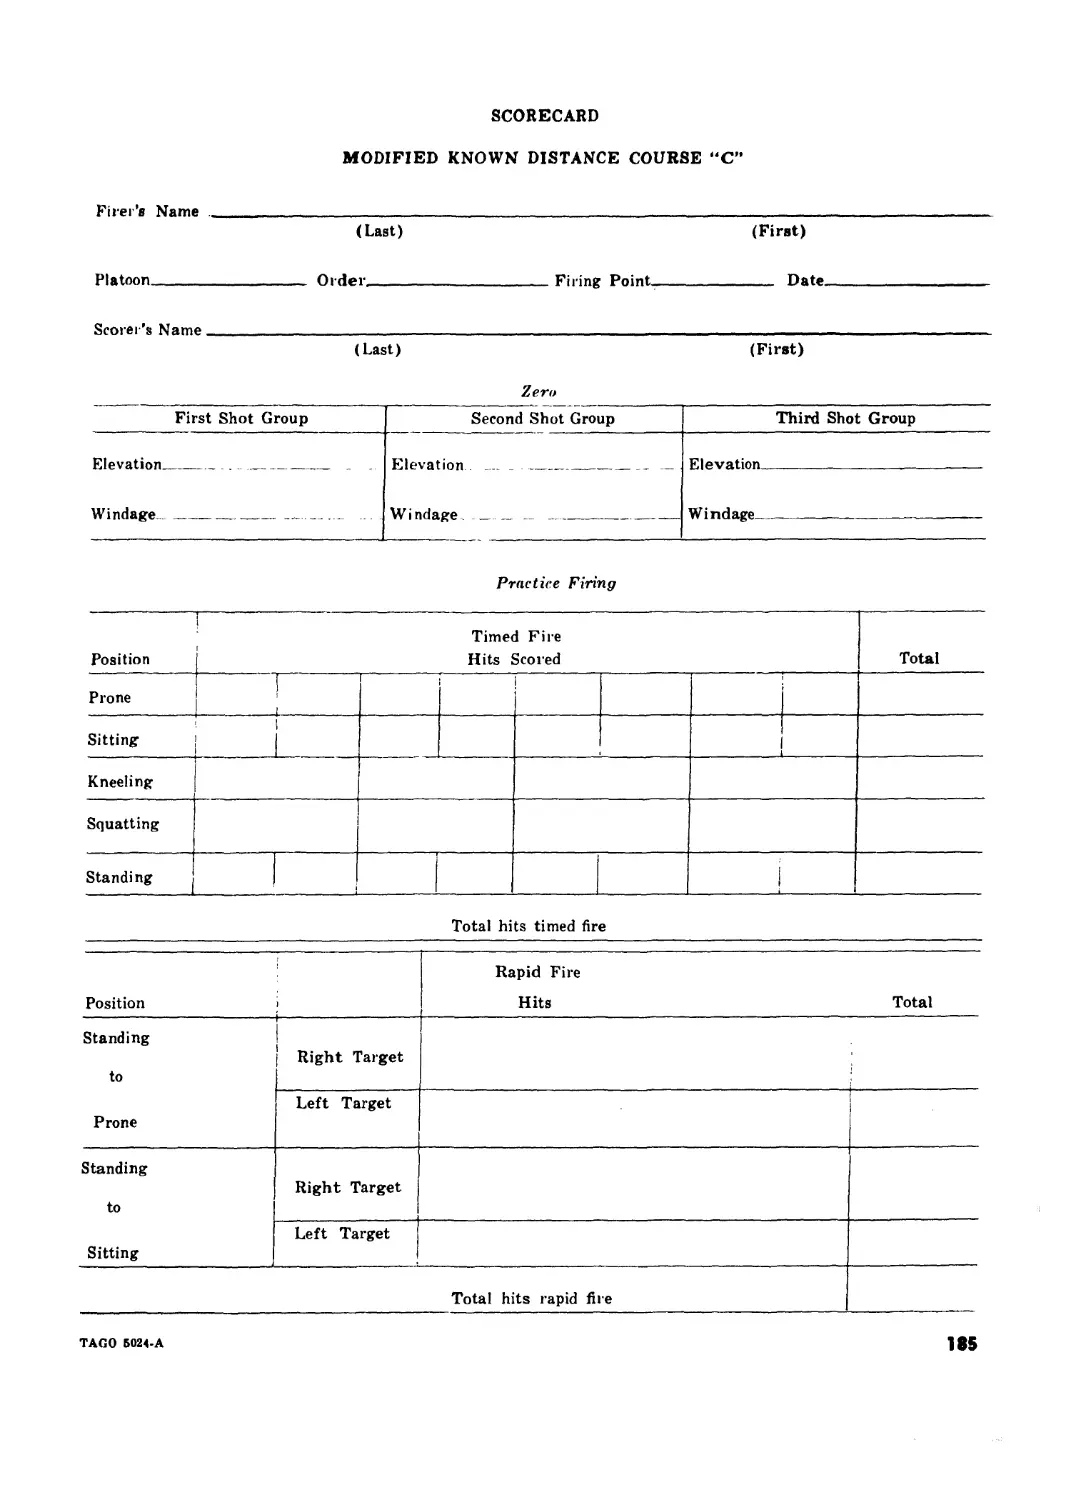
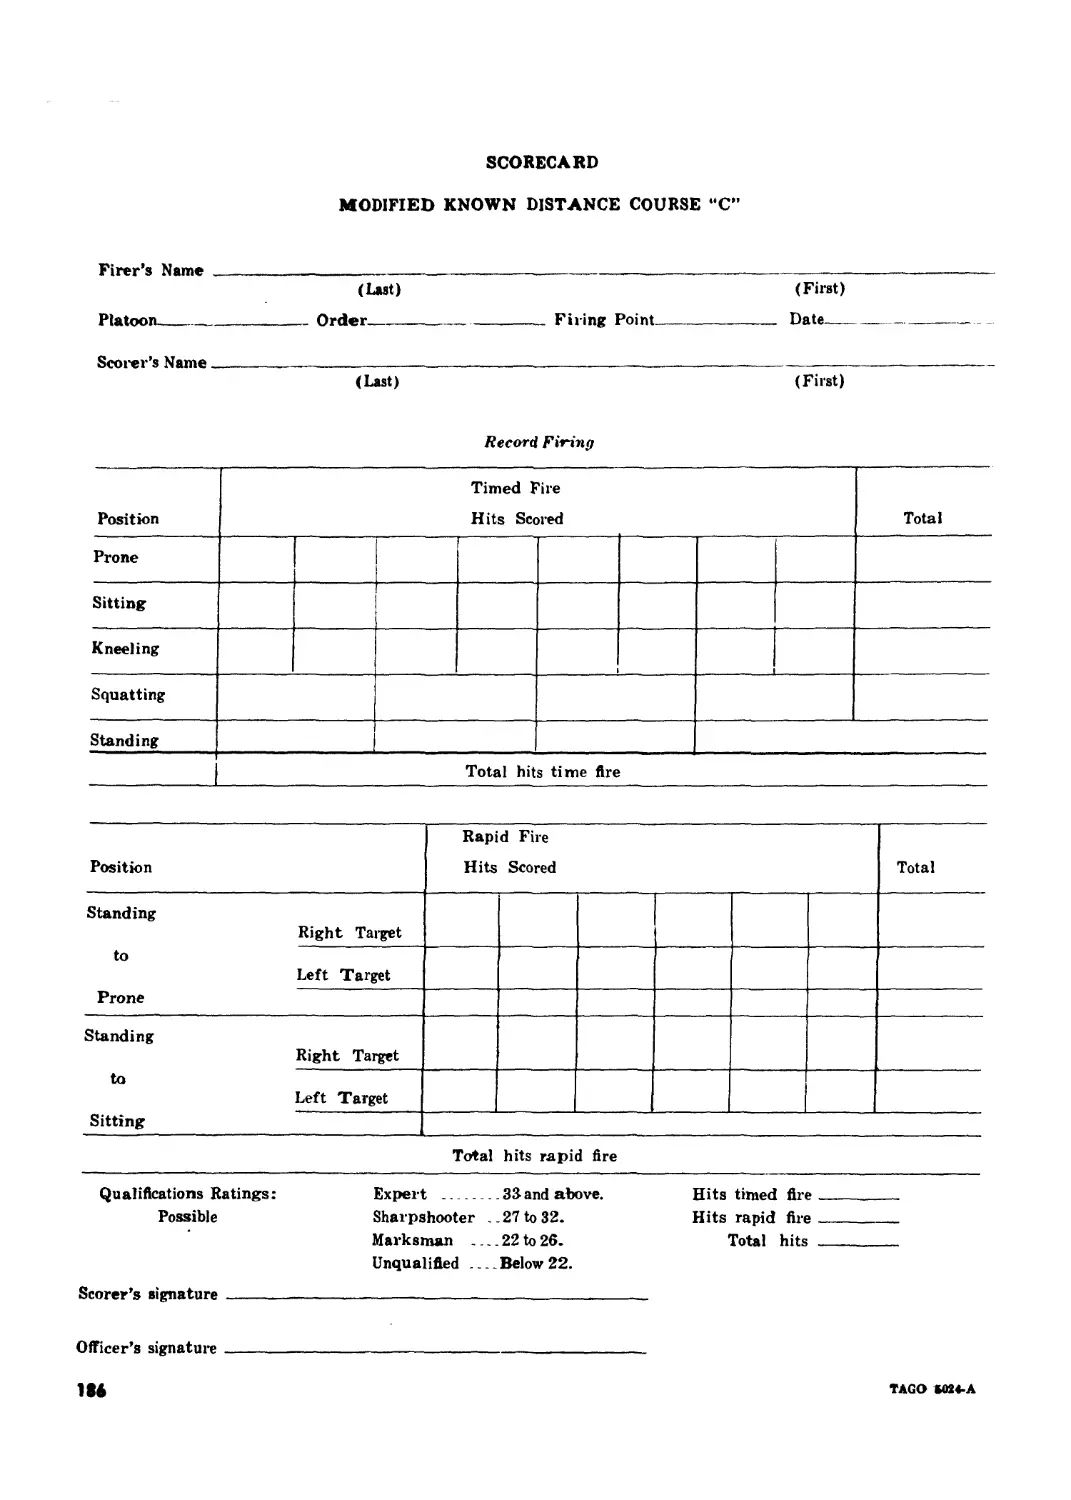
Section I. General - 57^59 90
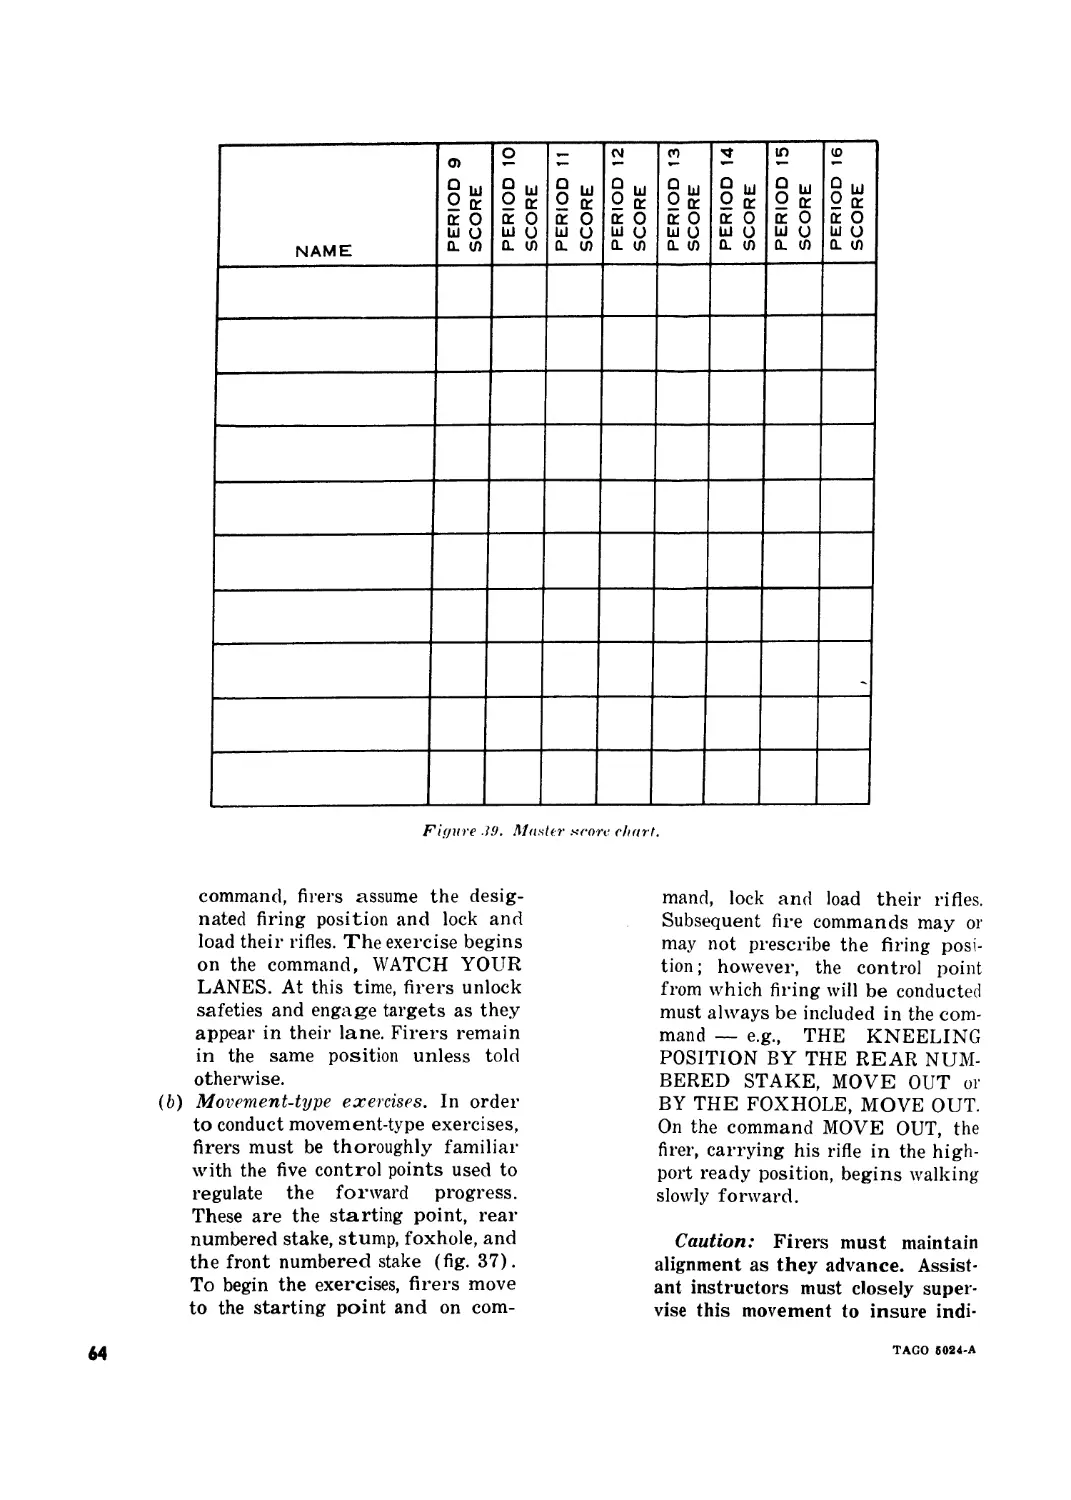
II. Standard record firing procedures and requirements 60-62 91
Chapter III. 7. Alternate record firing procedures and requirements INDIVIDUAL NIGHT FIRING 63-65 97
Section I. General 66-67 68-70 109 109
IL Fundamentals
Chapter III. 8. Conduct of training ADVANCED INDIVIDUAL MARKSMANSHIP (SNIPING) 71-73 111
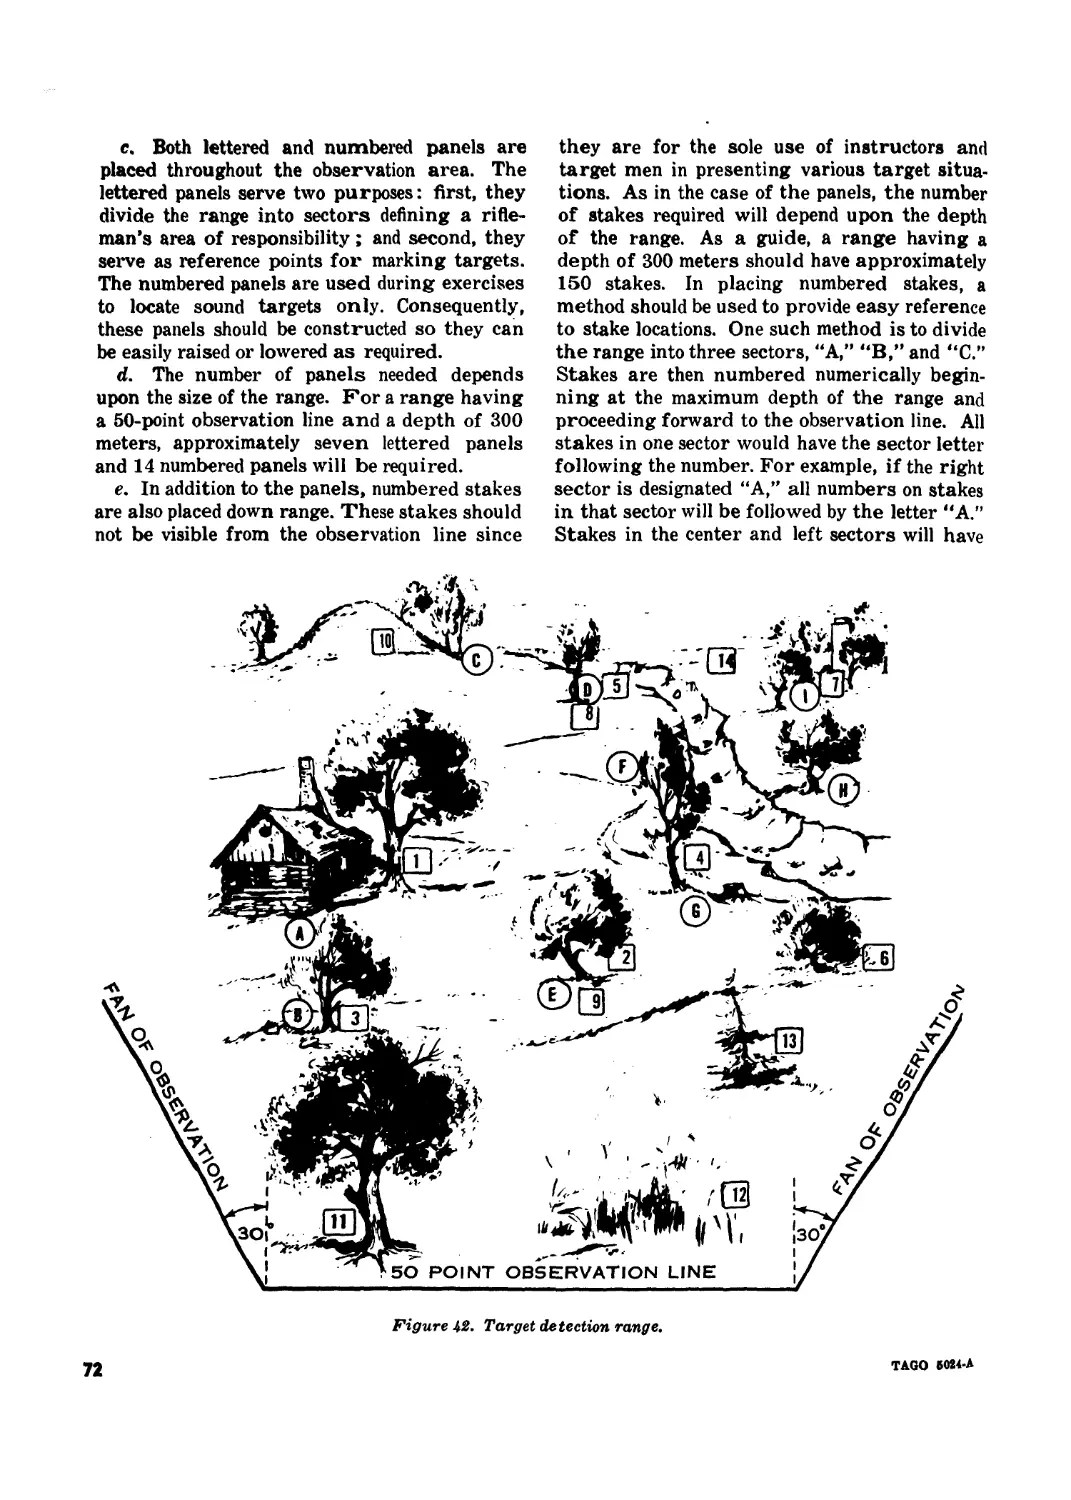
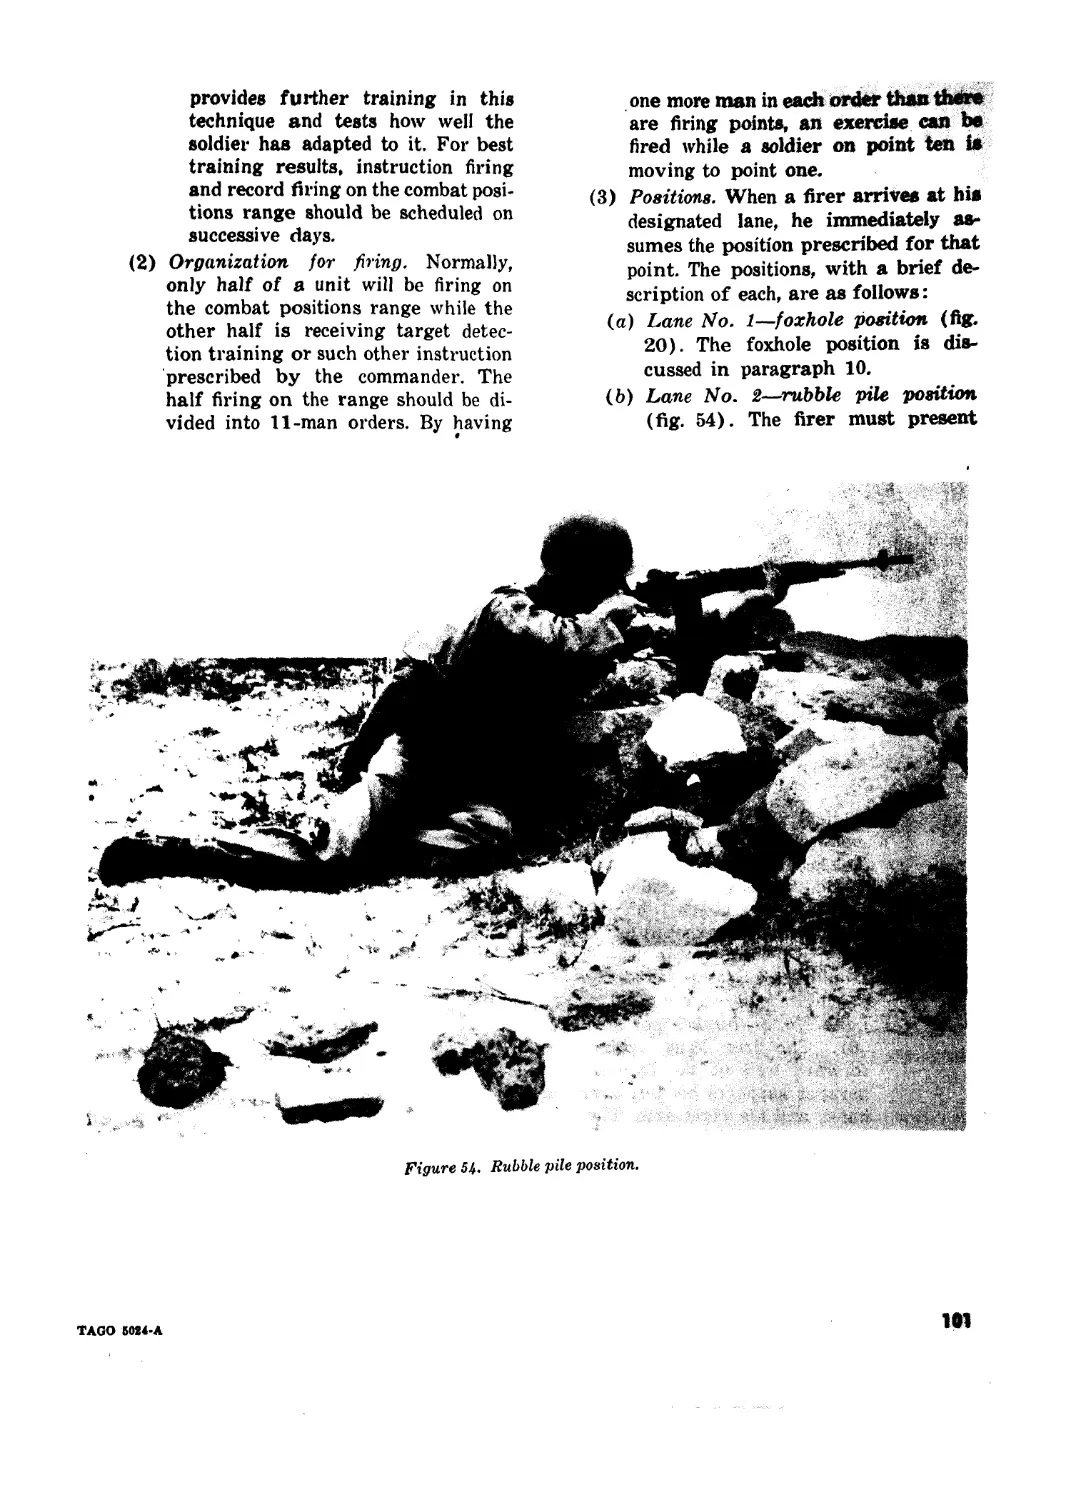
Section I. General .. ..... .... . 74-76 116 116
IL Technique of sniping. 77-81
III. Sniper exercises - - 82-84 123
Appendix I. REFERENCES ___________________________________ _________ 126
IL SAFETY --------------------------------------- --------- 127
III. RIFLE MARKSMANSHIP COURSES___________________ _________ 129
IV. PREMOBILIZATION READINESS
PROFICIENCY “C” COURSES___________________________ _________ 169
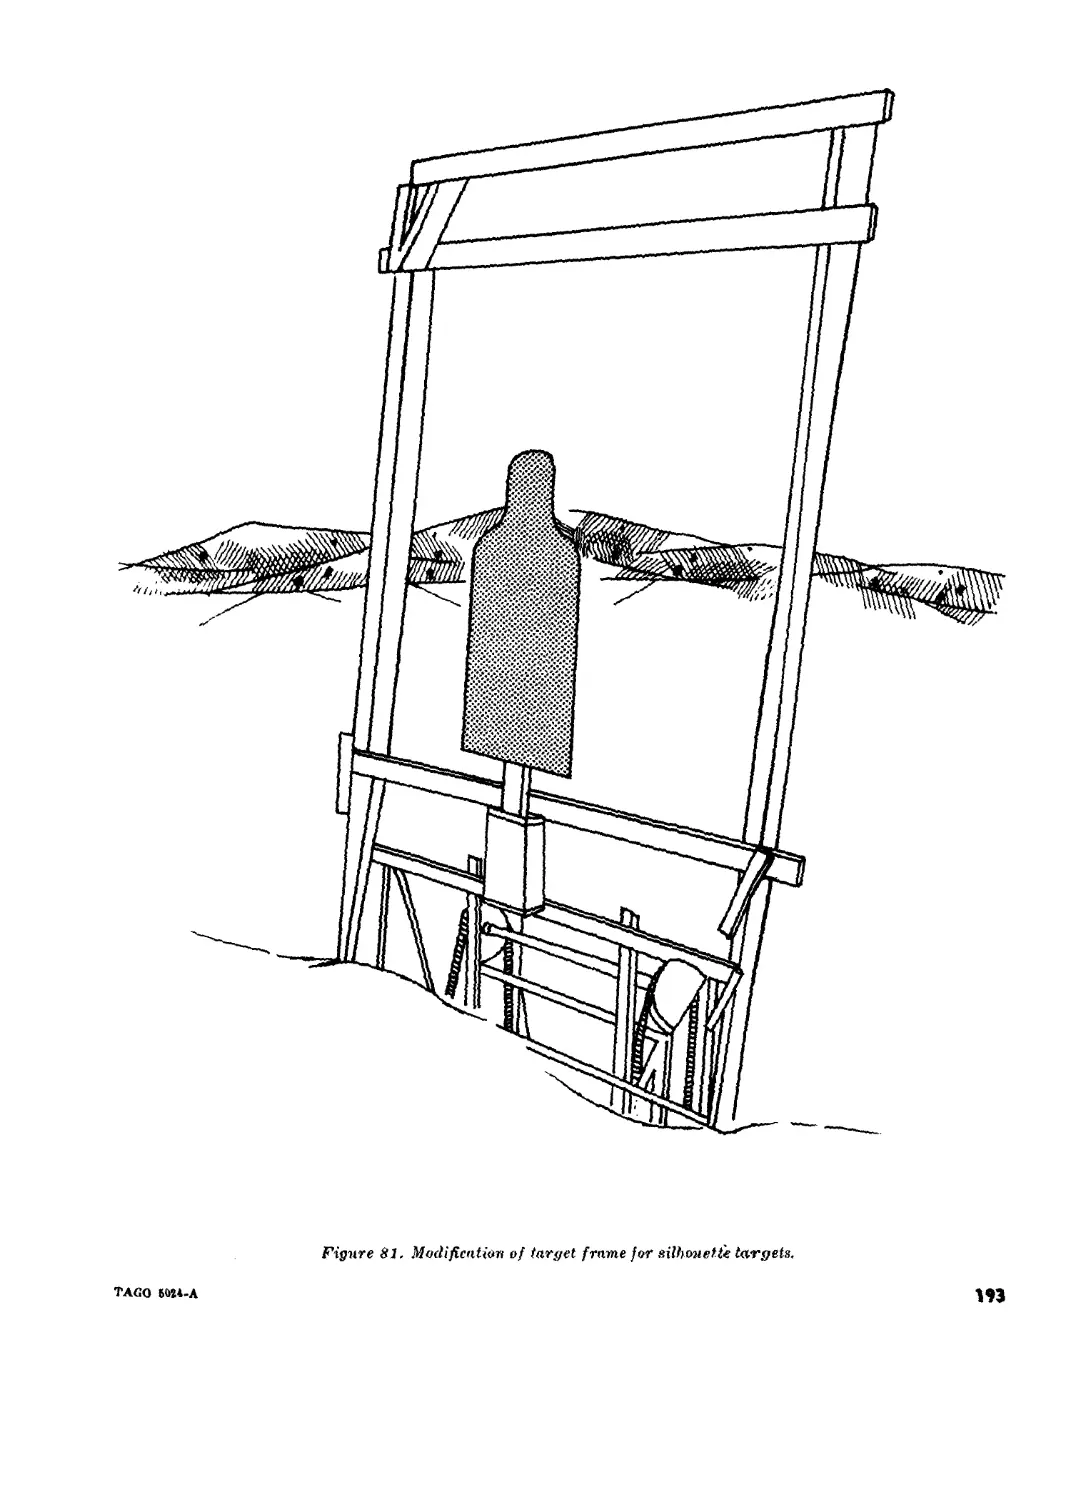
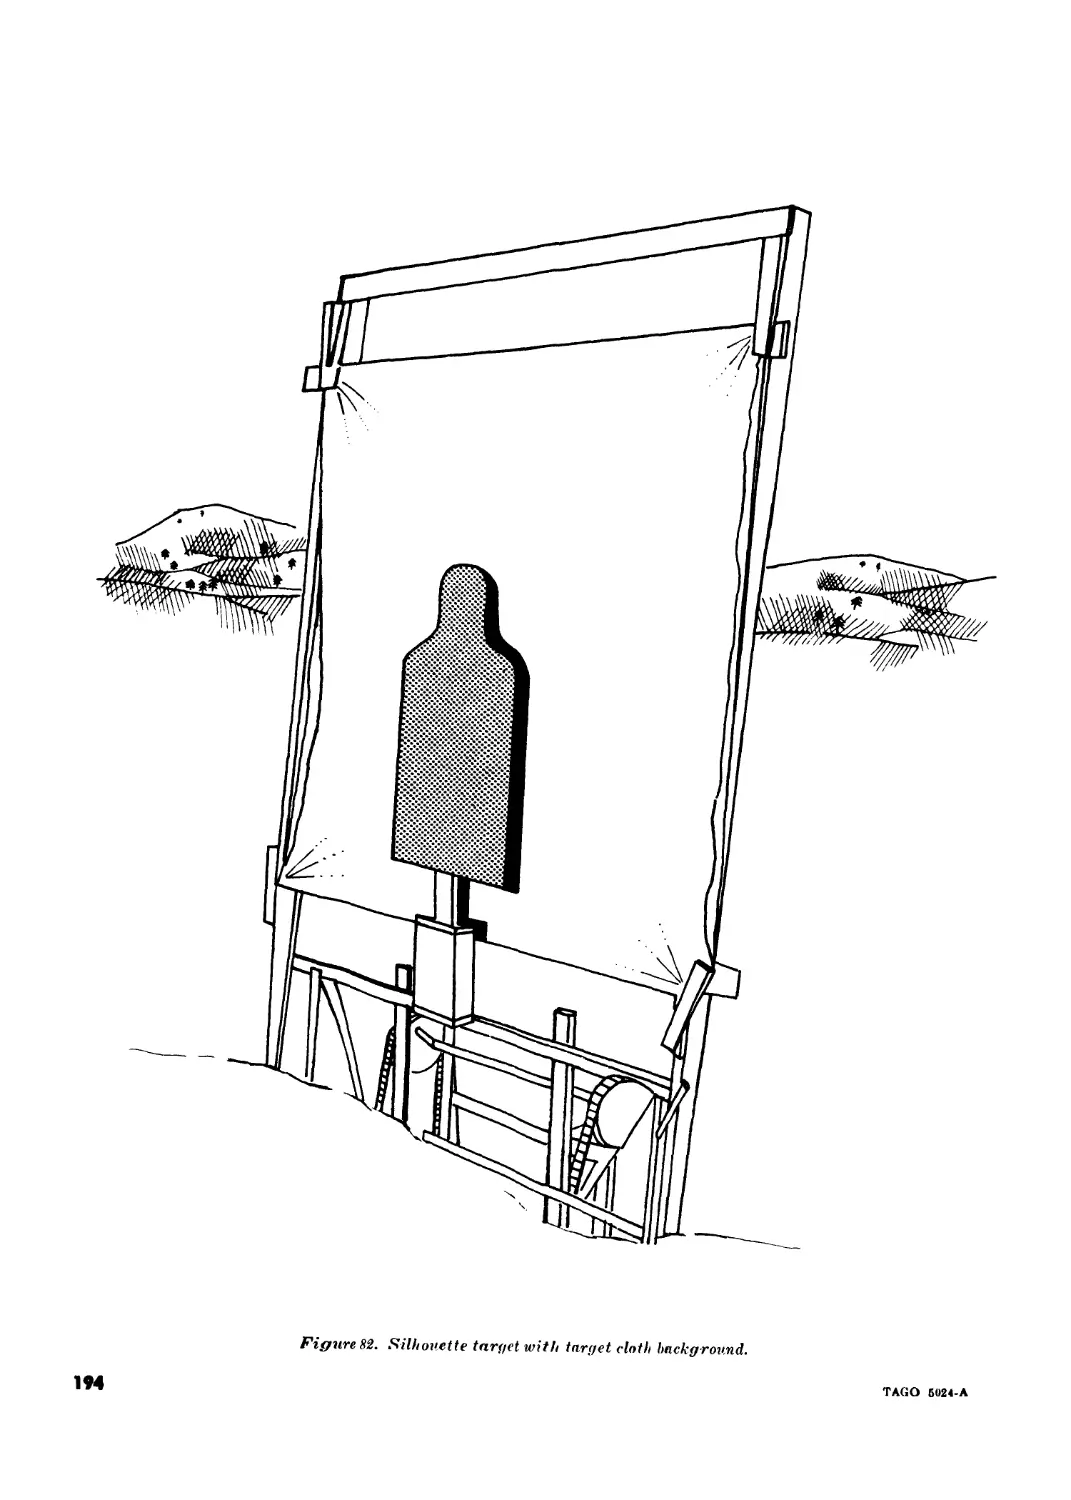
V. INSTALLATION OF SILHOUETTE
TARGETS ON KNOWN DISTANCE RANGES_________________ _________ 189
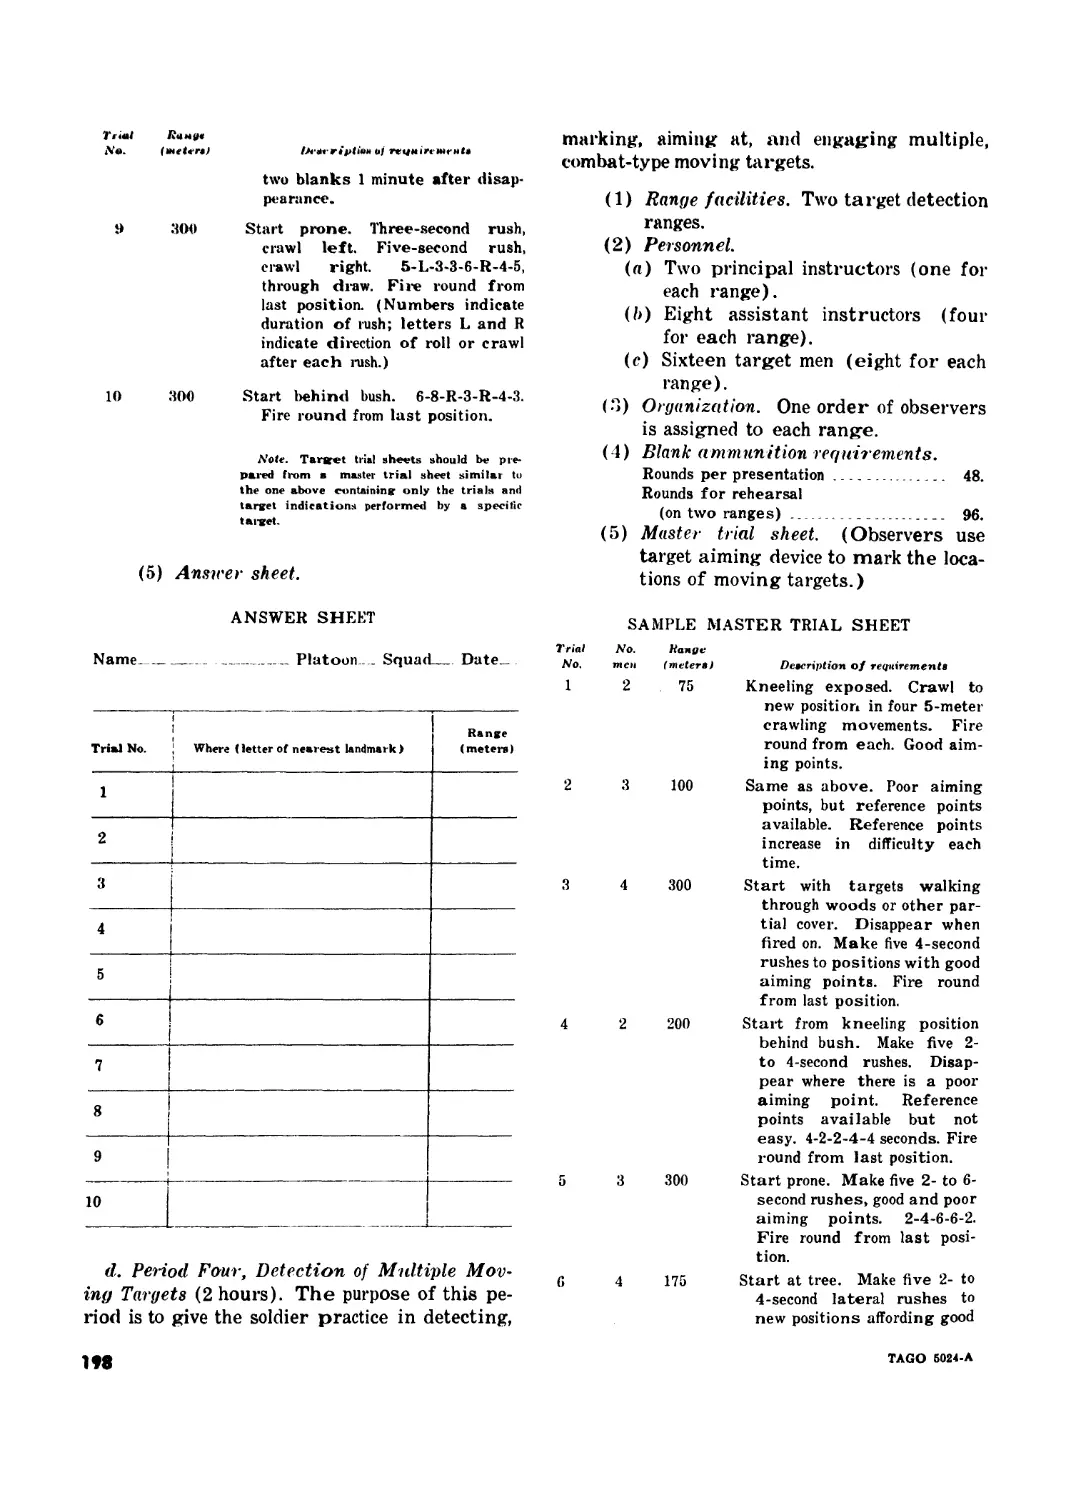
VI. TARGET DETECTION EXERCISES..__________________ _________ 195
VII. TRAINING AIDS________________________________ _________ 206
VIII. EVOLUTION OF INDIVIDUAL WEAPONS....................... 223
Index ---------------------------------------------------------------------- ------------ 227
* This manual supersedes FM 23-71, 5 September 1957.
TAGO 5024-A
CHAPTER I
INTRODUCTION
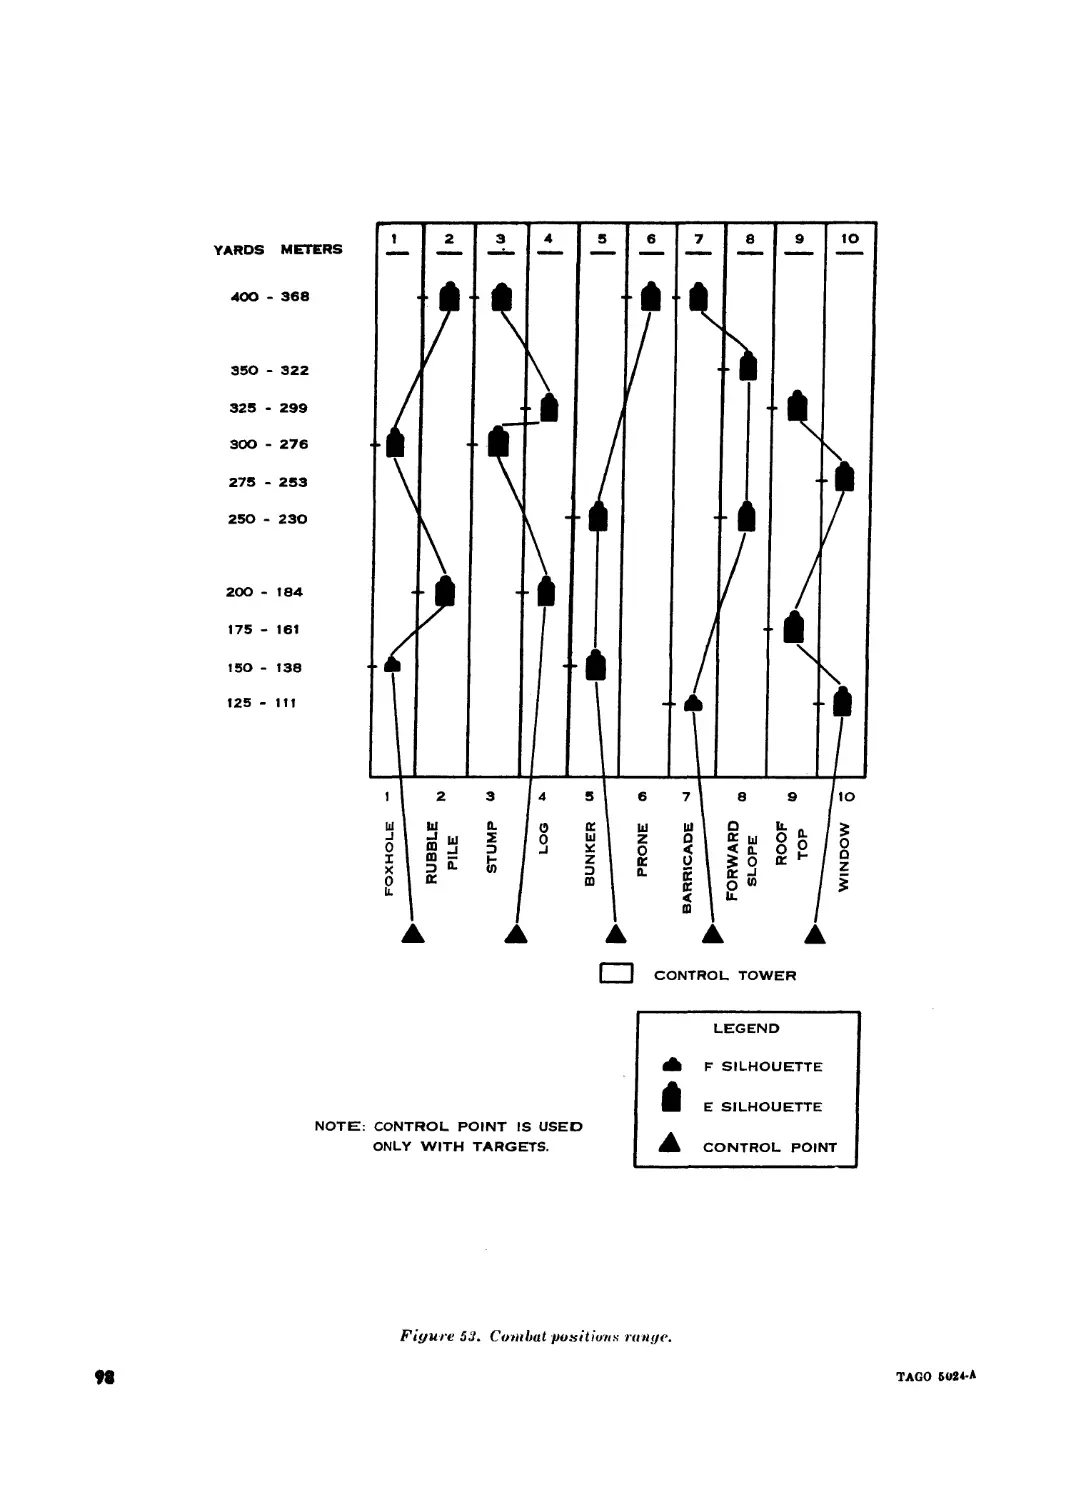
1. Purpose
a. This manual provides training guidance
in developing and maintaining the rifle marks-
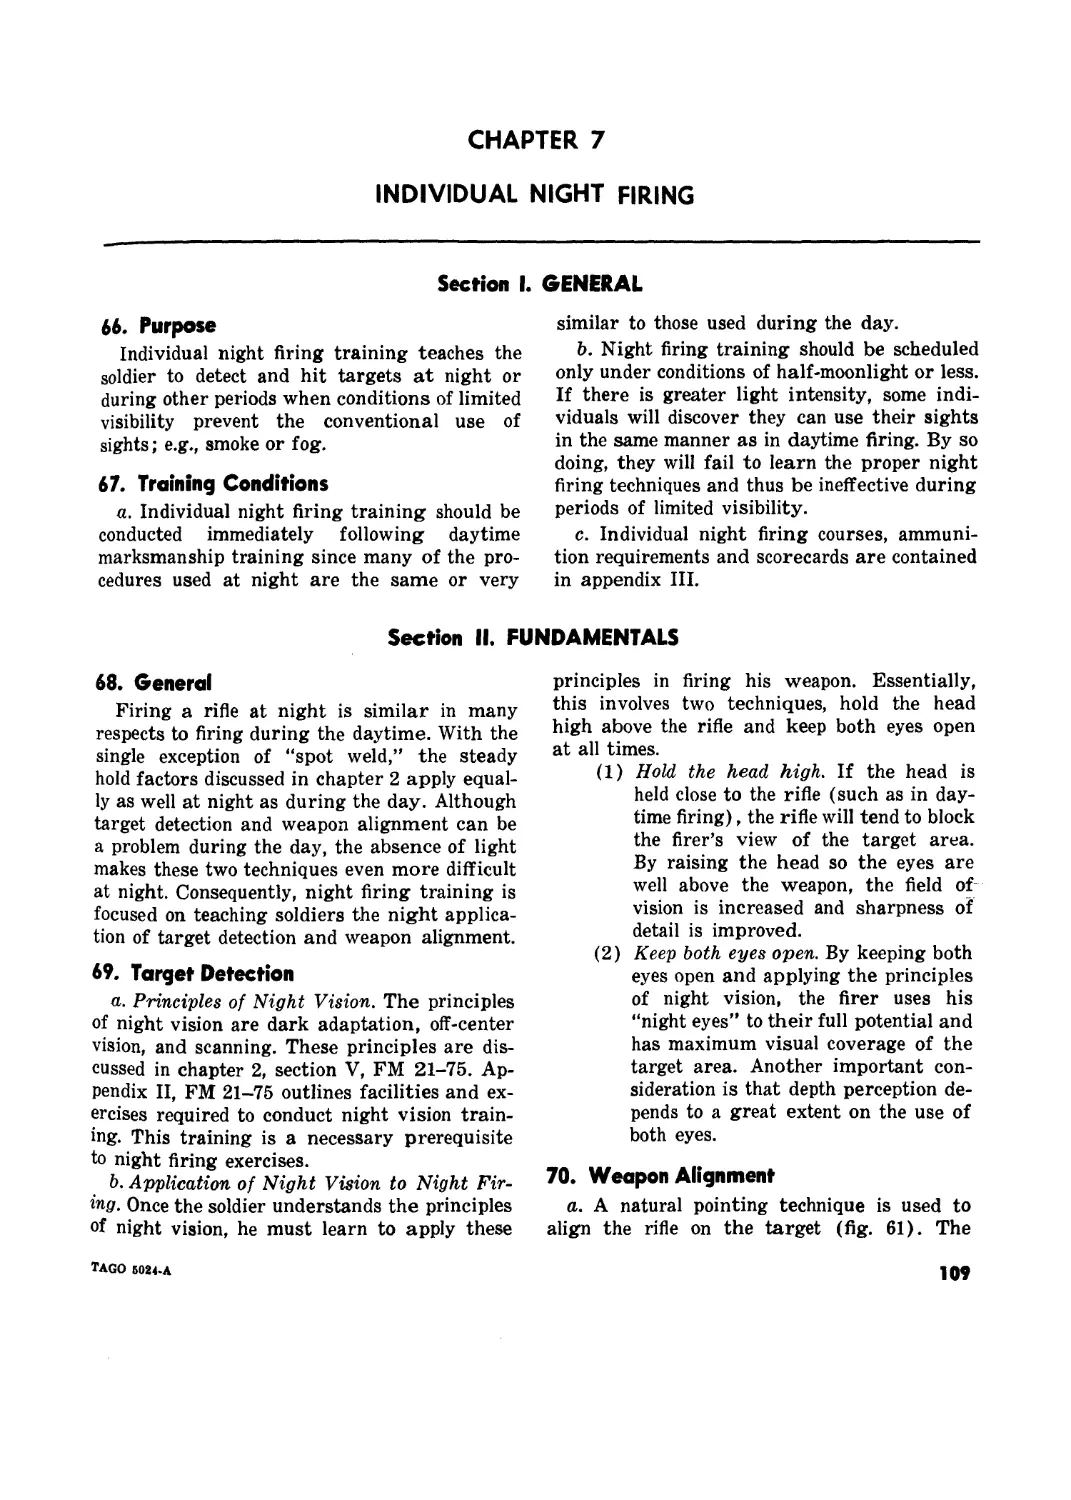
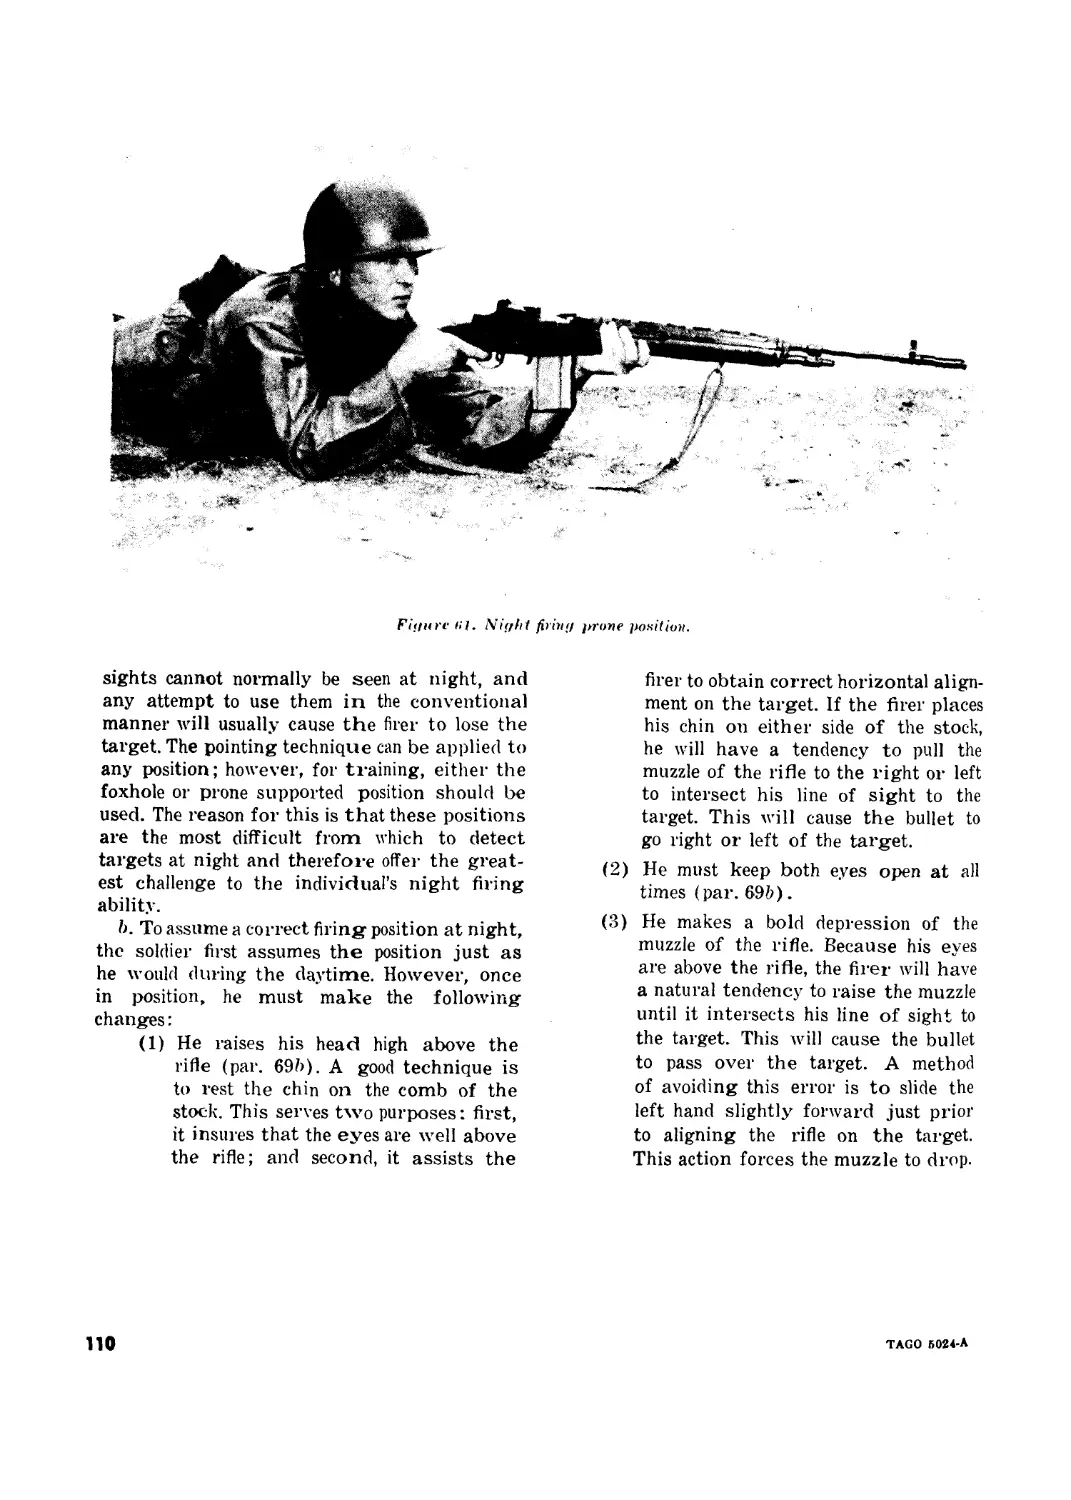
manship proficiency of the individual soldier
and is applicable to both nuclear and nonnuclear
warfare.
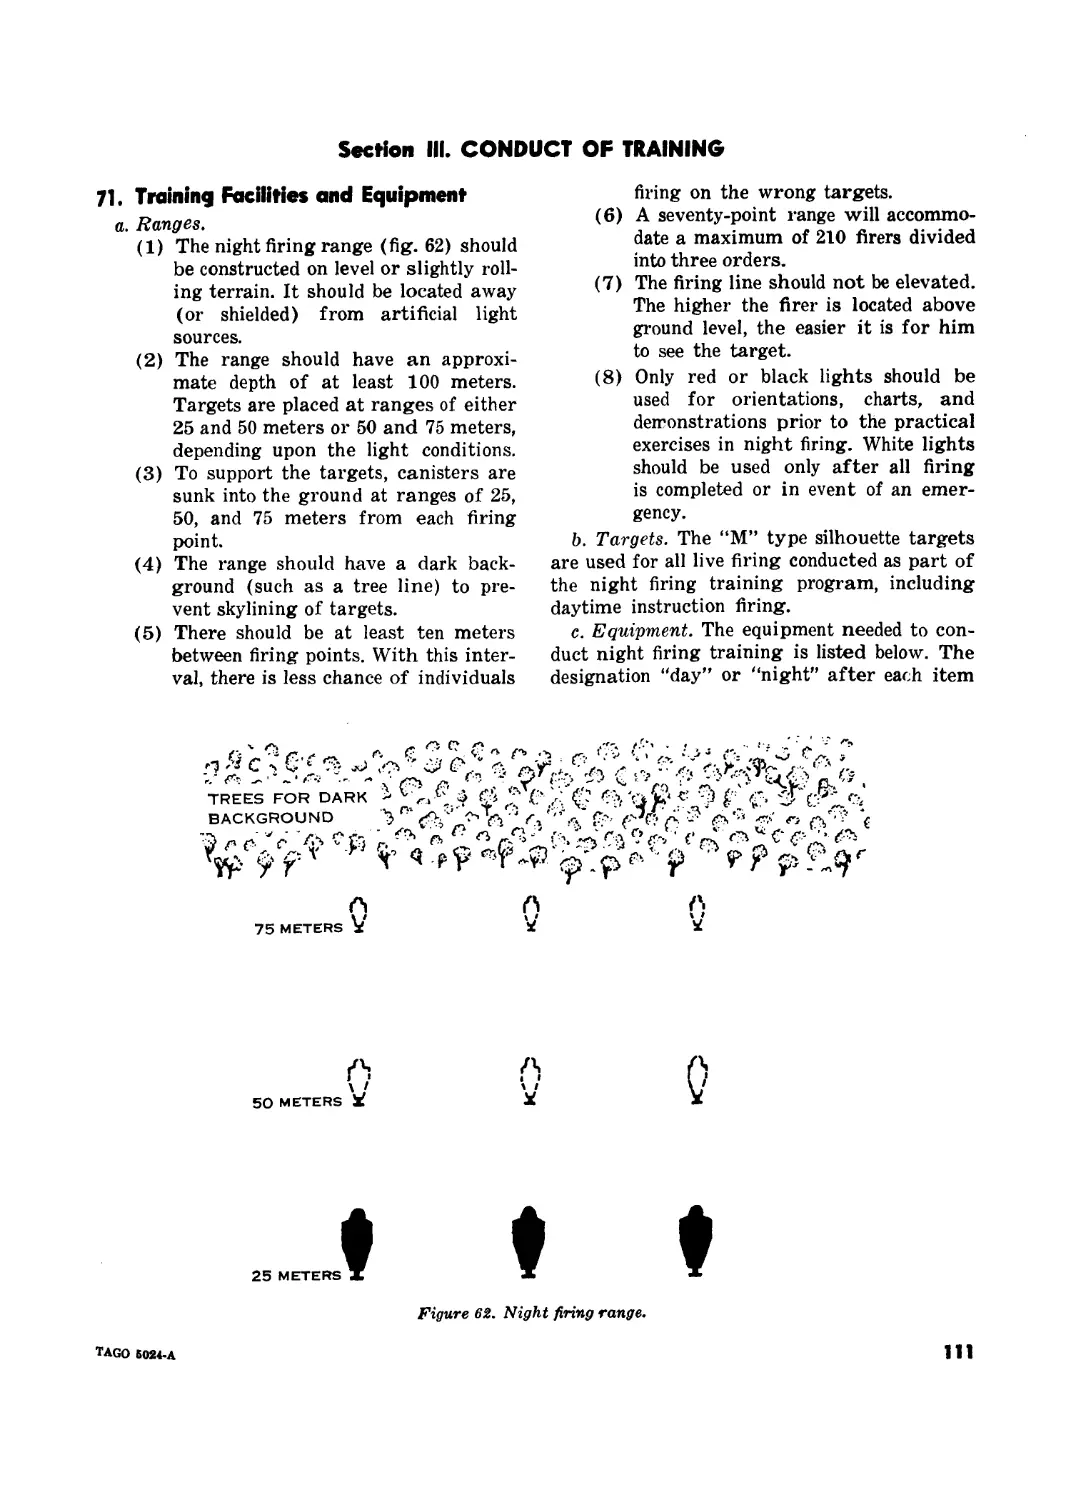
b. Users of this manual are encouraged to
submit recommended changes or comments to
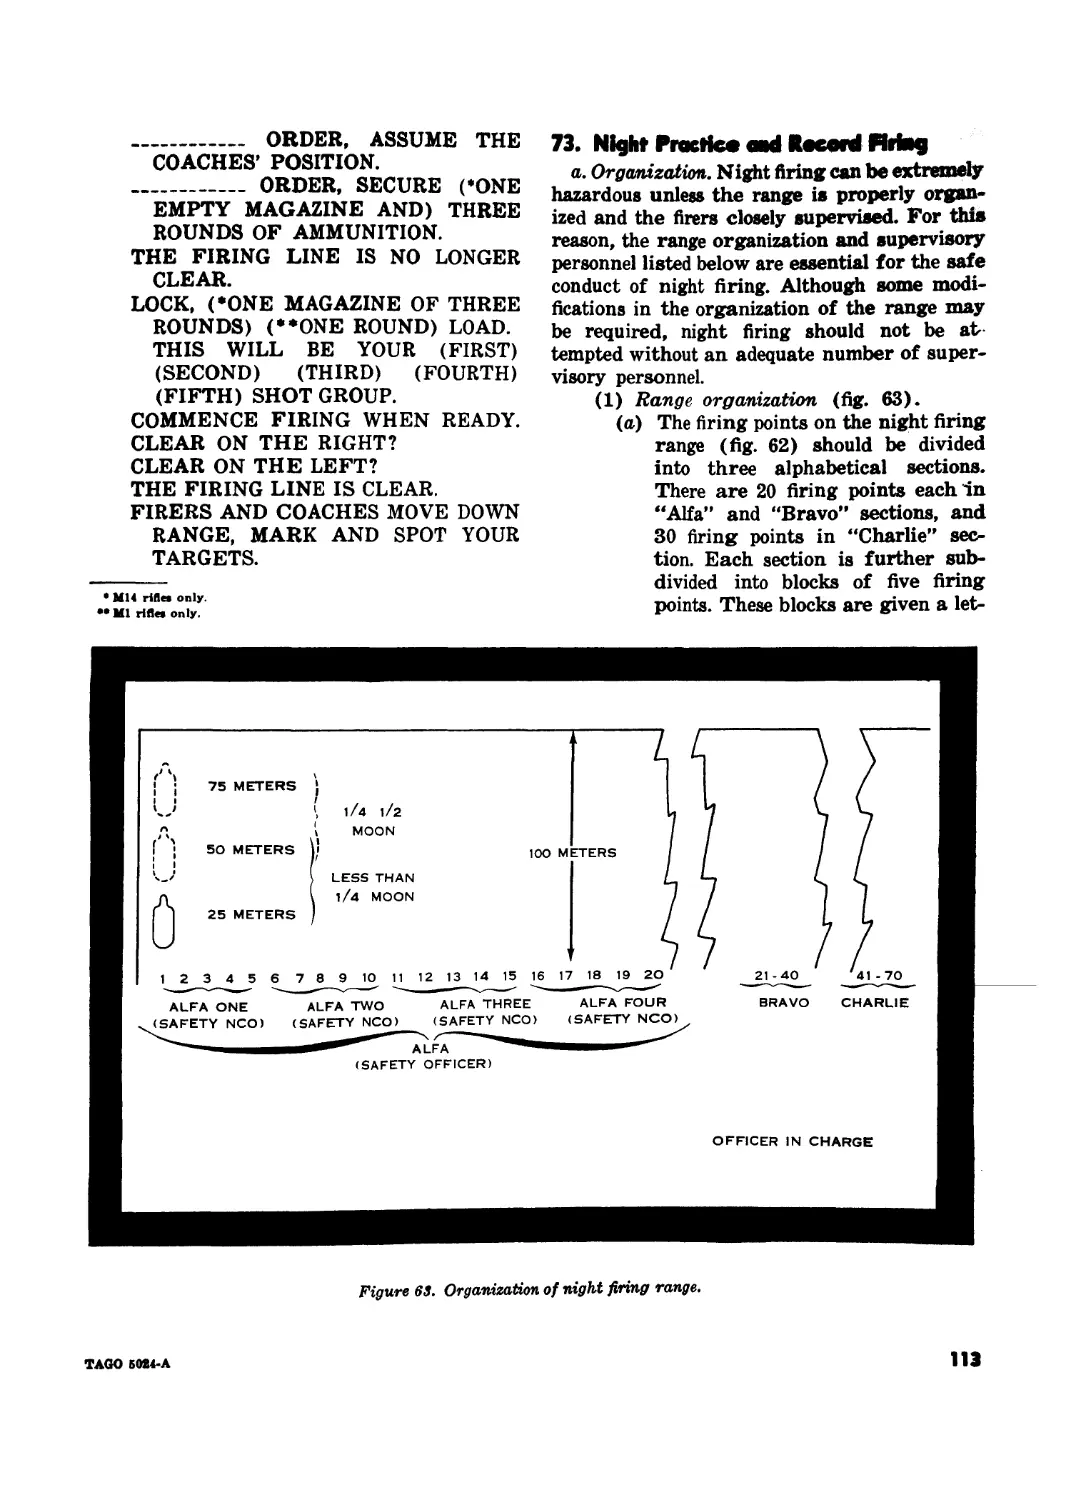
improve the manual. Comments should be
keyed to the specific page, paragraph, and line
of the text in which the change is recom-
mended. Reasons should be provided for each
comment to insure understanding and complete
evaluation. Comments should be forwarded di-
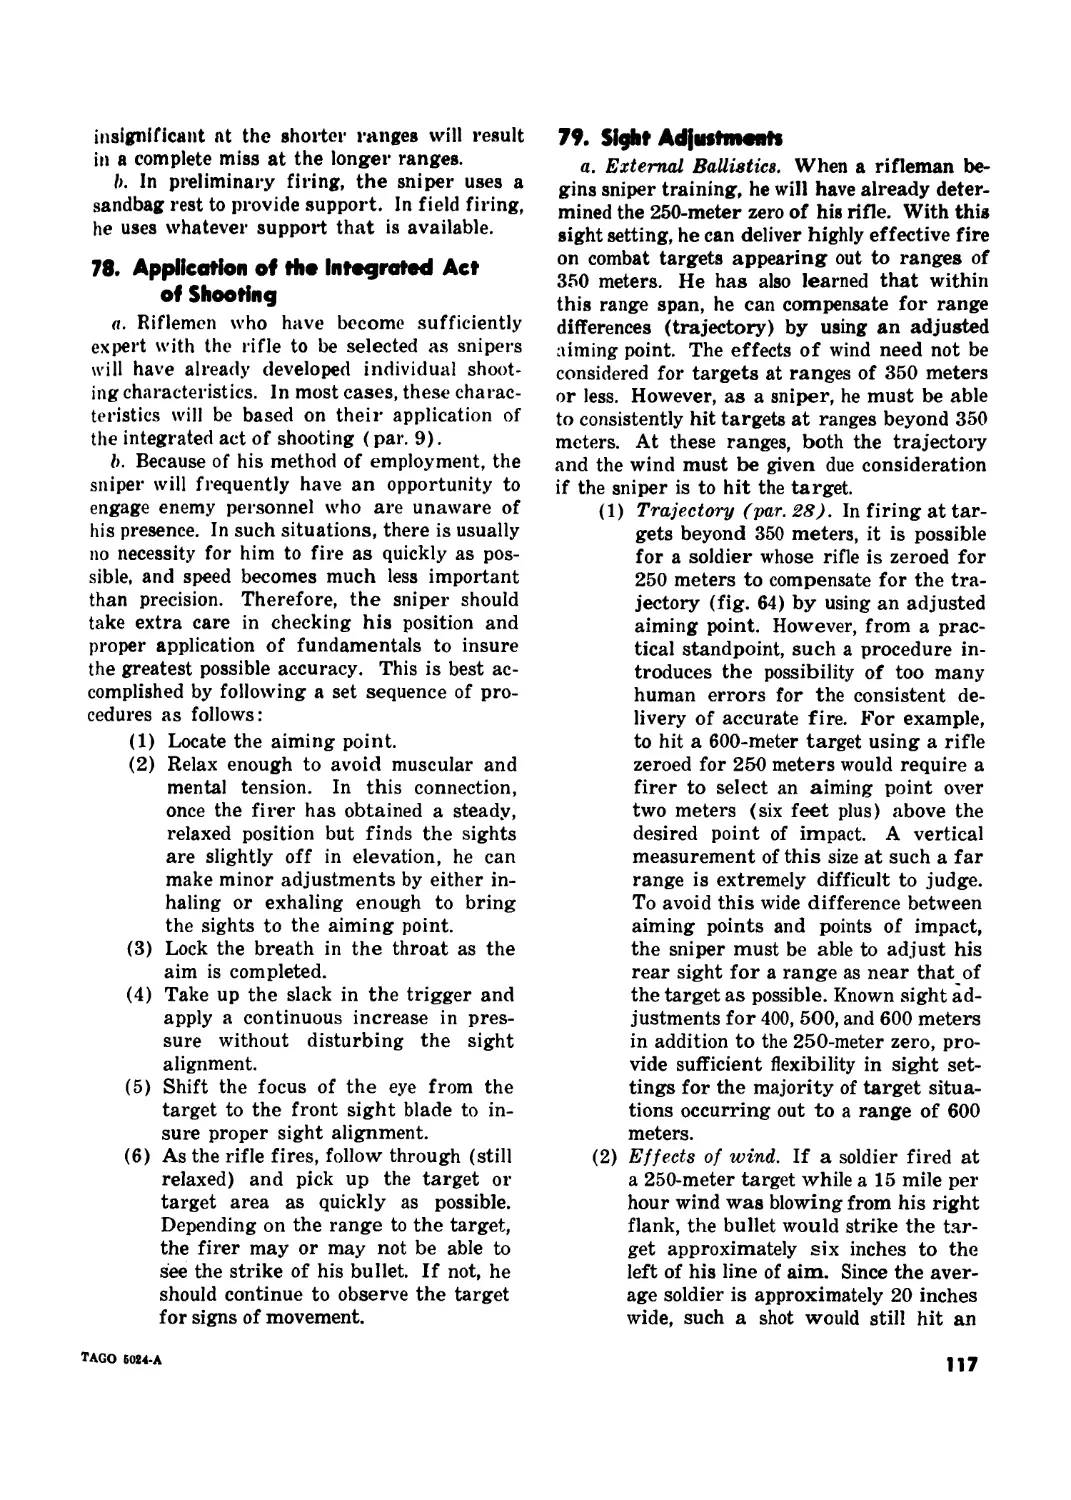
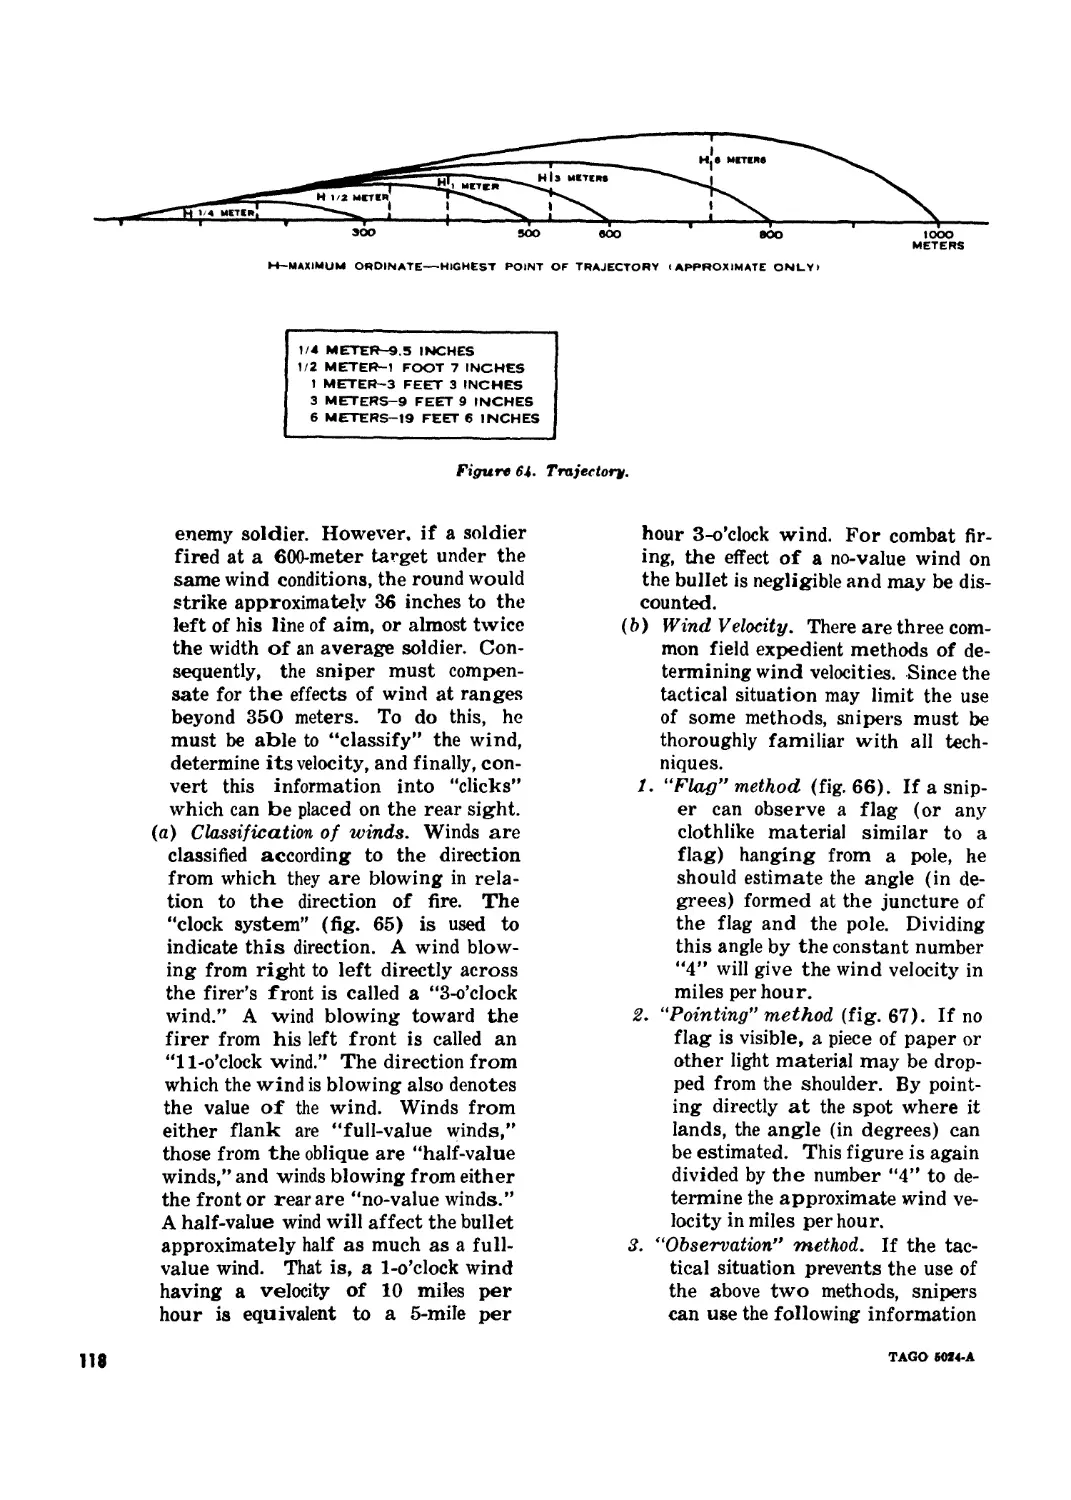
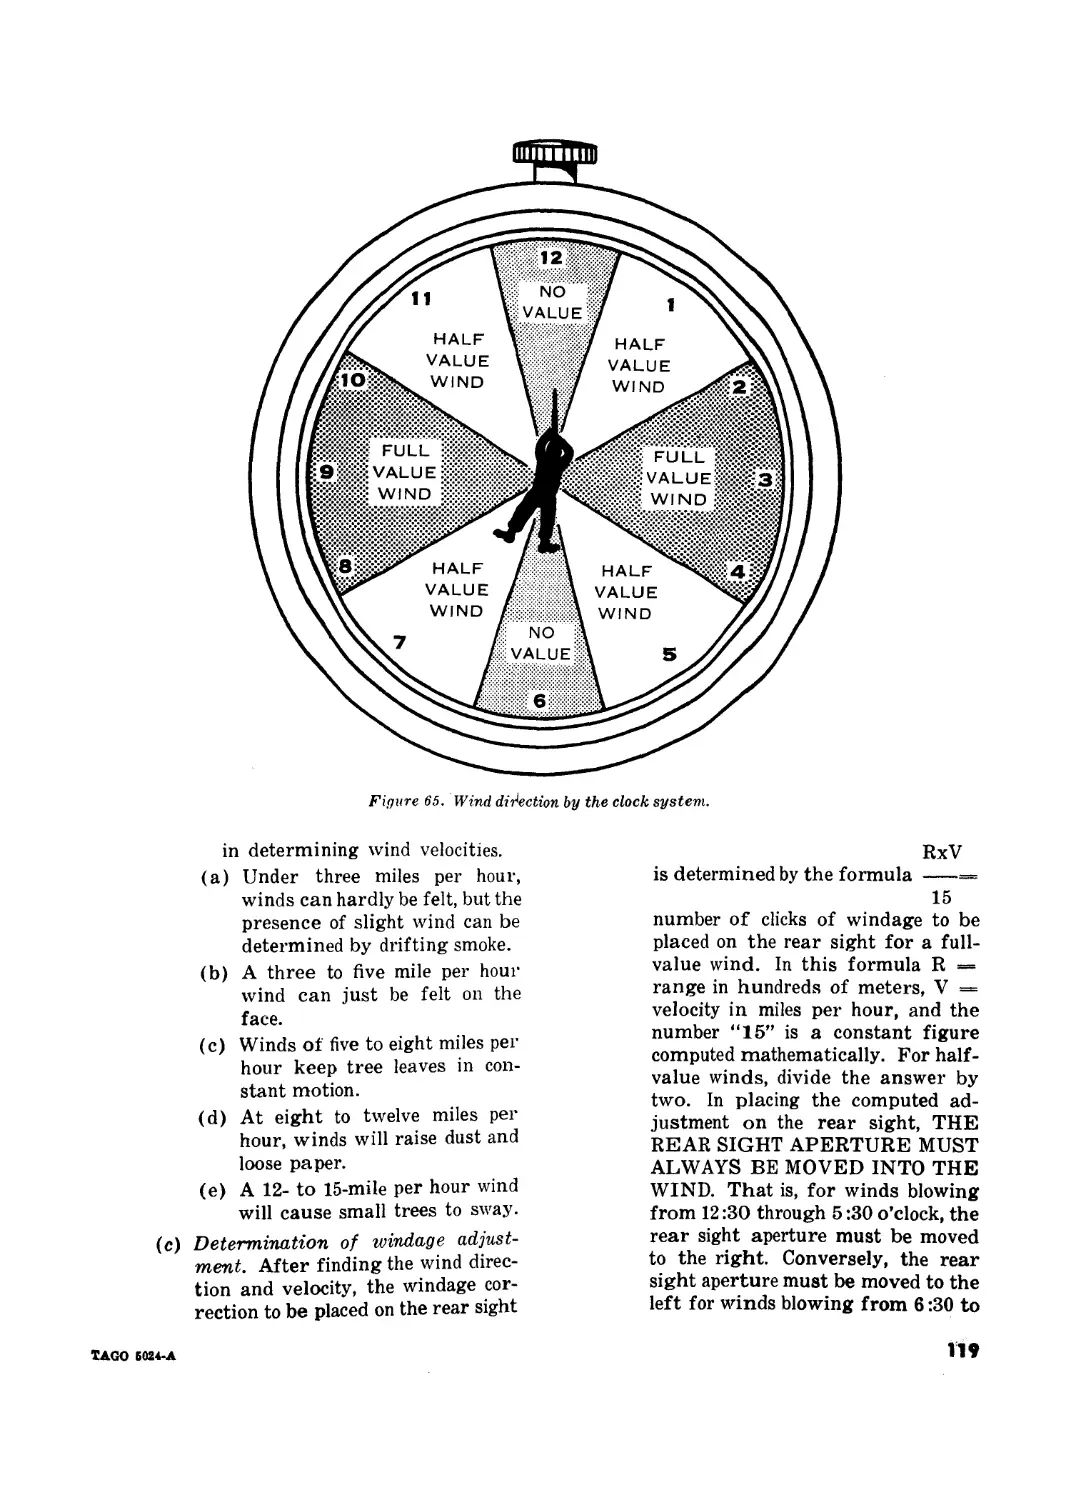
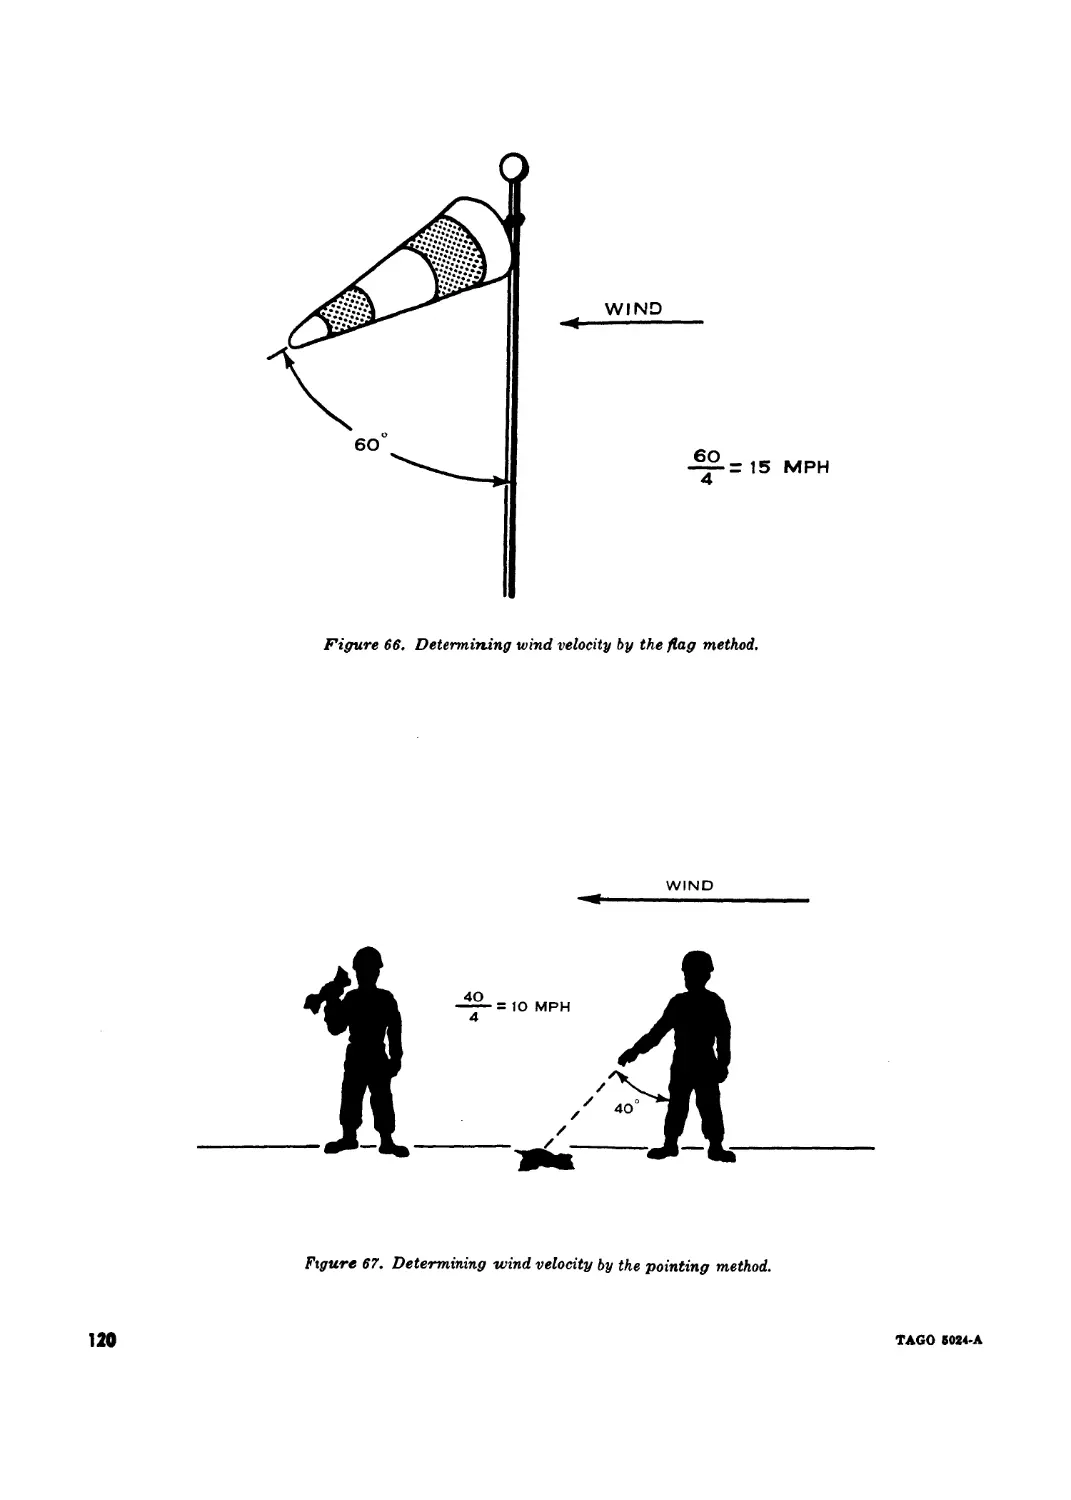
rect to the Commandant, United States Army
Infantry School, Fort Benning, Ga.
2. Objectives
The objectives of the United States Army
rifle marksmanship program are—
a. To develop in every soldier during basic
combat training—
(1) The confidence, will, knowledge, and
skills required to fire a rifle and hit
enemy personnel in combat.
(2) The ability to apply correct techniques
of rifle marksmanship when func-
tioning as an individual in a fire unit
engaged in combat.
b. To insure that every soldier maintains a
continuing degree of proficiency in combat
rifle firing, consistent with the mission of the
unit to which he is assigned.
c. To provide in time of peace a broad base
of shooters from which potential precision
marksmen can be selected and further trained
to successfully compete in interservice, civilian,
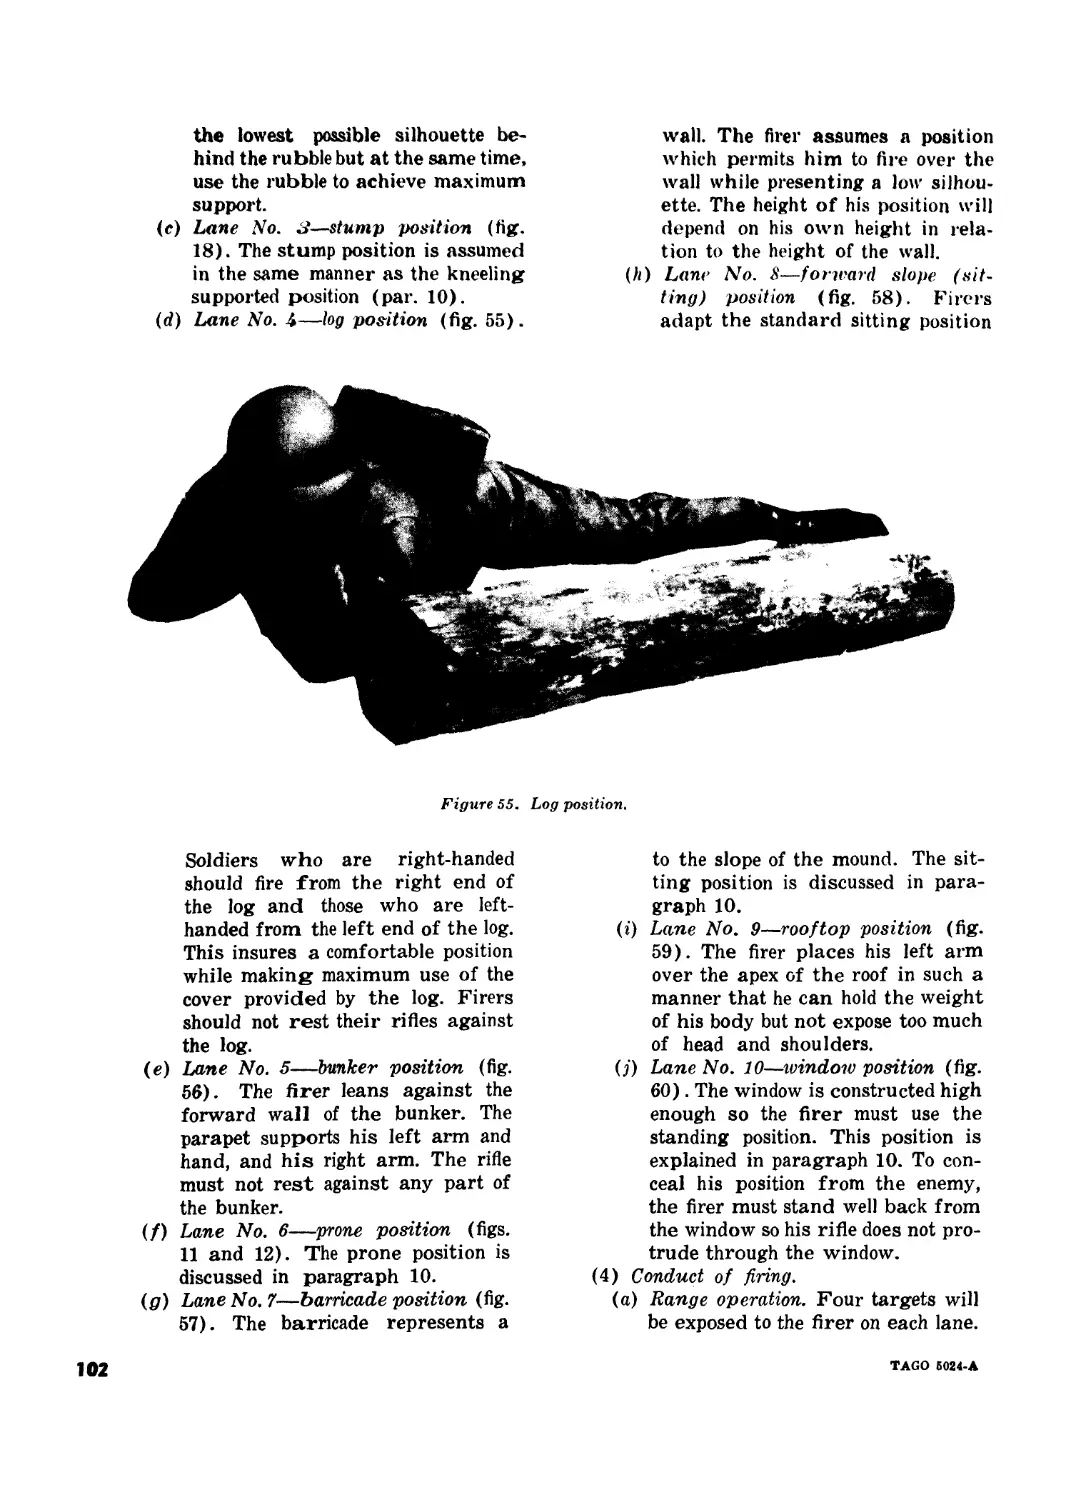
and international competition, and in time of
war to provide an instructor base or cadre for
sniper training if it is required.
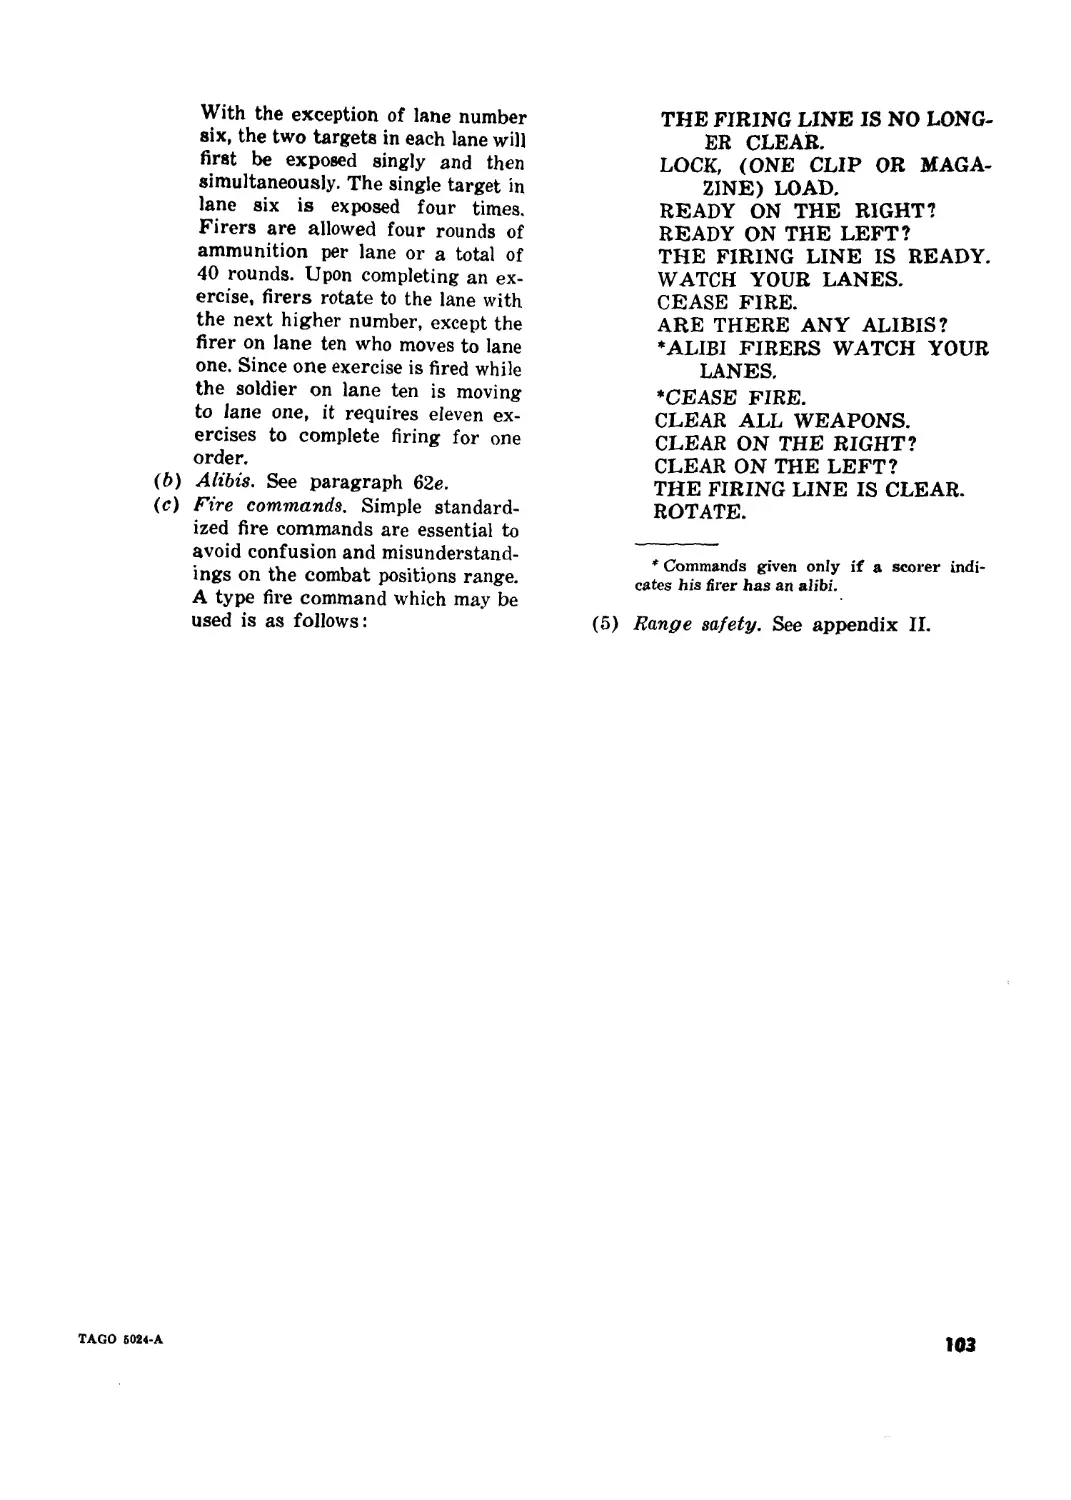
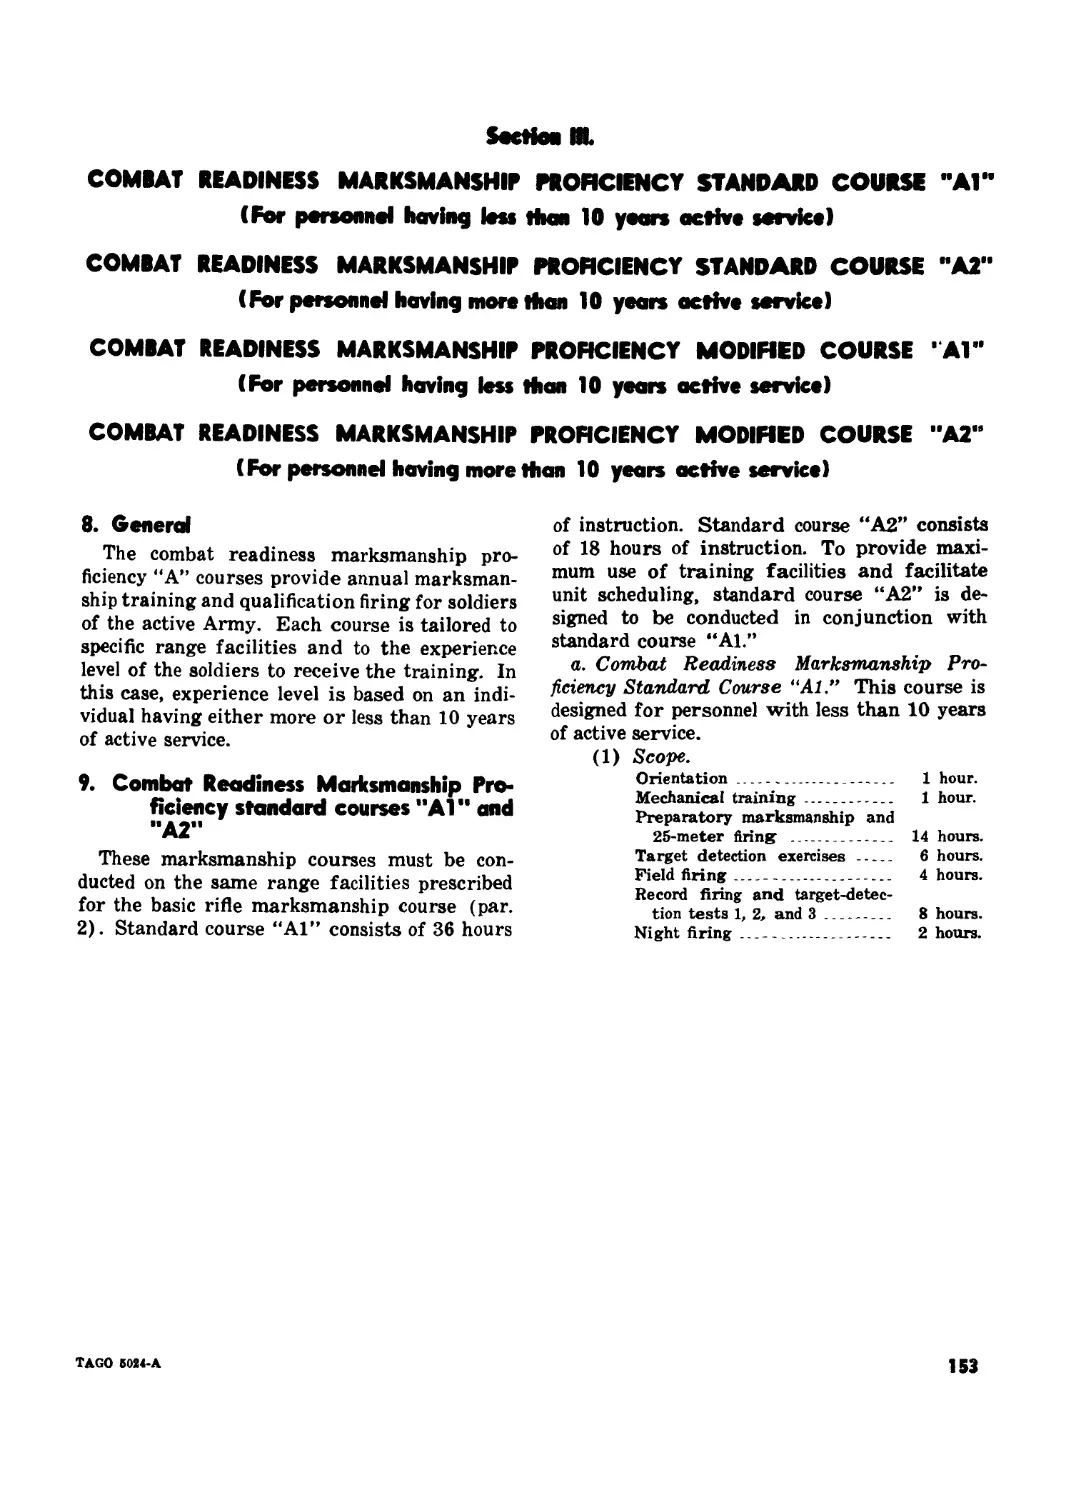
3. Scope
This manual contains detailed information
on conducting training in fundamentals of in-
dividual rifle marksmanship, battlesight zero,
field firing, target detection, record firing, in-
dividual night firing, and sniping. Information
on the mechanical operation, functioning, and
nomenclature of rifles may be found in the
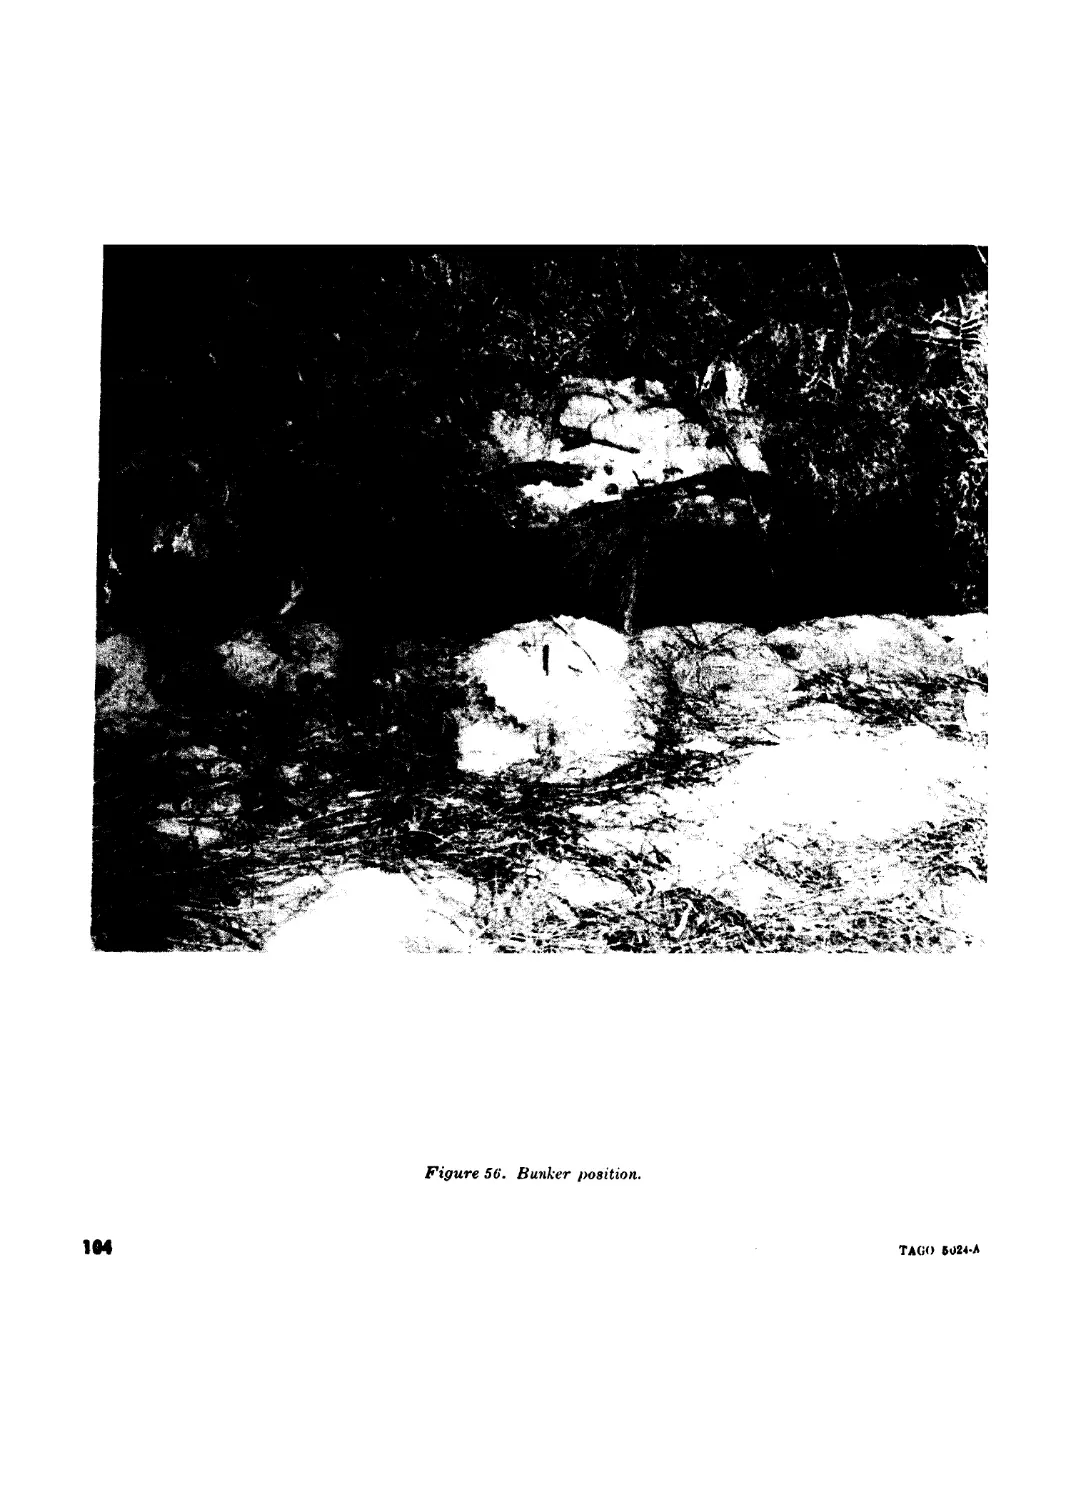
field manuals appropriate to the particular
weapon (app. I).
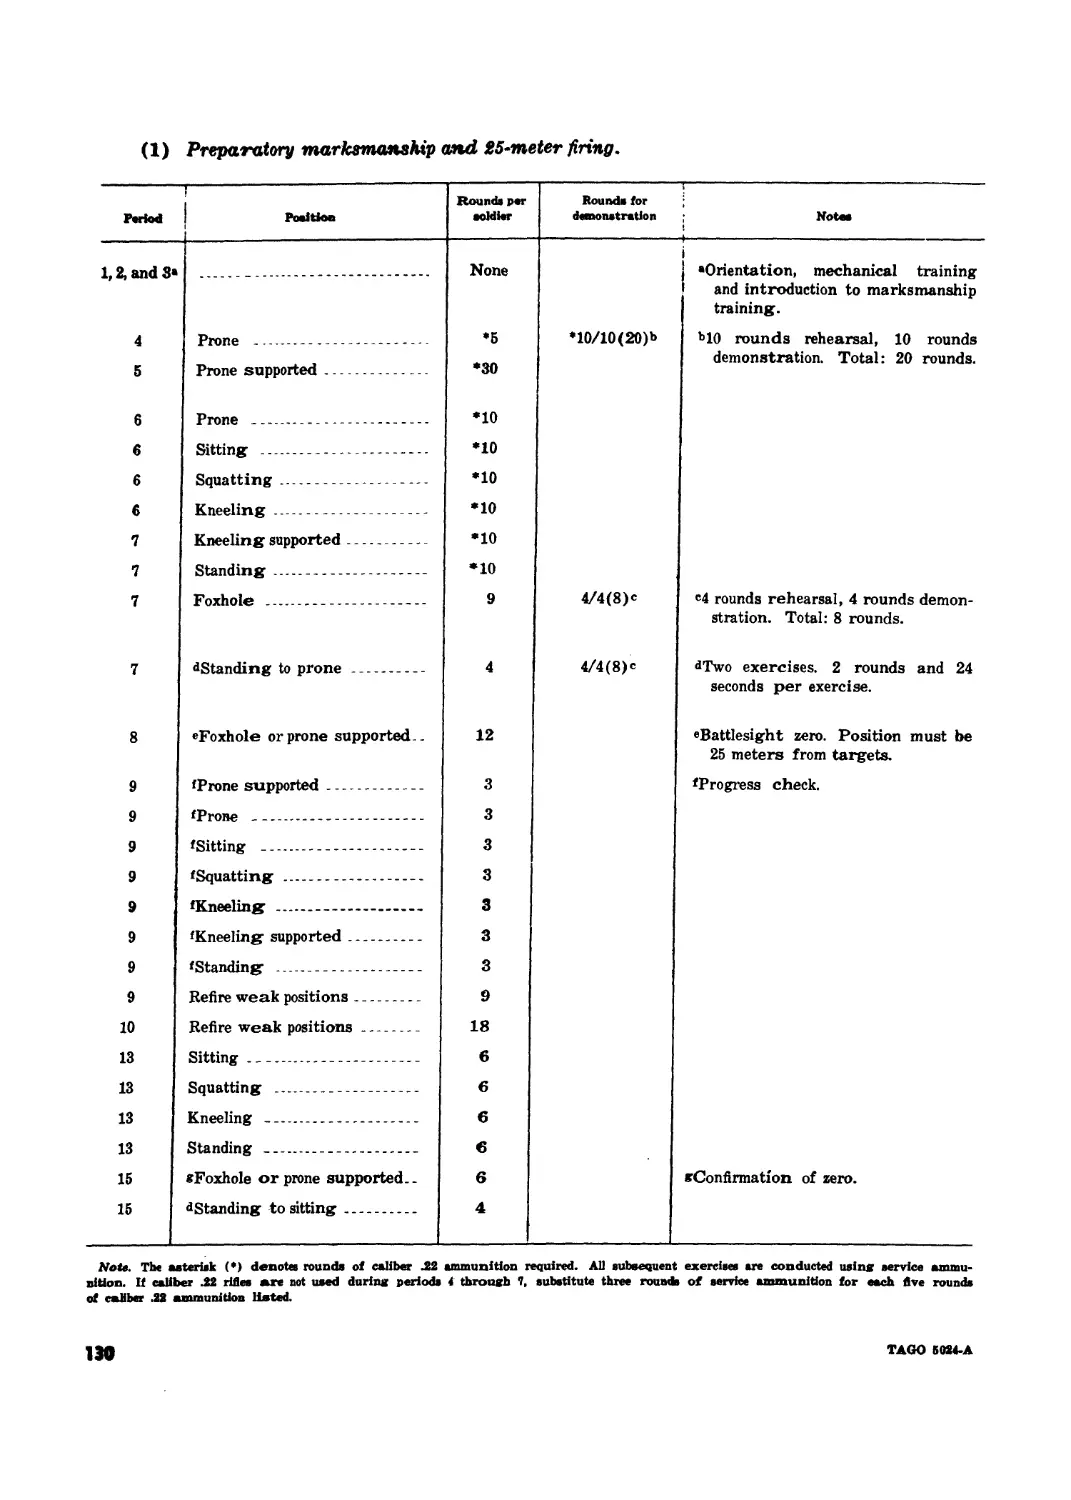
4. Rifle Marksmanship Training Courses
In order to provide maximum flexibility in
accomplishing the overall objectives of the
United States Army rifle marksmanship pro-
gram, several marksmanship courses have been
developed. These courses can be broadly divided
between those designed for active duty per-
sonnel and those designed for members of the
reserve components. Within each of these cate-
gories, there are several distinct courses of
instruction, each tailored for specific range
facilities and/or the experience level of the
soldiers receiving the training. The require-
ments and a synopsis of instruction for each
course are outlined in appendices III and IV.
The courses of fire outlined in this manual will
not be changed except by permission of the
Commanding General, United States Continen-
tal Army Command.
5. Training Conditions
ft. The procedures and techniques used in
the United States Army rifle marksmanship
training program are based on the concept that
riflemen must be proficient marksmen capable
of effectively applying their shooting skills in
combat. Initially during marksmanship train-
ing, emphasis is placed on learning or reviewing
shooting fundamentals. However, these funda-
mentals are taught in an environment designed
to prepare soldiers for later combat-type exer-
cises. For example, the soldier wears the nor-
mal equipment of a combat rifleman during live
fire exercises and practices fundamentals while
firing from positions approximating those
commonly used in combat. Later in the course,
TAGO 5024-A
3
emphasis is gradually focused on the combat
applications of marksmanship in addition to
the fundamentals. These applications are based
on conditions affecting marksmanship on the
battlefield. The more common of these are—
(1) Enemy personnel are seldom visible
except in the assault.
(2) Most combat targets are linear in
nature and will consist of a number
of men or objects irregularly spaced
along covered or concealed areas such
as ground folds, hedges, and borders
of woods.
(3) Most combat targets can be detected
by smoke, flash, dust, noise, or move-
ment and will only be visible for a
brief moment.
(4) Combat targets can be engaged by us-
ing nearby objects as reference points.
(5) The range at which individual person-
nel targets can be detected and ef-
fectively engaged will rarely exceed
300 meters.
(6) The nature of the target, irregularities
of terrain, and vegetation will gen-
erally require a rifleman to use a po-
sition other than prone in order to
fire effectively on the target. In a
defensive situation, the rifleman will
usually be firing from a foxhole posi-
tion or other type defensive em-
placement.
(7) Selecting an aiming point in elevation
is difficult because of the low outline
and obscurity of most combat targets.
(8) The conditions of rifle fire in combat
rarely require or permit mechanical
adjustments of the rear sight.
b. Competition between individuals and units
is an effective means of motivating the indi-
vidual and engendering unit pride, but it should
never be fostered at the expense of the ultimate
objective of the marksmanship program—to
produce well-trained combat riflemen. Should
this objective become secondary to obtaining
high scores on the range or qualifying the maxi-
mum number of soldiers, then it becomes a
matter of time before the more difficult aspects
of the marksmanship courses are either
eliminated or simplified to the point of being
useless. None of the marksmanship courses,
techniques, requirements, or objectives out-
lined in this manual are beyond the capability
of any individual who has been found physi-
cally qualified for military service PROVIDED
HE IS GIVEN GOOD INSTRUCTION AND
PROPER SUPERVISION.
4
TAGO 5024-A
CHAPTER 2
RIFLE MARKSMANSHIP FUNDAMENTALS
Section I. GENERAL
6. Purpose and Scope
a. Rifle marksmanship fundamentals train-
ing and 25-meter (1000-inch) firing teaches the
soldier the habits of good shooting and pre-
pares him for more advanced field firing exer-
cises.
b. To be proficient, a combat rifleman must
be able to detect targets, determine the ranges
to targets, and hit the targets when he fires
upon them. There are many variables affecting
an individual’s ability to detect and determine
the range to combat targets. These will be
discussed in chapter 5, Target Detection. How-
ever, by comparison, the factors affecting a
rifleman’s ability to fire and hit the target are
relatively constant. Essentially, the rifleman
must be able to assume a firing position which
affords him protection and at the same time
permits unrestricted observation of the target
area. He must hold the rifle in such a manner
that he and his rifle form a single, steady unit.
He must know how to correctly align his rifle
on the target; and, finally, he must be able to
fire his rifle without disturbing this alignment.
The skills needed to accomplish these require-
ments are known collectively as rifle marks-
manship fundamentals.
c. The degree of proficiency attained by a
rifleman is largely dependent upon the correct
teaching and application of marksmanship
fundamentals. Consequently, the sequence of
instruction outlined in Army Subject Sched-
ule 23—31 should be followed.
7. Use of .22 Caliber Rifles
Soldiers with little or no previous marksman-
ship experience should be given fundamentals
training on the 25-meter (1000-inch) range
using the .22 caliber rifle. By using this rifle,
the soldier can focus his attention on learning
and practicing the fundamentals of good marks-
manship without becoming concerned with the
recoil of the weapon. For planning purposes,
five rounds of .22 caliber ammunition can be
substituted for three rounds of service ammuni-
tion. When .22 caliber rifles are used, instruc-
tors must exercise close supervision of firers
when the transition is made to the service rifle.
It is during the first few exercises with the serv-
ice rifle that firers are most likely to begin
“flinching” or “bucking” (par. 9b(8)(b)) be-
cause of the added recoil. Such errors must be
quickly identified and corrected before they
become habit.
8. Early Firing Exercise and
Recoil Demonstration
An early firing exercise and recoil demon-
stration should be conducted for soldiers who
have little or no previous marksmanship ex-
perience. The early firing exercise is designed
to motivate soldiers toward the marksmanship
training. The recoil demonstration clearly
shows the soldiers that if they handle the
weapon properly, they will have nothing to fear
from recoil.
a. Early Firing Exercises. After receiving a
brief orientation on range procedures, safety,
and the prone position, each soldier fires five
rounds of .22 caliber ammunition (or three
rounds of service ammunition if .22 caliber
rifles are not used) at a 25-meter target. When
all soldiers have completed firing, they are as-
sembled at a central location to witness a well-
trained rifleman fire 10 rounds of .22 caliber
(or nine rounds of service ammunition) at a
25-meter target. By comparing his target with
that of the well-trained rifleman, each soldier
will see a definite need for further marksman-
ship training.
b. Recoil Demonstration. A recoil demon-
stration should be conducted before the soldier
TAGO Б024-А
5
fires the service rifle for the first time. The
demonstration is fired by a well-trained rifle-
man. He fires the first round while holding the
rifle to his side, in one hand. Next, he fires a
round while holding the butt of the weapon
tightly against his thigh. The third round is
fired with the rifle butt pressed firmly against
the demonstrator’s groin. A fourth round is
fired with the butt of the rifle placed firmly
against the pit of the stomach. The final round
will usually convince even the most skeptical
since it is fired with the rifle butt pressed
firmly against the point of the demonstrator’s
chin. As long as the demonstrator keeps the
rifle butt pressed firmly against his body, he
will have no difficulty in performing the demon-
stration. The soldiers should be instructed in
the principle of pressing the butt firmly against
the body to avoid the affects of recoil.
Section II. MARKSMANSHIP FUNDAMENTALS
9. The Integrated Act of Shooting
Combat rifle firing is an integrated act in-
volving several techniques and procedures
necessary to fire the rifle and hit the target.
This means that the procedures used in firing
the rifle in combat are applied instinctively and
almost simultaneously. The integrated act of
shooting can be divided into two parts—aiming
and the steady hold.
a. Aiming.
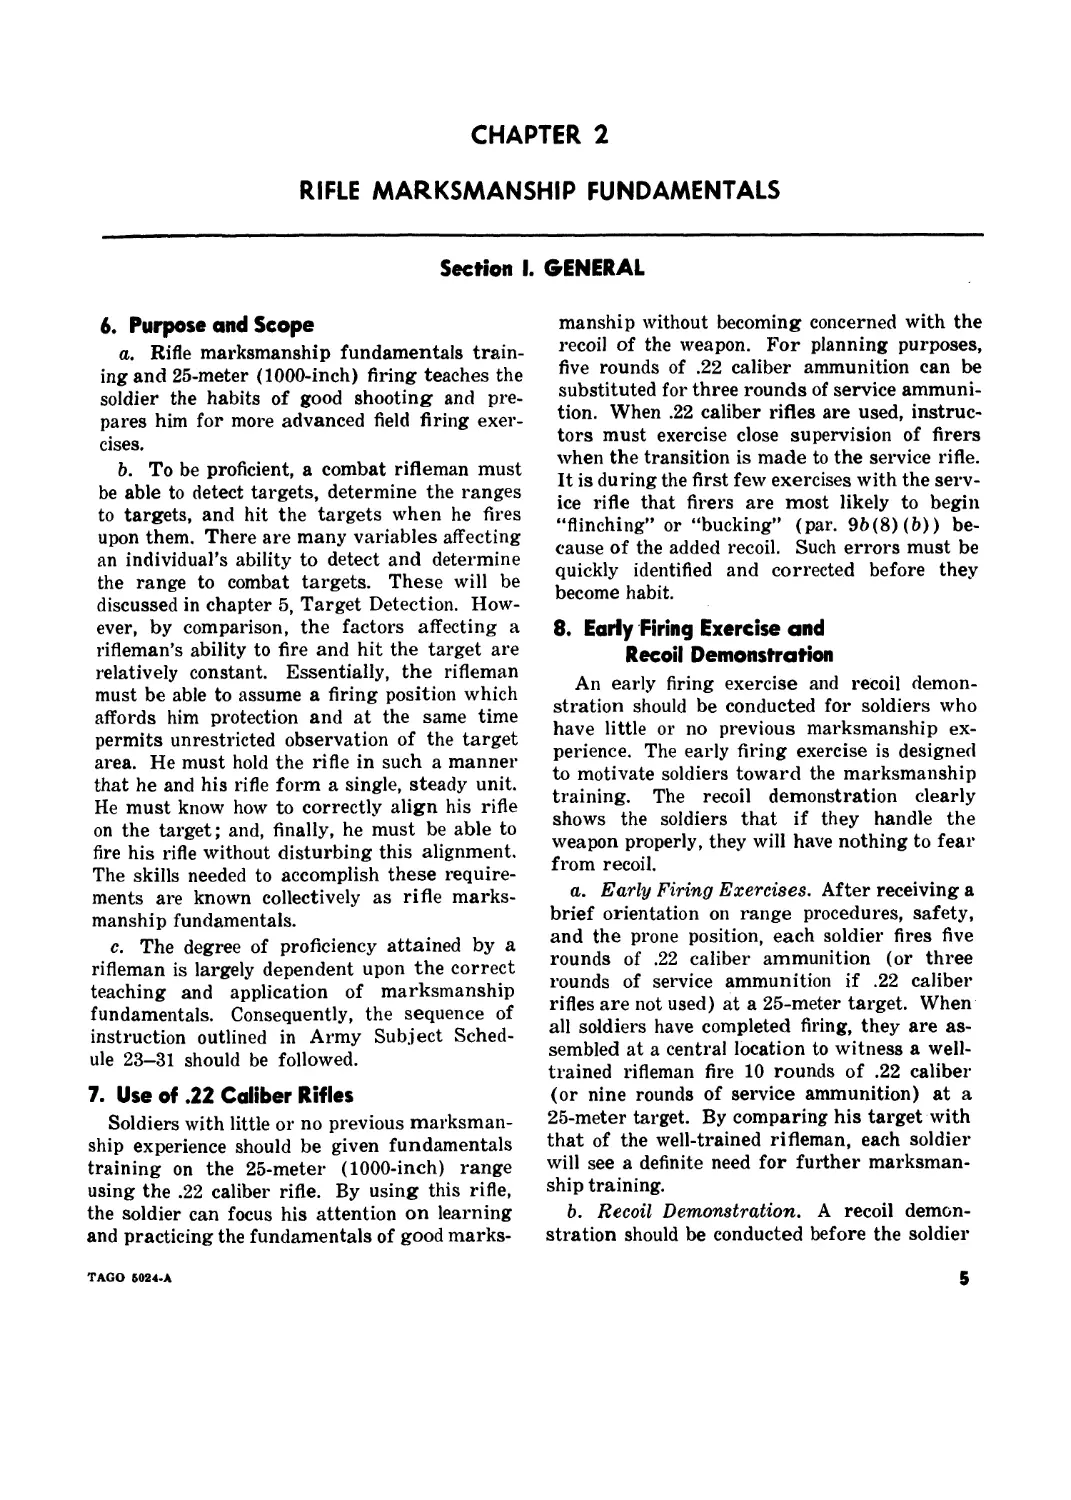
(1) In aiming, the firer is concerned with
correctly pointing his rifle so the bullet
will hit the target when he fires. To
do this, he must have the rear sight,
Figure 1. Correct sight alignment.
the front sight blade, and the target
or aiming point in their proper rela-
tionship. This relationship is known
as sight picture. Sight picture in-
volves two elements—sight alignment
and placement of the target or aiming
point.
(a) Correct sight alignment. To obtain
correct sight alignment, the sights
should be aligned as shown in fig-
ure 1. Notice that the top center of
the front sight blade is exactly in
the center of the rear sight aperture.
If an imaginary horizontal line is
drawn through the center of the
rear sight aperture, the top of the
front sight blade will appear to
touch this line. If an imaginary
vertical line is drawn through the
center of the rear sight aperture, the
line will appear to bisect the front
sight blade.
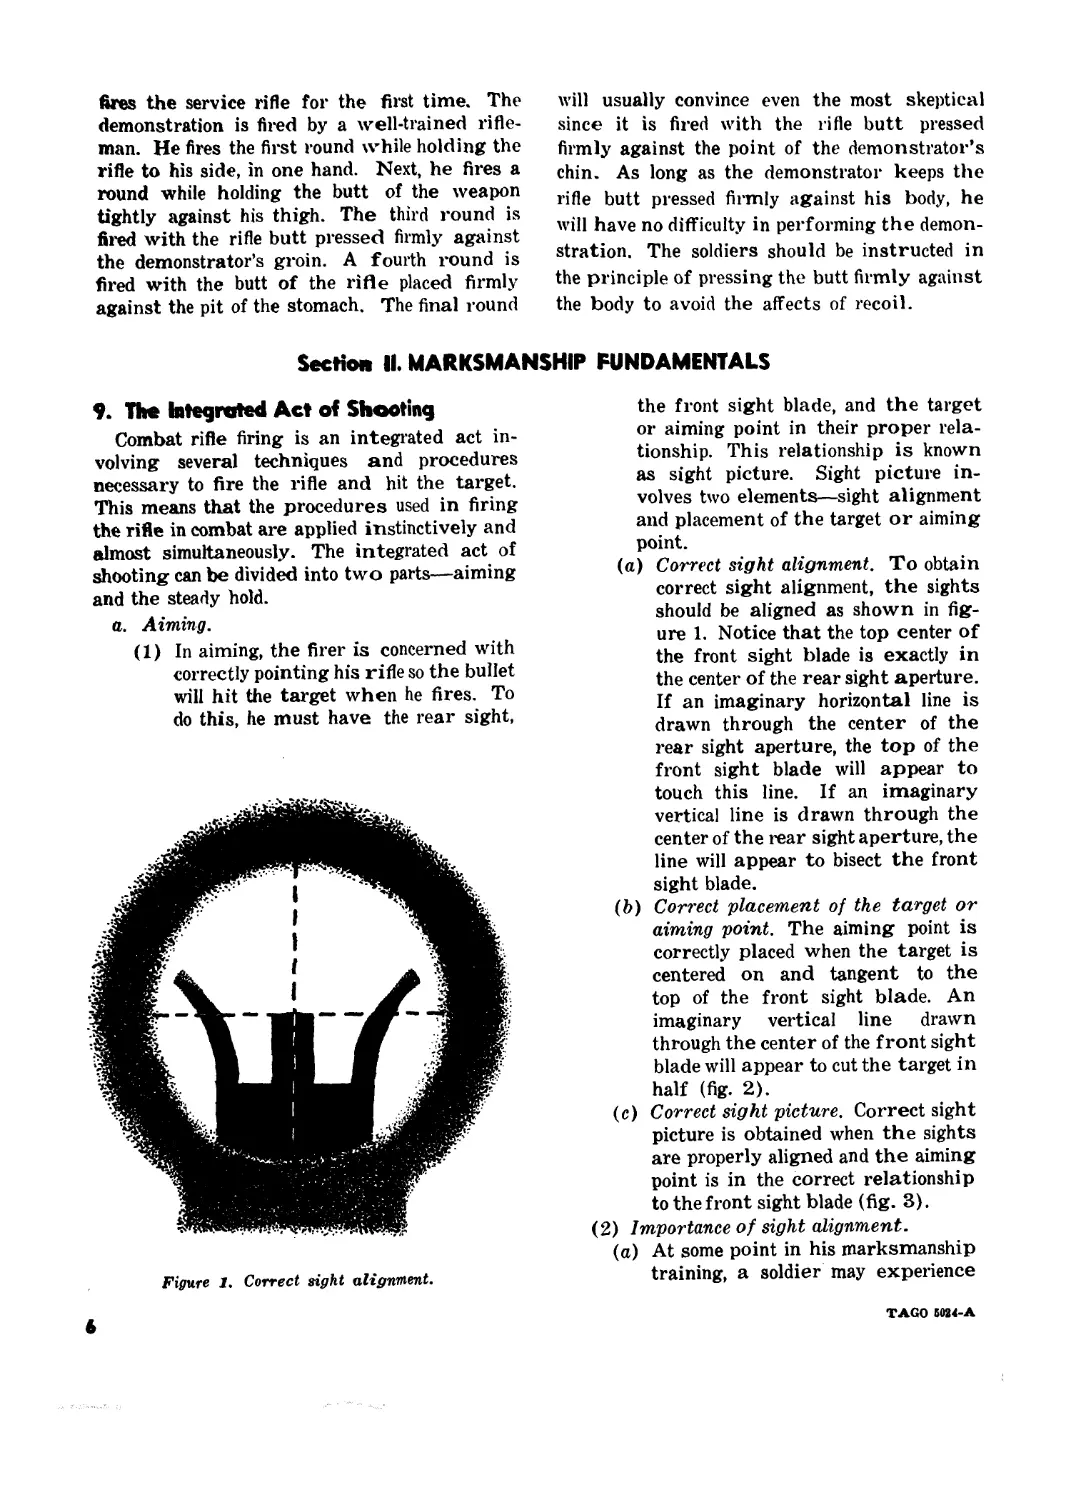
(b) Correct placement of the target or
aiming point. The aiming point is
correctly placed when the target is
centered on and tangent to the
top of the front sight blade. An
imaginary vertical line drawn
through the center of the front sight
blade will appear to cut the target in
half (fig. 2).
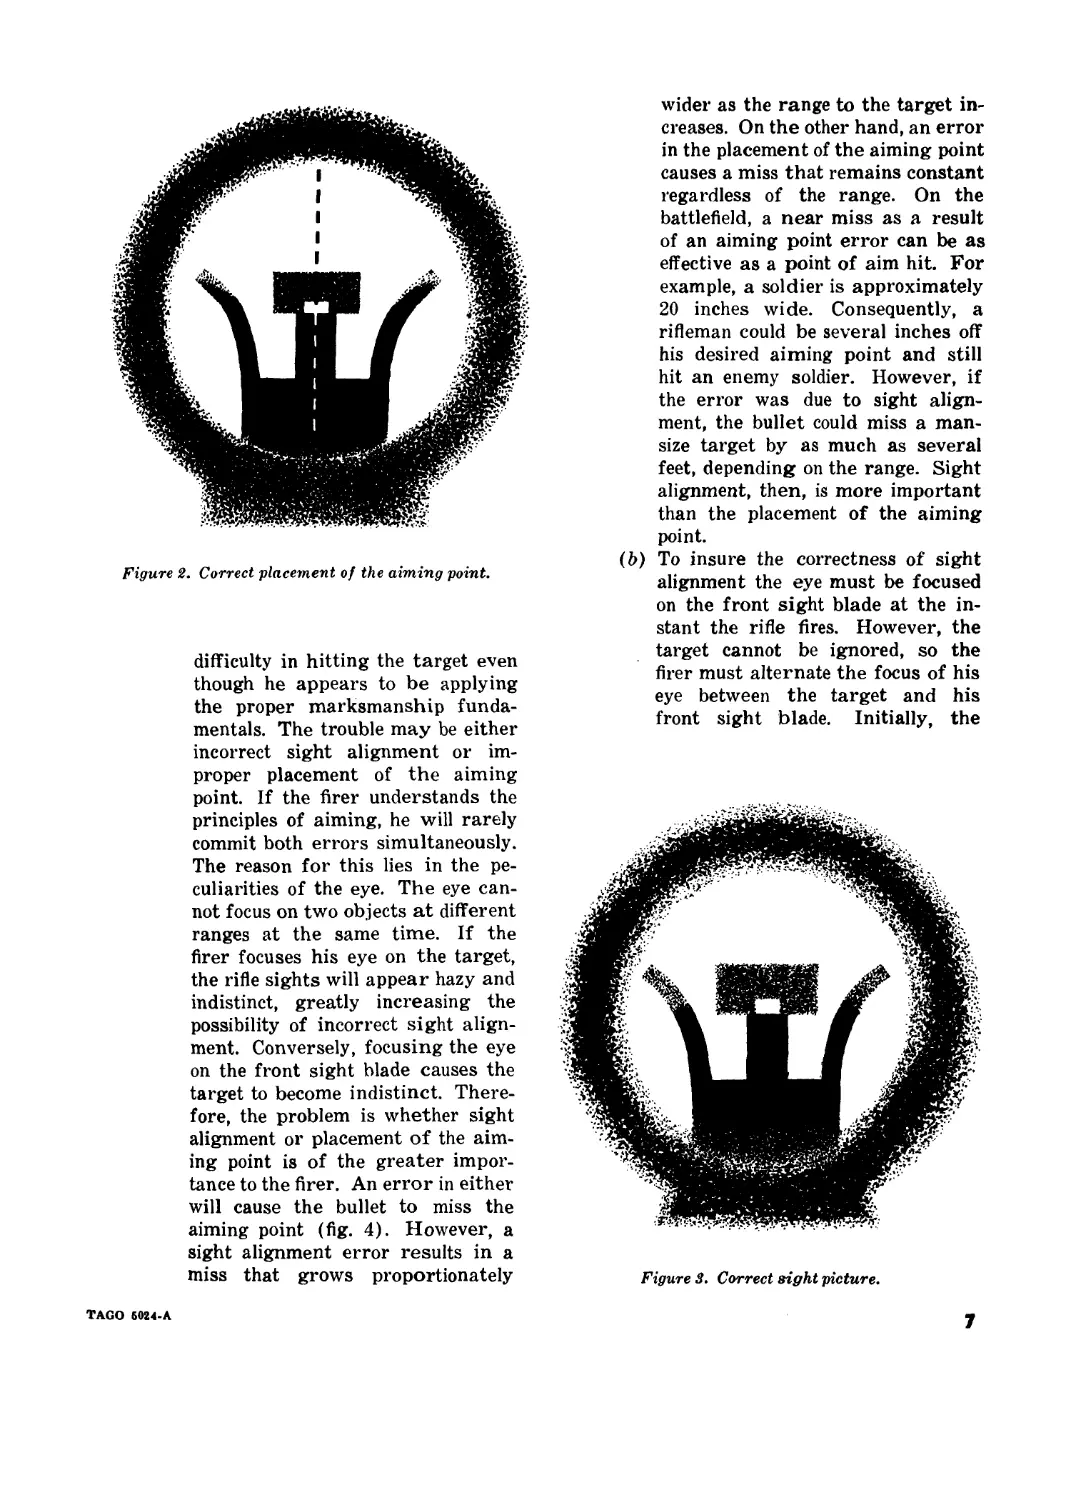
(c) Correct sight picture. Correct sight
picture is obtained when the sights
are properly aligned and the aiming
point is in the correct relationship
to the front sight blade (fig. 3).
(2) Importance of sight alignment.
(a) At some point in his marksmanship
training, a soldier may experience
TAGO Б024-А
6
Figure 2. Correct placement of the aiming point.
difficulty in hitting the target even
though he appears to be applying
the proper marksmanship funda-
mentals. The trouble may be either
incorrect sight alignment or im-
proper placement of the aiming
point. If the firer understands the
principles of aiming, he will rarely
commit both errors simultaneously.
The reason for this lies in the pe-
culiarities of the eye. The eye can-
not focus on two objects at different
ranges at the same time. If the
firer focuses his eye on the target,
the rifle sights will appear hazy and
indistinct, greatly increasing the
possibility of incorrect sight align-
ment. Conversely, focusing the eye
on the front sight blade causes the
target to become indistinct. There-
fore, the problem is whether sight
alignment or placement of the aim-
ing point is of the greater impor-
tance to the firer. An error in either
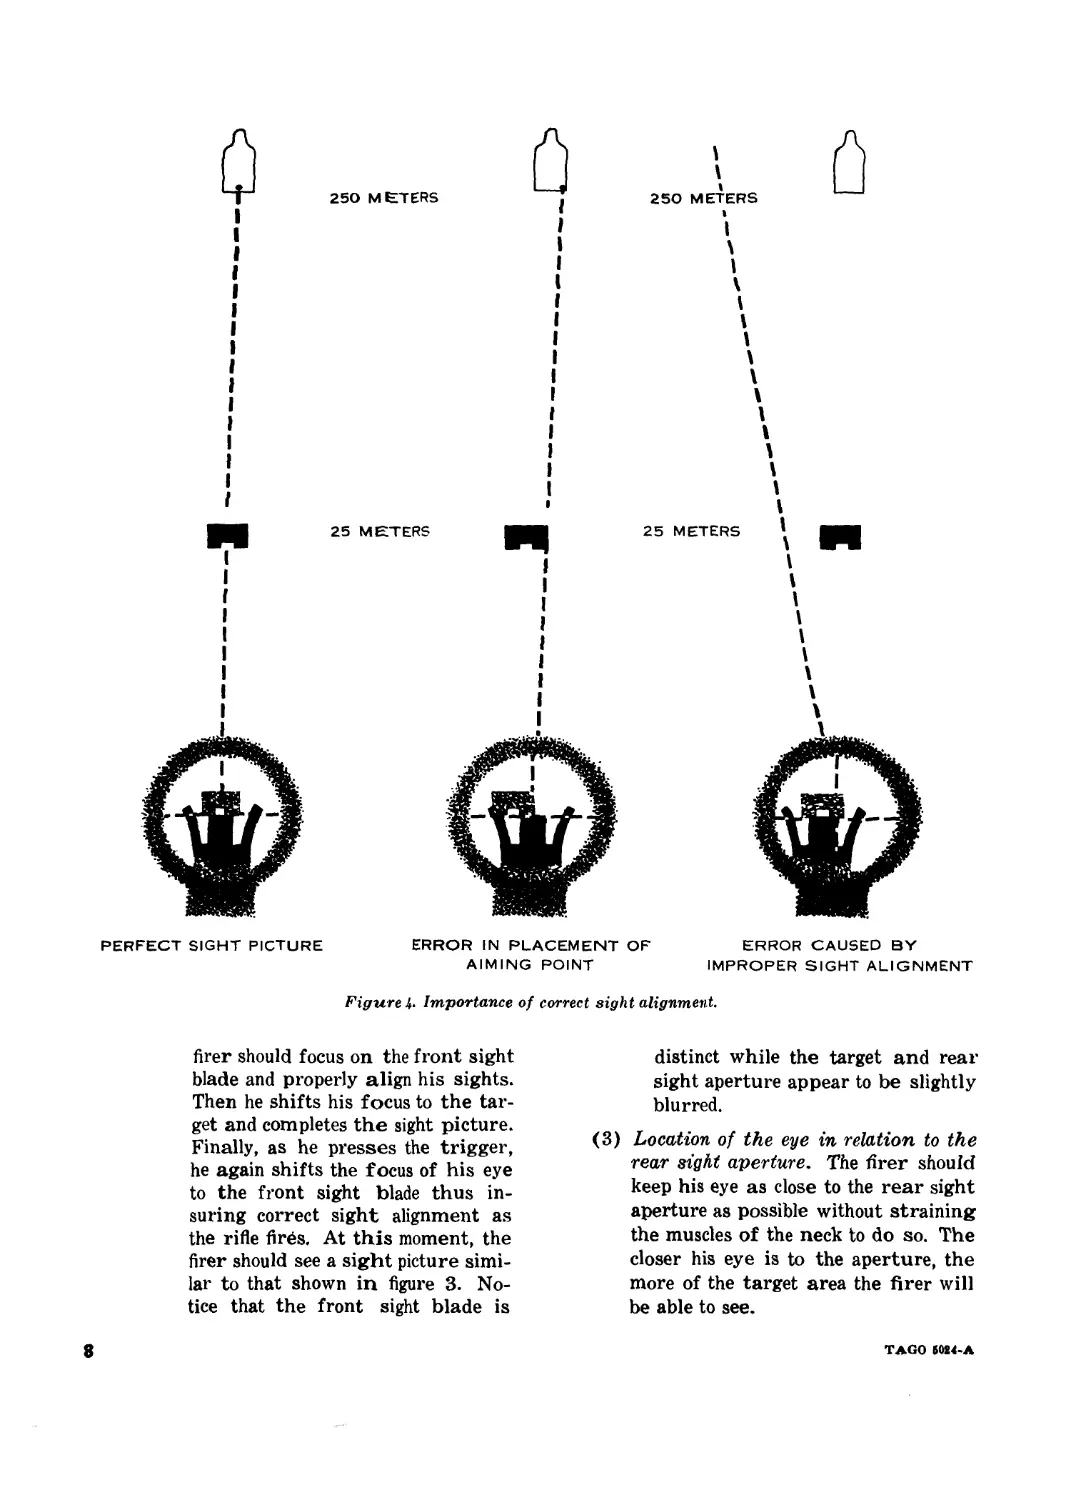
will cause the bullet to miss the
aiming point (fig. 4). However, a
sight alignment error results in a
miss that grows proportionately
wider as the range to the target in-
creases. On the other hand, an error
in the placement of the aiming point
causes a miss that remains constant
regardless of the range. On the
battlefield, a near miss as a result
of an aiming point error can be as
effective as a point of aim hit. For
example, a soldier is approximately
20 inches wide. Consequently, a
rifleman could be several inches off
his desired aiming point and still
hit an enemy soldier. However, if
the error was due to sight align-
ment, the bullet could miss a man-
size target by as much as several
feet, depending on the range. Sight
alignment, then, is more important
than the placement of the aiming
point.
(b) To insure the correctness of sight
alignment the eye must be focused
on the front sight blade at the in-
stant the rifle fires. However, the
target cannot be ignored, so the
firer must alternate the focus of his
eye between the target and his
front sight blade. Initially, the
Figure 8. Correct sight picture.
TAGO 6024-A
7
PERFECT SIGHT PICTURE
ERROR IN PLACEMENT OF
AIMING POINT
ERROR CAUSED BY
IMPROPER SIGHT ALIGNMENT
Figure !> Importance of correct sight alignment.
firer should focus on the front sight
blade and properly align his sights.
Then he shifts his focus to the tar-
get and completes the sight picture.
Finally, as he presses the trigger,
he again shifts the focus of his eye
to the front sight blade thus in-
suring correct sight alignment as
the rifle finds. At this moment, the
firer should see a sight picture simi-
lar to that shown in figure 3. No-
tice that the front sight blade is
distinct while the target and rear
sight aperture appear to be slightly
blurred.
(3) Location of the eye in relation to the
rear sight aperture. The firer should
keep his eye as close to the rear sight
aperture as possible without straining
the muscles of the neck to do so. The
closer his eye is to the aperture, the
more of the target area the firer will
be able to see.
8
TAGO 5024-A
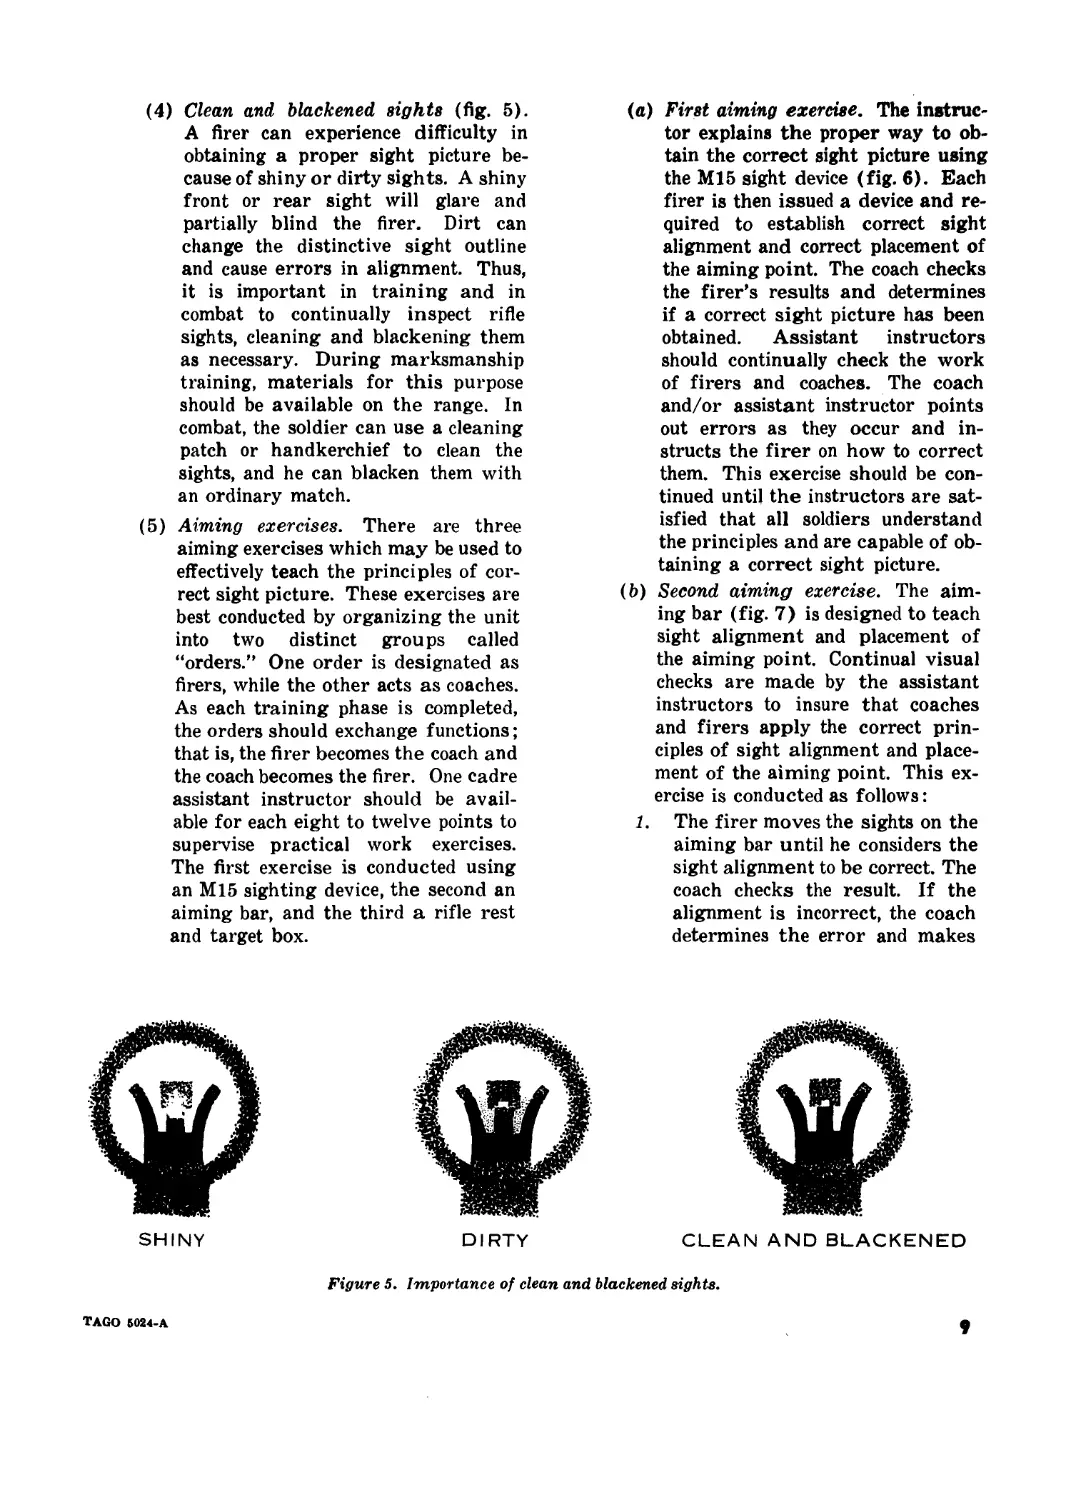
(4) Clean and blackened sights (fig. 5).
A firer can experience difficulty in
obtaining a proper sight picture be-
cause of shiny or dirty sights. A shiny
front or rear sight will glare and
partially blind the firer. Dirt can
change the distinctive sight outline
and cause errors in alignment. Thus,
it is important in training and in
combat to continually inspect rifle
sights, cleaning and blackening them
as necessary. During marksmanship
training, materials for this purpose
should be available on the range. In
combat, the soldier can use a cleaning
patch or handkerchief to clean the
sights, and he can blacken them with
an ordinary match.
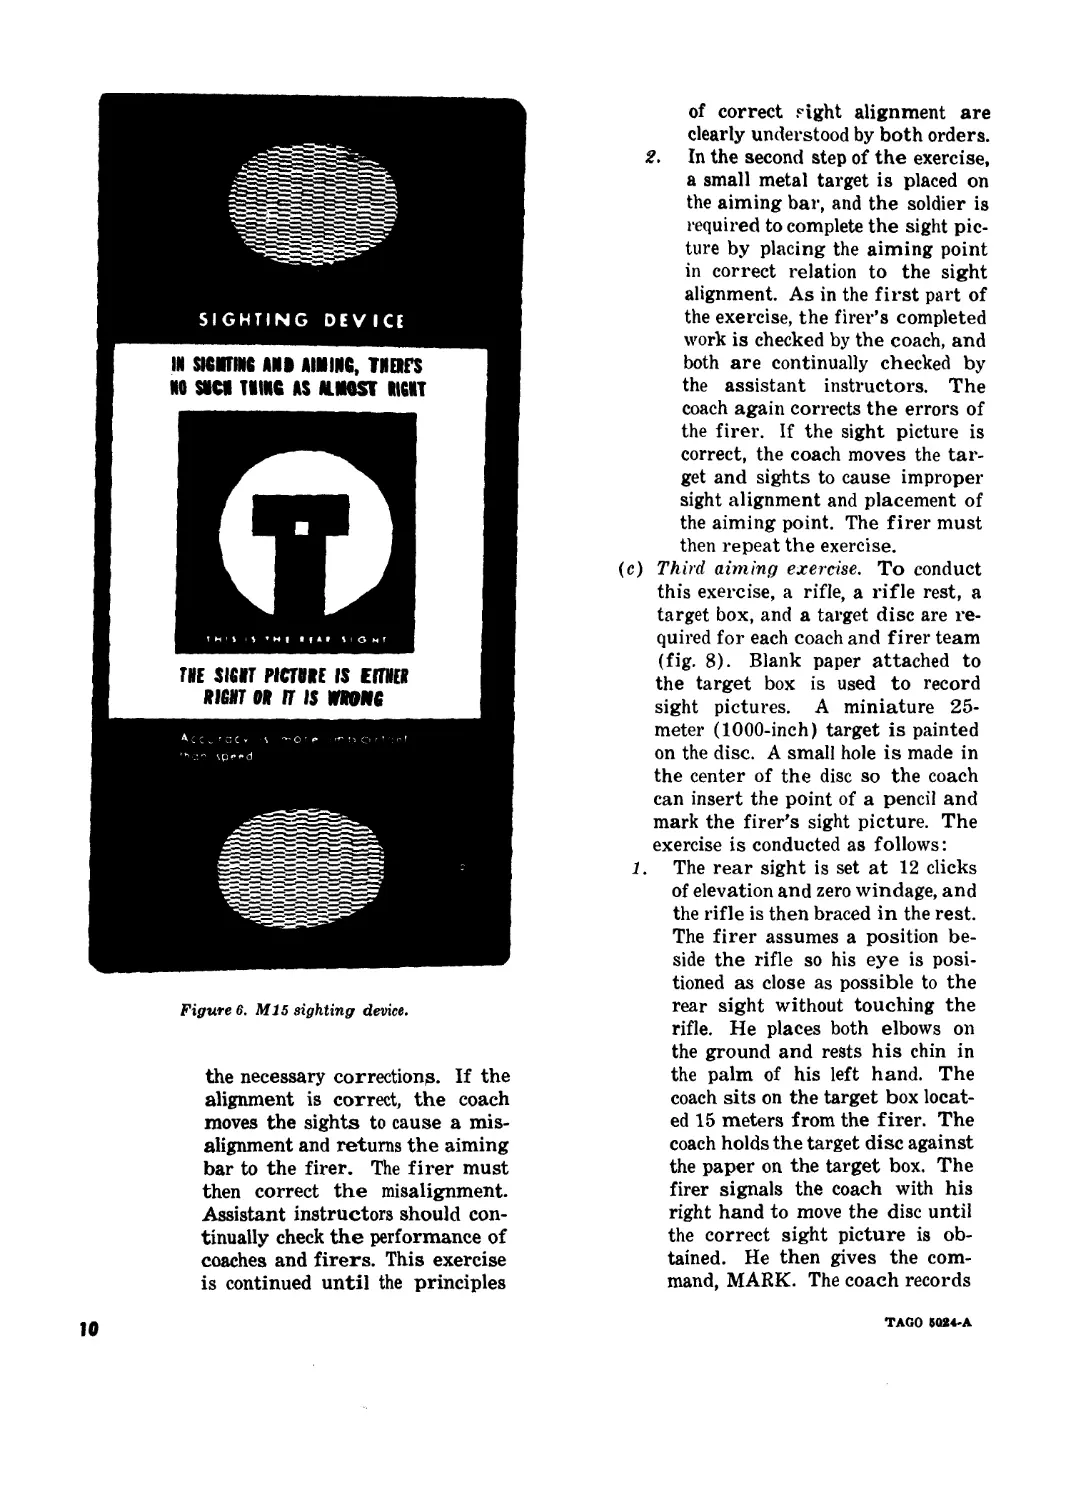
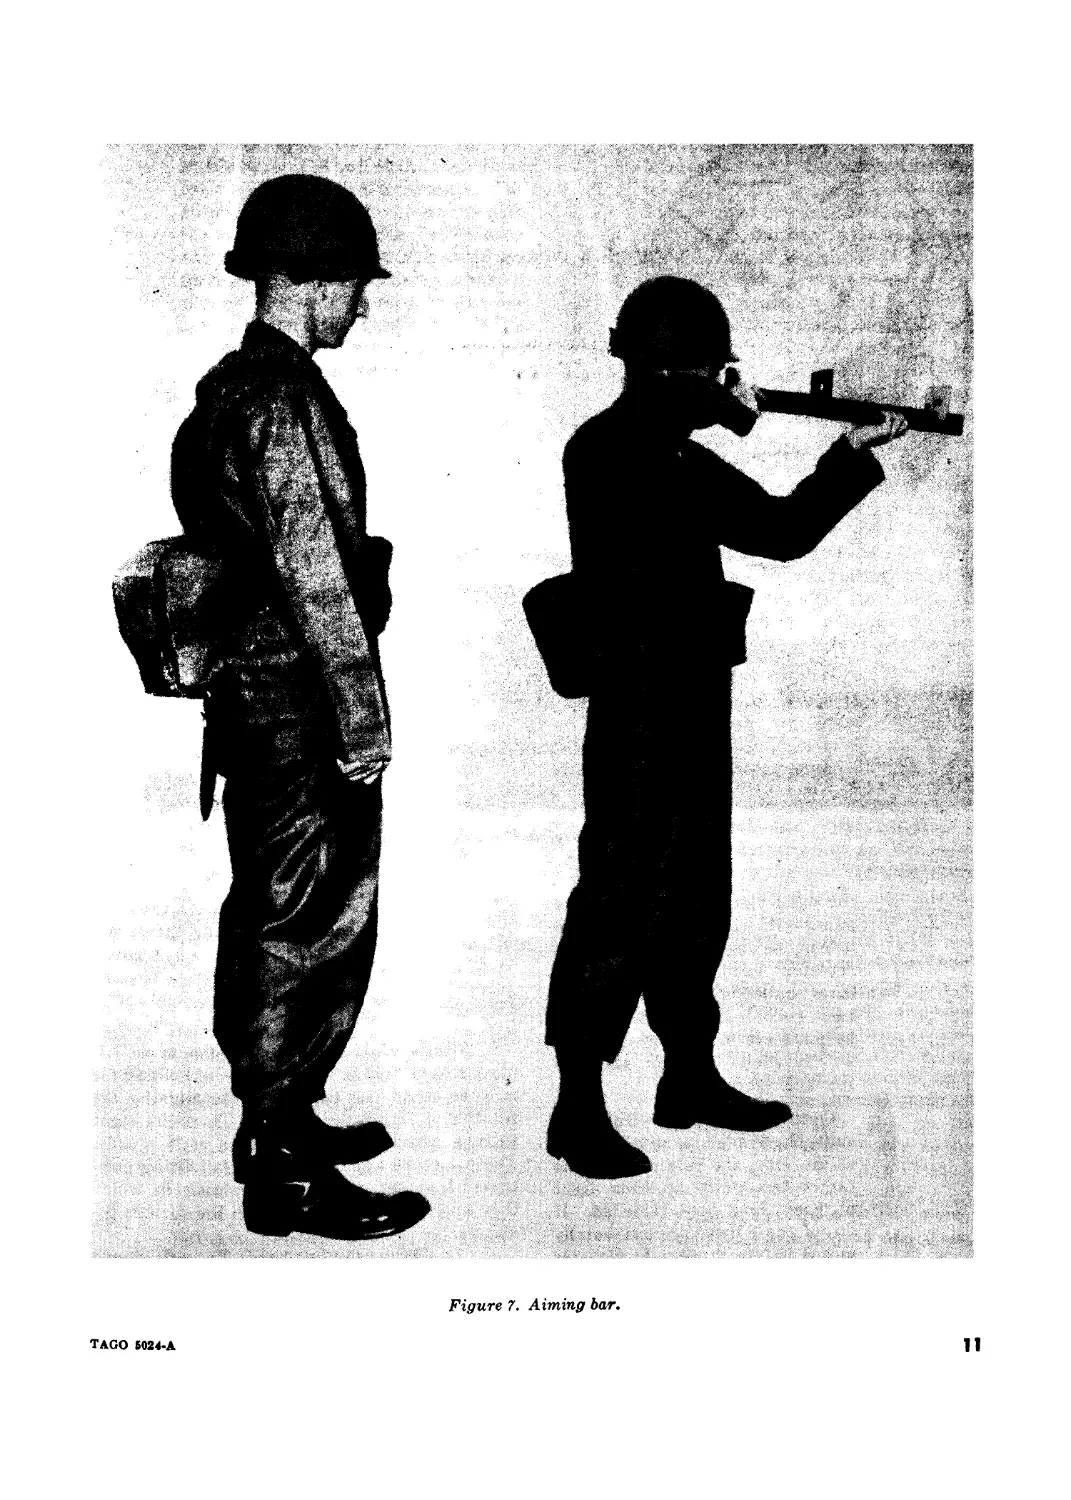
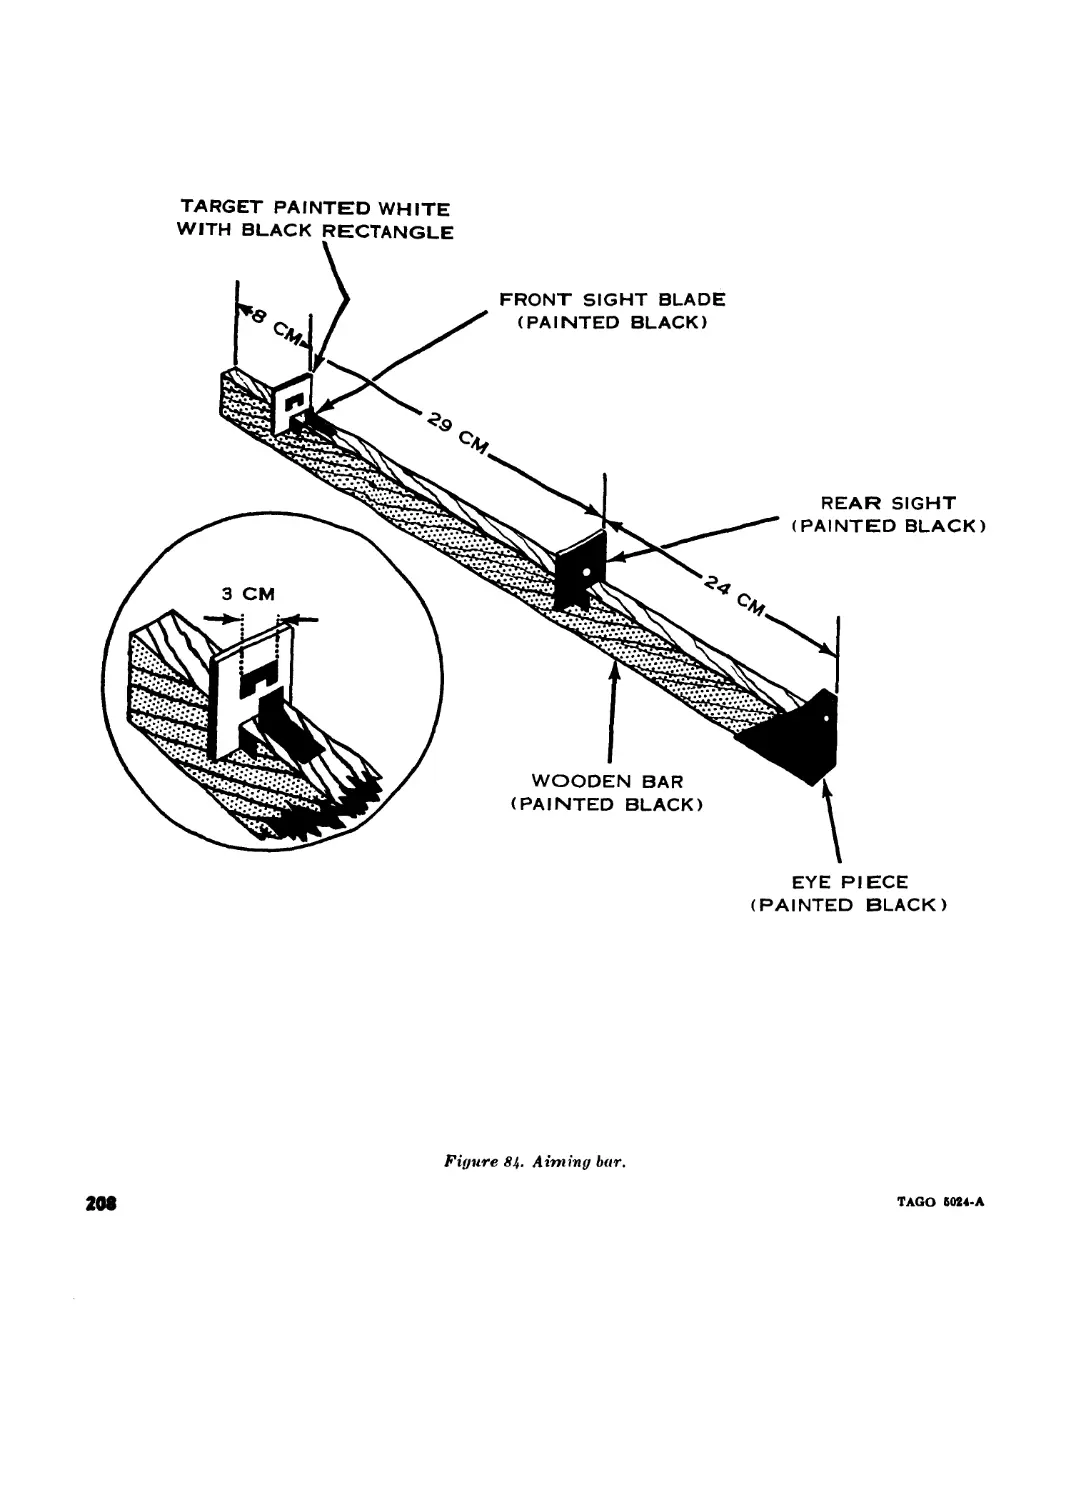
(5) Aiming exercises. There are three
aiming exercises which may be used to
effectively teach the principles of cor-
rect sight picture. These exercises are
best conducted by organizing the unit
into two distinct groups called
“orders.” One order is designated as
firers, while the other acts as coaches.
As each training phase is completed,
the orders should exchange functions;
that is, the firer becomes the coach and
the coach becomes the firer. One cadre
assistant instructor should be avail-
able for each eight to twelve points to
supervise practical work exercises.
The first exercise is conducted using
an M15 sighting device, the second an
aiming bar, and the third a rifle rest
and target box.
(a) First aiming exercise. The instruc-
tor explains the proper way to ob-
tain the correct sight picture using
the M15 sight device (fig. 6). Each
firer is then issued a device and re-
quired to establish correct sight
alignment and correct placement of
the aiming point. The coach checks
the firer’s results and determines
if a correct sight picture has been
obtained. Assistant instructors
should continually check the work
of firers and coaches. The coach
and/or assistant instructor points
out errors as they occur and in-
structs the firer on how to correct
them. This exercise should be con-
tinued until the instructors are sat-
isfied that all soldiers understand
the principles and are capable of ob-
taining a correct sight picture.
(b) Second aiming exercise. The aim-
ing bar (fig. 7) is designed to teach
sight alignment and placement of
the aiming point. Continual visual
checks are made by the assistant
instructors to insure that coaches
and firers apply the correct prin-
ciples of sight alignment and place-
ment of the aiming point. This ex-
ercise is conducted as follows:
1. The firer moves the sights on the
aiming bar until he considers the
sight alignment to be correct. The
coach checks the result. If the
alignment is incorrect, the coach
determines the error and makes
SHINY
Figure 5. Importance of clean and blackened sights.
TAGO Б024-А
9
Figures. M15 sighting device.
the necessary corrections. If the
alignment is correct the coach
moves the sights to cause a mis-
alignment and returns the aiming
bar to the firer. The firer must
then correct the misalignment.
Assistant instructors should con-
tinually check the performance of
coaches and firers. This exercise
is continued until the principles
of correct fight alignment are
clearly understood by both orders.
2. In the second step of the exercise,
a small metal target is placed on
the aiming bar, and the soldier is
required to complete the sight pic-
ture by placing the aiming point
in correct relation to the sight
alignment. As in the first part of
the exercise, the firer’s completed
work is checked by the coach, and
both are continually checked by
the assistant instructors. The
coach again corrects the errors of
the firer. If the sight picture is
correct, the coach moves the tar-
get and sights to cause improper
sight alignment and placement of
the aiming point. The firer must
then repeat the exercise.
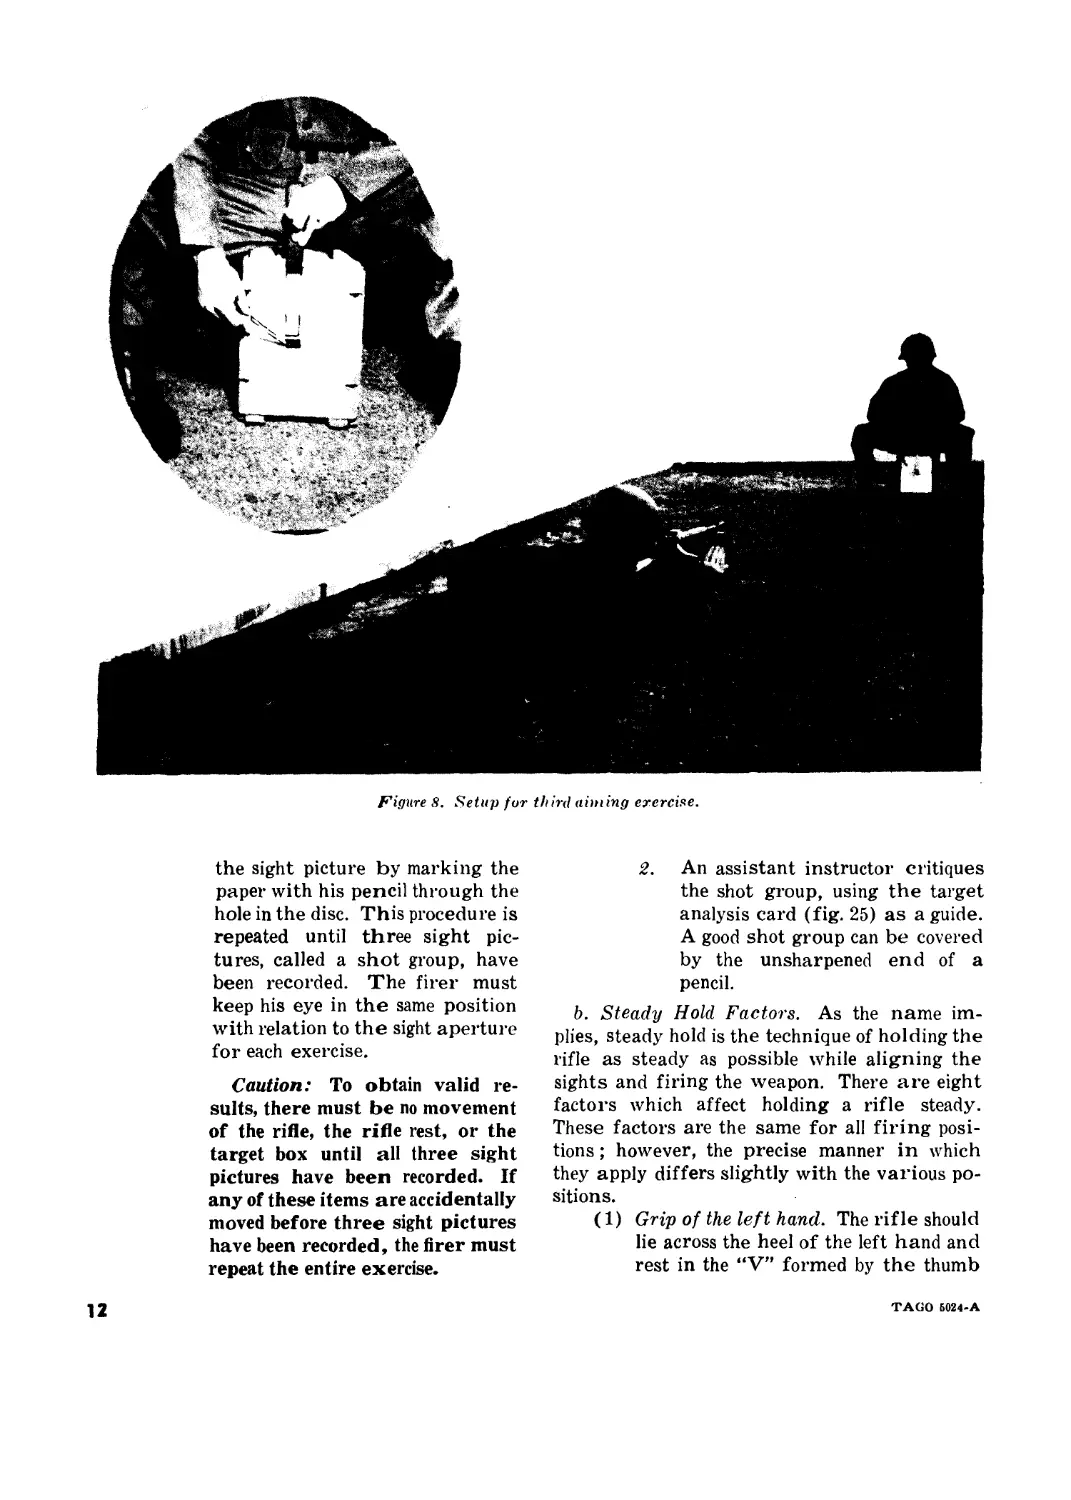
(c) Third aiming exercise. To conduct
this exercise, a rifle, a rifle rest, a
target box, and a target disc are re-
quired for each coach and firer team
(fig. 8). Blank paper attached to
the target box is used to record
sight pictures. A miniature 25-
meter (1000-inch) target is painted
on the disc. A small hole is made in
the center of the disc so the coach
can insert the point of a pencil and
mark the firer’s sight picture. The
exercise is conducted as follows:
1. The rear sight is set at 12 clicks
of elevation and zero windage, and
the rifle is then braced in the rest.
The firer assumes a position be-
side the rifle so his eye is posi-
tioned as close as possible to the
rear sight without touching the
rifle. He places both elbows on
the ground and rests his chin in
the palm of his left hand. The
coach sits on the target box locat-
ed 15 meters from the firer. The
coach holds the target disc against
the paper on the target box. The
firer signals the coach with his
right hand to move the disc until
the correct sight picture is ob-
tained. He then gives the com-
mand, MARK. The coach records
10
TAGO 5024-A
Figure 7. Aiming bar.
TAGO 5024-A
11
Figure 8. Setup fur third aiming exercise.
the sight picture by marking the
paper with his pencil through the
hole in the disc. This procedure is
repeated until three sight pic-
tures, called a shot group, have
been recorded. The firer must
keep his eye in the same position
with relation to the sight aperture
for each exercise.
Caution: To obtain valid re-
sults, there must be no movement
of the rifle, the rifle rest, or the
target box until all three sight
pictures have been recorded. If
any of these items are accidentally
moved before three sight pictures
have been recorded, the firer must
repeat the entire exercise.
2. An assistant instructor critiques
the shot group, using the target
analysis card (fig. 25) as a guide.
A good shot group can be covered
by the unsharpened end of a
pencil.
b. Steady Hold Factors. As the name im-
plies, steady hold is the technique of holding the
rifle as steady as possible while aligning the
sights and firing the weapon. There are eight
factors which affect holding a rifle steady.
These factors are the same for all firing posi-
tions ; however, the precise manner in which
they apply differs slightly with the various po-
sitions.
(1) Grip of the left hand. The rifle should
lie across the heel of the left hand and
rest in the “V” formed by the thumb
12
TAGO Б024-А
and forefinger. The grip on the rifle
should be relaxed but, at the same time,
exert a slight rearward pressure. The
rifle is held at a point which suits both
the conformation of the firer’s body
and the location of the target. If the
target is high, the left hand is moved
closer to the body thereby raising the
muzzle of the rifle. Conversely, if the
target is low, the left hand is moved
forward causing a corresponding drop
in the muzzle of the rifle. The left
wrist should be as straight as possible.
The left elbow should be directly under
the receiver of the rifle or as close to
this position as the conformation of
the firer’s body will permit. With the
left elbow directly under the rifle, the
bones (rather than the muscles) of the
arm support the rifle’s weight. The
further away from this position that
the elbow is located, the greater will
be the muscular effort needed to sup-
port the rifle. The resulting tensed
muscles cause trembling and a cor-
responding movement of the rifle. On
the other hand, firers must avoid ex-
cessive muscular strain in positioning
the elbow as this will also cause trem-
bling. Consequently, inexperienced
firers must, of necessity, undergo a
trial and error period until they find
the position best suited to them.
(2) Rifle butt in the pocket of the shoulder.
The firer must place the rifle butt
firmly into the pocket formed in the
right shoulder. The proper placement
of the butt lessens the effect of recoil,
helps steady the rifle, and prevents
the rifle butt from slipping on the
shoulder during firing.
(3) Grip of the right hand. The firer’s
right hand should grip the small of
the stock firmly but not rigidly. A
firm rearward pressure must be ex-
erted by the right hand to keep the
rifle butt in its proper position in the
pocket of the shoulder, and keep the
butt secure enough against the shoul-
der to avoid effects of recoil. The
thumb extends over the small of the
stock in order to obtain a spot weld.
The trigger finger is positioned on the
trigger so there is no contact between
the finger and the side of the stock.
This permits the trigger to be pressed
straight to the rear without disturb-
ing the aim of the rifle.
(4) Right elbow. The location of the right
elbow is important since it provides
balance to the firer’s position. Cor-
rectly positioned, the elbow helps form
a pocket in the shoulder for the rifle
butt. The exact location of the right
elbow varies in each position and will
be described in the explanation of the
positions.
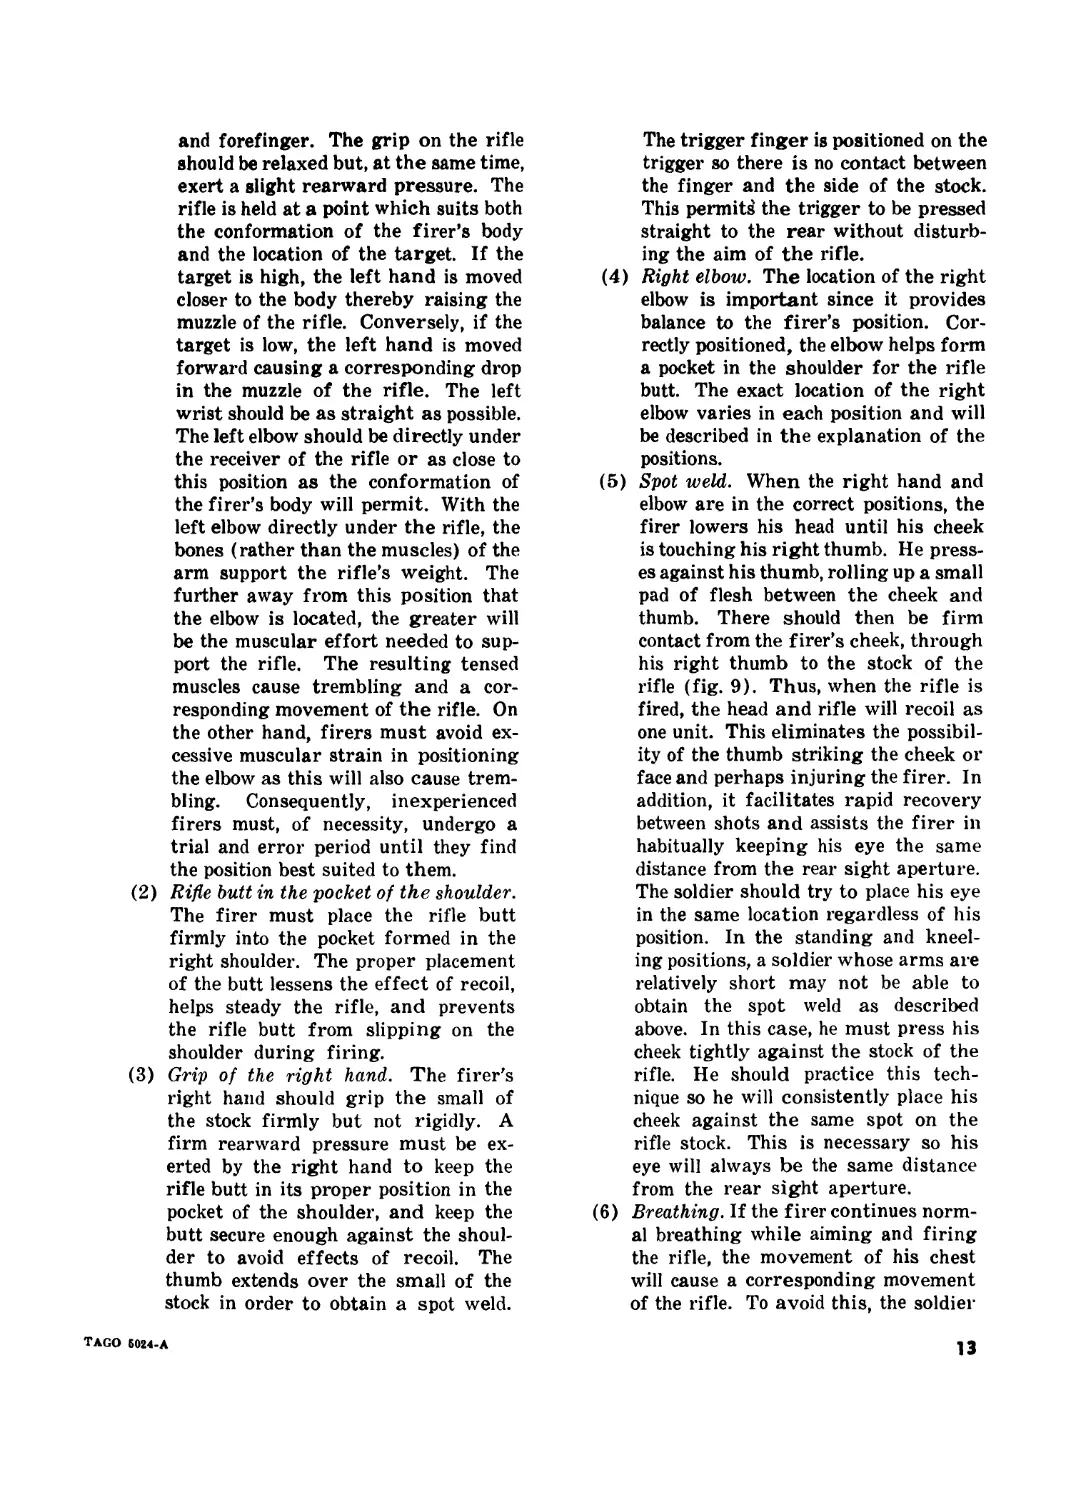
(5) Spot weld. When the right hand and
elbow are in the correct positions, the
firer lowers his head until his cheek
is touching his right thumb. He press-
es against his thumb, rolling up a small
pad of flesh between the cheek and
thumb. There should then be firm
contact from the firer’s cheek, through
his right thumb to the stock of the
rifle (fig. 9). Thus, when the rifle is
fired, the head and rifle will recoil as
one unit. This eliminates the possibil-
ity of the thumb striking the cheek or
face and perhaps injuring the firer. In
addition, it facilitates rapid recovery
between shots and assists the firer in
habitually keeping his eye the same
distance from the rear sight aperture.
The soldier should try to place his eye
in the same location regardless of his
position. In the standing and kneel-
ing positions, a soldier whose arms are
relatively short may not be able to
obtain the spot weld as described
above. In this case, he must press his
cheek tightly against the stock of the
rifle. He should practice this tech-
nique so he will consistently place his
cheek against the same spot on the
rifle stock. This is necessary so his
eye will always be the same distance
from the rear sight aperture.
(6) Breathing. If the firer continues norm-
al breathing while aiming and firing
the rifle, the movement of his chest
will cause a corresponding movement
of the rifle. To avoid this, the soldier
TAGO Б024-А
13
Figure 9. Spot weld.
must learn to hold his breath for the
few seconds required to aim and fire
the rifle. Initially, the firer takes a
normal breath, releases part of it, and
holds the remainder in his lungs by
locking his throat. He should not hold
his breath for more than ten seconds;
otherwise, his vision may begin to
blur, and lung strain may cause muscu-
lar tension.
(7) Relaxation. The soldier must learn to
relax as much as possible in the var-
ious firing positions. Undue muscle
strain or tension causes trembling
which is transmitted to the rifle. If he
finds that a particular position causes
excessive strain, he should vary the po-
sition slightly until the cause of the
strain has been eliminated. The firer
must use relaxation to check that he
has a natural position. This is accom-
plished by relaxing when in position
and checking to see if the sight picture
is correct. If the sight picture is not
correct the body is moved until in a
relaxed position the desired point of
aim is achieved. Muscle tension should
not be used to position the weapon.
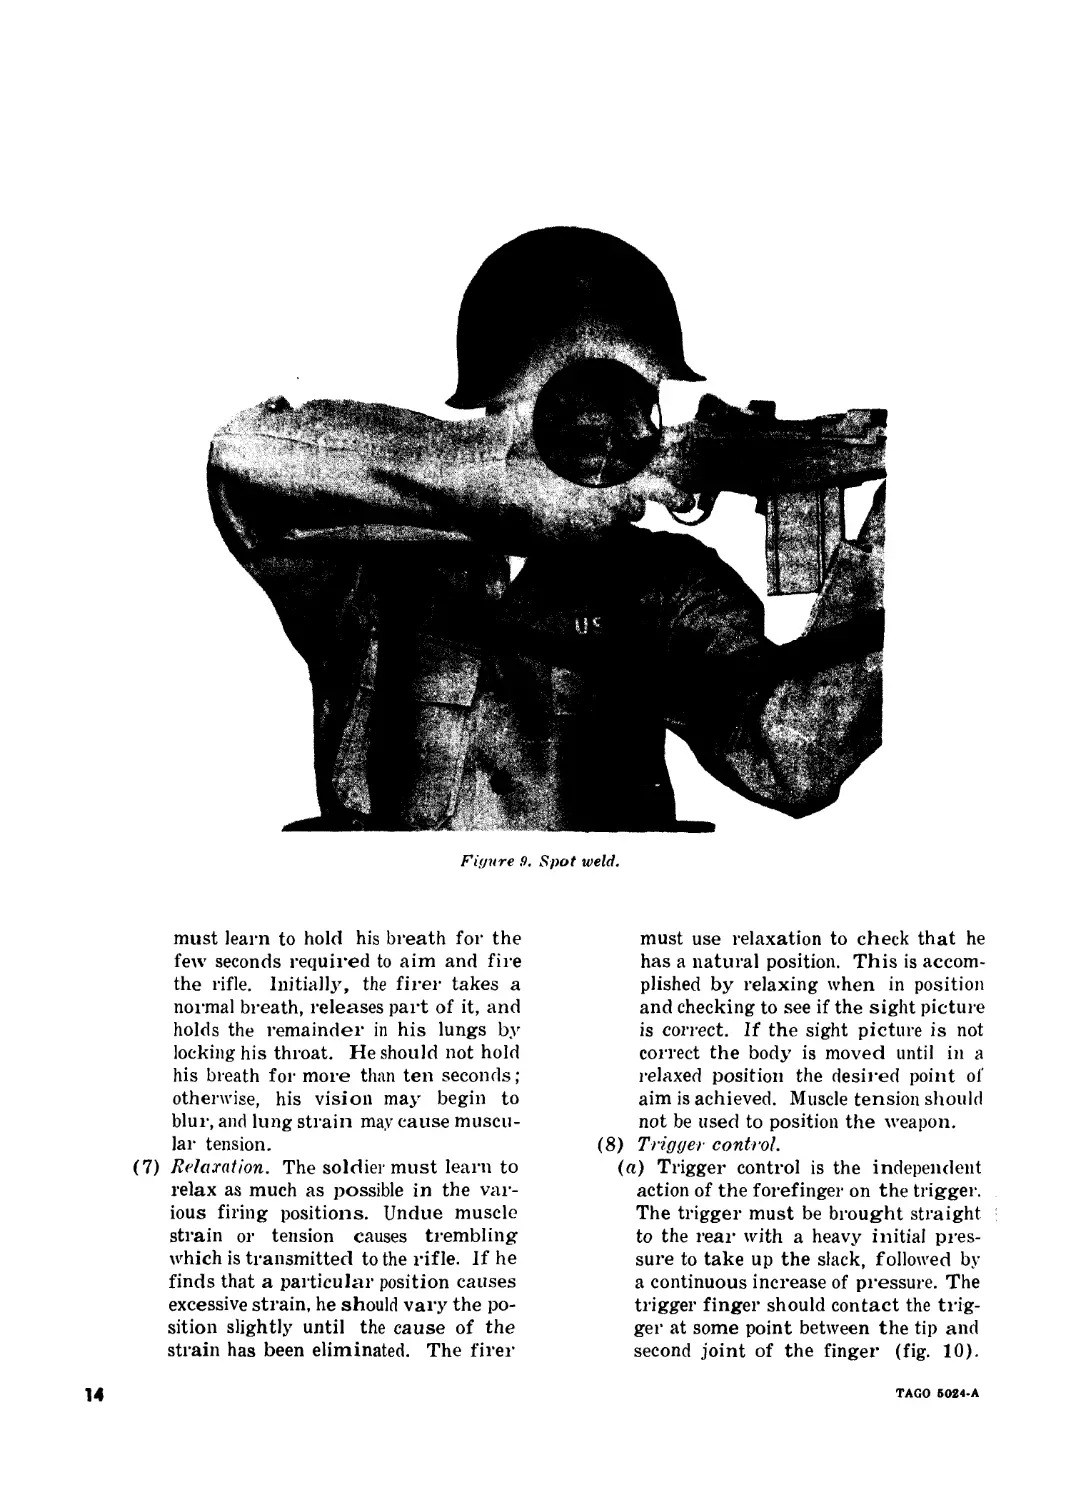
(8) Trigger control.
(a) Trigger control is the independent
action of the forefinger on the trigger.
The trigger must be brought straight
to the real’ with a heavy initial pres-
sure to take up the slack, followed by
a continuous increase of pressure. The
trigger finger should contact the trig-
ger at some point between the tip and
second joint of the finger (fig. 10).
14
TAGO 5024-A
Figure 10. Correct trigger finger position.
The finger must not touch the side of
the stock as this will cause pressure
to be applied at a slight angle rather
than straight to the rear. Such a side
pressure on the rifle, no matter how
slight, will tend to pull the sights off
the aiming point. Correctly applied
pressure on the trigger causes no
movement of the rifle barrel. It also
prevents the rifleman from knowing
exactly when the rifle will fire, thus
helping him to avoid flinching. Trig-
ger control is the most important of
the steady hold factors and without its
proper application, the other marks-
manship skills are practically useless.
Therefore, instructors should continu-
ally emphasize this fundamental
throughout rifle marksmanship train-
ing.
(b) Since trigger control is not only the
most important steady hold factor
but is also the most difficult marks-
manship fundamental for the inex-
perienced firer to master, the major-
ity of shooting errors stem directly
or indirectly from the improper ap-
plication of this technique. Failure
to hit the target frequently results
from the firer jerking the trigger
or applying pressure on both the
trigger and the side of the rifle.
Either of these actions can produce
misses. Therefore, instructors
should always check for indications
of improper trigger control since an
TAGO 5024-A
15
error in this technique can start a
chain reaction of other errors. By
so doing, the instructor can avoid
wasting time correcting a symptom
rather than the true cause of a
firer’s difficulty. Some of the indi-
cations of improper trigger control
are—
1. The flinch. This is the firer’s re-
action to the anticipated recoil of
the exploding round. It is indi-
cated by the firer moving his
head, closing his eyes, tensing his
left arm, moving his shoulders to
the rear, or a combination of
these.
2. The buck. This is an attempt by
the firer to take up the recoil,
just before the weapon fires, by
tensing his shoulder muscles and
moving his shoulder forward.
3. The jerk. This is an attempt by
the firer to make the rifle fire at
a certain time by rapidly applying
pressure on the trigger. He may
either try to fire the instant he
has a correct sight picture, or he
has been holding- his breath too
long, and he rapidly presses the
trigger before he has to exhale.
10. Firing Positions
a. The eight standard firing positions taught
in the rifle marksmanship program are prone,
prone supported, sitting, kneeling, kneeling sup-
ported, squatting, standing, and the foxhole.
On the battlefield, a rifleman must assume the
steadiest possible position which can provide
observation of the target area and some protec-
tion and/or concealment. Considering the many
variables of terrain, vegetation, and tactical
situations, there are innumerable possible po-
sitions that might be used. However, in most
instances, they will be variations of those listed
above.
b. Some soldiers will have more difficulty in
assuming a particular position than will others.
So long as the firer applies the fundamentals
of maximum support for his rifle, relaxation,
and trigger control, he should be permitted to
adjust the position to fit his own body confor-
mation.
c. During training in fundamentals, posi-
tions are taught as a step-by-step process. That
is, the soldier is guided through a series of pre-
cise movements until he is in the correct posi-
tion. The purpose of this is to insure that he
correctly applies all of the steady hold factors.
Through practice, the soldier will gradually be-
come accustomed to the feel of the positions,
and eventually he will know instinctively
whether his position is correct. This is particu-
larly important in combat since the soldier
must be able to assume positions rapidly. There
are any number of intermediate positions a
combat rifleman might use before assuming his
final firing position. Consequently, he must
know instinctively whether his position is cor-
rect rather than follow a set sequence of move-
ments to insure its correctness.
d. Throughout position training, the soldier
should be continually checked on the proper ap-
plication of the eight steady hold factors, par-
ticularly trigger control. This check is the re-
sponsibility of the coach who must closely ob-
serve the firer’s actions during all phases of
fundamentals training.
e. The methods of assuming the positions and
the conditions governing their use are as fol-
lows:
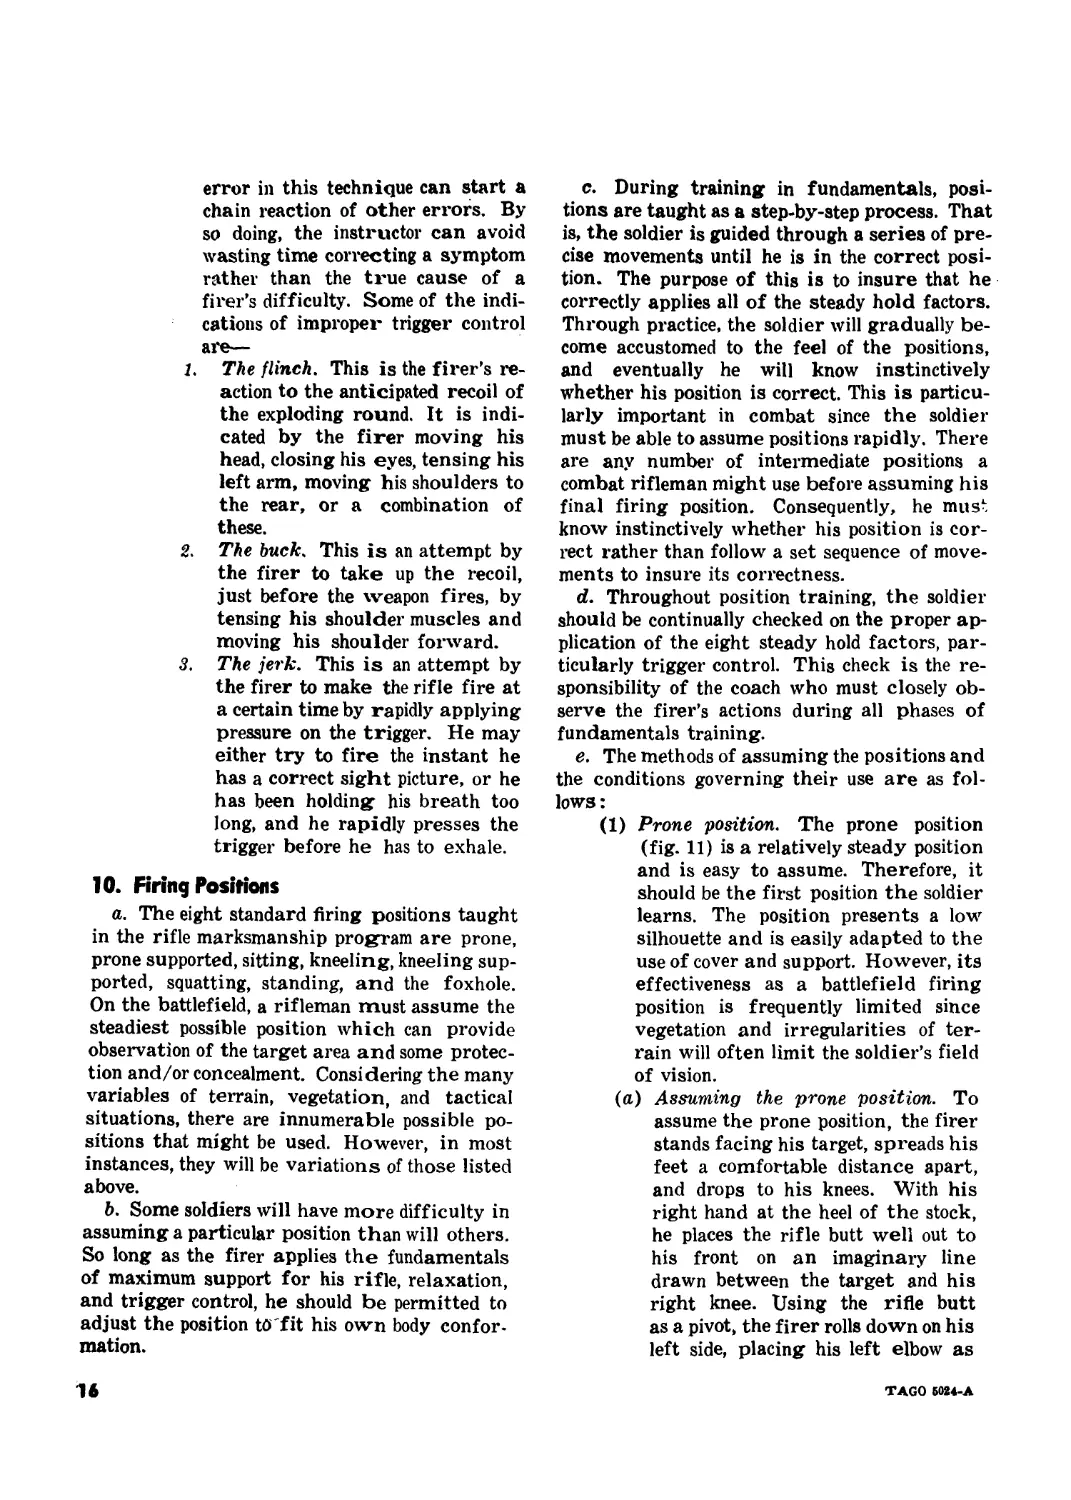
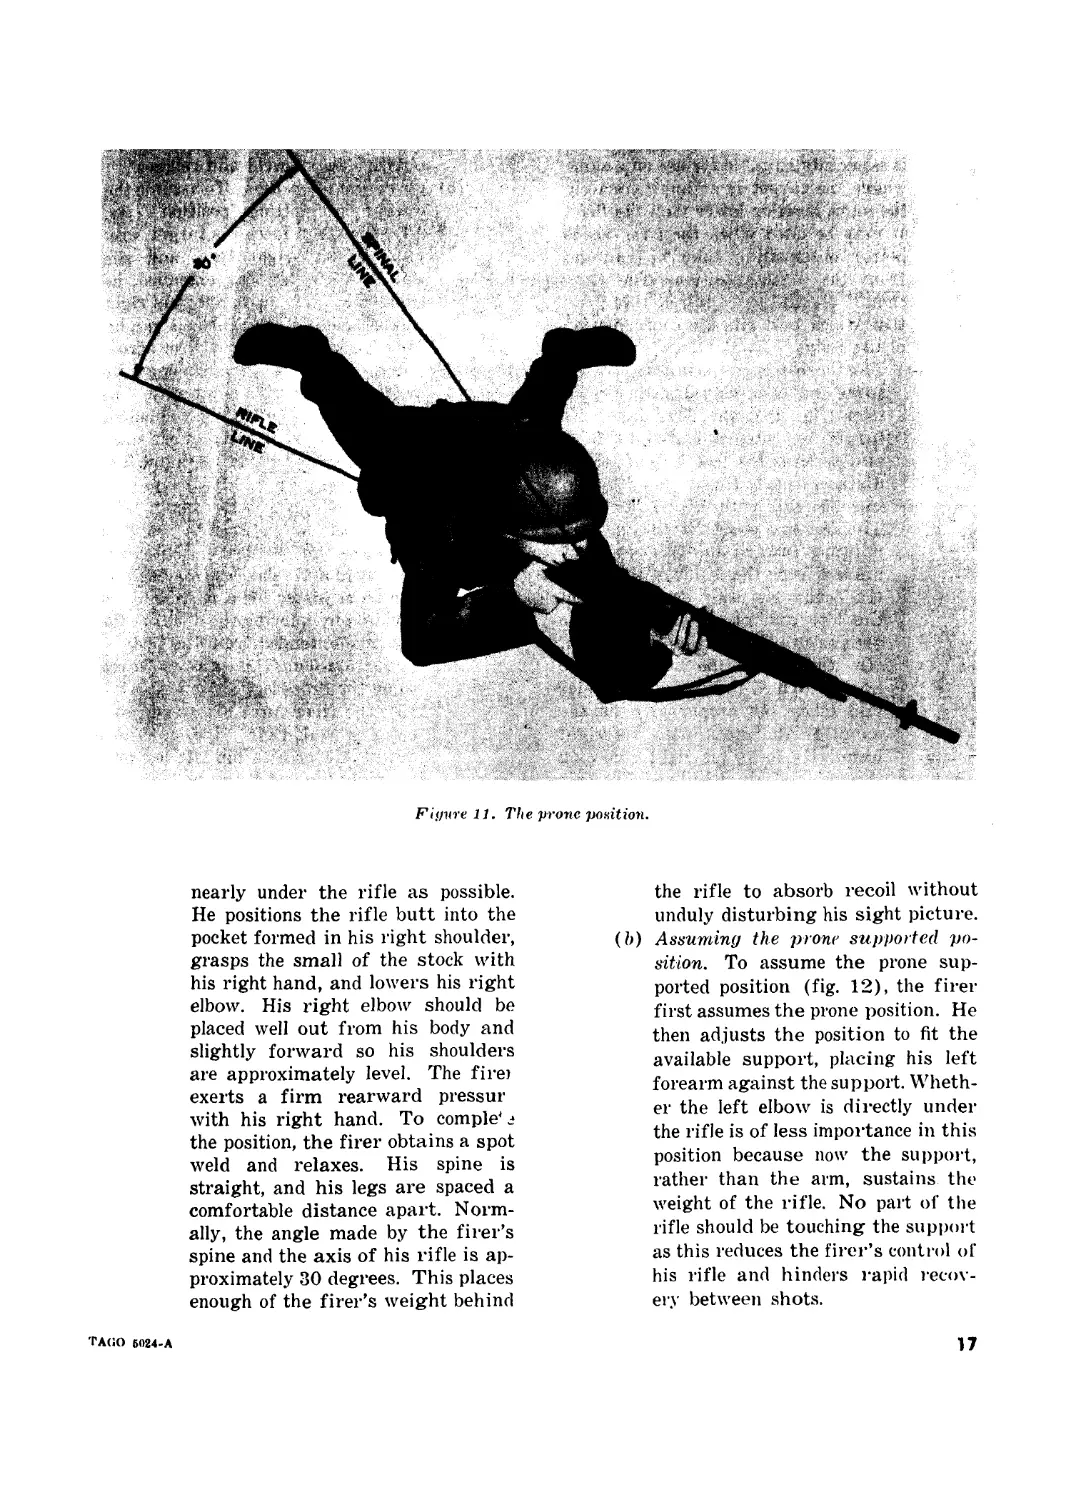
(1) Prone position. The prone position
(fig. 11) is a relatively steady position
and is easy to assume. Therefore, it
should be the first position the soldier
learns. The position presents a low
silhouette and is easily adapted to the
use of cover and support. However, its
effectiveness as a battlefield firing
position is frequently limited since
vegetation and irregularities of ter-
rain will often limit the soldier’s field
of vision.
(a) Assuming the prone position. To
assume the prone position, the firer
stands facing his target, spreads his
feet a comfortable distance apart,
and drops to his knees. With his
right hand at the heel of the stock,
he places the rifle butt well out to
his front on an imaginary line
drawn between the target and his
right knee. Using the rifle butt
as a pivot, the firer rolls down on his
left side, placing his left elbow as
16
TAGO Б024-А
Fiyure 11. The prone position.
nearly under the rifle as possible.
He positions the rifle butt into the
pocket formed in his right shoulder,
grasps the small of the stock with
his right hand, and lowers his right
elbow. His right elbow should be
placed well out from his body and
slightly forward so his shoulders
are approximately level. The fire)
exerts a firm rearward pressur
with his right hand. To comple' 2
the position, the firer obtains a spot
weld and relaxes. His spine is
straight, and his legs are spaced a
comfortable distance apart. Norm-
ally, the angle made by the fiver’s
spine and the axis of his rifle is ap-
proximately 30 degrees. This places
enough of the firer’s weight behind
the rifle to absorb recoil without
unduly disturbing his sight picture,
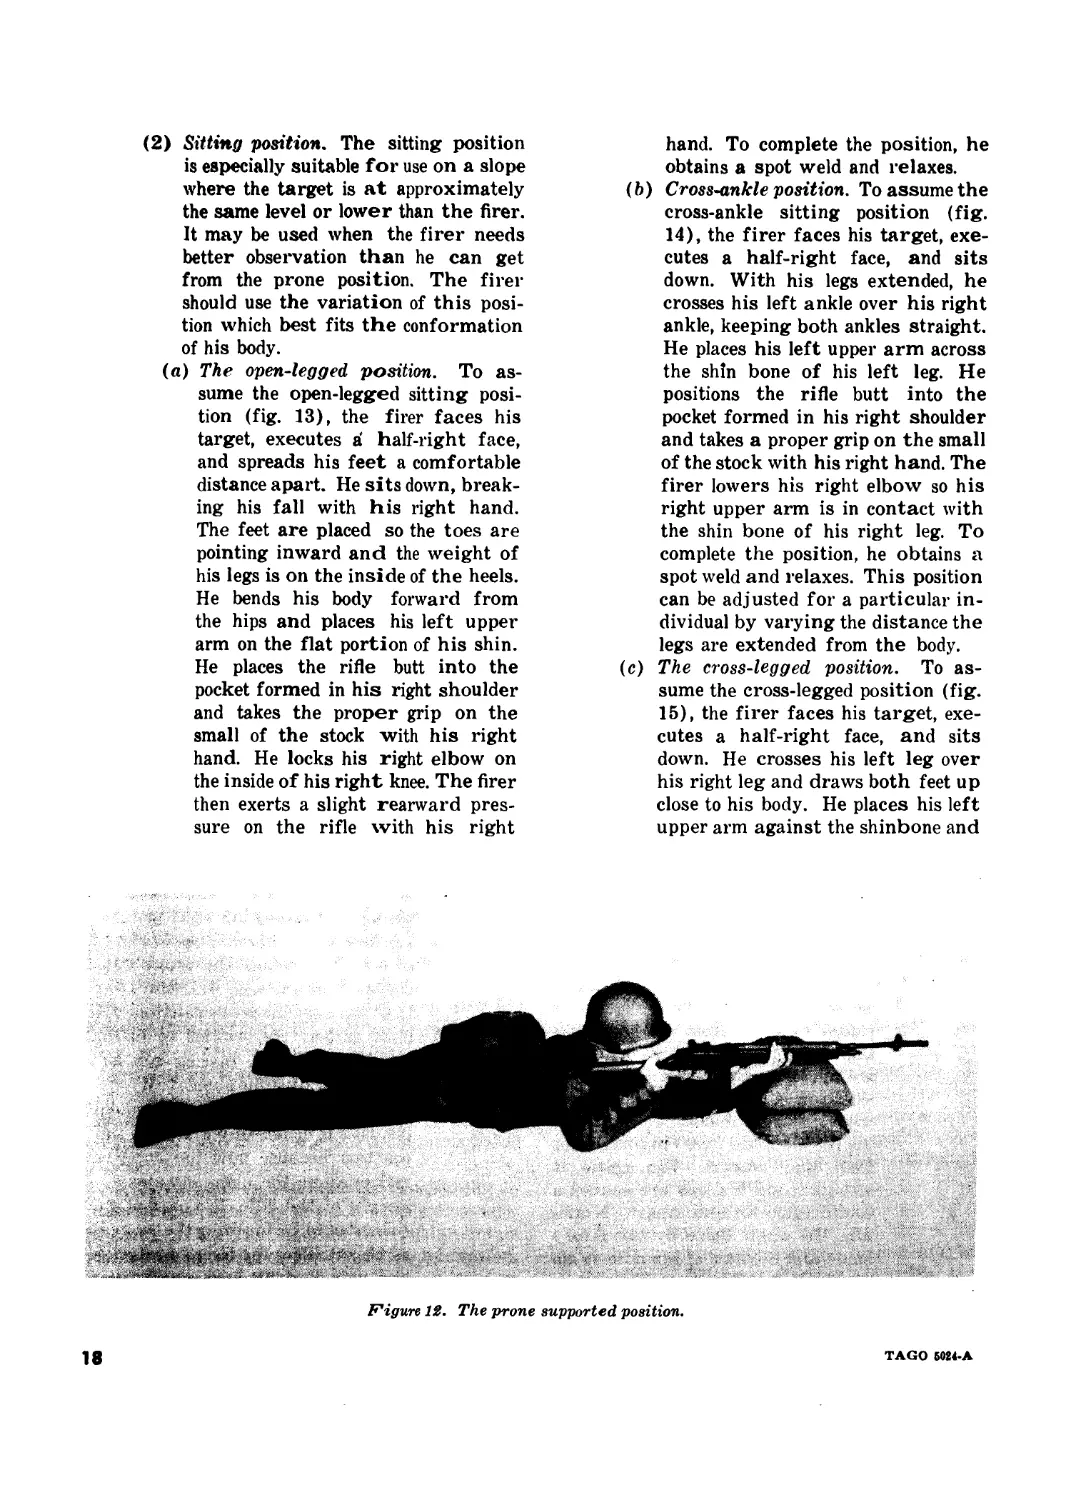
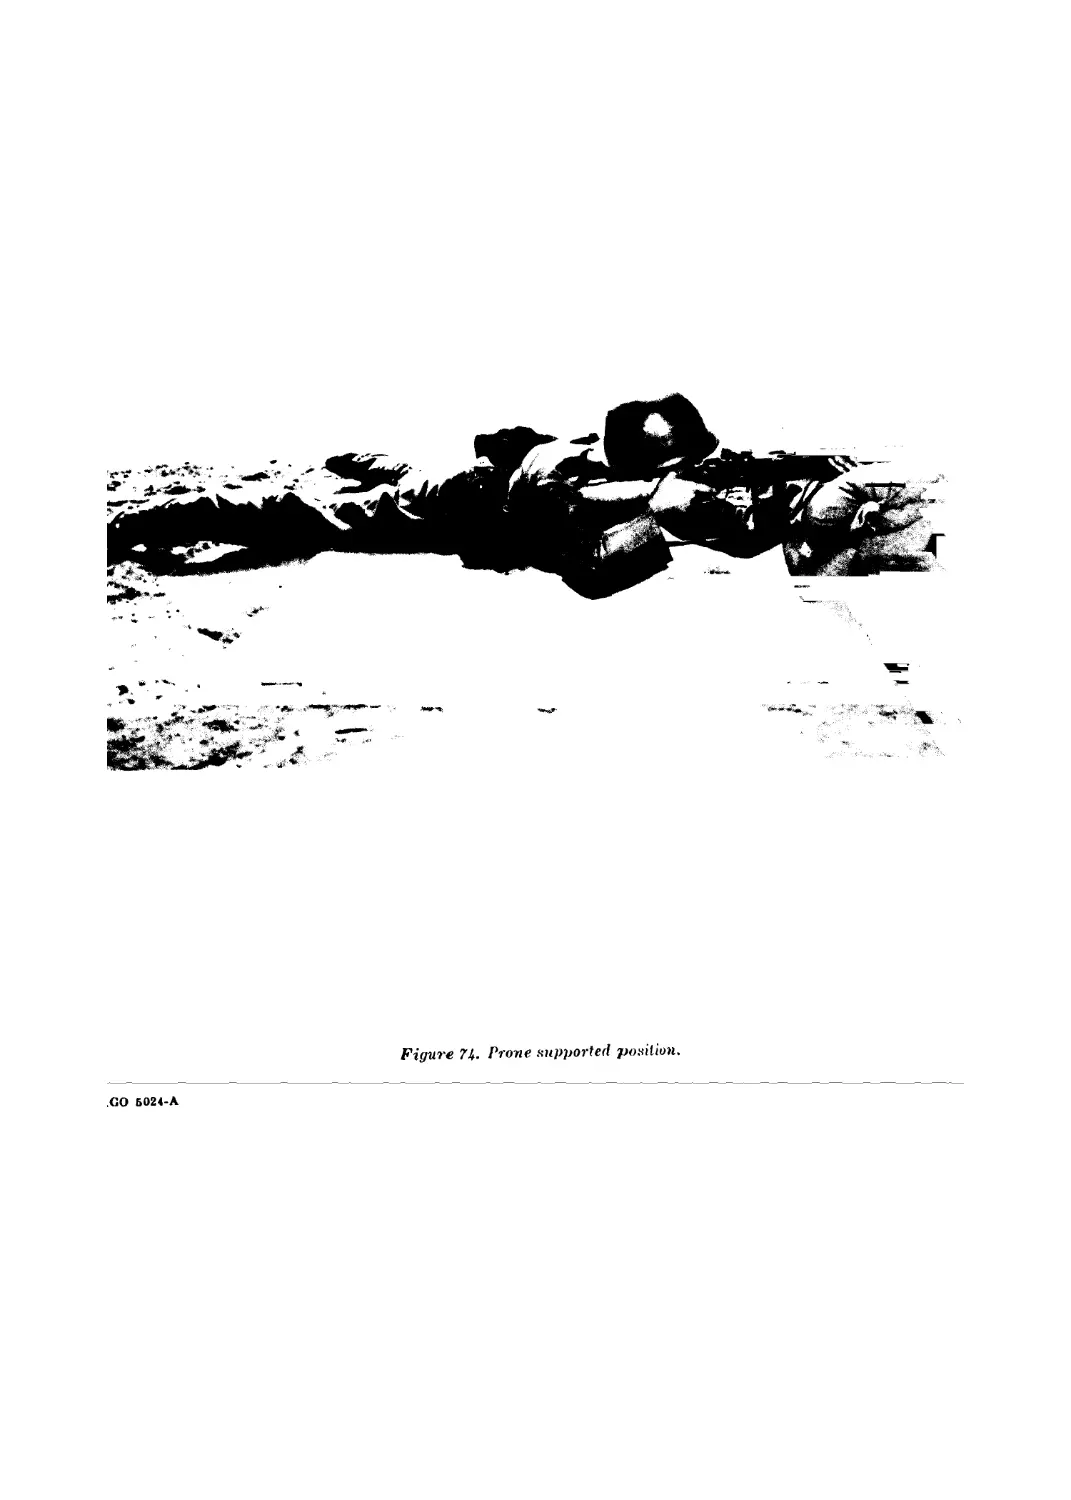
(b) Assuming the prone supported po-
sition. To assume the prone sup-
ported position (fig. 12), the firer
first assumes the prone position. He
then adjusts the position to fit the
available support, placing his left
forearm against the support. Wheth-
er the left elbow is directly under
the rifle is of less importance in this
position because now the support,
rather than the arm, sustains the
weight of the rifle. No part of the
rifle should be touching the support
as this reduces the firer’s control of
his rifle and hinders rapid recov-
ery between shots.
TACO 6024-A
17
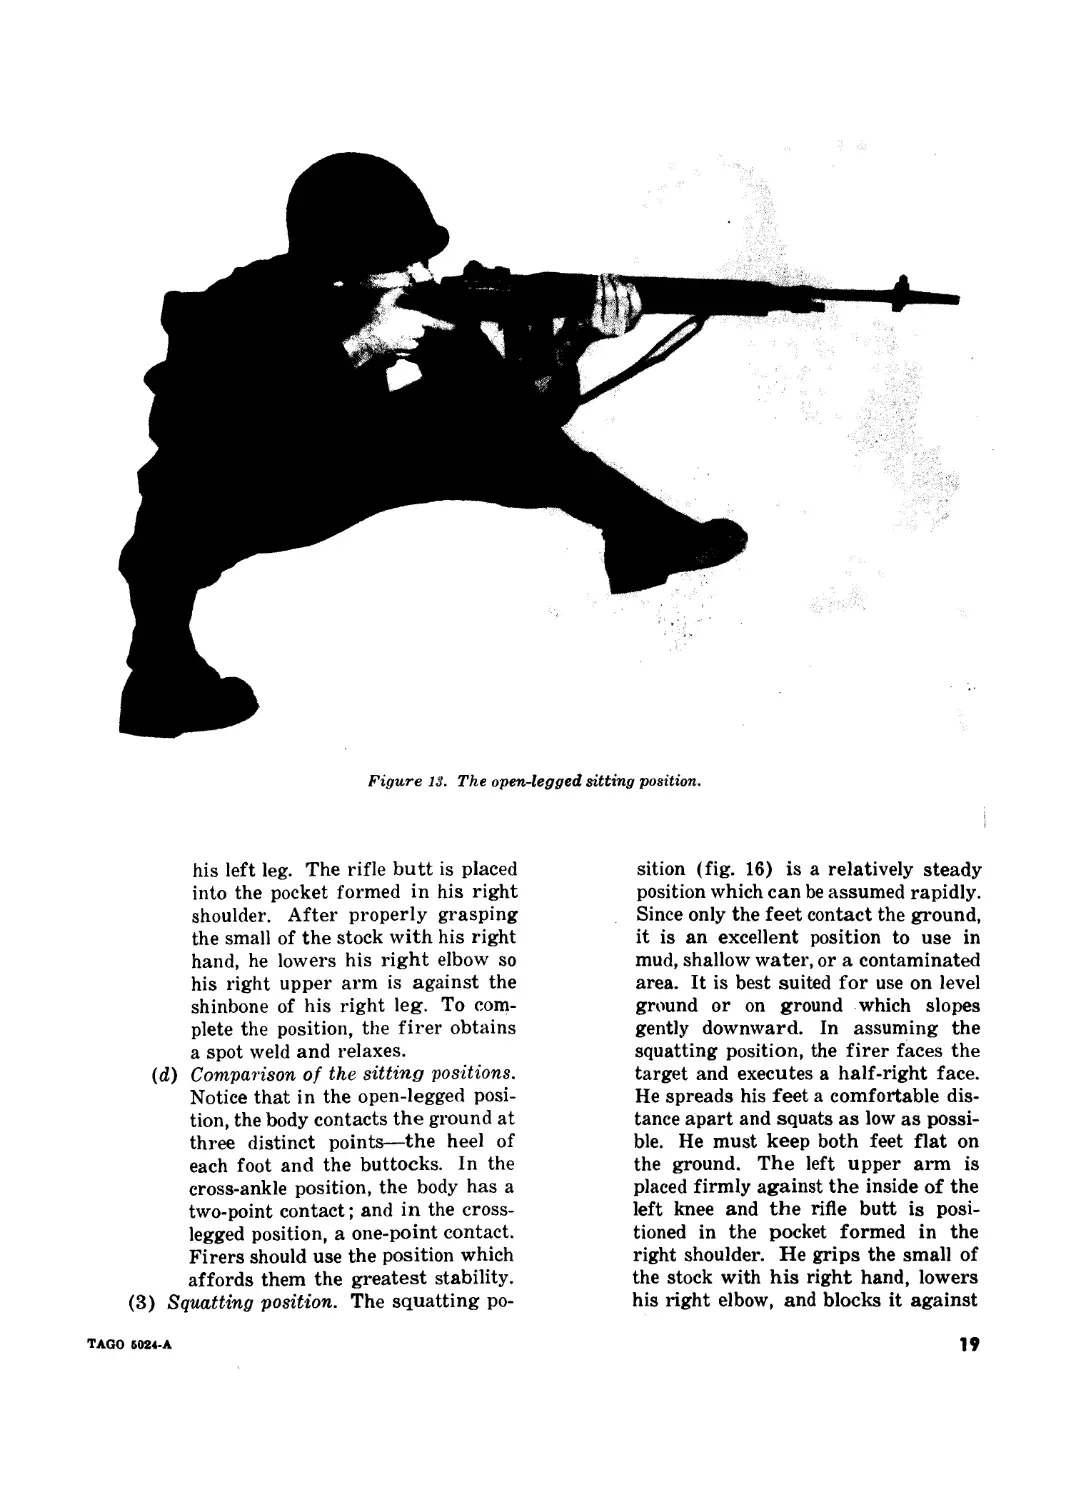
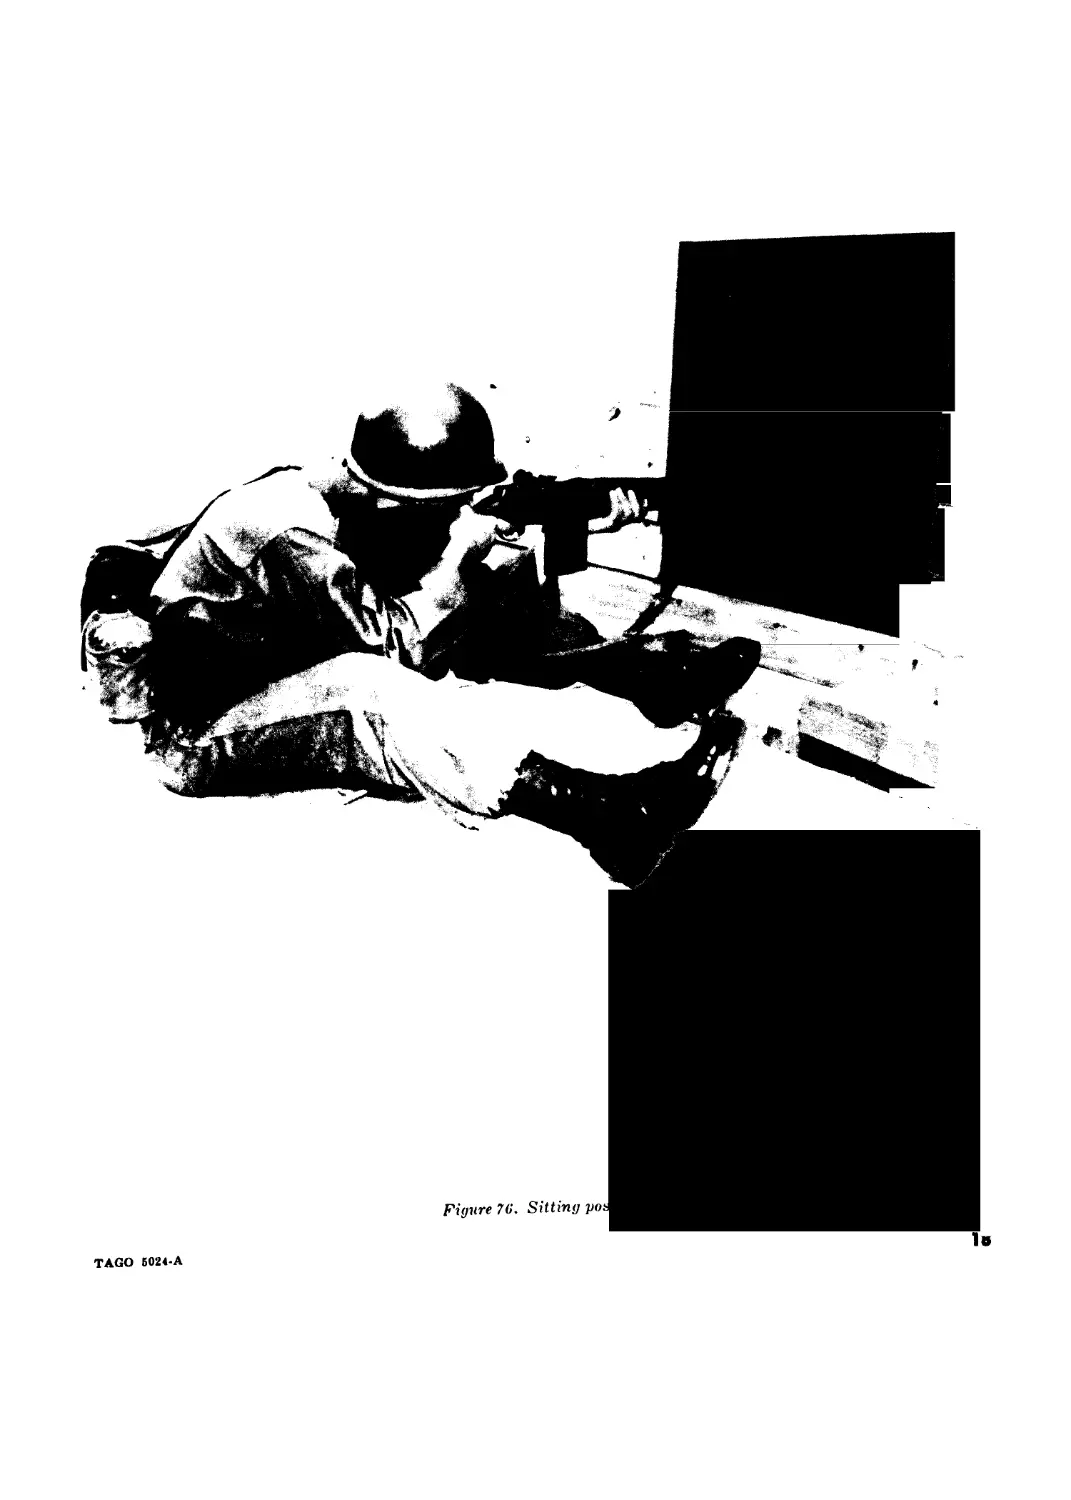
(2) Sitting position. The sitting position
is especially suitable for use on a slope
where the target is at approximately
the same level or lower than the firer.
It may be used when the firer needs
better observation than he can get
from the prone position. The firer
should use the variation of this posi-
tion which best fits the conformation
of his body.
(«) The open-legged position. To as-
sume the open-legged sitting posi-
tion (fig. 13), the firer faces his
target, executes a' half-right face,
and spreads his feet a comfortable
distance apart. He sits down, break-
ing his fall with his right hand.
The feet are placed so the toes are
pointing inward and the weight of
his legs is on the inside of the heels.
He bends his body forward from
the hips and places his left upper
arm on the flat portion of his shin.
He places the rifle butt into the
pocket formed in his right shoulder
and takes the proper grip on the
small of the stock with his right
hand. He locks his right elbow on
the inside of his right knee. The firer
then exerts a slight rearward pres-
sure on the rifle with his right
hand. To complete the position, he
obtains a spot weld and relaxes.
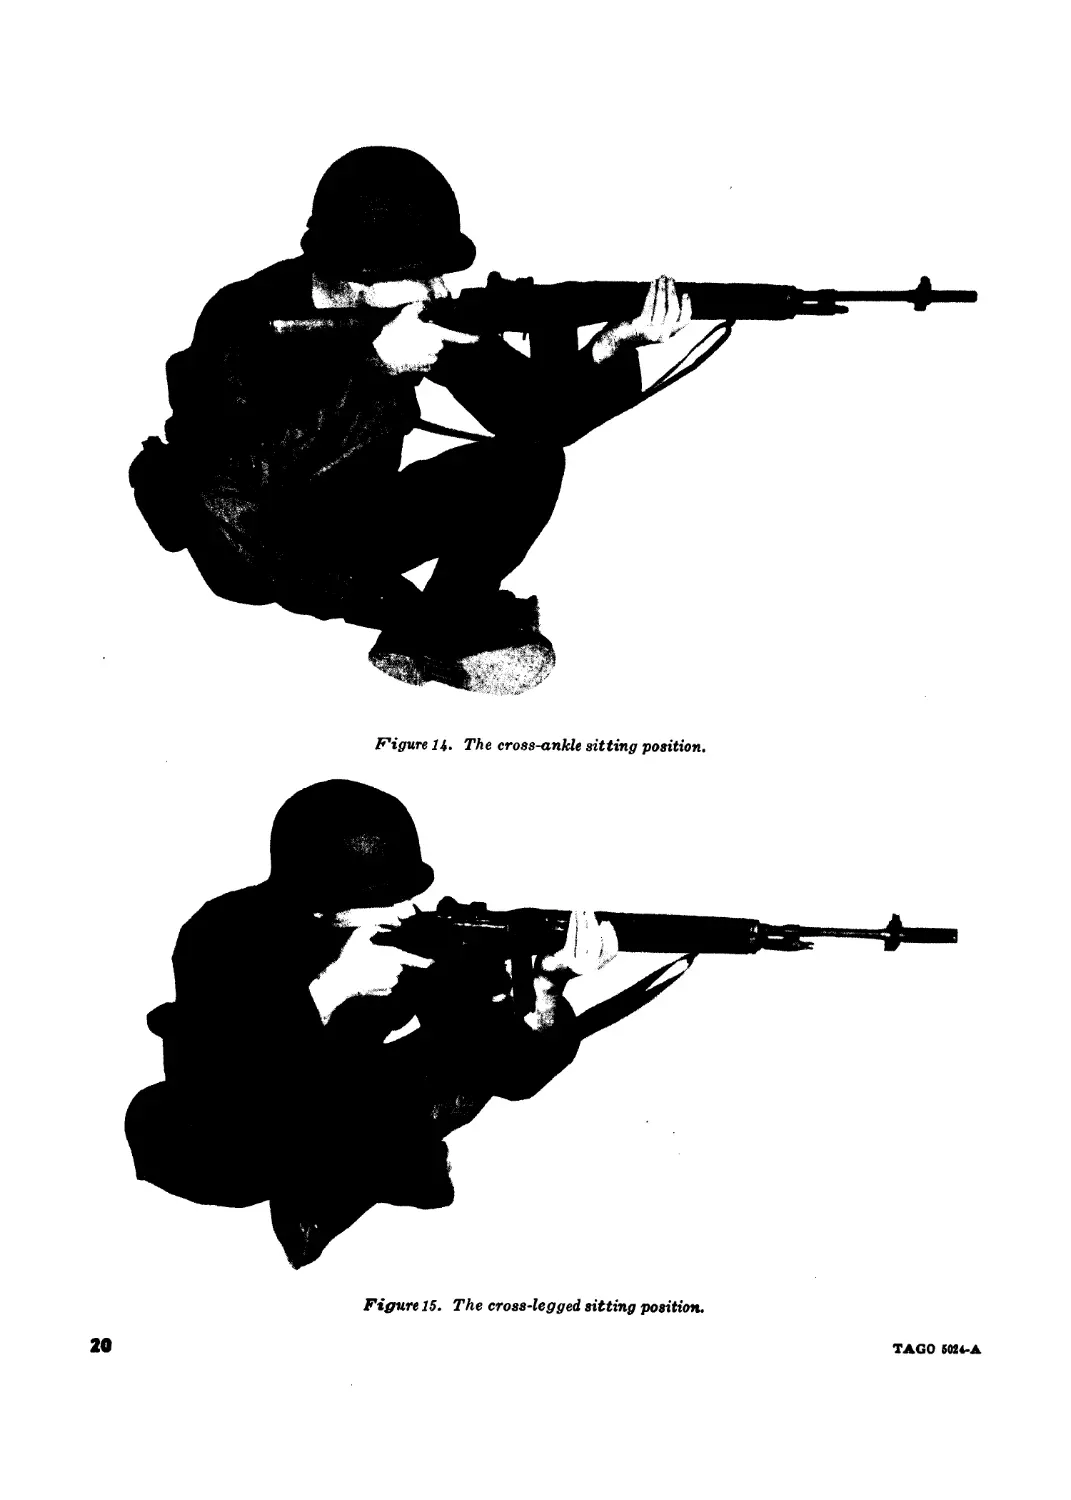
(b) Cross-ankle position. To assume the
cross-ankle sitting position (fig.
14), the firer faces his target, exe-
cutes a half-right face, and sits
down. With his legs extended, he
crosses his left ankle over his right
ankle, keeping both ankles straight.
He places his left upper arm across
the shin bone of his left leg. He
positions the rifle butt into the
pocket formed in his right shoulder
and takes a proper grip on the small
of the stock with his right hand. The
firer lowers his right elbow so his
right upper arm is in contact with
the shin bone of his right leg. To
complete the position, he obtains a
spot weld and relaxes. This position
can be adjusted for a particular in-
dividual by varying the distance the
legs are extended from the body.
(c) The cross-legged position. To as-
sume the cross-legged position (fig.
15), the firer faces his target, exe-
cutes a half-right face, and sits
down. He crosses his left leg over
his right leg and draws both feet up
close to his body. He places his left
upper arm against the shinbone and
Figure 12. The prone supported position.
18
TAGO Б024-А
Figure 13. The open-legged sitting position.
his left leg. The rifle butt is placed
into the pocket formed in his right
shoulder. After properly grasping
the small of the stock with his right
hand, he lowers his right elbow so
his right upper arm is against the
shinbone of his right leg. To com-
plete the position, the firer obtains
a spot weld and relaxes.
(d) Comparison of the sitting positions.
Notice that in the open-legged posi-
tion, the body contacts the ground at
three distinct points—the heel of
each foot and the buttocks. In the
cross-ankle position, the body has a
two-point contact; and in the cross-
legged position, a one-point contact.
Firers should use the position which
affords them the greatest stability.
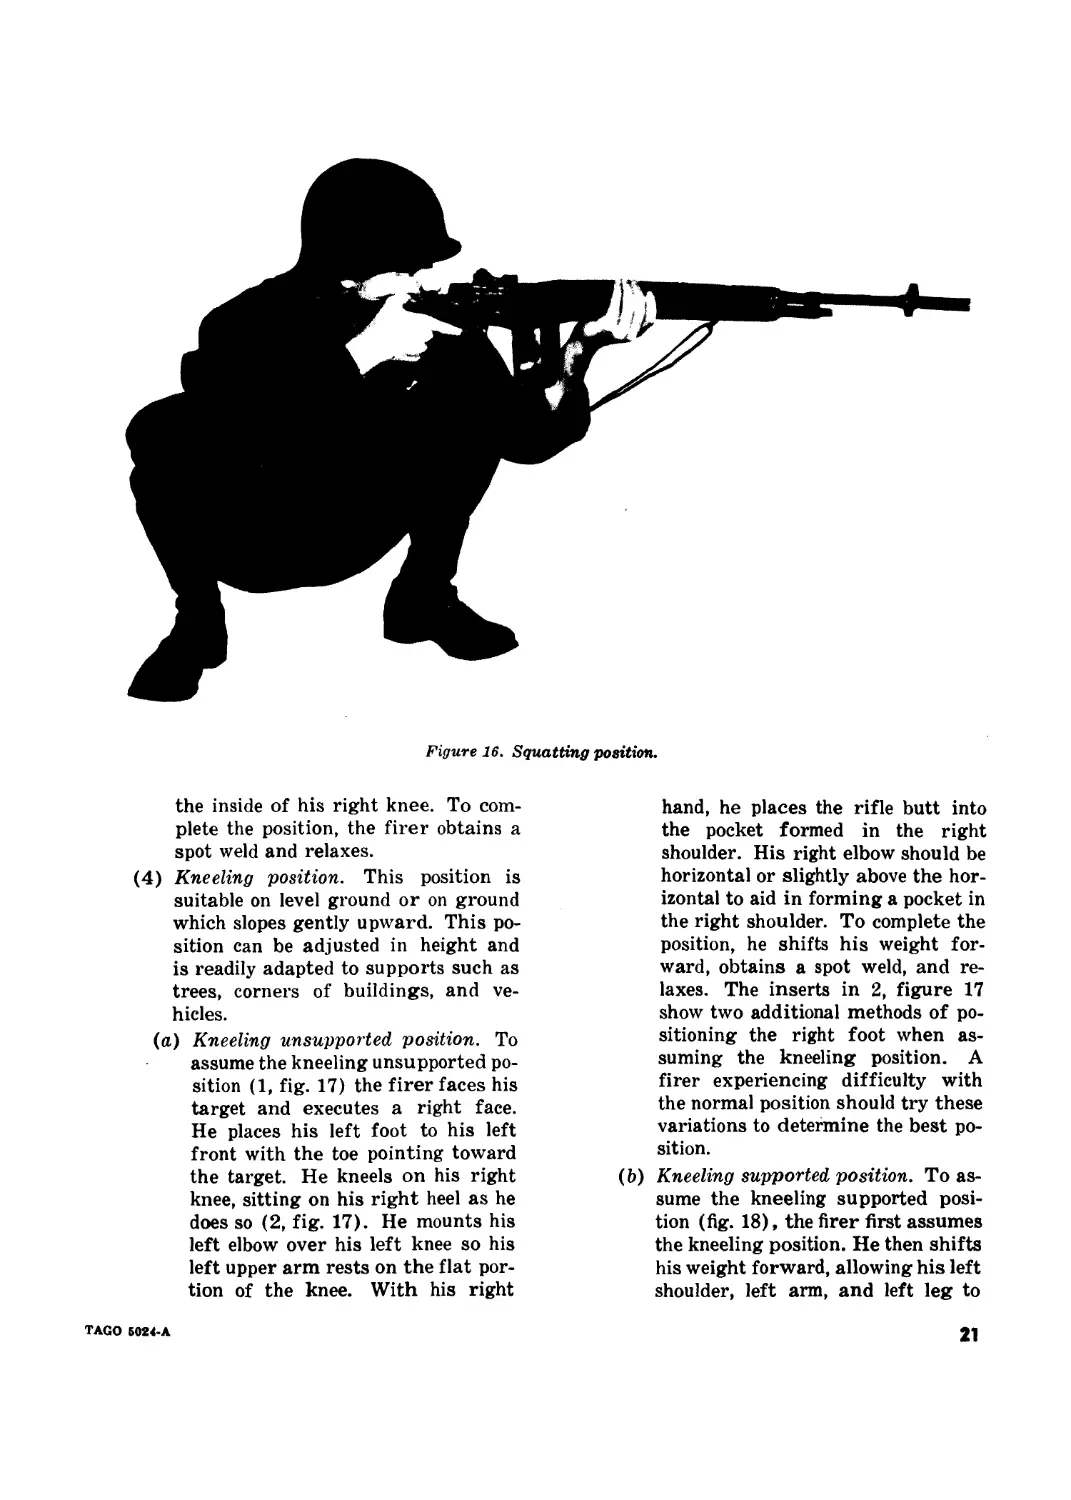
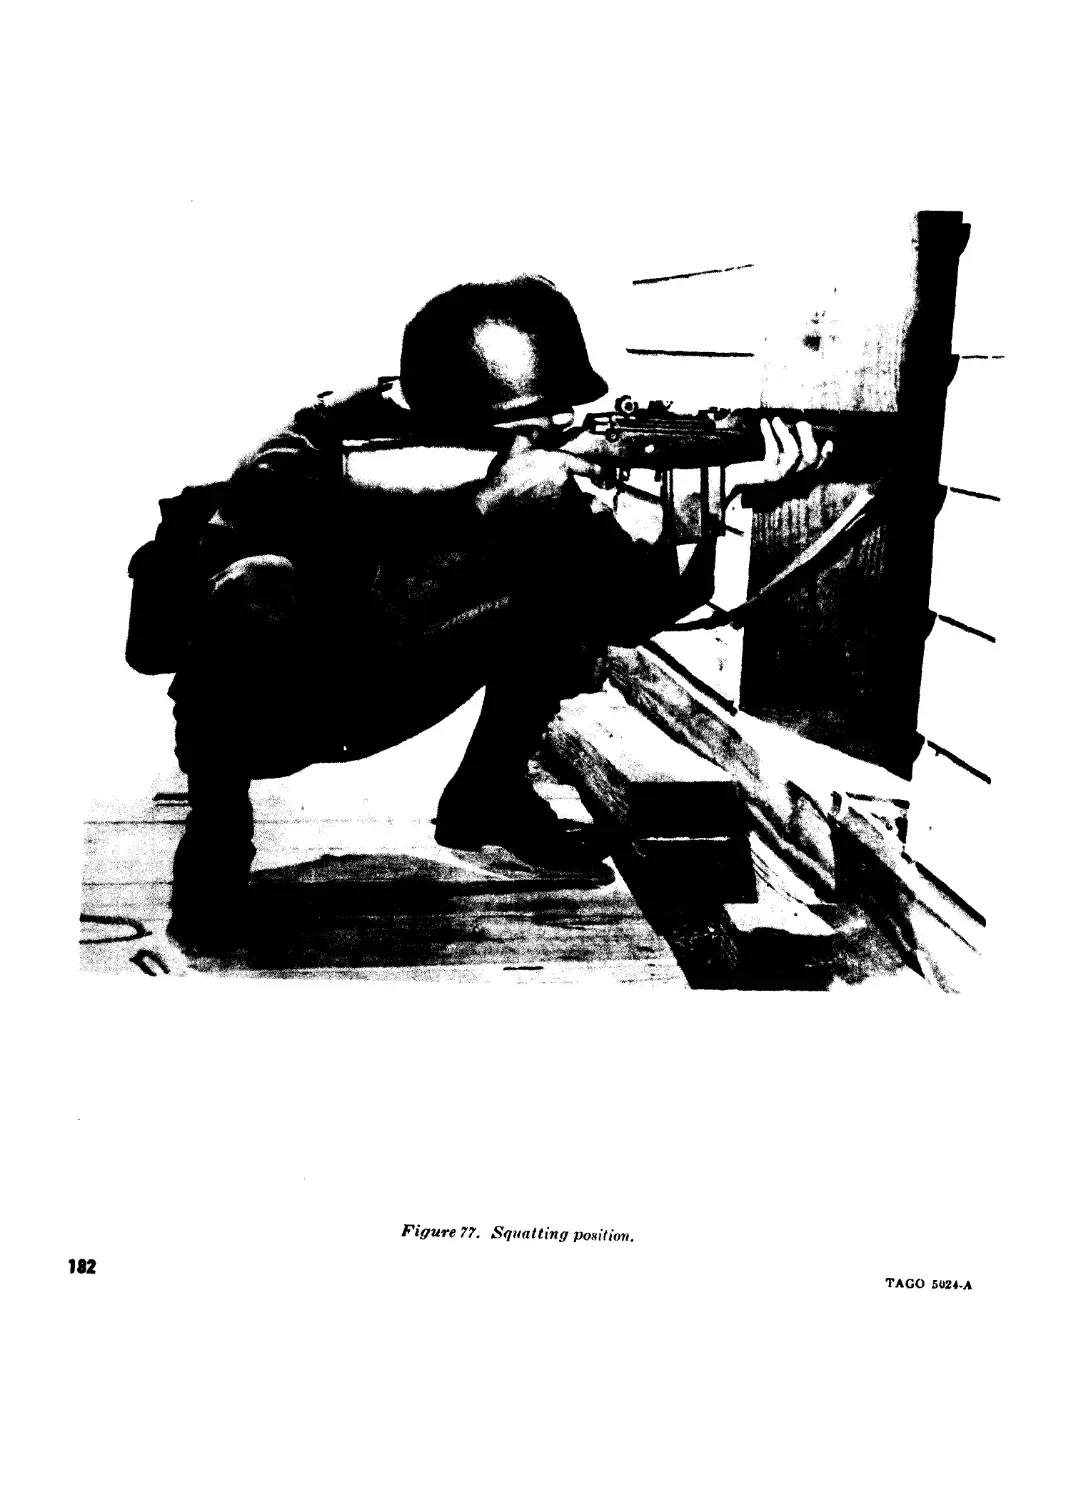
(3) Squatting position. The squatting po-
sition (fig. 16) is a relatively steady
position which can be assumed rapidly.
Since only the feet contact the ground,
it is an excellent position to use in
mud, shallow water, or a contaminated
area. It is best suited for use on level
ground or on ground which slopes
gently downward. In assuming the
squatting position, the firer faces the
target and executes a half-right face.
He spreads his feet a comfortable dis-
tance apart and squats as low as possi-
ble. He must keep both feet flat on
the ground. The left upper arm is
placed firmly against the inside of the
left knee and the rifle butt is posi-
tioned in the pocket formed in the
right shoulder. He grips the small of
the stock with his right hand, lowers
his right elbow, and blocks it against
TAGO Б024-А
19
Figure Ц. The cross-ankle sitting position.
Figure 15. The cross-legged sitting position.
20
TAGO 5024-A
Figure 16. Squatting position.
the inside of his right knee. To com-
plete the position, the firer obtains a
spot weld and relaxes.
(4) Kneeling position. This position is
suitable on level ground or on ground
which slopes gently upward. This po-
sition can be adjusted in height and
is readily adapted to supports such as
trees, corners of buildings, and ve-
hicles.
(a) Kneeling unsupported position. To
assume the kneeling unsupported po-
sition (1, fig. 17) the firer faces his
target and executes a right face.
He places his left foot to his left
front with the toe pointing toward
the target. He kneels on his right
knee, sitting on his right heel as he
does so (2, fig. 17). He mounts his
left elbow over his left knee so his
left upper arm rests on the flat por-
tion of the knee. With his right
hand, he places the rifle butt into
the pocket formed in the right
shoulder. His right elbow should be
horizontal or slightly above the hor-
izontal to aid in forming a pocket in
the right shoulder. To complete the
position, he shifts his weight for-
ward, obtains a spot weld, and re-
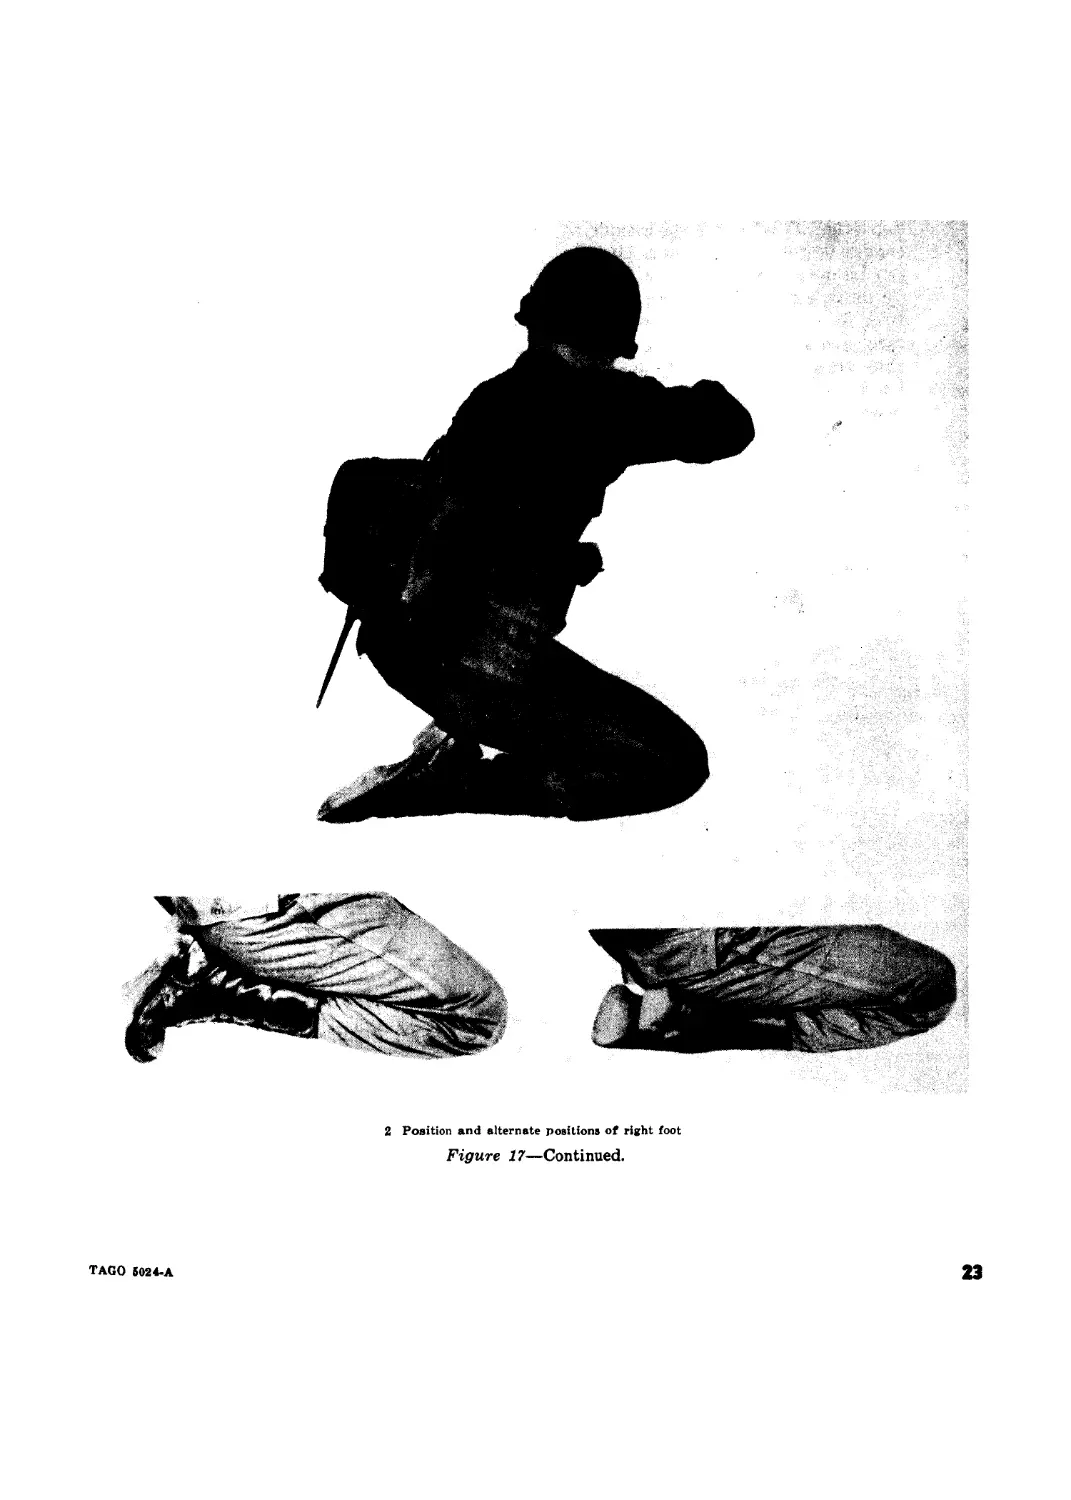
laxes. The inserts in 2, figure 17
show two additional methods of po-
sitioning the right foot when as-
suming the kneeling position. A
firer experiencing difficulty with
the normal position should try these
variations to determine the best po-
sition.
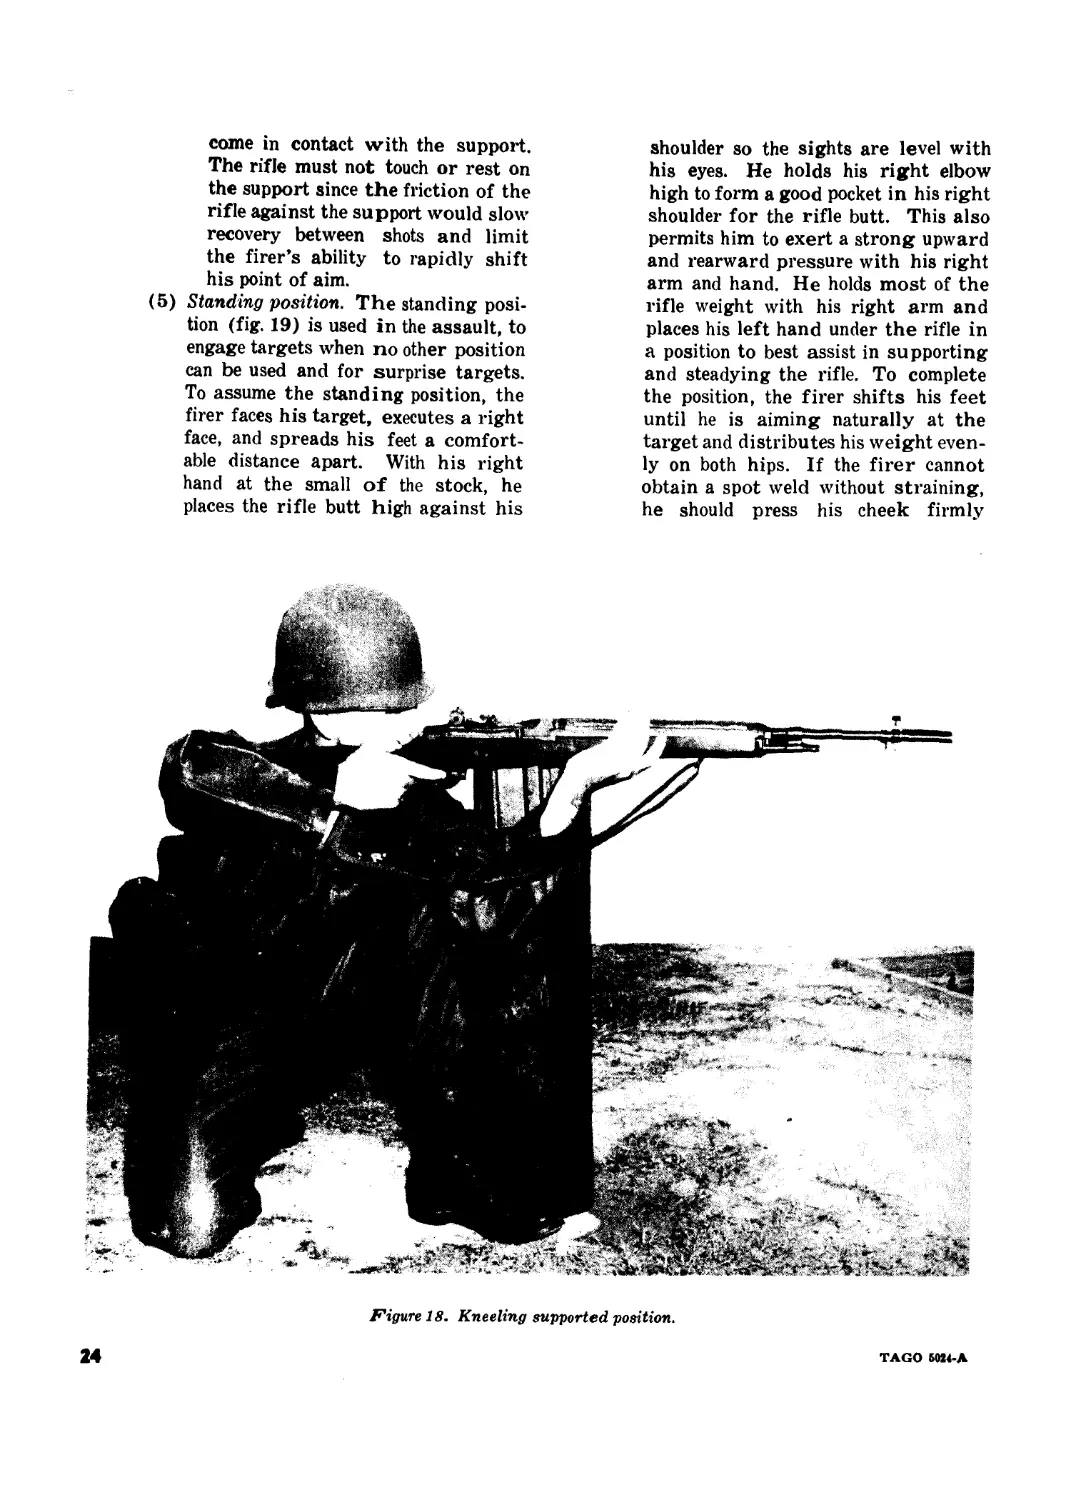
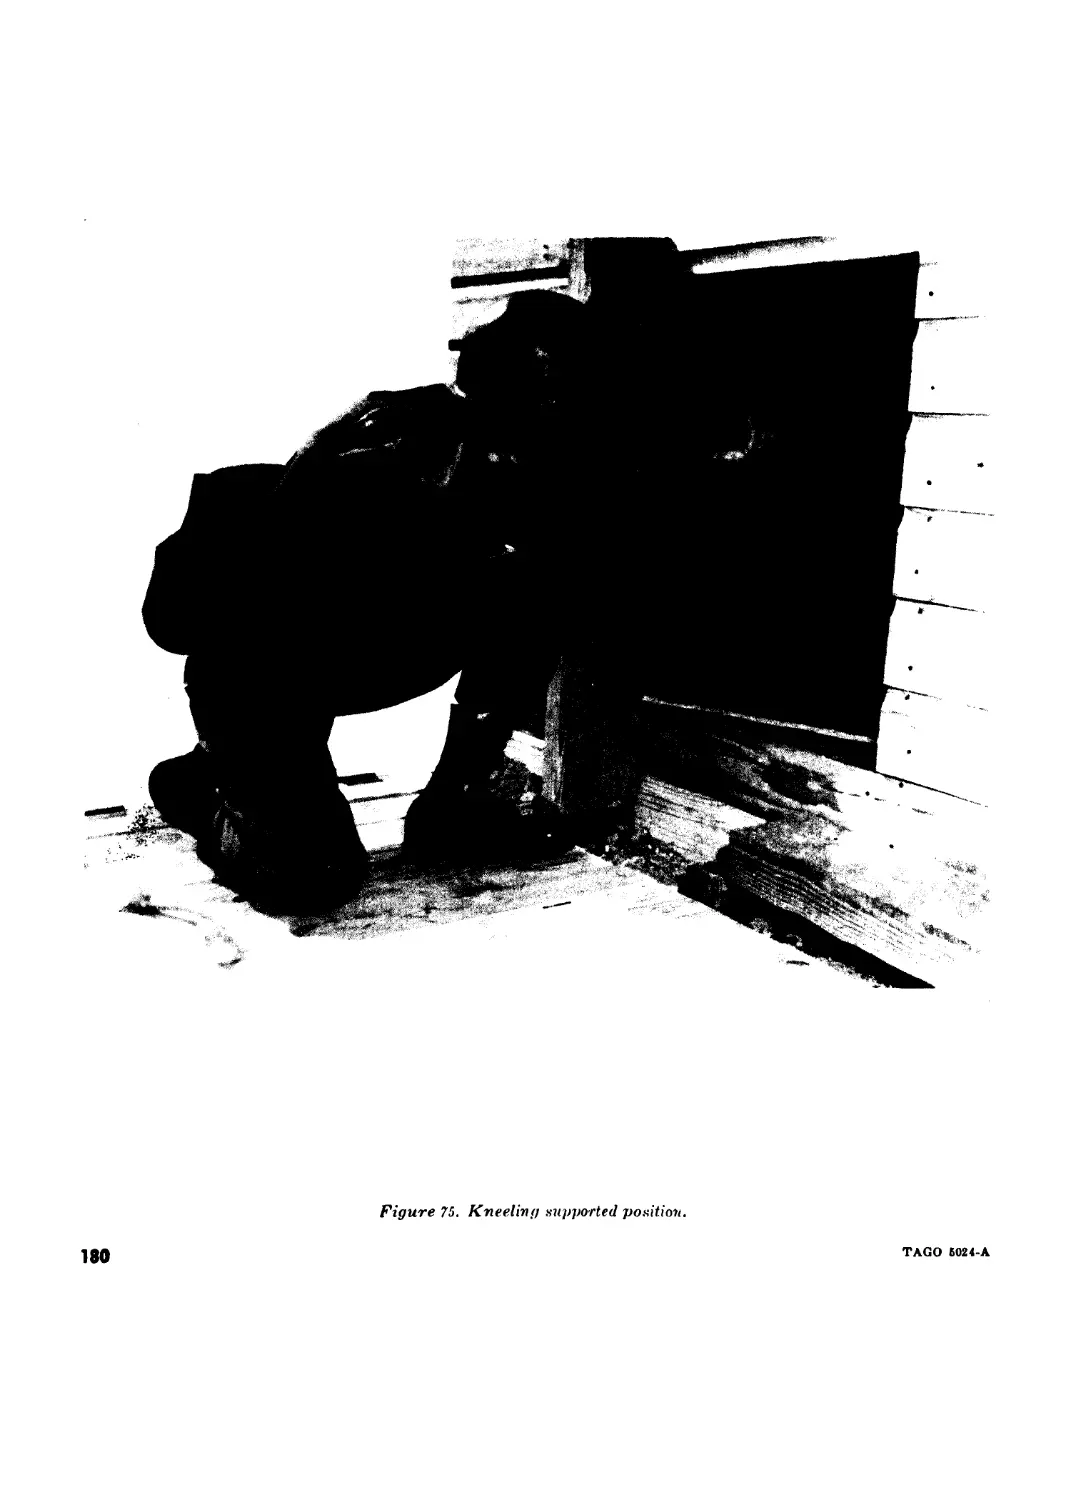
(b) Kneeling supported position. To as-
sume the kneeling supported posi-
tion (fig. 18), the firer first assumes
the kneeling position. He then shifts
his weight forward, allowing his left
shoulder, left arm, and left leg to
TAGO Б024-А
21
1 Unsupported
Figure 17. Kneeling position.
22
TAGO 5024-A
2 Position and alternate positions of right foot
Figure 17—Continued.
TAGO 6024-A
come in contact with the support.
The rifle must not touch or rest on
the support since the friction of the
rifle against the support would slow
recovery between shots and limit
the firer’s ability to rapidly shift
his point of aim.
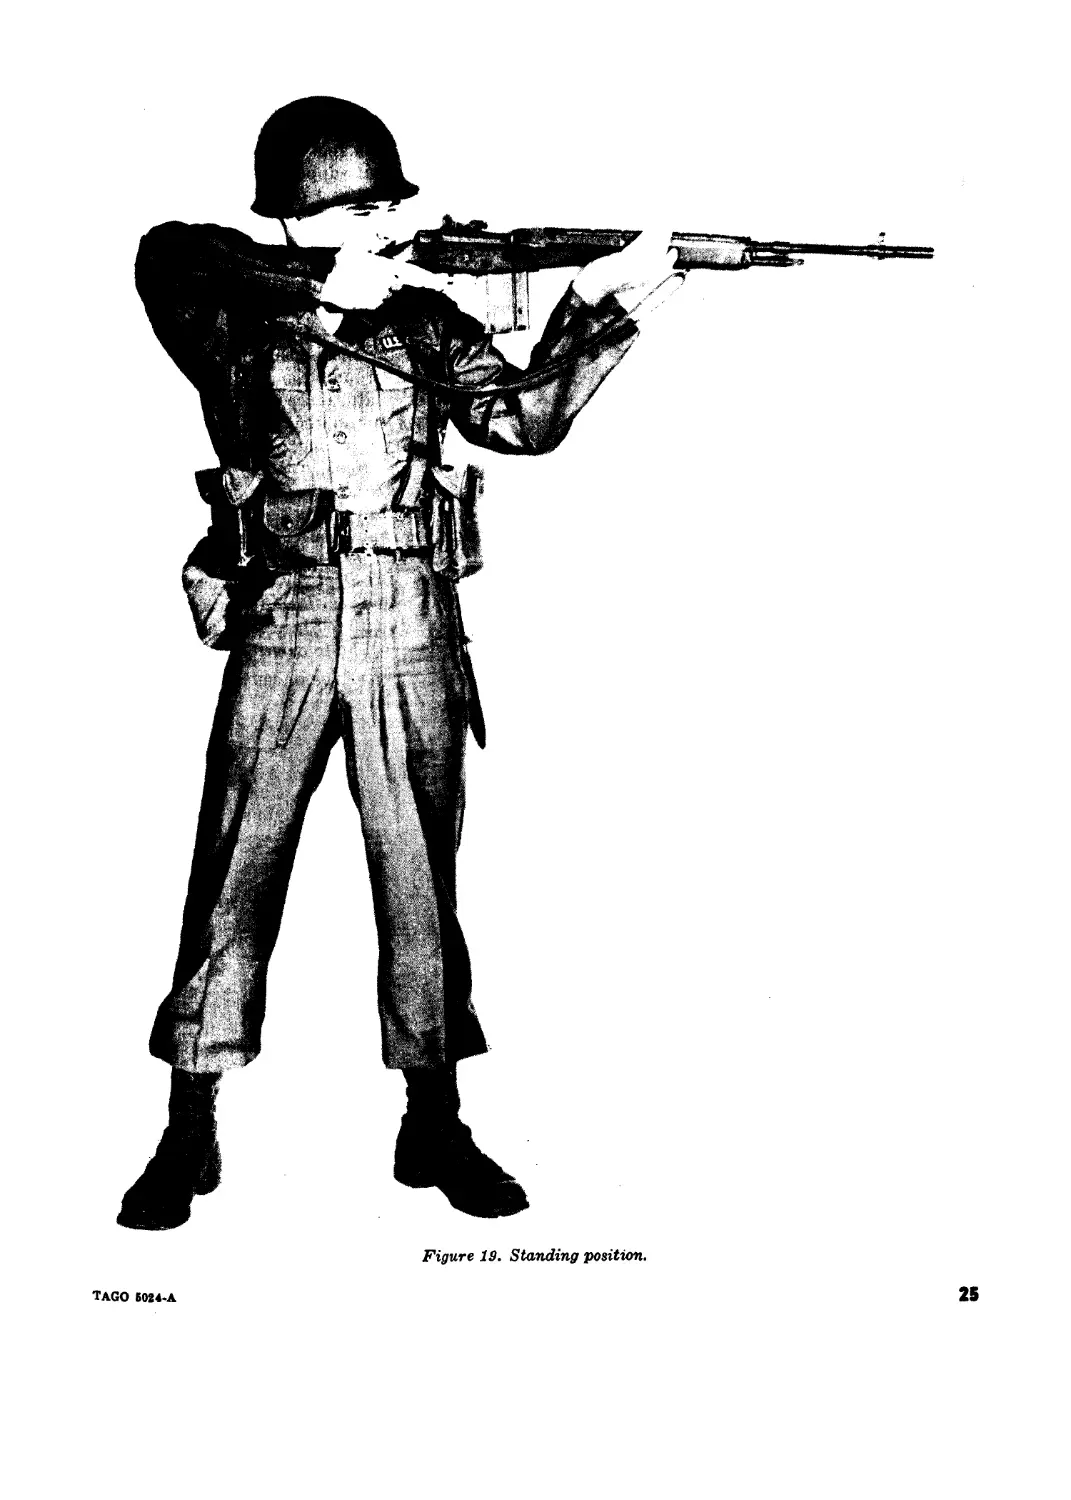
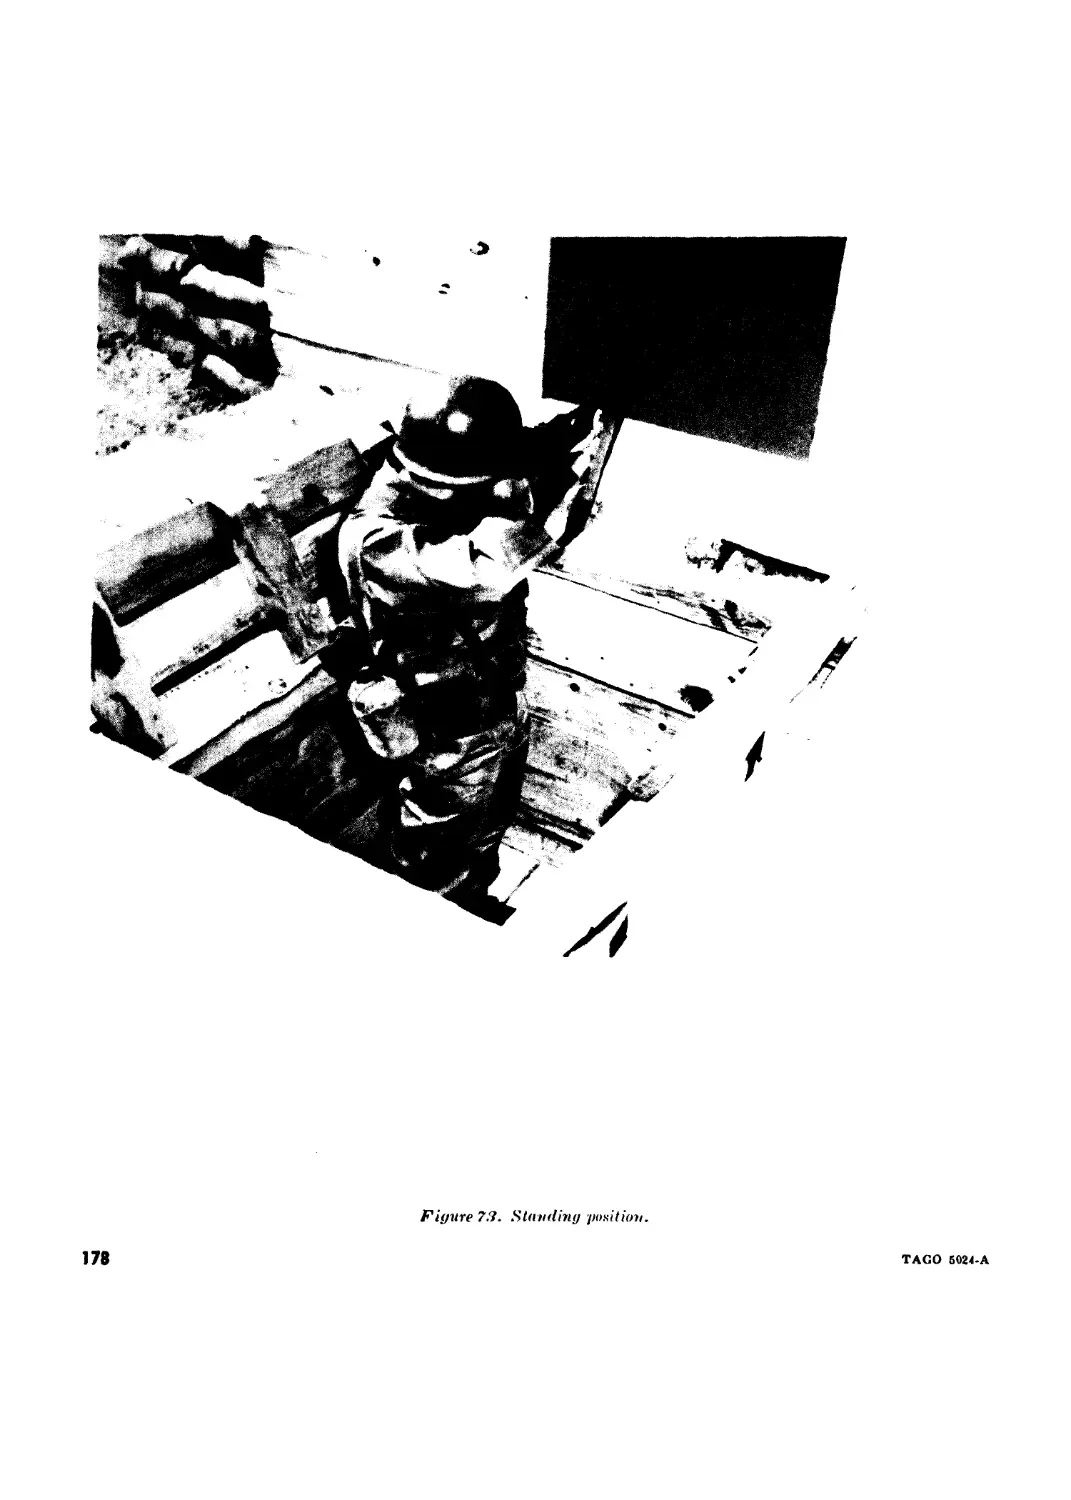
(5) Standing position. The standing posi-
tion (fig. 19) is used in the assault, to
engage targets when no other position
can be used and for surprise targets.
To assume the standing position, the
firer faces his target, executes a right
face, and spreads his feet a comfort-
able distance apart. With his right
hand at the small of the stock, he
places the rifle butt high against his
shoulder so the sights are level with
his eyes. He holds his right elbow
high to form a good pocket in his right
shoulder for the rifle butt. This also
permits him to exert a strong upward
and rearward pressure with his right
arm and hand. He holds most of the
rifle weight with his right arm and
places his left hand under the rifle in
a position to best assist in supporting
and steadying the rifle. To complete
the position, the firer shifts his feet
until he is aiming naturally at the
target and distributes his weight even-
ly on both hips. If the firer cannot
obtain a spot weld without straining,
he should press his cheek firmly
Figure 18. Kneeling supported position.
24
TAGO Б024-Л
Figure 19. Standing position.
TAGO Б024-А
25
against the side of the stock. He
should consistently make this contact
as far forward as possible without
causing undue muscular strain or
tension.
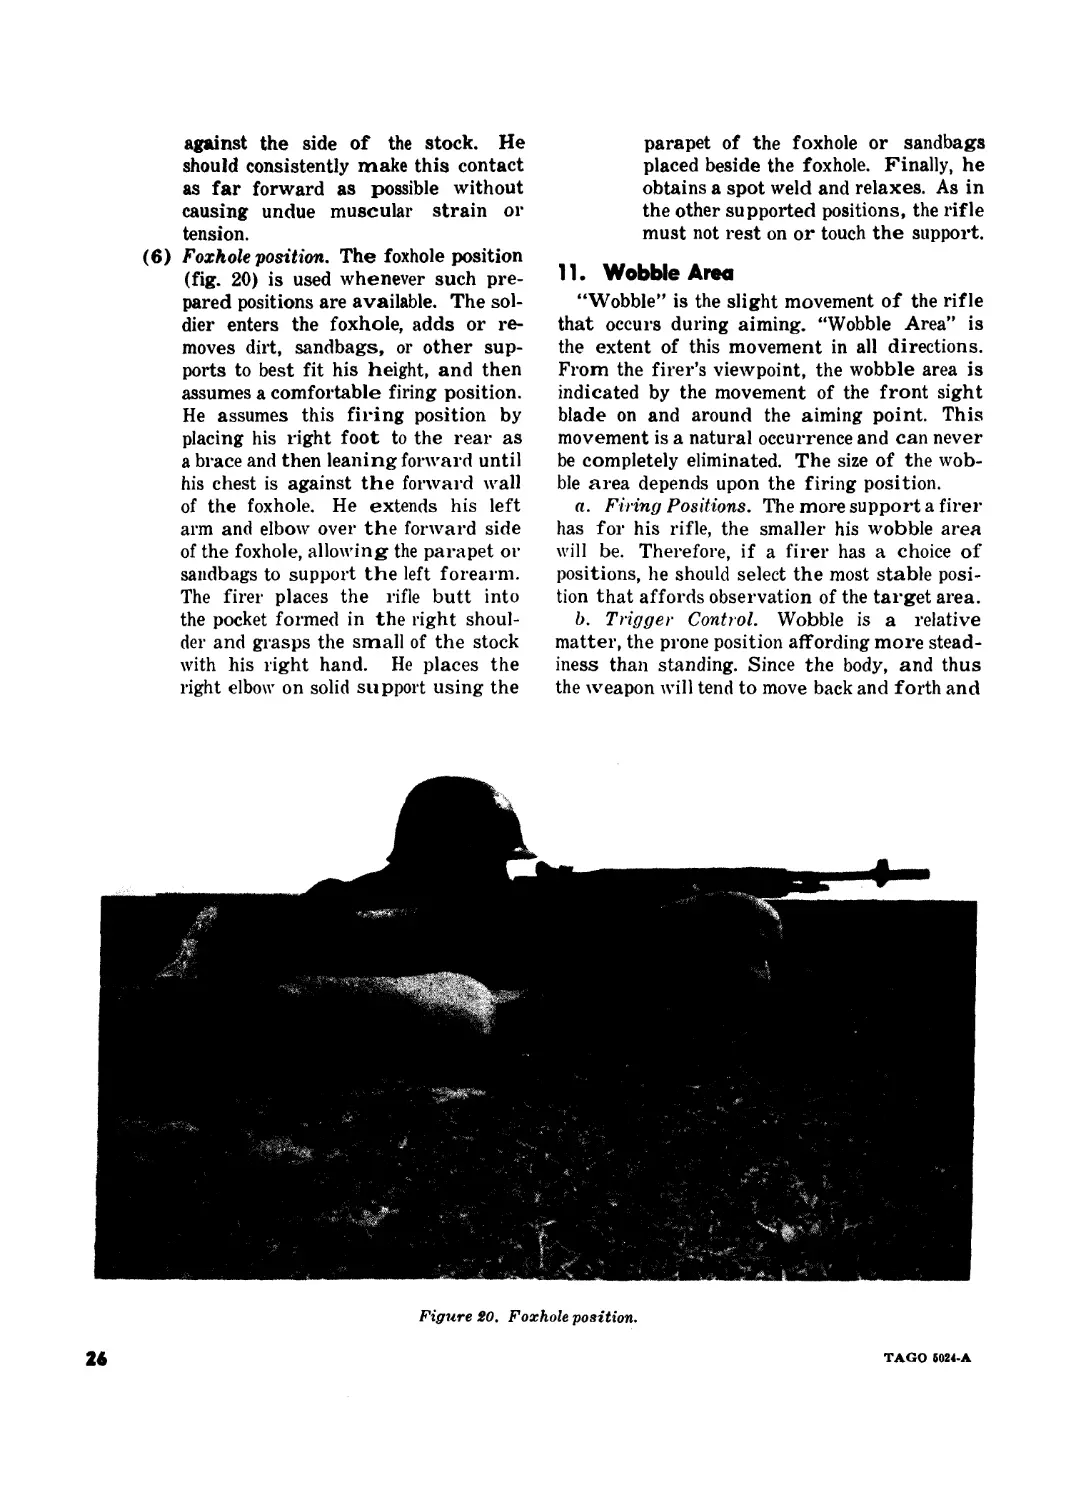
(6) Foxhole position. The foxhole position
(fig. 20) is used whenever such pre-
pared positions are available. The sol-
dier enters the foxhole, adds or re-
moves dirt, sandbags, or other sup-
ports to best fit his height, and then
assumes a comfortable firing position.
He assumes this firing position by
placing his right foot to the rear as
a brace and then leaning forward until
his chest is against the forward wall
of the foxhole. He extends his left
arm and elbow over the forward side
of the foxhole, allowing the parapet or
sandbags to support the left forearm.
The firer places the rifle butt into
the pocket formed in the right shoul-
der and grasps the small of the stock
with his right hand. He places the
right elbow on solid support using the
parapet of the foxhole or sandbags
placed beside the foxhole. Finally, he
obtains a spot weld and relaxes. As in
the other supported positions, the rifle
must not rest on or touch the support.
11. Wobble Area
“Wobble” is the slight movement of the rifle
that occurs during aiming. “Wobble Area” is
the extent of this movement in all directions.
From the firer’s viewpoint, the wobble area is
indicated by the movement of the front sight
blade on and around the aiming point. This
movement is a natural occurrence and can never
be completely eliminated. The size of the wob-
ble area depends upon the firing position.
a. Firing Positions. The more support a firer
has for his rifle, the smaller his wobble area
will be. Therefore, if a firer has a choice of
positions, he should select the most stable posi-
tion that affords observation of the target area.
b. Trigger Control. Wobble is a relative
matter, the prone position affording more stead-
iness than standing. Since the body, and thus
the weapon will tend to move back and forth and
Figure 20. Foxhole position.
u
TAGO Б024-А
-LOW LEFT”
‘‘HIGH RIGHT”
“HIT”
(ANYWHERE ON
BLACK TARGET)
Figure 21. Calling the shot.
or up and down, the inexperienced firer must be
taught to apply pressure to the trigger during
his wobble and not attempt to jerk the trigger
when the sight picture “looks perfect.” The
application of this principle of squeezing
through or during the wobble will greatly re-
duce the tendency of the shooter to jerk or snap
the shot and which may result in a miss. Es-
sentially, the firer must learn to control the
pressure on the trigger so the rifle will fire
during the few moments it is wobbling the least.
As soon as the firer has obtained a correct
sight picture, he begins applying pressure to
the trigger. Through training, he has learned
to shift the focus of his eye to the front sight
blade. It is at this time that the wobble area
becomes most readily apparent. So long as the
size of the wobble area does not exceed the size
of the target, pressure should continue to be
applied on the trigger. However, if the wobble
becomes excessive, causing the front sight
blade to move completely off the target, the
firer should hold the trigger pressure, reestab-
lish the correct sight picture and again steadily
increase the trigger pressure. He should con-
tinue applying pressure to the trigger even after
the rifle fires. This procedure helps to prevent
excessive wobbling at the instant the rifle is
fired.
12. Follow-Through
Follow-through is the continued application
of the fundamentals after each round has been
fired. That is, the firer does not shift his posi-
tion, move his head, or let the muzzle of the
rifle drop until a few moments after the rifle
has been fired. This procedure will insure that
there is no undue movement of the rifle until
after the round is fired and from a training
viewpoint, can assist the firer to correct his own
errors. By knowing his sight picture the in-
stant the round is fired, the soldier can analyze
his shot group in relation to this sight picture
and correct himself accordingly. In combat,
follow-through allows the soldier to observe
the strike of his bullet in relation to his aiming
point, enabling him, if necessary, to adjust his
aiming point and fire a second round.
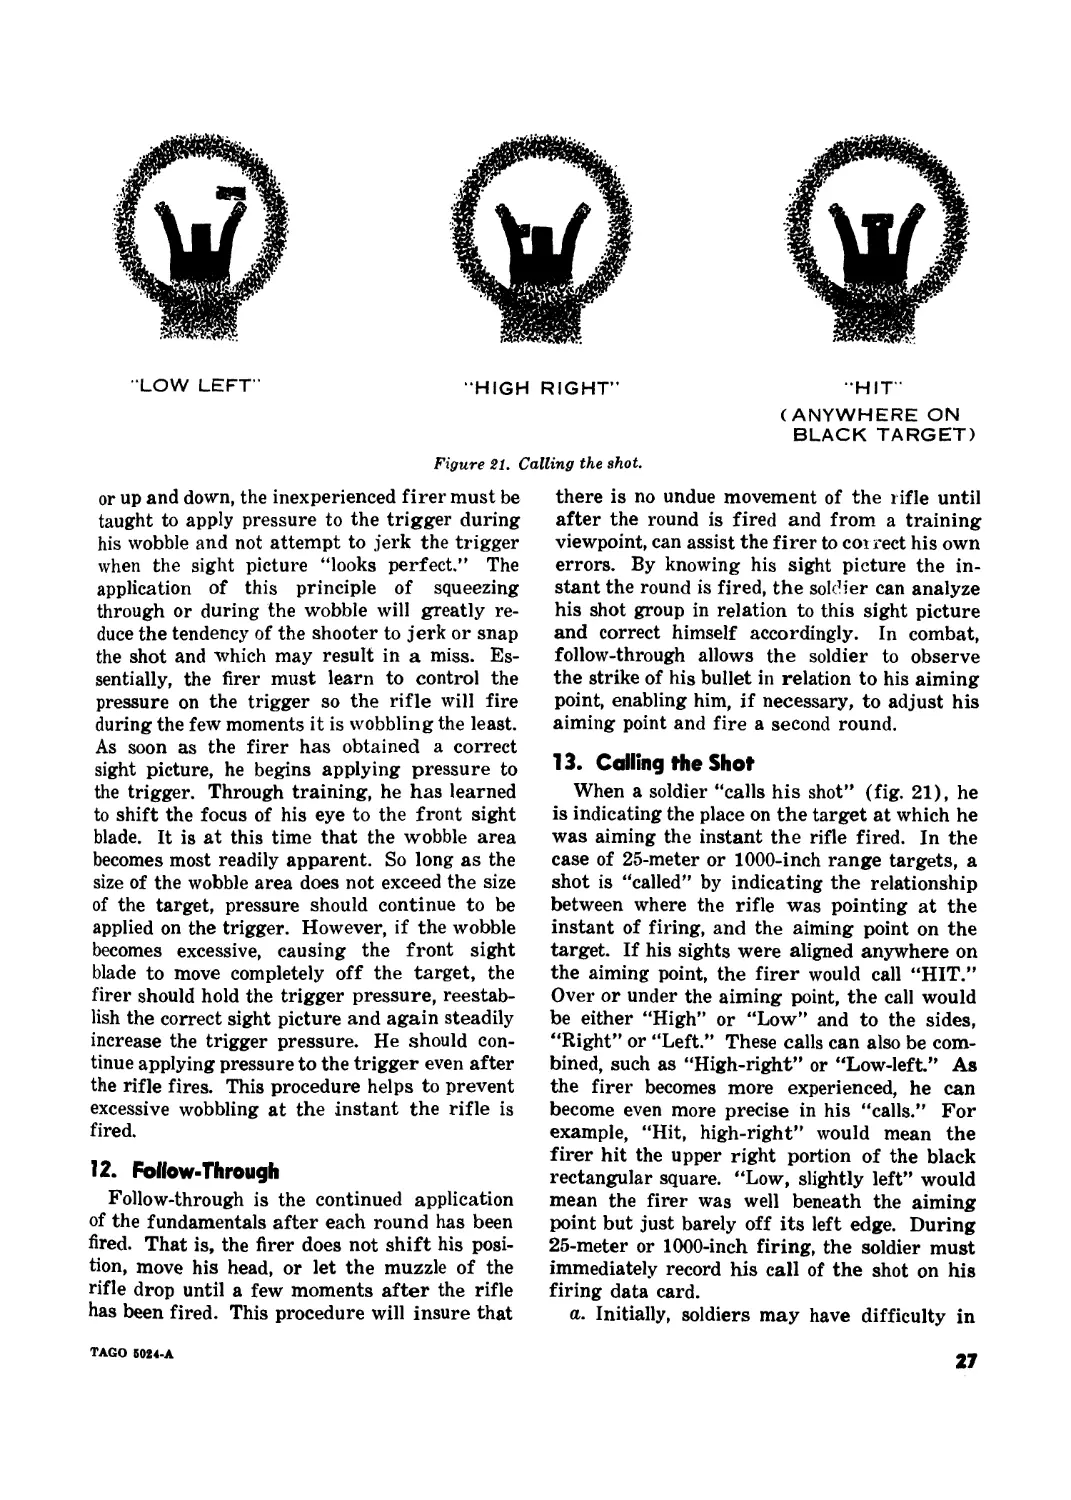
13. Calling the Shot
When a soldier “calls his shot” (fig. 21), he
is indicating the place on the target at which he
was aiming the instant the rifle fired. In the
case of 25-meter or 1000-inch range targets, a
shot is “called” by indicating the relationship
between where the rifle was pointing at the
instant of firing, and the aiming point on the
target. If his sights were aligned anywhere on
the aiming point, the firer would call “HIT.”
Over or under the aiming point, the call would
be either “High” or “Low” and to the sides,
“Right” or “Left.” These calls can also be com-
bined, such as “High-right” or “Low-left.” As
the firer becomes more experienced, he can
become even more precise in his “calls.” For
example, “Hit, high-right” would mean the
firer hit the upper right portion of the black
rectangular square. “Low, slightly left” would
mean the firer was well beneath the aiming
point but just barely off its left edge. During
25-meter or 1000-inch firing, the soldier must
immediately record his call of the shot on his
firing data card.
a. Initially, soldiers may have difficulty in
TAGO S024-A
27
calling their shots. The primary reason for this
is that many soldiers will not properly follow-
through and thus have no idea of their sight
picture at the instant of firing. Such firers
must receive close supervision if they are to
correct this fault.
b. A second problem in calling the shot oc-
curs during the initial firing exercises of marks-
manship fundamentals training. These exer-
cises are conducted before the rifles have been
zeroed; consequently, a firer might call a hit,
but the sight setting on his rifle is such that the
bullet strikes the lower left portion of the tar-
get paper. Firers should be aware of this fact;
otherwise, they are likely to become discour-
aged and discount the importance of calling
their shots. The soldier should be informed that
calling the shot is a means to assist him in ap-
plying the principles of follow-through, and
until he has zeroed his rifle, he cannot expect to
hit the point at which he aims. Later in the
course, during battlesight zero, calling the shot
has a direct and important application. In this
type of firing, soldiers who consistently call
their shots correctly will have considerably less
difficulty and will be able to make much more
accurate sight adjustments than will those who
neglect this technique. Without the ability to
call his shots the firer will never be able to get
his zero on a weapon.
14. Shot Group Analysis
a. A perfect shot group is one in which all
rounds hit the target at exactly the same point.
However, factors such as wind, the ability of
the firer, and the slight manufacturing differ-
ences between rounds make such a shot group
virtually impossible. Shot groups are analyzed
by studying the arrangement of the bullet holes
on the target. The distance between these holes
and the overall pattern made by the shot group
are considered in determining the proficiency of
the firer. As a general rule, the smaller the pat-
tern, the better the shot group.
b. Most unsatisfactory shot groups are usu-
ally elongated, either vertically or horizontally,
and are the direct result of incorrect sight pic-
tures. That is, at the instant of firing, the sol-
dier had an error in sight alignment or in the
placement of the aiming point, or he may have
had a combination of the two errors. However,
the fact that an obviously incorrect sight pic-
ture occurred at the instant of firing does not
necessarily mean that the only mistake was
aiming. For example, incorrect application of
pressure on the trigger will almost always pull
the sights out of alignment and or off the aim-
ing point. Improper breathing or undue mus-
cular strain can also cause aiming errors, al-
though these are less common mistakes than
improper trigger control. Coaches and or in-
structors must keep in mind that any of sev-
eral improperly applied fundamentals can dis-
arrange the sight picture and cause unsatisfac-
tory shot groups. Consequently, they should
carefully observe a firer’s application of all
fundamentals to in.c '-e that the actual mistake
is identified.
c. Assuming that all fundamentals except
aiming have been eliminated as the cause of a
firer’s unsatisfactory shot groups, the coach
or instructor can then use the size and config-
uration of the shot group patterns to determine
the specific type of aiming error. The rela-
tionship of these patterns to the type of aiming
errors is as follows:
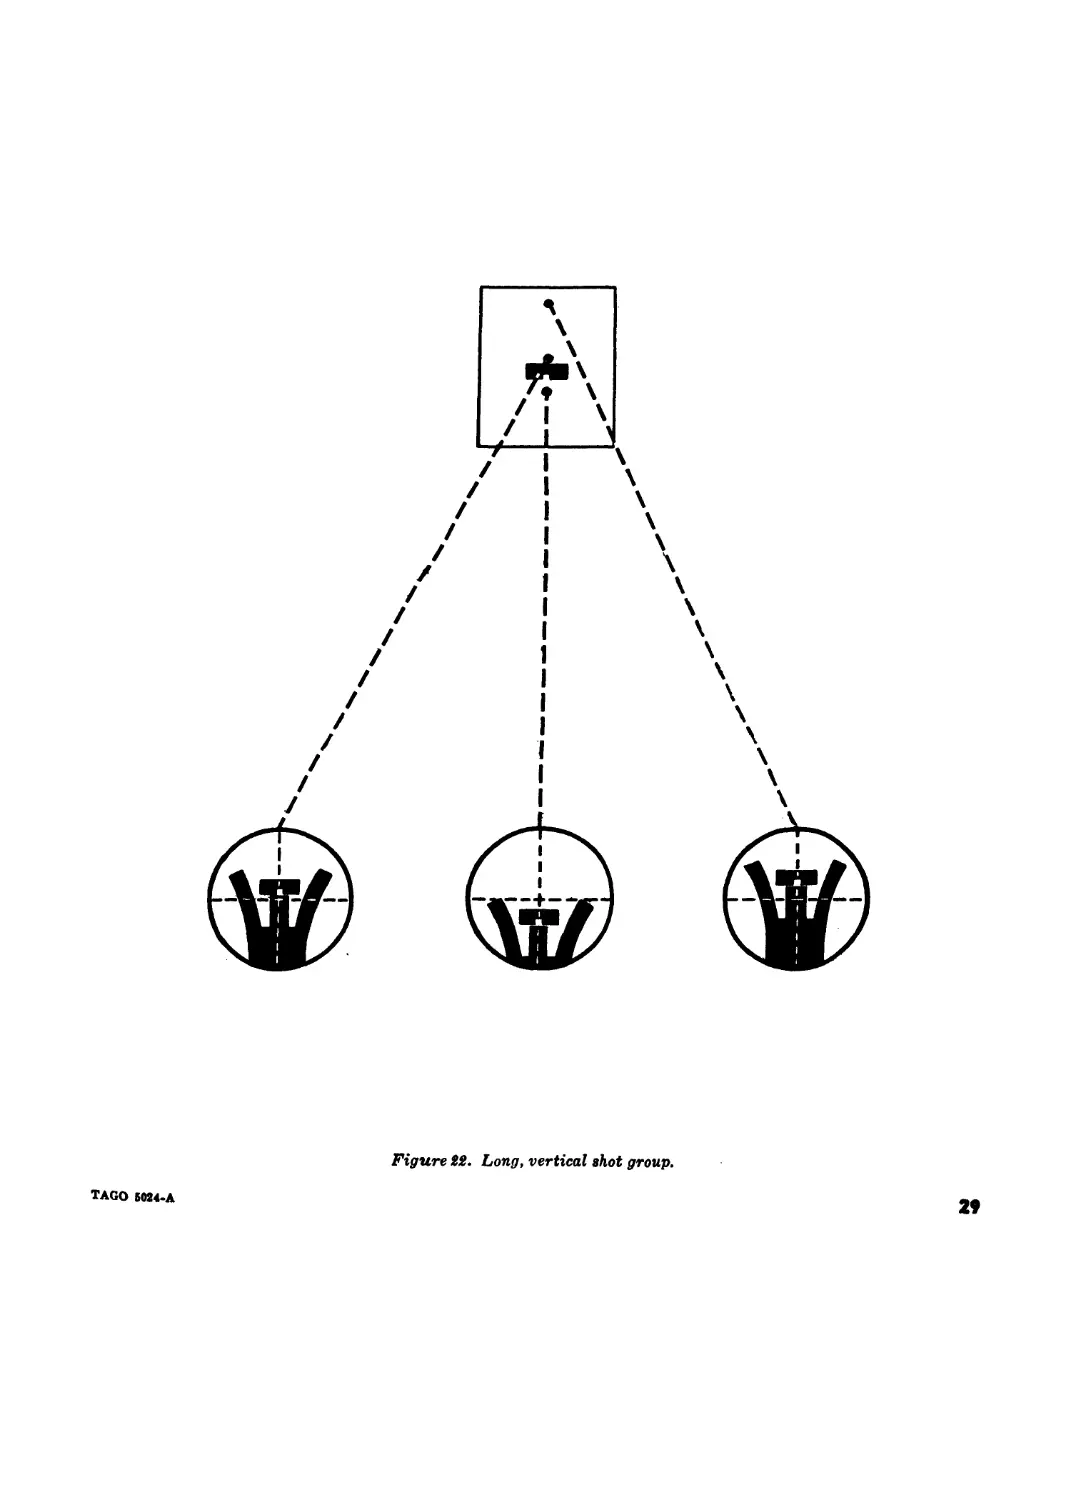
(1) Long, vertical shot groups are the re-
sult of improper horizontal sight align-
ment. That is, the firer has positioned
the front sight blade too high or too
low in the rear sight aperture (fig.
22).
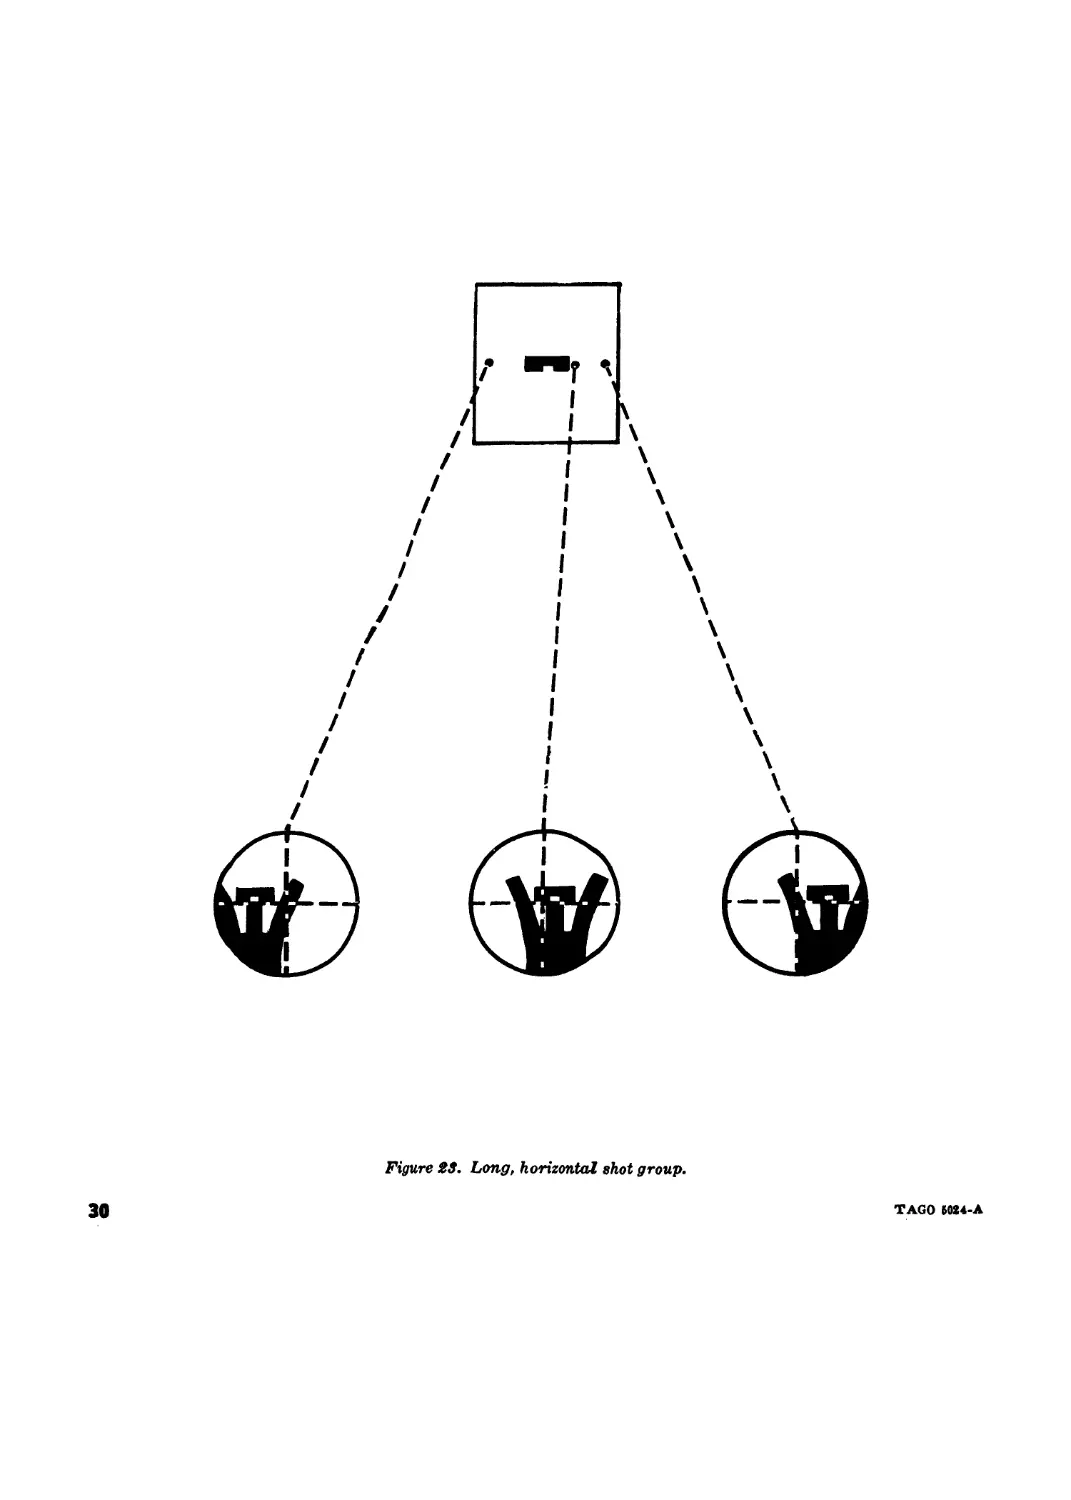
(2) Long, horizontal shot groups are the
result of improper vertical sight align-
ment. That is, the firer has positioned
the front sight blade too far to the
right or left in the rear sight aperture
(fig. 23).
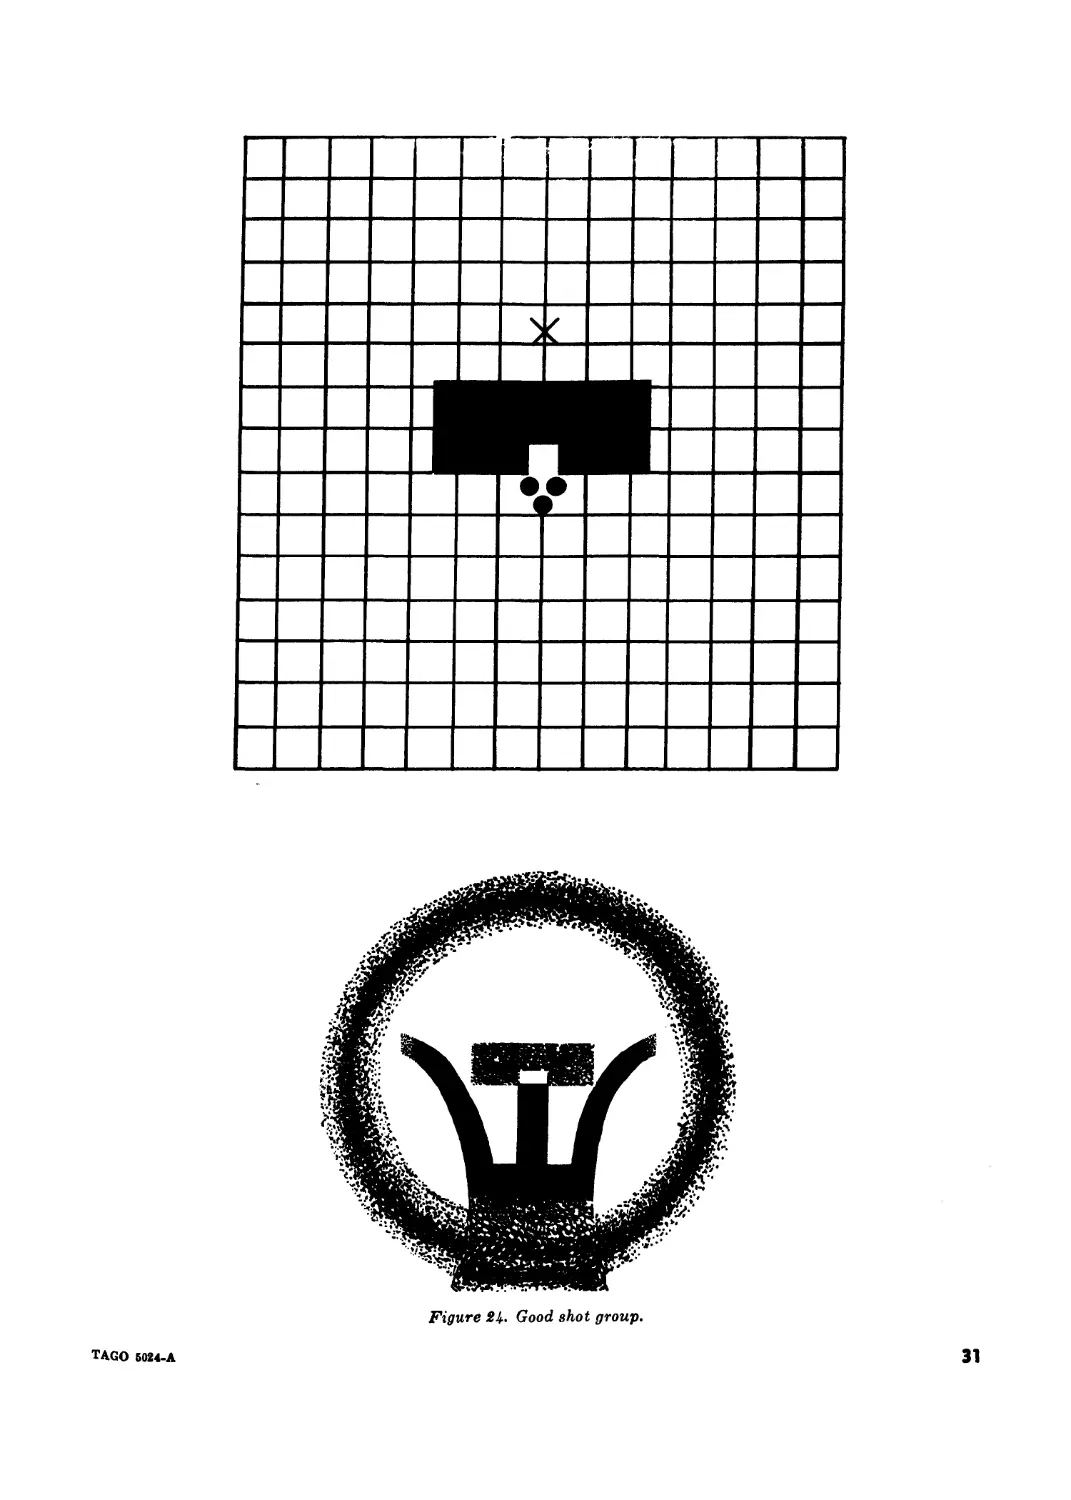
(3) A small or “tight” shot group indicates
proper application of the eight steady
hold factors, and correct sight pic-
ture (fig. 24).
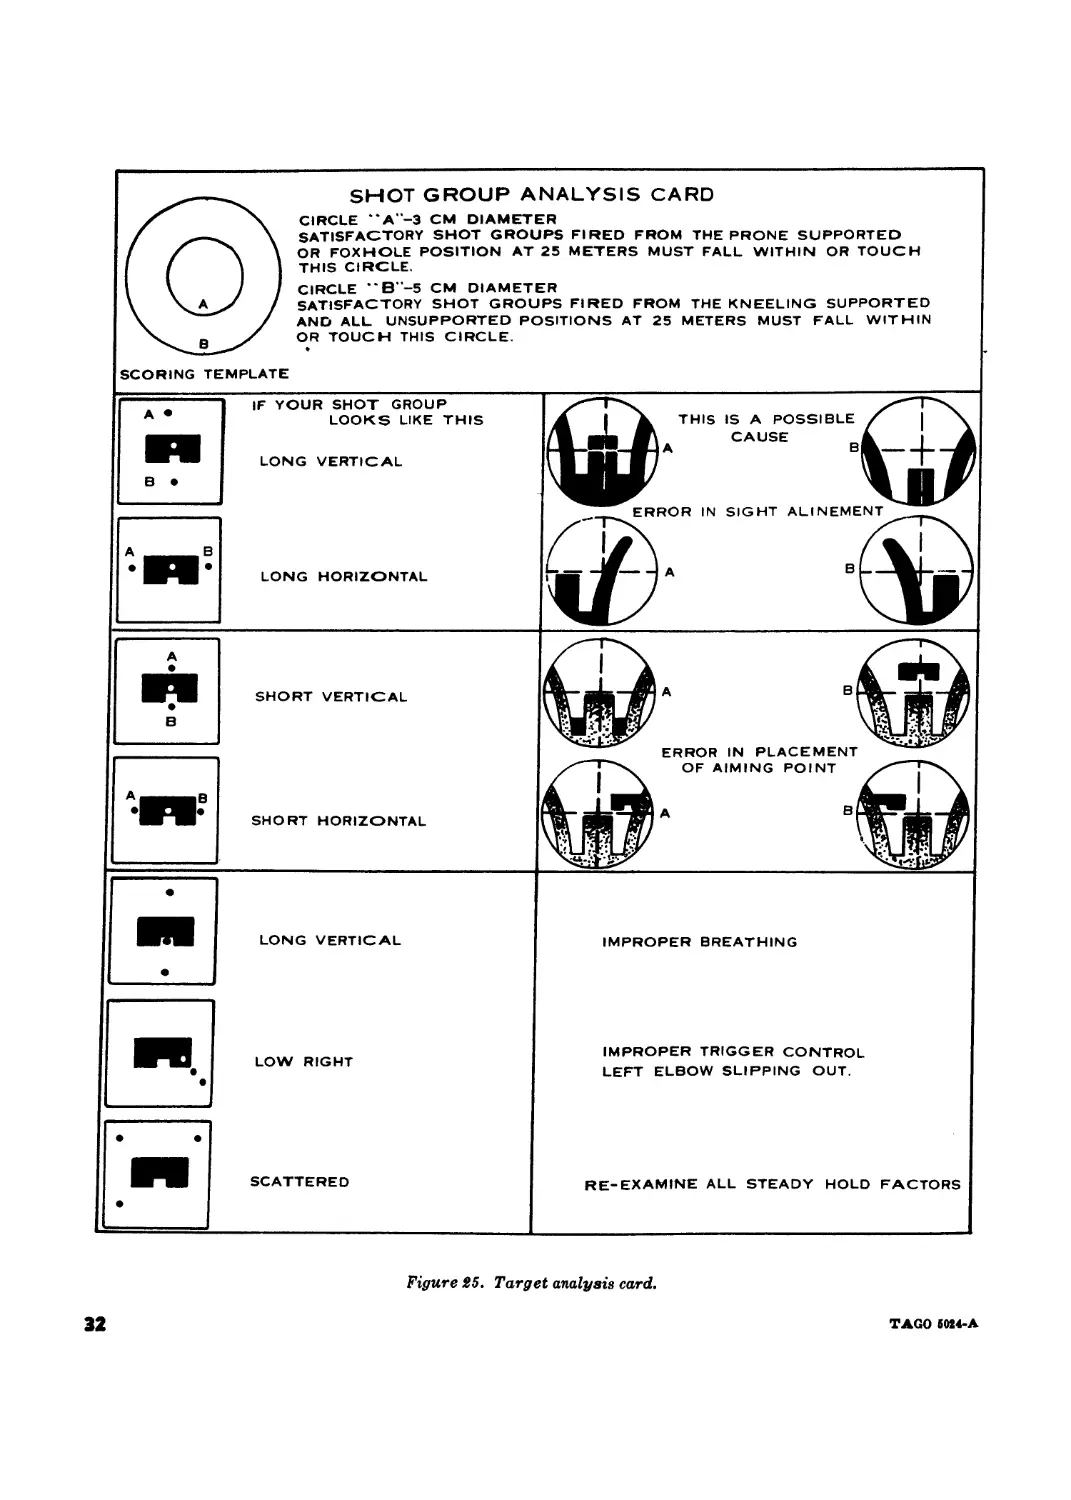
d. During fudamentals training, each soldier
should be given a target analysis card (fig. 25)
to assist him in determining and correcting his
own mistakes. These cards depict several dif-
ferent types of unsatisfactory shot groups, the
probable errors that caused them, and the
necessary corrective action.
28
TAGO 6024-A
Figure i2. Long, vertical shot group.
TAGO Б024-А
29
Figure IS. Ътя, korimtol еЫ Ifoup.
TAGO 5024-A
30
1 1
t
Figure 24-. Good shot group.
31
TAGO Б024-А
SCORING TEMPLATE
SHOT GROUP ANALYSIS CARD
CIRCLE ”A"-3 CM DIAMETER
SATISFACTORY SHOT GROUPS
OR FOXHOLE POSITION AT 25
THIS CIRCLE.
CIRCLE “B -5 CM DIAMETER
SATISFACTORY SHOT GROUPS
AND ALL UNSUPPORTED POSITIONS AT 25 METERS MUST FALL WITHIN
OR TOUCH THIS CIRCLE.
FIRED FROM THE PRONE SUPPORTED
METERS MUST FALL WITHIN OR TOUCH
FIRED FROM THE KNEELING SUPPORTED
IF YOUR SHOT GROUP
LOOKS LIKE THIS
LONG VERTICAL
LONG HORIZONTAL
SHORT VERTICAL
SHORT HORIZONTAL
THIS
ERROR IN PLACEMENT
OF AIMING POINT
ERROR IN
SIGHT ALINEMENT
В
В
В
В
IS A POSSIBLE
CAUSE
LONG VERTICAL
LOW RIGHT
SCATTERED
IMPROPER BREATHING
IMPROPER TRIGGER CONTROL
LEFT ELBOW SLIPPING OUT.
RE-EXAMINE ALL STEADY HOLD FACTORS
Figure 25. Target analysis card.
32
TAGO 5024-A
SITION
SITION
CALLTARGET
SITION
CALL TARGET
к
SITION
x
POSITION
13Г CALL TARGET
HIT TARGET
HIT TARGET
CALL TARGET
POSITION
POSITION
EL- . . W .
El______W
2J CALL TARGET
141 CALL TARGET
HIT TARGET
HIT TARGET
POSITION
POSITION
El_______W-------
HIT TARGET
POSITION
hit Target
El____W
HIT TARGET
9 | CALL TARGET
151 CALL TARGET
HIT TARGET
POSITION
POSITION
EL - W_____
HIT TARGET
CALLTARGET
El__— W
HIT TARGET
POSITION
POSITION
El_______W-------
61 CALL TARGET
El___ W
HIT-TARGET
II CALL TARGET
171 CALL TARGET
El____ W - _
HIT TARGET
El___:_W_____
HIT TARGET
El W
firing data card
POSITION
POSITION
HIT TARGET
El___W „. . „
HIT TARGET
El______W
1 Front
Figure 26. Firing data card.
POSITION
EL.
181 CALL TARGET
POSITION
EL W
TAGO Б024-А
33
CALL TARGET
SITION
CALL TARGET
SITION
CALL TARGET
x
SITION
MIT TARGET I??] CALL TARGET
HIT TARGET [3lj CALL TAiiGl T
POSITION
POSITION
El______W
26| CALL TARGET
EL
POSITION
EL
HIT TARGET
W
W
321 CALL TARGET
El_______W.
POSITION
El_______W
POSITION
271 CALL TARGET
33 CALL TARGET
El____W
HIT TARGET
HIT TARGET
HIT TARGET
POSITION
POSITION
W.
BATTLESiGHT ZEROING
CALL TARGET
I ft GROUP
231 CALL TARGET
El_______W_______
El____ W
HIT TARGET
POSITION
Fl_______W
29] CALL TARGET
HIT TARGET
il____W
HIT TARGET
A-ii
2nd GROUP
1 t'*T
POSITION
GROUP
POSITION
EL
NAME
ASN
RIFLE
NO
W____
HIT TARGET
EL w
HIT TARGET
J zzr
-*• II fil
POSITION
POSITION
EL
2 Back
Figure 26—Continued.
250 METER
BATTLESIGHT ZERO
W
34
TAGO 5024-A
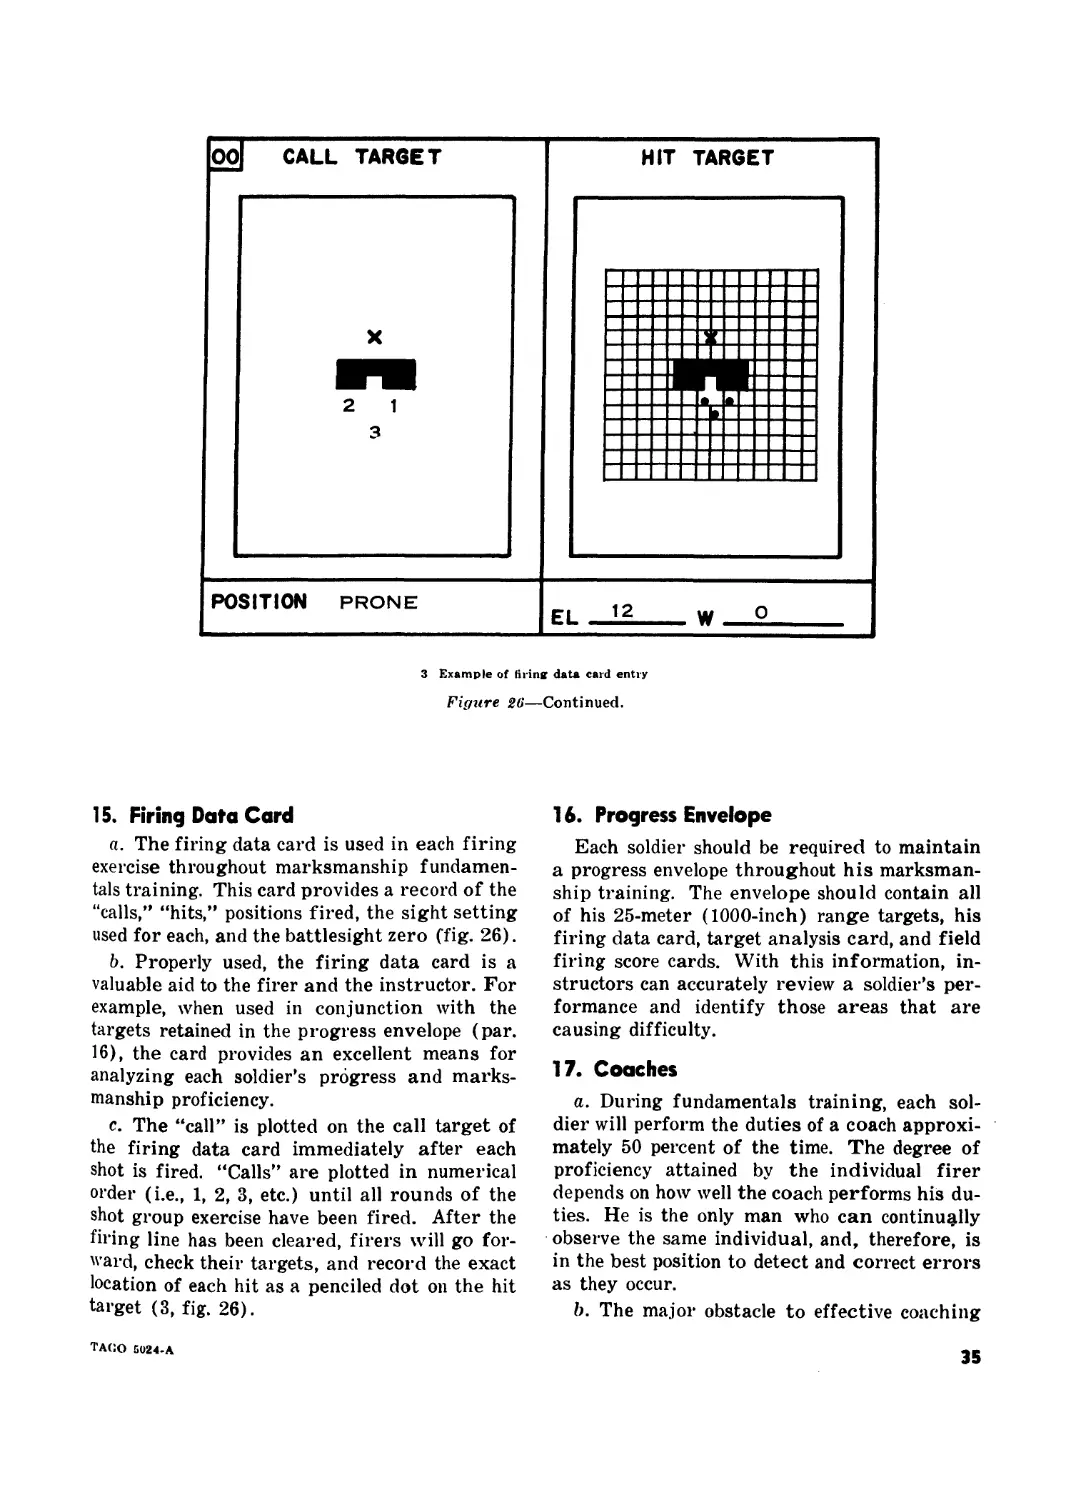
CALL TARGET
HIT TARGET
POSITION PRONE
3 Example of firing data card entry
Figure 26—Continued.
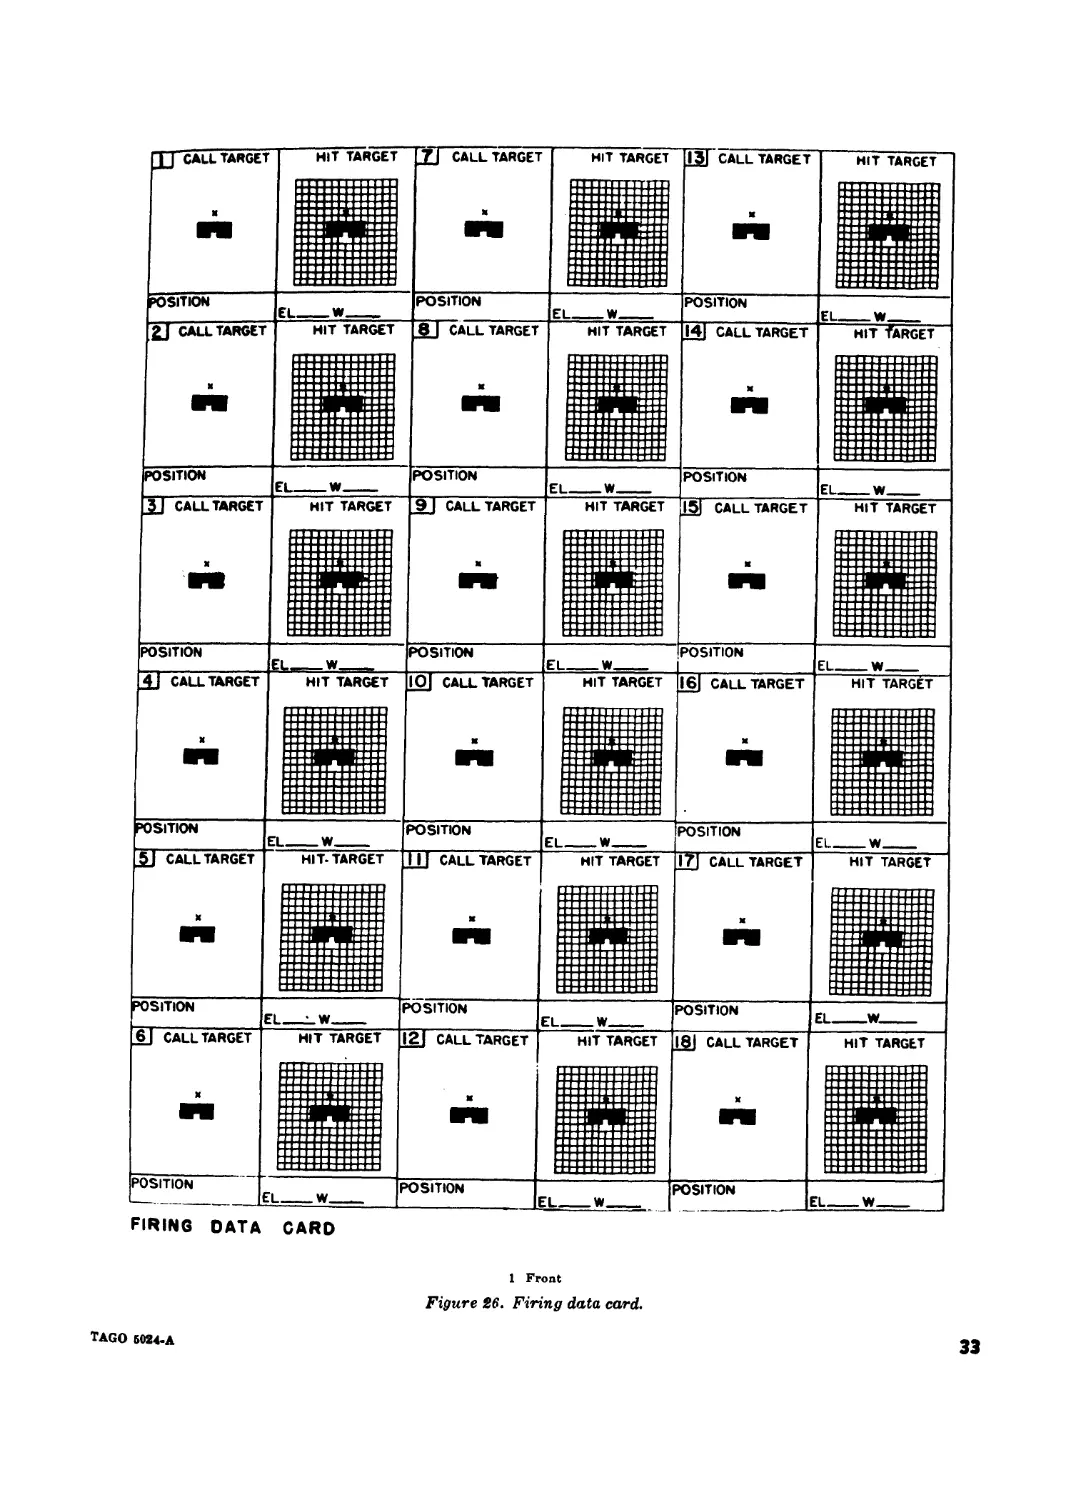
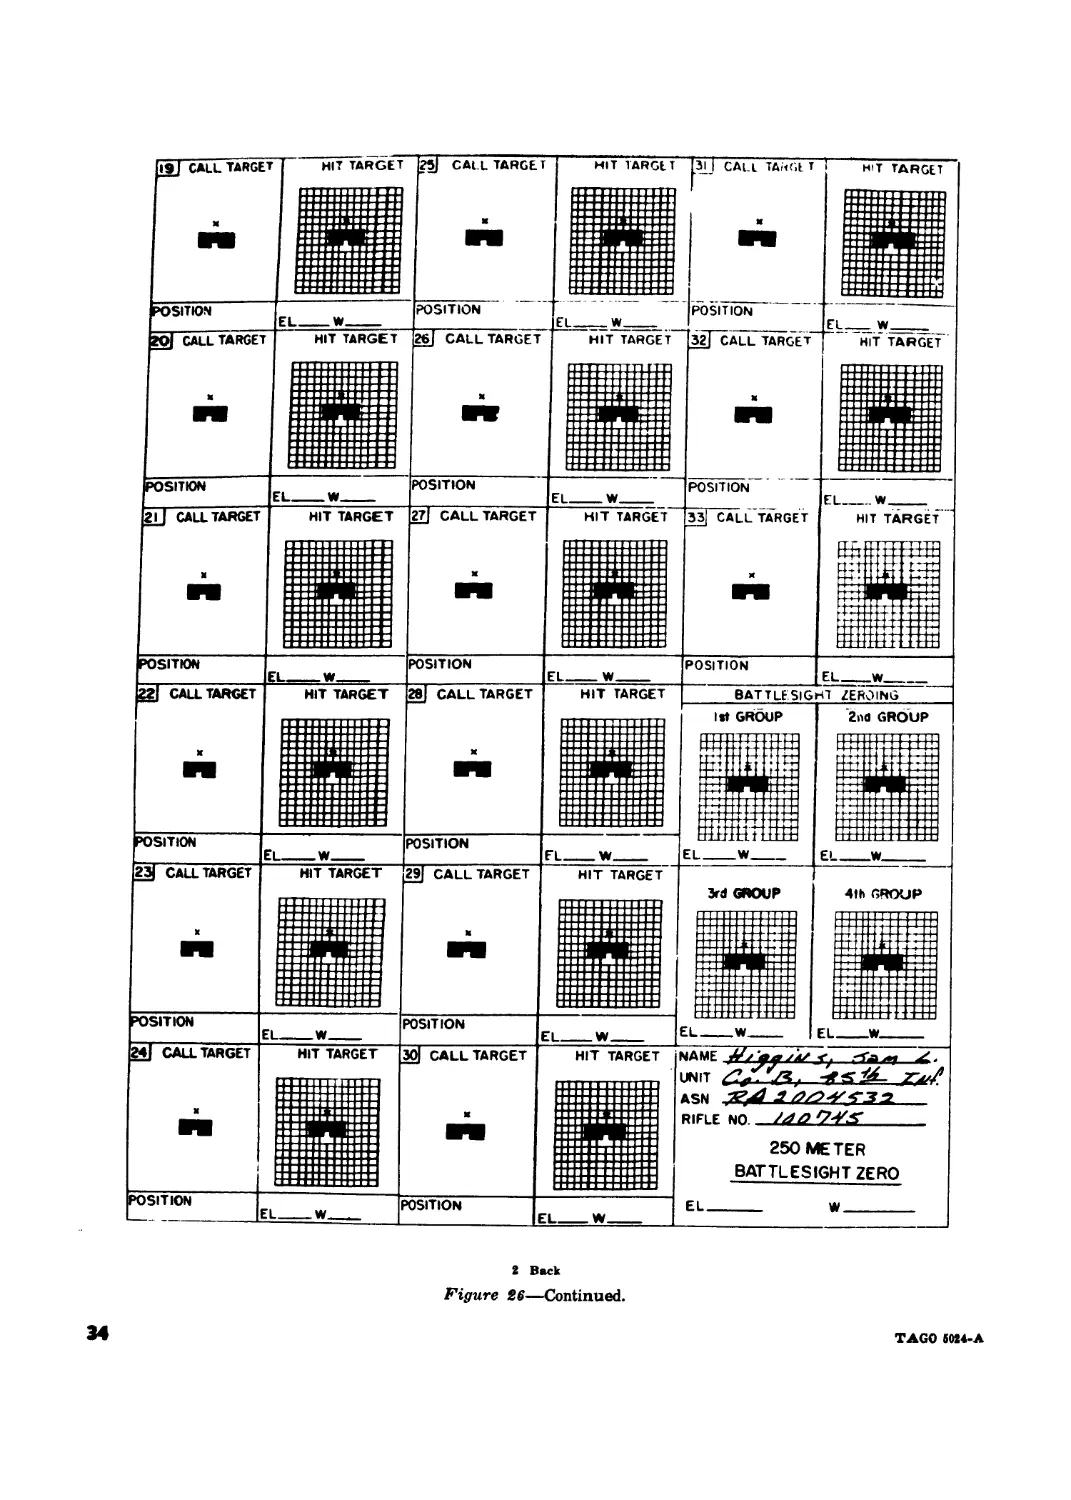
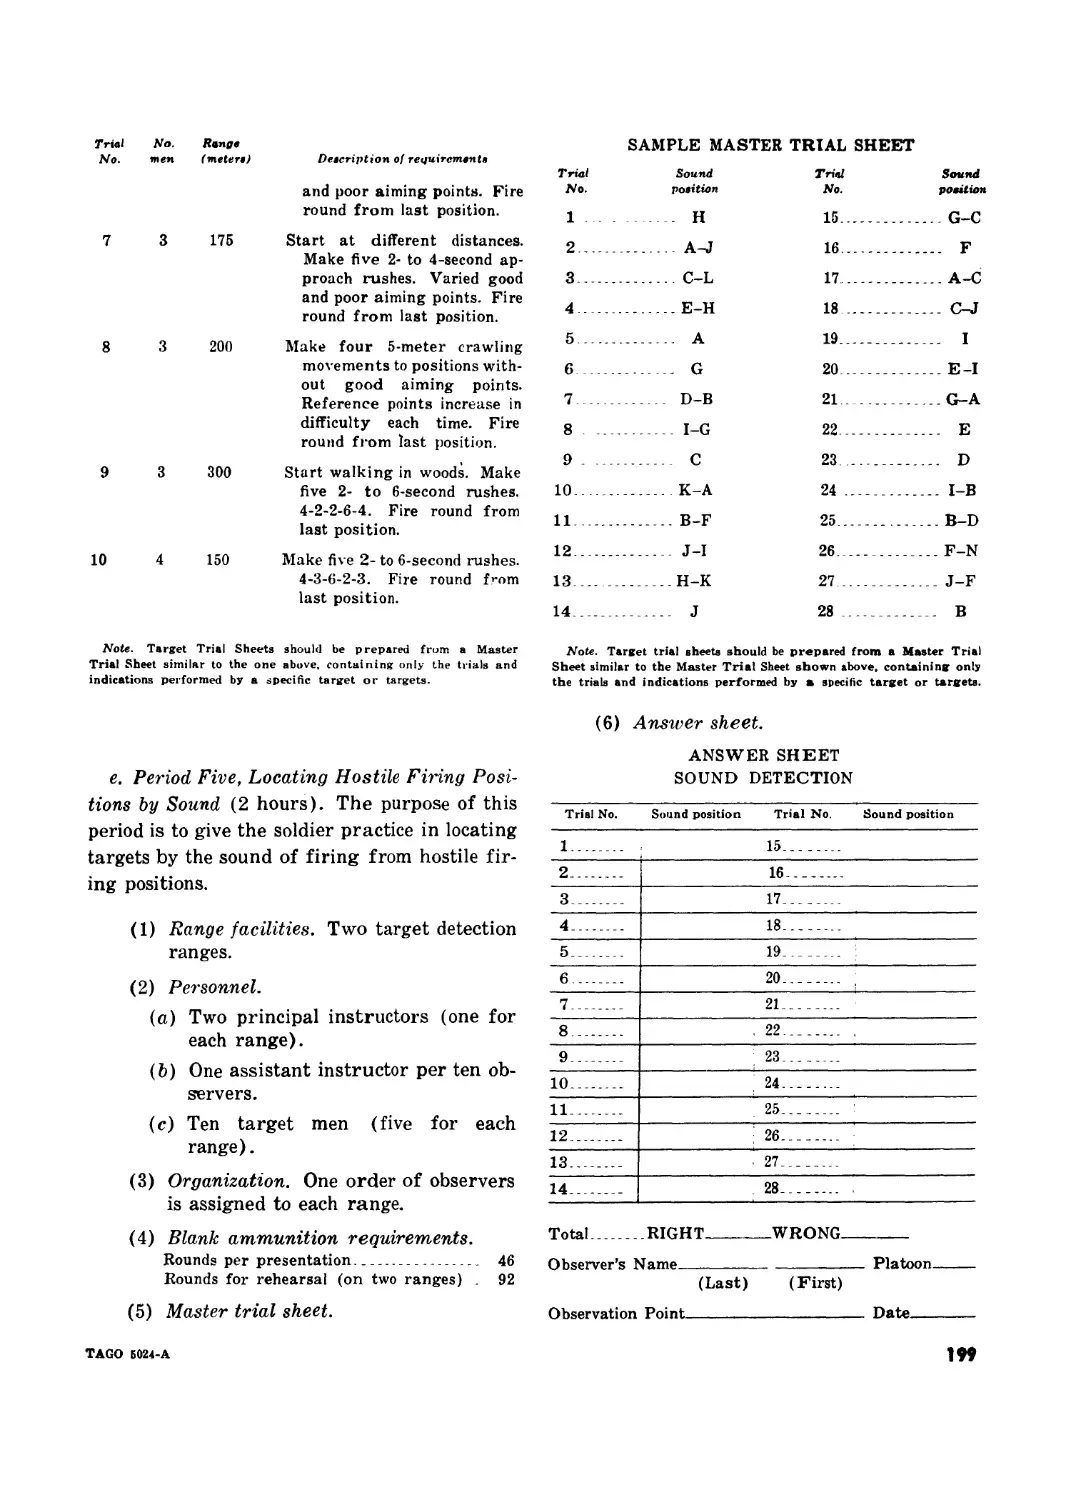
15. Firing Data Card
a. The firing data card is used in each firing
exercise throughout marksmanship fundamen-
tals training. This card provides a record of the
“calls,” “hits,” positions fired, the sight setting
used for each, and the battlesight zero (fig. 26).
b. Properly used, the firing data card is a
valuable aid to the firer and the instructor. For
example, when used in conjunction with the
targets retained in the progress envelope (par.
16), the card provides an excellent means for
analyzing each soldier’s progress and marks-
manship proficiency.
c. The “call” is plotted on the call target of
the firing data card immediately after each
shot is fired. “Calls” are plotted in numerical
order (i.e., 1, 2, 3, etc.) until all rounds of the
shot group exercise have been fired. After the
firing line has been cleared, firers will go for-
ward, check their targets, and record the exact
location of each hit as a penciled dot on the hit
target (3, fig. 26).
16. Progress Envelope
Each soldier should be required to maintain
a progress envelope throughout his marksman-
ship training. The envelope should contain all
of his 25-meter (1000-inch) range targets, his
firing data card, target analysis card, and field
firing score cards. With this information, in-
structors can accurately review a soldier’s per-
formance and identify those areas that are
causing difficulty.
17. Coaches
a. During fundamentals training, each sol-
dier will perform the duties of a coach approxi-
mately 50 percent of the time. The degree of
proficiency attained by the individual firer
depends on how well the coach performs his du-
ties. He is the only man who can continually
observe the same individual, and, therefore, is
in the best position to detect and correct errors
as they occur.
b. The major obstacle to effective coaching
TAGO 5024-A
35
is the attitude of the individual. Some soldiers
may feel that only expert marksmen can per-
form the duties of a coach with any degree of
success while they, as inexperienced firers, are
of little value in critiquing and advising their
fellow soldiers. This reasoning is completely
in error. The purpose of the coach is to con-
tinually check and assist the firer in the proper
application of marksmanship fundamentals.
The coach needs only to be attentive and follow
the instructor’s directions to satisfactorily per-
form this duty. He closely observes the firer’s
position and the manner in which the firer ap-
plies the steady hold factors to the various po-
sitions. The coach is particularly valuable in
checking those factors which the firer is unable
to observe for himself. Above all, the coach must
prevent the firer from repeating the same
errors.
c. Initially during an exercise, the coach
should be in a location where he can best ob-
serve the firer going into position. He then
should move to various points at the sides and
rear of the firer and check the correctness of
the position.
Caution: During live firing exercises, coaches
must never move forward of the firer or the
firing line.
The coach requires the firer to make such
adjustments as may be necessary to obtain a
correct position. When the coach is satisfied
with the firing position, he assumes a coaching
position alongside the firer. As a general rule,
the coach assumes a position similar to that
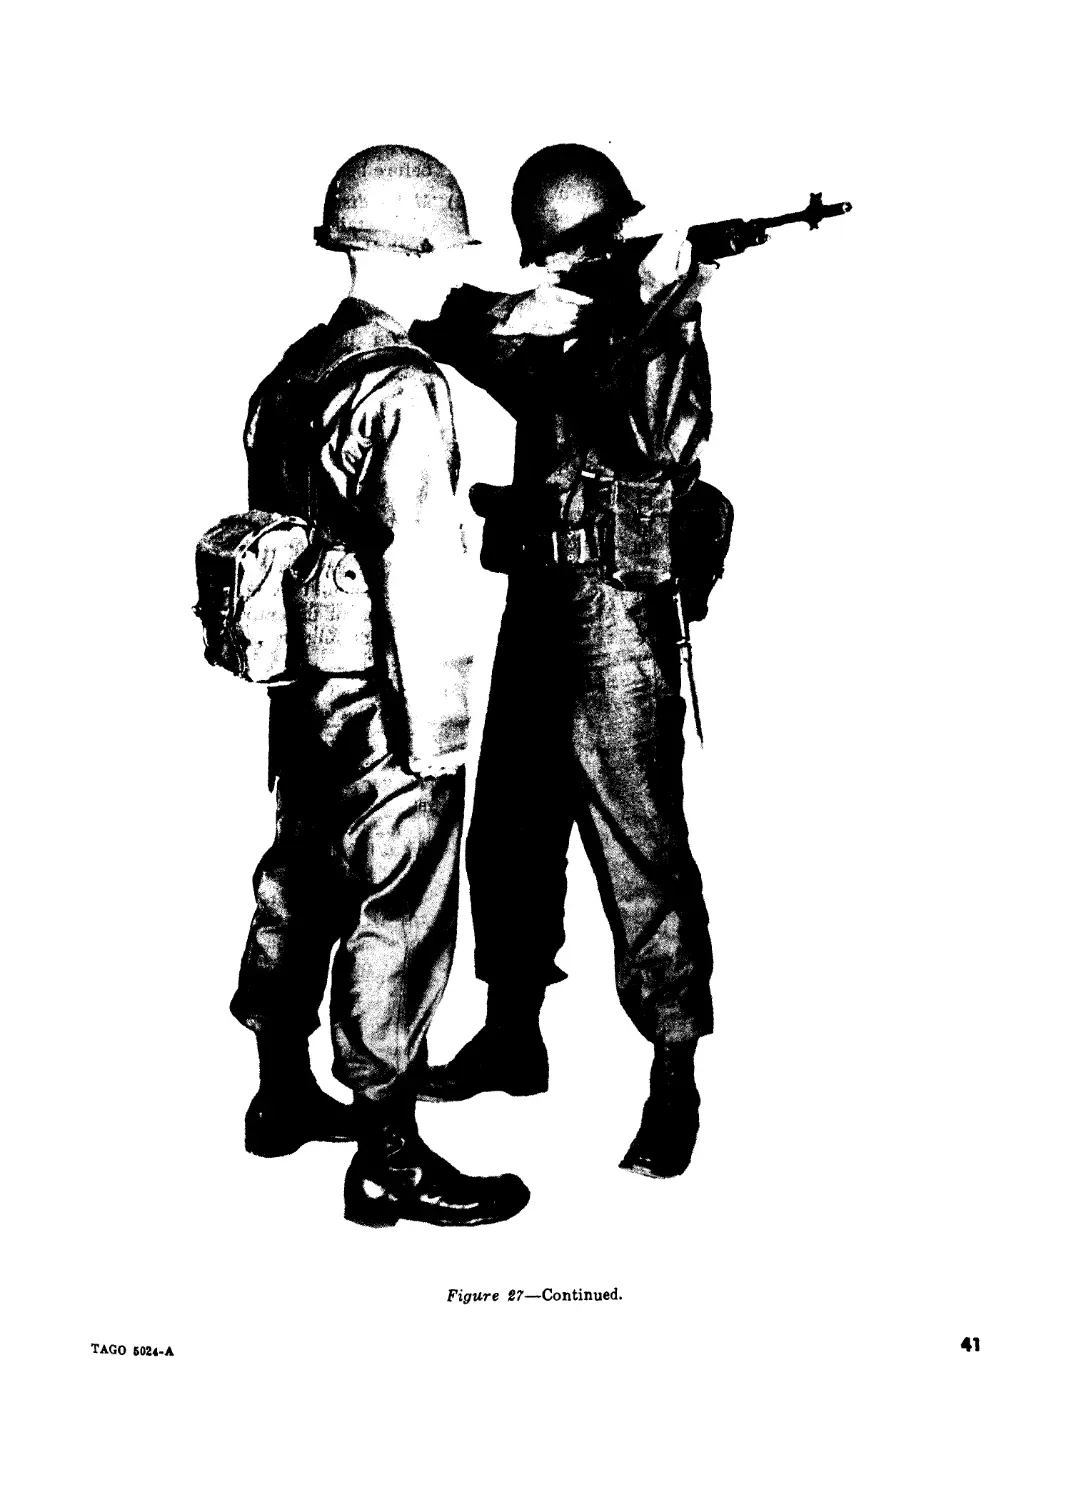
of the firer (fig. 27).
18. Ball and Dummy Exercises
a. In ball and dummy exercises, the coach
loads a dummy round or a live round into the
rifle.
Note. If ball and dummy exercises are conducted
using caliber .22 rifles, dummy rounds as such are not
necessary. The coach simply closes the bolt on an empty
chamber.
The firer must not watch the coach load his
rifle, since the value of the exercise is based on
the firer not knowing if a live round is in the
chamber. This is a particularly effective exer-
cise in detecting errors in aiming, trigger con-
trol, and those caused by the firer attempting
to compensate for recoil.
36
b. Ball and dummy exercises are conducted
as follows:
(1) The coach secures dummy rounds and
live rounds and assumes the proper
coaching position alongside the firer.
(2) The firer is directed to look away while
the coach loads a dummy or a live
round into the rifle.
(3) The coach allows the bolt to go for-
ward.
(4) The firer is told to aim, apply the
steady hold factors correctly, and fire.
(5) The coach observes the firer’s eyes and
face for evidence of flinching, the trig-
ger finger for improper trigger con-
trol, and the back and chest for im-
proper breathing techniques. When a
soldier attempts to fire a dummy
round, any of these errors will become
apparent to an observant coach.
19. Rapid Reloading
a. A skill of utmost importance to the combat
rifleman is the ability to reload his weapon as
rapidly as possible. How well the soldier per-
forms this skill on the battlefield cannot only
affect the success of his unit, but can also spell
the difference between inflicting casualties or
becoming one himself.
b. Rapid reloading exercises are conducted on
the 25-meter (1000-inch) range. The exercise
begins with the firers in the standing position.
On command from the control tower, one round
is loaded into the rifle. On the command to com-
mence fire, firers assume the designated posi-
tion (prone or sitting) and fire one round. If
the Ml rifle is used, the firer reloads an eight-
round clip, resumes his position, and fires one
additional round.
Note. For the initial exercise using Ml rifles, each
coach should draw three live and six dummy rounds.
One live round will be loaded singly by the firer. The
remaining rounds are loaded into a clip so that a live
round will be the first and last round of the clip. In this
way, the firer need not be concerned with which side of
the clip is loaded into the rifle first. For subsequent
exercises, only two rounds need be drawn since the
clip will still contain one live round from the previous
exercise.
If the firer is armed with the M14 rifle, he
reloads a magazine containing one round, re-
sumes his position, and fires the second round.
TAGO 5024-A
The maximum time to conduct a complete exer-
cise, beginning with the command to commence
firing, is 24 seconds.
c. Close supervision is essential during this
training to insure that all of the correct marks-
manship fundamentals, particularly trigger con-
trol, are being applied. Firers must learn not
to sacrifice accuracy for speed, but at the same
time, they must not use excessive time in firing
the second shot.
Section III. CORRECTIVE INSTRUCTION
20. Purpose
During some phase of marksmanship funda-
mentals training, a few soldiers will have more
difficulty understanding and applying the var-
ious techniques than others. To provide the
extra instruction required by the less skillful
firers without delaying the progress of the en-
tire unit, a concurrent, corrective training area
should be used. If a separate range is not avail-
able for this concurrent training, a number of
firing points should be set aside on the 25-meter
(1000-inch) range for this purpose.
21. Conduct
" a. In practically every instance, the size and
configuration of shot groups will identify those
firers having difficulty. Once they have been
identified, assistant instructors should be as-
signed to provide individual corrective instruc-
tion. Only the best qualified instructors should
be designated to conduct corrective instruction.
They must be well grounded in marksmanship
fundamentals, alert to common shooting errors,
and have a thorough understanding of how to
quickly correct these errors. In some cases,
the instructor can determine the cause of the
firers’ deficiencies simply by discussing the
problem with them and examining their shot
groups and other data contained in the
progress envelopes. However, in the majority
of cases, the instructor must closely observe
the soldier fire several rounds before the cause
of his errors can be determined. The reason for
this is that the instructor might hastily con-
clude that the firer’s poor shot groups are a
result of incorrect sight picture when, in fact,
the error in sight picture (like the poor shot
groups) is actually brought about by improper
trigger control. (See par. 9b(8) for discussion
of trigger control.)
Figure 27. Positions of the coach.
TAGO Б024-А
37
Figure 27—Continued.
38
TAGO Б024-А
Figure 27—Continued.
39
TAGO Б024-А
Figure 27—Continued.
40
TAGO Б024-А
Figure 27—Continued.
TAGO Б024-А
41
b. Time is a definite factor in corrective
instruction. While a firer is receiving’ corrective
instruction, he will, of necessity, miss the regu-
larly scheduled training of his unit. In view of
this, the instructors should provide intensified
training on those subjects the firer has missed
before he rejoins his unit.
c. If the instructor determines improper
trigger control to be the source of the firer’s
difficulty, he may be able to correct this simply
by telling the firer his specific error. A firer
who flinches can sometimes overcome this
tendency by using earplugs. However, if these
procedures fail to produce the desired results,
the following exercises can be used to improve
trigger control techniques:
(1) Blank target firing exercise. This ex-
ercise is designed to correct firers
who jerk the trigger once their sights
are aligned on the aiming point (par.
96(8)). The cause of this error is
that the firer is concentrating more
on the aiming point than he is on
either sight alignment or trigger con-
trol. In order to correct this error,
the firer must learn that the aiming
point is of secondary importance to
sight alignment and trigger control.
This can best be accomplished by
removing the aiming point, that is,
replacing the standard target with
a blank sheet of paper. The blank
paper provides a background on which
the firer can align his sights; however,
there is no specific aiming point which
would cause him to hurry his shot. The
assistant instructor should carefully
check the soldier’s trigger control as
he fires. If the aiming point was the
cause of the firer’s error, the assistant
instructor should note an almost im-
mediate improvement. If there is no
apparent improvement after the sol-
dier has fired several rounds, the as-
sistant instructor should check other
possible causes of incorrect trigger
control, such as improper breathing
or muscular tension. When the as-
sistant instructor is satisfied that the
error has been corrected, the soldier
should be required to fire one or two
more shot groups at a standard target
before being released.
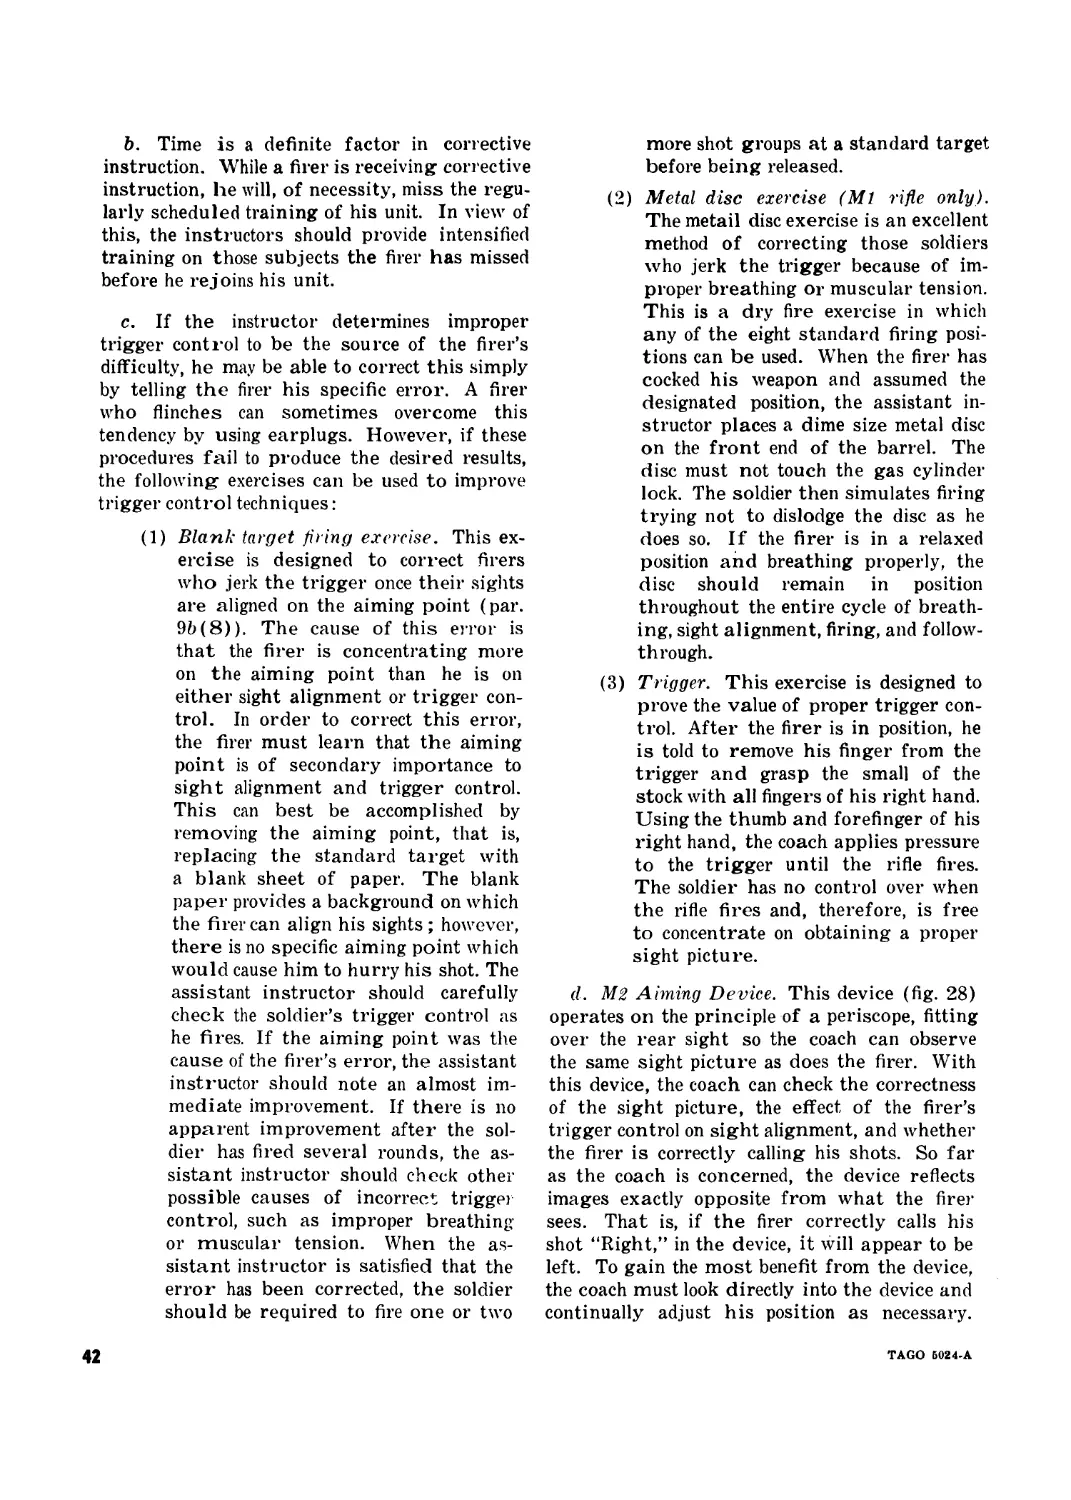
(2) Metal disc exercise (Ml rifle only).
The metail disc exercise is an excellent
method of correcting those soldiers
who jerk the trigger because of im-
proper breathing or muscular tension.
This is a dry fire exercise in which
any of the eight standard firing posi-
tions can be used. When the firer has
cocked his weapon and assumed the
designated position, the assistant in-
structor places a dime size metal disc
on the front end of the barrel. The
disc must not touch the gas cylinder
lock. The soldier then simulates firing
trying not to dislodge the disc as he
does so. If the firer is in a relaxed
position and breathing properly, the
disc should remain in position
throughout the entire cycle of breath-
ing, sight alignment, firing, and follow-
through.
(3) Trigger. This exercise is designed to
prove the value of proper trigger con-
trol. After the firer is in position, he
is told to remove his finger from the
trigger and grasp the small of the
stock with all fingers of his right hand.
Using the thumb and forefinger of his
right hand, the coach applies pressure
to the trigger until the rifle fires.
The soldier has no control over when
the rifle fires and, therefore, is free
to concentrate on obtaining a proper
sight picture.
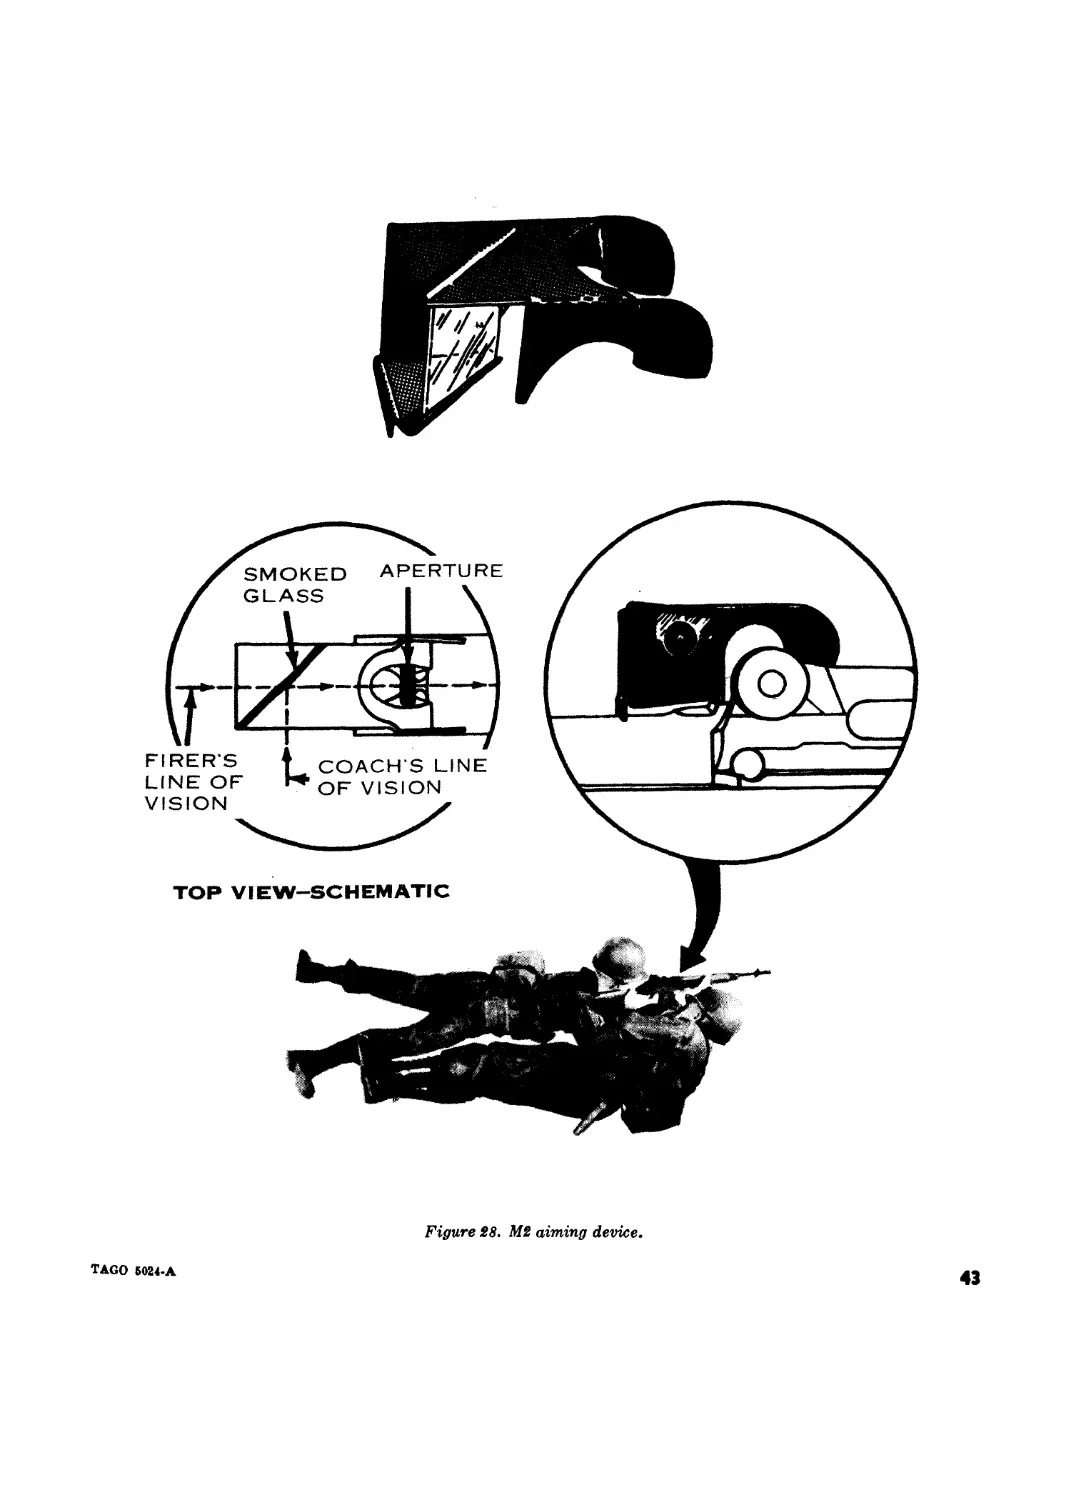
d. М2 Aiming Device. This device (fig. 28)
operates on the principle of a periscope, fitting
over the rear sight so the coach can observe
the same sight picture as does the firer. With
this device, the coach can check the correctness
of the sight picture, the effect of the firer’s
trigger control on sight alignment, and whether
the firer is correctly calling his shots. So far
as the coach is concerned, the device reflects
images exactly opposite from what the fire)’
sees. That is, if the firer correctly calls his
shot “Right,” in the device, it will appear to be
left. To gain the most benefit from the device,
the coach must look directly into the device and
continually adjust his position as necessary.
42
TAGO Б024-А
Figure 28. М2 aiming device.
43
TAGO Б024-А
Once in position, the coach must hold his
breath in order to have minimum body move-
ment while checking the firer’s sight picture.
Finally, he must watch closely for any sudden
changes in sight picture the moment before
firing. Any such sudden change will indicate
that the firer is either flinching or bucking.
This device may be used during any phase of
preparatory marksmanship and is particularly
valuable in conducting corrective instruction.
e. So far as possible, ball and dummy exer-
cises should be used extensively throughout
corrective instruction. Initially, some type of
exercises, such as positions and aiming, are
better conducted without live ammunition.
However, regardless of the training technique
used, each soldier should be required fo fire
several ball and dummy exercises before being
returned to the regular class. Instructors must
closely supervise this firing to insure that the
soldier has, in fact, overcome his difficulties.
Section IV. CONDUCT OF FIRING
22. General
a. During training in marksmanship funda-
mentals, all live firing exercises are conducted
on either 25-meter or 1000-inch ranges (fig.
29). Determination of battlesight zero and the
progress check are also fired on these ranges.
Although there is slightly more distance be-
tween the firing line and the targets on 1000-
inch ranges than on 25-meter ranges, the differ-
ence is negligible and may be discounted for
purposes of sight adjustment. However, most
25-meter ranges have foxholes and simulated
tree stumps constructed along the firing line,
whereas 1000-inch ranges do not. Since these
features are necessary to conduct firing from
supported positions, 25-meter ranges should be
used in preference to 1000-inch ranges when-
ever possible.
b. The 25-meter target (fig. 34) is used for
all 25-meter or 1000-inch range firing. Targets
are fastened to standard target panels or to “E”
type silhouettes located 25 meters or 1000
inches from the front numbered stakes.
c. Soldiers using service rifles during marks-
manship fundamentals training will fire three
rounds to form a shot group, while those using
.22 caliber rifles will fire five rounds. As each
firing exercise is completed, the soldier removes
his target from the panel or silhouette and
places it in his progress envelope. These targets
then serve as a basis for critiques and/or cor-
rective instruction.
d. Firing data cards should be filled out by
the firer for each exercise conducted on the 25-
meter or 1000-inch range.
e. Sufficient target analysis cards (fig. 25)
should be available so each firer may have one
for reference while examining his shot groups.
23. Range Management
a. Organization and Procedure.
(1) Based on a 200-man unit, the range
should have 110 firing points. The unit
is divided into two orders, and soldiers
in the first order are paired with
soldiers in the second order. Each pair
of soldiers is then assigned a firing
point, beginning with point number
one and extending through point num-
ber one hundred. One order is desig-
nated as firers and the other as
coaches. The extra ten firing points
are used to conduct corrective instruc-
tion.
(2) On 25-meter ranges, a foxhole and
stump are provided at each firing
point so instruction in firing from
supported positions can be conducted.
Since 1000-inch ranges do not contain
these features, exercises involving the
foxhole and kneeling supported posi-
tions are not conducted on ranges of
this type.
(3) A control tower should be centrally
located in the rear of the firing line. It
should be sufficiently elevated to per-
mit unrestricted observation of the
range, both in rear of the firing line
and a reasonable distance behind the
line of targets. All firing commands
are issued from the control tower and
must be obeyed immediately. The
single exception to this is in the event
an unsafe act occurs which escapes the
attention of the tower operator. In this
case, the first individual to see such an
act should command, “CEASE FIRE.”
44
TAGO 6024-A
1
TARGETS
1000 IN.
FIRING LINE
Figure 29. 25-meter and 1000-inch ranges.
(4) To provide both efficient range opera-
tion and effective instruction, the
following personnel are required:
(a) Control officer.
(b) Safety officer.
(c) Noncommissioned officer in charge.
(d) Ammunition detail.
(e) Ordnance small arms repairman.
(/) One assistant instructor per seven
to ten points.
(g) Medical personnel.
(5) Prior to beginning each live fire exer-
cise, all personnel must be briefed on
the range safety regulations (app. II).
TAGO Б024-А
45
(6) As a soldier completes firing a shot
group, his rifle is checked and cleared
by an assistant instructor. When all
soldiers have completed firing, and
their rifles have been individually
cleared by the assistant instructors,
the control tower operator announces
that the firing line is clear, and
coaches and firers may move down
range and stand by their targets until
critiqued by an assistant instructor.
b. Fire Commands. In order to simplify fir-
ing procedures, fire commands should be brief
and standardized as much as possible from one
exercise to the next. Type commands for exer-
cises are as follows:
(1) Shot group exercises.
FIRERS ASSUME THE____________
POSITION.
COACHES SECURE THREE (OR
FIVE) ROUNDS OF AMMUNI-
TION.
THE FIRING LINE IS NO LONGER
CLEAR.
LOCK.
ONE EMPTY MAGAZINE LOAD
(For magazine fed weapons only).
ONE ROUND LOAD.
YOU WILL FIRE AT THE (NUM-
BER OR LOCATION) TARGET.
COMMENCE FIRING WHEN
READY.
CEASE FIRING.
CLEAR ALL WEAPONS.
CLEAR ON THE RIGHT?
CLEAR ON THE LEFT?
THE FIRING LINE IS CLEAR.
COACHES AND FIRERS MOVE
DOWN RANGE AND CHECK
YOUR TARGETS.
(To conserve time, instructions for the
next exercise may be given as the
coaches and firers are returning from
the line of targets.)
(2) Rapid reloading exercise. Preliminary
instructions to describe the exercise
should be given prior to the actual fire
command. For example, “The next
exercise will be from the standing to
the prone position. You will be re-
quired to assume the prone position,
fire one round, reload rapidly and fire
a second round. You will have 24
seconds to complete this exerciser Tim-
ing begins on the command, COM-
MENCE FIRING. This is also your
command to assume the prone position
and fire the exercise.”
(a) Fire commands for magazine fed
rifles.
FIRERS STAND.
THE FIRING LINE IS NO
LONGER CLEAR.
COACHES SECURE TWO
ROUNDS OF AMMUNITION
AND TWO MAGAZINES.
LOAD ONE ROUND IN EACH
MAGAZINE.
LOCK.
ONE MAGAZINE LOAD.
YOU WILL FIRE AT THE (NUM-
BER OR LOCATION) TARGET.
READY ON THE RIGHT?
READY ON THE LEFT?
READY ON THE FIRING LINE.
UNLOCK WEAPONS.
COMMENCE FIRING.
CEASE FIRING.
CLEAR ON THE RIGHT?
CLEAR ON THE LEFT?
THE FIRING LINE IS CLEAR.
COACHES AND FIRERS MOVE
DOWN RANGE AND CHECK
YOUR TARGETS.
(b) Fire commands for clip fed rifles.
FIRERS STAND.
THE FIRING LINE IS NO
LONGER CLEAR.
COACHES SECURE THREE
’ (TWO) ROUNDS OF AM-
MUNITION.
Note. For the initial exercise, each
coach should draw three live and six
dummy rounds. One live round will be
loaded singly by the firer. The remaining
two live rounds are loaded as the first and
last round of the clip in order that the
firer need not be concerned with which side
46
TAGO Б024-А
of the clip is loaded into the rifle first. For
subsequent exercises, only two rounds need
be drawn since the clip will still contain
one live round from the previous exercise.
COACHES LOAD THE CLIP
WITH TWO LIVE AND SIX
DUMMY ROUNDS—A LIVE
ROUND MUST BE THE FIRST
ROUND ON BOTH SIDES OF
THE CLIP.
FIRERS PLACE THE CLIP IN
YOUR BELT.
LOCK.
ONE ROUND LOAD.
YOU WILL FIRE AT THE_____
________TARGET.
READY ON THE RIGHT?
READY ON THE LEFT?
THE FIRING LINE IS READY.
UNLOCK WEAPONS.
COMMENCE FIRING.
CEASE FIRING.
CLEAR ON THE RIGHT?
CLEAR ON THE LEFT?
THE FIRING LINE IS CLEAR.
COACHES AND FIRERS MOVE
DOWN RANGE AND CHECK
YOUR TARGETS.
c. Range Safety. See appendix II.
TAGO БО24-А
47
CHAPTER 3
SIGHT ADJUSTMENT, BATTLESIGHT ZERO, AND PROGRESS CHECKS
Section I. SIGHT ADJUSTMENT
24. General
Following fundamentals training, the soldier
must zero his service rifle. In order to ac-
complish this, the soldier must first learn the
operation of the rear sight, the use of the eleva-
tion and windage rule, and how to compute
sight changes.
25. The Rear Sight
a. The rear sight (fig. 30) of the service rifle
has an elevation knob and a windage knob
which are used to move the rear sight aperture
up or down and right or left respectively.
Changing the position of the rear sight aperture
causes a corresponding change in where a bullet
will strike the target. The elevation knob affects
the vertical location of the shot while the wind-
age knob affects the horizontal location. Both
knobs make an audible click when they are
turned. Each click changes the strike of the
bullet a definite distance, depending on the
range to the target. The elevation knob is ad-
justable from 0 to 72 clicks. The windage knob
can be adjusted to either 16 clicks to the right
or 16 clicks to the left of the center index line.
b. During training in marksmanship funda-
mentals, soldiers should conduct all firing ex-
ercises with the rear sights of their service
rifles set at twelve clicks of elevation and zero
windage. This setting should not be changed
until the soldier is ready to determine the bat-
tlesight zero of his rifle. The reason for this
is twofold: first, untrained firers will tend to
focus their attention on manipulating the sight
rather than learning to properly apply marks-
manship fundamentals. Second, during funda-
mentals training, the precise location of shot
groups on the target is unimportant since it
is the size of shot groups and not the location
that governs the proficiency of the firer.
26. Elevation and Windage Rule
One click of elevation or windage will move
the strike of a bullet a specific distance at a
specific range. For example, at a range of 25
meters, one click of either elevation or wind-
age will move the strike of a bullet .7 centi-
meter. At 100 meters, one click will move the
strike of the bullet approximately 3 centimeters.
To compute the distance one click will move the
strike of a bullet at any given range, multiply
the range in hundreds of meters times 3. For
example, to compute the distance one click of
elevation or windage will move the strike of
the bullet at a range of 250 meters, multiply 2.5
by 3. The answer in this case is 7.5 centimeters.
27. Sight Changes
a. To make sight changes, the firer first lo-
cates the center of his shot group (fig. 31) and
then estimates the distance between it and the
desired location. The distance in elevation is
estimated vertically, while the windage is esti-
mated horizontally. These distances are con-
verted to clicks by using the elevation and wind-
age rule. As a general rule, bold adjustments
will prove more advantageous to the firer. For
example, if there is a question whether to
move two or three clicks, the firer should nor-
mally make the adjustment requiring the great-
er number of clicks.
b. To raise the strike of the bullet, the firer
must increase the number of clicks of elevation.
Conversely, he decreases the elevation to lower
the strike of the bullet on the target. Right
windage moves the strike of the bullet to the
right, and left windage moves it to the left.
48
TAGO Б024-А
Figure 30. Rear sight.
TAGO Б024-А
4»
DESIRED LOCATION
—
U.D S-.IVI
• 3
1.4 CM-
CENTER OF SHOT GROUP IS 1.4 CENTIMETERS
HIGH AND 5.6 CENTIMETERS TO THE LEFT .
FIRING CONDUCTED AT 25 METERS (ONE CLICK
WILL MOVE STRIKE OF THE BULLET .7 CENTIMETERS)
1.4 CENTIMETERS - 2 CLICKS
5.6 CENTIMETERS - 8 CLICKS
SIGHT CHANGES NECESSARY—
8 CLICKS RIGHT
2 CLICKS DOWN
Figure 31. Example of computing sight changes.
50
TAGO Б024-А
Section II. BATTLESIGHT
28. Principles of Zeroing
a. In order to understand the principles of
zeroing, the soldier should have a basic knowl-
edge of ballistics; specifically, the relationship
between the path of the bullet in flight and the
line of aim. In flight, a bullet does not follow a
straight line but travels in a curve or arc. This
curved flight path of the bullet is called its
trajectory (fig. 32). The maximum height of a
bullet’s trajectory depends on the range to the
target. The greater the distance a bullet travels
before impact, the higher it must travel in its
trajectory. On the other hand, the line of aim
is a straight line distance through the rear
sight aperture, across the front sight, to the
aiming point or target.
b. After the bullet leaves the rifle, it is ini-
tially moving in an upward path, above the
line of aim. As the bullet travels farther, it
begins to drop and will eventually intersect the
line of aim. The range at which this intersec-
tion occurs is the zero for that sight setting.
c. Current doctrine of the United States
Army prescribes a battlesight zero for 250
meters. That is, the rear sight of a rifle should
be so adjusted that the trajectory of the bullet
and the line of aim intersect at a range of 250
meters. To phrase it another way, a soldier
firing a rifle properly zeroed for a range of
250 meters should hit his aiming point at that
range.
d. One method of determining the 250-meter
battlesight zero would be to fire at a 250-meter
aiming point, making the necessary adjust-
ments to place the center of the shot group on
the aiming point. However, such a method
would require extensive terrain and waste train-
ing time while firers moved between the firing
line and the targets to check the location of shot
groups.
e. A more suitable method of determining the
250-meter battlesight zero can be accomplished
at a range of 25 meters or 1000 inches (fig. 33).
This method is based on the principle that bul-
lets of the same type and caliber fired at the
same range have the same trajectory. That is,
if several bullets were fired from the same rifle
and all hit the same 250-meter aiming point,
the trajectories of all these bullets are the same.
Therefore, when each of these bullets reach a
distance of 25 meters or 1000 inches from the
muzzle of the rifle, they are all the same height
above the firer’s line of aim. Thus, by placing
an aiming point at a range of 25 meters or
1000 inches, the firer has only to adjust his
shot group the prescribed height above his 25-
meter or 1000-inch aiming point to obtain a
zero for 250 meters.
TRAJECTORY—LINE OF SIGHT RELATIONSHIP
TAGO 6024-A
51
PRINCIPLES OF ZEROING
250 M
Figure 33. Principles of bnttlesigkt zeroing.
29. Battf esight Zero Target
The battlesight zero target is identical to
the 25-meter targets previously used during
fundamentals training (fig. 34). However, in
order to use the elevation and windage rule
effectively, the firer must know the dimensions
of the target. Vertical and horizontal lines are
printed on the target, forming 1.4 centimeter
squares. As indicated in paragraph 26, one
click of elevation or windage will move the
strike of the bullet .7 centimeter at a range
of 25 meters. (Although 25 meters is slightly
less distance than 1000 inches, the difference is
insignificant and the same adjustment data can
be used for 1000-inch firing). Thus, in terms
of the 25-meter target, one click of elevation or
windage will move the strike of the bullet one-
half of one square.
30. Determining the Battlesight Zero
a. The 250-meter battlesight zero is deter-
mined by firing a series of 3-round shot groups
at the 25-meter target described in paragraph
29. The firer aims at the distinctive aiming
point at the bottom of the black rectangle and
adjusts his rear sight until the center of his
shot group is located 4.6 centimeters directly
above the aiming point. This point is desig-
nated by an “X” printed on the target. With
this sight setting, an aiming point at a range of
250 meters will coincide with the bullet’s point
of impact. The average soldier will need to fire
three or four shot groups in order to accurately
determine the battlesight zero of his rifle.
b. Once the zero has been established, there
should be no further adjustments of the rear
sight. In later field firing exercises, the soldier
will learn to hit targets located at ranges other
than 250 meters by adjusting his point of aim
slightly above or below the desired point of
impact.
c. Either of the two most stable firing posi-
tions, the foxhole or prone supported, may be
used for obtaining the battlesight zero. How-
ever, the position selected must be located the
prescribed 25 meters (1000 inches) from the
target.
d. Firing is conducted in the same manner
prescribed for the other 25-meter (1000-inch)
firing exercises.
52
TAGO 6024-A
— — — — — 2S 1.4 CM
4.6 : C M Из :м
“7 КЛ . 1
* 1
Figure 34. 25-meter (1000-inch) target.
TAGO Б024-А
53
31. Calibration of Hie Rear Sight
a. After the soldier has obtained the battle-
sight zero for his rifle, he must calibrate the
rear sight. This procedure is necessary since,
throughout the marksmanship course, the sol-
dier must continually check the rear sight and,
if necessary, reestablish the correct setting if
the adjusting knobs have been moved.
b. Although the rear sights of all service rifles
are essentially the same, some have a locking
nut on the elevation knob while others do not.
Whether a sight has this locking nut governs
the procedure used to calibrate the sight.
(1) Calibration procedure for sights with-
out locking nuts on the elevation knob
is as follows:
(a) Turn the elevation knob forward
until the rear sight aperture is at
its lowest possible setting. The firer
should count the clicks as he does
this and compare the number to that
recorded on his firing data card
as the battlesight zero of his rifle.
This procedure is simply a means of
checking the accuracy of the infor-
mation on the firing data card.
(b) Loosen the screw in the center of
the elevation knob until the knob can
again be turned forward.
(c) Turn the elevation knob forward
until the 250-meter index line (the
long line between the numbers 2
and 4 on the elevation knob) is op-
posite the index line on the receiver.
(d) From this point, turn the elevation
knob forward the number of clicks
of the 250-meter battlesight zero
setting.
(e) Hold the elevation knob in position
and tighten the center screw. Next,
turn the elevation knob to the rear
until it is at its highest possible
setting and again tighten the center
screw.
(/) To check the adjustment, set the
250-meter index line on the eleva-
tion knob opposite the index line
on the receiver. Then turn it for-
ward, counting the clicks. The num-
ber of clicks will be equal to the bat-
tlesight setting if the sight has been
calibrated correctly.
(2) Calibration procedure for sights with
a locking nut on the elevation knob is
as follows:
(a) Turn the elevation knob forward
until the aperture is at its lowest
possible setting.
(b) Set the 250-meter battlesight zero
by turning the elevation knob to the
rear the required number of clicks.
Lock the rear sight at this setting
by tightening the locking nut.
(c) Loosen the screw in the center of
the elevation knob so the knob can
turn without moving the aperture.
Turn the knob until the battlesight
index is opposite the index line on
the receiver.
(d) Tighten the screw in the center of
the elevation knob.
(e) Check the setting as described for
the other type of sight in (1) above.
Section III. PROGRESS CHECK
32. Purpose
Prior to beginning field firing, each soldier
should fire an exercise to determine his pro-
ficiency in correctly applying the fundamentals
of marksmanship. This exercise is called a prog-
ress check. In addition to identifying errors
that may still exist, the results of the progress
check enable instructors to take advantage of
scheduling procedures in subsequent field firing
periods. For some marksmanship courses, the
unit is divided into two groups; one group re-
ceiving field firing while the other group con-
ducts additional training on the 25-meter range.
By placing those firers having the most dif-
ficulty in the group remaining on the 25-meter
range, many of their errors can be corrected
without altering the training sequence of either
the individual or the unit. However, this use
54
TAGO 6024-A
of the progress check is of secondary import-
ance to the primary objectives of measuring the
fundamental shooting skills of each soldier
and identifying specific individual deficiencies.
33. Application
As a separate exercise, the progress check is
optional except for units conducting basic train-
ing. New recruits must receive a formal prog-
ress check as an integral part of their marks-
manship training. Units which do not conduct
a progress check as a separate and distinct ex-
ercise, should incorporate the principles and
techniques into all marksmanship fundamentals
training. That is, the scoring template should
be continually used to check and critique shot
groups during all 25-meter firing.
34. Conduct of Exercise
To conduct a progress check, each soldier
must fire one 3-round shot group from each of
the eight standard firing positions. Assistant
instructors check the results after each shot
group is fired, using a scoring template (fig.
35). This template is made of transparent plas-
tic with two circles imprinted on it. One circle
is three centimeters in diameter and the other
five centimeters. In checking shot groups fired
from the two most stable positions, prone sup-
ported and foxhole, the three rounds must lie
on or within the 3-centimeter circle to be con-
sidered satisfactory. The 5-centimeter circle is
used to check shot groups fired from the other
six positions. Again, the three rounds must lie
on or within the 5-centimeter circle to be con-
sidered satisfactory. Soldiers should be given
an opportunity to refire from those positions
found to be unsatisfactory if there is sufficient
time and ammunition available.
TAGO 6024-A
SS
CLEAR
XACETATEK
Figure 35. Scoring template.
56
TAGO Б024-А
CHAPTER 4
FIELD FIRING
Section I. CONDUCT OF INSTRUCTION
35. Purpose and Scope
Field firing provides the soldier with prac-
tical experience in firing at realistic targets lo-
cated at ranges comparable to those of the
battlefield. Field firing begins with simple ex-
ercises designed to familiarize the soldier with
the range, the targets, and the scoring system.
It is during these initial exercises that the sol-
dier learns to compensate for the sight setting
or zero of his rifle by adjusting his point of aim
on the target. He does this by firing at targets
located at ranges other than 250 meters, the
zero established for his rifle. During the first
field firing exercise, the soldier will have a
reasonable time to check his position, sight
picture, and fire at the target. However, in
subsequent exercises, speed becomes an increas-
ingly important factor since a time limit is im-
posed on the firer. In later exercises, there are
added requirements such as rapid reloading,
reducing a stoppage, and firing at multiple tar-
gets. Initially, the soldier fires from the more
stable positions and gradually progresses to the
less stable positions. Toward the end of his
field firing training, he is required to physically
advance toward the targets, quickly move in-
to position, and fire when the targets appear.
36. Adjusted Aiming Point
a. General. Using an adjusted aiming point
means that the firer is compensating for the
battlesight zero of his rifle by aiming above
or below the actual desired point of impact.
The reason for this procedure is that once the
soldier has established his battlesight zero for
250 meters, he should not change the sight set-
ting throughout the remainder of the marks-
manship course. Thus, he must learn to com-
pensate for his 250-meter sight setting when
he fires at targets located at ranges other than
250 meters.
b. Principle of Using Adjusted Aiming
Points. In zeroing his rifle, the soldier learns
that the trajectory of the bullet is above the
line of aim until it reaches the range for which
the rear sight is set (par. 28). In the case of
the battlesight zero, this range is 250 meters.
At this point, the trajectory of the bullet and
the line of aim intersect. Thus the bullet will
be above the line of aim until it reaches a dis-
tance of 250 meters (fig. 33). Beyond this
range, it will be moving below the line of aim.
Applying this fact to the target then, the soldier
should aim below the desired point of impact
for targets located at ranges of less than 250
meters. By lowering his point of aim, he also
lowers the flight path of the bullet. Conversely,
at ranges beyond 250 meters, he should aim
above the desired point of impact and subse-
quently raise the flight path of the bullet. Ob-
viously, pinpoint accuracy is not possible using
a technique such as this. A minor error in range
determination or selection of an aiming point
will cause the bullet to miss the precise point
a firer might wish to hit. However, on the bat-
tlefield, the job of the rifleman is to eliminate
the combat capability of enemy soldiers as
quickly as possible. A rifle bullet hitting any-
where on an enemy soldier’s body, even the
arms and legs will usually accomplish this.
Whether a combat rifleman intended to hit
an enemy soldier in the chest and actually hit
him in the region of the belt buckle is unim-
portant as long as the enemy has been elimi-
nated from the fight.
c. Pules for Applying Adjusted Aiming Point.
Considering the problems of range determina-
tion and the fact that pinpoint accuracy is not
usually required on the battlefield, it is possible
to use a “rule of thumb” in teaching the prin-
ciples of the adjusted aiming point. This rule
is: “For targets located at ranges up to 200
TAGO Б024-А
57
200 METERS OR LESS
MORE THAN 200 METERS
Figure 36. Aiming points at ranges not exceeding 500 meters.
meters, the rifleman should aim at the bottom
of the center of mass. At ranges between 200
and 500 meters, he should aim at the center
of mass (fig. 36).” To effectively engage tar-
gets beyond 500 meters, the rifleman must ap-
ply advanced individual marksmanship tech-
niques (sniping). These techniques are dis-
cussed in chapter 8. By aiming at the bottom
of center of mass for targets out to a range
of 200 meters and at the center of mass for
targets between 200 and 500 meters, a rifle-
man should usually be firing low on the target.
It follows then that a miss will probably be
short of the target rather than beyond it. Of
the two, a short miss is the more desirable since
the bullet will frequently ricochet into the tar-
get, producing the same effect as a direct hit.
A second advantage of hitting short is that the
firer is usually better able to see the bullet’s
actual point of impact. Knowing- this, he can
quickly readjust his aiming point and fire a
second, more accurate round. The range of 200
meters is used as the dividing line for adjust-
ing the aiming point (rather than 250 meters)
for the following reasons:
(1) Determining ranges in 100-meter in-
crements is much easier than deter-
mining ranges in 50-meter increments.
(2) The point of aim very nearly coin-
cides with the strike of the bullet at
200 meters. The discussion in b above,
illustrates the lack of practical im-
portance in the small deviation that
does exist.
d. Effects of Wind. Winds blowing across the
firer’s front will cause some lateral movement
of the bullet while in flight. However, at ranges
up to 300 meters (the maximum range for the
majority of point targets engaged in combat),
it would require a wind of gale force to cause
a properly aimed bullet to miss a man-size tar-
get. Unless the soldier is engaged in long range
sniping (ch. 8), he should discount the effects
of wind in selecting an aiming point.
e. Demonstration of Adjusted Aiming Point.
The need for using an adjusted aiming point
can be demonstrated with tracer ammunition.
To conduct this demonstration, the class should
be assembled on one side of the range so they
will have an oblique view of both the demon-
strator and the targets. When the demonstrator
fires, the class will be able to see the curved
path made by the bullet in flight. The demon-
stration should only be fired at the longer range
targets as this will give the most pronounced
arc to the trajectory.
f. Adjusted Aiming Point Training. The
soldier receives initial practical training in ap-
plying the principle of the adjusted aiming
point during the first field firing exercise. Tar-
58
TAGO 5024-A
gets are located at ranges either greater or
lesser than 200 meters, requiring the firer to
adjust his aiming point accordingly. In the
initial field firing exercise, soldiers are allowed
ample time to fire, and should conduct “self-
experiments” in selecting aiming points to fit
the range of the targets.
37. Rapid Reloading
During 25-meter (1000-inch) range firing,
the soldier receives initial training and practi-
cal exercises in the techniques of rapid reload-
ing. To continue his training in this skill, the
soldier will fire several exercises during which
he must rapidly reload. To conduct these ex-
ercises, the ammunition is issued in two maga-
zines or clips. The rifle is loaded with one of
the magazines or clips, and the firer carries the
other in his ammunition pouch or belt. As soon
as he has expended all of the ammunition in
the first magazine or clip, he must rapidly re-
load and be ready for the appearance of the
next target. If the soldier is armed with the
M14 rifle, it is possible that he will run out of
ammunition and not realize it until he attempts
to fire. In such cases he should still attempt to
reload and engage the target within the pre-
scribed time limit. In any event, there is no
time added to the exercise for the purpose of
reloading.
38. Reduction of Stoppages
During the later field firing exercises, one
dtimmy round should be placed among the live
rounds in the firer’s magazine or clip. When
this round fails to fire, the soldier must rapid-
ly pull the bolt handle to the rear, eject the
dummy round, release the bolt so a new round
is loaded, resume his position, and fire at the
target. This procedure is known as “immediate
action.” Unless the soldier learns to perform
this action rapidly and instinctively, the target
will be gone before he can fire. In combat, a
slight hesitation in performing immediate ac-
tion might well give an enemy soldier just time
enough to fire a killing round. Since speed is
so important, the firer must not be given ad-
ditional time during the exercise to perform
the immediate action required.
39. Positions and Engaging Single Targets
a. Field firing continues the soldier’s train-
ing in firing from both supported and unsup-
ported positions. However, greater emphasis is
placed on the combat application of these fir-
ing positions. Since the combat rifleman may
be moving or in a stationary position when
he encounters the enemy, he must be proficient
in rapidly assuming a firing position and en-
gaging targets in either situation. Field firing
exercises provide practical training in both
techniques. In some exercises, the firer engages
targets from stationary positions, while in
others he is required to walk forward and,
when targets appear, rapidly assume a position
and fire. Speed is emphasized by limiting tar-
get exposure times. As he progresses through
field firing, each soldier should eventually be
able to effectively engage targets at ranges out
to 200 meters within 5 seconds and targets be-
yond 200 meters within 10 seconds.
b. The purpose of imposing different time
limits for targets at different ranges is to em-
phasize the fleeting nature of combat targets,
and that a definite correlation exists between
the range to the target and the time require to
hit it. Through practical experience, firers will
find that a slight error in sight picture will
still produce a hit at a range of 75 meters,
but the same error will cause a miss at a range
of 300 meters. Hence, as a general rule, it re-
quires more time to fire an effective round at
longer ranges since the firer must take extra
care in his application of fundamentals. From
the combat rifleman’s viewpoint, this relation-
ship between range and time must also take in-
to consideration the degree of personal danger
posed by enemy targets. Normally, the closest
enemy targets are the most dangerous, and the
speed with which they are engaged becomes
increasingly important as the range decreases.
Considering all of these factors then, the com-
bat rifleman must possess both speed and ac-
curacy in firing on enemy targets. At shorter
ranges (200 meters and less) speed must be
emphasized and at longer ranges (over 200
meters) accuracy must be emphasized. For sol-
diers moving in the open, these factors have
an added application in determining the best
firing position from which to engage surprise
enemy targets. In such situations, the standing
position is obviously the quickest and easiest
firing position to assume. However, it is also
the least stable. Experience has shown that in
TAGO 6024-A
59
the standing position, the chances of hitting tar-
gets beyond 100 meters within five or ten sec-
onds are extremely remote. The prone position,
on the other hand, is the most stable of all the
unsupported positions; however, it too has
limited application on the battlefield. The rea-
son is that once in the prone position, the
firer will usually discover the terrain and/or
vegetation has masked the target. Thus, firers
moving in the open who detect targets beyond
a range of 100 meters should normally assume
either the sitting, squatting, or kneeling posi-
tion to engage them. Through practice, the
firer can determine which of the positions pro-
vide the best combination of speed, accuracy,
and observation for various target situations
and his own capabilities.
40. Engaging Multiple Targets
If a combat rifleman observes three enemy
soldiers, fires, and hits one of them, he can
expect the other two to quickly seek cover.
Consequently, the rifleman must be able to rap-
idly shift his point of aim and fire at a second
and even a third enemy soldier before they
have an opportunity to reach a protected posi-
tion. The last exercises conducted during field
firing training are designed to present just
such multiple target situations to the firer. As
in the single target exposure exercises, the firer
must engage the targets within prescribed time
limits and from various firing positions.
41. Application of Marksmanship Funda-
mentals and Corrective Instruction
a. Although field firing exercises are primari-
ly designed to teach skills which cannot be
logically conducted on 25-meter (1000-inch)
ranges, the fundamentals learned during this
earlier training phase must continue to be em-
phasized. Instructors should particularly check
firers for indications of improper trigger con-
trol. Many soldiers firing under time pressure
will develop a tendency to jerk the trigger. This
error must be stopped before it becomes a
habit.
b. A second fundamental frequently slighted
on the field firing range is that of position.
Continued emphasis must be placed on the im-
portance of correct body position. Since time
is a factor in field firing exercises, it is a good
technique to emphasize that it requires no long-
er to assume a correct position than it does an
incorrect one, and that firing results are con-
siderably better from a correct position.
c. Although coaches are not designated for
field firing exercises, assistant instructors
should perform this function for firers having
unusual difficulty. Trigger control and ball and
dummy exercises can be conducted on an in-
dividual basis. However, firers committing
major errors in fundamentals should be re-
moved from the firing line and returned to the
25-meter range for corrective instruction.
Section II. RANGE OPERATION
42. Range Facilities
Whenever possible, field firing exercises
should be conducted on standard field firing
ranges constructed for this specific purpose. If
such ranges are not available, field firing can
be conducted on a known distance range. How-
ever, both the known distance range and course
of fire must be modified to accomplish this.
Even with these modifications, the firing con-
ducted on the known distance range is, at best,
expedient training and cannot be considered
comparable to the benefits gained from train-
ing on standard field firing ranges. Therefore,
if there is a need for establishing a priority of
range use, the standard field firing range should
be given preference over the modified known
distance range.
43. Operation of Standard Field Firing
Ranges
The standard field firing range is constructed
on open, flat terrain having a minimum depth
of 300 meters (fig. 37). The vegetation is re-
moved so targets will be clearly visible to the
firer. The standard range consists of 35 lanes
and will accommodate a maximum of 115 sol-
diers in three 35-man firing orders. Foxholes
and stumps are placed along the firing line in
order to continue training in firing from both
supported and unsupported positions. Control
points are also required to regulate the forward
progress of firers during movement-type ex-
ercises. The stumps and foxholes are used as
two of these control points. Numbered stakes
are placed forward of the foxholes and other
60
TAGO 5024-A
-0-CONTROL POINTS:
--FOXHOLES
--STUMPS
REAR
— numbered
STAKES
--STARTING POINTS
Figure 37. Standard field firing range.
FORWARD
NUMBERED
STAKES
TAGO 6024-A
61
stakes are placed in rear of the stumps to pro-
vide additional control points. The starting
points are located behind the rear numbered
stakes and can be designated by stakes, a line
placed on the ground, or reference points such
as the line of ready chairs.
a. Targets, Target Devices, and Scoring.
(1) There are three rows or banks of tar-
gets on the standard field firing range.
One bank is located at a range of 75
meters, the second at 175 meters, and
the third at 300 meters. The targets
are silhouettes shaped in the general
outline of a man. At the 75-meter
range, the “F” type silhouette target
is used. This depicts the head and
shoulders of an average size man.
The “E” type, or full body silhouette,
is used at ranges of 175 and 300
meters.
(2) Each target is fastened to an auto-
matic target device (fig. 38). These
are electrically operated devices that
can be centrally or individually con-
trolled. The most satisfactory control
method is to connect all of the tar-
gets in one bank into one switch. This
switch will then raise or lower the
entire target bank at one time. Ex-
cept for the initial field firing exer-
cise, targets are exposed for a pre-
scribed period of time and then drop-
ped. Since it requires one or two
seconds for the mechanism to phys-
ically raise the targets, timing should
begin when the targets are fully ex-
posed rather than the moment the
switch activates the mechanism. Time
limits and sequence of target expo-
sures are prescribed by the scorecard
for the exercise being conducted.
(3) When a target is hit by a bullet, the
vibration activates a mechanism in the
device which causes the target to drop
or “kill.” Each kill is scored as a hit
for the firer. If the target does not
drop, he receives a miss. During
timed exercises, an audible signal such
as a buzzer, whistle, or bell should be
used to designate the expiration of the
time limit. Rounds fired after the sig-
nal has sounded are scored as misses.
Figure 38. Automatic target device (M31A1).
62
TAGO 5024-A
b. Range. Organization. The organization of
firers and range personnel to conduct field fir-
ing is as follows:
(1) Firers. Normally, the training sched-
ule requires half of a 200-man unit
to receive training on the field firing
range while the remainder of the unit
either fires on the 25-meter range, re-
ceives instruction in target detection,
or participates in other training deem-
ed appropriate by the commander.
Those on the field firing range are
divided into three orders. Initially, the
first order is designated as firers, the
second as scorers, and the third as
the ammunition detail. These duties
are rotated at the end of each exer-
cise.
(2) Range personnel. For best training
results, the following personnel are
required to conduct field firing.
(a) Range control officer. Responsible
for all the training and range opera-
tion. Responsible for conducting
safety orientation prior to each
scheduled period of instruction.
(b) Range safety officer. Responsible
for the safe operation of the range.
He insures that all personnel comply
with safety regulations and proce-
dures. This officer should not be as-
signed any duty except that of
safety.
(c) Target control operator. Responsi-
ble for the raising, lowering and
timing of the automatic target de-
vices. If possible, two men should
be designated to perform this duty
so one can maintain the target ex-
posure times while the other con-
trols the targets.
(d) Ammunition detail. Responsible for
the distribution of ammunition to
central points behind the firing line.
This detail should not be confused
with the ammunition men desig-
nated from among the firing orders.
(e) Ordnance detail. Should be com-
posed of two segments, one to con-
duct small arms repair and the other
to perform minor maintenance on
the automatic target devices.
(f) One assistant instructor per seven
to ten points. Primarily responsible
to insure that all firing personnel
observe safety procedures and regu-
lations. They should also assist those
firers having unusual difficulty in
hitting the targets.
(g) Medical personnel. Provide medical
support as required by regulations
governing live fire exercises.
c. Range Procedures.
(1) Orientation. Prior to beginning live
fire exercises, all personnel must re-
ceive an orientation on range safety.
In addition, the orientation should out-
line the procedures for conducting the
exercise to include the responsibilities
of the two nonfiring orders. In gen-
eral, these responsibilities are:
(a) Scorers. Responsible for maintain-
ing the score of the firer. He may
assist the firer by indicating the
impact of the bullet in relation to
the target—e.g., “short—right” or
“over—left.”
(b) Ammunition men. Issue ammuni-
tion to firers and, if necessary, fill
empty magazines for subsequent ex-
ercises.
(2) Master score chart. A master score
chart (fig. 39) indicating individual
scores for each exercise is an effective
method of maintaining a competitive
spirit within a unit. It also provides a
means of determining those individu-
als in need of closer supervision
and/or corrective instruction.
(3) Conduct of firing. During field firing,
soldiers will fire from both stationary
positions and positions which they as-
sume rapidly while moving forward.
In either of these two types of exer-
cises, targets may be exposed singly
or in multiples of two or three. The
positions of the firer and the sequence,
type, and time of target exposures
are prescribed on the scoreboard for
each exercise (app. III). Unless pre-
scribed otherwise, only one round
should be fired at each exposed target
regardless of whether or not it is hit.
(a) Stationary position exercises. On
TAGO 6024-A
63
NAME PERIOD 9 SCORE PERIOD 10 SCORE PERIOD 11 SCORE PERIOD 12 SCORE PERIOD 13 SCORE PERIOD 14 SCORE PERIOD 15 SCORE PERIOD 16 SCORE
-
Figure .39. Master xcore chart.
command, firers assume the desig-
nated firing position and lock and
load their rifles. The exercise begins
on the command, WATCH YOUR
LANES. At this time, firers unlock
safeties and engage targets as they
appear in their lane. Firers remain
in the same position unless told
otherwise.
(b) Movement-type exercises. In order
to conduct movement-type exercises,
firers must be thoroughly familiar
with the five control points used to
regulate the forward progress.
These are the starting point, rear
numbered stake, stump, foxhole, and
the front numbered stake (fig. 37).
To begin the exercises, firers move
to the starting point and on com-
mand, lock and load their rifles.
Subsequent fire commands may or
may not prescribe the firing posi-
tion ; however, the control point
from which firing will be conducted
must always be included in the com-
mand — e.g., THE KNEELING
POSITION BY THE REAR NUM-
BERED STAKE, MOVE OUT or
BY THE FOXHOLE, MOVE OUT.
On the command MOVE OUT, the
firer, carrying his rifle in the high-
port ready position, begins walking
slowly forward.
Caution: Firers must maintain
alignment as they advance. Assist-
ant instructors must closely super-
vise this movement to insure indi-
64
TAGO 6024-A
vidual firers do not get ahead of or
behind the other firers.
As the line of firers nears the
designated control point, targets are
exposed and firers rapidly assume
the designated position and engage
them. Firers should remain in this
position and continue to observe
their lanes for other targets to ap-
pear. If the firing position is not
designated, firers may select their
own position (par. 39).
(c) Single and multiple target exercises.
For the first several exercises, tar-
gets are exposed singly in each lane
and all 35 firers engage the targets
in their respective lanes. Later in
the training, multiple target exer-
cises are conducted. These exercises
require firers to make a major shift
in aiming points, both horizontally
and in range. Consequently, the
firers’ zone of responsibility must be
increased. To accomplish this, the
range operation is modified so only
half of the 35 firers are conducting
an exercise at any one time. How-
ever, this half is responsible for the
targets appearing on two lanes. To
avoid confusion, not all of the tar-
gets are used for multiple target
exercises. The odd-numbered 75-
meter targets and the even-num-
bered 175-meter targets are either
removed or disconnected. No
changes are made to the 300-meter
targets. Each firer can have any
combination of a 75-meter target, a
175-meter target, and two 300-
meter targets presented to him (fig.
40). A training technique to use in
conjunction with multiple target ex-
ercises is to require the firers on
odd-numbered lanes to dry fire while
firers on even-numbered lanes are
conducting the exercise. Upon com-
pleting an exercise, the firers on
the odd-numbered lanes fire the ex-
ercise while those on the even-num-
bered lanes dry fire.
(d) Fire commands. Simple, standard-
ized fire commands are essential to
avoid confusion during field firing
exercises. Example fire commands
are as follows:
1. Fire commands for exercises fired
from stationary positions.
(a) FIRERS, ASSUME THE______
_____________POSITION.
(b) LOCK,__________ROUNDS
LOAD.
(c) READY ON THE RIGHT?
(d) READY ON THE LEFT?
(e) WATCH YOUR LANES.
(f) CEASE FIRE, LOCK YOUR
WEAPON.
(g) Repeat (a) through (e) above
or give (h) through (k) below.
(h) CEASE FIRING, CLEAR
ALL WEAPONS.
(i) CLEAR ON THE RIGHT?
(j) CLEAR ON THE LEFT?
(k) THE FIRING LINE IS
CLEAR.
(1) Give instructions for next ex-
ercise.
2. Fire commands for movement-type
exercises. Before the initial ex-
ercise of this type, explain the use
of control points and the need for
maintaining alignment while ad-
vancing.
(a) FIRERS, MOVE TO THE
STARTING POINT
(b) LOCK,__________ROUNDS
LOAD.
(c) READY ON THE RIGHT?
(d) READY ON THE LEFT?
(e) THE FIRING LINE IS
READY.
(f) BY THE (control point), THE
(position), MOVE OUT. Or
BY THE (control point),
MOVE OUT.
Note. This command is repeated for
each control point as prescribed on the
scorecard.
TAGO 5024-A
65
FORWARD
-ч-NUMBERED
STAKES
-Ч-FOXHOLES
--STUMPS
REAR
-m--NUMBERED
STAKES
*---STARTING POINTS
CONTROL
POINTS:
Figure bO. Field firing range organized for multiple target firing.
TAGO 6024-A
66
(g) LOCK YOUR WEAPON,
FACE ABOUT, KEEPING
THE MUZZLE DOWN
RANGE, RETURN TO
STARTING POINT.
(h) Repeat (c) through (g) above
or (i) through (1) below.
(i) CLEAR ALL WEAPONS,
(j) CLEAR ON THE RIGHT?
(k) CLEAR ON THE LEFT?
(1) THE FIRING LINE IS
CLEAR.
(m) Give instructions for next ex-
ercise.
44. Operation of Modified Known
Distance Ranges
On known distance ranges, one row or bank
of targets is used. Fifty firing points are re-
quired to accommodate a 200-man unit. In or-
der to provide practical experience in firing
from different ranges, successive exercises are
conducted from the 100-yard (92-meter), 200-
yard (184-meter), and 300-yard (276-meter)
firing lines (fig. 41).
a. Targets. When firing at a range of 100
yards, the “F” or half-silhouette target is used.
The “E” or full-silhouette is used for the other
two ranges.
(1) Target installation. Silhouette targets
can be attached to either automatic
target devices (M31, M31A1) or the
standard target holding frames of the
known distance range (see app. V for
methods of installing devices or modi-
fying target frames). Of the two
methods, automatic target devices are
the more desirable because they elim-
inate the need for large pit details.
Regardless of the method used, the
manner of installing silhouette tar-
gets must not interfere with the use
of known distance ranges for com-
petitive firing.
(2) Target operation and scoring. The
operation and scoring of targets de-
pends upon whether automatic target
devices or manually operated targets
are used.
(a) If automatic target devices are
used, the operation and scoring of
targets is the same as prescribed
for standard field firing ranges
(par. 43л.). On known distance
ranges, there is the added require-
ment of replacing “F”-type silhou-
ette targets with the “E”-type tar-
gets when the firing line moves from
the 100- to the 200-yard line.
(6) If manually operated targets are
used, a pit detail is required to raise
and lower the targets. Targets are
raised at the time designated by the
officer in charge of the range. A buz-
zer in the pits (controlled from the
firing line) can be used as a means
of control. Upon receiving a signal,
target operators raise their tar-
gets. When a target is hit, it is
lowered by the operator and a chalk
mark is made over the bullet hole
in the back of the target. At the
end of the time limit, a command
or signal is given from the firing
line and those targets which have
not been hit are lowered. Scoring
is based on one point for each tar-
get hit. At the end of an exercise,
the target operator signals the
number of misses using a red flag.
(3) Target exposure time limits. During
all field firing exercises conducted on
the known distance range, targets are
exposed according to time limits pre-
scribed on the scorecards (app. III).
Initially, firers are allowed sufficient
time to become accustomed to the
new target situations and range pro-
cedures. As the training progresses,
these time limits are gradually re-
duced in order to emphasize the neces-
sity for both accuracy and speed in
engaging combat targets.
b. Range Organization. The organization of
firers and range personnel to conduct field fir-
ing on known distance ranges is as follows:
(1) Firers. Based on a strength of 200
soldiers, a unit scheduled to fire on a
known distance should be divided into
four platoons of equal size. The two
platoons which initially fire the exer-
cise are divided into two orders. One
order fires while the other scores. The
TAGO Б024-А
67
92 METERS
1OO YARD FIRING LINE
READY LINE
! 84 METERS
200 YARD FIRING LINE
276 METERS
300 YARD FIRING LINE
CONTROL TOWER
Figure 41. Known distance range organized for field firing.
68
TAGO 6024-A
scorers are also used to issue ammuni-
tion. If automatic target devices are
used on the range, the two nonfiring
platoons receive instruction in target
detection or such other training as
prescribed by the commander. If man-
ually operated targets are used, one
platoon must be used as a pit detail to
operate the targets, leaving one pla-
toon to conduct target detection or
other type training. When a pit detail
is required, the schedule should pro-
vide for a changeover between the pit
detail and the platoon conducting
training so each spends equal time
performing both activities. Ideally, all
four platoons should spend equal time
firing, acting as pit detail, and receiv-
ing target detection or other training.
(2) Range personnel. The range personnel
required to conduct field firing on
known distance ranges are the same as
prescribed for standard field firing
ranges with the following additions:
(a) If automatic target devices are
used, a detail is required to replace
the “F”-type silhouette targets with
the “E”-type targets when the firing
is moved from 100 to 200 yards.
This detail should be composed of
one noncommissioned officer in
charge and one soldier for every
three to five targets to be changed.
(h) If manually operated targets are
used, a pit detail is required as
follows:
1. Pit officer. Responsible to the
range officer for the operation of
the pits.
2. Pit noncommissioned officers.
(One per eight to ten targets.)
Supervise target operators.
3. Target operators. (One per
target.) Raises, lowers and scores
targets.
c. Range Procedures.
(1) Orientation. Prior to beginning live
fire exercises, all personnel must re-
ceive an orientation on range safety.
In addition, the orientation should out-
line the procedures for conducting the
exercise.
(2) Master score chart. As prescribed in
paragraph 43c(2).
(3) Conduct of firing. Firing tables and
scorecards for known distance field
firing are contained in appendix III.
The conduct of field firing on modified
known distance ranges follows the
same general procedures as prescribed
for standard field firing ranges. How-
ever, because known distance ranges
have only one target bank and lack
foxholes and stumps for supported
position firing, the procedures outlined
in paragraph 43c (3) must be modified
as follows:
(a) Stationary position exercises. No
change in procedures; however, fir-
ing is not conducted from either fox-
hole or kneeling supported positions.
(b) Movement-type exercises. No
change in procedures except in the
use of control points. The distance
which firers can move on modified
known distance ranges depends on
the width of the firing lines. If the
firing lines are constructed at ap-
proximately ground level, it may be
possible to use four stakes placed
2 meters apart as control points
(fig. 41). The rearmost stake is
designated “SP” (starting point),
the next two stakes as “A” and “B”
respectively (letters rather than
numbers are recommended to avoid
confusion with firing point num-
bers) , and the forward stake as the
“limit of advance” (on most ranges,
the stake indicating the firing point
number can be used to designate the
limit of advance). If the firing line
is elevated and relatively narrow,
firers may be able to move only a
few steps during the entire exercise.
In this instance, the only control
features required are a starting
point and a stake indicating the
limit of advance. With only two
control features, target control
operators must gauge when to ex-
pose the targets by the number of
steps taken by the firers rather than
their nearness to a control point.
TAGO 6024-A
69
(c) Single and multiple target exercises.
No change in procedures except that
required by the single bank of tar-
gets. During single target exercises,
firers engage the same target from
each firing line. The organization of
the firing line for multiple target
exercises is the same as prescribed
for standard field firing. That is,
firers on the even numbered points
engage targets appearing on two
lanes while firers in the odd num-
bered points dry fire the same exer-
cise. Upon completion of the exer-
cise, firers on the odd numbered
points conduct the exercise while
those on the even numbered points
dry fire. Thus each firer can engage
two adjacent targets, requiring him
to make a lateral shift of his aiming
point.
(d) Fire commands. Fire commands for
exercises fired from stationary posi-
tions are the same as those outlined
for standard field firing (par. 43c
(3) (d)). The same fire commands
for movement-type exercises on the
standard field firing range can also
be used on the modified known dis-
tance range provided the firing line
can accommodate four control
points. If only two control points
can be used (starting point and
limit of advance), that portion of
the fire command designating the
control point is eliminated.
d. Range Safety. See appendix II.
70
TAGO Б024-А
CHAPTER 5
TARGET DETECTION
Section I. GENERAL
45. Purpose
Even the most skilled marksman is useless if
he cannot find the target. For the combat rifle-
man, finding the target can be even more of a
problem than hitting it. Except during the
assault it is a rare soldier who fails to use some
cover and/or concealment when he is in the
vicinity of enemy units. Consequently, consider-
able emphasis must be placed on teaching
soldiers the techniques of detecting targets as
they will appear on the battlefield. As used in
this manual, the term “target detection” means
the process of locating, marking, and determin-
ing the range to combat targets. These targets
may be either single or multiple, stationary or
moving. They can also be completely visible,
partially visible, or completely hidden. The
purpose of this chapter is to outline procedures
for teaching soldiers how to detect enemy per-
sonnel on the battlefield under varying degrees
of mobility and concealment.
46. Training Concepts
Target detection training is based on concepts
governing the usual behavior and employment
of infantry units and the individuals within
those units on the battlefield. These concepts
are—
a. Enemy personnel are seldom seen except
in the assault.
b. The range at which individual enemy
soldiers can be detected rarely exceeds 300
meters.
c. There are many indications that can re-
veal the location of the enemy. Among the more
common are movement, sounds of movement,
sound and/or muzzle flash of a firing weapon,
and reflection of light from shiny objects. How-
ever, any of these indications will usually be
visible for only a brief moment.
d. A combat target does not have to be
visible in order to be hit by rifle fire. An enemy
soldier who has been observed moving into a
concealed position can be effectively engaged by
using a nearby terrain feature as a reference
point.
Section II. RANGE ORGANIZATION AND MANAGEMENT
47. Location
Since target detection training is usually con-
ducted concurrently with firing exercises, the
target detection ranges should be located with in
ten minutes movement time of the combat firing
ranges. It is also essential that target detection
ranges be located in areas having good natural
vegetation (fig. 42). The observation lines of
target detection ranges must be placed on
terrain which will approximate good defensive
locations for units occupying that particular
area.
48. Construction
«. The observation line should be among the
first areas of the target detection range to be
constructed. The reason for this is that the
location of all down range panels, sound sys-
tems, and any necessary trimming of foliage
depends on the degree of visibility from the
observation line. The observation line should
be wide enough to accommodate 50 points.
These points are sufficient for 50 two-man
teams or half of a 200-man unit.
b. The fan of observation should cover the
area between 30 degrees left of the left flank
point of the observation line to 30 degrees right
of the right flank point. Ideally, to provide
maximum flexibility in conducting exercises in
range determination, the target detection range
should have a depth in excess of 500 meters. In-
stallations having limited training space can
conduct satisfactory training on ranges having
a depth of at least 300 meters.
TAGO 6024-A
71
c. Both lettered and numbered panels are
placed throughout the observation area. The
lettered panels serve two purposes: first, they
divide the range into sectors defining a rifle-
man's area of responsibility; and second, they
serve as reference points for marking targets.
The numbered panels are used during exercises
to locate sound targets only. Consequently,
these panels should be constructed so they can
be easily raised or lowered as required.
d. The number of panels needed depends
upon the size of the range. For a range having
a 50-point observation line and a depth of 300
meters, approximately seven lettered panels
and 14 numbered panels will be required.
e. In addition to the panels, numbered stakes
are also placed down range. These stakes should
not be visible from the observation line since
they are for the sole use of instructors and
target men in presenting various target situa-
tions. As in the case of the panels, the number
of stakes required will depend upon the depth
of the range. As a guide, a range having a
depth of 300 meters should have approximately
150 stakes. In placing numbered stakes, a
method should be used to provide easy reference
to stake locations. One such method is to divide
the range into three sectors, “A,” “B,” and “C.”
Stakes are then numbered numerically begin-
ning at the maximum depth of the range and
proceeding forward to the observation line. All
stakes in one sector would have the sector letter
following the number. For example, if the right
sector is designated “A,” all numbers on stakes
in that sector will be followed by the letter “A.”
Stakes in the center and left sectors will have
Figure 42. Target detection range.
72
TAGO 6024-A
the letters “В” and “C,” respectively, after the
number.
f. The location of all panels and stakes must
be recorded on the master trial sheets.
g. For proper control of target men, it is
necessary to use sound equipment throughout
the observation area. Since problems of ade-
quate sound vary according to location, it
is best that a sound survey be conducted of each
target detection range before the equipment is
installed.
h. The exact positioning of panels, stakes,
and sound equipment should be checked from
the observation line. It is desirable that sound
equipment be concealed from the observation
line; however, this is not an absolute necessity.
49. Use of Field Expedient Areas for
Target Detection Training
If standard target detection ranges are not
available, the principles can be applied to parks,
open field, or other sparsely vegetated areas.
The following considerations provide a check-
list when adapting such areas for target detec-
tion training:
a. There should be more depth to the range
than for a standard target detection range. In
addition, the fan of observation should be in-
creased depending on the degree of camouflage
in the area.
b. Target men should be spaced wider apart
in areas having little natural vegetation. In
this regard, it may even be necessary to bring
in piles of brush, logs, and man-made objects
to add to the number of concealed positions.
50. Range Personnel and Equipment
a. The following personnel are required to
conduct and supervise target detection training:
(1) Officer in change and/or principal in-
structor.
(2) Four assistant instructors (based on
50-point observation line).
(3) Target men as required by the exer-
w
cise.
(4) Medical personnel.
b. The following equipment is required to
conduct target detection training:
(1) One master trial sheet per instructor
and assistant instructor (fig. 49).
(2) One target trial sheet per target man
(fig. 50).
(3) One answer sheet per observer.
(4) One aiming device per observation
point as required by the exercise (fig.
51).
(5) One camouflage suit per target man.
(6) Camouflage paint tubes as required
(at least one tube with each of the
four basic colors).
(7) For exercises in which observers
simulate firing on target men, there
should be one rifle (which has had the
firing pin removed) per observation
point.
(8) Target men should have their normal
combat field equipment, including steel
helmet and rifle.
Section III. CONDUCT OF TRAINING
51. Training Conditions
a. As in the case of firing exercises, personnel
receiving target detection training should wear
combat field equipment, including packs and
steel helmets. A portion of the target detection
training is devoted to teaching methods of
camouflaging this equipment.
b. Demonstrators for target detection train-
ing should Wear combat field equipment, includ-
ing packs and steel helmets. This will increase
their value as target men simulating the move-
ments and appearance of enemy soldiers.
52. Fundamentals of Target Detection
Initially, target detection is taught in three
distinct phases: first, how to locate a target;
second, how to mark the location of the target;
and third, how to determine the range to the
target. Later, these phases are combined into
practical exercises which test the overall target
detection ability of the soldier.
a. Locating Targets. The ability to locate a
combat target depends upon the observer’s posi-
tion, his skill in search and/or maintaining
observation over the area, and the type of indi-
cations made by the target.
tAG0 6024-A
73
(1) Selection of a position.
(a) Depending upon the situation, the
individual rifleman may or may not
select his own position. In most de-
fensive situations, the rifleman is
told where to prepare his position.
However, there are situations, such
as the attack and reorganization of
the objective, which require the in-
dividual to select his own position.
Although target detection training
courses prescribe conferences and
demonstrations on selection of posi-
tions, the instruction does not
normally include practical applica-
tion of this skill. Consequently, in-
structors must continually refer to
and emphasize the importance of
the observer’s position when con-
ducting practical exercises in other
target detection techniques.
(b) A good position is one that offers
maximum visibility of the area
while affording cover and/or con-
cealment. As used in this case,
“position” is both the observer’s
location on the ground and the posi-
tion of his body at that location.
(2) Searching and maintaining observa-
tion of an area.
(a) When a soldier moves into a new
area, he must quickly check for
enemy activity which may be of im-
mediate danger to him. This is a
very rapid search, lasting approxi-
mately 30 seconds. The search
should be conducted by making
quick glances at various specific
points throughout the area rather
than just sweeping the eyes across
the terrain in one continuous pano-
ramic view. The reason for this is
that the eyes are sensitive to any
slight movements occurring within
a wide arc of the object on which
they are focused. This is commonly
called “seeing something out of the
corner of the eye.” However, THE
EYES MUST BE FOCUSED ON
A SPECIFIC POINT IN ORDER
TO HAVE THIS SENSITIVITY.
A soldier looking at nothing in
particular in his area will generally
see nothing in particular. The
history of warfare records many ex-
amples of positions being surprised
and overwhelmed, even during day-
light in open terrain, simply because
observers were inattentive and
failed to use proper searching
techniques.
(b) If the soldier fails to locate the
enemy during the initial search, he
must then begin a systematic ex-
amination of the same area (fig.
43). Normally, the area nearest the
soldier offers the greatest potential
danger to him. Therefore, the
search should begin with the terrain
nearest the observer’s position.
Beginning at either flank, the
soldier should systematically search
the terrain to his front in a 180
degree arc, 50 meters in depth.
After reaching the opposite flank,
the soldier should search the next
area nearest his position. This
search should cover the terrain
located between approximately 40
and 90 meters of his position. The
second search of the terrain includes
about 10 meters of the area exam-
ined during the first search. This
technique insures complete coverage
of the area. The soldier continues
searching from one flank to the
other in 50-meter overlapping strips
as far out as he can see.
(c) To again take advantage of his side
vision, the soldier should focus his
eyes on specific points as he searches
from one flank to the other. He
should make mental notes of prom-
inent terrain features and areas
that may offer cover and/or con-
cealment to the enemy. In this way,
he becomes familiar with the
terrain as he searches it.
(d) After completing his detailed
search, the soldier may be required
to maintain observation of the area.
To do this, he should use a method
similar to his initial quick search of
the area. That is, he uses quick
74
TAGO Б024-А
Figure 4.?. Searching the terrain in overlapping strips.
glances at various points through-
out the entire area, focusing his
eyes on specific features. As he con-
ducts this search, he should devise a
set sequence of searching the area
to insure complete coverage of all
terrain. Since it is entirely possible
that this quick search may fail to
detect the initial movement of an
enemy, the observer should period-
ically repeat a systematic search of
the area as described in (b) above.
This systematic search should also
be conducted anytime the attention
of the observer has been distracted
from his area of responsibility.
(3) Target indications. As a general defi-
nition, a target indication is anything
a soldier does or fails to do that will
reveal his position to an enemy. Since
TAGO 6024-A
75
these indications apply equally to both
aides on the battlefield, a soldier must
learn target indications from the
standpoint of locating the enemy but,
at the same time, preventing the
enemy from using the same indica-
tions to locate him. These indications
can be grouped into three general
areas for instruction purposes. These
are sound, movement, and improper
camouflage.
(a) Sound. Targets indicated by sounds
such as footsteps, coughing, or
equipment noises provide only a
direction and general location. Con-
sequently, it is difficult to pinpoint a
target’s location by sound alone.
However, the fact that a sound has
alerted an observer greatly in-
creases the possibility that he will
eventually locate the target through
subsequent target indications (FM
21-75).
(b) Movement. The degree of difficulty
in locating moving targets depends
primarily on the speed of movement.
Slow, deliberate movements are
much more difficult to notice than
those which are quick and jerky.
The techniques outlined in (2) (a)
above are the best procedures for
locating moving targets (FM 21-
75).
(c) Camouflage. The lack or improper
use of camouflage and/or conceal-
ment are indications which reveal
the majority of targets detected on
the battlefield. Such things as light
reflecting from shiny surfaces, pre-
senting a dearly defined outline, or
a contrast with the background are
indicators easily noticed by an alert
observer. For instructional pur-
poses, camouflage indicators are
divided into three general groups:
shine, regularity of outline, and con-
trast with background.
1. Shine. Items such as belt buckles,
eyeglasses, or shiny metal sur-
faces will reflect light and act as
a beacon to the soldier’s position.
This is as true at night as it is
during the day. Consequently,
objects which reflect light should
either be discarded or dulled with
mud or camouflage.
£. Regularity of outline. The human
body and most types of military
equipment are familiar outlines
to all soldiers. The outlines of
such things as rifles, steel
helmets, and vehicles are all easily
identified. The reliability of this
indicator depends upon the visi-
bility and the experience of the
observers. On a clear day, most
soldiers can easily identify enemy
riflemen or equipment if a dis-
tinctive outline is presented. At
night or during other periods of
poor visibility, it is not only more
difficult to see outlines but inex-
perienced troops will frequently
mistake stumps and rocks for
enemy soldiers. This is an added
reason for soldiers to become com-
pletely familiar with the terrain
during periods of good visibility.
3. Contrast with the background.
(a) Suppose a soldier wearing a dark
uniform moved into a position in
front of a snowbank. The contrast
between the white snow and the
dark uniform would make him
clearly visible. However, if he is
wearing a white (or light-colored)
uniform, he will be more difficult to
see. Contrast with the background
is among the most difficult of the
target indicators for a soldier to
avoid. The reason for this is that
during operations in which the
soldier is moving, he is usually ex-
posed to any number of different
types and colors of backgrounds.
Since there is no one kind of per-
sonal camouflage which blends in all
areas, a moving soldier must be con-
tinually aware of the surrounding
terrain and vegetation.
(b) Contrasts in background are also a
common deficiency of defensive
positions. A parapet of freshly dug
earth around a foxhole is as notice-
74
TAGO 6024-A
able as a flag waving over it. Even
if the positions are camouflaged, it
is still possible to locate them from
the very materials used to provide
concealment. For example, a hill
having no vegetation except a row
of evenly spaced bushes along the
military crest leaves little doubt in
an observer’s mind as* to the
presence of defensive positions.
Even camouflage which blends with
the area can indirectly disclose a
position. Since camouflage materials
are usually cut from vegetation
within the immediate vicinity, an
observer seeing an area which has
been stripped of natural growth can
logically deduce the presence of
nearby camouflaged emplacements.
Another problem of using vegeta-
tion for camouflage is that it will
eventually wilt and turn brown.
This produces a contrast similar to
those positions having no camou-
flage at all.
b. Marking Targets.
(1) Once a target has been located, the
soldier may have to mark its location
in relation to some visible terrain
feature. There could be several
reasons for this. The enemy may have
only briefly disclosed his position be-
fore again becoming hidden from
view. In some situations, the rifleman
may be under orders not to fire and
disclose his position. Probably the
most common reason is that if the
soldier observes several targets at the
same moment, he can obviously fire
on only one of them at a time. Con-
sequently, he must mark the location
of the others until he is ready to en-
gage them.
(2) To mark the location of a target, the
soldier uses an aiming point or a
reference point. An aiming point is
a terrain feature directly on line be-
tween the soldier and the target. For
example, suppose a soldier observes
an enemy rifleman moving into a com-
pletely concealed position behind a
bush. By selecting a proper aiming
point on the busH, the soldier should
hit the enemy rifleman even though he
can’t see him. However, suppose the
enemy rifleman moves into a concealed
position which has no distinguishable
terrain feature in front of it. The
soldier must then select a nearby fea-
ture and determine its range and
general direction from the target. Of
the two, an aiming point is usually the
most effective means of delivering
accurate fire.
(3) The difficulty in using reference
points or aiming points to mark
targets moving from one location to
another depends on the following
factors.
(a) Number of targets. If several
targets appear and disappear at ap-
proximately the same time, it is
very difficult to note the point of---------
disappearance of each.
(b) Exposure time of target. Usually,
moving targets are only exposed for
a brief moment. Thus, the observer
must be alert to note the point of
disappearance for all of the targets.
In such situations, the soldier should
mark the location of as many
targets as possible before engaging
any of them. By so doing, he will
know the location of several targets
and can engage each of them in
rapid succession.
(c) Spacing of targets. The greater the
interval between targets, the more
difficult it is to note the movements
of each. When there is considerable
distance between targets, the ob-
server should accurately locate the
one nearest his position and note the
general area of the others.
(d) Good and poor aiming points. Tar-
gets disappearing behind good aim-
ing points can be easily marked for
future reference. On the other
hand, targets disappearing behind
poor aiming points are difficult to
mark accurately and are easily lost.
If two targets offer about the same
degree of danger to the soldier, but
one disappears behind a good aim-
TAGO 6024-A
77
ing point and the other behind a
poor aiming point, the soldier should
mark the location of the target be-
hind the good aiming point and
engage the other target first.
c etermining Range.
t) Simply stated, range determination is
the process of finding the distance
between two points. In most situa-
tions, one of these points will be the
observer’s own position. The other
point may be a target or prominent
terrain feature. THE ABILITY
TO ACCURATELY DETERMINE
RANGE IS A KEY SKILL NEEDED
BY THE COMBAT RIFLEMAN TO
ACCOMPLISH HIS VARIOUS MIS-
SIONS. Not only does the accurate
determination of range affect his
combat marksmanship proficiency, but
it is also required in the reporting of
information and the adjusting of
artillery and mortar fire.
2) There are any number of methods for
determining range. Measuring dis-
tances on maps, pacing the distance
between two points, using an optical
range finder, and firing a round at
the point in question. However, the
combat rifleman does not usually have
a map, and he rarely has access to an
optical range finder. Pacing the dis-
tance between two points is one
method a soldier can use, provided the
enemy is not in the vicinity. Firing
a round just to determine the range is
usually not desirable since it imme-
diately reveals the firer’s position to
enemy observers. For the most part,
then, the rifleman must use techniques
which require no equipment other than
that which he normally carries and
which can be accomplished without
exposing himself or revealing his po-
sition. There are two methods of
determining range which meet these
requirements; the 100-metei* mental
unit of measure method and the ap-
pearance of objects method.
(a) 100-meter mental unit of measure
method.
1. To use this method, the soldier
must be able to visualize a dis-
tance of 100 meters on the ground.
For ranges up to 500 meters, he
determines the number of 100-
meter increments between the
two points he wishes to measure
(fig. 44). Beyond 500 meters, the
soldier must select a point half-
way to the target, determine the
number of 100-meter increments
to this halfway point, and then
double it to find the range to the
target (fig. 45).
2. During training exercises, the
soldier must become familiar with
the effect that sloping ground has
on the appearance of a 100-
meter increment. Ground which
slopes upward gives the illusion
of greater distance and observers
have a tendency to underesti-
mate a 100-meter increment.
That is, they may select two
points as being 100 meters apart
when they are, in fact, 140 or
150 meters apart. Conversely,
ground which slopes downward
gives the illusion of shorter dis-
tances. In this case, the ob-
server’s tendency is to overesti-
mate; that is, to apply a 100-
meter unit of measure between
two points which are actually less
than 100 meters apart.
S. To become proficient in the 100-
meter mental unit of measure
method requires constant prac-
tice. Throughout the training
in this technique, comparisons
should be continually made be-
tween the range as determined
by the soldier and the actual
range as determined by pacing
or other more accurate means of
measurement. The best training
technique is to require the soldier
to pace the range after he has
visually determined it. (FoUthe
average soldier, 132 paces equals
100 meters.) In this way, he dis-
covers the actual range for him-
self, which makes a much greater
П
TAGO B024-A
Figure 44. 100-meter mental unit of measure ranges upto 500 meters.
TAGO 6024-A
79
Figure 45. 100-meter mental unit of measure ranges greater than 500 meters.
impression than if he is simply
told the correct range.
4. The greatest limitation of the
100-meter mental unit of measure
is that its accuracy is directly
related to how much of the ter-
rain is visible to the observer.
This is particularly true at the
greater ranges. If a target ap-
pears at a range of 500 meters or
more and the observer can only
see a portion of the ground be-
tween himself and the target, it
becomes very difficult to use the
100-meter mental unit of measure
method of range determination
with any degree of accuracy.
(b) Appearance of objects method.
1. The appearance of objects meth-
od is a means of determining
range by the size and other char-
acteristic details of the object in
question. This is a common
method of determining distances
and is used by most people in
their every-day living. For ex-
ample, a motorist attempting to
pass another car must judge the
distance of oncoming vehicles
based on his knowledge of how
vehicles appear at various dis-
tances. Of course, in this exam-
ple, the motorist is not interested
in precise distances, but only that
he has sufficient road space to
safely pass the car in front of
him. Suppose, though, the motor-
ist knew that at a distance of one
mile an oncoming vehicle ap-
peared to be one inch wide and
two inches high, with about a
half inch between the headlights.
80
TAGO 5024-A
Then, any time he saw other on-
coming vehicles which fitted these
dimensions he would know they
were about one mile away. This
same technique can be used by
riflemen to determine ranges on
the battlefield. If he knows the
characteristic size and detail of
personnel and equipment at
known ranges, then he can com-
pare these characteristics to
similar objects at unknown
ranges. When the characteristics
match, so then does the range.
2. To use the appearance of objects
method with any degree of accu-
racy, the soldier must be thor-
oughly familiar with the charac-
teristic details of objects as they
appear at various ranges. For
example, the soldier should study
the appearance of a man when
he is standing at a range of 100
same man in a kneeling position
and then in a prone position. By
comparing the appearance of
these positions at known ranges
from 100 to 500 meters, the sol-
dier can establish a series of
mental images which will help
him determine range on unfamil-
iar terrain. Training should also
be conducted in the appearance
of other familiar objects such as
weapons or vehicles. Because the
successful use of this method de-
pends upon the visibility, any-
thing which limits the visibility
(such as weather, smoke, or
darkness) will also limit the ef-
fectiveness of this method (fig.
46).
(c) Under proper conditions, either the
100-meter mental unit of measure
or the appearance of objects method
is an effective way of determining
range. However, proper conditions
FACTORS AFFECTING THE APPERANCE OF OBJECTS
FACTORS TO BE CONSIDERED IN determining range by eye. OBJECTS APPEAR NEARER THAN THEY REALLY ARE. OBJECTS APPEAR MORE DISTANT THAN THEY REALLY ARE.
THE TARGET—ITS CLEARNESS OF OUTLINE AND DETAILS. NATURE OF THE TERRAIN OR POSITION OF THE OBSERVER. LIGHT AND ATMOSPHERE. WHEN MOST OF THE TARGET fS VISIBLE AND OFFERS A CLEAR OUTLINE. WHEN LOOKING ACROSS A DEPRESSION. MOST OF WHICH IS HIDDEN FROM VIEW. WHEN LOOKING DOWNWARD FROM HIGH GROUND. WHEN LOOKING DOWN A STRAIGHT. OPEN ROAD OR ALONG A RAILROAD TRACK. WHEN LOOKING OVER UNIFORM SURFACES LIKE WATER. SNOW. DESERT. OR GRAIN FIELDS. IN BRIGHT LIGHT OR WHEN THE SUN IS SHINING FROM BEHIND THE OBSERVER. WHEN THE TARGET IS IN SHARP CONTRAST WITH THE BACKGROUND OR IS SILHOUETTED BY REASON OF SIZE. SHAPE. OR COLOR. WHEN SEEN IN THE CLEAR ATMOSPHERE OF HIGH ALTITUDES. WHEN ONLY A SMALL PART OF THE TARGET MAY BE SEEN OR IS SMALL IN RELATION TO ITS SURROUNDINGS. WHEN LOOKING ACROSS A DEPRESSION. ALL OF WHICH IS VISIBILE. WHEN LOOKING FROM LOW GROUND TOWARD HIGH GROUND. WHEN FIELD OF VISION IS NARROWLY CONFINED AS IN TWISTED STREETS. DRAWS. OR FOREST TRAILS. IN POOR LIGHT SUCH AS DAWN AND DUSK. IN RAIN. SNOW. OR FOG. OR WHEN THE SUN IS IN THE OBSERVER S EYES. WHEN THE TARGET BLENDS INTO THE BACKGROUND OR TERRAIN.
Figure 46. Factors affecting the appearance of objects.
meters. He fixes his appearance
firmly in his mind, carefully not-
ing details of size and the char-
acteristics of his uniform and
equipment. Next, he studies the
do not always exist on the battle-
field. Consequently, the soldier will
be required to use a combination of
methods. The terrain might limit
using the 100-meter mental unit of
TAGO БО24-А
81
measure method and the visibility
could limit using the appearance of
objects method. However, the sol-
dier might still be able to determine
ranges with a reasonable degree of
accuracy using both methods. For
example, an observer may not be
able to see all of the terrain out to
the target; however, he may see
enough to get a general idea of the
distance, say, within 100 meters.
experienced observer should arrive
at a figure close to the true range.
d. Sector Sketch. A sector sketch is a rough
schematic map of an observer’s area of respon-
sibility (fig. 47). It shows the range and di-
rection from the observer’s position to easily
recognizable objects, terrain features, avenues
of approach, and possible enemy positions. If
practicable, the observer should pace the dis-
tance between his position and reference points
in order to minimize range errors. By referring
Figure 47. Sector sketch.
A slight haze may obscure many of
the target details; however, the ob-
server should still be able to judge
its size. Thus by carefully con-
sidering the approximate ranges as
determined by both methods, an
to this sketch, the observer can quickly find
the range to a target appearing in the vicinity
of a reference point.
53. Engaging Targets
Unless a rifleman has specific orders to the
TAGO 5024-A
contrary, targets are engaged as soon as they
are detected. In the case of enemy personnel,
there are essentially three types of target
situations which confront the rifleman: a sta-
tionary target, a rapidly moving target, or a
slowly moving target.
a. A stationary target can be engaged using
reference or aiming points. Since stationary
targets are normally in a concealed position,
engaging them is usually as much a problem
of target detection as it is of marksmanship.
b. Although there are less detection prob-
lems involved in locating moving targets, the
movement itself complicates the selection of an
accurate aiming point. Unless the enemy is
completely unaware of the rifleman’s presence,
he will normally move by rushes from one
covered or concealed position to another.
While making the rush, the enemy soldier pre-
sents a rapidly moving target. However, for
a brief moment as he begins and ends the
rush, the movement is usually slow. The reason
for this is that a few steps are needed to gather
momentum to begin the rush and, by the same
token, a few steps are required to slow down
to avoid overrunning the new position. It is
at either of these two moments that a moving-
target is most vulnerable to aimed rifle fire.
c. A target moving directly toward the rifle
man can be engaged in the same manner as a
stationary target. However, to hit a target
moving laterally across his front, the rifleman
Mbst aim far enough in advance of the target
so the bullet will meet the target (fig. 48).
To hit a man walking laterally at ranges 200
meters and less, the rifleman should aim at the
forward edge of the body. For ranges beyond
200 meters, the rifleman should select an aiming-
point approximating one body width in front
of the target. If the target is running, these
target leads are doubled. That is, at ranges
less than 200 meters the rifleman aims approxi-
mately one body width in front of the target,
and beyond 200 meters he aims approximately
two body widths in front of the target.
TAGO 6024-A
83
OVER 200 METERS
AIM HERE
200 METERS OR LESS
AIM HERE ~
Figure 48. Target leads.
84
TAGO 6024-A
Section IV. PRACTICAL EXERCISES AND TESTS
54. Trial Sheets
a. Master Trial Sheets. The master trial
sheet (fig. 49) shows the number of target men
required for an exercise, the actions to be per-
formed by the target men, the duration of the
actions, and the panel or stake locations where
the actions will occur. A master trial sheet
should be made for each exercise.
MASTER TRIAL SHEET
Trial Range
No. ( meters) Description of requirements
1 200 Standing exposed by tree. Down to kneeling, exposed. Slow movement to out-of-sight position. Out-of-sight fire round for smoke indications.
2 150 Same as above with a poor aiming point.
3 175 Start standing. Disappear on command. Reappear in same position. Make five 4-second rushes with a good aiming point. Fire one round from last position.
4 300 Start from kneeling position behind bush. Make five 4- to 5-second rushes. Disappear where there is a poor aiming point. Reappear from same position. 5-3-3-5-5-seconds. Fire round from last position.
5 300 Start prone. Make five 4-5-8 second rushes. Disappear after each rush and roll or crouch to new position. Three-second rush, crawl left. Six-second rush, crawl right. Cross small draw. Appear and make 8-second rush, crawl left. Three-second rush, crawl right. Fire one round from last position.
6 175 Start prone. Make three 4-second and two 6-second lateral rushes to new concealment. Reappear at same point of disappearance. Vary time between rushes. Fire one round from last position.
7 175 Do same in reverse. Crawl or roll to new position after disappearing. Fire round from last position.
8 200 Run 200 yards from tree to position with a poor aiming point. Fire 2 blanks 1 minute after disappearance.
9 300 Start prone. Three-second rush, crawl left. Five-second rush, crawl right. 5-L-3-3-6- R-4-5, through draw. Fire round from last position. (Numbers indicate duration of rush; letters L and R indicate direction of roll or craw after each rush.)
10 300 Start behind bush. 6-8-R-3-R-4-3. Fire round from last position. Note. Target trial sheets should be prepared from a master trial sheet similar to the one above containing only the trials and target indications performed by a specific target. Figure U9. Master trial sheet.
b. Target Trial Sheets. A target trial sheet
(fig. 50) is issued to each man who will act
as an enemy target in the area of observation.
These men, called “target men,” use the target
trial sheets as a basis for their location and
actions throughout an exercise. All actions
performed by a target man which lead to his
eventual disclosure are termed a “trial.”
55. Conduct of Trials
Before a trial is conducted, observers should
face away from the range area so target men
can assume their positions unobserved. When
the target men are in position, the observers are
told to again face down range. There are four
types of trials conducted during target detec-
tion training. These are stationary target
trials, moving target trials, stationary sound
target trials, and multiple moving and sound
target trials.
a. Stationary Target Trials. Normally, there
are four phases in each stationary trial. The
first three phases last 30 seconds each. In
phase one, the target man remains motionless
in a slightly exposed position that will enable
him to observe the heads and chests of soldiers
along the observation line. In the second phase,
the same target man slowly raises his head and
shoulders until he can observe the soldiers on
the observation line from the ground up. In
phase three, the same target man makes
rapid, jerky movements continuously for 30
TAGO 6024-A
85
TARGET TRIAL SHEET
1 Front
Figure 50. Target trial sheet.
86
TAGO 5024-A
TARGET MAN NO. 1
TRIAL NO 1 5 6 8 2 25-25A-25B-3C-15D-25C 13-13A-13B-13C-13D 9-9A-9B-9C
TRIAL (PHASE)
1- 1- MOTIONLESS IN PRONE POSITION
2- SLOWLY RAISE AND LOWER HEAD AND SHOULDERS
3- SLOWLY RAISE HEAD AND SHOULDERS. DROP ABRUPTLY
4- FIRE TWO BLANKS
5-RUSH TO EACH POSITION. AWAIT COMMANDS TO STAND. DISAPPEAR.
AND MAKE NEXT MOVEMENT.
6-CRAWL TO EACH POSITION. AWAIT COMMANDS TO STAND. DISAPPEAR.
AND MAKE NEXT MOVEMENT.
8-RUSH TO EACH POSITION. STOPPING TWO SECONDS AT EACH.
RANGE J PERIOD 16
BACK SIDE
Fif/нге 50—Continued.
seconds. Finally, in phase four, the same
target man fires one or two blank rounds to-
ward the observation line (safety permitting).
The command to begin a stationary target trial
is TRIAL ONE, PHASE ONE, OBSERVE.
If, during the first phase, the observer thinks
he has located the target, he notes the letter
of the panel nearest the target and determines
the range from his position to the target. He
enters this information on his scoresheet and
an assistant instructor checks his solution. A
range emir of not more than ten percent is
considered satisfactory. If the observer has
selected the wrong panel or the error in range
exceeds ten percent, he should be told his an-
swer is incorrect and to continue his observa-
tion. If the answer is correct, the observer
should continue his observation of the area,
recording the required information on his
scoresheet for the subsequent phases. This
procedure is followed throughout the four
phases of stationary trials. (See app. IV for
examples of scoresheets.)
b. Moring Target Trials.
(1) The target trial sheets for moving
trials must indicate the specific trials
in which the target man will par-
ticipate, the stake location at which
he begins the trial and the stake loca-
tion to which he must move, and
finally, the type of movement and/or
other specific actions to be performed
by the target man. An example tar-
get trial sheet for target man number
one might indicate that he would
participate in trials 1, 3, 5, 9, 12, and
15. In trial one, the instructions state
that he will make one long rush from
stake 6B to stake 12B. In trial three,
he is told to make three short rushes
from stake 12 to stake 15B.
(2) In order to check the accuracy of ob-
pAf:O 5f»24-A
87
servers, aiming devices should be used
to mark the point of disappearance of
multiple moving targets (fig. 51).
Figure 51. Aiming device.
The observer simply aligns the two
sight knobs on the bar on the point
where he thinks the targets are lo-
cated. Normally, two students are
assigned to an aiming’ device, one to
act as the observer and the other to
check the observer’s work.
(3) To begin a moving trial, the command
is MOVING TARGET (S) STAND
UP, DISAPPEAR, AND BEGIN
YOUR MOVEMENTS. On these
commands, the applicable target men
reveal themselves to the observers,
move back into their concealed posi-
tions, and begin the movements as di-
rected by their target trial sheets.
During some exercises, the target
men may fire blank rounds after
reaching a new location. Observers
are allowed 30 seconds to mark the
point of disappearance with the aim-
ing device. The instructor then com-
mands, TARGETS STAND UP, AL-
TERNATE OBSERVERS CHECK
ALIGNMENT. The observer then
checks the accuracy of his work. This
procedure is continued until all of the
trials have been conducted.
c. Sound Target Trials. Before the trials
begin, the observers should draw a sector
sketch of the area. All of the numbered panels
should then be raised for sound target trials.
Each target man occupies a concealed position
in the vicinity of one of the numbered panels.
The instructor then informs the observer that
a shot will be fired from one of the reference
points. The observers must determine the
panel location nearest the sound and record the
information on their scoresheets. The com-
mands to conduct the exercise are, TRIAL
NUMBER (ONE): READY, AIM, FIRE.
STUDENTS RECORD YOUR ANSWERS.
Should it be necessary to reposition target men
for subsequent trials, the observers should face
away from the range while the movement is
taking place. In some trials, several target men
should fire simultaneously in order to demon-
strate the difficulty in locating similar sounds
coming from several directions at the same
time.
d. Multiple Moving and Sound Targets. To
conduct multiple moving and sound target ex-
ercises, eight target men are required (two
4-man teams). Observers are divided into
coaches and pupils with each pair having one
aiming device. The command to begin the ex-
ercise is, MOVING TARGETS STAND UP;
DISAPPEAR AND BEGIN YOUR MOVE-
MENT. The moving target men expose them-
selves, resume their concealed position, and be-
gin their rushes forward. After making their
movement, some of the target men should fire
one or more blank rounds. The observer acting
as the pupil must use the aiming device to mark
the point of disappearance of as many moving
targets as possible. He also notes the panel
location of sound targets on his scoresheet.
Upon completing a trial, the instructor com-
mands, TARGETS STAND UP, CHECK
88
TAGO 6024-A
alignment using coach and pupil
METHOD. At this time the target men stand
up and the coach checks the accuracy of the
pupil’s work. In the next trial, the coach be-
comes the pupil and the pupil becomes the
coach.
56. Target Detection Tests
As the final stage of their target detection
training, soldiers should be tested on their
ability to detect and determine ranges to single
stationary targets, marking the points of dis-
appearance of single and multiple moving tar-
gets, and locating targets by sound.
a. Test Number One—Stationary Targets.
Test number one is conducted using the same
four phases prescribed for the target detection
trials of stationary targets (par. 55a). In this
case, the observer receives points in propor-
tion to the number of phases needed to detect
the target. If the observer detects the target
in phase one, he receives four points; in phase
two, three points; and so on down to zero
points if he fails to detect the target after four
phases. To be considered correct, the observer
must again select the lettered panel nearest the
target and then determine the range from his
position to the target. A range error of ten
percent or less is considered satisfactory.
Master trial sheets, target trial sheets, and
range procedures are the same as prescribed
for the practical exercises in detecting sta-
tionary targets. Each observer should be given
approximately 16 trials involving detection of
stationary targets in order to provide enough
information to adequately judge his ability.
b. Test Number Two—Moving Targets.
Target detection test number two requires the
observer to mark the points of disappearance
of multiple moving targets. These tests are
conducted in the same manner as the practical
exercises for moving targets (par. 55b). Af-
ter the target men have completed their move-
ments, observers are allowed 30 seconds to
mark the points of disappearance, using the
aiming device. Assistant instructors check the
results and award one point for each correctly
marked target location.
c. Test Number Three—Sound Targets.
Test number three involves sound targets only.
The test is conducted in the same manner as
practical exercises for locating sound targets
(par. 55c). On command, one or two target
men fire their rifles, and the observer attempts
to locate the sound using the numbered panels
as reference points. One point is awarded for
each correct answer.
TAGO 5024-A
89
CHAPTER 6
RECORD FIRING
Section I. GENERAL
57. Purpose
Record firing is a series of practical exercises
which requires the soldier to apply individual
rifle marksmanship techniques learned in pre-
vious instruction. Although the soldier re-
ceives a qualification rating based on the num-
ber of targets which he hits, record firing
should not be considered so much a test as it
is an extremely valuable training exercise. If
record firing is correctly organized and con-
ducted, any soldier can gain much valuable
experience and become an effective combat rifle-
man regardless of his qualification rating.
Properly used, qualification ratings are impor-
tant since they provide goals for the individual
soldier to literally “shoot for.” They also aid
the commander in identifying the more pro-
ficient marksman of his unit. This can be a
significant consideration in the assignment of
personnel, since the better marksman should
be evenly divided among all elements of a
combat unit. However, the ultimate objective
of record firing, like all combat marksmanship
training, is to produce combat proficient marks-
men—not award qualification ratings.
58. Record Courses of Fire
Several record courses of fire have been de-
veloped in order to provide flexibility in adapt-
ing local facilities and training situations to
the marksmanship program. Record firing for
active Army units can be conducted on either
of two types of range complexes: a standard
record range specifically constructed for com-
bat record firing or a combination of a modified
known distance range and a combat positions
range. An expedient-type record course, de-
signed solely for use on modified known dis-
tance ranges, may be conducted at those in-
stallations which have neither a standard record
90
range nor a combat positions range. Of these
record courses, the course conducted on a
standard record range provides the greatest
training benefit since it requires the soldier to
apply all of the combat marksmanship skills.
If there is a choice or a need for establishing a
priority system, preference should be given the
course conducted on the standard record range.
59. Training Concepts
a. Uniform and Equipment. While firing the
record course, soldiers should wear combat
equipment, including combat packs and steel
helmets.
b. Assistance to the Firers.
(1) Record firing is strictly an individual
effort of each soldier. The firer should
not receive coaching or any other
assistance during the exercises. This
is particularly true of detecting tar-
gets, determining ranges, and locating
the impact of bullets. If a rifle sus-
tains a malfunction, it is the firer’s
responsibility to apply immediate ac-
tion and attempt to eliminate the
stoppage.
(2) The single exception to not assisting
the firer is in the interests of safety.
A firer attempting to clear a stoppage
may inadvertently point the muzzle of
his rifle to the flanks or rear. In such
instances, the scorer Or other range
personnel should immediately caution
the firer or, if need be, physically take
hold of the rifle and correct the dan-
ger themselves. During exercises in
which the firer is moving, the scorer
should also caution the firer to stay
on line with adjacent firers.
TAGO S024-A
Svetioa II. STANDARD RECORD FIRING PROCEDURES AND REQUIREMENTS
60. General
The standard record range achieves realism
by presenting the firer with various target sit-
uations he will likely encounter in combat.
Except where modification is necessary to in-
stall and maintain targets, the natural cover of
the terrain is left undisturbed. Single (Record
Firing I) and multiple (Record Firing II)
camouflaged targets are exposed briefly, ir-
regularly, and at ranges unknown to the firer.
The exercises require firing from the foxhole
position and unsupported positions of the firer’s
own choosing. Upon completion of record fir-
ing, the number of targets hit by each firer is
totaled. Based on this score, marksmanship
qualification ratings are awarded.
61. Organization
a. Firers.
(1) For scheduling purposes, the average
company/battery of approximately
200 men must be divided in half.
While half of the unit is firing the
record course or is tested on target
detection (ch. 5), the other half re-
ceives such other training as pre-
scribed by the commander. Since only
half of a unit can be scheduled for
firing and target detection testing at
one time, two training days are re-
quired to conduct Record Firing I and
II using one record range. To equalize
light conditions, the half which con-
ducts Record Firing I in the morning
of the first day should fire Record
Firing II in the afternoon of the
second day. Conversely, the half
which conducts Record Firing I in the
afternoon of the first day should con-
duct Record Firing II in the morning
of the second day.
(2) The half of the unit scheduled for
record firing must be further sub-
divided into two approximately equal
groups. Following the record firing
orientation, the first group begins rec-
ord firing while the second group
moves to the target detection range for
testing. After the first group com-
pletes firing (approximately two hours
TAGO 6024-A
required), it is moved to the target
detection range for testing and the
second group moves to the record
range for record firing. This proce-
dure is used for both Record Firing I
and Record Firing II.
b. Range and Range Personnel. There are
four general areas needed to form a record
range complex. These are an “Orientation
area,” “ready area,” “firing area,” and a “re-
tii^d area.” The requirements for these areas
to include the necessary range personnel are as
follows:
(1) Orientation area.
(a) Location and purpose. The location
of the orientation area for Record
Firing I should permit soldiers to
observe a demonstration of detect-
ing and firing on single targets. The
demonstration should be conducted
from both supported and unsup-
ported firing positions. The orienta-
tion for Record Firing II need not
be conducted in the same area since
it does not include a demonstration.
However, the orientation for both
Record Firing I and Record Firing
II should include instructions on
safety, range operations to include
procedures in the ready and retired
areas, and scoring procedures.
(b) Range personnel.
1. Principal instructor. Conducts
orientation. Can also be officer in
charge of record firing.
2. Safety officer. Supervises safety
requirements for firing demon-
stration conducted during the
Record Firing I orientation. Can
also be the safety officer for rec-
ord firing, however, he should not
have any other additional duties
except those directly concerned
with safety.
3. Two demonstrators. Conduct
demonstration of firing at single
targets from both supported and
unsupported positions. One dem-
onstrator is the firer and the other
is the scorer. Following the ori-
91
*en tation, they can be used as lane
scorers or to provide other as-
sistance as required.
(2) Ready area.
(a) Location and purpose. The ready
area should be located in the imme-
diate vicinity of the firing range,
however; firers should not be able
to see the targets on the range from
this area. While in the ready area,
each soldier should be allowed suffi-
cient time to blacken his rifle sights,
check the sight tension and battle-
sight zero setting, apply rifle grease
as needed, and visually check his
rifle for any apparent defects which
might cause malfunctions. An ord-
nance small arms repairman should
also be available in this area to
service those rifles requiring more
technical repairs.
(h) Range personnel.
1. Noncommissioned officer in
charge. Supervises the activities
of firers in the ready area.
2. Ordnance small arms repairman.
Replaces damaged or broken
parts discovered prior to or dur-
ing record firing.
Caution: The replacement of
certain rifle parts will change the
battlesight zero of the weapon.
The ordnance small arms repair-
man should so inform the non-
commissioned officer in charge of
the ready area so provisions for
rezeroing the rifle can be made.
(3) Firing area.
(a) Location and construction. Ideally,
a record firing range (fig. 52) should
be located on ground which has a
gradual slope downward for ap-
proximately 200 meters and then a
gradual upward slope for an addi-
tional 160 meters, giving a total
range depth of 360 meters. The
standard record range is divided in-
to 16 lanes, each 30 meters wide
with one foxhole in each lane. The
“E” and “F” type silhouette targets
attached to automatic target devices
are used for record firing.' Seven
targets are placed at 50-meter in-
tervals in each lane beginning at a
range of 50 meters from the line of
foxholes and extending to a range
of 350 meters. The “F” type or half-
silhouette, is used at ranges of 50
and 100 meters. The “E” type, or
full-silhouette, is used at all other
ranges. Targets must be camou-
flaged in positions approximating
those which enemy soldiers might
occupy. They must not be com-
pletely hidden, but rather situated
so an alert observer can reasonably
expect to detect their location. In
the raised position, targets must not
provide a distinctive outline against
the horizon or any other contrast
with the background. In this re-
gard, the color of the target must
blend with the surrounding area.
(b) Range personnel.
1. Officer in charge. Senior officer
on the range. Responsible for the
conduct of firing and the overall
operation of the range complex.
2. Safety officer. Enforces safety
regulations.
3. Noncommissioned officer in
charge. Supervises and coordi-
nates the actions of the target
control operator, lane scorers,
ammunition detail, target repair-
men, and the noncommissioned
officers in charge of the ready
and retired areas.
4. Target control operator. Respon-
sible for raising and lowering
targets within the prescribed time
limits as indicated on the score-
card. Issues fire commands and
sounds the signal denoting the
time limit for a target exposure
has expired. Continually checks
firing lanes and target areas for
safety violations.
5. Lane scorers. One lane scorer is
required for each lane (total of
16 for the standard record
range.) The lane scorers have the
following duties:
TAGO Б024-А
Figure 52. Standard record range.
(a) Check the location, proper opera-
tion, and camouflage of targets
within their lanes before firing be-
gins.
(b) Point out the right and left flank
limits of the lane to each firer.
(c) Record the hits, misses, and no fires
on the scorecard of each firer. Rule
on the validity of alibis and the
number of alibis to be fired (par.
62e). If in doubt, the lane scorers
should request the noncommissioned
officer in charge or the officer in
charge to rule on the alibi.
(d) Require each firer to observe all
safety precautions. During the
moving phases of record firing, the
lane scorer continually cautions the
firer to stay on line with firers in
adjacent lanes.
6. Ammunition, detail. Responsible
for the issue and accounting of
ammunition.
(4) Retired area.
(a) Location and purpose. The retired
area is also located in the immedi-
ate vicinity of the firing range,
usually about 100 meters behind the
ready area. Soldiers completing
record firing move to the retired
area where they are checked for live
ammunition and brass. They may
also clean their rifles in this area.
Caution: Until all phases of rec-
ord firing have been completed, the
firer should not disassemble his rifle
because this will affect the zero of
the weapon.
(b) Range personnel. One noncommis-
TAGO 5024-A
93
sioned -officer in charge is required
to check firers for live ammunition
and brass cartridge cases, and to
supervise the cleaning of rifles.
42. Conduct of Firing
a. Target Operation.
(1) Control tower. All targets are operated
from the control tower. The control
tower should be located in the center
and slightly to the rear of the line of
foxholes. It should be high enough to
permit the target control operator to
observe firers conducting both sup-
ported and unsupported firing phases.
For safety purposes, the tower should
also be high enough to permit obser-
vation of the entire target area.
(2) Target exposure times.
(a) In Record Firing I (single target
exposures), targets located at ranges
of 200 meters and less are exposed
for five seconds. Targets beyond
200 meters are exposed for ten
seconds.
(b) In Record Firing" II (multiple tar-
get exposure), exposure times are
based on the number of targets
raised and the range to the targets.
The target control operator should
follow the time and target sequence
prescribed by Record Firing II
scorecards for each target situation
(app. III).
(3) Signals. When the prescribed target
exposure time has elapsed, the target
control operator sounds a signal such
as a bell, buzzer, or whistle which is
audible to all firers and scorers.
Rounds fired after this signal are
scored as misses. To eliminate confu-
sion resulting from targets being hit
at the same moment the signal is
sounded, target control operators must
allow a few seconds interval between
the signal and the actual lowering of
targets.
b. Rotation of Firers Between Lanes. In
order to provide several different terrain situa-
tions, firers should be rotated between several
lanes during the course of Record Firing I and
IL To facilitate this movement, a system of
rotating four firers between each block of four
lanes should be used. For example, in the first
block of four lanes, the firer on lane one rotates
to lane two. The firers on lanes two and three
move to lanes three and four, respectively. The
firer on lane four moves to lane one. The
same system is followed by the next block of
four lanes beginning with lane five. Again, all
firers rotate one lane except the firer on lane
eight who moves to lane five. There are other
rotation systems which can be used; however,
the above system is least confusing to firers.
Note. In oider to provide maximum target and ter-
rain situations, soldiers should fire Record Firing П
on lanes different from those on which they conducted
Record Firing I.
c. Record Firing I (single target exposures).
Record Firing I consists of a supported position
firing phase followed by an unsupported posi-
tion firing phase. The same sequence of lane
rotation is used throughout both phases.
(1) Supported position phase of Record
Firing I.
(a) After receiving an orientation and
completing preparations in the
ready area, the soldier moves to the
firing area. Unless told otherwise,
the soldier moves to his designated
lane and stands or sits behind the
foxhole facing away from the target
area. On command, the firer hands
his scorecard to the lane scorer and
moves into the foxhole. There
should be several sandbags at each
foxhole so the firer can adjust the
emplacement to fit the conformation
of his body. After making these ad-
justments, the firer should be given
time to search his lane, using those
techniques learned in target detec-
tion training. Although the targets
must not be raised while the firer
is performing this search, such a
procedure will familiarize him with
the terrain, likely target locations,
and most important, place added
emphasis on previous target detec-
tion training.
(b) On command, the firer is issued
eight rounds of ammunition and
loads his rifle. The target control
operator then gives the command
TAGO 5024-A
WATCH YOUR LANES. Imme-
diately following this command, the
target operator begins raising and
lowering targets according to the
time and sequence prescribed by the
scorecard. Eight targets are pre-
sented singly to the firer in each lane
and he may only fire one round at
each target. Upon completing this
exercise to include alibi firing
(par. 62e), the target control opera-
tor requires a safety clearance of
the firing line. At this time, the
firer clears his rifle and returns un-
expended ammunition to the lane
scorer. The lane scorer checks the
clearance of the rifle, hands the
firer his scorecard, and points out
the next lane to which the firer
should move. On order, the firer
moves to the designated lane and
follows the same sequence pre-
scribed for the initial exercise. This
procedure is repeated until firers
have conducted a supported position
exercise on each of four lanes.
(2) Unsupported position phase of Rec-
ord Firing I. When the firer completes
the fourth exercise of the supported
phase, he again receives the command
to rotate. This time, however, he is
told to move to a standing position
directly in front of the foxhole. The
lane scorer takes up a standing posi-
tion immediately behind the firer. On
command, the firer is issued eight
rounds of ammunition and loads his
rifle. The command to begin the exer-
cise is MOVE OUT. On this command,
the firer and scorer begin moving
slowly toward the 50-meter targets.
The target control operator begins
raising and lowering targets singly
according to the times and sequence
prescribed by the scorecard. As the
firer detects a target, he assumes a
position of his own choosing and fires
at the target. As in the supported
phase, he may fire only one round at
each target. After firing at a target,
the firer may change his position,
BUT HE MUST NOT MOVE FOR-
WARD UNTIL HE RECEIVES AN-
OTHER COMMAND TO MOVE OUT.
While waiting for this command, the
firer should continue to search his lane
since other targets may appear. Dur-
ing movements, the lane scorer should
continually caution the firer to main-
tain alignment with firers in adja-
cent lanes. The procedures for clear-
ing rifles and rotating to subsequent
lanes are the same as prescribed for
the supported firing phase.
d. Record Firing II (multiple target expo-
sure). The sequence of actions for Record Fir-
ing II is similar to that of Record Firing I.
The firers receive an orientation prior to mov-
ing to the ready area (Record Firing II does
not include a demonstration). In the ready
area, they again inspect and otherwise prepare
their rifles for firing. On order, they move to
their designated lanes in the firing area, facing
away from the targets until told to move into
the foxholes. Firers should again adjust their
body position in the foxhole and then be given
time to search their lanes. Targets should not
be exposed while firers are making this search.
Like Record Firing I, Record Firing II also
consists of a supported and an unsupported
phase. However, the firer is required to engage
two or three targets appearing simultaneously
in his lane. These targets may be any combina-
tion of the 50-meter through the 350-meter
targets. Because of the added difficulties of
engaging multiple targets, there are more
rounds of ammunition issued for each exercise
than there are targets. In the first exercise,
eight rounds are issued to each firer to engage
six targets, 16 rounds are issued to hit 12
targets in the second exercise, and 16 rounds
are issued to hit 10 targets in the third exer-
cise. Thus, the firer may fire two rounds at
some targets but not at all of them. Each
soldier must decide for himself which targets
he is most likely to hit with a second round.
The firer is not permitted to carry over un-
expended ammunition from one exercise to
another, nor does he receive an added score for
unexpended rounds.
(1) Supported position phase of Record
Firing II. The supported position
phase of Record Firing II consists of
two exercises fired from the foxhole
TAGO Б024-А
95
position. In the first of these exer-
cises, only single and double target
situations are presented to the firer.
Following this exercise, the firer
rotates to another lane for the second
supported position exercise. In this
exercise, double and triple target
situations are presented to the firer.
(2) Unsupported position phase of Record
Firing IL Following the second sup-
ported position exercise, the firer
rotates to another lane for the un-
supported position firing phase. This
phase consists of one exercise fired
from unsupported positions of the
firer’s own choosing. The unsupported
position phase of Record Firing II be-
gins with the firer and lane scorer
standing in front of the foxhole. On
the command MOVE OUT, the firer
and scorer begin moving toward the
50-meter target. The target control
operator activates the targets, creat-
ing double and triple target situations
as prescribed by the scorecard. When
the firer detects the targets, he as-
sumes an unsupported position and
begins firing. After firing at those
targets he has detected, the firer should
continue searching his lane for other
targets. UNDER NO CIRCUM-
STANCES SHOULD HE MOVE
FORWARD UNTIL A FURTHER
COMMAND TO MOVE OUT IS
GIVEN. Throughout the unsupported
firing phase, the lane scorers should
continually caution the firer to main-
tain alignment with firers in adjacent
lanes.
e. Alibi Firing. If a firer is unable to fire at a
target through no fault of his own, he receives
an “alibi” for that particular target. This
means he will be given another opportunity to
fire at a target. For best results, alibi firing
should be conducted after each exercise and
before the firer rotates to the next lane. To con-
duct alibi firing, the target control operator first
asks, “ARE THERE ANY AbIBIS?” Those
scorers whose firers have bona fide alibis give
an affirmative signal (raising their hands or
holding up the scorecard). If there are alibis,
the target control operator commands ALIBI
FIRERS WATCH YOUR LANES. Targets are
then exposed singly regardless of whether the
alibi occurred in Record Firing I or Record
Firing II. As a general rule, alibi firing in Rec-
ord Firing I should be conducted using mid-
range targets (150—250 meters) as the majority
of the targets exposed during the regular exer-
cises are located at these ranges. In the case of
Record Firing II, the difficulties of scoring and
providing additional ammunition preclude the
use of multiple target situations for alibi firing.
Therefore to provide some degree of compar-
able difficulty to the standard Record Firing II
exercises, only the longer range targets (250-
350 meters) should be used. Since alibi firing
can never approximate the identical target
situation of the regular exercise, range per-
sonnel must insure alibis are legitimate before
they are allowed. Examples of bona fide alibis
are—
(1) Malfunctioning of target devices. This
includes targets which fail to appear
and targets which fail to drop when
they are hit.
(2) Malfunctioning of rifles provided the
firer attempted to apply correct im-
mediate action to eliminate the mal-
function. However, alibis for mal-
functions are valid only if they were
not due to improper maintenance or
failure to prepare the rifle for firing.
A general rule to follow in awarding
alibis for rifle malfunctions is to allow
an alibi for each target appearing dur-
ing and subsequent to the moment the
firer applies immediate action, pro-
vided the target drops before the
soldier can fire. However, if the firer
was slow in taking action to reduce
the stoppage, an alibi should not be
allowed.
/. Fire Commands. Simple, standardized fire
commands are essential to avoid confusion and
misunderstandings during the conduct of record
firing. Type commands which may be used are
as follows:
(1) Supported phases (Record Firing I
and II).
FIRERS ASSUME THE FOXHOLE
POSITION.
LANE GRADERS POINT OUT THE
LIMITS OF THE LANE.
W
TAGO 6024-A
LOCK, ONE (MAGAZINE OR
CLIP) OF EIGHT ROUNDS
LOAD.
WATCH YOUR LANES.
CEASE FIRING.
ARE THERE ANY ALIBIS?
♦ALIBI FIRERS WATCH YOUR
LANES.
♦CEASE FIRING.
CLEAR ALL WEAPONS.
CLEAR ON THE RIGHT?
CLEAR ON THE LEFT?
THE FIRING LINE IS CLEAR.
FIRERS ROTATE TO THE NEXT
LANE.
(2) Unsupported phases (Record Firing I
and 11).
FIRERS, STAND IN FRONT OF
THE FOXHOLE.
LOCK, ONE (MAGAZINE OR
CLIP) OF EIGHT ROUNDS
LOAD.
MOVE OUT (see scorecards, app.
III).
CEASE FIRING.
ARE THERE ANY ALIBIS?
♦ALIBI FIRERS WATCH YOUR
LANES.
♦CEASE FIRING.
CLEAR ALL WEAPONS.
CLEAR ON THE RIGHT?
CLEAR ON THE LEFT?
THE FIRING LINE IS CLEAR.
* Commands given only if alibis are indicated
by scorers.
g. Range Safety. See appendix II.
Section III. ALTERNATE RECORD FIRING PROCEDURES AND REQUIREMENTS
63. General
Alternate record firing is an expedient course
of fire designed for use at installations which
do not have standard record ranges. Like the
standard record course, the alternate record
course also requires soldiers to apply the funda-
mentals of combat marksmanship learned in
previous instruction. From a training view-
point, alternate record firing is less challeng-
ing than the standard course, primarily because
targets are easier to detect. However, alter-
nate record firing provides considerable train-
ing benefits in other skills and is a fair means
of determining the combat marksmanship pro-
ficiency of the individual soldier. Alternate rec-
ord firing is conducted in two phases, each of
which requires a specific type of range. Alter-
nate Record Firing I is conducted on a modified
known distance range, and Alternate Record
Firing II is conducted on a combat positions
range.
64. Alternate Record Firing I
a. Range organization, procedures, target
operation, and fire commands are the same as
prescribed for known distance field firing (par.
44).
b. Sequence and time of target exposures are
prescribed by the Alternate Record Firing I
scorecards (app. HI).
c. Procedures for awarding “alibis” are dis-
cussed in paragraph 62e.
d. Range safety procedures are outlined in
Appendix II.
65. Alternate Record Firing II
a. Range Characteristics. The combat posi-
tions range required for Alternate Record Fir-
ing II is essentially the same facility previously
used in conjunction with known distance marks-
manship courses. The range has a minimum
depth of 400 yards (368 meters) and an approx-
imate width of 100 yards (92 meters). There
are two targets in each lane except lane number
six which has one target. Figure 53 shows the
physical arrangement of the combat positions
range for Alternate Record Firing II. A com-
parison of this arrangement to the combat
positions ranges of the known distance marks-
manship courses will reveal the following
differences—
(1) The “window position” on lane four
has been moved to lane ten, and the
“log position” on lane ten has been
moved to lane four. This change is
necessary so firers in the standing
position have the closer range targets
while those in a prone position fire at
the more distant targets.
(2) The “B” type target on lane six has
been replaced by an “E” type sil-
houette target. The “E” target has al-
so been moved forward so the range
is reduced to 400 yards (368 meters).
TAGO 5014-A
YARDS METERS
400 - 368
350 - 322
325 - 299
300 - 276
275 - 253
250 - 230
200 - 184
175 - 161
150 - 138
125 - 111
NOTE: CONTROL POINT IS USED
ONLY WITH TARGETS.
LEGEND
A F SILHOUETTE
E SILHOUETTE
Ж CONTROL POINT
Figure 53. Coni bat positions range.
n
TAGO БО24-А
(3) Other modifications involve replacing
some “F” type targets with “E” tar-
gets. The arrangement of targets in-
dicated in figure 53 are recommended
but may be changed to meet local ter-
rain; however, the range to the fur-
thest target must not exceed 400
yards (368 meters).
b. Administrative Areas. In addition to the
firing range, a combat positions range complex
should include two "orientation areas,” a “ready
area,” and a “retired area.”
(1) Orientation areas. Ideally, there
should be two orientation areas used
in connection with the combat posi-
tions range. One of these areas must
be in the immediate vicinity of the
firing area so instructions can be
given on safety and range procedures
just prior to conducting the exercise.
The other orientation area consists of
a mock firing line along which all the
emplacements and objects of a combat
positions range have been constructed.
This second orientation area should be
located near the modified known dis-
tance range. In this way, that portion
of a unit not participating in known
distance field firing can receive con-
current training on the various posi-
tions used on the combat positions
range. Since there is no live firing
conducted in either orientation area,
they may be located on any suitable
terrain without regard for impact
areas.
(2) Ready area. The ready area should be
located near the firing area. Here, sol-
diers waiting to fire check their rifles
for serviceability, make necessary ad-
justments to their rear sights, and
blacken the sights. There should also
be an ordnance small arms repairman
in this area to assist firers in making
more technical adjustments and/or
repairs.
(3) Retired area. Soldiers completing rec-
ord firing move to a retired area where
they are checked for live ammunition
and brass. They may also clean their
rifles in this area.
Caution: Until all phases of record
firing have been completed, the firer
should not disassemble his rifle because
this will affect the zero of the weapon.
c. Range Organization.
(1) Targets. The “E” and "F” type sil-
houette targets are used in all lanes
of the combat positions range. Tar-
gets can be attached to automatic tar-
get devices or operated manually by
pit details. Of the two methods, auto-
matic target devices are more desir-
able since they provide for more ef-
ficient range operation, eliminate the
need for pit details, and facilitate
camouflage of the targets. The method
of control depends upon whether tar-
gets are operated automatically or
manually.
(a) Control of automatic target devices.
The target control operators raises
and lowers the targets attached to
the automatic devices. Depending
upon the skill of the operator, it
may be feasible to use a second
operator to control the target on
lane six. The sequence and time of
exposure for this target is not the
same as targets on the other lanes
and might cause confusion if only
one operator is available. In either
case, target control operators must
allow a second or two for targets to
become fully exposed before timing
is begun.
(b) Control of manually operated tar-
gets. If manually operated targets
are used, one down range target
operator is required for each target.
Each target operator must have tele-
phone communication to a telephone
operator on the firing line. Normal-
ly, there should be at least one tele-
phone operator for every two lanes.
Upon command from the tower
operator, the telephone operator
notifies the target operators when
to raise and lower their targets.
(c) Sequence and time of target expo-
sures. As prescribed by the Alter-
nate Record Firing II scorecards
(app. Ill).
99
TAGO 6024-A
(2) Range personnel. The following range
personnel are required to conduct Al-
ternate Record Firing II.
(a) Officer in charge. Responsible for
the conduct of firing.
(b) Safety officer. Enforces safety regu-
lations.
(c) Noncommissioned officer in charge.
Supervises enlisted range personnel.
Coordinates movement of firers be-
tween ready area, firing range, and
retired area.
(d) Target control operator (automatic
devices only). Issues fire commands
and raises and lowers targets ac-
cording to the sequence and time
prescribed on the scorecard (app.
III).
(e) Tower operator (manual targets
only). Issues fire commands and
signals telephone operators when to
raise and lower targets.
(/) One lane scorer per lane. Records
hits, misses, and no-fires on the
scorecard of each soldier firing on
his lane.
(g) One telephone operator per tivo
lanes (manual targets only). Main-
tains telephone contact with pit de-
tails; directs raising and lowering
of targets as prescribed by the tower
operator.
(h) One target operator per target
(manual targets only). Raises and
lowers targets on signal from tele-
phone operators.
(t) Target device repairman (automat-
ic device only). Performs on-the-
spot repairs of target devices which
have minor malfunctions.
(У) Ordnance small arms repairman.
Provides technical assistance in re-
pairing rifles. Located in or near
the ready area.
(k) Ammunition detail. Responsible for
the issue and accounting of ammuni-
tion.
(1) Medical personnel. Provides medical
support during live firing.
d. Preparation for and Conduct of Firing.
(1) Preparatory training. Soldiers con-
ducting the alternate record course
IM
should have completed fundamentals
training, known distance field firing,
and Alternate Record Firing I before
they fire on the combat positions
range. Since all of this firing has been
conducted on either a 1000-inch or
modified known distance range, many
soldiers will be unfamiliar with the
operation and requirements of firing
on a combat positions range. In order
that soldiers are not penalized for
this lack of familiarity, the following
training should be conducted prior to
record firing on the combat positions
range:
(a) The initial combat positions train-
ing is conducted in an orientation
area near the modified known dis-
tance range (b(l) above). This
training is conducted concurrent
with known distance field firing and
provides soldiers with practical ex-
perience in assuming each of the
ten positions used on the combat
positions range. For best results,
this training should be conducted
using the “coach and pupil” method.
At least three noncommissioned of-
ficers (one principal instructor and
two assistant instructors) should be
available to conduct the instruction.
The orientation should consist of
a short conference and demonstra-
tion on assuming each position fol-
lowed by practical exercises.
(b) The second training period on com-
bat positions firing should be an
actual practice firing of the Alter-
nate Record Firing II course. The
average soldier will find the target
situations presented on the combat
positions range considerably differ-
ent from those previously encoun-
tered. Here, he must locate the tar-
get and subsequently determine the
range, two skills not required of
him on the known distance range.
Thus, instructional firing on the
combat positions range exposes the
soldier to more of the problems of
combat marksmanship. Record fir-
ing on the combat positions range
TAGO 5084-A
provides further training in this
technique and tests how well the
soldier has adapted to it. For best
training results, instruction firing
and record firing on the combat posi-
tions range should be scheduled on
successive days.
(2) Organization for firing. Normally,
only half of a unit will be firing on
the combat positions range while the
other half is receiving target detec-
tion training or such other instruction
prescribed by the commander. The
half firing on the range should be di-
vided into 11-man orders. By having
one more man in each order than there
are firing points, an exercise can be
fired while a soldier on point ten is
moving to point one.
(3) Positions. When a firer arrives at his
designated lane, he immediately as-
sumes the position prescribed for that
point. The positions, with a brief de-
scription of each, are as follows:
(a) Lane No. 1—foxhole position (fig.
20) . The foxhole position is dis-
cussed in paragraph 10.
(b) Lane No. 2—rubble pile position
(fig. 54). The firer must present
Figure 54. Rubble pile position.
TAGO 5024-A
101
the lowest possible silhouette be-
hind the rubble but at the same time,
use the rubble to achieve maximum
support.
(c) Lane No. 3—stump position (fig.
18). The stump position is assumed
in the same manner as the kneeling
supported position (par. 10).
(d) Lane No. 4—log position (fig. 55).
wall. The firer assumes a position
which permits him to fire over the
wall while presenting a low silhou-
ette. The height of his position will
depend on his own height in rela-
tion to the height of the wall.
(Л) Lane No. 8—forward slope (sit-
ting) position (fig. 58). Firers
adapt the standard sitting position
Figure 55. Log position.
Soldiers who are right-handed
should fire from the right end of
the log and those who are left-
handed from the left end of the log.
This insures a comfortable position
while making maximum use of the
cover provided by the log. Firers
should not rest their rifles against
the log.
(e) Lane No. 5—bunker position (fig.
56). The firer leans against the
forward wall of the bunker. The
parapet supports his left arm and
hand, and his right arm. The rifle
must not rest against any part of
the bunker.
(/) Lane No. 6—prone position (figs.
11 and 12). The prone position is
discussed in paragraph 10.
(g) Lane No. 7—barricade position (fig.
57). The barricade represents a
to the slope of the mound. The sit-
ting position is discussed in para-
graph 10.
(0 Lane No. 9—rooftop position (fig.
59). The firer places his left arm
over the apex of the roof in such a
manner that he can hold the weight
of his body but not expose too much
of head and shoulders.
O’) Lane No. 10—window position (fig.
60). The window is constructed high
enough so the firer must use the
standing position. This position is
explained in paragraph 10. To con-
ceal his position from the enemy,
the firer must stand well back from
the window so his rifle does not pro-
trude through the window.
(4) Conduct of firing.
(a) Range operation. Four targets will
be exposed to the firer on each lane.
102
TAGO 5024-A
With the exception of lane number
six, the two targets in each lane will
first be exposed singly and then
simultaneously. The single target in
lane six is exposed four times.
Firers are allowed four rounds of
ammunition per lane or a total of
40 rounds. Upon completing an ex-
ercise, firers rotate to the lane with
the next higher number, except the
firer on lane ten who moves to lane
one. Since one exercise is fired while
the soldier on lane ten is moving
to lane one, it requires eleven ex-
ercises to complete firing for one
order.
(b) Alibis. See paragraph 62e.
(c) Fire commands. Simple standard-
ized fire commands are essential to
avoid confusion and misunderstand-
ings on the combat positions range.
A type fire command which may be
used is as follows:
THE FIRING LINE IS NO LONG-
ER CLEAR.
LOCK, (ONE CLIP OR MAGA-
ZINE) LOAD.
READY ON THE RIGHT?
READY ON THE LEFT?
THE FIRING LINE IS READY.
WATCH YOUR LANES.
CEASE FIRE.
ARE THERE ANY ALIBIS?
♦ALIBI FIRERS WATCH YOUR
LANES.
♦CEASE FIRE.
CLEAR ALL WEAPONS.
CLEAR ON THE RIGHT?
CLEAR ON THE LEFT?
THE FIRING LINE IS CLEAR.
ROTATE.
* Commands given only if a scorer indi-
cates his firer has an alibi.
(5) Range safety. See appendix II.
TAGO 6024-A
103
Figure 56. Bunker position.
IM
TAGO 5024-A
Figure 57. Barricade position.
IOS
Figure 58. Forward slope (sitting) position.
106
TAGO 5024-A
Figure 59. Rooftop position.
w
TAGO Б024-Л
Figure 60. Window position.
108
TAGO 5024-A
CHAPTER 7
INDIVIDUAL NIGHT FIRING
Section I. GENERAL
66. Purpose
Individual night firing training teaches the
soldier to detect and hit targets at night or
during other periods when conditions of limited
visibility prevent the conventional use of
sights; e.g., smoke or fog.
67. Training Conditions
a. Individual night firing training should be
conducted immediately following daytime
marksmanship training since many of the pro-
cedures used at night are the same or very
similar to those used during the day.
b. Night firing training should be scheduled
only under conditions of half-moonlight or less.
If there is greater light intensity, some indi-
viduals will discover they can use their sights
in the same manner as in daytime firing. By so
doing, they will fail to learn the proper night
firing techniques and thus be ineffective during
periods of limited visibility.
c. Individual night firing courses, ammuni-
tion requirements and scorecards are contained
in appendix III.
Section II. FUNDAMENTALS
68. General
Firing a rifle at night is similar in many
respects to firing during the daytime. With the
single exception of “spot weld,” the steady
hold factors discussed in chapter 2 apply equal-
ly as well at night as during the day. Although
target detection and weapon alignment can be
a problem during the day, the absence of light
makes these two techniques even more difficult
at night. Consequently, night firing training is
focused on teaching soldiers the night applica-
tion of target detection and weapon alignment.
69. Target Detection
a. Principles of Night Vision. The principles
of night vision are dark adaptation, off-center
vision, and scanning. These principles are dis-
cussed in chapter 2, section V, FM 21-75. Ap-
pendix II, FM 21-75 outlines facilities and ex-
ercises required to conduct night vision train-
ing. This training is a necessary prerequisite
to night firing exercises.
b. Application of Night Vision to Night Fir-
ing. Once the soldier understands the principles
of night vision, he must learn to apply these
principles in firing his weapon. Essentially,
this involves two techniques, hold the head
high above the rifle and keep both eyes open
at all times.
(1) Hold the head high. If the head is
held close to the rifle (such as in day-
time firing), the rifle will tend to block
the firer’s view of the target area.
By raising the head so the eyes are
well above the weapon, the field of
vision is increased and sharpness of
detail is improved.
(2) Keep both eyes open. By keeping both
eyes open and applying the principles
of night vision, the firer uses his
“night eyes” to their full potential and
has maximum visual coverage of the
target area. Another important con-
sideration is that depth perception de-
pends to a great extent on the use of
both eyes.
70. Weapon Alignment
a. A natural pointing technique is used to
align the rifle on the target (fig. 61). The
TAGO 6024-A
109
Пучке Hl. Niyht firin у prone position.
sights cannot normally be seen at night, and
any attempt to use them in the conventional
manner will usually cause the firer to lose the
target. The pointing technique can be applied to
any position; however, for training, either the
foxhole or prone supported position should be
used. The reason for this is that these positions
are the most difficult from which to detect
targets at night and therefore offer the great-
est challenge to the individual’s night firing
ability.
b. To assume a correct firing- position at night,
the soldier first assumes the position just as
he would during the daytime. However, once
in position, he must make the following
changes:
(1) He raises his head high above the
rifle (par. 69b). A good technique is
to rest the chin on the comb of the
stock. This serves two purposes: first,
it insures that the eyes are well above
the rifle; and second, it assists the
firer to obtain correct horizontal align-
ment on the target. If the firer places
his chin on either side of the stock,
he will have a tendency to pull the
muzzle of the rifle to the right or left
to intersect his line of sight to the
target. This will cause the bullet to
go right or left of the target.
(2) He must keep both eyes open at all
times (par. 69b).
(3) He makes a bold depression of the
muzzle of the rifle. Because his eyes
are above the rifle, the firer will have
a natural tendency to raise the muzzle
until it intersects his line of sight to
the target. This will cause the bullet
to pass over the target. A method
of avoiding this error is to slide the
left hand slightly forward just prior
to aligning the rifle on the target.
This action forces the muzzle to drop.
110
TAGO 6024-A
Section III. CONDUCT OF TRAINING
71. Training Facilities and Equipment
a. Ranges.
(1) The night firing range (fig. 62) should
be constructed on level or slightly roll-
ing terrain. It should be located away
(or shielded) from artificial light
sources.
(2) The range should have an approxi-
mate depth of at least 100 meters.
Targets are placed at ranges of either
25 and 50 meters or 50 and 75 meters,
depending upon the light conditions.
(3) To support the targets, canisters are
sunk into the ground at ranges of 25,
50, and 75 meters from each firing
point.
(4) The range should have a dark back-
ground (such as a tree line) to pre-
vent skylining of targets.
(5) There should be at least ten meters
between firing points. With this inter-
val, there is less chance of individuals
firing on the wrong targets.
(6) A seventy-point range will accommo-
date a maximum of 210 firers divided
into three orders.
(7) The firing line should not be elevated.
The higher the firer is located above
ground level, the easier it is for him
to see the target.
(8) Only red or black lights should be
used for orientations, charts, and
demonstrations prior to the practical
exercises in night firing. White lights
should be used only after all firing
is completed or in event of an emer-
gency.
b. Targets. The “M” type silhouette targets
are used for all live firing conducted as part of
the night firing training program, including
daytime instruction firing.
c. Equipment. The equipment needed to con-
duct night firing training is listed below. The
designation “day” or “night” after each item
A Л A
75 METERS V ¥
50 METERS
25 METERS
Figure 62. Night firing range.
TAGO Б024-А
111
indicates whether it is required for daytime
instruction firing, night firing, or both.
Нен* Night
One “M” type silhouette target per point X X
Three white spotters per target X
White chalk X* X*
One empty magazine per firing point
(M14 only) X
Public address system . XX
One flashlight with red filter per safety
officer and noncommissioned officer X
Safety equipment as required by AR
385-63 and local regulations............... X X
* For students during daytime firing and for range NCO’s during
night firing.
72. Daytime Instruction Firing
a. Organization.
(1) Range personnel.
(a) One officer in charge of the range,
(ft) One safety officer.
(c) One noncommissioned officer in
charge.
(d) One instructor (NCO) per five fir-
ing points.
(e) Ammunition detail.
(/) Medical personnel.
(2) Organization of firers. Firers are di-
vided into three orders. Initially, the
first order is designated the firers, the
second order the coaches, and the third
order the ammunition men. When the
first order completes firing, it becomes
the ammunition men; the second or-
der becomes the firers; and the third
order becomes the coaches. This pro-
cedure is continued until all orders
have completed firing.
b. Conduct of Firing.
(1) Prior to beginning the practical live
fire exercises, the firers should receive
an orientation on the pointing tech-
nique, range procedures, and range
safety. Following this orientation,
firers are divided into three orders
and moved to the firing line. Targets
are placed at a range of 50 meters.
The order acting as ammunition men
are directed to secure one empty
magazine and three loose rounds of
ammunition and issue them to the
firer. The firer loads all three rounds
into the magazine and on command,
fires at the “M” type silhouette target
using night firing techniques. (If Ml
rifies are used, rounds are loaded
singly.) Following each three-round
shot group the firing line is cleared,
and the firer is directed to move down
range and check his target. The firer
draws a chalkline through each hole
on the target and then places the
spotters in the holes. By analyzing the
location of the bullet holes, the firer
will be able to determine how he has
been holding his rifle and adjust his
position accordingly. For example, if
all rounds struck high on the target,
the firer knows he must lower his
rifle muzzle. Holes on the extreme
right or left edge of the target indi-
cate a need for better horizontal align-
ment. After noting the type of correc-
tion needed to move the shot group
into the center of the target, the firer
returns to the firing line and on com-
mand, fires another 3-round shot
group. When the shot group falls with-
in the center of target mass, the firer
attempts to duplicate the exact same
relationship between his head and the
alignment of his weapon in firing sub-
sequent exercises. When the firer is
able to do this consistently, he has
determined his own “feeling zero.”
That is, he will be able to hit the
same general area on the target re-
gardless of the light conditions just
by knowing how his weapon “feels”
when it is properly aligned.
(2) During daytime instruction firing, the
coaches assume a coaching position
alongside the firers. They should ob-
serve the firers for proper application
of all steady-hold factors except “spot
weld.” Again, special emphasis must
be placed on trigger control.
c. Fire Commands. Fire commands should be
simple and include only the information and in-
structions required to conduct the exercise. A
type fire command for daytime instruction fir-
ing is as follows:
___________ ORDER, MOVE TO THE
FIRING LINE AND ASSUME A
(FOXHOLE) (PRONE SUPPORTED)
POSITION.
112
TAGO 6024-A
________ ORDER, ASSUME THE
COACHES’ POSITION.
________ ORDER, SECURE (*ONE
EMPTY MAGAZINE AND) THREE
ROUNDS OF AMMUNITION.
THE FIRING LINE IS NO LONGER
CLEAR.
LOCK, (*ONE MAGAZINE OF THREE
ROUNDS) (**ONE ROUND) LOAD.
THIS WILL BE YOUR (FIRST)
(SECOND) (THIRD) (FOURTH)
(FIFTH) SHOT GROUP.
COMMENCE FIRING WHEN READY.
CLEAR ON THE RIGHT?
CLEAR ON THE LEFT?
THE FIRING LINE IS CLEAR.
FIRERS AND COACHES MOVE DOWN
RANGE, MARK AND SPOT YOUR
TARGETS.
73. Night Practice cmd Record Hrfaig
a. Organization. Night firing can be extremely
hazardous unless the range is properly organ-
ized and the firers closely supervised. For this
reason, the range organization and supervisory
personnel listed below are essential for the safe
conduct of night firing. Although some modi-
fications in the organization of the range may
be required, night firing should not be at-
tempted without an adequate number of super-
visory personnel.
(1) Range organization (fig. 63).
(a) The firing points on the night firing
range (fig. 62) should be divided
into three alphabetical sections.
There are 20 firing points each in
“Alfa” and “Bravo” sections, and
30 firing points in “Charlie” sec-
tion. Each section is further sub-
divided into blocks of five firing
points. These blocks are given a let-
* M14 rifle* only.
** Ml rifle* only.
Figure 63. Organization of night firing range.
TAGO 5024-A
113
ter and numerical designation. For
example, there are 20 firing points
or four 5-point blocks in Alfa sec-
tion. The first block is designated
“Alfa One”; the second, “Alfa
Two”; and so on.
(b) A safety officer should be assigned
responsibility for each alphabetical
section, and one safety noncom-
missioned officer should be assigned
responsibility for each numerical
block.
(2) Range personnel.
(a) One officer in charge of the range.
(b) One safety officer per alphabetical
section.
(c) One noncommissioned officer in
charge.
(d) One safety NCO per numerical
block.
(e) Ammunition detail.
(/) Medical personnel.
(3) Organization of firers. Firers are di-
vided into three orders. However, un-
like daytime instruction firing, the
nonfiring orders remain on the ready
line until called forward to fire. There
is no coaching of firers at night, and
ammunition is issued to the firer by
the block safety noncommissioned of-
ficer.
b. Conduct of Firing. Night practice firing
and night record firing are conducted in the
same manner except that during record firing
block safety NCO’s record the number of hits
on the firer’s scorecards.
(1) The range at which targets are placed
at night depends upon the degree of
illumination. If there is one-quarter
or less moonlight, targets are placed
at ranges of 25 and 50 meters. If there
is more than one-quarter moonlight
but less than half-moonlight, targets
are placed at 50 and 75 meters. Night
firing training cannot be effectively
conducted under light conditions
greater than half-moonlight.
(2) Initially, firers should receive a re-
view on the pointing technique. This
should be followed by an orientation
on safety and range procedures.
(3) For the first exercise, targets are
placed at the closest range permitted
by the light conditions, and each sol-
dier fires eight rounds at this target.
Following the first eight rounds, the
firing line is cleared and the firer is
directed to move down range and stand
by his target until it is scored by the
block safety NCO. The block safety
NCO uses a red filtered flashlight to
check the results of the firers within
his block. Upon completion of scor-
ing, all firers and safety NCO’s re-
turn to the firing line and the next
order is called forward to fire the
exercise. After the third order has
completed firing, they are directed to
remove the targets from the canisters
and move them to the further range.
When the third order and safety
NCO’s have returned to the firing line,
the first order is again called for-
ward to fire. The firing procedures
outlined above are repeated until the
three orders have completed all of the
exercises.
c. Fire Commands. Fire commands should
be simple and include only the information and
instruction required to conduct the exercise. A
type fire command for night practice and night
record firing is as follows:
ARE RANGE PERSONNEL READY TO
FIRE? (Block safety NCO’s signify
“up” to the section safety officer. Safety
officers in turn signify “up” to the of-
ficer in charge; e.g., “Alfa is up,”
“Bravo is up,” etc.)
IS THERE ANYONE DOWN RANGE?
(Repeat three times.)
THE FIRING LINE IS NO LONGER
CLEAR.
_________ ORDER, MOVE TO THE
FIRING LINE AND ASSUME A FOX-
HOLE (PRONE SUPPORTED)
NIGHT FIRING POSITION.
_________ ORDER AND _____________
ORDER, REMAIN ON THE READY
LINE.
SAFETY NCO’s ISSUE (*ONE MAGA-
ZINE) (**ONE CLIP) OF EIGHT
ROUNDS.
114
TAGO 6024-A
LOCK, ONE (‘MAGAZINE) (“CLIP)
OF EIGHT ROUNDS, LOAD.
COMMENCE FIRING WHEN READY.
(When firing is completed, each section
safety officer signifies his section is
clear; e.g., ALFA IS CLEAR, BRAVO
IS CLEAR, CHARLIE IS CLEAR.)
THE FIRING LINE IS CLEAR.
FIRERS MOVE DOWN RANGE AND
STAND BY YOUR TARGETS UNTIL
CHECKED BY THE SAFETY NCO.
(After third order completes firing on the
near targets) FIRERS MOVE TAR-
GETS TO (50) (75) METERS.
* M14 rifle» only.
•* Ml rifle» only.
TAGO 5024-A
115
CHAPTER 8
ADVANCED INDIVIDUAL MARKSMANSHIP (SNIPING)
SecHon I. GENERAL
74. Purpose
The ability of an individual rifleman to hit
selected targets at long range has long been
recognized as an effective means of disrupting
enemy morale and delaying his operations. The
history of warfare records many examples of
one or two expert riflemen delaying large num-
bers of enemy troops simply through their
ability to consistently hit whatever or whom-
ever they wished. The purpose of advanced
individual marksmanship training is to teach
selected riflemen the techniques of hitting tar-
gets at long ranges.
75. Selection of Personnel
Each individual selected to receive advanced
marksmanship training should be carefully
screened to insure he possesses the skills and
personal attributes necessary to become an ef-
fective sniper. He should be intelligent, self-
reliant, and an expert marksman. In addition
to firing at enemy personnel, snipers are an
excellent source of intelligence information.
Consequently, they must know or learn how to
use a map and compass and the proper methods
and means of reporting information. Perhaps
the most important personal attribute of a
sniper is patience, for he may be required to
occupy one position for several days. A detailed
discussion of the duties and tactical employment
of snipers is contained in chapter 8, FM 21—75.
76. Scope
a. Training Program.
(1) The advanced marksmanship training
program is prescribed by ATP 7-18-1.
This program is optional during peace-
time. During mobilization, sniper
training is mandatory for a minimum
of three riflemen per rifle platoon or
a rifle company.
(2) Although proficiency in marksman-
ship is the principal basis for selecting
a sniper, it is but one of the skills re-
quired of an effective sniper (ch. 8,
FM 21—75). Information on subjects
other than marksmanship which re-
late to sniper training are contained
in other training publications (app. I).
b. Sniper Marksmanship Training. The suc-
cess of sniper marksmanship training is con-
tingent upon the detailed application of funda-
mentals. Although these fundamentals are the
same for any marksmanship course, snipers
must pay closer attention to details if they are
to consistently deliver accurate fire at all
ranges. In addition to a thorough knowledge
and proficiency in the application of funda-
mentals, snipers must have an understanding of
external ballistics, sight adjustments, and tar-
get detection. The ability to accurately deter-
mine ranges is a particularly important snip-
ing skill.
Section II. TECHNIQUE OF SNIPING
77. Positions
a. The sniper fires from any position that
allows him to obtain support and steadiness for
himself and his rifle. The steady hold factors
outlined in chapter 2 have an even greater ap-
plication when firing at the longer ranges. A
slight error in trigger control which would cause
a round to strike a few inches higher than the
point intended at 100 meters, would be several
feet over the target at 600 meters. The same
holds true for the application of the other
steady hold factors. An error which would be
116
TAGO 6024-A
insignificant at the shorter ranges will result
in a complete miss at the longer ranges.
b. In preliminary firing, the sniper uses a
sandbag rest to provide support. In field firing,
he uses whatever support that is available.
78. Application of the Integrated Act
of Shooting
a. Riflemen who have become sufficiently
expert with the rifle to be selected as snipers
will have already developed individual shoot-
ing characteristics. In most cases, these charac-
teristics will be based on their application of
the integrated act of shooting (par. 9).
b. Because of his method of employment, the
sniper will frequently have an opportunity to
engage enemy personnel who are unaware of
his presence. In such situations, there is usually
no necessity for him to fire as quickly as pos-
sible, and speed becomes much less important
than precision. Therefore, the sniper should
take extra care in checking his position and
proper application of fundamentals to insure
the greatest possible accuracy. This is best ac-
complished by following a set sequence of pro-
cedures as follows:
(1) Locate the aiming point.
(2) Relax enough to avoid muscular and
mental tension. In this connection,
once the firer has obtained a steady,
relaxed position but finds the sights
are slightly off in elevation, he can
make minor adjustments by either in-
haling or exhaling enough to bring
the sights to the aiming point.
(3) Lock the breath in the throat as the
aim is completed.
(4) Take up the slack in the trigger and
apply a continuous increase in pres-
sure without disturbing the sight
alignment.
(5) Shift the focus of the eye from the
target to the front sight blade to in-
sure proper sight alignment.
(6) As the rifle fires, follow through (still
relaxed) and pick up the target or
target area as quickly as possible.
Depending on the range to the target,
the firer may or may not be able to
see the strike of his bullet. If not, he
should continue to observe the target
for signs of movement.
79. Sight Adjustments
a. External Ballistics. When a rifleman be-
gins sniper training, he will have already deter-
mined the 250-meter zero of his rifle. With this
sight setting, he can deliver highly effective fire
on combat targets appearing out to ranges of
350 meters. He has also learned that within
this range span, he can compensate for range
differences (trajectory) by using an adjusted
aiming point. The effects of wind need not be
considered for targets at ranges of 350 meters
or less. However, as a sniper, he must be able
to consistently hit targets at ranges beyond 350
meters. At these ranges, both the trajectory
and the wind must be given due consideration
if the sniper is to hit the target.
(1) Trajectory (par. 28). In firing at tar-
gets beyond 350 meters, it is possible
for a soldier whose rifle is zeroed for
250 meters to compensate for the tra-
jectory (fig. 64) by using an adjusted
aiming point. However, from a prac-
tical standpoint, such a procedure in-
troduces the possibility of too many
human errors for the consistent de-
livery of accurate fire. For example,
to hit a 600-meter target using a rifle
zeroed for 250 meters would require a
firer to select an aiming point over
two meters (six feet plus) above the
desired point of impact. A vertical
measurement of this size at such a far
range is extremely difficult to judge.
To avoid this wide difference between
aiming points and points of impact,
the sniper must be able to adjust his
rear sight for a range as near that of
the target as possible. Known sight ad-
justments for 400, 500, and 600 meters
in addition to the 250-meter zero, pro-
vide sufficient flexibility in sight set-
tings for the majority of target situa-
tions occurring out to a range of 600
meters.
(2) Effects of wind. If a soldier fired at
a 250-meter target while a 15 mile per
hour wind was blowing from his right
flank, the bullet would strike the tar-
get approximately six inches to the
left of his line of aim. Since the aver-
age soldier is approximately 20 inches
wide, such a shot would still hit an
TAGO 6024-A
117
1/4 METER.
Т-1
Н 1/2 M<TtR
^=Ъ—1
300
ijjllMETEIR
I
+
н!» MCTER9
His METERS
900 000
еоо
т
«ООО
METERS
М-MAXIMUM ORDINATE---HIGHEST POINT OF TRAJECTORY (APPROXIMATE ONLY!
1/4 METER-9.5 INCHES
1/2 METER-1 FOOT 7 INCHES
1 METER-3 FEET 3 INCHES
3 METERS—9 FEET 9 INCHES
6 METERS—19 FEET 6 INCHES
Figure 61. Trajectory.
enemy soldier. However, if a soldier
fired at a 600-meter target under the
same wind conditions, the round would
strike approximately 36 inches to the
left of his line of aim, or almost twice
the width of an average soldier. Con-
sequently, the sniper must compen-
sate for the effects of wind at ranges
beyond 350 meters. To do this, he
must be able to “classify” the wind,
determine its velocity, and finally, con-
vert this information into “clicks”
which can be placed on the rear sight.
(a) Classification of winds. Winds are
classified according to the direction
from which they are blowing in rela-
tion to the direction of fire. The
“clock system” (fig. 65) is used to
indicate this direction. A wind blow-
ing from right to left directly across
the firer’s front is called a “3-o’clock
wind.” A wind blowing toward the
firer from his left front is called an
“11-o’clock wind.” The direction from
which the wind is blowing also denotes
the value of the wind. Winds from
either flank are “full-value winds,”
those from the oblique are “half-value
winds,” and winds blowing from either
the front or rear are “no-value winds.”
A half-value wind will affect the bullet
approximately half as much as a full-
value wind. That is, a 1-o’clock wind
having a velocity of 10 miles per
hour is equivalent to a 5-miIe per
hour 3-o’clock wind. For combat fir-
ing, the effect of a no-value wind on
the bullet is negligible and may be dis-
counted.
(b) Wind Velocity. There are three com-
mon field expedient methods of de-
termining wind velocities. Since the
tactical situation may limit the use
of some methods, snipers must be
thoroughly familiar with all tech-
niques.
1. “Flag” method (fig. 66). If a snip-
er can observe a flag (or any
clothlike material similar to a
flag) hanging from a pole, he
should estimate the angle (in de-
grees) formed at the juncture of
the flag and the pole. Dividing
this angle by the constant number
“4” will give the wind velocity in
miles per hour.
2. “Pointing” method (fig. 67). If no
flag is visible, a piece of paper or
other light material may be drop-
ped from the shoulder. By point-
ing directly at the spot where it
lands, the angle (in degrees) can
be estimated. This figure is again
divided by the number “4” to de-
termine the approximate wind ve-
locity in miles per hour.
3. “Observation” method. If the tac-
tical situation prevents the use of
the above two methods, snipers
can use the following information
118
TAGO 6024-A
Illlllllllll
Figure 65. Wind direction by the clock system.
in determining wind velocities.
(a) Under three miles per hour,
winds can hardly be felt, but the
presence of slight wind can be
determined by drifting smoke.
(b) A three to five mile per hour
wind can just be felt on the
face.
(c) Winds of five to eight miles per
hour keep tree leaves in con-
stant motion.
(d) At eight to twelve miles per
hour, winds will raise dust and
loose paper.
(e> A 12- to 15-mile per hour wind
will cause small trees to sway.
(c) Determination of windage adjust-
ment. After finding the wind direc-
tion and velocity, the windage cor-
rection to be placed on the rear sight
RxV
is determined by the formula --—
15
number of clicks of windage to be
placed on the rear sight for a full-
value wind. In this formula R =
range in hundreds of meters, V ==
velocity in miles per hour, and the
number “15” is a constant figure
computed mathematically. For half-
value winds, divide the answer by
two. In placing the computed ad-
justment on the rear sight, THE
REAR SIGHT APERTURE MUST
ALWAYS BE MOVED INTO THE
WIND. That is, for winds blowing
from 12:30 through 5:30 o’clock, the
rear sight aperture must be moved
to the right. Conversely, the rear
sight aperture must be moved to the
left for winds blowing from 6:30 to
TAGO Б024-А
11*
WIND
-Ч------
Figure 66. Determining wind velocity by the flag method.
15 MPH
WIND
Figure 67. Determining wind velocity by the pointing method.
120
TAGO 6024-A
11:30 o'clock. An example of com-
puting a windage adjustment is as
follows: A 10-mile per hour wind is
blowing from 9 o’clock. The range
to the target is 600 meters. Con-
verting thia information for use in
the wind formula, R - 6 and V
— 10. Thus,
RxV 6 x 10 60
15 15 15
four clicks (left windage). Toplace
this adjustment on the sight, the
windage knob is turned four clicks
to the rear, moving the rear sight
aperture four clicks to the left or
into the wind.
b. Sight Manipulation. The ability to proper-
ly manipulate the rear sight is extremely im-
portant to the sniper. When a shot or shot
group is fired and is not in the desired location
in relation to the aiming point, the sights must
be moved in order to move the shot or group to
the correct location. Training in this skill must
include an explanation and demonstration of
the elevation and windage rule and the charac-
teristics of the rear sight (paras. 25, 26, and
27). Following this, the sniper should practice
rear sight manipulation until the procedure be-
comes second nature to him.
80. Zeroing
a. In addition to the 250-meter battlesight
zero, snipers must know the proper adjustment
for ranges of 400, 500, and 600 meters. These
zeros can be obtained by using one or a combi-
nation of the following methods:
(1) Measured distance. The most precise
method of zeroing a rifle is to place
distinctive aiming points at measured
ranges of 250, 400, 500, and 600 me-
ters. The sniper then fires 3-round
shot groups at each aiming point, ad-
justing the rear sight until the center
of the shot group and the aiming point
coincide at each range.
(2) 25-meter zero.
(a) The principles of firing at a 25-
meter aiming point in order to ob-
tain a zero for greater ranges are
discussed in paragraph 28. The com-
puted distances between a 25-meter
aiming point and the point of im-
pact necessary to obtain a zero for
ranges of 400, 500, and 600 meters
are listed below. The method tor ob-
taining a 250-meter zero is discussed
in chapter 3.
1. 400 meters: point of impact 7.8 cen-
timeters above the aiming point.
2. 500 meters: point of impact 9.2 cen-
timeters above the aiming point.
3. 600 meters: point of impact 11 cen-
timeters above the aiming point.
(b) Firing at a range of 25 meters to
obtain a zero sight setting for great-
er ranges is not as precise as firing
at the actual range. Characteristic
differences between firers, their
weapons, and the ammunition cause
the exact relationship between the
25-meter aiming point and the point
of impact for a precise zero at a
specific range to vary between each
firer. In the case of the 250-meter
battlesight zero, these variances are
insignificant and may be discounted.
However, at greater ranges the
small error at 25 meters becomes
greatly magnified and could result
in a miss even though the sniper
fired a well-aimed shot. Therefore,
when possible, zeros obtained on the
25-meter range should be confirmed
by firing at the actual range.
(3) Field expedient zeroing. A third meth-
od of zeroing may be used under field
conditions. The sniper will require an
observer equipped with fieldglasses to
assist him in this procedure. This
method is conducted as follows:
(a) The sniper and observer pick out an
aiming point in the center of an area
where the observer can see the strike
of the bullet. This can be a hillside,
a brick house, or any dry surface
where the strike of the bullet can be
observed. The range to this point
can be determined by map survey,
the range card of another weapon,
or by ground measurement.
(b) The sniper sets the estimated range
and windage adjustment on his rear
sight and fires one round. The ob-
TAGO 6024-A
111
server notes the strike of the bullet
and gives the elevation and windage
change necessary to bring it to the
point of aim. He does this by esti-
mating the distance between the bul-
let strike and the aiming point—
right or left, high or low. He con-
verts these distances to clicks by
dividing- the error in inches by the
number of inches one click will move
the strike of the bullet at that range.
For example, a sniper fires at a
chimney on the side of a brick house
at a range of 400 meters. The left
edge of the chimney, even with the
top of the second story windows is
his aiming point. The sniper sets
the elevation knob at 400 meters and
the windage knob at zero and fires
one shot. The observer sees a puff
of brick dust about four feet to the
right and two feet low of the aiming
point. He gives these corrections:
“up six clicks (24 inches at that
range) and left 12 clicks” (48 inches
at that range). The sniper places
these corrections on his sight and
fires a confirming round.
Note. It is extremely important when
zeroing or confirming a zero by this field
expedient method that the shot be well
aimed and correctly fired, because the
sniper is making a sight change on the
basis of one shot. He should use the best
support available. If he feels that he has
jerked the trigger or if he calls it a “bad
shot,” it should be disregarded.
b. As the sniper obtains the proper sight ad-
justment for each range, he should count the
number of clicks back to zero to determine the
correct sight setting for that range. If a full-
er half-value wind is blowing at greater than
one mile per hour, he should also recompute his
windage setting on the basis of zero or no-value
wind. For example, suppose during zero firing
at 400 meters there is a 15-mile per hour wind
blowing from 9 o'clock. Using the wind formula,
the sniper finds that this would require four
clicks left windage to compensate for drift. In
checking the actual windage adjustment of his
rear sight, the sniper finds it required six clicks
left windage to obtain the correct zero. By sub-
tracting four clicks from six clicks, the sniper
then knows that the 4O0-meter zero of his rifle
on a day when there is no wind is two clicks
left windage. This procedure is very important
since the sniper must make adjustments for
winds of different velocities and from different
directions on subsequent days.
81. Adjusted Aiming Point
Even though the sniper has zeroed his rifle
for various ranges, it would be virtually impos-
sible for him to determine the precise sight set-
ting for every target appearing on the battle-
field. In addition, the fleeting nature of some
combat targets may prevent the sniper from
computing and setting the correct windage ad-
justment on his rear sight in sufficient time to
fire. Consequently, snipers must understand
and be able to apply adjusted aiming points at
all ranges and under various wind conditions.
a. Adjusting Aiming Points for Range. For
targets appearing at ranges other than those
for which he has a prezeroed sight setting, e.g.,
450 meters, 575 meters, the sniper should use
the nearest sight adjustment which is beyond
the range to the target. In this way, the adjust-
ed aiming point will be below the desired point
of impact. Besides being an easier point to lo-
cate, this procedure increases the probability of
a ricochet hit if the round strikes short of the
target.
b. Adjusting Aiming Points for Wind.
(1) Under field conditions, winds may be
hastily characterized as either medium
or strong. A medium full-value wind
has a velocity of approximately 10 to
15 miles per hour and is characterized
by leaves and grass being in constant
motion. A full-value strong wind has
an approximate velocity of 15 to 20
miles per hour and is characterized by
the swaying trees and bushes. The
sniper adjusts his aiming point by
aiming into the wind. That is, if the
wind is blowing from the right, he
aims to the right of the target or if
the wind is blowing from the left, he
aims to the left of the target. The firer
can use the width of the front sight
post as a measure to obtain the approx-
imate distance he should aim into the
wind. The scale below indicates the
approximate widths to be used at var-
ious ranges in a full-value wind.
122
TAGO Б024-А
Ra*Oc Number of fioet
(meter») width» to иве
Medium wind» Strong wind»
100--------------------------- 0 0
200---------------------------- 0 о
300--------------------------- о 0
400.______________________ i 2
500---------------------------- 2 3
600_____________________________ 2 4
Example: A sniper firing at an enemy
target at a range of 400 meters with a
strong wind blowing from 9 o’clock
would aim to the left twice the width
of the front sight post.
(2) If there is a constant wind from a
given direction, the sniper may set the
proper windage adjustment for the
range at which targets are most likely
to appear.
(3) Windage adjustments, whether
through sight manipulation or use of
an adjusted aiming point, are always
based on an estimate of the wind velo-
city. Only practice in wind shooting
will develop proficiency in determin-
ing the proper sight setting or using
the proper adjusted aiming point. If
the situation permits, the best method
of determining the effects of wind is to
fire a well-aimed shot at the target.
The observed lateral error between the
aiming point and the point of impact
will be the distance to change the
sights or adjust the aiming point.
Section III. SNIPER EXERCISES
82. Range Determination Exercises
Range determination exercises follow the pro-
cedures and precepts outlined in chapter 5.
These exercises can be conducted on a target
detection range; however, the standard target
detection range and the exercises for range de-
termination should be modified to permit prac-
tice in determining ranges out to 1,000 meters.
Greatest emphasis should be placed on deter-
mining target ranges of 600 meters and less.
83. Selection of Position, Movement, and
Sight Adjustment Exercises
a. Methods.
(1) A specific target is designated to the
sniper. He must then select and oc-
cupy the best sniping position in the
immediate vicinity from which to en-
gage the target. He adjusts the rear
sight based on his determination of the
range and wind velocity and simulates
firing a shot at the target. The in-
structor then comments on the good
and bad points of the sniper's actions,
the position he selected, and his sight
adjustment. In subsequent exercises,
the situation can be expanded by in-
forming the sniper whether the target
is likely to remain visible or quickly
disappear.
(2) Prior to the start of this exercise, sev-
eral sniper posts are predesignated on
the terrain by panels or flags. Each
sniper is directed to select the two best
positions as a primary and alternate
sniping post. They must then give the
reasons which caused them to select or
reject each of the possible positions.
After each sniper has given his solu-
tion, the instructor discusses the ad-
vantages and disadvantages of each
position, summarizing by giving his
own selection of the best positions.
This exercise should be repeated on
varied and unfamiliar terrain. Even-
tually, the panels used to designate
sniper positions should be eliminated.
An added requirement could be to de-
termine the sight setting based on the
location of the position, the terrain,
and a simulated enemy situation.
(3) The sniper is shown a sector assumed
to be occupied by the enemy. The snip-
er is then told to study the terrain,
select a route forward, and move to a
designated sniping position. Upon ar-
riving at the sniping post, a target sit-
uation is indicated to the sniper, and he
must perform the necessary actions to
simulate firing a round. Following this
simulated shot, the sniper must select
a new position and a route to it. When
the sniper has presented his solution
TAGO Б024-А.
123
to this last requirement, the exercise
is concluded, and the sniper's actions
and decisions are critiqued.
b. Common Errors. The following are the
most common errors committed by inexperi-
enced personnel. Instructors may use this list
as a checksheet in critiquing individual per-
formance.
(1) The selected route and/or position is
too exposed or conspicuous.
(2) The selected position does not have
good observation and/or fields of fire.
(3) The sniper is not properly concealed
from all directions and can be detected
by the outline of his helmet, shoulder,
forearm, or leg; depending upon the
angle from which he is seen.
(4) The selected position is in the sunlight
instead of the shade.
(5) The sniper’s movements to and from
a position are jerky and abrupt, thus
attracting attention.
(6) The selected position does not have a
covered route of withdrawal.
84. Firing Exercises
a. Zeroing. Zero firing is conducted as indi-
cated in paragraph 80.
b. Field Firing.
(1) Sniper’s equipment. In addition to nor-
mal combat equipment, each sniper
must be equipped with field glasses.
(2) Range organization.
(a) Ideally, a sniper range should be lo-
cated on terrain which has been left
primarily in its natural state. The
range should beat least 600 meters in
depth and, if possible, 1,000 meters.
There should be provisions along the
firing line for several sniper positions,
each situated to provide a slightly dif-
ferent perspective of the target area.
(b) “E” and “F” silhouette targets are
used for all field firing. “F” targets
are placed at ranges of 100 through
200 meters. *‘E” targets are used from
200 meters through 600 meters. Tar-
gets should be arranged to provide
varying degrees of concealment at var-
ious ranges. Automatic devices (fig.
38) provide the most efficient target
operation; however, pit details can be
used if the devices are not available,
(c) Considering the magnitude of the
sniper range requirement in relation
to the number of snipers to be trained
and the time required to conduct such
training, it will probably be necessary
to superimpose this facility over a
range designed for other type train-
ing. Consequently, the target arrange-
ment and the requirements for range
and safety officers, safety NCO’s, and
other supervisory and support person-
nel must be based on the type of facil-
ity available and the number of snip-
ers to be trained.
(3) Range procedures. In order to provide
the most realistic training environ-
ment, range commands to commence
and cease firing are not used in sniper
exercises. The only exception to this
is in the event of an unsafe condition,
the command CEASE FIRE should be
given immediately. Snipers must be
given a thorough orientation on each
exercise to include safety requirements
before they are permitted to move into
position. Any time after the sniper has
assumed his firing position in the des-
ignated location, he should be permit-
ted to fire without further command.
Therefore, the range must be cleared
for firing before the exercises actually
begin. An NCO (assistant instructor)
must accompany each sniper as a
scorer and to insure the safe conduct
of the exercise. When the sniper com-
pletes firing, the NCO clears the snip-
er’s rifle and signals the range officer
that the weapon is clear.
(4) Conduct of field firing.
(a) Adjusted aiming point exercise.
Snipers initially set their sights for
a range of 400 meters. Without
changing this sight setting, they fire
at various targets appearing at
ranges between 1OO and 600 meters.
The sniper is required to determine
the range to each target and the
proper adjusted aiming point for
that range in relation to his setting.
124
TAGO 5024-A
If there is a wind of sufficient velo-
city, snipers should be required to
make mechanical sight adjustments
for some targets and use adjusted
aiming points for others. Similar
exercises should be conducted with
the sights set for 250, 500, and 600
meters.
(6) Instruction firing. Instruction fir-
ing is designed to develop speed in
locating various targets, determin-
ing their range, selecting adjusted
aiming points, and accurately en-
gaging them. In order to provide
training under various light condi-
tions, the exercises should be con-
ducted at least three times by each
sniper — once at dawn, once at mid-
day, and once at dusk. Instruction
firing is composed of three exercises
as follows:
1. First exercise. The sniper is al-
lowed 16 rounds of ammunition to
hit eight targets. (Four “F” and
four “E” silhouette targets are
used for this exercise.) Targets
are exposed singly without time
limit; however, after the target is
hit or two rounds have been fired
at it, the target should be dropped.
The interval between target ex-
posures and the location of tar-
g e t s should be continuously
changed so the sniper does not
know when or where the next tar-
get will appear. The scorer con-
tinually checks the sniper’s posi-
tion to insure he is properly con-
cealed. If he is not, the scorer
does not let the sniper fire. The
sniper is scored as follows:
For each target hit with the
first round___________________- 1® points
For each target hit with the
second round__________________ 5 points
Possible score......... 80 points
2. Second exercise. This exercise is
conducted and scored the same as
the first exercise except that the
sniper is allowed only 30 seconds
to locate and fire at targets out
to 200 meters and one minute for
targets located between 200 and
600 meters.
3. Third exercise. In this exercise, the
sniper is allowed 12 rounds to hit
four “E” silhouette targets placed
at ranges between 400 and 600
meters. For each target situation,
the sniper is required to adjust
his rear sight based on his own de-
termination of the range and
wind conditions. Target operation
is the same as in the first exer-
cise. Scoring is conducted as fol-
lows :
For each target hit with the
first round------------------10 points
For each target hit with the
second round____________________ 5 points
For each target hit with the
third round--------------------- 2 points
Possible score----------40 points
(c) Record firing. The same three exer-
cises outlined above are fired once
for record. Range operation and
scoring are the same as prescribed
for the instruction firing exercises.
Qualification scores and ratings are
contained in appendix III.
(d) Range safety. See appendix II.
TAGO 6024-A
125
APPENDIX 1
REFERENCES
AR 370-5 Qualification and Familiarization.
AR 385-63 Regulations for Firing Ammunition for Training, Target Practice, and Combat.
FM 21-6 Techniques of Military Instruction.
FM 21-75 Combat Training of the Individual Soldier and Patrolling.
FM 23-5 U. S. Rifle, Caliber .30, Ml.
FM 23-8 U. S. Rifle, 7.62-mm, M14.
TM 9-1005-223-12 Operator and Organizational Maintenances Manual; 7.62-mm Rifle, M14 and Rifle Bipod М2.
TM 9-1005-223—34 Field Maintenance Manual; 7.62-mm Rifle, Ml4 and Rifle Bipod М2.
TM 9-1275 Ordnance Maintenance; U. S. Rifles, Caliber .30, Ml, MIC (Sniper’s), and M10 (Sniper’s).
TM 9-1305-200 Small Arms Ammunition.
TM 9-2205 Fundamentals of Small Arms.
TM 9-6920-210—14 Operator, Organizational and Field Maintenance Manual: Targets, Target Material, and Training Course Layout.
ATP 7-18-1 Rifle Company, Infantry Airborne and Mechanized Infantry Battalions.
ATP 21-114 Male Military Personnel Without Prior Service.
ASubjScd 23-31 DA Pam 23-2 Rifle Marksmanship. Hits Count.
DA Pam 108-1 Index of Army Motion Pictures, Film Strips, Slides and Phono-Recordings.
126
TAGO 6024-A
APPENDIX II
SAFETY
1. Purpose
This appendix lists the standard safety pre-
cautions to be observed during rifle marksman-
ship training. These safety precautions have
general application and must therefore be sup-
plemented by local regulations governing the
operation of specific facilities, e.g., night firing
ranges.
2. Mechanical Training
a. All rifles must be cleared prior to conduct-
ing mechanical training.
b. A careful check of dummy rounds must be
made to insure that no live ammunition is
among them.
c. Toolboxes, spare parts boxes, or other con-
tainers in the vicinity of the training area must
be checked to insure the absence of live ammu-
nition.
3. Range Firing
a. Dummy rounds must be checked to insure
no live ammunition is among them.
b. Each rifle will be inspected by an officer
or NCO prior to firing to insure there is no ob-
structions in the bore. Upon completion of fir-
ing, each rifle will be inspected to insure that
all live ammunition has been removed from the
weapon.
c. Except while being used to conduct live
or dry fire exercises, all rifles will have bolts
open and safeties locked to the rear in any
area where live ammunition is being used or is
available.
d. When carrying a rifle on the range, the
muzzle will be pointed up and down range.
e. During live fire exercises, all rifles present
on the range will be presumed to be loaded and
must therefore never be pointed at anyone or
anything except the authorized targets.
/. During daytime live fire exercises, a red
streamer will be displayed from a prominent lo-
cation on the range.
g. During night firing exercises, a red flash-
ing light and a red streamer will be displayed
from prominent locations.
h. Live firing will not be conducted until all
prescribed roadblocks have been established and
all necessary range guards posted.
i. Ammunition will be issued only on com-
mand from the control tower.
j. Rifles will be loaded (or simulated loaded)
only on command from the control tower.
k. Prior to firing, all individuals to include
range personnel will be informed of the safety
limits of the range.
I. When not being used, rifles will be placed
in racks or in such a position as to be easily in-
spected to insure bolts are open and safeties en-
gaged.
m. Dry firing will not be conducted in rear of
the firing line unless supervised by an officer
or NCO.
n. Smoking is not permitted on the firing
line or near ammunition.
o. Running is not permitted on the range.
p. Personnel will not move forward of the fir-
ing line until given clearance by the officer in
charge.
q. Anyone observing an unsafe condition dur-
ing firing exercises is authorized to give the
command, CEASE FIRING. When this com-
mand is given, it will be relayed immediately to
the control officer who will command, CEASE
FIRING. The range safety officer is then re-
sponsible for investigating the unsafe condition,
taking necessary corrective action, and verify-
ing to the officer in charge that the unsafe con-
dition has been corrected and firing may be
resumed.
r. All personnel will be inspected for brass
and ammunition and their weapons cleared
prior to leaving the range.
TAGO 5024-A
127
4. Mt Operation
a. The command to commence firing will not
be given until clearance has been received from
the pit officer.
b. All members of the pit detail will wear
steel helmets.
c. Target operators will remain at their tar-
gets unless they have been granted permission
to leave by supervisory personnel.
d. No one will leave the pits until clearance
has been granted by the officer in charge of
the range.
e. Target operators must not expose any part
of their bodies above the protective berm while
marking or otherwise handling the targets and
target frames.
5. Exercises Which Require Movement of
Rrers
a. During any exercise requiring firers to
move with loaded rifles, safety NCO’s or scorers
will accompany the firers to insure their proper
alignment and that rifle muzzles are pointed
down range at all times.
b. If a rifle fails to fire during a movement
exercise, the firer must move forward when so
directed regardless of whether or not he has
cleared the stoppage.
6. Safety Noncommissioned Officers
a. The principal duty of safety NCO’s is to
enforce safety regulations to include inspecting
weapons upon completion of firing to insure
they can be safely removed from the firing line.
Safety NCO’s may also be used to critique and
correct the firers’ application of fundamentals
provided this duty does not interfere with their
principal task of enforcing safety regulations.
b. Safety NCO’s must understand the var-
ious signals necessary to insure safe operation
of the range. If possible, each safety NCO
should be equipped with a safety paddle (fig.
91) to assist in giving these signals. Methods
of giving signals with and without safety pad-
dles are as follows:
(1) With safety puddles.
(a) NOT READY or NOT CLEAR—
The safety paddle is held over the
head with the red side facing the
control tower.
(b) READY or CLEAR—The safety
paddle is held over the head with the
white side facing the control tower.
(2) Without safety paddles.
(a) NOT READY or NOT CLEAR—
The safety NCO faces the tower
and extends both arms over his head
with his hands clasped.
(b) READY or CLEAR—The safety
NCO faces the tower and extends
his arms up and to his front with
the palms of his hands toward the
control tower.
128
TAGO 6024-A
APPENDIX III
RIFLE MARKSMANSHIP COURSES
Section I. BASIC RIFLE MARKSMANSHIP COURSE
1. General
The marksmanship courses outlined below are
designed for company battery size units having
a personnel strength of 200 men. Units having
greater or lesser strength should adjust the
prescribed training hours accordingly. Detailed
description of subjects and time breakdown of
training periods are contained in Army Subject
Schedule 23—31.
2. Scope
The basic rifle marksmanship course is con-
ducted as part of ATP 21-114. Range facilities
required to conduct this course are one 110-
point 25-meter range (with foxholes and
stumps along the firing line), one 35-point field
firing range, two 50-point target detection
ranges, and one 16-lane record range. The
course consists of 75 hours of instruction as
follows:
Orientation ________________________ 1 hour.
Mechanical training----------------- 4 hours.
Preparatory marksmanship------------- 32 hours.
Target detection_____________________ 14 hours.
Field firing_________________________ 16 hours.
Record firing and target detection
testing___________________________ 8 hours.
Total marksmanship training---75 hours.
ATP subjects (conducted concurrently
with, but not included as part of, indi-
vidual marksmanship instruction)___12 hours.
3. Ammunition
a. Ammunition Required by Period or Ex-
ercise.
TAGO S024-A
129
(1) Preparatory marksmanship and 25-meter firing.
Period Position Rounds P«r soldier Rounds for demonstration i Notoe -f —- - — — -
1,2, and 3» None i j «Orientation, mechanical training I and introduction to marksmanship training.
4 5 Prone Prone supported ♦5 *30 ♦10/10(20)b ью rounds rehearsal, 10 rounds demonstration. Total: 20 rounds.
6 Prone *10
6 Sitting *10
6 Squatting *10
6 Kneeling *10
7 Kneeling supported *10
7 Standing *10
7 Foxhole 9 4/4(8)c c4 rounds rehearsal, 4 rounds demon- stration. Total: 8 rounds.
7 ^Standing to prone 4 4/4(8)e dTwo exercises. 2 rounds and 24 seconds per exercise.
8 «Foxhole or prone supported-. 12 eBattlesight zero. Position must be 25 meters from targets.
9 fProne supported 3 fProgress check.
9 fProne 3
9 ^Sitting 3
9 ^Squatting 3
9 ^Kneeling 3
9 ^Kneeling supported 3
9 ^Standing 3
9 Retire weak positions 9
10 Retire weak positions 18
13 Sitting 6
13 Squatting e
13 Kneeling 6
13 Standing 6
15 «Foxhole or prone supported.. 6 ^Confirmation of zero.
15 d Standing to sitting 4
Note. The asterisk (*) denotes rounds of caliber -2Л ammunition required. All subsequent exercises are conducted using service ammu-
nition. If caliber .22 rifles sure not used during periods 4 through 7, substitute three rounds of service ammunition for each flve rounds
of caliber .22 ammunition listed.
130
TAGO S024-A
(2) Field firing exercises.
(4) Record firing.
Period Round* per soldier Rounds for demonstration Notes
10 48 3/9(12)a Tracer rounds re-
quired for demonstra- tion. 3 rounds re- hearsal, 9 rounds demonstration. Total: 12 rounds.
11 36
12 36
13 24 4/8(12)b b4 rounds rehearsal,
8 rounds demon- stration. Total: 12 rounds.
14 40
15 40
16 36
Period Rounds per soldier Rounds for demonstration Notes
17 56 8/32(40) 8 rounds rehearsal, 16 rounds per demon- stration (2). Total: 40 rounds.
18 40
b. Recapitulation of Ammunition Require-
ments.
(3) Target detection.
Period Corresponds to target detection period—1 Number of presentations Blank rounds required ’
6 1 8 200
7 2 8 200
10 3 4 55
11 4 4 288
12 5 4 276
14 6 4 None
16 7 4 540
17 8 8 153
18 9 8 270
1 See appendix VI.
1 Includes rounds for rehearsals.
Caliber .22 rounds per soldier______________ 95
Caliber .22 rounds per unit (demonstration) . 20
Caliber 7.62-mm (or .30) rounds per soldier.. 463
Caliber 7.62-mm (or .30) rounds per unit
(demonstration) ----------------------------- 68
Caliber 7.62-mm (or .30) rounds tracer
(demonstration) ----------------------------- 12
Caliber 7.62-mm (or .30) rounds blank per
unit..................—------------------- 1,982
4. Scorecards and фиойЯсаНоп Scores
a. Scoreboards.
TAGO 5024-A
111
PERIOD TEN
SCORECARD
Filer's Name --------------------------------------------------------------------------------------------------------
(Last) (First)
Platoon_______________________________Firing Point_______________________________ r>at*
Scorer's Name-------------------------------------------------------------------------------------------
(Last) (First)
*Phase 1. Foxhole position.
Range (meters) Round Hit Miss
75 1
75 2
75 3
175 4
175 5
175 6
175 7
300 8
300 9
300 10
300 11
300 12
300 13
300 14
300 15
300 16
Total
•Phase 2. Prone supported position.
Range (meters) Round Hit Miss
75 1
175 2
175 3
175 4
300 5
300 6
300 7
300 8
Total
Total for period 10.
Hit Miss
Phase 1
2
3
4
5
Total
•Phase 3. Kneeling position.
Range (meters) Round Hit Mies
75 1
175 2
175 3
175 4
300 5
300 6
300 7
300 8
Total
•Phase 4. Squatting position.
Range (meters) Round Hit Miss
75 1
175 2
175 3
175 4
300 5
300 6
300 7
300 8
Total
•Phase 5. Sitting position.
Range (meters) Round Hit Miss
75 1
175 2
175 3
175 4
300 5
300 6
300 7
300 8
Total
* No time limit.
132
TAGO 5024-A
PERIOD ELEVEN
SCORECARD
Firer’s Name— .... - ......................................
(Last) (First)
Platoon Firing Point____________________________________________ Date
Scorer’s Name-------------------------------------------——-—-————--------------—--——--------
(Last) (First)
Phase 1. Foxhole position.
Range (meters) Time (seconds) Round Hit Miss
300 10 1
17Б 10 2
75 5 3
300 10 4
175 10 5
76 5 6
175 10 7
75 5 8
Total
Phase 3. Kneeling position.
Range (meters) Time (seconds) Round Hit Miss
300 10 1
175 10 2
75 5 3
300 10 4
175 10 5
75 5 6
Total
Phase 2. Sitting position.
Range (meters) Time (seconds) Round Hit Miss
300 10 1
175 10 2
75 5 3
300 10 4
175 10 5
75 5 6
175 10 7
75 5 8
Total
Phase 4. Kneeling supported position
Range (meters) Time (seconds) Round Hit Miss
300 10 1
175 10 2
75 5 3
300 10 4
175 10 5
75 5 6
175 10 7
75 5 8
Total
Total for period 11.
Hit Miss
Phase 1
2
3
4
5
Total
Phase 5. Standing position.
Range (meters) Time (seconds) Round Hit Miss
300 10 1
175 10 2
75 5 3
300 10 4
175 10 5
75 5 6
Total
TAGO 8024-A
133
PERIOD TWELVE
SCORECARD
Firer’s Name_________________________________________________________________________________________________ .
(Last) (First)
Platoon______________________________- Firing Point_______________________________ Date— .......- ........-
Scorer’s
(Last) (First)
Phase 1. Foxhole position. Phase 4. Prone position.
Range (meter*) Tim* ( seconds > Round Hit ' Mies
75 5 1
300 10 2
300 10 3 i
175 7 4 i !
175 7 5 j
300 10 6
Total
Range (meter*) Time (seconds) Round Hit Mias
75 5 1
175 7 2
300 10 3
300 10 4
175 7 5
300 10 6
Total
Phase 2. Kneeling position.
Range (meters) Time (seconds > Round Hit Miss
300 10 1
175 7 2
175 7 3
300 10 4
300 10 5
75 5 6
Total 1
Phase 5. Sitting position.
Range (meters ) Time (second*) Round Hit Miss
300 10 1
300 10 2
175 7 3
300 10 4
75 5 5
175 7 6
Total
Phase 3. Kneeling support position.
Range (meter*) Time (seconds) Round Hit Mis*
75 7 1
75 5 2
300 10 3
175 7 4
300 10 5
300 10 6
Total
Phase 6. Squatting position.
Range (meter*) Time (second*) Round Hit Miss
75 5 1
300 10 2
300 10 3
175 7 4
175 7 5
300 10 6
Total
Total for period 12.
Hit Mis*
Phase 1
2
3
4
5
6
Total
134
TAGO Б024-А
PERIOD THIRTEEN
SCORECARD
Firer’s Name______________* ____________________________________________________________________________________
(Last) (First)
Platoon________________________________Firing Point_____________________________ Date
Scorer's Name.................................................................................................
(Last) (First)
Phase 1
Place Position Range (meters) Time (seconds) Round Hit Miss
Rear stake Standing 76 5 1
By stump Standing 75 5 2
By foxhole Standing 75 5 3
By front stake Prone 75 5 4
Rear stake Squatting 175 7 5
By stump Kneeling supported 175 7 6
By foxhole Kneeling 175 7 7
By front stake Sitting 175 7 8
Rear stake Sitting 300 10 9
By stump Kneeling supported 300 10 10
By foxhole Kneeling 300 10 11
By front stake Squatting 300 10 12
Rear stake Kneeling 17Б 7 13
By stump Kneeling supported 300 10 14
By foxhole Squatting 17Б 7 15
By front stake Sitting 300 10 16
Phase 2
Rear stake Sitting 300 10 1
By stump Kneeling supported 175 7 2
By foxhole Squatting 300 10 3
By front stake Standing 75 5 4
Rear stake Kneeling 175 7 5
By stump Kneeling supported 300 10 6
By foxhole Standing 75 5 7
By front stake Squatting 175 7 8 f
Total for period 13
Hit Miss
Phase 1
2
Total
TAGO S024-A
135
PERIOD FOURTEEN
SCORECARD
Firer’s Name-----, -------------------------------------------------------------------------------------------------------
(Last) (First)
Platoon____________________________Firing Point_____________________________ Date----------------------------
Scorer’s Name—-----------------------------------------------------------------.------—- — -------------------------
(Last) (First)
Phase 1
Ptace Position Henge (meters) Time (seconds) Round Hit Miss
Rear stake Kneeling 175 7 1
By stump Kneeling supported 75 5 2
By foxhole Prone 300 10 3
By front stake Standing 75 5 4
Rear stake Squatting 175 7 5
By stump Kneeling supported 300 10 6
By foxhole Standing 175 7 7
By front stake Sitting 300 10 8
Phase 2 (positions optional with firer)
Place Range (meters) Time (seconds) Round Hit Miss
Rear stake 300 10 1
Rear stake 175 7 2
By stump 300 10 3
By foxhole 300 10 •'4
By front stake 175 7 5
Forward of stake 75 5 6
Rear stake 175 7 7
Rear stake 75 5 8
By stump 175 7 9
By stump 300 10 10
By foxhole 300 10 11
By foxhole 175 7 12
By front stake 300 10 13
Forward of stake 300 10 14
Forward of stake 300 10 15
Forward of stake 300 10 16
136
TAGO Б024-А
Phase 3 (positions optional with flrer)
Place Ran** (meter*) Time (aeeonda) Round — „.y,, Hit Шм
Behind stump 175 7 1
Behind stump 300 10 2
By stump 300 10 3
By stump 800 10 4
By foxhole 75 5 5
By front stake 175 7 6
By front stake 300 10 7
Forward of stake 175 7 8
Behind stump 300 10 9
Behind stump 300 10 10
By stump 75 5 11
By foxhole 175 7 12
By foxhole 300 10 13
By front stake 300 10 14
Forward of stake 75 5 15
Forward of stake 300 10 16
Total for period 14
Hit Шм
Phase 1
2
3
Total
TAGO Б0М-А
117
PERIOD FIFTEEN
SCORECARD
Fixer's Name..._____________________________________________________________________________________________
(Last) (First)
Platoon_____________________________Firing Point _____Date
Scorer’s Ngmp ---------------------------------------,------------------------------------
(Last) (First)
Phases 1 and 2 fired from foxhole position
Phase 1
Range (meters) Time (seconds) Hit Miss
First round Second round
75 175 20
175 300 Left 300 Right 30
175 300 Left 300 Right 30
Total
Ammunition 12 rounds.
Phase 2
Range (meters) Time (seconds) Hit Miss
First round Second round
75 175 20
175 300 Left 300 Right 30
175 300 Left 300 Right 30
Total
Ammunition 12 rounds.
Phase 3 (advancing exercises)
Place Position Range (meters ) Time (seconds) Hit Miss
First round Second round
Rear stake Kneeling 75 175 20
By stump Kneeling supported 175 300 Left 300 Right 30
By foxhole Sitting 175 300 Left 300 Right 30
Front stake Squatting 75 175 20
Total
Ammunition 16 rounds.
Totals for period 15
First round hits Second round hits Miss
Total hits
138
TAGO 6024-A
PERIOD SIXTEEN
SCORECARD
Firer’» Name__~______ ._________________________________________________________________________
(Last) (First)
Platoon---------------------------- Firing Point Date
Scorer’s Name.-______ _ __________________________________________________________________
(Last) (First)
Phases 1 and 2 fired from foxhole position
Phase 1
Ren ire ( meter») Time (second») Hit Miss
First round Second round
75 300 Left 300 Right 30
75 175 20
175 300 Left 300 Right 30
Total
Ammunition 12 rounds.
Phase 2
Range (meters) Time (seconds) mt Mim
First round Second round
75 175 20
75 175 300 Left 300 Right 40
300 Left 300 Right 25
Total
Ammunition 12 rounds.
Phase 3 (advancing exercises, optional positions)
Place Ranee (meters) Time (seconds) Hit Miss
First round Second round
By stump 75 300 Left 300 Right 30
By foxhole 75 175 20
Front stake 175 300 Left 300 Right 30
Total
Ammunition 12 rounds.
Total hits for period 16
First round hits Second round hits Miss
Total hits
TAGO 8024-A
139
PERIOD SEVENTEEN
SCORECARD
Firer’s Name____________________________________________________________ ASN
(Last) (First)
Unit_____________________________Order No. ......................... Weather: Record I_________________________
Record II_________________________________
Time: Record I (AM PM) Cross Out One
Record II (AM PM) Cross Out One
RECORD I
Foxhole position
Table 1. Firing Point No.
Round Ranee (met ere) Time (seconds) Hit Miss No Fire
1 250 10
2 300 10
3 200 5
4 150 5
5 50 5
6 350 10
7 100 5
8 200 5 1
Table 2. Firing Point No.
RECORD I
Unsupported positions
Table 5. Firing Point No.
Round Range (meters) Time (eeconds) Hit Miss No Fire
MO 1 150 5
2 350 10
MO 3 100 5
MO 4 200 5
5 300 10
6 200 5
MO 7 250 10
MO 8 150 5 1 1
1 100 5
2 250 10
3 300 10
4 150 5
5 50 5
6 350 10
7 100 5
8 200 5
Table 3. Firing Point No.
Table 6. Firing Point No.
MO 1 250 10
MO 2 300 10
3 150 5
4 250 10
MO 5 100 5
MO 6 200 5
7 300 10
MO 8 250 10 .
1 250 10
2 150 5
3 100 5
4 200 5
5 250 10
6 300 10
7 350 10
8 200 5
Table 4. Firing Point No.
Table 7. Firing Point No.
MO 1 200 5
MO 2 300 10
MO 3 150 5
4 350 10
MO 5 300 10
6 200 5
7 250 10
MO 8 150 5
1 50 5
2 200 5
3 100 5
4 200 5
5 150 5
6 250 10
7 300 10
8 150 5
Nott. MO—Move Out.
Record I Totals Hit Miss No Fire
1
140
TAGO 8024-A
PERIOD EIGHTEEN
SCORECARD
RECORD II RECORD II Foxhole position Unsupported positions Table 1. Firing Point No. Table 3. Firing Point No.
Phare Ranee ( meter») Time (seconds) Hit Miss No Fire Phare Range (meters) Time (seconds) Hit Mire No Fire
1 150 5 MO 1 100 15
2 300 10 200
3 100 15 MO 2 150 15
250 300
4 50 15 MO 3 100 25
200 200
Ammunition eight rounds. 300
MO 4 150 25
Table 2. Kring Point No. 250
Phase Range (meters) Time (seconds) Hit Mias No Fire 350
1 100 15 Ammunition 16 rounds. • Load one tnagasine (clip) of eight rounds in the weapon l place the other magaxine (clip) of eight rounds in the belt. Reload when neceeeary. Note. Unexpended ammunition from one table cannot be used for
350
2 200 15
250
3 100 15
150
4 100 25 Record II Totals Hit Mire No Fire
250
300
5 50 25
200 Grand total hits Record I and II
350 1
* Ammunition 16 rounds.
larffeis Rounds Exposed Record I 56 56 Record II 40 28 Totals 96 84 —
Qualification (circle one): Expert Sharpshooter Marksman Unqualified
Scorer's signature_________________________________________________________
Officer's signature________________________________________________________
b. Qualification Scores and Ratings. Quali- Possible ................... 84
fication scores are based on the total number Expert ...................... 51 and above,
of target hits obtained in Record Firing I and Sharpshooter ................ 40 to 50 inclusive.
П. Scores and qualification ratings are as Marksman .................... 27 to 89 inclusive,
follows: Unqualified.................. Below 27.
TAGO MZ4-A
Ml
Seetioa H. ALTERNATE BASIC RIFLE MARKSMANSHIP COURSE
5.Sc^m
The alternate basic rifle marksmanship
course is conducted as part of ATP 21-114.
Range facilities required to conduct this course
are one 100-point 1000-inch range, one known
distance range having at learnt 50 firing points,
two 50-point target detection ranges, and one
combat positions range. This course should be
conducted only if the range facilities required
for the basic rifle marksmanship course are
not available. The alternate basic rifle marks-
manship course consists of *81 training hours
as follows:
Orientation_________________________
1 hour.
Mechanical training _____________ 4 hours.
Preparatory marksmanship .......... 26 hours.
Known distance field firing ..... 12 hours.
Known distance record firing....... 4 hours.
Target detection ............. . 16 hours.
Combat positions firing............. 4 hours.
Combat positions record firing .... 2 hours.
♦Pit details....................... 12 hours.
Total hours _________________ 81.
ATP subjects (conducted concur-
rently with, but not included as
part of, individual marksmanship
instruction) ___________________- 6 hours.
* If automatic target devices are not used on the known diatanee
or combat position» ranffe.
6. Ammunition
a. Ammunition Required by Period or
Exercise.
(1) Preparatory inarksmanship and 1000-inch firing.
Period Position Rounds per soldier Rounds for demonstrations Notes
1,2, and 3» None •Orientation, mechanical training and
introduction to marksmanship.
4 Prone •6 •10/10 (20)b blO rounds rehearsal, 10 rounds dem-
onstration. Total: 20 rounds.
6 Prone supported •30 «This exercise is omitted if service
6 Prone t •10 rifles have been used for previous
6 Sitting •10 exercises.
6 Squatting _ _ •10 <>4 rounds rehearsal, 4 rounds dem-
6 Kneeling •10 onstration. Total: 8 rounds.
7 Standing •10 'Two exercises. 2 rounds and 24
7 «Prone supported 6 4/4 (8И seconds per exercise.
7 •Standing to prone 4 4/4 (8)<> fBattlesight zero.
7 •Standing to sitting 4 «Progress check.
8 fProne supported 12 hOne exercise conducted in 24 seconds.
9 «Prone supported 3
9 «Prone 3
9 «Sitting 3
9 «Squatting 3
9 «Kneeling 3
9 «Standing 3
9 ^Standing to prone 2
9 ^Standing to sitting 2
9 Refire weak positions 9
•The asterisk (•) denotes rounds of ealiber .22 ammunition required. AU subsequent exercises are conducted using service ammunition.
If caliber .22 rM«a are not used during periods four through seven, substitute 8 rounds of service ammunition for eaeh 6 rounds of
ealiber M ammunition listed.
142
TAGO Б024-Л
(2) Known distance field firing exercises.
Period Position Rounds per soldier Rounds for demonstrations Netos
10 See scorecard 52 «3/9 (12) «3 rounds tracer, rehearsal. 9 rounds tracer, demonstration. Total: 12 rounds.
11 See scorecard 48 blO/10 (20) h10 rounds rehearsal. 10 rounds dem- onstration. Total: 20 rounds.
12 See scorecard 48
«13 See scorecard 50 •Record Firing I
(3) Combat position firing exercises.
Period Position Rounds per soldier Rounds for demonstrations Notes
13 As prescribed None Orientation on combat positions range.
14 See scorecard 40 Practice firing.
15 See scorecard 40 Record firing II
(4) Target detection.
Period ’ Corresponds to target detection period: 2 Number of presentations Blank rounds required
6 1 8 *200
7 2 8 *200
•♦10 3 and 4 2 *225
*♦11 3 and 4 2 118
*♦12 5 2 ♦184
*♦18 5 2 92
14 6 4 None
14 7 4 *540
14 8 and 9 8 ♦423
1 Scheduling based on requirement for pit details.
2 See appendix. VI.
* Includes rounds for rehearsals.
•• One-half of unit.
b. Recapitulation of Ammunition Require-
ments
Caliber .22 rounds per soldier____________ 85
Caliber .22 rounds for demonstrations
(unit) --------------------------------- 20
Caliber 7.62-mm (or .30) per soldier______ 335
Caliber 7.62-mm (or .30)
for demonstrations (unit) _______________ 36
Caliber 7.62-mm (or .30) tracer___________ 12
Caliber 7.62-mm (or .30) blank ___________ 1,982
7. Scorecards and Qualification Ratings
a. Scorecards.
TAGO 5824-A
143
PERIOD TEN
SCORECARD
Firer’s Name--------------------------------------------------------------------------------------------------------
(Last) (First)
Platoon________________________________Firing Point________________________________ Date----------------------------
Scorer’s Name------------------------------------------------------------------------------------------------------—.
(Last) (First)
ALL TARGETS EXPOSED SINGLY
Phase 1. 100 yards (92 meters)
unde per ixercise Position Time (sec- onds) i Score
1 * Round Hit Miss
30 I 1 i I
4 Prone 30 2
30 3 !
30 4
30 5
30 6
30 7
8 Standing 30 8
30 9
30 10
30 11
30 12
Total
Phase 2. 200 yards (184 meters).
Rounds per Exercise Position Time (sec- onds) Score
* Round Hit Miss
30 j 1
4 Prone 30 2
30 3
30 4
15 5
4 Kneeling 15 6
15 7
15 8
15 9
4 Squatting 15 10
15 11
15 12
15 13
4 Sitting 15 14
15 15
15 16
Total
Phase 3. 300 yards (276 meters).
Rounds per Exercise Position j Time J (eec- i onds) i Score
* Round Hit Mies
’ 30 1
1 30 2
! 30 3
♦*8 Prone 30 4
30 5
30 6
30 7
30 8
15 9
15 10
15 11
♦*8 Kneeling 15 12
15 13
15 14
15 15
15 16
1 15 17
15 18
15 19
**8 Sitting 15 20
15 21
15 22
15 23
15 24
Total j
TOTALS FOR PERIOD TEN
Hit Miss
Phase 1
2
2
Total
* One round per target.
** Plus one dummy round loaded in magazine or clip to simulate
stoppage.
144
TAGO S024-A
PERIOD ELEVEN
SCORECARD
Fi rer’s Na me----------------------------------------------------------- ....... . ... ______________________ ,
(Last) (First)
Platoon--------------------------------Firing Point_____________________________Date
Scorer’s N a me________________________________________________________________________________________________________
(Last) (First)
ALL TARGETS EXPOSED SINGLY
Phase 1, 100 yards (92 meters).
Rounds per Exercise Position Time (sec- onds) Score
* Round Hit Miss
2 Standing to 8 1
kneeling 8 2
2 Standing to 7 3
squatting 7 4
6 5
4 Standing to 6 6
standing 6 7
6 1 8
Total 1
Phase 2. 200 yards (184 meters).
j Rounds per Exercise Position Time (sec- ( Score
onds) 1 * Round Hit Miss
2 Standing to sitting 12 ! i
12 2
2 Standing to kneeling 12 3
12 4
2 Standing to squatting 12 5
12 6
2 Standing to optional 12 . . _ -1 7
12 8
MO. Standing to optional 12 9
12 .. . 10
12 i 11
**8 MO. Standing to optional 12 ! 12
12 13
MO. Standing to optional 12 14
12 15
12 16
Total
* One round per target.
•• Pius one dummy round loaded in magazine or clip to simulate stoppage.
MO—Move Out.
Phase 3. 300 yards (276 meters).
Rounde per Exercise Position Time (sec- onds) Score
* Round Hit Miss
12 1
4 Standing to 12 2
squatting 12 3
12 4
12 5 i
4 Standing to 12 6 i i
sitting 12 7
12 8 1
12 9
4 Standing to 12 10
kneeling 12 11
12 12
12 13
4 Standing to 12 14
prone 12 15
12 16
MO. Standing 12 17
to optional 12 18
12 19
MO. Standing 12 20
to optional 12 21
**8 MO. Standing 12 22
to optional 12 23
12 24
Total
TOTALS FOR PERIOD ELEVEN
Hit Miss
Phase 1
2
3
Total
TAGO Б024-А
145
PERIOD TWELVE
SCORECARD
Filer’s Name___________________________________________________________________________________________________________
(Last) (First)
Platoon________________________________Firing Point_______________________________ Date________________________________
Scorer’s Name.
(Last)
(First)
SINGLE AND DOUBLE TARGET EXPOSURES
Phase 1. 200 yards (184 meters).
Rounds per exercise Position • Time (seconds) Target Score
•• Round Hit Miss
♦*»8 Standing: to prone 25 Left 1
Right 2
10 Left 3
Right 4
10 Left 5
Right 6
10 Left 7
Right 8
2 Standing to sitting 15 Left 9
Right 10
4 Standing to kneeling 15 Left 11
Right 12
10 Left 13
Right 14
2 Standing to sitting: 15 Left 15
Right 16
4 Standing: to kneeling 10 17
5 18
5 19
5 20
Total
* Time is based on 10 seconds for first round, after assuming position, 10 seconds to reload (if applicable), and 5 seconds for each
succeeding round.
** One round per target.
Firer loads one live round. When targets appear, he assumes designated position, fires, and reloads a magazine (clip) containing
seven live and one dummy round.
TAGO БО24-А
Phase 2, 300 yards (270 meters).
Rounds per exercise Position • Time (seconds) Target
•• Round Hit Miss
10 1
4 Standing to 5 2
prone 5 3
5 4
Left 5
25 Right 6
Left 7 i
Standing to 10 Right 8
prone Left 9
10 Right 10
Left 11
10 Right 12
4 Standing to 15 Left 13
kneeling Right 14
Left 15
10 Right 16
Left 17
4 Standing to 15 Right 18
squatting Left 19
10 Right 20
Left 21
4 Standing to 15 Right 22
sitting Left 23
10 Right 24
Left 25
4 Standing to 15 Right 26
prone Left 27
10 Right 28
Total 1
•Time is based on 10 seconds for first round, after assuming position, 10 seconds to reload (if applicable), and 6 seconds for each
succeeding round.
•* One round per target.
*** Firer loads one live round. When targets appear, he assumes designated position, flres, and reloads a magasine (elip) containing
seven live and one dummy round.
TOTALS FOR PERIOD TWELVE
Hit Miss
Phase 1
2
Total
TAGO 5024-A
147
PERIOD THIRTEEN
SCORECARD
Firer*s Nam» _______________________________________________________________________________________________________
(Last) (First)
Platoon_______________________________Firing Point______________________________ Date
Scorer's Name.................. ...................................... ..........................................
(Last) (First)
RECORD FIRE I
Phase 1. 100 yards (92 meters).
Rounds per exercise Petition * Time (seconds ) Target Score
•• Round Hit Miss
8 MO Standing to standing 10 Single target exposures 1
5 2
5 3
MO Standing to standing 10 4
5 6
MO Standing to standing 10 6
5 7
5 8
Total
• Time is based on 10 eeconds for first round. After assuming position, 10 seconds to reload (if applicable), and 6 seconds for each
succeeding round.
*• One round per target.
•••Firer loads single round. When targets appear, he assumes designated position, fires, and reloads a magazine (clip) containing
eight rounds.
MO—Move Out.
14«
TAGO 6024-A
Phase 2. 200 yards (184 meters).
Bounds per exercise Position • Time (seconds) Target
00 Round Hit Miss
8 MO Standing to sitting 10 Single target exposures 1
5 2
5 3
5 4
5 5
5 6
5 7
5 8
8 MO Standing to squatting 10 Single target exposures 9
5 10
5 11
MO Standing to squatting 10 12
5 13
MO Standing to squatting 10 14
5 15 1
5 16
MO Standing to kneeling 25 Left 17 L
Right 18
MO Standing to kneeling 15 Left 19
Right 20
10 Left 21
Right 22
MO Standing to kneeling 15 Left 23
Right (single) 24
5 L 25
Total
* Time is based on 10 second* ** for fl rat round, after assuming position, 10 seconds to reload (if applicable), and Б seconds for
succeeding round.
** One round per target.
•♦‘Firer loads single round. When targets appear, he assumes designated position, Area, and reloads a magarine (dip)
eight rounds.
MO—Move Out.
TAGO 50M-A
149
Phase 3. 300 yards (276 meters).
Rounds per exercise Position •Time (seconds) Target Score
•• Round Hit Miss
2 MO Standing to prone 10 Single target exposures Left 1
5 2
3 MO Standing to sitting 10 3
5 4
5 5
3 MO Standing to kneeling 10 6
5 7
5 8
♦*9 1 MO Standing to prone 25 9
Right 10
10 Left 11
Right 12
10 Left 13
Right 14
10 Left 15
Right 16
5 ' 5 L (Single) 17
Total
TOTALS FOR PERIOD THIRTEEN
J Hit Miss
Phase 1 ! , j
2! .
3 1 :
Total i i
* Time is based on 10 seconds for first round, after assuming position, 10 seconds to reload (if applicable), and 5 seconds for each
succeeding round.
• • One round per target.
• •• Firer loads single round. When targets appear, he assumes designated position, fires, and reloads a magazine (clip) containing
eight rounds.
MO—Move Out.
Signature of firer_------------—----------------------
Signature of яоогег-----------------------------------
Signature of officer----------------------------------
150
TAGO 5024-A
PERIOD FOURTEEN/FIFTEEN
SCORECARD
Firer’s Мято
(Last) (First)
Platoon________________________________Order Date_____________________________________________________________________
Scorer’s Name
(Last)
(First)
PRACTICE AND RECORD
Position Round Time (seconds) Target Range Hit Miss
meters / yards
1 10 F 138 150
Foxhole 2 10 E 276 300
3,4 15 f F-E j 276 300
5 10 i E 184 200
Rubble 6 10 ! E 368 400
pile 7,8 15 2-E 368 400
9 10 E 276 300
* Stump 10 10 E 368 400
11, 12 15 i 2-E 368 400
13 10 1 E 184 200
•Log 14 10 E 299 325
15,16 15 2-E 299 325
17 10 E 138 150
Bunker 18 10 E 230 250
19, 20 15 2-E 230 250
21 10 E 368 400
*Prone 22 10 E 368 400
23 10 E 368 400
24 10 E 368 400
25 10 . E 111 125
* Barricade 26 10 E 368 400
27, 28 15 2-E 368 400
’Forward 29 10 E 230 250
slope 30 10 E 322 350
31, 32 15 2-E 322 350
33 10 E 161 175
Roof top 34 io- E 299 325
35, 36 15 2-E 299 325
37 10 E 111 125
•Window 38,40 10 E 253 275
39, 40 15 2-E 253 275
Total
* Starting position is the standing ready position.
TAGO 6024-A
151
Record Пга Only
Hit Шм
Record fire I
Record fire II
Total
Qualification rating (circle one): EXPERT SHARPSHOOTER MARKSMAN UNQUALIFIED
F'irer’s signature__________________________________
Scorer’s signature _________________________________
Officer’s signature-------------------------------------------
b. Qualification Scores and Ratings. Quali-
fication ratings are based on the total number
of target hits obtained during record firing
(periods 13 and 15). Qualification scores and
ratings are as follows:
Possible....................
Expert .....................
Sharpshooter_______________
Marksman ...................
Unqualified ................
90.
60 and above.
60 to 59 inclusive.
36 to 49 inclusive.
Below 35.
152
TAGO Б024-А
Soctioa HL
COMBAT READINESS MARKSMANSHIP PROFICIENCY STANDARD COURSE "Al”
(For personnel having loss than 10 years active service)
COMBAT READINESS MARKSMANSHIP PROFICIENCY STANDARD COURSE "A2"
(For personnel having more than 10 years active service)
COMBAT READINESS MARKSMANSHIP PROFICIENCY MODIFIED COURSE 1 Al”
(For personnel having less than 10 years active service)
COMBAT READINESS MARKSMANSHIP PROHCIENCY MODIFIED COURSE "A2“
(For personnel having more than 10 years active service)
8. General
The combat readiness marksmanship pro-
ficiency “A” courses provide annual marksman-
ship training and qualification firing for soldiers
of the active Army. Each course is tailored to
specific range facilities and to the experience
level of the soldiers to receive the training. In
this case, experience level is based on an indi-
vidual having either more or less than 10 years
of active service.
9. Combat Readiness Marksmanship Pro-
ficiency standard courses "Al" and
"A2"
These marksmanship courses must be con-
ducted on the same range facilities prescribed
for the basic rifle marksmanship course (par.
2). Standard course “Al” consists of 36 hours
of instruction. Standard course “A2” consists
of 18 hours of instruction. To provide maxi-
mum use of training facilities and facilitate
unit scheduling, standard course “A2” is de-
signed to be conducted in conjunction with
standard course “Al.”
a. Combat Readiness Marksmanship Pro-
ficiency Standard Course “Al” This course is
designed for personnel with less than 10 years
of active service.
(1) Scope.
Orientation______________________ 1 hour.
Mechanical training-------------- 1 hour.
Preparatory marksmanship and
25-meter firing ---------------- 14 hours.
Target detection exercises ------ 6 hours.
Field firing--------------------- 4 hours.
Record firing and target-detec-
tion tests 1, 2, and 3___________ 8 hours.
Night firing ...------------------ 2 hours.
TAGO 6024-A
153
(2) Ammunition required by period or exercise.
(a) Preparatory marksmanship and 25 meter firing.
Period 1 । Position 1 Rounds per 1 soldier Rounds for demonatrationa 1 ' "" - * - - - - --- - - Notee
1 1 w _ . Orientation.
1 i Mechanical training. Introduction to 25-meter firing.
3 1
3 Prone supported 9 Periods 3 through 5 conducted on
3 Prone .... . 9 25-meter range. ‘3 exercises. 2 rounds and 24 sec-
3 Sitting* _. 9 onds per exercise.
4 Squatting 9 b8 rounds rehearsal, 4 rounds demon-
4 Kneeling 9 stration. Total: 12 rounds.
4 Standing 9 «Position must be 25 meters from
4 Kneeling supported 9 targets to correctly determine battlesight zero. dProgress check.
5 Foxhole ... 9
5 ‘Standing to prone 6 t>8/4(12)
5 ‘Standing to sitting 6
5 5 «Foxhole or prone supported .. dProne supported 12 3
5 dPrt>ne - 3 —
5 dSitting 3
5 5 5 5 5 5 d Squatting dKneeIing dStanding dKneeling supported dFoxhoIe - Retire weak positions 3 3 3 3 3 12
Total 132 12
(b ) Field firing.
Period Position Rounds per soldier Rounds for demonstrations Notes
6 See scorecard 56 ‘8/8(16) ‘8 rounds rehearsal, 8 rounds demon- stration. Total: 16 rounds.
(c) Target detection.
Period Corresponds to target detection period: 1 Number of presenta- tions Blank rounds required 2
5 1 4 120
6 4 and 7 4 828
7 8 8 153
8 9 8 270
1 See appendix VI*
2 Includes rounds for rehearsals.
154
TAGO 5024-A
(d) Record firing.
Period Position Rounds per soldier Round* for demonstrations Notes
7 8 See scorecard See scorecard Totals 56 40 •8/32 ( 40) •8 rounds rehearsal, 32 rounds demonstration. Total: 40 rounds.
96 40
(e) Night firing.
Period Position Rounds per soidier Round* for demonstrations Notes
9 Foxhole or prone supported.. 32 •4/8 (12) •4 rounds rehearsal, 8 rounds demon- stration. Total: 12 rounds.
(3) Recapitulation of ammunition require-
ments
Caliber 7.f2-inm (or .30) per
soldier ________________ _. 316 rounds.
Caliber 7.G2-mm (or .30) for
demonstration ____________ 80 rounds.
Caliber 7.62-mm (or .30)
blank --------------------- 1^.71 rounds.
(4) Score cards and qualification ratings.
(a) Field firing scorecard.
FIELD FIRING SCORECARD
COMBAT READINESS MARKSMANSHIP PROFICIENCY COURSE A
Firer’s Name------------------------------------------------------------------------------------------
(Last) (First)
Platoon_______________Order Firing Point--------------------------------------Date--------------------
Scorer’s Na me----------------------------------------------------------------------------------------
(Last) (First)
Phase 1
Phase 2
(No time limit)
Position Range (meters) Round Hit Miss
Foxhole 75 1
Foxhole 175 2
Foxhole 175 3
Foxhole 175 4
Foxhole 300 5
Foxhole 300 6
Foxhole 300 7
Foxhole 300 8
Total
Position Range (meters) Time (seconds) Round Hit Miss
Sitting 300 10 1
Sitting 75 5 2
Sitting 175 7 3
Sitting 300 10 4
Kneeling 75 5 5
Kneeling 300 10 6
Kneeling 175 7 7
Kneeling | 175 7 8
Total
TAGO 5024-A
Phase 3
Plaes Position Rance ( meter*) Time (Meonda) Round Hit Шм
Behind stump Standing 76 5 1
By stump Kneeling supported 175 5 2
By foxhole Squatting 175 5 3
By front stake Sitting 300 10 4
Behind stump Kneeling 175 5 5
By stump Standing 75 5 6
By foxhole Sitting 300 10 7
By front stake Prone 300 10 8
Behind stump Optional 175 5 9
By stump Optional 75 5 10
By foxhole Optional 300 10 11
By foxhole Optional 5 12
By front stake Optional 175 5 13
By front stake Optional 300 10 14
Forward of stake Optional 175 5 15
Forward of stake Optional 300 10 16
Total
Phase 4
(From foxhole)
Rance (meters) Time (seconds) Hits MiM
First Round Second Round
75 175 175 300 Left 300 Right 175 300 Left 300 Right 20 60 60
Total
IM
TAGO B0S4-A
Phase 5
Place Range (meters) Time (second*) Hite First Second Round Round Шм
Behind stump 75 175 20
By stump 175 300 Left 300 Right 60
By foxhole 175 300 Left 60
300 Right
Total
Hit M Im
Phase 1
2
3
4
5
Total
(b) Record firing scorecards. The score-
cards for Record Firing I and II
are identical to those prescribed for
Record Firing I and II of the Basic
Rifle Marksmanship Course (par.
4a.).
(c) Qualification scorecards and ratings.
As prescribed in par. 4b.
(d) Night firing scorecards and qualifi-
cation ratings. See par. 21.
b. Combat Readiness Marksmanship Profi-
ciency Standard Course “A2.” This course is
designed for personnel with more than 10 years
of active service.
(1) Scope.
Preparatory marksmanship and 25-
meter firing______________________ 4 hours.
Target detection _________________ 4 hours.
Field firing______________________ 4 hours.
Record Firing I or Record Firing II
and target detection test 1_______ 4 hours.
Night firing--------------------- 2 hours.
TAGO 6024-A
117
(2) Ammunition required by period or
exercise.
(a) Preparatory marksmanship and 25-
meter firing.
: Rounds:
1 1
! per '
Period' Position Soldier ’ Notee
• 1 i" 1 iProne supported . 3 4 Period 1 conducted on 25-meter range.
»1 Prone . . 1 3 a May be integrated with period 3. Standard Course “Al.”
a 1 'Sitting 3
bl Squatting i 3 ь May be integrated with period 4, Standard Course “Al.”
bl Kneeling 3 c May be integrated with period 5, Standard Course “Al.”
bl Standing 3
bl Kneeling supported 3 d One exercise con- ducted within 24 seconds.
el Foxhole ... 3 • Two exercises. 2 rounds and 24 sec- onds per exercise.
« 1 ^Standing to prone . 2
« 1 Standing to sitting. 4 t Position must be 25 meters from tar- gets to correctly determine battle- sight zero.
c 1 f Foxhole or prone supported Total 12 42
(b) Field firing. As prescribed in Stand-
ard Course “Al” (par.a (2) (b) above).
(c) Target detection.
1. If target detection training for
this course is integrated into pe-
riods 6 and 7 of Standard Course
“Al” (a (2) (c) above), rx ad-
ditional ammunition is requ.rec
If target detection training for
this course is conducted sepa-
rately, blank ammunition is re-
quired as follows:
Period Corresponds to target detection period: 1 Number of presen- tations - Blank rounds required 1
2 4 and 7 1 1 276
4 8 1 1 L 34
1 See appendix VI.
* Based on one presentation on one target detection range.
• Includes rounds for rehearsals.
(d) Record firing. To provide flexibility
in integrating this period with the
record firing of Standard Course
“Al” (a above), either Record Fir-
ing I or Record Firing II may be
conducted.
Period Position Rounds per Soldier
4 I 1 See scorecard j 56 rounds if Record Firing I is conducted. 40 rounds if Record Firing Il is conducted.
(e) Night firing. The night firing course
is the same as prescribed for Stand-
ard Course “Al” (a above).
(3) Recapitulation of ammunition require-
ments.
Caliber 7.62-mm (or .30) per
soldier. . __________ 186 or 170*
Caliber 7.62-mm (or .30)
blank _____________ . None or 310**
* Difference of 10 rounds depends upon whether
Record Firing I or Record Firing II is conducted.
••See (2) (c) above.
(4) Scorecards. Scorecards are the same
as those prescribed for Standard
Course “Al” (a (4) above).
1S8
TAGO 6024-A
(5) Qualification ratings.
(a) If Record Firing I is conducted:
Possible .. -. 66.
Expert ____ 34 or above.
Sharpshooter .. 27 to 33 inclusive.
Marksman .. 18 to 26 inclusive.
Unqualified ... ____ Below 18.
(b) If Record Firing II is conducted:
Possible . ... ---- 28.
Expert ....... .. 18 and above.
Sharpshooter .. 14 to 17 inclusive.
Marksman ... . 9 to 13 inclusive.
Unqualified Below 9.
10. Combat Readiness Marksmanship Pro-
ficiency Modified Courses "Al”
and "A2"
These marksmanship courses must be con-
ducted on the same range facilities prescribed
for the Alternate Basic Rifle Marksmanship
Course (par. 5). Modified Course “Al” re-
quires *36 training hours and Modified Course
“A2” requires 18 hours. To provide maximum
use of training facilities and facilitate unit
scheduling, Modified Course A2 is designed to
be conducted in conjunction with Modi*:
Course “Al.”
a. Combat Readiness Marksmanship Profit
ciency Modified Course “Al.” This course <
designed for personnel with less than 10 year
of active service.
(1) Scope.
Orientation ___________________________ i ___
Mechanical Training ...___________ 1
Preparatory Marksmanship and
1000-inch Firing___________.... 8 hour.
Known Distance Field Firing (In-
struction and Record Firing) .. 8 hour
Target Detection . 6 hour.
Combat Positions Firing (Instruc-
tion and Record Firing) _________ 4 hour.
Night Firing______________________ 2 hour
*Pit Details _____________________ 6 hour.
-Based on normal number and size of ranee facilities, units z_
be divided into four grroups during firing periods. Therefore. .
details must be shown separately. If pit details sre not . ’
this time may be used for such other training deemed ~._z.-'
by the commander.
(2) Ammunition required by period Or
exercise.
TAGO Б024-А
15*
(a) Preparatory marksmanship and 1000-inch firing.
Fattod Petition Round* per soldier Rounds for demonstrations XoCm
1 Orientation.
2 Mechanical training.
3 Prone supported .. 6 •3 exercises. 2 rounds and 24 sec-
3 Prone .. 6 onds per exercise.
3 Sitting 6
3 Squatting 6 bg rounds rehearsal, 4 rounds
3 Kneeling .. . 6 demonstration. Total: 12 rounds.
3 Standing 6 *>8/4(12)
«Battlesight xero.
3 “Standing to prone 6 dprogress check.
3 “Standing to sitting .., 6
4 cprone supported . 12
4 dProne supported 3
4 dProne 3
4 dSitting . ...... . 3
4 dSquatting .. 3
4 dKneeling 3
4 ^Standing 3
4 Retire weak positions 9
Total 87 12
(b) Known distance field firing.
Period Positions Rounds per soldier Rounds for demonstrations Notes
5 See scorecard . 50 “10/10(20) Instruction firing. Record firing. “10 rounds rehearsal, 10 rounds demonstration. Total: 20 rounds.
5 See scorecard ... 50
Totals 100 20
(c) Combat positions firing.
(d) Target detection.
Period Positions Rounds Per soldier Notes
6 See scorecard 40 Instruction firing.
6 See score card 40 Record firing.
Total 80
Period Corresponds to target detection period* Number of presentations Blank rounds required1
5 1 8 200
6 4 and 7 4 828
’ See appendix VI.
1 Includes rounds for rehearsals.
(e) Night firing.
Period Positions Rounds per soldier Rounds for demonstration Notes
7 Foxhole or prone supported.- 32 •4/8 (12) •4 rounds rehearsal, 8 rounds dem- onstration. Total: 12 rounds.
160
TAGO 502 4-A
(3) Recapitulation о/ ammunition re-
quirements.
Caliber 7.62-mm (or .30) per soldier.... 299
Caliber 7.62-mm (or .30) for
demonstrations....................... . 44
Caliber 7.62-mm (or .30) blank......... 1,028
(4) Scorecard and qualification ratings.
(a) Scorecards. The scorecards for
periods five and six are the same as
those prescribed for periods 13 and
14, respectively, of the alternate
basic rifle marksmanship course
(par. 7).
(b) Qualification scores and ratings.
Qualification scores and ratings are
the same as prescribed for the
alternate basic rifle marksmanship
course (par. 7b).
(c) Night firing scorecards and Qualifi-
cation ratings. See paragraph 21.
b. Combat Readiness Marksmanship Pro-
ficiency Modified Course “A2." This course is
designed for personnel with more than 10 years
of active service.
(1) Scope.
Preparatory marksmanship and
1000-inch firing-__________________ 4 hours*.
Known distance field firing (practice
and record) __________-............ 8 hours.
Target detection __________________ 4 hours.
Night firing ---------------------- 2 hours.
* Additional hours in preparatory marksmanship or mechanical
training may be scheduled as deemed necessary by the commander.
(2) Ammunition required by period or
exercise.
(a) Preparatory marksmanship and
1000-inch firing.
Period Position Rounds per soldier Notes
1 * Prone sup- ported .... 3 Period 1 conducted
1 •Prone 3 on 1000-inch range. sMay be integrated
1 •Sitting 3 with period 3 Modified Course "Al.” b3 exercises. 2
1 •Squatting .. 3 rounds and 24 seconds per exercise.
Period Position KmumIb рмг soldier Notes
1 •Kneeling ... 3 •May be integrated
with pejjod 4.
1 •Standing ... 3
1 •Standing to
prone b6
1 •Standing to
sitting — b6
1 «Prone sup-
ported ... 12 BattlesighT—
Total 42
(b) Known distance field firing (proc
tice and record). Practice and ret
ord known distance field firing
the same as that prescribed '
modified course "Al” (a(2) аЫ/.~.
(c) Target detection.
1. If target detection training
this course is integrated wit
period 6 of modified cour^
“Al” (a above), no addition
blank ammunition is requir?
2. If target detection training *
this course is conducted
rately, blank ammunition is
quired as follows:
Period Corresponds to target detection period1 * 3 4 5 Number of presentations’ Blank rounds required1
4 4 and 7 1 276
1 See appendix IV.
1 Baaed on one presentation on one target detection range.
1 Includes rounds for rehearsals.
(d) Night firing. The night firing cour^
is the same as precribed in modific
course "Al” (a above).
(3) Recapitulation of ammunition—r
quirements.
Caliber 7.62-mm (or .30) per soldier 17
Caliber 7.62-mm (or .30) blank----None or
* See (2) ( c) above.
(4) Scorecards. The scorecard for peric^
2 and 3, known distance field firi-
(practice and record), is the same *
that prescribed for period 13 of t!^
Alternate Basic Rifle Marksmanshi-
Course (par. 7).
(5) Qualification ratings.
Possible___________________ 50.
Expert--------------------- 33 and above.
Sharpshooter ------------- 27 to 32 inclusive.
Marksman ____________________ 22 to 26 inclusive.
Unqualified ------------------ Below 22.
TAGO 6024-A
йсНои IV. FUNDAMENTALS PROFICIENCY COURSE
IL &«мга1
Fundamentals proficiency course “B” is de-
signed for active Army units which have access
to 1000-inch and known distance ranges but no
combat positions range. Because this course
requires minimum application of combat marks-
manship skills, individual soldiers should not
be permitted to fire this course for qualification
more than three consecutive years.
12. Scope
Fundamentals proficiency course “B” re-
quires *27 training hours as follows:
Orientation and mechanical training______ 1 hour.
Preparatory marksmanship and
1000-inch firing ..... ......... 8 hours.
Known distance field firing (practice) . 4 hours.
Known distance field firing (record) . 4 hours.
Target detection 4 hours.
Night firing 2 hours.
•Pit details 4 hours.
• Based on normal number and (he of range facilities unit» must
be divided into four group» during liring period» on the known
distance range. Therefore, pit detail» mut be scheduled separately.
If pit details are not required because of the use of automatic target
devices, this time may be used for such other training as deemed ap-
propriate by the commander.
13. Ammunition Required by Period or Exercise
a. Preparatory Marksmanship and 1000-inch Firing.
Period Position Rounds per soldier Rounds for demonstrations Notes
1 Orientation and mechanical training.
2 Prone supported 6 Periods 2 and 3 conducted on 1000-
9 Prone 6 inch range.
2 Sitting - - 6 3 exercises. 2 rounds and 24 seconds
2 Squatting 6 per exercise.
2 Kneeling 6 b8 rounds rehearsal, 4 rounds dem-
2 Standing .... 6 onstration. Total: 12 rounds.
2 Standing to prone 6 b8/4 (12) «Battlesight zero.
2 Standing to sitting ... 6 d Progress check.
3 «Prone supported 12
3 «•Prone supported 3
3 dProne - 3
3 dSitting 3
3 ^Squatting 3
3 ^Kneeling 3
3 dStanding 3
3 Refire weak positions 9
Total 87 12
b. Known Distance Field Firing.
Period Position i Rounds per 1 soldier Rounds for demonstrations ——.—— Notes
4 See scorecard ! 50 10/10 (20) Instruction firing.
5 See scorecard I 50 Record firing.
10 rounds rehearsal, 10 rounds dem-
... onstration. Total: 20 rounds.
Totals - 100 20
c. Target Detection.
Period Corresponds to target detection period 1 Number of presen- tations Blank rounds required 1
5 4 and 7 4 828
* See appendix VI.
’ Includes rounds for rehearsals.
162
TAGO 5024-A
d. Night Firing.
Period Position ... ....... Rounds per soldier Rounds for demonstrations Notes
6 Foxhole or prone supported 32 M/8 (12) > *4 rounds rehearsal, 8 rounds I onstration. Total*. 12 rounds.
14. Recapitulation of Ammunition
Requirements
Caliber 7.62-mm (or .30)
rounds per soldier--- ----------- 219.
Caliber 7.62-mm (or .30)
rounds for demonstrations (per unit) .. 44.
Caliber 7.62-mm (or .30) rounds blank . 828.
and record) is the same as that prescribed fc
period 13 of the alternate basic rifle marksr- --
ship course (par. 7).
b. Qualification Ratings.
15. Scorecards and Qualification Ratings
a. Scorecards. The scorecard for periods
4 and 5, known distance field firing (practice
Possible__________________ 50.
Expert ___________________ 33 and
Sharpshooter _____________ 27 to 32 inc.»»,
Marksman _________________ 22 to 26 in cl „J.
Unqualified ______________ Below 22.
c. Night Firing Scorecards and Qualificati^
Ratings. See paragraph 27.
Section V. EMERGENCY PROFICIENCY COURSE
16. General
The emergency proficiency course is designed
to provide minimum marksmanship training in
order to POR qualify selected active Army
personnel. It should only be conducted under
emergency conditions when pressing personnel
movement schedules limit the available train-
ing time. There are two separate courses of
fire, each of which requires 8 training hours.
Emergency Proficiency Course One is conducted
on standard range facilities. Emergency Pro-
ficiency Course Two is conducted on modified
known distance ranges.
17. Emergency Proficiency Course One
c. Blank Ammunition Required for тагдъ
Detection.
Period Target detection period 1 Number of presen- tations Blank-: ’ required1
2 3 4 55
3 *9 4 150
1 See appendix VI.
1 Includes rounds for rehearsals.
* Conducted as conference, demonstration, and practical exerr'
a. Scope.
Orientation and battlesight zero--- 2 hours.
Field firing________________________ 1% hours.
Record firing_______________________ 114 hours.
♦Target detection ____________________ 3 hours.
* Tarset detection is conducted in conjunction with field
firing and record firing.
b. Ammunition Required for Firing Exer-
cises.
Period Position Rounds per soldier Notes
1 Foxhole or
prone. supported 12 Battlesight zero.
2 See scorecard 36 Field firing.
3 See scorecard 40 Record firing (II).
Total 88
rather than as a test.
d. Recapitulation of Ammunition Require
ments.
Caliber 7.62-mm (or .30)
rounds per soldier___________________ I
Caliber 7.62-mm (or .30) blank_______ ___
e. Scorecards.
(1) Field firing. As prescribed for perioc
11, basic rifle marksmanship cour^
(par. 4a).
(2) Record firing. As prescribed for recorc
firing II, (period 18), basic rifL
marksmanship course (par. 4a).
f. Qualification Scores and Ratings.
Possible________________ 28.
Expert------------------ 18 and above.
Sharpshooter ___________ 14 to 17 incl^giyA,
Marksman --------------- 9 to 13 inclusive.
Unqualified _____________ Below 9.
TAGO БМ4-А
163
18. Emergency Proficiency Course Two
a. Scope.
Orientation and battlesight zero_____ 2 hours.
•Known distance field firing
(practice) ___________________________ Щ hours.
♦Known distance field tiring
(record) ............................... hours.
•♦Target detection........................ 3 hours.
Corresponds ; Number J
to target ; ofpreeen- Blank rounds
Period detection period * ‘ tationa required *
2 3 4 ! 55 '
3 | 39_________j 4 i 150
' See appendix Vi.
: Includes rounds for rehearsals.
3 Conducted as conference, demonstration, and practical exercige
rather than as a teat.
* Based on having personnel other than the firers to be the pit
detail.
** Conducted in conjunction with field firing.
d. Recapitulation of Ammunition Require-
ments.
b. Ammunition Required for Firing Exer-
cises.
Period I Position Rounds per soldier Notes
1 Foxhole or |
prone supported. ' 12 Battlesight zero.
2 See scorecard' 50 Practice field firing.
3 See scorecard; 50 Record field firing.
Total j .. 112 ।
Caliber 7.62-mm (or .30)
rounds per soldier-------------------- 112.
Caliber 7.62-mm (or .30) blanks ________ 205.
e. Scorecard. The scorecard for periods 2
and 3 known distance field firing- (practice and
record) is the same as that prescribed for
period 13 of the alternate basic rifle marks-
manship course (par. 7).
f. Qualification Scores and Ratings.
Possible _______________ 50.
c. Ammunition Required for Target Detec-
tion.
Expert _____
Sharpshooter
Marksman _
Unqualified
33 and above.
27 to 32 inclusive.
22 to 26 inclusive.
Below 22.
Section VI. INDIVIDUAL NIGHT FIRING
19. General
There are two individual night firing courses:
An 8-hour course designed to be conducted as
part of ATP 21—114 and a 2-hour course de-
signed to maintain the night firing proficiency
of soldiers in the active Army.
20. 8-Hour Individual Night Firing Course
a. Scope.
Night vision and techniques of night
firing _________________________________ 1 hour.
Daytime instruction firing________________ 3 hours.
Night practice firing ____________________ 2 hours.
Night record firing_______________________ 2 hours.
b. Ammunition Required by Exercise.
Exercise Rounds per soldier Rounds for demonstrations Notes
Night vision and techniques of night firing. Daytime instruction firing Night practice firing Night record firing Total None 15 16 16 None «9/9 (18) Ь 4/8 (12) All firing is conducted from either foxhole or prone sup- ported position. «9 rounds rehearsal, 9 rounds demonstration. Total: 18 rounds. b 4 rounds rehearsal, 8 rounds demonstration. Total: 12 rounds.
47 30
144
TAGO 5024-A
c. Scorecard and Qualification Rating.
NIGHT FIRING
Firefв пате__________________________________________________ .. ___________________________ ... _____________
(Last) (First)
platoon--------------------Order_______________________ ... Firing Point Date------------------------------------------
Scorer’s name____________________________________________________ __________________________. - - . ----------
(Last) (First)
PRACTICE
Range Rounds Hite
25/50 1—8
50/75 9-16
Total
RECORD
Range Bounds Hit*
25/50 1-8
50/75 9-16
Qualification score
Expert _______________________ 10 and above.
Sharpshooter___________________ 7 to 8 inclusive.
Marksman________________________ 5 or 6.
Unqualified____________________ Below 5.
21. 2-Hour Individual Night Firing Course
a. Scope.
Review of night vision and techniques
of night firing -------------- % hour.
b. Ammunition Required by Exercise.
Night instruction and night record
firing_________________________________ hours.
Exercise Rounds per soldier Rounds for demonstrations Notes
Night practice firing Night record firing 16 16 *4/8(12) * 4 rounds rehearsal, 8 rounds demon- stration. Total: 12 rounds.
Totals 32 12
c. Scorecard and Qualification Rating. As prescribed in paragraph 20c above.
TAGO S024-A
145
Section VII. ADVANCED INDIVIDUAL MARKSMANSHIP (SNIPING)
22. Scope
(2) Field firing exercises.
Orientation .. ... -------------------. 2 hours.
Early Firing’ (Zero)__________________ 4 hours.
Target Detection ________________________ 4 hours.
Map reading . ---------------— 8 hours.
Instruction Firing--------------------- *26 hours.
Record Firing____________________________ *4 hours.
Exact number of hours required depends upon the sise of range
facilities and the number of snipers to be trained.
23. Ammunition Required by Exercise
a. Early Firing (Zero).
Exercise Rounds per sniper per exercise Rounds per sniper per three exercises
♦ First exercise 16 48 ~~
* Second exercise 16 48
♦ Third exercise 12 36
Totals 44 132
Range (meters) Rounds per sniper (basil) Rounds per eniper (tracer)
250 9 0
400 6 3
500 6 3
600 8 4
Totals 29 10
b. Instruction Firing
(1) Adjusted aiming point exercises.
Using sight setting of— Rounds per sniper (ball) Rounds per sniper (tracer)
400 10 H 5
500 10 5
600 10 5
*250 10 5
Totals 40 20
* Conducted if time and ammunition are available.
* Each exercise is fired three times; once at dawn or first light,
once at midday, and once at dusk.
c. Record Firing. Each of the three field
firing exercises (b(2) above) is fired once for
record. Forty-four rounds of ammunition per
sniper are required for record firing.
d. Recapitulation of Ammunition require-
ments.
Caliber 7.62-mm (or .30) rounds per
sniper ______________________________ 245.
Caliber 7.62-mm (or .30) rounds, tracer,
per sniper __________________________ 30.
24. Scorecards
A recommended scorecard for sniper training
is depicted below. This card must be reproduced
locally.
SNIPER’S SCORECARD
Firer’s name_________________________
(Last)
(First)
Unit ______________________________________________
Date _____________________________________
Zero Firing
Range (meters) Sight Setting
First Shot Group Second Shot Group Third Shot Group * Fourth Shot Group
250 EL W EL W EL W EL W
400 EL W EL W EL W EL W
500 EL w EL W ELW w EL W
600 EL w EL W EL w EL W
250 meters 400 meters 5,000 meters 600 meters
Zero sight adjustment: EL W . EL W EL W EL W..
* If required.
IM
TAGO Б024-А
Field Firing
First Exercise
Target Number First Trial Second Trial Third Trial
let Rd Hits 2d Rd Hite 1st Rd Hite 2d Rd Hite 1st Rd Hite 2d Rd Hite
1
2
3
4
5
6
7
8
Totals
X10 X5 X10 ХБ X10 ХБ
Points
Total Points
Second Exercise
Target Number First Trial Second Trial Third Trial
1st Rd Hite 2d Rd Hite 1st Rd Hite 2d Rd Hits 1st Rd Hite 2d Rd Hits
1
2
3
4
5
6
7
8
Totals
X10 X5 X10 X5 X10 X5
Points 1
Total Points
Third Exercise
Target Number First Trial Second Trial Third Trial
1st Rd Hite 2d Rd Hite 3d Rd Hite 1st Rd Hite 2d Rd Hits Sd Rd Hits 1st Rd Hits 2d Rd Hite 3d Rd Hite
1
2
3
4
Totals
X10 X5 X2 X10 X5 X2 X10 X5 X2
Points
Total points
Exercise Points First Trial Pointe Second Trial Pointe Third Trial
First Exercise Second Exercise Third Exercise
Scores per trial
Time of Day Weather Conditions
First Trial Second Trial Third Trial
TAGO 5024-A
167
Record Firing
First Exercise Second Exercise Third Exercise
Taqret Number 1st Rd Him M Rd Hite 1st Rd Id Rd Hits Hite 1st Rd Hite 3d Rd Hite 3d Rd Hite
1
2
3
4 4
5 1 1
б i
7
8 - " 't !
Totals i ।
X10 X5 XI0 I X5 X10 X5 X2
Points i [
Total Points Record Firings Qualification Time of Day Weather Scorer’s name — Expert .. Sharpshooter .. Marksman Unqualified ... 170 and above. .. 150 to 169 inclusive. .. 120 to 149 inclusive. Below 120.
1И
TAGO 5024-А
APPENDIX IV
PREMOBILIZATION READINESS PROFICIENCY ”C" COURSES
1. General
a. There are three separate and distinct
courses of fire which fall in the category of a
Premobilization Readiness Proficiency Course
“C.” These courses are designed for use by
reserve components. The principal difference
between the three courses of fire is the type of
range facility on which each is conducted. These
are as follows:
(1) Standard course “C.” This course is
conducted on either a 25-meter range
or a 1000-inch range (fig. 29.).
(2) Alternate course “C.” This course is
designed for reserve components
which do not have access to, or suf-
ficient area for constructing standard
25-meter ranges. A 25-meter range
must be specially constructed so each
firing lane is inclosed. In this way,
ricochets cannot escape the immediate
range area, thus eliminating the need
for a large impact area.
(3) Modified known distance course “C.”
All firing during this course is con-
ducted from the 200-yard/180~meter
firing line of a known distance range.
b. Although range facilities and firing pro-
cedures prescribed in these courses may differ
from those prescribed for active Army units,
the fundamentals of marksmanship and the
techniques for teaching these fundamentals are
the same. Consequently, the principles and tech-
niques outlined in chapter 2, should be followed
as closely as possible regardless of the course
of fire being conducted.
2. Standard Course "C"
a. Scope. Standard Course “C” is a 16-hour
course of instruction as follows:
Mechanical training_____________________ 1 hour.
Marksmanship fundamentals_______________ 3 hours.
25-meter zero and practice firing_______ 4 hours.
Record firing and 250-meter battlesight zero.. 4 hours.
Target detection________________________ 4 hours.
b. Range Organization.
(1) Organization of firers and range per-
sonnel. See chapter 2, paragraph 23a.
(2) Targets.
(a) The target sheet used for practice
and record firing consists of a 25-
meter zero target and eight target
blocks, each containing small black
silhouettes superimposed on a white
background (fig. 68). The zero tar-
get is used to zero the rifle for a
range of 25 meters. The slow fire
silhouette targets are in blocks one
and two. The timed-fire targets are
in blocks three through six. The
rapid-fire targets are in blocks seven
and eight. The silhouette targets
are purposely arranged within each
block so the firer must adjust his
aiming point horizontally and ver-
tically when he shifts from one tar-
get to another. The numbers in each
block of silhouette targets corre-
spond to the number of the exercise
indicated on the practice and record
scorecards.
(b) Upon completion of record firing,
each soldier must establish the 250-
meter battlesight zero of his rifle.
The standard 25-meter target (fig.
34) is used for this purpose.
c. Conduct of Firing.
(1) 25-meter zero. Initially, firers set their
rear sights at 12 clicks of elevation
and zero windage. Firers assume a
prone supported (or foxhole) position
and fire a 3-round shot group at the
25-meter zero target. The cutaway
portion of the black paster serves as
a distinctive aiming point. Firers
should “call” each shot and record this
call on the target diagram portion of
the practice scorecard. After all firers
1И
TAGO 6024-A
Figure (i8. Course 2~>-uieter/lOOO-huh target sheet.
have completed firing one 3-round shot
group, the firing line is cleared and
firers move forward to check their
targets. Firers record the actual loca-
tion of shot groups on the same tar-
get diagram used to record the “call.”
Upon returning to the firing line,
firers make the necessary sight adjust-
ments to move the center of their shot
groups into the center of the zero
circle. This new sight setting is then
recorded on the practice scorecard.
This procedure is repeated until three
3-round shot groups have been fired.
The final sight setting is recorded on
the scorecard as the zero for 25 meters.
The orders then exchange duties; that
is, the firer becomes the coach, and
the coach the firer. The exercise is
then repeated.
(2) Practice firing. Practice firing consists
of six timed-fire exercises and two
rapid-fire exercises. These exercises
are conducted as follows:
(a) Tinted-fire exercises. Each round is
loaded singly and only one round
is fired at each silhouette target.
When the time limit for an exercise
has expired, the firing line is cleared
and firers and coaches move for-
ward to score targets. A maximum
of one point is awarded for each
170
TAGO 6024-A
silhouette target hit. If a soldier in-
advertently fires two or more rounds
at one silhouette, he receives only
one point regardless of how many
times the target has been hit. This
procedure is repeated until all six
exercises have been fired. Scores are
recorded on the practice fire score-
card (fig. 69).
(b) Rapid five exercises. Each firer is
issued one magazine or clip of eight
rounds and one loose round for each
exercise. The firer places the maga-
zine or clip in his belt and holds
the loose round in his hand. On
command, the firer loads the loose
round and assumes the designated
position (prone or sitting). He fires
the loose round, loads the magazine
or clip, and fires the remaining eight
rounds. Three rounds are fired at
each silhouette target in blocks
seven and eight. After each nine
rounds, the firing line is cleared and
the firer and coach move forward to
score targets. Scoring is based on
one point per silhouette target hit, a
maximum of three hits or points al-
lowed for each silhouette.
(3) Record firing.
(a) The same six timed-fire and two
rapid-fire exercises conducted as
practice firing are repeated for rec-
ord firing. However, the firer’s score
is recorded on the record fire score-
card (fig. 70).
(b) Qualification scores are based on the
total number of points obtained in
the eight exercises. There is a total
possible score of 42 points. The
scores required for each qualifica-
tion rating are as follows*.
Expert _____________ 31 and above.
Sharpshooter 24 to 30 inclusive.
Marksman ...._______ 11 to 23 inclusive.
Unqualified ------ Below 11.
(4) 250-meter battlesight zero. Immedi-
ately upon completing record firing,
each soldier must determine the 250-
meter battlesight zero of his rifle. This
firing is conducted the same as the 25-
meter zero exercise, except that the
standard 25-meter battlesight zero tar-
get is used (fig. 34). Each soldier fires
three 3-round shot groups, adjusting
the rear sight until the center of his
shot group falls on the “X” printed
on the target. Shot group locations and
elevation and windage settings ar^
recorded on the record fire scorch,
(fig. 70).
d. Ammunition Required by Period or
cise.
(1) 25-meter zero and practice firin„
Period Exercite Petition Round» f So"
1 Mechanical training ..... . r
2 Preparatory All .. XT -
3 marksmanship 25-meter zero . Foxhole or prone (dry «1
3 «1 ...... supported .. _ bFoxhole or -
3 a2 prone supported Prone
3 S3 ...... «Kneeling sup-
3 »4 ported or sitting Squatting
3 s5 Kneeling
3 ‘6 ... Standing <
3 <*7 .... Standing to
3 <18 .... prone Standing to
sitting
Total 51
a Four rounds fired within 4 minutes.
b Foxhole used on 25-meter range, prone supported v
1,000-inch range.
c Kneeling supported used on 25-meterrange, sitting u
1,000-inch range.
d Nine rounds fired within 60 seconds on standard 25-meter
1,000-inch ranges. If Alternate Course **C” (inclosed firing 1--
is conducted, time limit is increased to 65 seconds.
(2) Record firing and 250-meter
sight zero.
Period Exercite Position Rounds & So’
4 Repeat 1 through 8 of practice firing As indicated in exercises 1
4 250-meter battle- sight zero Foxhole or prone supported .. - Total 51
171
t
TAGO 5024-A
PRACTICE SCORE CARD- STANDARD / ALTERNATE COURSE C <25 METER*/1 000 INCHES
LAST NAME FIRST NAME MIDDLE INITIAL GRADE
SERVICE NUMBER UNIT
EXERCISE ONE . TIMED FIRE MISSES NO FIRES HITS
FOXHOLE POSITION <*PRONE SUPPORTED» 4 ROUNDS 4 MINUTES
EXERCISE TWO TIMED FIRE MISSES NO FIRES hits
PRONE POSITION 4 ROUNDS 4 MINUTES
EXERCISE THREE - TIMED FIRE MISSES NO FIRES HITS
KNEELING SUPPORTED POSITION 4 ROUNDS <• SITTING» 4 MINUTES
EXERCISE FOUR • TIMED FIRE MISSES NO FIRES HITS
SQUATTING POSITION 4 ROUNDS 4 MINUTES
EXERCISE FIVE - TIMED FIRE MISSES NO FIRES HITS
KNEELING POSITION 4 ROUNDS 4 MINUTES
EXERCISE SIX • TIMED FIRE MISSES NO FIRES HITS
STANDING POSITION 4 ROUNDS 4 MINUTES
EXERCISE SEVEN - RAPID FIRE MISSES NO FIRES HITS
STANDING TO PRONE 9 ROUNDS •• 60/65 SECONDS
EXERCISE EIGHT - RAPID FIRE MISSES NO FIRES HITS
STANDING TO SITTING 9 ROUNDS ••60/65 SECONDS
NOTES; * FOR USE ON IOOO INCH RANGES
•• TIME INCREASED TO 65 SECONDS FOR ALTERNATE (INCLOSED FIRING LANE) COURSE "C". MISSES NO FIRES HITS
course: ,,c" totals
RECORD QUALIPICATION
SIGNATURE OF SCORER
SIGNATURE OF FIRER
SIGNATURE OF OFFICER
25 METER ZERO
ELEVATION WINDAGE
25 METER ZERO
ELEVATION .
WIN D AG E -
Figure 69. Practice fire scorecard.
172
TAGO 6024-A
гео meter zero
<Battle sights'
1ST SHOT GROUP
ELEVATION
WINDAGE
2ND SHOT GROUP
ELEVATION
WINDAGE
3D SHOT GROUP
250 METER ZERO
(BATTLE SIGHTS)
ELEVATION_________.
WINDAGE -----------
EXPERT . 31 AND ABOVE
SHARPSHOOTER 24 TO 30
MARKSMAN II TO 23
UNQUALIFIED BELOW It
RECORD SCORE CARD- STANDARD/ALTERNATE COURSE C (25 METERS/1 000 INCHES»
LAST NAME FIRST NAME MIDDLE INITIAL 1 GRADE
SERVICE NUMBER UNIT
EXERCISE ONE - TIMED FIRE MISSES NO FIRES HITS
FOXHOLE POSITION ( * PRONE SUPPORTED! 4 ROUNDS 4 MINUTES
EXERCISE TWO - TIMED FIRE MISSES NO FIRES HITS
PRONE POSITION 4 ROUNDS 4 MINUTES
EXERCISE THREE - TIMED FIRE MISSES NO FIRES HITS
KNEELING SUPPORTED POSITION 4 ROUNDS < * SITTING) 4 MINUTES
EXERCISE FOUR - TIMED FIRE MISSES NO FIRES HITS
SQUATTING POSITION 4 ROUNDS 4 MINUTES
EXERCISE FIVE - TIMED FIRE MISSES NO FIRES HITS
KNEELING POSITION 4 ROUNDS 4 MINUTES
EXERCISE SIX - TIMED FIRE MISSES NO FIRES HITS
STANDING POSITION 4 ROUNDS 4 MINUTES
EXERCISE SEVEN - RAPID FIRE MISSES NO FIRES HITS
STANDING TO PRONE ROUNDS •• 60/65 SECONDS
EXERCISE EIGHT - RAPID FIRE MISSES NO FIRES HITS
STANDING TO SITTING ROUNDS ••60/65 SECONDS
NOTES: * FOR USE ON IOOO INCH RANGES
• TIME INCREASED TO 65 SECONDS FOR ALTERNATE (INCLOSED FIRING LANE) COURSE "C”. MISSES NO FIRES HITS
COURSE "C" TOTALS
RECORD QUALIFICATION
SIGNATURE OF SCORER
SIGNATURE OF FIRER
IGNATURE OF OFFICER
Figure 70. Record fire scorecu rd.
TAGO БО24-А
in
(3) Target detection.
Farted CarrvapoMd» to target detection period—’ A'am bar of ratpitrad ’
5 3 and 93 4 205
1 Se« appandix VI.
Ineludw round» for w>*«ar»*h.
1 Tarcot detaction period К »houid be modiAed to be conducted a>
a conference*, demonstrative, «nd practical exorcise rather than as
a teat.
(4) Recapitulation of ammunition require-
ments.
Caliber 7.62-mm (or .30) rounds per
soldier ................... 102
Caliber 7.62-mm (or .30) blank 205
e. Fire Commands. Fire commands must be
simple and uniform to avoid confusion. Type
fire commands which can be used for standard
course “C” are as follows:
(1) Zero firing (25-meter and battle-
sight).
FIRERS ASSUME THE PRONE
SUPPORTED (FOXHOLE) POSI-
TION.
COACHES SECURE THREE LOOSE
ROUNDS OF AMMUNITION.
THE FIRING LINE IS NO LONGER
CLEAR.
LOCK.
♦ONE EMPTY MAGAZINE LOAD.
ONE ROUND LOAD.
•♦THIS WILL BE THREE ROUNDS
SLOW FIRE TO DETERMINE
THE (25-METER) (BATTLE-
SIGHT) ZERO OF YOUR RIFLE.
COMMENCE FIRING WHEN
READY.
CEASE FIRE.
CLEAR ALL WEAPONS.
CLEAR ON THE RIGHT?
CLEAR ON THE LEFT?
THE FIRING LINE IS CLEAR.
COACHES AND FIRERS MOVE
DOWN RANGE AND CHECK
YOUR TARGETS.
(Repeat above sequence for subse-
quent shot groups and firing or-
ders.)
* If Personnel are armed with M14 rifles.
** Only give for the initial 3-round shot group fired
by each order.
(2) Timed-fire exercises.
FIRERS ASSUME THE
POSITION.
COACHES SECURE (*ONE MAGA-
ZINE OF FOUR ROUNDS) (**-
ONE CLIP AND FOUR ROUNDS).
THE FIRING LINE IS NO LONGER
CLEAR.
LOCK.
(*ONE MAGAZINE OF FOUR
ROUNDS) (“ONE PARTIAL
CLIP OF FOUR ROUNDS) LOAD.
READY ON THE RIGHT?
READY ON THE LEFT?
THE FIRING LINE IS READY.
(A whistle, buzzer, horn, or other au-
dible signal should be sounded to
begin the exercise and again to cease
fire.)
CEASE FIRE (given simultaneously
with signal).
ARE THERE ANY ALIBIS? (See
ch. 6, par. 62e.)
(ALIBI FIRERS COMMENCE FIR-
ING.)
(CEASE FIRE.)
CLEAR ALL WEAPONS.
CLEAR ON THE RIGHT?
CLEAR ON THE LEFT?
THE FIRING LINE IS CLEAR.
COACHES AND FIRERS MOVE
DOWN RANGE AND CHECK
YOUR TARGETS.
• If personnel ere armed with Ml4 rifles.
•• If personnel sre armed with Ml rifles.
(3) Rapid fire exercises. Preliminary in-
structions to describe the exercise
should be given prior to the actual
fire command. For example, “the next
exercise will be nine rounds rapid fire
in which you move from the standing
to the prone position. You will load
the first round while in the standing
position. When the (whistle, buzzer,
or horn) sounds, you will assume the
prone position and fire the single
round. Reload as quickly as possible
with the (magazine) (clip) of eight
rounds and resume firing. Fire three
rounds at each silhouette target in
block seven on the target sheet. You
174
TAGO 6024-A
will have 60 seconds to complete this
exercise. Timing begins and ends
when you hear this signal (sound
signal). When you hear the second
signal, you must cease fire even if you
have not fired all of your rounds.”
FIRERS ASSUME A (PRONE)
(SITTING) POSITION.
RISE, KEEPING YOUR FEET IN
PLACE.
COACHES SECURE ONE LOOSE
ROUND AND ONE (‘MAGA-
ZINE) (“CLIP) OF EIGHT
ROUNDS.
THE FIRING LINE IS NO LONG-
ER CLEAR.
LOCK, ONE ROUND LOAD.
YOU WILL FIRE THREE
ROUNDS AT EACH SILHOU-
ETTE IN BLOCK NUMBER
(SEVEN) (EIGHT).
READY ON THE RIGHT?
READY ON THE LEFT?
THE FIRING LINE IS READY.
(A whistle, buzzer, horn, or other au-
dible signal should be sounded to
begin the exercise and again to cease
fire.)
CEASE FIRE (given simultaneous-
ly with signal).
ARE THERE ANY ALIBIS? (See
ch. 6, par. 62e.)
(ALIBI FIRERS COMMENCE
FIRING.)
(CEASE FIRE.)
CLEAR ALL WEAPONS.
CLEAR ON THE RIGHT?
CLEAR ON THE LEFT?
THE FIRING LINE IS CLEAR.
COACHES AND FIRERS MOVE
DOWN RANGE AND CHECK
YOUR TARGETS.
* For personnel armed with MH rifles.
• • For personnel armed with Ml rifles.
f. Range Safety. See appendix II.
3. Alternate Course ”C”
The principal difference between alternate
course ”C” and standard course “C” is ths
the alternate course requires a specially v
structed 25-meter range. The course of instruv
tion, targets, ammunition requirements,
scoring are the same for both marksmansh*
courses. The firing procedures for zero
timed-fire exercises are also the same. F
safety reasons, the procedures for conductin
rapid fire exercises require minor modification
a. Scope. As prescribed in paragraph >
above.
b. Range Characteristics.
(1) The alternate course “C" 25-meu.
range is designed for reserve compc
nents which have only limited space
which to construct the facility. i
eliminate the need for large i““
areas, targets are placed in front of
large impact berm, and bulletproof i..
closures are constructed around eaJ
firing lane (figs. 71 and 72). In thi.
way, a ricochet cannot escape fr^
the immediate range area.
(2) Foxholes are constructed in two »vt
so firing can be conducted from eith<
the standing position or tie foxhoL
position (fig. 73). Each fring poi
has a removable post to enable exc*
cises to be conducted from both th*
kneeling supported position and all
the unsupported positions (figs. 7^
77). For a discussion of the character
istics of each firing position, see cha-
ter 2, paragraph 10.
c. Range Organization. As prescribed^
Standard Course “C,” paragraph 2b abc.
d. Conduct of Firing. Except for rapid ш,-
exercises, the procedures for conducting alk*
nate course “C” are the same as prescribed fc
standard course “C” (par. 2c above). In th.,
rapid fire exercises of the alternate course, th
firer must not load his initial round until he hu
assumed the designated firing position. This i.
a safety requirement to avoid accidental firin
before the rifle muzzle is within the bulletproc
inclosure. Because of this added loading re-
quirement, the time for a rapid fire exercise in
the alternate course is increased from 60 to 65
seconds.
TAGO 6024-A
175
Figure 71. fc.« fur "C
TAGO 5024-A
Figure 72. Target as seen through the incl
Figure 73. Standing position.
178
TACO 6024-A
Figure 74. Prone supported position.
GO БО24-А
Figure 75. Kneeling supported position.
180
TAGO 6024-A
Iv
TAGO 6024-A
Figure 77. Squatting position.
182
TAGO 5U24-A
e. Ammunition Required by Period or Exer-
cise, As prescribed for Standard Course “C,”
paragraph 2b above.
f. Fire Commands.
(1) Fire commands for zero and timed-
fire exercises are the same as pre-
scribed for Standard Course “C,”
paragraph 2e. above.
(2) Fire commands for rapid fire exer-
cises differ from those used in the
standard course because of the change
in loading procedures. Preliminary in-
structions to describe the exercise
should be given prior to the actual
fire command. For example, “The next
exercise will be nine rounds rapid fire.
You will move from the standing to
the prone position. When in position,
load one round, fire, reload with the
magazine of eight rounds and resume
firing. Fire three rounds at each sil-
houette target in block number seven.
You will have 65 seconds to fire this
exercise. The exercise begins and ends
on this signal [sound signal[. When
you hear the signal the second time,
you must cease fire even if you have
not fired all of your rounds.”
FIRERS ASSUME A (PRONE)
(SITTING) POSITION.
RISE, KEEPING YOUR FEET IN
PLACE.
COACHES SECURE ONE LOOSE
ROUND AND ONE (’MAGA-
ZINE) (* **CLIP) OF EIGHT
ROUNDS.
THE FIRING LINE IS NO LONG-
ER CLEAR.
YOU WILL FIRE THREE
ROUNDS AT EACH SILHOU-
ETTE IN BLOCK NUMBER
(SEVEN) (EIGHT).
READY ON THE RIGHT?
READY ON THE LEFT?
THE FIRING LINE IS READY.
(A whistle, buzzer, horn, or other au-
dible signal should be sounded to
begin the exercise and sounded
again to signal cease fire.)
CEASE FIRE (given simultaneous-
ly with signal).
ARE THERE ANY ALIBIS? (S^-
ch. 6, par. 62c.)
(ALIBI FIRERS COMMENT-
FIRING.)
(CEASE FIRE.)
CLEAR ALL WEAPONS.
CLEAR ON THE RIGHT?
CLEAR ON THE LEFT?
THE FIRING LINE IS CLEAr
COACHES AND FIRERS MO
DOWN RANGE AND CHE^
YOUR TARGETS.
• If personnel are armed with M14 r
•• If регноппе! are armed with Ml ri...
(j. Range Safety. The safety precautions ou
lined in appendix II also apply to this mark.,
manship course. However, the extreme hazards
posed by accidental discharges of rifles and
the difficulty in maintaining observation over
the range area because of its manner of con-
struction require that range personnel main-
tain very close supervision of the firers and
range area throughout the firing exercises.
4. Modified Known Distance Course "C”
a. Scope. This course requires 20 traini-
hours as follows:
Orientation and mechanical training 1 hour.
Preparatory marksmanship______ _____ 3 hour.
Known distance field firing____________ 8 hour.
’Target detection and pit detail ....... 4 hour.
Known distance record firing 4 hour.
* To be conducted concurrently with firing exercises. Based on
four platoon unit, two platoons conduct firing while one 7'^?
receives target detection training and other acts as the pit ’
Platoons are rotated between these activities each half-day.
b. Range Organization.
(1) Organization of firers and range per-
sonnel. See chapter 4, paragraph 44.
(2) Targets. The “E” type silhouette tar-
get is used for all firing conducted in
this course. Methods of installing these
targets on known distance ranges are
outlined in appendix V.
c. Conduct of Firing. The firing exercises
conducted in this marksmanship course consist
of zeroing, timed-firing, and rapid firing. The
TAGO BO24-A
183
range procedures outlined in chapter 4, para-
graph 44 are applicable to this marksmanship
course with the following modifications:
(1) Zeroing. Zeroing is conducted from
the 200-yard/184-meter firing line. A
distinctive aiming: point such as the
“4-ring” and “bullseye” from a stand-
ard known distance target should be
fastened to the “E” silhouette target.
The exercise is fired in 3-round shot
groups and the firer adjusts his rear
sight until the center of his shot group
coincides with his point of aim. To
assist the firer, targets should be
pulled after each three rounds and
“spotters” placed on the bullet holes.
(2) Timed fire exercises. These exercises
are conducted in essentially the same
manner as the timed-fire exercises of
Standard Course “C” (par. 2c(2) (a)
above). The primary procedural dif-
ference is that scores are checked
from the firing line by having the pit
detail place spotters in the targets.
(3) Rapid fire exercises. To conduct these
exercises, the firer is issued one loose
round and one magazine or clip of
eight rounds. On command, the firer
loads the single round. On the com-
mand or signal to commence firing,
the firer assumes the designated posi-
tion, fires the single round, reloads,
and fires the remaining eight rounds.
The firer distributes his fire between
the two silhouette targets; however,
he must not fire more than six rounds
into one target.
d. Ammunition Required by Period or Ex-
ercise.
(1) Known distance field firing.
Perio» Position Round* per soldie r Nutee
1 None Orientation and mechanical train- ing.
2 All None Preparatory marks- manship training.
3 • Prone supported 9 In period 3, 27 rounds required for demonstration of rapid fire (9 rounds rehearsal, 18 rounds demon- stration).
3 ь Prone . 8 “ Zero. 60 seconds per shot.
3 ' Sitting . 8 b 13 seconds per shot
3 c Kneeling 4 c 12 seconds per shot.
3 d Squatting 4 d 11 seconds per shot.
3 d Standing .. 8 e Each soldier fires on two targets
3 e Standing to prone. 9 (par. 44d (3) (</), ch. 4). Exercise
4 f Prone . 8 conducted within 60 seconds.
4 f Sitting .. 8 f 10 seconds per shot.
4 f Kneeling 8
4 f Squatting 4
4 f Standing 4
4 e Standing to prone 9
4 e Standing to sitting 9
Total . 100 27 (demonstration)
(2) Target detection.
Period Corresponds to Target Detection Period—* Number of Presentations Blank Rounds Required2
3 3 and 9я 4 205
1 See appendix VI,
* Includes rounds for rehearsals.
Target detection period 9 should be modified to be conducted as
a conference, demonstration, and practical exercise rather thsn as a
test.
e. Scorecards and Qualification Ratings.
IM
TAGO 6024-A
SCORECARD
MODIFIED KNOWN DISTANCE COURSE “C”
Firer’s Name - ____________________________________________________________________________________.___________
(Last) (First)
Platoon Oider^____________________________________________Firing Point,_________________ Date
Scorer’s Name_______________________________________________________________________________________________________
(Last) (First)
Zero
First Shot Group Second Shot Group Third Shot Group
Elevation _ . Windage Elevation Windage Elevation W i ndage
Practice Firing
Position I Timed Fire Hits Scored Total
Prone 1 1 i
Sitting ' 1 1
Kneeling
Squatting
Standing — - J 1
Total hits timed fire
Position । Rapid Fire Hits Total
Standing to Prone Г ' " 1 1 | Right Target
Left Target
Standing to Sitting Right Target
Left Target
Total hits rapid fire
TAGO БО24-А
185
SCORECARD
MODIFIED KNOWN DISTANCE COURSE “C”
Firer’s Name___________________________________________________________________________—--------------------------------
(Last) (First)
Platoon Order----------------------------------------------Firing Point-------------------- Date------------------------
Scorer’s Name --------------------------------------------------------------------—--------------------------
(Last) (First)
Record Firing
Position Timed Fire Hits Scored Total
Prone
Sitting
Kneeling
Squatting
Standing
Total hits time Are
Position Rapid Fire Hits Scored Total
Standing Right Target
to Left Target
Prone
Standing Right Target
to Left Target
Sitting
Total hits rapid fire
Qualifications Ratings:
Possible
Expert ________33- and above.
Sharpshooter . .27 to 32.
Marksman ______22 to 26.
Unqualified___Below 22.
Hits timed fire______.___
Hits rapid fire
Total hits
Scorer’s signature
Officer’s signature_____________________________________________________________
1S6
TAGO W24-A
f. Fire Commands. Fire commands must be
simple and uniform to avoid confusion. Type
fire commands for modified known distance
course “C” are as follows:
(1) Zero firing.
FIRERS ASSUME THE PRONE
SUPPORTED POSITION.
COACHES SECURE THREE LOOSE
ROUNDS OF AMMUNITION.
THE FIRING LINE IS NO LONGER
CLEAR.
LOCK.
♦ONE EMPTY MAGAZINE LOAD.
ONE ROUND LOAD.
♦•THIS WILL BE THREE ROUNDS
SLOW FIRE TO DETERMINE
THE ZERO OF YOUR RIFLE.
YOU WILL HAVE THREE MIN-
UTES TO FIRE THREE ROUNDS.
COMMENCE FIRING WHEN
READY.
CEASE FIRE.
CLEAR ALL WEAPONS.
CLEAR ON THE RIGHT?
CLEAR ON THE LEFT?
THE FIRING LINE IS CLEAR.
COACHES AND FIRERS MOVE
DOWN RANGE AND CHECK
YOUR TARGETS.
(Repeat above sequence for subse-
quent shot groups and firing
orders.)
• If personnel ere armed with M14 rifles.
• • Only given for the initial 3-round shot group fired
by each order.
(2) Timed fire exercises.
FIRERS ASSUME THE ____________
POSITION.
COACHES SECURE _______________
ROUNDS OF AMMUNITION.
THE FIRING LINE IS NO LONGER
CLEAR.
LOCK.
_________ROUNDS LOAD.
THIS EXERCISE WILL BE_________
ROUNDS TIMED FIRE. YOU WILL
HAVE ___________ SECONDS IN
WHICH TO FIRE EACH SHOT.
READY ON THE RIGHT?
READY ON THE LEFT?
THE FIRING LINE IS READY.
(A whistle, buzzer, horn, or other audi-
ble signal should be sounded to begin
the exercise and again to cease fire.)
CEASE FIRE (given simultaneous-
ly with signal).
ARE THERE ANY ALIBIS? (See ch.
6, par. 62e.)
(ALIBI FIRERS COMMENCE FIR-
ING.)
(CEASE FIRE.)
CLEAR ALL WEAPONS.
CLEAR ON THE RIGHT?
CLEAR ON THE LEFT?
THE FIRING LINE IS CLEAR.
COACHES AND FIRERS MOVE
DOWN RANGE AND CHECK
YOUR TARGETS.
(3) Rapid fire exercises. Preliminary in-
structions to describe the exercise
should be given prior to the actual fire
command. For example, “the next ex-
ercise will be nine rounds rapid fire
in which you move from the standing
to the prone position. You will load
the first round while in the standing
position. When the (whistle, buzzer,
or horn) sounds, you will assume the
prone position and fire the single
round. Reload as quickly as possible
with the (magazine) (clip) of eight
rounds and resume firing. Distribute
your fire between the two targets so
that at least three but no more than
six rounds are fired at each target.
You will have 60 seconds to complete
this exercise. Timing begins and ends
when you hear this signal (sound sig-
nal). When you hear the second sig-
nal, you must cease fire even if you
have not fired all of your rounds.”
FIRERS ASSUME A (PRONE)
(SITTING) POSITION.
RISE, KEEPING YOUR FEET IN
PLACE.
COACHES SECURE ONE LOOSE
ROUND AND ONE (♦MAGA-
ZINE) (♦♦CLIP) OF EIGHT
ROUNDS.
THE FIRING LINE IS NO LONGER
CLEAR.
LOCK, ONE ROUND LOAD.
YOU WILL FIRE NINE ROUNDS
TAGO 6024-A
187
AT THE TWO SILHOUETTE TAR-
GETS IN YOUR LANES OF RE-
SPONSIBILITY.
READY ON THE RIGHT?
READY ON THE LEFT?
THE FIRING LINE IS READY.
(A whistle, buzzer, horn, or other au-
dible signal should be sounded to
begin the exercise and again to
cease fire.)
CEASE FIRE (given simultaneously
with signal).
ARE THERE ANY ALIBIS? (Seech.
6, par. 62e.)
(ALIBI FIRERS COMMENCE FIR-
ING.)
(CEASE FIRE.)
CLEAR ALL WEAPONS.
CLEAR ON THE RIGHT?
CLEAR ON THE LEFT?
THE FIRING LINE IS CLEAR.
COACHES AND FIRERS MOVE
DOWN RANGE AND CHECK
YOUR TARGETS.
• For personnel armed with ML4 rifle».
•‘For personnel armed with Ml rtflee.
g. Range Safety. See appendix II.
18t
TAGO 6024-A
APPENDIX V
INSTALLATION OF SILHOUETTE TARGETS ON KNOWN DISTANCE RANGES
1. General
The installation of silhouette targets on
known distance ranges, using either automatic
target devices or manually operated targets,
must be accomplished so as to retain the normal
known distance type firing capability of the
ranges.
2. Installation of
Automatic Target Devices
In order to provide the proper distance be-
tween the firing lines and the targets, the target
devices must be located in the immediate vi-
cinity of the target berm—either on top of the
berm, immediately in front of the berm, or at
some point on the forward slope of the berm.
a. Placing Target Devices on Top of the
Berm. The principal consideration in placing
the target devices on top of the target berm
(fig. 78) is whether the impact area behind
the targets will be visible to the firers. On
many known distance ranges, the height of the
TARGET DEVICE WITH
SILHOUETTE TARGET
Figure 78. Installation of automatic target devices on top of the target berm.
TAGO 6024-A
189
berm completely masks the impact area. Since
a principal objective of known distance combat
target firing is teaching the use of the “adjust-
ed aiming point,” firers must be able to see
the strike of their bullets. Therefore, this loca-
tion should only be selected if the impact area,
such as an impact berm behind the targets, is
visible from the firing lines,
b. Placing Target Devices Immediately in
Front of the Target Berm. On those known dis-
tance ranges which do not have visible impact
areas, first consideration should be given to
placing the target devices immediately in front
of the target berm (fig. 79). With the devices
in this location, the target berm becomes the
impact area and the firer is able to observe the
strike of his rounds. However, if the range has
elevated firing lines, the ЮО-yard firing line
may mask the targets from firers located on the
200- or 300-yard firing lines. Therefore, the
visibility of targets from each firing line must
be carefully checked prior to installing targets
in this locat?' n.
c. Placing Target Devices on the Forward
Slope of the Target Berm. Target devices should
only be placed on the forward slope of the target
berm (fig. 80) if the range has no impact berm,
but does have elevated firing lines which mask
the area in front of the berm. The reason for
this is that installing the devices on the slope
of the berm requires the most extensive modifi-
cation to the range. In addition to this method
being the most expensive, placing target devices
in this location causes the greatest problem of
range maintenance. In order to service the
devices, range personnel must walk up and
down the face of the berm, thus increasing the
eroding effect on the slope.
3. Installation of
Manually Operated Targets
Manually operated silhouette targets are in-
stalled on the standard target frames of the
known distance range. These frames must be
modified as shown in figure 81. This modifica-
tion does not preclude the use of the frames for
normal known distance type targets. If there
is no impact berm behind the target berm, tar-
get cloth is placed on the target frames behind
the silhouettes (fig. 82). Thus if a firer misses
the silhouette but hits the target cloth, the pit
detail places a spotter in the hole so the firer
can apply the principle of the “adjusted aim-
ing point.”
190
TAGO 6024-A
Figure 79. Installation of automatic target devices in front of the target berm.
:;0 6024-A
1
Figure 80. Installation of automatic target devices on the forward slope of the target berm.
192
TAGO 502Ч-А
Figure 81
tors* f««« f°r
TAGO
Figure 82. Silhouette tnrget with target cloth background.
194
TAGO 6024-A
APPENDIX VI
TARGET DETECTION EXERCISES
1. General
a. The exercises outlined in this appendix
serve as the basis for the target detection train-
ing conducted in conjunction with any of the
rifle marksmanship courses listed in appendix
III. Target detection periods of instruction are
listed in numerical sequence, however, this de-
notes only the recommended sequence of instruc-
tion and has no relation to the numerical periods
of a specific marksmanship course.
b. Training aids, equipment, and detailed
time breakdown for each target detection per-
iod listed in this appendix are outlined in Army
Subject Schedule 23—31.
c. Each marksmanship course outlined in
appendix III indicates the target detection per-
iods applicable to that course. For example,
Combat Readiness Marksmanship Proficiency
Course Al prescribes six hours of target detec-
tion training and two hours of target detection
tests. This training is to be conducted during
periods five through eight of the marksmanship
course. As indicated in paragraph 9a(2)(c),
appendix III, target detection period one is con-
ducted during period five of the Combat Readi-
ness Marksmanship Proficiency Course Al.
Target detection periods four and seven are
conducted during period six of the marksman-
ship course and so forth.
2. Target Detection Exercises
a. Period One, Introduction to Target Detec-
tion (2 hours). The purpose of this period is
to teach each soldier the necessary skills and
methods of detecting, marking, and estimating
the range to realistic battlefield targets.
(1) Range facilities. Two target detection
ranges.
(2) Personnel.
(a) Two principal instructors (one for
each range).
(5) Eight assistant instructors (four for
each range).
(c) Six target men (three for each
range).
Note. One principal instructor is needed at
both ranges. They have the responsibility for
setting up the range, training target men,
and conducting the class. Four assistant in-
structors are needed for each range. They
control the observers, assist in scoring, and
must be thoroughly familiar with the position
of the targets. The six target men, three for
each range, must be trained to perform the
duties of “targets.” Each one is assigned a
number of target placements within a certain
area, and all target men are given a target
sheet containing only the trial numbers and
the indications he is to perform.
(3) Organization. One order of observers
is assigned to each range.
(4) Blank ammunition requirements.
Rounds per presentation________________ 20
Rounds for rehearsal (on two ranges).. 40
(5) Master trial sheet.
Trial No. Where Range (meters) Target indications by phases
1 A, В 22 (1) Be slightly exposed; re- main still. (2) Raise and lower head and shoulders slowly. (3) Move head and shoulders from side to side slowly. (4) Fire blank.
2 В, D 66 (1) Be slightly exposed at start of trial; remain still. (2) Move head and shoulders from side to side. (3) Raise head slowly, drop abruptly. (4) Fire one blank.
3 E,F 161 (1) Be exposed but partly hidden, remain still. (2) Move forward and back 1 yard each 10 seconds. (3) Step out and back quick-
ly each 10 seconds.
TAGO 6024-A
195
Trial Range
Na. WAere (metere)
10
D, E 88
Trial Range
N«. When laetml Terf/tl niiretini bg phetei (4) Fire two blanka (10 sec- onds apart).
4 J, К 44 (1) Be slightly exposed at start, remain still. (2) Shake bush gently (each 5 seconds). (3) Raise and lower head slowly with shiny helmet liner. (4) Fire one blank round.
5 В 119 (1) Be exposed at start of trial (kneeling); remain still. (2) Move head and shoulders from side to side. (3) Jump out and back each 5 seconds. (4) Fire two blanks from ex- posed position (10 sec- onds apart).
6 F,H 95 (1) Be exposed at start of trial, remain still. (2) Assume kneeling position slowly and stand slowly. (3) Come up slowly; go down fast. (4) Fire two blanks from ex- posed position (10 sec- onds apart).
7 В 91 (1) Be exposed (kneeling) at start of trial; remain still. (2) Raise head slowly, drop abruptly, repeat every 5 seconds. (3) Same as (2) but with shiny helmet liner. (4) Fire two blanks from kneeling position (10 sec- onds apart).
8 D 51 (1) Be slightly exposed in prone position. (2) Raise head slowly, drop abruptly; repeat every 5 seconds. (3) Move to side and back every 5 seconds. (4) Fire blank (kneeling).
9 A, D 41 (1) Raise and lower head and shoulders.
Target indicatione bg phen»
(2) Raise head slowly, drop
abruptly; repeat every 5
seconds.
(3) Repeat with shiny helmet
liner.
(4) Fire blank.
(1) Be slightly exposed; re-
main still.
(2) Move side to side slowly.
(3) Same as (2) with shiny
helmet liner.
(4) Fire two blanks from
prone position (10 sec-
onds apart).
Note. Target Trial Sheets should be prepared from a
Master Trial Sheet similar to the one above; it should
contain only the trials and target indication performed
by a specific target. Although each target man has been
thoroughly rehearsed, the target trial sheets will insure
that no mistakes are made. For example, you may as-
sign your trials in the following manner: 1st target
man—extract trials 1, 4, 8, 9 as shown in the Master
Trial Sheet; 2d target man—extract trials 2, 7, 10; 3d
target man—extract trials 3, 5, 6.
(6) Answer sheet.
ANSWER SHEET
Name_________________ Platoon_Squad— Date____
(Last) (First)
Instructions
1. Do not change your answers to indicate anything
not actually seen.
2. There will be four phases during each trial. Al-
though the target remains in the same location, each
phase will consist of a different target indication.
Targets will each be presented four times. In the
appropriate space for each phase of each trial, place
either a V if you saw the target or an X if you
failed to see it.
3. Under the “WHERE,” mark the identifying letter
of the landmark nearest the target. If you are in
doubt as to the identity of the nearest landmark,
hold up your hand and the instructor will check with
you.
4. Under range enter your estimate to the target in
meters. Estimations within 25 meters will be con-
sidered correct.
196
TAGO Б024-А
Phoe num her Where (U Range faculties. Uno target detection Range
Trial No 1 2 я 4 (letter of nearest landmark) (meter») FHDgt?.
1 (2) Personnel. («) One principal instructor.
2 (6) Three target men. Blan]. ammunition requirements. Rounds per presentation 11.
3
4 . Rounds for rehearsal 11. (4) Master trial sheet.
5 Q А ШГПТ I? U APTT'D TDT A T 0ТТРТ7Т
6 oAMrLL MAblhK 1K1AL biiiUiSl Trial Range
7 No, (meters) Description of reQuire/menta 1 200 StanHincF руппяаН hv trAP Flnwn fn
8 . . kneeling, exposed. Slow move- ment to out-of-sight position. Out-
9 of-sight fire round for smoke indications.
10 .... 2 150 Same as above with a poor aiming point.
11 3 175 Start standing. Disappear on com- mand. Reappear in same position.
12 Make five 4-second rushes with a good aiming point. Fire one round
13 4 300 Start from kneeling position behind
14 bush. Make five 4- to 5-second rushes. Disappear where there is a poor aiming point. Reappear
15 from same position. 5-3-3-5-5- seconds. Fire round from last
16 position. 5 300 Start prone. Make five 4-5-8-second
Total... rushes. Disappear after each rush and roll or crouch to a new posi-
non. inree-secona rusn, crawl left. Six-second rush, crawl right. b. Period Two, Detection of Realistic Battle- Cross small draw. Appear and field Targets (2 hours). This period is con- ducted in the same manner as period one. Fire one round from last position. Range facilities, personnel, organization, am- 6 175 Start prone Make three 4.secOnd munition requirements, master trial sheet, and and two 6-second lateral rushes to answer sheet are the same as outlined for new Beappear at same point of disappearance. Vary period one. time between rushes. Fire one round from last position. c. Period Three, Detection of Single Moving 7 175 Do same in reverse. Crawl or roll m J. ro 1 V л XI • • , to new position after disappear- Targets (2 hours). The purpose of this period ing. Fire roundfrom last position, is to give the soldier practice in detecting and _ . ... 8 200 Run 200 yards from tree to position marking single, combat-type moving targets. with a poor aiming point. Fire
TAGO 6024-A
1*7
Trial Кит)»
No.
/Л'в< г<р(<ин и!
two blanks 1 minute after disap- pearance.
9 300 Start prone. Three-second rush, crawl left. Five-second rush, crawl right. 5-L-3-3-6-R-4-5, through draw. Fire round from last position. (Numbers indicate duration of rush; letters L and R indicate direction of roll or crawl after each rush.)
10 300 Start behind bush. 6-8-R-3-R-4-3. Fire round from last position.
Note. Tanret trial sheets should be pre-
pared from a master trial sheet similar to
the one above containing only the trials and
target indications performed by a specific
target.
(5) Answer sheet.
ANSWER SHEET
Name__________________ Platoon . Squad-_Date_
Trial No. i 1 J Where (letter of nearest landmark) i Range (meters 1
1
2 1 i
3
4
5
6
7
8
9
10
d. Period Four, Detection of Multiple Mov-
ing Targets (2 hours). The purpose of this pe-
riod is to give the soldier practice in detecting,
marking, aiming at, and engaging multiple,
combat-type moving targets.
(1) Range facilities. Two target detection
ranges.
(2) Personnel.
(a) Two principal instructors (one for
each range).
(/>) Eight assistant instructors (four
for each range).
(r) Sixteen target men (eight for each
range).
(3) Organization. One order of observers
is assigned to each range.
(4) Blank ammunition requirements.
Rounds per presentation_________________ 48.
Rounds for rehearsal
(on two ranges) ________________________ 96.
(5) Master trial sheet. (Observers use
target aiming device to mark the loca-
tions of moving targets.)
SAMPLE MASTER TRIAL SHEET
Trial No. Напое
No. men (meter a) Description of requirements
1 2 75 Kneeling exposed. Crawl to new position in four 5-meter crawling movements. Fire round from each. Good aim- ing points.
2 3 100 Same as above. Poor aiming points, but reference points available. Reference points increase in difficulty each time.
3 4 300 Start with targets walking through woods or other par- tial cover. Disappear when fired on. Make five 4-second rushes to positions with good aiming points. Fire round from last position.
4 2 200 Start from kneeling position behind bush. Make five 2- to 4-second rushes. Disap- pear where there is a poor aiming point. Reference points available but not easy. 4-2-2-4-4 seconds. Fire round from last position.
5 3 300 Start prone. Make five 2- to 6- second rushes, good and poor aiming points. 2-4-6-6-2. Fire round from last posi- tion.
6 4 175 Start at tree. Make five 2- to 4-second lateral rushes to new positions affording good
198
TAGO 6024-A
Trial No. Range
No. men ( meter*) Deecription of requirement* and poor aiming points. Fire round from last position.
7 3 175 Start at different distances. Make five 2- to 4-second ap- proach rushes. Varied good and poor aiming points. Fire round from last position.
8 3 200 Make four 5-meter crawling movements to positions with- out good aiming points. Reference points increase in difficulty each time. Fire round from last position.
9 3 300 Start walking in woods. Make five 2- to 6-second rushes. 4-2-2-6-4. Fire round from last position.
10 4 150 Make five 2- to 6-second rushes. 4-3-6-2-3. Fire round from last position.
Note. Target Trial Sheets should be prepared from a Master
Trial Sheet similar to the one above, containing only the trials and
indications performed by a specific target or targets.
SAMPLE MASTER TRIAL SHEET
Trial Sound Trial Sound
No. petition No. position
1 H 15 G-C
2 A-J 16 F
3 - C-L 17 A-C
4 E-H 18 C-J
5 A 19 I
6 G 20 E-I
7 D-B 21 G-A
8 I-G 22 E
9 c 23 ... .. .. D
10 K-A 24 I-B
11 B-F 25 B-D
12 J-I 26 F-N
13 H-K 27 J-F
14 J 28 В
Note. Target trial sheets should be prepared from a Master Trial
Sheet similar to the Master Trial Sheet shown above, containing only
the trials and indications performed by * specific target or targets.
(6) Answer sheet.
e. Period Five, Locating Hostile Firing Posi-
tions by Sound (2 hours). The purpose of this
period is to give the soldier practice in locating
targets by the sound of firing from hostile fir-
ing positions.
(1) Range facilities. Two target detection
ranges.
(2) Personnel.
(a) Two principal instructors (one for
each range).
(b) One assistant instructor per ten ob-
servers.
(c) Ten target men (five for each
range).
(3) Organization. One order of observers
is assigned to each range.
(4) Blank ammunition requirements.
Rounds per presentation_____________ 46
Rounds for rehearsal (on two ranges) . 92
(5) Master trial sheet.
Trial No. 1 ANSWER SHEET SOUND DETECTION Sound position Trial No. Sound position 15
2 16
3 17
4 18
5 19 :
6 20
7 21
8 , 22 ,
9 23
10 . 24
11 25 :
12 26
13 27
14 28
Total_______RIGHT WRONG
Observer’s Name--------------------------Platoon-------
(Last) (First)
Observation Point------------------------ Date---------
TAGO 6024-A
f. Period Six, Detection end Movement by
Opposing Teams, Personal Camouflage. The
purpose of this period is to give soldiers prac-
tical work in target detection and movement as
target teams, and to conduct demonstrations
and practical work in personal camouflage.
(1) Range facilities. Two target detection
ranges.
(2) Personnel.
(a) Two principal instructors (one for
each range).
(h) One assistant instructor per ten ob-
servers.
(c) Four demonstrators with camou-
flage suits (two for each range).
(3) Organization. One order of observers
is assigned to each range.
(4) Blank ammunition requirements.
There is no blank ammunition required
for this period.
(5) Master trial sheet.
MOVEMENTS BY TRIAL
(1) (2) (3) (4) (5) (6) (7) (8) (9) (10)
Soldier 6-sec 2-sec 5-m 4-sec 5-m 4-sec 10-m 2-sec 6-sec 50-m
targets rush rush low rush low rush high rush rush bound
Trial No.: crawl crawl crawl
1... X X X x X
2... X X X X X
3.. X X X X X
4... X X X X X
5... X X X X X
6... X X X X X
7... X X X X X
8... X X X X X
9... X X X X X
10... X X X X X
11... X X X X X
12... X X X X X
13... X X X X X
14... X X X X X
Note. The above Sample Master Trial Sheet reflects 14 trials for 10 soldiers acting as targets.
Units may revise the above Master Trial Sheet to include additional target requirements so as to
insure participation when larger squads are used, or have one squad of ten men or less
perform trials 1-7 and second squad of ten men or less perform trials 8-14.
(6) Target trial sheets.
Target Trial Sheet No. 1.
Trials: (2) 2-sec rush; (5) 5-m
low crawl; (6) 4-sec
rush;
(9) 6-secrush; (10) 50-m
bound.
Target Trial Sheet No. 2.
Trials: (1) 6-sec rush; (3) 5-m
low crawl; (6) 4-sec
rush;
(8) 2-secrush; (10) 50-m
bound.
TAGO 5024-A
200
Target Trial Sheet No. 3.
Trials: (2) 2-sec rush; (6) 4-sec
rush; (7) 10-m high
crawl;
(9) 6-sec rush; (10) 50-m
bound.
Target Trial Sheet No. 4.
Trials: (1) 6-sec rush; (3) 5-m
low crawl; (4) 4-sec
rush;
(8) 2-sec rush; (10) 50-m
bound.
Target Trial Sheet No. 5.
Trials: (4) 4-sec rush; (5) 5-m
low crawl; (8) 2-sec
rush;
(9) 6-sec rush; (10) 50-m
bound.
Target Trial Sheet No. 6.
Trials: (1) 6-sec rush; (3) 5-m
low crawl; (6) 4-sec
rush;
(8) 2-sec rush; (10) 50-m
bound.
Target Trial Sheet No. 7.
Trials: (1) 6-sec rush; (2) 2-sec
rush; (4) 4-sec rush;
(7) 10-m high crawl;
(10) 50-m bound.
Target Trial Sheet No. 8.
Trials: (4) 4-sec rush; (7) 10-m
high crawl; (8) 2-sec
rush;
(9) 6-sec rush; (10) 50-m
bound.
Target Trial Sheet No. 9.
Trials: (2) 2-sec rush; (6) 4-sec
rush; (7) 10-m high
crawl;
(9) 6-sec rush; (10) 50-m
bound.
Target Trial Sheet No. 10.
Trials: (1) 6-sec rush; (4) 4-sec
rush; (5) 5-m low
crawl;
(8) 2-sec rush; (10) 50-m
bound.
Target Trial Sheet No. 11.
Trials: (2) 2-sec rush; (6) 4-sec
rush; (7) 10-m high
crawl;
(8) 2-sec rush; (10) 50-m
bound.
Target Trial Sheet No. 12.
Trials: (2) 2-sec rush; (4) 4-sec
rush; (5) 5-m low
crawl;
(9) 6-sec rush; (10) 50-m
bound.
Target Trial Sheet No. 13.
Trials: (1) 6-sec rush; (3) 5-m
low crawl; (6) 4-sec
rush;
(8) 2-sec rush; (10) 50-m
bound.
Target Trial Sheet No. 14.
Trials: (2) 2-sec rush; (4) 4-sec
rush; (5) 5-m low
crawl;
(9) 6-sec rush; (10) 50-m
bound.
g. Period Seven, Combination of Sound Lo-
calization and Multiple Moving Targets (2
hours). The purpose of this period is to give
soldiers practice in detecting, marking, aiming
at, and engaging combinations of firing and
moving combat-type targets.
(1) Range facilities. Two target detection
ranges.
(2) Personnel.
(a) Two principal instructors (one for
each range).
(b) One assistant instructor per ten ob-
servers.
(c) Sixteen target men (eight for each
range).
(3) Organization. One order of observers
assigned to each range.
(4) Blank ammunition requirements.
Rounds per presentation ----------- 90.
Rounds for rehearsal
(on two ranges) ___________________ 180.
(5) Master trial sheet.
TAGO 5024-A
201
Trial No. Rongo (outer*) DeteriptioH rj гечмггонемСх
15 225 Two targets spaced far apart make 3-second rush; two targets close together fire 2 rounds each. Posi- tions with good aiming points.
16 275 Four targets make 1-, 2-, 3-, 4-second rushes after being fired on from observation line. Each target fires 1 round 2 seconds after disappear- ing. Positions with varied good and poor aiming points.
17 125 Four targets fire 1, 2. 3, 4 rounds from positions with varied good and poor aiming points.
18 300 Two targets make 1-second rush; two targets fire 1 round. Positions •without good aiming points.
19 125 Two targets make two 3-second rushes; one target makes 5-meter crawl; one target fires 1 round. Positions with varied good and poor aiming points.
20 175 One target makes 5-meter crawl; three targets fire 1, 2, 3 rounds. Positions with varied good and poor aiming points.
Note. Tarset Trial Sheets should be prepared from a Master Trial
Sheet similar to the one above, containing only the trials and target
indications performed by a specific target.
PERIOD SEVEN
ANNEX III
ANSWER SHEET
COMBINATION OF SOUND LOCALIZA-
TION AND MULTIPLE MOVING TARGETS
(Observers check each other’s alignment and
place number *of targets correctly aligned in
space opposite appropriate trial number.)
Name-------------------Platoon___. Squad__Date_____
Trial No. No. correct Trial No. No. correct
1 12
2 13
3 j 14... -
4. 15 -- --
5 16
6. 17 .
7 18 .
8 19
9. .. 20 .. .
10 Total
11 correct
Targets representing fire support should be
located in a tactically sound position. Moving
targets should be located generally to the flank
of the maneuver area. Where rushing targets
are widely separated (100 meters or more), fire
support may be centrally located.
Trial Range
No. (metm) Description of requirement»
1 150 Two targets make clumsy 5-meter crawling movements; two targets fire 4 rounds each toward the ob- servation line. All positions at good aiming points. Targets lo- cated within 10 meters of each other.
2 200 Three targets make skilled 5-meter crawling movements; one target fires 2 rounds after start of move- ment. All positions lack good aim- ing points and require use of refer- ence points. Distance between targets is 25 meters.
3 300 Two targets walking through bush until fired on from observation line. Targets disappear and then make 4-second rush.
(6) Answer sheet.
ANSWER SHEET
COMBINATION OF SOUND LOCALIZA-
TION AND MULTIPLE MOVING TARGETS
(Observers check each other’s alignment and
place number of targets correctly aligned in
space opposite appropriate trial number.)
Name Platoon Squad— Date.—
Trial No. No. correct Trial No. No. correct
1 12 - -. ---
2 13 -- ---
3 -i 14.. ...
4 15 -
5 16 - - - ---
6 17-_
7 18-- -- ...
8 19
9 20
10- ... - Total
11 correct
202
TAGO 6024-A
Л. Period Eight, Target Detection Test One
(1 hour). The purpose of this period is to test
the soldier’s ability to detect and estimate range
to single, stationary battlefield targets.
(1) Range facilities. One target detection
range.
(2) Personnel.
(a) One principal instructor.
(/>) Three assistant instructors.
(r) Three target men.
(3) Blank ammunition requirements.
Rounds per presentation 17
Rounds for rehearsal 17
(1) Master trial sheet.
SAMPLE MASTER TRIAL SHEET, TARGET
DETECTION TEST NO. 1
Trial No. Where Kano, (meter*) Target indications bg phase»
1 В 20 (1) Be slightly exposed at start of trial; remain still. (2) Raise and lower head and shoulders slowly. (3) Move head and shoulders from side to side slowly. (4) Fire one blank.
•> G 07 (1) Be slightly exposed in prone position at start of trial, remain still. (2) Raise and lower head and shoulders slowly. (3) Do same with shiny hel- met liner. (4) Fire one blank.
3 A 149 (1) Be exposed, crouching and motionless. (2) Raise up slowly and go down slowly. (3) Step to side slowly, re- main still, then step back (each five seconds). (4) Fire two blanks (stand- ing position).
4 G 135 (1) Be slightly exposed (kneeling) at start of trial, remain still. (2) Raise head and shoulders slowly, drop quickly. (3) Rustle bush every five seconds. (4) Fire one blank.
Trial No. Where Range (meter») Target iruiuationa bg phase*
5 H,F 150 (1) Be exposed in kneeling position, motionless. (2) Drop head abruptly, raieq, slowly every five seC^jd».? (3) Do same with shiny-bigf met liner. (4) Fire 2 blanks (kneeling position).
6 E 33 (1) Be slightly exposed (in prone position) at start of trial, remain still. (2) Raise and lower head and shoulders slowly. (3) Move head and shoulders slowly from side to side. (4) Fire one blank.
7 I 160 (1) Be partially exposed at start of trial; remain motionless. (2) Move out and back from chimney slowly. (3) Move out and back fast (each five seconds). (4) Fire two blanks (side of chimney).
8 A 110 (1) Be exposed in standing position at start of trial; remain motionless. (2) Walk forward slowly, one yard each 10 seconds. (3) Up and down fast, each five seconds. (4) Fire two blanks (stand- ing).
9 E 42 (1) Be slightly exposed (prone) at start of trial. (2) Move head and shoulders from side to side slowly. (3) Raise head slowly, then drop abruptly. (4) Fire one blank.
10 C 200 (1) Be exposed in standing position at start of trial, remain motionless. (2) Drop quickly, raise head slowly (each five sec- onds). (3) Step to side (each five seconds). (4) Fire two blanks (stand- ing)-
11 H 150 (1) Be exposed in kneeling position, remain motion- less. (2) Move forward one meter (each five seconds) very slowly.
TAGO 5024-A
203
TrW Raage
Ne. Where fmeterat Target mdieatHtiu by phaaea
(3) Move to side and back every five seconds.
(4) Fire one blank (kneel- ing).
12 E 24 (1) Be slightly exposed (prone at start of trial) remain still.
• (2) Move head and shoulders up and down slowly.
(3) Move head and shoulders slowly from side to side.
(4) File one blank.
Note. Target Trial Sheets should be prepared from a Master Trial
Sheet similar to the sample shown above. It should contain only
the triate and target indications performed by a specific target.
Although each target man has been thoroughly rehearsed, the Target
Trial Sheets will insure that no mistakes are made.
(5) Answer sheet.
TARGET DETECTION TEST NO. 1
ANSWER SHEET
Name____________Platoon- Squad____________Date
(Last) (First)
Instructions
1. Do not change your answers to indicate
anything not actually seen.
2. There will be four phases during each trial.
Although the target remains in the same
location, each phase will consist of a differ-
ent target indication. Targets will each be
presented four times. In the appropriate
space for each phase of each trial place
either a if you saw the target or an X
if you failed to see it.
3. Under the WHERE, mark the identifying
letter of the landmark nearest the target.
If you are in doubt as to the identity of the
nearest landmark, hold up your hand and
the instructor will check with you.
4. Under RANGE enter your range determi-
nation to the target in yards. Estimations
within 25 meters will be considered correct.
Trial No. P 1 lumb "a " er "T Where (letter of neareat landmark I Hanite (meteral
1
•> W . -
3
4
5
6
7
8
9 . ...
10
11
12
13
14
15
16
Total
i. Period Nine, Target Detection Tests Tiro
and Three (1 hour). The purpose of this period
is to test the soldier’s ability in detecting and
marking single and multiple moving targets and
his ability to locate sound of firing from one or
more positions.
(1) Range facilities. One target detection
range.
(2) Personnel.
(a) One principal instructor.
(b) Four assistant instructors.
(c) Four target men.
204
TAGO 60S4-A
(3) Blank ammunition requirements.
Rounds per presentation. 30
Rounds for rehearsal. . 30
(4) Master trial sheet and answer sheet,
target detection test 2.
SAMPLE MASTER TRIAL SHEET,
TARGET DETECTION TEST NO. 2
Trial No. Range
No. mm (metere)
Description of requirements
1 1 300
2 3 75
3 4 200
4 4 150
5 2 200
6 3 75
100
125
7 3 75
8 1 200
9 2 300
10 2 150
Man kneeling by tree, up on
command. 10-meter bound.
Poor aiming point.
Men rush 15 meters. Poor aim-
ing points.
Men rush 10 meters. Poor aim-
ing points.
Men rush 10 meters laterally.
Good aiming points.
10-meter rush. One man left,
the other man right. Poor
aiming points.
Three men making 10-meter
rush. One good aiming point,
two without aiming points.
Three men making 5-meter
rush. Poor aiming points.
Man making 20-meter rush.
Poor aiming point.
Two men, one making 5-meter
rush, one making 10-meter
rush. One good and one poor
aiming point.
Two men making 5-meter
lateral rush. Poor aiming
points.
Note. Target Trial Sheets should be prepared from a Master Trial
Sheet, similar to the Sample Master Trial Sheet shown above.
TARGET DETECTION TEST NO. 2
ANSWER SHEET
OBSERVER’S NAME__________- ____PLATOON—
(Last) (First)
OBSERVATION POINT DATE-------------------
Trial number No. of target* presented Right [ Wrong
1 1 i
2 3
3 4
4 4
5 2
6 3
7 3
8 1
9 Г 2 i
10 1 г i
25 targets presented
Total Right______________________________ Wrong
(5) Master trial sheet and answer sheet,
target detection test 3.
SAMPLE MASTER TRIAL SHEET,
TARGET DETECTION TEST NO. 3
Trial Sound Trial Sound
No. position No. position
1 В 11 ...____________ I-H
2 A-G 12..._______________ C
3 . D-B 13...____________ H
4 G 14_________________ B-I
5 J-F 15..._______________ E
G ... A 16...____________G-J
7 .... .... F 17...____________H-E
8 C-D 18__________________ D
!) J 19 _________________ I
10 E-A 20 ...__________F-C
ANSWER SHEET
SOUND DETECTION
Trial No. Sound position Trial No. Sound position
1........ 11
2 ... 12
3 13
4 14
5.. .... 15
6 16. _ ....
7 ...... 17
8... 18
9........ 19
10 . .... 20
Total______RIGHT WRONG
Observer's Name_______________Platoon------------------
(Last) (First)
Observation Point------------------------Date----------
TAGO 6024-A
205
APPENDIX VII
TRAINING AIDS
Properly used, training aids are of invalu-
able assistance in teaching rifle marksmanship.
Models, pictures, and/or charts can be used to
teach principles or techniques which would
otherwise require lengthy explanations. The
training aids listed in this appendix have been
found particularly useful for rifle marksman-
ship training. They are by no means the only
training aids which can be or should be used.
Specific areas and/or situations may require
special type training aids. Consequently, in-
structors should be encouraged to develop new
training aids which will best support their own
training program.
Note. The following additional training aids should
be made from figures listed in previous chapters.
1. Charts.
Figure 4. Importance of sight alignment
(ch. 2).
Figure 33. Principles of zeroing (ch. 3).
2. Training aids.
Figure 28. Aiming device (ch. 2).
Figure 35. Scoring template (ch. 3).
3. Films.
a. Training Films.
(1) 9-1172—U.S. Rifle, Cal. .30, Ml
—Principles of Operation.
(2) 9-2970—U.S. Rifle, Cal. 7.62-
mm. M14—Operation and Cycle
of Functioning.
b. Miscellaneous Film. 7-918—This Is The
Infantry.
206
TAGO «QS4-A
Figure S3. Chart, cycle of operation, Mll> rifle.
TAGO 5024-A
207
TARGET PAINTED WHITE
WITH BLACK RECTANGLE
EYE PIECE
(PAINTED BLACK)
Figure 84. Aiming bar.
208
TAGO 6024-A
CLEAR
ACETATE
Figure 85. Sight picture model.
TAGO 6024-A
2И
Figure 86. Rear sight model.
30 CM
-8 CM
61 CM
Figure 87. Fixed sight alignment device.
210
TAGO 5024-A
122 CM
CM
Figure 88. Chart, eight steady hold factors.
TAGO 6024-A
211
I
Figure 89. Blackboard with firing data card.
212
TAGO 5024-A
METAL PLATE ON WOOD BACKING
<---------------------------— 122 CM ---------------------------—----►
Figure 90. Metallic target.
TAGO 8024-A
213
METALLIC DISC
26 CM
WOOD HANDLE
61 CM
ONE SIDE PAINTED RED (FOR "NOT CLEAR" SIGNAL)
ONE SIDE PAINTED WHITE (FOR "ALL CLEAR" SIGNAL)
SAFETY PADDLE
Figure 91. Safety paddle.
214
TAGO 6024-A
Figure 92. Rifle rest.
215
/AGO 6024-A
122 CM
Figure 93. Chart, target detection.
216
TAGO 6024-A
122 CM
SINGLE MOVING TARGETS
ENGAGING FACTORS
1. AVAILABLE COVER AND
CONCEALMENT
2. EXPOSURE TIME
3. MOVEMENT TO NEW
POSITION
4. RANGE
5. DIRECTION OF MOVEMENT
6. FIRERS REACTION TIME
Figure 94. Chart, single moving targets.
О 6024-A
2
122 CM
MULTIPLE MOVING
TARGETS
MARKING FACTORS
1. NUMBER OF TARGETS
2. EXPOSURE TIME
3. SPACING OF TARGETS
4. TYPES OF AIMING POINTS
ENGAGING FACTORS
1. TYPES OF AIMING POINTS
2. PROXIMITY OF TARGET
Figxire 95. Chart, multiple moving targets.
2X8
TAGO 6024-A
T3=EJ
NIGHT VISION
DAYTIME INSTRUCTION FIRING
NIGHT PRACTICE FIRING
NIGHT RECORD FIRING
Figure 96. Chart, phases of night firing instruction.
TAGO 6024-A
219
4
Figure 97. Chart, technique of night firing.
220
TAGO 6024-A
TO MAKE THE TRAJECTORY OF THE BULLET INTER-
SECT THE LINE OF SIGHT AT THE TARGET. RICHO-
CHETS WILL KILL OR WOUND AND ASSIST IN ALIGN-
ING THE RIFLE ON THE TARGET
Figiire 98. Chart, correct pointing technique.
OFTEN RAISES THE MUZZLE SLIGHTY SO THAT THE
FRONT SIGHT INTERSECTS HIS LINE OF SIGHT TO
THE TARGET AND HE WILL FIRE OVER THE TARGET
Figure 99. Chart, tendency to raise muzzle.
TAGO 6024-A
221
SAFETY REGULATIONS
1. TAKE ALL COMMANDS FROM
O.I.C. OF FIRING
2. MOVE TO FIRING LINE ONLY
ON COMMAND
3. LOAD ONLY ON COMMAND
4. COMMENCE FIRING ONLY ON
COMMAND
5. LOCK AND CLEAR WEAPON
AFTER EACH EXERCISE
6. MOVE BACK TO READY LINE
AFTER NCO CLEARS WEAPON
7. MOVE DOWN RANGE ONLY
ON COMMAND
8. “CEASE FIRE” MAY BE GIVEN
BY ANYONE
5'
Figure 100. Chart, safety regulations.
222
TAGO Б024-А
APPENDIX VIII
EVOLUTION OF INDIVIDUAL WEAPONS
1. Military rifles were not always as ex-
cellent as they are today. In the early days,
black powder and lead balls were used by
every nation. Black powder was smoky, dirty,
and inefficient compared with modern propel-
lants. When one of these early rifles was fired, a
cloud of white smoke disclosed the rifleman’s
position, and a thick residue, like carbon and
soot, was deposited in the bore of the rifle. Black
powder has a lower energy content per cubic
centi-meter compared with modern rifle pow-
ders which have high velocities.
2. When the lead ball was fired from the
rifle it began to lose speed very quickly. A
sphere is poorly shaped for fast travel. Lead
balls from some of our early military rifles
fired at a muzzle speed (velocity) as high as
2,000 feet per second. But at a distance of 100
meters they would slow to about 1,500 feet
per second; whereas a bullet from our Ml or
M14 rifle today, at an initial velocity of 2,800
feet per second, loses only about 300 feet per
second the first 100 meters.
3. The lead balls of these early military rifles
were often “patched,” that is, greased linen,
flannel, or thin soft leather was wrapped (and
sometimes tied) over the ball. When this
greased patch was used it served as a lubri-
cant to ease loading, reduce escaping gas, and
keep the ball from losing lead onto the bore
as it traveled through it. But sometimes the
lead ball was used bare, in which case the
bore frequently picked up a lead coating which
grew progressively thicker, decreasing the ac-
curacy with each shot fired until the lead de-
posit was removed.
4. The same problem arose from the rough
residue left by the burning of black powder.
Unless the bores of those early rifles were
washed after each shot, the residue became
progressively thicker, making the diameter of
the bore smaller. Since most early rifles were
muzzle-loaders, it became increasingly difficult
to load, and accuracy diminished, due to con-
stantly reduced bore diameter. The effort re-
quired just to ram a lead ball, patched or
not, down 32 or more inches of barrel became
first exhausting and then all but impossible.
5. The inefficiency of black powder and early
projectiles led early rifle makers to build their
weapons with longer barrels and in larger
caliber bores than our rifles of today. This com-
bination gave as high velocity as could be
obtained without making rifles completely awk-
ward to handle and gave the desired killing ef-
fect needed for fighting infantry and cavalry.
When you cannot propel a missile at high ve-
locity, you must increase the weight in order
to get adequate effect. Any increase in weight
with a ball projectile results from an increase
in diameter.
6. In time the round projectile gave way to
the elongated one. It had been discovered as
early as the late 1700’s that elongated missiles
were more efficient in flight and traveled to
tremendously greater maximum ranges. Massed
squad and platoon fire with elongated bullet
rifles could be effective at 1,000 meters or
more. Several years prior to the war of 1861—
65, the elongated bullet rifle was adopted al-
most worldwide because it permitted faster
loading. Successful methods of making metal
cartridge cases had not yet been found, so most
of the first bullet rifles were muzzle-loaders
too. The early Sharps rifle was one of the ex-
ceptions. It was a breech-loader taking a linen
cartridge. Because there was no metal cartridge
case, such as is used in modern rifles, a portion
of the gas generated by the powder flashed
out at the juncture of breech-block and receiver
of this rifle.
7. By 1870 nearly all armies had adopted
breechloading infantry rifles (usually single
shot) which usually fired fixed, metallic, black
powder, lead bullet cartridges in calibers rang-
ing from .40 to .45. These improved firearms
TAGO 6024-A
223
could be fired by я trained soldier 15 or moie
times a minute. Lever action repeating rifles
had been developed to a level of real usability
by 1861, but had to be held to lesser powder
levels (for design reasons) than was desirable
for infantry use. The Spencer and Henry lever-
action rifles were used in the war of 1861-65
by many cavalry units. The Spencer carried
seven cartridges and the Henry carried 16.
Both weapons had a reach of about 225 meters,
and the rate of fire was five shots to one, com-
pared with the standard muzzle-loader.
8. The year 1886 was an historic one in in-
fantry rifle design. France adopted a manually
operated bolt-action rifle of caliber .32 (8-mm)
jacketed bullet design (to prevent melting and
failure to spin in the rifling grooves) for use
with nitrocellulose (smokeless) powder. The
ancient bondage to black powder had been dis-
solved. Soldiers using these newer rifles found
that very little smoke was given off in firing
to disclose their positions. By 1888 Britain and
Germany used similar new designs. And in 1892
the United States followed suit. By 1898 no
modern army was without a smaller caliber
repeating rifle of the new type. The new arms
were of 5- to 10-shot capacity, ranging in
caliber from .32 to .26 as compared to the
older .40 to .45 caliber sizes. Nitrocellulose
propellants and advances in metallurgy had
permitted a reduction in bullet diameter, a re-
tention of adequate shocking power, an increase
in average accuracy and penetration, and a flat-
tening of trajectory (extension of the limit
of grazing fire) by as much as 50 percent or
more. Logistically, the weight of individual rifle
cartridges had dropped by as much as 40 per-
cent.
9. The Springfield 1903 rifle reflected the era
of high development in rifles operated manually,
which ended in 1936 with the introduction into
U.S. service of the Garand design, designated
Ml. This first of the successful gas-operated
rifles of full infantry power outgunned enemy
rifles in Europe and the Pacific in the ratio
of 3 to 1. It was rugged, sure functioning,
powerful, and accurate. The tiring bolt manipu-
lation, so painfully learned by former genera-
tions of American soldiers, was no longer neces-
sary.
10. The Ml rifle ushered in an era that saw
foreign nations scrambling for semiautomatic
designs in individual infantry weapons. Britain
and France discarded their old, time proven
bolt actions and took up the Belgian FN design.
Soviet Russia developed as her now standard
infantry weapon, a rifle-powered submachine-
gun of 30 shot capacity (the AK) . And the U.S.,
exploiting the potential of John G. Garand’s
Ml, has modernized it as the Ml4 for increased
cartridge capacity (20 shots instead of 8) and
quick and simple adaptation to the automatic
rifle role.
11. On 1 May 1957, the Secretary of the
Army announced the adoption of the new rifle.
The M14 is equipped with a light barrel and
is designed primarily to replace the Ml rifle
in a semiautomatic fire role. It can be converted
to automatic fire by merely replacing the selec-
tor lock with a selector lever. The M14 weighs
approximately 11 pounds when combat loaded.
A bipod will add an additional pound when
the Ml4 is used in the automatic rifle role.
12. The M14 is basically the same in design
as the Ml rifle. Design changes, in nearly all
instances, were made to accommodate the
shorter 7.62-mm cartridge and to allow for the
use of a magazine instead of a clip for hold-
ing ammunition. Consequently, the receiver,
bolt, and firing pin are shorter, and the floor
plate of the trigger housing is cut away to
allow for the magazine. The most significant ad-
vantage of the M14 design is that it offers an
increase of 12 rounds in magazine capacity
over the Ml rifle with NO INCREASE IN
WEIGHT. The most significant advantage of
the M14 with bipod (in the automatic rifle
role) is that it offers the same magazine ca-
pacity as the BAR with a DECREASE IN
WEIGHT. The weight saving of the M14 with
bipod is about 10 pounds.
13. The new 7.62-mm cartridge is approxi-
mately i/£-inch shorter than the caliber .30 М2
cartridge and 12 percent lighter. New develop-
ments in powder permit the use of less powder
in a shorter case without sacrificing velocity
or increase in permissible pressure.
Relationship of Individual Weapon Design to
Combat Use of the Weapon.
14. To fully understand rifle marksmanship
and rifle marksmanship training, it is neces-
224
TAGO 5024-A
sary to know something of rifles, their char-
acteristics and combat usefulness. The rifle is
the primary individual weapon for all armies
because it is the most versatile and effective
weapon which can be carried and used by a
soldier in combat. The rifle can fire ordinary
bullets to kill enemy soldiers; it can fire armor-
piercing bullets to wreck truck engines; it can
fire tracer bullets to point out targets; and it
can fire incendiary bullets to start fires in in-
flammable materials. Add to this the fact that
the rifle can also shoot signal flares and power-
ful grenades and you can see that the rifle is
one of the most important weapons in the army.
15. But why the rifle? Isn’t a hand weapon
such as a pistol, revolver, or a hand grenade
more convenient in combat? A hand weapon
is far more convenient but it cannot do the
wide and far-reaching job of a shoulder weap-
on. The rifle is a weapon that can kill or de-
stroy at a considerable distance so that the
enemy can be prevented from getting too close.
If individual weapons can reach out a consider-
able distance it is easier to keep the enemy
where larger, more powerful supporting weap-
ons can smash him. The rifleman’s weapon must
be so constructed that it can be held with
steadiness while he directs accurate fire, power-
ful enough to kill enemy soldiers, as far away
as marksmanship skill and the precision of the
weapon will allow.
16. Here is where the sciences enter the pic-
ture. Man’s scientific level today is such that it
still takes the relatively long, steel barrel and
wooden or plastic stock of a rifle to obtain the
desired performance. It takes a certain quanti-
ty of today’s rifle powder to move a certain size
rifle bullet at a certain speed so that it will
have a certain desired effect on the targets ap-
propriate to it.
17. Closely related to the sciences of metal-
lurgy, chemistry, and ballistics, which give us
our firearms, is the related field of human me-
chanics. Human mechanics evaluates man’s
anatomy to deduce the best systems of weapon
configuration. Such items as length of rifle
stock, distance between handgrip (pistol grip
on a rifle) surface to pressure surface of the
trigger, shape of operating handles, and a
thousand other minute and often undreamed of
details go into the design of a rifle.
TAGO 6024-A
18. Many scientific and mechanical factors
influence marksmanship in some way. Metal-
lurgy has a large share in determining the
weight and bulk of a rifle, as well as its mech-
anism. Chemistry dictates heavily the bal-
listic qualities of the rifle. Ballistics in turn
fuses together the knowledge of metallurgy and
chemistry and adds physics in the design of a
cartridge and projectile that will satisfy com-
bat requirements.
19. The complex package called a “rifle” is
what soldiers live by on the battlefield. If the
design is well done, the rifle will fit the average
man very well and will delivei* accurate and
deadly fire on targets. Seven essential qualities
of a modern combat rifle are:
a. It must be accurate.
b. Its trajectory must be flat.
c. Its recoil must be moderate.
d. It must be powerful.
e. It must be easy to master.
f. Its mechanism must be unfailing.
g. It and its ammunition (in quantity) must
be light enough to carry under combat condi-
tions.
20. We are now in an era of “Emphasis on
Accuracy.” The vast numbers of our potential
enemies clearly point up the fact that accurate
rifle fire is the key to success. A soldier who
merely “sprays” shots in the vicinity of the
enemy produces little effect. Against an un-
seasoned enemy such fire may be temporarily
effective, but the result is not lasting. The mis-
sion of the rifleman is to kill the enemy. Against
seasoned troops, spraying shots have little ef-
fect. Someone once gave what is perhaps the
best definition of firepower when he said that,
“firepower is bullets hitting people!” The Ml
rifle and the M14 rifle are accurate weapons.
21. Trajectory-wise, the Ml and M14 rifles
are “flat-shooting.” That is, their bullets travel
very fast, so they can’t fall very much below
the line of sight over their usable range. And
because the bullets don’t “drop” much below
the extended line of the bore over combat
ranges, it is relatively easy to make hits with
them. Moderate recoil means that the muzzle
climb in firing is moderate, which makes for
fast recovery between shots. This is very im-
portant in rapid fire in combat against numbers
of enemy.
225
22. The U.S. military rifle must be powerful.
That means it must be able to kill an enemy
soldier as far away as the rifleman can surely
hit him. It must penetrate enemy helmets and
body armor easily up to the same range. It
should have enough punch to tear through the
side of enemy trucks to kill personnel riding
within, or to destroy the truck engine. The bul-
lets of the caliber .30 or 7.62-mm rifles are
relatively small and light—fine for high speed;
yet they are heavy enough and large enough
in diameter to deliver a killing blow when they
get where they are going.
23. The Ml and M14 rifles are extremely
simple in design, allowing for quick mastery
even by those with no previous knowledge of
firearms design. As for functioning, the ex-
haustive tests of Ordnance personnel, who put
these designs through their developmental paces
and field testing by using units, have confirmed
the reliability of the weapons mechanisms.
24. Lightness of rifle and ammunition is a
highly controversial issue. By some standards
the Ml and M14 (and indeed all military arms)
are heavy, but it must be remembered that the
ruggedness of a military weapon is something
which precludes matching the six-pound weight
of a commercial hunting rifle. And the much-
argued-for superiority of lightweight alloys,
plastics, and glass compounds must be balanced
against the yet-to-be confirmed field observa-
tions of their wearing qualities and stress re-
sistances.
25. The 7.62-mm NATO cartridge, standard
for our M14 rifles and M60 machineguns, is
actually lighter than the older caliber .30 car-
tridge by approximately 12 percent. This means
that our fighting men carry more ammunition
than before with no increase in total weight of
field load.
26. All in all, U.S. service rifles are admir-
able weapons; very accurate, very deadly.
They are the backbone of our land power.
226
TAGO 5024-A
INDEX
Paragraphs P**«« Paracrapha Ра«м
Adjusted aiming point: Sitting 10 16
Demonstration of 36 57 Squatting . . 10 16
Description -. 36 57 Standing 10 16
Rules for applying 36 57 Follow-through 12 27
Training 36 57 Instruction, corrections:
U se of 36 57 Blank target exercises 21 37
Wind effects - - - - 36 57 Conduct 21 37
Aiming 9 6 M12 aiming device 21 37
Aiming point adjusted: Metal disc exercise 21 37
For range .. ... 81 122 Purpose 20 37
For wind 81 122 Trigger 21 37
Ball and dummy round exercises ..... 18 36 Integrated shooting:
Battlesight zero: Aiming 9 6
Determining 30 52 Steady hold factors:
Principles of 28 51 Breathing 9 6
Rear sight calibration 31 54 Grip, left hand 9 6
Target 29 52 Grip, right hand 9 6
Breathing . . 9 6 Relaxation 9 6
Calibration, rear sight 31 54 Rifle butt 9 6
Coaches 17 35 Right elbow 9 6
Courses (app. IV): Spot weld 9 6
Alternate course “C” 3 3 Trigger control:
Modified known distance course Buck 9 6
“C” 4 3 Flinch 9 6
Standard course “C” 2 3 Jerk 9 6
Elevation, windage rule 26 48 Sight alignment 9 6
Firing, conduct of: Sight picture 9 6
Description 22, 62 44,94 Marksmanship courses (app. Ill) :
Range management: Advanced individual 22 44
Fire commands: Alternate basic course 5 3
Commands, clip fed rifles 23 44 Basic course 2 3
Commands, magazine fed Combat readiness proficiency 8 5
rifles ----- . 23 44 Emergency proficiency 16 35
Shot group exercise 23 44 Fundamentals proficiency 11 26
Rapid reloading 23 44 Individual night firing 19 36
Organization, procedure Firing data card 23 15 44 35 Marksmanship fundamentals, application 41 60
Firing, daytime instruction: Modified known distance range,
Conduct of firing 72 112 operation of:
Fire commands ... 72 112 Range organization 44 67
Organization Firing, night, individual: Purpose 72 66 112 109 Range procedures Range safety Targets 44 44 44 67 67 67
Target detection 69 109 Night practice, record firing:
Training conditions 67 109 Conduct of firing 73 113
Training facilities, equipment ... 71 111 Fire commands 73 113
Weapon alignment, positions 70 109 Organization 73 113
Firing positions 65 97 Objectives 2 3
Firing positions, types of: Positions:
Cross-ankle 10 16 Engaging multiple targets 40 60
Cross-legged 10 16 Engaging single targets 39 59
Foxhole 10 16 Positions (app. IV):
Kneeling 10 16 Kneeling supported 3 3
Kneeling supported 10 16 Prone supported 3 3
Kneeling unsupported 10 16 Sitting 3 3
Open-legged 10 16 Squatting 3 3
Prone 10 16 Standing j 3 3
TAGO Б024-А
227
РапчггжрЬа Page*
Paragraph* Ражей
Progress check:
Application--------------------........... 33 55
Exercise.................- -......... 34 55
Purpose ......- - -......-.......... 32 54
Progress envelope................ - 16 35
Ranges:
25-meter............................... 22 44
1000-inch .............. -.......... 22 44
Range facilities----.---------------- 42 60
Range management ...................... 23 44
Rear sight _____________________________ 25 48
Record fire courses---------------------- 58 90
Record firing I, alternate---------------- 64 97
Record firing II, alternate:
Administrative areas______________________ 65 97
Preparation for:
Firing, conduct --------------------- 65 97
Organization--------------------- 65 97
Positions:
Barricade ___________________________ 65 97
Bunker __________________________ 65 97
Foxhole__________________________ 65 97
Forward slope ------------------- 65 97
Log ____________________________ 65 97
Prone _________________________ 65 97
Rooftop _________________________ 65 97
Rubble pit ______________________ 65 97
Stump ___________________________ 65 97
Window__________________________ 65 97
Range safety-------------------------- 65 97
Training ____________________________ 65 97
Range characteristics -------------------- 65 97
Range organization:
Range personnel --------------------- 65 97
Targets ------------------------------ 65 97
Record fire procedures, requirements:
Conduct of firing:
Alibi firing__________________________ 62 94
Fire commands ___________________ 62 94
Firer rotation ------------------ 62 94
Range safety ___________________ 62 94
Record fire I .................. 62 94
Record fire II ------------------ 62 94
Target operation----------------- 62 94
Organization:
Firers _______________________________ 61 91
Range and personnel--------- 61 91
Record fire training concepts------------- 59 90
Relaxation -------------------------- 9 6
Reloading, rapid ____________________ 19, 37 36, 59
Rifles, .22 caliber:
Firing exercise------------------------ 8 5
Recoil demonstration................... 8 5
Safety (app. II)
Firer’s movement ------------------------- 5 3
Mechanical training-------------------- 2 3
NCO’s__________________________________ 6 5
Pit operation......................... 4 3
Purpose . __________________________ 1 3
Range firing_________________________ 3 3
Shot, calling the........................ 13 27
Shot groups:
Long, horizontal......................... 14 28
Long, vertical 14 28
Small ______________________________ 14 28
Shot group analysis -------- ....... 14 28
Sight:
Alignment_______ ... ................ 9 6
Picture _____________________________ 9 6
Sight adjustment:
Elevation, windage rule ................. 26 48
Rear sight........................... 25 48
Sight changes ................. 27 48
Sight changes . ................ 27 48
Snipers:
Integrated shooting...................... 78 117
Positions ... . . 77 116
Purpose ___________________________ 74 116
Scope:
Marksmanship training .. . 76 116
Training program ... .... 76 116
Selection _______________ ._____ 75 116
Sight adjustments:
External ballistics:
Observation method .... 79 117
Trajectory___________________ 79 117
Wind effects____ 79 117
Sight manipulation . 79 117
Sniper exercises:
Common errors ____________________________ 83 123
Movement ......................... 83 123
Range determination __________________ 82 123
Selection of position_________________ 83 123
Sight adjustment _____________________ 83 123
Sniper firing exercises:
Field firing ______________..... 84 124
Zeroing------------------------- 84 124
Spot weld ___________________________ 9 6
Standard field firing range,operation:
Range organization____________________ 43 60
Range procedures _____________________ 43 60
Targets, devices, scoring ____________ 43 60
Steady hold factors_________________________ 9 6
Stoppages, reduction of____________________ 38 59
Targets:
Construction_______________________________ 48 71
Detection, fundamentals of:
Determining range ________________ 52 73
Locating targets__________________ 52 73
Marking targets __________________ 52 73
Sector sketch_____________________ 52 73
Detection training ___________________ 49 73
Engaging targets _____________________ 53 82
Location _____________________________ 47 71
Purpose ______________________________ 45 71
Range personnel, equipment______ 50 73
Training concepts ____________________ 46 71
Training conditions___________________ 51 73
Targets, engaging:
Multiple __________________________________ 40 60
Single ------------------------------- 39 59
228
TAGO 6024-A
Paragraph* Page*
Paragraphs Pages
Taiffet detection tests:
Moving 56 89
Sound 56 89
Stationary . Targets, silhouette (app. V): 56 89
Installation manual devices 3 3
Installation automatic devices Targets, types of: 2 3
Moving 55 85
Multiples of 55 85
Sound 55 85
Stationary Trials, conduct of: 55 85
Moving target - . . . .. 55 85
Multiple moving, sound targets . 55 85
Sound target 55 85
Stationary target 55 85
Trial sheets:
Master . ------- 54 85
Target ___ _____ 54 85
Training:
Conditions ... _______ . 5 3
Courses . ................ 4 3
Purpose-scope . 3,6 3,5
Trigger control:
The buck _____________________________ 9 6
The flinch______ 8 8
The jerk ______________________________ 9 <>
Wobble area __________________________ 11 26
Zeroing:
Field expedient ----------------------- 80 121
25-meter zero__________________________ 80 121
Measured distance______________________ 80 121
By Order of the Secretary of the Army:
Official:
J. C. LAMBERT,
Major General, United States Army,
The Adjutant General.
HAROLD K. JOHNSON,
General, United States Army,
Chief of Staff.
Distribution:
Active Army:
DCSPER (2) Gp (1)
ACSI (2) CC (5)
DCSLOG (2) Bn (5)
ACSFOR (2) Co/Btry (5)
CORC (2) USATC AD (10)
CNGB (5) USATC Armor (10)
CRD (1) USATC Engr (10)
СОА (1) USATC Inf (10)
CINFO (1) USATC FA (10)
TIG (1) USASTC (10)
TSG (1) TJAGSA (1)
USCONARC (20) PMGS (5)
USACDC (10) MFSS (5)
ARADCOM (2) USA Ord Sch (5)
ARADCOM Rgn (1) USAES (5)
LOGCOMD (1) USAQMS (5)
Armies (5) USATSCH (5)
Corps (3) USASCS (5)
Div (10) USACMLCSCH (5)
Div Arty (5) USASESCS (5)
Bde (5) USACHS (1)
Regt (5)
NG: State AG (3); units—same as Active Army except allowance is two (2) copies to each unit.
USAR: Units—same as Active Army except allowance is one copy to each unit.
For explanation of abbreviations used, see AR 320-50.
U. S. Government Printing Office: 1964—750678
TAGO 5021-A
229